An important part of turning your app into a business is to optimize your user experience to drive the bottom line results you want. A popular way to do this is through manual experimentation, which involves setting up A/B tests for different components of your app and finding the top performing variant. Now, you can save time and effort - and still maximize the objectives you want - with Remote Config’s latest personalization feature. Personalization harnesses the power of machine learning to automatically find the optimal experience for each user to produce the best outcomes, taking the load off you.
At Firebase Summit 2021, we announced that Remote Config personalization is officially available in beta! Let’s take a closer look at this new feature, how it differs from A/B testing, and how you can use it today to grow your business.
Remote Config lets you dynamically control and change the behavior and appearance of your app without releasing a new version or setting up any complex infrastructure. You can use Remote Config to implement feature flags, perform A/B tests, customize your app for different user segments, and now, with personalization, optimize your user experience with minimal work. All you need to do is specify the objective you want to maximize, and personalization will continuously find and apply the right app configuration for each user, taking their behavior and preferences into account and tracking impact on secondary metrics along the way. For example, you can personalize the difficulty of your game according to player skill levels to maximize engagement and session duration.
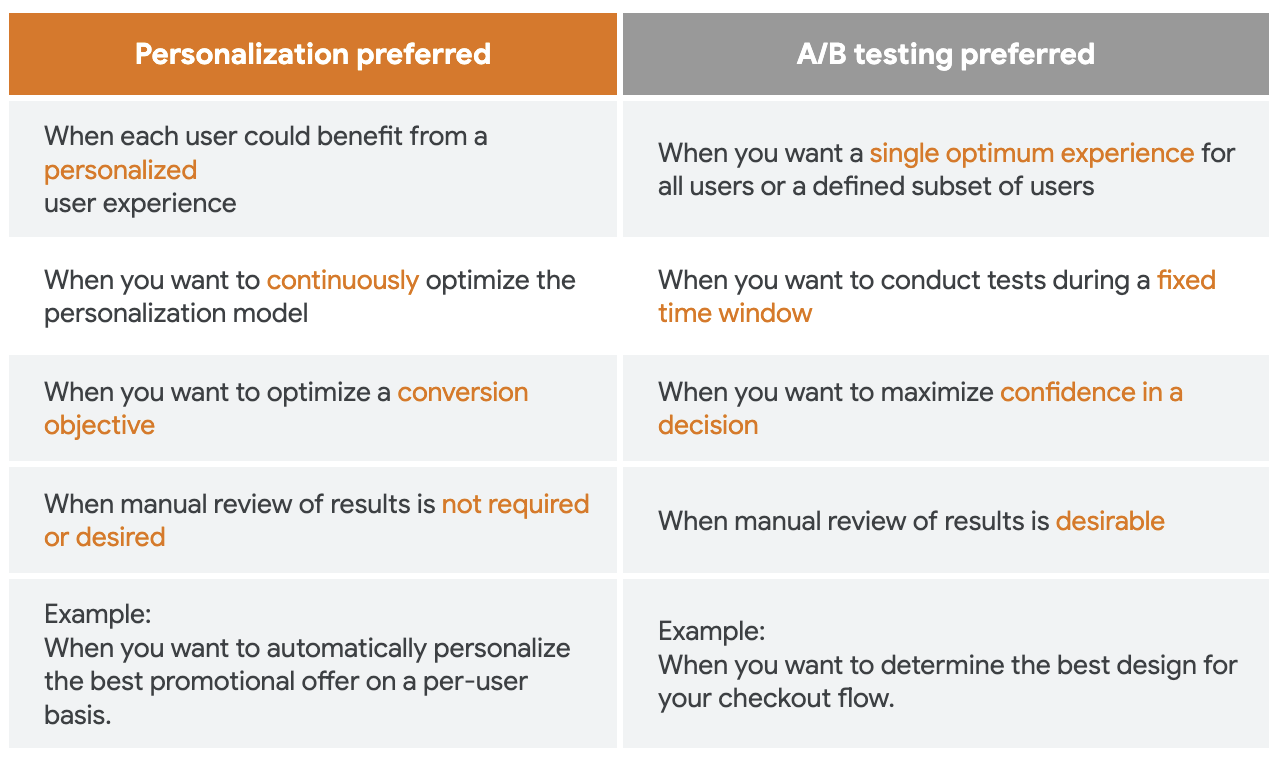
A/B testing and personalization are both good frameworks for app optimization. While they share some similarities, there are a few big differences that are worth pointing out. First, A/B testing requires you to be hands-on throughout the whole process - from setting up the experiment, determining the variables, monitoring and analyzing results, to rolling out the winning variant. With personalization, you determine the experiences you want to try and state the objective you want to maximize. Then, the personalization algorithm uses machine learning to do the rest. It automatically tries different alternatives with different users, learns which alternatives work best, and chooses the alternative that is predicted to maximize your objective.
Second, A/B testing finds a single, global optimum, while personalization gets more granular to find the optimum treatment for each user so you’re not leaving value on the table.
And a third important difference is the timing required for each feature. A/B testing usually takes at least a few weeks to run an experiment and return a result, whereas personalization goes to work immediately, optimizing selections from the moment it is enabled.
Halfbrick, the game studio behind titles like Jetpack Joyride, Dan the Man, and the instant-classic Fruit Ninja, used personalization to optimize ad frequency, which led to a 16% increase in revenue without affecting engagement or retention. They also used personalization to determine the best time (i.e. when users are most enjoying the game) to ask users to rate their app, and were able to boost positive app store ratings by 15%.
In their own words:
"The granularity achieved with Remote Config's personalization feature is impossible for a human to instrument. Personalization has given us new insight into how we can optimize our ad strategy and even helped us challenge our own assumptions that players don't like too many ads."
— Miguel Pastor, Product Manager, Halfbrick
Ahoy Games, another early customer, tried personalization in a number of their games and successfully grew in-app purchases by 12-13% with little to no effort from their team.
Their CEO, Deniz Piri, had this to say:
“We are very impressed with how magical the personalization feature has been. It's so much more than an A/B test, as it continuously optimizes and serves the right variant to the right groups of people to maximize conversion goals. Without Firebase, we would have a harder time succeeding in an arena full of bigger corporations with our humble 13-person team.”
Let’s walk through an example - say you wanted to personalize the moment you show an ad to players in your game based on how many levels they’ve completed, with the objective of maximizing the number of ad clicks generated in a gaming session.
We’ll suppose you have three alternatives that personalization can choose from:
Let’s look at how you can set this up in your application using Remote Config.
Alternatively, you can also check out this video walkthrough of the personalization feature which includes an overview and an example on how to personalize the timing for showing an app rating prompt to maximize the likelihood of users submitting a review. You can also check out the personalization documentation for complete instructions on getting started with personalization.
The first step will be to go into the Firebase console and into the Remote Config section to create an RC parameter that can be used to provide one of these alternatives in your application. This can be done by navigating to the Firebase console > Remote Config and clicking on “Create configuration” if it’s your first time using Remote Config, or “Add parameter” if you already have some created. This will open up the parameter editor as shown below.
Next, click on Add new > Personalization which will open the personalization editor where you can specify alternative values for the parameter, select the primary objective, as well as set additional metrics and targeting conditions for the personalization. In this example, I’m using ad clicks as the primary optimization goal, and tracking user engagement as a secondary metric to monitor as personalization delivers personalized values to users.
How to create a personalized parameter, including personalization goals and additional metric tracking within a few clicks in the Remote Config parameter editor.
Now you’ll just need to click on “Save” and “Publish changes” to make the new parameter available to any running application instances. The final step is to implement and use your new Remote Config parameter in your application code. You can follow the getting started guide to complete these final steps based on which platform your app is targeting.
From here, personalization will go to work immediately, selecting the best predicted alternative for each user, and collecting metrics along the way to help you determine the effectiveness of personalization in optimizing towards your primary goal. Over time, you’ll see a results summary screen similar to the one in the screenshot below:
The box in gray represents the baseline holdout group, while the box in blue represents the group of users who’ve received personalized values. The total lift shows how much additional value personalization has generated relative to the holdout group that didn’t receive personalized values. Since the baseline group will be much smaller than the personalization group, the numbers in the baseline holdout group are scaled up so that the numbers are comparable, and the total lift can be calculated. You can also breakdown baseline performance details to see how each alternative value performed individually.
As time goes by, you can revisit the results summary page to ensure that the personalization is continuing to deliver more value than the baseline group, maximizing your goal automatically as personalization and Remote Config do their work.
Now that personalization is available in public beta you can start scaling your app today without scaling your effort. Check it out in the Firebase console today, or take a look at our documentation to learn more.
With so much time spent on game development, the last thing any game developer wants to see is a low rating as a result of a buggy game. From our very first Crashlytics NDK release back in 2015, our commitment to game developers remains strong. And recently we released a number of NDK and Unity features that not only increase the stability of games, but also enable developers using Unreal, Cocos2d, Unity or any other native game engine to get to resolutions quickly and with more confidence. Read more about these improvements below.
To provide you with a more accurate view into the stability of your gaming apps, we’ve made significant changes to Crashlytics' native crash capture mechanism by adopting Google's open-source Crashpad library. As a result, you can now get access to several additional classes of errors on newer Android versions as well as get more reliable crash reporting on existing Android versions of your app. Additionally, with Crashpad you no longer have to deal with the inherent complexity of native crash capture and instead you can focus your time on growing your game.
The increased reliability of Crashpad lies in its pursuit of minimizing the amount of work done within the signal handler, which ultimately results in a more reliable crash capturing mechanism. One of Crashpad’s core design goals is to reduce the number of system calls inside the handler to just one. Upon receiving a signal, Crashpad captures the memory space of the crashed application by launching a brand new, healthy process, removing some of the problems of other crash capture approaches such as capturing SIGABRT on Android 10+ devices.
More accurate stack traces, especially within the application frames, lead to faster issue resolutions - there is no doubt about it! That is why we’ve switched our symbol file format to one that is more robust - the Breakpad symbol file. The additional debug information within the Breakpad symbol file, in many circumstances, results in a more accurate stack trace than what you’d see in the logcat.
The key to more accurate stack traces lies within the Call Frame Information that is stored within the debug section of the binaries. This information is what differentiates the Breakpad symbol file from our previous symbol file. Call frame information assists our backend stack unwinding process, minimizing the use of heuristics within application frames that may lead to incorrect stack traces. With this information, our backend more precisely determines how the frames within your application should be unwound and which symbols - inlined or not - correspond to each frame!
Take a look at the Google Games Developer Summit session that explains this in more detail. If you’re already using the Crashlytics NDK SDK, switching to the Breakpad symbol file is a breeze, just add symbolGenerator { breakpad() } to your build.gradle. Check out our docs for more info.
symbolGenerator { breakpad() }
The left image shows a stack that is unwound using our previous symbol format, and the right image shows the same stack unwound using the Breakpad symbol file.
The top image shows a frame symbolicated using our previous symbol format, and the bottom image shows the same frame symbolicated using the Breakpad symbol file.
We heard your feedback around symbol uploading for main applications and stand-alone libraries. And with the latest Crashlytics Gradle plugin, specifying the stripped library directory is no longer necessary so you can get quickly set up with minimal error. We’ve also allowed the unstripped path to point to disparate directories, allowing symbol upload for binaries that are compiled outside of the main application.
We’ve improved grouping for Unity crashes to help you more quickly debug and identify the exact cause of a crash. Our analysis backend now has a more robust set of Unity heuristics, resulting in much better issue fidelity and a more intuitive stack trace visual treatment. No longer will issues highlight a system frame when an application frame is the source of the problem.
Revised Unity Grouping in Crashlytics Console
We’ve enabled automatic capture of various hardware attributes and game-specific values to help solve unique issues related to the model of GPU and screen resolution for example, so you no longer have to capture these yourself and use up valuable key-value pairs.
Unity metadata in Crashlytics console
We hope these improvements help make identifying crashes much easier, and we will continue to improve the games experience by focusing on improving Unity IL2CPP support - support that includes capturing Unity Engine and native extension crashes. Let Crashlytics handle crashes for all of the components that your game depends on, because sometimes, the crash is not your game's fault. There is much more on the horizon, stay tuned!
In the meantime to get started, head to our NDK and Unity onboarding pages. We're excited to help you through your game development journey and can’t wait to hear what you think!