Spring Security - How to Enable and Disable CSRF
Last Updated :
04 Jan, 2025
Cross Site Request Forgery (CSRF) is one of the most severe vulnerabilities which can be exploited in various ways- from changing the user’s info without his knowledge to gaining full access to the user’s account. Please read more here What is Cross Site Request Forgery (CSRF). In this article, we will see how to enable and disable CSRF in Spring Security.
How to Enable and Disable CSRF in Spring Security?
In Spring Security, CSRF (Cross-Site Request Forgery) protection is enabled by default. However, you can explicitly enable or disable CSRF protection based on your application's requirements. CSRF protection is important for preventing malicious attacks where an unauthorized user tricks a victim into performing actions on a website without their knowledge or consent. To enable or disable CSRF protection in Spring Security, you can configure it in your application's security configuration class. Below is the sample code for doing so.
@Override
protected void configure(HttpSecurity http) throws Exception {
        http
        .authorizeHttpRequests()
        .anyRequest()
        .authenticated()
            .and()
            .formLogin()
            .and()
            .httpBasic();

        http.csrf().disable();
}
In the example above, the configure() method is overridden to customize the security configuration. By invoking the csrf() method, you can access the CSRF configuration options. Calling disable() will disable CSRF protection. If you want to enable CSRF protection, you can remove the disable() method call, and CSRF protection will be enabled with the default configuration.
Note: Remember that disabling CSRF protection should only be done if you have evaluated the potential risks and determined that it is safe to do so. In most cases, it is recommended to keep CSRF protection enabled to ensure the security of your application.
We will understand all the above concepts through an example project. For this concept, we're going to build on top of the simple Spring MVC example project.
Example Project
Step 1: Create Your Project and Configure Apache Tomcat Server
Note: We are going to use Spring Tool Suite 4 IDE for this project. Please refer to this article to install STS in your local machine How to Download and Install Spring Tool Suite (Spring Tools 4 for Eclipse) IDE.
Step 2: Folder Structure
Before moving to the project let’s have a look at the complete project structure for our Spring MVC application.
 Folder Structure
Step 3: Add Dependencies to pom.xml File
Add the following dependencies to your pom.xml file
- Spring Web MVC
- Java Servlet API
- Spring Security Config
- Spring Security Web
XML
<dependencies>

    <!-- https://mvnrepository.com/artifact/org.springframework/spring-webmvc -->
    <dependency>
        <groupId>org.springframework</groupId>
        <artifactId>spring-webmvc</artifactId>
        <version>5.3.24</version>
    </dependency>

    <!-- https://mvnrepository.com/artifact/javax.servlet/javax.servlet-api -->
    <dependency>
        <groupId>javax.servlet</groupId>
        <artifactId>javax.servlet-api</artifactId>
        <version>4.0.1</version>
        <scope>provided</scope>
    </dependency>

    <!-- https://mvnrepository.com/artifact/org.springframework.security/spring-security-config -->
    <dependency>
        <groupId>org.springframework.security</groupId>
        <artifactId>spring-security-config</artifactId>
        <version>5.7.3</version>
    </dependency>

    <!-- https://mvnrepository.com/artifact/org.springframework.security/spring-security-web -->
    <dependency>
        <groupId>org.springframework.security</groupId>
        <artifactId>spring-security-web</artifactId>
        <version>5.7.3</version>
    </dependency>

</dependencies>
Below is the complete pom.xml file. Please cross-verify if you have missed some dependencies.
XML
<?xml version="1.0" encoding="UTF-8"?>

<project xmlns="http://maven.apache.org/POM/4.0.0" xmlns:xsi="http://www.w3.org/2001/XMLSchema-instance"
  xsi:schemaLocation="http://maven.apache.org/POM/4.0.0 http://maven.apache.org/xsd/maven-4.0.0.xsd">
  <modelVersion>4.0.0</modelVersion>

  <groupId>com.gfg.springsecurity</groupId>
  <artifactId>springsecurity</artifactId>
  <version>0.0.1-SNAPSHOT</version>
  <packaging>war</packaging>

  <name>springsecurity Maven Webapp</name>
  <!-- FIXME change it to the project's website -->
  <url>http://www.gfg.com</url>

  <properties>
    <project.build.sourceEncoding>UTF-8</project.build.sourceEncoding>
    <maven.compiler.source>1.7</maven.compiler.source>
    <maven.compiler.target>1.7</maven.compiler.target>
  </properties>

  <dependencies>

    <!-- https://mvnrepository.com/artifact/org.springframework/spring-webmvc -->
    <dependency>
        <groupId>org.springframework</groupId>
        <artifactId>spring-webmvc</artifactId>
        <version>5.3.24</version>
    </dependency>

    <!-- https://mvnrepository.com/artifact/javax.servlet/javax.servlet-api -->
    <dependency>
        <groupId>javax.servlet</groupId>
        <artifactId>javax.servlet-api</artifactId>
        <version>4.0.1</version>
        <scope>provided</scope>
    </dependency>

    <!-- https://mvnrepository.com/artifact/org.springframework.security/spring-security-config -->
    <dependency>
        <groupId>org.springframework.security</groupId>
        <artifactId>spring-security-config</artifactId>
        <version>5.7.3</version>
    </dependency>

    <!-- https://mvnrepository.com/artifact/org.springframework.security/spring-security-web -->
    <dependency>
        <groupId>org.springframework.security</groupId>
        <artifactId>spring-security-web</artifactId>
        <version>5.7.3</version>
    </dependency>

  </dependencies>

  <build>
    <finalName>springsecurity</finalName>
    <pluginManagement><!-- lock down plugins versions to avoid using Maven defaults (may be moved to parent pom) -->
      <plugins>
        <plugin>
          <artifactId>maven-clean-plugin</artifactId>
          <version>3.1.0</version>
        </plugin>
        <!-- see http://maven.apache.org/ref/current/maven-core/default-bindings.html#Plugin_bindings_for_war_packaging -->
        <plugin>
          <artifactId>maven-resources-plugin</artifactId>
          <version>3.0.2</version>
        </plugin>
        <plugin>
          <artifactId>maven-compiler-plugin</artifactId>
          <version>3.8.0</version>
        </plugin>
        <plugin>
          <artifactId>maven-surefire-plugin</artifactId>
          <version>2.22.1</version>
        </plugin>
        <plugin>
          <artifactId>maven-war-plugin</artifactId>
          <version>3.2.2</version>
        </plugin>
        <plugin>
          <artifactId>maven-install-plugin</artifactId>
          <version>2.5.2</version>
        </plugin>
        <plugin>
          <artifactId>maven-deploy-plugin</artifactId>
          <version>2.8.2</version>
        </plugin>
      </plugins>
    </pluginManagement>
  </build>
</project>
Step 4: Configuring Dispatcher Servlet
Please refer to this article What is Dispatcher Servlet in Spring? and read more about Dispatcher Servlet which is a very very important concept to understand. Now we are going to configure Dispatcher Servlet with our Spring MVC application.
Go to the src > main > java and create a class WebAppInitilizer. Below is the code for the WebAppInitilizer.java file.
File: WebAppInitilizer.java
Java
package com.gfg.config;

import org.springframework.web.servlet.support.AbstractAnnotationConfigDispatcherServletInitializer;

public class WebAppInitilizer extends
               AbstractAnnotationConfigDispatcherServletInitializer {

    @Override
    protected Class<?>[] getRootConfigClasses() {
        // TODO Auto-generated method stub
        return null;
    }

    @Override
    protected Class<?>[] getServletConfigClasses() {
        Class[] configFiles = {MyAppConfig.class};
        return configFiles;
    }

    @Override
    protected String[] getServletMappings() {
        String[] mappings = {"/"};
        return mappings;
    }

}
Create another class in the same location (src > main > java) and name it MyAppConfig. Below is the code for the MyAppConfig.java file.
File: MyAppConfig.java
Java
package com.gfg.config;

import org.springframework.context.annotation.Bean;
import org.springframework.context.annotation.ComponentScan;
import org.springframework.context.annotation.Configuration;
import org.springframework.web.servlet.config.annotation.EnableWebMvc;
import org.springframework.web.servlet.view.InternalResourceViewResolver;

@Configuration
@EnableWebMvc
@ComponentScan("com")
public class MyAppConfig {

}
Reference article: Spring – Configure Dispatcher Servlet in Three Different Ways
Step 5: Create Your Spring MVC Controller
Go to the src > main > java and create a class GfgController. Below is the code for the GfgController.java file.
File: GfgController.java
Java
package com.gfg.controller;

import org.springframework.stereotype.Controller;
import org.springframework.web.bind.annotation.GetMapping;

@Controller
public class GfgController {

    @GetMapping("/gfg")
    public String helloGfg() {
        return "hello-gfg";
    }

}
Reference article: Create and Run Your First Spring MVC Controller in Eclipse/Spring Tool Suite
Step 6: Create Your Spring MVC View
Go to the src > main > webapp > WEB-INF > right-click > New > Folder and name the folder as views. Then views > right-click > New > JSP File and name your first view. Here we have named it as hello-gfg.jsp file. Below is the code for the hello-gfg.jsp file. We have created a simple web page inside that file.
File: hello-gfg.jsp
HTML
<!DOCTYPE html>
<html>
<body bgcolor="green">
    <h1>Hello GeeksforGeeks!</h1>
</body>
</html>
Reference article: How to Create Your First View in Spring MVC?
Step 7: Setting Up ViewResolver in Spring MVC
Go to the src > main > java > MyAppConfig and set your ViewResolver like this
File: MyAppConfig.java
Java
package com.gfg.config;

import org.springframework.context.annotation.Bean;
import org.springframework.context.annotation.ComponentScan;
import org.springframework.context.annotation.Configuration;
import org.springframework.web.servlet.config.annotation.EnableWebMvc;
import org.springframework.web.servlet.view.InternalResourceViewResolver;

@Configuration
@EnableWebMvc
@ComponentScan("com")
public class MyAppConfig {

    @Bean
    InternalResourceViewResolver viewResolver() {
        InternalResourceViewResolver viewResolver = new InternalResourceViewResolver();
        viewResolver.setPrefix("/WEB-INF/views/");
        viewResolver.setSuffix(".jsp");
        return viewResolver;
    }

}
Reference article: ViewResolver in Spring MVC
Step 8: Setting Up Spring Security Filter Chain
Go to the src > main > java and create a class MySecurityAppConfig and annotate the class with @EnableWebSecurity annotation. This class will help to create the spring security filter chain. Below is the code for the MySecurityAppConfig.java file.
File: MySecurityAppConfig.java
Java
package com.gfg.config;

import org.springframework.security.config.annotation.web.configuration.EnableWebSecurity;

// This class will help to create
// spring security filter chain
@EnableWebSecurity
public class MySecurityAppConfig extends WebSecurityConfigurerAdapter {

}
Step 9: Create Spring Security Initilizer
Go to the src > main > java and create a class SecurityInitializer. This class will help to register the spring security filter chain with our application. Below is the code for the SecurityInitializer.java file.
File: SecurityInitializer.java
Java
package com.gfg.config;

import org.springframework.security.web.context.AbstractSecurityWebApplicationInitializer;

// This class will help to register spring security
// filter chain with our application
public class SecurityInitializer extends AbstractSecurityWebApplicationInitializer {

}
Now we are done with setting up our Spring Security Filter Chain.
Step 10: Create Users and Password Encoder
Modify the MyAppConfig file. Here we are going to create the PasswordEncoder Bean.
File: MyAppConfig.java
Java
package com.gfg.config;

import org.springframework.context.annotation.Bean;
import org.springframework.context.annotation.ComponentScan;
import org.springframework.context.annotation.Configuration;
import org.springframework.security.crypto.bcrypt.BCryptPasswordEncoder;
import org.springframework.security.crypto.password.PasswordEncoder;
import org.springframework.web.servlet.config.annotation.EnableWebMvc;
import org.springframework.web.servlet.view.InternalResourceViewResolver;

@Configuration
@EnableWebMvc
@ComponentScan("com")
public class MyAppConfig {

    @Bean
    InternalResourceViewResolver viewResolver() {
        InternalResourceViewResolver viewResolver = new InternalResourceViewResolver();
        viewResolver.setPrefix("/WEB-INF/views/");
        viewResolver.setSuffix(".jsp");
        return viewResolver;
    }

      // Create the bean for PasswordEncoder
    @Bean
    PasswordEncoder getPasswordEncoder() {
        return new BCryptPasswordEncoder();
    }

}
Modify the MySecurityAppConfig file. Here we are going to create the User, and we are going to provide the password in Bcrypt format. And we are also going to provide the roles to the user.
Note: We are going to use Spring Security In-Memory Authentication. Please refer to this article for more detail.
File: MySecurityAppConfig.java
Java
package com.gfg.config;

import org.springframework.beans.factory.annotation.Autowired;
import org.springframework.security.config.annotation.authentication.builders.AuthenticationManagerBuilder;
import org.springframework.security.config.annotation.web.configuration.EnableWebSecurity;
import org.springframework.security.config.annotation.web.configuration.WebSecurityConfigurerAdapter;
import org.springframework.security.crypto.password.PasswordEncoder;

// This class will help to create
@SuppressWarnings("deprecation")
// spring security filter chain
@EnableWebSecurity
public class MySecurityAppConfig extends WebSecurityConfigurerAdapter {

    @Autowired
    private PasswordEncoder passwordEncoder;

    @Override
    protected void configure(AuthenticationManagerBuilder auth) throws Exception {
        auth.inMemoryAuthentication()
        .withUser("gfg")
        .password(passwordEncoder.encode("gfg123"))
        .roles("admin");
    }

}
Step 11: Configuring basic authentication through configure method
Modify the MySecurityAppConfig file. Here we are going to configure basic authentication by overriding the configure() method.
File: MySecurityAppConfig.java
Java
package com.gfg.config;

import org.springframework.beans.factory.annotation.Autowired;
import org.springframework.security.config.annotation.authentication.builders.AuthenticationManagerBuilder;
import org.springframework.security.config.annotation.web.builders.HttpSecurity;
import org.springframework.security.config.annotation.web.configuration.EnableWebSecurity;
import org.springframework.security.config.annotation.web.configuration.WebSecurityConfigurerAdapter;
import org.springframework.security.crypto.password.PasswordEncoder;

// This class will help to create
@SuppressWarnings("deprecation")
// spring security filter chain
@EnableWebSecurity
public class MySecurityAppConfig extends WebSecurityConfigurerAdapter {

    @Autowired
    private PasswordEncoder passwordEncoder;

    @Override
    protected void configure(AuthenticationManagerBuilder auth) throws Exception {
        auth.inMemoryAuthentication()
        .withUser("gfg")
        .password(passwordEncoder.encode("gfg123"))
        .roles("admin");
    }

    // Configuring basic authentication through configure method
    @Override
    protected void configure(HttpSecurity http) throws Exception {
        http
        .authorizeHttpRequests()
        .anyRequest()
        .authenticated()
            .and()
            .formLogin()
            .and()
            .httpBasic();

    }

}
Now, let's run the application and test it out.
Step 12: Run Your Spring MVC Application
To run our Spring MVC Application right-click on your project > Run As > Run on Server. After that use the following URL to run your controller.
http://localhost:8080/springsecurity/gfg
And it will ask for authentication to use the endpoint and a pop-up screen will be shown like this.

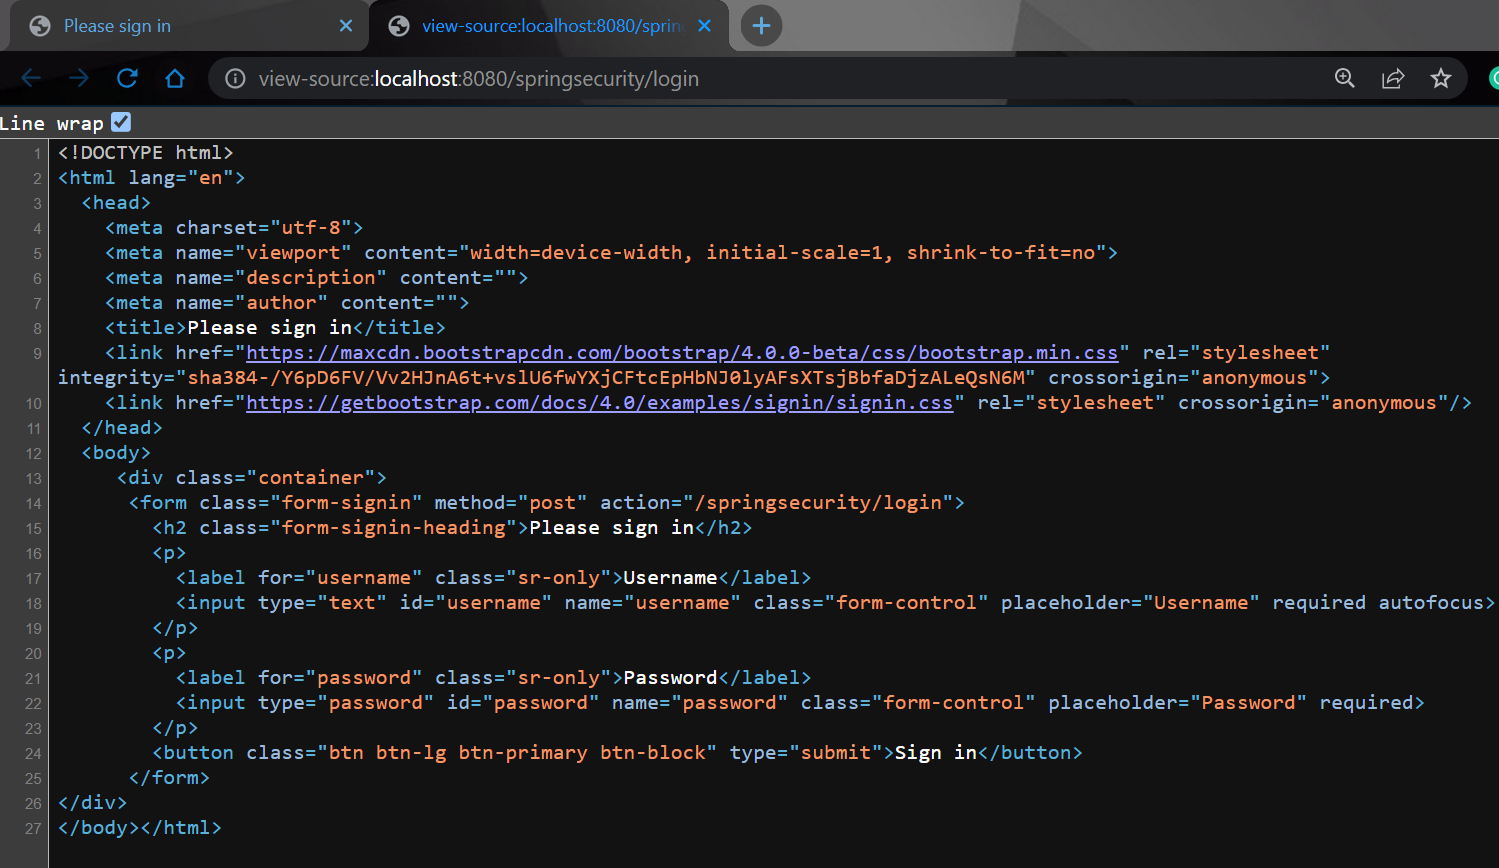
Now right-click and go to the View page source.

And you can see the 24th line. The CSRF (Cross-Site Request Forgery) protection is enabled by default. Let's now disable it.

Now again go to the MySecurityAppConfig file and write the following line in configure(HttpSecurity http) method.
http.csrf().disable();
or you can also write the same code like this.
@Override
protected void configure(HttpSecurity http) throws Exception {
        http
        .authorizeHttpRequests()
        .anyRequest()
        .authenticated()
            .and()
            .formLogin()
            .and()
            .httpBasic()
            .and()
            .csrf()
            .disable();
    }
File: MySecurityAppConfig.java
Java
package com.gfg.config;

import org.springframework.beans.factory.annotation.Autowired;
import org.springframework.security.config.annotation.authentication.builders.AuthenticationManagerBuilder;
import org.springframework.security.config.annotation.web.builders.HttpSecurity;
import org.springframework.security.config.annotation.web.configuration.EnableWebSecurity;
import org.springframework.security.config.annotation.web.configuration.WebSecurityConfigurerAdapter;
import org.springframework.security.crypto.password.PasswordEncoder;

// This class will help to create
@SuppressWarnings("deprecation")
// spring security filter chain
@EnableWebSecurity
public class MySecurityAppConfig extends WebSecurityConfigurerAdapter {

    @Autowired
    private PasswordEncoder passwordEncoder;

    @Override
    protected void configure(AuthenticationManagerBuilder auth) throws Exception {
        auth.inMemoryAuthentication()
        .withUser("gfg")
        .password(passwordEncoder.encode("gfg123"))
        .roles("admin");
    }

    // Configuring basic authentication through configure method
    @Override
    protected void configure(HttpSecurity http) throws Exception {
        http
        .authorizeHttpRequests()
        .anyRequest()
        .authenticated()
            .and()
            .formLogin()
            .and()
            .httpBasic();

        // Disable CSRF
        // in Spring Security
        http.csrf().disable();
    }

}
Now again Run Your Spring MVC Application and go to the View page source. and you can see there is no CSRF (Cross-Site Request Forgery) protection.
Similar Reads
How To Enable or Disable CGI Scripts in Apache?
This article will guide you on how to enable or disable CGI scripts in Apache. Configuring CGI scripts in Apache is a crucial aspect of managing dynamic content generation on web servers. The Common Gateway Interface (CGI) provides a standardized protocol for executing programs, allowing websites to
4 min read
Spring Security - Deny Access to All URLs
Spring Security is a framework that allows a programmer to use JEE components to set security limitations on Spring-framework-based Web applications. In a nutshell, it’s a library that can be utilized and customized to suit the demands of the programmer. Because it is a part of the same Spring famil
8 min read
Disable Security for a Profile in Spring Boot
In Spring Boot, Spring Security is the crucial aspect of protecting the endpoints and resources. But in some cases, we need to disable security for certain profiles like during development or for specific testing scenarios. Disabling security for the profile allows us to bypass the security constrai
5 min read
How to Enable or Disable Apache Modules?
Apache, one of the most widely used web servers, is known for its flexibility and power. This flexibility is largely due to its modular architecture, which allows administrators to enable or disable specific functionalities as needed. Apache modules can extend the core functionality of the server to
3 min read
Spring Security at Method Level
Spring Security provides a powerful way to secure Java applications, allowing developers to control authentication and access at different levels. One of its key features is method-level security, which lets us use security constraints on specific methods instead of the entire class or application.
2 min read
How to Change Default User and Password in Spring Security?
Spring Security is a powerful and highly customizable authentication and access-control framework. It is the de-facto standard for securing Spring-based applications. Spring Security is a framework that focuses on providing both authentication and authorization to Java applications. By default, Spri
4 min read
How to Enable or Disable SELinux Boolean Values?
As SELinux has tones of policies to handle and maintain the security level of the system. SELinux has given an easy way to dynamically update the policy. You need special arguments to make these policies persistent over a reboot, this capability is provided by the SELinux management utility. To see
2 min read
Disable @EnableScheduling on Spring Tests
In Spring applications, the @EnableScheduling annotation is commonly used to enable the execution of scheduled tasks. However, during testing, it may be necessary to disable this feature to avoid unwanted side effects or to control the test execution environment. This article will guide you through
5 min read
CSRF Protection in Spring Security
In Spring Security, CSRF stands for Cross-Site Request Forgery. It is used to protect in the Spring Security mechanism. It is designed to prevent the attackers from executing unauthorized actions on behalf of the authenticated users. Key Terminologies:CSRF AttackCSRF TokenCSRF Token RepositoryCSRF T
9 min read
Introduction to Spring Security and its Features
Spring Security is a powerful authentication and authorization framework used to secure Java-based web applications. It easily integrates with Spring Boot and provides advanced security mechanisms such as OAuth2, JWT-based authentication, role-based access control, and protection against common vuln
3 min read