SlideShare a Scribd company logo
Getting Started with TensorFlow
TensorFlow
Getting Started with Free Lab
1.Open CloudxLab
2.If already Enrolled, go to “My Lab”
3.Else Click on "Start Free Lab"
a.And Complete the process of enrollment
b.You might have sign using credit card or college
id
4.Go to “My Lab”
5.Open Jupyter
TensorFlow
1. Open jupyter from My Lab
2. Click on "New" -> Terminal
3. Type:
a.git clone https://github.com/cloudxlab/ml.git
4. Go to the Jupyter Browser and into the folder
ml/deep_learning
5. Open tensorflow.ipynb
Getting Started with TensorFlow
TensorFlow
Getting Started with TensorFlow
● Check if TensorFlow is available
>>> import tensorflow
>>> print(tensorflow.__version__)
Basics of RDD
Cheese burger,
soup and
a Plate of Noodles
please
Soup and
A Plate of
Noodles for
me
Ok.
One cheese burger
Two soups
Two plates of Noodles
Anything else, sir?
The chef is able to
optimize because of
clubbing multiple
order together
Lazy Evaluation Example - The waiter takes orders patiently
Basics of RDD
And Soup?
Cheese Burger...
Let me get a cheese burger
for you. I'll be right back!
Instant Evaluation
The soup order will be taken once the waiter is back.
Basics of RDD
Actions: Lazy Evaluation - Optimization - Scala
def Map1(x:String):String =
x.trim();
def Map2(x:String):String =
x.toUpperCase();
var lines = sc.textFile(...)
var lines1 = lines.map(Map1);
var lines2 =
lines1.map(Map2);
lines2.collect()
def Map3(x:String):String={
var y = x.trim();
return y.toUpperCase();
}
lines = sc.textFile(...)
lines2 = lines.map(Map3);
lines2.collect()
TensorFlow
TensorFlow
● Powerful open source library
○ For numerical computations
○ Fine-tuned for large-scale Machine Learning
TensorFlow
TensorFlow
● Developed by the Google Brain team
● It powers many of Google’s large-scale services, such as
○ Google Cloud Speech
○ Google Photos and
○ Google Search
TensorFlow
TensorFlow - Principal
● First define graph of computations
Operation
TensorFlow
TensorFlow - Principal
● Then TensorFlow runs this graph efficiently using optimized C++ code
Operation
TensorFlow
TensorFlow - Parallel Computation
● Also the graph can be broken into multiple chunks
● Each chunk can run
○ parallel across multiple
○ CPUs and
○ GPUs
TensorFlow
TensorFlow - Parallel Computation
● TensorFlow also supports distributed computing
○ We’ll cover Distributed TensorFlow later in the course
● Can train a network composed of
○ Billions of instances with millions of features each
TensorFlow
TensorFlow - Highlights - Runs Everywhere
● Runs on desktop and mobile devices such as
○ Windows
○ Linux
○ macOS
○ iOS and
○ Android
TensorFlow
TensorFlow - Highlights - TF.Learn
● Provides Python API called TF.Learn(tensorflow.contrib.learn)
● TF.Learn is compatible with Scikit-Learn
● Train machine learning models with just few lines of code
TensorFlow
TensorFlow - Highlights - Other APIs
● Many high-level APIs are built on top of TensorFlow such as
○ Keras and
○ Pretty Tensor
TensorFlow
TensorFlow - Highlights - Flexibility
● Python API offers flexibility to create all sorts of computations
○ Including any neural network architecture we can think of
TensorFlow
TensorFlow - Highlights - C++ API
● Includes highly efficient C++ implementations of many ML operations
● Also it has a C++ API to define our own high-performance operations
TensorFlow
TensorFlow - Highlights - TensorBoard
● Has a great visualization tool called TensorBoard
○ It allows to browse through the computation graph
○ Helps in viewing learning curves and more details
TensorFlow
TensorFlow - Highlights - Open Source
● Last but not the least
○ It has a dedicated team of passionate and helpful developers
○ Growing community contributing to improve it
○ One the the most popular open source projects on GitHub
TensorFlow
Deep Learning Libraries
Open source Deep Learning libraries (not an exhaustive list)
TensorFlow
Creating Our First Graph and Running It in a
Session
TensorFlow
Creating & Running a Graph
>>> import tensorflow as tf
>>> x = tf.Variable(3, name="x") #x = 3
>>> y = tf.Variable(4, name="y") # y = 4
>>> f = x*x*y + y + 2
TensorFlow
Creating & Running a Graph
>>> import tensorflow as tf
>>> x = tf.Variable(3, name="x")
>>> y = tf.Variable(4, name="y")
>>> f = x*x*y + y + 2
● This code does not perform any computation
● It just creates a computation graph
● Even the variables are not initialized up to this point
TensorFlow
Creating & Running a Graph
Then how do we start the computation?
TensorFlow
Creating & Running a Graph
● To evaluate this graph
○ We need to open a
○ TensorFlow session and
○ Use it to initialize the variables and evaluate f
TensorFlow
Creating & Running a Graph - TF Session
● A TensorFlow session takes care of
○ Placing the operations onto devices
■ Such as CPUs and GPUs
○ and Running them
○ It also holds all the variable values
TensorFlow
Creating & Running a Graph - TF Session
>>> sess = tf.Session() ← Creates the session
>>> sess.run(x.initializer)
>>> sess.run(y.initializer)
>>> result = sess.run(f) ← Evaluates
>>> print(result)
42
>>> sess.close() ← Closes the session to free up resources
Initialize the variables
TensorFlow
Creating & Running a Graph - TF Session
Better way
with tf.Session() as sess:
x.initializer.run()
y.initializer.run()
result = f.eval()
result
Output - 42
TensorFlow
Creating & Running a Graph - TF Session
Better way
with tf.Session() as sess:
x.initializer.run()
y.initializer.run()
result = f.eval()
result
Important - the session is automatically closed at the end of the block
TensorFlow
Creating & Running a Graph - TF Session
Another Better way
● Instead of manually running the initializer for every single variable
○ We can use can use the global_variables_initializer() function
init = tf.global_variables_initializer() # prepare an init node
with tf.Session() as sess:
init.run() # actually initialize all the variables
result = f.eval()
Important -
● It does not actually perform the initialization immediately
● It creates a node in the graph that will initialize all variables when it is run
TensorFlow
Creating & Running a Graph - Summary
TensorFlow Program
Build Computational Graph -
Construction Phase
Run Computational Graph -
Execution Phase
TensorFlow
Creating & Running a Graph - Summary
Construction Phase
● Typically computation graph is built
● Representing the ML model and
● The computations required to train it
TensorFlow
Creating & Running a Graph - Summary
Execution Phase
● Runs a loop that evaluates a training step repeatedly
● For example one step per mini-batch and
● Gradually improving the model parameters
● We will see the example shortly
TensorFlow
Managing Graphs
TensorFlow
Managing Graphs
● Any node we create is added to the default graph
>>> x1 = tf.Variable(1)
>>> x1.graph is tf.get_default_graph()
Output -
True
TensorFlow
Managing Graphs
● At times we may want to manage multiple independent graphs
● We can do by creating a new Graph and
○ Temporarily making it the default graph
○ Inside a with block
graph = tf.Graph()
with graph.as_default():
x2 = tf.Variable(2)
print(x2.graph is graph)
print(x2.graph is tf.get_default_graph())
Output-
True
False
TensorFlow
Managing Graphs
Important
● Use reset_graph function specified in notebook to
● Reset the default graph
TensorFlow
Lifecycle of a Node Value
TensorFlow
Lifecycle of a Node Value
Important
● When we evaluate a node
○ TensorFlow automatically determines the set of nodes that it depends
on and
○ It evaluate these node first
TensorFlow
Lifecycle of a Node Value
Example
● Consider the following code
w = tf.constant(3)
x = w + 2
y = x + 5
z = x * 3
with tf.Session() as sess:
print(y.eval()) # 10
print(z.eval()) # 15
TensorFlow
Lifecycle of a Node Value
Example
● Consider the following code
w = tf.constant(3)
x = w + 2
y = x + 5
z = x * 3
with tf.Session() as sess:
print(y.eval()) # 10
print(z.eval()) # 15
y
x
w
y.eval()
x = 3+2 = 5
y = 5+5
=10
w = 3
TensorFlow
Lifecycle of a Node Value
Example
● Consider the following code
w = tf.constant(3)
x = w + 2
y = x + 5
z = x * 3
with tf.Session() as sess:
print(y.eval()) # 10
print(z.eval()) # 15
z
x
w
z.eval()
x = 3+2 = 5
z = 5*3 =15
w = 3
TensorFlow
Lifecycle of a Node Value
Important
● Preceding code evaluates w and x twice
● Nodes values are dropped between graph runs
● Except variable values, which are maintained by the
○ Session across graph runs
● A variable starts its life when its initializer is run, and
○ It ends when the session is closed
TensorFlow
Lifecycle of a Node Value
Important
● To evaluate y and z without evaluating w and x twice
○ Ask TensorFlow to evaluate both y and z in just one graph run
with tf.Session() as sess:
y_val, z_val = sess.run([y, z])
print(y_val) # 10
print(z_val) # 15
TensorFlow
Ops
● TensorFlow operations are called ops
● Ops can take any number of inputs and produce any number of outputs
● For example,
○ Addition and multiplication ops
■ Each take two inputs and
■ Produce one output
○ Constant and variables take no input
■ They are called source ops
TensorFlow
Tensors
● The inputs and outputs are
○ Multidimensional arrays, called tensors
○ Hence the name TensorFlow
● Like NumPy arrays, tensors have a type and a shape
● In the Python API tensors are
○ Simply represented by NumPy ndarrays
● Tensors typically contain floats
○ But we can make them to carry strings (arbitrary byte arrays)
TensorFlow
Linear Regression with TensorFlow
TensorFlow
Linear Regression
+ = $1253
+ = $219 1
= $??
= $??
TensorFlow
Linear Regression
+ = $12/35/3
+ = $21/91/9
= $??
= $??
Did you notice that values are not integers?
TensorFlow
Linear Regression
[ 1
1 ] [ ] [ ]=
+ = $12/35/3
+ = $21/91/9
5/3
1/9
12/3
21/9
TensorFlow
Linear Regression
Θ yX
[ 1
1 ] [ ] [ ]=
5/3
1/9
12/3
21/9
TensorFlow
Linear Regression
Θ yX
[ 1
1 ] [ ] [ ]=
5/3
1/9
12/3
21/9
Optimum value of theta can calculated using the Normal Equation
Θ = (XT.X)-1.XT.y
៱
TensorFlow
Linear Regression - Sklearn
Θ yX
[ 1
1 ] [ ] [ ]=
5/3
1/9
12/3
21/9
Optimum value of theta can calculated using the Normal Equation
Θ = (XT.X)-1 .XT .y
៱
np.linalg.inv(X.T.dot(X)) .dot(X.T).dot(y)
TensorFlow
Linear Regression - Sklearn
Θ yX
[ 1
1 ] [ ] [ ]=
5/3
1/9
12/3
21/9
Optimum value of theta can calculated using the Normal Equation
Θ = (XT.X)-1 .XT .y
៱
np.linalg.inv(X.T.dot(X)) .dot(X.T).dot(y)
[[2.21428571], [1.07142857]
TensorFlow
Linear Regression
● Now, Let’s calculate theta using normal equation in TensorFlow
● We will use housing dataset of end-to-end project
Θ = (XT.X)-1.XT.y
៱
TensorFlow
>>> import numpy as np
>>> from sklearn.datasets import fetch_california_housing
>>> reset_graph()
>>> housing = fetch_california_housing()
Linear Regression
Fetches housing data
TensorFlow
>>> import numpy as np
>>> from sklearn.datasets import fetch_california_housing
>>> reset_graph()
>>> housing = fetch_california_housing()
>>> m, n = housing.data.shape
>>> housing_data_plus_bias = np.c_[np.ones((m, 1)), housing.data]
Linear Regression
Adds extra bias input feature (x0 = 1) to all training instances. (it
does so using NumPy so it runs immediately)
TensorFlow
Linear Regression
>>> import numpy as np
>>> from sklearn.datasets import fetch_california_housing
>>> reset_graph()
>>> housing = fetch_california_housing()
>>> m, n = housing.data.shape
>>> housing_data_plus_bias = np.c_[np.ones((m, 1)), housing.data]
>>> X = tf.constant(housing_data_plus_bias)
>>> y = tf.constant(housing.target.reshape(-1, 1))
Creates two TensorFlow constant nodes, X and y, to hold this data
and the targets
TensorFlow
Linear Regression
1.>>> import numpy as np
2.>>> from sklearn.datasets import fetch_california_housing
3.>>> reset_graph()
4.>>> housing = fetch_california_housing()
5.>>> m, n = housing.data.shape
6.>>> housing_data_plus_bias = np.c_[np.ones((m, 1)), housing.data]
7.>>> X = tf.constant(housing_data_plus_bias)
8.>>> y = tf.constant(housing.target.reshape(-1, 1))
9.>>> XT = tf.transpose(X)
10.>>> theta = tf.matmul(
1.tf.matmul(
a.tf.matrix_inverse(tf.matmul(XT, X)),
b.XT),
2.y)
Matrix operations provided by TensorFlow to define theta
TensorFlow
Linear Regression
Run previous code
with tf.Session() as sess:
theta_value = theta.eval()
theta_value
Output
array([[ -3.74651413e+01],
[ 4.35734153e-01],
[ 9.33829229e-03],
[ -1.06622010e-01],
[ 6.44106984e-01],
[ -4.25131839e-06],
[ -3.77322501e-03],
[ -4.26648885e-01],
[ -4.40514028e-01]], dtype=float32)
TensorFlow
Linear Regression
Compare different ways of calculating theta (Using NumPy and Scikit-Learn)
using the code shown in the notebook
TensorFlow
Linear Regression
The main benefit of previous code versus computing the Normal Equation
directly using NumPy is that
○ TensorFlow automatically runs this on
○ Your GPU card if you have one
○ Provided TensorFlow with GPU support is installed
TensorFlow
Implementing Gradient Descent
TensorFlow
Implementing Gradient Descent
● Let’s try using Batch Gradient Descent instead of Normal Equation
● In next couple of slides we will
○ First manually compute the gradients
○ Then use TensorFlow’s autodiff feature
○ And then use a couple of TensorFlow’s out-of-the-box optimizers
TensorFlow
Implementing Gradient Descent
Manually computing Gradients using Batch Gradient Descent
Gradient vector of the cost function
TensorFlow
Implementing Gradient Descent
Manually computing Gradients using Batch Gradient Descent
Gradient Descent step
TensorFlow
Implementing Gradient Descent
Manually computing Gradients using Batch Gradient Descent
using NumPy
# Using Numpy
eta = 0.1 # learning rate
n_iterations = 1000
m = 100
theta = np.random.randn(2,1) # random initialization
for iteration in range(n_iterations):
gradients = 2/m * X_b.T.dot(X_b.dot(theta) - y)
theta = theta - eta * gradients
print(theta)
TensorFlow
Implementing Gradient Descent
Manually computing Gradients using Batch Gradient Descent
using TF
Step 1- Normalize the feature vector list using Scikit-Learn
>>> from sklearn.preprocessing import StandardScaler
>>> scaler = StandardScaler()
>>> scaled_housing_data = scaler.fit_transform(housing.data)
>>> scaled_housing_data_plus_bias = np.c_[np.ones((m, 1)),
scaled_housing_data]
>>> print(scaled_housing_data_plus_bias.mean(axis=0))
>>> print(scaled_housing_data_plus_bias.mean(axis=1))
>>> print(scaled_housing_data_plus_bias.mean())
>>> print(scaled_housing_data_plus_bias.shape)
TensorFlow
Implementing Gradient Descent
Manually computing Gradients using Batch Gradient Descent
using TF
Step 2- Manually computing the gradient
Please check the code and explanation in the notebook
TensorFlow
Implementing Gradient Descent Using autodiff
TensorFlow
Using autodiff - Automatic Differentiation
Problem with manually calculating gradients
● Previous codes require mathematically deriving the gradients from the
cost function(MSE)
● In case of Linear Regression mathematically deriving the gradient is
reasonable easy
● But doing the same with deep neural networks is quite a headache
○ It would be tedious and
○ Error-prone and
○ Code might not be very efficient
TensorFlow
Using autodiff - Automatic Differentiation
Different options to find partial derivatives
● Let’s say we have a function f(x,y)
● And we need its partial derivatives with respect to x and y
○ To perform Gradient Descent or
○ Some other optimization algorithm
TensorFlow
Using autodiff - Automatic Differentiation
Different options to find partial derivatives
● There are four options to find partial derivatives
○ Symbolic Differentiation
○ Numerical Differentiation
○ Forward-mode autodiff
○ Reverse-mode autodiff
● We’ll cover these options in details later in the course
● TensorFlow implements Reverse-mode autodiff
TensorFlow
Using autodiff - Automatic Differentiation
Problem with manually calculating gradients
● Let’s say our function is
○ f(x)= exp(exp(exp(x)))
● As per the calculus its derivative f′(x) will be
○ f′(x) = exp(x) × exp(exp(x)) × exp(exp(exp(x)))
TensorFlow
Using autodiff - Automatic Differentiation
Problem with manually calculating gradients
● If we code f(x) and f′(x) separately then
○ exp function will be called 9 times
○ This is inefficient
f(x)= exp(exp(exp(x))) --> 3 times
f′(x) = exp(x) × exp(exp(x)) × exp(exp(exp(x))) --> 6
times
Total calls → 9 times
TensorFlow
Using autodiff - Automatic Differentiation
Problem with manually calculating gradients
● A more efficient solution will be to write function which
○ First computes exp(x)
○ Then exp(exp(x))
○ Then exp(exp(exp(x)))
○ And returns all the three
○ This way exp function will be called just three times, once in each step
TensorFlow
Using autodiff - Automatic Differentiation
● TensorFlow’s autodiff feature
○ Efficiently and automatically computes the gradient for us
○ Replace the gradients = … in the Gradient Descent code in the
previous section with the below line
○ gradients = tf.gradients(mse, [theta])[0]
○ And it will compute the gradients for us
Check the code in the notebook
TensorFlow
Using autodiff - Automatic Differentiation
gradients = tf.gradients(mse, [theta])[0]
● The gradients() function takes
○ An op (in this case mse) and
○ A list of variables (in this case just theta)
● And computes the gradients of each variables in the list
TensorFlow
● Slope at any point
● Here the curve is:
○ y = x*x
● Here we are computing
○ Slope at x = 5
○ dy/dx = d(x^2)/dx
○ 2*x
○ 2*5 = 10
Understanding Differentiation
Manual
TensorFlow
Using tensorFlow Autodiff
tf.reset_default_graph()
x = tf.constant(5.0)
y = tf.square(x)
z = tf.gradients(y, x)
with tf.Session() as s:
print(z[0].eval())
------
10.0
Understanding Differentiation
TensorFlow
Using autodiff - Automatic Differentiation
One more example on autodiff gradient computation
Find the partial derivatives of the following function with regards to `a` and
`b` at the point (0.2, 0.3)
def my_func(a, b):
z = 0
for i in range(100):
z = a * np.cos(z + i) + z * np.sin(b - i)
return z
Check the code in the notebook
TensorFlow
Implementing Gradient Descent Using an
Optimizer
TensorFlow
Implementing Gradient Descent
Using an Optimizer
● As we have seen TensorFlow computes the gradient for us
● It also provides a number of optimizers out of the box such as
○ Gradient Descent optimizer
○ Momentum optimizer
● We will cover these optimizers in details in the later part of the course
TensorFlow
Implementing Gradient Descent
Using an Optimizer - GradientDescentOptimizer
Replace the preceding gradients = ... and training_op = ... lines with the
following code
>>> optimizer =
tf.train.GradientDescentOptimizer(learning_rate=learning_rate)
>>> training_op = optimizer.minimize(mse)
Please check the code and explanation in the notebook
TensorFlow
Implementing Gradient Descent
Using an Optimizer - MomentumOptimizer
It adds momentum to SGD. Slightly different algorithm.
>>> optimizer =
tf.train.MomentumOptimizer(learning_rate=learning_rate,
momentum=0.9)
Please check the code and explanation in the notebook
TensorFlow
Feeding Data to the Training Algorithm
TensorFlow
Feeding Data to the Training Algorithm
Feeding and Placeholder nodes
● Feeding allows to substitute different values for one or more tensors at
run time
● Placeholders are nodes whose value is fed in at execution time
○ They don’t actually perform any computation
○ They just output the data we tell them to output at runtime
○ Typically used to pass the training data to TensorFlow during training
○ Mostly inputs and labels
placeholder
TensorFlow
Feeding Data to the Training Algorithm
Placeholder nodes - Example
>>> A = tf.placeholder(tf.float32, shape=(None, 3))
>>> B = A + 5
>>> with tf.Session() as sess:
B_val_1 = B.eval(feed_dict={A: [[1, 2, 3]]})
B_val_2 = B.eval(feed_dict={A: [[4, 5, 6], [7, 8, 9]]})
TensorFlow
Feeding Data to the Training Algorithm
Placeholder nodes - Example
>>> A = tf.placeholder(tf.float32, shape=(None, 3))
>>> B = A + 5
>>> with tf.Session() as sess:
B_val_1 = B.eval(feed_dict={A: [[1, 2, 3]]})
B_val_2 = B.eval(feed_dict={A: [[4, 5, 6], [7, 8, 9]]})
● Create a placeholder node “A”
● “A” must have rank 2 (two-dimensionals) and
● There must be three columns
● It can have any number of rows
TensorFlow
Feeding Data to the Training Algorithm
Placeholder nodes - Example
>>> A = tf.placeholder(tf.float32, shape=(None, 3))
>>> B = A + 5
>>> with tf.Session() as sess:
B_val_1 = B.eval(feed_dict={A: [[1, 2, 3]]})
B_val_2 = B.eval(feed_dict={A: [[4, 5, 6], [7, 8, 9]]})
● Create a node “B”
TensorFlow
Feeding Data to the Training Algorithm
Placeholder nodes - Example
>>> A = tf.placeholder(tf.float32, shape=(None, 3))
>>> B = A + 5
>>> with tf.Session() as sess:
B_val_1 = B.eval(feed_dict={A: [[1, 2, 3]]})
B_val_2 = B.eval(feed_dict={A: [[4, 5, 6], [7, 8, 9]]})
● While evaluating B
○ Pass a feed_dict to the eval() method
○ feed_dict specifies the value of A
Check the code in the notebook
TensorFlow
Feeding Data to the Training Algorithm
Placeholder nodes - Mini-batch Gradient Descent
● Let’s implement Mini-batch Gradient Descent using TensorFlow
● We need to replace X and y at every iteration with the next mini-batch
○ Check the complete code in the notebook
Check the complete code in the notebook
X = tf.placeholder(tf.float32, shape=(None, n + 1), name="X")
y = tf.placeholder(tf.float32, shape=(None, 1), name="y")
TensorFlow
Saving and Restoring Models
TensorFlow
Saving & Restoring Models
● We should save the model parameters to disk once it is trained
● It helps in
○ Using the trained models without retraining them
■ Remember training takes a lot of time
○ Using models in other programs
TensorFlow
Saving & Restoring Models - Checkpoints
● We should also save checkpoints to disks
○ At regular intervals during training
○ So that if the computer crashes during training
○ Then we can continue from the last saved checkpoint
○ Rather than start over from scratch
TensorFlow
Saving & Restoring Models - Save Models
How to save models in TensorFlow?
Step 1 - Create a Saver node
At the end of the construction phase(after all variable nodes are created)
>>> saver = tf.train.Saver() # Create Saver node
Check the complete code in the notebook
TensorFlow
Saving & Restoring Models - Save Models
How to save models in TensorFlow?
Step 2 - In the execution phase
● Just call its save() method whenever you want to save the model
● By passing the session and path of the checkpoint file
>>> save_path = saver.save(sess, "model_ckps/my_model_final.ckpt") #
Save model
Check the complete code in the notebook
TensorFlow
Saving & Restoring Models - Restore Models
How to restore models in TensorFlow?
● In the execution phase,
○ Do not initialize variables using init
○ Just call the restore() method of the Saver object
with tf.Session() as sess:
saver.restore(sess, "/tmp/my_model_final.ckpt")
best_theta_restored = theta.eval()
Check the complete code in the notebook
TensorFlow
Saving & Restoring Models - Restore Models
How to restore models in TensorFlow?
● Check if restored theta is same as the saved theta
np.allclose(best_theta, best_theta_restored)
Output - True
Check the complete code in the notebook
TensorFlow
Saving & Restoring Models - Restore Models
How to restore models in TensorFlow?
● Restore theta with a different name, such as "weights"
Check the complete code in the notebook
saver = tf.train.Saver({"weights": theta})
TensorFlow
Visualizing the Graph and Training Curves
Using TensorBoard
TensorFlow
TensorBoard
● In the previous example
○ We used print() function to
○ Visualize progress during training
● Training a massive deep neural network can be
○ Complex and
○ Confusing
● Better way to visualize is to use TensorBoard
TensorFlow
TensorBoard
● TensorBoard is a suite of web applications
○ For inspecting and understanding
○ TensorFlow runs and graphs
TensorFlow
TensorBoard
● TensorBoard makes easy to
○ Understand,
○ Debug and
○ Optimize
○ TensorFlow programs
TensorFlow
TensorBoard
● If we feed training stats to TensorBoard
○ It displays nice interactive visualizations of these stats
○ In the web browser
● If we feed graph definition to TensorBoard
○ It displays a great interface to browse through it
■ Very useful to identify errors in the graph
■ Find bottlenecks
TensorFlow
TensorBoard
● We can visualize using TensorBoard in two ways
○ Inside Jupyter (Using IFrame)
○ Using TensorBoard Server
TensorFlow
Visualize Graph Inside Jupyter
● We can visualize the graph inside the Jupyter instead of using
TensorBoard
Check the complete code in the notebook
TensorFlow
Using TensorBoard Server
● Let’s visualize our previous TensorFlow program using TensorBoard
server
● We have to tweak our program a bit
○ So that our program writes
○ The graph definition and training stats to
○ A Log directory, that TensorBoard will read from
TensorFlow
Using TensorBoard Server
● We use different log directory for every run of the program
● Else, TensorBoard merges stats from different runs
○ Which will mess up visualizations
● The simplest solution is to
○ Include timestamp in the log directory name
● Let’s visualize using TensorBoard
TensorFlow
Using TensorBoard Server
Step 1 - Add the following code at the beginning of the program
>>> from datetime import datetime
>>> now = datetime.utcnow().strftime("%Y%m%d%H%M%S")
>>> root_logdir = "tf_logs"
>>> logdir = "{}/run-{}/".format(root_logdir, now)
Includes the timestamp in the log directory name
TensorFlow
Using TensorBoard Server
Step 2 - Add the following code at the very end of the construction phase
>>> mse_summary = tf.summary.scalar('MSE', mse)
>>> file_writer = tf.summary.FileWriter(logdir,tf.get_default_graph())
TensorFlow
Using TensorBoard Server
Step 2 - Add the following code at the very end of the construction phase
>>> mse_summary = tf.summary.scalar('MSE', mse)
>>> file_writer = tf.summary.FileWriter(logdir,tf.get_default_graph())
● Creates a node in the graph that will evaluate the MSE and
○ Write it to a TensorBoard- compatible binary log string
○ Called a summary
TensorFlow
Using TensorBoard Server
Step 2 - Add the following code at the very end of the construction phase
>>> mse_summary = tf.summary.scalar('MSE', mse)
>>> file_writer =
tf.summary.FileWriter(logdir,tf.get_default_graph())
● Create a FileWriter
○ Used to write summaries to
○ Logfiles in the log directory
○ Writes the graph definition in a
○ Binary logfile called an events file
TensorFlow
Using TensorBoard Server
Step 2 - Add the following code at the very end of the construction phase
>>> mse_summary = tf.summary.scalar('MSE', mse)
>>> file_writer =
tf.summary.FileWriter(logdir,tf.get_default_graph())
● The first parameter is logdir
○ Indicates the path of the log directory
● The second parameter is the
○ Graph we want to visualize
○ Optional parameters
TensorFlow
Using TensorBoard Server
Step 3 - Update the execution phase
[...]
for batch_index in range(n_batches):
X_batch, y_batch = fetch_batch(epoch, batch_index, batch_size)
if batch_index % 10 == 0:
summary_str = mse_summary.eval(feed_dict={X: X_batch, y:
y_batch})
step = epoch * n_batches + batch_index
file_writer.add_summary(summary_str, step)
sess.run(training_op, feed_dict={X: X_batch, y: y_batch})
[...]
TensorFlow
Using TensorBoard Server
Step 3 - Update the execution phase
[...]
for batch_index in range(n_batches):
X_batch, y_batch = fetch_batch(epoch, batch_index, batch_size)
if batch_index % 10 == 0:
summary_str = mse_summary.eval(feed_dict={X:
X_batch, y: y_batch})
step = epoch * n_batches + batch_index
file_writer.add_summary(summary_str, step)
sess.run(training_op, feed_dict={X: X_batch, y: y_batch})
[...]
● Evaluate the mse_summary node regularly during training
○ e.g., every 10 mini-batches
TensorFlow
Using TensorBoard Server
Step 3 - Update the execution phase
[...]
for batch_index in range(n_batches):
X_batch, y_batch = fetch_batch(epoch, batch_index, batch_size)
if batch_index % 10 == 0:
summary_str = mse_summary.eval(feed_dict={X: X_batch, y:
y_batch})
step = epoch * n_batches + batch_index
file_writer.add_summary(summary_str, step)
sess.run(training_op, feed_dict={X: X_batch, y: y_batch})
[...]
Writes the summary from the previous step to the event file
TensorFlow
Using TensorBoard Server
Step 4 - Close the FileWriter at the end of the program
>>> file_writer.close()
TensorFlow
Using TensorBoard Server
Step 4 - Close the FileWriter at the end of the program
>>> file_writer.close()
TensorFlow
Using TensorBoard Server
Step 5 - Run the Program
● It will create log directory
○ And events files in that directory
○ Containing both the graph definition and
○ MSE Values
TensorFlow
Using TensorBoard Server
Step 6 - Check the files
>>> cd ~/ml/deep_learning/ # Go to the deep learning directory
>>> ls -lh tf_logs/run*
TensorFlow
Using TensorBoard Server
Step 7 - Fire up the TensorBoard server
>>> cd ~/ml/deep_learning/ # Go to the deep learning directory
>>> ls -lh tf_logs/run*
TensorFlow
4. Find hostname of console whether it is e, f, g.cloudxlab.com
5. Open the <hostname>:<port> in browser
Using TensorBoard Server
1.source activate py36
2.tensorboard --logdir ~/ml/deep_learning/tf_logs/ --port 6006
a. If you get error “port already in use”
b. Change port to 6007, 6008 and so on
c. We have opened port 6006 to 6016 in the firewall for TensorBoard
3. Find the port
Step 7 - Fire up the TensorBoard server
TensorFlow
Name Scopes
TensorFlow
Name Scopes
● When dealing with complex neural networks
○ The graph becomes cluttered with thousand of nodes
● We can avoid this by
○ Creating name scopes to group related nodes
TensorFlow
Name Scopes
Example
>>> reset_graph()
>>> a1 = tf.Variable(0, name="a") # name == "a"
>>> a2 = tf.Variable(0, name="a") # name == "a_1" (since a already
exists)
● When we create a node
○ TensorFlow checks if its name already exists
○ If yes, then it appends
■ An underscore followed by
■ An index to make the name unique
TensorFlow
Name Scopes
Example
with tf.name_scope("param"): # name == "param"
a3 = tf.Variable(0, name="a") # name == "param/a"
with tf.name_scope("param"): # name == "param_1"
a4 = tf.Variable(0, name="a") # name == "param_1/a"
with tf.name_scope("param"): # name == "param_2"
a5 = tf.Variable(0, name="a") # name == "param_2/a"
TensorFlow
Name Scopes
Example
for node in (a1, a2, a3, a4, a5):
print(node.op.name)
Output -
a
a_1
param/a
param_1/a
param_2/a
Check the complete code in the notebook
TensorFlow
Name Scopes
● In our previous TensorBoard example
○ We can define
○ “error” and “mse” ops within a
○ name scope called “loss”
>>> with tf.name_scope("loss") as scope:
error = y_pred - y
mse = tf.reduce_mean(tf.square(error), name="mse")
print(error.op.name) # loss/sub
print(mse.op.name) # loss/mse
Check the complete code in the notebook
TensorFlow
Name Scopes
A collapsed namescope in TensorBoard (mse and error nodes now appear
inside the loss namespace)
TensorFlow
Modularity
TensorFlow
Modularity
● Let’s say we want to add the output of
○ Two rectified linear units (ReLU)
● A ReLU computes
○ A linear function of the inputs and
○ Outputs the result if it is positive, and 0 otherwise
Rectified Linear Unit (ReLU)
TensorFlow
Modularity
1. How do we add the output of two RELUs?
1. Create a graph for first RELU
2. Create a graph for second RELU
3. Add them
TensorFlow
Modularity
n_features = 3
X = tf.placeholder(tf.float32, shape=(None, n_features), name="X")
w1 = tf.Variable(tf.random_normal((n_features, 1)), name="weights1")
w2 = tf.Variable(tf.random_normal((n_features, 1)), name="weights2")
b1 = tf.Variable(0.0, name="bias1")
b2 = tf.Variable(0.0, name="bias2")
z1 = tf.add(tf.matmul(X, w1), b1, name="z1")
z2 = tf.add(tf.matmul(X, w2), b2, name="z2")
relu1 = tf.maximum(z1, 0., name="relu1")
relu2 = tf.maximum(z1, 0., name="relu2")
output = tf.add(relu1, relu2, name="output")
Question - What is the problem with the code in notebook?
TensorFlow
Modularity
● Code in notebook is
○ Repetitive
○ Error-prone and
○ Hard to maintain
● Also what if we had to add output of five RELUs?
TensorFlow
Modularity
● TensorFlow lets us stay DRY
○ Don’t Repeat Yourself
● Create a function to build a RELU
● Check the code in the notebook
TensorFlow
Modularity
● Check the graph by running
○ tensorboard --logdir logs/relu2 --port 6006
TensorFlow
● If name already exists, it appends an “_” followed by an
index to make the name unique.
● So the first ReLU contains nodes named "weights",
"bias", "z", and "relu" (plus many more nodes with their
default name, such as "MatMul");
● The second ReLU contains nodes named "weights_1",
"bias_1", and so on; the third ReLU contains nodes
named "weights_2", "bias_2", and so on.
● TensorBoard identifies such series and collapses them
together to reduce clutter
Modularity
TensorFlow
● Using name scopes, you can make the graph much clearer.
● Simply move all the content of the relu() function inside a name scope.
Modularity
TensorFlow
Sharing Variables
TensorFlow
Sharing Variables - Classic Way
● How do we share a variable between various components?
● Classic way is to
○ First create the variable
○ Then pass it as a parameter to the functions
-----------------------
def f(X, threshold):
# Use threshold
# ....
threshold = 0.5
f(X1, threshold)
f(X2, threshold)
TensorFlow
● For example
○ To control the ReLU threshold (currently 0) using a shared threshold
variable for all ReLUs
○ Create variable first, and then pass it to the relu() function
Sharing Variables - Classic Way
Check the complete code in the notebook
TensorFlow
● For example
○ To control the ReLU threshold (currently 0) using a shared threshold
variable for all ReLUs
○ Create variable first, and then pass it to the relu() function
Sharing Variables - Classic Way
Step 2 - Passing it to a function
Step 1- Creating variable
TensorFlow
Question - What is the problem with previous
approach?
TensorFlow
Answer-
● If there are many shared parameters, then
○ It becomes painful to pass them
○ As parameters all the time
Sharing Variables
TensorFlow
1. Create a Python dictionary
a. Containing all the variables and
b. Pass it around to every function
2. Set the shared variable
a. As an attribute of the relu() function
b. Check the complete code in the notebook
Sharing Variables - Solutions
TensorFlow
● TensorFlow offers cleaner and more modular option
● Use the get_variable() function to
○ Create the shared variable if it does not exists
○ Or reuse it if it already exists
Sharing Variables - get_variable()
TensorFlow
● For example
○ Following code creates a variable named "relu/threshold"
Sharing Variables - get_variable()
0.0 is initial valueScalar
TensorFlow
● Note that this code will raise an exception if
○ If the variable has already been created
○ By an earlier call to get_variable()
● This prevents reusing variables by mistake
Sharing Variables - get_variable()
TensorFlow
● If we want to reuse a variable
○ We explicitly say so by setting the
○ Variable scope’s reuse attribute to True
● Note that here we don’t have to specify
○ The shape
○ Or the initializer
Sharing Variables - Reuse Variables
TensorFlow
● This code fetches the existing "relu/threshold" variable
● Or raises an exception
○ If it does not exist
○ Or if it was not created using get_variable()
Sharing Variables - Reuse Variables
TensorFlow
Important
● Once reuse is set to True
○ It cannot be set back to False within the block
● Only variables created by
○ get_variable() can be reused
Sharing Variables - Reuse Variables
TensorFlow
● Alternate way to reuse variables is to
○ Use reuse_variables() function
Sharing Variables - Reuse Variables
TensorFlow
● Now let’s come back to the original problem of sharing variables
● And make the relu() function
○ Access the threshold variable
○ Without having to pass it as a parameter
Sharing Variables - Reuse Variables
TensorFlow
Steps - 1
● This code first defines the relu() function
Sharing Variables - Reuse Variables
TensorFlow
Steps - 2
● Then creates the relu/threshold variable
○ As a scalar that
○ Will later be initialized to 0.0
Sharing Variables - Reuse Variables
TensorFlow
Steps - 3
● Then builds five ReLUs by calling the relu() function
Sharing Variables - Reuse Variables
TensorFlow
Steps - 4
● The relu() function reuses the relu/threshold variable
Sharing Variables - Reuse Variables
TensorFlow
Summary
TensorFlow
○ Basics of TensorFlow
○ Graph
○ Variables
○ Gradients
○ Optmizer
Summary - We learnt
○ TensorBoard
○ Placeholders
○ Saving and Restoring
○ Modularity
○ Name Scope
○ Sharing Variables:
■ Variable scope
TensorFlow
Summary
We will discuss more advanced topics
○ During the course like operations related to
■ Deep neural networks
■ Convolutional neural networks, and
■ Recurrent neural networks
We will also learn how to scale up TensorFlow using
○ Multithreading
○ Queues
○ Multiple GPUs and
○ Multiple servers
Questions?
https://discuss.cloudxlab.com
reachus@cloudxlab.com
Ad

More Related Content

What's hot (20)

Introduction to TensorFlow
Introduction to TensorFlowIntroduction to TensorFlow
Introduction to TensorFlow
Matthias Feys
 
Deep learning with tensorflow
Deep learning with tensorflowDeep learning with tensorflow
Deep learning with tensorflow
Charmi Chokshi
 
Rnn and lstm
Rnn and lstmRnn and lstm
Rnn and lstm
Shreshth Saxena
 
PyTorch Introduction
PyTorch IntroductionPyTorch Introduction
PyTorch Introduction
Yash Kawdiya
 
TensorFlow Tutorial | Deep Learning With TensorFlow | TensorFlow Tutorial For...
TensorFlow Tutorial | Deep Learning With TensorFlow | TensorFlow Tutorial For...TensorFlow Tutorial | Deep Learning With TensorFlow | TensorFlow Tutorial For...
TensorFlow Tutorial | Deep Learning With TensorFlow | TensorFlow Tutorial For...
Simplilearn
 
What is Deep Learning?
What is Deep Learning?What is Deep Learning?
What is Deep Learning?
NVIDIA
 
TensorFlow
TensorFlowTensorFlow
TensorFlow
Sang-Houn Choi
 
Introduction to Machine Learning with TensorFlow
Introduction to Machine Learning with TensorFlowIntroduction to Machine Learning with TensorFlow
Introduction to Machine Learning with TensorFlow
Paolo Tomeo
 
Attention Is All You Need
Attention Is All You NeedAttention Is All You Need
Attention Is All You Need
SEMINARGROOT
 
Machine Learning - Convolutional Neural Network
Machine Learning - Convolutional Neural NetworkMachine Learning - Convolutional Neural Network
Machine Learning - Convolutional Neural Network
Richard Kuo
 
Tensorflow - Intro (2017)
Tensorflow - Intro (2017)Tensorflow - Intro (2017)
Tensorflow - Intro (2017)
Alessio Tonioni
 
Deep Learning - RNN and CNN
Deep Learning - RNN and CNNDeep Learning - RNN and CNN
Deep Learning - RNN and CNN
Pradnya Saval
 
Introduction to Keras
Introduction to KerasIntroduction to Keras
Introduction to Keras
John Ramey
 
Neural Networks with Google TensorFlow
Neural Networks with Google TensorFlowNeural Networks with Google TensorFlow
Neural Networks with Google TensorFlow
Darshan Patel
 
What is Machine Learning | Introduction to Machine Learning | Machine Learnin...
What is Machine Learning | Introduction to Machine Learning | Machine Learnin...What is Machine Learning | Introduction to Machine Learning | Machine Learnin...
What is Machine Learning | Introduction to Machine Learning | Machine Learnin...
Simplilearn
 
Deep learning - A Visual Introduction
Deep learning - A Visual IntroductionDeep learning - A Visual Introduction
Deep learning - A Visual Introduction
Lukas Masuch
 
Introduction to Deep Learning
Introduction to Deep LearningIntroduction to Deep Learning
Introduction to Deep Learning
Oleg Mygryn
 
Multimodal Deep Learning
Multimodal Deep LearningMultimodal Deep Learning
Multimodal Deep Learning
Universitat Politècnica de Catalunya
 
Recurrent Neural Network (RNN) | RNN LSTM Tutorial | Deep Learning Course | S...
Recurrent Neural Network (RNN) | RNN LSTM Tutorial | Deep Learning Course | S...Recurrent Neural Network (RNN) | RNN LSTM Tutorial | Deep Learning Course | S...
Recurrent Neural Network (RNN) | RNN LSTM Tutorial | Deep Learning Course | S...
Simplilearn
 
Lstm
LstmLstm
Lstm
Mehrnaz Faraz
 
Introduction to TensorFlow
Introduction to TensorFlowIntroduction to TensorFlow
Introduction to TensorFlow
Matthias Feys
 
Deep learning with tensorflow
Deep learning with tensorflowDeep learning with tensorflow
Deep learning with tensorflow
Charmi Chokshi
 
PyTorch Introduction
PyTorch IntroductionPyTorch Introduction
PyTorch Introduction
Yash Kawdiya
 
TensorFlow Tutorial | Deep Learning With TensorFlow | TensorFlow Tutorial For...
TensorFlow Tutorial | Deep Learning With TensorFlow | TensorFlow Tutorial For...TensorFlow Tutorial | Deep Learning With TensorFlow | TensorFlow Tutorial For...
TensorFlow Tutorial | Deep Learning With TensorFlow | TensorFlow Tutorial For...
Simplilearn
 
What is Deep Learning?
What is Deep Learning?What is Deep Learning?
What is Deep Learning?
NVIDIA
 
Introduction to Machine Learning with TensorFlow
Introduction to Machine Learning with TensorFlowIntroduction to Machine Learning with TensorFlow
Introduction to Machine Learning with TensorFlow
Paolo Tomeo
 
Attention Is All You Need
Attention Is All You NeedAttention Is All You Need
Attention Is All You Need
SEMINARGROOT
 
Machine Learning - Convolutional Neural Network
Machine Learning - Convolutional Neural NetworkMachine Learning - Convolutional Neural Network
Machine Learning - Convolutional Neural Network
Richard Kuo
 
Tensorflow - Intro (2017)
Tensorflow - Intro (2017)Tensorflow - Intro (2017)
Tensorflow - Intro (2017)
Alessio Tonioni
 
Deep Learning - RNN and CNN
Deep Learning - RNN and CNNDeep Learning - RNN and CNN
Deep Learning - RNN and CNN
Pradnya Saval
 
Introduction to Keras
Introduction to KerasIntroduction to Keras
Introduction to Keras
John Ramey
 
Neural Networks with Google TensorFlow
Neural Networks with Google TensorFlowNeural Networks with Google TensorFlow
Neural Networks with Google TensorFlow
Darshan Patel
 
What is Machine Learning | Introduction to Machine Learning | Machine Learnin...
What is Machine Learning | Introduction to Machine Learning | Machine Learnin...What is Machine Learning | Introduction to Machine Learning | Machine Learnin...
What is Machine Learning | Introduction to Machine Learning | Machine Learnin...
Simplilearn
 
Deep learning - A Visual Introduction
Deep learning - A Visual IntroductionDeep learning - A Visual Introduction
Deep learning - A Visual Introduction
Lukas Masuch
 
Introduction to Deep Learning
Introduction to Deep LearningIntroduction to Deep Learning
Introduction to Deep Learning
Oleg Mygryn
 
Recurrent Neural Network (RNN) | RNN LSTM Tutorial | Deep Learning Course | S...
Recurrent Neural Network (RNN) | RNN LSTM Tutorial | Deep Learning Course | S...Recurrent Neural Network (RNN) | RNN LSTM Tutorial | Deep Learning Course | S...
Recurrent Neural Network (RNN) | RNN LSTM Tutorial | Deep Learning Course | S...
Simplilearn
 

Similar to Introduction To TensorFlow | Deep Learning Using TensorFlow | CloudxLab (20)

Advanced Spark and TensorFlow Meetup May 26, 2016
Advanced Spark and TensorFlow Meetup May 26, 2016Advanced Spark and TensorFlow Meetup May 26, 2016
Advanced Spark and TensorFlow Meetup May 26, 2016
Chris Fregly
 
Your first TensorFlow programming with Jupyter
Your first TensorFlow programming with JupyterYour first TensorFlow programming with Jupyter
Your first TensorFlow programming with Jupyter
Etsuji Nakai
 
Overview of TensorFlow For Natural Language Processing
Overview of TensorFlow For Natural Language ProcessingOverview of TensorFlow For Natural Language Processing
Overview of TensorFlow For Natural Language Processing
ananth
 
Introduction to TensorFlow
Introduction to TensorFlowIntroduction to TensorFlow
Introduction to TensorFlow
Ralph Vincent Regalado
 
TensorFlow Technology
TensorFlow TechnologyTensorFlow Technology
TensorFlow Technology
narayan dudhe
 
Natural language processing open seminar For Tensorflow usage
Natural language processing open seminar For Tensorflow usageNatural language processing open seminar For Tensorflow usage
Natural language processing open seminar For Tensorflow usage
hyunyoung Lee
 
Introduction to TensorFlow, by Machine Learning at Berkeley
Introduction to TensorFlow, by Machine Learning at BerkeleyIntroduction to TensorFlow, by Machine Learning at Berkeley
Introduction to TensorFlow, by Machine Learning at Berkeley
Ted Xiao
 
TensorFlow Tutorial.pdf
TensorFlow Tutorial.pdfTensorFlow Tutorial.pdf
TensorFlow Tutorial.pdf
Antonio Espinosa
 
Towards Machine Learning in Pharo with TensorFlow
Towards Machine Learning in Pharo with TensorFlowTowards Machine Learning in Pharo with TensorFlow
Towards Machine Learning in Pharo with TensorFlow
ESUG
 
TensorFlow example for AI Ukraine2016
TensorFlow example  for AI Ukraine2016TensorFlow example  for AI Ukraine2016
TensorFlow example for AI Ukraine2016
Andrii Babii
 
running Tensorflow in Production
running Tensorflow in Productionrunning Tensorflow in Production
running Tensorflow in Production
Matthias Feys
 
Introduction To Using TensorFlow & Deep Learning
Introduction To Using TensorFlow & Deep LearningIntroduction To Using TensorFlow & Deep Learning
Introduction To Using TensorFlow & Deep Learning
ali alemi
 
Tensorflow basics
Tensorflow basicsTensorflow basics
Tensorflow basics
IshaNemaCSPOcertifie
 
Logika dan Algoritma pemrograman
Logika dan Algoritma pemrogramanLogika dan Algoritma pemrograman
Logika dan Algoritma pemrograman
Arif Huda
 
Lecture Note DL&NN Tensorflow.pptx
Lecture Note DL&NN Tensorflow.pptxLecture Note DL&NN Tensorflow.pptx
Lecture Note DL&NN Tensorflow.pptx
BhaviniBhatt7
 
Uber's Journey in Distributed Deep Learning
Uber's Journey in Distributed Deep LearningUber's Journey in Distributed Deep Learning
Uber's Journey in Distributed Deep Learning
inside-BigData.com
 
Horovod ubers distributed deep learning framework by Alex Sergeev from Uber
Horovod ubers distributed deep learning framework  by Alex Sergeev from UberHorovod ubers distributed deep learning framework  by Alex Sergeev from Uber
Horovod ubers distributed deep learning framework by Alex Sergeev from Uber
Bill Liu
 
Introduction to TensorFlow 2
Introduction to TensorFlow 2Introduction to TensorFlow 2
Introduction to TensorFlow 2
Oswald Campesato
 
Tensor flow intro and summit info feb 2017
Tensor flow intro and summit info feb 2017Tensor flow intro and summit info feb 2017
Tensor flow intro and summit info feb 2017
Sam Witteveen
 
How to use tensorflow
How to use tensorflowHow to use tensorflow
How to use tensorflow
hyunyoung Lee
 
Advanced Spark and TensorFlow Meetup May 26, 2016
Advanced Spark and TensorFlow Meetup May 26, 2016Advanced Spark and TensorFlow Meetup May 26, 2016
Advanced Spark and TensorFlow Meetup May 26, 2016
Chris Fregly
 
Your first TensorFlow programming with Jupyter
Your first TensorFlow programming with JupyterYour first TensorFlow programming with Jupyter
Your first TensorFlow programming with Jupyter
Etsuji Nakai
 
Overview of TensorFlow For Natural Language Processing
Overview of TensorFlow For Natural Language ProcessingOverview of TensorFlow For Natural Language Processing
Overview of TensorFlow For Natural Language Processing
ananth
 
TensorFlow Technology
TensorFlow TechnologyTensorFlow Technology
TensorFlow Technology
narayan dudhe
 
Natural language processing open seminar For Tensorflow usage
Natural language processing open seminar For Tensorflow usageNatural language processing open seminar For Tensorflow usage
Natural language processing open seminar For Tensorflow usage
hyunyoung Lee
 
Introduction to TensorFlow, by Machine Learning at Berkeley
Introduction to TensorFlow, by Machine Learning at BerkeleyIntroduction to TensorFlow, by Machine Learning at Berkeley
Introduction to TensorFlow, by Machine Learning at Berkeley
Ted Xiao
 
Towards Machine Learning in Pharo with TensorFlow
Towards Machine Learning in Pharo with TensorFlowTowards Machine Learning in Pharo with TensorFlow
Towards Machine Learning in Pharo with TensorFlow
ESUG
 
TensorFlow example for AI Ukraine2016
TensorFlow example  for AI Ukraine2016TensorFlow example  for AI Ukraine2016
TensorFlow example for AI Ukraine2016
Andrii Babii
 
running Tensorflow in Production
running Tensorflow in Productionrunning Tensorflow in Production
running Tensorflow in Production
Matthias Feys
 
Introduction To Using TensorFlow & Deep Learning
Introduction To Using TensorFlow & Deep LearningIntroduction To Using TensorFlow & Deep Learning
Introduction To Using TensorFlow & Deep Learning
ali alemi
 
Logika dan Algoritma pemrograman
Logika dan Algoritma pemrogramanLogika dan Algoritma pemrograman
Logika dan Algoritma pemrograman
Arif Huda
 
Lecture Note DL&NN Tensorflow.pptx
Lecture Note DL&NN Tensorflow.pptxLecture Note DL&NN Tensorflow.pptx
Lecture Note DL&NN Tensorflow.pptx
BhaviniBhatt7
 
Uber's Journey in Distributed Deep Learning
Uber's Journey in Distributed Deep LearningUber's Journey in Distributed Deep Learning
Uber's Journey in Distributed Deep Learning
inside-BigData.com
 
Horovod ubers distributed deep learning framework by Alex Sergeev from Uber
Horovod ubers distributed deep learning framework  by Alex Sergeev from UberHorovod ubers distributed deep learning framework  by Alex Sergeev from Uber
Horovod ubers distributed deep learning framework by Alex Sergeev from Uber
Bill Liu
 
Introduction to TensorFlow 2
Introduction to TensorFlow 2Introduction to TensorFlow 2
Introduction to TensorFlow 2
Oswald Campesato
 
Tensor flow intro and summit info feb 2017
Tensor flow intro and summit info feb 2017Tensor flow intro and summit info feb 2017
Tensor flow intro and summit info feb 2017
Sam Witteveen
 
How to use tensorflow
How to use tensorflowHow to use tensorflow
How to use tensorflow
hyunyoung Lee
 
Ad

More from CloudxLab (20)

Understanding computer vision with Deep Learning
Understanding computer vision with Deep LearningUnderstanding computer vision with Deep Learning
Understanding computer vision with Deep Learning
CloudxLab
 
Deep Learning Overview
Deep Learning OverviewDeep Learning Overview
Deep Learning Overview
CloudxLab
 
Recurrent Neural Networks
Recurrent Neural NetworksRecurrent Neural Networks
Recurrent Neural Networks
CloudxLab
 
Natural Language Processing
Natural Language ProcessingNatural Language Processing
Natural Language Processing
CloudxLab
 
Naive Bayes
Naive BayesNaive Bayes
Naive Bayes
CloudxLab
 
Autoencoders
AutoencodersAutoencoders
Autoencoders
CloudxLab
 
Training Deep Neural Nets
Training Deep Neural NetsTraining Deep Neural Nets
Training Deep Neural Nets
CloudxLab
 
Reinforcement Learning
Reinforcement LearningReinforcement Learning
Reinforcement Learning
CloudxLab
 
Apache Spark - Key Value RDD - Transformations | Big Data Hadoop Spark Tutori...
Apache Spark - Key Value RDD - Transformations | Big Data Hadoop Spark Tutori...Apache Spark - Key Value RDD - Transformations | Big Data Hadoop Spark Tutori...
Apache Spark - Key Value RDD - Transformations | Big Data Hadoop Spark Tutori...
CloudxLab
 
Advanced Spark Programming - Part 2 | Big Data Hadoop Spark Tutorial | CloudxLab
Advanced Spark Programming - Part 2 | Big Data Hadoop Spark Tutorial | CloudxLabAdvanced Spark Programming - Part 2 | Big Data Hadoop Spark Tutorial | CloudxLab
Advanced Spark Programming - Part 2 | Big Data Hadoop Spark Tutorial | CloudxLab
CloudxLab
 
Apache Spark - Dataframes & Spark SQL - Part 2 | Big Data Hadoop Spark Tutori...
Apache Spark - Dataframes & Spark SQL - Part 2 | Big Data Hadoop Spark Tutori...Apache Spark - Dataframes & Spark SQL - Part 2 | Big Data Hadoop Spark Tutori...
Apache Spark - Dataframes & Spark SQL - Part 2 | Big Data Hadoop Spark Tutori...
CloudxLab
 
Apache Spark - Dataframes & Spark SQL - Part 1 | Big Data Hadoop Spark Tutori...
Apache Spark - Dataframes & Spark SQL - Part 1 | Big Data Hadoop Spark Tutori...Apache Spark - Dataframes & Spark SQL - Part 1 | Big Data Hadoop Spark Tutori...
Apache Spark - Dataframes & Spark SQL - Part 1 | Big Data Hadoop Spark Tutori...
CloudxLab
 
Apache Spark - Running on a Cluster | Big Data Hadoop Spark Tutorial | CloudxLab
Apache Spark - Running on a Cluster | Big Data Hadoop Spark Tutorial | CloudxLabApache Spark - Running on a Cluster | Big Data Hadoop Spark Tutorial | CloudxLab
Apache Spark - Running on a Cluster | Big Data Hadoop Spark Tutorial | CloudxLab
CloudxLab
 
Introduction to SparkR | Big Data Hadoop Spark Tutorial | CloudxLab
Introduction to SparkR | Big Data Hadoop Spark Tutorial | CloudxLabIntroduction to SparkR | Big Data Hadoop Spark Tutorial | CloudxLab
Introduction to SparkR | Big Data Hadoop Spark Tutorial | CloudxLab
CloudxLab
 
Introduction to NoSQL | Big Data Hadoop Spark Tutorial | CloudxLab
Introduction to NoSQL | Big Data Hadoop Spark Tutorial | CloudxLabIntroduction to NoSQL | Big Data Hadoop Spark Tutorial | CloudxLab
Introduction to NoSQL | Big Data Hadoop Spark Tutorial | CloudxLab
CloudxLab
 
Introduction to MapReduce - Hadoop Streaming | Big Data Hadoop Spark Tutorial...
Introduction to MapReduce - Hadoop Streaming | Big Data Hadoop Spark Tutorial...Introduction to MapReduce - Hadoop Streaming | Big Data Hadoop Spark Tutorial...
Introduction to MapReduce - Hadoop Streaming | Big Data Hadoop Spark Tutorial...
CloudxLab
 
Introduction to Deep Learning | CloudxLab
Introduction to Deep Learning | CloudxLabIntroduction to Deep Learning | CloudxLab
Introduction to Deep Learning | CloudxLab
CloudxLab
 
Dimensionality Reduction | Machine Learning | CloudxLab
Dimensionality Reduction | Machine Learning | CloudxLabDimensionality Reduction | Machine Learning | CloudxLab
Dimensionality Reduction | Machine Learning | CloudxLab
CloudxLab
 
Ensemble Learning and Random Forests
Ensemble Learning and Random ForestsEnsemble Learning and Random Forests
Ensemble Learning and Random Forests
CloudxLab
 
Decision Trees
Decision TreesDecision Trees
Decision Trees
CloudxLab
 
Understanding computer vision with Deep Learning
Understanding computer vision with Deep LearningUnderstanding computer vision with Deep Learning
Understanding computer vision with Deep Learning
CloudxLab
 
Deep Learning Overview
Deep Learning OverviewDeep Learning Overview
Deep Learning Overview
CloudxLab
 
Recurrent Neural Networks
Recurrent Neural NetworksRecurrent Neural Networks
Recurrent Neural Networks
CloudxLab
 
Natural Language Processing
Natural Language ProcessingNatural Language Processing
Natural Language Processing
CloudxLab
 
Autoencoders
AutoencodersAutoencoders
Autoencoders
CloudxLab
 
Training Deep Neural Nets
Training Deep Neural NetsTraining Deep Neural Nets
Training Deep Neural Nets
CloudxLab
 
Reinforcement Learning
Reinforcement LearningReinforcement Learning
Reinforcement Learning
CloudxLab
 
Apache Spark - Key Value RDD - Transformations | Big Data Hadoop Spark Tutori...
Apache Spark - Key Value RDD - Transformations | Big Data Hadoop Spark Tutori...Apache Spark - Key Value RDD - Transformations | Big Data Hadoop Spark Tutori...
Apache Spark - Key Value RDD - Transformations | Big Data Hadoop Spark Tutori...
CloudxLab
 
Advanced Spark Programming - Part 2 | Big Data Hadoop Spark Tutorial | CloudxLab
Advanced Spark Programming - Part 2 | Big Data Hadoop Spark Tutorial | CloudxLabAdvanced Spark Programming - Part 2 | Big Data Hadoop Spark Tutorial | CloudxLab
Advanced Spark Programming - Part 2 | Big Data Hadoop Spark Tutorial | CloudxLab
CloudxLab
 
Apache Spark - Dataframes & Spark SQL - Part 2 | Big Data Hadoop Spark Tutori...
Apache Spark - Dataframes & Spark SQL - Part 2 | Big Data Hadoop Spark Tutori...Apache Spark - Dataframes & Spark SQL - Part 2 | Big Data Hadoop Spark Tutori...
Apache Spark - Dataframes & Spark SQL - Part 2 | Big Data Hadoop Spark Tutori...
CloudxLab
 
Apache Spark - Dataframes & Spark SQL - Part 1 | Big Data Hadoop Spark Tutori...
Apache Spark - Dataframes & Spark SQL - Part 1 | Big Data Hadoop Spark Tutori...Apache Spark - Dataframes & Spark SQL - Part 1 | Big Data Hadoop Spark Tutori...
Apache Spark - Dataframes & Spark SQL - Part 1 | Big Data Hadoop Spark Tutori...
CloudxLab
 
Apache Spark - Running on a Cluster | Big Data Hadoop Spark Tutorial | CloudxLab
Apache Spark - Running on a Cluster | Big Data Hadoop Spark Tutorial | CloudxLabApache Spark - Running on a Cluster | Big Data Hadoop Spark Tutorial | CloudxLab
Apache Spark - Running on a Cluster | Big Data Hadoop Spark Tutorial | CloudxLab
CloudxLab
 
Introduction to SparkR | Big Data Hadoop Spark Tutorial | CloudxLab
Introduction to SparkR | Big Data Hadoop Spark Tutorial | CloudxLabIntroduction to SparkR | Big Data Hadoop Spark Tutorial | CloudxLab
Introduction to SparkR | Big Data Hadoop Spark Tutorial | CloudxLab
CloudxLab
 
Introduction to NoSQL | Big Data Hadoop Spark Tutorial | CloudxLab
Introduction to NoSQL | Big Data Hadoop Spark Tutorial | CloudxLabIntroduction to NoSQL | Big Data Hadoop Spark Tutorial | CloudxLab
Introduction to NoSQL | Big Data Hadoop Spark Tutorial | CloudxLab
CloudxLab
 
Introduction to MapReduce - Hadoop Streaming | Big Data Hadoop Spark Tutorial...
Introduction to MapReduce - Hadoop Streaming | Big Data Hadoop Spark Tutorial...Introduction to MapReduce - Hadoop Streaming | Big Data Hadoop Spark Tutorial...
Introduction to MapReduce - Hadoop Streaming | Big Data Hadoop Spark Tutorial...
CloudxLab
 
Introduction to Deep Learning | CloudxLab
Introduction to Deep Learning | CloudxLabIntroduction to Deep Learning | CloudxLab
Introduction to Deep Learning | CloudxLab
CloudxLab
 
Dimensionality Reduction | Machine Learning | CloudxLab
Dimensionality Reduction | Machine Learning | CloudxLabDimensionality Reduction | Machine Learning | CloudxLab
Dimensionality Reduction | Machine Learning | CloudxLab
CloudxLab
 
Ensemble Learning and Random Forests
Ensemble Learning and Random ForestsEnsemble Learning and Random Forests
Ensemble Learning and Random Forests
CloudxLab
 
Decision Trees
Decision TreesDecision Trees
Decision Trees
CloudxLab
 
Ad

Recently uploaded (20)

Hybridize Functions: A Tool for Automatically Refactoring Imperative Deep Lea...
Hybridize Functions: A Tool for Automatically Refactoring Imperative Deep Lea...Hybridize Functions: A Tool for Automatically Refactoring Imperative Deep Lea...
Hybridize Functions: A Tool for Automatically Refactoring Imperative Deep Lea...
Raffi Khatchadourian
 
UiPath Agentic Automation: Community Developer Opportunities
UiPath Agentic Automation: Community Developer OpportunitiesUiPath Agentic Automation: Community Developer Opportunities
UiPath Agentic Automation: Community Developer Opportunities
DianaGray10
 
GyrusAI - Broadcasting & Streaming Applications Driven by AI and ML
GyrusAI - Broadcasting & Streaming Applications Driven by AI and MLGyrusAI - Broadcasting & Streaming Applications Driven by AI and ML
GyrusAI - Broadcasting & Streaming Applications Driven by AI and ML
Gyrus AI
 
Bepents tech services - a premier cybersecurity consulting firm
Bepents tech services - a premier cybersecurity consulting firmBepents tech services - a premier cybersecurity consulting firm
Bepents tech services - a premier cybersecurity consulting firm
Benard76
 
Transcript: Canadian book publishing: Insights from the latest salary survey ...
Transcript: Canadian book publishing: Insights from the latest salary survey ...Transcript: Canadian book publishing: Insights from the latest salary survey ...
Transcript: Canadian book publishing: Insights from the latest salary survey ...
BookNet Canada
 
Viam product demo_ Deploying and scaling AI with hardware.pdf
Viam product demo_ Deploying and scaling AI with hardware.pdfViam product demo_ Deploying and scaling AI with hardware.pdf
Viam product demo_ Deploying and scaling AI with hardware.pdf
camilalamoratta
 
TrsLabs - AI Agents for All - Chatbots to Multi-Agents Systems
TrsLabs - AI Agents for All - Chatbots to Multi-Agents SystemsTrsLabs - AI Agents for All - Chatbots to Multi-Agents Systems
TrsLabs - AI Agents for All - Chatbots to Multi-Agents Systems
Trs Labs
 
Enterprise Integration Is Dead! Long Live AI-Driven Integration with Apache C...
Enterprise Integration Is Dead! Long Live AI-Driven Integration with Apache C...Enterprise Integration Is Dead! Long Live AI-Driven Integration with Apache C...
Enterprise Integration Is Dead! Long Live AI-Driven Integration with Apache C...
Markus Eisele
 
TrsLabs Consultants - DeFi, WEb3, Token Listing
TrsLabs Consultants - DeFi, WEb3, Token ListingTrsLabs Consultants - DeFi, WEb3, Token Listing
TrsLabs Consultants - DeFi, WEb3, Token Listing
Trs Labs
 
Web and Graphics Designing Training in Rajpura
Web and Graphics Designing Training in RajpuraWeb and Graphics Designing Training in Rajpura
Web and Graphics Designing Training in Rajpura
Erginous Technology
 
Q1 2025 Dropbox Earnings and Investor Presentation
Q1 2025 Dropbox Earnings and Investor PresentationQ1 2025 Dropbox Earnings and Investor Presentation
Q1 2025 Dropbox Earnings and Investor Presentation
Dropbox
 
How analogue intelligence complements AI
How analogue intelligence complements AIHow analogue intelligence complements AI
How analogue intelligence complements AI
Paul Rowe
 
HCL Nomad Web – Best Practices and Managing Multiuser Environments
HCL Nomad Web – Best Practices and Managing Multiuser EnvironmentsHCL Nomad Web – Best Practices and Managing Multiuser Environments
HCL Nomad Web – Best Practices and Managing Multiuser Environments
panagenda
 
Connect and Protect: Networks and Network Security
Connect and Protect: Networks and Network SecurityConnect and Protect: Networks and Network Security
Connect and Protect: Networks and Network Security
VICTOR MAESTRE RAMIREZ
 
Reimagine How You and Your Team Work with Microsoft 365 Copilot.pptx
Reimagine How You and Your Team Work with Microsoft 365 Copilot.pptxReimagine How You and Your Team Work with Microsoft 365 Copilot.pptx
Reimagine How You and Your Team Work with Microsoft 365 Copilot.pptx
John Moore
 
AI You Can Trust: The Critical Role of Governance and Quality.pdf
AI You Can Trust: The Critical Role of Governance and Quality.pdfAI You Can Trust: The Critical Role of Governance and Quality.pdf
AI You Can Trust: The Critical Role of Governance and Quality.pdf
Precisely
 
GDG Cloud Southlake #42: Suresh Mathew: Autonomous Resource Optimization: How...
GDG Cloud Southlake #42: Suresh Mathew: Autonomous Resource Optimization: How...GDG Cloud Southlake #42: Suresh Mathew: Autonomous Resource Optimization: How...
GDG Cloud Southlake #42: Suresh Mathew: Autonomous Resource Optimization: How...
James Anderson
 
The Microsoft Excel Parts Presentation.pdf
The Microsoft Excel Parts Presentation.pdfThe Microsoft Excel Parts Presentation.pdf
The Microsoft Excel Parts Presentation.pdf
YvonneRoseEranista
 
fennec fox optimization algorithm for optimal solution
fennec fox optimization algorithm for optimal solutionfennec fox optimization algorithm for optimal solution
fennec fox optimization algorithm for optimal solution
shallal2
 
Financial Services Technology Summit 2025
Financial Services Technology Summit 2025Financial Services Technology Summit 2025
Financial Services Technology Summit 2025
Ray Bugg
 
Hybridize Functions: A Tool for Automatically Refactoring Imperative Deep Lea...
Hybridize Functions: A Tool for Automatically Refactoring Imperative Deep Lea...Hybridize Functions: A Tool for Automatically Refactoring Imperative Deep Lea...
Hybridize Functions: A Tool for Automatically Refactoring Imperative Deep Lea...
Raffi Khatchadourian
 
UiPath Agentic Automation: Community Developer Opportunities
UiPath Agentic Automation: Community Developer OpportunitiesUiPath Agentic Automation: Community Developer Opportunities
UiPath Agentic Automation: Community Developer Opportunities
DianaGray10
 
GyrusAI - Broadcasting & Streaming Applications Driven by AI and ML
GyrusAI - Broadcasting & Streaming Applications Driven by AI and MLGyrusAI - Broadcasting & Streaming Applications Driven by AI and ML
GyrusAI - Broadcasting & Streaming Applications Driven by AI and ML
Gyrus AI
 
Bepents tech services - a premier cybersecurity consulting firm
Bepents tech services - a premier cybersecurity consulting firmBepents tech services - a premier cybersecurity consulting firm
Bepents tech services - a premier cybersecurity consulting firm
Benard76
 
Transcript: Canadian book publishing: Insights from the latest salary survey ...
Transcript: Canadian book publishing: Insights from the latest salary survey ...Transcript: Canadian book publishing: Insights from the latest salary survey ...
Transcript: Canadian book publishing: Insights from the latest salary survey ...
BookNet Canada
 
Viam product demo_ Deploying and scaling AI with hardware.pdf
Viam product demo_ Deploying and scaling AI with hardware.pdfViam product demo_ Deploying and scaling AI with hardware.pdf
Viam product demo_ Deploying and scaling AI with hardware.pdf
camilalamoratta
 
TrsLabs - AI Agents for All - Chatbots to Multi-Agents Systems
TrsLabs - AI Agents for All - Chatbots to Multi-Agents SystemsTrsLabs - AI Agents for All - Chatbots to Multi-Agents Systems
TrsLabs - AI Agents for All - Chatbots to Multi-Agents Systems
Trs Labs
 
Enterprise Integration Is Dead! Long Live AI-Driven Integration with Apache C...
Enterprise Integration Is Dead! Long Live AI-Driven Integration with Apache C...Enterprise Integration Is Dead! Long Live AI-Driven Integration with Apache C...
Enterprise Integration Is Dead! Long Live AI-Driven Integration with Apache C...
Markus Eisele
 
TrsLabs Consultants - DeFi, WEb3, Token Listing
TrsLabs Consultants - DeFi, WEb3, Token ListingTrsLabs Consultants - DeFi, WEb3, Token Listing
TrsLabs Consultants - DeFi, WEb3, Token Listing
Trs Labs
 
Web and Graphics Designing Training in Rajpura
Web and Graphics Designing Training in RajpuraWeb and Graphics Designing Training in Rajpura
Web and Graphics Designing Training in Rajpura
Erginous Technology
 
Q1 2025 Dropbox Earnings and Investor Presentation
Q1 2025 Dropbox Earnings and Investor PresentationQ1 2025 Dropbox Earnings and Investor Presentation
Q1 2025 Dropbox Earnings and Investor Presentation
Dropbox
 
How analogue intelligence complements AI
How analogue intelligence complements AIHow analogue intelligence complements AI
How analogue intelligence complements AI
Paul Rowe
 
HCL Nomad Web – Best Practices and Managing Multiuser Environments
HCL Nomad Web – Best Practices and Managing Multiuser EnvironmentsHCL Nomad Web – Best Practices and Managing Multiuser Environments
HCL Nomad Web – Best Practices and Managing Multiuser Environments
panagenda
 
Connect and Protect: Networks and Network Security
Connect and Protect: Networks and Network SecurityConnect and Protect: Networks and Network Security
Connect and Protect: Networks and Network Security
VICTOR MAESTRE RAMIREZ
 
Reimagine How You and Your Team Work with Microsoft 365 Copilot.pptx
Reimagine How You and Your Team Work with Microsoft 365 Copilot.pptxReimagine How You and Your Team Work with Microsoft 365 Copilot.pptx
Reimagine How You and Your Team Work with Microsoft 365 Copilot.pptx
John Moore
 
AI You Can Trust: The Critical Role of Governance and Quality.pdf
AI You Can Trust: The Critical Role of Governance and Quality.pdfAI You Can Trust: The Critical Role of Governance and Quality.pdf
AI You Can Trust: The Critical Role of Governance and Quality.pdf
Precisely
 
GDG Cloud Southlake #42: Suresh Mathew: Autonomous Resource Optimization: How...
GDG Cloud Southlake #42: Suresh Mathew: Autonomous Resource Optimization: How...GDG Cloud Southlake #42: Suresh Mathew: Autonomous Resource Optimization: How...
GDG Cloud Southlake #42: Suresh Mathew: Autonomous Resource Optimization: How...
James Anderson
 
The Microsoft Excel Parts Presentation.pdf
The Microsoft Excel Parts Presentation.pdfThe Microsoft Excel Parts Presentation.pdf
The Microsoft Excel Parts Presentation.pdf
YvonneRoseEranista
 
fennec fox optimization algorithm for optimal solution
fennec fox optimization algorithm for optimal solutionfennec fox optimization algorithm for optimal solution
fennec fox optimization algorithm for optimal solution
shallal2
 
Financial Services Technology Summit 2025
Financial Services Technology Summit 2025Financial Services Technology Summit 2025
Financial Services Technology Summit 2025
Ray Bugg
 

Introduction To TensorFlow | Deep Learning Using TensorFlow | CloudxLab

  • 1. Getting Started with TensorFlow
  • 2. TensorFlow Getting Started with Free Lab 1.Open CloudxLab 2.If already Enrolled, go to “My Lab” 3.Else Click on "Start Free Lab" a.And Complete the process of enrollment b.You might have sign using credit card or college id 4.Go to “My Lab” 5.Open Jupyter
  • 3. TensorFlow 1. Open jupyter from My Lab 2. Click on "New" -> Terminal 3. Type: a.git clone https://github.com/cloudxlab/ml.git 4. Go to the Jupyter Browser and into the folder ml/deep_learning 5. Open tensorflow.ipynb Getting Started with TensorFlow
  • 4. TensorFlow Getting Started with TensorFlow ● Check if TensorFlow is available >>> import tensorflow >>> print(tensorflow.__version__)
  • 5. Basics of RDD Cheese burger, soup and a Plate of Noodles please Soup and A Plate of Noodles for me Ok. One cheese burger Two soups Two plates of Noodles Anything else, sir? The chef is able to optimize because of clubbing multiple order together Lazy Evaluation Example - The waiter takes orders patiently
  • 6. Basics of RDD And Soup? Cheese Burger... Let me get a cheese burger for you. I'll be right back! Instant Evaluation The soup order will be taken once the waiter is back.
  • 7. Basics of RDD Actions: Lazy Evaluation - Optimization - Scala def Map1(x:String):String = x.trim(); def Map2(x:String):String = x.toUpperCase(); var lines = sc.textFile(...) var lines1 = lines.map(Map1); var lines2 = lines1.map(Map2); lines2.collect() def Map3(x:String):String={ var y = x.trim(); return y.toUpperCase(); } lines = sc.textFile(...) lines2 = lines.map(Map3); lines2.collect()
  • 8. TensorFlow TensorFlow ● Powerful open source library ○ For numerical computations ○ Fine-tuned for large-scale Machine Learning
  • 9. TensorFlow TensorFlow ● Developed by the Google Brain team ● It powers many of Google’s large-scale services, such as ○ Google Cloud Speech ○ Google Photos and ○ Google Search
  • 10. TensorFlow TensorFlow - Principal ● First define graph of computations Operation
  • 11. TensorFlow TensorFlow - Principal ● Then TensorFlow runs this graph efficiently using optimized C++ code Operation
  • 12. TensorFlow TensorFlow - Parallel Computation ● Also the graph can be broken into multiple chunks ● Each chunk can run ○ parallel across multiple ○ CPUs and ○ GPUs
  • 13. TensorFlow TensorFlow - Parallel Computation ● TensorFlow also supports distributed computing ○ We’ll cover Distributed TensorFlow later in the course ● Can train a network composed of ○ Billions of instances with millions of features each
  • 14. TensorFlow TensorFlow - Highlights - Runs Everywhere ● Runs on desktop and mobile devices such as ○ Windows ○ Linux ○ macOS ○ iOS and ○ Android
  • 15. TensorFlow TensorFlow - Highlights - TF.Learn ● Provides Python API called TF.Learn(tensorflow.contrib.learn) ● TF.Learn is compatible with Scikit-Learn ● Train machine learning models with just few lines of code
  • 16. TensorFlow TensorFlow - Highlights - Other APIs ● Many high-level APIs are built on top of TensorFlow such as ○ Keras and ○ Pretty Tensor
  • 17. TensorFlow TensorFlow - Highlights - Flexibility ● Python API offers flexibility to create all sorts of computations ○ Including any neural network architecture we can think of
  • 18. TensorFlow TensorFlow - Highlights - C++ API ● Includes highly efficient C++ implementations of many ML operations ● Also it has a C++ API to define our own high-performance operations
  • 19. TensorFlow TensorFlow - Highlights - TensorBoard ● Has a great visualization tool called TensorBoard ○ It allows to browse through the computation graph ○ Helps in viewing learning curves and more details
  • 20. TensorFlow TensorFlow - Highlights - Open Source ● Last but not the least ○ It has a dedicated team of passionate and helpful developers ○ Growing community contributing to improve it ○ One the the most popular open source projects on GitHub
  • 21. TensorFlow Deep Learning Libraries Open source Deep Learning libraries (not an exhaustive list)
  • 22. TensorFlow Creating Our First Graph and Running It in a Session
  • 23. TensorFlow Creating & Running a Graph >>> import tensorflow as tf >>> x = tf.Variable(3, name="x") #x = 3 >>> y = tf.Variable(4, name="y") # y = 4 >>> f = x*x*y + y + 2
  • 24. TensorFlow Creating & Running a Graph >>> import tensorflow as tf >>> x = tf.Variable(3, name="x") >>> y = tf.Variable(4, name="y") >>> f = x*x*y + y + 2 ● This code does not perform any computation ● It just creates a computation graph ● Even the variables are not initialized up to this point
  • 25. TensorFlow Creating & Running a Graph Then how do we start the computation?
  • 26. TensorFlow Creating & Running a Graph ● To evaluate this graph ○ We need to open a ○ TensorFlow session and ○ Use it to initialize the variables and evaluate f
  • 27. TensorFlow Creating & Running a Graph - TF Session ● A TensorFlow session takes care of ○ Placing the operations onto devices ■ Such as CPUs and GPUs ○ and Running them ○ It also holds all the variable values
  • 28. TensorFlow Creating & Running a Graph - TF Session >>> sess = tf.Session() ← Creates the session >>> sess.run(x.initializer) >>> sess.run(y.initializer) >>> result = sess.run(f) ← Evaluates >>> print(result) 42 >>> sess.close() ← Closes the session to free up resources Initialize the variables
  • 29. TensorFlow Creating & Running a Graph - TF Session Better way with tf.Session() as sess: x.initializer.run() y.initializer.run() result = f.eval() result Output - 42
  • 30. TensorFlow Creating & Running a Graph - TF Session Better way with tf.Session() as sess: x.initializer.run() y.initializer.run() result = f.eval() result Important - the session is automatically closed at the end of the block
  • 31. TensorFlow Creating & Running a Graph - TF Session Another Better way ● Instead of manually running the initializer for every single variable ○ We can use can use the global_variables_initializer() function init = tf.global_variables_initializer() # prepare an init node with tf.Session() as sess: init.run() # actually initialize all the variables result = f.eval()
  • 32. TensorFlow Creating & Running a Graph - TF Session Another Better way ● Instead of manually running the initializer for every single variable ○ We can use can use the global_variables_initializer() function init = tf.global_variables_initializer() # prepare an init node with tf.Session() as sess: init.run() # actually initialize all the variables result = f.eval() Important - ● It does not actually perform the initialization immediately ● It creates a node in the graph that will initialize all variables when it is run
  • 33. TensorFlow Creating & Running a Graph - Summary TensorFlow Program Build Computational Graph - Construction Phase Run Computational Graph - Execution Phase
  • 34. TensorFlow Creating & Running a Graph - Summary Construction Phase ● Typically computation graph is built ● Representing the ML model and ● The computations required to train it
  • 35. TensorFlow Creating & Running a Graph - Summary Execution Phase ● Runs a loop that evaluates a training step repeatedly ● For example one step per mini-batch and ● Gradually improving the model parameters ● We will see the example shortly
  • 37. TensorFlow Managing Graphs ● Any node we create is added to the default graph >>> x1 = tf.Variable(1) >>> x1.graph is tf.get_default_graph() Output - True
  • 38. TensorFlow Managing Graphs ● At times we may want to manage multiple independent graphs ● We can do by creating a new Graph and ○ Temporarily making it the default graph ○ Inside a with block graph = tf.Graph() with graph.as_default(): x2 = tf.Variable(2) print(x2.graph is graph) print(x2.graph is tf.get_default_graph()) Output- True False
  • 39. TensorFlow Managing Graphs Important ● Use reset_graph function specified in notebook to ● Reset the default graph
  • 41. TensorFlow Lifecycle of a Node Value Important ● When we evaluate a node ○ TensorFlow automatically determines the set of nodes that it depends on and ○ It evaluate these node first
  • 42. TensorFlow Lifecycle of a Node Value Example ● Consider the following code w = tf.constant(3) x = w + 2 y = x + 5 z = x * 3 with tf.Session() as sess: print(y.eval()) # 10 print(z.eval()) # 15
  • 43. TensorFlow Lifecycle of a Node Value Example ● Consider the following code w = tf.constant(3) x = w + 2 y = x + 5 z = x * 3 with tf.Session() as sess: print(y.eval()) # 10 print(z.eval()) # 15 y x w y.eval() x = 3+2 = 5 y = 5+5 =10 w = 3
  • 44. TensorFlow Lifecycle of a Node Value Example ● Consider the following code w = tf.constant(3) x = w + 2 y = x + 5 z = x * 3 with tf.Session() as sess: print(y.eval()) # 10 print(z.eval()) # 15 z x w z.eval() x = 3+2 = 5 z = 5*3 =15 w = 3
  • 45. TensorFlow Lifecycle of a Node Value Important ● Preceding code evaluates w and x twice ● Nodes values are dropped between graph runs ● Except variable values, which are maintained by the ○ Session across graph runs ● A variable starts its life when its initializer is run, and ○ It ends when the session is closed
  • 46. TensorFlow Lifecycle of a Node Value Important ● To evaluate y and z without evaluating w and x twice ○ Ask TensorFlow to evaluate both y and z in just one graph run with tf.Session() as sess: y_val, z_val = sess.run([y, z]) print(y_val) # 10 print(z_val) # 15
  • 47. TensorFlow Ops ● TensorFlow operations are called ops ● Ops can take any number of inputs and produce any number of outputs ● For example, ○ Addition and multiplication ops ■ Each take two inputs and ■ Produce one output ○ Constant and variables take no input ■ They are called source ops
  • 48. TensorFlow Tensors ● The inputs and outputs are ○ Multidimensional arrays, called tensors ○ Hence the name TensorFlow ● Like NumPy arrays, tensors have a type and a shape ● In the Python API tensors are ○ Simply represented by NumPy ndarrays ● Tensors typically contain floats ○ But we can make them to carry strings (arbitrary byte arrays)
  • 50. TensorFlow Linear Regression + = $1253 + = $219 1 = $?? = $??
  • 51. TensorFlow Linear Regression + = $12/35/3 + = $21/91/9 = $?? = $?? Did you notice that values are not integers?
  • 52. TensorFlow Linear Regression [ 1 1 ] [ ] [ ]= + = $12/35/3 + = $21/91/9 5/3 1/9 12/3 21/9
  • 53. TensorFlow Linear Regression Θ yX [ 1 1 ] [ ] [ ]= 5/3 1/9 12/3 21/9
  • 54. TensorFlow Linear Regression Θ yX [ 1 1 ] [ ] [ ]= 5/3 1/9 12/3 21/9 Optimum value of theta can calculated using the Normal Equation Θ = (XT.X)-1.XT.y ៱
  • 55. TensorFlow Linear Regression - Sklearn Θ yX [ 1 1 ] [ ] [ ]= 5/3 1/9 12/3 21/9 Optimum value of theta can calculated using the Normal Equation Θ = (XT.X)-1 .XT .y ៱ np.linalg.inv(X.T.dot(X)) .dot(X.T).dot(y)
  • 56. TensorFlow Linear Regression - Sklearn Θ yX [ 1 1 ] [ ] [ ]= 5/3 1/9 12/3 21/9 Optimum value of theta can calculated using the Normal Equation Θ = (XT.X)-1 .XT .y ៱ np.linalg.inv(X.T.dot(X)) .dot(X.T).dot(y) [[2.21428571], [1.07142857]
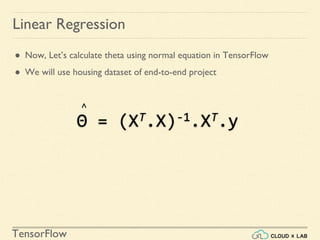
  • 57. TensorFlow Linear Regression ● Now, Let’s calculate theta using normal equation in TensorFlow ● We will use housing dataset of end-to-end project Θ = (XT.X)-1.XT.y ៱
  • 58. TensorFlow >>> import numpy as np >>> from sklearn.datasets import fetch_california_housing >>> reset_graph() >>> housing = fetch_california_housing() Linear Regression Fetches housing data
  • 59. TensorFlow >>> import numpy as np >>> from sklearn.datasets import fetch_california_housing >>> reset_graph() >>> housing = fetch_california_housing() >>> m, n = housing.data.shape >>> housing_data_plus_bias = np.c_[np.ones((m, 1)), housing.data] Linear Regression Adds extra bias input feature (x0 = 1) to all training instances. (it does so using NumPy so it runs immediately)
  • 60. TensorFlow Linear Regression >>> import numpy as np >>> from sklearn.datasets import fetch_california_housing >>> reset_graph() >>> housing = fetch_california_housing() >>> m, n = housing.data.shape >>> housing_data_plus_bias = np.c_[np.ones((m, 1)), housing.data] >>> X = tf.constant(housing_data_plus_bias) >>> y = tf.constant(housing.target.reshape(-1, 1)) Creates two TensorFlow constant nodes, X and y, to hold this data and the targets
  • 61. TensorFlow Linear Regression 1.>>> import numpy as np 2.>>> from sklearn.datasets import fetch_california_housing 3.>>> reset_graph() 4.>>> housing = fetch_california_housing() 5.>>> m, n = housing.data.shape 6.>>> housing_data_plus_bias = np.c_[np.ones((m, 1)), housing.data] 7.>>> X = tf.constant(housing_data_plus_bias) 8.>>> y = tf.constant(housing.target.reshape(-1, 1)) 9.>>> XT = tf.transpose(X) 10.>>> theta = tf.matmul( 1.tf.matmul( a.tf.matrix_inverse(tf.matmul(XT, X)), b.XT), 2.y) Matrix operations provided by TensorFlow to define theta
  • 62. TensorFlow Linear Regression Run previous code with tf.Session() as sess: theta_value = theta.eval() theta_value Output array([[ -3.74651413e+01], [ 4.35734153e-01], [ 9.33829229e-03], [ -1.06622010e-01], [ 6.44106984e-01], [ -4.25131839e-06], [ -3.77322501e-03], [ -4.26648885e-01], [ -4.40514028e-01]], dtype=float32)
  • 63. TensorFlow Linear Regression Compare different ways of calculating theta (Using NumPy and Scikit-Learn) using the code shown in the notebook
  • 64. TensorFlow Linear Regression The main benefit of previous code versus computing the Normal Equation directly using NumPy is that ○ TensorFlow automatically runs this on ○ Your GPU card if you have one ○ Provided TensorFlow with GPU support is installed
  • 66. TensorFlow Implementing Gradient Descent ● Let’s try using Batch Gradient Descent instead of Normal Equation ● In next couple of slides we will ○ First manually compute the gradients ○ Then use TensorFlow’s autodiff feature ○ And then use a couple of TensorFlow’s out-of-the-box optimizers
  • 67. TensorFlow Implementing Gradient Descent Manually computing Gradients using Batch Gradient Descent Gradient vector of the cost function
  • 68. TensorFlow Implementing Gradient Descent Manually computing Gradients using Batch Gradient Descent Gradient Descent step
  • 69. TensorFlow Implementing Gradient Descent Manually computing Gradients using Batch Gradient Descent using NumPy # Using Numpy eta = 0.1 # learning rate n_iterations = 1000 m = 100 theta = np.random.randn(2,1) # random initialization for iteration in range(n_iterations): gradients = 2/m * X_b.T.dot(X_b.dot(theta) - y) theta = theta - eta * gradients print(theta)
  • 70. TensorFlow Implementing Gradient Descent Manually computing Gradients using Batch Gradient Descent using TF Step 1- Normalize the feature vector list using Scikit-Learn >>> from sklearn.preprocessing import StandardScaler >>> scaler = StandardScaler() >>> scaled_housing_data = scaler.fit_transform(housing.data) >>> scaled_housing_data_plus_bias = np.c_[np.ones((m, 1)), scaled_housing_data] >>> print(scaled_housing_data_plus_bias.mean(axis=0)) >>> print(scaled_housing_data_plus_bias.mean(axis=1)) >>> print(scaled_housing_data_plus_bias.mean()) >>> print(scaled_housing_data_plus_bias.shape)
  • 71. TensorFlow Implementing Gradient Descent Manually computing Gradients using Batch Gradient Descent using TF Step 2- Manually computing the gradient Please check the code and explanation in the notebook
  • 73. TensorFlow Using autodiff - Automatic Differentiation Problem with manually calculating gradients ● Previous codes require mathematically deriving the gradients from the cost function(MSE) ● In case of Linear Regression mathematically deriving the gradient is reasonable easy ● But doing the same with deep neural networks is quite a headache ○ It would be tedious and ○ Error-prone and ○ Code might not be very efficient
  • 74. TensorFlow Using autodiff - Automatic Differentiation Different options to find partial derivatives ● Let’s say we have a function f(x,y) ● And we need its partial derivatives with respect to x and y ○ To perform Gradient Descent or ○ Some other optimization algorithm
  • 75. TensorFlow Using autodiff - Automatic Differentiation Different options to find partial derivatives ● There are four options to find partial derivatives ○ Symbolic Differentiation ○ Numerical Differentiation ○ Forward-mode autodiff ○ Reverse-mode autodiff ● We’ll cover these options in details later in the course ● TensorFlow implements Reverse-mode autodiff
  • 76. TensorFlow Using autodiff - Automatic Differentiation Problem with manually calculating gradients ● Let’s say our function is ○ f(x)= exp(exp(exp(x))) ● As per the calculus its derivative f′(x) will be ○ f′(x) = exp(x) × exp(exp(x)) × exp(exp(exp(x)))
  • 77. TensorFlow Using autodiff - Automatic Differentiation Problem with manually calculating gradients ● If we code f(x) and f′(x) separately then ○ exp function will be called 9 times ○ This is inefficient f(x)= exp(exp(exp(x))) --> 3 times f′(x) = exp(x) × exp(exp(x)) × exp(exp(exp(x))) --> 6 times Total calls → 9 times
  • 78. TensorFlow Using autodiff - Automatic Differentiation Problem with manually calculating gradients ● A more efficient solution will be to write function which ○ First computes exp(x) ○ Then exp(exp(x)) ○ Then exp(exp(exp(x))) ○ And returns all the three ○ This way exp function will be called just three times, once in each step
  • 79. TensorFlow Using autodiff - Automatic Differentiation ● TensorFlow’s autodiff feature ○ Efficiently and automatically computes the gradient for us ○ Replace the gradients = … in the Gradient Descent code in the previous section with the below line ○ gradients = tf.gradients(mse, [theta])[0] ○ And it will compute the gradients for us Check the code in the notebook
  • 80. TensorFlow Using autodiff - Automatic Differentiation gradients = tf.gradients(mse, [theta])[0] ● The gradients() function takes ○ An op (in this case mse) and ○ A list of variables (in this case just theta) ● And computes the gradients of each variables in the list
  • 81. TensorFlow ● Slope at any point ● Here the curve is: ○ y = x*x ● Here we are computing ○ Slope at x = 5 ○ dy/dx = d(x^2)/dx ○ 2*x ○ 2*5 = 10 Understanding Differentiation Manual
  • 82. TensorFlow Using tensorFlow Autodiff tf.reset_default_graph() x = tf.constant(5.0) y = tf.square(x) z = tf.gradients(y, x) with tf.Session() as s: print(z[0].eval()) ------ 10.0 Understanding Differentiation
  • 83. TensorFlow Using autodiff - Automatic Differentiation One more example on autodiff gradient computation Find the partial derivatives of the following function with regards to `a` and `b` at the point (0.2, 0.3) def my_func(a, b): z = 0 for i in range(100): z = a * np.cos(z + i) + z * np.sin(b - i) return z Check the code in the notebook
  • 85. TensorFlow Implementing Gradient Descent Using an Optimizer ● As we have seen TensorFlow computes the gradient for us ● It also provides a number of optimizers out of the box such as ○ Gradient Descent optimizer ○ Momentum optimizer ● We will cover these optimizers in details in the later part of the course
  • 86. TensorFlow Implementing Gradient Descent Using an Optimizer - GradientDescentOptimizer Replace the preceding gradients = ... and training_op = ... lines with the following code >>> optimizer = tf.train.GradientDescentOptimizer(learning_rate=learning_rate) >>> training_op = optimizer.minimize(mse) Please check the code and explanation in the notebook
  • 87. TensorFlow Implementing Gradient Descent Using an Optimizer - MomentumOptimizer It adds momentum to SGD. Slightly different algorithm. >>> optimizer = tf.train.MomentumOptimizer(learning_rate=learning_rate, momentum=0.9) Please check the code and explanation in the notebook
  • 88. TensorFlow Feeding Data to the Training Algorithm
  • 89. TensorFlow Feeding Data to the Training Algorithm Feeding and Placeholder nodes ● Feeding allows to substitute different values for one or more tensors at run time ● Placeholders are nodes whose value is fed in at execution time ○ They don’t actually perform any computation ○ They just output the data we tell them to output at runtime ○ Typically used to pass the training data to TensorFlow during training ○ Mostly inputs and labels placeholder
  • 90. TensorFlow Feeding Data to the Training Algorithm Placeholder nodes - Example >>> A = tf.placeholder(tf.float32, shape=(None, 3)) >>> B = A + 5 >>> with tf.Session() as sess: B_val_1 = B.eval(feed_dict={A: [[1, 2, 3]]}) B_val_2 = B.eval(feed_dict={A: [[4, 5, 6], [7, 8, 9]]})
  • 91. TensorFlow Feeding Data to the Training Algorithm Placeholder nodes - Example >>> A = tf.placeholder(tf.float32, shape=(None, 3)) >>> B = A + 5 >>> with tf.Session() as sess: B_val_1 = B.eval(feed_dict={A: [[1, 2, 3]]}) B_val_2 = B.eval(feed_dict={A: [[4, 5, 6], [7, 8, 9]]}) ● Create a placeholder node “A” ● “A” must have rank 2 (two-dimensionals) and ● There must be three columns ● It can have any number of rows
  • 92. TensorFlow Feeding Data to the Training Algorithm Placeholder nodes - Example >>> A = tf.placeholder(tf.float32, shape=(None, 3)) >>> B = A + 5 >>> with tf.Session() as sess: B_val_1 = B.eval(feed_dict={A: [[1, 2, 3]]}) B_val_2 = B.eval(feed_dict={A: [[4, 5, 6], [7, 8, 9]]}) ● Create a node “B”
  • 93. TensorFlow Feeding Data to the Training Algorithm Placeholder nodes - Example >>> A = tf.placeholder(tf.float32, shape=(None, 3)) >>> B = A + 5 >>> with tf.Session() as sess: B_val_1 = B.eval(feed_dict={A: [[1, 2, 3]]}) B_val_2 = B.eval(feed_dict={A: [[4, 5, 6], [7, 8, 9]]}) ● While evaluating B ○ Pass a feed_dict to the eval() method ○ feed_dict specifies the value of A Check the code in the notebook
  • 94. TensorFlow Feeding Data to the Training Algorithm Placeholder nodes - Mini-batch Gradient Descent ● Let’s implement Mini-batch Gradient Descent using TensorFlow ● We need to replace X and y at every iteration with the next mini-batch ○ Check the complete code in the notebook Check the complete code in the notebook X = tf.placeholder(tf.float32, shape=(None, n + 1), name="X") y = tf.placeholder(tf.float32, shape=(None, 1), name="y")
  • 96. TensorFlow Saving & Restoring Models ● We should save the model parameters to disk once it is trained ● It helps in ○ Using the trained models without retraining them ■ Remember training takes a lot of time ○ Using models in other programs
  • 97. TensorFlow Saving & Restoring Models - Checkpoints ● We should also save checkpoints to disks ○ At regular intervals during training ○ So that if the computer crashes during training ○ Then we can continue from the last saved checkpoint ○ Rather than start over from scratch
  • 98. TensorFlow Saving & Restoring Models - Save Models How to save models in TensorFlow? Step 1 - Create a Saver node At the end of the construction phase(after all variable nodes are created) >>> saver = tf.train.Saver() # Create Saver node Check the complete code in the notebook
  • 99. TensorFlow Saving & Restoring Models - Save Models How to save models in TensorFlow? Step 2 - In the execution phase ● Just call its save() method whenever you want to save the model ● By passing the session and path of the checkpoint file >>> save_path = saver.save(sess, "model_ckps/my_model_final.ckpt") # Save model Check the complete code in the notebook
  • 100. TensorFlow Saving & Restoring Models - Restore Models How to restore models in TensorFlow? ● In the execution phase, ○ Do not initialize variables using init ○ Just call the restore() method of the Saver object with tf.Session() as sess: saver.restore(sess, "/tmp/my_model_final.ckpt") best_theta_restored = theta.eval() Check the complete code in the notebook
  • 101. TensorFlow Saving & Restoring Models - Restore Models How to restore models in TensorFlow? ● Check if restored theta is same as the saved theta np.allclose(best_theta, best_theta_restored) Output - True Check the complete code in the notebook
  • 102. TensorFlow Saving & Restoring Models - Restore Models How to restore models in TensorFlow? ● Restore theta with a different name, such as "weights" Check the complete code in the notebook saver = tf.train.Saver({"weights": theta})
  • 103. TensorFlow Visualizing the Graph and Training Curves Using TensorBoard
  • 104. TensorFlow TensorBoard ● In the previous example ○ We used print() function to ○ Visualize progress during training ● Training a massive deep neural network can be ○ Complex and ○ Confusing ● Better way to visualize is to use TensorBoard
  • 105. TensorFlow TensorBoard ● TensorBoard is a suite of web applications ○ For inspecting and understanding ○ TensorFlow runs and graphs
  • 106. TensorFlow TensorBoard ● TensorBoard makes easy to ○ Understand, ○ Debug and ○ Optimize ○ TensorFlow programs
  • 107. TensorFlow TensorBoard ● If we feed training stats to TensorBoard ○ It displays nice interactive visualizations of these stats ○ In the web browser ● If we feed graph definition to TensorBoard ○ It displays a great interface to browse through it ■ Very useful to identify errors in the graph ■ Find bottlenecks
  • 108. TensorFlow TensorBoard ● We can visualize using TensorBoard in two ways ○ Inside Jupyter (Using IFrame) ○ Using TensorBoard Server
  • 109. TensorFlow Visualize Graph Inside Jupyter ● We can visualize the graph inside the Jupyter instead of using TensorBoard Check the complete code in the notebook
  • 110. TensorFlow Using TensorBoard Server ● Let’s visualize our previous TensorFlow program using TensorBoard server ● We have to tweak our program a bit ○ So that our program writes ○ The graph definition and training stats to ○ A Log directory, that TensorBoard will read from
  • 111. TensorFlow Using TensorBoard Server ● We use different log directory for every run of the program ● Else, TensorBoard merges stats from different runs ○ Which will mess up visualizations ● The simplest solution is to ○ Include timestamp in the log directory name ● Let’s visualize using TensorBoard
  • 112. TensorFlow Using TensorBoard Server Step 1 - Add the following code at the beginning of the program >>> from datetime import datetime >>> now = datetime.utcnow().strftime("%Y%m%d%H%M%S") >>> root_logdir = "tf_logs" >>> logdir = "{}/run-{}/".format(root_logdir, now) Includes the timestamp in the log directory name
  • 113. TensorFlow Using TensorBoard Server Step 2 - Add the following code at the very end of the construction phase >>> mse_summary = tf.summary.scalar('MSE', mse) >>> file_writer = tf.summary.FileWriter(logdir,tf.get_default_graph())
  • 114. TensorFlow Using TensorBoard Server Step 2 - Add the following code at the very end of the construction phase >>> mse_summary = tf.summary.scalar('MSE', mse) >>> file_writer = tf.summary.FileWriter(logdir,tf.get_default_graph()) ● Creates a node in the graph that will evaluate the MSE and ○ Write it to a TensorBoard- compatible binary log string ○ Called a summary
  • 115. TensorFlow Using TensorBoard Server Step 2 - Add the following code at the very end of the construction phase >>> mse_summary = tf.summary.scalar('MSE', mse) >>> file_writer = tf.summary.FileWriter(logdir,tf.get_default_graph()) ● Create a FileWriter ○ Used to write summaries to ○ Logfiles in the log directory ○ Writes the graph definition in a ○ Binary logfile called an events file
  • 116. TensorFlow Using TensorBoard Server Step 2 - Add the following code at the very end of the construction phase >>> mse_summary = tf.summary.scalar('MSE', mse) >>> file_writer = tf.summary.FileWriter(logdir,tf.get_default_graph()) ● The first parameter is logdir ○ Indicates the path of the log directory ● The second parameter is the ○ Graph we want to visualize ○ Optional parameters
  • 117. TensorFlow Using TensorBoard Server Step 3 - Update the execution phase [...] for batch_index in range(n_batches): X_batch, y_batch = fetch_batch(epoch, batch_index, batch_size) if batch_index % 10 == 0: summary_str = mse_summary.eval(feed_dict={X: X_batch, y: y_batch}) step = epoch * n_batches + batch_index file_writer.add_summary(summary_str, step) sess.run(training_op, feed_dict={X: X_batch, y: y_batch}) [...]
  • 118. TensorFlow Using TensorBoard Server Step 3 - Update the execution phase [...] for batch_index in range(n_batches): X_batch, y_batch = fetch_batch(epoch, batch_index, batch_size) if batch_index % 10 == 0: summary_str = mse_summary.eval(feed_dict={X: X_batch, y: y_batch}) step = epoch * n_batches + batch_index file_writer.add_summary(summary_str, step) sess.run(training_op, feed_dict={X: X_batch, y: y_batch}) [...] ● Evaluate the mse_summary node regularly during training ○ e.g., every 10 mini-batches
  • 119. TensorFlow Using TensorBoard Server Step 3 - Update the execution phase [...] for batch_index in range(n_batches): X_batch, y_batch = fetch_batch(epoch, batch_index, batch_size) if batch_index % 10 == 0: summary_str = mse_summary.eval(feed_dict={X: X_batch, y: y_batch}) step = epoch * n_batches + batch_index file_writer.add_summary(summary_str, step) sess.run(training_op, feed_dict={X: X_batch, y: y_batch}) [...] Writes the summary from the previous step to the event file
  • 120. TensorFlow Using TensorBoard Server Step 4 - Close the FileWriter at the end of the program >>> file_writer.close()
  • 121. TensorFlow Using TensorBoard Server Step 4 - Close the FileWriter at the end of the program >>> file_writer.close()
  • 122. TensorFlow Using TensorBoard Server Step 5 - Run the Program ● It will create log directory ○ And events files in that directory ○ Containing both the graph definition and ○ MSE Values
  • 123. TensorFlow Using TensorBoard Server Step 6 - Check the files >>> cd ~/ml/deep_learning/ # Go to the deep learning directory >>> ls -lh tf_logs/run*
  • 124. TensorFlow Using TensorBoard Server Step 7 - Fire up the TensorBoard server >>> cd ~/ml/deep_learning/ # Go to the deep learning directory >>> ls -lh tf_logs/run*
  • 125. TensorFlow 4. Find hostname of console whether it is e, f, g.cloudxlab.com 5. Open the <hostname>:<port> in browser Using TensorBoard Server 1.source activate py36 2.tensorboard --logdir ~/ml/deep_learning/tf_logs/ --port 6006 a. If you get error “port already in use” b. Change port to 6007, 6008 and so on c. We have opened port 6006 to 6016 in the firewall for TensorBoard 3. Find the port Step 7 - Fire up the TensorBoard server
  • 127. TensorFlow Name Scopes ● When dealing with complex neural networks ○ The graph becomes cluttered with thousand of nodes ● We can avoid this by ○ Creating name scopes to group related nodes
  • 128. TensorFlow Name Scopes Example >>> reset_graph() >>> a1 = tf.Variable(0, name="a") # name == "a" >>> a2 = tf.Variable(0, name="a") # name == "a_1" (since a already exists) ● When we create a node ○ TensorFlow checks if its name already exists ○ If yes, then it appends ■ An underscore followed by ■ An index to make the name unique
  • 129. TensorFlow Name Scopes Example with tf.name_scope("param"): # name == "param" a3 = tf.Variable(0, name="a") # name == "param/a" with tf.name_scope("param"): # name == "param_1" a4 = tf.Variable(0, name="a") # name == "param_1/a" with tf.name_scope("param"): # name == "param_2" a5 = tf.Variable(0, name="a") # name == "param_2/a"
  • 130. TensorFlow Name Scopes Example for node in (a1, a2, a3, a4, a5): print(node.op.name) Output - a a_1 param/a param_1/a param_2/a Check the complete code in the notebook
  • 131. TensorFlow Name Scopes ● In our previous TensorBoard example ○ We can define ○ “error” and “mse” ops within a ○ name scope called “loss” >>> with tf.name_scope("loss") as scope: error = y_pred - y mse = tf.reduce_mean(tf.square(error), name="mse") print(error.op.name) # loss/sub print(mse.op.name) # loss/mse Check the complete code in the notebook
  • 132. TensorFlow Name Scopes A collapsed namescope in TensorBoard (mse and error nodes now appear inside the loss namespace)
  • 134. TensorFlow Modularity ● Let’s say we want to add the output of ○ Two rectified linear units (ReLU) ● A ReLU computes ○ A linear function of the inputs and ○ Outputs the result if it is positive, and 0 otherwise Rectified Linear Unit (ReLU)
  • 135. TensorFlow Modularity 1. How do we add the output of two RELUs? 1. Create a graph for first RELU 2. Create a graph for second RELU 3. Add them
  • 136. TensorFlow Modularity n_features = 3 X = tf.placeholder(tf.float32, shape=(None, n_features), name="X") w1 = tf.Variable(tf.random_normal((n_features, 1)), name="weights1") w2 = tf.Variable(tf.random_normal((n_features, 1)), name="weights2") b1 = tf.Variable(0.0, name="bias1") b2 = tf.Variable(0.0, name="bias2") z1 = tf.add(tf.matmul(X, w1), b1, name="z1") z2 = tf.add(tf.matmul(X, w2), b2, name="z2") relu1 = tf.maximum(z1, 0., name="relu1") relu2 = tf.maximum(z1, 0., name="relu2") output = tf.add(relu1, relu2, name="output") Question - What is the problem with the code in notebook?
  • 137. TensorFlow Modularity ● Code in notebook is ○ Repetitive ○ Error-prone and ○ Hard to maintain ● Also what if we had to add output of five RELUs?
  • 138. TensorFlow Modularity ● TensorFlow lets us stay DRY ○ Don’t Repeat Yourself ● Create a function to build a RELU ● Check the code in the notebook
  • 139. TensorFlow Modularity ● Check the graph by running ○ tensorboard --logdir logs/relu2 --port 6006
  • 140. TensorFlow ● If name already exists, it appends an “_” followed by an index to make the name unique. ● So the first ReLU contains nodes named "weights", "bias", "z", and "relu" (plus many more nodes with their default name, such as "MatMul"); ● The second ReLU contains nodes named "weights_1", "bias_1", and so on; the third ReLU contains nodes named "weights_2", "bias_2", and so on. ● TensorBoard identifies such series and collapses them together to reduce clutter Modularity
  • 141. TensorFlow ● Using name scopes, you can make the graph much clearer. ● Simply move all the content of the relu() function inside a name scope. Modularity
  • 143. TensorFlow Sharing Variables - Classic Way ● How do we share a variable between various components? ● Classic way is to ○ First create the variable ○ Then pass it as a parameter to the functions ----------------------- def f(X, threshold): # Use threshold # .... threshold = 0.5 f(X1, threshold) f(X2, threshold)
  • 144. TensorFlow ● For example ○ To control the ReLU threshold (currently 0) using a shared threshold variable for all ReLUs ○ Create variable first, and then pass it to the relu() function Sharing Variables - Classic Way Check the complete code in the notebook
  • 145. TensorFlow ● For example ○ To control the ReLU threshold (currently 0) using a shared threshold variable for all ReLUs ○ Create variable first, and then pass it to the relu() function Sharing Variables - Classic Way Step 2 - Passing it to a function Step 1- Creating variable
  • 146. TensorFlow Question - What is the problem with previous approach?
  • 147. TensorFlow Answer- ● If there are many shared parameters, then ○ It becomes painful to pass them ○ As parameters all the time Sharing Variables
  • 148. TensorFlow 1. Create a Python dictionary a. Containing all the variables and b. Pass it around to every function 2. Set the shared variable a. As an attribute of the relu() function b. Check the complete code in the notebook Sharing Variables - Solutions
  • 149. TensorFlow ● TensorFlow offers cleaner and more modular option ● Use the get_variable() function to ○ Create the shared variable if it does not exists ○ Or reuse it if it already exists Sharing Variables - get_variable()
  • 150. TensorFlow ● For example ○ Following code creates a variable named "relu/threshold" Sharing Variables - get_variable() 0.0 is initial valueScalar
  • 151. TensorFlow ● Note that this code will raise an exception if ○ If the variable has already been created ○ By an earlier call to get_variable() ● This prevents reusing variables by mistake Sharing Variables - get_variable()
  • 152. TensorFlow ● If we want to reuse a variable ○ We explicitly say so by setting the ○ Variable scope’s reuse attribute to True ● Note that here we don’t have to specify ○ The shape ○ Or the initializer Sharing Variables - Reuse Variables
  • 153. TensorFlow ● This code fetches the existing "relu/threshold" variable ● Or raises an exception ○ If it does not exist ○ Or if it was not created using get_variable() Sharing Variables - Reuse Variables
  • 154. TensorFlow Important ● Once reuse is set to True ○ It cannot be set back to False within the block ● Only variables created by ○ get_variable() can be reused Sharing Variables - Reuse Variables
  • 155. TensorFlow ● Alternate way to reuse variables is to ○ Use reuse_variables() function Sharing Variables - Reuse Variables
  • 156. TensorFlow ● Now let’s come back to the original problem of sharing variables ● And make the relu() function ○ Access the threshold variable ○ Without having to pass it as a parameter Sharing Variables - Reuse Variables
  • 157. TensorFlow Steps - 1 ● This code first defines the relu() function Sharing Variables - Reuse Variables
  • 158. TensorFlow Steps - 2 ● Then creates the relu/threshold variable ○ As a scalar that ○ Will later be initialized to 0.0 Sharing Variables - Reuse Variables
  • 159. TensorFlow Steps - 3 ● Then builds five ReLUs by calling the relu() function Sharing Variables - Reuse Variables
  • 160. TensorFlow Steps - 4 ● The relu() function reuses the relu/threshold variable Sharing Variables - Reuse Variables
  • 162. TensorFlow ○ Basics of TensorFlow ○ Graph ○ Variables ○ Gradients ○ Optmizer Summary - We learnt ○ TensorBoard ○ Placeholders ○ Saving and Restoring ○ Modularity ○ Name Scope ○ Sharing Variables: ■ Variable scope
  • 163. TensorFlow Summary We will discuss more advanced topics ○ During the course like operations related to ■ Deep neural networks ■ Convolutional neural networks, and ■ Recurrent neural networks We will also learn how to scale up TensorFlow using ○ Multithreading ○ Queues ○ Multiple GPUs and ○ Multiple servers