Oracle9
0 likes552 views

This document provides installation instructions for Oracle9i Database on Windows. It includes information on planning the installation, reviewing system requirements, installing Oracle components like the database, client, and management tools, and post-installation configuration tasks. The document has several chapters that cover pre-installation planning, installing Oracle components, reviewing the contents of a starter database, and post-installation configuration. It also includes appendices that describe individual Oracle components and provide additional installation guidance for features like Oracle Real Application Clusters and transparent gateways to other databases.


![xii
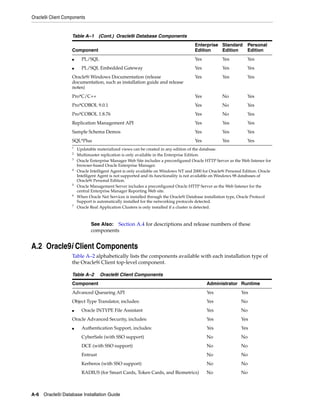
Conventions for Microsoft Windows Operating Systems
The following table describes conventions for Microsoft Windows operating systems
and provides examples of their use.
Convention Meaning Example
[ ] Brackets enclose one or more
optional items. Do not enter the
brackets.
DECIMAL (digits[
,precision])
{ } Braces enclose two or more items,
one of which is required. Do not
enter the braces.
{ENABLE | DISABLE}
| A vertical bar represents a choice
of two or more options within
brackets or braces. Enter one of the
options. Do not enter the vertical
bar.
{ENABLE | DISABLE}
[COMPRESS | NOCOMPRESS]
... Horizontal ellipsis points indicate
either:
■ That we have omitted parts of
the code that are not directly
related to the example
■ That you can repeat a portion
of the code
CREATE TABLE ...
ASsubquery;
SELECTcol1,col2, ...
,colnFROM employees;
.
.
.
Vertical ellipsis points indicate
that we have omitted several lines
of code not directly related to the
example.
Other notation You must enter symbols other
than brackets, braces, vertical bars,
and ellipsis points as shown.
acctbal NUMBER(11,2);
acct CONSTANT NUMBER(4) :=
3;
Italics Italicized text indicates
placeholders or variables for
which you must supply particular
values.
CONNECT SYSTEM/system_
password
DB_NAME =database_name
UPPERCASE Uppercase typeface indicates
elements supplied by the system.
We show these terms in uppercase
in order to distinguish them from
terms you define. Unless terms
appear in brackets, enter them in
the order and with the spelling
shown. However, because these
terms are not case sensitive, you
can enter them in lowercase.
SELECT last_name,
employee_id FROM
employees;
SELECT * FROM USER_TABLES;
DROP TABLE hr.employees;
lowercase Lowercase typeface indicates
programmatic elements that you
supply. For example, lowercase
indicates names of tables,
columns, or files.
Note: Some programmatic
elements use a mixture of
UPPERCASE and lowercase. Enter
these elements as shown.
SELECT last_name,
employee_id FROM
employees;
sqlplus hr/hr
CREATE USER mjones
IDENTIFIED BY ty3MU9;](https://image.slidesharecdn.com/oracle9requerimientos-101029114023-phpapp01/85/Oracle9-12-320.jpg)


![Oracle Enterprise Manager Requirements
2-12 Oracle9i Database Installation Guide
2.4.2 Oracle Enterprise Manager Web Site Requirements
If you want to run the Oracle Enterprise Manager Console and supported
management applications from within a Web browser, then you must install Oracle
Enterprise Manager Web Site. By default, Oracle Enterprise Manager Web Site bundles
a preconfigured Oracle HTTP Server to act as its Web listener. However, Web-enabled
Oracle Enterprise Manager also supports the following additional Web servers
(although any Web server using a standard common gateway interface [CGI] can
support Oracle Enterprise Manager release 1 [9.0.1]):
■ Oracle Internet Application Server release 1.0 or higher for Windows NT and
Windows 2000
■ Microsoft Internet Information Server release 4.0 or higher for Windows NT and
Windows 2000
■ Apache release 1.3.9 or higher for Windows NT and Windows 2000
2.4.3 Oracle Enterprise Manager Paging Server Requirements
To send Oracle Enterprise Manager administrators page notifications of event and job
status changes, optionally install the Oracle Enterprise Manager Paging Server on a
Windows NT or Windows 2000 computer that contains a modem configured to dial an
outside line.
Note: Oracle Enterprise Manager Configuration Assistant is
automatically started during the configuration phase in the Oracle9i
Database Custom installation type, the Oracle Management Server
installation type, and the Oracle9i Management and Integration
Custom installation type. However, if you want to configure the
Oracle Management Server, then this assistant must be manually
started after all other installation types. After an installation, Oracle
Enterprise Manager Configuration Assistant is available from Start >
Oracle - HOME_NAME > Configuration and Migration Tools >
Enterprise Manager Configuration Assistant.
See Also: "General Repository Guidelines" of Oracle Enterprise
Manager Configuration Guide for details on repository creation, initial
size of a release 1 (9.0.1) repository, and guidelines on how much it
can grow
Note: There are no system requirements specific to Oracle Enterprise
Manager Web Site (other than requiring 820 MB of available hard disk
space); only system requirements for the chosen Web server. See the
appropriate Web server documentation for system requirements.
See Also: Oracle Enterprise Manager Configuration Guide for more
information about Oracle Enterprise Manager Web Site](https://image.slidesharecdn.com/oracle9requerimientos-101029114023-phpapp01/85/Oracle9-46-320.jpg)


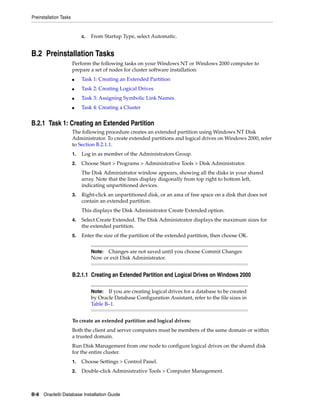
![Installing Oracle Components
4-18 Oracle9i Database Installation Guide
The Configuration Tools window appears at the end of installation and
automatically starts the following assistants to create and configure your network
and Oracle Internet Directory environments:
The End of Installation window appears.
8. Choose Exit to exit Oracle Universal Installer or choose Next Install to install
additional components.
4.4.3.2.2 Upgrading Oracle Internet Directory
Table 4–17 Configuration Assistants with the Oracle Internet Directory Installation Type
This Tool... Starts... And...
Oracle Net
Configuration
Assistant
If Oracle Net Services
release 1 (9.0.1) is not already
installed in the currently-specified
Oracle home
Note: Net8 release 8.1.7 or earlier
installations in this Oracle home will
be upgraded.
Automatically configures your Oracle Net Services
networking software
See Also: Section 3.4.1, "Configuring the Server
Network" for a description of the configuration
procedures performed
Starting Oracle
HTTP Service
In all cases Creates and starts the HTTP listener as a standalone
process for the current session in non-SSL mode on port
7777. The OracleHOME_NAMEHTTPServer service
starts after a computer reboot.
Oracle Intelligent
Agent
If the database and Intelligent Agent
are installed
Automatically starts the Agent service
OiD
Configuration
Assistant
In all cases Creates Oracle Internet Directory tablespaces and
schema in the Oracle9i Database and starts the Oracle
Internet Directory directory server
The port on which the Oracle Internet Directory Server is
started is logged in the file ORACLE_BASEORACLE_
HOMEldapinstalloidca.log.
By default Oracle Internet Directory server is started on
port 389. If this port is not available, then Oracle Internet
Directory server is started on an available port higher
than 5000.
Note: If a database needs to be installed, Oracle Database
Configuration Assistant automatically starts within OiD
Configuration Assistant to create a database with the
UTF8 character set.
Oracle Database Configuration Assistant enables the
changing of default passwords after database creation.
Do not use the Password Management button at this
time. Change the passwords for SYS and SYSTEM only
after the Oracle Internet Directory installation is
complete.
See Also: Section 4.4.4, "Reviewing the Installation Session Log"
for a summary of your installation session
Note: Before upgrading Oracle Internet Directory, the OID
Database Password must be reset to ods using the command line
OID Database Password Utility. Enter the following command:
oidpasswd [connect=net_service_name]](https://image.slidesharecdn.com/oracle9requerimientos-101029114023-phpapp01/85/Oracle9-78-320.jpg)


![Preinstallation Tasks
B-12 Oracle9i Database Installation Guide
The Oracle Object Manager window displays.
2. Select the row to update and click any spot within the highlighted row.
An edit window, with an active blinking cursor, opens in the New Link Name
column.
3. Enter the new Link name and choose Enter.
4. Repeat steps 2 and 3 to create additional symbolic link names.
5. Select Options > Commit.
B.2.3.3 Using ImportSYMLinks Utility
The ImportSYMLinks utility is a command line tool that assigns symbolic link names
or renames existing symbolic link names.
1. Create a TBL file.
2. Use the following command to import symbolic link mappings:
ImportSYMLinks.exe [/f:filename]
For example, ImportSYMLinks.exe /f:c:tempmysymlinks.tbl
where temp is the temporary directory defined in step 2 of Section B.1.4.1 and
filename is the full path and filename of the valid TBL file.
Note: Do not proceed to step 5 if the edit window is active.
Changes will not apply.
See Also:
■ Section B.1.4.1, "Installing the Raw Devices Management
Utilities Manually" to install ImportSYMLinks utility
■ Section B.1.3, "Oracle Cluster Setup Wizard Overview"
To... Do this...
Modify an existing
symbolic link name
1. Export existing links to a TBL file using the following
command:
ExportSYMLinks.exe [/f:filename]
If /f:filename is not specified, then the default filename,
symmap.tbl, is generated in the current working directory.
Note: Duplicate links are indented in the symmap.tbl file. All
valid unmapped device names are also exported.
Create a TBL file A sample ASCII file is located in the following directory on the
first component CD-ROM:1
preinstall_racolmsample.tbl
1. Create a TBL file.
2. Save the file.
1
This sample file contains symbolic link names associated with raw partitions for a two-node cluster
database.](https://image.slidesharecdn.com/oracle9requerimientos-101029114023-phpapp01/85/Oracle9-158-320.jpg)


![About Oracle Components in Noninteractive Mode
D-4 Oracle9i Database Installation Guide
5. Navigate to ORACLE_BASEORACLE_HOMEbin.
6. Run emca.rsp from the command prompt:
C:ORACLE_BASEORACLE_
HOMEbin>emca-RESPONSEFILEpathemca.rsp-SILENT
where path is the path to emca.rsp. For example, C:temp.
D.1.4.2 Running Oracle Enterprise Manager Configuration Assistant in a Silent
Installation Session
Oracle Management Server is automatically installed with the enterprise.rsp,
standard.rsp, and personal.rsp response files. If you use these response files to
install Oracle Management Server and you want to create a new repository, you must
run Oracle Enterprise Manager Configuration Assistant after the silent installation.
You can either run Oracle Enterprise Manager Configuration Assistant interactively to
create the repository, or you can edit and run the emca.rsp response file to silently
create the repository. Automatically running Oracle Enterprise Manager Configuration
Assistant silently after:
■ An enterprise.rsp, standard.rsp or personal.rsp response file
installation is not supported
■ A custom.rsp response file installation is supported. Refer to the steps in this
section for instructions
To automatically start Oracle Enterprise Manager Configuration Assistant during a
Custom Oracle9i Database, an Oracle Management Server, or a Custom Oracle9i
Management and Integration response file installation, perform the following steps:
1. Copy the parent installation response file to a local directory. Oracle Management
Server, which must be installed with the parent silent installation, is only available
for installation in the following parent response files:
■ custom.rsp
■ oms.rsp
■ omicustom.rsp
2. Edit the file by following the instructions in that file.
3. Ensure that Oracle Enterprise Manager Configuration Assistant starts in silent
mode by editing the following variables in the [oracle.sysman.oms_
9.0.1.0.0] section of the parent response file:
OPTIONAL_CONFIG_TOOLS
launchEMCA
s_responseFileEMCA
Important: Ensure that the value specified for the repository
USERNAME variable in the emca.rsp file is unique across your
network.
Note: -RESPONSEFILE and -SILENT parameters are required when
running emca.rsp.](https://image.slidesharecdn.com/oracle9requerimientos-101029114023-phpapp01/85/Oracle9-176-320.jpg)
![About Oracle Components in Noninteractive Mode
Advanced Installation Topics D-5
4. Copy the emca.rsp response file to a local directory.
5. Edit emca.rsp by following the instructions in the file.
6. Go to the directory where Oracle Universal Installer is installed.
7. Run the parent response file. This automatically starts the Oracle Enterprise
Manager Configuration Assistant response file (emca.rsp) when silent
installation is complete. For example,
C:>setup.exe-RESPONSEFILEfilename-SILENT
where filename is the full path of the parent response file.
An example of an updated [oracle.sysman.oms_9.0.1.0.0] section of a
parent response file for Windows NT and Windows 2000 is partially shown below:
[oracle.sysman.oms_9.0.1.0.0]
#---------------------------------------------------------------------------
# Name : OPTIONAL_CONFIG_TOOLS
# Datatype : StringList
# Description : Specifying "emca" will launch the Oracle Enterprise
# Manager Migration Assistant configuration tool at the end
# of installation.
# Valid values : {"emca"} or {}
# Example value : {"emca"}
# Default value : {}
# Mandatory : No
#---------------------------------------------------------------------------
OPTIONAL_CONFIG_TOOLS={emca}
#---------------------------------------------------------------------------
# Name : launchEMCA
# Datatype : Boolean
# Description : Launch the Enterprise Manager Configuration Assistant
# at the end of installation to configure Oracle Management
# Server
# Valid values : true, false
# Example value : true
# Default value : true
# Mandatory : No
#---------------------------------------------------------------------------
launchEMCA=<true>
#---------------------------------------------------------------------------
# Name : s_responseFileEMCA
# Datatype : String
# Description : This string contains the value of the -responseFile
# argument for launching the Enterprise Manager
# Configuration Assistant in silent mode. Use the
Note: On Windows NT or 2000, the OPTIONAL_CONFIG_TOOLS
variable must be set to emca.bat.
Note: Ensure that the value specified for the repository user's
USERNAME variable in emca.rsp is unique across your network.](https://image.slidesharecdn.com/oracle9requerimientos-101029114023-phpapp01/85/Oracle9-177-320.jpg)


Ad
More Related Content
What's hot (20)
Viewers also liked (9)


Ad
Similar to Oracle9 (18)


Ad
Recently uploaded (20)


Oracle9
- 1. Oracle9i Database Installation Guide Release 1 (9.0.1.1.1) for Windows A90162-02 January 2009
- 2. Oracle9i Database Installation Guide, Release 1 (9.0.1.1.1) for Windows A90162-02 Copyright © 1996, 2009, Oracle and/or its affiliates. All rights reserved. Primary Author: Brintha Bennet Contributing Author: Ashmita Bose Contributors: Harish Akali, Warren Briese, Kristy Browder, Toby Close, Jonathan Creighton, Marcel De Maria, Mike DeMarco, Saheli Dey, Raj Gupta, Nicole Haba, Daniella Hansell, Ana Hernandez, Clara Jaeckel, Stephen Lee, Mark Kennedy, Matt McKerle, Miranda Nash, Anita Puronto, David Saslav, David Saslav, Debbie Steiner, Linus Tanaka, Tom Van Raalte, Alice Watso, Zakia Zerhouni This software and related documentation are provided under a license agreement containing restrictions on use and disclosure and are protected by intellectual property laws. Except as expressly permitted in your license agreement or allowed by law, you may not use, copy, reproduce, translate, broadcast, modify, license, transmit, distribute, exhibit, perform, publish, or display any part, in any form, or by any means. Reverse engineering, disassembly, or decompilation of this software, unless required by law for interoperability, is prohibited. The information contained herein is subject to change without notice and is not warranted to be error-free. If you find any errors, please report them to us in writing. If this software or related documentation is delivered to the U.S. Government or anyone licensing it on behalf of the U.S. Government, the following notice is applicable: U.S. GOVERNMENT RIGHTS Programs, software, databases, and related documentation and technical data delivered to U.S. Government customers are "commercial computer software" or "commercial technical data" pursuant to the applicable Federal Acquisition Regulation and agency-specific supplemental regulations. As such, the use, duplication, disclosure, modification, and adaptation shall be subject to the restrictions and license terms set forth in the applicable Government contract, and, to the extent applicable by the terms of the Government contract, the additional rights set forth in FAR 52.227-19, Commercial Computer Software License (December 2007). Oracle USA, Inc., 500 Oracle Parkway, Redwood City, CA 94065. This software is developed for general use in a variety of information management applications. It is not developed or intended for use in any inherently dangerous applications, including applications which may create a risk of personal injury. If you use this software in dangerous applications, then you shall be responsible to take all appropriate fail-safe, backup, redundancy, and other measures to ensure the safe use of this software. Oracle Corporation and its affiliates disclaim any liability for any damages caused by use of this software in dangerous applications. Oracle is a registered trademark of Oracle Corporation and/or its affiliates. Other names may be trademarks of their respective owners. This software and documentation may provide access to or information on content, products, and services from third parties. Oracle Corporation and its affiliates are not responsible for and expressly disclaim all warranties of any kind with respect to third-party content, products, and services. Oracle Corporation and its affiliates will not be responsible for any loss, costs, or damages incurred due to your access to or use of third-party content, products, or services.
- 3. iii Contents Preface................................................................................................................................................................. ix Audience....................................................................................................................................................... ix Related Documents ..................................................................................................................................... x Conventions ................................................................................................................................................. x Documentation Accessibility................................................................................................................... xiv Accessibility of Code Examples in Documentation ............................................................................. xv Accessibility of Links to External Web Sites in Documentation......................................................... xv Component Accessibility ......................................................................................................................... xv What's New in Oracle9i for Windows?........................................................................................... xix Oracle9i Release 1 (9.0.1) New Features in Oracle9i for Windows .................................................... xix 1 Introducing Oracle9i for Windows NT 1.1 Oracle9i for Windows NT Overview ....................................................................................... 1-1 1.2 Planning Your Installation......................................................................................................... 1-1 1.2.1 Using Optimal Flexible Architecture................................................................................ 1-2 1.2.1.1 Benefits of Using Multiple Oracle Homes ................................................................ 1-2 1.2.1.2 Multiple Oracle Home Functionality in Different Releases ................................... 1-2 1.2.1.3 Oracle8 Releases Before 8.0.4 ...................................................................................... 1-2 1.2.1.4 Oracle8 Releases 8.0.4 to 8.0.6..................................................................................... 1-3 1.2.1.5 Oracle8i Release 8.1.3 to Oracle9i Release 1 (9.0.1).................................................. 1-3 1.2.2 Oracle Universal Installer Overview ................................................................................ 1-3 1.2.2.1 Oracle Universal Installer Restrictions...................................................................... 1-4 1.2.2.2 Using the Keyboard to Navigate Oracle Universal Installer.................................. 1-4 1.2.3 Oracle9i Products for Installation...................................................................................... 1-5 1.2.3.1 Oracle9i Database ......................................................................................................... 1-5 1.2.3.2 Oracle9i Client............................................................................................................... 1-5 1.2.3.3 Oracle9i Management and Integration...................................................................... 1-6 1.2.4 Licensing Information......................................................................................................... 1-6 1.2.5 Oracle9i Database Options ................................................................................................. 1-7 1.3 Documentation Library Overview ........................................................................................... 1-7 1.4 What Documentation Do I Read First?.................................................................................... 1-8 1.5 Getting Started with Installation ........................................................................................... 1-10
- 4. iv 2 Preinstallation Requirements 2.1 Single Oracle Home Components ............................................................................................ 2-1 2.2 Top-Level Component System Requirements........................................................................ 2-2 2.2.1 System Requirements for FAT and NTFS File Systems ................................................. 2-2 2.2.2 Oracle9i Database System Requirements......................................................................... 2-3 2.2.3 Oracle9i Client System Requirements .............................................................................. 2-4 2.2.4 Oracle9i Management and Integration System Requirements ..................................... 2-5 2.2.5 Unsupported Components and Features on Windows Terminal Servers .................. 2-7 2.2.6 Component Certification .................................................................................................... 2-7 2.3 Mandatory Individual Component Requirements ................................................................ 2-8 2.4 Oracle Enterprise Manager Requirements........................................................................... 2-11 2.4.1 Oracle Management Server Requirements ................................................................... 2-11 2.4.1.1 Use an Existing Repository ...................................................................................... 2-11 2.4.1.2 Create a New Repository.......................................................................................... 2-11 2.4.2 Oracle Enterprise Manager Web Site Requirements ................................................... 2-12 2.4.3 Oracle Enterprise Manager Paging Server Requirements .......................................... 2-12 2.5 Migration and Upgrade Requirements................................................................................. 2-13 2.5.1 Policies for Linking and Relinking Applications ......................................................... 2-13 2.5.2 Migrating and Upgrading Releases 7.x and 8.x ........................................................... 2-13 2.5.2.1 Oracle Command Line Tools with the Migration Utility .................................... 2-13 2.5.2.2 Required Oracle7 Server SQL*Net Patch Releases ............................................... 2-14 2.5.3 Oracle Real Application Clusters Migration and Upgrade Requirements .............. 2-14 2.6 Networking Protocol Vendor Requirements....................................................................... 2-15 3 Selecting Database Creation and Oracle Net Services Configuration Methods 3.1 About Database Creation and Network Configuration Methods ....................................... 3-1 3.2 Types of Database Environments............................................................................................. 3-3 3.3 Selecting a Database Creation Method .................................................................................... 3-4 3.4 Configuring Your Network....................................................................................................... 3-5 3.4.1 Configuring the Server Network....................................................................................... 3-6 3.4.2 Configuring the Client Network ....................................................................................... 3-8 4 Installing Oracle Components 4.1 Installation Differences Between Windows NT and UNIX .................................................. 4-1 4.2 Preinstallation Tasks................................................................................................................... 4-2 4.3 Installations Meeting Minimal Memory Requirements ........................................................ 4-3 4.4 Installing Oracle Components .................................................................................................. 4-3 4.4.1 Oracle9i Database Installation Types ............................................................................... 4-5 4.4.1.1 Enterprise Edition, Standard Edition, or Personal Edition Installation .............. 4-5 4.4.1.2 Custom Oracle9i Database Installations ................................................................... 4-9 4.4.2 Oracle9i Client Installation Types .................................................................................. 4-11 4.4.2.1 Client Administrator or Runtime Installations .................................................... 4-11 4.4.2.2 Custom Oracle9i Client Installations ..................................................................... 4-12 4.4.3 Oracle9i Management and Integration Installation Types ......................................... 4-13 4.4.3.1 Oracle Management Server Installation................................................................. 4-14 4.4.3.2 Oracle Internet Directory Installation..................................................................... 4-16
- 5. v 4.4.3.2.1 Installing Oracle Internet Directory for the First Time................................. 4-17 4.4.3.2.2 Upgrading Oracle Internet Directory.............................................................. 4-18 4.4.3.3 Oracle Integration Server Installation .................................................................... 4-20 4.4.3.4 Custom Oracle9i Management and Integration Installations ............................ 4-23 4.4.4 Reviewing the Installation Session Log ........................................................................ 4-26 4.5 Deinstalling Oracle Components and Services ................................................................... 4-26 4.5.1 Stopping Oracle Services for Windows......................................................................... 4-27 4.5.1.1 Stopping and Removing Oracle Internet Directory Services.............................. 4-27 4.5.1.2 Stopping and Removing Oracle Management Server Service Registry Entry . 4-27 4.5.2 Deinstalling Components with Oracle Universal Installer......................................... 4-28 4.5.3 Removing Oracle Keys From the Registry on Windows NT and Windows 2000 .. 4-28 4.5.3.1 Update the System Variable Path............................................................................ 4-30 4.5.3.2 Remove Oracle from the Start Menu ...................................................................... 4-30 4.5.4 Removing Oracle Keys from the Registry on Windows 98........................................ 4-30 4.5.4.1 Update the System Variable Path............................................................................ 4-31 4.5.4.2 Remove Oracle from the Start Menu ...................................................................... 4-31 5 Reviewing Your Installed Starter Database Contents 5.1 Usernames and Passwords Overview ..................................................................................... 5-1 5.1.1 Unlocking and Changing Passwords ............................................................................... 5-2 5.1.2 Granting Limited SYS Database Role Privileges ............................................................ 5-3 5.1.3 Reviewing Usernames and Passwords............................................................................. 5-3 5.2 Database Identification Overview ........................................................................................... 5-5 5.3 Oracle9i Services on Windows Overview ............................................................................... 5-6 5.4 Tablespaces and Datafiles Overview ....................................................................................... 5-6 5.5 Initialization Parameter File Overview.................................................................................... 5-8 5.6 Redo Log Files Overview........................................................................................................... 5-8 5.7 Control Files Overview .............................................................................................................. 5-9 5.8 Rollback Segments Overview ................................................................................................... 5-9 5.9 Data Dictionary Overview......................................................................................................... 5-9 6 Postinstallation Configuration Tasks 6.1 About NTFS File System and Windows NT Registry Permissions..................................... 6-1 6.1.1 Setting NTFS File System Security .................................................................................... 6-1 6.1.2 Setting Windows NT Registry Security............................................................................ 6-2 6.2 Validating Invalid PL/SQL Modules With the utlrp.sql Script........................................... 6-2 6.3 Individual Component Postinstallation Configuration Tasks ............................................. 6-3 6.3.1 Oracle OLAP Services ......................................................................................................... 6-6 6.3.1.1 OLAP Services Postinstallation Tasks....................................................................... 6-6 6.3.1.2 CORBA Naming Service.............................................................................................. 6-7 6.3.1.3 Unlocking OLAP Accounts and Changing OLAP Passwords .............................. 6-7 6.3.1.4 Memory Requirements for MOLAP .......................................................................... 6-8 6.3.1.5 Changes to the Oracle OLAP API .............................................................................. 6-8 6.3.2 Oracle Workflow.................................................................................................................. 6-8 6.3.2.1 Oracle Workflow Postinstallation Tasks................................................................... 6-8 6.3.2.2 workflow.log File.......................................................................................................... 6-8
- 6. vi 6.3.2.3 Installing and Configuring Your Web Server for Oracle Workflow..................... 6-9 A Individual Components Available for Installation A.1 Oracle9i Database Components............................................................................................... A-1 A.2 Oracle9i Client Components .................................................................................................... A-6 A.3 Oracle9i Management and Integration Components ........................................................... A-9 A.4 Component Descriptions ........................................................................................................ A-13 B Oracle Real Application Clusters Preinstallation Tasks B.1 About Oracle Real Application Clusters ................................................................................ B-1 B.1.1 Real Application Clusters System Requirements .......................................................... B-2 B.1.1.1 About Hardware and Network Configuration....................................................... B-2 B.1.2 Node Preparation for a Real Application Clusters Installation ................................... B-2 B.1.2.1 About Extended Partitions and Logical Drives ...................................................... B-2 B.1.2.2 Planning Your Logical Drives Configuration.......................................................... B-4 B.1.3 Oracle Cluster Setup Wizard Overview.......................................................................... B-6 B.1.4 Raw Devices Management Utilities Overview............................................................... B-6 B.1.4.1 Installing the Raw Devices Management Utilities Manually................................ B-7 B.2 Preinstallation Tasks.................................................................................................................. B-8 B.2.1 Task 1: Creating an Extended Partition........................................................................... B-8 B.2.1.1 Creating an Extended Partition and Logical Drives on Windows 2000.............. B-8 B.2.2 Task 2: Creating Logical Drives ....................................................................................... B-9 B.2.3 Task 3: Assigning Symbolic Link Names...................................................................... B-11 B.2.3.1 Using Oracle Cluster Setup Wizard........................................................................ B-11 B.2.3.2 Using Object Link Manager ..................................................................................... B-11 B.2.3.3 Using ImportSYMLinks Utility ............................................................................... B-12 B.2.4 Task 4: Creating a Cluster................................................................................................ B-13 B.3 Deleting Previous Versions of Oracle Operating System Dependent Clusterware....... B-14 B.4 Troubleshooting the Oracle Real Application Clusters Installation................................. B-15 C Oracle Transparent Gateways C.1 System Requirements for Oracle Transparent Gateways .................................................... C-1 C.1.1 Gateway System Requirements........................................................................................ C-1 C.1.1.1 Microsoft SQL Server Gateway System Requirements.......................................... C-2 C.1.1.2 Sybase Gateway System Requirements.................................................................... C-2 C.1.1.3 Teradata Gateway System Requirements................................................................ C-3 C.1.2 Tested Gateway Configurations....................................................................................... C-4 C.1.2.1 Microsoft SQL Server Gateway Configurations ..................................................... C-4 C.1.2.2 Sybase Gateway Configurations ............................................................................... C-4 C.1.2.3 Teradata Gateway Configurations............................................................................ C-5 C.1.3 Gateway Installation Worksheets..................................................................................... C-5 C.1.3.1 Microsoft SQL Server Worksheet.............................................................................. C-5 C.1.3.2 Sybase Worksheet........................................................................................................ C-6 C.1.3.3 Teradata Worksheet .................................................................................................... C-6 C.2 Installing Oracle Transparent Gateways................................................................................ C-7 C.3 Deinstalling Oracle Transparent Gateways ........................................................................... C-7
- 7. vii D Advanced Installation Topics D.1 About Oracle Components in Noninteractive Mode............................................................ D-1 D.1.1 Copying and Modifying a Response File........................................................................ D-2 D.1.2 Creating a Single Installation Stage From Multiple CD-ROMs................................... D-2 D.1.3 Running Oracle Universal Installer and Specifying a Response File.......................... D-3 D.1.4 Running Oracle Enterprise Manager Configuration Assistant in Silent Mode......... D-3 D.1.4.1 Silently Running Oracle Enterprise Manager Configuration Assistant as a Standalone Component .................................................................................... D-3 D.1.4.2 Running Oracle Enterprise Manager Configuration Assistant in a Silent Installation Session ...................................................................................................... D-4 D.2 About Oracle Components in Different Languages ............................................................. D-6 D.2.1 Running Oracle Universal Installer in Different Languages........................................ D-6 D.2.2 Using Oracle Components in Different Languages....................................................... D-7 D.3 About Web-based Installations................................................................................................ D-7 E Globalization Support E.1 About NLS_LANG Parameters................................................................................................ E-1 E.2 Commonly Used Values for NLS_LANG .............................................................................. E-2 E.3 NLS_LANG Settings in MS-DOS Mode and Batch Mode ................................................... E-3 F Installing and Removing Legato Components F.1 About LSM Server...................................................................................................................... F-1 F.1.1 Updating LSM Server......................................................................................................... F-1 F.1.2 Installing LSM Server......................................................................................................... F-2 F.1.3 Removing LSM Server ....................................................................................................... F-3 F.2 About LSM Administrator GUI............................................................................................... F-4 F.2.1 Updating LSM Administrator GUI.................................................................................. F-4 F.2.2 Installing LSM Administrator GUI .................................................................................. F-4 F.2.3 Removing LSM Administrator GUI................................................................................. F-5 Glossary Index
- 8. viii
- 9. ix Preface This guide is your primary source of introduction, preinstallation, installation, and postinstallation information for Oracle9i for Windows NT. This preface contains these topics: ■ Audience ■ Related Documents ■ Conventions ■ Documentation Accessibility ■ Accessibility of Code Examples in Documentation ■ Accessibility of Links to External Web Sites in Documentation ■ Component Accessibility Audience Oracle9i Database Installation Guide for Windows is necessary for anyone installing or configuring the Oracle9i Enterprise Edition, Oracle9i Standard Edition, and Oracle9i Personal Edition database types. Note that the term Oracle9i for Windows NT is used in this guide to describe all these types. This guide describes only the features of Oracle9i for Windows NT software that apply to the Windows NT, Windows 98, and Windows 2000 operating systems. Installation and migrations procedures for Oracle9i Personal Edition on Windows 98 are not covered in this guide. To use this document, you need to be familiar with the following: ■ Windows NT, Windows 2000, and Windows 98 and have installed and tested them on your computer system ■ Object-relational database management concepts See Also: ■ Oracle9i Database Concepts for more information about object-relational database management concepts ■ Section 1.3, "Documentation Library Overview" for information about the Oracle9i Online Documentation for Windows CD-ROM
- 10. x Related Documents For more information, see the following resources: ■ Oracle9i Database Getting Starting for Windows ■ Oracle9i Database Administrator's Guide for Windows ■ Oracle9i Network, Directory, and Security Guide for Windows ■ The documentation for Oracle Enterprise Manager Many books in the documentation set use the sample schemas of the seed database, which is installed by default when you install Oracle. Refer to Oracle9i Sample Schemas for information on how these schemas were created and how you can use them yourself. In North America, printed documentation is available for sale in the Oracle Store at http://oraclestore.oracle.com/ Customers in Europe, the Middle East, and Africa (EMEA) can purchase documentation from http://www.oraclebookshop.com/ Other customers can contact their Oracle representative to purchase printed documentation. To download free release notes, installation documentation, white papers, or other collateral, please visit the Oracle Technology Network (OTN). You must register online before using OTN; registration is free and can be done at http://www.oracle.com/technology/join/index.html If you already have a username and password for OTN, then you can go directly to the documentation section of the OTN Web site at http://otn.oracle.com/docs/index.htm To access the database documentation search engine directly, please visit http://tahiti.oracle.com/ Conventions This section describes the conventions used in the text and code examples of this documentation set. It describes: ■ Conventions in Text ■ Conventions in Code Examples ■ Conventions for Microsoft Windows Operating Systems Conventions in Text We use various conventions in text to help you more quickly identify special terms. The following table describes those conventions and provides examples of their use. Note: This installation guide and other platform-specific documentation are not available for purchase in printed format.
- 11. xi Conventions in Code Examples Code examples illustrate SQL, PL/SQL, SQL*Plus, or other command-line statements. They are displayed in a monospace (fixed-width) font and separated from normal text as shown in this example: SELECT username FROM dba_users WHERE username = 'MIGRATE'; The following table describes typographic conventions used in code examples and provides examples of their use. Convention Meaning Example Bold Bold typeface indicates terms that are defined in the text or terms that appear in a glossary, or both. When you specify this clause, you create an index-organized table. Italics Italic typeface indicates book titles or emphasis. Oracle9i Database Concepts Ensure that the recovery catalog and target database do not reside on the same disk. UPPERCASE monospace (fixed-width font) Uppercase monospace typeface indicates elements supplied by the system. Such elements include parameters, privileges, datatypes, RMAN keywords, SQL keywords, SQL*Plus or utility commands, packages and methods, as well as system-supplied column names, database objects and structures, usernames, and roles. You can specify this clause only for a NUMBER column. You can back up the database by using the BACKUP command. Query the TABLE_NAME column in the USER_TABLES data dictionary view. Use the DBMS_STATS.GENERATE_ STATS procedure. lowercase monospace (fixed-width font) Lowercase monospace typeface indicates executables, filenames, directory names, and sample user-supplied elements. Such elements include computer and database names, net service names, and connect identifiers, as well as user-supplied database objects and structures, column names, packages and classes, usernames and roles, program units, and parameter values. Note: Some programmatic elements use a mixture of UPPERCASE and lowercase. Enter these elements as shown. Enter sqlplus to open SQL*Plus. The password is specified in the orapwd file. Back up the datafiles and control files in the /disk1/oracle/dbs directory. The department_id, department_name, and location_id columns are in the hr.departments table. Set the QUERY_REWRITE_ ENABLED initialization parameter to true. Connect as oe user. The JRepUtil class implements these methods. lowercase monospace (fixed-width font) italic Lowercase monospace italic font represents placeholders or variables. You can specify the parallel_ clause. Run Uold_release.SQL where old_release refers to the release you installed prior to upgrading.
- 12. xii Conventions for Microsoft Windows Operating Systems The following table describes conventions for Microsoft Windows operating systems and provides examples of their use. Convention Meaning Example [ ] Brackets enclose one or more optional items. Do not enter the brackets. DECIMAL (digits[ ,precision]) { } Braces enclose two or more items, one of which is required. Do not enter the braces. {ENABLE | DISABLE} | A vertical bar represents a choice of two or more options within brackets or braces. Enter one of the options. Do not enter the vertical bar. {ENABLE | DISABLE} [COMPRESS | NOCOMPRESS] ... Horizontal ellipsis points indicate either: ■ That we have omitted parts of the code that are not directly related to the example ■ That you can repeat a portion of the code CREATE TABLE ... ASsubquery; SELECTcol1,col2, ... ,colnFROM employees; . . . Vertical ellipsis points indicate that we have omitted several lines of code not directly related to the example. Other notation You must enter symbols other than brackets, braces, vertical bars, and ellipsis points as shown. acctbal NUMBER(11,2); acct CONSTANT NUMBER(4) := 3; Italics Italicized text indicates placeholders or variables for which you must supply particular values. CONNECT SYSTEM/system_ password DB_NAME =database_name UPPERCASE Uppercase typeface indicates elements supplied by the system. We show these terms in uppercase in order to distinguish them from terms you define. Unless terms appear in brackets, enter them in the order and with the spelling shown. However, because these terms are not case sensitive, you can enter them in lowercase. SELECT last_name, employee_id FROM employees; SELECT * FROM USER_TABLES; DROP TABLE hr.employees; lowercase Lowercase typeface indicates programmatic elements that you supply. For example, lowercase indicates names of tables, columns, or files. Note: Some programmatic elements use a mixture of UPPERCASE and lowercase. Enter these elements as shown. SELECT last_name, employee_id FROM employees; sqlplus hr/hr CREATE USER mjones IDENTIFIED BY ty3MU9;
- 13. xiii Convention Meaning Example Bold Bold typeface indicates terms that are defined in the text or terms that appear in a glossary, or both. When you specify this clause, you create an index-organized table. Choose Start > How to start a program. To start the Oracle Database Configuration Assistant, choose Start > Programs > Oracle - HOME_NAME > Configuration and Migration Tools > Database Configuration Assistant. File and directory names File and directory names are not case sensitive. The following special characters are not allowed: left angle bracket (<), right angle bracket (>), colon (:), double quotation marks ("), slash (/), pipe (|), and dash (-). The special character backslash () is treated as an element separator, even when it appears in quotes. If the file name begins with , then Windows assumes it uses the Universal Naming Convention. c:winnt""system32 is the same as C:WINNTSYSTEM32 C:> Represents the Windows command prompt of the current hard disk drive. The escape character in a command prompt is the caret (^). Your prompt reflects the subdirectory in which you are working. Referred to as the command prompt in this manual. C:oracleoradata> The backslash () special character is sometimes required as an escape character for the double quotation mark (") special character at the Windows command prompt. Parentheses and the single quotation mark (') do not require an escape character. Refer to your Windows operating system documentation for more information on escape and special characters. C:>exp scott/tiger TABLES=emp QUERY="WHERE job='SALESMAN' and sal<1600" C:>imp SYSTEM/passwordFROMUSER=s cott TABLES=(emp, dept) HOME_NAME Represents the Oracle home name. The home name can be up to 16 alphanumeric characters. The only special character allowed in the home name is the underscore. C:> net start OracleHOME_ NAMETNSListener
- 14. xiv Documentation Accessibility Our goal is to make Oracle products, services, and supporting documentation accessible to all users, including users that are disabled. To that end, our documentation includes features that make information available to users of assistive technology. This documentation is available in HTML format, and contains markup to facilitate access by the disabled community. Accessibility standards will continue to evolve over time, and Oracle is actively engaged with other market-leading technology vendors to address technical obstacles so that our documentation can be accessible to all of our customers. For more information, visit the Oracle Accessibility Program Web site at http://www.oracle.com/accessibility/. Accessibility of Code Examples in Documentation Screen readers may not always correctly read the code examples in this document. The conventions for writing code require that closing braces should appear on an otherwise empty line; however, some screen readers may not always read a line of text that consists solely of a bracket or brace. ORACLE_HOME and ORACLE_BASE In releases prior to Oracle8i release 8.1.3, when you installed Oracle components, all subdirectories were located under a top level ORACLE_HOME directory that by default used one of the following names: ■ C:orant for Windows NT ■ C:orawin95 for Windows 95 ■ C:orawin98 for Windows 98 This release complies with Optimal Flexible Architecture (OFA) guidelines. All subdirectories are not under a top level ORACLE_HOME directory. There is a top level directory called ORACLE_BASE that by default is C:oracle. If you install Oracle9i release 1 (9.0.1) on a computer with no other Oracle software installed, then the default setting for the first Oracle home directory is C:oracleora90. The Oracle home directory is located directly under ORACLE_ BASE. All directory path examples in this guide follow OFA conventions. Refer to Oracle9i Database Getting Starting for Windows for additional information about OFA compliances and for information about installing Oracle products in non-OFA compliant directories. Go to the ORACLE_ BASEORACLE_ HOMErdbmsadmin directory. Convention Meaning Example
- 15. xv Accessibility of Links to External Web Sites in Documentation This documentation may contain links to Web sites of other companies or organizations that Oracle does not own or control. Oracle neither evaluates nor makes any representations regarding the accessibility of these Web sites. TTY Access to Oracle Support Services To reach AT&T Customer Assistants, dial 711 or 1.800.855.2880. An AT&T Customer Assistant will relay information between the customer and Oracle Support Services at 1.800.223.1711. Complete instructions for using the AT&T relay services are available at http://www.consumer.att.com/relay/tty/standard2.html. After the AT&T Customer Assistant contacts Oracle Support Services, an Oracle Support Services engineer will handle technical issues and provide customer support according to the Oracle service request process. Accessibility of Code Examples in Documentation JAWS, a Windows screen reader, may not always correctly read the code examples in this document. The conventions for writing code require that closing braces should appear on an otherwise empty line; however, JAWS may not always read a line of text that consists solely of a bracket or brace. Accessibility of Links to External Web Sites in Documentation This documentation may contain links to Web sites of other companies or organizations that Oracle Corporation does not own or control. Oracle Corporation neither evaluates nor makes any representations regarding the accessibility of these Web sites. Support for Hearing and Speech Impaired Customers Oracle Corporation provides dedicated Text Telephone (TTY) access to Oracle Support Services within the United States of America 24 hours a day, seven days a week. For technical questions, call: 1.800.446.2398 For non-technical questions, call: 1.800.464.2330 Component Accessibility This section contains information on component accessibility. Java Access Bridge Setup for Oracle9i for Windows This section contains setup information to enable Oracle9i components to use a screen reader. The following procedures are needed only if you use a screen reader. Java Access Bridge enables assistive technologies, such as a JAWS screen reader, to read Java applications running on Windows. Assistive technologies can read Oracle9i components, such as Oracle Universal Installer, Oracle Enterprise Manager, and Oracle Database Configuration Assistant.
- 16. xvi This section contains these topics: ■ Setup for Oracle Universal Installer ■ Setup for Oracle Installed Components Setup for Oracle Universal Installer Install and configure Java Access Bridge for Windows before installing Oracle9i components to enable assistive technologies to read Oracle Universal Installer windows. Before you Begin Exit any assistive technology software that is running. To install the Java Access Bridge: 1. From the first component CD-ROM, copy AccessBridgeaccessbridge1_ 0.zip to a location on your hard drive. 2. Extract the files onto your hard drive. 3. Add access-bridge.jar and jaccess-1_1.jar to the CLASSPATH user environment variable. 4. Open the Windows System Control Panel. For Windows NT or Windows 2000, choose Start > Settings > Control Panel > System. On Windows NT, select the Environment tab. On Windows 2000, select the Advance tab. Then, choose the Environment Variables button. 5. Add the following to the CLASSPATH user environment variable: ;x:AccessBridge-1_ 0installerinstallerFilesaccess-bridge.jar;x:AccessBridge installerinstallerFilesjaccess-1_1.jar where x:AccessBridge-1_0 is the full path of the Access Bridge location on your hard drive. 6. Copy JavaAccessBridge.dll and WindowsAccessBridge.dll from x:AccessBridge-1_0installerinstallerFiles to operating systemsystem32. Setup for Oracle Installed Components Install and configure Java Access Bridge for Windows after installing Oracle9i components to enable assistive technologies to read Oracle9i component windows. Perform the following steps to install and configure Java Access Bridge: ■ Step 1: Install Java Access Bridge Software ■ Step 2: Configure Oracle to use Java Access Bridge See Also: After installation, Java Access Bridge documentation located in: AccessBridge-1_0doc
- 17. xvii Step 1: Install Java Access Bridge Software To install the Java Access Bridge: 1. From the first component CD-ROM, copy AccessBridgeaccessbridge1_ 0.zip to a location on your hard drive. 2. Extract the files onto your hard drive. 3. Java Access Bridge must be installed into the subdirectory of Java Runtime Environment (JRE) 1.1.8 used by Oracle. By default, JRE 1.1.8 used by Oracle is installed in: C:ProgramFilesOraclejre1.1.8. The following table list the files to copy from the Java Access Bridge location on your hard drive to the appropriate subdirectory of the JRE used by Oracle. 4. In the destination folder, rename jaccess-1_1.jar to jaccess.jar. 5. Use a text editor to modify libawt.properties that is located in the subdirectory of JRE 1.1.8 used by Oracle. 6. Add the following lines to awt.properties: AWT.EventQueueClass=com.cun.java.accessibility.util.EventQueu eMonitor AWT.assistive_ technologies=com.sun.java.accessibility.AccessBridge Step 2: Configure Oracle to use Java Access Bridge To configure Oracle to use Java Access Bridge, set the system environment variable ORACLE_OEM_CLASSPATH to point to the installed Java Access Bridge files. Open the Windows System Control Panel. For Windows NT or Windows 2000, choose Start > Settings > Control Panel > System. ■ On Windows NT: 1. Select the Environment tab. 2. Select a variable in the System Variables list. 3. In the Variable field, enter ORACLE_OEM_CLASSPATH. 4. In the Value field, enter the full path of jaccess.jar and access-bridge.jar. For example, if JRE 1.1.8 is installed in the default location, then these paths are: c:ProgramFilesOraclejre1.1.8libjaccess.jar;c:Progra mFilesOralcejre1.1.8libaccess-bridge.jar Copy... To... AccessBridge-1_ 0installerinstallerFilesjaccess-1_ 1.jar libjaccess.jar (rename jaccess-1_1.jar to jaccess.jar) AccessBridge-1_0access-bridge.jar lib AccessBridge-1_0JavaAccessBridge.dll bin AccessBridge-1_ 0WindowsAccessBridge.dll bin
- 18. xviii 5. Choose Set. 6. Choose OK. ■ On Windows 2000: 1. Select the Advanced tab. 2. Choose the Environment Variables button. The Environment Variables dialog displays. 3. Choose the New button under the System Variable list. The New System Variable dialog displays. 4. In the Variable Name field, enter ORACLE_OEM_CLASSPATH. 5. In the Variable Value field, enter the full path of jaccess.jar and access-bridge.jar. For example, if JRE 1.1.8 is installed in the default location, then these paths are: c:ProgramFilesOraclejre1.1.8libjaccess.jar;c:Progra mFilesOralcejre1.1.8libaccess-bridge.jar 6. Choose OK. 7. Choose OK. 8. Choose OK.
- 19. xix What's New in Oracle9i for Windows? This section describes new features of Oracle9i for Windows release 1 (9.0.1) and provides pointers to additional information. The following sections describe the new features in Oracle9i: ■ Oracle9i Release 1 (9.0.1) New Features in Oracle9i for Windows Oracle9i Release 1 (9.0.1) New Features in Oracle9i for Windows This section contains these topics: ■ Integration With Windows NT and Windows 2000 ■ Oracle9i supports several versions of Microsoft Windows, including Windows 2000 and Windows NT. ■ Oracle9i supports enhanced integration with Microsoft Transaction Services and Internet Information Services. The public key infrastructure (PKI) and Single Sign-On capabilities in Oracle9i have also been well integrated with Windows 2000, Active Directory, and Microsoft Certificate Store. ■ Oracle9i also provides an enhanced solution to allow the Oracle database to participate as a Resource Manager in Microsoft Transaction Server and COM+ Transactions environment, providing enhanced performance and scalability. ■ Windows security supports Oracle Wallets in the registry and Active Directory and allows Oracle products to use Microsoft Certificate Store. ■ Customers who implement Oracle Internet Directory as their central Directory while using Active Directory to support their desktop environments can use Microsoft Active Directory Service Interfaces (ADSI) to access Oracle Internet Directory from the Windows desktop environment. ■ Meta-directory synchronization between Active Directory and Oracle Internet Directory facilitates centralized scheduling and configuration of Oracle and third party meta-directory components. Synchronization between Active Directory and Oracle Internet Directory can be achieved by deploying Oracle See Also: ■ Oracle9i Database New Features for the list of new features, options, and enhancements of Oracle9i ■ The README file at the root level of the documentation CD-ROM for more information about the Oracle9i Online Documentation for Windows
- 20. xx Directory Integration Platform and an Active Directory Synchronization agent from Siemens. ■ Oracle Fail Safe, shipping in a subsequent CD pack, provides high availability for Oracle databases and applications deployed on all Microsoft Cluster Server clusters configured with Windows NT and Windows 2000. ■ For Windows developers, Oracle9i offers an enhanced native OLE DB provider. XML, database events, and Oracle9i extensions are supported through Oracle Objects for OLE. The COM Automation Feature now supports Java stored procedures. ■ iSQL*Plus iSQL*Plus is a browser-based implementation of SQL*Plus. You can use iSQL*Plus over the Internet to connect to an Oracle database and perform the same actions as you would through the SQL*Plus command line. The iSQL*Plus implementation uses a Web browser, an Oracle HTTP Server with the iSQL*Plus Server, and an Oracle Database Server. ■ Microsoft Transaction Server (MTS) The following table describes some of the new features in Microsoft Transaction Server for Oracle9i. ■ Oracle COM Automation Oracle COM Automation Feature is now available for Java as well as PL/SQL. While the general functionality is parallel, the developer's guide indicates those areas where functionality, setup, and architecture differ. For this release, Oracle has renamed the com81.dll to orawpcom.dll. Users migrating from Oracle8i must rerun comwrap.sql to continue using Oracle COM Automation feature for PL/SQL. ■ Oracle DBA Studio Integration into the Enterprise Manager Console Oracle DBA Studio is no longer available as a separate application. The functionality of this component has been integrated with Oracle Enterprise Manager Console. New Features Description High availability The Oracle database is no longer dependent on the Oracle Service for MTS. Previously, if the Oracle Service for MTS was stopped, the Oracle database was unable to participate in Microsoft Transaction Server transactions. Improved scalability The code that allows an Oracle database to participate in Microsoft Transaction Server transactions is now embedded in each Microsoft Transaction Server application process. Easier configuration Previous versions required a Windows NT service named Oracle Service for MTS to be created for each Oracle database, enabling the database to participate in Microsoft Transaction Server transactions. Moreover, only one Oracle Service for MTS was supported for each Oracle database. This release no longer requires this service. See Also: Oracle Developer's Guide for Microsoft Transaction Server See Also: Oracle COM Automation Feature Developer's Guide
- 21. xxi ■ Oracle Objects for OLE Oracle Objects for OLE supports the creation of temporary binary large objects (BLOBs) or character large objects (CLOBs) that can be manipulated and then bound into SQL statements or PL/SQL blocks, or copied into permanent LOBs. Oracle Objects for OLE supports database events. This asynchronous notification is modeled along the same lines as the failover handler, thus a client can subscribe to one or more database events and can continue with other processing. Each database event that the client is interested in is stored as a subscription by Oracle Objects for OLE. ■ Oracle OLAP Services Oracle OLAP Services provides a Java OLAP API and an analytical engine. Using OLAP Services, developers can build analytical applications that support complex statistical, mathematical, and financial calculations along with predictive analytical functions such as forecasting, modeling, consolidations, allocations, and scenario management. Because the OLAP API is all Java, OLAP Services supports deployment of analytical applications to large, geographically distributed user communities on the Internet. Oracle OLAP Services is installed with Oracle9i Enterprise Edition. ■ Oracle Real Application Clusters Oracle Real Application Clusters is a new, breakthrough software architecture with scalability and high availability features that exceed the capabilities of previous Oracle cluster-enabled software releases. The following table describes some of the features in Oracle Real Application Clusters for Oracle9i. See Also: Oracle Enterprise Manager Administrator's Guide See Also: Oracle Objects for OLE Online Help See Also: Oracle9i OLAP Services Concepts and Administration Guide New Features Description Cache Fusion A breakthrough technology that guarantees cache coherency among multiple cluster nodes without incurring disk I/O costs. Cluster Configuration The Oracle9i release of Oracle Real Application Clusters on Windows provides for easier cluster configuration: ■ Oracle Operating System Dependent clusterware (Oracle OSDs) are provided in this release. The OSDs serve as communication links between the operating system and Oracle Real Application Clusters software. ■ The Oracle Cluster Setup Wizard creates a cluster or adds a node to an existing cluster. Centralized Node Information Easier configuration through centralized node information: ■ Use Oracle Enterprise Manager or the srvctl utility to manage instances, including adding or removing them. There is no need to update distributed files on the nodes. ■ Add an instance dynamically using Oracle Database Configuration Assistant.
- 22. xxii ■ Oracle Ultra Search Oracle Ultra Search, a new feature of Oracle9i, provides an "Out-of-the-Box" solution that can find your information wherever it lives. Ultra Search provides the following features: ■ Searches content regardless of location--in Oracle and non-Oracle databases, on Web servers, in files on disk, or on corporate mail servers. ■ Uses a "crawler" to crawl, index, and make searchable your corporate Intranet; the documents stay in their own repositories and the crawled information builds an index that stays within your firewall in a designated Oracle9i database. ■ Provides a Web-style search with intuitive search menus and self-service access. There is no need to code against hard-to-use low level APIs. For advanced users, however, APIs are also exposed. ■ Organizes and categorizes your content by extracting valuable metadata that can be used in portal applications. ■ Oracle Workflow Oracle Workflow now provides the Business Event System, a new application service that leverages the Oracle Advanced Queuing infrastructure to communicate business events among systems within an enterprise and between enterprises. The Business Event System includes the Event Manager, for registering subscriptions to significant events, and event activities, for modeling business events within workflow processes. This support allows Oracle Workflow users to deal with business objects, and E-business integration flows powerfully and flexibly, with minimal intrusion into core applications. ■ Oracle9i on Windows 2000 There are some differences between using Oracle9i on Windows 2000 and Windows NT 4.0. ■ Workspace Manager Workspace Manager provides a long-transaction framework built on a workspace management system. It uses a series of short transactions and multiple data versions to implement a complete long-transaction event that maintains atomicity See Also: ■ The Oracle9i Real Application Clusters documentation set for additional new features ■ The Oracle Real Application Clusters Guard for Windows documentation set for information about separately installable, Windows-specific enhancements to Oracle9i Real Application Clusters. This documentation is on the Oracle Fail Safe and Oracle Real Application Clusters Guard component CD-ROM, shipping in a subsequent CD pack. See Also: Visit the OTN Ultra Search Web page to learn more about the technology at: http://technet/index.html See Also: Oracle9i Database Getting Starting for Windows
- 23. xxiii and concurrency. Changes are stored in the database as different workspaces. Users are permitted to create new versions of data to update, while maintaining a copy of the old data. The ongoing results of the long transaction are stored persistently, ensuring concurrency and consistency. Oracle9i release 1 (9.0.1) Deprecated and Desupported Components The following components that were part of 8.1.7 are not available for installation with release 1 (9.0.1): ■ Database user INTERNAL CONNECTINTERNAL and CONNECTINTERNAL/PASSWORD are not supported in Oracle9i. ■ Logical Unit Type 6.2 (LU6.2) Protocol Support LU6.2 protocol is not supported for Oracle9i. Migrate or upgrade to TCP/IP-based protocols. ■ Server Manager Server Manager is no longer available. Use SQL*Plus instead. Most Server Manager scripts should work in a SQL*Plus environment, but some scripts need to be modified. ■ Windows 95 Windows 95 is not supported for Oracle9i. ■ Very Large Memory (VLM) Very Large Memory (VLM) configurations are not supported for this release. See Also: Oracle9i Application Developer's Guide - Workspace Manager See Also: Oracle9i Database Administrator's Guide See Also: Oracle9i Database Migration for information about modifying Server Manager scripts
- 24. xxiv
- 25. 1 Introducing Oracle9i for Windows NT 1-1 1Introducing Oracle9i for Windows NT This chapter introduces you to Oracle9i for Windows NT and helps you plan your installation. This chapter contains these topics: ■ Section 1.1, "Oracle9i for Windows NT Overview" ■ Section 1.2, "Planning Your Installation" ■ Section 1.3, "Documentation Library Overview" ■ Section 1.4, "What Documentation Do I Read First?" ■ Section 1.5, "Getting Started with Installation" 1.1 Oracle9i for Windows NT Overview Oracle9i for Windows NT is a development and deployment platform for the Internet. Oracle9i for Windows NT features include the following: ■ A built-in Java Virtual Machine (JVM) that lets you store and run Java code within an Oracle9i database ■ Support for the Common Object Request Broker Architecture (CORBA), the Internet Inter-ORB Protocol (IIOP), and Enterprise JavaBeans ■ Support for SQLJ, a programming syntax that lets you embed SQL statements in Java programs ■ Integration with the Component Object Model (COM) and Microsoft Transaction Server ■ Integration with Oracle Enterprise Manager Console and front-end management applications that are fully accessible from clients (including Web browsers) 1.2 Planning Your Installation This section provides information about Oracle Universal Installer, installation types, database configurations, and concepts you should be aware of in planning an installation. See Also: ■ Oracle9i Database Concepts ■ Oracle9i Database New Features ■ Oracle Enterprise Manager Concepts Guide
- 26. Planning Your Installation 1-2 Oracle9i Database Installation Guide ■ Section 1.2.1, "Using Optimal Flexible Architecture" ■ Section 1.2.2, "Oracle Universal Installer Overview" ■ Section 1.2.3, "Oracle9i Products for Installation" ■ Section 1.2.4, "Licensing Information" ■ Section 1.2.5, "Oracle9i Database Options" 1.2.1 Using Optimal Flexible Architecture Oracle Corporation recommends using the Optimal Flexible Architecture (OFA) standard when installing and configuring Oracle9i databases. The OFA standard is a set of configuration guidelines for creating fast, highly available, reliable Oracle databases that require little maintenance. The following advantages are the most important: ■ Structured organization of directories and files and the consistent naming used for database files simplify database administration. ■ Distribution of I/O across multiple disks prevents performance bottlenecks caused by multiple read or write commands issued simultaneously to a single drive. ■ Distribution of applications across multiple disks safeguards against database failures. ■ Login home directories are not at risk when database administrators add, move, or delete Oracle home directories. ■ Multiple versions of application software can execute concurrently. ■ Software upgrades can be tested in an Oracle home in a separate directory from the Oracle home where your production database is located. 1.2.1.1 Benefits of Using Multiple Oracle Homes The main benefit of using multiple Oracle homes is that you can run multiple releases of the same products concurrently. For example, you can test an Oracle9i release 1 (9.0.1) database patch before you run your production database Oracle9i release 1 (9.0.1) against it. 1.2.1.2 Multiple Oracle Home Functionality in Different Releases Modifications to multiple Oracle home functionality have occurred since it was introduced in Oracle8 release 8.0.4. This section helps you determine the capabilities of your Oracle home depending on the release you are using. 1.2.1.3 Oracle8 Releases Before 8.0.4 Releases of Oracle for Windows NT and Windows 95 prior to Oracle8 release 8.0.4 support only single Oracle homes, allowing you to install and run Oracle products in a single Oracle home. Different releases of Oracle products can be installed in the same Oracle home provided they have different first or second-digit release numbers. For example, you can install Oracle7 release 7.2 products and Oracle7 release 7.3 products or Oracle7 release 7.x and Oracle8 release 8.x products in the same Oracle home. However, you cannot install multiple third-digit releases of the same products. For Note: The Oracle Universal Installer supports OFA, but does not require OFA.
- 27. Planning Your Installation Introducing Oracle9i for Windows NT 1-3 example, you cannot install Oracle7 release 7.3.2 and Oracle7 release 7.3.3 products on the same computer; one installation overwrites the other. 1.2.1.4 Oracle8 Releases 8.0.4 to 8.0.6 You can install one or more releases of Oracle products in multiple Oracle homes. For example, with multiple Oracle homes, you can install Oracle8 release 8.0.x and Oracle8i release 8.1.3 products or Oracle7 release 7.x and Oracle8 release 8.0.x products in different Oracle homes on the same computer. You can also install different releases of Oracle products in the same Oracle home provided they have different first or second-digit release numbers. For example, you can install Oracle7 release 7.2 products and Oracle8 release 8.0.x products in the same Oracle home. 1.2.1.5 Oracle8i Release 8.1.3 to Oracle9i Release 1 (9.0.1) These releases have the same multiple Oracle home functionality as Oracle8 releases 8.0.4 to 8.0.6, but the following restrictions apply: ■ You cannot install any release from Oracle8i release 8.1.3 to Oracle9i release 1 (9.0.1) into an Oracle home that was created using the old installer. (The old installer was called Oracle Installer and was used for installations before Oracle8i release 8.1.3; the new Java-based installer is called Oracle Universal Installer.) ■ You cannot install releases prior to Oracle8i release 8.1.3 into an Oracle home that was created by any release from Oracle8i release 8.1.3 to Oracle9i release 1 (9.0.1). ■ Releases from Oracle8i release 8.1.3 to Oracle9i release 1 (9.0.1) must be installed in separate Oracle homes. You cannot have more than one release installed in each Oracle home. 1.2.2 Oracle Universal Installer Overview Oracle Universal Installer is a Java-based graphical user interface (GUI) tool that enables you to install Oracle components from your CD-ROM. Oracle Universal Installer provides the following capabilities: ■ Component and suite installations ■ Web-based installations ■ National language and globalization support ■ Distributed installation support ■ Unattended "silent" installations using response files ■ Deinstallation of installed components ■ Multiple Oracle homes support See Also: "Multiple Oracle Homes and Optimal Flexible Architecture" of Oracle9i Database Getting Starting for Windows See Also: Appendix D, "Advanced Installation Topics" for more information about Web-based and silent installations
- 28. Planning Your Installation 1-4 Oracle9i Database Installation Guide 1.2.2.1 Oracle Universal Installer Restrictions ■ Using the old Oracle Installer installer shipped with releases 7.x and 8.0.x) to install components into an Oracle9i release 1 (9.0.1) Oracle home directory is not supported. Likewise, you cannot install release 1 (9.0.1) components into a release 7.x, 8.0.x, 8.1.3, or 8.1.4 Oracle home. ■ Oracle Universal Installer automatically installs Oracle's version of the Java Runtime Environment (JRE) i call. This version is required to run Oracle Universal Installer and several Oracle assistants. Do not modify the JRE, unless doing so with a patch provided by OracleMetaLink. Visit: https://metalink.oracle.com/support/ ■ Oracle Universal Installer is capable of running a noninteractive installation of Oracle products and can optionally be configured for "silent" mode. Silent mode is a background process and does not display windows. ■ Oracle Universal Installer is capable of Web-based installations. Refer to Oracle Universal Installer Concepts Guide for more information about this Installer feature. ■ Installation of Oracle9i database components from a remote Terminal Services Client onto a Windows 2000 server that is running a Terminal Server Service or a Windows NT 4.0 Terminal Server is not supported. If you attempt to install Oracle9i in this manner, many database configuration tools, such as Oracle Data Migration Assistant, Oracle Database Configuration Assistant, Oracle Internet Directory Configuration Assistant, Oracle Net Configuration Assistant, and Oracle Workflow Configuration Assistant, hang. Start all the configuration tools from the Terminal Server console and not from the Terminal Services Client. 1.2.2.2 Using the Keyboard to Navigate Oracle Universal Installer This guide describes how to navigate Oracle Universal Installer windows with a mouse. You can also navigate with keyboard commands. Windows operating systems include a series of keyboard commands that can be used with Oracle Universal Installer. For example, the tab key enables you to navigate from item to item in a window. Oracle Universal Installer includes several windows that require navigation through components in a hierarchical tree. These windows include: ■ Available Product Components window (lists the components available for installation) ■ Summary window (lists the components about to be installed) ■ Inventory window (lists the installed components) Table 1–1 describes how to navigate these windows with keyboard commands: See Also: Oracle Universal Installer Concepts Guide This guide is included in your Oracle9i Online Documentation Library for Windows and is automatically installed on your hard drive during installation. Choose Start > Programs > Oracle Installation Products > Universal Installer Concepts Guide to access this guide. Table 1–1 Table 1-1 Keyboard Commands for Navigating Oracle Universal Installer To... Use The... Move up and down a list of components Up and down arrows Open an expandable tree of components Right arrow Close an expanded tree of components Left arrow
- 29. Planning Your Installation Introducing Oracle9i for Windows NT 1-5 1.2.3 Oracle9i Products for Installation During installation, you are asked to choose one of three top-level components. These products are: ■ Oracle9i Database ■ Oracle9i Client ■ "Oracle9i Management and Integration" Each top-level component contains several installation types, each of which contain a series of individual components. The following sections lists the three top-level components and their installation types. 1.2.3.1 Oracle9i Database The Oracle9i Database is an object-oriented relational database management system, which consists of an Oracle database and an Oracle instance. There are four installation types: Enterprise Edition, Standard Edition, Personal Edition, or Custom. ■ Enterprise Edition: If you select this type, Oracle Universal Installer installs a preconfigured seed database, networking services, licensable Oracle Options, database environment tools, the Oracle Enterprise Manager framework of management tools, including Console, Management Server, and Intelligent Agent, Oracle utilities, and online documentation. It also installs those products most commonly used in data warehousing and transaction processing environments. ■ Standard Edition: If you select this type, Oracle Universal Installer installs a preconfigured seed database, networking services, Oracle Enterprise Manager framework of management tools, including Console, Management Server, and Intelligent Agent, and Oracle utilities. ■ Personal Edition: If you select this type, Oracle Universal Installer installs the same software as the Enterprise Edition installation type, but supports only a single user development and deployment environment that requires full compatibility with Enterprise Edition and Standard Edition. Personal Edition is the only Oracle9i Database installation type that is supported on Windows 98. Note that Oracle Management Server and Intelligent Agent are not supported on Windows 98. ■ Custom: If you select this type, Oracle Universal Installer prompts you to select individual components to install from the components available with Enterprise Edition, Standard Edition, and Personal Edition installations. 1.2.3.2 Oracle9i Client The Oracle9i Client is a front-end database application that connects to the database through one or more application servers. There are three Client installation types: Administrator, Runtime, and Custom. Select or deselect a component Space bar See Also: The Microsoft Web site for information on standard keyboard navigational commands: http://www.microsoft.com/ Table 1–1 (Cont.) Table 1-1 Keyboard Commands for Navigating Oracle Universal To... Use The...
- 30. Planning Your Installation 1-6 Oracle9i Database Installation Guide ■ Administrator: If you select this type, Oracle Universal Installer installs the Oracle Enterprise Manager Console, including enterprise management tools, networking services, utilities, and basic client software. ■ Runtime: If you select this type, Oracle Universal Installer installs networking services and support files. ■ Custom: If you select this type, Oracle Universal Installer prompts you to select individual components to install from the components available with Administrator and Runtime. 1.2.3.3 Oracle9i Management and Integration Oracle Management Server is a central processing and distribution system for management tasks. It enables distributed control between clients and managed nodes. Oracle Internet Directory is an database-based LDAP v3 directory server. Oracle Integration Server is a suite of software that provides internet and intranet tools to integrate applications within and across organizations. There are four Management and Integration installation types: Oracle Management Server, Oracle Internet Directory, Oracle Integration Server, and Custom. ■ Oracle Management Server: If you select this type, Oracle Universal Installer installs the Oracle Management Server, which processes all system management tasks from the Enterprise Manager console and administers the distribution of these tasks to Intelligent Agents on managed nodes across the enterprise. In addition, Oracle Universal Installer installs basic client software. ■ Oracle Internet Directory: If you select this type, Oracle Universal Installer installs a Lightweight Directory Access Protocol (LDAP)-enabled Oracle Internet Directory Server, LDAP-enabled client tools, and the Oracle Internet Directory database schema. ■ Oracle Integration Server: If you select this type, Oracle Universal Installer installs XML-enabled components that integrate enterprise applications. Components include Oracle9i JVM, a workflow engine, and advanced queuing. ■ Custom: If you select this type, Oracle Universal Installer prompts you to select individual components to install from the components available with Oracle Management Server, Oracle Internet Directory, and Oracle Integration Server. 1.2.4 Licensing Information Although the component CD-ROM in your kit contains many Oracle components, you may use only those components for which you have purchased licenses. Those components that require separately purchasable licenses are identified in their descriptions in Appendix A. Oracle Support Services does not provide support for components for which licenses have not been purchased. See Also: Appendix A, "Individual Components Available for Installation" for a list of individual components installed with each installation type See Also: ■ Section 1.2.5, "Oracle9i Database Options" ■ Appendix A, "Individual Components Available for Installation"
- 31. Documentation Library Overview Introducing Oracle9i for Windows NT 1-7 1.2.5 Oracle9i Database Options The following products require a separate license: ■ Oracle Advanced Security ■ Oracle Change Management Pack ■ Oracle Data Mining ■ Oracle Diagnostics Pack ■ Oracle Label Security ■ Oracle Management Pack for SAP R/3 ■ Oracle Management Pack for Oracle Applications ■ Oracle OLAP Services ■ Oracle Partitioning ■ Oracle Real Application Clusters ■ Oracle Spatial ■ Oracle Tuning Pack 1.3 Documentation Library Overview Your Oracle documentation set is provided in both HTML and PDF formats on two CD-ROMs in your CD Pack that are labeled as follows: ■ Oracle9i Online Documentation Library CD-ROM for Windows ■ Oracle9i Online Documentation Library CD-ROM for Windows - Installation CD Use the first CD-ROM to browse the library from the CD-ROM or copy files directly to a local system. Use the second CD-ROM to install the documentation library with Oracle Universal Installer. The contents of the library are the same on both CDs. The library includes a Web-based search tool that enables you to search for information about a particular product, parameter, file name, procedure, error message, or other area of interest. The search tool also makes it possible to construct a "virtual book" drawn from the complete documentation library, but consisting of topics and procedures relevant for your needs. The library also includes a comprehensive Master Index, as well as lists of SQL and PL/SQL keywords, initialization parameters, catalog views, and data dictionary views. Instructions for installing the library and viewing its contents are in three README files at the root level of the documentation CD-ROMs: ■ README.htm ■ README.pdf ■ README.txt The contents of the three files are identical; only the format differs. See Also: ■ Global License Terms for additional licensing information ■ Appendix A.4, "Component Descriptions"
- 32. What Documentation Do I Read First? 1-8 Oracle9i Database Installation Guide The following manuals are not included on the Oracle9i Online Documentation Library for Windows CD-ROM: ■ This installation guide and Oracle9i Database Release Notes for Windows To access these documents before installation, open start_here.htm in the doc directory on the first component CD-ROM. To access these documents after installation, choose Start > Programs > Oracle - HOME_NAME > Release Documentation or open start_here.htm in the ORACLE_BASEORACLE_HOMEdoc directory on your hard drive. ■ Oracle Migration Workbench documentation The latest version can be viewed at: http://otn.oracle.com/ ■ Oracle Fail Safe and Oracle Real Application Clusters Guard documentation These documents are on the Oracle Fail Safe and Oracle Real Application Clusters Guard product CD-ROM, shipping in a subsequent CD pack. ■ Oracle Migration Workbench ■ After installation, Oracle Migration Workbench documentation is available in: ORACLE_BASEORACLE_HOMEOmwbDocs ■ Oracle Transparent Gateway ■ After installation, Oracle Transparent Gateway documentation is available in: ORACLE_BASEORACLE_HOMEtg4msqldoc ORACLE_BASEORACLE_HOMEtg4sybsdoc ORACLE_BASEORACLE_HOMEtg4teradoc ■ Oracle Data Mining Oracle9i Data Mining Administrator's Guide and Oracle9i Data Mining Concepts ship on the Oracle Data Mining CD-ROM in your CD pack. 1.4 What Documentation Do I Read First? The README file at the root level of the documentation CD-ROM includes a description of your Oracle documentation set. This README provides a list of: ■ Available online documentation formats ■ Documentation available on your Oracle9i Online Documentation Library for Windows CD-ROM Oracle Corporation recommends that you read or review the documentation listed in Table 1–2 before you install Oracle components. This helps ensure that you make the correct decisions during Oracle component installation. Table 1–2 What Documentation Do I Read First? For Information About... See... Important last-minute installation and configuration information Oracle9i Database release notes for Windows (click start_ here.htm in the doc directory on the component CD-ROM.) Note: After installation, view README files for additional components in the ORACLE_BASEORACLE_ HOMErelnotes directory.
- 33. What Documentation Do I Read First? Introducing Oracle9i for Windows NT 1-9 How to obtain customer support Oracle Customer Support Guide Basic database concepts and administration ■ Oracle9i Database Concepts ■ Oracle9i Database Administrator's Guide ■ Oracle9i Database Administrator's Guide for Windows Oracle Enterprise Manager concepts and administration ■ Oracle Enterprise Manager Concepts Guide ■ Oracle Enterprise Manager Administrator's Guide ■ Oracle Enterprise Manager Configuration Guide Networking concepts and administration Oracle9i Net Services Administrator's Guide Creating a correctly configured Oracle9i database from the start ■ Oracle9i Database Administrator's Guide for Windows ■ Oracle9i Database Administrator's Guide ■ Oracle9i Database Performance Guide and Reference Noninteractive installation using response files Appendix D.1, "About Oracle Components in Noninteractive Mode" Upgrading or migrating an Oracle database from a previous release ■ Section 2.5, "Migration and Upgrade Requirements" ■ Oracle9i Database Migration Note: Oracle Data Migration Assistant automatically prompts you during installation to migrate a pre-9.0 database detected on your hard drive. Do not use Oracle Data Migration Assistant to upgrade or migrate a cluster database. Upgrading an Oracle9i database configured for use with Oracle Internet Directory ■ Oracle Internet Directory Administrator's Guide ■ Section 2.5, "Migration and Upgrade Requirements" ■ Section 4.4.3.2, "Oracle Internet Directory Installation" Installing Oracle components in multiple homes on a computer ■ Section 1.2.1, "Using Optimal Flexible Architecture" ■ "Multiple Oracle Homes and Optimal Flexible Architecture" of Oracle9i Database Getting Starting for Windows Installing all Oracle components available on the CD-ROM Chapter 4, "Installing Oracle Components" Table 1–2 (Cont.) What Documentation Do I Read First? For Information About... See...
- 34. Getting Started with Installation 1-10 Oracle9i Database Installation Guide 1.5 Getting Started with Installation You are now ready to begin the installation process. To start quickly, follow these chapters in the order listed: To... See... Find out about installation requirements for: ■ Each installation type ■ Migrating an Oracle database ■ Individual components ■ Single Oracle home components ■ Oracle Enterprise Manager components ■ Networking protocols and vendors Chapter 2, "Preinstallation Requirements" Select a method for creating your Oracle9i database and configuring your Oracle Net client/server environment Chapter 3, "Selecting Database Creation and Oracle Net Services Configuration Methods" Perform preinstallation tasks for Oracle Real Application Clusters clustered databases Appendix B, "Oracle Real Application Clusters Preinstallation Tasks" Install and deinstall Oracle components Chapter 4, "Installing Oracle Components" Install Oracle components noninteractively Appendix D.1, "About Oracle Components in Noninteractive Mode"
- 35. 2 Preinstallation Requirements 2-1 2Preinstallation Requirements This chapter describes installation requirements for an Oracle9i installation. This chapter contains these topics: ■ Section 2.1, "Single Oracle Home Components" ■ Section 2.2, "Top-Level Component System Requirements" ■ Section 2.3, "Mandatory Individual Component Requirements" ■ Section 2.4, "Oracle Enterprise Manager Requirements" ■ Section 2.5, "Migration and Upgrade Requirements" ■ Section 2.6, "Networking Protocol Vendor Requirements" 2.1 Single Oracle Home Components Most Oracle components can be installed multiple times on the same computer. However, the following components can only be installed once for each computer: ■ Oracle Performance Monitor for Windows NT ■ Oracle Objects for OLE ■ Oracle Provider for OLE DB If you attempt to install these components a second time, Oracle Universal Installer detects that these products are already installed in another Oracle home and automatically removes them from the installation process without prompting you. The following information is logged to the installActions.log file in the c:ProgramFilesOracleInventorylogs directory. #product_name is a single oracle home product. It is already installed in currently_installed_location. If you are performing an installation and notice that one or more single Oracle home components are not available for installation during the current session, check to see if any of these components or any previous versions of these components are installed in another Oracle home. If you want to install these in the currently selected Oracle home, then first deinstall the conflicting versions. Note: All Oracle7 components and all Oracle8 release 8.0.3 components are non-multiple Oracle home products. See Also: Section 1.2.1, "Using Optimal Flexible Architecture"
- 36. Top-Level Component System Requirements 2-2 Oracle9i Database Installation Guide 2.2 Top-Level Component System Requirements The following sections list the system requirements for each top-level component. Each top-level component contains several installation types, each of which contain a series of individual components. Some individual components also have requirements that must be satisfied before installation. Those requirements are described in Section 2.3 and Section 2.4. ■ Section 2.2.1, "System Requirements for FAT and NTFS File Systems" ■ Section 2.2.2, "Oracle9i Database System Requirements" ■ Section 2.2.3, "Oracle9i Client System Requirements" ■ Section 2.2.4, "Oracle9i Management and Integration System Requirements" ■ Section 2.2.5, "Unsupported Components and Features on Windows Terminal Servers" ■ Section 2.2.6, "Component Certification" 2.2.1 System Requirements for FAT and NTFS File Systems This chapter lists system requirements for both the File Allocation Table (FAT) and NT File System (NTFS) file systems. Because of the difference in space allocation on both file systems, the hard disk requirements vary. Oracle Corporation recommends installing on NTFS for Windows NT and Windows 2000, or FAT32 for Windows 98. See Also: Appendix A, "Individual Components Available for Installation" for the installation types under which these components are installed Note: The hard disk requirements for each Oracle9i top-level component include 25 MB required to install Java Runtime Environment (JRE) and Oracle Universal Installer on the partition where the operating system is installed. If sufficient space is not detected, installation fails and an error message appears. See Also: Section 6.1, "About NTFS File System and Windows NT Registry Permissions" Note: You must review the FAT and NTFS system requirements listed in this section to determine if you have enough hard disk space for installation. These values are more accurate than the hard disk values reported by the Oracle Universal Installer Installation Types window and Summary window. These windows do not include: ■ Accurate FAT disk space values ■ The space required to create a database ■ The size of compressed files that are expanded on the hard drive
- 37. Top-Level Component System Requirements Preinstallation Requirements 2-3 2.2.2 Oracle9i Database System Requirements The Oracle9i Database top-level component consists of the following installation types: ■ Enterprise Edition ■ Standard Edition ■ Personal Edition ■ Custom The system requirements for Enterprise Edition, Standard Edition, and Personal Edition are described in Table 2–1. The requirements for Custom depend upon the components selected for installation. Table 2–1 Oracle9i Database System Requirements Requirement Enterprise Edition Standard Edition Personal Edition Operating System Windows NT 4.01 , Windows 20002 , and Windows Terminal Server3 1 Windows NT includes: Windows NT Workstation 4.0, Windows NT Server 4.0, Windows NT Server Enterprise Edition 4.0, and Windows NT 4.0 Server, Terminal Server Edition. 2 Windows 2000 includes: Windows 2000 Professional, Windows 2000 Server, Windows 2000 Advanced Server, and Windows 2000 Datacenter. 3 Oracle supports Terminal Services on Windows 2000 Server, Windows 2000 Advanced Server, and Windows 2000 Datacenter. See "Unsupported Components and Features on Windows Terminal Servers" for additional information. Windows NT 4.01 , Windows 20002 , and Windows Terminal Server3 Windows NT 4.01 , Windows 20002 , and Windows Terminal Server3 Windows NT 4.0 Service Pack Certified with 5.0 or higher Certified with 5.0 or higher Certified with 5.0 or higher Windows 2000 Service Pack Not required; certified with 1 or higher Not required; certified with 1 or higher Not required; certified with 1 or higher Minimal Processor4 Pentium 166 or Pentium 200 Pentium 166 or Pentium 200 Pentium 166 or Pentium 200 Recommended Processor Pentium 233 or Pentium 266 Pentium 233 or Pentium 266 Pentium 233 or Pentium 266 RAM5 128 MB (256 MB recommended) 128 MB (256 MB recommended) 128 MB (256 MB recommended) FAT file system: ■ Oracle home drive 4.5 GB 4.5 GB 4.0 GB ■ System drive 140 MB 140 MB 140 MB NTFS file system: ■ Oracle home drive 2.75 GB 2.7 GB 2.75 GB ■ System drive 140 MB 140 MB 140 MB Temp Space6 400 MB 400 MB 400 MB Virtual Memory7 Initial Size 200 MB Maximum Size 400 MB Initial Size 200 MB Maximum Size 400 MB Initial Size 200 MB Maximum Size 400 MB Video 256 color 256 color 256 color
- 38. Top-Level Component System Requirements 2-4 Oracle9i Database Installation Guide 2.2.3 Oracle9i Client System Requirements The Oracle9i Client top-level component consists of the following installation types: ■ Administrator ■ Runtime ■ Custom Table 2–2 describes the system requirements for Administrator and Runtime. The requirements for Custom depend upon the components selected for installation. 4 If you run the Oracle Intelligent Agent, Oracle Management Server (includes Oracle HTTP Server), and Oracle Enterprise Manager Client on the same computer, the minimal processor requirement is a Pentium III 866, the recommended processor requirement is a Pentium III 1 GHz, the minimal RAM requirement is 128 MB, and the recommended RAM requirement is 256 MB. 5 You cannot run Oracle Universal Installer and Oracle Data Migration Assistant or Oracle Database Configuration Assistant during the same installation session on a 128 MB computer. To run these assistants, answer No if prompted to migrate or create a database. After installation is complete and Oracle Universal Installer has exited, run these assistants. 6 If your default temp space is less than 400 MB, then update the TEMP user environment variable to a location with the required amount of space. You must reboot your computer for this change to take effect. 7 Depending on how many applications are running on the computer, you may need to further increase the paging file size or reduce the size of the System Global Area (SGA) if you run out of virtual memory. Note that if temporary files and the paging file are both stored on the same physical drive, a situation can occur where the space requirements for one can limit the size of another. If your system has limited free space, then first install the Oracle9i software. After the installation is finished, create a database with the Oracle Database Configuration Assistant. See Also: ■ Section 2.2.5, "Unsupported Components and Features on Windows Terminal Servers" ■ Section 4.3, "Installations Meeting Minimal Memory Requirements" ■ Section A.1, "Oracle9i Database Components" for a list of individual components installed with each installation type Table 2–2 Oracle9i Client System Requirements Requirement Administrator1 Runtime Operating System Windows 98, Windows NT 4.02 , Windows 20003 , and Windows Terminal Server4 Windows 98, Windows NT 4.02 , Windows 20003 , and Windows Terminal Server4 Windows NT 4.0 Service Pack Certified with 5.0 or higher Certified with 5.0 or higher Windows 2000 Service Pack Not required; certified with 1 or higher Not required; certified with 1 or higher Minimal Processor Pentium 166 Pentium 166 Recommended Processor Pentium I 266 Pentium I 266 RAM 128 MB (minimal) 256 (recommended) 128 MB (minimal) 256 (recommended) FAT file system: ■ Oracle home drive 1 GB 800 MB ■ System drive 51 MB 51 MB
- 39. Top-Level Component System Requirements Preinstallation Requirements 2-5 2.2.4 Oracle9i Management and Integration System Requirements The Oracle9i Management and Integration top-level component consists of the following installation types: ■ Oracle Management Server ■ Oracle Internet Directory ■ Oracle Integration Server ■ Custom The system requirements for Oracle Management Server, Oracle Internet Directory, and Oracle Integration Server are described in Table 2–3. The requirements for Custom depend upon the components selected for installation. NTFS file system: ■ Oracle home drive 650 MB 486 MB ■ System drive 51 MB 51 MB Web browser (if using Oracle Enterprise Manager Web Site) ■ Netscape Navigator 4.7 or higher ■ Microsoft Internet Explorer 5.0 or higher None 1 The processor and RAM requirements identified are applicable to an Enterprise Manager Client installation and to a thin Web-based Enterprise Manager Client. 2 Windows NT includes: Windows NT Workstation 4.0, Windows NT Server 4.0, Windows NT Server Enterprise Edition 4.0, and Windows NT 4.0 Server, Terminal Server Edition. 3 Windows 2000 includes: Windows 2000 Professional, Windows 2000 Server, Windows 2000 Advanced Server, and Windows 2000 Datacenter. 4 Oracle supports Terminal Services on Windows 2000 Server, Windows 2000 Advanced Server, and Windows 2000 Datacenter. See Section 2.2.5 for additional information. See Also: ■ Section 2.2.5, "Unsupported Components and Features on Windows Terminal Servers" ■ Section A.2, "Oracle9i Client Components" for a list of individual components installed with each installation type Table 2–3 Oracle9i Management and Integration System Requirements Requirement Oracle Management Server Oracle Internet Directory Oracle Integration Server Operating System Windows NT 4.01 , Windows 20002 , and Windows Terminal Server3 Windows NT 4.01 , Windows 20002 , and Windows Terminal Server3 Windows NT 4.01 , Windows 20002 , and Windows Terminal Server3 Windows NT 4.0 Service Pack Certified with 5.0 or higher Certified with 5.0 or higher Certified with 5.0 or higher Windows 2000 Service Pack Not required; certified with 1 or higher Not required; certified with 1 or higher Not required; certified with 1 or higher Table 2–2 (Cont.) Oracle9i Client System Requirements Requirement Administrator1 Runtime
- 40. Top-Level Component System Requirements 2-6 Oracle9i Database Installation Guide Minimal Processor Pentium 266 Pentium 166 Pentium 166 or Pentium 200 Processor Pentium II 300 Pentium II 300 Pentium 233 or Pentium 266 UNIX Emulation Utility None Cygwin 1.0. Visit: http://www.cygwi n.com/ or MKS Toolkit 5.1 or 6.0. Visit: http://www.mksso ftware.com/produ cts/ None RAM 128 MB (minimal) 256 MB (recommended) 128 MB (minimal) 256 MB (recommended) 128 MB (minimal) 256 MB (recommended) FAT file system: ■ Oracle home drive 1 GB 5 GB 5 GB ■ System drive 18.8 MB 34 MB 34 MB NTFS file system: ■ Oracle home drive 750 MB 3 GB (includes database; 300 MB without database) 3 GB (includes database; 300 MB without database) ■ System drive 40 MB 34 MB 40 MB Temp Space4 400 MB 400 MB 400 MB Virtual Memory5 Initial Size 200 MB Maximum Size 400 MB Initial Size 200 MB Maximum Size 400 MB Initial Size 200 MB Maximum Size 400 MB 1 Windows NT includes: Windows NT Workstation 4.0, Windows NT Server 4.0, Windows NT Server Enterprise Edition 4.0, and Windows NT 4.0 Server, Terminal Server Edition. 2 Windows 2000 includes: Windows 2000 Professional, Windows 2000 Server, Windows 2000 Advanced Server, and Windows 2000 Datacenter. 3 Oracle supports Terminal Services on Windows 2000 Server, Windows 2000 Advanced Server, and Windows 2000 Datacenter. See Section 2.2.5 for additional information. 4 If your default temp space is less than 400 MB, then update the TEMP user environment variable to a location with the required amount of space. You must reboot your computer for this change to take effect. 5 Depending on how many applications are running on the computer, you may need to further increase the paging file size or reduce the size of the System Global Area (SGA) if you run out of virtual memory. Note that if temporary files and the paging file are both stored on the same physical drive, a situation can occur where the space requirements for one can limit the size of another. If your system has limited free space, then first install the Oracle9i software. After the installation is finished, create a database with the Oracle Database Configuration Assistant. Table 2–3 (Cont.) Oracle9i Management and Integration System Requirements Requirement Oracle Management Server Oracle Internet Directory Oracle Integration Server
- 41. Top-Level Component System Requirements Preinstallation Requirements 2-7 2.2.5 Unsupported Components and Features on Windows Terminal Servers The following products and features are not supported on Windows Terminal Servers: ■ Installation of Oracle9i server components from a remote Terminal Services Client onto a Windows 2000 server that is running Terminal Server Service or a Windows NT 4.0 Terminal Server is unsupported. If you attempt to install Oracle9i in this manner, many database configuration tools, such as Oracle Data Migration, Oracle Database Configuration Assistant, Oracle Internet Directory Configuration Assistant, and Oracle Workflow Configuration Assistant, hang. Start all the configuration tools from the Terminal Server console and not from the Terminal Services Client. ■ Connection Manager ■ Oracle Fail Safe ■ Oracle HTTP Server powered by Apache ■ Oracle Migration Workbench ■ Oracle Names ■ Oracle Object Link Manager ■ Oracle Services for Microsoft Transaction Server ■ Server Management (SRVM) 2.2.6 Component Certification Oracle Corporation provides support information for components on various platforms, lists compatible client and database versions, and identifies patches and workaround information. Find the latest certification information at: https://metalink.oracle.com/ You must register online before using OracleMetaLink. After logging into OracleMetaLink, select Product Lifecycle from the left-hand column. See Also: ■ Section 2.2.5, "Unsupported Components and Features on Windows Terminal Servers" ■ Section A.3, "Oracle9i Management and Integration Components" for a list of individual components installed with each installation type See Also: ■ The Microsoft Web site for more information on terminal servers: http://www.microsoft.com/ ■ The OracleMetaLink Web site for the latest Terminal Server certification information: https://metalink.oracle.com/
- 42. Mandatory Individual Component Requirements 2-8 Oracle9i Database Installation Guide 2.3 Mandatory Individual Component Requirements Table 2–4 identifies mandatory individual component requirements that must be met before installation. See Appendix A, "Individual Components Available for Installation" for the installation types with which these individual components can be installed. Appropriate documentation for preinstallation procedures is also identified. This table does not include preinstallation requirements for Oracle Enterprise Manager, Oracle Real Application Clusters, or Oracle Transparent Gateways. See Also: ■ Section 2.4, "Oracle Enterprise Manager Requirements" ■ Appendix B, "Oracle Real Application Clusters Preinstallation Tasks" ■ Appendix C.1, "System Requirements for Oracle Transparent Gateways" Table 2–4 Mandatory Individual Component Requirements Component Description See Also... Oracle Advanced Security You must satisfy hardware and software requirements to use authentication support with Oracle components. In addition, using Oracle Advanced Security with Secure Socket Layer (SSL) and Public Key Infrastructure (PKI) requires preinstallation of an Lightweight Directory Access Protocol (LDAP) directory such as Oracle Internet Directory (provided on the component CD-ROMs). Oracle Advanced Security Administrator's Guide Oracle Real Application Clusters ■ Installation Perform the following tasks: 1. Install the Oracle9i operating system dependent layer or vendor-supplied operating system dependent layer, which includes your cluster software. This layer must be Oracle certified. 2. Set up raw devices before installing Oracle9i Enterprise Edition and Oracle Real Application Clusters. 3. Install Oracle Real Application Clusters only on a disk that is private to and exclusively owned by the installation system (for example, the system disk). Unless you have specific reasons to do so and understand the risks involved, do not install Oracle Real Application Clusters on a disk that can be owned or mounted by more than one system. ■ Your vendor documentation for information on operating system dependent layer installation ■ Appendix B, "Oracle Real Application Clusters Preinstallation Tasks" for raw device creation instructions Oracle Real Application Clusters (Cont.) ■ Upgrading and Migrating Review all upgrade and migration issues prior to installation. ■ Section 2.5, "Migration and Upgrade Requirements" ■ Oracle9i Database Migration
- 43. Mandatory Individual Component Requirements Preinstallation Requirements 2-9 Oracle Internet Directory ■ Migrating If you are migrating Oracle8i Database release 8.1.7 and Oracle Internet Directory release 2.1.1 to Oracle9i release 1 (9.0.1) and 3.0.1, respectively, ensure that you: ■ Stop the Oracle listener service, Oracle database service, and Oracle Internet Directory service. ■ Know the system identifier (SID), Oracle directory server (ODS) user password, and Oracle Internet Directory administrator password of the Oracle8i Database to migrate. ■ Perform a complete backup prior to migration. There is no network downtime during Oracle Internet Directory migration in a multinode replication environment. The other nodes are available while the migration of one node is in progress. In a replicated environment, Oracle Internet Directory release 3.0.1 running on one node can coexist with other nodes running Oracle Internet Directory releases 2.1.1 and 2.0.6. Review all guidelines for migrating a multinode replication network before migrating. Note: LDAP Data Interchange Format (LDIF)-based manual migration is available as an alternative to automatically migrating Oracle Internet Directory through Oracle Universal Installer. ■ Oracle Internet Directory Administrator's Guide ■ Currently installed Oracle9i Database If you have Oracle9i Database release 1 (9.0.1) installed on a computer and you now want to install Oracle Internet Directory release 3.0.1 in the same Oracle home, ensure that both the database and listener are running. ■ Chapter 4, "Installing Oracle Components" ■ No Oracle9i Database currently installed To install Oracle Internet Directory release 3.0.1, choose the Oracle Internet Directory installation type of the Oracle9i Management and Integration top level component; this creates the correct underlying Oracle9i Database as part of Oracle Internet Directory release 3.0.1 installation. ■ Chapter 4, "Installing Oracle Components" ■ Downgrading You cannot downgrade Oracle Internet Directory release 3.0.1 to 2.x. Table 2–4 (Cont.) Mandatory Individual Component Requirements Component Description See Also...
- 44. Mandatory Individual Component Requirements 2-10 Oracle9i Database Installation Guide Oracle Snap-Ins to the Microsoft Management Console Oracle9i ships several Snap-Ins for the Microsoft Management Console (MMC). The MMC is a built-in feature of Windows 2000. Windows NT requires the Windows NT 4.0 Option pack. Reapply service pack 5 after installing the Windows NT option pack. Install Internet Explorer version 5 (IE5) or later before installing Oracle Snap-Ins. If you install any Oracle Snap-Ins before installing IE5, then reinstall the Oracle Snap-Ins. The Oracle Snap-In components that have this dependency are: ■ Oracle Administration Assistant for Windows NT ■ Oracle Performance Monitor for Windows NT Note: Installing Oracle Administration Assistant for Windows NT automatically installs each Oracle Snap-in component. The following Web site to download the MMC add-on: http://www.microsoft .com/ Oracle Workflow Ensure that you have configured the required hardware and software. ■ Oracle Workflow Server Installation Notes ■ Oracle Workflow Client Installation Notes Oracle9i integration with Active Directory The user performing the Oracle9i installation must perform preinstallation requirements for integration to be successful. "Using Oracle9i Directory Server Features with Active Directory" of Oracle9i Network, Directory, and Security Guide for Windows Recovery Manager (part of Oracle Utilities) To back up to nondisk media, Recovery Manager requires a media management layer such as Legato Storage Manager (LSM) server, which is included on the CD-ROM. LSM server requires the following system configuration: ■ Minimum Processor: Intel Pentium 200 MHz ■ Recommended Processor: Intel Pentium 450 MHz or higher ■ RAM: 128 MB ■ Hard disk: 64 MB ■ Backup for Windows 98, Windows NT, and Windows 2000: Additional 5% of total backup data or 100 MB for online indexes Note: You must also meet the minimum Oracle9i Database requirements for the system configuration. For more information on these requirements, see Section 2.2.2, "Oracle9i Database System Requirements". Legato Storage Manager Administrator's Guide Table 2–4 (Cont.) Mandatory Individual Component Requirements Component Description See Also...
- 45. Oracle Enterprise Manager Requirements Preinstallation Requirements 2-11 2.4 Oracle Enterprise Manager Requirements Review the following requirements before beginning installation of Oracle Enterprise Manager components: ■ Oracle Management Server Requirements ■ Oracle Enterprise Manager Web Site Requirements ■ Oracle Enterprise Manager Paging Server Requirements 2.4.1 Oracle Management Server Requirements Oracle Management Server, the middle tier of the Oracle Enterprise Manager framework, is responsible for: ■ Authenticating Oracle Enterprise Manager administrators ■ Processing management functions ■ Providing a centralized data store of administrative information Prior to installing Oracle Management Server, determine whether you will use an existing Oracle Enterprise Manager repository or create a new Oracle Enterprise Manager repository. 2.4.1.1 Use an Existing Repository If the existing repository is release 1 (9.0.1), then no further preinstallation steps are required. If the existing repository is release 2.x, then upgrade the older repository to the current release by running Oracle Enterprise Manager Configuration Assistant after installation. 2.4.1.2 Create a New Repository If you decide to create a new release 1 (9.0.1) repository, then you must install and start a database (or select an existing, running database to which you have access) in which to create a new repository. Optionally, if the database software is detected in the Oracle home where Oracle Management Server is installed, then when the Oracle Enterprise Manager Configuration Assistant starts, you can choose to have the assistant create a new database instance and automatically create the repository in that new instance. The following database versions have been certified for the release 1 (9.0.1) repository: 9.0.1, 8.1.7, 8.1.6, and 8.0.6. See Also: Appendix A, "Individual Components Available for Installation" for the installation types under which Oracle Enterprise Manager components are installed Note: All Oracle Enterprise Manager products must be of the same release. Do not upgrade Oracle Management Server and the repository until all Oracle Enterprise Manager users have upgraded their software to Oracle9i release 1 (9.0.1). Older versions of Enterprise Manager are not supported with the new release.
- 46. Oracle Enterprise Manager Requirements 2-12 Oracle9i Database Installation Guide 2.4.2 Oracle Enterprise Manager Web Site Requirements If you want to run the Oracle Enterprise Manager Console and supported management applications from within a Web browser, then you must install Oracle Enterprise Manager Web Site. By default, Oracle Enterprise Manager Web Site bundles a preconfigured Oracle HTTP Server to act as its Web listener. However, Web-enabled Oracle Enterprise Manager also supports the following additional Web servers (although any Web server using a standard common gateway interface [CGI] can support Oracle Enterprise Manager release 1 [9.0.1]): ■ Oracle Internet Application Server release 1.0 or higher for Windows NT and Windows 2000 ■ Microsoft Internet Information Server release 4.0 or higher for Windows NT and Windows 2000 ■ Apache release 1.3.9 or higher for Windows NT and Windows 2000 2.4.3 Oracle Enterprise Manager Paging Server Requirements To send Oracle Enterprise Manager administrators page notifications of event and job status changes, optionally install the Oracle Enterprise Manager Paging Server on a Windows NT or Windows 2000 computer that contains a modem configured to dial an outside line. Note: Oracle Enterprise Manager Configuration Assistant is automatically started during the configuration phase in the Oracle9i Database Custom installation type, the Oracle Management Server installation type, and the Oracle9i Management and Integration Custom installation type. However, if you want to configure the Oracle Management Server, then this assistant must be manually started after all other installation types. After an installation, Oracle Enterprise Manager Configuration Assistant is available from Start > Oracle - HOME_NAME > Configuration and Migration Tools > Enterprise Manager Configuration Assistant. See Also: "General Repository Guidelines" of Oracle Enterprise Manager Configuration Guide for details on repository creation, initial size of a release 1 (9.0.1) repository, and guidelines on how much it can grow Note: There are no system requirements specific to Oracle Enterprise Manager Web Site (other than requiring 820 MB of available hard disk space); only system requirements for the chosen Web server. See the appropriate Web server documentation for system requirements. See Also: Oracle Enterprise Manager Configuration Guide for more information about Oracle Enterprise Manager Web Site
- 47. Migration and Upgrade Requirements Preinstallation Requirements 2-13 2.5 Migration and Upgrade Requirements Oracle Corporation recommends installing Oracle9i release 1 (9.0.1) into a new Oracle home directory. If you must install Oracle9i release 1 (9.0.1) into an Oracle home directory that contains previously installed Oracle8i components, then use Oracle Universal Installer to remove these components before beginning a new installation. Refer to Oracle9i Database Migration before deciding to migrate or upgrade an existing database. Migration and upgrade procedures on Windows NT are covered in Oracle9i Database Migration. However, this section describes several Windows NT-specific issues to understand before following the instructions in Oracle9i Database Migration. The following sections describe specific migration requirements: ■ Section 2.5.1, "Policies for Linking and Relinking Applications" ■ Section 2.5.2, "Migrating and Upgrading Releases 7.x and 8.x" ■ Section 2.5.3, "Oracle Real Application Clusters Migration and Upgrade Requirements" 2.5.1 Policies for Linking and Relinking Applications Oracle Corporation recommends that you upgrade your client software to match the current server software. For example, if you upgrade your Oracle server to release 1 (9.0.1), then Oracle corporation recommends upgrading the client software to release 1 (9.0.1) as well. Keeping the server and client software at the same release number ensures the maximum stability for your applications. In addition, the latest Oracle client software may provide added functionality and performance enhancements that were not available with previous releases. 2.5.2 Migrating and Upgrading Releases 7.x and 8.x Before using the Migration utility or Oracle Data Migration Assistant to migrate to the latest release, an Oracle7 database must be at least release 7.3.4 and an Oracle8 database must be at least release 8.0.6. See the documentation that accompanied your previous database release for information on how to migrate to release 7.3.4 or 8.0.6. 2.5.2.1 Oracle Command Line Tools with the Migration Utility If you use the Migration utility to migrate or upgrade your Oracle database, the instructions in Oracle9i Database Migration prompt you to enter information at the command prompt of an Oracle tool. The command tool to use (SQL*DBA, Server Manager, or SQL*Plus) depends upon the database release from which you are migrating or upgrading. Note: This guide does not describe Oracle9i Personal Edition installation and migration procedures on Windows 98. See the documentation included with your Oracle9i Personal Edition for Windows 98 software documentation for installation and migration instructions. See Also: Oracle9i Database Migration for rules regarding linking and relinking applications when you perform a feature release upgrade of the client software
- 48. Migration and Upgrade Requirements 2-14 Oracle9i Database Installation Guide Table 2–5 describes the tools to use and the method for starting these tools: If you use the Migration utility to migrate or upgrade your Oracle database, the instructions in Oracle9i Database Migration also prompt you to use the ORADIM utility at the MS-DOS command prompt. The ORADIM utility creates, starts, stops, and modifies database instances on Windows NT. Table 2–6 describes the method for starting the ORADIM utility depending upon the database release from which you are migrating or upgrading: 2.5.2.2 Required Oracle7 Server SQL*Net Patch Releases When migrating from Oracle7 Server release 7.3.4 to the latest release, install the appropriate patch of SQL*Net in the 7.3.4 Oracle home before migrating with either Oracle Data Migration Assistant or the Migration utility. Migration fails if you do not install the appropriate patch of SQL*Net. This table describes the required SQL*Net patch releases. When migrating from release 7.3.4, use the terminal patchset 7.3.4.5. Obtain this patch and installation instructions from OracleMetaLink: https://metalink.oracle.com/support/ 2.5.3 Oracle Real Application Clusters Migration and Upgrade Requirements Before following the migration procedures listed in the Oracle9i Database Migration, stop any operating system dependent clusterware layer services. Table 2–5 Oracle Command Line Tools If Migrating from Oracle Release... Use... By Entering... 7.1.x SQL*DBA C:>SQLDBA71MODE=LINE 7.2.x SQL*DBA C:>SQLDBA72MODE=LINE 7.3.x Server Manager C:>SVRMGR23 8.0.x Server Manager C:>SVRMGR30 8.1.x Server Manager or SQL*Plus C:>SVRMGRL or C:>SQLPLUS Table 2–6 ORADIM Versions If Migrating from Oracle Release... Use... By Entering... 7.1.x ORADIM71 C:>ORADIM71OPTIONS 7.2.x ORADIM72 C:>ORADIM72OPTIONS 7.3.x ORADIM73 C:>ORADIM73OPTIONS 8.0.x ORADIM80 C:>ORADIM80OPTIONS 8.1.x ORADIM C:>ORADIMOPTIONS See Also: "Postinstallation Database Creation" of Oracle9i Database Administrator's Guide for Windows for more information on using the ORADIM utility
- 49. Networking Protocol Vendor Requirements Preinstallation Requirements 2-15 ■ If you are using Oracle operating system dependent layers (OSDs), then stop the OracleCMService9i and OracleObjectService services. ■ If you are using vendor OSDs, then refer to your vendor documentation. 2.6 Networking Protocol Vendor Requirements Table 2–7 lists the supported vendor for each networking protocol: Note: Oracle Data Migration Configuration Assistant does not support the upgrade or migration of cluster databases. Instead, use the Migration utility to migrate after installation as described in Oracle9i Database Migration. See Also: ■ Oracle9i Database Migration ■ Oracle9i Real Application Clusters Concepts ■ Oracle9i Real Application Clusters Installation and Configuration ■ Oracle9i Real Application Clusters Administration ■ Oracle9i Real Application Clusters Deployment and Performance Table 2–7 Supported Networking Protocol Vendors Protocol Feature Operating System Supported Vendor TCP/IP protocol Windows NT and Windows 98 Microsoft TCP/IP Named Pipes protocol Windows NT and Windows 98 Microsoft NETBEUI Host naming method Windows NT Microsoft TCP/IP Windows native authentication method Windows NT and Windows 98 Microsoft Logical Unit Type 6.2 (LU6.2) protocol Windows NT LU6.2 protocol support is obsolete in this release. Note: The VI protocol is not supported on Windows platforms for this release.
- 50. Networking Protocol Vendor Requirements 2-16 Oracle9i Database Installation Guide
- 51. 3 Selecting Database Creation and Oracle Net Services Configuration Methods 3-1 3Selecting Database Creation and Oracle Net Services Configuration Methods This chapter describes the Oracle9i database creation and Oracle Net Services client/server configuration methods available during installation. At a minimum, you must understand the creation and networking methods before performing an installation. This chapter contains these topics: ■ Section 3.1, "About Database Creation and Network Configuration Methods" ■ Section 3.2, "Types of Database Environments" ■ Section 3.3, "Selecting a Database Creation Method" ■ Section 3.4, "Configuring Your Network" 3.1 About Database Creation and Network Configuration Methods Oracle Universal Installer provides several methods for creating an Oracle9i database and configuring your Oracle Net client/server networking environment during installation. The method to select during installation depends upon: ■ Your own expertise with database creation and network configuration ■ The requirements of your database and network environment You must understand these methods before you begin installation. By reviewing the information in this chapter, you can ensure that you create and configure a database and network environment that best matches your needs from the beginning. Oracle9i Database and Oracle Net components are installed through several installation types. Review the installation types in Table 3–1 to identify how much user input is required for database creation and network configuration during installation. See the remaining sections of this chapter for specific details on what information is automatically created, and what information you must provide. See Also: ■ Glossary for definitions of terms used in this chapter ■ Oracle9i Net Services Administrator's Guide for detailed descriptions of the networking concepts in this chapter
- 52. About Database Creation and Network Configuration Methods 3-2 Oracle9i Database Installation Guide Table 3–1 Installation Type Installation Types Amount of User Input Required for Database Creation Amount of User Input Required for Oracle Net Configuration Oracle9iDatabase Enterprise Edition Minimal None Standard Edition Minimal None Personal Edition Minimal None Enterprise Edition Minimal None Custom, and select: Oracle Net Services or Oracle9i Not applicable Extensive1 1 Selecting through the Custom installation type offers several database creation choices, from a complete custom creation requiring extensive user input to a creation requiring minimal user input. See Section 3.3, "Selecting a Database Creation Method" for more information. None2 or Extensive2 Not applicable 2 Selecting through the Custom installation type prompts you to create a configuration requiring either no user input or a configuration requiring extensive user input. See Section 3.4, "Configuring Your Network" for more information. Oracle9iClient3 3 You cannot install an Oracle9i Database through the Oracle9i Client top-level component. Administrator Not applicable Minimal Runtime Not applicable Minimal Oracle9i Management and Integration Oracle Management Server Not applicable Minimal Oracle Internet Directory Minimal Minimal Oracle Integration Server Minimal Minimal Custom, and select: Oracle9i or Oracle Net Services Extensive1 Not applicable Not applicable Minimal or Extensive Oracle Internet Directory Minimal Minimal
- 53. Types of Database Environments Selecting Database Creation and Oracle Net Services Configuration Methods 3-3 3.2 Types of Database Environments Oracle Universal Installer enables you to create an Oracle9i Database that operates in one of the environments shown in Table 3–2. Identify the environment appropriate for your Oracle9i Database: Note: ■ If you select the Oracle Internet Directory installation type described in Table 3–1, then an Oracle9i Database will be automatically installed if one is not currently installed in the same Oracle home. Use this database for storing only Oracle Internet Directory information. ■ If you select the Oracle Integration Server installation type and no Oracle9i Database is currently installed in the current Oracle home, then the same database that you receive with the Enterprise Edition installation type is automatically installed. Table 3–2 Database Configuration Types Environment Description General Purpose Users perform a variety of database tasks, ranging from simple transactions to complex queries. Select this database environment for general purpose usage. Transaction Processing Users perform large numbers of concurrent transactions, where each transaction is a relatively simple operation processing a small amount of data. Transactions consist of reading, writing, and deleting data in database tables. Billing databases, such as those commonly found on internet commerce sites, are the most common example of this database configuration. These are also known as online transaction processing (OLTP) databases. Data Warehouse Users perform numerous complex queries that process large volumes of data. Response time, accuracy, and availability are key issues. These queries (typically read-only) range from a simple fetch of a few records to complex queries that sort thousands of records from many different tables. Data warehousing environments are also known as Decision Support System (DSS) environments. Customized Allows you to create a customized database configuration or a custom installation of Oracle components that meets specialized requirements. Select this configuration method only if you are prepared to provide detailed component and database environment information. Choosing this option requires a longer installation session than choosing a preconfigured database. Software Only Allows you to install Oracle components without creating a database. Select this method only if you are prepared to provide extensive database configuration information when you create a database. Oracle Corporation recommends that you install at least one seed database to serve as a template for database configuration.
- 54. Selecting a Database Creation Method 3-4 Oracle9i Database Installation Guide 3.3 Selecting a Database Creation Method Oracle Database Configuration Assistant is a tool that enables you to create an Oracle9i Database for Transaction Processing, Data Warehouse, or General Purpose environments. Oracle Database Configuration Assistant is automatically started by Oracle Universal Installer when you select to create an Oracle9i Database as part of the installation process or can be manually run as a standalone tool after installation. When you run Oracle Universal Installer and select Oracle9i Database in the Available Products window, the Installation Types window appears and presents you with four installation types. Each installation type enables you to create the database configuration types listed in Table 3–2. The database configurations types (General Purpose, Transaction Processing, Data Warehouse, Customized, and Software Only) created with the Enterprise Edition, Standard Edition, Personal Edition, and Custom installation types and the amount of user input required are described in Table 3–3, Table 3–4, and Table 3–5. Review these selections and identify the database that best matches your database requirements and database creation expertise: See Also: Oracle Database Configuration Assistant Online Help for information on the initialization file parameters affected by your database selection See Also: ■ "Postinstallation Database Creation" of Oracle9i Database Administrator's Guide for Windows for information on running Oracle Database Configuration Assistant in standalone mode ■ "Database Tools Overview" of Oracle9i Database Getting Starting for Windows for instructions on starting this tool in standalone mode Table 3–3 Database Configuration--Enterprise Edition and Personal Edition If You Perform These Steps... Then... Select the Enterprise Edition or Personal Edition installation type. Oracle Database Configuration Assistant automatically starts at the end of installation and configures the database according to the selected database configuration type: ■ Default initialization parameters ■ Automatic installation and configuration of various database options, such as Oracle JVM, Oracle Spatial, and Oracle interMedia components1 ■ Advanced replication capabilities ■ Database configured in dedicated server mode2 ■ Archiving mode set to NOARCHIVELOG No user input is required other than the global database name and SID you are prompted to enter prior to Oracle Database Configuration Assistant startup. Note: Personal Edition does not offer Oracle Real Application Clusters. 1 Oracle Database Configuration Assistant configures only components installed through Oracle Universal Installer. 2 See "Postinstallation Database Creation" of Oracle9i Database Administrator's Guide for Windows for descriptions of dedicated server mode and shared server mode.
- 55. Configuring Your Network Selecting Database Creation and Oracle Net Services Configuration Methods 3-5 3.4 Configuring Your Network Oracle Net Configuration Assistant is a tool that enables you to configure your network environment to enable Oracle clients to connect to an Oracle9i database. Oracle Net Configuration Assistant can be automatically started from Oracle Universal Installer through most installation types or manually started as a standalone tool. Note: The Oracle9i database created through the Enterprise Edition installation type is also created if you select the Oracle Integration Server or Oracle Internet Directory installation type and no Oracle9i database is currently installed in the specified Oracle home. Table 3–4 Database Configuration--Standard Edition If You Perform These Steps... Then... Select the Standard Edition installation type. Oracle Database Configuration Assistant automatically starts at the end of installation and configures the database according to the selected database configuration type. The one difference is that the following components are not part of the Standard Edition installation type: ■ Oracle Advanced Security ■ Oracle COM Automation Feature ■ Oracle OLAP Services ■ Oracle Partitioning ■ Oracle Real Application Clusters ■ Oracle Spatial If you want to use these components with your Oracle9i database, you must separately install them through the Oracle9i Database Custom installation type and configure them manually with Oracle Database Configuration Assistant or by running scripts. Table 3–5 Database Configuration--Custom If You Perform These Steps... Then... 1. Select the Custom installation type. 2. Select Oracle9i and additional products in the Available Product Components window. 3. Select Yes when prompted to create a starter database. Oracle Database Configuration Assistant prompts you to select a database environment: Transaction Processing Data Warehouse General Purpose Oracle Database Configuration Assistant guides you in the creation of a database customized to match the environment (Transaction Processing, Data Warehouse, or General Purpose) and configuration mode (dedicated server or shared server) you select. Database options such as Oracle JVM, Oracle Spatial, advanced replication, and Oracle interMedia (if installed) are automatically configured. Select this option only if you are experienced with advanced database creation procedures, such as customizing: ■ Data, control, and undo log file settings ■ Tablespace and extent sizes ■ Database memory parameters ■ Archiving modes, formats, and destinations ■ Trace file destinations ■ Character set values
- 56. Configuring Your Network 3-6 Oracle9i Database Installation Guide Depending on the installation type selected, Oracle Net Configuration Assistant configures your network in one of the following ways: ■ Automatically configures your network for standard database connection methods with minimal user input ■ Creates a customized network by prompting for extensive input Configuration consists of creating and modifying a series of network files located in the ORACLE_BASEORACLE_HOMEnetworkadmin directory. 3.4.1 Configuring the Server Network The type of network configuration created with the server installation types and the amount of user input required are described in subsequent sections. Review Table 3–6 and Table 3–7 and identify the network configuration that best matches your requirements and network configuration expertise: See Also: ■ Oracle9i Net Services Administrator's Guide or the Oracle Net Configuration Assistant online help for information on running Oracle Net Configuration Assistant in standalone mode ■ "Database Tools Overview" of Oracle9i Database Getting Starting for Windows for instructions on starting Oracle Net Configuration Assistant in standalone mode
- 57. Configuring Your Network Selecting Database Creation and Oracle Net Services Configuration Methods 3-7 Table 3–6 Net Services Configuration--Enterprise Edition, Standard Edition, or Personal Edition If You Perform These Steps... Then... 1. Select Oracle9i Database. 2. Select the Enterprise Edition, Standard Edition, or Personal Edition installation type. Oracle Net Configuration Assistant automatically creates your Oracle Net server environment by configuring information in the following files: ■ listener.ora file Configures a listener named LISTENER with protocol addresses for both the Oracle9i Database (using your operating system's preferred protocol, which is typically TCP/IP on port 1521) and for external procedures (using the IPC protocol) Configures service information for external procedures ■ sqlnet.ora file Configures the database to accept operating system authenticated connections (OPS$) Configures the server's domain as the default domain (the TCP/IP domain in which your computer is located). This domain is automatically appended to any unqualified net service name Configures the naming methods the server uses to resolve a net service name to a connect descriptor ■ tnsnames.ora file Creates a net service name in the tnsnames.ora file to use for external procedures Note: You cannot configure access to a lightweight directory access protocol (LDAP)-compliant directory server through the Enterprise Edition, Standard Edition, and Personal Edition installation types. Directory server configuration is available only through the Custom installation type. Oracle Database Configuration Assistant automatically configures additional Oracle Net server information in the following files during successful creation of the Oracle9i Database: ■ listener.ora file Configures service information for the Oracle9i database ■ tnsnames.ora Configures one or more net service names in the tnsnames.ora file for the database to connect back to itself Note: Oracle Database Configuration Assistant configures additional information for Oracle Real Application Clusters installations. See Oracle9i Real Application Clusters Installation and Configuration for more information.
- 58. Configuring Your Network 3-8 Oracle9i Database Installation Guide 3.4.2 Configuring the Client Network The type of network configurations created with the client installation types and the amount of user input required are described in the following tables. Review Table 3–8 Table 3–7 Net Services Configuration-Custom Database If You Perform These Installation Types... Then... 1. Select Oracle9i Database. 2. Select Custom. 3. Select Oracle Net Services. Oracle Net Configuration Assistant first prompts you to select a naming method to a connect descriptor for connection to an Oracle9i database: ■ Complete directory server usage configuration. This requires that you enter a directory server type and location. Also specify the directory location that contains the Oracle Context. You are prompted for this information if you have never configured the Oracle home directory service usage. ■ Create listeners to use for database connections ■ Select the naming method to use when connecting to the local database. By default, the local naming method is selected. In most circumstances, Oracle Corporation recommends this default. You also have the option to use one of the following naming methods: local naming, directory naming, Oracle Names, host naming, or external naming. Oracle Net Configuration Assistant then automatically creates your Oracle Net server environment by configuring information in the following files: ■ listener.ora file Configures a listener with a name and protocol address that you choose. In addition, a protocol address and service information for external procedures are configured. ■ sqlnet.ora file Configures the database to accept operating system authenticated connections (OPS$) Configures the server's domain as the default domain (the TCP/IP domain in which your computer is located). This domain is automatically appended to any unqualified net service name. Configures the naming methods the server uses to resolve a name to a connect descriptor ■ tnsnames.ora and listener.ora files Creates a net service name entry for external procedure connections Oracle Database Configuration Assistant automatically configures additional Oracle Net server information in the following file during successful creation of the Oracle9i database: ■ listener.ora file Configures service information for the Oracle9i database ■ tnsnames.ora Configures one or more net service names in the tnsnames.ora file for the database to connect back to itself
- 59. Configuring Your Network Selecting Database Creation and Oracle Net Services Configuration Methods 3-9 and Table 3–9 and identify the network configuration that best matches your requirements and network configuration expertise: Table 3–8 Net Services Configuration--Administrator or Runtime If You Perform These Steps... Then... 1. Select Oracle9i Client. 2. Select Administrator or Runtime. Oracle Net Configuration Assistant selects the local naming method or directory naming method based on your existing directory usage configuration. Oracle Net Configuration Assistant then automatically creates your client environment by configuring information in the following files: ■ sqlnet.ora file Configures the client's domain as the default domain (the TCP/IP domain in which your computer is located). This domain is automatically appended to any unqualified net service name given in the connect string. Configures the naming methods the client uses to resolve a name to a connect descriptor ■ tnsnames.ora file Configures a net service name, if the local naming method was selected above
- 60. Configuring Your Network 3-10 Oracle9i Database Installation Guide Table 3–9 Net Services Configuration--Custom Client If You Perform These Steps... Then... 1. Select Oracle9i Client. 2. Select Custom. 3. Select Oracle Net Services. Oracle Net Configuration Assistant first prompts you to select a naming method to a connect descriptor for connection to an Oracle9i database: ■ Perform Typical configuration. This configuration method selects the local naming or directory naming method based on your existing directory usage configuration. ■ Or select the local naming or directory naming method to use for accessing the databases Depending on your selection, you are prompted for additional information. For the local naming method, you are prompted to enter a net service name, a database service name, and a networking protocol to use. By default, the database service name is its global database name. Oracle Net Configuration Assistant then automatically creates your Oracle Net client environment by configuring information in the following files: ■ sqlnet.ora file Configures the client to request operating system authenticated connections (OPS$) Configures the client's domain as the default domain (the TCP/IP domain in which your computer is located). This domain is automatically appended to any unqualified name. Configures the naming methods the client uses to resolve a name to a connect descriptor ■ tnsnames.ora file Configures a net service name, if the local naming method was selected above
- 61. 4 Installing Oracle Components 4-1 4Installing Oracle Components This chapter contains these topics: ■ Section 4.1, "Installation Differences Between Windows NT and UNIX" ■ Section 4.2, "Preinstallation Tasks" ■ Section 4.3, "Installations Meeting Minimal Memory Requirements" ■ Section 4.4, "Installing Oracle Components" ■ Section 4.5, "Deinstalling Oracle Components and Services" 4.1 Installation Differences Between Windows NT and UNIX Database administrators experienced with installing Oracle components in UNIX environments must note that many manual setup tasks required on UNIX are not required on Windows NT. Table 4–1 lists the key differences between UNIX and Windows installation. See Also: ■ Section 1.2.1, "Using Optimal Flexible Architecture" ■ Section 1.2.2.1, "Oracle Universal Installer Restrictions" ■ Section 1.2.2.2, "Using the Keyboard to Navigate Oracle Universal Installer" ■ Appendix D, "Advanced Installation Topics" for information on such topics as using response files, and installing and using Oracle components in different languages. ■ The README file on the documentation CD-ROM for information on installing and viewing your Oracle9i Online Documentation CD-ROM for Windows Table 4–1 Key Differences between UNIX and Windows Installations The... On UNIX Platforms... On Windows Platforms... Environment variables, such as PATH, ORACLE_BASE, ORACLE_HOME, and ORACLE_SID Must be set manually Are set in the registry by Oracle Universal Installer DBA account for database administrators Must be created manually Is created by Oracle Universal Installer Account for running Oracle Universal Installer Must be created manually Is not required
- 62. Preinstallation Tasks 4-2 Oracle9i Database Installation Guide 4.2 Preinstallation Tasks Perform the following tasks before installing Oracle components. To perform preinstallation tasks: 1. Read the appropriate online documentation described in Section 1.4, "What Documentation Do I Read First?" before you begin installation. This is particularly important if you are upgrading or migrating an existing Oracle database, or want to correctly configure your Oracle9i database from the start. 2. Review and satisfy applicable system and component requirements in Chapter 2, "Preinstallation Requirements" before you begin installation. Also, refer to Section 4.3 if your system only meets the minimal memory requirements. 3. Start your operating system. 4. Log on as a member of the Administrators group to the computer on which to install Oracle components. 5. Back up any databases to migrate or upgrade. Review Section 2.5, "Migration and Upgrade Requirements". 6. If applicable, install and test your network hardware and software. Optionally, review Appendix B, "Oracle Real Application Clusters Preinstallation Tasks" if installing Oracle Real Application Clusters. 7. Stop all Oracle services (if any are running) for the Oracle home into which you want to install Oracle components: a. On Windows NT, choose Start > Settings > Control Panel > Services. On Windows 2000, choose Start > Programs > Administrative Tools > Services. b. If any Oracle services (their names begin with Oracle) exist and have the status Started, select the service and choose Stop on Windows NT, or choose Action > Stop on Windows 2000. In particular, ensure that the Oracle listener service (named OracleHOME_NAMETNSListener for release 8.1 databases, OracleTNSListener80 for release 8.0 databases, or OracleTNSListener for release 7.3 databases) is stopped. c. Choose Close to exit the Services window. 8. Continue to Section 4.4. Account solely dedicated to installing and upgrading Oracle components Must be created manually Is not required See Also: "Oracle9i Windows/UNIX Differences" of Oracle9i Database Getting Starting for Windows Note: The ORACLE_HOME environment variable is automatically set in the registry. Setting this variable is not necessary or recommended and prevents multiple Oracle home environments from functioning properly. Table 4–1 (Cont.) Key Differences between UNIX and Windows Installations The... On UNIX Platforms... On Windows Platforms...
- 63. Installing Oracle Components Installing Oracle Components 4-3 4.3 Installations Meeting Minimal Memory Requirements On computer systems that meet the minimum memory and virtual memory requirements, 128 MB and 200 MB respectively, perform the following: ■ For Oracle9i Database installations: 1. During Oracle9i Database installation, choose the Software Only database configuration method. 2. After installation, run Oracle Net Configuration Assistant. Choose Start > Programs > Oracle - HOME_NAME > Configuration and Migration Tools > Net Configuration Assistant. 3. After installation, run Oracle Database Configuration Assistant from the Start Menu. Choose Start > Programs > Oracle - HOME_NAME > Configuration and Migration Tools > Database Configuration Assistant. ■ For Oracle9i Management and Integration installations: From the Configuration Tools window, stop the following configuration assistants: ■ OiD Configuration Assistant ■ Oracle Workflow Configuration Assistant 4.4 Installing Oracle Components Follow these procedures to install Oracle9i components. See Also: ■ Section 1.2.1, "Using Optimal Flexible Architecture" ■ "Multiple Oracle Homes and Optimal Flexible Architecture" of Oracle9i Database Getting Starting for Windows for more information ■ Appendix B, "Oracle Real Application Clusters Preinstallation Tasks" See Also: ■ Section 4.4.1, "Oracle9i Database Installation Types" for specific installation instructions ■ Section 4.4.3, "Oracle9i Management and Integration Installation Types" for specific installation instructions Note: ■ Using the old Oracle Installer (Installer shipped with releases 7.x and 8.0.x) to install components into an Oracle9i release 1 (9.0.1) Oracle home directory is not supported. Likewise, you cannot install release 1 (9.0.1) components into a release 7.x, 8.0.x, or 8.1.x Oracle home. ■ The Oracle Universal Installer is capable of running a noninteractive installation of Oracle products. See Section D.1, "About Oracle Components in Noninteractive Mode" for instructions on using this feature of Oracle Universal Installer.
- 64. Installing Oracle Components 4-4 Oracle9i Database Installation Guide To install Oracle components: 1. Ensure that you have followed all preinstallation steps described in Section 4.2. 2. Insert the first component CD-ROM. The Autorun window automatically appears. If the Autorun window does not appear: a. Choose Start > Run. b. Enter the following: DRIVE_LETTER:autorunautorun.exe The Autorun window appears. 3. Choose to install Oracle9i directly from the CD-ROMs or to copy the contents of each CD-ROM and install from your hard drive. Table 4–2 lists the procedures for each installation method. 4. Choose Next. The File Locations window appears. Do not change the directory path in the Source field. This is the location of installation files. 5. Enter the Oracle home name and directory path in which to install Oracle components in the Destination fields. The directory path must be a mapped drive. Table 4–2 Multiple CD-ROM Installations To... Do This... Install from the CD-ROMs Choose Install/Deinstall Products from the Autorun window. The Welcome window appears. Install from your hard drive 1. Create three directories at the same level on your hard drive with the names Disk1, Disk2, and Disk3. You must use these names. For example: d:installDisk1 d:installDisk2 d:installDisk3 2. Copy the contents of component CD-ROM 1 of 3 to the directory named Disk1. 3. Copy the contents of component CD-ROM 2 of 3 to the directory named Disk2. 4. Copy the contents of component CD-ROM 3 of 3 to the directory named Disk3. 5. Run Disk1setup.exe. The Welcome widows appears. Note: ■ If you have an existing Oracle home created with a pre-9.0.x release, you must change the default installation location to a new Oracle home. ■ Universal Naming Convention (UNC) names are not supported at this time.
- 65. Installing Oracle Components Installing Oracle Components 4-5 If you are installing Oracle Real Application Clusters, then all nodes in the cluster must have the same Oracle home name. The Oracle home name can be up to 16 characters in length and must include only alphanumeric characters and underscores. Spaces are not allowed. Note that Oracle Universal Installer does not accept a number as the first character in the Name field. The default directory path is <drive with the most available space>:oracleora90. 6. Choose Next. The Available Products window appears. 7. Select the Oracle top-level component you want to install and choose Next. See Table 4–3 for the appropriate section based on the selection you made. 4.4.1 Oracle9i Database Installation Types The Installation Types window appears when selecting Oracle9i Database at step 7 of the preceding procedure. 1. Select the installation type you want to install and choose Next. To install an Oracle Transparent Gateway, select Custom. See the appropriate section based on your selection. 4.4.1.1 Enterprise Edition, Standard Edition, or Personal Edition Installation The installation windows that appear if you select Enterprise Edition, Standard Edition, or Personal Edition at step 1 (preceding step), depend upon your computer configuration and which Oracle components are currently installed. Note: If you install Oracle9i into an Oracle home directory that already contains Oracle9i release 1 (9.0.1) client software, the listener is not created. To create the listener, install Oracle9i in a different Oracle home. Table 4–3 Oracle9i Available Products If You Select... See This Section... Oracle9i Database Section 4.4.1, "Oracle9i Database Installation Types" Oracle9i Client Section 4.4.2, "Oracle9i Client Installation Types" Oracle9i Management and Integration Section 4.4.3, "Oracle9i Management and Integration Installation Types" See Also: ■ Section 1.2.3, "Oracle9i Products for Installation" ■ Appendix A, "Individual Components Available for Installation" Table 4–4 Oracle9i Database Installation Types If You Select... See This Section... Enterprise Edition, Standard Edition, or Personal Edition Section 4.4.1.1, "Enterprise Edition, Standard Edition, or Personal Edition Installation" Custom Section 4.4.1.2, "Custom Oracle9i Database Installations"
- 66. Installing Oracle Components 4-6 Oracle9i Database Installation Guide If your computer is detected to be part of a cluster, the Cluster Node Selection window appears. Select the nodes in the cluster on which to install Oracle Real Application Clusters software and choose Next. 1. Select the appropriate database configuration from Table 4–5. 2. Choose Next. If a pre-9.0 Oracle database is detected on your computer, then the Upgrading or Migrating an Existing Database window appears. Optionally, select to migrate or upgrade your database with Oracle Data Migration Assistant. Go to step 3. If no Oracle database is detected on your computer, then the Database Identification window appears and prompts you select a preconfigured database type. Go to step 4. 3. Select whether or not to upgrade or migrate your database to the latest release. See Table 4–6 for the appropriate section based on the selection you made: See Also: Section 4.3, "Installations Meeting Minimal Memory Requirements" Table 4–5 Database Configuration Environment If You Select... Then Oracle Universal Installer... General Purpose Automatically starts Oracle Database Configuration Assistant to install a preconfigured database optimized for general purpose usage. Transaction Processing Automatically starts Oracle Database Configuration Assistant to install a preconfigured database optimized for transaction processing environment. Data Warehouse Automatically starts Oracle Database Configuration Assistant to install a preconfigured database optimized for data warehousing environment. Customized Automatically starts Oracle Database Configuration Assistant to enable the creation of a customized database. This option takes longer than the preconfigured options. Software Only Installs software only and does not run any configuration tools. Manually start Oracle Database Configuration Assistant and Oracle Net Configuration Assistant after installation to install and configure your database. Go to step 9. Note: Do not upgrade an Oracle9i database configured for use with Oracle Internet Directory through this installation type. Oracle9i database and Oracle Internet Directory upgrades must be performed by following the procedures in Section 4.4.3.2, "Oracle Internet Directory Installation."
- 67. Installing Oracle Components Installing Oracle Components 4-7 4. Enter the global database name and SID in the fields provided. If you selected to configure a customized database environment, then go to step 9. This information is used when Oracle Database Configuration Assistant creates your database after installation. 5. Choose Next. The Database File Location window appears. 6. Enter the directory location for the database files. The directory location must be a mapped drive. 7. Choose Next. The Database Character Set window appears. 8. Choose the database character set from the available options. By default, the database character set is automatically chosen based on the locale setting of the operating system. 9. Choose Next. The Summary window appears. 10. Review the space requirements to ensure that you have enough disk space and choose Install. Table 4–6 Upgrading or Migrating an Existing Database Window If You... Then... Want to upgrade or migrate 1. Select the Upgrade or Migrate an Existing Database check box and the SID of the database to upgrade or migrate to the latest Oracle9i database release. 2. Choose Next. The Summary window appears. 1. Go to step 10. Do not want to upgrade or migrate 1. Do not select the Upgrade or Migrate an Existing Database check box. 2. Choose Next. The Database Identification window appears. 1. Go to step 4. Note: For Oracle Real Application Clusters, the SID you enter is automatically appended with an identifier. For example, if DB is entered, the first instance in the cluster is given a SID of DB1, and the second instance is given a SID of DB2. Note: ■ Oracle Corporation recommends installing database files and Oracle software files on separate disks. ■ Universal Naming Convention (UNC) names are not supported at this time.
- 68. Installing Oracle Components 4-8 Oracle9i Database Installation Guide 11. If you are installing from the CD-ROMs, then you are prompted to insert the subsequent disks to continue with installation. 12. Wait until the selected components are installed. The Configuration Tools window appears at the end of installation and automatically starts the assistants shown in Table 4–7 to create and configure your database and network environments: The Configuration Tools window displays the results of running these assistants. Table 4–7 Configuration Assistants—Database Installation Type This Tool... Starts... And... Oracle Net Configuration Assistant ■ In all cases except when selecting the Software Only configuration type ■ If Oracle Net services release 1 (9.0.1) is not already installed in the currently-specified Oracle home Note: Net8 release 8.1.7 or earlier installations in this Oracle home will be upgraded. Automatically configures your Oracle Net server networking software See Also: Section 3.4.1, "Configuring the Server Network" for a description of the configuration procedures performed Starting Oracle HTTP Service In all cases except when selecting the Software Only configuration type Creates and starts the HTTP listener as a standalone process for the current session in non-SSL mode on port 7777. The OracleHOME_ NAMEHTTPServer service starts after a computer reboot. Oracle Database Configuration Assistant ■ If no Oracle database is installed in the currently-specified Oracle home ■ If you did not select to migrate or upgrade a detected database when prompted at step 3 See Also: Section 5.1, "Usernames and Passwords Overview" for information on password management Automatically creates an Oracle9i release 1 (9.0.1) database See Also: Section 3.3, "Selecting a Database Creation Method" for a description of the configuration procedures performed Oracle Data Migration Assistant If you selected to migrate or upgrade a detected database when prompted at step 3 Migrates or upgrades the selected database to Oracle9i release 1 (9.0.1) Oracle Intelligent Agent If the database and Intelligent Agent are installed Automatically starts the Agent service
- 69. Installing Oracle Components Installing Oracle Components 4-9 13. Choose Next to continue. The End of Installation window appears. 14. Choose Exit to exit Oracle Universal Installer or choose Next Install to install additional components. 4.4.1.2 Custom Oracle9i Database Installations The Available Product Components window appears when you select Custom at step 1 of Section 4.4.1. The Install Status column of the Available Product Components window displays the status of all components available for installation: 1. Select the check box of each component to install. 2. Choose Next. The Component Locations window appears and enables you to select alternate locations in which to install some components. 3. Choose Next to accept the default locations. Otherwise, choose a component from the list box and change the default location. 4. If you selected any of the following components at step 1, provide appropriate responses when prompted. Note that most components install silently without prompting you for additional information. Notes: ■ Oracle Enterprise Manager Configuration Assistant does not automatically start at the end of installation to configure Oracle Management Server or create its service. You must manually start Oracle Enterprise Manager Configuration Assistant after installation in order to create a new release 1 (9.0.1) repository, edit configuration parameters, remove a release 1 (9.0.1) repository, or upgrade a 2.x repository to the current release. Select Start > Programs > Oracle - HOME_NAME > Configuration and Migration Tools > Enterprise Manager Configuration Assistant. See Also: Oracle Enterprise Manager Configuration Guide for more information. ■ Oracle Database Configuration Assistant and Oracle Data Migration Assistant never run together during the same installation session. See Also: Section 4.4.4, "Reviewing the Installation Session Log" for a summary of your installation session Note: Only components with a check mark are installed.
- 70. Installing Oracle Components 4-10 Oracle9i Database Installation Guide The Summary window appears. 5. Review the space requirements to ensure that you have enough disk space and choose Install. Table 4–8 Custom Oracle9i Database Component Prompts If You Select... You Are... Oracle Net Services Not prompted to enter any information. However, Oracle Net Configuration Assistant starts at the end of installation to configure your server networking files if Oracle Net Services release 1 (9.0.1) is not already installed in the currently-specified Oracle home. Note: Net8 release 8.1.7 or earlier installations in this Oracle home will be upgraded. See Also: Section 3.4.1, "Configuring the Server Network" for a description of the configuration procedures performed Oracle Management Server Prompted to select between using an existing or new release 1 (9.0.1) repository. See Section 4.4.3.1, "Oracle Management Server Installation" for a description of windows that appear. See Also: Oracle Enterprise Manager Configuration Guide for more information Oracle Real Application Clusters Prompted to select the nodes in the cluster on which you want to install the software. Note: This component only appears for selection if your computer is detected to be part of a cluster. Oracle Services for Microsoft Transaction Server Prompted to: ■ Install Microsoft Transaction Server after installation, if it is not currently installed. ■ Enter a port on which the Oracle MTS Recovery Service will listen. Oracle9i Prompted to: ■ Create a database (if you did not select to migrate one). Oracle Database Configuration Assistant starts at the end of installation and guides you through database creation. ■ Enter the global database name and SID of the database to create. See Also: Section 3.3, "Selecting a Database Creation Method" for a description of the database configuration procedures you can perform Note: If an earlier release of an Oracle database is detected on your hard drive, then you are prompted to upgrade or migrate to Oracle9i Database release 1 (9.0.1). Oracle Data Migration Assistant starts at the end of installation and guides you through database upgrade or migration. Microsoft SQL Server Transparent Gateway Prompted to enter the Microsoft SQL Server Name and Microsoft SQL Database Name. Sybase Server Transparent Gateway Prompted to enter the Sybase Server Name, Sybase Database Name, and the directory path in which Sybase is installed. Teradata Transparent Gateway Prompted to enter the ODBC data source name.
- 71. Installing Oracle Components Installing Oracle Components 4-11 6. Wait until the selected components are installed and any configuration tools have completed running. If a configuration assistant fails, then correct the cause of the failure and choose Retry. The End of Installation window appears. 7. Choose Exit to exit Oracle Universal Installer or choose Next Install to install additional components. 4.4.2 Oracle9i Client Installation Types The Installation Types window appears when selecting Oracle9i Client at step 7 of the procedure to install Oracle components. 1. Select the installation type you want to install and choose Next. See the appropriate section based on your selection. 4.4.2.1 Client Administrator or Runtime Installations The Summary window appears. 1. Review the space requirements to ensure that you have enough disk space and choose Install. 2. Wait until the selected components are installed. The Configuration Tools window appears and Oracle Net Configuration Assistant starts. The configuration assistant prompts you to select a method to configure client access to your Oracle9i Database if Oracle Net Client release 1 (9.0.1) is not already installed in the currently-specified Oracle home. 3. Select a method for configuring client access to your Oracle9i Database. See the online Help and Section 3.4.2, "Configuring the Client Network" for more information on your choices. The End of Installation window appears. 4. Choose Exit to exit Oracle Universal Installer or choose Next Install to install additional components. See Also: Section 4.4.4, "Reviewing the Installation Session Log" for a summary of your installation session Note: Reboot your computer after the first Oracle installation on Windows 98. Subsequent installations only require a reboot if the Oracle home changes. See Also: Section A.2, "Oracle9i Client Components" for a list of components installed with each Oracle9i Client installation type Table 4–9 Oracle9i Client Installation Types If You Select... See This Section... Administrator or Runtime Section 4.4.2.1, "Client Administrator or Runtime Installations" Custom Section 4.4.2, "Oracle9i Client Installation Types" See Also: Section 3.4.2, "Configuring the Client Network"
- 72. Installing Oracle Components 4-12 Oracle9i Database Installation Guide 4.4.2.2 Custom Oracle9i Client Installations The Available Product Components window appears if you select Custom at step 1 of Section 4.4.2. The Install Status column of the Available Product Components window displays the status of all components available for installation. 1. Select the check box of each component to install. 2. Select appropriate components to install and choose Next. The Component Locations window appears and enables you to select alternate locations in which to install some components. 3. Choose Next to accept the default locations. Otherwise, choose a component to enable a text box for changing the default location, and choose Next. 4. If you select any of the components listed in Table 4–10, provide appropriate responses when prompted. Note that most components install silently without prompting you for additional information. The Summary window appears. 5. Review the space requirements to ensure that you have enough disk space and choose Install. 6. Wait until the selected components are installed and any configuration tools have completed running. The End of Installation window appears. 7. Choose Exit to exit Oracle Universal Installer or choose Next Install to install additional components. See Also: See Section 4.4.4, "Reviewing the Installation Session Log" for a summary of your installation session Note: Only components with a check mark are installed. Table 4–10 Custom Oracle9i Client Component Prompts If You Select... You Are... Oracle Net Services Not prompted to enter any information. However, Oracle Net Configuration Assistant starts at the end of installation and prompts you to configure client access to your Oracle9i database if Oracle Net Services release 1 (9.0.1) is not already installed in the currently-specified Oracle home. Note: Net8 release 8.1.7 or earlier installations in this Oracle home will be upgraded. See Also: Section 3.4.2, "Configuring the Client Network" for a description of the configuration procedures performed Oracle Services for Microsoft Transaction Server Prompted to: ■ Install Microsoft Transaction Server after installation, if it is not currently installed. ■ Enter a port on which the Oracle MTS Recovery Service will listen. See Also: Section 4.4.4, "Reviewing the Installation Session Log" for a summary of your installation session
- 73. Installing Oracle Components Installing Oracle Components 4-13 4.4.3 Oracle9i Management and Integration Installation Types The Installation Types window appears if you select Oracle9i Management and Integration at step 7 of the procedure to install Oracle components. 1. Select the installation type you want to install and choose Next. See the appropriate section based on your selection. See Also: ■ Section 4.3, "Installations Meeting Minimal Memory Requirements" ■ Section A.3, "Oracle9i Management and Integration Components" for a list of components installed with each Oracle9i Management and Integration installation type Table 4–11 Oracle9i Management and Integration Installation Types If You Select... See This Section... Oracle Management Server Section 4.4.3.1, "Oracle Management Server Installation" Oracle Internet Directory Section 4.4.3.2, "Oracle Internet Directory Installation" Oracle Integration Server Section 4.4.3.3, "Oracle Integration Server Installation" Custom Section 4.4.3.4, "Custom Oracle9i Management and Integration Installations"
- 74. Installing Oracle Components 4-14 Oracle9i Database Installation Guide 4.4.3.1 Oracle Management Server Installation 1. Carefully review Table 4–12 and select the repository type to use with the Oracle Management Server: The Summary window appears. 2. Review the space requirements to ensure that you have enough disk space and choose Install. Important: Do not upgrade or migrate the Oracle Management Server and repository until all users of both components have upgraded or migrated their Oracle Enterprise Manager software (for example, Console and Management Packs) to release 1 (9.0.1). All Oracle Enterprise Manager products must be of the same release. Older components are not compatible with the newer release. Table 4–12 Oracle Management Server Repository Types Types In This Situation... Use an existing repository Select this type: ■ If you have already created a release 1 (9.0.1) repository for the environment to be managed and want this Oracle Management Server to use that existing repository. Oracle Enterprise Manager Configuration Assistant automatically starts at the end of installation to configure the Management Server to use the existing repository. ■ If you want to upgrade an existing release 2.x repository to release 1 (9.0.1). Oracle Enterprise Manager Configuration Assistant automatically starts at the end of installation and performs some configuration procedures. However, the repository is not automatically upgraded. When installation is complete, manually start Oracle Enterprise Manager Configuration Assistant to upgrade the existing release 2.x repository to release 1 (9.0.1). Start Oracle Enterprise Manager Configuration Assistant as follows: Start > Programs > Oracle - HOME_NAME > Configuration and Migration Tools > Enterprise Manager Configuration Assistant Require a new repository Select this type: ■ If an existing release 1 (9.0.1) repository does not exist or if you want a completely separate management setup. Oracle Enterprise Manager Configuration Assistant automatically starts at the end of installation to create a new repository. See Also: Section 2.4.1.1, "Use an Existing Repository" for more information on upgrading and migrating an Oracle Enterprise Manager repository
- 75. Installing Oracle Components Installing Oracle Components 4-15 The Configuration Tools window appears at the end of installation and automatically starts the assistants shown in Table 4–11 to create and partially configure your network and database repository environments: The Welcome window of Enterprise Manager Configuration Assistant appears. 3. Click Next. The Select Database for Repository window appears. Table 4–14 provides appropriate responses based on the repository type you selected in step 1 of Oracle Management Server Installation: Table 4–13 Configuration Assistants With Management Server Installation Type This Tool... Starts... And... Oracle Net Configuration Assistant If Oracle Net Services release 1 (9.0.1) is not already installed in the currently-specified Oracle home Note: Net8 release 8.1.7 or earlier installations in this Oracle home will be upgraded. Prompts you to configure your Oracle Net networking software See Also: Section 3.4.2, "Configuring the Client Network" for a description of the configuration procedures performed Starting Oracle HTTP Service In all cases Creates and starts the HTTP listener as a standalone process for the current session in non-SSL mode on port 7777. Also uses port 3339 for browser based Oracle Enterprise Manager and the Oracle Enterprise Manager Repository Web Site. The OracleHOME_ NAMEHTTPServer service starts after a computer reboot. Enterprise Manager Configuration Assistant In all cases Guides you through repository creation and Oracle Management Server configuration. See step 3 for instructions. See Also: Oracle Enterprise Manager Configuration Guide for more information Table 4–14 Select Database for Repository Window Options If You Selected... You are Prompted to Enter the Following Information... Use an existing repository Release 1 (9.0.1.1.1) repository connection information: ■ Username and password for the existing release 1 (9.0.1) repository ■ The database connect string, specified as: hostname:port_number:SID If you need to upgrade your release 2.x repository to a release 1 (9.0.1) repository, then you must also start Oracle Enterprise Manager Configuration Assistant after installation to perform the upgrade. See Also: Section 2.4.1.1, "Use an Existing Repository"
- 76. Installing Oracle Components 4-16 Oracle9i Database Installation Guide 4. Provide appropriate responses to the remaining Oracle Enterprise Manager Configuration Assistant windows. The End of Installation window appears. 5. Choose Exit to exit Oracle Universal Installer or choose Next Install to install additional components. 6. If you are migrating or upgrading your repository, run the appropriate tool after installation as described in step 1 of Section 4.4.3.1, "Oracle Management Server Installation." 4.4.3.2 Oracle Internet Directory Installation One of the windows shown in Table 4–15 appears if you select Oracle Internet Directory at step 1 of Section 4.4.3.2, "Oracle Internet Directory Installation." The following steps are based on the window that appears. Require a new repository Information about the database in which to create the repository: ■ Username (with DBA privileges) and password (for example, SYSTEM/MANAGER) ■ The database connect string, specified as: hostname:port_number:SID ■ Role to use to connect (for example, SYSDBA) After Enterprise Manager Configuration Assistant connects to the database, you must provide the following: ■ Database username and password of the new repository owner. (Accept the default or choose a new name.) You must enter a unique username for each new repository owner in a network. ■ A default tablespace for the repository ■ A temporary tablespace for the repository See Also: Oracle Enterprise Manager Configuration Guide for more information on creating a new repository or using an existing repository Note: The default port number used by most databases is 1521. See Also: Section 4.4.4, "Reviewing the Installation Session Log" for a summary of your installation session Note: Oracle Corporation recommends installing the Oracle9i database through this option; this creates the correct underlying Oracle9i database as part of Oracle Internet Directory 3.0.1 installation. Table 4–14 (Cont.) Select Database for Repository Window Options If You Selected... You are Prompted to Enter the Following Information...
- 77. Installing Oracle Components Installing Oracle Components 4-17 4.4.3.2.1 Installing Oracle Internet Directory for the First Time 1. Select Yes to use the installed database with Oracle Internet Directory, and choose Next. Otherwise, select No, choose Next to use a different database with Oracle Internet Directory, and go to step 4. The Database Identification window appears. 2. Enter the SID of the installed database and choose Next. 3. Go to Step 5. 4. Enter the global database name and SID in the fields provided. This information is used when Oracle Database Configuration Assistant creates your database after installation. The OID Database File Location window appears. 5. Enter a directory location to install the Oracle Internet Directory database files. These database files correspond to Oracle Internet Directory-specific tables and schema created during configuration. Oracle Corporation recommends installing database files and Oracle software on separate hard disks. 6. Choose Next. The Summary window appears. 7. Review the space requirements to ensure that you have enough disk space and choose Install. Table 4–16 lists the information which is automatically set during installation: Table 4–15 Oracle Internet Directory Installation Options If Oracle database... Then the... Go to... Release 1 (9.0.1.1.1) is already installed on the computer, but Oracle Internet Directory release 3.0.1 is not installed Using an existing instance window appears and you are prompted for the SID you want to use for Oracle Internet Directory Step 1 of Section 4.4.3.2, "Oracle Internet Directory Installation." Release 1 (9.0.1.1.1) and Oracle Internet Directory release 3.0.1 are not installed on the computer Database Identification window appears and Oracle9i database is automatically installed in the same Oracle home directory with Oracle Internet Directory release 3.0.1 Step 4 of Section 4.4.3.2.1, "Installing Oracle Internet Directory for the First Time." Release 3 (8.1.7) and Oracle Internet Directory release 2.1.1.x are already installed on the computer Upgrade OID window appears and prompts you to upgrade to Oracle9i database and Oracle Internet Directory release 3.0.1 Step 1 of Section 4.4.3.2.2, "Upgrading Oracle Internet Directory." Table 4–16 Oracle9i Database Installation Types The... Is Automatically Set to... Use of an Encrypted Password Yes Encryption schema MD4 Approximate number of directory entries to be stored in Oracle Internet Directory Under 10,000 entries Password of the Administrator Distinguished Name welcome
- 78. Installing Oracle Components 4-18 Oracle9i Database Installation Guide The Configuration Tools window appears at the end of installation and automatically starts the following assistants to create and configure your network and Oracle Internet Directory environments: The End of Installation window appears. 8. Choose Exit to exit Oracle Universal Installer or choose Next Install to install additional components. 4.4.3.2.2 Upgrading Oracle Internet Directory Table 4–17 Configuration Assistants with the Oracle Internet Directory Installation Type This Tool... Starts... And... Oracle Net Configuration Assistant If Oracle Net Services release 1 (9.0.1) is not already installed in the currently-specified Oracle home Note: Net8 release 8.1.7 or earlier installations in this Oracle home will be upgraded. Automatically configures your Oracle Net Services networking software See Also: Section 3.4.1, "Configuring the Server Network" for a description of the configuration procedures performed Starting Oracle HTTP Service In all cases Creates and starts the HTTP listener as a standalone process for the current session in non-SSL mode on port 7777. The OracleHOME_NAMEHTTPServer service starts after a computer reboot. Oracle Intelligent Agent If the database and Intelligent Agent are installed Automatically starts the Agent service OiD Configuration Assistant In all cases Creates Oracle Internet Directory tablespaces and schema in the Oracle9i Database and starts the Oracle Internet Directory directory server The port on which the Oracle Internet Directory Server is started is logged in the file ORACLE_BASEORACLE_ HOMEldapinstalloidca.log. By default Oracle Internet Directory server is started on port 389. If this port is not available, then Oracle Internet Directory server is started on an available port higher than 5000. Note: If a database needs to be installed, Oracle Database Configuration Assistant automatically starts within OiD Configuration Assistant to create a database with the UTF8 character set. Oracle Database Configuration Assistant enables the changing of default passwords after database creation. Do not use the Password Management button at this time. Change the passwords for SYS and SYSTEM only after the Oracle Internet Directory installation is complete. See Also: Section 4.4.4, "Reviewing the Installation Session Log" for a summary of your installation session Note: Before upgrading Oracle Internet Directory, the OID Database Password must be reset to ods using the command line OID Database Password Utility. Enter the following command: oidpasswd [connect=net_service_name]
- 79. Installing Oracle Components Installing Oracle Components 4-19 If you intend to upgrade an existing Oracle Internet Directory installation and previously called Oracle8i Server, and you installed Oracle Internet Directory separately, then you must upgrade the OID database when you upgrade Oracle Internet Directory. Before upgrading, stop the Oracle Listener, Oracle Database, and Oracle Internet Directory services. 1. Make an appropriate selection and choose Next. The Upgrade OID data window appears. 2. Back up Oracle Internet Directory prior to upgrading and choose Next. The Oracle SID window appears. 3. Enter the system identifier (SID) of the Oracle8i database to upgrade and choose Next. The OID Password window appears. 4. Enter the password for the Oracle Directory Server user (ODS by default) and choose Next. The OID Administrator Password window appears. 5. Enter the password for the Oracle Internet Directory administrator (WELCOME by default) and choose Next. The Upgrading or Migrating an Existing Database window appears. 6. Select the Upgrade or Migrate an Existing Database check box and the SID of the database you want to migrate to an Oracle9i release 1 (9.0.1) database. The Summary window appears. 7. Review the space requirements to ensure that you have enough disk space and choose Install. 8. Wait until the selected components are installed. See Also: Oracle Internet Directory Administrator's Guide for more information on using the OID Database Password utility Select... To... Yes Automatically upgrade the existing Oracle8i database to release 1 (9.0.1) and the Oracle Internet Directory software, LDAP schema, and Oracle Internet Directory database schema to release 3.0.1. Choose Next and go to step 2. See Also: Table 2–4 for more information on upgrading No Not upgrade your release 8.1.7 Oracle8i database. Instead, a new Oracle9i database release 1 (9.0.1) is installed and configured for use with Oracle Internet Directory release 3.0.1. The release 8.1.7 Oracle8i database remains unchanged and only Oracle Internet Directory release 2.1.1 is upgraded to release 3.0.1. Note: Ensure that you enter a SID for an Oracle8i database that is configured for use with Oracle Internet Directory.
- 80. Installing Oracle Components 4-20 Oracle9i Database Installation Guide The Configuration Tools window appears and automatically starts the following assistants to upgrade your Oracle8i database and Oracle Internet Directory environments: The End of Installation window appears. 9. Choose Exit to exit Oracle Universal Installer or choose Next Install to install additional components. 4.4.3.3 Oracle Integration Server Installation Go to the appropriate step based on whether an Oracle database is detected on your computer: Table 4–18 Configuration Assistants with Oracle Internet Directory Upgrade This Tool... Starts... And... Oracle Net Configuration Assistant If Oracle Net Services release 1 (9.0.1) is not already installed in the currently-specified Oracle home Note: Net8 release 8.1.7 or earlier installations in this Oracle home will be upgraded. Prompts you to configure your Oracle Net server networking software. Select Perform typical configuration and accept all default settings by choosing the Next button as each window appears. See Also: Section 3.4.1, "Configuring the Server Network" for a description of the configuration procedures performed Starting Oracle HTTP Service In all cases except when selecting the Software Only configuration type Creates and starts the HTTP listener as a standalone process for the current session in non-SSL mode on port 7777. The OracleHOME_NAMEHTTPServer service starts after a computer reboot. Oracle Intelligent Agent If the database and Intelligent Agent are installed Automatically starts the Agent service Oracle Data Migration Assistant In all cases Upgrades Oracle8i database release 8.1.7 to release 1 (9.0.1) OiD Upgrade Assistant In all cases Upgrades Oracle Internet Directory release 2.1.1 to release 3.0.1 See Also: Section 4.4.4, "Reviewing the Installation Session Log" for a summary of your installation session If... Then... Go To... A pre-release 1 (9.0.1) Oracle database is detected on your computer The Upgrading or Migrating an Existing Database window appears and prompts you to migrate or upgrade your database with Oracle Data Migration Assistant Step 1 No Oracle database is detected on your computer The Database Identification window appears and prompts you to enter the global database name and SID for your Oracle9i Database Step 2
- 81. Installing Oracle Components Installing Oracle Components 4-21 1. Select whether or not to upgrade or migrate your database to the latest release: 2. Enter the global database name and SID in the fields provided. This information is used when Oracle Database Configuration Assistant creates your database after installation. 3. Choose Next. The Database File Location window appears. 4. Enter the directory location for the database files. The directory location must be a mapped drive. 5. Choose Next. The Database Character Set window appears. 6. Choose the database character set from the available options. By default, the database character set is automatically chosen based on the locale setting of the operating system. 7. Choose Next. The Summary window appears. 8. Review the space requirements to ensure that you have enough disk space and choose Install. If You... Then... Want to upgrade or migrate 1. Select the Upgrade or Migrate an Existing Database check box and the SID of the database to upgrade or migrate to the latest Oracle9i Database release. 2. Choose Next. The Summary window appears. 1. Go to step 8. Do not want to upgrade or migrate 1. Do not select the Upgrade or Migrate an Existing Database check box. 2. Choose Next. The Database Identification window appears. 1. Go to step 2. Note: ■ Oracle Corporation recommends installing database files and Oracle software files on separate disks. ■ Universal Naming Convention (UNC) names are not supported at this time.
- 82. Installing Oracle Components 4-22 Oracle9i Database Installation Guide 9. Wait until the selected components are installed. The Configuration Tools window appears at the end of installation and, based on your selections above, automatically starts the assistants shown in Table 4–19 to create and configure your database and network environments: 10. Choose Exit to exit Oracle Universal Installer or choose Next Install to install additional components. Table 4–19 Configuration Assistants—Oracle Integration Server Installation Type This Tool... Starts... And... Oracle Net Configuration Assistant If Oracle Net Services release 1 (9.0.1) is not already installed in the currently-specified Oracle home Note: Net8 release 8.1.7 or earlier installations in this Oracle home will be upgraded. Automatically configures your Oracle Net Services networking software See Also: Section 3.4.1, "Configuring the Server Network" for a description of the configuration procedures performed Starting Oracle HTTP Service In all cases except when selecting the Software Only configuration type Creates and starts the HTTP listener as a standalone process for the current session in non-SSL mode on port 7777. The OracleHOME_NAMEHTTPServer service starts after a computer reboot. Oracle Data Migration Assistant If you selected to migrate or upgrade a detected database when prompted at step 1 Migrates or upgrades the selected database to Oracle9i release 1 (9.0.1) Oracle Database Configuration Assistant If a release 1 (9.0.1) Oracle9i Database is not already installed in the currently-specified Oracle home Automatically creates an Oracle9i release 1 (9.0.1) database Oracle Intelligent Agent If the database and Intelligent Agent are installed Automatically starts the Agent service Oracle Workflow Configuration Assistant In all cases. Configures Oracle Workflow schema in the Oracle9i database You are prompted for the Workflow Password, SYS Password, and SYSTEM Password. Several MS-DOS command prompts automatically open and close. Do not manually close these windows, or you will interrupt the configuration process. See Also: Oracle Workflow Server Installation Notes for instructions about using Oracle Workflow Configuration Assistant See Also: ■ Oracle Workflow Server Installation Notes for information about Oracle Workflow Configuration Assistant and postinstallation procedures ■ Section 4.4.4, "Reviewing the Installation Session Log" for a summary of your installation session
- 83. Installing Oracle Components Installing Oracle Components 4-23 4.4.3.4 Custom Oracle9i Management and Integration Installations The Available Product Components window displays all components available for installation if you select Custom at step 1. 1. Select the check box of each component to install. 2. Choose Next. The Component Locations window appears and enables you to select alternate locations in which to install some components. 3. Choose Next to accept the default locations. Otherwise, choose a component to enable a text box for changing the default location. Then, choose Next. 4. If you select any of the components shown in Table 4–20, provide appropriate responses when prompted. Note that most components install silently without prompting you for additional information: 5. Enter the global database name and SID for the Oracle9i Database and choose Next: The OID Database File Location window appears if a database is not currently installed. 6. Enter a directory location in which to install the Oracle Internet Directory database files. Oracle Corporation recommends installing database files and Oracle software on separate hard disks. These database files correspond to Oracle Internet Directory-specific tables and schema created during configuration. 7. Choose Next. Note: Only components with a check mark are installed. Table 4–20 Custom Oracle9i Management and Integration Component Prompts If You Select... Then... Oracle Management Server Go to Section 4.4.3.1, "Oracle Management Server Installation" for installation instructions. Oracle Integration Server Go to Section 4.4.3.3, "Oracle Integration Server Installation" for installation instructions. You are prompted to create a new Oracle9i Database if one is not installed in the currently-specified Oracle home. Oracle Internet Directory The procedures to follow depend upon the following: ■ If Oracle9i Database release 1 (9.0.1) is already installed in the currently-specified Oracle home, but Oracle Internet Directory 3.0.1 is not, go to step 1 of Section 4.4.3.2.1, "Installing Oracle Internet Directory for the First Time". ■ If Oracle9i database Release 1 (9.0.1.1.1) and Oracle Internet Directory releases 3.0.1 are not installed in the currently-specified Oracle home, the Database Identification window appears. Go to step 5 of Section 4.4.3.4, "Custom Oracle9i Management and Integration Installations". ■ If Oracle8i database release 8.1.7 and Oracle Internet Directory release 2.0.6 are already installed in the currently-specified Oracle home, go to step 1 of Section 4.4.3.2.2, "Upgrading Oracle Internet Directory".
- 84. Installing Oracle Components 4-24 Oracle9i Database Installation Guide The OID User Password Encryption window appears. 8. Select whether or not to enable password encryption and choose Next. The User Password Hashing Algorithm window appears. 9. Select an encryption schema to use and choose Next. The OID Administrator Password window appears. 10. Enter a password. This password enables you to make all changes in Oracle Internet Directory. 11. Enter the same password a second time and choose Next. The OID Size Configuration window appears. 12. Select the approximate number of directory entries to be stored in Oracle Internet Directory and choose Next. The Summary window appears. 13. Review the space requirements to ensure that you have enough disk space and choose Install. The Configuration Tools window appears at the end of installation and automatically starts the assistants shown in Table 4–21 to create and configure the Oracle9i Database for use with Oracle Internet Directory: Table 4–21 Configuration Assistants—Custom Oracle9i Management and Integration Installation Type This Tool... Starts... And... Oracle Net Configuration Assistant If Oracle Net Services release 1 (9.0.1) is not already installed in the currently-specified Oracle home Note: Net8 release 8.1.7 or earlier installations in this Oracle home will be upgraded. Automatically configures your Oracle Net listener networking software See Also: Section 3.4.1, "Configuring the Server Network" for a description of the configuration procedures performed Starting Oracle HTTP Service If you select the Oracle HTTP Server in the Available Product Components window Starts the HTTP listener in non-SSL mode on port 7777 Oracle Intelligent Agent If the database and Intelligent Agent are installed Automatically starts the Agent service OiD Configuration Assistant If you select Oracle Internet Directory in the Available Product Components window Creates Oracle Internet Directory tablespaces and schema in the Oracle9i Database and starts the Oracle Internet Directory directory server See Also: Table 4–14 for more information on OiD Configuration Assistant
- 85. Installing Oracle Components Installing Oracle Components 4-25 The End of Installation window appears. Oracle Database Configuration Assistant If you select Oracle9i in the Available Product Components window, and you chose not to upgrade when prompted, and you selected Yes when prompted to install an Oracle9i database Oracle Database Configuration Assistant automatically starts within OiD Configuration Assistant to guide you through a Custom installation to create a database with the UTF8 character set. DBCA enables the changing of default passwords after database creation. Do not use the Password Management button at this time. Change the passwords for SYS and SYSTEM only after the Oracle Internet Directory installation is complete. Oracle Data Migration Assistant If you select to upgrade a database Upgrades the selected database to Oracle9i Oracle Enterprise Manager Configuration Assistant If you select to install Oracle Management Server in the Available Product Components window Enables the configuration of the local Oracle Management Server to use an existing repository or to create a new repository Oracle Workflow Configuration Assistant If you select to install Oracle Workflow in the Available Product Components window Configures Oracle Workflow schema in the Oracle9i database You are prompted for the Workflow Password, SYS Password, and SYSTEM Password. Several MS-DOS command prompts automatically open and close. Do not manually close these windows, or you will interrupt the configuration process. See Also: Oracle Workflow Server Installation Notes for instructions on using Oracle Workflow Configuration Assistant Note: It is not possible to install and configure Oracle Internet Directory and Oracle Workflow in the same installation session. If you perform a Custom installation and choose to install both Oracle Internet Directory and Oracle Workflow, then only OiD Configuration Assistant starts during postinstallation. To configure Oracle Workflow, you must manually start Oracle Workflow Configuration Assistant after installation. To configure Oracle Workflow manually: 1. Exit Oracle Universal Installer at the end of installation. 2. Enter the following command: DRIVE_LETTER:ORACLE_BASEORACLE_HOMEwfinstall> wfinstall.bat See Also: Oracle Workflow Server Installation Notes for more information Table 4–21 (Cont.) Configuration Assistants—Custom Oracle9i Management and Integration Installation Type This Tool... Starts... And...
- 86. Deinstalling Oracle Components and Services 4-26 Oracle9i Database Installation Guide 14. Choose Exit to exit Oracle Universal Installer or choose Next Install to install additional components. 4.4.4 Reviewing the Installation Session Log The first time the Installer runs it creates the SYSTEM_DRIVE:Program FilesOracleInventorylogs directory. An inventory of installed components and installation actions performed are kept in this directory. installActions.log is the most recent log file. Log file names of previous installation sessions are also in this directory and take the form installActionsdate_time.log (for example, installActions2001-07-14_ 09-00-56-am.log). You can also view a list of installed components by choosing Installed Products on any window of Oracle Universal Installer. A window of installed programs appears. 4.5 Deinstalling Oracle Components and Services This section describes how to deinstall Oracle components, utilities, and services. This section contains these topics: ■ Section 4.5.1, "Stopping Oracle Services for Windows" ■ Section 4.5.2, "Deinstalling Components with Oracle Universal Installer" ■ Section 4.5.3, "Removing Oracle Keys From the Registry on Windows NT and Windows 2000" ■ Section 4.5.4, "Removing Oracle Keys from the Registry on Windows 98" See Also: Section 4.4.4, "Reviewing the Installation Session Log" for a summary of your installation session Note: Do not delete or manually alter the Inventory directory or its contents. Doing so can prevent the Installer from locating products that you install on your system. Notes: ■ Silent deinstallations are not supported at this time. ■ Deinstalling Oracle9i JVM causes Oracle Universal Installer to remove the database and other products dependent on Oracle9i JVM from your system.
- 87. Deinstalling Oracle Components and Services Installing Oracle Components 4-27 4.5.1 Stopping Oracle Services for Windows You must first stop the Oracle Windows NT services before deinstalling Oracle components or removing any registry entries. To stop Windows NT services: 1. Choose Start > Settings > Control Panel > Services. 2. If any Oracle services (names begin with Oracle or Ora) exist and have the status Started, select the service, and choose Stop. 3. Choose Close to exit the Services window. 4. Exit the Control Panel. 4.5.1.1 Stopping and Removing Oracle Internet Directory Services 1. Stop the Oracle Internet Directory Server at the MS-DOS command prompt: C:> oidctl CONNECT=NET_SERVICE_NAME SERVER=OIDLDAPD INSTANCE=SERVER INSTANCE_NUMBER STOP where NET_SERVICE_NAME is the network connection to the Oracle Internet Directory Server and SERVER_INSTANCE_NUMBER is the instance number (this number appears in the Server List tab of Oracle Directory Manager). 2. Stop the Oracle Internet Directory Monitor at the MS-DOS command prompt: C:> oidmon STOP 3. Remove the Oracle Internet Directory service OracleDirectoryService from the registry: C:> oidmon REMOVE 4. Follow the procedures in Section 4.5.2 to remove the Oracle9i Database configured with Oracle Internet Directory. 4.5.1.2 Stopping and Removing Oracle Management Server Service Registry Entry 1. Stop the Oracle Management Server (OracleHOME_NAMEManagementServer) from the Control Panel: On Windows NT, choose Start > Settings > Control Panel > Services. On Windows 2000, choose Start > Programs > Administrative Tools > Services. Note: Manual removal of components is permitted only if you exit Oracle Universal Installer during an installation. For example: ■ Choosing Cancel ■ Turning off the computer ■ If the installation does not complete (that is, all required configuration tools do not run at the end) ■ In these cases, Oracle Universal Installer does not register the installation in its inventory. However, files may have been copied to your Oracle home. Remove these files manually and restart the installation.
- 88. Deinstalling Oracle Components and Services 4-28 Oracle9i Database Installation Guide 2. Remove the Oracle Management Server service OracleHOME_ NAMEManagementServer from the registry: C:> omsntsrv -u Home_Name where Home_Name is the Oracle home name. 4.5.2 Deinstalling Components with Oracle Universal Installer This section describes how to use Oracle Universal Installer to deinstall Oracle components (which deinstalls them from the installer inventory) instead of removing them manually. Do not delete an Oracle home manually (for example, by deleting the directory structure with Windows NT Explorer or MS-DOS command prompt) because the components in that Oracle home remain registered in the Oracle Universal Installer inventory. If you then attempt an installation in the same Oracle home, some or all of the components selected may not be installed because the installer determines they are already installed. Oracle Universal Installer creates Windows NT services for Oracle components during installation. However, the installer does not delete services created by Oracle Net Configuration Assistant, OiD Configuration Assistant, and Oracle Database Configuration Assistant. To deinstall components with Oracle Universal Installer: 1. Ensure that you first follow the instructions in Section 4.5.1. 2. Choose Start > Programs > Oracle Installation Products > Universal Installer. The Welcome window for Oracle Universal Installer appears. 3. Choose the Deinstall Products button. The Inventory window appears. 4. Expand the tree of installed components until you find the components to deinstall. 5. Check the boxes of components to deinstall. 6. Choose Remove. The Confirmation window appears. 7. Choose Yes to deinstall the selected components. The components are deinstalled from your computer. The Inventory window appears without the deinstalled components. 8. Choose Close to close the Inventory window. 9. Choose Exit to exit Oracle Universal Installer. 4.5.3 Removing Oracle Keys From the Registry on Windows NT and Windows 2000 In rare situations, you may want to correct serious system problems by completely removing Oracle components from the computer. Note: A message may appear indicating that removing some components may cause other components to not function properly.
- 89. Deinstalling Oracle Components and Services Installing Oracle Components 4-29 Remove all Oracle components from your computer only as a last resort, and only if you want to remove all Oracle components from your system. Oracle Universal Installer does not delete services created by Oracle Net Configuration Assistant, OiD Configuration Assistant, and Oracle Database Configuration Assistant. In addition, several other registry keys are not deleted. To remove the Oracle Net Service Registry Entry: 1. Log in as a member of the Administrators group. 2. Ensure that you first follow the instructions in Section 4.5.1. 3. Start the registry at the MS-DOS command prompt: C:> regedt32 4. Go to HKEY_LOCAL_MACHINESYSTEMCurrentControlSetServices and delete the OracleHOME_NAMETNSListener registry entry. Oracle Universal Installer automatically deletes all other Oracle Net Services. 5. Exit the registry. To remove all Oracle components from a computer on Windows NT: 1. Log in as a member of the Administrators group. 2. Ensure that you first follow the instructions in Section 4.5.1. 3. Start the registry at the MS-DOS command prompt: C:> regedt32 4. Go to HKEY_CLASSES_ROOT. 5. Delete any key that starts with Oracle, ORA, or ORCL. 6. Go to HKEY_LOCAL_MACHINESOFTWARE. 7. Delete the ORACLE and Apache Group keys. 8. Go to HKEY_LOCAL_MACHINESOFTWAREODBCodbcinst.ini. 9. Delete the Oracle ODBC Driver key. 10. Go to HKEY_LOCAL_MACHINESYSTEMCurrentControlSetServices. 11. Delete all keys under here that begin with ORACLE. 12. Go to HKEY_LOCAL_MACHINESYSTEMCurrentControlSetServices EventlogApplication. 13. Delete all keys under here that begin with ORACLE. Note: You can also use the ORADIM utility to manually deinstall an instance and services. See "Postinstallation Database Creation" of Oracle9i Database Administrator's Guide for Windows. Caution: These instructions remove all Oracle components, services, and registry entries from your computer. In addition, any database files under ORACLE_BASEoradataDB_NAME are also removed. Exercise extreme care when removing registry entries. Removing incorrect entries can break your system.
- 90. Deinstalling Oracle Components and Services 4-30 Oracle9i Database Installation Guide 14. Go to HKEY_CURRENT_USER. 15. Delete ORACLE. 16. Go to HKEY_CURRENT_USERSOFTWAREORACLE. 17. Delete keys that start with Oracle or ORCL (if any exist). 18. Go to HKEY_CURRENT_USERSOFTWAREODBCodbcinst.ini. 19. Delete any Oracle keys (if any exist). 20. Close the registry. 21. Reboot your computer. 4.5.3.1 Update the System Variable Path 1. Go to Start > Settings > Control Panel > System > Environment tab. 2. Choose the system variable path and modify the Path variable. 3. Remove any Oracle entries from the path. For example, if JRE was installed by Oracle, remove the %ORACLE_HOME%BIN path and the JRE path. You may see a path similar to this one: C:oracleora81bin;G:program filesoraclejre1.1.7bin 4. Exit the Control Panel. 4.5.3.2 Remove Oracle from the Start Menu 1. Go to SYSTEM_DRIVE:winntprofilesall usersstart menuprograms. 2. Delete the following icons: ■ Oracle - HOME_NAME ■ Oracle Installation Products where HOME_NAME is the previous Oracle home name. 3. Delete SYSTEM_DRIVE:program filesoracle through Windows NT Explorer. 4. Delete all ORACLE_BASE directories on your hard drive. 5. Reboot your computer. 4.5.4 Removing Oracle Keys from the Registry on Windows 98 To remove all Oracle components from a computer on Windows 98: 1. Start the registry at the MS-DOS command prompt: C:> regedit 2. Go to HKEY_CLASSES_ROOT. 3. Delete any key that starts with Oracle or ORCL. 4. Go to HKEY_LOCAL_MACHINESOFTWAREORACLE. 5. Delete the ORACLE key. 6. Go to HKEY_LOCAL_MACHINESOFTWAREODBCodbcinst.ini. 7. Delete the Oracle ODBC Driver key.
- 91. Deinstalling Oracle Components and Services Installing Oracle Components 4-31 8. Go to HKEY_CURRENT_USERSOFTWAREORACLE. 9. Delete keys that start with Oracle or ORCL (if any exist). 10. Go to HKEY_CURRENT_USERSOFTWAREODBCodbcinst.ini. 11. Delete any Oracle keys. 12. Close the registry. 13. Reboot your computer. 4.5.4.1 Update the System Variable Path Edit your autoexec.bat file and remove your %ORACLE_HOME%BIN and JRE paths from the path setting. 4.5.4.2 Remove Oracle from the Start Menu 1. Delete SYSTEM_DRIVE:Program FilesOracle through Windows Explorer. 2. Delete icons from: ■ SYSTEM_DRIVE:windowsstart menuprogramsoracle - HOME_ NAME ■ SYSTEM_DRIVE:windowsstart menuprogramsoracle installation products where HOME_NAME is the previous Oracle home name. 3. Delete all ORACLE_BASE directories on your hard drive. 4. Reboot your computer.
- 92. Deinstalling Oracle Components and Services 4-32 Oracle9i Database Installation Guide
- 93. 5 Reviewing Your Installed Starter Database Contents 5-1 5 Reviewing Your Installed Starter Database Contents This chapter describes the contents of the default starter database created through Oracle Database Configuration Assistant for the Enterprise Edition, Standard Edition, Personal Edition, Oracle Internet Directory, or Oracle Integration Server installation types. Where possible, references to information applicable to the custom database creation method are provided. This chapter contains these topics: ■ Section 5.1, "Usernames and Passwords Overview" ■ Section 5.2, "Database Identification Overview" ■ Section 5.3, "Oracle9i Services on Windows Overview" ■ Section 5.4, "Tablespaces and Datafiles Overview" ■ Section 5.5, "Initialization Parameter File Overview" ■ Section 5.6, "Redo Log Files Overview" ■ Section 5.7, "Control Files Overview" ■ Section 5.8, "Rollback Segments Overview" ■ Section 5.9, "Data Dictionary Overview" 5.1 Usernames and Passwords Overview Oracle9i installs with a number of default database accounts. Oracle Database Configuration Assistant locks and expires all default database accounts upon successful installation with the following exceptions: ■ SYS ■ SYSTEM ■ SCOTT ■ DBSNMP ■ OUTLN ■ AURORA$ORB$UNAUTHENTICATED ■ AURORA$JIS$UTILITY$ ■ OSE$HTTP$ADMIN
- 94. Usernames and Passwords Overview 5-2 Oracle9i Database Installation Guide You must unlock all other accounts before using them. Oracle Corporation recommends changing all user passwords immediately after installation. At a minimum, Oracle Database Configuration Assistant creates the SYS, SYSTEM, and DBSNMP accounts in all databases. Additional accounts are created depending on the components installed. Unlock accounts and change passwords before using these accounts. Table 5–2 describes the accounts and passwords. 5.1.1 Unlocking and Changing Passwords At the end of installation, several configuration assistants automatically start to create and configure your database and network environments. One such assistant is the Oracle Database Configuration Assistant. When Oracle Database Configuration Assistant finishes your database configuration, it displays a screen with your database information and the Password Management button. Use the Password Management button to change this information immediately after installation. To change a password during the database installation and configuration process: 1. From the Oracle Database Configuration Assistant window, choose the Password Management button. 2. Select the username and clear the check mark. 3. Enter a new password and confirm the new password for each username. Alternatively, use SQL*Plus to unlock accounts and change passwords any time after the installation process. To change a password after installation: 1. Start SQL*Plus: C:> sqlplus /NOLOG 2. Connect as SYSDBA: SQL> CONNECT / AS SYSDBA WARNING: If installing Oracle Internet Directory, then change the passwords for SYS and SYSTEM only after the Oracle Internet Directory installation is complete. Tip: ■ Oracle9i Database Administrator's Guide for information on Oracle security procedures and security best practices ■ Oracle Enterprise Manager Administrator's Guide for information on security management Note: The Password Management button is not available when using Oracle Database Configuration Assistant as a standalone tool. Note: If you unlock a password, but do not specify a new password, then the password is expired until the next time you access that account.
- 95. Usernames and Passwords Overview Reviewing Your Installed Starter Database Contents 5-3 3. Change the password according to the SQL commands indicated in Table 5–1: 5.1.2 Granting Limited SYS Database Role Privileges Any database user can be granted limited SYS database role privileges to use the Oracle Enterprise Manager Diagnostic Pack. Grant users access to these necessary SYS privileges by granting the OEM_MONITOR role. This role is created when the database is installed and is defined in the following SQL script: ORACLE_BASEORACLE_HOMErdbmsadmincatsnmp.sql 5.1.3 Reviewing Usernames and Passwords Table 5–2 describes the administrative user names and passwords. Table 5–1 SQL Commands for Administering Accounts and Passwords To... Do this... Unlock a password ALTER USER username ACCOUNT UNLOCK; Lock a password ALTER USER username ACCOUNT LOCK; Change the password of an unlocked account ALTER USER username IDENTIFIED BY password; Change the password of a locked account ALTER USER username IDENTIFIED BY password ACCOUNT UNLOCK; See Also: Oracle9i SQL Reference for information on the GRANT statement Table 5–2 Administrative User Names and Passwords User Name Password Description See Also SYSTEM1 MANAGER Used for performing database administration tasks. SYSTEM includes the AQ_ADMINISTRATOR_ ROLE and DBA database roles. Oracle9i Database Administrator's Guide SYS1 CHANGE_ON_ INSTALL2 Used for performing database administration tasks.3 Oracle9i Database Administrator's Guide AURORA$JIS$ UTILITY$ Randomly assigned at installation Used internally by Enterprise JavaBeans (EJB) and Common Object Request Broker Architecture (CORBA) Tools. Log on as SYS to change the password for this username. Not applicable AURORA$ORB$ UNAUTHENTIC ATED Randomly assigned at installation Used internally by EJB and CORBA Tools. Log on as SYS to change the password for this username. Not applicable CTXSYS CTXSYS The Oracle Text username with CONNECT, DBA, and RESOURCE database roles. Oracle Text Reference DBSNMP DBSNMP Includes the CONNECT and SELECT ANY DICTIONARY database roles. Run catnsnmp.sql if you want to drop this role and user. Oracle Intelligent Agent User's Guide LBACSYS LBACSYS The Oracle Label Security administrator username. Oracle Label Security Administrator's Guide
- 96. Usernames and Passwords Overview 5-4 Oracle9i Database Installation Guide MDSYS MDSYS The Oracle Spatial and Oracle Locator administrator username. Oracle Spatial User's Guide and Reference OLAPDBA OLAPDBA OLAPDBA is the identity that OLAP Services uses to authenticate user credentials. When you change the password for OLAPDBA in the database, you must make the same change to the User Password configuration setting for OLAP Services. OLAPDBA includes the OLAP_DBA database role. ■ Oracle9i OLAP Services Concepts and Administration Guide ■ OLAP Services Instance Manager Help OLAPSVR INSTANCE The proxy identification used by all OLAP Services connections. Includes the OLAP_DBA, CONNECT, RESOURCE, and SELECT_ CATALOG_ROLE database roles. When you change the password for OLAPSVR in the database, you must make the same change to the OlapProxyPwd configuration setting for OLAP Services. ■ Oracle9i OLAP Services Concepts and Administration Guide ■ OLAP Services Instance Manager Help OLAPSYS MANAGER OLAPSYS is the identity used to create OLAP metadata structures. OLAPSYS includes OLAP_DBA, CONNECT, and RESOURCE database roles. Oracle9i OLAP Services Concepts and Administration Guide ORDPLUGINS ORDPLUGINS The Oracle interMedia Audio and Video username with CONNECT and RESOURCE database roles. Allows non-native plug-in formats for one session. Oracle interMedia User's Guide and Reference ORDSYS ORDSYS The Oracle interMedia Audio, Video, Locator, and Image administrator username with CONNECT, JAVAUSERPRIV, and RESOURCE database roles. Oracle interMedia User's Guide and Reference OSE$HTTP$AD MIN Randomly assigned at installation Used internally by the Oracle Servlet Engine. Log on as SYS to change the password for this username. Not applicable OUTLN OUTLN Centrally manages metadata associated with stored outlines. Supports plan stability, which enables maintenance of the same execution plans for the same SQL statements. Includes CONNECT and RESOURCE database roles ■ Oracle9i Database Concepts ■ Oracle9i Database Performance Guide and Reference SCOTT TIGER Includes CONNECT and RESOURCE database roles. Oracle9i Database Administrator's Guide for Windows Table 5–2 (Cont.) Administrative User Names and Passwords User Name Password Description See Also
- 97. Database Identification Overview Reviewing Your Installed Starter Database Contents 5-5 5.2 Database Identification Overview The Oracle9i Database is identified by its global database name, which consists of the database name and network domain in which the database is located. The global database name uniquely distinguishes a database from any other database. You create a global database name when prompted in the Oracle Universal Installer Database Identification window during Oracle9i Database installation. The global database name takes the form: database_name.database_domain For example: sales.us.acme.com The DB_NAME parameter (value sales) and DB_DOMAIN name parameter (value us.acme.com) combine to create the global database name value assigned to the SERVICE_NAMES parameter (valuesales.us.acme.com). WKSYS WKSYS Used for storing Ultra Search system dictionaries and PL/SQL packages. WKSYS includes CONNECT, CTXAPP, DBA, JAVASYSPRIV, JAVAUSERPRIV, and RESOURCE database roles Oracle Ultra Search Online Documentation 1 If installing Oracle Internet Directory, then change the passwords for SYS and SYSTEM only after the Oracle Internet Directory installation is complete. 2 SQL statement must include the privilege AS SYSDBA or AS SYSOPER. 3 SYS includes the following database roles: AQ_ADMINISTRATOR_ROLE, AQ_USER_ROLE, CONNECT, CTXAPP, DBA, DELETE_CATALOG_ROLE, EXECUTE_CATALOG_ROLE, EXP_FULL_DATABASE, HS_ ADMIN_ROLE, IMP_FULL_DATABASE, JAVA_ADMIN, JAVADEBUGPRIV, JAVA_DEPLOY, JAVAIDPRIV, JAVAUSERPRIV, JAVASYSPRIV, OEM_MONITOR, OLAP_DBA, RECOVERY_CATALOG_OWNER, RESOURCE, SELECT_CATALOG_ROLE, WKADMIN, WKUSER, WM_ADMIN_ROLE See Also: ■ "Privileges, Roles, and Security Policies" of Oracle9i Database Concepts ■ "The Oracle Database Administrator" of Oracle9i Database Administrator's Guide ■ "Administering External Users and Roles" of Oracle9i Network, Directory, and Security Guide for Windows Where... Is... sales The name you give your database. The database name portion is a string of no more than eight characters that can contain alpha, numeric, and additional characters. The database name is assigned to the DB_NAME parameter in the init.ora file. us.acme.com The network domain in which the database is located, making the global database name unique. The domain portion is a string of no more than 128 characters that can contain alpha, numeric, period (.), and additional characters. The domain name is assigned to the DB_DOMAIN parameter in the init.ora file. Table 5–2 (Cont.) Administrative User Names and Passwords User Name Password Description See Also
- 98. Oracle9i Services on Windows Overview 5-6 Oracle9i Database Installation Guide The system identifier (SID) identifies a specific Oracle9i instance that references the database. The SID uniquely distinguishes a database instance from any other database instance on the same computer. Multiple Oracle homes enable you to have multiple, active Oracle databases on a single computer. Each database requires a unique global database name, and each database instance on the same computer requires a unique SID. The SID name is taken from the value you entered for the database name in the Database Identification window, although you had the opportunity to change it. The SID can be up to 64 alphanumeric characters in length. For example, if the SID and database name for an Oracle database are ORCL, each database file is located in the ORACLE_BASEoradataorcl directory and the initialization parameter file is located in the ORACLE_BASEadminorclpfile directory. The directory orcl is named after the DB_NAME parameter value. 5.3 Oracle9i Services on Windows Overview Two main Oracle services are automatically started after installation: ■ OracleServiceSID (the Oracle9i Database service) ■ OracleHOME_NAMETNSListener (the Oracle9i Database listener service) If you installed Oracle Enterprise Manager components, additional services automatically start: ■ OracleHOME_NAMEAgent ■ OracleHOME_NAMEManagementServer ■ OracleHOME_NAMEHTTPServer However, other services for networking or other individual components may not automatically start. 5.4 Tablespaces and Datafiles Overview An Oracle9i Database is divided into smaller logical areas of space known as tablespaces. Each tablespace corresponds to one or more physical datafiles. Datafiles contain the contents of logical database structures such as tables and indexes. A datafile can be associated with only one tablespace and database. Table 5–3 list the tablespaces and datafiles in the Oracle9i Database. Datafiles are located in the ORACLE_BASEoradataDB_NAME directory. See Also: ■ Section 6.3, "Individual Component Postinstallation Configuration Tasks" ■ "Oracle9i Services on Windows" of Oracle9i Database Getting Starting for Windows for a complete list of services and instructions on starting Oracle services in the Windows NT Control Panel. Note: Unless you specified different names with Oracle Database Configuration Assistant, the tablespaces and datafiles described in the following table are also automatically included in the Custom database.
- 99. Tablespaces and Datafiles Overview Reviewing Your Installed Starter Database Contents 5-7 Table 5–3 Tablespaces and Datafiles Tablespace Datafile Contains... CWMLITE CWMLITE.DBF OLAP tablespace DRSYS drsys01.dbf Oracle Text-related Schema objects. EXAMPLE EXAMPLE01.DBF Sample Schema INDX indx01.dbf Indexes associated with the data in the USERS tablespace. TEMP temp01.dbf Temporary tables and/or indexes created during the processing of your SQL statement. You may need to expand this tablespace if you are executing a SQL statement that involves a lot of sorting, such as the constructs GROUP BY, ORDER BY, or DISTINCT. TOOLS tools01.dbf Nothing. This datafile is created for use if the user wants to install any third-party or Oracle tools/components. SYSTEM system01.dbf The data dictionary, including definitions of tables, views, and stored procedures needed by the Oracle9i Database. Information in this area is maintained automatically. The SYSTEM tablespace is present in all Oracle databases. UNDOTBS UNDOTBS01.DBF A dedicated tablespaces that stores only undo information when the database is run in automatic undo management mode. An undo tablespace contains one or more undo segments. Undo segments maintain transaction history that is used to roll back, or undo, changes to the database. All starter databases are configured to run in automatic undo management mode. USERS users01.dbf Your application data. As you create and enter data into tables, you fill this space with your data. Note: If you choose to create a new repository and accept the default settings when running Oracle Enterprise Manager Configuration Assistant, a tablespace named OEM_REPOSITORY and a datafile named oem_repository.ora are also created. See Also: ■ "Tablespaces, Datafiles, and Control Files" of Oracle9i Database Concepts ■ "Managing Tablespaces" and "Managing Datafiles" of Oracle9i Database Administrator's Guide ■ "Managing Undo Space" of Oracle9i Database Administrator's Guide
- 100. Initialization Parameter File Overview 5-8 Oracle9i Database Installation Guide 5.5 Initialization Parameter File Overview The starter database contains one database initialization parameter file located in the ORACLE_BASEadminDB_NAMEpfile directory: 5.6 Redo Log Files Overview The starter database contains three redo log files located in the ORACLE_ BASEoradataDB_NAME directory: Initialization Parameter File Description init.ora The parameter file init.ora must exist for an instance to start. A parameter file is a text file that contains a list of instance configuration parameters. The starter database init.ora file has preconfigured parameters. No edits are required to this file in order to use the starter database. See Also: ■ "Oracle9i Database Specifications for Windows NT" of Oracle9i Database Administrator's Guide for Windows for a list of Oracle9i Database-specific initialization parameters for Windows NT and their default values ■ Oracle9i Database Reference for more information on initialization parameters Note: The redo logs redo01.log, redo02.log, and redo03.log are also automatically included in the Custom database. Database Files File Size Description redo01.log redo02.log redo03.log 100 MB 100 MB 100 MB A redo log can be either an online redo log or an archived redo log. The online redo log is a set of two or more redo log groups that records all changes made to Oracle datafiles and control files. An archived redo log is a copy of an online redo log that has been copied to an offline destination. If the database is in ARCHIVELOG mode and automatic archiving is enabled, then the archive process or processes copy each online redo log to one or more archive log destinations after it is filled. See Also: ■ Oracle9i User-Managed Backup and Recovery Guide ■ "Managing the Online Redo Log" of Oracle9i Database Administrator's Guide
- 101. Data Dictionary Overview Reviewing Your Installed Starter Database Contents 5-9 5.7 Control Files Overview The starter database contains three control files located in the ORACLE_BASE oradataDB_NAME directory: 5.8 Rollback Segments Overview Oracle9i databases are capable of managing their own undo (rollback) segments. Administrators no longer need to carefully plan and tune the number and sizes of rollback segments or decide how to strategically assign transactions to a particular rollback segment. Oracle9i also allows administrators to allocate their undo space in a single undo tablespace with the database taking care of issues such as undo block contention, consistent read retention, and space utilization. 5.9 Data Dictionary Overview The data dictionary is a protected collection of tables and views containing reference information about the database, its structures, and its users. The data stored in the dictionary includes the following: ■ Names of the Oracle database users ■ Privileges and roles granted to each user ■ Names and definitions of schema objects (including tables, views, snapshots, indexes, clusters, synonyms, sequences, procedures, functions, and packages) ■ Integrity constraints ■ Space allocation for database objects Control Files Description control01.ctl control02.ctl control03.ctl A control file is an administrative file required to start and run the database. The control file records the physical structure of the database. For example, a control file contains the database name, and the names and locations of the database's datafiles and redo log files. Note: ■ The files control01.ctl, control02.ctl, and control03.ctl are also automatically included in the Custom database. ■ Oracle Corporation recommends that you keep at least three control files (on separate physical drives) for each database and set the CONTROL_FILES initialization parameter to list each control file. See Also: "Managing Control Files" of Oracle9i Database Administrator's Guide for information on setting this initialization parameter value See Also: ■ Oracle9i Database Administrator's Guide ■ Oracle9i User-Managed Backup and Recovery Guide
- 102. Data Dictionary Overview 5-10 Oracle9i Database Installation Guide ■ Auditing information, such as who accessed or updated various objects See Also: ■ "The Data Dictionary" of Oracle9i Database Concepts ■ "Static Data Dictionary Views" of Oracle9i Database Reference
- 103. 6 Postinstallation Configuration Tasks 6-1 6Postinstallation Configuration Tasks This chapter identifies postinstallation configuration tasks. Where appropriate, this chapter references other guides for procedures on performing these configuration tasks. This chapter contains these topics: ■ Section 6.1, "About NTFS File System and Windows NT Registry Permissions" ■ Section 6.2, "Validating Invalid PL/SQL Modules With the utlrp.sql Script" ■ Section 6.3, "Individual Component Postinstallation Configuration Tasks" 6.1 About NTFS File System and Windows NT Registry Permissions Oracle Corporation recommends that you configure Oracle9i database files, directories, and registry settings to allow only authorized database administrators (DBAs) to have full control. These topics describe how to perform these tasks: ■ Section 6.1.1, "Setting NTFS File System Security" ■ Section 6.1.2, "Setting Windows NT Registry Security" 6.1.1 Setting NTFS File System Security The Oracle9i database uses files to store database data, backup data, log information, and so on. To do this, the Oracle9i database process runs under a security account. This security account (the Windows NT LocalSystem account called SYSTEM) includes the ability to create and access these files. The security account is assigned to the service that the Oracle9i database uses (in the Control Panel). This account requires full file system permissions to create, read, write, delete, and execute files. To ensure that only authorized users have full file system permissions: 1. Go into Windows NT Explorer. 2. Right-click Oracle9i database files (in the ORACLE_BASEoradataDB_NAME directory), executables and dynamic link libraries (in the ORACLE_BASEORACLE_ HOMEbin directory), and directories. 3. Select Properties from the menu that appears. 4. Adjust the file and directory permissions to ensure that: ■ Only the security account that the Oracle9i Database is configured to use has full control permissions to these files See Also: Your Windows NT documentation for more information about modifying NTFS file system and Windows NT registry settings
- 104. Validating Invalid PL/SQL Modules With the utlrp.sql Script 6-2 Oracle9i Database Installation Guide ■ User accounts that must run Oracle applications (for example, SQL*Plus and Pro*C) have read privileges on their executables (for example, sqlplus.exe for SQL*Plus) 6.1.2 Setting Windows NT Registry Security Oracle Corporation recommends that you remove write permissions from users who are not Oracle9i DBAs or system administrators in HKEY_LOCAL_ MACHINESOFTWAREORACLE of the Windows NT registry. To remove write permissions: 1. Open the registry. 2. Go to HKEY_LOCAL_MACHINESOFTWAREORACLE. 3. Select Permissions from the Security main menu. The Registry Key Permissions dialog box appears. 4. Remove write permissions from any users who are not Oracle9i DBAs or system administrators. Note that the SYSTEM account must have Full Control, since this is the account with which the Oracle9i Database runs. 5. Ensure that user accounts that must run Oracle applications have read privileges. 6. Choose OK. 7. Exit the registry. 6.2 Validating Invalid PL/SQL Modules With the utlrp.sql Script When the Oracle9i Database is created through the Enterprise Edition, Standard Edition, or Personal Edition installation type, the utlrp.sql script is automatically run. However, when an Oracle9i Database is created through the Custom installation type, this script is not automatically run. Oracle Corporation recommends running the utlrp.sql script after creating, upgrading, or migrating a database. This script recompiles all PL/SQL modules that may be in an INVALID state, including packages, procedures, types, and so on. This step is optional, but recommended so that the cost of recompilation is incurred during the installation rather than in the future. 1. Start SQL*Plus: C:>sqlplus 2. Connect to the database with the SYS account: SQL>CONNECTSYS/PASSWORD AS SYSDBA Note: The Oracle9i Database uses the Windows NT LocalSystem built-in security account. Therefore, file permissions must be granted to the SYSTEM account of the local computer running the Oracle9i Database. Note: There should be no other data definition language (DDL) statements running on the database while it is running, and packages STANDARD and DBMS_STANDARD must already be valid.
- 105. Individual Component Postinstallation Configuration Tasks Postinstallation Configuration Tasks 6-3 where PASSWORD is CHANGE_ON_INSTALL by default, unless you changed it after installation. 3. Start the database (if necessary): SQL>STARTUP 4. Run the utlrp.sql script: SQL>@ORACLE_BASEORACLE_HOMErdbmsadminutlrp.sql 6.3 Individual Component Postinstallation Configuration Tasks Some individual components require postinstallation configuration tasks. Table 6–1 lists configuration requirements and the sections or documents referenced for specific configuration procedures. This table does not include postinstallation configuration tasks for Oracle OLAP Services and Oracle Workflow. See Also: ■ Section 6.3.1, "Oracle OLAP Services" ■ Section 6.3.2, "Oracle Workflow" Table 6–1 Individual Component Postinstallation Configuration Tasks Component Description See Also... Management Pack for Oracle Applications After installation is complete, you have additional configuration tasks to perform before using the Management Pack for Oracle Applications. Getting Started with the Oracle Management Pack for Oracle Applications Shared server support Configuration is dependent on how support was installed. If you installed the Oracle9i database through the Enterprise Edition, Standard Edition, or Personal Edition installation types, shared support was not configured. If you created your Oracle9i database through Oracle Database Configuration Assistant, you were offered a choice of shared or dedicated server support. ■ "Postinstallation Configuration Tasks" of Oracle9i Database Administrator's Guide for Windows ■ Chapter 3, "Selecting Database Creation and Oracle Net Services Configuration Methods" Oracle Net Services network software Oracle Net Configuration Assistant is a tool that assists you in configuring your Oracle network. If you installed Oracle Net Services, Oracle Net Configuration Assistant automatically guided you through network configuration of client computers and Oracle9i Database servers. You can also configure your Oracle network after installation with the Oracle Net Configuration Assistant and Oracle Net Manager tools. ■ Oracle9i Net Services Administrator's Guide and the online help available with both tools ■ Section 3.4, "Configuring Your Network" for a discussion of available configuration choices
- 106. Individual Component Postinstallation Configuration Tasks 6-4 Oracle9i Database Installation Guide Oracle Administration Assistant for Windows NT This tool requires the Microsoft Management Console (the latest version available is recommended) and HTML Help 1.2 or higher to run. Microsoft Management Console is included with Windows 2000, but must be manually installed if you are using Windows NT 4.0. Microsoft documentation or visit: http://www.microsoft.com / Oracle Advanced Security Authentication, encryption, integrity support, and enterprise user security require configuration. Oracle Advanced Security Administrator's Guide Oracle Enterprise Manager There are two situations where postinstallation configuration is required: Case 1: If you installed Oracle Management Server through the Oracle9i Database installation type and you want to start Oracle Enterprise Manager by logging into that Management Server, then you must start Oracle Enterprise Manager Configuration Assistant after installation to configure the Oracle Management Server to use a repository and to create its service. Case 2: If you installed Oracle Management Server and you want to upgrade an existing release 2.x repository to a release 1 (9.0.1) repository, then you must start Oracle Enterprise Manager Configuration Assistant to upgrade the repository. Oracle Enterprise Manager Configuration Guide Oracle HTTP Server You can start, stop, and verify the status of Oracle HTTP Server; view the default initial static page; and check log files. Oracle Enterprise Manager Configuration Guide ■ Oracle interMedia ■ Oracle Spatial These components are automatically configured when installed during the same installation as the Oracle9i Database. If you installed these components during a separate installation from the Oracle9i Database or if you manually copied Oracle7 listener.ora and tnsnames.ora files into your Oracle9i network directory, manual configuration tasks need to be performed. "Postinstallation Configuration Tasks" of Oracle9i Database Administrator's Guide for Windows for procedures Table 6–1 (Cont.) Individual Component Postinstallation Configuration Tasks Component Description See Also...
- 107. Individual Component Postinstallation Configuration Tasks Postinstallation Configuration Tasks 6-5 Oracle Internet Directory ■ UNIX Emulation Utility You must download a UNIX emulation utility for Windows NT to run Oracle Internet Directory's shell script tools on Windows NT (BULKLOAD.SH, BULKDELETE.SH, BULKMODIFY.SH, CATALOG.SH, and LDAPREPL.SH). Two certified third-party software vendors provide this utility: ■ Cygnus (open source) http://www.cygwin.co m/ ■ MKS Toolkit (commercially available) http://www.mkssoftwa re.com/products/ Oracle Internet Directory Administrator's Guide Oracle Internet Directory (Cont.) ■ Password Encryption If you are upgrading from Oracle Internet Directory release 2.1.1, you must upgrade the password to support multiple hash schemes. Oracle Internet Directory Administrator's Guide Oracle Real Application Clusters Postinstallation configuration procedures must be performed to enable high availability and Oracle Enterprise Manager functionality. Oracle9i Real Application Clusters Installation and Configuration Oracle Services for Microsoft Transaction Server For Windows NT installation, if you did not install the Microsoft Management Console (MMC) before installing Oracle9i, then you must manually start the OracleMTSRecoveryServic e service and change its status to Automatic. Perform the following tasks before using Oracle Services for Microsoft Transaction Server: ■ Create the Microsoft Transaction Server administrator account ■ Schedule a database server-level transaction recovery job "Managing Recovery Scenarios" of Oracle Developer's Guide for Microsoft Transaction Server PL/SQL External Routines Configuration is dependent on the network configuration files used. In nearly all cases, configuration is automatic. However, if you are using pre-8.0.3 tnsnames.ora and listener.ora files with your 9.0 database, manual configuration is required. "Developing Applications" of Oracle9i Database Getting Starting for Windows Table 6–1 (Cont.) Individual Component Postinstallation Configuration Tasks Component Description See Also...
- 108. Individual Component Postinstallation Configuration Tasks 6-6 Oracle9i Database Installation Guide 6.3.1 Oracle OLAP Services This section contains these topics: ■ Section 6.3.1.1, "OLAP Services Postinstallation Tasks" ■ Section 6.3.1.2, "CORBA Naming Service" ■ Section 6.3.1.3, "Unlocking OLAP Accounts and Changing OLAP Passwords" ■ Section 6.3.1.4, "Memory Requirements for MOLAP" ■ Section 6.3.1.5, "Changes to the Oracle OLAP API" 6.3.1.1 OLAP Services Postinstallation Tasks After installing OLAP Services, perform the following additional steps. 1. Two scripts must be executed for the OLAP metadata to set up materialized views correctly for the OLAP API. To execute these scripts: a. Unlock the OLAPSYS identity and reset the password. b. Open SQL*Plus or SQL*Plus Worksheet from the Windows Program menu. c. Log in using the OLAPSYS identity. d. Execute these scripts: @oracle_home/cwmlite/admin/onemrv.sql @oracle_home/cwmlite/admin/onemrsyn.sql 2. The OLAP API client batch file must be edited so that the OLAP service name appears in upper-case letters. To edit this file: a. Use any text editor to open the batch file: ORACLE_BASEORACLE_HOMEolapolapibinolapi.bat b. Change the service name from lower- to upper-case letters in three places in the last line of the file, in the -ServerName, -DORBagentAddr, and -SessionIIOPService settings. c. Save the file. Pro*COBOL Pro*COBOL supports specific compilers. "Introducing Pro*COBOL" of Pro*COBOL Precompiler Getting Started for Windows SQL*Plus help file If you want to use online help with SQL*Plus, you must populate the SQL*Plus tables with help files. "Installing SQL*Plus Help and Demonstration Tables" of SQL*Plus Getting Started for Windows Note: ORACLE_HOME is the pathname of your Oracle home directory, such as c:OraHome90. Table 6–1 (Cont.) Individual Component Postinstallation Configuration Tasks Component Description See Also...
- 109. Individual Component Postinstallation Configuration Tasks Postinstallation Configuration Tasks 6-7 3. The SID must be appended to the SessionIIOPService configuration settings. To edit the Windows registry where this value is stored: a. Open the Windows Run dialog box and start regedit. b. On the HKEY_LOCAL_MACHINE page, expand the folders for SOFTWARE/ORACLE/OLAP/ExpressServer/OLAPServer. c. Select OLAPI. d. The registry settings appear in the right pane. e. Double-click SessionIIOPService. f. The Edit string dialog box is displayed. g. In the Value data box, add the SID for your OLAP-enabled database to the end of the value. h. Choose OK. 6.3.1.2 CORBA Naming Service An OLAP service automatically registers with the Oracle CORBA naming service, which is provided with the Oracle database. Java clients that are connecting through the OLAP API should use this naming service to locate the OLAP service. 6.3.1.3 Unlocking OLAP Accounts and Changing OLAP Passwords Oracle9i OLAP Services uses the system-provided Oracle usernames OLAPSRV and OLAPDBA to connect to the Oracle database. OLAP Services stores these passwords in the Windows registry. If the password for an OLAP system username is changed in the Oracle database before it is changed in the Windows registry, neither the Oracle9i OLAP service nor Oracle9i OLAP Services Instance Manager can connect to the Oracle database. Because OLAP Services Instance Manager is used to save the OLAP system passwords to the Windows registry in an encrypted form, you cannot update the system passwords in the Windows registry if you cannot access OLAP Services Instance Manager. During installation of Oracle9i, you are prompted to unlock system-provided database identities (usernames) and reset their passwords. If you reset the password using a password other than the default password, the password in the database and the password in the Windows registry do not match and you cannot access OLAP Services Instance Manager. If you do not reset the password, Oracle expires the password and you cannot access OLAP Services Instance Manager. To prevent this situation, during installation you should do the following: 1. Unlock the username. 2. Reset the password to the default password as shown in the following table. See Also: ■ "Connecting to a Data Store" of Oracle9i OLAP Services Developer's Guide to the Oracle OLAP API ■ Technical Note Number A92121-01, "Getting the CORBA Stub for an OLAP API Connection" available from http://www.oracle.com/support/metalink/
- 110. Individual Component Postinstallation Configuration Tasks 6-8 Oracle9i Database Installation Guide After installation is complete, you can change the passwords for the OLAP Services system usernames by first resetting the passwords in OLAP Services Instance Manager and then resetting the password in the database. 6.3.1.4 Memory Requirements for MOLAP The PageBufferCount configuration parameter has a default setting of 4096, which is appropriate for ROLAP applications. Instances of OLAP Services that support MOLAP applications require additional memory resources. To support MOLAP, set PageBufferCount to NA to give OLAP Services access to half of the physical memory. Note that you may need to fine tune this setting to allow sufficient memory for the database to run on the same computer. 6.3.1.5 Changes to the Oracle OLAP API The CURSOR_MANAGER_DATA_UPDATED event in the CursorManagerUpdateEvent class is not supported in this release. 6.3.2 Oracle Workflow This section contains these topics: ■ Section 6.3.2.1, "Oracle Workflow Postinstallation Tasks" ■ Section 6.3.2.2, "workflow.log File" ■ Section 6.3.2.3, "Installing and Configuring Your Web Server for Oracle Workflow" 6.3.2.1 Oracle Workflow Postinstallation Tasks You must perform a number of configuration procedures, including: ■ Editing the init.ora parameter file ■ Installing and configuring a Web server ■ Verifying your base URL ■ Setting up the Oracle Workflow Monitor and HTML help 6.3.2.2 workflow.log File The workflow.log file produced during installation of Oracle Workflow can contain sensitive information. To protect this sensitive information, either delete workflow.log or change the permissions for the file so that only authorized administrators can access it. User Name Default Password OLAPSRV INSTANCE OLAPDBA OLAPDBA See Also: "Tuning" of Oracle9i OLAP Services Concepts and Administration Guide for more information See Also: ■ Oracle Workflow Server Installation Notes ■ Oracle Workflow Client Installation Notes ■ Oracle Workflow Guide
- 111. Individual Component Postinstallation Configuration Tasks Postinstallation Configuration Tasks 6-9 6.3.2.3 Installing and Configuring Your Web Server for Oracle Workflow If you install Oracle9i Application Server release 1.0.2.2 as your Web server, specify the settings listed in Table 6–2 when creating a Database Access Descriptor (DAD) for Oracle Workflow. Table 6–2 Oracle Workflow DAD Settings Field... Enter... Database Access Descriptor Name your_Workflow_DAD Schema Name Leave Blank Oracle User Name Leave Blank Oracle Password Leave Blank Oracle Connect String connect_string Authentication Mode Basic Session Cookie Name Leave Blank Package/Session Management Type Stateless (Reset Package State) Enable Connection Pooling? Yes Default (Home) Page wfa_html.home Attention: Be sure you leave the Oracle User Name and Oracle Password blank to enable mod_plsql database authentication. You can also leave any remaining settings blank.
- 112. Individual Component Postinstallation Configuration Tasks 6-10 Oracle9i Database Installation Guide
- 113. A Individual Components Available for Installation A-1 AIndividual Components Available for Installation This appendix identifies higher-level components available with each installation type. The Custom installation type is not listed for any of the above three top-level components since it enables installation of all components in the current category. Specific topics discussed are: ■ Appendix A.1, "Oracle9i Database Components" ■ Appendix A.2, "Oracle9i Client Components" ■ Appendix A.3, "Oracle9i Management and Integration Components" ■ Appendix A.4, "Component Descriptions" A.1 Oracle9i Database Components Table A–1 alphabetically lists the components available with each installation type of the Oracle9i Database top-level component. Note: Some components can only be installed through a Custom installation. Such components have an availability of "No" listed for other installation types in the tables in this appendix. See Also: Section 4.4.4, "Reviewing the Installation Session Log" for information about a log file of all components and features installed (including lower-level components such as Required Support Files or Common Files) Table A–1 Oracle9i Database Components Component Enterprise Edition Standard Edition Personal Edition Advanced Queueing Yes Yes Yes Advanced Replication1 Yes2 Yes Yes Generic Connectivity Yes Yes Yes Object Type Translator, includes: Yes Yes Yes ■ Oracle INTYPE File Assistant Yes Yes Yes Oracle Administration Assistant for Windows NT Yes Yes Yes
- 114. Oracle9i Database Components A-2 Oracle9i Database Installation Guide Oracle Advanced Security, includes: Yes No Yes ■ Authentication Support, includes: Yes No Yes DCE (with SSO support) Yes No Yes Entrust Yes No Yes Kerberos (with SSO support) Yes No Yes RADIUS (for Smart Cards, Token Cards, and Biometrics) Yes No Yes Secure Socket Layer (with X.509 version 3 and SSO support) Yes Yes Yes ■ Encryption and Integrity Support, includes: Yes No Yes DES40 Encryption Yes No Yes DES56 Encryption Yes No Yes 3DES_112 Encryption (2-key option) Yes No Yes 3DES_168 Integrity (3-key option) Yes No Yes MD5 Integrity Yes No Yes RC4_40 Encryption Yes No Yes RC4_56 Encryption Yes No Yes RC4_128 Encryption Yes No Yes RC4_256 Encryption Yes No Yes SHA-1 Integrity Yes No Yes ■ Enterprise User Security, includes: Yes No Yes Oracle Enterprise Login Assistant Yes No Yes Oracle Enterprise Security Manager (available as an Oracle Enterprise Manager Integrated Application) Yes No Yes Oracle Wallet Manager Note: Oracle Enterprise Login Assistant, Oracle Enterprise Security Manager, and Oracle Wallet Manager are features of Oracle Advanced Security and can only be used if you have purchased an Oracle Advanced Security license. Yes No Yes ■ Thin JDBC Java-based Encryption Support, includes: Yes No Yes DES40 Encryption Yes No Yes DES56 Encryption Yes No Yes MD5 Integrity Yes No Yes RC4_40 Encryption Yes No Yes RC4_56 Encryption Yes No Yes RC4_128 Encryption Yes No Yes RC4_256 Encryption Yes No Yes SHA-1 Integrity Yes No Yes Table A–1 (Cont.) Oracle9i Database Components Component Enterprise Edition Standard Edition Personal Edition
- 115. Oracle9i Database Components Individual Components Available for Installation A-3 Oracle Call Interface Yes Yes Yes Oracle COM Automation Feature Yes No Yes Oracle Connection Manager No No No Oracle Data Migration Assistant Yes Yes Yes Oracle Database Configuration Assistant Yes Yes Yes Oracle Dynamic Services Yes Yes Yes Oracle Enterprise JavaBeans and CORBA Tools Yes Yes Yes Oracle Enterprise Manager, includes: Yes Yes Yes ■ Oracle Enterprise Manager Client, includes: Yes Yes Yes Oracle Enterprise Manager Console Yes Yes Yes Oracle Enterprise Manager Integrated Applications, includes: Yes Yes Yes - Oracle Data Guard Manager Yes Yes Yes - Oracle Directory Manager Yes Yes Yes - Oracle Enterprise Security Manager Note: Licensed through the Oracle Advanced Security. Yes Yes Yes - Oracle Forms Server Manager Yes Yes Yes - Oracle LogMiner Viewer Yes Yes Yes - Oracle Net Manager Yes Yes Yes - OLAP Services Instance Manager Yes Yes Yes - Oracle Policy Manager Yes Yes Yes - Oracle Spatial Index Advisor Yes Yes Yes - Oracle Text Manager Yes Yes Yes - SQL*Plus Worksheet Yes Yes Yes Oracle Enterprise Manager Management Packs, include: Yes No No - Oracle Change Management Pack Yes No No - Oracle Diagnostics Pack Yes No No - Oracle Management Pack for Oracle Applications Yes No No - Oracle Standard Management Pack No Yes No - Oracle Tuning Pack Yes No No ■ Oracle Enterprise Manager Paging Server Yes Yes Yes ■ Oracle Enterprise Manager Quick Tours Yes No Yes ■ Oracle Enterprise Manager Web Site3 Yes Yes Yes ■ Oracle Intelligent Agent (includes data collection services)4 Yes Yes Yes ■ Oracle Management Server5 , includes: Yes Yes Yes Table A–1 (Cont.) Oracle9i Database Components Component Enterprise Edition Standard Edition Personal Edition
- 116. Oracle9i Database Components A-4 Oracle9i Database Installation Guide Oracle Enterprise Manager Configuration Assistant Yes Yes Yes Oracle HTTP Server powered by Apache, includes: Yes Yes Yes ■ Apache Configuration for Oracle Java Server Pages Yes Yes Yes ■ Apache Configuration for Oracle XML Developer's Kit Yes Yes Yes ■ Apache JServ, includes: Yes Yes Yes JSDK Yes Yes Yes Sun JDK Yes Yes Yes ■ Apache Module for Oracle Servlet Engine Yes Yes Yes ■ Apache Web Server Files Yes Yes Yes ■ Business Components for Java (BC4J) Runtime Yes Yes Yes ■ Oracle Mod PL/SQL Gateway Yes Yes Yes ■ Oracle Perl Interpreter Yes Yes Yes Oracle interMedia, includes: Yes Yes Yes ■ Oracle interMedia Annotator Yes Yes Yes ■ Oracle interMedia Audio Yes Yes Yes ■ Oracle interMedia Client Option Yes Yes Yes ■ Oracle interMedia Image Yes Yes Yes ■ Oracle interMedia Locator Yes Yes Yes ■ Oracle interMedia Video Yes Yes Yes Oracle Internet Directory Client Yes Yes Yes Oracle JDBC Drivers, includes: Yes Yes Yes ■ Oracle JDBC Thin Driver for JDK 1.1 Yes Yes Yes ■ Oracle JDBC Thin Driver for JDK 1.2 Yes Yes Yes ■ Oracle JDBC/OCI Driver for JDK 1.1 Yes Yes Yes ■ Oracle JDBC/OCI Driver for JDK 1.2 Yes Yes Yes Oracle Migration Workbench No No No Oracle Label Security No No No Oracle Names No No No Oracle Objects for OLE Yes Yes Yes Oracle ODBC Driver Yes Yes Yes Oracle OLAP Services Yes No No Oracle Net Services, includes: Yes Yes Yes ■ Oracle Net Configuration Assistant Yes Yes Yes ■ Oracle Net Manager Yes Yes Yes ■ Oracle Net Listener Yes Yes Yes ■ Oracle Net Protocol Support6 Yes Yes Yes Table A–1 (Cont.) Oracle9i Database Components Component Enterprise Edition Standard Edition Personal Edition
- 117. Oracle9i Database Components Individual Components Available for Installation A-5 Oracle Partitioning Yes No Yes Oracle Performance Monitor for Windows NT No No No Oracle Provider for OLE DB Yes Yes Yes Oracle Remote Configuration Agent Yes Yes Yes Oracle Services for Microsoft Transaction Server No No No Oracle SNMP Agent Yes Yes Yes Oracle Spatial Yes No Yes Oracle SQLJ, includes: Yes Yes Yes ■ SQLJ Runtime Yes Yes Yes ■ SQLJ Translator Yes Yes Yes Oracle Syndication Server Yes Yes Yes Oracle Text Yes Yes Yes Oracle Trace Yes Yes Yes Oracle Universal Installer, includes: Yes Yes Yes ■ Oracle's version of Java Runtime Environment Yes Yes Yes ■ Oracle Home Selector Yes Yes Yes Oracle Utilities, includes: Yes Yes Yes ■ Character Set Migration Utility Yes Yes Yes ■ Database Verify Utility Yes Yes Yes ■ Export Yes Yes Yes ■ Import Yes Yes Yes ■ Migration Utility Yes Yes Yes ■ Recovery Manager Yes Yes Yes ■ SQL*Loader Yes Yes Yes Oracle Ultra Search Middle Tier Yes Yes Yes Oracle Ultra Search Server Yes Yes Yes Oracle Workspace Manager Yes Yes Yes Oracle XML Developer's Kit Yes Yes Yes Oracle XML SQL Utility Yes Yes Yes Oracle9i JVM, includes: Yes Yes Yes ■ Java Virtual Machine Yes Yes Yes Oracle9i JVM Accelerator Yes Yes Yes ■ Oracle Servlet Engine Yes Yes Yes ■ Oracle9i Real Application Clusters7 Yes No No Oracle9i Server (the Oracle9i Database), includes: Yes Yes Yes ■ Oracle Database Demos Yes Yes Yes Table A–1 (Cont.) Oracle9i Database Components Component Enterprise Edition Standard Edition Personal Edition
- 118. Oracle9i Client Components A-6 Oracle9i Database Installation Guide A.2 Oracle9i Client Components Table A–2 alphabetically lists the components available with each installation type of the Oracle9i Client top-level component. ■ PL/SQL Yes Yes Yes ■ PL/SQL Embedded Gateway Yes Yes Yes Oracle9i Windows Documentation (release documentation, such as installation guide and release notes) Yes Yes Yes Pro*C/C++ Yes No Yes Pro*COBOL 9.0.1 Yes No Yes Pro*COBOL 1.8.76 Yes No Yes Replication Management API Yes Yes Yes Sample Schema Demos Yes Yes Yes SQL*Plus Yes Yes Yes 1 Updatable materialized views can be created in any edition of the database. 2 Multimaster replication is only available in the Enterprise Edition. 3 Oracle Enterprise Manager Web Site includes a preconfigured Oracle HTTP Server as the Web listener for browser-based Oracle Enterprise Manager. 4 Oracle Intelligent Agent is only available on Windows NT and 2000 for Oracle9i Personal Edition. Oracle Intelligent Agent is not supported and its functionality is not available on Windows 98 databases of Oracle9i Personal Edition. 5 Oracle Management Server includes a preconfigured Oracle HTTP Server as the Web listener for the central Enterprise Manager Reporting Web site. 6 When Oracle Net Services is installed through the Oracle9i Database installation type, Oracle Protocol Support is automatically installed for the networking protocols detected. 7 Oracle Real Application Clusters is only installed if a cluster is detected. See Also: Section A.4 for descriptions and release numbers of these components Table A–2 Oracle9i Client Components Component Administrator Runtime Advanced Queueing API Yes Yes Object Type Translator, includes: Yes No ■ Oracle INTYPE File Assistant Yes No Oracle Advanced Security, includes: Yes Yes ■ Authentication Support, includes: Yes Yes CyberSafe (with SSO support) No No DCE (with SSO support) No No Entrust No No Kerberos (with SSO support) No No RADIUS (for Smart Cards, Token Cards, and Biometrics) No No Table A–1 (Cont.) Oracle9i Database Components Component Enterprise Edition Standard Edition Personal Edition
- 119. Oracle9i Client Components Individual Components Available for Installation A-7 Secure Socket Layer (with X.509 version 3 and SSO support) Yes Yes ■ Enterprise User Security, includes: Yes Yes 3DES_112 Encryption (2-key option) Yes Yes 3DES_168 Integrity (3-key option) Yes Yes DES40 Encryption Yes Yes DES56 Encryption Yes Yes MD5 Integrity Yes Yes RC4_40 Encryption Yes Yes RC4_56 Encryption Yes Yes RC4_128 Encryption Yes Yes RC4_256 Encryption Yes Yes SHA-1 Integrity Yes Yes ■ Enterprise User Security, includes: Yes Yes Oracle Enterprise Login Assistant1 Yes Yes Oracle Enterprise Security Manager1 (available as an Oracle Enterprise Manager Integrated Application) Yes No Oracle Wallet Manager1 Yes Yes ■ Thin JDBC Java-based Encryption Support, includes: Yes Yes DES40 Encryption Yes Yes DES56 Encryption Yes Yes MD5 Integrity Yes Yes RC4_40 Encryption Yes Yes RC4_56 Encryption Yes Yes RC4_128 Encryption Yes Yes RC4_256 Encryption Yes Yes SHA-1 Integrity Yes Yes Oracle Call Interface Yes No Oracle Dynamic Services Server Yes Yes Oracle Enterprise JavaBeans and CORBA Tools Yes Yes Oracle Enterprise Manager, includes: Yes No ■ Oracle Enterprise Manager Client, includes: Yes No Oracle Enterprise Manager Console Yes No Oracle Enterprise Manager Integrated Applications, includes: Yes No - Oracle Data Guard Manager Yes No - Oracle Directory Manager Yes No Table A–2 (Cont.) Oracle9i Client Components Component Administrator Runtime
- 120. Oracle9i Client Components A-8 Oracle9i Database Installation Guide - Oracle Enterprise Security Manager Note: Licensed through Oracle Advanced Security. Yes No - Oracle Forms Server Manager Yes No - Oracle LogMiner Viewer Yes No - Oracle Net Manager Yes No - Oracle Policy Manager Yes No - OLAP Services Instance Manager Yes No - Oracle Spatial Index Advisor Yes No - Oracle Text Manager Yes No - SQL*Plus Worksheet Yes No ■ Oracle Enterprise Manager Management Packs, include: Yes No Oracle Change Management Pack Yes No Oracle Diagnostics Pack Yes No Oracle Management Pack for Oracle Applications Yes No Oracle Standard Management Pack No No Oracle Tuning Pack Yes No Oracle HTTP Server2 No No Oracle interMedia Annotator Yes Yes Oracle interMedia Client Option Yes Yes Oracle Internet Directory Client Yes Yes Oracle JDBC Drivers, includes: Yes Yes ■ Oracle JDBC Thin Driver for JDK 1.1 Yes Yes ■ Oracle JDBC Thin Driver for JDK 1.2 Yes Yes ■ Oracle JDBC/OCI Driver for JDK 1.1 Yes Yes ■ Oracle JDBC/OCI Driver for JDK 1.2 Yes Yes Oracle Migration Workbench No No Oracle Net Services, includes: Yes Yes ■ Oracle Net Configuration Assistant Yes Yes ■ Oracle Net Manager Yes Yes ■ Oracle Net Protocol Support Yes Yes Oracle Objects for OLE Yes No Oracle ODBC Driver Yes No Oracle Provider for OLE DB Yes No Oracle Services for Microsoft Transaction Server No No Oracle SQLJ, includes: Yes Yes ■ SQLJ Runtime Yes Yes ■ SQLJ Translator Yes Yes Table A–2 (Cont.) Oracle9i Client Components Component Administrator Runtime
- 121. Oracle9i Management and Integration Components Individual Components Available for Installation A-9 A.3 Oracle9i Management and Integration Components Table A–3 alphabetically lists the components available with each installation type of the Oracle9i Management and Integration top-level component. Oracle Syndication Server Yes Yes Oracle Ultra Search Middle Tier Yes No Oracle Universal Installer, includes: Yes Yes ■ Oracle's version of Java Runtime Environment Yes Yes ■ Oracle Home Selector Yes Yes Oracle Utilities, includes: Yes Yes ■ Character Set Migration Utility Yes Yes ■ Export Yes Yes ■ Import Yes Yes ■ Recovery Manager Yes Yes ■ SQL*Loader Yes Yes Oracle Workflow Builder No No Oracle Workflow Mailer No No Oracle XML Developer's Kit Yes No Oracle XML SQL Utility Yes No Oracle9i Windows Documentation (release documentation, such as installation guide and release notes) Yes Yes PL/SQL Yes Yes Pro*C/C++ Yes No Pro*COBOL 9.0.1 Yes No Pro*COBOL 1.8.76 Yes No Replication Management API Yes Yes SQL*Plus Yes Yes 1 Oracle Enterprise Login Assistant, Oracle Enterprise Security Manager, and Oracle Wallet Manager are features of Oracle Advanced Security and can only be used if you have purchased an Oracle Advanced Security license. 2 See "Oracle HTTP Server powered by Apache, includes:" on page A-4 for a list of subcomponents installed with Oracle HTTP Server. See Also: Section A.4 for descriptions and release numbers of these components Note: This table lists all the components that are installed with the Oracle Internet Directory and Oracle Integration Server installation types if an Oracle9i Database is not currently installed. Table A–2 (Cont.) Oracle9i Client Components Component Administrator Runtime
- 122. Oracle9i Management and Integration Components A-10 Oracle9i Database Installation Guide Table A–3 Oracle9i Management and Integration Components Component Oracle Management Server Oracle Internet Directory Oracle Integration Server Advanced Queueing API Yes Yes Yes Advanced Replication Management API No Yes Yes Generic Connectivity No Yes Yes Object Type Translator, includes: No Yes Yes ■ Oracle INTYPE File Assistant No Yes Yes Oracle Advanced Security, includes: Yes Yes Yes ■ Oracle Enterprise Login Assistant1 Yes Yes No ■ Oracle Enterprise Security Manager1 (available as an Oracle Enterprise Manager Integrated Application) Yes No No ■ Secure Socket Layer (with X.509 version 3 and SSO support) Yes Yes Yes ■ Oracle Wallet Manager1 Yes Yes Yes Oracle Call Interface No Yes Yes Oracle Connection Manager No No No Oracle Data Migration Assistant No Yes Yes Oracle Database Configuration Assistant No Yes Yes Oracle Dynamic Services Server No Yes Yes Oracle Enterprise JavaBeans and CORBA Tools No Yes Yes Oracle Enterprise Manager, includes: Yes No No ■ Oracle Enterprise Manager Client, includes: Yes No No Oracle Enterprise Manager Console Yes No No Oracle Enterprise Manager Integrated Applications, includes: Yes No No - OLAP Services Instance Manager Yes No No - Oracle Data Guard Manager Yes No No - Oracle Directory Manager Yes Yes No - Oracle Enterprise Security Manager Note: Licensed through Oracle Advanced Security. Yes No No - Oracle Forms Server Manager Yes No No - Oracle LogMiner Viewer Yes No No - Oracle Net Manager Yes No No - Oracle Policy Manager Yes No No - Oracle Spatial Index Advisor Yes No No - Oracle Text Manager Yes No No - SQL*Plus Worksheet Yes No No
- 123. Oracle9i Management and Integration Components Individual Components Available for Installation A-11 ■ Oracle Enterprise Manager Management Packs, include: Yes No No Oracle Change Management Pack Yes No No Oracle Diagnostics Pack Yes No No Oracle Management Pack for Oracle Applications Yes No No Oracle Standard Management Pack No No No Oracle Tuning Pack Yes No No ■ Oracle Enterprise Manager Paging Server Yes No No ■ Oracle Enterprise Manager Quick Tours Yes No No ■ Oracle Management Server, includes:2 Yes No No Oracle Enterprise Manager Configuration Assistant Yes No No ■ Oracle Enterprise Manager Web Site2 Yes No No ■ Oracle Intelligent Agent Yes Yes Yes Oracle HTTP Server3 Yes Yes Yes Oracle interMedia Annotator Yes Yes Yes Oracle interMedia, includes: Yes Yes Yes ■ interMedia Audio Yes Yes Yes ■ interMedia Image Yes Yes Yes ■ interMedia Locator Yes Yes Yes ■ interMedia Video Yes Yes Yes Oracle interMedia Client Option No Yes Yes Oracle Internet Directory Client Yes Yes Yes Oracle Internet Directory Client Toolset No Yes Yes Oracle Internet Directory Configuration Assistant No Yes No Oracle Internet Directory Server No Yes No Oracle JDBC Drivers, includes: Yes Yes Yes ■ Oracle JDBC Thin Driver for JDK 1.1 Yes Yes Yes ■ Oracle JDBC Thin Driver for JDK 1.2 ■ Yes Yes Yes ■ Oracle JDBC/OCI Driver for JDK 1.1 Yes Yes Yes ■ Oracle JDBC/OCI Driver for JDK 1.2 Yes Yes Yes Oracle Names No No No Oracle Net Services, includes: Yes Yes Yes ■ Oracle Net Configuration Assistant Yes Yes Yes ■ Oracle Net Listener Yes Yes Yes ■ Oracle Net Manager Yes Yes Yes Table A–3 (Cont.) Oracle9i Management and Integration Components Component Oracle Management Server Oracle Internet Directory Oracle Integration Server
- 124. Oracle9i Management and Integration Components A-12 Oracle9i Database Installation Guide ■ Oracle Net Protocol Support No No Yes Oracle Objects for OLE No No Yes Oracle ODBC Driver No No No Oracle Partitioning No No Yes Oracle Provider for OLE DB No No Yes Oracle Remote Configuration Agent No Yes Yes Oracle SNMP Agent Yes No Yes Oracle SQLJ, includes: Yes No No ■ SQLJ Runtime Yes Yes Yes ■ SQLJ Translator No No No Oracle Syndication Server No Yes Yes Oracle Text Yes No Yes Oracle Trace No Yes Yes Oracle Ultra Search Middle Tier No Yes Yes Oracle Ultra Search Server No Yes Yes Oracle Universal Installer, includes: Yes Yes Yes ■ Oracle's version of Java Runtime Environment Yes Yes Yes ■ Oracle Home Selector Yes Yes Yes Oracle Utilities, includes: No Yes Yes ■ Character Set Migration Utility No Yes Yes ■ Database Verify Utility No Yes Yes ■ Export Yes Yes Yes ■ Import Yes Yes Yes ■ Migration Utility No Yes Yes ■ Recovery Manager Yes Yes Yes ■ SQL*Loader Yes Yes Yes Oracle Workflow No No Yes Oracle Workspace Manager No Yes No Oracle XML Developer's Kit4 Yes Yes Yes Oracle XML SQL Utility Yes Yes Yes Oracle9i JVM, includes: No Yes Yes ■ Enterprise JavaBeans and CORBA Tools No Yes Yes ■ Java Virtual Machine No Yes Yes ■ Oracle9i JVM Accelerator No Yes Yes ■ Oracle Java Tools No Yes Yes ■ Oracle Servlet Engine No Yes Yes Table A–3 (Cont.) Oracle9i Management and Integration Components Component Oracle Management Server Oracle Internet Directory Oracle Integration Server
- 125. Component Descriptions Individual Components Available for Installation A-13 A.4 Component Descriptions Table A–4 provides descriptions and release numbers of individual components available for installation with the three top-level components. References are made to documentation that more fully describes these components. Some components described below are automatically installed with other components. Oracle9i Server (the Oracle9i Database), includes: No Yes Yes ■ Oracle Database Demos No Yes Yes ■ PL/SQL No Yes Yes ■ PL/SQL Embedded Gateway No Yes Yes Oracle9i Windows Documentation (release documentation, such as installation guide and release notes) Yes Yes Yes Pro*C/C++ No No No Pro*COBOL 1.8.76 No No No Replication Management API No Yes Yes SQL*Plus Yes Yes Yes 1 Oracle Enterprise Login Assistant, Oracle Wallet Manager, and Oracle Enterprise Security Manager are features of Oracle Advanced Security and can only be used if you have purchased an Oracle Advanced Security license. 2 Oracle Management Server includes a preconfigured Oracle HTTP Server as a Web listener for the central Enterprise Manager Reporting Web Site and for browser-based Enterprise Manager. 3 See "Oracle HTTP Server powered by Apache, includes:" in Table A–1 for a list of subcomponents installed with Oracle HTTP Server. 4 A subset of the Oracle XML Developer's Kit is installed with Oracle Internet Directory. See the installation log in the SYSTEM_DRIVE:Program FilesOracleInventorylogs directory for a specific list. Note: Components that require a separate license are identified in their descriptions in this appendix. Table A–4 Component Descriptions Component Release Description See Also... Advanced Queueing 9.0.1 A component that provides the functionality to support the Advanced Queueing application programming interface (API). Oracle9i Application Developer's Guide - Advanced Queuing Advanced Replication 9.0.1 A component that provides the functionality to support the Advanced Replication Management API. The API is a tool that enables you to build customized scripts for replication administration. Oracle9i ReplicationOracle9 i Replication Management API Reference Table A–3 (Cont.) Oracle9i Management and Integration Components Component Oracle Management Server Oracle Internet Directory Oracle Integration Server
- 126. Component Descriptions A-14 Oracle9i Database Installation Guide Assistant Common Files (installed with Oracle assistants, such as Oracle Database Configuration Assistant and Oracle Net Configuration Assistant) 9.0.1 A collection of automatically installed files required by Oracle assistants. These files include: BaliShare 1.1.9 (compressed)DBUI 2.1.2EWT 3.3.18 (compressed)EWTCompat 3.3.15ICE Browser 5.06.3 (compressed)Java Swing Components 1.1.1 (compressed)JEWT 4.1.7JLE 1.0.6Kodiak 1.2.1Oracle Help for Java 3.2.9 - JEWT (compressed) Not applicable Enterprise JavaBeans 9.0.1 An architecture for developing transactional applications as distributed components in Java Oracle9i Enterprise JavaBeans Developer's Guide and Reference Generic Connectivity 9.0.1 Also known as Heterogeneous Services, this feature implements an extensibility framework for accessing non-Oracle systems. This feature integrates the core of Oracle's gateway technology directly into the database server by extending the Oracle SQL engine to optimize and rewrite SQL for non-Oracle data stores. Oracle9i Heterogeneous Connectivity Administrator's Guide Java Runtime Environment (Oracle's version) 1.1.8 Required for running Java applications, such as Oracle Universal Installer. Not applicable Java Virtual Machine (part of Oracle9i JVM) 9.0.1 A complete JDK 1.2-compliant Java execution environment. The Java VM runs in the same process space and address space as the database server, sharing its memory heaps and directly accessing its relational data. This design optimizes memory use, increases throughput, and delivers an open, highly available, secure, and manageable Java server. Oracle9i Java Developer's Guide LSM Administrator GUI 5.7 A client tool for administering the Legato Storage Manager (LSM) server from a separate Windows NT computer. ■ Appendix F, "Installing and Removing Legato Components " ■ Legato Storage Manager Administrator 's Guide Table A–4 (Cont.) Component Descriptions Component Release Description See Also...
- 127. Component Descriptions Individual Components Available for Installation A-15 Legato Storage Manager (LSM) server 5.7 If you are using Recovery Manager (RMAN) for database backups, a media management component such as LSM server is required for backing up and restoring from tape. You can choose to install the media management component on the first component CD-ROM, which is LSM server, or use a third-party media management component that also complies with Oracle's Backup Solutions Program. LSM server also includes a scaled-down version of Legato NetWorker. For more information on this component, call toll free (1) 888-8-LEGATO in the United States of America. ■ Appendix F, "Installing and Removing Legato Components " ■ Legato Storage Manager Administrator 's Guide LogMiner Viewer (an Oracle Enterprise Manager Integrated Application) 9.0.1 A tool that enables you to query redo log files to help analyze past database modification activity. Oracle Enterprise Manager Concepts GuideOracle9i Database Administrator's Guide Object Type Translator (OTT) 9.0.1 OTT is used to create C-struct representations of Abstract Data Types that have been created and stored in an Oracle database. To take advantage of objects, run OTT against the database, and a header file is generated that includes the C-structs. Oracle Call Interface Programmer's Guide Oracle Administration Assistant for Windows NT 9.0.1 A tool that enables you to start and stop the database service, automatically start Oracle services, view Oracle background process information, and configure database users to be authenticated by Windows NT. "Authenticating Database Users with Windows" of Oracle9i Network, Directory, and Security Guide for Windows Oracle Advanced Security 9.0.1 Oracle Advanced Security provides the following comprehensive suite of security services for Oracle9i. This multicomponent product requires a separate license. Oracle Advanced Security Administrator's Guide Authentication support - Strong authentication support is provided. Oracle Advanced Security Administrator's Guide Authorization support - Authorization solutions are provided with the distributed computing environment (DCE), and with the enterprise role management functionality in Oracle Advanced Security. Oracle Advanced Security Administrator's Guide Table A–4 (Cont.) Component Descriptions Component Release Description See Also...
- 128. Component Descriptions A-16 Oracle9i Database Installation Guide Encryption and Integrity support - Data confidentiality is ensured using the encryption and data integrity types. Note: Recent changes in United States Export Administration Regulations (EAR) make it possible for Oracle Corporation to ship one edition of Oracle Advanced Security worldwide. Oracle Advanced Security includes strong encryption for protocols into the Oracle9i Database that were previously available only to the U.S. and Canadian markets. Oracle Advanced Security Administrator's Guide Oracle Advanced Security (Cont.)Enterprise User Security support - Integration with Lightweight Directory Access Protocol (LDAP) v3-compliant directory services is provided, such as Oracle Internet Directory, for centralized enterprise user management, enterprise role management, and single sign-on. Oracle Advanced Security Administrator's Guide Single Sign On support - Single sign on is provided (users authenticate once). Strong authentication then occurs transparently in subsequent connections. Kerberos, CyberSafe, DCE, and secure socket layer (SSL)-based single sign on are supported. Oracle Advanced Security Administrator's Guide Oracle Call Interface (OCI) 9.0.1 An API for accessing an Oracle database from a C or C++ program. You make calls directly to the OCI functions from within your C or C++ program to direct the execution of your SQL statements. Oracle Call Interface Programmer's GuideOracle Call Interface Getting Started for Windows Oracle Change Management Pack (an optional Oracle Enterprise Manager Management Pack) 9.0.1 The Oracle Change Management Pack is a group of integrated applications used to track and make changes to database object definitions. You can use the pack to track metadata changes in databases, eliminate errors and loss of data when upgrading databases to support new applications, analyze the impact and complex dependencies associated with metadata change, and automatically perform upgrades using easy-to-learn wizards that teach systematic upgrade steps. This component requires a separate license. Getting Started with Oracle Change Management Pack Oracle COM Automation Feature 9.0.1 A feature that enables PL/SQL developers to programmatically manipulate COM objects through the OLE Automation interface (IDispatch). Oracle COM Automation Feature Developer's Guide Table A–4 (Cont.) Component Descriptions Component Release Description See Also...
- 129. Component Descriptions Individual Components Available for Installation A-17 Oracle Connection Manager 9.0.1 A component that acts like a router through which client connection requests can either be sent to the next hop or directly to a server. Clients who route their connection requests through Oracle Connection Manager can take advantage of the connection concentration, access control, or multiprotocol support features configured on that Connection Manager. Oracle9i Net Services Administrator's Guide Oracle Data Guard Manager (an Oracle Enterprise Manager Integrated Application) 9.0.1 A tool that helps to automate the tasks involved in setting up and managing a standby database environment. Oracle Enterprise Manager Concepts GuideOracle9i Data Guard Concepts and Administration Oracle Data Migration Assistant 9.0.1 A tool that migrates existing Oracle databases (release 7.3.4.0.0 or later) to Oracle9i release 1 (9.0.1). Oracle9i Database Migration Oracle Database Configuration Assistant 9.0.1 A tool that automates the process of creating, modifying, and deleting an Oracle9i database. You can create an Oracle9i database that is customized to the needs of your environment. Oracle9i Database Administrator's Guide "Postinstallation Database Creation" of Oracle9i Database Administrator's Guide for Windows Oracle Database Demos 9.0.1 A collection of demonstrations that illustrate important Oracle9i database features. Not applicable Oracle Developer Forms Server Manager (an Oracle Enterprise Manager Integrated Application) 9.0.1 A tool that enables you to control and monitor Forms Listener, Forms Server, Load Balancer Server, and Load Balancer Client. In addition to providing basic controls such as startup and shutdown, this tool can also monitor for events that include service down, excessive memory usage, and excessive CPU usage, and can also automatically fix the problems when they occur. Oracle Enterprise Manager Concepts Guide Table A–4 (Cont.) Component Descriptions Component Release Description See Also...
- 130. Component Descriptions A-18 Oracle9i Database Installation Guide Oracle Diagnostics Pack (an optional Oracle Enterprise Manager Management Pack) 9.0.1 The Oracle Diagnostics Pack extends Oracle Enterprise Manager to enable the monitoring, diagnosing, and capacity planning of the multitiered Oracle server environment. The Oracle Diagnostics Pack provides discovery and graphical representation of targets, such as databases or nodes, automated collection of performance and resource usage data, and central monitoring and administration of remote systems using intelligent agents. The Oracle Diagnostics Pack offers a single performance monitoring solution that combines automated agent-based monitoring with real-time graphical charts and historical trend analysis, providing a logical step-by-step methodology for discovering and investigating performance problems. It also provides automated generation and Web publication of Performance Manager charts and Capacity Planner analysis reports. This component requires a separate license. Getting Started with the Oracle Diagnostics Pack Oracle Directory Manager (an Oracle Enterprise Manager Integrated Application) 3.0.1 A Java-based tool for administering most functional areas of Oracle Internet Directory and its related processes. Oracle Internet Directory Administrator's Guide Oracle Dynamic Services 9.0.1 Oracle Dynamic Services is a Java-based programmable framework for composing, managing, and deploying Internet services. Oracle Dynamic Services User's and Administrator's GuideOracle Dynamic Services readme located in ORACLE_ BASEORACLE_ HOMEdsdocr eadme.txt Oracle Enterprise JavaBeans and CORBA Tools 9.0.1 An architecture for developing transactional applications as distributed components in Java. Oracle9i Enterprise JavaBeans Developer's Guide and Reference Oracle Enterprise Login Assistant 9.0.1 A tool that enables single sign on, which implements a subset of Oracle Wallet Manager functionality for opening a user wallet and enabling applications to use it. Oracle Advanced Security Administrator's Guide Oracle Enterprise Manager Administrator's Guide Table A–4 (Cont.) Component Descriptions Component Release Description See Also...
- 131. Component Descriptions Individual Components Available for Installation A-19 Oracle Enterprise Manager 9.0.1 A suite of components that provide an integrated solution for centrally managing your heterogeneous environment. Oracle Enterprise Manager combines a graphical console, Oracle Management Servers, Oracle Intelligent Agents, and tools to provide an integrated, comprehensive systems management platform for managing Oracle and third-party components. Oracle Enterprise Manager Administrator's Guide Oracle Enterprise ManagerClient 9.0.1 The first tier of Oracle Enterprise Manager is comprised of clients such as consoles and management applications, which present graphical user interfaces to administrators for all management tasks. These client components can be installed locally or brought up with a Web browser. Oracle Enterprise Manager Concepts Guide Oracle Enterprise Manager Configuration Assistant (installed automatically with Oracle Management Server) 9.0.1 A tool that assists administrators with Oracle Enterprise Manager repository creation, removal, upgrade, and configuration. Oracle Enterprise Manager Administrator's Guide Oracle Enterprise Manager Console 9.0.1 Client interface for the first tier of Oracle Enterprise Manager, which:Centrally administers, diagnoses, and tunes multiple databasesManages other Oracle components and servicesMonitors and responds to the status of Oracle components and third-party services 24 hours a daySchedules jobs on multiple nodes at varying time intervalsMonitors networked services for eventsCustomizes your display by organizing databases and other services into logical administrative groups Oracle Enterprise Manager Administrator's Guide Oracle Enterprise Manager Integrated Applications 9.0.1 Applications integrated with Oracle Enterprise Manager for managing your Oracle environment, and installed with Oracle Enterprise Manager if your environment requires them. Most applications are accessible from the Oracle Enterprise Manager Navigator pane and/or the console application drawers, or from your operating system. Oracle Enterprise Manager Administrator's Guide Oracle Enterprise Manager Paging Server 9.0.1 A feature that enables administrators to receive paging notifications from the Oracle Enterprise Manager Console. Oracle Enterprise Manager Configuration Guide Table A–4 (Cont.) Component Descriptions Component Release Description See Also...
- 132. Component Descriptions A-20 Oracle9i Database Installation Guide Oracle Enterprise Manager Quick Tours 9.0.1 HTML-based training tools that provide a fast and easy way to learn about a variety of Oracle Enterprise Manager components without having to actually install them. Quick tours are provided for the following components:Oracle Enterprise ManagerOracle Change Management PackOracle Diagnostics PackOracle Tuning PackOracle Management Pack for Oracle ApplicationsManagement Pack for SAP R/3Oracle Standard Management Pack Oracle Enterprise Manager Administrator's Guide Oracle Enterprise Manager Web Site 9.0.1 A component that enables administrators to access the Oracle Enterprise Manager Console from a Web browser. Oracle Enterprise Manager Administrator's Guide Oracle Enterprise Security Manager (an Oracle Enterprise Manager Integrated Application) 9.0.1 A tool that helps you administer the Oracle environment for user security using an LDAP-compliant directory server. This tool allows an administrator to manage enterprise-level role authorization among multiple databases simultaneously. Oracle Advanced Security Administrator's Guide Oracle Fail Safe 3.2.1 A component that provides high availability for Oracle databases and applications deployed on all Microsoft Cluster Server clusters configured with Windows NT or Windows 2000 Datacenter Oracle Fail Safe Concepts and Administration Guide on the CD-ROM on which Oracle Fail Safe is shipped Oracle Home Selector (installed with Oracle Universal Installer) 1.7.0 A tool that enables you to edit your environment path to make an appropriate Oracle home directory your primary home. "Multiple Oracle Homes and Optimal Flexible Architecture" of Oracle9i Database Getting Starting for Windows Oracle HTTP Serverpowered by Apache 1.3.12 A component that provides a preconfigured, ready-to-use listener used by browser-based Oracle Enterprise Manager Console and the central Enterprise Manager Repository Web Site. Oracle Enterprise Manager Configuration Guide Online documentation available from the Start Menu Table A–4 (Cont.) Component Descriptions Component Release Description See Also...
- 133. Component Descriptions Individual Components Available for Installation A-21 Oracle Integration Server 9.0.1 An installation type designed to transform traditional businesses into e-businesses. Oracle Integration Server is designed to integrate and facilitate communication among the various applications (including customer relationship management, enterprise resource planning, business-to-business Internet marketplaces, and auction sites) that comprise an e-business. Oracle Integration Server consists of the following components:Oracle9i Database (with Advanced Queuing, Oracle9i JVM, and Oracle Enterprise JavaBeans and CORBA Tools)Partitioning Advanced Replication Oracle Advanced Security Oracle Workflow Oracle Internet Directory The documentation listed in the descriptions for each of the components installed with Oracle Integration Server Oracle Intelligent Agent 9.0.1 Oracle Intelligent Agent monitors targets on a managed node for registered events and scheduled jobs sent by the Oracle Enterprise Manager Console. Oracle Intelligent Agent also collects statistical data for Capacity Planner and Performance Manager, which are data collecting applications in the Oracle Diagnostics Pack. Oracle Intelligent Agent User's Guide OracleinterMedia 9.0.1 A component that provides file management in a variety of media, from text to audio to video. Files in each medium are managed through a specific component of interMedia. This multicomponent product requires a separate license. Oracle interMedia User's Guide and Reference Oracle interMedia readme located in ORACLE_ BASEORACLE_ HOMEorddadm inREADME.txt OracleinterMediaAudio (installed with Oracle interMedia) 9.0.1 A component that provides for the storage, retrieval, and management of digitized audio data within an Oracle database. Oracle interMedia User's Guide and Reference Oracle interMedia readme located in ORACLE_ BASEORACLE_ HOMEorddadm inREADME.txt Table A–4 (Cont.) Component Descriptions Component Release Description See Also...
- 134. Component Descriptions A-22 Oracle9i Database Installation Guide OracleinterMediaClient Option (part of Oracle interMedia) 9.0.1 A component that provides an Oracle interMedia Audio, Image, and Video Java interface that lets you use client-side applications to manipulate and/or modify multimedia data stored in a network-accessible database on the server. It also provides a simple Oracle interMedia Image sample (simpimg.exe) developed using Microsoft Visual C++. simpimg.exe locates and updates images using Oracle interMedia Image in an Oracle9i Database. Oracle interMedia User's Guide and Reference Oracle interMedia readme located in ORACLE_ BASEORACLE_ HOMEorddadm inREADME.txt OracleinterMediaImage (installed with Oracle interMedia) 9.0.1 A component that provides for the storage, retrieval, and processing of two-dimensional, static bitmapped images. Images are stored efficiently using popular compression schemes in industry-standard desktop publishing image interchange formats. Oracle interMedia User's Guide and Reference Oracle interMedia readme located in ORACLE_ BASEORACLE_ HOMEorddadm inREADME.txt OracleinterMedia Locator (installed with Oracle interMedia) 9.0.1 A component that enables Oracle9i to support online Internet-based geocoding facilities for locator applications and proximity queries. Oracle Spatial User's Guide and Reference Oracle interMedia readme located in ORACLE_ BASEORACLE_ HOMEorddadm inREADME.txt OracleinterMedia Video (installed with Oracle interMedia) 9.0.1 A component that provides for the storage, retrieval, and management of digitized video data within an Oracle database. Oracle interMedia User's Guide and Reference Oracle interMedia readme located in ORACLE_ BASEORACLE_ HOMEorddadm inREADME.txt Table A–4 (Cont.) Component Descriptions Component Release Description See Also...
- 135. Component Descriptions Individual Components Available for Installation A-23 Oracle Internet Directory 3.0.1 An Oracle9i Database-based LDAP v3 directory server, which can be configured prior to server installation for use in centralizing database user, Oracle Net network connector, database listener, Oracle Advanced Security, and Oracle Integration Server parameters, as well as for general-purpose LDAP usage (when purchased separately). Installing the Oracle9i Database through the Custom installation type enables the user to specify the LDAP directory server to use for storing these attributes. A typical installation scenario is to install Oracle Internet Directory on a dedicated server (distinct from the target resource for a particular Oracle9i Database installation). Oracle Internet Directory Administrator's Guide Oracle Internet Directory Client 3.0.1 A component that enables the various components of the Oracle9i Database to use Oracle Internet Directory for centralized storage (as mentioned under the description for Oracle Internet Directory). Oracle Internet Directory Administrator's Guide Oracle Internet Directory Configuration Assistant 3.0.1 A tool for creating the Oracle Internet Directory tablespaces and schema in the Oracle9i Database when Oracle Internet Directory is installed. Oracle Internet Directory Administrator's Guide Oracle Internet Directory Server 3.0.1 A component that responds to LDAP client requests for information about people and resources, and to updates of that information. Oracle Internet Directory Administrator's Guide Oracle Internet File System (Oracle 9iFS) 1.2 Oracle 9iFS makes the Oracle9i Database look and act like a file system that can be accessed through Windows, the Web, FTP, and e-mail clients. Oracle 9iFS is also a superior development platform for many content management applications. Using Java and XML, you can leverage all the capabilities of the file system, customizing its appearance and behavior to fit your needs. Oracle Internet File System Setup and Administration Guide Note: This component ships on a separate CD-ROM in your CD pack. Oracle INTYPE File Assistant (installed with the Object Type Translator) 9.0.1 An assistant that helps you to create an INTYPE file, which provides a list of types for the Object Type Translator to translate. This component is automatically installed with the Object Type Translator. Oracle Call Interface Getting Started for Windows Oracle Java Database Connectivity (JDBC) Drivers 9.0.1 A standard set of Java classes, specified by JavaSoft, that provide vendor-independent access to relational data from Java. Oracle9i JDBC Developer's Guide and Reference Table A–4 (Cont.) Component Descriptions Component Release Description See Also...
- 136. Component Descriptions A-24 Oracle9i Database Installation Guide Oracle Java Tools 9.0.1 Provides Java tools to build and deploy Java stored procedures, CORBA objects, and Enterprise JavaBeans with Oracle9i JVM. Oracle9i SQLJ Developer's Guide and Reference Oracle Management Pack for Oracle Applications (an optional Oracle Enterprise Manager Management Pack) 9.0.1 The Oracle Management Pack for Oracle Applications extends Oracle Enterprise Manager to enable administrators to correlate all tiers of their Oracle Applications deployment. This deployment extends from Oracle Applications-specific Concurrent Processing down through the middle tier to the database and node. This component requires a separate license. Getting Started with the Oracle Management Pack for Oracle Applications Oracle Management Server 9.0.1 The middle tier of Oracle Enterprise Manager, which provides centralized intelligence and distributed control between console clients and managed nodes. Oracle Enterprise Manager Administrator's Guide Oracle Migration Workbench 2.0.1 Tools that simplify the process of migrating data and applications from non-Oracle databases to Oracle9i. The Oracle Migration Workbench enables quick and easy migration of an entire application system (that is, the database schema including triggers and stored procedures) in an integrated, visual environment. Migrations from the following non-Oracle databases are supported:Microsoft AccessMicrosoft SQL ServerSybase Adaptive Server Oracle Migration Workbench Reference for MS Access Reference GuideOracle Migration Workbench Reference for MS SQL Server and Sybase Adaptive Server Reference Guide Note: Access these documents from ORACLE_ BASEORACLE_ HOMEOmwbDoc s or http://otn.or acle.com/ Oracle Label Security 9.0.1 Provides sophisticated Fine Grain Access Control, including label-based access control. This component requires a separate license. Oracle Label Security Administrator's Guide Table A–4 (Cont.) Component Descriptions Component Release Description See Also...
- 137. Component Descriptions Individual Components Available for Installation A-25 Oracle Names 9.0.1 A distributed naming service developed for Oracle environments to help simplify the setup and administration of global, client/server computing networks. Oracle Names does this by establishing and maintaining an integrated system of Names servers. Oracle Names servers work like a directory server, storing addresses for all the database services on a network and making them available to clients that want to make a connection. Note: In future releases, Oracle Names will not be supported as a centralized naming method. Consider using directory naming. Oracle9i Net Services Administrator's Guide Oracle Net Configuration Assistant (previously called Net8 Configuration Assistant) 9.0.1 A postinstallation tool that enables you to configure network components. Oracle Net Configuration Assistant runs automatically after installation, as described in this guide. Use it on either the client or server. It may also be run in standalone mode to configure naming methods usage, the listener, net service names in the tnsnames.ora file, and directory server usage. Oracle9i Net Services Administrator's Guide Oracle Net Listener 9.0.1 A process that resides on the server whose responsibility is to listen for incoming client connection requests and manage traffic to the server. Oracle9i Net Services Administrator's Guide Table A–4 (Cont.) Component Descriptions Component Release Description See Also...
- 138. Component Descriptions A-26 Oracle9i Database Installation Guide Oracle Net Manager (previously called Net8 Assistant) (an Oracle Enterprise Manager Integrated Application) 9.0.1 A tool that combines configuration abilities with component control to provide an integrated environment for configuring and managing Oracle Net Services. It can be used on either the client or server. Use Oracle Net Manager to configure the following network components: ■ Naming Methods Configure the different ways in which connect identifiers are resolved into connect descriptors. ■ Naming Define simple names, connect identifiers, and map them to connect descriptors to identify the network location and identification of a service. Oracle Net Manager supports configuration of connect descriptors in local tnsnames.ora files, a centralized LDAP-compliant directory server, or an Oracle Names server. ■ Listeners Create and configure listeners to receive client connections. Oracle9i Net Services Administrator's Guide Oracle Net Protocol Support 9.0.1 Support that enables client/server conversation over a network using the Named Pipes or TCP/IP protocol. This combination of Oracle components enables an Oracle application on a client to communicate with remote Oracle databases through Named Pipes or TCP/IP (if the Oracle database is running on a host system that supports network communication using Named Pipes or TCP/IP). Oracle9i Net Services Administrator's Guide Oracle Net Services 9.0.1 A suite of networking components that provide enterprise-wide connectivity solutions in distributed, heterogeneous computing environments. Oracle Net Services is comprised of Oracle Net, listener, Oracle Connection Manager, Oracle Net Configuration Assistant, and Oracle Net Manager. Oracle9i Net Services Administrator's Guide Oracle Objects for Object Linking and Embedding (OO4O) 9.0.1 A custom control (OCX or ActiveX) combined with an OLE in-process server that lets you plug native Oracle9i Database functionality into your Windows applications. Online help available from the Start Menu. Table A–4 (Cont.) Component Descriptions Component Release Description See Also...
- 139. Component Descriptions Individual Components Available for Installation A-27 Oracle Objects Functionality 9.0.1 Lets you create and manipulate objects, as well as integrate objects with standard relational functionality. - Oracle OLAP Services 9.0.1 OLAP Services provides a Java OLAP API and an analytical engine. Using OLAP Services, developers can build analytical applications that support complex statistical, mathematical, and financial calculations along with predictive analytical functions such as forecasting, modeling, consolidations, allocations, and scenario management. Because the OLAP API is all Java, OLAP Services supports deployment of analytical applications to large, geographically distributed user communities on the Internet. OLAP Services is installed with Oracle9i Enterprise Edition. This component requires a separate license. Oracle9i OLAP Services Concepts and Administration GuideOracle9i OLAP Services Developer's Guide to the Oracle OLAP API Oracle Open Database Connectivity (ODBC) Driver 9.0.1 A component that provides support for ODBC connections from Windows NT, Windows 2000, and Windows 98 client systems to Oracle9i databases. The Oracle ODBC Driver complies with Version 3.51 of the Microsoft ODBC specification. The SQLBulkOperations ODBC function is not supported. Online help available from the Start Menu. Oracle Partitioning 9.0.1 A feature that provides more control in managing tables and indexes by directing all maintenance operations to individual partitions rather than to tables and index names. This component requires a separate license. Oracle9i Database Concepts Oracle Performance Monitor for Windows NT 9.0.1 A tool that enables database administrators to monitor local and remote database performance through the Windows NT Performance Monitor. "Monitoring a Database" of Oracle9i Database Administrator's Guide for Windows Oracle Policy Manager (an Oracle Enterprise Manager Integrated Application) 9.0.1 Enables you to create and administer security policies for a Virtual Private Database (VPD) and Oracle Label Security. Oracle Label Security Administrator's Guide Oracle Provider for OLE DB 9.0.1 Interfaces that offer high performance and efficient access to Oracle data by applications, compilers, and other database components. Oracle Provider for OLE DB Developer's Guide Table A–4 (Cont.) Component Descriptions Component Release Description See Also...
- 140. Component Descriptions A-28 Oracle9i Database Installation Guide Oracle Real Application Clusters 9.0.1 A component that enables multiple Oracle instances to share a single Oracle database. This component requires a separate license. ■ Appendix B, "Oracle Real Application Clusters Preinstallatio n Tasks" ■ Oracle9i Real Application Clusters Installation and Configuration Oracle Real Application Clusters Guard 3.2 A component that integrates Oracle Real Application Clusters databases with Microsoft Cluster Server clusters deployed on Windows NT and Windows 2000. This component enhances the high availability features of Oracle Real Application Clusters by offering these additional benefits:Automatically restarts failed instances and listeners in a cluster, if you wantDetects and resolves problems with instances that hangEliminates connect-time failover TCP/IP timeout delays for new connection requestsOptionally, runs user-written scripts after a cluster database comes online or goes offline Oracle Real Application Clusters Guard Concepts and Administration Guide on the CD-ROM on which Oracle Real Application Clusters Guard is shipped Oracle Remote Configuration Agent 9.0.1 A component that enables remote configuration and monitoring from Oracle Administration Assistant for Windows NT. Not applicable Oracle Services for Microsoft Transaction Server 9.0.1 A component that provides full integration of database releases 8.0.6, 8.1.x, and 9.0 with Microsoft Transaction Server. This component enables you to develop and deploy COM-based applications using Microsoft Transaction Server. Oracle Developer's Guide for Microsoft Transaction Server Oracle Servlet Engine (part of Oracle Oracle9i JVM) 9.0.1 A Web server built directly into the Oracle9i Database. Oracle Servlet Engine includes an HTTP listener and the ability to distribute Java Server Pages (JSPs) and run servlets directly on the database. Oracle9i Servlet Engine Developer's Guide Oracle SNMP Agent 9.0.1 A component that enables Oracle components to be located, identified, and monitored by any SNMP-based network management system. Oracle SNMP Support Reference Guide Oracle Spatial (previously called Oracle8i Spatial) 9.0.1 A component that makes the storage, retrieval, and manipulation of spatial data easier and more intuitive to users. This component requires a separate license. Oracle Spatial User's Guide and Reference Table A–4 (Cont.) Component Descriptions Component Release Description See Also...
- 141. Component Descriptions Individual Components Available for Installation A-29 Oracle Spatial Index Advisor (an Oracle Enterprise Manager Integrated Application) 9.0.1 A tool that helps you analyze and tune spatial indexes on data. With the analyzer, you can see if indexes are properly defined for optimum query performance. The analyzer also provides an understanding of distribution of the data through visual inspection. Oracle Enterprise Manager Administrator's Guide Oracle SQLJ 9.0.1 A preprocessor for Java programs with embedded SQL statements. It generates Java programs with JDBC calls. Oracle9i SQLJ Developer's Guide and Reference Oracle Standard Management Pack 9.0.1 The Oracle Standard Management Pack is an optional set of applications that provide advanced tools that allow you to monitor and diagnose problems, tune high impact indexes, and track and compare changes in your Oracle environment. Getting Started with the Oracle Standard Management Pack Oracle Syndication Server 9.0.1 Oracle Syndication Server securely syndicates internet content to internet subscribers. Oracle Syndication Server supports all available communication mechanisms while allowing the subscriber access through multiple channels to internet resources, enterprise portals, corporate databases, and conventional file systems. Oracle Syndication Server User's and Administrator's GuideOracle Syndication Server readme located in ORACLE_ BASEORACLE_ HOMEsyndicat iondocreadm e.txt OracleText (installed with Oracle interMedia) (previously called Oracle interMedia Text) 9.0.1 A component that manages and searches for text in the database as quickly and easily as any other type of data. Oracle Text's search techniques make text a standard datatype in the Oracle9i Database that you can create, modify, and delete. Additionally, with Oracle Text, new text-based developments or extensions to existing applications are easy and cost-effective to build with standard SQL tools. With Oracle Text, you can search for data in any Oracle database application that uses text. This can range from search-enabling a comments field in an existing application to implementing large-scale document management systems dealing with multiple document formats and complex search criteria. Oracle Text also supports basic full-text searches in most languages supported by the Oracle9i Database. Oracle Text Reference Table A–4 (Cont.) Component Descriptions Component Release Description See Also...
- 142. Component Descriptions A-30 Oracle9i Database Installation Guide OracleText Manager (an Oracle Enterprise Manager Integrated Application) 9.0.1 A text-search system for managing and searching for text in the Oracle9i Database. This application helps you manage and search for text in the database as quickly and easily as any other type of data. Oracle Enterprise Manager Administrator's Guide Oracle Trace 9.0.1 A component that collects performance and resource utilization data, such as SQL Parse, Execute, Fetch statistics, and Wait statistics. Oracle9i Database Performance Guide and Reference Oracle Tuning Pack (an optional Oracle Enterprise Manager Management Pack) 9.0.1 The Oracle Tuning Pack provides advanced tools that focus on tuning the highest impact database performance areas, such as: application SQL, indexing strategies, instance parameters controlling I/O, SGA performance, and object sizing, placement, and reorganization. The tools in this pack work together to accomplish many database tuning tasks. The applications included in the Oracle Tuning Pack are: Oracle SQL Analyze, Oracle Expert, Outline Editor, Outline Management, Oracle Index Tuning Wizard, Reorg Wizard, and the Tablespace Map. This component requires a separate license. Database Tuning with the Oracle Tuning Pack Oracle Universal Installer 2.0.1 A graphical user interface (GUI) application that lets you quickly install, update, and remove Oracle components. Universal Installer Concepts Guide Oracle Utilities 9.0.1 A suite of components used for database administration. Oracle Utilities include the Character Set Migration utility, Export utility, Import utility, SQL*Loader, Database Verify utility, Migration utility, and Recovery Manager. Oracle9i Database Utilities Note: Windows NT-only utilities like the ORADIM utility are described in Oracle9i Database Administrator's Guide for Windows Oracle Wallet Manager 9.0.1 A tool that generates a public-private key pair and creates a certificate request for submission to a certificate authority, installs a certificate for the identity, and configures trusted certificates for the identity. Oracle Advanced Security Administrator's Guide Table A–4 (Cont.) Component Descriptions Component Release Description See Also...
- 143. Component Descriptions Individual Components Available for Installation A-31 Oracle Workflow 2.6.1 Oracle Workflow is a complete workflow management system that supports business process definition and automation. Its technology enables automation and continuous improvement of business processes, routing information of any type according to user-defined business rules. Oracle Workflow Guide Oracle Workflow Builder 2.6.1 Oracle Workflow Builder is a graphical user interface tool for creating, viewing, and modifying workflow process definitions. It contains a Navigator window to define the activities and components of your business process. Oracle Workflow Guide Oracle Workflow Mailer 2.6.1 This component performs e-mail send and response processing for the Oracle Workflow Notification System. The program sends notification e-mail messages to users and interprets user responses to complete the notifications. This component has an implementation that can integrate directly with any MAPI-compliant mail application on Windows NT. Install the MAPI-compliant implementation on a Windows NT computer by selecting Oracle Workflow Mailer through the Custom installation type of the Oracle9i Client top-level component. This implementation requires a MAPI-compliant mail application installed on the computer and acting as your mail server. Oracle Workflow Guide Oracle Workspace Manager 9.0.1 Oracle Workspace Manager provides a long-transaction framework built on a workspace management system. It uses a series of short transactions and multiple data versions to implement a complete long-transaction event that maintains atomicity and concurrency. Changes are stored in the database as different workspaces. Users are permitted to create new versions of data to update, while maintaining a copy of the old data. The ongoing results of the long transaction are stored persistently, ensuring concurrency and consistency. Oracle9i Application Developer's Guide - Workspace Manager Table A–4 (Cont.) Component Descriptions Component Release Description See Also...
- 144. Component Descriptions A-32 Oracle9i Database Installation Guide Oracle XML Developer's Kit 9.0.1 This kit consists of a set of APIs for parsing and generating XML data. These interfaces have been written for Java, C, C++, and PL/SQL. This kit consists of the following components: XML Parser for Java XML Parser for C XML Parser for C++ XML Parser for PL/SQL XML Class Generator for Java XML Class Generator for C++ XML Transviewer Beans XSQL Servlet Oracle9i Application Developer's Guide - XMLOracle9i XML Reference Oracle XML SQL Utility 9.0.1 This utility is a set of Java classes and PL/SQL wrappers that permit queries to return result sets or objects wrapped in XML. Oracle9i Application Developer's Guide - XMLOracle9i XML Reference Oracle9i Advanced Analytic Services - Data Mining 9.0.1 Oracle9i Advanced Analytic Services -- Data Mining, which is embedded in the database, enables you to build integrated business intelligence applications with complete programmatic control of data mining functions that deliver powerful, scalable modeling and real-time scoring. All model-building and scoring functions are accessible through a Java-based API. Data Mining enables e-businesses to incorporate predictions and classifications throughout all customer interactions and business processes. This component requires a separate license. Oracle9i Data Mining Administrator's GuideOracle9i Data Mining Concepts Note: This documentation ships on the Oracle Data Mining CD-ROM in your CD Pack. Oracle9i JVM 9.0.1 A component that provides a JDK 1.2-compliant Java Virtual Machine, a CORBA 2.0 Object Request Broker, embedded JDBC drivers, a SQLJ translator, and an Enterprise JavaBeans transaction server. Oracle9i Java Developer's Guide Oracle9i JVM Accelerator (part of Oracle9i JVM) 9.0.1 This component enhances the current functionality of Oracle9i JVM to provide native compilation of Java code to improve performance. Oracle9i Java Stored Procedures Developer's Guide Oracle9i JVM Servlet Container (JSC) 9.0.1 The Oracle9i JVM Servlet Container is a built-in Web server running inside the database. It is a servlet runner that works with the Oracle HTTP Server and with Oracle9i JVM to enable distribution of Java Server Pages (JSPs) and to enable servlets to run directly in the database. Oracle9i Servlet Engine Developer's GuideOracle9i Java Developer's Guide Oracle9i Server 9.0.1 The database component of the Oracle9i Enterprise Edition, Oracle9i Standard Edition, or Oracle9i Personal Edition software. Oracle9i Database New FeaturesOracle9i Database Concepts Table A–4 (Cont.) Component Descriptions Component Release Description See Also...
- 145. Component Descriptions Individual Components Available for Installation A-33 Oracle9i Windows Documentation (Release documentation, such as Installation Guide and Release Notes) 9.0.1 The installation guide (this guide) describes how to install Oracle components. The Oracle9i Database release notes for Windows contain important last minute information not included in the documentation library of your Oracle9i Online Windows Documentation CD-ROM. This installation guide Oracle9i Database release notes for Windows PL/SQL 9.0.1 PL/SQL, Oracle's procedural extension of SQL, is an advanced fourth-generation programming language (4GL). It offers modern features such as data encapsulation, overloading, collection types, exception handling, and information hiding. PL/SQL also offers seamless SQL access, tight integration with the Oracle server and tools, portability, and security. PL/SQL User's Guide and Reference PL/SQL Embedded Gateway 9.0.1 This component takes and incorporates PL/SQL Gateway generic functionality directly into the Oracle9i Database. This component enables users to use their browsers to invoke PL/SQL procedures stored in an Oracle9i Database. The stored procedures can retrieve data from tables in the database, and generate HTTP responses (for example, HTML pages) that include the data to return to the client browser. Oracle9i Servlet Engine Developer's Guide Pro*C/C++ 9.0.1 The Pro*C/C++ precompiler takes SQL statements embedded in your C and C++ programs and converts them to standard C code. When you precompile this code, the result is a C or C++ program that you compile and use to build applications that access an Oracle9i database. Pro*C/C++ Precompiler Programmer's GuidePro*C/C++ Precompiler Getting Started for Windows Pro*COBOL 9.0.1 and 1.8.76 To access an Oracle9i Database, you use a high-level query language called Structured Query Language (SQL). You often use SQL through an interactive interface, such as SQL*Plus. Pro*COBOL is a precompiler that converts SQL statements embedded within COBOL programs into standard Oracle run-time library calls. The output file can then be compiled by a COBOL compiler. Pro*COBOL Precompiler Programmer's GuidePro*COBOL Precompiler Getting Started for Windows Table A–4 (Cont.) Component Descriptions Component Release Description See Also...
- 146. Component Descriptions A-34 Oracle9i Database Installation Guide Server Management (SRVM) 9.0.1 A component that provides the management tools and utilities to manage an Oracle Real Application Clusters configuration. This component is automatically installed on the server with Oracle Real Application Clusters. ■ Appendix B, "Oracle Real Application Clusters Preinstallatio n Tasks" ■ Oracle9i Real Application Clusters Installation and Configuration SQL*Plus 9.0.1 A tool that lets you use the SQL and PL/SQL database languages in Windows environments. SQL*Plus has both command line and graphical user interface (GUI) versions. SQL*Plus User's Guide and Reference SQL*Plus Worksheet (an Oracle Enterprise Manager Integrated Application) 9.0.1 A GUI application for manually entering SQL, PL/SQL, and database administrator commands or running stored scripts. Oracle Enterprise Manager Administrator's Guide SQLJ Runtime (installed with Oracle SQLJ) 9.0.1 A thin layer of pure Java code that runs above the JDBC driver. When Oracle SQLJ translates your SQLJ source code, embedded SQL commands in your Java application are replaced by calls to the SQLJ runtime. Oracle9i SQLJ Developer's Guide and Reference SQLJ Translator (installed with Oracle SQLJ) 9.0.1 A preprocessor for Java programs that contains embedded SQL statements. SQLJ Translator converts the SQL statements to JDBC calls. Oracle9i SQLJ Developer's Guide and Reference WINSOCK2 on Windows NT support 9.0.1 Oracle Net supports both the WINSOCK 1.1 and WINSOCK2 socket interface. Oracle Net automatically detects WINSOCK2 on Windows NT and uses it if it is available. WINSOCK2 is a standard feature of the Windows NT release 4.0 operating system. Oracle uses these WINSOCK2 features in Oracle Net Services:Overlapped I/O with eventsShared sockets (can be enabled as an optional feature) "Oracle Net Services Configuration" of Oracle9i Network, Directory, and Security Guide for Windows XML Development Kit 9.0.1 Required for integrating and running XML applications with the database. Oracle9i Application Developer's Guide - XML Table A–4 (Cont.) Component Descriptions Component Release Description See Also...
- 147. B Oracle Real Application Clusters Preinstallation Tasks B-1 B Oracle Real Application Clusters Preinstallation Tasks This appendix describes the required preinstallation tasks for cluster software and Oracle Real Application Clusters on Windows. Windows-specific information is described in this section and in the Oracle Cluster Setup Wizard online Help. This appendix contains these topics: ■ Section B.1, "About Oracle Real Application Clusters" ■ Section B.2, "Preinstallation Tasks" ■ Section B.3, "Deleting Previous Versions of Oracle Operating System Dependent Clusterware" ■ Section B.4, "Troubleshooting the Oracle Real Application Clusters Installation" B.1 About Oracle Real Application Clusters This appendix is intended for network administrators and database administrators who install, configure, and use Oracle Real Application Clusters on Windows NT or Windows 2000 clusters. This appendix assumes you are familiar with Oracle Real Application Clusters concepts and Windows NT or Windows 2000 operating systems. You must install and test your operating system for the cluster and network hardware before installing Oracle Real Application Clusters. This section contains these topics: ■ Section B.1.1, "Real Application Clusters System Requirements" Note: Oracle Real Application Clusters requires a separate license. See Also: The following Oracle9i Real Application Clusters documentation set included on your Oracle9i Online Documentation for Windows CD-ROM: ■ Oracle9i Real Application Clusters Documentation Online Roadmap ■ Oracle9i Real Application Clusters Concepts ■ Oracle9i Real Application Clusters Installation and Configuration ■ Oracle9i Real Application Clusters Administration ■ Oracle9i Real Application Clusters Deployment and Performance
- 148. About Oracle Real Application Clusters B-2 Oracle9i Database Installation Guide ■ Section B.1.2, "Node Preparation for a Real Application Clusters Installation" ■ Section B.1.3, "Oracle Cluster Setup Wizard Overview" ■ Section B.1.4, "Raw Devices Management Utilities Overview" B.1.1 Real Application Clusters System Requirements In addition to the system requirements listed in Chapter 2, you must meet these requirements: Hardware Each node in a cluster requires the following hardware: ■ External shared hard disks ■ Certified hardware configurations Software Each node in a cluster requires the following software: ■ Certified vendor-supplied operating system dependent clusterware layer ■ Oracle operating system dependent clusterware layer RAM 256 MB for each instance B.1.1.1 About Hardware and Network Configuration Before running the Oracle Cluster Setup Wizard, have the following information available about your hardware and network configuration: ■ The public network names (known as host or TCP/IP names) of each node ■ Whether you have a high-speed private interconnect and, if so, what are the private network names of each node ■ Whether you are using Virtual Interface Architecture (VIA) hardware and, if so, what are the available Network Interface Card (NIC) names B.1.2 Node Preparation for a Real Application Clusters Installation You must create a specific number of logical drives on Windows computers prior to running Oracle Universal Installer. Oracle Real Application Clusters uses logical drives to store the control, data, and redo log files. You must properly configure logical drives on shared disks in order to create an Oracle Real Application Clusters database using Oracle Database Configuration Assistant. B.1.2.1 About Extended Partitions and Logical Drives An extended partition identifies raw space on the disk. Oracle9i database files can only be stored on logical drives within an extended partition. See Also: Section 2.2.2, "Oracle9i Database System Requirements" Note: Creating a large number of logical partitions may cause a significant increase in the time needed to reboot and start the disk administration tools.
- 149. About Oracle Real Application Clusters Oracle Real Application Clusters Preinstallation Tasks B-3 Only one extended partition can be created for each disk. Oracle Corporation recommends creating the extended partition on an unpartitioned disk and using the entire disk for the extended partition. Windows 2000 offers two disk storage types: basic and dynamic. Create primary partitions, an extended partition, and logical drives only on basic disks. A basic disk uses the same partitions as earlier versions of Windows and contains up to four primary partitions, or three primary partitions and one extended partition. Within the extended partition, assign a symbolic name to each of the logical drives. For example, for a database named db, use the following format for a symbolic link to the logical drives created for the two redo log files, required for an instance of a cluster database: db_redo1_1 db_redo1_2 A symbolic link serves as a name for a logical drive which the Oracle database uses as a datafile, such as db_system1 for the SYSTEM tablespace. It is also used when Oracle Database Configuration Assistant copies the seed datafiles from the component CD-ROMs. A copy of the datafile is made to db_system1 that links to a specific logical drive. The hard disk numbers may be different from node to node, but the number of logical drives and the drive sizes must be identical. When the nodes are rebooted, the hard disk and partition names can change, and symbolic link names can map to a different partition. However, the physical disk remains the same. The Oracle Object Service tracks and updates the symbolic links, so that the links are mapped correctly after rebooting. To use Oracle Database Configuration Assistant, you must configure logical drives as described in this section. Create these devices before running Oracle Universal Installer to install the Oracle9i Enterprise Edition software. Oracle Database Configuration Assistant cannot create an Oracle Real Application Clusters database unless you have properly configured these logical drives: ■ Seven for datafiles ■ Two for control files ■ One logical drive for each instance for the automatic undo tablespace (or one rollback segment tablespace for the database if you do not use automatic undo management) ■ At least two for redo log files for each instance ■ One for context ■ Recommended: One for the server parameter file ■ One for Oracle9i interMedia ■ One for Oracle OLAP Services ■ One for the Voting disk. This logical drive stores configuration data for Server Management (SRVM) and for the Oracle Operating System Dependent clusterware (Oracle operating system dependent clusterware). Vendor operating system dependent clusterware requires the voting disk for Oracle Real Application Clusters configuration information. If you do not create the database with Oracle Database Configuration Assistant, then the number of logical drives you create depends on the number of datafiles, redo log
- 150. About Oracle Real Application Clusters B-4 Oracle9i Database Installation Guide files, and control files you plan to create. However, you must still create a logical drive of 100 MB for the Voting disk. B.1.2.2 Planning Your Logical Drives Configuration Consider the following when planning your logical drives configuration: ■ Ensure that there are a few spare logical drives of the same size. You may need these for emergency file relocations or additions if a tablespace unexpectedly becomes full. If a logical drive is unused, you can drop it and recreate it as two drives, as needed. ■ You cannot extend a logical drive after it has been created with Windows disk management tools. Therefore, it is not possible to add more space to the logical drive. As a consequence, the size of the datafile created in the logical drive becomes a fixed size and cannot be extended. To add more space to a database tablespace, create an extended partition with the required size. Then execute the ALTER TABLESPACE tablespace_name ADD DATAFILE SQL statement. ■ For best results, select a limited set of standard partition sizes for your entire database. Partition sizes of 50 MB, 100 MB, 500 MB, and 1 GB are suitable for most databases. Also create a few very small and very large spare partitions that are, for example, 1 MB and perhaps 5 GB or greater in size. ■ Based on your plans for using each logical drive, determine the placement of the spare logical drives. You can mix different sizes on one disk, or segment each disk into same-sized drives. When Oracle Database Configuration Assistant creates the database, it verifies that you created the symbolic link names and the logical drives are sized to meet the minimum size requirements. Use the tablespace size requirements in Table B–1 for the General Purpose, Transaction Processing, and Data Warehouse database configuration types. The preconfigured database options automatically create tablespaces and files with the capacities shown in Table B–1. If you use the Customized database configuration, use these recommended sizes as guidelines. Note: Each instance of an Oracle Real Application Clusters database has its own log files, but control files and datafiles are shared by instances in a cluster. Each instance's log files must be readable by all other instances to facilitate database recovery. See Also: Oracle9i SQL Reference for additional ALTER TABLESPACE syntax
- 151. About Oracle Real Application Clusters Oracle Real Application Clusters Preinstallation Tasks B-5 Note: Windows disk management tools write a signature to the first 1 MB of space on each physical disk. The first extended partition created on each disk starts after this initial signature of 1 MB size. Therefore, when considering size requirements of your disks for Oracle Real Application Clusters database usage, remember to account for an initial 1 MB of space on each disk that cannot be used for extended partitions. Oracle Database Configuration Assistant's Customized database creation type requires the extended partitions names and sizes listed in Table B–1. These extended partitions contains database control files, datafiles, and redo log files after an Oracle Real Application Clusters database is created on them by Oracle Database Configuration Assistant. Table B–1 Logical Drive File Sizes for Oracle Database Configuration Assistant Create a Partition For... With File Size... SYSTEM tablespace 400 MB Server parameter file 5 MB USERS tablespace 120 MB TEMP tablespace 100 MB UNDOTBS tablespace1 or RBS tablespace 1 By default, Oracle Database Configuration Assistant uses automatic undo management. You should have one undo tablespace for each instance. If you use manual undo management, make the RBS tablespace raw device datafile at least 625 MB in size. 625 MB (total) 625 MB EXAMPLE tablespace 160 MB CWMLITE tablespace (OLAP) 100 MB INDX tablespace 70 MB TOOLS tablespace 12 MB DRSYS tablespace 90 MB First control file 110 MB Second control file 110 MB Two redo log files for each node 120 MB (for each file) srvcfg (Voting disk (for clusterware) 100 MB
- 152. About Oracle Real Application Clusters B-6 Oracle9i Database Installation Guide B.1.3 Oracle Cluster Setup Wizard Overview The Oracle Cluster Setup Wizard performs the following tasks on all nodes: ■ Installs and starts Oracle9i operating system dependent clusterware ■ Installs Object Link Manager and starts the Oracle Object Service on all nodes. This tool creates persistent symbolic links to the logical drives required for an Oracle Real Application Clusters database. The service updates all nodes when symbolic links are modified, and is set to Automatic, so that it starts whenever you reboot. ■ Preserves existing symbolic link information created by previous invocations of Oracle Object Link Manager ■ Installs other disk management tools on all nodes ■ Adds a node to an existing cluster B.1.4 Raw Devices Management Utilities Overview Additional disk management tools are installed by the Oracle Cluster Setup Wizard on all nodes. These tools are not installed if you do not run Oracle Cluster Setup Wizard. Table B–2 describes the disk management tools. Note: Undo tablespace raw device datafiles for the preconfigured Transaction Processing and General Purpose database templates should be at least 200 MB each. If you use the preconfigured Data Warehousing database, then create a raw device datafile for an undo tablespace for the first instance that is at least 625 MB in size. For subsequent instances, create undo tablespace raw device datafiles that are at least 200 MB in size. If you use the New Database template with automatic undo management, then divide the 625 MB among the instances. If you have more than two instances, make sure that the undo tablespace raw device datafiles are at least 50 MB in size. If you use manual undo management, make the RBS tablespace raw device datafile at least 625 MB in size. Note: Oracle Cluster Setup Wizard installs Oracle9i operating system dependent clusterware and raw device management utilities. If you do not use Cluster Setup Wizard, then Oracle Object Link Manager and the raw device management utilities do not get installed until Oracle Universal Installer is run. The raw device management utilities are required to configure a raw device before Oracle Universal Installer is invoked. If you intend to use vendor operating system dependent clusterware instead of Oracle9i operating system dependent clusterware, then you can temporarily install the raw device management utilities. See Also: Section B.1.4.1 for installation instructions if you do not run Oracle Cluster Setup Wizard
- 153. About Oracle Real Application Clusters Oracle Real Application Clusters Preinstallation Tasks B-7 B.1.4.1 Installing the Raw Devices Management Utilities Manually If you did not install Oracle9i operating system dependent clusterware using the Oracle Cluster Setup Wizard, then install the raw device management utilities manually. To manually install the disk management utilities, perform the following tasks on each node of the cluster: 1. Create a temporary directory. 2. From the first component CD-ROM, copy the contents of the preinstall_ racolm directory to the temporary directory you created. 3. Install Oracle Object Service by entering the following command from the temporary directory you created: C:temp> OracleOBJService /INSTALL 4. Set the Oracle Object Service service on each node in the cluster to automatic. a. Choose Start > Settings > Control Panel > Services. b. Select the Oracle Object Service. Choose Startup. Table B–2 Raw Devices Disk Management Utilities Tool Used for the following tasks... Object Link Manager A graphical user interface (GUI) tool that creates or modifies symbolic links to logical drives. This utility can be used as part of the Oracle Cluster Setup Wizard, or separately. DeleteDisk Reformats an entire disk and deletes its contents. LetterDelete Removes all drive letters from Oracle raw partitions and updates the disk key registry to disable reboot mappings. LogPartFormat Initializes all space in a logical partition to zero and removes the symbolic link name. crlogdr Creates and deletes logical drives and their associated symbolic names on a disk that does not have a primary partition and one extended partition. Use this tool to review the disk layout. ExportSYMLinks Reads persistent symbolic links from their respective disk drives and generates a TBL file of the list (named by default symmap.tbl). ImportSYMLinks Reads a TBL file and creates persistent symbolic links on the disks and on all nodes in the cluster. See Also: ■ Section B.1.4.1, "Installing the Raw Devices Management Utilities Manually" ■ The readme file on using the tools. The disk management tools and the readme file are located in the directoryolm directory, where directory is where you installed the Oracle operating system dependent clusterware with the Oracle Cluster Setup Wizard. Note: The Oracle Cluster Setup Wizard automatically creates and starts this service.
- 154. Preinstallation Tasks B-8 Oracle9i Database Installation Guide c. From Startup Type, select Automatic. B.2 Preinstallation Tasks Perform the following tasks on your Windows NT or Windows 2000 computer to prepare a set of nodes for cluster software installation: ■ Task 1: Creating an Extended Partition ■ Task 2: Creating Logical Drives ■ Task 3: Assigning Symbolic Link Names ■ Task 4: Creating a Cluster B.2.1 Task 1: Creating an Extended Partition The following procedure creates an extended partition using Windows NT Disk Administrator. To create extended partitions and logical drives on Windows 2000, refer to Section B.2.1.1. 1. Log in as member of the Administrators Group. 2. Choose Start > Programs > Administrative Tools > Disk Administrator. The Disk Administrator window appears, showing all the disks in your shared array. Note that the lines display diagonally from top right to bottom left, indicating unpartitioned devices. 3. Right-click an unpartitioned disk, or an area of free space on a disk that does not contain an extended partition. This displays the Disk Administrator Create Extended option. 4. Select Create Extended. The Disk Administrator displays the maximum sizes for the extended partition. 5. Enter the size of the partition of the extended partition, then choose OK. B.2.1.1 Creating an Extended Partition and Logical Drives on Windows 2000 To create an extended partition and logical drives: Both the client and server computers must be members of the same domain or within a trusted domain. Run Disk Management from one node to configure logical drives on the shared disk for the entire cluster. 1. Choose Settings > Control Panel. 2. Double-click Administrative Tools > Computer Management. Note: Changes are not saved until you choose Commit Changes Now or exit Disk Administrator. Note: If you are creating logical drives for a database to be created by Oracle Database Configuration Assistant, refer to the file sizes in Table B–1.
- 155. Preinstallation Tasks Oracle Real Application Clusters Preinstallation Tasks B-9 3. In the console tree, select Disk Management. The Disk Management window displays disks and volumes in a graphical view and in a list view. View the status of a disk or volume in the Status column of the list view. Figure B–1 shows the status of Healthy for volumes, and Online for disks. Figure B–1 Computer Management Window 1. Right-click an unallocated region of a basic disk, and choose Create Partition. Or, right-click free space in an extended partition, and choose Create Logical Drive. 2. In the Create Partition wizard, choose Next > Primary Partition > Extended Partition, or Logical Drive, and follow the instructions on your screen. 3. For each logical drive, select the logical drive and unassign drive letters. To view properties of a basic disk, in Disk Management, right-click the partition, logical drive, or other basic volume, and click Properties. B.2.2 Task 2: Creating Logical Drives Run the Windows NT Disk Administrator from one node to configure logical drives on the shared disk for the entire cluster. You can use more than one disk to accommodate all the partitions, depending on your shared disk array's configuration. Note: If the Disk Management window is open during any disk management modifications, such as creating symbolic links or adding logical partitions, you need to close and open the window to view any changes you applied. See Also: Section B.2.1.1, "Creating an Extended Partition and Logical Drives on Windows 2000"
- 156. Preinstallation Tasks B-10 Oracle9i Database Installation Guide 1. Select an area of free space in the extended partition. 2. Choose Partition > Create. The Disk Administrator window displays the minimum and maximum sizes for the logical drive. a. Enter the size of the logical drive that you want to create. Create the logical drives with file sizes shown in Table B–1. b. Choose OK. 3. Select the logical drive. 4. Choose Tools > Assign Drive Letter. 5. Select the Do not assign a drive letter option, then choose OK. 6. Repeat Steps 1-5 until the required number of logical drives are created. 7. Choose Partition > Commit Changes Now. A confirmation dialog appears, informing you that changes have been made to the disk. 1. Choose Yes to acknowledge the message. A dialog box appears, informing you the disks have been updated successfully. 2. Choose OK. 3. Choose Partition > Exit. Changes should be visible on all nodes. The Disk Administrator window below illustrates an example of a disk configuration. The logical partitions are sized to allow Oracle Database Configuration Assistant to create a cluster database. Note: Oracle Corporation recommends you do not create more than 120 logical drives in an extended partition. Creating a large number of logical drives can cause a significant increase in the time needed to reboot and start the disk administration tools. Note: Optionally, run the LetterDelete utility after creating all logical drives to remove all drive letter assignments with a single command. Note: Changes are not saved until you choose Commit Changes Now or exit the Disk Administrator.
- 157. Preinstallation Tasks Oracle Real Application Clusters Preinstallation Tasks B-11 The Disk Administrator window shows two disks. The following table describes the partitions on Disk 0 and Disk 1: B.2.3 Task 3: Assigning Symbolic Link Names Use one of the following methods to assign symbolic link names: ■ Section B.2.3.1, "Using Oracle Cluster Setup Wizard" ■ Section B.2.3.2, "Using Object Link Manager" ■ Section B.2.3.3, "Using ImportSYMLinks Utility" B.2.3.1 Using Oracle Cluster Setup Wizard The Oracle Cluster Setup Wizard assists with cluster creation and the addition of nodes to an existing cluster. It also enables you to assign symbolic link names to logical drives. Refer to Section B.2.4 to create symbolic link names and create a cluster using Oracle Cluster Setup Wizard. B.2.3.2 Using Object Link Manager Object Link Manager is a GUI tool that assigns symbolic link names or renames existing symbolic link names. 1. Select c:tempGUIOracleOBJManager.exe where temp is the temporary directory defined in step 2 of Section B.1.4.1. This disk... Contains... Disk 0 A primary partition Disk 1 An extended partition with 36 logical partitions and an area of free space See Also: ■ Section B.1.3, "Oracle Cluster Setup Wizard Overview" ■ Section B.1.4.1, "Installing the Raw Devices Management Utilities Manually" to install Oracle Object Link Manager
- 158. Preinstallation Tasks B-12 Oracle9i Database Installation Guide The Oracle Object Manager window displays. 2. Select the row to update and click any spot within the highlighted row. An edit window, with an active blinking cursor, opens in the New Link Name column. 3. Enter the new Link name and choose Enter. 4. Repeat steps 2 and 3 to create additional symbolic link names. 5. Select Options > Commit. B.2.3.3 Using ImportSYMLinks Utility The ImportSYMLinks utility is a command line tool that assigns symbolic link names or renames existing symbolic link names. 1. Create a TBL file. 2. Use the following command to import symbolic link mappings: ImportSYMLinks.exe [/f:filename] For example, ImportSYMLinks.exe /f:c:tempmysymlinks.tbl where temp is the temporary directory defined in step 2 of Section B.1.4.1 and filename is the full path and filename of the valid TBL file. Note: Do not proceed to step 5 if the edit window is active. Changes will not apply. See Also: ■ Section B.1.4.1, "Installing the Raw Devices Management Utilities Manually" to install ImportSYMLinks utility ■ Section B.1.3, "Oracle Cluster Setup Wizard Overview" To... Do this... Modify an existing symbolic link name 1. Export existing links to a TBL file using the following command: ExportSYMLinks.exe [/f:filename] If /f:filename is not specified, then the default filename, symmap.tbl, is generated in the current working directory. Note: Duplicate links are indented in the symmap.tbl file. All valid unmapped device names are also exported. Create a TBL file A sample ASCII file is located in the following directory on the first component CD-ROM:1 preinstall_racolmsample.tbl 1. Create a TBL file. 2. Save the file. 1 This sample file contains symbolic link names associated with raw partitions for a two-node cluster database.
- 159. Preinstallation Tasks Oracle Real Application Clusters Preinstallation Tasks B-13 B.2.4 Task 4: Creating a Cluster If you intend to use Oracle9i operating system dependent clusterware, then use the Oracle Cluster Setup Wizard to install Oracle9i operating system dependent clusterware, assign symbolic links, and create a cluster. If you intend to use vendor operating system dependent clusterware, then refer to your vendor documentation. Run the Oracle Cluster Setup Wizard on a node that is to become a node in the cluster. Running the wizard from a node that will not become a node in the cluster is not supported. To add a node to an existing cluster, run the Oracle Cluster Setup Wizard from the CD-ROM at any time. Before you Begin ■ Make sure all the nodes to be part of the cluster are up and can communicate with each other in a TCP/IP environment. ■ Make sure you have 2 MB available on each node to install the Oracle operating system dependent clusterware and Object Link Manager. ■ Stop the vendor operating system dependent clusterware. This only applies if you plan to install the Oracle operating system dependent clusterware, and have a version of your vendor operating system dependent clusterware running. 1. On one node of the cluster, insert the first component CD-ROM, and navigate to the preinstall_racclustersetup directory. See Also: ■ Section B.1.3, "Oracle Cluster Setup Wizard Overview" ■ "Adding a Node at the Clusterware Layer on Windows NT and Windows 2000" of Oracle9i Real Application Clusters Administration Note: Oracle Corporation recommends using the same username and password on each node in a cluster, or a domain username. You must have administrative privileges and each node must be in the same domain. To verify administrative privileges, from the node on which the Oracle Cluster Setup Wizard runs, enter the following for each node in the cluster: NET USE host_nameC$ where host_name is the public network name for the other node. For example, if you run the Oracle Cluster Setup Wizard on node1 and plan to create a four-node cluster with node1, node2, node3, and node4, then enter the following commands on node1: NET USE node2C$ NET USE node3C$ NET USE node4C$ If the following appears, you have administrative privileges on each node: The command completed successfully.
- 160. Deleting Previous Versions of Oracle Operating System Dependent Clusterware B-14 Oracle9i Database Installation Guide 2. Select clustersetup.exe. The Oracle Cluster Setup Wizard appears 3. Choose Next. 4. Choose to Create a cluster, then choose Next. The Disk Configuration screen displays. 5. Optionally, perform one of the following tasks to rename or add a symbolic link: 6. From the Disk Configuration screen, assign a Voting disk, labeled as srvcfg, by highlighting the corresponding row. 7. Choose Next. 8. Complete the additional Oracle Cluster Setup screens. B.3 Deleting Previous Versions of Oracle Operating System Dependent Clusterware If you want to deinstall previous versions of Oracle operating system dependent clusterware, use the following steps to manually remove them. To... Do this... Rename a symbolic link 1. Choose the Create Oracle Symbolic Links button. The Oracle Object Link Manger windows displays. 1. From the Symbolic Link column, select a row to update. The cursor starts blinking. 1. Enter the new link name. 2. Repeat steps 2 and 3 to rename any additional symbolic link names. 3. Choose Apply. 4. When the progress bar at the bottom of the screen stops moving, choose Close. Create a symbolic link 1. Choose the Create Oracle Symbolic Links button. The Object Link Manager window displays. 1. From the Symbolic Link column, select an empty row. The cursor starts blinking. 1. Enter a link name. 2. Repeat steps 2 and 3 to assign any additional symbolic link names. 3. When the progress bar at the bottom of the screen stops moving, choose Close. See Also: ■ Oracle Cluster Setup Wizard online Help ■ "Performing Cluster Diagnostics" if the Node Selection Page does not display ■ Chapter 4 for installation steps for Oracle9i Enterprise Edition and Oracle Real Application Clusters
- 161. Troubleshooting the Oracle Real Application Clusters Installation Oracle Real Application Clusters Preinstallation Tasks B-15 To manually delete previous versions of Oracle operating system dependent clusterware: 1. Shut down the Oracle database. 2. Stop the operating system dependent clusterware service, OracleCMService. 1. Start the registry editor from the command prompt: C:> regedt32 The Registry Editor window appears. 2. Navigate to HKEY_LOCAL_MACHINESOFTWAREORACLEOSD. 3. Delete the OSD subkey. 4. Navigate to HKEY_LOCAL_ MACHINESYSTEMCurrentControlSetServices. 5. Delete the service entry for OracleCMService. 6. Repeat the steps on all nodes within the cluster. 7. Reboot the computers on which you deleted the keys. B.4 Troubleshooting the Oracle Real Application Clusters Installation This section contains these topics: ■ Performing Cluster Diagnostics ■ Terminal Services Client on Windows 2000 ■ Stopping Preexisting Oracle Services ■ Mappings Do Not Appear ■ Unable to Start a Dedicated Server Process ■ Windows NT Disk Administrator Cannot Create Logical Drives ■ Compatibility Issues for Physical Partitions and Logical Drives Performing Cluster Diagnostics If Oracle Universal Installer does not display the Node Selection page, perform clusterware diagnostics by executing the lsnodes -v command and analyzing its output. From the preinstall_rac directory, execute the following: lsnodes -v Refer to your clusterware documentation if the detailed output indicates that your clusterware is not running. Terminal Services Client on Windows 2000 Do not use Terminal Services Client with any of the disk management tools. Changes may not apply. Note:: For Oracle Parallel Server releases 8.0 and 7.3, stop the OraclePGMSService.
- 162. Troubleshooting the Oracle Real Application Clusters Installation B-16 Oracle9i Database Installation Guide Stopping Preexisting Oracle Services You may get the following warning message while using the Cluster Setup Wizard if you have OracleGSDService or OracleServiceSID running on any of the nodes in the cluster you are creating: The nodes that we are trying to install the software on could not be cleaned completely Please stop these services on all the nodes and then start Oracle Cluster Setup Wizard again. Mappings Do Not Appear If mappings do not appear in the Object Link Manager, make sure the Oracle Object Service is started on all nodes in the cluster. Unable to Start a Dedicated Server Process Make sure OracleServiceSID and OracleHOME_NAMETNSListener run under the same Windows NT account with the same user ID. Windows NT Disk Administrator Cannot Create Logical Drives Most likely, an extended partition was not created. Create the extended partition and the multiple logical drives within the extended partition. Compatibility Issues for Physical Partitions and Logical Drives Question: What is the impact if I have created logical drives, but defined physical disk convention names for them. For example: PhysicalDrivesys1=DeviceHarddisk2Partition1 PhysicalDriveusr1=DeviceHarddisk3Partition1 Answer: An Oracle database handles the datafile using the physical disk convention, even though it really is a logical drive. This will not cause any data corruption or loss, as long as you continue using the physical disk naming conventions. Oracle Corporation recommends that you convert to the logical drive at your earliest convenience. Question: What is the impact if I have created logical names representing Partition0. For example: db_system1=DeviceHarddisk1Partition0 Answer: This poses severe problems because the Disk Administrator typically writes a signature into the first block of every disk, and consequently the Oracle database may overwrite a portion of the signature with a datafile header. Note: This may also cause data loss. Never use Partition0 with the logical partition convention.
- 163. Troubleshooting the Oracle Real Application Clusters Installation Oracle Real Application Clusters Preinstallation Tasks B-17 Question: How do I transfer the contents of any raw partition to a standard file system for backup purposes? Answer: Use the Oracle utility OCOPY to copy data to or from a raw partition for both physical partitions and logical drives. The physical partition and logical drive conventions are not compatible with one another due to the extra block that is skipped for physical raw conventions. This also means you cannot simply do an OCOPY command from a physical disk to a logical drive, as the contents of these partitions are incompatible. If your database installation uses physical disk conventions with logical drives, Oracle Corporation recommends converting to the logical drive conventions using these steps. To convert from a physical convention to a logical convention: 1. Perform a full database export to a (local) file system. 2. Create logical drives and define logical names for these partitions. 3. Re-create the database using Oracle Database Configuration Assistant on the new logical drives. 4. Perform the full database import to the newly-created database. See Also: ■ Oracle9i Database Administrator's Guide for Windows ■ Oracle9i Database Getting Starting for Windows
- 164. Troubleshooting the Oracle Real Application Clusters Installation B-18 Oracle9i Database Installation Guide
- 165. C Oracle Transparent Gateways C-1 COracle Transparent Gateways This appendix explains how to install the Oracle Transparent Gateway software from the component CD-ROM. This appendix contains these topics: ■ Section C.1, "System Requirements for Oracle Transparent Gateways" ■ Section C.2, "Installing Oracle Transparent Gateways" ■ Section C.3, "Deinstalling Oracle Transparent Gateways" C.1 System Requirements for Oracle Transparent Gateways Review the following sections before installing Oracle Transparent Gateways: ■ Section C.1.1, "Gateway System Requirements" ■ Section C.1.2, "Tested Gateway Configurations" ■ Section C.1.3, "Gateway Installation Worksheets" Gateway components can be located on one platform or distributed over several platforms. Use the installation worksheet provided for your configuration to ensure that you have all the information required before beginning installation. As Oracle continues to support new releases and changes of the Oracle database server and Microsoft SQL Server, the supported configuration information is updated. For current, supported configuration information, visit: http://www.oracle.com/technology/products/gateways/index.html C.1.1 Gateway System Requirements The following tables summarize system requirements for Oracle Transparent Gateways. Oracle Corporation supports the software configurations described in this section as long as the underlying system software products are supported by their respective vendors. Verify the latest support status with your system software See Also: The Oracle Transparent Gateway documentation (available after installation): ■ ORACLE_BASEORACLE_HOMEtg4msqldoc ■ ORACLE_BASEORACLE_HOMEtg4sybsdoc ■ ORACLE_BASEORACLE_HOMEtg4teradoc
- 166. System Requirements for Oracle Transparent Gateways C-2 Oracle9i Database Installation Guide vendors. Refer to the table that contains information about the database type for which you need access: ■ Section C.1.1.1, "Microsoft SQL Server Gateway System Requirements" ■ Section C.1.1.2, "Sybase Gateway System Requirements" ■ Section C.1.1.3, "Teradata Gateway System Requirements" C.1.1.1 Microsoft SQL Server Gateway System Requirements Review Table C–1 to ensure that your system meets requirements to create a gateway for the Oracle Transparent Gateway for Microsoft SQL Server. C.1.1.2 Sybase Gateway System Requirements Review Table C–2 to ensure that your system meets requirements to create a gateway for the Oracle Transparent Gateway for Sybase. Table C–1 Microsoft SQL Server Gateway System Requirements Hardware and Software Requirements Processor An Intel or 100% compatible personal computer (PC), based on a Pentium processor Memory 26 MB of real memory is recommended to support the gateway. The total real memory requirement for the concurrent use of the gateway also depends on these factors: ■ The SQL statement issued by the user ■ The number of cursors currently opened against Microsoft SQL ■ The number of columns in the table being accessed CD-ROM Drive An internal or external CD-ROM drive Disk Space 200 MB of free disk space Operating System Microsoft Windows NT Workstation Version 4.0, Microsoft Windows NT Server Version 4.0, or Microsoft Windows 2000 Oracle Database Server Oracle9i Database release 1 (9.0.1) The Oracle database server can reside on any supported platform. Oracle Networking On the gateway computer: ■ Oracle Net Services ■ Oracle Protocol Support for Named Pipes or TCP/IP On the Oracle database server computer: ■ Oracle Net Services ■ Oracle Protocol Support for Named Pipes or TCP/IP The Oracle Net Services components are included on the Oracle9i component CD-ROM. Microsoft ■ Network transport protocol software, TCP/IP or Named Pipes, included with Microsoft Windows NT ■ Microsoft SQL Server Version 7.0 or SQL Server 2000, installed on a computer with Microsoft Windows NT Server
- 167. System Requirements for Oracle Transparent Gateways Oracle Transparent Gateways C-3 C.1.1.3 Teradata Gateway System Requirements Review Table C–3 to ensure that your system meets requirements to create a gateway for the Oracle Transparent Gateway for Teradata. Table C–2 Sybase Gateway System Requirements Hardware and Software Requirements Processor An Intel or 100% compatible personal computer (PC), based on a Pentium processor Memory 26 MB of real memory is recommended to support the gateway. The total real memory requirement for the concurrent use of the gateway also depends on these factors: ■ The SQL statement issued by the user ■ The number of cursors currently opened against Sybase ■ The number of columns in the table being accessed CD-ROM Drive An internal or external CD-ROM drive Disk Space 200 MB of free disk space Operating System Microsoft Windows NT Workstation Version 4.0, Microsoft Windows NT Server Version 4.0, or Microsoft Windows 2000 Oracle Database Server Oracle9i Database release 1 (9.0.1) The Oracle database server can reside on any supported platform. Oracle Networking On the gateway computer: ■ Oracle Net Services ■ Oracle Protocol Support for Named Pipes or TCP/IP On the Oracle database server computer: ■ Oracle Net Services ■ Oracle Protocol Support for Named Pipes or TCP/IP The Oracle Net Services components are included on the Oracle9i component CD-ROM. Sybase Sybase Server or Client, version 11.9.2 or 12.0 is required. If Sybase Server is not on the same computer as the gateway, then the version of Sybase Open client library certified for your Sybase Server is required. Table C–3 Teradata Gateway System Requirements Hardware and Software Requirements Processor An Intel or 100% compatible personal computer (PC), based on a Pentium processor Memory 26 MB of real memory is recommended to support the gateway. The total real memory requirement for the concurrent use of the gateway also depends on these factors: ■ The SQL statement issued by the user ■ The number of cursors currently opened against Teradata ■ The number of columns in the table being accessed CD-ROM Drive An internal or external CD-ROM drive Disk Space 200 MB of free disk space
- 168. System Requirements for Oracle Transparent Gateways C-4 Oracle9i Database Installation Guide C.1.2 Tested Gateway Configurations The following tables provide gateway configurations tested by Oracle at the time of this document release. Oracle continues to provide support for the most recent releases of Oracle and non-Oracle systems in a timely manner. C.1.2.1 Microsoft SQL Server Gateway Configurations See Table C–4 for configurations for creating a gateway for the Oracle Transparent Gateway for Microsoft SQL Server. C.1.2.2 Sybase Gateway Configurations See Table C–5 for configurations for creating a gateway for the Oracle Transparent Gateway for Sybase. Operating System Windows NT Workstation Version 4.0, Microsoft Windows NT Server Version 4.0, or Microsoft Windows 2000 Oracle Database Server Oracle9i Database release 1 (9.0.1) The Oracle database server can reside on any supported platform. Oracle Networking On the gateway computer: ■ Oracle Net Services ■ Oracle Protocol Support for Named Pipes or TCP/IP On the Oracle database server computer: ■ Oracle Net Services ■ Oracle Protocol Support for Named Pipes or TCP/IP The Oracle Net Services components are included on the Oracle9i component CD-ROM. Teradata Teradata V2R.03.00.02 or V2R.04.00.0115 NCR's Teradata ODBC Driver Version 02.08.00.00 See Also: Oracle Corporation continually updates supported gateway configurations. For the latest supported configuration information, either contact Oracle Support Services or visit the following Web site: http://www.oracle.com/technology/products/gateways/i ndex.html Table C–4 Microsoft SQL Server Gateway Configurations Database Gateway and Operating System Microsoft SQL Server Version 7.0 tg4msql release 9.0.1 running on Windows NT 4.0, Service Pack 6.0.a tg4msql release 9.0.1 running on Windows 2000, Service Pack 2 Microsoft SQL Server 2000 tg4msql release 9.0.1 running on Windows NT 4.0, Service Pack 6.0.a tg4msql release 9.0.1 running on Windows 2000, Service Pack 2 Table C–3 (Cont.) Teradata Gateway System Requirements Hardware and Software Requirements
- 169. System Requirements for Oracle Transparent Gateways Oracle Transparent Gateways C-5 C.1.2.3 Teradata Gateway Configurations See Table C–6 for configurations for creating a gateway for the Oracle Transparent Gateway for Teradata. C.1.3 Gateway Installation Worksheets Select the worksheet appropriate for your system in one of the following tables, and use the values you enter as a reference during the configuration process: ■ Section C.1.3.1, "Microsoft SQL Server Worksheet" ■ Section C.1.3.2, "Sybase Worksheet" ■ Section C.1.3.3, "Teradata Worksheet" C.1.3.1 Microsoft SQL Server Worksheet Enter your system values in Table C–7 to prepare for a Microsoft SQL Server gateway configuration. Table C–5 Sybase Gateway Configurations Database Gateway and Operating System Sybase Version 11.9.2 tg4sybs release 9.0.1 running on Windows NT 4.0, Service Pack 6.0.a tg4sybs release 9.0.1 running on Windows 2000, Service Pack 2 Sybase Version 12.0 tg4sybs release 9.0.1 running on Windows NT 4.0, Service Pack 6.0.a tg4sybs release 9.0.1 running on Windows 2000, Service Pack 2 Table C–6 Teradata Gateway Configurations Database Gateway and Operating System Teradata V2R.03.00.02 through NCR's Teradata ODBC Driver Version 02.08.00.00 tg4tera release 9.0.1 running on Windows NT 4.0, Service Pack 6.0.a tg4tera release 9.0.1 running on Windows 2000, Service Pack 2 Teradata V2R.04.00.0115 through NCR's Teradata ODBC Driver Version 02.08.00.00 tg4tera release 9.0.1 running on Windows NT 4.0, Service Pack 6.0.a tg4tera release 9.0.1 running on Windows 2000, Service Pack 2 Table C–7 Microsoft SQL Server Installation Worksheet Description Value Oracle database server computer name Oracle database server platform (operating system and its version number) ORACLE_HOME of Oracle database server (full path name) Gateway computer name
- 170. System Requirements for Oracle Transparent Gateways C-6 Oracle9i Database Installation Guide C.1.3.2 Sybase Worksheet Enter your system values in Table C–8 to prepare for a Sybase gateway configuration. C.1.3.3 Teradata Worksheet Enter your system values in Table C–9 to prepare for a Teradata gateway configuration. Gateway computer platform (operating system and its version number) ORACLE_HOME of the gateway (full path name) Name of the Microsoft SQL Server to which the gateway will connect Name of the Microsoft SQL Server database to which the gateway will connect Table C–8 Sybase Installation Worksheet Description Value Oracle database server computer name Oracle database server platform (operating system and its version number) ORACLE_HOME of Oracle database server (full path name) Gateway computer name Gateway computer platform (operating system and its version number) ORACLE_HOME of the gateway (full path name) Name of the Sybase Server to which the gateway will connect Name of the Sybase database to which the gateway will connect Table C–9 Tetradata Installation Worksheet Description Value Oracle database server computer name Table C–7 (Cont.) Microsoft SQL Server Installation Worksheet Description Value
- 171. Deinstalling Oracle Transparent Gateways Oracle Transparent Gateways C-7 C.2 Installing Oracle Transparent Gateways Complete instructions for starting Oracle Universal Installer and installing the Gateway software are discussed in Chapter 4. C.3 Deinstalling Oracle Transparent Gateways Complete instructions for deinstalling Oracle components are discussed in Chapter 4. Oracle database server platform (operating system and its version number) ORACLE_HOME of Oracle database server (full path name) Gateway computer name ORACLE_HOME of the gateway (full path name) ODBC Data Source Name (DSN) to be used by the gateway See Also: ■ Section 4.4, "Installing Oracle Components" for information about starting Oracle Universal Installer ■ Section 4.4.1.2, "Custom Oracle9i Database Installations" for information about installing the Gateway software ■ Section 4.4.4, "Reviewing the Installation Session Log" for a summary of your installation session See Also: Section 4.5.2, "Deinstalling Components with Oracle Universal Installer" Table C–9 (Cont.) Tetradata Installation Worksheet Description Value
- 172. Deinstalling Oracle Transparent Gateways C-8 Oracle9i Database Installation Guide
- 173. D Advanced Installation Topics D-1 DAdvanced Installation Topics This appendix describes advanced installation topics. This appendix contains these topics: ■ Section D.1, "About Oracle Components in Noninteractive Mode" ■ Section D.2, "About Oracle Components in Different Languages" ■ Section D.3, "About Web-based Installations" D.1 About Oracle Components in Noninteractive Mode Typically, Oracle Universal Installer runs in interactive mode, which means you are prompted to provide information in windows. However, experienced users can also run Oracle Universal Installer in noninteractive (also called silent) mode by using response files. These are text files containing variables and values used by Oracle Universal Installer during the installation process. Silent installations are recommended in cases when no interaction with the user is intended or when a nongraphical terminal is used. The user needs to first edit a response file to specify the components to install. With Oracle Universal Installer (OUI) release 1.7.x or earlier, the target installation system still requires login to a desktop system on Windows NT. Using silent installation enables you to bypass the graphical user interface (GUI) of Oracle Universal Installer interactive mode. Table D–1 lists the available response files in the Response directory on the first component CD-ROM: Note: Noninteractive deinstallations are not supported at this time. Table D–1 Response Files Response File Name This File Silently Runs The... enterprise.rsp Enterprise Edition installation of Oracle9i Database standard.rsp Standard Edition installation of Oracle9i Database personal.rsp Personal Edition installation of Oracle9i Database custom.rsp Custom installation of Oracle9i Database clientadmin.rsp Administrator installation of Oracle9i Client clientruntime.rsp Runtime installation of Oracle9i Client clientcustom.rsp Custom installation of Oracle9i Client
- 174. About Oracle Components in Noninteractive Mode D-2 Oracle9i Database Installation Guide D.1.1 Copying and Modifying a Response File To copy and modify a response file: 1. Copy the appropriate files from the Response directory on the first component CD-ROM to your hard drive. 2. Choose Start > Programs > Oracle Installation Products > Universal Installer Concepts Guide. The Oracle Universal Installer Concepts Guide appears in HTML format. 3. Modify the templates with any text file editor by following the instructions in both the response files and the Oracle Universal Installer Concepts Guide. D.1.2 Creating a Single Installation Stage From Multiple CD-ROMs Release 1 (9.0.1) is included on three component CD-ROMs. This means that you may not be able to answer all installation questions, walk away, and expect the installation to be finished upon return. It is possible to copy the contents of the three CD-ROMs to a hard disk staging area so that Oracle Universal Installer finds the second and third CD-ROMs without prompting. To create a single installation stage from multiple CD-ROMs: 1. Ensure that you have enough disk space on your hard drive to hold the contents of three CD-ROMs. 2. Create three directories at the same level on your hard drive with the names Disk1, Disk2, and Disk3. You must use these names. 3. Copy the contents of component CD-ROM 1 of 3 to the directory named Disk1. 4. Copy the contents of component CD-ROM 2 of 3 to the directory named Disk2. 5. Copy the contents of component CD-ROM 3 of 3 to the directory named Disk3. 6. Run setup.exe from the directory named Disk1. Installation proceeds without prompting you to insert additional component CD-ROMs. oms.rsp Oracle Management Server installation of Oracle9i Management and Integration oid.rsp Oracle Internet Directory installation of Oracle9i Management and Integration omicustom.rsp Custom installation of Oracle Management Infrastructure dbca.rsp Oracle Database Configuration Assistant netca.rsp Oracle Net Configuration Assistant to perform the configuration you receive with the Enterprise Edition, Standard Edition, Personal Edition, Administrator, Runtime, Oracle Integration Server, Oracle Management Server, or Oracle Internet Directory installation types. emca.rsp Oracle Enterprise Manager Configuration Assistant as a component or as part of a silent installation session to create a repository. See Section D.1.4 for procedures. Table D–1 (Cont.) Response Files Response File Name This File Silently Runs The...
- 175. About Oracle Components in Noninteractive Mode Advanced Installation Topics D-3 D.1.3 Running Oracle Universal Installer and Specifying a Response File To run Oracle Universal Installer and specify the response file: 1. Go to the MS-DOS command prompt. 2. Go to the directory where Oracle Universal Installer is installed. 3. Run the appropriate response file. For example, C:programfilesoracleouiinstall>setup.exe-RESPONSEFILEfilena me-SILENT-NOWELCOME D.1.4 Running Oracle Enterprise Manager Configuration Assistant in Silent Mode You can silently run Oracle Enterprise Manager Configuration Assistant as a standalone component or as part of a silent installation session to create a repository. Advanced features, such as repository upgrade, deletion, and modification from silent mode are not supported. These advanced features of Oracle Enterprise Manager Configuration Assistant must be performed in interactive mode. Oracle Enterprise Manager Configuration Assistant in silent mode only supports repository creation. D.1.4.1 Silently Running Oracle Enterprise Manager Configuration Assistant as a Standalone Component 1. Ensure that Oracle Management Server is installed on the computer on which to silently run Oracle Enterprise Manager Configuration Assistant. 2. Verify that ORACLE_BASEORACLE_HOMEbin is set in the Windows NT or 2000 environment path. 3. Copy the emca.rsp response file from the Response file directory of the first component CD-ROM to a local directory. 4. Edit emca.rsp by following the instructions in the file. Where... Description filename Identifies the full path of the specific response file -SILENT Runs Oracle Universal Installer in complete silent mode. The Welcome window is suppressed automatically. This parameter is optional. If you use -SILENT, -NOWELCOME is not necessary. -NOWELCOME Suppresses the Welcome window that appears during installation. This parameter is optional. See Also: Oracle Universal Installer Concepts Guide Important: If you create more than one Oracle Enterprise Manager repository in a network, then each Oracle Enterprise Manager repository username must be unique. Ensure that the value specified for the repository USERNAME variable in the emca.rsp file is unique across your network. It is extremely important to ensure that the name of each repository user created is unique across your entire network. If you use the same response file more than once to create a repository, the repositories created must be on separate networks.
- 176. About Oracle Components in Noninteractive Mode D-4 Oracle9i Database Installation Guide 5. Navigate to ORACLE_BASEORACLE_HOMEbin. 6. Run emca.rsp from the command prompt: C:ORACLE_BASEORACLE_ HOMEbin>emca-RESPONSEFILEpathemca.rsp-SILENT where path is the path to emca.rsp. For example, C:temp. D.1.4.2 Running Oracle Enterprise Manager Configuration Assistant in a Silent Installation Session Oracle Management Server is automatically installed with the enterprise.rsp, standard.rsp, and personal.rsp response files. If you use these response files to install Oracle Management Server and you want to create a new repository, you must run Oracle Enterprise Manager Configuration Assistant after the silent installation. You can either run Oracle Enterprise Manager Configuration Assistant interactively to create the repository, or you can edit and run the emca.rsp response file to silently create the repository. Automatically running Oracle Enterprise Manager Configuration Assistant silently after: ■ An enterprise.rsp, standard.rsp or personal.rsp response file installation is not supported ■ A custom.rsp response file installation is supported. Refer to the steps in this section for instructions To automatically start Oracle Enterprise Manager Configuration Assistant during a Custom Oracle9i Database, an Oracle Management Server, or a Custom Oracle9i Management and Integration response file installation, perform the following steps: 1. Copy the parent installation response file to a local directory. Oracle Management Server, which must be installed with the parent silent installation, is only available for installation in the following parent response files: ■ custom.rsp ■ oms.rsp ■ omicustom.rsp 2. Edit the file by following the instructions in that file. 3. Ensure that Oracle Enterprise Manager Configuration Assistant starts in silent mode by editing the following variables in the [oracle.sysman.oms_ 9.0.1.0.0] section of the parent response file: OPTIONAL_CONFIG_TOOLS launchEMCA s_responseFileEMCA Important: Ensure that the value specified for the repository USERNAME variable in the emca.rsp file is unique across your network. Note: -RESPONSEFILE and -SILENT parameters are required when running emca.rsp.
- 177. About Oracle Components in Noninteractive Mode Advanced Installation Topics D-5 4. Copy the emca.rsp response file to a local directory. 5. Edit emca.rsp by following the instructions in the file. 6. Go to the directory where Oracle Universal Installer is installed. 7. Run the parent response file. This automatically starts the Oracle Enterprise Manager Configuration Assistant response file (emca.rsp) when silent installation is complete. For example, C:>setup.exe-RESPONSEFILEfilename-SILENT where filename is the full path of the parent response file. An example of an updated [oracle.sysman.oms_9.0.1.0.0] section of a parent response file for Windows NT and Windows 2000 is partially shown below: [oracle.sysman.oms_9.0.1.0.0] #--------------------------------------------------------------------------- # Name : OPTIONAL_CONFIG_TOOLS # Datatype : StringList # Description : Specifying "emca" will launch the Oracle Enterprise # Manager Migration Assistant configuration tool at the end # of installation. # Valid values : {"emca"} or {} # Example value : {"emca"} # Default value : {} # Mandatory : No #--------------------------------------------------------------------------- OPTIONAL_CONFIG_TOOLS={emca} #--------------------------------------------------------------------------- # Name : launchEMCA # Datatype : Boolean # Description : Launch the Enterprise Manager Configuration Assistant # at the end of installation to configure Oracle Management # Server # Valid values : true, false # Example value : true # Default value : true # Mandatory : No #--------------------------------------------------------------------------- launchEMCA=<true> #--------------------------------------------------------------------------- # Name : s_responseFileEMCA # Datatype : String # Description : This string contains the value of the -responseFile # argument for launching the Enterprise Manager # Configuration Assistant in silent mode. Use the Note: On Windows NT or 2000, the OPTIONAL_CONFIG_TOOLS variable must be set to emca.bat. Note: Ensure that the value specified for the repository user's USERNAME variable in emca.rsp is unique across your network.
- 178. About Oracle Components in Different Languages D-6 Oracle9i Database Installation Guide # "emca.rsp" response file template from the CD to customize # silent Enteprise Manager configuration. Set the value of # this variable to your customized EMCA response file # location. # Valid values : The full path to a customized EMCA response file based on # the emca.rsp template. # Example value : "c:tempresponseemca.rsp" # Default value : None # Mandatory : Yes, for installs with the "-silent" flag #--------------------------------------------------------------------------- s_responseFileEMCA=<c:tempresponseemca.rsp> D.2 About Oracle Components in Different Languages This section describes the following features: ■ Running Oracle Universal Installer in Different Languages ■ Using Oracle Components in Different Languages D.2.1 Running Oracle Universal Installer in Different Languages Oracle Universal Installer runs by default in the selected language of your operating system. Oracle Universal Installer can also be run in the following languages: ■ Brazilian Portuguese ■ German ■ Japanese ■ Simplified Chinese ■ French ■ Italian ■ Korean ■ Spanish To run Oracle Universal Installer in a different language: 1. Change the language in which your operating system is running. For example, on Windows NT: 1. Choose Start > Settings > Control Panel > Regional Settings. 2. Select a language from the above list and choose OK. 2. Run Oracle Universal Installer by following the instructions in Section 4.4, "Installing Oracle Components". Note: The selected language is assigned to the NLS_LANG registry parameter. See Also: "Configuration Parameters and the Registry" of Oracle9i Database Getting Starting for Windows for more information on using the registry
- 179. About Web-based Installations Advanced Installation Topics D-7 D.2.2 Using Oracle Components in Different Languages You can select other languages in which to use Oracle components (for example, Oracle Net Configuration Assistant, Oracle Database Configuration Assistant, Oracle Enterprise Manager Configuration Assistant). Note that this does not change the language in which Oracle Universal Installer is run. For the Oracle component to run in the selected language, it must be the same as the language set for your operating system. You can change your operating system language in the Control Panel's Regional Settings window. To use components in different languages: 1. Follow the instructions in Section 4.4, "Installing Oracle Components" to start Oracle Universal Installer. 2. Select the top-level component you want to install: ■ Oracle9i Database ■ Oracle9i Client ■ Oracle9i Management and Integration 3. Select the Custom installation type. The Available Product Components window appears. 4. Choose Product Languages. The Language Selection window appears. 5. Select a language in which to use Oracle components from the Available Languages field. 6. Use the > arrow to move the language to the Selected Languages field and choose OK. 7. Select appropriate components for installation and choose Next. After installation is complete, the dialog box wording, messages, and online help for the installed components display in the language you selected. D.3 About Web-based Installations To install Oracle components from a Web browser: 1. Configure your Web server so that it can serve files from the release 1 (9.0.1) component CD-ROMs. 2. In the File Locations window of Oracle Universal Installer, enter the URL of the products.jar file. For example: http://acme.us.oracle.com/901/stage/products.jar When performing a Web-based installation on a computer in which no Oracle products have previously been installed, you may experience two errors. These errors occur when installing the Oracle Administration Assistant for Windows NT and Oracle Intelligent Agent. Both errors occur when Oracle Universal Installer attempts to download a library from the indicated URL. The error messages are as follows: ■ First error: ErrorOccurred
- 180. About Web-based Installations D-8 Oracle9i Database Installation Guide ■ Second error: Therewasanerrorduringloadinglibrary:NtServicesQueries. To work around these two errors, do the following: 1. In both cases, when the errors occur, you are given an option to stop the installation of all components or to stop the installation of that particular component. Choose to stop the installation of only that particular component and continue. 2. After installation is complete, restart Oracle Universal Installer. 3. Use the same URL as was used in the original installation, and perform an Oracle9i Database Custom installation. 4. In the Available Product Components window of Oracle Universal Installer, choose to install Oracle Intelligent Agent (located under Oracle Enterprise Manager Products) and Oracle Administration Assistant for Windows NT. Deselect all other selected components. The installation of these two components now proceeds normally.
- 181. E Globalization Support E-1 EGlobalization Support This appendix describes Globalization Support. This appendix contains these topics: ■ Section E.1, "About NLS_LANG Parameters" ■ Section E.2, "Commonly Used Values for NLS_LANG" ■ Section E.3, "NLS_LANG Settings in MS-DOS Mode and Batch Mode" E.1 About NLS_LANG Parameters Oracle provides Globalization Support that enables users to interact with a database in their own language, as defined by the NLS_LANG parameter. When you install Oracle9i components, the NLS_LANG parameter is set in the registry. The default value of the NLS_LANG parameter at installation is automatically chosen based on the locale setting of the operating system. The operating system locale and NLS_LANG value mappings are listed in Section E.2. The NLS_LANG parameter is stored in the registry under the HKEY_LOCAL_ MACHINESOFTWAREORACLEHOMEIDNLS_LANG subkey, where ID is the unique number identifying the Oracle home. The NLS_LANG parameter uses the following format: NLS_LANG=LANGUAGE_TERRITORY.CHARACTER_SET where: ■ LANGUAGE Specifies the language and conventions for displaying messages, day name, and month name. ■ TERRITORY Specifies the territory and conventions for calculating week and day numbers. ■ CHARACTER_SET Controls the character set used for displaying messages.
- 182. Commonly Used Values for NLS_LANG E-2 Oracle9i Database Installation Guide E.2 Commonly Used Values for NLS_LANG Table E–1 lists commonly used NLS_LANG values for various operating system locales: See Also: ■ Oracle9i Database Getting Starting for Windows for more information on the subkey locations for multiple Oracle homes ■ Oracle9i Globalization Support Guide for information on the NLS_ LANG parameter and Globalization Support initialization parameters Table E–1 NLS_LANG Parameter Values Operating System Locale NLS_LANG Value Arabic (U.A.E.) ARABIC_UNITED ARAB EMIRATES.AR8MSWIN1256 Bulgarian BULGARIAN_BULGARIA.CL8MSWIN1251 Catalan CATALAN_CATALONIA.WE8MSWIN1252 Chinese (PRC) SIMPLIFIED CHINESE_CHINA.ZHS16GBK Chinese (Taiwan) TRADITIONAL CHINESE_TAIWAN.ZHT16MSWIN950 Croatian CROATIAN_CROATIA.EE8MSWIN1250 Czech CZECH_CZECH REPUBLIC.EE8MSWIN1250 Danish DANISH_DENMARK.WE8MSWIN1252 Dutch (Netherlands) DUTCH_THE NETHERLANDS.WE8MSWIN1252 English (United Kingdom) ENGLISH_UNITED KINGDOM.WE8MSWIN1252 English (United States) AMERICAN_AMERICA.WE8MSWIN1252 Estonian ESTONIAN_ESTONIA.BLT8MSWIN1257 Finnish FINNISH_FINLAND.WE8MSWIN1252 French (Canada) CANADIAN FRENCH_CANADA.WE8MSWIN1252 French (France) FRENCH_FRANCE.WE8MSWIN1252 German (Germany) GERMAN_GERMANY.WE8MSWIN1252 Greek GREEK_GREECE.EL8MSWIN1253 Hebrew HEBREW_ISRAEL.IW8MSWIN1255 Hungarian HUNGARIAN_HUNGARY.EE8MSWIN1250 Icelandic ICELANDIC_ICELAND.WE8MSWIN1252 Indonesian INDONESIAN_INDONESIA.WE8MSWIN1252 Italian (Italy) ITALIAN_ITALY.WE8MSWIN1252 Japanese JAPANESE_JAPAN.JA16SJIS Korean KOREAN_KOREA.KO16MSWIN949 Latvian LATVIAN_LATVIA.BLT8MSWIN1257 Lithuanian LITHUANIAN_LITHUANIA.BLT8MSWIN1257 Norwegian NORWEGIAN_NORWAY.WE8MSWIN1252 Polish POLISH_POLAND.EE8MSWIN1250
- 183. NLS_LANG Settings in MS-DOS Mode and Batch Mode Globalization Support E-3 E.3 NLS_LANG Settings in MS-DOS Mode and Batch Mode When using the Oracle Internet Directory command line tools and Oracle utilities such as SQL*Plus, SQL Loader, Import, and Export in MS-DOS mode, the character set field of the NLS_LANG parameter for the session must first be set to the correct value. This is required because MS-DOS mode uses, with a few exceptions, a different character set (or code-page) from Windows (ANSI code-page), and the default Oracle home NLS_LANG parameter in the registry is always set to the appropriate Windows code-page. If the NLS_LANG parameter for the MS-DOS mode session is not set appropriately, error messages and data can be corrupted due to incorrect character set conversion. For Japanese, Korean, Simplified Chinese, and Traditional Chinese, the MS-DOS code-page is identical to the ANSI code-page. In this case, there is no need to set the NLS_LANG parameter in MS-DOS mode. Similarly, in batch mode, set the correct character set value of the NLS_LANG by inserting a SETNLS_LANG command at the start of the batch procedure, according to the character set of the files to be processed in the procedure. Portuguese (Brazil) BRAZILIAN PORTUGUESE_BRAZIL.WE8MSWIN1252 Portuguese (Portugal) PORTUGUESE_PORTUGAL.WE8MSWIN1252 Romanian ROMANIAN_ROMANIA.EE8MSWIN1250 Russian RUSSIAN_CIS.CL8MSWIN1251 Slovak SLOVAK_SLOVAKIA.EE8MSWIN1250 Spanish (Spain) SPANISH_SPAIN.WE8MSWIN1252 Swedish SWEDISH_SWEDEN.WE8MSWIN1252 Thai THAI_THAILAND.TH8TISASCII Spanish (Mexico) MEXICAN SPANISH_MEXICO.WE8MSWIN1252 Spanish (Venezuela) LATIN AMERICAN SPANISH_VENEZUELA.WE8MSWIN1252 Turkish TURKISH_TURKEY.TR8MSWIN1254 Ukrainian UKRAINIAN_UKRAINE.CL8MSWIN1251 Vietnamese VIETNAMESE_VIETNAM.VN8MSWIN1258 Note: Oracle Internet Directory command line tools are run from the computer's MS-DOS command prompt. You do not need a UNIX emulation utility for Windows NT to run these tools. An emulation utility is only required for running Oracle Internet Directory's shell script tools. See Oracle Internet Directory Administrator's Guide for more information. Table E–1 (Cont.) NLS_LANG Parameter Values Operating System Locale NLS_LANG Value
- 184. NLS_LANG Settings in MS-DOS Mode and Batch Mode E-4 Oracle9i Database Installation Guide Table E–2 lists the Oracle character sets that correspond to the MS-DOS mode for various operating system locales: Table E–2 Oracle Character Sets for Operating System Locales Operating System Locale Character Set Arabic AR8ASMO8X Catalan WE8PC850 Chinese (PRC) ZHS16GBK Chinese (Taiwan) ZHT16MSWIN950 Czech EE8PC852 Danish WE8PC850 Dutch WE8PC850 English (United Kingdom) WE8PC850 English (United States) US8PC437 Finnish WE8PC850 French WE8PC850 German WE8PC850 Greek EL8PC737 Hungarian EE8PC852 Italian WE8PC850 Japanese JA16SJIS Korean KO16MSWIN949 Norwegian WE8PC850 Polish EE8PC852 Portuguese WE8PC850 Romanian EE8PC852 Russian RU8PC866 Slovak EE8PC852 Slovenian EE8PC852 Spanish WE8PC850 Swedish WE8PC850 Turkish TR8PC857 See Also: "Managing Globalization Support in the Directory" of Oracle Internet Directory Administrator's Guide for Oracle Internet Directory Globalization Support issues and required NLS_LANG environment variables for the various components and tools in an Oracle Internet Directory environment
- 185. F Installing and Removing Legato Components F-1 FInstalling and Removing Legato Components This appendix describes how to install and remove Legato Storage Manager (LSM) components. This appendix contains these topics: ■ Section F.1, "About LSM Server" ■ Section F.2, "About LSM Administrator GUI" F.1 About LSM Server LSM server is a media management layer (MML). An MML, such as LSM, is required for backing up and restoring from tape storage if you are using Recovery Manager (RMAN) for Oracle database backups and restores. LSM is a scaled-down version of Legato NetWorker. This section describes how to perform the following steps: ■ Section F.1.1, "Updating LSM Server" ■ Section F.1.2, "Installing LSM Server" ■ Section F.1.3, "Removing LSM Server" F.1.1 Updating LSM Server To update to a newer version of LSM server: 1. Perform a partial removal of LSM server by following the steps in Section F.1.3 and selecting Partial Removal. Note: You do not need to separately install these two Legato components on the same computer. The LSM server software includes LSM Administrator GUI. If you install LSM server, do not separately install LSM Administrator GUI on the same computer. To administer LSM server from a separate Windows NT or Windows 2000 computer, install LSM Administrator GUI on that Windows NT or Windows 2000 computer using the instructions in Section F.2.2. Note: If you install LSM server software according to the instructions in this section, you do not need to separately install LSM Administrator GUI on the same computer.
- 186. About LSM Server F-2 Oracle9i Database Installation Guide 2. Install the updated version of LSM server by following the steps in Section F.1.2. F.1.2 Installing LSM Server To install LSM server: 1. Log on to the computer as a member of the Administrator's group of Windows NT or Windows 2000. 2. Shut down all Oracle instances on the Windows system, using SQL*Plus. 3. Stop all Oracle database services. Oracle database services are of the form OracleServiceSID. For example, on Windows NT: a. Choose Start > Settings > Control Panel. b. Choose Services. c. Select OracleServiceSID, and choose Stop. d. Choose Close to exit from the Services window. 4. Insert the first component CD-ROM. The Autorun window appears. If the Autorun window does not appear: a. Choose Start > Run. b. Enter the following: DRIVE_LETTER:autorunautorun.exe The Autorun window appears. 5. Choose Explore CD. 6. Navigate to the lsm directory. 7. Choose the lsm57_nt.exe self-extracting zip file. 8. Specify a directory in which to unzip the files when prompted. 9. Choose the lsminst.exe file. When the installation is complete, the LSM server is installed in the C:win32appnsr directory by default. Note: Running lsminst.exe installs the LSM server software in C:win32appnsr by default. If you do not want LSM server installed in this directory due to insufficient space, lack of a C: drive, and so on, follow these instructions: 1. Copy the entire LSM directory from the CD-ROM to the drive in which you want to install LSM server. 2. Extract the files from the lsm57_nt.exe self-extracting zip file. 3. Modify the server.iss file located in the LSM directory. Change Path=C:win32appnsr to Path=drive:path name. You can change either the drive name (from the default C:) or the directory path name (from the default win32appnsr), or both. The Path must end with nsr and must not contain any spaces. Save the updated server.iss file. 4. Choose lsminst.exe. Follow the instructions in Step 10 to verify the installation.
- 187. About LSM Server Installing and Removing Legato Components F-3 10. Verify that Legato services have started. On Windows NT: 1. Choose Start > Settings > Control Panel. 2. Choose Services. On Windows 2000: ■ Choose Start > Programs > Administrative Tools > Services. Check that the Status of each of the following services is marked Started: NetWorkerBackupandRecoverServer NetWorkerPowerMonitor (on Windows 2000 only) NetWorkerRemoteExecService 11. Add the LSM installation directory to your system search path: a. Open the Control Panel. b. Choose System. c. Choose the Environment tab. d. Select Path from the System Variables list box. e. Add the following to the Value field: ;C:win32appnsrbin where the semicolon (;) separates the new entry from the existing entries. If you installed LSM server in a nondefault drive or directory, replace C:win32appnsrbin above with the correct drive and path name, where the path name always ends in bin. f. Choose Set. g. Choose OK. h. Restart your computer for all changes to take effect. F.1.3 Removing LSM Server To remove LSM server: 1. Log on to the computer as a member of the Administrator's group of Windows NT or Windows 2000. Tip: The "Media Management" chapter in the Legato Storage Manager Administrator's Guide for storage device configuration information Note: Do not remove your indexes if you are upgrading from LSM to Legato NetWorker Module for Oracle. Select Partial Removal. Ensure that you have a recent, full backup of the file indexes (nsrindex), server resource files (nsrres), and media database (nsrmm) available. See the Installation Guide for the Legato NetWorker Module for the Oracle version to which you are upgrading. You cannot remove LSM server using Oracle Universal Installer. Follow the steps below to remove the LSM server software.
- 188. About LSM Administrator GUI F-4 Oracle9i Database Installation Guide 2. Shut down all Oracle instances on the Windows system, using SQL*Plus. 3. Stop all Oracle database services. Oracle database services are of the form OracleServiceSID. For example, on Windows NT: a. Choose Start > Settings > Control Panel. b. Choose Services. c. Select OracleServiceSID, and choose Stop. d. Choose Close to exit from the Services window. 4. Choose Start > Programs > NetWorker Group > Uninstall NetWorker. 5. Select either Complete Removal or Partial Removal. The NetWorker Uninstaller removes LSM server from your computer. 6. If you are updating from a previous version of the LSM server software on Windows NT, remove the interface file, orasbt.dll, from the C:winntsystem32 directory, where winnt is the installation directory for Windows NT. 7. If you selected Partial Removal, be sure to remove the nsrbin directory manually. For example, if LSM was installed in the default directory, then remove the C:win32appnsrbin directory. F.2 About LSM Administrator GUI If you want to administer LSM server from a separate Windows NT or Windows 2000 computer, you need to install LSM Administrator GUI (included on the first component CD-ROM) on the computer. This section describes how to perform the following steps: ■ Section F.2.1, "Updating LSM Administrator GUI" ■ Section F.2.2, "Installing LSM Administrator GUI" ■ Section F.2.3, "Removing LSM Administrator GUI" F.2.1 Updating LSM Administrator GUI To update to a newer version of LSM Administrator GUI on your Windows NT client computer: 1. Perform a complete removal of the existing LSM Administrator GUI using the procedure in Section F.2.3. 2. Install the updated version of LSM Administrator GUI using the procedure in Section F.2.2. F.2.2 Installing LSM Administrator GUI If you plan to use LSM server to back up to tape, and want to administer LSM server from a Windows NT or Windows 2000 client computer, you need to install LSM Administrator GUI on the client computer. Note: Select Complete Removal only if you want to remove all your database, index, and resource files.
- 189. About LSM Administrator GUI Installing and Removing Legato Components F-5 To install LSM Administrator GUI on your Windows NT or Windows 2000 client computer: 1. Log on to the computer as a member of the Administrator's group of Windows NT or Windows 2000. 2. Insert the first component CD-ROM into your CD-ROM drive. 3. Navigate to the lsm folder on the CD-ROM. 4. Choose the lsm57_nt.exe self-extracting zip file. 5. Specify a directory in which to unzip the files when prompted. 6. Choose setup.exe, or run setup.exe from the MS-DOS command prompt without any command options. SETUP Options appears. 7. Select Client Only and choose Next. 8. Choose Next in the Choose destination directory window to accept the default destination directory, C:Program Filesnsr, for LSM Administrator GUI installation. To choose an alternate destination directory for the installation, choose Browse and select the desired location. 9. Leave the field blank and choose Next in the Authorize NetWorker Servers window. A message box appears stating that the software has been installed successfully. 10. Choose OK. 11. Verify that Legato services have started: On Windows NT: a. Choose Start > Settings > Control Panel. b. Choose Services. On Windows 2000: ■ Choose Start > Programs > Administrative Tools > Services. Check that the Status of each of the following services is marked Started: NetWorkerPowerMonitor (on Windows 2000 only) NetWorkerRemoteExecService F.2.3 Removing LSM Administrator GUI To remove LSM Administrator GUI from your Windows NT or Windows 2000 client computer: 1. Log on to the computer as a member of the Administrator's group of Windows NT or Windows 2000. Note: Installation of LSM Administrator GUI is supported only on Windows NT and Windows 2000. Also, before you install LSM Administrator GUI, be sure that LSM server and NetWorker software are not currently installed on your Windows NT or Windows 2000 client computer. See Also: Legato Storage Manager Administrator's Guide for more information on using LSM Administrator GUI
- 190. About LSM Administrator GUI F-6 Oracle9i Database Installation Guide 2. Shut down all Oracle instances on the Windows system, using SQL*Plus. 3. Stop all Oracle database services. Oracle database services are of the form OracleServiceSID. For example, on Windows NT: a. Choose Start > Settings > Control Panel. b. Choose Services. c. Select OracleServiceSID, and choose Stop. d. Choose Close to exit from the Services window. 4. Choose Start > Programs > NetWorker Group > Uninstall NetWorker. 5. Select Complete as the uninstall option in the Uninstall NetWorker window, and choose OK. 6. When a message box appears stating that the client has been removed successfully, choose OK.
- 191. Glossary-1 Glossary automatic undo management mode A mode of the database in which undo data is stored in a dedicated undo tablespace. Unlike in manual undo management mode, the only undo management that you must perform is the creation of the undo tablespace. All other undo management is performed automatically. cluster A cluster generally comprises two or more computers, or "nodes." Oracle Real Application Clusters software and a collection of hardware, known as a "cluster," unite the processing power of each component to become a single, robust computing environment. Oracle Real Application Clusters is a robust computing environment that harnesses the processing power of multiple, interconnected computers. connect descriptor A specially formatted description of the destination for a network connection. A connect descriptor contains destination service and network route information. The destination service is indicated by using its service name for the Oracle9i Database or its Oracle system identifier (SID) for Oracle release 8.0, or version 7 databases. The network route provides, at a minimum, the location of the listener through use of a network address. connect identifier A name, net service name, or service name that resolves to a connect descriptor. Users initiate a connect request by passing a username and password along with a connect identifier in a connect string for the service to which they want to connect, for example: SQL> CONNECT username/password@connect_identifier default domain The network domain within which most client requests take place. It can be the domain where the client resides, or a domain from which the client often requests network services. The default domain is also the client configuration parameter that determines what domain to append to unqualified network name requests. A name request is unqualified if it does not have a "." character within it. Directory Information Tree (DIT) A hierarchical tree-like structure in a directory server of the Distinguished Names (DNs) of the entries.
- 192. directory naming context Glossary-2 directory naming context A subtree that is of significance within a directory server. It is usually the top of some organizational subtree. Some directories only allow one such context that is fixed; others allow none to many to be configured by the directory administrator. directory naming A naming method that specifies a directory server to resolve a net service name into a connect descriptor. The net service name is stored centrally in a directory server. directory server An Lightweight Directory Access Protocol (LDAP)-compliant directory server. A directory can provide centralized storage and retrieval of database network components, user and corporate policies preferences, user authentication, and security information, replacing client-side and server-side localized files. external procedures A PL/SQL routine executing on an Oracle server can call an external procedure or function that is written in the C programming language and stored in a shared library. In order for the Oracle9i Database to connect to external procedures, the server must be configured with a net service name and the listener must be configured with protocol address and service information. global database name The full database name that uniquely distinguishes it from any other database in your network domain. For example: sales.us.acme.com where sales is the name you want to call your database and us.acme.com is the network domain in which the database is located. Interprocess Communication (IPC) A protocol used by client applications that resides on the same node as the listener to communicate with the database. IPC can provide a faster local connection than TCP/IP. installation type An installation type is a predefined component set that automatically selects which components to install. See Section 1.2.3, "Oracle9i Products for Installation" for a list of installation types available with each top-level component. ldap.ora file A file created by the Oracle Net Configuration Assistant that contains the following directory access information: ■ Type of directory ■ Location of directory ■ Default administrative context the client or server uses to look up or configure connect identifiers for connections to database services The ldap.ora file resides in ORACLE_BASEORACLE_HOMEnetworkadmin. listener A process that resides on the server whose responsibility is to listen for incoming client connection requests and manage the traffic to the server.
- 193. net service name Glossary-3 When a client requests a network session with a database server, a listener receives the actual request. If the client information matches the listener information, then the listener grants a connection to the database server. listener.ora file A configuration file for the listener that identifies the: ■ Listener name ■ Protocol addresses on which it is accepting connection requests ■ Services for which it is listening The listener.ora file resides in ORACLE_BASEORACLE_HOMEnetworkadmin. An Oracle9i Database does not require identification of the database service because of service registration. However, static service configuration is required for an Oracle9i Database if you plan to use Oracle Enterprise Manager. local naming A naming method that resolves a net service name into a connect descriptor. This name is configured and stored in the tnsnames.ora file on each individual client. manual undo management mode A mode of the database in which undo blocks are stored in user-managed rollback segments. In automatic undo management mode, undo blocks are stored in system-managed, dedicated undo tablespaces. naming method A resolution method used by a client application to resolve a connect identifier to a network address when attempting to connect to a database service. Oracle Net Services supports the following naming methods: ■ Local naming ■ Directory naming ■ Oracle Names ■ Host naming ■ External naming net service name A simple name for a service that resolves to a connect descriptor. Users initiate a connect request by passing a username and password along with a net service name in a connect string for the service to which they want to connect: SQL> CONNECT username/password@net_service_name Depending on your needs, net service names can be stored in a variety of places, including: ■ Local configuration file, tnsnames.ora, on each client ■ Directory server ■ Oracle Names server ■ External naming service, such as Network Information Service (NIS) or Cell Directory Service (CDS)
- 194. operating system authenticated connections Glossary-4 operating system authenticated connections Windows NT login credentials can be used to authenticate users connecting to an Oracle9i database. The benefits of Windows NT native authentication include: ■ Enabling users to connect to multiple Oracle9i databases without supplying a username or password ■ Centralizing Oracle9i database user authorization information in Windows NT, which frees Oracle9i from storing or managing user passwords OPS$ The initialization file parameter OS_AUTHENT_PREFIX enables users to specify a prefix that Oracle uses to authenticate users attempting to connect to the database. Oracle concatenates the value of this parameter to the beginning of the user's operating system account name and password. When a connection request is attempted, Oracle compares the prefixed username with Oracle user names in the database. The default value of this parameter is "" (a null string), thereby eliminating the addition of any prefix to operating system account names. In earlier releases, OPS$ (short for operating system specific) was the default setting. Oracle Context The root of a directory subtree with a relative distinguished name of cn=OracleContext, under which all Oracle software information is kept. There may be one (or more than one) Oracle Context in a directory. An Oracle Context can be associated with a directory naming context. The Oracle Context can contain the following Oracle entries: ■ Connect identifiers for use with Oracle Net Services directory naming to make database connections ■ Enterprise user security for use with Oracle Advanced Security Oracle home name The name of the current Oracle home. Each Oracle home has a home name that distinguishes it from all other Oracle homes on your computer. During installation, you are prompted to enter an Oracle home name in the Name field of the Oracle Universal Installer's File Locations window. Oracle home The directory path in which to install Oracle components (for example, D:oracleora90). You are prompted to enter an Oracle home in the Path field of the Oracle Universal Installer's File Locations window. Oracle Management Server The middle tier of Oracle Enterprise Manager, which provides centralized intelligence and distribution control between console clients and managed nodes. Oracle schema A set of rules that determine what can be stored in an LDAP-compliant directory server. Oracle has its own schema that is applied to many types of Oracle entries, including Oracle Net Services entries. The Oracle schema for Oracle Net Services entries includes the attributes the entries may contain.
- 195. service registration Glossary-5 Oracle9i Database Online Documentation CD-ROM The CD-ROMs in your kit that include the Oracle9i Database Online Documentation. The Oracle9i Database Online Documentation CD-ROMs are separate from the component CD-ROMs. The Oracle9i Database Online Documentation CD-ROMs do not include this installation guide or Oracle9i release notes for Windows. These documents are only included on the first component CD-ROM. Oracle9i Enterprise Edition The complete database type. Oracle9i Personal Edition One of the available Oracle9i database types. Oracle9i Personal Edition for Windows NT and Windows 2000 does not include Oracle Real Application Clusters. Oracle9i Standard Edition One of the available Oracle9i Database types. Oracle9i Standard Edition does not include Oracle Advanced Security, Oracle COM Automation Feature, Oracle OLAP Services, Oracle Partitioning, Oracle Real Application Clusters, and Oracle Spatial. protocol address An address that identifies the network address of a network object. When a connection is made, the client and the receiver of the request, such as the listener, Oracle Names Server, or Oracle Connection Manager, are configured with identical protocol addresses. The client uses this address to send the connection request to a particular network object location, and the recipient "listens" for requests on this address. It is important to install the same protocols for the client and the connection recipient, as well as configure the same addresses. repository A set of tables in an Oracle database that store information regarding the state of services managed and monitored by Oracle Enterprise Manager, as well as information about the separately licensable management packs. It is used as a back-end store by the Oracle Management Servers. sqlnet.ora file A configuration file for the client or server that specifies the: ■ Client domain to append to unqualified service names or net service names ■ Order of naming methods for the client to use when resolving a name ■ Logging and tracing features to use ■ Route of connections ■ Preferred Oracle Names servers ■ External naming parameters ■ Oracle Advanced Security parameters The sqlnet.ora file resides in ORACLE_BASEORACLE_HOMEnetworkadmin. service registration A feature by which the PMON process (an instance background process) automatically registers information with a listener. Because this information is registered with the
- 196. SID Glossary-6 listener, the listener.ora file does not need to be configured with this static information. Service registration provides the listener with the following information: ■ Service name(s) for each running instance of the database ■ Instance name(s) of the database ■ Service handlers (dispatchers and dedicated servers) available for each instance This allows the listener to direct a client's request appropriately. ■ Dispatcher, instance, and node load information This allows the listener to determine which dispatcher can best handle a client connection's request. If all dispatchers are blocked, the listener can spawn a dedicated server for the connection. This information allows the listener to determine how best to service a client connection request. SID The Oracle system identifier that uniquely distinguishes the database from any other database on your computer. The SID automatically defaults to the database name portion of the global database name (sales in the example sales.us.acme.com) until you reach eight characters or enter a period. You can accept or change the default value. Note: For Oracle Real Application Clusters, the SID you enter is automatically appended with an identifier. For example, if DB is entered, the first instance in the cluster is given a SID of DB1, and the second instance is given a SID of DB2. system identifier See SID. Terminal Server Microsoft Windows Terminal Server is a Windows thin-client terminal server, a product that adds support for multiple, simultaneous client sessions on the Windows NT Server. Windows Terminal Server provides an operating system graphical user interface (GUI) to users of Oracle9i databases. tnsnames.ora file A configuration file that contains net service names mapped to connect descriptors. This file is used for the local naming method. The tnsnames.ora file resides in ORACLE_BASEORACLE_HOMEnetworkadmin. top-level components When you run Oracle Universal Installer from the component CD-ROM, you are prompted in the Available Products window to install a top-level component. Each top-level component contains several installation types from which to choose. Each installation type contains a predefined set of individual components. See Section 1.2.3, "Oracle9i Products for Installation" for a list of installation types available with each top-level component. UNC See Universal Naming Convention (UNC)
- 197. Virtual Interface Architecture (VIA) Glossary-7 undo tablespace A dedicated tablespace that stores only undo information when the database is run in automatic undo management mode. An undo tablespace contains one or more undo segments. The creation of any other types of segment (for example, tables, indexes) in undo tablespaces is not allowed. In the automatic mode, each Oracle instance is assigned one and only one undo tablespace. Each undo tablespace is composed of a set of undo files. Undo blocks are grouped in extents. At any point in time, an extent is either allocated to (and used by) a transaction table, or is free. Blocks in undo tablespaces are grouped into the following categories: ■ File control blocks, bitmap blocks, and so forth used for space management ■ Undo segments containing transaction table blocks, undo blocks, and extent-map blocks used for transaction management ■ Free blocks that are unallocated to file control or undo segments unqualified name A net service name that does not contain a network domain. Universal Naming Convention (UNC) The Universal Naming Convention provides a means to access files on a network without mapping the network drive to a drive letter. UNC names are constructed in the following manner: computer nameshare namefilename Virtual Interface Architecture (VIA) Virtual Interface Architecture is an industry-standard architecture for intercluster communications. VIA's rapid server-to-server communication enhances an application's scalability and performance. VIA does this by allowing a single application to run efficiently across dozens of clustered nodes and by accelerating the data exchange among distributed application modules running on different application servers.
- 198. Virtual Interface Architecture (VIA) Glossary-8
- 199. Index-1 Index Numerics 3DES_112 encryption support installation types available with, A-2, A-7 3DES_168 integrity support installation types available with, A-2, A-7 A Active Directory support preinstallation requirements for integration with Oracle, 2-10 administrative context configuration, 3-8 Administrator installation type components installed with, A-6 definition, 1-6 installing, 4-11 system requirements for, 2-4 Administrators group requirements for Oracle installations, 4-2 Advanced Queueing defined, A-13 installation types available with, A-1, A-6, A-10 Advanced Replication defined, A-13 installation types available with, A-1, A-10 Apache Configuration for Oracle Java Server Pages installation types available with, A-4 Apache Configuration for XML Developer’s Kit installation types available with, A-4 Apache JServ installation types available with, A-4 Apache Web Server Files installation types available with, A-4 Assistant Common Files defined, A-14 AURORA$JIS$UTILITY$ username and password, 5-3 AURORA$ORB$UNAUTHENTICATED username and password, 5-3 authentication support defined, A-15 installation types available with, A-2, A-6 preinstallation requirements, 2-8 authorization support defined, A-15 B backup perform before migrating or upgrading, 4-2 BaliShare, A-14 batch mode setting the NLS_LANG parameter, E-3 Business Components for Java (BC4J) Runtime installation types available with, A-4 C certification, 2-7 Character Set Migration Utility installation types available with, A-9, A-12 client installations instructions, 4-11 to 4-12 response files, D-1 CMWLITE tablespace CMWLITE01.DBF datafile, 5-7 description, 5-7 components available for installation, 1-5, A-1 certification, 2-7 compatibility matrix, 2-7 for single Oracle homes, 2-1 installation of single Oracle home components, 2-1 installing, 4-3 installing single Oracle home components a second time, 2-1 mandatory preinstallation requirements, 2-8 postinstallation configuration guidelines, 6-3 removing database, Oracle Internet Directory, and Net Services services and registry entries, 4-28 removing manually on Windows 98, 4-30 removing manually on Windows NT, 4-29 using in different languages, D-7 connection descriptor definition, 3-7 contact information Legato, A-15 control files, 5-9
- 200. Index-2 for Oracle Real Application Clusters, B-5 copying data logical partitions, B-17 crlogdr utility, B-7 CTXSYS database role, 5-3 username and password, 5-3 Custom installation type defined, 1-5, 1-6 installing, 4-9, 4-12, 4-23 custom.rsp file description, D-1 CWM tablespace Oracle Real Application Clusters, B-5 CyberSafe support installation types available with, A-6 D data dictionary description, 5-9 in starter database, 5-9 data warehousing database environment, 3-3 defined, 3-3 same as DSS database environment, 3-3 database control files, 5-9 data dictionary, 5-9 datafiles, 5-6 default passwords, 5-1 default usernames, 5-1 granting limited SYS role privileges, 5-3 initialization parameter file, 5-8 redo log files, 5-8 roles, 5-3 to 5-4 rollback segments, 5-9 tablespaces, 5-6 undo segments, 5-9 database types Oracle9i Database, 1-5 Database Verify utility installation types available with, A-5, A-12 databases available database types, 1-5 configuration types, 3-4 configuring with a directory server, 3-8 creating database environments, 3-3 Custom installation type, 3-5 installation, 4-5 migration requirements, 2-13 removing, 4-28 selecting a creation method, 3-4 supported creation methods, 3-1 user input required for creation, 3-1 datafiles, 5-7, B-5 DB_DOMAIN parameter, 5-5 DB_NAME parameter, 5-5 dbca.rsp file description, D-2 DBSNMP database roles, 5-3 username and password, 5-3 DBUI, A-14 DCE support installation types available with, A-2, A-6 Decision Support System. See DSS default character set, 4-7, 4-18, 4-21, 4-25 default control files, 5-9 default datafiles, 5-7 default domain configuration, 3-7, 3-8, 3-9, 3-10 default initialization parameter file init.ora, 5-8 default port, 4-16 default redo log files, 5-8 default tablespaces, 5-7 deinstallation of database, Oracle Internet Directory, and Net Services services and registry entries, 4-28 of Oracle components, 4-29, 4-30 DeleteDisk utility, B-7 deleting Oracle OSDs, B-14 deprecated and desupported components, 0-xxiii DES40 encryption support installation types available with, A-2, A-7 DES56 encryption support installation types available with, A-2, A-7 differences between installing Oracle on Windows NT and UNIX, 4-1 directory server configuring access through the Custom installation type, 3-7 configuring client access to a directory server, 3-9 configuring database access to a directory server, 3-8 documentation accessing on the CD-ROM, 1-7 creating single installation stage, D-2 getting started with, 1-8 on using Oracle Universal Installer, 1-4 on using response files, D-2 order in which to read, 1-8 viewing HTML and PDF formats, 1-7 dr01.dbf datafile, 5-7 DRSYS tablespace description, 5-7 Oracle Real Application Clusters, B-5 DSS same as data warehousing database environment, 3-3 E emca.rsp file description, D-2 encryption and integrity support defined, A-16
- 201. Index-3 installation types available with, A-2, A-7 Enterprise Edition installation type components installed with, A-1 defined, 1-5 installing, 4-5 system requirements for, 2-3 enterprise user security support defined, A-16 installation types available with, A-2, A-7 enterprise.rsp file description, D-1 Entrust support installation types available with, A-2, A-6 environment restrictions on setting ORACLE_HOME, 4-3 EWT, A-14 EXAMPLE tablespace description, 5-7 EXAMPLE01.DBF datafile, 5-7 EXAMPLE01.DBF datafile, 5-7 Export utility, A-30 installation types available with, A-5, A-9, A-12 ExportSYMLinks utility, B-7 external procedures configuration, 3-8 postinstallation configuration tasks, 6-5 F FAT system requirements, 2-2 features, new, 0-xix to 0-xxiii file sizes for Oracle Database Configuration Assistant for Oracle Real Application Clusters, B-5 file systems system requirements, 2-2 files Oracle Universal Installer log files, 4-26 G gateway. See Oracle Transparent Gateway Generic Connectivity defined, A-14 installation types available with, A-1, A-10 generic documentation references Windows NT-specific NLS_LANG values, E-2 Windows NT-specific NLS_TERRITORY values, E-2 Windows NT-specific parameter file name and location, 5-8 Windows NT-specific redo log file location, 5-8 Windows NT-specific redo log file size, 5-8 getting started overview of, 1-10 global database name defined, 4-21, 5-5 H Heterogeneous Services. See Generic Connectivity host naming adapter supported vendors, 2-15 I ICE Browser, A-14 Import utility, A-30 installation types available with, A-5, A-9, A-12 ImportSYMLinks utility, B-7 INDX tablespace description, 5-7 indx01.dbf datafile, 5-7 Oracle Real Application Clusters, B-5 indx01.dbf datafile, 5-7 initialization parameter file description, 5-8 in database, 5-8 init.ora, 5-8 installactions.log file, 2-1, 4-26 installation accessing installation documentation on the CD-ROM, 1-7 Administrator installation type, 4-11 available components, 1-5, A-1 available installation types, A-1 Custom installation type, 4-9, 4-12, 4-23 differences between installing Oracle on UNIX and Windows NT, 4-1 Enterprise Edition installation type, 4-5 in noninteractive mode, D-1 Java Access Bridge, 0-xv keyboard navigation, 1-4 of single Oracle home components, 2-1 Oracle Integration Server, 1-6 Oracle Integration Server installation type, 4-20 Oracle Internet Directory, 1-6 Oracle Internet Directory installation type, 4-16 Oracle Management Server installation type, 4-14 Personal Edition installation type, 4-5 preinstallation, 4-2 requirements, 2-2 Optimal Flexible Architecture, 1-2 restrictions on installing in pre-8.1.5 homes, 1-4, 4-3 restrictions on using old Oracle Installer, 1-4, 4-3 reviewing a log of an installation session, 4-26 Runtime installation type, 4-11 selecting the Oracle9i Client, 4-11 selecting the Oracle9i Database installation type, 4-5 selecting the Oracle9i Management and Integration, 4-13 single installation stage, 4-4, D-2 Standard Edition installation type, 4-5 steps, 4-3 top-level components, 1-5 Web-based, D-7 installation documentation defined, A-33 installation types available with, A-6, A-9, A-13
- 202. Index-4 installation types available with each top-level component, 1-5 with Oracle9i Client, 1-5, 2-4, A-1, A-6 with Oracle9i Database, 1-5 with Oracle9i Enterprise Edition, A-1 with Oracle9i Management and Integration, 1-6, 2-5, A-9 with Oracle9i Personal Edition, A-1 with Oracle9i Standard Edition, A-1 Inventory directory, 4-26 IPC configuration, 3-7 J Java Access Bridge installation and configuration, 0-xv to 0-xviii Java Runtime Environment defined, A-14 installation types available with, A-5, A-9, A-12 Oracle’s version of, 1-4 requirements, 2-2 restrictions on modifying, 1-4 Java Swing Components, A-14 Java Virtual Machine defined, A-14 installation types available with, A-5, A-12 JDBC, A-23 JSDK installation types available with, A-4 JVM Accelerator defined, A-32 installation types available with, A-5, A-12 K Kerberos support installation types available with, A-2, A-6 keyboard navigation, 1-4 Kodiak, A-14 L languages installing Oracle components in different languages, D-6 using Oracle components in different languages, D-7 LBACSYS database roles, 5-3 username and password, 5-3 LDAP-compliant directory server configuring clients with a directory server, 3-9 configuring the database with a directory server, 3-8 Legato component descriptions, A-14 configuring with Recovery Manager, 2-10 installing Legato components, F-1 removing Legato components, F-1 LetterDelete utility, B-7 licensing issues, 1-6 listener configuration, 3-7, 3-8 creation, 3-8 installing the database into a directory with client software, 4-5 stopping before installation, 4-2 listener.ora file configuring with Oracle Database Configuration Assistant, 3-7, 3-8 configuring with Oracle Net Configuration Assistant, 3-7, 3-8, 3-10 log files reviewing an installation session, 4-26 logical partitions compatibility issues, B-16 configuring for Oracle Real Application Clusters, B-9 control files tablespace, B-5 copying data, B-17 CWM tablespace, B-5 file sizes for Oracle Database Configuration Assistant, B-5 file sizes for Oracle Database Configuration Assistant Custom database type, B-4 redo log files, B-5 voting disk, B-5 LogPartFormat utility, B-7 LSM Administrator GUI client administration of a LSM server, F-4 defined, A-14 installing, F-4 removing, F-5 updating, F-4 using with LSM server, F-1, F-4 LSM server configuring with Recovery Manager, 2-10, F-1 defined, A-15, F-1 installing manually, F-2 removing, F-3 updating, F-1 using with LSM Administrator GUI, F-1, F-4 Windows NT services of, F-3, F-5 lsminst.exe file, F-2 LU6.2 protocol support, 0-xxiii desupported vendors, 2-15 M mandatory individual component requirements, 2-8 MD5 integrity support installation types available with, A-2, A-7 MDSYS database roles, 5-4 username and password, 5-4 Media Management Layer defined, F-1 Microsoft ODBC specification Oracle ODBC Driver compliance with, A-27
- 203. Index-5 MIG. See Migration utility migration automatically starting Oracle Data Migration Assistant during installation, 4-8, 4-22 backing up before migrating or upgrading, 4-2 from non-Oracle databases, A-24 from releases prior to 7.3.4. and 8.0.6, 2-13 Oracle Real Application Clusters requirements, 2-14 reading migration documentation before running Oracle Universal Installer, 4-2 required Oracle7 Server SQL*Net patch releases, 2-14 requirements, 2-13 using Oracle command line tools, 2-13 with Oracle Data Migration Assistant, 4-7, 4-21 Migration utility installation types available with, A-5, A-12 requires database release 7.3.4.0.0 or higher, 2-13 using, 2-14 MS-DOS mode setting the NLS_LANG parameter, E-3 multiple Oracle homes system identifier, 5-6 N Named Pipes protocol support supported vendors, 2-15 naming method configuration, 3-7, 3-8, 3-9, 3-10 net service name configuration, 3-7, 3-8, 3-9 Net Services configuring the database with a directory server, 3-8 installing through the Custom installation type, 4-10, 4-12 location of network configuration files, 3-6 removing, 4-28 supported configuration methods, 3-1 user input required for configuration, 3-1 netca.rsp file description, D-2 network location of network configuration files, 3-6 selecting a Oracle Net configuration method, 3-5 new features, 0-xix to 0-xxiii NLS support, E-2 NLS_LANG parameter, E-1 setting in MS-DOS mode and batch mode, E-3 territory and character set defaults, E-2 noninteractive installation overview, D-1 NTFS file system permission setting, 6-1 system requirements, 2-2 O Object INTYPE File Assistant installation types available with, A-6 Object Link Manager, B-7 Object Type Translator defined, A-15 installation types available with, A-1, A-6, A-10 OCI defined, A-16 installation types available with, A-3, A-7, A-10 ODBC. See Oracle ODBC Driver oem_repository.ora datafile, 5-7 OiD Configuration Assistant automatically starting during installation, 4-18, 4-24 automatically starting Oracle Database Configuration Assistant, 4-18, 4-25 defined, A-23 installation types available with, A-11 OiD Upgrade Assistant automatically starting during installation, 4-20 OIDCTL utility stopping Oracle Internet Directory Server, 4-27 OIDMON utility removing the Oracle Internet Directory Windows NT service, 4-27 oid.rsp file description, D-2 OLAP Services. See Oracle OLAP Services OLAPDBA database roles, 5-4 username and password, 5-4 OLAPSVR database roles, 5-4 username and password, 5-4 OLAPSYS database roles, 5-4 username and password, 5-4 OLTP database environment, 3-3 defined, 3-3 omicustom.rsp file description, D-2 OMSNTSRV utility removing the Oracle Management Server service, 4-28 oms.rsp file description, D-2 Online Transaction Processing. See OLTP operating system authenticated connections configuration, 3-7, 3-8, 3-10 OPS$ configuration, 3-7, 3-8, 3-10 Optimal Flexible Architecture installation issues and restrictions for, 1-2 Oracle Administration Assistant for Windows NT defined, A-15 installation types available with, A-1 postinstallation configuration tasks, 6-4
- 204. Index-6 Oracle Advanced Security authentication enterprise user security support, A-2 authentication support, A-2, A-6 authentication support defined, A-15 authorization support defined, A-15 encryption and integrity support, A-2, A-7 encryption and integrity support defined, A-16 enterprise user security, A-7 enterprise user security support defined, A-16 installation types available with, A-2, A-6, A-10 Oracle Enterprise Login Assistant, A-2, A-7, A-10 Oracle Enterprise Security Manager, A-2, A-7 Oracle Wallet Manager, A-2, A-7 overview defined, A-15 postinstallation configuration tasks, 6-4 preinstallation requirements, 2-8 SSO support defined, A-16 Thin JDBC Java-based encryption support, A-2, A-7 Oracle Call Interface defined, A-16 installation types available with, A-3, A-7, A-10 Oracle Cluster Setup Wizard running, B-6 Oracle COM Automation Feature defined, A-16 installation types available with, A-3 Oracle Connection Manager defined, A-17 installation types available with, A-3, A-10 Oracle Data Gatherer installed with Oracle Intelligent Agent, A-21 Oracle Data Migration Assistant automatically starting during installation, 4-8, 4-10, 4-20, 4-22 defined, A-17 installation types available with, A-3, A-10 migrating in Oracle Universal Installer, 4-7, 4-21 never started with Oracle Database Configuration Assistant during the same installation session, 4-9 requires database release 7.3.4 or higher, 2-13 Oracle Database Configuration Assistant automatically starting during installation, 4-8, 4-22 configuring Oracle Real Application Clusters, 3-7 configuring the listener.ora file, 3-7, 3-8 creating a Custom database type, 3-5 creating a database environment, 3-4 creating database environments, 3-3 defined, A-17 installation types available with, A-3, A-10 never started with Oracle Data Migration Assistant during the same installation session, 4-9 selecting a database creation method, 3-4 Oracle Database Configuration Assistant Custom database type logical partition sizes, B-4 Oracle Database Demos defined, A-17 installation types available with, A-5, A-13 Oracle Directory Manager defined, A-18 installation types available with, A-3, A-7, A-10 Oracle Documentation viewing from the CD-ROM, 1-7 Oracle Dynamic Services installation types available with, A-3 Oracle Dynamic Services Server installation types available with, A-7, A-10 Oracle Enterprise JavaBeans and CORBA Tools defined, A-18 installation types available with, A-3, A-7, A-10 Oracle Enterprise Login Assistant defined, A-18 feature of Oracle Advanced Security, A-2, A-7, A-10 installation types available with, A-2, A-7, A-10 Oracle Enterprise Manager defined, A-19 installation types available with, A-3, A-7, A-10 Oracle Enterprise Manager Paging Server requirements, 2-12 Oracle Management Server requirements, 2-11 postinstallation configuration tasks, 6-4 preinstallation requirements, 2-11 requirements for running the three tiers from the same computer, 2-3 Web browser requirements, 2-12 Oracle Enterprise Manager Client defined, A-19 installation types available with, A-3, A-7, A-10 Oracle Enterprise Manager Configuration Assistant automatically starting during installation, 4-15 capabilities, 4-9 creating a new repository, 2-11, 4-16, 6-4 defined, A-19 installation types available with, A-4, A-11 not automatically run after Typical installation type, 4-9 running in silent mode, D-2 using an existing repository, 2-11, 4-15, 6-4 Oracle Enterprise Manager Console defined, A-19 installation types available with, A-3, A-7, A-10 Oracle Enterprise Manager Integrated Applications defined, A-19 installation types available with, A-3, A-7, A-10 Oracle Enterprise Manager Migration Assistant migrating to a new repository, 4-14 Oracle Enterprise Manager Paging Server defined, A-19 installation requirement, 2-12 installation types available with, A-3, A-11 Oracle Enterprise Manager Quick Tours defined, A-20 installation types available with, A-11 Oracle Enterprise Manager Web Site browser requirements, 2-12
- 205. Index-7 defined, A-20 installation types available with, A-3, A-11 supported Web browsers, 2-5 Oracle Enterprise Security Manager defined, A-20 installation types available with, A-2, A-3, A-7, A-8, A-10 Oracle Forms Server Manager defined, A-17 installation types available with, A-3, A-8, A-10 Oracle Help for Java, A-14 Oracle home installing single homes components a second time, 2-1 single Oracle home components, 2-1 single Oracle homes components, 2-1 Oracle home name maximum length, 4-5 Oracle Home Selector defined, A-20 installation types available with, A-5, A-9, A-12 Oracle HTTP Server automatically starting the service during installation, 4-8, 4-15, 4-18, 4-20, 4-22, 4-24 defined, A-20 installation types available with, A-4 Oracle Enterprise Manager Web Site requirements, 2-12 postinstallation configuration tasks, 6-4 Oracle Integration Server function, 1-6 installation, 1-6 Oracle Integration Server installation type components installed with, A-10 defined, 1-6, A-21 installing, 4-20 installing through the Custom installation type, 4-23 system requirements for, 2-5 Oracle Intelligent Agent defined, A-21 installation types available with, A-3, A-11 Oracle Agent Extensions no longer installed with, A-21 Oracle interMedia defined, A-21 installation types available with, A-4 postinstallation configuration tasks, 6-4 separately licensed, A-21 Oracle interMedia Annotator installation types available with, A-8, A-11 Oracle interMedia Audio defined, A-21 installation types available with, A-4 Oracle interMedia Client Option defined, A-22 installation types available with, A-4, A-8, A-11 Oracle interMedia Image defined, A-22 installation types available with, A-4 Oracle interMedia Locator defined, A-22 installation types available with, A-4 Oracle interMedia Video defined, A-22 installation types available with, A-4 Oracle Internet Directory configuring an 9.0.1 database with Oracle Internet Directory, 2-9 defined, A-23 downgrading requirements, 2-9 function, 1-6 installation, 1-6 installing for the first time, 4-17 installing through the Custom installation type, 4-23 LDIF-based upgrading, 2-9 NLS issues, E-4 postinstallation configuration tasks, 6-5 preinstallation requirements, 2-9 removing, 4-28 required NLS_LANG environment variables for tools, E-4 running command line tools in MS-DOS mode, E-3 UNIX emulation utility requirement, 2-5, 6-5 upgrade instructions, 4-18 Oracle Internet Directory Client defined, A-23 installation types available with, A-4, A-8, A-11 Oracle Internet Directory Client toolset installation types available with, A-11 Oracle Internet Directory Configuration Assistant. See OiD Configuration Assistant Oracle Internet Directory installation type components installed with, A-10 defined, 1-6 installing, 4-16 system requirements for, 2-5 Oracle Internet Directory Server defined, A-23 installation types available with, A-11 removing the Oracle NT service, 4-27 stopping, 4-27 Oracle Internet File System CD-ROMs available on, A-23 defined, A-23 Oracle INTYPE File Assistant defined, A-23 installation types available with, A-1, A-10 Oracle inventory log files, 4-26 Oracle JDBC Drivers defined, A-23 installation types available with, A-4, A-8, A-11 Oracle JDBC Thin Driver for JDK 1.1 installation types available with, A-4, A-8, A-11 Oracle JDBC Thin Driver for JDK 1.2 installation types available with, A-4, A-8, A-11 Oracle JDBC/OCI Driver for JDK 1.1
- 206. Index-8 installation types available with, A-4, A-8, A-11 Oracle JDBC/OCI Driver for JDK 1.2 installation types available with, A-4, A-8, A-11 Oracle JVM defined, A-32 installation types available with, A-5 naming convention with Oracle9i database type, A-32 Oracle Management Server creating a new repository, 2-11, 4-14, 6-3 defined, A-24 installation types available with, A-3, A-11 installing through the Custom installation type, 4-10 migration and upgrade restrictions, 4-14 preinstallation requirements, 2-11 removing the Oracle NT service, 4-28 using an existing repository, 2-11, 4-14, 6-3 Oracle Management Server installation type defined, 1-6 installing, 4-14 system requirements for, 2-5 Oracle Migration Workbench defined, A-24 documentation available in OMWB directory, 1-8 installation types available with, A-4, A-8 latest documentation on Oracle Technology Network, 1-8 non-Oracle databases from which migration is supported, A-24 Oracle Mod PL/SQL Gateway installation types available with, A-4 Oracle Names defined, A-25 installation types available with, A-4 Oracle Net configuring the server environment, 3-6 selecting a configuration method, 3-5 Oracle Net Client installation types available with, A-8, A-11 Oracle Net Configuration Assistant automatically starting during installation, 4-8, 4-15, 4-18, 4-20, 4-22, 4-24 configuring client access to a directory server, 3-9 configuring the client environment, 3-8 configuring the database to access a directory server, 3-6, 3-8 configuring the listener.ora file, 3-7, 3-8, 3-10 configuring the sqlnet.ora file, 3-7, 3-8, 3-9, 3-10 configuring the tnsnames.ora file, 3-7, 3-8, 3-9 defined, A-25 installation types available with, A-4, A-8, A-11 Oracle Net configuration assistant configuring clients with a directory server, 3-9 Oracle Net Listener installation types available with, A-4, A-11 Oracle Net Manager defined, A-26 installation types available with, A-2, A-4, A-8, A-11 Oracle Net Services installation types available with, A-4 postinstallation configuration tasks, 6-3 Oracle Object Service, B-6 Oracle Objects for OLE defined, A-26 installation types available with, A-4, A-8, A-12 single Oracle home component, 2-1 Oracle ODBC Driver compliance with Microsoft ODBC specification, A-27 defined, A-27 installation types available with, A-4, A-8, A-12 Oracle OLAP Services defined, A-27 installation types available with, A-4 postinstallation configuration tasks, 6-6 to 6-8 Oracle Open Database Connectivity Driver. See Oracle ODBC Driver Oracle OSDs deleting, B-14 Oracle Real Application Clusters, 0-xxi, B-3 Oracle Partitioning defined, A-27 installation types available with, A-5, A-12 separately licensed, A-27 Oracle Performance Monitor for Windows NT defined, A-27 installation types available with, A-5 single Oracle home component, 2-1 Oracle Perl Interpreter installation types available with, A-4 Oracle Protocol Support installation types available with, A-4, A-8, A-12 Oracle Provider for OLE DB defined, A-27 installation types available with, A-5, A-8, A-12 single Oracle home component, 2-1 Oracle Real Application Clusters assigning a SID, 4-7 configuring with Oracle Database Configuration Assistant, 3-7 control files, B-5 CWM tablespace, B-5 datafiles, B-5 defined, A-28 DRSYS tablespace, B-5 file sizes for Oracle Database Configuration Assistant, B-5 INDX tablespace, B-5 installation types available with, A-5 installing through the Custom installation type, 4-10 logical partitions for Oracle Database Configuration Assistant Custom database type, B-4 migration and upgrade requirements, 2-14 Oracle Cluster Setup Wizard, B-6 Oracle Object Service, B-6 postinstallation configuration tasks, 6-5
- 207. Index-9 preinstallation requirements, 2-8 preinstallation tasks, B-8 RBS tablespace, B-5 redo log files, B-5 selecting the cluster nodes on which to install software, 4-6 separately licensed, A-28 SID, 4-7 SYSTEM tablespace, B-5 TOOLS tablespace (tools01.dbf), B-5 USERS tablespace, B-5 USERS tablespace (users01.dbf), B-5 using Disk Management, B-8 voting disk, B-5 Oracle Remote Configuration Agent defined, A-28 installation types available with, A-5, A-12 Oracle services stopping, 4-2, 4-27 Oracle Services for Microsoft Transaction Server defined, A-28 installation types available with, A-5, A-8 installing through the Custom installation type, 4-10, 4-12 post-installation configuration tasks, 6-5 requires installation of Microsoft Transaction Server, 4-10, 4-12 Oracle Servlet Engine defined, A-28 installation types available with, A-5, A-12 Oracle Snap-Ins for Microsoft Management Console preinstallation requirements for integration with Oracle, 2-10 Oracle SNMP Agent defined, A-28 installation types available with, A-5, A-12 Oracle Spatial defined, A-28 installation types available with, A-5 postinstallation configuration tasks, 6-4 separately licensed, A-28 Oracle Spatial Index Advisor defined, A-29 installation types available with, A-3, A-8, A-10 Oracle SQLJ defined, A-29 installation types available with, A-5, A-8, A-12 Oracle Support Services URL address of, 2-14 Oracle Syndication Server installation types available with, A-5, A-9, A-12 Oracle Text defined, A-29 installation types available with, A-5 Oracle Text Manager defined, A-30 installation types available with, A-3, A-8, A-10 Oracle Trace defined, A-30 installation types available with, A-5, A-12 Oracle Transparent Gateway deinstalling, C-7 hardware requirements, C-1 installation worksheets, C-5 installing, C-7 Microsoft SQL Server installation worksheet for, C-5 system requirements for, C-2 software requirements, C-1 Sybase installation worksheet for, C-6 system requirements for, C-3 system requirements, C-1 Teradata installation worksheet for, C-6 Oracle Ultra Search Middle Tier installation types available with, A-5, A-9, A-12 Oracle Ultra Search Server installation types available with, A-5, A-12 Oracle Universal Installer configuring Net Services environment, 3-1 creating a database, 3-1 defined, 1-3, A-30 documentation on using, 1-4 installation types available with, A-5, A-9, A-12 inventory, 4-26 keyboard navigation, 1-4 log files, 4-26 removing components, 4-28 restrictions on installing in pre-8.1.5 homes, 1-4, 4-3 running components in different languages, D-7 running in different languages, D-6 running in noninteractive mode, D-1 running Oracle Database Configuration Assistant, 3-4 running Oracle Net Configuration Assistant, 3-5 running silently, D-1 selecting a Oracle Net configuration method, 3-5 Oracle Utilities Database Verify utility, A-30 defined, A-30 Export utility, A-30 Import utility, A-30 installation types available with, A-5, A-9, A-12 Migration utility, A-30 Recovery Manager, A-30 setting in MS-DOS mode, E-3 SQL*Loader, A-30 Oracle Wallet Manager defined, A-30 feature of Oracle Advanced Security, A-2 installation types available with, A-2, A-7, A-10 Oracle Windows NT services stopping, 4-2, 4-27 Oracle Workflow defined, A-31 installation types available with, A-12 postinstallation configuration tasks, 6-8 to 6-9 preinstallation requirements for integration with
- 208. Index-10 Oracle, 2-10 Oracle Workflow Builder defined, A-31 installation types available with, A-9 Oracle Workflow Configuration Assistant, 4-25 automatically starting during installation, 4-22, 4-25 Oracle Workflow Mailer defined, A-31 installation types available with, A-9 Oracle Workspace Manager installation types available with, A-5, A-12 Oracle XML Developer’s Kit defined, A-32 installation types available with, A-5, A-9, A-12 Oracle XML SQL Utility defined, A-32 installation types available with, A-5, A-9, A-12 ORACLE_HOME restrictions on setting in the environment, 4-3 ORACLE_HOME environment parameter do not set in path, 4-3 Oracle9i differences between installing on Windows NT and UNIX, 4-1 features of, 1-1 installing, 4-5 installing through the Custom installation type, 4-10 Oracle9i Client defined, 1-5 installation types available with, 1-5, 2-4, A-1, A-6 installing, 4-11 Oracle9i Database installation types available with, 1-5 system requirements, 2-3 Oracle9i database type defined, 1-1 Oracle9i Enterprise Edition defined, 1-5 installing, 4-5 Oracle9i Enterprise Edition database type defined, 1-1 Oracle9i JVM installation types available with, A-12 Oracle9i Management and Integration components installed with, A-10 defined, 1-6 installation types available with, 1-6, A-9 installing, 4-13 Oracle9i Online Documentation CD-ROM overview, 1-7 Oracle9i Personal Edition defined, 1-5 installing, 4-5 Oracle9i Personal Edition database type defined, 1-1 installation on Windows NT and 2000 only, 2-13 Windows 98 installation and migration not described in this documentation set, 2-13 Oracle9i Real Application Clusters creating symbolic links, B-7 Oracle9i Server installation types available with, A-1, A-13 Oracle9i Standard Edition defined, 1-5 Oracle9i top-level component installation types available with, 1-5 Oracle9i Windows Documentation defined, A-33 installation types available with, A-6, A-9, A-13 OraclePGMSService, B-15 ORADIM utility documentation on, A-30 using, 2-14 ORASBT.DLL file, F-4 ORDPLUGINS database roles, 5-4 username and password, 5-4 ORDSYS database roles, 5-4 username and password, 5-4 OSE$HTTP$ADMIN username and password, 5-4 OTT defined, A-15 installation types available with, A-1, A-6, A-10 OUTLN database roles, 5-4 username and password, 5-4 overview of Oracle9i for Windows NT, 1-1 P passwords changing, 5-2 Performance Monitor, A-27 Personal Edition installation type defined, 1-5 installing, 4-5 system requirements for, 2-3 personal.rsp file description, D-1 PL/SQL defined, A-33 installation types available with, A-6, A-9, A-13 PL/SQL Embedded Gateway defined, A-33 installation types available with, A-6, A-13 PL/SQL external procedures postinstallation configuration tasks, 6-5 PL/SQL modules validating, 6-2 port 1521, 4-16 postinstallation changing passwords, 5-2 configuration requirements for individual components, 6-3
- 209. Index-11 setting NTFS file system permissions, 6-1 setting Windows NT registry security, 6-2 validating invalid PL/SQL modules, 6-2 preinstallation perform database backup, 4-2 requirements for individual components, 2-8 requirements for Oracle Advanced Security, 2-8 requirements for Oracle Enterprise Manager, 2-11 requirements for Oracle Internet Directory, 2-9 requirements for Oracle Management Server, 2-11 requirements for Oracle Real Applic, 2-8 requirements for Oracle Real Application Clusters, B-8 requirements for Oracle Snap-Ins for Microsoft Management Console, 2-10 requirements for Oracle Workflow, 2-10 requirements for Oracle9i integration with Active Directory, 2-10 requirements for Recovery Manager, 2-10 stop services, 4-2 tasks, 4-2 Pro*C/C++ defined, A-33 installation types available with, A-9, A-13 Pro*COBOL defined, A-33 installation types available with, A-9, A-13 postinstallation configuration tasks, 6-6 product certification, 2-7 protocol stack vendors requirements, 2-15 R RADIUS support installation types available with, A-2, A-6 raw partitions datafiles, B-5 DRSYS tablespace, B-5 INDX tablespace, B-5 RBS tablespace, B-5 SYSTEM tablespace, B-5 TOOLS tablespace, B-5 USERS tablespace, B-5 RBS tablespace Oracle Real Application Clusters, B-5 RC4_128 encryption support installation types available with, A-2, A-7 RC4_256 encryption support installation types available with, A-2, A-7 RC4_40 encryption support installation types available with, A-2, A-7 RC4_56 encryption support installation types available with, A-2, A-7 README files location of, 1-8 Recovery Manager configuring with LSM server, 2-10 installation types available with, A-5, A-9, A-12 MML requirements, F-1 preinstallation requirements, 2-10 redo log files, 5-8 in starter database, 5-8 Oracle Real Application Clusters, B-5 registry exercise care when using, 4-29 setting security, 6-2 release notes defined, A-33 installation types available with, A-6, A-9, A-13 location on CD-ROM, 1-8 removing database, Oracle Internet Directory, and Net Services services and registry entries, 4-28 Oracle components manually on Windows 98, 4-30 Oracle components manually on Windows NT, 4-29 Replication Management API defined, A-13 installation types available with, A-6, A-9, A-13 repository creating a dedicated tablespace and datafile, 5-7 creating a new repository, 2-11, 4-14, 6-3 migration and upgrade restrictions, 2-11, 4-14 using an existing repository, 2-11, 4-14, 6-3 requirements for Administrator installation type, 2-4 for Enterprise Edition installation type, 2-3 for individual components, 2-8 for Java Runtime Environment, 2-2 for migrating a database, 2-13 for Oracle Enterprise Manager, 2-11 for Oracle Integration Server installation type, 2-5 for Oracle Internet Directory installation type, 2-5 for Oracle Management Server installation type, 2-5 for Personal Edition installation type, 2-3 for Runtime installation type, 2-4 for Standard Edition installation type, 2-3 for top-level components, 2-2 postinstallation for Oracle components, 6-3 preinstallation, 4-2 preinstallation requirements for individual components, 2-8 response files client file descriptions, D-1 documentation on, D-2 modifying, D-2 on CD-ROM, D-1 single installation stage, D-2 specifying during installation, D-3 using, D-1 RMAN. See Recovery Manager roles, 5-3 to 5-4 rollback segments starter database, 5-9 Runtime installation type components installed with, A-6
- 210. Index-12 installing, 4-11 system requirements for, 2-4 S Sample Schema Demos installation types available with, A-6 SCOTT database roles, 5-4 username and password, 5-4 SecurID Authentication Adapter supported vendors, 2-15 Server Management (SRVM) defined, A-34 SERVICE_NAMES parameter, 5-5 services stopping, 4-2, 4-27 SHA-1 encryption support installation types available with, A-2, A-7 shared server creating, 3-5 postinstallation configuration tasks, 6-3 SID for Oracle Real Application Clusters, 4-7 silent installation overview, D-1 single Oracle home components, 2-1 installing single home components a second time, 2-1 SMUI, A-14 SQL*Loader installation types available with, A-5, A-9, A-12 SQL*Plus defined, A-34 installation types available with, A-6, A-9, A-13 installing online help of, 6-6 setting the NLS_LANG parameter in MS-DOS mode, E-3 SQL*Plus Worksheet defined, A-34 SQLJ Runtime defined, A-34 installation types available with, A-5, A-8, A-12 SQLJ Translator defined, A-34 installation types available with, A-5, A-8, A-12 sqlnet.ora file configuring with Oracle Net Configuration Assistant, 3-7, 3-8, 3-9, 3-10 srvctl utility, 0-xxi SSL support installation types available with, A-2, A-7, A-10 SSO support defined, A-16 installation types available with, A-2, A-6, A-7, A-10 Standard Edition installation type components installed with, A-1 defined, 1-5 installing, 4-5 system requirements for, 2-3 standard.rsp file description, D-1 start_here.htm location of, 1-8 starter database passwords, 5-3 to 5-4 starter database usernames, 5-3 to 5-4 Sun SDK installation types available with, A-4 support URL address of, 2-14 symbolic links existing configuration, B-6 for Oracle9i Real Application Clusters, B-7 SYS database roles, 5-3 username and password, 5-3 SYSTEM database roles, 5-3 username and password, 5-3 system identifier multiple Oracle homes, 5-6 system requirements for Administrator installation type, 2-4 for Enterprise Edition installation type, 2-3 for FAT and NTFS file systems, 2-2 for Oracle Integration Server installation type, 2-5 for Oracle Internet Directory installation type, 2-5 for Oracle Management Server installation type, 2-5 for Personal Edition installation type, 2-3 for Runtime installation type, 2-4 for Standard Edition installation type, 2-3 for top-level components, 2-2 Oracle9i Database, 2-3 SYSTEM tablespace description, 5-7 SYSTEM tablespace Oracle Real Application Clusters, B-5 system01.dbf datafile, 5-7 T tablespaces, 5-7 expanding for large sorts, 5-7 in database, 5-6 TEMP, 5-7 TOOLS, 5-7 USERS, 5-7 TCP/IP protocol support supported vendors, 2-15 technical support URL address of, 2-14 TEMP tablespace (temp01.dbf) description, 5-7 Oracle Real Application Clusters, B-5 temp01.dbf datafile, 5-7 Terminal Services Client on Windows 2000 Oracle Real Application Clusters, B-15
- 211. Index-13 Thin JDBC Java-based encryption support installation types available with, A-2, A-7 tnsnames.ora file configuring with Oracle Net Configuration Assistant, 3-7, 3-8, 3-9 TOOLS tablespace (tools01.dbf) description, 5-7 Oracle Real Application Clusters, B-5 top-level components defined, 1-5 system requirements, 2-2 Transaction Processing. See OLTP Transparent Gateway. See Oracle Transparent Gateway troubleshooting Inventory log files, 4-26 U undo segments starter database, 5-9 UNDOTBS01.DBF datafile, 5-7 UNIX differences between installing Oracle on Windows NT, 4-1 upgrading backing up before upgrading, 4-2 reading upgrade documentation before running Oracle Universal Installer, 4-2 usernames changing passwords, 5-2 USERS tablespace (users01.dbf) description, 5-7 Oracle Real Application Clusters, B-5 utlrp.sql file, 6-2 V VI protocol support, 2-15 voting disk Oracle Real Application Clusters, B-5 W Web browser requirements for Oracle Enterprise Manager, 2-12 supported browsers for running Oracle Enterprise Manager Web Site, 2-5 Web-based installations, D-7 Windows 98 rebooting after first-time Oracle installations, 4-11 Windows native authentication supported vendors, 2-15 Windows NT differences in Oracle installation with UNIX, 4-1 WINSOCK2 on Windows NT support defined, A-34 X X.509 support installation types available with, A-2, A-7, A-10 XML Oracle XML Developer’s Kit, A-5, A-9, A-12, A-32 Oracle XML SQL utility, A-5, A-9, A-12
- 212. Index-14