3.1.d manual bash script guide lsstv 2.0r11
2 likes829 views

This document provides an overview of Linux shell scripting and is intended for students and Linux system administrators. It begins with introductions to Linux, the shell, and shell scripting. It then covers various shell scripting topics through 10 chapters, including variables, conditionals, loops, redirection, pipes, traps, functions, and interactive scripts. The document is published under a Creative Commons license and is maintained by its author, Vivek Gite, who provides contact information for feedback.


![Linux Shell Scripting Tutorial - A Beginner's handbook:About 1
Linux Shell Scripting Tutorial - A Beginner's
handbook:About
This document is Copyright (C) 1999-2009 by Vivek Gite
[1]
and its contributors. Some rights reserved.
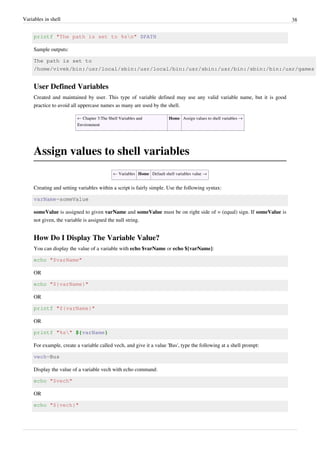
Audience
This book is for students and Linux System Administrators. It provides the skills to read, write, and debug Linux
shell scripts using bash shell. The book begins by describing Linux and simple scripts to automate frequently
executed commands and continues by describing conditional logic, user interaction, loops, menus, traps, and
functions. Finally, book covers various sys admin related scripts such as making a backup, using cron jobs, writing
interactive tools, web based tools, remote login, ftp and database backup related scripts. This book is intended for
Linux system administrators or students who have mastered the basics of a Linux Operating System. You should be
able to:
• Login to local or remote Linux system.
• Use basic Linux commands, such as cp, mv, rm, man,less, chmod and others.
• Create and edit text files in vi or any other text editor.
• GUI is not required except for interactive GTK+ based GUI scripts.
Licensing Information
This book is available under Creative Commons Attribution-Noncommercial-Share Alike 3.0 Unported
[2]
.
• You are free:
• to Share — to copy, distribute and transmit the work
• to Remix — to adapt the work
• Under the following conditions:
• Attribution — If you republish this content, we require that you:
1. Indicate that the content is from "Linux Shell Scripting Tutorial - A Beginner's handbook" (http://bash.
cyberciti.biz/guide/Main_Page), and nixCraft (http://nixcraft.com/).
2. Hyperlink to the original article on the source site (e.g., http://bash.cyberciti.biz/guide/What_Is_Linux)
3. Show the author name (e.g., Vivek Gite) for all pages.
4. Hyperlink each contributors name back to their profile page on the source wiki (e.g., http://bash.cyberciti.biz/
guide/User:USERNAME)
• Noncommercial — You may not use this work for commercial purposes including the Internet ad supported
websites or any sort of print media.
• Share Alike — If you alter, transform, or build upon this work, you may distribute the resulting work only under
the same or similar license to this one.
With the understanding that:
• Waiver — Any of the above conditions can be waived if you get permission from the copyright holder (i.e. the
Author: Vivek Gite).
• Other Rights — In no way are any of the following rights affected by the license:
• Your fair dealing or fair use rights;
• The author's moral rights;
• Rights other persons may have either in the work itself or in how the work is used, such as publicity or privacy
rights.](https://image.slidesharecdn.com/dvkeygvkrr6sj5lhsszc-signature-b02a6c073768d8536fdd50c0a47af6292b168fbd705c8180447bb0b754b59738-poli-141223132220-conversion-gate02/85/3-1-d-manual-bash-script-guide-lsstv-2-0r11-8-320.jpg)
![Linux Shell Scripting Tutorial - A Beginner's handbook:About 2
• Notice — For any reuse or distribution, you must make clear to others the license terms of this work. The best
way to do this is with a link to this web page (http://bash.cyberciti.biz/guide/
Linux_Shell_Scripting_Tutorial_-_A_Beginner%27s_handbook:About).
History
• Ver.0.8 - 1998 - First draft with only 8 pages.
• Ver.0.9 - 2000 - Second draft with a few more pages.
• Ver.1.0 - 2002 - Third draft published on freeos.com.
• Ver.1.5r3 - 2004 - Updated version published on freeos.com.
• Ver.2.0.beta - Aug-2009 - Wiki started.
• This document is now in a wiki format.
• All user contributed content licensed under Attribution-Noncommercial-Share Alike 3.0 Unported.
Disclaimer
• This web site / wiki ("Site") provides educational learning information on Linux scripting for sys admin work, but
you are 100% responsible for what you do or don't do with it.
• The information compiled by Vivek Gite (and its contributors) as well as the links to complimentary material are
provided "as is" with no warranty, express or implied, for their accuracy or reliability.
• You use these sites at your own risk, and acknowledge that, while every effort has been made to correct errors
before they appear, this site may include certain inaccuracies, errors, or omissions. nixCraft makes no
representations as to the suitability, reliability, availability, timeliness, and accuracy of the information on this site
for any purpose.
• Using this site (cyberciti.biz) means you accept its terms
[3]
.
• All trademark within are property of their respective holders.
• Although the author and its contributors believes the contents to be accurate at the time of publication, no liability
is assumed for them, their application or any consequences thereof. If any misrepresentations, errors or other need
of clarification is found, please contact the us immediately
[4]
. Please read our disclaimer
[3]
and privacy policy
[5]
.
• The opinions and ideas expressed in this book are solely those of the author, and do not necessarily reflect those
of nixCraft consultancy services
[6]
and/or my current/past employers.
About the author
• This book is created and maintained by Vivek Gite - a Sr. UNIX admin. Vivek is specialized in the design of high
performance computing (HPC) using Linux, security and optimization for the internet and intranet usage. Vivek
has a particular interest in TCP/IP, Anti DDoS, Server side optimization, computer clusters, parallel computing,
HPTC and embedded Linux / FreeBSD devices etc. Visit my Linux admin blog
[7]
for more tutorials, guides and
news about FOSS.](https://image.slidesharecdn.com/dvkeygvkrr6sj5lhsszc-signature-b02a6c073768d8536fdd50c0a47af6292b168fbd705c8180447bb0b754b59738-poli-141223132220-conversion-gate02/85/3-1-d-manual-bash-script-guide-lsstv-2-0r11-9-320.jpg)
![Linux Shell Scripting Tutorial - A Beginner's handbook:About 3
Feedback
• Please give me your feedback. Whatever you see here, is based upon my own hard-earned experience. I have
taught myself both through trial and error. Shoot me an email at vivek@nixcraft.com
[8]
.
• If you see a typo, a spelling mistake, or an error, please edit wiki page. Alternatively, you can tell me about it by
sending me an e-mail.
Donations
If you found this book useful please send charitable donations ($10 is minimum and recommended) to the following
non-profit organization that helps to support, promote, and develop free software:
• The FreeBSD Foundation
[9]
• The Free Software Foundation (FSF)
[10]
• The OpenBSD Foundation
[11]
• The Linux Foundation
[12]
References
[1] http://vivekgite.com/
[2] http://creativecommons.org/licenses/by-nc-sa/3.0/
[3] http://www.cyberciti.biz/tips/disclaimer
[4] http://www.cyberciti.biz/tips/contact_us
[5] http://www.cyberciti.biz/tips/privacy
[6] http://vivekgite.com/about/services/
[7] http://www.cyberciti.biz/
[8] mailto:vivek@nixcraft.com
[9] http://www.freebsdfoundation.org/
[10] http://www.fsf.org/
[11] http://www.openbsdfoundation.org/
[12] http://www.linuxfoundation.org/](https://image.slidesharecdn.com/dvkeygvkrr6sj5lhsszc-signature-b02a6c073768d8536fdd50c0a47af6292b168fbd705c8180447bb0b754b59738-poli-141223132220-conversion-gate02/85/3-1-d-manual-bash-script-guide-lsstv-2-0r11-10-320.jpg)

![Who created Linux 5
Who created Linux
← What Is Linux Home Where can I download Linux →
Linus Torvalds, of the Linux kernel
In 1991 Linus Torvalds was studying UNIX at a university, where he
was using a special educational experimental purpose operating system
called Minix (a small version of UNIX to be used in the academic
environment). However, Minix had its limitations and Linus felt he
could create something better. Therefore, he developed his own version
of Minix, known as Linux. Linux was Open Source right from the start.
Linux is a kernel developed by Linus. The kernel was bundled with
system utilities and libraries from the GNU project to create a usable
operating system. Sometimes people refer to Linux as GNU/Linux
because it has system utilities and libraries from the GNU project.
Linus Torvalds is credited for creating the Linux Kernel, not the entire
Linux operating system
[1]
.
Linux distribution = Linux kernel + GNU system utilities and libraries
+ Installation scripts + Management utilities etc.
Please note that Linux is now packaged for different uses in Linux
distributions, which contain the sometimes modified kernel along with
a variety of other software packages tailored to different requirements such as:
1. Server
2. Desktop
3. Workstation
4. Routers
5. Various embedded devices
6. Mobile phones
More information on Linus Torvalds can be found on his blog.
External links
• Linus's Blog
[2]
References
[1] GNU/Linux (http://www.gnu.org/gnu/gnu-linux-faq.html) FAQ by Richard Stallman
[2] http://torvalds-family.blogspot.com/
← What Is Linux Home Where can I download Linux →](https://image.slidesharecdn.com/dvkeygvkrr6sj5lhsszc-signature-b02a6c073768d8536fdd50c0a47af6292b168fbd705c8180447bb0b754b59738-poli-141223132220-conversion-gate02/85/3-1-d-manual-bash-script-guide-lsstv-2-0r11-12-320.jpg)


![What is Linux Shell 9
but it is by far not as powerful as our Linux Shells are!
Shell Prompt
There are various ways to get shell access:
• Terminal - Linux desktop provide a GUI based login system. Once logged in you can gain access to a shell by
running X Terminal (XTerm), Gnome Terminal (GTerm), or KDE Terminal (KTerm) application.
• Connect via secure shell (SSH) - You will get a shell prompt as soon as you log in into remote server or
workstation.
• Use the console - A few Linux system also provides a text-based login system. Generally you get a shell prompt
as soon as you log in to the system.
How do I find Out My Current Shell Name?
To find all of the available shells in your system, type the following command:
cat /etc/shells
In case the shells file has more than one shell listed under it, then it means that more than one shell is supported by
your Platform
Command Line Interface (CLI)
The shell provides an interface to Linux where you can type or enter commands using the keyboard. It is known as
the command line interface (CLI). To find out your current shell type following command
[1]
.:
echo $SHELL
ps $$
ps -p $$
Basic Command Line Editing
You can use the following key combinations to edit and recall commands:
• CTRL + L : Clear the screen.
• CTRL + W : Delete the word starting at cursor.
• CTRL + U : Clear the line i.e. Delete the all words from command line.
• Up and Down arrow keys : Recall commands (see command history).
• Tab : Auto-complete files, directory, command names and much more.
• CTRL + R : Search through previously used commands (see command history)
• CTRL + C : Cancel currently running commands.
• CTRL + T : Swap the last two characters before the cursor.
• ESC + T : Swap the last two words before the cursor.](https://image.slidesharecdn.com/dvkeygvkrr6sj5lhsszc-signature-b02a6c073768d8536fdd50c0a47af6292b168fbd705c8180447bb0b754b59738-poli-141223132220-conversion-gate02/85/3-1-d-manual-bash-script-guide-lsstv-2-0r11-16-320.jpg)

![What is Linux Shell 11
References
[1] Command to find out current shell name (http://www.cyberciti.biz/tips/how-do-i-find-out-what-shell-im-using.html) from the nixCraft
FAQ section.
← What is Linux Kernel Home Unix philosophy →
Unix philosophy
← What is Linux Shell Home But how do you use the shell
→
The Unix philosophy is philosophical approaches to developing software based on the experience of leading
developers of the Unix operating system. The following philosophical approaches also applies to Linux operating
systems.
• Do one thing and do it well - Write programs that do one thing and do it well. Write programs to work together.
Write programs to handle text streams, because that is a universal interface.
• Everything is file - Ease of use and security is offered by treating hardware as a file.
• small is beautiful
• Store data and configuration in flat text files - Text file is a universal interface. Easy to create, backup and move
files to another system.
• Use shell scripts to increase leverage and portability - Use shell script to automate common tasks across various
UNIX / Linux installations.
• Chain programs together to complete complex task - Use shell pipes and filters to chain small utilities that
perform one task at time.
• Choose portability over efficiency.
• Keep it Simple, Stupid (KISS).
External links
• Wikipedia:Unix philosophy
• The Unix Philosophy in One Lesson
[1]
← What is Linux Shell Home But how do you use the shell
→
References
[1] http://www.catb.org/~esr/writings/taoup/html/ch01s07.html](https://image.slidesharecdn.com/dvkeygvkrr6sj5lhsszc-signature-b02a6c073768d8536fdd50c0a47af6292b168fbd705c8180447bb0b754b59738-poli-141223132220-conversion-gate02/85/3-1-d-manual-bash-script-guide-lsstv-2-0r11-18-320.jpg)


![17
Chapter 2: Getting Started With Shell
Programming
The bash shell
← Chapter 2: Getting Started With Shell Programming Home Shell commands →
Bash is the shell, or command language interpreter, for the Linux operating system. The name is an acronym for the
Bourne-Again SHell, a pun on Stephen Bourne, the author of the direct ancestor of the current Unix shell sh, which
appeared in the Seventh Edition Bell Labs Research version of Unix Bash Reference Manual
[1]
.
Introduction to BASH
• Developed by GNU project.
• The default Linux shell.
• Backward-compatible with the original sh UNIX shell.
• Bash is largely compatible with sh and incorporates useful features from the Korn shell ksh and the C shell csh.
• Bash is the default shell for Linux. However, it does runs on every version of Unix and a few other operating
systems such as ms-dos, os/2, and Windows platforms.
Quoting from the official Bash home page:
Bash is the shell, or command language interpreter, that will appear in the GNU operating system. It is intended to
conform to the IEEE POSIX P1003.2/ISO 9945.2 Shell and Tools standard. It offers functional improvements over sh
for both programming and interactive use. In addition, most sh scripts can be run by Bash without modification.
The improvements offered by BASH include:
The Bash syntax is an improved version of the Bourne shell syntax. In most cases Bourne shell scripts can be
executed by Bash without any problems.
• Command line editing.
• Command line completion.
• Unlimited size command history.
• Prompt control.
• Indexed arrays of unlimited size (Arrays).
• Integer arithmetic in any base from two to sixty-four.
• Bash startup files - You can run bash as an interactive login shell, or interactive non-login shell. See Bash startup
files
[2]
for more information.
• Bash conditional expressions: Used in composing various expressions for the test builtin or [[ or [ commands.
• The Directory Stack - History of visited directories.
• The Restricted Shell: A more controlled mode of shell execution.
• Bash POSIX Mode: Making Bash behave more closely to what the POSIX standard specifies.](https://image.slidesharecdn.com/dvkeygvkrr6sj5lhsszc-signature-b02a6c073768d8536fdd50c0a47af6292b168fbd705c8180447bb0b754b59738-poli-141223132220-conversion-gate02/85/3-1-d-manual-bash-script-guide-lsstv-2-0r11-24-320.jpg)
![The bash shell 18
Bash v4.0 Features
• Usual run time environment: POSIX
• Command and file name completion - Bash can automatically fill in partially typed commands or arguments to
the commands such as file name, hostname and much more.
• Pipeline - Bash can chain various process using their standard streams files via Pipes. It allows you to connect
stdout (command output) directly as stdin (command input) to next command.
• Arithmetic support:
• Integer arithmetic supported.
• Floating point arithmetic is not supported.
• Exponential notation is limited via printf builtin.
• Date and time arithmetic is not supported.
• Hash table: Bash uses a hash table to remember the full pathnames of executable files.
• Pattern Matching and regular expressions are supported.
• Globbing - For example, you can use *.conf to match all those conf files in /etc directory.
• Directory stack is supported via pushd and popd builtins.
• Command history and History completion fully supported by Bash.
• Custom command prompt - Allows you to change the default prompt.
Authors
• Brian J. Fox authored the GNU Bash shell, in 1987.
• Fox maintained Bash as the primary maintainer until 1993, at which point Chet Ramey took over.
• Chet Ramey is the current maintainer of the GNU Bourne Again Shell and GNU Readline.
Download Bash Shell
• Bash is the default shell under Linux. The current production versions are Bash 3.x and 4.x. You can grab it from
the official website
[3]
.
External links
• Bash home page
[4]
• Chet's home page
[5]
References
[1] Bash Reference Manual.
[2] http://bash.cyberciti.biz/bash-reference-manual/Bash-Startup-Files.html
[3] http://ftp.gnu.org/gnu/bash/
[4] http://www.gnu.org/software/bash/bash.html
[5] http://cnswww.cns.cwru.edu/php/chet/
← Chapter 2: Getting Started With Shell Programming Home Shell commands →](https://image.slidesharecdn.com/dvkeygvkrr6sj5lhsszc-signature-b02a6c073768d8536fdd50c0a47af6292b168fbd705c8180447bb0b754b59738-poli-141223132220-conversion-gate02/85/3-1-d-manual-bash-script-guide-lsstv-2-0r11-25-320.jpg)

![Shell commands 20
List of command bash keywords and built in commands
• JOB_SPEC &
• (( expression ))
• . filename
• [[:]]
• [ arg... ]
• expression
• alias
• bg
• bind
• builtin
• caller
• case
• command
• compgen
• complete
• continue
• declare
• dirs
• disown
• echo
• enable
• eval
• exec
• exit
• export
• false
• fc
• fg
• for
• getopts
• hash
• help
• history
• if
• jobs
• kill
• let
• local
• logout
• popd
• printf
• pushd
• pwd
• read
• readonly
• return](https://image.slidesharecdn.com/dvkeygvkrr6sj5lhsszc-signature-b02a6c073768d8536fdd50c0a47af6292b168fbd705c8180447bb0b754b59738-poli-141223132220-conversion-gate02/85/3-1-d-manual-bash-script-guide-lsstv-2-0r11-27-320.jpg)


![Shebang 27
Shebang
← Hello, World!
Tutorial
Home Shell Comments →
The #! syntax used in scripts to indicate an interpreter for execution under UNIX / Linux operating systems. Most
Linux shell and perl / python script starts with the following line:
#!/bin/bash
OR
#!/usr/bin/perl
OR
#!/usr/bin/python
Starting a Script With #!
1. It is called a shebang or a "bang" line.
2. It is nothing but the absolute path to the Bash interpreter.
3. It consists of a number sign and an exclamation point character (#!), followed by the full path to the interpreter
such as /bin/bash.
4. All scripts under Linux execute using the interpreter specified on a first line
[1]
.
5. Almost all bash scripts often begin with #!/bin/bash (assuming that Bash has been installed in /bin)
6. This ensures that Bash will be used to interpret the script, even if it is executed under another shell
[2]
.
7. The shebang was introduced by Dennis Ritchie between Version 7 Unix and 8 at Bell Laboratories. It was then
also added to the BSD line at Berkeley
[3]
.
Ignoring An Interpreter Line (shebang)
• If you do not specify an interpreter line, the default is usually the /bin/sh. But, it is recommended that you set
#!/bin/bash line.
/bin/sh
For a system boot script, use /bin/sh:
#!/bin/sh
sh is the standard command interpreter for the system. The current version of sh is in the process of being changed to
conform with the POSIX 1003.2 and 1003.2a specifications for the shell.](https://image.slidesharecdn.com/dvkeygvkrr6sj5lhsszc-signature-b02a6c073768d8536fdd50c0a47af6292b168fbd705c8180447bb0b754b59738-poli-141223132220-conversion-gate02/85/3-1-d-manual-bash-script-guide-lsstv-2-0r11-34-320.jpg)
![Shebang 28
An example of /bin/sh script
• /etc/init.d/policykit
#! /bin/sh
### BEGIN INIT INFO
# Provides: policykit
# Required-Start: $local_fs
# Required-Stop: $local_fs
# Default-Start: 2 3 4 5
# Default-Stop:
# Short-Description: Create PolicyKit runtime directories
# Description: Create directories which PolicyKit needs at
runtime,
# such as /var/run/PolicyKit
### END INIT INFO
# Author: Martin Pitt <martin.pitt@ubuntu.com>
case "$1" in
start)
mkdir -p /var/run/PolicyKit
chown root:polkituser /var/run/PolicyKit
chmod 770 /var/run/PolicyKit
;;
stop|restart|force-reload)
;;
*)
echo "Usage: $SCRIPTNAME {start|stop|restart|force-reload}" >&2
exit 3
;;
esac
:
For a typical script use the #!/bin/bash shell.
External links
• Explain: #!/bin/bash
[4]
- or #!/bin/bash -- In A Shell Script
• Shebang (Unix)
References
[1] Howto Make Script More Portable With #!/usr/bin/env As a Shebang (http://www.cyberciti.biz/tips/
finding-bash-perl-python-portably-using-env.html) FAQ by nixCraft.
[2] Bash man page and the official documentation.
[3] extracts from 4.0BSD (http://www.in-ulm.de/~mascheck/various/shebang/sys1.c.html) /usr/src/sys/newsys/sys1.c.
[4] http://www.cyberciti.biz/faq/binbash-interpreter-spoofing/](https://image.slidesharecdn.com/dvkeygvkrr6sj5lhsszc-signature-b02a6c073768d8536fdd50c0a47af6292b168fbd705c8180447bb0b754b59738-poli-141223132220-conversion-gate02/85/3-1-d-manual-bash-script-guide-lsstv-2-0r11-35-320.jpg)

![Shell Comments 30
External links
• Shell scripting: Put multiple line comment
[1]
←
Shebang
Home Setting up permissions on a script
→
References
[1] http://www.cyberciti.biz/faq/bash-comment-out-multiple-line-code/
Setting up permissions on a script
← Shell Comments Home Execute a script →
The chmod command (change mode) is a shell command in Linux. It can change file system modes of files and
directories. The modes include permissions and special modes. Each shell script must have the execute permission.
Mode can be either a symbolic representation of changes to make, or an octal number representing the bit pattern for
the new mode bits.
Examples
Allowing everyone to execute the script, enter:
chmod +x script.sh
OR
chmod 0766 script.sh
Only allow owner to execute the script, enter:
chmod 0700 script.sh
OR
chmod u=rwx,go= script.sh
OR
chmod u+x script.sh
To view the permissions, use:
ls -l script.sh
Set the permissions for the user and the group to read and execute only (no write permission), enter:
chmod ug=rx script.sh](https://image.slidesharecdn.com/dvkeygvkrr6sj5lhsszc-signature-b02a6c073768d8536fdd50c0a47af6292b168fbd705c8180447bb0b754b59738-poli-141223132220-conversion-gate02/85/3-1-d-manual-bash-script-guide-lsstv-2-0r11-37-320.jpg)
![Setting up permissions on a script 31
Remove read and execute permission for the group and user, enter:
chmod ug= script.sh
More about chmod
Type the following command to read chmod man page:
man chmod
Please note that script must have both executable and read permission.
External links
• How to use chmod and chown command
[1]
• Chmod Numeric Permissions Notation UNIX / Linux Command
[2]
← Shell Comments Home Execute a script →
References
[1] http://www.cyberciti.biz/faq/how-to-use-chmod-and-chown-command/
[2] http://www.cyberciti.biz/faq/unix-linux-bsd-chmod-numeric-permissions-notation-command/
Execute a script
← Setting up permissions on a script Home Debug a script →
A shell script can be executed using the following syntax:
chmod +x script.sh
./script.sh
You can also run the script directly as follows without setting the script execute permission:
bash script.sh
. script.sh
In last example, you are using . (dot) command (a.k.a., source) which reads and executes commands from filename
in the current shell. If filename does not contain a slash, directory names in PATH are used to find the directory
containing filename.
When a script is executed using either the bash command or the dot (.) command. you do not have to set executable
permissions on script.](https://image.slidesharecdn.com/dvkeygvkrr6sj5lhsszc-signature-b02a6c073768d8536fdd50c0a47af6292b168fbd705c8180447bb0b754b59738-poli-141223132220-conversion-gate02/85/3-1-d-manual-bash-script-guide-lsstv-2-0r11-38-320.jpg)

![Debug a script 33
executes them
>/tmp/debug.txt
See also
• Setting shell options
External links
• How to debug a Shell
[1]
Script under Linux or UNIX.
← Execute a script Home Chapter 2 Challenges →
References
[1] http://www.cyberciti.biz/tips/debugging-shell-script.html
Chapter 2 Challenges
← Debug a script Home Chapter 3:The Shell Variables and Environment →
• Write the following shell script, and note the output:
# Script to print currently logged in users information, and current
date & time.
clear
echo "Hello $USER"
echo -e "Today is c ";date
echo -e "Number of user login : c" ; who | wc -l
echo "Calendar"
cal
exit 0
• Write a program that prints your favorite movie name. It should print director name on the next line.
• Write a shell script that prints out your name and waits for the user to press the [Enter] key before the script ends.
• List 10 builtin and external commands.
• cd to /etc/init.d and view various system init scripts.
• Chapter 2 answers
← Debug a script Home Chapter 3:The Shell Variables and Environment →](https://image.slidesharecdn.com/dvkeygvkrr6sj5lhsszc-signature-b02a6c073768d8536fdd50c0a47af6292b168fbd705c8180447bb0b754b59738-poli-141223132220-conversion-gate02/85/3-1-d-manual-bash-script-guide-lsstv-2-0r11-40-320.jpg)
![34
Chapter 3:The Shell Variables and
Environment
Variables in shell
← Chapter 3:The Shell Variables and
Environment
Home Assign values to shell variables →
You can use variables to store data and configuration options. There are two types of variable as follows:
System Variables
Created and maintained by Linux bash shell itself. This type of variable (with the exception of auto_resume and
histchars) is defined in CAPITAL LETTERS. You can configure aspects of the shell by modifying system variables
such as PS1, PATH, LANG,HISTSIZE,and DISPLAY etc.
View All System Variables
To see all system variables, type the following command at a console / terminal:
set
OR
env
OR
printenv
Sample Outputs from set command:
BASH=/bin/bash
BASH_ARGC=()
BASH_ARGV=()
BASH_LINENO=()
BASH_SOURCE=()
BASH_VERSINFO=([0]="3" [1]="2" [2]="39" [3]="1" [4]="release"
[5]="i486-pc-linux-gnu")
BASH_VERSION='3.2.39(1)-release'
COLORTERM=gnome-terminal
COLUMNS=158
DBUS_SESSION_BUS_ADDRESS=unix:abstract=/tmp/dbus-FSGj0JzI4V,guid=7f59a3dd0813f52d6296ee40
DESKTOP_SESSION=gnome
DIRSTACK=()
DISPLAY=:0.0](https://image.slidesharecdn.com/dvkeygvkrr6sj5lhsszc-signature-b02a6c073768d8536fdd50c0a47af6292b168fbd705c8180447bb0b754b59738-poli-141223132220-conversion-gate02/85/3-1-d-manual-bash-script-guide-lsstv-2-0r11-41-320.jpg)
![Variables in shell 35
EUID=1000
GDMSESSION=gnome
GDM_LANG=en_IN
GDM_XSERVER_LOCATION=local
GNOME_DESKTOP_SESSION_ID=this-is-deprecated
GPG_AGENT_INFO=/tmp/gpg-X7NqIv/S.gpg-agent:7340:1
GROUPS=()
GTK_RC_FILES=/etc/gtk/gtkrc:/home/vivek/.gtkrc-1.2-gnome2
HISTFILE=/home/vivek/.bash_history
HISTFILESIZE=500
HISTSIZE=500
HOME=/home/vivek
HOSTNAME=vivek-desktop
HOSTTYPE=i486
IFS=$' tn'
LANG=en_IN
LINES=57
LOGNAME=vivek
MACHTYPE=i486-pc-linux-gnu
MAILCHECK=60
OLDPWD=/home/vivek
OPTERR=1
OPTIND=1
ORBIT_SOCKETDIR=/tmp/orbit-vivek
OSTYPE=linux-gnu
PATH=/usr/local/sbin:/usr/local/bin:/usr/sbin:/usr/bin:/sbin:/bin:/usr/games
PIPESTATUS=([0]="0")
PPID=7542
PS1='${debian_chroot:+($debian_chroot)}u@h:w$ '
PS2='> '
PS4='+ '
PWD=/tmp
SESSION_MANAGER=local/vivek-desktop:/tmp/.ICE-unix/7194
SHELL=/bin/bash
SHELLOPTS=braceexpand:emacs:hashall:histexpand:history:interactive-comments:monitor
SHLVL=1
SSH_AGENT_PID=7339
SSH_AUTH_SOCK=/tmp/ssh-IoFXYh7194/agent.7194
TERM=xterm
UID=1000
USER=vivek
USERNAME=vivek
WINDOWID=18874428
WINDOWPATH=7
XAUTHORITY=/home/vivek/.Xauthority
XDG_DATA_DIRS=/usr/local/share/:/usr/share/:/usr/share/gdm/
XDG_SESSION_COOKIE=186611583e30fed08439ca0047067c9d-1251633372.846960-528440704](https://image.slidesharecdn.com/dvkeygvkrr6sj5lhsszc-signature-b02a6c073768d8536fdd50c0a47af6292b168fbd705c8180447bb0b754b59738-poli-141223132220-conversion-gate02/85/3-1-d-manual-bash-script-guide-lsstv-2-0r11-42-320.jpg)
![Variables in shell 36
_=set
command_not_found_handle ()
{
if [ -x /usr/lib/command-not-found ]; then
/usr/bin/python /usr/lib/command-not-found -- $1;
return $?;
else
return 127;
fi
}
mp3 ()
{
local o=$IFS;
IFS=$(echo -en "nb");
/usr/bin/beep-media-player "$(cat $@)" & IFS=o
}
genpasswd ()
{
local l=$1;
[ "$l" == "" ] && l=16;
tr -dc A-Za-z0-9_ < /dev/urandom | head -c ${l} | xargs
}
xrpm ()
{
[ "$1" != "" ] && ( rpm2cpio "$1" | cpio -idmv )
}
Commonly Used Shell Variables
The following variables are set by the shell:
System Variable Meaning To View Variable Value
Type
BASH_VERSION Holds the version of this instance of bash. echo $BASH_VERSION
HOSTNAME The name of the your computer. echo $HOSTNAME
CDPATH The search path for the cd command. echo $CDPATH
HISTFILE The name of the file in which command history is saved. echo $HISTFILE
HISTFILESIZE The maximum number of lines contained in the history file. echo $HISTFILESIZE
HISTSIZE The number of commands to remember in the command history. The default value is 500. echo $HISTSIZE
HOME The home directory of the current user. echo $HOME
IFS The Internal Field Separator that is used for word splitting after expansion and to split lines into
words with the read builtin command. The default value is <space><tab><newline>.
echo $IFS
LANG Used to determine the locale category for any category not specifically selected with a variable
starting with LC_.
echo $LANG
PATH The search path for commands. It is a colon-separated list of directories in which the shell looks for
commands.
echo $PATH
PS1 Your prompt settings. echo $PS1](https://image.slidesharecdn.com/dvkeygvkrr6sj5lhsszc-signature-b02a6c073768d8536fdd50c0a47af6292b168fbd705c8180447bb0b754b59738-poli-141223132220-conversion-gate02/85/3-1-d-manual-bash-script-guide-lsstv-2-0r11-43-320.jpg)


![Quoting 48
echo "*"
echo "*"
echo "@"
Continue command on next line
You can use the backslash () as last character on line to continue command on next line:
echo "A monkey-tailed boy named Goku is found by an old martial
>arts expert who raises him as his grandson. One day Goku meets a
>girl named Bulma and together they go on a quest to retrieve the seven
Dragon Balls"
You can also use the backslash while writing program or function:
# Purpose: clean /tmp/$domain ?
check_temp_clean() {
[ "$SERVER_MODE" = "daemon" ] || return 1
[ "$SERVER_MODE" = "init" ] && return 0
# note use of the backslash character to continue command on
next line
[ "$SERVER_MODE" = "clean"
-a -e /usr/local/etc/nixcraft/lighttpd/disk_cache.init ] &&
return 0
return 1
}
Protecting command line arguments
Type the following command to find out all c program file (*.c):
find $HOME -name *.c
In the above example, the *.c is expanded by the bash shell. It will try to match all filename ending with .c in the
/home directory (current user's home directory) such as main.c, lib1.c, lib2.c, ssh.c, auth.c etc. You can escape the
wild card using the backslash as the escape character:
find $HOME -name *.c
find $HOME -name *main.c
find /nas01/apps/admin -iname *py
You can also use the double quote
find $HOME -name "*.c"
← Echo
Command
Home Export Variables →](https://image.slidesharecdn.com/dvkeygvkrr6sj5lhsszc-signature-b02a6c073768d8536fdd50c0a47af6292b168fbd705c8180447bb0b754b59738-poli-141223132220-conversion-gate02/85/3-1-d-manual-bash-script-guide-lsstv-2-0r11-55-320.jpg)


![Recalling command history 64
Recall commands
Simply hit [Up] and [Down] arrow keys.
Interactively search history
Press [CTRL-r] from the shell prompt to search backwords through history buffer or file for a command:
(reverse-i-search)`rpm ': rpm -ql rhn-client-tools-0.4.20-9.el5
To repeat last command
Just type !! at a shell prompt:
date
!!
To repeat last command started with ...
Recall the most recent command starting with vn
date
vnstat
ls
ifconfig
route -n
!vn
To repeat a command by its number
Recall to command line number 13:
history
!13
See history command help page for more detailed information about the events and usage:
man bash
help history
← Create the constants variable Home Path name expansion →](https://image.slidesharecdn.com/dvkeygvkrr6sj5lhsszc-signature-b02a6c073768d8536fdd50c0a47af6292b168fbd705c8180447bb0b754b59738-poli-141223132220-conversion-gate02/85/3-1-d-manual-bash-script-guide-lsstv-2-0r11-71-320.jpg)

![Path name expansion 66
Another example:
D=/webroot
mkdir -p $D/{dev,etc,bin,sbin,var,tmp}
Wildcards
• Bash supports the following three simple wildcards:
1. * - Matches any string, including the null string
2. ? - Matches any single (one) character.
3. [...] - Matches any one of the enclosed characters.
Examples
To display all configuration (.conf) files stored in /etc directory, enter:
ls /etc/*.conf
To display all C project header files, enter:
ls *.h
To display all C project .c files, enter:
ls *.c
You can combine wildcards with curly braces:
ls *.{c,h}
Sample outputs:
f.c fo1.c fo1.h fo2.c fo2.h fo3.c fo3.h fo4.c fo4.h fo5.c
fo5.h t.c
To list all png file (image1.png, image2.png...image7.png, imageX.png), enter:
ls image?.png
To list all file configuration file start with either letter a or b, enter:
ls /etc/[ab]*.conf
← Recalling command history Home Create and use aliases →](https://image.slidesharecdn.com/dvkeygvkrr6sj5lhsszc-signature-b02a6c073768d8536fdd50c0a47af6292b168fbd705c8180447bb0b754b59738-poli-141223132220-conversion-gate02/85/3-1-d-manual-bash-script-guide-lsstv-2-0r11-73-320.jpg)


![Create and use aliases 69
How do I ignore an alias?
Consider the following example:
alias ls='ls --color'
To ignore an aliase called ls and run ls command, enter
[1]
:
ls
OR
"ls"
Or just use the full path:
/bin/ls
$(which ls)
References
[1] Bash Shell: Ignore Aliases / Functions When Running A Command (http://www.cyberciti.biz/faq/
ignore-shell-aliases-functions-when-running-command/)
← Path name
expansion
Home The tilde expansion
→
The tilde expansion
← Create and use aliases Home Startup scripts →
• The tilde (~) may be used to refer your own home directory or other users home directory.
Syntax
Display your home directory file listing:
ls ~
Display a file called .bashrc stored in your home directory:
ls ~/.bashrc
cat ~/.bashrc
• If the tilde-prefix is a ~+, the value of the shell variable PWD replaces the tilde-prefix.
pwd
ls ~+
• If the tilde-prefix is a ~-, the value of the shell variable OLDPWD, if it is set, is substituted.
cd /etc
pwd](https://image.slidesharecdn.com/dvkeygvkrr6sj5lhsszc-signature-b02a6c073768d8536fdd50c0a47af6292b168fbd705c8180447bb0b754b59738-poli-141223132220-conversion-gate02/85/3-1-d-manual-bash-script-guide-lsstv-2-0r11-76-320.jpg)


![Using aliases 72
Using aliases
← Startup scripts Home Changing bash prompt
→
• Task: Customize your bash shell environment by creating alias as follows:
Alias The system will run...
c Clear the screen
update Update and install the newest versions of all packages currently installed on the Debian system.
ports Lists all listening TCP/UDP ports with the PID of the associated process.
vi Run vim text editor instead of old vi.
• Edit ~/.bashrc file:
vi ~/.bashrc
Append the following aliases:
alias c='clear'
alias update='apt-get update && apt-get upgrade'
alias ports='netstat -tulpn'
alias vi='vim'
• Save and close the file. Test your changed by doing logout and login back operation. Or simply type the
following:
. ~/bashrc
OR
bash
• To list all your aliases, enter:
alias
See also
• Create and use aliases
• Bash Shell Temporarily Disable an Alias
[1]
← Startup scripts Home Changing bash prompt
→](https://image.slidesharecdn.com/dvkeygvkrr6sj5lhsszc-signature-b02a6c073768d8536fdd50c0a47af6292b168fbd705c8180447bb0b754b59738-poli-141223132220-conversion-gate02/85/3-1-d-manual-bash-script-guide-lsstv-2-0r11-79-320.jpg)
![Using aliases 73
References
[1] http://www.cyberciti.biz/faq/bash-shell-temporarily-disable-an-alias/
Changing bash prompt
← Using aliases Home Setting shell options →
• Task: You need to customize your bash prompt by editing PS1 variable.
• Display, your current prompt setting, enter:
echo $PS1
Sample outputs:
u@h:w$
• For testing purpose set PS1 as follows and notice the change:
PS1='your wish is my command : '
Sample outputs:
vivek@vivek-desktop:~$ PS1='your wish is my command : '
your wish is my command :
Customizing Prompt
Bash shell allows prompt strings to be customized by inserting a number of backslash-escaped special characters.
Quoting from the bash man page:
Sequence Description
a An ASCII bell character (07)
d The date in "Weekday Month Date" format (e.g., "Tue May 26")
e An ASCII escape character (033)
h The hostname up to the first .
H The hostname (FQDN)
j The number of jobs currently managed by the shell
l The basename of the shell’s terminal device name
n Newline
r Carriage return
s The name of the shell, the basename of $0 (the portion following the final slash)
t The current time in 24-hour HH:MM:SS format
T The current time in 12-hour HH:MM:SS format
@ The current time in 12-hour am/pm format
A The current time in 24-hour HH:MM format
u The username of the current user
v The version of bash (e.g., 2.00)](https://image.slidesharecdn.com/dvkeygvkrr6sj5lhsszc-signature-b02a6c073768d8536fdd50c0a47af6292b168fbd705c8180447bb0b754b59738-poli-141223132220-conversion-gate02/85/3-1-d-manual-bash-script-guide-lsstv-2-0r11-80-320.jpg)
![Changing bash prompt 74
V T The release of bash, version + patch level (e.g., 2.00.0)
w The current working directory, with $HOME abbreviated with a tilde
W The basename of the current working directory, with $HOME abbreviated with a tilde
! The history number of this command
# The command number of this command
$ If the effective UID is 0, a #, otherwise a $
nnn The character corresponding to the octal number nnn
A backslash
[ Begin a sequence of non-printing characters, which could be used to embed a terminal control sequence into the prompt
] End a sequence of non-printing characters</pre>
You can use above backslash-escaped sequence to display name of the host with current working directory:
PS1='h W $ '
Adding color to prompt
It is quite easy to add colors to your prompt. Set green color promot for normal user account
[1]
:
export PS1='[e[1;32m][u@h W]$[e[0m] '
And red color prompt for root user account:
export PS1='[e[1;31m][u@h W]$[e[0m] '
How do I make prompt setting permanent?
Edit your ~/.bashrc or ~/.bash_profile
vi ~/.bashrc
Append your PS1 definition:
export PS1='[e[1;32m][u@h W]$[e[0m] '
Save and close the file.
PROMPT_COMMAND variable
If PROMPT_COMMAND environment variable set, the value is executed as a command prior to issuing each
primary prompt. In other words, the contents of this variable are executed as a regular Bash command just before
Bash displays a prompt
[2]
:
PROMPT_COMMAND="echo Yahooo"
Sample outputs:
[vivek@vivek-desktop man]$ PROMPT_COMMAND="echo Yahooo"
Yahooo
[vivek@vivek-desktop man]$ date
Tue Oct 20 23:50:01 IST 2009
Yahooo](https://image.slidesharecdn.com/dvkeygvkrr6sj5lhsszc-signature-b02a6c073768d8536fdd50c0a47af6292b168fbd705c8180447bb0b754b59738-poli-141223132220-conversion-gate02/85/3-1-d-manual-bash-script-guide-lsstv-2-0r11-81-320.jpg)
![Changing bash prompt 75
Creating complex prompt
Edit ~/.bashrc file:
vi ~/.bashrc
Add the following two shell functions
[3]
bash_prompt_command() {
# How many characters of the $PWD should be kept
local pwdmaxlen=25
# Indicate that there has been dir truncation
local trunc_symbol=".."
local dir=${PWD##*/}
pwdmaxlen=$(( ( pwdmaxlen < ${#dir} ) ? ${#dir} : pwdmaxlen ))
NEW_PWD=${PWD/#$HOME/~}
local pwdoffset=$(( ${#NEW_PWD} - pwdmaxlen ))
if [ ${pwdoffset} -gt "0" ]
then
NEW_PWD=${NEW_PWD:$pwdoffset:$pwdmaxlen}
NEW_PWD=${trunc_symbol}/${NEW_PWD#*/}
fi
}
bash_prompt() {
case $TERM in
xterm*|rxvt*)
local TITLEBAR='[033]0;u:${NEW_PWD}007]'
;;
*)
local TITLEBAR=""
;;
esac
local NONE="[033[0m]" # unsets color to term's fg color
# regular colors
local K="[033[0;30m]" # black
local R="[033[0;31m]" # red
local G="[033[0;32m]" # green
local Y="[033[0;33m]" # yellow
local B="[033[0;34m]" # blue
local M="[033[0;35m]" # magenta
local C="[033[0;36m]" # cyan
local W="[033[0;37m]" # white
# emphasized (bolded) colors
local EMK="[033[1;30m]"
local EMR="[033[1;31m]"
local EMG="[033[1;32m]"](https://image.slidesharecdn.com/dvkeygvkrr6sj5lhsszc-signature-b02a6c073768d8536fdd50c0a47af6292b168fbd705c8180447bb0b754b59738-poli-141223132220-conversion-gate02/85/3-1-d-manual-bash-script-guide-lsstv-2-0r11-82-320.jpg)
![Changing bash prompt 76
local EMY="[033[1;33m]"
local EMB="[033[1;34m]"
local EMM="[033[1;35m]"
local EMC="[033[1;36m]"
local EMW="[033[1;37m]"
# background colors
local BGK="[033[40m]"
local BGR="[033[41m]"
local BGG="[033[42m]"
local BGY="[033[43m]"
local BGB="[033[44m]"
local BGM="[033[45m]"
local BGC="[033[46m]"
local BGW="[033[47m]"
local UC=$W # user's color
[ $UID -eq "0" ] && UC=$R # root's color
PS1="$TITLEBAR ${EMK}[${UC}u${EMK}@${UC}h
${EMB}${NEW_PWD}${EMK}]${UC}$ ${NONE}"
# without colors: PS1="[u@h ${NEW_PWD}]$ "
# extra backslash in front of $ to make bash colorize the prompt
}
# init it by setting PROMPT_COMMAND
PROMPT_COMMAND=bash_prompt_command
bash_prompt
unset bash_prompt
External links
• How to: Change / Setup bash custom prompt (PS1)
[4]
• BASH Shell change the color of my shell prompt under Linux or UNIX
[5]
• Color Bash Prompt
[6]
• Bash Prompt HOWTO
[7]
← Using aliases Home Setting shell options →](https://image.slidesharecdn.com/dvkeygvkrr6sj5lhsszc-signature-b02a6c073768d8536fdd50c0a47af6292b168fbd705c8180447bb0b754b59738-poli-141223132220-conversion-gate02/85/3-1-d-manual-bash-script-guide-lsstv-2-0r11-83-320.jpg)
![Changing bash prompt 77
References
[1] BASH Shell change the color of my shell prompt under Linux or UNIX (http://www.cyberciti.biz/faq/
bash-shell-change-the-color-of-my-shell-prompt-under-linux-or-unix/)
[2] PROMPT_COMMAND (http://tldp.org/HOWTO/Bash-Prompt-HOWTO/x264.html) from Bash prompt howto
[3] Color bash prompt (http://wiki.archlinux.org/index.php/Color_Bash_Prompt) code taken from the official Arch Linux wiki
[4] http://www.cyberciti.biz/tips/howto-linux-unix-bash-shell-setup-prompt.html
[5] http://www.cyberciti.biz/faq/bash-shell-change-the-color-of-my-shell-prompt-under-linux-or-unix/
[6] http://wiki.archlinux.org/index.php/Color_Bash_Prompt
[7] http://tldp.org/HOWTO/Bash-Prompt-HOWTO/
Setting shell options
← Changing bash
prompt
Home Setting system wide shell options →
• Task: Make changes to your bash shell environment using set and shopt commands.
• The set and shopt command controls several values of variables controlling shell behavior.
List currently configured shell options
Type the following command:
set -o
Sample outputs:
allexport off
braceexpand on
emacs on
errexit off
errtrace off
functrace off
hashall on
histexpand on
history on
ignoreeof off
interactive-comments on
keyword off
monitor on
noclobber off
noexec off
noglob off
nolog off
notify off
nounset off
onecmd off
physical off
pipefail off
posix off](https://image.slidesharecdn.com/dvkeygvkrr6sj5lhsszc-signature-b02a6c073768d8536fdd50c0a47af6292b168fbd705c8180447bb0b754b59738-poli-141223132220-conversion-gate02/85/3-1-d-manual-bash-script-guide-lsstv-2-0r11-84-320.jpg)
![Setting shell options 78
privileged off
verbose off
vi off
xtrace off
• See set command for detailed explanation of each variable.
How do I set and unset shell variable options?
To set shell variable option use the following syntax:
set -o variableName
To unset shell variable option use the following syntax:
set +o variableName
Examples
Disable <CTRL-d> which is used to logout of a login shell (local or remote login session over ssh).
set -o ignoreeof
Now, try pressing [CTRL-d] Sample outputs:
Use "exit" to leave the shell.
Turn it off, enter:
set +o ignoreeof
shopt command
You can turn on or off the values of variables controlling optional behavior using the shopt command. To view a list
of some of the currently configured option via shopt, enter:
shopt
shopt -p
Sample outputs:
cdable_vars off
cdspell off
checkhash off
checkwinsize on
cmdhist on
compat31 off
dotglob off
execfail off
expand_aliases on
extdebug off
extglob off
extquote on
failglob off
force_fignore on
gnu_errfmt off](https://image.slidesharecdn.com/dvkeygvkrr6sj5lhsszc-signature-b02a6c073768d8536fdd50c0a47af6292b168fbd705c8180447bb0b754b59738-poli-141223132220-conversion-gate02/85/3-1-d-manual-bash-script-guide-lsstv-2-0r11-85-320.jpg)
![Setting shell options 79
histappend off
histreedit off
histverify off
hostcomplete on
huponexit off
interactive_comments on
lithist off
login_shell off
mailwarn off
no_empty_cmd_completion off
nocaseglob off
nocasematch off
nullglob off
progcomp on
promptvars on
restricted_shell off
shift_verbose off
sourcepath on
xpg_echo off
How do I enable (set) and disable (unset) each option?
To enable (set) each option, enter:
shopt -s optionName
To disable (unset) each option, enter:
shopt -u optionName
Examples
If cdspell option set, minor errors in the spelling of a directory name in a cd command will be corrected. The errors
checked for are transposed characters, a missing character, and one character too many. If a correction is found, the
corrected file name is printed, and the command proceeds. For example, type the command (note /etc directory
spelling):
cd /etcc
Sample outputs:
bash: cd: /etcc: No such file or directory
Now, turn on cdspell option and try again the same cd command, enter:
shopt -s cdspell
cd /etcc
Sample outputs:
/etc
[vivek@vivek-desktop /etc]$](https://image.slidesharecdn.com/dvkeygvkrr6sj5lhsszc-signature-b02a6c073768d8536fdd50c0a47af6292b168fbd705c8180447bb0b754b59738-poli-141223132220-conversion-gate02/85/3-1-d-manual-bash-script-guide-lsstv-2-0r11-86-320.jpg)
![Setting shell options 80
Customizing Bash environment with shopt and set
Edit your ~/.bashrc, enter:
vi ~/.bashrc
Add the following commands:
# Correct dir spellings
shopt -q -s cdspell
# Make sure display get updated when terminal window get resized
shopt -q -s checkwinsize
# Turn on the extended pattern matching features
shopt -q -s extglob
# Append rather than overwrite history on exit
shopt -s histappend
# Make multi-line commandsline in history
shopt -q -s cmdhist
# Get immediate notification of bacground job termination
set -o notify
# Disable [CTRL-D] which is used to exit the shell
set -o ignoreeof
# Disable core files
ulimit -S -c 0 > /dev/null 2>&1
How do I setup environment variables?
Simply add the settings to ~/.bashrc:
# Store 5000 commands in history buffer
export HISTSIZE=5000
# Store 5000 commands in history FILE
export HISTFILESIZE=5000
# Avoid duplicates in hisotry
export HISTIGNORE='&:[ ]*'
# Use less command as a pager
export PAGER=less
# Set vim as default text editor
export EDITOR=vim](https://image.slidesharecdn.com/dvkeygvkrr6sj5lhsszc-signature-b02a6c073768d8536fdd50c0a47af6292b168fbd705c8180447bb0b754b59738-poli-141223132220-conversion-gate02/85/3-1-d-manual-bash-script-guide-lsstv-2-0r11-87-320.jpg)


![Bash structured language constructs 85
Addition is 7. But,
echo $(( 5 < 2 ))
Sample Output:
0
Answer is zero (0). Shell simple compared two number and returned result as true or false. Is 5 is less than 2? No. So
0 is returned. The Boolean (logical data) type is a primitive data type having one of two values
• True
• False
In shell:
• 0 value indicates false.
• 1 or non-zero value indicate true.
Examples
Operator Example Description True / False Evaluates To
5 > 12 echo $(( 5 > 12 )) Is 5 greater than 12? No (false) 0
5 == 10 echo $(( 5 == 10 )) Is 5 equal to 10? No (false) 0
5 != 2 echo $(( 5 != 2 )) 5 is not equal to 2? Yes (true) 1
1 < 2 echo $(( 1 < 2 )) Is 1 less than 2? Yes (true) 1
5 == 5 echo $(( 5 == 5 )) Is 5 equal to 5? Yes (true) 1
Now, it makes no sense to use echo command for comparisons. But, when you compare it with some value it
becomes very useful. For example:
if [ file exists /etc/resolv.conf ]
then
make a copy
else
print an error on screen
fi
← Chapter 4: Conditionals Execution (Decision Making) Home Test command →](https://image.slidesharecdn.com/dvkeygvkrr6sj5lhsszc-signature-b02a6c073768d8536fdd50c0a47af6292b168fbd705c8180447bb0b754b59738-poli-141223132220-conversion-gate02/85/3-1-d-manual-bash-script-guide-lsstv-2-0r11-92-320.jpg)

![Test command 87
See also
• Perform arithmetic operations
• Numeric comparison
← Bash structured language constructs Home if structures to execute code based on a condition →
If structures to execute code based on a condition
← Test
command
Home If..else..fi →
Now, you can use the if statement to test a condition. if command The general syntax is as follows:
if condition
then
command1
command2
...
commandN
fi
OR
if test var == value
then
command1
command2
...
commandN
fi
OR
if test -f /file/exists
then
command1
command2
...
commandN
fi
OR
if [ condition ]
then
command1
command2
....
..](https://image.slidesharecdn.com/dvkeygvkrr6sj5lhsszc-signature-b02a6c073768d8536fdd50c0a47af6292b168fbd705c8180447bb0b754b59738-poli-141223132220-conversion-gate02/85/3-1-d-manual-bash-script-guide-lsstv-2-0r11-94-320.jpg)


![If..else..fi 90
OR
if [ condition ]
then
if given condition true
execute all commands up to else statement
or to fi if there is no else statement
else
if given condition false
execute all commands up to fi
fi
Make sure you always end the construct with fi.
if/then/else Example
Update verify.sh as follows
##!/bin/bash
read -p "Enter a password" pass
if test "$pass" = "jerry"
then
echo "Password verified."
else
echo "Access denied."
fi
Save and close the file. Run it as follows:
./verify.sh
You have updated verify.sh and added an else statement to existing if command to create if..else..fi structure. If
$pass (i.e. password) is equal to "jerry", then "Password verified." is displayed. However, with else statement, the
script can display "Access denied." message on screen. This ensures that your script will always execute one of the
code block as follows:
if command is successful
then
print "Password verified message."
else # if condition is false
print "Access denied message."
fi](https://image.slidesharecdn.com/dvkeygvkrr6sj5lhsszc-signature-b02a6c073768d8536fdd50c0a47af6292b168fbd705c8180447bb0b754b59738-poli-141223132220-conversion-gate02/85/3-1-d-manual-bash-script-guide-lsstv-2-0r11-97-320.jpg)

![If..else..fi 92
then
echo "Error - $FILE not found or mcelog is not configured for 64
bit Linux systems."
exit 1
fi
# okay search for errors in file
error_log=$(grep -c -i "hardware error" $FILE)
# error found or not?
if [ $error_log -gt 0 ]
then # yes error(s) found, let send an email
echo "$AMESS" | email -s "$ASUB" $AEMAIL
else # naa, everything looks okay
echo "$OK_MESS"
fi
← if structures to execute code based on a condition Home Nested ifs →
Nested ifs
← If..else..fi Home Multilevel if-then-else
→
You can put if command within if command and create the nested ifs as follows:
if condition
then
if condition
then
.....
..
do this
else
....
..
do this
fi
else
...
.....
do this
fi
← If..else..fi Home Multilevel if-then-else
→](https://image.slidesharecdn.com/dvkeygvkrr6sj5lhsszc-signature-b02a6c073768d8536fdd50c0a47af6292b168fbd705c8180447bb0b754b59738-poli-141223132220-conversion-gate02/85/3-1-d-manual-bash-script-guide-lsstv-2-0r11-99-320.jpg)
![Nested ifs 93
Multilevel if-then-else
← Nested ifs Home The exit status of a command →
if..elif..else..fi allows the script to have various possibilities and conditions. This is handy, when you want to
compare one variable to a different values.
if condition
then
condition is true
execute all commands up to elif statement
elif condition1
then
condition1 is true
execute all commands up to elif statement
elif condition2
then
condition2 is true
execute all commands up to elif statement
elif conditionN
then
conditionN is true
execute all commands up to else statement
else
None of the above conditions are true
execute all commands up to fi
fi
In if..elif..else..fi structure, the block of the first true condition is executed. If no condition is true, the else block, is
executed.
Example
A simple shell script to determine if the given number is a negative or a positive number (numest.sh):
#!/bin/bash
read -p "Enter a number : " n
if [ $n -gt 0 ]; then
echo "$n is a positive."
elif [ $n -lt 0 ]
then
echo "$n is a negative."
elif [ $n -eq 0 ]
then
echo "$n is zero number."](https://image.slidesharecdn.com/dvkeygvkrr6sj5lhsszc-signature-b02a6c073768d8536fdd50c0a47af6292b168fbd705c8180447bb0b754b59738-poli-141223132220-conversion-gate02/85/3-1-d-manual-bash-script-guide-lsstv-2-0r11-100-320.jpg)


![Logical AND && 98
Exit if a directory /tmp/foo does not exist
test ! -d /tmp/foo && { read -p "Directory /tmp/foo not found. Hit
[Enter] to exit..." enter; exit 1; }
External links
• How to display error message instantly when command fails
[1]
← Conditional execution Home Logical OR
→
References
[1] http://www.cyberciti.biz/tips/shell-displaying-error-messages.html
Logical OR ||
← Logical
AND
Home Logical Not !
→
Logical OR (||) is boolean operator. It can execute commands or shell functions based on the exit status of another
command.
Syntax
command1 || command2
OR
First_command || Second_command
command2 is executed if, and only if, command1 returns a non-zero exit status. In other words, run command1
successfully or run command2.
Example
cat /etc/shadow 2>/dev/null || echo "Failed to open file"
The cat command will try to display /etc/shadow file and it (the cat command) sets the exit stats to non-zero value if
it failed to open /etc/shadow file. Therefore, 'Failed to open file' will be displayed cat command failed to open the
file.
Find username else display an error
grep "^vivek" /etc/passwd || echo "User vivek not found in /etc/passwd"
How Do I Combine Both Logical Operators?
Try it as follows:
cat /etc/shadow 2>/dev/null && echo "File successfully opened." || echo
"Failed to open file."](https://image.slidesharecdn.com/dvkeygvkrr6sj5lhsszc-signature-b02a6c073768d8536fdd50c0a47af6292b168fbd705c8180447bb0b754b59738-poli-141223132220-conversion-gate02/85/3-1-d-manual-bash-script-guide-lsstv-2-0r11-105-320.jpg)
![Logical OR || 99
Make sure only root can run this script:
test $(id -u) -eq 0 && echo "You are root" || echo "You are NOT root"
OR
test $(id -u) -eq 0 && echo "Root user can run this script." || echo
"Use sudo or su to become a root user."
External links
• How to display error message instantly when command fails
[1]
← Logical
AND
Home Logical Not !
→
Logical Not !
← Logical
OR
Home Conditional expression →
Logical not (!) is boolean operator, which is used to test whether expression is true or not. For example, if file not
exists, then display an error on screen.
Syntax
The test command syntax is as follows:
! expression
OR
[ ! expression ]
OR
if test ! condition
then
command1
command2
fi
if [ ! condition ]
then
command1
command2
fi
Where,
• True if expression is false.](https://image.slidesharecdn.com/dvkeygvkrr6sj5lhsszc-signature-b02a6c073768d8536fdd50c0a47af6292b168fbd705c8180447bb0b754b59738-poli-141223132220-conversion-gate02/85/3-1-d-manual-bash-script-guide-lsstv-2-0r11-106-320.jpg)
![Logical Not ! 100
Examples
Try the following example:
test ! -f /etc/resolv.conf && echo "File /etc/resolv.conf not found."
OR
test ! -f /etc/resolv.conf && echo "File /etc/resolv.conf not found."
|| echo "File /etc/resolv.conf found."
Create a directory /backup, if doesn't exits:
[ ! -d /backup ] && mkdir /backup
Die (exit) if $HOME/.config file not found:
[ ! -f $HOME/.config ] && { echo "Error: $HOME/.config file not
found."; exit 1; }
Die (exit) if directory /usr/bin not found
[ ! -d /usr/bin ] && exit
Here is a sample script that use logical not ! to make backup directories on fly:
#!/bin/bash
# A sample shell script to backup MySQL database
# Get todays date
NOW=$(date +"%d-%m-%Y")
# Location to store mysql backup
BAK="/nas10/.mysql-database"
# MySQL Server Login Information
MUSER="root" #### mysql user name ###
MPASS="YOUR-PASSWORD-HERE" #### mysql password ###
MHOST="127.0.0.1" #### mysql host name ###
# Full path to common utilities
MYSQL="/usr/bin/mysql"
MYSQLDUMP="/usr/bin/mysqldump"
GZIP="/bin/gzip"
# If backup directory does not exits create it using logical not
if [ ! -d "$BAK" ]
then
mkdir -p "$BAK"
fi
# Get all mysql databases names
DBS="$($MYSQL -u $MUSER -h $MHOST -p$MPASS -Bse 'show databases')"](https://image.slidesharecdn.com/dvkeygvkrr6sj5lhsszc-signature-b02a6c073768d8536fdd50c0a47af6292b168fbd705c8180447bb0b754b59738-poli-141223132220-conversion-gate02/85/3-1-d-manual-bash-script-guide-lsstv-2-0r11-107-320.jpg)
![Logical Not ! 101
# Start backup
echo -n "Dumping..."
# Use the for loop
for db in $DBS
do
FILE="$BAK/mysql-$db.$NOW-$(date +"%T").gz"
$MYSQLDUMP -u $MUSER -h $MHOST -p$MPASS $db | $GZIP -9 > $FILE
echo -n "."
done
echo -n "...Done"
echo ""
• Please note that the bash shell pipes also support ! operator. It "reverses" the exit code of a command.
← Logical
OR
Home Conditional expression →
Conditional expression using [
← Logical Not ! Home Numeric comparison
→
The test command is used to check file types and compare values. You can also use [ as test command. It is used for:
• File attributes comparisons
• Perform string comparisons.
• Arithmetic comparisons.
Syntax
[ condition ]
OR
[ ! condition ]
OR
[ condition ] && true-command
OR
[ condition ] || false-command
OR
[ condition ] && true-command || false-command](https://image.slidesharecdn.com/dvkeygvkrr6sj5lhsszc-signature-b02a6c073768d8536fdd50c0a47af6292b168fbd705c8180447bb0b754b59738-poli-141223132220-conversion-gate02/85/3-1-d-manual-bash-script-guide-lsstv-2-0r11-108-320.jpg)
![Conditional expression using [ 102
Examples
[ 5 == 5 ] && echo "Yes" || echo "No"
[ 5 == 15 ] && echo "Yes" || echo "No"
[ 5 != 10 ] && echo "Yes" || echo "No"
[ -f /etc/resolv.conf ] && echo "File /etc/resolv.conf found." || echo
"File /etc/resolv.conf not found."
[ -f /etc/resolv1.conf ] && echo "File /etc/resolv.conf found." || echo
"File /etc/resolv.conf not found."
← Logical Not ! Home Numeric comparison
→
Conditional expression using <nowiki>[[</
nowiki>
This article is a stub. You can help us by expanding it
[1]
.
References
[1] http://en.wikipedia.org/wiki/Bash_test_conditional_expression_%28safer_version%29
Numeric comparison
← Conditional expression Home String comparison
→
The test command can perform various numeric comparison using the following operators:
Operator Syntax Description Example
eq INTEGER1 -eq
INTEGER2
INTEGER1 is equal to INTEGER2 #!/bin/bash
read -p "Please enter and confirm number 10 via keyboard
: " n
if test $n -eq 10
then
echo "Thanks for entering 10 number."
fi
ge INTEGER1 -ge
INTEGER2
INTEGER1 is greater than or equal to
INTEGER2
#!/bin/bash
read -p "Enter number >= 10 : " n
if test $n -ge 10
then
echo "$n is greater than or equal to 10"
fi](https://image.slidesharecdn.com/dvkeygvkrr6sj5lhsszc-signature-b02a6c073768d8536fdd50c0a47af6292b168fbd705c8180447bb0b754b59738-poli-141223132220-conversion-gate02/85/3-1-d-manual-bash-script-guide-lsstv-2-0r11-109-320.jpg)


![String comparison 105
echo "No password was entered!!! Cannot verify an empty
password!!!"
exit 1
fi
if test "$pass" != "tom"
then
echo "Wrong password!"
fi
← Numeric comparison Home File attributes comparisons
→
File attributes comparisons
← String
comparison
Home Shell command line parameters →
Use the following file comparisons to test various file attributes. You can use the test command or conditional
expression using [.
-a file
True if file exists.
Example
[ -a /etc/resolv.conf ] && echo "File found" || echo "Not found"
-b file
True if file exists and is a block special file.
Example
[ -b /dev/zero ] && echo "block special file found" || echo "block
special file not found"
OR
[ -b /dev/sda ] && echo "block special file found" || echo "block
special file not found"](https://image.slidesharecdn.com/dvkeygvkrr6sj5lhsszc-signature-b02a6c073768d8536fdd50c0a47af6292b168fbd705c8180447bb0b754b59738-poli-141223132220-conversion-gate02/85/3-1-d-manual-bash-script-guide-lsstv-2-0r11-112-320.jpg)
![File attributes comparisons 106
-c file
True if file exists and is a character special file.
Example
[ -c /dev/tty0 ] && echo "Character special file found." || echo
"Character special file not found."
-d dir
True if file exists and is a directory.
Example
#!/bin/bash
DEST=/backup
SRC=/home
# Make sure backup dir exits
[ ! -d $DEST ] && mkdir -p $DEST
# If source directory does not exits, die...
[ ! -d $SRC ] && { echo "$SRC directory not found. Cannot make backup
to $DEST"; exit 1; }
# Okay, dump backup using tar
echo "Backup directory $DEST..."
echo "Source directory $SRC..."
/bin/tar zcf $SRC $DEST/backup.tar.gz 2>/dev/null
# Find out if backup failed or not
[ $? -eq 0 ] && echo "Backup done!" || echo "Backup failed"
-e file
True if file exists.
Example
[ -e /tmp/test.txt ] && echo "File found" || echo "File not found"
-f file
True if file exists and is a regular file.
Example
[ ! -f /path/to/file ] && echo "File not found!"
A sample shell script that compare various file attributes and create webalizer (application that generates web pages
of analysis, from access and usage log) stats configuration file to given Internet domain name.](https://image.slidesharecdn.com/dvkeygvkrr6sj5lhsszc-signature-b02a6c073768d8536fdd50c0a47af6292b168fbd705c8180447bb0b754b59738-poli-141223132220-conversion-gate02/85/3-1-d-manual-bash-script-guide-lsstv-2-0r11-113-320.jpg)
![File attributes comparisons 107
#!/bin/bash
# Purpose: A Shell Script To Create Webalizer Stats Configration File
# Written by: Vivek Gite
# ---------------------------------------------------------------------
# Set vars
# Apache vroot for each domain
HTTPDROOT="/home/httpd"
# Path to GeoIP DB
GEOIPDBPATH="/usr/local/share/GeoIP/GeoIP.dat"
# Get the Internet domain such as cyberciti.biz
echo "*** A Shell Script To Create Webalizer Stats Configration File
***"
read -p "Enter a domain name : " DOMAIN
# Make sure we got the Input else die with an error on screen
[ -z $DOMAIN ] && { echo "Please enter a domain name. Try again!"; exit
1; }
# Alright, set some variable based upon $DOMAIN
OUT="$HTTPDROOT/$DOMAIN/stats/webalizer.conf"
CONFROOT="$HTTPDROOT/$DOMAIN/stats"
LOGFILE="$HTTPDROOT/$DOMAIN/logs/access.log"
# Die if configuration file exits...
[ -f $OUT ] && { echo "Webalizer configuration file '$OUT' exits for
domain $DOMAIN."; exit 2; }
# Make sure configuration directory exists
[ ! -d $CONFROOT ] && mkdir -p $CONFROOT
# Write a log file
>$OUT
echo "LogFile $LOGFILE" >> $OUT
echo "LogType clf" >> $OUT
echo "OutputDir $CONFROOT/out" >> $OUT
echo "HistoryName $CONFROOT/webalizer.hist" >> $OUT
echo "Incremental yes" >> $OUT
echo "IncrementalName $CONFROOT/webalizer.current" >> $OUT
echo "HostName $DOMAIN" >> $OUT
echo "Quiet yes" >> $OUT
echo "FoldSeqErr yes" >> $OUT
echo "AllSearchStr yes" >> $OUT
echo "HideSite $DOMAIN" >> $OUT](https://image.slidesharecdn.com/dvkeygvkrr6sj5lhsszc-signature-b02a6c073768d8536fdd50c0a47af6292b168fbd705c8180447bb0b754b59738-poli-141223132220-conversion-gate02/85/3-1-d-manual-bash-script-guide-lsstv-2-0r11-114-320.jpg)


![Parameters Set by the Shell 114
Parameters Set by the Shell
← How to use positional parameters Home Create usage messages →
Bash shell set several special parameters. For example $? (see return values section) holds the return value of the
executed command.
• All command line parameters or arguments can be accessed via $1, $2, $3,..., $9.
• $* holds all command line parameters or arguments.
• $# holds the number of positional parameters.
• $- holds flags supplied to the shell.
• $? holds the return value set by the previously executed command.
• $$ holds the process number of the shell (current shell).
• $! hold the process number of the last background command.
• $@ holds all command line parameters or arguments.
Use echo command to display special shell parameters:
echo $#
You can store them to a shell variables as follows:
status=$?
[ $status -eq 0 ] && echo "Lighttpd ... [Ok]" || echo "Lighttpd ...
[Failed]"
• Assignment to special parameter is not allowed:
# okay
status=$?
# noop not allowed
$?=-1
← How to use positional parameters Home Create usage messages →](https://image.slidesharecdn.com/dvkeygvkrr6sj5lhsszc-signature-b02a6c073768d8536fdd50c0a47af6292b168fbd705c8180447bb0b754b59738-poli-141223132220-conversion-gate02/85/3-1-d-manual-bash-script-guide-lsstv-2-0r11-121-320.jpg)
![Create usage messages 115
Create usage messages
← Parameters Set by the
Shell
Home Exit command
→
You can use the if command to check command line arguments. Many Linux commands display an error or usage
information when required command line option is not passed. For example, try the following command:
gcc
Sample outputs:
gcc: no input files
Try rm command:
rm
Sample outputs:
rm: missing operand
Try `rm --help' for more information.
How Do I Add Usage Functionality To The Script?
A shell script that depends upon user input must:
• Verify the number of arguments passed to it.
• Display an error or usage message if arguments or input is not passed to the script. Your shell script can also
create such usage message using if command and $# special shell variable parameter. Create a shell script called
userlookup.sh:
#!/bin/bash
# A shell script to lookup usernames in /etc/passwd file
# Written by: Vivek Gite
# Last updated on: Sep/10/2003
# -------------------------------------------------------
# Set vars
user=$1 # first command line argument
passwddb=/etc/passwd
# Verify the type of input and number of values
# Display an error message if the username (input) is not correct
# Exit the shell script with a status of 1 using exit 1 command.
[ $# -eq 0 ] && { echo "Usage: $0 username"; exit 1; }
grep "^$user" $passwddb >/dev/null
retval=$? # store exit status of grep](https://image.slidesharecdn.com/dvkeygvkrr6sj5lhsszc-signature-b02a6c073768d8536fdd50c0a47af6292b168fbd705c8180447bb0b754b59738-poli-141223132220-conversion-gate02/85/3-1-d-manual-bash-script-guide-lsstv-2-0r11-122-320.jpg)
![Create usage messages 116
# If grep found username, it sets exit status to zero
# Use exit status to make the decision
[ $retval -eq 0 ] && echo "$user found" || echo "$user not found"
Save and close the file. Run it as follows:
chmod +x userlookup.sh
./userlookup.sh
Sample outputs:
Usage: ./userlookup.sh username
Pass the command line argument kate:
./userlookup.sh kate
Sample outputs:
kate not found
Pass the command line argument vivek:
./userlookup.sh vivek
Sample outputs:
vivek found
← Parameters Set by the
Shell
Home Exit command
→](https://image.slidesharecdn.com/dvkeygvkrr6sj5lhsszc-signature-b02a6c073768d8536fdd50c0a47af6292b168fbd705c8180447bb0b754b59738-poli-141223132220-conversion-gate02/85/3-1-d-manual-bash-script-guide-lsstv-2-0r11-123-320.jpg)
![Exit command 117
Exit command
← Create usage messages Home The case statement →
The syntax is as follows:
exit N
• The exit statement is used to exit from the shell script with a status of N.
• Use the exit statement to indicate successful or unsuccessful shell script termination.
• The value of N can be used by other commands or shell scripts to take their own action.
• If N is omitted, the exit status is that of the last command executed.
• Use the exit statement to terminate shell script upon an error.
• If N is set to 0 means normal shell exit. Create a shell script called exitcmd.sh:
#!/bin/bash
echo "This is a test."
# Terminate our shell script with success message
exit 0
Save and close the file. Run it as follows:
chmod +x exitcmd.sh
./exitcmd.sh
Sample outputs:
This is a test.
To see exit status of the script, enter (see the exit status of a command for more information about special shell
variable $?) :
echo $?
Shell script example
• Any non zero value indicates unsuccessful shell script termination.
• Create a shell script called datatapebackup.sh:
#!/bin/bash
BAK=/data2
TAPE=/dev/st0
echo "Trying to backup ${BAK} directory to tape device ${TAPE} .."
# See if $BAK exits or not else die
# Set unsuccessful shell script termination with exit status # 1
[ ! -d $BAK ] && { echo "Source backup directory $BAK not found."; exit
1; }
# See if $TAPE device exits or not else die
# Set unsuccessful shell script termination with exit status # 2](https://image.slidesharecdn.com/dvkeygvkrr6sj5lhsszc-signature-b02a6c073768d8536fdd50c0a47af6292b168fbd705c8180447bb0b754b59738-poli-141223132220-conversion-gate02/85/3-1-d-manual-bash-script-guide-lsstv-2-0r11-124-320.jpg)
![Exit command 118
[ ! -b $TAPE ] && { echo "Backup tape drive $TAPE not found or
configured."; exit 2; }
# Okay back it up
tar cvf $TAPE $BAK 2> /tmp/error.log
if [ $? -ne 0 ]
then
# die with unsuccessful shell script termination exit status # 3
echo "An error occurred while making a tape backup, see
/tmp/error.log file".
exit 3
fi
# Terminate our shell script with success message i.e. backup done!
exit 0
Save and close the file. Run it as follows:
chmod +x datatapebackup.sh
./datatapebackup.sh
echo $?
← Create usage messages Home The case statement →](https://image.slidesharecdn.com/dvkeygvkrr6sj5lhsszc-signature-b02a6c073768d8536fdd50c0a47af6292b168fbd705c8180447bb0b754b59738-poli-141223132220-conversion-gate02/85/3-1-d-manual-bash-script-guide-lsstv-2-0r11-125-320.jpg)

![The case statement 120
pattern7|pattern8|patternN)
command1
...
....
commandN
;;
*)
esac
• The case statement allows you to easily check pattern (conditions) and then process a command-line if that
condition evaluates to true.
• In other words the $variable-name is compared against the patterns until a match is found.
• *) acts as default and it is executed if no match is found.
• The pattern can include wildcards.
• You must include ;; at the end of each commandN. The shell executes all the statements up to the two semicolons
that are next to each other.
• The esac is always required to indicate end of case statement.
Example
Create a shell script called rental.sh:
#!/bin/bash
# if no command line arg given
# set rental to Unknown
if [ -z $1 ]
then
rental="*** Unknown vehicle ***"
elif [ -n $1 ]
then
# otherwise make first arg as a rental
rental=$1
fi
# use case statement to make decision for rental
case $rental in
"car") echo "For $rental rental is Rs.20 per k/m.";;
"van") echo "For $rental rental is Rs.10 per k/m.";;
"jeep") echo "For $rental rental is Rs.5 per k/m.";;
"bicycle") echo "For $rental rental 20 paisa per k/m.";;
"enfield") echo "For $rental rental Rs.3 per k/m.";;
"thunderbird") echo "For $rental rental Rs.5 per k/m.";;
*) echo "Sorry, I can not get a $rental rental for you!";;
esac
Save and close the file. Run it as follows:
chmod +x rental.sh
./rental.sh](https://image.slidesharecdn.com/dvkeygvkrr6sj5lhsszc-signature-b02a6c073768d8536fdd50c0a47af6292b168fbd705c8180447bb0b754b59738-poli-141223132220-conversion-gate02/85/3-1-d-manual-bash-script-guide-lsstv-2-0r11-127-320.jpg)
![The case statement 121
./rental.sh jeep
./rental.sh enfield
./rental.sh bike
Sample outputs:
Sorry, I can not gat a *** Unknown vehicle *** rental for you!
For jeep rental is Rs.5 per k/m.
For enfield rental Rs.3 per k/m.
Sorry, I can not gat a bike rental for you!
The case statement first checks $rental against each option for a match. If it matches "car", the echo command will
display rental for car. If it matches "van", the echo command will display rental for van and so on. If it matches
nothing i.e. * (default option), an appropriate warning message is printed.
Using Multiple Patterns
#!/bin/bash
NOW=$(date +"%a")
case $NOW in
Mon)
echo "Full backup";;
Tue|Wed|Thu|Fri)
echo "Partial backup";;
Sat|Sun)
echo "No backup";;
*) ;;
esac
The following shell script demonstrate the concept of command line parameters processing using the case statement
(casecmdargs.sh):
#!/bin/bash
OPT=$1 # option
FILE=$2 # filename
# test -e and -E command line args matching
case $OPT in
-e|-E)
echo "Editing $2 file..."
# make sure filename is passed else an error displayed
[ -z $FILE ] && { echo "File name missing"; exit 1; } || vi
$FILE
;;
-c|-C)
echo "Displaying $2 file..."
[ -z $FILE ] && { echo "File name missing"; exit 1; } || cat
$FILE
;;](https://image.slidesharecdn.com/dvkeygvkrr6sj5lhsszc-signature-b02a6c073768d8536fdd50c0a47af6292b168fbd705c8180447bb0b754b59738-poli-141223132220-conversion-gate02/85/3-1-d-manual-bash-script-guide-lsstv-2-0r11-128-320.jpg)

![The case statement 123
./allinonebackup.sh sql
# Dump file system using tape device
./allinonebackup.sh tar
# however, the following will fail as patterns are case sensitive
# you must use command line argument tar and not TAR, Tar, TaR etc.
./allinonebackup.sh TAR
← Exit
command
Home Dealing with case sensitive pattern →
Dealing with case sensitive pattern
← The case
statement
Home Chapter 4 Challenges →
Words can differ in meaning based on differing use of uppercase and lowercase letters. Linux allow a file to have
more than one name. For example, Sample.txt, SAMPLE.txt, and SAMPLE.TXT all are three different file names.
The case sensitive problem also applies to the case statement. For example, our backup script can be executed as
follows:
./allinonebackup.sh tar
However, the following example will not work, as patterns are case sensitive. You must use command line argument
tar and not TAR, Tar, TaR etc:
./allinonebackup.sh TAR
However, you can get around this problem using any one of the following solution.
Solution # 1: Convert pattern to lowercase
You can convert a pattern to lowercase using the tr command and here strings as follows:
echo "TeSt" | tr '[:upper:]' '[:lower:]'
var="TesT"
tr '[:upper:]' '[:lower:]' <<<"$var"
You can update the script as follows:
#!/bin/bash
# A shell script to backup mysql, webserver and files to tape
# allinonebackup.sh version 2.0
# -------------------------------------------------------
# covert all passed arguments to lowercase using
# tr command and here strings
opt=$( tr '[:upper:]' '[:lower:]' <<<"$1" )
case $opt in
sql)](https://image.slidesharecdn.com/dvkeygvkrr6sj5lhsszc-signature-b02a6c073768d8536fdd50c0a47af6292b168fbd705c8180447bb0b754b59738-poli-141223132220-conversion-gate02/85/3-1-d-manual-bash-script-guide-lsstv-2-0r11-130-320.jpg)
![Dealing with case sensitive pattern 124
echo "Running mysql backup using mysqldump tool..."
;;
sync)
echo "Running backup using rsync tool..."
;;
tar)
echo "Running tape backup using tar tool..."
;;
*)
echo "Backup shell script utility"
echo "Usage: $0 {sql|sync|tar}"
echo " sql : Run mySQL backup utility."
echo " sync : Run web server backup utility."
echo " tar : Run tape backup utility." ;;
esac
Run it as follows:
./allinonebackup.sh TAR
./allinonebackup.sh TaR
Solution # 2: Use regex with case patterns
Case command pattern supports regular expressions, which provide a concise and flexible means for identifying
words, or patterns of characters. For example, you can match tar pattern using the following syntax:
[Tt][Aa][Rr]
• The above is called a bracket expression.
• It matches a single character that is contained within the brackets.
• For example, [tom] matches "t", "o", or "m".
• [a-z] specifies a range which matches any lowercase letter from "a" to "z".
• [Aa] matches "A", or "a".
• [Tt][Aa][Rr] matches "tar", "TAR", "taR", "TaR", etc
• With regex you can avoid the external tr command.
• Here is the update version of the same script:
#!/bin/bash
# A shell script to backup mysql, webserver and files to tape
opt=$1
#########################################################
# Use regex to match all command line arguments #
# [Tt][Aa][Rr] matches "tar", "TAR", "taR", "TaR", etc #
# [Ss][Qq][Ll] matches "sql", "SQL", "SQl", "SqL", etc #
#########################################################
case $opt in
[Ss][Qq][Ll])
echo "Running mysql backup using mysqldump tool..."](https://image.slidesharecdn.com/dvkeygvkrr6sj5lhsszc-signature-b02a6c073768d8536fdd50c0a47af6292b168fbd705c8180447bb0b754b59738-poli-141223132220-conversion-gate02/85/3-1-d-manual-bash-script-guide-lsstv-2-0r11-131-320.jpg)
![Dealing with case sensitive pattern 125
;;
[Ss][Yy][Nn][Cc])
echo "Running backup using rsync tool..."
;;
[Tt][Aa][Rr])
echo "Running tape backup using tar tool..."
;;
*)
echo "Backup shell script utility"
echo "Usage: $0 {sql|sync|tar}"
echo " sql : Run mySQL backup utility."
echo " sync : Run web server backup utility."
echo " tar : Run tape backup utilty." ;;
esac
Solution # 3: Turn on nocasematch
If you turn on nocasematch option, shell matches patterns in a case-insensitive fashion when performing matching
while executing case or [[ conditional commands.
How do I turn on nocasematch option?
Type the following command:
shopt -s nocasematch
How do I turn off nocasematch option?
Type the following command:
shopt -u nocasematch
Here is an updated version of the same:
#!/bin/bash
# A shell script to backup mysql, webserver and files to tape
opt=$1
# Turn on a case-insensitive matching (-s set nocasematch)
shopt -s nocasematch
case $opt in
sql)
echo "Running mysql backup using mysqldump tool..."
;;
sync)
echo "Running backup using rsync tool..."
;;
tar)
echo "Running tape backup using tar tool..."
;;
*)
echo "Backup shell script utility"](https://image.slidesharecdn.com/dvkeygvkrr6sj5lhsszc-signature-b02a6c073768d8536fdd50c0a47af6292b168fbd705c8180447bb0b754b59738-poli-141223132220-conversion-gate02/85/3-1-d-manual-bash-script-guide-lsstv-2-0r11-132-320.jpg)


![The for loop statement 128
....
...
commandN
done
The for loop variable's contents syntax:
for var in $fileNames
do
command1
command2
....
...
commandN
done
The for loop command substitution syntax:
for var in $(Linux-command-name)
do
command1
command2
....
...
commandN
done
The for loop explicit file list using bash array syntax:
# define an array
ArrayName=(~/.config/*.conf)
for var in "${ArrayName[@]}"
do
command1 on $var
command2
....
...
commandN
done
The for loop three-expression syntax ( this type of for loop share a common heritage with the C programming
language ):
for (( EXP1; EXP2; EXP3 ))
do
command1
command2
command3
done
The above syntax is characterized by a three-parameter loop control expression; consisting of an initializer (EXP1), a
loop-test or condition (EXP2), and a counting expression (EXP3).](https://image.slidesharecdn.com/dvkeygvkrr6sj5lhsszc-signature-b02a6c073768d8536fdd50c0a47af6292b168fbd705c8180447bb0b754b59738-poli-141223132220-conversion-gate02/85/3-1-d-manual-bash-script-guide-lsstv-2-0r11-135-320.jpg)
![The for loop statement 129
More about the for loop
The for loop execute a command line once for every new value assigned to a var (variable) in specified list
(item1...itemN) i.e. repeat all statement between do and done till condition is not satisfied. The lists or values are
normally:
1. Strings
2. Numbers
3. Command line arguments
4. File names
5. Linux command output
Example
Create a shell script called testforloop.sh:
#!/bin/bash
for i in 1 2 3 4 5
do
echo "Welcome $i times."
done
Save and close the file. Run it as follows:
chmod +x testforloop.sh
./testforloop.sh
The for loop first creates i variable and assigned a number to i from the list of number from 1 to 5. The shell execute
echo statement for each assignment of i. This is known as iteration. This process will continue until all the items in
the list were not finished. See bash for loop examples
[1]
page for more information.
The For Loop Using Strings
Create a shell script called forcars.sh
#!/bin/bash
# A simple shell script to print list of cars
for car in bmw ford toyota nissan
do
echo "Value of car is: $car"
done
Another example, create a shell script called forcmds.sh:
#!/bin/bash
# A simple shell script to run commands
for command in date pwd df
do
echo
echo "*** The output of $command command >"
#run command
$command
echo](https://image.slidesharecdn.com/dvkeygvkrr6sj5lhsszc-signature-b02a6c073768d8536fdd50c0a47af6292b168fbd705c8180447bb0b754b59738-poli-141223132220-conversion-gate02/85/3-1-d-manual-bash-script-guide-lsstv-2-0r11-136-320.jpg)
![The for loop statement 130
done
Save and close the file. Run it as follows:
chmod +x forcmds.sh
./forcmds.sh
Sample outputs:
*** The output of date command >
Sun Sep 6 14:32:41 IST 2009
*** The output of pwd command >
/1.5/share/data/songs
*** The output of df command >
Filesystem 1K-blocks Used Available Use% Mounted on
/dev/sdb2 96116904 27589760 63644592 31% /
tmpfs 4149972 0 4149972 0% /lib/init/rw
varrun 4149972 272 4149700 1% /var/run
varlock 4149972 0 4149972 0% /var/lock
udev 4149972 2808 4147164 1% /dev
tmpfs 4149972 356 4149616 1% /dev/shm
/dev/sdb5 286374908 274733944 11640964 96% /share
/dev/sdc2 240402848 159452732 68738308 70% /disk1p2
/dev/sda5 1341352436 412128756 861086932 33% /1.5
/dev/sdd1 1442145212 26365188 1342523224 2% /media/backup
The For Loop Using Variable's Contents
Create a shell script called forfilenames.sh
#!/bin/bash
# A shell script to verify user password database
files="/etc/passwd /etc/group /etc/shadow /etc/gshdow"
for f in $files
do
[ -f $f ] && echo "$f file found" || echo "*** Error - $f file
missing."
done](https://image.slidesharecdn.com/dvkeygvkrr6sj5lhsszc-signature-b02a6c073768d8536fdd50c0a47af6292b168fbd705c8180447bb0b754b59738-poli-141223132220-conversion-gate02/85/3-1-d-manual-bash-script-guide-lsstv-2-0r11-137-320.jpg)
![The for loop statement 131
The For Loop Using Command-line Arguments
Create a shell script called forcmdargs.sh:
#!/bin/bash
# A simple shell script to display a file on screen passed as command
line argument
[ $# -eq 0 ] && { echo "Usage: $0 file1 file2 fileN"; exit 1; }
# read all command line arguments via the for loop
for f in $*
do
echo
echo "< $f >"
[ -f $f ] && cat $f || echo "$f not file."
echo "------------------------------------------------"
done
Save and close the file. Run it as follows:
chmod +x forcmdargs.sh
./forcmdargs.sh /etc/resolv.conf /etc/hostname
Sample outputs:
< /etc/resolv.conf >
nameserver 127.0.0.1
nameserver 4.2.2.1
nameserver 4.2.2.2
------------------------------------------------
< /etc/hostname >
vivek-desktop
------------------------------------------------
The for loop using command substitution
Command substitution is nothing but a shell command output stored in into a string or a variable. The command is a
shell command and must be enclosed between grave accents or $(..). The syntax is as follows:
$(command-name)
`command-name`
var=$(command-name)
NOW=$(date)
echo $NOW
Create a shell script called forcmdsub.sh:
#!/bin/bash
echo "Printing file names in /tmp directory:"
for f in $(ls /tmp/*)
do](https://image.slidesharecdn.com/dvkeygvkrr6sj5lhsszc-signature-b02a6c073768d8536fdd50c0a47af6292b168fbd705c8180447bb0b754b59738-poli-141223132220-conversion-gate02/85/3-1-d-manual-bash-script-guide-lsstv-2-0r11-138-320.jpg)
![The for loop statement 132
echo $f
done
The for loop using ranges or counting
The for loop can be set using the numerical range. The range is specified by a beginning and ending number. The for
loop executes a sequence of commands for each member in a list of items. A representative example in BASH is as
follows to display multiplication table with for loop (multiplication.sh):
#!/bin/bash
n=$1
# make sure command line arguments are passed to the script
if [ $# -eq 0 ]
then
echo "A shell script to print multiplication table."
echo "Usage : $0 number"
exit 1
fi
# Use for loop
for i in {1..10}
do
echo "$n * $i = $(( $i * $n))"
done
Save and close the file. Run it as follows:
chmod +x multiplication.sh
./multiplication.sh
./multiplication.sh 13
Sample outputs:
13 * 1 = 13
13 * 2 = 26
13 * 3 = 39
13 * 4 = 52
13 * 5 = 65
13 * 6 = 78
13 * 7 = 91
13 * 8 = 104
13 * 9 = 117
13 * 10 = 130](https://image.slidesharecdn.com/dvkeygvkrr6sj5lhsszc-signature-b02a6c073768d8536fdd50c0a47af6292b168fbd705c8180447bb0b754b59738-poli-141223132220-conversion-gate02/85/3-1-d-manual-bash-script-guide-lsstv-2-0r11-139-320.jpg)
![The for loop statement 133
Further readings
• BASH For Loop Examples
[1]
• KSH For Loop Examples
[2]
← Chapter 5: Bash Loops Home Nested for loop statement →
References
[1] http://www.cyberciti.biz/faq/bash-for-loop/
[2] http://www.cyberciti.biz/faq/ksh-for-loop/
Nested for loop statement
← for
loop
Home While loop →
Nested for loops means loop within loop. They are useful for when you want to repeat something serveral times for
several things. For example, create a shell script called nestedfor.sh:
#!/bin/bash
# A shell script to print each number five times.
for (( i = 1; i <= 5; i++ )) ### Outer for loop ###
do
for (( j = 1 ; j <= 5; j++ )) ### Inner for loop ###
do
echo -n "$i "
done
echo "" #### print the new line ###
done
Save and close the file. Run it as follows:
chmod +x nestedfor.sh
./nestedfor.sh
Sample outputs:
1 1 1 1 1
2 2 2 2 2
3 3 3 3 3
4 4 4 4 4
5 5 5 5 5
For each value of i the inner loop is cycled through 5 times, with the variable j taking values from 1 to 5. The inner
for loop terminates when the value of j exceeds 5, and the outer loop terminates when the value of i exceeds 5.](https://image.slidesharecdn.com/dvkeygvkrr6sj5lhsszc-signature-b02a6c073768d8536fdd50c0a47af6292b168fbd705c8180447bb0b754b59738-poli-141223132220-conversion-gate02/85/3-1-d-manual-bash-script-guide-lsstv-2-0r11-140-320.jpg)
![Nested for loop statement 134
Chessboard Example
A chessboard is the type of checkerboard used in the game of chess, and consists of 64 squares - eight rows and eight
columns arranged in two alternating colors. The colors are called "black" and "white". Let us write a shell script
called chessboard.sh to display a chessboard on screen:
#!/bin/bash
for (( i = 1; i <= 8; i++ )) ### Outer for loop ###
do
for (( j = 1 ; j <= 8; j++ )) ### Inner for loop ###
do
total=$(( $i + $j)) # total
tmp=$(( $total % 2)) # modulus
# Find out odd and even number and change the color
# alternating colors using odd and even number logic
if [ $tmp -eq 0 ];
then
echo -e -n "033[47m "
else
echo -e -n "033[40m "
fi
done
echo "" #### print the new line ###
done
Save and close the file. Run it as follows:
chmod +x chessboard.sh
./chessboard.sh
Sample outputs:
← for
loop
Home While loop →](https://image.slidesharecdn.com/dvkeygvkrr6sj5lhsszc-signature-b02a6c073768d8536fdd50c0a47af6292b168fbd705c8180447bb0b754b59738-poli-141223132220-conversion-gate02/85/3-1-d-manual-bash-script-guide-lsstv-2-0r11-141-320.jpg)
![The while loop statement 135
The while loop statement
← Nested for loop statement Home : infinite while loop →
The while statement is used to executes a list of commands repeatedly.
The while loop syntax
The syntax is:
while [ condition ]
do
command1
command2
..
....
commandN
done
Command1..commandN will executes while a condition is true. To read a text file line-by-line, use the following
syntax:
while IFS= read -r line
do
command1 on $line
command2 on $line
..
....
commandN
done < "/path/to/filename"
OR
while IFS= read -r field1 filed2 field3 ... fieldN
do
command1 on $field1
command2 on $field1 and $field3
..
....
commandN on $field1 ... $fieldN
done < "/path/to dir/file name with space"
IFS is used to set field separator (default is while space). The -r option to read command disables backslash escaping
(e.g., n, t). This is failsafe while read loop for reading text files.](https://image.slidesharecdn.com/dvkeygvkrr6sj5lhsszc-signature-b02a6c073768d8536fdd50c0a47af6292b168fbd705c8180447bb0b754b59738-poli-141223132220-conversion-gate02/85/3-1-d-manual-bash-script-guide-lsstv-2-0r11-142-320.jpg)
![The while loop statement 136
while loop Example
Create a shell script called while.sh:
#!/bin/bash
# set n to 1
n=1
# continue until $n equals 5
while [ $n -le 5 ]
do
echo "Welcome $n times."
n=$(( n+1 )) # increments $n
done
Save and close the file. Run it as follows:
chmod +x while.sh
./while.sh
Sample outputs:
Welcome 1 times.
Welcome 2 times.
Welcome 3 times.
Welcome 4 times.
Welcome 5 times.
The script initializes the variable n to 1, and then increments it by one. The while loop prints out the "Welcome $n
times" until it equals 5 and exit the loop.
Using ((expression)) Format With The While Loop
You can use ((expression)) syntax to test arithmetic evaluation (condition). If the value of the expression is non-zero,
the return status is 0; otherwise the return status is 1. To replace while loop condition while [ $n -le 5 ] with while ((
num <= 10 )) to improve code readability:
#!/bin/bash
n=1
while (( $n <= 5 ))
do
echo "Welcome $n times."
n=$(( n+1 ))
done
Reading A Text File
You can read a text file using read command and while loop as follows (whilereadfile.sh):
#!/bin/bash
file=/etc/resolv.conf
while IFS= read -r line
do
# echo line is stored in $line](https://image.slidesharecdn.com/dvkeygvkrr6sj5lhsszc-signature-b02a6c073768d8536fdd50c0a47af6292b168fbd705c8180447bb0b754b59738-poli-141223132220-conversion-gate02/85/3-1-d-manual-bash-script-guide-lsstv-2-0r11-143-320.jpg)
![The while loop statement 137
echo $line
done < "$file"
Save and close the file. Run it as follows:
chmod +x whilereadfile.sh
./whilereadfile.sh
Sample outputs:
nameserver 127.0.0.1
nameserver 192.168.1.254
nameserver 4.2.2.1
Reading A Text File With Separate Fields
You can store above output in two separate fields as follows (whilereadfields.sh):
#!/bin/bash
file=/etc/resolv.conf
while IFS= read -r f1 f2
do
echo "field # 1 : $f1 ==> field #2 : $f2"
done < "$file"
Run it as follows:
chmod +x whilereadfields.sh
./whilereadfields.sh
Sample outputs:
field # 1 : nameserver ==> field #2 : 127.0.0.1
field # 1 : nameserver ==> field #2 : 192.168.1.254
field # 1 : nameserver ==> field #2 : 4.2.2.1
Another useful example for reading and phrasing /etc/passwd
[1]
file using the while loop (readpasswd.sh):
#!/bin/bash
file=/etc/passwd
# set field delimiter to :
# read all 7 fields into 7 vars
while IFS=: read -r user enpass uid gid desc home shell
do
# only display if UID >= 500
[ $uid -ge 500 ] && echo "User $user ($uid) assigned "$home"
home directory with $shell shell."
done < "$file"
Save and close the file. Run it as follows:
chmod +x readpasswd.sh
./readpasswd.sh](https://image.slidesharecdn.com/dvkeygvkrr6sj5lhsszc-signature-b02a6c073768d8536fdd50c0a47af6292b168fbd705c8180447bb0b754b59738-poli-141223132220-conversion-gate02/85/3-1-d-manual-bash-script-guide-lsstv-2-0r11-144-320.jpg)
![The while loop statement 138
Sample output:
User nobody (65534) assigned "/nonexistent" home directory with /bin/sh
shell.
User vivek (1000) assigned "/home/vivek" home directory with /bin/bash
shell.
User oracle (1004) assigned "/usr/lib/oracle/xe" home directory with
/bin/bash shell.
User simran (1001) assigned "/home/simran" home directory with
/bin/bash shell.
User t2 (1002) assigned "/home/t2" home directory with
/usr/local/bin/t2.bot shell.
External Links
• Bash While Loop Example
[2]
• Howto: Read One Character At A Time
[3]
← Nested for loop statement Home : infinite while loop →
References
[1] http://www.cyberciti.biz/faq/understanding-etcpasswd-file-format/
[2] http://www.cyberciti.biz/faq/bash-while-loop/
[3] http://www.cyberciti.biz/faq/linux-unix-read-one-character-atatime-while-loop/](https://image.slidesharecdn.com/dvkeygvkrr6sj5lhsszc-signature-b02a6c073768d8536fdd50c0a47af6292b168fbd705c8180447bb0b754b59738-poli-141223132220-conversion-gate02/85/3-1-d-manual-bash-script-guide-lsstv-2-0r11-145-320.jpg)
![Use of : to set infinite while loop 139
Use of : to set infinite while loop
← While
loop
Home Until loop
→
You can use : special command with while loop to tests or set an infinite loop or an endless loop. An infinite loop
occurs when the condition will never be met, due to some inherent characteristic of the loop. There are a few
situations when this is desired behavior. For example, the menu driven program typically continue till user selects to
exit their main menu (loop). To set an infinite while loop use:
1. true command - do nothing, successfully (always returns exit code 0)
2. false command - do nothing, unsuccessfully (always returns exit code 1)
3. : command - no effect; the command does nothing (always returns exit code 0)
Syntax
Use : command to set an infinite loop:
#!/bin/bash
# Recommend syntax for setting an infinite while loop
while :
do
echo "Do something; hit [CTRL+C] to stop!"
done
Use the true command to set an infinite loop:
#!/bin/bash
while true
do
echo "Do something; hit [CTRL+C] to stop!"
done
Use the false command to set an infinite loop:
#!/bin/bash
while false
do
echo "Do something; hit [CTRL+C] to stop!"
done
Note the first syntax is recommended as : is part of shell itself i.e. : is a shell builtin command.](https://image.slidesharecdn.com/dvkeygvkrr6sj5lhsszc-signature-b02a6c073768d8536fdd50c0a47af6292b168fbd705c8180447bb0b754b59738-poli-141223132220-conversion-gate02/85/3-1-d-manual-bash-script-guide-lsstv-2-0r11-146-320.jpg)
![Use of : to set infinite while loop 140
A menu driven program using while loop
The following menu driven program typically continue till user selects to exit by pressing 4 option. The case
statement is used to match values against $choice variable and it will take appropriate action according to users
choice. Create a shell script called menu.sh:
#!/bin/bash
# set an infinite loop
while :
do
clear
# display menu
echo "Server Name - $(hostname)"
echo "-------------------------------"
echo " M A I N - M E N U"
echo "-------------------------------"
echo "1. Display date and time."
echo "2. Display what users are doing."
echo "3. Display network connections."
echo "4. Exit"
# get input from the user
read -p "Enter your choice [ 1 -4 ] " choice
# make decision using case..in..esac
case $choice in
1)
echo "Today is $(date)"
read -p "Press [Enter] key to continue..."
readEnterKey
;;
2)
w
read -p "Press [Enter] key to continue..."
readEnterKey
;;
3)
netstat -nat
read -p "Press [Enter] key to continue..."
readEnterKey
;;
4)
echo "Bye!"
exit 0
;;
*)
echo "Error: Invalid option..."
read -p "Press [Enter] key to continue..."
readEnterKey
;;
esac](https://image.slidesharecdn.com/dvkeygvkrr6sj5lhsszc-signature-b02a6c073768d8536fdd50c0a47af6292b168fbd705c8180447bb0b754b59738-poli-141223132220-conversion-gate02/85/3-1-d-manual-bash-script-guide-lsstv-2-0r11-147-320.jpg)
![Use of : to set infinite while loop 141
done
Save and close the file. Run it as follows:
chmod +x menu.sh
./menu.sh
Sample outputs:
← While
loop
Home Until loop
→
The until loop statement
← : infinite while loop Home select loop →
Just like while loop, until loop is also based on a condition.
Syntax
The until loop continues running commands as long as the item in list continues to evaluate true. Once an item
evaluates false, the loop is exited. The syntax is:
until [ condition ]
do
command1
command2
...
....
commandN
done](https://image.slidesharecdn.com/dvkeygvkrr6sj5lhsszc-signature-b02a6c073768d8536fdd50c0a47af6292b168fbd705c8180447bb0b754b59738-poli-141223132220-conversion-gate02/85/3-1-d-manual-bash-script-guide-lsstv-2-0r11-148-320.jpg)
![The until loop statement 142
The while loop vs the until loop
1. The until loop executes until a nonzero status is returned.
2. The while command executes until a zero status is returned.
3. The until loop always executes at least once.
Example
Create a shell script called until.sh:
#!/bin/bash
i=1
until [ $i -gt 6 ]
do
echo "Welcome $i times."
i=$(( i+1 ))
done
Save and close the file. Run it as follows:
chmod +x until.sh
./until.sh
Sample outputs:
Welcome 1 times.
Welcome 2 times.
Welcome 3 times.
Welcome 4 times.
Welcome 5 times.
Welcome 6 times.
The loop in the above example initializes the variable i to 1, and then increments and displays out the message until
it equals 6.
← : infinite while loop Home select loop →](https://image.slidesharecdn.com/dvkeygvkrr6sj5lhsszc-signature-b02a6c073768d8536fdd50c0a47af6292b168fbd705c8180447bb0b754b59738-poli-141223132220-conversion-gate02/85/3-1-d-manual-bash-script-guide-lsstv-2-0r11-149-320.jpg)


![Exit the select loop statement 148
Atlantis was the fourth operational shuttle built.
--------------
Enter the space shuttle to get quick information : 8
Bye!
← select loop Home Break statement
→
Using the break statement
← Exit select
loop
Home Continue statement →
Use the break statement to exit from within a FOR, WHILE or UNTIL loop i.e. stop stop loop execution.
Syntax
break
OR
break N
Example: for loop break statement
Create a shell script called forbreak.sh:
#!/bin/bash
match=$1 # fileName
found=0 # set to 1 if file found in the for loop
# show usage
[ $# -eq 0 ] && { echo "Usage: $0 fileName"; exit 1; }
# Try to find file in /etc
for f in /etc/*
do
if [ $f == "$match" ]
then
echo "$match file found!"
found=1 # file found
break # break the for looop
fi
done
# noop file not found
[ $found -ne 1 ] && echo "$match file not found in /etc directory"](https://image.slidesharecdn.com/dvkeygvkrr6sj5lhsszc-signature-b02a6c073768d8536fdd50c0a47af6292b168fbd705c8180447bb0b754b59738-poli-141223132220-conversion-gate02/85/3-1-d-manual-bash-script-guide-lsstv-2-0r11-155-320.jpg)
![Using the break statement 149
Save and close the file. Run it as follows:
chmod +x forbreak.sh
./forbreak.sh /etc/resolv1.conf
./forbreak.sh /etc/resolv.conf
Sample outputs:
/etc/resolv1.conf file not found in /etc directory
/etc/resolv.conf file found!
Example: while loop break statement
Create a shell script called whilebreak.sh:
#!/bin/bash
# set an infinite while loop
while :
do
read -p "Enter number ( -9999 to exit ) : " n
# break while loop if input is -9999
[ $n -eq -9999 ] && { echo "Bye!"; break; }
isEvenNo=$(( $n % 2 )) # get modules
[ $isEvenNo -eq 0 ] && echo "$n is an even number." || echo "$n
is an odd number."
done
Save and close the file. Run it as follows:
chmod +x whilebreak.sh
./whilebreak.sh
Sample outputs:
Enter number ( -9999 to exit ) : 11
11 is an odd number.
Enter number ( -9999 to exit ) : -2
-2 is an even number.
Enter number ( -9999 to exit ) : 20
20 is an even number.
Enter number ( -9999 to exit ) : -9999
Bye!](https://image.slidesharecdn.com/dvkeygvkrr6sj5lhsszc-signature-b02a6c073768d8536fdd50c0a47af6292b168fbd705c8180447bb0b754b59738-poli-141223132220-conversion-gate02/85/3-1-d-manual-bash-script-guide-lsstv-2-0r11-156-320.jpg)
![Using the break statement 150
How To Break Out Of a Nested Loop
A nested loop means loop within loop. You can break out of a certain number of levels in a nested loop by adding
break n statement. n is the number of levels of nesting. For example, following code will break out the second done
statement:
...
for i in something
do
while true
do
cmd1
cmd2
[ condition ] && break 2
done
done
....
..
The above break 2 will breaks you out of two enclosing for and while loop.
← Exit select
loop
Home Continue statement →
Using the continue statement
← Break
statement
Home Command substitution →
The continue statement is used to resume the next iteration of the enclosing FOR, WHILE or UNTIL loop.
Syntax
continue
OR
continue n
OR
...
..
for i in something
do
[ condition ] && continue
cmd1
cmd2
done](https://image.slidesharecdn.com/dvkeygvkrr6sj5lhsszc-signature-b02a6c073768d8536fdd50c0a47af6292b168fbd705c8180447bb0b754b59738-poli-141223132220-conversion-gate02/85/3-1-d-manual-bash-script-guide-lsstv-2-0r11-157-320.jpg)
![Using the continue statement 151
..
...
OR
...
..
while true
do
[ condition1 ] && continue
cmd1
cmd2
[ condition2 ] && break
done
..
...
The following two examples assumes that familiarity with MySQL and BIND 9 named servers.
Example: MySQL Backup Shell Script
• Use the continue statement to return to the top of the loop by skipping the rest of the commands in in the loop.
#!/bin/bash
# A sample mysql backup script
# Must be run as the root user
# Written by Vivek Gite
# Last updated on : 23/Aug/2003
# ---------------------------------
# MySQL Login Info
MUSER="admin" # MySQL user
MHOST="192.168.1.100" # MySQL server ip
MPASS="MySQLServerPassword" # MySQL password
# format dd-mm-yyyy
NOW=$(date +"%d-%m-%Y")
# Backupfile path
BPATH=/backup/mysql/$NOW
# if backup path does not exists, create it
[ ! -d $BPATH ] && mkdir -p $BPATH
# get database name lists
DBS="$(/usr/bin/mysql -u $MUSER -h $MHOST -p$MPASS -Bse 'show
databases')"
for db in $DBS
do
# Bakcup file name](https://image.slidesharecdn.com/dvkeygvkrr6sj5lhsszc-signature-b02a6c073768d8536fdd50c0a47af6292b168fbd705c8180447bb0b754b59738-poli-141223132220-conversion-gate02/85/3-1-d-manual-bash-script-guide-lsstv-2-0r11-158-320.jpg)
![Using the continue statement 152
FILE="${BPATH}/${db}.gz"
# skip database backup if database name is adserverstats or mint
[ "$db" == "adserverstats" ] && continue
[ "$db" == "mint" ] && continue
# okay lets dump a database backup
/usr/bin/mysqldump -u $MUSER -h $MHOST -p$MPASS $db | /bin/gzip -9 >
$FILE
done
Example: Bind9 named.conf Example
#!/bin/bash
# convert all domain names to a lowercase
DOMAINS="$(echo $@|tr '[A-Z]' '[a-z]')"
# Path to named.conf
NAMEDCONF="/var/named/chroot/etc/named.conf"
# Check named.conf for error
NAMEDCHEKCONF="/usr/sbin/named-checkconf -t /var/named/chroot/"
# Display usage and die
if [ $# -eq 0 ]
then
echo "Usage: $0 domain1 domain2 ..."
exit 1
fi
# okay use for loop to process all domain names passed
# as a command line args
for d in $DOMAINS
do
# if domain alrady exits, skip the rest of the loop
grep $d $NAMEDCONF >/dev/null
if [ $? -eq 0 ]
then
echo "$d exits in in $NAMEDCONF, skiping ..."
continue # skip it
fi
# else add domain to named.conf
echo "Adding domain $d to $NAMEDCONF..."
echo "zone "${d}" {" >> $NAMEDCONF
echo " type master;" >> $NAMEDCONF](https://image.slidesharecdn.com/dvkeygvkrr6sj5lhsszc-signature-b02a6c073768d8536fdd50c0a47af6292b168fbd705c8180447bb0b754b59738-poli-141223132220-conversion-gate02/85/3-1-d-manual-bash-script-guide-lsstv-2-0r11-159-320.jpg)
![Using the continue statement 153
echo " file "/etc/named/master.${d}";" >> $NAMEDCONF
echo " allow-transfer { slaveservers; };" >> $NAMEDCONF
echo "};" >> $NAMEDCONF
# Run named configuration file syntax checking tool
$NAMEDCHEKCONF >/dev/null
if [ $? -ne 0 ] # error found?
then
echo "**** Warning: named-checkconf - Cannot reload named
due to errors for $d ****"
else
echo "**** Domain $d sucessfully added to $NAMEDCONF
****"
fi
done
← Break
statement
Home Command substitution →
Command substitution
← Continue statement Home Chapter 5 Challenges →
Command substitution is nothing but run a shell command and store it's output to a variable or display back using
echo command. For example, display date and time:
echo "Today is $(date)"
OR
echo "Computer name is $(hostname)"
Syntax
You can use the grave accent (`) to perform a command substitution. The syntax is:
`command-name`
OR
$(command-name)
Command substitution in an echo command
echo "Text $(command-name)"
OR
echo -e "List of logged on users and what they are doing:n $(w)"
Sample outputs:](https://image.slidesharecdn.com/dvkeygvkrr6sj5lhsszc-signature-b02a6c073768d8536fdd50c0a47af6292b168fbd705c8180447bb0b754b59738-poli-141223132220-conversion-gate02/85/3-1-d-manual-bash-script-guide-lsstv-2-0r11-160-320.jpg)

![Chapter 5 Challenges 155
Chapter 5 Challenges
← Command
substitution
Home Chapter 6: Shell Redirection →
• Decide whether the following sentence is true or false:
1. For repeated actions use if-then-else.
2. For choice making use bash shell loop.
3. To executes for each value in a list use while loop.
4. Use break statement to return to the top of the loop.
5. Use continue statement to return to the top of the loop.
6. The PS3 reserved variable is used by select statement.
7. The default value for PS3 is set to #?.
• Write a menu driven script using the select statement to print calories for food items such as pizza, burger, Salad,
Pasta etc.
• Write a shell script that, given a file name as the argument will count vowels, blank spaces, characters, number of
line and symbols.
• Write a shell script that, given a file name as the argument will count English language articles such As 'A', 'An'
and 'The'.
• Write a shell script that, given a file name as the argument will write the even numbered line to a file with name
evenfile and odd numbered lines in a text file called oddfile.
• Write a shell script to monitor Linux server disk space using a while loop. Send an email alert when percentage of
used disk space is >= 90%.
• Write a shell script to determine if an input number is a palindrome or not. A palindromic number is a number
where the digits, with decimal representation usually assumed, are the same read backwards, for example, 58285.
• Write a shell program to read a number *such as 123) and find the sum of digits (1+2+3=6).
• Write a shell program to read a number and display reverse the number. For example, 123 should be printed as as
321.
• Write the shell program which produces a report from the output of ls -l in the following format using the for loop
statement:
file1
file2
[DIR] test/
Total regular files : 7
Total directories : 4
Total symbolic links : 0
Total size of regular files : 2940
• Write a shell script that will count the number of files in each of your sub-directories using the for loop.
• Write a shell script that accepts two directory names as arguments and deletes those files in the first directory
which are similarly named in the second directory.
• Write a shell script to search for no password entries in /etc/passwd and lock all accounts.
• Write a shell program to read two numbers and display all the odd numbers between those two numbers.
• Chapter 5 answers](https://image.slidesharecdn.com/dvkeygvkrr6sj5lhsszc-signature-b02a6c073768d8536fdd50c0a47af6292b168fbd705c8180447bb0b754b59738-poli-141223132220-conversion-gate02/85/3-1-d-manual-bash-script-guide-lsstv-2-0r11-162-320.jpg)


![Here documents 165
HERE document and mail command
For example, write an email using the mail command. Create a shell script called tapebackup1.sh:
#!/bin/bash
# run tar command and dump data to tape
tar -cvf /dev/st0 /www /home 2>/dev/null
# Okay find out if tar was a success or a failure
[ $? -eq 0 ] && status="Success!" || status="Failed!!!"
# write an email to admin
mail -s 'Backup status' vivek@nixcraft.co.in<<END_OF_EMAIL
The backup job finished.
End date: $(date)
Hostname : $(hostname)
Status : $status
END_OF_EMAIL
Save and close the file. Run it as follows:
chmod +x tapebackup1.sh
./tapebackup1.sh
Sample outputs:
Subject: Test
From: root <root@www-03.nixcraft.net.in>
Date: 12:57 Am
To: vivek@nixcraft.co.in
The backup job finished.
End date: Thu Sep 17 14:27:35 CDT 2009
Hostname : txvip1.simplyguide.org
Status : Success
The script provides the constant multi-line text input to the mail command.
← /dev/null discards unwanted output Home here strings
→](https://image.slidesharecdn.com/dvkeygvkrr6sj5lhsszc-signature-b02a6c073768d8536fdd50c0a47af6292b168fbd705c8180447bb0b754b59738-poli-141223132220-conversion-gate02/85/3-1-d-manual-bash-script-guide-lsstv-2-0r11-172-320.jpg)


![Redirection of standard error 168
Redirect Script Errors
You can redirect script error to a log file called scripts.err:
./script.sh 2>scripts.err
/path/to/example.pl 2>scripts.err
Append To Error Log
You can append standard error to end of error.log file using >> operator:
command-name 2>>error.log
./script.sh 2>>error.log
/path/to/example.pl 2>>error.log
External links
• BASH Shell: How To Redirect stderr To stdout ( redirect stderr to a File )
[1]
• BASH Shell Redirect Output and Errors To /dev/null
[2]
• How do I save or redirect stdout and stderr into different files?
[3]
← here strings Home Redirection of standard output →
References
[1] http://www.cyberciti.biz/faq/redirecting-stderr-to-stdout/
[2] http://www.cyberciti.biz/faq/how-to-redirect-output-and-errors-to-devnull/
[3] http://www.cyberciti.biz/faq/saving-stdout-stderr-into-separate-files/](https://image.slidesharecdn.com/dvkeygvkrr6sj5lhsszc-signature-b02a6c073768d8536fdd50c0a47af6292b168fbd705c8180447bb0b754b59738-poli-141223132220-conversion-gate02/85/3-1-d-manual-bash-script-guide-lsstv-2-0r11-175-320.jpg)
![Redirection of standard output 169
Redirection of standard output
← Redirection of standard error Home Appending redirected output
→
To redirect output simple use the following syntax:
command > /path/to/file
/path/to/script.sh > output.txt
For example, send output of date command to a file called now.txt:
date > now.txt
You can also use the > operator to print file, enter:
cat file.txt > /dev/lp0
OR
sudo bash -c "cat file.txt > /dev/lp0"
To make a usage listing of the directories in the /home partition, enter:
sudo bash -c "cd /home ; du -s *│ sort -rn >/tmp/usage"
You can also use the following syntax:
echo "Today is $(date)" 1>/tmp/now.txt
External links
• BASH Shell: How To Redirect stderr To stdout ( redirect stderr to a File )
[1]
• BASH Shell Redirect Output and Errors To /dev/null
[2]
• How do I save or redirect stdout and stderr into different files?
[3]
← Redirection of standard error Home Appending redirected output
→](https://image.slidesharecdn.com/dvkeygvkrr6sj5lhsszc-signature-b02a6c073768d8536fdd50c0a47af6292b168fbd705c8180447bb0b754b59738-poli-141223132220-conversion-gate02/85/3-1-d-manual-bash-script-guide-lsstv-2-0r11-176-320.jpg)
![Appending redirected output 170
Appending redirected output
← Redirection of standard output Home Redirection of both standard error and output →
You can append the output to the same file using >> operator, enter:
date >> now.txt
cat now.txt
You can also use the following syntax:
echo "Today is $(date)" 1>>/tmp/now.txt
External links
• BASH Shell: How To Redirect stderr To stdout ( redirect stderr to a File )
[1]
• BASH Shell Redirect Output and Errors To /dev/null
[2]
• How do I save or redirect stdout and stderr into different files?
[3]
← Redirection of standard output Home Redirection of both standard error and output →
Redirection of both standard error and output
← Appending redirected output Home Writing output to files →
You can redirect both stdout and stderr to file using the following syntax:
command-name &>filename
command-name >cmd.log 2>&1
command-name >/dev/null 2>&1
This syntax is often used with cron jobs:
@hourly /scripts/backup/nas.backup >/dev/null 2>&1
OR
@hourly /scripts/backup/nas.backup &>/dev/null](https://image.slidesharecdn.com/dvkeygvkrr6sj5lhsszc-signature-b02a6c073768d8536fdd50c0a47af6292b168fbd705c8180447bb0b754b59738-poli-141223132220-conversion-gate02/85/3-1-d-manual-bash-script-guide-lsstv-2-0r11-177-320.jpg)
![Redirection of both standard error and output 171
External links
• BASH Shell: How To Redirect stderr To stdout ( redirect stderr to a File )
[1]
• BASH Shell Redirect Output and Errors To /dev/null
[2]
• How do I save or redirect stdout and stderr into different files?
[3]
← Appending redirected output Home Writing output to files →
Writing output to files
← Redirection of both standard error and output Home Assigns the file descriptor (fd) to file for output →
You need to use the redirection symbol, >, to send data to a file. For example, my script called ./payment.py generate
output as follows on screen:
./payment.py -a -t net
Sample outputs:
+-+-----------+---------+-------------+
|#| Month | NetRev | Paid Details|
+-+-----------+---------+-------------+
|1| Feb-09| 747.56 | 06-Apr-2009 |
|2| Mar-09| 373.14 | 20-Apr-2009 |
|3| Apr-09| 163.66 | 19-May-2009 |
|4| May-09| 158.18 | 19-Jun-2009 |
|5| Jun-09| 3768.96 | 17-Jul-2009 |
|6| Jul-09| 2150.06 | 21-Aug-2009 |
+-+-----------+---------+-------------+
Use the > redirection symbol, to send data to a file called netrevenue.txt, enter:
./payment.py -a -t net >netrevenue.txt
Append Output To Files
Use the >> redirection symbols, to append to a file called netrevenue.txt, enter:
./payment.py -a -t net >>netrevenue.txt
Avoid Overwriting To Files
To disallow existing regular files to be overwritten with the > operator set noclobber option as follows:
echo "Test" > /tmp/test.txt
set -C
echo "Test 123" > /tmp/test.txt
Sample outputs:
bash: /tmp/test.txt: cannot overwrite existing file](https://image.slidesharecdn.com/dvkeygvkrr6sj5lhsszc-signature-b02a6c073768d8536fdd50c0a47af6292b168fbd705c8180447bb0b754b59738-poli-141223132220-conversion-gate02/85/3-1-d-manual-bash-script-guide-lsstv-2-0r11-178-320.jpg)
![Writing output to files 172
To enable existing regular files to be overwritten with the > operator set noclobber option as follows:
cat /tmp/test.txt
set +C
echo "Test 123" > /tmp/test.txt
cat /tmp/test.txt
Reading and Writing From Files
Create a text file called fnames.txt:
vivek
tom
Jerry
Ashish
Babu
Now, run tr command as follows to convert all lowercase names to the uppercase, enter:
tr "[a-z]" "[A-Z]" < fnames.txt
Sample outputs:
VIVEK
TOM
JERRY
ASHISH
BABU
You can save the output to a file called output.txt, enter:
tr "[a-z]" "[A-Z]" < fnames.txt > output.txt
cat output.txt
Notice do not use the same file name for standard input and standard output. This will result into data loss and results
are unpredictable.
To sort names stored in output.txt, enter:
sort < output.txt
Finally, store all sorted named to a file called sorted.txt
sort < output.txt > sorted.txt
However,
sort > sorted1.txt < output.txt
← Redirection of both standard error and output Home Assigns the file descriptor (fd) to file for output →](https://image.slidesharecdn.com/dvkeygvkrr6sj5lhsszc-signature-b02a6c073768d8536fdd50c0a47af6292b168fbd705c8180447bb0b754b59738-poli-141223132220-conversion-gate02/85/3-1-d-manual-bash-script-guide-lsstv-2-0r11-179-320.jpg)


![Reads from the file descriptor (fd) 178
chmod +x displayfds.sh
./displayfds.sh
Sample output:
*** My pid is 19560
*** Currently open files by ./displayfds.sh scripts..
total 0
lrwx------ 1 vivek vivek 64 2009-09-20 01:45 0 -> /dev/pts/2
lrwx------ 1 vivek vivek 64 2009-09-20 01:45 1 -> /dev/pts/2
lrwx------ 1 vivek vivek 64 2009-09-20 01:45 2 -> /dev/pts/2
lr-x------ 1 vivek vivek 64 2009-09-20 01:45 255 ->
/tmp/displayfds.sh
lr-x------ 1 vivek vivek 64 2009-09-20 01:45 3 -> /etc/resolv.conf
l-wx------ 1 vivek vivek 64 2009-09-20 01:45 4 -> /tmp/output.txt
1. The file descriptors 3 is assigned to /etc/resolv.conf and 4 is assinged to /tmp/output.txt.
2. Fd # 0, 1, and 2 are all assinged to /dev/pts/2 i.e. my screen in this output.
3. The ls /proc/$mypid/fd command lists all open fds using scripts PID (process identification number) number.
4. The proc file system (/proc) is a pseudo-file system which is used as an interface to kernel data structures.
5. There is a numerical subdirectory for each running process; the subdirectory is named by the process ID. Each
such subdirectory contains the pseudo-files and directories.
6. /proc/[PID]/fd is one of such directory containing one entry for each file which the process has open, named by
its file descriptor, and which is a symbolic link to the actual file. Thus, 0 is standard input, 1 standard output, 2
standard error, 3 /etc/resolv.conf, 4 /tmp/output.txt etc.
Shell Script To Read File Line by Line
Create a shell script called readfile.sh:
#!/bin/bash
# Shell script utility to read a file line line.
FILE="$1"
# make sure filename supplied at a shell prompt else die
[ $# -eq 0 ] && { echo "Usage: $0 filename"; exit 1; }
# make sure file exist else die
[ ! -f $FILE ] && { echo "Error - File $FILE does not exists." ; exit
2; }
# make sure file readonly else die
[ ! -r $FILE ] && { echo "Error - Can not read $FILE file."; exit 3; }
IFS=$(echo -en "nb")
exec 3<$FILE
while read -u 3 -r line
do](https://image.slidesharecdn.com/dvkeygvkrr6sj5lhsszc-signature-b02a6c073768d8536fdd50c0a47af6292b168fbd705c8180447bb0b754b59738-poli-141223132220-conversion-gate02/85/3-1-d-manual-bash-script-guide-lsstv-2-0r11-185-320.jpg)

![Executes commands and send output to the file descriptor (fd) 180
# Write date, time and hostname
echo "---------------------------------------------------" >&3
echo "System Info run @ $(date) for $(hostname)" >&3
echo "---------------------------------------------------" >&3
echo "****************************" >&3
echo "*** Installed Hard Disks ***" >&3
echo "****************************" >&3
fdisk -l | egrep "^Disk /dev" >&3
echo "************************************" >&3
echo "*** File System Disk Space Usage ***" >&3
echo "************************************" >&3
df -H >&3
echo "***********************" >&3
echo "*** CPU Information ***" >&3
echo "***********************" >&3
grep 'model name' /proc/cpuinfo | uniq | awk -F: '{ print $2}' >&3
echo "*****************************" >&3
echo "*** Operating System Info ***" >&3
echo "*****************************" >&3
uname -a >&3
[ -x /usr/bin/lsb_release ] && /usr/bin/lsb_release -a >&3 || echo
"/usr/bin/lsb_release not found." >&3
echo "**************************************" >&3
echo "*** Amount Of Free And Used Memory ***" >&3
echo "**************************************" >&3
free -m >&3
echo "************************************" >&3
echo "*** Top 10 Memory Eating Process ***" >&3
echo "************************************" >&3
ps -auxf | sort -nr -k 4 | head -10 >&3
echo "**********************************" >&3
echo "*** Top 10 CPU Eating Process ***" >&3
echo "**********************************" >&3
ps -auxf | sort -nr -k 3 | head -10 >&3
echo "******************************************" >&3
echo "*** Network Device Information [eth0] ***" >&3
echo "******************************************" >&3
netstat -i | grep -q eth0 && /sbin/ifconfig eth0 >&3 || echo "eth0 is
not installed" >&3](https://image.slidesharecdn.com/dvkeygvkrr6sj5lhsszc-signature-b02a6c073768d8536fdd50c0a47af6292b168fbd705c8180447bb0b754b59738-poli-141223132220-conversion-gate02/85/3-1-d-manual-bash-script-guide-lsstv-2-0r11-187-320.jpg)
![Executes commands and send output to the file descriptor (fd) 181
echo "******************************************" >&3
echo "*** Network Device Information [eth1] ***" >&3
echo "******************************************" >&3
netstat -i | grep -q eth1 && /sbin/ifconfig eth1 >&3 || echo "eth1 is
not installed" >&3
echo "********************************" >&3
echo "*** Wireless Device [wlan0] ***" >&3
echo "********************************" >&3
netstat -i | grep -q wlan0 && /sbin/ifconfig wlan0 >&3 || echo "wlan0 is
not installed" >&3
echo "*************************************" >&3
echo "*** All Network Interfaces Stats ***" >&3
echo "*************************************" >&3
netstat -i >&3
echo "System info wrote to $OUTPUT file."
Save and close the file. Run it as follows:
chmod +x sysinfo.sh
./sysinfo.sh
Sample outputs:
---------------------------------------------------
System Info run @ Sun Sep 20 02:41:43 IST 2009 for vivek-desktop
---------------------------------------------------
****************************
*** Installed Hard Disks ***
****************************
Disk /dev/sda: 1500.3 GB, 1500301910016 bytes
Disk /dev/sdb: 500.1 GB, 500107862016 bytes
Disk /dev/sdc: 500.1 GB, 500107862016 bytes
************************************
*** File System Disk Space Usage ***
************************************
Filesystem Size Used Avail Use% Mounted on
/dev/sdb2 99G 29G 65G 31% /
tmpfs 4.3G 0 4.3G 0% /lib/init/rw
varrun 4.3G 267k 4.3G 1% /var/run
varlock 4.3G 0 4.3G 0% /var/lock
udev 4.3G 2.9M 4.3G 1% /dev
tmpfs 4.3G 361k 4.3G 1% /dev/shm
/dev/sdb5 294G 282G 12G 96% /share
/dev/sdc2 247G 164G 71G 70% /disk1p2](https://image.slidesharecdn.com/dvkeygvkrr6sj5lhsszc-signature-b02a6c073768d8536fdd50c0a47af6292b168fbd705c8180447bb0b754b59738-poli-141223132220-conversion-gate02/85/3-1-d-manual-bash-script-guide-lsstv-2-0r11-188-320.jpg)

![Executes commands and send output to the file descriptor (fd) 183
-outfile SYSLOG -errfile SYSLOG -pidfile /var/run/tomcat5.5.pid
-Djava.awt.headless=true -Xmx128M
-Djava.endorsed.dirs=/usr/share/tomcat5.5/common/endorsed
-Dcatalina.base=/var/lib/tomcat5.5 -Dcatalina.home=/usr/share/tomcat5.5
-Djava.io.tmpdir=/var/lib/tomcat5.5/temp -Djava.security.manager
-Djava.security.policy=/var/lib/tomcat5.5/conf/catalina.policy
-Djava.util.logging.manager=org.apache.juli.ClassLoaderLogManager
-Djava.util.logging.config.file=/var/lib/tomcat5.5/conf/logging.properties
org.apache.catalina.startup.Bootstrap
vivek 8283 0.0 0.3 113548 28888 ? Sl Sep19 0:03
gnome-terminal
vivek 18341 0.3 0.3 62048 28732 pts/2 S 01:07 0:20 |
_ gedit /tmp/x
vivek 17561 0.0 0.3 77692 27172 ? S 00:33 0:01
_ nautilus --no-desktop --browser
vivek 8181 0.0 0.2 52844 22180 ? S Sep19 0:15
_ gnome-panel
vivek 8147 0.0 0.2 63868 17652 ? Ssl Sep19 0:02
/usr/lib/gnome-settings-daemon/gnome-settings-daemon
**********************************
*** Top 10 CPU Eating Process ***
**********************************
vivek 8413 5.8 4.1 658020 343836 ? Dl Sep19 29:51
_ /opt/firefox/firefox-bin
vivek 8600 3.9 1.1 175616 93900 ? Sl Sep19 20:00
/usr/bin/python /usr/bin/deluge
root 7701 3.0 0.5 314200 41940 tty7 SLs+ Sep19 15:20
_ /usr/X11R6/bin/X :0 -br -audit 0 -auth /var/lib/gdm/:0.Xauth
-nolisten tcp vt7
vivek 8097 1.4 0.0 31124 4776 ? Ssl Sep19 7:18
/usr/bin/pulseaudio -D --log-target=syslog
vivek 18058 1.2 2.3 241724 198904 pts/1 Sl 00:54 1:18 vi
/tmp/sysinfo.sh
vivek 18341 0.3 0.3 62048 28732 pts/2 R 01:07 0:20 |
_ gedit /tmp/x
root 8302 0.1 0.0 0 0 ? S< Sep19 0:53 _
[ntos_wq]
www-data 8064 0.0 0.0 30204 2412 ? S Sep19 0:00
_ /usr/bin/php-cgi
www-data 8063 0.0 0.0 30204 2412 ? S Sep19 0:00
_ /usr/bin/php-cgi
www-data 8062 0.0 0.0 30204 2412 ? S Sep19 0:00
_ /usr/bin/php-cgi
******************************************
*** Network Device Information [eth0] ***
******************************************
eth0 is not installed](https://image.slidesharecdn.com/dvkeygvkrr6sj5lhsszc-signature-b02a6c073768d8536fdd50c0a47af6292b168fbd705c8180447bb0b754b59738-poli-141223132220-conversion-gate02/85/3-1-d-manual-bash-script-guide-lsstv-2-0r11-190-320.jpg)
![Executes commands and send output to the file descriptor (fd) 184
******************************************
*** Network Device Information [eth1] ***
******************************************
eth1 is not installed
********************************
*** Wireless Device [wlan0] ***
********************************
wlan0 Link encap:Ethernet HWaddr 00:1e:2a:47:42:8d
inet addr:192.168.1.100 Bcast:192.168.1.255
Mask:255.255.255.0
inet6 addr: fe80::21e:2aff:fe47:428d/64 Scope:Link
UP BROADCAST RUNNING MULTICAST MTU:1500 Metric:1
RX packets:648676 errors:0 dropped:0 overruns:0 frame:0
TX packets:622282 errors:0 dropped:0 overruns:0 carrier:0
collisions:0 txqueuelen:1000
RX bytes:465564933 (465.5 MB) TX bytes:310468013 (310.4 MB)
Interrupt:18 Memory:e3000000-e3010000
*************************************
*** All Network Interfaces Stats ***
*************************************
Kernel Interface table
Iface MTU Met RX-OK RX-ERR RX-DRP RX-OVR TX-OK TX-ERR TX-DRP
TX-OVR Flg
lo 16436 0 6784 0 0 0 6784 0 0
0 LRU
vmnet1 1500 0 0 0 0 0 60 0 0
0 BMRU
vmnet3 1500 0 0 0 0 0 60 0 0
0 BMRU
vmnet8 1500 0 0 0 0 0 60 0 0
0 BMRU
wlan0 1500 0 648676 0 0 0 622282 0 0
0 BMRU
← Reads from the file descriptor (fd) Home Chapter 6 Challenges →](https://image.slidesharecdn.com/dvkeygvkrr6sj5lhsszc-signature-b02a6c073768d8536fdd50c0a47af6292b168fbd705c8180447bb0b754b59738-poli-141223132220-conversion-gate02/85/3-1-d-manual-bash-script-guide-lsstv-2-0r11-191-320.jpg)

![186
Chapter 7: Pipes and Filters
Linking Commands
← Chapter 7: Pipes and Filters Home Multiple commands
→
Under bash you can create a sequence of one or more commands separated by one of the following operators:
Operator Syntax Description Example
; command1;
command2
Separates commands that are executed in sequence. In this example, pwd is executed only
after date command completes.
date ; pwd
& command arg
&
The shell executes the command in the background in a subshell. The shell
does not wait for the command to finish, and the return status is 0. The &
operator runs the command in background while freeing up your terminal
for other work.
In this example, find command is
executed in background while freeing up
your shell prompt.
find / -iname "*.pdf" >/tmp/output.txt &
&& command1 &&
command2
command2 is executed if, and only if, command1 returns an exit status of
zero i.e. command2 only runs if first command1 run successfully.
[ ! -d /backup ] && mkdir -p /backup
See Logical AND section for examples.
|| command1 ||
command2
command2 is executed if and only if command1 returns a non-zero exit
status i.e. command2 only runs if first command fails.
tar cvf /dev/st0 /home || mail -s 'Backup
failed' you@example.com </dev/null
See Logical OR section for examples.
| command1 |
command2
Linux shell pipes join the standard output of command1 to the standard
input of command2.
In this example, output of the ps
command is provided as the standard
input to the grep command
ps aux | grep httpd
← Chapter 7: Pipes and Filters Home Multiple commands
→](https://image.slidesharecdn.com/dvkeygvkrr6sj5lhsszc-signature-b02a6c073768d8536fdd50c0a47af6292b168fbd705c8180447bb0b754b59738-poli-141223132220-conversion-gate02/85/3-1-d-manual-bash-script-guide-lsstv-2-0r11-193-320.jpg)
![Multiple commands 187
Multiple commands
← Linking Commands Home Putting jobs in background →
You can build a sequences of commands using the ; character (operator) and syntax is:
command1 ; command2 ; commandN
OR
{ command1; command2 }
This way you can run commands one after the other. The following example, shell scripts display an error message if
sufficient command line arguments are not passed (math.sh):
#!/bin/bash
a=$1
b=$3
op=$2
ans=0
# display usage
# run commands one after the other using ; chracter
[ $# -eq 0 ] && { echo -e "Usage: $0 num1 op num2nt $0 1 + 5"; exit
1; }
case $op in
+)
ans=$((( a+b )));;
-)
ans=$((( a-b )));;
/)
ans=$((( a/b )));;
*|x)
ans=$((( a*b )));;
*)
echo "Unknown operator."
exit 2;;
esac
echo "$a $op $b = $ans"
Save and close the file. Run it as follows:
chmod +x math.sh
./math.sh
./math.sh 1 + 5
./math.sh 10 * 5
Without ; and && character (operator) joining multiple command the following one liner:](https://image.slidesharecdn.com/dvkeygvkrr6sj5lhsszc-signature-b02a6c073768d8536fdd50c0a47af6292b168fbd705c8180447bb0b754b59738-poli-141223132220-conversion-gate02/85/3-1-d-manual-bash-script-guide-lsstv-2-0r11-194-320.jpg)
![Multiple commands 188
[ $# -eq 0 ] && { echo -e "Usage: $0 num1 op num2nt $0 1 + 5"; exit
1; }
would look like as follows:
if [ $# -eq 0 ]
then
echo -e "Usage: $0 num1 op num2nt $0 1 + 5"
exit 1;
fi
Examples
Use the watch command to monitor temp file (/tmp) system every 5 seconds:
watch -n 5 'df /tmp; ls -lASFt /tmp'
← Linking Commands Home Putting jobs in background →
Putting jobs in background
← Multiple commands Home Pipes →
• Linux supports executing multiple processes in parallel or in series.
• You always begin your first session (login session) on the Linux system with a single process running bash as
shell.
• Most Linux commands such as editing files, displacing current date & time, logged in users etc can be done with
various Linux commands.
• You type all commands at a shell prompt one by one. These program always take control of your screen and when
done you will get back the shell prompt to type a new set of commands.
• However, sometime you need to carry out tasks in background and use the terminal for other purpose. For
example, find all mp3 files stored on a disk while writing a c program.
Job Control
• The bash shell allows you to run tasks (or commands) in the background using the facility called job control.
• Job control refers to the ability to selectively stop, suspend the execution of processes and continue (resume) their
execution at a later point.
• A user typically employs this facility via an interactive interface supplied jointly by the system’s terminal driver
and bash.](https://image.slidesharecdn.com/dvkeygvkrr6sj5lhsszc-signature-b02a6c073768d8536fdd50c0a47af6292b168fbd705c8180447bb0b754b59738-poli-141223132220-conversion-gate02/85/3-1-d-manual-bash-script-guide-lsstv-2-0r11-195-320.jpg)
![Putting jobs in background 189
Jobs
• Processes under the influence of a job control facility are referred to as jobs.
• Each job has a unique id called job number.
• You can use the following command to control the job:
• fg - Place job in the foreground.
• bg - Place job in the background.
• jobs - Lists the active jobs on screen.
Background process
• A command that has been scheduled nonsequentially is called background process.
• You can not see the background processes on screen. For example, Apache httpd server runs in background to
serve web pages. You can put your shell script or any command in background.
Foreground process
• A command that you can see the command on screen is called the foreground process.
How do I put commands in background?
The syntax is as follows for putting jobs in background:
command &
command arg1 arg2 &
command1 | command2 arg1 &
command1 | command2 arg1 > output &
• The & operator puts command in the background and free up your terminal.
• The command which runs in background is called a job.
• You can type other command while background command is running.
Example
For example, if you type:
find /nas -name "*.mp3" > /tmp/filelist.txt &
Sample outputs:
[1] 1307
The find command is now running in background. When bash starts a job in the background, it prints a line showing
a job number ([1]) and a process identification number (PID - 1307). A job sends a message to the terminal upon
completion as follows identifying the job by its number and showing that it has completed:
[1]+ Done find /share/ -name "*.mp3" >
/tmp/filelist
← Multiple commands Home Pipes →](https://image.slidesharecdn.com/dvkeygvkrr6sj5lhsszc-signature-b02a6c073768d8536fdd50c0a47af6292b168fbd705c8180447bb0b754b59738-poli-141223132220-conversion-gate02/85/3-1-d-manual-bash-script-guide-lsstv-2-0r11-196-320.jpg)


![How to use pipes to connect programs 192
Count logged in users
Output of who command is given as input to wc command, so that it will number of user who logged on to the
system:
who | wc -l
Find out if user vivek logged in or not
who | grep -i vivek
Count total files in current directory
ls -l | wc -l
Execute a shutdown command at a given time
echo "shutdown -h now" | at 12am tomorrow
Format output of mount command
Display mount command output in a nice format
mount | column -t
Backup (tar over ssh)
Use tar command over secure ssh session to backup local /home file system:
tar zcvf - /home | ssh user@server "cat >
/backup/home_fs.workstation_sep_21_09.tar.gz"
Case conversion
v="Unix Philosophy"; echo $v | tr '[:lower:]' '[:upper:]'
echo 'tHIs IS A TeSt' | tr '[:upper:]' '[:lower:]'
Birthday Email Reminder
echo "/usr/bin/mail -s 'Birthday gift for Julia' vivek@gite.in < /dev/null" | at 17:45
Create An ISO CD Image
Create an ISO cdrom image from contents of /home/vivek/photos directory:
mkisofs -V Photos -r /home/vivek/photos | gzip -9 >
/tmp/photos.iso.cd.gz
You can burn an ISO cdrom image using the following syntax:
gzip -dc /tmp/photos.iso.cd.gz | cdrecord -v dev=/dev/dvdrw -](https://image.slidesharecdn.com/dvkeygvkrr6sj5lhsszc-signature-b02a6c073768d8536fdd50c0a47af6292b168fbd705c8180447bb0b754b59738-poli-141223132220-conversion-gate02/85/3-1-d-manual-bash-script-guide-lsstv-2-0r11-199-320.jpg)


![Filters 196
Example
In this example, the grep command act as a filter (it will filter out name vivek from its input):
cut -d: -f1 /etc/passwd | sort | uniq | grep vivek
Filter ps command output using the grep command:
ps aux | grep php-cgi
Consider the following example:
sort < sname | uniq > u_sname
The uniq command is filter, which takes its input from the sort command and passes output as input to uniq
command; Then uniq command output is redirected to "u_sname" file. The grep command is considered as one of
most popular filter under Linux and UNIX like operating systems.
Commonly used filter commands
• awk
[1]
• cut
[2]
• grep
[3]
• gzip
[4]
• head
[5]
• paste
[6]
• perl
[7]
• sed
[8]
• sort
[9]
• split
[10]
• strings
[11]
• tac
[12]
• tail
[13]
• tee
[14]
• tr
[15]
• uniq
[16]
• wc
[17]
← Why use pipes Home Chapter 7 Challenges →](https://image.slidesharecdn.com/dvkeygvkrr6sj5lhsszc-signature-b02a6c073768d8536fdd50c0a47af6292b168fbd705c8180447bb0b754b59738-poli-141223132220-conversion-gate02/85/3-1-d-manual-bash-script-guide-lsstv-2-0r11-203-320.jpg)
![Filters 197
References
[1] http://www.gnu.org/manual/gawk/gawk.html
[2] http://www.gnu.org/software/coreutils/manual/html_node/cut-invocation.html
[3] http://www.gnu.org/software/grep/
[4] http://www.gnu.org/software/gzip/
[5] http://www.gnu.org/software/coreutils/manual/html_node/head-invocation.html
[6] http://www.gnu.org/software/coreutils/manual/html_node/paste-invocation.html
[7] http://perldoc.perl.org/perl.html
[8] http://www.gnu.org/software/sed/sed.html
[9] http://www.gnu.org/software/coreutils/manual/html_node/sort-invocation.html
[10] http://www.gnu.org/software/coreutils/manual/html_node/split-invocation.html
[11] http://sourceware.org/binutils/docs-2.19/binutils/strings.html
[12] http://www.gnu.org/software/coreutils/manual/html_node/tac-invocation.html
[13] http://www.gnu.org/software/coreutils/manual/html_node/tail-invocation.html
[14] http://www.gnu.org/software/coreutils/manual/html_node/tee-invocation.html
[15] http://www.gnu.org/software/coreutils/manual/html_node/tr-invocation.html
[16] http://www.gnu.org/software/coreutils/manual/html_node/uniq-invocation.html
[17] http://www.gnu.org/software/coreutils/manual/html_node/wc-invocation.html
Chapter 7 Challenges
←
Filters
Home Chapter 8: Traps
→
• Decide whether the following sentence is true or false:
1. Linux is rich with filter programs.
2. A filter is a program that gets most of its data from its standard input and writes its main results to its standard
ouput.
3. A set of processes chained by their standard streams, so that the output of each process feeds directly as input to
the next one is called Linux pipeline.
4. You can run commands one after the other using ; operator.
5. You can run commands one after the other using && operator.
6. Second command only runs if first is successful when you use conditional or (||) operator.
7. A filter is very useful as part of Linux pipes.
• Chapter 7 answers](https://image.slidesharecdn.com/dvkeygvkrr6sj5lhsszc-signature-b02a6c073768d8536fdd50c0a47af6292b168fbd705c8180447bb0b754b59738-poli-141223132220-conversion-gate02/85/3-1-d-manual-bash-script-guide-lsstv-2-0r11-204-320.jpg)


![What is a Process? 200
A sample Linux processes life cycle
[1]
Process States
Every Linux process has its own life cycle such as creation, execution, termination, and removal.Every process has
its own state that shows what is currently happening in the process. The status of the process which can be one of the
following:
1. D (uninterruptible sleep) - Process is sleeping and cannot be bring back until an event such as I/O occurred. For
example, process foo is a process waiting for keyboard interrupt.
2. R (running) - Process is running or executing.
3. S (sleeping) - Process is not running and is waiting for an event or a signal.
4. T (traced or stopped) - Process is stopped by signals such as SIGINT or SIGSTOP.
5. Z (zombie or defunct) - Processes marked <defunct> are dead processes (so-called "zombies") that remain
because their parent has not destroyed them properly. These processes will be destroyed by init if the parent
process exits.
How do I view Process states
To view states of a process, enter:
ps -C processName -o pid=,cmd,stat
For example, to display states of lighttpd, php-cgi and firefox-bin processes, enter:
ps -C firefox-bin -o pid=,cmd,stat
ps -C lighttpd -o pid=,cmd,stat
ps -C php-cgi -o pid=,cmd,stat
Sample outputs:
CMD STAT
7633 /opt/firefox/firefox-bin Sl
CMD STAT
32082 /usr/sbin/lighttpd -f /etc/ S
32326 /usr/sbin/lighttpd -f /etc/ S
CMD STAT](https://image.slidesharecdn.com/dvkeygvkrr6sj5lhsszc-signature-b02a6c073768d8536fdd50c0a47af6292b168fbd705c8180447bb0b754b59738-poli-141223132220-conversion-gate02/85/3-1-d-manual-bash-script-guide-lsstv-2-0r11-207-320.jpg)
![What is a Process? 201
1644 /usr/bin/php-cgi S
31331 /usr/bin/php-cgi S
31332 /usr/bin/php-cgi S
31538 /usr/bin/php-cgi S
External links
• Linux Kernel Process Management
[2]
• Wikipedia:Copy-on-write
• man pages fork(2), top(1), ps(1).
References
[1] Chapter 3: Process - Understanding the Linux Kernel, Third Edition, O'Reilly Media.
[2] http://www.informit.com/articles/article.aspx?p=370047&seqNum=2
← Signals Home How to view Processes →
How to view Processes
← What is a
Process?
Home Sending signal to Processes
→
You need to use the ps command, pstree command, and pgrep command to view a snapshot of the current processes.
ps - View process
To view current process use the ps command:
ps
ps aux | less
ps aux | grep "process-name"
ps aux | grep "httpd"
ps alx | grep "mysqld"
pstree - Display a tree of processes
To display a tree of processes use the pstree command:
pstree
Sample outputs:
init─┬─acpid
├─apache2───6*[apache2]
├─atd
├─atop
├─avahi-daemon───avahi-daemon
├─bonobo-activati───{bonobo-activati}
├─console-kit-dae───63*[{console-kit-dae}]](https://image.slidesharecdn.com/dvkeygvkrr6sj5lhsszc-signature-b02a6c073768d8536fdd50c0a47af6292b168fbd705c8180447bb0b754b59738-poli-141223132220-conversion-gate02/85/3-1-d-manual-bash-script-guide-lsstv-2-0r11-208-320.jpg)
![How to view Processes 202
├─cron
├─2*[dbus-daemon]
├─dbus-launch
├─dd
├─deluge───5*[{deluge}]
├─dhclient
├─dnsmasq
├─evince───{evince}
├─firefox───run-mozilla.sh───firefox-bin───27*[{firefox-bin}]
├─gconfd-2
├─gdm───gdm─┬─Xorg
│ └─gnome-session─┬─gnome-panel
│ ├─gpg-agent
│ ├─metacity
│ ├─nautilus
│ ├─python
│ ├─seahorse-agent
│ ├─ssh-agent
│ ├─tracker-applet
│ ├─trackerd───2*[{trackerd}]
│ ├─update-notifier
│ └─{gnome-session}
├─gedit
├─6*[getty]
├─gnome-power-man
├─gnome-screensav
├─gnome-settings-───{gnome-settings-}
├─gnome-terminal─┬─bash───pstree
│ ├─bash───ssltx───ssh
│ ├─gnome-pty-helpe
│ └─{gnome-terminal}
├─gvfs-fuse-daemo───3*[{gvfs-fuse-daemo}]
├─gvfs-gphoto2-vo
├─gvfs-hal-volume
├─gvfsd
├─gvfsd-burn
├─gvfsd-trash
├─hald───hald-runner─┬─hald-addon-acpi
│ ├─hald-addon-cpuf
│ ├─hald-addon-inpu
│ └─hald-addon-stor
├─jsvc─┬─jsvc
│ └─jsvc───39*[{jsvc}]
├─klogd
├─lighttpd───2*[php-cgi───4*[php-cgi]]
├─mixer_applet2───{mixer_applet2}
├─mount.ntfs](https://image.slidesharecdn.com/dvkeygvkrr6sj5lhsszc-signature-b02a6c073768d8536fdd50c0a47af6292b168fbd705c8180447bb0b754b59738-poli-141223132220-conversion-gate02/85/3-1-d-manual-bash-script-guide-lsstv-2-0r11-209-320.jpg)
![How to view Processes 203
├─mysqld_safe─┬─logger
│ └─mysqld───10*[{mysqld}]
├─netspeed_applet
├─ntpd
├─pppd───sh───pptpgw
├─pptpcm
├─pulseaudio─┬─gconf-helper
│ └─2*[{pulseaudio}]
├─squid───squid───unlinkd
├─sshproxyd
├─syslogd
├─system-tools-ba
├─thunderbird───run-mozilla.sh───thunderbird-bin───10*[{thunderbird-bin}]
├─udevd
├─vmnet-bridge
├─2*[vmnet-dhcpd]
├─vmnet-natd
├─3*[vmnet-netifup]
├─winbindd───winbindd
├─workrave───{workrave}
├─workrave-applet
└─wpa_supplicant
pgrep - Look up processes
pgrep looks through the currently running processes and lists the process IDs which matches the selection criteria to
screen. List the processes called php-cgi AND owned by vivek user.
pgrep -u vivek php-cgi
To list the processes owned by vivek OR krish.
pgrep -u vivek,krish
External links
• Show All Running Processes in Linux
[1]
• ps - Displays The Processes
[2]
← What is a
Process?
Home Sending signal to Processes
→](https://image.slidesharecdn.com/dvkeygvkrr6sj5lhsszc-signature-b02a6c073768d8536fdd50c0a47af6292b168fbd705c8180447bb0b754b59738-poli-141223132220-conversion-gate02/85/3-1-d-manual-bash-script-guide-lsstv-2-0r11-210-320.jpg)
![How to view Processes 204
References
[1] http://www.cyberciti.biz/faq/show-all-running-processes-in-linux/
[2] http://www.cyberciti.biz/tips/top-linux-monitoring-tools.html#5
Sending signal to Processes
← How to view Processes Home Terminating Processes →
You can send various signals to commands / process and shell scripts using the, pkill command, kill command, and
killall command.
kill - send a signal to a process
The default signal for kill is TERM. To list available signals, enter:
kill -l
Sample outputs:
1) SIGHUP 2) SIGINT 3) SIGQUIT 4) SIGILL
5) SIGTRAP 6) SIGABRT 7) SIGBUS 8) SIGFPE
9) SIGKILL 10) SIGUSR1 11) SIGSEGV 12) SIGUSR2
13) SIGPIPE 14) SIGALRM 15) SIGTERM 16) SIGSTKFLT
17) SIGCHLD 18) SIGCONT 19) SIGSTOP 20) SIGTSTP
21) SIGTTIN 22) SIGTTOU 23) SIGURG 24) SIGXCPU
25) SIGXFSZ 26) SIGVTALRM 27) SIGPROF 28) SIGWINCH
29) SIGIO 30) SIGPWR 31) SIGSYS 34) SIGRTMIN
35) SIGRTMIN+1 36) SIGRTMIN+2 37) SIGRTMIN+3 38)
SIGRTMIN+4
39) SIGRTMIN+5 40) SIGRTMIN+6 41) SIGRTMIN+7 42)
SIGRTMIN+8
43) SIGRTMIN+9 44) SIGRTMIN+10 45) SIGRTMIN+11 46)
SIGRTMIN+12
47) SIGRTMIN+13 48) SIGRTMIN+14 49) SIGRTMIN+15 50)
SIGRTMAX-14
51) SIGRTMAX-13 52) SIGRTMAX-12 53) SIGRTMAX-11 54)
SIGRTMAX-10
55) SIGRTMAX-9 56) SIGRTMAX-8 57) SIGRTMAX-7 58)
SIGRTMAX-6
59) SIGRTMAX-5 60) SIGRTMAX-4 61) SIGRTMAX-3 62)
SIGRTMAX-2
63) SIGRTMAX-1 64) SIGRTMAX](https://image.slidesharecdn.com/dvkeygvkrr6sj5lhsszc-signature-b02a6c073768d8536fdd50c0a47af6292b168fbd705c8180447bb0b754b59738-poli-141223132220-conversion-gate02/85/3-1-d-manual-bash-script-guide-lsstv-2-0r11-211-320.jpg)

![Sending signal to Processes 206
External links
• Kill process in Linux or terminate a process in UNIX / Linux
[1]
• Linux / UNIX killing a process
[2]
• Linux logout user or logoff user with pkill command
[3]
← How to view Processes Home Terminating Processes →
References
[1] http://www.cyberciti.biz/faq/kill-process-in-linux-or-terminate-a-process-in-unix-or-linux-systems/
[2] http://www.cyberciti.biz/faq/howto-linux-unix-killing-restarting-the-process/
[3] http://www.cyberciti.biz/faq/linux-logout-user-howto/
Terminating Processes
← Sending signal to Processes Home Shell signal values →
• Generally, all process terminates on their own. In this example, find command will terminate when it completed
its task:
find /home -name "*.c" 2>error.log 1>filelists &
• You can terminate foreground process by pressing CTRL+C. It will send a TERM signal to the process. In this
example, ls -R is running on screen:
ls -R /
• To terminate simply press CTRL+C (hold down CTRL key and press C) to send an in interrupt signal to the ls
command.
• To terminate unwanted background process use kill command with -9 signal as described in sending signal to
processes section:
kill -TERM pid
kill -KILL pid
• To stop (suspend) a foreground process hit CTRL+Z (hold down CTRL key and press z). To resume the
foreground process use the fg command, enter:
fg jobid
fg 1
fg %](https://image.slidesharecdn.com/dvkeygvkrr6sj5lhsszc-signature-b02a6c073768d8536fdd50c0a47af6292b168fbd705c8180447bb0b754b59738-poli-141223132220-conversion-gate02/85/3-1-d-manual-bash-script-guide-lsstv-2-0r11-213-320.jpg)
![Terminating Processes 207
Example
Create a shell script called phpjail.sh. This script is used to start php service in a jail. This is done to improve Apache
or Lighttpd web server security. This script demonstrates the usage of the pgrep command, pkill commands, and
other skilled you've learned so far.
#!/bin/sh
# A shell script to start / stop php-cgi process.
# Author: Vivek Gite <vivek@gite.in>
# Last updated on June-23-2007.
# ----------------------------------------------
fFCGI=/usr/bin/spawn-fcgi
fIP=127.0.0.1
fPORT=9000
fUSER=phpjail
fGROUP=phpjail
fCHILD=10
fJAILDIR=/phpjail
fPID=/var/run/fcgi.php.pid
fPHPCGI=/usr/bin/php-cgi
# path to binary files.
PKILL=/usr/bin/pkill
RM=/bin/rm
PGREP=/usr/bin/pgrep
GREP=/bin/grep
ID=/usr/bin/id
# Must be run as root else die
[ $(${ID} -u) -eq 0 ] || { echo "$0: Only root may run this script.";
exit 1; }
# Jail user must exits else die
${GREP} -q $fUSER /etc/passwd || { echo "$0: User $fUSER not found in
/etc/passwd."; exit 2; }
# Jail group must exits else die
${GREP} -q $fGROUP /etc/passwd || { echo "$0: Group $fGROUP not found
in /etc/group."; exit 3; }
# Jail directory must exits else die
[ ! -d ${fJAILDIR} ] && { echo "$0: php-cgi jail directory
"${fJAILDIR}" not found."; exit 4; }
# Use case to make decision
case "$1" in
start)](https://image.slidesharecdn.com/dvkeygvkrr6sj5lhsszc-signature-b02a6c073768d8536fdd50c0a47af6292b168fbd705c8180447bb0b754b59738-poli-141223132220-conversion-gate02/85/3-1-d-manual-bash-script-guide-lsstv-2-0r11-214-320.jpg)
![Terminating Processes 208
# start php-cgi in jail at given IP and server port
$fFCGI -a $fIP -p $fPORT -u $fUSER -g $fGROUP -C
$fCHILD -c $fJAILDIR -P $fPID -- $fPHPCGI
[ $? -eq 0 ] && echo "Starting php-cgi .. [ OK ]" ||
echo "Starting php-cgi .. [ FAILED ]"
;;
stop)
# make sure php-cgi is running
read line < "$fPID"
if [ -d /proc/$line ]
then
# kill php-cgi owned by user
${PKILL} -KILL -u $fUSER php-cgi
[ $? -eq 0 ] && echo "Stopping php-cgi .. [ OK ]"
|| echo "Stopping php-cgi .. [ FAILED
]"
${RM} -f $fPID
else
echo "$0: php-cgi is not running."
fi
;;
status)
# find out if php-cgi is running or not
${PGREP} -u ${fUSER} php-cgi >/dev/null 2>&1
[ $? -eq 0 ] && echo "$0: php-cgi is running at
$fIP:$fPORT"
|| echo "$0: php-cgi is not running at
$fIP:$fPORT"
;;
*)
# display usage
echo "Usage: $0 {start|stop|status}"
esac
I highly recommend the following two articles which deals with php and web server security:
• Apache2 mod_fastcgi: Connect to External PHP via UNIX Socket or TCP/IP Port
[1]
• Lighttpd FasCGI PHP, MySQL chroot jail installation under Debian Linux
[2]
← Sending signal to Processes Home Shell signal values →](https://image.slidesharecdn.com/dvkeygvkrr6sj5lhsszc-signature-b02a6c073768d8536fdd50c0a47af6292b168fbd705c8180447bb0b754b59738-poli-141223132220-conversion-gate02/85/3-1-d-manual-bash-script-guide-lsstv-2-0r11-215-320.jpg)
![Terminating Processes 209
References
[1] http://www.cyberciti.biz/tips/rhel-fedora-centos-apache2-external-php-spawn.html
[2] http://www.cyberciti.biz/tips/howto-setup-lighttpd-php-mysql-chrooted-jail.html
Shell signal values
← Terminating
Processes
Home trap statement
→
• You must know signal and their values while writing the shell scripts.
• You cannot use (trap) all available signals.
• Some signals can never be caught. For example, the signals SIGKILL (9) and SIGSTOP (19) cannot be caught,
blocked, or ignored.
• The following table is a list of the commonly used signal numbers, description and whether they can be trapped or
not:
Number Constant Description Default action Trappable
(Yes/No)
0 0 Success Terminate the process. Yes
1 SIGHUP Hangup detected on controlling terminal or death of controlling process. Also,
used to reload configuration files for many UNIX / Linux daemons.
Terminate the process. Yes
2 SIGINT Interrupt from keyboard (Ctrl+C) Terminate the process. Yes
3 SIGQUIT Quit from keyboard (Ctrl-. or, Ctrl-4 or, on the virtual console, the SysRq key) Terminate the process
and dump core.
Yes
4 SIGILL Terminate the process and dump core. Illegal instruction. Yes
6 SIGABRT Abort signal from abort(3) - software generated. Terminate the process
and dump core.
Yes
8 SIGFPE Floating point exception. Terminate the process
and dump core.
Yes
9 SIGKILL Kill signal Terminate the process. No
15 SIGTERM Termination signal Terminate the process. Yes
20 SIGSTP Stop typed at tty (CTRL+z) Stop the process. Yes
To view list of all signals, enter:
kill -l
To view numeric number for given signal called SIGTSTP, enter:
kill -l SIGTSTP
You can also view list of signal by visiting /usr/include/linux/signal.h file:
more /usr/include/linux/signal.h
← Terminating
Processes
Home trap statement
→](https://image.slidesharecdn.com/dvkeygvkrr6sj5lhsszc-signature-b02a6c073768d8536fdd50c0a47af6292b168fbd705c8180447bb0b754b59738-poli-141223132220-conversion-gate02/85/3-1-d-manual-bash-script-guide-lsstv-2-0r11-216-320.jpg)


![How to clear trap 212
How to clear trap
← trap statement Home Include trap statements in a script
→
To clear a trap use the following syntax:
trap - signal
trap - signal1 signal2
For example, set a trap for rm command:
file=/tmp/test4563.txt
trap 'rm $file' 1 2 3 15
trap
To clear SIGINT (2), enter:
trap - SIGINT
trap
To clear all traps, enter:
trap - 1 2 3 15
trap
Create a shell script called oddoreven.sh:
#!/bin/bash
# Shell script to find out odd or even number provided by the user
# ----
# set variables to an integer attribute
declare -i times=0
declare -i n=0
# capture CTRL+C, CTRL+Z and quit singles using the trap
trap 'echo " disabled"' SIGINT SIGQUIT SIGTSTP
# set an infinite while loop
# user need to enter -9999 to exit the loop
while true
do
# get date
read -p "Enter number (-9999 to exit) : " n
# if it is -9999 die
[ $n -eq -9999 ] && { echo "Bye!"; break; }
# find out if $n is odd or even
ans=$(( n % 2 ))
# display result
[ $ans -eq 0 ] && echo "$n is an even number." || echo "$n is an
odd number."](https://image.slidesharecdn.com/dvkeygvkrr6sj5lhsszc-signature-b02a6c073768d8536fdd50c0a47af6292b168fbd705c8180447bb0b754b59738-poli-141223132220-conversion-gate02/85/3-1-d-manual-bash-script-guide-lsstv-2-0r11-219-320.jpg)

![Include trap statements in a script 214
Include trap statements in a script
← How to clear trap Home Use the trap statement to catch signals and handle errors →
You can use the trap command in shell script as follows. Create a shell script called mainmenu01.sh:
#!/bin/bash
# capture CTRL+C, CTRL+Z and quit singles using the trap
trap 'echo "Control-C disabled."' SIGINT
trap 'echo "Cannot terminate this script."' SIGQUIT
trap 'echo "Control-Z disabled."' SIGTSTP
# Create infinite while loop
while true
do
clear
# display menu
echo "Server Name - $(hostname)"
echo "-------------------------------"
echo " M A I N - M E N U"
echo "-------------------------------"
echo "1. Display date and time."
echo "2. Display what users are doing."
echo "3. Display network connections."
echo "4. Exit"
# get input from the user
read -p "Enter your choice [ 1 -4 ] " choice
# make decision using case..in..esac
case $choice in
1)
echo "Today is $(date)"
read -p "Press [Enter] key to continue..."
readEnterKey
;;
2)
w
read -p "Press [Enter] key to continue..."
readEnterKey
;;
3)
netstat -nat
read -p "Press [Enter] key to continue..."
readEnterKey
;;](https://image.slidesharecdn.com/dvkeygvkrr6sj5lhsszc-signature-b02a6c073768d8536fdd50c0a47af6292b168fbd705c8180447bb0b754b59738-poli-141223132220-conversion-gate02/85/3-1-d-manual-bash-script-guide-lsstv-2-0r11-221-320.jpg)
![Include trap statements in a script 215
4)
echo "Bye!"
exit 0
;;
*)
echo "Error: Invalid option..."
read -p "Press [Enter] key to continue..."
readEnterKey
;;
esac
done
Save and close the file. Run it as follows:
chmod +x mainmenu01.sh
./mainmenu01.sh
Sample outputs:
Server Name - vivek-desktop
-------------------------------
M A I N - M E N U
-------------------------------
1. Display date and time.
2. Display what users are doing.
3. Display network connections.
4. Exit
Enter your choice [ 1 -4 ] ^CControl-C disabled.
^ZControl-Z disabled.
1
Today is Wed Sep 23 00:26:38 IST 2009
Press [Enter] key to continue...
Server Name - vivek-desktop
-------------------------------
M A I N - M E N U
-------------------------------
1. Display date and time.
2. Display what users are doing.
3. Display network connections.
4. Exit
Enter your choice [ 1 -4 ] 4
Bye!
← How to clear trap Home Use the trap statement to catch signals and handle errors →](https://image.slidesharecdn.com/dvkeygvkrr6sj5lhsszc-signature-b02a6c073768d8536fdd50c0a47af6292b168fbd705c8180447bb0b754b59738-poli-141223132220-conversion-gate02/85/3-1-d-manual-bash-script-guide-lsstv-2-0r11-222-320.jpg)
![Use the trap statement to catch signals and handle errors 216
Use the trap statement to catch signals and
handle errors
← Include trap statements in a
script
Home What is a Subshell? →
You can define 'functions' in scripts using the following syntax:
die(){
echo "An error occurred."
exit 2
}
You can simply call it as normal command:
die
You can pass arguments to function:
#!/bin/bash
# define var
file="/tmp/data.$$"
# create function
die(){
echo "$@"
exit 2
}
# ... call die if needed
[ ! -f $file ] && die "$0: File $file not found." || echo "$0: File
$file found."
The trap command and functions
You can use the trap command with shell functions as follows:
# define die()
die(){
echo "..."
}
# set trap and call die()
trap 'die' 1 2 3 15
....
...
The following is an updated shell script from how to clear a trap section:](https://image.slidesharecdn.com/dvkeygvkrr6sj5lhsszc-signature-b02a6c073768d8536fdd50c0a47af6292b168fbd705c8180447bb0b754b59738-poli-141223132220-conversion-gate02/85/3-1-d-manual-bash-script-guide-lsstv-2-0r11-223-320.jpg)
![Use the trap statement to catch signals and handle errors 217
#!/bin/bash
# Shell script to find out odd or even number provided by the user
# set variables to an integer attribute
declare -i times=0
declare -i n=0
# define function
warning(){
echo -e "n*** CTRL+C and CTRL+Z keys are disabled. Please enter
number only. Hit [Enter] key to continue..."
}
# capture CTRL+C, CTRL+Z and quit singles using the trap
trap 'warning' SIGINT SIGQUIT SIGTSTP
# set an infinite while loop
# user need to enter -9999 to exit the loop
while true
do
# get date
read -p "Enter number (-9999 to exit) : " n
# if it is -9999 die
[ $n -eq -9999 ] && { echo "Bye!"; break; }
# $n is 0, just get next number
[ $n -eq 0 ] && continue
# find out if $n is odd or evern
ans=$(( n % 2 ))
# display result
[ $ans -eq 0 ] && echo "$n is an even number." || echo "$n is an
odd number."
# increase counter by 1
times=$(( ++times ))
done
# reset all traps
trap - SIGINT SIGQUIT SIGTSTP
# display counter
echo "You played $times times."
exit 0
The following example, add a user to the Linux system by updating /etc/passwd file and creating home directory at
/home for user. It traps various single to avoid errors while creating user accounts. If user pressed CTRL+C or script](https://image.slidesharecdn.com/dvkeygvkrr6sj5lhsszc-signature-b02a6c073768d8536fdd50c0a47af6292b168fbd705c8180447bb0b754b59738-poli-141223132220-conversion-gate02/85/3-1-d-manual-bash-script-guide-lsstv-2-0r11-224-320.jpg)
![Use the trap statement to catch signals and handle errors 218
terminated it will try to rollback changes made to system files. Traps are turned on before the useradd command in
shell script, and then turn off the trap after the chpasswd line.
#!/bin/bash
# setupaccounts.sh: A Shell script to add user to the Linux system.
# set path to binary files
ADD=/usr/sbin/useradd
SETPASSWORD=/usr/sbin/chpasswd
USERDEL=/usr/sbin/userdel
# set variables
HOMEBASE=/home
HOMEDIR=""
username=""
# define function to clean up useradd procedure
# handle errors using this function
clean_up_useradd(){
# remove dir
[ -d $HOMEDIR ] && /bin/rm -rf $HOMEDIR
# remove user from passwd if exits
grep -q "^${username}" /etc/passwd && $USERDEL ${username}
# now exit
exit
}
# make sure script is run by root else die
[ $(id -u) -eq 0 ] || { echo "$0: Only root may add a user or group to
the system."; exit 1;}
# get username and password
read -p "Enter user name : " username
# create homedir path
HOMEDIR="${HOMEBASE}/${username}"
# capture 0 2 3 15 signals
# if script failed while adding user make sure we clean up mess from
# /home directory and /etc/passwd file
# catch signals using clean_up_useradd()
trap 'clean_up_useradd' SIGINT SIGQUIT SIGTERM
# get password
read -sp "Enter user password : " password
# make sure user doesn't exits else die
grep -q "^${username}" /etc/passwd && { echo "$0: The user '$username'
already exits."; exit 2;}](https://image.slidesharecdn.com/dvkeygvkrr6sj5lhsszc-signature-b02a6c073768d8536fdd50c0a47af6292b168fbd705c8180447bb0b754b59738-poli-141223132220-conversion-gate02/85/3-1-d-manual-bash-script-guide-lsstv-2-0r11-225-320.jpg)
![Use the trap statement to catch signals and handle errors 219
# create a home dir
echo "Creating home directory for ${username} at ${HOMEDIR}..."
[ ! -d ${HOMEDIR} ] && mkdir -p ${HOMEDIR}
# Add user
echo "Adding user ${username}..."
${ADD} -s /bin/bash -d ${HOMEDIR} ${username} || { echo "$0: User
addition failed."; exit 3; }
# Set a password
echo "Setting up the password for ${username}..."
#printf "%s|%sn" $username $password | ${SETPASSWORD} || { echo "$0:
Failed to set password for the user."; exit 3; }
echo "$username:$password" | ${SETPASSWORD} || { echo "$0: Failed to
set password for the user."; exit 3; }
# reset all traps
trap - 0 SIGINT SIGQUIT SIGTERM
# add rest of the script...
You can run this script as follows: chmod +x setupaccounts.sh ./setupaccounts.sh Sample outputs:
Enter user name : testuser
Enter user password : Creating home directory for testuser at
/home/testuser...
Adding user testuser...
Setting up the password for testuser...
← Include trap statements in a
script
Home What is a Subshell? →](https://image.slidesharecdn.com/dvkeygvkrr6sj5lhsszc-signature-b02a6c073768d8536fdd50c0a47af6292b168fbd705c8180447bb0b754b59738-poli-141223132220-conversion-gate02/85/3-1-d-manual-bash-script-guide-lsstv-2-0r11-226-320.jpg)


![Compound command 222
Compound command
← What is a
Subshell?
Home exec command →
A compound command is one of the following syntax format:
( list )
( command1; command2 )
{ command1; command2 }
Why use ( command1; command2 ) syntax
In the following example, you are running multiple commands:
hostname ; date ; who | wc -l
Now try to save output to a file called /tmp/output.txt:
hostname ; date ; who | wc -l > /tmp/output.txt
cat /tmp/output.txt
All commands will run but only the output of last pipe is saved to the file. To save output of all of the above
commands to file, enter:
( hostname ; date ; who | wc -l ) > /tmp/output.txt
cat /tmp/output.txt
All commands inside ( ... ) run using a subshell.
Why use { command1; command2; } syntax
• This syntax allows you to run all commands in the current shell environment.
• It works like a group command:
[ $? -eq 0 ] && { echo "Usage: $0 filename"; exit 1; }
← What is a
Subshell?
Home exec command →](https://image.slidesharecdn.com/dvkeygvkrr6sj5lhsszc-signature-b02a6c073768d8536fdd50c0a47af6292b168fbd705c8180447bb0b754b59738-poli-141223132220-conversion-gate02/85/3-1-d-manual-bash-script-guide-lsstv-2-0r11-229-320.jpg)
![Exec command 223
Exec command
← Compound
command
Home Chapter 8 Challenges →
• The exec command is used to replace the current shell with the command without spawning a new process or
subshell.
• The exec command is alos used to assign the file descriptor fd to filename:
exec 3> /tmp/output
• The exec command is used by "wrapper" scripts. For example, php-cgi can run as cgi program after setting
environment variables or other configuration.
• By using exec, the resources used by the php.cgi shell program do not need to stay in use after the program is
started. The following script can be run using Apache web server
[1]
and it will speed up php execution:
#!/bin/bash
# Shell Script wrapper to Run PHP5 using mod_fastcgi under Apache 2.2.x
# Tested under CentOS Linux and FreeBSD and 7.x server.
PHP_CGI=/usr/local/bin/php-cgi
# for centos / rhel set it as follows
# PHP_CGI=/usr/bin/php-cgi
export PHP_FCGI_CHILDREN=4
export PHP_FCGI_MAX_REQUESTS=1000
exec $PHP_CGI
← Compound
command
Home Chapter 8 Challenges →
References
[1] http://www.cyberciti.biz/faq/freebsd-apache-php-mod_fastcgi-tutorial/](https://image.slidesharecdn.com/dvkeygvkrr6sj5lhsszc-signature-b02a6c073768d8536fdd50c0a47af6292b168fbd705c8180447bb0b754b59738-poli-141223132220-conversion-gate02/85/3-1-d-manual-bash-script-guide-lsstv-2-0r11-230-320.jpg)


![Writing your first shell function 226
• One line functions inside { ... } must end with a semicolon. Otherwise you get an error on screen:
xrpm() { rpm2cpio "$1" | cpio -idmv }
Above will not work. However, the following will work (notice semicolon at the end):
xrpm() { rpm2cpio "$1" | cpio -idmv; }
← Chapter 9:
Functions
Home Displaying functions
→
Displaying functions
← Writing your first shell function Home Removing functions →
To display defined function names use the declare command. Type the following command at a shell prompt:
declare -f
Sample outputs:
declare -f command_not_found_handle
declare -f genpasswd
declare -f grabmp3
declare -f hello
declare -f mp3
declare -f xrpm
Display Function Source Code
To view function names and source code, enter:
declare -f
OR
declare -f | less
Sample outputs:
command_not_found_handle ()
{
if [ -x /usr/lib/command-not-found ]; then
/usr/bin/python /usr/lib/command-not-found -- $1;
return $?;
else
return 127;
fi
}
genpasswd ()
{
local l=$1;](https://image.slidesharecdn.com/dvkeygvkrr6sj5lhsszc-signature-b02a6c073768d8536fdd50c0a47af6292b168fbd705c8180447bb0b754b59738-poli-141223132220-conversion-gate02/85/3-1-d-manual-bash-script-guide-lsstv-2-0r11-233-320.jpg)
![Displaying functions 227
[ "$l" == "" ] && l=16;
tr -dc A-Za-z0-9_ < /dev/urandom | head -c ${l} | xargs
}
grabmp3 ()
{
local t=$($HOME/bin/mp3 | sed 's/^n//');
grep -q "$t" $HOME/out/best.eng.mp3
if [ $? -ne 0 ]; then
echo "$t" >> $HOME/out/best.eng.mp3;
echo "'$t' - added!";
else
echo "Duplicate entry found!";
fi
}
hello ()
{
echo "Hello $1"
}
mp3 ()
{
local o=$IFS;
IFS=$(echo -en "nb");
/usr/bin/beep-media-player "$(cat $@)" & IFS=o
}
xrpm ()
{
[ "$1" != "" ] && ( rpm2cpio "$1" | cpio -idmv )
}
To view a specific function source code, enter:
declare -f functioName
declare -f xrpm
Notice if you just type the declare command with no arguments, then it will list all declared variables and functions.
See also
• declare command
← Writing your first shell function Home Removing functions →](https://image.slidesharecdn.com/dvkeygvkrr6sj5lhsszc-signature-b02a6c073768d8536fdd50c0a47af6292b168fbd705c8180447bb0b754b59738-poli-141223132220-conversion-gate02/85/3-1-d-manual-bash-script-guide-lsstv-2-0r11-234-320.jpg)

![Defining functions 229
One Line Functions Syntax
One line functions inside { ... } must end with a semicolon:
function name { command1; command2; commandN;}
OR
name() { command1; command2; commandN;}
where name is the name of the function, and "command1; command2;" is a list of commands used in the function.
You need to replace name with actual function name such as delete_account:
rollback(){
...
}
add_user(){
...
}
delete_user(){
...
}
Example
Define a function called mount_nas and umount_nas:
# function to mount NAS device
mount_nas(){
# define variables
NASMNT=/nas10
NASSERVER="nas10.nixcraft.net.in"
NASUSER="vivek"
NASPASSWORD="myNasAccountPassword"
[ ! -d $NASMNT ] && /bin/mkdir -p $NASMNT
mount | grep -q $NASMNT
[ $? -eq 0 ] || /bin/mount -t cifs //$NASSERVER/$NASUSER -o
username=$NASUSER,password=$NASPASSWORD $NASMNT
}
# function to unmount NAS device
umount_nas(){
NASMNT=/nas10
mount | grep -q $NASMNT
[ $? -eq 0 ] && /bin/umount $NASMNT
}
You can type your function at the beginning of the shell script:](https://image.slidesharecdn.com/dvkeygvkrr6sj5lhsszc-signature-b02a6c073768d8536fdd50c0a47af6292b168fbd705c8180447bb0b754b59738-poli-141223132220-conversion-gate02/85/3-1-d-manual-bash-script-guide-lsstv-2-0r11-236-320.jpg)
![Defining functions 230
#!/bin/bash
# define variables
NASMNT=/nas10
....
..
....
# define functions
function umount_nas(){
/bin/mount | grep -q $NASMNT
[ $? -eq 0 ] && /bin/umount $NASMNT
}
# another function
functiom mount_nas(){
command1
command2
}
....
...
### main logic ##
[ $? -eq 0 ] && { echo "Usage: $0 device"; exit 1; }
...
.....
# When you wish to access function, you use the following format:
umount_nas
← Removing
functions
Home Writing functions
→](https://image.slidesharecdn.com/dvkeygvkrr6sj5lhsszc-signature-b02a6c073768d8536fdd50c0a47af6292b168fbd705c8180447bb0b754b59738-poli-141223132220-conversion-gate02/85/3-1-d-manual-bash-script-guide-lsstv-2-0r11-237-320.jpg)


![Calling functions 234
### SETUP MYSQL LOGIN/Password ###
MUSER='root'
MPASS='mySqlLoginPassword'
MHOST="127.0.0.1"
### SETUP MYSQL BACKUP PATHS ###
MBAKPATH=${NASMNT}/mysql
### SETUP TAR BALL BACKUP PATHS ###
TBAKPATH=${NASMNT}/tarballs
### Setup file system dirs to backup ###
TAR_SRC_DIRS='/etc /var/named/chroot /root /home /var/www/html
/usr/local/mailboxes'
### Date format dd-mm-yyyy ###
NOW=$(date +"%d-%m-%Y")
### Time format hh_mm_ssAM|PM ###
TIME_FORMAT='%H_%M_%S%P'
###############################
# User Defined Functions #
###############################
#
# Purpose: Send warning email.
#
tar_warn_email(){
$LOGGER "$(basename $0) GNU/tar: *** Failed at $(date) ***"
$MAILCMD -s "GNU/TAR Backup Failed" "${WARN_ADMIN_EMAIL_IDS}"<<EOF
GNU/Tar backup failed @ $(date) for $(hostname)
EOF
}
#
# Purpose: Backup file system directories.
#
backup_tar(){
$LOGGER "$(basename $0) GNU/tar: Started at $(date)"
# call function to mount nas device
mount_nas
[ ! -d ${TBAKPATH}/$NOW/ ] && $MKDIR -p ${TBAKPATH}/$NOW/
local path="${TBAKPATH}/$NOW/fs-$(date
+"${TIME_FORMAT}").tar.gz"
$GTAR --exclude "*/proc/*" --exclude "*/dev/*" --exclude
'*/cache/*' -zcvf $path $TAR_SRC_DIRS](https://image.slidesharecdn.com/dvkeygvkrr6sj5lhsszc-signature-b02a6c073768d8536fdd50c0a47af6292b168fbd705c8180447bb0b754b59738-poli-141223132220-conversion-gate02/85/3-1-d-manual-bash-script-guide-lsstv-2-0r11-241-320.jpg)
![Calling functions 235
[ $? -ne 0 ] && tar_warn_email
# call function to unmount nas device
umount_nas
$LOGGER "$(basename $0) GNU/tar: Ended at $(date)"
}
#
# Purpose: Mount backup nas device.
#
mount_nas(){
[ ! -d $NASMNT ] && $MKDIR -p $NASMNT
$MOUNT | $GREP $NASMNT >/dev/null
[ $? -eq 0 ] || $MOUNT -t cifs //$NASSERVER/$NASUSER -o
username=$NASUSER,password=$NASPASSWORD $NASMNT
}
#
# Purpose: Unmount backup nas device.
#
umount_nas(){
$MOUNT | $GREP $NASMNT >/dev/null
[ $? -eq 0 ] && $UMOUNT $NASMNT
}
#
# Purpose: Backup mysql database.
#
mysql(){
$LOGGER "$(basename $0) mysql: Started at $(date)"
local DBS="$($MYSQL -u $MUSER -h $MHOST -p$MPASS -Bse 'show
databases')"
local db=""
local linkname=""
[ ! -d $MBAKPATH/$NOW ] && $MKDIR -p $MBAKPATH/$NOW
for db in $DBS
do
[ "$db" == "sgopenxadserver" ] && continue
local tTime=$(date +"${TIME_FORMAT}")
local FILE="${MBAKPATH}/$NOW/${db}.${tTime}.gz"
$MYSQLDUMP -u $MUSER -h $MHOST -p$MPASS $db | $GZIP -9 >
$FILE
#create latest file link
linkname="${MBAKPATH}/$NOW/${db}.latest"
[ -L $linkname ] && /bin/rm $linkname
/bin/ln -s $FILE $linkname
done
$LOGGER "$(basename $0) mysql: Ended at $(date)"
}
#](https://image.slidesharecdn.com/dvkeygvkrr6sj5lhsszc-signature-b02a6c073768d8536fdd50c0a47af6292b168fbd705c8180447bb0b754b59738-poli-141223132220-conversion-gate02/85/3-1-d-manual-bash-script-guide-lsstv-2-0r11-242-320.jpg)


![Pass arguments into a function 238
chmod +x fresh.sh
./fresh.sh
Sample outputs:
**** calling fresh() 1st time ****
fresh(): $0 is ./fresh.sh
fresh(): $1 is Tomato
fresh(): $t is Tomato
fresh(): total args passed to me 1
fresh(): all args ($@) passed to me -"Tomato"
fresh(): all args ($*) passed to me -"Tomato"
**** calling fresh() 2nd time ****
fresh(): $0 is ./fresh.sh
fresh(): $1 is Tomato
fresh(): $t is Tomato
fresh(): total args passed to me 3
fresh(): all args ($@) passed to me -"Tomato Onion Paneer"
fresh(): all args ($*) passed to me -"Tomato Onion Paneer"
Function shell variables
• All function parameters or arguments can be accessed via $1, $2, $3,..., $N.
• $0 always point to the shell script name.
• $* or $@ holds all parameters or arguments passed to the function.
• $# holds the number of positional parameters passed to the function.
How Do I Display Function Name?
$0 always point to the shell script name. However, you can use an array variable called FUNCNAME which
contains the names of all shell functions currently in the execution call stack. The element with index 0 is the name
any currently-executing shell function.This variable exists only when a shell function is executing.
FUNCNAME in action
Create a shell script called funcback.sh:
#!/bin/bash
# funcback.sh : Use $FUNCNAME
backup(){
local d="$1"
[[ -z $d ]] && { echo "${FUNCNAME}(): directory name not
specified"; exit 1; }
echo "Starting backup..."
}
backup $1
Save and close the file. Run it as follows:
chmod +x funcback.sh
funcback.sh /home](https://image.slidesharecdn.com/dvkeygvkrr6sj5lhsszc-signature-b02a6c073768d8536fdd50c0a47af6292b168fbd705c8180447bb0b754b59738-poli-141223132220-conversion-gate02/85/3-1-d-manual-bash-script-guide-lsstv-2-0r11-245-320.jpg)
![Pass arguments into a function 239
funcback.sh
Sample outputs:
backup(): directory name not specified
Example
Create a shell script to determine if given name is file or directory (cmdargs.sh):
#!/bin/bash
file="$1"
# User-defined function
is_file_dir(){
# $f is local variable
local f="$1"
# file attributes comparisons using test i.e. [ ... ]
[ -f "$f" ] && { echo "$f is a regular file."; exit 0; }
[ -d "$f" ] && { echo "$f is a directory."; exit 0; }
[ -L "$f" ] && { echo "$f is a symbolic link."; exit 0; }
[ -x "$f" ] && { echo "$f is an executeble file."; exit 0; }
}
# make sure filename supplied as command line arg else die
[ $# -eq 0 ] && { echo "Usage: $0 filename"; exit 1; }
# invoke the is_file_dir and pass $file as arg
is_file_dir "$file"
Run it as follows:
./cmdargs.sh /etc/resolv.conf
./cmdargs.sh /bin/date
./cmdargs.sh $HOME
./cmdargs.sh /sbin
Sample outputs:
/etc/resolv.conf is a regular file.
/bin/date is a regular file.
/home/vivek is a directory.
/sbin is a directory.
← Calling functions Home local variable →](https://image.slidesharecdn.com/dvkeygvkrr6sj5lhsszc-signature-b02a6c073768d8536fdd50c0a47af6292b168fbd705c8180447bb0b754b59738-poli-141223132220-conversion-gate02/85/3-1-d-manual-bash-script-guide-lsstv-2-0r11-246-320.jpg)

![Local variable 241
#!/bin/bash
# global d variable
d=/apache.jail
# User defined function
create_jail(){
# d is only visible to this fucntion
local d=$1
echo "create_jail(): d is set to $d"
}
echo "Before calling create_jail d is set to $d"
create_jail "/home/apache/jail"
echo "After calling create_jail d is set to $d"
Sample output:
Before calling create_jail d is set to /apache.jail
create_jail(): d is set to /home/apache/jail
After calling create_jail d is set to /apache/jail
Example
In the following example:
• The declare command is used to create the constant variable called PASSWD_FILE.
• The function die() is defined before all other functions.
• You can call a function from the same script or other function. For example, die() is called from is_user_exist().
• All function variables are local. This is a good programming practice.
#!/bin/bash
# Make readonly variable i.e. constant variable
declare -r PASSWD_FILE=/etc/passwd
#
# Purpose: Display message and die with given exit code
#
die(){
local message="$1"
local exitCode=$2
echo "$message"
[ "$exitCode" == "" ] && exit 1 || exit $exitCode
}
#
# Purpose: Find out if user exits or not
#
does_user_exist(){](https://image.slidesharecdn.com/dvkeygvkrr6sj5lhsszc-signature-b02a6c073768d8536fdd50c0a47af6292b168fbd705c8180447bb0b754b59738-poli-141223132220-conversion-gate02/85/3-1-d-manual-bash-script-guide-lsstv-2-0r11-248-320.jpg)
![Local variable 242
local u=$1
grep -qEw "^$u" $PASSWD_FILE && die "Username $u exists."
}
#
# Purpose: Is script run by root? Else die..
#
is_user_root(){
[ "$(id -u)" != "0" ] && die "You must be root to run this script" 2
}
#
# Purpose: Display usage
#
usage(){
echo "Usage: $0 username"
exit 2
}
[ $# -eq 0 ] && usage
# invoke the function is_root_user
is_user_root
# call the function is_user_exist
does_user_exist "$1"
# display something on screen
echo "Adding user $1 to database..."
# just display command but do not add a user to system
echo "/sbin/useradd -s /sbin/bash -m $1"
← Pass arguments into a function Home Returning from a function
→](https://image.slidesharecdn.com/dvkeygvkrr6sj5lhsszc-signature-b02a6c073768d8536fdd50c0a47af6292b168fbd705c8180447bb0b754b59738-poli-141223132220-conversion-gate02/85/3-1-d-manual-bash-script-guide-lsstv-2-0r11-249-320.jpg)
![Returning from a function 243
Returning from a function
← local variable Home Shell functions library →
• In mathematics a function ƒ takes an input, x, and returns an output ƒ(x).
• In computer a shell function name can take an input, $1 and return back the value (true or false) to the script.
• In other words, you can return from a function with an exit status.
Syntax
• The return command causes a function to exit with the return value specified by N and syntax is:
return N
• If N is not specified, the return status is that of the last command.
• The return command terminates the function.
• The return command is not necessary when the return value is that of the last command executed.
Example
Create a shell script called isroot.sh as follows:
#!/bin/bash
# version 1.0
# Purpose: Determine if current user is root or not
is_root_user(){
[ $(id -u) -eq 0 ]
}
# invoke the function
# make decision using conditional logical operators
is_root_user && echo "You can run this script." || echo "You need to
run this script as a root user."
Save and close the file. Run it as follows:
chmod +x isroot.sh
./isroot.sh
Sample outputs:
You need to run this script as a root user.
Run it as the root user:
sudo ./isroot.sh
Sample outputs:](https://image.slidesharecdn.com/dvkeygvkrr6sj5lhsszc-signature-b02a6c073768d8536fdd50c0a47af6292b168fbd705c8180447bb0b754b59738-poli-141223132220-conversion-gate02/85/3-1-d-manual-bash-script-guide-lsstv-2-0r11-250-320.jpg)
![Returning from a function 244
[sudo] password for vivek:
You can run this script.
The following is an updated version of the same script. This version create the constants variables using the declare
command called TRUE and FALSE.
#!/bin/bash
# version 2.0
# define constants
declare -r TRUE=0
declare -r FALSE=1
# Purpose: Determine if current user is root or not
is_root_user(){
# root user has user id (UID) zero.
[ $(id -u) -eq 0 ] && return $TRUE || return $FALSE
}
is_root_user && echo "You can run this script." || echo "You need to
run this script as a root user."
Returning a string or word from a function
• You cannot return a word or anything else from a function.
• However, you can use echo or printf command to send back output easily to the script.
#!/bin/bash
# Variables
domain="CyberCiti.BIz"
out=""
##################################################################
# Purpose: Converts a string to lower case
# Arguments:
# $@ -> String to convert to lower case
##################################################################
function to_lower()
{
local str="$@"
local output
output=$(tr '[A-Z]' '[a-z]'<<<"${str}")
echo $output
}
# invoke the to_lower()
to_lower "This Is a TEST"
# invoke to_lower() and store its result to $out variable
out=$(to_lower ${domain})](https://image.slidesharecdn.com/dvkeygvkrr6sj5lhsszc-signature-b02a6c073768d8536fdd50c0a47af6292b168fbd705c8180447bb0b754b59738-poli-141223132220-conversion-gate02/85/3-1-d-manual-bash-script-guide-lsstv-2-0r11-251-320.jpg)
![Returning from a function 245
# Display back the result from $out
echo "Domain name : $out"
← local variable Home Shell functions library →
Shell functions library
← Returning from a
function
Home Source command
→
• You can store all your function in a function files called functions library.
• You can load all function into the current script or the command prompt.
• The syntax is as follows to load all functions:
. /path/to/your/functions.sh
Example
Create a function file called myfunctions.sh:
#!/bin/bash
# set variables
declare -r TRUE=0
declare -r FALSE=1
declare -r PASSWD_FILE=/etc/passwd
##################################################################
# Purpose: Converts a string to lower case
# Arguments:
# $1 -> String to convert to lower case
##################################################################
function to_lower()
{
local str="$@"
local output
output=$(tr '[A-Z]' '[a-z]'<<<"${str}")
echo $output
}
##################################################################
# Purpose: Display an error message and die
# Arguments:
# $1 -> Message
# $2 -> Exit status (optional)
##################################################################
function die()
{](https://image.slidesharecdn.com/dvkeygvkrr6sj5lhsszc-signature-b02a6c073768d8536fdd50c0a47af6292b168fbd705c8180447bb0b754b59738-poli-141223132220-conversion-gate02/85/3-1-d-manual-bash-script-guide-lsstv-2-0r11-252-320.jpg)
![Shell functions library 246
local m="$1" # message
local e=${2-1} # default exit status 1
echo "$m"
exit $e
}
##################################################################
# Purpose: Return true if script is executed by the root user
# Arguments: none
# Return: True or False
##################################################################
function is_root()
{
[ $(id -u) -eq 0 ] && return $TRUE || return $FALSE
}
##################################################################
# Purpose: Return true $user exits in /etc/passwd
# Arguments: $1 (username) -> Username to check in /etc/passwd
# Return: True or False
##################################################################
function is_user_exits()
{
local u="$1"
grep -q "^${u}" $PASSWD_FILE && return $TRUE || return $FALSE
}
You can load myfunctions.sh into the current shell environment, enter:
. myfunctions.sh
OR
. /path/to/myfunctions.sh
How do I load myfunctions.sh into the script?
Create a script called functionsdemo.sh:
#!/bin/bash
# Load the myfunctions.sh
# My local path is /home/vivek/lsst2/myfunctions.sh
. /home/vivek/lsst2/myfunctions.sh
# Define local variables
# var1 is not visitable or used by myfunctions.sh
var1="The Mahabharata is the longest and, arguably, one of the greatest
epic poems in any language."](https://image.slidesharecdn.com/dvkeygvkrr6sj5lhsszc-signature-b02a6c073768d8536fdd50c0a47af6292b168fbd705c8180447bb0b754b59738-poli-141223132220-conversion-gate02/85/3-1-d-manual-bash-script-guide-lsstv-2-0r11-253-320.jpg)


![Recursive function 249
Recursive function
← Source
command
Home Putting functions in background
→
• A recursive function is a function that repeatedly calls itself.
• No limit is placed on the number of recursive calls.
• Create a shell script called fact.sh:
#!/bin/bash
# fact.sh - Shell script to to find factorial of given command line arg
factorial(){
local i=$1
local f
declare -i i
declare -i f
# factorial() is called until the value of $f is returned and is it
is <= 2
# This is called the recursion
[ $i -le 2 ] && echo $i || { f=$(( i - 1)); f=$(factorial $f); f=$((
f * i )); echo $f; }
}
# display usage
[ $# -eq 0 ] && { echo "Usage: $0 number"; exit 1; }
# call factorial
factorial $1
Save and close the file. Run it as follows:
chmod +x fact.sh
./fact.sh
./fact.sh 2
./fact.sh 5
Sample outputs:
2
120
• You can debug the script as follows:
bash -x ./fact.sh 5
Sample outputs:](https://image.slidesharecdn.com/dvkeygvkrr6sj5lhsszc-signature-b02a6c073768d8536fdd50c0a47af6292b168fbd705c8180447bb0b754b59738-poli-141223132220-conversion-gate02/85/3-1-d-manual-bash-script-guide-lsstv-2-0r11-256-320.jpg)
![Recursive function 250
+ '[' 1 -eq 0 ']'
+ factorial 5
+ local i=5
+ local f
+ declare -i i
+ declare -i f
+ [[ 5 -le 2 ]]
+ f=4
++ factorial 4
++ local i=4
++ local f
++ declare -i i
++ declare -i f
++ [[ 4 -le 2 ]]
++ f=3
+++ factorial 3
+++ local i=3
+++ local f
+++ declare -i i
+++ declare -i f
+++ [[ 3 -le 2 ]]
+++ f=2
++++ factorial 2
++++ local i=2
++++ local f
++++ declare -i i
++++ declare -i f
++++ [[ 2 -le 2 ]]
++++ echo 2
+++ f=2
+++ f=6
+++ echo 6
++ f=6
++ f=24
++ echo 24
+ f=24
+ f=120
+ echo 120
120
• Recursive functions are slow under bash.
• Avoid using recursive functions if possible.
• For serious number crunching take a look at the GNU C/C++/Fortran Compiler Collection (GCC).](https://image.slidesharecdn.com/dvkeygvkrr6sj5lhsszc-signature-b02a6c073768d8536fdd50c0a47af6292b168fbd705c8180447bb0b754b59738-poli-141223132220-conversion-gate02/85/3-1-d-manual-bash-script-guide-lsstv-2-0r11-257-320.jpg)
![Recursive function 251
External links
• Wikipedia:Recursion (computer science)
• GNU C/C++/Fortran
[1]
Compiler Collection.
← Source
command
Home Putting functions in background
→
References
[1] http://gcc.gnu.org/
Putting functions in background
← Recursive function Home Chapter 9 Challenges →
• The & operator puts command in background and free up your terminal.
• You can also put a function in background.
How Do I Put a Function In Background?
• The syntax is as follows:
name(){
echo "Do something"
sleep 1
}
# put a function in the background
name &
# do something
Example
• You can display a series of dots (progress bar) while performing tape backup. This is useful for the user or
operator to display a progress bar.
• Create a shell script called progressdots.sh
[1]
:
#!/bin/bash
# progressdots.sh - Display progress while making backup
# Based on idea presnted by nixCraft forum user rockdalinux
# Show progress dots
progress(){
echo -n "$0: Please wait..."
while true
do
echo -n "."
sleep 5](https://image.slidesharecdn.com/dvkeygvkrr6sj5lhsszc-signature-b02a6c073768d8536fdd50c0a47af6292b168fbd705c8180447bb0b754b59738-poli-141223132220-conversion-gate02/85/3-1-d-manual-bash-script-guide-lsstv-2-0r11-258-320.jpg)
![Putting functions in background 252
done
}
dobackup(){
# put backup commands here
tar -zcvf /dev/st0 /home >/dev/null 2>&1
}
# Start it in the background
progress &
# Save progress() PID
# You need to use the PID to kill the function
MYSELF=$!
# Start backup
# Transfer control to dobackup()
dobackup
# Kill progress
kill $MYSELF >/dev/null 2>&1
echo -n "...done."
echo
Save and close the file. Run it as follows:
chmod +x progressdots.sh
./progressdots.sh
Sample outputs:
./progressdots.sh: Please wait..................done.
External links
• Bar
[2]
is a simple tool to copy a stream of data and print a display for the user on stderr showing (a) the amount
of data passed, (b) the throughput of the data transfer, and (c) the transfer time, or, if the total size of the data
stream is known, the estimated time remaining, what percentage of the data transfer has been completed, and a
progress bar.
• pv
[3]
(Pipe Viewer) is a terminal-based tool for monitoring the progress of data through a pipeline.
• dialog - Another way to add a progress bar to your script using dialog --gauge.](https://image.slidesharecdn.com/dvkeygvkrr6sj5lhsszc-signature-b02a6c073768d8536fdd50c0a47af6292b168fbd705c8180447bb0b754b59738-poli-141223132220-conversion-gate02/85/3-1-d-manual-bash-script-guide-lsstv-2-0r11-259-320.jpg)
![Putting functions in background 253
References
[1] Shell Script To Show Progress Indicators / Dots While Making The Backups (http://nixcraft.com/getting-started-tutorials/
13664-shell-script-show-progress-indicators-dots-while-making-backups.html) from the nixCraft forum.
[2] http://clpbar.sourceforge.net/
[3] http://www.ivarch.com/programs/pv.shtml
← Recursive function Home Chapter 9 Challenges →
Chapter 9 Challenges
← Recursive function Home [[|
→]]
• Decide whether the following sentence is true or false:
1. The function file does not need to be executable.
2. The function is treated the same as other shell command.
3. To invoke the function, just type the name of the function.
4. You must create a function at the start of a script.
5. You must write a function before invoking it.
6. All single line function must follow the final command with a semicolon.
7. A recursive function is a function that repeatedly calls itself.
8. The return command return from a function with an exit status.
9. The { list; } also creates a function. ( [ $# -eq 0 ] && { echo "I'm function"; exit 1; } )
10. Bash does support pointer arithmetic, and indirect referencing just like C programs.
• Create user-defined functions in a shell script for the following tasks:
1. add_user() - Add a user to the system.
2. add_group() - Add a group to the system.
3. change_password() - Change user password.
4. delete_user() - Remove a user from the system.
• Chapter 9 answers
← Recursive function Home [[|
→]]](https://image.slidesharecdn.com/dvkeygvkrr6sj5lhsszc-signature-b02a6c073768d8536fdd50c0a47af6292b168fbd705c8180447bb0b754b59738-poli-141223132220-conversion-gate02/85/3-1-d-manual-bash-script-guide-lsstv-2-0r11-260-320.jpg)
![254
Chapter 10: Interactive Scripts
Menu driven scripts
• You use some sort of generic application menu everyday.
• A menu is nothing but a list of commands presented to a user by a shell script.
• For example, you can write a menu driven shell script to get the terminal information. The menu driven shell
script works as "shortcuts to frequently used commands that avoid the user having to remember syntax".
• Usually, you need to type the instructions or commands to complete the task.
• Command input can be done with the help of menus.
Syntax
Create a shell script called menu.sh:
#!/bin/bash
# A menu driven shell script sample template
## ----------------------------------
# Step #1: Define variables
# ----------------------------------
EDITOR=vim
PASSWD=/etc/passwd
RED='033[0;41;30m'
STD='033[0;0;39m'
# ----------------------------------
# Step #2: User defined function
# ----------------------------------
pause(){
read -p "Press [Enter] key to continue..." fackEnterKey
}
one(){
echo "one() called"
pause
}
# do something in two()
two(){
echo "two() called"
pause
}
# function to display menus
show_menus() {](https://image.slidesharecdn.com/dvkeygvkrr6sj5lhsszc-signature-b02a6c073768d8536fdd50c0a47af6292b168fbd705c8180447bb0b754b59738-poli-141223132220-conversion-gate02/85/3-1-d-manual-bash-script-guide-lsstv-2-0r11-261-320.jpg)
![Menu driven scripts 255
clear
echo "~~~~~~~~~~~~~~~~~~~~~"
echo " M A I N - M E N U"
echo "~~~~~~~~~~~~~~~~~~~~~"
echo "1. Set Terminal"
echo "2. Reset Terminal"
echo "3. Exit"
}
# read input from the keyboard and take a action
# invoke the one() when the user select 1 from the menu option.
# invoke the two() when the user select 2 from the menu option.
# Exit when user the user select 3 form the menu option.
read_options(){
local choice
read -p "Enter choice [ 1 - 3] " choice
case $choice in
1) one ;;
2) two ;;
3) exit 0;;
*) echo -e "${RED}Error...${STD}" && sleep 2
esac
}
# ----------------------------------------------
# Step #3: Trap CTRL+C, CTRL+Z and quit singles
# ----------------------------------------------
trap '' SIGINT SIGQUIT SIGTSTP
# -----------------------------------
# Step #4: Main logic - infinite loop
# ------------------------------------
while true
do
show_menus
read_options
done
Save and close the file. Run it as follows:
chmod +x menu.sh
./menu.sh
Sample outputs:](https://image.slidesharecdn.com/dvkeygvkrr6sj5lhsszc-signature-b02a6c073768d8536fdd50c0a47af6292b168fbd705c8180447bb0b754b59738-poli-141223132220-conversion-gate02/85/3-1-d-manual-bash-script-guide-lsstv-2-0r11-262-320.jpg)
![Menu driven scripts 256
Getting information about your system
• Create a script called grabsysinfo.sh:
#!/bin/bash
# grabsysinfo.sh - A simple menu driven shell script to to get
information about your
# Linux server / desktop.
# Author: Vivek Gite
# Date: 12/Sep/2007
# Define variables
LSB=/usr/bin/lsb_release
# Purpose: Display pause prompt
# $1-> Message (optional)
function pause(){
local message="$@"
[ -z $message ] && message="Press [Enter] key to continue..."
read -p "$message" readEnterKey
}
# Purpose - Display a menu on screen
function show_menu(){
date
echo "---------------------------"
echo " Main Menu"
echo "---------------------------"
echo "1. Operating system info"
echo "2. Hostname and dns info"
echo "3. Network info"
echo "4. Who is online"
echo "5. Last logged in users"
echo "6. Free and used memory info"](https://image.slidesharecdn.com/dvkeygvkrr6sj5lhsszc-signature-b02a6c073768d8536fdd50c0a47af6292b168fbd705c8180447bb0b754b59738-poli-141223132220-conversion-gate02/85/3-1-d-manual-bash-script-guide-lsstv-2-0r11-263-320.jpg)
![Getting information about your system 257
echo "7. exit"
}
# Purpose - Display header message
# $1 - message
function write_header(){
local h="$@"
echo
"---------------------------------------------------------------"
echo " ${h}"
echo
"---------------------------------------------------------------"
}
# Purpose - Get info about your operating system
function os_info(){
write_header " System information "
echo "Operating system : $(uname)"
[ -x $LSB ] && $LSB -a || echo "$LSB command is not insalled (set
$LSB variable)"
#pause "Press [Enter] key to continue..."
pause
}
# Purpose - Get info about host such as dns, IP, and hostname
function host_info(){
local dnsips=$(sed -e '/^$/d' /etc/resolv.conf | awk '{if
(tolower($1)=="nameserver") print $2}')
write_header " Hostname and DNS information "
echo "Hostname : $(hostname -s)"
echo "DNS domain : $(hostname -d)"
echo "Fully qualified domain name : $(hostname -f)"
echo "Network address (IP) : $(hostname -i)"
echo "DNS name servers (DNS IP) : ${dnsips}"
pause
}
# Purpose - Network inferface and routing info
function net_info(){
devices=$(netstat -i | cut -d" " -f1 | egrep -v
"^Kernel|Iface|lo")
write_header " Network information "
echo "Total network interfaces found : $(wc -w <<<${devices})"
echo "*** IP Addresses Information ***"
ip -4 address show](https://image.slidesharecdn.com/dvkeygvkrr6sj5lhsszc-signature-b02a6c073768d8536fdd50c0a47af6292b168fbd705c8180447bb0b754b59738-poli-141223132220-conversion-gate02/85/3-1-d-manual-bash-script-guide-lsstv-2-0r11-264-320.jpg)
![Getting information about your system 258
echo "***********************"
echo "*** Network routing ***"
echo "***********************"
netstat -nr
echo "**************************************"
echo "*** Interface traffic information ***"
echo "**************************************"
netstat -i
pause
}
# Purpose - Display a list of users currently logged on
# display a list of receltly loggged in users
function user_info(){
local cmd="$1"
case "$cmd" in
who) write_header " Who is online "; who -H; pause ;;
last) write_header " List of last logged in users "; last ;
pause ;;
esac
}
# Purpose - Display used and free memory info
function mem_info(){
write_header " Free and used memory "
free -m
echo "*********************************"
echo "*** Virtual memory statistics ***"
echo "*********************************"
vmstat
echo "***********************************"
echo "*** Top 5 memory eating process ***"
echo "***********************************"
ps auxf | sort -nr -k 4 | head -5
pause
}
# Purpose - Get input via the keyboard and make a decision using
case..esac
function read_input(){
local c
read -p "Enter your choice [ 1 - 7 ] " c
case $c in
1) os_info ;;
2) host_info ;;](https://image.slidesharecdn.com/dvkeygvkrr6sj5lhsszc-signature-b02a6c073768d8536fdd50c0a47af6292b168fbd705c8180447bb0b754b59738-poli-141223132220-conversion-gate02/85/3-1-d-manual-bash-script-guide-lsstv-2-0r11-265-320.jpg)


![Bash display dialog boxes 262
Positioning the box
The --begin y x option can be used to to set the position of the upper left corner of a dialog box on the screen.
dialog --begin 10 30 --backtitle "System Information"
--title "About"
--msgbox 'This is an entirely open source software.' 10 30
Where,
• --begin 10 30: 10 is y i.e. horizontal position and 30 is vertical position.
Dialog command with y x position and backtitle
Common dialog boxes and their options
Box options:
--calendar <text> <height> <width> <day>
<month> <year>
--checklist <text> <height> <width> <list
height> <tag1> <item1> <status1>...
--dselect <directory> <height> <width>
--editbox <file> <height> <width>
--fselect <filepath> <height> <width>
--gauge <text> <height> <width>
[<percent>]
--infobox <text> <height> <width>
--inputbox <text> <height> <width>
[<init>]
--inputmenu <text> <height> <width> <menu
height> <tag1> <item1>...
--menu <text> <height> <width> <menu
height> <tag1> <item1>...
--msgbox <text> <height> <width>](https://image.slidesharecdn.com/dvkeygvkrr6sj5lhsszc-signature-b02a6c073768d8536fdd50c0a47af6292b168fbd705c8180447bb0b754b59738-poli-141223132220-conversion-gate02/85/3-1-d-manual-bash-script-guide-lsstv-2-0r11-269-320.jpg)
![Bash display dialog boxes 263
--passwordbox <text> <height> <width>
[<init>]
--pause <text> <height> <width>
<seconds>
--progressbox <height> <width>
--radiolist <text> <height> <width> <list
height> <tag1> <item1> <status1>...
--tailbox <file> <height> <width>
--tailboxbg <file> <height> <width>
--textbox <file> <height> <width>
--timebox <text> <height> <width> <hour>
<minute> <second>
--yesno <text> <height> <width>
Dialog customization with configuration file
• You can customize various aspects of the dialog command with ~/.dialogrc file.
• $HOME/.dialogrc is a default configuration file.
How do I create a sample ~/.dialogrc file?
Type the following command:
dialog --create-rc ~/.dialogrc
To customize ~/.dialogrc, enter:
vi ~/.dialogrc
Turn on shadow dialog boxes
use_shadow = ON
Turn on color support ON
use_colors = ON
Change default blue background color to BLACK
screen_color = (CYAN,BLACK,ON)
Save and close the file. Here is my sample configuration file:
#
# Run-time configuration file for dialog
#
# Automatically generated by "dialog --create-rc <file>"
#
#
# Types of values:](https://image.slidesharecdn.com/dvkeygvkrr6sj5lhsszc-signature-b02a6c073768d8536fdd50c0a47af6292b168fbd705c8180447bb0b754b59738-poli-141223132220-conversion-gate02/85/3-1-d-manual-bash-script-guide-lsstv-2-0r11-270-320.jpg)


![A yes/no dialog box 267
A yes/no dialog box
• You can display a yes/no dialog box using the following syntax:
dialog --common-options --yesno text height width
• This dialog box is useful for asking questions that require the user to answer either yes or no.
• The dialog box has a Yes button and a No button, in which the user can switch between by pressing the TAB key.
• On exit, no text is written to dialog’s output. In addition to the "Yes" and "No" exit codes and ESC exit status may
be returned as follows:
• 0 - Yes chosen.
• 1 - No chosen.
• 255 - Escape key was pressed i.e. box closed.
Example
• Create a script called dynbox.sh:
#!/bin/bash
# dynbox.sh - Yes/No box demo
dialog --title "Delete file"
--backtitle "Linux Shell Script Tutorial Example"
--yesno "Are you sure you want to permanently delete "/tmp/foo.txt"?"
7 60
# Get exit status
# 0 means user hit [yes] button.
# 1 means user hit [no] button.
# 255 means user hit [Esc] key.
response=$?
case $response in
0) echo "File deleted.";;
1) echo "File not deleted.";;
255) echo "[ESC] key pressed.";;
esac
Save and close the file. Run it as follows:
chmod +x dynbox.sh
./dynbox.sh](https://image.slidesharecdn.com/dvkeygvkrr6sj5lhsszc-signature-b02a6c073768d8536fdd50c0a47af6292b168fbd705c8180447bb0b754b59738-poli-141223132220-conversion-gate02/85/3-1-d-manual-bash-script-guide-lsstv-2-0r11-274-320.jpg)

![An input dialog box 269
dialog --title "Hello" --clear --msgbox "Hello ${n}, let us be
friends!" 10 41
}
# cleanup - add a trap that will remove $OUTPUT
# if any of the signals - SIGHUP SIGINT SIGTERM it received.
trap "rm $OUTPUT; exit" SIGHUP SIGINT SIGTERM
# show an inputbox
dialog --title "Inputbox - To take input from you"
--backtitle "Linux Shell Script Tutorial Example"
--inputbox "Enter your name " 8 60 2>$OUTPUT
# get respose
respose=$?
# get data stored in $OUPUT using input redirection
name=$(<$OUTPUT)
# make a decsion
case $respose in
0)
sayhello ${name}
;;
1)
echo "Cancel pressed."
;;
255)
echo "[ESC] key pressed."
esac
# remove $OUTPUT file
rm $OUTPUT
Save and close the file. Run it as follows:
chmod +x yesnobox.sh
./yesnobox.sh
Sample outputs:](https://image.slidesharecdn.com/dvkeygvkrr6sj5lhsszc-signature-b02a6c073768d8536fdd50c0a47af6292b168fbd705c8180447bb0b754b59738-poli-141223132220-conversion-gate02/85/3-1-d-manual-bash-script-guide-lsstv-2-0r11-276-320.jpg)
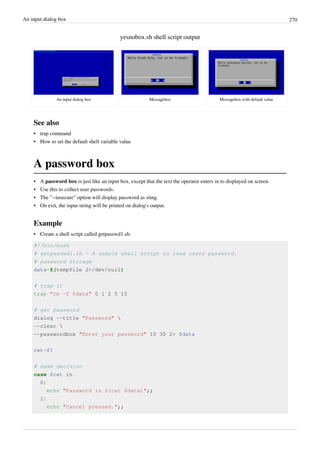
![A password box 271
255)
[ -s $data ] && cat $data || echo "ESC pressed.";;
esac
Save and close the file. Run it as follows:
chmod +x getpasswd1.sh
./getpasswd1.sh
Sample outputs:
getpasswd1.sh shell script output
A password dialog box (by default the password widget is not user
friendly as no character is displayed)
Displaying user password
The --insecure option
• The --insecure option makes the password widget friendlier but less secure, by echoing asterisks for each
character.
• Create a shell script called getpasswd2.sh:
#!/bin/bash
# getpasswd2.sh - A sample shell script to read users password.
# password storage
data=$(tempfile 2>/dev/null)
# trap it
trap "rm -f $data" 0 1 2 5 15
# get password with the --insecure option
dialog --title "Password"
--clear
--insecure
--passwordbox "Enter your password" 10 30 2> $data
ret=$?](https://image.slidesharecdn.com/dvkeygvkrr6sj5lhsszc-signature-b02a6c073768d8536fdd50c0a47af6292b168fbd705c8180447bb0b754b59738-poli-141223132220-conversion-gate02/85/3-1-d-manual-bash-script-guide-lsstv-2-0r11-278-320.jpg)
![A password box 272
# make decison
case $ret in
0)
echo "Password is $(cat $data)";;
1)
echo "Cancel pressed.";;
255)
[ -s $data ] && cat $data || echo "ESC pressed.";;
esac
Sample outputs:
A password dialog box with the --insecure option](https://image.slidesharecdn.com/dvkeygvkrr6sj5lhsszc-signature-b02a6c073768d8536fdd50c0a47af6292b168fbd705c8180447bb0b754b59738-poli-141223132220-conversion-gate02/85/3-1-d-manual-bash-script-guide-lsstv-2-0r11-279-320.jpg)

![A menu box 274
#
function display_output(){
local h=${1-10} # box height default 10
local w=${2-41} # box width default 41
local t=${3-Output} # box title
dialog --backtitle "Linux Shell Script Tutorial" --title "${t}"
--clear --msgbox "$(<$OUTPUT)" ${h} ${w}
}
#
# Purpose - display current system date & time
#
function show_date(){
echo "Today is $(date) @ $(hostname -f)." >$OUTPUT
display_output 6 60 "Date and Time"
}
#
# Purpose - display a calendar
#
function show_calendar(){
cal >$OUTPUT
display_output 13 25 "Calendar"
}
#
# set infinite loop
#
while true
do
### display main menu ###
dialog --clear --help-button --backtitle "Linux Shell Script Tutorial"
--title "[ M A I N - M E N U ]"
--menu "You can use the UP/DOWN arrow keys, the first n
letter of the choice as a hot key, or the n
number keys 1-9 to choose an option.n
Choose the TASK" 15 50 4
Date/time "Displays date and time"
Calendar "Displays a calendar"
Editor "Start a text editor"
Exit "Exit to the shell" 2>"${INPUT}"
menuitem=$(<"${INPUT}")
# make decsion
case $menuitem in
Date/time) show_date;;](https://image.slidesharecdn.com/dvkeygvkrr6sj5lhsszc-signature-b02a6c073768d8536fdd50c0a47af6292b168fbd705c8180447bb0b754b59738-poli-141223132220-conversion-gate02/85/3-1-d-manual-bash-script-guide-lsstv-2-0r11-281-320.jpg)
![A menu box 275
Calendar) show_calendar;;
Editor) $vi_editor;;
Exit) echo "Bye"; break;;
esac
done
# if temp files found, delete em
[ -f $OUTPUT ] && rm $OUTPUT
[ -f $INPUT ] && rm $INPUT
Save and close the file. Run it as follows:
chmod +x utilitymenu.sh
./utilitymenu.sh
Sample outputs:
utilitymenu.sh shell script output (dialog command with menus)
A menu based
dialog box
Messagebox displaying date &
time
Messagebox
displaying a
calendar
Vi IMproved,
a
programmers
text editor](https://image.slidesharecdn.com/dvkeygvkrr6sj5lhsszc-signature-b02a6c073768d8536fdd50c0a47af6292b168fbd705c8180447bb0b754b59738-poli-141223132220-conversion-gate02/85/3-1-d-manual-bash-script-guide-lsstv-2-0r11-282-320.jpg)
![A progress bar (gauge box) 276
A progress bar (gauge box)
• You can create a progress bar (progress indicator) when copying/moving files or making backups using the
gauge box.
• It displays a meter along the bottom of the box. The meter indicates the percentage. New percentages are read
from standard input, one integer per line. The meter is updated to reflect each new percentage.
• If the standard input reads the string "START_BAR", then the first line following is taken as an integer
percentage, then subsequent lines up to another "START_BAR" are used for a new prompt. The gauge exits when
EOF is reached on the standard input.
• The syntax is as follows:
echo percentage | dialog --gauge "text" height width percent
echo "10" | dialog --gauge "Please wait" 10 70 0
echo "50" | dialog --gauge "Please wait" 10 70 0
echo "100" | dialog --gauge "Please wait" 10 70 0
• However, you need to use the while or for loop to show 0 to 100% progress. In this example, the for loop is used
to display progress:
for i in $(seq 0 10 100) ; do sleep 1; echo $i | dialog --gauge "Please
wait" 10 70 0; done
Example
Create a shell script dvdcopy.sh:
#!/bin/bash
# dvdcopy.sh - A sample shell script to display a progress bar
# set counter to 0
counter=0
(
# set infinite while loop
while :
do
cat <<EOF
XXX
$counter
Disk copy /dev/dvd to /home/data ( $counter%):
XXX
EOF
# increase counter by 10
(( counter+=10 ))
[ $counter -eq 100 ] && break
# delay it a specified amount of time i.e 1 sec
sleep 1
done
) |
dialog --title "File Copy" --gauge "Please wait" 7 70 0
Save and close the file. Run it as follows:](https://image.slidesharecdn.com/dvkeygvkrr6sj5lhsszc-signature-b02a6c073768d8536fdd50c0a47af6292b168fbd705c8180447bb0b754b59738-poli-141223132220-conversion-gate02/85/3-1-d-manual-bash-script-guide-lsstv-2-0r11-283-320.jpg)
![A progress bar (gauge box) 277
chmod +x dvdcopy.sh
./dvdcopy.sh
Sample outputs:
A sample progress bar (gauge box)
File Copy Progress Bar With Dialog
• Create a shell script called pcp.sh:
#!/bin/bash
# pcp.sh: A shell script to copy /bin/* and /etc/* files
# Display a progress bar while copying files.
# * Based upon Greg's (GreyCat's) GPLd wiki example. *
# --------------------------------------------------------
# Create an array of all files in /etc and /bin directory
DIRS=(/bin/* /etc/*)
# Destination directory
DEST="/tmp/test.$$"
# Create $DEST if does not exits
[ ! -d $DEST ] && mkdir -p $DEST
#
# Show a progress bar
# ---------------------------------
# Redirect dialog commands input using substitution
#
dialog --title "Copy file" --gauge "Copying file..." 10 75 < <(
# Get total number of files in array
n=${#DIRS[*]};
# set counter - it will increase every-time a file is copied to $DEST
i=0](https://image.slidesharecdn.com/dvkeygvkrr6sj5lhsszc-signature-b02a6c073768d8536fdd50c0a47af6292b168fbd705c8180447bb0b754b59738-poli-141223132220-conversion-gate02/85/3-1-d-manual-bash-script-guide-lsstv-2-0r11-284-320.jpg)
![A progress bar (gauge box) 278
#
# Start the for loop
#
# read each file from $DIRS array
# $f has filename
for f in "${DIRS[@]}"
do
# calculate progress
PCT=$(( 100*(++i)/n ))
# update dialog box
cat <<EOF
XXX
$PCT
Copying file "$f"...
XXX
EOF
# copy file $f to $DEST
/bin/cp $f ${DEST} &>/dev/null
done
)
# just delete $DEST directory
/bin/rm -rf $DEST
Save and close the file. Run it as follows:
chmod +x pcp.sh
./pcp.sh](https://image.slidesharecdn.com/dvkeygvkrr6sj5lhsszc-signature-b02a6c073768d8536fdd50c0a47af6292b168fbd705c8180447bb0b754b59738-poli-141223132220-conversion-gate02/85/3-1-d-manual-bash-script-guide-lsstv-2-0r11-285-320.jpg)
![The form dialog for input 279
The form dialog for input
A sample data entry form dialog box
• The form dialog displays data entry
form which consisting of labels and
fields.
• You can set the field length.
• An operator can use up/down
arrows to move between fields and
tab to move between windows.
The syntax is as follows:
dialog --form text height width formheight [ label y x item y x flen
ilen ]
• Where,
• The field length flen and input-length ilen tell how long the field can be.
• If flen is zero, the corresponding field cannot be altered. and the contents of the field determine the
displayed-length.
• If flen is negative, the corresponding field cannot be altered, and the negated value of flen is used as the
displayed-length.
• If ilen is zero, it is set to flen.
Example
• Create a shell script called useradd1.sh:
#!/bin/bash
# useradd1.sh - A simple shell script to display the form dialog on
screen
# set field names i.e. shell variables
shell=""
groups=""
user=""
home=""
# open fd
exec 3>&1
# Store data to $VALUES variable
VALUES=$(dialog --ok-label "Submit"
--backtitle "Linux User Managment"
--title "Useradd"
--form "Create a new user"
15 50 0
"Username:" 1 1 "$user" 1 10 10 0
"Shell:" 2 1 "$shell" 2 10 15 0
"Group:" 3 1 "$groups" 3 10 8 0
"HOME:" 4 1 "$home" 4 10 40 0](https://image.slidesharecdn.com/dvkeygvkrr6sj5lhsszc-signature-b02a6c073768d8536fdd50c0a47af6292b168fbd705c8180447bb0b754b59738-poli-141223132220-conversion-gate02/85/3-1-d-manual-bash-script-guide-lsstv-2-0r11-286-320.jpg)
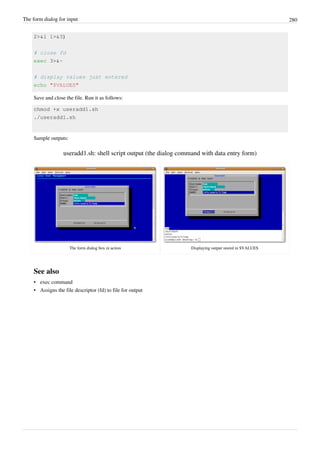
![Console management 281
Console management
• The Linux system console is used to display messages from the BIOS, the kernel and from the other programs.
• Console is nothing but a physical device consisting of a keyboard and a screen.
• The terminfo database on a Linux (and UNIX) computer describes terminals including its attributes and
capabilities. Terminfo describes terminals by giving a set of capabilities which they have, by specifying how to
perform screen operations, and by specifying padding requirements and initialization sequences.
• You can control your console via shell scripts using the following commands:
• tty - print the file name of the terminal connected to standard input.
• reset - terminal initialization.
• tput - initialize a terminal or query terminfo database.
• setleds - set the keyboard leds.
• setterm - set terminal attributes.
tput Command Examples
The tput command is very useful to add some spice to your Linux shell scripts.
External links
• Discover tput
[1]
: Add some spice to your UNIX shell scripts.
References
[1] http://www.ibm.com/developerworks/aix/library/au-learningtput/index.html](https://image.slidesharecdn.com/dvkeygvkrr6sj5lhsszc-signature-b02a6c073768d8536fdd50c0a47af6292b168fbd705c8180447bb0b754b59738-poli-141223132220-conversion-gate02/85/3-1-d-manual-bash-script-guide-lsstv-2-0r11-288-320.jpg)
![Get the name of the current terminal 282
Get the name of the current terminal
The tty command display the file name of the terminal connected to standard input. Type the following command:
tty
Sample outputs:
/dev/pts/0
OR
/dev/tty1
In this example, tar command will run, only if standard input is a terminal. Create a shell script called termtest.sh:
#!/bin/bash
# termtest.sh: Run the tar command only if command run from a termina
tty -s
status=$?
if [ $status -eq 0 ]
then
echo "Running backup using tar command..."
# tar cvf /dev/st0 /home
else
logger "$0 must run from a terminal"
fi
Save and close the file. Run it as follows:
chmod +x termtest.sh
./termtest.sh](https://image.slidesharecdn.com/dvkeygvkrr6sj5lhsszc-signature-b02a6c073768d8536fdd50c0a47af6292b168fbd705c8180447bb0b754b59738-poli-141223132220-conversion-gate02/85/3-1-d-manual-bash-script-guide-lsstv-2-0r11-289-320.jpg)
![Fixing the display with reset 283
Fixing the display with reset
Sometime your terminal gets messed up. It will be full of weird character sequences that can lock down your display.
These characters will hide what you type or character displayed into strange symbols.
Messed up bash terminal session
To fix your display type the reset command
[1]
:
reset
References
[1] BASH – fix the display (http://www.cyberciti.biz/tips/bash-fix-the-display.html).](https://image.slidesharecdn.com/dvkeygvkrr6sj5lhsszc-signature-b02a6c073768d8536fdd50c0a47af6292b168fbd705c8180447bb0b754b59738-poli-141223132220-conversion-gate02/85/3-1-d-manual-bash-script-guide-lsstv-2-0r11-290-320.jpg)


![288
/etc
Shell scripting help
• If you see a typo, a spelling mistake, or an error, please edit wiki page. Alternatively, you can tell me about it by
sending me an e-mail.
Have a Question About Shell Scripting?
• If you'd like to contact us about helping you with a Linux / UNIX shell scripting problem just click here to visit
our
[1]
( http://nixcraft.com ) excellent shell scripting tech support forum.
• View more scripts at Bash shell scripting directory
[2]
- http://bash.cyberciti.biz .
• Enjoy! Peace & Love!!
• Copyright © 1999-2009 Vivek Gite <vivek@nixcraft.com> and its contributors.
References
[1] http://nixcraft.com/
[2] http://bash.cyberciti.biz
Recommended Books
Recommended Books:
• Learning the bash Shell: Unix Shell Programming In a Nutshell (O'Reilly)
[1]
• bash Cookbook: Solutions and Examples for bash Users - Cookbooks (O'Reilly)
[2]
• Linux Shell Scripting with Bash (Sams)
[3]
• Mastering Unix Shell Scripting: Bash, Bourne, and Korn Shell Scripting for Programmers, System
Administrators, and UNIX Gurus (Wiley)
[4]
• Learning the vi and Vim Editors (O'Reilly)
[5]
References
[1] http://www.amazon.com/gp/product/0596009658?ie=UTF8&tag=cyberciti-20&linkCode=as2&camp=1789&creative=390957&
creativeASIN=0596009658
[2] http://www.amazon.com/gp/product/0596526784?ie=UTF8&tag=cyberciti-20&linkCode=as2&camp=1789&creative=390957&
creativeASIN=0596526784
[3] http://www.amazon.com/gp/product/0672326426?ie=UTF8&tag=cyberciti-20&linkCode=as2&camp=1789&creative=390957&
creativeASIN=0672326426
[4] http://www.amazon.com/gp/product/0470183012?ie=UTF8&tag=cyberciti-20&linkCode=as2&camp=1789&creative=390957&
creativeASIN=0470183012
[5] http://www.amazon.com/gp/product/059652983X?ie=UTF8&tag=cyberciti-20&linkCode=as2&camp=1789&creative=390957&
creativeASIN=059652983X](https://image.slidesharecdn.com/dvkeygvkrr6sj5lhsszc-signature-b02a6c073768d8536fdd50c0a47af6292b168fbd705c8180447bb0b754b59738-poli-141223132220-conversion-gate02/85/3-1-d-manual-bash-script-guide-lsstv-2-0r11-295-320.jpg)


3.1.d manual bash script guide lsstv 2.0r11
- 1. PDF generated using the open source mwlib toolkit. See http://code.pediapress.com/ for more information. PDF generated at: Mon, 31 May 2010 07:27:26 CET Linux Shell Scripting Tutorial v2.0 Written by Vivek Gite <[email protected]> and Edited By Various Contributors
- 2. Contents Articles Linux Shell Scripting Tutorial - A Beginner's handbook:About 1 Chapter 1: Quick Introduction to Linux 4 What Is Linux 4 Who created Linux 5 Where can I download Linux 6 How do I Install Linux 6 Linux usage in everyday life 7 What is Linux Kernel 7 What is Linux Shell 8 Unix philosophy 11 But how do you use the shell 12 What is a Shell Script or shell scripting 13 Why shell scripting 14 Chapter 1 Challenges 16 Chapter 2: Getting Started With Shell Programming 17 The bash shell 17 Shell commands 19 The role of shells in the Linux environment 21 Other standard shells 23 Hello, World! Tutorial 25 Shebang 27 Shell Comments 29 Setting up permissions on a script 30 Execute a script 31 Debug a script 32 Chapter 2 Challenges 33 Chapter 3:The Shell Variables and Environment 34 Variables in shell 34 Assign values to shell variables 38 Default shell variables value 40 Rules for Naming variable name 41
- 3. Display the value of shell variables 42 Quoting 46 The export statement 49 Unset shell and environment variables 50 Getting User Input Via Keyboard 50 Perform arithmetic operations 54 Create an integer variable 56 Create the constants variable 57 Bash variable existence check 58 Customize the bash shell environments 59 Recalling command history 63 Path name expansion 65 Create and use aliases 67 The tilde expansion 69 Startup scripts 70 Using aliases 72 Changing bash prompt 73 Setting shell options 77 Setting system wide shell options 82 Chapter 3 Challenges 83 Chapter 4: Conditionals Execution (Decision Making) 84 Bash structured language constructs 84 Test command 86 If structures to execute code based on a condition 87 If..else..fi 89 Nested ifs 92 Multilevel if-then-else 93 The exit status of a command 94 Conditional execution 97 Logical AND && 97 Logical OR || 98 Logical Not ! 99 Conditional expression using [ 101 Conditional expression using <nowiki>[[</nowiki> 102 Numeric comparison 102 String comparison 104 File attributes comparisons 105
- 4. Shell command line parameters 110 How to use positional parameters 112 Parameters Set by the Shell 114 Create usage messages 115 Exit command 117 The case statement 119 Dealing with case sensitive pattern 123 Chapter 4 Challenges 126 Chapter 5: Bash Loops 127 The for loop statement 127 Nested for loop statement 133 The while loop statement 135 Use of : to set infinite while loop 139 The until loop statement 141 The select loop statement 143 Exit the select loop statement 146 Using the break statement 148 Using the continue statement 150 Command substitution 153 Chapter 5 Challenges 155 Chapter 6: Shell Redirection 157 Input and Output 157 Standard input 158 Standard output 159 Standard error 160 Empty file creation 161 /dev/null discards unwanted output 162 Here documents 164 Here strings 166 Redirection of standard error 167 Redirection of standard output 169 Appending redirected output 170 Redirection of both standard error and output 170 Writing output to files 171 Assigns the file descriptor (fd) to file for output 173 Assigns the file descriptor (fd) to file for input 174
- 5. Closes the file descriptor (fd) 175 Opening the file descriptors for reading and writing 175 Reads from the file descriptor (fd) 176 Executes commands and send output to the file descriptor (fd) 179 Chapter 6 Challenges 185 Chapter 7: Pipes and Filters 186 Linking Commands 186 Multiple commands 187 Putting jobs in background 188 Pipes 190 How to use pipes to connect programs 191 Input redirection in pipes 193 Output redirection in pipes 194 Why use pipes 194 Filters 195 Chapter 7 Challenges 197 Chapter 8: Traps 198 Signals 198 What is a Process? 199 How to view Processes 201 Sending signal to Processes 204 Terminating Processes 206 Shell signal values 209 The trap statement 210 How to clear trap 212 Include trap statements in a script 214 Use the trap statement to catch signals and handle errors 216 What is a Subshell? 220 Compound command 222 Exec command 223 Chapter 8 Challenges 224 Chapter 9: Functions 225 Writing your first shell function 225 Displaying functions 226 Removing functions 228
- 6. Defining functions 228 Writing functions 231 Calling functions 232 Pass arguments into a function 237 Local variable 240 Returning from a function 243 Shell functions library 245 Source command 248 Recursive function 249 Putting functions in background 251 Chapter 9 Challenges 253 Chapter 10: Interactive Scripts 254 Menu driven scripts 254 Getting information about your system 256 Bash display dialog boxes 260 Dialog customization with configuration file 263 A yes/no dialog box 267 An input dialog box 268 A password box 270 A menu box 273 A progress bar (gauge box) 276 The form dialog for input 279 Console management 281 Get the name of the current terminal 282 Fixing the display with reset 283 Get screen width and hight with tput 284 Moving the cursor with tput 284 Display centered text in the screen in reverse video 285 Set the keyboard leds 286 Turn on or off NumLock leds 286 Turn on or off CapsLock leds 287 Turn on or off ScrollLock leds 287 /etc 288 Shell scripting help 288 Recommended Books 288
- 7. References Article Sources and Contributors 289 Image Sources, Licenses and Contributors 293 Article Licenses License 294
- 8. Linux Shell Scripting Tutorial - A Beginner's handbook:About 1 Linux Shell Scripting Tutorial - A Beginner's handbook:About This document is Copyright (C) 1999-2009 by Vivek Gite [1] and its contributors. Some rights reserved. Audience This book is for students and Linux System Administrators. It provides the skills to read, write, and debug Linux shell scripts using bash shell. The book begins by describing Linux and simple scripts to automate frequently executed commands and continues by describing conditional logic, user interaction, loops, menus, traps, and functions. Finally, book covers various sys admin related scripts such as making a backup, using cron jobs, writing interactive tools, web based tools, remote login, ftp and database backup related scripts. This book is intended for Linux system administrators or students who have mastered the basics of a Linux Operating System. You should be able to: • Login to local or remote Linux system. • Use basic Linux commands, such as cp, mv, rm, man,less, chmod and others. • Create and edit text files in vi or any other text editor. • GUI is not required except for interactive GTK+ based GUI scripts. Licensing Information This book is available under Creative Commons Attribution-Noncommercial-Share Alike 3.0 Unported [2] . • You are free: • to Share — to copy, distribute and transmit the work • to Remix — to adapt the work • Under the following conditions: • Attribution — If you republish this content, we require that you: 1. Indicate that the content is from "Linux Shell Scripting Tutorial - A Beginner's handbook" (http://bash. cyberciti.biz/guide/Main_Page), and nixCraft (http://nixcraft.com/). 2. Hyperlink to the original article on the source site (e.g., http://bash.cyberciti.biz/guide/What_Is_Linux) 3. Show the author name (e.g., Vivek Gite) for all pages. 4. Hyperlink each contributors name back to their profile page on the source wiki (e.g., http://bash.cyberciti.biz/ guide/User:USERNAME) • Noncommercial — You may not use this work for commercial purposes including the Internet ad supported websites or any sort of print media. • Share Alike — If you alter, transform, or build upon this work, you may distribute the resulting work only under the same or similar license to this one. With the understanding that: • Waiver — Any of the above conditions can be waived if you get permission from the copyright holder (i.e. the Author: Vivek Gite). • Other Rights — In no way are any of the following rights affected by the license: • Your fair dealing or fair use rights; • The author's moral rights; • Rights other persons may have either in the work itself or in how the work is used, such as publicity or privacy rights.
- 9. Linux Shell Scripting Tutorial - A Beginner's handbook:About 2 • Notice — For any reuse or distribution, you must make clear to others the license terms of this work. The best way to do this is with a link to this web page (http://bash.cyberciti.biz/guide/ Linux_Shell_Scripting_Tutorial_-_A_Beginner%27s_handbook:About). History • Ver.0.8 - 1998 - First draft with only 8 pages. • Ver.0.9 - 2000 - Second draft with a few more pages. • Ver.1.0 - 2002 - Third draft published on freeos.com. • Ver.1.5r3 - 2004 - Updated version published on freeos.com. • Ver.2.0.beta - Aug-2009 - Wiki started. • This document is now in a wiki format. • All user contributed content licensed under Attribution-Noncommercial-Share Alike 3.0 Unported. Disclaimer • This web site / wiki ("Site") provides educational learning information on Linux scripting for sys admin work, but you are 100% responsible for what you do or don't do with it. • The information compiled by Vivek Gite (and its contributors) as well as the links to complimentary material are provided "as is" with no warranty, express or implied, for their accuracy or reliability. • You use these sites at your own risk, and acknowledge that, while every effort has been made to correct errors before they appear, this site may include certain inaccuracies, errors, or omissions. nixCraft makes no representations as to the suitability, reliability, availability, timeliness, and accuracy of the information on this site for any purpose. • Using this site (cyberciti.biz) means you accept its terms [3] . • All trademark within are property of their respective holders. • Although the author and its contributors believes the contents to be accurate at the time of publication, no liability is assumed for them, their application or any consequences thereof. If any misrepresentations, errors or other need of clarification is found, please contact the us immediately [4] . Please read our disclaimer [3] and privacy policy [5] . • The opinions and ideas expressed in this book are solely those of the author, and do not necessarily reflect those of nixCraft consultancy services [6] and/or my current/past employers. About the author • This book is created and maintained by Vivek Gite - a Sr. UNIX admin. Vivek is specialized in the design of high performance computing (HPC) using Linux, security and optimization for the internet and intranet usage. Vivek has a particular interest in TCP/IP, Anti DDoS, Server side optimization, computer clusters, parallel computing, HPTC and embedded Linux / FreeBSD devices etc. Visit my Linux admin blog [7] for more tutorials, guides and news about FOSS.
- 10. Linux Shell Scripting Tutorial - A Beginner's handbook:About 3 Feedback • Please give me your feedback. Whatever you see here, is based upon my own hard-earned experience. I have taught myself both through trial and error. Shoot me an email at [email protected] [8] . • If you see a typo, a spelling mistake, or an error, please edit wiki page. Alternatively, you can tell me about it by sending me an e-mail. Donations If you found this book useful please send charitable donations ($10 is minimum and recommended) to the following non-profit organization that helps to support, promote, and develop free software: • The FreeBSD Foundation [9] • The Free Software Foundation (FSF) [10] • The OpenBSD Foundation [11] • The Linux Foundation [12] References [1] http://vivekgite.com/ [2] http://creativecommons.org/licenses/by-nc-sa/3.0/ [3] http://www.cyberciti.biz/tips/disclaimer [4] http://www.cyberciti.biz/tips/contact_us [5] http://www.cyberciti.biz/tips/privacy [6] http://vivekgite.com/about/services/ [7] http://www.cyberciti.biz/ [8] mailto:[email protected] [9] http://www.freebsdfoundation.org/ [10] http://www.fsf.org/ [11] http://www.openbsdfoundation.org/ [12] http://www.linuxfoundation.org/
- 11. 4 Chapter 1: Quick Introduction to Linux What Is Linux ← Main Page Home Who created Linux → Linux is a free open-source operating system based on Unix. Linus Torvalds originally created Linux with the assistance of developers from around the world. Linux is: • Free • Unix Like • Open Source • Network operating system Strictly speaking, Linux is a kernel. A kernel provides access to the computer hardware and control access to resources such as: • Files and data. • Running programs. • Loading programs into memory. • Networks. • Security and firewall. • Other resources etc. The kernel decides who will use a resource, for how long and when.You can download the Linux kernel from the official web site. However, the Linux kernel itself is useless unless you get all the applications such as text editors, email clients, browsers, office applications, etc. Therefore, someone came up with idea of a Linux distribution. A typical Linux distribution includes: • Linux kernel. • GNU application utilities such as text editors, browsers etc. • Collection of various GUI (X windows) applications and utilities. • Office application software. • Software development tools and compilers. • Thousands of ready to use application software packages. • Linux Installation programs/scripts. • Linux post installation management tools daily work such as adding users, installing applications, etc. • And, a Shell to glue everything together. Corporate and small businesses users need support while running Linux, so companies such as Red Hat or Novell provide Linux tech-support and sell it as product. Nevertheless, community driven Linux distributions do exist such as Debian, Gentoo and they are entirely free. There are over 200+ Linux distributions. ← Main Page Home Who created Linux →
- 12. Who created Linux 5 Who created Linux ← What Is Linux Home Where can I download Linux → Linus Torvalds, of the Linux kernel In 1991 Linus Torvalds was studying UNIX at a university, where he was using a special educational experimental purpose operating system called Minix (a small version of UNIX to be used in the academic environment). However, Minix had its limitations and Linus felt he could create something better. Therefore, he developed his own version of Minix, known as Linux. Linux was Open Source right from the start. Linux is a kernel developed by Linus. The kernel was bundled with system utilities and libraries from the GNU project to create a usable operating system. Sometimes people refer to Linux as GNU/Linux because it has system utilities and libraries from the GNU project. Linus Torvalds is credited for creating the Linux Kernel, not the entire Linux operating system [1] . Linux distribution = Linux kernel + GNU system utilities and libraries + Installation scripts + Management utilities etc. Please note that Linux is now packaged for different uses in Linux distributions, which contain the sometimes modified kernel along with a variety of other software packages tailored to different requirements such as: 1. Server 2. Desktop 3. Workstation 4. Routers 5. Various embedded devices 6. Mobile phones More information on Linus Torvalds can be found on his blog. External links • Linus's Blog [2] References [1] GNU/Linux (http://www.gnu.org/gnu/gnu-linux-faq.html) FAQ by Richard Stallman [2] http://torvalds-family.blogspot.com/ ← What Is Linux Home Where can I download Linux →
- 13. Where can I download Linux 6 Where can I download Linux ← Who created Linux Home How do I Install Linux → Linux is available for download over the internet. However, this is only useful if your internet connection is fast. Another way is to order the CD-ROMs, which saves time, and the installation is fast and automatic. I recommend the following most popular Linux distributions. If you are in India then you can get a Linux distribution from the leading computer magazines such as PC Quest or Digit. Most Linux books from you local bookstore also include a Linux distribution. See the list of recommended Linux books. ← Who created Linux Home How do I Install Linux → How do I Install Linux ← Where can I download Linux Home Linux usage in everyday life → See the Linux installation section, which provides guidance and step-by-step instructions for installing Linux. ← Where can I download Linux Home Linux usage in everyday life →
- 14. Linux usage in everyday life 7 Linux usage in everyday life ← How do I Install Linux Home What is Linux Kernel → You can use Linux as a server operating system or as a stand alone operating system on your PC. As a server operating system it provides different services/network resources to a client. A server operating system must be: • Stable • Robust • Secure • High performance Linux offers all of the above characteristics plus it is free and open source. It is an excellent operating system for: • Desktop computer • Web server • Software development workstation • Network monitoring workstation • Workgroup server • Killer network services such as DHCP, Firewall, Router, FTP, SSH, Mail, Proxy, Proxy Cache server etc. ← How do I Install Linux Home What is Linux Kernel → What is Linux Kernel ← Linux usage in everyday life Home What is Linux Shell → The kernel is the heart of the Linux operating system. It manages the resources of Linux such as: • File management • Multitasking • Memory management • I/O management • Process management • Device management • Networking support including IPv4 and IPv6 • Advanced features such as virtual memory, shared libraries, demand loading, shared copy-on-write executables etc The kernel decides who will use these resources and for how long and when. It runs your programs or sets up to execute binary files. The kernel acts as an intermediary between the computer hardware and various applications.
- 15. What is Linux Kernel 8 ← Linux usage in everyday life Home What is Linux Shell → What is Linux Shell ← What is Linux Kernel Home Unix philosophy → Computers understand the language of zeros and ones known as binary language. In the early days of computing, instructions were provided using binary language, which is difficult for all of us to read and write. Therefore, in an operating system there is a special program called the shell. The shell accepts human readable commands and translates them into something the kernel can read and process. What Is a Shell? • The shell is a user program or it is an environment provided for user interaction. • It is a command language interpreter that executes commands read from the standard input device such as keyboard or from a file. • The shell gets started when you log in or open a console (terminal). • Quick and dirty way to execute utilities. • The shell is not part of system kernel, but uses the system kernel to execute programs, create files etc. • Several shells are available for Linux including: • BASH ( Bourne-Again SHell ) - Most common shell in Linux. It's Open Source. • CSH (C SHell) - The C shell's syntax and usage are very similar to the C programming language. • KSH (Korn SHell) - Created by David Korn at AT & T Bell Labs. The Korn Shell also was the base for the POSIX Shell standard specifications. • TCSH - It is an enhanced but completely compatible version of the Berkeley UNIX C shell (CSH). Please note that each shell does the same job, but each understands different command syntax and provides different built-in functions. Under MS-DOS, the shell name is COMMAND.COM which is also used for the same purpose,
- 16. What is Linux Shell 9 but it is by far not as powerful as our Linux Shells are! Shell Prompt There are various ways to get shell access: • Terminal - Linux desktop provide a GUI based login system. Once logged in you can gain access to a shell by running X Terminal (XTerm), Gnome Terminal (GTerm), or KDE Terminal (KTerm) application. • Connect via secure shell (SSH) - You will get a shell prompt as soon as you log in into remote server or workstation. • Use the console - A few Linux system also provides a text-based login system. Generally you get a shell prompt as soon as you log in to the system. How do I find Out My Current Shell Name? To find all of the available shells in your system, type the following command: cat /etc/shells In case the shells file has more than one shell listed under it, then it means that more than one shell is supported by your Platform Command Line Interface (CLI) The shell provides an interface to Linux where you can type or enter commands using the keyboard. It is known as the command line interface (CLI). To find out your current shell type following command [1] .: echo $SHELL ps $$ ps -p $$ Basic Command Line Editing You can use the following key combinations to edit and recall commands: • CTRL + L : Clear the screen. • CTRL + W : Delete the word starting at cursor. • CTRL + U : Clear the line i.e. Delete the all words from command line. • Up and Down arrow keys : Recall commands (see command history). • Tab : Auto-complete files, directory, command names and much more. • CTRL + R : Search through previously used commands (see command history) • CTRL + C : Cancel currently running commands. • CTRL + T : Swap the last two characters before the cursor. • ESC + T : Swap the last two words before the cursor.
- 17. What is Linux Shell 10 Executing A Command Type your command, and press enter key. Try this the date command which will display current date and time: date Sample outputs: Tue Apr 27 05:20:35 IST 2010 Command And File Completion The Bash shell will complete file and command names, when possible and/or when you tell them to. For example, if you type sle and pressing Tab key will make the shell automatically complete your command name. Another example, if you type ls /e and pressing Tab key will make the shell automatically complete your word to /etc as it sees that /etc/ is a directory which starts with /e. Getting Help In Linux • Most commands under Linux will come with documentation. • You can view documentation with the man command or info command. In this example, open the manpage for date command: man date • You can read info documentation as follows for the ls command: info ls • Many commands accepts --help or -h command line option. In this example, display help options for the date command: date --help • In short use any one of the following option to get more information about Linux commands: man commandName info commandName commandName -h commandName --help
- 18. What is Linux Shell 11 References [1] Command to find out current shell name (http://www.cyberciti.biz/tips/how-do-i-find-out-what-shell-im-using.html) from the nixCraft FAQ section. ← What is Linux Kernel Home Unix philosophy → Unix philosophy ← What is Linux Shell Home But how do you use the shell → The Unix philosophy is philosophical approaches to developing software based on the experience of leading developers of the Unix operating system. The following philosophical approaches also applies to Linux operating systems. • Do one thing and do it well - Write programs that do one thing and do it well. Write programs to work together. Write programs to handle text streams, because that is a universal interface. • Everything is file - Ease of use and security is offered by treating hardware as a file. • small is beautiful • Store data and configuration in flat text files - Text file is a universal interface. Easy to create, backup and move files to another system. • Use shell scripts to increase leverage and portability - Use shell script to automate common tasks across various UNIX / Linux installations. • Chain programs together to complete complex task - Use shell pipes and filters to chain small utilities that perform one task at time. • Choose portability over efficiency. • Keep it Simple, Stupid (KISS). External links • Wikipedia:Unix philosophy • The Unix Philosophy in One Lesson [1] ← What is Linux Shell Home But how do you use the shell → References [1] http://www.catb.org/~esr/writings/taoup/html/ch01s07.html
- 19. But how do you use the shell 12 But how do you use the shell ← Unix philosophy Home What is a Shell Script or shell scripting → To use the shell you simply type commands. A command is a computer program, which is built to perform a specific task. Examples of commands include: ls clear cal date If your Linux system is booted into a text mode, you can start using the shell as soon as you log in. If you started in a graphical mode (GUI), such as the Gnome desktop or Kde desktop, you can open a shell by going to Applications >> System Tools >> Terminal. Using Linux Terminal Alternatively, you can switch to a virtual console by pressing Ctrl-Alt-F1 and logging in with your username and password. To switch back to graphical mode, simply press Alt-F7. You may want to add terminal application to the panel. It's useful to have within short reach. Using The Terminal A Linux terminal provides a means by which to allow you to easily interact with your shell such as Bash. A shell is nothing but a program that interprets and executes the commands that you type at a command line prompt. When you start GNOME or KDE or X Windows Terminal, the application starts the default shell that is specified in your system account. You can switch to a different shell at any time. In this tutorial, you are going to use GNOME terminal. Configuring The Gnome Terminal Program Linux Terminal Profiles The gnome-terminal program is fully configurable. You can define profiles which set the following options for you: • Foreground and background color. • Font size and type (family). • Windows title and command • Scrollback buffer. • And much more. How Do I Edit A Profile To edit a profile: • Select Edit > Current Profile • Select the profile you want to edit, then click Edit.
- 20. But how do you use the shell 13 ← Unix philosophy Home What is a Shell Script or shell scripting → What is a Shell Script or shell scripting ← But how do you use the shell Home Why shell scripting → Normally shells are interactive. It means the shell will accept command from you (via keyboard) and execute them. However, if you store a sequence of commands to a text file and tell the shell to execute the text file instead of entering the commands, that is known as a shell program or shell script. A Shell script can be defined as - "a series of command(s) stored in a plain text file". A shell script is similar to a batch file in MS-DOS, but it is much more powerful compared to a batch file. Shell scripts are a fundamental part of the UNIX and Linux programming environment. Each shell script consists of • Shell keywords such as if..else, do..while. • Shell commands such as pwd, test, echo, continue, type. • Linux binary commands such as w, who, free etc.. • Text processing utilities such as grep, awk, cut. • Functions - add frequent actions together via functions. For example, /etc/init.d/functions file contains functions to be used by most or all system shell scripts in the /etc/init.d directory. • Control flow statments such as if..then..else or shell loops to preform repeated actions. Each script has purpose • Specific purpose - For example, backup file system and database to NAS server. • Act like a command - Each shell script executed like any command under Linux. • Script code usability - Shell scripts can be extended from existing scripts. Also, you can use functions files to package frequently used tasks. Did you know? • It is the shell that lets you run different commands without having to type the full pathname to them even when they do not exist in the current directory. • It is the shell that expands wildcard characters, such as * or ?, thus saving you laborious typing. • It is the shell that gives you the ability to run previously run commands without having to type the full command again by pressing the up arrow, or pulling up a complete list with the history command. • It is the shell that does input, output and error redirection. ← But how do you use the shell Home Why shell scripting →
- 21. Why shell scripting 14 Why shell scripting ← What is a Shell Script or shell scripting Home Chapter 1 Challenges → Shell scripts are useful for automating processes that you repeat at the prompt. Why shell scripting? • Shell scripts can take input from a user or file and output them to the screen. • Whenever you find yourself doing the same task over and over again you should use shell scripting, i.e., repetitive task automation. • Creating your own power tools/utilities. • Automating command input or entry. • Customizing administrative tasks. • Creating simple applications. • Since scripts are well tested, the chances of errors are reduced while configuring services or system administration tasks such as adding new users. Practical examples where shell scripting actively used • Monitoring your Linux system. • Data backup and creating snapshots. • Dumping Oracle or MySQL database for backup. • Creating email based alert system. • Find out what processes are eating up your system resources. • Find out available and free memory. • Find out all logged in users and what they are doing. • Find out if all necessary network services are running or not. For example if web server failed then send an alert to system administrator via a pager or an email. • Find out all failed login attempt, if login attempt are continue repeatedly from same network IP automatically block all those IPs accessing your network/service via firewall. • User administration as per your own security policies. • Find out information about local or remote servers. • Configure server such as BIND (DNS server) to add zone entries. Shell scripting is fun. It is useful to create nice (perhaps ugly) things in shell scripting. Here are few script example I use everyday: • Find out today's weather (useful when you are busy in a chat room). • Find out what that site is running (just like netcraft). • Download RSS feeds and display them as you login or in your email. • Find out the name of the MP3 file you are listening to. • Monitor your domain expiry date every day.
- 22. Why shell scripting 15 Advantages • Easy to use. • Quick start, and interactive debugging. • Time Saving. • Sys Admin task automation. • Shell scripts can execute without any additional effort on nearly any modern UNIX / Linux / BSD / Mac OS X operating system as they are written an interpreted language. Disadvantages • Compatibility problems between different platforms. • Slow execution speed. • A new process launched for almost every shell command executed. Which Shell we are going to use in this tutorial? • Bash shell. Learning Objectives After completing this tutorial, you will be able to: • Understand the basis of Linux shell scripting. • Write shell scripts and use it to save time with automated scripts. • Customize shell start-up files. • Create nifty utilities. • Control your administration tasks such as Linux user management, Linux system monitoring etc. ← What is a Shell Script or shell scripting Home Chapter 1 Challenges →
- 23. Chapter 1 Challenges 16 Chapter 1 Challenges ← Why shell scripting Home Chapter 2: Getting Started With Shell Programming → • What is the shell? • Decide whether the following sentence is true or false: 1. Linux is a collection of programs and utilities glued together by the bash shell. 2. Shell manages files and data. 3. Shell manages networks, memory and other resources. 4. Linux kernel runs programs and loads them into the memory. 5. Bash shell is a poor user interface. 6. Bourne Shell is also known as /bin/sh. 7. Bash Shell is also known as /bin/bash or /usr/local/bin/bash. 8. C Shell offers more C like syntax. 9. A few commands are built into the shell. 10. Linux file system organised as hierarchy. 11. To refer to several files with similar names you need to use wildcards. 12. Wildcards increase command typing time. 13. Command ls is used to list directories. 14. rmdir command will only remove empty directories. 15. Everything is file in Linux. 16. rm -i filename command will prompts for confirmation. 17. Linux can run many programs at the same time. 18. The bash shell is just a program. • Write a command names, which can display the files to the terminal. • Write a command to list details of all files ending in '.perl' in reverse time order. • Write a command to list your running programs. • Write a command to list files waiting to be printed. • Write a command to delete 3 files called file1.txt, file2.txt, and data1.txt. • Write a command to creates a new sub-directory called 'foo' in /tmp. • Write a command to delete the directory called 'foo'. • Write a command to read all ls command options. • Chapter 1 answers ← Why shell scripting Home Chapter 2: Getting Started With Shell Programming →
- 24. 17 Chapter 2: Getting Started With Shell Programming The bash shell ← Chapter 2: Getting Started With Shell Programming Home Shell commands → Bash is the shell, or command language interpreter, for the Linux operating system. The name is an acronym for the Bourne-Again SHell, a pun on Stephen Bourne, the author of the direct ancestor of the current Unix shell sh, which appeared in the Seventh Edition Bell Labs Research version of Unix Bash Reference Manual [1] . Introduction to BASH • Developed by GNU project. • The default Linux shell. • Backward-compatible with the original sh UNIX shell. • Bash is largely compatible with sh and incorporates useful features from the Korn shell ksh and the C shell csh. • Bash is the default shell for Linux. However, it does runs on every version of Unix and a few other operating systems such as ms-dos, os/2, and Windows platforms. Quoting from the official Bash home page: Bash is the shell, or command language interpreter, that will appear in the GNU operating system. It is intended to conform to the IEEE POSIX P1003.2/ISO 9945.2 Shell and Tools standard. It offers functional improvements over sh for both programming and interactive use. In addition, most sh scripts can be run by Bash without modification. The improvements offered by BASH include: The Bash syntax is an improved version of the Bourne shell syntax. In most cases Bourne shell scripts can be executed by Bash without any problems. • Command line editing. • Command line completion. • Unlimited size command history. • Prompt control. • Indexed arrays of unlimited size (Arrays). • Integer arithmetic in any base from two to sixty-four. • Bash startup files - You can run bash as an interactive login shell, or interactive non-login shell. See Bash startup files [2] for more information. • Bash conditional expressions: Used in composing various expressions for the test builtin or [[ or [ commands. • The Directory Stack - History of visited directories. • The Restricted Shell: A more controlled mode of shell execution. • Bash POSIX Mode: Making Bash behave more closely to what the POSIX standard specifies.
- 25. The bash shell 18 Bash v4.0 Features • Usual run time environment: POSIX • Command and file name completion - Bash can automatically fill in partially typed commands or arguments to the commands such as file name, hostname and much more. • Pipeline - Bash can chain various process using their standard streams files via Pipes. It allows you to connect stdout (command output) directly as stdin (command input) to next command. • Arithmetic support: • Integer arithmetic supported. • Floating point arithmetic is not supported. • Exponential notation is limited via printf builtin. • Date and time arithmetic is not supported. • Hash table: Bash uses a hash table to remember the full pathnames of executable files. • Pattern Matching and regular expressions are supported. • Globbing - For example, you can use *.conf to match all those conf files in /etc directory. • Directory stack is supported via pushd and popd builtins. • Command history and History completion fully supported by Bash. • Custom command prompt - Allows you to change the default prompt. Authors • Brian J. Fox authored the GNU Bash shell, in 1987. • Fox maintained Bash as the primary maintainer until 1993, at which point Chet Ramey took over. • Chet Ramey is the current maintainer of the GNU Bourne Again Shell and GNU Readline. Download Bash Shell • Bash is the default shell under Linux. The current production versions are Bash 3.x and 4.x. You can grab it from the official website [3] . External links • Bash home page [4] • Chet's home page [5] References [1] Bash Reference Manual. [2] http://bash.cyberciti.biz/bash-reference-manual/Bash-Startup-Files.html [3] http://ftp.gnu.org/gnu/bash/ [4] http://www.gnu.org/software/bash/bash.html [5] http://cnswww.cns.cwru.edu/php/chet/ ← Chapter 2: Getting Started With Shell Programming Home Shell commands →
- 26. Shell commands 19 Shell commands ← The bash shell Home The role of shells in the Linux environment → The bash shell comes with two types of commands: • Internal commands (builtins) - part of the shell itself, i.e. built into the shell. • External commands - separate binaries stored in /sbin, /usr/sbin, /usr/bin, /bin, or /usr/local/bin directories. Bash and Command Types The bash shell understands the following types of commands: • Aliases such as ll • Keywords such as if • Functions (user defined functions such as genpasswd) • Built in such as pwd • Files such as /bin/date The type command can be used find out a command type. type command The type command can be used to find out if a command is built in or an external binary file. Find out if ls is built in or an external command Type the following command at a shell prompt: type -a ls Sample Output: ls is /bin/ls To find out if history command is built in or an external command, enter: type -a history sample Output: history is a shell built in However, some commands are supplied as both internal and external commands. For example: type -a true type -a echo sample Outputs: echo is a shell built in echo is /bin/echo
- 27. Shell commands 20 List of command bash keywords and built in commands • JOB_SPEC & • (( expression )) • . filename • [[:]] • [ arg... ] • expression • alias • bg • bind • builtin • caller • case • command • compgen • complete • continue • declare • dirs • disown • echo • enable • eval • exec • exit • export • false • fc • fg • for • getopts • hash • help • history • if • jobs • kill • let • local • logout • popd • printf • pushd • pwd • read • readonly • return
- 28. Shell commands 21 • select • set • shift • shopt • source • suspend • test • time • times • trap • true • type • typeset • ulimit • umask • unalias • unset • until • variables • while ← The bash shell Home The role of shells in the Linux environment → The role of shells in the Linux environment ← Shell commands Home Other standard shells → Shell is used for various purposes under Linux. Linux user environment is made of the following components: • Kernel - The core of Linux operating system. • Shell - Provides an interface between the user and the kernel. • Terminal emulator - The xterm program is a terminal emulator for the X Window System. It allows user to enter commands and display back their results on screen. • Linux Desktop and Windows Manager - Linux desktop is collection of various software apps. It includes the file manger, the windows manager, the Terminal emulator and much more. KDE and Gnome are two examples of the complete desktop environment in Linux.
- 29. The role of shells in the Linux environment 22 Login User can login locally into the console when in runlevel # 3 or graphically when in runlevel # 5 (the level numbers may differ depending on the distribution). In both cases you need to provide username and password. Bash uses the following initialization and start-up files: 1. /etc/profile - The systemwide initialization file, executed for login shells. 2. /etc/bash.bashrc - The systemwide per-interactive-shell startup file. This is a non-standard file which may not exist on your distribution. Even if it exists, it will not be sourced unless it is done explicitly in another start-up file. 3. /etc/bash.logout - The systemwide login shell cleanup file, executed when a login shell exits. 4. $HOME/.bash_profile - The personal initialization file, executed for login shells. 5. $HOME/.bashrc - The individual per-interactive-shell startup file. 6. $HOME/.bash_logout - The individual login shell cleanup file, executed when a login shell exits. 7. $HOME/.inputrc - Individual readline initialization file. Bash Startup Scripts Script of commands executed at login to set up environment. For example, setup JAVA_HOME path. Login Shell Login shells are first shell started when you log in to the system. Login shells set environment which is exported to non-login shells. Login shell calls the following when a user logs in: • /etc/profile runs first when a user logs in runlevel # 3 (the level numbers may differ depending on the distribution). • /etc/profile.d • $HOME/.bash_profile, $HOME/.bash_login, and $HOME/.profile, runs second when a user logs in in that order. $HOME/.bash_profile calls $HOME/.bashrc, which calls /etc/bashrc (/etc/bash.bashrc). Non-Login Shell • When an interactive shell that is not a login shell is started, bash reads and executes commands from /etc/bash.bashrc or /etc/bashrc and $HOME/.bashrc, if these files exist. First, it calls $HOME/.bashrc. This calls /etc/bash.bashrc, which calls /etc/profile.d. Bash Logout Scripts • When a login shell exits, bash reads and executes commands from the file $HOME/.bash_logout, if it exists. ← Shell commands Home Other standard shells →
- 30. Other standard shells 23 Other standard shells ← The role of shells in the Linux environment Home Hello, World! Tutorial → In Linux, a lot of work is done using a command line shell. Linux comes preinstalled with Bash. Many other shells are available under Linux: • tcsh - An enhanced version of csh, the C shell. • ksh - The real, AT&T version of the Korn shell. • csh - Shell with C-like syntax, standard login shell on BSD systems. • zsh - A powerful interactive shell. • scsh- An open-source Unix shell embedded within Scheme programming language. Find out available binary packages shell list To find the list of available shell packages under Red Hat Enterprise Linux / CentOS Linux / Fedora Linux, enter: yum search shell To find the list of available shell packages under Debian Linux / Ubuntu Linux, enter: apt-cache search shell Pathnames of valid login shells /etc/shells is a text file which contains the full pathnames of valid login shells. This file is consulted by chsh and available to be queried by other programs such as ftp servers. cat /etc/shells Sample outputs: /bin/sh /bin/bash /sbin/nologin /bin/tcsh /bin/csh /bin/zsh /bin/ksh
- 31. Other standard shells 24 which command You can also use the which command to display the full path of (shell) commands: which commandname which bash Sample outputs: /bin/bash For each of its command line arguments it prints to stdout (screen) the full path of the executables that would have been executed when this argument had been entered at the shell prompt: which date which gcc which vi However, which cannot tell you exactly what the shell will execute in all cases as it is an external command. For more accurate information, use type command as follows: type -p commandName type -p bash type -p date type -p gcc type -p echo ← The role of shells in the Linux environment Home Hello, World! Tutorial →
- 32. Hello, World! Tutorial 25 Hello, World! Tutorial ← Other standard shells Home Shebang → To create a shell script: 1. Use a text editor such as vi. Put required Linux commands and logic in the file. 2. Save and close the file (exit form vi). 3. Make the script executable. 4. You should then of course test the script, and once satisfied with the output, move it to the production environment. 5. The simplest program in Bash consists of a line that tells the computer a command. Start up your favorite text editor (such as vi): vi hello.sh Essential Vi Commands • Open a file: vi filename • To go into edit mode: press ESC and type I • To go into command mode: press ESC • To save a file press ESC and type :w fileName • To save a file and quit: press ESC and type :wq OR press ESC and type :x • To jump to a line: press ESC and type the line number • To Search for a string: Press ESC and type /wordToSearch • To quit vi: Press ESC and type :q Save the following into a file called hello.sh:
- 33. Hello, World! Tutorial 26 #!/bin/bash echo "Hello, World!" echo "Knowledge is power." Save and close the file. You can run the script as follows: ./hello.sh Sample outputs: bash: ./hello.sh: Permission denied Saving and Running Your Script The command ./hello.sh displayed an error message on the screen. It will not run script since you've not set execute permission for your script hello.sh. To execute this program, type the following command: chmod +x hello.sh ./hello.sh Sample Outputs: Hello, World! Knowledge is power. See also • chmod command • vi command ← Other standard shells Home Shebang →
- 34. Shebang 27 Shebang ← Hello, World! Tutorial Home Shell Comments → The #! syntax used in scripts to indicate an interpreter for execution under UNIX / Linux operating systems. Most Linux shell and perl / python script starts with the following line: #!/bin/bash OR #!/usr/bin/perl OR #!/usr/bin/python Starting a Script With #! 1. It is called a shebang or a "bang" line. 2. It is nothing but the absolute path to the Bash interpreter. 3. It consists of a number sign and an exclamation point character (#!), followed by the full path to the interpreter such as /bin/bash. 4. All scripts under Linux execute using the interpreter specified on a first line [1] . 5. Almost all bash scripts often begin with #!/bin/bash (assuming that Bash has been installed in /bin) 6. This ensures that Bash will be used to interpret the script, even if it is executed under another shell [2] . 7. The shebang was introduced by Dennis Ritchie between Version 7 Unix and 8 at Bell Laboratories. It was then also added to the BSD line at Berkeley [3] . Ignoring An Interpreter Line (shebang) • If you do not specify an interpreter line, the default is usually the /bin/sh. But, it is recommended that you set #!/bin/bash line. /bin/sh For a system boot script, use /bin/sh: #!/bin/sh sh is the standard command interpreter for the system. The current version of sh is in the process of being changed to conform with the POSIX 1003.2 and 1003.2a specifications for the shell.
- 35. Shebang 28 An example of /bin/sh script • /etc/init.d/policykit #! /bin/sh ### BEGIN INIT INFO # Provides: policykit # Required-Start: $local_fs # Required-Stop: $local_fs # Default-Start: 2 3 4 5 # Default-Stop: # Short-Description: Create PolicyKit runtime directories # Description: Create directories which PolicyKit needs at runtime, # such as /var/run/PolicyKit ### END INIT INFO # Author: Martin Pitt <[email protected]> case "$1" in start) mkdir -p /var/run/PolicyKit chown root:polkituser /var/run/PolicyKit chmod 770 /var/run/PolicyKit ;; stop|restart|force-reload) ;; *) echo "Usage: $SCRIPTNAME {start|stop|restart|force-reload}" >&2 exit 3 ;; esac : For a typical script use the #!/bin/bash shell. External links • Explain: #!/bin/bash [4] - or #!/bin/bash -- In A Shell Script • Shebang (Unix) References [1] Howto Make Script More Portable With #!/usr/bin/env As a Shebang (http://www.cyberciti.biz/tips/ finding-bash-perl-python-portably-using-env.html) FAQ by nixCraft. [2] Bash man page and the official documentation. [3] extracts from 4.0BSD (http://www.in-ulm.de/~mascheck/various/shebang/sys1.c.html) /usr/src/sys/newsys/sys1.c. [4] http://www.cyberciti.biz/faq/binbash-interpreter-spoofing/
- 36. Shebang 29 ← Hello, World! Tutorial Home Shell Comments → Shell Comments ← Shebang Home Setting up permissions on a script → Take look at the following shell script: #!/bin/bash # A Simple Shell Script To Get Linux Network Information # Vivek Gite - 30/Aug/2009 echo "Current date : $(date) @ $(hostname)" echo "Network configuration" /sbin/ifconfig The first line is called a shebang or a "bang" line. The following are the next two lines of the program: # A Simple Shell Script To Get Linux Network Information # Vivek Gite - 30/Aug/2009 • A word or line beginning with # causes that word and all remaining characters on that line to be ignored. • These lines aren't statements for the bash to execute. In fact, the bash totally ignores them. • These notes are called comments. • It is nothing but explanatory text about script. • It makes source code easier to understand. • These notes are for humans and other sys admins. • It helps other sys admins to understand your code, logic and it helps them to modify the script you wrote. Multiple Line Comment You can use HERE DOCUMENT feature as follows to create multiple line comment: #!/bin/bash echo "Adding new users to LDAP Server..." <<COMMENT1 Master LDAP server : dir1.nixcraft.net.in Add user to master and it will get sync to backup server too Profile and active directory hooks are below COMMENT1 echo "Searching for user..."
- 37. Shell Comments 30 External links • Shell scripting: Put multiple line comment [1] ← Shebang Home Setting up permissions on a script → References [1] http://www.cyberciti.biz/faq/bash-comment-out-multiple-line-code/ Setting up permissions on a script ← Shell Comments Home Execute a script → The chmod command (change mode) is a shell command in Linux. It can change file system modes of files and directories. The modes include permissions and special modes. Each shell script must have the execute permission. Mode can be either a symbolic representation of changes to make, or an octal number representing the bit pattern for the new mode bits. Examples Allowing everyone to execute the script, enter: chmod +x script.sh OR chmod 0766 script.sh Only allow owner to execute the script, enter: chmod 0700 script.sh OR chmod u=rwx,go= script.sh OR chmod u+x script.sh To view the permissions, use: ls -l script.sh Set the permissions for the user and the group to read and execute only (no write permission), enter: chmod ug=rx script.sh
- 38. Setting up permissions on a script 31 Remove read and execute permission for the group and user, enter: chmod ug= script.sh More about chmod Type the following command to read chmod man page: man chmod Please note that script must have both executable and read permission. External links • How to use chmod and chown command [1] • Chmod Numeric Permissions Notation UNIX / Linux Command [2] ← Shell Comments Home Execute a script → References [1] http://www.cyberciti.biz/faq/how-to-use-chmod-and-chown-command/ [2] http://www.cyberciti.biz/faq/unix-linux-bsd-chmod-numeric-permissions-notation-command/ Execute a script ← Setting up permissions on a script Home Debug a script → A shell script can be executed using the following syntax: chmod +x script.sh ./script.sh You can also run the script directly as follows without setting the script execute permission: bash script.sh . script.sh In last example, you are using . (dot) command (a.k.a., source) which reads and executes commands from filename in the current shell. If filename does not contain a slash, directory names in PATH are used to find the directory containing filename. When a script is executed using either the bash command or the dot (.) command. you do not have to set executable permissions on script.
- 39. Debug a script 32 Debug a script ← Execute a script Home Chapter 2 Challenges → You need to run a shell script with -x option from the command line itself: bash -x script-name OR bash -xv script-name You can also modify shebang line to run an entire script in debugging mode: #!/bin/bash -x echo "Hello ${LOGNAME}" echo "Today is $(date)" echo "Users currently on the machine, and their processes:" w Use of set builtin command Bash shell offers debugging options which can be turn on or off using set command. • set -x : Display commands and their arguments as they are executed. • set -v : Display shell input lines as they are read. • set -n : Read commands but do not execute them. This may be used to check a shell script for syntax errors. #!/bin/bash ### Turn on debug mode ### set -x # Run shell commands echo "Hello $(LOGNAME)" echo "Today is $(date)" echo "Users currently on the machine, and their processes:" w ### Turn OFF debug mode ### set +x # Add more commands without debug mode Another example using set -n and set -o noexec: #!/bin/bash set -n # only read command but do not execute them set -o noexec echo "This is a test" # no file is created as bash will only read commands but do not
- 40. Debug a script 33 executes them >/tmp/debug.txt See also • Setting shell options External links • How to debug a Shell [1] Script under Linux or UNIX. ← Execute a script Home Chapter 2 Challenges → References [1] http://www.cyberciti.biz/tips/debugging-shell-script.html Chapter 2 Challenges ← Debug a script Home Chapter 3:The Shell Variables and Environment → • Write the following shell script, and note the output: # Script to print currently logged in users information, and current date & time. clear echo "Hello $USER" echo -e "Today is c ";date echo -e "Number of user login : c" ; who | wc -l echo "Calendar" cal exit 0 • Write a program that prints your favorite movie name. It should print director name on the next line. • Write a shell script that prints out your name and waits for the user to press the [Enter] key before the script ends. • List 10 builtin and external commands. • cd to /etc/init.d and view various system init scripts. • Chapter 2 answers ← Debug a script Home Chapter 3:The Shell Variables and Environment →
- 41. 34 Chapter 3:The Shell Variables and Environment Variables in shell ← Chapter 3:The Shell Variables and Environment Home Assign values to shell variables → You can use variables to store data and configuration options. There are two types of variable as follows: System Variables Created and maintained by Linux bash shell itself. This type of variable (with the exception of auto_resume and histchars) is defined in CAPITAL LETTERS. You can configure aspects of the shell by modifying system variables such as PS1, PATH, LANG,HISTSIZE,and DISPLAY etc. View All System Variables To see all system variables, type the following command at a console / terminal: set OR env OR printenv Sample Outputs from set command: BASH=/bin/bash BASH_ARGC=() BASH_ARGV=() BASH_LINENO=() BASH_SOURCE=() BASH_VERSINFO=([0]="3" [1]="2" [2]="39" [3]="1" [4]="release" [5]="i486-pc-linux-gnu") BASH_VERSION='3.2.39(1)-release' COLORTERM=gnome-terminal COLUMNS=158 DBUS_SESSION_BUS_ADDRESS=unix:abstract=/tmp/dbus-FSGj0JzI4V,guid=7f59a3dd0813f52d6296ee40 DESKTOP_SESSION=gnome DIRSTACK=() DISPLAY=:0.0
- 42. Variables in shell 35 EUID=1000 GDMSESSION=gnome GDM_LANG=en_IN GDM_XSERVER_LOCATION=local GNOME_DESKTOP_SESSION_ID=this-is-deprecated GPG_AGENT_INFO=/tmp/gpg-X7NqIv/S.gpg-agent:7340:1 GROUPS=() GTK_RC_FILES=/etc/gtk/gtkrc:/home/vivek/.gtkrc-1.2-gnome2 HISTFILE=/home/vivek/.bash_history HISTFILESIZE=500 HISTSIZE=500 HOME=/home/vivek HOSTNAME=vivek-desktop HOSTTYPE=i486 IFS=$' tn' LANG=en_IN LINES=57 LOGNAME=vivek MACHTYPE=i486-pc-linux-gnu MAILCHECK=60 OLDPWD=/home/vivek OPTERR=1 OPTIND=1 ORBIT_SOCKETDIR=/tmp/orbit-vivek OSTYPE=linux-gnu PATH=/usr/local/sbin:/usr/local/bin:/usr/sbin:/usr/bin:/sbin:/bin:/usr/games PIPESTATUS=([0]="0") PPID=7542 PS1='${debian_chroot:+($debian_chroot)}u@h:w$ ' PS2='> ' PS4='+ ' PWD=/tmp SESSION_MANAGER=local/vivek-desktop:/tmp/.ICE-unix/7194 SHELL=/bin/bash SHELLOPTS=braceexpand:emacs:hashall:histexpand:history:interactive-comments:monitor SHLVL=1 SSH_AGENT_PID=7339 SSH_AUTH_SOCK=/tmp/ssh-IoFXYh7194/agent.7194 TERM=xterm UID=1000 USER=vivek USERNAME=vivek WINDOWID=18874428 WINDOWPATH=7 XAUTHORITY=/home/vivek/.Xauthority XDG_DATA_DIRS=/usr/local/share/:/usr/share/:/usr/share/gdm/ XDG_SESSION_COOKIE=186611583e30fed08439ca0047067c9d-1251633372.846960-528440704
- 43. Variables in shell 36 _=set command_not_found_handle () { if [ -x /usr/lib/command-not-found ]; then /usr/bin/python /usr/lib/command-not-found -- $1; return $?; else return 127; fi } mp3 () { local o=$IFS; IFS=$(echo -en "nb"); /usr/bin/beep-media-player "$(cat $@)" & IFS=o } genpasswd () { local l=$1; [ "$l" == "" ] && l=16; tr -dc A-Za-z0-9_ < /dev/urandom | head -c ${l} | xargs } xrpm () { [ "$1" != "" ] && ( rpm2cpio "$1" | cpio -idmv ) } Commonly Used Shell Variables The following variables are set by the shell: System Variable Meaning To View Variable Value Type BASH_VERSION Holds the version of this instance of bash. echo $BASH_VERSION HOSTNAME The name of the your computer. echo $HOSTNAME CDPATH The search path for the cd command. echo $CDPATH HISTFILE The name of the file in which command history is saved. echo $HISTFILE HISTFILESIZE The maximum number of lines contained in the history file. echo $HISTFILESIZE HISTSIZE The number of commands to remember in the command history. The default value is 500. echo $HISTSIZE HOME The home directory of the current user. echo $HOME IFS The Internal Field Separator that is used for word splitting after expansion and to split lines into words with the read builtin command. The default value is <space><tab><newline>. echo $IFS LANG Used to determine the locale category for any category not specifically selected with a variable starting with LC_. echo $LANG PATH The search path for commands. It is a colon-separated list of directories in which the shell looks for commands. echo $PATH PS1 Your prompt settings. echo $PS1
- 44. Variables in shell 37 TMOUT The default timeout for the read builtin command. Alsom in an interactive shell, the value is interpreted as the number of seconds to wait for input after issuing the command. If not input provided it will logout user. echo $TMOUT TERM Your login terminal type. echo $TERM export TERM=vt100 SHELL Set path to login shell. echo $SHELL DISPLAY Set X display name echo $DISPLAY export DISPLAY=:0.1 EDITOR Set name of default text editor. export EDITOR=/usr/bin/vim • Note you may add above variable (export command) to the initialization file located in the home directory of your account such as ~/.bash_profile. How Do I Display The Value Of a Variable? Use echo command to display variable value. To display the program search path, type: echo "$PATH" To display your prompt setting, type: echo "$PS1" All variable names must be prefixed with $ symbol, and the entire construct should be enclosed in quotes. Try the following example to display the value of a variable without using $ prefix: echo "HOME" To display the value of a variable with echo $HOME: echo "$HOME" You must use $ followed by variable name to print a variable's contents. The variable name may also be enclosed in braces: echo "${HOME}" This is useful when the variable name is followed by a character that could be part of a variable name: echo "${HOME}work" Say hello to printf The printf command is just like echo command and is available under various versions of UNIX operating systems. It is a good idea to use printf if portability is a major concern for you. The syntax is as follows: printf "$VARIABLE_NAMEn" printf "String %s" $VARIABLE_NAME printf "Signed Decimal Number %d" $VARIABLE_NAME printf "Floating Point Number %f" $VARIABLE_NAME</source> To display the program search path, type: printf "$PATHn" OR
- 45. Variables in shell 38 printf "The path is set to %sn" $PATH Sample outputs: The path is set to /home/vivek/bin:/usr/local/sbin:/usr/local/bin:/usr/sbin:/usr/bin:/sbin:/bin:/usr/games User Defined Variables Created and maintained by user. This type of variable defined may use any valid variable name, but it is good practice to avoid all uppercase names as many are used by the shell. ← Chapter 3:The Shell Variables and Environment Home Assign values to shell variables → Assign values to shell variables ← Variables Home Default shell variables value → Creating and setting variables within a script is fairly simple. Use the following syntax: varName=someValue someValue is assigned to given varName and someValue must be on right side of = (equal) sign. If someValue is not given, the variable is assigned the null string. How Do I Display The Variable Value? You can display the value of a variable with echo $varName or echo ${varName}: echo "$varName" OR echo "${varName}" OR printf "${varName}" OR printf "%s" ${varName} For example, create a variable called vech, and give it a value 'Bus', type the following at a shell prompt: vech=Bus Display the value of a variable vech with echo command: echo "$vech" OR echo "${vech}"
- 46. Assign values to shell variables 39 Create a variable called _jail and give it a value "/httpd.java.jail_2", type the following at a shell prompt: _jail="/httpd.java.jail_2" printf "The java jail is located at %snStarting chroot()...n" $_jail However, n=10 # this is ok 10=no# Error, NOT Ok, Value must be on right side of = sign. Common Examples Define your home directory: myhome="/home/v/vivek" echo "$myhome" Set file path: input="/home/sales/data.txt" echo "Input file $input" Store current date (you can store the output of date by running the shell command): NOW=$(date) echo $NOW Set NAS device backup path: BACKUP="/nas05" echo "Backing up files to $BACKUP/$USERNAME" More About ${varName} Syntax You need to use ${varName} to avoid any kind of ambiguity. For example, try to print "MySHELL=>$SHELLCode<=" echo "MySHELL=>$SHELLCode<=" Sample outputs: MySHELL=><= The bash shell would try to look for an variable called SHELLCode instead of $SHELL. To avoid this kind of ambiguity use ${varName} syntax i.e. ${BASH}Code: echo "MySHELL=>${SHELL}Code<=" Sample outputs: MySHELL=>/bin/bashCode<= ← Variables Home Default shell variables value →
- 47. Default shell variables value 40 Default shell variables value ← Assign values to shell variables Home Rules for Naming variable name → You can set the default shell variable value using the following syntax. For example, try to display the value of an undefined variable called grandslam: echo $grandslam Nothing will be displayed as the variable grandslam was not set in the first place. If $grandslam unset, set name to "Maria Sharapova", enter: echo ${grandslam=Maria Sharapova} Sample outputs: Maria Sharapova You can also use the following syntax: echo ${grandslam-Maria Sharapova} • if $grandslam name is not set use default "Maria Sharapova": echo ${grandslam-Maria Sharapova} • if $grandslam unset, set name to default "Maria Sharapova": echo ${grandslam=Maria Sharapova} The := syntax If the variable is an empty, you can assign a default value. The syntax is: ${var:=defaultValue} Example Type the following command at a shell prompt: echo ${arg:=Foo} bank=HSBC echo ${bank:=Citi} unset bank echo ${bank:=Citi} In this example, the function die assigns a default value if $1 argument is missing: die(){ local error=${1:=Undefined error} echo "$0: $LINE $error" } die "File not found" die The second die call will produce an error on screen:
- 48. Default shell variables value 41 bash: $1: cannot assign in this way Update the die function as follows: die(){ local error=${1:-Undefined error} echo "$0: $LINE $error" } # call die() with an argument die "File not found" # call die() without an argument die ← Assign values to shell variables Home Rules for Naming variable name → Rules for Naming variable name ← Default shell variables value Home Echo Command → Variable name must begin with alphanumeric character or underscore character (_), followed by one or more alphanumeric or underscore characters. Valid shell variable examples: HOME SYSTEM_VERSION vech no Do not put spaces on either side of the equal sign when assigning value to variable. For example, the following is valid variable declaration: no=10 However, any of the following variable declaration will result into an error such as command not found: no =10 no= 10 no = 10 Variables names are case-sensitive, just like filenames. no=10 No=11 NO=20 nO=2 All are different variable names, to display value 20 you've to use $NO variable:
- 49. Rules for Naming variable name 42 echo "$no" # print 10 but not 20 echo "$No" # print 11 but not 20 echo "$nO" # print 2 but not 20 echo "$NO" # print 20 You can define a NULL variable as follows (NULL variable is variable which has no value at the time of definition): vech= vech="" Try to print it's value by issuing the following command: echo $vech Do not use ?,* and other special characters, to name your variable. ?no=10 #invalid out*put=/tmp/filename.txt #invalid _GREP=/usr/bin/grep #valid echo "$_GREP" ← Default shell variables value Home Echo Command → Display the value of shell variables ← Rules for Naming variable name Home Quoting → To display the value of a variable, either use echo or printf command as follows: echo $varName # not advisable unless you know what the variable contains OR (see quoting): echo "$varName" OR printf "%sn" "$varName"
- 50. Display the value of shell variables 43 Generating Output With echo command Use echo command to display a line of text or a variable value. It offers no formatting option. It is a good command to display a simple output when you know that the variable's contens will not cause problems. For most uses, printf is preferable. echo Command Examples #!/bin/bash # Display welcome message, computer name and date echo "*** Backup Shell Script ***" echo echo "*** Run time: $(date) @ $(hostname)" echo # Define variables BACKUP="/nas05" NOW=$(date +"%d-%m-%Y") # Let us start backup echo "*** Dumping MySQL Database to $BACKUP/$NOW..." # Just sleep for 3 secs sleep 3 # And we are done... echo echo "*** Backup wrote to $BACKUP/$NOW/latest.tar.gz" Printing file names with echo You can also print the file names using wildcards and echo command: cd /etc echo *.conf Sample outputs: aatv.conf adduser.conf apg.conf argus.conf atool.conf brltty.conf ca-certificates.conf chkrootkit.conf cowpoke.conf cvs-cron.conf cvs-pserver.conf dconf.conf dconf-custom.conf debconf.conf deluser.conf .... ... .. wodim.conf wpa_supplicant.conf wvdial.conf xorg.conf
- 51. Display the value of shell variables 44 Generating Output With printf command printf command format and display data on screen. However, printf does not provide a new line. You need to provide format string using % directives and escapes to format numeric and string arguments in a way that is mostly similar to the C printf() function. Use printf to generate formatted output. printf Format Directives From the printf man page: FORMAT controls the output as in C printf. Interpreted sequences are: " double quote NNN character with octal value NNN (1 to 3 digits) backslash a alert (BEL) b backspace c produce no further output f form feed n new line r carriage return t horizontal tab v vertical tab xHH byte with hexadecimal value HH (1 to 2 digits) uHHHH Unicode (ISO/IEC 10646) character with hex value HHHH (4 digits) UHHHHHHHH Unicode character with hex value HHHHHHHH (8 digits) %% a single % %b ARGUMENT as a string with '' escapes interpreted, except that octal escapes are of the form 0 or 0NNN and all C format specifications ending with one of diouxXfeEgGcs,
- 52. Display the value of shell variables 45 with ARGUMENTs converted to proper type first. Variable widths are handled. Format control string syntax is as follows: printf "%w.pLn" $varName Where, • w - Minimum field width. • p - Display number of digits after the decimal point (precision). • L - a conversion character. It can be: • s - String • d - Integer • e - Exponential • f - Floating point printf Command Examples Type the following at a shell prompt: vech="Car" printf "%sn" $vech printf "%1sn" $vech printf "%1.1sn" $vech printf "%1.2sn" $vech printf "%1.3sn" $vech printf "%10.3sn" $vech printf "%10.1sn" $vech no=10 printf "%dn" $no big=5355765 printf "%en" $big printf "%5.2en" $big sales=54245.22 printf "%fn" $sales printf "%.2fn" $sales ← Rules for Naming variable name Home Quoting →
- 53. Quoting 46 Quoting ← Echo Command Home Export Variables → Your bash shell understands special characters with special meanings. For example, $var is used to expand the variable value. Bash expands variables and wildcards, for example: echo "$PATH" echo "$PS1" echo /etc/*.conf However, sometime you do not wish to use variables or wildcards. For example, do not print value of $PATH, but just print $PATH on screen as a word. You can enable or disable the meaning of a special character by enclosing them in single quotes. This is also useful to suppress warnings and error messages while writing the shell scripts. echo "Path is $PATH" ## $PATH will be expanded OR echo 'I want to print $PATH' ## PATH will not be expanded Quoting There are three types of quotes: Quote type Name Meaning Example (type at shell prompt) " The double quote The double quote ( "quote" ) protects everything enclosed between two double quote marks except $, ', " and .Use the double quotes when you want only variables and command substitution. * Variable - Yes * Wildcards - No * Command substitution - yes The double quotes allowes to print the value of $SHELL variable, disables the meaning of wildcards, and finally allows command substitution. echo "$SHELL" echo "/etc/*.conf" echo "Today is $(date)" ' The single quote The single quote ( 'quote' ) protects everything enclosed between two single quote marks. It is used to turn off the special meaning of all characters. * Variable - No * Wildcards - No * Command substitution - No The single quotes prevents displaying variable $SHELL value, disabled the meaning of wildcards /etc/*.conf, and finally command substitution ($date) itself. echo '$SHELL' echo '/etc/*.conf' echo 'Today is $(date)' The Backslash Use backslash to change the special meaning of the characters or to escape special characters within the text such as quotation marks. You can use before dollar sign to tell the shell to have no special meaning. Disable the meaning of the next character in $PATH (i.e. do not display value of $PATH variable): echo "Path is $PATH" echo "Path is $PATH"
- 54. Quoting 47 The Backslash The backslash ( ) alters the special meaning of the ' and " i.e. it will escape or cancel the special meaning of the next character. The following will display filename in double quote: FILE="/etc/resolv.conf" echo "File is "$FILE" " Sample Outputs: File is "/etc/resolv.conf" The following will remove the special meaning of the dollar ( $ ) sign: FILE="/etc/resolv.conf" echo "File is $FILE " Sample Outputs: File is $FILE The backslash-escaped characters You can use the following backslash-escaped characters. It will get replaced as specified by the ANSI C standard. Quoting directly from bash man page: a alert (bell) b backspace e an escape character f form feed n new line r carriage return t horizontal tab v vertical tab backslash ' single quote nnn the eight-bit character whose value is the octal value nnn (one to three digits) xHH the eight-bit character whose value is the hexadecimal value HH (one or two hex digits) cx a control-x character Examples echo "Pizza bill $22.5" echo -e "a Ding donga" echo "CIFS path must be NT-Server-NameShareName" echo -e "Sr.not DVD (price) " echo -e "1t Spirited Away (INR.200)" echo -e "2t Dragon Ball Z (INR.300)" The special parameters * and @ have special meaning when in double quotes, but you can disable them with the backslash:
- 55. Quoting 48 echo "*" echo "*" echo "@" Continue command on next line You can use the backslash () as last character on line to continue command on next line: echo "A monkey-tailed boy named Goku is found by an old martial >arts expert who raises him as his grandson. One day Goku meets a >girl named Bulma and together they go on a quest to retrieve the seven Dragon Balls" You can also use the backslash while writing program or function: # Purpose: clean /tmp/$domain ? check_temp_clean() { [ "$SERVER_MODE" = "daemon" ] || return 1 [ "$SERVER_MODE" = "init" ] && return 0 # note use of the backslash character to continue command on next line [ "$SERVER_MODE" = "clean" -a -e /usr/local/etc/nixcraft/lighttpd/disk_cache.init ] && return 0 return 1 } Protecting command line arguments Type the following command to find out all c program file (*.c): find $HOME -name *.c In the above example, the *.c is expanded by the bash shell. It will try to match all filename ending with .c in the /home directory (current user's home directory) such as main.c, lib1.c, lib2.c, ssh.c, auth.c etc. You can escape the wild card using the backslash as the escape character: find $HOME -name *.c find $HOME -name *main.c find /nas01/apps/admin -iname *py You can also use the double quote find $HOME -name "*.c" ← Echo Command Home Export Variables →
- 56. The export statement 49 The export statement ← Quoting Home Unset → The export builtin automatically exports to the environment of child processes. For example, Create the variable called vech, and give it a value "Bus": vech=Bus Display the value of a variable with echo, enter: echo "$vech" Now, start a new shell instance, enter: bash Now, display back the value of a variable vech with echo, enter: echo $vech You will get an empty line as the variable vech is not exported to new process. To make the variable known to child processes, use the export command. Try the following example at a console or terminal: export backup="/nas10/mysql" echo "Backup dir $backup" bash echo "Backup dir $backup" By default all user defined variables are local. They are not exported to new processes. Use export command to export variables and functions to child processes. If no variable names or function names are given, or if the -p option is given, a list of all names that are exported in this shell is printed. An argument of -n says to remove the export property from subsequent NAMEs. export -p Please note that system environment variables are passed to new processes. ← Quoting Home Unset →
- 57. Unset shell and environment variables 50 Unset shell and environment variables ← Export Variables Home Getting User Input Via Keyboard → Use unset command to delete the variables during program execution. It can remove both functions and shell variables. vech=Bus echo $vech unset vech echo $vech ← Export Variables Home Getting User Input Via Keyboard → Getting User Input Via Keyboard ← Unset Home Perform arithmetic operations → You can accept input from the keyboard and assign an input value to a user defined shell variable using read command. read Command Syntax read -p "Prompt" variable1 variable2 variableN Where, • -p "Prompt" : Display prompt to user without a newline. • variable1 : The first input (word) is assigned to the variable1. • variable2 : The second input (word) is assigned to the variable2. Handling Input Create a script called greet.sh as follows: #!/bin/bash read -p "Enter your name : " name echo "Hi, $name. Let us be friends!" Save and close the file. Run it as follows: chmod +x greet.sh ./greet.sh Sample Outputs: Enter your name : Vivek Gite Hi, Vivek Gite. Let us be friends!
- 58. Getting User Input Via Keyboard 51 Examples Try the following examples. Multiple Input (number.sh) #!/bin/bash # read three numbers and assigned them to 3 vars read -p "Enter number one : " n1 read -p "Enter number two : " n2 read -p "Enter number three : " n3 # display back 3 numbers - punched by user. echo "Number1 - $n1" echo "Number2 - $n2" echo "Number3 - $n3" Display Domain Owner Information A shell script to display the Internet domain name owner information (domain.sh): #!/bin/bash read -p "Enter the Internet domain name (e.g. nixcraft.com) : " domain_name whois $domain_name Timeout Input You can time out read command using the -t option. It causes read to time out and return failure if a complete line of input is not read within TIMEOUT seconds. For example, if no input provided within 10 second, program will be aborted (domain2.sh): #!/bin/bash read -t 10 -p "Enter the Internet domain name (e.g. nixcraft.com) : " domain_name whois $domain_name Handling Passwords The -s option causes input coming from a terminal do not be displayed on the screen. This is useful for password handling (readpass.sh): #!/bin/bash read -s -p "Enter Password : " my_password echo echo "Your password - $my_password"
- 59. Getting User Input Via Keyboard 52 Handling multiple values Consider the following example: read -p "Enter directory to delete : " dirname echo "$dirname" Sample outputs: Enter directory to delete : foo bar /tmp/data foo bar /tmp/data The user supplied three values instead of one. The string is now made of three different fields. All three words are assigned to dirname using $IFS internal field separator. The $IFS determines how shell recognizes fields. $IFS To display default value of $IFS, enter: echo "$IFS" You will see a whitespace which is nothing but a space, a tab, and a newline (default). You can print actual values of IFS using the following command (see Here strings): cat -etv <<<"$IFS" Sample outputs: ^I$ $ Where, • $ - end of line i.e. newline • ^I$ - tab and newline But how do I use $IFS and read command together? Create a variable called nameservers and give it total 3 values as follows (note all values are separated by a whitespace): nameservers="ns1.nixcraft.net ns2.nixcraft.net ns3.nixcraft.net" Display the value of a variable nameservers with echo command or printf command: echo "$nameservers" OR printf "%s" $nameservers Now, you can simply split $nameservers using the read command as follows (see Here strings): read -r ns1 ns2 ns3 <<< "$nameservers" Where, • The read command reads input from $nameservers variable. • The default value of $IFS is used to assign values to three separate variables. Your input is broken into tokens using $IFS and assigned to three variables.
- 60. Getting User Input Via Keyboard 53 • In other words, the IFS variable worked as token delimiter or separator. • The first token (ns1.nixcraft.net) is saved as the value of the first variable ($ns1) • The second token (ns2.nixcraft.net) is saved as the value of the second variable ($ns2). • The third token (ns3.nixcraft.net) is saved as the value of the third variable ($ns3). • To display the value of each variable use echo command or printf command as follows: echo "DNS Server #1 $ns1" echo " #2 $ns2" echo " #3 $ns2" OR use the printf command printf "DNS Server #1 %sn #2 %sn #3 %sn" $ns1 $ns2 $ns3 Sample outputs: DNS Server #1 ns1.nixcraft.net #2 ns2.nixcraft.net #3 ns3.nixcraft.net How do I change the IFS separator value? Consider the following /etc/passwd line: gitevivek:x:1002:1002::/home/gitevivek:/bin/sh Assign the above line to a variable called pwd: pwd="gitevivek:x:1002:1002::/home/gitevivek:/bin/sh" Save the Internal Field Separator to a variable called old: old="$IFS" Set the Internal Field Separator to a colon (i.e. change the Internal Field Separator): IFS=: Read $pwd and generate tokens using $IFS and store them into respective fields: read -r login password uid gid info home shell <<< "$pwd" printf "Your login name is %s, uid %d, gid %d, home dir set to %s with %s as login shelln" $login $uid $gid $home $shell Sample outputs: Your login name is gitevivek, uid 1002, gid 1002, home dir set to /home/gitevivek with /bin/sh as login shell Finally, restore the Internal Field Separator value using $old: IFS="$old" Where, • : - act as token separator on $pwd i.e. the contents of the IFS variable are used as token delimiters. • login - Field # 1 is generated using the first token and is saved as the value of the first variable ($login)
- 61. Getting User Input Via Keyboard 54 • password - Field # 2 is generated using the second token and is saved as the value of the second variable ($password) • uid - Field # 3 and so on... • gid - Field # 4 • info - Field # 5 • home - Field # 6 • shell - Field # 7 See also • $IFS • $* • $@ • read command ← Unset Home Perform arithmetic operations → Perform arithmetic operations ← Getting User Input Via Keyboard Home Create an integer variable → You can perform math operations on Bash shell variables. The bash shell has built-in arithmetic option. You can also use external command such as expr and bc calculator. Arithmetic Expansion in Bash Shell Arithmetic expansion and evaluation is done by placing an integer expression using the following format: $((expression)) $(( n1+n2 )) $(( n1/n2 )) $(( n1-n2 )) Examples Add two numbers on fly using the echo command: echo $(( 10 + 5 )) Add two numbers using x and y variable. Create a shell program called add.sh using a text editor: #!/bin/bash x=5 y=10 ans=$(( x + y )) echo "$x + $y = $ans" Save and close the file. Run it as follows:
- 62. Perform arithmetic operations 55 chmod +x add.sh ./add.sh Sample Outputs: 5 + 10 = 15 Create an interactive program using the read command called add1.sh using a text editor: #!/bin/bash read -p "Enter two numbers : " x y ans=$(( x + y )) echo "$x + $y = $ans" Save and close the file. Run it as follows: chmod +x add1.sh ./add1.sh Sample Outputs: Enter two numbers : 20 30 20 + 30 = 50 Mathematical Operators With Integers Operator Description Example Evaluates To + Addition echo $(( 20 + 5 )) 25 - Subtraction echo $(( 20 - 5 )) 15 / Division echo $(( 20 / 5 )) 4 * Multiplication echo $(( 20 * 5 )) 100 % Modulus echo $(( 20 % 3 )) 2 ++ post-increment (add variable value by 1) x=5 echo $(( x++ )) 6 -- post-decrement (subtract variable value by 1) x=5 echo $(( x-- )) 4 ** Exponentiation x=2 y=3 echo $(( x ** y )) 8 Order of Precedence Operators are evaluated in order of precedence. The levels are listed in order of decreasing precedence (quoting form the bash man page). id++ id-- variable post-increment and post-decrement ++id --id variable pre-increment and pre-decrement - + unary minus and plus
- 63. Perform arithmetic operations 56 ! ~ logical and bitwise negation ** exponentiation * / % multiplication, division, remainder + - addition, subtraction << >> left and right bitwise shifts <= >= < > comparison == != equality and inequality & bitwise AND ^ bitwise exclusive OR | bitwise OR && logical AND || logical OR expr?expr:expr conditional operator = *= /= %= += -= <<= >>= &= ^= |= assignment expr1 , expr2 comma ← Getting User Input Via Keyboard Home Create an integer variable → Create an integer variable ← Perform arithmetic operations Home Create the constants variable → • To create an integer variable use the declare command as follows: declare -i y=10 echo $y • Create a shell script called intmath.sh: #!/bin/bash # set x,y and z to an integer data type declare -i x=10 declare -i y=10 declare -i z=0 z=$(( x + y )) echo "$x + $y = $z" # try setting to character 'a' x=a z=$(( x + y )) echo "$x + $y = $z"
- 64. Create an integer variable 57 Save and close the file. Run it as follows: chmod +x intmath.sh ./intmath.sh Sample outputs: 10 + 10 = 20 0 + 10 = 10 • When you try to set the variable x to character 'a', shell converted it to an integer attribute i.e. zero number. ← Perform arithmetic operations Home Create the constants variable → Create the constants variable ← Create an integer variable Home Bash variable existence check → • You can create the constants variables using the readonly command or declare command. • The readonly buitin syntax is as follows: readonly var readonly varName=value • The declare builtin syntax is as follows: declare -r var declare -r varName=value Example • Create a constant variable called DATA and make it's value is always the same throughout the shell script i.e. it can't be changed: readonly DATA=/home/sales/data/feb09.dat echo $DATA /home/sales/data/feb09.dat DATA=/tmp/foo # Error ... readonly variable • You cannnot unset (delete) the readonly variable: unset DATA Sample outputs: bash: unset: DATA: cannot unset: readonly variable ← Create an integer variable Home Bash variable existence check →
- 65. Bash variable existence check 58 Bash variable existence check ← Create the constants variable Home Customize the bash shell environments → • If the variable is not defined, you can stop executing the Bash script with the following syntax: ${varName?Error varName is not defined} ${varName:?Error varName is not defined or is empty} • This is useful for a sanity checking • The script will stop executing if the variable is not defined. Example • Create a shell script called varcheck.sh: #!/bin/bash # varcheck.sh: Variable sanity check with :? path=${1:?Error command line argument not passed} echo "Backup path is $path." echo "I'm done if $path is set." Run it as follows: chmod +x varcheck.sh ./varcheck.sh /home Sample outputs: Backup path is /home. I'm done if $path is set. Run the script without any arguments: ./varcheck.sh Sample outputs: ./varcheck.sh: line 3: 1: Error command line argument not passed ← Customize the bash shell environments Home Chapter 3 Challenges →
- 66. Customize the bash shell environments 59 Customize the bash shell environments ← Bash variable existence check Home Recalling command history → • Strictly speaking there are two types of shell variables: 1. Local variables (shell variable) - Used by shell and or user scripts. All user created variables are local unless exported using the export command. 2. Environment variables - Used by shell or user but they are also passed onto other command. Environment variables are passed to subprocesses or subshells. How do I configure and customize the Bash shell environment? • Your Bash shell can be configured using the following: 1. Variables 2. set command 3. shopt command How do I view local variables? Use the set built-in command to view all variables: set Usually, all upper-case variables are set by bash. For example, echo $SHELL echo $MAIL How do I export local variables? Use the export command: export EDITOR=/usr/bin/vim # export DISPLAY environment variable and run xeyes export DISPLAY=localhost:11.0 xeyes Be careful when changing the shell variables. For a complete list of variables set by shell, read the man page for bash by typing the following command: man bash
- 67. Customize the bash shell environments 60 How do I view environment variables? Use the env command to view all environment variables: env Sample outputs: ORBIT_SOCKETDIR=/tmp/orbit-vivek SSH_AGENT_PID=4296 GPG_AGENT_INFO=/tmp/gpg-ElCDl5/S.gpg-agent:4297:1 TERM=xterm SHELL=/bin/bash XDG_SESSION_COOKIE=186611583e30fed08439ca0047067c9d-1255929792.297209-1700262470 GTK_RC_FILES=/etc/gtk/gtkrc:/home/vivek/.gtkrc-1.2-gnome2 WINDOWID=48252673 GTK_MODULES=canberra-gtk-module USER=vivek SSH_AUTH_SOCK=/tmp/keyring-s4fcR1/socket.ssh GNOME_KEYRING_SOCKET=/tmp/keyring-s4fcR1/socket SESSION_MANAGER=local/vivek-desktop:/tmp/.ICE-unix/4109 USERNAME=vivek DESKTOP_SESSION=gnome PATH=/usr/local/sbin:/usr/local/bin:/usr/sbin:/usr/bin:/sbin:/bin:/usr/games GDM_XSERVER_LOCATION=local PWD=/home/vivek LANG=en_IN GDM_LANG=en_IN GDMSESSION=gnome SHLVL=1 HOME=/home/vivek GNOME_DESKTOP_SESSION_ID=this-is-deprecated LOGNAME=vivek DBUS_SESSION_BUS_ADDRESS=unix:abstract=/tmp/dbus-16XVNAMkFB,guid=0acb6a08e3992ccc7338726c XDG_DATA_DIRS=/usr/local/share/:/usr/share/:/usr/share/gdm/ WINDOWPATH=7 DISPLAY=:0.0 COLORTERM=gnome-terminal XAUTHORITY=/home/vivek/.Xauthority OLDPWD=/usr/share/man _=/usr/bin/env
- 68. Customize the bash shell environments 61 Common Environment Variables • HOME - Your home directory path. • PATH - Set your executable search path. • PWD - Your current working directory. • See more standard environment variables list. How do I locate command? The which command displays the pathnames of the files which would be executed in the current environment. It does this by searching the PATH for executable files matching the names of the arguments. which command-name Show fortune command path which print a random, hopefully interesting, adage on screen. Type the following command: which fortune Sample output: /usr/games/fortune Display your current PATH: echo $PATH Sample outputs: /usr/local/sbin:/usr/local/bin:/usr/sbin:/usr/bin:/sbin:/bin:/usr/games Customize your PATH variable and remove /usr/games from PATH: export PATH=/usr/local/sbin:/usr/local/bin:/usr/sbin:/usr/bin:/sbin:/bin Now, try searching fortune command path, enter: which fortune Try executing fortune command: fortune Sample outputs: -bash: fortune: command not found The fortune command could not be located because '/usr/games' is not included in the PATH environment variable. You can type full command path (/usr/games/fortune) or simply add /usr/games to PATH variable: export PATH=$PATH:/usr/games fortune Sample outputs: Your lucky number has been disconnected.
- 69. Customize the bash shell environments 62 whereis command The whereis command is used to locate the binary, source, and manual page files for a command. whereis command-name whereis ls Sample outputs: ls: /bin/ls /usr/share/man/man1/ls.1.gz whatis command The whatis command is used display a short description about command. whatis command searches the manual page names and displays the manual page descriptions for a command: whatis command-name whatis date whatis ifconfig whatis ping Sample outputs: date (1) - print or set the system date and time ifconfig (8) - configure a network interface ping (8) - send ICMP ECHO_REQUEST to network hosts ← Bash variable existence check Home Recalling command history →
- 70. Recalling command history 63 Recalling command history ← Customize the bash shell environments Home Path name expansion → • Bash keeps a command history in buffer or a default file called ~/.bash_history. • The history buffer can hold many commands. • Use history command to display a list of command you entered at a shell prompt. You can also repeat commands stored in history. • The history command displays the history list with line numbers. • By default history is enabled but can be disabled using set builtin command. • You can recall the basic command with arrow keys. See list of executed commands Type the following command history Sample outputs: 3 tail -f /var/log/maillog 4 cat /etc/resolv.conf 5 vnstat 6 vnstat -m 7 rpm -qa | grep vnstat 8 yum update vnstat 9 cd /opt/ 10 wget http://humdi.net/vnstat/vnstat-1.9.tar.gz 11 tar -zxvf vnstat-1.9.tar.gz 12 cd vnstat-1.9 13 ls 14 vi INSTALL 15 make 16 cd examples/ 17 ls 18 vi vnstat.cgi 19 cd .. 20 ls 21 cd cfg/ 22 ls 23 vi vnstat.conf 24 cd /t, 25 cd /tmp/ 26 yumdownloader --source vnstat 27 rpm -ivh vnstat-1.6-1.el5.src.rpm 28 cd -
- 71. Recalling command history 64 Recall commands Simply hit [Up] and [Down] arrow keys. Interactively search history Press [CTRL-r] from the shell prompt to search backwords through history buffer or file for a command: (reverse-i-search)`rpm ': rpm -ql rhn-client-tools-0.4.20-9.el5 To repeat last command Just type !! at a shell prompt: date !! To repeat last command started with ... Recall the most recent command starting with vn date vnstat ls ifconfig route -n !vn To repeat a command by its number Recall to command line number 13: history !13 See history command help page for more detailed information about the events and usage: man bash help history ← Create the constants variable Home Path name expansion →
- 72. Path name expansion 65 Path name expansion ← Recalling command history Home Create and use aliases → • Bash shell support path name expansion using the following techniques. Curly braces • A curly braces ({..}) expands to create pattern and syntax is: { pattern1, pattern2, patternN } text{ pattern1, pattern2, patternN } text1{ pattern1, pattern2, patternN }text2 command something/{ pattern1, pattern2, patternN } • It will save command typing time. • Arbitrary strings may be generated. Examples Create a string pattern: echo I like {tom,jerry} Sample outputs: I like tom jerry A string is created, however this can be used to create unique file names: echo file{1,2,3}.txt Sample outputs: file1.txt file2.txt file3.txt OR echo file{1..5}.txt Sample outputs: file1.txt file2.txt file3.txt file4.txt file5.txt The filenames generated do not need to exist. You can also run a command for every pattern inside the braces. Usaully, you can type the following to list three files: ls -l /etc/resolv.conf /etc/hosts /etc/passwd But, with curly braces: ls /etc/{resolv.conf,hosts,passwd} Sample outputs: To remove files called hello.sh, hello.py, hello.pl, and hello.c, enter: rm -v hello.{sh,py,pl,c}
- 73. Path name expansion 66 Another example: D=/webroot mkdir -p $D/{dev,etc,bin,sbin,var,tmp} Wildcards • Bash supports the following three simple wildcards: 1. * - Matches any string, including the null string 2. ? - Matches any single (one) character. 3. [...] - Matches any one of the enclosed characters. Examples To display all configuration (.conf) files stored in /etc directory, enter: ls /etc/*.conf To display all C project header files, enter: ls *.h To display all C project .c files, enter: ls *.c You can combine wildcards with curly braces: ls *.{c,h} Sample outputs: f.c fo1.c fo1.h fo2.c fo2.h fo3.c fo3.h fo4.c fo4.h fo5.c fo5.h t.c To list all png file (image1.png, image2.png...image7.png, imageX.png), enter: ls image?.png To list all file configuration file start with either letter a or b, enter: ls /etc/[ab]*.conf ← Recalling command history Home Create and use aliases →
- 74. Create and use aliases 67 Create and use aliases ← Path name expansion Home The tilde expansion → • An alias is nothing but shortcut to commands. • Use alias command to display list of all defined aliases. • Add user defined aliases to ~/.bashrc file. Create and use aliases Use the following syntax: alias name='command' alias name='command arg1 arg2' Examples Create an aliase called c to clear the terminal screen, enter: alias c='clear' To clear the terminal, enter: c Create an aliase called d to display the system date and time, enter: alias d='date' d Sample outputs: Tue Oct 20 01:38:59 IST 2009 How do I remove the alias? • Aliases are created and listed with the alias command, and removed with the unalias command. The syntax is: unalias alias-name unalias c unalias c d To list currently defined aliases, enter: alias alias c='clear' alias d='date' If you need to unalise a command called d, enter: unalias d alias
- 75. Create and use aliases 68 If the -a option is given, then remove all alias definitions, enter: unalias -a alias How do I permanently add aliases to my session? • If you want to add aliases for every user, place them either in /etc/bashrc or /etc/profile.d/useralias.sh file. Please note that you need to create /etc/profile.d/useralias.sh file. • User specific alias must be placed in ~/.bashrc ($HOME/.bashrc) file. Sample ~/.bashrc file • Example ~/.bashrc script: # make sure bc start with standard math library alias bc='bc -l' # protect cp, mv, rm command with confirmation alias cp='cp -i' alias mv='mv -i' alias rm='rm -i' # Make sure dnstop only shows eth1 stats alias dnstop='dnstop -l 5 eth1' # Make grep pretty alias grep='grep --color' # ls command shortcuts alias l.='ls -d .* --color=tty' alias ll='ls -l --color=tty' alias ls='ls --color=tty' # Centos/RHEL server update alias update='yum update' alias updatey='yum -y update' # vi is vim alias vi='vim' # Make sure vnstat use eth1 by default alias vnstat='vnstat -i eth1'
- 76. Create and use aliases 69 How do I ignore an alias? Consider the following example: alias ls='ls --color' To ignore an aliase called ls and run ls command, enter [1] : ls OR "ls" Or just use the full path: /bin/ls $(which ls) References [1] Bash Shell: Ignore Aliases / Functions When Running A Command (http://www.cyberciti.biz/faq/ ignore-shell-aliases-functions-when-running-command/) ← Path name expansion Home The tilde expansion → The tilde expansion ← Create and use aliases Home Startup scripts → • The tilde (~) may be used to refer your own home directory or other users home directory. Syntax Display your home directory file listing: ls ~ Display a file called .bashrc stored in your home directory: ls ~/.bashrc cat ~/.bashrc • If the tilde-prefix is a ~+, the value of the shell variable PWD replaces the tilde-prefix. pwd ls ~+ • If the tilde-prefix is a ~-, the value of the shell variable OLDPWD, if it is set, is substituted. cd /etc pwd
- 77. The tilde expansion 70 cd /bin pwd echo $OLDPWD # display /etc/ directory listing and not /bin ls ~- ← Create and use aliases Home Startup scripts → Startup scripts ← The tilde expansion Home Using aliases → If you'd like to set the bash environment variables permanently, add your settings to the initialization file located in the home directory of your account $HOME/.bash_profile. Script Execution Order 1. /etc/profile - It contains Linux system wide environment and startup programs. This file runs first when a user logs in to the system. This file also act as a system-wide profile file for the bash shell. 2. /etc/profile.d - /etc/profile calls /etc/profile.d/. It is a directory and all scripts in this directory called by /etc/profile using a for loop. This file runs second when a user logs in. 3. ~/.bash_profile or $HOME/.bash_profile - Finally, the file ~/.bash_profile is called in the users home directory ($HOME). This file runs third when a user logs in. This file calls ~/.bashrc in the users home directory. Please note that each script can add or undo changes made in previously called script. For example, the PS1 variable is set in the /etc/profile, but it can be modified in the ~/.bash_profile or ~/.bashrc file. Usage • Use above files to customize your environment. • Typical examples: 1. Set PATH and PS1 (shell prompt) variables. 2. Set default printer via PRINTER variable. 3. Set default text editor via EDITOR variable. 4. Set default pager via PAGER variable. 5. Set default umask (file mode creation mask). 6. Override and remove unwanted settings such as variables or aliases (undo changes). 7. Set up environment. 8. Set up aliases. 9. Set up functions.
- 78. Startup scripts 71 How do I view dot (.) files? Type the following command in your $HOME directory: ls -a OR ls -A | less Sample outputs: .bash_logout .bash_profile .bashrc domain-check-2.txt .mozilla safe s.img test12 test1.csv .zshrc To view contains of the file, enter: cat .bash_profile OR cat $HOME/.bash_profile OR cat ~/.bash_profile See also • The role of shells in the Linux environment ← The tilde expansion Home Using aliases →
- 79. Using aliases 72 Using aliases ← Startup scripts Home Changing bash prompt → • Task: Customize your bash shell environment by creating alias as follows: Alias The system will run... c Clear the screen update Update and install the newest versions of all packages currently installed on the Debian system. ports Lists all listening TCP/UDP ports with the PID of the associated process. vi Run vim text editor instead of old vi. • Edit ~/.bashrc file: vi ~/.bashrc Append the following aliases: alias c='clear' alias update='apt-get update && apt-get upgrade' alias ports='netstat -tulpn' alias vi='vim' • Save and close the file. Test your changed by doing logout and login back operation. Or simply type the following: . ~/bashrc OR bash • To list all your aliases, enter: alias See also • Create and use aliases • Bash Shell Temporarily Disable an Alias [1] ← Startup scripts Home Changing bash prompt →
- 80. Using aliases 73 References [1] http://www.cyberciti.biz/faq/bash-shell-temporarily-disable-an-alias/ Changing bash prompt ← Using aliases Home Setting shell options → • Task: You need to customize your bash prompt by editing PS1 variable. • Display, your current prompt setting, enter: echo $PS1 Sample outputs: u@h:w$ • For testing purpose set PS1 as follows and notice the change: PS1='your wish is my command : ' Sample outputs: vivek@vivek-desktop:~$ PS1='your wish is my command : ' your wish is my command : Customizing Prompt Bash shell allows prompt strings to be customized by inserting a number of backslash-escaped special characters. Quoting from the bash man page: Sequence Description a An ASCII bell character (07) d The date in "Weekday Month Date" format (e.g., "Tue May 26") e An ASCII escape character (033) h The hostname up to the first . H The hostname (FQDN) j The number of jobs currently managed by the shell l The basename of the shell’s terminal device name n Newline r Carriage return s The name of the shell, the basename of $0 (the portion following the final slash) t The current time in 24-hour HH:MM:SS format T The current time in 12-hour HH:MM:SS format @ The current time in 12-hour am/pm format A The current time in 24-hour HH:MM format u The username of the current user v The version of bash (e.g., 2.00)
- 81. Changing bash prompt 74 V T The release of bash, version + patch level (e.g., 2.00.0) w The current working directory, with $HOME abbreviated with a tilde W The basename of the current working directory, with $HOME abbreviated with a tilde ! The history number of this command # The command number of this command $ If the effective UID is 0, a #, otherwise a $ nnn The character corresponding to the octal number nnn A backslash [ Begin a sequence of non-printing characters, which could be used to embed a terminal control sequence into the prompt ] End a sequence of non-printing characters</pre> You can use above backslash-escaped sequence to display name of the host with current working directory: PS1='h W $ ' Adding color to prompt It is quite easy to add colors to your prompt. Set green color promot for normal user account [1] : export PS1='[e[1;32m][u@h W]$[e[0m] ' And red color prompt for root user account: export PS1='[e[1;31m][u@h W]$[e[0m] ' How do I make prompt setting permanent? Edit your ~/.bashrc or ~/.bash_profile vi ~/.bashrc Append your PS1 definition: export PS1='[e[1;32m][u@h W]$[e[0m] ' Save and close the file. PROMPT_COMMAND variable If PROMPT_COMMAND environment variable set, the value is executed as a command prior to issuing each primary prompt. In other words, the contents of this variable are executed as a regular Bash command just before Bash displays a prompt [2] : PROMPT_COMMAND="echo Yahooo" Sample outputs: [vivek@vivek-desktop man]$ PROMPT_COMMAND="echo Yahooo" Yahooo [vivek@vivek-desktop man]$ date Tue Oct 20 23:50:01 IST 2009 Yahooo
- 82. Changing bash prompt 75 Creating complex prompt Edit ~/.bashrc file: vi ~/.bashrc Add the following two shell functions [3] bash_prompt_command() { # How many characters of the $PWD should be kept local pwdmaxlen=25 # Indicate that there has been dir truncation local trunc_symbol=".." local dir=${PWD##*/} pwdmaxlen=$(( ( pwdmaxlen < ${#dir} ) ? ${#dir} : pwdmaxlen )) NEW_PWD=${PWD/#$HOME/~} local pwdoffset=$(( ${#NEW_PWD} - pwdmaxlen )) if [ ${pwdoffset} -gt "0" ] then NEW_PWD=${NEW_PWD:$pwdoffset:$pwdmaxlen} NEW_PWD=${trunc_symbol}/${NEW_PWD#*/} fi } bash_prompt() { case $TERM in xterm*|rxvt*) local TITLEBAR='[033]0;u:${NEW_PWD}007]' ;; *) local TITLEBAR="" ;; esac local NONE="[033[0m]" # unsets color to term's fg color # regular colors local K="[033[0;30m]" # black local R="[033[0;31m]" # red local G="[033[0;32m]" # green local Y="[033[0;33m]" # yellow local B="[033[0;34m]" # blue local M="[033[0;35m]" # magenta local C="[033[0;36m]" # cyan local W="[033[0;37m]" # white # emphasized (bolded) colors local EMK="[033[1;30m]" local EMR="[033[1;31m]" local EMG="[033[1;32m]"
- 83. Changing bash prompt 76 local EMY="[033[1;33m]" local EMB="[033[1;34m]" local EMM="[033[1;35m]" local EMC="[033[1;36m]" local EMW="[033[1;37m]" # background colors local BGK="[033[40m]" local BGR="[033[41m]" local BGG="[033[42m]" local BGY="[033[43m]" local BGB="[033[44m]" local BGM="[033[45m]" local BGC="[033[46m]" local BGW="[033[47m]" local UC=$W # user's color [ $UID -eq "0" ] && UC=$R # root's color PS1="$TITLEBAR ${EMK}[${UC}u${EMK}@${UC}h ${EMB}${NEW_PWD}${EMK}]${UC}$ ${NONE}" # without colors: PS1="[u@h ${NEW_PWD}]$ " # extra backslash in front of $ to make bash colorize the prompt } # init it by setting PROMPT_COMMAND PROMPT_COMMAND=bash_prompt_command bash_prompt unset bash_prompt External links • How to: Change / Setup bash custom prompt (PS1) [4] • BASH Shell change the color of my shell prompt under Linux or UNIX [5] • Color Bash Prompt [6] • Bash Prompt HOWTO [7] ← Using aliases Home Setting shell options →
- 84. Changing bash prompt 77 References [1] BASH Shell change the color of my shell prompt under Linux or UNIX (http://www.cyberciti.biz/faq/ bash-shell-change-the-color-of-my-shell-prompt-under-linux-or-unix/) [2] PROMPT_COMMAND (http://tldp.org/HOWTO/Bash-Prompt-HOWTO/x264.html) from Bash prompt howto [3] Color bash prompt (http://wiki.archlinux.org/index.php/Color_Bash_Prompt) code taken from the official Arch Linux wiki [4] http://www.cyberciti.biz/tips/howto-linux-unix-bash-shell-setup-prompt.html [5] http://www.cyberciti.biz/faq/bash-shell-change-the-color-of-my-shell-prompt-under-linux-or-unix/ [6] http://wiki.archlinux.org/index.php/Color_Bash_Prompt [7] http://tldp.org/HOWTO/Bash-Prompt-HOWTO/ Setting shell options ← Changing bash prompt Home Setting system wide shell options → • Task: Make changes to your bash shell environment using set and shopt commands. • The set and shopt command controls several values of variables controlling shell behavior. List currently configured shell options Type the following command: set -o Sample outputs: allexport off braceexpand on emacs on errexit off errtrace off functrace off hashall on histexpand on history on ignoreeof off interactive-comments on keyword off monitor on noclobber off noexec off noglob off nolog off notify off nounset off onecmd off physical off pipefail off posix off
- 85. Setting shell options 78 privileged off verbose off vi off xtrace off • See set command for detailed explanation of each variable. How do I set and unset shell variable options? To set shell variable option use the following syntax: set -o variableName To unset shell variable option use the following syntax: set +o variableName Examples Disable <CTRL-d> which is used to logout of a login shell (local or remote login session over ssh). set -o ignoreeof Now, try pressing [CTRL-d] Sample outputs: Use "exit" to leave the shell. Turn it off, enter: set +o ignoreeof shopt command You can turn on or off the values of variables controlling optional behavior using the shopt command. To view a list of some of the currently configured option via shopt, enter: shopt shopt -p Sample outputs: cdable_vars off cdspell off checkhash off checkwinsize on cmdhist on compat31 off dotglob off execfail off expand_aliases on extdebug off extglob off extquote on failglob off force_fignore on gnu_errfmt off
- 86. Setting shell options 79 histappend off histreedit off histverify off hostcomplete on huponexit off interactive_comments on lithist off login_shell off mailwarn off no_empty_cmd_completion off nocaseglob off nocasematch off nullglob off progcomp on promptvars on restricted_shell off shift_verbose off sourcepath on xpg_echo off How do I enable (set) and disable (unset) each option? To enable (set) each option, enter: shopt -s optionName To disable (unset) each option, enter: shopt -u optionName Examples If cdspell option set, minor errors in the spelling of a directory name in a cd command will be corrected. The errors checked for are transposed characters, a missing character, and one character too many. If a correction is found, the corrected file name is printed, and the command proceeds. For example, type the command (note /etc directory spelling): cd /etcc Sample outputs: bash: cd: /etcc: No such file or directory Now, turn on cdspell option and try again the same cd command, enter: shopt -s cdspell cd /etcc Sample outputs: /etc [vivek@vivek-desktop /etc]$
- 87. Setting shell options 80 Customizing Bash environment with shopt and set Edit your ~/.bashrc, enter: vi ~/.bashrc Add the following commands: # Correct dir spellings shopt -q -s cdspell # Make sure display get updated when terminal window get resized shopt -q -s checkwinsize # Turn on the extended pattern matching features shopt -q -s extglob # Append rather than overwrite history on exit shopt -s histappend # Make multi-line commandsline in history shopt -q -s cmdhist # Get immediate notification of bacground job termination set -o notify # Disable [CTRL-D] which is used to exit the shell set -o ignoreeof # Disable core files ulimit -S -c 0 > /dev/null 2>&1 How do I setup environment variables? Simply add the settings to ~/.bashrc: # Store 5000 commands in history buffer export HISTSIZE=5000 # Store 5000 commands in history FILE export HISTFILESIZE=5000 # Avoid duplicates in hisotry export HISTIGNORE='&:[ ]*' # Use less command as a pager export PAGER=less # Set vim as default text editor export EDITOR=vim
- 88. Setting shell options 81 export VISUAL=vim export SVN_EDITOR="$VISUAL" # Oracle database specific export ORACLE_HOME=/usr/lib/oracle/xe/app/oracle/product/10.2.0/server export ORACLE_SID=XE export NLS_LANG=$($ORACLE_HOME/bin/nls_lang.sh) # Set JAVA_HOME export JAVA_HOME=/usr/lib/jvm/java-6-sun/jre # Add ORACLE, JAVA and ~/bin bin to PATH export PATH=$PATH:$ORACLE_HOME/bin:$HOME/bin:$JAVA_HOME/bin # Secure SSH login stuff using keychain # No need to input password again ever /usr/bin/keychain $HOME/.ssh/id_dsa source $HOME/.keychain/$HOSTNAME-sh # Turn on Bash command completion source /etc/bash_completion # MS-DOS / XP cmd like stuff alias edit=$VISUAL alias copy='cp' alias cls='clear' alias del='rm' alias dir='ls' alias md='mkdir' alias move='mv' alias rd='rmdir' alias ren='mv' alias ipconfig='ifconfig' # Other Linux stuff alias bc='bc -l' alias diff='diff -u' # get updates from RHN alias update='yum -y update' # set eth1 as default alias dnstop='dnstop -l 5 eth1' alias vnstat='vnstat -i eth1' # force colorful grep output alias grep='grep --color'
- 89. Setting shell options 82 # ls stuff alias l.='ls -d .* --color=tty' alias ll='ls -l --color=tty' alias ls='ls --color=tty' ← Changing bash prompt Home Setting system wide shell options → Setting system wide shell options ← Setting shell options Home Chapter 3 Challenges → • By default /etc/profile file act as a system-wide profile file for the Bash shell. • You can force setting using this file for all user. However, it is recommended that you use /etc/profile.d file under CentOS / Fedora / Redhat Enterprise Linux. For all other distribution edit /etc/profile file. • Task: Setting up a JAVA_HOME and PATH settings for all user. • Create /etc/profile.d/java.sh file, enter: #!/bin/bash export JAVA_HOME=/opt/jdk1.5.0_12 export PATH=$PATH:$JAVA_HOME/bin Save and close the file. Setup executable permission: chmod +x /etc/profile.d/java.sh ← Setting shell options Home Chapter 3 Challenges →
- 90. Chapter 3 Challenges 83 Chapter 3 Challenges ← Setting system wide shell options Home Chapter 4: Conditionals Execution (Decision Making) → 1. Make a backup of existing variable called PS1 to OLDPS1. Set PS1 to '$'. Reset your prompt using OLDPS1 variable. 2. Customize your bash prompt by setting PS1 variable to 'I Love Scripting '. 3. Edit your $HOME/.bashrc file and set your new PS1 variable. 4. Create a list of legal and illegal bash variable names. Describe why each is either legal or illegal. 5. Write a command to display the environment. 6. Write a shell script that allows a user to enter his or her top three ice cream flavors. Your script should then print out the name of all three flavors. 7. Write a shell script that allows a user to enter any Internet domain name (host name such as www.cyberciti.biz). Your script should than print out the IP address of the Internet domain name. 8. Write a shell script that allows a user to enter any existing file name. The program should then copy file to /tmp directory. 9. Write a shell script that allows a user to enter directory name. The program should then create directory name in /tmp directory. 10. Write a shell script that allows a user to enter three file names. The program should then copy all files to USB pen. 11. Write a simple shell script where the user enters a pizza parlor bill total. Your script should then display a 10 percent tip. 12. Write a simple calculator program that allows user to enter two numeric values and operand as follows. The program should then print out the sum of two numbers. Make sure it works according to entered operand. Enter two values : 10 20 Enter operand ( +, -, /, *) : + Output: 10 + 20 = 30 • Chapter 3 answers ← Setting system wide shell options Home Chapter 4: Conditionals Execution (Decision Making) →
- 91. 84 Chapter 4: Conditionals Execution (Decision Making) Bash structured language constructs ← Chapter 4: Conditionals Execution (Decision Making) Home Test command → You can use the if command to test a condition. For example, shell script may need to execute tar command only if a certain condition exists (such as backup only on Friday night). If today is Friday execute tar command otherwise print an error message on screen. . More About Logic • So far, the script you've used followed sequential flow: #!/bin/bash echo "Today is $(date)" echo "Current directory : $PWD" echo "What Users Are Doing:" w • Each command and/or statement is executed once, in order in above script. • With sequential flow scripts, you cannot write complex applications (intelligent Linux scripts). • However, with if command you will be able to selectively run certain commands (or part) of your script. • You can create a warning message and run script more interactively using if command to execute code based on a condition. But What Is A Condition? • A condition is nothing but an expression that evaluates to a boolean value (true or false). • In other words condition can be either true or false. • A condition is used in shell script loops and if statements. So, How Do I Make One? A condition is mainly a comparison between two values. Open a shell prompt (console) and type the following command: echo $(( 5 + 2 )) Sample Output: 7
- 92. Bash structured language constructs 85 Addition is 7. But, echo $(( 5 < 2 )) Sample Output: 0 Answer is zero (0). Shell simple compared two number and returned result as true or false. Is 5 is less than 2? No. So 0 is returned. The Boolean (logical data) type is a primitive data type having one of two values • True • False In shell: • 0 value indicates false. • 1 or non-zero value indicate true. Examples Operator Example Description True / False Evaluates To 5 > 12 echo $(( 5 > 12 )) Is 5 greater than 12? No (false) 0 5 == 10 echo $(( 5 == 10 )) Is 5 equal to 10? No (false) 0 5 != 2 echo $(( 5 != 2 )) 5 is not equal to 2? Yes (true) 1 1 < 2 echo $(( 1 < 2 )) Is 1 less than 2? Yes (true) 1 5 == 5 echo $(( 5 == 5 )) Is 5 equal to 5? Yes (true) 1 Now, it makes no sense to use echo command for comparisons. But, when you compare it with some value it becomes very useful. For example: if [ file exists /etc/resolv.conf ] then make a copy else print an error on screen fi ← Chapter 4: Conditionals Execution (Decision Making) Home Test command →
- 93. Test command 86 Test command ← Bash structured language constructs Home if structures to execute code based on a condition → The test command is used to check file types and compare values. Test is used in conditional execution. It is used for: • File attributes comparisons • Perform string comparisons. • Arithmetic comparisons. test command syntax test condition OR test condition && true-command OR test condition || false-command OR test condition && true-command || false-command Type the following command at a shell prompt (is 5 greater than 2? ): test 5 > 2 && echo "Yes" test 1 > 2 && echo "Yes" Sample Output: Yes Yes Rather than test whether a number is greater than 2, you have used redirection to create an empty file called 2 (see shell redirection). To test for greater than, use the -gt operator (see numeric operator syntax): test 5 -gt 2 && echo "Yes" test 1 -gt 2 && echo "Yes" Yes You need to use the test command while make decision. Try the following examples and note down its output: test 5 = 5 && echo Yes || echo No test 5 = 15 && echo Yes || echo No test 5 != 10 && echo Yes || echo No test -f /etc/resolv.conf && echo "File /etc/resolv.conf found." || echo "File /etc/resolv.conf not found." test -f /etc/resolv1.conf && echo "File /etc/resolv1.conf found." || echo "File /etc/resolv1.conf not found."
- 94. Test command 87 See also • Perform arithmetic operations • Numeric comparison ← Bash structured language constructs Home if structures to execute code based on a condition → If structures to execute code based on a condition ← Test command Home If..else..fi → Now, you can use the if statement to test a condition. if command The general syntax is as follows: if condition then command1 command2 ... commandN fi OR if test var == value then command1 command2 ... commandN fi OR if test -f /file/exists then command1 command2 ... commandN fi OR if [ condition ] then command1 command2 .... ..
- 95. If structures to execute code based on a condition 88 fi If given condition is true than the command1, command2..commandN are executed. Otherwise script continues directly to the next statement following the if structure. Open a text editor and create the script called verify.sh: #!/bin/bash read -p "Enter a password" pass if test "$pass" == "jerry" then echo "Password verified." fi Save and close the file. Run it as follows: chmod +x verify.sh ./verify.sh Sample Outputs: Enter a password : jerry Password verified. Run it again: ./verify.sh Sample Output: Enter a password : tom The if structure is pretty straightforward. The read command will read the password and store it to variable called pass. If $pass (i.e. password) is equal to "jerry", then "Password verified." is displayed. However, if it is not equal to "jerry", the script does not print any message and script will go to the next statement. Here is another example (number.sh): #!/bin/bash read -p "Enter # 5 : " number if test $number == 5 then echo "Thanks for entering # 5" fi if test $number != 5 then echo "I told you to enter # 5. Please try again." fi Enter # 5 : 5 Thanks for entering # 5 Save and close the file. Run it as follows: chmod +x number.sh ./number.sh Sample Outputs:
- 96. If structures to execute code based on a condition 89 Enter # 5 : 5 Thanks for entering # 5 Try it again: ./number.sh Sample Outputs: Enter # 5 : 11 I told you to enter # 5. Please try again. ← Test command Home If..else..fi → If..else..fi ← if structures to execute code based on a condition Home Nested ifs → if..else..fi allows to make choice based on the success or failure of a command. For example, find out if file exists (true condition) or not (false condition) and take action based on a condition result. if..then..else Syntax if command then command executed successfully execute all commands up to else statement or to fi if there is no else statement else command failed so execute all commands up to fi fi OR if test var -eq val then command executed successfully execute all commands up to else statement or to fi if there is no else statement else if command failed then execute all commands up to fi fi
- 97. If..else..fi 90 OR if [ condition ] then if given condition true execute all commands up to else statement or to fi if there is no else statement else if given condition false execute all commands up to fi fi Make sure you always end the construct with fi. if/then/else Example Update verify.sh as follows ##!/bin/bash read -p "Enter a password" pass if test "$pass" = "jerry" then echo "Password verified." else echo "Access denied." fi Save and close the file. Run it as follows: ./verify.sh You have updated verify.sh and added an else statement to existing if command to create if..else..fi structure. If $pass (i.e. password) is equal to "jerry", then "Password verified." is displayed. However, with else statement, the script can display "Access denied." message on screen. This ensures that your script will always execute one of the code block as follows: if command is successful then print "Password verified message." else # if condition is false print "Access denied message." fi
- 98. If..else..fi 91 Number Testing Script Create a shell script called testnum.sh: #!/bin/bash read -p "Enter number : " n if test $n -ge 0 then echo "$n is positive number." else echo "$n number is negative number." fi Save and close the file. Run it as follows: chmod +x testnum.sh ./testnum.sh Putting It All Together The following script (chk_hardware.sh) use mcelog command on x86-64 machines running a 64-bit Linux kernel. It will find out hardware error such as RAM or CPU and send an e-mail to server administrator. This is useful for predicting server hardware failure before actual server crash. This script demonstrates: • Script comments • Shell script variable • if..else..fi command • Sending an e-mail from the script #!/bin/bash # Purpose: Detecting Hardware Errors # Author: Vivek Gite <[email protected]> # Note : The script must run as a cron-job. # Last updated on : 28-Aug-2007 # ----------------------------------------------- # Store path to commands LOGGER=/usr/bin/logger FILE=/var/log/mcelog # Store email settings AEMAIL="[email protected]" ASUB="H/W Error - $(hostname)" AMESS="Warning - Hardware errors found on $(hostname) @ $(date). See log file for the details /var/log/mcelog." OK_MESS="OK: NO Hardware Error Found." WARN_MESS="ERROR: Hardware Error Found." # Check if $FILE exists or not if test ! -f "$FILE"
- 99. If..else..fi 92 then echo "Error - $FILE not found or mcelog is not configured for 64 bit Linux systems." exit 1 fi # okay search for errors in file error_log=$(grep -c -i "hardware error" $FILE) # error found or not? if [ $error_log -gt 0 ] then # yes error(s) found, let send an email echo "$AMESS" | email -s "$ASUB" $AEMAIL else # naa, everything looks okay echo "$OK_MESS" fi ← if structures to execute code based on a condition Home Nested ifs → Nested ifs ← If..else..fi Home Multilevel if-then-else → You can put if command within if command and create the nested ifs as follows: if condition then if condition then ..... .. do this else .... .. do this fi else ... ..... do this fi ← If..else..fi Home Multilevel if-then-else →
- 100. Nested ifs 93 Multilevel if-then-else ← Nested ifs Home The exit status of a command → if..elif..else..fi allows the script to have various possibilities and conditions. This is handy, when you want to compare one variable to a different values. if condition then condition is true execute all commands up to elif statement elif condition1 then condition1 is true execute all commands up to elif statement elif condition2 then condition2 is true execute all commands up to elif statement elif conditionN then conditionN is true execute all commands up to else statement else None of the above conditions are true execute all commands up to fi fi In if..elif..else..fi structure, the block of the first true condition is executed. If no condition is true, the else block, is executed. Example A simple shell script to determine if the given number is a negative or a positive number (numest.sh): #!/bin/bash read -p "Enter a number : " n if [ $n -gt 0 ]; then echo "$n is a positive." elif [ $n -lt 0 ] then echo "$n is a negative." elif [ $n -eq 0 ] then echo "$n is zero number."
- 101. Multilevel if-then-else 94 else echo "Oops! $n is not a number." fi Save and close the file. Run it as follows: chmod +x numest.sh ./numest.sh ← Nested ifs Home The exit status of a command → The exit status of a command ← Multilevel if-then-else Home Conditional execution → Each Linux command returns a status when it terminates normally or abnormally. You can use command exit status in the shell script to display an error message or take some sort of action. For example, if tar command is unsuccessful, it returns a code which tells the shell script to send an e-mail to sys admin. Exit Status • Every Linux command executed by the shell script or user, has an exit status. • The exit status is an integer number. • The Linux man pages stats the exit statuses of each command. • 0 exit status means the command was successful without any errors. • A non-zero (1-255 values) exit status means command was failure. • You can use special shell variable called ? to get the exit status of the previously executed command. To print ? variable use the echo command: echo $? date # run date command echo $? # print exit status foobar123 # not a valid command echo $? # print exit status How Do I See Exit Status Of The Command? Type the following command: date To view exist status of date command, enter: echo $? Sample Output: 0
- 102. The exit status of a command 95 Try non-existence command date1 echo $? ls /eeteec echo $? Sample Output: 2 According to ls man page - exit status is 0 if OK, 1 if minor problems, 2 if serious trouble. How Do I Store Exit Status Of The Command In a Shell Variable? Assign $? to a shell variable: ls -l /tmp status=$? echo "ls command exit stats - $status" Exit Status Shell Script Example A simple shell script to locate username (finduser.sh) #!/bin/bash # set var PASSWD_FILE=/etc/passwd # get user name read -p "Enter a user name : " username # try to locate username in in /etc/passwd grep "^$username" $PASSWD_FILE > /dev/null # store exit status of grep # if found grep will return 0 exit stauts # if not found, grep will return a nonzero exit stauts status=$? if test $status -eq 0 then echo "User '$username' found in $PASSWD_FILE file." else echo "User '$username' not found in $PASSWD_FILE file." fi Save and close the file. Run it as follows: chmod +x finduser.sh ./finduser.sh Sample Outputs:
- 103. The exit status of a command 96 Enter a user name : vivek User 'vivek' found in /etc/passwd file. Run it again: chmod +x finduser.sh ./finduser.sh Sample Outputs: Enter a user name : tommy User 'tommy' not found in /etc/passwd file. You can combine the grep and if command in a single statement as follows: if grep "^$username:" /etc/passwd >/dev/null then echo "User '$username' found in $PASSWD_FILE file." else echo "User '$username' not found in $PASSWD_FILE file." fi Notice that standard output from grep command is ignored by sending it to /dev/null. ← Multilevel if-then-else Home Conditional execution →
- 104. Conditional execution 97 Conditional execution ← The exit status of a command Home Logical AND → You can link two commands under bash shell using conditional execution based on the exit status of the last command. This is useful to control the sequence of command execution. Also, you can do conditional execution using the if statement. The bash support the following two conditional executions: 1. Logical AND && - Run second command only if first is successful. 2. Logical OR || - Run second command only if first is not successful. ← The exit status of a command Home Logical AND → Logical AND && ← Conditional execution Home Logical OR → Logical and (&&) is boolean operator. It can execute commands or shell functions based on the exit status of another command. Syntax command1 && command2 OR First_command && Second_command command2 is executed if, and only if, command1 returns an exit status of zero (true). In other words, run command1 and if it is successfull, then run command2. Example Type the following at a shell prompt: rm /tmp/filename && echo "File deleted." The echo command will only run if the rm command exits successfully with a status of zero. If file is deleted successfully the rm command set the exit stats to zero and echo command get executed. Lookup a username in /etc/passwd file grep "^vivek" /etc/passwd && echo "Vivek found in /etc/passwd"
- 105. Logical AND && 98 Exit if a directory /tmp/foo does not exist test ! -d /tmp/foo && { read -p "Directory /tmp/foo not found. Hit [Enter] to exit..." enter; exit 1; } External links • How to display error message instantly when command fails [1] ← Conditional execution Home Logical OR → References [1] http://www.cyberciti.biz/tips/shell-displaying-error-messages.html Logical OR || ← Logical AND Home Logical Not ! → Logical OR (||) is boolean operator. It can execute commands or shell functions based on the exit status of another command. Syntax command1 || command2 OR First_command || Second_command command2 is executed if, and only if, command1 returns a non-zero exit status. In other words, run command1 successfully or run command2. Example cat /etc/shadow 2>/dev/null || echo "Failed to open file" The cat command will try to display /etc/shadow file and it (the cat command) sets the exit stats to non-zero value if it failed to open /etc/shadow file. Therefore, 'Failed to open file' will be displayed cat command failed to open the file. Find username else display an error grep "^vivek" /etc/passwd || echo "User vivek not found in /etc/passwd" How Do I Combine Both Logical Operators? Try it as follows: cat /etc/shadow 2>/dev/null && echo "File successfully opened." || echo "Failed to open file."
- 106. Logical OR || 99 Make sure only root can run this script: test $(id -u) -eq 0 && echo "You are root" || echo "You are NOT root" OR test $(id -u) -eq 0 && echo "Root user can run this script." || echo "Use sudo or su to become a root user." External links • How to display error message instantly when command fails [1] ← Logical AND Home Logical Not ! → Logical Not ! ← Logical OR Home Conditional expression → Logical not (!) is boolean operator, which is used to test whether expression is true or not. For example, if file not exists, then display an error on screen. Syntax The test command syntax is as follows: ! expression OR [ ! expression ] OR if test ! condition then command1 command2 fi if [ ! condition ] then command1 command2 fi Where, • True if expression is false.
- 107. Logical Not ! 100 Examples Try the following example: test ! -f /etc/resolv.conf && echo "File /etc/resolv.conf not found." OR test ! -f /etc/resolv.conf && echo "File /etc/resolv.conf not found." || echo "File /etc/resolv.conf found." Create a directory /backup, if doesn't exits: [ ! -d /backup ] && mkdir /backup Die (exit) if $HOME/.config file not found: [ ! -f $HOME/.config ] && { echo "Error: $HOME/.config file not found."; exit 1; } Die (exit) if directory /usr/bin not found [ ! -d /usr/bin ] && exit Here is a sample script that use logical not ! to make backup directories on fly: #!/bin/bash # A sample shell script to backup MySQL database # Get todays date NOW=$(date +"%d-%m-%Y") # Location to store mysql backup BAK="/nas10/.mysql-database" # MySQL Server Login Information MUSER="root" #### mysql user name ### MPASS="YOUR-PASSWORD-HERE" #### mysql password ### MHOST="127.0.0.1" #### mysql host name ### # Full path to common utilities MYSQL="/usr/bin/mysql" MYSQLDUMP="/usr/bin/mysqldump" GZIP="/bin/gzip" # If backup directory does not exits create it using logical not if [ ! -d "$BAK" ] then mkdir -p "$BAK" fi # Get all mysql databases names DBS="$($MYSQL -u $MUSER -h $MHOST -p$MPASS -Bse 'show databases')"
- 108. Logical Not ! 101 # Start backup echo -n "Dumping..." # Use the for loop for db in $DBS do FILE="$BAK/mysql-$db.$NOW-$(date +"%T").gz" $MYSQLDUMP -u $MUSER -h $MHOST -p$MPASS $db | $GZIP -9 > $FILE echo -n "." done echo -n "...Done" echo "" • Please note that the bash shell pipes also support ! operator. It "reverses" the exit code of a command. ← Logical OR Home Conditional expression → Conditional expression using [ ← Logical Not ! Home Numeric comparison → The test command is used to check file types and compare values. You can also use [ as test command. It is used for: • File attributes comparisons • Perform string comparisons. • Arithmetic comparisons. Syntax [ condition ] OR [ ! condition ] OR [ condition ] && true-command OR [ condition ] || false-command OR [ condition ] && true-command || false-command
- 109. Conditional expression using [ 102 Examples [ 5 == 5 ] && echo "Yes" || echo "No" [ 5 == 15 ] && echo "Yes" || echo "No" [ 5 != 10 ] && echo "Yes" || echo "No" [ -f /etc/resolv.conf ] && echo "File /etc/resolv.conf found." || echo "File /etc/resolv.conf not found." [ -f /etc/resolv1.conf ] && echo "File /etc/resolv.conf found." || echo "File /etc/resolv.conf not found." ← Logical Not ! Home Numeric comparison → Conditional expression using <nowiki>[[</ nowiki> This article is a stub. You can help us by expanding it [1] . References [1] http://en.wikipedia.org/wiki/Bash_test_conditional_expression_%28safer_version%29 Numeric comparison ← Conditional expression Home String comparison → The test command can perform various numeric comparison using the following operators: Operator Syntax Description Example eq INTEGER1 -eq INTEGER2 INTEGER1 is equal to INTEGER2 #!/bin/bash read -p "Please enter and confirm number 10 via keyboard : " n if test $n -eq 10 then echo "Thanks for entering 10 number." fi ge INTEGER1 -ge INTEGER2 INTEGER1 is greater than or equal to INTEGER2 #!/bin/bash read -p "Enter number >= 10 : " n if test $n -ge 10 then echo "$n is greater than or equal to 10" fi
- 110. Numeric comparison 103 gt INTEGER1 -gt INTEGER2 INTEGER1 is greater than INTEGER2 #!/bin/bash read -p "Enter number > 20 : " n if test $n -gt 20 then echo "$n is greater than 20." fi le INTEGER1 -le INTEGER2 INTEGER1 is less than or equal to INTEGER2 #!/bin/bash read -p "Enter backup level : " n if test $n -le 6 then echo "Incremental backup requested." fi if test $n -eq 7 then echo "Full backup requested." fi lt INTEGER1 -lt INTEGER2 INTEGER1 is less than INTEGER2 #!/bin/bash read -p "Do not enter negative number here : " n if test $n -lt 0 then echo "Dam! you entered negative number!!" fi ne INTEGER1 -ne INTEGER2 INTEGER1 is not equal to INTEGER2 #!/bin/bash read -p "Do not enter -1 number here : " n if test $n -ne -1 then echo "Thanks for not entering -1." fi ← Conditional expression Home String comparison →
- 111. String comparison 104 String comparison ← Numeric comparison Home File attributes comparisons → String comparison can be done using test command itself. The strings are equal Use the following syntax: STRING1 = STRING2 Example #!/bin/bash read -s -p "Enter your password " pass echo if test "$pass" = "tom" then echo "You are allowed to login!" fi The strings are not equal Use the following syntax: STRING1 != STRING2 Example #!/bin/bash read -s -p "Enter your password " pass echo if test "$pass" != "tom" then echo "Wrong password!" fi The length of STRING is zero Use the following syntax (this is useful to see if variable is empty or not): -z STRING Example #!/bin/bash read -s -p "Enter your password " pass echo if test -z $pass then
- 112. String comparison 105 echo "No password was entered!!! Cannot verify an empty password!!!" exit 1 fi if test "$pass" != "tom" then echo "Wrong password!" fi ← Numeric comparison Home File attributes comparisons → File attributes comparisons ← String comparison Home Shell command line parameters → Use the following file comparisons to test various file attributes. You can use the test command or conditional expression using [. -a file True if file exists. Example [ -a /etc/resolv.conf ] && echo "File found" || echo "Not found" -b file True if file exists and is a block special file. Example [ -b /dev/zero ] && echo "block special file found" || echo "block special file not found" OR [ -b /dev/sda ] && echo "block special file found" || echo "block special file not found"
- 113. File attributes comparisons 106 -c file True if file exists and is a character special file. Example [ -c /dev/tty0 ] && echo "Character special file found." || echo "Character special file not found." -d dir True if file exists and is a directory. Example #!/bin/bash DEST=/backup SRC=/home # Make sure backup dir exits [ ! -d $DEST ] && mkdir -p $DEST # If source directory does not exits, die... [ ! -d $SRC ] && { echo "$SRC directory not found. Cannot make backup to $DEST"; exit 1; } # Okay, dump backup using tar echo "Backup directory $DEST..." echo "Source directory $SRC..." /bin/tar zcf $SRC $DEST/backup.tar.gz 2>/dev/null # Find out if backup failed or not [ $? -eq 0 ] && echo "Backup done!" || echo "Backup failed" -e file True if file exists. Example [ -e /tmp/test.txt ] && echo "File found" || echo "File not found" -f file True if file exists and is a regular file. Example [ ! -f /path/to/file ] && echo "File not found!" A sample shell script that compare various file attributes and create webalizer (application that generates web pages of analysis, from access and usage log) stats configuration file to given Internet domain name.
- 114. File attributes comparisons 107 #!/bin/bash # Purpose: A Shell Script To Create Webalizer Stats Configration File # Written by: Vivek Gite # --------------------------------------------------------------------- # Set vars # Apache vroot for each domain HTTPDROOT="/home/httpd" # Path to GeoIP DB GEOIPDBPATH="/usr/local/share/GeoIP/GeoIP.dat" # Get the Internet domain such as cyberciti.biz echo "*** A Shell Script To Create Webalizer Stats Configration File ***" read -p "Enter a domain name : " DOMAIN # Make sure we got the Input else die with an error on screen [ -z $DOMAIN ] && { echo "Please enter a domain name. Try again!"; exit 1; } # Alright, set some variable based upon $DOMAIN OUT="$HTTPDROOT/$DOMAIN/stats/webalizer.conf" CONFROOT="$HTTPDROOT/$DOMAIN/stats" LOGFILE="$HTTPDROOT/$DOMAIN/logs/access.log" # Die if configuration file exits... [ -f $OUT ] && { echo "Webalizer configuration file '$OUT' exits for domain $DOMAIN."; exit 2; } # Make sure configuration directory exists [ ! -d $CONFROOT ] && mkdir -p $CONFROOT # Write a log file >$OUT echo "LogFile $LOGFILE" >> $OUT echo "LogType clf" >> $OUT echo "OutputDir $CONFROOT/out" >> $OUT echo "HistoryName $CONFROOT/webalizer.hist" >> $OUT echo "Incremental yes" >> $OUT echo "IncrementalName $CONFROOT/webalizer.current" >> $OUT echo "HostName $DOMAIN" >> $OUT echo "Quiet yes" >> $OUT echo "FoldSeqErr yes" >> $OUT echo "AllSearchStr yes" >> $OUT echo "HideSite $DOMAIN" >> $OUT
- 115. File attributes comparisons 108 echo "HideSite localhost" >> $OUT echo "HideReferrer $DOMAIN" >> $OUT echo "HideURL *.gif" >> $OUT echo "HideURL *.GIF" >> $OUT echo "HideURL *.jpg" >> $OUT echo "HideURL *.JPG" >> $OUT echo "HideURL *.png" >> $OUT echo "HideURL *.PNG" >> $OUT echo "HideURL *.ra" >> $OUT echo "GroupReferrer yahoo.com/ Yahoo!" >> $OUT echo "GroupReferrer excite.com/ Excite" >> $OUT echo "GroupReferrer infoseek.com/ InfoSeek" >> $OUT echo "GroupReferrer webcrawler.com/ WebCrawler" >> $OUT echo "SearchEngine .yahoo. p=" >> $OUT echo "SearchEngine altavista.com q=" >> $OUT echo "SearchEngine .google. q=" >> $OUT echo "SearchEngine eureka.com q=" >> $OUT echo "SearchEngine lycos.com query=" >> $OUT echo "SearchEngine hotbot.com MT=" >> $OUT echo "SearchEngine msn.com MT=" >> $OUT echo "SearchEngine infoseek.com qt=" >> $OUT echo "SearchEngine webcrawler searchText=" >> $OUT echo "SearchEngine excite search=" >> $OUT echo "SearchEngine netscape.com search=" >> $OUT echo "SearchEngine mamma.com query=" >> $OUT echo "SearchEngine alltheweb.com query=" >> $OUT echo "SearchEngine northernlight.com qr=" >> $OUT echo "CountryFlags yes" >> $OUT echo "GeoIP yes" >> $OUT echo "GeoIPDatabase $GEOIPDBPATH" >> $OUT echo "GraphMonths 72" >> $OUT echo "IndexMonths 120" >> $OUT echo "GraphMonths 72" >> $OUT echo "TopReferrers 20" >> $OUT echo "TopSites 20" >> $OUT echo "TopURLs 50" >> $OUT echo "TopKURLs 50" >> $OUT echo "Weblizer config wrote to $OUT"
- 116. File attributes comparisons 109 -g file True if file exists and is set-group-id. -h file True if file exists and is a symbolic link. -k file True if file exists and its ‘‘sticky’’ bit is set. -p file True if file exists and is a named pipe (FIFO). -r file True if file exists and is readable. -s file True if file exists and has a size greater than zero. -t fd True if file descriptor fd is open and refers to a terminal. -u file True if file exists and its set-user-id bit is set. -w file True if file exists and is writable. -x file True if file exists and is executable.
- 117. File attributes comparisons 110 -O file True if file exists and is owned by the effective user id. -G file True if file exists and is owned by the effective group id. -L file True if file exists and is a symbolic link. -S file True if file exists and is a socket. -N file True if file exists and has been modified since it was last read. ← String comparison Home Shell command line parameters → Shell command line parameters ← File attributes comparisons Home How to use positional parameters → Most Linux command can take different actions depending on the command line arguments supplied to the command. What is a command line argument? A command line argument is nothing but an argument sent to a program being called. A program can take any number of command line arguments. For example, type the following command: ls grate_stories_of Sample Outputs: grate_stories_of: No such file or directory. ls is the name of an actual command and shell executed this command when you type command at shell prompt. The first word on the command line is: • ls - name of the command to be executed. • Everything else on command line is taken as arguments to this command. Consider the following example: tail +10 /path/to/file.txt • tail : command name.
- 118. Shell command line parameters 111 • +10 /path/to/file.txt : The arguments. Examples Try the following command and note down its command line arguments: Command Command name Total number of arguments Argument name(s) ls ls 0 N/A ls /etc/resolv.conf ls 1 /etc/resolv.conf cp /etc/resolv.conf /tmp/test.txt cp 2 /etc/resolv.conf, and /tmp/test.txt sort -r -n /path/to/file sort 3 -r, -n, and /path/to/file date +"%-d-%m-%Y" date 1 +"%-d-%m-%Y" Command line parameters different names A Command line parameter also known as: • Command line options • Options • Positional parameters • Flag • Switches or switch • Command-line arguments Why use command line arguments • Telling the command/utility which option to use. • Informing the utility/command which file or group of files to process (reading/writing of files). ← File attributes comparisons Home How to use positional parameters →
- 119. How to use positional parameters 112 How to use positional parameters ← Shell command line parameters Home Parameters Set by the Shell → All command line parameters ( positional parameters ) are available via special shell variable $1, $2, $3,...,$9. How Do I Access Command-Line Arguments Create a simple shell script called cmdargs.sh: #!/bin/bash echo "The script name : $0" echo "The value of the first argument to the script : $1" echo "The value of the second argument to the script : $2" echo "The value of the third argument to the script : $3" echo "The number of arguments passed to the script : $#" echo "The value of all command-line arguments ($* version) : $*" echo "The value of all command-line arguments ($@ version) : $@" Save and close the file. Rut it as follows: chmod +x cmdargs.sh ./cmdargs.sh bmw ford toyota Sample outputs: The script name : ./cmdargs.sh The value of the first argument to the script : bmw The value of the second argument to the script : ford The value of the third argument to the script : toyota The number of arguments passed to the script : 3 The value of all command-line arguments ($* version) : bmw ford toyota The value of all command-line arguments ($@ version) : bmw ford toyota Try the following examples: ls /tmp ./math 10 + 2 ~/scripts/addzone cyberciti.com ~/scripts/adddomain cyberciti.biz '74.86.48.99' '2607:f0d0:1002:11::4' /etc/init.d/named reload /usr/local/etc/rc.d/jail restart cyberciti.biz
- 120. How to use positional parameters 113 Shell script name ($0) Total number of arguments ($#) Actual Command line argument ($1,..,$9) ls 1 /tmp ./math 3 10, +, and 3 ~/scripts/addzone 1 cyberciti.com ~/scripts/adddomain 3 cyberciti.biz, 74.86.48.99, and 2607:f0d0:1002:11::4 /etc/init.d/named reload 1 reload /usr/local/etc/rc.d/jail 2 restart, and cyberciti.biz A Note About $@ and $* • $@ expanded as "$1" "$2" "$3" ... "$n" • $* expanded as "$1y$2y$3y...$n", where y is the value of $IFS variable i.e. "$*" is one long string and $IFS act as an separator or token delimiters. Example: The Difference Between $@ and $* Create a shell script called pizza.sh: #!/bin/bash IFS=", " echo "* Displaying all pizza names using $@" echo "$@" echo echo "* Displaying all pizza names using $*" echo "$*" Save and close the file. Run it as follows: chmod +x pizza.sh ./pizza.sh Margherita Tomato Panner Gourmet Sample outputs: * Displaying all pizza names using $@ Margherita Tomato Panner Gourmet *Displaying all pizza names using $* Margherita,Tomato,Panner,Gourmet ← Shell command line parameters Home Parameters Set by the Shell →
- 121. Parameters Set by the Shell 114 Parameters Set by the Shell ← How to use positional parameters Home Create usage messages → Bash shell set several special parameters. For example $? (see return values section) holds the return value of the executed command. • All command line parameters or arguments can be accessed via $1, $2, $3,..., $9. • $* holds all command line parameters or arguments. • $# holds the number of positional parameters. • $- holds flags supplied to the shell. • $? holds the return value set by the previously executed command. • $$ holds the process number of the shell (current shell). • $! hold the process number of the last background command. • $@ holds all command line parameters or arguments. Use echo command to display special shell parameters: echo $# You can store them to a shell variables as follows: status=$? [ $status -eq 0 ] && echo "Lighttpd ... [Ok]" || echo "Lighttpd ... [Failed]" • Assignment to special parameter is not allowed: # okay status=$? # noop not allowed $?=-1 ← How to use positional parameters Home Create usage messages →
- 122. Create usage messages 115 Create usage messages ← Parameters Set by the Shell Home Exit command → You can use the if command to check command line arguments. Many Linux commands display an error or usage information when required command line option is not passed. For example, try the following command: gcc Sample outputs: gcc: no input files Try rm command: rm Sample outputs: rm: missing operand Try `rm --help' for more information. How Do I Add Usage Functionality To The Script? A shell script that depends upon user input must: • Verify the number of arguments passed to it. • Display an error or usage message if arguments or input is not passed to the script. Your shell script can also create such usage message using if command and $# special shell variable parameter. Create a shell script called userlookup.sh: #!/bin/bash # A shell script to lookup usernames in /etc/passwd file # Written by: Vivek Gite # Last updated on: Sep/10/2003 # ------------------------------------------------------- # Set vars user=$1 # first command line argument passwddb=/etc/passwd # Verify the type of input and number of values # Display an error message if the username (input) is not correct # Exit the shell script with a status of 1 using exit 1 command. [ $# -eq 0 ] && { echo "Usage: $0 username"; exit 1; } grep "^$user" $passwddb >/dev/null retval=$? # store exit status of grep
- 123. Create usage messages 116 # If grep found username, it sets exit status to zero # Use exit status to make the decision [ $retval -eq 0 ] && echo "$user found" || echo "$user not found" Save and close the file. Run it as follows: chmod +x userlookup.sh ./userlookup.sh Sample outputs: Usage: ./userlookup.sh username Pass the command line argument kate: ./userlookup.sh kate Sample outputs: kate not found Pass the command line argument vivek: ./userlookup.sh vivek Sample outputs: vivek found ← Parameters Set by the Shell Home Exit command →
- 124. Exit command 117 Exit command ← Create usage messages Home The case statement → The syntax is as follows: exit N • The exit statement is used to exit from the shell script with a status of N. • Use the exit statement to indicate successful or unsuccessful shell script termination. • The value of N can be used by other commands or shell scripts to take their own action. • If N is omitted, the exit status is that of the last command executed. • Use the exit statement to terminate shell script upon an error. • If N is set to 0 means normal shell exit. Create a shell script called exitcmd.sh: #!/bin/bash echo "This is a test." # Terminate our shell script with success message exit 0 Save and close the file. Run it as follows: chmod +x exitcmd.sh ./exitcmd.sh Sample outputs: This is a test. To see exit status of the script, enter (see the exit status of a command for more information about special shell variable $?) : echo $? Shell script example • Any non zero value indicates unsuccessful shell script termination. • Create a shell script called datatapebackup.sh: #!/bin/bash BAK=/data2 TAPE=/dev/st0 echo "Trying to backup ${BAK} directory to tape device ${TAPE} .." # See if $BAK exits or not else die # Set unsuccessful shell script termination with exit status # 1 [ ! -d $BAK ] && { echo "Source backup directory $BAK not found."; exit 1; } # See if $TAPE device exits or not else die # Set unsuccessful shell script termination with exit status # 2
- 125. Exit command 118 [ ! -b $TAPE ] && { echo "Backup tape drive $TAPE not found or configured."; exit 2; } # Okay back it up tar cvf $TAPE $BAK 2> /tmp/error.log if [ $? -ne 0 ] then # die with unsuccessful shell script termination exit status # 3 echo "An error occurred while making a tape backup, see /tmp/error.log file". exit 3 fi # Terminate our shell script with success message i.e. backup done! exit 0 Save and close the file. Run it as follows: chmod +x datatapebackup.sh ./datatapebackup.sh echo $? ← Create usage messages Home The case statement →
- 126. The case statement 119 The case statement ← Exit command Home Dealing with case sensitive pattern → The case statement is good alternative to multilevel if-then-else-fi statement. It enable you to match several values against one variable. It is easier to read and write. Syntax The syntax is as follows: case $variable-name in pattern1) command1 ... .... commandN ;; pattern2) command1 ... .... commandN ;; patternN) command1 ... .... commandN ;; *) esac OR case $variable-name in pattern1|pattern2|pattern3) command1 ... .... commandN ;; pattern4|pattern5|pattern6) command1 ... .... commandN ;;
- 127. The case statement 120 pattern7|pattern8|patternN) command1 ... .... commandN ;; *) esac • The case statement allows you to easily check pattern (conditions) and then process a command-line if that condition evaluates to true. • In other words the $variable-name is compared against the patterns until a match is found. • *) acts as default and it is executed if no match is found. • The pattern can include wildcards. • You must include ;; at the end of each commandN. The shell executes all the statements up to the two semicolons that are next to each other. • The esac is always required to indicate end of case statement. Example Create a shell script called rental.sh: #!/bin/bash # if no command line arg given # set rental to Unknown if [ -z $1 ] then rental="*** Unknown vehicle ***" elif [ -n $1 ] then # otherwise make first arg as a rental rental=$1 fi # use case statement to make decision for rental case $rental in "car") echo "For $rental rental is Rs.20 per k/m.";; "van") echo "For $rental rental is Rs.10 per k/m.";; "jeep") echo "For $rental rental is Rs.5 per k/m.";; "bicycle") echo "For $rental rental 20 paisa per k/m.";; "enfield") echo "For $rental rental Rs.3 per k/m.";; "thunderbird") echo "For $rental rental Rs.5 per k/m.";; *) echo "Sorry, I can not get a $rental rental for you!";; esac Save and close the file. Run it as follows: chmod +x rental.sh ./rental.sh
- 128. The case statement 121 ./rental.sh jeep ./rental.sh enfield ./rental.sh bike Sample outputs: Sorry, I can not gat a *** Unknown vehicle *** rental for you! For jeep rental is Rs.5 per k/m. For enfield rental Rs.3 per k/m. Sorry, I can not gat a bike rental for you! The case statement first checks $rental against each option for a match. If it matches "car", the echo command will display rental for car. If it matches "van", the echo command will display rental for van and so on. If it matches nothing i.e. * (default option), an appropriate warning message is printed. Using Multiple Patterns #!/bin/bash NOW=$(date +"%a") case $NOW in Mon) echo "Full backup";; Tue|Wed|Thu|Fri) echo "Partial backup";; Sat|Sun) echo "No backup";; *) ;; esac The following shell script demonstrate the concept of command line parameters processing using the case statement (casecmdargs.sh): #!/bin/bash OPT=$1 # option FILE=$2 # filename # test -e and -E command line args matching case $OPT in -e|-E) echo "Editing $2 file..." # make sure filename is passed else an error displayed [ -z $FILE ] && { echo "File name missing"; exit 1; } || vi $FILE ;; -c|-C) echo "Displaying $2 file..." [ -z $FILE ] && { echo "File name missing"; exit 1; } || cat $FILE ;;
- 129. The case statement 122 -d|-D) echo "Today is $(date)" ;; *) echo "Bad argument!" echo "Usage: $0 -ecd filename" echo " -e file : Edit file." echo " -c file : Display file." echo " -d : Display current date and time." ;; esac Run it as follows: chmod +x casecmdargs.sh ./casecmdargs.sh ./casecmdargs.sh -e /tmp/file ./casecmdargs.sh -E /tmp/file ./casecmdargs.sh -e ./casecmdargs.sh -D Creating a backup script Create a backup script called allinonebackup.sh: #!/bin/bash # A shell script to backup mysql, webserver and files to tape opt=$1 case $opt in sql) echo "Running mysql backup using mysqldump tool..." ;; sync) echo "Running backup using rsync tool..." ;; tar) echo "Running tape backup using tar tool..." ;; *) echo "Backup shell script utility" echo "Usage: $0 {sql|sync|tar}" echo " sql : Run mySQL backup utility." echo " sync : Run web server backup utility." echo " tar : Run tape backup utility." ;; esac Save and close the file. Run it as follows: chmod +x allinonebackup.sh # run sql backup
- 130. The case statement 123 ./allinonebackup.sh sql # Dump file system using tape device ./allinonebackup.sh tar # however, the following will fail as patterns are case sensitive # you must use command line argument tar and not TAR, Tar, TaR etc. ./allinonebackup.sh TAR ← Exit command Home Dealing with case sensitive pattern → Dealing with case sensitive pattern ← The case statement Home Chapter 4 Challenges → Words can differ in meaning based on differing use of uppercase and lowercase letters. Linux allow a file to have more than one name. For example, Sample.txt, SAMPLE.txt, and SAMPLE.TXT all are three different file names. The case sensitive problem also applies to the case statement. For example, our backup script can be executed as follows: ./allinonebackup.sh tar However, the following example will not work, as patterns are case sensitive. You must use command line argument tar and not TAR, Tar, TaR etc: ./allinonebackup.sh TAR However, you can get around this problem using any one of the following solution. Solution # 1: Convert pattern to lowercase You can convert a pattern to lowercase using the tr command and here strings as follows: echo "TeSt" | tr '[:upper:]' '[:lower:]' var="TesT" tr '[:upper:]' '[:lower:]' <<<"$var" You can update the script as follows: #!/bin/bash # A shell script to backup mysql, webserver and files to tape # allinonebackup.sh version 2.0 # ------------------------------------------------------- # covert all passed arguments to lowercase using # tr command and here strings opt=$( tr '[:upper:]' '[:lower:]' <<<"$1" ) case $opt in sql)
- 131. Dealing with case sensitive pattern 124 echo "Running mysql backup using mysqldump tool..." ;; sync) echo "Running backup using rsync tool..." ;; tar) echo "Running tape backup using tar tool..." ;; *) echo "Backup shell script utility" echo "Usage: $0 {sql|sync|tar}" echo " sql : Run mySQL backup utility." echo " sync : Run web server backup utility." echo " tar : Run tape backup utility." ;; esac Run it as follows: ./allinonebackup.sh TAR ./allinonebackup.sh TaR Solution # 2: Use regex with case patterns Case command pattern supports regular expressions, which provide a concise and flexible means for identifying words, or patterns of characters. For example, you can match tar pattern using the following syntax: [Tt][Aa][Rr] • The above is called a bracket expression. • It matches a single character that is contained within the brackets. • For example, [tom] matches "t", "o", or "m". • [a-z] specifies a range which matches any lowercase letter from "a" to "z". • [Aa] matches "A", or "a". • [Tt][Aa][Rr] matches "tar", "TAR", "taR", "TaR", etc • With regex you can avoid the external tr command. • Here is the update version of the same script: #!/bin/bash # A shell script to backup mysql, webserver and files to tape opt=$1 ######################################################### # Use regex to match all command line arguments # # [Tt][Aa][Rr] matches "tar", "TAR", "taR", "TaR", etc # # [Ss][Qq][Ll] matches "sql", "SQL", "SQl", "SqL", etc # ######################################################### case $opt in [Ss][Qq][Ll]) echo "Running mysql backup using mysqldump tool..."
- 132. Dealing with case sensitive pattern 125 ;; [Ss][Yy][Nn][Cc]) echo "Running backup using rsync tool..." ;; [Tt][Aa][Rr]) echo "Running tape backup using tar tool..." ;; *) echo "Backup shell script utility" echo "Usage: $0 {sql|sync|tar}" echo " sql : Run mySQL backup utility." echo " sync : Run web server backup utility." echo " tar : Run tape backup utilty." ;; esac Solution # 3: Turn on nocasematch If you turn on nocasematch option, shell matches patterns in a case-insensitive fashion when performing matching while executing case or [[ conditional commands. How do I turn on nocasematch option? Type the following command: shopt -s nocasematch How do I turn off nocasematch option? Type the following command: shopt -u nocasematch Here is an updated version of the same: #!/bin/bash # A shell script to backup mysql, webserver and files to tape opt=$1 # Turn on a case-insensitive matching (-s set nocasematch) shopt -s nocasematch case $opt in sql) echo "Running mysql backup using mysqldump tool..." ;; sync) echo "Running backup using rsync tool..." ;; tar) echo "Running tape backup using tar tool..." ;; *) echo "Backup shell script utility"
- 133. Dealing with case sensitive pattern 126 echo "Usage: $0 {sql|sync|tar}" echo " sql : Run mySQL backup utility." echo " sync : Run web server backup utility." echo " tar : Run tape backup utilty." ;; esac # Turn off a case-insensitive matching (-u unset nocasematch) shopt -u nocasematch See also • set command • shopt command ← The case statement Home Chapter 4 Challenges → Chapter 4 Challenges ← Dealing with case sensitive pattern Home Chapter 5: Bash Loops → • Decide whether the following sentence is true or false: 1. The case statement provides an alternative method for performing conditional execution. 2. *) acts as default in the case statement. 3. For testing conditions you can only use the case..in...esac statement. 4. AND operator is || 5. OR operator is || 6. NOT operator is ! • Write a shell script that display one of ten unique fortune cookie message, at random each it is run. • Chapter 4 answers ← Dealing with case sensitive pattern Home Chapter 5: Bash Loops →
- 134. 127 Chapter 5: Bash Loops The for loop statement ← Chapter 5: Bash Loops Home Nested for loop statement → Bash shell can repeat particular instruction again and again, until particular condition satisfies. A group of instruction that is executed repeatedly is called a loop. Bash supports: • The for loop • The while loop Each and every loop must: • First, the variable used in loop condition must be initialized, then execution of the loop begins. • A test (condition) is made at the beginning of each iteration. • The body of loop ends with a statement that modifies the value of the test (condition) variable. • Repeatedly execute a block of statements. The for loop syntax The for loop syntax is as follows: for var in item1 item2 ... itemN do command1 command2 .... ... commandN done The for loop numerical explicit list syntax: for var in list-of-values do command1 command2 .... ... commandN done The for loop explicit file list syntax: for var in file1 file2 file3 fileN do command1 command2
- 135. The for loop statement 128 .... ... commandN done The for loop variable's contents syntax: for var in $fileNames do command1 command2 .... ... commandN done The for loop command substitution syntax: for var in $(Linux-command-name) do command1 command2 .... ... commandN done The for loop explicit file list using bash array syntax: # define an array ArrayName=(~/.config/*.conf) for var in "${ArrayName[@]}" do command1 on $var command2 .... ... commandN done The for loop three-expression syntax ( this type of for loop share a common heritage with the C programming language ): for (( EXP1; EXP2; EXP3 )) do command1 command2 command3 done The above syntax is characterized by a three-parameter loop control expression; consisting of an initializer (EXP1), a loop-test or condition (EXP2), and a counting expression (EXP3).
- 136. The for loop statement 129 More about the for loop The for loop execute a command line once for every new value assigned to a var (variable) in specified list (item1...itemN) i.e. repeat all statement between do and done till condition is not satisfied. The lists or values are normally: 1. Strings 2. Numbers 3. Command line arguments 4. File names 5. Linux command output Example Create a shell script called testforloop.sh: #!/bin/bash for i in 1 2 3 4 5 do echo "Welcome $i times." done Save and close the file. Run it as follows: chmod +x testforloop.sh ./testforloop.sh The for loop first creates i variable and assigned a number to i from the list of number from 1 to 5. The shell execute echo statement for each assignment of i. This is known as iteration. This process will continue until all the items in the list were not finished. See bash for loop examples [1] page for more information. The For Loop Using Strings Create a shell script called forcars.sh #!/bin/bash # A simple shell script to print list of cars for car in bmw ford toyota nissan do echo "Value of car is: $car" done Another example, create a shell script called forcmds.sh: #!/bin/bash # A simple shell script to run commands for command in date pwd df do echo echo "*** The output of $command command >" #run command $command echo
- 137. The for loop statement 130 done Save and close the file. Run it as follows: chmod +x forcmds.sh ./forcmds.sh Sample outputs: *** The output of date command > Sun Sep 6 14:32:41 IST 2009 *** The output of pwd command > /1.5/share/data/songs *** The output of df command > Filesystem 1K-blocks Used Available Use% Mounted on /dev/sdb2 96116904 27589760 63644592 31% / tmpfs 4149972 0 4149972 0% /lib/init/rw varrun 4149972 272 4149700 1% /var/run varlock 4149972 0 4149972 0% /var/lock udev 4149972 2808 4147164 1% /dev tmpfs 4149972 356 4149616 1% /dev/shm /dev/sdb5 286374908 274733944 11640964 96% /share /dev/sdc2 240402848 159452732 68738308 70% /disk1p2 /dev/sda5 1341352436 412128756 861086932 33% /1.5 /dev/sdd1 1442145212 26365188 1342523224 2% /media/backup The For Loop Using Variable's Contents Create a shell script called forfilenames.sh #!/bin/bash # A shell script to verify user password database files="/etc/passwd /etc/group /etc/shadow /etc/gshdow" for f in $files do [ -f $f ] && echo "$f file found" || echo "*** Error - $f file missing." done
- 138. The for loop statement 131 The For Loop Using Command-line Arguments Create a shell script called forcmdargs.sh: #!/bin/bash # A simple shell script to display a file on screen passed as command line argument [ $# -eq 0 ] && { echo "Usage: $0 file1 file2 fileN"; exit 1; } # read all command line arguments via the for loop for f in $* do echo echo "< $f >" [ -f $f ] && cat $f || echo "$f not file." echo "------------------------------------------------" done Save and close the file. Run it as follows: chmod +x forcmdargs.sh ./forcmdargs.sh /etc/resolv.conf /etc/hostname Sample outputs: < /etc/resolv.conf > nameserver 127.0.0.1 nameserver 4.2.2.1 nameserver 4.2.2.2 ------------------------------------------------ < /etc/hostname > vivek-desktop ------------------------------------------------ The for loop using command substitution Command substitution is nothing but a shell command output stored in into a string or a variable. The command is a shell command and must be enclosed between grave accents or $(..). The syntax is as follows: $(command-name) `command-name` var=$(command-name) NOW=$(date) echo $NOW Create a shell script called forcmdsub.sh: #!/bin/bash echo "Printing file names in /tmp directory:" for f in $(ls /tmp/*) do
- 139. The for loop statement 132 echo $f done The for loop using ranges or counting The for loop can be set using the numerical range. The range is specified by a beginning and ending number. The for loop executes a sequence of commands for each member in a list of items. A representative example in BASH is as follows to display multiplication table with for loop (multiplication.sh): #!/bin/bash n=$1 # make sure command line arguments are passed to the script if [ $# -eq 0 ] then echo "A shell script to print multiplication table." echo "Usage : $0 number" exit 1 fi # Use for loop for i in {1..10} do echo "$n * $i = $(( $i * $n))" done Save and close the file. Run it as follows: chmod +x multiplication.sh ./multiplication.sh ./multiplication.sh 13 Sample outputs: 13 * 1 = 13 13 * 2 = 26 13 * 3 = 39 13 * 4 = 52 13 * 5 = 65 13 * 6 = 78 13 * 7 = 91 13 * 8 = 104 13 * 9 = 117 13 * 10 = 130
- 140. The for loop statement 133 Further readings • BASH For Loop Examples [1] • KSH For Loop Examples [2] ← Chapter 5: Bash Loops Home Nested for loop statement → References [1] http://www.cyberciti.biz/faq/bash-for-loop/ [2] http://www.cyberciti.biz/faq/ksh-for-loop/ Nested for loop statement ← for loop Home While loop → Nested for loops means loop within loop. They are useful for when you want to repeat something serveral times for several things. For example, create a shell script called nestedfor.sh: #!/bin/bash # A shell script to print each number five times. for (( i = 1; i <= 5; i++ )) ### Outer for loop ### do for (( j = 1 ; j <= 5; j++ )) ### Inner for loop ### do echo -n "$i " done echo "" #### print the new line ### done Save and close the file. Run it as follows: chmod +x nestedfor.sh ./nestedfor.sh Sample outputs: 1 1 1 1 1 2 2 2 2 2 3 3 3 3 3 4 4 4 4 4 5 5 5 5 5 For each value of i the inner loop is cycled through 5 times, with the variable j taking values from 1 to 5. The inner for loop terminates when the value of j exceeds 5, and the outer loop terminates when the value of i exceeds 5.
- 141. Nested for loop statement 134 Chessboard Example A chessboard is the type of checkerboard used in the game of chess, and consists of 64 squares - eight rows and eight columns arranged in two alternating colors. The colors are called "black" and "white". Let us write a shell script called chessboard.sh to display a chessboard on screen: #!/bin/bash for (( i = 1; i <= 8; i++ )) ### Outer for loop ### do for (( j = 1 ; j <= 8; j++ )) ### Inner for loop ### do total=$(( $i + $j)) # total tmp=$(( $total % 2)) # modulus # Find out odd and even number and change the color # alternating colors using odd and even number logic if [ $tmp -eq 0 ]; then echo -e -n "033[47m " else echo -e -n "033[40m " fi done echo "" #### print the new line ### done Save and close the file. Run it as follows: chmod +x chessboard.sh ./chessboard.sh Sample outputs: ← for loop Home While loop →
- 142. The while loop statement 135 The while loop statement ← Nested for loop statement Home : infinite while loop → The while statement is used to executes a list of commands repeatedly. The while loop syntax The syntax is: while [ condition ] do command1 command2 .. .... commandN done Command1..commandN will executes while a condition is true. To read a text file line-by-line, use the following syntax: while IFS= read -r line do command1 on $line command2 on $line .. .... commandN done < "/path/to/filename" OR while IFS= read -r field1 filed2 field3 ... fieldN do command1 on $field1 command2 on $field1 and $field3 .. .... commandN on $field1 ... $fieldN done < "/path/to dir/file name with space" IFS is used to set field separator (default is while space). The -r option to read command disables backslash escaping (e.g., n, t). This is failsafe while read loop for reading text files.
- 143. The while loop statement 136 while loop Example Create a shell script called while.sh: #!/bin/bash # set n to 1 n=1 # continue until $n equals 5 while [ $n -le 5 ] do echo "Welcome $n times." n=$(( n+1 )) # increments $n done Save and close the file. Run it as follows: chmod +x while.sh ./while.sh Sample outputs: Welcome 1 times. Welcome 2 times. Welcome 3 times. Welcome 4 times. Welcome 5 times. The script initializes the variable n to 1, and then increments it by one. The while loop prints out the "Welcome $n times" until it equals 5 and exit the loop. Using ((expression)) Format With The While Loop You can use ((expression)) syntax to test arithmetic evaluation (condition). If the value of the expression is non-zero, the return status is 0; otherwise the return status is 1. To replace while loop condition while [ $n -le 5 ] with while (( num <= 10 )) to improve code readability: #!/bin/bash n=1 while (( $n <= 5 )) do echo "Welcome $n times." n=$(( n+1 )) done Reading A Text File You can read a text file using read command and while loop as follows (whilereadfile.sh): #!/bin/bash file=/etc/resolv.conf while IFS= read -r line do # echo line is stored in $line
- 144. The while loop statement 137 echo $line done < "$file" Save and close the file. Run it as follows: chmod +x whilereadfile.sh ./whilereadfile.sh Sample outputs: nameserver 127.0.0.1 nameserver 192.168.1.254 nameserver 4.2.2.1 Reading A Text File With Separate Fields You can store above output in two separate fields as follows (whilereadfields.sh): #!/bin/bash file=/etc/resolv.conf while IFS= read -r f1 f2 do echo "field # 1 : $f1 ==> field #2 : $f2" done < "$file" Run it as follows: chmod +x whilereadfields.sh ./whilereadfields.sh Sample outputs: field # 1 : nameserver ==> field #2 : 127.0.0.1 field # 1 : nameserver ==> field #2 : 192.168.1.254 field # 1 : nameserver ==> field #2 : 4.2.2.1 Another useful example for reading and phrasing /etc/passwd [1] file using the while loop (readpasswd.sh): #!/bin/bash file=/etc/passwd # set field delimiter to : # read all 7 fields into 7 vars while IFS=: read -r user enpass uid gid desc home shell do # only display if UID >= 500 [ $uid -ge 500 ] && echo "User $user ($uid) assigned "$home" home directory with $shell shell." done < "$file" Save and close the file. Run it as follows: chmod +x readpasswd.sh ./readpasswd.sh
- 145. The while loop statement 138 Sample output: User nobody (65534) assigned "/nonexistent" home directory with /bin/sh shell. User vivek (1000) assigned "/home/vivek" home directory with /bin/bash shell. User oracle (1004) assigned "/usr/lib/oracle/xe" home directory with /bin/bash shell. User simran (1001) assigned "/home/simran" home directory with /bin/bash shell. User t2 (1002) assigned "/home/t2" home directory with /usr/local/bin/t2.bot shell. External Links • Bash While Loop Example [2] • Howto: Read One Character At A Time [3] ← Nested for loop statement Home : infinite while loop → References [1] http://www.cyberciti.biz/faq/understanding-etcpasswd-file-format/ [2] http://www.cyberciti.biz/faq/bash-while-loop/ [3] http://www.cyberciti.biz/faq/linux-unix-read-one-character-atatime-while-loop/
- 146. Use of : to set infinite while loop 139 Use of : to set infinite while loop ← While loop Home Until loop → You can use : special command with while loop to tests or set an infinite loop or an endless loop. An infinite loop occurs when the condition will never be met, due to some inherent characteristic of the loop. There are a few situations when this is desired behavior. For example, the menu driven program typically continue till user selects to exit their main menu (loop). To set an infinite while loop use: 1. true command - do nothing, successfully (always returns exit code 0) 2. false command - do nothing, unsuccessfully (always returns exit code 1) 3. : command - no effect; the command does nothing (always returns exit code 0) Syntax Use : command to set an infinite loop: #!/bin/bash # Recommend syntax for setting an infinite while loop while : do echo "Do something; hit [CTRL+C] to stop!" done Use the true command to set an infinite loop: #!/bin/bash while true do echo "Do something; hit [CTRL+C] to stop!" done Use the false command to set an infinite loop: #!/bin/bash while false do echo "Do something; hit [CTRL+C] to stop!" done Note the first syntax is recommended as : is part of shell itself i.e. : is a shell builtin command.
- 147. Use of : to set infinite while loop 140 A menu driven program using while loop The following menu driven program typically continue till user selects to exit by pressing 4 option. The case statement is used to match values against $choice variable and it will take appropriate action according to users choice. Create a shell script called menu.sh: #!/bin/bash # set an infinite loop while : do clear # display menu echo "Server Name - $(hostname)" echo "-------------------------------" echo " M A I N - M E N U" echo "-------------------------------" echo "1. Display date and time." echo "2. Display what users are doing." echo "3. Display network connections." echo "4. Exit" # get input from the user read -p "Enter your choice [ 1 -4 ] " choice # make decision using case..in..esac case $choice in 1) echo "Today is $(date)" read -p "Press [Enter] key to continue..." readEnterKey ;; 2) w read -p "Press [Enter] key to continue..." readEnterKey ;; 3) netstat -nat read -p "Press [Enter] key to continue..." readEnterKey ;; 4) echo "Bye!" exit 0 ;; *) echo "Error: Invalid option..." read -p "Press [Enter] key to continue..." readEnterKey ;; esac
- 148. Use of : to set infinite while loop 141 done Save and close the file. Run it as follows: chmod +x menu.sh ./menu.sh Sample outputs: ← While loop Home Until loop → The until loop statement ← : infinite while loop Home select loop → Just like while loop, until loop is also based on a condition. Syntax The until loop continues running commands as long as the item in list continues to evaluate true. Once an item evaluates false, the loop is exited. The syntax is: until [ condition ] do command1 command2 ... .... commandN done
- 149. The until loop statement 142 The while loop vs the until loop 1. The until loop executes until a nonzero status is returned. 2. The while command executes until a zero status is returned. 3. The until loop always executes at least once. Example Create a shell script called until.sh: #!/bin/bash i=1 until [ $i -gt 6 ] do echo "Welcome $i times." i=$(( i+1 )) done Save and close the file. Run it as follows: chmod +x until.sh ./until.sh Sample outputs: Welcome 1 times. Welcome 2 times. Welcome 3 times. Welcome 4 times. Welcome 5 times. Welcome 6 times. The loop in the above example initializes the variable i to 1, and then increments and displays out the message until it equals 6. ← : infinite while loop Home select loop →
- 150. The select loop statement 143 The select loop statement ← Until loop Home Exit select loop → The Bash Shell also offer select Loop, the syntax is: select varName in list do command1 command2 .... ...... commandN done OR (combine both select and case statement) select varName in list do case $varName in pattern1) command1;; pattern2) command2;; pattern1) command3;; *) echo "Error select option 1..3";; esac done • Select command use PS3 variable to print its prompt. • Each word in list is printed on screen preceded by a number. • If the line consists of the number corresponding to one of the displayed words (from the list), then varName is set to that word. You can use if..else.fi or case..in..esac to make a decision. • If the line is empty, WORDS and the prompt are redisplayed. • If EOF (end of file) is read, the command completes. • The loop continues until a break (CTRL+C) is encountered. Example Create a shell script called select.sh: #!/bin/bash # Set PS3 prompt PS3="Enter the space shuttle to get more information : " # set shuttle list select shuttle in columbia endeavour challenger discovery atlantis
- 151. The select loop statement 144 enterprise pathfinder do echo "$shuttle selected" done Save and close the file. Run it as follows: chmod +x select.sh ./select.sh Sample outputs: /tmp/x.sh 1) columbia 3) challenger 5) atlantis 7) pathfinder 2) endeavour 4) discovery 6) enterprise Enter the space shuttle name to get more information : 1 columbia selected Enter the space shuttle name to get more information : Combining the select and the case statement Another select loop example and decision making does with case..in..esac statement (selectshuttle.sh): #!/bin/bash # The default value for PS3 is set to #?. # Change it i.e. Set PS3 prompt PS3="Enter the space shuttle to get quick information : " # set shuttle list select shuttle in columbia endeavour challenger discovery atlantis enterprise pathfinder do case $shuttle in columbia) echo "--------------" echo "Space Shuttle Columbia was the first spaceworthy space shuttle in NASA's orbital fleet." echo "--------------" ;; endeavour) echo "--------------" echo "Space Shuttle Endeavour is one of three currently operational orbiters in the Space Shuttle." echo "--------------" ;; challenger) echo "--------------" echo "Space Shuttle Challenger was NASA's second Space Shuttle orbiter to be put into service." echo "--------------" ;;
- 152. The select loop statement 145 discovery) echo "--------------" echo "Discovery became the third operational orbiter, and is now the oldest one in service." echo "--------------" ;; atlantis) echo "--------------" echo "Atlantis was the fourth operational shuttle built." echo "--------------" ;; enterprise) echo "--------------" echo "Space Shuttle Enterprise was the first Space Shuttle orbiter." echo "--------------" ;; pathfinder) echo "--------------" echo "Space Shuttle Orbiter Pathfinder is a Space Shuttle simulator made of steel and wood." echo "--------------" ;; *) echo "Error: Please try again (select 1..7)!" ;; esac done Save and close the file. Run it as follows: chmod +x selectshuttle.sh ./selectshuttle.sh Sample outputs:
- 153. The select loop statement 146 selectshuttle.sh output ← Until loop Home Exit select loop → Exit the select loop statement ← select loop Home Break statement → You can exiting the select loop statement either pressing Ctrl+C or by adding the exit option as follows: #!/bin/bash # Set PS3 prompt PS3="Enter the space shuttle to get quick information : " # set shuttle list # exit option select shuttle in columbia endeavour challenger discovery atlantis enterprise pathfinder exit do case $shuttle in columbia) echo "--------------" echo "Space Shuttle Columbia was the first spaceworthy space shuttle in NASA's orbital fleet." echo "--------------" ;; endeavour) echo "--------------" echo "Space Shuttle Endeavour is one of three currently operational orbiters in the Space Shuttle." echo "--------------" ;; challenger) echo "--------------"
- 154. Exit the select loop statement 147 echo "Space Shuttle Challenger was NASA's second Space Shuttle orbiter to be put into service." echo "--------------" ;; discovery) echo "--------------" echo "Discovery became the third operational orbiter, and is now the oldest one in service." echo "--------------" ;; atlantis) echo "--------------" echo "Atlantis was the fourth operational shuttle built." echo "--------------" ;; enterprise) echo "--------------" echo "Space Shuttle Enterprise was the first Space Shuttle orbiter." echo "--------------" ;; pathfinder) echo "--------------" echo "Space Shuttle Orbiter Pathfinder is a Space Shuttle simulator made of steel and wood." echo "--------------" ;; exit) echo "Bye!" break ;; *) echo "Error: Please try again (select 1..8)!" ;; esac done Sample output: 1) columbia 3) challenger 5) atlantis 7) pathfinder 2) endeavour 4) discovery 6) enterprise 8) exit Enter the space shuttle to get quick information : 5 --------------
- 155. Exit the select loop statement 148 Atlantis was the fourth operational shuttle built. -------------- Enter the space shuttle to get quick information : 8 Bye! ← select loop Home Break statement → Using the break statement ← Exit select loop Home Continue statement → Use the break statement to exit from within a FOR, WHILE or UNTIL loop i.e. stop stop loop execution. Syntax break OR break N Example: for loop break statement Create a shell script called forbreak.sh: #!/bin/bash match=$1 # fileName found=0 # set to 1 if file found in the for loop # show usage [ $# -eq 0 ] && { echo "Usage: $0 fileName"; exit 1; } # Try to find file in /etc for f in /etc/* do if [ $f == "$match" ] then echo "$match file found!" found=1 # file found break # break the for looop fi done # noop file not found [ $found -ne 1 ] && echo "$match file not found in /etc directory"
- 156. Using the break statement 149 Save and close the file. Run it as follows: chmod +x forbreak.sh ./forbreak.sh /etc/resolv1.conf ./forbreak.sh /etc/resolv.conf Sample outputs: /etc/resolv1.conf file not found in /etc directory /etc/resolv.conf file found! Example: while loop break statement Create a shell script called whilebreak.sh: #!/bin/bash # set an infinite while loop while : do read -p "Enter number ( -9999 to exit ) : " n # break while loop if input is -9999 [ $n -eq -9999 ] && { echo "Bye!"; break; } isEvenNo=$(( $n % 2 )) # get modules [ $isEvenNo -eq 0 ] && echo "$n is an even number." || echo "$n is an odd number." done Save and close the file. Run it as follows: chmod +x whilebreak.sh ./whilebreak.sh Sample outputs: Enter number ( -9999 to exit ) : 11 11 is an odd number. Enter number ( -9999 to exit ) : -2 -2 is an even number. Enter number ( -9999 to exit ) : 20 20 is an even number. Enter number ( -9999 to exit ) : -9999 Bye!
- 157. Using the break statement 150 How To Break Out Of a Nested Loop A nested loop means loop within loop. You can break out of a certain number of levels in a nested loop by adding break n statement. n is the number of levels of nesting. For example, following code will break out the second done statement: ... for i in something do while true do cmd1 cmd2 [ condition ] && break 2 done done .... .. The above break 2 will breaks you out of two enclosing for and while loop. ← Exit select loop Home Continue statement → Using the continue statement ← Break statement Home Command substitution → The continue statement is used to resume the next iteration of the enclosing FOR, WHILE or UNTIL loop. Syntax continue OR continue n OR ... .. for i in something do [ condition ] && continue cmd1 cmd2 done
- 158. Using the continue statement 151 .. ... OR ... .. while true do [ condition1 ] && continue cmd1 cmd2 [ condition2 ] && break done .. ... The following two examples assumes that familiarity with MySQL and BIND 9 named servers. Example: MySQL Backup Shell Script • Use the continue statement to return to the top of the loop by skipping the rest of the commands in in the loop. #!/bin/bash # A sample mysql backup script # Must be run as the root user # Written by Vivek Gite # Last updated on : 23/Aug/2003 # --------------------------------- # MySQL Login Info MUSER="admin" # MySQL user MHOST="192.168.1.100" # MySQL server ip MPASS="MySQLServerPassword" # MySQL password # format dd-mm-yyyy NOW=$(date +"%d-%m-%Y") # Backupfile path BPATH=/backup/mysql/$NOW # if backup path does not exists, create it [ ! -d $BPATH ] && mkdir -p $BPATH # get database name lists DBS="$(/usr/bin/mysql -u $MUSER -h $MHOST -p$MPASS -Bse 'show databases')" for db in $DBS do # Bakcup file name
- 159. Using the continue statement 152 FILE="${BPATH}/${db}.gz" # skip database backup if database name is adserverstats or mint [ "$db" == "adserverstats" ] && continue [ "$db" == "mint" ] && continue # okay lets dump a database backup /usr/bin/mysqldump -u $MUSER -h $MHOST -p$MPASS $db | /bin/gzip -9 > $FILE done Example: Bind9 named.conf Example #!/bin/bash # convert all domain names to a lowercase DOMAINS="$(echo $@|tr '[A-Z]' '[a-z]')" # Path to named.conf NAMEDCONF="/var/named/chroot/etc/named.conf" # Check named.conf for error NAMEDCHEKCONF="/usr/sbin/named-checkconf -t /var/named/chroot/" # Display usage and die if [ $# -eq 0 ] then echo "Usage: $0 domain1 domain2 ..." exit 1 fi # okay use for loop to process all domain names passed # as a command line args for d in $DOMAINS do # if domain alrady exits, skip the rest of the loop grep $d $NAMEDCONF >/dev/null if [ $? -eq 0 ] then echo "$d exits in in $NAMEDCONF, skiping ..." continue # skip it fi # else add domain to named.conf echo "Adding domain $d to $NAMEDCONF..." echo "zone "${d}" {" >> $NAMEDCONF echo " type master;" >> $NAMEDCONF
- 160. Using the continue statement 153 echo " file "/etc/named/master.${d}";" >> $NAMEDCONF echo " allow-transfer { slaveservers; };" >> $NAMEDCONF echo "};" >> $NAMEDCONF # Run named configuration file syntax checking tool $NAMEDCHEKCONF >/dev/null if [ $? -ne 0 ] # error found? then echo "**** Warning: named-checkconf - Cannot reload named due to errors for $d ****" else echo "**** Domain $d sucessfully added to $NAMEDCONF ****" fi done ← Break statement Home Command substitution → Command substitution ← Continue statement Home Chapter 5 Challenges → Command substitution is nothing but run a shell command and store it's output to a variable or display back using echo command. For example, display date and time: echo "Today is $(date)" OR echo "Computer name is $(hostname)" Syntax You can use the grave accent (`) to perform a command substitution. The syntax is: `command-name` OR $(command-name) Command substitution in an echo command echo "Text $(command-name)" OR echo -e "List of logged on users and what they are doing:n $(w)" Sample outputs:
- 161. Command substitution 154 List of logged on users and what they are doing: 09:49:06 up 4:09, 3 users, load average: 0.34, 0.33, 0.28 USER TTY FROM LOGIN@ IDLE JCPU PCPU WHAT vivek tty7 :0 05:40 ? 9:06m 0.09s /usr/bin/gnome- vivek pts/0 :0.0 07:02 0.00s 2:07m 0.13s bash vivek pts/2 :0.0 09:03 20:46m 0.04s 0.00s /bin/bash ./ssl Command substitution and shell variables You can store command output to a shell variable using the following syntax: var=$(command-name) Store current date and time to a variable called NOW: NOW=$(date) echo "$NOW" Store system's host name to a variable called SERVERNAME: SERVERNAME=$(hostname) echo "Running command @ $SERVERNAME...." Store current working directory name to a variable called CWD: CWD=$(pwd) cd /path/some/where/else echo "Current dir $(pwd) and now going back to old dir .." cd $CWD Command substitution and shell loops Shell loop can use command substitution to get input: for f in $(ls /etc/*.conf) do echo "$f" done ← Continue statement Home Chapter 5 Challenges →
- 162. Chapter 5 Challenges 155 Chapter 5 Challenges ← Command substitution Home Chapter 6: Shell Redirection → • Decide whether the following sentence is true or false: 1. For repeated actions use if-then-else. 2. For choice making use bash shell loop. 3. To executes for each value in a list use while loop. 4. Use break statement to return to the top of the loop. 5. Use continue statement to return to the top of the loop. 6. The PS3 reserved variable is used by select statement. 7. The default value for PS3 is set to #?. • Write a menu driven script using the select statement to print calories for food items such as pizza, burger, Salad, Pasta etc. • Write a shell script that, given a file name as the argument will count vowels, blank spaces, characters, number of line and symbols. • Write a shell script that, given a file name as the argument will count English language articles such As 'A', 'An' and 'The'. • Write a shell script that, given a file name as the argument will write the even numbered line to a file with name evenfile and odd numbered lines in a text file called oddfile. • Write a shell script to monitor Linux server disk space using a while loop. Send an email alert when percentage of used disk space is >= 90%. • Write a shell script to determine if an input number is a palindrome or not. A palindromic number is a number where the digits, with decimal representation usually assumed, are the same read backwards, for example, 58285. • Write a shell program to read a number *such as 123) and find the sum of digits (1+2+3=6). • Write a shell program to read a number and display reverse the number. For example, 123 should be printed as as 321. • Write the shell program which produces a report from the output of ls -l in the following format using the for loop statement: file1 file2 [DIR] test/ Total regular files : 7 Total directories : 4 Total symbolic links : 0 Total size of regular files : 2940 • Write a shell script that will count the number of files in each of your sub-directories using the for loop. • Write a shell script that accepts two directory names as arguments and deletes those files in the first directory which are similarly named in the second directory. • Write a shell script to search for no password entries in /etc/passwd and lock all accounts. • Write a shell program to read two numbers and display all the odd numbers between those two numbers. • Chapter 5 answers
- 163. Chapter 5 Challenges 156 ← Command substitution Home Chapter 6: Shell Redirection →
- 164. 157 Chapter 6: Shell Redirection Input and Output ← Chapter 6: Shell Redirection Home Standard input → Almost all commands produces the output to screen or take input from the keyboard, but in Linux it is possible to send output to a file or to read input from a file. Each shell command has its own input and outputs. Before a command is executed, its input and output may be redirected using a special notation interpreted by the shell. For example, sending output of date command to a file instead of to the screen. Changing the default path of input or output is called redirection. • In Linux everything is a file. • Your hardware is also a file: • 0 - Input - Keyboard (stdin) • 1 - Output - Screen (stdout) • 2 - Error - Screen (stderr) • The above three numbers are standard POSIX numbers and also known as file descriptors (FD). Every Linux command at least open the above streams to talk with users or other system programs. Integer value
- 165. Input and Output 158 Standard File File Descriptor Number Meaning Example (type at shell prompt) stdin 0 Read input from a file (the default is keyboard) cat < filename stdout 1 Send data to a file (the default is screen). date > output.txt cat output.txt stderr 2 Send all error messages to a file (the default is screen). rm /tmp/4815162342.txt 2>error.txt cat error.txt You can manipulate the final result by redirecting input and output. ← Chapter 6: Shell Redirection Home Standard input → Standard input ← Input and Output Home Standard output → • Standard input is the default input method, which is used by all commands to read its input. • It is denoted by zero number (0). • Also known as stdin. • The default standard input is the keyboard. • < is input redirection symbol and syntax is: command < filename • For example, you can run cat command as follows to display /etc/passwd on screen: cat < /etc/passwd
- 166. Standard input 159 • To sort /etc/resolv.conf file, enter: sort < /etc/resolv.conf ← Input and Output Home Standard output → Standard output ← Standard input Home Standard error → • Standard output is used by a command to writes (display) its output. • The default is the screen. • It is denoted by one number (1). • Also known as stdout. • The default standard output is the screen. • > is output redirection symbol and syntax is: command > output.file.name For example, ls command by default writes its output to the screen: ls But, you can save the output to a file called output.txt, enter: ls > /tmp/output.txt
- 167. Standard output 160 To view file, enter: cat /tmp/output.txt • Please note that /tmp/output.txt file is created if it doesn't exist. And if file /tmp/output.txt file is overwritten if it exits. • You can also save your script output to the file: ./your.script.name.sh > myoutput cat myoutput ← Standard input Home Standard error → Standard error ← Standard output Home Empty file creation → • Standard error is the default error output device, which is used to write all system error messages. • It is denoted by two number (2). • Also known as stderr. • The default standard input is the screen or monitor. • 2> is input redirection symbol and syntax is: command 2> errors.txt For example, send find command errors to a file called fileerrors.txt, sothat you can review errors later on, enter: find / -iname "*.conf" 2>fileerrors.txt cat fileerrors.txt
- 168. Standard error 161 ← Standard output Home Empty file creation → Empty file creation ← Standard error Home /dev/null discards unwanted output → • To create empty file use the following syntax: >newfile.name • > operator redirects output to a file. If no command given and if file doesn't exist it will create empty file. For example, create a shell script called tarbackup.sh: #!/bin/bash TAR=/bin/tar # SCSI tape device TAPE=/dev/st0 # Backup dir names BDIRS="/www /home /etc /usr/local/mailboxes /phpjail /pythonjail /perlcgibin" # Logfile name ERRLOG=/tmp/tar.logfile.txt
- 169. Empty file creation 162 # Remove old log file and create the empty log file >$ERRLOG # Okay lets make a backup $TAR -cvf $TAPE $BDIRS 2>$ERRLOG Notice you can also use touch command for empty file creation: touch /tmp/newtextfile Save and close the file. Run it as follows: chmod +x tarbackup.sh ./tarbackup.sh ← Standard error Home /dev/null discards unwanted output → /dev/null discards unwanted output ← Empty file creation Home here documents → All data written on a /dev/null or /dev/zero special file is discarded by the system. Use /dev/null to send any unwanted output from program/command and syntax is: command >/dev/null This syntax redirects the command standard output messages to /dev/null where it is ignored by the shell. OR command 2>/dev/null This syntax redirects the command error output messages to /dev/null where it is ignored by the shell. OR command &>/dev/null This syntax redirects both standard output and error output messages to /dev/null where it is ignored by the shell. Example Try searching user vivek in /etc/passwd file: grep vivek /etc/passwd && echo "Vivek found" || "Vivek not found" Sample outputs: vivek:x:1000:1000:Vivek Gite,,,,:/home/vivek:/bin/bash Vivek found To ignore actual output and just display the message, modify your command as follows: grep vivek /etc/passwd >/dev/null && echo "Vivek found" || "Vivek not found"
- 170. /dev/null discards unwanted output 163 Sample outputs: Vivek found Consider the following example from the exit status chapter. The output of grep "^$username" $PASSWD_FILE > /dev/null is send to /dev/null where it is ignored by the shell. #!/bin/bash # set var PASSWD_FILE=/etc/passwd # get user name read -p "Enter a user name : " username # try to locate username in in /etc/passwd # grep "^$username" $PASSWD_FILE > /dev/null # store exit status of grep # if found grep will return 0 exit stauts # if not found, grep will return a nonzero exit stauts status=$? if test $status -eq 0 then echo "User '$username' found in $PASSWD_FILE file." else echo "User '$username' not found in $PASSWD_FILE file." fi ← Empty file creation Home here documents →
- 171. Here documents 164 Here documents ← /dev/null discards unwanted output Home here strings → To create a here document use the following syntax: command <<HERE text1 text2 testN $varName HERE This type of redirection tells the shell to read input from the current source (HERE) until a line containg only word (HERE) is seen. HERE word is not subjected to variable name, parameter expansion, arithmetic expansion, pathname expansion, or command substitution. All of the lines read up to that point are then used as the standard input for a command. Files are processed in this manner are commonly called here documents. Example Use here document feature to give constant text to a command. For example the following command will count the words for input: echo 'This is a test.' | wc -w Sample outputs: 4 But, how do you count lots of lines at a time? Use here document as follows: wc -w <<EOF > This is a test. > Apple juice. > 100% fruit juice and no added sugar, colour or preservative. > EOF Sample outputs: 16 The <<, reads the shell input typed after the wc command at the PS2 prompts, >) up to a line which is identical to word EOF.
- 172. Here documents 165 HERE document and mail command For example, write an email using the mail command. Create a shell script called tapebackup1.sh: #!/bin/bash # run tar command and dump data to tape tar -cvf /dev/st0 /www /home 2>/dev/null # Okay find out if tar was a success or a failure [ $? -eq 0 ] && status="Success!" || status="Failed!!!" # write an email to admin mail -s 'Backup status' [email protected]<<END_OF_EMAIL The backup job finished. End date: $(date) Hostname : $(hostname) Status : $status END_OF_EMAIL Save and close the file. Run it as follows: chmod +x tapebackup1.sh ./tapebackup1.sh Sample outputs: Subject: Test From: root <[email protected]> Date: 12:57 Am To: [email protected] The backup job finished. End date: Thu Sep 17 14:27:35 CDT 2009 Hostname : txvip1.simplyguide.org Status : Success The script provides the constant multi-line text input to the mail command. ← /dev/null discards unwanted output Home here strings →
- 173. Here strings 166 Here strings ← here documents Home Redirection of standard error → Here strings is just like here documents and syntax is: command <<<$word OR command arg1 <<<"$word" The $word (a shell variable) is expanded and supplied to the command on its standard input. The following wc command will count words from given argument: wc -w <<< "This is a test." Sample outputs: 4 grepping into a shell variable Usually, you can not grep into a $var. For example, try to grep word "nor" using $var: var="Neither in this world nor elsewhere is there any happiness in store for him who always doubts." grep "nor" $var Sample outputs: grep: Neither: No such file or directory grep: in: No such file or directory grep: this: No such file or directory grep: world: No such file or directory grep: nor: No such file or directory grep: elsewhere: No such file or directory grep: is: No such file or directory However, with here string you can grep into $var, enter: grep "nor" <<<$var >/dev/null && echo "Found" || echo "Not found" Sample output: Found Notice you can use shell pipes to grep into $var: echo $var | grep -q "nor" && echo "Found" || echo "Not found" However, here strings looks more logical and easy to read.
- 174. Here strings 167 Counting network interfaces The following command counts the total active network interfaces: wc -w <<<$(netstat -i | cut -d" " -f1 | egrep -v "^Kernel|Iface|lo") Sample outputs: 3 ← here documents Home Redirection of standard error → Redirection of standard error ← here strings Home Redirection of standard output → To redirect standard error into file called error.log, enter: command-name 2>error.log Find all .profile files in /home directory and log errors to /tmp/error file, enter: find /home -name .profile 2>/tmp/error Sample output: /home/t2/.profile /home/vivek/ttt/skel/.profile To view errors, enter: more /tmp/error Sample outputs: find: `/home/vivek/.cpan/build/Acme-POE-Tree-1.01-qqmq77': Permission denied find: `/home/vivek/.cpan/build/Lchown-1.00-uOM4tb': Permission denied find: `/home/vivek/.cpan/build/IO-Tty-1.07-F9rDy3': Permission denied find: `/home/vivek/.cpan/build/POE-Test-Loops-1.002-9AjIro': Permission denied find: `/home/vivek/.cpan/build/POE-1.003-KwXVB1': Permission denied find: `/home/vivek/.cpan/build/Curses-1.27-ZLo169': Permission denied
- 175. Redirection of standard error 168 Redirect Script Errors You can redirect script error to a log file called scripts.err: ./script.sh 2>scripts.err /path/to/example.pl 2>scripts.err Append To Error Log You can append standard error to end of error.log file using >> operator: command-name 2>>error.log ./script.sh 2>>error.log /path/to/example.pl 2>>error.log External links • BASH Shell: How To Redirect stderr To stdout ( redirect stderr to a File ) [1] • BASH Shell Redirect Output and Errors To /dev/null [2] • How do I save or redirect stdout and stderr into different files? [3] ← here strings Home Redirection of standard output → References [1] http://www.cyberciti.biz/faq/redirecting-stderr-to-stdout/ [2] http://www.cyberciti.biz/faq/how-to-redirect-output-and-errors-to-devnull/ [3] http://www.cyberciti.biz/faq/saving-stdout-stderr-into-separate-files/
- 176. Redirection of standard output 169 Redirection of standard output ← Redirection of standard error Home Appending redirected output → To redirect output simple use the following syntax: command > /path/to/file /path/to/script.sh > output.txt For example, send output of date command to a file called now.txt: date > now.txt You can also use the > operator to print file, enter: cat file.txt > /dev/lp0 OR sudo bash -c "cat file.txt > /dev/lp0" To make a usage listing of the directories in the /home partition, enter: sudo bash -c "cd /home ; du -s *│ sort -rn >/tmp/usage" You can also use the following syntax: echo "Today is $(date)" 1>/tmp/now.txt External links • BASH Shell: How To Redirect stderr To stdout ( redirect stderr to a File ) [1] • BASH Shell Redirect Output and Errors To /dev/null [2] • How do I save or redirect stdout and stderr into different files? [3] ← Redirection of standard error Home Appending redirected output →
- 177. Appending redirected output 170 Appending redirected output ← Redirection of standard output Home Redirection of both standard error and output → You can append the output to the same file using >> operator, enter: date >> now.txt cat now.txt You can also use the following syntax: echo "Today is $(date)" 1>>/tmp/now.txt External links • BASH Shell: How To Redirect stderr To stdout ( redirect stderr to a File ) [1] • BASH Shell Redirect Output and Errors To /dev/null [2] • How do I save or redirect stdout and stderr into different files? [3] ← Redirection of standard output Home Redirection of both standard error and output → Redirection of both standard error and output ← Appending redirected output Home Writing output to files → You can redirect both stdout and stderr to file using the following syntax: command-name &>filename command-name >cmd.log 2>&1 command-name >/dev/null 2>&1 This syntax is often used with cron jobs: @hourly /scripts/backup/nas.backup >/dev/null 2>&1 OR @hourly /scripts/backup/nas.backup &>/dev/null
- 178. Redirection of both standard error and output 171 External links • BASH Shell: How To Redirect stderr To stdout ( redirect stderr to a File ) [1] • BASH Shell Redirect Output and Errors To /dev/null [2] • How do I save or redirect stdout and stderr into different files? [3] ← Appending redirected output Home Writing output to files → Writing output to files ← Redirection of both standard error and output Home Assigns the file descriptor (fd) to file for output → You need to use the redirection symbol, >, to send data to a file. For example, my script called ./payment.py generate output as follows on screen: ./payment.py -a -t net Sample outputs: +-+-----------+---------+-------------+ |#| Month | NetRev | Paid Details| +-+-----------+---------+-------------+ |1| Feb-09| 747.56 | 06-Apr-2009 | |2| Mar-09| 373.14 | 20-Apr-2009 | |3| Apr-09| 163.66 | 19-May-2009 | |4| May-09| 158.18 | 19-Jun-2009 | |5| Jun-09| 3768.96 | 17-Jul-2009 | |6| Jul-09| 2150.06 | 21-Aug-2009 | +-+-----------+---------+-------------+ Use the > redirection symbol, to send data to a file called netrevenue.txt, enter: ./payment.py -a -t net >netrevenue.txt Append Output To Files Use the >> redirection symbols, to append to a file called netrevenue.txt, enter: ./payment.py -a -t net >>netrevenue.txt Avoid Overwriting To Files To disallow existing regular files to be overwritten with the > operator set noclobber option as follows: echo "Test" > /tmp/test.txt set -C echo "Test 123" > /tmp/test.txt Sample outputs: bash: /tmp/test.txt: cannot overwrite existing file
- 179. Writing output to files 172 To enable existing regular files to be overwritten with the > operator set noclobber option as follows: cat /tmp/test.txt set +C echo "Test 123" > /tmp/test.txt cat /tmp/test.txt Reading and Writing From Files Create a text file called fnames.txt: vivek tom Jerry Ashish Babu Now, run tr command as follows to convert all lowercase names to the uppercase, enter: tr "[a-z]" "[A-Z]" < fnames.txt Sample outputs: VIVEK TOM JERRY ASHISH BABU You can save the output to a file called output.txt, enter: tr "[a-z]" "[A-Z]" < fnames.txt > output.txt cat output.txt Notice do not use the same file name for standard input and standard output. This will result into data loss and results are unpredictable. To sort names stored in output.txt, enter: sort < output.txt Finally, store all sorted named to a file called sorted.txt sort < output.txt > sorted.txt However, sort > sorted1.txt < output.txt ← Redirection of both standard error and output Home Assigns the file descriptor (fd) to file for output →
- 180. Assigns the file descriptor (fd) to file for output 173 Assigns the file descriptor (fd) to file for output ← Writing output to files Home Assigns the file descriptor (fd) to file for input → File descriptors 0, 1 and 2 are reserved for stdin, stdout and stderr respectively. However, bash shell allows you to assign a file descriptor to an input file or output file. This is done to improve file reading and writing performance. This is known as user defined file descriptors. Syntax You can assign a file descriptor to an output file with the following syntax: exec fd> output.txt • where, fd >= 3 Example Create a shell script called fdwrite.sh: #!/bin/bash # Let us assign the file descriptor to file for output # fd # 3 is output file exec 3> /tmp/output.txt # Executes echo commands and # Send output to # the file descriptor (fd) # 3 i.e. write output to /tmp/output.txt echo "This is a test" >&3 # Write date command output to fd # 3 date >&3 # Close fd # 3 exec 3<&- Save and close the file. Run it as follows: chmod +x fdwrite.sh ./fdwrite.sh cat /tmp/output.txt Sample outputs: This is a test Sun Sep 20 01:10:38 IST 2009 ← Writing output to files Home Assigns the file descriptor (fd) to file for input →
- 181. Assigns the file descriptor (fd) to file for input 174 Assigns the file descriptor (fd) to file for input ← Assigns the file descriptor (fd) to file for output Home Closes the file descriptor (fd) → To assign a file descriptor to an input file use the following syntax: exec fd< input.txt • where, fd >= 3. Example Create a shell script called fdread.sh: #!/bin/bash # Let us assign the file descriptor to file for input # fd # 3 is Input file exec 3< /etc/resolv.conf # Executes cat commands and read input from # the file descriptor (fd) # 3 i.e. read input from /etc/resolv.conf file cat <&3 # Close fd # 3 exec 3<&- Save and close the file. Run it as follows: chmod +x fdread.sh ./fdread.sh ← Assigns the file descriptor (fd) to file for output Home Closes the file descriptor (fd) →
- 182. Closes the file descriptor (fd) 175 Closes the file descriptor (fd) ← Assigns the file descriptor (fd) to file for input Home Opening the file descriptors for reading and writing → To closes the file descriptor use the following syntax: exec fd<&- To close fd # 5, enter: exec 5<&- Opening the file descriptors for reading and writing ← Closes the file descriptor (fd) Home Reads from the file descriptor (fd) → Bash supports the following syntax to open file for both reading and writing on file descriptor: exec fd<>fileName • File descriptor 0 is used if fd is not specified. • If the file does not exist, it is created. • This syntax is useful to update file. Example Create a shell script called fdreadwrite.sh #!/bin/bash FILENAME="/tmp/out.txt" # Opening file descriptors # 3 for reading and writing # i.e. /tmp/out.txt exec 3<>$FILENAME # Write to file echo "Today is $(date)" >&3 echo "Fear is the path to the dark side. Fear leads to anger. " >&3 echo "Anger leads to hate. Hate leads to suffering." >&3 echo "--- Yoda" >&3 # close fd # 3 exec 3>&- ← Closes the file descriptor (fd) Home Reads from the file descriptor (fd) →
- 183. Reads from the file descriptor (fd) 176 Reads from the file descriptor (fd) ← Opening the file descriptors for reading and writing Home Executes commands and send output to the file descriptor (fd) → You can use the read command to read data from the keyboard or file. You can pass the -u option to the read command from file descriptor instead of the keyboard. This is useful to read file line by line or one word at a time. Syntax read -u fd var1 var2 ... varN OR use the while loop to read the entire file line: while IFS= read -u fd -r line do command1 on $line command2 on $line .. .... commandN done Example Create a shell script called readwritefd.sh as follows: #!/bin/bash # Let us assign the file descriptor to file for input fd # 3 is Input file exec 3< /etc/resolv.conf # Let us assign the file descriptor to file for output fd # 3 is Input file exec 4> /tmp/output.txt # Use read command to read first line of the file using fd # 3 read -u 3 a b # Display data on screen echo "Data read from fd # 3:" echo $a $b # Write the same data to fd # 4 i.e. our output file echo "Wrting data read from fd #3 to fd#4 ... " echo "Field #1 - $a " >&4 echo "Field #2 - $b " >&4 # Close fd # 3 and # 4
- 184. Reads from the file descriptor (fd) 177 exec 3<&- exec 4<&- Save and close the file. Run it as follows: chmod +x readwritefd.sh ./readwritefd.sh Sample output: Data read from fd # 3: nameserver 192.168.1.254 Wrting data read from fd #3 to fd#4 ... To view data written to fd # 4 i.e. /tmp/output.txt, use the cat command as follows: cat /tmp/output.txt Sample outputs: Field #1 - nameserver Field #2 - 192.168.1.254 Shell Script To Display Its Own FDs The following shell script displays its actual fd numbers and file associated with them (displayfds.sh): #!/bin/bash # Let us assign the file descriptor to file for input fd # 3 is Input file exec 3< /etc/resolv.conf # Let us assign the file descriptor to file for output fd # 3 is Input file exec 4> /tmp/output.txt # Use read command to read first line of the file read -u 3 a b echo "*** My pid is $$" mypid=$$ echo "*** Currently open files by $0 scripts.." ls -l /proc/$mypid/fd # Close fd # 3 and # 4 exec 3<&- exec 4<&- Save and close the file. Run it as follows:
- 185. Reads from the file descriptor (fd) 178 chmod +x displayfds.sh ./displayfds.sh Sample output: *** My pid is 19560 *** Currently open files by ./displayfds.sh scripts.. total 0 lrwx------ 1 vivek vivek 64 2009-09-20 01:45 0 -> /dev/pts/2 lrwx------ 1 vivek vivek 64 2009-09-20 01:45 1 -> /dev/pts/2 lrwx------ 1 vivek vivek 64 2009-09-20 01:45 2 -> /dev/pts/2 lr-x------ 1 vivek vivek 64 2009-09-20 01:45 255 -> /tmp/displayfds.sh lr-x------ 1 vivek vivek 64 2009-09-20 01:45 3 -> /etc/resolv.conf l-wx------ 1 vivek vivek 64 2009-09-20 01:45 4 -> /tmp/output.txt 1. The file descriptors 3 is assigned to /etc/resolv.conf and 4 is assinged to /tmp/output.txt. 2. Fd # 0, 1, and 2 are all assinged to /dev/pts/2 i.e. my screen in this output. 3. The ls /proc/$mypid/fd command lists all open fds using scripts PID (process identification number) number. 4. The proc file system (/proc) is a pseudo-file system which is used as an interface to kernel data structures. 5. There is a numerical subdirectory for each running process; the subdirectory is named by the process ID. Each such subdirectory contains the pseudo-files and directories. 6. /proc/[PID]/fd is one of such directory containing one entry for each file which the process has open, named by its file descriptor, and which is a symbolic link to the actual file. Thus, 0 is standard input, 1 standard output, 2 standard error, 3 /etc/resolv.conf, 4 /tmp/output.txt etc. Shell Script To Read File Line by Line Create a shell script called readfile.sh: #!/bin/bash # Shell script utility to read a file line line. FILE="$1" # make sure filename supplied at a shell prompt else die [ $# -eq 0 ] && { echo "Usage: $0 filename"; exit 1; } # make sure file exist else die [ ! -f $FILE ] && { echo "Error - File $FILE does not exists." ; exit 2; } # make sure file readonly else die [ ! -r $FILE ] && { echo "Error - Can not read $FILE file."; exit 3; } IFS=$(echo -en "nb") exec 3<$FILE while read -u 3 -r line do
- 186. Reads from the file descriptor (fd) 179 echo $line done # Close fd # 3 exec 3<&- # exit with 0 success status exit 0 Save and close the file. Run it as follows: chmod +x readfile.sh ./readfile.sh /etc/resolv.conf ← Opening the file descriptors for reading and writing Home Executes commands and send output to the file descriptor (fd) → Executes commands and send output to the file descriptor (fd) ← Reads from the file descriptor (fd) Home Chapter 6 Challenges → The syntax is as follows to run or execute commands and send output to the file descriptor: command-name >& fd ./shell-script >& fd For example, send output of 'free -m' command to the fd # 4: #!/bin/bash exec 4> /tmp/out.txt free -m >&4 Shell Script To Collect System Information Create a shell script called sysinfo.sh: #!/bin/bash # get date in dd-mm-yyyy format NOW=$(date +"%d-%m-%Y") # create output file name OUTPUT="/tmp/sysinfo.$NOW.log" # Assign the fd 3 to $OUTPUT file exec 3> $OUTPUT
- 187. Executes commands and send output to the file descriptor (fd) 180 # Write date, time and hostname echo "---------------------------------------------------" >&3 echo "System Info run @ $(date) for $(hostname)" >&3 echo "---------------------------------------------------" >&3 echo "****************************" >&3 echo "*** Installed Hard Disks ***" >&3 echo "****************************" >&3 fdisk -l | egrep "^Disk /dev" >&3 echo "************************************" >&3 echo "*** File System Disk Space Usage ***" >&3 echo "************************************" >&3 df -H >&3 echo "***********************" >&3 echo "*** CPU Information ***" >&3 echo "***********************" >&3 grep 'model name' /proc/cpuinfo | uniq | awk -F: '{ print $2}' >&3 echo "*****************************" >&3 echo "*** Operating System Info ***" >&3 echo "*****************************" >&3 uname -a >&3 [ -x /usr/bin/lsb_release ] && /usr/bin/lsb_release -a >&3 || echo "/usr/bin/lsb_release not found." >&3 echo "**************************************" >&3 echo "*** Amount Of Free And Used Memory ***" >&3 echo "**************************************" >&3 free -m >&3 echo "************************************" >&3 echo "*** Top 10 Memory Eating Process ***" >&3 echo "************************************" >&3 ps -auxf | sort -nr -k 4 | head -10 >&3 echo "**********************************" >&3 echo "*** Top 10 CPU Eating Process ***" >&3 echo "**********************************" >&3 ps -auxf | sort -nr -k 3 | head -10 >&3 echo "******************************************" >&3 echo "*** Network Device Information [eth0] ***" >&3 echo "******************************************" >&3 netstat -i | grep -q eth0 && /sbin/ifconfig eth0 >&3 || echo "eth0 is not installed" >&3
- 188. Executes commands and send output to the file descriptor (fd) 181 echo "******************************************" >&3 echo "*** Network Device Information [eth1] ***" >&3 echo "******************************************" >&3 netstat -i | grep -q eth1 && /sbin/ifconfig eth1 >&3 || echo "eth1 is not installed" >&3 echo "********************************" >&3 echo "*** Wireless Device [wlan0] ***" >&3 echo "********************************" >&3 netstat -i | grep -q wlan0 && /sbin/ifconfig wlan0 >&3 || echo "wlan0 is not installed" >&3 echo "*************************************" >&3 echo "*** All Network Interfaces Stats ***" >&3 echo "*************************************" >&3 netstat -i >&3 echo "System info wrote to $OUTPUT file." Save and close the file. Run it as follows: chmod +x sysinfo.sh ./sysinfo.sh Sample outputs: --------------------------------------------------- System Info run @ Sun Sep 20 02:41:43 IST 2009 for vivek-desktop --------------------------------------------------- **************************** *** Installed Hard Disks *** **************************** Disk /dev/sda: 1500.3 GB, 1500301910016 bytes Disk /dev/sdb: 500.1 GB, 500107862016 bytes Disk /dev/sdc: 500.1 GB, 500107862016 bytes ************************************ *** File System Disk Space Usage *** ************************************ Filesystem Size Used Avail Use% Mounted on /dev/sdb2 99G 29G 65G 31% / tmpfs 4.3G 0 4.3G 0% /lib/init/rw varrun 4.3G 267k 4.3G 1% /var/run varlock 4.3G 0 4.3G 0% /var/lock udev 4.3G 2.9M 4.3G 1% /dev tmpfs 4.3G 361k 4.3G 1% /dev/shm /dev/sdb5 294G 282G 12G 96% /share /dev/sdc2 247G 164G 71G 70% /disk1p2
- 189. Executes commands and send output to the file descriptor (fd) 182 /dev/sda5 1.4T 444G 861G 34% /1.5 *********************** *** CPU Information *** *********************** Filesystem Size Used Avail Use% Mounted on /dev/sdb2 99G 29G 65G 31% / tmpfs 4.3G 0 4.3G 0% /lib/init/rw varrun 4.3G 267k 4.3G 1% /var/run varlock 4.3G 0 4.3G 0% /var/lock udev 4.3G 2.9M 4.3G 1% /dev tmpfs 4.3G 361k 4.3G 1% /dev/shm /dev/sdb5 294G 282G 12G 96% /share /dev/sdc2 247G 164G 71G 70% /disk1p2 /dev/sda5 1.4T 444G 861G 34% /1.5 ***************************** *** Operating System Info *** ***************************** Linux vivek-desktop 2.6.27-11-server #1 SMP Wed Apr 1 21:53:55 UTC 2009 i686 GNU/Linux Distributor ID: Ubuntu Description: Ubuntu 8.10 Release: 8.10 Codename: intrepid ************************************** *** Amount Of Free And Used Memory *** ************************************** total used free shared buffers cached Mem: 8105 4178 3926 0 181 3093 -/+ buffers/cache: 903 7201 Swap: 1906 0 1906 ************************************ *** Top 10 Memory Eating Process *** ************************************ vivek 8413 5.8 4.1 658020 343488 ? Rl Sep19 29:51 _ /opt/firefox/firefox-bin vivek 18058 1.2 2.3 241724 198904 pts/1 Sl 00:54 1:18 vi /home/vivek/output.txt vivek 8600 3.9 1.1 175616 93900 ? Sl Sep19 20:00 /usr/bin/python /usr/bin/deluge root 7701 3.0 0.5 314200 41940 tty7 SLs+ Sep19 15:20 _ /usr/X11R6/bin/X :0 -br -audit 0 -auth /var/lib/gdm/:0.Xauth -nolisten tcp vt7 tomcat55 7875 0.0 0.4 293688 36460 ? Sl Sep19 0:17 _ /usr/bin/jsvc -user tomcat55 -cp /usr/share/java/commons-daemon.jar:/usr/share/tomcat5.5/bin/bootstrap.jar
- 190. Executes commands and send output to the file descriptor (fd) 183 -outfile SYSLOG -errfile SYSLOG -pidfile /var/run/tomcat5.5.pid -Djava.awt.headless=true -Xmx128M -Djava.endorsed.dirs=/usr/share/tomcat5.5/common/endorsed -Dcatalina.base=/var/lib/tomcat5.5 -Dcatalina.home=/usr/share/tomcat5.5 -Djava.io.tmpdir=/var/lib/tomcat5.5/temp -Djava.security.manager -Djava.security.policy=/var/lib/tomcat5.5/conf/catalina.policy -Djava.util.logging.manager=org.apache.juli.ClassLoaderLogManager -Djava.util.logging.config.file=/var/lib/tomcat5.5/conf/logging.properties org.apache.catalina.startup.Bootstrap vivek 8283 0.0 0.3 113548 28888 ? Sl Sep19 0:03 gnome-terminal vivek 18341 0.3 0.3 62048 28732 pts/2 S 01:07 0:20 | _ gedit /tmp/x vivek 17561 0.0 0.3 77692 27172 ? S 00:33 0:01 _ nautilus --no-desktop --browser vivek 8181 0.0 0.2 52844 22180 ? S Sep19 0:15 _ gnome-panel vivek 8147 0.0 0.2 63868 17652 ? Ssl Sep19 0:02 /usr/lib/gnome-settings-daemon/gnome-settings-daemon ********************************** *** Top 10 CPU Eating Process *** ********************************** vivek 8413 5.8 4.1 658020 343836 ? Dl Sep19 29:51 _ /opt/firefox/firefox-bin vivek 8600 3.9 1.1 175616 93900 ? Sl Sep19 20:00 /usr/bin/python /usr/bin/deluge root 7701 3.0 0.5 314200 41940 tty7 SLs+ Sep19 15:20 _ /usr/X11R6/bin/X :0 -br -audit 0 -auth /var/lib/gdm/:0.Xauth -nolisten tcp vt7 vivek 8097 1.4 0.0 31124 4776 ? Ssl Sep19 7:18 /usr/bin/pulseaudio -D --log-target=syslog vivek 18058 1.2 2.3 241724 198904 pts/1 Sl 00:54 1:18 vi /tmp/sysinfo.sh vivek 18341 0.3 0.3 62048 28732 pts/2 R 01:07 0:20 | _ gedit /tmp/x root 8302 0.1 0.0 0 0 ? S< Sep19 0:53 _ [ntos_wq] www-data 8064 0.0 0.0 30204 2412 ? S Sep19 0:00 _ /usr/bin/php-cgi www-data 8063 0.0 0.0 30204 2412 ? S Sep19 0:00 _ /usr/bin/php-cgi www-data 8062 0.0 0.0 30204 2412 ? S Sep19 0:00 _ /usr/bin/php-cgi ****************************************** *** Network Device Information [eth0] *** ****************************************** eth0 is not installed
- 191. Executes commands and send output to the file descriptor (fd) 184 ****************************************** *** Network Device Information [eth1] *** ****************************************** eth1 is not installed ******************************** *** Wireless Device [wlan0] *** ******************************** wlan0 Link encap:Ethernet HWaddr 00:1e:2a:47:42:8d inet addr:192.168.1.100 Bcast:192.168.1.255 Mask:255.255.255.0 inet6 addr: fe80::21e:2aff:fe47:428d/64 Scope:Link UP BROADCAST RUNNING MULTICAST MTU:1500 Metric:1 RX packets:648676 errors:0 dropped:0 overruns:0 frame:0 TX packets:622282 errors:0 dropped:0 overruns:0 carrier:0 collisions:0 txqueuelen:1000 RX bytes:465564933 (465.5 MB) TX bytes:310468013 (310.4 MB) Interrupt:18 Memory:e3000000-e3010000 ************************************* *** All Network Interfaces Stats *** ************************************* Kernel Interface table Iface MTU Met RX-OK RX-ERR RX-DRP RX-OVR TX-OK TX-ERR TX-DRP TX-OVR Flg lo 16436 0 6784 0 0 0 6784 0 0 0 LRU vmnet1 1500 0 0 0 0 0 60 0 0 0 BMRU vmnet3 1500 0 0 0 0 0 60 0 0 0 BMRU vmnet8 1500 0 0 0 0 0 60 0 0 0 BMRU wlan0 1500 0 648676 0 0 0 622282 0 0 0 BMRU ← Reads from the file descriptor (fd) Home Chapter 6 Challenges →
- 192. Chapter 6 Challenges 185 Chapter 6 Challenges ← Executes commands and send output to the file descriptor (fd) Home Chapter 7: Pipes and Filters → • Decide whether the following sentence is true or false: 1. To create empty file use >filename. 2. If no files given cat command reads from standard input. 3. The standard input defaults to user keyboard. 4. 0<filename''' takes standard input from file. # '''2>filename puts standard output to file. 5. ./script.sh 2>&1 puts standard error to current destination of standard output. 6. >output.txt if output.txt doesn't exist it is created and if it exist it is overwritten. 7. The order in which you place redirection is significant. 8. The following command will generate an error message - </etc/passwd grep vivek 9. The following two commands will produced the same results: sort < input.txt > output.txt sort > output.txt < input.txt • Write a shell command that associates the file descriptor 2 to a file called log.txt and send fd # 2 to a log.txt instead of the screen. Then associates fd # 1 with the file associated with the fd # 2. • Write a shell script to open /etc/passwd file using fd (input) and copy the same to /tmp/passwd.output file using file descriptor (output). • Chapter 6 answers ← Executes commands and send output to the file descriptor (fd) Home Chapter 7: Pipes and Filters →
- 193. 186 Chapter 7: Pipes and Filters Linking Commands ← Chapter 7: Pipes and Filters Home Multiple commands → Under bash you can create a sequence of one or more commands separated by one of the following operators: Operator Syntax Description Example ; command1; command2 Separates commands that are executed in sequence. In this example, pwd is executed only after date command completes. date ; pwd & command arg & The shell executes the command in the background in a subshell. The shell does not wait for the command to finish, and the return status is 0. The & operator runs the command in background while freeing up your terminal for other work. In this example, find command is executed in background while freeing up your shell prompt. find / -iname "*.pdf" >/tmp/output.txt & && command1 && command2 command2 is executed if, and only if, command1 returns an exit status of zero i.e. command2 only runs if first command1 run successfully. [ ! -d /backup ] && mkdir -p /backup See Logical AND section for examples. || command1 || command2 command2 is executed if and only if command1 returns a non-zero exit status i.e. command2 only runs if first command fails. tar cvf /dev/st0 /home || mail -s 'Backup failed' [email protected] </dev/null See Logical OR section for examples. | command1 | command2 Linux shell pipes join the standard output of command1 to the standard input of command2. In this example, output of the ps command is provided as the standard input to the grep command ps aux | grep httpd ← Chapter 7: Pipes and Filters Home Multiple commands →
- 194. Multiple commands 187 Multiple commands ← Linking Commands Home Putting jobs in background → You can build a sequences of commands using the ; character (operator) and syntax is: command1 ; command2 ; commandN OR { command1; command2 } This way you can run commands one after the other. The following example, shell scripts display an error message if sufficient command line arguments are not passed (math.sh): #!/bin/bash a=$1 b=$3 op=$2 ans=0 # display usage # run commands one after the other using ; chracter [ $# -eq 0 ] && { echo -e "Usage: $0 num1 op num2nt $0 1 + 5"; exit 1; } case $op in +) ans=$((( a+b )));; -) ans=$((( a-b )));; /) ans=$((( a/b )));; *|x) ans=$((( a*b )));; *) echo "Unknown operator." exit 2;; esac echo "$a $op $b = $ans" Save and close the file. Run it as follows: chmod +x math.sh ./math.sh ./math.sh 1 + 5 ./math.sh 10 * 5 Without ; and && character (operator) joining multiple command the following one liner:
- 195. Multiple commands 188 [ $# -eq 0 ] && { echo -e "Usage: $0 num1 op num2nt $0 1 + 5"; exit 1; } would look like as follows: if [ $# -eq 0 ] then echo -e "Usage: $0 num1 op num2nt $0 1 + 5" exit 1; fi Examples Use the watch command to monitor temp file (/tmp) system every 5 seconds: watch -n 5 'df /tmp; ls -lASFt /tmp' ← Linking Commands Home Putting jobs in background → Putting jobs in background ← Multiple commands Home Pipes → • Linux supports executing multiple processes in parallel or in series. • You always begin your first session (login session) on the Linux system with a single process running bash as shell. • Most Linux commands such as editing files, displacing current date & time, logged in users etc can be done with various Linux commands. • You type all commands at a shell prompt one by one. These program always take control of your screen and when done you will get back the shell prompt to type a new set of commands. • However, sometime you need to carry out tasks in background and use the terminal for other purpose. For example, find all mp3 files stored on a disk while writing a c program. Job Control • The bash shell allows you to run tasks (or commands) in the background using the facility called job control. • Job control refers to the ability to selectively stop, suspend the execution of processes and continue (resume) their execution at a later point. • A user typically employs this facility via an interactive interface supplied jointly by the system’s terminal driver and bash.
- 196. Putting jobs in background 189 Jobs • Processes under the influence of a job control facility are referred to as jobs. • Each job has a unique id called job number. • You can use the following command to control the job: • fg - Place job in the foreground. • bg - Place job in the background. • jobs - Lists the active jobs on screen. Background process • A command that has been scheduled nonsequentially is called background process. • You can not see the background processes on screen. For example, Apache httpd server runs in background to serve web pages. You can put your shell script or any command in background. Foreground process • A command that you can see the command on screen is called the foreground process. How do I put commands in background? The syntax is as follows for putting jobs in background: command & command arg1 arg2 & command1 | command2 arg1 & command1 | command2 arg1 > output & • The & operator puts command in the background and free up your terminal. • The command which runs in background is called a job. • You can type other command while background command is running. Example For example, if you type: find /nas -name "*.mp3" > /tmp/filelist.txt & Sample outputs: [1] 1307 The find command is now running in background. When bash starts a job in the background, it prints a line showing a job number ([1]) and a process identification number (PID - 1307). A job sends a message to the terminal upon completion as follows identifying the job by its number and showing that it has completed: [1]+ Done find /share/ -name "*.mp3" > /tmp/filelist ← Multiple commands Home Pipes →
- 197. Pipes 190 Pipes ← Putting jobs in background Home How to use pipes to connect programs → A shell pipe is a way to connect the output of one program to the input of another program without any temporary file. Syntax command1 | command2 command1 | command2 | commandN command1 arg1 | command2 arg1 arg2 get_data_command | verify_data_command | process_data_command | format_data_command > output.data.file get_data_command < input.data.file | verify_data_command | process_data_command | format_data_command > output.data.file • You can connect two or more commands at a time. • The data path which joins two programs is called a pipe. • The vertical bar (|) is the pipe symbol. • A shell pipe supports Unix philosophy of chaining programs thorougher to complete complex task. • Redirection in pipes is also allowed. • The data path only works in one direction: ← Putting jobs in background Home How to use pipes to connect programs →
- 198. How to use pipes to connect programs 191 How to use pipes to connect programs ← Pipes Home Input redirection in pipes → • Use the vertical bar (|) between two commands. In this example, send ls command output to grep command i.e. find out if data.txt file exits or not in the current working directory): ls | grep "data.txt" • All command line arguments (parameters) listed after command name, but before the the vertical bar: ls -al | grep "data.txt" • There is no need to put spaces between command names and vertical bars, it is optional: ls -al|grep "data.txt" • However, I recommend putting white spacing between the command names and vertical bars to improve the readability. • You can redirect pipe output to a file (output redirection with > symbol): ps aux | grep httpd > /tmp/ps.output.log Examples Common shell pipe examples: Pause ls command output Send output of the ls command as input to the more command. So that output is printed one screen full page at a time: ls -l | more Show a sorted list of logged on users Output of who command is given as input to sort command. So that it will print a sorted list of users: who | sort who | sort > sorted_list.txt
- 199. How to use pipes to connect programs 192 Count logged in users Output of who command is given as input to wc command, so that it will number of user who logged on to the system: who | wc -l Find out if user vivek logged in or not who | grep -i vivek Count total files in current directory ls -l | wc -l Execute a shutdown command at a given time echo "shutdown -h now" | at 12am tomorrow Format output of mount command Display mount command output in a nice format mount | column -t Backup (tar over ssh) Use tar command over secure ssh session to backup local /home file system: tar zcvf - /home | ssh user@server "cat > /backup/home_fs.workstation_sep_21_09.tar.gz" Case conversion v="Unix Philosophy"; echo $v | tr '[:lower:]' '[:upper:]' echo 'tHIs IS A TeSt' | tr '[:upper:]' '[:lower:]' Birthday Email Reminder echo "/usr/bin/mail -s 'Birthday gift for Julia' [email protected] < /dev/null" | at 17:45 Create An ISO CD Image Create an ISO cdrom image from contents of /home/vivek/photos directory: mkisofs -V Photos -r /home/vivek/photos | gzip -9 > /tmp/photos.iso.cd.gz You can burn an ISO cdrom image using the following syntax: gzip -dc /tmp/photos.iso.cd.gz | cdrecord -v dev=/dev/dvdrw -
- 200. How to use pipes to connect programs 193 It is also possible to create an ISO image and burn it directly to cd: mkisofs -V Photos -r /home/vivek/photos | cdrecord -v dev=/dev/dvdrw - Create a random password tr -dc A-Za-z0-9_ < /dev/urandom | head -c12 | xargs ← Pipes Home Input redirection in pipes → Input redirection in pipes ← How to use pipes to connect programs Home Output redirection in pipes → • The input < redirection symbol can be used with pipes to get input from a file: command1 < input.txt | command2 command1 < input.txt | command2 arg1 | command3 For example, the sort command will get input from /etc/passwd file, which is piped to grep command: sort < input.txt | grep something sort < input.txt | uniq | grep something ← How to use pipes to connect programs Home Output redirection in pipes →
- 201. Output redirection in pipes 194 Output redirection in pipes ← Input redirection in pipes Home Why use pipes → You redirect the standard output of the last command using a pipe with > or >> redirection symbol. The syntax is: command1 | command2 > output.txt command1 | command2 arg1 > output.txt command1 < input.txt | command2 > output.txt command1 < input.txt | command2 arg1 arg2 | command3 arg1 > output.txt For example, sort all process memory wise and save the output to a file called memory.txt: ps -e -orss=,args= | sort -b -k1,1n > memory.txt Or directly send an email to your account, enter: ps -e -orss=,args= | sort -b -k1,1n | mail -s 'Memory process' [email protected] ← Input redirection in pipes Home Why use pipes → Why use pipes ← Output redirection in pipes Home Filters → In this example, mysqldump a database backup program is used to backup a database called wiki: mysqldump -u root -p'passWord' wiki > /tmp/wikidb.backup gzip -9 /tmp/wikidb.backup scp /tmp/wikidb.backup [email protected]:~/mysql • The mysqldump command is used to backup database called wiki to /tmp/wikidb.backup file. • The gzip command is used to compress large database file to save the disk space. • The scp command is used to move file to offsite backup server called secure.backupserver.com. • All three commands run one after the other. • A temporary file is created on local disk in /tmp. • However, using pipes you can join the standard output of mysqldump command to the standard input of gzip command without creating /tmp/wikidb.backup file: mysqldump -u root -p'passWord' wiki | gzip -9 > /tmp/wikidb.backup scp /tmp/wikidb.backup [email protected]:~/mysql • You can avoid creating a temporary file all together and run commands at the same time:
- 202. Why use pipes 195 mysqldump -u root -p'passWord' wiki | gzip -9 | ssh [email protected] "cat > /home/user/mysql/wikidb.gz" • The above syntax is compact and easy to use. • You just chained three programs together to complete complex task to make a remote mysql backup using pipes. • Filtering out data is another good reason to use pipes. • Notice standard error from pipes are mixed together: ← Output redirection in pipes Home Filters → Filters ← Why use pipes Home Chapter 7 Challenges → • If a Linux command accepts its input data from the standard input and produces its output (result) on standard output is known as a filter. • Filters usually works with Linux pipes. Syntax The syntax is: command1 | command2 command1 file.txt | command2 command1 args < input.txt | command2 Where, • command2 is a filter command.
- 203. Filters 196 Example In this example, the grep command act as a filter (it will filter out name vivek from its input): cut -d: -f1 /etc/passwd | sort | uniq | grep vivek Filter ps command output using the grep command: ps aux | grep php-cgi Consider the following example: sort < sname | uniq > u_sname The uniq command is filter, which takes its input from the sort command and passes output as input to uniq command; Then uniq command output is redirected to "u_sname" file. The grep command is considered as one of most popular filter under Linux and UNIX like operating systems. Commonly used filter commands • awk [1] • cut [2] • grep [3] • gzip [4] • head [5] • paste [6] • perl [7] • sed [8] • sort [9] • split [10] • strings [11] • tac [12] • tail [13] • tee [14] • tr [15] • uniq [16] • wc [17] ← Why use pipes Home Chapter 7 Challenges →
- 204. Filters 197 References [1] http://www.gnu.org/manual/gawk/gawk.html [2] http://www.gnu.org/software/coreutils/manual/html_node/cut-invocation.html [3] http://www.gnu.org/software/grep/ [4] http://www.gnu.org/software/gzip/ [5] http://www.gnu.org/software/coreutils/manual/html_node/head-invocation.html [6] http://www.gnu.org/software/coreutils/manual/html_node/paste-invocation.html [7] http://perldoc.perl.org/perl.html [8] http://www.gnu.org/software/sed/sed.html [9] http://www.gnu.org/software/coreutils/manual/html_node/sort-invocation.html [10] http://www.gnu.org/software/coreutils/manual/html_node/split-invocation.html [11] http://sourceware.org/binutils/docs-2.19/binutils/strings.html [12] http://www.gnu.org/software/coreutils/manual/html_node/tac-invocation.html [13] http://www.gnu.org/software/coreutils/manual/html_node/tail-invocation.html [14] http://www.gnu.org/software/coreutils/manual/html_node/tee-invocation.html [15] http://www.gnu.org/software/coreutils/manual/html_node/tr-invocation.html [16] http://www.gnu.org/software/coreutils/manual/html_node/uniq-invocation.html [17] http://www.gnu.org/software/coreutils/manual/html_node/wc-invocation.html Chapter 7 Challenges ← Filters Home Chapter 8: Traps → • Decide whether the following sentence is true or false: 1. Linux is rich with filter programs. 2. A filter is a program that gets most of its data from its standard input and writes its main results to its standard ouput. 3. A set of processes chained by their standard streams, so that the output of each process feeds directly as input to the next one is called Linux pipeline. 4. You can run commands one after the other using ; operator. 5. You can run commands one after the other using && operator. 6. Second command only runs if first is successful when you use conditional or (||) operator. 7. A filter is very useful as part of Linux pipes. • Chapter 7 answers
- 205. 198 Chapter 8: Traps Signals ← Chapter 8: Traps Home What is a Process? → • Linux supports both POSIX reliable signals ("standard signals") and POSIX real-time signals. • A signal is nothing but some sort of inter-process communication (techniques for the exchanging data among multiple threads in one or more processes or commands) in Linux and Unix like operating systems. • A signal is sent to a process or command in order notify an event that occurred. • For example, while running a command called 'ls -R /, you may hit CTRL+C (or Break) to cancel command execution. As soon as you hit CTRL+C, a signals called SIGINT (2) sent to indicate interrupt from keyboard. When, SIGINT is sent to ls command, Linux interrupts the process's normal flow of execution. In this example, ls command get terminated. • However, you can register a signal handler for CTRL+C and take some sort of action like ignore it or display a message on the screen when ls command is interrupted by SIGINT. • You need to use the trap command to catch signals and handle errors under Linux shell scripts. • You can send various signals to commands and process. For example, to terminate foreground process you can hit Ctrl+C key combination. To kill background process you can use the kill command and send SIGTERM (terminate command): kill -TERM pid kill -TERM 1234 ← Chapter 8: Traps Home What is a Process? →
- 206. What is a Process? 199 What is a Process? ← Signals Home How to view Processes → Linux is a multiuser (multiple users can login to Linux and share its resources) and multitasking operating system. It means you can run multiple commands and carry out multiple tasks at a time. More about Process For example, you can write a c program, while listening mp3s or download files using P2P in background. • A process is program (or command typed by user) to perform specific Job. • In Linux when you start a process, it is given a unique number called a PID or process-id. • PIDs start from 0 to 65535. • PID 1 is always assigned to init process, which is the first process started at boot time. Type the following command to verify that init always has PID 1: ps -C init -o pid=,cmd Sample outputs: CMD 1 /sbin/init Parent and Child Processes • A parent process is a Linux process that has created one or more child processes. • A process can fork a child i.e create a child process. • For example, if a user types the ls command at a shell prompt. • The shell executes ls command. • The Linux kernel will duplicate the shell's pages of memory and then execute the ls command. • In UNIX, every process is created using fork and exec method. However, this model results in a waste of system resources. • Under Linux, the fork method is implemented using copy-on-write pages, so the only penalty that it incurs is the time and memory required to duplicate the parent's page tables, and to create a unique task structure for the child. • The copy-on-write model avoids creation of unnecessary copies of structures when creating new processes. • For example, user types ls command at a shell prompt. • The Linux kernel will fork and create a subprocess or child process of bash. • In this example, bash is parent and ls command is child. In other words, the ls command is pointed to the same pages of memory as the bash shell. • Then, the child execs the ls command using copy-on-write.
- 207. What is a Process? 200 A sample Linux processes life cycle [1] Process States Every Linux process has its own life cycle such as creation, execution, termination, and removal.Every process has its own state that shows what is currently happening in the process. The status of the process which can be one of the following: 1. D (uninterruptible sleep) - Process is sleeping and cannot be bring back until an event such as I/O occurred. For example, process foo is a process waiting for keyboard interrupt. 2. R (running) - Process is running or executing. 3. S (sleeping) - Process is not running and is waiting for an event or a signal. 4. T (traced or stopped) - Process is stopped by signals such as SIGINT or SIGSTOP. 5. Z (zombie or defunct) - Processes marked <defunct> are dead processes (so-called "zombies") that remain because their parent has not destroyed them properly. These processes will be destroyed by init if the parent process exits. How do I view Process states To view states of a process, enter: ps -C processName -o pid=,cmd,stat For example, to display states of lighttpd, php-cgi and firefox-bin processes, enter: ps -C firefox-bin -o pid=,cmd,stat ps -C lighttpd -o pid=,cmd,stat ps -C php-cgi -o pid=,cmd,stat Sample outputs: CMD STAT 7633 /opt/firefox/firefox-bin Sl CMD STAT 32082 /usr/sbin/lighttpd -f /etc/ S 32326 /usr/sbin/lighttpd -f /etc/ S CMD STAT
- 208. What is a Process? 201 1644 /usr/bin/php-cgi S 31331 /usr/bin/php-cgi S 31332 /usr/bin/php-cgi S 31538 /usr/bin/php-cgi S External links • Linux Kernel Process Management [2] • Wikipedia:Copy-on-write • man pages fork(2), top(1), ps(1). References [1] Chapter 3: Process - Understanding the Linux Kernel, Third Edition, O'Reilly Media. [2] http://www.informit.com/articles/article.aspx?p=370047&seqNum=2 ← Signals Home How to view Processes → How to view Processes ← What is a Process? Home Sending signal to Processes → You need to use the ps command, pstree command, and pgrep command to view a snapshot of the current processes. ps - View process To view current process use the ps command: ps ps aux | less ps aux | grep "process-name" ps aux | grep "httpd" ps alx | grep "mysqld" pstree - Display a tree of processes To display a tree of processes use the pstree command: pstree Sample outputs: init─┬─acpid ├─apache2───6*[apache2] ├─atd ├─atop ├─avahi-daemon───avahi-daemon ├─bonobo-activati───{bonobo-activati} ├─console-kit-dae───63*[{console-kit-dae}]
- 209. How to view Processes 202 ├─cron ├─2*[dbus-daemon] ├─dbus-launch ├─dd ├─deluge───5*[{deluge}] ├─dhclient ├─dnsmasq ├─evince───{evince} ├─firefox───run-mozilla.sh───firefox-bin───27*[{firefox-bin}] ├─gconfd-2 ├─gdm───gdm─┬─Xorg │ └─gnome-session─┬─gnome-panel │ ├─gpg-agent │ ├─metacity │ ├─nautilus │ ├─python │ ├─seahorse-agent │ ├─ssh-agent │ ├─tracker-applet │ ├─trackerd───2*[{trackerd}] │ ├─update-notifier │ └─{gnome-session} ├─gedit ├─6*[getty] ├─gnome-power-man ├─gnome-screensav ├─gnome-settings-───{gnome-settings-} ├─gnome-terminal─┬─bash───pstree │ ├─bash───ssltx───ssh │ ├─gnome-pty-helpe │ └─{gnome-terminal} ├─gvfs-fuse-daemo───3*[{gvfs-fuse-daemo}] ├─gvfs-gphoto2-vo ├─gvfs-hal-volume ├─gvfsd ├─gvfsd-burn ├─gvfsd-trash ├─hald───hald-runner─┬─hald-addon-acpi │ ├─hald-addon-cpuf │ ├─hald-addon-inpu │ └─hald-addon-stor ├─jsvc─┬─jsvc │ └─jsvc───39*[{jsvc}] ├─klogd ├─lighttpd───2*[php-cgi───4*[php-cgi]] ├─mixer_applet2───{mixer_applet2} ├─mount.ntfs
- 210. How to view Processes 203 ├─mysqld_safe─┬─logger │ └─mysqld───10*[{mysqld}] ├─netspeed_applet ├─ntpd ├─pppd───sh───pptpgw ├─pptpcm ├─pulseaudio─┬─gconf-helper │ └─2*[{pulseaudio}] ├─squid───squid───unlinkd ├─sshproxyd ├─syslogd ├─system-tools-ba ├─thunderbird───run-mozilla.sh───thunderbird-bin───10*[{thunderbird-bin}] ├─udevd ├─vmnet-bridge ├─2*[vmnet-dhcpd] ├─vmnet-natd ├─3*[vmnet-netifup] ├─winbindd───winbindd ├─workrave───{workrave} ├─workrave-applet └─wpa_supplicant pgrep - Look up processes pgrep looks through the currently running processes and lists the process IDs which matches the selection criteria to screen. List the processes called php-cgi AND owned by vivek user. pgrep -u vivek php-cgi To list the processes owned by vivek OR krish. pgrep -u vivek,krish External links • Show All Running Processes in Linux [1] • ps - Displays The Processes [2] ← What is a Process? Home Sending signal to Processes →
- 211. How to view Processes 204 References [1] http://www.cyberciti.biz/faq/show-all-running-processes-in-linux/ [2] http://www.cyberciti.biz/tips/top-linux-monitoring-tools.html#5 Sending signal to Processes ← How to view Processes Home Terminating Processes → You can send various signals to commands / process and shell scripts using the, pkill command, kill command, and killall command. kill - send a signal to a process The default signal for kill is TERM. To list available signals, enter: kill -l Sample outputs: 1) SIGHUP 2) SIGINT 3) SIGQUIT 4) SIGILL 5) SIGTRAP 6) SIGABRT 7) SIGBUS 8) SIGFPE 9) SIGKILL 10) SIGUSR1 11) SIGSEGV 12) SIGUSR2 13) SIGPIPE 14) SIGALRM 15) SIGTERM 16) SIGSTKFLT 17) SIGCHLD 18) SIGCONT 19) SIGSTOP 20) SIGTSTP 21) SIGTTIN 22) SIGTTOU 23) SIGURG 24) SIGXCPU 25) SIGXFSZ 26) SIGVTALRM 27) SIGPROF 28) SIGWINCH 29) SIGIO 30) SIGPWR 31) SIGSYS 34) SIGRTMIN 35) SIGRTMIN+1 36) SIGRTMIN+2 37) SIGRTMIN+3 38) SIGRTMIN+4 39) SIGRTMIN+5 40) SIGRTMIN+6 41) SIGRTMIN+7 42) SIGRTMIN+8 43) SIGRTMIN+9 44) SIGRTMIN+10 45) SIGRTMIN+11 46) SIGRTMIN+12 47) SIGRTMIN+13 48) SIGRTMIN+14 49) SIGRTMIN+15 50) SIGRTMAX-14 51) SIGRTMAX-13 52) SIGRTMAX-12 53) SIGRTMAX-11 54) SIGRTMAX-10 55) SIGRTMAX-9 56) SIGRTMAX-8 57) SIGRTMAX-7 58) SIGRTMAX-6 59) SIGRTMAX-5 60) SIGRTMAX-4 61) SIGRTMAX-3 62) SIGRTMAX-2 63) SIGRTMAX-1 64) SIGRTMAX
- 212. Sending signal to Processes 205 kill command Examples The kill command can send all of the above signals to commands and process. However, commands only give response if they are programmed to recognize those signals. Particularly useful signals include: 1. SIGHUP (1) - Hangup detected on controlling terminal or death of controlling process. 2. SIGINT (2) - Interrupt from keyboard. 3. SIGKILL (9) - Kill signal i.e. kill running process. 4. SIGSTOP (19) - Stop process. 5. SIGCONT (18) - Continue process if stopped. To send a kill signal to PID # 1234 use: kill -9 1234 OR kill -KILL 1234 OR kill -SIGKILL 1234 killall - kill processes by name killall sends a signal to all processes running any of the specified commands . If no signal name is specified, SIGTERM is sent. To terminate all firefox process (child and parent), enter: killall processName killall firefox-bin To send a KILL signal to firefox, enter: killall -s SIGKILL firefox-bin pkill - kill process The pkill command is another command with additional options to kill process by its name, user name, group name, terminal, UID, EUID, and GID. It will send the specified signal (by default SIGTERM) to each process instead of listing them on stdout. To send a kill signal to php-cgi process, enter: pkill -KILL php-cgi The above example will kill all users php-cgi process. However, -u option will kill only processes whose effective user ID is set to vivek: pkill -KILL -u vivek php-cgi Make sshd reread its configuration file, enter: pkill -HUP sshd
- 213. Sending signal to Processes 206 External links • Kill process in Linux or terminate a process in UNIX / Linux [1] • Linux / UNIX killing a process [2] • Linux logout user or logoff user with pkill command [3] ← How to view Processes Home Terminating Processes → References [1] http://www.cyberciti.biz/faq/kill-process-in-linux-or-terminate-a-process-in-unix-or-linux-systems/ [2] http://www.cyberciti.biz/faq/howto-linux-unix-killing-restarting-the-process/ [3] http://www.cyberciti.biz/faq/linux-logout-user-howto/ Terminating Processes ← Sending signal to Processes Home Shell signal values → • Generally, all process terminates on their own. In this example, find command will terminate when it completed its task: find /home -name "*.c" 2>error.log 1>filelists & • You can terminate foreground process by pressing CTRL+C. It will send a TERM signal to the process. In this example, ls -R is running on screen: ls -R / • To terminate simply press CTRL+C (hold down CTRL key and press C) to send an in interrupt signal to the ls command. • To terminate unwanted background process use kill command with -9 signal as described in sending signal to processes section: kill -TERM pid kill -KILL pid • To stop (suspend) a foreground process hit CTRL+Z (hold down CTRL key and press z). To resume the foreground process use the fg command, enter: fg jobid fg 1 fg %
- 214. Terminating Processes 207 Example Create a shell script called phpjail.sh. This script is used to start php service in a jail. This is done to improve Apache or Lighttpd web server security. This script demonstrates the usage of the pgrep command, pkill commands, and other skilled you've learned so far. #!/bin/sh # A shell script to start / stop php-cgi process. # Author: Vivek Gite <[email protected]> # Last updated on June-23-2007. # ---------------------------------------------- fFCGI=/usr/bin/spawn-fcgi fIP=127.0.0.1 fPORT=9000 fUSER=phpjail fGROUP=phpjail fCHILD=10 fJAILDIR=/phpjail fPID=/var/run/fcgi.php.pid fPHPCGI=/usr/bin/php-cgi # path to binary files. PKILL=/usr/bin/pkill RM=/bin/rm PGREP=/usr/bin/pgrep GREP=/bin/grep ID=/usr/bin/id # Must be run as root else die [ $(${ID} -u) -eq 0 ] || { echo "$0: Only root may run this script."; exit 1; } # Jail user must exits else die ${GREP} -q $fUSER /etc/passwd || { echo "$0: User $fUSER not found in /etc/passwd."; exit 2; } # Jail group must exits else die ${GREP} -q $fGROUP /etc/passwd || { echo "$0: Group $fGROUP not found in /etc/group."; exit 3; } # Jail directory must exits else die [ ! -d ${fJAILDIR} ] && { echo "$0: php-cgi jail directory "${fJAILDIR}" not found."; exit 4; } # Use case to make decision case "$1" in start)
- 215. Terminating Processes 208 # start php-cgi in jail at given IP and server port $fFCGI -a $fIP -p $fPORT -u $fUSER -g $fGROUP -C $fCHILD -c $fJAILDIR -P $fPID -- $fPHPCGI [ $? -eq 0 ] && echo "Starting php-cgi .. [ OK ]" || echo "Starting php-cgi .. [ FAILED ]" ;; stop) # make sure php-cgi is running read line < "$fPID" if [ -d /proc/$line ] then # kill php-cgi owned by user ${PKILL} -KILL -u $fUSER php-cgi [ $? -eq 0 ] && echo "Stopping php-cgi .. [ OK ]" || echo "Stopping php-cgi .. [ FAILED ]" ${RM} -f $fPID else echo "$0: php-cgi is not running." fi ;; status) # find out if php-cgi is running or not ${PGREP} -u ${fUSER} php-cgi >/dev/null 2>&1 [ $? -eq 0 ] && echo "$0: php-cgi is running at $fIP:$fPORT" || echo "$0: php-cgi is not running at $fIP:$fPORT" ;; *) # display usage echo "Usage: $0 {start|stop|status}" esac I highly recommend the following two articles which deals with php and web server security: • Apache2 mod_fastcgi: Connect to External PHP via UNIX Socket or TCP/IP Port [1] • Lighttpd FasCGI PHP, MySQL chroot jail installation under Debian Linux [2] ← Sending signal to Processes Home Shell signal values →
- 216. Terminating Processes 209 References [1] http://www.cyberciti.biz/tips/rhel-fedora-centos-apache2-external-php-spawn.html [2] http://www.cyberciti.biz/tips/howto-setup-lighttpd-php-mysql-chrooted-jail.html Shell signal values ← Terminating Processes Home trap statement → • You must know signal and their values while writing the shell scripts. • You cannot use (trap) all available signals. • Some signals can never be caught. For example, the signals SIGKILL (9) and SIGSTOP (19) cannot be caught, blocked, or ignored. • The following table is a list of the commonly used signal numbers, description and whether they can be trapped or not: Number Constant Description Default action Trappable (Yes/No) 0 0 Success Terminate the process. Yes 1 SIGHUP Hangup detected on controlling terminal or death of controlling process. Also, used to reload configuration files for many UNIX / Linux daemons. Terminate the process. Yes 2 SIGINT Interrupt from keyboard (Ctrl+C) Terminate the process. Yes 3 SIGQUIT Quit from keyboard (Ctrl-. or, Ctrl-4 or, on the virtual console, the SysRq key) Terminate the process and dump core. Yes 4 SIGILL Terminate the process and dump core. Illegal instruction. Yes 6 SIGABRT Abort signal from abort(3) - software generated. Terminate the process and dump core. Yes 8 SIGFPE Floating point exception. Terminate the process and dump core. Yes 9 SIGKILL Kill signal Terminate the process. No 15 SIGTERM Termination signal Terminate the process. Yes 20 SIGSTP Stop typed at tty (CTRL+z) Stop the process. Yes To view list of all signals, enter: kill -l To view numeric number for given signal called SIGTSTP, enter: kill -l SIGTSTP You can also view list of signal by visiting /usr/include/linux/signal.h file: more /usr/include/linux/signal.h ← Terminating Processes Home trap statement →
- 217. The trap statement 210 The trap statement ← Shell signal values Home How to clear trap → • While running a script user may press Break or CTRL+C to terminate the process. • User can also stop the process by pressing CTRL+Z. • Error can occurred dues to bug in a shell script such as arithmetic overflow. • This may result into errors or unpredictable output. • Whenever user interrupts a signal is send to the command or the script. • Signals force the script to exit. • However, the trap command captures an interrupt. • The trap command provides the script to captures an interrupt (signal) and then clean it up within the script. Syntax The syntax is as follows trap arg signal trap command signal trap 'action' signal1 signal2 signalN trap 'action' SIGINT trap 'action' SIGTERM SIGINT SIGFPE SIGSTP trap 'action' 15 2 8 20 Example Create a shell script called testtrap.sh: #!/bin/bash # capture an interrupt # 0 trap 'echo "Exit 0 signal detected..."' 0 # display something echo "This is a test" # exit shell script with 0 signal exit 0 Save and close the file. Run it as follows: chmod +x testtrap.sh ./testtrap.sh Sample outputs: This is a test Exit 0 signal detected... • The first line sets a trap when script tries to exit with status 0. • Then script exits the shell with 0, which would result in running echo command.
- 218. The trap statement 211 • Try the following example at a shell prompt (make sure /tmp/rap54ibs2sap.txt doesn't exits). • Define a shell variable called $file: file=/tmp/rap54ibs2sap.txt Now, try to remove $file, enter: rm $file Sample output: rm: cannot remove `/tmp/rap54ibs2sap.txt': No such file or directory Now sets a trap for rm command: trap "rm $file; exit" 0 1 2 3 15 Display list of defined traps, enter: trap Sample outputs: trap -- 'rm /tmp/rap54ibs2sap.txt; exit' EXIT trap -- 'rm /tmp/rap54ibs2sap.txt; exit' SIGHUP trap -- 'rm /tmp/rap54ibs2sap.txt; exit' SIGINT trap -- 'rm /tmp/rap54ibs2sap.txt; exit' SIGQUIT trap -- 'rm /tmp/rap54ibs2sap.txt; exit' SIGTERM Now, try again to remove the $file, enter: rm $file This time rm command did not displayed an error. The $file doesn't exist yet. The trap command simply exit whenever it get 0, 1, 2, 3, or 15 signal. Try capturing CTRL+C: #!/bin/bash # capture an interrupt # 2 (SIGINT) trap '' 2 # read CTRL+C from keyboard with 30 second timeout read -t 30 -p "I'm sleeping hit CTRL+C to exit..." Sample outputs: I'm sleeping hit CTRL+C to exit...^C^C^C^C ← Shell signal values Home How to clear trap →
- 219. How to clear trap 212 How to clear trap ← trap statement Home Include trap statements in a script → To clear a trap use the following syntax: trap - signal trap - signal1 signal2 For example, set a trap for rm command: file=/tmp/test4563.txt trap 'rm $file' 1 2 3 15 trap To clear SIGINT (2), enter: trap - SIGINT trap To clear all traps, enter: trap - 1 2 3 15 trap Create a shell script called oddoreven.sh: #!/bin/bash # Shell script to find out odd or even number provided by the user # ---- # set variables to an integer attribute declare -i times=0 declare -i n=0 # capture CTRL+C, CTRL+Z and quit singles using the trap trap 'echo " disabled"' SIGINT SIGQUIT SIGTSTP # set an infinite while loop # user need to enter -9999 to exit the loop while true do # get date read -p "Enter number (-9999 to exit) : " n # if it is -9999 die [ $n -eq -9999 ] && { echo "Bye!"; break; } # find out if $n is odd or even ans=$(( n % 2 )) # display result [ $ans -eq 0 ] && echo "$n is an even number." || echo "$n is an odd number."
- 220. How to clear trap 213 # increase counter by 1 times=$(( ++times )) done # reset all traps trap - SIGINT SIGQUIT SIGTSTP # display counter echo "You played $times times." exit 0 Save and close the file. Run it as follows: chmod +x oddoreven.sh ./oddoreven.sh Sample outputs: Enter number (-9999 to exit) : 2 2 is an even number. Enter number (-9999 to exit) : 999 999 is an odd number. Enter number (-9999 to exit) : ^C disabled 0 is an even number. Enter number (-9999 to exit) : -9999 Bye! You played 3 times. ← trap statement Home Include trap statements in a script →
- 221. Include trap statements in a script 214 Include trap statements in a script ← How to clear trap Home Use the trap statement to catch signals and handle errors → You can use the trap command in shell script as follows. Create a shell script called mainmenu01.sh: #!/bin/bash # capture CTRL+C, CTRL+Z and quit singles using the trap trap 'echo "Control-C disabled."' SIGINT trap 'echo "Cannot terminate this script."' SIGQUIT trap 'echo "Control-Z disabled."' SIGTSTP # Create infinite while loop while true do clear # display menu echo "Server Name - $(hostname)" echo "-------------------------------" echo " M A I N - M E N U" echo "-------------------------------" echo "1. Display date and time." echo "2. Display what users are doing." echo "3. Display network connections." echo "4. Exit" # get input from the user read -p "Enter your choice [ 1 -4 ] " choice # make decision using case..in..esac case $choice in 1) echo "Today is $(date)" read -p "Press [Enter] key to continue..." readEnterKey ;; 2) w read -p "Press [Enter] key to continue..." readEnterKey ;; 3) netstat -nat read -p "Press [Enter] key to continue..." readEnterKey ;;
- 222. Include trap statements in a script 215 4) echo "Bye!" exit 0 ;; *) echo "Error: Invalid option..." read -p "Press [Enter] key to continue..." readEnterKey ;; esac done Save and close the file. Run it as follows: chmod +x mainmenu01.sh ./mainmenu01.sh Sample outputs: Server Name - vivek-desktop ------------------------------- M A I N - M E N U ------------------------------- 1. Display date and time. 2. Display what users are doing. 3. Display network connections. 4. Exit Enter your choice [ 1 -4 ] ^CControl-C disabled. ^ZControl-Z disabled. 1 Today is Wed Sep 23 00:26:38 IST 2009 Press [Enter] key to continue... Server Name - vivek-desktop ------------------------------- M A I N - M E N U ------------------------------- 1. Display date and time. 2. Display what users are doing. 3. Display network connections. 4. Exit Enter your choice [ 1 -4 ] 4 Bye! ← How to clear trap Home Use the trap statement to catch signals and handle errors →
- 223. Use the trap statement to catch signals and handle errors 216 Use the trap statement to catch signals and handle errors ← Include trap statements in a script Home What is a Subshell? → You can define 'functions' in scripts using the following syntax: die(){ echo "An error occurred." exit 2 } You can simply call it as normal command: die You can pass arguments to function: #!/bin/bash # define var file="/tmp/data.$$" # create function die(){ echo "$@" exit 2 } # ... call die if needed [ ! -f $file ] && die "$0: File $file not found." || echo "$0: File $file found." The trap command and functions You can use the trap command with shell functions as follows: # define die() die(){ echo "..." } # set trap and call die() trap 'die' 1 2 3 15 .... ... The following is an updated shell script from how to clear a trap section:
- 224. Use the trap statement to catch signals and handle errors 217 #!/bin/bash # Shell script to find out odd or even number provided by the user # set variables to an integer attribute declare -i times=0 declare -i n=0 # define function warning(){ echo -e "n*** CTRL+C and CTRL+Z keys are disabled. Please enter number only. Hit [Enter] key to continue..." } # capture CTRL+C, CTRL+Z and quit singles using the trap trap 'warning' SIGINT SIGQUIT SIGTSTP # set an infinite while loop # user need to enter -9999 to exit the loop while true do # get date read -p "Enter number (-9999 to exit) : " n # if it is -9999 die [ $n -eq -9999 ] && { echo "Bye!"; break; } # $n is 0, just get next number [ $n -eq 0 ] && continue # find out if $n is odd or evern ans=$(( n % 2 )) # display result [ $ans -eq 0 ] && echo "$n is an even number." || echo "$n is an odd number." # increase counter by 1 times=$(( ++times )) done # reset all traps trap - SIGINT SIGQUIT SIGTSTP # display counter echo "You played $times times." exit 0 The following example, add a user to the Linux system by updating /etc/passwd file and creating home directory at /home for user. It traps various single to avoid errors while creating user accounts. If user pressed CTRL+C or script
- 225. Use the trap statement to catch signals and handle errors 218 terminated it will try to rollback changes made to system files. Traps are turned on before the useradd command in shell script, and then turn off the trap after the chpasswd line. #!/bin/bash # setupaccounts.sh: A Shell script to add user to the Linux system. # set path to binary files ADD=/usr/sbin/useradd SETPASSWORD=/usr/sbin/chpasswd USERDEL=/usr/sbin/userdel # set variables HOMEBASE=/home HOMEDIR="" username="" # define function to clean up useradd procedure # handle errors using this function clean_up_useradd(){ # remove dir [ -d $HOMEDIR ] && /bin/rm -rf $HOMEDIR # remove user from passwd if exits grep -q "^${username}" /etc/passwd && $USERDEL ${username} # now exit exit } # make sure script is run by root else die [ $(id -u) -eq 0 ] || { echo "$0: Only root may add a user or group to the system."; exit 1;} # get username and password read -p "Enter user name : " username # create homedir path HOMEDIR="${HOMEBASE}/${username}" # capture 0 2 3 15 signals # if script failed while adding user make sure we clean up mess from # /home directory and /etc/passwd file # catch signals using clean_up_useradd() trap 'clean_up_useradd' SIGINT SIGQUIT SIGTERM # get password read -sp "Enter user password : " password # make sure user doesn't exits else die grep -q "^${username}" /etc/passwd && { echo "$0: The user '$username' already exits."; exit 2;}
- 226. Use the trap statement to catch signals and handle errors 219 # create a home dir echo "Creating home directory for ${username} at ${HOMEDIR}..." [ ! -d ${HOMEDIR} ] && mkdir -p ${HOMEDIR} # Add user echo "Adding user ${username}..." ${ADD} -s /bin/bash -d ${HOMEDIR} ${username} || { echo "$0: User addition failed."; exit 3; } # Set a password echo "Setting up the password for ${username}..." #printf "%s|%sn" $username $password | ${SETPASSWORD} || { echo "$0: Failed to set password for the user."; exit 3; } echo "$username:$password" | ${SETPASSWORD} || { echo "$0: Failed to set password for the user."; exit 3; } # reset all traps trap - 0 SIGINT SIGQUIT SIGTERM # add rest of the script... You can run this script as follows: chmod +x setupaccounts.sh ./setupaccounts.sh Sample outputs: Enter user name : testuser Enter user password : Creating home directory for testuser at /home/testuser... Adding user testuser... Setting up the password for testuser... ← Include trap statements in a script Home What is a Subshell? →
- 227. What is a Subshell? 220 What is a Subshell? ← Use the trap statement to catch signals and handle errors Home Compound command → • Whenever you run a shell script, it creates a new process called subshell and your script will get executed using a subshell. • A Subshell can be used to do parallel processing. • If you start another shell on top of your current shell, it can be referred to as a subshell. Type the following command to see subshell value: echo $BASH_SUBSHELL OR echo "Current shell: $BASH_SUBSHELL"; ( echo "Running du in subshell: $BASH_SUBSHELL" ;cd /tmp; du 2>/tmp/error 1>/tmp/output) • Any commands enclosed within parentheses are run in a subshell. Exporting Functions and Variables A subshell does not inherit a variable's setting. Use the export command to export variables and functions to subshell: WWWJAIL=/apache.jail export WWWJAIL die() { echo "$@"; exit 2; } export -f die # now call script that will access die() and $WWWJAIL /etc/nixcraft/setupjail -d cyberciti.com • However, environment variables (such as $HOME, $MAIL etc) are passed to subshell. Use exec command to avoid subshell You can use the exec command to avoid subshell. The exec command replaces this shell with the specified program without swapping a new subshell or proces. For example, exec command # redirect the shells stderr to null exec 2>/dev/null
- 228. What is a Subshell? 221 The . (dot) Command and Subshell The . (dot) command is used to run shell scripts as follows: . script.sh The dot command allows you to modify current shell variables. For example, create a shell script as follows called /tmp/dottest.sh: #!/bin/bash echo "In script before : $WWWJAIL" WWWJAIL=/apache.jail echo "In script after : $WWWJAIL" Close and save the file. Run it as follows: chmod +x /tmp/dottest.sh Now, define a variable called WWWJAIL at a shell prompt: WWWJAIL=/foobar echo $WWWJAIL Sample outputs: /foobar Run the script: /tmp/dottest.sh Check the value of WWWJAIL: echo $WWWJAIL You should see the orignal value of $WWWJAIL (/foobar) as the shell script was executed in a subshell. Now, try the dot command: . /tmp/dottest.sh echo $WWWJAIL Sample outputs: /apache.jail The value of $WWWJAIL (/apache.jail) was changed as the script was run in the current shell using the dot command. ← Use the trap statement to catch signals and handle errors Home Compound command →
- 229. Compound command 222 Compound command ← What is a Subshell? Home exec command → A compound command is one of the following syntax format: ( list ) ( command1; command2 ) { command1; command2 } Why use ( command1; command2 ) syntax In the following example, you are running multiple commands: hostname ; date ; who | wc -l Now try to save output to a file called /tmp/output.txt: hostname ; date ; who | wc -l > /tmp/output.txt cat /tmp/output.txt All commands will run but only the output of last pipe is saved to the file. To save output of all of the above commands to file, enter: ( hostname ; date ; who | wc -l ) > /tmp/output.txt cat /tmp/output.txt All commands inside ( ... ) run using a subshell. Why use { command1; command2; } syntax • This syntax allows you to run all commands in the current shell environment. • It works like a group command: [ $? -eq 0 ] && { echo "Usage: $0 filename"; exit 1; } ← What is a Subshell? Home exec command →
- 230. Exec command 223 Exec command ← Compound command Home Chapter 8 Challenges → • The exec command is used to replace the current shell with the command without spawning a new process or subshell. • The exec command is alos used to assign the file descriptor fd to filename: exec 3> /tmp/output • The exec command is used by "wrapper" scripts. For example, php-cgi can run as cgi program after setting environment variables or other configuration. • By using exec, the resources used by the php.cgi shell program do not need to stay in use after the program is started. The following script can be run using Apache web server [1] and it will speed up php execution: #!/bin/bash # Shell Script wrapper to Run PHP5 using mod_fastcgi under Apache 2.2.x # Tested under CentOS Linux and FreeBSD and 7.x server. PHP_CGI=/usr/local/bin/php-cgi # for centos / rhel set it as follows # PHP_CGI=/usr/bin/php-cgi export PHP_FCGI_CHILDREN=4 export PHP_FCGI_MAX_REQUESTS=1000 exec $PHP_CGI ← Compound command Home Chapter 8 Challenges → References [1] http://www.cyberciti.biz/faq/freebsd-apache-php-mod_fastcgi-tutorial/
- 231. Chapter 8 Challenges 224 Chapter 8 Challenges ← exec command Home Chapter 9: Functions → • Decide whether the following sentence is true or false: 1. You can make the shell variable known to subshells with export command. 2. To suspend a foreground process in a screen press CTRL+C. 3. Commands enclosed within parentheses (...) are always executed in a subshell. 4. CTRL+C sends a single to background process. 5. To launch a gedit text editor as a background process append an ampersand to the end of gedit command. gedit & 6. To send a SIGKILL (KILL or 9) to all running process use the kill command. kill -KILL pid 7. Process is on the run queue means it is in runnable (R) state. 8. init process always has PID 1. 9. Every process has a parent. 10. You can also trap the EXIT (0) signal with the trap command. 11. All process in Linux starts with a process called "fork and exec". 12. A process has PID and file descriptors. • Describe how the trap statement works • Write a shell command to locate a specific process is running or not (for example, find out if mysqld process is running or not)? • Write a shell command that will execute the command vim without forking. • From vi it is possible to run date or ps aux command without wasting time spawning another process. Write a vi command syntax to run shell command to execute in same shell. • How do you use set a trap that will work through out time of script execution. • What is a process? What is the difference between a process and a program? • What is a Linux daemon? Using an appropriate Linux command list some of the daemons on a Linux system you have access to. • How do the terms parent and child relate to process creation? • Rum the pstree command. This will only work on a Linux. Why? • Write a Linux command to send a signal to all processes. • Chapter 8 answers ← exec command Home Chapter 9: Functions →
- 232. 225 Chapter 9: Functions Writing your first shell function ← Chapter 9: Functions Home Displaying functions → We humans are certainly an intelligent species. We work with others and we depend on each other for common tasks. For example, you depend on a milkman to deliver milk in milk bottles or cartons. This logic applies to computer programs including shell scripts. When scripts gets complex you need to use divide and conquer technique. Shell functions • Sometime shell scripts get complicated. • To avoid large and complicated scripts use functions. • You divide large scripts into a small chunks/entities called functions. • Functions makes shell script modular and easy to use. • Function avoids repetitive code. For example, is_root_user() function can be reused by various shell scripts to determine whether logged on user is root or not. • Function performs a specific task. For example, add or delete a user account. • Function used like normal command. • In other high level programming languages function is also known as procedure, method, subroutine, or routine. Writing the hello() function Type the following command at a shell prompt: hello() { echo 'Hello world!' ; } Invoking the hello() function hello() function can be used like normal command. To execute, simply type: hello Passing the arguments to the hello() function You can pass command line arguments to user defined functions. Define hello as follows: hello() { echo "Hello $1, let us be a friend." ; } You can hello function and pass an argument as follows: hello Vivek Sample outputs: Hello Vivek, let us be a friend.
- 233. Writing your first shell function 226 • One line functions inside { ... } must end with a semicolon. Otherwise you get an error on screen: xrpm() { rpm2cpio "$1" | cpio -idmv } Above will not work. However, the following will work (notice semicolon at the end): xrpm() { rpm2cpio "$1" | cpio -idmv; } ← Chapter 9: Functions Home Displaying functions → Displaying functions ← Writing your first shell function Home Removing functions → To display defined function names use the declare command. Type the following command at a shell prompt: declare -f Sample outputs: declare -f command_not_found_handle declare -f genpasswd declare -f grabmp3 declare -f hello declare -f mp3 declare -f xrpm Display Function Source Code To view function names and source code, enter: declare -f OR declare -f | less Sample outputs: command_not_found_handle () { if [ -x /usr/lib/command-not-found ]; then /usr/bin/python /usr/lib/command-not-found -- $1; return $?; else return 127; fi } genpasswd () { local l=$1;
- 234. Displaying functions 227 [ "$l" == "" ] && l=16; tr -dc A-Za-z0-9_ < /dev/urandom | head -c ${l} | xargs } grabmp3 () { local t=$($HOME/bin/mp3 | sed 's/^n//'); grep -q "$t" $HOME/out/best.eng.mp3 if [ $? -ne 0 ]; then echo "$t" >> $HOME/out/best.eng.mp3; echo "'$t' - added!"; else echo "Duplicate entry found!"; fi } hello () { echo "Hello $1" } mp3 () { local o=$IFS; IFS=$(echo -en "nb"); /usr/bin/beep-media-player "$(cat $@)" & IFS=o } xrpm () { [ "$1" != "" ] && ( rpm2cpio "$1" | cpio -idmv ) } To view a specific function source code, enter: declare -f functioName declare -f xrpm Notice if you just type the declare command with no arguments, then it will list all declared variables and functions. See also • declare command ← Writing your first shell function Home Removing functions →
- 235. Removing functions 228 Removing functions ← Displaying functions Home Defining functions → To unset or remove the function use the unset command as follows: unset -f functionName unset -f hello declare See also • unset command • declare command ← Displaying functions Home Defining functions → Defining functions ← Removing functions Home Writing functions → To define a function, use the following syntax: name() compound_command ## POSIX compliant ## see the bash man page for def. of a compound command OR function name { ## ksh style works in bash command1 command2 } OR function name() { ## bash-only hybrid command1 command2 }
- 236. Defining functions 229 One Line Functions Syntax One line functions inside { ... } must end with a semicolon: function name { command1; command2; commandN;} OR name() { command1; command2; commandN;} where name is the name of the function, and "command1; command2;" is a list of commands used in the function. You need to replace name with actual function name such as delete_account: rollback(){ ... } add_user(){ ... } delete_user(){ ... } Example Define a function called mount_nas and umount_nas: # function to mount NAS device mount_nas(){ # define variables NASMNT=/nas10 NASSERVER="nas10.nixcraft.net.in" NASUSER="vivek" NASPASSWORD="myNasAccountPassword" [ ! -d $NASMNT ] && /bin/mkdir -p $NASMNT mount | grep -q $NASMNT [ $? -eq 0 ] || /bin/mount -t cifs //$NASSERVER/$NASUSER -o username=$NASUSER,password=$NASPASSWORD $NASMNT } # function to unmount NAS device umount_nas(){ NASMNT=/nas10 mount | grep -q $NASMNT [ $? -eq 0 ] && /bin/umount $NASMNT } You can type your function at the beginning of the shell script:
- 237. Defining functions 230 #!/bin/bash # define variables NASMNT=/nas10 .... .. .... # define functions function umount_nas(){ /bin/mount | grep -q $NASMNT [ $? -eq 0 ] && /bin/umount $NASMNT } # another function functiom mount_nas(){ command1 command2 } .... ... ### main logic ## [ $? -eq 0 ] && { echo "Usage: $0 device"; exit 1; } ... ..... # When you wish to access function, you use the following format: umount_nas ← Removing functions Home Writing functions →
- 238. Writing functions 231 Writing functions ← Defining functions Home Calling functions → • Write shell function: name() { command list; } • The idea is very simple create a modular scripts. • Place frequently used commands or logic in a script. • You can call the function whenever it is required rather writing or repeating the same code again. • You can create a functions file. • /etc/init.d/functions is default functions file which contains functions to be used by most or all shell scripts in the /etc/init.d directory. This file can be autoloaded as and when required. • You can view /etc/init.d/functions file with the following command: less /etc/init.d/functions • All shell functions are treated as a command. • You must define a function at the start of a script. • You must load a function file at the start of a script using source (or .) command: . /path/to/fuctions.sh OR source /path/to/fuctions.sh • You can call function like normal command: name name arg1 arg2 Write a function at the start of a script A function must be created before calling. For example, the following script (ftest.sh) will fail: #!/bin/bash TEST="/tmp/filename" # call delete_file; fail... delete_file # write delete_file() delete_file(){ echo "Deleting $TEST..." }
- 239. Writing functions 232 Sample output: ./ftest.sh: line 5: delete_file: command not found To avoid such problems write a function at the start of a script. Also, define all variables at the start of a script: #!/bin/bash # define variables at the start of script # so that it can be accessed by our function TEST="/tmp/filename" # write delete_file() function delete_file(){ echo "Deleting $TEST..." } # call delete_file delete_file ← Defining functions Home Calling functions → Calling functions ← Writing functions Home Pass arguments into a function → To call or invoke the function, type the name of the function: functioName For example, define and write a function called yday() to display yesterday's date: yday(){ date --date='1 day ago'; } To invoke the function yday(): yday In the end your program should like as follows: #!/bin/bash # write the function yday(){ date --date='1 day ago' } # invoke the function yday
- 240. Calling functions 233 Putting It All Together • Create a shell script called nas_backup.sh. • Function such as mount_nas and other get called several times (code reuse). • The use functions makes script easy to modify and read. • All functions and variables are created at the start of a script. • You must declare the variable before any commands attempt to use them. • This script also demonstrate the use of here documents, sending an alert email, command substitution, invoke the command via variables, logging a message to a syslog, and much more. #!/bin/bash # A shell script to backup MySQL database and directories to a nas server. # Written by Vivek Gite <[email protected]> # Last updated on, Feb-2-2007 ############################### # Variables # ############################### ### SETUP BIN PATHS ### MKDIR=/bin/mkdir CP=/bin/cp GTAR=/bin/tar RSYNC=/usr/bin/rsync MOUNT=/bin/mount UMOUNT=/bin/umount GREP=/bin/grep AWK=/bin/awk SED=/bin/sed CUT=/bin/cut MYSQL=/usr/bin/mysql MYSQLADMIN=/usr/bin/mysqladmin MYSQLDUMP=/usr/bin/mysqldump GZIP=/bin/gzip LOGGER=/usr/bin/logger MAILCMD=/bin/mail DU=/usr/bin/du RM=/bin/rm ### SETUP NAS LOGIN ### NASUSER=vivek NASPASSWORD=MyPassWord NASSERVER=nas10.nixcraft.net.in NASMNT=/nas10 ### ADMIN Notification Email Ids ### WARN_ADMIN_EMAIL_IDS="[email protected],[email protected],[email protected]"
- 241. Calling functions 234 ### SETUP MYSQL LOGIN/Password ### MUSER='root' MPASS='mySqlLoginPassword' MHOST="127.0.0.1" ### SETUP MYSQL BACKUP PATHS ### MBAKPATH=${NASMNT}/mysql ### SETUP TAR BALL BACKUP PATHS ### TBAKPATH=${NASMNT}/tarballs ### Setup file system dirs to backup ### TAR_SRC_DIRS='/etc /var/named/chroot /root /home /var/www/html /usr/local/mailboxes' ### Date format dd-mm-yyyy ### NOW=$(date +"%d-%m-%Y") ### Time format hh_mm_ssAM|PM ### TIME_FORMAT='%H_%M_%S%P' ############################### # User Defined Functions # ############################### # # Purpose: Send warning email. # tar_warn_email(){ $LOGGER "$(basename $0) GNU/tar: *** Failed at $(date) ***" $MAILCMD -s "GNU/TAR Backup Failed" "${WARN_ADMIN_EMAIL_IDS}"<<EOF GNU/Tar backup failed @ $(date) for $(hostname) EOF } # # Purpose: Backup file system directories. # backup_tar(){ $LOGGER "$(basename $0) GNU/tar: Started at $(date)" # call function to mount nas device mount_nas [ ! -d ${TBAKPATH}/$NOW/ ] && $MKDIR -p ${TBAKPATH}/$NOW/ local path="${TBAKPATH}/$NOW/fs-$(date +"${TIME_FORMAT}").tar.gz" $GTAR --exclude "*/proc/*" --exclude "*/dev/*" --exclude '*/cache/*' -zcvf $path $TAR_SRC_DIRS
- 242. Calling functions 235 [ $? -ne 0 ] && tar_warn_email # call function to unmount nas device umount_nas $LOGGER "$(basename $0) GNU/tar: Ended at $(date)" } # # Purpose: Mount backup nas device. # mount_nas(){ [ ! -d $NASMNT ] && $MKDIR -p $NASMNT $MOUNT | $GREP $NASMNT >/dev/null [ $? -eq 0 ] || $MOUNT -t cifs //$NASSERVER/$NASUSER -o username=$NASUSER,password=$NASPASSWORD $NASMNT } # # Purpose: Unmount backup nas device. # umount_nas(){ $MOUNT | $GREP $NASMNT >/dev/null [ $? -eq 0 ] && $UMOUNT $NASMNT } # # Purpose: Backup mysql database. # mysql(){ $LOGGER "$(basename $0) mysql: Started at $(date)" local DBS="$($MYSQL -u $MUSER -h $MHOST -p$MPASS -Bse 'show databases')" local db="" local linkname="" [ ! -d $MBAKPATH/$NOW ] && $MKDIR -p $MBAKPATH/$NOW for db in $DBS do [ "$db" == "sgopenxadserver" ] && continue local tTime=$(date +"${TIME_FORMAT}") local FILE="${MBAKPATH}/$NOW/${db}.${tTime}.gz" $MYSQLDUMP -u $MUSER -h $MHOST -p$MPASS $db | $GZIP -9 > $FILE #create latest file link linkname="${MBAKPATH}/$NOW/${db}.latest" [ -L $linkname ] && /bin/rm $linkname /bin/ln -s $FILE $linkname done $LOGGER "$(basename $0) mysql: Ended at $(date)" } #
- 243. Calling functions 236 # Purpose: Wrapper function to call other functions. # backup_mysql(){ mount_nas # call function to mount nas device mysql umount_nas # call function to unmount nas device } ################################### # Main Script Logic Starts Here # ################################### case "$1" in mysql) backup_mysql ;; fsbak) backup_tar ;; mount) mount_nas ;; umount) umount_nas ;; *) echo "Usage: $0 {mysql|fsbak|mount|umount}" echo "" echo "Use this shell script to backup mysql database and directories to backup nas server." esac You can run this script as follows to make a mysql database backup: ./nas_backup.sh mysql To make a file system backup, enter: ./nas_backup.sh fsbak ← Writing functions Home Pass arguments into a function →
- 244. Pass arguments into a function 237 Pass arguments into a function ← Calling functions Home local variable → • Shell functions have their own command line argument. • Use variable $1, $2..$n to access argument passed to the function. • The syntax is as follows: name(){ arg1=$1 arg2=$2 command on $arg1 } • To invoke the the function use the following syntax: name foo bar Where, 1. name = function name. 2. foo = Argument # 1 passed to the function (positional parameter # 1). 3. bar = Argument # 2 passed to the function. Example Create a function called fresh.sh: #!/bin/bash # write a function fresh(){ # t stores $1 argument passed to fresh() t=$1 echo "fresh(): $0 is $0" echo "fresh(): $1 is $1" echo "fresh(): $t is $t" echo "fresh(): total args passed to me $#" echo "fresh(): all args ($@) passed to me -"$@"" echo "fresh(): all args ($*) passed to me -"$*"" } # invoke the function with "Tomato" argument echo "**** calling fresh() 1st time ****" fresh Tomato # invoke the function with total 3 arguments echo "**** calling fresh() 2nd time ****" fresh Tomato Onion Paneer Save and close the file. Run it as follows:
- 245. Pass arguments into a function 238 chmod +x fresh.sh ./fresh.sh Sample outputs: **** calling fresh() 1st time **** fresh(): $0 is ./fresh.sh fresh(): $1 is Tomato fresh(): $t is Tomato fresh(): total args passed to me 1 fresh(): all args ($@) passed to me -"Tomato" fresh(): all args ($*) passed to me -"Tomato" **** calling fresh() 2nd time **** fresh(): $0 is ./fresh.sh fresh(): $1 is Tomato fresh(): $t is Tomato fresh(): total args passed to me 3 fresh(): all args ($@) passed to me -"Tomato Onion Paneer" fresh(): all args ($*) passed to me -"Tomato Onion Paneer" Function shell variables • All function parameters or arguments can be accessed via $1, $2, $3,..., $N. • $0 always point to the shell script name. • $* or $@ holds all parameters or arguments passed to the function. • $# holds the number of positional parameters passed to the function. How Do I Display Function Name? $0 always point to the shell script name. However, you can use an array variable called FUNCNAME which contains the names of all shell functions currently in the execution call stack. The element with index 0 is the name any currently-executing shell function.This variable exists only when a shell function is executing. FUNCNAME in action Create a shell script called funcback.sh: #!/bin/bash # funcback.sh : Use $FUNCNAME backup(){ local d="$1" [[ -z $d ]] && { echo "${FUNCNAME}(): directory name not specified"; exit 1; } echo "Starting backup..." } backup $1 Save and close the file. Run it as follows: chmod +x funcback.sh funcback.sh /home
- 246. Pass arguments into a function 239 funcback.sh Sample outputs: backup(): directory name not specified Example Create a shell script to determine if given name is file or directory (cmdargs.sh): #!/bin/bash file="$1" # User-defined function is_file_dir(){ # $f is local variable local f="$1" # file attributes comparisons using test i.e. [ ... ] [ -f "$f" ] && { echo "$f is a regular file."; exit 0; } [ -d "$f" ] && { echo "$f is a directory."; exit 0; } [ -L "$f" ] && { echo "$f is a symbolic link."; exit 0; } [ -x "$f" ] && { echo "$f is an executeble file."; exit 0; } } # make sure filename supplied as command line arg else die [ $# -eq 0 ] && { echo "Usage: $0 filename"; exit 1; } # invoke the is_file_dir and pass $file as arg is_file_dir "$file" Run it as follows: ./cmdargs.sh /etc/resolv.conf ./cmdargs.sh /bin/date ./cmdargs.sh $HOME ./cmdargs.sh /sbin Sample outputs: /etc/resolv.conf is a regular file. /bin/date is a regular file. /home/vivek is a directory. /sbin is a directory. ← Calling functions Home local variable →
- 247. Local variable 240 Local variable ← Pass arguments into a function Home Returning from a function → • By default all variables are global. • Modifying a variable in a function changes it in the whole script. • This can be result into problem. For example, create a shell script called fvar.sh: #!/bin/bash create_jail(){ d=$1 echo "create_jail(): d is set to $d" } d=/apache.jail echo "Before calling create_jail d is set to $d" create_jail "/home/apache/jail" echo "After calling create_jail d is set to $d" Save and close the file. Run it as follows: chmod +x fvar.sh ./fvar.sh Sample outputs: Before calling create_jail d is set to /apache.jail create_jail(): d is set to /home/apache/jail After calling create_jail d is set to /home/apache/jail local command • You can create a local variables using the local command and syntax is: local var=value local varName OR function name(){ local var=$1 command1 on $var } • local command can only be used within a function. • It makes the variable name have a visible scope restricted to that function and its children only. The following is an updated version of the above script:
- 248. Local variable 241 #!/bin/bash # global d variable d=/apache.jail # User defined function create_jail(){ # d is only visible to this fucntion local d=$1 echo "create_jail(): d is set to $d" } echo "Before calling create_jail d is set to $d" create_jail "/home/apache/jail" echo "After calling create_jail d is set to $d" Sample output: Before calling create_jail d is set to /apache.jail create_jail(): d is set to /home/apache/jail After calling create_jail d is set to /apache/jail Example In the following example: • The declare command is used to create the constant variable called PASSWD_FILE. • The function die() is defined before all other functions. • You can call a function from the same script or other function. For example, die() is called from is_user_exist(). • All function variables are local. This is a good programming practice. #!/bin/bash # Make readonly variable i.e. constant variable declare -r PASSWD_FILE=/etc/passwd # # Purpose: Display message and die with given exit code # die(){ local message="$1" local exitCode=$2 echo "$message" [ "$exitCode" == "" ] && exit 1 || exit $exitCode } # # Purpose: Find out if user exits or not # does_user_exist(){
- 249. Local variable 242 local u=$1 grep -qEw "^$u" $PASSWD_FILE && die "Username $u exists." } # # Purpose: Is script run by root? Else die.. # is_user_root(){ [ "$(id -u)" != "0" ] && die "You must be root to run this script" 2 } # # Purpose: Display usage # usage(){ echo "Usage: $0 username" exit 2 } [ $# -eq 0 ] && usage # invoke the function is_root_user is_user_root # call the function is_user_exist does_user_exist "$1" # display something on screen echo "Adding user $1 to database..." # just display command but do not add a user to system echo "/sbin/useradd -s /sbin/bash -m $1" ← Pass arguments into a function Home Returning from a function →
- 250. Returning from a function 243 Returning from a function ← local variable Home Shell functions library → • In mathematics a function ƒ takes an input, x, and returns an output ƒ(x). • In computer a shell function name can take an input, $1 and return back the value (true or false) to the script. • In other words, you can return from a function with an exit status. Syntax • The return command causes a function to exit with the return value specified by N and syntax is: return N • If N is not specified, the return status is that of the last command. • The return command terminates the function. • The return command is not necessary when the return value is that of the last command executed. Example Create a shell script called isroot.sh as follows: #!/bin/bash # version 1.0 # Purpose: Determine if current user is root or not is_root_user(){ [ $(id -u) -eq 0 ] } # invoke the function # make decision using conditional logical operators is_root_user && echo "You can run this script." || echo "You need to run this script as a root user." Save and close the file. Run it as follows: chmod +x isroot.sh ./isroot.sh Sample outputs: You need to run this script as a root user. Run it as the root user: sudo ./isroot.sh Sample outputs:
- 251. Returning from a function 244 [sudo] password for vivek: You can run this script. The following is an updated version of the same script. This version create the constants variables using the declare command called TRUE and FALSE. #!/bin/bash # version 2.0 # define constants declare -r TRUE=0 declare -r FALSE=1 # Purpose: Determine if current user is root or not is_root_user(){ # root user has user id (UID) zero. [ $(id -u) -eq 0 ] && return $TRUE || return $FALSE } is_root_user && echo "You can run this script." || echo "You need to run this script as a root user." Returning a string or word from a function • You cannot return a word or anything else from a function. • However, you can use echo or printf command to send back output easily to the script. #!/bin/bash # Variables domain="CyberCiti.BIz" out="" ################################################################## # Purpose: Converts a string to lower case # Arguments: # $@ -> String to convert to lower case ################################################################## function to_lower() { local str="$@" local output output=$(tr '[A-Z]' '[a-z]'<<<"${str}") echo $output } # invoke the to_lower() to_lower "This Is a TEST" # invoke to_lower() and store its result to $out variable out=$(to_lower ${domain})
- 252. Returning from a function 245 # Display back the result from $out echo "Domain name : $out" ← local variable Home Shell functions library → Shell functions library ← Returning from a function Home Source command → • You can store all your function in a function files called functions library. • You can load all function into the current script or the command prompt. • The syntax is as follows to load all functions: . /path/to/your/functions.sh Example Create a function file called myfunctions.sh: #!/bin/bash # set variables declare -r TRUE=0 declare -r FALSE=1 declare -r PASSWD_FILE=/etc/passwd ################################################################## # Purpose: Converts a string to lower case # Arguments: # $1 -> String to convert to lower case ################################################################## function to_lower() { local str="$@" local output output=$(tr '[A-Z]' '[a-z]'<<<"${str}") echo $output } ################################################################## # Purpose: Display an error message and die # Arguments: # $1 -> Message # $2 -> Exit status (optional) ################################################################## function die() {
- 253. Shell functions library 246 local m="$1" # message local e=${2-1} # default exit status 1 echo "$m" exit $e } ################################################################## # Purpose: Return true if script is executed by the root user # Arguments: none # Return: True or False ################################################################## function is_root() { [ $(id -u) -eq 0 ] && return $TRUE || return $FALSE } ################################################################## # Purpose: Return true $user exits in /etc/passwd # Arguments: $1 (username) -> Username to check in /etc/passwd # Return: True or False ################################################################## function is_user_exits() { local u="$1" grep -q "^${u}" $PASSWD_FILE && return $TRUE || return $FALSE } You can load myfunctions.sh into the current shell environment, enter: . myfunctions.sh OR . /path/to/myfunctions.sh How do I load myfunctions.sh into the script? Create a script called functionsdemo.sh: #!/bin/bash # Load the myfunctions.sh # My local path is /home/vivek/lsst2/myfunctions.sh . /home/vivek/lsst2/myfunctions.sh # Define local variables # var1 is not visitable or used by myfunctions.sh var1="The Mahabharata is the longest and, arguably, one of the greatest epic poems in any language."
- 254. Shell functions library 247 # Invoke the is_root() is_root && echo "You are logged in as root." || echo "You are not logged in as root." # Find out if user account vivek exits or not is_user_exits "vivek" && echo "Account found." || echo "Account not found." # Display $var1 echo -e "*** Orignal quote: n${var1}" # Invoke the to_lower() # Pass $var1 as arg to to_lower() # Use command substitution inside echo echo -e "*** Lowercase version: n$(to_lower ${var1})" Save and close the file. Run it as follows: chmod +x functionsdemo.sh ./functionsdemo.sh Sample outputs: You are not logged in as root. Account found. *** Orignal quote: The Mahabharata is the longest and, arguably, one of the greatest epic poems in any language. *** Lowercase version: the mahabharata is the longest and, arguably, one of the greatest epic poems in any language. ← Returning from a function Home Source command →
- 255. Source command 248 Source command ← Shell functions library Home Recursive function → • The source command can be used to load any functions file into the current shell script or a command prompt. • It read and execute commands from given FILENAME and return. • The pathnames in $PATH are used to find the directory containing FILENAME. If any ARGUMENTS are supplied, they become the positional parameters when FILENAME is executed. • The syntax is as follows: source functions.sh source /path/to/functions.sh source functions.sh WWWROOT=/apache.jail PHPROOT=/fastcgi.php_jail • Our previous example can be updated using source command as follows: #!/bin/bash # load myfunctions.sh function file source /home/vivek/lsst2/myfunctions.sh # local variable quote="He WHO Sees me in all things, and ALL things in me, is never far from me, and I am never far from him." # invoke is_root() is_root && echo "You are a superuser." || echo "You are not a superuser." # call to_lower() with ${quote} to_lower ${quote} ← Shell functions library Home Recursive function →
- 256. Recursive function 249 Recursive function ← Source command Home Putting functions in background → • A recursive function is a function that repeatedly calls itself. • No limit is placed on the number of recursive calls. • Create a shell script called fact.sh: #!/bin/bash # fact.sh - Shell script to to find factorial of given command line arg factorial(){ local i=$1 local f declare -i i declare -i f # factorial() is called until the value of $f is returned and is it is <= 2 # This is called the recursion [ $i -le 2 ] && echo $i || { f=$(( i - 1)); f=$(factorial $f); f=$(( f * i )); echo $f; } } # display usage [ $# -eq 0 ] && { echo "Usage: $0 number"; exit 1; } # call factorial factorial $1 Save and close the file. Run it as follows: chmod +x fact.sh ./fact.sh ./fact.sh 2 ./fact.sh 5 Sample outputs: 2 120 • You can debug the script as follows: bash -x ./fact.sh 5 Sample outputs:
- 257. Recursive function 250 + '[' 1 -eq 0 ']' + factorial 5 + local i=5 + local f + declare -i i + declare -i f + [[ 5 -le 2 ]] + f=4 ++ factorial 4 ++ local i=4 ++ local f ++ declare -i i ++ declare -i f ++ [[ 4 -le 2 ]] ++ f=3 +++ factorial 3 +++ local i=3 +++ local f +++ declare -i i +++ declare -i f +++ [[ 3 -le 2 ]] +++ f=2 ++++ factorial 2 ++++ local i=2 ++++ local f ++++ declare -i i ++++ declare -i f ++++ [[ 2 -le 2 ]] ++++ echo 2 +++ f=2 +++ f=6 +++ echo 6 ++ f=6 ++ f=24 ++ echo 24 + f=24 + f=120 + echo 120 120 • Recursive functions are slow under bash. • Avoid using recursive functions if possible. • For serious number crunching take a look at the GNU C/C++/Fortran Compiler Collection (GCC).
- 258. Recursive function 251 External links • Wikipedia:Recursion (computer science) • GNU C/C++/Fortran [1] Compiler Collection. ← Source command Home Putting functions in background → References [1] http://gcc.gnu.org/ Putting functions in background ← Recursive function Home Chapter 9 Challenges → • The & operator puts command in background and free up your terminal. • You can also put a function in background. How Do I Put a Function In Background? • The syntax is as follows: name(){ echo "Do something" sleep 1 } # put a function in the background name & # do something Example • You can display a series of dots (progress bar) while performing tape backup. This is useful for the user or operator to display a progress bar. • Create a shell script called progressdots.sh [1] : #!/bin/bash # progressdots.sh - Display progress while making backup # Based on idea presnted by nixCraft forum user rockdalinux # Show progress dots progress(){ echo -n "$0: Please wait..." while true do echo -n "." sleep 5
- 259. Putting functions in background 252 done } dobackup(){ # put backup commands here tar -zcvf /dev/st0 /home >/dev/null 2>&1 } # Start it in the background progress & # Save progress() PID # You need to use the PID to kill the function MYSELF=$! # Start backup # Transfer control to dobackup() dobackup # Kill progress kill $MYSELF >/dev/null 2>&1 echo -n "...done." echo Save and close the file. Run it as follows: chmod +x progressdots.sh ./progressdots.sh Sample outputs: ./progressdots.sh: Please wait..................done. External links • Bar [2] is a simple tool to copy a stream of data and print a display for the user on stderr showing (a) the amount of data passed, (b) the throughput of the data transfer, and (c) the transfer time, or, if the total size of the data stream is known, the estimated time remaining, what percentage of the data transfer has been completed, and a progress bar. • pv [3] (Pipe Viewer) is a terminal-based tool for monitoring the progress of data through a pipeline. • dialog - Another way to add a progress bar to your script using dialog --gauge.
- 260. Putting functions in background 253 References [1] Shell Script To Show Progress Indicators / Dots While Making The Backups (http://nixcraft.com/getting-started-tutorials/ 13664-shell-script-show-progress-indicators-dots-while-making-backups.html) from the nixCraft forum. [2] http://clpbar.sourceforge.net/ [3] http://www.ivarch.com/programs/pv.shtml ← Recursive function Home Chapter 9 Challenges → Chapter 9 Challenges ← Recursive function Home [[| →]] • Decide whether the following sentence is true or false: 1. The function file does not need to be executable. 2. The function is treated the same as other shell command. 3. To invoke the function, just type the name of the function. 4. You must create a function at the start of a script. 5. You must write a function before invoking it. 6. All single line function must follow the final command with a semicolon. 7. A recursive function is a function that repeatedly calls itself. 8. The return command return from a function with an exit status. 9. The { list; } also creates a function. ( [ $# -eq 0 ] && { echo "I'm function"; exit 1; } ) 10. Bash does support pointer arithmetic, and indirect referencing just like C programs. • Create user-defined functions in a shell script for the following tasks: 1. add_user() - Add a user to the system. 2. add_group() - Add a group to the system. 3. change_password() - Change user password. 4. delete_user() - Remove a user from the system. • Chapter 9 answers ← Recursive function Home [[| →]]
- 261. 254 Chapter 10: Interactive Scripts Menu driven scripts • You use some sort of generic application menu everyday. • A menu is nothing but a list of commands presented to a user by a shell script. • For example, you can write a menu driven shell script to get the terminal information. The menu driven shell script works as "shortcuts to frequently used commands that avoid the user having to remember syntax". • Usually, you need to type the instructions or commands to complete the task. • Command input can be done with the help of menus. Syntax Create a shell script called menu.sh: #!/bin/bash # A menu driven shell script sample template ## ---------------------------------- # Step #1: Define variables # ---------------------------------- EDITOR=vim PASSWD=/etc/passwd RED='033[0;41;30m' STD='033[0;0;39m' # ---------------------------------- # Step #2: User defined function # ---------------------------------- pause(){ read -p "Press [Enter] key to continue..." fackEnterKey } one(){ echo "one() called" pause } # do something in two() two(){ echo "two() called" pause } # function to display menus show_menus() {
- 262. Menu driven scripts 255 clear echo "~~~~~~~~~~~~~~~~~~~~~" echo " M A I N - M E N U" echo "~~~~~~~~~~~~~~~~~~~~~" echo "1. Set Terminal" echo "2. Reset Terminal" echo "3. Exit" } # read input from the keyboard and take a action # invoke the one() when the user select 1 from the menu option. # invoke the two() when the user select 2 from the menu option. # Exit when user the user select 3 form the menu option. read_options(){ local choice read -p "Enter choice [ 1 - 3] " choice case $choice in 1) one ;; 2) two ;; 3) exit 0;; *) echo -e "${RED}Error...${STD}" && sleep 2 esac } # ---------------------------------------------- # Step #3: Trap CTRL+C, CTRL+Z and quit singles # ---------------------------------------------- trap '' SIGINT SIGQUIT SIGTSTP # ----------------------------------- # Step #4: Main logic - infinite loop # ------------------------------------ while true do show_menus read_options done Save and close the file. Run it as follows: chmod +x menu.sh ./menu.sh Sample outputs:
- 263. Menu driven scripts 256 Getting information about your system • Create a script called grabsysinfo.sh: #!/bin/bash # grabsysinfo.sh - A simple menu driven shell script to to get information about your # Linux server / desktop. # Author: Vivek Gite # Date: 12/Sep/2007 # Define variables LSB=/usr/bin/lsb_release # Purpose: Display pause prompt # $1-> Message (optional) function pause(){ local message="$@" [ -z $message ] && message="Press [Enter] key to continue..." read -p "$message" readEnterKey } # Purpose - Display a menu on screen function show_menu(){ date echo "---------------------------" echo " Main Menu" echo "---------------------------" echo "1. Operating system info" echo "2. Hostname and dns info" echo "3. Network info" echo "4. Who is online" echo "5. Last logged in users" echo "6. Free and used memory info"
- 264. Getting information about your system 257 echo "7. exit" } # Purpose - Display header message # $1 - message function write_header(){ local h="$@" echo "---------------------------------------------------------------" echo " ${h}" echo "---------------------------------------------------------------" } # Purpose - Get info about your operating system function os_info(){ write_header " System information " echo "Operating system : $(uname)" [ -x $LSB ] && $LSB -a || echo "$LSB command is not insalled (set $LSB variable)" #pause "Press [Enter] key to continue..." pause } # Purpose - Get info about host such as dns, IP, and hostname function host_info(){ local dnsips=$(sed -e '/^$/d' /etc/resolv.conf | awk '{if (tolower($1)=="nameserver") print $2}') write_header " Hostname and DNS information " echo "Hostname : $(hostname -s)" echo "DNS domain : $(hostname -d)" echo "Fully qualified domain name : $(hostname -f)" echo "Network address (IP) : $(hostname -i)" echo "DNS name servers (DNS IP) : ${dnsips}" pause } # Purpose - Network inferface and routing info function net_info(){ devices=$(netstat -i | cut -d" " -f1 | egrep -v "^Kernel|Iface|lo") write_header " Network information " echo "Total network interfaces found : $(wc -w <<<${devices})" echo "*** IP Addresses Information ***" ip -4 address show
- 265. Getting information about your system 258 echo "***********************" echo "*** Network routing ***" echo "***********************" netstat -nr echo "**************************************" echo "*** Interface traffic information ***" echo "**************************************" netstat -i pause } # Purpose - Display a list of users currently logged on # display a list of receltly loggged in users function user_info(){ local cmd="$1" case "$cmd" in who) write_header " Who is online "; who -H; pause ;; last) write_header " List of last logged in users "; last ; pause ;; esac } # Purpose - Display used and free memory info function mem_info(){ write_header " Free and used memory " free -m echo "*********************************" echo "*** Virtual memory statistics ***" echo "*********************************" vmstat echo "***********************************" echo "*** Top 5 memory eating process ***" echo "***********************************" ps auxf | sort -nr -k 4 | head -5 pause } # Purpose - Get input via the keyboard and make a decision using case..esac function read_input(){ local c read -p "Enter your choice [ 1 - 7 ] " c case $c in 1) os_info ;; 2) host_info ;;
- 266. Getting information about your system 259 3) net_info ;; 4) user_info "who" ;; 5) user_info "last" ;; 6) mem_info ;; 7) echo "Bye!"; exit 0 ;; *) echo "Please select between 1 to 7 choice only." pause esac } # ignore CTRL+C, CTRL+Z and quit singles using the trap trap '' SIGINT SIGQUIT SIGTSTP # main logic while true do clear show_menu # display memu read_input # wait for user input done Save and close the file. Run it as follows: chmod +x grabsysinfo.sh ./grabsysinfo.sh
- 267. Getting information about your system 260 Sample outputs: Bash display dialog boxes • The dialog command allows you to display a variety of questions or display messages using dialog boxes from a shell script. • Use the dialog utility for creating TTY (terminal) dialog boxes. Install dialog command Type the following command to install the dialog command line utility under Debian or Ubuntu Linux: sudo apt-get update sudo apt-get install dialog Type the following command to install the dialog command line utility under CentOS or Redhat Linux: yum install dialog
- 268. Bash display dialog boxes 261 Syntax The syntax is as follows: dialog --common-options --boxType "Text" Height Width --box-specific-option • --common-options are used to set dialog boxes background color, title, etc. • All dialog boxes have at least three parameters: • "Text" : The caption or contents of the box. • height : The height of the dialog box. • width : The width of the dialog box. Your first dialog dialog command in action Type the following command at a shell prompt: dialog --title "Hello" --msgbox 'Hello world!' 6 20 1. A message box is displayed on the screen with a single OK button. 2. You can use this dialog box to display any message you like. 3. After reading the message, the user can press the ENTER key so that dialog will exit and the calling shell script can continue its operation. 4. If the message is too large for the space, dialog may allow you to scroll it. In this case, a percentage is shown in the base of the widget. 5. On exit, no text is written to dialog’s output. Only an "OK" button is provided for input, but an ESC exit status may be returned. Understanding dialog options • --title "Hello" : Set a "title string" (caption) to be displayed at the top of the dialog box. In this example, set a title string to "Hello". • --msgbox 'Hello world!' : Create a message box with "Hello world!" message. • 6 : Set the height of the msgbox box. • 20 : Set the width of the msgbox box. Setting backtitle You can set a backtitle string to be displayed on the backdrop, at the top of the screen using the --backtitle "Title" syntax: dialog --backtitle "System Information" --title "About" --msgbox 'This is an entirely open source software.' 10 30
- 269. Bash display dialog boxes 262 Positioning the box The --begin y x option can be used to to set the position of the upper left corner of a dialog box on the screen. dialog --begin 10 30 --backtitle "System Information" --title "About" --msgbox 'This is an entirely open source software.' 10 30 Where, • --begin 10 30: 10 is y i.e. horizontal position and 30 is vertical position. Dialog command with y x position and backtitle Common dialog boxes and their options Box options: --calendar <text> <height> <width> <day> <month> <year> --checklist <text> <height> <width> <list height> <tag1> <item1> <status1>... --dselect <directory> <height> <width> --editbox <file> <height> <width> --fselect <filepath> <height> <width> --gauge <text> <height> <width> [<percent>] --infobox <text> <height> <width> --inputbox <text> <height> <width> [<init>] --inputmenu <text> <height> <width> <menu height> <tag1> <item1>... --menu <text> <height> <width> <menu height> <tag1> <item1>... --msgbox <text> <height> <width>
- 270. Bash display dialog boxes 263 --passwordbox <text> <height> <width> [<init>] --pause <text> <height> <width> <seconds> --progressbox <height> <width> --radiolist <text> <height> <width> <list height> <tag1> <item1> <status1>... --tailbox <file> <height> <width> --tailboxbg <file> <height> <width> --textbox <file> <height> <width> --timebox <text> <height> <width> <hour> <minute> <second> --yesno <text> <height> <width> Dialog customization with configuration file • You can customize various aspects of the dialog command with ~/.dialogrc file. • $HOME/.dialogrc is a default configuration file. How do I create a sample ~/.dialogrc file? Type the following command: dialog --create-rc ~/.dialogrc To customize ~/.dialogrc, enter: vi ~/.dialogrc Turn on shadow dialog boxes use_shadow = ON Turn on color support ON use_colors = ON Change default blue background color to BLACK screen_color = (CYAN,BLACK,ON) Save and close the file. Here is my sample configuration file: # # Run-time configuration file for dialog # # Automatically generated by "dialog --create-rc <file>" # # # Types of values:
- 271. Dialog customization with configuration file 264 # # Number - <number> # String - "string" # Boolean - <ON|OFF> # Attribute - (foreground,background,highlight?) # Set aspect-ration. aspect = 0 # Set separator (for multiple widgets output). separate_widget = "" # Set tab-length (for textbox tab-conversion). tab_len = 0 # Make tab-traversal for checklist, etc., include the list. visit_items = OFF # Shadow dialog boxes? This also turns on color. use_shadow = ON # Turn color support ON or OFF use_colors = ON # Screen color screen_color = (CYAN,GREEN,ON) # Shadow color shadow_color = (BLACK,BLACK,ON) # Dialog box color dialog_color = (BLACK,WHITE,OFF) # Dialog box title color title_color = (BLUE,WHITE,ON) # Dialog box border color border_color = (WHITE,WHITE,ON) # Active button color button_active_color = (WHITE,BLUE,ON) # Inactive button color button_inactive_color = (BLACK,WHITE,OFF) # Active button key color button_key_active_color = (WHITE,BLUE,ON)
- 272. Dialog customization with configuration file 265 # Inactive button key color button_key_inactive_color = (RED,WHITE,OFF) # Active button label color button_label_active_color = (YELLOW,BLUE,ON) # Inactive button label color button_label_inactive_color = (BLACK,WHITE,ON) # Input box color inputbox_color = (BLACK,WHITE,OFF) # Input box border color inputbox_border_color = (BLACK,WHITE,OFF) # Search box color searchbox_color = (BLACK,WHITE,OFF) # Search box title color searchbox_title_color = (BLUE,WHITE,ON) # Search box border color searchbox_border_color = (WHITE,WHITE,ON) # File position indicator color position_indicator_color = (BLUE,WHITE,ON) # Menu box color menubox_color = (BLACK,WHITE,OFF) # Menu box border color menubox_border_color = (WHITE,WHITE,ON) # Item color item_color = (BLACK,WHITE,OFF) # Selected item color item_selected_color = (WHITE,BLUE,ON) # Tag color tag_color = (BLUE,WHITE,ON) # Selected tag color tag_selected_color = (YELLOW,BLUE,ON) # Tag key color
- 273. Dialog customization with configuration file 266 tag_key_color = (RED,WHITE,OFF) # Selected tag key color tag_key_selected_color = (RED,BLUE,ON) # Check box color check_color = (BLACK,WHITE,OFF) # Selected check box color check_selected_color = (WHITE,BLUE,ON) # Up arrow color uarrow_color = (GREEN,WHITE,ON) # Down arrow color darrow_color = (GREEN,WHITE,ON) # Item help-text color itemhelp_color = (WHITE,BLACK,OFF) # Active form text color form_active_text_color = (WHITE,BLUE,ON) # Form text color form_text_color = (WHITE,CYAN,ON) # Readonly form item color form_item_readonly_color = (CYAN,WHITE,ON) See also • $HOME/.dialogrc file
- 274. A yes/no dialog box 267 A yes/no dialog box • You can display a yes/no dialog box using the following syntax: dialog --common-options --yesno text height width • This dialog box is useful for asking questions that require the user to answer either yes or no. • The dialog box has a Yes button and a No button, in which the user can switch between by pressing the TAB key. • On exit, no text is written to dialog’s output. In addition to the "Yes" and "No" exit codes and ESC exit status may be returned as follows: • 0 - Yes chosen. • 1 - No chosen. • 255 - Escape key was pressed i.e. box closed. Example • Create a script called dynbox.sh: #!/bin/bash # dynbox.sh - Yes/No box demo dialog --title "Delete file" --backtitle "Linux Shell Script Tutorial Example" --yesno "Are you sure you want to permanently delete "/tmp/foo.txt"?" 7 60 # Get exit status # 0 means user hit [yes] button. # 1 means user hit [no] button. # 255 means user hit [Esc] key. response=$? case $response in 0) echo "File deleted.";; 1) echo "File not deleted.";; 255) echo "[ESC] key pressed.";; esac Save and close the file. Run it as follows: chmod +x dynbox.sh ./dynbox.sh
- 275. A yes/no dialog box 268 Asking questions that require the user to answer either yes or no An input dialog box • An input box is useful when you want to ask questions that require the user to input a data as the answer via the keyboard. • When entering the data, the backspace, delete and cursor keys can be used to correct typing errors. • If the input data is longer than can fit in the dialog box, the input field will be scrolled. • On exit, the input string will be printed on dialog’s output. This can be redirected to a text file. Example • Create a shell script called yesnobox.sh: #!/bin/bash # yesnobox.sh - An inputbox demon shell script OUTPUT="/tmp/input.txt" # create empty file >$OUTPUT # Purpose - say hello to user # $1 -> name (set default to 'anonymous person') function sayhello(){ local n=${@-"anonymous person"} #display it
- 276. An input dialog box 269 dialog --title "Hello" --clear --msgbox "Hello ${n}, let us be friends!" 10 41 } # cleanup - add a trap that will remove $OUTPUT # if any of the signals - SIGHUP SIGINT SIGTERM it received. trap "rm $OUTPUT; exit" SIGHUP SIGINT SIGTERM # show an inputbox dialog --title "Inputbox - To take input from you" --backtitle "Linux Shell Script Tutorial Example" --inputbox "Enter your name " 8 60 2>$OUTPUT # get respose respose=$? # get data stored in $OUPUT using input redirection name=$(<$OUTPUT) # make a decsion case $respose in 0) sayhello ${name} ;; 1) echo "Cancel pressed." ;; 255) echo "[ESC] key pressed." esac # remove $OUTPUT file rm $OUTPUT Save and close the file. Run it as follows: chmod +x yesnobox.sh ./yesnobox.sh Sample outputs:
- 277. An input dialog box 270 yesnobox.sh shell script output An input dialog box Messagebox Messagebox with default value See also • trap command • How to set the default shell variable value A password box • A password box is just like an input box, except that the text the operator enters in to displayed on screen. • Use this to collect user passwords. • The "--insecure" option will display password as sting. • On exit, the input string will be printed on dialog's output. Example • Create a shell script called getpasswd1.sh: #!/bin/bash # getpasswd1.sh - A sample shell script to read users password. # password storage data=$(tempfile 2>/dev/null) # trap it trap "rm -f $data" 0 1 2 5 15 # get password dialog --title "Password" --clear --passwordbox "Enter your password" 10 30 2> $data ret=$? # make decision case $ret in 0) echo "Password is $(cat $data)";; 1) echo "Cancel pressed.";;
- 278. A password box 271 255) [ -s $data ] && cat $data || echo "ESC pressed.";; esac Save and close the file. Run it as follows: chmod +x getpasswd1.sh ./getpasswd1.sh Sample outputs: getpasswd1.sh shell script output A password dialog box (by default the password widget is not user friendly as no character is displayed) Displaying user password The --insecure option • The --insecure option makes the password widget friendlier but less secure, by echoing asterisks for each character. • Create a shell script called getpasswd2.sh: #!/bin/bash # getpasswd2.sh - A sample shell script to read users password. # password storage data=$(tempfile 2>/dev/null) # trap it trap "rm -f $data" 0 1 2 5 15 # get password with the --insecure option dialog --title "Password" --clear --insecure --passwordbox "Enter your password" 10 30 2> $data ret=$?
- 279. A password box 272 # make decison case $ret in 0) echo "Password is $(cat $data)";; 1) echo "Cancel pressed.";; 255) [ -s $data ] && cat $data || echo "ESC pressed.";; esac Sample outputs: A password dialog box with the --insecure option
- 280. A menu box 273 A menu box • A menu box display a list of choices to the user in the form of a menu. • Each menu is made of a tag string and an item string. In this example, a tag (e.g., Calendar) is on left side and an item (e.g., "Displays a calendar") is on right side: Date/time "Displays date and time" Calendar "Displays a calendar" Editor "Start a text editor" Exit "Exit to the shell" A sample menu output • The tag gives the entry a name to distinguish it from the other entries in the menu. Use the tag to make decision using if statement or case..esac statement. • The item is nothing but a short description of the option that the entry represents. • All choices (menus) are displayed in the order given. • On exit the tag of the chosen menu entry will be printed on dialog’s output. This can be redirected to the file using the following syntax: > /tmp/menu.output • If the "--help-button" option is given, the corresponding help text will be printed if the user selects the help button. Example • Create a shell script called utilitymenu.sh: #!/bin/bash # utilitymenu.sh - A sample shell script to display menus on screen # Store menu options selected by the user INPUT=/tmp/menu.sh.$$ # Storage file for displaying cal and date command output OUTPUT=/tmp/output.sh.$$ # get text editor or fall back to vi_editor vi_editor=${EDITOR-vi} # trap and delete temp files trap "rm $OUTPUT; rm $INPUT; exit" SIGHUP SIGINT SIGTERM # # Purpose - display output using msgbox # $1 -> set msgbox height # $2 -> set msgbox width # $3 -> set msgbox title
- 281. A menu box 274 # function display_output(){ local h=${1-10} # box height default 10 local w=${2-41} # box width default 41 local t=${3-Output} # box title dialog --backtitle "Linux Shell Script Tutorial" --title "${t}" --clear --msgbox "$(<$OUTPUT)" ${h} ${w} } # # Purpose - display current system date & time # function show_date(){ echo "Today is $(date) @ $(hostname -f)." >$OUTPUT display_output 6 60 "Date and Time" } # # Purpose - display a calendar # function show_calendar(){ cal >$OUTPUT display_output 13 25 "Calendar" } # # set infinite loop # while true do ### display main menu ### dialog --clear --help-button --backtitle "Linux Shell Script Tutorial" --title "[ M A I N - M E N U ]" --menu "You can use the UP/DOWN arrow keys, the first n letter of the choice as a hot key, or the n number keys 1-9 to choose an option.n Choose the TASK" 15 50 4 Date/time "Displays date and time" Calendar "Displays a calendar" Editor "Start a text editor" Exit "Exit to the shell" 2>"${INPUT}" menuitem=$(<"${INPUT}") # make decsion case $menuitem in Date/time) show_date;;
- 282. A menu box 275 Calendar) show_calendar;; Editor) $vi_editor;; Exit) echo "Bye"; break;; esac done # if temp files found, delete em [ -f $OUTPUT ] && rm $OUTPUT [ -f $INPUT ] && rm $INPUT Save and close the file. Run it as follows: chmod +x utilitymenu.sh ./utilitymenu.sh Sample outputs: utilitymenu.sh shell script output (dialog command with menus) A menu based dialog box Messagebox displaying date & time Messagebox displaying a calendar Vi IMproved, a programmers text editor
- 283. A progress bar (gauge box) 276 A progress bar (gauge box) • You can create a progress bar (progress indicator) when copying/moving files or making backups using the gauge box. • It displays a meter along the bottom of the box. The meter indicates the percentage. New percentages are read from standard input, one integer per line. The meter is updated to reflect each new percentage. • If the standard input reads the string "START_BAR", then the first line following is taken as an integer percentage, then subsequent lines up to another "START_BAR" are used for a new prompt. The gauge exits when EOF is reached on the standard input. • The syntax is as follows: echo percentage | dialog --gauge "text" height width percent echo "10" | dialog --gauge "Please wait" 10 70 0 echo "50" | dialog --gauge "Please wait" 10 70 0 echo "100" | dialog --gauge "Please wait" 10 70 0 • However, you need to use the while or for loop to show 0 to 100% progress. In this example, the for loop is used to display progress: for i in $(seq 0 10 100) ; do sleep 1; echo $i | dialog --gauge "Please wait" 10 70 0; done Example Create a shell script dvdcopy.sh: #!/bin/bash # dvdcopy.sh - A sample shell script to display a progress bar # set counter to 0 counter=0 ( # set infinite while loop while : do cat <<EOF XXX $counter Disk copy /dev/dvd to /home/data ( $counter%): XXX EOF # increase counter by 10 (( counter+=10 )) [ $counter -eq 100 ] && break # delay it a specified amount of time i.e 1 sec sleep 1 done ) | dialog --title "File Copy" --gauge "Please wait" 7 70 0 Save and close the file. Run it as follows:
- 284. A progress bar (gauge box) 277 chmod +x dvdcopy.sh ./dvdcopy.sh Sample outputs: A sample progress bar (gauge box) File Copy Progress Bar With Dialog • Create a shell script called pcp.sh: #!/bin/bash # pcp.sh: A shell script to copy /bin/* and /etc/* files # Display a progress bar while copying files. # * Based upon Greg's (GreyCat's) GPLd wiki example. * # -------------------------------------------------------- # Create an array of all files in /etc and /bin directory DIRS=(/bin/* /etc/*) # Destination directory DEST="/tmp/test.$$" # Create $DEST if does not exits [ ! -d $DEST ] && mkdir -p $DEST # # Show a progress bar # --------------------------------- # Redirect dialog commands input using substitution # dialog --title "Copy file" --gauge "Copying file..." 10 75 < <( # Get total number of files in array n=${#DIRS[*]}; # set counter - it will increase every-time a file is copied to $DEST i=0
- 285. A progress bar (gauge box) 278 # # Start the for loop # # read each file from $DIRS array # $f has filename for f in "${DIRS[@]}" do # calculate progress PCT=$(( 100*(++i)/n )) # update dialog box cat <<EOF XXX $PCT Copying file "$f"... XXX EOF # copy file $f to $DEST /bin/cp $f ${DEST} &>/dev/null done ) # just delete $DEST directory /bin/rm -rf $DEST Save and close the file. Run it as follows: chmod +x pcp.sh ./pcp.sh
- 286. The form dialog for input 279 The form dialog for input A sample data entry form dialog box • The form dialog displays data entry form which consisting of labels and fields. • You can set the field length. • An operator can use up/down arrows to move between fields and tab to move between windows. The syntax is as follows: dialog --form text height width formheight [ label y x item y x flen ilen ] • Where, • The field length flen and input-length ilen tell how long the field can be. • If flen is zero, the corresponding field cannot be altered. and the contents of the field determine the displayed-length. • If flen is negative, the corresponding field cannot be altered, and the negated value of flen is used as the displayed-length. • If ilen is zero, it is set to flen. Example • Create a shell script called useradd1.sh: #!/bin/bash # useradd1.sh - A simple shell script to display the form dialog on screen # set field names i.e. shell variables shell="" groups="" user="" home="" # open fd exec 3>&1 # Store data to $VALUES variable VALUES=$(dialog --ok-label "Submit" --backtitle "Linux User Managment" --title "Useradd" --form "Create a new user" 15 50 0 "Username:" 1 1 "$user" 1 10 10 0 "Shell:" 2 1 "$shell" 2 10 15 0 "Group:" 3 1 "$groups" 3 10 8 0 "HOME:" 4 1 "$home" 4 10 40 0
- 287. The form dialog for input 280 2>&1 1>&3) # close fd exec 3>&- # display values just entered echo "$VALUES" Save and close the file. Run it as follows: chmod +x useradd1.sh ./useradd1.sh Sample outputs: useradd1.sh: shell script output (the dialog command with data entry form) The form dialog box in action Displaying output stored in $VALUES See also • exec command • Assigns the file descriptor (fd) to file for output
- 288. Console management 281 Console management • The Linux system console is used to display messages from the BIOS, the kernel and from the other programs. • Console is nothing but a physical device consisting of a keyboard and a screen. • The terminfo database on a Linux (and UNIX) computer describes terminals including its attributes and capabilities. Terminfo describes terminals by giving a set of capabilities which they have, by specifying how to perform screen operations, and by specifying padding requirements and initialization sequences. • You can control your console via shell scripts using the following commands: • tty - print the file name of the terminal connected to standard input. • reset - terminal initialization. • tput - initialize a terminal or query terminfo database. • setleds - set the keyboard leds. • setterm - set terminal attributes. tput Command Examples The tput command is very useful to add some spice to your Linux shell scripts. External links • Discover tput [1] : Add some spice to your UNIX shell scripts. References [1] http://www.ibm.com/developerworks/aix/library/au-learningtput/index.html
- 289. Get the name of the current terminal 282 Get the name of the current terminal The tty command display the file name of the terminal connected to standard input. Type the following command: tty Sample outputs: /dev/pts/0 OR /dev/tty1 In this example, tar command will run, only if standard input is a terminal. Create a shell script called termtest.sh: #!/bin/bash # termtest.sh: Run the tar command only if command run from a termina tty -s status=$? if [ $status -eq 0 ] then echo "Running backup using tar command..." # tar cvf /dev/st0 /home else logger "$0 must run from a terminal" fi Save and close the file. Run it as follows: chmod +x termtest.sh ./termtest.sh
- 290. Fixing the display with reset 283 Fixing the display with reset Sometime your terminal gets messed up. It will be full of weird character sequences that can lock down your display. These characters will hide what you type or character displayed into strange symbols. Messed up bash terminal session To fix your display type the reset command [1] : reset References [1] BASH – fix the display (http://www.cyberciti.biz/tips/bash-fix-the-display.html).
- 291. Get screen width and hight with tput 284 Get screen width and hight with tput Type the following command at a shell prompt to get screen width: tput cols Sample outputs: 157 You can get and export screen width with the shell variable called COLUMNS (used by the select builtin command to determine the terminal width when printing selection lists): COLUMNS=$(tput cols) export COLUMNS To get height, enter: tput lines Sample outputs: 56 Moving the cursor with tput You can use the tput command to set cursor position on screen. It will take x and/or y coordinates in the device's rows and columns. In this example, move the cursor to the 10th column (X) and the 5th row (Y) on a device and display a message using read command: tput cup 10 5 read -p 'Hello world!'
- 292. Moving the cursor with tput 285 Moving the cursor with tput command Display centered text in the screen in reverse video #!/bin/bash # Get current width and hight COLUMNS=$(tput cols) LINES=$(tput lines) # Set default message if $1 input not provided MESSAGE="${1:-Linux Shell Scripting Tutorial v2.0}" # Calculate x and y so that we can display $MESSAGE # centered in the screen x=$(( $LINES / 2 )) y=$(( ( $COLUMNS - ${#MESSAGE} ) / 2 )) # Clear the screen tput clear # set x and y position tput cup $x $y # set reverse video mode tput rev
- 293. Display centered text in the screen in reverse video 286 # Alright display message echo "${MESSAGE}" # Start cleaning up... tput sgr0 tput rc Set the keyboard leds The setleds command can be used display and changes status of NumLock, CapsLock and ScrollLock using a shell script. Turn on or off NumLock leds To turn on CapsLock, use the setleads command as follows: setleads -D +num To turn off CapsLock, enter: setleads -D -num Where, • -D : Change both the VT flags and their default settings. • +num : Clear NumLock. • -num : Set NumLock. Note: At present, the NumLock setting influences the interpretation of keypad keys. Pressing the NumLock key complements the NumLock setting. See also • setleads command
- 294. Turn on or off CapsLock leds 287 Turn on or off CapsLock leds To turn on CapsLock, use the setleads command as follows: setleads -D +caps To turn off CapsLock, enter: setleads -D -caps Where, • -D : Change both the VT flags and their default settings. • +caps : Clear CapsLock. • -caps : Set CapsLock. Note: At present, the CapsLock setting complements the Shift key when applied to letters. Pressing the CapsLock key complements the CapsLock setting. See also • setleads command Turn on or off ScrollLock leds To turn on CapsLock, use the setleads command as follows: setleads -D +scroll To turn off CapsLock, enter: setleads -D -scroll Where, • -D : Change both the VT flags and their default settings. • +scroll : Clear ScrollLock. • -scroll : Set ScrollLock. Note: At present, pressing the ScrollLock key (or ^S/^Q) stops/starts console output. See also • setleads command
- 295. 288 /etc Shell scripting help • If you see a typo, a spelling mistake, or an error, please edit wiki page. Alternatively, you can tell me about it by sending me an e-mail. Have a Question About Shell Scripting? • If you'd like to contact us about helping you with a Linux / UNIX shell scripting problem just click here to visit our [1] ( http://nixcraft.com ) excellent shell scripting tech support forum. • View more scripts at Bash shell scripting directory [2] - http://bash.cyberciti.biz . • Enjoy! Peace & Love!! • Copyright © 1999-2009 Vivek Gite <[email protected]> and its contributors. References [1] http://nixcraft.com/ [2] http://bash.cyberciti.biz Recommended Books Recommended Books: • Learning the bash Shell: Unix Shell Programming In a Nutshell (O'Reilly) [1] • bash Cookbook: Solutions and Examples for bash Users - Cookbooks (O'Reilly) [2] • Linux Shell Scripting with Bash (Sams) [3] • Mastering Unix Shell Scripting: Bash, Bourne, and Korn Shell Scripting for Programmers, System Administrators, and UNIX Gurus (Wiley) [4] • Learning the vi and Vim Editors (O'Reilly) [5] References [1] http://www.amazon.com/gp/product/0596009658?ie=UTF8&tag=cyberciti-20&linkCode=as2&camp=1789&creative=390957& creativeASIN=0596009658 [2] http://www.amazon.com/gp/product/0596526784?ie=UTF8&tag=cyberciti-20&linkCode=as2&camp=1789&creative=390957& creativeASIN=0596526784 [3] http://www.amazon.com/gp/product/0672326426?ie=UTF8&tag=cyberciti-20&linkCode=as2&camp=1789&creative=390957& creativeASIN=0672326426 [4] http://www.amazon.com/gp/product/0470183012?ie=UTF8&tag=cyberciti-20&linkCode=as2&camp=1789&creative=390957& creativeASIN=0470183012 [5] http://www.amazon.com/gp/product/059652983X?ie=UTF8&tag=cyberciti-20&linkCode=as2&camp=1789&creative=390957& creativeASIN=059652983X
- 296. Article Sources and Contributors 289 Article Sources and Contributors Linux Shell Scripting Tutorial - A Beginner's handbook:About Source: http://bash.cyberciti.biz/wiki/index.php?oldid=2080 Contributors: Admin, 3 anonymous edits What Is Linux Source: http://bash.cyberciti.biz/wiki/index.php?oldid=2474 Contributors: Admin, 4 anonymous edits Who created Linux Source: http://bash.cyberciti.biz/wiki/index.php?oldid=2301 Contributors: Admin, 2 anonymous edits Where can I download Linux Source: http://bash.cyberciti.biz/wiki/index.php?oldid=833 Contributors: Admin How do I Install Linux Source: http://bash.cyberciti.biz/wiki/index.php?oldid=2457 Contributors: Admin Linux usage in everyday life Source: http://bash.cyberciti.biz/wiki/index.php?oldid=835 Contributors: Admin What is Linux Kernel Source: http://bash.cyberciti.biz/wiki/index.php?oldid=1786 Contributors: Admin, 1 anonymous edits What is Linux Shell Source: http://bash.cyberciti.biz/wiki/index.php?oldid=2408 Contributors: Admin, S1024b, TheBonsai, 6 anonymous edits Unix philosophy Source: http://bash.cyberciti.biz/wiki/index.php?oldid=2045 Contributors: Admin, 2 anonymous edits But how do you use the shell Source: http://bash.cyberciti.biz/wiki/index.php?oldid=2394 Contributors: Admin, 1 anonymous edits What is a Shell Script or shell scripting Source: http://bash.cyberciti.biz/wiki/index.php?oldid=2405 Contributors: Admin, Cfajohnson, S1024b, 5 anonymous edits Why shell scripting Source: http://bash.cyberciti.biz/wiki/index.php?oldid=2406 Contributors: Admin, Jagadeeshreddy, 13 anonymous edits Chapter 1 Challenges Source: http://bash.cyberciti.biz/wiki/index.php?oldid=1975 Contributors: Admin, 1 anonymous edits The bash shell Source: http://bash.cyberciti.biz/wiki/index.php?oldid=2476 Contributors: Admin, 8 anonymous edits Shell commands Source: http://bash.cyberciti.biz/wiki/index.php?oldid=1893 Contributors: Admin, TheBonsai, 4 anonymous edits The role of shells in the Linux environment Source: http://bash.cyberciti.biz/wiki/index.php?oldid=1834 Contributors: Admin, Cfajohnson Other standard shells Source: http://bash.cyberciti.biz/wiki/index.php?oldid=2219 Contributors: Admin, Cfajohnson Hello, World! Tutorial Source: http://bash.cyberciti.biz/wiki/index.php?oldid=2464 Contributors: Admin, 5 anonymous edits Shebang Source: http://bash.cyberciti.biz/wiki/index.php?oldid=2409 Contributors: Admin, 5 anonymous edits Shell Comments Source: http://bash.cyberciti.biz/wiki/index.php?oldid=2259 Contributors: Admin, 3 anonymous edits Setting up permissions on a script Source: http://bash.cyberciti.biz/wiki/index.php?oldid=2472 Contributors: Admin, 2 anonymous edits Execute a script Source: http://bash.cyberciti.biz/wiki/index.php?oldid=1835 Contributors: Admin, Cfajohnson Debug a script Source: http://bash.cyberciti.biz/wiki/index.php?oldid=2060 Contributors: Admin, Vivek, 1 anonymous edits Chapter 2 Challenges Source: http://bash.cyberciti.biz/wiki/index.php?oldid=1979 Contributors: Admin, Dovis, 2 anonymous edits Variables in shell Source: http://bash.cyberciti.biz/wiki/index.php?oldid=2269 Contributors: Admin, Cfajohnson, 3 anonymous edits Assign values to shell variables Source: http://bash.cyberciti.biz/wiki/index.php?oldid=2224 Contributors: Admin, Cfajohnson Default shell variables value Source: http://bash.cyberciti.biz/wiki/index.php?oldid=1842 Contributors: Admin, Cfajohnson, Xlevanus Rules for Naming variable name Source: http://bash.cyberciti.biz/wiki/index.php?oldid=1854 Contributors: Admin, Cfajohnson Display the value of shell variables Source: http://bash.cyberciti.biz/wiki/index.php?oldid=1846 Contributors: Admin, Cfajohnson, Xlevanus Quoting Source: http://bash.cyberciti.biz/wiki/index.php?oldid=2444 Contributors: Admin, Cfajohnson, 3 anonymous edits The export statement Source: http://bash.cyberciti.biz/wiki/index.php?oldid=2445 Contributors: Admin, Cfajohnson, Xlevanus, 1 anonymous edits Unset shell and environment variables Source: http://bash.cyberciti.biz/wiki/index.php?oldid=875 Contributors: Admin Getting User Input Via Keyboard Source: http://bash.cyberciti.biz/wiki/index.php?oldid=2432 Contributors: Admin, Dovis, 13 anonymous edits Perform arithmetic operations Source: http://bash.cyberciti.biz/wiki/index.php?oldid=2095 Contributors: Admin, 2 anonymous edits Create an integer variable Source: http://bash.cyberciti.biz/wiki/index.php?oldid=1174 Contributors: Admin Create the constants variable Source: http://bash.cyberciti.biz/wiki/index.php?oldid=1824 Contributors: Admin, PuntoS, Xlevanus Bash variable existence check Source: http://bash.cyberciti.biz/wiki/index.php?oldid=2079 Contributors: Admin, Cfajohnson, Test Customize the bash shell environments Source: http://bash.cyberciti.biz/wiki/index.php?oldid=1778 Contributors: Admin Recalling command history Source: http://bash.cyberciti.biz/wiki/index.php?oldid=2092 Contributors: Admin, 1 anonymous edits Path name expansion Source: http://bash.cyberciti.biz/wiki/index.php?oldid=2072 Contributors: Admin, 2 anonymous edits Create and use aliases Source: http://bash.cyberciti.biz/wiki/index.php?oldid=2386 Contributors: Admin, 1 anonymous edits The tilde expansion Source: http://bash.cyberciti.biz/wiki/index.php?oldid=1681 Contributors: Admin Startup scripts Source: http://bash.cyberciti.biz/wiki/index.php?oldid=1780 Contributors: Admin Using aliases Source: http://bash.cyberciti.biz/wiki/index.php?oldid=1716 Contributors: Admin Changing bash prompt Source: http://bash.cyberciti.biz/wiki/index.php?oldid=1890 Contributors: Admin Setting shell options Source: http://bash.cyberciti.biz/wiki/index.php?oldid=1891 Contributors: Admin Setting system wide shell options Source: http://bash.cyberciti.biz/wiki/index.php?oldid=1775 Contributors: Admin Chapter 3 Challenges Source: http://bash.cyberciti.biz/wiki/index.php?oldid=1916 Contributors: Admin Bash structured language constructs Source: http://bash.cyberciti.biz/wiki/index.php?oldid=2262 Contributors: Admin, Cfajohnson, Groundswell, 3 anonymous edits
- 297. Article Sources and Contributors 290 Test command Source: http://bash.cyberciti.biz/wiki/index.php?oldid=2461 Contributors: 2A01:E35:2E81:500:216:D4FF:FE66:295D, Admin, Cfajohnson, 1 anonymous edits If structures to execute code based on a condition Source: http://bash.cyberciti.biz/wiki/index.php?oldid=2263 Contributors: Admin If..else..fi Source: http://bash.cyberciti.biz/wiki/index.php?oldid=2264 Contributors: Admin, Cfajohnson, 1 anonymous edits Nested ifs Source: http://bash.cyberciti.biz/wiki/index.php?oldid=887 Contributors: Admin Multilevel if-then-else Source: http://bash.cyberciti.biz/wiki/index.php?oldid=1481 Contributors: Admin, Xlevanus The exit status of a command Source: http://bash.cyberciti.biz/wiki/index.php?oldid=1930 Contributors: Admin, Cfajohnson, 1 anonymous edits Conditional execution Source: http://bash.cyberciti.biz/wiki/index.php?oldid=1592 Contributors: Admin, 1 anonymous edits Logical AND && Source: http://bash.cyberciti.biz/wiki/index.php?oldid=1595 Contributors: Admin, 3 anonymous edits Logical OR || Source: http://bash.cyberciti.biz/wiki/index.php?oldid=1068 Contributors: Admin Logical Not ! Source: http://bash.cyberciti.biz/wiki/index.php?oldid=2266 Contributors: Admin, 1 anonymous edits Conditional expression using [ Source: http://bash.cyberciti.biz/wiki/index.php?oldid=895 Contributors: Admin Conditional expression using <nowiki>[[</nowiki> Source: http://bash.cyberciti.biz/wiki/index.php?oldid=1705 Contributors: Admin Numeric comparison Source: http://bash.cyberciti.biz/wiki/index.php?oldid=896 Contributors: Admin String comparison Source: http://bash.cyberciti.biz/wiki/index.php?oldid=1830 Contributors: Admin, 1 anonymous edits File attributes comparisons Source: http://bash.cyberciti.biz/wiki/index.php?oldid=1712 Contributors: Admin, 2 anonymous edits Shell command line parameters Source: http://bash.cyberciti.biz/wiki/index.php?oldid=899 Contributors: Admin How to use positional parameters Source: http://bash.cyberciti.biz/wiki/index.php?oldid=2467 Contributors: Admin Parameters Set by the Shell Source: http://bash.cyberciti.biz/wiki/index.php?oldid=1690 Contributors: Admin Create usage messages Source: http://bash.cyberciti.biz/wiki/index.php?oldid=1314 Contributors: Admin Exit command Source: http://bash.cyberciti.biz/wiki/index.php?oldid=975 Contributors: Admin The case statement Source: http://bash.cyberciti.biz/wiki/index.php?oldid=2085 Contributors: Admin, Cfajohnson, Stripling20, 1 anonymous edits Dealing with case sensitive pattern Source: http://bash.cyberciti.biz/wiki/index.php?oldid=2086 Contributors: Admin, Stripling20 Chapter 4 Challenges Source: http://bash.cyberciti.biz/wiki/index.php?oldid=2291 Contributors: Admin, 1 anonymous edits The for loop statement Source: http://bash.cyberciti.biz/wiki/index.php?oldid=1725 Contributors: Admin Nested for loop statement Source: http://bash.cyberciti.biz/wiki/index.php?oldid=2077 Contributors: Admin, 1 anonymous edits The while loop statement Source: http://bash.cyberciti.biz/wiki/index.php?oldid=2420 Contributors: Admin, 2 anonymous edits Use of : to set infinite while loop Source: http://bash.cyberciti.biz/wiki/index.php?oldid=2254 Contributors: Admin, Kaillash The until loop statement Source: http://bash.cyberciti.biz/wiki/index.php?oldid=910 Contributors: Admin The select loop statement Source: http://bash.cyberciti.biz/wiki/index.php?oldid=1996 Contributors: Admin, 1 anonymous edits Exit the select loop statement Source: http://bash.cyberciti.biz/wiki/index.php?oldid=912 Contributors: Admin Using the break statement Source: http://bash.cyberciti.biz/wiki/index.php?oldid=913 Contributors: Admin Using the continue statement Source: http://bash.cyberciti.biz/wiki/index.php?oldid=914 Contributors: Admin Command substitution Source: http://bash.cyberciti.biz/wiki/index.php?oldid=1628 Contributors: Admin Chapter 5 Challenges Source: http://bash.cyberciti.biz/wiki/index.php?oldid=1993 Contributors: Admin Input and Output Source: http://bash.cyberciti.biz/wiki/index.php?oldid=920 Contributors: Admin Standard input Source: http://bash.cyberciti.biz/wiki/index.php?oldid=921 Contributors: Admin Standard output Source: http://bash.cyberciti.biz/wiki/index.php?oldid=922 Contributors: Admin Standard error Source: http://bash.cyberciti.biz/wiki/index.php?oldid=923 Contributors: Admin Empty file creation Source: http://bash.cyberciti.biz/wiki/index.php?oldid=1103 Contributors: Admin, Philippe.Petrinko /dev/null discards unwanted output Source: http://bash.cyberciti.biz/wiki/index.php?oldid=1310 Contributors: Admin Here documents Source: http://bash.cyberciti.biz/wiki/index.php?oldid=926 Contributors: Admin Here strings Source: http://bash.cyberciti.biz/wiki/index.php?oldid=2430 Contributors: Admin, 1 anonymous edits Redirection of standard error Source: http://bash.cyberciti.biz/wiki/index.php?oldid=930 Contributors: Admin Redirection of standard output Source: http://bash.cyberciti.biz/wiki/index.php?oldid=932 Contributors: Admin Appending redirected output Source: http://bash.cyberciti.biz/wiki/index.php?oldid=933 Contributors: Admin Redirection of both standard error and output Source: http://bash.cyberciti.biz/wiki/index.php?oldid=934 Contributors: Admin Writing output to files Source: http://bash.cyberciti.biz/wiki/index.php?oldid=1745 Contributors: Admin Assigns the file descriptor (fd) to file for output Source: http://bash.cyberciti.biz/wiki/index.php?oldid=936 Contributors: Admin Assigns the file descriptor (fd) to file for input Source: http://bash.cyberciti.biz/wiki/index.php?oldid=1944 Contributors: Admin, 1 anonymous edits Closes the file descriptor (fd) Source: http://bash.cyberciti.biz/wiki/index.php?oldid=938 Contributors: Admin Opening the file descriptors for reading and writing Source: http://bash.cyberciti.biz/wiki/index.php?oldid=939 Contributors: Admin
- 298. Article Sources and Contributors 291 Reads from the file descriptor (fd) Source: http://bash.cyberciti.biz/wiki/index.php?oldid=940 Contributors: Admin Executes commands and send output to the file descriptor (fd) Source: http://bash.cyberciti.biz/wiki/index.php?oldid=1945 Contributors: Admin, 1 anonymous edits Chapter 6 Challenges Source: http://bash.cyberciti.biz/wiki/index.php?oldid=1919 Contributors: Admin Linking Commands Source: http://bash.cyberciti.biz/wiki/index.php?oldid=944 Contributors: Admin Multiple commands Source: http://bash.cyberciti.biz/wiki/index.php?oldid=2423 Contributors: Admin, 1 anonymous edits Putting jobs in background Source: http://bash.cyberciti.biz/wiki/index.php?oldid=2433 Contributors: Admin, 1 anonymous edits Pipes Source: http://bash.cyberciti.biz/wiki/index.php?oldid=948 Contributors: Admin How to use pipes to connect programs Source: http://bash.cyberciti.biz/wiki/index.php?oldid=2065 Contributors: Admin, 3 anonymous edits Input redirection in pipes Source: http://bash.cyberciti.biz/wiki/index.php?oldid=954 Contributors: Admin Output redirection in pipes Source: http://bash.cyberciti.biz/wiki/index.php?oldid=955 Contributors: Admin Why use pipes Source: http://bash.cyberciti.biz/wiki/index.php?oldid=956 Contributors: Admin Filters Source: http://bash.cyberciti.biz/wiki/index.php?oldid=1297 Contributors: Admin, Philippe.Petrinko Chapter 7 Challenges Source: http://bash.cyberciti.biz/wiki/index.php?oldid=1920 Contributors: Admin Signals Source: http://bash.cyberciti.biz/wiki/index.php?oldid=2294 Contributors: Admin, 2 anonymous edits What is a Process? Source: http://bash.cyberciti.biz/wiki/index.php?oldid=2295 Contributors: Admin, Wburwash, 1 anonymous edits How to view Processes Source: http://bash.cyberciti.biz/wiki/index.php?oldid=1048 Contributors: Admin Sending signal to Processes Source: http://bash.cyberciti.biz/wiki/index.php?oldid=1870 Contributors: Admin Terminating Processes Source: http://bash.cyberciti.biz/wiki/index.php?oldid=1871 Contributors: Admin Shell signal values Source: http://bash.cyberciti.biz/wiki/index.php?oldid=2296 Contributors: Admin, 1 anonymous edits The trap statement Source: http://bash.cyberciti.biz/wiki/index.php?oldid=1872 Contributors: Admin How to clear trap Source: http://bash.cyberciti.biz/wiki/index.php?oldid=1940 Contributors: Admin, 1 anonymous edits Include trap statements in a script Source: http://bash.cyberciti.biz/wiki/index.php?oldid=1054 Contributors: Admin Use the trap statement to catch signals and handle errors Source: http://bash.cyberciti.biz/wiki/index.php?oldid=2005 Contributors: Admin, 1 anonymous edits What is a Subshell? Source: http://bash.cyberciti.biz/wiki/index.php?oldid=1066 Contributors: Admin Compound command Source: http://bash.cyberciti.biz/wiki/index.php?oldid=1058 Contributors: Admin Exec command Source: http://bash.cyberciti.biz/wiki/index.php?oldid=1090 Contributors: Admin Chapter 8 Challenges Source: http://bash.cyberciti.biz/wiki/index.php?oldid=1921 Contributors: Admin, 1 anonymous edits Writing your first shell function Source: http://bash.cyberciti.biz/wiki/index.php?oldid=1709 Contributors: Admin Displaying functions Source: http://bash.cyberciti.biz/wiki/index.php?oldid=1789 Contributors: Admin, 1 anonymous edits Removing functions Source: http://bash.cyberciti.biz/wiki/index.php?oldid=1243 Contributors: Admin Defining functions Source: http://bash.cyberciti.biz/wiki/index.php?oldid=2053 Contributors: Admin, Cfajohnson Writing functions Source: http://bash.cyberciti.biz/wiki/index.php?oldid=2054 Contributors: Admin, Cfajohnson Calling functions Source: http://bash.cyberciti.biz/wiki/index.php?oldid=1685 Contributors: Admin Pass arguments into a function Source: http://bash.cyberciti.biz/wiki/index.php?oldid=1881 Contributors: Admin Local variable Source: http://bash.cyberciti.biz/wiki/index.php?oldid=2055 Contributors: Admin, Cfajohnson, 3 anonymous edits Returning from a function Source: http://bash.cyberciti.biz/wiki/index.php?oldid=2057 Contributors: Admin, Cfajohnson Shell functions library Source: http://bash.cyberciti.biz/wiki/index.php?oldid=1252 Contributors: Admin Source command Source: http://bash.cyberciti.biz/wiki/index.php?oldid=1253 Contributors: Admin Recursive function Source: http://bash.cyberciti.biz/wiki/index.php?oldid=1688 Contributors: Admin Putting functions in background Source: http://bash.cyberciti.biz/wiki/index.php?oldid=2304 Contributors: Admin, 1 anonymous edits Chapter 9 Challenges Source: http://bash.cyberciti.biz/wiki/index.php?oldid=1922 Contributors: Admin Menu driven scripts Source: http://bash.cyberciti.biz/wiki/index.php?oldid=2443 Contributors: Admin, 3 anonymous edits Getting information about your system Source: http://bash.cyberciti.biz/wiki/index.php?oldid=1442 Contributors: Admin, Noahspurrier Bash display dialog boxes Source: http://bash.cyberciti.biz/wiki/index.php?oldid=1368 Contributors: Admin Dialog customization with configuration file Source: http://bash.cyberciti.biz/wiki/index.php?oldid=2418 Contributors: Admin, 1 anonymous edits A yes/no dialog box Source: http://bash.cyberciti.biz/wiki/index.php?oldid=1411 Contributors: Admin An input dialog box Source: http://bash.cyberciti.biz/wiki/index.php?oldid=2075 Contributors: Admin, 1 anonymous edits A password box Source: http://bash.cyberciti.biz/wiki/index.php?oldid=1581 Contributors: Admin A menu box Source: http://bash.cyberciti.biz/wiki/index.php?oldid=1464 Contributors: Admin A progress bar (gauge box) Source: http://bash.cyberciti.biz/wiki/index.php?oldid=1564 Contributors: Admin The form dialog for input Source: http://bash.cyberciti.biz/wiki/index.php?oldid=1925 Contributors: Admin, 1 anonymous edits
- 299. Article Sources and Contributors 292 Console management Source: http://bash.cyberciti.biz/wiki/index.php?oldid=2359 Contributors: Admin Get the name of the current terminal Source: http://bash.cyberciti.biz/wiki/index.php?oldid=2360 Contributors: Admin Fixing the display with reset Source: http://bash.cyberciti.biz/wiki/index.php?oldid=2361 Contributors: Admin Get screen width and hight with tput Source: http://bash.cyberciti.biz/wiki/index.php?oldid=2362 Contributors: Admin Moving the cursor with tput Source: http://bash.cyberciti.biz/wiki/index.php?oldid=2363 Contributors: Admin Display centered text in the screen in reverse video Source: http://bash.cyberciti.biz/wiki/index.php?oldid=2371 Contributors: Admin Set the keyboard leds Source: http://bash.cyberciti.biz/wiki/index.php?oldid=2364 Contributors: Admin Turn on or off NumLock leds Source: http://bash.cyberciti.biz/wiki/index.php?oldid=2365 Contributors: Admin Turn on or off CapsLock leds Source: http://bash.cyberciti.biz/wiki/index.php?oldid=2366 Contributors: Admin Turn on or off ScrollLock leds Source: http://bash.cyberciti.biz/wiki/index.php?oldid=2367 Contributors: Admin Shell scripting help Source: http://bash.cyberciti.biz/wiki/index.php?oldid=1589 Contributors: Admin Recommended Books Source: http://bash.cyberciti.biz/wiki/index.php?oldid=2027 Contributors: Admin
- 300. Image Sources, Licenses and Contributors 293 Image Sources, Licenses and Contributors File:Linus Torvalds.jpeg Source: http://bash.cyberciti.biz/wiki/index.php?title=File:Linus_Torvalds.jpeg License: unknown Contributors: Admin File:Rela.gif Source: http://bash.cyberciti.biz/wiki/index.php?title=File:Rela.gif License: unknown Contributors: - File:Linux-desktop-terminal.png Source: http://bash.cyberciti.biz/wiki/index.php?title=File:Linux-desktop-terminal.png License: unknown Contributors: Admin File:Screenshot-Editing Profile.png Source: http://bash.cyberciti.biz/wiki/index.php?title=File:Screenshot-Editing_Profile.png License: unknown Contributors: - File:Chessboard.sh-output.png Source: http://bash.cyberciti.biz/wiki/index.php?title=File:Chessboard.sh-output.png License: unknown Contributors: - File:Menu.sh-output.png Source: http://bash.cyberciti.biz/wiki/index.php?title=File:Menu.sh-output.png License: unknown Contributors: - File:Space-shuttle-sh-output.png Source: http://bash.cyberciti.biz/wiki/index.php?title=File:Space-shuttle-sh-output.png License: unknown Contributors: - File:Shell-input-output.png Source: http://bash.cyberciti.biz/wiki/index.php?title=File:Shell-input-output.png License: unknown Contributors: - File:Input-redirection etc passwd.png Source: http://bash.cyberciti.biz/wiki/index.php?title=File:Input-redirection_etc_passwd.png License: unknown Contributors: - File:Output-redirect filename.png Source: http://bash.cyberciti.biz/wiki/index.php?title=File:Output-redirect_filename.png License: unknown Contributors: - File:stderr-redirect.png Source: http://bash.cyberciti.biz/wiki/index.php?title=File:Stderr-redirect.png License: unknown Contributors: Admin File:Shell-pipes.png Source: http://bash.cyberciti.biz/wiki/index.php?title=File:Shell-pipes.png License: unknown Contributors: - File:Pipes-stderr.png Source: http://bash.cyberciti.biz/wiki/index.php?title=File:Pipes-stderr.png License: unknown Contributors: Admin File:Linux-processes-life-cycle.png Source: http://bash.cyberciti.biz/wiki/index.php?title=File:Linux-processes-life-cycle.png License: unknown Contributors: Admin File:Menu-driven-output.png Source: http://bash.cyberciti.biz/wiki/index.php?title=File:Menu-driven-output.png License: unknown Contributors: - File:Grabsysinfo.sh-output.png Source: http://bash.cyberciti.biz/wiki/index.php?title=File:Grabsysinfo.sh-output.png License: unknown Contributors: Admin File:Bash-shell-dialog-msgbox-output.png Source: http://bash.cyberciti.biz/wiki/index.php?title=File:Bash-shell-dialog-msgbox-output.png License: unknown Contributors: - File:Bash-dialog-output-with-yx-pos.png Source: http://bash.cyberciti.biz/wiki/index.php?title=File:Bash-dialog-output-with-yx-pos.png License: unknown Contributors: - File:Dialog-yesno-box-output.png Source: http://bash.cyberciti.biz/wiki/index.php?title=File:Dialog-yesno-box-output.png License: unknown Contributors: Admin File:Input-dialog-1.png Source: http://bash.cyberciti.biz/wiki/index.php?title=File:Input-dialog-1.png License: unknown Contributors: Admin File:Input-dialog-2.png Source: http://bash.cyberciti.biz/wiki/index.php?title=File:Input-dialog-2.png License: unknown Contributors: - File:Input-dialog-3.png Source: http://bash.cyberciti.biz/wiki/index.php?title=File:Input-dialog-3.png License: unknown Contributors: Admin File:Password-1.png Source: http://bash.cyberciti.biz/wiki/index.php?title=File:Password-1.png License: unknown Contributors: Admin File:Password-2.png Source: http://bash.cyberciti.biz/wiki/index.php?title=File:Password-2.png License: unknown Contributors: Admin File:Password-3.png Source: http://bash.cyberciti.biz/wiki/index.php?title=File:Password-3.png License: unknown Contributors: Admin File:Dialog-menu-output.png Source: http://bash.cyberciti.biz/wiki/index.php?title=File:Dialog-menu-output.png License: unknown Contributors: Admin File:Utilitymenu.sh-output-1.png Source: http://bash.cyberciti.biz/wiki/index.php?title=File:Utilitymenu.sh-output-1.png License: unknown Contributors: - File:Utilitymenu.sh-output-2.png Source: http://bash.cyberciti.biz/wiki/index.php?title=File:Utilitymenu.sh-output-2.png License: unknown Contributors: - File:Utilitymenu.sh-output-3.png Source: http://bash.cyberciti.biz/wiki/index.php?title=File:Utilitymenu.sh-output-3.png License: unknown Contributors: - File:Utilitymenu.sh-output-4.png Source: http://bash.cyberciti.biz/wiki/index.php?title=File:Utilitymenu.sh-output-4.png License: unknown Contributors: Admin File:Shell-progress-bar.png Source: http://bash.cyberciti.biz/wiki/index.php?title=File:Shell-progress-bar.png License: unknown Contributors: - File:Shell-data-entry-form.png Source: http://bash.cyberciti.biz/wiki/index.php?title=File:Shell-data-entry-form.png License: unknown Contributors: - File:Createuser.sh-1-form.png Source: http://bash.cyberciti.biz/wiki/index.php?title=File:Createuser.sh-1-form.png License: unknown Contributors: - File:Createuser.sh-2-form.png Source: http://bash.cyberciti.biz/wiki/index.php?title=File:Createuser.sh-2-form.png License: unknown Contributors: - File:Bash-fix-terminal.png Source: http://bash.cyberciti.biz/wiki/index.php?title=File:Bash-fix-terminal.png License: unknown Contributors: Admin File:Bash-linux-tput-moving-the-cursor.png Source: http://bash.cyberciti.biz/wiki/index.php?title=File:Bash-linux-tput-moving-the-cursor.png License: unknown Contributors: Admin
- 301. License 294 License Attribution-Noncommercial-Share Alike 3.0 Unported http://creativecommons.org/licenses/by-nc-sa/3.0/