SlideShare a Scribd company logo
AZURE HANDS-ON LAB
Build your Infrastructure in the Cloud using Windows Azure IaaS
Atanas Gergiminov
2017
Azure Hands-on Lab
1
Lab Task 1
Activating Microsoft Azure Subscription Using Azure Pass
Creating an Azure Pass subscription is a two step process.
• Redeem your Azure Pass Promo Code
• Activate your subscription
Redeeming a Microsoft Azure Pass Promo Code:
1. Open a browser and navigate to:
http://www.microsoftazurepass.com
It is recommended you use an In-Private Browser session. Other log-ins can persist
and cause errors during the activation step.
2. Select your country in the drop down menu.
Enter your Azure Pass Promo Code.
Click Submit.
3. Click Sign in to sign into your Microsoft Account (Live ID) or Organizational
Account (Org ID).
The Azure subscription will be created in this account
Azure Hands-on Lab
2
If you do not have a Microsoft Account or Org ID you can create one by clicking on
the https://signup.live.com
4. Enter your account login information and select Sign In.
Or
If your account is both a Live ID and Org ID please select which account you would
like to use.
Azure Hands-on Lab
3
5. Confirm Information
Click Submit
Azure Hands-on Lab
4
6. Click Activate
Activating a Microsoft Azure Pass Subscription:
1. Fill Out the Requested Information
This needs to match your account information
Click Sign up
Azure Hands-on Lab
5
2. It make take a few minutes, DO NOT refresh or close your browser.
3. Your subscription has been created and is being provisioned, this can take up to
10 minutes.
After your subscription is provisioned you can start using by clicking Portal.
In the future you can navigate directly to the management portal:
https://portal.azure.com
Azure Hands-on Lab
6
Lab Task 2
Create Resource groups
1. Open the Azure Portal (https://portal.azure.com), open Resource groups and click
the Add button.
2. In the Resource group blade, type CorpNet for the Resource group name, choose
the nearest region (North Europe) for the Resource group location then click the
Create button.
Azure Hands-on Lab
7
Lab Task 3
Networking
To create a VNet in the Resource Manager deployment model by using the Azure
portal, follow the steps below.
Part 1: Create VNET
1. Click the NEW button.
2. Click the Networking category
3. Click Virtual Network.
4. Select a deployment model to Resource Manager and click Create
5. Name the Virtual Network CorpVNET.
6. Specify the following configuration in Address space tile and changing the values:
Address space CIDR block: 10.0.0.0/24
Subnet name: default
Subnet CIDR block: 10.0.0.0/25
Azure Hands-on Lab
8
This will allocate an address block of up to 256 addresses (251 usable as the first 4
and last IP are reserved).
7. Select Use existing and choose previously created resource group CorpNet.
Configure the region where the virtual network will be created. For Location choose
North Europe.
8. Click the Create button to create the virtual network.
Azure Hands-on Lab
9
Part 2: Create a virtual network gateway
Point-to-site connections require the following settings:
Gateway type: VPN
VPN type: Route-based
1. Click the NEW button.
2. Click the Networking category
3. Click Virtual network gateway.
4. Name the Virtual network gateway CorpGW
5. Gateway type: Select VPN. VPN gateways use the virtual network gateway type
VPN. VPN type: Select the VPN type Route-based. SKU: Select Standard gateway
SKU from the dropdown.
Azure Hands-on Lab
10
6. Choose the virtual network to which you want to add this gateway. Click Virtual
network to open the Choose a virtual network blade. Select the CorpVNet. If you
don't see your VNet, make sure the Location field is pointing to the region in which
your virtual network is located.
7. Choose a public IP address. Click Public IP address to open the Choose public IP
address blade. Click +Create New to open the Create public IP address blade. Input
a name CorpGW for your public IP address. This blade creates a public IP address
object to which a public IP address will be dynamically assigned.
Click OK to save your changes to this blade.
8. Subscription: Verify that the correct subscription is selected.
Resource group: This setting is determined by the Virtual Network that you select.
Don't adjust the Location after you've specified the previous settings.
Verify the settings. You can select Pin to dashboard at the bottom of the blade if
you want your gateway to appear on the dashboard.
Click Create to begin creating the gateway.
Azure Hands-on Lab
11
The settings will be validated and you'll see the "Deploying Virtual network
gateway" tile on the dashboard. Creating a gateway can take up to 45 minutes. You
may need to refresh your portal page to see the completed status.
After the gateway is created, you can view the IP address that has been assigned to
it by looking at the virtual network in the portal. The gateway will appear as a
connected device. You can click the connected device (your virtual network
gateway) to view more information.
Azure Hands-on Lab
12
Part 3: Generate certificates
Certificates are used by Azure to authenticate VPN clients for Point-to-Site VPNs.
You export public certificate data (not the private key) as a Base-64 encoded X.509
.cer file from either a root certificate generated by an enterprise certificate solution,
or a self-signed root certificate. You then import the public certificate data from the
root certificate to Azure. Additionally, you need to generate a client certificate from
the root certificate for clients. Each client that wants to connect to the virtual
network using a P2S connection must have a client certificate installed that was
generated from the root certificate.
Create a self-signed certificate
The following steps walk you through creating a self-signed certificate using
makecert. These steps are not deployment-model specific. They are valid for both
Resource Manager and classic.
1. Download makecert from http://bit.ly/2meC5gX
2. Run AZCerts.bat file as Administrator
This file will be run following commands:
makecert.exe -sky exchange -r -n "CN=AzureRoot" -pe -a sha256 -len 2048 -ss My "AzureRoot.cer"
makecert.exe -n "CN=AzureClient" -pe -sky exchange -m 96 -ss My -in "AzureRoot" -is my -a sha256
Azure Hands-on Lab
13
3. Double click on newly created AzureRoot.cer file, go to Details > Copy to File…
Export the root certificate as a Base-64 encoded X.509 (.cer) file. You need to export
it in this format so that you can open the certificate with text editor.
Azure Hands-on Lab
14
4. Save file as Azure.cer name
5. Once the virtual network gateway has been created, navigate to the Settings
section of the virtual network gateway blade. In the Settings section, click Point-to-
site configuration to open the Configuration blade.
Azure Hands-on Lab
15
6. Address pool is the pool of IP addresses from which clients that connect will
receive an IP address. Add the address pool 172.16.1.0/24, and then click Save.
7. Upload the root certificate .cer file
Open the certificate Azure.cer with a text editor, such as Notepad. Copy only the
following section as one continuous line:
Azure Hands-on Lab
16
8. Paste the certificate data into the Public Certificate Data field. Name the
certificate, and then click Save.
9. Download and install the VPN client configuration package
Clients connecting to Azure using P2S must have both a client certificate, and a VPN
client configuration package installed. VPN client configuration packages are
available for Windows clients.
The VPN client package contains information to configure the VPN client software
that is built into Windows. The configuration is specific to the VPN that you want to
connect to. The package does not install additional software.
On the Point-to-site configuration blade, click Download VPN client to open the
Download VPN client blade.
10. Select the correct package for your client, then click Download. For 64-bit
clients, select AMD64. For 32-bit clients, select x86.
Azure Hands-on Lab
17
11. Install the package on the client computer. If you get a SmartScreen popup, click
More info, then Run anyway to install the package.
12. On the client computer, navigate to Network Settings and click VPN. You will see
the connection listed. It will show the name of the virtual network that it will
connect to
13. Connect to Azure
To connect to your CorpVNet, on the client computer, navigate to VPN connections
and locate the VPN connection that you created. It is named the same name as your
virtual network. Click Connect. A pop-up message may appear that refers to using
the certificate. If this happens, click Continue to use elevated privileges.
On the Connection status page, click Connect to start the connection. If you see a
Select Certificate screen, verify that the client certificate showing is the one that you
want to use to connect. If it is not, use the drop-down arrow to select the correct
certificate, and then click OK.
Azure Hands-on Lab
18
14. Your connection should now be established.
Azure Hands-on Lab
19
Lab Task 4
Create Storage Account
1. Click on New > Data + Storage > Storage Account
2. Provide storage account details
Name: Unique storage account name
Deployment model: Resource manager
Account kind: General purpose
Performance: Standard
Replication: Locally-redundant storage (LRS)
Storage service encryption: Disables
Azure Hands-on Lab
20
3. Select Use existing and choose previously created resource group CorpNet.
Configure the region where the storage account will be created. For Location choose
North Europe.
4. Click the Create button to create the storage account.
Azure Hands-on Lab
21
Lab Task 5
Create availability set
1. Click New and search Availability sets in Search the marketplace
Choose Availability set and click Create.
2. Provide availability set details
Name: HA
Resource group: Use existing > CorpNet
Location: North Europe
Fault domains: 2
Update domains: 5
Managed: NO
Azure Hands-on Lab
22
Azure Hands-on Lab
23
Lab Task 6
Create VM from Marketplace
In this task, you will create a new virtual machine using the Azure Management
Portal.
1. Click on the +NEW button.
2. Click Compute and then click Windows Server 2016 Datacenter.
3. Ensure you specify the deployment model as Resource Manager and click Create.
4. Specify the following virtual machine Basic configuration:
Name: CorpSRV2016
VM disk type: HDD
User Name: demouser
Password: demo@pass123
Resource group: Use existing > CorpNet
Then click OK to continue
Azure Hands-on Lab
24
Azure Hands-on Lab
25
5. Choose a size A5 Standard
Then click Select to continue
6. Specify the following virtual machine Settings:
Storage
Use managed disks: No
Storage account: Select storage account name previously created in task 4
Network
Virtual network: Select Virtual Network name previously created in task 2
Subnet: default (10.0.0.0/25)
Public IP address: CorpSRV2016-ip
Network security group (firewall): CorpSRV2016-nsg
Azure Hands-on Lab
26
Extensions: No extensions
High availability: Select availability set name previously created in task 5
Boot diagnostics: Enabled
Guest OS diagnostics: Enabled
Diagnostics storage account: Select storage account name previously created in
task 4
Azure Hands-on Lab
27
7. View Summary, wait final validation process and click OK.
Azure Hands-on Lab
28
8. After the virtual machine is created, click the Connect button on the toolbar.
9. Depending on your remote desktop protocol client and browser configuration you
will either be prompted to open an RDP file or you will need to download it and then
open it separately to connect.
10. Login with the credentials specified during creation:
User: demouser
Password: demo@pass123
11. Set a static internal private IP address: Go to VM settings Network interfaces
12. Click on network interface name (corpsrv2016904)
Azure Hands-on Lab
29
13. Go to network interface Settings IP configuration
14. Click on ipconfig name
15. On Assignment choose Static and Save configuration
16. Connect to VM through the Remote desktop using internal IP address. (Make
sure the VPN is connected)
Azure Hands-on Lab
30
Lab Task 7
Create Backup Vault and backup Virtual machine
A recovery services vault is an entity that stores the backups and recovery points
that have been created over time. The recovery services vault also contains the
backup policies associated with the protected virtual machines.
To create a recovery services vault:
1. Click the NEW button.
2. Click the Storage category
3. Click Backup and Site Recovery (OMS).
4. Name the Recovery Service Vault: Backup.
Select Use existing choose previously created resource group CorpNet and click
Create
Azure Hands-on Lab
31
5. After the Recovery Service Vault is created, click the All Resources
and then Backup
6. In the Getting Started section, click Backup to open the Getting started with
backup blade.
7. In Backup Goal choose
Where is your workload running? : Azure
What do you want to backup?: Virtual machine
Azure Hands-on Lab
32
And click OK
8. Choose Backup policy: Create New
Policy name: DailyBackup
and click OK
9. Items to backup
Select previously created VM: CorpSRV2016
and click OK
Azure Hands-on Lab
33
Lab Task 8
Create OMS Workspace
You can get up and running quickly with Azure Log Analytics, which helps you
evaluate operational intelligence gathered from your IT infrastructure. You can
easily start exploring, analyzing, and take action on data that you collect for free.
Create a workspace
1. Click the NEW button.
2. Click the Monitoring + Management
3. Click the Log Analytics
4. Provide OMS Workspace details
Azure Hands-on Lab
34
OMS Workspace: Must be Unique name
Resource group: Select Use existing and choose previously created resource group
CorpNet
Pricing tier: Free
5. After the OMS Workspace is created, in the Workspace data sources section,
click Virtual machines to open list with previously created VMs.
6. Select CorpSRV2016
7. Click Connect button
Azure Hands-on Lab
35
8. After VM is connected, go to the Workspace data sources section, click Storage
accounts logs and then +Add button to open Add storage account log blade.
For Storage account choose previously created storage. For Data Type choose
Events and click OK
9. Go to the Workspace data sources section, click Azure Activity logs and choose
your azure subscriptions and Connect to OMS
Azure Hands-on Lab
36
10. Login to OMS portal
Go OMS Workspace > OMS portal
or
https://microsoft.com/oms
11. In OMS Dashboard click Solutions Gallery
and ADD Alert management, Security and Audit, Antimalware Assessment and
Activity Log Analytics
Azure Hands-on Lab
37
Microsoft Operations Management suite mobile app for Windows Phone, iOS, and
Android
https://www.microsoft.com/en-us/cloud-platform/operations-management-suite-
mobile-apps

More Related Content

What's hot (20)

PPTX
Web server architecture
Tewodros K
 
PDF
Kubernetes architecture
Janakiram MSV
 
PDF
Terraform: An Overview & Introduction
Lee Trout
 
PDF
Introduction to Terraform and Google Cloud Platform
Pradeep Bhadani
 
PDF
OpenStack Architecture
Mirantis
 
PDF
KubeCon EU 2016: Kubernetes Storage 101
KubeAcademy
 
PDF
NF102: Nutanix AHV Basics
NEXTtour
 
PPTX
virtualization and hypervisors
Gaurav Suri
 
PDF
Terraform
Christophe Marchal
 
PDF
Introduction to AWS (Amazon Web Services)
Albert Suwandhi
 
PPT
Active Directory
Sandeep Kapadane
 
PPTX
Microsoft azure
Mohammad Ilyas Malik
 
PDF
Podman Overview and internals.pdf
Saim Safder
 
PPTX
Introduction to OpenStack Cinder
Sean McGinnis
 
PDF
Introduction to virtualization
Sasikumar Thirumoorthy
 
PPTX
Introduction to Amazon Web Services (AWS)
Garvit Anand
 
PPT
Squid server
Rohit Phulsunge
 
PDF
Non-Fluff Software Defined Networking, Network Function Virtualization and IoT
Mark Ryan Castellani
 
PDF
Ansible Tutorial.pdf
NigussMehari4
 
PDF
Understanding Azure Networking Services
InCycleSoftware
 
Web server architecture
Tewodros K
 
Kubernetes architecture
Janakiram MSV
 
Terraform: An Overview & Introduction
Lee Trout
 
Introduction to Terraform and Google Cloud Platform
Pradeep Bhadani
 
OpenStack Architecture
Mirantis
 
KubeCon EU 2016: Kubernetes Storage 101
KubeAcademy
 
NF102: Nutanix AHV Basics
NEXTtour
 
virtualization and hypervisors
Gaurav Suri
 
Introduction to AWS (Amazon Web Services)
Albert Suwandhi
 
Active Directory
Sandeep Kapadane
 
Microsoft azure
Mohammad Ilyas Malik
 
Podman Overview and internals.pdf
Saim Safder
 
Introduction to OpenStack Cinder
Sean McGinnis
 
Introduction to virtualization
Sasikumar Thirumoorthy
 
Introduction to Amazon Web Services (AWS)
Garvit Anand
 
Squid server
Rohit Phulsunge
 
Non-Fluff Software Defined Networking, Network Function Virtualization and IoT
Mark Ryan Castellani
 
Ansible Tutorial.pdf
NigussMehari4
 
Understanding Azure Networking Services
InCycleSoftware
 

Similar to Azure hands on lab (20)

PDF
Aws project jenkins-build-server
saifam
 
PPTX
Get Started With Microsoft Azure Cloud Service
Jayant Chauhan
 
PDF
Dev ops & laas fundamental
Kanin Kearpimy
 
PDF
ArcMC for Azure 2.2 Setup Guide
Protect724mouni
 
PDF
Azure Administrator Interview Questions By ScholarHat
Scholarhat
 
PDF
HDinsight Workshop - Prerequisite Activity
Idan Tohami
 
PPTX
Windows azure active directory
Krunal Trivedi
 
PPTX
DEVNET-1120 Intercloud Fabric - AWS and Azure Account Setup and Utilization
Cisco DevNet
 
PDF
Microsoft Lync Server 2010 Installation
Shahab Al Yamin Chawdhury
 
PDF
Actor Model Import Connector for Microsoft Active Directory
protect724rkeer
 
PDF
AWS DataSync.pdf
Manas Mondal
 
PPTX
Raspberry pi and Azure
Faisal Mehmood
 
PDF
CloudStudio User manual (basic edition):
comworks
 
PDF
AWS essentials EC2
mustafa sarac
 
PDF
Citrix StoreFront - Implementation Guide
Nuno Alves
 
PDF
Create and Configure Windows Server 2016 VM in the Azure Step by Step
Ahmed Abdelwahed
 
DOC
( 16 ) Office 2007 Create An Extranet Site With Forms Authentication
LiquidHub
 
PDF
Step by step installation of microsoft dynamics 365 finance and operations on...
Umesh Pandit
 
PPTX
SharePoint Farm Setup On Azure
Senthamil Selvan
 
PPTX
Understanding Windows Azure’s Active Directory (AD) and PowerShell Tools
EPC Group
 
Aws project jenkins-build-server
saifam
 
Get Started With Microsoft Azure Cloud Service
Jayant Chauhan
 
Dev ops & laas fundamental
Kanin Kearpimy
 
ArcMC for Azure 2.2 Setup Guide
Protect724mouni
 
Azure Administrator Interview Questions By ScholarHat
Scholarhat
 
HDinsight Workshop - Prerequisite Activity
Idan Tohami
 
Windows azure active directory
Krunal Trivedi
 
DEVNET-1120 Intercloud Fabric - AWS and Azure Account Setup and Utilization
Cisco DevNet
 
Microsoft Lync Server 2010 Installation
Shahab Al Yamin Chawdhury
 
Actor Model Import Connector for Microsoft Active Directory
protect724rkeer
 
AWS DataSync.pdf
Manas Mondal
 
Raspberry pi and Azure
Faisal Mehmood
 
CloudStudio User manual (basic edition):
comworks
 
AWS essentials EC2
mustafa sarac
 
Citrix StoreFront - Implementation Guide
Nuno Alves
 
Create and Configure Windows Server 2016 VM in the Azure Step by Step
Ahmed Abdelwahed
 
( 16 ) Office 2007 Create An Extranet Site With Forms Authentication
LiquidHub
 
Step by step installation of microsoft dynamics 365 finance and operations on...
Umesh Pandit
 
SharePoint Farm Setup On Azure
Senthamil Selvan
 
Understanding Windows Azure’s Active Directory (AD) and PowerShell Tools
EPC Group
 
Ad

More from Atanas Gergiminov (8)

PPTX
Cisco Security portfolio update
Atanas Gergiminov
 
PDF
Modern Devices Management
Atanas Gergiminov
 
PDF
Microsoft Azure - Introduction to microsoft's public cloud
Atanas Gergiminov
 
PDF
Microsoft Azure for Small and Medium Businesses
Atanas Gergiminov
 
PDF
New Cisco Small Business Products
Atanas Gergiminov
 
PDF
Meraki cloud managed products
Atanas Gergiminov
 
PDF
New Cisco Access Points
Atanas Gergiminov
 
PDF
Cisco Small and Midsize Business Training
Atanas Gergiminov
 
Cisco Security portfolio update
Atanas Gergiminov
 
Modern Devices Management
Atanas Gergiminov
 
Microsoft Azure - Introduction to microsoft's public cloud
Atanas Gergiminov
 
Microsoft Azure for Small and Medium Businesses
Atanas Gergiminov
 
New Cisco Small Business Products
Atanas Gergiminov
 
Meraki cloud managed products
Atanas Gergiminov
 
New Cisco Access Points
Atanas Gergiminov
 
Cisco Small and Midsize Business Training
Atanas Gergiminov
 
Ad

Recently uploaded (20)

PDF
Basics of Electronics for IOT(actuators ,microcontroller etc..)
arnavmanesh
 
PDF
introduction to computer hardware and sofeware
chauhanshraddha2007
 
PDF
Per Axbom: The spectacular lies of maps
Nexer Digital
 
PPTX
Earn Agentblazer Status with Slack Community Patna.pptx
SanjeetMishra29
 
PDF
Researching The Best Chat SDK Providers in 2025
Ray Fields
 
PDF
Responsible AI and AI Ethics - By Sylvester Ebhonu
Sylvester Ebhonu
 
PPTX
PCU Keynote at IEEE World Congress on Services 250710.pptx
Ramesh Jain
 
PDF
GDG Cloud Munich - Intro - Luiz Carneiro - #BuildWithAI - July - Abdel.pdf
Luiz Carneiro
 
PDF
The Future of Artificial Intelligence (AI)
Mukul
 
PPTX
What-is-the-World-Wide-Web -- Introduction
tonifi9488
 
PDF
SalesForce Managed Services Benefits (1).pdf
TechForce Services
 
PDF
Tea4chat - another LLM Project by Kerem Atam
a0m0rajab1
 
PDF
The Future of Mobile Is Context-Aware—Are You Ready?
iProgrammer Solutions Private Limited
 
PPTX
AI Code Generation Risks (Ramkumar Dilli, CIO, Myridius)
Priyanka Aash
 
PDF
Trying to figure out MCP by actually building an app from scratch with open s...
Julien SIMON
 
PDF
CIFDAQ's Market Wrap : Bears Back in Control?
CIFDAQ
 
PPTX
Machine Learning Benefits Across Industries
SynapseIndia
 
PDF
State-Dependent Conformal Perception Bounds for Neuro-Symbolic Verification
Ivan Ruchkin
 
PPTX
The Future of AI & Machine Learning.pptx
pritsen4700
 
PDF
Peak of Data & AI Encore - Real-Time Insights & Scalable Editing with ArcGIS
Safe Software
 
Basics of Electronics for IOT(actuators ,microcontroller etc..)
arnavmanesh
 
introduction to computer hardware and sofeware
chauhanshraddha2007
 
Per Axbom: The spectacular lies of maps
Nexer Digital
 
Earn Agentblazer Status with Slack Community Patna.pptx
SanjeetMishra29
 
Researching The Best Chat SDK Providers in 2025
Ray Fields
 
Responsible AI and AI Ethics - By Sylvester Ebhonu
Sylvester Ebhonu
 
PCU Keynote at IEEE World Congress on Services 250710.pptx
Ramesh Jain
 
GDG Cloud Munich - Intro - Luiz Carneiro - #BuildWithAI - July - Abdel.pdf
Luiz Carneiro
 
The Future of Artificial Intelligence (AI)
Mukul
 
What-is-the-World-Wide-Web -- Introduction
tonifi9488
 
SalesForce Managed Services Benefits (1).pdf
TechForce Services
 
Tea4chat - another LLM Project by Kerem Atam
a0m0rajab1
 
The Future of Mobile Is Context-Aware—Are You Ready?
iProgrammer Solutions Private Limited
 
AI Code Generation Risks (Ramkumar Dilli, CIO, Myridius)
Priyanka Aash
 
Trying to figure out MCP by actually building an app from scratch with open s...
Julien SIMON
 
CIFDAQ's Market Wrap : Bears Back in Control?
CIFDAQ
 
Machine Learning Benefits Across Industries
SynapseIndia
 
State-Dependent Conformal Perception Bounds for Neuro-Symbolic Verification
Ivan Ruchkin
 
The Future of AI & Machine Learning.pptx
pritsen4700
 
Peak of Data & AI Encore - Real-Time Insights & Scalable Editing with ArcGIS
Safe Software
 

Azure hands on lab

  • 1. AZURE HANDS-ON LAB Build your Infrastructure in the Cloud using Windows Azure IaaS Atanas Gergiminov 2017
  • 2. Azure Hands-on Lab 1 Lab Task 1 Activating Microsoft Azure Subscription Using Azure Pass Creating an Azure Pass subscription is a two step process. • Redeem your Azure Pass Promo Code • Activate your subscription Redeeming a Microsoft Azure Pass Promo Code: 1. Open a browser and navigate to: http://www.microsoftazurepass.com It is recommended you use an In-Private Browser session. Other log-ins can persist and cause errors during the activation step. 2. Select your country in the drop down menu. Enter your Azure Pass Promo Code. Click Submit. 3. Click Sign in to sign into your Microsoft Account (Live ID) or Organizational Account (Org ID). The Azure subscription will be created in this account
  • 3. Azure Hands-on Lab 2 If you do not have a Microsoft Account or Org ID you can create one by clicking on the https://signup.live.com 4. Enter your account login information and select Sign In. Or If your account is both a Live ID and Org ID please select which account you would like to use.
  • 4. Azure Hands-on Lab 3 5. Confirm Information Click Submit
  • 5. Azure Hands-on Lab 4 6. Click Activate Activating a Microsoft Azure Pass Subscription: 1. Fill Out the Requested Information This needs to match your account information Click Sign up
  • 6. Azure Hands-on Lab 5 2. It make take a few minutes, DO NOT refresh or close your browser. 3. Your subscription has been created and is being provisioned, this can take up to 10 minutes. After your subscription is provisioned you can start using by clicking Portal. In the future you can navigate directly to the management portal: https://portal.azure.com
  • 7. Azure Hands-on Lab 6 Lab Task 2 Create Resource groups 1. Open the Azure Portal (https://portal.azure.com), open Resource groups and click the Add button. 2. In the Resource group blade, type CorpNet for the Resource group name, choose the nearest region (North Europe) for the Resource group location then click the Create button.
  • 8. Azure Hands-on Lab 7 Lab Task 3 Networking To create a VNet in the Resource Manager deployment model by using the Azure portal, follow the steps below. Part 1: Create VNET 1. Click the NEW button. 2. Click the Networking category 3. Click Virtual Network. 4. Select a deployment model to Resource Manager and click Create 5. Name the Virtual Network CorpVNET. 6. Specify the following configuration in Address space tile and changing the values: Address space CIDR block: 10.0.0.0/24 Subnet name: default Subnet CIDR block: 10.0.0.0/25
  • 9. Azure Hands-on Lab 8 This will allocate an address block of up to 256 addresses (251 usable as the first 4 and last IP are reserved). 7. Select Use existing and choose previously created resource group CorpNet. Configure the region where the virtual network will be created. For Location choose North Europe. 8. Click the Create button to create the virtual network.
  • 10. Azure Hands-on Lab 9 Part 2: Create a virtual network gateway Point-to-site connections require the following settings: Gateway type: VPN VPN type: Route-based 1. Click the NEW button. 2. Click the Networking category 3. Click Virtual network gateway. 4. Name the Virtual network gateway CorpGW 5. Gateway type: Select VPN. VPN gateways use the virtual network gateway type VPN. VPN type: Select the VPN type Route-based. SKU: Select Standard gateway SKU from the dropdown.
  • 11. Azure Hands-on Lab 10 6. Choose the virtual network to which you want to add this gateway. Click Virtual network to open the Choose a virtual network blade. Select the CorpVNet. If you don't see your VNet, make sure the Location field is pointing to the region in which your virtual network is located. 7. Choose a public IP address. Click Public IP address to open the Choose public IP address blade. Click +Create New to open the Create public IP address blade. Input a name CorpGW for your public IP address. This blade creates a public IP address object to which a public IP address will be dynamically assigned. Click OK to save your changes to this blade. 8. Subscription: Verify that the correct subscription is selected. Resource group: This setting is determined by the Virtual Network that you select. Don't adjust the Location after you've specified the previous settings. Verify the settings. You can select Pin to dashboard at the bottom of the blade if you want your gateway to appear on the dashboard. Click Create to begin creating the gateway.
  • 12. Azure Hands-on Lab 11 The settings will be validated and you'll see the "Deploying Virtual network gateway" tile on the dashboard. Creating a gateway can take up to 45 minutes. You may need to refresh your portal page to see the completed status. After the gateway is created, you can view the IP address that has been assigned to it by looking at the virtual network in the portal. The gateway will appear as a connected device. You can click the connected device (your virtual network gateway) to view more information.
  • 13. Azure Hands-on Lab 12 Part 3: Generate certificates Certificates are used by Azure to authenticate VPN clients for Point-to-Site VPNs. You export public certificate data (not the private key) as a Base-64 encoded X.509 .cer file from either a root certificate generated by an enterprise certificate solution, or a self-signed root certificate. You then import the public certificate data from the root certificate to Azure. Additionally, you need to generate a client certificate from the root certificate for clients. Each client that wants to connect to the virtual network using a P2S connection must have a client certificate installed that was generated from the root certificate. Create a self-signed certificate The following steps walk you through creating a self-signed certificate using makecert. These steps are not deployment-model specific. They are valid for both Resource Manager and classic. 1. Download makecert from http://bit.ly/2meC5gX 2. Run AZCerts.bat file as Administrator This file will be run following commands: makecert.exe -sky exchange -r -n "CN=AzureRoot" -pe -a sha256 -len 2048 -ss My "AzureRoot.cer" makecert.exe -n "CN=AzureClient" -pe -sky exchange -m 96 -ss My -in "AzureRoot" -is my -a sha256
  • 14. Azure Hands-on Lab 13 3. Double click on newly created AzureRoot.cer file, go to Details > Copy to File… Export the root certificate as a Base-64 encoded X.509 (.cer) file. You need to export it in this format so that you can open the certificate with text editor.
  • 15. Azure Hands-on Lab 14 4. Save file as Azure.cer name 5. Once the virtual network gateway has been created, navigate to the Settings section of the virtual network gateway blade. In the Settings section, click Point-to- site configuration to open the Configuration blade.
  • 16. Azure Hands-on Lab 15 6. Address pool is the pool of IP addresses from which clients that connect will receive an IP address. Add the address pool 172.16.1.0/24, and then click Save. 7. Upload the root certificate .cer file Open the certificate Azure.cer with a text editor, such as Notepad. Copy only the following section as one continuous line:
  • 17. Azure Hands-on Lab 16 8. Paste the certificate data into the Public Certificate Data field. Name the certificate, and then click Save. 9. Download and install the VPN client configuration package Clients connecting to Azure using P2S must have both a client certificate, and a VPN client configuration package installed. VPN client configuration packages are available for Windows clients. The VPN client package contains information to configure the VPN client software that is built into Windows. The configuration is specific to the VPN that you want to connect to. The package does not install additional software. On the Point-to-site configuration blade, click Download VPN client to open the Download VPN client blade. 10. Select the correct package for your client, then click Download. For 64-bit clients, select AMD64. For 32-bit clients, select x86.
  • 18. Azure Hands-on Lab 17 11. Install the package on the client computer. If you get a SmartScreen popup, click More info, then Run anyway to install the package. 12. On the client computer, navigate to Network Settings and click VPN. You will see the connection listed. It will show the name of the virtual network that it will connect to 13. Connect to Azure To connect to your CorpVNet, on the client computer, navigate to VPN connections and locate the VPN connection that you created. It is named the same name as your virtual network. Click Connect. A pop-up message may appear that refers to using the certificate. If this happens, click Continue to use elevated privileges. On the Connection status page, click Connect to start the connection. If you see a Select Certificate screen, verify that the client certificate showing is the one that you want to use to connect. If it is not, use the drop-down arrow to select the correct certificate, and then click OK.
  • 19. Azure Hands-on Lab 18 14. Your connection should now be established.
  • 20. Azure Hands-on Lab 19 Lab Task 4 Create Storage Account 1. Click on New > Data + Storage > Storage Account 2. Provide storage account details Name: Unique storage account name Deployment model: Resource manager Account kind: General purpose Performance: Standard Replication: Locally-redundant storage (LRS) Storage service encryption: Disables
  • 21. Azure Hands-on Lab 20 3. Select Use existing and choose previously created resource group CorpNet. Configure the region where the storage account will be created. For Location choose North Europe. 4. Click the Create button to create the storage account.
  • 22. Azure Hands-on Lab 21 Lab Task 5 Create availability set 1. Click New and search Availability sets in Search the marketplace Choose Availability set and click Create. 2. Provide availability set details Name: HA Resource group: Use existing > CorpNet Location: North Europe Fault domains: 2 Update domains: 5 Managed: NO
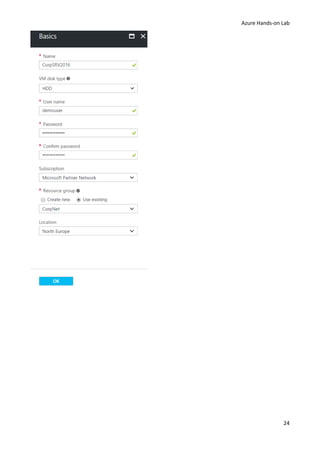
  • 24. Azure Hands-on Lab 23 Lab Task 6 Create VM from Marketplace In this task, you will create a new virtual machine using the Azure Management Portal. 1. Click on the +NEW button. 2. Click Compute and then click Windows Server 2016 Datacenter. 3. Ensure you specify the deployment model as Resource Manager and click Create. 4. Specify the following virtual machine Basic configuration: Name: CorpSRV2016 VM disk type: HDD User Name: demouser Password: demo@pass123 Resource group: Use existing > CorpNet Then click OK to continue
  • 26. Azure Hands-on Lab 25 5. Choose a size A5 Standard Then click Select to continue 6. Specify the following virtual machine Settings: Storage Use managed disks: No Storage account: Select storage account name previously created in task 4 Network Virtual network: Select Virtual Network name previously created in task 2 Subnet: default (10.0.0.0/25) Public IP address: CorpSRV2016-ip Network security group (firewall): CorpSRV2016-nsg
  • 27. Azure Hands-on Lab 26 Extensions: No extensions High availability: Select availability set name previously created in task 5 Boot diagnostics: Enabled Guest OS diagnostics: Enabled Diagnostics storage account: Select storage account name previously created in task 4
  • 28. Azure Hands-on Lab 27 7. View Summary, wait final validation process and click OK.
  • 29. Azure Hands-on Lab 28 8. After the virtual machine is created, click the Connect button on the toolbar. 9. Depending on your remote desktop protocol client and browser configuration you will either be prompted to open an RDP file or you will need to download it and then open it separately to connect. 10. Login with the credentials specified during creation: User: demouser Password: demo@pass123 11. Set a static internal private IP address: Go to VM settings Network interfaces 12. Click on network interface name (corpsrv2016904)
  • 30. Azure Hands-on Lab 29 13. Go to network interface Settings IP configuration 14. Click on ipconfig name 15. On Assignment choose Static and Save configuration 16. Connect to VM through the Remote desktop using internal IP address. (Make sure the VPN is connected)
  • 31. Azure Hands-on Lab 30 Lab Task 7 Create Backup Vault and backup Virtual machine A recovery services vault is an entity that stores the backups and recovery points that have been created over time. The recovery services vault also contains the backup policies associated with the protected virtual machines. To create a recovery services vault: 1. Click the NEW button. 2. Click the Storage category 3. Click Backup and Site Recovery (OMS). 4. Name the Recovery Service Vault: Backup. Select Use existing choose previously created resource group CorpNet and click Create
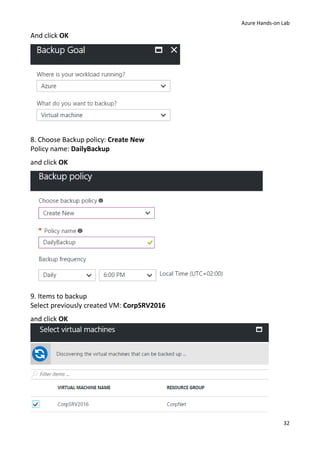
  • 32. Azure Hands-on Lab 31 5. After the Recovery Service Vault is created, click the All Resources and then Backup 6. In the Getting Started section, click Backup to open the Getting started with backup blade. 7. In Backup Goal choose Where is your workload running? : Azure What do you want to backup?: Virtual machine
  • 33. Azure Hands-on Lab 32 And click OK 8. Choose Backup policy: Create New Policy name: DailyBackup and click OK 9. Items to backup Select previously created VM: CorpSRV2016 and click OK
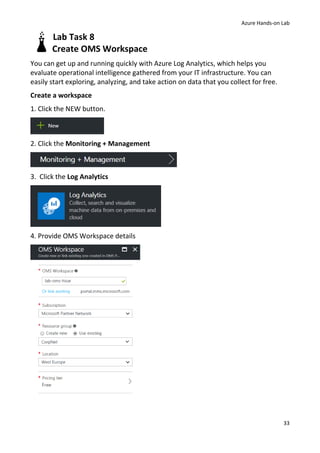
  • 34. Azure Hands-on Lab 33 Lab Task 8 Create OMS Workspace You can get up and running quickly with Azure Log Analytics, which helps you evaluate operational intelligence gathered from your IT infrastructure. You can easily start exploring, analyzing, and take action on data that you collect for free. Create a workspace 1. Click the NEW button. 2. Click the Monitoring + Management 3. Click the Log Analytics 4. Provide OMS Workspace details
  • 35. Azure Hands-on Lab 34 OMS Workspace: Must be Unique name Resource group: Select Use existing and choose previously created resource group CorpNet Pricing tier: Free 5. After the OMS Workspace is created, in the Workspace data sources section, click Virtual machines to open list with previously created VMs. 6. Select CorpSRV2016 7. Click Connect button
  • 36. Azure Hands-on Lab 35 8. After VM is connected, go to the Workspace data sources section, click Storage accounts logs and then +Add button to open Add storage account log blade. For Storage account choose previously created storage. For Data Type choose Events and click OK 9. Go to the Workspace data sources section, click Azure Activity logs and choose your azure subscriptions and Connect to OMS
  • 37. Azure Hands-on Lab 36 10. Login to OMS portal Go OMS Workspace > OMS portal or https://microsoft.com/oms 11. In OMS Dashboard click Solutions Gallery and ADD Alert management, Security and Audit, Antimalware Assessment and Activity Log Analytics
  • 38. Azure Hands-on Lab 37 Microsoft Operations Management suite mobile app for Windows Phone, iOS, and Android https://www.microsoft.com/en-us/cloud-platform/operations-management-suite- mobile-apps