SlideShare a Scribd company logo
Contract Management
Agency Presentation
Modernized Electronic Government Procurement System (mPhilGEPS)
INTRODUCTION
In all procuring methods contract management is one of the most important stages, in this process
the implementation of contact includes creation of contract, payment milestones, contract approval,
amendment of contract, extension of contract, suspension of contract, evaluation of contract,
advance payment, liquidated damages, retention money, work measurement, and Termination of
Contract. All these stages of contract implementation vary according to their procurement methods.
There are different sets of rules and regulations for Goods, Supplies & Materials, and Infrastructure
projects and for consultancy.
SYSTEM STRUCTURE
Web Browsers that can Access the System:
∙ Google Chrome
∙ Mozilla Firefox
∙ Internet Explorer (version 11)
∙ Safari
mGEPS – Reconsideration and Protest is a module of the larger web application Modernized Electronic
Government Procurement System (mGEPS) that can be accessed anywhere in the Philippines as long as an internet
connection is available.
Main Users of the System:
Contract Management System has three users: (1) Contract Administrator (2) Contract Approver
SYSTEM STRUCTURE
Stakeholder Name Role
Contract Administrator
− Create contract
− Suspend contract
− Lift a suspension
− Raise Liquidated Damages
− Amend Contract
− Extend Contract
− Cancel Contract
− Evaluate Contract
− Raise Advance Payment
− Terminate Contract
− Raise Retention Money
− View and Download Statement of Work Accomplished (SWA)
− View and Download Milestone
− View Payment History
− Update Payment details
Login Access:
Agency user is required either to be contract administrator or contract approver
SYSTEM STRUCTURE
Getting Started________________________________________
This section will illustrate the step by step walkthrough of the system from initiation through exit. The logical
arrangement of the information shall enable the Procuring Entity user to fully understand the flow and
functionality of the system.
Stakeholder Name Role
Contract Approver
− Approval of Contract Creation
− Approval of Suspension
− Approval of the Suspension Lifting’
− Approval of Amendment
− Approval of Cancellation
− Approval of Termination
− View and Download Statement of Work Accomplished (SWA)
− Review and Provide recommendation on Statement of Work Accomplished (SWA)
− View and Download Milestone
− View and Download Contract Details
LANDING PAGE
LANDING PAGE
System URL or link is https://www.philgeps.gov.ph/
1. Menus in Landing Page
The following are the
Menus in the landing page:
∙ Home – the page after
selecting the URL
∙ About -
∙ Announcement
∙ Services
∙ Bulletin Board
∙ Open Data
∙ Login
∙ Signup
∙ Contact
SYSTEM LOG-IN FOR
PROCURING USERS
SYSTEM LOGIN FOR PROCURING USERS
Step 1: Key in MGEPS URL or link : https://www.philgeps.gov.ph/
SYSTEM LOGIN FOR PROCURING USERS
Step 2: In landing page select LOGIN menu Item.
Step 3: In first box of drop-down field, choose Log in type. Select Login as Agency/Observer
Step 4: In second box or text field, type or key in the username given by System Administrator
Step 5: In third box or text field, type or key in the password given by System Administrator
Step 6: In fourth box or text field, type the Captcha then select LOG IN button.
SYSTEM LOGIN FOR PROCURING USERS
Step 7: If any of the box or fields are left unanswered, a prompt message will appear beneath the boxes and user
will be asked for the certain field to be filled up.
User needs to select login type
User needs to key in username
User needs to key in password
User needs to key in Captcha
SYSTEM LOGIN FOR PROCURING USERS
Step 8: If Incorrect username or password, a prompt message will be shown, and user needs to key in correct
username and password.
SYSTEM LOGIN FOR PROCURING USERS
Step 9: Successful login will route the system to pending task of the user on the MGEPS system.
ACCESSING CONTRACT
MANAGEMENT
ACCESSING CONTRACT MANAGEMENT
A. Accessing Through Pending Task
Step 1: Agency user having Contract Administrator or Contract Approver access privilege, login into the system.
After the login, from “Pending Task” window, click either on the count number in front of the required task i.e.
Purchase Order under preparation or Purchase Order pending for approval etc.
ACCESSING CONTRACT MANAGEMENT
A. Accessing Through Pending Task
Step 2: This will take the user to concerned sub menu of Contract Management.
Step 3: As per the requirement of action, agency user clicks either of the Contract Management sub menu to
perform the task(s).
ACCESSING CONTRACT MANAGEMENT
B. Accessing Through Contract Management
Step 1: Agency user having Contract Administrator or Contract Approver access privilege, login into the system.
After the login, click on ‘Menu’ button and from the menu items list, click on ‘Contract Management’.
ACCESSING CONTRACT MANAGEMENT
B. Accessing Through Contract Management
Step 2: This will further open sub menu list of “Contract Management”
Step 3: As per the requirement the agency user Click on
- “Create Purchase Order/Contract” to create purchase order or
- “Draft Purchase Order/Contract” to edit the draft purchase order or
- “Pending Purchase Order/Contract” to recall/approve/send back the purchase order under approval or
- “Approved/Purchase Order/Contract” to view approved purchase order or
- “Pending contract” or “Suspended Contract” to view suspended contract or
- “Terminated Contract” to view terminated contract sub menu to perform the task(s).
CREATE CONTRACT /
PURCHASE ORDER
CREATE CONTRACT / PURCHASE ORDER
Step 1: To create a contract, agency user having Contract Administrator access privilege, login into the system and
accesses ‘’Create Purchase Order / Contract’’. This will display list of Awarded Bid Notices for which, create
contracts / purchase orders are pending. Please note also that the Awarded Merchant/Agency should already
have Accepted the Award.
CREATE CONTRACT / PURCHASE ORDER
Step 2: Fill in the single or combination of search criteria for searching any awarded notice number for which
purchase order / contract is to be generated and then click on “Search” icon. To remove / erase the data in search
criteria, click on “Eraser” icon.
Step 3: click on “Select” for the concern awarded notice, this will display a list of actions, and then click on
“Create Purchase Order” option.
CREATE CONTRACT / PURCHASE ORDER
Step 4: This will prompt the message as “Purchase Order Initiated”. Click on Ok. This will take the user to
Purchase Order / Contract Creation Step 1.
Purchase Order / Contract Creation Step 1 Form
Step 1: System will create new Purchase Order and will display the step 1 of the purchase order wherein following
information is displayed among it some needs to be filled before sending the said purchase order to the merchant
for acceptance.
CREATE CONTRACT / PURCHASE ORDER
Field Name Editable Mandatory Description
PO ID No System Generated PO Number is
populated.
PO No Yes Yes Fill in agency’s purchase order no
PO date Yes Yes Current date is auto populated, and it can
be greater than current date.
Notice Reference Number No No Auto populated from selected Award.
Control Number No No Auto populated from selected Award.
Notice Title No No Auto populated from selected Award.
Notice Type No No Auto populated from selected Award.
Project Name No No Auto populated from selected Award.
Description No No Auto populated from selected Award.
Business Category No No Auto populated from selected Award.
Period of Contract No No Auto populated from selected Award.
Delivery/Project Location No No Auto populated from selected Award.
Procurement Program/Project No No Auto populated from selected Award.
Mode of Procurement No No Auto populated from selected Award.
Source of Fund No No Auto populated from selected Award.
Budget No No Auto populated from selected Award.
Purchase Order / Contract Creation Step 1 Form
CREATE CONTRACT / PURCHASE ORDER
Field Name Editable Mandatory Description
Notice Publication No No Auto populated from selected Award.
Mode of Bid submission No No Auto populated from selected Award.
Classification No No Auto populated from selected Award.
Lot Type No No Auto populated from selected Award.
Bid Opening type No No Auto populated from selected Award.
Contract Amount No No Auto populated from selected Award.
Form of Performance Security Yes Yes The user can select any of the below option.
In case it is not applicable select “Not
Applicable”.
1. Cash or cashier’s/manager’s cheque
2. Bank draft/guarantee or irrevocable letter
of credit
3. Surety bond
4. Not Applicable
Upload performance security Yes Yes User can click choose file and upload the
document or image file.
Not Applicable if “Form of Performance
Security” selected is “Not Applicable”.
Purchase Order / Contract Creation Step 1 Form
CREATE CONTRACT / PURCHASE ORDER
Field Name Editable Mandatory Description
Performance Security Amount Yes Yes Fill in the performance security amount.
Not Applicable if “Form of Performance
Security” selected is “Not Applicable”.
Performance Security from Date Yes Yes Select date from which performance
security starts its validity.
Not Applicable if “Form of Performance
Security” selected is “Not Applicable”.
Performance Security to Date Yes Yes Select date from which performance
security ends its validity.
Not Applicable if “Form of Performance
Security” selected is “Not Applicable”.
Performance Security Period (in months) No No Auto calculated.
Not Applicable if “Form of Performance
Security” selected is “Not Applicable”.
Purchase Order / Contract Creation Step 1 Form
CREATE CONTRACT / PURCHASE ORDER
Purchase Order / Contract Creation Step 1 Form
CREATE CONTRACT / PURCHASE ORDER
Purchase Order / Contract Creation Step 1 Form
CREATE CONTRACT / PURCHASE ORDER
Step 2: If the advance payment option selected as “Yes” then, the agency user will get additional field / box
added to enter the advance payment amount.
Purchase Order / Contract Creation Step 1 Form
CREATE CONTRACT / PURCHASE ORDER
Step 3: However, if the advance payment amount exceeds 50% of contract amount then, the system will pop up
the message as “Advance payment Amount should not exceeds 50% of Contract Amount”.
Purchase Order / Contract Creation Step 1 Form
CREATE CONTRACT / PURCHASE ORDER
Purchase Order / Contract Creation Step 1 Form
Step 4: So, agency user need to add the advance payment amount, accordingly. Once the correct amount filled in,
click on “Save And Continue”
Step 5: Once, the required mandatory information is added then, click on “Save And Continue”
Step 6: Click on ‘Yes’ to save the purchase order. If selects ‘No’, system will take the agency user back to purchase
order step 1.
CREATE CONTRACT / PURCHASE ORDER
Step 7: System prompt an information “Purchase order saved successfully”. Clicking on “OK” will lead to step no
2 of Purchase Order / Contract Creation. This will take the user to Purchase Order / Contract Creation Step 2
Form.
Purchase Order / Contract Creation Step 1 Form
CREATE CONTRACT / PURCHASE ORDER
Step 1: Step no 2 displays price bid data filled up at the time of creating purchase request.
Purchase Order / Contract Creation Step 2 Form
CREATE CONTRACT / PURCHASE ORDER
Step 2: By clicking on “HTML Report” icon, this will display a popup and user can view the price bid details like
UNSPSC Code, Quantity, Unit of Measurement etc. This report can be downloaded in excel format by clicking on
“Export to Excel” tab. Click “Close icon” to close the pop-up.
Purchase Order / Contract Creation Step 2 Form
CREATE CONTRACT / PURCHASE ORDER
Step 3: This will get the said template downloaded in the destination folder, by clicking on the file name, excel
report will get displayed.
Purchase Order / Contract Creation Step 2 Form
Step 4: Agency user can add the templates for terms and conditions, in step no 2 of Purchase Order creation. To
add the templates, user needs to click on “View Template” icon.
CREATE CONTRACT / PURCHASE ORDER
Step 5: This will open a popup to select list of Terms and condition Templates. Agency user can add the required
template(s) by clicking on the box available at the right-hand side of template name.
Note: Templates listed are configured from the CMS Template Master by Portal Admin / Agency users with access
Purchase Order / Contract Creation Step 2 Form
CREATE CONTRACT / PURCHASE ORDER
Step 6: Once the template(s) is selected then, click on “Save” to add templates to the purchase order. If clicks on
“Close”, system will take agency user back to step no 2 of create purchase order.
Purchase Order / Contract Creation Step 2 Form
Step 7: Prompt for successful addition of templates.
CREATE CONTRACT / PURCHASE ORDER
Step 8: Agency user can view the templates by clicking on, “View Template”. Templates can be removed if
required. To remove the templates, click on “Remove”.
Purchase Order / Contract Creation Step 2 Form
Step 9: Click on “Yes” to remove the template(s). If clicks on “No”, system will take agency user back to step no 2
of create purchase order.
CREATE CONTRACT / PURCHASE ORDER
Step 10: Prompt for successful removal of template(s).
Purchase Order / Contract Creation Step 2 Form
Step 11: Once, the required information is added then, click on “Save And Continue”
CREATE CONTRACT / PURCHASE ORDER
Step 12: Click on “Yes” to save the purchase order. If clicks on “No”, system will take the agency user back to step
no 2 of create purchase order.
Purchase Order / Contract Creation Step 2 Form
Step 13: Prompt for successful saving of Purchase Order. Clicking on Ok will lead to Purchase Order / Contract
Creation Step 3 Form.
CREATE CONTRACT / PURCHASE ORDER
Step 1: Step 3 Form auto populate the data filled in at Steps 1 and 2 Form of create purchase order.
Purchase Order / Contract Creation Step 3 Form
CREATE CONTRACT / PURCHASE ORDER
Purchase Order / Contract Creation Step 3 Form
CREATE CONTRACT / PURCHASE ORDER
Purchase Order / Contract Creation Step 3 Form
CREATE CONTRACT / PURCHASE ORDER
Step 2: Supervision of implementation of contract is possible through the milestone. Here agency user can need
to add the milestone(s). In case of Advance payment was provided in the Step 1 Form, then Remaining Contract
Amount would be reduced with that amount.
Purchase Order / Contract Creation Step 3 Form
Step 3: To add the milestone(s), click on “Add Milestone” tab.
CREATE CONTRACT / PURCHASE ORDER
Step 4: This will open add milestone window containing milestone parameters to be added i. e. Milestone details,
Quantity, Percentage of Work etc. Agency user needs to fill in the intended details, accordingly. In case of goods
and supply, computation type can be taken as Percentage of work or Amount.
Purchase Order / Contract Creation Step 3 Form
CREATE CONTRACT / PURCHASE ORDER
Step 5: Once milestone parameters are added then, click on “Save”. If clicks on “Close”, system will take agency
user back to step no 3 of create purchase order.
Purchase Order / Contract Creation Step 3 Form
Step 6: Click on “Yes” to save the milestone. If clicks on “No”, system will take agency user back to add milestone
window.
Step 7: Prompt for successful milestone addition.
CREATE CONTRACT / PURCHASE ORDER
Step 8: Added milestone(s) can be removed if required. To remove the milestone, click on “Select” available in
front of intended to remove milestone and then click on “Remove”.
Purchase Order / Contract Creation Step 3 Form
CREATE CONTRACT / PURCHASE ORDER
Step 9: Click on “Yes” to remove the milestone. If clicks on “No”, system will take agency user back to Step 3 Form
of create purchase order.
Purchase Order / Contract Creation Step 3 Form
Step 10: Prompt for successful removal of milestone.
CREATE CONTRACT / PURCHASE ORDER
Step 11: Once the milestone(s) added then, agency user needs to write the comments before sending the
purchase order / contract to the approver for getting the approval.
Purchase Order / Contract Creation Step 3 Form
Step 12: Agency user needs to upload the supporting document along with the approval request. Write the
document name in the box and upload the concerned document.
CREATE CONTRACT / PURCHASE ORDER
Purchase Order / Contract Creation Step 3 Form
Step 13: Once the comments are written and supporting
document is uploaded then, click on, “Select Approver” so that
the purchase request can get approved. This will display a list
of officials who are having the access privilege of approver.
Click on the box available at the left-hand side of the name of
an official to whom the user wish to send the purchase order
for approval and then click on “Save”. If clicks on “Close”,
system will take agency user back to step no 3 of create
purchase order.
CREATE CONTRACT / PURCHASE ORDER
Step 14: Now click on, “Send for Approval” tab to send the purchase order to the approver. If clicks on, “Close”,
system will take the user back to “Create Purchase Order” page. Agency user can take a print out of the said
purchase order by clicking on “Print” button.
Purchase Order / Contract Creation Step 3 Form
CREATE CONTRACT / PURCHASE ORDER
Step 15: Click on “Yes” to send the purchase order for approval. If clicks on “No”, system will take agency user
back to step no 3 of create purchase order.
Purchase Order / Contract Creation Step 3 Form
Step 16: Prompt for purchase order successfully sent to the approver.
EDIT CONTRACT /
PURCHASE ORDER
EDIT CONTRACT / PURCHASE ORDER
Step 1: To edit drafted purchase order / contract, agency user having Contract Administrator or Contract Approver
access privilege, login into the system and accesses “Draft Purchase Order / Contract” sub menu of ‘Contract
Management’’. This will display list of pending for approval contracts / purchase orders.
EDIT CONTRACT / PURCHASE ORDER
Step 2: Fill in the single or combination of search criteria for searching any particular draft contract / purchase
order and then click on “Search” icon. To remove / erase the data in search criteria, click on “Eraser” icon.
Step 3: Agency user then, click on “Select”, available in front of concerned purchase order / contract having the
status as “In-Preparation”, this will display list of actions; from this list click on “Edit”. This will take the agency
user to Step 1 Form of said purchase order / contract. Succeeding steps please refer back to Create
Contract/Purchase Order of this manual edit and send for approval.
DELETE CONTRACT /
PURCHASE ORDER
DELETE CONTRACT / PURCHASE ORDER
Step 1: agency user can Delete purchase order / contract, if required until it is in draft mode.
Step 2: To delete any purchase order / contract, agency user having Contract Administrator access privileges, login
into the system and accesses “Draft Purchase Order / Contract” sub menu of ‘Contract Management’’. This will
display list of contracts / purchase orders.
Step 3: Fill in the single or combination of search criteria for searching any particular contract / purchase order
and then click on “Search” icon. To remove / erase the data in search criteria, click on “Eraser” icon.
Step 4: Agency user then, click on “Select”, available in front of concerned purchase order / contract, this will
display list of actions; from this list click on “Delete”.
VIEW COMMENTS
VIEW COMMENTS
Step 1: agency users can View Comments of any purchase order / contract.
Step 2: To view the comments, agency user having Contract Administrator or Contract Approver access privilege,
login into the system and accesses ‘Contract Management’’ and it’s any of sub menu.
Step 3: As per the requirement, agency user clicks either of the Contract Management sub menu to view the
comments.
Step 4: This will display the list of purchase order. fill in the single or combination of search criteria for searching
any contract / purchase order and then click on “Search” icon. To remove / erase the data in search criteria, click
on “Eraser” icon.
VIEW COMMENTS
Step 5: Agency user then, click on “Select”, available in front of concerned purchase order / contract, this will
display list of actions; from this list click on “View Comments”.
Step 6: This opens “View Purchase Order Comments” box.
APPROVING/ REJECTING
THE CONTRACT
APPROVING/ REJECTING THE CONTRACT
Step 1: The concerned Contract Approver receives the notification in pending task an email notification regarding
to have a pending purchase order / contract for approval.
APPROVING/ REJECTING THE CONTRACT
Step 2: To approve pending Contract or Purchase Order, agency user having Contract Approver access privilege,
login into the system and access ‘’Pending Purchase Order / Contract’’ sub menu of Contract Management.
Alternative This will display list of pending for approval contracts / purchase orders with status as “Pending for
Approval”.
Step 3: Click on “Select” available in front of the concern purchase order / contract. This will display list of
actions; from the list click on “View PO / Contract for Approval”.
APPROVING/ REJECTING THE CONTRACT
Step 4.a: This will display “Approve Purchase Order” page with the information like merchant details, milestones
etc. At the bottom of this page, the approver needs to write the comments according to the approval or rejection
of purchase order / contract.
Step 4.b: Provide comments for Rejection of Purchase Order / Contract
APPROVING/ REJECTING THE CONTRACT
Step 5: Click on “Approve” or “Reject”
Step 6: Click on “Yes” to continue Purchase Order / Contract. If clicks on “No”, system will
take agency user back to “Approve Purchase Order” page.
Step 7: Prompt for successful Purchase Oder rejection / sending back.
APPROVING/ REJECTING THE CONTRACT
Step 8.b: If Rejection is done, then after the rejection from Contract Approver, the said purchase order /
contract lands under “Draft Purchase Orders”, submenu of ‘’Create Purchase Order / Contract’’ with the status
as “In Preparation”.
Step 8.a: After the approval from Contract Approver, the said purchase order / contract lands under “Approved
Purchase Orders”, submenu of ‘’Create Purchase Order / Contract’’ with “Merchant Acceptance” status as
“Pending for Acceptance”.
SUSPEND CONTRACT
SUSPEND CONTRACT
Step 1: To suspend a contract, agency user having Contract Administrator or Contract Approver access privilege,
login into the system and accesses “Approved Purchase Orders” sub menu of ‘Contract Management’’. This will
display list of approved purchase orders for which, award status is “NTP Issued” and merchant acceptance status
is “Accepted”.
SUSPEND CONTRACT
Step 2: Fill in the single or combination of search criteria for searching any published purchase order which needs
to be suspended and then click on “Search” icon. To remove / erase the data in search criteria, click on “Eraser”
icon.
Step 3: Then, click on ‘‘Select’’ this will display a list of actions and then click on ‘‘Contract Suspension’’ option,
available in front of that contract / purchase order.
Step 4: This will display contract suspension page with the approved purchase order details.
SUSPEND CONTRACT
SUSPEND CONTRACT
SUSPEND CONTRACT
Step 5: Agency user then needs to add the supporting document for the suspension along with the comments.
Step 6: To add the supporting document/s, agency user needs to click on “Add document name and supporting
documents” hyperlink. It will then open a box / window wherein the user can write the name of the document
which is to be uploaded by clicking on “Choose File” button. User can add multiple documents if required by
clicking on green colored “Add More” tab.
SUSPEND CONTRACT
Step 7: Then, click on ‘‘Submit’’ to upload the supporting document. If clicks on “Close”, system will take agency
user back to “Contract Suspension” page.
Step 8: Prompt for successfully uploading of supporting documents.
SUSPEND CONTRACT
Step 9: Uploaded document/s can be
removed by clicking on the “X (Cross)”
sign. Then write the suspension
comments.
Step 10: Then select the approver so that
contract suspension can get approved. To
select the approver, click in the box
available at the left-hand side of the name
of the official and then click on “Save”.
Then click on “Send for Approval”.
However, if clicks on “Close”, system will
take the agency user back to “Contract
Suspension” page.
SUSPEND CONTRACT
Step 11: Click on “Yes” to send the contract suspension for approval. If clicks on “No”, system will take agency
user back to “Contract Suspension” page.
Step 12: Prompt for contract suspension successfully sent for approval.
APPROVAL / REJECTION
OF SUSPENSION
APPROVAL / REJECTION OF SUSPENSION
Step 1: To approve the contract suspension, agency user having Contract Administrator or Contract Approver
access privilege, login into the system and accesses “Pending Contracts / Purchase Orders” sub menu of
‘’Contract Management’’. This will display list of pending for approval contracts / purchase orders.
APPROVAL / REJECTION OF SUSPENSION
Step 2: Fill in the single or combination of search criteria for searching any particular pending for approval
contract / purchase order and then click on “Search” icon. To remove / erase the data in search criteria, click on
“Eraser” icon.
Step 3: Then, click on ‘‘Select’’ this will display a list of actions and then click on ‘‘View Contract Suspend
Approval’’ option, available in front of that contract / purchase order.
APPROVAL / REJECTION OF SUSPENSION
Step 4: This will display Contract / Purchase Order Suspension Approval page. On this page, the approver can
view the comments and the supporting document/s uploaded by the creator.
Step 5: Below this section on the same page, the approver can fill in the comments for approving or rejecting the
suspension.
APPROVAL / REJECTION OF SUSPENSION
Step 6: Once the commenting is done, agency user needs to click on “Approve” tab to approve the suspension.
However, if wish to reject the suspension then, the user needs to click on “Reject”.
Step 7: Click on “Yes” to approve or reject the suspension. If clicks on “No”, system will take agency user back to
“Contract / PO Suspension” page.
Step 8: Prompt for successful approval or rejection of contract suspension. The concerned merchant will get email
notification about the suspension of contract.
LIFT OF SUSPENSION
LIFT OF SUSPENSION
Step 1: To lift a suspension, agency user having Contract Administrator or Contract Approver access privilege,
login into the system and accesses ‘’Suspended Contract / Purchase Order’’ sub menu of ‘Contract
Management’’. This will display list of suspended contracts / purchase orders.
Step 2: Fill in the single or combination of search criteria for the required suspended contract or purchase order.
Select “Search Icon”. To remove / erase the data in search criteria, click on “Eraser” icon.
LIFT OF SUSPENSION
Step 3: Then, click on ‘‘Select’’ this will display a list of actions and then click on ‘‘Lifting of a Suspension Order’’
option, available in front of that contract / purchase order.
LIFT OF SUSPENSION
LIFT OF SUSPENSION
Step 4: This will display Contract / Purchase Order Suspension Approval page with the approved purchase order
details.
LIFT OF SUSPENSION
Step 5: Agency user then needs to add the
supporting document for lifting the suspension
along with the comments.
Step 6: To add the supporting document/s,
agency user needs to click on “Add document
name and supporting documents” hyperlink. It
will then open a box / window wherein the user
can write the name of the document which is to
be uploaded by clicking on “Choose File” button.
User can add multiple documents if required by
clicking on green colored “Add More” tab.
LIFT OF SUSPENSION
Step 7: Then, click on ‘‘Submit’’ to upload the supporting document. If clicks on “Close”, system will take agency
user back to “Contract Suspension” page.
Step 8: Prompt for successfully uploading of supporting documents.
LIFT OF SUSPENSION
Step 9: Uploaded document/s can be removed by
clicking on the “X (Cross)” sign. Then write the lifting
of suspension comments.
Step 10: Then select the approver so that lifting of
contract suspension can get approval by clicking in
the box available at the left-hand side of the name of
the official and then click on “Save”.
LIFT OF SUSPENSION
Step 11: Then click on “Send for Approval”. However, if clicks on “Close”, system will take the agency user back to
“Contract Suspension” page.
Step 12: Click on “Yes” to send the lifting of contract suspension for approval. If clicks on “No”, system will take
agency user back to “Contract Suspension” page.
Step 13: Prompt for contract suspension successfully sent for approval.
APPROVAL OF
SUSPENSION LIFTING
APPROVAL OF SUSPENSION LIFTING
Step 1: To approve lifting of the contract suspension, agency user having Contract Approver access privilege, login
into the system and accesses “Pending Contracts / Purchase Orders” sub menu of ‘’Contract Management’’. This
will display list of pending for approval contracts / purchase orders.
Step 2: Fill in the single or combination of search criteria for searching any particular pending for approval
contract / purchase order and then click on “Search” icon. To remove / erase the data in search criteria, click on
“Eraser” icon.
Step 3: Then, click on ‘‘Select’’ for the purchase order in concern, this will display a list of actions and then click on
‘‘View Contract Lift Suspend Approval’’ option, available in front of that contract / purchase order.
APPROVAL OF SUSPENSION LIFTING
Step 4: This will display Contract / Purchase Order Lift Suspension Approval page. On this page, the approver can
view the comments and the supporting document/s uploaded by the creator.
Step 5: Below this section on the same page, the approver fills in the comments for approving to lift a suspension.
APPROVAL OF SUSPENSION LIFTING
Step 7: Click on “Yes” to approve lifting of contract suspension. If clicks on “No”, system will take agency user
back to “Contract / Purchase Order Lift Suspension Approval” page.
Step 8: Prompt for successful approval of lifting of contract suspension. The concerned merchant will get email
notification about the suspension of contract.
CONTRACT AMENDMENT
CONTRACT AMENDMENT
Step 1: To amend contract, agency user having Contract Administrator access privilege, login into the system and
accesses “Approved Purchase Orders” sub menu of ‘Contract Management’’. This will display list of approved
purchase orders for which, award status is “NTP Issued” and merchant acceptance status is “Accepted”.
CONTRACT AMENDMENT
Step 2: Fill in the single or combination of search criteria for searching any approved purchase order / contract
which needs to be amended and then click on “Search” icon. To remove / erase the data in search criteria, click
on “Eraser” icon.
Step 3: Then, click on ‘‘Select’’ this will display a list of actions and then click on ‘‘Create Amendment’’ option,
available in front of that contract / purchase order.
Step 4: This will display purchase order / contract amendment page with the approved purchase order/ contract
details.
CONTRACT AMENDMENT
CONTRACT AMENDMENT
CONTRACT AMENDMENT
Step 6: Agency user then needs to add the supporting document for the amendment along with the comments and
extended dates for performance security period.
Step 7: To add the supporting document/s, agency user needs to click on “Add document name and supporting
document” hyperlink. It will then open a box / window wherein the user can write the name of the document
which is to be uploaded by clicking on “Choose File” button. User can add multiple documents if required by clicking
on green colored “Add More” tab.
Step 8: Then, click on ‘‘Submit’’ to upload the supporting document. If clicks on “Close”, system will take agency
user back to “Create Amendment” page.
CONTRACT AMENDMENT
Step 9: Prompt for successfully uploading of supporting documents.
Step 10: Then write in the comments, accordingly and change the start and end date of performance security.
CONTRACT AMENDMENT
Step 11: Then select the approver so that the amendment
can get approval and then click on “Send for Approval”.
However, if clicks on “Close”, system will take the agency
user back to approved purchase order page.
Step 12: Click on “Yes” to send the contract amendment
for approval. If clicks on “No”, system will take agency
user back to “Contract Amendment” page.
CONTRACT AMENDMENT
Step 13: Prompt for contract amendment successfully sent for approval.
APPROVAL / REJECTION
CONTRACT AMENDMENT
APPROVAL / REJECTION CONTRACT AMENDMENT
Step 1: To approve the contract amendment, agency user having Contract Approver access privilege, login into
the system and accesses “Pending Contracts / Purchase Orders” sub menu of ‘Contract Management’’. This will
display list of pending for approval contracts / purchase orders.
APPROVAL / REJECTION CONTRACT AMENDMENT
Step 2: Fill in the single or combination of search criteria for searching any particular pending for approval
contract / purchase order and then click on “Search” icon. To remove / erase the data in search criteria, click on
“Eraser” icon.
Step 3: Then, click on ‘‘Select’’ this will display a list of actions and then click on ‘‘View Contract Amendment
Approval’’ option, available in front of that contract / purchase order.
APPROVAL / REJECTION CONTRACT AMENDMENT
Step 4: This will display Contract Amendment Approval page. On this page, the approver can view the comments
and the supporting document/s uploaded by amendment creator.
Step 5: Below this section on the same page, the approver can write in the comments for approving or rejecting
the amendment.
APPROVAL / REJECTION CONTRACT AMENDMENT
Step 6: Once the commenting is done, agency user needs to click on “Approve” tab to approve the amendment.
However, if wish to reject the amendment then, the user needs to click on “Reject”.
Step 7: Click on “Yes” to approve or reject the amendment. If clicks on “No”, system will take agency user back to
“Contract / PO Amendment” page.
Step 8: Prompt for successful approval or rejection of contract amendment.
CONTRACT EXTENSION
CONTRACT EXTENSION
Step 1: To extend the contract, agency user having Contract Administrator or Contract Approver access privilege,
login into the system and accesses “Pending Contracts / Purchase Orders” sub menu of ‘Contract Management’’.
This will display list of pending for approval contracts / purchase orders.
CONTRACT EXTENSION
Step 2: Fill in the single or combination of search criteria for searching any particular contract / purchase order
and then click on “Search” icon. To remove / erase the data in search criteria, click on “Eraser” icon.
Step 3: Then, click on ‘‘Select’’ this will display a list of actions and then click on ‘‘Contract Extension’’ option,
available in front of that contract / purchase order.
CONTRACT EXTENSION
CONTRACT EXTENSION
Step 4: This will display contract extension page with the approved purchase order details
Step 5: Agency user needs to edit the milestone to extend contract dates. So, click on ‘‘Select’’ available in front
of the milestones, this will display a list of actions and then click on ‘‘Edit’’.
CONTRACT EXTENSION
Step 6: This will display Edit Milestone window with the details. Agency user needs to click in Extension Valid To
field, this will pop up a calendar to select the extended date.
CONTRACT EXTENSION
Step 7: Once the extension date is selected then, click on “Save”. However, if clicks on “Close”, the data will get
discarded.
Step 8: Click on “Yes” to save the milestone. If clicks on “No”, system will take agency user back to “Edit
Milestone” window
Step 9: Prompt for successful saving the milestone.
CONTRACT EXTENSION
Step 10: Agency user then needs to add the supporting document for the extension along with the comments
and extended dates for performance security period.
CONTRACT EXTENSION
Step 11: To add the supporting document/s, agency user needs to click on “Add document name and supporting
document” hyperlink. It will then open a box / window wherein the user can write the name of the document
which is to be uploaded by clicking on “Choose File” button. User can add multiple documents if required by
clicking on green colored “Add More” tab.
Step 12: Then, click on ‘‘Submit’’ to upload the supporting document. If clicks on “Close”, system will take agency
user back to “Contract Extension” page.
CONTRACT EXTENSION
Step 13: Prompt for successfully uploading of supporting documents.
CONTRACT EXTENSION
Step 14: Then write in the comments, accordingly and change the end date of performance security.
Step 15: Then select the approver so that the
amendment can get approval. Select the
approver by clicking in the box available at
the left-hand side of the name of the official
and then click on “Save”
CONTRACT EXTENSION
Step 17: Click on “Yes” to send the contract extension for approval. If clicks on “No”, system will take agency user
back to “Contract Extension” page.
Step 16: Then click on “Send for Approval”. However, if clicks on “Close”, system will take the agency user back to
“Contract Extension” page.
Step 18: Prompt for contract extension successfully sent for approval.
APPROVAL / REJECTION
CONTRACT EXTENSION
APPROVAL / REJECTION CONTRACT EXTENSION
Step 1: To approve the contract extension, agency user having Contract Administrator or Contract Approver
access privilege, login into the system and accesses “Pending Contracts / Purchase Orders” sub menu of
‘Contract Management’’. This will display list of pending for approval contracts / purchase orders.
Step 2: Fill in the single or combination of search criteria for searching any particular contract / purchase order
and then click on “Search” icon. To remove / erase the data in search criteria, click on “Eraser” icon.
APPROVAL / REJECTION CONTRACT EXTENSION
Step 3: Then, click on ‘‘Select’’ this will display a list of actions and then click on ‘‘View Contract Extend
Approval’’ option, available in front of that contract / purchase order.
APPROVAL / REJECTION CONTRACT EXTENSION
Step 4: This will display Contract / Purchase Order Extension Approval page. On this page, the approver can view
the comments and the supporting document/s uploaded by the creator.
Step 5: Below this section on the same page, the approver can write in the comments for approving the extension
of contract.
Step 6: Once the commenting is done, agency user needs to click on “Approve” or “Reject” button
APPROVAL / REJECTION CONTRACT EXTENSION
Step 7: Click on “Yes” to proceed. If clicks on “No”, system will take agency user back to “Contract / Purchase
Order Extension Approval” page.
Step 8: Prompt for successful approval/rejection of extension of contract.
TERMINATION OF
CONTRACT
TERMINATION OF CONTRACT
Step 1: To terminate contract, agency user having Contract Administrator access privilege, login into the system
and access “Approved Purchase Orders” sub menu of ‘Contract Management’’. This will display list of approved
purchase.
TERMINATION OF CONTRACT
Step 2: Fill in the single or combination of search criteria for searching any published award notice number for
which notice to proceed is to be generated and then click on “Search” icon. To remove / erase the data in search
criteria, click on “Eraser” icon.
Step 3: Then, click on ‘‘Select’’ this will display a list of actions and then click on ‘‘Terminate of Contract’’ option,
available in front of that contract / purchase order.
TERMINATION OF CONTRACT
Step 4: This will display contract amendment page with the approved purchase order details.
TERMINATION OF CONTRACT
Step 5: Agency user then needs to add the supporting document for contract termination along with the
comments.
Step 6: To add the supporting document/s, agency user needs to click on “Add document name and supporting
document” hyperlink. It will then open a box / window wherein the user can write the name of the document
which is to be uploaded by clicking on “Choose File” button. User can add multiple documents if required by
clicking on green colored “Add More” tab.
TERMINATION OF CONTRACT
Step 7: Then, click on ‘‘Submit’’ to upload the supporting document. If clicks on “Close”, system will take agency
user back to “Contract Termination” page.
TERMINATION OF CONTRACT
Step 9: Then write in the comments and select from the dropdown, grounds for termination.
TERMINATION OF CONTRACT
Step 10: Then select the approver so that
contract termination can get approval. Select
the approver by clicking in the box available
at the left-hand side of the name of the
official and then click on “Save”
TERMINATION OF CONTRACT
Step 12: Click on “Yes” to send the contract termination for approval. If clicks on “No”, system will take agency
user back to “Contract Termination” page.
Step 13: Prompt for contract termination successfully sent for approval.
APPROVAL OF
TERMINATION OF
CONTRACT
APPROVAL OF TERMINATION OF CONTRACT
Step 1: To approve the contract termination, agency user having Contract Approver access privilege, login into the
system and accesses “Pending Contracts / Purchase Orders” sub menu of ‘Contract Management’’. This will
display list of pending for approval contracts / purchase orders.
Step 2: Fill in the single or combination of search criteria for searching any particular contract / purchase order
and then click on “Search” icon. To remove / erase the data in search criteria, click on “Eraser” icon.
APPROVAL OF TERMINATION OF CONTRACT
Step 3: Then, click on ‘‘Select’’ this will display a list of actions and then click on ‘‘View Contract Terminate
Approval’’ option, available in front of that contract / purchase order.
APPROVAL OF TERMINATION OF CONTRACT
Step 4: This will display Contract / PO Termination Approval page. On this page, the approver can view the
comments and the supporting document/s uploaded by the creator.
Step 5: Below this section on the same page, the approver can write in the comments for approving contract
termination.
APPROVAL OF TERMINATION OF CONTRACT
Step 6: Once the commenting is done, agency user needs to click on “Approve” or “Reject” button
Step 7: Click on “Yes” to proceed. If, clicks on “No”, system will take agency user back to “Contract / PO Termination
Approval” page.
Step 8: Prompt for successful approval/rejection of contract termination.
UPDATE GOODS
RECEIPTS NOTE
UPDATE GOODS RECEIPTS NOTE
Step 1: The user will get to update Goods note (Update GRN) in case classification is Goods or Goods – General
Support Services. To update Goods Receipts, Note, agency user having Contract Administrator access privilege,
login into the system and accesses “Approved Contracts / Purchase Orders” sub menu of ‘Contract
Management’’. This will display list of pending for approval contracts / purchase orders.
Step 2: Fill in the single or combination of search criteria for searching any contract / purchase order and then
click on “Search” icon. To remove / erase the data in search criteria, click on “Eraser” icon.
UPDATE GOODS RECEIPTS NOTE
Step 3: Then, click on ‘‘Select’’ this will display a list of actions and then click on ‘‘Update GRN’ option, available
in front of that contract / purchase order.
UPDATE GOODS RECEIPTS NOTE
Step 4: This will display Contract/PO Update GRN page with the approved purchase order, milestones, and
payment history details.
UPDATE GOODS RECEIPTS NOTE
Step 4: This will display Contract/PO Update GRN page with the approved purchase order, milestones, and
payment history details.
UPDATE GOODS RECEIPTS NOTE
Step 4: This will display Contract/PO Update GRN page with the approved purchase order, milestones, and
payment history details.
UPDATE GOODS RECEIPTS NOTE
Step 5: Agency user then need to click on ‘‘Select’’ button for the milestone. This will display actions, click on
‘‘Update GRN’’ available in front of a milestone for which the user wants to update the GRN.
UPDATE GOODS RECEIPTS NOTE
Step 6: This will display ‘Update GRN’ window with
the milestone details.
Step 7: Agency user needs to fill up the details like
Amount due, delivered quantity etc. Rejected
quantity will get auto populated.
UPDATE GOODS RECEIPTS NOTE
Step 8: Agency user then needs to add certification of Acceptance or Certification of Completed Delivery and
writing of comments for updating GRN. To add the Certificates, agency user needs to click on “Choose File”
button.
Step 9: Write the comment in the box provided, and then click on “Save”. If clicks on “Close”, system will take
agency user back to “Update GRN” page.
UPDATE GOODS RECEIPTS NOTE
Step 10: Click on “Yes” to update GRN. If clicks on “No”, system will take agency user back to “Update GRN” page.
Step 11: Prompt for GTRN updated successfully.
UPDATE GOODS RECEIPTS NOTE
Step 12: Once the GRN is updated then, agency users can view updated GRN and needs to raise Liquidated
Damages
Step 13: To view updated GRN, click on ‘‘Select’’ this will display a list of actions and then click on ‘‘View
GRN’’ option, available in front of GRN Details. This will open update GRN window. Users can take a
printout of the same by clicking on “Print” tab. Click on “Close” to close update GRN window.
APPROVING
STATEMENT OF WORK
ACCOMPLISHED
APPROVING STATEMENT OF WORK ACCOMPLISHED
Step 1: To Approve Statement of Work Accomplished in case when classification is Works Infra Projects or
Consultancy, agency user having Contract Administrator access privilege, login into the system and accesses
“Pending For Approval Purchase Order / Contract” sub menu of ‘Contract Management’’. This will display list of
pending for approval contracts / purchase orders.
Step 2: Fill in the single or combination of search criteria for searching any contract / purchase order for which
statement of work accomplished is to be approved and then click on “Search” icon. To remove / erase the data in
search criteria, click on “Eraser” icon.
Step 3: Then, click on ‘‘Select’’ this will display a list of actions and then click on ‘‘View Contract / SWA Approval’’
option, available in front of that contract / purchase order.
APPROVING STATEMENT OF WORK ACCOMPLISHED
Step 4: This will display Approve SWA page. At the bottom of this page, agency user will get the option to approve
statement of work.
APPROVING STATEMENT OF WORK ACCOMPLISHED
Step 5: Click on ‘‘Select’’ this will display a list of actions and then click on ‘‘Approve SWA’’ option.
APPROVING STATEMENT OF WORK ACCOMPLISHED
Step 6: This will display Approve SWA pop-up with the
details filled by merchant. Along with, an option to upload,
certificate of acceptance or project completion.
Step 7: If the user forgets or skips to brows and upload
the certificate of acceptance or project completion then,
system prompts the message “Please Upload Certificate
of Acceptance or Certificate of Project Completion.”
APPROVING STATEMENT OF WORK ACCOMPLISHED
Step 8: Agency user then needs to upload the certificate of acceptance or project completion by clicking on
“Browse” button along with the comments for approval and then click on “Approve”.
Step 9: Click on “Yes” to approve the Contract / Purchase Order SWA. If clicks on “No”, system will take agency
user back to “Approve SWA” page.
APPROVING STATEMENT OF WORK ACCOMPLISHED
Step 10: Prompt message SWA successfully approved will be displayed. Click “OK” to close the message. further
user needs to raise Liquidated Damages.
REJECTING STATEMENT OF
WORK ACCOMPLISHED
REJECTING STATEMENT OF WORK ACCOMPLISHED
Step 1: To Reject Statement of Work Accomplished, agency user having Contract Administrator access privilege,
login into the system and accesses “Pending for Approval Purchase Order / Contract” sub menu of ‘Contract
Management’’.
REJECTING STATEMENT OF WORK ACCOMPLISHED
Step 5: Click on ‘‘Select’’ this will display a list of actions and then click on ‘‘Approve SWA’’ option.
REJECTING STATEMENT OF WORK ACCOMPLISHED
Step 2: Continuing from the ‘‘View Contract / SWA Approval’’ page. Agency user then needs to upload the
certificate of acceptance or project completion by clicking on “Browse” button along with the comments for
rejection and then click on “Reject”.
REJECTING STATEMENT OF WORK ACCOMPLISHED
Step 3: Click on “Yes” to reject the Contract / Purchase Order SWA. If clicks on “No”, system will take agency user
back to “Approve SWA” page.
Step 4: The System then prompts for SWA successfully rejected.
VIEWING STATEMENT OF
WORK ACCOMPLISHED
VIEWING STATEMENT OF WORK ACCOMPLISHED
Step 1: To View Statement of Work Accomplished, agency user having Contract Administrator or Contract
Approver access privilege, login into the system and accesses “Approved Purchase Order / Contract” sub menu of
‘Contract Management’’. This will display list of approved contracts / purchase orders.
Step 2: Fill in the single or combination of search criteria for searching any contract / purchase order for which
statement of work accomplished is to be viewed and then click on “Search” icon. To remove / erase the data in
search criteria, click on “Eraser” icon.
VIEWING STATEMENT OF WORK ACCOMPLISHED
Step 3: Then, click on ‘‘Select’’ this will display a list of actions and then click on ‘‘View Statement of Work
Accomplished’’ option, available in front of that contract / purchase order.
VIEWING STATEMENT OF WORK ACCOMPLISHED
Step 4: This will display “Contracts / Purchase Order Statement of Work Accomplished” page. At the bottom of
this page, agency user will get Statement of Work Accomplished and milestones details.
VIEWING STATEMENT OF WORK ACCOMPLISHED
Step 4: This will display “Contracts / Purchase Order Statement of Work Accomplished” page. At the bottom of
this page, agency user will get Statement of Work Accomplished and milestones details.
VIEWING STATEMENT OF WORK ACCOMPLISHED
Step 4: This will display “Contracts / Purchase Order Statement of Work Accomplished” page. At the bottom of
this page, agency user will get Statement of Work Accomplished and milestones details.
Step 5: From these details, click on ‘‘Select’’ option, available in front of milestones, this will display a list of
actions. From that list, click on, ‘‘View SWA’’ option.
VIEWING STATEMENT OF WORK ACCOMPLISHED
Step 6: This will further open Update SWA window, from which, user can view and print the Statement of Work
Accomplished.
CREATING LIQUIDATED
DAMAGES
CREATING LIQUIDATED DAMAGES
Step 1: To raise liquidated damages, agency user having Contract Administrator or Contract Approver access
privilege, login into the system and accesses “Approved Purchase Order / Contract”. sub menu of ‘Contract
Management’’. This will display list of approved contracts / purchase orders.
Step 2: Fill in the single or combination of search criteria for searching any contract / purchase order for which
liquidated damage is to be raised and then click on “Search” icon. To remove / erase the data in search criteria,
click on “Eraser” icon.
CREATING LIQUIDATED DAMAGES
Step 3: Then, click on ‘‘Select’’ this will display a list of actions and then click on ‘‘View Statement of Work
Accomplished’’ for classification is Works Infra Projects or Consultancy or Click “Update GRN” option for
classification is Goods or Goods – General Support Services , available in front of that contract / purchase order.
CREATING LIQUIDATED DAMAGES
Step 4: This will display “Contracts / Purchase Order Statement of Work Accomplished” page or “Contract / PO
Update GRN” page. At the bottom under GRN Details section for classification is Goods or Goods – General
Support Services or SWA Details for classification is Works Infra Projects or Consultancy, agency user will click on
Select button for the milestone in concern. This will display Liquidated Damages option.
CREATING LIQUIDATED DAMAGES
Step 5: Clicking on, liquidated damages option, will display, Liquidated Damages page with milestone details.
CREATING LIQUIDATED DAMAGES
Step 6: Agency user then needs to add the supporting document by clicking on “Choose File” option for raising
liquidated damages.
Step 7: Then write in the comments, accordingly and liquidated damages number of days. Liquidated Damages
amount and total Liquidated Damages percentage will get auto calculated and displayed.
CREATING LIQUIDATED DAMAGES
Step 8: Then select the approver for approving Liquidated Damages. To select the approver, click in the box
available at the left-hand side of the name of the official and then click on “Save”.
CREATING LIQUIDATED DAMAGES
Step 9: Then click on “Send for Approval”. However, if clicks on “Cancel”, system will take the agency user back to
Liquidated Damages page.
Step 10: Click on “Yes” to send Liquidated Damages approval. If clicks on “No”, system will take agency user back to
“Liquidated Damages” page.
Step 11: Prompt for Liquidated Damages successfully sent for approval.
APPROVING / REJECTING
LIQUIDATED DAMAGE
APPROVING / REJECTING LIQUIDATED DAMAGE
Step 1: To approve Liquidated Damages, agency user having Contract Approver access privilege, login into the
system and accesses “Pending Contracts / Purchase Orders” sub menu of “Contract Management’’. This will
display list of pending for approval contracts / purchase orders.
Step 2: Fill in the single or combination of search criteria for searching any pending for approval contract /
purchase order and then click on “Search” icon. To remove / erase the data in search criteria, click on “Eraser”
icon.
Step 3: Then, click on ‘‘Select’’ this will display a list of actions and then click on ‘‘Approve Liquidated Damages’’
option, available in front of that contract / purchase order.
APPROVING / REJECTING LIQUIDATED DAMAGE
Step 4: This will display Approve Liquidated Damages page. On this page, the approver can view the supporting
document/s uploaded by the creator.
APPROVING / REJECTING LIQUIDATED DAMAGE
Step 5: Below this section on the same page, the approver can write in the comments for approving Liquidated
Damages.
Step 6: Once the commenting is done, agency user needs to click on “Approve” or “Reject” as needed.
APPROVING / REJECTING LIQUIDATED DAMAGE
Step 7: Click on “Yes” to proceed. If clicks on “No”, system will take agency user back to “Approve Liquidated
Damages” page.
Step 8: Prompt for successful approval/rejection of Liquidated Damages.
RAISING RETENTION
MONEY
RAISING RETENTION MONEY
Step 1: To raise retention money, agency user having Contract Administrator access privilege, login into the
system and accesses “Approved Purchase Orders” sub menu of ‘Contract Management’’. This will display list of
approved purchase orders.
Step 2: Fill in the single or combination of search criteria for searching any contract / purchase order and then
click on “Search” icon. To remove / erase the data in search criteria, click on “Eraser” icon.
RAISING RETENTION MONEY
Step 3: Click on ‘‘Select’’ this will display a list of actions and then click on ‘‘View Statement of Work
Accomplished’’ for classification is Works Infra Projects or Consultancy or Click “Update GRN” option for
classification is Goods or Goods – General Support Services , available in front of that contract / purchase order.
Step 4: This will display “Contracts / Purchase Order Statement of Work Accomplished” page or “Contract / PO
Update GRN” page. At the bottom under GRN Details section for classification is Goods or Goods – General
Support Services or SWA Details for classification is Works Infra Projects or Consultancy, agency user will click on
Select button for the milestone in concern.
RAISING RETENTION MONEY
Step 5: Click on ‘‘Select’’ this will display a list of actions, from this list, click on ‘‘Retention Money’’ option.
RAISING RETENTION MONEY
Step 6: This will display Retention Money page with milestone details.
Step 7: Agency user needs to add the due retention money amount. However, this amount should not be
exceeding 50% of total amount due. If, mistakenly the user adds exceeded amount then system will pop up the
message as, “Retention money Amount should not exceeds 50% of Amount Due”.
RAISING RETENTION MONEY
Step 8: Agency user then needs to add the supporting document by clicking on “Choose File” button.
RAISING RETENTION MONEY
Step 9: Then write in the comments and select
the approver by clicking on “Select Approver”.
Select the approver by clicking in the box
available at the left-hand side of the name of
the official and then click on “Save”
Step 10: Then click on “Send for Approval”.
However, if clicks on “Close”, system will take
the agency user back to retention money page.
RAISING RETENTION MONEY
Step 11: Click on “Yes” to send retention money for approval. If clicks on “No”, system will take agency user back
to “Retention Money” page.
Step 12: Prompt for retention money successfully sent for approval.
APPROVING /
REJECTING RETENTION
MONEY
APPROVING / REJECTING RETENTION MONEY
Step 1: To approve retention money, agency user having Contract Administrator or Contract Approver access
privilege, login into the system and accesses “Pending Contracts / Purchase Orders” sub menu of ‘Contract
Management’’. This will display list of pending for approval contracts / purchase orders.
Step 2: Fill in the single or combination of search criteria for searching any contract / purchase order and then
click on “Search” icon. To remove / erase the data in search criteria, click on “Eraser” icon.
Step 3: Then, click on ‘‘Select’’ this will display a list of actions and then click on ‘‘Approve Retention Money’’
option, available in front of that contract / purchase order
APPROVING / REJECTING RETENTION MONEY
Step 4: This will display Approve Retention Money page. On this page, the approver can view the supporting
document/s uploaded by the creator.
Step 5: Below this section on the same page, the approver can write in the comments for approving retention
money.
VIEW GENERATED
INVOICE
VIEW GENERATED INVOICE
Step 1: To view generated invoice, agency user having Contract Administrator or Contract Approver access
privilege, login into the system and accesses “Update Good Receipts Note (For Goods Bid Notice) and “Approve
Statement of Work Accomplished (SWA)” (For Works and Infra Bid Notice). This will display list of pending for
approval contracts / purchase orders.
Step 2: Then, click on ‘‘Select’’ this will display a list of actions and then click on ‘‘View Invoice Generation’’
option, available in front of the milestone / GRN / SWA Details.
VIEW GENERATED INVOICE
Step 3: This will display merchant generated invoice with and without Joint Venture.
Step 4: By clicking on “Print” button, user can take a printout of Invoice.
VIEW GENERATED INVOICE
Invoice for Non-Joint Venture.
VIEW GENERATED INVOICE
Invoice for Joint Venture.
ACCEPT GENERATED
INVOICE
ACCEPT GENERATED INVOICE
Step 1: To accept generated invoice, agency user having Contract Administrator or Contract Approver access
privilege, login into the system and accesses “Update Good Receipts Note (For Goods Bid Notice) and “Approve
Statement of Work Accomplished (SWA)” (For Works and Infra Bid Notice). This will display list of pending for
approval contracts / purchase orders.
Step 2: To accept the invoice, click on ‘‘Select’’ this will display a list of actions and then click on ‘‘Accept Invoice’’
option, available in front of the milestone / GRN / SWA Details.
ACCEPT GENERATED INVOICE
Step 3: This will display invoice details. Agency user then needs to fill in the OR Number.
ACCEPT GENERATED INVOICE
Step 4: Select from the drop down the Payment Mode either as Cash / Cashier's / Manager’s Cheque, Bank
Draft / Guarantee or irrevocable letter of credit, Surety Bond or Not Applicable.
Step 5: Agency user then needs to write the comments and add the supporting document/s, by clicking on “Choose
File” button. User can add multiple documents if required by clicking on green colored “Add More” tab.
ACCEPT GENERATED INVOICE
Step 6: Once all the mandatory process is done, agency user needs to click on “Accept Invoice” tab to approve the
invoice.
Step 7: Click on “Yes” to approve the invoice. If clicks on “No”, system will take agency user back to “Invoice
Details” page.
ACCEPT GENERATED INVOICE
Step 8: Prompt for successful approval of invoice along with, status as Invoice Accepted in GRN details
REJECT GENERATED
INVOICE
REJECT GENERATED INVOICE
Step 1: Continuing from Step 5 of Accept Generated Invoice.
Step 2: Once all the mandatory process is done, agency user needs to click on “Reject Invoice” button to reject
the invoice.
REJECT GENERATED INVOICE
Step 3: Click on “Yes” to reject the invoice. If clicks on “No”, system will take agency user back to “Invoice Details”
page.
Step 4: Prompt for successful rejection of invoice along with, status as Invoice Rejected in GRN / SWA details. In
such a case merchant needs to re-generate and re-submit the invoice.
PROCEED TO PAYMENT
PROCEED TO PAYMENT
Step 1: To view generated invoice, agency user having Contract Administrator or Contract Approver access
privilege, login into the system and accesses “Update Good Receipts Note (For Goods Bid Notice) and “Approve
Statement of Work Accomplished (SWA)” (For Works and Infra Bid Notice). This will display list of pending for
approval contracts / purchase orders.
PROCEED TO PAYMENT
Step 2: To proceed for payment, click on ‘‘Select’’ this will display a list of actions and then click on ‘‘Proceed to
Payment’’ option, available in front of the milestone / GRN / SWA Details.
PROCEED TO PAYMENT
Step 3: This will display Contract / PO GRN Payment Details.
PROCEED TO PAYMENT
Step 4: To view the invoice, agency user needs to click on, “Click Here” option, available in front of View Invoice.
Agency user then needs to fill in the comments and add the supporting document/s, by clicking on “Choose File”
button.
Step 5: Once all the mandatory process is done, agency user needs to click on “Accept Invoice” tab to approve
the invoice payment.
Step 6: Click on “Yes” to approve the invoice payment. If clicks on “No”, system will take agency user back to
“Contract / PO GRN Payment Details” page.
PROCEED TO PAYMENT
Step 7: Prompt for successful approval of invoice payment along with, status as Payment Generated in GRN / SWA
details.
INITIATING ADVANCE
PAYMENT
INITIATING ADVANCE PAYMENT
Step 1: To initiate advance Payment, agency user having Contract Administrator access privilege, login into the
system and accesses “Approved Contracts / Approved Purchase Orders” sub menu of ‘Contract Management’’.
This will display list of approved contracts / purchase orders.
Step 2: Fill in the single or combination of search criteria for searching any contract / purchase order and then
click on “Search” icon. To remove / erase the data in search criteria, click on “Eraser” icon.
INITIATING ADVANCE PAYMENT
Step 3: Then, click on ‘‘Select’’ this will display a list of actions and then click on ‘‘Advance Payment’’ option,
available in front of that contract / purchase order.
INITIATING ADVANCE PAYMENT
Step 4: This will display Contract / Purchase Order Advance Payment page along with purchase order details.
Step 5: At the bottom of this page, agency user can write in the comments for initiating advance payment.
Step 6: Once the commenting is done, agency user needs to upload the supporting document by clicking on
“Choose File” button.
INITIATING ADVANCE PAYMENT
Step 7: Then select the approver so that the
amendment can get approval. Select the
approver by clicking in the box available at the
left-hand side of the name of the official and then
click on “Save”
Step 8: And then click on “Send for Approval”.
INITIATING ADVANCE PAYMENT
Step 9: Click on “Yes” to send advance payment for approval. If clicks on “No”, system will take agency user back
to “Contract / Purchase Order Advance Payment” page.
Step 10: Prompt for advance payment successfully sent for approval with status showing as “Pending for
Approval”.
APPROVING ADVANCE
PAYMENT
APPROVING ADVANCE PAYMENT
Step 1: To approve the advance payment, agency user having Contract Approver access privilege, login into the
system and accesses “Pending Contracts / Purchase Orders” sub menu of ‘Contract Management’’. This will
display list of pending for approval contracts / purchase orders.
Step 2: Fill in the single or combination of search criteria for searching any contract / purchase order and then
click on “Search” icon. To remove / erase the data in search criteria, click on “Eraser” icon.
Step 3: Then, click on ‘‘Select’’ this will display a list of actions and then click on ‘‘Approve Advance Payment’’
option, available in front of that contract / purchase order.
APPROVING ADVANCE PAYMENT
Step 4: This will display Contract / Purchase Order Advance Payment page along with purchase order and
advance payment details.
APPROVING ADVANCE PAYMENT
Step 5: In the advance payment section, the approver needs to fill in the comment for approving the advance
payment and then click on “Approve” button.
Step 6: Click on “Yes” to approve advance payment. If clicks on “No”, system will take agency user back to
“Contract / Purchase Order Advance Payment” page.
Step 7: Prompt for advance payment successfully approved with the status showing as “Approved”.
VIEW PAYMENT
HISTORY
VIEW PAYMENT HISTORY
Step 1: To view Payment history, agency user having Contract Administrator or Contract Approver access privilege,
login into the system and accesses “Approved Contracts / Approved Purchase Orders” sub menu of ‘Contract
Management’’. This will display list of approved contracts / purchase orders.
Step 2: Fill in the single or combination of search criteria for searching any contract / purchase order and then
click on “Search” icon. To remove / erase the data in search criteria, click on “Eraser” icon.
Step 3: Then, click on ‘‘Select’’ this will display a list of actions and then click on ‘‘Payment History’’ option,
available in front of that contract / purchase order.
VIEW PAYMENT HISTORY
Step 2: This will further open sub menu list of “Contract Management”
VIEW PAYMENT HISTORY
Step 2: This will further open sub menu list of “Contract Management”
Ad

More Related Content

Similar to Contract Management For Procuring Entity .pptx (20)

Procure 2 pay life cycle
Procure 2 pay life cycleProcure 2 pay life cycle
Procure 2 pay life cycle
pratapbehera123
 
Optimizing Contract Renewals with Oracle Service Contracts
Optimizing Contract Renewals with Oracle Service ContractsOptimizing Contract Renewals with Oracle Service Contracts
Optimizing Contract Renewals with Oracle Service Contracts
Jade Global
 
Improved Approval Flow in Odoo 17 Studio App
Improved Approval Flow in Odoo 17 Studio AppImproved Approval Flow in Odoo 17 Studio App
Improved Approval Flow in Odoo 17 Studio App
Celine George
 
Payments on contracts
Payments on contractsPayments on contracts
Payments on contracts
naji maalouf
 
How to_ Salesforce CPQ_ Manage Renewals and Amendments.pdf
How to_ Salesforce CPQ_ Manage Renewals and Amendments.pdfHow to_ Salesforce CPQ_ Manage Renewals and Amendments.pdf
How to_ Salesforce CPQ_ Manage Renewals and Amendments.pdf
victorothugadi
 
On-Demand Customer Communication Management (CCM)
On-Demand Customer Communication Management (CCM)On-Demand Customer Communication Management (CCM)
On-Demand Customer Communication Management (CCM)
Newgen Software Technologies Limited
 
What’s new in summer’15 release - Security & Compliance
What’s new in summer’15 release - Security & ComplianceWhat’s new in summer’15 release - Security & Compliance
What’s new in summer’15 release - Security & Compliance
Shesh Kondi
 
What’s new in summer’15 release - Security & Compliance
What’s new in summer’15 release - Security & ComplianceWhat’s new in summer’15 release - Security & Compliance
What’s new in summer’15 release - Security & Compliance
Shesh Kondi
 
IntelliPro BPMS - Process Frameworks
IntelliPro BPMS - Process FrameworksIntelliPro BPMS - Process Frameworks
IntelliPro BPMS - Process Frameworks
iLeap
 
iContract.pptx
iContract.pptxiContract.pptx
iContract.pptx
Manish Chauhan
 
OfficeCentral Manual-en-procurement v3-r4
OfficeCentral Manual-en-procurement v3-r4OfficeCentral Manual-en-procurement v3-r4
OfficeCentral Manual-en-procurement v3-r4
venturesmarketing
 
E trading platform for insurance
E trading platform for insurance E trading platform for insurance
E trading platform for insurance
supriyo12
 
Online shopping ecommerce java project
Online shopping ecommerce java projectOnline shopping ecommerce java project
Online shopping ecommerce java project
Tutorial Learners
 
PPT-6 How to buy and sell shares in Stock Exchange.pptx
PPT-6 How to buy and sell shares in Stock Exchange.pptxPPT-6 How to buy and sell shares in Stock Exchange.pptx
PPT-6 How to buy and sell shares in Stock Exchange.pptx
Hilsonyusuf
 
PPT-6 How to buy and sell shares in Stock Exchange updated 30 Sept 2022.pdf
PPT-6 How to buy and sell shares in Stock Exchange updated 30 Sept 2022.pdfPPT-6 How to buy and sell shares in Stock Exchange updated 30 Sept 2022.pdf
PPT-6 How to buy and sell shares in Stock Exchange updated 30 Sept 2022.pdf
Rajatjaiswal76
 
PPT-6 How to buy and sell shares in Stock Exchange updated 30 Sept 2022.pdf
PPT-6 How to buy and sell shares in Stock Exchange updated 30 Sept 2022.pdfPPT-6 How to buy and sell shares in Stock Exchange updated 30 Sept 2022.pdf
PPT-6 How to buy and sell shares in Stock Exchange updated 30 Sept 2022.pdf
Rajatjaiswal76
 
PPT-6 How to buy and sell shares in Stock Exchange.pptx
PPT-6 How to buy and sell shares in Stock Exchange.pptxPPT-6 How to buy and sell shares in Stock Exchange.pptx
PPT-6 How to buy and sell shares in Stock Exchange.pptx
Nimish Savaliya
 
NetSuite Procure To Pay Process.pdf
NetSuite Procure To Pay Process.pdfNetSuite Procure To Pay Process.pdf
NetSuite Procure To Pay Process.pdf
Pratik686562
 
Advanced Uses of Salesforce's Login Flows
Advanced Uses of Salesforce's Login FlowsAdvanced Uses of Salesforce's Login Flows
Advanced Uses of Salesforce's Login Flows
Salesforce Developers
 
CreditPoint Software Product Overview
CreditPoint Software Product Overview CreditPoint Software Product Overview
CreditPoint Software Product Overview
Charlie Pilkington
 
Procure 2 pay life cycle
Procure 2 pay life cycleProcure 2 pay life cycle
Procure 2 pay life cycle
pratapbehera123
 
Optimizing Contract Renewals with Oracle Service Contracts
Optimizing Contract Renewals with Oracle Service ContractsOptimizing Contract Renewals with Oracle Service Contracts
Optimizing Contract Renewals with Oracle Service Contracts
Jade Global
 
Improved Approval Flow in Odoo 17 Studio App
Improved Approval Flow in Odoo 17 Studio AppImproved Approval Flow in Odoo 17 Studio App
Improved Approval Flow in Odoo 17 Studio App
Celine George
 
Payments on contracts
Payments on contractsPayments on contracts
Payments on contracts
naji maalouf
 
How to_ Salesforce CPQ_ Manage Renewals and Amendments.pdf
How to_ Salesforce CPQ_ Manage Renewals and Amendments.pdfHow to_ Salesforce CPQ_ Manage Renewals and Amendments.pdf
How to_ Salesforce CPQ_ Manage Renewals and Amendments.pdf
victorothugadi
 
What’s new in summer’15 release - Security & Compliance
What’s new in summer’15 release - Security & ComplianceWhat’s new in summer’15 release - Security & Compliance
What’s new in summer’15 release - Security & Compliance
Shesh Kondi
 
What’s new in summer’15 release - Security & Compliance
What’s new in summer’15 release - Security & ComplianceWhat’s new in summer’15 release - Security & Compliance
What’s new in summer’15 release - Security & Compliance
Shesh Kondi
 
IntelliPro BPMS - Process Frameworks
IntelliPro BPMS - Process FrameworksIntelliPro BPMS - Process Frameworks
IntelliPro BPMS - Process Frameworks
iLeap
 
OfficeCentral Manual-en-procurement v3-r4
OfficeCentral Manual-en-procurement v3-r4OfficeCentral Manual-en-procurement v3-r4
OfficeCentral Manual-en-procurement v3-r4
venturesmarketing
 
E trading platform for insurance
E trading platform for insurance E trading platform for insurance
E trading platform for insurance
supriyo12
 
Online shopping ecommerce java project
Online shopping ecommerce java projectOnline shopping ecommerce java project
Online shopping ecommerce java project
Tutorial Learners
 
PPT-6 How to buy and sell shares in Stock Exchange.pptx
PPT-6 How to buy and sell shares in Stock Exchange.pptxPPT-6 How to buy and sell shares in Stock Exchange.pptx
PPT-6 How to buy and sell shares in Stock Exchange.pptx
Hilsonyusuf
 
PPT-6 How to buy and sell shares in Stock Exchange updated 30 Sept 2022.pdf
PPT-6 How to buy and sell shares in Stock Exchange updated 30 Sept 2022.pdfPPT-6 How to buy and sell shares in Stock Exchange updated 30 Sept 2022.pdf
PPT-6 How to buy and sell shares in Stock Exchange updated 30 Sept 2022.pdf
Rajatjaiswal76
 
PPT-6 How to buy and sell shares in Stock Exchange updated 30 Sept 2022.pdf
PPT-6 How to buy and sell shares in Stock Exchange updated 30 Sept 2022.pdfPPT-6 How to buy and sell shares in Stock Exchange updated 30 Sept 2022.pdf
PPT-6 How to buy and sell shares in Stock Exchange updated 30 Sept 2022.pdf
Rajatjaiswal76
 
PPT-6 How to buy and sell shares in Stock Exchange.pptx
PPT-6 How to buy and sell shares in Stock Exchange.pptxPPT-6 How to buy and sell shares in Stock Exchange.pptx
PPT-6 How to buy and sell shares in Stock Exchange.pptx
Nimish Savaliya
 
NetSuite Procure To Pay Process.pdf
NetSuite Procure To Pay Process.pdfNetSuite Procure To Pay Process.pdf
NetSuite Procure To Pay Process.pdf
Pratik686562
 
Advanced Uses of Salesforce's Login Flows
Advanced Uses of Salesforce's Login FlowsAdvanced Uses of Salesforce's Login Flows
Advanced Uses of Salesforce's Login Flows
Salesforce Developers
 
CreditPoint Software Product Overview
CreditPoint Software Product Overview CreditPoint Software Product Overview
CreditPoint Software Product Overview
Charlie Pilkington
 

Recently uploaded (20)

Brown and Black Modern Watercolor Presentation.pptx
Brown and Black Modern Watercolor Presentation.pptxBrown and Black Modern Watercolor Presentation.pptx
Brown and Black Modern Watercolor Presentation.pptx
johncolumnago
 
George Mankiw Principle of Economics Chapter 26
George Mankiw Principle of Economics Chapter 26George Mankiw Principle of Economics Chapter 26
George Mankiw Principle of Economics Chapter 26
DyandraRenata
 
Consolidated accounting notes presentation
Consolidated accounting notes presentationConsolidated accounting notes presentation
Consolidated accounting notes presentation
ashforddube14
 
Potential Crypto Airdrops – Checklist to Track the Most Promising Airdrops.pdf
Potential Crypto Airdrops – Checklist to Track the Most Promising Airdrops.pdfPotential Crypto Airdrops – Checklist to Track the Most Promising Airdrops.pdf
Potential Crypto Airdrops – Checklist to Track the Most Promising Airdrops.pdf
Coin Gabbar
 
DOC-20250502-WA0001..pdfjejsjjsjsjsjsjsjjsjs
DOC-20250502-WA0001..pdfjejsjjsjsjsjsjsjjsjsDOC-20250502-WA0001..pdfjejsjjsjsjsjsjsjjsjs
DOC-20250502-WA0001..pdfjejsjjsjsjsjsjsjjsjs
opppppppooooo5
 
Maximise Your Online Visibility - Lead Generation for Accountants.pdf
Maximise Your Online Visibility - Lead Generation for Accountants.pdfMaximise Your Online Visibility - Lead Generation for Accountants.pdf
Maximise Your Online Visibility - Lead Generation for Accountants.pdf
Accounting Leads
 
Truxton Capital: Middle Market Quarterly Review - April 2025
Truxton Capital: Middle Market Quarterly Review - April 2025Truxton Capital: Middle Market Quarterly Review - April 2025
Truxton Capital: Middle Market Quarterly Review - April 2025
truxtontrust
 
Depreciation of equipment's ____-__ .ppt
Depreciation of equipment's ____-__ .pptDepreciation of equipment's ____-__ .ppt
Depreciation of equipment's ____-__ .ppt
bluehhh07
 
Digitizing Dollars- Redefining B2B Payments with Stablecoin Strategy.pdf
Digitizing Dollars- Redefining B2B Payments with Stablecoin Strategy.pdfDigitizing Dollars- Redefining B2B Payments with Stablecoin Strategy.pdf
Digitizing Dollars- Redefining B2B Payments with Stablecoin Strategy.pdf
Jasper Colin
 
Top Dividend Paying Stocks in India 2025
Top Dividend Paying Stocks in India 2025Top Dividend Paying Stocks in India 2025
Top Dividend Paying Stocks in India 2025
Amit Finowings
 
Abhay Bhutada Building Success with Vision and Responsibility
Abhay Bhutada Building Success with Vision and ResponsibilityAbhay Bhutada Building Success with Vision and Responsibility
Abhay Bhutada Building Success with Vision and Responsibility
Harsh Mishra
 
The Impact of the Abhay Bhutada Foundation in Education
The Impact of the Abhay Bhutada Foundation in EducationThe Impact of the Abhay Bhutada Foundation in Education
The Impact of the Abhay Bhutada Foundation in Education
Harsh Mishra
 
TriStar Gold Corporate Presentation May 2025
TriStar Gold Corporate Presentation May 2025TriStar Gold Corporate Presentation May 2025
TriStar Gold Corporate Presentation May 2025
Adnet Communications
 
Lecture-1-Chap.-17-00000000000000000000000000.pdf
Lecture-1-Chap.-17-00000000000000000000000000.pdfLecture-1-Chap.-17-00000000000000000000000000.pdf
Lecture-1-Chap.-17-00000000000000000000000000.pdf
TNguyn808979
 
Hard Money Loan – Fast Cash, But at What Cost.pptx
Hard Money Loan – Fast Cash, But at What Cost.pptxHard Money Loan – Fast Cash, But at What Cost.pptx
Hard Money Loan – Fast Cash, But at What Cost.pptx
ameliajena8
 
Hormones (mid terms) by yhbybhnybhunudr rida.pptx
Hormones (mid terms) by yhbybhnybhunudr rida.pptxHormones (mid terms) by yhbybhnybhunudr rida.pptx
Hormones (mid terms) by yhbybhnybhunudr rida.pptx
yousafmuzammil19
 
Chapter of corporate finance of capital budegting
Chapter of corporate finance of capital budegtingChapter of corporate finance of capital budegting
Chapter of corporate finance of capital budegting
vanshsharma541544
 
Consolidated Accounting notes presentation 2
Consolidated Accounting notes presentation 2Consolidated Accounting notes presentation 2
Consolidated Accounting notes presentation 2
ashforddube14
 
downhill-all-the-way (1).pdf BAth university
downhill-all-the-way (1).pdf  BAth universitydownhill-all-the-way (1).pdf  BAth university
downhill-all-the-way (1).pdf BAth university
Henry Tapper
 
Money Mindset Mastery_ Transform Your Financial Life.pdf
Money Mindset Mastery_ Transform Your Financial Life.pdfMoney Mindset Mastery_ Transform Your Financial Life.pdf
Money Mindset Mastery_ Transform Your Financial Life.pdf
pckhetal
 
Brown and Black Modern Watercolor Presentation.pptx
Brown and Black Modern Watercolor Presentation.pptxBrown and Black Modern Watercolor Presentation.pptx
Brown and Black Modern Watercolor Presentation.pptx
johncolumnago
 
George Mankiw Principle of Economics Chapter 26
George Mankiw Principle of Economics Chapter 26George Mankiw Principle of Economics Chapter 26
George Mankiw Principle of Economics Chapter 26
DyandraRenata
 
Consolidated accounting notes presentation
Consolidated accounting notes presentationConsolidated accounting notes presentation
Consolidated accounting notes presentation
ashforddube14
 
Potential Crypto Airdrops – Checklist to Track the Most Promising Airdrops.pdf
Potential Crypto Airdrops – Checklist to Track the Most Promising Airdrops.pdfPotential Crypto Airdrops – Checklist to Track the Most Promising Airdrops.pdf
Potential Crypto Airdrops – Checklist to Track the Most Promising Airdrops.pdf
Coin Gabbar
 
DOC-20250502-WA0001..pdfjejsjjsjsjsjsjsjjsjs
DOC-20250502-WA0001..pdfjejsjjsjsjsjsjsjjsjsDOC-20250502-WA0001..pdfjejsjjsjsjsjsjsjjsjs
DOC-20250502-WA0001..pdfjejsjjsjsjsjsjsjjsjs
opppppppooooo5
 
Maximise Your Online Visibility - Lead Generation for Accountants.pdf
Maximise Your Online Visibility - Lead Generation for Accountants.pdfMaximise Your Online Visibility - Lead Generation for Accountants.pdf
Maximise Your Online Visibility - Lead Generation for Accountants.pdf
Accounting Leads
 
Truxton Capital: Middle Market Quarterly Review - April 2025
Truxton Capital: Middle Market Quarterly Review - April 2025Truxton Capital: Middle Market Quarterly Review - April 2025
Truxton Capital: Middle Market Quarterly Review - April 2025
truxtontrust
 
Depreciation of equipment's ____-__ .ppt
Depreciation of equipment's ____-__ .pptDepreciation of equipment's ____-__ .ppt
Depreciation of equipment's ____-__ .ppt
bluehhh07
 
Digitizing Dollars- Redefining B2B Payments with Stablecoin Strategy.pdf
Digitizing Dollars- Redefining B2B Payments with Stablecoin Strategy.pdfDigitizing Dollars- Redefining B2B Payments with Stablecoin Strategy.pdf
Digitizing Dollars- Redefining B2B Payments with Stablecoin Strategy.pdf
Jasper Colin
 
Top Dividend Paying Stocks in India 2025
Top Dividend Paying Stocks in India 2025Top Dividend Paying Stocks in India 2025
Top Dividend Paying Stocks in India 2025
Amit Finowings
 
Abhay Bhutada Building Success with Vision and Responsibility
Abhay Bhutada Building Success with Vision and ResponsibilityAbhay Bhutada Building Success with Vision and Responsibility
Abhay Bhutada Building Success with Vision and Responsibility
Harsh Mishra
 
The Impact of the Abhay Bhutada Foundation in Education
The Impact of the Abhay Bhutada Foundation in EducationThe Impact of the Abhay Bhutada Foundation in Education
The Impact of the Abhay Bhutada Foundation in Education
Harsh Mishra
 
TriStar Gold Corporate Presentation May 2025
TriStar Gold Corporate Presentation May 2025TriStar Gold Corporate Presentation May 2025
TriStar Gold Corporate Presentation May 2025
Adnet Communications
 
Lecture-1-Chap.-17-00000000000000000000000000.pdf
Lecture-1-Chap.-17-00000000000000000000000000.pdfLecture-1-Chap.-17-00000000000000000000000000.pdf
Lecture-1-Chap.-17-00000000000000000000000000.pdf
TNguyn808979
 
Hard Money Loan – Fast Cash, But at What Cost.pptx
Hard Money Loan – Fast Cash, But at What Cost.pptxHard Money Loan – Fast Cash, But at What Cost.pptx
Hard Money Loan – Fast Cash, But at What Cost.pptx
ameliajena8
 
Hormones (mid terms) by yhbybhnybhunudr rida.pptx
Hormones (mid terms) by yhbybhnybhunudr rida.pptxHormones (mid terms) by yhbybhnybhunudr rida.pptx
Hormones (mid terms) by yhbybhnybhunudr rida.pptx
yousafmuzammil19
 
Chapter of corporate finance of capital budegting
Chapter of corporate finance of capital budegtingChapter of corporate finance of capital budegting
Chapter of corporate finance of capital budegting
vanshsharma541544
 
Consolidated Accounting notes presentation 2
Consolidated Accounting notes presentation 2Consolidated Accounting notes presentation 2
Consolidated Accounting notes presentation 2
ashforddube14
 
downhill-all-the-way (1).pdf BAth university
downhill-all-the-way (1).pdf  BAth universitydownhill-all-the-way (1).pdf  BAth university
downhill-all-the-way (1).pdf BAth university
Henry Tapper
 
Money Mindset Mastery_ Transform Your Financial Life.pdf
Money Mindset Mastery_ Transform Your Financial Life.pdfMoney Mindset Mastery_ Transform Your Financial Life.pdf
Money Mindset Mastery_ Transform Your Financial Life.pdf
pckhetal
 
Ad

Contract Management For Procuring Entity .pptx

  • 1. Contract Management Agency Presentation Modernized Electronic Government Procurement System (mPhilGEPS)
  • 2. INTRODUCTION In all procuring methods contract management is one of the most important stages, in this process the implementation of contact includes creation of contract, payment milestones, contract approval, amendment of contract, extension of contract, suspension of contract, evaluation of contract, advance payment, liquidated damages, retention money, work measurement, and Termination of Contract. All these stages of contract implementation vary according to their procurement methods. There are different sets of rules and regulations for Goods, Supplies & Materials, and Infrastructure projects and for consultancy.
  • 3. SYSTEM STRUCTURE Web Browsers that can Access the System: ∙ Google Chrome ∙ Mozilla Firefox ∙ Internet Explorer (version 11) ∙ Safari mGEPS – Reconsideration and Protest is a module of the larger web application Modernized Electronic Government Procurement System (mGEPS) that can be accessed anywhere in the Philippines as long as an internet connection is available. Main Users of the System: Contract Management System has three users: (1) Contract Administrator (2) Contract Approver
  • 4. SYSTEM STRUCTURE Stakeholder Name Role Contract Administrator − Create contract − Suspend contract − Lift a suspension − Raise Liquidated Damages − Amend Contract − Extend Contract − Cancel Contract − Evaluate Contract − Raise Advance Payment − Terminate Contract − Raise Retention Money − View and Download Statement of Work Accomplished (SWA) − View and Download Milestone − View Payment History − Update Payment details Login Access: Agency user is required either to be contract administrator or contract approver
  • 5. SYSTEM STRUCTURE Getting Started________________________________________ This section will illustrate the step by step walkthrough of the system from initiation through exit. The logical arrangement of the information shall enable the Procuring Entity user to fully understand the flow and functionality of the system. Stakeholder Name Role Contract Approver − Approval of Contract Creation − Approval of Suspension − Approval of the Suspension Lifting’ − Approval of Amendment − Approval of Cancellation − Approval of Termination − View and Download Statement of Work Accomplished (SWA) − Review and Provide recommendation on Statement of Work Accomplished (SWA) − View and Download Milestone − View and Download Contract Details
  • 7. LANDING PAGE System URL or link is https://www.philgeps.gov.ph/ 1. Menus in Landing Page The following are the Menus in the landing page: ∙ Home – the page after selecting the URL ∙ About - ∙ Announcement ∙ Services ∙ Bulletin Board ∙ Open Data ∙ Login ∙ Signup ∙ Contact
  • 9. SYSTEM LOGIN FOR PROCURING USERS Step 1: Key in MGEPS URL or link : https://www.philgeps.gov.ph/
  • 10. SYSTEM LOGIN FOR PROCURING USERS Step 2: In landing page select LOGIN menu Item. Step 3: In first box of drop-down field, choose Log in type. Select Login as Agency/Observer Step 4: In second box or text field, type or key in the username given by System Administrator Step 5: In third box or text field, type or key in the password given by System Administrator Step 6: In fourth box or text field, type the Captcha then select LOG IN button.
  • 11. SYSTEM LOGIN FOR PROCURING USERS Step 7: If any of the box or fields are left unanswered, a prompt message will appear beneath the boxes and user will be asked for the certain field to be filled up. User needs to select login type User needs to key in username User needs to key in password User needs to key in Captcha
  • 12. SYSTEM LOGIN FOR PROCURING USERS Step 8: If Incorrect username or password, a prompt message will be shown, and user needs to key in correct username and password.
  • 13. SYSTEM LOGIN FOR PROCURING USERS Step 9: Successful login will route the system to pending task of the user on the MGEPS system.
  • 15. ACCESSING CONTRACT MANAGEMENT A. Accessing Through Pending Task Step 1: Agency user having Contract Administrator or Contract Approver access privilege, login into the system. After the login, from “Pending Task” window, click either on the count number in front of the required task i.e. Purchase Order under preparation or Purchase Order pending for approval etc.
  • 16. ACCESSING CONTRACT MANAGEMENT A. Accessing Through Pending Task Step 2: This will take the user to concerned sub menu of Contract Management. Step 3: As per the requirement of action, agency user clicks either of the Contract Management sub menu to perform the task(s).
  • 17. ACCESSING CONTRACT MANAGEMENT B. Accessing Through Contract Management Step 1: Agency user having Contract Administrator or Contract Approver access privilege, login into the system. After the login, click on ‘Menu’ button and from the menu items list, click on ‘Contract Management’.
  • 18. ACCESSING CONTRACT MANAGEMENT B. Accessing Through Contract Management Step 2: This will further open sub menu list of “Contract Management” Step 3: As per the requirement the agency user Click on - “Create Purchase Order/Contract” to create purchase order or - “Draft Purchase Order/Contract” to edit the draft purchase order or - “Pending Purchase Order/Contract” to recall/approve/send back the purchase order under approval or - “Approved/Purchase Order/Contract” to view approved purchase order or - “Pending contract” or “Suspended Contract” to view suspended contract or - “Terminated Contract” to view terminated contract sub menu to perform the task(s).
  • 20. CREATE CONTRACT / PURCHASE ORDER Step 1: To create a contract, agency user having Contract Administrator access privilege, login into the system and accesses ‘’Create Purchase Order / Contract’’. This will display list of Awarded Bid Notices for which, create contracts / purchase orders are pending. Please note also that the Awarded Merchant/Agency should already have Accepted the Award.
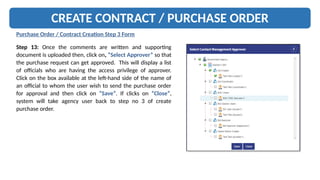
  • 21. CREATE CONTRACT / PURCHASE ORDER Step 2: Fill in the single or combination of search criteria for searching any awarded notice number for which purchase order / contract is to be generated and then click on “Search” icon. To remove / erase the data in search criteria, click on “Eraser” icon. Step 3: click on “Select” for the concern awarded notice, this will display a list of actions, and then click on “Create Purchase Order” option.
  • 22. CREATE CONTRACT / PURCHASE ORDER Step 4: This will prompt the message as “Purchase Order Initiated”. Click on Ok. This will take the user to Purchase Order / Contract Creation Step 1. Purchase Order / Contract Creation Step 1 Form Step 1: System will create new Purchase Order and will display the step 1 of the purchase order wherein following information is displayed among it some needs to be filled before sending the said purchase order to the merchant for acceptance.
  • 23. CREATE CONTRACT / PURCHASE ORDER Field Name Editable Mandatory Description PO ID No System Generated PO Number is populated. PO No Yes Yes Fill in agency’s purchase order no PO date Yes Yes Current date is auto populated, and it can be greater than current date. Notice Reference Number No No Auto populated from selected Award. Control Number No No Auto populated from selected Award. Notice Title No No Auto populated from selected Award. Notice Type No No Auto populated from selected Award. Project Name No No Auto populated from selected Award. Description No No Auto populated from selected Award. Business Category No No Auto populated from selected Award. Period of Contract No No Auto populated from selected Award. Delivery/Project Location No No Auto populated from selected Award. Procurement Program/Project No No Auto populated from selected Award. Mode of Procurement No No Auto populated from selected Award. Source of Fund No No Auto populated from selected Award. Budget No No Auto populated from selected Award. Purchase Order / Contract Creation Step 1 Form
  • 24. CREATE CONTRACT / PURCHASE ORDER Field Name Editable Mandatory Description Notice Publication No No Auto populated from selected Award. Mode of Bid submission No No Auto populated from selected Award. Classification No No Auto populated from selected Award. Lot Type No No Auto populated from selected Award. Bid Opening type No No Auto populated from selected Award. Contract Amount No No Auto populated from selected Award. Form of Performance Security Yes Yes The user can select any of the below option. In case it is not applicable select “Not Applicable”. 1. Cash or cashier’s/manager’s cheque 2. Bank draft/guarantee or irrevocable letter of credit 3. Surety bond 4. Not Applicable Upload performance security Yes Yes User can click choose file and upload the document or image file. Not Applicable if “Form of Performance Security” selected is “Not Applicable”. Purchase Order / Contract Creation Step 1 Form
  • 25. CREATE CONTRACT / PURCHASE ORDER Field Name Editable Mandatory Description Performance Security Amount Yes Yes Fill in the performance security amount. Not Applicable if “Form of Performance Security” selected is “Not Applicable”. Performance Security from Date Yes Yes Select date from which performance security starts its validity. Not Applicable if “Form of Performance Security” selected is “Not Applicable”. Performance Security to Date Yes Yes Select date from which performance security ends its validity. Not Applicable if “Form of Performance Security” selected is “Not Applicable”. Performance Security Period (in months) No No Auto calculated. Not Applicable if “Form of Performance Security” selected is “Not Applicable”. Purchase Order / Contract Creation Step 1 Form
  • 26. CREATE CONTRACT / PURCHASE ORDER Purchase Order / Contract Creation Step 1 Form
  • 27. CREATE CONTRACT / PURCHASE ORDER Purchase Order / Contract Creation Step 1 Form
  • 28. CREATE CONTRACT / PURCHASE ORDER Step 2: If the advance payment option selected as “Yes” then, the agency user will get additional field / box added to enter the advance payment amount. Purchase Order / Contract Creation Step 1 Form
  • 29. CREATE CONTRACT / PURCHASE ORDER Step 3: However, if the advance payment amount exceeds 50% of contract amount then, the system will pop up the message as “Advance payment Amount should not exceeds 50% of Contract Amount”. Purchase Order / Contract Creation Step 1 Form
  • 30. CREATE CONTRACT / PURCHASE ORDER Purchase Order / Contract Creation Step 1 Form Step 4: So, agency user need to add the advance payment amount, accordingly. Once the correct amount filled in, click on “Save And Continue” Step 5: Once, the required mandatory information is added then, click on “Save And Continue” Step 6: Click on ‘Yes’ to save the purchase order. If selects ‘No’, system will take the agency user back to purchase order step 1.
  • 31. CREATE CONTRACT / PURCHASE ORDER Step 7: System prompt an information “Purchase order saved successfully”. Clicking on “OK” will lead to step no 2 of Purchase Order / Contract Creation. This will take the user to Purchase Order / Contract Creation Step 2 Form. Purchase Order / Contract Creation Step 1 Form
  • 32. CREATE CONTRACT / PURCHASE ORDER Step 1: Step no 2 displays price bid data filled up at the time of creating purchase request. Purchase Order / Contract Creation Step 2 Form
  • 33. CREATE CONTRACT / PURCHASE ORDER Step 2: By clicking on “HTML Report” icon, this will display a popup and user can view the price bid details like UNSPSC Code, Quantity, Unit of Measurement etc. This report can be downloaded in excel format by clicking on “Export to Excel” tab. Click “Close icon” to close the pop-up. Purchase Order / Contract Creation Step 2 Form
  • 34. CREATE CONTRACT / PURCHASE ORDER Step 3: This will get the said template downloaded in the destination folder, by clicking on the file name, excel report will get displayed. Purchase Order / Contract Creation Step 2 Form Step 4: Agency user can add the templates for terms and conditions, in step no 2 of Purchase Order creation. To add the templates, user needs to click on “View Template” icon.
  • 35. CREATE CONTRACT / PURCHASE ORDER Step 5: This will open a popup to select list of Terms and condition Templates. Agency user can add the required template(s) by clicking on the box available at the right-hand side of template name. Note: Templates listed are configured from the CMS Template Master by Portal Admin / Agency users with access Purchase Order / Contract Creation Step 2 Form
  • 36. CREATE CONTRACT / PURCHASE ORDER Step 6: Once the template(s) is selected then, click on “Save” to add templates to the purchase order. If clicks on “Close”, system will take agency user back to step no 2 of create purchase order. Purchase Order / Contract Creation Step 2 Form Step 7: Prompt for successful addition of templates.
  • 37. CREATE CONTRACT / PURCHASE ORDER Step 8: Agency user can view the templates by clicking on, “View Template”. Templates can be removed if required. To remove the templates, click on “Remove”. Purchase Order / Contract Creation Step 2 Form Step 9: Click on “Yes” to remove the template(s). If clicks on “No”, system will take agency user back to step no 2 of create purchase order.
  • 38. CREATE CONTRACT / PURCHASE ORDER Step 10: Prompt for successful removal of template(s). Purchase Order / Contract Creation Step 2 Form Step 11: Once, the required information is added then, click on “Save And Continue”
  • 39. CREATE CONTRACT / PURCHASE ORDER Step 12: Click on “Yes” to save the purchase order. If clicks on “No”, system will take the agency user back to step no 2 of create purchase order. Purchase Order / Contract Creation Step 2 Form Step 13: Prompt for successful saving of Purchase Order. Clicking on Ok will lead to Purchase Order / Contract Creation Step 3 Form.
  • 40. CREATE CONTRACT / PURCHASE ORDER Step 1: Step 3 Form auto populate the data filled in at Steps 1 and 2 Form of create purchase order. Purchase Order / Contract Creation Step 3 Form
  • 41. CREATE CONTRACT / PURCHASE ORDER Purchase Order / Contract Creation Step 3 Form
  • 42. CREATE CONTRACT / PURCHASE ORDER Purchase Order / Contract Creation Step 3 Form
  • 43. CREATE CONTRACT / PURCHASE ORDER Step 2: Supervision of implementation of contract is possible through the milestone. Here agency user can need to add the milestone(s). In case of Advance payment was provided in the Step 1 Form, then Remaining Contract Amount would be reduced with that amount. Purchase Order / Contract Creation Step 3 Form Step 3: To add the milestone(s), click on “Add Milestone” tab.
  • 44. CREATE CONTRACT / PURCHASE ORDER Step 4: This will open add milestone window containing milestone parameters to be added i. e. Milestone details, Quantity, Percentage of Work etc. Agency user needs to fill in the intended details, accordingly. In case of goods and supply, computation type can be taken as Percentage of work or Amount. Purchase Order / Contract Creation Step 3 Form
  • 45. CREATE CONTRACT / PURCHASE ORDER Step 5: Once milestone parameters are added then, click on “Save”. If clicks on “Close”, system will take agency user back to step no 3 of create purchase order. Purchase Order / Contract Creation Step 3 Form Step 6: Click on “Yes” to save the milestone. If clicks on “No”, system will take agency user back to add milestone window.
  • 46. CREATE CONTRACT / PURCHASE ORDER Step 5: Once milestone parameters are added then, click on “Save”. If clicks on “Close”, system will take agency user back to step no 3 of create purchase order. Purchase Order / Contract Creation Step 3 Form Step 6: Click on “Yes” to save the milestone. If clicks on “No”, system will take agency user back to add milestone window. Step 7: Prompt for successful milestone addition.
  • 47. CREATE CONTRACT / PURCHASE ORDER Step 8: Added milestone(s) can be removed if required. To remove the milestone, click on “Select” available in front of intended to remove milestone and then click on “Remove”. Purchase Order / Contract Creation Step 3 Form
  • 48. CREATE CONTRACT / PURCHASE ORDER Step 9: Click on “Yes” to remove the milestone. If clicks on “No”, system will take agency user back to Step 3 Form of create purchase order. Purchase Order / Contract Creation Step 3 Form Step 10: Prompt for successful removal of milestone.
  • 49. CREATE CONTRACT / PURCHASE ORDER Step 11: Once the milestone(s) added then, agency user needs to write the comments before sending the purchase order / contract to the approver for getting the approval. Purchase Order / Contract Creation Step 3 Form Step 12: Agency user needs to upload the supporting document along with the approval request. Write the document name in the box and upload the concerned document.
  • 50. CREATE CONTRACT / PURCHASE ORDER Purchase Order / Contract Creation Step 3 Form Step 13: Once the comments are written and supporting document is uploaded then, click on, “Select Approver” so that the purchase request can get approved. This will display a list of officials who are having the access privilege of approver. Click on the box available at the left-hand side of the name of an official to whom the user wish to send the purchase order for approval and then click on “Save”. If clicks on “Close”, system will take agency user back to step no 3 of create purchase order.
  • 51. CREATE CONTRACT / PURCHASE ORDER Step 14: Now click on, “Send for Approval” tab to send the purchase order to the approver. If clicks on, “Close”, system will take the user back to “Create Purchase Order” page. Agency user can take a print out of the said purchase order by clicking on “Print” button. Purchase Order / Contract Creation Step 3 Form
  • 52. CREATE CONTRACT / PURCHASE ORDER Step 15: Click on “Yes” to send the purchase order for approval. If clicks on “No”, system will take agency user back to step no 3 of create purchase order. Purchase Order / Contract Creation Step 3 Form Step 16: Prompt for purchase order successfully sent to the approver.
  • 54. EDIT CONTRACT / PURCHASE ORDER Step 1: To edit drafted purchase order / contract, agency user having Contract Administrator or Contract Approver access privilege, login into the system and accesses “Draft Purchase Order / Contract” sub menu of ‘Contract Management’’. This will display list of pending for approval contracts / purchase orders.
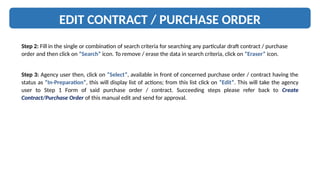
  • 55. EDIT CONTRACT / PURCHASE ORDER Step 2: Fill in the single or combination of search criteria for searching any particular draft contract / purchase order and then click on “Search” icon. To remove / erase the data in search criteria, click on “Eraser” icon. Step 3: Agency user then, click on “Select”, available in front of concerned purchase order / contract having the status as “In-Preparation”, this will display list of actions; from this list click on “Edit”. This will take the agency user to Step 1 Form of said purchase order / contract. Succeeding steps please refer back to Create Contract/Purchase Order of this manual edit and send for approval.
  • 57. DELETE CONTRACT / PURCHASE ORDER Step 1: agency user can Delete purchase order / contract, if required until it is in draft mode. Step 2: To delete any purchase order / contract, agency user having Contract Administrator access privileges, login into the system and accesses “Draft Purchase Order / Contract” sub menu of ‘Contract Management’’. This will display list of contracts / purchase orders. Step 3: Fill in the single or combination of search criteria for searching any particular contract / purchase order and then click on “Search” icon. To remove / erase the data in search criteria, click on “Eraser” icon. Step 4: Agency user then, click on “Select”, available in front of concerned purchase order / contract, this will display list of actions; from this list click on “Delete”.
  • 59. VIEW COMMENTS Step 1: agency users can View Comments of any purchase order / contract. Step 2: To view the comments, agency user having Contract Administrator or Contract Approver access privilege, login into the system and accesses ‘Contract Management’’ and it’s any of sub menu. Step 3: As per the requirement, agency user clicks either of the Contract Management sub menu to view the comments. Step 4: This will display the list of purchase order. fill in the single or combination of search criteria for searching any contract / purchase order and then click on “Search” icon. To remove / erase the data in search criteria, click on “Eraser” icon.
  • 60. VIEW COMMENTS Step 5: Agency user then, click on “Select”, available in front of concerned purchase order / contract, this will display list of actions; from this list click on “View Comments”. Step 6: This opens “View Purchase Order Comments” box.
  • 62. APPROVING/ REJECTING THE CONTRACT Step 1: The concerned Contract Approver receives the notification in pending task an email notification regarding to have a pending purchase order / contract for approval.
  • 63. APPROVING/ REJECTING THE CONTRACT Step 2: To approve pending Contract or Purchase Order, agency user having Contract Approver access privilege, login into the system and access ‘’Pending Purchase Order / Contract’’ sub menu of Contract Management. Alternative This will display list of pending for approval contracts / purchase orders with status as “Pending for Approval”. Step 3: Click on “Select” available in front of the concern purchase order / contract. This will display list of actions; from the list click on “View PO / Contract for Approval”.
  • 67. APPROVING/ REJECTING THE CONTRACT Step 4.a: This will display “Approve Purchase Order” page with the information like merchant details, milestones etc. At the bottom of this page, the approver needs to write the comments according to the approval or rejection of purchase order / contract. Step 4.b: Provide comments for Rejection of Purchase Order / Contract
  • 68. APPROVING/ REJECTING THE CONTRACT Step 5: Click on “Approve” or “Reject” Step 6: Click on “Yes” to continue Purchase Order / Contract. If clicks on “No”, system will take agency user back to “Approve Purchase Order” page. Step 7: Prompt for successful Purchase Oder rejection / sending back.
  • 69. APPROVING/ REJECTING THE CONTRACT Step 8.b: If Rejection is done, then after the rejection from Contract Approver, the said purchase order / contract lands under “Draft Purchase Orders”, submenu of ‘’Create Purchase Order / Contract’’ with the status as “In Preparation”. Step 8.a: After the approval from Contract Approver, the said purchase order / contract lands under “Approved Purchase Orders”, submenu of ‘’Create Purchase Order / Contract’’ with “Merchant Acceptance” status as “Pending for Acceptance”.
  • 71. SUSPEND CONTRACT Step 1: To suspend a contract, agency user having Contract Administrator or Contract Approver access privilege, login into the system and accesses “Approved Purchase Orders” sub menu of ‘Contract Management’’. This will display list of approved purchase orders for which, award status is “NTP Issued” and merchant acceptance status is “Accepted”.
  • 72. SUSPEND CONTRACT Step 2: Fill in the single or combination of search criteria for searching any published purchase order which needs to be suspended and then click on “Search” icon. To remove / erase the data in search criteria, click on “Eraser” icon. Step 3: Then, click on ‘‘Select’’ this will display a list of actions and then click on ‘‘Contract Suspension’’ option, available in front of that contract / purchase order. Step 4: This will display contract suspension page with the approved purchase order details.
  • 75. SUSPEND CONTRACT Step 5: Agency user then needs to add the supporting document for the suspension along with the comments. Step 6: To add the supporting document/s, agency user needs to click on “Add document name and supporting documents” hyperlink. It will then open a box / window wherein the user can write the name of the document which is to be uploaded by clicking on “Choose File” button. User can add multiple documents if required by clicking on green colored “Add More” tab.
  • 76. SUSPEND CONTRACT Step 5: Agency user then needs to add the supporting document for the suspension along with the comments. Step 6: To add the supporting document/s, agency user needs to click on “Add document name and supporting documents” hyperlink. It will then open a box / window wherein the user can write the name of the document which is to be uploaded by clicking on “Choose File” button. User can add multiple documents if required by clicking on green colored “Add More” tab.
  • 77. SUSPEND CONTRACT Step 7: Then, click on ‘‘Submit’’ to upload the supporting document. If clicks on “Close”, system will take agency user back to “Contract Suspension” page. Step 8: Prompt for successfully uploading of supporting documents.
  • 78. SUSPEND CONTRACT Step 9: Uploaded document/s can be removed by clicking on the “X (Cross)” sign. Then write the suspension comments. Step 10: Then select the approver so that contract suspension can get approved. To select the approver, click in the box available at the left-hand side of the name of the official and then click on “Save”. Then click on “Send for Approval”. However, if clicks on “Close”, system will take the agency user back to “Contract Suspension” page.
  • 79. SUSPEND CONTRACT Step 11: Click on “Yes” to send the contract suspension for approval. If clicks on “No”, system will take agency user back to “Contract Suspension” page. Step 12: Prompt for contract suspension successfully sent for approval.
  • 81. APPROVAL / REJECTION OF SUSPENSION Step 1: To approve the contract suspension, agency user having Contract Administrator or Contract Approver access privilege, login into the system and accesses “Pending Contracts / Purchase Orders” sub menu of ‘’Contract Management’’. This will display list of pending for approval contracts / purchase orders.
  • 82. APPROVAL / REJECTION OF SUSPENSION Step 2: Fill in the single or combination of search criteria for searching any particular pending for approval contract / purchase order and then click on “Search” icon. To remove / erase the data in search criteria, click on “Eraser” icon. Step 3: Then, click on ‘‘Select’’ this will display a list of actions and then click on ‘‘View Contract Suspend Approval’’ option, available in front of that contract / purchase order.
  • 83. APPROVAL / REJECTION OF SUSPENSION Step 4: This will display Contract / Purchase Order Suspension Approval page. On this page, the approver can view the comments and the supporting document/s uploaded by the creator. Step 5: Below this section on the same page, the approver can fill in the comments for approving or rejecting the suspension.
  • 84. APPROVAL / REJECTION OF SUSPENSION Step 6: Once the commenting is done, agency user needs to click on “Approve” tab to approve the suspension. However, if wish to reject the suspension then, the user needs to click on “Reject”. Step 7: Click on “Yes” to approve or reject the suspension. If clicks on “No”, system will take agency user back to “Contract / PO Suspension” page. Step 8: Prompt for successful approval or rejection of contract suspension. The concerned merchant will get email notification about the suspension of contract.
  • 86. LIFT OF SUSPENSION Step 1: To lift a suspension, agency user having Contract Administrator or Contract Approver access privilege, login into the system and accesses ‘’Suspended Contract / Purchase Order’’ sub menu of ‘Contract Management’’. This will display list of suspended contracts / purchase orders. Step 2: Fill in the single or combination of search criteria for the required suspended contract or purchase order. Select “Search Icon”. To remove / erase the data in search criteria, click on “Eraser” icon.
  • 87. LIFT OF SUSPENSION Step 3: Then, click on ‘‘Select’’ this will display a list of actions and then click on ‘‘Lifting of a Suspension Order’’ option, available in front of that contract / purchase order.
  • 89. LIFT OF SUSPENSION Step 4: This will display Contract / Purchase Order Suspension Approval page with the approved purchase order details.
  • 90. LIFT OF SUSPENSION Step 5: Agency user then needs to add the supporting document for lifting the suspension along with the comments. Step 6: To add the supporting document/s, agency user needs to click on “Add document name and supporting documents” hyperlink. It will then open a box / window wherein the user can write the name of the document which is to be uploaded by clicking on “Choose File” button. User can add multiple documents if required by clicking on green colored “Add More” tab.
  • 91. LIFT OF SUSPENSION Step 7: Then, click on ‘‘Submit’’ to upload the supporting document. If clicks on “Close”, system will take agency user back to “Contract Suspension” page. Step 8: Prompt for successfully uploading of supporting documents.
  • 92. LIFT OF SUSPENSION Step 9: Uploaded document/s can be removed by clicking on the “X (Cross)” sign. Then write the lifting of suspension comments. Step 10: Then select the approver so that lifting of contract suspension can get approval by clicking in the box available at the left-hand side of the name of the official and then click on “Save”.
  • 93. LIFT OF SUSPENSION Step 11: Then click on “Send for Approval”. However, if clicks on “Close”, system will take the agency user back to “Contract Suspension” page. Step 12: Click on “Yes” to send the lifting of contract suspension for approval. If clicks on “No”, system will take agency user back to “Contract Suspension” page. Step 13: Prompt for contract suspension successfully sent for approval.
  • 95. APPROVAL OF SUSPENSION LIFTING Step 1: To approve lifting of the contract suspension, agency user having Contract Approver access privilege, login into the system and accesses “Pending Contracts / Purchase Orders” sub menu of ‘’Contract Management’’. This will display list of pending for approval contracts / purchase orders. Step 2: Fill in the single or combination of search criteria for searching any particular pending for approval contract / purchase order and then click on “Search” icon. To remove / erase the data in search criteria, click on “Eraser” icon. Step 3: Then, click on ‘‘Select’’ for the purchase order in concern, this will display a list of actions and then click on ‘‘View Contract Lift Suspend Approval’’ option, available in front of that contract / purchase order.
  • 98. APPROVAL OF SUSPENSION LIFTING Step 4: This will display Contract / Purchase Order Lift Suspension Approval page. On this page, the approver can view the comments and the supporting document/s uploaded by the creator. Step 5: Below this section on the same page, the approver fills in the comments for approving to lift a suspension.
  • 99. APPROVAL OF SUSPENSION LIFTING Step 7: Click on “Yes” to approve lifting of contract suspension. If clicks on “No”, system will take agency user back to “Contract / Purchase Order Lift Suspension Approval” page. Step 8: Prompt for successful approval of lifting of contract suspension. The concerned merchant will get email notification about the suspension of contract.
  • 101. CONTRACT AMENDMENT Step 1: To amend contract, agency user having Contract Administrator access privilege, login into the system and accesses “Approved Purchase Orders” sub menu of ‘Contract Management’’. This will display list of approved purchase orders for which, award status is “NTP Issued” and merchant acceptance status is “Accepted”.
  • 102. CONTRACT AMENDMENT Step 1: To amend contract, agency user having Contract Administrator access privilege, login into the system and accesses “Approved Purchase Orders” sub menu of ‘Contract Management’’. This will display list of approved purchase orders for which, award status is “NTP Issued” and merchant acceptance status is “Accepted”.
  • 103. CONTRACT AMENDMENT Step 2: Fill in the single or combination of search criteria for searching any approved purchase order / contract which needs to be amended and then click on “Search” icon. To remove / erase the data in search criteria, click on “Eraser” icon. Step 3: Then, click on ‘‘Select’’ this will display a list of actions and then click on ‘‘Create Amendment’’ option, available in front of that contract / purchase order. Step 4: This will display purchase order / contract amendment page with the approved purchase order/ contract details.
  • 106. CONTRACT AMENDMENT Step 6: Agency user then needs to add the supporting document for the amendment along with the comments and extended dates for performance security period. Step 7: To add the supporting document/s, agency user needs to click on “Add document name and supporting document” hyperlink. It will then open a box / window wherein the user can write the name of the document which is to be uploaded by clicking on “Choose File” button. User can add multiple documents if required by clicking on green colored “Add More” tab. Step 8: Then, click on ‘‘Submit’’ to upload the supporting document. If clicks on “Close”, system will take agency user back to “Create Amendment” page.
  • 107. CONTRACT AMENDMENT Step 9: Prompt for successfully uploading of supporting documents. Step 10: Then write in the comments, accordingly and change the start and end date of performance security.
  • 108. CONTRACT AMENDMENT Step 11: Then select the approver so that the amendment can get approval and then click on “Send for Approval”. However, if clicks on “Close”, system will take the agency user back to approved purchase order page. Step 12: Click on “Yes” to send the contract amendment for approval. If clicks on “No”, system will take agency user back to “Contract Amendment” page.
  • 109. CONTRACT AMENDMENT Step 13: Prompt for contract amendment successfully sent for approval.
  • 111. APPROVAL / REJECTION CONTRACT AMENDMENT Step 1: To approve the contract amendment, agency user having Contract Approver access privilege, login into the system and accesses “Pending Contracts / Purchase Orders” sub menu of ‘Contract Management’’. This will display list of pending for approval contracts / purchase orders.
  • 112. APPROVAL / REJECTION CONTRACT AMENDMENT Step 2: Fill in the single or combination of search criteria for searching any particular pending for approval contract / purchase order and then click on “Search” icon. To remove / erase the data in search criteria, click on “Eraser” icon. Step 3: Then, click on ‘‘Select’’ this will display a list of actions and then click on ‘‘View Contract Amendment Approval’’ option, available in front of that contract / purchase order.
  • 113. APPROVAL / REJECTION CONTRACT AMENDMENT Step 4: This will display Contract Amendment Approval page. On this page, the approver can view the comments and the supporting document/s uploaded by amendment creator. Step 5: Below this section on the same page, the approver can write in the comments for approving or rejecting the amendment.
  • 114. APPROVAL / REJECTION CONTRACT AMENDMENT Step 6: Once the commenting is done, agency user needs to click on “Approve” tab to approve the amendment. However, if wish to reject the amendment then, the user needs to click on “Reject”. Step 7: Click on “Yes” to approve or reject the amendment. If clicks on “No”, system will take agency user back to “Contract / PO Amendment” page. Step 8: Prompt for successful approval or rejection of contract amendment.
  • 116. CONTRACT EXTENSION Step 1: To extend the contract, agency user having Contract Administrator or Contract Approver access privilege, login into the system and accesses “Pending Contracts / Purchase Orders” sub menu of ‘Contract Management’’. This will display list of pending for approval contracts / purchase orders.
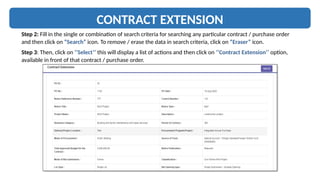
  • 117. CONTRACT EXTENSION Step 2: Fill in the single or combination of search criteria for searching any particular contract / purchase order and then click on “Search” icon. To remove / erase the data in search criteria, click on “Eraser” icon. Step 3: Then, click on ‘‘Select’’ this will display a list of actions and then click on ‘‘Contract Extension’’ option, available in front of that contract / purchase order.
  • 119. CONTRACT EXTENSION Step 4: This will display contract extension page with the approved purchase order details Step 5: Agency user needs to edit the milestone to extend contract dates. So, click on ‘‘Select’’ available in front of the milestones, this will display a list of actions and then click on ‘‘Edit’’.
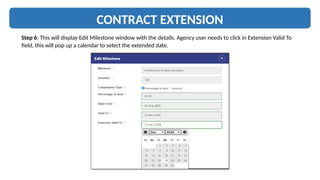
  • 120. CONTRACT EXTENSION Step 6: This will display Edit Milestone window with the details. Agency user needs to click in Extension Valid To field, this will pop up a calendar to select the extended date.
  • 121. CONTRACT EXTENSION Step 7: Once the extension date is selected then, click on “Save”. However, if clicks on “Close”, the data will get discarded. Step 8: Click on “Yes” to save the milestone. If clicks on “No”, system will take agency user back to “Edit Milestone” window Step 9: Prompt for successful saving the milestone.
  • 122. CONTRACT EXTENSION Step 10: Agency user then needs to add the supporting document for the extension along with the comments and extended dates for performance security period.
  • 123. CONTRACT EXTENSION Step 11: To add the supporting document/s, agency user needs to click on “Add document name and supporting document” hyperlink. It will then open a box / window wherein the user can write the name of the document which is to be uploaded by clicking on “Choose File” button. User can add multiple documents if required by clicking on green colored “Add More” tab. Step 12: Then, click on ‘‘Submit’’ to upload the supporting document. If clicks on “Close”, system will take agency user back to “Contract Extension” page.
  • 124. CONTRACT EXTENSION Step 13: Prompt for successfully uploading of supporting documents.
  • 125. CONTRACT EXTENSION Step 14: Then write in the comments, accordingly and change the end date of performance security. Step 15: Then select the approver so that the amendment can get approval. Select the approver by clicking in the box available at the left-hand side of the name of the official and then click on “Save”
  • 126. CONTRACT EXTENSION Step 17: Click on “Yes” to send the contract extension for approval. If clicks on “No”, system will take agency user back to “Contract Extension” page. Step 16: Then click on “Send for Approval”. However, if clicks on “Close”, system will take the agency user back to “Contract Extension” page. Step 18: Prompt for contract extension successfully sent for approval.
  • 128. APPROVAL / REJECTION CONTRACT EXTENSION Step 1: To approve the contract extension, agency user having Contract Administrator or Contract Approver access privilege, login into the system and accesses “Pending Contracts / Purchase Orders” sub menu of ‘Contract Management’’. This will display list of pending for approval contracts / purchase orders. Step 2: Fill in the single or combination of search criteria for searching any particular contract / purchase order and then click on “Search” icon. To remove / erase the data in search criteria, click on “Eraser” icon.
  • 129. APPROVAL / REJECTION CONTRACT EXTENSION Step 3: Then, click on ‘‘Select’’ this will display a list of actions and then click on ‘‘View Contract Extend Approval’’ option, available in front of that contract / purchase order.
  • 130. APPROVAL / REJECTION CONTRACT EXTENSION
  • 131. APPROVAL / REJECTION CONTRACT EXTENSION
  • 132. APPROVAL / REJECTION CONTRACT EXTENSION Step 4: This will display Contract / Purchase Order Extension Approval page. On this page, the approver can view the comments and the supporting document/s uploaded by the creator. Step 5: Below this section on the same page, the approver can write in the comments for approving the extension of contract. Step 6: Once the commenting is done, agency user needs to click on “Approve” or “Reject” button
  • 133. APPROVAL / REJECTION CONTRACT EXTENSION Step 7: Click on “Yes” to proceed. If clicks on “No”, system will take agency user back to “Contract / Purchase Order Extension Approval” page. Step 8: Prompt for successful approval/rejection of extension of contract.
  • 135. TERMINATION OF CONTRACT Step 1: To terminate contract, agency user having Contract Administrator access privilege, login into the system and access “Approved Purchase Orders” sub menu of ‘Contract Management’’. This will display list of approved purchase.
  • 136. TERMINATION OF CONTRACT Step 2: Fill in the single or combination of search criteria for searching any published award notice number for which notice to proceed is to be generated and then click on “Search” icon. To remove / erase the data in search criteria, click on “Eraser” icon. Step 3: Then, click on ‘‘Select’’ this will display a list of actions and then click on ‘‘Terminate of Contract’’ option, available in front of that contract / purchase order.
  • 137. TERMINATION OF CONTRACT Step 4: This will display contract amendment page with the approved purchase order details.
  • 139. TERMINATION OF CONTRACT Step 5: Agency user then needs to add the supporting document for contract termination along with the comments. Step 6: To add the supporting document/s, agency user needs to click on “Add document name and supporting document” hyperlink. It will then open a box / window wherein the user can write the name of the document which is to be uploaded by clicking on “Choose File” button. User can add multiple documents if required by clicking on green colored “Add More” tab.
  • 140. TERMINATION OF CONTRACT Step 7: Then, click on ‘‘Submit’’ to upload the supporting document. If clicks on “Close”, system will take agency user back to “Contract Termination” page.
  • 141. TERMINATION OF CONTRACT Step 9: Then write in the comments and select from the dropdown, grounds for termination.
  • 142. TERMINATION OF CONTRACT Step 10: Then select the approver so that contract termination can get approval. Select the approver by clicking in the box available at the left-hand side of the name of the official and then click on “Save”
  • 143. TERMINATION OF CONTRACT Step 12: Click on “Yes” to send the contract termination for approval. If clicks on “No”, system will take agency user back to “Contract Termination” page. Step 13: Prompt for contract termination successfully sent for approval.
  • 145. APPROVAL OF TERMINATION OF CONTRACT Step 1: To approve the contract termination, agency user having Contract Approver access privilege, login into the system and accesses “Pending Contracts / Purchase Orders” sub menu of ‘Contract Management’’. This will display list of pending for approval contracts / purchase orders. Step 2: Fill in the single or combination of search criteria for searching any particular contract / purchase order and then click on “Search” icon. To remove / erase the data in search criteria, click on “Eraser” icon.
  • 146. APPROVAL OF TERMINATION OF CONTRACT Step 3: Then, click on ‘‘Select’’ this will display a list of actions and then click on ‘‘View Contract Terminate Approval’’ option, available in front of that contract / purchase order.
  • 147. APPROVAL OF TERMINATION OF CONTRACT Step 4: This will display Contract / PO Termination Approval page. On this page, the approver can view the comments and the supporting document/s uploaded by the creator. Step 5: Below this section on the same page, the approver can write in the comments for approving contract termination.
  • 148. APPROVAL OF TERMINATION OF CONTRACT Step 6: Once the commenting is done, agency user needs to click on “Approve” or “Reject” button Step 7: Click on “Yes” to proceed. If, clicks on “No”, system will take agency user back to “Contract / PO Termination Approval” page. Step 8: Prompt for successful approval/rejection of contract termination.
  • 150. UPDATE GOODS RECEIPTS NOTE Step 1: The user will get to update Goods note (Update GRN) in case classification is Goods or Goods – General Support Services. To update Goods Receipts, Note, agency user having Contract Administrator access privilege, login into the system and accesses “Approved Contracts / Purchase Orders” sub menu of ‘Contract Management’’. This will display list of pending for approval contracts / purchase orders. Step 2: Fill in the single or combination of search criteria for searching any contract / purchase order and then click on “Search” icon. To remove / erase the data in search criteria, click on “Eraser” icon.
  • 151. UPDATE GOODS RECEIPTS NOTE Step 3: Then, click on ‘‘Select’’ this will display a list of actions and then click on ‘‘Update GRN’ option, available in front of that contract / purchase order.
  • 152. UPDATE GOODS RECEIPTS NOTE Step 4: This will display Contract/PO Update GRN page with the approved purchase order, milestones, and payment history details.
  • 153. UPDATE GOODS RECEIPTS NOTE Step 4: This will display Contract/PO Update GRN page with the approved purchase order, milestones, and payment history details.
  • 154. UPDATE GOODS RECEIPTS NOTE Step 4: This will display Contract/PO Update GRN page with the approved purchase order, milestones, and payment history details.
  • 155. UPDATE GOODS RECEIPTS NOTE Step 5: Agency user then need to click on ‘‘Select’’ button for the milestone. This will display actions, click on ‘‘Update GRN’’ available in front of a milestone for which the user wants to update the GRN.
  • 156. UPDATE GOODS RECEIPTS NOTE Step 6: This will display ‘Update GRN’ window with the milestone details. Step 7: Agency user needs to fill up the details like Amount due, delivered quantity etc. Rejected quantity will get auto populated.
  • 157. UPDATE GOODS RECEIPTS NOTE Step 8: Agency user then needs to add certification of Acceptance or Certification of Completed Delivery and writing of comments for updating GRN. To add the Certificates, agency user needs to click on “Choose File” button. Step 9: Write the comment in the box provided, and then click on “Save”. If clicks on “Close”, system will take agency user back to “Update GRN” page.
  • 158. UPDATE GOODS RECEIPTS NOTE Step 10: Click on “Yes” to update GRN. If clicks on “No”, system will take agency user back to “Update GRN” page. Step 11: Prompt for GTRN updated successfully.
  • 159. UPDATE GOODS RECEIPTS NOTE Step 12: Once the GRN is updated then, agency users can view updated GRN and needs to raise Liquidated Damages Step 13: To view updated GRN, click on ‘‘Select’’ this will display a list of actions and then click on ‘‘View GRN’’ option, available in front of GRN Details. This will open update GRN window. Users can take a printout of the same by clicking on “Print” tab. Click on “Close” to close update GRN window.
  • 161. APPROVING STATEMENT OF WORK ACCOMPLISHED Step 1: To Approve Statement of Work Accomplished in case when classification is Works Infra Projects or Consultancy, agency user having Contract Administrator access privilege, login into the system and accesses “Pending For Approval Purchase Order / Contract” sub menu of ‘Contract Management’’. This will display list of pending for approval contracts / purchase orders. Step 2: Fill in the single or combination of search criteria for searching any contract / purchase order for which statement of work accomplished is to be approved and then click on “Search” icon. To remove / erase the data in search criteria, click on “Eraser” icon. Step 3: Then, click on ‘‘Select’’ this will display a list of actions and then click on ‘‘View Contract / SWA Approval’’ option, available in front of that contract / purchase order.
  • 162. APPROVING STATEMENT OF WORK ACCOMPLISHED Step 4: This will display Approve SWA page. At the bottom of this page, agency user will get the option to approve statement of work.
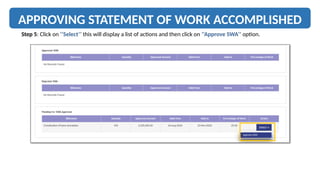
  • 163. APPROVING STATEMENT OF WORK ACCOMPLISHED Step 5: Click on ‘‘Select’’ this will display a list of actions and then click on ‘‘Approve SWA’’ option.
  • 164. APPROVING STATEMENT OF WORK ACCOMPLISHED Step 6: This will display Approve SWA pop-up with the details filled by merchant. Along with, an option to upload, certificate of acceptance or project completion. Step 7: If the user forgets or skips to brows and upload the certificate of acceptance or project completion then, system prompts the message “Please Upload Certificate of Acceptance or Certificate of Project Completion.”
  • 165. APPROVING STATEMENT OF WORK ACCOMPLISHED Step 8: Agency user then needs to upload the certificate of acceptance or project completion by clicking on “Browse” button along with the comments for approval and then click on “Approve”. Step 9: Click on “Yes” to approve the Contract / Purchase Order SWA. If clicks on “No”, system will take agency user back to “Approve SWA” page.
  • 166. APPROVING STATEMENT OF WORK ACCOMPLISHED Step 10: Prompt message SWA successfully approved will be displayed. Click “OK” to close the message. further user needs to raise Liquidated Damages.
  • 168. REJECTING STATEMENT OF WORK ACCOMPLISHED Step 1: To Reject Statement of Work Accomplished, agency user having Contract Administrator access privilege, login into the system and accesses “Pending for Approval Purchase Order / Contract” sub menu of ‘Contract Management’’.
  • 169. REJECTING STATEMENT OF WORK ACCOMPLISHED Step 5: Click on ‘‘Select’’ this will display a list of actions and then click on ‘‘Approve SWA’’ option.
  • 170. REJECTING STATEMENT OF WORK ACCOMPLISHED Step 2: Continuing from the ‘‘View Contract / SWA Approval’’ page. Agency user then needs to upload the certificate of acceptance or project completion by clicking on “Browse” button along with the comments for rejection and then click on “Reject”.
  • 171. REJECTING STATEMENT OF WORK ACCOMPLISHED Step 3: Click on “Yes” to reject the Contract / Purchase Order SWA. If clicks on “No”, system will take agency user back to “Approve SWA” page. Step 4: The System then prompts for SWA successfully rejected.
  • 172. VIEWING STATEMENT OF WORK ACCOMPLISHED
  • 173. VIEWING STATEMENT OF WORK ACCOMPLISHED Step 1: To View Statement of Work Accomplished, agency user having Contract Administrator or Contract Approver access privilege, login into the system and accesses “Approved Purchase Order / Contract” sub menu of ‘Contract Management’’. This will display list of approved contracts / purchase orders. Step 2: Fill in the single or combination of search criteria for searching any contract / purchase order for which statement of work accomplished is to be viewed and then click on “Search” icon. To remove / erase the data in search criteria, click on “Eraser” icon.
  • 174. VIEWING STATEMENT OF WORK ACCOMPLISHED Step 3: Then, click on ‘‘Select’’ this will display a list of actions and then click on ‘‘View Statement of Work Accomplished’’ option, available in front of that contract / purchase order.
  • 175. VIEWING STATEMENT OF WORK ACCOMPLISHED Step 4: This will display “Contracts / Purchase Order Statement of Work Accomplished” page. At the bottom of this page, agency user will get Statement of Work Accomplished and milestones details.
  • 176. VIEWING STATEMENT OF WORK ACCOMPLISHED Step 4: This will display “Contracts / Purchase Order Statement of Work Accomplished” page. At the bottom of this page, agency user will get Statement of Work Accomplished and milestones details.
  • 177. VIEWING STATEMENT OF WORK ACCOMPLISHED Step 4: This will display “Contracts / Purchase Order Statement of Work Accomplished” page. At the bottom of this page, agency user will get Statement of Work Accomplished and milestones details. Step 5: From these details, click on ‘‘Select’’ option, available in front of milestones, this will display a list of actions. From that list, click on, ‘‘View SWA’’ option.
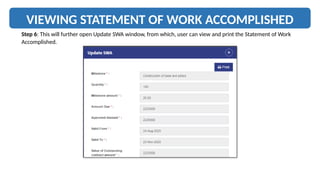
  • 178. VIEWING STATEMENT OF WORK ACCOMPLISHED Step 6: This will further open Update SWA window, from which, user can view and print the Statement of Work Accomplished.
  • 180. CREATING LIQUIDATED DAMAGES Step 1: To raise liquidated damages, agency user having Contract Administrator or Contract Approver access privilege, login into the system and accesses “Approved Purchase Order / Contract”. sub menu of ‘Contract Management’’. This will display list of approved contracts / purchase orders. Step 2: Fill in the single or combination of search criteria for searching any contract / purchase order for which liquidated damage is to be raised and then click on “Search” icon. To remove / erase the data in search criteria, click on “Eraser” icon.
  • 181. CREATING LIQUIDATED DAMAGES Step 3: Then, click on ‘‘Select’’ this will display a list of actions and then click on ‘‘View Statement of Work Accomplished’’ for classification is Works Infra Projects or Consultancy or Click “Update GRN” option for classification is Goods or Goods – General Support Services , available in front of that contract / purchase order.
  • 182. CREATING LIQUIDATED DAMAGES Step 4: This will display “Contracts / Purchase Order Statement of Work Accomplished” page or “Contract / PO Update GRN” page. At the bottom under GRN Details section for classification is Goods or Goods – General Support Services or SWA Details for classification is Works Infra Projects or Consultancy, agency user will click on Select button for the milestone in concern. This will display Liquidated Damages option.
  • 183. CREATING LIQUIDATED DAMAGES Step 4: This will display “Contracts / Purchase Order Statement of Work Accomplished” page or “Contract / PO Update GRN” page. At the bottom under GRN Details section for classification is Goods or Goods – General Support Services or SWA Details for classification is Works Infra Projects or Consultancy, agency user will click on Select button for the milestone in concern. This will display Liquidated Damages option.
  • 184. CREATING LIQUIDATED DAMAGES Step 5: Clicking on, liquidated damages option, will display, Liquidated Damages page with milestone details.
  • 185. CREATING LIQUIDATED DAMAGES Step 6: Agency user then needs to add the supporting document by clicking on “Choose File” option for raising liquidated damages. Step 7: Then write in the comments, accordingly and liquidated damages number of days. Liquidated Damages amount and total Liquidated Damages percentage will get auto calculated and displayed.
  • 186. CREATING LIQUIDATED DAMAGES Step 8: Then select the approver for approving Liquidated Damages. To select the approver, click in the box available at the left-hand side of the name of the official and then click on “Save”.
  • 187. CREATING LIQUIDATED DAMAGES Step 9: Then click on “Send for Approval”. However, if clicks on “Cancel”, system will take the agency user back to Liquidated Damages page. Step 10: Click on “Yes” to send Liquidated Damages approval. If clicks on “No”, system will take agency user back to “Liquidated Damages” page. Step 11: Prompt for Liquidated Damages successfully sent for approval.
  • 189. APPROVING / REJECTING LIQUIDATED DAMAGE Step 1: To approve Liquidated Damages, agency user having Contract Approver access privilege, login into the system and accesses “Pending Contracts / Purchase Orders” sub menu of “Contract Management’’. This will display list of pending for approval contracts / purchase orders. Step 2: Fill in the single or combination of search criteria for searching any pending for approval contract / purchase order and then click on “Search” icon. To remove / erase the data in search criteria, click on “Eraser” icon. Step 3: Then, click on ‘‘Select’’ this will display a list of actions and then click on ‘‘Approve Liquidated Damages’’ option, available in front of that contract / purchase order.
  • 190. APPROVING / REJECTING LIQUIDATED DAMAGE Step 4: This will display Approve Liquidated Damages page. On this page, the approver can view the supporting document/s uploaded by the creator.
  • 191. APPROVING / REJECTING LIQUIDATED DAMAGE Step 5: Below this section on the same page, the approver can write in the comments for approving Liquidated Damages. Step 6: Once the commenting is done, agency user needs to click on “Approve” or “Reject” as needed.
  • 192. APPROVING / REJECTING LIQUIDATED DAMAGE Step 7: Click on “Yes” to proceed. If clicks on “No”, system will take agency user back to “Approve Liquidated Damages” page. Step 8: Prompt for successful approval/rejection of Liquidated Damages.
  • 194. RAISING RETENTION MONEY Step 1: To raise retention money, agency user having Contract Administrator access privilege, login into the system and accesses “Approved Purchase Orders” sub menu of ‘Contract Management’’. This will display list of approved purchase orders. Step 2: Fill in the single or combination of search criteria for searching any contract / purchase order and then click on “Search” icon. To remove / erase the data in search criteria, click on “Eraser” icon.
  • 195. RAISING RETENTION MONEY Step 3: Click on ‘‘Select’’ this will display a list of actions and then click on ‘‘View Statement of Work Accomplished’’ for classification is Works Infra Projects or Consultancy or Click “Update GRN” option for classification is Goods or Goods – General Support Services , available in front of that contract / purchase order. Step 4: This will display “Contracts / Purchase Order Statement of Work Accomplished” page or “Contract / PO Update GRN” page. At the bottom under GRN Details section for classification is Goods or Goods – General Support Services or SWA Details for classification is Works Infra Projects or Consultancy, agency user will click on Select button for the milestone in concern.
  • 196. RAISING RETENTION MONEY Step 5: Click on ‘‘Select’’ this will display a list of actions, from this list, click on ‘‘Retention Money’’ option.
  • 197. RAISING RETENTION MONEY Step 6: This will display Retention Money page with milestone details. Step 7: Agency user needs to add the due retention money amount. However, this amount should not be exceeding 50% of total amount due. If, mistakenly the user adds exceeded amount then system will pop up the message as, “Retention money Amount should not exceeds 50% of Amount Due”.
  • 198. RAISING RETENTION MONEY Step 8: Agency user then needs to add the supporting document by clicking on “Choose File” button.
  • 199. RAISING RETENTION MONEY Step 9: Then write in the comments and select the approver by clicking on “Select Approver”. Select the approver by clicking in the box available at the left-hand side of the name of the official and then click on “Save” Step 10: Then click on “Send for Approval”. However, if clicks on “Close”, system will take the agency user back to retention money page.
  • 200. RAISING RETENTION MONEY Step 11: Click on “Yes” to send retention money for approval. If clicks on “No”, system will take agency user back to “Retention Money” page. Step 12: Prompt for retention money successfully sent for approval.
  • 202. APPROVING / REJECTING RETENTION MONEY Step 1: To approve retention money, agency user having Contract Administrator or Contract Approver access privilege, login into the system and accesses “Pending Contracts / Purchase Orders” sub menu of ‘Contract Management’’. This will display list of pending for approval contracts / purchase orders. Step 2: Fill in the single or combination of search criteria for searching any contract / purchase order and then click on “Search” icon. To remove / erase the data in search criteria, click on “Eraser” icon. Step 3: Then, click on ‘‘Select’’ this will display a list of actions and then click on ‘‘Approve Retention Money’’ option, available in front of that contract / purchase order
  • 203. APPROVING / REJECTING RETENTION MONEY Step 4: This will display Approve Retention Money page. On this page, the approver can view the supporting document/s uploaded by the creator. Step 5: Below this section on the same page, the approver can write in the comments for approving retention money.
  • 205. VIEW GENERATED INVOICE Step 1: To view generated invoice, agency user having Contract Administrator or Contract Approver access privilege, login into the system and accesses “Update Good Receipts Note (For Goods Bid Notice) and “Approve Statement of Work Accomplished (SWA)” (For Works and Infra Bid Notice). This will display list of pending for approval contracts / purchase orders. Step 2: Then, click on ‘‘Select’’ this will display a list of actions and then click on ‘‘View Invoice Generation’’ option, available in front of the milestone / GRN / SWA Details.
  • 206. VIEW GENERATED INVOICE Step 3: This will display merchant generated invoice with and without Joint Venture. Step 4: By clicking on “Print” button, user can take a printout of Invoice.
  • 207. VIEW GENERATED INVOICE Invoice for Non-Joint Venture.
  • 208. VIEW GENERATED INVOICE Invoice for Joint Venture.
  • 210. ACCEPT GENERATED INVOICE Step 1: To accept generated invoice, agency user having Contract Administrator or Contract Approver access privilege, login into the system and accesses “Update Good Receipts Note (For Goods Bid Notice) and “Approve Statement of Work Accomplished (SWA)” (For Works and Infra Bid Notice). This will display list of pending for approval contracts / purchase orders. Step 2: To accept the invoice, click on ‘‘Select’’ this will display a list of actions and then click on ‘‘Accept Invoice’’ option, available in front of the milestone / GRN / SWA Details.
  • 212. ACCEPT GENERATED INVOICE Step 3: This will display invoice details. Agency user then needs to fill in the OR Number.
  • 213. ACCEPT GENERATED INVOICE Step 4: Select from the drop down the Payment Mode either as Cash / Cashier's / Manager’s Cheque, Bank Draft / Guarantee or irrevocable letter of credit, Surety Bond or Not Applicable. Step 5: Agency user then needs to write the comments and add the supporting document/s, by clicking on “Choose File” button. User can add multiple documents if required by clicking on green colored “Add More” tab.
  • 214. ACCEPT GENERATED INVOICE Step 6: Once all the mandatory process is done, agency user needs to click on “Accept Invoice” tab to approve the invoice. Step 7: Click on “Yes” to approve the invoice. If clicks on “No”, system will take agency user back to “Invoice Details” page.
  • 215. ACCEPT GENERATED INVOICE Step 8: Prompt for successful approval of invoice along with, status as Invoice Accepted in GRN details
  • 217. REJECT GENERATED INVOICE Step 1: Continuing from Step 5 of Accept Generated Invoice. Step 2: Once all the mandatory process is done, agency user needs to click on “Reject Invoice” button to reject the invoice.
  • 218. REJECT GENERATED INVOICE Step 3: Click on “Yes” to reject the invoice. If clicks on “No”, system will take agency user back to “Invoice Details” page. Step 4: Prompt for successful rejection of invoice along with, status as Invoice Rejected in GRN / SWA details. In such a case merchant needs to re-generate and re-submit the invoice.
  • 220. PROCEED TO PAYMENT Step 1: To view generated invoice, agency user having Contract Administrator or Contract Approver access privilege, login into the system and accesses “Update Good Receipts Note (For Goods Bid Notice) and “Approve Statement of Work Accomplished (SWA)” (For Works and Infra Bid Notice). This will display list of pending for approval contracts / purchase orders.
  • 221. PROCEED TO PAYMENT Step 2: To proceed for payment, click on ‘‘Select’’ this will display a list of actions and then click on ‘‘Proceed to Payment’’ option, available in front of the milestone / GRN / SWA Details.
  • 222. PROCEED TO PAYMENT Step 3: This will display Contract / PO GRN Payment Details.
  • 223. PROCEED TO PAYMENT Step 4: To view the invoice, agency user needs to click on, “Click Here” option, available in front of View Invoice. Agency user then needs to fill in the comments and add the supporting document/s, by clicking on “Choose File” button. Step 5: Once all the mandatory process is done, agency user needs to click on “Accept Invoice” tab to approve the invoice payment. Step 6: Click on “Yes” to approve the invoice payment. If clicks on “No”, system will take agency user back to “Contract / PO GRN Payment Details” page.
  • 224. PROCEED TO PAYMENT Step 7: Prompt for successful approval of invoice payment along with, status as Payment Generated in GRN / SWA details.
  • 226. INITIATING ADVANCE PAYMENT Step 1: To initiate advance Payment, agency user having Contract Administrator access privilege, login into the system and accesses “Approved Contracts / Approved Purchase Orders” sub menu of ‘Contract Management’’. This will display list of approved contracts / purchase orders. Step 2: Fill in the single or combination of search criteria for searching any contract / purchase order and then click on “Search” icon. To remove / erase the data in search criteria, click on “Eraser” icon.
  • 227. INITIATING ADVANCE PAYMENT Step 3: Then, click on ‘‘Select’’ this will display a list of actions and then click on ‘‘Advance Payment’’ option, available in front of that contract / purchase order.
  • 229. INITIATING ADVANCE PAYMENT Step 4: This will display Contract / Purchase Order Advance Payment page along with purchase order details. Step 5: At the bottom of this page, agency user can write in the comments for initiating advance payment. Step 6: Once the commenting is done, agency user needs to upload the supporting document by clicking on “Choose File” button.
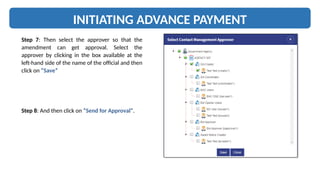
  • 230. INITIATING ADVANCE PAYMENT Step 7: Then select the approver so that the amendment can get approval. Select the approver by clicking in the box available at the left-hand side of the name of the official and then click on “Save” Step 8: And then click on “Send for Approval”.
  • 231. INITIATING ADVANCE PAYMENT Step 9: Click on “Yes” to send advance payment for approval. If clicks on “No”, system will take agency user back to “Contract / Purchase Order Advance Payment” page. Step 10: Prompt for advance payment successfully sent for approval with status showing as “Pending for Approval”.
  • 233. APPROVING ADVANCE PAYMENT Step 1: To approve the advance payment, agency user having Contract Approver access privilege, login into the system and accesses “Pending Contracts / Purchase Orders” sub menu of ‘Contract Management’’. This will display list of pending for approval contracts / purchase orders. Step 2: Fill in the single or combination of search criteria for searching any contract / purchase order and then click on “Search” icon. To remove / erase the data in search criteria, click on “Eraser” icon. Step 3: Then, click on ‘‘Select’’ this will display a list of actions and then click on ‘‘Approve Advance Payment’’ option, available in front of that contract / purchase order.
  • 234. APPROVING ADVANCE PAYMENT Step 4: This will display Contract / Purchase Order Advance Payment page along with purchase order and advance payment details.
  • 235. APPROVING ADVANCE PAYMENT Step 5: In the advance payment section, the approver needs to fill in the comment for approving the advance payment and then click on “Approve” button. Step 6: Click on “Yes” to approve advance payment. If clicks on “No”, system will take agency user back to “Contract / Purchase Order Advance Payment” page. Step 7: Prompt for advance payment successfully approved with the status showing as “Approved”.
  • 237. VIEW PAYMENT HISTORY Step 1: To view Payment history, agency user having Contract Administrator or Contract Approver access privilege, login into the system and accesses “Approved Contracts / Approved Purchase Orders” sub menu of ‘Contract Management’’. This will display list of approved contracts / purchase orders. Step 2: Fill in the single or combination of search criteria for searching any contract / purchase order and then click on “Search” icon. To remove / erase the data in search criteria, click on “Eraser” icon. Step 3: Then, click on ‘‘Select’’ this will display a list of actions and then click on ‘‘Payment History’’ option, available in front of that contract / purchase order.
  • 238. VIEW PAYMENT HISTORY Step 2: This will further open sub menu list of “Contract Management”
  • 239. VIEW PAYMENT HISTORY Step 2: This will further open sub menu list of “Contract Management”