


![18 Chapter 2
Creating the Log File Set
The DSI compiler, sdlcomp, uses the class specification file to create or update
an empty log file set. The log file set is then used to receive logged data from
the dsilog program.
To create a log file set, complete the following tasks:
1 Run sdlcomp with the appropriate variables and options. For example,
sdlcomp [-maxclass value] specification_file
[logfile_set[log file]] [options]
2 Check the output for errors and make changes as needed.
For more information about sdlcomp, see the Compiler Syntax in Chapter 4.
Testing the Class Specification File and the Logging Process
(Optional)
DSI uses a program, sdlgendata, that allows you to test your class
specification file against an incoming source of generated data. You can then
examine the output of this process to verify that DSI can log the data
according to your specifications. For more information about sdlgendata, see
Testing the Logging Process with Sdlgendata in Chapter 4.
To test your class specification file for the logging process:
1 Feed the data that is generated by sdlgendata to the dsilog program.
The syntax is:
sdlgendata logfile_set class | dsilog logfile_set class -vo
2 Check the output to see if your class specification file matches the format
of your data collection process. If the sdlgendata program outputs
something different from your program, you have either an error in your
output format or an error in the class specification file.
3 Before you begin collecting real data, delete all log files from the testing
process.](https://image.slidesharecdn.com/datasourceintegrationguide-140322133749-phpapp02/85/Data-source-integration-guide-for-HP-Performance-Agent-18-320.jpg)


![DSI Class Specification Reference 25
Class Specification Syntax
Syntax statements shown in brackets [ ] are optional. Multiple statements
shown in braces { } indicate that one of the statements must be chosen.
Italicized words indicate a variable name or number you enter. Commas can
be used to separate syntax statements for clarity anywhere except directly
preceding the semicolon, which marks the end of the class specification and
the end of each metric specification. Statements are not case-sensitive.
Comments start with # or //. Everything following a # or // on a line is ignored.
Note the required semicolon after the class description and after each metric
description. Detailed information about each part of the class specification
and examples follow.
CLASS class_name = class_id_number
[LABEL "class_label_name"]
[INDEX BY {HOUR | DAY | MONTH} MAX INDEXES number
[[ROLL BY {HOUR | DAY | MONTH} [ACTION "action" ]
[ CAPACITY {maximum_record_number} ]
[ RECORDS PER HOUR number ]
;
METRICS
metric_name = metric_id_number
[ LABEL "metric_label_name" ]
[ TOTALED | AVERAGED | SUMMARIZED BY metric_name ]
[ MAXIMUM metric_maximum_number ]
[PRECISION {0 | 1 | 2 | 3 | 4 | 5} ]
[TYPE TEXT LENGTH "length"]
;
User-defined descriptions, such as metric_label_name or class_label_name,
cannot be the same as any of the keyword elements of the DSI class
specification syntax.](https://image.slidesharecdn.com/datasourceintegrationguide-140322133749-phpapp02/85/Data-source-integration-guide-for-HP-Performance-Agent-25-320.jpg)
![26 Chapter 3
CLASS Description
To create a class description, assign a name to a group of metrics from a
specific data source, specify the capacity of the class, and designate how data
in the class will be rolled when the capacity is exceeded.
You must begin the class description with the CLASS keyword. The final
parameter in the class specification must be followed by a semicolon.
Syntax
CLASS class_name = class_id_number
[LABEL "class_label_name"]
[INDEX BY { HOUR | DAY | MONTH } MAX INDEXES number
[[ ROLL BY { HOUR | DAY | MONTH } [ACTION "action"]
[ CAPACITY {maximum_record_number} ]
[ RECORDS PER HOUR number]
;
Default Settings
The default settings for the class description are:
LABEL (class_name)
INDEX BY DAY
MAX INDEXES 9
RECORDS PER HOUR 12
To use the defaults, enter only the CLASS keyword with a class_name and
numeric class_id_number.](https://image.slidesharecdn.com/datasourceintegrationguide-140322133749-phpapp02/85/Data-source-integration-guide-for-HP-Performance-Agent-26-320.jpg)
![DSI Class Specification Reference 27
CLASS
The class name and class ID identify a group of metrics from a specific data
source.
Syntax
CLASS class_name = class_id_number
How to Use It
The class_name and class_ID_number must meet the following requirements:
• class_name is alphanumeric and can be up to 20 characters long. The
name must start with an alphabetic character and can contain
underscores (but no special characters).
• class_ID_number must be numeric and can be up to six digits long.
• Neither the class_name or the class_ID_number are case-sensitive.
• The class_name and class_ID_number must each be unique among all the
classes you define and cannot be the same as any applications defined in
the Performance agent parm file. (For information about the parm file, see
Chapter 2 of the HP Performance agent for UNIX User's Manual.).
Example
CLASS VMSTAT_STATS = 10001;
LABEL
The class label identifies the class as a whole. It is used instead of the class
name in Performance Manager.
Syntax
[ LABEL "class_label_name" ]](https://image.slidesharecdn.com/datasourceintegrationguide-140322133749-phpapp02/85/Data-source-integration-guide-for-HP-Performance-Agent-27-320.jpg)
![28 Chapter 3
How To Use It
The class_label_name must meet the following requirements:
• It must be enclosed in double quotation marks.
• It can be up to 48 characters long.
• It cannot be the same as any of the keyword elements of the DSI class
specification syntax, such as CAPACITY, ACTION and so on.
• If it contains a double quotation mark, precede it with a backslash (). For
example, you would enter ""my" data" if the label is "my" data.
• If no label is specified, the class_name is used as the default.
Example
CLASS VMSTAT_STATS = 10001
LABEL "VMSTAT data";
INDEX BY, MAX INDEXES, AND ROLL BY
INDEX BY, MAX INDEXES, and ROLL BY settings allow you to specify how to
store data and when to discard it. With these settings you designate the
blocks of data to store, the maximum number of blocks to store, and the size of
the block of data to discard when data reaches its maximum index value.
Syntax
[NDEX BY {HOUR | DAY | MONTH} MAX INDEXES number]
[[ROLL BY {HOUR | DAY | MONTH} [ACTION "action"]]
How To Use It
INDEX BY settings allow blocks of data to be rolled out of the class when the
class capacity is reached. The INDEX BY and RECORDS PER HOUR options can
be used to indirectly set the capacity of the class as described later in
Controlling Log File Size.](https://image.slidesharecdn.com/datasourceintegrationguide-140322133749-phpapp02/85/Data-source-integration-guide-for-HP-Performance-Agent-28-320.jpg)


![DSI Class Specification Reference 37
RECORDS PER HOUR
The RECORDS PER HOUR setting determines how many records are written to
the log file every hour. The default number for RECORDS PER HOUR is 12 to
match Performance agent's measurement interval of data sampling once
every five minutes (60 minutes/12 records = logging every five minutes).
The default number or the number you enter could require the logging process
to summarize data before it becomes part of the log file. The method used for
summarizing each data item is specified in the metric description. For more
information, see Summarization Method later in this chapter.
Syntax
[RECORDS PER HOUR number]
How To Use It
The logging process uses this value to summarize incoming data to produce
the number of records specified. For example, if data arrives every minute and
you have set RECORDS PER HOUR to 6 (every 10 minutes), 10 data points are
summarized to write each record to the class. Some common RECORDS PER
HOUR settings are shown below:
RECORDS PER HOUR 6 --> 1 record/10 minutes
RECORDS PER HOUR 12 --> 1 record/5 minutes
RECORDS PER HOUR 60 --> 1 record/minute
RECORDS PER HOUR 120 --> 1 record/30 seconds
Notes
RECORDS PER HOUR can be overridden by the -s seconds option in dsilog.
However, overriding the original setting could cause problems when
Performance Manager graphs the data.
If dsilog receives no metric data for an entire logging interval, a missing
data indicator is logged for that metric. DSI can be forced to use the last value
logged with the -asyn option in dsilog. For a description of the -asyn option,
see dsilog Logging Process in Chapter 4.](https://image.slidesharecdn.com/datasourceintegrationguide-140322133749-phpapp02/85/Data-source-integration-guide-for-HP-Performance-Agent-37-320.jpg)

![DSI Class Specification Reference 39
CAPACITY
CAPACITY is the number of records to be stored in the class.
Syntax
[CAPACITY {maximum_record_number}]
How To Use It
Class capacity is derived from the setting in RECORDS PER HOUR, INDEX BY,
and MAX INDEXES. The CAPACITY setting is ignored unless a capacity larger
than the derived values of these other settings is specified. If this situation
occurs, the MAX INDEXES setting is increased to provide the specified capacity.
Example
INDEX BY DAY
MAX INDEXES 9
RECORDS PER HOUR 12
CAPACITY 3000
In the above example, the derived class capacity is 2,592 records (9 days * 24
hours per day * 12 records per hour).
Because 3000 is greater than 2592, sdlcomp increases MAX INDEXES to 11,
resulting in the class capacity of 3168. After compilation, you can see the
resulting MAX INDEXES and CAPACITY values by running sdlutil with the
-decomp option.](https://image.slidesharecdn.com/datasourceintegrationguide-140322133749-phpapp02/85/Data-source-integration-guide-for-HP-Performance-Agent-39-320.jpg)
![40 Chapter 3
Metrics Descriptions
The metrics descriptions in the class specification file are used to define the
individual data items for the class. The metrics description equates a metric
name with a numeric identifier and specifies the method to be used when data
must be summarized because more records per hour are arriving than you
have specified with the RECORDS PER HOUR setting.
Note that there is a maximum limit of 100 metrics in the dsilog format file.
METRICS
metric_name = metric_id_number
[LABEL "metric_label_name"]
[TOTALED | AVERAGED | SUMMARIZED BY metric_name]
[MAXIMUM metric_maximum_number]
[PRECISION { 0 | 1 | 2 | 3 | 4 | 5 }]
TYPE TEXT LENGTH "length"
METRICS
The metric name and id number identify the metric being collected.
Syntax
METRICS
metric_name = metric_id_number
User-defined descriptions, such as the metric_label_name, cannot be the same
as any of the keyword elements of the DSI class specification syntax.
For numeric metrics, you can specify the summarization method (TOTALED,
AVERAGED, SUMMARIZED BY), a MAXIMUM (for Performance Manager 3.x only),
and PRECISION. For text metrics, you can only specify the TYPE TEXT LENGTH.](https://image.slidesharecdn.com/datasourceintegrationguide-140322133749-phpapp02/85/Data-source-integration-guide-for-HP-Performance-Agent-40-320.jpg)

![42 Chapter 3
The simplest metric description, which uses the metric name as the label and
the defaults of AVERAGED, MAXIMUM 100, and PRECISION 3 decimal places,
requires the following description:
METRICS
metric_name = metric_id_number
Example
VM;
VM is an example of reusing a metric definition that has already been defined
in another class in the same log file set.
LABEL
The metric label identifies the metric in Performance Manager graphs and
exported data.
Syntax
[LABEL "metric_label_name"]
How To Use It
Specify a text string, surrounded by double quotation marks, to label the
metric in graphs and exported data. Up to 48 characters are allowed. If no
label is specified, the metric name is used to identify the metric.
Notes
If the label contains a double quotation mark, precede it with a backslash ().
For example, you would enter ""my" data" if the label is “my” data.
You must compile each class using sdlcomp and then start logging the data
for that class using the dsilog process, regardless of whether you have
reused metric names.](https://image.slidesharecdn.com/datasourceintegrationguide-140322133749-phpapp02/85/Data-source-integration-guide-for-HP-Performance-Agent-42-320.jpg)
![DSI Class Specification Reference 43
The metric_label_name cannot be the same as any of the keyword elements of
the DSI class specification syntax such as CAPACITY, ACTION and so on.
Example
METRICS
RUN_Q_PROCS = 106
LABEL "Procs in run q";
Summarization Method
The summarization method determines how to summarize data if the number
of records exceeds the number set in the RECORDS PER HOUR option of the
CLASS section. For example, you would want to total a count of occurrences,
but you would want to average a rate. The summarization method is only
valid for numeric metrics.
Syntax
[{TOTALED | AVERAGED | SUMMARIZED BY metric_name}]
How To Use It
SUMMARIZED BY should be used when a metric is not being averaged over time,
but over another metric in the class. For example, assume you have defined
metrics TOTAL_ORDERS and LINES_PER_ORDER. If these metrics are given to
the logging process every five minutes but records are being written only once
each hour, to correctly summarize LINES_PER_ORDER to be (total lines / total
orders), the logging process must perform the following calculation every five
minutes:
• Multiply LINES_PER_ORDER * TOTAL_ORDERS at the end of each
five-minute interval and maintain the result in an internal running count
of total lines.
• Maintain the running count of TOTAL_ORDERS.
• At the end of the hour, divide total lines by TOTAL_ORDERS.
To specify this kind of calculation, you would specify LINES_PER_ORDER as
SUMMARIZED BY TOTAL_ORDERS.](https://image.slidesharecdn.com/datasourceintegrationguide-140322133749-phpapp02/85/Data-source-integration-guide-for-HP-Performance-Agent-43-320.jpg)
![44 Chapter 3
If no summarization method is specified, the metric defaults to AVERAGED.
Example
METRICS
ITEM_1_3 = 11203
LABEL "TOTAL_ORDERS"
TOTALED;
ITEM_1_5 = 11205
LABEL "LINES_PER_ORDER"
SUMMARIZED BY ITEM_1_3;
MAXIMUM
The metric maximum value for Performance Manager 3.x only, identifies how
large the number might be. It is only valid for numeric metrics. It is meant to
be used for estimating a maximum value range for graphing the metric in
Performance Manager 3.x.
Syntax
[MAXIMUM metric_maximum_number]
How To Use It
Specify the expected maximum value for any metric. This value does not
specify the largest acceptable number for logged data. (See the table in the
following section for the largest acceptable numbers according to precision
settings.)
The MAXIMUM setting is primarily used to estimate graphing ranges in the
analysis software about the initial size of a graph containing the metric and to
determine a precision if PRECISION is not specified. The default is 100. Zero is
always used as the minimum value because the kinds of numbers expected to
be logged are counts, average counts, rates, and percentages.](https://image.slidesharecdn.com/datasourceintegrationguide-140322133749-phpapp02/85/Data-source-integration-guide-for-HP-Performance-Agent-44-320.jpg)
![DSI Class Specification Reference 45
Example
METRICS
RUN_Q_PROCS = 106
LABEL "Procs in run q"
MAXIMUM 50;
PRECISION
PRECISION identifies the number of decimal places to be used for metric
values. If PRECISION is not specified, it is calculated based on the MAXIMUM
specified. If neither is specified, the default PRECISION value is 3. This setting
is valid only for numeric metrics.
Syntax
[PRECISION{0|1|2|3|4|5}]
How To Use It
The PRECISION setting determines the largest value that can be logged. Use
PRECISION 0 for whole numbers.
PRECISION
# of Decimal
Places
Largest
Acceptable
Numbers MAXIMUM
0 0 2,147,483,647 > 10,000
1 1 214,748,364.7 1001 to 10,000
2 2 21,474,836.47 101 to 1,000
3 3 2,147,483.647 11 to 1,000
4 4 214,748.3647 2 to 10
5 5 21,474.83647 1](https://image.slidesharecdn.com/datasourceintegrationguide-140322133749-phpapp02/85/Data-source-integration-guide-for-HP-Performance-Agent-45-320.jpg)
![46 Chapter 3
Example
METRICS
RUN_Q_PROCS = 106
LABEL "Procs in run q"
PRECISION 1;
TYPE TEXT LENGTH
The three keywords TYPE TEXT LENGTH specify that the metric is textual
rather than numeric. Text is defined as any character other than ^d, n, or the
separator, if any.
Because the default delimiter between data items for dsilog input is blank
space, you will need to change the delimiter if the text contains embedded
spaces. Use the dsilog -c char option to specify a different separator as
described in Chapter 4, DSI Program Reference.
Syntax
[TYPE TEXT LENGTH length]
How To Use It
The length must be greater than zero and less than 4096.
Notes
Summarization method, MAXIMUM, and PRECISION cannot be specified with
text metrics. Text cannot be summarized, which means that dsilog will take
the first logged value in an interval and ignore the rest.
Example
METRICS
text_1 = 16
LABEL "first text metric"
TYPE TEXT LENGTH 20
;](https://image.slidesharecdn.com/datasourceintegrationguide-140322133749-phpapp02/85/Data-source-integration-guide-for-HP-Performance-Agent-46-320.jpg)


![50 Chapter 4
sdlcomp Compiler
The sdlcomp compiler checks the class specification file for errors. If no errors
are found, it adds the class and metric descriptions to the description file in
the log file set you name. It also sets up the pointers in the log file set's root
file to the log file to be used for data storage. If either the log file set or the log
file does not exist, it is created by the compiler.
Compiler Syntax
sdlcomp [-maxclass value] specification_file
[logfile_set[log file]] [options]
You can put the DSI files anywhere on your system by specifying a full path in
the compiler command. However, once the path has been specified, DSI log
files cannot be moved to different directories. (SDL62 is the associated class
specification error message, described in SDL Error Messages in Chapter 6.
The format used by DSI for the class specification error messages is the prefix
SDL (Self Describing Logfile), followed by the message number.
Variables and Options Definitions
-maxclass value allows you to specify the maximum number of
classes to be provided for when creating a new
log file set. This option is ignored if it is used
with the name of an existing log file set. Each
additional class consumes about 500 bytes of
disk space in overhead, whether the class is
used or not. The default is 10 if -maxclass is
not specified.
specification_file is the name of the file that contains the class
specification. If it is not in the current
directory, it must be fully qualified.
logfile_set is the name of the log file set this class should](https://image.slidesharecdn.com/datasourceintegrationguide-140322133749-phpapp02/85/Data-source-integration-guide-for-HP-Performance-Agent-50-320.jpg)


![56 Chapter 4
dsilog Logging Process
The dsilog process requires that either devise your own program or use one
that is already in existence for you to gain access to the data. You can then
pipe this data into dsilog, which logs the data into the log file set. A separate
logging process must be used for each class you define.
dsilog expects to receive data from stdin. To start the logging process, you
could pipe the output of the process you are using to collect data to dsilog as
shown in the following example.
vmstat 60 | dsilog logfile_set class
You can only have one pipe ( | ) in the command line. This is because with two
pipes, UNIX buffering will hold up the output from the first command until
8000 characters have been written before continuing to the second command
and piping out to the log file.
You could also use a fifo (named pipe). For example,
mkfifo -m 777 myfifo
dsilog logfile_set class -i myfifo &
vmstat 60 > myfifo &
The & causes the process to run in the background.
Note that you may need to increase the values of the UNIX kernel parameters
shmmni and nflocks if you are planning to run a large number of dsilog
processes. Shmmni specifies the maximum number of shared memory
segments; nflocks specifies the maximum number of file locks on a system.
The default value for each is 200. Each active DSI log file set uses a shared
memory segment (shmmni) and one or more file locks (nflocks). On HP-UX,
you can change the settings for shmmni and nflocks using the System
Administration and Maintenance utility (SAM).
Syntax
dsilog logfile_set class [options]
The dsilog parameters and options are described on the following pages.](https://image.slidesharecdn.com/datasourceintegrationguide-140322133749-phpapp02/85/Data-source-integration-guide-for-HP-Performance-Agent-56-320.jpg)


![60 Chapter 4
Testing the Logging Process with Sdlgendata
Before you begin logging data, you can test the compiled log file set and the
logging process using the sdlgendata program. sdlgendata discovers the
metrics for a class (as described in the class specification) and generates data
for each metric in a class.
Syntax
sdlgendata logfile_set class [options]
Sdlgendata parameters and options are explained below.
By piping sdlgendata output to dsilog with either the -vi or -vo options,
you can verify the input (-vi) and verify the output (-vo) before you begin
logging with your own process or program.
Table 2 Sdlgendata parameters and options
Variables and
Options Definitions
logfile_set is the name of the log file set to generate data for.
class is the data class to generate data for.
-timestamp
[number]
provides a timestamp with the data. If a negative
number or no number is supplied, the current time
is used for the timestamp. If a positive number is
used, the time starts at 0 and is incremented by
number for each new data record.
-wait number causes a wait of number seconds between records
generated.
-cycle number recycles data after number cycles.
-vers displays version information.
-? displays the syntax description.](https://image.slidesharecdn.com/datasourceintegrationguide-140322133749-phpapp02/85/Data-source-integration-guide-for-HP-Performance-Agent-60-320.jpg)


![DSI Program Reference 67
Exporting DSI Data
To export the data from a DSI log file, use the Performance agent extract
program's export function. See Chapters 5 and 6 of the HP Performance agent
for UNIX User's Manual for details on how to use extract to export data. An
example of exporting DSI data using command line arguments is provided on
the following page.
There are several ways to find out what classes and metrics can be exported
from the DSI log file. You can use sdlutil to list this information as described
in Managing Data With sdlutil later in this chapter. Or you can use the
extract guide command to create an export template file that lists the
classes and metrics in the DSI log file. You can then use vi to edit, name, and
save the file. The export template file is used to specify the export format, as
described in Chapters 5 and 6 of the HP Performance agent for UNIX User's
Manual.
Example of Using Extract to Export DSI Log File Data
extract -xp -l logfile_set -C class [options]
You can use extract command line options to do the following:
• Specify an export output file.
• Set begin and end dates and times for the first and last intervals to
export.
• Export data only between certain times (shifts).
• Exclude data for certain days of the week (such as weekends).
• Specify a separation character to put between metrics on reports.
• Choose whether or not to display headings and blank records for intervals
when no data arrives and what the value displayed should be for missing
or null data.
• Display exported date/time in UNIX format or date and time format.
• Set additional summarization levels.
You must be root or the creator of the log file to export DSI log file data.](https://image.slidesharecdn.com/datasourceintegrationguide-140322133749-phpapp02/85/Data-source-integration-guide-for-HP-Performance-Agent-67-320.jpg)

![DSI Program Reference 69
Managing Data With sdlutil
To manage the data from a DSI log file, use the sdlutil program to do any of
the following tasks:
• list currently defined class and metric information to stdout. You can
redirect output to a file.
• list complete statistics for classes to stdout.
• show metric descriptions for all metrics listed.
• list the files in a log file set.
• remove classes and data from a log file set.
• recreate a class specification from the information in the log file set.
• display version information.
Syntax
sdlutil logfile_set [option]
Variables and
Options Definitions
logfile_set is the name of a log file set created by
compiling a class specification.
-classes classlist provides a class description of all classes listed.
If none are listed, all are provided. Separate
the Items in the classlist with spaces.
-stats classlist provides complete statistics for all classes
listed. If none are listed, all are provided.
Separate the Items in the classlist with spaces.](https://image.slidesharecdn.com/datasourceintegrationguide-140322133749-phpapp02/85/Data-source-integration-guide-for-HP-Performance-Agent-69-320.jpg)


Data source integration guide for HP Performance Agent
- 1. HP Performance Agent for the Unix operating system Software Version: 5.00 Data Source Integration Guide Document Release Date: August 2009 Software Release Date: August 2009
- 2. 2 Legal Notices Warranty The only warranties for HP products and services are set forth in the express warranty statements accompanying such products and services. Nothing herein should be construed as constituting an additional warranty. HP shall not be liable for technical or editorial errors or omissions contained herein. The information contained herein is subject to change without notice. Restricted Rights Legend Confidential computer software. Valid license from HP required for possession, use or copying. Consistent with FAR 12.211 and 12.212, Commercial Computer Software, Computer Software Documentation, and Technical Data for Commercial Items are licensed to the U.S. Government under vendor's standard commercial license. Copyright Notices © Copyright 2007-2009 Hewlett-Packard Development Company, L.P.
- 3. 3 Documentation Updates The title page of this document contains the following identifying information: • Software Version number, which indicates the software version. • Document Release Date, which changes each time the document is updated. • Software Release Date, which indicates the release date of this version of the software. To check for recent updates or to verify that you are using the most recent edition of a document, go to: http://h20230.www2.hp.com/selfsolve/manuals This site requires that you register for an HP Passport and sign in. To register for an HP Passport ID, go to: http://h20229.www2.hp.com/passport-registration.html Or click the New users - please register link on the HP Passport login page. You will also receive updated or new editions if you subscribe to the appropriate product support service. Contact your HP sales representative for details.
- 4. 4 Support Visit the HP Software Support web site at: www.hp.com/go/hpsoftwaresupport This web site provides contact information and details about the products, services, and support that HP Software offers. HP Software online support provides customer self-solve capabilities. It provides a fast and efficient way to access interactive technical support tools needed to manage your business. As a valued support customer, you can benefit by using the support web site to: • Search for knowledge documents of interest • Submit and track support cases and enhancement requests • Download software patches • Manage support contracts • Look up HP support contacts • Review information about available services • Enter into discussions with other software customers • Research and register for software training Most of the support areas require that you register as an HP Passport user and sign in. Many also require a support contract. To register for an HP Passport ID, go to: http://h20229.www2.hp.com/passport-registration.html To find more information about access levels, go to: http://h20230.www2.hp.com/new_access_levels.jsp
- 5. 5 Contents 1 Overview of Data Source Integration . . . . . . . . . . . . . . . . . . . . . . . . . . . . . . . . . . . . . . . 9 Introduction . . . . . . . . . . . . . . . . . . . . . . . . . . . . . . . . . . . . . . . . . . . . . . . . . . . . . . . . . . . . . . 9 How DSI Works . . . . . . . . . . . . . . . . . . . . . . . . . . . . . . . . . . . . . . . . . . . . . . . . . . . . . . . . . . 10 Creating the Class Specification . . . . . . . . . . . . . . . . . . . . . . . . . . . . . . . . . . . . . . . . . . 11 Collecting and Logging the Data . . . . . . . . . . . . . . . . . . . . . . . . . . . . . . . . . . . . . . . . . . 11 Using the Data . . . . . . . . . . . . . . . . . . . . . . . . . . . . . . . . . . . . . . . . . . . . . . . . . . . . . . . . 11 2 Using Data Source Integration . . . . . . . . . . . . . . . . . . . . . . . . . . . . . . . . . . . . . . . . . . . . 13 Introduction . . . . . . . . . . . . . . . . . . . . . . . . . . . . . . . . . . . . . . . . . . . . . . . . . . . . . . . . . . . . . 13 Planning Data Collection. . . . . . . . . . . . . . . . . . . . . . . . . . . . . . . . . . . . . . . . . . . . . . . . . . . 14 Defining the Log File Format . . . . . . . . . . . . . . . . . . . . . . . . . . . . . . . . . . . . . . . . . . . . . . . 15 How Log Files Are Organized . . . . . . . . . . . . . . . . . . . . . . . . . . . . . . . . . . . . . . . . . . . . 16 Creating the Log File Set. . . . . . . . . . . . . . . . . . . . . . . . . . . . . . . . . . . . . . . . . . . . . . . . . . . 18 Testing the Class Specification File and the Logging Process (Optional) . . . . . . . . . . 18 Logging Data to the Log File Set . . . . . . . . . . . . . . . . . . . . . . . . . . . . . . . . . . . . . . . . . . . . 19 Using the Logged Data . . . . . . . . . . . . . . . . . . . . . . . . . . . . . . . . . . . . . . . . . . . . . . . . . . . . 21 3 DSI Class Specification Reference . . . . . . . . . . . . . . . . . . . . . . . . . . . . . . . . . . . . . . . . . 23 Introduction . . . . . . . . . . . . . . . . . . . . . . . . . . . . . . . . . . . . . . . . . . . . . . . . . . . . . . . . . . . . . 23 Class Specifications . . . . . . . . . . . . . . . . . . . . . . . . . . . . . . . . . . . . . . . . . . . . . . . . . . . . . . . 24 Class Specification Syntax . . . . . . . . . . . . . . . . . . . . . . . . . . . . . . . . . . . . . . . . . . . . . . . . . 25 CLASS Description . . . . . . . . . . . . . . . . . . . . . . . . . . . . . . . . . . . . . . . . . . . . . . . . . . . . . . . 26 CLASS . . . . . . . . . . . . . . . . . . . . . . . . . . . . . . . . . . . . . . . . . . . . . . . . . . . . . . . . . . . . . . . 27 LABEL. . . . . . . . . . . . . . . . . . . . . . . . . . . . . . . . . . . . . . . . . . . . . . . . . . . . . . . . . . . . . . . 27 INDEX BY, MAX INDEXES, AND ROLL BY . . . . . . . . . . . . . . . . . . . . . . . . . . . . . . . . 28 Controlling Log File Size . . . . . . . . . . . . . . . . . . . . . . . . . . . . . . . . . . . . . . . . . . . . . . . . . . . 35 RECORDS PER HOUR . . . . . . . . . . . . . . . . . . . . . . . . . . . . . . . . . . . . . . . . . . . . . . . . . . . . 37 CAPACITY . . . . . . . . . . . . . . . . . . . . . . . . . . . . . . . . . . . . . . . . . . . . . . . . . . . . . . . . . . . . . . 39
- 6. 6 Metrics Descriptions . . . . . . . . . . . . . . . . . . . . . . . . . . . . . . . . . . . . . . . . . . . . . . . . . . . . . . 40 METRICS . . . . . . . . . . . . . . . . . . . . . . . . . . . . . . . . . . . . . . . . . . . . . . . . . . . . . . . . . . . . 40 LABEL. . . . . . . . . . . . . . . . . . . . . . . . . . . . . . . . . . . . . . . . . . . . . . . . . . . . . . . . . . . . . . . 42 Summarization Method . . . . . . . . . . . . . . . . . . . . . . . . . . . . . . . . . . . . . . . . . . . . . . . . . 43 MAXIMUM . . . . . . . . . . . . . . . . . . . . . . . . . . . . . . . . . . . . . . . . . . . . . . . . . . . . . . . . . . . 44 PRECISION . . . . . . . . . . . . . . . . . . . . . . . . . . . . . . . . . . . . . . . . . . . . . . . . . . . . . . . . . . 45 TYPE TEXT LENGTH . . . . . . . . . . . . . . . . . . . . . . . . . . . . . . . . . . . . . . . . . . . . . . . . . . 46 Sample Class Specification . . . . . . . . . . . . . . . . . . . . . . . . . . . . . . . . . . . . . . . . . . . . . . . . . 47 4 DSI Program Reference. . . . . . . . . . . . . . . . . . . . . . . . . . . . . . . . . . . . . . . . . . . . . . . . . . . 49 Introduction . . . . . . . . . . . . . . . . . . . . . . . . . . . . . . . . . . . . . . . . . . . . . . . . . . . . . . . . . . . . . 49 sdlcomp Compiler. . . . . . . . . . . . . . . . . . . . . . . . . . . . . . . . . . . . . . . . . . . . . . . . . . . . . . . . . 50 Compiler Syntax . . . . . . . . . . . . . . . . . . . . . . . . . . . . . . . . . . . . . . . . . . . . . . . . . . . . . . . 50 Sample Compiler Output . . . . . . . . . . . . . . . . . . . . . . . . . . . . . . . . . . . . . . . . . . . . . . . . 51 Configuration Files . . . . . . . . . . . . . . . . . . . . . . . . . . . . . . . . . . . . . . . . . . . . . . . . . . . . . . . 54 Defining Alarms for DSI Metrics . . . . . . . . . . . . . . . . . . . . . . . . . . . . . . . . . . . . . . . . . . 54 Alarm Processing . . . . . . . . . . . . . . . . . . . . . . . . . . . . . . . . . . . . . . . . . . . . . . . . . . . . . . 55 dsilog Logging Process. . . . . . . . . . . . . . . . . . . . . . . . . . . . . . . . . . . . . . . . . . . . . . . . . . . . . 56 How dsilog Processes Data. . . . . . . . . . . . . . . . . . . . . . . . . . . . . . . . . . . . . . . . . . . . . . . 59 Testing the Logging Process with Sdlgendata . . . . . . . . . . . . . . . . . . . . . . . . . . . . . . . 60 Creating a Format File . . . . . . . . . . . . . . . . . . . . . . . . . . . . . . . . . . . . . . . . . . . . . . . . . . . . 64 Changing a Class Specification. . . . . . . . . . . . . . . . . . . . . . . . . . . . . . . . . . . . . . . . . . . . . . 66 Exporting DSI Data . . . . . . . . . . . . . . . . . . . . . . . . . . . . . . . . . . . . . . . . . . . . . . . . . . . . . . . 67 Example of Using Extract to Export DSI Log File Data . . . . . . . . . . . . . . . . . . . . . . . 67 Viewing Data in Performance Manager . . . . . . . . . . . . . . . . . . . . . . . . . . . . . . . . . . . . 68 Managing Data With sdlutil . . . . . . . . . . . . . . . . . . . . . . . . . . . . . . . . . . . . . . . . . . . . . . . . 69 Syntax . . . . . . . . . . . . . . . . . . . . . . . . . . . . . . . . . . . . . . . . . . . . . . . . . . . . . . . . . . . . . . . 69 5 Examples of Data Source Integration . . . . . . . . . . . . . . . . . . . . . . . . . . . . . . . . . . . . . . 71 Introduction . . . . . . . . . . . . . . . . . . . . . . . . . . . . . . . . . . . . . . . . . . . . . . . . . . . . . . . . . . . . . 71 Writing a dsilog Script. . . . . . . . . . . . . . . . . . . . . . . . . . . . . . . . . . . . . . . . . . . . . . . . . . . . . 72 Logging vmstat Data . . . . . . . . . . . . . . . . . . . . . . . . . . . . . . . . . . . . . . . . . . . . . . . . . . . . . . 74 Creating a Class Specification File . . . . . . . . . . . . . . . . . . . . . . . . . . . . . . . . . . . . . . . . 74 Compiling the Class Specification File . . . . . . . . . . . . . . . . . . . . . . . . . . . . . . . . . . . . . 75 Starting the dsilog Logging Process. . . . . . . . . . . . . . . . . . . . . . . . . . . . . . . . . . . . . . . . 76 Accessing the Data . . . . . . . . . . . . . . . . . . . . . . . . . . . . . . . . . . . . . . . . . . . . . . . . . . . . . 76
- 7. 7 Logging sar Data from One File . . . . . . . . . . . . . . . . . . . . . . . . . . . . . . . . . . . . . . . . . . . . . 77 Creating a Class Specification File . . . . . . . . . . . . . . . . . . . . . . . . . . . . . . . . . . . . . . . . 78 Compiling the Class Specification File . . . . . . . . . . . . . . . . . . . . . . . . . . . . . . . . . . . . . 79 Starting the DSI Logging Process . . . . . . . . . . . . . . . . . . . . . . . . . . . . . . . . . . . . . . . . . 80 Logging sar Data from Several Files . . . . . . . . . . . . . . . . . . . . . . . . . . . . . . . . . . . . . . . . . 82 Creating Class Specification Files . . . . . . . . . . . . . . . . . . . . . . . . . . . . . . . . . . . . . . . . . 82 Compiling the Class Specification Files . . . . . . . . . . . . . . . . . . . . . . . . . . . . . . . . . . . . 87 Starting the DSI Logging Process . . . . . . . . . . . . . . . . . . . . . . . . . . . . . . . . . . . . . . . . . 87 Logging sar Data for Several Options. . . . . . . . . . . . . . . . . . . . . . . . . . . . . . . . . . . . . . . . . 89 Logging the Number of System Users . . . . . . . . . . . . . . . . . . . . . . . . . . . . . . . . . . . . . . . . 96 6 Error Message . . . . . . . . . . . . . . . . . . . . . . . . . . . . . . . . . . . . . . . . . . . . . . . . . . . . . . . . . . 99 DSI Error Messages. . . . . . . . . . . . . . . . . . . . . . . . . . . . . . . . . . . . . . . . . . . . . . . . . . . . . . . 99 SDL Error Messages . . . . . . . . . . . . . . . . . . . . . . . . . . . . . . . . . . . . . . . . . . . . . . . . . . . . . 100 DSILOG Error Messages. . . . . . . . . . . . . . . . . . . . . . . . . . . . . . . . . . . . . . . . . . . . . . . . . . 116 General Error Messages . . . . . . . . . . . . . . . . . . . . . . . . . . . . . . . . . . . . . . . . . . . . . . . . . . 120 Index . . . . . . . . . . . . . . . . . . . . . . . . . . . . . . . . . . . . . . . . . . . . . . . . . . . . . . . . . . . . . . . . . . . . . 123
- 8. 8
- 9. 9 1 Overview of Data Source Integration Introduction Data Source Integration (DSI) technology allows you to use HP Performance agent to log data, define alarms, and access metrics from new sources of data beyond the metrics logged by the Performance agent scopeux collector. Metrics can be acquired from data sources such as databases, LAN monitors, and end-user applications. The data you log using DSI can be displayed in HP Performance Manager along with the standard performance metrics logged by the scopeux collector. DSI logged data can also be exported, using the Performance agent extract program, for display in spreadsheets or similar analysis packages. Performance Manager in this document refers to version 4.0 and beyond for UNIX and Windows platforms. Performance Manager 3.x (PerfView) will connect to Performance agent 4.0 and beyond for all UNIX platforms except for Performance agent for Linux. In the future, connectivity to Performance Manager 3.x will be discontinued.
- 10. 10 Chapter 1 How DSI Works The following diagram shows how DSI log files are created and used to log and manage data. DSI log files contain self-describing data that is collected outside of the Performance agent scopeux collector. DSI processes are described in more detail on the next page. Figure 1 Data Source Integration Process Using DSI to log data consists of the following tasks:
- 11. Overview of Data Source Integration 11 Creating the Class Specification You first create and compile a specification for each class of data you want to log. The specification describes the class of data as well as the individual metrics to be logged within the class. When you compile the specification using the DSI compiler, sdlcomp, a set of empty log files are created to accept data from the dsilog program. This process creates the log file set that contains a root file, a description file, and one or more data files. Collecting and Logging the Data Then you collect the data to be logged by starting up the process of interest. You can either pipe the output of the collection process to the dsilog program directly or from a file where the data was stored. dsilog processes the data according to the specification and writes it to the appropriate log file. dsilog allows you to specify the form and format of the incoming data. The data that you feed into the DSI process should contain multiple data records. A record consists of the metric values contained in a single line. If you send data to DSI one record at a time, stop the process, and then send another record, dsilog can append but cannot summarize the data. Using the Data You can use Performance Manager to display DSI log file data. Or you can use the Performance agent extract program to export the data for use with other analysis tools. You can also configure alarms to occur when DSI metrics exceed defined conditions. For more information about exporting data and configuring alarms, see the HP Performance agent for UNIX User's Manual.
- 12. 12 Chapter 1
- 13. 13 2 Using Data Source Integration Introduction This chapter is an overview of how you use DSI and contains the following information: • Planning data collection • Defining the log file format in the class specification file • Creating the empty log file set • Logging data to the log file set • Using the logged data For detailed reference information on DSI class specifications and DSI programs, see Chapter 3, DSI Class Specification Reference and Chapter 4, DSI Program Reference.
- 14. 14 Chapter 2 Planning Data Collection Before creating the DSI class specification files and starting the logging process, you need to address the following topics: • Understand your environment well enough to know what kinds of data would be useful in managing your computing resources. • What data is available? • Where is the data? • How can you collect the data? • What are the delimiters between data items? For proper processing by dsilog, metric values in the input stream must be separated by blanks (the default) or a user-defined delimiter. • What is the frequency of collection • How much space is required to maintain logs? • What is the output of the program or process that you use to access the data? • Which alarms do you want generated and under what conditions? • What options do you have for logging with the class specification and the dsilog process?
- 15. Using Data Source Integration 15 Defining the Log File Format Once you have a clear understanding of what kind of data you want to collect, create a class specification to define the data to be logged and to define the log file set that will contain the logged data. You enter the following information in the class specification: • Data class name and ID number • Label name (optional) that is a substitute for the class name. (For example, if a label name is present, it can be used in Performance Manager.) • What you want to happen when old data is rolled out to make room for new data. See How Log Files Are Organized for more information. • Metric names and other descriptive information, such as how many decimals to allow for metric values. • How you want the data summarized if you want to log a limited number of records per hour. Here is an example of a class specification: CLASS VMSTAT_STATS = 10001 LABEL "VMSTAT data" INDEX BY HOUR MAX INDEXES 12 ROLL BY HOUR RECORDS PER HOUR 120; METRICS RUN_Q_PROCS = 106 LABEL "Procs in run q" PRECISION 0; BLOCKED_PROCS = 107 LABEL "Blocked Processes" PRECISION 0; You can include one class or multiple classes in a class specification file. When you have completed the class specification file, name the file and then save it. When you run the DSI compiler, sdlcomp, you use this file to create the log file set. For more information about class specification and metric description syntax, see Chapter 3, DSI Class Specification Reference
- 16. 16 Chapter 2 How Log Files Are Organized Log files are organized into classes. Each class, which represents one source of incoming data, consists of a group of data items, or metrics, that are logged together. Each record, or row, of data in a class represents one sample of the values for that group of metrics. The data for classes is stored on disk in log files that are part of the log file set. The log file set contains a root file, a description file, and one or more log files. All the data from a class is always kept in a single data file. However, when you provide a log file set name to the sdlcomp compiler, you can store multiple classes together in a single log file set or in separate log file sets. The figure below illustrates how two classes can be stored in a single log file set.
- 17. Using Data Source Integration 17 Because each class is created as a circular log file, you can set the storage capacity for each class separately, even if you have specified that multiple classes should be stored in a single log file set. When the storage capacity is reached, the class is “rolled”, which means the oldest records in the class are deleted to make room for new data. You can specify actions, such as exporting the old data to an archive file, to be performed whenever the class is rolled.
- 18. 18 Chapter 2 Creating the Log File Set The DSI compiler, sdlcomp, uses the class specification file to create or update an empty log file set. The log file set is then used to receive logged data from the dsilog program. To create a log file set, complete the following tasks: 1 Run sdlcomp with the appropriate variables and options. For example, sdlcomp [-maxclass value] specification_file [logfile_set[log file]] [options] 2 Check the output for errors and make changes as needed. For more information about sdlcomp, see the Compiler Syntax in Chapter 4. Testing the Class Specification File and the Logging Process (Optional) DSI uses a program, sdlgendata, that allows you to test your class specification file against an incoming source of generated data. You can then examine the output of this process to verify that DSI can log the data according to your specifications. For more information about sdlgendata, see Testing the Logging Process with Sdlgendata in Chapter 4. To test your class specification file for the logging process: 1 Feed the data that is generated by sdlgendata to the dsilog program. The syntax is: sdlgendata logfile_set class | dsilog logfile_set class -vo 2 Check the output to see if your class specification file matches the format of your data collection process. If the sdlgendata program outputs something different from your program, you have either an error in your output format or an error in the class specification file. 3 Before you begin collecting real data, delete all log files from the testing process.
- 19. Using Data Source Integration 19 Logging Data to the Log File Set After you have created the log file set, and optionally tested it, update Performance agent configuration files as needed, and then run the dsilog program to log incoming data. 1 Update the data source configuration file, datasources, to add the DSI log files as data sources for generating alarms or to view from an Performance Manager analysis system. For more information about datasources, see “Configuring Data Sources” in the HP Performance agent Installation and Configuration Guide for UNIX.. 2 Modify the alarm definitions file, alarmdef, if you want to alarm on specific DSI metrics. For more information, see Defining Alarms for DSI Metrics in Chapter 4. 3 Optionally, test the logging process by piping data (which may be generated by sdlgendata to match your class specification) to the dsilog program with the -vi option set. 4 Check the data to be sure it is being correctly logged. 5 After testing, remove the data that was tested. 6 Start the collection process from the command line. 7 Pipe the data from the collection process to dsilog (or some other way to get it to stdin) with the appropriate variables and options set. For example: <program or process with variables>| dsilog logfile_set class The perflbd.rc file is maintained as a symbolic link to the datasources file for HP Performance agent on all supported UNIX operating systems, except HP Performance agent on Linux. The dsilog program is designed to receive a continuous stream of data. Therefore, it is important to structure scripts so that dsilog receives continuous input data. Do not write scripts that create a new dsilog process for new input data points. This can cause duplicate timestamps to be written to the dsilog file, and can cause problems for Performance Manager and perfalarm when reading the file. See Chapter 5, Examples of Data Source Integration, for examples of problematic and recommended scripts
- 20. 20 Chapter 2 For more information about dsilog options, see dsilog Logging Process in Chapter 4.
- 21. Using Data Source Integration 21 Using the Logged Data Once you have created the DSI log files, you can export the data using the Performance agent's extract program. You can also configure alarms to occur when DSI metrics exceed defined conditions. Here are ways to use logged DSI data: • Export the data for use in reporting tools such as spreadsheets. • Display exported DSI data using analysis tools such as in Performance Manager. • Monitor alarms using Performance Manager, HP Operations Manager, or HP Network Node Manager. For more information about exporting data and defining alarms, see the HP Performance agent for UNIX User's Manual. For information about displaying DSI data in Performance Manager and monitoring alarms in Performance Manager, Operations Manager, and Network Node Manager, see Performance Manager online Help. You cannot create extracted log files from DSI log files.
- 22. 22 Chapter 2
- 23. 23 3 DSI Class Specification Reference Introduction This chapter provides detailed reference information about: • Class specifications • Class specifications syntax • Metrics descriptions in the class specifications
- 24. 24 Chapter 3 Class Specifications For each source of incoming data, you must create a class specification file to describe the format for storing incoming data. To create the file, use the class specification language described in the next section, Class Specification Syntax. The class specification file contains: • a class description, which assigns a name and numeric ID to the incoming data set, determines how much data will be stored, and specifies when to roll data to make room for new data. • metric descriptions for each individual data item. A metric description names and describes a data item. It also specifies the summary level to apply to data (RECORDS PER HOUR) if more than one record arrives in the time interval that is configured for the class. To generate the class specification file, use any editor or word processor that lets you save the file as an ASCII text file. You specify the name of the class specification file when you run sdlcomp to compile it. When the class specification is compiled, it automatically creates or updates a log file set for storage of the data. The class specification allows you to determine how many records per hour will be stored for the class, and to specify a summarization method to be used if more records arrive than you want to store. For instance, if you have requested that 12 records per hour be stored (a record every five minutes) and records arrive every minute, you could have some of the data items averaged and others totaled to maintain a running count. Avoid the use of class specification file names that conflict with these naming conventions, or sdlcomp will fail. The DSI compiler, sdlcomp, creates files with the following names for a log file set (named logfile_set_name): logfile_set_name and logfile_set_name.desc sldcomp creates a file with the following default name for a class (named class_name): logfile_set_name.class_name
- 25. DSI Class Specification Reference 25 Class Specification Syntax Syntax statements shown in brackets [ ] are optional. Multiple statements shown in braces { } indicate that one of the statements must be chosen. Italicized words indicate a variable name or number you enter. Commas can be used to separate syntax statements for clarity anywhere except directly preceding the semicolon, which marks the end of the class specification and the end of each metric specification. Statements are not case-sensitive. Comments start with # or //. Everything following a # or // on a line is ignored. Note the required semicolon after the class description and after each metric description. Detailed information about each part of the class specification and examples follow. CLASS class_name = class_id_number [LABEL "class_label_name"] [INDEX BY {HOUR | DAY | MONTH} MAX INDEXES number [[ROLL BY {HOUR | DAY | MONTH} [ACTION "action" ] [ CAPACITY {maximum_record_number} ] [ RECORDS PER HOUR number ] ; METRICS metric_name = metric_id_number [ LABEL "metric_label_name" ] [ TOTALED | AVERAGED | SUMMARIZED BY metric_name ] [ MAXIMUM metric_maximum_number ] [PRECISION {0 | 1 | 2 | 3 | 4 | 5} ] [TYPE TEXT LENGTH "length"] ; User-defined descriptions, such as metric_label_name or class_label_name, cannot be the same as any of the keyword elements of the DSI class specification syntax.
- 26. 26 Chapter 3 CLASS Description To create a class description, assign a name to a group of metrics from a specific data source, specify the capacity of the class, and designate how data in the class will be rolled when the capacity is exceeded. You must begin the class description with the CLASS keyword. The final parameter in the class specification must be followed by a semicolon. Syntax CLASS class_name = class_id_number [LABEL "class_label_name"] [INDEX BY { HOUR | DAY | MONTH } MAX INDEXES number [[ ROLL BY { HOUR | DAY | MONTH } [ACTION "action"] [ CAPACITY {maximum_record_number} ] [ RECORDS PER HOUR number] ; Default Settings The default settings for the class description are: LABEL (class_name) INDEX BY DAY MAX INDEXES 9 RECORDS PER HOUR 12 To use the defaults, enter only the CLASS keyword with a class_name and numeric class_id_number.
- 27. DSI Class Specification Reference 27 CLASS The class name and class ID identify a group of metrics from a specific data source. Syntax CLASS class_name = class_id_number How to Use It The class_name and class_ID_number must meet the following requirements: • class_name is alphanumeric and can be up to 20 characters long. The name must start with an alphabetic character and can contain underscores (but no special characters). • class_ID_number must be numeric and can be up to six digits long. • Neither the class_name or the class_ID_number are case-sensitive. • The class_name and class_ID_number must each be unique among all the classes you define and cannot be the same as any applications defined in the Performance agent parm file. (For information about the parm file, see Chapter 2 of the HP Performance agent for UNIX User's Manual.). Example CLASS VMSTAT_STATS = 10001; LABEL The class label identifies the class as a whole. It is used instead of the class name in Performance Manager. Syntax [ LABEL "class_label_name" ]
- 28. 28 Chapter 3 How To Use It The class_label_name must meet the following requirements: • It must be enclosed in double quotation marks. • It can be up to 48 characters long. • It cannot be the same as any of the keyword elements of the DSI class specification syntax, such as CAPACITY, ACTION and so on. • If it contains a double quotation mark, precede it with a backslash (). For example, you would enter ""my" data" if the label is "my" data. • If no label is specified, the class_name is used as the default. Example CLASS VMSTAT_STATS = 10001 LABEL "VMSTAT data"; INDEX BY, MAX INDEXES, AND ROLL BY INDEX BY, MAX INDEXES, and ROLL BY settings allow you to specify how to store data and when to discard it. With these settings you designate the blocks of data to store, the maximum number of blocks to store, and the size of the block of data to discard when data reaches its maximum index value. Syntax [NDEX BY {HOUR | DAY | MONTH} MAX INDEXES number] [[ROLL BY {HOUR | DAY | MONTH} [ACTION "action"]] How To Use It INDEX BY settings allow blocks of data to be rolled out of the class when the class capacity is reached. The INDEX BY and RECORDS PER HOUR options can be used to indirectly set the capacity of the class as described later in Controlling Log File Size.
- 29. DSI Class Specification Reference 29 The INDEX BY setting cannot exceed the ROLL BY setting. For example, INDEX BY DAY does not work with ROLL BY HOUR, but INDEX BY HOUR does work with ROLL BY DAY. If ROLL BY is not specified, the INDEX BY setting is used. When the capacity is reached, all the records logged in the oldest roll interval are freed for reuse. Any specified ACTION is performed before the data is discarded (rolled). This optional ACTION can be used to export the data to another location before it is removed from the class. For information about exporting data, see Chapter 4, DSI Program Reference. Notes on Roll Actions The UNIX command specified in the ACTION statement cannot be run in the background. Also, do not specify a command in the ACTION statement that will cause a long delay, because new data won’t be logged during the delay. If the command is more than one line long, mark the start and end of each line with double quotation marks. Be sure to include spaces where necessary inside the quotation marks to ensure that the various command line options will remain separated when the lines are concatenated. If the command contains a double quotation mark, precede it with a backslash (). The ACTION statement is limited to 199 characters or less. Within the ACTION statement, you can use macros to define the time window of the data to be rolled out of the log file. These macros are expanded by dsilog. You can use $PT_START$ to specify the beginning of the block of data to be rolled out in UNIX time (seconds since 1/1/70 00:00:00) and $PT_END$ to specify the end of the data in UNIX time. These are particularly useful when combined with the extract program to export the data before it is overwritten. If a macro is used, its expanded length is used against the 199-character limit. Examples The following examples may help to clarify the relationship between the INDEX BY, MAX INDEXES, and the ROLL BY clauses. The following example indirectly sets the CAPACITY to 144 records (1*12*12).
- 30. 30 Chapter 3 CLASS VMSTAT_STATS = 10001 LABEL "VMSTAT data" INDEX BY HOUR MAX INDEXES 12 RECORDS PER HOUR 12; The following example indirectly sets the CAPACITY to 1440 records (1*12*120). CLASS VMSTAT_STATS = 10001 LABEL "VMSTAT data" INDEX BY HOUR MAX INDEXES 12 RECORDS PER HOUR 120; The following example shows ROLL BY HOUR. CLASS VMSTAT_STATS = 10001 LABEL "VMSTAT data" INDEX BY HOUR MAX INDEXES 12 ROLL BY HOUR RECORDS PER HOUR 120; The following example causes all the data currently identified for rolling (excluding weekends) to be exported to a file called sys.sdl before the data is overwritten. Note that the last lines of the last example are enclosed in double quotation marks to indicate that they form a single command. CLASS VMSTAT_STATS = 10001 LABEL "VMSTAT data" INDEX BY HOUR MAX INDEXES 12 ROLL BY HOUR ACTION "extract -xp -l sdl_new -C SYS_STATS " "-B $PT_START$ -E $PT_END$ -f sys.sdl, purge -we 17 " RECORDS PER HOUR 120; Other Examples The suggested index settings below may help you to consider how much data you want to store.
- 31. DSI Class Specification Reference 31 INDEX BY MAX INDEXES Amount of Data Stored HOUR 72 3 days HOUR 168 7 days HOUR 744 31 days DAY 365 1 year MONTH 12 1 year
- 32. 32 Chapter 3 The following table provides a detailed explanation of settings using ROLL BY INDEX BY MAX INDEXES ROLL BY Meaning DAY 9 DAY Nine days of data will be stored in the log file. Before logging day 10, day 1 is rolled out. These are the default values for index and max indexes. HOUR 72 HOUR 72 hours (three days) of data will be stored in the log file. Before logging hour 73, hour 1 is rolled out. Thereafter, at the start of each succeeding hour, the “oldest” hour is rolled out. HOUR 168 DAY 168 hours (seven days) of data will be stored in the log file. Before logging hour 169 (day 8), day 1 is rolled out. Thereafter, at the start of each succeeding day, the “oldest” day is rolled out. HOUR 744 MONTH 744 hours (31 days) of data will be stored in the log file. Before logging hour 745 (day 32), month 1 is rolled out. Thereafter, before logging hour 745, the “oldest” month is rolled out. For example, dsilog is started on April 15 and logs data through May 16 (744 hours). Before logging hour 745 (the first hour of May 17), dsilog will roll out the data for the month of April (April 15 - 30).
- 33. DSI Class Specification Reference 33 DAY 30 DAY 30 days of data will be stored in the log file. Before logging day 31, day 1 is rolled out. Thereafter, at the start of each succeeding day, the “oldest” month is rolled out. For example, dsilog is started on April 1 and logs data all month, then the April 1st will be rolled out when May 1st (day 31) data is to be logged. DAY 62 MONTH 62 days of data will be stored in the log file. Before logging day 63, month 1 is rolled out. Thereafter, before logging day 63 the “oldest” month is rolled out. For example, if dsilog is started on March 1 and logs data for the months of March and April, there will be 61 days of data in the log file. Once dsilog logs May 1st data (the 62nd day), the log file will be full. Before dsilog can log the data for May 2nd, it will roll out the entire month of March. INDEX BY MAX INDEXES ROLL BY Meaning
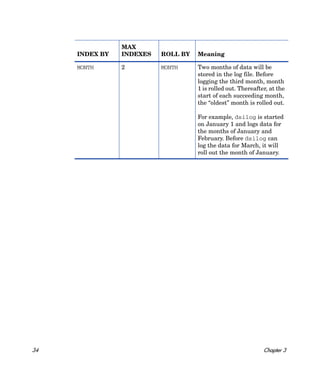
- 34. 34 Chapter 3 MONTH 2 MONTH Two months of data will be stored in the log file. Before logging the third month, month 1 is rolled out. Thereafter, at the start of each succeeding month, the “oldest” month is rolled out. For example, dsilog is started on January 1 and logs data for the months of January and February. Before dsilog can log the data for March, it will roll out the month of January. INDEX BY MAX INDEXES ROLL BY Meaning
- 35. DSI Class Specification Reference 35 Controlling Log File Size You determine how much data is to be stored in each class and how much data to discard to make room for new data. Class capacity is calculated from INDEX BY (hour, day, or month), RECORDS PER HOUR, and MAX INDEXES. The following examples show the results of different settings. In this example, the class capacity is 288 (24 indexes * 12 records per hour). INDEX BY HOUR MAX INDEXES 24 RECORDS PER HOUR 12 In this example, the class capacity is 504 (7 days * 24 hours per day * 3 records per hour). INDEX BY DAY MAX INDEXES 7 RECORDS PER HOUR 3 In this example, the class capacity is 14,880 (2 months * 31 days per month * 24 hours per day * 10 records per hour). INDEX BY MONTH MAX INDEXES 2 RECORDS PER HOUR 10 If you do not specify values for INDEX BY, RECORDS PER HOUR, and MAX INDEXES, DSI uses the defaults for the class descriptions. See “Default Settings” under CLASS Description earlier in this chapter. The ROLL BY option lets you determine how much data to discard each time the class record capacity is reached. The setting for ROLL BY is constrained by the INDEX BY setting in that the ROLL BY unit (hour, day, month) cannot be smaller than the INDEX BY unit. The following example illustrates how rolling occurs given the sample INDEX BY DAY MAX INDEXES 6 ROLL BY DAY
- 36. 36 Chapter 3 In the above example, the class capacity is limited to six days of data by the setting: MAX INDEXES 6. The deletion of data is set for a day's worth by the setting: ROLL BY DAY. When the seventh day's worth of data arrives, the oldest day's worth of data is discarded. Note that in the beginning of the logging process, no data is discarded. After the class fills up for the first time at the end of 7 days, the roll takes place once a day. Example log Day 2 - 21 records Day 3 - 24 records Day 4 - 21 records Day 5 - 24 records Day 6 - 21 records Space is freed when data collection reaches 6 days. On day 7, DSI rolls the oldest day’s worth of data, making room for day 7 data records.
- 37. DSI Class Specification Reference 37 RECORDS PER HOUR The RECORDS PER HOUR setting determines how many records are written to the log file every hour. The default number for RECORDS PER HOUR is 12 to match Performance agent's measurement interval of data sampling once every five minutes (60 minutes/12 records = logging every five minutes). The default number or the number you enter could require the logging process to summarize data before it becomes part of the log file. The method used for summarizing each data item is specified in the metric description. For more information, see Summarization Method later in this chapter. Syntax [RECORDS PER HOUR number] How To Use It The logging process uses this value to summarize incoming data to produce the number of records specified. For example, if data arrives every minute and you have set RECORDS PER HOUR to 6 (every 10 minutes), 10 data points are summarized to write each record to the class. Some common RECORDS PER HOUR settings are shown below: RECORDS PER HOUR 6 --> 1 record/10 minutes RECORDS PER HOUR 12 --> 1 record/5 minutes RECORDS PER HOUR 60 --> 1 record/minute RECORDS PER HOUR 120 --> 1 record/30 seconds Notes RECORDS PER HOUR can be overridden by the -s seconds option in dsilog. However, overriding the original setting could cause problems when Performance Manager graphs the data. If dsilog receives no metric data for an entire logging interval, a missing data indicator is logged for that metric. DSI can be forced to use the last value logged with the -asyn option in dsilog. For a description of the -asyn option, see dsilog Logging Process in Chapter 4.
- 38. 38 Chapter 3 Example In this example, a record will be written every 10 minutes. CLASS VMSTAT_STATS = 10001 LABEL "VMSTAT data" RECORDS PER HOUR 6;
- 39. DSI Class Specification Reference 39 CAPACITY CAPACITY is the number of records to be stored in the class. Syntax [CAPACITY {maximum_record_number}] How To Use It Class capacity is derived from the setting in RECORDS PER HOUR, INDEX BY, and MAX INDEXES. The CAPACITY setting is ignored unless a capacity larger than the derived values of these other settings is specified. If this situation occurs, the MAX INDEXES setting is increased to provide the specified capacity. Example INDEX BY DAY MAX INDEXES 9 RECORDS PER HOUR 12 CAPACITY 3000 In the above example, the derived class capacity is 2,592 records (9 days * 24 hours per day * 12 records per hour). Because 3000 is greater than 2592, sdlcomp increases MAX INDEXES to 11, resulting in the class capacity of 3168. After compilation, you can see the resulting MAX INDEXES and CAPACITY values by running sdlutil with the -decomp option.
- 40. 40 Chapter 3 Metrics Descriptions The metrics descriptions in the class specification file are used to define the individual data items for the class. The metrics description equates a metric name with a numeric identifier and specifies the method to be used when data must be summarized because more records per hour are arriving than you have specified with the RECORDS PER HOUR setting. Note that there is a maximum limit of 100 metrics in the dsilog format file. METRICS metric_name = metric_id_number [LABEL "metric_label_name"] [TOTALED | AVERAGED | SUMMARIZED BY metric_name] [MAXIMUM metric_maximum_number] [PRECISION { 0 | 1 | 2 | 3 | 4 | 5 }] TYPE TEXT LENGTH "length" METRICS The metric name and id number identify the metric being collected. Syntax METRICS metric_name = metric_id_number User-defined descriptions, such as the metric_label_name, cannot be the same as any of the keyword elements of the DSI class specification syntax. For numeric metrics, you can specify the summarization method (TOTALED, AVERAGED, SUMMARIZED BY), a MAXIMUM (for Performance Manager 3.x only), and PRECISION. For text metrics, you can only specify the TYPE TEXT LENGTH.
- 41. DSI Class Specification Reference 41 How To Use It The metrics section must start with the METRICS keyword before the first metric definition. Each metric must have a metric name that meets the following requirements: • Must not be longer than 20 characters. • Must begin with an alphabetic character. • Can contain only alphanumeric characters and underscores. • Is not case-sensitive. The metric also has a metric ID number that must not be longer than 6 characters. The metric_name and metric_id_number must each be unique among all the metrics you define in the class. The combination class_name:metric_name must be unique for this system, and it cannot be the same as any application_name:metric_name. Each metric description is separated from the next by a semicolon (;). You can reuse metric names from any other class whose data is stored in the same log file set if the definitions are identical as well (see How Log Files Are Organized in Chapter 2). To reuse a metric definition that has already been defined in another class in the same log file set, specify just the metric_name without the metric_id_number or any other specifications. If any of the options are to be set differently than the previously defined metric, the metric must be given a unique name and numeric identifier and redefined. The order of the metric names in this section of the class specification determines the order of the fields when you export the logged data. If the order of incoming data is different than the order you list in this specification or if you do not want to log all the data in the incoming data stream, see Chapter 4, DSI Program Reference for information about how to map the metrics to the correct location. A timestamp metric is automatically inserted as the first metric in each class. If you want the timestamp to appear in a different position in exported data, include the short form of the internally defined metric definition (DATE_TIME;) in the position you want it to appear. To omit the timestamp and use a UNIX timestamp (seconds since 1/1/70 00:00:00) that is part of the incoming data, choose the -timestamp option when starting the dsilog process.
- 42. 42 Chapter 3 The simplest metric description, which uses the metric name as the label and the defaults of AVERAGED, MAXIMUM 100, and PRECISION 3 decimal places, requires the following description: METRICS metric_name = metric_id_number Example VM; VM is an example of reusing a metric definition that has already been defined in another class in the same log file set. LABEL The metric label identifies the metric in Performance Manager graphs and exported data. Syntax [LABEL "metric_label_name"] How To Use It Specify a text string, surrounded by double quotation marks, to label the metric in graphs and exported data. Up to 48 characters are allowed. If no label is specified, the metric name is used to identify the metric. Notes If the label contains a double quotation mark, precede it with a backslash (). For example, you would enter ""my" data" if the label is “my” data. You must compile each class using sdlcomp and then start logging the data for that class using the dsilog process, regardless of whether you have reused metric names.
- 43. DSI Class Specification Reference 43 The metric_label_name cannot be the same as any of the keyword elements of the DSI class specification syntax such as CAPACITY, ACTION and so on. Example METRICS RUN_Q_PROCS = 106 LABEL "Procs in run q"; Summarization Method The summarization method determines how to summarize data if the number of records exceeds the number set in the RECORDS PER HOUR option of the CLASS section. For example, you would want to total a count of occurrences, but you would want to average a rate. The summarization method is only valid for numeric metrics. Syntax [{TOTALED | AVERAGED | SUMMARIZED BY metric_name}] How To Use It SUMMARIZED BY should be used when a metric is not being averaged over time, but over another metric in the class. For example, assume you have defined metrics TOTAL_ORDERS and LINES_PER_ORDER. If these metrics are given to the logging process every five minutes but records are being written only once each hour, to correctly summarize LINES_PER_ORDER to be (total lines / total orders), the logging process must perform the following calculation every five minutes: • Multiply LINES_PER_ORDER * TOTAL_ORDERS at the end of each five-minute interval and maintain the result in an internal running count of total lines. • Maintain the running count of TOTAL_ORDERS. • At the end of the hour, divide total lines by TOTAL_ORDERS. To specify this kind of calculation, you would specify LINES_PER_ORDER as SUMMARIZED BY TOTAL_ORDERS.
- 44. 44 Chapter 3 If no summarization method is specified, the metric defaults to AVERAGED. Example METRICS ITEM_1_3 = 11203 LABEL "TOTAL_ORDERS" TOTALED; ITEM_1_5 = 11205 LABEL "LINES_PER_ORDER" SUMMARIZED BY ITEM_1_3; MAXIMUM The metric maximum value for Performance Manager 3.x only, identifies how large the number might be. It is only valid for numeric metrics. It is meant to be used for estimating a maximum value range for graphing the metric in Performance Manager 3.x. Syntax [MAXIMUM metric_maximum_number] How To Use It Specify the expected maximum value for any metric. This value does not specify the largest acceptable number for logged data. (See the table in the following section for the largest acceptable numbers according to precision settings.) The MAXIMUM setting is primarily used to estimate graphing ranges in the analysis software about the initial size of a graph containing the metric and to determine a precision if PRECISION is not specified. The default is 100. Zero is always used as the minimum value because the kinds of numbers expected to be logged are counts, average counts, rates, and percentages.
- 45. DSI Class Specification Reference 45 Example METRICS RUN_Q_PROCS = 106 LABEL "Procs in run q" MAXIMUM 50; PRECISION PRECISION identifies the number of decimal places to be used for metric values. If PRECISION is not specified, it is calculated based on the MAXIMUM specified. If neither is specified, the default PRECISION value is 3. This setting is valid only for numeric metrics. Syntax [PRECISION{0|1|2|3|4|5}] How To Use It The PRECISION setting determines the largest value that can be logged. Use PRECISION 0 for whole numbers. PRECISION # of Decimal Places Largest Acceptable Numbers MAXIMUM 0 0 2,147,483,647 > 10,000 1 1 214,748,364.7 1001 to 10,000 2 2 21,474,836.47 101 to 1,000 3 3 2,147,483.647 11 to 1,000 4 4 214,748.3647 2 to 10 5 5 21,474.83647 1
- 46. 46 Chapter 3 Example METRICS RUN_Q_PROCS = 106 LABEL "Procs in run q" PRECISION 1; TYPE TEXT LENGTH The three keywords TYPE TEXT LENGTH specify that the metric is textual rather than numeric. Text is defined as any character other than ^d, n, or the separator, if any. Because the default delimiter between data items for dsilog input is blank space, you will need to change the delimiter if the text contains embedded spaces. Use the dsilog -c char option to specify a different separator as described in Chapter 4, DSI Program Reference. Syntax [TYPE TEXT LENGTH length] How To Use It The length must be greater than zero and less than 4096. Notes Summarization method, MAXIMUM, and PRECISION cannot be specified with text metrics. Text cannot be summarized, which means that dsilog will take the first logged value in an interval and ignore the rest. Example METRICS text_1 = 16 LABEL "first text metric" TYPE TEXT LENGTH 20 ;
- 47. DSI Class Specification Reference 47 Sample Class Specification CLASS VMSTAT_STATS = 10001 LABEL "VMSTAT data" INDEX BY HOUR MAX INDEXES 12 ROLL BY HOUR RECORDS PER HOUR 120; METRICS RUN_Q_PROCS = 106 LABEL "Procs in run q" PRECISION 0; BLOCKED_PROCS = 107 LABEL "Blocked Processes" PRECISION 0; SWAPPED_PROCS = 108 LABEL "Swapped Processes" PRECISION 0; AVG_VIRT_PAGES = 201 LABEL "Avg Virt Mem Pages" PRECISION 0; FREE_LIST_SIZE = 202 LABEL "Mem Free List Size" PRECISION 0; PAGE_RECLAIMS = 303 LABEL "Page Reclaims" PRECISION 0; ADDR_TRANS_FAULTS = 304 LABEL "Addr Trans Faults" PRECISION 0; PAGES_PAGED_IN = 305 LABEL "Pages Paged In" PRECISION 0; PAGES_PAGED_OUT = 306
- 48. 48 Chapter 3 LABEL "Pages Paged Out" PRECISION 0; PAGES_FREED = 307 LABEL "Pages Freed/Sec" PRECISION 0; MEM_SHORTFALL = 308 LABEL "Exp Mem Shortfall" PRECISION 0; CLOCKED_PAGES = 309 LABEL "Pages Scanned/Sec" PRECISION 0; DEVICE_INTERRUPTS = 401 LABEL "Device Interrupts" PRECISION 0; SYSTEM_CALLS = 402 LABEL "System Calls" PRECISION 0; CONTEXT_SWITCHES = 403 LABEL "Context Switches/Sec" PRECISION 0; USER_CPU = 501 LABEL "User CPU" PRECISION 0; SYSTEM_CPU = 502 LABEL "System CPU" PRECISION 0; IDLE_CPU = 503 LABEL "Idle CPU" PRECISION 0;
- 49. 49 4 DSI Program Reference Introduction This chapter provides detailed reference information about: • the sdlcomp compiler • configuration files datasources and alarmdef • the dsilog logging process • exporting DSI data using the Performance agent extract program • the sdlutil data source management utility
- 50. 50 Chapter 4 sdlcomp Compiler The sdlcomp compiler checks the class specification file for errors. If no errors are found, it adds the class and metric descriptions to the description file in the log file set you name. It also sets up the pointers in the log file set's root file to the log file to be used for data storage. If either the log file set or the log file does not exist, it is created by the compiler. Compiler Syntax sdlcomp [-maxclass value] specification_file [logfile_set[log file]] [options] You can put the DSI files anywhere on your system by specifying a full path in the compiler command. However, once the path has been specified, DSI log files cannot be moved to different directories. (SDL62 is the associated class specification error message, described in SDL Error Messages in Chapter 6. The format used by DSI for the class specification error messages is the prefix SDL (Self Describing Logfile), followed by the message number. Variables and Options Definitions -maxclass value allows you to specify the maximum number of classes to be provided for when creating a new log file set. This option is ignored if it is used with the name of an existing log file set. Each additional class consumes about 500 bytes of disk space in overhead, whether the class is used or not. The default is 10 if -maxclass is not specified. specification_file is the name of the file that contains the class specification. If it is not in the current directory, it must be fully qualified. logfile_set is the name of the log file set this class should
- 51. DSI Program Reference 51 Sample Compiler Output Given the following command line: ->sdlcomp vmstat.spec sdl_new the following code is sample output for a successful compile. Note that vmstat.spec is the sample specification file presented in the previous chapter. sdlcomp Check class specification syntax. CLASS VMSTAT_STATS = 10001 LABEL "VMSTAT data" INDEX BY HOUR MAX INDEXES 12 ROLL BY HOUR RECORDS PER HOUR 120; METRICS RUN_Q_PROCS = 106 LABEL "Procs in run q" PRECISION 0; log file is the log file in the set that will contain the data for this class. If no log file is named, a new log file is created for the class and is named automatically. -verbose prints a detailed description of the compiler output to stdout. -vers displays version information. -? displays the syntax description. -u allows you to log more than one record per second. Use this option to log unsummarized data only. Variables and Options Definitions
- 52. 52 Chapter 4 BLOCKED_PROCS = 107 LABEL "Blocked Processes" PRECISION 0; SWAPPED_PROCS = 108 LABEL "Swapped Processes" PRECISION 0; AVG_VIRT_PAGES = 201 LABEL "Avg Virt Mem Pages" PRECISION 0; FREE_LIST_SIZE = 202 LABEL "Mem Free List Size" PRECISION 0; PAGE_RECLAIMS = 303 LABEL "Page Reclaims" PRECISION 0; ADDR_TRANS_FAULTS = 304 LABEL "Addr Trans Faults" PRECISION 0; PAGES_PAGED_IN = 305 LABEL "Pages Paged In" PRECISION 0; PAGES_PAGED_OUT = 306 LABEL "Pages Paged Out" PRECISION 0; PAGES_FREED = 307 LABEL "Pages Freed/Sec" PRECISION 0; MEM_SHORTFALL = 308 LABEL "Exp Mem Shortfall" PRECISION 0; CLOCKED_PAGES = 309 LABEL "Pages Scanned/Sec" PRECISION 0; DEVICE_INTERRUPTS = 401 LABEL "Device Interrupts" PRECISION 0; SYSTEM_CALLS = 402 LABEL "System Calls" PRECISION 0;
- 53. DSI Program Reference 53 CONTEXT_SWITCHES = 403 LABEL "Context Switches/Sec" PRECISION 0; USER_CPU = 501 LABEL "User CPU" PRECISION 0; SYSTEM_CPU = 502 LABEL "System CPU" PRECISION 0; IDLE_CPU = 503 LABEL "Idle CPU" PRECISION 0; Note: Time stamp inserted as first metric by default. Syntax check successful. Update SDL sdl_new. Open SDL sdl_new Add class VMSTAT_STATS. Check class VMSTAT_STATS. Class VMSTAT_STATS successfully added to log file set. For explanations of error messages and recovery, see Chapter 6, Error Message.
- 54. 54 Chapter 4 Configuration Files Before you start logging data, you may need to update two Performance agent configuration files: • /var/opt/OV/conf/perf/datasources — see “Configuring Data Sources” in the HP Performance agent Installation and Configuration Guide for UNIX for detailed information about using and updating the datasources configuration file. • /var/opt/perf/alarmdef — see the next section, Defining Alarms for DSI Metrics for information about using the alarmdef configuration file. Defining Alarms for DSI Metrics You can use Performance agent to define alarms on DSI metrics. These alarms notify you when DSI metrics meet or exceed conditions that you have defined. To define alarms, you specify conditions that, when met or exceeded, trigger an alert notification or action. You define alarms for data logged through DSI the same way as for other Performance agent metrics — in the alarmdef file on the Performance agent system. The alarmdef file is located in the var/ opt/perf/ configuration directory of Performance agent. Whenever you specify a DSI metric name in an alarm definition, it should be fully qualified; that is, preceded by the datasource_name, and the class_name as shown below: datasource_name:class_name:metric_name • datasource_name is the name you have used to configure the data source in the datasources file. See “Configuring Data Sources” in the HP Performance agent Installation and Configuration Guide for UNIX for more information. • class_name is the name you have used to identify the class in the class specification for the data source. You do not need to enter the class_name if the metric name is unique (not reused) in the class specification. The perflbd.rc file is maintained as a symbolic link to the datasources file for Performance agent on all supported UNIX operating systems, except Performance agent on Linux.
- 55. DSI Program Reference 55 • metric_name is the data item from the class specification for the data source. However, if you choose not to fully qualify a metric name, you need to include the USE statement in the alarmdef file to identify which data source to use. For more information about the USE statement, see Chapter 7, “Performance Alarms,” in the HP Performance agent for UNIX User's Manual. To activate the changes you made to the alarmdef file so that it can be read by the alarm generator, enter the ovpa restart alarm command in the command line. For detailed information on the alarm definition syntax, how alarms are processed, and customizing alarm definitions, see Chapter 7 in the HP Performance agent for UNIX User's Manual. Alarm Processing As data is logged by dsilog it is compared to the alarm definitions in the alarmdef file to determine if a condition is met or exceeded. When this occurs, an alert notification or action is triggered. You can configure where you want alarm notifications sent and whether you want local actions performed. Alarm notifications can be sent to the central Performance Manager analysis system where you can draw graphs of metrics that characterize your system performance. SNMP traps can be sent to HP Network Node Manager. Local actions can be performed on the Performance agent system. Alarm information can also be sent to Operations Manager.
- 56. 56 Chapter 4 dsilog Logging Process The dsilog process requires that either devise your own program or use one that is already in existence for you to gain access to the data. You can then pipe this data into dsilog, which logs the data into the log file set. A separate logging process must be used for each class you define. dsilog expects to receive data from stdin. To start the logging process, you could pipe the output of the process you are using to collect data to dsilog as shown in the following example. vmstat 60 | dsilog logfile_set class You can only have one pipe ( | ) in the command line. This is because with two pipes, UNIX buffering will hold up the output from the first command until 8000 characters have been written before continuing to the second command and piping out to the log file. You could also use a fifo (named pipe). For example, mkfifo -m 777 myfifo dsilog logfile_set class -i myfifo & vmstat 60 > myfifo & The & causes the process to run in the background. Note that you may need to increase the values of the UNIX kernel parameters shmmni and nflocks if you are planning to run a large number of dsilog processes. Shmmni specifies the maximum number of shared memory segments; nflocks specifies the maximum number of file locks on a system. The default value for each is 200. Each active DSI log file set uses a shared memory segment (shmmni) and one or more file locks (nflocks). On HP-UX, you can change the settings for shmmni and nflocks using the System Administration and Maintenance utility (SAM). Syntax dsilog logfile_set class [options] The dsilog parameters and options are described on the following pages.
- 57. DSI Program Reference 57 Table 1 dsilog parameters and options Variables and Options Definitions logfile_set is the name of the log file set where the data is to be stored. If it is not in the current directory, the name must be fully qualified. class is the name of the class to be logged. -asyn specifies that the data will arrive asynchronously with the RECORDS PER HOUR rate. If no data arrives during a logging interval, the data for the last logging interval is repeated. However, if dsilog has logged no data yet, the metric value logged is treated as missing data. This causes a flat line to be drawn in a graphical display of the data and causes data to be repeated in each record if the data is exported. -c char uses the specified character as a string delimiter/ separator. You may not use the following as separators: decimal, minus sign, ^z, n. If there are embedded spaces in any text metrics then you must specify a unique separator using this option. -f format file names a file that describes the data that will be input to the logging process. If this option is not specified, dsilog derives the format of the input from the class specification with the following assumptions. See Creating a Format File later in this chapter for more information. Each data item in an input record corresponds to a metric that has been defined in the class specification. The metrics are defined in the class specification in the order in which they appear as data items in the input record. If there are more data items in an input record than there are metric definitions, dsilog ignores all additional data items.
- 58. 58 Chapter 4 -f format file (continued) If the class specification lists more metric definitions than there are input data items, the field will show “missing” data when the data is exported, and no data will be available for that metric when graphing data in the analysis software. The number of fields in the format file is limited to 100. -i fifo or ASCII file indicates that the input should come from the fifo or ASCII file named. If this option is not used, input comes from stdin. If you use this method, start dsilog before starting your collection process. See man page mkfifo for more information about using a fifo. Also see Chapter 5, Examples of Data Source Integration for examples. -s seconds is the number of seconds by which to summarize the data. The -s option overrides the summarization interval and the summarization rate defaults to RECORDS PER HOUR in the class specification. If present, this option overrides the value of RECORDS PER HOUR. A zero (0) turns off summarization, which means that all incoming data is logged. Caution should be used with the -s 0 option because dsilog will timestamp the log data at the time the point arrived. This can cause problems for Performance Manager and perfalarm, which work best with timestamps at regular intervals. If the log file will be accessed by Performance Manager or the OV Performance perfalarm program, use of the -s 0 option is discouraged. Table 1 dsilog parameters and options Variables and Options Definitions
- 59. DSI Program Reference 59 How dsilog Processes Data The dsilog program scans each input data string, parsing delimited fields into individual numeric or text metrics. A key rule for predicting how the data will be processed is the validity of the input string. A valid input string requires that a delimiter be present between any specified metric types (numeric or text). A blank is the default delimiter, but a different delimiter can be specified with the dsilog -c char command line option. You must include a new line character at the end of any record fed to DSI in order for DSI to interpret it properly. -t prints everything that is logged to stdout in ASCII format. -timestamp indicates that the logging process should not provide the timestamp, but use the one already provided in the input data. The timestamp in the incoming data must be in UNIX timestamp format (seconds since 1/1/70 00:00:00) and represent the local time. -vi filters the input through dsilog and writes errors to stdout instead of the log file. It does not write the actual data logged to stdout (see the -vo option below). This can be used to check the validity of the input. -vo filters the input through dsilog and writes the actual data logged and errors to stdout instead of the log file. This can be used to check the validity of the data summarization. -vers displays version information -? displays the syntax description. Table 1 dsilog parameters and options Variables and Options Definitions
- 60. 60 Chapter 4 Testing the Logging Process with Sdlgendata Before you begin logging data, you can test the compiled log file set and the logging process using the sdlgendata program. sdlgendata discovers the metrics for a class (as described in the class specification) and generates data for each metric in a class. Syntax sdlgendata logfile_set class [options] Sdlgendata parameters and options are explained below. By piping sdlgendata output to dsilog with either the -vi or -vo options, you can verify the input (-vi) and verify the output (-vo) before you begin logging with your own process or program. Table 2 Sdlgendata parameters and options Variables and Options Definitions logfile_set is the name of the log file set to generate data for. class is the data class to generate data for. -timestamp [number] provides a timestamp with the data. If a negative number or no number is supplied, the current time is used for the timestamp. If a positive number is used, the time starts at 0 and is incremented by number for each new data record. -wait number causes a wait of number seconds between records generated. -cycle number recycles data after number cycles. -vers displays version information. -? displays the syntax description.
- 61. DSI Program Reference 61 Use the following command to pipe data from sdlgendata to the logging process. The -vi option specifies that data is discarded and errors are written to stdout. Press CTRL+C or other interrupt control character to stop data generation. sdlgendata logfile_set class -wait 5 | dsilog logfile_set class -s 10 -vi The previous command generates data that looks like this: dsilog I: 744996402 1.0000 2.0000 3.0000 4.0000 5.0000 6.0000 7.0000 I: 744996407 2.0000 3.0000 4.0000 5.0000 6.0000 7.0000 8.0000 I: 744996412 3.0000 4.0000 5.0000 6.0000 7.0000 8.0000 9.0000 I: 744996417 4.0000 5.0000 6.0000 7.0000 8.0000 9.0000 10.0000 I: 744996422 5.0000 6.0000 7.0000 8.0000 9.0000 10.0000 11.0000 I: 744996427 6.0000 7.0000 8.0000 9.0000 10.0000 11.0000 12.0000 I: 744996432 7.0000 8.0000 9.0000 10.000 11.000 12.0000 13.0000 I: 744996437 8.0000 9.0000 10.0000 11.0000 12.0000 13.0000 14.0000 After you are finished testing, delete all log files created from the test. Otherwise, these files remain as part of the log file test.
- 62. 62 Chapter 4 You can also use the -vo option of dsilog to examine input and summarized output for your real data without actually logging it. The following command pipes vmstat at 5-second intervals to dsilog where it is summarized to 10 seconds. ->vmstat 5 | dsilog logfile_set class -s 10 -vo dsilog I: 744997230 0.0000 0.0000 21.0000 2158.0000 1603.0000 2.0000 2.0000 I: 744997235 0.0000 0.0000 24.0000 2341.0000 1514.0000 0.0000 0.0000 interval marker L: 744997230 0.0000 0.0000 22.5000 2249.5000 1558.5000 1.0000 1.0000 I: 744997240 0.0000 0.0000 23.0000 2330.0000 1513.0000 0.0000 0.0000 I: 744997245 0.0000 0.0000 20.0000 2326.0000 1513.0000 0.0000 0.0000 interval marker L: 744997240 0.0000 0.0000 21.5000 2328.0000 1513.0000 0.0000 0.0000 I: 744997250 0.0000 0.0000 22.0000 2326.0000 1513.0000 0.0000 0.0000 I: 744997255 0.0000 0.0000 22.0000 2303.0000 1513.0000 0.0000 0.0000 interval marker L: 744997250 0.0000 0.0000 22.0000 2314.5000 1513.0000 0.0000 0.0000 I: 744997260 0.0000 0.0000 22.0000 2303.0000 1512.0000 0.0000 0.0000 I: 744997265 0.0000 0.0000 28.0000 2917.0000 1089.0000 9.0000 33.0000 interval marker L: 744997260 0.0000 0.0000 25.0000 2610.0000 1300.5000 4.5000 16.5000 I: 744997270 0.0000 0.0000 28.0000 2887.0000 1011.0000 3.0000 9.0000 I: 744997275 0.0000 0.0000 27.0000 3128.0000 763.0000
- 63. DSI Program Reference 63 8.0000 6.0000 interval marker L: 744997270 0.0000 0.0000 27.5000 3007.5000 887.0000 5.5000 12.5000 You can also use the dsilog -vo option to use a file of old data for testing, as long as the data contains its own UNIX timestamp (seconds since 1/1/70 00:00:00). To use a file of old data, enter a command like this: dsilog -timestamp -vo <oldfile>
- 64. 64 Chapter 4 Creating a Format File Create a format file to map the data input to the class specification if: • the data input contains data that is not included in the class specification. • incoming data has metrics in a different order than you have specified in the class specification. A format file is an ASCII text file that you can create with vi or any text editor. Use the -f option in dsilog to specify the fully qualified name of the format file. Because the logging process works by searching for the first valid character after a delimiter (either a space by default or user-defined with the dsilog -c option) to start the next metric, the format file simply tells the logging process which fields to skip and what metric names to associate with fields not skipped. $numeric tells the logging process to skip one numeric metric field and go to the next. $any tells the logging process to skip one text metric field and go to the next. Note that the format file is limited to 100 fields. For example, if the incoming data stream contains this information: ABC 987 654 123 456 and you want to log only the first numeric field into a metric named metric_1, the format file would look like this: $any metric_1 This tells the logging process to log only the information in the first numeric field and discard the rest of the data. To log only the information in the third numeric field, the format file would look like this: $any $numeric $numeric metric_1 To log all four numeric data items, in reverse order, the format file would look like this: $any metric_4 metric_3 metric_2 metric_1
- 65. DSI Program Reference 65 If the incoming data stream contains the following information: /users 15.9 3295 56.79% xdisk1 /dev/dsk/ c0d0s* and you want to log only the first text metric and the first two numeric fields into metric fields you name text_1, num_1, and num_2, respectively, the format file would look like this: text_1 num_1 num_2 This tells the logging process to log only the information in the first three fields and discard the rest of the data. To log all of the data, but discard the “%” following the third metric, the format file would look like this: text_1 num_1 num_2 num_3 $any text_2 text_3 Since you are logging numeric fields and the “%” is considered to be a text field, you need to skip it to correctly log the text field that follows it. To log the data items in a different order the format file would look like this: text_3 num_2 num_1 num_3 $any text_2 text_1 Note that this will result in only the first six characters of text_3 being logged if text_1 is declared to be six characters long in the class specification. To log all of text_3 as the first value, change the class specification and alter the data stream to allow extra space.
- 66. 66 Chapter 4 Changing a Class Specification To change a class specification file, you must recreate the whole log file set as follows: 1 Stop the dsilog process. 2 Export the data from the existing log file using the UNIX timestamp option if you want to save it or integrate the old data with the new data you will be logging. See Exporting DSI Data later in this chapter for information on how to do this. 3 Run sdlutil to remove the log file set. See Managing Data With sdlutil later in this chapter for information on how to do this. 4 Update the class specification file. 5 Run sdlcomp to recompile the class specification. 6 Optionally, use the -i option in dsilog to integrate in the old data you exported in step 2. You may need to manipulate the data to line up with the new data using the -f format_file option 7 Run dsilog to start logging based on the new class specification. 8 As long as you have not changed the log file set name or location, you do not need to update the datasources file.
- 67. DSI Program Reference 67 Exporting DSI Data To export the data from a DSI log file, use the Performance agent extract program's export function. See Chapters 5 and 6 of the HP Performance agent for UNIX User's Manual for details on how to use extract to export data. An example of exporting DSI data using command line arguments is provided on the following page. There are several ways to find out what classes and metrics can be exported from the DSI log file. You can use sdlutil to list this information as described in Managing Data With sdlutil later in this chapter. Or you can use the extract guide command to create an export template file that lists the classes and metrics in the DSI log file. You can then use vi to edit, name, and save the file. The export template file is used to specify the export format, as described in Chapters 5 and 6 of the HP Performance agent for UNIX User's Manual. Example of Using Extract to Export DSI Log File Data extract -xp -l logfile_set -C class [options] You can use extract command line options to do the following: • Specify an export output file. • Set begin and end dates and times for the first and last intervals to export. • Export data only between certain times (shifts). • Exclude data for certain days of the week (such as weekends). • Specify a separation character to put between metrics on reports. • Choose whether or not to display headings and blank records for intervals when no data arrives and what the value displayed should be for missing or null data. • Display exported date/time in UNIX format or date and time format. • Set additional summarization levels. You must be root or the creator of the log file to export DSI log file data.
- 68. 68 Chapter 4 Viewing Data in Performance Manager In order to display data from a DSI log file in Performance Manager, you need to configure the DSI log file as an Performance agent data source. Before you start logging data, configure the data source by adding it to the datasources file on the Performance agent system. See “Configuring Data Sources” in the HP Performance agent Installation and Configuration Guide for UNIX for detailed information. You can centrally view, monitor, analyze, compare, and forecast trends in DSI data using Performance Manager. Performance Manager helps you identify current and potential problems. It provides the information you need to resolve problems before user productivity is affected. For information about using Performance Manager, see Performance Manager online Help.
- 69. DSI Program Reference 69 Managing Data With sdlutil To manage the data from a DSI log file, use the sdlutil program to do any of the following tasks: • list currently defined class and metric information to stdout. You can redirect output to a file. • list complete statistics for classes to stdout. • show metric descriptions for all metrics listed. • list the files in a log file set. • remove classes and data from a log file set. • recreate a class specification from the information in the log file set. • display version information. Syntax sdlutil logfile_set [option] Variables and Options Definitions logfile_set is the name of a log file set created by compiling a class specification. -classes classlist provides a class description of all classes listed. If none are listed, all are provided. Separate the Items in the classlist with spaces. -stats classlist provides complete statistics for all classes listed. If none are listed, all are provided. Separate the Items in the classlist with spaces.
- 70. 70 Chapter 4 -metrics metriclist provides metric descriptions for all metrics in the metriclist. If none are listed, all are provided. Separate the Items in the metriclist with spaces. -id displays the shared memory segment ID used by the log file. -files lists all the files in the log file set. -rm all removes all classes and data as well as their data and shared memory ID from the log file. -decomp classlist recreates a class specification from the information in the log file set. The results are written to stdout and should be redirected to a file if you plan to make changes to the file and reuse it. Separate the Items in the classlist with spaces. -vers displays version information. -? displays the syntax description. Variables and Options Definitions
- 71. 71 5 Examples of Data Source Integration Introduction Data source integration is a very powerful and very flexible technology. Implementation of DSI can range from simple and straightforward to very complex. This chapter contains examples of using DSI for the following tasks: • writing a dsilog script • logging vmstat data • logging sar data • logging who word count
- 72. 72 Chapter 5 Writing a dsilog Script The dsilog code is designed to receive a continuous stream of data rows as input. This stream of input is summarized by dsilog according to the specification directives for each class, and one summarized data row is logged per requested summarization interval. Performance Manager and perfalarm work best when the timestamps written in the log conform to the expected summarization rate (records per hour). This happens automatically when dsilog is allowed to do the summarization. dsilog process for each arriving input row, which may cause problems with Performance Manager and perfalarm. This method is not recommended. • Problematic dsilog script • Recommended dsilog script Example 1 - Problematic dsilog Script In the following script, a new dsilog process is executed for each arriving input row. while : do feed_one_data_row | dsilog sdlname classname sleep 50 done Example 2 - Recommended dsilog Script In the following script, one dsilog process receives a continuous stream of input data. feed_one_data_row is written as a function, which provides a continuous data stream to a single dsilog process. # Begin data feed function feed_one_data_row() { while :
- 73. Examples of Data Source Integration 73 do # Perform whatever operations necessary to produce one row # of data for feed to a dsilog process sleep 50 done } # End data feed function # Script mainline code feed_one_data_row | dsilog sdlname classname
- 74. 74 Chapter 5 Logging vmstat Data This example shows you how to set up data source integration using default settings to log the first two values reported by vmstat. You can either read this section as an overview of how the data source integration process works, or perform each task to create an equivalent DSI log file on your system. The procedures needed to implement data source integration are: • Creating a class specification file. • Compiling the class specification file. • Starting the dsilog logging process. Creating a Class Specification File The class specification file is a text file that you create to describe the class, or set of incoming data, as well as each individual number you intend to log as a metric within the class. The file can be created with the text editor of your choice. The file for this example of data source integration should be created in the /tmp/ directory. The following example shows the class specification file required to describe the first two vmstat numbers for logging in a class called VMSTAT_STATS. Because only two metrics are defined in this class, the logging process ignores the remainder of each vmstat output record. Each line in the file is explained in the comment lines that follow it. CLASS VMSTAT_STATS = 10001; # Assigns a unique name and number to vmstat class data. # The semicolon is required to terminate the class section # of the file. METRICS # Indicates that everything that follows is a description # of a number (metric) to be logged. RUN_Q_PROCS = 106; # Assigns a unique name and number to a single metric. # The semicolon is required to terminate each metric.
- 75. Examples of Data Source Integration 75 BLOCKED_PROCS = 107; # Assigns a unique name and number to another metric. # The semicolon is required to terminate each metric. Compiling the Class Specification File When you compile the class specification file using sdlcomp, the file is checked for syntax errors. If none are found, sdlcomp creates or updates a set of log files to hold the data for the class. Use the file name you gave to the class specification file and then specify a name for logfile_set_name that makes it easy to remember what kind of data the log file contains. In the command and compiler output example below, / tmp/vmstat.spec is used as the file name and /tmp/VMSTAT_DATA is used for the log file set. -> sdlcomp /tmp/vmstat.spec /tmp/VMSTAT_DATA sdlcomp X.01.04 Check class specification syntax. CLASS VMSTAT_STATS = 10001; METRICS RUN_Q_PROCS = 106; BLOCKED_PROCS = 107; NOTE: Time stamp inserted as first metric by default. Syntax check successful. Update SDL VMSTAT_DATA. Shared memory ID used by vmstat_data=219 Class VMSTAT_STATS successfully added to log file set. This example creates a log file set called VMSTAT_DATA in the /tmp/ directory, which includes a root file and description file in addition to the data file. The log file set is ready to accept logged data. If there are syntax errors in the class specification file, messages indicating the problems are displayed and the log file set is not created.
- 76. 76 Chapter 5 Starting the dsilog Logging Process Now you can pipe the output of vmstat directly to the dsilog logging process. Use the following command: vmstat 60 | dsilog /tmp/VMSTAT_DATA VMSTAT_STATS & This command runs vmstat every 60 seconds and sends the output directly to the VMSTAT_STATS class in the VMSTAT_DATA log file set. The command runs in the background. You could also use remsh to feed vmstat in from a remote system. Note that the following message is generated at the start of the logging process: Metric null has invalid data Ignore to end of line, metric value exceeds maximum This message is a result of the header line in the vmstat output that dsilog cannot log. Although the message appears on the screen, dsilog continues to run and begins logging data with the first valid input line. Accessing the Data You can use the sdlutil program to report on the contents of the class: sdlutil /tmp/VMSTAT_DATA -stats VMSTAT_STATS You can use extract program command line arguments to export data from the class. For example: extract -xp -l /tmp/VMSTAT_DATA -C VMSTAT_STATS -ut -f stdout Note that to export DSI data, you must be root or the creator of the log file. By default, data will be summarized and logged once every five minutes.
- 77. Examples of Data Source Integration 77 Logging sar Data from One File This example shows you how to set up several DSI data collections using the standard sar (system activity report) utility to provide the data. When you use a system utility, it is important to understand exactly how that utility reports the data. For example, note the difference between the following two sar commands: sar -u 1 1 HP-UX hpptc99 A.11.00 E 9000/855 04/10/99 10:53:15 %usr %sys %wio %idle 10:53:16 2 7 6 85 sar -u 5 2 HP-UX hpptc99 A.11.00 E 9000/855 04/10/99 10:53:31 %usr %sys %wio %idle 10:53:36 4 5 0 91 10:53:41 0 0 0 99 Average 2 2 0 95 As you can see, specifying an iteration value greater than 1 causes sar to display an average across the interval. This average may or may not be of interest but can affect your DSI class specification file and data conversion. You should be aware that the output of sar, or other system utilities, may be different when executed on different UNIX platforms. You should become very familiar with the utility you are planning to use before creating your DSI class specification file. Our first example uses sar to monitor CPU utilization via the -u option of sar. If you look at the man page for sar, you will see that the -u option reports the portion of time running in user mode (%usr), running in system mode (%sys), idle with some process waiting for block I/O (%wio), and otherwise idle (%idle). Because we are more interested in monitoring CPU activity over a long period of time, we use the form of sar that does not show the average.
- 78. 78 Chapter 5 Creating a Class Specification File The first task to complete is the creation of a DSI class specification file. The following is an example of a class specification that can be used to describe the incoming data: # sar_u.spec # # sar -u class definition for HP systems. # # ==> 1 minute data; max 24 hours; indexed by hour; roll by day # CLASS sar_u = 1000 LABEL "sar -u data" INDEX BY hour MAX INDEXES 24 ROLL BY day ACTION "./sar_u_roll $PT_START$ $PT_END$" RECORDS PER HOUR 60 ; METRICS hours_1 = 1001 LABEL "Collection Hour" PRECISION 0; minutes_1 = 1002 LABEL "Collection Minute" PRECISION 0; seconds_1 = 1003 LABEL "Collection Second" PRECISION 0; user_cpu = 1004 LABEL "%user" AVERAGED MAXIMUM 100 PRECISION 0 ; sys_cpu = 1005 LABEL "%sys" AVERAGED MAXIMUM 100 PRECISION 0 ;
- 79. Examples of Data Source Integration 79 wait_IO_cpu = 1006 LABEL "%wio" AVERAGED MAXIMUM 100 PRECISION 0 ; idle_cpu = 1007 LABEL "%idle" AVERAGED MAXIMUM 100 PRECISION 0 ; Compiling the Class Specification File The next task is to compile the class specification file using the following command. sdlcomp sar_u.spec sar_u_log The output of the sar -u command is a system header line, a blank line, an option header line, and a data line consisting of a time stamp followed by the data we want to capture. The last line is the only line that is interesting. So, from the sar -u command, we need a mechanism to save only the last line of output and feed that data to DSI. dsilog expects to receive data from stdin. To start the logging process, you could pipe output from the process you are using to dsilog. However, you can only have one pipe (|) in the command line. When two pipes are used, UNIX buffering retains the output from the first command until 8000 characters have been written before continuing to the second command and piping out to the log file. As a result, doing something like the following does not work: sar -u 60 1 | tail -1 | dsilog Therefore, we use a fifo as the input source for DSI. However, this is not without its problems. Assume we were to use the following script: #!/bin/ksh sar_u_feed # sar_u_feed script that provides sar -u data to DSI via # a fifo(sar_u.fifo)
- 80. 80 Chapter 5 while : # (infinite loop) do # specify a one minute interval using tail to extract the # last sar output record(contains the time stamp and data), # saving the data to a file. /usr/bin/sar -u 60 1 2>/tmp/dsierr | tail -1 > /usr/tmp/ sar_u_data # Copy the sar data to the fifo that the dsilog process is # reading. cat /usr/tmp/sar_u_data > ./sar_u.fifo done Unfortunately, this script will not produce the desired results if run as is. This is because the cat command opens the fifo, writes the data record, and then closes the fifo. The close indicates to dsilog that there is no more data to be written to the log, so dsilog writes this one data record and terminates. What is needed is a dummy process to “hold” the fifo open. Therefore, we need a dummy fifo and a process that opens the dummy fifo for input and the sar_u.fifo for output. This will hold the sar_u.fifo open, thereby preventing dsilog from terminating. Starting the DSI Logging Process Now let's take a step by step approach to getting the sar -u data to dsilog. 1 Create two fifos; one is the dummy fifo used to “hold open” the real input fifo. # Dummy fifo. mkfifo ./hold_open.fifo # Real input fifo for dsilog mkfifo ./sar_u.fifo 2 Start dsilog using the -i option to specify the input coming from a fifo. It is important to start dsilog before starting the sar data feed (sar_u_feed).
- 81. Examples of Data Source Integration 81 dsilog ./sar_u_log sar_u -i ./sar_u.fifo & 3 Start the dummy process to hold open the input fifo. cat ./hold_open.fifo > ./sar_u.fifo & 4 Start the sar data feed script (sar_u_feed). ./sar_u_feed & 5 The sar_u_feed script will feed data to dsilog until it is killed or the cat that holds the fifo open is killed. Our class specification file states that sar_u_log will be indexed by hour, contain a maximum of 24 hours, and at the start of the next day (roll by day), the script sar_u_roll will be executed. !/bin/ksh sar_u_roll # # Save parameters and current date in sar_u_log_roll_file. # (Example of adding comments/other data to the roll file). mydate=`date` echo "$# $0 $1 $2" >> ./sar_u_log_roll_file echo $mydate >> ./sar_u_log_roll_file extract -l ./sar_u_log -C sar_u -B $1 -E $2 -1 -f stdout -xp >> ./sar_u_log_roll_file 6 The roll script saves the data being rolled out in an ASCII text file that can be examined with a text editor or printed to a printer.
- 82. 82 Chapter 5 Logging sar Data from Several Files If you are interested in more than just CPU utilization, you can either have one class specification file that describes the data, or have a class specification file for each option and compile these into one log file set. The first example shows separate class specification files compiled into a single log file set. In this example, we will monitor CPU utilization, buffer activity (sar -b), and system calls (sar -c). Logging data in this manner requires three class specification files, three dsilog processes, three dsilog input fifos, and three scripts to provide the sar data. Creating Class Specification Files The following are the class specification files for each of these options. # sar_u_mc.spec # # sar -u class definition for log files on HP systems. # # ==> 1 minute data; max 24 hours; indexed by hour; roll by day # CLASS sar_u = 1000 LABEL "sar -u data" INDEX BY hour MAX INDEXES 24 ROLL BY day ACTION "./sar_u_mc_roll $PT_START$ $PT_END$" RECORDS PER HOUR 60 ; METRICS hours_1 = 1001 LABEL "Collection Hour" PRECISION 0 ; minutes_1 = 1002 LABEL "Collection Minute" PRECISION 0 ; seconds_1 = 1003 LABEL "Collection Second"
- 83. Examples of Data Source Integration 83 PRECISION 0 ; user_cpu = 1004 LABEL "%user" AVERAGED MAXIMUM 100 PRECISION 0 ; sys_cpu = 1005 LABEL "%sys" AVERAGED MAXIMUM 100 PRECISION 0 ; wait_IO_cpu = 1006 LABEL "%wio" AVERAGED MAXIMUM 100 PRECISION 0 ; idle_cpu = 1007 LABEL "%idle" AVERAGED MAXIMUM 100 PRECISION 0 ; # sar_b_mc.spec # # sar -b class definition for log files on HP systems. # # ==> 1 minute data; max 24 hours; indexed by hour; roll by day # CLASS sar_b = 2000 LABEL "sar -b data" INDEX BY hour MAX INDEXES 24 ROLL BY day ACTION "./sar_b_mc_roll $PT_START$ $PT_END$" RECORDS PER HOUR 60 ; METRICS hours_2 = 2001 LABEL "Collection Hour"
- 84. 84 Chapter 5 PRECISION 0 ; minutes_2 = 2002 LABEL "Collection Minute" PRECISION 0 ; seconds_2 = 2003 LABEL "Collection Second" PRECISION 0 ; bread_per_sec = 2004 LABEL "bread/s" PRECISION 0 ; lread_per_sec = 2005 LABEL "lread/s" PRECISION 0 ; read_cache = 2006 LABEL "%rcache" MAXIMUM 100 PRECISION 0 ; bwrit_per_sec = 2007 LABEL "bwrit/s" PRECISION 0 ; lwrit_per_sec = 2008 LABEL "lwrit/s" PRECISION 0 ; write_cache = 2009 LABEL "%wcache" MAXIMUM 100 PRECISION 0 ; pread_per_sec = 2010 LABEL "pread/s" PRECISION 0 ;
- 85. Examples of Data Source Integration 85 pwrit_per_sec = 2011 LABEL "pwrit/s" PRECISION 0 ; # sar_c_mc.spec # # sar -c class definition for log files on HP systems. # # ==> 1 minute data; max 24 hours; indexed by hour; roll by day # CLASS sar_c = 5000 LABEL "sar -c data" INDEX BY hour MAX INDEXES 24 ROLL BY day ACTION "./sar_c_mc_roll $PT_START$ $PT_END$" RECORDS PER HOUR 60 ; METRICS hours_5 = 5001 LABEL "Collection Hour" PRECISION 0 ; minutes_5 = 5002 LABEL "Collection Minute" PRECISION 0 ; seconds_5 = 5003 LABEL "Collection Second" PRECISION 0 ; scall_per_sec = 5004 LABEL "scall/s" PRECISION 0 ; sread_per_sec = 5005 LABEL "sread/s" PRECISION 0 ; swrit_per_sec = 5006 LABEL "swrit/s"
- 86. 86 Chapter 5 PRECISION 0 ; fork_per_sec = 5007 LABEL "fork/s" PRECISION 2 ; exec_per_sec = 5008 LABEL "exec/s" PRECISION 2 ; rchar_per_sec = 5009 LABEL "rchar" PRECISION 0 ; wchar_per_sec = 5010 LABEL "wchar/s" PRECISION 0 ; The following are the two additional scripts that are needed to supply the sar data. #!/bin/ksh # sar_b_feed script that provides sar -b data to DSI via # a fifo (sar_b.fifo) while : # (infinite loop) do # specify a one minute interval using tail to extract the # last sar output record(contains the time stamp and data), # saving the data to a file. /usr/bin/sar -b 60 1 2>/tmp/dsierr | tail -1 &> /usr/tmp/sar_b_data # Copy the sar data to the fifo that the dsilog process is reading. cat /usr/tmp/sar_b_data > ./sar_b.fifo done #!/bin/ksh sar_c_feed # sar_c_feed script that provides sar -c data to DSI via # a fifo(sar_c.fifo)
- 87. Examples of Data Source Integration 87 while : # (infinite loop) do # specify a one minute interval using tail to extract the # last sar output record(contains the time stamp and data), # saving the data to a file. /usr/bin/sar -c 60 1 2>/tmp/dsierr | tail -1 > /usr/tmp/sar_c_data # Copy the sar data to the fifo that the dsilog process is reading. cat /usr/tmp/sar_c_data > ./sar_c.fifo done Compiling the Class Specification Files Compile the three specification files into one log file set: sdlcomp ./sar_u_mc.spec sar_mc_log sdlcomp ./sar_b_mc.spec sar_mc_log sdlcomp ./sar_c_mc.spec sar_mc_log Starting the DSI Logging Process Returning to the step by step approach for the sar data: 1 Create four fifos; one will be the dummy fifo used to “hold open” the three real input fifos. # Dummy fifo. mkfifo ./hold_open.fifo # sar -u input fifo for dsilog. mkfifo ./sar_u.fifo # sar -b input fifo for dsilog. mkfifo ./sar_b.fifo # sar -c input fifo for dsilog. mkfifo ./sar_c.fifo
- 88. 88 Chapter 5 2 Start dsilog using the -i option to specify the input coming from a fifo. It is important to start dsilog before starting the sar data feeds. dsilog ./sar_mc_log sar_u -i ./sar_u.fifo & dsilog ./sar_mc_log sar_b -i ./sar_b.fifo & dsilog ./sar_mc_log sar_c -i ./sar_c.fifo & 3 Start the dummy process to hold open the input fifo. cat ./hold_open.fifo > ./sar_u.fifo & cat ./hold_open.fifo > ./sar_b.fifo & cat ./hold_open.fifo > ./sar_c.fifo & 4 Start the sar data feed scripts. ./sar_u_feed & ./sar_b_feed & ./sar_c_feed &
- 89. Examples of Data Source Integration 89 Logging sar Data for Several Options The last example for using sar to supply data to DSI uses one specification file to define the data from several sar options (ubycwavm). # sar_ubycwavm.spec # # sar -ubycwavm class definition for HP systems. # # ==> 1 minute data; max 24 hours; indexed by hour; roll by day # CLASS sar_ubycwavm = 1000 LABEL "sar -ubycwavm data" INDEX BY hour MAX INDEXES 24 ROLL BY day ACTION "./sar_ubycwavm_roll $PT_START$ $PT_END$" RECORDS PER HOUR 60 ; METRICS hours = 1001 LABEL "Collection Hour" PRECISION 0; minutes = 1002 LABEL "Collection Minute" PRECISION 0; seconds = 1003 LABEL "Collection Second" PRECISION 0; user_cpu = 1004 LABEL "%user" AVERAGED MAXIMUM 100 PRECISION 0 ; sys_cpu = 1005 LABEL "%sys" AVERAGED MAXIMUM 100 PRECISION 0 ; wait_IO_cpu = 1006
- 90. 90 Chapter 5 LABEL "%wio" AVERAGED MAXIMUM 100 PRECISION 0 ; idle_cpu = 1007 LABEL "%idle" AVERAGED MAXIMUM 100 PRECISION 0 ; bread_per_sec = 1008 LABEL "bread/s" PRECISION 0 ; lread_per_sec = 1009 LABEL "lread/s" PRECISION 0 ; read_cache = 1010 LABEL "%rcache" MAXIMUM 100 PRECISION 0 ; bwrit_per_sec = 1011 LABEL "bwrit/s" PRECISION 0 ; lwrit_per_sec = 1012 LABEL "lwrit/s" PRECISION 0 ; write_cache = 1013 LABEL "%wcache" MAXIMUM 100 PRECISION 0 ; pread_per_sec = 1014 LABEL "pread/s" PRECISION 0 ; pwrit_per_sec = 1015
- 91. Examples of Data Source Integration 91 LABEL "pwrit/s" PRECISION 0 ; rawch = 1016 LABEL "rawch/s" PRECISION 0 ; canch = 1017 LABEL "canch/s" PRECISION 0 ; outch = 1018 LABEL "outch/s" PRECISION 0 ; rcvin = 1019 LABEL "rcvin/s" PRECISION 0 ; xmtin = 1020 LABEL "xmtin/s" PRECISION 0 ; mdmin = 1021 LABEL "mdmin/s" PRECISION 0 ; scall_per_sec = 1022 LABEL "scall/s" PRECISION 0 ; sread_per_sec = 1023 LABEL "sread/s" PRECISION 0 ; swrit_per_sec = 1024 LABEL "swrit/s" PRECISION 0 ; fork_per_sec = 1025
- 92. 92 Chapter 5 LABEL "fork/s" PRECISION 2 ; exec_per_sec = 1026 LABEL "exec/s" PRECISION 2 ; rchar_per_sec = 1027 LABEL "rchar/s" PRECISION 0 ; wchar_per_sec = 1028 LABEL "wchar/s" PRECISION 0 ; swpin = 1029 LABEL "swpin/s" PRECISION 2 ; bswin = 1030 LABEL "bswin/s" PRECISION 1 ; swpot = 1031 LABEL "swpot/s" PRECISION 2 ; bswot = 1032 LABEL "bswot/s" PRECISION 1 ; blks = 1033 LABEL "pswch/s" PRECISION 0 ; iget_per_sec = 1034 LABEL "iget/s" PRECISION 0 ; namei_per_sec = 1035 LABEL "namei/s"
- 93. Examples of Data Source Integration 93 PRECISION 0 ; dirbk_per_sec = 1036 LABEL "dirbk/s" PRECISION 0 ; num_proc = 1037 LABEL "num proc" PRECISION 0 ; proc_tbl_size = 1038 LABEL "proc tbl size" PRECISION 0 ; proc_ov = 1039 LABEL "proc ov" PRECISION 0 ; num_inode = 1040 LABEL "num inode" PRECISION 0 ; inode_tbl_sz = 1041 LABEL "inode tbl sz" PRECISION 0 ; inode_ov = 1042 LABEL "inode ov" PRECISION 0 ; num_file = 1043 LABEL "num file" PRECISION 0 ; file_tbl_sz = 1044 LABEL "file tbl sz" PRECISION 0 ; file_ov = 1045 LABEL "file ov"
- 94. 94 Chapter 5 PRECISION 0 ; msg_per_sec = 1046 LABEL "msg/s" PRECISION 2 ; LABEL "sema/s" PRECISION 2 ; At this point, we need to look at the output generated from sar -ubycwavm 1 1: HP-UX hpptc16 A.09.00 E 9000/855 04/11/95 12:01:41 %usr %sys %wio %idle bread/s lread/s %rcache bwrit/s lwrit/s %wcache pread/s pwrit/s rawch/s canch/s outch/s cvin/s xmtin/s mdmin/s scall/s sread/s swrit/s fork/s exec/s rchar/s wchar/s swpin/s bswin/s swpot/s bswot/s pswch/s iget/s namei/s dirbk/s text-sz ov proc-sz ov inod-sz ov file-sz ov msg/s sema/s 12:01:42 22 48 30 0 0 342 100 33 81 59 0 0 0 0 470 0 0 0 801 127 71 1.00 1.00 975872 272384 0.00 0.0 0.00 0.0 251 28 215 107 N/A N/A 131/532 0 639/644 0 358/1141 0 40.00 0.00 This output looks similar to the sar -u output with several additional lines of headers and data. We will again use tail to extract the lines of data, but we need to present this as “one” data record to dsilog. The following script captures the data and uses the tr (translate character) utility to “strip” the line feeds so dsilog will see it as one single line of input data.
- 95. Examples of Data Source Integration 95 #!/bin/ksh Sar_ubycwavm_feed # Script that provides sar data to DSI via a fifo(sar_data.fifo) while : # (infinite loop) do # specify a one minute interval using tail to extract the # last sar output records (contains the time stamp and data) # and pipe that data to tr to strip the new lines converting # the eight lines of output to one line of output. /usr/bin/sar -ubycwavm 60 1 2>/tmp/dsierr | tail -8 | tr "012" " " > /usr/tmp/sar_data # Copy the sar data to the fifo that the dsilog process is reading. cat /usr/tmp/sar_data > ./sar_data.fifo # Print a newline on the fifo so that DSI knows that this is # the end of the input record. print "012" > ./sar_data.fifo done The step-by-step process follows that for the earlier sar -u example with the exception of log file set names, class names, fifo name (sar_ubycwavm.fifo), and the script listed above to provide the sar data.
- 96. 96 Chapter 5 Logging the Number of System Users The next example uses who to monitor the number of system users. Again, we start with a class specification file. # who_wc.spec # # who word count DSI spec file # CLASS who_metrics = 150 LABEL "who wc data" INDEX BY hour MAX INDEXES 120 ROLL BY hour RECORDS PER HOUR 60 ; METRICS who_wc = 151 label "who wc" averaged maximum 1000 precision 0 ; Compile the specification file to create a log file: sdlcomp ./who_wc.spec ./who_wc_log. Unlike sar, you cannot specify an interval or iteration value with who, so we create a script that provides, at a minimum, interval control. #!/bin/ksh who_data_feed while : do # sleep for one minute (this should correspond with the # RECORDS PER HOUR clause in the specification file). sleep 60 # Pipe the output of who into wc to count
- 97. Examples of Data Source Integration 97 # the number of users on the system. who | wc -l > /usr/tmp/who_data # copy the data record to the pipe being read by dsilog. cat /usr/tmp/who_data > ./who.fifo done Again we need a fifo and a script to supply the data to dsilog, so we return to the step by step process. 1 Create two fifos; one will be the dummy fifo used to “hold open” the real input fifo. # Dummy fifo. mkfifo ./hold_open.fifo # Real input fifo for dsilog. mkfifo ./who.fifo 2 Start dsilog using the -i option to specify the input coming from a fifo. It is important to start dsilog before starting the who data feed. dsilog ./who_wc_log who_metrics -i ./who.fifo & 3 Start the dummy process to hold open the input fifo. cat ./hold_open.fifo > ./who.fifo & 4 Start the who data feed script (who_data_feed). ./who_data_feed &
- 98. 98 Chapter 5
- 99. 99 6 Error Message DSI Error Messages There are three types of DSI error messages: class specification, dsilog logging process, and general. • Class specification error messages format consists of the prefix SDL, followed by the message number. • dsilog logging process messages format consists of the prefix DSILOG, followed by the message number. • General error messages can be generated by either of the above as well as other tasks. These messages have a minus sign (-) prefix and the message number. DSI error messages are listed in this chapter. SDL and DSILOG error messages are listed in numeric order, along with the actions you take to recover from the error condition. General error messages are self-explanatory, so no recovery actions are given.
- 100. 100 Chapter 6 SDL Error Messages SDL error messages are Self Describing Logfile class specification error messages, with the format, SDL<message number>. Message SDL1 ERROR: Expected equal sign, “=”. An “=” was expected here. Action: See Class Specification Syntax in Chapter 3 for more information. Message SDL2 ERROR: Expected semi-colon, “;”. A semi-colon (;) marks the end of the class specification and the end of each metric specification. You may also see this message if an incorrect or misspelled word is found where a semi-colon should have been. For example: If you enter class xxxxx = 10 label "this is a test" metric 1000; instead of class xxxxx = 10 label "this is a test" capacity 1000; you would see this error message and it would point to the word “metric.” Action: See Class Specification Syntax in Chapter 3 for more information. Message SDL3 ERROR: Precision must be one of {0, 1, 2, 3, 4, 5} Precision determines the number of decimal places used when converting numbers internally to integers and back to numeric representations of the metric value. Action: See PRECISION in Chapter 3 for more information.
- 101. Error Message 101 Message SDL4 ERROR: Expected quoted string. A string of text was expected. Action: See Class Specification Syntax in Chapter 3 for more information. Message SDL5 ERROR: Unterminated string. The string must end in double quotes. Action: See Class Specification Syntax in Chapter 3 for more information. Message SDL6 NOTE: Time stamp inserted at first metric by default. A timestamp metric is automatically inserted as the first metric in each class. Action: See Class Specification Syntax in Chapter 3 for more information. Message SDL7 ERROR: Expected metric description. The metrics section must start with the METRICS keyword before the first metric definition. Action: See Class Specification Syntax in Chapter 3 for more information. Message SDL8 ERROR: Expected data class specification. The class section of the class specification must start with the CLASS keyword. Action: See Class Specification Syntax in Chapter 3 for more information. Message SDL9 ERROR: Expected identifier. An identifier for either the metric or class was expected. The identifier must start with an alphabetic character, can contain alphanumeric characters or underscores, and is not case-sensitive.
- 102. 102 Chapter 6 Action: See Class Specification Syntax in Chapter 3 for more information. Message SDL10 ERROR: Expected positive integer. Number form is incorrect. Action: Enter numbers as positive integers only. Message SDL13 ERROR: Expected specification for maximum number of indexes. The maximum number of indexes is required to calculate class capacity. Action: See Class Specification Syntax in Chapter 3 for more information. Message SDL14 ERROR: Syntax Error. The syntax you entered is incorrect. Action: Check the syntax and make corrections as needed. See Class Specification Syntax in Chapter 3 for more information. Message SDL15 ERROR: Expected metric description. A metric description is missing. Action: Enter a metric description to define the individual data items for the class. See Class Specification Syntax in Chapter 3 for more information. Message SDL16 ERROR: Expected metric type. Each metric must have a metric_name and a numeric metric_id. Action: See Metrics Descriptions in Chapter 3 for more information. Message SDL17 ERROR: Time stamp metric attributes may not be changed.
- 103. Error Message 103 A timestamp metric is automatically inserted as the first metric in each class. You can change the position of the timestamp, or eliminate it and use a UNIX timestamp. Action: See Metrics Descriptions in Chapter 3 for more information. Message SDL18 ERROR: Roll action limited to 199 characters. The upper limit for ROLL BY action is 199 characters. Action: See INDEX BY, MAX INDEXES, AND ROLL BY in Chapter 3 for more information. Message SDL19 ERROR: Could not open specification file (file). In the command line sdlcomp specification_file, the specification file could not be opened. The error follows in the next line as in: $/usr/perf/bin/sdlcomp /xxx ERROR: Could not open specification file /xxx. Action: Verify that the file is readable. If it is, verify the name of the file and that is was entered correctly. MessageSDL20 ERROR: Metric descriptions not found. Metric description is incorrectly formatted. Action: Make sure you begin the metrics section of the class statement with the METRICS keyword. See Metrics Descriptions in Chapter 3 for more information. Message SDL21 ERROR: Expected metric name to begin metric description. Metric name may be missing or metric description is incorrectly formatted. Action: Metric name may be missing or metric description is incorrectly formatted.
- 104. 104 Chapter 6 Message SDL24 ERROR: Expected MAX INDEXES specification. A MAX INDEXES value is required when you specify INDEX BY. Action: Enter the required value. See INDEX BY, MAX INDEXES, AND ROLL BY in Chapter 3 for more information. Message SDL25 ERROR: Expected index SPAN specification. A value is missing for INDEX BY. Action: Enter a qualifier when you specify INDEX BY. See INDEX BY, MAX INDEXES, AND ROLL BY in Chapter 3 for more information. Message SDL26 ERROR: Minimum must be zero. The number must be zero or greater. Message SDL27 Expected positive integer. A positive value is missing. Action: Enter numbers as positive integers only. Message SDL29 ERROR: Summarization metric does not exist. You used SUMMARIZED BY for the summarization method, but did not specify a metric_name. Action: See Metrics Descriptions in Chapter 3 for more information. Message SDL30 ERROR: Expected 'HOUR', 'DAY', or 'MONTH'. A qualifier for the entry is missing. Action: You must enter one of these qualifiers. See INDEX BY, MAX INDEXES, AND ROLL BY in Chapter 3 for more information.
- 105. Error Message 105 Message SDL33 ERROR: Class id number must be between 1 and 999999. The class-id must be numeric and can contain up to 6 digits. Action: Enter a class ID number for the class that does not exceed the six-digit maximum. See Class Specification Syntax in Chapter 3 for more information. Message SDL35 ERROR: Found more than one index/capacity statement. You can only have one INDEX BY or CAPACITY statement per CLASS section. Action: Complete the entries according to the formatting restrictions in Class Specification Syntax in Chapter 3. Message SDL36 ERROR: Found more than one metric type statement. You can have only one METRICS keyword for each metric definition. Action: See Metrics Descriptions in Chapter 3 for formatting information. Message SDL37 ERROR: Found more than one metric maximum statement. You can have only one MAXIMUM statement for each metric definition. Action: See Metrics Descriptions in Chapter 3 for formatting information. Message SDL39 ERROR: Found more than one metric summarization specification. You can have only one summarization method (TOTALED, AVERAGED, or SUMMARIZED BY) for each metric definition. Action: See Summarization Method in Chapter 3 for more information. Message SDL40 ERROR: Found more than one label statement. You can have only one LABEL for each metric or class definition.
- 106. 106 Chapter 6 Action: See Class Specification Syntax in Chapter 3 for more information. Message SDL42 ERROR: Found more than one metric precision statement. You can have only one PRECISION statement for each metric definition. Action: See the PRECISION in Chapter 3 for more information. Message SDL44 ERROR: SCALE, MINIMUM, MAXIMUM, (summarization) are inconsistent with text metrics These elements of the class specification syntax are only valid for numeric metrics. Action: See Class Specification Syntax in Chapter 3 for more information. Message SDL46 ERROR: Inappropriate summarization metric (!). You cannot summarize by the timestamp metric. Action: See Class Specification Syntax in Chapter 3 for more information. Message SDL47 ERROR: Expected metric name. Each METRICS statement must include a metric_name. Action: See Metrics Descriptions in Chapter 3 for more information. Message SDL47 ERROR: Expected metric name. Each METRICS statement must include a metric_name. Action: See Metrics Descriptions in Chapter 3 for more information. Message SDL48 ERROR: Expected positive integer. The CAPACITY statement requires a positive integer.
- 107. Error Message 107 Action: See CAPACITY in Chapter 3 for more information. Message SDL49 ERROR: Expected metric specification statement. The METRICS keyword must precede the first metric definition. Action: See Metrics Descriptions in Chapter 3 for more information. Message SDL50 Object name too long. The metric_name or class_name can only have up to 20 characters. Action: See Class Specification Syntax in Chapter 3 for more information. Message SDL51 ERROR: Label too long (max 20 chars). The class_label or metric_label can only have up to 20 characters. Action: See Class Specification Syntax in Chapter 3 for more information. Message SDL53 ERROR: Metric must be between 1 and 999999. The metric_id can contain up to 6 digits only. Action: See Metrics Descriptions in Chapter 3 for more information. Message SDL54 ERROR: Found more than one collection rate statement. You can have only one RECORDS PER HOUR statement for each class description. Action: See RECORDS PER HOUR in Chapter 3 for more information. Message SDL55 ERROR: Found more than one roll action statement. You can have only one ROLL BY statement for each class specification.
- 108. 108 Chapter 6 Action: See INDEX BY, MAX INDEXES, AND ROLL BY in Chapter 3 for more information. Message SDL56 ERROR: ROLL BY option cannot be specified without INDEX BY option. The ROLL BY statement must be preceded by an INDEX BY statement. Action: See INDEX BY, MAX INDEXES, AND ROLL BY in Chapter 3 for more information. Message SDL57 ERROR: ROLL BY must specify time equal to or greater than INDEX BY. Because the roll interval depends on the index interval to identify the data to discard, the ROLL BY time must be greater than or equal to the INDEX BY time. Action: See INDEX BY, MAX INDEXES, AND ROLL BY in Chapter 3 for more information. Message SDL58 ERROR: Metric cannot be used to summarize itself. The SUMMARIZED BY metric cannot be the same as the metric_name. Action: See Class Specification Syntax in Chapter 3 for more information. Message SDL62 ERROR: Could not open SDL (name). Explanatory messages follow this error. It could be a file system error as in: $/usr/perf/bin/sdlutil xxxxx –classes ERROR: Could not open SDL xxxxx. ERROR: Could not open log file set. or it could be an internal error as in:
- 109. Error Message 109 $/usr/perf/bin/sdlutil xxxxx –classes ERROR: Could not open SDL xxxxx. ERROR: File is not SDL root file or the description file is not accessible. You might also see this error if the log file has been moved. Because the pathname information is stored in the DSI log files, the log files cannot be moved to different directories. Action: If the above description or the follow-up messages do not point to some obvious problem, use sdlutil to remove the log file set and rebuild it. Message SDL63 ERROR: Some files in log file set (name) are missing. The list of files that make up the log file set was checked and one or more files needed for successful operation were not found. Action: Unless you know precisely what happened, the best action is to use sdlutil to remove the log file set and start over. Message SDL66 ERROR: Could not open class (name). An explanatory message will follow. Action: Unless it is obvious what the problem is, use sdlutil to remove the log file set and start over. Message SDL67 ERROR: Add class failure. Explanatory messages will follow. The compiler could not add the new class to the log file set. Action: If all the correct classes in the log file set are accessible, specify a new or different log file set. If they are not, use sdlutil to remove the log file set and start over. Message SDL72 ERROR: Could not open export files (name).
- 110. 110 Chapter 6 The file to which the exported data was supposed to be written couldn't be opened. Action: Check to see if the export file path exists and what permissions it has. Message SDL73 ERROR: Could not remove shared memory ID (name). An explanatory message will follow. Action: To remove the shared memory ID, you must either be the user who created the log file set or the root user. Use the UNIX command ipcrm -m id to remove the shared memory ID. Message SDL74 ERROR: Not all files could be removed. All the files in the log file set could not be removed. Explanatory messages will follow. Action: Do the following to list the files and shared memory ID: sdlutil (logfile set) -files sdlutil (logfile set) -id To remove the files, use the UNIX command rm filename. To remove the shared memory ID, use the UNIX command ipcrm -m id. Note that the shared memory ID will only exist and need to be deleted if sdlutil did not properly delete it when the log file set was closed. Message SDL80 ERROR: Summarization metric (metric) not found in class. The SUMMARIZED BY metric was not previously defined in the METRIC section. Action: See Metrics Descriptions in Chapter 3 for more information. Message SDL81 ERROR: Metric id (id) already defined in SDL. The metric_id only needs to be defined once. To reuse a metric definition that has already been defined in another class, specify just the metric_name without the metric_id or any other specifications.
- 111. Error Message 111 Action: See METRICS in Chapter 3 for more information. Message SDL82 ERROR: Metric name (name) already defined in SDL. The metric_name only needs to be defined once. To reuse a metric definition that has already been defined in another class, specify just the metric_name without the metric_id or any other specifications. Action: See METRICS in Chapter 3 for more information. Message SDL83 ERROR: Class id (id) already defined in SDL. The class_id only needs to be defined once. Check the spelling to be sure you have entered it correctly. Action: See Class Specification Syntax in Chapter 3 for more information. Message SDL84 ERROR: Class name (name) already defined in SDL. The class_name only needs to be defined once. Check the spelling to be sure you have entered it correctly. Action: See Class Specification Syntax in Chapter 3 for more information. Message SDL85 ERROR: Must specify class to de-compile. You must specify a class list when you use -decomp. Action: See Managing Data With sdlutil in Chapter 4 for more information. Message SDL87 ERROR: You must specify maximum number of classes with -maxclass. When you use the -maxclass option, you must specify the maximum number of classes to be provided for when creating a new log file set. Action: See sdlcomp Compiler in Chapter 4 for more information.
- 112. 112 Chapter 6 Message SDL88 ERROR: Option "!" is not valid. The command line entry is not valid. Action: Check what you have entered to ensure that it follows the correct syntax. Message SDL89 ERROR: Maximum number of classes (!) for -maxclass is not valid. The -maxclass number must be greater than zero. Action: See sdlcomp Compiler in Chapter 4 for more information. Message SDL90 ERROR: -f option but no result file specified. You must specify a format file when using the -f option. Action: You must specify a format file when using the -f option. Message SDL91 ERROR: No specification file named. No name assigned to class specification file. Action: You must enter a specification_file when using sdlcomp. See sdlcomp Compiler in Chapter 4 for more information. Message SDL92 ERROR: No log file set named. You must enter a logfile_set when using sdlcomp. Action: See sdlcomp Compiler in Chapter 4 for more information. Message SDL93 ERROR: Metric ID already defined in class. The metric_id only needs to be defined once.
- 113. Error Message 113 Action: To reuse a metric definition that has already been defined in another class, specify just the metric_name without the metric_id or any other specifications. See Metrics Descriptions in Chapter 3 for more information. Message SDL94 ERROR: Metric name already defined in class. The metric-name only needs to be defined once. Action: To reuse a metric definition that has already been defined in another class, specify just the metric_name without the metric_id or any other specifications. See Metrics Descriptions in Chapter 3 for more information. Message SDL95 ERROR: Text found after complete class specification. The sdlcomp compiler found text it did not recognize as part of the class specification. Action: Reenter the specification and try again. Message SDL96 ERROR: Collection rate statement not valid. The proper format is RECORDS PER HOUR (number). The keywords must be present in this order and cannot be abbreviated. Action: Correct the keyword and follow the required the format. Message SDL97 ERROR: Expecting integer between 1 and 2,147,483,647. You must use a number in this range. Action: Enter a number that falls within the range. Message SDL98 ERROR: Action requires preceding ROLL BY statement. The entry is out of order or is missing in the class specification file.
- 114. 114 Chapter 6 Action: The action specifies what will happen when the log file rolls. It is important to first know when it should roll. ROLL BY must precede ACTION. For example: class xxxxx = 10 index by month max indexes 12 action "ll *"; should have been: class xxxxx = 10 index by month max indexes 12 roll by month action "ll *"; Message SDL99 ERROR: MAX INDEXES requires preceeding INDEX BY statement. The entry is out of order or is missing in the class specification file. Action: To specify a maximum number of indexes, the program needs to know where you are doing an indexing by. The INDEX BY statement must precede MAX INDEXES. For example: class xxxxx = 10 max indexes 12 label "this is a test"; should have been: class xxxxx = 10 index by month max indexes 12 label "this is a test"; Message SDL100 WARNING: CAPACITY UNLIMITED not implemented, derived value used. (SDL-100) Message SDL101 ERROR: Derived capacity too large. (SDL-101)
- 115. Error Message 115 Message SDL102 ERROR: Text Length should not exceed 4096. The maximum allowed length for the text metric is 4096. Message SDL103 ERROR: RECORDS PER HOUR should not be greater than 3600 for logging summarized data. Action: The RECORDS PER HOUR can be greater than 3600 only for unsummarized data. Use the -u option to compile.
- 116. 116 Chapter 6 DSILOG Error Messages DSILOG error messages are dsilog logging process messages with the format, DSILOG<message number>. Message DSILOG1 ERROR: Self describing log file not specified. Action: Correct the command line and try again. Message DSILOG2 ERROR: Data class name not specified. The data class must be the second parameter passed to dsilog. Action: Correct the command line and try again. Message DSILOG3 ERROR: Could not open data input file (name). The file specified in the command line couldn't be opened. A UNIX file system error appears in the next line of the error message. Message DSILOG4 ERROR: OpenClass ("name") failed. The class specified couldn't be opened. It may not be in the log file set specified, or its data file isn't accessible. Action: Explanatory messages will follow giving either an internal error description or a file system error. Message DSILOG5 ERROR: Open of root log file (name) failed. The log file set root file couldn't be opened. The reason is shown in the explanatory messages. Message DSILOG6 ERROR: Time stamp not defined in data class.
- 117. Error Message 117 The class was built and no timestamp was included. Action: Use sdlutil to remove the log file set and start over. Message DSILOG7 ERROR: (Internal error) AddPoint ( ) failed. dsilog tried to write a record to the data file and couldn't. Explanatory messages will follow. Message DSILOG8 ERROR: Invalid command line parameter (name). The parameter shown was either not recognized as a valid command line option, or it was out of place in the command line. Action: Correct the command line parameter and try again. Message DSILOG9 ERROR: Could not open format file (name). The file directing the match of incoming metrics to those in the data class could not be found or was inaccessible. Explanatory messages will follow with the UNIX file system error. Action: Check the class specification file to verify that it is present. Message DSILOG10 ERROR: Illegal metric name (name). The format file contained a metric name that was longer than the maximum metric name size or it did not otherwise conform to metric name syntax. Action: Correct the metric name in the class specification and rerun dsilog. Message DSILOG11 ERROR: Too many input metrics defined. Max 100. Only 100 metrics can be specified in the format file Action: The input should be reformatted externally to dsilog, or the data source should be split into two or more data sources.
- 118. 118 Chapter 6 Message DSILOG12 ERROR: Could not find metric (name) in class. The metric name found in the format file could not be found in the data class. Action: Make corrections and try again. Message DSILOG13 ERROR: Required time stamp not found in input specification. The -timestamp command line option was used, but the format file did not specify where the timestamp could be found in the incoming data. Action: Specify where the timestamp can be found. Message DSILOG14 ERROR: (number) errors, collection aborted. Serious errors were detected when setting up for collection. Action: Correct the errors and retry. The -vi and -vo options can also be used to verify the data as it comes in and as it would be logged. Message DSILOG15 ERROR: Self describing log file and data class not specified. The command line must specify the log file set and the data class to log data to. Action: Correct the command line entry and try again. Message DSILOG16 ERROR: Self describing log file set root file (name) could not be accessed. error=(number). Couldn't open the log file set root file. Action: Check the explanatory messages that follow for the problem. Message (unnumbered) Metric null has invalid data Ignore to end of line, metric value exceeds maximum
- 119. Error Message 119 This warning message occurs when dsilog doesn’t log any data for a particular line of input. This happens when the input doesn’t fit the format expected by the DSI log files, such as when blank or header lines are present in the input or when a metric value exceeds the specified precision. In this case, the offending lines will be skipped (not logged). dsilog will resume logging data for the next valid input line. Message DSILOG17 ERROR: Logfile set is created to log unsummarized data, could not log summarized data. Action: If the set of log files are created using the -u option during compilation, use -s 0 option to log using dsilog. Using the option indicates that the data logged is unsummarized.
- 120. 120 Chapter 6 General Error Messages Error Explanation -3 Attempt was made to add more classes than allowed by max-class. -5 Could not open file containing class data. -6 Could not read file. -7 Could not write to file. -9 Attempt was made to write to log file when write access was not requested. -11 Could not find the pointer to the class. -13 File or data structure not initialized. -14 Class description file could not be read. -15 Class description file could not be written to. -16 Not all metrics needed to define a class were found in the metric description class. -17 The path name of a file in the log file set is more than 1024 characters long. -18 Class name is more then 20 characters long. -19 File is not log file set root file. -20 File is not part of a lod file set. -21 The current software cannot access the log file set. -22 Could not get shared memory segment or id. -23 Could not attach to shared memory segment. -24 Unable to open log file set. -25 Could not determine current working directory.
- 121. Error Message 121 -26 Could not read class header from class data file. -27 Open of file in log file set failed. -28 Could not open data class. -29 Lseek failed. -30 Could not read from log file. -31 Could not write on log file. -32 Remove failed. -33 shmctl (REM_ID) failed. -34 Log file set is incomplete: root or description file is missing. -35 The target log file for adding a class is not in the current log file set. Error Explanation
- 122. 122 Chapter 6
- 123. 123 Index A accessing DSI data, 67, 68 action, 55 alarm generator, 55 processing, 55 alarmdef changes, 55 alarmdef file, 54 alarm definition DSI metric name in, 54 alarms configuring, 55 defining, 54 alert, 55 C capacity, 35 statement, 39 changing alarmdef file, 55 class specifications, 66 class capacity, 35, 39 definitions, 24 description, 16 description defaults, 26 ID requirements, 27 index interval, 28 label, 27 listing with sdlutil, 69 name requirements, 27 records per hour, 37 roll interval, 29 statement, 27 syntax, 27 class specification changing, 66 compiling, 75, 79, 87 creating, 74, 78, 82 metrics definition, 40 recreate using sdlutil, 69 testing, 60 compiler output, sample, 51 compiling class specification, 75, 79, 87 configuring alarms, 55 creating class specification, 11 log files, 16
- 124. 124 D data accessing, 67, 68 collecting, 11 exporting, 67 logging, 11 managing, 69 data source integration error messages, 99 examples of using DSI, 71 how it works, 10 overview, 9 testing, 60 decimal places, metrics, 45 defaults class description, 26 class label, 27 delimiters, 46, 59 maximum metric value, 44 metrics, 42 records per hour, 37 separator, 46 separators, 59 summarization level, 37, 56 delimiters, 46, 59 displaying data in Performance Manager, 68 DSI. See also data source integration dsilog input to, 56 logging process, 56, 76 syntax, 56 writing a script, 72 dsilog program, 19 DSI metrics in alarm definitions, 54 E error messages, 99 escape characters, 28, 29, 42 examples of using DSI, 71 logging sar data for several options, 89 logging sar data from one file, 77 logging sar data from several files, 82 logging the number of system users, 96 logging vmstat data, 74 writing a dsilog script, 72 excluding data from logging, 64 exporting logged data, 67, 76 extract program, 67 F fifo, 56 files alarmdef, 54 format file, 56, 64 I index interval, class, 28 input to dsilog, 56 K kernel parameters, 56 L label class, 27 metrics, 42 length text metrics, 46 log file size, controlling, 35 log files DSI, 10 organization, 16
- 125. 125 log file sets defining, 16 listing with sdlutil, 69 naming, 24 rolling, 35 logged data, exporting, 67 logging data run dsilog program, 19 logging process, 56, 76 dsilog, 76 testing, 60 M managing DSI data, 69 mapping incoming data to specification, 64 maximum value, metrics, 44 metrics defaults, 42 definition, 40 description, 16 id requirements, 41 keyword, 41 label, 42 label requirements, 42 listing with sdlutil, 69 name requirements, 41 order, 41 precision, 45 reusing name, 41, 42 summarization method, 43 text, 46 metrics in alarm definitions, 54 minimum value, metrics, 44 modify class specification file, 66 N named pipe, 56 Network Node Manager, 55 numeric format option, 64 numeric metrics, format file, 64 O Operations Manager, 55 order of metrics, changing, 64 overview data source integration, 9 P Performance Manager displaying DSI data, 68 piping data to dsilog, 56 precision, 45 metrics, 45 processing alarms, 55 R records per hour, 37, 56 reusing metric names, 41, 42 roll action, 29 example of action, 30 interval, 29 S sample compiler output, 51 sar example of logging sar data for several options, 89 example of logging sar data from one file, 77 example of logging sar data from several files, 82
- 126. 126 scopeux, 10 SDL prefix for class specification error messages, 50 sdlcomp, 75 compiler, 75 sdlcomp compiler, 15 sdlgendata, 60 sdlutil, 69, 76 syntax, 69 sending alarm information, 55 separator, 46 separators, 59 SNMP traps, 55 starting logging process, 56 statistics, listing with sdlutil, 69 summarization level, 56 default, 37 summarization method, 43 summarized by option, 43 syntax dsilog, 56 export, 67 sdlutil, 69 T testing class specification, 60 logging process, 60 text metrics format file, 64 specifying, 46 timestamp, 41 suppressing, 56 troubleshooting sdlcomp, 53 U UNIX kernel parameters, 56 UNIX timestamp, 41 utilities, sdlutil, 69 V version information, displaying, 69 vmstat example of logging vmstat data, 74 W who word count example, 96 writing a dsilog script, 72 problematic dsilog script example, 72 recommended dsilog script example, 72
- 127. We appreciate your feedback! If an email client is configured on this system, by default an email window opens when you click on the bookmark “Comments”. In case you do not have the email client configured, copy the information below to a web mail client, and send this email to [email protected] Product name: Document title: Version number: Feedback: