Deployment guide series tivoli provisioning manager for os deployment v5.1 sg247397
1 like2,545 views

This document provides a guide for deploying the Tivoli Provisioning Manager for OS Deployment V5.1. It discusses planning and architecture considerations for image management systems. It then covers installing the TPM server and creating profiles for deploying Windows XP, Windows 2000, Windows Vista and Linux operating systems in unattended and cloning modes. The document is intended to help IT professionals learn how to use TPM for OS deployment in their environment.


![DB2 IP Address = 127.0.0.1 since the IBM DB2 server was installed on the
manchester machine
DB2 port = 60000 as defined previously
DB2 database name = tpmfosd as defined previously
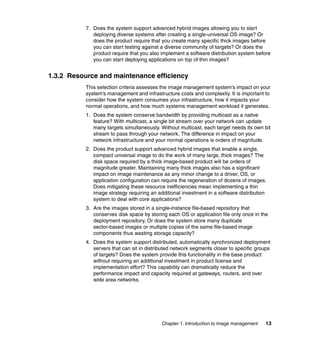
DB2 credentials = db2inst1 as the instance owner
Example 3-12 shows our installation steps:
Example 3-12 Installation steps
manchester:/usr/local/tpmfos-5.1 # ./setup
1) English
2) Español
3) Français
4) Deutsch
5) Italiano
6) Português
7) í•œêμ-ì–´
8) 日本語
9) ç 体ä¸-æ–‡
10) ç é«”ä¸-æ–‡
--> 1
IBM Tivoli Provisioning Manager for OS Deployment setup v.5.1 (000.32)
Licensed Materials - Property of IBM.
(C) Copyright IBM Corporation 1998, 2006.
All Rights Reserved. IBM, the IBM logo, and Tivoli are trademarks
of IBM Corporation in the United States, other countries or both.
This program will configure and initialize the OS deployment server.
Do you want to continue? [y/n (Default n)]: y
Enter the installation directory [/usr/local/tpmfos-5.1]:
/usr/local/tpmfos-5.1
This software requires a large amount of disk space to store client
images.
Please enter the directory where to store these data.
Data directory [/usr/local/tpmfos-5.1/files]:
/usr/local/tpmfos-5.1/files
This software can be managed from a web-based console.
You can choose to use a secure link (HTTPS) to the server console.
Chapter 3. Installing the Tivoli Provisioning Manager for OS Deployment environment 99](https://image.slidesharecdn.com/deploymentguideseriestivoliprovisioningmanagerforosdeploymentv5-1sg247397-120524001333-phpapp01/85/Deployment-guide-series-tivoli-provisioning-manager-for-os-deployment-v5-1-sg247397-115-320.jpg)
![You can also change the default ports. You must also choose the
administrator name
Do you want to use SSL to access the Web interface? [y/n (default y)]:
y
Enter the HTTP console port [8080]: 8080
Enter the HTTPS console port [443]: 443
Enter the administrator name [admin]: admin
Enter the administrator password:
Confirm password:
According to the RPM database, the Java package is not installed
Do you want to install the Java package with YaST? [y/n (default y)]: n
According to the RPM database, the MySQL Connector/J package is not
installed
Do you want to install MySQL Connector/J package with YaST? [y/n
(default y)]: n
According to the RPM database, MySQL server package is not installed
Do you want to install MySQL server with YaST? [y/n (default y)]: n
This software requires a third party database to store deployment
objects.
Can you provide a MySQL database? [y/n (default y)]: y
Enter the IP address of your MySQL server [127.0.0.1]: 127.0.0.1
Enter the port used by your MySQL server on 127.0.0.1 [3306]: 60000
Enter the name of an existing (empty) database [AutoDeploy]: tpmfosd
If the database tpmfosd on server 127.0.0.1 does not exist, please
create it now!
Press return to continue...
Enter the user name to access the database [root]: db2inst1
100 Deployment Guide Series: Tivoli Provisioning Manager for OS Deployment V5.1](https://image.slidesharecdn.com/deploymentguideseriestivoliprovisioningmanagerforosdeploymentv5-1sg247397-120524001333-phpapp01/85/Deployment-guide-series-tivoli-provisioning-manager-for-os-deployment-v5-1-sg247397-116-320.jpg)
![Enter the password to access the database:
Confirm password:
The installation program will now create the configuration file and
initialize the server.
Please wait...
IBM Tivoli Provisioning Manager for OS Deployment server v.5.1 (000.32)
Licensed Materials - Property of IBM. L-DDAC-6RLW3E
(C) Copyright IBM Corporation 1998, 2006.
All Rights Reserved. IBM, the IBM logo, and Tivoli are trademarks
of IBM Corporation in the United States, other countries or both.
** Rembo server has successfully stopped
OS deployment server initialized successfully.
File /usr/local/tpmfos-5.1/files/global/rad/radb.ini created
successfully.
URL to access database:
mysql://127.0.0.1:60000/tpmfosd?useUnicode=true&characterEncoding=UTF-8
Username to access the database: db2inst1
Password to access the database: hidden
Do you want to create startup scripts? [y/n (default y)]: y
...
...
...
Startup scripts (rembo, dbgw, rbagent) have been created in
/etc/rc.d/init.d.
Do you want to start all the services ? [y/n (default y)]: n
Goodbye!
Chapter 3. Installing the Tivoli Provisioning Manager for OS Deployment environment 101](https://image.slidesharecdn.com/deploymentguideseriestivoliprovisioningmanagerforosdeploymentv5-1sg247397-120524001333-phpapp01/85/Deployment-guide-series-tivoli-provisioning-manager-for-os-deployment-v5-1-sg247397-117-320.jpg)
![Tip: Pay attention when prompted to install the MySQL database and the
MySQL/J connector package. Obviously you should answer No. But, when the
installer asks you the following:
This software requires a third party database to store deployment
objects.
Can you provide a MySQL database? [y/n (default y)]:
You must answer Yes, even if you will provide a DB2 database instead of the
expected MySQL because replying No causes the installation to be
cancelled. This is a well-know problem of the installer that is fixed in the next
release.
Then, you can continue the installation providing the IDB DB2 parameters
even if the installer believes you are referring to a MySQL database.
Since the MySQL connection is embedded in the installer all the database scripts
created will have a wrong connection path. To fix this, a last configuration step is
needed before running the system, so we answer as not to start the services at
the end of the installation.
Customizing the installation
What we need to do is modify the connection string used by the DBGW
component to interface with the database.
1. We edit the /usr/local/tpmfos-5.1/files/global/rad/radb.ini file to substitute the
“embedded” mysql code with the db2 value.
The radb.ini displayed is shown in Example 3-13:
Example 3-13 radb.ini file created by the installer
[Settings]
ODBC_Source=mysql://127.0.0.1:60000/tpmfosd?useUnicode=true&characterEn
coding=UTF-8
ODBC_Username=db2inst1
ODBC_Password=A756051188AAAE66231177B230031971
2. Next we modify the radb.ini file in order to connect using the DB2 JDBC
connectivity:
Example 3-14 radb.ini file modified to support DB2 JDBC connection
[Settings]
ODBC_Source=db2://127.0.0.1:60000/tpmfosd
ODBC_Username=db2inst1
102 Deployment Guide Series: Tivoli Provisioning Manager for OS Deployment V5.1](https://image.slidesharecdn.com/deploymentguideseriestivoliprovisioningmanagerforosdeploymentv5-1sg247397-120524001333-phpapp01/85/Deployment-guide-series-tivoli-provisioning-manager-for-os-deployment-v5-1-sg247397-118-320.jpg)


![To get a list of the rbagent’s command switches you can run rbagent -h
command. The following example shows a list of command line switches for
rbagent.
Example 3-33 RbAgent command line switches
C:Program FilesCommon FilesIBM Tivoli>rbagent.exe -h
IBM Tivoli Provisioning Manager for OS Deployment Web extension v.5.1.0.1
(101.04)
Licensed Materials - Property of IBM. L-DDAC-6RLW3E
(C) Copyright IBM Corporation 1998, 8 2007.
All Rights Reserved. IBM, the IBM logo, and Tivoli are trademarks
of IBM Corporation in the United States, other countries or both.
usage: rbagent [-d] [-v loglevel] [-q] [-o] [-f iface]
-s srvip:password [-p srvport] [arguments]
-d: enable debugging mode, do not detach
-v: set logging verbosity (1-6)
-q: quiet (do not display banner)
-o: run in offline mode (no connection to the server)
-f: iface is the IP address of the preferred interface/subnet to use
-s: srvip is an IP address, password can be plaintext or MD5
-p: srvport is then NBP port of the server
arguments are optional supported operations
C:Program FilesCommon FilesIBM Tivoli>
As you can see from the help switches, rbagent can work in online (requires
connection to the Tivoli Provisioning Manager for OS Deployment server) and
offline mode (does not require connection to the Tivoli Provisioning Manager for
OS Deployment server). To use offline mode, use -o switch. To use rbagent in
online mode and connect to the server, you have the following two options:
Specify -s switch to explicitly define which server you want to connect to and
which password to use.
Start rbagent without -s switch and the server connection parameters will be
read from the rbagent.conf file.
RbAgent does not have an explicit help command; rather, it lists all available
commands if input was not recognized. To get a list of available commands, you
can use any word that is not a known command. The list of commands you get
depends upon whether you are using offline or online mode. The list of online
mode commands contains all commands from offline mode and commands
available only when connected to server. The following example is a result of
running rbagent -q -s 172.20.20.101:password command and lists all online
and offline commands. To get a list of only offline commands, run rbagent -o
help command.
Chapter 3. Installing the Tivoli Provisioning Manager for OS Deployment environment 131](https://image.slidesharecdn.com/deploymentguideseriestivoliprovisioningmanagerforosdeploymentv5-1sg247397-120524001333-phpapp01/85/Deployment-guide-series-tivoli-provisioning-manager-for-os-deployment-v5-1-sg247397-147-320.jpg)
![Example 3-34 Commands available in rbagent
Connect 172.20.20.128 -> 172.20.20.101
Starting Rembo Agent
[10:27:36] <ERR> Invalid RbAgent command: help
Known commands:
report : update agent status on the server
process-commands : process pending server commands
hostinfo : display general information on the machine
radget : download a .RAD archive from the server
radput : upload a .RAD archive to the server
radcheck : verify the consistency of a .RAD archive
radunpack : explode the content of a .RAD archive on a local path
mkimage : create a rembo archive from a local drive
rsimage : restore a rembo archive to a local drive
isoget : generate an ISO image from server files
buildpcidb : create a PCI database export from a text file
install-kernel : install rembo on a system partition
install-archive : install an archive on a local partition
create-cdrom : create a bootable cdrom
fallback-mbr : disable hard disk boot with a fall back MBR
cmdlines : process a rbagent command lines file
joindomain : join a Windows domain
resetminisetup : reset the mini-setup progress flag
checkdevices : look for devices not functioning properly
instwimgapi : install Microsoft Windows Imaging DLL and file driver
rad-radinfo : describe the logical content of a .RAD archive
rad-radput : upload a .RAD archive to the server, with ODBC records
rad-radget : download a .RAD archive from the server, with ODBC
records
rad-srvradput : asynchronously upload a .RAD archive on the server,
with ODBC records
rad-isoget : build an ISO image from the server, with ODBC records
rad-chksoft : simulate the creation of a new software package
rad-mksoft : create a new software package
rad-mkwinsetup : create a Windows setup image
rad-mkvistaclone : create a Windows Vista WIM image
rad-mklinuxsetup : create a Linux setup image
rad-mksolarisboot : create a Solaris boot image
rad-jumpstart-pre : generate Jumpstart pre-installation files
rad-jumpstart-post : upload Jumpstart logs to the server
rad-uploadlogs : send local log files to the server
rad-deployhost : trigger a client deployment on the server
rad-hoststatus : get the deployment status for a client
rad-hostlogs : get the deployment logs for a client
rad-schemelist : list all deployment schemes registered in the database
rad-configlist : list all OS configurations registered in the database
rad-serverlist : list all RAD servers registered in the database
rad-srvsync : trigger a server file synchronization process
132 Deployment Guide Series: Tivoli Provisioning Manager for OS Deployment V5.1](https://image.slidesharecdn.com/deploymentguideseriestivoliprovisioningmanagerforosdeploymentv5-1sg247397-120524001333-phpapp01/85/Deployment-guide-series-tivoli-provisioning-manager-for-os-deployment-v5-1-sg247397-148-320.jpg)
![rad-hostlist : list some hosts registered in the database
rad-registerhost : update a client record in the database
rad-unregisterhost : remove a client record from the database
rad-hidepassword : return the encoded form of a password as used
internally
rad-configure : force server to reload radconfig.csv
rad-mkbootcd : create a bootable CD-ROM to start RAD without PXE
rad-runtask : execute any pending activity
Stopping Rembo Agent
Each command has a short description next to it, so you can easily see what it is
used for. Most of these commands require additional parameters. If a command
requires additional parameters, you will get a list of parameters when you start
the command. Following is an example for running the following command:
rbagent -q -s 172.20.20.101:password rad-hidepassword
Example 3-35 Help on rad-hidepassword command
Connect 172.20.20.128 -> 172.20.20.101
Starting Rembo Agent
[11:35:08] <ERR> usage: rad-hidepassword <password> [md5]
[11:35:08] <ERR> RbAgent command rad-hidepassword has failed [AGT:1788]
Stopping Rembo Agent
Notice the line starting with usage—this is a usage explanation for the command.
You can see that the command requires a password attribute, which can
optionally be followed by keyword md5 that causes the password to be encrypted
using MD5.
Now that we know how to connect to the server and list known commands it is
time to list the commands you might find useful. Please remember that you need
to prefix these commands with rbagent and any command switches you would
like to use (for example rbagent -s srvip:password). Indicate whether the
command can be run offline or online and can be found in brackets next to the
command name.
radunpack (OFFLINE) - this command allows you to unpack RAD files to the
local directory. This can be useful if you just need some files from the RAD
archive and do not want to import the RAD file to the server and use it in
deployment. The syntax of this command is as follows:
radunpack radfilename.rad local-destination-path
Chapter 3. Installing the Tivoli Provisioning Manager for OS Deployment environment 133](https://image.slidesharecdn.com/deploymentguideseriestivoliprovisioningmanagerforosdeploymentv5-1sg247397-120524001333-phpapp01/85/Deployment-guide-series-tivoli-provisioning-manager-for-os-deployment-v5-1-sg247397-149-320.jpg)
![joindomain (OFFLINE) - it is not very likely you will have to run this command
manually since you can make the machine join the domain when it is
deployed. However, it is good to know this command exists in rbagent should
you decide to use it later manually or from some other configuration
management tool. The syntax of this command is as follows:
to join domain: joindomain domain adminuser adminpwd [joinou]
to join a workgroup: joindomain /w workgroup [adminuser adminpwd]
to change the trust account: joindomain /s domain trustpwd
rad-mksoft (ONLINE) - use this command to manually build software
packages. “Example - registering hosts from the command line” on page 134
shows how to automatically build device driver software packages using this
command. The syntax of this command is as follows:
rad-mksoft sourcepath ["<attr>=value" ...]
<attr> is in (descr,content,pkgname,dest,cmdline,
pass,flags,dosubst,norules)
rad-registerhost (ONLINE) - this command is very useful if you have
naming conventions where simple attribute mapping is not enough. If you use
scripting to create host names, you might use this command in your script to
automatically register hosts to Tivoli Provisioning Manager for OS
Deployment server. See the following example on how to use this command
in scripts. The syntax of this command is as follows:
rad-registerhost <IP|MAC|SN|UUID>=... [HostName=...] [...]
rad-unregisterhost (ONLINE) - use this command to unregister the machine
from the Tivoli Provisioning Manager for OS Deployment server. You might
use it for automatic maintenance of the hosts list (for example, to integrate
with the monitoring solution to remove machines not reachable for more than
30 days). The syntax of this command is as follows:
rad-unregisterhost <IP|MAC|SN|HostName|Description>=...
rad-hidepassword (ONLINE) - this command is used to create an encrypted
password using clear text password as input. This is very useful if you want to
manually update passwords in configuration files. If you use this command to
generate password for configuration files, specify the md5 keyword. The
syntax of this command is as follows:
rad-hidepassword <password> [md5]
Example - registering hosts from the command line
In this example we look at a company that has four different locations: London,
Paris, Sydney, and Zagreb. They are implementing Tivoli Provisioning Manager
for OS Deployment and want to register hosts with host names in accordance
with their naming policy. The computer name has to take the form
134 Deployment Guide Series: Tivoli Provisioning Manager for OS Deployment V5.1](https://image.slidesharecdn.com/deploymentguideseriestivoliprovisioningmanagerforosdeploymentv5-1sg247397-120524001333-phpapp01/85/Deployment-guide-series-tivoli-provisioning-manager-for-os-deployment-v5-1-sg247397-150-320.jpg)
![LLLMMMMMM where LLL is a three letter code for the location and MMMMMM
is the last three octets (six hexadecimal characters) of the MAC address.
When registering new hosts or assigning a name to an already registered one,
you can use some special keywords that are dynamically replaced with host
specific information at the time of deployment. These special keywords must be
enclosed in square brackets [ ]. [IP] is replaced by the full IP address of the host
being deployed, while [MAC] is replaced by the hardware address. To set
hostnames based on the MAC address, you can enter the following value in the
Host name field: pc[MAC]. The computer with the MAC address
00:01:02:03:04:05 will be named pc000102030405. The following keywords can
be used:
[IP] - the full IP address (received by DHCP)
[MAC] - hardware address
[SN] - serial number as found in DMI (SMBIOS)
[AT] - DMI asset tag
[BOM] - unique identifier in Tivoli Provisioning Manager for OS Deployment
server database
Every keyword supports a ’range’ extension if you want to include only part of the
dynamic information. [IP3] corresponds to the last octet of the IP address
(pc-[IP3] becomes pc-12 if IP address is 192.168.0.12). [IP1-3] corresponds to
octets 1 to 3. [MAC4-6] is replaced by the last three digits of the MAC address.
Note: The host name that uses dynamic keywords is expanded only during
deployment. Do not expect it to be updated dynamically in the administrative
console if no deployment has occurred.
Dynamic keywords are used to get MMMMMM part of the name in our scenario.
We also have to calculate the location code. We will assume that the input to the
script is an IP address. The host name is generated according to the naming
policy. The host is then registered to the server using the provided IP address
and generated host name.
Each location has different C-class subnets (netmask is 255.255.255.0) that we
will use to determine the location of the machine.
Following is a list of locations, location codes, and IP addresses used on that
location:
London (LON) - 10.1.1.x
Paris (PAR) - 10.1.2.x
Chapter 3. Installing the Tivoli Provisioning Manager for OS Deployment environment 135](https://image.slidesharecdn.com/deploymentguideseriestivoliprovisioningmanagerforosdeploymentv5-1sg247397-120524001333-phpapp01/85/Deployment-guide-series-tivoli-provisioning-manager-for-os-deployment-v5-1-sg247397-151-320.jpg)
![Sydney (SYD) - 10.1.3.x
Zagreb (ZAG) - 10.1.4.x
If the machine in Zagreb has the MAC address 00:01:02:03:04:05, then its name
should be ZAG030405. This is done in the following two steps:
1. In the first step we do not know the MAC address of the machine, so we will
leave this for the deployment phase. To determine the host name, we will use
the third octet of the IP address and then register the host using the host
name like LON[MAC4-6] for London machines, SYD[MAC4-6] for Sydney
machines, and so on.
2. The second part of this process occurs during the deployment of machines.
When the machines are deployed they will be assigned a host name
according to their MAC address.
Example 3-36 shows a script that converts IP to location codes and registers
host machines to the Tivoli Provisioning Manager for OS Deployment server. The
script accepts a single IP address as input and assumes rbagent is properly
configured and can be found using your PATH variable.
Example 3-36 Example script
#!/bin/sh
B_IP=$1
B_SUBNET=`echo $B_IP | cut -d"." -f3`
case $B_SUBNET in
1) B_LOCCODE=LON;;
2) B_LOCCODE=PAR;;
3) B_LOCCODE=SYD;;
4) B_LOCCODE=ZAG;;
*) exit 1;;
esac
B_HOSTNAME=$B_LOCCODE"[MAC4-6]"
echo Registering host - IP:$B_IP, hostname:$B_HOSTNAME
rbagent rad-registerhost IP=$B_IP HostName="$B_HOSTNAME"
The machines are registered as LON[MAC4-6], PAR[MAC4-6], SYD[MAC4-6],
ZAG[MAC4-6]. During deployment they will get names such as, LON5174BF,
SYD75257A, and so on.
136 Deployment Guide Series: Tivoli Provisioning Manager for OS Deployment V5.1](https://image.slidesharecdn.com/deploymentguideseriestivoliprovisioningmanagerforosdeploymentv5-1sg247397-120524001333-phpapp01/85/Deployment-guide-series-tivoli-provisioning-manager-for-os-deployment-v5-1-sg247397-152-320.jpg)


![Details of the contents of the sysprep.inf file are documented at the following
Web site:
http://technet2.microsoft.com/WindowsVista/en/library/71b576bd-cca6-466
f-a1db-16500be3098f1033.mspx?mfr=true
The key parameters are documented in Example 4-3.
Example 4-3 Available sysprep.inf variables
[Unattended]
ExtendOemPartition
OemPnPDriversPath
OemSkipEula
InstallFilesPath
KeepPageFile
ResetSourcePath
UpdateHAL
UpdateUPHAL
UpdateInstalledDrivers
TapiConfigured
[GuiUnattended]
AdminPassword
Autologon
AutoLogonCount
OEMDuplicatorString
OEMSkipRegional
OEMSkipWelcome
TimeZone
[UserData]
Supports the same set of entries as the Unattend.txt file.
[LicenseFilePrintData]
Supports the same set of entries as the Unattend.txt file.
[GuiRunOnce]
Supports the same set of entries as the Unattend.txt file.
[Display]
Supports the same set of entries as the Unattend.txt file.
[RegionalSettings]
Supports the same set of entries as the Unattend.txt file.
[Networking]
Supports the same set of entries as the Unattend.txt file.
[Identification]
Supports the same set of entries as the Unattend.txt file.
[TapiLocation]
162 Deployment Guide Series: Tivoli Provisioning Manager for OS Deployment V5.1](https://image.slidesharecdn.com/deploymentguideseriestivoliprovisioningmanagerforosdeploymentv5-1sg247397-120524001333-phpapp01/85/Deployment-guide-series-tivoli-provisioning-manager-for-os-deployment-v5-1-sg247397-178-320.jpg)
![[Sysprep]
Automatically generates the entries in the [SysprepMassStorage]
section.
[SysprepMassStorage]
Allows you to use the same image on computers with different
mass-storage devices.
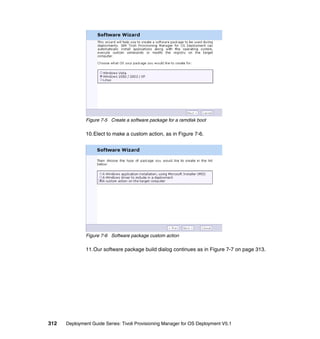
If you want to do something simple like run a script after installation completes,
then see Example 4-4, which gives you the critical but incomplete items from the
sysprep.inf file that you will need. In this example, we run the
c:run_this_command.cmd file the first time that the target machine boots after
installation.
Example 4-4 sysprep.inf sample
[Unattended]
.
[GuiUnattended]
.
AutoLogonCount=1
AutoLogon=Yes
.
[GuiRunOnce]
.
Command0=C:run_this_command.cmd
.
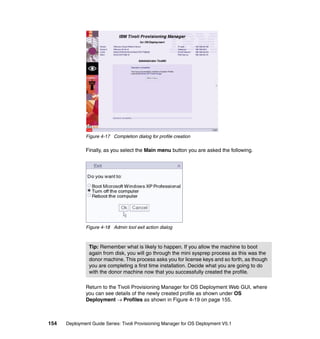
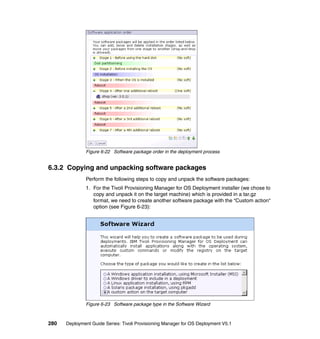
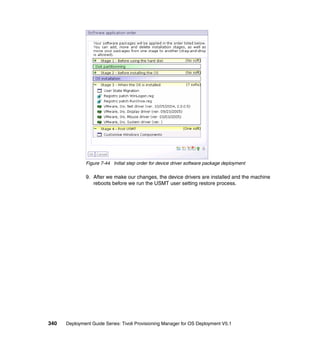
From this same screen in Figure 4-26 on page 161, we customize the menu that
is offered to the user of Tivoli Provisioning Manager for OS Deployment when
they select the image profile to be deployed. This is shown again in Figure 4-26
on page 161. Why would we do this?
To change the dialog text to make it easier for business users to understand.
To add image branding to the dialogs.
To password protect certain images.
To add timeouts to the display for auto selection of a single-option image.
This customization process starts as shown in Figure 4-27 on page 164.
Chapter 4. Installing pre-Vista systems 163](https://image.slidesharecdn.com/deploymentguideseriestivoliprovisioningmanagerforosdeploymentv5-1sg247397-120524001333-phpapp01/85/Deployment-guide-series-tivoli-provisioning-manager-for-os-deployment-v5-1-sg247397-179-320.jpg)


![Example 4-5 unattended.txt file built by setupmgr
;SetupMgrTag
[Data]
AutoPartition=1
MsDosInitiated="0"
UnattendedInstall="Yes"
[Unattended]
UnattendMode=FullUnattended
OemSkipEula=Yes
OemPreinstall=Yes
[GuiUnattended]
AdminPassword=xxxxxx
AutoLogon=Yes
AutoLogonCount=1
OEMSkipRegional=1
TimeZone=85
OemSkipWelcome=1
[GuiRunOnce]
Command0 = "9.3.4.137Unattendedafter_install.cmd"
[UserData]
FullName=IBM
OrgName=IBM
ComputerName=*
[LicenseFilePrintData]
AutoMode=PerServer
AutoUsers=5
[SetupMgr]
DistFolder=C:win2000dist
DistShare=win2000dist
[Identification]
JoinWorkgroup=WORKGROUP
[SysPrepMassStorage]
??????????????????
[Networking]
InstallDefaultComponents=Yes
186 Deployment Guide Series: Tivoli Provisioning Manager for OS Deployment V5.1](https://image.slidesharecdn.com/deploymentguideseriestivoliprovisioningmanagerforosdeploymentv5-1sg247397-120524001333-phpapp01/85/Deployment-guide-series-tivoli-provisioning-manager-for-os-deployment-v5-1-sg247397-202-320.jpg)
![We now have a template that we can use; however, it is important to
remember that Tivoli Provisioning Manager for OS Deployment will
overwrite many user supplied options.
So which ones should we use? We can use [SysPrepMassStorage] ,
[Components] and [GUIRunOnce], but note that [GuiRunOnce] should be run
in conjunction with [GuiUnattended].
4.5 Real world OS installation scenarios
Our real world problem is to perform two operations as a part of the installation
process.
1. Configure the Windows Firewall on the newly installed server.
2. Remove Windows Media® Player and Microsoft Messenger from the
installation.
You can achieve these results quickly and easily using Tivoli Provisioning
Manager for OS Deployment.
4.5.1 Configuring the Windows firewall
To configure the Windows firewall during an unattended installation of the
operating system, you normally have to provide an unattend.txt file as an
argument to the setup command. We can simplify this process, by adding the
unattend.txt arguments to the OS profile in Tivoli Provisioning Manager for OS
Deployment.
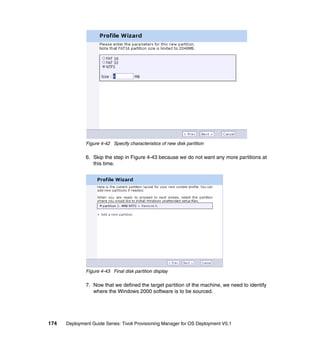
1. In Figure 4-61 on page 188 we add the details to the profile. The parameters
that we used as shown in Example 4-6 on page 188, enables the firewall but
will admit connections from the local network on port 80, for example to allow
the default HTTP web traffic.
Chapter 4. Installing pre-Vista systems 187](https://image.slidesharecdn.com/deploymentguideseriestivoliprovisioningmanagerforosdeploymentv5-1sg247397-120524001333-phpapp01/85/Deployment-guide-series-tivoli-provisioning-manager-for-os-deployment-v5-1-sg247397-203-320.jpg)
![Figure 4-61 Firewall configuration in unattend.txt
2. We also log packets that we drop and connection details into
c:WindowsWindowsFirewall.log.
Example 4-6 Firewall configuration sample
[WindowsFirewall]
Profiles=WindowsFirewall.ITSO
Logfile = %WINDIR%WindowsFirewall.log
LogDroppedPackets = 1
LogConnections = 1
;
; enable standard ITSO profile
;
[WindowsFirewall.ITSO]
Type = 1
Mode = 1
Exceptions = 1
PortOpenings = WindowsFirewall.WebServer
;
; allow only port 80 TCP through firewall
;
[WindowsFirewall.WebServer]
Protocol = 6
Port = 80
Name = Web Server (TCP 80)
Mode = 1
Scope = 1
3. After the Windows 2003 OS installation is complete, the firewall is enabled, as
shown in Figure 4-62 on page 189. This is controlled by the mode operand in
the profile.
188 Deployment Guide Series: Tivoli Provisioning Manager for OS Deployment V5.1](https://image.slidesharecdn.com/deploymentguideseriestivoliprovisioningmanagerforosdeploymentv5-1sg247397-120524001333-phpapp01/85/Deployment-guide-series-tivoli-provisioning-manager-for-os-deployment-v5-1-sg247397-204-320.jpg)


![6. We can change the firewall configuration to only allow TCP connections
through port 80 from the local subnet only, as shown in Figure 4-65. And this
is controlled by the scope argument.
Figure 4-65 Firewall configuration to only allow local subnet connections
4.5.2 Removing imaged profile operating system features
To remove features like Media Player or MSN® Messenger, we have to use the
sysocmgr command. So how do we automate this process? Why would we need
to do this? Well, read the following note, and consider that we may prefer to use
Opera and iTunes as our default Web browser and media player software.
This technique is suitable for cloned images where the donor machine was
prepared with sysprep.
Note: sysprep will re-enable some Microsoft components that were disabled
in the donor image.
In Example 4-7, a sysprep.inf extract automatically logs onto the OS with the
Administrator account when the installation is complete. It then runs the
sysocmgr command. Note that this operation only happens once, see
AutoLogonCount.
Example 4-7 sysprep.inf for adding and removing Windows components
; autologon the machine the first time to run add / remove programs
[GuiUnattended]
AdminPassword=itso05
AutoLogon=Yes
AutoLogonCount=1
OEMSkipRegional=1
TimeZone=85
Chapter 4. Installing pre-Vista systems 191](https://image.slidesharecdn.com/deploymentguideseriestivoliprovisioningmanagerforosdeploymentv5-1sg247397-120524001333-phpapp01/85/Deployment-guide-series-tivoli-provisioning-manager-for-os-deployment-v5-1-sg247397-207-320.jpg)
![OemSkipWelcome=1
; run command to install or remove windows components
[GuiRunOnce]
"sysocmgr /i:%windir%infsysoc.inf /u:%windir%infunattend.txt /q
/r /c /x"
The arguments passed to sysocmgr include the components to be added to or
removed from the OS, and they are defined as in Example 4-8.
Example 4-8 sysocmgr parameters
[Components]
IEAccess = On
OEAccess = Off
WMPOCM = Off
WMAccess = Off
4.5.3 Removing unattended profile operating system features
We will use this deployment problem as an example of how to copy some files to
the target machine and then run a batch program. In our case, we want to copy
the add_remove.cfg and add_remove.cmd to the install directory on the target
computer and then run the add_remove.cmd command file. The contents of these
files are shown in Example 4-9 and Example 4-10. When running these scripts,
consider the security context in which they are run. If you need to run the
command as the database instance owner, for example, then use the runas.exe
command to set the context for the command.
Example 4-9 Sample sysocmgr component arguments in add_remove.cfg
[Components]
IEAccess = On
OEAccess = Off
WMPOCM = Off
WMAccess = Off
The command you can run that reads the arguments in Example 4-9 is shown in
Example 4-10.
Example 4-10 Sample sysocmgr command in add_remove.cmd
sysocmgr /i:%windir%infsysoc.inf /u:installadd_remove.cfg /q /r
To achieve the addition and removal of Windows components after the
installation is complete, Microsoft provides the sysocmgr command to perform
192 Deployment Guide Series: Tivoli Provisioning Manager for OS Deployment V5.1](https://image.slidesharecdn.com/deploymentguideseriestivoliprovisioningmanagerforosdeploymentv5-1sg247397-120524001333-phpapp01/85/Deployment-guide-series-tivoli-provisioning-manager-for-os-deployment-v5-1-sg247397-208-320.jpg)


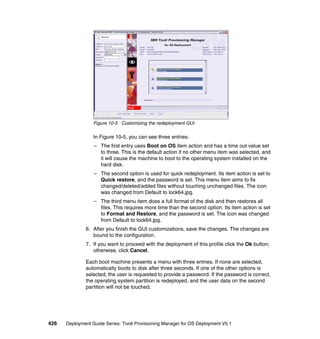
![We use the USMT loadstate.exe command to restore the user personality after
the OS profile is deployed.
This is USMT specific, but it allows us to explore techniques that are available to
us with Tivoli Provisioning Manager for OS Deployment. The problem that we
have is that the user profile restore process, run by the loadstate.exe command
of USMT, must run in the context of an administrator. See the USMT
documentation for further information. We could have each user restore their
own settings as they log onto the new machine, but we want all profiles restored
as the machine is built so that we are free to delete these saved profiles.
The design that we chose uses Tivoli Provisioning Manager for OS Deployment
software packages to copy files to the target machine and also to make registry
changes. The registry changes make the target computer logon on the first time
automatically after the OS is installed, and then runs the USMT loadstate.exe
command to restore all profiles on the machine.
After the restore is completed, we then disable automatic logon and remove any
reference to the local administrator password.
First let us look at the registry changes that we need to achieve this result in
Example 4-11. These registry changes cause the Administrator to automatically
login with the associated password. We will show you how to embed this within a
Tivoli Provisioning Manager for OS Deployment software package.
Example 4-11 Registry change to enable automatic logon
Windows Registry Editor Version 5.00
[HKEY_LOCAL_MACHINESOFTWAREMicrosoftWindows
NTCurrentVersionWinlogon]
"AutoAdminLogon"="1"
"DefaultUserName"="Administrator"
"DefaultPassword"="notsure"
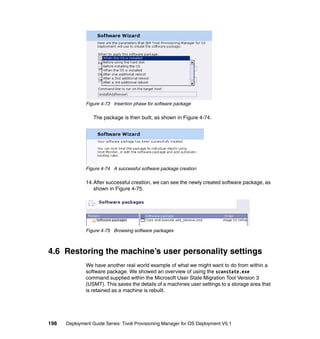
1. We use the software package creation wizard as before, but this time we
identify that we want to make a registry change as in Figure 4-76 on page 200
and Figure 4-77 on page 200. We then have to locate the .reg file that
contains the appropriate registry file change.
Tip: Create your registry changes using regedt32 or regedit, and then export
them to a file. It is this .reg export file that is imported by the software package
wizard.
Chapter 4. Installing pre-Vista systems 199](https://image.slidesharecdn.com/deploymentguideseriestivoliprovisioningmanagerforosdeploymentv5-1sg247397-120524001333-phpapp01/85/Deployment-guide-series-tivoli-provisioning-manager-for-os-deployment-v5-1-sg247397-215-320.jpg)


![At this point the target machine automatically logs on as Administrator after
the OS is deployed and the machine is allowed to reboot.
6. Insert another registry change to identify the command to run when the logon
is complete. Let us have a look at the details of this change in Example 4-12.
This simply says - ‘run c:instaluserstaterestore.cmd as Administrator logs
on’. In this way, we have the right user context to restore all profiles with the
USMT loadstate.exe command.
Example 4-12 Run the restore.cmd command as logon time
Windows Registry Editor Version 5.00
[HKEY_LOCAL_MACHINESOFTWAREMicrosoftWindowsCurrentVersionRunOnce]
"USMT"="C:installUserStaterestore.cmd"
The restore.cmd command is sent down to the target machine by another
software package bound to the same deployment scheme. This is not strictly
necessary, as we could run the commands using UNC qualified commands
from the save server on which we staged the scanstate.exe profiles.
7. So, as before, we create another software package, the highlights of which
you can see in Figure 4-81.
Figure 4-81 Identify the run key registry change export file
8. Next, we confirm that we want to update the registry key that we designed in
our solution. See Figure 4-82 on page 203.
202 Deployment Guide Series: Tivoli Provisioning Manager for OS Deployment V5.1](https://image.slidesharecdn.com/deploymentguideseriestivoliprovisioningmanagerforosdeploymentv5-1sg247397-120524001333-phpapp01/85/Deployment-guide-series-tivoli-provisioning-manager-for-os-deployment-v5-1-sg247397-218-320.jpg)


![%ZPATH%loadstate.exe
192.168.72.131UserMigrationdata%COMPUTERNAME%
/i:%ZPATH%miguser.xml /i:%ZPATH%migsys.xml /i:%ZPATH%migapp.xml /r:5
/w:10 /progress:%ZTMP%%COMPUTERNAME%_progress.log /lac /v:13 /decrypt
/key:"itso" /l:%ZTMP%%COMPUTERNAME%_loadstate.log
echo Done restoring user settings >> %ZTMP%%COMPUTERNAME%.log
echo Disabling the auto logon >> %ZTMP%%COMPUTERNAME%.log
regedit /s disable.reg
echo Done >> %ZTMP%%COMPUTERNAME%.log
echo Rebooting the machine .... >> %ZTMP%%COMPUTERNAME%.log
shutdown -t 30 -r -c "TPM for OS Deployment will now reboot the
machine. All deployment activity completed OK"
15.Note that in the restore.cmd script we update the registry, as in
Example 4-14. This is to stop the target machine from logging on
automatically as the local administrator. Note that the action to run
restore.cmd is removed from the runonce key after it is run a single time, so
there is no explicit action to perform.
Example 4-14 Disable automatic logon
Windows Registry Editor Version 5.00
[HKEY_LOCAL_MACHINESOFTWAREMicrosoftWindows
NTCurrentVersionWinlogon]
"AutoAdminLogon"="0"
"DefaultPassword"="XXXXX"
Figure 4-88 on page 210 shows the final software package sequence scheme
that we used.
Chapter 4. Installing pre-Vista systems 209](https://image.slidesharecdn.com/deploymentguideseriestivoliprovisioningmanagerforosdeploymentv5-1sg247397-120524001333-phpapp01/85/Deployment-guide-series-tivoli-provisioning-manager-for-os-deployment-v5-1-sg247397-225-320.jpg)


![2. Select Edit link in the Fixed host properties section as shown in Figure 5-44.
Figure 5-44 Fixed host properties access
3. You can enter different regular expressions or provide variable substitution
here. For instance, the [IP] variable in the Hostname field automatically
inserts the machine assigned IP address.
You can also concatenate a fixed field with these variables.
Examples:
Vista-[IP] could give Vista-9.1.2.3
You will see in the Tivoli Provisioning Manager for Operating System
Deployment Guide (Fix Pack 1), SC32-2582 under "Setting up profile
configurations and fixed common parameters" that you can also use the
[MAC], [SN], [AT] keywords for Mac address, Serial Number, and Asset Tag
to identify your target. A range extension is also supported by each of these
keywords.
Moreover, if you need more flexibility, you can create different kinds of
associations through a feature available in the Tivoli Provisioning Manager for
OS Deployment. To achieve this, go to OS Deployment → Host Monitor
Chapter 5. Installing Vista systems 243](https://image.slidesharecdn.com/deploymentguideseriestivoliprovisioningmanagerforosdeploymentv5-1sg247397-120524001333-phpapp01/85/Deployment-guide-series-tivoli-provisioning-manager-for-os-deployment-v5-1-sg247397-259-320.jpg)
![and launch the Export hosts feature at the bottom of the screen to export
your existing hosts definitions in a .csv file. You can use this file as a model to
create your own .csv file, and then import a list of new hosts using the Import
hosts function. An example is to create a list with only the SN and the IP
fields.
In our example, we selected the following parameters, as in Figure 5-45, and
clicked OK.
Hostname: Vista-[IP]
TCP/IP mode: Use a dynamic IP address (DHCP)
Figure 5-45 Fixed Host Properties information
4. Select the Edit link from the Windows-specific section.
5. Enter your product key, Network type, and Administrator name. Click OK as
shown in Figure 5-45. Here we also provided values for the screen resolution.
244 Deployment Guide Series: Tivoli Provisioning Manager for OS Deployment V5.1](https://image.slidesharecdn.com/deploymentguideseriestivoliprovisioningmanagerforosdeploymentv5-1sg247397-120524001333-phpapp01/85/Deployment-guide-series-tivoli-provisioning-manager-for-os-deployment-v5-1-sg247397-260-320.jpg)


![Example 7-1 Sample praid.exe configuration file
; * Policy.RAID-5-HSP
; *
; * This policy configures a RAID controller with a RAID-5 array using
; * all available drives and a single hot-spare drive.
; *
; * This policy will be used on the following RAID controllers:
; * - ServeRAID-4H
; * - ServeRAID-4Mx
; * - ServeRAID-4Lx
; * - ServeRAID-5i
; * - ServeRAID-6i/6i+
; * - ServeRAID-6M
; * - ServeRAID-7k
; * - ServeRAID-7t
; * - ServeRAID-8i
[Policy.RAID-5-HSP]
AppliesTo.1 = t:ServeRAID-4H
AppliesTo.2 = t:ServeRAID-4Mx
AppliesTo.3 = t:ServeRAID-4Lx
AppliesTo.4 = t:ServeRAID-5i
AppliesTo.5 = t:ServeRAID-6i
AppliesTo.6 = t:ServeRAID-6M
AppliesTo.7 = t:ServeRAID-7k
AppliesTo.8 = t:ServeRAID-7t
AppliesTo.9 = t:ServeRAID-8i
Array_Mode = CUSTOM
Array.A = ALL
Hotspares = 1
Logical_Mode = CUSTOM
Logical.1 = A:FILL:5
;Note: Uncomment the policy name and AppliesTo.1 to activate this
policy.
; * Policy.auto-mode
; *
308 Deployment Guide Series: Tivoli Provisioning Manager for OS Deployment V5.1](https://image.slidesharecdn.com/deploymentguideseriestivoliprovisioningmanagerforosdeploymentv5-1sg247397-120524001333-phpapp01/85/Deployment-guide-series-tivoli-provisioning-manager-for-os-deployment-v5-1-sg247397-324-320.jpg)
![; * This policy configures all controllers with PRAID default values
for arrays
; * and logical drives.
; * (Any RAID controller not configured by Policy.RAID-5-HSP will use
this policy.)
; * Note: PRAID default configuration values include a RAID-1 array on
controllers with 2
; * drives. The RAID level varies for controllers with more
than 2 drives.
; * See the PRAID documentation for more details.
;[Policy.auto-mode]
;AppliesTo.1 = ALL
4. Because of the limited space on the virtual floppy disk, we need to package
up the ServerGuide Scripting Toolkit and any RAID configuration files you
created as a self-extracting zip file. There are utilities available to do this,
such as the Pkware family that has zip, unzip, and utilities to convert zip files
to self extracting .exe files.
If we continue to edit the floppy disk according to our needs, when this is
detached from the virtual machine, it will be transportable.
Example 7-2 shows how we create a zip file using Pkware.
Example 7-2 Using Pkware to create a zip file
C:sgshare>.pkwarepkzip.exe raid.zip .raid*.*
PKZIP (R) FAST! Create/Update Utility Version 2.04g 02-01-93
Copr. 1989-1993 PKWARE Inc. All Rights Reserved. Shareware Version
PKZIP Reg. U.S. Pat. and Tm. Off. Patent No. 5,051,745
? 80486 CPU detected.
? XMS version 2.00 detected.
? DPMI version 0.90 detected.
? Using Normal Compression.
Creating ZIP: RAID.ZIP
Adding: ACU.EXE Deflating (59%), done.
Adding: ACUAHCI.EXE Deflating (64%), done.
Adding: ACUICHSV.EXE Deflating (64%), done.
Adding: ACUSAS.EXE Deflating (63%), done.
Adding: ACUSAS8E.EXE Deflating (58%), done.
Adding: ADSCFG.BAT Deflating (77%), done.
Adding: ALTBOOT.EXE Deflating (55%), done.
Chapter 7. Common deployment features 309](https://image.slidesharecdn.com/deploymentguideseriestivoliprovisioningmanagerforosdeploymentv5-1sg247397-120524001333-phpapp01/85/Deployment-guide-series-tivoli-provisioning-manager-for-os-deployment-v5-1-sg247397-325-320.jpg)


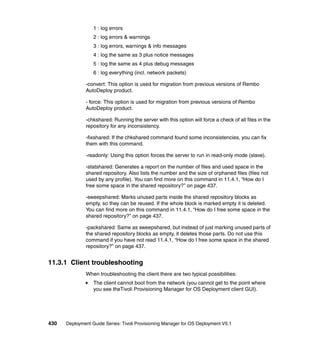
![DiskSize SYSIBM INTEGER 4 0 Yes
Model SYSIBM VARCHAR 40 0 Yes
Firmware SYSIBM VARCHAR 8 0 Yes
Serial SYSIBM VARCHAR 20 0 Yes
ATA48bits SYSIBM CHARACTER 1 0 Yes
15 record(s) selected.
We want to use the value of the DiskSize column from the DiskInventory table in
my binding rule. This translates to the DiskSize field of the Disk record when we
write the rule. There may also be multiple physical disks on the machine. So how
do we just check the size of the first physical disk? All instances of Disk are
loaded into an array and are addressable by their array index within the rule.
So, the first physical disk is addressed as Disk[0], and to look at the physical
size of the first disk, you use Disk[0] DiskSize within your rule record. To decide
if the value of this field is appropriate for our needs, we have to apply some
logical operators to is value.
The available operators are shown in Table 7-3.
Table 7-3 Free form rule logical operators
Operator Meaning
< is smaller than
<= is less than or equal to
=> is greater than or equal to
> is greater than
== is equal to
!= is not equal to
&& logical AND operator
|| logical OR operator
So finally, our free form rule to bind profiles to computers that have their first
physical hard disk that is greater than or equal to 8 Gigabytes, looks like that in
Example 7-9 on page 328. Note that this expression is just going to look in the
first two memory slots of the motherboard. The DMI schema supports up to 8, so
you might want to extend the expression to sum the values from all eight slots.
Chapter 7. Common deployment features 327](https://image.slidesharecdn.com/deploymentguideseriestivoliprovisioningmanagerforosdeploymentv5-1sg247397-120524001333-phpapp01/85/Deployment-guide-series-tivoli-provisioning-manager-for-os-deployment-v5-1-sg247397-343-320.jpg)
![Example 7-9 Free form binding rule for selecting disk size of target
Disk[0].DiskSize > 8*1024*1024 && (DMI.Mem1Size+DMI.Mem2Size) >=
2*1024*1024
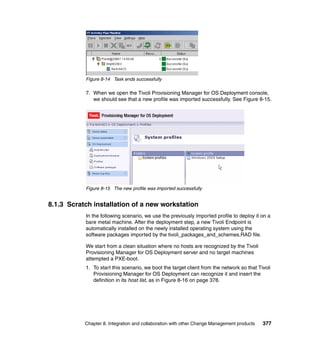
7.3 Collecting inventory from the target machines
In the previous section, we showed you how to use the information collected
about the target machine. Here we discuss how this information is collected and
also how you can browse it interactively from the Tivoli Provisioning Manager for
OS Deployment interface.
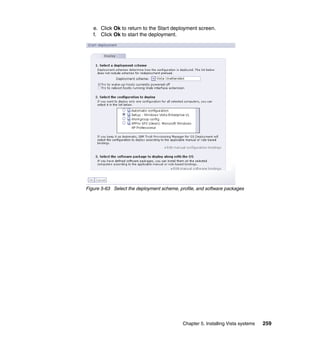
1. Within the definition of a deployment scheme, we chose when the inventory of
the target machine is done and what information is taken. This can be seen in
Figure 7-24, where we opted to take all available information at all times. Be
clear that this scan is done as a part of the initial capture by Tivoli
Provisioning Manager for OS Deployment, for example, its appearance in the
Host Monitor list, or subsequently, when a profile is deployed to the target.
Figure 7-24 Controlling inventory scope in deployment scheme
2. The data can then be browsed from the Host Monitor, as shown in
Figure 7-25 on page 329.
328 Deployment Guide Series: Tivoli Provisioning Manager for OS Deployment V5.1](https://image.slidesharecdn.com/deploymentguideseriestivoliprovisioningmanagerforosdeploymentv5-1sg247397-120524001333-phpapp01/85/Deployment-guide-series-tivoli-provisioning-manager-for-os-deployment-v5-1-sg247397-344-320.jpg)


![}
}
# process all directories from the passed root directory
recurse($ARGV[0]);
Running the script from Example 7-10 on page 342 with device_drivers.pl
c:/ibmtools/drivers gives us a result similar to that shown in Example 7-11.
Example 7-11 STDOUT from running device_drivers.pl
RAD-MKSOFT processing driver in directory
C:IBMTOOLSDRIVERS/Q38Z01US/PRO1000/W
S03XP32/
RAD-MKSOFT IBM Tivoli Provisioning Manager for OS Deployment Web
extension v.5.1
.0.1 (101.02)
RAD-MKSOFT Licensed Materials - Property of IBM. L-DDAC-6RLW3E
RAD-MKSOFT (C) Copyright IBM Corporation 1998, 5 2007.
RAD-MKSOFT All Rights Reserved. IBM, the IBM logo, and Tivoli are
trademarks
RAD-MKSOFT of IBM Corporation in the United States, other countries or
both.
RAD-MKSOFT Connect 192.168.56.131 -> 192.168.56.131
RAD-MKSOFT Starting Rembo Agent
RAD-MKSOFT [00:22:55] <NOT> Parsing driver in
local://root/C$/IBMTOOLS/DRIVERS/Q
38Z01US/PRO1000/WS03XP32/e1000325.inf
RAD-MKSOFT [Progress] 4% done (Waiting for the server to build * )
RAD-MKSOFT [Progress] 82% done (Uploading shared files * Progress:
0B/0B Speed:
0B/s )
RAD-MKSOFT 28 automatic binding rules will be created[Progress] 99%
done (Softwa
re package creation completed)
RAD-MKSOFT { type: "pkg",
RAD-MKSOFT content: "win-drv",
RAD-MKSOFT class: "Net",
RAD-MKSOFT vendor: "Intel",
RAD-MKSOFT version: "08/14/2003,7.2.17.0",
RAD-MKSOFT provider: "Intel",
RAD-MKSOFT catalog: "e1000325.cat",
RAD-MKSOFT devices: nil,
Chapter 7. Common deployment features 343](https://image.slidesharecdn.com/deploymentguideseriestivoliprovisioningmanagerforosdeploymentv5-1sg247397-120524001333-phpapp01/85/Deployment-guide-series-tivoli-provisioning-manager-for-os-deployment-v5-1-sg247397-359-320.jpg)

![RAD-MKSOFT cmdline: "",
RAD-MKSOFT seqdescr: "When the OS is installed",
RAD-MKSOFT pkgname: "wsxp1.pkg",
RAD-MKSOFT srvpath: "net://global/updates/wsxp1.pkg" }
RAD-MKSOFT [00:23:02] <NOT> A win-drv software named 'Intel Net driver
(4)' has
been created
RAD-MKSOFT Stopping Rembo Agent
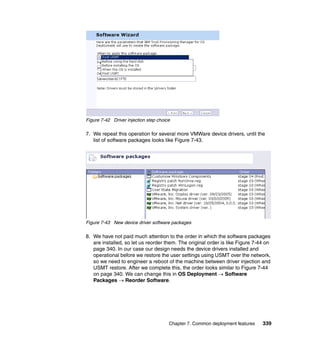
Look at Figure 7-46 to see, in the Tivoli Provisioning Manager for OS Deployment
user interface, all the new device driver software packages that we built.
Figure 7-46 Automatically created device driver software packages
This is useful technique to speed up the building of a prototype environment, but
remember to review your host bindings as described earlier.
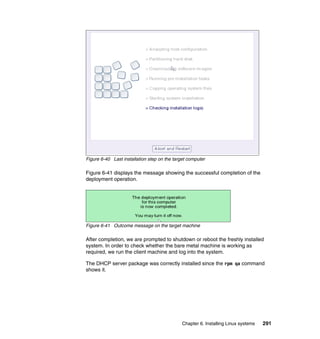
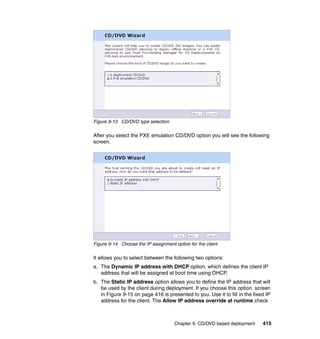
7.5 Understanding the host boot settings
So the deployment of the OS profile completes according to your design, but the
new target does not boot from the OS on disk. This is because we need to
understand better the boot settings associated with the target host.
Important: In order to boot the newly deployed OS, change the boot
sequence as described next.
In the default environment where the boot order is Network, CDROM, Disk, after
the OS installation has completed, the target PC will return to the PXE Client
menu, as shown in Figure 7-47 on page 346.
Chapter 7. Common deployment features 345](https://image.slidesharecdn.com/deploymentguideseriestivoliprovisioningmanagerforosdeploymentv5-1sg247397-120524001333-phpapp01/85/Deployment-guide-series-tivoli-provisioning-manager-for-os-deployment-v5-1-sg247397-361-320.jpg)


![– Windows: Use the service manager. Also look at the Windows Event
Viewer. The IBM Tivoli Provisioning Manager for OS Deployment server
logs fatal error messages into the event manager.
– Linux/FreeBSD/OS X: type ps aux | grep rembo
– Solaris: type ps -elf | grep rembo
If the service does not start, run the Tivoli Provisioning Manager for OS
Deployment executable from the command-line with the following options:
rembo -d -v 4. This will run IBM Tivoli Provisioning Manager for OS
Deployment server as a console application with all debugging output
redirected to your command window. You can increase the debug level (the
-v parameter) to six for maximum details. See section “Server command-line
options” for more command line arguments.
If you start the server in the command line with a high verbosity level, you will
get lots of information, and it might be better to look at the log files. You can
find the Tivoli Provisioning Manager for OS Deployment server log files in the
logs directory inside the server file repository (for example C:TPMfOS Files
on Windows or /opt/tpmfos-5.1/files on Unix/Linux).
If the error message is related to your network configuration, try to solve it and
run the server again. Verify Network interfaces parameter. You can find it
under Server parameters → Configuration → Base parameters.
If it still does not work, contact your IBM support.
Server command-line options
Tivoli Provisioning Manager for OS Deployment server has several command
line parameters you can use in troubleshooting. Command syntax is as follows:
rembo [-d] [-v loglevel] [options]
Following is the list of options you can use:
-c: Use this parameter to specify the configuration file to use. The default file
name for the configuration file is rembo.conf.
-sdb: Use this parameter to specify the server database file to use. The default
name for the server database file is server.db.
-d: This command line argument causes all log messages to be printed on the
standard output.
-v: You can use this command line argument to set the verbosity of the
messages printed to the log files and standard output. Log levels are defined as
follows:
0 : no output
Chapter 11. Troubleshooting, best practices, and common questions 429](https://image.slidesharecdn.com/deploymentguideseriestivoliprovisioningmanagerforosdeploymentv5-1sg247397-120524001333-phpapp01/85/Deployment-guide-series-tivoli-provisioning-manager-for-os-deployment-v5-1-sg247397-445-320.jpg)


![service specific error code 5, you have an invalid password set in your
rbagent.conf file.
Example 11-1 Invalid password on client
[2007/02/01 03:55:52.203] Connect 172.20.20.128 -> 172.30.30.101
[2007/02/01 03:55:52.453] Connection refused: invalid password
[2007/02/01 03:55:52.453] Connection refused
[2007/02/01 03:55:52.453] <ERR> Server refused our connection, invalid password
[2007/02/01 03:55:52.453] <ERR> Exiting with error code 5
This will happen if you change the password on the server or manually change
the encoded password string in rbagent.conf file.
Solution 1: Uninstall the agent and make sure the rbagent.conf file is deleted
from the agent directory. Install the agent again. Installation will ask for the
address and password of the server.
Solution 2: Generate a new encoded password, and replace the encrypted string
in the rembo.conf file. You can generate the new encrypted password using the
following command:
rbagent -q -d -s <ipaddr>:<passwd> rad-hidepassword <passwd> md5
You will get output similar to the following:
Example 11-2 Output of rbagent rad-hidepassword command
Connect 172.20.20.128 -> 172.30.30.101
Starting Rembo Agent
Result: 5926D4FFE73F106A0BC0929068981515
Stopping Rembo Agent
The encrypted password is on the “Result” line. Replace the old password value
in the rbagent.conf file with the one generated by the rad-hidepassword
command.
11.3.2 Error messages
This section provides information about the error messages related to the Tivoli
Provisioning Manager for OS Deployment.
Administrator toolkit error messages
This section lists the error messages that may occur on a client computer when
using the administrator toolkit. They are usually displayed in a dialog box, with an
OK button.
Chapter 11. Troubleshooting, best practices, and common questions 433](https://image.slidesharecdn.com/deploymentguideseriestivoliprovisioningmanagerforosdeploymentv5-1sg247397-120524001333-phpapp01/85/Deployment-guide-series-tivoli-provisioning-manager-for-os-deployment-v5-1-sg247397-449-320.jpg)


![the OS Deployment → Host Monitor → Export hosts feature. This generates
the CSV file whose first line contains names of all the fields you can use. You can
use it as a reference and example file for creation of your own CSV file.
11.4.3 How do I control generated host names for new machines?
There are a couple of ways you can control the host name to the machine,
mapping, and host name generation for new machines that automatically register
to Tivoli Provisioning Manager for OS Deployment server during the PXE boot.
Probably the easiest way, if you have a list of MAC addresses, serial numbers, or
UUIDs, is to generate a comma separated file and import it to Tivoli Provisioning
Manager for OS Deployment server. This will register all hosts and when they
connect to the Tivoli Provisioning Manager for OS Deployment server they will be
recognized and assigned the host name that was already registered.
The second option for host name generation is to use keywords that get
expanded at the time of deployment. These keywords are as follows:
[IP] - This keyword is expanded to the IP address of the machine. Notice that
this is done without padding with zeros or dots. That means that the address
10.1.23.45 and address 10.12.34.5 are expanded to the same
value—1012345. You can use this keyword with “range” extension, which
allows you to select only part of the IP address. In our example, with address
10.1.23.45, using the keyword [IP1] would give the result 10. Using [IP3-4]
would return 2345. Notice, however, that the substring of the IP address
might not be unique.
[MAC] - This keyword is expanded to the value of the MAC address of the
network card used to contact Tivoli Provisioning Manager for OS Deployment
server. If the MAC address of the card was 01:23:45:67:89:AB, then [MAC] is
expanded to 0123456789AB. [MAC4-6] will return the last three octets of the
MAC address - 6789AB. Notice that the substring of the MAC address might
not be unique.
[SN] - This keyword returns the serial number of the machine.
[AT] - This keyword returns the asset tag of the machine.
[BOMID] - This is the unique number assigned by Tivoli Provisioning Manager
for OS Deployment server. You can use this keyword as [BOMID0000] to get
output padded with zeros - 0001, 0002, 0003, and so on.
These keywords can also be combined with a fixed string. For example using the
host name definition PC[MAC4-6] returns the host name containing letters PC
followed by the last three octets of the MAC address. If the MAC address on that
machine was 01:23:45:67:89:AB, the resulting name would be PC6789AB.
Chapter 11. Troubleshooting, best practices, and common questions 441](https://image.slidesharecdn.com/deploymentguideseriestivoliprovisioningmanagerforosdeploymentv5-1sg247397-120524001333-phpapp01/85/Deployment-guide-series-tivoli-provisioning-manager-for-os-deployment-v5-1-sg247397-457-320.jpg)


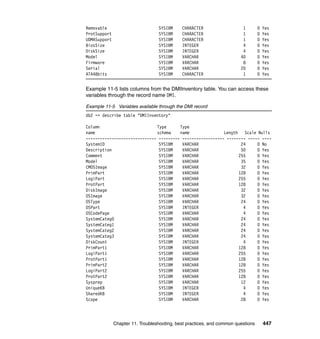
![For disks and PCI devices, you can use the function sizeof (respectively
sizeof(Disk) and sizeof(PCI) ) to discover the number of devices present. You
can then use indices to access these devices. Following are couple of examples
of useful fields:
Order.IP: a string, the host IP address, such as 192.168.1.2
Order.MAC: a string, the host MAC address, such as 00:01:02:03:04:05
Order.SN: a string, the host Serial Number, such as CH12345678
Order.Model: a string, the computer model name, such as e-Vectra
DMI.Vendor: a string, the vendor name, such as Hewlett-Packard
DMI.Product: a string, same as Order.Model
DMI.ProcModel: a string, the processor model
DMI.AssetTag: a string, asset tag
Disk[0].Type: a string, the disk 0 drive type, such as ATAPI
Disk[0].Media: a string, the disk 0 media type, such as Disk or CD-ROM
Disk[0].DiskSize: a number, the physical size of the disk (if detected)
PCI[0].VendorID: a string, the hexadecimal vendor ID of the device
PCI[0].DeviceID: a string, the hexadecimal device ID of the device
The variables you can use are actually column names in selected tables. On the
following pages you can find the list of all columns from the database tables,
which you can use as variables in your free-text expressions. The list is a result
of running the describe table command. The result contains the column name,
which you can use as the variable, its data type (integer, varchar etc.), data
length, and whether that field can be empty (Nulls = Yes) or not (Nulls = No).
Example 11-4 lists columns from the DiskInventory table. You can access these
variables through the record name Disk.
Example 11-4 Variables available through Disk record
db2 => describe table "DiskInventory"
Column Type Type
name schema name Length Scale Nulls
------------------------------ --------- ------------------ -------- ----- ----
BomID SYSIBM INTEGER 4 0 Yes
DiskID SYSIBM INTEGER 4 0 Yes
Controller SYSIBM SMALLINT 2 0 Yes
Device SYSIBM INTEGER 4 0 Yes
Type SYSIBM VARCHAR 5 0 Yes
Media SYSIBM VARCHAR 8 0 Yes
446 Deployment Guide Series: Tivoli Provisioning Manager for OS Deployment V5.1](https://image.slidesharecdn.com/deploymentguideseriestivoliprovisioningmanagerforosdeploymentv5-1sg247397-120524001333-phpapp01/85/Deployment-guide-series-tivoli-provisioning-manager-for-os-deployment-v5-1-sg247397-462-320.jpg)


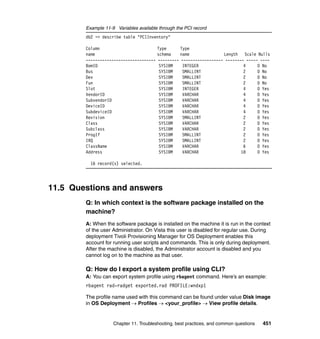

![Q: Do I need a physical floppy disk to create a RAMDISK
image?
A: No, you can also use emulation software for the floppy disk.
Q: Why can’t I log on as Administrator to my Vista image after
deployment?
A: The Vista sysprep process automatically disables this account, so create
another one before you sysprep it.
Q: How do I list all schemes and configurations from CLI?
A: You can get a list of all schemas and configurations using rbagent’s
rad-configlist and rad-schemelist commands.
Q: How do I create a software package from the CLI?
A: You can create and check software packages using rbagent. Two rbagent
commands you will need for this purpose are rad-chksoft and rad-mksoft.
Command rad-chksoft <source_path> will simulate package creation and show
package attributes.
Command rbagent rad-mksoft <source_path> [“<attr>=value” ...] will
create the software package. Attr can be any of the following: descr, content,
pkgname, dest, cmdline, pass, flags, dosubst, norules. Specifiying attr values on
the command line overrides the defaults.
Q: Why do I get a green screen on the successfully deployed
host, and a yellow status value on the host monitor?
A: This can happen when PXE activation (the process of enabling PXE when
booting on the hard-disk) does not work. Tivoli Provisioning Manager for OS
Deployment's PXE boot code manages the multiple reboots needed to install a
computer. To manage these reboots, the PXE boot code has to intercept the boot
process of the computer at every boot.
If the computer is configured to always boot on the network (LAN device first in
the list of boot devices), there is nothing to do, as Tivoli Provisioning Manager for
OS Deployment is loaded in memory at every boot.
If the computer is configured to boot on the hard-disk, you can change the MBR
of the hard-disk and make it point to the Tivoli Provisioning Manager for OS
Deployment work partition at the end of the hard-disk. Tivoli Provisioning
Chapter 11. Troubleshooting, best practices, and common questions 453](https://image.slidesharecdn.com/deploymentguideseriestivoliprovisioningmanagerforosdeploymentv5-1sg247397-120524001333-phpapp01/85/Deployment-guide-series-tivoli-provisioning-manager-for-os-deployment-v5-1-sg247397-469-320.jpg)


![2. The second step is to create a differential between a chosen checkpoint state
and the latest checkpoint state of the master server. This builds a .rad file (or
possibly several .dat files if you have indicated a file size limit) in the TPMfOS
Filesimport directory. This step can be performed synchronously (RbAgent
waits until the task is complete before returning control) or asynchronously
(RbAgent returns control immediately). In the asynchronous mode, however,
Tivoli Provisioning Manager for OS Deployment prevents the user from
launching two .rad file creation processes concurrently.
Note: If changes were made on the master server since the last
checkpoint, you cannot create a differential with the last checkpoint as the
endpoint. You must first create a new checkpoint reflecting the current
state of the master server.
3. When ever convenient, you can use any available tool to transfer the .rad
from the master server to the slave server. Tivoli Provisioning Manager for
OS Deployment does not intervene in this transfer process.
4. When you want to synchronize your slave server, you must copy your
differential file from its current location (either still on the master server or on a
local directory) to the specific TPMfOS Filesimportauto directory. This
directory is automatically created when the sync.pak package is present.
Tivoli Provisioning Manager for OS Deployment checks every minute for
changes in the TPMfOS Filesimportauto directory. Whenever a new file is
found, it is checked for coherence if it is a .rad file, or recomposed as a .rad
file if it were a .dat file. It is automatically renamed with a .ok extension if the
process went smoothly, or with a .err extension in case of error (logs should
be looked at to find the error itself).
5. If the checking process terminates successfully, the content of the .rad.ok file
is automatically synchronized with the shared repository. You should be
aware that this synchronization process concerns files only. Databases are
not synchronized, each server keeps its own host lists. It is possible to
customize the files that are synchronized by indicating which folders are
concerned. To do so, edit the [RSyncConf] section of the TPMfOS
Filesglobalserverstatesequence.ini file where the list of folders were initially
populated. Subfolders are recursively and automatically included.
Specific RbAgent commands
The package sync.pak implements several RbAgent commands, which should
be used for this specific synchronization process. These commands, described
next, allow you to create new checkpoints, list existing ones, and create .rad
files.
456 Deployment Guide Series: Tivoli Provisioning Manager for OS Deployment V5.1](https://image.slidesharecdn.com/deploymentguideseriestivoliprovisioningmanagerforosdeploymentv5-1sg247397-120524001333-phpapp01/85/Deployment-guide-series-tivoli-provisioning-manager-for-os-deployment-v5-1-sg247397-472-320.jpg)
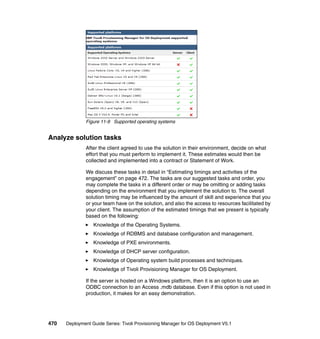
![sync-seqidlist: This command, performed on the master server, returns the
list of all valid checkpoints. These checkpoints are extracted from the server
file system. The command normally exits with status 0. When the command
exits with status 1, an error has occurred and is described in the standard
output.
sync-newseqid new-sequence-id | auto [force] [TaskID=n
Description=d]: This command, performed on the master server,
asynchronously creates a new checkpoint.
– new-sequence-id is a string identifying the new checkpoint.
– auto is the keyword to generate a new sequence id automatically.
– force is an optional keyword required to override an existing checkpoint.
– n is an unsigned 64 bit integer in decimal form used for status reports.
– d is a freely usable string, used for status reports.
The command normally exits with status 0. When the command exits with
status 1, an error has occurred and is described in the standard output.
Checkpoint information is stored in TPMfOS Files/global/serverstate.
sync-radget newdiff.rad from-seqid [Split=n] [TaskID=m
Description=d]: This command, to be performed on the master server,
synchronously creates a differential RAD file.
– newdiff.rad is a RbAgent URL, for example,
local://root/c$/temp/diff-0-1.rad.
– from-seqid is the reference checkpoint from where files can be omitted.
– Split=n optionally forces splitting the file in fragments of n MB.
– m is an unsigned 64 bit integer in decimal form used for status reports
– d is a freely usable string, used for status reports.
The command normally exits with status 0. When the command exits with
status 1, an error has occurred and is described in the standard output. The
command creates a newdiff.rad file. With option Split, several files can be
created. They are automatically renamed, for example newdiff.rad becomes
newdiff-rad-x-of-y.dat . Each fragment finishes with an MD5 and a signature
(20 bytes). With option Split, newdiff-rad.dsc is a description of the fragments.
The command cannot start if the server files do not match the last checkpoint.
Therefore, running sync-newseqid before sync-radget is a prerequisite.
sync-srvradget newdiff.rad from-seqid [Split=n] [TaskID=m Description=d]:
This is the asynchronous version of the sync-radget command. Another
important difference is in the definition of the parameter newdiff.rad, which is
here a path relative to c:TPMfOS Filesimport. The command normally
returns very quickly; however, if it returns after several minutes, the server is
not responding. Although asynchronous, two or more sync-srvradget
commands cannot run concurrently.
Chapter 11. Troubleshooting, best practices, and common questions 457](https://image.slidesharecdn.com/deploymentguideseriestivoliprovisioningmanagerforosdeploymentv5-1sg247397-120524001333-phpapp01/85/Deployment-guide-series-tivoli-provisioning-manager-for-os-deployment-v5-1-sg247397-473-320.jpg)


More Related Content
What's hot (15)
Viewers also liked (6)
Similar to Deployment guide series tivoli provisioning manager for os deployment v5.1 sg247397 (20)


More from Banking at Ho Chi Minh city (20)


Recently uploaded (20)


Deployment guide series tivoli provisioning manager for os deployment v5.1 sg247397
- 1. Front cover Deployment Guide Series: Tivoli Provisioning Manager for OS Deployment V5.1 Insider’s Guide to TPM for OS Deployment Learn how to migrate to VISTA easily Best practices for large deployments Vasfi Gucer Damir Bacalja Dominique Bertin Richard Hine Scott M Kay Francesco Latino ibm.com/redbooks
- 3. International Technical Support Organization Deployment Guide Series: Tivoli Provisioning Manager for OS Deployment V5.1 May 2007 SG24-7397-00
- 4. Note: Before using this information and the product it supports, read the information in “Notices” on page ix. First Edition (May 2007) This edition applies to IBM Tivoli Provisioning Manager for OS Deployment V5.1. © Copyright International Business Machines Corporation 2007. All rights reserved. Note to U.S. Government Users Restricted Rights -- Use, duplication or disclosure restricted by GSA ADP Schedule Contract with IBM Corp.
- 5. Contents Notices . . . . . . . . . . . . . . . . . . . . . . . . . . . . . . . . . . . . . . . . . . . . . . . . . . . . . . . ix Trademarks . . . . . . . . . . . . . . . . . . . . . . . . . . . . . . . . . . . . . . . . . . . . . . . . . . . . x Preface . . . . . . . . . . . . . . . . . . . . . . . . . . . . . . . . . . . . . . . . . . . . . . . . . . . . . . . xi The team that wrote this Redbooks publication . . . . . . . . . . . . . . . . . . . . . . . . . xi Become a published author . . . . . . . . . . . . . . . . . . . . . . . . . . . . . . . . . . . . . . . xiii Comments welcome. . . . . . . . . . . . . . . . . . . . . . . . . . . . . . . . . . . . . . . . . . . . . xiv Part 1. Planning and architecture . . . . . . . . . . . . . . . . . . . . . . . . . . . . . . . . . . . . . . . . . . . . . . 1 Chapter 1. Introduction to image management . . . . . . . . . . . . . . . . . . . . . . 3 1.1 Device configuration life cycle . . . . . . . . . . . . . . . . . . . . . . . . . . . . . . . . . . . 4 1.2 Business requirements . . . . . . . . . . . . . . . . . . . . . . . . . . . . . . . . . . . . . . . . 8 1.2.1 Why Vista? . . . . . . . . . . . . . . . . . . . . . . . . . . . . . . . . . . . . . . . . . . . . . 8 1.2.2 A deployment project . . . . . . . . . . . . . . . . . . . . . . . . . . . . . . . . . . . . . 9 1.3 Requirements for a tool to assist the deployment effort . . . . . . . . . . . . . . 11 1.3.1 Time to value. . . . . . . . . . . . . . . . . . . . . . . . . . . . . . . . . . . . . . . . . . . 12 1.3.2 Resource and maintenance efficiency . . . . . . . . . . . . . . . . . . . . . . . 13 1.3.3 Flexibility . . . . . . . . . . . . . . . . . . . . . . . . . . . . . . . . . . . . . . . . . . . . . . 14 1.3.4 Security . . . . . . . . . . . . . . . . . . . . . . . . . . . . . . . . . . . . . . . . . . . . . . . 14 1.4 Common OS deployment scenarios . . . . . . . . . . . . . . . . . . . . . . . . . . . . . 15 1.4.1 Rollout of new desktop hardware and SOE . . . . . . . . . . . . . . . . . . . 15 1.4.2 Rebuild of a previously deployed user workstation . . . . . . . . . . . . . . 16 1.4.3 Upgrade of hardware and subsequent Vista install. . . . . . . . . . . . . . 17 Chapter 2. Architecture and deployment scenarios . . . . . . . . . . . . . . . . . 19 2.1 Tivoli Provisioning Manager for OS Deployment features. . . . . . . . . . . . . 20 2.2 Architecture . . . . . . . . . . . . . . . . . . . . . . . . . . . . . . . . . . . . . . . . . . . . . . . . 22 2.2.1 Design considerations . . . . . . . . . . . . . . . . . . . . . . . . . . . . . . . . . . . . 22 2.2.2 Small site architecture . . . . . . . . . . . . . . . . . . . . . . . . . . . . . . . . . . . . 47 2.2.3 Enterprise architecture . . . . . . . . . . . . . . . . . . . . . . . . . . . . . . . . . . . 55 Part 2. Deployment . . . . . . . . . . . . . . . . . . . . . . . . . . . . . . . . . . . . . . . . . . . . . . . . . . . . . . . . . 73 Chapter 3. Installing the Tivoli Provisioning Manager for OS Deployment environment. . . . . . . . . . . . . . . . . . . . . . . . . . . . . . . . . . . . . . . . . 75 3.1 Server installation on Windows systems . . . . . . . . . . . . . . . . . . . . . . . . . . 76 3.1.1 Prerequisites . . . . . . . . . . . . . . . . . . . . . . . . . . . . . . . . . . . . . . . . . . . 76 3.1.2 Using alternate Relational Database Management Systems . . . . . . 80 © Copyright IBM Corp. 2007. All rights reserved. iii
- 6. 3.1.3 Installing the Tivoli Provisioning Manager for OS Deployment server85 3.2 Installing the server on Linux systems . . . . . . . . . . . . . . . . . . . . . . . . . . . 91 3.2.1 Prerequisites . . . . . . . . . . . . . . . . . . . . . . . . . . . . . . . . . . . . . . . . . . . 92 3.2.2 Installing the Relational Database Management System . . . . . . . . . 93 3.2.3 Installing the Tivoli Provisioning Manager for OS Deployment server97 3.2.4 Configuring the Tivoli Provisioning Manager for OS Deployment environment . . . . . . . . . . . . . . . . . . . . . . . . . . . . . . . . . . . . . . . . . . 104 3.2.5 Run the Tivoli Provisioning Manager for OS Deployment environment 107 3.2.6 Upgrade to fixpacks . . . . . . . . . . . . . . . . . . . . . . . . . . . . . . . . . . . . 109 3.3 Initial login and installation verification . . . . . . . . . . . . . . . . . . . . . . . . . . 112 3.3.1 Connecting using HTTPS . . . . . . . . . . . . . . . . . . . . . . . . . . . . . . . . 112 3.3.2 Installation verification . . . . . . . . . . . . . . . . . . . . . . . . . . . . . . . . . . . 113 3.4 Advanced DHCP options. . . . . . . . . . . . . . . . . . . . . . . . . . . . . . . . . . . . . 115 3.5 Web interface extension . . . . . . . . . . . . . . . . . . . . . . . . . . . . . . . . . . . . . 123 3.5.1 Installing on Windows systems . . . . . . . . . . . . . . . . . . . . . . . . . . . . 124 3.5.2 Installing on Linux systems . . . . . . . . . . . . . . . . . . . . . . . . . . . . . . . 127 3.5.3 Running rbagent from command line . . . . . . . . . . . . . . . . . . . . . . . 130 Chapter 4. Installing pre-Vista systems . . . . . . . . . . . . . . . . . . . . . . . . . . 137 4.1 Introduction . . . . . . . . . . . . . . . . . . . . . . . . . . . . . . . . . . . . . . . . . . . . . . . 138 4.2 User State Migration . . . . . . . . . . . . . . . . . . . . . . . . . . . . . . . . . . . . . . . . 138 4.2.1 Saving the personality of an XP machine . . . . . . . . . . . . . . . . . . . . 139 4.3 Creating a cloned profile of Windows XP . . . . . . . . . . . . . . . . . . . . . . . . 145 4.3.1 Changing the contents of the cloned machine . . . . . . . . . . . . . . . . 155 4.4 Creating an unattended profile for Windows 2000 . . . . . . . . . . . . . . . . . 171 4.4.1 Creating a slipstreamed OS image . . . . . . . . . . . . . . . . . . . . . . . . . 175 4.4.2 Selecting the Windows 2000 source tree . . . . . . . . . . . . . . . . . . . . 176 4.4.3 Building a custom sysprep.inf with setupmgr . . . . . . . . . . . . . . . . . 178 4.5 Real world OS installation scenarios. . . . . . . . . . . . . . . . . . . . . . . . . . . . 187 4.5.1 Configuring the Windows firewall . . . . . . . . . . . . . . . . . . . . . . . . . . 187 4.5.2 Removing imaged profile operating system features . . . . . . . . . . . 191 4.5.3 Removing unattended profile operating system features . . . . . . . . 192 4.6 Restoring the machine’s user personality settings . . . . . . . . . . . . . . . . . 198 Chapter 5. Installing Vista systems . . . . . . . . . . . . . . . . . . . . . . . . . . . . . . 213 5.1 Do I upgrade or replace?. . . . . . . . . . . . . . . . . . . . . . . . . . . . . . . . . . . . . 214 5.2 Creating an unattended Windows Vista profile . . . . . . . . . . . . . . . . . . . . 215 5.2.1 Creating the Profile . . . . . . . . . . . . . . . . . . . . . . . . . . . . . . . . . . . . . 216 5.2.2 Creating the WinPE software package . . . . . . . . . . . . . . . . . . . . . . 225 5.3 Creating a cloning Windows Vista profile . . . . . . . . . . . . . . . . . . . . . . . . 230 5.3.1 Preparing the system . . . . . . . . . . . . . . . . . . . . . . . . . . . . . . . . . . . 231 5.3.2 Capturing the System Image. . . . . . . . . . . . . . . . . . . . . . . . . . . . . . 232 iv Deployment Guide Series: Tivoli Provisioning Manager for OS Deployment V5.1
- 7. 5.3.3 Configuring the System profile . . . . . . . . . . . . . . . . . . . . . . . . . . . . 241 5.4 Deploying a Windows profile . . . . . . . . . . . . . . . . . . . . . . . . . . . . . . . . . . 246 5.4.1 Creating a deployment scheme . . . . . . . . . . . . . . . . . . . . . . . . . . . 246 5.4.2 Registering hosts in Tivoli Provisioning Manager for OS Deployment server . . . . . . . . . . . . . . . . . . . . . . . . . . . . . . . . . . . . . . . . . . . . . . . 253 5.4.3 Creating a new user through a software package. . . . . . . . . . . . . . 255 5.4.4 Deploying a Vista profile . . . . . . . . . . . . . . . . . . . . . . . . . . . . . . . . . 257 Chapter 6. Installing Linux systems . . . . . . . . . . . . . . . . . . . . . . . . . . . . . 263 6.1 Introduction and general requirements . . . . . . . . . . . . . . . . . . . . . . . . . . 264 6.2 Creating an unattended setup profile . . . . . . . . . . . . . . . . . . . . . . . . . . . 265 6.3 Creating software packages . . . . . . . . . . . . . . . . . . . . . . . . . . . . . . . . . . 275 6.3.1 RPM software packages . . . . . . . . . . . . . . . . . . . . . . . . . . . . . . . . . 276 6.3.2 Copying and unpacking software packages . . . . . . . . . . . . . . . . . . 280 6.3.3 Executing a command. . . . . . . . . . . . . . . . . . . . . . . . . . . . . . . . . . . 283 6.3.4 Software packages binding . . . . . . . . . . . . . . . . . . . . . . . . . . . . . . . 283 6.4 The deployment process . . . . . . . . . . . . . . . . . . . . . . . . . . . . . . . . . . . . . 286 6.5 Cloning a machine. . . . . . . . . . . . . . . . . . . . . . . . . . . . . . . . . . . . . . . . . . 292 6.5.1 Capturing the image . . . . . . . . . . . . . . . . . . . . . . . . . . . . . . . . . . . . 293 6.5.2 Customizing the captured profile. . . . . . . . . . . . . . . . . . . . . . . . . . . 297 6.6 Deploying the cloned profile . . . . . . . . . . . . . . . . . . . . . . . . . . . . . . . . . . 299 Chapter 7. Common deployment features . . . . . . . . . . . . . . . . . . . . . . . . 303 7.1 Configuring RAID arrays . . . . . . . . . . . . . . . . . . . . . . . . . . . . . . . . . . . . . 304 7.1.1 Building the bootable DOS diskette . . . . . . . . . . . . . . . . . . . . . . . . 305 7.2 Software package rules and bindings . . . . . . . . . . . . . . . . . . . . . . . . . . . 315 7.2.1 Binding software packages to deployment schemes . . . . . . . . . . . 319 7.2.2 Advanced binding scenarios . . . . . . . . . . . . . . . . . . . . . . . . . . . . . . 324 7.3 Collecting inventory from the target machines . . . . . . . . . . . . . . . . . . . . 328 7.4 Device driver injection . . . . . . . . . . . . . . . . . . . . . . . . . . . . . . . . . . . . . . . 332 7.4.1 How does this process work? . . . . . . . . . . . . . . . . . . . . . . . . . . . . . 332 7.4.2 Device driver software package rules with a different OS. . . . . . . . 335 7.4.3 Creating a device driver software package . . . . . . . . . . . . . . . . . . . 336 7.4.4 Quickly building device driver software packages. . . . . . . . . . . . . . 341 7.5 Understanding the host boot settings . . . . . . . . . . . . . . . . . . . . . . . . . . . 345 7.6 User administration . . . . . . . . . . . . . . . . . . . . . . . . . . . . . . . . . . . . . . . . . 353 7.6.1 Creating the authentication domain . . . . . . . . . . . . . . . . . . . . . . . . 353 7.6.2 Setting user permissions . . . . . . . . . . . . . . . . . . . . . . . . . . . . . . . . . 355 Chapter 8. Integration and collaboration with other Change Management products. . . . . . . . . . . . . . . . . . . . . . . . . . . . . . . . . . . . . . . . . . . 359 8.1 Tivoli Configuration Manager V 4.2.3 . . . . . . . . . . . . . . . . . . . . . . . . . . . 361 8.1.1 Installing the Operating System Imaging Solution . . . . . . . . . . . . . 362 8.1.2 Importing a profile . . . . . . . . . . . . . . . . . . . . . . . . . . . . . . . . . . . . . . 373 Contents v
- 8. 8.1.3 Scratch installation of a new workstation . . . . . . . . . . . . . . . . . . . . 377 8.1.4 Saving user settings . . . . . . . . . . . . . . . . . . . . . . . . . . . . . . . . . . . . 385 8.2 Tivoli Provisioning Manager V5.1 . . . . . . . . . . . . . . . . . . . . . . . . . . . . . . 399 8.3 Tivoli Provisioning Manager Express V4.1 for Software Distribution . . . 400 8.4 IBM Director . . . . . . . . . . . . . . . . . . . . . . . . . . . . . . . . . . . . . . . . . . . . . . 400 8.4.1 Product components . . . . . . . . . . . . . . . . . . . . . . . . . . . . . . . . . . . . 401 8.5 Collaboration with other products . . . . . . . . . . . . . . . . . . . . . . . . . . . . . . 402 Chapter 9. CD/DVD based deployment . . . . . . . . . . . . . . . . . . . . . . . . . . . 403 9.1 Deployment CD/DVD . . . . . . . . . . . . . . . . . . . . . . . . . . . . . . . . . . . . . . . 404 9.1.1 CD/DVD creation. . . . . . . . . . . . . . . . . . . . . . . . . . . . . . . . . . . . . . . 404 9.1.2 OS deployment . . . . . . . . . . . . . . . . . . . . . . . . . . . . . . . . . . . . . . . . 411 9.2 PXE emulation CD/DVD . . . . . . . . . . . . . . . . . . . . . . . . . . . . . . . . . . . . . 413 9.2.1 CD/DVD creation. . . . . . . . . . . . . . . . . . . . . . . . . . . . . . . . . . . . . . . 414 9.2.2 OS deployment . . . . . . . . . . . . . . . . . . . . . . . . . . . . . . . . . . . . . . . . 417 Chapter 10. Redeployment and self-healing feature . . . . . . . . . . . . . . . . 419 10.1 Redeployment basics . . . . . . . . . . . . . . . . . . . . . . . . . . . . . . . . . . . . . . 420 10.2 Setting up redeployment . . . . . . . . . . . . . . . . . . . . . . . . . . . . . . . . . . . . 421 10.3 Redeployment scenario. . . . . . . . . . . . . . . . . . . . . . . . . . . . . . . . . . . . . 422 Chapter 11. Troubleshooting, best practices, and common questions . 427 11.1 Troubleshooting basics . . . . . . . . . . . . . . . . . . . . . . . . . . . . . . . . . . . . . 428 11.2 Tivoli Provisioning Manager for OS Deployment considerations . . . . . 428 11.3 Server service/daemon troubleshooting . . . . . . . . . . . . . . . . . . . . . . . . 428 11.3.1 Client troubleshooting . . . . . . . . . . . . . . . . . . . . . . . . . . . . . . . . . . 430 11.3.2 Error messages. . . . . . . . . . . . . . . . . . . . . . . . . . . . . . . . . . . . . . . 433 11.4 Common questions . . . . . . . . . . . . . . . . . . . . . . . . . . . . . . . . . . . . . . . . 437 11.4.1 How do I free some space in the shared repository? . . . . . . . . . . 437 11.4.2 How do I register new hosts? . . . . . . . . . . . . . . . . . . . . . . . . . . . . 440 11.4.3 How do I control generated host names for new machines? . . . . 441 11.4.4 How do I create binding rules? . . . . . . . . . . . . . . . . . . . . . . . . . . . 442 11.5 Questions and answers. . . . . . . . . . . . . . . . . . . . . . . . . . . . . . . . . . . . . 451 11.6 Synchronization with the RbAgent . . . . . . . . . . . . . . . . . . . . . . . . . . . . 455 Part 3. Planning for an engagement . . . . . . . . . . . . . . . . . . . . . . . . . . . . . . . . . . . . . . . . . . 459 Appendix A. Planning for a client engagement . . . . . . . . . . . . . . . . . . . . 461 Services engagement preparation . . . . . . . . . . . . . . . . . . . . . . . . . . . . . . . . . 462 Implementation skills . . . . . . . . . . . . . . . . . . . . . . . . . . . . . . . . . . . . . . . . . 462 Available resources . . . . . . . . . . . . . . . . . . . . . . . . . . . . . . . . . . . . . . . . . . 462 Solution scope and components . . . . . . . . . . . . . . . . . . . . . . . . . . . . . . . . . . 463 Basic solution definition. . . . . . . . . . . . . . . . . . . . . . . . . . . . . . . . . . . . . . . 463 Advanced solution definition . . . . . . . . . . . . . . . . . . . . . . . . . . . . . . . . . . . 465 vi Deployment Guide Series: Tivoli Provisioning Manager for OS Deployment V5.1
- 9. Services engagement overview . . . . . . . . . . . . . . . . . . . . . . . . . . . . . . . . . . . 465 Executive Assessment . . . . . . . . . . . . . . . . . . . . . . . . . . . . . . . . . . . . . . . 466 Demonstration system set up . . . . . . . . . . . . . . . . . . . . . . . . . . . . . . . . . . 467 Hardware and software requirements . . . . . . . . . . . . . . . . . . . . . . . . . . . . 467 Analyze solution tasks. . . . . . . . . . . . . . . . . . . . . . . . . . . . . . . . . . . . . . . . 470 Creating a contract . . . . . . . . . . . . . . . . . . . . . . . . . . . . . . . . . . . . . . . . . . 471 Estimating timings and activities of the engagement . . . . . . . . . . . . . . . . . . . 472 Perform environmental analysis and plan tasks . . . . . . . . . . . . . . . . . . . . 473 Plan the solution . . . . . . . . . . . . . . . . . . . . . . . . . . . . . . . . . . . . . . . . . . . . 476 Implement the solution . . . . . . . . . . . . . . . . . . . . . . . . . . . . . . . . . . . . . . . 477 Close the engagement . . . . . . . . . . . . . . . . . . . . . . . . . . . . . . . . . . . . . . . 478 Appendix B. Sample Statement of Work for Tivoli Provisioning Manager for OS Deployment . . . . . . . . . . . . . . . . . . . . . . . . . . . . . . . . . . . 479 Building an operating system deployment solution . . . . . . . . . . . . . . . . . . . . 480 Executive summary . . . . . . . . . . . . . . . . . . . . . . . . . . . . . . . . . . . . . . . . . . 480 Solution description . . . . . . . . . . . . . . . . . . . . . . . . . . . . . . . . . . . . . . . . . . 481 Assumptions . . . . . . . . . . . . . . . . . . . . . . . . . . . . . . . . . . . . . . . . . . . . . . . 481 Business partner responsibilities. . . . . . . . . . . . . . . . . . . . . . . . . . . . . . . . 481 Customer responsibilities . . . . . . . . . . . . . . . . . . . . . . . . . . . . . . . . . . . . . 482 Staffing estimates . . . . . . . . . . . . . . . . . . . . . . . . . . . . . . . . . . . . . . . . . . . 482 Testing . . . . . . . . . . . . . . . . . . . . . . . . . . . . . . . . . . . . . . . . . . . . . . . . . . . 483 Deliverables . . . . . . . . . . . . . . . . . . . . . . . . . . . . . . . . . . . . . . . . . . . . . . . 483 Completion criteria . . . . . . . . . . . . . . . . . . . . . . . . . . . . . . . . . . . . . . . . . . 483 Abbreviations and acronyms . . . . . . . . . . . . . . . . . . . . . . . . . . . . . . . . . . . 485 Related publications . . . . . . . . . . . . . . . . . . . . . . . . . . . . . . . . . . . . . . . . . . 487 IBM Redbooks . . . . . . . . . . . . . . . . . . . . . . . . . . . . . . . . . . . . . . . . . . . . . . . . 487 Other publications . . . . . . . . . . . . . . . . . . . . . . . . . . . . . . . . . . . . . . . . . . . . . 487 Online resources . . . . . . . . . . . . . . . . . . . . . . . . . . . . . . . . . . . . . . . . . . . . . . 487 How to get IBM Redbooks . . . . . . . . . . . . . . . . . . . . . . . . . . . . . . . . . . . . . . . 489 Help from IBM . . . . . . . . . . . . . . . . . . . . . . . . . . . . . . . . . . . . . . . . . . . . . . . . 489 Index . . . . . . . . . . . . . . . . . . . . . . . . . . . . . . . . . . . . . . . . . . . . . . . . . . . . . . . 491 Contents vii
- 10. viii Deployment Guide Series: Tivoli Provisioning Manager for OS Deployment V5.1
- 11. Notices This information was developed for products and services offered in the U.S.A. IBM may not offer the products, services, or features discussed in this document in other countries. Consult your local IBM representative for information on the products and services currently available in your area. Any reference to an IBM product, program, or service is not intended to state or imply that only that IBM product, program, or service may be used. Any functionally equivalent product, program, or service that does not infringe any IBM intellectual property right may be used instead. However, it is the user's responsibility to evaluate and verify the operation of any non-IBM product, program, or service. IBM may have patents or pending patent applications covering subject matter described in this document. The furnishing of this document does not give you any license to these patents. You can send license inquiries, in writing, to: IBM Director of Licensing, IBM Corporation, North Castle Drive, Armonk, NY 10504-1785 U.S.A. The following paragraph does not apply to the United Kingdom or any other country where such provisions are inconsistent with local law: INTERNATIONAL BUSINESS MACHINES CORPORATION PROVIDES THIS PUBLICATION "AS IS" WITHOUT WARRANTY OF ANY KIND, EITHER EXPRESS OR IMPLIED, INCLUDING, BUT NOT LIMITED TO, THE IMPLIED WARRANTIES OF NON-INFRINGEMENT, MERCHANTABILITY OR FITNESS FOR A PARTICULAR PURPOSE. Some states do not allow disclaimer of express or implied warranties in certain transactions, therefore, this statement may not apply to you. This information could include technical inaccuracies or typographical errors. Changes are periodically made to the information herein; these changes will be incorporated in new editions of the publication. IBM may make improvements and/or changes in the product(s) and/or the program(s) described in this publication at any time without notice. Any references in this information to non-IBM Web sites are provided for convenience only and do not in any manner serve as an endorsement of those Web sites. The materials at those Web sites are not part of the materials for this IBM product and use of those Web sites is at your own risk. IBM may use or distribute any of the information you supply in any way it believes appropriate without incurring any obligation to you. Information concerning non-IBM products was obtained from the suppliers of those products, their published announcements or other publicly available sources. IBM has not tested those products and cannot confirm the accuracy of performance, compatibility or any other claims related to non-IBM products. Questions on the capabilities of non-IBM products should be addressed to the suppliers of those products. This information contains examples of data and reports used in daily business operations. To illustrate them as completely as possible, the examples include the names of individuals, companies, brands, and products. All of these names are fictitious and any similarity to the names and addresses used by an actual business enterprise is entirely coincidental. COPYRIGHT LICENSE: This information contains sample application programs in source language, which illustrate programming techniques on various operating platforms. You may copy, modify, and distribute these sample programs in any form without payment to IBM, for the purposes of developing, using, marketing or distributing application programs conforming to the application programming interface for the operating platform for which the sample programs are written. These examples have not been thoroughly tested under all conditions. IBM, therefore, cannot guarantee or imply reliability, serviceability, or function of these programs. © Copyright IBM Corp. 2007. All rights reserved. ix
- 12. Trademarks The following terms are trademarks of the International Business Machines Corporation in the United States, other countries, or both: AIX® MVS™ Tivoli Enterprise™ BladeCenter® NetView® Tivoli Enterprise Console® Candle® PartnerWorld® Tivoli® DB2 Universal Database™ Redbooks® VTAM® DB2® Redbooks (logo) ® xSeries® IBM® ServerGuide™ IMS™ System x™ The following terms are trademarks of other companies: Oracle, JD Edwards, PeopleSoft, Siebel, and TopLink are registered trademarks of Oracle Corporation and/or its affiliates. ITIL is a registered trademark, and a registered community trademark of the Office of Government Commerce, and is registered in the U.S. Patent and Trademark Office. Adobe, Acrobat, and Portable Document Format (PDF) are either registered trademarks or trademarks of Adobe Systems Incorporated in the United States, other countries, or both. Java, JDBC, JDK, J2EE, Solaris, Ultra, and all Java-based trademarks are trademarks of Sun Microsystems, Inc. in the United States, other countries, or both. Access, Active Directory, Aero, BitLocker, Internet Explorer, Microsoft, MS-DOS, MSN, Windows Media, Windows NT, Windows Vista, Windows, and the Windows logo are trademarks of Microsoft Corporation in the United States, other countries, or both. i386, Intel, Pentium, Xeon, Intel logo, Intel Inside logo, and Intel Centrino logo are trademarks or registered trademarks of Intel Corporation or its subsidiaries in the United States, other countries, or both. UNIX is a registered trademark of The Open Group in the United States and other countries. Linux is a trademark of Linus Torvalds in the United States, other countries, or both. Other company, product, or service names may be trademarks or service marks of others. x Deployment Guide Series: Tivoli Provisioning Manager for OS Deployment V5.1
- 13. Preface Tivoli® Provisioning Manager for OS Deployment provisions operating systems (OS) and applications to computers using the PXE (Pre-boot eXecution Environment) industry standard for bare-metal installation. A bare-metal installation eliminates the need for an operating system to be present on a local disk drive. Tivoli Provisioning Manager for OS Deployment is a turn-key solution to the most common provisioning issues and provides an easy to use, turn-key solution for education, small-to-medium businesses (SMB) or larger accounts. In this easy-to-follow IBM® Redbooks® publication we cover different image management scenarios with Tivoli Provisioning Manager for OS Deployment, such as Windows® XP, Windows 2003, Vista, and Linux® deployments. We also discuss how to design and implement a highly-effective image management solution for small, medium, and enterprise accounts, taking into consideration network bandwidth limitations and large OS image sizes. We also provide some best practices on how to integrate Tivoli Provisioning Manager for OS Deployment with other change management products, CD/DVD-based deployment, image redeployment, and troubleshooting. Finally, we cover Tivoli Provisioning Manager for OS Deployment sales engagement planning, including a sample statement of work. The primary audience for this section is Tivoli Provisioning Manager for OS Deployment Business Partners and pre-sales Systems Engineers. This book is a major reference for IT Specialists and IT Architects working in the image management area. The team that wrote this Redbooks publication This Redbooks publication was produced by a team of specialists from around the world working at the International Technical Support Organization, Austin Center. Vasfi Gucer is an IBM Certified Consultant IT Specialist working at the ITSO Austin Center. He worked with IBM Turkey for 10 years and has been with the ITSO since January 1999. He has more than 12 years of experience in systems management, networking hardware, and distributed platform software. He worked on various Tivoli customer projects as a Systems Architect in Turkey and in the United States. Vasfi is also a Certified Tivoli Consultant. © Copyright IBM Corp. 2007. All rights reserved. xi
- 14. Damir Bacalja is an Advisory IT Specialist from IBM Croatia. He holds a degree in electrical engineering and is also ITIL® certified. He has worked with Tivoli products in Framework, Tivoli Configuration Manager, Tivoli Monitoring, Tivoli Enterprise™ Console, Remote Control, and Tivoli Storage Manager, for almost eight years. He joined IBM as part of IBM Global Services and took part in many Tivoli implementations. Since 2002 he is part of the IBM Software group as a Tivoli Technical Sales Specialist for the SEA region. He has strong skills in UNIX®, Windows, and shell scripting. Dominique Bertin holds a technology certificate in electric engineering from the University of Creteil, near Paris in France. He began as a Honeywell Bull representative on different mainframe customer sites for seven years, and then started working as a Software Engineer in the National Software Center in the Bull company. After 12 years at Bull, he joined a software services company that was acquired by Candle® corporation five years later. After the IBM acquisition of Candle, he moved to a Tivoli presales position. He is currently assigned to the Tivoli Configuration Manager, Tivoli Provisioning Manager for OS Deployment, and Tivoli Provisioning Manager for Software products within the Tivoli Business Automation segment. Richard Hine Richard has a bachelors degree in medical science from the University of Manchester in the UK, and has worked for IBM since 1981. He worked with IBM Mainframes for 11 years doing services and support roles with MVS™, IMS™ and VTAM®, taking assignments to teach automation techniques and assembler programming. During this time, he also took a job supporting the IBM first Point of Sale deployment in Europe at Boots of Nottingham in the U.K. He moved to country technical support in 1991 to support IBM network management tools on distributed systems, where he taught at the international education center in La Hulpe and supported field services engagements for the NetView® automationa family of products—both distributed and mainframe. During this time Richard also did several international services engagements in the Middle East, and wrote an ANO based TCP/IP monitoring application that was used in IBM South Africa. Richard moved to Tivoli in 1996 with IBM acquisition. He worked in a presales role for the UK on all Framework products, latterly leading the UK Advanced Technology Team. Certified in 2002, Richard has been published in the Managed View and two other IBM Redbooks publications. Currently he works with the Tivoli Performance and Business automation products in a presales capacity for the UK Financial Services Sector. Scott M Kay is an Advisory Technical Specialist working for the IBM Software group in Australia. His speciality is Tivoli Business Automation tools. He has 15 years of experience in the IT field. In that time Scott has held various roles from operational support, SOE development, to systems management. After joining IBM in 1999 Scott worked in roles all directly related to the Tivoli suite of products xii Deployment Guide Series: Tivoli Provisioning Manager for OS Deployment V5.1
- 15. in Global Services, Tivoli Professional services, and finally in his current presales role in the Software Group. Francesco Latino is a Level 2 Customer Support Software Engineer in Tivoli Configuration Manager and Tivoli Provisioning Manager. He holds a Computer Science degree from the Department of Computer Science, University of Bari. His areas of expertise include Tivoli Inventory, Tivoli Software Distribution, Common Inventory Technology, and Tivoli Provisioning Manager for OS Deployment products. He has skills in procedural and object-oriented programming, TCP/IP network protocol, J2EE™ platform, and electronic commerce. Thanks to the following people for their contributions to this project: Arzu Gucer International Technical Support Organization, Austin Center Dennis R Goetz, Peter Greulich, Dennis Ligay, Mike Orr, Hakan Thyr IBM USA David Clerc, Anne Vandeventer Faltin, Jacques Fontignie, Marc Vuilleumier Stueckelberg, Pierre-Antoine Queloz IBM Switzerland Elisabetta Rinaldi IBM Italy Mike Gare, Kimberly Mungal IBM Canada Sean Safron IBM USA KaTrina Love Abram IBM USA Become a published author Join us for a two-to-six week residency program! Help write an IBM Redbooks publication dealing with specific products or solutions, while getting hands-on experience with leading-edge technologies. You will have the opportunity to team with IBM technical professionals, Business Partners, and Clients. Preface xiii
- 16. Your efforts will help increase product acceptance and customer satisfaction. As a bonus, you will develop a network of contacts in IBM development labs, and increase your productivity and marketability. Find out more about the residency program, browse the residency index, and apply online at the following Web site: ibm.com/redbooks/residencies.html Comments welcome Your comments are important to us! We want our Redbooks publication to be as helpful as possible. Send us your comments about this or other Redbooks publication in one of the following ways: Use the online Contact us review book form found at: ibm.com/redbooks Send your comments in an e-mail to: [email protected] Mail your comments to: IBM Corporation, International Technical Support Organization Dept. HYTD Mail Station P099 2455 South Road Poughkeepsie, NY 12601-5400 xiv Deployment Guide Series: Tivoli Provisioning Manager for OS Deployment V5.1
- 17. Part 1 Part 1 Planning and architecture In part 1 we introduce the planning and architectural considerations when deploying a Tivoli Provisioning Manager for OS Deployment environment. We cover the actual deployment steps in Part 2. © Copyright IBM Corp. 2007. All rights reserved. 1
- 18. 2 Deployment Guide Series: Tivoli Provisioning Manager for OS Deployment V5.1
- 19. 1 Chapter 1. Introduction to image management In this chapter we discuss the concept of the device configuration life cycle and how Tivoli Provisioning Manager for OS Deployment can assist in this management process. This is found in 1.1, “Device configuration life cycle” on page 4. We look at business needs—the sort of IT changes that are coming and that justify an investment in a technology such as Tivoli Provisioning Manager for OS Deployment. We also look at how this technology reduces costs associated with deployment and redeployment of operating systems. This is found in 1.2, “Business requirements” on page 8. Finally several common deployment scenarios involving Tivoli Provisioning Manager for OS Deployment are discussed at a high level, showing how cost savings can be made. This is found in 1.4, “Common OS deployment scenarios” on page 15. © Copyright IBM Corp. 2007. All rights reserved. 3
- 20. 1.1 Device configuration life cycle Every facet of IT these days seems to have a life cycle management strategy, process, or best practice, for example, asset life cycle management, software life cycle management, user account life cycle management, and storage life cycle management to name but a few. What they all have in common is that through collective experience the tasks normally undertaken throughout the life cycle of the item in question were identified so that they can be managed as individual tasks and as a whole cycle. It is then possible to measure these tasks, the costs involved with them, and the time they take and improve them in terms of efficiency, effectiveness, and cost. The device configuration life cycle addresses the physical management of computers from the time they are delivered to the time they leave an organization. Device configuration life cycle management can go by different names and have tasks with different terminology, usually dependant upon the vendor you are talking to; however, in essence the main tasks or activities involved are shown in Figure 1-1. Tasks and Activities within the Device Configuration Lifecycle Bare Metal OS Deployment Backup and Restore Software distribution Application and Data Security Configuration Asset and Inventory Management Software License Remote Control and usage Management Software Maintenance and Patch Management Reporting for Critical Decision Making Figure 1-1 Tasks and activities within the device configuration life cycle 4 Deployment Guide Series: Tivoli Provisioning Manager for OS Deployment V5.1
- 21. There are many product suites on the market today that can enable or automate these tasks and a few that claim to do it all. Most organizations, however, already have mature tools and processes in place for many of the tasks in the life cycle and are not about to rip and replace their existing solution unless there is a very good business case to do so. This is where Tivoli Provisioning Manager for OS Deployment offers an excellent opportunity. Tivoli Provisioning Manager for OS Deployment is a stand alone product that offers significant integration capability, so much so that it has already been integrated with Tivoli Provisioning Manager, Tivoli Provisioning Manager for Software, and soon to be integrated with IBM Director. Tasks and Activities within the Device Configuration Lifecycle TIVOLI PROVISIONING MANAGER BARE METAL OS DEPLOYMENT FOR OS DEPLOYMENT FULL AUTOMATION Backup and Restore Software distribution Application and Data Security Configuration Asset and Inventory Management Software License Remote Control and usage Management Software Maintenance and Patch Management Reporting for Critical Decision Making Figure 1-2 Tivoli Provisioning Manager for Operating Systems role in the configuration life cycle The core capability of Tivoli Provisioning Manager for OS Deployment is the ability to intelligently automate the deployment of operating systems. This capability extends from the many flavors of Microsoft® Windows, through SUSE and Red Hat Linux to Sun Solaris™. The deployment of an operating system is the one item in the configuration life cycle that every single computer will definitely receive at least once and potentially more often during its working life. This is shown in context of the device configuration life cycle in Figure 1-2. Chapter 1. Introduction to image management 5
- 22. After installed, the product offers cost savings in the following areas: Deployment manpower Using Tivoli Provisioning Manager for OS Deployment during a deployment should significantly reduce the number of personnel and the level of skill required to deploy the computer workstations. The deployment role becomes more of a box-moving role as opposed to a technical role. The universal system profile Through the use of a universal system profile, it is possible to have one image and a collection of driver packages for deployment to a range of hardware. The savings to be made here are in the following areas: – Image storage space Due to the ability Tivoli Provisioning Manager for OS Deployment has to modify an image and to add drivers through driver injection on the fly during an image deployment, one image and a collection of driver packages need storage space as opposed to an image for every hardware model. This is true for the master server and every distributed copy in the network. – Image maintenance Instead of building a new image every time a new model of hardware or driver is released, all that is required is the packaging of the driver, the establishment of the rules for the deployment of that driver and testing of the deployment and rules. – Image replication Minimal images mean less time and resources are used to move those images around the network to where they are needed. Ease of redeployment Once an OS is installed using Tivoli Provisioning Manager for OS Deployment, redeployment is as simple as a few menu clicks in the Web console. Many organizations have a system to “automatically” reinstall an operating system. Those automatic solutions usually involve the help desk consultant talking the user, or worse, the user’s colleague, through the steps required to enter all the information needed to kick off a rebuild and then waiting the hour to hour and a half for the build to complete. In some cases, a rebuild requires a site visit by a technical staff member. The savings that can be made here are harder to quantify but easy to identify. Any time a user is taken away from their core responsibility to help fix a problem is a business cost. In an organization large enough, it is easy for these distractions to add up to lost man-days on a daily basis due to users being involved in helping with a fix. 6 Deployment Guide Series: Tivoli Provisioning Manager for OS Deployment V5.1
- 23. Tivoli Provisioning Manager for OS Deployment also touches other parts of the device configuration life cycle with functionality that enables the core OS deployment functionality, as can be seen in Figure 1-3. Tasks and Activities within the Device Configuration Lifecycle TIVOLI PROVISIONING MANAGER Bare Metal OS Deployment FOR OS DEPLOYMENT DEPLOYMENT ENABLING FUNCTIONALITY Backup and Restore SOFTWARE DISTRIBUTION Application and Data Security Configuration ASSET AND INVENTORY MANAGEMENT Software License Remote Control and usage Management Software Maintenance and Patch Management Reporting for Critical Decision Making Figure 1-3 Deployment enabling functionality of Tivoli Provisioning Manager for OS Deployment Deployment enabling functionality Tivoli Provisioning Manager for OS Deployment’s core function is its ability to deploy operating systems. Included in the product are some other capabilities that enable this core function. Following are these capabilities: – Software distribution The software distribution capability gives Tivoli Provisioning Manager for OS Deployment the ability to inject driver packages into an operating system during deployment and install software after the operating system starts. – Inventory When Tivoli Provisioning Manager for OS Deployment boots a computer using PXE, it automatically scans the computer and stores this data in its Chapter 1. Introduction to image management 7
- 24. database. Having the results of these scans available allows Tivoli Provisioning Manager for OS Deployment to make decisions based on this data about which drivers to inject during OS deployment and which software to deploy after OS deployment. Coupled with the enabling capabilities, Tivoli Provisioning Manager for OS Deployment is able to intelligently install a full SOE in an automated manner completely automating the first task in the device configuration life cycle, bare metal OS deployment. 1.2 Business requirements High-level business requirements are simple: help me save money to improve my profitability or efficiency. But as you start to drill down into this requirement it starts to become a little less clear cut. Quite often you have to spend money now to make a longer term gain or to avoid spending more money later. And so it is with Microsoft’s Vista. Do I migrate now? The promise is so great, easier support, greater security, but then there is the cost of doing it now and the potential for problems. The remainder of this section discusses the reasons an organization would migrate to Microsoft Vista and the sort of requirements an organization could have of a deployment solution to enable a large scale rollout of Vista. 1.2.1 Why Vista? Microsoft Vista is here, and chances are it is coming to your organization sooner than you think. Many organizations are expecting to make a move towards Vista within a year. The larger the organization, the higher the probability that this will occur. This significant commitment in time and expense is driven by a variety of factors that include much needed features introduced in Vista and the realities of waning support for older versions of Windows. While enhancements in user experience like Vista's Aero™ Glass interface have monopolized the marketing spotlight, it is enhancements under the covers that are motivating enterprise customers to upgrade. Vista introduces a new developer platform, .NET Framework 3.0 that enables faster development of applications that will have better interfaces, better integration with other applications, and better code in general. .NET Framework is comprised of key components that include the Windows Workflow Foundation (WWF), which makes Vista the first OS to embed a workflow development and runtime environment, and the Windows Communication Foundation (WCF) that 8 Deployment Guide Series: Tivoli Provisioning Manager for OS Deployment V5.1
- 25. dramatically simplifies the way connections between services are defined and managed. Perhaps the most important innovation driving enterprise adoption of Vista is enhanced Security. Vista is the first operating system Microsoft has built from design to release using the Security Development Life cycle (SDL) under their Trustworthy Computing Initiative. Immediately beneficial security enhancements include User Account Control that eliminates the need for average users to log in with Administrator privileges and by default grant that privilege to every application, virus, or other form of malware they intentionally or inadvertently launch. In addition, Vista introduces a multi-tiered rights management and encryption technology (BitLocker™) that protects data on the disk, even if the disk is inside a stolen mobile computer. These are only a few of the security enhancements in Vista that represent the quantum leap in integrated client security that the enterprise has been waiting for. Beyond the innovations Vista offers as a motivation to upgrade, there is also the fact that older versions of Windows are becoming less supportable. With Windows 2000 already out of mainstream support and losing critical update support in 2010, and the launch of Vista starting the two year countdown to the end of mainstream support for Windows XP, upgrade is inevitable. If your enterprise may be one that falls into this group, starting to plan and test now is your best defense against unmanageable complexity and unpredictable costs. 1.2.2 A deployment project It is estimated that a project of 12-18 months is required to develop and test a Vista Standard Operating Environment (SOE) in a corporate environment. The larger the environment the longer and more complex the project. This sort of project would include phases such as the following: 1. A full audit of all applications in use by all users within the organization. To be able to plan the testing of all the SOE applications it is important to quantify them all, prioritize, and plan with certainty. Being presented with 10 untested applications just before the rollout would unpleasantly impact the project schedule. 2. Testing of all SOE applications for compatibility with Vista. With the new security enhancements within Vista, it is probable that a percentage of current applications will not work. Some of these will of course be patched by their vendor to make them compatible, but of course the custom applications written in house or by a contracted company will require an explicit effort applied to make them compatible. This project phase has the potential to be the most time consuming and least satisfying, as old but Chapter 1. Introduction to image management 9
- 26. important applications may not work in Vista and may have to be worked around. 3. The development of a deployment methodology. When rolling out a change of this magnitude to any organization, a rock solid deployment methodology is crucial. Obviously an automation tool to deliver an image is a part of the methodology, but what sort of image will that tool deploy. There are three commonly used image types to consider: – Thick Images are large images that contain the complete operating system, all drivers, and core applications. Simple image creation enabled by simple tools has made thick images the most common form of image; however, it is at the expense of high-maintenance costs. Because thick images contain so much target specific configuration, diverse environments need to create and manage many large images to satisfy the needs of their user population. When any small component of an image must be changed (for example a security policy upgrade to the firewall or virus scanner definitions), the entire image must be manually rebuilt. The result is many large images taking up large amounts of maintenance resource and disk space and large amounts of bandwidth during deployment. – Thin Images evolved as a reaction to the high total cost of thick images, but because of the limitations of the simple imaging tools, they created as many problems as they solved. Thin Images exclude core applications, which must then be deployed using another software distribution system after first boot of the base image. The benefit is fewer, smaller, more generic based images to store and deploy thus saving disk space and network bandwidth, and subsequent changes to an image or core application results in far less image regeneration. End-to-end deployment is now slower and requires a software distribution system and scripting to complete. Actual bytes deployed will likely be more than in thick images because of duplication of files in the application install and OS install, although the install is spread out over a longer period of time. Note that not having all applications deployed at first boot introduces security risks. – Hybrid Images offer the best of thick and thin images without the disadvantages. Advanced hybrid imaging systems separate drivers and applications from OS images and store them in a file-based repository. At deploy-time the correct drivers are automatically selected and injected into the image, the correct updates and core applications are loaded into the image, and the resulting image is deployed to the target—all before first boot. This allows an organization to maintain as few as one universal image that automatically adapts to each target at deploy-time when the minimum number of files possible is deployed over the network. The result is minimal disk space, minimal network bandwidth, and a system that allows modification to driver or application configuration without the need 10 Deployment Guide Series: Tivoli Provisioning Manager for OS Deployment V5.1
- 27. to generate and catalogue a new image. The most advanced hybrid imaging systems go a step further by providing a policy-based configuration capability. This allows the image to be adapted by global policies as well as physical attributes of the target. For example, a policy such as "deploy ThinkVantage Access™ Connection on Lenovo laptops only" would ensure that redundant software is not deployed on other brands of laptop. The challenge for the enterprise is that very few image management systems on the market support this advanced form of imaging. 4. The development of a user data migration strategy. The migration to Vista will not be viewed as a success if your users lose data. Despite this, it does not make sense to migrate all aspects of a user’s existing configuration. Over time, most user desktops get cluttered with unused disk shares, defunct network printers, and configuration changes that were motivated by idiosyncrasies in the original operating system environment. Additionally, as application compatibility may require the upgrade or replacement of some applications, some preferences and configuration data may be redundant in the new desktop environment. As a result, blind migration of all existing "personality" may not be the right approach to take. A fresh OS install is an opportunity to clean house, but this takes planning. Determine what data and configuration is important to your users and acceptable under your current security policy, and put the tools and processes in place to migrate them cleanly to the new system. Many settings are predictable (for example the location of the target computer dictates which printers or disk shares should be configured) and the right deployment tool can recreate the correct settings based on current IT and security policy rather than migrate potentially incorrect or out-dated settings from the existing desktop configuration. This is an important philosophical distinction to consider when selecting an image management system. Some are better aligned with the "migrate existing settings regardless if they are correct" philosophy, and others align better with the "recreate clean settings from current IT policy" philosophy. 1.3 Requirements for a tool to assist the deployment effort Following is a list of criteria that can be used in the assessment of a deployment tool. Chapter 1. Introduction to image management 11
- 28. 1.3.1 Time to value How long it takes to start getting significant improvements in efficiency in your migration process is key to the over all performance of your image management system. Many systems management products either remain on a shelf or are never implemented to their full potential because of the complexity of their installation and configuration. Consider the following aspects of the system's Time to Value. 1. How long does it take to install the product and start using it in your migration planning process? Will installation take 30 minutes? Or 30 days? 2. Is the system an integrated single-vendor solution that provides fully automated end-to-end deployment of desktops from Wake-on-LAN to BIOS configuration, RAID configuration, disk partitioning, OS/driver/application deployment, offline servicing, user data migration through to user configuration, and first boot? Or does the system leave major aspects of image creation and deployment to manual intervention or other 3rd party tools? 3. Does the system consist of a single-product install providing you with all the functionality you will require in both test and full-scale production deployment (native multicast, USMT integration, native PXE, native configuration database, and so forth)? Or does it consist of multiple components, each carrying additional purchase costs, additional implementation time, additional interface and management training, and additional infrastructure? 4. Does the system scale to tens of thousands of targets after the initial simple installation, or will you have to purchase, install, integrate, and configure additional enterprise product modules? 5. Does the product have a single, simple intuitive interface that spans all product functions, or does it require that you learn multiple different interfaces and jump between them during the planning, testing, and deployment processes? 6. Does the system provide rules-based deployment configuration? For example, does it support the ability to define a rule such as: "If target location is France, set keyboard to French", or "If target is Vista, deploy Acrobat® 7.0"? At deploy-time, the system should then assess the target against all such rules and adapt the configuration accordingly. This rules-based capability dramatically reduces the time required to configure the images for large and diverse populations. Without this capability, each target image would have to be manually configured. Note: This capability is only possible if the system supports advanced hybrid images. 12 Deployment Guide Series: Tivoli Provisioning Manager for OS Deployment V5.1
- 29. 7. Does the system support advanced hybrid images allowing you to start deploying diverse systems after creating a single-universal OS image? Or does the product require that you create many specific thick images before you can start testing against a diverse community of targets? Or does the product require that you also implement a software distribution system before you can start deploying applications on top of thin images? 1.3.2 Resource and maintenance efficiency This selection criteria assesses the image management system's impact on your system’s management and infrastructure costs and complexity. It is important to consider how the system consumes your infrastructure, how it impacts your normal operations, and how much systems management workload it generates. 1. Does the system conserve bandwidth by providing multicast as a native feature? With multicast, a single bit stream over your network can update many targets simultaneously. Without multicast, each target needs its own bit stream to pass through your network. The difference in impact on your network infrastructure and your normal operations is orders of magnitude. 2. Does the product support advanced hybrid images that enable a single, compact universal image to do the work of many large, thick images? The disk space required by a thick image-based product will be orders of magnitude greater. Maintaining many thick images also has a significant impact on image maintenance as any minor change to a driver, OS, or application configuration can require the regeneration of dozens of images. Does mitigating these resource inefficiencies mean implementing a thin image strategy requiring an additional investment in a software distribution system to deal with core applications? 3. Are the images stored in a single-instance file-based repository that conserves disk space by storing each OS or application file only once in the deployment repository. Or does the system store many duplicate sector-based images or multiple copies of the same file-based image components thus wasting storage capacity? 4. Does the system support distributed, automatically synchronized deployment servers that can sit in distributed network segments closer to specific groups of targets? Does the system provide this functionality in the base product without requiring an additional investment in product license and implementation effort? This capability can dramatically reduce the performance impact and capacity required at gateways, routers, and over wide area networks. Chapter 1. Introduction to image management 13
- 30. 1.3.3 Flexibility As your choice of unified image management system is likely one you will have to live with for years to come, it is important that it is flexible enough to adapt to your changing requirements over time. 1. Will the system provide a single-product experience for all of your heterogeneous targets (for example Windows, Linux, Unix) now and in the future? Or will you require additional image management systems to support deployment and maintenance of your non-Windows targets? 2. Can the system be implemented on a server platform you currently support (Windows, Linux, AIX®, Solaris, FreeBSD, Mac OS-X, AIX) or does it require that you procure and maintain a nonstandard platform in your systems management environment? 3. Is the product open, providing a native pre-installation environment and image format, and supporting Microsoft WinPE and Microsoft WIM (Windows Imaging) images? Or does the product force you to abandon Microsoft best-practice and rely only on a proprietary pre-installation environment and image format in all situations? In some situations, the native tools and formats may be superior, although, in others the OS vendor does know best. 4. Will the product integrate easily into any systems management ecosystem, seamlessly providing an image management foundation to any vendor's holistic provisioning solution? Or does the product restrict its interfaces in an attempt to force you to build on its foundation with only the same vendor's systems management portfolio? 5. Does the vendor that supplies the product also provide a portfolio of integrated provisioning and systems management products if you are looking for a simple path to increase the sophistication of your automation infrastructure? 1.3.4 Security Mitigating security risks is a top-3 budget item for most enterprise IT organizations. Introducing new security risks with the image management system results in subsequent cost and effort to provide perimeter defenses around the new exposures. The best way to avoid this collateral cost is to select an image management system that was architected to minimize the security exposures it introduces. 1. Has the system implemented Option-43 of the PXE specification that prevents malicious PXE Server impersonation on your network by forcing explicit identification of the PXE server network address? If not, an intruder that gets access to any server on your network could deploy code that 14 Deployment Guide Series: Tivoli Provisioning Manager for OS Deployment V5.1
- 31. impersonates a PXE server on your network giving the intruder the ability to alter your desktop configurations. 2. Does the product disallow a user break of the deployment process at the target keyboard? If not, someone with access to the target during the deployment could gain administrator-level privileges on your network. 3. Does the product support Offline Servicing for Vista? Offline servicing allows security updates and configuration changes to be applied to the target after the OS and core application deployment, but before the first boot. If the product does not support this Microsoft best practice function, the target is exposed to many forms of intrusion and malware between first boot and the application of the security updates. 4. Has the product implemented an encrypted transport protocol that prevents either reading or altering the image bit stream while it is being deployed over your network? Keep in mind, depending on your applications, these bit streams could contain sensitive data or passwords. Many products just support SMB (Server Message Block) or HTTP transport protocols that leave the data exposed to malicious intruders or applications. SMB and HTTP also require the creation of a user on the network and the storage of that user's password on the boot media—an unnecessary security exposure. 1.4 Common OS deployment scenarios The following three scenarios are typical of those in many corporate sites. The aim of the scenarios is to show how Tivoli Provisioning Manager for OS Deployment can help in times of deployment and also with day-to-day support issues. The scenarios all assume that a corporate SOE was developed. The common theme with all of these scenarios is that the SOE deployment component of the task at hand has become a minor part of the process. It is now a quick, simple step. 1.4.1 Rollout of new desktop hardware and SOE A multinational organization decides to upgrade their workstation fleet and SOE. They enter into a contract with a large hardware supplier to supply 15,000 desktop PCs of three different specifications and 5,000 laptops of two different specifications. The hardware supplier is contracted to supply the workstations directly to their final destination across three continents into 25 sites. The organization has spent the previous 12 months developing their Vista SOE, their deployment methodology, and deploying Tivoli Provisioning Manager for OS Deployment. The solution developed uses a universal system profile. The universal system profile allows them to have one image that can be deployed to Chapter 1. Introduction to image management 15
- 32. every desktop computer and laptop. When the computers first PXE boot and contact Tivoli Provisioning Manager for OS Deployment, an inventory is taken of its components. Using this inventory or Bill of Materials (BOM), rules can be established to select the appropriate drivers to inject and software to install. For example, the drivers for a desktop computer are different than those required by a laptop computer. Based on the model number of the computer and the PCI, Tivoli Provisioning Manager for OS Deployment can inject. The organization allows a level of user level workstation customization, and although the users are supposed to store all business data in specific business systems and backed up data drives, inevitably there is data stored locally on user workstations. To avoid upsetting the users and to make the workstation upgrade as seamless to the users as possible the customization and data needs to be migrated to their new machine. This is achieved by using the Microsoft User State Migration Tool. The deployment process for desktop computers flows as follows: The vendor ships the computers to the site as per the deployment schedule. The deployment is to take place overnight. At close of business, the user state migration tool is run to back up all appropriate user settings and data. The new workstation computers that have arrived that day are unboxed and physically moved to the desktops in batches of 30. When 30 workstations are plugged in they are all powered on, network boot is selected and the computer logs into a multicast deployment. The 4GB image deployment over a 100Mbps LAN to 30 workstations completes in 30 minutes. The user state migration is completed, moving the user settings back to user workstations. In this scenario, the bulk of the work was in planning and building of a SOE. When it came time to actually deploy the computers, the work was very simple consisting mainly of physically moving boxes and plugging them in. With regard to the laptop computers, they are also shipped directly to the home office of the proposed user. A deployment resource builds them in groups just as with the desktop computers. When the user comes into their home office to swap out their machine, the user state migration is run to move all settings and data. 1.4.2 Rebuild of a previously deployed user workstation A user contacts the help desk because of issues with their workstation. The workstation is not performing properly, and it seems like there may be an issue with some file corruption. The help desk consultant spends 15 minutes with the 16 Deployment Guide Series: Tivoli Provisioning Manager for OS Deployment V5.1
- 33. user trying to determine what the problem with the workstation is. It is apparent that there is a problem, but a diagnosis is eluding them. The help desk consultant decides that a workstation rebuild is the best way forward. Tivoli Provisioning Manager for OS Deployment was rolled out across the enterprise a few months previously. During that rollout a decision was made to install the RbAgent, Tivoli Provisioning Manager for OS Deployment’s optional agent, onto every workstation. RbAgent gives the Tivoli Provisioning Manager for OS Deployment administrator, amongst other things, the ability to reboot a computer and to force a PXE boot. In this support instance, after gaining agreement from the user, the help desk consultant locates the user’s computer in the management web console and executes deploy now against it. At the users end, the computer pops up notification that it is being rebooted for a redeployment. The computer promptly reboots and the SOE deployment commences. Due to the fact that the computer is on a production network and it is during working hours, the bandwidth consumed during the deployment is limited to 50% of the 100Mbps available. The 4GB SOE is deployed in approximately 15 minutes. Instead of having the issue with the computer escalated up through the support organization and using more time up, decisive action was taken and in less than 45 minutes the user was able to once again log in and do productive work. 1.4.3 Upgrade of hardware and subsequent Vista install An organization that upgraded its desktop workstation fleet last year decided, for a variety of reasons, to move to Microsoft Vista. At the time of deployment last year they believed that 512 MB of RAM per computer would be plenty of memory for the foreseeable future. Unfortunately this was not the case and so now they are going to have to add another 512MB memory module to each machine. Having deployed Tivoli Provisioning Manager for OS Deployment for their upgrade last year they are well placed to complete this piece of work at their four 100 workstation sites overnight at one site per night using three human resources. Following is the upgrade process: As all the workstations are already defined within Tivoli Provisioning Manager for OS Deployment, it is a simple task of binding the new Vista profile and the rollout deployment scheme to all the workstations. This is done. Chapter 1. Introduction to image management 17
- 34. After each computer is opened and has its RAM upgraded, the computer is rebooted and F12 is pressed to force a network boot. As the computer is bound to the SOE the computer joins a rolling non-synchronized multicast deployment scheme. This scheme ensures maximum efficiency of concurrent data transfer but without the necessity to synchronize computers. The deployment is completed overnight as planned. 18 Deployment Guide Series: Tivoli Provisioning Manager for OS Deployment V5.1
- 35. 2 Chapter 2. Architecture and deployment scenarios This chapter presents two case studies for the implementation of Tivoli Provisioning Manager for OS Deployment: A small implementation on a single LAN. A large enterprise with multiple subnets in the main office, remote sites connected via lower speed communication links, and the sort of security scrutiny that characterizes large organizations today. Subjects such as server sizing and placement, image replication, driver injection, unicast and multicast, firewalls, and security considerations are discussed. These are the sort of subjects that are not explicitly discussed in the Tivoli Provisioning Manager for OS Deployment user guide, but are of great importance when designing an implementation of a tool in a production environment. The chapter is broken into the following sections: “Tivoli Provisioning Manager for OS Deployment features” on page 20 “Architecture” on page 22 © Copyright IBM Corp. 2007. All rights reserved. 19
- 36. 2.1 Tivoli Provisioning Manager for OS Deployment features Following are the major features of Tivoli Provisioning Manager for OS Deployment and a short description of the features. It is these features that make Tivoli Provisioning Manager for OS Deployment such an indispensable tool for use during the life cycle of computer systems. System cloning Tivoli Provisioning Manager for OS Deployment incorporates the ability to capture a file-based clone image of a target workstation. Using Tivoli Provisioning Manager for OS Deployment’s built-in Pre-boot eXecution Environment (PXE) server to boot the target system, it is possible to take a cloned image of that system from the Tivoli Provisioning Manager for OS Deployment Web console. This image is stored on the Tivoli Provisioning Manager for OS Deployment server and is referred to as a profile. Driver injection Tivoli Provisioning Manager for OS Deployment includes the ability to add a driver to an image as the image is being deployed to a computer. This feature leads to the ability to create a universal system profile that in turn reduces the number of images that need to be managed. Software deployment Tivoli Provisioning Manager for OS Deployment includes the ability to create software packages that can be deployed along with the OS image. Universal system profile The universal system profile is the ability provided by Tivoli Provisioning Manager for OS Deployment to support many different computer models and configurations with one image. This is achieved by the automated addition of various driver and software packages during image deployment. Microsoft Vista support Microsoft’s latest and greatest operating system is supported by Tivoli Provisioning Manager for OS Deployment in unattended setup and cloning modes. No touch build capability Tivoli Provisioning Manager for OS Deployment has features that enable a true no touch build capability. Whether set to boot from the hard disk or the network, Tivoli Provisioning Manager for OS Deployment can be configured to take control of the target system and to deploy a profile. Unattended setup Tivoli Provisioning Manager for OS Deployment supports the unattended setup mode of installation. In this feature all of the parameters that need to be provided to the installer during the OS installation are predefined in the Tivoli 20 Deployment Guide Series: Tivoli Provisioning Manager for OS Deployment V5.1
- 37. Provisioning Manager for OS Deployment server and fed to the installer during the installation. This type of installation is best where a one-off installation is going to be made or where installation to a number of different hardware types requires an investment of time to build a master image and all of the appropriate drivers and or application packages. Unicast and multicast image deployment In Tivoli Provisioning Manager for OS Deployment, profiles, or what is being deployed, are defined separately to how the profile is to be deployed. How the profile is to be deployed is defined in what is known as a deployment scheme. it is in the deployment scheme that you can define the communication method between the server and client. This can be unicast or multicast. Generally, individual workstation and server builds are done using unicast, while builds and batches of workstations use multicast, for the time and network bandwidth savings that it offers. Adjustable network bandwidth utilization during build Deployment Schemes also offer the ability to limit the amount of network bandwidth that is used during a deployment. This is very useful when a deployment is being executed over a LAN during the business day. An unlimited deployment has the capability to really slow the network segment down as it could potentially use all available bandwidth; however, if you limited the bandwidth to say 50Mbps on a 100Mbps LAN it could only ever absorb half the available bandwidth. Highly efficient image storage By using an MD5 (Message Digest 5) algorithm to individually identify each file being stored in the image repository, it is possible to eliminate the need to store duplicates of any file. What this means is that one Windows XP image may take 3GB of storage space, but two variations of an XP image could take less than 4GB. This efficiency of storage also translates to less image data needing to be replicated between servers in larger implementations. Build from DVD In some instances, a workstation that needs to be built may be at the end of a 64Kbps link, or worse. Attempting to install a 4GB image in a case like this is impractical. The data transfer, if all went well, would take more than 7 days. In an instance like this it is possible to cut a DVD of the image and deployment scheme, ship it to the site, then boot from that DVD and deploy the image from the DVD. Boot from CD/DVD If the network card, in a particular target system, does not support PXE boot, or if PXE is not allowed on a network, it is possible to build a boot CD or DVD on the Tivoli Provisioning Manager for OS Deployment server, and use it to boot the target computer and connect it to the Tivoli Provisioning Manager for OS Deployment server to have an image deployed. Chapter 2. Architecture and deployment scenarios 21
- 38. Network sensitive image replication The replication of workstation and server images around a WAN is a controversial subject. Many organizations like to have full control over all data on their network. Because of this Tivoli Provisioning Manager for OS Deployment comes with the following two methods to replicate data between servers: – Scheduled, bandwidth controlled replication This option allows you to set up a replication schedule between servers and to dictate the maximum bandwidth that can be used by that replication. – Command line export utilities Through the use of command line utilities, it is possible to produce different files containing all changes since a previous checkpoint. These files can then be moved to the slave servers using the corporate software distribution tool or burnt to a DVD and physically moved between servers. Redeployment This feature provides the ability to place one or more reference images into a hidden partition on the computer. During the system boot it is possible to do one of the following: – Boot the system off the current image on the hard drive. – Do a quick clean of the currently deployed image against the reference image. – Do a full restore of the reference image. Using this feature it is possible to effectively have a fresh image deployment every day for the optimum performance of a system. 2.2 Architecture We start our Tivoli Provisioning Manager for OS Deployment architecture discussion with some design considerations. These are subjects that could be important in understanding how the product works, and how it fits into a larger corporate environment. The subjects covered are by no means a conclusive list. 2.2.1 Design considerations This section aims to describe various items and product features that you should consider when designing a Tivoli Provisioning Manager for OS Deployment implementation. Many of the items are quite obvious but warrant discussion and further explanation; likewise, others are less obvious and may assist a designer in reaching an appropriate design. While the following list is quite 22 Deployment Guide Series: Tivoli Provisioning Manager for OS Deployment V5.1
- 39. comprehensive, it should not be considered the definitive list of considerations as every organization has its own set of idiosyncrasies to take into account. Many of the subjects have links through to section two of this book, which contains more detailed step-by-step guides to Tivoli Provisioning Manager for OS Deployment features. Unattended setup Unattended setup of a Windows or Linux operating system entails the provision of all the parameters required in the setup of the operating system by the Tivoli Provisioning Manager for OS Deployment. Unattended setup is a more time consuming method of deploying an operating system and cannot be used on the same scale that cloning can. However it is the easiest type of deployment profile to set up. All activities take place on the server via the Web interface. A full description of how to set up an unattended setup deployment profile can be found in Chapter 4, “Installing pre-Vista systems” on page 137. An advantage of an unattended setup profile is that it is a more generic installation, because the setup program detects the hardware and peripherals present and detects if a driver is available, and then installs it. The important task that the deployer has is to ensure that all the necessary drivers are available. An unattended setup can be a good way to build an initial system for cloning. It is also very good for building systems in an environment where the hardware has large differences. Figure 2-1 on page 24 shows the potential inputs to an unattended setup. This instance includes the original files and parameters such as the license key, host name, administrator account details, and the domain to join. It also includes a driver package and a software package. Chapter 2. Architecture and deployment scenarios 23
- 40. Driver Unattended package install Driver Parameters package Software Package Operating system installation files Result = an OS setup in unattended mode Figure 2-1 Unattended setup Cloned image Cloning is a major feature of Tivoli Provisioning Manager for OS Deployment and in conjunction with deployment schemes gives the product its versatility. Cloning is a fairly simple process, but it does take more set up than an unattended operating system setup. The process to clone a machine is as follows: 1. Start with a reference machine that is representative of the different systems to which you are going to deploy. 2. Clean the machine. By this we mean empty the recycle bin, disconnect network drives and printers, close all applications, and delete all temporary files and caches. 3. Run sysprep. Sysprep is Microsoft’s utility for preparing the operating system for duplication. It clears out many of the internal system settings that identify that instance of the operating system. When the workstation is booted for the first time after deployment, Tivoli Provisioning Manager for OS Deployment supplies all the parameters required to complete the mini setup, and give this instance of the operating system its personality. 24 Deployment Guide Series: Tivoli Provisioning Manager for OS Deployment V5.1
- 41. 4. Boot the workstation using the network as the boot device, and then from the Tivoli Provisioning Manager for OS Deployment Web GUI start the administrator toolkit. This allows you to capture the image. A full and detailed description of the creation of a cloned image can be found in 4.4, “Creating an unattended profile for Windows 2000” on page 171. As you can see there are more steps involved in preparing a cloned image, but when it comes to the deployment of the image it is much faster and can be deployed concurrently to many more systems. Figure 2-2 shows the cloning process. The snapshot of the reference personal computer (PC) is copied to all the computers being built along with parameters such as the license key, host name, administrator account details, and the domain to join. It also includes two driver packages and a software package to further customize the installation. Reference PC Parameters Driver Software Package package Driver Package Snapshot is combined with parameters and packages at build time to rapidly apply a personality to multiple computers concurrently Tivoli Provisioning Manager for OS Deployment server takes a "snapshot" of the reference PC Figure 2-2 Cloned systems Universal system profile A universal system profile is a cloned image that was prepared with all drivers for disk types and hardware abstraction layer (HAL) variants that are used in the Chapter 2. Architecture and deployment scenarios 25
- 42. organization, so that one cloned image can be sent to many hardware types and the mini setup can cater to the changes necessary for the image to work. Figure 2-3 shows a universal system profile. With the addition of appropriate driver packages the cloned image made on one type of hardware can be made to work properly with hardware of another type. For maximum efficiency in storage and ease of profile management, use a universal system profile. Parameters Driver Driver Driver Driver Driver Packages Previously created snapshot Software Software Software Software Packages Using a universal image that includes the appropriate drivers, it is possible to build many different kinds of hardware from the same image Figure 2-3 Universal system profile Driver packages Often the difference between two computer models is minimal, a BIOS version or the video card and so forth; however, the difference is enough to make the clone image captured from one computer model not work on the other. To fix this you could always capture an image from the second model and build rules to ensure that each image was only deployed on the appropriate model, or you could build and apply a driver package. A driver package is simply the driver files packaged with their identifying information and potentially a deployment rule. When the package is installed the files are automatically copied into the Drivers directory on the target system, generally after the OS files are deployed. When the system boots up and sysprep runs, the driver for the hardware is installed by the operating system. 26 Deployment Guide Series: Tivoli Provisioning Manager for OS Deployment V5.1
- 43. In some instances it may be desirable to install the driver package after one of the system reboots or in a specific order to avoid software conflicts. These characteristics are all controllable and set up in the driver package creation wizard. Using this functionality it is possible to just add driver packages to images as a vendor’s hardware evolves over time. A full description of how to create a driver package is included in 7.4, “Device driver injection” on page 332. Software packages Like driver packages, software packages are all the files required to deploy a software application bundled up for addition to a deployment; however, the difference between the two is that a software package is executed and the software is installed as opposed to a driver package that places the files into the file system for installation by the operating system. Tivoli Provisioning Manager for OS Deployment has the capability to install the following: A Windows application, using the Windows Installer, MSI (Microsoft Installer Package) A Linux application, using RPM (Red Hat Package Management) A Solaris application, using PKGADD A custom action on the target computer. These actions include the following: – Copy and run a single file – Execute a command – Modify a Windows registry – Create or modify a Windows INI file – Copy a single text file Using this capability it is possible to start to build a SOE by first deploying an operating system and then installing software and customizing that operating system. An example of the steps taken to produce a software package are in 7.2, “Software package rules and bindings” on page 315. It is important at this stage to point out that Tivoli Provisioning Manager for OS Deployment is not a software distribution tool like Tivoli Configuration Manager, Tivoli Provisioning Manager for Software, or Tivoli Provisioning Manager. It lacks many of the features that make up a true software distribution tool. Binding In Tivoli Provisioning Manager for OS Deployment, the term binding refers to an association made between two components within the system. It is possible to bind a profile to a host, a software package to a host, or a software package to a Chapter 2. Architecture and deployment scenarios 27
- 44. deployment scheme. These bindings can be explicit or implicit. By default when you deploy a profile to a computer, that computer is implicitly bound to that profile. If you network boot the computer again, it, by default, automatically starts loading the bound profile unless you change that behavior. You may choose to explicitly bind a profile, software, or driver packages to a host. Using rules, you can implicitly bind software packages and driver packages to host as well. More information about the options available and some scenarios appear in 7.2, “Software package rules and bindings” on page 315. Hostnames Some organizations have very strict computer naming conventions while others are happy for a host to be assigned a number from a random pool. There is a lot to be said about the pros and cons of each naming style. Tivoli Provisioning Manager for OS Deployment offers a number of ways to register a host name within the system: 1. Manually type a name into the Web console after a computer registers with Tivoli Provisioning Manager for OS Deployment, but has not yet had an image deployed. This is fine for one or two computers but during a major deployment is unacceptable 2. Import a list of hostnames. This is a good way to populate the host database, especially if the computer naming convention does not rely on any characteristic of the actual computer. Each name however must be linked some way to a unique characteristic of a computer. This could be the MAC address, the UUID/GUID, the serial number, or a fixed asset tag. These could be acquired from the manufacturer with the hardware shipment. In short, Tivoli Provisioning Manager for OS Deployment must have some way of uniquely identifying a computer to allow the match up with a pre populated host name. The import host button is at the bottom of the Host monitor panel. 3. Automatically generate a host name. Tivoli Provisioning Manager for OS Deployment has a variety of keywords that will allow the extraction of all or part of a key hardware identifier and build it into the hostname according to a template. This means you could incorporate all or part of the computer’s serial number or asset number into its hostname. More details about how to achieve this is contained in “Configuring the System profile” on page 241. 4. Let Tivoli Provisioning Manager for OS Deployment decide. Tivoli Provisioning Manager for OS Deployment will assign a hostname. Deployment schemes A deployment scheme determines how computers are installed, not what is being installed. In order to cater to the many different scenarios that occur during 28 Deployment Guide Series: Tivoli Provisioning Manager for OS Deployment V5.1
- 45. the deployment and redeployment of computers, Tivoli Provisioning Manager for OS Deployment offers the ability to customize how profiles are deployed. For example, during a rollout of a new fleet of computers, it may be that in a staging area 50 computers are built concurrently using a multicast protocol, and at the conclusion of the deployment the computers are shutdown before the sysprep is run because the organization decided that they want the computer to join a domain when it is on site. Whereas rebuilding a workstation out on a branch network would use a unicast protocol and the computer would reboot ready for the user to log on when the deployment completed. This redeployment of the profile required absolutely no action from the user apart from the removal of their hands from the keyboard. Both of these examples are deployment schemes that optimize the way a profile is deployed for the specific task at hand. Characteristics that can be set in a deployment scheme include the following: The level of interactivity required during a deployment. Interaction ranges from none where hosts are already defined in the system to prompt the first time a system is to be deployed but not every subsequent deployment, or prompt every time a system is to be deployed or redeployed. When a profile is being deployed, by default Tivoli Provisioning Manager for OS Deployment compares the computer model that the profile was created on with the computer model it is being deployed onto. If there is a mismatch one of three behaviors can be selected: Ignore—this is for when profiles are model independent. Prompt—or when you would like an operator to decide whether it is ok to proceed. Or abort—for when you want the models to match. Data collection. Tivoli Provisioning Manager for OS Deployment by default takes an inventory of all computers it deploys. On Windows systems it can also take a software inventory. In the deployment scheme it is possible to set when the inventory is taken, before deployment, after deployment, or at each boot and whether the screen is locked or not during this process. You can set the type of information gathered, PCI inventory, DMI inventory, disk and software inventories, along with deployment logs that can be stored on the server or on the computer being deployed. Bear in mind that all inventories require database space and depending upon how many computers are being deployed, your database could grow quite large. Actions when the deployment is completed. There are the following two stages to this: – When all the files are transferred to the computer, you can have the computer shut down and complete the installation when the computer is explicitly rebooted. This could be useful when you want customizations to occur when the computer reaches its final destination. You could have sysprep run interactively, which is useful for instance if the time zone of Chapter 2. Architecture and deployment scenarios 29
- 46. the workstation was unknown during the build and could only be determined once it reached its final destination. Stop when sysprep is ready to run unattended, which gives the opportunity to move the computer to the user environment for final customization, or joining of a domain when sysprep is complete and the computer is ready for use. – The second stage, after the points listed above, is for you to choose whether the system shuts down, reboots, or just displays a green banner announcing completion. Network usage. Understanding these settings is important. There are three options: – Unicast, used for single deployments or where multicast is either not allowed or not supported. With unicast, as the number of concurrent computers being deployed increases, network performance decreases rapidly. A unicast is effectively a private conversation between two computers. If the profile to be deployed was 2GB, the Tivoli Provisioning Manager for OS Deployment server has to serve up 2GB of data and that 2GB has to traverse your network. If you were deploying three computers concurrently using the same profile, the server has to maintain three sessions doing the same thing, queue and process the 2GB three times and that resultant 6GB has to traverse the network via one network card. Now with a reasonable sort of server on a gigabit network that is probably not a big deal, but on a 10MB network it means at least one hour and 40 minutes of saturated network, and if you added any more sessions you would probably find that the bottleneck in the system was your server. Figure 2-4 on page 31 shows a unicast to four computers, each computer receives a separate, directly addressed data transmission. The server has to work four times harder and the network carries four times the traffic than it does during a single build. 30 Deployment Guide Series: Tivoli Provisioning Manager for OS Deployment V5.1
- 47. Server The packets on the network are addressed to individual computers, so only the specific addressee can accept the packet. With unicast each computer has a private communication with the server PC 1 PC 1 PC 1 PC 1 PC 2 PC 2 PC 2 PC 2 PC 3 PC 3 PC 3 PC 3 PC 4 PC 4 PC 4 PC 4 Figure 2-4 Unicast It is for this reason that multicast was developed. Multicast in Tivoli Provisioning Manager for OS Deployment was designed for robustness as opposed to speed. The aim is to get the transfer done to all targeted clients on the first attempt during a deployment, thus lowering project risk. The way it works is as follows: On each client computer the files that are received are recorded in a special content file so that the client knows which files it has and which files it needs. The server elects one of the client computers as the master and effectively communicates with it but with other slave computers listening in on the transfer. The master controls the speed of the transfer and what is requested. Depending on the performance of the slave computers, they may be able to keep up and receive, process, and write at the same rate as the master, or if not they drop the packets. After the master finishes its transfer, an incomplete slave is promoted to the master and it starts requesting files according to what is required in its content file. All the other incomplete slaves listen in and accept packets that they require. This process continues until all the client computers have all required files. So lets carry our unicast example forward into our multicast explanation and distribute our 2GB image to three computers. One of the computers is of a lower performance specification than the other two. There is a 2GB Chapter 2. Architecture and deployment scenarios 31
- 48. transfer to the machine designated by the server as the master client. The first slave keeps up with the master; therefore, it receives and processes all the packets and finishes at the same time as the master. The third computer however could not keep up. Its internal speed is just not the same as the other two and as such it could not cope with the data stream. It managed to retain only 80% of the 2GB and therefore requires a retransmission of 20% or 400 MB of the data. The server serves up this catch up data and then all computers are completed. This resulted in only 2.4GB of data traversing the network instead of 6GB as with a unicast. Because of the retransmission it takes longer than a unicast; however, the network utilization is markedly less. The implementation of multicast in Tivoli Provisioning Manager for OS Deployment starts to show speed efficiency at around 10 clients. Most efficiency is gained when computers of the same specification are being built together. Tivoli Provisioning Manager for OS Deployment offers the following two variants of multicast: • Synchronized multicast. With this option it is possible to have the start of transmission delay until a predetermined number of clients register with the server or a time-out period is reached. After one of these criteria is met, transmission commences. It is possible to start other clients and bring them seamlessly into the transmission after it has commenced, with the files that are missed at the start being caught up at the end. • Soft synchronization multicast is the second type of multicast. It is less efficient but good for rolling deployments. In this instance of multicast client systems do not explicitly synchronize, they just start downloading when they are ready. If multiple client systems are downloading files in parallel they automatically share the same bandwidth. Figure 2-5 on page 33 shows how multicast packets are addressed to a group. Those who opt into the group can receive the packets. Multicast puts a lower load on the server and network resources. 32 Deployment Guide Series: Tivoli Provisioning Manager for OS Deployment V5.1
- 49. Server The packets on the network are addressed to a group, so all members of the group can accept the packet. In this way 1 packet can be accepted by many computers, reducing the amount of network traffic Group Group Group Group Figure 2-5 Multicast Onsite deployment. Enable this feature if you want to use the advanced redeployment feature. More about the redeployment feature can be read in the section on “Chapter 10, “Redeployment and self-healing feature” on page 419”. Using these various options it is possible to cater to most deployment situations in the most efficient way. A thorough Tivoli Provisioning Manager for OS Deployment design includes specifications for the deployment schemes to be used in the final implementation. These specifications would also highlight the necessity for things like multicast support and the level of interaction that is expected with each deployment type. Image replication It is important to have a good understanding of how file replication in Tivoli Provisioning Manager for OS Deployment works, so that the effect it has on a production network is appreciated. How replication works When a profile is captured or built with the Tivoli Provisioning Manager for OS Deployment server, the files undergo the following process: as files are sent the server, they are uniquely identified using an MD5 algorithm. Having identified the file the process then determines whether there is another copy of the file already Chapter 2. Architecture and deployment scenarios 33
- 50. in storage on the server. If there is, the existing file is referenced in the new profile and if not, the process stores the file in a 128MB file repository block and its corresponding table of contents file. There are two methods you can use to replicate images between Tivoli Provisioning Manager for OS Deployment servers: Use the built in file replication service. Manually generate change files at the command line and use another tool to move these files around the network. Built in file replication service In a multi tiered implementation, one server is designated as the master server. This is usually the server at the master site, but must be the server where profiles are inserted into the system. The other servers in the environment are designated as slave servers. When replication starts the new table of contents files are all sent to the receiving server. The receiving server then compares those table of contents files with the table of contents files it has and builds a list of all the files it requires to be up-to-date. It then sends that requirements list file back to the master server. The master server then builds a.RAD file of all these required files and commences replicating it to the receiving server using no more than the bandwidth specified in the replication setup panel. As the file repository only ever stores one copy of any specific file, subsequent to the initial replication of a particular OS all that should ever traverse the network is the delta between the existing profiles and the new profiles. This feature saves a large amount of network bandwidth. The data flow is shown in Figure 2-6 on page 35. 34 Deployment Guide Series: Tivoli Provisioning Manager for OS Deployment V5.1
- 51. Master Server 12 11 1 10 2 9 3 3 8 4 7 5 6 .RAD File 4 .RAD File TO C li 1 st Re q'd file s .RAD File 5 2 Slave 1 Table of Contents files sent to slave server at a scheduled time Server 2 List of required files is returned to the master server 3 The required files are all assembled into a .RAD file for transfer 4 RAD file is sent to the slave server 5 Slave server checks the .RAD file and then incorporates its contents into its repository Figure 2-6 Tivoli Provisioning Manager for OS Deployment replication data flow In a multi tiered environment, the replication setup has to be given some consideration as it is done on a schedule. It is important that enough time is given between scheduled instances for the replication to complete. In the instance of three-tiered architecture, each predecessor must be completed prior to the successor starting. Into this equation you must factor the bandwidth limitation you place on the replication. Command line method Tivoli Provisioning Manager for OS Deployment offers a command line interface called RbAgent. RbAgent can be run from any workstation that has connectivity to the Tivoli Provisioning Manager for OS Deployment server. When executed the RbAgent command connects back to the Tivoli Provisioning Manager for OS Deployment server, and assuming the appropriate .PAK file is present in the, by default, C:Program FilesCommon FilesIBM Tivolipackages directory, runs the command. This command line capability offers excellent integration opportunities with preexisting tools for file transfer and configuration management, such as those Chapter 2. Architecture and deployment scenarios 35
- 52. already incorporated into IBM Tivoli Configuration Manager V4.2.3 FP2, IBM Tivoli Provisioning Manager, and IBM Provisioning Manager for Software. 1. To synchronize servers from the command line you need to first download the file sync.pak from the following IBM OPAL Web site: http://www.ibm.com/software/tivoli/features/it-serv-mgmt/opal.html, 2. Copy that file into the directory as stated above. 3. Stop and start the “Rembo Server” service. This will make the commands implemented in sync.pak available to RbAgent. Then the process is to use the commands available to first create a zero checkpoint of the master server. Then subsequently every time an activity of any significance takes place, another checkpoint is created. From any two checkpoints, different files containing all the file repository changes that need to be sent to a slave server can be generated. These different files are called .RAD files. A further option is the ability to break a .RAD file down into smaller .DAT files for manageability. The generated .RAD or .DAT files are transferred using your tool of choice to the target server and placed in the C:TPMFOS FilesimportAuto directory. This directory is automatically created when the Sync.PAK file is placed in the packages directory. The Tivoli Provisioning Manager for OS Deployment server checks every minute for new files. When one is found it reassembles it if it is a series of .DAT files, checks it for consistency, and then if all is ok gives it a .OK extension. The server incorporates the content of the file into the shared repository, making that content available for use in that server. A full description of the RbAgent commands necessary for replication are in 11.6, “Synchronization with the RbAgent” on page 455. Important: While the command line method of repository synchronization does give control of the replication process back to the user, the following must be noted: Manual replication using the RbAgent replicates only repository changes. Each server maintains its own database of hosts and information associated with those hosts. Keeping track of what each checkpoint represents and where target servers are up to in terms of file repository replication, are tasks that need to be incorporated into the overall replication process. 36 Deployment Guide Series: Tivoli Provisioning Manager for OS Deployment V5.1
- 53. Profile migration The separation of development, test, and production environments is a long standing IT best practice. Tivoli Provisioning Manager for OS Deployment incorporates functions that allow for the export and import of developed profiles, software packages, and deployment schemes. This allows these objects to be moved between environments easily and quickly. Export Use the following steps to export a profile, software package, or deployment scheme: 1. Go to the OS Deployment screen. 2. Select one of the following: system profiles screen, the software deployments screen, or the deployment scheme screen. 3. At the bottom of the screen select RAD Export. This starts the RAD Export Wizard. You will be guided through a series of screens allowing you to select the items you want to export. The server will analyze the objects you want to export and approximate the size of the export file and give you the following three options for how to deal with the file: • You could download it directly to the computer you were accessing the Tivoli Provisioning Manager for OS Deployment server from. This would allow you to use it as a staging point. • You can export to a directory on the Tivoli Provisioning Manager for OS Deployment server. This may be the option you use if you have physically separate environments and need to load the file onto a removable device to move it. Or you had another tool that was going to do the physical move for you. • You can move the file directly to another machine that is running the Tivoli Provisioning Manager for OS Deployment Web extension, RbAgent. With this option, if the importing system is accessible in the network you are connected to, you could move the file directly to that computer. Tip: When working with Tivoli Provisioning Manager for OS Deployment Web extension, or RbAgent, it is important to remember that it does not resolve hostnames. You must always use an explicit IP address. Import At the importation end, it is almost a reverse of the export. 1. Navigate to the OS Deployment screen. Chapter 2. Architecture and deployment scenarios 37
- 54. 2. Select one of the following: the system profiles screen, the software deployments screen, or the deployment scheme screen. 3. At the bottom of that screen select RAD Import. You are presented with the following three options for the location of the .RAD file for import: • The local computer you are working from. • The Import directory of the importing server. You may recall that one of the export options was to export to the importing server. • The IP address of a server running the Web extension where the file is located. 4. Which ever option you choose, the next step is to identify the .RAD file at the location you selected for importation. Tivoli Provisioning Manager for OS Deployment will then analyze the file and import the parts of it that it requires. Remember that it is just the files that are not already stored on the server that it will import. Tip: Accessing to the export and import functions achievable through right clicking on an item to be exported or through the use of the context menu that appears at the bottom left of the Web interface. Client boot options Tivoli Provisioning Manager for OS Deployment offers a number of options that augment the standard way a computer boots. Most computers are set up by default to boot off the hard disk. If there is no hard disk, it tries the CD/DVD drive. If that is not available, it tries for other removable devices, and if there are not any of them available, it tries for a network or PXE boot. This gives the computer the best chance of finding a bootable device. Of course most systems let you change this order, but to do that you have to access a special menu by using predefined keys at very specific times during the boot process. Another way offered to change the boot order is to press the F12 key (on many computers) at a specific time during the boot process, which takes you directly to the boot from network option. For this to be successful there has to be a PXE server available to service this request. This process is fine for someone who is comfortable with computers and in fact is usually the way bulk builds of workstations are initiated. For someone who has very little knowledge of computers, asking them to press F12 during the boot of their computer would draw a blank stare. It is this situation that is avoided with some of the options available in Tivoli Provisioning Manager for OS Deployment. After the initial build of a computer is completed you have some options about how much Tivoli Provisioning Manager for OS Deployment gets involved in the boot process. 38 Deployment Guide Series: Tivoli Provisioning Manager for OS Deployment V5.1
- 55. Generally computers are set to boot from their hard drive after a deployment. With Tivoli Provisioning Manager for OS Deployment, however, it is possible to boot from the hard drive or network, each method having options to control behavior. Hard drive boot Booting off the hard drive is probably the first choice and the traditional choice that IT departments make. Should you want to rebuild a machine at a later time due to malfunction or upgrade, you would need to contact the user and have them intervene in the boot process so that Tivoli Provisioning Manager for OS Deployment could boot the machine and take control remotely. This is not ideal in a support situation. If you wanted a completely hands free experience for your user, the RbAgent could be included in the standard computer build. The inclusion of RbAgent allows the Deploy Now function within the tool to be executed when a redeployment is needed. Under instruction from the server, RbAgent shuts the computer down after writing a temporary master boot record that instructs the computer to boot from the network at the next boot. The computer reboots using the network boot method, connects to the Tivoli Provisioning Manager for OS Deployment server, and deploys the profile using the deployment scheme as selected by the operator. This method gives a fully hands free deployment. Network boot Another option is to set computers to boot off the network every boot, and set the action that will be taken in the Tivoli Provisioning Manager for OS Deployment server. Possible actions include the following: The computer is completely ignored in the console. In this case the Tivoli Provisioning Manager for OS Deployment does not answer PXE requests (the computer times out during PXE). The computer is configured to boot on the hard disk in the console. In this case the computer boots on the disk. The computer has one or more configurations bound to it in the database (you can double-click a host to see the current bindings of that host). In this case, the computer shows a menu with the list of bound configurations. You can click one configuration to deploy it. The customized GUI in each of the configurations in the Web console can be used to change the look and feel of this boot menu (select an entry after a time-out, ask for a password). The computer has no configuration bound to it in the database. In this case a locked screen is shown. All of these options give you the opportunity to change the boot behavior of the computer from the Tivoli Provisioning Manager for OS Deployment console. Chapter 2. Architecture and deployment scenarios 39
- 56. Redeployment Within Tivoli Provisioning Manager for OS Deployment there is a function called Redeployment. This is not to be mistaken with the activity of redeploying an image to a computer. Redeployment in Tivoli Provisioning Manager for OS Deployment terms is a special deployment scheme that gives you the ability to rapidly restore an image to a computer from a hidden partition on the computer’s hard disk. The real value in this feature is for computers that fall into the following three categories: Computers that have rigidly fixed configurations such as ATMs, POS, or other embedded systems. Computers in public areas such as libraries, Internet cafes, or educational facilities. Critical systems in industries such as banking and finance, or even machines where security threats such as viruses or keyloggers/adware are a great concern. These machines can be effectively rebuilt everytime the computer is rebooted. Following is how it works: During the original image deployment to the computer, Tivoli Provisioning Manager for OS Deployment creates a hidden partition on the hard drive of the target computer. When it finishes deploying the master image on the computer, it stores a reference image into that hidden partition. It is possible to store multiple, different images in that hidden partition. Each time the system is booted, either off the hard drive or using PXE, Tivoli Provisioning Manager for OS Deployment intercepts the boot process of the computer and presents a customizable menu of the following possible actions: – Do a quick restore from the reference partition. This option just restores altered and added files to their reference. It only adds 10-15 seconds to a system boot. – Do a format and restore from the reference partition. This option takes a couple of minutes but results in a complete refresh. – Choose and deploy another configuration on the reference partition. This option takes as long as the format and restore option. – Just boot off the hard drive. Each of these options can be associated with a timer to allow for an automated action upon reboot after a time-out. 40 Deployment Guide Series: Tivoli Provisioning Manager for OS Deployment V5.1
- 57. With redeployment enabled in a school library or in an internet cafe, a possible scenario is that at the end of every day all the computers are shut down. Every morning when the computers are booted they wait 10 seconds then start doing a quick restore as the default option is automatically selected. This would ensure that a fresh environment is available to the users everyday, devoid of adware, viruses, or caches containing inappropriate material. Server specification The size and configuration of a Tivoli Provisioning Manager for OS Deployment server should be decided after taking a number of factors into consideration. First, the number of hosts you want to define within the server. After you reach 1-2000 hosts, the GUI starts to reach the limits of its navigability and becomes a practical limitation. It just takes too long to scroll through the host list. With that said, if you used RbAgent, and set the implementation up so that distributions were all triggered from the client interface this would not be an issue and scalability up to 5000 hosts on one database is easily achievable. Where an organization’s computers exceed 2000, it would be wise to start splitting the database across servers. You would still replicate all the profiles and deployment schemes. This scenario is discussed in our large enterprise case study in 2.2.3, “Enterprise architecture” on page 55. Second, consider the amount of work the server will be doing. If it is the plan to concurrently deploy multiple, different profiles using a unicast deployment scheme on an ongoing basis, so a high I/O requirement, it will be necessary to ensure that a disk subsystem capable of serving up this level of data is provided. This could mean the use of a RAID array, or depending on the requirement, right up to a channel attached SAN (storage area network) solution. This type of solution would probably only be required on a site where a large scale centralized build LAN was being heavily utilized. Being able to serve up data out of a disk subsystem is one thing, you also need to be able to get that data onto the network. You may want to consider multiple NICs (network inferface card) on a switched network in our extreme instance above, but also a high speed LAN such as 100MB or 1GB for maximum transfer speed. Third, consider memory. The minimum specification for a Tivoli Provisioning Manager for OS Deployment server is 1GB of RAM. Depending on the number of users and the number of concurrent builds being undertaken, extra RAM would be prudent. During a computer build RAM usage can reach 500MB as the server assembles and queues the files required. Therefore, once again how the server is to be used, for example the number of concurrent build sessions, dictates the memory requirement. A multiuser RDBMS instead of the built in Access Chapter 2. Architecture and deployment scenarios 41
- 58. database will also increase the memory requirement by the amount recommended by the RDBMS vendor. Finally, consider processors. The minimum specification for a Tivoli Provisioning Manager for OS Deployment server is dual Xeon® 1GHZ processors. The server is multi threaded and so benefits from the second CPU when it is busy. At what point do you go to four processors? In our extreme example above with a SAN and dual NICs on a switched network, four CPUs would certainly be warranted assuming sufficient RAM was available as well. When specifying a build server for a deployment project you need to keep in mind that unless you are an organization that builds systems as a core competency, this server requirement will be transient, and while you can configure an extremely high performance server to fulfill your immediate build performance requirements, performance can also be improved by other simple strategies such as using multicast deployment schemes to groups of computers with similar performance, good and appropriate network infrastructure, and well built and considered profiles. PXE Preboot eXecution Environment (PXE). This is the protocol used by Tivoli Provisioning Manager for OS Deployment to remotely download the Tivoli Provisioning Manager for OS Deployment kernel necessary to boot the computer and undertake the actions to deploy an operating system onto a computer. Generally a PXE server would be on the same network subnet as the computer being deployed, but in larger installations this may not be the case. If so it is important to ensure that the “DHCP” settings on your network are correctly configured. DHCP is discussed further in “DHCP” on page 43. Network booting without PXE In some instances it may be necessary to boot a workstation without using PXE boot. This may be because the network card does not support PXE—unlikely, but possible, or more likely in a network where for a policy or security reason PXE is not available. In this instance it is possible to build a bootable CD or DVD from a computer with the RbAgent installed in it. To create the boot image, go to the directory where RbAgent is installed, by default on a Windows machine: “C:Program Filescommon filesIBM tivoliRbagent.exe” Enter: rbagent.exe -s <host_ip_address>:<host_password> rad-mkbootcd <full_path_to_boot_iso> <host_ip_address> <host_password> Where: 42 Deployment Guide Series: Tivoli Provisioning Manager for OS Deployment V5.1
- 59. host_ip_address = IP Address of the Tivoli Provisioning Manager for OS Deployment Server host_password = Password for the administrative user (usually admin) on your Tivoli Provisioning Manager for OS Deployment Server. full_path_to_boot_iso = The full path to the iso file you wish to create on the machine where you run the command including the filename. Example 2-1 rbagent.exe C:Program Filescommon filesIBM tivolirbagent.exe -s 10.10.10.10:abcd rad-mkbootcd C:boot.iso 10.10.10.10 abcd In Example 2-1there are the following two parts: First the part that allows RbAgent connection to the Tivoli Provisioning Manager for OS Deployment server: “Rbagent -s<IP_Address>:<Password>” this part tells RbAgent which server to connect to by IP address (only IP address) and the connection password. Second part: rad-mkbootcd <full_path_to_boot_iso> <host_ip_address> <host_password>, tells the rad-mkbootcd command where the ISO is to be created, the IP address and password of the server that the boot CD will try to connect to. Once booted, the behavior of the computer is identical to any PXE booted system. For more information about RbAgent commands refer to 11.6, “Synchronization with the RbAgent” on page 455. DVD deployment In some instances computers that require deployment are at remote sites, sites serviced by communications links not suitable for large data transfers, or just with no connectivity. These computers still form a part of an organization’s inventory and need to be managed. In situations such as these Tivoli Provisioning Manager for OS Deployment has the capability to build an image onto a DVD or spanned across several DVDs. The DVD can be transported to the computer via mail, courier, or carrier pigeon and deployed with or without connectivity to the Tivoli Provisioning Manager for OS Deployment server. A full description of making a DVD deployment disk is in Chapter 9, “CD/DVD based deployment” on page 403. DHCP The Dynamic Host Configuration Protocol (DHCP) is a mature, well documented protocol that has been in use for many years. It is used by network attached Chapter 2. Architecture and deployment scenarios 43
- 60. devices that require an IP address, but have no dependence on that address, for example, workstations. Before the advent of DHCP, every IP device attached to a network required the administrative overhead of setting and tracking the address of every IP device on their network. One of the features of DHCP is the ability to enable various options to change the default behavior of the protocol. Things like the addresses of various services on the local network, configuration settings like timeouts, and vendor specific information. There is a list of well over 100 of these options available and detailed information can be found by searching for “DHCP options” on the Internet. Of interest to us in our discussion regarding design considerations are DHCP options 43 and 60. By default Tivoli Provisioning Manager for OS Deployment’s installer makes any required changes automatically for you; however, it is important to understand what is being changed and how it works, especially in the case of larger corporate networks where networking is never simple. In order to support PXE clients on a network, the DHCP server is usually configured in one of the following three modes: Option 60 not set, Option 43 not set Option 60 set to 'PXEClient', Option 43 not set Option 60 set to 'PXEClient', Option 43 set When option 60 nor option 43 is set, PXE clients have no clue on where the PXE server is, and they will therefore wait until a PXE server contacts them. In this mode, the PXE server must listen to DHCP discovery packets sent by PXE clients and answer at the same time as the DHCP server does. When option 60 is set to 'PXEClient', it means that the DHCP server knows where the PXE server is. If option 43 is not set, the PXE server is on the same computer as the DHCP server (same IP address). If option 43 is set, PXE clients must decode option 43 to know how to reach the PXE server. In most situations, option 43 does not need to be set up, because the PXE server will either listen to DHCP discovery packets (DHCPProxy) or be on the same computer as the DHCP server. However, if the PXE server is on a separate subnet (it cannot listen to DHCP discovery packets). Or if there are several PXE servers on the same subnet, option 43 is the only viable solution in order to instruct PXE clients on what to do. Option 43 is a binary buffer, containing a list of sub-options. Sub-options are packed in the binary buffer, in no specific order. Most sub-options are optional. Some examples of option 43 are in 3.1, “Server installation on Windows systems” on page 76. 44 Deployment Guide Series: Tivoli Provisioning Manager for OS Deployment V5.1
- 61. Firewalls Table 2-1 and Table 2-2 on page 46 list the server communication ports. Table 2-1 has client communication ports. Table 2-2 on page 46 is required by the different Tivoli Provisioning Manager for OS Deployment protocols and services. Should it be required for network design or security reasons, all ports except port 69 for TFTP can be modified. TFTP cannot be modified as this specific port is part of the PXE specification. Table 2-1 Ports required for server communication Description Port Protocol Modifiable Purpose DHCP 67 UDP Yes To issue IP addresses (Dynamic Host Configuration and other network boot Protocol) information PXE BINL 4011 UDP Yes To create an (Preboot eXecution environment on a Environment)(Boot computer where a boot Information Negotiation program can be loaded Layer) TFTP 69 UDP No Protocol used to (Trivial File Transfer Protocol) (part of PXE transfer the boot specification) program to the PXE environment on a booting computer MTFTP 4015 UDP & TCP Disabled in Disabled in V5.1 (Multicast Trivial File Transfer V5.1 protocol) NBP 4012 UDP Yes For exchanging (Network Bootstrap Program) messages with the boot server FILE 4013 UDP Yes For transferring files to a computer in unicast mode MCAST 10000 - UDP Address: Yes For transferring files to (Multicast) 10500 239.2.0.1-239.2.1. multiple computers in 1 multicast m Chapter 2. Architecture and deployment scenarios 45
- 62. Table 2-2 Ports required for client communication Description Port Protocol Modifiable Purpose DHCP 68 UDP Yes To request and receive (Dynamic Host Configuration an IP address and other Protocol) network boot information MTFTP 8500-8 UDP Disabled in Disabled in V5.1 (Multicast Trivial File Transfer 510 V5.1 Protocol) MCAST 9999 UDP Yes To acknowledge receipt (Multicast) of Mcast packets when designated the master Remote control 4014 UDP Yes To allow the TPMfOSd (Web Interface Extension) server to communicate to the Web extension The ports that you need to open for Tivoli Provisioning Manager for OS Deployment to effectively communicate across a firewall depend on the functionality you want to use across the firewall. In a highly-secure environment, it may be best to just remove the computer that requires building or rebuilding and reconnect it after the work is done on a build LAN. An example is in a DMZ (demilitarized zone) where servers are to be built and rebuilt. It is highly unlikley that DHCP, PXE, or multicast would be available. This reduces the number of ports required on the host side to just 3, 69, 4012, and 4013. None would be required on the client side. Use Table 2-1 on page 45 and Table 2-2 as guides to help you decide which services are required and the ports you will need to open. Security As you would expect in an enterprise class systems management tool there are a variety of security options available for exploitation. Following are some of those options: Authentication against a Windows domain. With this option you can specify an Active Directory® server to authenticate against. Within Tivoli Provisioning Manager for OS Deployment you can define categories of users such as administrators, deployers, operators or profile developers each with a different level of system access and privilege. Each of these categories of user can have specific users or groups of users subscribed to them, granting access to that specific level of privilege. 46 Deployment Guide Series: Tivoli Provisioning Manager for OS Deployment V5.1
- 63. It is also possible to limit the scope of the search for a user through Active Directory by limiting the search path to one group of users. Authentication against a Radius server. Similar to the Active Directory authentication is the Radius authentication. In this case it is also possible to assign groups to Tivoli Provisioning Manager for OS Deployment roles; however, it is not possible to limit the directory search path to a specific user group. Authentication against the local account database on the host server. This is similar to the domain authentication, however authentication and group membership is that of the local server account database. Use of the superuser account. Of course the simplest method of using the tool is to just have one user account and password. This of course would be a security breach in most organizations. A detailed description of how you go about setting up a Tivoli Provisioning Manager for OS Deployment authentication domain is in 7.6.1, “Creating the authentication domain” on page 353. 2.2.2 Small site architecture The target site for our small Tivoli Provisioning Manager for OS Deployment design has the following characteristics: It has 200 Windows workstations of various configurations of Windows 2000 and Windows XP spread across two floors of an office building on two IP subnets. LAN speed is 100Mbps. The workstations were acquired over a five year period and there were at last count 12 different hardware configurations with no Standard Operating Environment (SOE). The CIO studied the costs involved in supporting the disparate workstation fleet with no SOE and decided to refresh every workstation over the next year and deploy an SOE based on Microsoft Vista. The organization has 15 Windows servers that include Windows 2000, and Windows 2003. These servers are in a data room connected by a 1GB switch to the network backbone. Last year one of the organization’s application server disks failed. It took three days to get the server back up again. The backups were all current; however, there was no build process for the server. The technician who built the server had left the company. Because no one could find the build media for the OS or the application, in the end it took three frantic days to rebuild Chapter 2. Architecture and deployment scenarios 47
- 64. the server and bring it back on line. The CIO wants this procedure automated so that this situation never arises again. The topology of the site is laid out in Figure 2-7. Tivoli Provisioning Manager for OS deployment server DB High speed network backbone Other servers Workstations Figure 2-7 Small site topology The organization’s requirements for the solution are as follows: – The ability to automate the rebuild of current workstations. – The ability to automate the rollout of the new Microsoft Vista SOE. – The ability to rebuild new workstations with the new SOE. – The ability to easily manage the different versions of their SOE. – The ability to use Tivoli Provisioning Manager for OS Deployment as a component of their disaster recovery plan for individual servers in their server fleet. – The system should pay for itself in savings made in man hours spent deploying and redeploying workstations and server infrastructure. The organization chose Tivoli Provisioning Manager for OS Deployment as the tool to help them fulfill their requirements. The following is a description of how they set up their environment to exploit the tool to their best advantage. 48 Deployment Guide Series: Tivoli Provisioning Manager for OS Deployment V5.1
- 65. The design The requirements as stated above can easily be fulfilled by a single Tivoli Provisioning Manager for OS Deployment server located within the server farm in the data room. This server would, like the rest of the server fleet, be a Windows server. Server hardware A separate server was decided upon as the existing servers are currently all fairly heavily utilized. The specification of this server is appears in Table 2-3. Table 2-3 Small site server specification Quantity Server type Speed RAM Free Disk 1 Dual Xeon 1Ghz 1GB 10Gb This is the minimum specification for a Tivoli Provisioning Manager for OS Deployment server as documented in Tivoli Provisioning Manager for Operating System Deployment Guide (Fix Pack 1), SC32-2582. The implementation of the Tivoli Provisioning Manager for OS Deployment server is described in Chapter 3, “Installing the Tivoli Provisioning Manager for OS Deployment environment” on page 75. As there is going to be one PXE server and several subnets, it is important to set up DHCP with options 43 and 60 enabled and configured so that the workstations will know the IP address of the PXE server. A detailed explanation of these settings are in 3.4, “Advanced DHCP options” on page 115. Profiles Due to the fact that the CIO wants to see a quick return on his investment with an almost immediate reduction in the cost of rebuilding workstations, it is decided that the following approach to build profiles will be taken. Unattended setup profiles The current workstation fleet consists of a variety of hardware, and only adhoc rebuilds are currently being executed. So the decision is made to quickly implement an unattended set up of Windows 2000 and Windows XP that caters to the variety of hardware currently used by the organization. It takes the IT department just one day to assemble all of the drivers necessary to build the current Windows 2000 workstation and a Windows XP workstation. This unattended setup is ready for use in one day. The same process is used for the assembly of the server build. Chapter 2. Architecture and deployment scenarios 49
- 66. The steps in this process are detailed in 4.4, “Creating an unattended profile for Windows 2000” on page 171. Clone profile The move to Microsoft Vista is a longer term project. The IT department is developing a SOE that has the same base for all users plus certain applications for specific job roles. They studied the capabilities of Tivoli Provisioning Manager for OS Deployment closely and decided to deploy these common applications as a part of the base image and other optional applications where possible as part of the deployment. The step-by-step process for the creation of a Vista clone profile can be found in Chapter 5, “Installing Vista systems” on page 213. The process used to bind software packages to a deployment scheme implicitly through rules or explicitly can be found in 7.2.1, “Binding software packages to deployment schemes” on page 319. Software All software currently in the production SOE needs to be packaged so that when the rebuild of a current workstation takes place packages can be reloaded as part of that process. A number of packages are built for applications and customizations required by the SOE. These packages are bound to the deployment scheme as per the example in “Binding software packages to deployment schemes” on page 319. Deployment schemes A number of deployment schemes are to be set up to meet the following conditions: The rollout of new computer hardware with the Vista SOE installed The rebuild of a single computers Multicast rollout deployment scheme This scheme is used for new hardware deployments where groups of workstations are built together. The characteristics of this deployment scheme are detailed in Table 2-4. Table 2-4 Multicast rollout deployment scheme Settings Setting Comment General settings Allow BOM editing Never (Always run Not necessary, all host unattended) information to be pre loaded 50 Deployment Guide Series: Tivoli Provisioning Manager for OS Deployment V5.1
- 67. Settings Setting Comment Request User confirmation No No allowance of user rejection of build Enforce Model locking No Using a universal profile Deployment method Full Deployment Run sysprep at build time When deployment is done Show green screen For visual confirmation of completion Unbind configuration at the Yes Another configuration will end be bound later Deployment status report Store full log --------------------------------- Save deployment log to: --------------------------------- --------------------------------- Hardware inventory PCI, Disk, DMI Store hardware but no software Perform Inventory Locked --------------------------------- Network settings Before start wait 120 seconds To synchronize other multicast clients Bandwidth limitation 50Mbps Deployment will be across a production network, potentially during the day Deploy using unicast No Using Multicast Crypt network traffic No Within a private network Use “BIOS fall back MBR” No Not necessary. Tested the to start PXE adapter in this computer model Alternate image server --------------------------------- This build is to come from the designated server and no other Redeployment Redeployment partition --------------------------------- --------------------------------- User authentication --------------------------------- --------------------------------- Authentication options --------------------------------- --------------------------------- Software binding settings Chapter 2. Architecture and deployment scenarios 51
- 68. Settings Setting Comment Discard all other binding No Apply group and hardware rules binding Bound software --------------------------------- --------------------------------- Single computer deployment scheme This scheme is for general use in one-off deployments or system rebuilds. The deployment occurs over a production 100Mbps LAN, probably during business hours. The characteristics of this scheme are laid out in Table 2-5. Table 2-5 Single computer deployment scheme Settings Setting Comment General settings Allow BOM editing Only for unknown new host Unnecessary for rebuilds but possibly necessary for a new computer Request User confirmation Yes Allow a user to reject a rebuild Enforce Model locking No Using a universal profile Deployment method Full Deployment Run sysprep at build time When deployment is done Reboot the computer Ready for use Unbind configuration at the No This configuration end Deployment status report Store full log --------------------------------- Save deployment log to: --------------------------------- --------------------------------- Hardware inventory PCI, Disk, DMI store hardware but no software Perform Inventory Locked Network settings Before start wait --------------------------------- Not using Multicast Bandwidth limitation 50Mbps 50% of the 100Mbps production bandwidth Deploy using unicast Yes --------------------------------- 52 Deployment Guide Series: Tivoli Provisioning Manager for OS Deployment V5.1
- 69. Settings Setting Comment Crypt network traffic No Within a private network Use “BIOS fall back MBR” No Not necessary. Tested the to start PXE adapter in this computer model Alternate image server --------------------------------- There is no other local build server Redeployment Redeployment partition --------------------------------- --------------------------------- User authentication --------------------------------- --------------------------------- Authentication options --------------------------------- --------------------------------- Software binding settings Discard all other binding No Apply group and hardware rules binding Bound software --------------------------------- --------------------------------- Computer boot sequence There will be a variety of computer boot sequences for the different computers in the organization’s environment. These are detailed below including the reasoning behind each one. Servers Once built, servers will have their boot sequence changed to the following: 1. Hard Disk 2. CD ROM 3. Removable device 4. Network Boot To ensure that an inadvertent network boot does not start a deployment, the boot setting for the server group is set to boot from hard drive. For a deployment to occur this must be explicitly overridden. Workstations User workstations will be set to boot in the following order: 1. Hard Disk Chapter 2. Architecture and deployment scenarios 53
- 70. 2. CD ROM 3. Removable device 4. Network Boot These workstations will also have the RbAgent loaded. This will allow an administrator, in a situation where a workstation needs to be rebuilt, to shutdown and restart the computer off the network without needing to ask the user to change the boot order. Migration strategy Due to the small size of the organization, new profile and deployment schemes are not developed on the production server, but on dedicated workstations. Although not the ideal separate development environment that is best practice, this situation is the reality of many organizations that cannot justify the expenditure in the extra infrastructure necessary to build a dedicated test environment. So in this instance there is no migration as profiles are built on the production server. Security settings The organization runs an Active Directory for all its user authentication. It is decided that all users logging on to Tivoli Provisioning Manager for OS Deployment should also authenticate against Active Directory. Four user categories are defined within the system, and they are laid out in: Table 2-6. The roles range from Administrative access down to the sort of very restricted access that is given to contracted staff during a rollout. Table 2-6 Security roles Role Active HTTP console Security policy directory access group Administrator Administrators Access all areas No restriction Developer Developers OS Deployment - yes Deny changes to the server configuration Server Log files - yes Server parameters No Server status - Yes Operator Operators OS Deployment - yes Deny addition/removal of hosts Server Log files - No Deny any changes to RAD hosts Server parameters No Deny changes to the server configuration Server status - Yes 54 Deployment Guide Series: Tivoli Provisioning Manager for OS Deployment V5.1
- 71. Role Active HTTP console Security policy directory access group Installer Installers OS Deployment - yes Deny addition/removal of hosts Server Log files - No Deny any changes to RAD hosts Server parameters No Deny changes to RAD deployment schemes Server status - No Deny changes to RAD software packages Deny changes to RAD system profiles Deny changes to the server configuration 2.2.3 Enterprise architecture The target organization for our enterprise design is a growing organization based in London with branches in Wales, Scotland, England, and Northern Ireland. Each branch office has between 50 and 100 workstations and 4-10 servers. The organization wants the implementation to be global in nature, for example a central database for the deployment history and inventory. A central database also provides backup server capability. As is IT best practice, the organization wants the design to include a test facility for the creation and testing of profiles and packages. The test facility will include a development environment and a pre production environment. This environment will allow for the capture and testing of profiles, deployment schemes, and the export import process between environments. Following are the high-level requirements of the system: To develop a low-risk methodology of rolling out the new Vista SOE To reduce the cost and complexity of rebuilding a workstation To reduce the cost and complexity of rebuilding a server To make the rebuild process no touch To integrate the new tool into the existing corporate environment, tools and processes The design The requirements, stated in the previous section, can be fulfilled with Tivoli Provisioning Manager for OS Deployment server and a design that encompasses existing tools and processes within the organization. Chapter 2. Architecture and deployment scenarios 55
- 72. Test facility The test facility is being installed as two separate systems. First the development environment, then the pre production environment. Both of these environments are linked by a physical network and processes to migrate profiles from test to pre production. Figure 2-8 shows the topology of the test environment. Test facility Development environment Pre-production environment RAD archive transfer Same as production environment One standalone server + workstations – To a lower scale – On which new profiles, packages, … are created • 1 regional server only – One workstation of each type – Allows to test – Allows to test • Server replication • Tivoli Provisioning Manager for OS Deployment objects creation • Tivoli Provisioning Manager for OS Deployment archive importation • Tivoli Provisioning Manager for OS Deployment objects deployment • Deployment of RAD objects • Tivoli Provisioning Manager for OS Deployment • Backup mechanism in case of slave failure archive exportation Figure 2-8 Test facility Development environment This is a single server multi workstation environment. Development server hardware Table 2-7 shows you the development server hardware for the test facility. Table 2-7 Development server hardware Quantity Server type Speed RAM Free disk 1 Dual Xeon 1Ghz 1GB 10Gb 56 Deployment Guide Series: Tivoli Provisioning Manager for OS Deployment V5.1
- 73. Note: Tivoli Provisioning Manager for OS Deployment will work on a server of a lower specification; however, the performance of the system may be compromised. During the course of writing this IBM Redbooks publication, we ran a Tivoli Provisioning Manager for OS Deployment server on a variety of hardware including a single CPU, 512MB VMware workstation. Development client hardware Client hardware would ideally consist of one of every type of production client system being used in the organization. This includes desktop workstations, laptops, servers, and virtual systems. Development installation Installation of the Development Tivoli Provisioning Manager for OS Deployment server is simple as it uses the standard database, so it is just a matter of following the installation wizard. Pre-production environment The pre-production environment is a representative subset of the production environment. It consists of a master server, a slave server, and where possible one of each production target systems. Depending on the actual production topology it may be prudent to incorporate a simulated or real slow network link between the master and slave servers. For the purposes of this exercise we have drawn the pre-production environment with no reference to other systems. In reality the pre-production environment may be built within an existing pre-production environment representing a branch or department of an organization. This can be an important factor as the systems will be co-existing in the production environment and sharing resources such as server hardware and network bandwidth. It is important to understand how the replication of images between servers will affect ongoing transactions and backups. Pre-production server hardware Table 2-8 shows you the pre-production server hardware for the test facility. Table 2-8 Pre-production server hardware Quantity Server type Speed RAM Free disk 2 Dual Xeon 1Ghz 1GB 10Gb Chapter 2. Architecture and deployment scenarios 57
- 74. Pre-production client hardware Client hardware would ideally consist of one of every type of production client system being used in the organization. This would include desktop workstations, laptops, servers, and virtual systems. Pre-production installation The pre-production environment’s installation is a little different from the development environment in that it utilizes a multi-user relational database management system. The full explanation of the installation of Tivoli Provisioning Manager for OS Deployment with an alternate database is included in 3.1.2, “Using alternate Relational Database Management Systems” on page 80”. The most important thing to remember when installing with the alternate database is that the database and an ODBC source (system DSN named AutoDeploy) must be installed before the Tivoli Provisioning Manager for OS Deployment wizard is run. After both the servers are installed, a replication regime needs to be set up to replicate deployment profiles that are imported from the development server to the pre production master server so that the profiles are available on the slave server for deployment and testing. To be an accurate reflection of a production environment, this replication regime should be the same as that in the production environment. A discussion regarding the different replication methods is included in “Image replication” on page 33”. Production environment The production environment, as represented in Figure 2-9 on page 59, shows the five sites sharing the one RDBMS with the London site acting as the master. The London server hosts the RDBMS for the implementation and is a dedicated server. The four slave servers are all being run on the local file and print servers at their respective sites. 58 Deployment Guide Series: Tivoli Provisioning Manager for OS Deployment V5.1
- 75. Production server infrastructure The main Tivoli Provisioning Manager for OS Deployment server in London (M) M DB W S E NI One Tivoli Provisioning Manager for OS Deployment server Per region •Synchronized with the main Tivoli Provisioning Manager for OS Deployment •Utilizing the same database •Using the main Tivoli Provisioning Manager for OS Deployment in London as a backup server Workstations connected to the regional Tivoli Provisioning Manager for OS Deployment server Figure 2-9 Production environment The server specifications are in Table 2-9. Table 2-9 Server specifications Servers Applications Server Speed RAM Free disk run type London Tivoli Dual 1GHZ 2GB 100GB Master OProvisioning Xean Manager for OS Deployment DB2® Branch File and Print Dual 1GHZ 1.5 GB 60GB Servers - slave services Xeon Dedicated disk The master server is running 1GB of RAM for the Tivoli Provisioning Manager for OS Deployment server and 1GB for the DB2 server. As this will be a small database by any standard and there will be minimal querying, it is not necessary Chapter 2. Architecture and deployment scenarios 59
- 76. to increase the number of CPUs or to separate the DB2 off onto a separate server. 100GB of disk gives plenty of space for a large portfolio of images. The branch file and print servers were all running 512K of RAM. This was upgraded to 1.5GB when the Tivoli Provisioning Manager for OS Deployment was deployed along with a 60GB dedicated disk for images. Profiles The organization has approximately 400 workstations and 30 servers, and as such there are a variety of profiles that need to be made available to build and rebuild these computers. The function of the current builds are as follows: Transaction workstations. These are currently Windows XP and are primarily used to run the organization’s main transactional application, which is accessed via a Web browser. These users have access to an e-mail application and a number of other utility applications. They store no data on these computers and are allowed to make no changes to the look and feel of the operating environment. This control is exerted by security policy through Active Directory. The individual computers are not assigned to any one user. The employees who use the computers have no sense of ownership of them. Back office workstations. These workstations are currently also Windows XP but running many applications via a Web browser and loaded locally. These users do exercise a degree of autonomy over the look and feel of their computer as it is assigned to them and they use it exclusively. Within the various back office departments there are a variety of different applications loaded for different job roles. Although company policy is not to store data on the local computer hard drive, users do tend to have a lot of data stored locally. Power user workstations. These workstations are predominantly in the IT department, but there are a number scattered around the company via the informal network of friends. These are workstations based no the back office workstation but with fewer controls on configuration changes, usually with more memory, applications, and disk. Windows 2000 servers. The file and print services are all built on a Windows 2000 platform. It is a standard build but across a variety of models of server hardware 60 Deployment Guide Series: Tivoli Provisioning Manager for OS Deployment V5.1
- 77. Windows 2003 servers. The e-mail system, accounting application, and a number of back end IT systems, such as backup, run on a Windows 2003 platform. This platform is also across a variety of Hardware models. Linux business application servers. There are 10 X86 multi CPU Linux servers running the organization’s business application. Each site has two load balanced servers linked back to the master site in London. A Windows Vista™ SOE is in development for the various workstation categories previously mentioned. Unattended setup profiles It is decided that for all server builds, that is the Windows 2000, Windows 2003, and Linux server builds, that an unattended setup profile will be developed. This is because the predominant reason that one of the existing servers would be rebuilt would be as part of a disaster recovery, that being a machine or a site failure. If that were to happen, the chances that the hardware the organization would be able to use for the replacement server would not necessarily be the same or even come from the same vendor as the original server. Therefore it was thought that the unattended setup offered more flexibility in this instance. Clone profile A universal image is developed for all SOE versions. Across the 400 workstation computers, there are only 15 different models, so it is easy to build the necessary driver packages for injection into the image during the build process. The image is based upon the transaction workstation used by operators for face-to-face and phone-based transactions. A naming convention within the organization designates a workstation’s function and also the group that it is assigned to within Tivoli Provisioning Manager for OS Deployment. Each group has a profile bound to it so that when the workstation is built or rebuilt it automatically gets the correct profile. The driver packages are bound to the PCI ID of the component it supports and so are automatically installed with an image if the computer hardware requires the driver. The base software required by all users has been included in the universal profile. Deployment schemes A number of deployment schemes are to be set up to meet the following conditions: Chapter 2. Architecture and deployment scenarios 61
- 78. The bulk rollout of new computer hardware with the Vista SOE installed The rebuild of a single computer The build of a single computer The build of a redeployable computer. This equates to three deployment schemes. Details of those three schemes follow. Multicast rollout deployment scheme This scheme will be used for new hardware deployments on a dedicated build LAN where groups of 10-15 workstations will be built at once. The characteristics of this deployment scheme are detailed in Table 2-10. Table 2-10 Multicast rollout deployment scheme Settings Setting Comment General settings Allow BOM editing Never (Always run Not necessary, all host unattended) information to be pre loaded Request User confirmation No No allowance of user rejection of build Enforce Model locking No Using a universal profile Deployment method Full Deployment Run sysprep at build time When deployment is done Show green screen For visual confirmation of completion Unbind configuration at the Yes Another configuration will end be bound later Deployment status report Store full log ---------------------------------- Save deployment log to: ---------------------------------- ---------------------------------- Hardware inventory PCI, Disk, DMI Store hardware but no software Perform Inventory Locked ---------------------------------- Network settings Before start wait 120 seconds To synchronize other multicast clients 62 Deployment Guide Series: Tivoli Provisioning Manager for OS Deployment V5.1
- 79. Settings Setting Comment Bandwidth limitation None Dedicated build network Deploy using unicast No Using Multicast Crypt network traffic No Within a private network Use “BIOS fall back MBR“ No Not necessary, tested the to start PXE adapter in this computer model Alternate image server ---------------------------------- This build is to come from the designated server and no other Redeployment Redeployment partition ---------------------------------- ---------------------------------- User authentication ---------------------------------- ---------------------------------- Authentication options ---------------------------------- ---------------------------------- Software binding settings Discard all other binding No Apply group and hardware rules binding Bound software ---------------------------------- ---------------------------------- Single computer deployment scheme This scheme is for general use in one-off deployments or system rebuilds. The deployment will occur over a production 100Mbps LAN probably during business hours. The characteristics of this scheme are in Table 2-11. Table 2-11 Single computer deployment scheme Settings Setting Comment General settings Allow BOM editing Only for unknown new host Unnecessary for rebuilds but possibly necessary for a new computer Request User confirmation Yes Allow a user to reject a rebuild Enforce Model locking No Using a universal profile Deployment method Full deployment Run sysprep at build time Chapter 2. Architecture and deployment scenarios 63
- 80. Settings Setting Comment When deployment is done Reboot the computer Ready for use Unbind configuration at the No This configuration end Deployment status report Store full log ---------------------------------- Save deployment log to: ---------------------------------- ---------------------------------- Hardware inventory PCI, Disk, DMI Store hardware but no software Perform Inventory Locked ---------------------------------- Network settings Before start wait ---------------------------------- Not using Multicast Bandwidth limitation 50Mbps 50% of the 100Mbps production bandwidth Deploy using unicast Yes ---------------------------------- Crypt network traffic No Within a private network Use “BIOS fall back MBR“ No Not necessary. Tested the to start PXE adapter in this computer model Alternate image server ---------------------------------- There is not other local build server Redeployment Redeployment partition ---------------------------------- ---------------------------------- User authentication ---------------------------------- ---------------------------------- Authentication options ---------------------------------- ---------------------------------- Software binding settings Discard all other binding No Apply group and hardware rules binding Bound software ---------------------------------- ---------------------------------- Redeployment deployment scheme Due to the utility nature of the transaction workstations, these workstations will be deployed with a redeployment scheme. The workstations will have a customized menu with the following two options: 64 Deployment Guide Series: Tivoli Provisioning Manager for OS Deployment V5.1
- 81. 1. Quick Restore - this option will have a five second timer. 2. Full format and restore. This will ensure that every time the PC is rebooted it is returned to its pristine state reducing the need to log calls to the help desk for computer configuration issues. A screen shot of the menu is provided in Figure 2-10. Figure 2-10 Customized redeployment menu The deployment scheme settings are laid out in Table 2-12. Table 2-12 Redeployment deployment scheme Settings Setting Comment General settings Allow BOM editing Only for unknown new host Unnecessary for rebuilds but possibly necessary for a new computer Chapter 2. Architecture and deployment scenarios 65
- 82. Settings Setting Comment Request User confirmation No No allowance for a user to reject a rebuild Enforce Model locking No Using a universal profile Deployment method Full Deployment Run sysprep at build time When deployment is done Reboot the computer Ready for use Unbind configuration at the No This configuration and end deployment scheme are to be bound to this computer Deployment status report Store full log ---------------------------------- Save deployment log to: ---------------------------------- ---------------------------------- Hardware inventory PCI, Disk, DMI Store hardware but no software Perform Inventory Locked ---------------------------------- Network settings Before start wait ---------------------------------- Not using Multicast Bandwidth limitation 50Mbps 50% of the 100Mbps production bandwidth Deploy using unicast Yes ---------------------------------- Crypt network traffic No Within a private network Use “BIOS fall back MBR“ No Not necessary, tested the to start PXE adapter in this computer model Alternate image server ---------------------------------- There is not other local build server Redeployment Redeployment partition 2000 Mb The size of the SOE User authentication Does not require ---------------------------------- authentication Authentication options ---------------------------------- ---------------------------------- Software binding settings 66 Deployment Guide Series: Tivoli Provisioning Manager for OS Deployment V5.1
- 83. Settings Setting Comment Discard all other binding No Apply group and hardware rules binding Bound software ---------------------------------- ---------------------------------- Computer boot sequence There will be a variety of computer boot sequences for the different computers in the organization’s environment. These are detailed in the following sections, including the reasoning behind each one. Servers After built, servers will have their boot sequence changed to the following: 1. Hard Disk 2. CD ROM 3. Removable device 4. Network Boot To ensure that an inadvertent network boot does not start, a deployment boot setting for the server group is set to boot from hard drive. For a deployment to occur this must be explicitly overridden. Transaction workstations The Transaction workstations that will have a redeployment image stored locally will be permanently set to boot in the following order: 1. Network 2. CD ROM 3. Removable device 4. Hard disk Booting off the network or the hard drive looks the same on a redeployable computer. There are two extra screens: the Tivoli splash screen and the Redeployment menu. However when booted off the network those screens are sourced from the Tivoli Provisioning Manager for OS Deployment server and therefore can be changed by the administrator, adding or removing items without it being necessary to visit each computer. It is also possible to send a new image to the computer without any physical contact to it. Chapter 2. Architecture and deployment scenarios 67
- 84. Back office and power user workstations The back office and power user workstations will be set to boot in the following order: 1. Hard disk 2. CD ROM 3. Removable device 4. Network boot These workstations will also have the RbAgent loaded. This will allow an administrator, in a situation where a workstation needs to be rebuilt, to shutdown and restart the computer off the network without needing to ask the user to change the boot order. Profile migration Profiles will be developed in the Test environment and initially tested there. After a profile is ready for production migration, it will be migrated from Test to pre production via a DVD. This process is explained in detail in ““Migration strategy” on page 54”. After the profile is tested in the pre production environment, the same DVD that was imported to pre production can be imported into the production environment. Using the same DVD ensures the integrity of the profile. Image replication Image replication between the different sites is going to be executed using the current replication tool in production within the organization. It was decided to use the current tool for a number of reasons: 1. Replication really only needs to occur on an ad-hoc basis; therefore, having another scheduled task on the network was an unnecessary management overhead. 2. Control. The organization has run on minimal network bandwidth between sites for many years. A focus on the traffic flowing over these network links made any upgrades unnecessary. By using the current replication tool, control over the traffic can be maintained. 3. The ability to stop and restart a replication, checkpoint restart capability, and adaptive bandwidth control are not part of the built-in replication service. Security settings The organization’s central authentication service is Microsoft Active Directory. It is decided that this will also be used for authentication in the Tivoli Provisioning Manager for OS Deployment solution. 68 Deployment Guide Series: Tivoli Provisioning Manager for OS Deployment V5.1
- 85. Four user groups are created within Active Directory, one for each Tivoli Provisioning Manager for OS Deployment role. In the HTTP Console Security screen, the Active Directory groups are defined within each Tivoli Provisioning Manager for OS Deployment role. Then when users are subscribed to the Active Directory groups according to their designated role, they inherit access to the Tivoli Provisioning Manager for OS Deployment role. The four roles defined within the organization’s system are laid out in: Table 2-13. Table 2-13 Security roles Role Active HTTP console Security policy directory access group Administrator Administrators Access all areas No restriction Developer Developers OS Deployment - yes Deny changes to the server configuration Server Log files - yes Server parameters No Server status - Yes Operator Operators OS Deployment - yes Deny addition/removal of hosts Server Log files - No Deny any changes to RAD hosts Server parameters No Deny changes to the server configuration Server status - Yes Installer Installers OS Deployment - yes Deny addition/removal of hosts Server Log files - No Deny any changes to RAD hosts Server parameters No Deny changes to RAD deployment schemes Server status - No Deny changes to RAD software packages Deny changes to RAD system profiles Deny changes to the server configuration The company expands As is the way of the world our organization merges with another multinational organization. It is decided to expand the Tivoli Provisioning Manager for OS Deployment system. The new organization is spread around the world with offices in France, Spain, Austria, Germany, Japan, India, and Taiwan. The head office is still based in London. The existing architecture needs to be changed to more effectively deal with the larger organization. Architecture The new architecture will incorporate three tiers and break the organization up into the following three regions: Great Britain Europe Chapter 2. Architecture and deployment scenarios 69
- 86. Asia London will remain the master site. There will be four separate databases: a master in London and one each in the English, European, and Asian hub sites. There will be no replication of host information between these databases, only profile and deployment scheme data. The physical layout is shown in Figure 2-11. Adapting the production environment • Level 1 server has an independent database – Specific replication mechanism between level 1 and 2 servers Level • Level 2 and 3 servers share databases London • Level 2 are backup for level 3 servers 1 Great-Britain Europe Asia 2 3 Figure 2-11 Expanded production environment Profile development will continue to be done at the London master site. It is at this point that profiles are introduced to the system for replication out to the regions. Replication As with the original architecture, the actual replication of data is done using a third-party replication tool. The third-party tool allows the organization to manage the replication requirements of Tivoli Provisioning Manager for OS Deployment along with the rest of their data replication with one tool. In a large and complex environment such as this, being able to stop and start replication, dynamically 70 Deployment Guide Series: Tivoli Provisioning Manager for OS Deployment V5.1
- 87. adjust bandwidth utilization to the level of traffic on the network, and schedule data movement adds real value. The process to drive replication from the command line is described in “Image replication” on page 33. Test environment Just as the architecture of the production environment has changed with the expansion of the organization, the test facility must change as well. There is little point to having a pre-production environment if it does not mirror production in at least the major functions. In the case of the test facility, to mirror production we need to add another level of server to replicate the master site. The server that was the master server will now replicate that of a regional center. The new master server will have its own database that will not contain any host information. This information is kept down at the regional level. This architecture is shown in Figure 2-12. Adapting the test facility • Development server remains identical • Pre-production server adds one level of servers RAD archive transfer Figure 2-12 Expanding the test facility Chapter 2. Architecture and deployment scenarios 71
- 88. 72 Deployment Guide Series: Tivoli Provisioning Manager for OS Deployment V5.1
- 89. Part 2 Part 2 Deployment In part two we discuss deployment scenarios with Tivoli Provisioning Manager for OS Deployment. This part also includes actual deployment steps. © Copyright IBM Corp. 2007. All rights reserved. 73
- 90. 74 Deployment Guide Series: Tivoli Provisioning Manager for OS Deployment V5.1
- 91. 3 Chapter 3. Installing the Tivoli Provisioning Manager for OS Deployment environment This chapter provides information about prerequisites for the installation as well as the installation procedure for Tivoli Provisioning Manager for OS Deployment server on Windows and Linux platforms. It also gives an overview of Web interface extension. Following is a list of topics: “Server installation on Windows systems” on page 76 “Installing the server on Linux systems” on page 91 “Initial login and installation verification” on page 112 “Advanced DHCP options” on page 115 “Web interface extension” on page 123 © Copyright IBM Corp. 2007. All rights reserved. 75
- 92. 3.1 Server installation on Windows systems This chapter gives you a step-by-step guide to the product installation on Windows. Installation was done on Windows 2003 but should be the same for all supported Windows platforms. 3.1.1 Prerequisites In this chapter we list hardware and software prerequisites for installation of Tivoli Provisioning Manager for OS Deployment server on Windows. These prerequisites are for product version 5.1.0.1. Please consult product documentation for a complete list of prerequisites. You can find the latest documentation of all Tivoli products at the following Web site: http://publib.boulder.ibm.com/tividd/td/tdprodlist.html Hardware prerequisites Table 3-1 lists the minimum requirements for Tivoli Provisioning Manager for OS Deployment server installation. Table 3-1 Tivoli Provisioning Manager for OS Deployment server system requirements Server type Processor speed RAM Free disk space Dual-Xeon 1 GHz CPU Minimum 1 GB Minimum 10 GB Table 3-2 contains the configuration information of the machine used in our lab as the Tivoli Provisioning Manager for OS Deployment Windows server. Table 3-2 Lab Windows server configuration Server type Processor speed RAM Free disk space Intel® Pentium® 4 3.0 GHz 1.5 GHz 80 GB Software prerequisites Tivoli Provisioning Manager for OS Deployment server on Windows platform has to be installed on one of the following Windows versions: Windows 2000 Server Windows 2003 Server Tivoli Provisioning Manager for OS Deployment requires a functional DHCP server in the environment. Database for storing information about hosts, deployment states, and other data required by the server is also required. 76 Deployment Guide Series: Tivoli Provisioning Manager for OS Deployment V5.1
- 93. DHCP prerequisites For Tivoli Provisioning Manager for OS Deployment to operate properly a functional DHCP server is required. If options 43 or 60 are set, remove them. If you do not know what options 43 and 60 are or how to set them, please check 3.4, “Advanced DHCP options” on page 115. There are two possible scenarios: Tivoli Provisioning Manager for OS Deployment server and DHCP server reside on different machines. Tivoli Provisioning Manager for OS Deployment server and DHCP server reside on the same machine. In the first case where two different machines are used, you do not have to configure anything on DHCP server. Tivoli Provisioning Manager for OS Deployment server listens to DHCP requests sent by PXE clients and offers PXE parameters without disturbing normal DHCP operation. Important: If your Tivoli Provisioning Manager for OS Deployment server and DHCP server reside on the same machine you must set DHCP option 60 (class identifier) to PXEClient. In the second case, you need to specify option 60 to PXEClient on DHCP server to let clients know that Tivoli Provisioning Manager for OS Deployment server is on the same IP address as the DHCP server. Adding DHCP option 60 to Windows 2000/2003 DHCP server By default, option 60 is not set on Windows 2000/2003. If the Tivoli Provisioning Manager for OS Deployment server is running on the same host as the DHCP server, you have to add this option and set its value to PXEClient in order to tell PXE clients that both servers are on the same machine. Use the following steps to add option 60 on Windows 2000: 1. Open a command window (select Start → Run → cmd). 2. Type netsh. 3. Type dhcp. 4. Type server servername or server ip_address. You should then see a command prompt that says: dhcp server>. 5. Type add optiondef 60 PXEClient STRING 0 comment=”Enable PXE boot”. 6. Type set optionvalue 60 STRING PXEClient. 7. To confirm that everything was set correctly, type show optionvalue 60. Chapter 3. Installing the Tivoli Provisioning Manager for OS Deployment environment 77
- 94. Following is an example of setting up option 60 on Windows DHCP server in our environment. Command netsh was started locally on the DHCP server. Example 3-1 Setting DHCP option 60 in Windows C:>netsh netsh>dhcp netsh dhcp>server localhost netsh dhcp server>add optiondef 60 PXEClient STRING 0 comment="Enable PXE boot" Command completed successfully. netsh dhcp server>set optionvalue 60 STRING PXEClient Command completed successfully. netsh dhcp server>show optionvalue 60 DHCP Standard Option : General Option Values: OptionId : 60 Option Value: Number of Option Elements = 1 Option Element Type = STRING Option Element Value = PXEClient Command completed successfully. netsh dhcp server>exit Note: Due to the nature of PXE, you cannot run two PXE servers on the same machine at the same time. If you installed another PXE boot tool such as Microsoft ADS, you should disable it prior to installing Tivoli Provisioning Manager for OS Deployment. Adding DHCP option 60 to a host with ISC DHCP server If you are using the Internet Software Consortium (ISC) DHCP server 2.0, you can add the DHCP option 60 to a group of hosts or to a single host by adding the following statement to a section of the configuration file: option dhcp-class-identifier “PXEClient”; If you were using option 43 (vendor-encapsulated-options) for another PXE application, remove it for Tivoli Provisioning Manager for OS Deployment hosts. 78 Deployment Guide Series: Tivoli Provisioning Manager for OS Deployment V5.1
- 95. The modifications to perform on an ISC DHCP server 3.0 are the same as for a 2.0 server, but the names differ: For the hosts running Tivoli Provisioning Manager for OS Deployment you have to add the following statement: vendor-class-identifier “PXEClient”; If you are running any other PXE applications you have to remove any occurrences of the following statement: option space PXE; The Tivoli Provisioning Manager for OS Deployment server will respond to all requests, including requests originating from unknown hosts. If the option “Completely ignore unknown hosts” is set for the server, it will only respond to discovery requests originating from known hosts. You can specify either the IP address or the Ethernet address on the host list. At this stage the IP address of the remote-boot client is known. Tip: The VMWare DHCP server is actually ISC DHCP 2.0. This allows you to configure options 43 and 60 for your virtual machines without needing to install and configure DHCP additional servers inside one of the virtual machines. Database prerequisites When installed for the first time on Windows, Tivoli Provisioning Manager for OS Deployment can set up a Microsoft Access database that is used for storing all parameters and host inventory. You do not need MS Access to use it, the MDAC component of Windows 2000/XP/Vista (and freely available for other versions of Windows from the Microsoft Web site) is sufficient for Tivoli Provisioning Manager for OS Deployment to work. Although this database is sufficient for using Tivoli Provisioning Manager for OS Deployment with a few hundred clients, you might need to customize or convert the database for integration into a corporate environment. Tivoli Provisioning Manager for OS Deployment supports custom databases, and any ODBC compliant database engine such as DB2, Microsoft SQL Server, or Oracle®. If you want to use your own ODBC/JDBC™ source, ensure that it was created as a System DSN (not a User DSN) because it has to be usable by the Tivoli Provisioning Manager for OS Deployment Server service. Before starting the installation of Tivoli Provisioning Manager for OS Deployment server, create an empty database and a System DSN pointing to this database. Tivoli Provisioning Manager for OS Deployment server automatically populates the database with the necessary tables. You can find detailed instructions on how to create ODBC data source in “Creating the ODBC data source” on page 82. Chapter 3. Installing the Tivoli Provisioning Manager for OS Deployment environment 79
- 96. Note: If you want to use a database other than Microsoft Access, create the database and ODBC data source before you start installing Tivoli Provisioning Manager for OS Deployment server. The ODBC data source has to be defined on the same machine where Tivoli Provisioning Manager for OS Deployment server will be installed. 3.1.2 Using alternate Relational Database Management Systems In our lab we decided to test Tivoli Provisioning Manager for OS Deployment with DB2. This chapter describes how to configure DB2-based ODBC data source for use with Tivoli Provisioning Manager for OS Deployment. The instructions given here are for DB2 but should be similar for any other ODBC compliant database. Important: ODBC data source configuration is done on Tivoli Provisioning Manager for OS Deployment server. The data source has to be system data source, not user data source. Creating the DB2 database When creating the DB2 database, no special options are required. Also you are not required to create database tables in the database. These are created automatically the first time Tivoli Provisioning Manager for OS Deployment server connects to the database. All you have to do is create the database. Use the following steps to create a DB2 database: 1. Start a DB2 command line by selecting Start → Run → db2cmd. 2. Type db2 create db tpmosd. Figure 3-1 on page 81 shows the output. 80 Deployment Guide Series: Tivoli Provisioning Manager for OS Deployment V5.1
- 97. Figure 3-1 Creating DB2 database on Windows ODBC driver installation If your database resides on a remote DB2 server you must have an ODBC driver installed on the Tivoli Provisioning Manager for OS Deployment server to connect to that database. If your database is on the same machine as Tivoli Provisioning Manager for OS Deployment server, this driver was already installed when you installed DB2 Server. There are many ways to install the DB2 ODBC driver. This driver is shipped with DB2 Server, DB2 Administrative Client, and DB2 Run-time Client. If you do not have any of the mentioned components installed on the Tivoli Provisioning Manager for OS Deployment server machine you can download and install DB2 Run-time Client Lite. This package has less than 20 MB and you can get it from the following location: https://www6.software.ibm.com/dl/rtcl/rtcl-p Use your IBM user ID to log on to the page. If you do not have one you can freely register using the link on the same page. After you download the package, install DB2 Run-time Client “Lite” using Typical install. Chapter 3. Installing the Tivoli Provisioning Manager for OS Deployment environment 81
- 98. Creating the ODBC data source Perform the following steps to create an ODBC data source: 1. To start ODBC Data Source Administrator choose: On Windows 2000: Start → Settings → Control Panel → Administrative Tools → Data Sources (ODBC) On Windows 2003: Start → Control Panel → Administrative Tools → Data Sources (ODBC) 2. After you start the ODBC Data Source Administration program, select the System DSN tab. You should see the following panel. If you included Microsoft Access database in the installation you will see the AutoDeploy data source already defined. You can see it is using Microsoft Access driver. See Figure 3-2. Figure 3-2 ODBC Data Source Administrator 3. If you have the AutoDeploy data source defined, delete it by selecting the data source, and then clicking the Remove button. Click Yes when asked for confirmation. 4. To create a new data source click the Add... button. You are presented with a screen that lists all of the ODBC drivers on the system. Find the IBM DB2 ODBC DRIVER item in the list, and select it. Click Finish as shown in Figure 3-3 on page 83. 82 Deployment Guide Series: Tivoli Provisioning Manager for OS Deployment V5.1
- 99. Figure 3-3 Select ODBC driver 5. After you select the correct ODBC driver, enter the parameters required to define an ODBC data source. First, enter the ODBC data source name. The ODBC data source name must be AutoDeploy (See Figure 3-4). If your database is on this machine you can select it from the Database alias pull-down menu. Figure 3-4 Selecting ODBC data source name and the database alias it points to 6. If your database is on the remote machine, add the database to this menu by clicking the Add button. Note that this button is disabled if the Data source name field is empty. After you click the Add button, you can define parameters for connection to your database. 7. Verify that the Data source name field is set to AutoDeploy. Click the TCP/IP tab, and type the required parameters. The database name and alias should match the name of the database you created. In the Host name field you can enter either the host name or the IP address of the database server. Finally, the port number has to correspond to the instance in which the database is Chapter 3. Installing the Tivoli Provisioning Manager for OS Deployment environment 83
- 100. created. The default for a single-instance database server is 60000. If unsure, contact your database administrator. See Figure 3-5. Figure 3-5 Connecting to remote DB2 database 8. Click the OK button to create the data source. You should see the AutoDeploy data source in the list of defined ODBC data sources, as shown in Figure 3-6. Figure 3-6 Defined AutoDeploy ODBC data source 84 Deployment Guide Series: Tivoli Provisioning Manager for OS Deployment V5.1
- 101. 9. To verify this ODBC data source click the Configure... button, and enter credentials for connection to the database in the User ID and Password fields. Test the connection by clicking the Connect button. See Figure 3-7. Figure 3-7 Testing connection to ODBC data source 10.If you get the message “Connection tested successfully”, then your ODBC data source is properly defined. If you get an error message verify your connection settings. 3.1.3 Installing the Tivoli Provisioning Manager for OS Deployment server Perform the following steps to install the Tivoli Provisioning Manager for OS Deployment server: 1. When you run the installation program, the very first screen of the installation requires you to choose the language of the installation. Some options use Asian fonts and will appear as boxes if you do not have proper fonts installed (See Figure 3-8 on page 86). If you do not intend to use one of the Asian languages for installation, you do not have to worry about this. Chapter 3. Installing the Tivoli Provisioning Manager for OS Deployment environment 85
- 102. Figure 3-8 Choose language 2. After the welcome screen and product license you a screen appears that allows you to choose Tivoli Provisioning Manager for OS Deployment components (Figure 3-9 on page 87). By default all components are installed, and in typical installations you do not need to change these defaults. If for some reason you do want to change them, following is what they stand for: – OS Deployment server - Tivoli Provisioning Manager for OS Deployment core server installation files - if you deselect this one you will not install the server. – ODBC Gateway - this service allows Tivoli Provisioning Manager for OS Deployment clients to use an ODBC source to retrieve their configuration and to store inventory information in a database. This service is automatically started and stopped when the Tivoli Provisioning Manager for OS Deployment server service is started and stopped. – Access data file - in order to have an ODBC data source out-of-the-box, Tivoli Provisioning Manager for OS Deployment ships with a prebuilt Microsoft Access database. If you plan on using a different database you do not have to install this component. Take note that Tivoli Provisioning Manager for OS Deployment server will not function properly until you configure this other data source. – Multilingual interface - you can choose which languages will be available in the user interface by selecting/deselecting items under this option. – Web interface extension - this option allows you to use Web interface. If you do not install this option you will not be able to use Web interface for product administration and configuration. 86 Deployment Guide Series: Tivoli Provisioning Manager for OS Deployment V5.1
- 103. Figure 3-9 Choose components 3. The following screen allows you to specify the server data folder. This folder is used for storing images, Rembo Auto Deploy (RAD) export/import files, server and client log files, and other data required by the server. Make sure this location has sufficient space since client images can have several gigabytes of data. Figure 3-10 Select server data folder 4. We are using Web console to administer our server. To do so we need to configure ports on which our server will run. These ports must not be in use Chapter 3. Installing the Tivoli Provisioning Manager for OS Deployment environment 87
- 104. by other programs. The default ports are 8080 for HTTP (non-encrypted) communication and 443 for HTTPS (encrypted) communication. You must change these if they conflict with other open ports on the server. Checking the Disable HTTPS console access check box disables HTTPS access to the console, and you will be able to connect to the console using only HTTP. If you choose to use HTTPS, a self-signed certificate is automatically created. See Figure 3-11. Figure 3-11 Choose ports 5. The screen in Figure 3-12 on page 89 allows you to enter super-user’s username and password. This username and password is for initially logging onto the console. It is also used when setting up replication between servers. This user ID is intended to be used only by the main OS provisioning server administrator in order to get access to all configuration parameters of the server. There is only one super-user login. You can specify additional users and assign them different permissions using administrative console. Note: Super-user ID is not created on the operating system. Credentials for this user are only created and stored in the rembo.conf file. Web interface extension (also known as RbAgent) is a very useful part of Tivoli Provisioning Manager for OS Deployment. It allows the administrators to remotely access local drives, reboot machines in order to start the provisioning process, collect DMI scan information, and so on. 88 Deployment Guide Series: Tivoli Provisioning Manager for OS Deployment V5.1
- 105. Figure 3-12 Enter administrator’s credentials The credentials you enter on the screen in Figure 3-13 on page 90 are used to run the Web interface extension service. Make sure this account has enough privileges to access the folders and files you want to use with Tivoli Provisioning Manager for OS Deployment. It also has to have “Logon as a service” privilege. Tip: To assign “Log on as a Service” right to a user on Windows 2000/2003 server, click Control Panel → Administrative Tools → Local Security Policy → Local Policies → User Rights Assignments → Log on as a service. Since we were working in a lab environment and wanted to have full access to all drives and directories we used a local administrative account. For more information on this topic go to 3.5, “Web interface extension” on page 123. Chapter 3. Installing the Tivoli Provisioning Manager for OS Deployment environment 89
- 106. Figure 3-13 Configure Web interface extension 6. If Tivoli Provisioning Manager for OS Deployment installation detects a system ODBC data source called “AutoDeploy”, it will present you with the following screen in Figure 3-14. The ODBC driver might be different depending on the Relational Database Management System (RDBMS) you use. Enter the required credentials to connect to the data source. Figure 3-14 ODBC data source credentials 90 Deployment Guide Series: Tivoli Provisioning Manager for OS Deployment V5.1
- 107. 7. That is all the information required to install Tivoli Provisioning Manager for OS Deployment server. Click Next and then Install to complete the installation of the product. 3.2 Installing the server on Linux systems This section describes the installation of Tivoli Provisioning Manager for OS Deployment on Linux operating systems. Although we refer to a specific release of the Tivoli Provisioning Manager for OS Deployment, 5.1.0.0, and to a specific distribution of Linux, the SuSE Linux Enterprise Server 9, the steps you perform are very similar among different releases of the product and different distributions of Linux. Starting from a standard installation of a Linux operating system, we present a complete sequence of instructions that will lead to a running Tivoli Provisioning Manager for OS Deployment environment using IBM DB2 as the RDBMS. Furthermore some tuning and configuration steps are performed in order to have the environment working at each boot of the machine. Tivoli Provisioning Manager for Operating System Deployment Guide (Fix Pack 1), SC32-2582 only describes the UNIX/Linux installation using a MySQL database. We walk you through the steps of installing the product to work with a DB2 database; moreover, we will provide some details to let advanced users tune and configure the Tivoli Provisioning Manager for Operating System Deployment. The following shows how to build a Tivoli Provisioning Manager for OS Deployment environment using the following five main steps: 1. Install the Relational Database Management System. 2. Install the Tivoli Provisioning Manager for OS Deployment server. 3. Configure the Tivoli Provisioning Manager for OS Deployment environment. 4. Run the Tivoli Provisioning Manager for OS Deployment environment. 5. Upgrade using fixpacks (optional). We start with discussing the prerequisites that the Tivoli Provisioning Manager for OS Deployment environment needs, then we go through each of the previously mentioned five steps. Chapter 3. Installing the Tivoli Provisioning Manager for OS Deployment environment 91
- 108. 3.2.1 Prerequisites Planning the Tivoli Provisioning Manager for OS Deployment installation means checking if our environment meets the product requirements. We will overlook the client requirements since it is not the intent of this section; instead, we focus on the server component requirements. Software requirements As stated in Tivoli Provisioning Manager for Operating System Deployment Guide (Fix Pack 1), SC32-2582, the supported Linux platforms are the following: Fedora Core 3,4,5 (i386™) Red Hat Enterprise Linux: RHEL3, RHEL4 (i386) SuSE Linux Professional: 8,9,10 (i386) SuSE Linux Enterprise Server: SLES9 (i386) Debian GNU/Linux: Debian Sarge 3.1 (i386) We meet these requirements using the machine manchester.itsc.austin.ibm.com, equipped with a SuSE Linux Enterprise Server 9 whose kernel version is 2.6.5-7.97-smp. Tivoli Provisioning Manager for Operating System Deployment Guide (Fix Pack 1), SC32-2582 shows a supported RDBMS (for the UNIX/Linux installation) only, the MySQL database, explaining in detail how to use it with the product. Although not mentioned in the manual at the time of writing this IBM Redbooks publication, the IBM DB2 database is officially supported. We will use the latter, IBM DB2 Universal Database™ (UDB) Enterprise Server Edition (ESE) V8.1, because the Tivoli Provisioning Manager for OS Deployment server needs a reliable database to avoid inconsistency and data corruption. Another reason to use IBM DB2 is the possibility to have more synchronized Tivoli Provisioning Manager for OS Deployment servers distributed on different machines that can share the same database. This is the case where the advanced feature of the IBM DB2 can be configured to obtain better performance. Since the Tivoli Provisioning Manager for OS Deployment data are mostly stored on a file system, it could be useful to use a RAID system to prevent some common risks. On some Linux distributions, it can be performed by the operating system itself. The last prerequisite is a DHCP server, correctly configured to support the PXE-boot server provided by the Tivoli Provisioning Manager for OS Deployment server. It may happen that the DHCP server is installed on a different machine 92 Deployment Guide Series: Tivoli Provisioning Manager for OS Deployment V5.1
- 109. from the Tivoli Provisioning Manager for OS Deployment server or they may reside on the same machine; nonetheless, both the configurations are supported. Hardware requirements The hardware requirements for the machine where the Tivoli Provisioning Manager for OS Deployment will run are described in Table 3-3: Table 3-3 Tivoli Provisioning Manager for OS Deployment server hardware requirements Server Type Processor Speed RAM Free Disk space Dual-Xeon 1GHz CPU 1 GB 10 GB The manchester.itsc.austin.ibm.com machine that we use is an IBM xSeries® 342 provided with the following equipment: Table 3-4 Hardware used for the Tivoli Provisioning Manager for OS Deployment server Server Type Processor Speed RAM Free Disk space IBM xSeries 342 2 x 1GHz 2 GB 60 GB 3.2.2 Installing the Relational Database Management System As previously mentioned we will install the IBM DB2 Relational Database Management System version 8.1. Access to the database is performed through a component of the Tivoli Provisioning Manager for OS Deployment server that is called Database gateway (DBGW). It was designed to interface the product to the deployment database managed by the Relational Database Management System. On UNIX/Linux systems, the DBGW is a Java™ archive (dbgw.jar) that connects the Tivoli Provisioning Manager for OS Deployment server to the Relational Database Management System using the JDBC connection. IBM DB2 supports four types of JDBC connections depending on the environment and the components installed. Since the IBM DB2 will be installed on the same machine where the Tivoli Provisioning Manager for OS Deployment will run, we describe the details of setting up a database connection only in this specific configuration. For further details on JDBC and DB2 connectivity, read the document at the following Web address: http://www-128.ibm.com/developerworks/db2/library/techarticle/0203zikop oulos/0203zikopoulos.html Chapter 3. Installing the Tivoli Provisioning Manager for OS Deployment environment 93
- 110. Manually installing with the db2_install script We will start the IBM DB2 Universal Database (UDB) Enterprise Server Edition (ESE) V8.1 database installation using the db2_install script. For more details about the IBM DB2 product, refer to the IBM DB2 Information Center at the following Web location: http://publib.boulder.ibm.com/infocenter/db2luw/v8//index.jsp Usually the IBM DB2 installer for Linux systems is provided in a tar.gz format. Unpack it, and run db2_install command with -p option, indicating the acronym of the DB2 product to be installed: ./db2_install -p ese With this command, the IBM DB2 Universal Database (UDB) Enterprise Server Edition (ESE) V8.1 is installed on the default path /opt/IBM/db2/V8.1. We use the default configuration for kernel parameters, semaphore array, and message queue limits, as shown by the ipcs -l command. See Example 3-2. Example 3-2 ipcs -l command manchester:/opt/IBM/db2/V8.1 # ipcs -l ------ Shared Memory Limits -------- max number of segments = 4096 max seg size (kbytes) = 262144 max total shared memory (kbytes) = 8388608 min seg size (bytes) = 1 ------ Semaphore Limits -------- max number of arrays = 1024 max semaphores per array = 250 max semaphores system wide = 32000 max ops per semop call = 32 semaphore max value = 32767 ------ Messages: Limits -------- max queues system wide = 1024 max size of message (bytes) = 8192 default max size of queue (bytes) = 16384 After the installation, manually set the DB2 server. Following is the procedure we will perform: 1. Create group and user IDs for a DB2 installation. 2. Create a DB2 Administration Server (DAS). 94 Deployment Guide Series: Tivoli Provisioning Manager for OS Deployment V5.1
- 111. 3. Create an instance using db2icrt. 4. Create links for DB2 |files (Optional). 5. Configure TCP/IP communications for a DB2 instance. 6. Update the product license key. Creating the needed user and group accounts is performed on Linux with the groupadd and mkuser commands: Example 3-3 groupadd and mkuser commands groupadd -g 999 db2iadm1 groupadd -g 998 db2fadm1 groupadd -g 997 dasadm1 mkuser -u 1004 -g db2iadm1 -m -d /home/db2inst1 db2inst1 mkuser -u 1003 -g db2fadm1 -m -d /home/db2fenc1 db2fenc1 mkuser -u 1002 -g dasadm1 -m -d /home/dasusr1 dasusr1 Then, we create the DB2 Administration Server with the dascrt command: /opt/IBM/db2/V8.1/instance/dascrt -u dasusr1 The next step creates the DB2 instance with the db2icrt command: /opt/IBM/db2/V8.1/instance/db2icrt -a server -u db2fenc1 db2inst1 To run JDBC programs on UNIX/Linux systems with DB2 JDBC support, ensure that the DB2 parameter JDK_PATH is correctly set pointing to an existing JDK™ path. If you need to modify the DB2 configuration to set the correct JDK_PATH parameter, you should run the following commands after logging in as the instance owner: Example 3-4 Setting the correct JDK_PATH parameter db2 update dbm cfg using JDK_PATH /opt/IBMJava2-142 db2 update admin cfg using JDK_PATH /opt/IBMJava2-142 Since we will use the IBM DB2 Driver for JDBC and SQLJ type 4 connectivity, we only need to enable the DB2 TCP/IP listener. To do this, first we need to check that the file /etc/services contained in the port that will be used by the DB2 listener for the TCP/IP connections. In our case the TCP/IP listener DB2_db2inst1 will use the 60000 port: Example 3-5 /etc/services file manchester:/ # cat /etc/services | grep DB2 ibm-db2 523/tcp # IBM-DB2 Chapter 3. Installing the Tivoli Provisioning Manager for OS Deployment environment 95
- 112. ibm-db2 523/udp # IBM-DB2 questdb2-lnchr 5677/tcp # Quest Central DB2 Launchr questdb2-lnchr 5677/udp # Quest Central DB2 Launchr DB2_db2inst1 60000/tcp DB2_db2inst1_1 60001/tcp DB2_db2inst1_2 60002/tcp DB2_db2inst1_END 60003/tcp After logged as the instance owner (db2inst1 in our case), to activate the TCP/IP listener that will provide the needed JDBC connectivity we have to insert the port number in the DB2 server configuration and set the environment variable DB2COMM to TCP/IP. Example 3-6 Setting the environment variable DB2COMM db2set DB2COMM=TCPIP db2 update dbm cfg using SVCENAME 60000 You need to restart the DB2 server now: Example 3-7 Restart the DB2 server ./db2stop ./db2start The last step of the installation requires that you activate the license of the IBM DB2 product, as shown in Example 3-8: Example 3-8 Activate the license of the IBM DB2 product db2instance_path/adm/db2licm -a db2ese.lic DBI1402I License added successfully If you are logged as user db2inst1 you can start your db2 instance with the db2start command and create the deployment database that will be used by TPM for OS Deployment. From the DB2 CLP, we choose “tpmfosd” as the name for the deployment database: db2 => create database tpmfosd In 3.2.4, “Configuring the Tivoli Provisioning Manager for OS Deployment environment” on page 104, we describe how to configure the DB2 server to start at each boot of the machine in order to always have the Tivoli Provisioning Manager for OS Deployment environment up and running. 96 Deployment Guide Series: Tivoli Provisioning Manager for OS Deployment V5.1
- 113. 3.2.3 Installing the Tivoli Provisioning Manager for OS Deployment server Now that we have the deployment database created (we called it tpmfosd) we will proceed by installing the Tivoli Provisioning Manager for OS Deployment server using the manual installation as described in Tivoli Provisioning Manager for Operating System Deployment Guide (Fix Pack 1), SC32-2582. The manual installation is needed because some customizations should be performed and some steps differ from the documented procedure. This is mainly due to the installation script provided in the current release of the product, which was built to work only with the MySQL database, even if the DBGW component can support the IBM DB2 JDBC connector. For this reason, we will follow the manual steps as described in the guide, except for the following: We use the IBM DB2 JDBC connector instead of the MySQL one. Instead of the MySQL “embedded” parameter provided by default, we will use IBM DB2 parameter for DBGW connection. Note: The setup script will be improved in the next release of Tivoli Provisioning Manager for OS Deployment to provide support to other databases during the installation. The steps to be performed can be summarized as follows: 1. Run the installer: a. Unpack the Tivoli Provisioning Manager for OS Deployment binaries. b. Create links to the IBM DB2 JDBC connector files. c. Run the setup script. 2. Customize the installation: a. Modify DBGW parameters in radb.ini file. b. Modify DBGW parameters in startup script. Running the installer The Tivoli Provisioning Manager for OS Deployment installer is provided in a .tar.gz format (TPMfOSd-5.1.000.32-linux.tar.gz). 1. Unpack the tar file some where in your file system. We do this in the /usr/local folder obtaining the directory tpmfos-5.1. See Example 3-9. Example 3-9 Unpack the installer manchester:/usr/local # gunzip TPMfOSd-5.1.000.32-linux.tar.gz manchester:/usr/local # tar -xvf TPMfOSd-5.1.000.32-linux.tar Chapter 3. Installing the Tivoli Provisioning Manager for OS Deployment environment 97
- 114. manchester:/usr/local # cd tpmfos-5.1 manchester:/usr/local/tpmfos-5.1 # The folder tpmfos-5.1 will contain the following files: Example 3-10 tpmfos-5.1 folder contents . .. LICENSE-AGREEMENT dbgw.jar hostsync.nc netdebug radsync.nc rbcc rembo setup NOTICES docs netclnt packages rbagent rbnetfs.so scripts 2. Create the required links in the /usr/local/tpmfos-5.1 folder to the IBM DB2 JDBC connector files. These links will help during the start up of the DBGW, which needs those files in the CLASSPATH parameter. Since we are using the JDBC type 4, the required jar files to link are as follows: db2jcc.jar db2jcc_license_cu.jar The links can be created using the ln -s command as shown in Example 3-11: Example 3-11 ln -s command manchester:/usr/local/tpmfos-5.1 # ln -s /home/db2inst1/sqllib/java/db2jcc.jar db2jcc.jar manchester:/usr/local/tpmfos-5.1 # ln -s /home/db2inst1/sqllib/java/db2jcc_license_cu.jar db2jcc_license_cu.jar 3. Now we can run the setup script customizing the installation and configuring the connection for the IBM DB2 database. The IBM DB2 JDBC parameters are as follows: 98 Deployment Guide Series: Tivoli Provisioning Manager for OS Deployment V5.1
- 115. DB2 IP Address = 127.0.0.1 since the IBM DB2 server was installed on the manchester machine DB2 port = 60000 as defined previously DB2 database name = tpmfosd as defined previously DB2 credentials = db2inst1 as the instance owner Example 3-12 shows our installation steps: Example 3-12 Installation steps manchester:/usr/local/tpmfos-5.1 # ./setup 1) English 2) Español 3) Français 4) Deutsch 5) Italiano 6) Português 7) í•œêμ-ì–´ 8) 日本語 9) ç 体ä¸-æ–‡ 10) ç é«”ä¸-æ–‡ --> 1 IBM Tivoli Provisioning Manager for OS Deployment setup v.5.1 (000.32) Licensed Materials - Property of IBM. (C) Copyright IBM Corporation 1998, 2006. All Rights Reserved. IBM, the IBM logo, and Tivoli are trademarks of IBM Corporation in the United States, other countries or both. This program will configure and initialize the OS deployment server. Do you want to continue? [y/n (Default n)]: y Enter the installation directory [/usr/local/tpmfos-5.1]: /usr/local/tpmfos-5.1 This software requires a large amount of disk space to store client images. Please enter the directory where to store these data. Data directory [/usr/local/tpmfos-5.1/files]: /usr/local/tpmfos-5.1/files This software can be managed from a web-based console. You can choose to use a secure link (HTTPS) to the server console. Chapter 3. Installing the Tivoli Provisioning Manager for OS Deployment environment 99
- 116. You can also change the default ports. You must also choose the administrator name Do you want to use SSL to access the Web interface? [y/n (default y)]: y Enter the HTTP console port [8080]: 8080 Enter the HTTPS console port [443]: 443 Enter the administrator name [admin]: admin Enter the administrator password: Confirm password: According to the RPM database, the Java package is not installed Do you want to install the Java package with YaST? [y/n (default y)]: n According to the RPM database, the MySQL Connector/J package is not installed Do you want to install MySQL Connector/J package with YaST? [y/n (default y)]: n According to the RPM database, MySQL server package is not installed Do you want to install MySQL server with YaST? [y/n (default y)]: n This software requires a third party database to store deployment objects. Can you provide a MySQL database? [y/n (default y)]: y Enter the IP address of your MySQL server [127.0.0.1]: 127.0.0.1 Enter the port used by your MySQL server on 127.0.0.1 [3306]: 60000 Enter the name of an existing (empty) database [AutoDeploy]: tpmfosd If the database tpmfosd on server 127.0.0.1 does not exist, please create it now! Press return to continue... Enter the user name to access the database [root]: db2inst1 100 Deployment Guide Series: Tivoli Provisioning Manager for OS Deployment V5.1
- 117. Enter the password to access the database: Confirm password: The installation program will now create the configuration file and initialize the server. Please wait... IBM Tivoli Provisioning Manager for OS Deployment server v.5.1 (000.32) Licensed Materials - Property of IBM. L-DDAC-6RLW3E (C) Copyright IBM Corporation 1998, 2006. All Rights Reserved. IBM, the IBM logo, and Tivoli are trademarks of IBM Corporation in the United States, other countries or both. ** Rembo server has successfully stopped OS deployment server initialized successfully. File /usr/local/tpmfos-5.1/files/global/rad/radb.ini created successfully. URL to access database: mysql://127.0.0.1:60000/tpmfosd?useUnicode=true&characterEncoding=UTF-8 Username to access the database: db2inst1 Password to access the database: hidden Do you want to create startup scripts? [y/n (default y)]: y ... ... ... Startup scripts (rembo, dbgw, rbagent) have been created in /etc/rc.d/init.d. Do you want to start all the services ? [y/n (default y)]: n Goodbye! Chapter 3. Installing the Tivoli Provisioning Manager for OS Deployment environment 101
- 118. Tip: Pay attention when prompted to install the MySQL database and the MySQL/J connector package. Obviously you should answer No. But, when the installer asks you the following: This software requires a third party database to store deployment objects. Can you provide a MySQL database? [y/n (default y)]: You must answer Yes, even if you will provide a DB2 database instead of the expected MySQL because replying No causes the installation to be cancelled. This is a well-know problem of the installer that is fixed in the next release. Then, you can continue the installation providing the IDB DB2 parameters even if the installer believes you are referring to a MySQL database. Since the MySQL connection is embedded in the installer all the database scripts created will have a wrong connection path. To fix this, a last configuration step is needed before running the system, so we answer as not to start the services at the end of the installation. Customizing the installation What we need to do is modify the connection string used by the DBGW component to interface with the database. 1. We edit the /usr/local/tpmfos-5.1/files/global/rad/radb.ini file to substitute the “embedded” mysql code with the db2 value. The radb.ini displayed is shown in Example 3-13: Example 3-13 radb.ini file created by the installer [Settings] ODBC_Source=mysql://127.0.0.1:60000/tpmfosd?useUnicode=true&characterEn coding=UTF-8 ODBC_Username=db2inst1 ODBC_Password=A756051188AAAE66231177B230031971 2. Next we modify the radb.ini file in order to connect using the DB2 JDBC connectivity: Example 3-14 radb.ini file modified to support DB2 JDBC connection [Settings] ODBC_Source=db2://127.0.0.1:60000/tpmfosd ODBC_Username=db2inst1 102 Deployment Guide Series: Tivoli Provisioning Manager for OS Deployment V5.1
- 119. ODBC_Password=A756051188AAAE66231177B230031971 3. Similar changes need to be performed on the DBGW start up script created by the installer at the path /etc/init.d/dbgw. We changed the following: The way the DBGW is run. – We substituted the link to the MySQL JDBC connector with the DB2 ones from the classpath. – We substituted the parameter jdbc.drivers with the IBM DB2 JDBC type 4 class to be used. The way the java binary is found at the beginning of the script. Note: In this step, we encountered a problem, because the command which java that is run in the start up script returned an empty string, when the PATH environment variable did not contain the required value. To fix this problem, we entered the full path of the java binary for the JAVA_BIN variable in the script. This is how the /etc/init.d/dbgw appears: Example 3-15 /etc/init.d/dbgw after the customization #! /bin/sh # Copyright (c) 1998-2005 Rembo Technology SaRL, Switzerland # # /etc/init.d/dbgw # ### BEGIN INIT INFO # Provides: dbgw # Required-Start: # Required-Stop: # Default-Start: 3 5 # Default-Stop: # Description: IBM Tivoli Provisioning Manager for OS Deployment Database gateway ### END INIT INFO SYSCONFIG_FILE="/etc/sysconfig/rembovars" . /etc/rc.status rc_reset # source Rembo settings . ${SYSCONFIG_FILE} #JAVA_BIN=`which java` Chapter 3. Installing the Tivoli Provisioning Manager for OS Deployment environment 103
- 120. JAVA_BIN="/usr/lib/java/jre/bin/java" DBGW_BIN="${REMBO_DIR}/dbgw.jar" DBGW_PID="${CHROOT_PREFIX}/var/run/dbgw.pid" DBGW_PARAMS=" -cp ${REMBO_DIR}/dbgw.jar:${REMBO_DIR}/db2jcc.jar:${REMBO_DIR}/db2jcc_licen se_cu.jar -Djdbc.drivers=com.ibm.db2.jcc.DB2Driver com.rembo.dbgw.Dbgw" ... Now the Tivoli Provisioning Manager for OS Deployment is correctly installed on the system. It is a good idea to configure the program to start at each system startup. 3.2.4 Configuring the Tivoli Provisioning Manager for OS Deployment environment In order to configure the involved components to start when the system boots, we need to customize the /etc/init.d files. The sequence of components to be started at the system boot are as follows: 1. DB2 instance 2. DBGW component 3. RbAgent component (a listener for the Rembo component) 4. Rembo component (the core of the Tivoli Provisioning Manager for OS Deployment server) Automatically starting the DB2 instance To perform this step, you can run the command db2iauto -on db2inst1 that adds a line at the end of the inittab file, as shown in Example 3-16: Example 3-16 inittab file after the db2iauto command ... ... # vbox (voice box) getty # I6:35:respawn:/usr/sbin/vboxgetty -d /dev/ttyI6 # I7:35:respawn:/usr/sbin/vboxgetty -d /dev/ttyI7 # end of /etc/inittab fmc:2345:respawn:/opt/IBM/db2/V8.1/bin/db2fmcd #DB2 Fault Monitor Coordinator 104 Deployment Guide Series: Tivoli Provisioning Manager for OS Deployment V5.1
- 121. We strongly suggest that you comment this line added by the command since it is not the correct way to add Linux processes at the start up sequence. Create the DB2 boot script in the /etc/init.d folder named db2 that will accept the start and stop input as follows: Example 3-17 Creating the DB2 boot script manchester:/etc/init.d # cat db2 # Script to start and stop db2 # # Name: db2 # Date: 01/09/2007 ######################################## #!/bin/sh case "$1" in start) # Start db2 su - db2inst1 -c /home/db2inst1/sqllib/adm/db2start ;; stop) # Stop db2 su - db2inst1 -c /home/db2inst1/sqllib/adm/db2stop ;; esac Then link this script from folder rc3.d and rc5.d giving it the correct priority. Since we want the DB2 to start before the Tivoli Provisioning Manager for OS Deployment environment is started and stopped, but after the Tivoli Provisioning Manager for OS Deployment environment is shutdown, we give it the highest priority at start up creating the following links: Example 3-18 Creating links manchester:/etc/init.d/rc3.d # ln -s S03db2 ../db2 manchester:/etc/init.d/rc5.d # ln -s S03db2 ../db2 And the lowest priority at shut down with the following links: Example 3-19 Creating links manchester:/etc/init.d/rc3.d # ln -s K22db2 ../db2 manchester:/etc/init.d/rc5.d # ln -s K22db2 ../db2 Chapter 3. Installing the Tivoli Provisioning Manager for OS Deployment environment 105
- 122. Automatically starting the Tivoli Provisioning Manager for OS Deployment components Now that the DB2 is correctly configured, we have to set the correct priority for the Tivoli Provisioning Manager for OS Deployment scripts automatically created by the setup command. Example 3-20 shows how the rc3.5 and rc5.d folders displayed at the end of our configuration. Since they have the same values for the involved scripts, we insert only one directory listing: Example 3-20 /etc/init.d/rc3.d and /etc/init.d/rc5.d folders ... ... lrwxrwxrwx 1 root root 8 Jan 9 20:41 K21rembo -> ../rembo lrwxrwxrwx 1 root root 10 Jan 9 20:41 K21rbagent -> ../rbagent lrwxrwxrwx 1 root root 7 Jan 9 20:41 K21dbgw -> ../dbgw rwxrwxrwx 1 root root 6 Jan 11 01:44 S03db2 -> ../db2 lrwxrwxrwx 1 root root 6 Jan 11 01:44 K22db2 -> ../db2 rwxrwxrwx 1 root root 8 Jan 11 17:41 S21rembo -> ../rembo lrwxrwxrwx 1 root root 10 Jan 11 17:41 S21rbagent -> ../rbagent lrwxrwxrwx 1 root root 7 Jan 11 17:41 S21dbgw -> ../dbgw At the next startup, the ps -ef command should return a list similar to the following: Example 3-21 ps -ef output after system reboot root 2482 1 0 Jan11 ? 00:00:00 db2wdog db2inst1 2542 2482 0 Jan11 ? 00:00:00 db2sysc root 2543 2542 0 Jan11 ? 00:00:00 db2ckpwd root 2544 2542 0 Jan11 ? 00:00:00 db2ckpwd root 2545 2542 0 Jan11 ? 00:00:00 db2ckpwd root 2546 2542 0 Jan11 ? 00:00:00 db2gds db2inst1 2547 2542 0 Jan11 ? 00:00:01 db2ipccm db2inst1 2548 2542 0 Jan11 ? 00:00:00 db2tcpcm db2inst1 2549 2542 0 Jan11 ? 00:00:00 db2tcpcm db2inst1 2562 2542 0 Jan11 ? 00:00:00 db2resync db2inst1 2563 2546 0 Jan11 ? 00:00:00 db2srvlst db2inst1 2565 2542 0 Jan11 ? 00:00:00 db2hmon ... ... ... 106 Deployment Guide Series: Tivoli Provisioning Manager for OS Deployment V5.1
- 123. root 3954 1 0 Jan11 ? 00:00:54 /usr/lib/java/jre/bin/java -cp /usr/local/tpmfos-5.1/dbgw.jar:/usr/local/tpmfo ... ... root 4018 1 0 Jan11 ? 00:00:00 /usr/local/tpmfos-5.1/rbagent -s 127.0.0.1 BE82E15372D5192E7E9EEDE37F285C39 ... ... root 4038 1 0 Jan11 ? 00:01:00 /usr/local/tpmfos-5.1/rembo db2inst1 4057 2549 0 Jan11 ? 00:01:39 db2agent (tpmfosd) db2inst1 4058 2546 0 Jan11 ? 00:00:00 db2loggr (TPMFOSD) db2inst1 4059 2546 0 Jan11 ? 00:00:05 db2loggw (TPMFOSD) db2inst1 4060 2546 0 Jan11 ? 00:00:00 db2lfr (TPMFOSD) db2inst1 4061 2546 0 Jan11 ? 00:00:00 db2dlock (TPMFOSD) db2inst1 4062 2546 0 Jan11 ? 00:00:00 db2pfchr db2inst1 4063 2546 0 Jan11 ? 00:00:00 db2pfchr db2inst1 4064 2546 0 Jan11 ? 00:00:00 db2pfchr ... ... root 25205 24906 0 21:19 pts/1 00:00:00 ps -ef Notice that the sequence of process spawned by the system is how we defined it: first the DB2 processes, then the DBGW process followed by the RbAgent and the Rembo components. 3.2.5 Run the Tivoli Provisioning Manager for OS Deployment environment After each reboot you should have a running environment since the startup scripts are run by the system. However you can start stop each component in two ways: Using the startup script in the /etc/init.d folder Manually from command line To start and stop each script you can simply insert the script name followed by the start or stop argument. Remember to follow the correct sequence when starting or stopping each component, as shown in Example 3-22: Example 3-22 Correct sequence when starting or stopping each component manchester:/etc/init.d # rembo stop Chapter 3. Installing the Tivoli Provisioning Manager for OS Deployment environment 107
- 124. manchester:/etc/init.d # rbagent stop manchester:/etc/init.d # dbgw stop manchester:/etc/init.d # db2 stop .. .. manchester:/etc/init.d # db2 start manchester:/etc/init.d # dbgw start manchester:/etc/init.d # rbagent start manchester:/etc/init.d # rembo start Otherwise you can manually run each component involved: For the DB2 component, you have to log on as the instance owner and use the db2start and db2stop commands: Example 3-23 db2start and db2stop commands manchester:/ # su - db2inst1 db2inst1@manchester:~> db2start db2inst1@manchester:~> db2stop To start the DBGW component, you need to have the path to the Java binaries added to the $PATH environment variable and correctly set the classpath as follows: Example 3-24 Java binaries added to the $PATH environment variable manchester:/usr/local/tpmfos-5.1 # java -cp .:dbgw.jar:db2jcc.jar:db2jcc_license_cu.jar -Djdbc.drivers=com.ibm.db2.jcc.DB2Driver com.rembo.dbgw.Dbgw -d If you want to run the Rembo component, use the following: manchester:/usr/local/tpmfos-5.1 # ./rembo -d To start the RbAgent, insert the address of the Rembo server where you want to connect to (in this case it is on the same machine) and the password of the “admin” user in clear or encrypted text (the encrypted value is in the rembo.conf file of the Tivoli Provisioning Manager for OS Deployment server): manchester:/usr/local/tpmfos-5.1 # ./rbagent -s localhost:<pwd> After performing these steps you will be able to see the Web console showing the release number of the GA: it is 5.1.0.0 as shown in Figure 3-15 on page 109. 108 Deployment Guide Series: Tivoli Provisioning Manager for OS Deployment V5.1
- 125. Figure 3-15 The Web console showing the build number 3.2.6 Upgrade to fixpacks Each fixpack that is delivered for the Tivoli Provisioning Manager for OS Deployment (currently only Fixpack 1 is available) must be installed on top of the GA release (the 5.1.0.0). This means that you can install the Fixpack 1 on the GA release and that will bring the version to 5.1.0.1 release. When Fixpack 2 becomes available, you first need to remove Fixpack 1 and then install Fixpack 2 on top of the GA release 5.1.0.0. As you will see in the next steps, each fixpack creates a backup of the GA binaries in order to restore them when you decide to upgrade to the next fixpack. We upgraded our environment to the Tivoli Provisioning Manager for OS Deployment Fixpack 1 and below we show the procedure we performed: First of all we stop the Tivoli Provisioning Manager for OS Deployment services in the following order (see Example 3-25 on page 110): 1. RbAgent 2. Rembo 3. DBGW Chapter 3. Installing the Tivoli Provisioning Manager for OS Deployment environment 109
- 126. Example 3-25 Stopping the Tivoli Provisioning Manager for OS Deployment services manchester:/etc/init.d # ./rbagent stop Shutting down IBM Tivoli Provisioning Manager for OS Deployment Web interface extension manchester:/etc/init.d # ./rembo stop Shutting down IBM Tivoli Provisioning Manager for OS Deployment server manchester:/etc/init.d # ./dbgw stop Shutting down IBM Tivoli Provisioning Manager for OS Deployment Database gateway Unpack the Fixpack 1 archive named 5.1.0-TIV-TPMOSD-linux-FP0001.tar on top of the Tivoli Provisioning Manager for OS Deployment root directory (by default /usr/local/tpmfos-5.1). In the last step we run the ifixapply command: Example 3-26 Upgrading to Fixpack 1 manchester:/usr/local # ls . .. 5.1.0-TIV-TPMOSD-linux-FP0001.tar bin include man share tpmfos-5.1 TPMfOSd-5.1.000.32-linux.tar games lib sbin src manchester:/usr/local # tar -xvf 5.1.0-TIV-TPMOSD-linux-FP0001.tar ... ... ... manchester:/usr/local # cd tpm* manchester:/usr/local # ./ifixapply ... ... ... manchester:/usr/local/tpmfos-5.1 # ls . datafile docs ifixremove radsync.nc 110 Deployment Guide Series: Tivoli Provisioning Manager for OS Deployment V5.1
- 127. rdf setup .. db2jcc.jar files netclnt rbagent rembo ITPMOSD0501.sys2 db2jcc_license_cu.jar ga netdebug rbagent.log rembo.conf LICENSE-AGREEMENT dbgw.jar hostsync.nc packages rbcc scripts NOTICES ifixapply pcheck rbnetfs.so server.db As you can see the “ga” folder contains the replaced binaries that will be restored when running the ifixremove command. Since each fixpack is built on top of the GA release, this should be the same behavior for all the subsequent fixpacks. Remember that the prerequisite is to install each fixpack on top of the GA version. That means that you need to remove the old one before installing the new one. Figure 3-16 on page 112 shows the Web console with the Tivoli Provisioning Manager for OS Deployment release after the upgrade to Fixpack 1, which is 5.1.0.1. Chapter 3. Installing the Tivoli Provisioning Manager for OS Deployment environment 111
- 128. Figure 3-16 The Web console showing the build number after the installation of Fixpack 1 3.3 Initial login and installation verification Regardless of the platform that you install Tivoli Provisioning Manager for OS Deployment server on, you should verify the installation. This section contains information on how to perform an initial log on to the administrative console and verify the installation. 3.3.1 Connecting using HTTPS After the server is successfully installed, log on to the Web console and verify the installation. 1. You can access Tivoli Provisioning Manager for OS Deployment administrative console using following the following URL: http://server_hostname_or_ip:port_number (e.g. http://nice:8080) If you enabled HTTPS access you will most likely receive a warning in your browser about the untrusted certificate. This is because the certificate used to encrypt the connection is a self-signed certificate and you do not have it in 112 Deployment Guide Series: Tivoli Provisioning Manager for OS Deployment V5.1
- 129. your Trusted Root Certification Authorities store. The warning in Internet Explorer® looks similar to Figure 3-17. Figure 3-17 Certificate warning 2. It is safe to click Yes here. 3. If you do not want this pop-up to reappear every time you connect to the server, you can import the certificate to your Trusted Root Certificate Authorities store. Go to step 4. 4. On the warning screen click View Certificates. This opens a new window with detailed information on the certificate. 5. Click Install certificate... 6. When you get to the screen where you can choose the certificate store, select Automatically select the certificate store based on the type of certificate. 7. Finish the installation of the certificate by clicking Next, and then click Finish. 8. At the end of this process you will get a final prompt asking whether you want to install this certificate or not. Click Yes. This process imports Tivoli Provisioning Manager for OS Deployment server certificate to your browser, so you will not get the security alert again. 3.3.2 Installation verification The easiest way to check which version is currently installed is to look at the login screen of the Web console (does not require login). The version information is next to the username and password fields. This is useful when you want to quickly check the current version of the product (for example after fixpack installation). See Figure 3-18 on page 114. Chapter 3. Installing the Tivoli Provisioning Manager for OS Deployment environment 113
- 130. Figure 3-18 Tivoli Provisioning Manager for OS Deployment version To verify your installation, log into the console using the administrative username and password you supplied during the installation. On the left side of the console click the Server status, and then click Installation check. You should see a screen similar to Figure 3-19. Figure 3-19 Verification of successful installation 114 Deployment Guide Series: Tivoli Provisioning Manager for OS Deployment V5.1
- 131. 3.4 Advanced DHCP options Configuring your DHCP infrastructure to support PXE servers is usually limited to adding option 60 depending on where the PXE server is located. In order to support PXE clients on a network, the DHCP server is usually configured in one of the following three modes: 1. Option 60 not set, Option 43 not set 2. Option 60 set to 'PXEClient', Option 43 not set 3. Option 60 set to 'PXEClient', Option 43 set When option 60 nor option 43 is set, PXE clients will have no clue where the PXE server is, and they will therefore wait until a PXE server contacts them. In this mode, the PXE server must listen to DHCP discovery packets sent by PXE clients and answer at the same time as the DHCP server does. This mode of operation is called DHCPProxy. Communication between client, DHCP, and Tivoli Provisioning Manager for OS Deployment server in this case has the following steps: 1. The PXE enabled NIC on the client machine broadcasts the DHCP request to the network. 2. The DHCP server recognizes the request and replies to the client. Since option 60 is not set, the client waits to be contacted by Tivoli Provisioning Manager for OS Deployment server. 3. At the same time the server recognizes the DHCP request and sends the PXE parameters to the client. 4. The client contacts Tivoli Provisioning Manager for OS Deployment server using the address received by the Tivoli Provisioning Manager for OS Deployment server. It initiates TFTP file transfer to download theTivoli Provisioning Manager for OS Deployment client. 5. The Tivoli Provisioning Manager for OS Deployment client is downloaded to client machine using TFTP. Chapter 3. Installing the Tivoli Provisioning Manager for OS Deployment environment 115
- 132. Figure 3-20 Option 60 not set, Option 43 not set It is obvious that this mode of operation can only be used when Tivoli Provisioning Manager for OS Deployment server is able to listen to the client’s DHCP broadcasts. If the server is in a different VLAN (virtual LAN) separated by a firewall and so on and can’t hear the client’s broadcasts, you will have to use option 43 and option 60 as described as follows. When option 60 is set to 'PXEClient', it means that the DHCP server knows where the PXE server is. If option 43 is not set, the PXE server is on the same computer as the DHCP server (same IP address). Communication between the client, the DHCP, and Tivoli Provisioning Manager for OS Deployment server in this case has the following steps: 1. The PXE enabled NIC on the client machine broadcasts DHCP request to network. 2. The DHCP server recognizes the request and replies to the client. Option 60 is set to PXEClient. Since option 43 is not set, the Tivoli Provisioning Manager for OS Deployment server must be on the same IP as the DHCP server. 3. The client contacts the Tivoli Provisioning Manager for OS Deployment server using the DHCP server address. It initiates TFTP file transfer to download the Tivoli Provisioning Manager for OS Deployment client. 4. The Tivoli Provisioning Manager for OS Deployment client is downloaded to the client machine using TFTP. 116 Deployment Guide Series: Tivoli Provisioning Manager for OS Deployment V5.1
- 133. Figure 3-21 Option 60 set, Option 43 not set If option 43 is set, PXE clients must decode option 43 to know how to reach the PXE server. In most situations, option 43 does not need to be set up, because the PXE server will either listen to the DHCP discovery packets (DHCPProxy) or be on the same computer as the DHCP server. However, if the PXE server is on a separate subnet (it cannot listen to DHCP discovery packets) or if there are several PXE servers on the same subnet, option 43 is the only viable solution to instruct PXE clients on what to do. Figure 3-22 Option 60 set, Option 43 set Communication between the client, the DHCP, and the Tivoli Provisioning Manager for OS Deployment server in this case has the following steps: Chapter 3. Installing the Tivoli Provisioning Manager for OS Deployment environment 117
- 134. 1. The PXE enabled NIC on the client machine broadcasts the DHCP request to the network. 2. The DHCP server recognizes the request and replies to the client. Option 60 is set to PXEClient. Option 43 is set as well, telling the client where to look for the Tivoli Provisioning Manager for OS Deployment server. 3. The client contacts the Tivoli Provisioning Manager for OS Deployment server using the address specified in option 43. It initiates TFTP file transfer to download the Tivoli Provisioning Manager for OS Deployment client. 4. The Tivoli Provisioning Manager for OS Deployment client is downloaded to the client machine using TFTP. Option 43 is a binary buffer, containing a list of sub-options. Sub-options are packed in the binary buffer in no specific order. Most sub-options are optional. An exhaustive list of sub-options can be found in the PXE specifications. We will only describe sub-options that are of interest in order to specify the IP address of the PXE server. Other configurations, like multicast discovery, multiple unicast servers, or multiple choices are not shown here. PXE option 6: PXE_DISCOVERY_CONTROL. This option tells the PXE client how to contact PXE servers using unicast, multicast, or broadcast. In our example, we will use the value '7', meaning use PXE_BOOT_SERVERS list, disable multicast and broadcast discovery. The format of this option is one byte. PXE option 8: PXE_BOOT_SERVERS. This is a list of IP addresses, each address corresponding to one PXE server (when discovery_control is unicast). A PXE server is identified by a number (Rembo is 15) and its IP address. In our example, we will only use one IP address, the address of the PXE server we want to use for the host, which will receive these DHCP options. The format of this option is two bytes for the server type (15 for Rembo), one byte for the number of servers to list (1 in our example), and four bytes per server address. In our example, the total length of this option is seven bytes. PXE option 9: PXE_BOOT_MENU. This option contains a list of choices to prompt on the screen at boot time. In our example, we will have only one line that will go to server type 15 (Rembo). We need to have a PXE boot menu even if we do not use it (for example, boot straight on the first line of the menu). The format of this option is two bytes for the server type (15 for Rembo), one byte for the length of the string to display and the string to display on screen. In our example we use 'RB' as the string to display. The total length of this option is therefore five. PXE option 10 (0A): PXE_BOOT_TIMEOUT. This option is required to specify how long (in seconds) the boot menu is displayed and the text of a prompt that is displayed during the waiting time. If time out is set to 0 seconds, it means that we 118 Deployment Guide Series: Tivoli Provisioning Manager for OS Deployment V5.1
- 135. do not want to wait, but we want to boot using the first line of the boot menu. The prompt text is not displayed, but it must be at least one character long. In our example, we will set the prompt to ‘R’. The format of this option is one byte for the time out value, followed by the prompt text. If the time out value is FF, then the menu is presented and the PXE client waits indefinitely for user selection. In our example, the total length for this option will be two bytes (one for time out and one for letter ‘R’). PXE option 255 (FF): PXE_END. The binary buffer of DHCP option 43 must end with FF in order to be valid. In addition to the standard PXE server type 15, the IBM Tivoli Provisioning Manager for OS Deployment servers accept any number between 33008 (80F0 in hexadecimal) and 33280 (8200 in hexadecimal). These PXE server type numbers are used to differentiate multiple Tivoli Provisioning Manager for OS Deployment servers in the BOOT_SERVERS sub-option of DHCP option 43. The BOOT_SERVERS sub-option consists of a PXE server type number followed by one or more server IP addresses. If the administrator wants to display two lines in the menu, pointing to two separate servers, the two servers must use different PXE server type numbers or they will be seen as only one server by the PXE network card. First example - single PXE server, no menu Now that we have described the options, let us try to build the binary buffer for option 43 for the following example: we want to have clients A and B boot on server 192.10.10.10 and clients C and D boot on server 192.10.11.10, which is on a different subnet (a valid gateway must be set up for C and D in order to communicate with the PXE server on a different subnet). We do not want menus. We just need to point clients to the correct server. Figure 3-23 PXE booting across subnets using options 43 and 60 Chapter 3. Installing the Tivoli Provisioning Manager for OS Deployment environment 119
- 136. Following are the options we have to insert in the binary buffer, along with their values: Note: Server type 15 is translated into 00:0F in hexadecimal. IP address 192.10.10.10 is translated into C0:0A:0A:0A and 192.10.11.10 is translated into C0:0A:0B:0A. Letters 'R' and 'B' are translated into 52 and 42. PXE option 6, length 1, value = 07 PXE option 8, length 7, value = 00:0F:01:C0:0A:0A:0A (clients A and B) PXE option 8, length 7, value = 00:0F:01:C0:0A:0B:0A (clients C and D) PXE option 9, length 5, value = 00:0F:02:52:42 PXE option A, length 2, value = 00:52 PXE option FF, to close the buffer The format of the binary buffer that we must use for DHCP option 43 is similar to what is used for the DHCP packet itself: the buffer is a list of options, each option starting with its option number (one byte), followed by its length (one byte), and its value (a list of bytes). Following is the transcription of the above example, for clients A and B: Option 43 = 06:01:07:08:07:00:0F:01:C0:0A:0A:0A:09:05:00:0F:02:52:42:0A:02:00:52:FF And for clients C and D: Option 43 = 06:01:07:08:07:00:0F:01:C0:0A:0B:0A:09:05:00:0F:02:52:42:0A:02:00:52:FF If your DHCP server is running on Windows NT®, you can enter these values one-by-one in option 43 by selecting hexadecimal input. If your DHCP server is ISC DHCP (version 2.x), then you can enter the above strings as is (bytes separated with colons) for parameter 'vendor-encapsulated-options' (exact name depending on the version you are using). If your DHCP server is ISC DHCP (version 3.x), then you can use the explicit syntax to describe the PXE options, as follows in Example 3-27 on page 121. 120 Deployment Guide Series: Tivoli Provisioning Manager for OS Deployment V5.1
- 137. Example 3-27 PXE options # In the global section: option space PXE; option PXE.discovery-control code 6 = unsigned integer 8; option PXE.boot-server code 8 = { unsigned integer 16, unsigned integer 8, ip-address }; option PXE.boot-menu code 9 = { unsigned integer 16, unsigned integer 8, text}; option PXE.menu-prompt code 10 = { unsigned integer 8, text }; # In the scope/host section: option dhcp-parameter-request-list 60,43; option vendor-class-identifier "PXEClient"; vendor-option-space PXE; option PXE.discovery-control 7; option PXE.boot-server 15 1 192.160.160.160; # address of Rembo server option PXE.boot-menu 15 5 "Rembo"; option PXE.menu-prompt 0 "Rembo"; Second example - multiple PXE servers with menu Let us consider the following example: a specific PXE computer has to show a text mode menu with two lines, each line corresponding to a different IBM Tivoli Provisioning Manager for OS Deployment server. In this example, the first server is at the address 172.30.30.101 (AC:1E:1E:65 in hexadecimal), and the second server is at the address 172.30.30.102 (AC:1E:1E:66 in hexadecimal). Following is what needs to be done: 1. Assign a boot server type to each of the servers. Tivoli Provisioning Manager for OS Deployment servers accept server type 15 and server types from 33008 to 33280. For our example, we will use 33009 (80F1) for the first server, and 33010 (80F2) for the second server. 2. Configure the sub-options of DHCP option 43 as follows: – PXE option 6, length 1,value = 07 – PXE option 8, length 14 (0E), value = 80:F1:01:AC:1E:1E:65:80:F2:01:AC:1E:1E:66 – PXE option 9, length 22 (16), value = 80:F1:08:53:65:72:76:65:82:20:41:80:F2:08:53:65:72:76:65:82:20:42 – PXE option A, length 7, value =0F:53:65:6C:65:63:74 – PXE option FF, to close the buffer Chapter 3. Installing the Tivoli Provisioning Manager for OS Deployment environment 121
- 138. Following are some details: Option 6, with a value of 7, is used to configure the PXE boot discovery in unicast mode using the option 8 for the list of available servers. Option 8 defines the two PXE servers. The first server is defined by the first 7 bytes, starting with the boot server type (80:F1, 33009), followed by one IP address: AC:1E:1E:65 (172.30.30.101). The second server is defined in the same manner, using boot server type 80:F2 (33010) and IP address AC:1E:1E:66 (172.30.30.102). Option 9 defines the boot menu that is displayed at boot time. The first 11 bytes correspond to the first line, for the first server. It shows the string Server A associated with type 80:F1 (first server). The second line shows the string Server B, associated with type 80:F2 (second server). Option 10 (0A) specifies a 15 second time out and shows the string Select as the boot menu prompt. The full option 43 would read as shown in Example 3-28. Example 3-28 option 43 06:01:07:08:0E:80:F1:01:AC:1E:1E:65:80:F2:01:AC:1E:1E:66:09:16:80:F1:08 :53:65:72:76:65:72:20:41:80:F2:08:53:65:72:76:65:72:20:42:0A:07:0F:53:6 5:6C:65:63:74:FF Tip: You can use multiple lines in the menu prompt to start new line insert codes for new line and carriage return (0A:0D). We used the following option 43 code in the lab. You can find the resulting menu in Example 3-29. Example 3-29 Resulting menu 06:01:07:08:0E:80:F1:01:AC:1E:1E:65:80:F2:01:AC:1E:1E:65:09:26:80:F1:13 :54:50:4D:4F:53:44:20:2D:20:6D:61:6E:63:68:65:73:74:65:72:80:F2:0D:54:5 0:4D:4F:53:44:20:2D:20:6E:69:63:65:0A:4A:FF:28:5F:5F:29:0A:0D:28:6F:6F: 29:0A:0D:20:5C:2F:2D:2D:2D:2D:2D:2D:2D:5C:0A:0D:20:20:7C:7C:20:50:58:45 :20:7C:20:5C:0A:0D:20:20:7C:7C:2D:2D:2D:2D:7C:7C:20:20:2A:0A:0D:20:20:5 E:5E:20:20:20:20:5E:5E:0A:0D:53:65:6C:65:63:74:3A:FF 122 Deployment Guide Series: Tivoli Provisioning Manager for OS Deployment V5.1
- 139. Figure 3-24 Menu showing two PXE servers 3.5 Web interface extension The Web interface extension is an optional component that can run under most operating systems. When installed, it can be used by the Tivoli Provisioning Manager for OS Deployment server to perform actions on remote computers and to gather information from remote computers. For example, it is responsible for restarting the computer when a deployment starts or for performing an operating system inventory. Tip: Web interface extension is usually called RbAgent. It is called this way because that is the name of the Web interface extension executable. Credentials used to run the Web interface extension must be sufficient to browse, read, and write directories you want to be accessible remotely. The most important use of the Web interface extension is to access the server files from your browser. It is used to transfer files between the computer running the browser and the server. When the Web interface extension is not installed on the computer running the browser you cannot do the following from that machine: Browse, download to, or upload from machines other than server when using features like “RAD Export” or “RAD Import”. You can still use these features using file systems on the server. Chapter 3. Installing the Tivoli Provisioning Manager for OS Deployment environment 123
- 140. Create unattended profiles and image file clone profiles. To create profiles of this type, Web interface extension has to be installed on the machine from which you connect to the server. 3.5.1 Installing on Windows systems This section guides you through the installation steps of the Web interface extension on a client. 1. There is an easy way to verify if the Web interface extension is already installed. Go to Server status → Web interface extension. If you do not have Web interface extension installed on your machine you will see a screen similar to Figure 3-25. 2. If you do not have Web interface extension installed, you can download and install it from the Tivoli Provisioning Manager for OS Deployment server. Click the link named Click here to download the Web interface extension installer for Windows to download the Web interface extension from the server. Figure 3-25 Web interface extension download for Windows 3. After starting the installation using the rbagent.msi file, select the installation language, and click Next when prompted in the welcome wizard. 4. Select I accept the terms in the licence agreement, and click Next. 124 Deployment Guide Series: Tivoli Provisioning Manager for OS Deployment V5.1
- 141. 5. When the server configuration screen, as shown in Figure 3-26, appears specify the server IP address (not host name) and administrator password on this screen. Attention: You must specify the IP address and NOT the hostname in the Server IP Address field. If you specify the hostname, Web interface extension cannot connect to the server. Figure 3-26 Server connection parameters 6. Next, enter credentials for Web interface extension service. See Figure 3-27 on page 126. When Web Interface Extension service is started, it runs in context of the user specified here. We recommend that you use an unprivileged account that has access only to files and directories related to the Tivoli Provisioning Manager for OS Deployment. If you do not need to browse file systems on this machine and only want to use extension for remote reboots and inventory, you can leave these fields empty. Service will then run in context of Local System. Chapter 3. Installing the Tivoli Provisioning Manager for OS Deployment environment 125
- 142. Figure 3-27 User account specification 7. Click Install, and then Finish. The two following screens will lead you to the end of installation. After Web interface extension is installed you will see a screen similar to Figure 3-28 on page 127. This confirms that the agent was successfully installed and has connected to server. 126 Deployment Guide Series: Tivoli Provisioning Manager for OS Deployment V5.1
- 143. Figure 3-28 Windows Web Interface Extension version installed You can find your newly installed Web interface extension in directory %ProgramFiles%Common FilesIBM Tivoli. This directory contains the following three files: rbagent.exe - Web interface extension executable. rbagent.conf - agent configuration file that contains the IP address of the server and an encrypted password for connection to the Tivoli Provisioning Manager for OS Deployment server. rbagent.log - agent log file that is recreated each time service is started. The service name of the Web interface extension depends on the service pack level you are using. It is named “Rembo Agent” (older name) or “IBM Tivoli Web Interface Extension” (new name). 3.5.2 Installing on Linux systems This section guides you through the steps to install the Web Interface Extension on a client. Chapter 3. Installing the Tivoli Provisioning Manager for OS Deployment environment 127
- 144. 1. There is an easy way to verify if the Web interface extension is already installed. Go to Server status → Web interface extension. If you do not have the Web interface extension installed on your machine you will see a screen similar to Figure 3-29. 2. If you do not have the Web interface extension installed you can download and install it from the Tivoli Provisioning Manager for OS Deployment server. Click the link named Click here to download the Web interface extension installer for Windows to download the Web interface extension from the server. Figure 3-29 Web interface extension download for Linux The file you downloaded is not an installer—it is rbagent executable you can run immediately. This kind of distribution (not using RPM or DEB packages) allows usage on larger number Linux distributions. However, it also means that for some Linux distributions you have to create startup scripts manually. Startup scripts for Debian, RedHat, and Suse can be found in the server installation package for Linux. Here is a short example of the rbagent init.d script that should work in most Linux distributions. Adjust paths in the variables and IP address of the server to suit your environment. 128 Deployment Guide Series: Tivoli Provisioning Manager for OS Deployment V5.1
- 145. Example 3-30 Sample rbagent startup script #! /bin/sh # exit on any error set -e # get rbagent configuration variables . /etc/rbagentvars RBAGENT_BIN="${TPMOSD_DIR}/rbagent" RBAGENT_PID="/var/run/rbagent.pid" RBAGENT_CONF="${TPMOSD_DIR}/rbagent.conf" RBAGENT_PARAMS="-s 1.2.3.4:${TPMOSD_PWD}" NAME=rbagent SCRIPTNAME=/etc/init.d/$NAME PATH=/usr/local/sbin:/usr/local/bin:/sbin:/bin:/usr/sbin:/usr/bin:$TPMOSD_DIR # Gracefully exit if the package has been removed. test -x $RBAGENT_BIN || exit 0 case "$1" in start) echo -n "Starting $NAME" ${RBAGENT_BIN} ${RBAGENT_PARAMS} echo "." ;; stop) echo -n "Stopping $NAME" kill `cat ${RBAGENT_PID}` echo "." ;; *) echo "Usage: $SCRIPTNAME {start|stop}" >&2 exit 1 ;; esac exit 0 This script uses a configuration file with rbagent configuration variables. The file is called rbagentvars and is placed in the /etc directory. Example 3-31 shows sample contents of that file. Example 3-31 Configuration variables in /etc/rbagentvars # rbagent startup script configuration variables REMBO_DIR="/opt/rbagent" Chapter 3. Installing the Tivoli Provisioning Manager for OS Deployment environment 129
- 146. REMBO_PWD="BE82E15372D5192E7E9EEDE37F285C39" Finally, if you want rbagent to automatically start and stop when you restart the machine, then link this script to rcX.d directories, where X is the runlevel number. The files in these directories are used to control programs (start/stop) according to the runlevel system entered. You can find more information on runlevels by running the man init command on a Linux system. Note: The Web interface extension tries to read DMI information when doing the inventory of the machine. To do so it requires root privileges. If security is an issue you can run rbagent in context of a non-root account. Everything will function normally but you cannot collect DMI information. Example 3-32 contains commands you can use to create links to startup script. Note that some scripts start with the letter K while others start with the letter S. This is an indication whether in that runlevel process should be started (S) or killed (K). You have to run these commands as root in order to be able to write to /etc/rc.d/rcX.d directories. Example 3-32 Linking rbagent startup script to rc.d directories cd /etc/rc.d/rc0.d && ln -s ../../init.d/rbagent K33rbagent cd /etc/rc.d/rc1.d && ln -s ../../init.d/rbagent K33rbagent cd /etc/rc.d/rc2.d && ln -s ../../init.d/rbagent S66rbagent cd /etc/rc.d/rc3.d && ln -s ../../init.d/rbagent S66rbagent cd /etc/rc.d/rc5.d && ln -s ../../init.d/rbagent S66rbagent cd /etc/rc.d/rc6.d && ln -s ../../init.d/rbagent K33rbagent 3.5.3 Running rbagent from command line Web interface extension, even though its name does not suggest so, can also be run from command line. This might be useful if you need to use some of the Tivoli Provisioning Manager for OS Deployment features from the command line. Note: Not all rbagent commands are intended to be run interactively. Most of these commands are used in scripts during the deployment of machines. Be sure you know what you are doing before using any of the rbagent commands on your machine. As previously mentioned, the rbagent command is mostly run automatically in deployment scrips; however, there are few useful commands that can be run interactively or in user scripts. 130 Deployment Guide Series: Tivoli Provisioning Manager for OS Deployment V5.1
- 147. To get a list of the rbagent’s command switches you can run rbagent -h command. The following example shows a list of command line switches for rbagent. Example 3-33 RbAgent command line switches C:Program FilesCommon FilesIBM Tivoli>rbagent.exe -h IBM Tivoli Provisioning Manager for OS Deployment Web extension v.5.1.0.1 (101.04) Licensed Materials - Property of IBM. L-DDAC-6RLW3E (C) Copyright IBM Corporation 1998, 8 2007. All Rights Reserved. IBM, the IBM logo, and Tivoli are trademarks of IBM Corporation in the United States, other countries or both. usage: rbagent [-d] [-v loglevel] [-q] [-o] [-f iface] -s srvip:password [-p srvport] [arguments] -d: enable debugging mode, do not detach -v: set logging verbosity (1-6) -q: quiet (do not display banner) -o: run in offline mode (no connection to the server) -f: iface is the IP address of the preferred interface/subnet to use -s: srvip is an IP address, password can be plaintext or MD5 -p: srvport is then NBP port of the server arguments are optional supported operations C:Program FilesCommon FilesIBM Tivoli> As you can see from the help switches, rbagent can work in online (requires connection to the Tivoli Provisioning Manager for OS Deployment server) and offline mode (does not require connection to the Tivoli Provisioning Manager for OS Deployment server). To use offline mode, use -o switch. To use rbagent in online mode and connect to the server, you have the following two options: Specify -s switch to explicitly define which server you want to connect to and which password to use. Start rbagent without -s switch and the server connection parameters will be read from the rbagent.conf file. RbAgent does not have an explicit help command; rather, it lists all available commands if input was not recognized. To get a list of available commands, you can use any word that is not a known command. The list of commands you get depends upon whether you are using offline or online mode. The list of online mode commands contains all commands from offline mode and commands available only when connected to server. The following example is a result of running rbagent -q -s 172.20.20.101:password command and lists all online and offline commands. To get a list of only offline commands, run rbagent -o help command. Chapter 3. Installing the Tivoli Provisioning Manager for OS Deployment environment 131
- 148. Example 3-34 Commands available in rbagent Connect 172.20.20.128 -> 172.20.20.101 Starting Rembo Agent [10:27:36] <ERR> Invalid RbAgent command: help Known commands: report : update agent status on the server process-commands : process pending server commands hostinfo : display general information on the machine radget : download a .RAD archive from the server radput : upload a .RAD archive to the server radcheck : verify the consistency of a .RAD archive radunpack : explode the content of a .RAD archive on a local path mkimage : create a rembo archive from a local drive rsimage : restore a rembo archive to a local drive isoget : generate an ISO image from server files buildpcidb : create a PCI database export from a text file install-kernel : install rembo on a system partition install-archive : install an archive on a local partition create-cdrom : create a bootable cdrom fallback-mbr : disable hard disk boot with a fall back MBR cmdlines : process a rbagent command lines file joindomain : join a Windows domain resetminisetup : reset the mini-setup progress flag checkdevices : look for devices not functioning properly instwimgapi : install Microsoft Windows Imaging DLL and file driver rad-radinfo : describe the logical content of a .RAD archive rad-radput : upload a .RAD archive to the server, with ODBC records rad-radget : download a .RAD archive from the server, with ODBC records rad-srvradput : asynchronously upload a .RAD archive on the server, with ODBC records rad-isoget : build an ISO image from the server, with ODBC records rad-chksoft : simulate the creation of a new software package rad-mksoft : create a new software package rad-mkwinsetup : create a Windows setup image rad-mkvistaclone : create a Windows Vista WIM image rad-mklinuxsetup : create a Linux setup image rad-mksolarisboot : create a Solaris boot image rad-jumpstart-pre : generate Jumpstart pre-installation files rad-jumpstart-post : upload Jumpstart logs to the server rad-uploadlogs : send local log files to the server rad-deployhost : trigger a client deployment on the server rad-hoststatus : get the deployment status for a client rad-hostlogs : get the deployment logs for a client rad-schemelist : list all deployment schemes registered in the database rad-configlist : list all OS configurations registered in the database rad-serverlist : list all RAD servers registered in the database rad-srvsync : trigger a server file synchronization process 132 Deployment Guide Series: Tivoli Provisioning Manager for OS Deployment V5.1
- 149. rad-hostlist : list some hosts registered in the database rad-registerhost : update a client record in the database rad-unregisterhost : remove a client record from the database rad-hidepassword : return the encoded form of a password as used internally rad-configure : force server to reload radconfig.csv rad-mkbootcd : create a bootable CD-ROM to start RAD without PXE rad-runtask : execute any pending activity Stopping Rembo Agent Each command has a short description next to it, so you can easily see what it is used for. Most of these commands require additional parameters. If a command requires additional parameters, you will get a list of parameters when you start the command. Following is an example for running the following command: rbagent -q -s 172.20.20.101:password rad-hidepassword Example 3-35 Help on rad-hidepassword command Connect 172.20.20.128 -> 172.20.20.101 Starting Rembo Agent [11:35:08] <ERR> usage: rad-hidepassword <password> [md5] [11:35:08] <ERR> RbAgent command rad-hidepassword has failed [AGT:1788] Stopping Rembo Agent Notice the line starting with usage—this is a usage explanation for the command. You can see that the command requires a password attribute, which can optionally be followed by keyword md5 that causes the password to be encrypted using MD5. Now that we know how to connect to the server and list known commands it is time to list the commands you might find useful. Please remember that you need to prefix these commands with rbagent and any command switches you would like to use (for example rbagent -s srvip:password). Indicate whether the command can be run offline or online and can be found in brackets next to the command name. radunpack (OFFLINE) - this command allows you to unpack RAD files to the local directory. This can be useful if you just need some files from the RAD archive and do not want to import the RAD file to the server and use it in deployment. The syntax of this command is as follows: radunpack radfilename.rad local-destination-path Chapter 3. Installing the Tivoli Provisioning Manager for OS Deployment environment 133
- 150. joindomain (OFFLINE) - it is not very likely you will have to run this command manually since you can make the machine join the domain when it is deployed. However, it is good to know this command exists in rbagent should you decide to use it later manually or from some other configuration management tool. The syntax of this command is as follows: to join domain: joindomain domain adminuser adminpwd [joinou] to join a workgroup: joindomain /w workgroup [adminuser adminpwd] to change the trust account: joindomain /s domain trustpwd rad-mksoft (ONLINE) - use this command to manually build software packages. “Example - registering hosts from the command line” on page 134 shows how to automatically build device driver software packages using this command. The syntax of this command is as follows: rad-mksoft sourcepath ["<attr>=value" ...] <attr> is in (descr,content,pkgname,dest,cmdline, pass,flags,dosubst,norules) rad-registerhost (ONLINE) - this command is very useful if you have naming conventions where simple attribute mapping is not enough. If you use scripting to create host names, you might use this command in your script to automatically register hosts to Tivoli Provisioning Manager for OS Deployment server. See the following example on how to use this command in scripts. The syntax of this command is as follows: rad-registerhost <IP|MAC|SN|UUID>=... [HostName=...] [...] rad-unregisterhost (ONLINE) - use this command to unregister the machine from the Tivoli Provisioning Manager for OS Deployment server. You might use it for automatic maintenance of the hosts list (for example, to integrate with the monitoring solution to remove machines not reachable for more than 30 days). The syntax of this command is as follows: rad-unregisterhost <IP|MAC|SN|HostName|Description>=... rad-hidepassword (ONLINE) - this command is used to create an encrypted password using clear text password as input. This is very useful if you want to manually update passwords in configuration files. If you use this command to generate password for configuration files, specify the md5 keyword. The syntax of this command is as follows: rad-hidepassword <password> [md5] Example - registering hosts from the command line In this example we look at a company that has four different locations: London, Paris, Sydney, and Zagreb. They are implementing Tivoli Provisioning Manager for OS Deployment and want to register hosts with host names in accordance with their naming policy. The computer name has to take the form 134 Deployment Guide Series: Tivoli Provisioning Manager for OS Deployment V5.1
- 151. LLLMMMMMM where LLL is a three letter code for the location and MMMMMM is the last three octets (six hexadecimal characters) of the MAC address. When registering new hosts or assigning a name to an already registered one, you can use some special keywords that are dynamically replaced with host specific information at the time of deployment. These special keywords must be enclosed in square brackets [ ]. [IP] is replaced by the full IP address of the host being deployed, while [MAC] is replaced by the hardware address. To set hostnames based on the MAC address, you can enter the following value in the Host name field: pc[MAC]. The computer with the MAC address 00:01:02:03:04:05 will be named pc000102030405. The following keywords can be used: [IP] - the full IP address (received by DHCP) [MAC] - hardware address [SN] - serial number as found in DMI (SMBIOS) [AT] - DMI asset tag [BOM] - unique identifier in Tivoli Provisioning Manager for OS Deployment server database Every keyword supports a ’range’ extension if you want to include only part of the dynamic information. [IP3] corresponds to the last octet of the IP address (pc-[IP3] becomes pc-12 if IP address is 192.168.0.12). [IP1-3] corresponds to octets 1 to 3. [MAC4-6] is replaced by the last three digits of the MAC address. Note: The host name that uses dynamic keywords is expanded only during deployment. Do not expect it to be updated dynamically in the administrative console if no deployment has occurred. Dynamic keywords are used to get MMMMMM part of the name in our scenario. We also have to calculate the location code. We will assume that the input to the script is an IP address. The host name is generated according to the naming policy. The host is then registered to the server using the provided IP address and generated host name. Each location has different C-class subnets (netmask is 255.255.255.0) that we will use to determine the location of the machine. Following is a list of locations, location codes, and IP addresses used on that location: London (LON) - 10.1.1.x Paris (PAR) - 10.1.2.x Chapter 3. Installing the Tivoli Provisioning Manager for OS Deployment environment 135
- 152. Sydney (SYD) - 10.1.3.x Zagreb (ZAG) - 10.1.4.x If the machine in Zagreb has the MAC address 00:01:02:03:04:05, then its name should be ZAG030405. This is done in the following two steps: 1. In the first step we do not know the MAC address of the machine, so we will leave this for the deployment phase. To determine the host name, we will use the third octet of the IP address and then register the host using the host name like LON[MAC4-6] for London machines, SYD[MAC4-6] for Sydney machines, and so on. 2. The second part of this process occurs during the deployment of machines. When the machines are deployed they will be assigned a host name according to their MAC address. Example 3-36 shows a script that converts IP to location codes and registers host machines to the Tivoli Provisioning Manager for OS Deployment server. The script accepts a single IP address as input and assumes rbagent is properly configured and can be found using your PATH variable. Example 3-36 Example script #!/bin/sh B_IP=$1 B_SUBNET=`echo $B_IP | cut -d"." -f3` case $B_SUBNET in 1) B_LOCCODE=LON;; 2) B_LOCCODE=PAR;; 3) B_LOCCODE=SYD;; 4) B_LOCCODE=ZAG;; *) exit 1;; esac B_HOSTNAME=$B_LOCCODE"[MAC4-6]" echo Registering host - IP:$B_IP, hostname:$B_HOSTNAME rbagent rad-registerhost IP=$B_IP HostName="$B_HOSTNAME" The machines are registered as LON[MAC4-6], PAR[MAC4-6], SYD[MAC4-6], ZAG[MAC4-6]. During deployment they will get names such as, LON5174BF, SYD75257A, and so on. 136 Deployment Guide Series: Tivoli Provisioning Manager for OS Deployment V5.1
- 153. 4 Chapter 4. Installing pre-Vista systems In this chapter we discuss and describe how we install and migrate to Windows Operating systems other than Microsoft Vista. We include details of the operating system installation and also how the personality of the machine is preserved during such a migration. We also describe how such non Vista operating systems can be installed on a machine that at the time has no operating system installed. We will cover the case of server builds, where we may also have to consider the configuration of RAID arrays. The chapter has the following topics: “Introduction” on page 138 “User State Migration” on page 138 “Creating a cloned profile of Windows XP” on page 145 “Creating an unattended profile for Windows 2000” on page 171 “Real world OS installation scenarios” on page 187 “Restoring the machine’s user personality settings” on page 198 © Copyright IBM Corp. 2007. All rights reserved. 137
- 154. 4.1 Introduction In this chapter we review the process of dealing with Windows Operating Systems, other than Windows Vista, and discuss the following scenarios: Installing Windows XP on a bare metal machine. Indentifying any differences in this process when dealing with other non-Vista Windows operating systems. Upgrading Windows 2000 to Windows XP. Preserving user preferences and data over the operating system migration. 4.2 User State Migration For the migration of the machine personality, we could use different techniques. Here we opted to use the User State Migration Tool (USMT) Version 3 from Microsoft. Visit the following Web site for details about this tool: http://technet2.microsoft.com/WindowsVista/en/library/91f62fc4-621f-453 7-b311-1307df0105611033.mspx It is also possible to achieve much of the same result by using the Thinkvantage System Migration Assistant 5.2 from Lenovo. This technology is available for use on IBM X series servers and workstations, and OEM licenses can be purchased for use on equipment made by other manufacturers. Further details of the ThinkVantage System Migration Assistant can be found at the following Web address: http://www-307.ibm.com/pc/support/site.wss/document.do?sitestyle=lenovo &lndocid=MIGR-66945 The installation of USMT 3.0 on Windows XP is via a simple setup command with no options. The completion of the installation process is shown in Figure 4-1 on page 139. 138 Deployment Guide Series: Tivoli Provisioning Manager for OS Deployment V5.1
- 155. Figure 4-1 Completion panel from the installation of USMT 3 There is no GUI to drive this application, but, by default, the application binaries are located at C:Program FilesUSMT30. The key files that we are concerned with are shown in Table 4-1. Table 4-1 Significant files from the installation of USMT 3.0 Name Function ScanState.exe To scan and save user settings LoadState.exe To load user settings from a saved source MigUser.xml Default policy for migration of user settings MigSys.xml Default policy for the migration of system settings MigApp.xml Default settings for the migration of applications 4.2.1 Saving the personality of an XP machine We use the scanstate command to save the machine personality before we re-image it. For this to work efficiently, the command has to run in the context of an account with administrative rights because without such rights some settings will not be migrated. Remember that in the arguments passed to the command, we have to identify the desired target. The command in Figure 4-1 on page 140 explicitly prepares the backed up data ready for migration to an XP machine as Chapter 4. Installing pre-Vista systems 139
- 156. defined by the /targxp argument. All of the commands are included in the script in Figure 4-1. Example 4-1 Sample script to backup machine personality @echo off echo This command will backup the personality of the machine ready for migration to XP VER | FIND "Windows 2000" >NUL IF NOT ERRORLEVEL 1 ECHO Windows 2000 found, collecting data for migration to XP "C:Program FilesUSMT30scanstate" /targetxp /i:migsys.xml /i:migapp.xml /i:miguser.xml /genconfig:config.xml /v:13 "C:Program FilesUSMT30scanstate" "itsont03Project DataTITI-7V01-OSDeploymentUSMT%COMPUTERNAME%" /targetxp /i:migsys.xml /i:migapp.xml /i:miguser.xml /o /config:config.xml /v:13 /encrypt /key:"mykey" VER | FIND "Windows XP" >NUL IF NOT ERRORLEVEL 1 ECHO Windows XP found, collecting data for migration to XP "C:Program FilesUSMT30scanstate" /targetxp /i:migsys.xml /i:migapp.xml /i:miguser.xml /genconfig:config.xml /v:13 "C:Program FilesUSMT30scanstate" "itsont03Project DataTITI-7V01-OSDeploymentUSMT%COMPUTERNAME%" /targetxp /i:migsys.xml /i:migapp.xml /i:miguser.xml /o /config:config.xml /v:13 /encrypt /key:"mykey" goto :eof :nosupport ECHO We do not support this operating system VER :eof When this operation completes, you will see what is written to the screen shown in Figure 4-1. As the script was run in a context that had administrative rights, we were able to restore multiple user profiles. In real life, this operation is integrated into an automated process. This could be achieved in a number of ways: Group Policy Objects Tivoli Provisioning Manager workflows We recommend that this is done automatically outside the control of Tivoli Provisioning Manager for OS Deployment so that the profile information is available on a share when the machine is migrated and the profiles need to be restored. 140 Deployment Guide Series: Tivoli Provisioning Manager for OS Deployment V5.1
- 157. If you are unsure if the target workstation target will be Vista, XP, or Windows 2000, you need to generate different profile archives—one for each possibility. This has to be catered for in the backup and restore scripts that pass arguments to the scanstate and loadstate commands. Example 4-2 Results of the saving of a machines personality C:>"C:Program FilesUSMT30backup.bat" C:>rem this will backup profiles for use in an XP machine C:>"C:Program FilesUSMT30scanstate" /targetxp /i:migsys.xml /i:migapp.xml /i:miguser.xml /genconfig:config.xml /v:13 Log messages are being sent to 'C:Program FilesUSMT30ScanState.log' Scanning the computer for files and settings... ScanState has successfully created the config file at 'C:config.xml'. C:>"C:Program FilesUSMT30scanstate" "Program filesUSMT30LION" /targetxp /i:migsys.xml /i:migapp.xml /i:miguser.xml /o /config:config.xml /v:13 /encrypt /key:"mykey" Log messages are being sent to 'C:Program FilesUSMT30ScanState.log' Scanning the computer for files and settings... Collecting files and settings for: This Computer 'LIONAdministrator' (user 1 of 2) 'LIONRichard Hine' (user 2 of 2) Saving files and settings - 1 minute(s) remaining... ScanState has successfully collected the files and settings. Somewhere to save our user profiles Note that we are qualifying output files of this command with fully qualified UNC names. This avoids the need to set up an explicit network share. It does however assume that we have read access to the unattended share. To make sure that this is the case, add this share to the null session share list as defined in the Local Security policy of the server of the share. An example of this is Figure 4-2 on page 142. Chapter 4. Installing pre-Vista systems 141
- 158. Figure 4-2 Setting up a Null Session Share In our scripts we save away the user profile information using USMT, by directing the saved data to a network drive. There are different techniques you can use, but we are using a network drive to which all users have read and write access. We do this, as the script logs its activities back to the share. The file server is Windows 2003, and we need to perform some server administration to give us the necessary permissions. 1. We set up a share called UserMigration, and in the Security settings for the share grant everyone read and write access as seen in Figure 4-3 on page 143. If this is not valid at your site, then change the script to write their log files elsewhere. Note that the scanstate.exe command can encrypt the profile stores using a key of your choice, so even if they can ‘read’ the file, they cannot make any use of it. 142 Deployment Guide Series: Tivoli Provisioning Manager for OS Deployment V5.1
- 159. Figure 4-3 Give everyone access to the share 2. For Windows 2003, we also enable the Guest Account for anonymous access to the server. This is done in the Local Users and Groups of the Computer Management console as in Figure 4-5 on page 144. Just check that the account is enabled, as by default it is disabled. See Figure 4-4 on page 144. Chapter 4. Installing pre-Vista systems 143
- 160. Figure 4-4 Enable the guest account on WIndows 2003 3. Check that the Windows 2003 machine has the Guest account enabled. Figure 4-5 Check guest account enabled 4. Test that this share is working, as we have shown in Figure 4-6 on page 145, where we type the contents of a file without having to explicitly authenticate with the server beforehand. 144 Deployment Guide Series: Tivoli Provisioning Manager for OS Deployment V5.1
- 161. Figure 4-6 Testing the null session share Summary Now that we saved the personality of the machine to a safe place, we can move the system from Windows 2000 to XP. We built the XP image that we used to migrate the Windows 2000 to an XP machine. Windows XP can be defined to Tivoli Provisioning Manager for OS Deployment in one of the following two ways, using different profile types: Cloned Unattended Next, we create a cloned profile containing Windows XP. 4.3 Creating a cloned profile of Windows XP This process follows the following steps, which removes any personal data from the machine. Use the following steps to clean up the donor XP machine: 1. Remove any network shares. 2. Remove any remote printer definitions. Chapter 4. Installing pre-Vista systems 145
- 162. 3. Empty the Web browser cache. 4. Remove any user files. 5. Empty the contents of the Trash Can. Run sysprep on the donor machine to remove its identify before it is installed on other machines. The sysprep infrastructure is located in the deploy.cab file, which is under the supporttools directory of the Windows XP installation media. Expand the contents of this cab file into a new directory on the donor machine called sysprep. There are many options to this command that we do not further discuss here but are well documented at the following Web site: http://support.microsoft.com/kb/30257 With Windows XP, we used c:sysprepsysprep -quiet -mini -forceshutdown -activated -reseal, which when it has completed shutdowns the donor machine. At this point, Tivoli Provisioning Manager for OS Deployment knows nothing of this donor machine, and one way of registering it is to perform a network boot of this machine. At this point, the machine is automatically registered and picks up the Tivoli Provisioning Manager for OS Deployment PXE Client code. So, power up the donor machine again, and make sure that you boot it from the network before booting from the hard disk. If the default boot order in the BIOS is set to boot from disk first, this can usually be overwritten by selecting a special key sequence on power up. F12 or ESC are common. When the machine does a network boot, you will see it looking for a DHCP address, which when it has been allocated is followed by the Tivoli Provisioning Manager for OS Deployment PXE Client logo screen appearing on the console—much like the example in Figure 4-7 on page 147. For an unattended operation you might want to consider making starting from the network the first option in the boot sequence. 146 Deployment Guide Series: Tivoli Provisioning Manager for OS Deployment V5.1
- 163. Figure 4-7 Tivoli Provisioning Manager for OS Deployment PXE Client boot screen At this point, we should see the following two things: We should also see a new machine appear under OS Deployment > Host Monitor with a MAC address the same as that in the Tivoli Provisioning Manager for OS Deployment client screen as in Figure 4-9 on page 149. We should also see that the Tivoli Provisioning Manager for OS Deployment PXE Client screen is locked, as shown in Figure 4-8 on page 148. Chapter 4. Installing pre-Vista systems 147
- 164. Figure 4-8 Tivoli Provisioning Manager for OS Deployment PXE Client locked menu. This client screen remains locked until it is released from the Tivoli Provisioning Manager GUI. It is from the Tivoli Provisioning Manager GUI that we want to start the admin toolkit (also called administrator toolkit) in order to start building the XP image profile. Tip: If you are running more than one PXE server in your environment, check that the PXE server identified in the client GUI is the one you expect to use, or you may get unpredictable results. 148 Deployment Guide Series: Tivoli Provisioning Manager for OS Deployment V5.1
- 165. Figure 4-9 Ready to start the admin toolkit on a new donor machine In Figure 4-9 we start the admin toolkit from the context menu of the newly discovered machine, which you can see just behind and above the right hand context menu. When we do this we see the information shown in Figure 4-10. Figure 4-10 Starting the admin toolkit Chapter 4. Installing pre-Vista systems 149
- 166. Press OK to continue, and then finally you will see the admin toolkit primary menu of the Tivoli Provisioning Manager for OS Deployment PXE Client menu, as shown in Figure 4-11. Figure 4-11 The admin toolkit primary menu Now we are ready to make the new image profile. Select Make a new image, and you are then presented with the options, as shown in Figure 4-12 on page 151. 150 Deployment Guide Series: Tivoli Provisioning Manager for OS Deployment V5.1
- 167. Figure 4-12 Admin toolkit image creation menu After you select Create a System Profile, you are asked to name the profile, as shown in Figure 4-13 on page 152. Chapter 4. Installing pre-Vista systems 151
- 168. Figure 4-13 Naming the new profile Next, we are asked for further details of the profile we are creating, including if we want to capture and use the CMOS settings from the donor machine, as shown in Figure 4-14. Be careful here if you save the CMOS settings with the profile, as this makes the profile hardware specific. There are checks that you can make during deployment to ensure that the model of the target is the same as that of the donor, which should be used if the CMOS data is captured. We suggest that the use of this feature is in the setting of the boot sequence of the target to the same as those defined in the donor machine. In this way, we can set the target to always boot from the network first. Figure 4-14 CMOS settings in the image profile 152 Deployment Guide Series: Tivoli Provisioning Manager for OS Deployment V5.1
- 169. We are then asked to confirm the creation of the profile in Figure 4-15. Figure 4-15 Profile creation confirmation Now we can monitor the profile creation process, as shown in Figure 4-16. Figure 4-16 Profile creation progress dialog When the profile creation process completes, a notification in the Tivoli Provisioning Manager for OS Deployment PXE Client screen appears, as shown in Figure 4-17 on page 154. Chapter 4. Installing pre-Vista systems 153
- 170. Figure 4-17 Completion dialog for profile creation Finally, as you select the Main menu button you are asked the following. Figure 4-18 Admin tool exit action dialog Tip: Remember what is likely to happen. If you allow the machine to boot again from disk, you will go through the mini sysprep process as this was the donor machine. This process asks you for license keys and so forth, as though you are completing a first time installation. Decide what you are going to do with the donor machine now that you successfully created the profile. Return to the Tivoli Provisioning Manager for OS Deployment Web GUI, where you can see details of the newly created profile as shown under OS Deployment → Profiles as shown in Figure 4-19 on page 155. 154 Deployment Guide Series: Tivoli Provisioning Manager for OS Deployment V5.1
- 171. Figure 4-19 Newly created profile Now that we have a new cloned profile, we can explore and change its contents if required. Windows 2000 and 2003 When we repeat this operation, but with a Windows 2000 donor machine, we use c:sysprepsysprep -quiet -mini -forceshutdown. This completes our process of creating a clone operating system image for Wndows XP, 2000, and 2003. 4.3.1 Changing the contents of the cloned machine What is different about Tivoli Provisioning Manager for OS Deployment is that we have not simply copied the disk sectors to create the clone image. Instead, we copied the files from the donor machine. This means that we can now browse and change the details of the profile after it is captured. Open the profile, as shown in Figure 4-20 on page 156. Chapter 4. Installing pre-Vista systems 155
- 172. Figure 4-20 Opening the newly created image profile When the profile is open, you will see the overview, as shown in Figure 4-21 on page 157. From here you can do the following: Add and delete directories from the image Add and delete files from the image Change the hard disk layout Review the binding details for computer models Change and view the system code page Add additional user binding categories If we edit the profile details, we can add system category information, which then allows us to associate this profile with software applications. In this way, the software applications are ‘bound’ to the image. Changes to the profile appear in Figure 4-22 on page 158. 156 Deployment Guide Series: Tivoli Provisioning Manager for OS Deployment V5.1
- 173. Figure 4-21 Overview details of the profile Chapter 4. Installing pre-Vista systems 157
- 174. Figure 4-22 Changing the profile details After we finish with the profile details, we can modify the details of the disk partitions in the image. This may be useful if the donor machine is much smaller than the likely targets or maybe we want to create a new partition on the target for the purposes of local redeployment. You see in Figure 4-23 on page 159 that we can add or extend a partition. The partition size can be modified by sliding the bar on the boundary of the disk in the tool. See the arrows. We recommend that you allow the disk partition to take 100% of the target disk in order to cater to different disk sizes. 158 Deployment Guide Series: Tivoli Provisioning Manager for OS Deployment V5.1
- 175. Figure 4-23 Modify the disk partitions in the profile In Figure 4-24 on page 160, you see that we created a new partition that takes 31% of the physical disk. We recommend however, that you use 100% of the available physical disk to make the process less dependent on the physical characteristics of the target. Remember that this can be used to target the first physical disk of a machine while leaving the second physical disk unchanged. Note that TPM for OS Deployment does not clone from all physical disks, and if it is a requirement to install data or applications on a second physical disk, do it with a software package. Chapter 4. Installing pre-Vista systems 159
- 176. Figure 4-24 Adding a new disk partition Details of how the OS is configured on the target machine is contained in the configuration profile. You see this in Figure 4-25. It is this information that is used by the mini setup process that was requested when we did the initial sysprep to build this image, and will be run when the target OS boots after initial deployment. It is at this time that the machine is given its new identity including host name and other network characteristics. Figure 4-25 Profile configuration name 160 Deployment Guide Series: Tivoli Provisioning Manager for OS Deployment V5.1
- 177. When you select the named profile, you will see the summary as shown in Figure 4-26. Figure 4-26 Profile configuration summary You see that we can make customer additions to the sysprep.inf file. Remember that this file is used when the image is deployed to a new target. Such modifications are useful to allow you to run custom actions when the deployment is completed. They might include the following: A script to update an associated Change Record. A script to send an e-mail notification to an Administrator. The sysprep process is documented at the following Web site: http://www.microsoft.com/technet/prodtechnol/winxppro/deploy/duplicatio n.mspx Chapter 4. Installing pre-Vista systems 161
- 178. Details of the contents of the sysprep.inf file are documented at the following Web site: http://technet2.microsoft.com/WindowsVista/en/library/71b576bd-cca6-466 f-a1db-16500be3098f1033.mspx?mfr=true The key parameters are documented in Example 4-3. Example 4-3 Available sysprep.inf variables [Unattended] ExtendOemPartition OemPnPDriversPath OemSkipEula InstallFilesPath KeepPageFile ResetSourcePath UpdateHAL UpdateUPHAL UpdateInstalledDrivers TapiConfigured [GuiUnattended] AdminPassword Autologon AutoLogonCount OEMDuplicatorString OEMSkipRegional OEMSkipWelcome TimeZone [UserData] Supports the same set of entries as the Unattend.txt file. [LicenseFilePrintData] Supports the same set of entries as the Unattend.txt file. [GuiRunOnce] Supports the same set of entries as the Unattend.txt file. [Display] Supports the same set of entries as the Unattend.txt file. [RegionalSettings] Supports the same set of entries as the Unattend.txt file. [Networking] Supports the same set of entries as the Unattend.txt file. [Identification] Supports the same set of entries as the Unattend.txt file. [TapiLocation] 162 Deployment Guide Series: Tivoli Provisioning Manager for OS Deployment V5.1
- 179. [Sysprep] Automatically generates the entries in the [SysprepMassStorage] section. [SysprepMassStorage] Allows you to use the same image on computers with different mass-storage devices. If you want to do something simple like run a script after installation completes, then see Example 4-4, which gives you the critical but incomplete items from the sysprep.inf file that you will need. In this example, we run the c:run_this_command.cmd file the first time that the target machine boots after installation. Example 4-4 sysprep.inf sample [Unattended] . [GuiUnattended] . AutoLogonCount=1 AutoLogon=Yes . [GuiRunOnce] . Command0=C:run_this_command.cmd . From this same screen in Figure 4-26 on page 161, we customize the menu that is offered to the user of Tivoli Provisioning Manager for OS Deployment when they select the image profile to be deployed. This is shown again in Figure 4-26 on page 161. Why would we do this? To change the dialog text to make it easier for business users to understand. To add image branding to the dialogs. To password protect certain images. To add timeouts to the display for auto selection of a single-option image. This customization process starts as shown in Figure 4-27 on page 164. Chapter 4. Installing pre-Vista systems 163
- 180. Figure 4-27 Initial client side GUI dialog From here we can perform the customization, as shown in Figure 4-28 on page 165. 164 Deployment Guide Series: Tivoli Provisioning Manager for OS Deployment V5.1
- 181. Figure 4-28 Client side GUI customization After this is complete, we can further change the profile to perform system customization, as shown in Figure 4-29. Figure 4-29 Profile system customization Next we can perform OS customization, as shown in Figure 4-30 on page 166. Chapter 4. Installing pre-Vista systems 165
- 182. Figure 4-30 Profile OS customization There are others you can view, but as a real example let us say that we need to append the uk.ibm.com DNS domain to the host name search order; therefore, select EDIT from the fixed host properties dialog as shown in Figure 4-31. Here you are allowed to edit them as shown in Figure 4-32 on page 167. Figure 4-31 Profile fixed host properties 166 Deployment Guide Series: Tivoli Provisioning Manager for OS Deployment V5.1
- 183. Figure 4-32 Changing the profile fixed host properties Finally the changes are written back to the profile as shown in Figure 4-33. Figure 4-33 Amended fixed host properties We can also look into the profile image and see which patches and applications were installed when the image was captured. So if you select Get more information from the Profile Details screen, you see what is shown in Figure 4-34 on page 168. Here you see the Microsoft patches that are integrated to the image. Note that the patch names for example KB867282 are hyperlinks to the Microsoft support Web site. In this case, to the following Microsoft Web site: http://support.microsoft.com/default.asxp?scid=kb;en_us;KB867282 Chapter 4. Installing pre-Vista systems 167
- 184. Further down the detail of the OS Image Analysis page, we can see the applications that were installed in the image. This is shown in Figure 4-35 on page 169. Figure 4-34 Profile image details from OS image analysis 168 Deployment Guide Series: Tivoli Provisioning Manager for OS Deployment V5.1
- 185. Figure 4-35 Details of applications integrated into the OS Image Now that we changed the setup characteristics of the image and browsed the installed patch and application list, we can change the file and directory contents of the image. This is great if we need to add or delete files or directories after we capture the initial image—as it stops us from having to revisit the processes of the following: Machine cleanup Re running sysprep New profile creation or replacement This feature thus saves time in the process of keeping up-to-date with small changes in a system base image. It also saves disk space as we can modify the original image rather than creating a new one. The other benefit to this feature is that it reduces the administrative effort in tracking large numbers of image variants. From the Profile Details as shown in Figure 4-21 on page 157, we select Browse Image of Primary Partition. This then gives an explorer style interface to view the files in the image as seen in Figure 4-37 on page 170. Chapter 4. Installing pre-Vista systems 169
- 186. Figure 4-36 Launching the partition image explorer From the image explorer, we are able to create and delete folders as well as add and delete files from folders. Figure 4-37 Partition image explorer Now that we have created, viewed, and modified a cloned image, let us look at the process of handling unattended setup techniques. 170 Deployment Guide Series: Tivoli Provisioning Manager for OS Deployment V5.1
- 187. 4.4 Creating an unattended profile for Windows 2000 We perform the following steps to create an unattended profile for Windows 2000: 1. Select Add a new profile, as shown in Figure 4-38. Figure 4-38 Creating a new OS profile 2. Decide what sort of profile we want to create. In Figure 4-39 on page 172 we create a profile for a Windows 2000 server. Chapter 4. Installing pre-Vista systems 171
- 188. Figure 4-39 Creating a WIndows 2000 system profile 3. Use an unattended set up process for this profile rather than create an image based profile. This is shown in Figure 4-40. Figure 4-40 Unattended Windows profile 172 Deployment Guide Series: Tivoli Provisioning Manager for OS Deployment V5.1
- 189. 4. Define the partition size that will be used for the Windows 2000 installation. This can be defined as an absolute value or as a proportion of the available space. As you are unlikely to know the size of all target disks, we recommend that you specify an absolute size unless you are going to use 100% of the disk. You can see this in Figure 4-41. Figure 4-41 Specify the size of the target partition 5. Specify the characteristics of the new disk partition, as in Figure 4-41. Chapter 4. Installing pre-Vista systems 173
- 190. Figure 4-42 Specify characteristics of new disk partition 6. Skip the step in Figure 4-43 because we do not want any more partitions at this time. Figure 4-43 Final disk partition display 7. Now that we defined the target partition of the machine, we need to identify where the Windows 2000 software is to be sourced. 174 Deployment Guide Series: Tivoli Provisioning Manager for OS Deployment V5.1
- 191. Important: For this to work you need the Web Extensions installed on your workstation, making sure that it is configured to point to the Tivoli Provisioning Manager for OS Deployment server that will be hosting the new profiles. This is a special consideration in an environment where there are multiple Tivoli Provisioning Manager for OS Deployment servers. We recommend that you point your RbAgent configuration to the central server, as the profile images are replicated from here. Important: The configuration file can be changed manually and then the RbAgent service restarted. The configuration file does NOT support a host name rather than an IP address. See Program FilesCommon filesIBM Tivolirbagent.conf. In Figure 4-44 on page 176 we browse the local disk of the workstation running the browser interface to select the I386 directory of the Windows 2000 image that may be on CD or was copied locally to the workstation disk. 4.4.1 Creating a slipstreamed OS image You may want to point to a version of the I386 directory that already has all of the current service packs slipstreamed into the base directory. The advantages of this mean the following for you: You do not have to install any service packs after the POS installation is complete. You do not have to move the base and the patched code to the target. This saves time for the installation process and saves space on the Tivoli Provisioning Manager for OS Deployment Server. We do not cover slipstreaming in details; instead, we provide a summary. Following is an example for Service Pack 4, where you need to perform the following steps: 1. Copy Windows 2000 i386 CD directory to disk with xcopy <cd>i386 <disk>win2000i386 /e. 2. Make a temp directory on local disk. md <disk>win2000sp4. 3. Copy service pack to the new directory with copy <cd>w2kso4_en.exe <disk>win2000sp4. 4. Extract the service pack while in the <disk>win2000sp4 directory with a w2kso4_en.exe /x. Chapter 4. Installing pre-Vista systems 175
- 192. 5. Slipstream the service pack into the base with the following: <disk>win2000sp4update.exe -s:<disk>win2000 At this point the Service Pack 4 is integrated into the base code. This process is pretty much the same for all Windows operating system variants. 4.4.2 Selecting the Windows 2000 source tree Perform the following to select the Windows 2000 source tree: 1. Select the I386 path in the profile wizard, as shown in Figure 4-44. Figure 4-44 Windows 2000 When we are done, you will see the final path, as in Figure 4-45 on page 177. 176 Deployment Guide Series: Tivoli Provisioning Manager for OS Deployment V5.1
- 193. Figure 4-45 Selected path for I386 Windows 2000 directory 2. When the files are delivered to the target machine, Tivoli Provisioning Manager for OS Deployment runs the appropriate setup command, which requires parameters to be passed as this is a silent installation. This includes the product key, so here we provide a default, as shown in Figure 4-46. Figure 4-46 Providing a Windows 2000 product key 3. Who owns the target machine? What time zone does it operate in? What is the administrator password? Provide the answers as in Figure 4-47 on page 178. Chapter 4. Installing pre-Vista systems 177
- 194. Figure 4-47 Windows 2000 target machine details 4. There may be additional parameters that you want to pass to the unattended install process. You can manually create the contents of this file. Alternately, you can use the setupmgr utility that can be found in the deploy.cab file from the Windows 2000 distribution CD. We will use the Windows 2000 distribution CD here to make it easier to create a template for your custom requirements. Tip: These overrides for the sysprep process can apply to image and unattended operating system profiles. 4.4.3 Building a custom sysprep.inf with setupmgr Perform the following to build a a custom sysprep.inf with setupmgr: 1. Start the setupmgr, as shown in Figure 4-48 on page 179. 178 Deployment Guide Series: Tivoli Provisioning Manager for OS Deployment V5.1
- 195. Figure 4-48 Starting setupmgr 2. Generate an unattended install answers response file, as shown in Figure 4-49. Figure 4-49 Starting an unattended installation response file 3. We are working with a Windows 2000 unattended installation response file. See Figure 4-50 on page 180. Chapter 4. Installing pre-Vista systems 179
- 196. Figure 4-50 Opting for a Windows 2000 unattended installation 4. We are working with Windows 2000 Server, as in Figure 4-51. Figure 4-51 setupmgr Windows 2000 Server 5. We need a fully unattended setup, as in Figure 4-52 on page 181. 180 Deployment Guide Series: Tivoli Provisioning Manager for OS Deployment V5.1
- 197. Figure 4-52 Fully automated installation 6. Accept Windows licensing. See Figure 4-53. Figure 4-53 Accepting the Windows license 7. Enter Name and Organization information, as shown in Figure 4-54 on page 182. Chapter 4. Installing pre-Vista systems 181
- 198. Figure 4-54 Specify name and organization 8. Assign names to computer, as shown in Figure 4-55. Figure 4-55 Assign computer names 9. We are now prompted to add details of the Administrator password of this machine. 182 Deployment Guide Series: Tivoli Provisioning Manager for OS Deployment V5.1
- 199. Figure 4-56 Specify 1 autologon to run custom script 10.Specify typical network settings, as in Figure 4-57. Figure 4-57 Specify network settings 11.Name the workgroup or domain. See Figure 4-58 on page 184. Chapter 4. Installing pre-Vista systems 183
- 200. Figure 4-58 Specify workgroup or domain Note: Note that there are specific functions in Tivoli Provisioning Manager for OS Deployment to add the new target to a domain. See 3.5.3, “Running rbagent from command line” on page 130 for more information. 12.Specify the time zone, as in Figure 4-59. Figure 4-59 Specify the time zone 184 Deployment Guide Series: Tivoli Provisioning Manager for OS Deployment V5.1
- 201. There are other options that are made available by setupmgr that you can specify but remember that we are just using this tool to help in generating the unattended.txt file, so for now we will skip the other options. What is important to know is how you are going to get a command to run after the operating system is installed. This script hook can be used for many purposes, for example: – Sending an e-mail notification – Sending an SMS text message – Updating a change control record – Restoring user personalities to the machine This same hook can also be used for the installation of software, but we recommend that there are better ways to do this that offer more control and flexibility, so we council against its use for this purpose. What we will do here is use this hook to start the restoration of all user personalities that were saved for a machine of this host name. Figure 4-60 Running a command after system installation When the setupmgr process finishes, we are left with a template that looks similar to Example 4-5 on page 186. Chapter 4. Installing pre-Vista systems 185
- 202. Example 4-5 unattended.txt file built by setupmgr ;SetupMgrTag [Data] AutoPartition=1 MsDosInitiated="0" UnattendedInstall="Yes" [Unattended] UnattendMode=FullUnattended OemSkipEula=Yes OemPreinstall=Yes [GuiUnattended] AdminPassword=xxxxxx AutoLogon=Yes AutoLogonCount=1 OEMSkipRegional=1 TimeZone=85 OemSkipWelcome=1 [GuiRunOnce] Command0 = "9.3.4.137Unattendedafter_install.cmd" [UserData] FullName=IBM OrgName=IBM ComputerName=* [LicenseFilePrintData] AutoMode=PerServer AutoUsers=5 [SetupMgr] DistFolder=C:win2000dist DistShare=win2000dist [Identification] JoinWorkgroup=WORKGROUP [SysPrepMassStorage] ?????????????????? [Networking] InstallDefaultComponents=Yes 186 Deployment Guide Series: Tivoli Provisioning Manager for OS Deployment V5.1
- 203. We now have a template that we can use; however, it is important to remember that Tivoli Provisioning Manager for OS Deployment will overwrite many user supplied options. So which ones should we use? We can use [SysPrepMassStorage] , [Components] and [GUIRunOnce], but note that [GuiRunOnce] should be run in conjunction with [GuiUnattended]. 4.5 Real world OS installation scenarios Our real world problem is to perform two operations as a part of the installation process. 1. Configure the Windows Firewall on the newly installed server. 2. Remove Windows Media® Player and Microsoft Messenger from the installation. You can achieve these results quickly and easily using Tivoli Provisioning Manager for OS Deployment. 4.5.1 Configuring the Windows firewall To configure the Windows firewall during an unattended installation of the operating system, you normally have to provide an unattend.txt file as an argument to the setup command. We can simplify this process, by adding the unattend.txt arguments to the OS profile in Tivoli Provisioning Manager for OS Deployment. 1. In Figure 4-61 on page 188 we add the details to the profile. The parameters that we used as shown in Example 4-6 on page 188, enables the firewall but will admit connections from the local network on port 80, for example to allow the default HTTP web traffic. Chapter 4. Installing pre-Vista systems 187
- 204. Figure 4-61 Firewall configuration in unattend.txt 2. We also log packets that we drop and connection details into c:WindowsWindowsFirewall.log. Example 4-6 Firewall configuration sample [WindowsFirewall] Profiles=WindowsFirewall.ITSO Logfile = %WINDIR%WindowsFirewall.log LogDroppedPackets = 1 LogConnections = 1 ; ; enable standard ITSO profile ; [WindowsFirewall.ITSO] Type = 1 Mode = 1 Exceptions = 1 PortOpenings = WindowsFirewall.WebServer ; ; allow only port 80 TCP through firewall ; [WindowsFirewall.WebServer] Protocol = 6 Port = 80 Name = Web Server (TCP 80) Mode = 1 Scope = 1 3. After the Windows 2003 OS installation is complete, the firewall is enabled, as shown in Figure 4-62 on page 189. This is controlled by the mode operand in the profile. 188 Deployment Guide Series: Tivoli Provisioning Manager for OS Deployment V5.1
- 205. Figure 4-62 Firewall is enabled 4. Look at the details of the firewall configuration to see that we successfully created a new profile called Web Server (TCP(80). Chapter 4. Installing pre-Vista systems 189
- 206. Figure 4-63 Firewall configuration profile 5. Look at the details of this configuration to see the firewall port settings. These are shown in Figure 4-64, where we only allow TCP connections on port 80 through the firewall. This behavior is controlled by the scope and port settings in the profile. Figure 4-64 Firewall port settings 190 Deployment Guide Series: Tivoli Provisioning Manager for OS Deployment V5.1
- 207. 6. We can change the firewall configuration to only allow TCP connections through port 80 from the local subnet only, as shown in Figure 4-65. And this is controlled by the scope argument. Figure 4-65 Firewall configuration to only allow local subnet connections 4.5.2 Removing imaged profile operating system features To remove features like Media Player or MSN® Messenger, we have to use the sysocmgr command. So how do we automate this process? Why would we need to do this? Well, read the following note, and consider that we may prefer to use Opera and iTunes as our default Web browser and media player software. This technique is suitable for cloned images where the donor machine was prepared with sysprep. Note: sysprep will re-enable some Microsoft components that were disabled in the donor image. In Example 4-7, a sysprep.inf extract automatically logs onto the OS with the Administrator account when the installation is complete. It then runs the sysocmgr command. Note that this operation only happens once, see AutoLogonCount. Example 4-7 sysprep.inf for adding and removing Windows components ; autologon the machine the first time to run add / remove programs [GuiUnattended] AdminPassword=itso05 AutoLogon=Yes AutoLogonCount=1 OEMSkipRegional=1 TimeZone=85 Chapter 4. Installing pre-Vista systems 191
- 208. OemSkipWelcome=1 ; run command to install or remove windows components [GuiRunOnce] "sysocmgr /i:%windir%infsysoc.inf /u:%windir%infunattend.txt /q /r /c /x" The arguments passed to sysocmgr include the components to be added to or removed from the OS, and they are defined as in Example 4-8. Example 4-8 sysocmgr parameters [Components] IEAccess = On OEAccess = Off WMPOCM = Off WMAccess = Off 4.5.3 Removing unattended profile operating system features We will use this deployment problem as an example of how to copy some files to the target machine and then run a batch program. In our case, we want to copy the add_remove.cfg and add_remove.cmd to the install directory on the target computer and then run the add_remove.cmd command file. The contents of these files are shown in Example 4-9 and Example 4-10. When running these scripts, consider the security context in which they are run. If you need to run the command as the database instance owner, for example, then use the runas.exe command to set the context for the command. Example 4-9 Sample sysocmgr component arguments in add_remove.cfg [Components] IEAccess = On OEAccess = Off WMPOCM = Off WMAccess = Off The command you can run that reads the arguments in Example 4-9 is shown in Example 4-10. Example 4-10 Sample sysocmgr command in add_remove.cmd sysocmgr /i:%windir%infsysoc.inf /u:installadd_remove.cfg /q /r To achieve the addition and removal of Windows components after the installation is complete, Microsoft provides the sysocmgr command to perform 192 Deployment Guide Series: Tivoli Provisioning Manager for OS Deployment V5.1
- 209. Add / Remove programs and components via CLI. For us, we will have to build a Tivoli Provisioning Manager for OS Deployment software package. Software packages are versatile items, but in this case, we are going to define a package that copies the contents of a directory to the target machine, and then executes a command. Important: Do not be confused by the term software package. There is no function available within Tivoli Provisioning Manager for OS Deployment to explicitly install just software packages. The only item that can be explicitly installed with Tivoli Provisioning Manager for OS Deployment is a profile that contains either an unattended setup of an OS or, a clone of an OS. The only way that a software package can be installed is by association with an OS profile, meaning it is pulled by the installation of the OS. As a working model, consider Tivoli Provisioning Manager for OS Deployment as a part of a change management suite, such as the Tivoli Provisioning Manager that installs the OS, and does basic configuration as in the Firewall configuration and the Windows component installation and removal. Use Tivoli Provisioning Manager to install patches, middleware, and applications on the new server or on the workstation. Note: Tivoli Provisioning Manager V5.1 also has image management capabilities, and it uses Tivoli Provisioning Manager for OS Deployment Embedded Edition under the hood. This is discussed more in the section 8.2, “Tivoli Provisioning Manager V5.1” on page 399. Chapter 4. Installing pre-Vista systems 193
- 210. Figure 4-66 Starting the creation of a new software package 7. So, we use the supplied wizard to start the package creation as in Figure 4-66. The wizard then asks us details about the target OS, note that Vista targets are different here. 194 Deployment Guide Series: Tivoli Provisioning Manager for OS Deployment V5.1
- 211. 8. The use of a software package is several fold, but in Figure 4-67, we define that we will run a custom action on the target computer. The custom action shown in Figure 4-68 is to copy down some files to the target and then execute a command. Figure 4-67 Defining a custom action on the target computer 9. We identify where the source of the files is located in Figure 4-69 on page 196. Figure 4-68 Copy files and execute program on target computer Chapter 4. Installing pre-Vista systems 195
- 212. Figure 4-69 Identify the source of files for software package Important: Place nothing in the root directory of import; instead, place items under a sub directory. So identifying the source of a Software package, create the files under .../import/<software_package_directory> and not under .../import/. 10.In our case the software package files we need are located under the <Tivoli Provisioning Manager for OS Deployment_files_root>importAddRemove directory. So select this from the wizard, as shown in Figure 4-70. Figure 4-70 Select the import directory for the software package 11.We give the package a name, as you can see in Figure 4-71 on page 197. We identified the name of the package and its source; therefore, we can now move on to define its other attributes. 196 Deployment Guide Series: Tivoli Provisioning Manager for OS Deployment V5.1
- 213. Figure 4-71 Naming the software package 12.Figure 4-72 identifies at which stage of the OS deployment that we want the execution of our commands to run. We have various choices here, as you can also see in Figure 4-73 on page 198. Figure 4-72 Software package attributes Why do we have so many choices? Well consider that we may have to set up the disk RAID configuration before the OS is deployed, which is catered for in the Before the OS is Installed Phase. Consider that you only want to install an Anti Virus update after your firewalls are fully configured and are operational. Your firewall configuration may take a reboot to activate, so in this case, link the installation of the Firewall Configuration to the When the OS is installed phase, and the Anti Virus update to the After one additional reboot. In this way, the reboot dependencies between the software packages are preserved. 13.In our case, it is fine to install the software package when the OS in installed without a reboot. In Figure 4-72, we also identify the command to be executed, and the target path for the source directory. Chapter 4. Installing pre-Vista systems 197
- 214. Figure 4-73 Insertion phase for software package The package is then built, as shown in Figure 4-74. Figure 4-74 A successful software package creation 14.After successful creation, we can see the newly created software package, as shown in Figure 4-75. Figure 4-75 Browsing software packages 4.6 Restoring the machine’s user personality settings We have another real world example of what we might want to do from within a software package. We showed an overview of using the scanstate.exe command supplied within the Microsoft User State Migration Tool Version 3 (USMT). This saves the details of a machines user settings to a storage area that is retained as a machine is rebuilt. 198 Deployment Guide Series: Tivoli Provisioning Manager for OS Deployment V5.1
- 215. We use the USMT loadstate.exe command to restore the user personality after the OS profile is deployed. This is USMT specific, but it allows us to explore techniques that are available to us with Tivoli Provisioning Manager for OS Deployment. The problem that we have is that the user profile restore process, run by the loadstate.exe command of USMT, must run in the context of an administrator. See the USMT documentation for further information. We could have each user restore their own settings as they log onto the new machine, but we want all profiles restored as the machine is built so that we are free to delete these saved profiles. The design that we chose uses Tivoli Provisioning Manager for OS Deployment software packages to copy files to the target machine and also to make registry changes. The registry changes make the target computer logon on the first time automatically after the OS is installed, and then runs the USMT loadstate.exe command to restore all profiles on the machine. After the restore is completed, we then disable automatic logon and remove any reference to the local administrator password. First let us look at the registry changes that we need to achieve this result in Example 4-11. These registry changes cause the Administrator to automatically login with the associated password. We will show you how to embed this within a Tivoli Provisioning Manager for OS Deployment software package. Example 4-11 Registry change to enable automatic logon Windows Registry Editor Version 5.00 [HKEY_LOCAL_MACHINESOFTWAREMicrosoftWindows NTCurrentVersionWinlogon] "AutoAdminLogon"="1" "DefaultUserName"="Administrator" "DefaultPassword"="notsure" 1. We use the software package creation wizard as before, but this time we identify that we want to make a registry change as in Figure 4-76 on page 200 and Figure 4-77 on page 200. We then have to locate the .reg file that contains the appropriate registry file change. Tip: Create your registry changes using regedt32 or regedit, and then export them to a file. It is this .reg export file that is imported by the software package wizard. Chapter 4. Installing pre-Vista systems 199
- 216. Figure 4-76 Software package registry change wizard 2. The wizard continues and we specify that we want to perform a registry change, as seen in Figure 4-77. Figure 4-77 Making a registry change from within a software package 3. Figure 4-78 on page 201 locates the winlogon.reg exported registry file from regedt32 that will be imported into the software package. As the wizard continues, we see a confirmation of the registry key that will be changed by this file in Figure 4-79 on page 201. 200 Deployment Guide Series: Tivoli Provisioning Manager for OS Deployment V5.1
- 217. Figure 4-78 Choose our winlogon.reg registry file 4. Confirm that you are updating the registry key that you expect, as shown in Figure 4-79. Figure 4-79 Confirm the registry key to update 5. Choose where you want to stage the registry update file on the target machine, as shown in Figure 4-80. Figure 4-80 Choose staging location for registry update file. Chapter 4. Installing pre-Vista systems 201
- 218. At this point the target machine automatically logs on as Administrator after the OS is deployed and the machine is allowed to reboot. 6. Insert another registry change to identify the command to run when the logon is complete. Let us have a look at the details of this change in Example 4-12. This simply says - ‘run c:instaluserstaterestore.cmd as Administrator logs on’. In this way, we have the right user context to restore all profiles with the USMT loadstate.exe command. Example 4-12 Run the restore.cmd command as logon time Windows Registry Editor Version 5.00 [HKEY_LOCAL_MACHINESOFTWAREMicrosoftWindowsCurrentVersionRunOnce] "USMT"="C:installUserStaterestore.cmd" The restore.cmd command is sent down to the target machine by another software package bound to the same deployment scheme. This is not strictly necessary, as we could run the commands using UNC qualified commands from the save server on which we staged the scanstate.exe profiles. 7. So, as before, we create another software package, the highlights of which you can see in Figure 4-81. Figure 4-81 Identify the run key registry change export file 8. Next, we confirm that we want to update the registry key that we designed in our solution. See Figure 4-82 on page 203. 202 Deployment Guide Series: Tivoli Provisioning Manager for OS Deployment V5.1
- 219. Figure 4-82 Confirm that we are updating the runonce registry key on the target Now that we have our three software packages that deploy USMT and make our two required registry changes, let us look at how we control the sequencing of the software packages on the target machine. We could choose to run the loadstate.exe binary from USMT to perform the restore process from a UNC qualified drive. This means running the script shown in Example 4-13 on page 208. The restore.cmd script is run from the runonce registry key. This is important if the software packages have dependencies between themselves, or if there is a reboot required before an installation can start. 9. From OS Deployment → Software Packages → Reorder Software you can see the sequencing of deployment that we created, as shown in Figure 4-83 on page 204, You can chose the sequence phase as you build the new software package, but let us see how this can be changed after they are built. The initial settings in Figure 4-83 on page 204 define that we will make the two registry changes and copy the USMT binaries to the target machine after the mini sysprep is done for a cloned installation, and after the setup for an unattended install. We will then reboot the machine and run our software package that adds and removes selected WIndows Components. This is a ‘drag and drop’ style interface, allowing for the creation and deletion of nodes in the deployment sequencing available from the palette at the bottom right of the interface. Chapter 4. Installing pre-Vista systems 203
- 220. Figure 4-83 Initial sequence of software package deployment 10.In our example, we have no need to execute the Customize Windows Components operation after a reboot operation, so we drag it into the ‘Stage 3’ phase of the deployment sequence, as shown in Figure 4-84 on page 205. 204 Deployment Guide Series: Tivoli Provisioning Manager for OS Deployment V5.1
- 221. Figure 4-84 Resequenced execution phasing 11.Let us say that we require that one step only be executed after another is complete. How do we achieve this without an intervening reboot operation? To achieve this, we insert a new ‘Installation Stage’ in the deployment scheme. This is done, as in Figure 4-85 on page 206, using the palette at the bottom right of the interface. The name of the new sequence for us is ‘Post USMT’. Chapter 4. Installing pre-Vista systems 205
- 222. Figure 4-85 Insert a new installation step 12.You will see that the new stage is inserted at the end of the schema as in Figure 4-86 on page 207, which needs to be moved up the sequence using the ‘up’ and ‘down’ arrows in the tool palette at the bottom right of the interface. 206 Deployment Guide Series: Tivoli Provisioning Manager for OS Deployment V5.1
- 223. Figure 4-86 Newly inserted deployment stage 13.When this operation is complete, you will see something similar to Figure 4-87 on page 208. You will also see that we have a reboot step that we do not need and that adds time to the deployment elapsed time. So once again using the tool palette, let us clean up this schema. We are performing this exercise to show you a way that you can manipulate the execution sequence of software packages, and how you might insert reboot operations where required. The sequence shown here does work for USMT profile restoration, but it is not the only sequence that can achieve the desired result. Chapter 4. Installing pre-Vista systems 207
- 224. Figure 4-87 Complete resequencing on new deployment stage Figure 4-88 on page 210 shows our completed software package deployment sequence schema. 14.There are several ways to get our desired result, we could for example have added a reboot at the end, but we chose to control the reboot from within the USMT restore script. Example 4-13 shows the complete contents. Example 4-13 User state migration restore script @rem Restore machine personality to XP machine @echo off set ZPATH="192.168.72.131UserMigration" set ZTMP=192.168.72.131UserMigrationlogs echo Starting the restore process > %ZTMP%%COMPUTERNAME%.log echo Environment variables .. >> %ZTMP%%COMPUTERNAME%.log set >> %ZTMP%%COMPUTERNAME%.log %SystemDrive% cd installUserState echo Check %COMPUTERNAME%_progress.log and %COMPUTERNAME%_loadstate.log for details >> %ZTMP%%COMPUTERNAME%.log 208 Deployment Guide Series: Tivoli Provisioning Manager for OS Deployment V5.1
- 225. %ZPATH%loadstate.exe 192.168.72.131UserMigrationdata%COMPUTERNAME% /i:%ZPATH%miguser.xml /i:%ZPATH%migsys.xml /i:%ZPATH%migapp.xml /r:5 /w:10 /progress:%ZTMP%%COMPUTERNAME%_progress.log /lac /v:13 /decrypt /key:"itso" /l:%ZTMP%%COMPUTERNAME%_loadstate.log echo Done restoring user settings >> %ZTMP%%COMPUTERNAME%.log echo Disabling the auto logon >> %ZTMP%%COMPUTERNAME%.log regedit /s disable.reg echo Done >> %ZTMP%%COMPUTERNAME%.log echo Rebooting the machine .... >> %ZTMP%%COMPUTERNAME%.log shutdown -t 30 -r -c "TPM for OS Deployment will now reboot the machine. All deployment activity completed OK" 15.Note that in the restore.cmd script we update the registry, as in Example 4-14. This is to stop the target machine from logging on automatically as the local administrator. Note that the action to run restore.cmd is removed from the runonce key after it is run a single time, so there is no explicit action to perform. Example 4-14 Disable automatic logon Windows Registry Editor Version 5.00 [HKEY_LOCAL_MACHINESOFTWAREMicrosoftWindows NTCurrentVersionWinlogon] "AutoAdminLogon"="0" "DefaultPassword"="XXXXX" Figure 4-88 on page 210 shows the final software package sequence scheme that we used. Chapter 4. Installing pre-Vista systems 209
- 226. Figure 4-88 Completed software package sequence. All four software packages should now be bound to the deployment scheme called ‘Deployment’, as shown in Figure 4-89 on page 211. This is not an automatic action and should be done after the software packages are created and the new deployment scheme is made. The process of creating new deployment schemes and binding software packages to these schemes is covered in 5.4, “Deploying a Windows profile” on page 246. 210 Deployment Guide Series: Tivoli Provisioning Manager for OS Deployment V5.1
- 227. Figure 4-89 Bind software packages to the deployment scheme 16.So, when we deploy a Cloned XP image to a new target using the deployment scheme named ‘Deployment’, we will restore all defined user settings, and also selectively add and remove Windows components according to our requirements with ZERO local interaction with the target machine. Chapter 4. Installing pre-Vista systems 211
- 228. 212 Deployment Guide Series: Tivoli Provisioning Manager for OS Deployment V5.1
- 229. 5 Chapter 5. Installing Vista systems This chapter provides step-by-step instructions for getting bare metal working for the Microsoft Vista operating system. It gives also some guidelines regarding the different possibilities you have between upgrading or replacing your existing pre-Vista systems. We cover the different possibilities regarding upgrading or replacing your pre-Vista environments, the two different ways of creating a Vista system profile, and the subsequent deployment of this profile on a target. Note: The Tivoli Provisioning Manager for OS Deployment term for an Operating System image is called a profile. This chapter contains the following sections: “Creating an unattended Windows Vista profile” on page 215 “Do I upgrade or replace?” on page 214 “Creating a cloning Windows Vista profile” on page 230 “Deploying a Windows profile” on page 246 © Copyright IBM Corp. 2007. All rights reserved. 213
- 230. 5.1 Do I upgrade or replace? Microsoft offers different upgrade paths for licenses and software that are well documented at the following Web address: http://www.microsoft.com/windows/products/windowsvista/buyorupgrade/upg radepaths.mspx We do not deal with license upgrade paths here, instead, we look at upgrading the technology. The workstation options are summarized in Figure 5-1 on page 215. In the cases where people are upgrading from Windows NT, Windows 2000, or some variants of Windows XP, they will have to install the Vista OS from scratch using the techniques mentioned in the chapters that follow. This process typically involves the following: 1. Saving user files and settings of the donor machine. 2. Assessing whether the machine is ready for an upgrade. 3. Upgrading the machine to Vista. 4. Restoring the user files and settings to the new operating system. Only in the case where the original machine was Windows XP Home or Windows XP Professional can the OS be upgraded in place. 214 Deployment Guide Series: Tivoli Provisioning Manager for OS Deployment V5.1
- 231. Figure 5-1 Technical upgrade options to Windows Vista Upgrading the operating system using an unattended profile exploits the native function of the unattended installation process to migrate user settings and preserve user files. 5.2 Creating an unattended Windows Vista profile The main purpose of Tivoli Provisioning Manager for OS Deployment is to deploy an operating system on client computers by replicating a reference system. However, unattended installation of the operating system is also possible. If you decide to create an unattended Windows Vista installation profile, Tivoli Provisioning Manager for OS Deployment does not replicate a reference system. You will have to give the Tivoli Provisioning Manager for OS Deployment server all of the details that it would need to walk through an installation of a Windows Vista operating system. Note: Unattended installation effectively means native installation. Chapter 5. Installing Vista systems 215
- 232. All of the installation tasks are executed from the Tivoli Provisioning Manager for OS Deployment server. Creating unattended installation profiles is easier than cloning profiles. However, Tivoli Provisioning Manager for OS Deployment's native mode of operation is centered around cloning-mode system profiles because this method of deployment is faster than unattended installation. When deploying computers on a large scale, unattended installation is not possible. We cover the Windows Vista profile in the following two steps: Creating the Profile Creating the WinPE software package 5.2.1 Creating the Profile Use the following steps to create an unattended Windows Vista profile: 1. Launch the Tivoli Provisioning Manager for OS Deployment Web console (Figure 5-2 on page 217). It can be done in the following two different ways: a. Remotely from your Internet browser using the syntax http://TPM server name:8080. b. Locally from your from Tivoli Provisioning Manager for OS Deployment server: Start → Programs → IBM Tivoli Provisioning Manager → Web console. If you are connecting to the Web console for the first time, take a few minutes to read important information by clicking the First time console user link as shown in Figure 5-2 on page 217. 216 Deployment Guide Series: Tivoli Provisioning Manager for OS Deployment V5.1
- 233. Figure 5-2 Launch the Tivoli Provisioning Web console 2. Log on with the User ID and Password that you specified during the Tivoli Provisioning Manager for OS Deployment installation—if you have not yet created another User ID. 3. Click the OS Deployment menu item, and select Profiles. 4. Click the New Profile button at the bottom of the screen. You will get a screen as shown in Figure 5-3 on page 218. A wizard will guide you through the different steps of creating a profile. We are going to explain all these steps in detail. Chapter 5. Installing Vista systems 217
- 234. Figure 5-3 Create a new System profile 5. Select the type of profile to be created, an Unattended setup (scripted install) in our case as shown in Figure 5-4, and click Next. Figure 5-4 Choose the deployment mode 6. Select the deployment mode, namely A Windows Vista system profile, in our case as shown in Figure 5-5 on page 219, and then click Next. 218 Deployment Guide Series: Tivoli Provisioning Manager for OS Deployment V5.1
- 235. Figure 5-5 Choose the operating system type 7. The wizard will ask you to specify the folder where the Windows setup files are located as shown in Figure 5-6. We copied all of the CD content on disk into the C:tempCode-Vista directory. Click Next. Figure 5-6 Specifying where the Windows Vista setup files are located 8. The wizard indicates which version was found in the directory you just provided. Click Next. See Figure 5-7 on page 220. Chapter 5. Installing Vista systems 219
- 236. Figure 5-7 Version found 9. Specify a size for the Windows Vista partition. This can be done as a fixed MB size or as a percentage of the total disk space. In Figure 5-8, we select a percentage. Figure 5-8 Partition size specification 220 Deployment Guide Series: Tivoli Provisioning Manager for OS Deployment V5.1
- 237. 10.Figure 5-9 shows that you must select parameters for this new partition. Specify the format as FAT16, FAT 32, or NTFS, as well as the size, and click Next. Tip: If you choose a value of 100%, you can possibly restore your profile on any kind of hard disk size. Figure 5-9 Select parameters for the partition 11.Click the radio button next to the partition you want to use as the target partition for Windows to complete the partition layout process. See Figure 5-10 on page 222. Chapter 5. Installing Vista systems 221
- 238. Figure 5-10 Select the partition 12.For a later fully unattended installation, you must enter a valid Windows Product Key as shown in Figure 5-11, and click Next. Figure 5-11 Windows Product Key 13.You can configure some fixed properties, such as registered owner and time zone as shown in Figure 5-12 on page 223. Click Next. 222 Deployment Guide Series: Tivoli Provisioning Manager for OS Deployment V5.1
- 239. Figure 5-12 Fixed properties 14.The next screen (Figure 5-13) allows you to specify a custom configuration file with custom settings that you can use in your system profile. Tivoli Provisioning Manager for OS Deployment automatically patches this file with host-specific settings. If you do not need it, click Next to skip this step. Figure 5-13 Custom set up configuration file 15.In Figure 5-14 on page 224 you are asked to enter a description for your system profile, such as Windows Vista Enterprise. Chapter 5. Installing Vista systems 223
- 240. Figure 5-14 System profile description 16.Click Next to start the creation of the unattended set up profile. It might take a few moments for Tivoli Provisioning Manager for OS Deployment to create the archive containing all the files required for Windows installation (Figure 5-15). Figure 5-15 Profile packaging in process 17.Figure 5-16 on page 225 displays a message indicating that the system profile was successfully created. A WinPE software package is required to deploy a Vista profile. Click the here link in order to switch directly in the software package wizard as shown in Figure 5-16 on page 225. You do not 224 Deployment Guide Series: Tivoli Provisioning Manager for OS Deployment V5.1
- 241. have to worry because if you already clicked Finish, you can still create this package from the software packages link in your Web console as described in section 5.2.2, “Creating the WinPE software package” on page 225. Figure 5-16 Profile successfully created 5.2.2 Creating the WinPE software package If you just created your Vista profile, you are probably coming just from the step before as described in Figure 5-16. In such a case, just continue with this section and go through the next steps described in the following pages. In the opposite case, start the software package wizard from OS Deployment → Software packages, and select New software → Windows Vista → A custom action on the target computer → A WinPE 2.0 Ramdisk image. Continue through the screens to the end of this section. Chapter 5. Installing Vista systems 225
- 242. 18.Read the information in the following note about WinPE, and click Next, as shown in Figure 5-17. Note: Microsoft Windows Preinstallation Environment (Windows PE) 2.0 provides preparation and installation tools for the Microsoft Windows Vista operating system. Microsoft WinPE is a minimal OS, based on the Windows XP kernel, that replaces MS-DOS® during the initial OS installation stages beginning with Vista OS, which is known as Longhorn. It provides a GUI environment during the entire installation instead of the old text-based screen prompts that are common during the initial set up of earlier Windows installations. Figure 5-17 Information about WinPE 19.Specify where the Vista source code is located, and then click Next as shown in Figure 5-18 on page 227. This screen shows different possibilities. Most of them require the Web Interface Extension to be installed. 226 Deployment Guide Series: Tivoli Provisioning Manager for OS Deployment V5.1
- 243. Figure 5-18 Vista code location 20.A default description is provided by the product as shown in Figure 5-19. You can modify it to fit your naming conventions, and then click Next. Figure 5-19 Description of the WinPE software package 21.A default name is also provided for your package, as it will be stored on the server side. We modified it with a more meaningful name as shown in Figure 5-20 on page 228. Click Next. Chapter 5. Installing Vista systems 227
- 244. Figure 5-20 Name the software package The software package generation starts. It should take a few minutes depending on your computer speed. Figure 5-21 WinPE package generation 22.At the generation completion, a screen appears that explains how to bind this package to individual targets, as shown in Figure 5-22 on page 229. Click Finish. 228 Deployment Guide Series: Tivoli Provisioning Manager for OS Deployment V5.1
- 245. Figure 5-22 Successful creation of the software package 23.Go to OS Deployment → Software packages to see your new package as shown in Figure 5-23. Figure 5-23 Control of the software package creation 24.To get a detailed description of this package, double-click it. You will get a screen similar to Figure 5-24 on page 230. Chapter 5. Installing Vista systems 229
- 246. Figure 5-24 Detailed description of the software package 25.At this point, you created an unattended Vista profile and a specific WinPE software package requested for deployment of a Vista operating system. Before you can deploy this new image on a target, you must configure it properly. Please refer to “Configuring the System profile” on page 241. This section is common to the unattended and cloning installations. 5.3 Creating a cloning Windows Vista profile Tivoli Provisioning Manager for OS Deployment's native mode of operation is centered around cloning-mode system profiles. Deployment through the cloning method is faster than an unattended installation. The cloning-mode system profiles are more efficient for deployment than the unattended installation system profiles. Cloning a Vista profile consists of taking an image of a computer containing a running and configured version of Windows Vista. Next, run the profile creation from the system to be cloned using a Tivoli Provisioning Manager for OS Deployment Administrative Toolkit that is distributed to the clone host by the Tivoli Provisioning Manager for OS Deployment server. This section guides you through the three main steps to create a system profile based on the Windows Vista Client. Preparing the System 230 Deployment Guide Series: Tivoli Provisioning Manager for OS Deployment V5.1
- 247. Capturing the System Image Configuring the System profile 5.3.1 Preparing the system Tivoli Provisioning Manager for OS Deployment does not perform any cleanup on your machine. Before you can clone your Vista machine, you need to make sure that the system is as clean as possible before you start. Typically this means that you need to do the following: Empty the machine recycle bin. Delete the Internet cached files—cookies and history. Delete your temporary directories and files. Disconnect any network shares and remote printers. Also be aware that the account named Administrator needs to exist in the machine to be cloned; however, Vista disables it as a part of the deployment process, so have an additional account belonging to the Administrator group in order for the deployment process to work properly. Be ready to run a Microsoft utility called Sysprep on this system that will be considered as your reference OS. Windows Vista only allows you to run Sysprep on the operating system three times. After that, the Sysprep tool refuses to start, so always start from your original reference image. Microsoft Sysprep for Windows Vista is available on every installed Vista OS. The following steps allow you to start the Sysprep utility. 1. Close all of the open applications and run the Sysprep executable file located in the c:windowssystem32sysprep directory. Windows Vista asks for your permission to continue. Click Continue, as shown in Figure 5-25. Figure 5-25 User Account Control Chapter 5. Installing Vista systems 231
- 248. 2. In the System Preparation Tool pop-up, select the following options, as shown in Figure 5-26: a. Select Enter System Audit Mode from the System Cleanup action drop-down menu. b. Select the Generalize check box. c. Select Shutdown from the Shutdown Options menu. d. Click OK. The Vista system should shut down automatically and become ready to capture the image. Figure 5-26 System Preparation 5.3.2 Capturing the System Image 1. Start your reference Windows Vista system and boot it to the network so that the Tivoli Provisioning Manager for OS Deployment server can discover it and manage it. When you boot your computer, the BIOS looks for the boot priority in the configuration. If it is configured to boot first on disk, it must be overridden simply by pressing the F12 or ESC keys at the beginning of the boot sequence. After the Tivoli Provisioning Manager for OS Deployment server catches the system, a screen appears on the Vista machine, as described in Figure 5-27 on page 233. 232 Deployment Guide Series: Tivoli Provisioning Manager for OS Deployment V5.1
- 249. Figure 5-27 Boot in the network 2. After the Tivoli Provisioning Manager for OS Deployment server identifies the computer and writes a basic hardware scan data into the Tivoli Provisioning Manager for OS Deployment database, the guest will display a screen as shown in Figure 5-28. Note: If you have several PXE servers in your architecture, you must verify if the IP address displayed in the upper right part of the screen matches with the PXE server you expect to use. Figure 5-28 Guest identification 3. Log on to your Tivoli Provisioning Manager for OS Deployment Web console from a Web browser using the syntax http://TPM server name:8080 or from your from Tivoli Provisioning Manager for OS Deployment server: Start → Programs → IBM Tivoli Provisioning Manager → Web console. Chapter 5. Installing Vista systems 233
- 250. 4. Select OS Deployment and then Host Monitor in the left pane as shown in Figure 5-29. Figure 5-29 Access to the targets 5. Select the newly discovered system in the Host Monitor view, and choose Start admin toolkit from the left margin menu. Alternately, right-click the discovered host and select Start admin toolkit from the pop-up menu, as shown in Figure 5-30. Figure 5-30 Launching the admin toolkit 6. The following screen is displayed (Figure 5-31 on page 235). If you want to bind the Administrator Toolkit to the template server, you can do so by checking the Bind the Administrator Toolkit to selected hosts option. This has the effect of causing the admin toolkit to launch on the Tivoli Provisioning Manager for OS Deployment client when ever the network boots from the 234 Deployment Guide Series: Tivoli Provisioning Manager for OS Deployment V5.1
- 251. Tivoli Provisioning Manager for OS Deployment server. This might be useful if you need to perform extra work on the template server; otherwise, download the admin toolkit to the client each time you need to adjust the profile. Deselect the option Try to wake-up hosts currently powered off, and click OK. Figure 5-31 Start Admin Toolkit 7. Go back to your reference Vista machine. You should see a screen as shown in Figure 5-32 on page 236. Select the Make a new image icon. Other possibilities are available from this screen to modify the disk partition or Restore an image that was previously saved. Chapter 5. Installing Vista systems 235
- 252. Figure 5-32 Image creation 8. The Image Creation menu is then displayed (Figure 5-33). Click the icon to select the Create a System Profile. Figure 5-33 System profile creation 9. In the Description field, press the Esc key to erase its content. Then type Windows Vista, and click Next. (Figure 5-34 on page 237). You can type a description of your profile in the Comment field. 236 Deployment Guide Series: Tivoli Provisioning Manager for OS Deployment V5.1
- 253. Figure 5-34 Name your profile 10.The Model name field is automatically populated. For the purpose in this publication, you can see that we are working with VMWare tools. Tivoli Provisioning Manager for OS Deployment automatically populated the Model name. You can leave it as is if you want to deploy the profile only on this particular model. You can also erase the model name if the image has to be installed on a different kind of machine without any verifications. Click Next, as shown in Figure 5-35. Figure 5-35 Model name specification 11.Review your profile parameters, and click Next as shown in Figure 5-36 on page 238. We modified the Model name to deploy only the profile on a specific model. Chapter 5. Installing Vista systems 237
- 254. Figure 5-36 Verification 12.Building the image will take several minutes and depends on the speed of your network, the size of the image, and if any similar images were already created. See Figure 5-37. Figure 5-37 Image building 13.If you look at the bottom of the screen, you will see a Tivoli icon as shown in Figure 5-38 on page 239. This icon hides some very useful features. You can launch a console locally to check the different steps for image cloning. 238 Deployment Guide Series: Tivoli Provisioning Manager for OS Deployment V5.1
- 255. All these detailed messages can also be uploaded on the server by selecting the Upload console option. This log can be useful for analysis purposes. You can access the log from your Web console. a. Go to OS Deployment → Host Monitor → Host details. b. Click Logs tab, and select the log corresponding to your image cloning. c. The download option gives you the option of saving this log where you want. Figure 5-38 Checking the image building 14.. Verify the successful creation of your image, as shown in Figure 5-39. Click Ok. Figure 5-39 Successful creation of an image 15..Click Exit Administrator Toolkit, as shown in Figure 5-40 on page 240. Chapter 5. Installing Vista systems 239
- 256. Figure 5-40 Main functions menu 16.To exit from the Administrator Toolkit, select one of the options that is the most convenient for you. Figure 5-41 shows that you can either turn off the computer or reboot it with the possibility to enforce a boot on Vista. Figure 5-41 Exit menu 17.Return to your Tivoli Provisioning Manager for OS Deployment Web console, and select OS Deployment → Host Monitor as shown in Figure 5-42 on page 241. You will see a green color for your host, which means that your OS capture was successfully completed. Different colors can be seen depending on the activity. 240 Deployment Guide Series: Tivoli Provisioning Manager for OS Deployment V5.1
- 257. Figure 5-42 OS capture is successfully completed 5.3.3 Configuring the System profile A profile needs to be configured before it can be deployed on a target. This is true for both the Unattended and the Cloning profiles. 1. Select the profile you want to configure, and click the Configure link, as indicated in Figure 5-43. Chapter 5. Installing Vista systems 241
- 258. Figure 5-43 Profile selection for configuration 242 Deployment Guide Series: Tivoli Provisioning Manager for OS Deployment V5.1
- 259. 2. Select Edit link in the Fixed host properties section as shown in Figure 5-44. Figure 5-44 Fixed host properties access 3. You can enter different regular expressions or provide variable substitution here. For instance, the [IP] variable in the Hostname field automatically inserts the machine assigned IP address. You can also concatenate a fixed field with these variables. Examples: Vista-[IP] could give Vista-9.1.2.3 You will see in the Tivoli Provisioning Manager for Operating System Deployment Guide (Fix Pack 1), SC32-2582 under "Setting up profile configurations and fixed common parameters" that you can also use the [MAC], [SN], [AT] keywords for Mac address, Serial Number, and Asset Tag to identify your target. A range extension is also supported by each of these keywords. Moreover, if you need more flexibility, you can create different kinds of associations through a feature available in the Tivoli Provisioning Manager for OS Deployment. To achieve this, go to OS Deployment → Host Monitor Chapter 5. Installing Vista systems 243
- 260. and launch the Export hosts feature at the bottom of the screen to export your existing hosts definitions in a .csv file. You can use this file as a model to create your own .csv file, and then import a list of new hosts using the Import hosts function. An example is to create a list with only the SN and the IP fields. In our example, we selected the following parameters, as in Figure 5-45, and clicked OK. Hostname: Vista-[IP] TCP/IP mode: Use a dynamic IP address (DHCP) Figure 5-45 Fixed Host Properties information 4. Select the Edit link from the Windows-specific section. 5. Enter your product key, Network type, and Administrator name. Click OK as shown in Figure 5-45. Here we also provided values for the screen resolution. 244 Deployment Guide Series: Tivoli Provisioning Manager for OS Deployment V5.1
- 261. Figure 5-46 Fixed Windows settings 6. Select Edit link from the Fixed user properties section. The Figure 5-46 gives you an example of how the form can be filled. There are also four freely configurable user categories that can be used to store information regarding the user (such as position, department, and location), and that can be used in the software matching mechanism (automatic binding rules). Click Ok. Chapter 5. Installing Vista systems 245
- 262. Figure 5-47 Fixed user properties 5.4 Deploying a Windows profile Before deploying a profile on a target computer, you must specify how your profile is going to be deployed. In Tivoli Provisioning Manager for OS Deployment, this is done through a deployment scheme. The following sections describes how to create a deployment scheme, how to register new target hosts in your Tivoli Provisioning Manager for OS Deployment server database, and also explains an example of Vista deployment. 5.4.1 Creating a deployment scheme Deployment schemes allow an administrator to create different deployment methods. For example, you can ensure that the deployment user must specify the hostname for each deployment. 1. Select OS Deployment → Deployment schemes in the left pane of the Window, as shown in Figure 5-48 on page 247. 246 Deployment Guide Series: Tivoli Provisioning Manager for OS Deployment V5.1
- 263. Figure 5-48 Creating/Browsing the deployment schemes 2. Select New scheme at the bottom left side, and type a name for this new scheme. Click Next as shown in Figure 5-49 on page 248. Chapter 5. Installing Vista systems 247
- 264. Figure 5-49 Naming your deployment scheme 3. Even if we are deploying an unattended profile, we can still ask to edit the host-specific parameters (such as host name, user name, and so on) interactively at the time of the deployment. Indeed, the typical use of Tivoli Provisioning Manager for OS Deployment involves configuring the target hosts to boot from disk first; however, occasionally, you will press F12 at start up, to boot from the network when a deployment is needed. Select the Always edit host-specific parameters interactively option to avoid repeated deployments of the OS on your machine that will happen without any user option to halt this looping process. If you do not want to follow the typical way, and you prefer configuring your hosts to always boot first from the network, then you must activate the Boot on hard-disk option in the Boot settings of your host definition after the deployment is completed. If this is not done, these hosts will return to the screen prompting you to deploy the image again—giving us a loop in the process. In this case, you should choose the Never edit parameters, run the deployment unattended option. This then gives you a zero touch installation scenario. Select Always edit host-specific parameters interactively, and then click Next as shown in Figure 5-50 on page 249. Note: For more information on host boot settings, refer to 7.5, “Understanding the host boot settings” on page 345. 248 Deployment Guide Series: Tivoli Provisioning Manager for OS Deployment V5.1
- 265. Figure 5-50 Unattended deployment 4. Now, you can get Tivoli Provisioning Manager for OS Deployment to do Hardware and Software inventory on the target. Different possibilities are given to decide when it must be performed and what level of information you want to collect. See Figure 5-51 for an example, and click Next. Figure 5-51 Hardware and Software inventory parameters Chapter 5. Installing Vista systems 249
- 266. 5. You can also decide whether few tasks must be done by the user and manage the state of your target at the end of the deployment. Figure 5-52 shows the default options. Click Next. Figure 5-52 Control the target after deployment 6. Tivoli Provisioning Manager for OS Deployment allows you to control the network bandwidth when you deploy your profiles as shown in Figure 5-53 on page 251. The Tivoli Provisioning Manager for Operating System Deployment Guide (Fix Pack 1), SC32-2582 manual gives you all the details about these options under the "Customizing deployment schemes" chapter. 250 Deployment Guide Series: Tivoli Provisioning Manager for OS Deployment V5.1
- 267. Figure 5-53 Networking mode 7. The On site deployment features screen gives you the ability to enable the Redeployment feature of Tivoli Provisioning Manager for OS Deployment on your target. This feature is described in detail in Chapter 10, “Redeployment and self-healing feature” on page 419. In our example, we leave the option unchecked. Click Next, as in Figure 5-54. Figure 5-54 Redeployment feature implementation Chapter 5. Installing Vista systems 251
- 268. 8. You will get the last screen saying your deployment scheme is now set. Click Finish to close the wizard. See Figure 5-55. Figure 5-55 Click Finish 9. You can still verify your new deployment scheme (do not forget to select it in the list) and eventually edit parameters before using it in a deployment. If you want to, go to OS Deployment → Deployment schemes in the left pane of your console as shown in Figure 5-56 on page 253. 252 Deployment Guide Series: Tivoli Provisioning Manager for OS Deployment V5.1
- 269. Figure 5-56 View and modify Deployment schemes 5.4.2 Registering hosts in Tivoli Provisioning Manager for OS Deployment server If your target is already known to Tivoli Provisioning Manager for OS Deployment server, you can skip this section, and go directly to the 5.4.4, “Deploying a Vista profile” on page 257. Tivoli Provisioning Manager for OS Deployment offers the following three different techniques to register new hosts (targets) in your server database: Boot the target on the network to automatically register it. To boot on the network, press the F12 or ESC keys at the beginning of the boot sequence. Manually register a host or a range of hosts from the Web console. Go to OS Deployment → Host Monitor and click Register new hosts at the bottom of the page to get a screen as shown in Figure 5-57 on page 254. Chapter 5. Installing Vista systems 253
- 270. You can specify either the MAC address, IP address, Serial number, UUID, or any combination of them. Figure 5-57 Registering a host manually Tip: When can it be useful to manually register a new host? This may arise when automatic registration does not work with some type of hardware. Some older versions cannot support some new features such as the Enhanced PXE feature. You can disable this feature after you manually register your new host and before you start the deployment. Go to OS Deployment → Host Monitor, select your host in the Host Monitor list, view host details, edit Boot Settings, and check the Disable enhanced PXE access option. To register hosts as IP range, click the appropriate link, as shown in Figure 5-57. Specify a starting address and a Count. Click Register. You will get nine new hosts registered from IP address 9.3.4.120 to 9.3.4.128. Figure 5-58 Registering hosts as IP range Import a list of hosts from a .csv file. 254 Deployment Guide Series: Tivoli Provisioning Manager for OS Deployment V5.1
- 271. To start with, you need to know the format of the file recognized by Tivoli Provisioning Manager for OS Deployment. Go to OS Deployment → Host Monitor and click Export hosts at the bottom of the page. You will be allowed to save a hostexport.csv file where you want to save. Analyze this file as a template before creating your own .csv file. To import it, click Import hosts at the bottom of the page. Tip: When can it be useful to import a list? You can parse the hostexport.csv file with a script and create a new .csv to industrialize your deployments by, for instance, specifying an association between Serial Numbers and Host names. 5.4.3 Creating a new user through a software package At the end of the deployment of the Vista profile on your new target, you can expect to have an additional local user created with the standard Administrator account. You can manage this requirement by creating a software package before proceeding to the deployment phase. 1. Go to OS Deployment → Software packages → new software. 2. Check the following options in the Software Package Wizard: – Windows Vista – A custom action on the target computer – A configuration change to perform on the target computer (a registry patch, a command to execute) – Execute a single command 3. Enter a name and a description for your new software package as shown in Figure 5-59 on page 256. Chapter 5. Installing Vista systems 255
- 272. Figure 5-59 User creation through a software package 4. Specify when you want to execute your software package, and type the exact command line to create your local user as shown in Figure 5-60. Click Next. You will get a screen saying that your software package was successfully created. Figure 5-60 User creation command line 5. Click Finish to exit the software wizard. Now, you can see your new software package in the Software packages list, as shown in Figure 5-61 on page 257. 256 Deployment Guide Series: Tivoli Provisioning Manager for OS Deployment V5.1
- 273. Figure 5-61 New software package created 6. In order to get this user created at the end of the Vista profile deployment, just remember that we have to bind this new software package during the next phase, which is described in “Deploying a Vista profile” on page 257. Important: The method previously discussed is one way of creating a user in order to fulfill this Vista requirement. There is also an alternative way to create a user with the Tivoli Provisioning Manager for OS Deployment. To use this method, do the following: Open a Vista profile, and then open the associated configuration page. You will see an option called "Create a local account for the user". If you set this option, a user is automatically created, using the Full Name field as the user name. 5.4.4 Deploying a Vista profile To be ready for use by an end-user, a computer must have the operating system installed at the end of the deployment as well as the required applications and drivers. Deployment is a process of installing a profile on a computer. When the deployment is complete, the operating system is installed and ready to be used by the user defined for this host in the database. Tivoli Provisioning Manager for OS Deployment allows you to install the required application packages and drivers as part of the initial deployment. Refer to 7.2, “Software package rules and bindings” on page 315 and 7.4, “Device driver injection” on page 332 for more information about those topics. In this section we review the deployment of a Vista profile. Chapter 5. Installing Vista systems 257
- 274. We use the automatic registration technique of a new target in the following example. 1. To register your new target host, you first need to boot it on the network, by pressing the F12 or ESC keys just at the beginning of the boot sequence. 2. A new entry appears in the Host Monitor list. Select it, right-click, and select Deploy now from the submenu, as shown in Figure 5-62. Figure 5-62 Start the deployment from the Web console 3. A screen similar to Figure 5-63 on page 259 will appear. a. Select the Deployment scheme that you created earlier in the section “Creating a deployment scheme” on page 246. b. Select the profile you want to deploy on the target. c. Remember that we also want to install a WinPE software package and to create a customer user on this target. Click the Edit manual software binding link. A screen similar to Figure 5-64 on page 260 appears. You can refer to the section “Software package rules and bindings” on page 315 for more information and alternative ways for the software package binding process. d. Select the software packages you want to deploy along with the OS. 258 Deployment Guide Series: Tivoli Provisioning Manager for OS Deployment V5.1
- 275. e. Click Ok to return to the Start deployment screen. f. Click Ok to start the deployment. Figure 5-63 Select the deployment scheme, profile, and software packages Chapter 5. Installing Vista systems 259
- 276. Figure 5-64 Select the software packages to deploy 4. Now, you can see a screen as shown in Figure 5-65 on page 261 on your target computer. It will take several minutes and several boots before you see Vista running on your target. Sometimes this may take a little more time. You can access the same features here as previously described during the cloning profile creation in Figure 5-38 on page 239. Remember the following features: Click the red Tivoli icon at the bottom-left corner of the screen. You can launch a console locally to see what is happening after selecting the Show Console option in the menu. This does not affect the deployment process. You can also upload all this detailed information on the server by selecting the Upload console option. You will then have the ability to access the log from your Web console, a. Go to OS Deployment → Host Monitor → Host details. b. Click the Logs tab, and select the log corresponding to your image deployment. c. The download option allows you to save this log in the location you want to save it. 260 Deployment Guide Series: Tivoli Provisioning Manager for OS Deployment V5.1
- 277. Figure 5-65 Unattended Vista profile deployment Chapter 5. Installing Vista systems 261
- 278. 262 Deployment Guide Series: Tivoli Provisioning Manager for OS Deployment V5.1
- 279. 6 Chapter 6. Installing Linux systems In this chapter we describe how to get a bare metal machine work with a Linux operating system using one of the main features of Tivoli Provisioning Manager for OS Deployment: the deployment of a profile. We also create software packages that are automatically installed on the target computer after the deployment process. We assume that you have a working Tivoli Provisioning Manager for OS Deployment environment. For information on how to install Tivoli Provisioning Manager for OS Deployment, you can refer to Deployment Guide Series: Tivoli Provisioning Manager for OS Deployment V5.1, SG24-7397. This chapter has the following sections: “Introduction and general requirements” on page 264 “Creating an unattended setup profile” on page 265 “Creating software packages” on page 275 “The deployment process” on page 286 “Cloning a machine” on page 292 “Deploying the cloned profile” on page 299 © Copyright IBM Corp. 2007. All rights reserved. 263
- 280. 6.1 Introduction and general requirements The first step is to choose what to deploy. With Tivoli Provisioning Manager for OS Deployment, you can either clone a machine or you can create an unattended setup profile. The former option copies the operating system together with the installed software from a source machine to a destination machine. The latter performs an automatic installation of an operating system as though you are at the machine with the installation CDs. We start this chapter with the steps to perform an unattended installation of a Linux profile with some software packages that will be deployed on a bare metal machine. Then, we describe the cloning process of a Linux machine and the customizing of the captured image. According to the Tivoli Provisioning Manager for Operating System Deployment Guide (Fix Pack 1), SC32-2582, the UNIX/Linux supported operating systems for deployments are as follows: Linux Fedora Core: Fedora3, Fedora4 (cloning + setup) RedHat Enterprise Linux (RHEL): versions 3, 4 (cloning + setup) SuSE Linux Professional: versions 8, 9 (cloning + setup) SuSE Linux Enterprise Server (SLES): version 9 (cloning + setup) Debian GNU-Linux 3.1 (Sarge) (cloning ONLY) Sun Solaris (Sparc): versions 8, 9, 10 (cloning + setup) For both the unattended set up and the cloning deployments, we use Red Hat Enterprise Linux 4, AS Update 3. In terms of Tivoli Provisioning Manager for OS Deployment, we will do the following: Create an unattended Linux installation profile using RHEL 4 installation CDs. Clone a machine having the RHEL 4 operating system. For a target machine, the official requirements are as follows: PXE-compliant bootrom, either version 2.00 and above Minimal CPU: PentiumR type level Minimal RAM memory: 128 MB Video Electronics Standards Association (VESA) release 2.0 or later, compliant Video BIOS to get high resolution (VGA fallback is always possible in case of incompatibility). However, Tivoli Provisioning Manager for OS Deployment can also work on headless machines. 264 Deployment Guide Series: Tivoli Provisioning Manager for OS Deployment V5.1
- 281. Either a traditional Advanced Technology Attachment (ATA) drive with Ultra™ Direct Memory Access (DMA) support if speed is required or a BIOS-supported hard drive. Desktop Management Interface (DMI) support for collecting hardware information, such as model and serial number. To meet these requirements, we use machines equipped with at least 8 GB of disk space since the Linux installation and the hidden partition used by Tivoli Provisioning Manager for OS Deployment during the deploy may have problems with hard disk of lower capacity. 6.2 Creating an unattended setup profile In order to create a new unattended profile, perform the following steps: 1. Select OS Deployment → Profiles, and then choose the New Profile item. The Web Interface Extension component is needed for this procedure. If you have not installed this in your system you will get the message shown in Figure 6-1. Figure 6-1 The Web interface extension is needed when creating new profiles 2. If the Web interface extension is running on your machine, you can proceed to creating a new profile. Configure the profile to do the following: – Be a Linux unattended setup profile – Set correctly the partitions in order to have the following: • A swap partition of 1GB • A boot partition of 256 MB • A root partition on the remaining disk space – Set KDE as the desktop environment Chapter 6. Installing Linux systems 265
- 282. – Install some basic software (RPMs provided in the installation CDs) – Set correctly the language and regional settings 3. The first window of the wizard asks you the operating system that will be contained in the profile. Select the Linux system profile option as shown in Figure 6-2. Figure 6-2 Choosing the OS on the Profile Wizard 4. In the next Profile Wizard window, choose the Unattended setup, as shown in Figure 6-3 on page 267. This is because we want to install a new operating system using the installation CDs. Since one of the main purposes of Tivoli Provisioning Manager for OS Deployment is to make the installation process simpler and faster, the profile wizard will continue prompting the installation parameters in order to avoid the manual intervention on the client machine after the deploy now command is submitted. All these parameters that are needed to install an operating system on a bare metal machine are automatically provided to the process without any user intervention at a later time. Moreover, Tivoli Provisioning Manager for OS Deployment allows users to modify these configuration parameters after the completion of the wizard. 266 Deployment Guide Series: Tivoli Provisioning Manager for OS Deployment V5.1
- 283. Figure 6-3 Choosing the Unattended setup option in the Profile Wizard 5. As we are installing the system on a bare metal machine, we need to configure the partition layout. We will accept the default configuration, which is created in the following order: – A SWAP partition of 1024 MB. – A separate partition where the “/boot” filesystem is mounted of 256 MB. – A partition (formatted as ext3) on the remaining disk size where the root file system is mounted. We suggest allocating 100% of the remaining disk size to the root file system as shown in Figure 6-4 on page 268 and setting it in the last position of the disk in order to avoid insufficient space problems. This failure may arise both by the Linux unattended installation or by the deployment process. We experienced it when setting the root partition to a fixed 4 GB size. Allocating all the disk space for the last root partition should prevent both the problems since the following applies: – The Linux installation has all the available disk blocks for copying binaries (8GB in our case). – The deployment process has all the available disk blocks for temporary storage (since it uses the free space remaining in the last partition). Chapter 6. Installing Linux systems 267
- 284. Figure 6-4 Setting the partition layout in the Profile Wizard 6. The partition layout can be subsequently modified by accessing the properties of the specific configuration. Figure 6-5 shows how the editor of the partition layout appears from the Web console. Figure 6-5 Partition layout editor for the configuration created 7. The next steps (see Figure 6-6 on page 269) ask you to select the path where the installation CDs/DVDs can be accessed. Since all the deployment steps do not require you to manually insert the needed media on the target machine, all the data is required to be loaded on the server at this step. 268 Deployment Guide Series: Tivoli Provisioning Manager for OS Deployment V5.1
- 285. Figure 6-6 Select source media in the Profile Wizard 8. Figure 6-7 on page 270 shows that the operating system we provided in the installation CDs was recognized and we are prompted for the base configuration to use. Here, we choose the KDE option. Chapter 6. Installing Linux systems 269
- 286. Figure 6-7 Choosing the base configuration in the Profile Wizard 9. In the last two steps of the profile wizard, we can do the following: – Select which of the software provided with the installation CDs is added to the machine. – Set the language and regional settings. Figure 6-8 on page 271 and Figure 6-9 on page 271 shows our settings. 270 Deployment Guide Series: Tivoli Provisioning Manager for OS Deployment V5.1
- 287. Figure 6-8 Additional software installation in the Profile Wizard Figure 6-9 Language and regional settings in the Profile Wizard 10.Since we are not using advanced settings, we will leave the File field empty as shown in Figure 6-10 on page 272. Chapter 6. Installing Linux systems 271
- 288. Figure 6-10 Advanced configuration in the Profile Wizard 11.Finally, insert the name of the profile with a descriptive comment. Take care to describe the complete name of the operating system we used, Red Hat Enterprise Linux 4 AS, Update 3 as shown in Figure 6-11 on page 273. 272 Deployment Guide Series: Tivoli Provisioning Manager for OS Deployment V5.1
- 289. Figure 6-11 Inserting name and description of the profile in the Profile Wizard 12.After completing all the configuration steps, the server will load all the data and creates the profile in its database. Figure 6-12 on page 274 shows that you may be prompted to insert different installation CDs. Chapter 6. Installing Linux systems 273
- 290. Figure 6-12 Required installation media in the Profile Wizard 13.If all the steps are performed correctly, you will receive a message stating that the profile was successfully created as shown in Figure 6-13. Figure 6-13 Outcome message in the Profile Wizard 274 Deployment Guide Series: Tivoli Provisioning Manager for OS Deployment V5.1
- 291. 14.After completing the Profile Wizard, you can also use the Web console to modify the recently specified settings. To perform this operation, navigate through your profiles list (OS Deployment → Profiles), and edit the specific binded configuration. Figure 6-14 Profile details 15.You cannot manually bind the configuration created with this profile to a specific host since it is automatically performed after the first deploy. If you want to bind manually, do the following: a. Go to the Hosts list. b. Double-click the specific host. c. Manually bind the configuration from the Binding panel. 6.3 Creating software packages You may find it useful to add some specific software installations at the end of the deployment process. Software packages can let you upgrade your bare bones system installation to a bare metal machine building process that leads to a working computer equipped with the needed applications. If the required software is provided with the installation CDs, you can use the previous wizard steps (as described in 6.2, “Creating an unattended setup profile” on page 265), and select those needed programs from the Additional software list (see Figure 6-8 on page 271). Otherwise you can use the “Software packages” feature of Tivoli Provisioning Manager for OS Deployment to install some programs or to perform other configuration operations on the target machine. In the following paragraphs, we describe how to create and configure software packages and how to bind them to target machines. Chapter 6. Installing Linux systems 275
- 292. Our software packages perform the following operations: Install an RPM containing the DHCP server. Copy and unpack the Tivoli Provisioning Manager for OS Deployment installer provided in a tar.gz format. Copy a system file containing release information. 6.3.1 RPM software packages Perform the following steps to create the software package that installs the DHCP server from an RPM: 1. Choose the New Software item from OS Deployment → Software Packages. In the first window of the Software Wizard, select RPM as the type of package: Figure 6-15 Choosing the type of software package in the Software Wizard 2. Provide the full path of the RPM package that will be loaded into the Tivoli Provisioning Manager for OS Deployment server. The package that is used is a RPM binary containing the DHCP server. 276 Deployment Guide Series: Tivoli Provisioning Manager for OS Deployment V5.1
- 293. Figure 6-16 Inserting the full path to the package in the Software Wizard If the RPM is correctly loaded by the wizard, some general information will appear as shown in Figure 6-17. Figure 6-17 General package information in the Software Wizard 3. Next, we are prompted to insert a name and a description that will help to identify this software package through the list. We recommend that you insert a descriptive value. See Figure 6-18 on page 278. Chapter 6. Installing Linux systems 277
- 294. Figure 6-18 Name and description for the package in the Software Wizard 4. Next the most important window of the wizard is shown asking us to define the following: – When to apply the software package. – Where to copy the RPM package. – Which command to use to install the RPM. Figure 6-19 shows the selected values. Figure 6-19 Software package parameters in the Software Wizard 5. If all the wizard steps are performed correctly, you will get a message stating that “Your software package was successfully created” as shown in Figure 6-19. 278 Deployment Guide Series: Tivoli Provisioning Manager for OS Deployment V5.1
- 295. Figure 6-20 Outcome message in the Software Wizard In the list of the software packages, it will appear as shown in Figure 6-21. Figure 6-21 List of the software packages 6. If you right-click each software package and select Reorder software package, you can see all the existing software packages grouped by the step of the deployment process, which is when they will be added to the target system. It is very important to choose the right order for each package in the list. We choose to add the software packages after one additional reboot of the system. Chapter 6. Installing Linux systems 279
- 296. Figure 6-22 Software package order in the deployment process 6.3.2 Copying and unpacking software packages Perform the following steps to copy and unpack the software packages: 1. For the Tivoli Provisioning Manager for OS Deployment installer (we chose to copy and unpack it on the target machine) which is provided in a tar.gz format, we need to create another software package with the “Custom action“ option (see Figure 6-23): Figure 6-23 Software package type in the Software Wizard 280 Deployment Guide Series: Tivoli Provisioning Manager for OS Deployment V5.1
- 297. 2. Choose to copy a file on the target system, since we have to put the installer on the machine where it will be installed. Figure 6-24 Type of operation in the Software Wizard 3. Be careful when you are prompted to insert the source folder. Here, you will have to insert the path of the folder containing the installer that will be copied on to the target machine (see Figure 6-25). Figure 6-25 Source path of the file in the Software Wizard 4. As previously described, we need to insert a name to identify this profile in the database as shown in Figure 6-26 on page 282. Chapter 6. Installing Linux systems 281
- 298. Figure 6-26 Name and description for the package in the Software Wizard 5. The last panel of the wizard requires you to insert the following parameters: – Destination path /usr/local – Command line cd /usr/local ; gunzip -c /usr/local/TPMfOSd-5.1.000.32-linux.tar.gz | tar -xvf - – Installation stage After one additional reboot. Note that in the command line section, we insert commands that unpack the Tivoli Provisioning Manager for OS Deployment installer as shown in Figure 6-27. Figure 6-27 Script details in the Software Wizard After the wizard steps are completed, the creation of the software package starts. 282 Deployment Guide Series: Tivoli Provisioning Manager for OS Deployment V5.1
- 299. 6.3.3 Executing a command In this last package, we want to copy in the root directory of the target machine, a file (/proc/version) containing some useful release information. 1. To achieve this, we create a new software package called rhel release that executes a single command in order to copy the specific file on the required destination. After choosing the A custom action on the target computer option, select the Execute a single command option as shown in Figure 6-28. Figure 6-28 Type of software package in the Software Wizard The syntax of the command that will perform the copy is as follows: cp /proc/version /rhel_release When the software package is deployed, we will have this new file in the root folder of the target machine as shown in Figure 6-29. Figure 6-29 Command details in the Software Wizard 6.3.4 Software packages binding As for configurations, you can bind software packages to hosts in order to create a permanent relationship and automatically install them during each deployment performed. This operation can be performed in the following two ways: Chapter 6. Installing Linux systems 283
- 300. Manually, for each host-software package Automatically with binding rules Manually binding software packages to a host To perform manual binding 1. Select the host to which you want to associate a software binding from the Hosts list. 2. Double-click the host name to accessing to the Binding panel. 3. Add the specific software package or configuration. We manually bind to the target host two of the three packages created: – DHCP server RPM – Tivoli Provisioning Manager for OS Deployment installer Figure 6-30 shows what we did. Figure 6-30 Our bindings for the target computer Automatically binding software packages to a host You can also create software packages that can be automatically binded to a host using matching criteria. Using this process you avoid adding each software package to each host manually. We can copy the file containing the release information, the rhel release software package, for only one particular Linux distribution. This can be done without 284 Deployment Guide Series: Tivoli Provisioning Manager for OS Deployment V5.1
- 301. manually binding the software package for each of the several hosts where the distribution will be deployed. We can also add a binding rule to the software package in order to bind it automatically to the hosts where that specific Linux release will be deployed. To achieve this, perform the following steps: 1. Add a new binding rule for the rhel release package. 2. Select, as matching criteria, that the deployed profile is the specific RHEL 4 unattended setup profile. Figure 6-31 Binding rule for the rhel release software package As you can see in the binding panel of the specific host, the rhel release software package was automatically binded since the RHEL 4 Linux unattended profile (the matching criteria) was already bound. During deployment, this software package is added to the system as the previous two (DHCP server RPM and Tivoli Provisioning Manager for OS Deployment installer). Figure 6-32 Software package binding for the target computer Chapter 6. Installing Linux systems 285
- 302. 6.4 The deployment process After creating the profile and the software packages, choose the related bindings. We can start the deploy on the specific host. In the Deploy now window, choose the following: The deployment scheme to use The profile to deploy The software packages to add If you manually bound for the specific host the previously created configuration and software packages in the previous step, they are checked in the related lists, namely Edit manual configuration bindings and Edit software configuration bindings. Since these lists only show the manual link to profiles and packages, the binding entailed by the automatic rules are not checked even if they will be deployed. Figure 6-33 and Figure 6-34 on page 287 show that we want to deploy the Linux RHEL 4 profile with the DHCP and Tivoli Provisioning Manager for OS Deployment software packages manually added. Even if the rhel release software package is not checked in the list (since we did not add it manually) it will be deployed because it matches its binding rule. Figure 6-33 Deploy now options 286 Deployment Guide Series: Tivoli Provisioning Manager for OS Deployment V5.1
- 303. Figure 6-34 Manual software bindings After starting the deployment from the Web console, the client machine performs a network boot in order to load the Tivoli Provisioning Manager for OS Deployment mini operating system. This is a simple operating system that contacts the Tivoli Provisioning Manager for OS Deployment server and runs the deploy on the target machine. Following is the sequence of the steps performed on the client machine during the deploy of our profile with the binded software packages. 1. The client machine boots from the network and loads the Tivoli Provisioning Manager for OS Deployment mini operating system. 2. The deployment starts on the client machine. 3. After the “Starting system installation” step, the Linux installer, called Anaconda, is started on the client machine. 4. Anaconda performs the unattended system installation on the client machine. 5. The client machine reboots from the hard disk, and the early installed Linux is loaded to install the software packages binded to the host. 6. The client machine reboots, forcing the loading of Tivoli Provisioning Manager for OS Deployment mini operating system for the last deployment steps. 7. The client machine informs the customer that the deploy ended correctly. Chapter 6. Installing Linux systems 287
- 304. Note: The second reboot after OS installation and before software installation (step 5) is option, but is recommended to minimize the risk of a file system corruption. Figure 6-35 shows the sequence of operations performed on the client machine after booting from the network. You can see the Tivoli Provisioning Manager for OS Deployment panel on the client that displays the action that is currently being performed. Figure 6-35 Copy operating system files step on the target machine Figure 6-36 on page 289 shows the last step performed on the target computer before the Linux installer is loaded. There is a Tivoli button in this window that helps you during troubleshooting operations. 288 Deployment Guide Series: Tivoli Provisioning Manager for OS Deployment V5.1
- 305. Figure 6-36 Starting system installation on the target machine After the Linux installation is configured by the deployment process, the installer (called Anaconda) is launched to perform the unattended installation. All the parameters provided in this step can be modified through editing the profile and the binded configuration from the Web console. Figure 6-37 The Linux installer started on the target client After Anaconda completes its tasks, the system reboots from hard disk and the Linux operating system installed earlier is loaded. During this step, the software packages are also installed. Chapter 6. Installing Linux systems 289
- 306. Figure 6-38 Linux is loaded on the target computer Figure 6-39 Panel before the last reboot Finally the target machine forces another reboot from Tivoli Provisioning Manager for OS Deployment mini operating system in order to complete the remaining operations and to inform the user of the status. If the installation of the operating system encountered some problems, some errors may appear on the client during this last step. As mentioned earlier, you may find the Tivoli button very useful to show errors or to upload logs. 290 Deployment Guide Series: Tivoli Provisioning Manager for OS Deployment V5.1
- 307. Figure 6-40 Last installation step on the target computer Figure 6-41 displays the message showing the successful completion of the deployment operation. Figure 6-41 Outcome message on the target machine After completion, we are prompted to shutdown or reboot the freshly installed system. In order to check whether the bare metal machine is working as required, we run the client machine and log into the system. The DHCP server package was correctly installed since the rpm qa command shows it. Chapter 6. Installing Linux systems 291
- 308. Figure 6-42 Checking DHCP server RPM installation Also the Tivoli Provisioning Manager for OS Deployment installer was correctly copied and unpacked as shown in Figure 6-43. Figure 6-43 Checking the Tivoli Provisioning Manager for OS Deployment installer Finally the rhel release package was added to the deploy since we found the copied file in the root directory, as shown in Figure 6-44. Even if this software package was not manually added to the binding list, it matched the binding rule that we created and was added to the deploy. Figure 6-44 Checking rhel release package 6.5 Cloning a machine Another important feature of Tivoli Provisioning Manager for OS Deployment is the cloning of machines with the Windows or Linux operating system running. Creating a clone of a machine means building an image of the content its disks contain: 292 Deployment Guide Series: Tivoli Provisioning Manager for OS Deployment V5.1
- 309. The operating system The operating system settings and drivers The software and the data During the cloning operations, all the content of the disks of a source machine are imported as an image on the server to deploy it at a later time. This means that you can clone a machine used as a prototype and deploy its image on several machines that appear as the original one. Obviously, the cloning operation implies the customizing of some basic settings on each target machine. We show how to capture the image of a source machine running a Linux operating system and how to deploy it taking care of some useful advice. In the following sections we used the Linux RHEL 4 computer, which was created earlier, as a source machine. We deploy its cloned profile on a machine of the same model but with a hard disk of different capacity. Although a wide range of modifications are possible on each captured profile, the cloning procedure should be performed between machines of similar models in order to avoid incompatibility problems. We explain how to customize a cloned image modifying the partition scheme to use all of the disk size of the target machine. The cloning steps may be summarized into the following: Run a “make a new image” task from the source client to capture its image. Modify the captured profile on the server to fit the destination machine characteristics (we will change only the partition scheme). Deploy the profile on the destination machine. 6.5.1 Capturing the image Before creating an image of a source machine, you need to perform some cleaning steps that will remove unwanted files: Empty the trash Delete temporary directories and files Disconnect network drives and remote printers Note that the Tivoli Provisioning Manager for OS Deployment supports both GRUB and LILO bootloaders, but we strongly suggest using the former instead of the latter. If you do not plan to use the Redeployment feature, it can be installed on the MBR or on the boot sector of the Linux boot partition. The cloning operation on the Linux machine does not require that you install a specific software as Sysprep for Windows systems. For Linux cloned profiles, Tivoli Provisioning Manager for OS Deployment automatically copies and uses a Chapter 6. Installing Linux systems 293
- 310. simple tool called Linprep that configures the destination machine after the deployment with the needed customization. Linprep is used only for cloning profiles and it is copied during deployment on the target machine. It is run at the first boot of the target machine just after the deploy. When the “Starting system installation” step of the deployment process completes and the machine boots the early installed system, it is launched by a script in /etc/init.d at runlevel 1. The customizations performed are as follows: Reconfigure the network settings, the primary network interface (DHCP or static ip address), and the gateway and similar tasks. Reinstall the bootloader (GRUB or LILO). The bootloader is software that stores the physical address of the kernel to load. Since this address changes at each new deployment, the bootloader cannot be installed by Tivoli Provisioning Manager for OS Deployment during the deployment operations; therefore, Linprep runs LILO or GRUB installers at the first boot of the system when this address is known and will not change. After executing Linprep, the Linux system is rebooted (other runlevel 1 scripts are not executed) and the deployment completes. Note: In future releases, it is expected that Tivoli Provisioning Manager for OS Deployment will use the Web interface extension interface instead of Linprep. 1. The first step to start the capture is to access the source machine and boot it from the network in order to start the Admin Toolkit interface on the client. In future releases, it will be possible to capture the image of a machine from the Web console, while in the current release you have to physically access the source client. You may need to manually bind the Admin Toolkit interface on the specific machine; otherwise, no operations will be allowed on it. Figure 6-45 on page 294 shows the main menu of the Admin Toolkit interface. Figure 6-45 Main menu of the Admin Toolkit interface 294 Deployment Guide Series: Tivoli Provisioning Manager for OS Deployment V5.1
- 311. 2. Since we need to capture an image of this machine, choose the make a new image option. Figure 6-46 Make a new image task on the Admin Toolkit interface 3. Insert the name of the profile that will contain this image (cloneRHEL4), and accept to create a default configuration (automatically bound) for it. Figure 6-47 Inserting the profile name in the Admin Toolkit interface Chapter 6. Installing Linux systems 295
- 312. Figure 6-48 Default configuration in the Admin Toolkit interface 4. At the end of the operations, if the captured image is correctly stored in a profile, you will see the message Operation Completed as shown in Figure 6-49 on page 296. Figure 6-49 Outcome message in the Admin Toolkit interface 5. You can browse the Web console to find the captured profile in the list as shown in Figure 6-50. 296 Deployment Guide Series: Tivoli Provisioning Manager for OS Deployment V5.1
- 313. Figure 6-50 List of profiles in the Tivoli Provisioning Manager for OS Deployment server 6.5.2 Customizing the captured profile During the deployment of the captured image, we advise you to ensure that Tivoli Provisioning Manager for OS Deployment gets enough disk space for the deployment operations. On the target machine, the process uses both the unpartitioned space at the end of the hard disk and the free space at the end of the last partition. The sum of these areas must be large enough for storing all partition images that are deployed at the same time on the client computer—it should typically be half of the size of the data on the hard disk—the available space should be 1 GB if your OS partition contains about 2 GB of data. We suggest that you ensure that the swap partition of the image is not at the end of the disk when deploying a Linux system profile, since this partition is usually small and if there is no unpartitioned space (as in our case where we will partition all the available disk space), the deployment of the cloned profile will fail because of insufficient free disk space. Since our destination machine has a hard disk with higher disk size (10GB), we modify the captured profile to use the 100% of the disk space for the last root partition. We also check that the last partition (since we will not leave any unpartitioned space) will be enough for the deployment process. Figure 6-51 shows our profile after the capturing. Chapter 6. Installing Linux systems 297
- 314. Figure 6-51 The partition layout of the captured image Next, set the third partition, where the root file system will be mounted, to use all the available disk space as shown in Figure 6-52. Figure 6-52 Using all the available disk space After the changes, the partition scheme will use all the available disk space of the target machine (10GB) instead of the fixed size of the source machine (8GB), as shown in Figure 6-53 on page 298. Figure 6-53 The partition layout after the changes 298 Deployment Guide Series: Tivoli Provisioning Manager for OS Deployment V5.1
- 315. 6.6 Deploying the cloned profile After the customization steps, we can distribute the cloned profile to the target machine. We select the destination client from the hosts list and deploy the cloneRHEL4 profile. Figure 6-54 Deploying the cloned profile cloneRHEL4 Note: In the manual bindings of the software packages, there is no software selected since we are deploying a cloned profile and we will get all the installed software from the source machine. Figure 6-55 No manual bindings for software packages Chapter 6. Installing Linux systems 299
- 316. During the deploying operations, the target machine performs the following steps: Boot from the network to connect to Tivoli Provisioning Manager for OS Deployment server. Start the deployment. After the “Starting system installation” step, run the earlier installed system. Run Linprep, then reboot. Boot from the network (forced by the deployment process) to terminate the installation. Figure 6-56 shows that the deployment process is started on the client. Figure 6-56 Deployment step on the client After the “Starting system installation” step, the system runs the earlier installed Linux. Then Linprep is launched to perform the needed customization. After the configuration ends, a reboot from Tivoli Provisioning Manager for OS Deployment mini operating system is forced and final deployment steps are performed. Note: Note that Linprep is not customizable. You can only customize the profile you have to deploy. Figure 6-57 shows one of the operations performed after the reboot—resizing the last partition used as temporary storage. 300 Deployment Guide Series: Tivoli Provisioning Manager for OS Deployment V5.1
- 317. Figure 6-57 Last deployment steps At the end of the process, we receive a message as shown in Figure 6-58. Figure 6-58 Outcome message at the end of the cloning process If we run Linux, we can check the following: All the software of the source machine that was installed on the destination. For example, the DHCP RPM was installed even if not binded. Whether the disk partitioning is correctly set. The root partition uses all the available space. Linprep log that shows the Linprep operations. Figure 6-59 on page 301 shows the disk size to 9 GB of the last root partition and the DHCP server installed as it was on the source machine. Figure 6-59 DHCP server installed For an example of Linprep.log, see Example 6-1. Chapter 6. Installing Linux systems 301
- 318. Example 6-1 Linprep.log Distribution : unknown RedHat Parsing /etc/linprep.inf..... Time Zone = 110 Boot loader = grub Root partition = disk://0:3 Boot partition = disk://0:2 BootLoaderLocation = disk://0:0 MacAddress = * Language -> Keyboard = 0409 Host Name = pc-000C2955E702 Found GRUB bootloader Changing administrator password Change root password: executing: echo root:XXXX | /usr/sbin/chpasswd Changing DNS settings Generate new /etc/resolv.conf (DNS) Changing network configuration Modifying /etc/sysconfig/network OK Modifing /etc/sysconfig/network-scripts/ifcfg-eth0 DHCP actived OK Changing hostname Modifying /etc/hosts Adding 127.0.0.1localhost pc-000C2955E702 OK Changing timezone Modifing file /etc/sysconfig/clock new Timezone : Etc/GMT+1 OK Changing keyboard mapping Adjusting keyboard locale console keytable : us ERROR with file /etc/X11/XF86Config-4 : No such file or directory Unable to open device /dev/sda Found a valid RAD protected MBR on /dev/hda Using /dev/hda as root device Installing GRUB on MBR Executing grub-install --recheck '(hd0)' Saving MBR Linprep finished. 302 Deployment Guide Series: Tivoli Provisioning Manager for OS Deployment V5.1
- 319. 7 Chapter 7. Common deployment features In this chapter we discuss deployment features that are common to all operating system deployments. The chapter contains the following sections: “Configuring RAID arrays” on page 304 “Software package rules and bindings” on page 315 “Collecting inventory from the target machines” on page 328 “Device driver injection” on page 332 “Understanding the host boot settings” on page 345 “User administration” on page 353 © Copyright IBM Corp. 2007. All rights reserved. 303
- 320. 7.1 Configuring RAID arrays When building servers, it is a typical requirement that the RAID configuration on the server be done before the Operating System is installed. In this chapter, we take you through the process of having Tivoli Provisioning Manager for OS Deployment do the work for you. Remember also that when servers are decommissioned, and they contained sensitive data, it may be a requirement to formally remove the data from the RAID disks, which can also be accomplished with this technique. Typically each hardware manufacturer has their own tools to configure their own RAID configuration, and these differences are not important for the purposes of this chapter. We focus on the general principles, and we use the IBM System x™ Server RAID environment as an example. HP provides a toolkit, which you can download from the following Web site: http://h18004.www1.hp.com/products/servers/management/toolkit/index.htm l The toolkits for DELL can be found at the following Web sites: http://www.dell.com/content/topics/global.aspx/sys_mgmt/en/server_deplo y?c=us&cs=04&l=en&s=bsd http://support.dell.com/support/downloads/download.aspx?fileid=123204 IBM provides a toolkit to automate the RAID configuration process called the IBM ServerGuide™ Scripting Toolkit. The details are at the following Web site: http://www-03.ibm.com/systems/management/sgstk.html Details of the latest release of the toolkit available at the time of publication can be found at the following Web site: http://www-304.ibm.com/jct01004c/systems/support/supportsite.wss/docdis play?lndocid=MIGR-53564&brandind=5000008 The ServerGuide Scripting Toolkit provides for the following three deployment scenarios for the configuration process: A DOS-startable CD or standalone DOS-startable diskette with data CD A DOS-startable diskette with network share A Remote Supervisor Adapter II or BladeCenter® Management Module and network share. 304 Deployment Guide Series: Tivoli Provisioning Manager for OS Deployment V5.1
- 321. We will build a DOS Bootable Diskette with the appropriate configuration files and executables, that when booted, performs the required RAID configuration without any manual intervention. Install the ServerGuide Scripting Toolkit in standalone mode on your Windows preparation machine. The machine that we used to prepare the DOS image was Windows. This can also be done in a Linux environment, but that scenario is not covered here. You will also find it useful to have a real diskette drive available to you, but if that is not the case, then virtual alternatives can be used. Our preparation station was Windows running as a VMWare guest operating system, which allows for the attachment and manipulation of virtual diskette images. There are also various shareware and open source alternatives available. You might use Virtual Floppy Drive 2.1, which is a free tool that can be downloaded from the following Web site: http://chitchat.at.infoseek.co.jp/vmware/vfd.html#download. There are other tools available with a similar function. 7.1.1 Building the bootable DOS diskette When you install the ServerGuide Scripting Toolkit in standalone mode, you will see that there are some supplied bootable DOS images under the C:sgsharesgdeploysgtbootimages directory; however, we are going to use the sample under C:sgsharesgdeploysgtkadsimages called tk_raid.vfd. 1. Select the sample that you want to use, and attach it to the VMWare virtual machine, as shown in Figure 7-2 on page 306. After a virtual machine is booted, it is possible to dynamically change the attached virtual floppy as shown in Figure 7-1. Figure 7-1 Changing an attached virtual floppy Chapter 7. Common deployment features 305
- 322. Figure 7-2 Attaching sample diskette image to VMWare machine 2. Look at the A: drive within the virtual machine, and you will see something similar to Figure 7-3 on page 307. Note that this gives us full read and write access to the image. There are a number of helper utilities provided by the ServerGuide scripting Toolkit, which are documented in Chapter 3. “Customizing Toolkit Scenarios” of the IBM ServerGuide Scripting Toolkit User’s Reference Version 1.3. The guide itself is located under: C:sgsharesgdeploysgtkdocs (The pdf is put on disk when toolkit is installed.). 306 Deployment Guide Series: Tivoli Provisioning Manager for OS Deployment V5.1
- 323. Figure 7-3 Browse the attached sample diskette image The significant logic of the boot process for this diskette is as follows: autoexec.bat is run which does the following: a. Runs usrvars.bat to set RD_FILE variable to identify the RAID configuration file that will be used by the praid.exe RAID configuration binary. b. Runs tkzip.exe to copy the ServerGuide Scripting Toolkit utilities to the RAMDRIVE identified by the %RAMDSK% environment variable. c. Runs the praid.exe utility with the %RD_FILE% configuration file to configure the RAID array. d. Saves the return code into non volatile CMOS storage. e. Reboots the machine. 3. Make the appropriate praid.exe configuration file modifications using the samples in the following directory as a template: C:sgsharesgdeploysgtkexamplesraidtemplate.ini We include RAID5HSP.ini as a sample of how you can do RAID 5 configuration that uses all available drives, keeping one as a hot standby. See Example 7-1 on page 308. Chapter 7. Common deployment features 307
- 324. Example 7-1 Sample praid.exe configuration file ; * Policy.RAID-5-HSP ; * ; * This policy configures a RAID controller with a RAID-5 array using ; * all available drives and a single hot-spare drive. ; * ; * This policy will be used on the following RAID controllers: ; * - ServeRAID-4H ; * - ServeRAID-4Mx ; * - ServeRAID-4Lx ; * - ServeRAID-5i ; * - ServeRAID-6i/6i+ ; * - ServeRAID-6M ; * - ServeRAID-7k ; * - ServeRAID-7t ; * - ServeRAID-8i [Policy.RAID-5-HSP] AppliesTo.1 = t:ServeRAID-4H AppliesTo.2 = t:ServeRAID-4Mx AppliesTo.3 = t:ServeRAID-4Lx AppliesTo.4 = t:ServeRAID-5i AppliesTo.5 = t:ServeRAID-6i AppliesTo.6 = t:ServeRAID-6M AppliesTo.7 = t:ServeRAID-7k AppliesTo.8 = t:ServeRAID-7t AppliesTo.9 = t:ServeRAID-8i Array_Mode = CUSTOM Array.A = ALL Hotspares = 1 Logical_Mode = CUSTOM Logical.1 = A:FILL:5 ;Note: Uncomment the policy name and AppliesTo.1 to activate this policy. ; * Policy.auto-mode ; * 308 Deployment Guide Series: Tivoli Provisioning Manager for OS Deployment V5.1
- 325. ; * This policy configures all controllers with PRAID default values for arrays ; * and logical drives. ; * (Any RAID controller not configured by Policy.RAID-5-HSP will use this policy.) ; * Note: PRAID default configuration values include a RAID-1 array on controllers with 2 ; * drives. The RAID level varies for controllers with more than 2 drives. ; * See the PRAID documentation for more details. ;[Policy.auto-mode] ;AppliesTo.1 = ALL 4. Because of the limited space on the virtual floppy disk, we need to package up the ServerGuide Scripting Toolkit and any RAID configuration files you created as a self-extracting zip file. There are utilities available to do this, such as the Pkware family that has zip, unzip, and utilities to convert zip files to self extracting .exe files. If we continue to edit the floppy disk according to our needs, when this is detached from the virtual machine, it will be transportable. Example 7-2 shows how we create a zip file using Pkware. Example 7-2 Using Pkware to create a zip file C:sgshare>.pkwarepkzip.exe raid.zip .raid*.* PKZIP (R) FAST! Create/Update Utility Version 2.04g 02-01-93 Copr. 1989-1993 PKWARE Inc. All Rights Reserved. Shareware Version PKZIP Reg. U.S. Pat. and Tm. Off. Patent No. 5,051,745 ? 80486 CPU detected. ? XMS version 2.00 detected. ? DPMI version 0.90 detected. ? Using Normal Compression. Creating ZIP: RAID.ZIP Adding: ACU.EXE Deflating (59%), done. Adding: ACUAHCI.EXE Deflating (64%), done. Adding: ACUICHSV.EXE Deflating (64%), done. Adding: ACUSAS.EXE Deflating (63%), done. Adding: ACUSAS8E.EXE Deflating (58%), done. Adding: ADSCFG.BAT Deflating (77%), done. Adding: ALTBOOT.EXE Deflating (55%), done. Chapter 7. Common deployment features 309
- 326. Adding: CFG1030.EXE Deflating (57%), done. Adding: CFGGEN.EXE Deflating (40%), done. Adding: CFGRAID.BAT Deflating (82%), done. Adding: CKVARS.BAT Deflating (82%), done. Adding: CLINI.EXE Deflating (55%), done. Adding: CLRENV.BAT Deflating (64%), done. Adding: CLRFIB.BAT Deflating (59%), done. Adding: CLRNET.BAT Deflating (60%), done. Adding: CLROS.BAT Deflating (83%), done. Adding: CLRUPDS.BAT Deflating (61%), done. Adding: DYNALOAD.COM Deflating (21%), done. Adding: HWDETECT.EXE Deflating (52%), done. Adding: IPSRASPI.SYS Deflating (87%), done. Adding: IPSSEND.EXE Deflating (66%), done. Adding: LOADRAID.BAT Deflati (71%), done. Adding: PRAID.EXE Deflating (61%), done. Adding: RAIDCLN.BAT Deflating (78%), done. Adding: RAIDSEL.EXE Deflating (52%), done. Adding: REBOOT.COM Storing ( 0%), done. Adding: SAVESTAT.EXE Deflating (52%), done. Adding: SLEEP.EXE Deflating (32%), done. C:sgshare> 5. Now that we created the .zip file, we need to make it a self-extracting .exe file for subsequent expansion in the booted DOS environment. Example 7-3 demonstrates the use of the zip2exe.exe utility. Example 7-3 Creating a self extracting zip file C:sgshare>.pkwarezip2exe raid.zip ZIP2EXE (tm) Self-Extract Creator Version 2.04g 02-01-93 Copyr. 1989-1993 PKWARE Inc. All Rights Reserved. Shareware Version ? Creating a Full Featured Self Extractor RAID.ZIP => RAID.EXE 6. Finally we have to copy the newly created self-extracting zip file to the diskette as in Example 7-4. Example 7-4 Copy the self-extracting zip file to the diskette C:sgshare>xcopy RAID.EXE a: 310 Deployment Guide Series: Tivoli Provisioning Manager for OS Deployment V5.1
- 327. C:RAID.EXE 1 File(s) copied 7. If you are working in a real environment with real diskettes, you can make a diskette image with utilities such as RawWrite.exe, as illustrated in Figure 7-4, and save it to C:WorkRAID.VFD. Figure 7-4 Capturing virtual image from A: drive 8. You could alternatively use the rbagent command as in Example 7-5. Example 7-5 Creating an image from a diskette drive rbagent mkimage a: net://images/diskette.img Also look at the helper batch files under c:sgdeploysgtkboot as they may help you with the creation of these images. At this point we finished creating our DOS boot disk that will perform our required RAID configuration. We now need to integrate this image into our Tivoli Provisioning Manager for OS Deployment deployment scheme. 9. Create a software package, as in Figure 7-5 on page 312. Chapter 7. Common deployment features 311
- 328. Figure 7-5 Create a software package for a ramdisk boot 10.Elect to make a custom action, as in Figure 7-6. Figure 7-6 Software package custom action 11.Our software package build dialog continues as in Figure 7-7 on page 313. 312 Deployment Guide Series: Tivoli Provisioning Manager for OS Deployment V5.1
- 329. Figure 7-7 Select the software package custom action type 12.In Figure 7-8, select to boot from a floppy disk. Figure 7-8 Boot from a virtual floppy disk. 13.Give the software package a name, as in Figure 7-9. Figure 7-9 Name the DOS ramdisk software package 14.Direct the dialogs to our floppy disk, as in Figure 7-10 on page 314. Chapter 7. Common deployment features 313
- 330. Figure 7-10 Software package boot diskette location 15.The creation dialog also then prompts us for the installation step for this DOS boot process. We will change this later, so the default is good for now. This is shown in Figure 7-11. Figure 7-11 Select installation step for the RAID configuration 16.Continue the software package until it is successfully created, and then use the OS Deployment → Software Packages → Reorder Software dialog to make sure that the RAID configuration happens before the OS is installed. When this process is finished, the deployment step order looks similar to Figure 7-12 on page 315. 314 Deployment Guide Series: Tivoli Provisioning Manager for OS Deployment V5.1
- 331. Figure 7-12 Deployment steps for software packages including RAID configuration 7.2 Software package rules and bindings We need to bind a software package to the OS profile if we want it installed as a part of the same workflow. 1. From within the details of the software package, we create a new rule, as in Figure 7-13 on page 316. The details of the rule can be many, but only want this software package to be bound to the Windows 2003 unattended installation profile. Chapter 7. Common deployment features 315
- 332. Figure 7-13 Binding a software package to an OS profile 2. In this binding criteria, you might choose to make use of the hardware inventory that is available to you from the scan done by Tivoli Provisioning Manager for OS Deployment. The data returned by the scanning process is controlled by the deployment scheme, as shown in Figure 7-14 on page 317. Note that this data just supplements that associated with the host definition itself that may contain other data such as geographical location, department, and building. 316 Deployment Guide Series: Tivoli Provisioning Manager for OS Deployment V5.1
- 333. Figure 7-14 Control inventory data from the deployment schema 3. In Figure 7-15 on page 318, we define the binding criteria with the software package. In this simple example, we only define the profile name. Chapter 7. Common deployment features 317
- 334. Figure 7-15 Define software package binding criteria 4. When this process completes, and the OS Profile is deployed to the target, review the details of the target host as in Figure 7-16 on page 319, where you can see the software package bound to the deployment of the OS profile. 318 Deployment Guide Series: Tivoli Provisioning Manager for OS Deployment V5.1
- 335. Figure 7-16 Browse the host OS profile and software package bindings 7.2.1 Binding software packages to deployment schemes When you deploy an OS profile to a machine, you may also want to deploy one or more software packages. In our case, we want to add and remove some Microsoft components and also restore the user settings as we deploy WIndows XP. Following is how we link these three components. 1. One way to bind the components is to use deployment schemes, but as you see in Figure 7-17 on page 320, there are no bound software packages by default. Chapter 7. Common deployment features 319
- 336. Figure 7-17 Deployment scheme with no bound software packages 2. As you deploy a profile to a target, name the profile, and also an associated deployment scheme, as shown in Figure 7-18 on page 321. 320 Deployment Guide Series: Tivoli Provisioning Manager for OS Deployment V5.1
- 337. Figure 7-18 Choose a deployment scheme for a profile 3. Let us now look at the details of the schema called Deployment. If you look at the bottom of the panel in Figure 7-17 on page 320, you will see that by default there are no software packages bound to the deployment scheme. We will now bind our two software packages. So select Edit in the Software Bindings section of the schema definition in Figure 7-17 on page 320, and you will see the currently defined software packages as in Figure 7-19. Figure 7-19 Software packages available for binding to deployment schema 4. We select them all and continue, as shown in Figure 7-20 on page 322. Chapter 7. Common deployment features 321
- 338. Figure 7-20 Bind all software packages to deployment schema When this is complete you, it will look similar to Figure 7-21, showing that the software packages were added to the deployment scheme. Figure 7-21 Amended scheme with bound software packages Note that this is one technique in using bindings. Rather than bind the software packages to the scheme you can also bind them to the host at the time of deployment. This will achieve the same result but only for this deployment. For more permanent results, we suggest that you modify the scheme bindings as we did. See Figure 7-22 on page 323 for details of how this is done. 322 Deployment Guide Series: Tivoli Provisioning Manager for OS Deployment V5.1
- 339. Figure 7-22 Change the software packaging bindings at deployment time 5. You may also want to change the order in which the software packages are deployed, as they may have dependencies on each other. You can do this as in Figure 7-23 on page 324. This is done from OS Deployment > Software Packages > Reorder Software. Here you can see that the User State Migration and the Windows component activities are all completed as a part of the OS installation. Chapter 7. Common deployment features 323
- 340. Figure 7-23 Re ordering the installation order of the software packages 7.2.2 Advanced binding scenarios Consider now that you may want to perform some advanced bindings of profiles to machines. What scenarios might you want to support? Consider the following: My image needs at least a 8 GB partition on the first physical disk. My image runs database software, so it needs at least 2 GB of physical memory. Use of free form text in the binding rules allows us to do this. You can interrogate any field in the records that you see defined in Table 7-2 on page 326. Note that you might want to look into the two parts of the RDBMS schema that hold information of interest to use. The tables are shown in Table 7-1. Table 7-1 Schema tables Bill of materials related Machine configuration related BOM SoftwareProfile DiskInventory SoftwareItem DMIInventory GroupingRule 324 Deployment Guide Series: Tivoli Provisioning Manager for OS Deployment V5.1
- 341. Bill of materials related Machine configuration related PCIInventory Groups PCIDescription SystemProfile Deployment ErrorLog Settings UserProfile The schema is created automatically when the Rembo TCP to ODBC gateway service on Windows starts. The equivalent daemon on Unix looks similar to Example 7-6. Example 7-6 Active Tivoli Provisioning Manager for OS database interface process usr/lib/java/jre/bin/java -cp /usr/local/tpmfos-5.1/dbgw.jar:/usr/local/tpmfos-5.1/db2jcc.jar:/usr/lo cal/tpmfos-5.1/db2jcc_license_cu.jar -Djdbc.drivers=com.ibm.db2.jcc.DB2Driver com.rembo.dbgw.Dbgw There are several ways to look at the defined schema and its details. Example 7-7 shows some tips for use in a DB2 environment. You can also use the DB2 command center if you have access to a graphical environment, which you start with the db2cc command. Example 7-7 Listing the Tivoli Provisioning Manager for OS Deployment schema details #!/bin/sh # source the DB2 environment . /home/db2inst1/sqllib/db2profile # connect to the database db2 connect to tpmfosd user db2inst1 using db2inst1 # list all the tables in the schema db2 list tables # list the details of the BOM table db2 describe table BOM # terminate DB2 connction db2 connect reset Chapter 7. Common deployment features 325
- 342. Tip: A lot of the table and column names in the schema have quotation mark (“) characters in their name. You have to escape this character in a unix shell. To make your life easier, use DDL, for example su - db2inst1 -c “db2 -tvf cmds.ddl, where cmds.ddl does not have the db2 command prefix and the lines end with a semicolon (;) character. To use freeform text in our binding rules, we address the record and not the table. In Table 7-2, you can see the association between the schema table and the record name. Table 7-2 Mapping rule records to RDBMS schema tables Record name Table name Disk DiskInventory DMI DMIInventory Order BOM User UserProfile System SystemProfile PCI PCIInventory We list the DiskInventory table, as shown in Example 7-8. As we said before, we have had to use the escape character in front of the table name, as the shell will strip the leading and trailing quotation mark (“) from some of the column names. Example 7-8 Listing the details of he DiskInventory table manchester:/usr/local/scripts # db2 describe table "DiskInventory" Column Type Type name schema name Length Scale Nulls ------------------------------ --------- ------------------ -------- ---------- BomID SYSIBM INTEGER 4 0 Yes DiskID SYSIBM INTEGER 4 0 Yes Controller SYSIBM SMALLINT 2 0 Yes Device SYSIBM INTEGER 4 0 Yes Type SYSIBM VARCHAR 5 0 Yes Media SYSIBM VARCHAR 8 0 Yes Removable SYSIBM CHARACTER 1 0 Yes ProtSupport SYSIBM CHARACTER 1 0 Yes UDMASupport SYSIBM CHARACTER 1 0 Yes BiosSize SYSIBM INTEGER 4 0 Yes 326 Deployment Guide Series: Tivoli Provisioning Manager for OS Deployment V5.1
- 343. DiskSize SYSIBM INTEGER 4 0 Yes Model SYSIBM VARCHAR 40 0 Yes Firmware SYSIBM VARCHAR 8 0 Yes Serial SYSIBM VARCHAR 20 0 Yes ATA48bits SYSIBM CHARACTER 1 0 Yes 15 record(s) selected. We want to use the value of the DiskSize column from the DiskInventory table in my binding rule. This translates to the DiskSize field of the Disk record when we write the rule. There may also be multiple physical disks on the machine. So how do we just check the size of the first physical disk? All instances of Disk are loaded into an array and are addressable by their array index within the rule. So, the first physical disk is addressed as Disk[0], and to look at the physical size of the first disk, you use Disk[0] DiskSize within your rule record. To decide if the value of this field is appropriate for our needs, we have to apply some logical operators to is value. The available operators are shown in Table 7-3. Table 7-3 Free form rule logical operators Operator Meaning < is smaller than <= is less than or equal to => is greater than or equal to > is greater than == is equal to != is not equal to && logical AND operator || logical OR operator So finally, our free form rule to bind profiles to computers that have their first physical hard disk that is greater than or equal to 8 Gigabytes, looks like that in Example 7-9 on page 328. Note that this expression is just going to look in the first two memory slots of the motherboard. The DMI schema supports up to 8, so you might want to extend the expression to sum the values from all eight slots. Chapter 7. Common deployment features 327
- 344. Example 7-9 Free form binding rule for selecting disk size of target Disk[0].DiskSize > 8*1024*1024 && (DMI.Mem1Size+DMI.Mem2Size) >= 2*1024*1024 7.3 Collecting inventory from the target machines In the previous section, we showed you how to use the information collected about the target machine. Here we discuss how this information is collected and also how you can browse it interactively from the Tivoli Provisioning Manager for OS Deployment interface. 1. Within the definition of a deployment scheme, we chose when the inventory of the target machine is done and what information is taken. This can be seen in Figure 7-24, where we opted to take all available information at all times. Be clear that this scan is done as a part of the initial capture by Tivoli Provisioning Manager for OS Deployment, for example, its appearance in the Host Monitor list, or subsequently, when a profile is deployed to the target. Figure 7-24 Controlling inventory scope in deployment scheme 2. The data can then be browsed from the Host Monitor, as shown in Figure 7-25 on page 329. 328 Deployment Guide Series: Tivoli Provisioning Manager for OS Deployment V5.1
- 345. Figure 7-25 Browsing the host inventory 3. Now that we have the inventory information we want to treat the machines that match the inventory search all in the same way. To start this process, we create a customer host list as in Figure 7-26. Figure 7-26 Creating a custom host list Chapter 7. Common deployment features 329
- 346. 4. Now we give it a name, as shown in Figure 7-27. Figure 7-27 Name the custom host list Figure 7-28 Create a custom host list from a query 5. This starts the dialog in Figure 7-29 on page 331 that allows you to search for hosts by their inventory attributes. 330 Deployment Guide Series: Tivoli Provisioning Manager for OS Deployment V5.1
- 347. Figure 7-29 Selecting host search criteria 6. If you know the exact model of your machine community, then you can define a search as in Figure 7-30. Note that we select BOM Information (Bill of Materials) in the dialog check box. Figure 7-30 Wildcard search of machine serial numbers 7. If you want to search for hosts, where some software was specifically bound, for example there is no generic binding rule in effect. You can find these hosts as follows. Enter Adobe® Reader% in the search keyword box, and select the Manually bound software box. This identifies all hosts where any version of the Chapter 7. Common deployment features 331
- 348. Acrobat Reader was installed. This assumes that you are collecting software inventory information that is not the default. 7.4 Device driver injection If a required device driver is not contained within the profile that you are deploying to a new target, then at best the hardware on the target will not be exploited, like poor screen performance. At worst, the network card will not initialize correctly, and you will have no network access to correct the problem, mandating a local visit to the machine. An alternative is to have cloned machine images in a profile that contains all possible device drivers. This is not practical for the following reasons: You will have to update the machine profiles as new drivers become available for your hardware. Alternately, you will have to maintain multiple images for different hardware combinations, which is time consuming to produce and expensive with disk utilization. Tivoli Provisioning Manager for OS Deployment adopts a different approach and allows you to inject your required drivers into the image at deployment time. This means that you can always use the same image, and Tivoli Provisioning Manager for OS Deployment dynamically binds the hardware specific device driver to the deployment for your particular hardware. 7.4.1 How does this process work? All PCI based devices have a unique set of identifiers, as can be seen in the hardware inventory of a sample host for its Ethernet card. You can see in Figure 7-32 on page 333 that this card is uniquely identified by its VendorID and DeviceID. Consider devices that we are handling for the first time. As we need the PCI information to inject the appropriate device driver, it is important that you scan Peripheral Component Interconnect (PCI) devices as a part of the profile deployment. This is controlled in the scheme associated with the profile in the General Settings section, as shown in Figure 7-31 on page 333. 332 Deployment Guide Series: Tivoli Provisioning Manager for OS Deployment V5.1
- 349. Figure 7-31 Changing the deployment scheme to scan for PCI hardware Most modern onboard computer peripherals use a PCI bus, but for those that may not, we suggest that you integrate the appropriate device drivers into the base build of the OS image. Figure 7-32 PCI details for ethernet card from hardware inventory As the OS is deployed to the target the hardware scan of the target PCI devices occurs according to the policy you defined in the deployment scheme. Now look Chapter 7. Common deployment features 333
- 350. at the rules associated with the device driver software packages, and see if any match. Look at the details of the software package in Figure 7-33. It supports 22 different devices, each identified by unique PCI attributes. Figure 7-33 Sample device driver software package Looking more closely at the rules associated with the software package, we see in Figure 7-34 that we have a VendorID:DeviceID pair that is the same as that of the ethernet card found in the hardware inventory scan of the target PC. Figure 7-34 Matching PCI device driver selection rule Figure 7-35 shows more detail of this binding rule by showing the common name of the device. Figure 7-35 PCI binding rule detail So it appears that when we deploy our OS profile to the target with this hardware, implicit rule binding automatically installs this device driver for us. 334 Deployment Guide Series: Tivoli Provisioning Manager for OS Deployment V5.1
- 351. It is in this way that only the required drivers are pushed to the target, and one image can support multiple hardware types. 7.4.2 Device driver software package rules with a different OS What happens when we deploy a different OS to the same target, and the Windows 2000 driver is different than the Windows XP device driver? If you noticed in our binding rule in Figure 7-35 on page 334, we accept any Windows OS variant to make our device driver eligible for installation. If we want to package different device drivers that cater to the same device but on different operating systems, then we need to specify the required OS variant in the binding rule. You can edit the binding rule associated with the software package as in Figure 7-36. You see here that this package installs on any Windows variant. Figure 7-36 Editing a device driver binding rule Use the list box options shown in Figure 7-37 on page 336 to specify the OS for which this device driver is appropriate. Chapter 7. Common deployment features 335
- 352. Figure 7-37 Changing the OS selection binding rule Note: Be careful with your device driver binding rules. The default behavior for the device driver software build process includes rules that target all variants of Windows. If you are building images for different versions of Windows, make sure that your OS specific device driver is bound to the appropriate OS. See Figure 7-37. 7.4.3 Creating a device driver software package Now, create another software package, but this time direct the build wizard in Figure 7-38 on page 337, to include a device driver in the deployment. 1. In the Figure 7-38 on page 337, we use the VMWare device drivers, for video and network support, and so forth. This is only shown as an example, as there is an MSI to complete the whole installation for you. 336 Deployment Guide Series: Tivoli Provisioning Manager for OS Deployment V5.1
- 353. Figure 7-38 Device driver injection software package build wizard 2. In the case of Windows 2000, 2003, and XP, navigate to the directory containing the .inf and the .cat files for your device driver. When in the right location, the build wizard confirms the driver details as in Figure 7-39. 3. You are also asked if you want the software package containing the device driver automatically bound to a machine if there is a matching DMI entry found in the hardware inventory for the target. Select Yes, which has the effect of creating a binding rule that conditionally links the host and the software package. Figure 7-39 Driver injection—device driver details 4. Look at the software package binding rules in Figure 7-40 on page 338. Chapter 7. Common deployment features 337
- 354. Figure 7-40 Implicit binding rules for device driver software package 5. Figure 7-41shows how details of a selected rule appear. Figure 7-41 Implicit rule linking device driver with PCI ID 6. You, once again, are asked at what step in the deployment you want this driver to be injected into the image. We will return to this, but the prompt is shown in Figure 7-42 on page 339. 338 Deployment Guide Series: Tivoli Provisioning Manager for OS Deployment V5.1
- 355. Figure 7-42 Driver injection step choice 7. We repeat this operation for several more VMWare device drivers, until the list of software packages looks like Figure 7-43. Figure 7-43 New device driver software packages 8. We have not paid much attention to the order in which the software packages are installed, so let us reorder them. The original order is like Figure 7-44 on page 340. In our case our design needs the device drivers installed and operational before we restore the user settings using USMT over the network, so we need to engineer a reboot of the machine between driver injection and USMT restore. After we complete this, the order looks similar to Figure 7-44 on page 340. We can change this in OS Deployment → Software Packages → Reorder Software. Chapter 7. Common deployment features 339
- 356. Figure 7-44 Initial step order for device driver software package deployment 9. After we make our changes, the device drivers are installed and the machine reboots before we run the USMT user setting restore process. 340 Deployment Guide Series: Tivoli Provisioning Manager for OS Deployment V5.1
- 357. Figure 7-45 Final software package deployment steps Restriction: Microsoft does not automatically recognize all devices. If we implicitly bind a device driver software package to a deployment profile, then there may be occasions where this device driver is not installed on the target at deployment time. This can be because the unattended install or the mini sysprep done after a cloned image installation, does not recognize the device. For example, some SCSI devices behave in this way. To circumvent this problem, you can explicitly bind the software package to the profile that will be deployed to the target machine. You may consider binding all such device driver software packages in this way. The up side of this approach is that the driver will be installed, and the only downside is that some device drivers will be deployed to the target that is not used. 7.4.4 Quickly building device driver software packages Following is an aid to the quick building of device driver software packages that will help with a pilot deployment of TPM for OS Deployment. Chapter 7. Common deployment features 341
- 358. Before you start a pilot deployment, gather all of your extra device drivers, and load them under a single mount point on your disk, and then use this script to quickly build the software packages. You can use as many sub directories as you need, and the names of the directories are not important, just make sure that the drivers are expanded. In the case of IBM device drivers for Windows, they are usually shipped as self-extracting executables that install somewhere under C:/IBMTOOLS/DRIVERS. Example 7-10 Script to automate device driver software package building #c:perlbinperl.exe -w # # usage:- device_drivers.pl <path_to_root_of_device_driver_directories> # example:-device_drivers.pl c:/ibmtools/drivers # Richard Hine - ITSO - Feb 2007 # # where has my rbagent binary been installed ? # this assumes that the rbagent.conf file connects you to the required server # if this is not the desired behaviour then modify the rbagent to use the -s switch to identify the TPM server # my $rbagent = "C:Program filescommon filesibm tivolirbagent.exe"; # subroutine to process all files and directories recursively sub recurse($) { my($path) = @_; $path .= '/' if($path !~ //$/); # check that we have a cat and inf files if (`ls -alr $path|grep -i cat` && `ls -alr $path|grep -i inf`) { print "nnRAD-MKSOFT processing driver in directory $pathnn"; # execute software package build and write all results to STDOUT open(TPM,""$rbagent" rad-mksoft "$path"|"); while (<TPM>) { print "RAD-MKSOFT $_"; } } # loop through the files contained in the directory for my $file (glob($path.'*')) { # if the file is a directory then go around again if( -d $file) { recurse($file); } 342 Deployment Guide Series: Tivoli Provisioning Manager for OS Deployment V5.1
- 359. } } # process all directories from the passed root directory recurse($ARGV[0]); Running the script from Example 7-10 on page 342 with device_drivers.pl c:/ibmtools/drivers gives us a result similar to that shown in Example 7-11. Example 7-11 STDOUT from running device_drivers.pl RAD-MKSOFT processing driver in directory C:IBMTOOLSDRIVERS/Q38Z01US/PRO1000/W S03XP32/ RAD-MKSOFT IBM Tivoli Provisioning Manager for OS Deployment Web extension v.5.1 .0.1 (101.02) RAD-MKSOFT Licensed Materials - Property of IBM. L-DDAC-6RLW3E RAD-MKSOFT (C) Copyright IBM Corporation 1998, 5 2007. RAD-MKSOFT All Rights Reserved. IBM, the IBM logo, and Tivoli are trademarks RAD-MKSOFT of IBM Corporation in the United States, other countries or both. RAD-MKSOFT Connect 192.168.56.131 -> 192.168.56.131 RAD-MKSOFT Starting Rembo Agent RAD-MKSOFT [00:22:55] <NOT> Parsing driver in local://root/C$/IBMTOOLS/DRIVERS/Q 38Z01US/PRO1000/WS03XP32/e1000325.inf RAD-MKSOFT [Progress] 4% done (Waiting for the server to build * ) RAD-MKSOFT [Progress] 82% done (Uploading shared files * Progress: 0B/0B Speed: 0B/s ) RAD-MKSOFT 28 automatic binding rules will be created[Progress] 99% done (Softwa re package creation completed) RAD-MKSOFT { type: "pkg", RAD-MKSOFT content: "win-drv", RAD-MKSOFT class: "Net", RAD-MKSOFT vendor: "Intel", RAD-MKSOFT version: "08/14/2003,7.2.17.0", RAD-MKSOFT provider: "Intel", RAD-MKSOFT catalog: "e1000325.cat", RAD-MKSOFT devices: nil, Chapter 7. Common deployment features 343
- 360. RAD-MKSOFT __devices: "inf_DeviceType", RAD-MKSOFT devnames: { "Intel(R) PRO/1000 Gigabit Server Adapter", RAD-MKSOFT "Netfinity Gigabit Ethernet SX Adapter", RAD-MKSOFT "Intel(R) PRO/1000 F Server Adapter", RAD-MKSOFT "Gigabit Ethernet SX Server Adapter", RAD-MKSOFT "Gigabit Ethernet Server Adapter", RAD-MKSOFT "Intel(R) PRO/1000 T Server Adapter", RAD-MKSOFT "Intel(R) PRO/1000 XT Server Adapter", RAD-MKSOFT "Intel(R) PRO/1000 XT Desktop Adapter", RAD-MKSOFT "iSeries 1000/100/10 Ethernet Adapter", RAD-MKSOFT "Intel(R) PRO/1000 XT Network Connection", RAD-MKSOFT "Intel(R) PRO/1000 XF Server Adapter", RAD-MKSOFT "iSeries Gigabit Ethernet Adapter", RAD-MKSOFT "Intel(R) PRO/1000 XF Network Connection", RAD-MKSOFT "Intel(R) 82544GC Based Network Connection", RAD-MKSOFT "Intel(R) PRO/1000 T Desktop Adapter", RAD-MKSOFT "Intel(R) PRO/1000 T Network Connection", RAD-MKSOFT "Intel(R) PRO/1000 MT Desktop Adapter", RAD-MKSOFT "Intel(R) PRO/1000 MT Network Connection", RAD-MKSOFT "Intel(R) PRO/1000 MT Mobile Connection", RAD-MKSOFT "Intel(R) PRO/1000 MT Desktop Connection", RAD-MKSOFT "Intel(R) PRO/1000 MT Server Adapter", RAD-MKSOFT "Intel(R) PRO/1000 MF Server Adapter", RAD-MKSOFT "Intel(R) PRO/1000 MF Server Adapter (LX)", RAD-MKSOFT "Intel(R) PRO/1000 MT Dual Port Server Adapter", RAD-MKSOFT "Intel(R) PRO/1000 MT Dual Port Network Connection", RAD-MKSOFT "Intel(R) PRO/1000 MF Dual Port Server Adapter", RAD-MKSOFT "Intel(R) PRO/1000 MF Dual Port Network Connection", RAD-MKSOFT "Intel(R) PRO/1000 MT Network Adapter", RAD-MKSOFT "Intel(R) PRO/1000 CT Desktop Connection", RAD-MKSOFT "Intel(R) PRO/1000 CT Network Connection", RAD-MKSOFT "Intel(R) PRO/1000 MT Server Connection", RAD-MKSOFT "Intel(R) PRO/1000 MF Server Adapter(LX)", RAD-MKSOFT "Intel(R) PRO/1000 MB Server Connection", RAD-MKSOFT "Intel(R) PRO/1000 MB Dual Port Server Connection" }, RAD-MKSOFT infnames: { "e1000325" }, RAD-MKSOFT totaldevs: 28, RAD-MKSOFT descr: "Intel Net driver (4)", RAD-MKSOFT pass: 0, RAD-MKSOFT seqid: 3, RAD-MKSOFT flags: 0, RAD-MKSOFT dest: "driversNet-0B6265", RAD-MKSOFT comment: "28 devices, incl. Intel(R) PRO/1000 Gigabit Server Adapte r", 344 Deployment Guide Series: Tivoli Provisioning Manager for OS Deployment V5.1
- 361. RAD-MKSOFT cmdline: "", RAD-MKSOFT seqdescr: "When the OS is installed", RAD-MKSOFT pkgname: "wsxp1.pkg", RAD-MKSOFT srvpath: "net://global/updates/wsxp1.pkg" } RAD-MKSOFT [00:23:02] <NOT> A win-drv software named 'Intel Net driver (4)' has been created RAD-MKSOFT Stopping Rembo Agent Look at Figure 7-46 to see, in the Tivoli Provisioning Manager for OS Deployment user interface, all the new device driver software packages that we built. Figure 7-46 Automatically created device driver software packages This is useful technique to speed up the building of a prototype environment, but remember to review your host bindings as described earlier. 7.5 Understanding the host boot settings So the deployment of the OS profile completes according to your design, but the new target does not boot from the OS on disk. This is because we need to understand better the boot settings associated with the target host. Important: In order to boot the newly deployed OS, change the boot sequence as described next. In the default environment where the boot order is Network, CDROM, Disk, after the OS installation has completed, the target PC will return to the PXE Client menu, as shown in Figure 7-47 on page 346. Chapter 7. Common deployment features 345
- 362. Figure 7-47 Default behavior returning client to PXE client deployment menu This is not what we want, so to change this we must modify the configuration of the Host entry in Tivoli Provisioning Manager for OS Deployment. Edit the host configuration details under the Host tab as in Figure 7-49 on page 348. At the bottom of the screen, notice the Boot configuration details in Figure 7-50 on page 349. Under the PXE Boot Options, you have the following three choices: Use Alternate PXE server Boot on hard disk Boot on hard disk if idle By default, none of these options are selected. Let us understand then, the practical implications of using these options. Use an alternate PXE Server This provides us with a local alternative to the modifications of DHCP Server Options where we can provide the IP address of the PXE server that will be used for network boot requests. The practical use of this is that we can implement a temporary change to the network behavior, so that for a short period, the network 346 Deployment Guide Series: Tivoli Provisioning Manager for OS Deployment V5.1
- 363. boot request is implicitly routed to a test PXE Server. After testing is complete, then service from the production server resumes. It is implicit, as this Tivoli Provisioning Manager for OS Deployment option ignores the boot request for the identified server. The alternative to this requires that the DHCP options are changed. The change control around this activity may be difficult and time consuming. In summary, this option tells the host to ignore the Tivoli Provisioning Manager for OS Deployment server that holds this host definition. In this way, if the PC doing the network boot finds this server, it is ignored and looks for another. Boot on hard disk When set, this option stops the PC loading the PXE Client over the network and boots straight from the hard disk. The PXE Client is about 15 MB in size, and if there are no pending deployments, or a local user has no need to redeploy their machine, then the loading and booting of the PXE Clients just wastes time and bandwidth. Boot on hard disk if idle Selecting this option, makes the PC load and boot the PXE Client from the PXE Server in all cases. If there is a pending deployment, then after the PXE Client is loaded, the profile deployment is activated. This is desired behavior when you are actively deploying profiles. It is also desired behavior if you want users to always have the option to rebuild their machines at boot time. Another use for this option is where you have the target PC in a public area, such as a school or a library, where you want to return it to a known state at every reboot. Here you provide a default profile in a customized menu structure with a select time-out. As the time-out expires, the machine is reimaged from the already installed redeployment profile. Tip: During active deployment activity, select Boot on hard disk if idle. During times of no deployment activity, select Boot on hard disk. Remember that you can set these options at the individual host or the host group level. If you look at Figure 7-48 on page 348, you can see that we are setting the values at the group level for unknown hosts. This means, that the values defined in this panel are applied to all new hosts that are added to Tivoli Provisioning Manager for OS Deployment. Chapter 7. Common deployment features 347
- 364. Figure 7-48 Define default boot options for all unknown hosts 1. To change the settings for individual hosts, start with the host configuration details, as shown in Figure 7-50 on page 349. Figure 7-49 Edit the host configuration details 348 Deployment Guide Series: Tivoli Provisioning Manager for OS Deployment V5.1
- 365. 2. Scroll to the Boot Settings on the host details, as shown in Figure 7-50. Figure 7-50 Host entry boot settings 3. Select the options appropriate to your needs, as we discussed earlier. In the environment, where we are still actively distributing profiles to this target, select Boot from hard disk if idle. It may help with your understanding if we look at a flow chart of the boot process during a deployment using Tivoli Provisioning Manager for OS Deployment. The start of this process is shown in Figure 7-51 on page 350. Chapter 7. Common deployment features 349
- 366. Figure 7-51 PC Boot process - phase 1 After the PXE Client is started, we move on in the process to Figure 7-52 on page 351. Note that we update the DISK MBR (Master Boot Record) to point to a small and temporary disk partition that contains the Tivoli Provisioning Manager for OS Deployment PXE Client. This is required as a reboot is required for the disk partitioning to take effect, and the Tivoli Provisioning Manager for OS Deployment client needs to regain control as the machine restarts. The restart boots from disk, and the disk MBR points to the Tivoli Provisioning Manager for OS Deployment client, which is loaded into memory and the OS installation process then continues. 350 Deployment Guide Series: Tivoli Provisioning Manager for OS Deployment V5.1
- 367. Figure 7-52 PC Boot process - phase 2 At the end of the phase 2, which is shown in Figure 7-52, the Tivoli Provisioning Manager for OS Deployment client tries to start the network to re-establish connection with the Tivoli Provisioning Manager for OS Deployment server. Not all network cards support this process, and if it fails we need to recover. This process continues in Figure 7-53 on page 352. Chapter 7. Common deployment features 351
- 368. Figure 7-53 PC Boot process - phase 3 If the NIC does not support this network start request, then we use the ‘fallback MBR’ option if set in the host definition. This allows the boot operation to continue with the next device in the sequence, which will be the network. If this were not to happen, the automated boot process stops at this point and manual intervention is required. If the network starts Ok, then the connection with the Tivoli Provisioning Manager for OS Deployment server is re-established and the OS installation continues. The MBR is updated to point to the OS partition, and the Tivoli Provisioning Manager for OS Deployment partition is removed. 352 Deployment Guide Series: Tivoli Provisioning Manager for OS Deployment V5.1
- 369. 7.6 User administration Tivoli Provisioning Manager for OS Deployment allows multiple users to access the administrative console. User access can be controlled based on their role in the organization. This chapter describes how to set up access controls and administer Tivoli Provisioning Manager for OS Deployment users. 7.6.1 Creating the authentication domain By default, after installation only the super-user is allowed to login to the Tivoli Provisioning Manager for OS Deployment administrative console. If you want to allow other users to log onto the Web console you have to enable security, which is done by creating a special authentication domain called HTTP. Authentication domains are controlled from the Server parameters → Predefined channels part of the Tivoli Provisioning Manager for OS Deployment administrative console. To create an authentication domain called HTTP, click the New auth. domain button as shown in Figure 7-54. Figure 7-54 New authentication domain button The authentication domain can verify its users against several user repositories. The user repository is determined by the authentication domain type. There are three domain types defined in Tivoli Provisioning Manager for OS Deployment: Chapter 7. Common deployment features 353
- 370. Local - Server’s local user database is used for authentication. You can optionally specify a user group to additionally narrow the number of users available to log onto the Web administration console. If you specify user groups only, users that are members of that group will be allowed to log on to the Tivoli Provisioning Manager for OS Deployment administrative console. If you do not specify a user group then all users defined on the local machine can log onto the administrative console. Remote NT - A Windows domain account is required to log onto the administrative console. Specify a host name of the Windows domain controller server. As with local users, you can optionally specify a user group to additionally narrow the number of users available to log onto the Web administration console. If you specify user groups only, users that are members of that group are allowed to log onto the Tivoli Provisioning Manager for OS Deployment administrative console. If you do not specify a user group then all users defined in the domain can log onto the administrative console. RADIUS - The user database of RADIUS server is used for authentication. Specify the RADIUS server address and password to use this type of authentication. Figure 7-55 shows an example of how to create the authentication domain HTTP whose users are authenticated against the Windows domain. Figure 7-55 Authentication domain HTTP 354 Deployment Guide Series: Tivoli Provisioning Manager for OS Deployment V5.1
- 371. The domain server name in this example is adsrv.test.itso.com, and users must be members of the TPMOSD Administrators domain group. Tip: Tivoli Provisioning Manager for OS Deployment uses a special authentication domain named ‘HTTP’ to authenticate users allowed to access the Web administrative console. The HTTP authentication domain only defined who has permissions to log onto the Web console and where credentials will be verified. However we have not yet defined what these users are allowed to do after they log onto the console. We explain this in the next section, 7.6.2, “Setting user permissions” on page 355. 7.6.2 Setting user permissions After you define the authentication domain, assign users to different roles in Tivoli Provisioning Manager for OS Deployment. There are two built-in roles defined: ADMINISTRATORS and OPERATORS. These are just predefined roles—you can define as many roles as you need. To explain how user permissions are configured we use the following example. A company has four locations where Tivoli Provisioning Manager for OS Deployment is used: London, Paris, Sydney, and Zagreb. Each of these locations has an administrative group that is populated with clients at respective locations. The locations also have operators in charge of deployment for machines on that site. We want to assign user rights so that local operators have access only to their local machines. Also we want to limit them so they do not see other machines and have no access to server configuration. Set user permissions from Server parameters → HTTP Console Security. Opening that page returns base parameters like super-user login name and HTTP authentication domain parameters. It also lists currently defined security roles. We define four security roles: Australia, Croatia, France, and the United Kingdom. Define a new role by clicking on the New security role button located on the Server parameters → HTTP Console Security page. Figure 7-56 on page 356 shows how you can easily customize security roles. Deselect boxes for console pages and administrative groups that you do not want this role to have access to. You can see that the Australian administrator has access only to hosts in Sydney and all console pages except those in the Server Parameters part of the administrative console. Chapter 7. Common deployment features 355
- 372. Figure 7-56 Create a security role From the Security screen shown in Figure 7-56, you can add and remove users that belong to this role by using the buttons at the bottom right of the page. When a role is initially created it has a special entry defined that allows any user to use the role. 1. To define users for this role, click the Remove everyone from this role button on the lower-right part of the page. 2. After you remove the entry “Everyone” from the role, add users by clicking the Add a new member in this role... button. When adding users, specify the user name or group name that you want to make a member of this role. You can additionally limit access to the Web administrative console by using security policies. 3. Click the Set security policies button (found at middle-right part of the page) to open the security policies window, as shown in Figure 7-57 on page 357. Use this window to configure additional limitations for the selected role. For our example we disabled access to server configuration. The limitations we 356 Deployment Guide Series: Tivoli Provisioning Manager for OS Deployment V5.1
- 373. have set here for this role will remove the entire “Server properties” tab from the administrative console for the administrators in Australia. Figure 7-57 Security policies This was a simple example about how you can limit access to the Web administrative console pages as well as to other resources. Figure 7-58 shows what the administrative console looks like for an Australian administrator. Notice that on the left there is no Server properties tab and that this administrator can see only hosts in Sydney. Figure 7-58 Administrative console after security is applied As you can see it is easy to set access permissions and roles in many different ways to seamlessly integrate with your security policy and existing authentication mechanisms (Windows domain or RADIUS). Chapter 7. Common deployment features 357
- 374. 358 Deployment Guide Series: Tivoli Provisioning Manager for OS Deployment V5.1
- 375. 8 Chapter 8. Integration and collaboration with other Change Management products In this chapter we discuss how the Tivoli Provisioning Manager for OS Deployment product can be integrated or used in collaboration with other change management products. We discuss Tivoli Configuration Manager integration in detail with three different scenarios. Tivoli Provisioning Manager V5.1 integration is covered extensively in “Chapter 9, Image management” of the Deployment Guide Series: IBM Tivoli Provisioning Manager Version 5.1, SG24-7261 IBM Redbooks publication, so we will not cover this integration in detail here. Tivoli Provisioning Manager V5.1 Fixpack 2 (currently scheduled for the end of March 2007) introduces many enhancements in this area, so we strongly suggest that you install this Fixpack when available. Other products we discuss in regards to integration are Tivoli Provisioning Manager Express V4.1 for Software Distribution and IBM Director. Finally we have a short section on how to use Tivoli Provisioning Manager for OS © Copyright IBM Corp. 2007. All rights reserved. 359
- 376. Deployment in collaboration with other systems management products, such as Microsoft Systems Management Server (SMS) This chapter is broken down into the following sections: “Tivoli Configuration Manager V 4.2.3” on page 361 “Tivoli Provisioning Manager V5.1” on page 399 “Tivoli Provisioning Manager Express V4.1 for Software Distribution” on page 400 “IBM Director” on page 400 “Collaboration with other products” on page 402 360 Deployment Guide Series: Tivoli Provisioning Manager for OS Deployment V5.1
- 377. 8.1 Tivoli Configuration Manager V 4.2.3 The integration between Tivoli Configuration Manager and Tivoli Provisioning Manager for OS Deployment (we refer to as the Operating System Imaging Solution) was implemented to enhance the image management functionality of Tivoli Configuration Manager. This integration provides Tivoli Configuration Manager with remote deployment capability using an embedded Tivoli Provisioning Manager for the OS Deployment engine. Note: Note that the Tivoli Configuration Manager’s Pristine Manager component also provides remote deployment capabilities, leveraging on the Microsoft Automated Deployment Services (ADS) or Microsoft Remote Installation Services (RIS). One of the main advantages that the Operating System Imaging Solution introduces is the deployment engine implemented by some IBM software (Tivoli Provisioning Manager for OS Deployment) instead of a third-party tool. Also this solution provides an enhanced functionality, compared to the Pristine Manager component. Currently the Operating System Imaging Solution provides several scenarios. We present the following: Performing a scratch installation of a new workstation with a new Tivoli Configuration Manager Endpoint Saving or restoring user settings using a customizable external tool (USMT is default) Restoring an operating system image with the captured Tivoli Configuration Manager Endpoint settings The Tivoli Provisioning Manager for OS Deployment features are available starting from Tivoli Configuration Manager V4.2.3 Fixpack 2, which is shipped with the integration plug-in (called the Rembo plug-in). It is also possible to use the old Rembo Auto Deploy product instead of the Tivoli Provisioning Manager for OS Deployment, but we strongly suggest you use Tivoli Provisioning Manager for OS Deployment in order to avoid some known issues. For detailed information, refer to the official guide shipped with the Tivoli Configuration Manager V4.2.3 Fixpack 2 documentation bundle: IBM Tivoli Configuration Manager User's Guide for Operating System Imaging Solution, SC32-2578. The Operating System Imaging Solution can support complex distributed environments where several Tivoli Provisioning Manager for OS Deployment Chapter 8. Integration and collaboration with other Change Management products 361
- 378. servers are synchronized and managed by the Tivoli Configuration Manager. A typical scenario involves several components and roles: Interconnected Tivoli Configuration Manager Tivoli Management Regions (TMR). Tivoli Provisioning Manager for OS Deployment servers installed on the Tivoli Configuration Manager TMRs with APM (Activity Planner) plug-in registered. Tivoli Provisioning Manager for OS Deployment servers synchronization managed by Tivoli Configuration Manager. Image deployments on targets performed only by specific Tivoli Provisioning Manager for OS Deployment servers called “slaves”. In IBM Tivoli Tivoli(R) Configuration Manager User's Guide for Operating System Imaging Solution, SC32-2578 an example based on the above environment is taken as reference and documented. In this chapter we step through a simpler scenario, with one TMR server. We provide a step-by-step guide to get the integration working in a real life Tivoli Configuration Manager configuration. 8.1.1 Installing the Operating System Imaging Solution Our configuration consists of a Tivoli Provisioning Manager for OS Deployment server that will be installed on a Tivoli Configuration Manager TMR in order to centralize all the deployment operations. We want all the Operating System Imaging Solution components to be installed on a single machine and use two targets configured as follows: A bare metal machine A Windows XP machine with a Tivoli Configuration Manager Endpoint Figure 8-1 on page 363 shows the environment we use: An Operating System Imaging Solution server Two target machines 362 Deployment Guide Series: Tivoli Provisioning Manager for OS Deployment V5.1
- 379. Figure 8-1 Our environment On the server machine, the main components involved in the integration scenarios are as follows: Activity Planner component of Tivoli Configuration Manager, which will manage the Tivoli Provisioning Manager for OS Deployment’s deployment scenarios. Tivoli Provisioning Manager for OS Deployment server, which will implement the deployment operations The interaction between Activity Planner and Tivoli Provisioning Manager for OS Deployment occurs through the following components: The Rembo plug-in that provides Activity Planner with the capabilities to interact with Tivoli Provisioning Manager for OS Deployment. The sync.pak and radtcm.pak files that provide the integration functionalities to the Tivoli Provisioning Manager for OS Deployment server. Before starting the installation process review the following prerequisites. Check the Tivoli Provisioning Manager for OS Deployment and Tivoli Configuration Manager prerequisites. We strongly suggest that you refer to IBM Tivoli Tivoli(R) Configuration Manager User's Guide for Operating System Imaging Solution, SC32-2578 and IBM Tivoli Configuration Manager Release Notes Version 4.2.3, GI11-0926 respectively. Make sure that all the items on the following checklist are available: – Tivoli Configuration Manager V4.2.3 Fixpack 2 environment Chapter 8. Integration and collaboration with other Change Management products 363
- 380. – Rembo plug-in to be installed – Tivoli Provisioning Manager for OS Deployment installer – MS SQL or IBM DB2 Universal Database to be used as deployment database – radtcm.pak and sync.pak files – a RAD file with schemes and software packages that must be imported in the Tivoli Provisioning Manager for OS Deployment server We also highlight that this solution was designed to work only for deploying the following Windows operating systems: Windows 2000 Windows 2003 Windows XP Professional Important: Please check the correct build you are using, since a lot of changes were made. This integration is going to be available as an OPAL package. Refer to IBM Tivoli OS Deployment Plug-in for Tivoli Configuration Manager integration at the following OPAL Web site: http://www-306.ibm.com/software/tivoli/features/opal/ Our Windows 2003 server has the following components: Tivoli Configuration Manager 423 Fixpack 2 where no Rembo plug-in is installed Tivoli Provisioning Manager for OS Deployment V5.1 sync.pak and radtcm.pak dated 2007-02-06 The RAD file (named tivoli_packages_and_schemes.RAD) containing the needed software packages and schema for this integration DB2 V8.2.4 with ODBC driver for the deployment database Tip: Tivoli Configuration Manager V4.2.3 Fixpack 4, will provide some enhancements in the Operating System Imaging Solution area. The Fixpack was not available at the time of writing this publication. We suggest that you install this Fixpack, when it becomes available. The first step of the installation is related to the deployment database. We already installed and used the IBM DB2 RDBMS for the Tivoli Configuration Manager V4.2.3 environment, so we will simply do the following: Create a deployment database in the existing IBM DB2 installation 364 Deployment Guide Series: Tivoli Provisioning Manager for OS Deployment V5.1
- 381. Publish it with the ODBC driver 1. Open the DB2CLI prompt, and create the deployment database with the command in Example 8-1: Example 8-1 db2 create database db2 create database TCMrembo 2. Publish this database with the IBM DB2 ODBC driver provided with the IBM DB2 installation. Pay attention and name the ODBC database AutoDeploy; otherwise, it will not be discovered during the Tivoli Provisioning Manager for OS Deployment installation, and the system will use the embedded MS Access one, which is incorrect for this environment. See Figure 8-2. Figure 8-2 Publishing the database Tip: You can avoid the publishing of the database with ODBC, and use a direct connection to the database following the instructions at the following Web site: http://www-1.ibm.com/support/docview.wss?uid=swg21247013 3. Before running the installer, we put the following two pak files in the c:Program FilesCommon FilesIBM Tivolipackages folder: – sync.pak – radtcm.pak This is needed to provide Tivoli Provisioning Manager for OS Deployment server with the capability to interact with the Tivoli Configuration Manager environment. Chapter 8. Integration and collaboration with other Change Management products 365
- 382. Note: For Linux installation, the default path is /usr/local/tpmfos-5.1/packages. Add the two pak files before running the installer to be sure that they are taken correctly. Otherwise when Activity Planner tries to run Tivoli Provisioning Manager for OS Deployment commands, you will receive some “unsupported command” errors. 4. Install the Tivoli Provisioning Manager for OS Deployment 5.1 with the default steps. See “Server installation on Windows systems” on page 76 if you need information about this step. On Windows systems, the Tivoli Provisioning Manager for OS Deployment server runs under a service called remboserver. Since this service needs to invoke some Tivoli Configuration Manager commands (for example, wapmrpt to inform Activity Planner when the operations finish), change the user that starts it to a user that has sufficient credentials in the Tivoli environment. By default on Windows 2003s, each service is run by the “Local Service Account”, but this user has no privileges in our Tivoli Configuration Manager environment; therefore, when it tries to run the wapmrpt command, we get an error. So we provide the Tivoli Provisioning Manager for OS Deployment service with the Administrator credentials, as shown in Figure 8-3. Figure 8-3 Administrator credentials 366 Deployment Guide Series: Tivoli Provisioning Manager for OS Deployment V5.1
- 383. In this way the Tivoli Provisioning Manager for OS Deployment server can invoke the Tivoli Configuration Manager executables with the required privileges. A similar customization can be performed on Linux machines in order to run the Tivoli Provisioning Manager for OS Deployment binaries with a valid Tivoli account. 5. To install the Rembo plug-in, you required a Microsoft tool called User State Migration Tool (USMT). This tool creates a software distribution package that is downloaded onto the endpoint and lets Tivoli Configuration Manager save or restore the user settings. This is necessary to accomplish the following Operating System Imaging Solution scenarios: – Backup user setting – Restore user setting We downloaded and installed the required USMT 2.6 packages from the following Web site: http://www.microsoft.com/downloads/details.aspx?FamilyID=4AF2D2C9-F1 6C-4C52-A203-8DAF944DD555&displaylang=en 6. Double-click the USMT.MSI installer, and select to install it on the default path—c:USMT. 7. Now you can install the Rembo plug-in using the Tivoli Desktop. Select Desktop → Install → Install Product, and choose the REMBO.IND file. See Figure 8-4. Figure 8-4 Installing the Rembo plug-in 8. Install the REMBO.IND file on the Managed Node that is also our TMR server. See Figure 8-5 on page 368. Chapter 8. Integration and collaboration with other Change Management products 367
- 384. Figure 8-5 Installing on Managed Node The required installation options for the Rembo plug-in are as follows: – Rembo Server: the name of the Tivoli Configuration Manager TMR server, where the Tivoli Provisioning Manager for OS Deployment component will be installed. – Installation Type: specifies which Operating System Imaging Solution operations will be available on each Managed Node, where the Rembo plug-in is installed. – USMT Path: the path where the USMT tool is installed. a. For Rembo Server, type the name of the Tivoli Configuration Manager TMR, since we are planning to install the Tivoli Provisioning Manager for OS Deployment on the same machine. b. Choose the Complete operation, since we will have only one node to perform the integration operations. c. Enter the path where USMT was installed. See Figure 8-6 on page 369. 368 Deployment Guide Series: Tivoli Provisioning Manager for OS Deployment V5.1
- 385. Figure 8-6 Install options 9. To be sure that the integration was installed and the Rembo plug-in was registered in the Activity Planner component, run the following commands to register the plug-in, and restart the Activity Planner component: Example 8-2 Registering the plug-in ./reg_rembo_plugin.sh wstopapm wstartapm From Tivoli Configuration Manager point of view, the Rembo plug-in creates the following: – An ITMC-REMBO-remboserver-region that contains: • An ITMC-REMBO-remboserver-region task library These tasks are used to run the Operating System Imaging Solution commands on target machines. • An ITMC-REMBO-remboserver-region profile manager It contains two software packages: ITMC-REMBO-AG-remboserver-region.1 and ITMC-REMBO-BR-remboserver-region.1, used respectively to install the Web Interface Extension and to backup and restore user settings. The ITMC-REMBO-BR-remboserver-region.1 software package is the one you can customize if you want to change the behavior of the USMT product or if you want to use your own tool. This software package is installed on the target machine in order to implement the backup and restore user settings scenario. 10.Check all the parameters in the rembo.ini file. In this file you will also see the name of the software distribution package that is used to backup and restore Chapter 8. Integration and collaboration with other Change Management products 369
- 386. the user settings. If you want to use another package, you may change this parameter. 11.To check if the plug-in was installed we run the Activity Plan Editor and see the Rembo plug-in icon displayed as shown in the following figure. Figure 8-7 Rembo plug-in 12.Another required installation step is the customization of the config.csv file that contains the configuration parameters for each Tivoli Provisioning Manager for OS Deployment server environment. This file is a comma-separated file, where each line refers to a specific server of the environment. It is created once and copied on all the involved Tivoli Provisioning Manager for OS Deployment servers. Each Tivoli Provisioning Manager for OS Deployment server reads its own line and provided parameters. This config.csv file needs to be placed in the folder <DATADIR>/global/rad of the server, and a restart of the product is needed. For more information about the syntax and parameters, please refer to the following Web site: http://www-1.ibm.com/support/docview.wss?uid=swg21247013. The main parameters used for the Operating System Imaging Solution are as follows: The database connection parameters The path to some Activity Planner executables Tivoli Provisioning Manager for OS Deployment synchronization information Tivoli Configuration Manager and Tivoli Provisioning Manager for OS Deployment notifications In our scenario we write a single, line since we use one Tivoli Provisioning Manager for OS Deployment server. Pay attention to two important parameters: BinDir: the path where the wapmrpt command is located to let Tivoli Provisioning Manager for OS Deployment run Tivoli Configuration Manager commands. Reporting: sets the reporting options. We insert “ud” to always inform Activity Planner whenever a Tivoli Provisioning Manager for OS Deployment 370 Deployment Guide Series: Tivoli Provisioning Manager for OS Deployment V5.1
- 387. operation finishes; otherwise, you might see pending plans in the Activity Plan Monitoring window. Example 8-3 shows our config.csv file: Example 8-3 config.csv file "HostName";"Interfaces";"DbName";"DbUser";"DbPass";"MasterIP";"MasterDb Name";"MasterDbUser";"MasterDbPass";"BinDir";"Description";"Reporting"; "AutoSync";"PollInterval" "fra-tcm423";"192.168.87.143";"AUTODEPLOY";;;"SELF";AUTODEPLOY;;;"C:/Pr ogram Files/Tivoli/bin/w32-ix86/bin/";;"ud";;1 13.Restart the Tivoli Provisioning Manager for OS Deployment server to make sure that the settings are effective. 14.Do not forget to import the packages and schemes used in the Tivoli Configuration Manager integration onto the Tivoli Provisioning Manager for OS Deployment servers. The information related to this step is missing in IBM Tivoli Tivoli(R) Configuration Manager User's Guide for Operating System Imaging Solution, SC32-2578, but will be included in the Tivoli Configuration Manager V4.2.3 Fixpack 4 official guide. The file is usually named tivoli_packages_and_schemes.RAD and contains what each Tivoli Provisioning Manager for OS Deployment server needs to interact with Tivoli Configuration Manager tasks: – Deployment schemes • Tivoli bare metal machine • Tivoli reinstall machine – Software packages • Tivoli Endpoint • Tivoli Endpoint for bare metal machines • Tivoli eprestoration • Tivoli response file for bare metal machines • Tivoli wrapper to restore Endpoint Since these schemes and software packages are used during Operating System Imaging Solution operations, you need to import them onto your Tivoli Provisioning Manager for OS Deployment servers before any other scenario. You can do this in one of the two following ways: – From the Tivoli Provisioning Manager for OS Deployment Web Console as if it were a Tivoli Provisioning Manager for OS Deployment standalone server. Chapter 8. Integration and collaboration with other Change Management products 371
- 388. – As an Activity Planner task with the “Import RAD“ scenario. 15.We copy the tivoli_packages_and_schemes RAD file onto the Tivoli Provisioning Manager for OS Deployment server at the path <DATADIR>import, and import it from the Web console. See Figure 8-8. Figure 8-8 RAD Import Wizard Now the Operating System Imaging Solution installation is completed. The Tivoli Configuration Manager environment was configured to the following: Run commands for Tivoli Provisioning Manager for OS Deployment server with the Activity Planner component. Distribute software distribution packages when software distribution operations are needed in the deployment scenarios (for example the ITMC-REMBO-BR-remboserver-region.1 package used in the saving/restoring user setting tasks). The Tivoli Provisioning Manager for OS Deployment was properly set up to do the following: Receive deployment commands from Tivoli Configuration Manager environment. Communicate the state of the deployment operations to Tivoli Configuration Manager environment. We implement the following three scenarios and provide step-by-step instructions that you can use to complete deployment tasks: 1. Importing a profile onto the Tivoli Configuration Manager server. We use the following Activity Planner operation: 372 Deployment Guide Series: Tivoli Provisioning Manager for OS Deployment V5.1
- 389. – Import RAD. 2. Scratch installation of new workstation and new Endpoint. We will use the following Activity Planner operation: – Install new workstation. 3. Installing a new workstation saving user settings. We will use the following Activity Planner operation: – Backup user settings. – Install new workstation. – Restore user settings. 8.1.2 Importing a profile Importing profiles in the Operating System Imaging Solution environment requires a .RAD file containing one or more deployment images. It does not matter how you create them. What is required is that the profiles should be compatible with the target machines. The recommended way is to have a test Tivoli Provisioning Manager for OS Deployment server used to create the profiles that will be imported on the production Tivoli Configuration Manager hub server. The “Import RAD” operation is supported only on the hub TMR server since the synchronization between other Tivoli Provisioning Manager for OS Deployment servers is managed by specific Activity Planner scenarios. Since we only have one deployment server, we will not perform any hierarchical distribution of the profiles through slave servers. We simply import the RAD file containing the profiles on the only server we use and are ready to start deployment operations. To import a RAD file, you only need to copy it into the <DATADIR>/import folder of the Tivoli Provisioning Manager for OS Deployment server, so that it can be viewed and imported automatically using the Activity Planner. 1. To begin the importing procedure, start the Activity Plan Editor, and click the Rembo plug-in icon. 2. Insert the parameters, as shown in Figure 8-9 on page 374. Chapter 8. Integration and collaboration with other Change Management products 373
- 390. Figure 8-9 Insert parameters 3. Notice that we chose the “Import RAD” scenario from the list. The required property for this scenario is only the name of the RAD file, since the system will search for it on the <DATADIR>import folder of the server. To set it, click the Properties button. See Figure 8-10 on page 375. 374 Deployment Guide Series: Tivoli Provisioning Manager for OS Deployment V5.1
- 391. Figure 8-10 Setting the properties 4. As for all the Activity Planner plans, select the targets of this activity: We chose the only machine we used where both the Tivoli Configuration Manager server and Tivoli Provisioning Manager for OS Deployment server are installed. See Figure 8-11 and Figure 8-12 on page 376. Figure 8-11 Select the targets of the activity Chapter 8. Integration and collaboration with other Change Management products 375
- 392. Figure 8-12 Select the targets of the activity 5. Save it as a template. 6. Close the editor, and open the Activity Plan Monitor in order to run the created plan as shown in Figure 8-13. Figure 8-13 Run the plan After several minutes, the task successfully ends, since the Tivoli Provisioning Manager for OS Deployment server completed the import RAD operation correctly and informed the Activity Planner Monitor using the wapmrpt executable. See Figure 8-14 on page 377. Note: If the deployment task is finished, but the Activity Planner Monitor is not informed of this, probably Tivoli Provisioning Manager for OS Deployment server cannot run the wapmrpt executable correctly and update the status of the plan on the monitor. As troubleshooting, we suggest you check weather the user of the remboserver service has enough Tivoli privileges and that the path of wapmrpt command is correctly set in the config.csv file. 376 Deployment Guide Series: Tivoli Provisioning Manager for OS Deployment V5.1
- 393. Figure 8-14 Task ends successfully 7. When we open the Tivoli Provisioning Manager for OS Deployment console, we should see that a new profile was imported successfully. See Figure 8-15. Figure 8-15 The new profile was imported successfully 8.1.3 Scratch installation of a new workstation In the following scenario, we use the previously imported profile to deploy it on a bare metal machine. After the deployment step, a new Tivoli Endpoint is automatically installed on the newly installed operating system using the software packages imported by the tivoli_packages_and_schemes.RAD file. We start from a clean situation where no hosts are recognized by the Tivoli Provisioning Manager for OS Deployment server and no target machines attempted a PXE-boot. 1. To start this scenario, we boot the target client from the network so that Tivoli Provisioning Manager for OS Deployment can recognize it and insert the definition in its host list, as in Figure 8-16 on page 378. Chapter 8. Integration and collaboration with other Change Management products 377
- 394. Figure 8-16 Booting the target client As you can see in Figure 8-17, the target machine is recognized with the assigned IP address. Figure 8-17 The target machine is recognized 2. As for the “Import RAD” procedure, create a specific Activity Planner plan. Select the Install new workstation operation from the drop-down list. 3. In order to use bare metal machines as targets of this plan, a preliminary step is required. Select Tools → New workstation Manager inside the Activity Plan Editor. This tool queries the Tivoli Provisioning Manager for OS Deployment engine and detects machines that previously made a PXE-boot and can be managed in the Operating System Imaging Solution scenarios. 378 Deployment Guide Series: Tivoli Provisioning Manager for OS Deployment V5.1
- 395. Otherwise, we cannot see any bare metal machines as the target for any plan. See Figure 8-18. Figure 8-18 New workstation Manager window With the New workstation Manager tool, we can see the previously discovered machine. This window simply queries the deployment database, asking for available hosts in the list. Figure 8-19 shows our bare metal machine that made a PXE-boot. Figure 8-19 Bare metal machine After it is loaded, the New Workstation Manager window lets you insert some required information, such as the following: – The host name that will be assigned to the bare metal machine – The Endpoint label (since after the deployment this machine, Tivoli Endpoint, will be installed on this machine) – The profile that will be deployed 4. Set these values and choose the Windows 2003 profile imported with the RAD file. See Figure 8-20 on page 380. Chapter 8. Integration and collaboration with other Change Management products 379
- 396. Figure 8-20 New workstation Manager tool 5. After we save these changes, the New workstation Manager tool performs an update of the modified host information in the Tivoli Provisioning Manager for OS Deployment database. Next a refresh of the Tivoli Provisioning Manager for OS Deployment Web Console page shows the new host details. See Figure 8-21. Figure 8-21 New host details Now we can create a deployment scenario by clicking the Rembo plug-in icon and selecting the Install new workstation task from the list, as shown in Figure 8-22 on page 381. 380 Deployment Guide Series: Tivoli Provisioning Manager for OS Deployment V5.1
- 397. Figure 8-22 Install new workstation task 6. As properties for this plan, insert the Tivoli Endpoint login parameters used during the Tivoli Endpoint installation on the fresh-installed machine. See Figure 8-23. The parameters that customize the login of the Tivoli Endpoint are as follows: – Tivoli Gateway IP address – Tivoli Gateway listening port Figure 8-23 Endpoint log in parameters We see the newly added bare metal machine as a target, in the Select Target window. See Figure 8-24 on page 382. Chapter 8. Integration and collaboration with other Change Management products 381
- 398. Figure 8-24 Select Target After created and saved, the plan is run using Activity Plan Monitor, as shown in Figure 8-25. Figure 8-25 Run the plan You can see all of the deployment operations on the target machine where the Tivoli Provisioning Manager for OS Deployment operations are performed, as in Figure 8-26 on page 383. 382 Deployment Guide Series: Tivoli Provisioning Manager for OS Deployment V5.1
- 399. Figure 8-26 Deployment operations on the target machine After the deployment task is finished, it is shown on the target machine, as shown in Figure 8-27. Figure 8-27 Deployment task is finished, Since we inserted the value “ud” for the report parameter in the config.csv file, Activity Plan Monitor is notified that the task has successfully finished. See Figure 8-28. Figure 8-28 Activity Plan Monitor Notice that the machine disappeared from the New workstation Manager window (Figure 8-29 on page 384), since it now has an installed operating system and a running Tivoli Endpoint. If for any reason you want to repeat the same operation, you need to do the following: 1. Remove the host from the Tivoli Provisioning Manager for OS Deployment hosts list (if it is present). 2. Boot the target machine with the PXE-boot. Chapter 8. Integration and collaboration with other Change Management products 383
- 400. 3. Select it in the “new workstation manager” tool where it will re-appear. Figure 8-29 New workstation Manager window-machine not showing 4. As a further test, check the login parameters of the Tivoli Endpoint. See Figure 8-30. Figure 8-30 Login parameters of the Tivoli Endpoint 5. Verify that the Endpoint was added to the specified Gateway, as shown in Example 8-4: Example 8-4 Verify that the Endpoint was added to the specified Gateway G 1023513693.1.590 fra-tcm423-gw 1023513693.5.522+#TMF_Endpoint::Endpoint# eptest 384 Deployment Guide Series: Tivoli Provisioning Manager for OS Deployment V5.1
- 401. 8.1.4 Saving user settings The last scenario consists of the following: 1. Back up the user settings (using the default tool USMT). 2. Install a new profile on the target machine (as already done). 3. Restore the user settings (using the default tool USMT). As we mentioned before, we use the default USMT tool in these scenarios, but other applications can also be used. To perform backup-restore operations with a different application, you need to customize the SPB ITCM-REMBO-BR-remboserver-region.1 software distribution package on the TMR. You may either change the binaries used or modify the way they are run in the deployment procedure. Next we show how to customize this package in order to run the USMT binaries with advanced options and collect specific user settings. In order to modify the information collected by the USMT tool you have to do the following: 1. Change the .inf files on the server, since they will be copied on each target machine where the USMT is run. 2. Change the way the loadstate and scanstate are run on the target machines from the Software Distribution Package Editor. Note: For more information about USMT please refer to the following Web site: http://www.microsoft.com/technet/desktopdeployment/userstate/usersta teusmt.mspx By default, the ITCM-REMBO-BR-remboserver-region.1 package runs the USMT executable to collect user settings with the default configuration; however, this default configuration does not save any important settings. So we change the invocation performed on the USMT scanstate executable (that performs the saving of user settings) in order to add the /i:Miguser.inf option. We simply add that option in the scanstate invocation. We do not need to change the content of the .inf files since the default content is enough for our test purposes. In this scenario, we only need to save and restore desktop settings and appearance. 1. We start by opening the Software Distribution Package Editor. Since we will be working on the ITCM-REMBO-BR-remboserver-region.1 package, select it. See Figure 8-32 on page 386. Chapter 8. Integration and collaboration with other Change Management products 385
- 402. Figure 8-31 Software Distribution Package Editor 2. Open the package, as in Figure 8-32. Figure 8-32 ITCM-REMBO-BR-remboserver-region.1 package 3. We found the executable scanstate invoked when saving user settings and we insert the required invocation option as shown below in Figure 8-33 on page 387: 386 Deployment Guide Series: Tivoli Provisioning Manager for OS Deployment V5.1
- 403. Figure 8-33 Insert the required invocation option 4. Leave the .inf files as default but, if needed, you can modify them. You can only modify the .inf files contained on the Tivoli Provisioning Manager for OS Deployment server where the USMT was installed. They will be copied and used on each target machine when the USMT package is distributed and started. Now that we customized the USMT usage, we can run the “Backup user settings” scenario to save the settings of the client machine. Our target is a machine with a Tivoli Endpoint installed. On this machine we plan to do the following: – Backup the user settings (desktop appearance as example) – Install a new profile as it was a bare metal machine – Restore the save settings to configure the desktop as it was before the scenario 5. Run the Activity Plan Editor, and create a new plan as shown in Figure 8-34 on page 388. Chapter 8. Integration and collaboration with other Change Management products 387
- 404. Figure 8-34 Create a new plan For this scenario the following parameters are needed: – Repository path and credentials. Network path, where to store the saved settings and credentials. – Target machine credentials, since some packages will be installed and run on the target machine, the credentials are needed. – The way the data will be stored. With this parameter you choose how to differentiate the several settings stored. 6. In the rembo.ini file you can also set the destination_path parameter. This parameter specifies the name of the destination directory on the target Tivoli Endpoint where the backup/restore tool is installed and run. Note: Be careful when inserting the repository path: use a correct network path of a machine where the client settings will be stored. In the Figure 8-35 on page 389, we show the values we insert, and we choose to do the following: – Save the settings on the same Tivoli Configuration Manager server machine. – Use the Tivoli Endpoint label so that for each Tivoli Endpoint a folder with the specified name will be created. 388 Deployment Guide Series: Tivoli Provisioning Manager for OS Deployment V5.1
- 405. Figure 8-35 Backup user settings 7. Select our machine as the target of this plan, as shown in Figure 8-36. Since this is not a bare metal machine, but a running Tivoli Endpoint, it is not necessary to use the New Workstation Manager tool. The Tivoli Endpoint can be a target of Activity Planner plan without any additional steps (as for the “Import RAD” scenario, where the server was available by default). Figure 8-36 Select our machine as target of this plan 8. In the next step, run the plan from the Activity Plan Monitor. See Figure 8-37 on page 390. Chapter 8. Integration and collaboration with other Change Management products 389
- 406. Figure 8-37 Run the plan The plan finishes successfully, as shown in Figure 8-38. Figure 8-38 The plan finishes successfully 9. After the task is finished, the settings are saved on the Repository machine in the specified folder. Notice that a nested folder with the Tivoli Endpoint label was created, since we chose to identify each backup by Tivoli Endpoint name. See Figure 8-39. Figure 8-39 Settings are saved on the Repository machine On the target machine, you can see the binaries installed and used. See Figure 8-40 on page 391. Notice that these binaries were installed in the destination_path parameter taken from the rembo.ini file. 390 Deployment Guide Series: Tivoli Provisioning Manager for OS Deployment V5.1
- 407. Figure 8-40 Binaries installed and used on the target machine You can also see the logs on the client related to the USMT usage, as shown in Example 8-5. Example 8-5 Logs Info Command line used: C:ITCM-REMBO-integrationUSMTbinscanstate.exe /i:MigUser.inf /o /all "C:WINDOWSTEMPUSMT" We show the desktop in Figure 8-41 on page 392, before installing the new profile. Notice the “New Folder” on the desktop. This configuration was saved and will be restored after the “Restore user settings” scenario. Chapter 8. Integration and collaboration with other Change Management products 391
- 408. Figure 8-41 Windows desktop 10.After saving the user settings, run an “Install New Workstation” plan. This machine will be formatted and a new profile will be installed on it. 11.If this host previously performed a PXE-boot, remove it from the Tivoli Provisioning Manager for OS Deployment database and reboot it from the network so that it will be recognized by Tivoli Provisioning Manager for OS Deployment as a bare metal machine; otherwise, a PXE-boot has to be performed. See Figure 8-42 on page 393. 392 Deployment Guide Series: Tivoli Provisioning Manager for OS Deployment V5.1
- 409. Figure 8-42 PXE-boot 12.After the target is booted with PXE-boot, the New Workstation Manager tool will recognize this client so that it will again be available as a target for the “Install new workstation” plan. See Figure 8-43. Figure 8-43 The target is again available for the “Install new workstation” plan 13.As done before, create an “Install a new workstation” plan to deploy the previously imported profile. Perform the same tasks in order to install the operating system image and automatically have a Tivoli Endpoint installed on the machine. See Figure 8-44 on page 394. Chapter 8. Integration and collaboration with other Change Management products 393
- 410. Figure 8-44 Activity Properties 14.Start the deployment operations, as shown in Figure 8-45 and Figure 8-46. Figure 8-45 Start the deployment operations Figure 8-46 Start the deployment operations After that plan successfully completes, the operating system will be installed and the desktop of the machine will appear with the default settings as follows. 394 Deployment Guide Series: Tivoli Provisioning Manager for OS Deployment V5.1
- 411. Figure 8-47 The machine appears with the default settings 15.Start the scenario that will restore the saved settings. Aim to show that it is possible to configure the installed operating system as it was before the deployment. Since we did back up the old settings using the /i:Miguser.inf option, we will only restore the desktop appearance. 16.The Activity Plan operation we select for this scenario is the “Restore user settings”. This task requires similar parameters as the backup procedure since it needs to have access to the repository and use the stored settings. We insert the same parameters as shown Figure 8-47. Chapter 8. Integration and collaboration with other Change Management products 395
- 412. : Figure 8-48 Restore user settings properties 17.Choose the Tivoli Endpoint as the target of this scenario. See Figure 8-49. Figure 8-49 Choose the Tivoli Endpoint as the target 18.Select the restore setting as the name of the activity. See Figure 8-50 on page 397. 396 Deployment Guide Series: Tivoli Provisioning Manager for OS Deployment V5.1
- 413. Figure 8-50 Activity Properties 19.Finally, run the task to restore the old settings on the target machine, as shown in Figure 8-51. Figure 8-51 Running the task The stored data disappears from the repository, since it was copied on the specified target machine. After it is copied, the ITCM-REMBO-BR-remboserver-region.1 software distribution package containing the USMT executable runs the loadstore executable that performs the restoration task. Figure 8-51 shows the repository empty after the restoration. Chapter 8. Integration and collaboration with other Change Management products 397
- 414. Figure 8-52 Repository empty On the target machine, it is possible to see the old settings that were saved and restored when the loadstore executable was run. See Figure 8-53. Figure 8-53 Old settings that have been saved and restored As you can see the previously settings were correctly restored on the fresh-installed Tivoli Endpoint. The desk top has the same image and the same “New Folder” as before. See Figure 8-54 on page 399. 398 Deployment Guide Series: Tivoli Provisioning Manager for OS Deployment V5.1
- 415. Figure 8-54 The Windows desktop 8.2 Tivoli Provisioning Manager V5.1 Tivoli Provisioning Manager V5.1, built on a Service Oriented Architecture, enhances usability for executing changes while keeping server and desktop software compliant. Tivoli Provisioning Manager helps organizations with provisioning, configuration, and maintenance of servers and virtual servers, operating systems, middleware, applications, storage and network devices acting as routers, switches, firewalls, and load balancers. Tivoli Provisioning Manager V5.1 already supports image management using Tivoli Provisioning Manager for OS Deployment API under the hood. This current integration was discussed in “Chapter 9, Image management” of the following publication: Deployment Guide Series: IBM Tivoli Provisioning Manager Version 5.1, SG24-7261. Note that Tivoli Provisioning Manager V5.1 Fixpack 2 (currently scheduled end of March 2007) will extend the current image management functionality in Tivoli Provisioning Manager V5.1 by including the Embedded Edition of Tivoli Provisioning Manager for OS Deployment product. Fixpack 2 will bring the Tivoli Provisioning Manager code level to V5.1.0.2. With this level, Tivoli Provisioning Chapter 8. Integration and collaboration with other Change Management products 399
- 416. Manager will provide the same level of image management functionality as Tivoli Provisioning Manager for OS Deployment. Note: The previous discussion is also valid for the Tivoli Provisioning Manager for Software V5.1 product. For a detailed discussion of Tivoli Provisioning Manager for Software and Tivoli Provisioning Manager, you can refer to Deployment Guide Series: IBM Tivoli Provisioning Manager Version 5.1, SG24-7261. 8.3 Tivoli Provisioning Manager Express V4.1 for Software Distribution Tivoli Provisioning Manager Express Version 4.1 for Software Distribution is an easy-to-use, comprehensive solution for software distribution, patch, inventory, and asset management. In Version 5.1, expected to be available in 3Q 2007, it is currently planned to provide a link from the GUI to launch the Tivoli Provisioning Manager for OS Deployment. For more information on IBM Tivoli Provisioning Manager Express V4.1 for Software Distribution product, you can refer to the following IBM Redbooks publication: Deployment Guide Series: IBM Tivoli Provisioning Manager Express V4.1 for Software Distribution, SG24-7236. 8.4 IBM Director IBM Director is an integrated, easy-to-use suite of tools that provide clients with flexible systems management capabilities to help realize maximum systems availability and lower IT costs. The new version of IBM Director, currently scheduled to be available in 2Q 2007, is expected to integrate with a module called Tivoli Provisioning Manager for OS Deployment DX (Directory Extension), which is a flexible and powerful tool that you can use to remotely perform configuration, deployment, and retirement operations on both IBM and non-IBM systems. Using Tivoli Provisioning Manager for OS Deployment DX, you can perform the following tasks: Update system firmware Modify configuration settings Install operating systems and applications Back up and recover primary partitions 400 Deployment Guide Series: Tivoli Provisioning Manager for OS Deployment V5.1
- 417. Securely erase data from disks Tivoli Provisioning Manager for OS Deployment DX is an IBM Director extension. Tivoli Provisioning Manager for OS Deployment DX integrates seamlessly with IBM Director. You can use the same administrative console to perform both deployment and management tasks. 8.4.1 Product components The Tivoli Provisioning Manager for OS Deployment DX software has the following three components: – The management server – The deployment server – The console The management server A management server is a server on which both IBM Director Server and Tivoli Provisioning Manager for OS Deployment DX are installed. The management server is the main component of Tivoli Provisioning Manager for OS Deployment DX. It contains the application logic, monitors the status of Tivoli Provisioning Manager for OS Deployment DX tasks, and stores data both in the IBM Director database and in its own database. When you install the management server, the console and the deployment server are installed automatically also. The deployment server The Tivoli Provisioning Manager for OS Deployment DX deployment server handles communication between the management server and target systems. Using Multicast Trivial File Transfer Protocol (MTFTP) and Trivial File Transfer Protocol (TFTP). It also delivers commands, data files, and applications to target systems. The instance of a deployment server that is installed on the management server contains the master repository, which is the collection of files that the target system uses to run tasks on target systems. These files can include system environments, images, utilities, and batch files. The instance of the deployment server that is installed on a remote deployment server contains a remote repository. The following lists information about the services that the deployment server contains. Chapter 8. Integration and collaboration with other Change Management products 401
- 418. The console The console is the graphical user interface (GUI) component of Tivoli Provisioning Manager for OS Deployment DX. The console must be installed on any IBM Director Console from which a system administrator will remotely access the management server and perform tasks. The IBM Director Console is the GUI that provides access to the IBM Director Server and the management server. When you add Tivoli Provisioning Manager for OS Deployment DX to your IBM Director environment, the Tivoli Provisioning Manager for OS Deployment DX tasks and menu items are added to the IBM Director Console. 8.5 Collaboration with other products It is pretty simple to imagine different kinds of integration scenarios with some other Tivoli products or even competitive systems management products. Following is a non-exhaustive list of examples: Use a change management product, such as Tivoli Configuration Manager or Tivoli Provisioning Manager to manage your RAD images. Suppose you need to maintain different environments to be compliant with the ITIL best practices and especially the Change Management process. A typical scenario could be to move an image you built and certified on one Tivoli Provisioning Manager for OS Deployment Development environment to your Tivoli Provisioning Manager for OS Deployment Production environment. Use the inventory data from other change management applications such as Tivoli Configuration Manager or Tivoli Provisioning Manager to register new target hosts in your Tivoli Provisioning Manager for OS Deployment database. Install software agents of other systems management products as part of OS imaging. 402 Deployment Guide Series: Tivoli Provisioning Manager for OS Deployment V5.1
- 419. 9 Chapter 9. CD/DVD based deployment This chapter describes how to deploy machines without using network boot. In this type of deployment, a CD/DVD is used to boot the machine. Two types of CD/DVD can be created: Deployment CD/DVD allowing deployment of machines without connection to the Tivoli Provisioning Manager for OS Deployment server. PXE emulation CD allowing booting and connection to the Tivoli Provisioning Manager for OS Deployment server in a PXE-less environment. This chapter contains the following sections: “Deployment CD/DVD” on page 404 “PXE emulation CD/DVD” on page 413 © Copyright IBM Corp. 2007. All rights reserved. 403
- 420. 9.1 Deployment CD/DVD This kind of deployment is usually used when OS deployment is needed and there is no connection or connection to the server is very slow. Some typical situations are as follows: Small branch office with slow link and no local deployment server. Isolated PC in system room with no connection to internal network. Laptop users currently away from LAN or connected via modem. Figure 9-1 shows those typical scenarios. Figure 9-1 Typical scenarios when CD/DVD deployment is used Tip: If the data you want to use does not fit on a single CD/DVD, Tivoli Provisioning Manager for OS Deployment will automatically create multiple CD/DVD images volumes to suite your needs. 9.1.1 CD/DVD creation Creation of deployment CD/DVD is simple and has a wizard to guide you through. Here are the steps required to generate deployment CD/DVD: 1. Launch the deployment CD/DVD configuration wizard by clicking the Generate CD button. You can find the deployment CD/DVD button on Deployment Schemes, Profiles and Software packages pages in the OS 404 Deployment Guide Series: Tivoli Provisioning Manager for OS Deployment V5.1
- 421. Deployment part of the administrative console. Figure 9-2 shows where the Generate CD button is located. Figure 9-2 Generate CD button 2. When the CD/DVD generation wizard is started, choose between deployment CD/DVD and PXE emulation CD/DVD. Choose A deployment CD/DVD option. See Figure 9-3 on page 406. For the PXE emulation option see “PXE emulation CD/DVD” on page 413. Chapter 9. CD/DVD based deployment 405
- 422. Figure 9-3 Deployment or PXE emulation is the question 3. Figure 9-4 on page 408 shows a window that you can use to select the data you want to include on your deployment CD/DVD. This screen lists all of your deployment schemes, software packages, and system profiles so you can select the ones you want to include on your CD/DVD. You can include as many system profiles and software packages as you like. Tivoli Provisioning Manager for OS Deployment automatically spans multiple CDs/DVDs to hold all the data you selected. Tivoli Provisioning Manager for OS Deployment is using file level imaging that allows for same files to be saved only once to the shared repository. This is applied to the deployment CD/DVD as well. Let us take a look at the following table. It lists five different profiles and their size when restored. Table 9-1 List of sample profiles System profiles Restore size (GB) WinXPSP2 (clean) 0.8 WinXPSP2 (utilities) 1.2 WinXPSP2 (utilities + office) 1.7 WinXPSP2 (utilities + retail application) 1.5 WinXPSP2 (utilities + office + data mining application) 2.1 The total size of all these profiles when restored is 7.3 GB. However, when files are stored in the Tivoli Provisioning Manager for OS Deployment shared repository, the same file is written only once. From our example we can determine the approximate size for different software in the listed profiles (for 406 Deployment Guide Series: Tivoli Provisioning Manager for OS Deployment V5.1
- 423. example, utilities with office is 500 MB bigger than utilities itself—this means that the office package has approximately 500 MB). The following table lists different software configurations and their approximate size. Table 9-2 Software configuration sizes Software name Software size (GB) Windows XP with SP2 0.8 Utilities 0.4 Office package 0.5 Retail application 0.3 Data mining application 0.4 We can see that approximately only 2.4 GB is required to store all data needed to restore these profiles. Tip: If you want to use a specific deployment scheme select only that one. If you select multiple, randomly chosen one will be used during deployment. The scheme selection requires a bit of attention with CD/DVD deployment. The deployment scheme specifies how deployment will be done—it defines what the GUI on the client should look like, will you be able to review OS deployment settings or not, whether inventory occurs, for which components and when, will redeployment features be used, and so forth. In typical deployment this is set from the server. When using deployment CD/DVD, you initiate deployment locally with no server connection so the scheme has to be selected in some other way. Following is how the scheme is selected when using CD/DVD deployment: – If the deployment scheme, called Default, exists on CD/DVD it is used regardless of the number of other schemes that were included on the deployment CD/DVD. – If the deployment scheme, called Default, is not present, one of the deployment schemes included on the CD/DVD is randomly chosen. That is why you should select only one deployment scheme—the one you want to be effective when using this deployment CD/DVD. Chapter 9. CD/DVD based deployment 407
- 424. Figure 9-4 Choosing data to include on the deployment CD/DVD 4. After you select all the data you want to include to your deployment CD/DVD, specify the maximum size of the individual image. This information is required so that Tivoli Provisioning Manager for OS Deployment can create multiple images if necessary to fit all data (for example, if you have 1 GB of data and specify the maximum size of images 650 MB then two volumes are created to hold all data required for deployment. Figure 9-5 Input ISO image size After you select the data and set the image size, Tivoli Provisioning Manager for OS Deployment will prepare files for image creation, calculate the total size of data, and calculate how many images are required. 408 Deployment Guide Series: Tivoli Provisioning Manager for OS Deployment V5.1
- 425. Figure 9-6 Simulation of ISO image(s) creation 5. After ISO image(s) simulation is complete, you will see a screen that allows you to download ISO image(s). This screen also shows the number of created ISO images on this screen, as shown in Figure 9-7 on page 410. You can use several methods to save the image(s): a. Download image(s) directly from the server by clicking the Click here to download... link. You will get a “Save as...” screen in your browser as you get for any other download. If there are multiple images you are prompted to save each file. The prompt for the next file is shown after the previous image download is completed. b. Using Web interface extension on your machine (you will only see this option if Web interface extension is detected on your machine). c. Save it on the server in the import directory. This directory can be found in the server’s data directory (for example, C:TPMfOS Files). d. Save it on some other computer with Web interface extension. You have to enter the IP address (not host name) of the machine where you want to save image file(s) to. Chapter 9. CD/DVD based deployment 409
- 426. Figure 9-7 Download methods 6. In our example, we decided to use Web interface extension on the local computer. Selecting this option gives you additional screens where you can input the destination for deployment CD/DVD image(s). You can also use the Browse... button to browse your local disks for the destination. Tip: When using Web interface extension to download multiple ISO images, you do not have to specify a separate name for every file. For example, if you name your image myimage.iso, Tivoli Provisioning Manager for OS Deployment will automatically name images myimage-1.iso, myimage-2.iso, and so forth. Figure 9-8 Specify the name and location for the ISO file(s) 410 Deployment Guide Series: Tivoli Provisioning Manager for OS Deployment V5.1
- 427. If all downloads complete successfully you should see following screen confirming successful export of all ISO images. Figure 9-9 Successful ISO export confirmation screen 7. And finally, burn these ISO images using your favorite CD/DVD creation tool. 9.1.2 OS deployment Deployment of the OS when using deployment CD/DVD is for the most part the same as when host deployment is triggered from the server or from the Administrative Toolkit. It has only three simple steps: 1. Boot the machine from CD/DVD. To boot the machine using CD/DVD, insert the deployment CD/DVD into the drive and restart the machine. If your machine does not boot from the CD/DVD, check the BIOS boot list to see whether your optical drive is included in the boot sequence and is listed before the hard disk. Most machines also provide the possibility to select the temporary boot device without changing the boot sequence in the BIOS. 2. Select the profile you want to restore. Notice that you cannot use the automatic host name generation based on the IP address or the MAC address because the machine booted from the CD/DVD is not defined. Figure 9-10 on page 412 shows the profile selection screen when booting from CD/DVD. As this screen is determined by the scheme, it is the same as the case when deployment is started from Tivoli Provisioning Manager for OS Deployment server. Figure 9-10 on page 412 also shows that server the host name and MAC address fields are empty, while the server address is 0.0.0.0. This is all a result of the network not being used when booting from CD/DVD. Chapter 9. CD/DVD based deployment 411
- 428. Figure 9-10 Select the profile to deploy 3. The final step before you start the deployment is to edit the host parameters. Notice that this screen is not shown if your scheme has the Allow BOM editing setting set to “never (Always run unattended). We highly recommend that you set this parameter to “Always review parameters locally” in the scheme if it will be used for deployment CD/DVD. This will allow you to easily adjust the basic host configuration at the time of deployment. You could also do a partial configuration in the scheme and ask only for some parameters. You could, for example, input the serial number, time zone, language, 412 Deployment Guide Series: Tivoli Provisioning Manager for OS Deployment V5.1
- 429. workgroup name, user name, and organization. During deployment all of these parameters are automatically filled. The person deploying the machine then only has to enter the password for the Administrator. Figure 9-11 Editing host parameters At the end of the deployment Tivoli Provisioning Manager for OS Deployment will do one of the following four things: Turn off computer Boot the operating system Reboot the machine Display a green banner The resulting action depends on the When deployment is done setting in the deployment scheme. 9.2 PXE emulation CD/DVD PXE emulation CD/DVD is usually used when the OS deployment is needed and it is not possible to use PXE to boot the client. Some typical situations are as follows: Network card does not support PXE. Chapter 9. CD/DVD based deployment 413
- 430. Firewall prevents PXE traffic. PXE boot not allowed. DHCP server is not available. 9.2.1 CD/DVD creation Creation of the PXE emulation CD/DVD is simple. It also has a wizard to guide you through the process. Use the following steps to generate the PXE emulation CD/DVD: 1. Launch the PXE emulation CD configuration wizard by clicking the Generate CD button. The Generate CD button is on the Deployment Schemes, Profiles, and Software packages pages in the OS Deployment part of the administrative console. Figure 9-12 shows where the Generate CD button is located. Figure 9-12 Generate CD button 2. When the CD/DVD generation wizard is started, choose between the deployment CD/DVD and the PXE emulation CD/DVD. Choose the PXE emulation CD/DVD option. For deployment options see “Deployment CD/DVD” on page 404. 414 Deployment Guide Series: Tivoli Provisioning Manager for OS Deployment V5.1
- 431. Figure 9-13 CD/DVD type selection After you select the PXE emulation CD/DVD option you will see the following screen. Figure 9-14 Choose the IP assignment option for the client It allows you to select between the following two options: a. The Dynamic IP address with DHCP option, which defines the client IP address that will be assigned at boot time using DHCP. b. The Static IP address option allows you to define the IP address that will be used by the client during deployment. If you choose this option, screen in Figure 9-15 on page 416 is presented to you. Use it to fill in the fixed IP address for the client. The Allow IP address override at runtime check Chapter 9. CD/DVD based deployment 415
- 432. box allows you to allow changing of the IP on the client at boot time. If this option is turned off, the client can use only the defined IP address. It is useful to check this option so you can use the same CD on multiple clients at the same time. Figure 9-15 Manual IP configuration for client 3. Figure 9-16 shows the server IP configuration screen. As with the client, you have an option to allow the IP address of the server to be changed at boot time. If you want to use the same PXE emulation CD for connection to multiple servers you must select this option. Figure 9-16 Server IP address configuration 416 Deployment Guide Series: Tivoli Provisioning Manager for OS Deployment V5.1
- 433. 4. That is all the information required to create a PXE emulation CD/DVD. Download the ISO image from the final screen in the wizard. Figure 9-17 shows where the link for download can be found. This image is very small (less than 5 MB). Figure 9-17 Downloading the PXE emulation CD ISO image 9.2.2 OS deployment Deployment of the OS when using PXE emulation CD/DVD is almost identical to the one when the machine is booted using the PXE. This is because the PXE emulation CD/DVD, as its name says, is used only to boot the machine using the CD/DVD instead of the network card. To use the PXE emulation CD/DVD you have to boot the machine from the CD/DVD. To boot the machine using CD/DVD, insert the PXE emulation CD/DVD into the drive and restart the machine. If your machine does not boot from the CD/DVD, check the BIOS boot list to see whether your optical drive is included in the boot sequence and is listed before the hard disk. Most machines also provide the possibility to select the temporary boot device without changing the boot sequence in BIOS. When the machine is started using PXE emulation CD/DVD you might see a screen similar to Figure 9-18 on page 418. You will see it if you allowed for IP of the client or the server to be updated at boot time. Note that the input window will look different if you allowed for only one IP address to be modified at boot time. For example, if you enabled the client IP address change but did not enable the server IP address change, you will not see the field with the server IP address. Chapter 9. CD/DVD based deployment 417
- 434. Figure 9-18 Changing the IP parameters at boot time After you verify and enter the correct IP information for the client and server, the machine will connect to the server and behave as though it was booted from the network. There are a couple of options you might see: Locked screen - No deployment or administrative action was started on the machine from theTivoli Provisioning Manager for OS Deployment server. List of profiles - List of profiles that are bound to this machine. Click Profile to start the deployment process. Admin toolkit - Admin toolkit was bound to this machine or started from the Tivoli Provisioning Manager for OS Deployment server. To continue with the OS deployment, refer to the following chapters based on the operating system you want to deploy: For deployment of Windows pre-Vista operating systems, go to Chapter 4, “Installing pre-Vista systems” on page 137. For deployment of Windows Vista operating system, go to Chapter 5, “Installing Vista systems” on page 213. For deployment of the Linux operating system, go to Chapter 6, “Installing Linux systems” on page 263. 418 Deployment Guide Series: Tivoli Provisioning Manager for OS Deployment V5.1
- 435. 10 Chapter 10. Redeployment and self-healing feature This section describes how to set Tivoli Provisioning Manager for OS Deployment up for redeployment. Redeployment is the process of quickly reinstalling a system configuration previously installed by Tivoli Provisioning Manager for OS Deployment without additional network load. It is especially useful for schools, public computers, and critical businesses where computers need to be restored to a clean state at every boot. A computer generally works the best and the fastest on the day that it is installed. At that time, the system is completely clean, free of any undesirable CPU-consuming gadgets, and all programs are configured for their optimal use by the system administrator. The purpose of redeployment is to ensure that the system is reset to this optimal state at every boot, at some fixed interval or available to the user on demand. This chapter is broken down into the following sections: “Redeployment basics” on page 420 “Setting up redeployment” on page 421 “Redeployment scenario” on page 422 © Copyright IBM Corp. 2007. All rights reserved. 419
- 436. 10.1 Redeployment basics There are three categories of systems that experience the most visible need for the redeployment technology: Public computers, such as schools, universities, and internet cafes, where users cannot be relied on to preserve the computer integrity, since the computer is not their own Critical systems, such as banks, insurance companies, and industrial plants, where the company cannot afford to risk computers being reconfigured or infected by malicious software Embedded systems, such as ticket machines, airport information systems, and ATMs that need to be quickly rebuilt to their original configuration without using a specific infrastructure Because redeployment often occurs at the user’s desk, it is necessary to find a solution that is quick, user-friendly, does not require any significant infrastructure, and does not affect the work process of other users. This rules out standard deployment tools because they impose a significant load in the network and affect other users’ ability to perform their tasks. Tivoli Provisioning Manager for OS Deployment addresses the challenge of redeployment using the following steps: At the end of a deployment, Tivoli Provisioning Manager for OS Deployment creates a reference image of the computer, and saves it into a protected redeployment partition (invisible to the user and to the operating system itself). This adds approximately a minute to the deployment process, as most of the files are already present as multiple files archive on the disk at that time. Every time a computer starts, Tivoli Provisioning Manager for OS Deployment hooks the boot process before the operating system starts (using PXE or a special Master Boot Record). If configured to do so, Tivoli Provisioning Manager for OS Deployment authenticates the user of the computer against the server database to restrict the use or the maintenance of the computer to unauthorized persons. If configured to do so, Tivoli Provisioning Manager for OS Deployment offers the choice of several configurations available on the computer (multiboot) and several levels of cleaning. Using the reference image saved during deployment, Tivoli Provisioning Manager for OS Deployment resynchronizes the hard-disk contents to its reference state. This usually takes only a few seconds, but can take up to a few minutes if everything on the hard disk was destroyed. 420 Deployment Guide Series: Tivoli Provisioning Manager for OS Deployment V5.1
- 437. 10.2 Setting up redeployment Because redeployment is basically the replay of a standard deployment operation, you must first configure a regular deployment process, and try it on a test computer. When you have performed these two stages, follow the instructions provided to turn your one-time deployment configuration into a redeployment configuration. Redeployment is a feature that affects how the computer is being preloaded, not what is in the deployed configuration. Redeployment is enabled by customizing a deployment scheme. You can either edit the Default deployment scheme (if you want all your computers to use redeployment), or create a new deployment scheme that you will use explicitly for redeployment. The following explanations are based on the second choice, although both situations are similar. 1. To create a new deployment scheme, go to the Deployment schemes page, and click New Scheme. This initiates the deployment scheme wizard that guides you through the customization of deployment parameters. Follow the steps as you would for a regular deployment, until you reach the panel labeled On-site deployment features (Figure 10-1). Figure 10-1 Enabling redeployment feature 2. Select the check box to enable support for quick redeployment of the same configuration, and click Next. 3. On the next panel (shown on Figure 10-2 on page 422), select Yes to keep Tivoli Provisioning Manager for OS Deployment images in a protected Chapter 10. Redeployment and self-healing feature 421
- 438. redeployment partition, and enter the space that you want to allocate to this special partition. Enter a value at least as large as the total size of all system and software images to be deployed on the computer, as it will retain all these images. If you are unsure, start with approximately 800 MB for a Windows 2000 configuration, 1500 MB for a Windows XP configuration, or 1500 MB for a Linux configuration. If you want a more precise number, check the image sizes reported in a deployment log and round the sum up to accommodate the miscellaneous structures used for redeployment. Figure 10-2 Set the redeployment partition size Note: The space that you allocate to the redeployment partition is literally subtracted from the hard-disk total capacity, as seen by Windows or Linux. It is not simply a hidden partition, but instead a hardware-protected area, as defined in ATA-5 specification. If necessary, you can recover this space simply by running another deployment operation that does not include redeployment. 4. Click Next, and then Finish to complete the customization process and obtain a deployment scheme ready for redeployment. 10.3 Redeployment scenario After you successfully create a redeployment scheme, let us see how this can be used in a real life example. In the introduction to this chapter we mentioned 422 Deployment Guide Series: Tivoli Provisioning Manager for OS Deployment V5.1
- 439. several scenarios where redeployment is very useful; however, all of these scenarios targeted machines that could easily be reformatted and the operating system (OS) reprovisioned since they did not keep any data locally. However there is another type of machine where this functionality can be very useful—business laptops. Laptop computers spend most of their time away from the wired LAN connection. Not only that, but they spend most of the time with no connection at all. Regardless if you are a journalist who is somewhere abroad reporting on world soccer championship or a CEO flying to a different town to give a presentation to investors, it is a very unpleasant surprise when you realize that your mobile computer is not working as expected any more. It could be a virus, some program you installed that clashes with your office application, or some drivers you needed for your camera that a have problem with your graphic card. The bottom line is that there are numerous reasons why something can go wrong with your machine while you are away from your LAN or technical support. What is important is that all these problems can be treated with a single solution—the redeployment feature in Tivoli Provisioning Manager for OS Deployment. In our example we set up a laptop that, in normal circumstances, boots to the hard disk. In case of a problem, the user should be able to redeploy the operating system on the machine without a network connection or losing their data. Following is a list of steps required to achieve this using Tivoli Provisioning Manager for OS Deployment: 1. Create a system profile that has two partitions—one for the operating system and one for the user data. 2. Set up a system profile configuration that does not redeploy the partition with user data. a. This can be done from the configuration details panel. Go to OS Deployment -> Profiles and open the profile you want to edit (double-click the profile, or select View Profile option from the contextual menus). b. At the bottom of this screen select the configuration you want to use in redeployment. c. After the Configuration details screen opens, click the Edit button in the OS Deployment section. This screen (Figure 10-3 on page 424) allows you to list partitions that you do not want to deploy or redeploy in a semi-colon separated list. Primary partitions have numbers 1-4, while extended partitions start from 5. In our scenario we do not want to redeploy the data partition so we enter number 2 in the Do not redeploy field. Chapter 10. Redeployment and self-healing feature 423
- 440. Figure 10-3 Do not deploy data partition 3. Create a deployment scheme with the redeployment feature turned on (see “Setting up redeployment” on page 421). 4. Create a menu that will be used with the redeployment feature. This menu will boot to disk by default after three seconds if one of the redeployment options were not chosen. To prevent accidental redeployments we password protect the redeployment menu items. a. To create this menu go to the Host Monitor, and right-click the host you want to deploy. b. Select the Deploy now option (you can select any host since you can cancel the deployment later). c. When the deployment screen opens click the Redeploy tab. d. Select the configuration you want to redeploy, and click the Customize Gui button as shown on Figure 10-4 on page 425. 424 Deployment Guide Series: Tivoli Provisioning Manager for OS Deployment V5.1
- 441. Figure 10-4 Customize the redeployment GUI 5. After you get the GUI customization screen, you can add menu items, sub-menus, edit text displayed on these menus, time outs, passwords and so forth. In our example we create three menu items for the following: – Booting directly to disk (time out 3 seconds) – Redeployment using fast redeployment (password protected) – Redeployment using full format (password protected) Figure 10-5 on page 426 shows how the redeployment GUI can easily be customized. Chapter 10. Redeployment and self-healing feature 425
- 442. Figure 10-5 Customizing the redeployment GUI In Figure 10-5, you can see three entries: – The first entry uses Boot on OS item action and has a time out value set to three. This is the default action if no other menu item was selected, and it will cause the machine to boot to the operating system installed on the hard disk. – The second option is used for quick redeployment. Its item action is set to Quick restore, and the password is set. This menu item aims to fix changed/deleted/added files without touching unchanged files. The icon was changed from Default to lock64.jpg. – The third menu item does a full format of the disk and then restores all files. This requires more time than the second option. Its item action is set to Format and Restore, and the password is set. The icon was changed from Default to lock64.jpg. 6. After you finish the GUI customizations, save the changes. The changes are bound to the configuration. 7. If you want to proceed with the deployment of this profile click the Ok button; otherwise, click Cancel. Each boot machine presents a menu with three entries. If none are selected, automatically boots to disk after three seconds. If one of the other options is selected, the user is requested to provide a password. If the password is correct, the operating system partition is redeployed, and the user data on the second partition will not be touched. 426 Deployment Guide Series: Tivoli Provisioning Manager for OS Deployment V5.1
- 443. 11 Chapter 11. Troubleshooting, best practices, and common questions In this chapter we discuss troubleshooting, best practices, and frequently asked questions for Tivoli Provisioning for OS Deployment. This chapter contains basics of troubleshooting: where to find logs, what error messages mean, and solutions to some of the most common questions. It is divided into the following four sections: “Troubleshooting basics” on page 428 “Common questions” on page 437 “Questions and answers” on page 451 “Synchronization with the RbAgent” on page 455 © Copyright IBM Corp. 2007. All rights reserved. 427
- 444. 11.1 Troubleshooting basics This chapter gives you an introduction to troubleshooting potential problems with Tivoli Provisioning Manager for OS Deployment. It explains how to generate log files with different levels of verbosity, where to find them, and how to use them. 11.2 Tivoli Provisioning Manager for OS Deployment considerations Before you start searching for errors in log files, you should be aware of the following: For Windows cloning, due to the Microsoft Sysprep limitation, it is not possible to change the administrator password during the deployment if the system profile contains a non-empty administrator password. The current version of Tivoli Provisioning Manager for OS Deployment only images the first system drive or RAID volume, as reported by the BIOS. Alternate drives must be installed using OS-based tools or using command lines. The current version of Tivoli Provisioning Manager for OS Deployment only supports incremental images on the primary OS partition. If you want to install software on a secondary partition, you must use software update packages with an unattended setup command line. 11.3 Server service/daemon troubleshooting If your server does not seem to work properly or you suspect that something is going wrong, you have several options to collect debug information from the server: If the service works and the server is reachable, a first check is to use the Web console, and select the Server status → Installation check. If you can read the summary, the server is obviously running and you can check here for possible errors. If your service works but you want more debugging information, you may have a look under Server log files where all log types are displayed. The log verbosity level can be increased if necessary from the configuration panel found under Server parameters → Configuration. If the Web console cannot contact the server, check if the rembo service/process is running the following: 428 Deployment Guide Series: Tivoli Provisioning Manager for OS Deployment V5.1
- 445. – Windows: Use the service manager. Also look at the Windows Event Viewer. The IBM Tivoli Provisioning Manager for OS Deployment server logs fatal error messages into the event manager. – Linux/FreeBSD/OS X: type ps aux | grep rembo – Solaris: type ps -elf | grep rembo If the service does not start, run the Tivoli Provisioning Manager for OS Deployment executable from the command-line with the following options: rembo -d -v 4. This will run IBM Tivoli Provisioning Manager for OS Deployment server as a console application with all debugging output redirected to your command window. You can increase the debug level (the -v parameter) to six for maximum details. See section “Server command-line options” for more command line arguments. If you start the server in the command line with a high verbosity level, you will get lots of information, and it might be better to look at the log files. You can find the Tivoli Provisioning Manager for OS Deployment server log files in the logs directory inside the server file repository (for example C:TPMfOS Files on Windows or /opt/tpmfos-5.1/files on Unix/Linux). If the error message is related to your network configuration, try to solve it and run the server again. Verify Network interfaces parameter. You can find it under Server parameters → Configuration → Base parameters. If it still does not work, contact your IBM support. Server command-line options Tivoli Provisioning Manager for OS Deployment server has several command line parameters you can use in troubleshooting. Command syntax is as follows: rembo [-d] [-v loglevel] [options] Following is the list of options you can use: -c: Use this parameter to specify the configuration file to use. The default file name for the configuration file is rembo.conf. -sdb: Use this parameter to specify the server database file to use. The default name for the server database file is server.db. -d: This command line argument causes all log messages to be printed on the standard output. -v: You can use this command line argument to set the verbosity of the messages printed to the log files and standard output. Log levels are defined as follows: 0 : no output Chapter 11. Troubleshooting, best practices, and common questions 429
- 446. 1 : log errors 2 : log errors & warnings 3 : log errors, warnings & info messages 4 : log the same as 3 plus notice messages 5 : log the same as 4 plus debug messages 6 : log everything (incl. network packets) -convert: This option is used for migration from previous versions of Rembo AutoDeploy product. - force: This option is used for migration from previous versions of Rembo AutoDeploy product. -chkshared: Running the server with this option will force a check of all files in the repository for any inconsistency. -fixshared: If the chkshared command found some inconsistencies, you can fix them with this command. -readonly: Using this option forces the server to run in read-only mode (slave). -statshared: Generates a report on the number of files and used space in the shared repository. Also lists the number and the size of orphaned files (files not used by any profile). You can find more on this command in 11.4.1, “How do I free some space in the shared repository?” on page 437. -sweepshared: Marks unused parts inside the shared repository blocks as empty, so they can be reused. If the whole block is marked empty it is deleted. You can find more on this command in 11.4.1, “How do I free some space in the shared repository?” on page 437. -packshared: Same as sweepshared, but instead of just marking unused parts of the shared repository blocks as empty, it deletes those parts. Do not use this command if you have not read 11.4.1, “How do I free some space in the shared repository?” on page 437. 11.3.1 Client troubleshooting When troubleshooting the client there are two typical possibilities: The client cannot boot from the network (you cannot get to the point where you see theTivoli Provisioning Manager for OS Deployment client GUI). 430 Deployment Guide Series: Tivoli Provisioning Manager for OS Deployment V5.1
- 447. The client cannot connect to the server (machine is booted but rbagent cannot connect to the Tivoli Provisioning Manager for OS Deployment server). When the client is unable to boot from the network, it could happen for a number of reasons. To troubleshoot this problem it is best to use the great help tool built into the product called PXE check wizard. It is placed in the installation check part of the administrative console. To start it, go to Server status → Installation check. You can start the PXE check wizard using the Check PXE boot button at the bottom of the window. Figure 11-1shows where this button can be found. Figure 11-1 The Check PXE boot button Start the PXE check wizard, and click Next. This will start the troubleshooting screen. It guides you through the PXE boot stages based on your answers to yes/no questions about those boot stages. What makes this wizard very useful is that for each potential problem in the PXE boot there is a screen showing what your screen should look like. This makes it easy to compare with the problematic client screen and identify the root cause in a couple of clicks just using yes/no questions. Chapter 11. Troubleshooting, best practices, and common questions 431
- 448. Figure 11-2 Troubleshooting the PXE boot problems If the client cannot connect to the server there are two typical reasons for this. First one is that during configuration you specified server’s host name instead of IP address. You have to specify the IP address of the server. If you do this you will have to change the IP address in the configuration file. The file rbagent.conf has one line that has the IP address of the server and the encrypted password in form ip_address:encrypted_password. To change the IP address in the rbagent.conf file, follow these steps: 1. Stop the rbagent process. 2. Open the rbagent.conf file. 3. Change the first part of the file to correct the IP address of your Tivoli Provisioning Manager for OS Deployment server. 4. Save the changes. 5. Start the rbagent process. The second most common reason for the client not being able to connect to the server is an invalid password. If the log file rbagent.log shows errors similar to the one in Example 11-1 on page 433and on the Windows service fails with the 432 Deployment Guide Series: Tivoli Provisioning Manager for OS Deployment V5.1
- 449. service specific error code 5, you have an invalid password set in your rbagent.conf file. Example 11-1 Invalid password on client [2007/02/01 03:55:52.203] Connect 172.20.20.128 -> 172.30.30.101 [2007/02/01 03:55:52.453] Connection refused: invalid password [2007/02/01 03:55:52.453] Connection refused [2007/02/01 03:55:52.453] <ERR> Server refused our connection, invalid password [2007/02/01 03:55:52.453] <ERR> Exiting with error code 5 This will happen if you change the password on the server or manually change the encoded password string in rbagent.conf file. Solution 1: Uninstall the agent and make sure the rbagent.conf file is deleted from the agent directory. Install the agent again. Installation will ask for the address and password of the server. Solution 2: Generate a new encoded password, and replace the encrypted string in the rembo.conf file. You can generate the new encrypted password using the following command: rbagent -q -d -s <ipaddr>:<passwd> rad-hidepassword <passwd> md5 You will get output similar to the following: Example 11-2 Output of rbagent rad-hidepassword command Connect 172.20.20.128 -> 172.30.30.101 Starting Rembo Agent Result: 5926D4FFE73F106A0BC0929068981515 Stopping Rembo Agent The encrypted password is on the “Result” line. Replace the old password value in the rbagent.conf file with the one generated by the rad-hidepassword command. 11.3.2 Error messages This section provides information about the error messages related to the Tivoli Provisioning Manager for OS Deployment. Administrator toolkit error messages This section lists the error messages that may occur on a client computer when using the administrator toolkit. They are usually displayed in a dialog box, with an OK button. Chapter 11. Troubleshooting, best practices, and common questions 433
- 450. Sysprep is not installed This message will appear when you are creating a Windows system profile for cloning. Prior to creating a system profile, you need to run the tool “Sysprep” under the operating system Partitions do not fit on this hard disk The system profile to be deployed on this host is bigger than the size of this hard disk. It could be also that you have a protected partition on your disk and there is not enough space on the disk for the current profile. Logical partitions do not fit on this hard disk See error messages “Partitions do not fit on this hard disk”. Fatal error, No hard disk detected! This message will appear if you try to deploy a host without the hard disk. No system configuration This message will appear when you are creating a snapshot and you did not choose a system profile, which must be the first step during this process. No system profile This message will appear when your host starts a deployment but no configuration is selected. The reason is that you have a deployment scheme with a setting “Never edit parameters”, and the database entry for the host being deployed is empty. Warning: files skipped This warning message occurs when creating a system profile, if some files could not be properly read. If you need hints on the name of the unreadable files and folders, look at the console log (in the client computer Start menu). Usually, running the chkdsk under Windows solves this problem. Unknown/unsupported OS This warning message occurs when creating a system profile for cloning. The operating system installed could not be recognized or is not supported. Software snapshots are only supported on Windows This message occurs if you try to build a software snapshot on Linux, which is not supported by this version of Tivoli Provisioning Manager for OS Deployment. 434 Deployment Guide Series: Tivoli Provisioning Manager for OS Deployment V5.1
- 451. Several orders matching your query have been found This warning message occurs in the context of the database query tool, if the request is ambiguous. If the record listed is not the one you want to see, retry with a more specific query. Deployment error messages This section lists the error messages that may occur on a client computer, during a deployment. They are displayed in a red panel, in the center of the screen, and are logged to the ODBC database. SoftwareProfile and SoftwareItem tables must use the same ODBC source This message should never appear with a standard configuration. It will appears if you split the two tables “SoftwareItem” and “SystemProfile” in two different ODBC sources. Invalid destination folder for software copy/snapshot This means that the destination folder that you specified during the software package creation does not exist. Unexpected end of deployment job This message could appear if one of the required tasks fails during the deployment. You are not authorized to use this machine (off-line) This message appears when the process of authentication failed, the reason could be that the network is down. There is no known configuration for this host This message appears when you are running without being connected to the network, and the database entry for the host to deploy does not contain a valid configuration. This configuration was not intended This message appears when the deployment scheme has the setting “Never edit parameters”. It means that the host is not the same model as the system profile deployed. No entry found in the BOM for this host This message occurs when there is no entry in the Bill of Material table (no host definition) matching the client computer MAC address, UUID, and serial number and the deployment settings are set to disable the manual edition of the Bill of Material. Chapter 11. Troubleshooting, best practices, and common questions 435
- 452. No system partition has been defined This error should never occur, unless you tampered with the definition of a system profile. It results from a system profile definition where no partition is marked as bootable (OSPart is zero in the database). Invalid software item in the database This error should never occur, unless you tampered with the definition of software items. It results from an unknown software package type. Cannot process, software items in pass zero This error is raised when a floppy-disk or partition software package is scheduled for use in pass zero, which conflicts with the Sysprep process. To avoid this error, either schedule these software items with negative pass numbers (before Sysprep) or with positive pass numbers (after Sysprep). Cannot process, software items before pass zero This error is raised when the software package that involves writing to the operating system partition is used before the pass zero, where the operating system partition is formatted. To avoid this error, always schedule these software items with a positive or zero pass number. The following file(s) are missing This error message should not occur. It indicates that a required image file is missing from the server or from the deployment CD-Rom and probably results from a corruption on the server or on an incorrect software CD. Required file has not been enumerated This AutoCD-specific error message should never occur. It indicates that a CD-set has not been generated correctly, probably due to an error of the program. If the message occurs, send a report to IBM support with a copy of the CD-set. There is not enough space in partition to download the images This error results in a system profile partitioning scheme that is not compatible with Tivoli Provisioning Manager for OS Deployment. The hard disk partition scheme must be done so that the sum of the unpartitioned disk space and of the free space in the last partition is large enough to store all compressed partition and software images. System setup has not properly completed. This error results from a previous serious error in the Sysprep process, that prevented the mini-set up from completing or even to start. 436 Deployment Guide Series: Tivoli Provisioning Manager for OS Deployment V5.1
- 453. Connection refused in sql.rbc This error happens when the TCP to ODBC gateway service that should be running on the server is not accepting connections. This service is normally automatically started when the Tivoli Provisioning Manager for OS Deployment Server service is started. On the server (using the service manager), check that the TCP to ODBC Gateway service is installed and running. Network not initialized This error results from an abruptly aborted deployment, followed by a hard-disk boot that tries to restart the deployment. However, as the computer was started in the network, this is not possible. To restart the deployment, reboot the computer on network boot. This computer has been interrupted during a deployment This message appears (on a black background) when you reboot on the hard disk after a stopped deployment (typically due to an error or to the user pressing the abort button). It means that the deployment was not completed, and that it should be restarted since the operating system is not fully installed. 11.4 Common questions This chapter contains answers to some of the common questions related to management of Tivoli Provisioning Manager for OS Deployment resources. 11.4.1 How do I free some space in the shared repository? When you delete profiles, file usage of the shared repository remains the same. Why did it not shrink, and how to manage this? The shared repository contains all the files and data required to restore the system profiles you defined on your Tivoli Provisioning Manager for OS Deployment server. This repository keeps only one copy of any file, regardless of the number of profiles that might use that file. That is why the shared repository is already much smaller than the sum of individual profiles. When you delete a profile, no files are deleted from the shared repository. There are two main reasons for that behavior: Other profiles might need files that were used by this profile You might need these files when you create new images First reason is obvious, if other profiles are using the file, you have to keep it in the shared repository to allow proper restore of those profiles. However, the Chapter 11. Troubleshooting, best practices, and common questions 437
- 454. second one might not be so obvious. Even if the files are not required by any of the profiles, they are kept in the repository. These files are kept in the repository so that if you need them again you do not have to transfer all the files again to the server. This can drastically improve the time required to create new profiles because you only need to transfer files that do not exist on the server. Note: To run commands for management of shared repository you have to shutdown Tivoli Provisioning Manager for OS Deployment server. If you deleted some profiles and want to see how much space can be recovered you can use statshared command. Here is how it works. The shared repository consists of shared repository blocks, 128 MB files that contain operating system files and corresponding MD5 index information. When you start the statshared command it will analyze the shared repository blocks and will report how much data is not used by any profile. This data is called orphaned data. Example 11-3 contains a sample report that this command generates. The report contains information about files in the repository, whether they are used or they are orphaned (not used by any profile). The lower part of the table lists the disk usage summary. The real size column describes how much storage these files consume when they are restored. The storage used column lists how much storage they consume in the shared repository where they are compressed. Use the following command to start the statshared process: rembo -d -statshared You will see a lot of output on the screen because messages from all log files are written to standard output. Close to the end of the output you should see the following report. Example 11-3 Result of the statshared command FILE > Shared repository analysis result: FILE > ============================================ FILE > FILE > FILE COUNT | Complete | Partial | Empty | FILE > -------------+----------+---------+--------+ FILE > Used files | 13283 | 0 | 0 | FILE > Orphan files | 12372 | 0 | 0 | FILE > -------------+----------+---------+--------+ FILE > FILE > DISK USAGE (KB) | Real size | Storage used | FILE > ----------------+------------+--------------+ FILE > Complete files | 2206568 | 1481496 | FILE > Partial files | 0 | 0 | FILE > Orphan files | 2833986 | 2101858 | FILE > ----------------+------------+--------------+ 438 Deployment Guide Series: Tivoli Provisioning Manager for OS Deployment V5.1
- 455. FILE > Preallocated space : 6415 KB FILE > Recoverable space : 2101859 KB FILE > Compactable space : 2108274 KB If you see that you have many orphaned files taking a lot of space (60% in our example) you might want to run the sweepshared command. This command will analyze the shared repository and mark unused space inside the shared repository blocks. Parts of the shared repository blocks that were marked as unused can now be reused by the Tivoli Provisioning Manager for OS Deployment server for new files. If all data inside the block is marked as unused, that block is removed from the file system. However, if the block is only partially unused it will remain on the file system. Blocks on the file system will still have 128 MB but, as mentioned before, unused parts within the block can now be used for new files uploaded to Tivoli Provisioning Manager for OS Deployment server. Use the following command to start the sweepshared process: rembo -d -sweepshared If this command does not help you because none of the blocks could be deleted or you need disk space for some other application that is not Tivoli Provisioning Manager for OS Deployment, then you try the packshared command. We highly recommended you do not run this command because it will most likely fragment your repository and possibly lower the performance of your Tivoli Provisioning Manager for OS Deployment server. This command performs similar to the sweepshared command, but instead of just marking parts of the block as available it rather deletes these parts and reduces the amount of disk that the shared repository block uses on the disk. Use the following command to start the packshared process: rembo -d -packshared To summarize, we spoke about the following three server commands that manage the shared repository: statshared - reports the number of unused files and how much space they take. sweepshared - marks unused parts of the shared repository as empty and deletes blocks that have all parts marked as empty. packshared - similar to sweepshared but also deletes unused parts of the shared repository blocks. Figure 11-3 on page 440 shows how these commands impact the shared repository. Let us assume that we have three profiles on the server (Windows XP, Windows Vista and RedHat). If we delete the RedHat profile, then the files required for that profile become orphaned. We can run the statshared command Chapter 11. Troubleshooting, best practices, and common questions 439
- 456. to see how much data can be recovered. This is shown as the initial state. After we run the sweepshared command, it will mark parts that were used by the RedHat profile as empty and that space can be reused by Tivoli Provisioning Manager for OS Deployment server. Since the second block was completely filled with the Redhat profile data, it is no longer needed and is deleted. Each of the other two blocks still use 128 MB on the file system. After we run the packshared command, it deletes the empty parts from the shared repository blocks. This reduces the file size of the remaining two blocks. Notice that this fragments the repository and possibly lowers the I/O performance of the server. Use sweepshared if possible and packshared only if necessary. Figure 11-3 Result of using the sweepshared and packshared commands 11.4.2 How do I register new hosts? There are a couple of ways you can register new hosts: Using OS Deployment → Host Monitor → Import hosts feature of the administrative console Using rad-registerhost rbagent command - see “Example - registering hosts from the command line” on page 134 Allowing hosts to automatically register - see “How do I control generated host names for new machines?” on page 441. If you are using the import hosts feature you have to generate a CSV file that will be imported to Tivoli Provisioning Manager for OS Deployment server. This CSV file has lots of attributes you can specify. There is a simple way to get the list of attributes you can use in this file. Export the current state of hosts to a file using 440 Deployment Guide Series: Tivoli Provisioning Manager for OS Deployment V5.1
- 457. the OS Deployment → Host Monitor → Export hosts feature. This generates the CSV file whose first line contains names of all the fields you can use. You can use it as a reference and example file for creation of your own CSV file. 11.4.3 How do I control generated host names for new machines? There are a couple of ways you can control the host name to the machine, mapping, and host name generation for new machines that automatically register to Tivoli Provisioning Manager for OS Deployment server during the PXE boot. Probably the easiest way, if you have a list of MAC addresses, serial numbers, or UUIDs, is to generate a comma separated file and import it to Tivoli Provisioning Manager for OS Deployment server. This will register all hosts and when they connect to the Tivoli Provisioning Manager for OS Deployment server they will be recognized and assigned the host name that was already registered. The second option for host name generation is to use keywords that get expanded at the time of deployment. These keywords are as follows: [IP] - This keyword is expanded to the IP address of the machine. Notice that this is done without padding with zeros or dots. That means that the address 10.1.23.45 and address 10.12.34.5 are expanded to the same value—1012345. You can use this keyword with “range” extension, which allows you to select only part of the IP address. In our example, with address 10.1.23.45, using the keyword [IP1] would give the result 10. Using [IP3-4] would return 2345. Notice, however, that the substring of the IP address might not be unique. [MAC] - This keyword is expanded to the value of the MAC address of the network card used to contact Tivoli Provisioning Manager for OS Deployment server. If the MAC address of the card was 01:23:45:67:89:AB, then [MAC] is expanded to 0123456789AB. [MAC4-6] will return the last three octets of the MAC address - 6789AB. Notice that the substring of the MAC address might not be unique. [SN] - This keyword returns the serial number of the machine. [AT] - This keyword returns the asset tag of the machine. [BOMID] - This is the unique number assigned by Tivoli Provisioning Manager for OS Deployment server. You can use this keyword as [BOMID0000] to get output padded with zeros - 0001, 0002, 0003, and so on. These keywords can also be combined with a fixed string. For example using the host name definition PC[MAC4-6] returns the host name containing letters PC followed by the last three octets of the MAC address. If the MAC address on that machine was 01:23:45:67:89:AB, the resulting name would be PC6789AB. Chapter 11. Troubleshooting, best practices, and common questions 441
- 458. 11.4.4 How do I create binding rules? Bindings in Tivoli Provisioning Manager for OS Deployment allow you to bind configurations and software packages to hosts. Bindings can be static or dynamic. When using static binding you define explicitly which packages or configurations are bound to which hosts. When you use dynamic binding you define binding rules. These rules dynamically bind configurations and software packages to some hosts based on those hosts’ parameters. Creation of these dynamic rules is very simple. When you want to create a binding rule you will get a screen with predefined attributes that you can use in the queries. Pull-down menus are populated with existing values from the database. Figure 11-4 on page 443 shows the binding rule creation page for software packages. Notice several things: The criteria you enter in one screen is matched using the AND logical operator, meaning that all conditions you specified inside the single rule must be met. The logical operator OR is used between multiple rules. This means that any host that meets all requirements in any row is included in the list. Among machine specific attributes you can also find attributes like configuration, system profile, deployment scheme, and administrative group. This allows you to bind packages not only to hosts based on their attributes but also based on the type of deployment. For example you could bind a package to a specific configuration (for example, notebook in finance) or a specific deployment scheme (for example, only install the software package if the deployment uses CD/DVD). 442 Deployment Guide Series: Tivoli Provisioning Manager for OS Deployment V5.1
- 459. Figure 11-4 Software bindings On this screen you will also notice one special field: free-text condition. This field allows you to manually specify the binding rule. Following is an example: When doing machine inventory Tivoli Provisioning Manager for OS Deployment gathers information about all memory modules and slots in your computer. If you want to check if the machine has more than 2 GB of memory, you can use the free-text condition like the following one: (DMI.MemSize1+DMI.MemSize2) > 2*1024*1024 This condition will sum the size of memory in the first two memory slots and compare them to the value of 2 * 1024 * 1024. Since the memory size is stored in kilobytes (KB), this value equals to 2 GB of memory. You can see from this example that it is possible to use basic arithmetic operators like +, -, / and *. Note: Variable names are case sensitive. Using the wrong case in variable names will most likely result in the expression to always be false. It is also possible to use logic operators in free-text condition as well. Let us assume that you want to bind a software package to all machines that have more Chapter 11. Troubleshooting, best practices, and common questions 443
- 460. than 2 GB RAM and processor faster than 2 GHz. To achieve this we will extend the previous example with the logical expression for CPU speed: ((DMI.MemSize1+DMI.MemSize2) > 2*1024*1024) && (DMI.ProcSpeed > 2000) As you can see it is possible to use the following logical operators: Operator && for logical AND Operator || for logical OR Another interesting use of binding is with configurations in system profiles. Using bindings you can bind specific configuration to hosts conforming to binding rules. Figure 11-5 shows the configuration bindings setup screen. As you can see the attributes listed here are different than those listed for the software package. However you will notice that the free-text condition is available here as well—this gives you free hands when binding the configuration to specific host(s). One of the most interesting examples is using the SMBIOS Asset Tag attribute to deploy specific configurations. With Tivoli Provisioning Manager for OS Deployment this is an easy task. All you have to do is specify a free-text binding rule similar to the following: DMI.AssetTag = ‘my asset tag’ This is very useful when machines are physically the same but have different business purposes and therefore require different configurations. You could accomplish this also by using user categories in the Tivoli Provisioning Manager for OS Deployment. You assign different categories to different machines and later use these categories in queries. Figure 11-5 Configuration bindings 444 Deployment Guide Series: Tivoli Provisioning Manager for OS Deployment V5.1
- 461. The conditions determine the applicability of the rule and should evaluate to true or false. A condition must be formed using the variables also used for the keyword substitutions in the software packages combined with Java-like logical operators, listed by order of priority in the following table: Table 11-1 Logical operators for free-text conditions Operator Meaning < smaller than <= smaller than or equal to >= greater than or equal to > greater than == equal to != not equal to && AND operator || OR operator Note: If a condition cannot be evaluated, it is considered to be false. Variables used in these examples and variables you can use in your free-text conditions are actually column names in different tables in the database. To simplify and shorten database table names used in free-text queries, the table names were changed. Table 11-2 contains the list of variable record names and their corresponding database table name. Table 11-2 Variable record names to database record names mapping Variable record name Database record name Disk DiskInventory DMI DMIInventory Order BOM User UserProfile System SystemProfile PCI PCIInventory Chapter 11. Troubleshooting, best practices, and common questions 445
- 462. For disks and PCI devices, you can use the function sizeof (respectively sizeof(Disk) and sizeof(PCI) ) to discover the number of devices present. You can then use indices to access these devices. Following are couple of examples of useful fields: Order.IP: a string, the host IP address, such as 192.168.1.2 Order.MAC: a string, the host MAC address, such as 00:01:02:03:04:05 Order.SN: a string, the host Serial Number, such as CH12345678 Order.Model: a string, the computer model name, such as e-Vectra DMI.Vendor: a string, the vendor name, such as Hewlett-Packard DMI.Product: a string, same as Order.Model DMI.ProcModel: a string, the processor model DMI.AssetTag: a string, asset tag Disk[0].Type: a string, the disk 0 drive type, such as ATAPI Disk[0].Media: a string, the disk 0 media type, such as Disk or CD-ROM Disk[0].DiskSize: a number, the physical size of the disk (if detected) PCI[0].VendorID: a string, the hexadecimal vendor ID of the device PCI[0].DeviceID: a string, the hexadecimal device ID of the device The variables you can use are actually column names in selected tables. On the following pages you can find the list of all columns from the database tables, which you can use as variables in your free-text expressions. The list is a result of running the describe table command. The result contains the column name, which you can use as the variable, its data type (integer, varchar etc.), data length, and whether that field can be empty (Nulls = Yes) or not (Nulls = No). Example 11-4 lists columns from the DiskInventory table. You can access these variables through the record name Disk. Example 11-4 Variables available through Disk record db2 => describe table "DiskInventory" Column Type Type name schema name Length Scale Nulls ------------------------------ --------- ------------------ -------- ----- ---- BomID SYSIBM INTEGER 4 0 Yes DiskID SYSIBM INTEGER 4 0 Yes Controller SYSIBM SMALLINT 2 0 Yes Device SYSIBM INTEGER 4 0 Yes Type SYSIBM VARCHAR 5 0 Yes Media SYSIBM VARCHAR 8 0 Yes 446 Deployment Guide Series: Tivoli Provisioning Manager for OS Deployment V5.1
- 463. Removable SYSIBM CHARACTER 1 0 Yes ProtSupport SYSIBM CHARACTER 1 0 Yes UDMASupport SYSIBM CHARACTER 1 0 Yes BiosSize SYSIBM INTEGER 4 0 Yes DiskSize SYSIBM INTEGER 4 0 Yes Model SYSIBM VARCHAR 40 0 Yes Firmware SYSIBM VARCHAR 8 0 Yes Serial SYSIBM VARCHAR 20 0 Yes ATA48bits SYSIBM CHARACTER 1 0 Yes Example 11-5 lists columns from the DMIInventory table. You can access these variables through the record name DMI. Example 11-5 Variables available through the DMI record db2 => describe table "DMIInventory" Column Type Type name schema name Length Scale Nulls ------------------------------ --------- ------------------ -------- ----- ---- SystemID SYSIBM VARCHAR 24 0 No Description SYSIBM VARCHAR 50 0 Yes Comment SYSIBM VARCHAR 255 0 Yes Model SYSIBM VARCHAR 35 0 Yes CMOSImage SYSIBM VARCHAR 32 0 Yes PrimPart SYSIBM VARCHAR 128 0 Yes LogiPart SYSIBM VARCHAR 255 0 Yes ProtPart SYSIBM VARCHAR 128 0 Yes DiskImage SYSIBM VARCHAR 32 0 Yes OSImage SYSIBM VARCHAR 32 0 Yes OSType SYSIBM VARCHAR 24 0 Yes OSPart SYSIBM INTEGER 4 0 Yes OSCodePage SYSIBM VARCHAR 4 0 Yes SystemCateg0 SYSIBM VARCHAR 24 0 Yes SystemCateg1 SYSIBM VARCHAR 24 0 Yes SystemCateg2 SYSIBM VARCHAR 24 0 Yes SystemCateg3 SYSIBM VARCHAR 24 0 Yes DiskCount SYSIBM INTEGER 4 0 Yes PrimPart1 SYSIBM VARCHAR 128 0 Yes LogiPart1 SYSIBM VARCHAR 255 0 Yes ProtPart1 SYSIBM VARCHAR 128 0 Yes PrimPart2 SYSIBM VARCHAR 128 0 Yes LogiPart2 SYSIBM VARCHAR 255 0 Yes ProtPart2 SYSIBM VARCHAR 128 0 Yes Sysprep SYSIBM VARCHAR 12 0 Yes UniqueKB SYSIBM INTEGER 4 0 Yes SharedKB SYSIBM INTEGER 4 0 Yes Scope SYSIBM VARCHAR 28 0 Yes Chapter 11. Troubleshooting, best practices, and common questions 447
- 464. NewScope SYSIBM VARCHAR 28 0 Yes Example 11-6 lists columns from the BOM table. You can access these variables through the record name Order. Example 11-6 Variables available through the Order record db2 => describe table BOM Column Type Type name schema name Length Scale Nulls ------------------------------ --------- ------------------ -------- ----- ---- BomID SYSIBM INTEGER 4 0 No DeplCount SYSIBM INTEGER 4 0 Yes Description SYSIBM VARCHAR 32 0 Yes SN SYSIBM VARCHAR 64 0 Yes UUID SYSIBM VARCHAR 32 0 Yes MAC SYSIBM VARCHAR 18 0 Yes Model SYSIBM VARCHAR 64 0 Yes Platform SYSIBM VARCHAR 6 0 Yes HostName SYSIBM VARCHAR 32 0 Yes IPSettings SYSIBM VARCHAR 9 0 Yes IP SYSIBM VARCHAR 15 0 Yes NetMask SYSIBM VARCHAR 15 0 Yes Gateway SYSIBM VARCHAR 15 0 Yes DNSServer1 SYSIBM VARCHAR 15 0 Yes DNSServer2 SYSIBM VARCHAR 15 0 Yes DNSServer3 SYSIBM VARCHAR 15 0 Yes DNSDomain SYSIBM VARCHAR 32 0 Yes DNSOrder SYSIBM VARCHAR 64 0 Yes WINSServer1 SYSIBM VARCHAR 24 0 Yes WINSServer2 SYSIBM VARCHAR 24 0 Yes BitsPerPel SYSIBM VARCHAR 5 0 Yes Xresolution SYSIBM VARCHAR 5 0 Yes Yresolution SYSIBM VARCHAR 5 0 Yes Vrefresh SYSIBM VARCHAR 5 0 Yes IdentScope SYSIBM VARCHAR 10 0 Yes ScopeName SYSIBM VARCHAR 32 0 Yes OrgUnit SYSIBM VARCHAR 128 0 Yes JoinDomUser SYSIBM VARCHAR 32 0 Yes JoinDomPass SYSIBM VARCHAR 32 0 Yes ProductKey SYSIBM VARCHAR 32 0 Yes AdministratorName SYSIBM VARCHAR 50 0 Yes NameService SYSIBM VARCHAR 16 0 Yes NameServer SYSIBM VARCHAR 40 0 Yes LDAPProfile SYSIBM VARCHAR 64 0 Yes KerberosRealm SYSIBM VARCHAR 48 0 Yes KAdminServer SYSIBM VARCHAR 48 0 Yes KDCServer1 SYSIBM VARCHAR 48 0 Yes 448 Deployment Guide Series: Tivoli Provisioning Manager for OS Deployment V5.1
- 465. KDCServer2 SYSIBM VARCHAR 48 0 Yes KDCServer3 SYSIBM VARCHAR 48 0 Yes TimeServer SYSIBM VARCHAR 48 0 Yes TermInfo SYSIBM VARCHAR 24 0 Yes EnableIPv6 SYSIBM CHARACTER 1 0 Yes TaskID SYSIBM BIGINT 8 0 Yes SystemID SYSIBM VARCHAR 24 0 Yes DeplSet SYSIBM VARCHAR 24 0 Yes GroupID SYSIBM VARCHAR 32 0 Yes DeployGroupID SYSIBM VARCHAR 32 0 Yes UserID SYSIBM VARCHAR 20 0 Yes Status SYSIBM VARCHAR 8 0 Yes StatusDate SYSIBM TIMESTAMP 10 0 Yes IdentDate SYSIBM TIMESTAMP 10 0 Yes MonitorLocation SYSIBM VARCHAR 50 0 Yes MonitorLayout SYSIBM VARCHAR 16 0 Yes RemboServer SYSIBM VARCHAR 15 0 Yes RemboOptions SYSIBM INTEGER 4 0 Yes RemboLockout SYSIBM INTEGER 4 0 Yes PXEBootMode SYSIBM INTEGER 4 0 Yes SrvHostID SYSIBM INTEGER 4 0 Yes SrvHostID21 SYSIBM INTEGER 4 0 Yes SrvHostID41 SYSIBM INTEGER 4 0 Yes Example 11-7 lists columns from the UserProfile table. You can access these variables through the record name User. Example 11-7 Variables available through the User record db2 => describe table "UserProfile" Column Type Type name schema name Length Scale Nulls ------------------------------ --------- ------------------ -------- ----- ---- UserID SYSIBM VARCHAR 20 0 No FullName SYSIBM VARCHAR 50 0 Yes OrgName SYSIBM VARCHAR 50 0 Yes Locale SYSIBM VARCHAR 30 0 Yes TimeZone SYSIBM VARCHAR 4 0 Yes UserName SYSIBM VARCHAR 32 0 Yes UserDomain SYSIBM VARCHAR 32 0 Yes AdminPasswd SYSIBM VARCHAR 32 0 Yes UserCateg0 SYSIBM VARCHAR 200 0 Yes UserCateg1 SYSIBM VARCHAR 24 0 Yes UserCateg2 SYSIBM VARCHAR 24 0 Yes UserCateg3 SYSIBM VARCHAR 24 0 Yes UserCateg4 SYSIBM VARCHAR 50 0 Yes UserCateg5 SYSIBM VARCHAR 50 0 Yes UserCateg6 SYSIBM VARCHAR 50 0 Yes Chapter 11. Troubleshooting, best practices, and common questions 449
- 466. UserCateg7 SYSIBM VARCHAR 50 0 Yes UserCateg8 SYSIBM VARCHAR 50 0 Yes UserCateg9 SYSIBM VARCHAR 50 0 Yes Example 11-8 lists columns from the SystemProfile table. You can access these variables through the record name System. Example 11-8 Variables available through System record db2 => describe table "SystemProfile" Column Type Type name schema name Length Scale Nulls ------------------------------ --------- ------------------ -------- ----- ---- SystemID SYSIBM VARCHAR 24 0 No Description SYSIBM VARCHAR 50 0 Yes Comment SYSIBM VARCHAR 255 0 Yes Model SYSIBM VARCHAR 35 0 Yes CMOSImage SYSIBM VARCHAR 32 0 Yes PrimPart SYSIBM VARCHAR 128 0 Yes LogiPart SYSIBM VARCHAR 255 0 Yes ProtPart SYSIBM VARCHAR 128 0 Yes DiskImage SYSIBM VARCHAR 32 0 Yes OSImage SYSIBM VARCHAR 32 0 Yes OSType SYSIBM VARCHAR 24 0 Yes OSPart SYSIBM INTEGER 4 0 Yes OSCodePage SYSIBM VARCHAR 4 0 Yes SystemCateg0 SYSIBM VARCHAR 24 0 Yes SystemCateg1 SYSIBM VARCHAR 24 0 Yes SystemCateg2 SYSIBM VARCHAR 24 0 Yes SystemCateg3 SYSIBM VARCHAR 24 0 Yes DiskCount SYSIBM INTEGER 4 0 Yes PrimPart1 SYSIBM VARCHAR 128 0 Yes LogiPart1 SYSIBM VARCHAR 255 0 Yes ProtPart1 SYSIBM VARCHAR 128 0 Yes PrimPart2 SYSIBM VARCHAR 128 0 Yes LogiPart2 SYSIBM VARCHAR 255 0 Yes ProtPart2 SYSIBM VARCHAR 128 0 Yes Sysprep SYSIBM VARCHAR 12 0 Yes UniqueKB SYSIBM INTEGER 4 0 Yes SharedKB SYSIBM INTEGER 4 0 Yes Scope SYSIBM VARCHAR 28 0 Yes NewScope SYSIBM VARCHAR 28 0 Yes 29 record(s) selected. Example 11-9 on page 451 lists columns from the PCIInventory table. You can access these variables through the record name PCI. 450 Deployment Guide Series: Tivoli Provisioning Manager for OS Deployment V5.1
- 467. Example 11-9 Variables available through the PCI record db2 => describe table "PCIInventory" Column Type Type name schema name Length Scale Nulls ------------------------------ --------- ------------------ -------- ----- ---- BomID SYSIBM INTEGER 4 0 No Bus SYSIBM SMALLINT 2 0 No Dev SYSIBM SMALLINT 2 0 No Fun SYSIBM SMALLINT 2 0 No Slot SYSIBM INTEGER 4 0 Yes VendorID SYSIBM VARCHAR 4 0 Yes SubvendorID SYSIBM VARCHAR 4 0 Yes DeviceID SYSIBM VARCHAR 4 0 Yes SubdeviceID SYSIBM VARCHAR 4 0 Yes Revision SYSIBM SMALLINT 2 0 Yes Class SYSIBM VARCHAR 2 0 Yes Subclass SYSIBM VARCHAR 2 0 Yes ProgIf SYSIBM SMALLINT 2 0 Yes IRQ SYSIBM SMALLINT 2 0 Yes ClassName SYSIBM VARCHAR 6 0 Yes Address SYSIBM VARCHAR 18 0 Yes 16 record(s) selected. 11.5 Questions and answers Q: In which context is the software package installed on the machine? A: When the software package is installed on the machine it is run in the context of the user Administrator. On Vista this user is disabled for regular use. During deployment Tivoli Provisioning Manager for OS Deployment enables this account for running user scripts and commands. This is only during deployment. After the machine is disabled, the Administrator account is disabled and you cannot log on to the machine as that user. Q: How do I export a system profile using CLI? A: You can export system profile using rbagent command. Here’s an example: rbagent rad-radget exported.rad PROFILE:wndxp1 The profile name used with this command can be found under value Disk image in OS Deployment → Profiles → <your_profile> → View profile details. Chapter 11. Troubleshooting, best practices, and common questions 451
- 468. Q: Is there a way to install rbagent silently? A: Yes, you can find the rbagent.msi installation file on the server in the directory <tpmosd file repository>/global/http/agents.msi, and install it silently on the remote machine using the following command: msiexec /qb /i rbagent.msi SERVER_IP=x.x.x.x NET_PASSWORD=pwd The NET_PASSWORD variable can be clean text as well as an MD5 encrypted password. Q: How do I have Tivoli Provisioning Manager for OS Deployment PM ignore all network booted machines? A: There is a way to allow only registered hosts to boot using the PXE and ignore all unknown/unregistered hosts. Go to your default administrative group in OS Deployment → Host Monitor, and click the link Configure handling of unknown hosts. Figure 11-6 shows where this link can be found. When you open the configuration screen, check the option Completely ignore unknown hosts (closed server). Figure 11-6 Handling of unknown hosts 452 Deployment Guide Series: Tivoli Provisioning Manager for OS Deployment V5.1
- 469. Q: Do I need a physical floppy disk to create a RAMDISK image? A: No, you can also use emulation software for the floppy disk. Q: Why can’t I log on as Administrator to my Vista image after deployment? A: The Vista sysprep process automatically disables this account, so create another one before you sysprep it. Q: How do I list all schemes and configurations from CLI? A: You can get a list of all schemas and configurations using rbagent’s rad-configlist and rad-schemelist commands. Q: How do I create a software package from the CLI? A: You can create and check software packages using rbagent. Two rbagent commands you will need for this purpose are rad-chksoft and rad-mksoft. Command rad-chksoft <source_path> will simulate package creation and show package attributes. Command rbagent rad-mksoft <source_path> [“<attr>=value” ...] will create the software package. Attr can be any of the following: descr, content, pkgname, dest, cmdline, pass, flags, dosubst, norules. Specifiying attr values on the command line overrides the defaults. Q: Why do I get a green screen on the successfully deployed host, and a yellow status value on the host monitor? A: This can happen when PXE activation (the process of enabling PXE when booting on the hard-disk) does not work. Tivoli Provisioning Manager for OS Deployment's PXE boot code manages the multiple reboots needed to install a computer. To manage these reboots, the PXE boot code has to intercept the boot process of the computer at every boot. If the computer is configured to always boot on the network (LAN device first in the list of boot devices), there is nothing to do, as Tivoli Provisioning Manager for OS Deployment is loaded in memory at every boot. If the computer is configured to boot on the hard-disk, you can change the MBR of the hard-disk and make it point to the Tivoli Provisioning Manager for OS Deployment work partition at the end of the hard-disk. Tivoli Provisioning Chapter 11. Troubleshooting, best practices, and common questions 453
- 470. Manager for OS Deployment is then loaded from the hard-disk when the computer boots, instead of loading the operating system. The drawback of this method is that, since the computer did not use the network card to boot, PXE is not available to Tivoli Provisioning Manager for OS Deployment. To enable network access, PXE is activated with a special function in the PXE card that makes it behave as though the computer had booted on the LAN. However, this is not documented in PXE, and does not work on every network card. If the network does not support this, an error is raised, and access to the server fails (the message Network started, followed by an error). When PXE activation does not work, you can write a special MBR telling the BIOS that the hard-disk is not a valid boot device. By default, the BIOS falls back to the next device in the list, which in most computers is the network. As a result, the computer boots on the network, and Tivoli Provisioning Manager for OS Deployment has full access to the network. This is the purpose of the Use BIOS fallback MBR to start PXE check box. Q: How do I control bandwidth utilization between master and slave servers? A: This can be defined on the same screen where replication is set up (Server parameters → Servers replication). Figure 11-7 on page 455 shows where the replication bandwidth can be set. 454 Deployment Guide Series: Tivoli Provisioning Manager for OS Deployment V5.1
- 471. Figure 11-7 Setting replication bandwidth 11.6 Synchronization with the RbAgent Synchronization with the RbAgent is possible thanks to a special package, sync.pak (included with Tivoli Configuration Manager FixPack 3). This package must be located with the other .pak files, which is in C:Program FilesCommon FilesIBMIBM Tivolipackages for Windows OS, on both master and slave servers. The main concept behind this synchronization process is to keep a list of important master server states and to create differentials between states. These differentials can then be transferred from master to slave to update the slave server. Steps for the RbAgent synchronization are as follows. 1. The first step is to create a new checkpoint on the master server when this server is in a stable and safe state. After major changes on the master server, a new checkpoint is created. Checkpoint 0 (zero) refers to the initial state of the server and is always present. Chapter 11. Troubleshooting, best practices, and common questions 455
- 472. 2. The second step is to create a differential between a chosen checkpoint state and the latest checkpoint state of the master server. This builds a .rad file (or possibly several .dat files if you have indicated a file size limit) in the TPMfOS Filesimport directory. This step can be performed synchronously (RbAgent waits until the task is complete before returning control) or asynchronously (RbAgent returns control immediately). In the asynchronous mode, however, Tivoli Provisioning Manager for OS Deployment prevents the user from launching two .rad file creation processes concurrently. Note: If changes were made on the master server since the last checkpoint, you cannot create a differential with the last checkpoint as the endpoint. You must first create a new checkpoint reflecting the current state of the master server. 3. When ever convenient, you can use any available tool to transfer the .rad from the master server to the slave server. Tivoli Provisioning Manager for OS Deployment does not intervene in this transfer process. 4. When you want to synchronize your slave server, you must copy your differential file from its current location (either still on the master server or on a local directory) to the specific TPMfOS Filesimportauto directory. This directory is automatically created when the sync.pak package is present. Tivoli Provisioning Manager for OS Deployment checks every minute for changes in the TPMfOS Filesimportauto directory. Whenever a new file is found, it is checked for coherence if it is a .rad file, or recomposed as a .rad file if it were a .dat file. It is automatically renamed with a .ok extension if the process went smoothly, or with a .err extension in case of error (logs should be looked at to find the error itself). 5. If the checking process terminates successfully, the content of the .rad.ok file is automatically synchronized with the shared repository. You should be aware that this synchronization process concerns files only. Databases are not synchronized, each server keeps its own host lists. It is possible to customize the files that are synchronized by indicating which folders are concerned. To do so, edit the [RSyncConf] section of the TPMfOS Filesglobalserverstatesequence.ini file where the list of folders were initially populated. Subfolders are recursively and automatically included. Specific RbAgent commands The package sync.pak implements several RbAgent commands, which should be used for this specific synchronization process. These commands, described next, allow you to create new checkpoints, list existing ones, and create .rad files. 456 Deployment Guide Series: Tivoli Provisioning Manager for OS Deployment V5.1
- 473. sync-seqidlist: This command, performed on the master server, returns the list of all valid checkpoints. These checkpoints are extracted from the server file system. The command normally exits with status 0. When the command exits with status 1, an error has occurred and is described in the standard output. sync-newseqid new-sequence-id | auto [force] [TaskID=n Description=d]: This command, performed on the master server, asynchronously creates a new checkpoint. – new-sequence-id is a string identifying the new checkpoint. – auto is the keyword to generate a new sequence id automatically. – force is an optional keyword required to override an existing checkpoint. – n is an unsigned 64 bit integer in decimal form used for status reports. – d is a freely usable string, used for status reports. The command normally exits with status 0. When the command exits with status 1, an error has occurred and is described in the standard output. Checkpoint information is stored in TPMfOS Files/global/serverstate. sync-radget newdiff.rad from-seqid [Split=n] [TaskID=m Description=d]: This command, to be performed on the master server, synchronously creates a differential RAD file. – newdiff.rad is a RbAgent URL, for example, local://root/c$/temp/diff-0-1.rad. – from-seqid is the reference checkpoint from where files can be omitted. – Split=n optionally forces splitting the file in fragments of n MB. – m is an unsigned 64 bit integer in decimal form used for status reports – d is a freely usable string, used for status reports. The command normally exits with status 0. When the command exits with status 1, an error has occurred and is described in the standard output. The command creates a newdiff.rad file. With option Split, several files can be created. They are automatically renamed, for example newdiff.rad becomes newdiff-rad-x-of-y.dat . Each fragment finishes with an MD5 and a signature (20 bytes). With option Split, newdiff-rad.dsc is a description of the fragments. The command cannot start if the server files do not match the last checkpoint. Therefore, running sync-newseqid before sync-radget is a prerequisite. sync-srvradget newdiff.rad from-seqid [Split=n] [TaskID=m Description=d]: This is the asynchronous version of the sync-radget command. Another important difference is in the definition of the parameter newdiff.rad, which is here a path relative to c:TPMfOS Filesimport. The command normally returns very quickly; however, if it returns after several minutes, the server is not responding. Although asynchronous, two or more sync-srvradget commands cannot run concurrently. Chapter 11. Troubleshooting, best practices, and common questions 457
- 474. 458 Deployment Guide Series: Tivoli Provisioning Manager for OS Deployment V5.1
- 475. Part 3 Part 3 Planning for an engagement Part three discusses the service engagement for Tivoli Provisioning Manager for OS Deployment, in general. It also provides a sample Statement of Work, which can be used in such engagements. The target audience of this part is Business Partners and Solution Developers. © Copyright IBM Corp. 2007. All rights reserved. 459
- 476. 460 Deployment Guide Series: Tivoli Provisioning Manager for OS Deployment V5.1
- 477. A Appendix A. Planning for a client engagement In this chapter, we discuss service engagement for Tivoli Provisioning Manager for OS Deployment in general. The target audience of this chapter is Business Partners and Solution Developers. The topics that we discuss include the following: “Services engagement preparation” on page 462 “Solution scope and components” on page 463 “Services engagement overview” on page 465 “Estimating timings and activities of the engagement” on page 472 Important: The time estimates in this chapter are not representative of all the possible implementation scenarios of a Tivoli Provisioning Manager for OS Deployment based solution. Each environment is considered as unique and the time estimates regarded as general guidelines, not absolute numbers. © Copyright IBM Corp. 2007. All rights reserved. 461
- 478. Services engagement preparation This section describes resources available to help you successfully deliver a solution. The discussion is divided into the following sections: “Implementation skills” on page 462 “Available resources” on page 462 Implementation skills To successfully develop and deploy a Tivoli Provisioning Manager for OS Deployment based solution, you must acquire some specialized skills. The following lists the skills needed to implement and customize the solution. General skills – Operating System administration skills on Windows 2000 and Linux-based systems – TCP/IP protocol networking skills with and understanding of DHCP server administration and PXE environments. – Database administration skills Storage skills – Understanding RAID configuration Windows skills – Understanding the Windows cloning process – Understanding the Windows unattended installation process Linux Skills – Understanding the linux build process Solaris skill – Understanding the Solaris build process The exact skills balance that you will need depends on the environment that you intend to build with this technology, and also the server platform on which you intend to host the management solution. Available resources The prerequisite skills listed in the previous tables are those needed to customize or develop the solution. For each of these skills there are a variety of resources available to help acquire the necessary skill level. The educational resources available are as follows: 462 Deployment Guide Series: Tivoli Provisioning Manager for OS Deployment V5.1
- 479. Online Help - Tivoli Provisioning Manager for OS Deployment provides seminars on the Web. details of these materials are at the following Web address: http://www-306.ibm.com/software/tivoli/education/edu_prd.html Further technical information including trial code, white papers and support links. These are at the following Web address: http://www-306.ibm.com/software/tivoli/products/prov-mgr-os-deploy/ Classroom Training - IBM PartnerWorld® provides current information about available classes, their dates, locations, and registration. Additionally, check the PartnerEducation Web site, which serves as a single point-of-contact for all Business Partner education and training. Further details are at the following Web address: http://www-306.ibm.com/software/tivoli/education/ IBM Technical Education Services (ITES) - ITES offers a variety of classes at all knowledge levels to help you achieve any of the offering's prerequisite skills. IBM Redbooks publications - You can access various practical and architectural information regarding IBM hardware and software platforms from the IBM Redbooks publications. These PDFs are available for download from the Web site http://ibm.com/redbooks. Solution scope and components Define the scope of the solution. The solution can be one of the two types of basic offerings in “Basic solution definition” on page 463, or you can add additional components in the section, “Advanced solution definition” on page 465. Basic solution definition Tivoli Provisioning Manager for OS Deployment provides an easy-to-use console for remote deployment and management of operating systems. It includes flexible alternatives for creating and managing operating system cloned or scripted image installs. Tivoli Provisioning Manager for OS Deployment can help significantly reduce the number of images required across your environment and the effort required to manage those images. With Tivoli Provisioning Manager for OS Deployment, clients can discover key hardware information from a bare metal server. From there it can identify the appropriate image to be deployed and automatically install that image. With the benefit of the Universal Image and driver injection at installation, numerous hardware types can be supported with the same core image because the Appendix A. Planning for a client engagement 463
- 480. hardware unique drivers are handled separately. This means less confusion about what operating system to install, fewer problems with missing drivers, and a better overall approach to managing images across the environment. In addition, Tivoli Provisioning Manager for OS Deployment can create a file-based image. Each file only needs to be captured and stored once rather than a full image. As a result, the process for capturing the image is faster, the number of images that you need to manage is fewer and deployment and re-imaging new systems is faster than alternative methods. There are several flavors of the solution that can be presented to the client: The solution can be used to clone and then deploy Windows Operating Systems and also to drive an unattended set up of a target machine. The solution can be used to perform the same as above but for Linux and Solaris machines. The solution can be used to configure or scratch RAID configurations as a part of the deployment process. A summary of the products capabilities is provided in Figure 11-8. Figure 11-8 Summary of Tivoli Provisioning Manager for OS Deployment features 464 Deployment Guide Series: Tivoli Provisioning Manager for OS Deployment V5.1
- 481. Advanced solution definition The imaging solution can be integrated with other systems management products or technologies, to provide a more comprehensive solution, such as the following: Integration with Tivoli Provision Manager to provide Network and SAN allocation and configuration. Building software packages and processes to restore user environments with Microsoft USMT or Lenovo ThinkVantage technologies. Build RAID software packages to configure RAID environments before OS Deployment. Enhancement to integrate with IBM Tivoli Enterprise Console®, IBM Tivoli Monitoring or the CCMDB Change Management Process Manager. Services engagement overview Implementers of a solution routinely rely on their skills and previous experiences as a guide, but there are always some issues that may require some educated guesswork. The goal of this section is to help you minimize the guesswork involved in planning and implementing a solution by providing a framework and time estimates for the major tasks. A typical services engagement consists of the following: Build an executive assessment, see “Executive Assessment” on page 466. Set up a demonstration system or proof of technology, see “Demonstration system set up” on page 467. Analyze the solution tasks, see “Analyze solution tasks” on page 470. Create a contract, or commonly known as, Statement of Work, see “Creating a contract” on page 471. The representative tasks and the time involved for custom solution execution are included in the following section. Since each client has a unique set of needs, the actual set of tasks to accomplish and the time involved may vary. However, this list should help you understand the implementation details, size the solution more accurately for the client, and ensure a profitable engagement for yourself. It is important to work with your clients to understand their expectations. After you gather this data, document the tasks, deliverables, and associated costs in a Statement of Work. The Statement of Work acts as your contractual agreement with the client for the duration of the project; therefore, a detailed and well-defined Statement of Work is advantageous both to you and to your client. Appendix A. Planning for a client engagement 465
- 482. A good overall understanding of the solution scope is a crucial prerequisite to successfully developing, and implementing it. As a Solution Provider, you must understand what is involved in developing such a solution before you can discuss it with your client and size it for a cost estimate. Executive Assessment The Executive Assessment is a service that can be offered to prospective clients as a billable service. It offers a process designed to help you evaluate the business needs of a company that is planning to deploy a solution for e-business. This toolset helps you ask the right people the right questions, so that you get the information you need to propose the appropriate solution. The complete Executive Assessment process should take approximately 10 to 16 hours. The task breakdown is shown in Table 11-3. Table 11-3 Solution task Task Estimated time (hours) An initial fact-finding meeting, asking questions, and 3 gathering data A review and analysis of competing solutions 2 Preparation of a set of strategic recommendations 1 Creation of a demonstration prototype 3-9 A presentation of findings and close for a contract 1 Total 10-16 This is a business-case assessment, not a technical assessment, so the audience should be business owners, line-of-business executives, marketing and sales managers, and finally, the IT manager. The business owner or line-of-business executive is likely to be the decision maker. For their initial investment, your clients get the following: A business assessment prepared by a professional (you) A competitive analysis A prototype solution for their review A strategic and tactical proposal for justifying and implementing their solution for e-business 466 Deployment Guide Series: Tivoli Provisioning Manager for OS Deployment V5.1
- 483. Demonstration system set up A demonstration system is typically set up in advance to show your clients the attributes of the solution. The demonstration system can typically be set up with a limited number of systems that are separate from the system that will be used by the production system. The demonstration can be virtualized with technologies such as Zen, VMWARE, or Microsoft Virtual Server. To do a simple demonstration, you need one server, one donor machine, and one target. If it is a key part of the engagement that you need to test some hardware specifics like RAID configuration or support for a specific set of Network Interface Cards, then use real hardware. The demonstration system allows your clients to evaluate whether the solution suits their particular needs. The tasks of demonstrating the solution and its time estimate is shown in Table 11-4. Table 11-4 Solution demonstration tasks Task Estimated time (hours) Set up hardware 1-2 Perform network configuration 1 Install and configure operating system 4-6 Install and configure database 1-2 Install Tivoli Provisioning for OS Deployment 2 -3 Build donor machine 1-2 Build and test unattended setup profile 1-2 Build and test custom software package 4-6 Demonstrate OS deployment to client 2 Total 17 - 26 Hardware and software requirements Check the product manuals and release notes for revisions, but at the time of going to press. Following is the list of requirements. Appendix A. Planning for a client engagement 467
- 484. The minimum configuration for the Tivoli Provisioning Manager for OS Deployment server includes: Server hardware requirements Minimum of a Dual-Xeon 1 GHz CPU Minimum 1 GB RAM Minimum 10 GB free disk space Server software requirements Windows 2000 Server v Windows 2003 Server Linux Fedora Core: versions 3,4,5 (i386) v RedHat Enterprise Linux (RHEL): versions 3, 4 (i386) SuSE Linux Professional: versions 8, 9,10 (i386) SuSE Linux Enterprise Server (SLES): versions 9, 10 (i386) Debian GNU-Linux 3.1 (Sarge) (i386) SUN Solaris versions 8 (Sparc) SUN Solaris versions 9 (Sparc) SUN Solaris versions 10 (Sparc) FreeBSD: version 6.0 or higher Mac OS X 10.4 (universal binary) Database Server requirements DB2 version 8.2 v MS SQL MySQL Client hardware requirements Remote-boot clients should be equipped with a PXE-compliant bootrom, either version 2.00 and above. Most recent computers with on-board network adapters have built-in PXE support. The network cards that are shown to work the best with IBM Tivoli Provisioning Manager for OS Deployment are Intel adapters. For computers without built-in PXE support, you might consider using a PXE emulation floppy available from various third-party sources. Solaris client computers need at least to have Open Boot PROM version 3.25 or above. SUN provides a patch for upgrading all older SUN Ultra machines to Open Boot PROM 3.25. 468 Deployment Guide Series: Tivoli Provisioning Manager for OS Deployment V5.1
- 485. Other client computer requirements are as follows: Minimal CPU: Pentium type level. Minimal RAM memory: 128 MB. VESA compliant (release 2.0 or later) Video BIOS to get high resolution (VGA fallback is always possible in case of incompatibility). However Tivoli Provisioning Manager for OS Deployment can also work on headless machines. Either a traditional ATA drive (with Ultra DMA support if speed is required) or a BIOS-supported hard drive. DMI support for collecting hardware information, such as model and serial number. Tivoli Provisioning Manager for OS Deployment also works with VMWare workstations. Supported operating systems for deployment targets Windows 2000, Windows 2000 Server, Windows 2003 Server (cloning + setup). Windows XP, Windows XP/64 (cloning + setup). Windows Vista (cloning and unattended). Linux Fedora Core: Fedora3, Fedora4 (cloning + setup). RedHat Enterprise Linux (RHEL): versions 3, 4 (cloning + setup). SuSE Linux Professional: versions 8, 9 (cloning + setup). SuSE Linux Enterprise Server (SLES): version 9 (cloning + setup). Debian GNU-Linux 3.1 (Sarge) (cloning ONLY). Sun Solaris (Sparc): versions 8, 9, 10 (cloning + setup). Tivoli Provisioning Manager for OS Deployment can natively write files on the Second Extended File system (Ext2) and Third Extended File system (Ext3). This means that the product can create and format Ext2 and Ext3 partitions, and can add, delete, and modify files on these partitions. ReiserFS, JFS, XFS and other available file systems for Linux are only supported in unattended setup (scripted install) mode. However, you will not be able to install software packages on these file systems during a deployment. Unattended setup is not supported for all distributions. Cloning is only supported on Ext2 and Ext3 partitions. Logical Volume Manager (LVM) on Extended 2 and Extended 3 partitions is not yet supported. These requirements are summarized as in Figure 11-9 on page 470. Appendix A. Planning for a client engagement 469
- 486. Figure 11-9 Supported operating systems Analyze solution tasks After the client agreed to use the solution in their environment, decide on what effort that you must perform to implement it. These estimates would then be collected and implemented into a contract or Statement of Work. We discuss these tasks in detail in “Estimating timings and activities of the engagement” on page 472. The tasks are our suggested tasks and order, you may complete the tasks in a different order or may be omitting or adding tasks depending on the environment that you implement the solution to. The overall solution timing may be influenced by the amount of skill and experience that you or your team have on the solution, and also the access to resources facilitated by your client. The assumption of the estimated timings that we present is typically based on the following: Knowledge of the Operating Systems. Knowledge of RDBMS and database configuration and management. Knowledge of PXE environments. Knowledge of DHCP server configuration. Knowledge of Operating system build processes and techniques. Knowledge of Tivoli Provisioning Manager for OS Deployment. If the server is hosted on a Windows platform, then it is an option to use an ODBC connection to an Access .mdb database. Even if this option is not used in production, it makes for an easy demonstration. 470 Deployment Guide Series: Tivoli Provisioning Manager for OS Deployment V5.1
- 487. Depending on your skills and experience, the estimates presented may be too high or too low. Table 11-5 illustrates one method of approximating more realistic time estimates for your efforts based on whether you or your team are new to each skill area or could be considered experts. A novice represents someone who completed training in the skill area but has no hands-on experience. An expert represents someone who completed training in the skill area and has also implemented Tivoli Provisioning Manager for OS Deployment projects. You may use the percentages in Table 11-5 to adjust your time estimate. Table 11-5 Skill adjustment Skill Novice Expert increase by reduce by Experience of the operating system 25% 10% Experience of RDBMS and database 10 10 management Deep understanding of Tivoli Provisioning 40% 20% Manager for OS Deployment Deep understanding of operating system 30% 30% build techniques Deep understanding of PXE environments 10% 10% For the detailed task break down, see “Estimating timings and activities of the engagement” on page 472. Creating a contract A contract or Statement of Work is a binding contractual agreement between you and your client that defines the service engagement that you must perform and the result that the client can expect from the engagement. The contract should leave nothing in a doubtful term. A Statement of Work should contain the following: Executive summary of the solution, which is typically a short (less than a page) summary of the solution and its benefit. You must specify any major restriction of the implementation, such as the following: – The solution is only implemented for finance application servers. – The solution will be implemented in phases. Solution description, which contains the major components and solution building blocks that will be implemented. It should cover conceptual Appendix A. Planning for a client engagement 471
- 488. architecture of the solution and solution scope in general. This description is aimed for technical personnel to understand the implementation scope. Assumptions, which lists all the assumptions that are used to prepare the contract and to provide task estimation. Any deviation to the assumptions that are used will definitely impact the scope of engagement and must be managed using the change management procedure. Typical changes include cost changes or scope changes. Business partner responsibilities, which lists all the responsibilities or major tasks to be performed by you or your team to implement the solution. Customer responsibilities, which lists all the responsibilities or items that the client must provide for you or your team to perform the engagement. If you cannot obtain any item in the client responsibilities, then a change management procedure may be invoked. Staffing estimates, which lists the estimated personnel that must implement the solution. Project schedule and milestones, which shows the major steps, schedule, and achievement calendar that can be used to check the project progress. Testing methodology, which lists the test cases to ensure that the project implementation is successful. Deliverables, which provides tangible items that the client will get at the end of the service engagement, including: – Machine installation – Documentation – Training Completion criteria, which lists the items when provided to the client, indicates that the engagement is successfully completed. For most service engagements, this is probably the most delicate to define. It should have clear targets agreed by both parties, and should not be too general. A sample Statement of Work is provided in Appendix B, “Sample Statement of Work for Tivoli Provisioning Manager for OS Deployment” on page 479. Estimating timings and activities of the engagement The fundamentals of delivering a profitable and successful services engagement is to correctly identify the tasks that you must perform and to adequately allocate the necessary time to perform them. This section guides you on the tasks that you may need to perform a Tivoli Provisioning Manager for OS Deployment solution implementation and also estimating the timings. The estimates rely on some basic assumptions, which invalidate the estimates if the items in the 472 Deployment Guide Series: Tivoli Provisioning Manager for OS Deployment V5.1
- 489. following list become a significant requirement for the client. Use the engagement characteristics table in Table 11-6 to help mitigate such variances. Managed environment variance: – The number of target servers and workstation variants will effect the number of device driver specifics that have to be catered for in the software packages and deployment profiles. – The variance in the number of RAID configurations and manufacturers involved adds to the time required to build RAID configuration DOS or Linux-based software packages. Managed environment size and network topology: – Do you need a hierarchical Tivoli Provisioning Manager for OS Deployment server to cater for slow WAN links? User-based characteristics and needs: – Do you need to cater for mobile users? – Do users need to be able to re-image their own machines? It is useful to characterize the deployment type that is required by the client into either primarily workstation or primarily a server deployment. We list the characteristics of the different types of engagements in Table 11-6. Table 11-6 Engagement deployment characteristics Characteristic Workstation Hybrid Server Rate of change of targets HIGH MEDIUM LOW Number of target variants MEDIUM MEDIUM LOW Use of WAN connections HIGH MEDIUM LOW Use of local OS rebuilding HIGH MEDIUM LOW Need to perm RAID configuration LOW LOW HIGH Need for custom software packages MEDIUM MEDIUM MEDIUM Perform environmental analysis and plan tasks This section discusses the tasks for environment analysis engagement. Table 11-7 on page 474 shows the timing estimate for the major components of the tasks for the environment analysis service. Appendix A. Planning for a client engagement 473
- 490. Table 11-7 Estimated time in hours for identified tasks Task Workstation Hybrid Server Identify business 2 2 2 objectives and project sponsor Gather details of 3 2 1 network topology Gather details of 0 1 2 RAID configuration requirement Gather details of 4 3 3 OS profile requirements Gather details of 4 4 4 hardware variance Complete design 6 5 4 Communicate plan 1 1 1 to project sponsor TOTAL HOURS 20 18 17 To help gather these technical requirements, use the provided sample questions and notes on the issues that they raise as in Table 11-8 on page 475, in order to guide the planning process. Note: Collect machine type and device driver details. It will make a pilot deployment, or a ‘proof of concept’, much smoother if you collect details of all hardware devices and the locations of any associated device drivers, before the onsite technical activities start. Having the correct device drivers avoids any confusion between OS driver support, and Tivoli Provisioning Manager for OS Deployment deployment support. 474 Deployment Guide Series: Tivoli Provisioning Manager for OS Deployment V5.1
- 491. Table 11-8 Technical requirement gathering sample questions. Question Notes Is the deployment problem for servers and Look at the timing for the tasks associated or workstations? with the type of deployment that you are undertaking. How many OS types do you want to The more OS types you have to build the deploy? more time it will take. You will also have to decide if it is appropriate to use image or unattended profiles. How many different machine types do you The more variance here, the more device have? drives you will have to cater for. Check that they are supported by the PXE Client and that they are provided with the base install of the OS profile. If not, then you will have to consider driver injection software packages. Do you have any RAID devices to Design and implement a DOS or Linux configure? boot diskette image to perform your required RAID configuration. This is hardware vendor specific. How often do you renew machines? A short renewal cycle is likely to introduce more hardware variance in your estate, once again consider device driver support. Do you have any post OS installation User migration and restoration? OS tasks to complete? component manipulation? These requirements have to be designed and delivered within a software package. Do you already use a PXE based If running multiple PXE solutions, then you deployment solution? need to customize the DHCP server to avoid clashes. Why have multiple solutions? Do you use DHCP for network addresses? If not, then you need to implement DHCP for solution or use CDROM based profile distribution. Do you need to deploy images over a Does your network support IP multicast, WAN connection? and do you have enough bandwidth to move OS images over the network. You may need local servers, and have to export / import the objects from the build server. Appendix A. Planning for a client engagement 475
- 492. Question Notes Do you need to support mobile users? You may need to build CDROM-based local boot images. Do your users have CDROMs? You may need to use redeployment profiles. Do your users have enough free space on This may stop you from using the their hard disks? redeployment schemes for local image restoration. Do you need to return your PCs to a Great requirement for using redeployment known state on a regular basis? profiles. Do you need to have a development and a You will need to design a process to production system? export RAD objects for the development server and then re-import them into production. Do they need a granular security model You will need to implement security realms and map users into this realm. What is your licensing model with Do you have a site license or are the Microsoft? machines individually licensed? A single key makes it easier to control host license key entries. If not then you have to define host by host. Do you have a naming convention for your You can auto-generate host names at workstations and servers? deployment time, or you can export, edit, and import host details according to local requirements. Plan the solution Planning the deployment of a Tivoli Provisioning Manager for OS Deployment solution includes the sub-tasks described in the following list. Gathering requirements At the beginning of your engagement, you should meet with your clients to understand their proposed objectives and to gather their requirements. First, determine the functional requirements. Functional requirements define the business functions that the OS Deployment system is going to provide. You determine your requirements by developing a good understanding of the business needs and of what you hope to achieve. For example, look at issues such as business goals, purpose, and usage questions, such as who the users are, and how they expect to interact. It is important to gather these 476 Deployment Guide Series: Tivoli Provisioning Manager for OS Deployment V5.1
- 493. requirements early, and discover any challenges that may lie ahead while they can still be dealt with easily. After you determine the functional requirements, you can clarify the technical or system requirements. The technical requirement involves spending time at the client site to determine and understand the available data sources. Design the solution Topics that should be addressed range from scalability, functionality, and performance of this solution. Design involves understanding the client's environment including hardware, software, data volumes, special requirements, and operational procedures. It is necessary to identify and plan for any additional tuning of software that may be required because of the client's environment or special needs. In addition, an analysis of the modifications made to the scenarios and reports needs to be performed. After you design the proposed solution and review it with your client, you are ready to begin development of the offering. Perform gap analysis This task may involve performing a gap analysis to give the client an estimate of the development effort required to set up the solution. At its core, the analysis seeks to determine what customizable components need to be extended, modified, or created. The number and complexity of customizable components drive the size of the project and the required resources. After you design the proposed solution and review it with your client, you are ready to proceed. Implement the solution The implementation of the solution is performed using the tasks described in Table 11-9. Note that here we are estimating times to perform the activity a single time. Also note that there appears not to be a large difference in the timings with different complexities of engagement. Remember that the numbers of each item will vary significantly which will reflect on the total time for the project. Table 11-9 Time line estimates for implementation activities Task Estimated time (hours) Workstation Hybrid Server Modify or implement DHCP Server 1-2 1-2 1-2 Build OS, RDBMS and Tivoli Provisioning 7 7 7 Manager Server (x1) Appendix A. Planning for a client engagement 477
- 494. Task Estimated time (hours) Workstation Hybrid Server Build unattended OS profiles (x1) 2-3 2-3 2-3 Build cloned image profiles (x1) 2-3 2-3 2-3 Build deployment schemes (x1) 4-5 4-5 3-4 Build software packages (x1) 2-3 2-3 2-3 Build RAID software package (x1) 0 5-6 5-6 Build driver injection software package 1-2 1-2 1-2 (x1) Build host groupings (x1) 4-6 3-4 2-3 Customize host group settings (x1) 2-3 2-3 2-3 Implement software bindings (x1) 2-3 2-3 2-3 Test solution 16 16 16 Deliver education 7 7 7 Document solution 14 14 14 Total 64-74 68-78 66-76 Close the engagement When the technical work is complete, and the education is delivered, formally close the engagement with the project sponsor or their deputy. We suggest that you cover the following agenda items during the meeting with the project sponsor. 1. Review of original business objectives. 2. Summary of how solution meets defined objectives. 3. Summary of services delivered. 4. Summary of new capability. 5. Other services or product identified during the engagement. 6. Thanks and closing. 478 Deployment Guide Series: Tivoli Provisioning Manager for OS Deployment V5.1
- 495. B Appendix B. Sample Statement of Work for Tivoli Provisioning Manager for OS Deployment In this appendix, we provide a skeleton document that you can use for developing your own customized Statement of Work. © Copyright IBM Corp. 2007. All rights reserved. 479
- 496. Building an operating system deployment solution The content of the Statement of Work would include activities to do the following: Build an operating system deployment infrastructure Build one deployment image for Microsoft Vista Build one deployment image for Microsoft Windows XP Build one deployment image for Microsoft Windows 2003 Build one RAID configuration software package Build one user state migration software package. Produce and Redeployment deployment Produce a CD for local restore The building of the OS deployment solution Statement of Work, consists of the following sections. “Executive summary” on page 480 “Solution description” on page 481 “Assumptions” on page 481 “Business partner responsibilities” on page 481 “Customer responsibilities” on page 482 “Staffing estimates” on page 482 “Testing” on page 483 “Deliverables” on page 483 “Completion criteria” on page 483 Executive summary This service will build the infrastructure required to support the deployment of new operating systems in your target environment. It will also supply working samples of the key items that you will need to deploy a production solution. After this work is completed, you will have the infrastructure necessary to successfully build new machines with minimal physical intervention, and maximal image consistency. 480 Deployment Guide Series: Tivoli Provisioning Manager for OS Deployment V5.1
- 497. Solution description There is a need to quickly deploy and configure new operating systems to servers and workstations, with minimal human intervention, and in a consistent and repeatable way. We also provide support for mobile users who are unable to connect to the network at a convenient time. They are able to quickly rebuild their machine and quickly become business productive once again. Tivoli Provisioning Manager for OS Deployment can capture and deploy operating systems. It can also perform any required post installation operating system configuration. At this point, we would hand off to other members of the Tivoli Provisioning Manager family for the installation of middleware, business applications, and also any configuration of software or hardware that may be required. This service offering will provide a quick time to value for your investment in this Tivoli Provisioning Manager for OS Deployment technology, by proving a working environment within five working days. Assumptions These are the assumptions that are made in this Statement of Work: We will have local administrator access to the management server. We will have administrative access to the management server database. We will have access to DHCP Server configuration. We will have access to Windows OS media and customer license keys We will have full access to a sample target workstation, server and RAID array. The RAID configuration supports DOS based command line configuration Business partner responsibilities This service will be provided according to the high standards of <name of Business Partner>, an IBM Certified Business Partner. We will provide the following: Skilled staff to undertake the defined activities. Documentation of the completed solution. Project management of these activities. Appendix B. Sample Statement of Work for Tivoli Provisioning Manager for OS Deployment 481
- 498. Note: Insert any additional responsibilities here that you will be taking on as part of this project. Customer responsibilities This section describes the responsibilities the customer has to the Business Partner, for example: Designating a representative who will be the focal point for all communication with the Business Partner relative to this project and who will have the authority to act on the customer’s behalf in matters regarding this project. Designating operations personnel to work with the Business Partner as appropriate. Providing all product data in a format as requested. Providing all data and information required for implementation. Providing suitable workspace with internet and telephone access for the services specialists while working on customer premises. Providing user IDs, passwords, and IP addresses as required, enabling the Business Partner to perform the service. Note: Add any client responsibilities that you need to assign in order to complete a successful delivery of your service. Staffing estimates The project will be performed with one Tivoli Provisioning Manager for OS Deployment specialist who will be on site as required by the project schedule. We will also provide project management services, and will be onsite at the end of the project for its formal closure. The project is estimated to be performed within five working days. This is six man days of effort in total. We expect that we will need a single member of your staff working with us throughout this time who will also perform any mediation role required between us and any other required technical resources within your computer operation. This would be five man days in total. Note: You may want to revise these estimates if you want to provide extra services, such as education. 482 Deployment Guide Series: Tivoli Provisioning Manager for OS Deployment V5.1
- 499. Testing The testing of the solution will be done through the use of the infrastructure, to deploy packages to the target machines. Testing will be complete, when we have successfully performed the following: Deployed a Windows XP image to a target workstation, and started the OS. Deployed a Windows 2003 image to a target server, and started the OS. Deployed a Windows Vista image to a target machine and started the OS Restore user settings from Windows 2000 to a Vista machine. Configured RAID settings before the OS installation. Deliverables At the end of this engagement, you will have the following: One management server with all required software installed. Two defined users, each with a different scope of authority. One sample Windows XP deployment image. One sample Windows 2003 deployment package. One sample Windows Vista deployment package. One sample target machine for such deployments. Documentation for the deployed environment. Completion criteria The completion criteria for this project are as follows: The successful completion of all the tests. The delivery of the solution documentation. Appendix B. Sample Statement of Work for Tivoli Provisioning Manager for OS Deployment 483
- 500. 484 Deployment Guide Series: Tivoli Provisioning Manager for OS Deployment V5.1
- 501. Abbreviations and acronyms ADS Microsoft Automated MTFTP Multicast Trivial File Transfer Deployment Services Protocol APM Activity Planner NIC network inferface card ATA AT Attachment ODBC Open DataBase Connectivity BIOS basic input/output system OS operating system CMOS Complementary Metal Oxide PCI Peripheral Component Semiconductor Interconnect DBGW database gateway PXE Pre-boot eXecution DHCP Dynamic Host Configuration Environment Protocol RAD Rembo Auto Deploy DMA Direct Memory Access RAID Redundant Array of DMI Desktop Management Independent Disks Interface RHEL Red Hat Enterprise Linux DMZ demilitarized zone RIS Microsoft Remote Installation DSN Data Source Name Services DX Director Extension RPM Red Hat Package Management Ext2 Extended File system 2 SAN storage area network Ext3 Extended File system 3 SDL Security Development Life GRUB GRand Unified Bootloader cycle GUI graphical user interface SMB Server Message Block HAL hardware abstraction layer SMBIOS System Management BIOS IBM International Business SMS Microsoft Systems Machines Corporation Management Server ISC Internet Software Consortium SOE Standard Operating ITES IBM Technical Education Environment Services SuSE SuSE Linux Enterprise Server ITSO International Technical TFTP Trivial File Transfer Protocol Support Organization TMR Tivoli Management Region JDBC Java Database Connectivity USMT User State Migration Tool LAN local area network VESA Video Electronics Standards LVM Logical Volume Manager Association MBR Master Boot Record WCF Windows Communication MD5 Message Digest 5 Foundation MSI Microsoft Installer Package WIM Windows Imaging © Copyright IBM Corp. 2007. All rights reserved. 485
- 502. WWF Windows Workflow Foundation 486 Deployment Guide Series: Tivoli Provisioning Manager for OS Deployment V5.1
- 503. Related publications The publications listed in this section are considered particularly suitable for a more detailed discussion of the topics covered in this IBM Redbooks publication. IBM Redbooks For information about ordering these publications, see “How to get IBM Redbooks” on page 489. Note that some of the documents referenced here may be available in softcopy only. Deployment Guide Series: IBM Tivoli Provisioning Manager Version 5.1, SG24-7261 Deployment Guide Series: IBM Tivoli Provisioning Manager Express V4.1 for Software Distribution, SG24-7236 Other publications These publications are also relevant as further information sources: Tivoli Provisioning Manager for Operating System Deployment Guide (Fix Pack 1), SC32-2582 IBM Tivoli Configuration Manager User's Guide for Operating System Imaging Solution, SC32-2578 Online resources These Web sites are also relevant as further information sources: Information about JDBC and DB2 connectivity: http://www-128.ibm.com/developerworks/db2/library/techarticle/0203zi kopoulos/0203zikopoulos.html IBM DB2 Information Center: http://publib.boulder.ibm.com/infocenter/db2luw/v8//index.jsp Document about User State Migration Tool Version 3: © Copyright IBM Corp. 2007. All rights reserved. 487
- 504. http://technet2.microsoft.com/WindowsVista/en/library/91f62fc4-621f- 4537-b311-1307df0105611033.mspx Information about JDBC and DB2 connectivity http://www-128.ibm.com/developerworks/db2/library/techarticle/0203zi kopoulos/0203zikopoulos.html Information about ThinkVantage System Migration Assistant: http://www-307.ibm.com/pc/support/site.wss/document.do?sitestyle=len ovo&lndocid=MIGR-66945 HP Web site for configuring RAID arrays: http://h18004.www1.hp.com/products/servers/management/toolkit/index. html Dell Web sites for configuring RAID arrays: http://www.dell.com/content/topics/global.aspx/sys_mgmt/en/server_de ploy?c=us&cs=04&l=en&s=bsd http://support.dell.com/support/downloads/download.aspx?fileid=12320 4 Download location of the IBM toolkit to automate the RAID configuration: http://www-03.ibm.com/systems/management/sgstk.html Information about the IBM toolkit: http://www-304.ibm.com/jct01004c/systems/support/supportsite.wss/doc display?lndocid=MIGR-53564&brandind=5000008 Virtual Floppy Drive 2.1 download location: http://chitchat.at.infoseek.co.jp/vmware/vfd.html#download Information about sysprep parameters: http://support.microsoft.com/kb/30257 Information about the sysprep process: http://www.microsoft.com/technet/prodtechnol/winxppro/deploy/duplica tion.mspx Contents of the sysprep.inf file: http://technet2.microsoft.com/WindowsVista/en/library/71b576bd-cca6- 466f-a1db-16500be3098f1033.mspx?mfr=true IBM OPAL website http://www.ibm.com/software/tivoli/features/it-serv-mgmt/opal.html 488 Deployment Guide Series: Tivoli Provisioning Manager for OS Deployment V5.1
- 505. How to get IBM Redbooks You can search for, view, or download Redbooks, Redpapers, Hints and Tips, draft publications and Additional materials, as well as order hardcopy Redbooks or CD-ROMs, at this Web site: ibm.com/redbooks Help from IBM IBM Support and downloads ibm.com/support IBM Global Services ibm.com/services Related publications 489
- 506. 490 Deployment Guide Series: Tivoli Provisioning Manager for OS Deployment V5.1
- 507. Index Boot configuration details 346 Symbols boot from CD/DVD 21 .dat files 456 Boot from hard disk if idle 349 .NET Framework 3.0 8 boot options .rad file 456 hard drive boot 39 .rad.ok files 456 network boot 39 .reg export fil 199 bootable DOS diskette 305 /etc/services file 95 bootloader 294 business requirements 8, 476 A Access data file 86 Access database 41 C CD/DVD creation 404 Active Directory 47, 54 Change Management products 359 Activity Plan Editor 370, 373, 378, 387 Change Record 161 Activity Plan Monitor 376, 382, 389 chkshared 430 Activity Plan Monitoring window 371 class identifier 77 Activity Planner 363, 366, 373 client boot options 38 Activity Planner plan 375 client troubleshooting 430 administrator 17 cloned image 24–25 advanced binding scenarios 324 cloning advanced DHCP options 115 advantages 230 advanced hybrid images 12 Linux 292 alternate PXE Server 346 versus unattended installation 216, 230 alternate RDBMS 80 Windows Vista 230 APM (Activity Planner) 362 Windows XP 145 assessment of a deployment tool 11 cloning process 25 attended installation profile 216 cloning-mode system profiles 230 AutoDeploy 58, 365 closing the engagement 478 AutoDeploy datasource 82, 90 CMOS settings 152 autogenerate hostnames 476 collecting inventory 328 AutoLogonCount 191 Command line export utilities 22 Common deployment features 303 B collecting inventory 328 bandwidth controlled replication 22 configuring host boot settings 345 bare metal machines 378 configuring RAID arrays 304 Bill of Material 435 device driver injection 332 binding 27 software package rules and bindings 315 binding rule creation 442 common OS deployment scenarios 15 binding software packages 319 rebuild of a previously deployed user workstation BitLocker 9 16 BladeCenter® Management Module 304 rollout of new desktop hardware 15 blind migration 11 upgrade of hardware and subsequent Vista in- BOM table 448 stall 17 © Copyright IBM Corp. 2007. All rights reserved. 491
- 508. Completely ignore unknown hosts option 79 data collection 29 config.csv file 370 multicast rollout 50 Configuration Life cycle 5 network usage 30 connecting using HTTPS 112 soft synchronization multicast 32 creating a cloned profile unicast 30 Linux 292 network usages Windows Vista 230 synchronized multicast 32 Windows XP 145 describe table command 446 creating an unattended profile Device Configuration Life cycle 5 Linux 265 device driver 337 Vista 230 device driver injection 332 Windows 2000 171 how this works 332 creating authentication domain 353 DHCP 294 creating software packages 275 DHCP broadcasts 116 binding 283 DHCP discovery packets 44 RPM software packages 276 DHCP option 60 77 software package build dialog 312 DHCP request 115 Windows 311 DHCP server 44, 77–79, 92, 115–117 custom action 195 DHCPProxy 115 custom sysprep.inf 178 disk types 25 Customize Windows Components operation 204 disk usage summary 438 DiskInventory table 446 DMI information 130 D DMI support 265 dascrt command 95 DMIInventory table 447 Database gateway (DBGW) 93 DMZ (demilitarized zone) 46 Database Server requirements 468 DNS domain 166 DB2 database donor machine 146 ODBC driver installation 81 DOS boot disk 311 DB2 Run-time Client Lite 81 DOS Bootable Diskette 305 DB2 Server 81 DOS-startable CD 304 DB2 V8.2.4 364 DOS-startable diskette 304 DB2COMM environment variable 96 driver injection 20 DBGW parameters 97 creating a device driver software package 336 DEB packages 128 driver package 23, 26 Debian GNU/Linux 92 driver package creation wizard 27 Debian GNU-Linux 3.1 (Sarge) 264 Dynamic Host Configuration Protocol (DHCP) 43 defined objectives 478 DELL 304 deploy command 266 E Deploy Now function 39 efficiency in storage 26 deploy.cab 146, 178 efficient image storage 21 deployment database. 364 empty the recycle bin 231 deployment error messages 435 Endpoint 361 deployment methodology 10 Endpoint label 379 deployment process 286 engagement activities 472 deployment rule 26 engagement timings 472 deployment scheme 21 error messages 433 actions 29 Administrator toolkit 433 492 Deployment Guide Series: Tivoli Provisioning Manager for OS Deployment V5.1
- 509. deployment 435 image replication 33 built in file replication service 34 how it works? 33 F implement the solution 477 Fedora 92 incremental images 428 filesystem 439 inittab file 104 firewalls 45 inject drivers 332 fixshared 430 inject required drivers 332 floppy disk 453 install rbagent silently 452 fresh OS install 11 install the Vista from scratch 214 functional requirements 476 Installation RbAgent 123 G Server installation gap analysis 477 on Linux 91 Goup Policy Object 140 prerequisites granular security model 476 hardware 93 greater security 8 GRUB bootloader 293 RDBMS 93 Guest account 144 software 92 Server installation on Windows prerequisites 76 H database 79 HAL (hardware abstraction layer) 25 DHCP 77 headless machines 264 hardware 76 host boot settings 345 software 76 Host entry 346 Web Interface Extension 123 host list 377 on Linux systems 127 Host Monitor 328 on Windows systems 124 hostnames 28 Installation Stage 205 assigned by Tivoli Provisioning Manager for OS Installing Deployment 28 Operating System Imaging Solution 362 automatic generation 28 Relational Database Management System 91, importing 28 93 manually entering 28 server on Linux systems 91 HP 304 server on Windows systems 76 hub TMR server 373 using alternate RDBMS Hybrid Images 10 creating DB2 database 80 creating ODBC data source 82 I ODBC driver installation 81 IBM DB2 JDBC connector files 98 Web Interface Extension on Linux systems 127 IBM Director 5, 400 Web Interface Extension on Windows systems IBM OPAL website 36 123 IBM ServerGuide Scripting Toolkit 304 integrated client security 9 IBM support 429 Internet cached files 231 IBM System X Server RAID environment 304 ISC (Internet Software Consortium) 78 IBM Technical Education Services (ITES) 463 ISC DHCP server 2.0 78 IBM X series servers 138 ISC DHCP server 3.0 79 ifixapply command 110 ITMC-REMBO-BR-remboserver-region.1 software ifixremove command 111 package 369 Index 493
- 510. ITMC-REMBO-remboserver-region 369 mini setup 24 mini sysprep process 154 more than one PXE server 148 J moving from Windows 2000 to XP 145 JDBC connection 93 MS Access 79 JDK_PATH parameter 95 MS SQL 364 joindomain 134 MSI (Microsoft Installer Package) 27 MSN Messenger 191 L multicast 13 legacy ATA drive 265 multicast packets 32 Lenovo 138 Multilingual interface 86 LILO bootloader 293 multi-tiered rights management 9 Linprep 294, 301 MySQL database 91, 102 Linprep.log 301 Linux boot partition 293 Linux cloned profile 293 N naming convention 476 Linux distributions 128 native installation 215 Linux Fedora Core 264 network bandwidth savings 21 loadstate.exe 199 network bandwidth utilization 21 Local Service Account 366 network boot 28 locked screen 39 network booting without PXE 42 Logical Volume Manager (LVM) 469 Network sensitive image replication 22 Logon as a service privilege 89 network shares 231 new Tivoli Endpoint 377 M New Workstation Manager tool 389, 393 MAC address 135 No system partition 436 Mac OS-X 14 no touch build capability 20 managed environment variance 473 non volatile CMOS storage. 307 Managed Node 367 manual intervention 266 MBR (Master Boot Record) 350 O ODBC driver 364 MD5 (Message Digest 5) 21 ODBC Gateway 86 MD5 index information 438 ODBC Gateway service 437 Media Player 191 ODBC source 435 Microsoft 214 ODBC/JDBC source 79 Microsoft Automated Deployment Services (ADS) older versions of Windows 8 361 OPAL site 364 Microsoft licensing 476 Operating System Imaging Solution 361, 369, 371 Microsoft Remote Installation Services (RIS) 361 commands 369–370, 372 Microsoft SQL Server 79 deployment schemes 371 Microsoft Sysprep limitation 428 Tivoli bare metal machine 371 Microsoft Virtual Server 467 Tivoli reinstall machine 371 Microsoft Vista 8, 214 environment 373 license upgrade path 214 importing a profile 373 Microsoft Vista support 20 installing 362 Microsoft WIM images 14 operations 371 Microsoft WinPE 14 saving user settings 385 mini operating system 300 scratch installation scenario 377 494 Deployment Guide Series: Tivoli Provisioning Manager for OS Deployment V5.1
- 511. server 362 PXE activation 453 software packages 371 PXE boot code 453 Tivoli Endpoint 371 PXE Boot Options 346 Tivoli Endpoint for bare metal machines 371 Alternate PXE server 346 Tivoli eprestoration 371 Boot on hard disk 346 Tivoli response file for bare metal machines Boot on hard disk if idle 346 371 PXE Client 350 Tivoli wrapper to restore Endpoint 371 PXE Client locked menu 148 test environment 363 PXE Client logo screen 146 option 43 44, 78, 115 PXE option 10 (0A) 118 option 60 44, 115 PXE option 255 119 orphaned files 439 PXE option 6 118 OS Deployment server 86 PXE option 8 118 OS installation scenarios 187 PXE option 9 118 configuring the Windows firewall 187 PXE options 121 PXE server 115 PXE-boot server 92 P PXEClient 77 packshared command 439 PXEClient option 77 PCI attributes 334 PCI bus 333 PCI information 332 R PCIInventory table 450 RAD (Rembo Auto Deploy) 87 performing environmental analysis 473 RAD Export 123 pilot deployment, 474 RAD Export Wizard 37 PKGADD 27 RAD Import 123 Pkware 309 radb.ini file 97 plan the solution 476 rad-hidepassword 134 design the solution 477 RADIUS 354 gathering requirements 476 rad-mksoft 134 perform gap analysis 477 rad-registerhost 134 praid.exe 307 radtcm.pak 363 Preboot eXecution Environment (PXE) 42 radunpack 133 preserve user files 215 rad-unregisterhost 134 pre-Vista environments 213 RAID array 137 pre-Vista systems 213 RAID configuration 311, 467 primary OS partition 428 RAID disks 304 Pristine Manager 361 RAMDISK image 453 Pristine Manager component 361 RawWrite.exe 311 profile 20 RbAgent 17, 35–36, 39, 42, 54, 68, 88, 123 exporting 37 RbAgent commands 36, 456 importing 37 RbAgent configuration 175 migration 37 rbagent process 432 profile creation rbagent service 175 locally 216 rbagent.conf 127, 131, 432–433 remotely 216 rbagent.exe 127 profile manager 369 rbagent.log 127, 432 project sponsor 478 rbagent.msi 124, 452 proof of concept 474 rbagentvars 129 Index 495
- 512. rcX.d directories 130 server.db 429 RDBMS vendor 42 ServerGuide Scripting Toolkit 305, 309 Red Hat Enterprise Linux 92 Service Oriented Architecture 399 Redbooks Web site 489 Set security policies 356 Contact us xiv setting user permissions 355 redeployment 22, 40, 420 setupmgr 178 basics 420 shared repository 437 how it works 40 shared repository blocks 438 scenario 422 slave server 362 setting up 421 slave servers 58 RedHat 439 slipstreamed OS image 175 RedHat Enterprise Linux (RHEL) 264 Slipstreaming 175 RedHat profile 440 SMB (Server Message Block) 15 regedit 199 snapshot 25 regedt32 199 Snchronization with the RbAgent 455 region 369 SOE applications 9 release the locked screen 148 soft synchronization multicast 32 Rembo Auto Deploy 361 software deployment 20 Rembo AutoDeploy 430 software distribution package 367, 369 Rembo component 104, 107 Software Distribution Package Editor 385 Rembo plug-in 361, 363 software package 23, 27, 193, 198, 337 Rembo plug-in icon 370 software package rules 315 rembo.conf 429 Software Package WinPE 230 REMBO.IND file 367 Software Package wizard 225 rembo.ini file 369, 388 SoftwareProfile table 435 Remote Supervisor Adapter II 304 sql.rbc 437 repository synchronization 36 Standard Operating Environment (SOE) 9, 47 requirement gathering questions 475 Statement of Work 470 restoring the user personality settings 198 static ip address 294 RPM (Red Hat Package Management) 27 statshared command 438 runlevel 1 294 subnets 47 runlevel number 130 Sun Solaris (Sparc) 264 super-user 88 supportools directory 146 S SuSE Linux Enterprise Server 92 SAN (storage area network) 41 SuSE Linux Enterprise Server (SLES) 264 save money 8 SuSE Linux Professional 92, 264 saving the personality 139 sweepshared command 439 saving USMT profiles 141 switched network 41 scanstate.exe 139, 142 sync.pak 363, 455 scheduled replication 22 Sync.PAK file 36 school library 41 synchronized multicast 32 secondary partition 428 sysocmgr 191 security 46 sysprep 24, 146 Security Development Life cycle (SDL) 9 Sysprep executable file 231 security policies 357 sysprep infrastructure 146 sensitive data 304 Sysprep tool 231 server command-line options 429 Sysprep utility 231 server specification 41 sysprep.inf file 161 496 Deployment Guide Series: Tivoli Provisioning Manager for OS Deployment V5.1
- 513. System Image 231 client engagement 461 system inventory 123 common OS deployment scenarios 15 SystemProfile table 450 Configuration Life cycle 5 considerations 428 data 92 T deployment CD/DVD based 404 target Tivoli Endpoint 388 deployment scenarios task library 369 enterprise 55 temporary directories 231 company expands 69 TFTP file transfer 115 deployment schemes 61 Thick Images 10 design 55 Thin Images 10 small site 47 ThinkVantage Access Connection 11 deployment scheme 52 ThinkVantage System Migration Assistant 138 design 49 Time to Value 12 topology 48 Tivoli account 367 deployment scheme 29 Tivoli Configuration Manager Endpoin 362 DHCP Server on a different different machine Tivoli Configuration Manager V4.2.3 361 77 Activity Planner 363 DHCP Server on the same machine 77 Fixpack 2 361 domains 353 Operating System Imaging Solution 361 Local 354 Pristine Manager component 361 RADIUS 354 Rembo Auto Deploy product 361 Remote NT 354 remote deployment capability 361 driver packages 26 software packages 371 DVD deployment 43 Tivoli Provisioning Manager for OS Deployment engagement preparation 462 integration 362 features 20 Tivoli Desktop 367 adjustable network bandwidth utilization 21 Tivoli Endpoint 381, 384, 388–389, 398 boot from CD/DVD 21 Tivoli Endpoint installation 381 build from DVD 21 Tivoli Endpoint label 388 design considerations 22 Tivoli Endpoint login parameters 381 driver injection 20 Tivoli environment 366 highly efficient image storage 21 Tivoli eprestoration software package 371 network sensitive image replication 22 Tivoli Gateway IP address 381 no touch build capability 20 Tivoli Gateway listening port 381 redeployment 22 Tivoli Management Regions (TMR) 362 software deployment 20 Tivoli Provisioning Manager Express V4.1 for Soft- system cloning 20 ware Distribution 400 uattended setup 20 Tivoli Provisioning Manager for OS Deployment 5, unicast and multicast image deployment 21 47, 77–78, 85, 91–93, 96–97, 104, 108, 111, 119, universal system profile 20 121, 125, 131, 134, 136, 140, 145–146, 155, 163, Fixpack 1 109 175, 215–216, 223–224, 264, 266, 420, 428, 474 image replication 33 architecture 22 implementation skills 462 authentication domain 47 installation 75 available resources 462 on Linux systems 91 binding 27 on Windows systems 76 capabilities 7 installer 285 client boot options 38 integration and collaboration with other products Index 497
- 514. 359 Troubleshooting IBM Director 400 basics 428 Tivoli Provisioning Manager Express V4.1 common questions 437 for Software Distribution 400 error messages 433 Tivoli Provisioning Manager V5.1 399 Questions and answers 451 kernel 42 redeployment 419 native mode of operation 230 self-healing 419 PXE Client code 146 Trusted Root Certification Authorities store 113 PXE Client screen 147 Trustworthy Computing Initiative 9 PXE emulation CD/DVD 413 two PXE servers on the same machine 78 redeployment 40, 419 type 4 connectivity 95 security 46, 353 services 109 services engagement overview 465 U Ultra DMA support 265 software packages 27 unattend.txt arguments 187 solution scope and components 463 unattended installation advanced solution definition 465 Vista 216 analyze solution tasks 470 unattended installation profile basic solution 463 Vista 216 creating a contract 471 Windows 2000 171 demonstration system set up 467 unattended installation response file 179 estimating timings 472 unattended setup 20 executive assessment 466 advantage 23 plan the solution 476 unattended setup command line 428 sample Statement of Work 479 unattended.txt file 185 troubleshooting 428 universal system profile 25 client 430 unknown software package type 436 common questions 437 use PXE_BOOT_SERVERS list 118 error messages 433 User administration 353 Server service/daemon 428 user data migration strategy 11 unattended setup 23 user intervention 266 universal system profile 25 User State Migration 138 User administration 353 User State Migration Tool (USMT) 138, 367 Web console 216 UserProfile table 449 Tivoli Provisioning Manager for OS Deployment DX USMT binaries 203 400 Tivoli Provisioning Manager for OS Deployment Em- bedded Edition 193 V Tivoli Provisioning Manager for Software 400 variable names 443 Tivoli Provisioning Manager V5.1 399 VESA compliant 264 Tivoli Provisioning Manager workflows 140 VESA compliant Video BIOS 469 tivoli_packages_and_schemes.RAD 371 virtual diskette images 305 tk_raid.vfd 305 virtual floppy disk 309 tkzip.exe 307 Virtual Floppy Drive 305 TMR server 367 virtual image 311 TPM for OS Deployment 365 virtual machine 309 TPMfOS Filesmport 456 virtual servers 399 TPMfOS Filesmportauto 456 Vista 9, 50, 213, 215 Trash Can 146 Vista deployment project 9 498 Deployment Guide Series: Tivoli Provisioning Manager for OS Deployment V5.1
- 515. Vista install 17 Vista migration 11 Vista support 20 Vista upgrade paths 214 Vista's Aero Glass interface 8 VLAN (virtual LAN) 116 VMWARE 467 VMWare device drivers 339 VMWare guest operating system 305 VMWare virtual machine 305 W wapmrpt t 366 Web console 87 Web Interface Extension 86, 88, 123, 125–127, 369 WIM (Windows Imaging) 14 Windows 2000 47, 214 Windows 2000 Server 76 Windows 2003 Server 76 Windows Communication Foundation (WCF) 8 Windows DHCP server 78 Windows INI file 27 Windows NT 214 Windows registry 27 Windows Vista Client 230 Windows Vista profile 216 Windows Vista SOE 61 Windows Workflow Foundation (WWF) 8 Windows XP 47, 145, 214 Windows XP Professional 364 winlogon.reg 200 X XP image profile 148 Z Zen 467 zero touch installation 248 Index 499
- 516. 500 Deployment Guide Series: Tivoli Provisioning Manager for OS Deployment V5.1
- 517. Deployment Guide Series: Tivoli Provisioning Manager for OS Deployment V5.1 (1.0” spine) 0.875”<->1.498” 460 <-> 788 pages
- 520. Back cover ® Deployment Guide Series: Tivoli Provisioning Manager for OS Deployment V5.1 Insider’s Guide to Tivoli® Provisioning Manager for OS Deployment provisions TPM for OS operating systems (OS) and applications to computers using INTERNATIONAL Deployment the PXE (Pre-boot eXecution Environment) industry standard TECHNICAL for bare-metal installation. A bare-metal installation SUPPORT Learn how to migrate eliminates the need for an operating system to be present on ORGANIZATION a local disk drive. Tivoli Provisioning Manager for OS to VISTA easily Deployment is a turn-key solution to the most common provisioning issues and provides an easy to use, turn-key Best practices for solution for education, small-to-medium businesses (SMB) or BUILDING TECHNICAL large deployments larger accounts. INFORMATION BASED ON PRACTICAL EXPERIENCE In this easy-to-follow IBM® Redbooks® publication we cover different image management scenarios with Tivoli Provisioning Manager for OS Deployment, such as IBM Redbooks are developed by the IBM International Technical Windows® XP, Windows 2003, Vista, and Linux® Support Organization. Experts deployments. We also discuss how to design and implement from IBM, Customers and a highly-effective image management solution Partners from around the world create timely technical We also provide some best practices on how to integrate information based on realistic Tivoli Provisioning Manager for OS Deployment with other scenarios. Specific change management products, CD/DVD based deployment, recommendations are provided image redeployment , troubleshooting. and planning for sales to help you implement IT engagement. solutions more effectively in your environment. This book is a major reference for IT Specialists and IT Architects working in the image management area. For more information: ibm.com/redbooks SG24-7397-00 ISBN 0738486280