SlideShare a Scribd company logo
En2502 album template editor user manual
Album Template Editor User Manual EN2502
 Imaxel Lab SL, 2005-2012 2
History
Date Doc version Description Author
26.06.2009 1.0 Created by Esther Vigil
Last update
Album Template Editor User Manual EN2502
 Imaxel Lab SL, 2005-2012 3
Índice
1. Introduction 6
2. Getting Started 6
2.1 Paper Setup 6
2.2 Margins 7
2.3 Special sheets 7
2.4 Summary 7
3. Album Properties 9
3.1 Album Summary 9
3.2 Album thumbnail 10
3.3 Setup the album sheets 11
3.3.1 Normal Sheets 12
3.3.2 Special Sheets 13
3.3.3 Design Margins 14
3.3.4 Cut Margins 15
3.3.5 Crop Marks 16
3.3.6 Variable Spine 17
3.4 Ranges setup 19
3.5 Work Options 20
3.5.1 Work mode 21
3.5.2 Framing mode 21
3.5.3 Design options 22
4. Sheet Layout 23
4.1 Tasks: Album sheets 26
4.1.1 Add and copy sheets 26
4.1.2 Set background colour 26
4.1.3 Set background image 27
4.1.4 Set background texture 28
4.1.5 Add a clipart image 28
4.1.6 Clear the sheet background 29
4.2 Tasks: Sheet properties 29
4.2.1 Allow to change the background 29
4.2.2 Allow to edit the design 30
4.2.3 Use in composition 30
4.2.4 Print this sheet always 30
4.3 Tasks: Layer Control 30
Album Template Editor User Manual EN2502
 Imaxel Lab SL, 2005-2012 4
4.3.1 Visible 30
4.3.2 Selectable 31
4.4 Working area 31
4.4.1 Zoom tool 31
4.4.2 Rulers 31
4.4.3 Hand tool 31
4.4.4 Arrow keys 32
4.4.5 Grid and Margins 32
4.4.6 Preview / Design View 32
4.4.7 Selection tool 34
4.4.8 Sheet background colour 34
5. Frames 35
5.1 Create frames 35
5.1.1 Photo Frame 36
5.1.2 Photo Frame below background 36
5.1.3 Text Frame 37
5.2 Edit Frames 38
5.2.1 Frame size 38
5.2.2 Frame rotation 38
5.2.3 Frame properties 39
5.3 Default frame properties 42
5.4 Set frames ratio 43
5.5 Organize and align items 44
5.5.1 Organize menu command functionalities: 45
5.5.2 Mirror 46
5.5.3 Swap pages 47
5.6 Arrange Items 49
5.7 Set frames order 49
6. Sheets options 50
6.1 Add sheets 51
6.2 Organize sheets 51
6.3 Delete sheets 52
6.4 Scale sheets 52
7. Themes 53
7.1 Add theme 54
7.2 Edit theme 55
Album Template Editor User Manual EN2502
 Imaxel Lab SL, 2005-2012 5
7.3 View album themes 55
7.4 Delete theme 56
7.5 Setup themes in the photo kiosk 56
8. Product options 58
8.1 Add a new Category 59
8.2 Add a new Item 60
9. Saving templates 62
10. Keyboard shortcuts 63
Album Template Editor User Manual EN2502
 Imaxel Lab SL, 2005-2012 6
1. Introduction
Welcome to the Album Template Editor for the Imaxel Kiosk Software module. The Album Editor will
let you create your own personalized products in order to optimize your kiosk business by adding new
functionalities and features. The new templates you’ll create can be easily added to the Station
Manager program which controls your kiosk in order to easily offer them to your end users.
WARNING: To add new products, you must have an open catalog which allows you to add and modify
the local products setup in your kiosk. If you’re not sure whether you have or not an open catalog
available, please contact your local distributor or directly with Imaxel Lab in case you already are an
authorized dealer.
2. Getting Started
 Open the Software Album Editor by double click on the icon.
 Click on Create a New Template or Edit an Existing Template, in order to edit a template
already created.
 Fill in the following fields: Paper Setup, Margins, Special Sheets and Summary (please, note
that these options can be edited or entered at a later stage, in Album Properties (see page 8)
2.1 Paper Setup
These fields refer to the printing support measurements. It’s very important to write, the exact value
of the paper you will use to print, in the fields: Width (mm) and Height (mm)
Select any of available formats in the menu list or, select Other if you want to entry a different format.
You can select one or two pages per sheet, in order to type of binding.
Album Template Editor User Manual EN2502
 Imaxel Lab SL, 2005-2012 7
2.2 Margins
These margins are just a help tool for design purposes, since the final customer will not see them. The
margins value should be indicated here in millimeters.
2.3 Special sheets
If your album is going to have special pages: Lining, Cover, Back Cover, Front page or Back page, you
can select them.
 Select Special sheets clicking on the checkbox
2.4 Summary
Fill in the relevant fields.
Album Title: It’s the name that displayed in the software interface, below the picture of the product.
Album Description: It is an additional information about the product. Displayed below Album Title.
Author: It’s the designer’s name or the name of the laboratory.
Product Name: It’s the product name displayed in the ticket order.
IMPORTANT: The Code Number must always be a numeric value and cannot begin with the
number 0. It’s very important that the Product Code is the same one than in Station Manager.
Album Template Editor User Manual EN2502
 Imaxel Lab SL, 2005-2012 8
Once the start up values have been set, you can start working with your new template.
 Click on Create the new Album.
There are three tabs to set up and edit the product: Album Properties, Product Options and Sheet
Layout. To begin with, first click on Album Properties:
Album Template Editor User Manual EN2502
 Imaxel Lab SL, 2005-2012 9
3. Album Properties
 Click on Album Properties on the top left part of the screen.
The left side of the screen contains the configuration menu with the following options:
Album Summary, Album Thumbnail, Setup album sheets and Work Options.
3.1 Album Summary
 By clicking on Album Summary you can fill or change the following fields: Album title, Album
description, Paper description, Product code, Product name and Author.
IMPORTANT: The Code Number must always be a numeric value and cannot begin with the
number 0. It’s very important that the Product Code is the same one than in Station Manager.
Album Template Editor User Manual EN2502
 Imaxel Lab SL, 2005-2012 10
3.2 Album thumbnail
 Click on Album thumbnail to use to one of the template’s sheet or you can load an image from
a file.
This image will be visible, on the kiosk or on the software online ImageDesk, for the final customer to
choose the product. It must be a PNG or JPG file and is better to use a small size picture (around 50
mm x 50 mm and 72 dpi is recommended)
Album Template Editor User Manual EN2502
 Imaxel Lab SL, 2005-2012 11
3.3 Setup the album sheets
 Click on Setup the album sheets.
A new menu will open:
Album Template Editor User Manual EN2502
 Imaxel Lab SL, 2005-2012 12
You can enter different values like: size of normal and special sheets, number of pages per sheet,
design and cut margins, crop marks and variable spine.
You can setup sheets ranges too.
 Click on Sheets Setup button to get the next window and setting up more details about
Margins, Special Sheets, Crop Marks, etc.…
3.3.1 Normal Sheets
 Enter the size of the normal sheets, and also decide whether you want one or two sheets per
page.
Album Template Editor User Manual EN2502
 Imaxel Lab SL, 2005-2012 13
3.3.2 Special Sheets
There are two types of Special Sheets:
Fixed Special Sheets: Front Page and Back Page. They have the same measures as normal sheets since
they’re internal sheets too.
Variable Special Sheets: Lining, Cover and Back Cover. Their measures can be different compared to
normal sheets. The size changes according to the number of internal sheets. The measure of the cover
and the lining will have the size of the normal sheet + minimum width of the spine (see page 16)
Use the Special Sheets tab to define the size of the Lining, Front Cover, Back Cover, Front Page, etc.
NOTE: Special sheets must be included in the template only when you’ll be printing them together
with the rest of normal sheets.
Album Template Editor User Manual EN2502
 Imaxel Lab SL, 2005-2012 14
3.3.3 Design Margins
The Design Margins are used as a guide for the sheet layout, but are no visible for the end customer.
 Select Design Margins. Enter the margins values desired for Inner, Outer, Upper and Lower
margin.
Album Template Editor User Manual EN2502
 Imaxel Lab SL, 2005-2012 15
3.3.4 Cut Margins
The Cut Margins will define the useful area of the template. Any part of an image or text in a
composition, which is out the cut margins, will be cutting.
 Select Cut Margins tab, enter the margin values
Album Template Editor User Manual EN2502
 Imaxel Lab SL, 2005-2012 16
3.3.5 Crop Marks
These marks will help you in the cut and composition process.
 Select Crop Marks in output image if you want to print the crop marks in the output image.
Album Template Editor User Manual EN2502
 Imaxel Lab SL, 2005-2012 17
3.3.6 Variable Spine
You must enter these values when the album has the following features:
 The template contains a customizable cover.
 The album has not a fix number of sheets. This number can be variable depending on the
sheets ranges entered (see page 18)
Variable spine in Cover / Lining
 Enter the minimum width (mm) of the spine of the Cover / Lining will have.
Variable spine formula
 Enter the exact values of the parameters A and B in order to calculate the width of the spine,
when the number of sheets has exceeded the minimal width value of the spine, the formula
for variable spine begins to work automatically.
Variable spine formula = A + B*N
A: The cleft size (mm) of the spine.
B: The thickness (mm) of a normal sheet + the thickness (mm) of the cover.
N: It’s the number of sheets. Value used for N is always 1
Album Template Editor User Manual EN2502
 Imaxel Lab SL, 2005-2012 18
For example:
Cover width 593,50 mm
Cleft 2,50 mm
Cover & normal sheet thickness 0,50 mm
Minimum spine width 9,00 mm
Normal sheets Number Spine width (mm) Increase (mm) Final cover width (mm)
1 3 0 593,5
2 3,5 0 593,5
3 4 0 593,5
4 4,5 0 593,5
5 5 0 593,5
6 5,5 0 593,5
7 6 0 593,5
8 6,5 0 593,5
9 7 0 593,5
10 7,5 0 593,5
11 8 0 593,5
12 8,5 0 593,5
13 9 0 593,5
14 9,5 0,5 594
15 10 1 594,5
16 10,5 1,5 595
17 11 2 595,5
18 11,5 2,5 596
19 12 3 596,5
20 12,5 3,5 597
21 13 4 597,5
22 13,5 4,5 598
Before the page 13 the formula is not applied, since the minimum value has not been reached.
From the page 14 on, the final cover width increases by step.
Album Template Editor User Manual EN2502
 Imaxel Lab SL, 2005-2012 19
3.4 Ranges setup
In the same product album, you can setup several ranges of minimum and maximum sheets in order to
the end user could choose according to the number of photos selected or price.
If the template has a cover / lining and the spine width can be variable, you must enter the values in
Variable Spine screen (see page 16)
Default range means that when the end user selects this template, the initial range of sheets will be
the default value.
Album Template Editor User Manual EN2502
 Imaxel Lab SL, 2005-2012 20
 Click on Add when you want to create a new sheet range.
 Click on Edit to change any value of the sheet range.
 Click on Delete if you want delete a sheet range.
 Click on Default to mark a sheet range by default.
3.5 Work Options
Here you can set the working mode of the template in order to:
 Work mode
 Framing mode
 Design options
Album Template Editor User Manual EN2502
 Imaxel Lab SL, 2005-2012 21
3.5.1 Work mode
 By selecting Only manual mode, the end user program will fill in the pages one after another.
 By selecting Only automatic mode, the program will trend to fill up as many pages as possible
according to the number of pictures selected by the end user and the maximum number of
pages defined. For example: The minimum number of pages is 3, and only three pictures have
been selected to create an album. In this case, the program will take one template containing
a single frame, and will repeat it three times. Anyway, the end user can re-edit the album later
on, and change the number of frames in each page.
 Select Automatic and Manual Modes, if you want that the end user can decide between
Automatic and Manual mode to compose an album.
 Select Express Mode to allow to the end user only a basic edition. The album will be composed
automatically, using the templates according to the number of photos and the sheets range
chosen.
3.5.2 Framing mode
Select the Framing Mode for the pictures. It applies to the pictures which are not proportional to the
frame to be put in.
 Fit: The photo is placed completely inside the frame. If the frame isn't proportional to the
photo, part of the frame can be blank.
Album Template Editor User Manual EN2502
 Imaxel Lab SL, 2005-2012 22
 Fill: The photo fills completely the frame, without blank areas. But if the frame is not
proportional, part of the photo will be cropped.
3.5.3 Design options
 Enable the template selection menu: To allow your customers to access the menu template
selection. For example, the template has different layouts, with this option the customer can
choose or change the layout.
 Disable the template selection menu: A typical example happens with the calendars to be
printed in several pages: select the Disable the template selection menu to avoid customers
changing templates and avoiding errors with the order of the pages.
Album Template Editor User Manual EN2502
 Imaxel Lab SL, 2005-2012 23
4. Sheet Layout
The sheet layout window is divided in three working areas:
 Thumbnails: It shows the thumbnail of the sheets created and the quantity of photo frames
created.
Album Template Editor User Manual EN2502
 Imaxel Lab SL, 2005-2012 24
 Sheet: Composition work area.
Album Template Editor User Manual EN2502
 Imaxel Lab SL, 2005-2012 25
 Tasks: This panel shows the design and setup options frequently used in order to create a
composition. This panel is divided in three sections: Album sheets, Sheet Properties and Layer
Control.
Album Template Editor User Manual EN2502
 Imaxel Lab SL, 2005-2012 26
4.1 Tasks: Album sheets
4.1.1 Add and copy sheets
Add new sheets to the current album template. You can add new sheets, with the same size, or make
copies of the sheets created.
4.1.2 Set background colour
By default there’s no colour assigned to a background, so the Transparent option is showed. To set a
background colour Select a colour among three options showed (System, Web or Custom), or click on
More Colours to get a specific one.
Album Template Editor User Manual EN2502
 Imaxel Lab SL, 2005-2012 27
4.1.3 Set background image
This option allows you add a background image to the sheet. Previously, the image had made with an
image editor like Photoshop, for example. The format file of the background image must be jpg or png
(if it contains transparency areas)
Album Template Editor User Manual EN2502
 Imaxel Lab SL, 2005-2012 28
4.1.4 Set background texture
This option allows you to apply a pattern image to the sheet. This pattern will repeat many times to fill
the background.
The advantage to use a pattern is that the image is smaller than a background image and therefore,
the template is not so heavy.
4.1.5 Add a clipart image
It allows you to add an image object that be set on any part of the composition. The clipart image can
be edited (sized and rotated) and moved over the sheet. The clipart will be located in an upper layer of
the sheet.
Album Template Editor User Manual EN2502
 Imaxel Lab SL, 2005-2012 29
4.1.6 Clear the sheet background
Use it to remove a background image of a sheet.
4.2 Tasks: Sheet properties
The sheet properties at the panel Tasks will allow you to configure the proper permissions for the end
users in order to avoid the template modification.
 Click on the checkbox option to activate/deactivate each one of the available options.
4.2.1 Allow to change the background
If this option is enable, the customer will be allowed to change the sheet background.
Album Template Editor User Manual EN2502
 Imaxel Lab SL, 2005-2012 30
4.2.2 Allow to edit the design
If this option is enable, the end user will be allowed to edit the template, change or resize the photo
frames and text frames (only in software online Image Desk)
4.2.3 Use in composition
This is a special option which gives special category to a sheet. When an automatic album is created,
sheets tagged as Use in Composition will have preference between of the rest the sheets.
4.2.4 Print this sheet always
If this option is enable, the sheet will be always printed even though no image has been inserted in the
sheet.
This feature is used, for example, in these cases:
 To leave a blank sheet in a concrete place of the album.
 To print a corporate logotype or a Copyright no matter which kind of album you’ll be making.
By default this option is disabled.
4.3 Tasks: Layer Control
The Layer control menu allows you to set useful options while you are designing the sheets. This
option is very important when you have several items display at the sheet, since it will allow you to
quickly edit it. Except the background, all other items of the composition have available two options:
Visible and Selectable.
4.3.1 Visible
Set whether the element is visible or not during the composition designing process.
Album Template Editor User Manual EN2502
 Imaxel Lab SL, 2005-2012 31
4.3.2 Selectable
Set whether the element is selectable or not during the composition designing process. This option is
useful when you want to edit items in lower levels shapes that are covered by other upper elements
which doesn’t allow you to select the desired item.
4.4 Working area
Frequently you may need some tools in order to design more accurately.
The rulers and zoom tool will help you with this:
4.4.1 Zoom tool
Use the Zoom tool in the Toolbars to increase or decrease the working area. Also you can use the keys
+ and – in the numeric keyboard.
4.4.2 Rulers
Use the rulers in order to move the composition horizontally or vertically. Click over one ruler and
without dropping the mouse, drag it in order to scroll the working area.
4.4.3 Hand tool
When the template is bigger than the working area, use the hand tool to move quickly over the
template. The hand tool allows you scroll the sheet template in any direction. Click and drag in the
desired direction.
Album Template Editor User Manual EN2502
 Imaxel Lab SL, 2005-2012 32
4.4.4 Arrow keys
You can use the arrow keys (in the keyboard) in order to move over the working area.
4.4.5 Grid and Margins
You can help yourself with the grid. The grid gives you a visual guide for positioning the items in the
composition.
You can also choose whether to show or not the margins by clicking on View Margins.
Working area with grid and margins
4.4.6 Preview / Design View
Preliminary View: This option allows to see the final result of the composition. Photo frames will
display predetermined pictures.
 From View menu, select Preliminary View
Album Template Editor User Manual EN2502
 Imaxel Lab SL, 2005-2012 33
Preview
Design View: Selecting Design View, the Preview will be turned off and you will return to the original
edition screen.
 From View menu, select Design View
Album Template Editor User Manual EN2502
 Imaxel Lab SL, 2005-2012 34
Design view
4.4.7 Selection tool
 Click on Selection button to select one or several items.
4.4.8 Sheet background colour
You can change the background colour with this tool.
Album Template Editor User Manual EN2502
 Imaxel Lab SL, 2005-2012 35
5. Frames
5.1 Create frames
The frames are the containers in the composition where the customer upload the images.
You then need to define the spaces where the personalised pictures from the end user application will
be located. You must create as many frames as pictures you want to be featured on a sheet.
The frames can be:
Album Template Editor User Manual EN2502
 Imaxel Lab SL, 2005-2012 36
5.1.1 Photo Frame
When the background is completely opaque you must use this frame, in order to define the space
where the end user’s photo will be located. The image will be on the background.
The size of the frame appears in the centre.
 Click on Add frame to create a photo frame
5.1.2 Photo Frame below background
This type of frame is used when the background image features a transparency. In this case, the size of
the frame will have to be 4 mm (approx.) bigger on each side in order to avoid white strips around the
picture. The photo will be below the background.
 Click on Add frame below background
Album Template Editor User Manual EN2502
 Imaxel Lab SL, 2005-2012 37
5.1.3 Text Frame
Add Text Frame to enable the end customer to insert a text. When you add a text frame, the font tools
will activate to define: typography, color, size...
Common typographies should be used. Since the predefined font in the template, must be installed in
the photographic kiosk in order to avoid any mistake.
 Click on Add text frame
Album Template Editor User Manual EN2502
 Imaxel Lab SL, 2005-2012 38
5.2 Edit Frames
5.2.1 Frame size
You can edit the frame size created click on the frame and dragging the circular controls sited in both
sides and at the corners. Drag any of these controls in order to resize it horizontally (width) or use the
controls in the upper and lower sides of the frame in order to resize it vertically (height). By dragging
any of the controls at the corners´ frame, you can resize the width and height at the same time. The
control in the upper side is used for manual rotation.
 To resize the frame, drag the frame control and press the Shift key at the same time, in order
to preserve the ratio (proportion) of the frame.
5.2.2 Frame rotation
Automatic rotation
Frames can be rotated gradually from 15º to 15º or they can be turned over in 90º by using the
commands available in the menu Rotate. Later on in this manual we will see how to rotate the frames
manually. Use the menu options in order to rotate automatically the frame:
 Click on Rotate and choose one of the following options:
Turn over: Turn the frame in 90º
Rotate right / Rotate left: Turn the frame 15º left or right.
Make horizontal / Make vertical: Set the frame position to horizontal or vertical.
NOTE: Turning or turning over the frame will affect the image inserted by the customer. That
means the image inserted will take the frame rotation angle.
Album Template Editor User Manual EN2502
 Imaxel Lab SL, 2005-2012 39
Manual Rotation
You can use the circular control in the upper side of the frame to rotate it manually. When the frame is
parallel or perpendicular to the frame, purple colour guides will be shown, in order to help you
matching the frame in the composition.
5.2.3 Frame properties
 Click on Frames menu to change its properties.
A window will be displayed where you can enter the following values:
Size and position
Define the personalized values for Size, Position and Rotation. This tab allows you to enter values more
accurately than with the automatic or manual edition of the frames.
Album Template Editor User Manual EN2502
 Imaxel Lab SL, 2005-2012 40
Borders
 Click on the tab Borders to show the borders in the frame.
 Click on the check box Draw borders
 Enter the values in mm, and select one of the available colours in the menu.
 Click on More colours… to open the mixer colours.
Album Template Editor User Manual EN2502
 Imaxel Lab SL, 2005-2012 41
Shadow
 Click on the tab Shadow in order to show a parallel shadow around the frame.
 Click on the check box Draw shadow
 Enter the value in mm of the shadow displayed, selecting a colour and a percentage of opacity
in % (0-100)
Shape and text
Define the frame shape and the text orientation selecting one of the options available in the menu.
Additionally, you can choose additional options in order to adapt it to other writing style like Arabic,
Hebrew, Japanese, etc…
Album Template Editor User Manual EN2502
 Imaxel Lab SL, 2005-2012 42
5.3 Default frame properties
With the new version 1.42 you can define the default size, borders and shadow values that will have all
the frames by default when adding to the template.
Album Template Editor User Manual EN2502
 Imaxel Lab SL, 2005-2012 43
5.4 Set frames ratio
You can define the default ratio size for all the frames added by default to the template.
 Click on Frames menu
 Select Set frames ratio
 Select the ratio desired
You will be able to select sheets and define the new ratio for all the frames in the selected sheets.
 Click on Frames menu
 Select Set frames ratio
 Select the sheets to change frame ratio
 Select the ratio desired
Album Template Editor User Manual EN2502
 Imaxel Lab SL, 2005-2012 44
This option is only available from version 1.42 on.
5.5 Organize and align items
The Organize menu allows you centre the item horizontal and vertically in the composition. You can
also align in several ways the different items inside the composition.
Please, note that the Align and Make the same size options will only available when you have created
more than one item in the active template.
Album Template Editor User Manual EN2502
 Imaxel Lab SL, 2005-2012 45
 Hold the Control key (Ctrl) and click on several items to select several ones. Also you can select
some of them by dragging and clicking your left mouse button.
5.5.1 Organize menu command functionalities:
Align Up
Align the items selected at the upper “borderline” side.
Align Down
Align the items selected at the lowest “borderline” side.
Align Left
Align the items selected at the “borderline” left.
Align Right
Align the items selected at the “borderline” right.
Align Horizontally
Align the items selected based on a horizontal central axis of all the items selected.
Align Vertically
Align the items selected based on a vertical central axis of all the items selected.
Align Centers
Align the items selected based on a horizontal/vertical central axis of all the items.
Album Template Editor User Manual EN2502
 Imaxel Lab SL, 2005-2012 46
Center
Align the item selected in the center of the template.
Center Horizontally
Center the item selected horizontally in the template.
Center Vertically
Center the item selected vertically in the template.
Make the same size, both
Establish the same (width, height) size to the items selected, taking like a reference the first item
chosen.
Make the same size, width
Establish the same width size to the items selected, taking like a reference the first item chosen.
Make the same size, height
Establish the same height size to the items selected, taking like a reference the first item chosen.
5.5.2 Mirror
The function Mirror allows to move the items of a page to the opposite page.
The process is the following:
Deletes all the items of the opposite page.
Duplicates all the items of the page and moves them to the opposite page.
The items placed between the two pages are not reflected.
This option is available only in sheets with two pages.
 From Pages menu, select Mirror left / right page
Album Template Editor User Manual EN2502
 Imaxel Lab SL, 2005-2012 47
Original design
Design with the right page reflected
5.5.3 Swap pages
The option Swap pages allows to exchange items of a page to the opposite page.
 From Pages menu, select Swap pages
Album Template Editor User Manual EN2502
 Imaxel Lab SL, 2005-2012 48
Original design
Design with swap applied
The background image remains always fixed. Only the position of items has changed.
Album Template Editor User Manual EN2502
 Imaxel Lab SL, 2005-2012 49
5.6 Arrange Items
When you have several frames in the composition, you can establish your stack arrangement. That
means you can decide which frames would be shown in front or behind of others. Cliparts will be
located, always, in an upper layer.
 Select the items to be arranged
 Click on Arrange menu
 Click on the available options
5.7 Set frames order
You can set up the order in which the photos will be placed in the frames of a sheet with this tool:
 Click on Set frames order in the toolbar
 Select, clicking on the frames, one to one, in the order wished
Album Template Editor User Manual EN2502
 Imaxel Lab SL, 2005-2012 50
The photos will be placed on this sheet of the album in this order.
This option is available from v.1.42 on.
6. Sheets options
Album Template Editor User Manual EN2502
 Imaxel Lab SL, 2005-2012 51
6.1 Add sheets
(see page 25)
6.2 Organize sheets
Now, from v. 1.42 on, is possible to change the order of the sheets with a drag-and-drop movement.
To access this menu right click in a sheet and select Organize sheets.
 Click on Sheets and Organize Sheets
 Select the sheet , drag and drop it to the whished place
Album Template Editor User Manual EN2502
 Imaxel Lab SL, 2005-2012 52
6.3 Delete sheets
You can delete any sheet created selecting Delete Sheet.
6.4 Scale sheets
In the menu Sheets-Scale sheets now, the designer has the possibility to rescale a template and reuse
the frame organization for another proportional size.
The Template editor will preserve the aspect ratio of the frames and the disposition.
Album Template Editor User Manual EN2502
 Imaxel Lab SL, 2005-2012 53
7. Themes
With themes, you can design several groups of backgrounds related to a theme. It allows the end
users to choose the theme more appropriate for their photos.
You must create two templates: One with frames only...
...and the other one only with groups of backgrounds, without frames.
Album Template Editor User Manual EN2502
 Imaxel Lab SL, 2005-2012 54
Both templates must be same size.
7.1 Add theme
 To create a new theme, click on Themes, Add theme and a pop up window opens
 Define the theme properties: Theme title, Theme description and Theme internal code
 Load an image to show the theme as a thumbnail. It can be a picture or a sheet of the
template.
Album Template Editor User Manual EN2502
 Imaxel Lab SL, 2005-2012 55
By default, the theme is always available, click on the tag box to activate it.
7.2 Edit theme
 Select Edit theme in order to change any property or the thumbnail of the theme
7.3 View album themes
Select this option to see all the themes created. The thumbnails appear in the right side of the screen.
Album Template Editor User Manual EN2502
 Imaxel Lab SL, 2005-2012 56
7.4 Delete theme
To delete a theme, select Delete theme or right clicking on the thumbnail of the theme.
7.5 Setup themes in the photo kiosk
When the two templates have done, you must rename only the file of backgrounds template. For
example: the name file of original template is themes_portrait.imaxel-af will be
themes_portrait.imaxel-theme This file will have to be at:
C:ProgramFiles ImaxelStationManagerproductosthemes
Album Template Editor User Manual EN2502
 Imaxel Lab SL, 2005-2012 57
In the Station Manager, the product (frames template) will be associated with the backgrounds
template.
 Open Station Manager, in Management open Products and Prices
 Select the album and click on Edit Product button
 Click on Themes tab and click on checkbox to select the themes that will be associated with the
album
Album Template Editor User Manual EN2502
 Imaxel Lab SL, 2005-2012 58
Customer Picture Theme (bottom right of the window) means that the background sheets of album
will be the user’s photos.
 Click on checkbox to select this option
This option is only available from version 1.42 on.
8. Product options
You can create an album with different variables. For example: different cover, colour...
In Products Options screen you can enter these variables.
 Click on Product Options on the top left part of the screen.
The scroll down menu, on the right of the screen, will display two options, Categories or Items. These
Album Template Editor User Manual EN2502
 Imaxel Lab SL, 2005-2012 59
two options are now active. In order to add a new item, you must previously create a New Category.
Also you can add categories and items from the Task panel located in the right part of the screen.
8.1 Add a new Category
 Click on Add a new Category. A window will open up where you can decide the Category title,
its description, the internal code and whether this category is available or not
 Once this is done, click on OK
Album Template Editor User Manual EN2502
 Imaxel Lab SL, 2005-2012 60
8.2 Add a new Item
Each category can be composed of different items. To add an item:
 Click on the chosen category to highlight it. Then click on Add a new Item
 A pop up window will appear. Enter the details of the item (category title, description, code)
 Click on Load image to load a miniature of the item. You can load an image from the clipart
gallery or add one from another file.
Album Template Editor User Manual EN2502
 Imaxel Lab SL, 2005-2012 61
 Click on a Category to see all the items related.
 Right click on an item to add another one, edit it, delete it, and move it upwards or downwards
in the list.
You can also do this by using the menu Tasks on the right side of the screen.
Album Template Editor User Manual EN2502
 Imaxel Lab SL, 2005-2012 62
9. Saving templates
To save a template:
 From File menu, select Save or Save as
The template stores all images, both the used ones and the ones not used. When you save a template,
a pop up window opens with the images not used. Now, you can choose between delete or preserve
them.
Album Template Editor User Manual EN2502
 Imaxel Lab SL, 2005-2012 63
10. Keyboard shortcuts
File menu
CTRL + U – New file
CTRL + A – Open file
CTRL + G – Save file
Edition menu
CTRL + Z – Undo
CTRL + Y – Redo
CTRL + X – Cut
CTRL + C – Copy
CTRL + V – Paste
SUPR – Delete
CTRL + E – Select all
Other shortcuts
F4 – Frame properties
CTRL + R – Rotate right
CTRL + T – Rotate left
ALT + Mouse wheel – Zoom in / out
CTRL + Mouse wheel – Move left / right
Mouse wheel – Move up / down
Numeric key ‘+’ – Zoom in
Numeric key ‘-‘ – Zoom out
Arrows – Move up / down / left / right
Album Template Editor User Manual EN2502
 Imaxel Lab SL, 2005-2012 64
CTRL + H – Activate drag tool
CTRL + S – Activate selection tool
START key – View all
SHIFT + drag frame controller – Change frame size, preserving the ratio
Ad

More Related Content

Viewers also liked (16)

Glorious Wedding Album, Delhi, Wedding Albums, Photo Books
Glorious Wedding Album, Delhi, Wedding Albums, Photo BooksGlorious Wedding Album, Delhi, Wedding Albums, Photo Books
Glorious Wedding Album, Delhi, Wedding Albums, Photo Books
IndiaMART InterMESH Limited
 
Elizabethan customs and family life
Elizabethan customs and family lifeElizabethan customs and family life
Elizabethan customs and family life
alloyd1
 
Wedding photography2
Wedding photography2Wedding photography2
Wedding photography2
Sue Crickmore
 
Ricky & Delia's Wedding
Ricky & Delia's WeddingRicky & Delia's Wedding
Ricky & Delia's Wedding
hippielayla86
 
Wedding Album
Wedding AlbumWedding Album
Wedding Album
Tony DeLiso
 
Wedding Album Proof For Kristin&Steven
Wedding Album Proof For Kristin&StevenWedding Album Proof For Kristin&Steven
Wedding Album Proof For Kristin&Steven
Steve Stanganelli
 
Ppt Rosalia De Castro Y Galicia
Ppt Rosalia De Castro Y GaliciaPpt Rosalia De Castro Y Galicia
Ppt Rosalia De Castro Y Galicia
Lunden MacDonald
 
Ronua - Programatica2010
Ronua - Programatica2010Ronua - Programatica2010
Ronua - Programatica2010
Agora Group
 
En2501 composer template editor user manual
En2501 composer template editor user manualEn2501 composer template editor user manual
En2501 composer template editor user manual
Heo Gòm
 
Stunning Custom Album Design - Destination Wedding Photography
Stunning Custom Album Design - Destination Wedding PhotographyStunning Custom Album Design - Destination Wedding Photography
Stunning Custom Album Design - Destination Wedding Photography
Photo Stories
 
Rosalia De Castro
Rosalia De CastroRosalia De Castro
Rosalia De Castro
profedelenguajrv
 
PSD Wedding Album Templates
PSD Wedding Album TemplatesPSD Wedding Album Templates
PSD Wedding Album Templates
Nirvana Imaging
 
Zipforms Online 6 Users guide
Zipforms Online 6 Users guideZipforms Online 6 Users guide
Zipforms Online 6 Users guide
Matthew Rathbun
 
User manual template
User manual templateUser manual template
User manual template
Hemamalini Varadachari
 
Sample User Manual
Sample User ManualSample User Manual
Sample User Manual
lisalugo
 
Orangescrum Gantt chart Add on User Manual
Orangescrum Gantt chart Add on User ManualOrangescrum Gantt chart Add on User Manual
Orangescrum Gantt chart Add on User Manual
Orangescrum
 
Glorious Wedding Album, Delhi, Wedding Albums, Photo Books
Glorious Wedding Album, Delhi, Wedding Albums, Photo BooksGlorious Wedding Album, Delhi, Wedding Albums, Photo Books
Glorious Wedding Album, Delhi, Wedding Albums, Photo Books
IndiaMART InterMESH Limited
 
Elizabethan customs and family life
Elizabethan customs and family lifeElizabethan customs and family life
Elizabethan customs and family life
alloyd1
 
Wedding photography2
Wedding photography2Wedding photography2
Wedding photography2
Sue Crickmore
 
Ricky & Delia's Wedding
Ricky & Delia's WeddingRicky & Delia's Wedding
Ricky & Delia's Wedding
hippielayla86
 
Wedding Album Proof For Kristin&Steven
Wedding Album Proof For Kristin&StevenWedding Album Proof For Kristin&Steven
Wedding Album Proof For Kristin&Steven
Steve Stanganelli
 
Ppt Rosalia De Castro Y Galicia
Ppt Rosalia De Castro Y GaliciaPpt Rosalia De Castro Y Galicia
Ppt Rosalia De Castro Y Galicia
Lunden MacDonald
 
Ronua - Programatica2010
Ronua - Programatica2010Ronua - Programatica2010
Ronua - Programatica2010
Agora Group
 
En2501 composer template editor user manual
En2501 composer template editor user manualEn2501 composer template editor user manual
En2501 composer template editor user manual
Heo Gòm
 
Stunning Custom Album Design - Destination Wedding Photography
Stunning Custom Album Design - Destination Wedding PhotographyStunning Custom Album Design - Destination Wedding Photography
Stunning Custom Album Design - Destination Wedding Photography
Photo Stories
 
PSD Wedding Album Templates
PSD Wedding Album TemplatesPSD Wedding Album Templates
PSD Wedding Album Templates
Nirvana Imaging
 
Zipforms Online 6 Users guide
Zipforms Online 6 Users guideZipforms Online 6 Users guide
Zipforms Online 6 Users guide
Matthew Rathbun
 
Sample User Manual
Sample User ManualSample User Manual
Sample User Manual
lisalugo
 
Orangescrum Gantt chart Add on User Manual
Orangescrum Gantt chart Add on User ManualOrangescrum Gantt chart Add on User Manual
Orangescrum Gantt chart Add on User Manual
Orangescrum
 

Similar to En2502 album template editor user manual (20)

Sheet metal design
Sheet metal designSheet metal design
Sheet metal design
Hien Dinh
 
Electrónica y PCB: Tutorial de Easyeda V6.4.3
Electrónica y PCB: Tutorial de Easyeda  V6.4.3Electrónica y PCB: Tutorial de Easyeda  V6.4.3
Electrónica y PCB: Tutorial de Easyeda V6.4.3
SANTIAGO PABLO ALBERTO
 
Knowledgeware
KnowledgewareKnowledgeware
Knowledgeware
musawi
 
Access3
Access3Access3
Access3
JTHSICT
 
Dtp Using Publisher 2007
Dtp Using Publisher 2007Dtp Using Publisher 2007
Dtp Using Publisher 2007
Sutinder Mann
 
2. template files training en
2. template files training en2. template files training en
2. template files training en
Heo Gòm
 
Wunderman template 3x4_jan 2012
Wunderman template 3x4_jan 2012Wunderman template 3x4_jan 2012
Wunderman template 3x4_jan 2012
catawunderman
 
Rhino cam nesting_gettingstartedguide
Rhino cam nesting_gettingstartedguideRhino cam nesting_gettingstartedguide
Rhino cam nesting_gettingstartedguide
Javier Euler Vilca
 
WEBINAR ON SOLIDWORKS 2019-Enhancements
WEBINAR ON SOLIDWORKS 2019-EnhancementsWEBINAR ON SOLIDWORKS 2019-Enhancements
WEBINAR ON SOLIDWORKS 2019-Enhancements
CADCIM Technologies
 
CAD/CAM - Wood picnic table (CATIA)
CAD/CAM - Wood picnic table (CATIA)CAD/CAM - Wood picnic table (CATIA)
CAD/CAM - Wood picnic table (CATIA)
Sisubalan Selvan
 
Furniture Exercise
Furniture ExerciseFurniture Exercise
Furniture Exercise
guestb7041
 
Work Sample - Draft Publication Manual
Work Sample - Draft Publication ManualWork Sample - Draft Publication Manual
Work Sample - Draft Publication Manual
Marshall Hopkins
 
Microsoft Project 2003 Configuration Training Level 2 Itvamp 2007
Microsoft Project 2003 Configuration Training Level 2 Itvamp 2007Microsoft Project 2003 Configuration Training Level 2 Itvamp 2007
Microsoft Project 2003 Configuration Training Level 2 Itvamp 2007
ITVAMP, LLC
 
Manual taller 3000 gt 1993 en
Manual taller 3000 gt 1993 enManual taller 3000 gt 1993 en
Manual taller 3000 gt 1993 en
foroamigospeugeot
 
Understanding basic features
Understanding basic featuresUnderstanding basic features
Understanding basic features
Mr_Burns
 
Presentation authoring step_by_step_booklet
Presentation authoring step_by_step_bookletPresentation authoring step_by_step_booklet
Presentation authoring step_by_step_booklet
Emaax Amjad
 
Presentation authoring step_by_step_booklet
Presentation authoring step_by_step_bookletPresentation authoring step_by_step_booklet
Presentation authoring step_by_step_booklet
Emaax Amjad
 
SJI6510_Authoring _With_Structured_FrameMaker
SJI6510_Authoring _With_Structured_FrameMakerSJI6510_Authoring _With_Structured_FrameMaker
SJI6510_Authoring _With_Structured_FrameMaker
W. Ben Rhodes, M.A.
 
Tutorial for design of foundations using safe
Tutorial for design of foundations using safeTutorial for design of foundations using safe
Tutorial for design of foundations using safe
Asaye Dilbo
 
Excel chapter 1
Excel chapter 1Excel chapter 1
Excel chapter 1
Wayland Baptist University
 
Sheet metal design
Sheet metal designSheet metal design
Sheet metal design
Hien Dinh
 
Electrónica y PCB: Tutorial de Easyeda V6.4.3
Electrónica y PCB: Tutorial de Easyeda  V6.4.3Electrónica y PCB: Tutorial de Easyeda  V6.4.3
Electrónica y PCB: Tutorial de Easyeda V6.4.3
SANTIAGO PABLO ALBERTO
 
Knowledgeware
KnowledgewareKnowledgeware
Knowledgeware
musawi
 
Dtp Using Publisher 2007
Dtp Using Publisher 2007Dtp Using Publisher 2007
Dtp Using Publisher 2007
Sutinder Mann
 
2. template files training en
2. template files training en2. template files training en
2. template files training en
Heo Gòm
 
Wunderman template 3x4_jan 2012
Wunderman template 3x4_jan 2012Wunderman template 3x4_jan 2012
Wunderman template 3x4_jan 2012
catawunderman
 
Rhino cam nesting_gettingstartedguide
Rhino cam nesting_gettingstartedguideRhino cam nesting_gettingstartedguide
Rhino cam nesting_gettingstartedguide
Javier Euler Vilca
 
WEBINAR ON SOLIDWORKS 2019-Enhancements
WEBINAR ON SOLIDWORKS 2019-EnhancementsWEBINAR ON SOLIDWORKS 2019-Enhancements
WEBINAR ON SOLIDWORKS 2019-Enhancements
CADCIM Technologies
 
CAD/CAM - Wood picnic table (CATIA)
CAD/CAM - Wood picnic table (CATIA)CAD/CAM - Wood picnic table (CATIA)
CAD/CAM - Wood picnic table (CATIA)
Sisubalan Selvan
 
Furniture Exercise
Furniture ExerciseFurniture Exercise
Furniture Exercise
guestb7041
 
Work Sample - Draft Publication Manual
Work Sample - Draft Publication ManualWork Sample - Draft Publication Manual
Work Sample - Draft Publication Manual
Marshall Hopkins
 
Microsoft Project 2003 Configuration Training Level 2 Itvamp 2007
Microsoft Project 2003 Configuration Training Level 2 Itvamp 2007Microsoft Project 2003 Configuration Training Level 2 Itvamp 2007
Microsoft Project 2003 Configuration Training Level 2 Itvamp 2007
ITVAMP, LLC
 
Manual taller 3000 gt 1993 en
Manual taller 3000 gt 1993 enManual taller 3000 gt 1993 en
Manual taller 3000 gt 1993 en
foroamigospeugeot
 
Understanding basic features
Understanding basic featuresUnderstanding basic features
Understanding basic features
Mr_Burns
 
Presentation authoring step_by_step_booklet
Presentation authoring step_by_step_bookletPresentation authoring step_by_step_booklet
Presentation authoring step_by_step_booklet
Emaax Amjad
 
Presentation authoring step_by_step_booklet
Presentation authoring step_by_step_bookletPresentation authoring step_by_step_booklet
Presentation authoring step_by_step_booklet
Emaax Amjad
 
SJI6510_Authoring _With_Structured_FrameMaker
SJI6510_Authoring _With_Structured_FrameMakerSJI6510_Authoring _With_Structured_FrameMaker
SJI6510_Authoring _With_Structured_FrameMaker
W. Ben Rhodes, M.A.
 
Tutorial for design of foundations using safe
Tutorial for design of foundations using safeTutorial for design of foundations using safe
Tutorial for design of foundations using safe
Asaye Dilbo
 
Ad

More from Heo Gòm (20)

Windows 8 1_power user guide
Windows 8 1_power user guideWindows 8 1_power user guide
Windows 8 1_power user guide
Heo Gòm
 
Windows to go a guide for education
Windows to go   a guide for educationWindows to go   a guide for education
Windows to go a guide for education
Heo Gòm
 
Windows store apps a deployment guide for education
Windows store apps   a deployment guide for educationWindows store apps   a deployment guide for education
Windows store apps a deployment guide for education
Heo Gòm
 
Windows 8 1
Windows 8 1Windows 8 1
Windows 8 1
Heo Gòm
 
Windows 8.1 deployment to p cs a guide for education
Windows 8.1 deployment to p cs   a guide for educationWindows 8.1 deployment to p cs   a guide for education
Windows 8.1 deployment to p cs a guide for education
Heo Gòm
 
Windows 8.1 deployment planning a guide for education
Windows 8.1 deployment planning   a guide for educationWindows 8.1 deployment planning   a guide for education
Windows 8.1 deployment planning a guide for education
Heo Gòm
 
Windows 8 product guide business english
Windows 8 product guide business englishWindows 8 product guide business english
Windows 8 product guide business english
Heo Gòm
 
Win8 accessibility tutorials
Win8 accessibility tutorialsWin8 accessibility tutorials
Win8 accessibility tutorials
Heo Gòm
 
W8 brochure download
W8 brochure downloadW8 brochure download
W8 brochure download
Heo Gòm
 
Sharepoint adoption guide
Sharepoint adoption guideSharepoint adoption guide
Sharepoint adoption guide
Heo Gòm
 
Office365 midsizebusinessquickdeploymentguide
Office365 midsizebusinessquickdeploymentguideOffice365 midsizebusinessquickdeploymentguide
Office365 midsizebusinessquickdeploymentguide
Heo Gòm
 
Moodle plugininstallguide v1
Moodle plugininstallguide v1Moodle plugininstallguide v1
Moodle plugininstallguide v1
Heo Gòm
 
Moodle andoffice365withadfs
Moodle andoffice365withadfsMoodle andoffice365withadfs
Moodle andoffice365withadfs
Heo Gòm
 
How to recover office doc
How to recover office docHow to recover office doc
How to recover office doc
Heo Gòm
 
Getting to know_office_365
Getting to know_office_365Getting to know_office_365
Getting to know_office_365
Heo Gòm
 
Explore share point-2013
Explore share point-2013Explore share point-2013
Explore share point-2013
Heo Gòm
 
Discover share point
Discover share pointDiscover share point
Discover share point
Heo Gòm
 
Deployment guide-for-share point-2013
Deployment guide-for-share point-2013Deployment guide-for-share point-2013
Deployment guide-for-share point-2013
Heo Gòm
 
Deployment guide-for-office-2013
Deployment guide-for-office-2013Deployment guide-for-office-2013
Deployment guide-for-office-2013
Heo Gòm
 
3671 explore windows-8.1_update_wsg_external
3671 explore windows-8.1_update_wsg_external3671 explore windows-8.1_update_wsg_external
3671 explore windows-8.1_update_wsg_external
Heo Gòm
 
Windows 8 1_power user guide
Windows 8 1_power user guideWindows 8 1_power user guide
Windows 8 1_power user guide
Heo Gòm
 
Windows to go a guide for education
Windows to go   a guide for educationWindows to go   a guide for education
Windows to go a guide for education
Heo Gòm
 
Windows store apps a deployment guide for education
Windows store apps   a deployment guide for educationWindows store apps   a deployment guide for education
Windows store apps a deployment guide for education
Heo Gòm
 
Windows 8 1
Windows 8 1Windows 8 1
Windows 8 1
Heo Gòm
 
Windows 8.1 deployment to p cs a guide for education
Windows 8.1 deployment to p cs   a guide for educationWindows 8.1 deployment to p cs   a guide for education
Windows 8.1 deployment to p cs a guide for education
Heo Gòm
 
Windows 8.1 deployment planning a guide for education
Windows 8.1 deployment planning   a guide for educationWindows 8.1 deployment planning   a guide for education
Windows 8.1 deployment planning a guide for education
Heo Gòm
 
Windows 8 product guide business english
Windows 8 product guide business englishWindows 8 product guide business english
Windows 8 product guide business english
Heo Gòm
 
Win8 accessibility tutorials
Win8 accessibility tutorialsWin8 accessibility tutorials
Win8 accessibility tutorials
Heo Gòm
 
W8 brochure download
W8 brochure downloadW8 brochure download
W8 brochure download
Heo Gòm
 
Sharepoint adoption guide
Sharepoint adoption guideSharepoint adoption guide
Sharepoint adoption guide
Heo Gòm
 
Office365 midsizebusinessquickdeploymentguide
Office365 midsizebusinessquickdeploymentguideOffice365 midsizebusinessquickdeploymentguide
Office365 midsizebusinessquickdeploymentguide
Heo Gòm
 
Moodle plugininstallguide v1
Moodle plugininstallguide v1Moodle plugininstallguide v1
Moodle plugininstallguide v1
Heo Gòm
 
Moodle andoffice365withadfs
Moodle andoffice365withadfsMoodle andoffice365withadfs
Moodle andoffice365withadfs
Heo Gòm
 
How to recover office doc
How to recover office docHow to recover office doc
How to recover office doc
Heo Gòm
 
Getting to know_office_365
Getting to know_office_365Getting to know_office_365
Getting to know_office_365
Heo Gòm
 
Explore share point-2013
Explore share point-2013Explore share point-2013
Explore share point-2013
Heo Gòm
 
Discover share point
Discover share pointDiscover share point
Discover share point
Heo Gòm
 
Deployment guide-for-share point-2013
Deployment guide-for-share point-2013Deployment guide-for-share point-2013
Deployment guide-for-share point-2013
Heo Gòm
 
Deployment guide-for-office-2013
Deployment guide-for-office-2013Deployment guide-for-office-2013
Deployment guide-for-office-2013
Heo Gòm
 
3671 explore windows-8.1_update_wsg_external
3671 explore windows-8.1_update_wsg_external3671 explore windows-8.1_update_wsg_external
3671 explore windows-8.1_update_wsg_external
Heo Gòm
 
Ad

Recently uploaded (20)

Expand your AI adoption with AgentExchange
Expand your AI adoption with AgentExchangeExpand your AI adoption with AgentExchange
Expand your AI adoption with AgentExchange
Fexle Services Pvt. Ltd.
 
The Significance of Hardware in Information Systems.pdf
The Significance of Hardware in Information Systems.pdfThe Significance of Hardware in Information Systems.pdf
The Significance of Hardware in Information Systems.pdf
drewplanas10
 
Adobe Illustrator Crack FREE Download 2025 Latest Version
Adobe Illustrator Crack FREE Download 2025 Latest VersionAdobe Illustrator Crack FREE Download 2025 Latest Version
Adobe Illustrator Crack FREE Download 2025 Latest Version
kashifyounis067
 
How to Batch Export Lotus Notes NSF Emails to Outlook PST Easily?
How to Batch Export Lotus Notes NSF Emails to Outlook PST Easily?How to Batch Export Lotus Notes NSF Emails to Outlook PST Easily?
How to Batch Export Lotus Notes NSF Emails to Outlook PST Easily?
steaveroggers
 
Automation Techniques in RPA - UiPath Certificate
Automation Techniques in RPA - UiPath CertificateAutomation Techniques in RPA - UiPath Certificate
Automation Techniques in RPA - UiPath Certificate
VICTOR MAESTRE RAMIREZ
 
LEARN SEO AND INCREASE YOUR KNOWLDGE IN SOFTWARE INDUSTRY
LEARN SEO AND INCREASE YOUR KNOWLDGE IN SOFTWARE INDUSTRYLEARN SEO AND INCREASE YOUR KNOWLDGE IN SOFTWARE INDUSTRY
LEARN SEO AND INCREASE YOUR KNOWLDGE IN SOFTWARE INDUSTRY
NidaFarooq10
 
PDF Reader Pro Crack Latest Version FREE Download 2025
PDF Reader Pro Crack Latest Version FREE Download 2025PDF Reader Pro Crack Latest Version FREE Download 2025
PDF Reader Pro Crack Latest Version FREE Download 2025
mu394968
 
Proactive Vulnerability Detection in Source Code Using Graph Neural Networks:...
Proactive Vulnerability Detection in Source Code Using Graph Neural Networks:...Proactive Vulnerability Detection in Source Code Using Graph Neural Networks:...
Proactive Vulnerability Detection in Source Code Using Graph Neural Networks:...
Ranjan Baisak
 
Douwan Crack 2025 new verson+ License code
Douwan Crack 2025 new verson+ License codeDouwan Crack 2025 new verson+ License code
Douwan Crack 2025 new verson+ License code
aneelaramzan63
 
Microsoft AI Nonprofit Use Cases and Live Demo_2025.04.30.pdf
Microsoft AI Nonprofit Use Cases and Live Demo_2025.04.30.pdfMicrosoft AI Nonprofit Use Cases and Live Demo_2025.04.30.pdf
Microsoft AI Nonprofit Use Cases and Live Demo_2025.04.30.pdf
TechSoup
 
Salesforce Data Cloud- Hyperscale data platform, built for Salesforce.
Salesforce Data Cloud- Hyperscale data platform, built for Salesforce.Salesforce Data Cloud- Hyperscale data platform, built for Salesforce.
Salesforce Data Cloud- Hyperscale data platform, built for Salesforce.
Dele Amefo
 
Exploring Code Comprehension in Scientific Programming: Preliminary Insight...
Exploring Code Comprehension  in Scientific Programming:  Preliminary Insight...Exploring Code Comprehension  in Scientific Programming:  Preliminary Insight...
Exploring Code Comprehension in Scientific Programming: Preliminary Insight...
University of Hawai‘i at Mānoa
 
Adobe After Effects Crack FREE FRESH version 2025
Adobe After Effects Crack FREE FRESH version 2025Adobe After Effects Crack FREE FRESH version 2025
Adobe After Effects Crack FREE FRESH version 2025
kashifyounis067
 
Solidworks Crack 2025 latest new + license code
Solidworks Crack 2025 latest new + license codeSolidworks Crack 2025 latest new + license code
Solidworks Crack 2025 latest new + license code
aneelaramzan63
 
EASEUS Partition Master Crack + License Code
EASEUS Partition Master Crack + License CodeEASEUS Partition Master Crack + License Code
EASEUS Partition Master Crack + License Code
aneelaramzan63
 
Exceptional Behaviors: How Frequently Are They Tested? (AST 2025)
Exceptional Behaviors: How Frequently Are They Tested? (AST 2025)Exceptional Behaviors: How Frequently Are They Tested? (AST 2025)
Exceptional Behaviors: How Frequently Are They Tested? (AST 2025)
Andre Hora
 
WinRAR Crack for Windows (100% Working 2025)
WinRAR Crack for Windows (100% Working 2025)WinRAR Crack for Windows (100% Working 2025)
WinRAR Crack for Windows (100% Working 2025)
sh607827
 
Designing AI-Powered APIs on Azure: Best Practices& Considerations
Designing AI-Powered APIs on Azure: Best Practices& ConsiderationsDesigning AI-Powered APIs on Azure: Best Practices& Considerations
Designing AI-Powered APIs on Azure: Best Practices& Considerations
Dinusha Kumarasiri
 
Adobe Lightroom Classic Crack FREE Latest link 2025
Adobe Lightroom Classic Crack FREE Latest link 2025Adobe Lightroom Classic Crack FREE Latest link 2025
Adobe Lightroom Classic Crack FREE Latest link 2025
kashifyounis067
 
Meet the Agents: How AI Is Learning to Think, Plan, and Collaborate
Meet the Agents: How AI Is Learning to Think, Plan, and CollaborateMeet the Agents: How AI Is Learning to Think, Plan, and Collaborate
Meet the Agents: How AI Is Learning to Think, Plan, and Collaborate
Maxim Salnikov
 
Expand your AI adoption with AgentExchange
Expand your AI adoption with AgentExchangeExpand your AI adoption with AgentExchange
Expand your AI adoption with AgentExchange
Fexle Services Pvt. Ltd.
 
The Significance of Hardware in Information Systems.pdf
The Significance of Hardware in Information Systems.pdfThe Significance of Hardware in Information Systems.pdf
The Significance of Hardware in Information Systems.pdf
drewplanas10
 
Adobe Illustrator Crack FREE Download 2025 Latest Version
Adobe Illustrator Crack FREE Download 2025 Latest VersionAdobe Illustrator Crack FREE Download 2025 Latest Version
Adobe Illustrator Crack FREE Download 2025 Latest Version
kashifyounis067
 
How to Batch Export Lotus Notes NSF Emails to Outlook PST Easily?
How to Batch Export Lotus Notes NSF Emails to Outlook PST Easily?How to Batch Export Lotus Notes NSF Emails to Outlook PST Easily?
How to Batch Export Lotus Notes NSF Emails to Outlook PST Easily?
steaveroggers
 
Automation Techniques in RPA - UiPath Certificate
Automation Techniques in RPA - UiPath CertificateAutomation Techniques in RPA - UiPath Certificate
Automation Techniques in RPA - UiPath Certificate
VICTOR MAESTRE RAMIREZ
 
LEARN SEO AND INCREASE YOUR KNOWLDGE IN SOFTWARE INDUSTRY
LEARN SEO AND INCREASE YOUR KNOWLDGE IN SOFTWARE INDUSTRYLEARN SEO AND INCREASE YOUR KNOWLDGE IN SOFTWARE INDUSTRY
LEARN SEO AND INCREASE YOUR KNOWLDGE IN SOFTWARE INDUSTRY
NidaFarooq10
 
PDF Reader Pro Crack Latest Version FREE Download 2025
PDF Reader Pro Crack Latest Version FREE Download 2025PDF Reader Pro Crack Latest Version FREE Download 2025
PDF Reader Pro Crack Latest Version FREE Download 2025
mu394968
 
Proactive Vulnerability Detection in Source Code Using Graph Neural Networks:...
Proactive Vulnerability Detection in Source Code Using Graph Neural Networks:...Proactive Vulnerability Detection in Source Code Using Graph Neural Networks:...
Proactive Vulnerability Detection in Source Code Using Graph Neural Networks:...
Ranjan Baisak
 
Douwan Crack 2025 new verson+ License code
Douwan Crack 2025 new verson+ License codeDouwan Crack 2025 new verson+ License code
Douwan Crack 2025 new verson+ License code
aneelaramzan63
 
Microsoft AI Nonprofit Use Cases and Live Demo_2025.04.30.pdf
Microsoft AI Nonprofit Use Cases and Live Demo_2025.04.30.pdfMicrosoft AI Nonprofit Use Cases and Live Demo_2025.04.30.pdf
Microsoft AI Nonprofit Use Cases and Live Demo_2025.04.30.pdf
TechSoup
 
Salesforce Data Cloud- Hyperscale data platform, built for Salesforce.
Salesforce Data Cloud- Hyperscale data platform, built for Salesforce.Salesforce Data Cloud- Hyperscale data platform, built for Salesforce.
Salesforce Data Cloud- Hyperscale data platform, built for Salesforce.
Dele Amefo
 
Exploring Code Comprehension in Scientific Programming: Preliminary Insight...
Exploring Code Comprehension  in Scientific Programming:  Preliminary Insight...Exploring Code Comprehension  in Scientific Programming:  Preliminary Insight...
Exploring Code Comprehension in Scientific Programming: Preliminary Insight...
University of Hawai‘i at Mānoa
 
Adobe After Effects Crack FREE FRESH version 2025
Adobe After Effects Crack FREE FRESH version 2025Adobe After Effects Crack FREE FRESH version 2025
Adobe After Effects Crack FREE FRESH version 2025
kashifyounis067
 
Solidworks Crack 2025 latest new + license code
Solidworks Crack 2025 latest new + license codeSolidworks Crack 2025 latest new + license code
Solidworks Crack 2025 latest new + license code
aneelaramzan63
 
EASEUS Partition Master Crack + License Code
EASEUS Partition Master Crack + License CodeEASEUS Partition Master Crack + License Code
EASEUS Partition Master Crack + License Code
aneelaramzan63
 
Exceptional Behaviors: How Frequently Are They Tested? (AST 2025)
Exceptional Behaviors: How Frequently Are They Tested? (AST 2025)Exceptional Behaviors: How Frequently Are They Tested? (AST 2025)
Exceptional Behaviors: How Frequently Are They Tested? (AST 2025)
Andre Hora
 
WinRAR Crack for Windows (100% Working 2025)
WinRAR Crack for Windows (100% Working 2025)WinRAR Crack for Windows (100% Working 2025)
WinRAR Crack for Windows (100% Working 2025)
sh607827
 
Designing AI-Powered APIs on Azure: Best Practices& Considerations
Designing AI-Powered APIs on Azure: Best Practices& ConsiderationsDesigning AI-Powered APIs on Azure: Best Practices& Considerations
Designing AI-Powered APIs on Azure: Best Practices& Considerations
Dinusha Kumarasiri
 
Adobe Lightroom Classic Crack FREE Latest link 2025
Adobe Lightroom Classic Crack FREE Latest link 2025Adobe Lightroom Classic Crack FREE Latest link 2025
Adobe Lightroom Classic Crack FREE Latest link 2025
kashifyounis067
 
Meet the Agents: How AI Is Learning to Think, Plan, and Collaborate
Meet the Agents: How AI Is Learning to Think, Plan, and CollaborateMeet the Agents: How AI Is Learning to Think, Plan, and Collaborate
Meet the Agents: How AI Is Learning to Think, Plan, and Collaborate
Maxim Salnikov
 

En2502 album template editor user manual

  • 2. Album Template Editor User Manual EN2502  Imaxel Lab SL, 2005-2012 2 History Date Doc version Description Author 26.06.2009 1.0 Created by Esther Vigil Last update
  • 3. Album Template Editor User Manual EN2502  Imaxel Lab SL, 2005-2012 3 Índice 1. Introduction 6 2. Getting Started 6 2.1 Paper Setup 6 2.2 Margins 7 2.3 Special sheets 7 2.4 Summary 7 3. Album Properties 9 3.1 Album Summary 9 3.2 Album thumbnail 10 3.3 Setup the album sheets 11 3.3.1 Normal Sheets 12 3.3.2 Special Sheets 13 3.3.3 Design Margins 14 3.3.4 Cut Margins 15 3.3.5 Crop Marks 16 3.3.6 Variable Spine 17 3.4 Ranges setup 19 3.5 Work Options 20 3.5.1 Work mode 21 3.5.2 Framing mode 21 3.5.3 Design options 22 4. Sheet Layout 23 4.1 Tasks: Album sheets 26 4.1.1 Add and copy sheets 26 4.1.2 Set background colour 26 4.1.3 Set background image 27 4.1.4 Set background texture 28 4.1.5 Add a clipart image 28 4.1.6 Clear the sheet background 29 4.2 Tasks: Sheet properties 29 4.2.1 Allow to change the background 29 4.2.2 Allow to edit the design 30 4.2.3 Use in composition 30 4.2.4 Print this sheet always 30 4.3 Tasks: Layer Control 30
  • 4. Album Template Editor User Manual EN2502  Imaxel Lab SL, 2005-2012 4 4.3.1 Visible 30 4.3.2 Selectable 31 4.4 Working area 31 4.4.1 Zoom tool 31 4.4.2 Rulers 31 4.4.3 Hand tool 31 4.4.4 Arrow keys 32 4.4.5 Grid and Margins 32 4.4.6 Preview / Design View 32 4.4.7 Selection tool 34 4.4.8 Sheet background colour 34 5. Frames 35 5.1 Create frames 35 5.1.1 Photo Frame 36 5.1.2 Photo Frame below background 36 5.1.3 Text Frame 37 5.2 Edit Frames 38 5.2.1 Frame size 38 5.2.2 Frame rotation 38 5.2.3 Frame properties 39 5.3 Default frame properties 42 5.4 Set frames ratio 43 5.5 Organize and align items 44 5.5.1 Organize menu command functionalities: 45 5.5.2 Mirror 46 5.5.3 Swap pages 47 5.6 Arrange Items 49 5.7 Set frames order 49 6. Sheets options 50 6.1 Add sheets 51 6.2 Organize sheets 51 6.3 Delete sheets 52 6.4 Scale sheets 52 7. Themes 53 7.1 Add theme 54 7.2 Edit theme 55
  • 5. Album Template Editor User Manual EN2502  Imaxel Lab SL, 2005-2012 5 7.3 View album themes 55 7.4 Delete theme 56 7.5 Setup themes in the photo kiosk 56 8. Product options 58 8.1 Add a new Category 59 8.2 Add a new Item 60 9. Saving templates 62 10. Keyboard shortcuts 63
  • 6. Album Template Editor User Manual EN2502  Imaxel Lab SL, 2005-2012 6 1. Introduction Welcome to the Album Template Editor for the Imaxel Kiosk Software module. The Album Editor will let you create your own personalized products in order to optimize your kiosk business by adding new functionalities and features. The new templates you’ll create can be easily added to the Station Manager program which controls your kiosk in order to easily offer them to your end users. WARNING: To add new products, you must have an open catalog which allows you to add and modify the local products setup in your kiosk. If you’re not sure whether you have or not an open catalog available, please contact your local distributor or directly with Imaxel Lab in case you already are an authorized dealer. 2. Getting Started  Open the Software Album Editor by double click on the icon.  Click on Create a New Template or Edit an Existing Template, in order to edit a template already created.  Fill in the following fields: Paper Setup, Margins, Special Sheets and Summary (please, note that these options can be edited or entered at a later stage, in Album Properties (see page 8) 2.1 Paper Setup These fields refer to the printing support measurements. It’s very important to write, the exact value of the paper you will use to print, in the fields: Width (mm) and Height (mm) Select any of available formats in the menu list or, select Other if you want to entry a different format. You can select one or two pages per sheet, in order to type of binding.
  • 7. Album Template Editor User Manual EN2502  Imaxel Lab SL, 2005-2012 7 2.2 Margins These margins are just a help tool for design purposes, since the final customer will not see them. The margins value should be indicated here in millimeters. 2.3 Special sheets If your album is going to have special pages: Lining, Cover, Back Cover, Front page or Back page, you can select them.  Select Special sheets clicking on the checkbox 2.4 Summary Fill in the relevant fields. Album Title: It’s the name that displayed in the software interface, below the picture of the product. Album Description: It is an additional information about the product. Displayed below Album Title. Author: It’s the designer’s name or the name of the laboratory. Product Name: It’s the product name displayed in the ticket order. IMPORTANT: The Code Number must always be a numeric value and cannot begin with the number 0. It’s very important that the Product Code is the same one than in Station Manager.
  • 8. Album Template Editor User Manual EN2502  Imaxel Lab SL, 2005-2012 8 Once the start up values have been set, you can start working with your new template.  Click on Create the new Album. There are three tabs to set up and edit the product: Album Properties, Product Options and Sheet Layout. To begin with, first click on Album Properties:
  • 9. Album Template Editor User Manual EN2502  Imaxel Lab SL, 2005-2012 9 3. Album Properties  Click on Album Properties on the top left part of the screen. The left side of the screen contains the configuration menu with the following options: Album Summary, Album Thumbnail, Setup album sheets and Work Options. 3.1 Album Summary  By clicking on Album Summary you can fill or change the following fields: Album title, Album description, Paper description, Product code, Product name and Author. IMPORTANT: The Code Number must always be a numeric value and cannot begin with the number 0. It’s very important that the Product Code is the same one than in Station Manager.
  • 10. Album Template Editor User Manual EN2502  Imaxel Lab SL, 2005-2012 10 3.2 Album thumbnail  Click on Album thumbnail to use to one of the template’s sheet or you can load an image from a file. This image will be visible, on the kiosk or on the software online ImageDesk, for the final customer to choose the product. It must be a PNG or JPG file and is better to use a small size picture (around 50 mm x 50 mm and 72 dpi is recommended)
  • 11. Album Template Editor User Manual EN2502  Imaxel Lab SL, 2005-2012 11 3.3 Setup the album sheets  Click on Setup the album sheets. A new menu will open:
  • 12. Album Template Editor User Manual EN2502  Imaxel Lab SL, 2005-2012 12 You can enter different values like: size of normal and special sheets, number of pages per sheet, design and cut margins, crop marks and variable spine. You can setup sheets ranges too.  Click on Sheets Setup button to get the next window and setting up more details about Margins, Special Sheets, Crop Marks, etc.… 3.3.1 Normal Sheets  Enter the size of the normal sheets, and also decide whether you want one or two sheets per page.
  • 13. Album Template Editor User Manual EN2502  Imaxel Lab SL, 2005-2012 13 3.3.2 Special Sheets There are two types of Special Sheets: Fixed Special Sheets: Front Page and Back Page. They have the same measures as normal sheets since they’re internal sheets too. Variable Special Sheets: Lining, Cover and Back Cover. Their measures can be different compared to normal sheets. The size changes according to the number of internal sheets. The measure of the cover and the lining will have the size of the normal sheet + minimum width of the spine (see page 16) Use the Special Sheets tab to define the size of the Lining, Front Cover, Back Cover, Front Page, etc. NOTE: Special sheets must be included in the template only when you’ll be printing them together with the rest of normal sheets.
  • 14. Album Template Editor User Manual EN2502  Imaxel Lab SL, 2005-2012 14 3.3.3 Design Margins The Design Margins are used as a guide for the sheet layout, but are no visible for the end customer.  Select Design Margins. Enter the margins values desired for Inner, Outer, Upper and Lower margin.
  • 15. Album Template Editor User Manual EN2502  Imaxel Lab SL, 2005-2012 15 3.3.4 Cut Margins The Cut Margins will define the useful area of the template. Any part of an image or text in a composition, which is out the cut margins, will be cutting.  Select Cut Margins tab, enter the margin values
  • 16. Album Template Editor User Manual EN2502  Imaxel Lab SL, 2005-2012 16 3.3.5 Crop Marks These marks will help you in the cut and composition process.  Select Crop Marks in output image if you want to print the crop marks in the output image.
  • 17. Album Template Editor User Manual EN2502  Imaxel Lab SL, 2005-2012 17 3.3.6 Variable Spine You must enter these values when the album has the following features:  The template contains a customizable cover.  The album has not a fix number of sheets. This number can be variable depending on the sheets ranges entered (see page 18) Variable spine in Cover / Lining  Enter the minimum width (mm) of the spine of the Cover / Lining will have. Variable spine formula  Enter the exact values of the parameters A and B in order to calculate the width of the spine, when the number of sheets has exceeded the minimal width value of the spine, the formula for variable spine begins to work automatically. Variable spine formula = A + B*N A: The cleft size (mm) of the spine. B: The thickness (mm) of a normal sheet + the thickness (mm) of the cover. N: It’s the number of sheets. Value used for N is always 1
  • 18. Album Template Editor User Manual EN2502  Imaxel Lab SL, 2005-2012 18 For example: Cover width 593,50 mm Cleft 2,50 mm Cover & normal sheet thickness 0,50 mm Minimum spine width 9,00 mm Normal sheets Number Spine width (mm) Increase (mm) Final cover width (mm) 1 3 0 593,5 2 3,5 0 593,5 3 4 0 593,5 4 4,5 0 593,5 5 5 0 593,5 6 5,5 0 593,5 7 6 0 593,5 8 6,5 0 593,5 9 7 0 593,5 10 7,5 0 593,5 11 8 0 593,5 12 8,5 0 593,5 13 9 0 593,5 14 9,5 0,5 594 15 10 1 594,5 16 10,5 1,5 595 17 11 2 595,5 18 11,5 2,5 596 19 12 3 596,5 20 12,5 3,5 597 21 13 4 597,5 22 13,5 4,5 598 Before the page 13 the formula is not applied, since the minimum value has not been reached. From the page 14 on, the final cover width increases by step.
  • 19. Album Template Editor User Manual EN2502  Imaxel Lab SL, 2005-2012 19 3.4 Ranges setup In the same product album, you can setup several ranges of minimum and maximum sheets in order to the end user could choose according to the number of photos selected or price. If the template has a cover / lining and the spine width can be variable, you must enter the values in Variable Spine screen (see page 16) Default range means that when the end user selects this template, the initial range of sheets will be the default value.
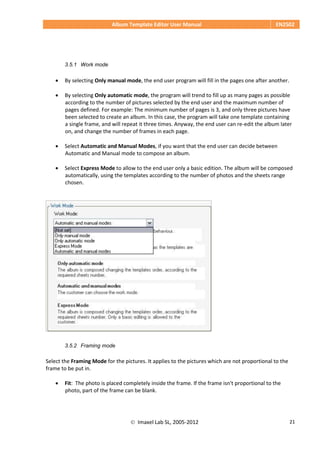
  • 20. Album Template Editor User Manual EN2502  Imaxel Lab SL, 2005-2012 20  Click on Add when you want to create a new sheet range.  Click on Edit to change any value of the sheet range.  Click on Delete if you want delete a sheet range.  Click on Default to mark a sheet range by default. 3.5 Work Options Here you can set the working mode of the template in order to:  Work mode  Framing mode  Design options
  • 21. Album Template Editor User Manual EN2502  Imaxel Lab SL, 2005-2012 21 3.5.1 Work mode  By selecting Only manual mode, the end user program will fill in the pages one after another.  By selecting Only automatic mode, the program will trend to fill up as many pages as possible according to the number of pictures selected by the end user and the maximum number of pages defined. For example: The minimum number of pages is 3, and only three pictures have been selected to create an album. In this case, the program will take one template containing a single frame, and will repeat it three times. Anyway, the end user can re-edit the album later on, and change the number of frames in each page.  Select Automatic and Manual Modes, if you want that the end user can decide between Automatic and Manual mode to compose an album.  Select Express Mode to allow to the end user only a basic edition. The album will be composed automatically, using the templates according to the number of photos and the sheets range chosen. 3.5.2 Framing mode Select the Framing Mode for the pictures. It applies to the pictures which are not proportional to the frame to be put in.  Fit: The photo is placed completely inside the frame. If the frame isn't proportional to the photo, part of the frame can be blank.
  • 22. Album Template Editor User Manual EN2502  Imaxel Lab SL, 2005-2012 22  Fill: The photo fills completely the frame, without blank areas. But if the frame is not proportional, part of the photo will be cropped. 3.5.3 Design options  Enable the template selection menu: To allow your customers to access the menu template selection. For example, the template has different layouts, with this option the customer can choose or change the layout.  Disable the template selection menu: A typical example happens with the calendars to be printed in several pages: select the Disable the template selection menu to avoid customers changing templates and avoiding errors with the order of the pages.
  • 23. Album Template Editor User Manual EN2502  Imaxel Lab SL, 2005-2012 23 4. Sheet Layout The sheet layout window is divided in three working areas:  Thumbnails: It shows the thumbnail of the sheets created and the quantity of photo frames created.
  • 24. Album Template Editor User Manual EN2502  Imaxel Lab SL, 2005-2012 24  Sheet: Composition work area.
  • 25. Album Template Editor User Manual EN2502  Imaxel Lab SL, 2005-2012 25  Tasks: This panel shows the design and setup options frequently used in order to create a composition. This panel is divided in three sections: Album sheets, Sheet Properties and Layer Control.
  • 26. Album Template Editor User Manual EN2502  Imaxel Lab SL, 2005-2012 26 4.1 Tasks: Album sheets 4.1.1 Add and copy sheets Add new sheets to the current album template. You can add new sheets, with the same size, or make copies of the sheets created. 4.1.2 Set background colour By default there’s no colour assigned to a background, so the Transparent option is showed. To set a background colour Select a colour among three options showed (System, Web or Custom), or click on More Colours to get a specific one.
  • 27. Album Template Editor User Manual EN2502  Imaxel Lab SL, 2005-2012 27 4.1.3 Set background image This option allows you add a background image to the sheet. Previously, the image had made with an image editor like Photoshop, for example. The format file of the background image must be jpg or png (if it contains transparency areas)
  • 28. Album Template Editor User Manual EN2502  Imaxel Lab SL, 2005-2012 28 4.1.4 Set background texture This option allows you to apply a pattern image to the sheet. This pattern will repeat many times to fill the background. The advantage to use a pattern is that the image is smaller than a background image and therefore, the template is not so heavy. 4.1.5 Add a clipart image It allows you to add an image object that be set on any part of the composition. The clipart image can be edited (sized and rotated) and moved over the sheet. The clipart will be located in an upper layer of the sheet.
  • 29. Album Template Editor User Manual EN2502  Imaxel Lab SL, 2005-2012 29 4.1.6 Clear the sheet background Use it to remove a background image of a sheet. 4.2 Tasks: Sheet properties The sheet properties at the panel Tasks will allow you to configure the proper permissions for the end users in order to avoid the template modification.  Click on the checkbox option to activate/deactivate each one of the available options. 4.2.1 Allow to change the background If this option is enable, the customer will be allowed to change the sheet background.
  • 30. Album Template Editor User Manual EN2502  Imaxel Lab SL, 2005-2012 30 4.2.2 Allow to edit the design If this option is enable, the end user will be allowed to edit the template, change or resize the photo frames and text frames (only in software online Image Desk) 4.2.3 Use in composition This is a special option which gives special category to a sheet. When an automatic album is created, sheets tagged as Use in Composition will have preference between of the rest the sheets. 4.2.4 Print this sheet always If this option is enable, the sheet will be always printed even though no image has been inserted in the sheet. This feature is used, for example, in these cases:  To leave a blank sheet in a concrete place of the album.  To print a corporate logotype or a Copyright no matter which kind of album you’ll be making. By default this option is disabled. 4.3 Tasks: Layer Control The Layer control menu allows you to set useful options while you are designing the sheets. This option is very important when you have several items display at the sheet, since it will allow you to quickly edit it. Except the background, all other items of the composition have available two options: Visible and Selectable. 4.3.1 Visible Set whether the element is visible or not during the composition designing process.
  • 31. Album Template Editor User Manual EN2502  Imaxel Lab SL, 2005-2012 31 4.3.2 Selectable Set whether the element is selectable or not during the composition designing process. This option is useful when you want to edit items in lower levels shapes that are covered by other upper elements which doesn’t allow you to select the desired item. 4.4 Working area Frequently you may need some tools in order to design more accurately. The rulers and zoom tool will help you with this: 4.4.1 Zoom tool Use the Zoom tool in the Toolbars to increase or decrease the working area. Also you can use the keys + and – in the numeric keyboard. 4.4.2 Rulers Use the rulers in order to move the composition horizontally or vertically. Click over one ruler and without dropping the mouse, drag it in order to scroll the working area. 4.4.3 Hand tool When the template is bigger than the working area, use the hand tool to move quickly over the template. The hand tool allows you scroll the sheet template in any direction. Click and drag in the desired direction.
  • 32. Album Template Editor User Manual EN2502  Imaxel Lab SL, 2005-2012 32 4.4.4 Arrow keys You can use the arrow keys (in the keyboard) in order to move over the working area. 4.4.5 Grid and Margins You can help yourself with the grid. The grid gives you a visual guide for positioning the items in the composition. You can also choose whether to show or not the margins by clicking on View Margins. Working area with grid and margins 4.4.6 Preview / Design View Preliminary View: This option allows to see the final result of the composition. Photo frames will display predetermined pictures.  From View menu, select Preliminary View
  • 33. Album Template Editor User Manual EN2502  Imaxel Lab SL, 2005-2012 33 Preview Design View: Selecting Design View, the Preview will be turned off and you will return to the original edition screen.  From View menu, select Design View
  • 34. Album Template Editor User Manual EN2502  Imaxel Lab SL, 2005-2012 34 Design view 4.4.7 Selection tool  Click on Selection button to select one or several items. 4.4.8 Sheet background colour You can change the background colour with this tool.
  • 35. Album Template Editor User Manual EN2502  Imaxel Lab SL, 2005-2012 35 5. Frames 5.1 Create frames The frames are the containers in the composition where the customer upload the images. You then need to define the spaces where the personalised pictures from the end user application will be located. You must create as many frames as pictures you want to be featured on a sheet. The frames can be:
  • 36. Album Template Editor User Manual EN2502  Imaxel Lab SL, 2005-2012 36 5.1.1 Photo Frame When the background is completely opaque you must use this frame, in order to define the space where the end user’s photo will be located. The image will be on the background. The size of the frame appears in the centre.  Click on Add frame to create a photo frame 5.1.2 Photo Frame below background This type of frame is used when the background image features a transparency. In this case, the size of the frame will have to be 4 mm (approx.) bigger on each side in order to avoid white strips around the picture. The photo will be below the background.  Click on Add frame below background
  • 37. Album Template Editor User Manual EN2502  Imaxel Lab SL, 2005-2012 37 5.1.3 Text Frame Add Text Frame to enable the end customer to insert a text. When you add a text frame, the font tools will activate to define: typography, color, size... Common typographies should be used. Since the predefined font in the template, must be installed in the photographic kiosk in order to avoid any mistake.  Click on Add text frame
  • 38. Album Template Editor User Manual EN2502  Imaxel Lab SL, 2005-2012 38 5.2 Edit Frames 5.2.1 Frame size You can edit the frame size created click on the frame and dragging the circular controls sited in both sides and at the corners. Drag any of these controls in order to resize it horizontally (width) or use the controls in the upper and lower sides of the frame in order to resize it vertically (height). By dragging any of the controls at the corners´ frame, you can resize the width and height at the same time. The control in the upper side is used for manual rotation.  To resize the frame, drag the frame control and press the Shift key at the same time, in order to preserve the ratio (proportion) of the frame. 5.2.2 Frame rotation Automatic rotation Frames can be rotated gradually from 15º to 15º or they can be turned over in 90º by using the commands available in the menu Rotate. Later on in this manual we will see how to rotate the frames manually. Use the menu options in order to rotate automatically the frame:  Click on Rotate and choose one of the following options: Turn over: Turn the frame in 90º Rotate right / Rotate left: Turn the frame 15º left or right. Make horizontal / Make vertical: Set the frame position to horizontal or vertical. NOTE: Turning or turning over the frame will affect the image inserted by the customer. That means the image inserted will take the frame rotation angle.
  • 39. Album Template Editor User Manual EN2502  Imaxel Lab SL, 2005-2012 39 Manual Rotation You can use the circular control in the upper side of the frame to rotate it manually. When the frame is parallel or perpendicular to the frame, purple colour guides will be shown, in order to help you matching the frame in the composition. 5.2.3 Frame properties  Click on Frames menu to change its properties. A window will be displayed where you can enter the following values: Size and position Define the personalized values for Size, Position and Rotation. This tab allows you to enter values more accurately than with the automatic or manual edition of the frames.
  • 40. Album Template Editor User Manual EN2502  Imaxel Lab SL, 2005-2012 40 Borders  Click on the tab Borders to show the borders in the frame.  Click on the check box Draw borders  Enter the values in mm, and select one of the available colours in the menu.  Click on More colours… to open the mixer colours.
  • 41. Album Template Editor User Manual EN2502  Imaxel Lab SL, 2005-2012 41 Shadow  Click on the tab Shadow in order to show a parallel shadow around the frame.  Click on the check box Draw shadow  Enter the value in mm of the shadow displayed, selecting a colour and a percentage of opacity in % (0-100) Shape and text Define the frame shape and the text orientation selecting one of the options available in the menu. Additionally, you can choose additional options in order to adapt it to other writing style like Arabic, Hebrew, Japanese, etc…
  • 42. Album Template Editor User Manual EN2502  Imaxel Lab SL, 2005-2012 42 5.3 Default frame properties With the new version 1.42 you can define the default size, borders and shadow values that will have all the frames by default when adding to the template.
  • 43. Album Template Editor User Manual EN2502  Imaxel Lab SL, 2005-2012 43 5.4 Set frames ratio You can define the default ratio size for all the frames added by default to the template.  Click on Frames menu  Select Set frames ratio  Select the ratio desired You will be able to select sheets and define the new ratio for all the frames in the selected sheets.  Click on Frames menu  Select Set frames ratio  Select the sheets to change frame ratio  Select the ratio desired
  • 44. Album Template Editor User Manual EN2502  Imaxel Lab SL, 2005-2012 44 This option is only available from version 1.42 on. 5.5 Organize and align items The Organize menu allows you centre the item horizontal and vertically in the composition. You can also align in several ways the different items inside the composition. Please, note that the Align and Make the same size options will only available when you have created more than one item in the active template.
  • 45. Album Template Editor User Manual EN2502  Imaxel Lab SL, 2005-2012 45  Hold the Control key (Ctrl) and click on several items to select several ones. Also you can select some of them by dragging and clicking your left mouse button. 5.5.1 Organize menu command functionalities: Align Up Align the items selected at the upper “borderline” side. Align Down Align the items selected at the lowest “borderline” side. Align Left Align the items selected at the “borderline” left. Align Right Align the items selected at the “borderline” right. Align Horizontally Align the items selected based on a horizontal central axis of all the items selected. Align Vertically Align the items selected based on a vertical central axis of all the items selected. Align Centers Align the items selected based on a horizontal/vertical central axis of all the items.
  • 46. Album Template Editor User Manual EN2502  Imaxel Lab SL, 2005-2012 46 Center Align the item selected in the center of the template. Center Horizontally Center the item selected horizontally in the template. Center Vertically Center the item selected vertically in the template. Make the same size, both Establish the same (width, height) size to the items selected, taking like a reference the first item chosen. Make the same size, width Establish the same width size to the items selected, taking like a reference the first item chosen. Make the same size, height Establish the same height size to the items selected, taking like a reference the first item chosen. 5.5.2 Mirror The function Mirror allows to move the items of a page to the opposite page. The process is the following: Deletes all the items of the opposite page. Duplicates all the items of the page and moves them to the opposite page. The items placed between the two pages are not reflected. This option is available only in sheets with two pages.  From Pages menu, select Mirror left / right page
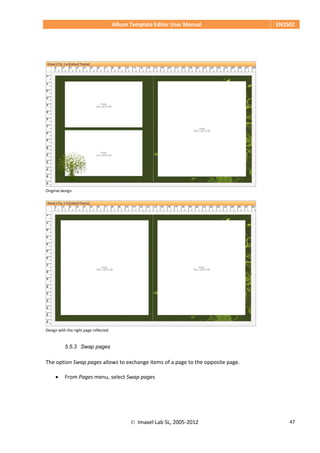
  • 47. Album Template Editor User Manual EN2502  Imaxel Lab SL, 2005-2012 47 Original design Design with the right page reflected 5.5.3 Swap pages The option Swap pages allows to exchange items of a page to the opposite page.  From Pages menu, select Swap pages
  • 48. Album Template Editor User Manual EN2502  Imaxel Lab SL, 2005-2012 48 Original design Design with swap applied The background image remains always fixed. Only the position of items has changed.
  • 49. Album Template Editor User Manual EN2502  Imaxel Lab SL, 2005-2012 49 5.6 Arrange Items When you have several frames in the composition, you can establish your stack arrangement. That means you can decide which frames would be shown in front or behind of others. Cliparts will be located, always, in an upper layer.  Select the items to be arranged  Click on Arrange menu  Click on the available options 5.7 Set frames order You can set up the order in which the photos will be placed in the frames of a sheet with this tool:  Click on Set frames order in the toolbar  Select, clicking on the frames, one to one, in the order wished
  • 50. Album Template Editor User Manual EN2502  Imaxel Lab SL, 2005-2012 50 The photos will be placed on this sheet of the album in this order. This option is available from v.1.42 on. 6. Sheets options
  • 51. Album Template Editor User Manual EN2502  Imaxel Lab SL, 2005-2012 51 6.1 Add sheets (see page 25) 6.2 Organize sheets Now, from v. 1.42 on, is possible to change the order of the sheets with a drag-and-drop movement. To access this menu right click in a sheet and select Organize sheets.  Click on Sheets and Organize Sheets  Select the sheet , drag and drop it to the whished place
  • 52. Album Template Editor User Manual EN2502  Imaxel Lab SL, 2005-2012 52 6.3 Delete sheets You can delete any sheet created selecting Delete Sheet. 6.4 Scale sheets In the menu Sheets-Scale sheets now, the designer has the possibility to rescale a template and reuse the frame organization for another proportional size. The Template editor will preserve the aspect ratio of the frames and the disposition.
  • 53. Album Template Editor User Manual EN2502  Imaxel Lab SL, 2005-2012 53 7. Themes With themes, you can design several groups of backgrounds related to a theme. It allows the end users to choose the theme more appropriate for their photos. You must create two templates: One with frames only... ...and the other one only with groups of backgrounds, without frames.
  • 54. Album Template Editor User Manual EN2502  Imaxel Lab SL, 2005-2012 54 Both templates must be same size. 7.1 Add theme  To create a new theme, click on Themes, Add theme and a pop up window opens  Define the theme properties: Theme title, Theme description and Theme internal code  Load an image to show the theme as a thumbnail. It can be a picture or a sheet of the template.
  • 55. Album Template Editor User Manual EN2502  Imaxel Lab SL, 2005-2012 55 By default, the theme is always available, click on the tag box to activate it. 7.2 Edit theme  Select Edit theme in order to change any property or the thumbnail of the theme 7.3 View album themes Select this option to see all the themes created. The thumbnails appear in the right side of the screen.
  • 56. Album Template Editor User Manual EN2502  Imaxel Lab SL, 2005-2012 56 7.4 Delete theme To delete a theme, select Delete theme or right clicking on the thumbnail of the theme. 7.5 Setup themes in the photo kiosk When the two templates have done, you must rename only the file of backgrounds template. For example: the name file of original template is themes_portrait.imaxel-af will be themes_portrait.imaxel-theme This file will have to be at: C:ProgramFiles ImaxelStationManagerproductosthemes
  • 57. Album Template Editor User Manual EN2502  Imaxel Lab SL, 2005-2012 57 In the Station Manager, the product (frames template) will be associated with the backgrounds template.  Open Station Manager, in Management open Products and Prices  Select the album and click on Edit Product button  Click on Themes tab and click on checkbox to select the themes that will be associated with the album
  • 58. Album Template Editor User Manual EN2502  Imaxel Lab SL, 2005-2012 58 Customer Picture Theme (bottom right of the window) means that the background sheets of album will be the user’s photos.  Click on checkbox to select this option This option is only available from version 1.42 on. 8. Product options You can create an album with different variables. For example: different cover, colour... In Products Options screen you can enter these variables.  Click on Product Options on the top left part of the screen. The scroll down menu, on the right of the screen, will display two options, Categories or Items. These
  • 59. Album Template Editor User Manual EN2502  Imaxel Lab SL, 2005-2012 59 two options are now active. In order to add a new item, you must previously create a New Category. Also you can add categories and items from the Task panel located in the right part of the screen. 8.1 Add a new Category  Click on Add a new Category. A window will open up where you can decide the Category title, its description, the internal code and whether this category is available or not  Once this is done, click on OK
  • 60. Album Template Editor User Manual EN2502  Imaxel Lab SL, 2005-2012 60 8.2 Add a new Item Each category can be composed of different items. To add an item:  Click on the chosen category to highlight it. Then click on Add a new Item  A pop up window will appear. Enter the details of the item (category title, description, code)  Click on Load image to load a miniature of the item. You can load an image from the clipart gallery or add one from another file.
  • 61. Album Template Editor User Manual EN2502  Imaxel Lab SL, 2005-2012 61  Click on a Category to see all the items related.  Right click on an item to add another one, edit it, delete it, and move it upwards or downwards in the list. You can also do this by using the menu Tasks on the right side of the screen.
  • 62. Album Template Editor User Manual EN2502  Imaxel Lab SL, 2005-2012 62 9. Saving templates To save a template:  From File menu, select Save or Save as The template stores all images, both the used ones and the ones not used. When you save a template, a pop up window opens with the images not used. Now, you can choose between delete or preserve them.
  • 63. Album Template Editor User Manual EN2502  Imaxel Lab SL, 2005-2012 63 10. Keyboard shortcuts File menu CTRL + U – New file CTRL + A – Open file CTRL + G – Save file Edition menu CTRL + Z – Undo CTRL + Y – Redo CTRL + X – Cut CTRL + C – Copy CTRL + V – Paste SUPR – Delete CTRL + E – Select all Other shortcuts F4 – Frame properties CTRL + R – Rotate right CTRL + T – Rotate left ALT + Mouse wheel – Zoom in / out CTRL + Mouse wheel – Move left / right Mouse wheel – Move up / down Numeric key ‘+’ – Zoom in Numeric key ‘-‘ – Zoom out Arrows – Move up / down / left / right
  • 64. Album Template Editor User Manual EN2502  Imaxel Lab SL, 2005-2012 64 CTRL + H – Activate drag tool CTRL + S – Activate selection tool START key – View all SHIFT + drag frame controller – Change frame size, preserving the ratio