


![Local versus Shared Storage
Advantages of using local storage:
Easy to physically move the box
Most common location for installing ESX]
Ideal for small environment
Advantages of using shared storage:
Central repository
Scalable and recoverable implementation
Multiple hosts can access the same storage space
Virtual machines can be clustered across physical hosts
Virtual machines can take advantage of vSphere features like VMware VMotion
Allow data replication
83](https://image.slidesharecdn.com/general-and-completetrainingslidev0-241021062608-2bcc7838/85/General-and-complete_Training_Slide_v0-9-TGT-pptx-83-320.jpg)


General-and-complete_Training_Slide_v0.9-TGT.pptx
- 1. vSphere 4 Administration Training Agenda for Towngas Telecom Prepared by: TSD Department
- 3. 3 VMware ESXi4.1 Host Hardware Physical Design Specifications
- 4. datastore Name Capacity Free Type ESX01_LocalDatastore 131.00 GB 75.73 GB vmfs3 ESX02_LocalDatastore 131.00 GB 130.45 GB vmfs3 ESX03_LocalDatastore 131.00 GB 122.77 GB vmfs3 ESX04_LocalDatastore 131.00 GB 130.45 GB vmfs3 FC_Datastore_1 984.00 GB 910.90 GB vmfs3 FC_Datastore_2 825.75 GB 808.85 GB vmfs3 SATA_Datastore_1 492.00 GB 175.13 GB vmfs3 SATA_Datastore_2 984.00 GB 573.29 GB vmfs3 SATA_Datastore_3 984.00 GB 799.41 GB vmfs3 SATA_Datastore_4 984.00 GB 891.32 GB vmfs3 SATA_Datastore_5 984.00 GB 819.15 GB vmfs3 4
- 5. vSwitch and dvswitch connection diagram 5
- 6. Part 1 About VMware vSphere Introduce to VMware vSphere Virtualization is not sim, nor emu Understand the concept of virtualization Identify the benefits of using a virtual machine Describe vSphere components Describe scenarios for using virtualization 6 provide the basic concept about the followings
- 7. Existing Applications Future Applications What Is VMware vSphere? An infrastructure virtualization suite that: Provide virtualization, management, resource optimization, application availability, and operational automatic capabilities Aggregates physical hardware resources and provides virtual resource to the datacenter 7 VMotion, HA, svMotion, FT, vDR vCompute vStorage vNetwork Availability vStorage Scalability vShield Zone VMSafe DRS Hot Add ESX ESXi DRS VMFS Thin Provisioning Distributed Switch Application Services Infrastructure Services VMware vSphere 4.0 App App App App App App VMware vCenter Suite Internal Cloud External Cloud
- 8. What Is Virtualization? Virtualization is a technology that transforms hardware into software. Virtualization allows you to run multiple operating systems as virtual machines on a single computer. Each copy of an operating system is installed into a virtual machine. Virtualization is not: Simulation Emulation 8 App OS App OS VMware
- 9. x86 Architecture Virtualization Layer How Does Virtualization Work? A virtualization layer is installed. It uses either a host or hypervisor architecture. 9 Application Operating System Application Operating System CPU Memory NIC Disk
- 10. Host Operating System-Based Virtualization A host-based virtualization system requires on operating system (such as Windows or Linux) to be installed on the computer. 10 x86 Architecture Application Operating System Application Operating System Application Operating System VMware Server Windows or Linux Operating System
- 11. Virtualization Using a Bare-Metal Hypervisor A bare-metal hypervisor system does not require an operating system. The hypervisor is the operating system. 11 x86 Architecture VMware Hypervisor Application Operating System CPU Memory NIC Disk Application Operating System Application Operating System
- 12. What is a Virtual Machine? From the user’s perspective, it is a software platform that, like a physical computer, runs an operating system and application. From the hypervisor’s perspective, it is a discrete set of files. These are the main files: Configuration file Virtual disk file NVRAM settings file Log file 12 Application Operating System Hardware Virtual Machine
- 13. Why Use Virtual Machines? Physical Machine Difficult to move or copy Bound to specific set of hardware components Often has short life cycle Requires personal contact to upgrade hardware 13 Virtual Machine Easy to move and copy • Encapsulated into files • Independent of physical hardware Easy to manage • Isolated from other virtual machines running on the same physical hardware • Insulated from physical hardware changes App OS VMware
- 14. Virtual machines ESX/ESXi Hosts vSphere Components VMware ESX/ESXi VMware vCenter Server VMware vSphere Client VMware vSphere Web Access VMware vStorage VMFS VMware Virtual SMP 14 App OS App OS App OS App OS App OS Virtual SMP VMFS vCenter Server DRS HA Consolidated Backup Plug-in vSphere Client vSphereWeb Access vSphere SDK VMware vSphere enterprise server enterprise network enterprise storage
- 15. Using vSphere in a Datacenter Infrastructure Optimization Business Continuity Desktop Management Software Lifecycle •VMware vCenter •VMware vCenter Converter •VMware Capacity Planner •VMware vCenter Site Recovery Manager •VMwareView •VMware ACE •VMware Lab Manager Resource Management Availability Mobility Security •VMware DRS •VMware DPM •VMware HA •VMware Consolidated Backup •VMware Data Recovery •VMware vCenter Server Heartbeat •VMware Storage VMotion •VMware VMotion •VMware vCenter Update Manager Virtual Platform •VMware ESX •VMware ESXi •VMwareVirtual SMP •VMware vStorage VMFS •VMware Server •VMware Workstation •VMware Fusion •VMware Player 15 vSphere is compatible with various other VMware products. For up-to-date version compatibility information, go to http://www.vmwar e.com
- 16. Summarize of Part 1 Any questions about the concept? Do you need to speed up? Should you suggest to skip some topics? Do you need a break? 16
- 17. Part 2 ESXi Basic What does in ESXi Configuring ESXi vSphere Client connect to ESXi 17 We are now getting ready for the kickoff the installation of ESXi!
- 18. ESX/ESXi: Virtualization Platform ESX and ESXi are bare-metal, efficient, and reliable hypervisors running directly on server. ESX and ESXi abstract CPU, memory, storage, and networking into multiple virtual machines. 18 Virtual machines ESX/ESXi Hosts App OS App OS App OS App OS App OS Virtual SMP VMFS vCenter Server DRS HA Consolidated Backup Plug-in vSphere Client vSphere Web Access vSphere SDK VMware vSphere enterprise server enterprise network enterprise storage
- 19. ESX/ESXi Features Can use standard and distributed virtual switches, NIC teaming, and VLANs Can use the VMware vStorage VMFS for storing virtual machines Can be managed by VMware vCenter Server Can take advantage of various VMware vSphere feature, such as VMware VMotion Can be accessed using the VMware vSphere Client 19 App OS App OS ESXi App OS App OS ESX
- 20. ESXi Architecture 20 x86 Architecture VMware Hypervisor Application Operating System CPU Memory NIC Disk Application Operating System Application Operating System VMM VMM VMM vCenter Server vSphere Client vSphere API/SDK vCLI (scripting) CIM (Hardware Management) VMkernel
- 21. ESXi Installable Hardware Prerequisites Processor – 64-bit Server: Up to 64 logical CPUs (cores or hyperthreads) Memory – 3GB RAM minimum, 512GB maximum One or more Ethernet controllers: 10 Gigabit Ethernet NIC card are supported. For best performance and security, use separate Ethernet controllers for the management network and the virtual machine networks. Disk storage: A SCSI adapter, Fiber Channel LUN, iSCSI disk, or RAID LUN with unpartitioned space SATA, SCSI, SAS, SANs 21
- 22. ESXi Storage Behavior On the hard disk or USB device from which ESXi is booting, the disk partition layout is as follow: Any existing hardware vendors’ diagnostic partition is retained In the remaining space, the software creates: One 4GB VFAT scratch partition for system swap One 110MB diagnostic partition for core dumps One VMware vStorage VMFS partition on the remaining free space On all other internal disks without a partition table or partition, a VMFS datastore is created. If the scratch partition is not enable, the host will use an addition 512MB of memory. 22
- 23. Configuring ESXi The direct console user interface is similar to the BIOS of a computer with a keyboard-only user interface. 23
- 24. Configuring ESXi: root Access 24 The direct console allows an administrator to: Set a root password (complex passwords only) Enable or disable lockdown mode (to prevent user access to host as root)
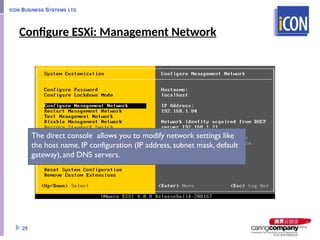
- 25. Configure ESXi: Management Network 25 The direct console allows you to modify network settings like the host name, IP configuration (IP address, subnet mask, default gateway), and DNS servers.
- 26. Configuring ESXi: Other Settings 26 The direct console allows an administrator: To configure the keyboard layout (default in English) To view support information To view system logs
- 27. Using the vSphere Client The vSphere Client is an interface used to connect remotely to ESX/ESXi or vCenter Server from any Windows PC. Download software from the main page of ESX/ESXi 27
- 28. Logging In to ESX/ESXi At the vSphere Client login screen, enter: Host name or IP address of ESX/ESXi host User name root Password of user root 28
- 29. vSphere Client: Configuration Tab 29
- 30. Viewing Processor and Memory Configuration 30
- 31. ESX/ESXi Licensing Before purchasing and activating licenses, you can install ESX/ESXi in evaluation mode. Evaluation mode Is intended for demonstration and evaluation purpose Allows software to be completely operational immediately after installation Does not require and licensing configuration Provides fully functionality of ESX/ESXi for 60 days from the time you install it Allows the software to notify you of the time remaining in the evaluation period 31
- 32. License Assignment Procedure 32 The license key is a multicharacter String provided by VMware.
- 33. Synchronizing Host Time Using NTP Network Time Protocol is a client-server protocol used to synchronize a computer’s clock to a time reference. NTP is important: For accurate performance graphs For accurate time stamps in log message So that virtual machines have a source to synchronize with 33
- 34. ESX/ESXi as an NTP Client 34 NTP server NTP server NTP server NTP Client U D P p o r t 1 2 3 ESX/ESXi host An ESX/ESXi host can be configured as an NTP client. As an NTP client it can synchronize time with an NTP server on the Internet.
- 35. Configuring ESX/ESXi as an NTP Client The Time Configuration link allows you : To set the date and time To configure your host as an NTP client 35
- 36. Network Settings: DNS and Routing The DNS and Routing link allows you to change: Host name and domain DNS server addresses and search domains Service console and VMkernel gateways 36
- 37. ESX Service Console Firewall The ESX Service console has a firewall through which you can enable or disable incoming or outgoing connections for a range of services. 37
- 38. ESX/ESXi User Account Best Practices Strictly control root privileges to the ESX/ESXi host. Use the vSphere Client to manage the ESX/ESXi host. Ideally, use vCenter Server – and thus vCenter Server user accounts – to manage hosts. 38
- 39. Viewing ESX/ESXi System Logs View using the vSphere Client. Export system logs to an archive file. Send in to VMware Support. 39
- 40. Summarize of Part 2 Any questions on ESXi? Do you need to speed up? Should you suggest to skip some topics? Do you need a break? 40
- 41. Part 3 Using vCenter Server What does in vCenter Server vCenter Server Architecture Navigate using the vSphere Client Create and organize vCenter Server inventory objects Add license keys to vCenter Server View vCenter Server logs and events Create a vCenter Server administrator 41
- 42. vCenter Server: Management Platform VMware vCenter Server is the central point for configuring, provisioning, and managing virtualized IT environments. 42 Virtual machines ESX/ESXi Hosts App OS App OS App OS App OS App OS Virtual SMP VMFS vCenter Server DRS HA Consolidated Backup Plug-in vSphere Client vSphereWeb Access vSphere SDK VMware vSphere enterprise server enterprise network enterprise storage
- 43. vCenter Architecture 43 vCenter Server and additional modules vSphere Web Access Database Server Active Directory Domain vSphere Client Web Browser Host (ESX or ESXi) Host (ESX or ESXi) Host (ESX or ESXi) Managed Hosts
- 44. vCenter Server Components 44 Core Services Additional Services Update Manager Converter User Access Control vSphere API Active Directory Interface Distributed Services Database Interface ESX/ESXi Management vCenter Server database Hosts Third-party applications Plug-in Active Directory Domain
- 45. vCenter Server Modules These modules provide additional features and functionality to vCenter Server. Example: VMware vCenter Update Manager VMware vCenter Converter These modules include a server component and a client component: The client component is a plug-in available for download and installation to vSphere Clients after the server component is installed in vCenter Server. The client component alters the interface by adding items related to the enhanced functionality 45
- 46. vCenter Server: Physical or Virtual Machine When using a physical machine: A dedicated server is required vCenter Server is not susceptible to potential VMware vSphere outage. vCenter Server performance is limited only by the system hardware. When using a virtual machine: A dedicated server is not required. vCenter Server is susceptible to potential vSphere outage. The vCenter Server instance can be migrated from one system to another during maintenance activities. vCenter Server must content for resources with the other virtual machines on the hosts. 46
- 47. vCenter Server Hardware/Software Requirements Hardware requirements (physical or virtual machine) Processor – 2.0GHz or higher AMD or Intel x86 processor* Memory – 2GB RAM minimum* Disk storage – 1GB minimum, 2GB recommended* Network – Gigabit recommended * Requirements higher if vCenter Server database running on same system Software requirements Guest operating systems supported: Windows XP Pro, Windows Server 2003, 2008 (not R2) For a complete, detailed list of supported guest operating systems, see the vSphere installation guide. 47
- 48. vCenter Database Requirements Each vCenter Server instance must have a connection to a database to organize all the configuration data. Supported database: Microsoft SQL Server 2005 Microsoft SQL Server 2008 Oracle 10g and 11g For a completed list of supported databases, see the vSphere installation guide. Default database: Microsoft SQL Server 2005 Express Bundled with vCenter Server Used for product evaluations and demos Also used for small deployments (up to 5 hosts and 50 virtual machines) 48
- 49. Navigating the vSphere Client 49 Search box Home page Navigation bar
- 50. vCenter License Overview License are managed and monitored from vCenter Server. Licensing consists of the following components: Product – A license to use a vSphere software component or feature License key – A 25-character serial number that corresponds to a product Asset – A machine on which product is installed vCenter Server can also manage licenses for legacy hosts. vCenter Server must have a VMware License Server connection. When adding a legacy host to the vCenter Server inventory, vCenter Server checks out vCenter Server agent licenses from the License Server. 50
- 51. Summarize of Part 3 51
- 52. Part 4 vNetwork Standard Switches Describe the components of a vNetwork standard switch Describe the vNetwork connection types View the vNetwork standard switch configuration 52 This is the most important session in VMware vSphere
- 53. vNetwork Standard Switch A vNetwork standard switch (vSwitch) Directs network traffic between virtual machines and links to external networks Combines the bandwidth of multiple network adapters and balances traffic among them. It can also handle physical NIC failover. Models a physical Ethernet switch Default number of ports is 56 (4,088 maximum). A virtual machine’s NIC can connect to a port. Each uplink adapter uses one port. 53
- 54. vNetwork Standard Switch Components 54 App OS App OS App OS App OS Service console Physical NICs vSwitches Virtual Physical vNICs Ports and Port groups Physical Switches Host Host VMotion Port VMotion Port VM Port Group VM Port Group SC Port Network configuration at host level
- 55. vSwitch Ports A vSwitch allows the following connection types: VMkernel port Service console port (ESX only) Virtual machine port group 55 Virtual Switch Virtual machine port groups VMkernel port Service Console port Uplink ports
- 56. vNetwork Distributed Switch A vNetwork distributed switch provides similar functionality to a vNetwork standard switch, but it exists across the entire datacenter to use. VMware vCenter Server owns the configuration of the distributed switch, and the configuration will be consistent across all the hosts that use it. The behavior of distributed switches are consistent with standard switches. You can configure virtual machine port groups, VMkernel ports, and service console ports on a distributed switch. 56
- 57. Benefits of Distributed Switches The benefits of distributed switches over standard switches: Simplify datacenter administration Provide support for private VLANs Enable networking statistics and policies to migrate with virtual machines during a migration using VMware vMotion Provide for customization and third-party development 57 App OS switch App OS App OS switch App OS App OS switch App OS App OS DistributedVirtual Switch App OS App OS App OS App OS App OS Standard Switches Distributed Switches
- 58. vNetwork Distributed Switch Architecture 58 App OS App OS App OS App OS Service console Physical NICs (uplinks) Hidden vSwitches (I/O plane) Virtual Physical vNICs Physical Switches Host 1 Host 2 VMotion Port Group Virtual Machine Port Group Service Console Port Group Distributed switch (control plane) Distributed Ports and port groups
- 59. Distributed Switch Example 59 Virtual Physical Distributed Switch: Production uplinks VMotion Port Group Uplink Port Group vmnic0 vmnic1 vmnic2 vmnic0 vmnic1 vmnic2 ESX01 ESX01 Example: Create a distributed switch name Production, to be used for virtual machine networking. Assign uplinks, vmnic1 on host ESX01 and vmnic2 on host ESX02, to the distributed switch.
- 60. Creating a Distributed Switch 60 Enter name of switch, number of uplink ports, then choose the physical adapters from each host to add to the switch.
- 61. Viewing Distributed Switches 61 Use the Configuration tab to modify the switch.
- 62. Connecting a Virtual Machine to a Port Group 62 Connect a virtual machine by assigning the port group to its network adapter.
- 63. Adding a Host to a Distributed Switch Right-click the distributed switch, then choose Add host. 63
- 64. VMkernel and Service Console Connections 64
- 65. Managing Physical Adapters (Uplinks) 65
- 66. Editing General Switch Properties The Properties tab has settings for general information, policies, and advanced settings. General information includes name, number of uplink ports and optional name, number of ports, and notes. 66 Distributed ports and port groups inherit property settings defined at the switch level.
- 67. Editing Advanced Switch Properties Advanced information Maximum MTU Cisco Discovery Protocol Administrator Contact information 67
- 68. Editing Distributed Port Group Settings 68 Distributed Port Group > Edit Settings Port binding determines when a virtual machine is bound to the port.
- 69. Editing Port Group Policies 69 Distributed Port Group > Edit Settings The Policies page shows settings for the five subcategories.
- 70. Security Policy Administrators can configure Layer 2 Ethernet security options at the virtual switch and at the port groups. 70 Distributed Port Group > Edit Settings
- 71. Traffic-Shaping Policy Network traffic shaping is a mechanism for controlling a virtual machine’ network bandwidth. Average rate, peak rate, and burst size are configurable 71 Time Outbound bandwidth Burst size = bandwidth x time Peak bandwidth Average bandwidth
- 72. Configuring Traffic Shaping You can shape both inbound and outbound traffic on distributed switches. 72 Distributed Port Group > Edit Settings
- 73. VLANs ESX/ESXi supports 802.1Q VLAN tagging. Virtual switch tagging is one of three tagging policies supported. Packet from virtual machine are tagged as they exit the virtual switch Packets are cleared (untagged) as the virtual machine. There is little affect on performance. 73 VLAN 105 VLAN 106 Physical NIC Physical Switch Trunk POrt Virtual Switch VM VM
- 74. Advanced settings 74 Distributed Port Group> Edit Settings Blocking, traffic shaping, VLAN, NIC teaming, and security policies can be configured at the port level if permitted at the port group level.
- 75. Summarize of Part 4 vSwtich concept vNetwork Distributed Switch basic PVLAN 75
- 76. Part 5 Storage Describe VMware vSphere storage technologies and datastores Describe the various way to view storage information Understand the storage device naming convention 76 This is the most important session in VMware vSphere
- 77. Storage Overview Datastores can exist on locally attached or shared storage (Fibre Channel, iSCSI, and NAS). 77 Locally Attached Fibre Channel iSCSI NAS VMware vStorage VMFS NFS Raw Device Mappings (RDMs) Storage Technology Datastore Types
- 78. Storage technology overview Locally-attached storage – Internal or external storage disks or array attached to the host through a direct connect Fibre Channel – A high-speed SCSI transport protocol used for storage area networking (SAN) Fibre Channel switches interconnect multiple nodes to form the “fabric” in a Fibre Channel SAN. iSCSI – A SCSI transport protocol, enabling access to storage devices over standard TCP/IP networks iSCSI maps SCSI block-oriented storage over TCP/IP Network-attached storage (NAS) – Storage shared over the network at the file system level 78
- 79. Datastores A datastore is logical storage unit, which can use disk space on one physical device or one disk partition, or span several physical devices. Types of datastore: VMware Virtual Machine File System (VMFS) Network File System (NFS) Datastores are used to hold virtual machines, templates, and ISO images. A VMFS datastore can be also hold a raw device mapping (RDM), used to access raw data. 79 App OS App OS Volume VM content Datastore
- 80. VMFS 80 VMDK VMDK VMDK VMDK VMDK VMDK VMDK VMFS Volume App OS App OS VM1 VM2 Clustered file system Underlying technology for VMotion, VMware HA, and DRS Allows concurrent access to shared storage Provides on-disk locking Can reside on local, Fibre Channel, or iSCSI storage
- 81. NFS 81 VMDK VMDK App OS App OS VM1 VM2 NFS Volume Storage shared over the network at a file system level Only NFS version 3 over TCP/IP is supported.
- 82. Raw Device Mapping (RDM) 82 App OS App OS VM1 VM2 VM content Mapping File VM content Mapped Device A mapping file in a VMFS volume that acts as a proxy for a raw physical device A raw disk is a repository for large amounts of data that you do not want to move onto a virtual disk
- 83. Local versus Shared Storage Advantages of using local storage: Easy to physically move the box Most common location for installing ESX] Ideal for small environment Advantages of using shared storage: Central repository Scalable and recoverable implementation Multiple hosts can access the same storage space Virtual machines can be clustered across physical hosts Virtual machines can take advantage of vSphere features like VMware VMotion Allow data replication 83
- 84. Storage Device Naming Conventions Storage devices are identified in several ways: SCSI ID – Unique SCSI identifier Canonical name – The Network Address Authority (NAA) ID is a unique LUN identifier, guaranteed to be unique across reboots. For those devices without a unique ID, a VMware mpx reference is used instead. Runtime name – Uses the convention vmhbaA:C:T:L. This name is not presistent through reboots. 84
- 85. Physical Storage Considerations Discuss vSphere storage needs with your storage administration team: LUN sizes I/O bandwidth Disk cache parameters Zoning and masking Identical LUN presentation to each VMware ESX/ESXi host Active-active or active passive arrays Export properties for NFS datastores 85
- 86. Using Fibre Channel with ESX/ESXi Uses of Fibre Channel SAN LUNs: VMFS datastores to hold virtual machines, ISO images, and templates RDMs to hold a virtual machine’s raw data Supports vSphere features such as VMotion, VMware High Availability, and VMware Distributed Resource Scheduler (DRS) To boot ESX from a SAN LUN ESX/ESXi supports: 8GB Fibre Channel Fibre Channel over Ethernet (FCoE) 86
- 87. 87 SP SP ESX Server HBA HBA Disk Array Storage System Physical hard disks LUNs (logical Unit Numbers) SP (Storage Processor) FC (Fibre Channel ) Switches “The fabric” Servers with host bus adapters (HBA) ESX Server HBA HBA Fibre Channel SAN Components
- 88. Fibre Channel Addressing and Access Control 88 SP 0 11 12 Disk Array ……….. ESX Server HBA ESX Server HBA Mask LUN 11 Mask LUN 12 21:00:00:E0:8B:19:53:53 21:00:00:E0:8B:19:AD:69 50:00:00:E0:8B:20:AD:BC LUNs LUNs Masking: Done at SP or server level, makes a LUN “invisible” when a target is scanned WWN (World- Wide name): Unique, 64 bit address assigned to Fibre Channel node Zoning: Done at switch level, used to segment the fabric
- 89. Accessing Fibre Channel Storage 89 Install Fibre Channel adapters. During the boot sequence, the adapters are recognized by the ESX/ESXi host. Clicking the Rescan link allows the ESX/ESXi host to rescan all host bus adapters for new storage devices. An ESX/ESXi host support up to 256 LUNs and 16 HBAs.
- 90. Viewing Fibre Channel Storage Information 90 The Storage View tab provides information about all SCSI adapter and NAS mounts.
- 91. View Fibre Channel Storage Maps 91
- 92. Using a VMFS with ESX/ESXi Use VMFS datastores whenever possible: VMFS is optimize for storing and accessing large files. A VMFS can have maximum volume size of 64TB. NFS datastores are great for storing virtual machines. However, some functions are not supported. Use RDMs if your virtual machine: Is performing SAN snapshotting Is clustered to a physical machine using Microsoft Cluster Service (MSCS) Has large amount of data that you do not want to convert into a virtual disk 92
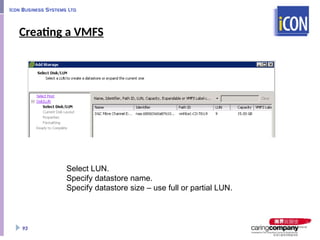
- 93. Creating a VMFS 93 Select LUN. Specify datastore name. Specify datastore size – use full or partial LUN.
- 94. Viewing VMFS Datastores Storage link in the configuration tab, and Storage View tab 94
- 95. Growing a VMFS Grow a VMFS to give it more space or possibly to improve performance. Two ways to grow a VMFS: Add an extent to the VMFS – This feature allows you to dynamically add a new extent to a VMFS. Grow the datastore – This feature allows you to dynamically expand a VMFS on the volume partition on which it is located. 95 SAN3 SAN3 LUN 6 LUN 7 VMFS
- 96. Comparing Methods for Growing a VMFS Growing the datastore Adding extents to the datastore VM power state On On Newly provisioned LUN No Yes Existing array-expanded LUN Yes Yes Limits An extent can be grown any number of times, up to 2TB. A datastore can have up to 32 extents, each up to 2TB. New partition No Yes VM availability impact None, if data has only one extent. Introduces dependency on first extent. 96
- 97. Summarize of Part 5 97
- 98. Part 6 Virtual Machine Virtual machine create, modify Virtual machine snapshot Template and deployment Virtual machine migration vMotion 98 This involved your daily operation on the VM guest
- 99. What Is a Virtual Machine? It is a set of virtual hardware on which a supported guest operating system and its applications run. It is a set of discrete files. A virtual machine’s configuration file describes the virtual machine’s configuration, including its virtual hardware. Avoid using special characters and spaces in the virtual machine’s name. 99 Application Operating System Hardware Virtual Machine MyVM.vmx guestOS = “winnetstandard” displayName = “MyVM” (etc.)
- 100. What Files Make Up a Virtual Machine? File name Description <VM_name>.vmx Virtual machine configuration file <VM_name>.vmdk File describing virtual disk characteristics <VM_name>-flat.vmdk Preallocated virtual disk file that contains the data <VM_name>.nvram Virtual machine BIOS vmware.log Virtual machine log file vmware.log (where # is number starting with 1) File containing old virtual machine log entries <VM_name>.vswp Virtual machine swap file <VM_name>.vmsd File that describes virtual machine’s snapshots Additional files can exist if snapshots are taken or raw disk mappings are added (to be discussed later) 100
- 101. Displaying a Virtual Machine’s Files Click the Storage link in the Configuration tab. Right-click a datastore to browse its files. 101
- 102. Displaying Files Using the Storage Views Tab 102
- 103. Virtual Machine Hardware Here is the hardware of VM VM Chipset 1 CPU (up to 8 CPUs with VMware SMP) 1-4 SCSI adapters; 1-15 devices per adapter 1-10 NICs Keyboard and Mouse 1 Floppy controller up to 2 floppy drivers Up to 2 ports of Serial/Comm Port, 3 ports of Parallel Port 1 IDE controller, up to 4 CD-ROMs VMware Display Card Up to 255GB RAM 103
- 104. CPU and Memory Up to eight virtual CPUs (vCPUs) Virtual SMP license required Also depends on number of licensed CPUs on a host and the number of processors supported by a guest operating system Maximum memory size (up to 255GB) Amount the guest operating system will be told it has 104 Virtual Machine
- 105. Virtual Disk Parameter Sample value Virtual disk size 4GB Datastore MyVMFS Virtual disk note 0:0 Virtual storage adapter LSILogic (or BusLogic) Virtual disk files <VM_name>.vmdk and <VM_name>-flat.vmd Advanced settings: Mode Independent – Persistent or nonpersistent 105 Virtual Machine Server1-flat.vmdk Server1.vmdk Datastore
- 106. Virtual NIC The following network adapters might be available for your virtual machine: vlance – Also called PCNet32, supported by most 32-bit guest operating systems vmxnet – Provides significantly better performance than vlance Flexible – Can function as either vlance or vmxnet E1000 – High-performance adapter available on for some guest operating systems Enhanced vmxnet – vmxnet adapter with enhanced performance Vmxnet3 – Builds on the Enhanced vmxnet adapter 106 NIC Virtual Machine
- 107. Other Devices CD-ROM drive Connect to CD-ROM or ISO image. Floppy drive Connect to floppy or floppy image. Generic SCSI devices (such as tape libraries) Can be connected to additional SCSI adapters 107
- 108. Virtual Machine Console Send power changes to virtual machine. Access virtual machine’s guest operating system. Send Ctrl+Alt+Del to guest operating system. Press Ctrl-Alt-Ins in virtual machine console Press Ctrl+Alt to release cursor from virtual machine console 108 VM console icon VM Console
- 109. VMware Tools 109 VMware Tools installs into guest operating system like an application. Feature include: Driver devices Virtual machine heartbeat Improved mouse Memory management Support for quiescing a file system Time synchroization Ability to gracefully shut down virtual machine VMware Tools Icon
- 110. Creating a Virtual Machine: Launch Wizard Create a virtual machine in the VMware vCenter Server inventory. In the Host and Clusters view, select a datacenter, cluster, or host. In the VMs and Templates view, select a datacenter or folder. Launch the Create New Virtual Machine wizard. Perform a “typical” or “custom” configuration. 110
- 111. Choosing the Typical Configuration Information needed for a typical configuration: Virtual machine name and inventory location Location in which to place the virtual machine (cluster, host, resource pool) Datastore on which to store virtual machine’s files Guest operating system and version Disk parameters for creating a new virtual disk: Disk size Disk-provisioning settings: Allocate and commit space on demand (Thin Provisioning) Support clustering features such as Fault Tolerance 111
- 112. Choosing the Custom Configuration Additional information needed for a custom configuration: Virtual machine version (version 7 is the latest) Number of CPUs and size of memory Number of NICs, network to connect to, use network adapter type SCSI connector type Whether to create a new disk, use an existing disk, use an RDM, or no disk Additional disk-provisioning settings: Store virtual disk with virtual machine or in a different datastore Virtual device node (for example, SCSI(0:0)) Mode-independent (persistent and nonpersistent) You can also edit the virtual machine settings before completing the create tak. For example, attach an ISO image to the virtual CD-ROM devoce. 112
- 113. Virtual Appliances Preconfigured virtual machines: Usually designed for a single purse (for example, a safe browser or firewall) Deployed as an OVF template Available from the VMware Virtual Appliance Marketplace http://www.vmware.com/appliances Upload into vCenter Server using the vSphere Client. 113
- 114. Deploy OVF Template 114 Another way to deploy a virtual appliance: Deploy from the OVF template.
- 115. What Is a Template? 115 A master copy of a virtual machine used to create and provision new virtual machines An image that typically includes a guest operating system, a set of applications, and a specific virtual machine configuration
- 116. Creating a Template Clone virtual machine to template. Virtual machine can either be powered on or powered off. Convert virtual machine to template Virtual machine must be powered off Clone an existing template. Select template in inventory first. 116
- 117. Updating a Template To update a template: Convert the template to a virtual machine. Place the virtual machine on an isolated network to prevent user access. Make appropriate changes to the virtual machine. Convert the virtual machine back to a template. 117
- 118. Deploying a Virtual Machine from Template To deploy a virtual machine, provide such information as virtual machine name, inventory location, host, datastore, and guest operating system customization data. 118
- 119. Cloning a Virtual Machine Cloning is an alternative to deployment a virtual machine. A clone is an exact copy of the virtual machine. The virtual machine being cloned can either be powered on or powered off. 119
- 120. Customizing the Guest Operating System During cloning or deploying from template, you have the option of running the Guest Customization wizard. The wizard lets you create a specification you can use to prepare the guest operating systems of virtual machines. Specifications can be stored in the database. You can edit existing specifications using the Customization Specifications Manager. Customization of clone’s guest is recommended to prevent software and network conflicts. 120
- 121. Modifying Virtual Machine Settings A virtual machine’s configuration can be modified using its Properties dialog box. Add virtual hardware. Some hardware can be added while the virtual machine is powered on. Remove virtual hardware. Set virtual machine options. Control a virtual machine’s CPU and memory resources. 121
- 122. Hot-Pluggable Devices Hot-pluggable devices are USB controller, Ethernet adapters, hard disks, and SCSI devices. CPU and memory can also be added while the virtual machine is powered on. 122
- 123. Increasing Virtual Disk Size: Hot Extend Feature Hot Extend Is used to increase size of a virtual disk Is supported for vStroage VMFS flat virtual disk in persistent mode and without any virtual machine snapshots. Using appropriate tools, the guest operating system can dynamically grow the file system to use this new allocated disk space. 123
- 125. Creating a Raw Device Mapping To create an RDM, go to the virtual machine’s Properties dialog box and add a hard disk device of type raw device mappings. 125 VM A VMFS LUN14.vmdk LUN14 Ext3 or NFS vmhba1:0:14 Virtual SCSI Node: scsi0:0
- 126. Virtual Machine Options 126 General Options vApp Options VMware Tools Power Management Advanced
- 127. Options: General Options 127 VM display name .vmx file location VM directory Guest operating system type
- 128. Options: VMware Tools 128 Customize power button actions. When to run VMware Tools scripts Update checks and time sync
- 129. Options: Power Management 129 Suspend or standby the guest operating system gracefully. Wake on LAN.
- 130. Advanced: Boot Options 130 Delay power on. Boot into BIOS.
- 131. Advanced: Paravirtualization Paravirtualization, supported by some guest operating systems, makes a guest operation system aware that is running inside a virtual machine rather than the physical hardware. 131
- 132. Virtual Machine Snapshots Snapshots allow you to preserve the state of the virtual machine so that you can return to the same state repeatedly. For example, if you are testing software, snapshots allow you to back out of these changes. 132
- 133. Taking a Snapshot You can take a snapshot while a virtual machine is powered on, powered off, or suspended A snapshot captures the entire state of the virtual machine: Memory state, settings state, and disk state 133
- 134. Managing Snapshots The Snapshot Manager let you review all snapshots for the active virtual machine and act on them directly. Revert to a snapshot. Delete one or all snapshots. 134
- 135. Virtual Machine Snapshot Files A snapshot consists of a set of files: the memory state (.vmsn), the description file (-00000#.vmdk), and the delta file (-00000#-delta.vmdk). The snapshot list file (.vmsd) keeps track of the virtual machine’s snapshots. 135
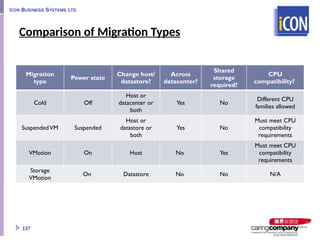
- 136. Migrating Virtual Machines Migration is the process of moving a virtual machine from one host or storage location to another. Types of migrations: Cold – Migrate a virtual machine that is powered off. Suspend – Migrate a virtual machine that is suspended VMware VMotion – Migrate a virtual machine that is powered on. Storage VMotion – Migrate just a virtual machine’s files, while the virtual machine is powered on, to a different datastore. A main use of migration is to improve overall hardware utilization. VMotion has additional uses: It allows continued virtual machine operation while accommodating scheduled hardware downtime. It allows VMware Distributed Resource Scheduler to balance virtual machines across hosts 136
- 137. Comparison of Migration Types Migration type Power state Change host/ datastore? Across datacenter? Shared storage required? CPU compatibility? Cold Off Host or datacenter or both Yes No Different CPU families allowed SuspendedVM Suspended Host or datastore or both Yes No Must meet CPU compatibility requirements VMotion On Host No Yes Must meet CPU compatibility requirements Storage VMotion On Datastore No No N/A 137
- 138. Benefits of Storage VMotion Migration with Storage VMotion: Performing storage maintenance and reconfiguration Redistributing storage load Evacuating physical storage about to be retired Storage tiering Upgrading ESX/ESXi hosts without virtual machine downtime 138 App OS App OS App OS
- 139. Storage VMotion In Action 139 App OS App OS App OS
- 140. Migrating Using Storage VMotion 140 SVmotion Available when virtual machine is powered off
- 141. Storage VMotion Guidelines and Limitations Guidelines: Spend time planning and coordinating with administrators. Perform during off-peak hours. Ensure that source host has access both to source and target datastores. Limitations: Virtual machines with snapshots cannot be migrated. The virtual machine must be powered off to concurrently migrate to another host and datastore. Up to four concurrent Storage VMotion migrations can occur. 141
- 142. Summarize of Part 6 Are you able to become the virtual machine troubleshooter? 142
- 143. Part 7 VMware vSphere Maintenance Looking after the logs and events Setting up alarm Update manager Update the ESXi host (remediated) Access control to the datacenter Virtual Machine backup 143 This section shown hot to maintain and backup
- 144. vCenter Server Events 144 Details of selected event Event search
- 145. vCenter Server System Logs 145 Log search
- 146. What Is an Alarm? An alarm is a notification that occurs in response to selected events or conditions that occur with an object in the inventory. Default alarms exist for various inventory objects. Many default alarms for hosts and virtual machines You can create custom alarms for a wide range of inventory objects. Virtual machines, hosts, clusters, datacenters, datastores, networks, distributed switches, and distributed port groups 146
- 147. Creating an Alarm Right-click inventory object, then choose Alarm > Add alarm. 147 Alarm supported for: - Virtual Machines - Hosts - Clusters - Datacenters - Datastores - Networks - Distributed switches - Distributed port groups
- 148. Alarm Triggers An alarm is comprised of a trigger. There are two types: Condition, or state, trigger – Monitors the current condition or state; for example: A virtual machine’s current snapshot is above 2GB in size. A host is using 90 percent of its total memory. A datastore has been disconnected from all hosts. Event – Monitors events; for example: The health of a host’s hardware has changed. There are insufficient licenses in the datacenter. A distributed virtual port group has been reconfigured. 148
- 149. Configuring Condition Triggers Condition triggers for a virtual machine 149
- 150. Configuring Event Triggers Event trigger for a host 150
- 151. Configuring Reporting Options 151 Use the Reporting pane to avoid needless re-alarms. Avoid repeats Avoid small fluctuations
- 152. Configure Actions 152 Every alarm type has the following actions: • Send a notification email, send a notification trap, or run a command. Virtual machine alarms and host alarms have additional actions available.
- 153. Configuring vCenter Server Notifications In the menu bar, choose Administration > vCenter Server Settings. 153 Click Mail to set SMTP parameters. Click SNMP to specify trap destinations.
- 154. Update Manager Update Manager patches and updates ESX/ESXi hosts and the virtual machines, templates, and virtual appliances hosted on them. Update Manager reduces security risks Keeping systems up to date reduces the number of vulnerabilities. Many security breaches exploit older vulnerabilities. Reducing the diversity of systems in an environment: Makes management easier Reduces security risks 154
- 155. Update Manager Capabilities Automated patch downloading: Begins with information-only downloading Can be scheduled at regular intervals For ESX/ESXi patching: http://www.vmware.com For Windows/Linux virtual machines and applications: https://shavlik.com Creation of baselines and baseline groups Scanning Inventory systems are scanned for baseline compliance. Remediation Inventory systems that are not current can be automatically patched. 155
- 156. Update Manager Components 156 Internet VC DB Patch DB Patch DB App OS App OS App OS Hosts Database server vCenter Server system Update Manager server vSphere Client w/Update Manager plug-in Optional download server vmware.com https://shavlik.com Update Manager agent are installed in to virtual machines.
- 157. Installing Update Manager Launch the VMware vCenter Installer, then click vCenter Update Manager. Update Manager server software can run on the vCenter Server system or on another Windows system. 157
- 158. Information Needed for Update Manager Installation vCenter Server information: IP address User name and password Database options: Install a Microsoft SQL Server 2005 Express instance. Or use an existing supported database and provide data source name. Update manager port settings: IP address or host name of Update Manager SOAP port, web port, and SSL port Identify whether you want to configure proxy settings. Destination folder and location for downloading patches 158
- 159. Installing the Update Manager Client Plug-In To install the Update Manager Client: Install the Update Manager Extension plug-in into the vSphere Client. 159
- 160. Configuring Update manager Settings Configure virtual machine and ESX/ESXi host settings. Virtual machines can be protected by snapshots. Host update require maintenance mode. 160
- 161. Creating a Baseline A baseline consists of one ore more patches. A baseline group consists of multiple baselines. To create a baseline, click Create. 161
- 162. New Baseline: Name, Type, Patch Options 1. Specify name and description. 2. Choose a baseline type. 3. Choose a patch option: Fixed or Dynamic. 162
- 163. Finding specific Fixed Patches 163 Fixed baselines - Select updates from the patch database to include in the baseline.
- 164. Attaching Baselines 1. Select inventory object. It is a best practice to attach a baseline to a folder instead of to an individual object. 2. Click the Update Manager tab. 3. Click Attach, then select baselines. 164
- 165. Scanning Hosts Scan ESX/ESXi hosts just as you would virtual machines. Always use the Hosts and Clusters view to use Update Manager with ESX/ESXi hosts. Attach baselines to folder or host before scan. Scan can be performed while virtual machine are running. 165
- 166. Remediating Baselines 166 Right-click inventory object, then choose Remediate. Or create a scheduled task.
- 167. Access Control Overview The access control system allows the vCenter Server administrator to specify which users or groups can perform which actions on which objects. Key concepts: Privilege – Defines an action that can be performed Role – A set of privileges Object – The target of the action Windows user/group – Indicates who can perform the action Together, a role, a user/group, and an object define a permission 167 Permissio n Role Object User/ Group
- 168. Users and Groups 168 VC Server ESX Server ESX Server VI Client VI Client ESX Server users and groups are those defined in its service console. VirtualCenter users and groups are those defined in the VirtualCenter Server’s Windows domain.
- 169. Roles and Privileges 169 Roles are collection of privileges. • They allow users to perform tasks. • They are grouped in categories. There are system roles, sample roles and custom-built roles.
- 170. Objects Objects are entities upon which actions are performed. Examples of objects are datacenters, folders, resource pools, clusters, hosts, datastores, networks, and virtual machines. All object have a Permission tab. This tab shows what user/group and role are associated with the selected object. 170
- 171. Assigning Permissions To add a permission, go to the object’s Permissions tab, right- click the viewing area, then select Add Permission. Select a user and a role. You can also propagate the permission to child objects. 171
- 172. View Roles and Assignments The Roles pane shows what users are assigned the selected role on a particular object. 172
- 173. Applying Permissions: Scenario 1 173 • A permission can propagate down the object hierarchy to all subobjects, or it can apply only to an immediate object. Greg – Datacenter Administrator Greg – No Access
- 174. Applying Permission: Scenario 2 • If a user is a member of multiple groups with permissions on the same object • The user is assigned the union of privileges assigned to the groups for that object. Group1 – VM_Power_On (custom role) Group2 – Take_Snapshots (custom role) Members of Group1: Greg Susan Members of Group2: Greg Carla
- 175. Applying Permissions: Scenario 3 175 • If a user is a member of multiple groups with permission on different objects • For each object on which the group has permissions, the same permissions apply as if granted to the user directly. • You can override permissions set at a higher level by explicitly setting different permissions fop an object at a lower level. Group1 – VM Administrator Group2 – Read-Only Members of Group1: Greg Susan Members of Group2: Greg Carla
- 176. Applying Permissions: Scenario 4 176 • Permissions defined explicitly for the user on an object take precedence over all group permissions on that same object Group1 – VM_Power_On (custom role) Group2 – Take_Snapshots (custom role) Members of Group1: Greg Susan Members of Group2: Greg Carla Greg – No Access
- 177. What to Back Up There are the vSphere components to back up: ESX service console ESXi configuration Virtual machine data 177
- 178. Backing Up ESXi Configuration Data Always back up your ESXi host configure after changing the configuration or upgrade the ESXi image. To back up an ESXi Installable or ESXi Embedded configuration, use the vicfg-cfgbackup command. Use command to back up or restore the host’s configuration. Run from the vSphere Command-Line Interface. 178
- 179. Back Up Virtual Machines Store application data in separate virtual disks from system images. Use full virtual machine backups for system images. The alternative is to redeploy from template. Use Consolidated Backup or Data Recovery. 179 Application Operating System os.vmdk os_1.vmdk VMFS volume
- 180. Consolidated Backup Works along with third-party backup agents to perform backups Centralizes backup on a Consolidated Backup proxy server, which can be a physical or virtual machine Eliminates the need for having a backup agent installed in each virtual machine Can read virtual disk data to back up directly from storage (Fibre Channel or iSCSI) Supports file-level full and incremental backups for Windows virtual machines and image-level backups of any supported guest operating system 180
- 181. Data Recovery Backup-and –recovery appliance Agentless, disk-based backup and recovery tool for virtual machines Linux appliance vCenter Server integration vSphere Client plug-in Wizard-driven backup and restore job creation For the vSphere administrator who Wants a simple user interface with minimal options Wants to leverage disk as destination storage 181 VMFS vCenter Server App OS App OS App OS Virtual Appliance
- 182. Setting Up Data Recovery 1. Add the appliance to the vCenter server inventory by deploying an OVF template a. Configure the appliance networking. b. Configure the appliance time zone. 2. Add the destination storage device to the appliance. 3. Install the Data Recovery plug-in into the vSphere Client. 4. Access the management user interface in the vSphere Client at Home > Solutions and Applications. The host for the appliance and the host for the virtual machine being backed up must be licensed for Data Recovery 182
- 183. Backup Job Create a backup job using the management UI. Each appliance supports backing up 100 virtual machines. Each appliance supports a maximum of 100 backup jobs. A backup job consists of: Source (virtual machines to back up) Destination Backup window Retention policy 183
- 184. Backup Job: Source The backup source can be at any level in the inventory – datacenter, folder, host, virtual machine, virtual machine’s disk. 184 The user is warned if: - Virtual machines is not on a licensed host - More than 100 virtual machines are selected for backup
- 185. Backup Job: Destination The destination storage can be a VMware vStorage VMFS datastore (local, iSCSI, or Fibre Channel), an NFS datastore, or a CIFS share. Destination is formatted as deduplication storage Manually add the destination, a virtual disk, to the appliance. Each backup job can use at most two different destinations. 185
- 186. Backup Job: Backup Window Specify the time during the week when the backup can run. Virtual machines are stored in ascending order based on the last backup time. Virtual machines not backed up for the longest time have highest priority. 186
- 187. Backup Job: Retention Policy Specify a predefined or custom retention policy. 187
- 188. Restore Job: Selecting Object to Restore To create a restore job, select the object to restore: For example, multiple virtual machines or a certain disk of a virtual machine 188
- 189. Restore Job: Selecting the Destination Select the destination: Original location of virtual machine Different host, resource pool, or datastore 189
- 190. Summarize of Part 7 Update manager to update ESXi host Datacenter object permission Virtual machine backup 190
- 191. VMware vSphere Training End. 191
Editor's Notes
- #7: 5 VMware® vSphere™ is an infrastructure virtualization suite that provides virtualization, management, resource optimization, application availability, and operational automation capabilities in an integrated package. vSphere virtualizes and aggregates the underlying physical hardware resource across multiple systems and provides polls of virtual resources to the datacenter. In addition, vSphere provides a set of distributed services that enable detailed, policy-driven resource allocation, high availability, and consolidated backup of entire virtual datacenter.
- #8: 17 As desktop and server processing capacity has consistently increased year after year, virtualization has proved to be a powerful technology to simplify software development and testing, to enable server consolidation, and to enhance datacenter agility and business continuity. Fully abstracting the operating system and applications from the hardware and encapsulating them into portable virtual machine has enabled virtual infrastructure features simply not possible with hardware alone. For example, servers can now run in extremely fault-tolerant configurations on virtual infrastructure 24 hours per day, 7 days per week, 365 days per year, with no downtime needed for backups or hardware maintenance. Virtualization is an architecture that allows you to run multiple operating systems simultaneously on a single computer. Each copy of an operating system is installed on its own virtual machine. Virtualization is often confused with simulation and emulation. It is neither of these things. Simulation is something that looks like something else. A flight simulator is a well-known example: it is a machine (or a computer program) that can make it look like you are flying a plane. Virtualization is not simulation. The real operating system is installed on the virtualized hardware. Emulations require software to translate commands for the emulated hardware into commands the physical hardware can understand. This translation process is slow and usually causes software packages running inside an emulator to run slowly. Also, emulation packages can fail to translate correctly some of the machine-language commands. Virtualization is not emulation. No command translations take place when you use VMware virtualization products.
- #9: 18 The term virtualization broadly describes the separation of a service request from the underlying physical delivery of that service. With x86 computer virtualization, a virtualization layer is installed between the hardware and the operating system. This virtualization layer allows multiple operating system instances to run concurrently within virtual machines on a single computer, dynamically partitioning and sharing the available physical resources, such as CPU, storage, memory, and I/O devices. For industry-standard x86 systems, virtualization approaches use either a hosted or a hypervisor architecture.
- #10: 19 Host operating system-based virtualization – also called host-base virtualization – installs and runs the virtualization layer as an application on top of an operating system and support the broadest range of hardware configurations. For example, VMware Server is a free application that can be installed on a supported Windows or Linux system and that provides host-base virtualization. Once VMware Server is installed, virtual machine can be created and employed. Other VMware applications that employ a hosted architecture are VMware Player, ACE, and Workstation.
- #11: 20 In contrast, a hypervisor (or, bare-metal) architecture installs the virtualization layer directly on a clean x86-sbased system. Because it has direct access to the hardware resources, rather than going through an operating system, a hypervisor is more efficient than a hosted architecture and delivers greater scalability, robustness, and performance. A hypervisor is the primary component of virtualization that enables basic computer system partitioning (that is, simple partitioning of CPU, memory, and I/O). VMware ESX™/ESXi employs a hypervisor architecture on certified hardware for datacenter-class performance. For a very good discussion on virtualization, see the white paper “Understanding Full Virtualization, Paravirtualization, and Hardware Assist” at http://www.vmware.com/files/pdf/VMware_paravirtualization.pdf .
- #12: 21 From the user’s perspective, a virtual machine is a software platform that, like a physical computer, runs an operating system and applications. An operating system that has been virtualized is called a guest operating system. One supported guest operating system runs in each virtual machine that is created. Each virtual machine is completely independent and can have its own applications and its own security. From the perspective of the hypervisor, a virtual machine is discrete set of files, including a configuration file, virtual disk files, an NVRAM settings file, and a log file. Virtual machines are portable. They can easily be backed up and cloned. They are just an encapsulated set of files. Virtual machines will be discussed in detail in a later module.
- #13: 22 In a physical machine, the operating system (Windows, UNIX, Linux, and so forth) is installed directly on the hardware. This requires specific device drivers to support specific hardware. If the computer is upgraded with new hardware, new device drivers are required. Hardware upgrades also require direct hands-on contact by technical support personnel. Virtual machines are 100 percent software. The virtual machine is nothing more than a set of files. This includes files known as virtual disks, which replaced hard disk storage. All the files for a single virtual machine are located in one directory. Because it uses standardized virtual device drivers, the hardware can be upgraded without any change to the virtual machine. Multiple virtual machines are isolated from one another. So now you can have your database server and your email server running on the same physical computer. The isolation between the virtual machines means that software-dependency conflicts and performance-tuning conflicts are not a problems. Because a virtual machine is just a set of files, it is simple to move the entire virtual machine to a new server to perform hardware upgrades. This also makes disaster recovery planning and testing much easier.
- #14: 23 VMware vSphere™ consists of the following components: VMware ESX/ESXi – The virtualization platform for vSphere VMware vCenter™ Sever – The central point for configuring, provisioning, and managing virtualized IT environments VMware vSphere Client – An interface that allows users to connect remotely to vCenter Server or ESX/ESXi from any Windows PC. VMware vSphere Web Access – A web interface that allows virtual machine management and access to remote consoles VMware vStorage VMFS – A high-performance cluster file system for ESX/ESXi virtual machines VMware Virtual SMP – A feature that enables a single virtual machine to use multiple physical processors simultaneously vSphere also provides functionality for resource management such as VMware Distributed Resource Scheduler (DRS), for availability such as VMware High Availability, and for data protection such as VMware Consolidated Backup and VMware Data Recovery.
- #15: 24 vSphere is most commonly used for creating a responsive datacenter with a virtualized IT infrastructure. Datacenter administrators use vSphere for the following: Solving the problems of server proliferation (lack of space, power, and cooling in server rooms) by replacing single-application servers with virtual machines consolidated onto a much smaller number of physical hosts Making better use of server hardware by deploying new servers in virtual machines to avoid adding more underutilized servers to the datacenter Provisioning new servers in virtual machines, which makes minutes rather than the days or weeks necessary for provisioning a physical server In the diagram above, the boxed items represent the components of a vSphere environment. All other items are VMware products that can provide added features and functionality to the vSphere environment. Go to http://www.vmware.com for information on the versions of these products that are compatible with vSphere.
- #18: 35 VMware ESX and ESXi provide a virtualization layer that abstracts the processor, memory, storage and networking resources of the physical host into multiple virtual machines. ESX and ESXi are hypervisors that create the foundation for a dynamic and automated datacenter.
- #19: 36 ESX/ESXi allows you to network virtual machines as you would physical machines, using standard and distributed virtual switches, NIC teaming, and VLANs. ESX/ESXi provides a few options for storing virtual machines. The most common way is using the VMware vStorage Virtual Machine File System (VMFS), a high-performance cluster file system that can be used to centralize virtual machine file storage for greater manageability, flexibility, and availability. Multiple ESX/ESXi hosts can be centrally managed by VMware vCenter Server. vCenter Server can be used to provision, monitor, and manage the virtual machines located on these hosts. ESX/ESXi can take advantage of the various features and components of VMware vSphere, such as VMware VMotion™, Storage VMotion, VMware High Availability, Distributed Resource Scheduler (DRS), Distributed Power Management (DPM), Consolidated Backup, and vCenter Update Manager. ESX/ESXi hosts can be access with the VMware vSphere Client. The vSphere Client is a graphical user interface that acts as a console to operate virtual machines and as an administration interface to ESX/ESXi hosts and vCenter Server.
- #20: 38 ESXi is enterprise-class hypervisor with a thin 32MB footprint for added security and reliability. An ESXi host can be accessed using a number of interfaces, such as the vSphere Client (connected directly to the host or to vCenter Server), the vSphere Command-Line Interface (vCLI), the vSphere API/SDK, and CIM (Common Information Model). CIM is a management standard prompted by the Distributed Management Task Force. Much of the information that you can find using the CIM interface is also available through the vSphere API. However, there is come information that can be found only through CIM; most important, the health status of the hardware hosting ESXi. Under ESXi, application running within virtual machine access CPU, memory, disk, and network interface without direct access to the underlying hardware. The ESXi hypervisor is known as the VMkernel. The VMkernel receives virtual machines’ requests for resource from the virtual machine monitor (VMM) and presents them to the physical hardware. ESXi is support on AMD Opteron processors, Intel processors, Xeon and above. ESXi includes a 64-bit VMkernel. As a result, server with 32-bit-only processors are not supported. ESXi offers support for a number of 64-bit guest operating systems. For the complete list of supported systems for ESXi, see the compatibility guide at http://www.vmware.com/resources /guides.html .
- #21: 600 For ESXi Installable, you need a 64-bit server (AMD Opteron, Intel Xeon, or Intel Nehalem). The server can have up to 64 logical CPUs (cores or hyperthreads) and can support up to 256 virtual CPUs per host. A minimum of3GB memory is required. An ESXi host can have up to 512GB memory. The ESXi host must have one or more Ethernet controllers, a 5GB disk, a basic SCSI controller, internal RAID controller, and SCSI disk or a local RAID LUN. ESXi Installable supports installing on and booting from SATA disk drives, SCSI disk drivers, or Serial Attached SCSI (SAS) disk drives. An ESXi Embedded host comes from the hardware vendor in a state that is ready to use because the ESXi software is preinstalled in the firmware of the vendor’s hardware. For more information on the installation and setup of ESXi, see the following manuals at http://www.vmware.com/support/pubs : ESXi Installable and vCenter Server Setup Guide ESXi Embedded and vCenter Server Setup Guide For details on the configuration maximum, see the configuration Maximums Guide at http://www.vmware.com/support/pubs .
- #22: 602 When you power on ESXi (Installable or Embedded). The host enters an initial bootup phase. Storage devices are configured with defaults. The disk-formatting software retains existing diagnostic partitions that are created by the hardware vendor. In the remaining space, the software creates: One 4GB VFAT scratch partition for system swap One 110MB diagnostic partition for core dumps, if this partition is not present on another disk One VMFS3 partition on the remaining free space The VFAT scratch and diagnostic partitions are created only on the disk from which the ESXi host is booting. On other disks, the software creates one VMFS3 partition per blank disk, using the whole disk. The software formats blank disks only. You might want to override this default behavior if, for example, your policy is to use shared storage device instead of local storage. To prevent automatic disk formatting from occurring, detach local storage device from the host before you power on the host for the first (or before you power on the host after you reset the host to the configuration default). Automatic disk formatting occurs the first time you power on the host and when you power on the host after you reset the host to the configuration default. For subsequent reboots, you do not need to detach local storage devices. If automatic disk formatting already occurred and you want to override the VMware vStorage VMFS formatting, you can remove the datastore.
- #23: 44 The direct console user interface is used to configure certain settings for ESXi Embedded and ESXi Installable. The direct console is similar to the BIOS of a computer in that it has a keyboard-only user interface. The direct console can be access from the ESX console. To start customizing system settings, press F2.
- #24: 45 The administrative user name for the ESXi host is root. By default, the administrative password is null. If you do not set a root password, you will be unable to log in to the ESXi host with the vSphere Client. To set the root password, select Configure Root Password, then press Enter. If you receive an error when setting the root password, it is likely that the password you chose is not complex enough. In general, choose a password that is more than six characters long and that has at least one uppercase character, one lowercase character, and one digit. When enabled, lockdown mode prevents remote personnel from logging in to the ESXi host with root login name. By default, lockdown mode is disabled. Users can still access the host through the direct console or through an authorized centralized management application, such as vCenter Server. When lockdown mode is enabled, you can create a user with administrator privileges to connect to a standalone host. But do not use this approach in environments with numerous hosts, because maintaining separate user password database for each host might be difficult to manage. To enable or disable lockdown mode, select Configure Lockdown Mode, then press Enter. Choose to either enable or disable.
- #25: 46 You must set up your IP address before your ESXi host is operational. By default, a DHCP-assigned address is configured for the ESXi host. To change or configure basic network settings, use the direct console or the vSphere Client. From the direct console, you can change the host name, IP settings (such as IP address, subnet mask, default gateway), and DNS servers. You can also modify the network adapter used for the management network, configure VLAN settings, and an IPv6 configuration, and set customer DNS suffixes. You can also restart the management network (without having to reboot the system), test the management network (using ping requests), and disable a management network.
- #26: 47 Finally, the direct console allows you to change the keyboard layout (the default is English), view support information, and view system logs. You can also restart management agents, reset the system configure, and remove custom extensions.
- #27: 48 The vSphere Client is the primary interface for managing all aspects of the vSphere environment. It is the interface to the vCenter Server and hosts. It also provides console access to virtual machines. After ESX or ESXi is installed, a Welcome page is displayed, from which you can download the vSphere Client. For the list of versions of ESX and ESXi hosts that the vSphere Client is compatible with, see the installation guide at http://www.vmware.com/resources/guides.html .
- #28: 49 The vSphere Client provides direct access to an ESX/ESXi host. To log in to an ESX/ESXi host, provide the host name, a user account, and a password. In most case, you will log in to the ESX/ESXi host as user root The Use Windows session credentials check box applies only when using the vSphere Client to log in to a vCenter Server system.
- #29: 50 After you log in, the vSphere Client shows the ESX/ESXi host in the left pane. Click the Configuration tab to view or configure the host’s hardware and software settings. On the Configuration tab, you can view the health of your host’s hardware, view the host’s processor and memory configuration, and license keys, and configure a host’s networking and storage. The vSphere Client also allows you to add a host’s license key, configure the host as an Network Time Protocol (NTP) client, configure or modify the primary and secondary DNS servers, and modify the ESX service console’s firewall. You will use the Configuration tab to configure storage and networking in a later module.
- #30: 51 In the Hardware section of the Configuration tab, the Processors link allows you to view information about your host’s CPUs, such as model, processor speed, and the number of sockets, cores, and logical processors. The Memory link (show above) allows you to view information about the physical memory, such as total size and the amount of memory currently used form system overhead, virtual machines, and the service console (if viewing an ESX host) On an ESX host, you can change the memory size of service console if necessary. The change takes effect on the next system reboot. Increase the size of service console memory if you are going to run one or more management agent (such as a backup agent or system management agent) on the service console. The amount of additional memory necessary for the service console depends on the agent software to be run.
- #31: 52 To assign a valid license key to your ESX/ESXi host, click the Licensed Features link. The Licensed Features pane shows what type of license and what product features you currently have. In the example above, the host is running licensed mode. Click the Edit link to the right of the license type (not shown in the example). The Assign License dialog box enables you to toggle evaluation or assign a new license key to the host by entering the key, a multicharacter string provided by VMware.
- #32: 53
- #33: 54 The Network Time Protocol (NTP) is an Internet standard protocol used to synchronize computer clock times in a network. There are several benefits to synchronizing an ESX/ESXi host’s time: Performance data can be displayed and interpreted properly. Accurate time stamps appear in log message (which make audit logs meaningful). Virtual machines can synchronize their time with the ESX/ESXi host. This is also beneficial to applications, such as database applications, running on the virtual machine. For more information on NTP, see http://www.ntp.org .
- #34: 55 NTP is a client-server protocol. When you configure the ESX/ESXi host to be an NTP client, the host synchronizes its time with an NTP server, which could be a server on the Internet. The system depends on multiple “strata” (layers) of time servers, stratum 1 devices are connected directly to extremely sophisticated clock devices like atomic clocks to ensure that they have absolutely perfect time. Stratum 1 time servers are supposed to have time accurate to within 200 microseconds (1/5000th of a second). Stratum 2 time servers get their time from stratum 1. This is requested and delivered via TCP/IP UDP port 123. There may be up to four strata in the hierarchy, and time within the lower levels is still supposed to be accurate to within 1/100th of a second.
- #35: 56 To configure your ESX/ESXi host to be an NTP client, click the host’s Configuration tab, then click the Time Configuration link. This displays the Time Configuration dialog box, shown above. Here, you can enable the NTP client software and specify one or more NTP servers to synchronize with. You can also specify one or more NTP servers with which the ESX/ESXi host (the NTP client) can synchronize time.
- #36: 57 The host’s DNS and Routing link allows you to change the host name and domain, the primary and secondary DNS services, as well as the service console gateway and VMkernel gateway. To configure these settings, click the host’s Configuration tab, then click the DNS and Routing link to display the information as shown above.
- #37: 58 ESX includes a firewall between the service console and the network. To ensure the integrity of the service console, there are very few firewall ports that are open by default. To provide or prevent access to certain services or clients, you must modify the firewall properties. To modify the firewall properties, click the host’s Configuration tab, then click the Security Profile link. In the Security Profile pane, click the Properties link (not shown above). The Firewall Properties dialog box appears (shown above). To provide access to a service or client, select the appropriate check box. To prevent access, deselect the appropriate check box. For example, if you want to use the iSCSI software initiator, you must provide access to the iSCSI software client by selecting its check box.
- #38: 59 On an ESX or ESXi host, the root user account is the most powerful user account on the system. The user root has access to all files and all commands. This user has almost unlimited capabilities. Therefore, securing this account is the most important step you can take to secure the ESX/ESXi host. As a guideline, always use the vSphere Client to log in to your ESX/ESXi host. It is possible to log in to your ESX host from the service console. Likewise, it is possible to log in to your ESXi host through the vCLI. Furthermore, once your host is managed by a vCenter Server, use the vSphere Client to log in to the vCenter Server and manage your host from there. Use the vSphere Client to connect directly to the ESX/ESXi host in unusual circumstances; for example, when the vCenter Server is down. When you log in to vCenter Server, you will use vCenter Server user accounts. These user accounts can be either local or domain accounts.
- #39: 60 To view ESX/ESXi system logs, in the vSphere Client menu bar, click View > Administration > System Logs. ESX and ESXi have the log files hostd.log and message. These log files contain entries made during the bootup sequence and while the system is up and running. ESX has the additional log file vmkernel, vmksummary.txt, and vmkwarning. These log files track service console availability; VMkernel alerts, warnings, and messages; and ESX host availability (including uptime and downtime). The log file contents are especially useful to VMware Support. When working on a problem with VMware Support, you will need to provide them with your host’s log files. The vSphere Client allows you to export system logs to a compressed archive file on the desktop of your system. You can then send the log archive to VMware Support for further troubleshooting. To export the system logs, click Export System Logs.
- #42: 71 VMware vCenter Server is the management server for VMware ESX/ESXi hosts and virtual machines. The software consists of numerous services and modules. It is installed on a Windows server. vCenter Server provides advanced features such as VMware Distributed Resource Scheduler (DRS), VMware High Availability, and VMware VMotion.
- #43: 72-73 The vCenter Server Architecture relies on the following components: VMware vSphere Client – The same vSphere Client used to manage ESX/ESXi hosts is used to connect to the vCenter Server. Once an ESX/ESXi host is managed by vCenter, administrators should always use vCenter Server to manage that host. VMware vSphere Web Access – An alternative to the vSphere Client, vSphere Web Access is a browser-based application. You use it to manage virtual machines on ESX (currently, not ESXi) and vCenter Server deployments. Running vSphere Web Access does not require a lot of hardware resources, and you can use it to give users lightweight access to virtual machines. Active Directory (AD) domain – Since the vCenter Server is installed on a Windows platform, security for the vCenter Server is built on Windows security. The vCenter Server system is not required to belong to an Active directory domain. However, if the vCenter Server system is a member of an Active Directory domain, user accounts and groups from the domain will be available on the vCenter Server system. If the vCenter Server system is not a member of a domain, then vCenter Server uses local Windows users and groups. This has profound security implications for vSphere administration. For example, by default, anyone with Domain Administrators privileges in the AD domain will have full administrative powers over all ESX/ESXi hosts and virtual machines that are being managed by vCenter Server. vSphere administrator will need to plan and coordinate security carefully with Windows Active Directory administrators. Managed hosts – vCenter Server manages ESX/ESXi hosts as well as the virtual machines that run on them.
- #44: 74 vCenter Server consists of the following services and interfaces: Core services – This represents the core functionality of the vCenter Server, which includes management of resources and virtual machines, task scheduling, statistics logging, management of alarms and events, virtual machine provisioning, and host and virtual machine configuration. Distributed services – This is additional functionality of the vCenter Server; for example, VMotion, DRS, and VMware HA. They are installed with vCenter Server. Plug-in – This is also additional functionality. It is packaged separately from the base product and requires separate installation. No additional license is necessary. Examples of plug-ins include VMware vCenter Update manager and vCenter Converter. Database interface – this provides access to the vCenter Server database. ESX/ESXi management – vCenter Server provides access to the ESX/ESXi host using a vCenter Server agent (also known as the vpxa process), which is installed on the host when it is added to vCenter Server inventory. The vCenter Server agent communicates with the host agent (also known as the hostd process) to relay to tasks to perform on the host. The host agent, like the vCenter Server agent, resides on the ESX/ESXi hosts. Active Directory interface – This provides access to domain user accounts. VMware vSphere API – Along with the vSphere SDK, the vSphere API provides an interface for writing custom applications the access vCenter Server functionality.
- #45: 75 vCenter Server modules are applications that provide additional features and functionality. Typically, modules are comprised of a server component and a client component. After the server component of a module is installed, it is registered with vCenter Server, and the client component (also known as a plug-in) is available to vSphere Client for download. After a plug-in is installed on a vSphere Client, it might alter the interface by adding view, tabs, toolbar buttons, and menu operations related to the enhanced functionality. The vCenter Server additional modules are: vCenter Update Manager – Works with ESX/ESXi hosts, virtual machines, and virtual appliances running on ESX/ESXi hosts. Update Manager allows you to scan for compliance and apply updates for guest operating systems, virtual appliances, and hosts. vCenter Converter – Enables users to convert physical machines, and virtual machines in a variety of format, to virtual machines that run on ESX/ESXi hosts. Converted systems can be imported into any location in the vCenter Server inventory. Modules leverage core vCenter Server capabilities, such as authentication and permission management, but can have their own types of events, tasks, metadata, and privileges. Modules require vCenter Server, and they can be installed any time after vCenter Server has been installed. Modules and vCenter Server can be upgrade independently.
- #46: 76 vCenter Server can run on a physical machine or a virtual machine. When running vCenter Server on a physical machine, a dedicated server is required. However, vCenter Server is not susceptible to potential outage in the vSphere environment. Backups of vCenter Server files are done using traditional backup tools, and vCenter Server performance is limited by the capabilities of the server hardware. There are several advantages to running vCenter Server in a virtual machine: Instead of dedicating an entire physical server to vCenter Server, you can run it in a virtual machine along with others on the same ESX/ESXi host as other virtual machines. However, it is desirable to place the vCenter Server virtual machine outside of the environment you are managing. By encapsulating the vCenter Server instance in a virtual machine, you can transfer it from one host to another, enabling maintenance and other activities. The vCenter Server virtual machine can be backed up using Consolidated Backup. If the vCenter Server database is on a separate server, it is backed up separately. Using VMware HA, you can provide high availability for the vCenter Server system.
- #47: 77 vCenter Server hardware must meet the following requirements: Processor – 2.0GHz or higher AMD or Inter x86 processor. Processor requirements can be larger if you database is run on the some hardware. Memory – 2GB RAM minimum. RAM requirements can be larger if your database is run on the same hardware. Disk storage – 1GB minimum, 2GB recommended. You might need more storage if your database runs on the same hardware. Networking – Gigabit recommended (10/100 Ethernet adapter minimum). vCenter Server is supported as a service on the 32-bit versions of a number of Windows guest operating systems. For the complete list of supported guest operating systems, see the vSphere Installation Guide at http://www.vmware.com/support/pubs .
- #48: 78 vCenter Server requires a database to store and organize server data. Update Manager also requires a database as well. It is possible for Update Manager to use the vCenter Server database. However, VMware recommends using one database for the vCenter Server and another database for Update Manger. vCenter Server supports SQL Server and Oracle databases. You must have administration credentials to log in to these databases. Contact your DBA for these credentials. Alternatively, you can install the bundled Microsoft SQL Server 2005 Express database. This database is intended to be used for small deployments of up to 5 hosts and 50 virtual machines. For smaller deployments, you might not need a separate database for Update Manager. For more details on the vCenter Server database requirements and for a complete list of support databases, see the vSphere Installation Guide at http://www.vmware.com/support/pubs .
- #49: 97 The navigation bar displays the hierarchical navigational path to the current vSphere Client view. For example, when you display the Host and Clusters Inventory view, the navigation bar displays Host > Inventory > Hosts and Clusters. You can click any item in the navigation bar to display a menu of all options available at that level of the hierarchy. The vSphere Client also has a search field, which is available in all its views. By default, the vSphere Client searches every kind of inventory object, but you can click the icon to limit your search. When you perform a simple search by entering search terms in the search field, the result appear in results pane displayed directly beneath the search field.
- #50: 105 In the vSphere environment, license reporting and management are centralized. All product and feature licenses are encapsulated in 25-character license keys that you can manage and monitor from vCenter Server. License information can be viewed by product, license key, or asset: Product – A license to use a vSphere software component or feature. Examples of products are ESX Enterprise, vCenter Enterprise, and VMotion. License key – The serial number that corresponds to a product. Asset – A machine on which a product is installed. For an asset to run certain software legally, the asset must be license to do so. You can split some license keys by applying them to multiple assets. For example, you can split for-CPU license by applying it to two 2-CPU hosts. vCenter Server can also manage licenses for legacy hosts. To do this, you must download the VMware License Server at the VMware Web site and install the VMware License Server on the vCenter Server system. When you add an ESX3.x/ESXi3.5 host to the vCenter Server 4.0 inventory, vCenter Server checks out vCenter Server agent license from the License Server. For detailed information about VMware licensing, go to the license portal at http://www.vmware.com/support/licensing.html .
- #53: 120 A virtual switch is a software construct, implemented in the VMkernel, that provides networking connectivity for an ESX/ESXi host. All network communication, whether it is internal or external to the ESX/ESXi host, must be defined through a virtual switch. A virtual switch provides connections for virtual machines to communicate with one another, whether they are on the same host or on a different host. The VMkernel connects to a virtual switch in order to access IP storage. The service console connects to a virtual switch for remote management of the ESX host. Use vSwitch to combine the bandwidth of multiple network adapters and balance communications traffic among them. They can also be configured to handle physical NIC failover. When a virtual switch is created, 56 ports are created by default. You can modify the number of ports afterward, up to a maximum of 4,088. The virtual switch created during the installation of ESX/ESXi is given 24 ports by default. When two or more virtual machines are connected to the same vSwitch, network traffic between them is routed locally. If an uplink adapter is attached to the vSwitch, each virtual machine can access the external network that the adapter is connected to.
- #54: 121 vNetwork standard switch components are configured at the host level. Each virtual machine and the service console has one or more of its own virtual network adapters, or vNICs. The operating system and applications talk to a vNIC through a standard device driver or a VMware –optimized device driver. The VMkernel also has vNICs for VMotion and IP storage network requirements. Each ESX/ESXi host has one or more virtual switches. You can create a maximum of 127 vSwitches on a single host. On one side of the virtual switch are port groups that connect to virtual machines. Each logical port on the vSwitch is a member of a single port group. The default number of logical ports for a vSwitch is 56. However, a vSwitch can be created with up to 4,088 ports in ESX/ESXi. On the other side are uplink connections to physical Ethernet adapters on the server where the virtual switch resides.
- #55: 122 Before using a virtual switch, one or more connections must be defined. The graphic above shows a single virtual switch with all three connection type defined. Virtual machines, the service console, and VMkernel components connect to the outside world through the physical Ethernet adapters that are connected to the virtual switch uplink ports.
- #56: 132 A vNetwork distributed switch provides similar functionality to a vNetwork standard switch, but its configuration is centralized to vCenter Server. The distributed switch implements capabilities similar to those of standard switches. There are port group that virtual machines connect to. Virtual machines, service console, and VMkernel interfaces can be connected to port groups. There is some configuration that is specific to the host, however. A host’s uplinks are allocated to the distributed switch and are managed in the host’s network configuration. Similarly, the configuration of the VMkernel and service console port groups is specific to each host, and therefore is managed in the host’s network configuration as well.
- #57: 133 Having the network configuration at the datacenter level (distributed switches) instead of at the host level (standard switches) offers several advantages: Datacenter setup and administration are simplified by centralizing network configuration. For example, adding a new host to a cluster and making it VMware compatible is must easier. Distributed switches support private VLANs. Private VLANs allow you to use VLAN IDs within a private network without having to worry about duplicating VLAN IDs across a wider network. Distributed ports migrate with their clients. So for example, when you migrate a virtual machine with VMotion, are distributed port statistics and policies move with the virtual machine, thus simplifying debugging and troubleshooting. Enterprise networking vendors can provide proprietary networking interface to monitor, control, and manage virtual networks. The vNetwork Appliance API allows third-party developers to cerate distributed switch solutions.
- #58: 134-135 The vNetwork distributed switch components move network management to the datacenter level. A distributed switch is a managed entity configured inside vCenter Server. It abstracts a set of virtual switches configured on each associated host. vCenter Server owns the configuration of distributed switches, and the configuration is consistent across all hosts. Each distributed switch includes distributes ports. A distributed port represents a port to which we can connect any networking entity, such as a virtual machine, a service console interface, or a VMkernel interface. vCenter Server stores the state of distributed ports in the vCenter Server database, so networking statistics and policies migrate with virtual machines when moved from host to host. This network VMotion feature is key to implementing state-dependent features like inline intrusion-detection systems, firewalls, and third-party virtual switches. A distributed port group provides a way to logically group distributed ports to simplify configuration. A distributed port group specifies port configuration options for each member port on a vNetwork distribute switch. Distributed virtual port groups define how a connection is made through a distributed switch to a network. Ports can also exist without port groups. An uplink is an abstraction to associate the vmnics from multiple hosts to a single distributed switch. An uplink is to a distributed switch what a vmnic is to a standard vSwitch. The vNetwork distributed switch architecture consists of two planes: the control plane and the I/O plane. The control plane resides in vCenter Server. The control plane is responsible for the switch configuration. For example, in the case of a conflict in the assignment of a distribute port (say, because of a virtual machine and its template are powered on), the control plane is responsible for deciding what to do. The I/O plane is implemented as a hidden vSwitch inside the VMkernel of each ESX/ESXi host. The I/O plane manages the I/O hardware on the host and is responsible for forwarding packets. Be careful not to confuse a distributed switch with a single switch spanning across several hosts. Two virtual machines on different hosts can communicate with each other only if both virtual machines have uplinks in the same broadcast domain. Consider a distributed switch as a template for the network configuration on each ESX/ESXi host.
- #59: 136 In the example above, a distributed switch named Production is created. A port group named VMPortGroup is defined on this switch. vmnic1 on host ESX01 is assigned to the distributed switch as is vmnic2 on ESX02. When the distributed switch is created, an uplink port group is also created to include the uplinks of the hosts.
- #60: 137 To create a distributed switch, go to the Networking inventory view (Home > Inventor > Networking). You can create a distributed switch at the datacenter or cluster level. Right-click the datacenter, then choose New vNetwork Distributed Switch. The Create vNetwork Distributed Switch wizard appears, as shown above. The General Properties page of the wizard prompts you to name the distributed switch and select the maximum number of uplink ports for any host associated with this distributed switch. On the Add Hosts page of wizard, select the physical adapters to use for the distributed switch. Adapters are listed by host. The Ready to Complete page prompts you to confirm the configuration and choose whether to create a default distributed port group. No virtual machine or VLANs are assigned to the port group at this time.
- #61: 138 To view a distributed switch, select the distributed switch in the inventory, then click the Configuration tab. The left pane of the Configuration tab shows the port groups. In the example above, there is only one port group, dvPortGroup, which has no virtual machines connected to it. The right pane, hidden by the Pan and Zoom window, shows the uplink port group. In the example above, the uplink port group is named Production-DVUplinks-71, where 71 is an identifier chosen by vCenter Server.
- #62: 139 You connect a virtual machine to a distributed switch by connecting the virtual machine’s NIC to a port group on the distributed switch. For an individual virtual machine, this can be done through the virtual machine’s properties. To display a virtual machine’s properties, right-click the virtual machine in the Hosts and Custer (or VMs and Templates) inventory view, then choose Edit Settings. The virtual machine properties dialog box appears. Select the desired network adapter in the Hardware list. The right pane shows network connection information for the virtual machine. In the Network Label list, choose the distributed switch to connect to. You can select by network label or you can specify a port on the distributed switch with the port ID.
- #63: 140 this is not work by following the steps To add a host to a distributed switch, go to Networking inventory view. Right-click the distributed switch, then choose Add Host. The Add Host to Distributed Virtual Switch wizard appears. Select the host from the list, then select one or more of its network adapters to add to the distributed switch. You can add only one host at a time.
- #64: 141 The Manage Virtual Adapters dialog box provides the means to add, edit, and remove the service console and VMkernel virtual adapters used by the selected host. To get to this dialog box, select your host in the Hosts and Clusters inventory view, then click the Configuration tab. In the Hardware section, select Networking, then click Manage Virtual Adapters. In the Manage Virtual Adapters dialog box, if you select Add, you can create a new adapter. But you also have the option to migrate the existing adapters from the vSwitch to the distributed switch. If you already have a virtual adapter listed (in the example above, vmk1), you also have the option to migrate the virtual adapter to a different virtual switch.
- #65: 142 To add or remove a physical adapter from the uplink port group, go to the Distribute Virtual Switch view in the networking display of the host’s Configuration tab. Then click the Manage Virtual Adapters link. The association of physical adapters to distributed virtual switch uplink groups is a pre-host configuration, so you cannot perform it at the datacenter level. In the Manage Physical Adapters dialog box, click the Click to Add NIC link to add a physical adapter. Click the Remove link next to an uplink to delete the uplink from the distributed switch. When adding adapters, you can assign them directly to a specific uplink category. Or you can select the topmost <Click to Add NIC> link to allow the system to decide.
- #66: 148 If necessary, you can edit the properties of a distributed switch. To do this, in the Networking inventory view, right-click the distributed switch, then choose Edit Settings. The distributed switch settings dialog box appears, as shown above. The distributed switch settings dialog box includes three tabs: Properties, Network Adapters, and Private VLAN. The Network Adapters tab is read-only from that allows you to verify which physical adapters are connected to the distributed switch. The Private VLAN tab allows you to set up private VLANs for the distributed switch. Private VLANs are discussed later in this lesson. The Network Adapters and Private VLAN tabs are available only for distributed switches, not for distributed ports or distributed port groups. Settings on the Properties tab are grouped into three major categories: General, Policies, and Advanced. With few exceptions, the same properties apply to distributed ports and distributed port groups. General properties for the distributed switch allow you to edit the information specified when creating the distributed switch. You also have the option to name the uplinks and add notes. Naming uplinks is a good way to help administrators understand which uplinks to associate with port groups for the policies settings.
- #67: 149-150 Advanced properties on the distributed switch allow you to define the maximum transmission unit, the Cisco Discovery Protocol (CDP) status, and administrator contact details. Maximum transmission unit (MTU) determines the maximum size of frames in this distributed switch. The distributed switch drops any frames bigger than the specified size. If your environment supports jumbo fames, use this option to enable or disable jumbo frames on the distributed switch. To enable jumbo frames on the distributed switch, set Maximum MTU to 9000. To take advantage of jumbo frames, the network must support it end to end. That is, jumbo frame support must be enabled on the physical switch, on the distributed switch, and in the guest operating system of the virtual machine. To enable jumbo frames in the guest operating system of a virtual machine, first ensure that the latest version of VMware Tools is installed. Then, for the virtual network adapter, use either the vmxnet3, or enhanced vmxnet, or e1000 virtual device. ESXi support jumbo frames only in the guest operating system. It does not include support jumbo frames in the ESXi VMkernel TCP/IP stack. Like standard switches, distributed switches support Cisco Discovery Protocol. CDP allows vCenter Server and the vSphere Client to identify properties of a physical switch, such as switch name, port number, port speed/duplex settings, and so forth. Use this option to configure CDP so that information about the physical adapter name and ESX/ESXi host names are passed to Cisco switches. Once enabled, CDP has three operation modes: Listen mode – The ESX/ESXi host detects and displays information about the associated Cisco switch port, but information about the vSwitch is not available on the Cisco switch administrator. Advertise mode – The ESX/ESXi host makes information about the vSwitch available to the Cisco switch administrator, but does not detect and display information about the Cisco switch. Both mode - The ESX/ESXi host detects and displays information about the associated Cisco switch and makes information about the vSwitch available to the Cisco switch administrator. To view the Cisco information from the vSphere Client, CDP mode for the distributed switch must be either Listen or Both. Once the distributed switch is set to the correct CDP mode, you can view the Cisco information for the distributed switch by simply clicking the information icon. Since the CDP advertisements of Cisco equipment typically occur once a minute, you might notice a delay between enabling CDP and the availability of CDP data from the vSphere Client.
- #68: 151 After creating a distributed port group, use the Distributed Port Group Settings dialog box to edit the general information and set policies for the ports within the port group. To get to the dialog box, go to the Networking inventory view. Right-click the distributed port group, then choose Edit Settings. General settings for the distributed port group allow you to rename the distributed port group, give it a description, and specify the number of ports. You also have the option to select the port binding type. In the port binding, choose when ports are assigned to virtual machines connected to this port group: Select Static binding to assign a port to a virtual machine when the virtual machine is connected to the port group. Select Dynamic binding to assign a port to a virtual machine the first time the virtual machine powers on after it is connected to the port group. This is useful if you want to assign more virtual machines to the distributed port group than the number of ports, because the virtual machines are not all running at the same time. For example, you can have a distributed port group with 16 distributed port and 40 virtual machines configured to connect to it. This results in a maximum of 16 virtual machines that can be powered up at the same time. Select Ephemeral – no binding for no port binding.
- #69: 152 The policies page shows all the options for each of the five subcategories below it. Most of the distributed port group policies are also used with standard switches: Security policies – Security policies are discussed shortly. They apply to both distributed switches and standard switches. Traffic-shaping policies – Traffic shaping is discussed shortly. Ingress and egress traffic shaping apply to distributed switches. Only egress traffic shaping is available on standard switches. VLAN policies – VLANs are discussed shortly. They apply to both distributed switches and standard switches. Distributed switches have additional options. Teaming and failover policies – teaming and failover are discussed in the “Scalability” module. They apply both to distributed switches and to standard switches. Miscellaneous policies – a miscellaneous policy applies only to distributed switches. It allows you to specify whether to block all ports of the distributed switch or distributed port group. Blocking has the same meaning as it has in the physical switch environment: no traffic will go through, but the NIC will still sense the carrier. To edit the distributed ort group policies, go to the Networking inventory view, right-click the distributed port group, then choose Edit Settings. Click the appropriate policy in the left pane of the port group’s Settings dialog box.
- #70: 153-154 Security policies are defined at the distributed port group level (in a standard switch, security policies can be defined at both the virtual switch and port group level). The network security policy contains the following exceptions: Promiscuous Mode – When set to Reject, place a guest adapter in promiscuous mode has no effect on which frame are received by the adapter (default is Reject). MAC Address Changes – When set to Reject, if the guest attempts to change the MAC address assigned to the virtual NIC, it stops receiving frame (default is Accept). Forged Transmits – When set to Reject, drops any frames that the guest sends, where the source address field contains a MAC address other than the assigned virtual NIC MAC address (default is Accept). In general, these policies give you the option of disallowing certain behaviors that could compromise security. For example, a hacker might use promiscuous mode device to capture network traffic for unscrupulous activities. Or someone could impersonate a node and gain unauthorized access by spoofing its MAC address. Set Promiscuous Mode to Accept if you want to use an application in a virtual machine that sniffs packets, such as a network-based intrusion-detection system. Set MAC Address Changes and Forged Transmits to Reject to help protect against certain attacks launched by a rogue guest operating system. Leave MAC Address Changes and Forged Transmits at their default (Accept). The default retains the functions of certain guest applications if these applications normally change the mapped MAC address, as do some guest operating system – based firewalls. A possible scenario for wanting to set those policies is the case of a host that has “public exposure”, such as a Web server. One might be concerned with the possibility of it being compromised and then used as a launch pad for attaches either on other hosts owned or operated by the owner or against other hosts owned by others. By changing the originator information, a host could intend to spoof another system into allowing unauthorized access or it might want to avoid calling attention to its intrusion.
- #71: 155 A virtual machine’s network bandwidth can be controlled by enabling the network traffic shaper. The ESX/ESXi host shapes traffic by establishing parameters for three traffic characteristics: average bandwidth, peak bandwidth, and burst size. You can set values for these characteristics through the vSphere Client, establishing a traffic-shaping policy for each uplink adapter: Average Bandwidth – Establishes the number of kilobits per second to allow across the vSwitch averaged over time – the allowed average load. Peak Bandwidth – The maximum bandwidth the vSwitch can absorb without dropping packets. If traffic exceeds the peak bandwidth you establish, excess packets and there are enough spare cycles to handle the queued packets. If the queue is full, the packets are dripped. Even if you have spare bandwidth because the connection has been idle, the peak bandwidth parameter limits transmission to no more than peak until traffic returns to the allowed average loaded. Burst Size – Establishes the maximum number of kilobytes to allow in a burst. If a burst exceeds the burst-size parameter, excess packets are queued for later transmission. If the queue is full, the packets are dropped. When you specify value for these two characteristics, you indicate what you expect the vSwitch to handle during normal operations. Average bandwidth and peak bandwidth are specified in Kbps (kilobits per second), and the burst size is specified in KB (kilobytes). Network traffic shaping is off by default.
- #72: 156 Distributed switches have the ability to shape both inbound and outbound traffic. (Standard switches can shape only outbound traffic.) Traffic-shaping policies are disabled by default so that services have a free, clear connection to the physical network. Enabling the policy for either ingress traffic shaping or egress traffic shaping sets limits on the amount of networking bandwidth allocated for each virtual adapter associated with the port group. If you enable the policy, you must define the average bandwidth available for the distributed switch. Peak Bandwidth is the bandwidth to allow for short bursts, while Burst Size defines the maximum amount of traffic that can be generated at a speed above average. Virtual machines connected to the port group will use the burst capacity once they have accumulated enough burst bonus, which is the difference between the amount of traffic generated and the average, capped by the burst size.
- #73: 157 The ESX/ESXi host provides VLAN support through virtual switch tagging, which is provided by giving a port group a VLAN ID (by default, a VLAN ID is optional). The VMkernel then takes care of all tagging and untagging as the packets pass through the virtual switch. A switch port on the physical ESX host must be defined as a static trunk port. A trunk port is a port on a physical Ethernet switch configured to send and receive packets tagged with a VLAN ID. No VLAN configuration is required in the virtual machine. In fact, the virtual machine does not know it is connected to a VLAN. For more information on how ESX has implemented VLANs, see the white paper “VMware ESX Server 3 802.1Q VLAN Solution” at http://www.vmware.com/pdf/esx3_vlan_wp.pdf .
- #74: 162 Advanced distributed port group properties allow you to fine-tune port behavior. Distributed port group policies can be overridden on a per-port level. Click the Edit Override Settings link to fine-tune which policies can be overridden at the port level. You can also specify which settings are allowed or not allowed to be overridden at the port level. Additional advanced port group properties: Live port moving – Allows standalone ports to be moved to a distributed port group while the ports are in use. Moving the port to a distributed port group allows the port to acquire all of that port group’s configuration. Standalone ports can be created only by using the vSphere SDK and not from the vSphere Client interface. Configure reset at disconnect – When a distributed port is disconnected from a virtual machine, the configuration of the distributed port is reset to the distributed port group setting and any pre-port configuration is discarded. Port Name Format – Provides a template for assigning names to the distributed ports in this distributed port group.
- #77: 173 Several storage technologies are supported in by VMware ESX/ESXi hosts in the VMware vSphere environment: locally attached storage, Fibre Channel storage, iSCSI storage, and network-attached storage (NAS). Datastores are logical containers, analogous to file systems, that hide specifics of each storage device and provide a uniform model for storing virtual machine files. Datastores can also be used for storing ISO images, virtual machine templates, and floppy images. Depending on the type of storage you used, datastores can have the following file system formats: VMware vStorage Virtual Machine File System (VMFS), raw device mapping (RDM), and Network File System (NFS). Datastores can exist on either locally attached storage or shared storage, such as Fibre Channel, iSCSI, and NAS.
- #78: 174 vSphere supports a number of storage technologies: Local storage – Internal or external storage disks or arrays attached to the host through a direct connection. Fibre Channel – A high-speed transport protocol used for storage area networks (SANs). Fibre Channel encapsulates SCSI commands, which are transmitted between Fibre Channel nodes. In switch interconnects multiple nodes, forming the “fabric” in a Fibre Channel network. iSCSI – A SCSI transport protocol, enabling access to storage devices over standard TCP/IP networks. iSCSI maps SCSI block-oriented storage over TCP/IP. Initiators, such as an iSCSI HBA in an ESX/ESXi hosts, send SCSI commands to targets, located in iSCSI storage systems. NAS – Storage shared over standard TCP/IP networks at a file system level. NAS storage is used to hold NFS datastores.
- #79: 175 A virtual machine is stored as a set of files in its own directory in the datastore. The datastore can be a VMFS datastore or an NFS datastore. Datastore can be used for storing ISO image, floppy images, virtual machines, and templates. A VMFS datastore can also hold a raw device mapping (RDM). An RDM is used by a virtual machine to access its data. VMFS datastores, NFS datastores, and RDMs are discussed next.
- #80: 176-177 VMFS is a clustered file system that allows multiple physical servers to read and write to the same storage device simultaneously. The cluster file system enable unique virtualization-based services, such as alive migration of running virtual machines from one physical server to another, automatic restart of a failed virtual machine on a separate physical server, and clustering virtual machines across different physical servers. VMFS allows IT organizations to greatly simplify virtual machine provisioning by efficiently storing the entire machines state in a central location. VMFS allows multiple ESX/ESXi hosts to access shared virtual machine storage concurrently. VMFS provides the foundation that allows the scaling of virtualization beyond the boundaries of a single system. VMFS provides on-disk distributed locking to ensure that the same virtual machine is not powered on by multiple servers at the same time. If a physical server fails, the on-disk lock for each virtual machine can be released so that virtual machine can be restarted on other physical servers. In the example above, the ESX host has three virtual machines running on it. The lines connecting the virtual machines to the disk icons for the virtual machine disks (VMDKs) are logical representations of the association and allocation of the larger VMSF volume, which is make up of one large volume with a unique logical unit number (LUN). The virtual machines see the assigned storage volume only as a SCSI target from within the guest operating system. The virtual machine contents are really just files on the VMFS volume. VMFS can be deployed on a variety of SCSI-based storage devices: locally attached storage, Fibre Channel storage, and iSCSI storage. A virtual disk stored on VMFS always appears to the virtual machine as a mounted SCSI device. The virtual disk hides the physical storage layer from the virtual machine’s operating system. This feature allows you to run even operating systems not certified for SAN inside the virtual machine. For the operating system inside the virtual machine, VMFS preserves the internal file system semantics, which ensure correct application behavior and data integrity for applications running in virtual machines.
- #81: 178 NFS is a file-sharing protocol that ESX/ESXi hosts use to communicate with a NAS device. NAS is a specialized storage device that connects to a network and can provide file access services to ESX/ESXi hosts. NFS datastore are treated just like VMFS datastore. They can be used to hold virtual machines’ file, templates, and ISO images. In addition, an NFS volume allows the migration using VMware VMotion of virtual machines whose files reside on an NFS datastore. ESX/ESXi hosts support NFS version 3 over TCP only.
- #82: 179 For virtual machines running on an ESX/ESXi host, instead of storing virtual machine data in a virtual disk file, you can store the data directly on a raw LUN. This is useful if you are running applications in your virtual machine that must know the physical characteristics of the storage device. Additionally, mapping a raw LUN allows you to use existing SAN commands to manage storage for the disk. A raw device mapping (RDM) is used to map the raw LUN. An RDM is special file in a VMFS volume that acts as a proxy for a raw LUN. An RDM maps a file in a VMSF volume to a raw volume. A virtual machine then references the RDM, which in turn points to the raw volume holding the virtual machine’s data. An RDM is recommended when a virtual machine must interact with a real disk on the SAN. This is the case, for example, when you make disk array snapshots, or when you have a large amount of data that you do not want to move onto a virtual disk. An RDM is also used when you want to cluster a virtual machine with a physical machine using Microsoft Cluster Server (MSCS). For more information on setting up Microsoft Cluster Service with RDMs, see setup for Microsoft Cluster Service at http://www.vmware.com/support/pubs .
- #83: 180 Local storage can be used to hold virtual machines. In many small environments, this is how the ESX/ESXi host it first implemented. And, because the virtual machines are all located on the locally attached storage device of the host, managing the host, securing the host, or physically relocating the host can be easier because all storage is contained within a single host. Local storage (as opposed to SAN storage) is where most administrators will install ESX. Shared storage offers a number of benefits over local storage. Shared storage allows VMotion migrations to be performed; allows you to have a fast, central repository for virtual machine templates; allows you to recover virtual machines on another host if you have a host failure; allows clustering of virtual machines across hosts; and allows you to allocate large amounts (terabytes) of storage to your ESX/ESXi hosts.
- #84: 181 On ESX/ESXI hosts, SSI storage devices use a variety of identifiers: SCSI ID – This is the unique address of a SCSI device. Canonical name – This is the Network Address Authority ID. NAA IDs are globally unique identifiers that are persistent across system reboots. For those devices that do not have an NAA ID, an “mpx” name is used instead. mpx is not an acronym. It is a VMware-specific namespace. The mpx namespace is used when no other valid namespace can be obtained from the LUN, such as an NAA ID. An mpx name is not globally unique and is not persistent across reboots. Typically, only local device will not have a globally unique identifier such as an NAA ID and thus names starting with mpx. Runtime name – This name exists to assist customers who are familiar with this format from earlier versions of ESX/ESXi. The naming convention is vmhbaN:C:T:L, where N is the number of the vmhba (host bus adapter), C is the channel number (always zero from ESX/ESXI), T is the target ID, and L is the LUN number. This name is not persistent across systems reboots. Additional names for storage devices are the iSCSI qualified name (IQN), used for iSCSI targets, and the World Wide Name (WWN), used for Fibre Channel targets. Storage device names appear in various panels in the vSphere Client. You will see examples of these panels later in the module.
- #85: 182 Before you implement your vSphere environment, discuss your vSphere Storage needs with your storage administration team. Discuss things like LUN size, I/O bandwidth required by your applications, disk cache parameters, zoning and masking, identical LUN presentation to each ESX/ESXi host, which multipathing setting to use (active-active or active-passive) for your storage arrays, and what NFS settings to use. For information that will you plan for your storage needs, see the SAN System Design and Deployment Guide at http://www.vmware.com/support/pubs .
- #86: 186 Fibre Channel SAN storage is commonly used for VMFS datastore. VMFS datastores are used to hold virtual machines’ files, ISO images, templates, and RDMs that point to raw volume on the Fibre Channel SAN. VMFS datastores on a Fibre Channel SAN can be shared across multiple ESX/ESXi hosts. As a result, Fibre Channel plays an important role in supporting vSphere features such as VMotion, VMware High Availability, VMware Distributed Resource Scheduler (DRS), and VMware Consolidated Backup. Installing and booting an ESX host from a Fibre Channel SAN LUN is supported. To boot from SAN, the BIOS of the Fibre Channel adapter must be configured with the WWN and LUN number of the boot device, and the system BIOS must designate the Fibre Channel adapter as a boot controller.
- #87: 187-188 A Fibre Channel SAN consists of the following: Storage system – This is the hardware that consists of a set of physical hard disks, or disk array, and one or more intelligent controllers. The storage system supports the creation of LUNs. Disk arrays’ storage processors aggregate physical disks into logical volumes, or LUNs, each with a LUN number identifier. LUN – The logical unit number is the address of a logical unit (LU). An LU is a unit of storage access. An LU can be a JBOD (just a bunch of disks) or a part of a JBOD, a RAID set (also referred to as a “storage container”), or a part of a storage container. Both a JBOD and a storage container can be partitioned into multiple LUNs. An LU can also be a control function like an array gatekeeper LUN or tape controller. Storage processor – A storage processor can partition a JBOD or RAID set into one or more LUNs. It can restrict access of a particular LUN to one or more server connections. Each connection is referenced by the server HBA’s WWN, and it might also require defining the operating system in the connection tables to adjust how the storage array controller presents Fibre Channel and SCSI commands to a particular server. HBA – The host bus adapter connects the ESX/ESXi host to the Fibre Channel network. It is required, along with cables attached to the Fibre Channel switch ports. A minimum of two HBA adapters are used for fault-tolerant configurations. Virtual machines see standard SCSI connections and are not aware of the underlying SAN being accessed. Fibre Channel switches – One or more Fibre Channel (FC) switches from the Fibre Channel fabric. The FC fabric interconnects multiple nodes. The FC switches from packets from the FC messages and add the source and destination address to each packet. The FC switch might have to be updated by flash upgrade to firmware to resolve interoperability issue and to add new features.
- #88: 189 There are several mechanisms for controlling a host’s access to LUNs. Soft zoning, which is done on a Fibre Channel switch, controls LUN visibility per WWN. The Fibre Channel switch might also implement hard zoning, which is the control of storage processor (SP) visibility per switch port. Fabric zoning controls target presentation and tells an ESX host whether a target exists or not. If the host can’t get to the target, it can’t see the LUNs. In many well-managed SAN environments, both soft and hard zoning are in used. The purpose of using both is to make accidental access to volumes by servers very unlikely. Zoning is especially important in environments where physical Windows servers are accessing the SAN, because Windows operating systems typically write a disk signature on any storage volumes they see. These volumes might, in fact, be in used by non-Windows Systems. WWNs are assigned by the manufacturer of the SAN equipment. HBAs and SPs have WWNs. WWNs are used by SAN administrators to identify your equipment for zoning purposes. The SP or the hosts themselves might also implement LUN masking, which controls LUN visibility per host. An ESX/ESXi host offers a mechanism for LUN masking. Although LUN masking can be done within the ESX/ESXi host, LUN masking is normally performed at the SP level and, with newer switches, can also be done at the switch/fabric level. Though it could be done at the host level, it normally is not, for the sake of security and data integrity. If a LUN is masked, the SP does not tell the host the LUN exists, nor does it allow any communication with it.
- #89: 190 All supported PCI devices (SCSI, Fibre Channel, Ethernet, iSCSI, and so on) are assigned to the VMkernel and are recognized by the VMkernel when the ESX/ESXi host boots. ESX/ESXi supports 256 KUNs, found in the range of 0-255. However, during installation, the ESX installer can see only the first 128 LUNs. To display a list of storage adapters, select your host in the inventory, click the Configuration tab, and then click the Storage Adapters link.
- #90: 191 The Storage Views tab allows you to review associations between all storage entities available in VMware vCenter Server and analyze storage usage. The storage usage data appears as reports and storage topology maps on the Storage View tab. Use the Reports view to analyze storage space utilization and availability, mutlipathing status, and other storage properties of the select object and items related to it. Use the Storage Views tab to view information about your Fibre Channel storage. You can also view the relationship between various entities and storage, for example: Datastore to virtual machine or host Virtual machine/host/cluster to datastore Virtual machine to SCSI volume, path, adapter, or target The reports provided are searchable, and the views are customizable in that you can choose what pieces of information to display by right-clicking the header bar of the report and selecting the desired values to display. Reports are automatically updated every 30 minutes. You can manually update the reports by clicking Update link.
- #91: 192 Storage maps are an easy way to visually represent relationships between selected inventory objects and storage. For example, you can view what targets a virtual machine can see, or how many paths a virtual machine has to a storage device. Maps can assist in troubleshooting by showing problem entities.
- #92: 213 VMFS datastores primarily serve as repositories for virtual machines’ files. A VMFS is optimized for storing and accessing large files such as virtual disks and memory images of suspended virtual machines. The maximum size of a VMFS is 64TB. You can certainly use an NFS datastore to store your virtual machines. However, not all functions are supported. For example, you cannot store an RDM on an NFS datastore (an RDM must be located on a VMFS), and you cannot cluster a virtual machine that resides on an NFS datastore using Microsoft Cluster Service. As for RDMs, choose RDMs over VMFS datastores if a virtual machine is using SAN snapshot applications, a virtual machine is clustered with a physical machine using Microsoft Cluster Service, or you want to keep the virtual machine’s data on a raw disk instead of converting it to a virtual disk because, for example, the data disk is very large, otherwise use a VMFS datastore to store you virtual machines to take advantages of features like template deployment as well as for portability.
- #93: 214 To create a VMFS datastore, select your host in the inventory, then click the Configuration tab. Select Storage from the Hardware panel. Click the Add Storage link. The Add Storage wizard guides you through the configuration steps. First, select Disk/LUN as the storage type. Then provide the following information for your VMFS, shown above: Select a device to use for your datastore. Select the device that does not have a datastore name displayed in the VMFS Label column. The name present in the VMFS Label column indicates that the device contains a copy of an existing VMFS datastore. The Current Disk Layout page opens. If the disk you are formatting is blank, the Current Disk layout page presents the entire disk space to you for storage configuration. If the disk is not blank, you can choose to use the entire device or just the free space on the device. Enter a datastore name. Choose a descriptive name, one that reflects the purpose or function of the datastore, or if desired, the hardware characteristics of the device itself. Specify the maximum size of the VMFS datastore. After the VMFS is created, view its properties by selecting the VMFS in the Storage list (on the host’s Configuration tab).
- #94: 215 There are a couple of ways to view information about your VMFS datastores. One way is to use the Storage link in your host’s Configuration tab. Another way is to view the Show all Datastores report in your host’s Storage Views tab.
- #95: 217 When you need to create new virtual machines on a datastore, or when the virtual machines running on this storage require more space, you can dynamically increase the capacity of a VMFS datastore. Use one of the following methods: Add an extent to the VMFS – An extent is a partition on a LUN. You can add a new extend to any existing VMFS datastore. The datastore can stretch over multiple extents, up to 32. Grow the database – Grow an extent in an existing VMFS datastore. Only extents with free space immediately after them are expandable. As a result, rather than adding the new extent, you can grow the existing extent so that it fills the available adjacent capacity.
- #96: 218-219 Here is a comparison between growing the existing datastore (referred to as Volume Grow) versus adding extents to the datastore (referred to as Extent Grow): There is no need to power off virtual machines when using either Volume grow or Extent grow. When the LUN is newly provisioned, the administrator cannot perform Volume Grow, but extent grow can be utilized to grow VMFS datastore capacity. Volume Grow and Extent Grow can both be performed on an existing array that has expended LUN. Each extent can be grown up to a maximum of 2TB. The maximum number of extents on which the datastore can stretch is 32. With Volume Grow, no new partition is added. But with Extent Grow, a new partition is added. Virtual machine availability impact refers to what happens to virtual machine availability when Volume Grow and Extent Grow features are used. With Volume Grow, availability is not affected. However with Extent Grow, there is a dependency on the first extent. This first extent contains the metadata for the entire extent set. If that mater LUN is lost, it could cause a loss of all data on the entire extent set. The method you choose to grow your VMFS with depends on what you want to accomplish. For example, one reason for using Extent Grow instead of Volume Grow is to create a VMFS greater than 2TB in size. The maximum size of a VMFS extent is 2TB. If your VMFS currently consists of one extent, additional extents must be added if you want to increase the size of your VMFS past 2TB. For example, a 6TB VMFS is made of three extents. Here is an example of using Volume Grow instead of Extent Grow: Your storage administrator has given you a 50GB LUN on which you format a VMFS. Over time, your VMFS fills up and you ask your storage administrator to grow the LUN to 100GB. After the underlying LUN is increased (using array management utilities), you use Volume Grow to dynamically grow the VMFS to use the newly available space on the LUN. By starting out with a smaller LUN and growing as needed, you can prevent wasting disk space as well as money. Volume Grow of RDMs is not supported. In other words, if you grow an RDM’s underlying LUN on the array, you still have to remove the RDM and re-create it to pick up the new size attributes.
- #99: 247 A virtual machine is configured with a set of virtual hardware on which a supported guest operating system and its applications run. The virtual machine is a set of discrete files. This virtual machine’s configuration file describes the virtual machine’s configuration, which includes the virtual hardware, such as CPU, memory, disk, network interface, CD-ROM drive, and floppy drive. When naming virtual machines, it is a best practice to avoid using special characters, including spaces, in the virtual machine name. The virtual machine name is used to name the file that make up the virtual machine.
- #100: 248-249 The table above lists the files that make up a virtual machine. Except for the log files, the name of each file starts with the virtual machine’s name (<VM_name>). A virtual machine consists of the following files: A configuration file (.vmx) One or more virtual disk files (first virtual disk has file <VM_name>.vmdk and <VM_name>-flat.vmdk; subsequent virtual disks are name <VM_name>_#.vmdk and <VM_name>_#-flat.vmdk, where # is the next number in the sequence, starting with 1) A file containing the virtual machine’s BIOS (.nvram) A log file (.log) A set of files used to archive old log entires (-#.log) (six of these files are maintained at any time) A swap file (.swap) A snapshot description file (.vmsd) (this file is empty if the virtual machine has no snapshots) A virtual machine can have addition files if one or more snapshots have been taken or if raw device mappings have been added. This is discussed later in this module. If the virtual machine has more than one disk file, the file pair for the second disk file and on it named <VM_name>_#.vmdk and <VM_name>_#-flat.vmdk, where # is the next number in sequence, starting with 1. For example, if the virtual machine named Test01 has two virtual disks, Test01_1.vmdk, and Test01_1-flat.vmdk. Regarding the archive log files, six of these files are maintained at any time. For example, -1.log to -6.log might exist at first. The next time an archive log file is created (for example, when the virtual machine is powered off and powered back on), -2.log to -7.log are maintained (-1.log is deleted), then -3.log to -8.log, and so forth.
- #101: 250 A virtual machine’s files are located in either a VMware vStorage VMFS datastore or an NFS datastore. You can display a virtual machine’s files using the VMware vSphere Client if you know the datastore on which the virtual machine is located. To find out what datastores you virtual machine is using, select your virtual machine in the inventory and view its Summary tab. The list of datastores used by the virtual machine is shown in the Resources section. To display the virtual machine’s files on a datastore, select your VMware ESX/ESXi host from the inventory and then click its Summary tab. The list of datastores accessible by the ESX/ESXi host is shown in the Resource section. You right-click a datastore and then select Browse Datastore from the drop-down menu. The contents of the datastore are displayed. Double-click into any virtual machine’s folder to display its files. Notice that the datastore browser shows the virtual disk as consisting of only one file, the .vmdk file. In reality, a virtual disk consists of two files: the .vmdk file, which describes the virtual disk’s characteristics, and a –flat.vmdk file (not shown), which contains the virtual disk’s data.
- #102: 251 You can also use the host’s Storage Views tab to display a virtual machine’s files. To do this, select a virtual machine in the inventory, then click the Storage Views tab. Display the Show all Virtual Machines Files report to view all the files for the virtual machine selected.
- #103: 252 A virtual machine uses virtual hardware. Each guest operating system sees ordinary hardware devices – it does not know that these devices are virtual. Furthermore, all virtual machines have uniform hardware (except for a small number of variations that the system administrator can apply). This makes virtual machines uniform and portable across platforms. For a complete list of virtual machine configuration maximum, see Configuration Maximums, VMware vSphere 4.0 at http://www.vmware.com/support/pubs .
- #104: 253 Although the vSphere Client interface can provide a default memory size for your virtual machine at the time of creation, you should understand the memory needs of your application and guest operating system and size accordingly. The maximum memory size allowed for any virtual machine is 255GB. Memory size is the maximum amount of physical memory that the virtual machine can use. VMware Virtual SMP allows you to take advantage of configuring a virtual machine with up to eight virtual CPUs, allowing larger CPU-intensive workloads to run on ESX/ESXi hosts. It is also possible to assign any integer number of virtual CPUs between one and eight to a virtual machine. Many guest operating system/application combinations are not enhanced by the addition CPU. Multi-vCPU virtual machines should be created only in the comparatively infrequent instances where they are of benefit and not as a standard configuration. Not every computer can host virtual machines with multiple virtual CPUs. In a later module, we will discuss the relationship between a virtual machine’s number of virtual CPUs and the physical processors on the computer that hosts it.
- #105: 254 A virtual machine should have at least one virtual disk. Adding the first virtual disk implicitly adds a virtual SCSI adapter for it to be connected. The ESX/ESXi host offers a choice of adapters: BusLogic Parallel, LSI Logic Parallel, LSI Logic SAS, or VMware Paravirtual. The Virtual Machine creation wizard in the vSphere Client automatically selects the type of virtual SCSI adapter, based on the choice of guest operating system. You select a VMS to hold the new, blank virtual disk, and specify the disk’s size. Choose a descriptive filenames for the virtual disk. You can also site the disk at a specific virtual SCSI target ID and LUN. Finally, choose the appropriate disk mode. You can change the disk mode any time the virtual machine is powered off. ESX/ESXi host virtual disks are monolithic and pre-extended. In other words, if you make a 6GB virtual disk, the result will be a single 6GB file.
- #106: 255 -256 There are several virtual network adapters available to the virtual machine: vlance – Support only on legacy virtual machines. A vlance adapter uses the stock driver that the guest operating system provides and does not require that VMware Tools be installed in the virtual machine. vlance is supported by most 32-bit guest operating systems (except Windows Vista). vmxnet – Supported only on legacy virtual machines. It usually provides significantly better performance than a vlance adapter, but it requires VMware Tools be installed. Flexible – Supported on virtual machines that were created on ESX 3.x or greater and that run 32-bit guest operating systems. The Flexible adapter functions as a vlance adapter if VMware Tools is not installed in the virtual machine. it functions as a vmxnet adapter if VMware Tools is installed in the virtual machine. e1000 – Emulates the functioning of an e1000 network card. It is the default adapter type for virtual machines that were created on ESX 3.x or greater and that run 64-bit guest operating systems. Enhanced vmxnet – An upgraded version of the vmxnet adapter, Enhanced vmxnet provides some high-performance features commonly used on modern networks, such as jumbo frames. It requires that VMware Tools be installed in the virtual machine. vmxnet3 – The third-generation virtual NIC emulation (after vmxnet and enhanced vmxnet) available through VMware Tools. vmxnet features include message signaled interrupts subject TCP segmentation off-loading (TSO) over IPv6, VLAN off-loading, and support for VMDirectPath I/O technologies.
- #107: 257 Virtual CPU and virtual memory are your minimum required virtual machine. Having a virtual hard disk and virtual NICs will make the virtual machine more useful. Additional virtual hardware that you can add to your virtual machine are a virtual CD/DVD-ROM drive, a virtual floppy drive, and generic virtual SCSI devices. The virtual CD/DVD-ROM drive or floppy drive can point to either the CD/DVD-ROM drive or floppy drive located on the ESX/ESXi host, a CD/DVD-ROM ISO image (.iso) or floppy (.flp) image, or even the CD/DVD-ROM or floppy drive on your local system. You can map the virtual machine’s CD/DVD-ROM drive either to a physical drive or to an IOSO file for your CD/DVD-ROM drive. An ISO file is a CD/DVD-ROM that has been “ripped” : its file system is copied byte-for-byte to the disk service. These virtual CDs/DVDs-ROM can be accessed remotely and are usually faster than physical CDs/DVs.
- #108: 258 The virtual machine’s console, available in the vSphere Client, provides the mouse, keyboard, and screen functionality. To install an operating system, you must use the virtual machine’s console. The virtual machine console allows access to the BIOS of the virtual machine and offers the ability to power the virtual machine on and off and to reset it. The virtual machine console is normally not used to connect to the virtual machine for daily tasks. Tools like Remote Desktop Connection, Cirtix, or Virtual Network Connection, for examples, are normally used to connect the virtual machine. The virtual machine console is used for tasks like power cycling, configuring hardware, and troubleshooting network issues. The virtual machine console allows you to send the Ctrl+Alt+Del key sequence specifically to the virtual machine. This is accomplished by press Ctrl+Alt+Ins in the virtual machine console or select VM in the virtual machine console menu bar and choosing Send Ctrl+Alt+Del from the drop-down menu. Likewise, to release the cursor from the virtual machine console so that you can use it in order windows, press Ctrl+Alt. To view the virtual machine’s console, right-click your virtual machine in the inventory, then choose Open Console.
- #109: 259 VMware Tools is a suite of utilities that enhances the performance of the virtual machine’s guest operating system and improves management of the virtual machine. Installing VMware Tools in the guest operating system is vital. Although the guest operating system can run without VMware Tools, you lose important functionality and convenience. When you install VMware Tools, you install the following: The VMware Tools service. This service synchronizes the time in the guest operating system with the time in the host operating system. A set of VMware device drivers, including an SVGA display driver, the vmxnet networking driver for some guest operating system, the BusLogic SCSI driver for some guest operating system, the memory control driver for efficient memory allocation between virtual machines, the sync driver to quiesce I/O for VMware Consolidated Backup, and the VMware mouse driver. The VMware Tools control panel, which enables you to modify settings and connect and disconnect virtual devices. A set of scripts that helps you to automate guest operating system operating. The scripts run when the virtual machine’s power state changes, if you configure them to do so. The VMware user process, which enables you to copy and paste text between the guest operating system and the managed host operating systems.
- #110: 265 To create virtual machine, navigate to either the Hosts and Cluster view or the VMs and Templates view. In the Hosts and Cluster view, right-click the datacenter, cluster, or host, then choose New Virtual Machine. The Create New Virtual Machine wizard is launched. In the VMs and Templates view, right-click the datacenter or folder, if one exists. The wizard asks whether you want to perform a “typical” or “custom” configuration. The typical path shortens the process by skipping some choices that rarely need changing from their defaults. The current path provides more flexibility and options.
- #111: 266 If you choose the typical configuration, the New Virtual Machine wizard prompts you for information such as the virtual machine name, where in the vCenter Server inventory to place the virtual machine, the datastore on which to locate the virtual machine’s files, and the guest operating system to be installed into the virtual machine. You will also be prompted for the size of the virtual disk and an option to choose disk provisioning settings: Allocate and commit space on demand (Thin Provisioning) – If you do not select this check box, the virtual disk file will be expanded to the specified size now. If you select the check box, the virtual disk file will grow as the virtual machine is used. Support clustering features such as Fault Tolerance – If you select this check box, then this virtual machine can take advantage of the VMware Fault Tolerance feature (discussed in a later module).
- #112: 267 If you choose the custom configuration, the New Virtual Machine wizard prompts you for additional information like the virtual machine version and specifics about the virtual hardware to add. The latest virtual machine version is version 7, which is compatible with ESX/ESXi 4.0 and greater hosts. Version 7 provides greater virtual machine functionality than the previous version (version 4) and is recommended for virtual machines that do not need to migrate to ESX/ESXi 3.x hosts. The wizard also gives you to choice of creating a new virtual disk, using an existing virtual disk, creating an RDM, or using no disk at all. Specify whether you want to store the virtual disk file on the same datastore as the virtual machine files, or whether you want to store the virtual disk file on a separate datastore. You can also set advanced options, such as selecting a virtual device node for a disk or raw device mapping. You can also enable and configure independent mode for disks. Select Independent Persistent if you want changes to be immediately and permanently written to the disk. Select Independent Nonpersistent to discard changes when the virtual machine is powered off or reverted to a snapshot. In most cases, you do not need to change the advanced options for virtual disks. You can perform additional configuration before completing the virtual machine. For example, you can attach an ISO image to the virtual CD-ROM device once the virtual machine is created.
- #113: 270 A virtual appliance is a preconfigured virtual machine that typically includes a preinstalled guest operating system and other software. It is usually designed for a specific purpose; for example, to provide a secure Web browser, a firewall, or a backup/restore utility. A virtual appliance can be added, or imported, to your vCenter Server or ESX/ESXi inventory. The concept of importing a virtual appliance is similar to deploying a virtual machine from a template. Virtual appliance can be imported from Web site like the VMware Virtual Appliance Marketplace at http://www.vmware.com/appliances/ . To import a virtual appliance to your vCenter Server form the VMware Virtual Appliance Marketplace, use the vSphere Client. In the menu bar, select File > Browse VA Marketplace. The Deploy OVF Template wizard launches and steps you through the process of choosing the virtual appliance, downloading it to an ESX host, and adding it to the vCenter Server inventory. Virtual appliances are deployed as an Open Virtual Machine (OVF) template. OVF is a platform-independent, efficient, extensible, and open packaging and distribution format for virtual machines. OVF files are compressed, allowing for faster downloads. The vSphere Client validates an OVF file before importing it and ensures that it is compatible with the intended destination server. If the appliance is incompatible with the selected host, it cannot be import.
- #114: 271 In addition to virtual appliance, the vSphere Client allows you to import the exported any file in OVF format. To import a virtual appliance, select the host or cluster in the inventory that you plan to run the appliance, then choose File > Deploy OVF Template. This launches the OVF Template wizard. To wizard allows you to specify the OVF filename from which to import. If you are importing an OVF file from the Internet, you can also specify the URL pointing to the file itself. Exporting virtual machines allows you to create virtual appliances that can be imported by other users. You can use the export function to distribute preinstalled software as a virtual appliance or as access and use the templates in your vCenter Server inventory. To export a virtual machine, select the virtual machine in the inventory. The virtual machine you select must not have connections to local drivers like CD-ROMs. From the menu bar, choose File > Export > Export OVF Template.
- #115: 276 A template is a master copy of a virtual machine that can be used to create and provision new virtual machines. This image includes a guest operating system, a set of applications, and a configuration that provides virtual counterparts to hardware components. Templates coexist with virtual machines at any level within the template and virtual machine domain. You can order collections of virtual machines and templates into arbitrary folders and apply a variety of permissions both to virtual machines and templates. Virtual machines can be transformed into templates without requiring a full copy of the virtual machine files and the creation of a new object. You can use templates to create new virtual machines by deploying the template as a virtual machine. When complete, the deployed virtual machine is added to the folder chosen by the user when the template war created.
- #116: 277 There are three ways to create a template: Clone a virtual machine to a template Convert a virtual machine to a template Clone an existing template When you clone a virtual machine to template, the original virtual machine is retained. When you convert a virtual machine to a template, the original virtual machine goes away. When you clone an existing template, you can make a copy of a template that has already been created. The Clone to Template option offers the choice between normal and compact disk (compressed) format. The Convert to Template option leaves the virtual machine’s disk file intact (which users normal disk format).
- #117: 279 If you need to update your template to include new patches or software, you do not have to create a brand-new template. Instead, first covert the template back to a virtual machine. this allows you to power on the virtual machine. For added security, disconnect the virtual machine from the network or place the virtual machine on an isolated network to prevent users from accessing it while you are updating the virtual machine. Log in to the virtual machine’s guest operating system and apply the patch or install additional software – whatever it necessary. When that is done, convert the virtual machine back to a template. To convert a template back to a virtual machine, navigate the VMs and Templates inventory view. Right-click the template then choose Convert to Virtual Machine.
- #118: 280 To deploy a virtual machine from a template, navigate to the VMs and Templates inventory view. Right-click the template, then choose Deploy Virtual Machine from this Template. The Deploy Template wizard asks you for virtual machine deployment information. You also have the option of having vCenter Server customize the guest operating system for you.
- #119: 281 Cloning a virtual machine is an alternative to deploying a virtual machine from a template. As when deploying from template, when you close, you have the option of customizing the guest operating system in the clone. The virtual machine can be either be powered on or powered off. To clone a virtual machine, right-click your virtual machine in the inventory, then choose Clone.
- #120: 282 The Guest Customization wizard allows you to create specifications that you can use to prepare the guest operating systems of virtual machines to function in a target environment. You can store specifications in the database to customize the guest operating system of a virtual machine during the cloning or deploying process. Use the Customization Specification Manager to manage customization specifications that you create with the Guest Customization wizard. To enable guest operating system customization, vCenter Server must first be configured for this task. To customize Windows virtual machines, you install Microsoft sysprep files on the vCenter Server system. For example, for Windows 2003: Retrieve the installer for Microsoft Windows 2003 sysprep from the Microsoft Web site. Copy the files from the .cab file WindowsServer23003-KB892778-SP1-DeployTools-x86-ENU.cab to C:\Documents and Settings\ALLUSERPROFILE\Application Data\VMware\VMware VirtualCenter\sysprep\svr2003 . For more details to how to prepare for guest customization, see vSphere Basic System Administrator Guide at http://www.cmware.com/support/pubs .
- #121: 313 In might be necessary to modify a virtual machine’s configuration; for example, to add another network adapter or to add another virtual disk. All virtual machine changes can be made while the virtual machine is powered off. However, some hardware changes can be made to the virtual machine while it is powered on. In addition to adding virtual hardware, you can also remove virtual hardware and set various virtual machine options. All virtual machine configuration is done using the virtual machine’s Properties dialog box. To display a virtual machine’s properties, right-click your virtual machine in the inventory, then choose Edit Settings. The virtual machine Properties dialog box appears, as shown above. The Hardware tab is used to modify the hardware on the virtual machine. The Options tab is covered later in this lesson. The Resource tab is covered in a later module.
- #122: 314 To add hardware to your virtual machine, in the virtual machine Properties dialog box, click Add. The list of devices you are allowed to add depends on whether the virtual machine you selected in powered on or powered off. In the example, the virtual machine is powered on. Therefore, the devices you are allowed to add while the virtual machine is powered on are USB controllers, Ethernet adapters, hard disks, and SCSI devices. These devices are known as hot-pluggable devices because they can be added to a virtual machine that is up and running. CPU and memory can also be added while the virtual machine is powered on, as long as the guest operating system supports this task. In addition, VMware Tools must be enabled for hot-plug functionality in order for this feature to work properly.
- #123: 315 With the Hot Extend feature, it is also possible to increase the size of a virtual disk while the virtual machine is up and running. With Hot Extend, you can increase the size of any virtual disk belonging to the virtual machine as long as it is a flat virtual disk in persistent mode and the virtual machine does not have any snapshots.
- #124: 316 To increase the size of a virtual disk, display the virtual machine’s properties (right-click the virtual machine, then choose Edit Settings). Select the desired hard disk in the Hardware pane. In the resulting Disk Provisioning panel, enter the new size for the hard disk. After you increase the size of a virtual disk, you must use the appropriate tool within the guest operating system itself to allow the file system on this disk to use the newly allocated disk space. For example, use the diskpart utility in a Windows 2004 guest operating system.
- #125: 317 When you map a LUN to a VMFS volume, vCenter Server creates a file that points to the raw LUN. Encapsulating disk information in a file allows vCenter Server to lock the LUN so that only one virtual machine can write to it. The RDM is a file that has a .vmdk extension, but the file contains only disk information describing the mapping to the LUN on the ESX/ESXi host. The actual data is stored on the LUN. Also note that you cannot deploy a virtual machine from a template and store its data on a LUN; you can store its data only in a virtual disk file. To create an RDM, go to the Virtual Machine Properties dialog box and click Add. Add a hard disk of type raw device mapping s. then select the LUN that the RDM will map to. You will also be asked to select a compatibility mode: Physical compatibility mode – Allows the guest operating system to access the hardware directly. Physical compatibility is useful if you are using SAN-aware applications in the virtual machine. However, a LUN configured for physical compatibility cannot be cloned, made into a template, or migrated if the migration involves copying the disk. Virtual compatibility mode – Allows the virtual machine to use VMware snapshots and other advanced functionality. Virtual compatibility allows the LUN to behave as if it were a virtual disk. When you clone the disk, make a template out of it, or migrate it (if the migration involves copying the disk), the contents of the LUN are copied into a virtual disk (.vmdk) file.
- #126: 318 The Options tab in the Virtual Machine Properties Editor allows you to change a virtual machine’s options. It has several powerful features, which are distributed into five categories: General Options vApp Options VMware Tools Power Management Advanced. The next several pages cover some of the important things you can do to modify a virtual machine from the Option tab.
- #127: 319 General Options pane can be used to modify things like the display name used for the virtual machine and the type of guest operating system installed the location and name of the configuration file (.vmx file) is displayed, and the location of the virtual machine’s directory is also shown. You can select the text for the configuration file and working location if you need to copy and paste them into a document. But only the display name and the guest operating system type can be modified. NOTE If you change the display name, that will not change the names of all of the virtual machine files or the directory the virtual machine is stored in. when a virtual machine is first created, the filenames and the directory name associated with the virtual machine are based on its display name. But changing the display name later does not modify these file and directory names.
- #128: 320 The VMware Tools pane controls how the VMware Tools in the virtual machine respond to certain external events. You can use these to customize the power buttons on the virtual machine. The VMware Tools program can be set to run certain scripts when specific event (like a power-off) occur. But that has to be set from within the guest operating system by opening the VMware Tools window. Once the scripts are selected and enabled, this window controls when the virtual machine checks to see if scripts should be run. This gives you the advantage of enabling or disabling script operations from outside the virtual machine while it is powered off. The Advanced panel has two important functions. One check box is used to check and possible update VMware Tools automatically if a newer version become available. The outer is to enable time synchronization with the host. As a best practice, time synchronization with the host should always be enabled. However, if the virtual machine is forcing its clock to sync to the ESX/ESXi host, you must ensure two other things have been configured: The host should have its time synched to some external source, preferably via NTP. The guest operating system should not be trying to synchronize time on its own. Most Windows system automatically synchronize to a Windows Active Directory domain controller. Many UNIX and Linux systems are configured to synchronize to external NTP servers. Best practice is to let VMware Tools synchronize time to the host – and disable these other time synchronization systems within the guest operating system.
- #129: 321 The Power Management pane allows you to choose how the virtual machine should respond when it is placed in the standby power state. The virtual machine can either be suspended or the guest operating system can be placed in standby mode, leaving the virtual machine powered on. If you opt for placing the guest operating system in standby mode, you can enable Wake on LAN. This is not available on all guest operating systems.
- #130: 322 Advanced options address things that usually do not need to be set for a virtual machine. We cover a few of these options in this lesson. The Boot Options pane allows you to do two things. You can use the Power-on Boot Delay panel to delay a virtual machine power-on. This can be useful to help stagger virtual machine startups when several virtual machines are being powered on. You can use the Force BIOS setup panel to make changes to the BIOS settings like forcing a virtual machine to boot from a CD-ROM. The next time the virtual machine powers on, it goes straight into BIOS. This is much easier than powering the virtual machine on, opening a console, and quickly trying to press the F2 key to go into BIOS.
- #131: 323 Paravirtualization is a virtualization enhancement where a guest operating system is aware that it is running inside a virtual machine rather than on physical hardware. Virtual Machine Interface (VMI) is a paravirtualization standard that enables improved performance for virtual machines capable of utilizing it. This feature is available only for those versions of the Linux guest operating system that support VMI Paravirtualization. Enabling paravirtualization utilize one of the virtual machine’s PCI slots. Also, enabling paravirtualization can limit how and where the virtual machine can be migrated. Consider the following before enabling this feature: These hosts support VMI paravirtualization: ESX/ESXi 3.5 and greater, and Workstation 6.0 and greater. A virtual machine with paravirtualization enabled and that is powered off can be moved manually to a host that does not support paravirtualization. However, this can result in reduced performance. A virtual machine with paravirtualization enabled and that is powered on or in a suspended power state cannot be migrated to a host that does not support paravirtualization Not allowed are automated VMware Distributed Resource Scheduler migrations of virtual machine with paravirtualization enabled to hosts that do not support paravirtualization.
- #132: 329 vCenter Server snapshots allow you to preserve the state of the virtual machine so you can return to the same state repeatedly. Snapshots are useful when you need to revert repeatedly to the same state but don’t want to create multiple virtual machines. With snapshots, you create backup-and –restore positions in a linear process. You can also preserve a baseline before diverging a virtual machine in a process tree. The relationship between snapshots is like that between a parent and a child. In a linear process, each snapshot has one parent and one child, expect for the last snapshot, which has no children. In the example above, the snapshot (Base Image, Security Patch 1.0, Security Patch 1.0.1, and Security Patch 1.0.2) are organized in a linear process. Another way to organize snapshots is in a process tree, where each snapshot has one parent, but one snapshot can have more than one child. Many snapshots have no children. You can revert to either a parent or a child snapshot.
- #133: 330 To take a snapshot, right-click your virtual machine in the inventory, then choose Snapshot > Take Snapshot. The Take Virtual Machine Snapshot dialog box appears. Enter a snapshot name and description. A snapshot captures the entire state of the virtual machine at the time you take the snapshot. This includes: Memory state – The contents of the virtual machine’s memory (captured only if the virtual machine is powered on and if you select the Snapshot the virtual machine’s memory check box) Settings state – The virtual machine settings Disk state – The state of all virtual machine’s virtual disks At the time you take the snapshot, you can also choose quiesce the guest operating system. To do this, select the Quiesce guest file system (Needs VMware Tools installed) check box. Note that this quiesces the file system of the guest operating system. It does not quiesce any applications that are currently running. Snapshots of RDM physical compatibility mode disks are not supported.
- #134: 331 The Snapshot Manager window allows you to perform three tasks: Delete – this task commits the snapshot data to the parent snapshot, then removes the selected snapshot. Delete All – This task commits all the intermediate snapshots before the current-state icon (“You are here”) to the base disk and removes all existing snapshot for that virtual machine. Go to – This task allows you to restore, or revert to, a particular snapshot. The snapshot that you restore becomes the current snapshot. When you revert to a snapshot, you return all these items to the state that they were in at the time you took the snapshot. If you want the virtual machine to be suspended, powered on, or powered off when you launch it, be sure it is in the correct state when you take the snapshot. To display the Snapshot Manager, right-click virtual machine in the inventory, then choose Snapshot > Snapshot Manager.
- #135: 332 A virtual machine can have one or more snapshots. Each snapshot consists of the following files: Memory state file - <VM_name>-Snapshot#.vmsn , where # is the number in the sequence, starting with 1. This file holds the memory state at the time the snapshot was taken. The size of this file is the size of the virtual machine’s maximum memory (only if memory is captured – otherwise, the file is much smaller). Snapshot description file - <VM_name>-00000#.vmdk . This is a small, text file that contains information about the snapshot. Snapshot delta file - <VM_name>-00000#-delta.vmdk . This file contains the changes to the virtual disk’s data at the time the snapshot was taken. <VM_name>.vmsd is the snapshot list file, created at the time the virtual machine is created. It maintains information about all the snapshots (such as name of the snapshot .vmsn file and the name of the virtual disk file) that belong to this virtual machine.
- #136: 335 Migration is the process of moving a virtual machine from one host or storage location to another. Copying a virtual machine creates a new virtual machine. It is not a form of migration. In vCenter Server, you have the following migration options: Cold migration – Moving a powered-off virtual machine to a new host. Optionally, you can relocation configuration and disk files to new storage locations. Cold migration can be used to migrate virtual machines from one datacenter to another. Migrating a suspended virtual machine – Moving a suspended virtual machine to a new host. Optionally, you can relocate configuration and disk files to new storage location. You can migrate suspended virtual machines from one datacenter to another. Migration with VMotion – Moving a powered-on virtual machine to a new host. Migration with VMotion allows you to move a virtual machine to a new host without any interruption in the availability of the virtual machine. Migration with VMotion cannot be used to move virtual machines from one datacenter to another. Migration with Storage VMotion – Moving the virtual disks or configuration files of a powered-on virtual machine to a new datastore. Migration with storage VMotion allows you to move a virtual machine’s storage without any interruption in the availability of the virtual machine.
- #137: 336 The table above compares the different migration techniques. A driving factor behind the decision to use a particular migration technique is the actual purpose for performing a migration. For example, if you need to bring a host down for maintenance yet keep the virtual machine up and running, you would choose to migrate the virtual machine using VMotion instead of performing a cold or suspended virtual machine migration. If you need to move a virtual machine’s files to a different datastore to better balance the load, use Storage VMotion for this task. Some migration techniques, such as VMotion, have special hardware requirements that must be met in order to function properly. Other techniques, such as a cold migration or a suspended virtual machine migration, do not have special hardware requirements in order to function properly.
- #138: 337 There are several uses of Storage VMotion: Moving virtual machines off a storage device to allow maintenance or reconfiguration of the storage device without virtual machine downtime Manually redistributing virtual machines or virtual disks to different storage volumes to balance capacity and improve performance Evacuating physical storage that is about to be retired, such as storage arrays coming off the maintenance and release cycles Storage tiering: migrating virtual machines from Fibre Channel to iSCSI or NAS or within or between enclosures; or moving virtual machines to tiered storage with different service levels due to changing business requirements for that virtual machine Upgrading VMware Infrastructure without virtual machine downtime. During an upgrade of an ESX/ESXi host from one version to the next, the vSphere administrator can migrate running virtual machines from a VMFS2 datastore to a VMFS3 datastore and upgrade VMFS2 datastore without any impact on virtual machines. The vSphere administrator can then use Storage VMotion to migrate virtual machines back to the original datastore without any virtual machine downtime.
- #139: 339-340 This diagram shows what happens when you migrate a virtual machine using Storage VMotion. Upon initiating a migration, vSphere copies all virtual machine files except the disks from the old virtual machine directory to a new directory on the destination datastore. vSphere enables changed block tracking on the virtual machine’s disk. Changed block tracking tracks changes to the disk so that vSphere knows which regions of the disk include data. vSphere does this by creating a bitmap for each block of data in the VMDK files. If any blocks are modified, the corresponding bit in the bitmap is updated to reflect the modification. In this way, vSphere can determine which blocks of data are static and which blocks have updated data. vSphere “precopies” the virtual machine’s disk and swap file from the disk on the source to the disk on the destination. During this time, the virtual machine is running and may be writing to its disk. Therefore, some regions of the disk change and must be resent. This is where changed block tracking comes in. vSphere first copies the contents of the entire disk to the destination. This is the first precopy iteration. It then queries the changed block tracking module to determine which regions of the disk were written to during the first iteration. vSphere performs a second iteration of precopy, only copying those regions that were changed during the first iteration. Typically, the number of changed regions is significantly smaller than the total size of the disk, so the second iteration takes much less time. vSphere continues precopying until the amount of modified data is small enough to be copied very quickly. ESX/ESXi invokes fast suspend/resume on the virtual machine. fast suspend/resume does exactly what its name implies: the virtual machine is quickly suspended and resumed. The new virtual machine process uses the destination virtual machine home and disks. Before ESX/ESXi allows the new virtual machine to start running again, the final changed regions of the source disk are moved to the destination so that the destination disk image is identical of the source. Once the virtual machine is running on the destination datastore, ESX/ESXi removes the component files of the virtual machine from the source host.
- #140: 341 To migrate a virtual machine using Storage VMotion, right-click a virtual machine that is powered on, then choose Migrate. The Migrate Virtual Machine wizard appears. Select Change datastore. You select the destination datastore as well as the disk format of the virtual disk. By default, the disk format used will be the same format as the source’s.
- #141: 342 A virtual machine and its host must meet certain resource and configuration requirements for the virtual machine disks to be migrated with Storage VMotion. One of the requirements of Storage VMotion is that the host on which the virtual machine is running must have access both to the source and the garget datastores. Storage VMotion is subject to the following limitations: Virtual machine with snapshots cannot be migrated using Storage VMotion You cannot migrate virtual machines to a different host and a different datastore simultaneously, unless you are power off the virtual machine. vSphere supports a maximum of four simultaneous VMotion or Storage VMotion accesses to a single datastore. A migration with VMotion involves two simultaneous accesses to the datastore: by the source and destination hosts. A migration with Storage VMotion involves one access to the source datastore and one access to the destination datastore. Therefore, if no other migrations are occurring, up to four concurrent Storage VMotion migrations involving the datastore can occur simultaneously.
- #144: 107 A vCenter Server event is the outcome or result of running a vCenter Server task. To display events, go to any inventory view and click any object. A Tasks & Events tab exists for any object and allows you to view the tasks and events related to that object. You can also view events for the entire vCenter Server by going to the menu bar and choosing View > Management > Events. You can search for a particular event – for example, by description, type, or target – using the event search box. Being able to view vCenter Server events can be very useful when troubleshooting problems.
- #145: 108 Link events, vCenter Server system logs can also be very useful, in particular to VMware Support, for troubleshooting problems. To view the list of system logs, go to Home > Administration > System Logs. Logs can be searched in the same way as events. In the system log list, you can see all the logs that are currently available for viewing, you can view vCenter client logs and vCenter server logs. Like ESX host logs, you can export vCenter Server’s system logs to a compressed, archive file. This is useful when you are working with VMware technical support to troubleshoot your vCenter Server problem.
- #146: 419 Alarms are notifications that occur in response to select events or conditions that occur with an object in the inventory. Most objects have default alarms set on them and you can define custom alarms. VMware provides a set of default alarms for most objects in the vSphere Client inventory. For example, alarms exist for host, virtual machine, and resource pool memory and CPU usage. You can also define custom alarms for virtual machines, hosts, clusters, datacenters, datastores, networks vNetwork distributed switches, and distributed port groups.
- #147: 420 To create an alarm, right-click an object in the inventory, then choose Alarm > Add Alarm. The Alarm Settings dialog box appears. There are four tabs: General, Triggers, Reporting, and Actions. The General tab is shown above. In this tab, you name the alarm, give it a description, and give it an alarm type. You also choose what to monitor: Monitor for specific conditions or state – This is a condition-based alarm. Condition-based alarms can be created for virtual machines, hosts, and datastores. Monitor for specific events occurring on this object – This is an event-based alarm. Event-based alarms can be created for virtual machines, hosts, clusters, datacenters, datastores, networks, distributed virtual switches, and distributed virtual part groups. The General tab also allows you to enable or disable the alarm (by selecting or deselecting the check box).
- #148: 421 You configure alarm triggers to generate warnings and alerts when the specified criteria is met. Alarms have two types of triggers: condition or state triggers, and event triggers. Condition, or state, triggers – These triggers monitor the current condition or state of virtual machines, hosts, and datastores. This includes power states, connection stats, and performance metrics such as CPU and disk usage. Event triggers – these riggers monitor event that occur in response to operations occurring with any managed object is the inventory, the vCenter Server system, or the license server. For example, an event is recorded each time a virtual machine is cloned, created, deleted, deployed, and migrated.
- #149: 422 Condition, or state, trigger monitor metric for a host, virtual machine, or datastore. State triggers monitor the current state of a host, virtual machine, or datastore. In the example above, you can configure a condition trigger so that a virtual machine’s CPU usage must be above 75 percent for more than 5 minutes to generate a warning, and above 90 percent for more than 5 minutes to generate an alert. Time periods are used to ensure that the metric conditions are valid and not caused by incidental spikes.
- #150: 423 Event triggers do not rely on thresholds or durations. They use arguments, operators, and values to identify the triggering condition. When the triggers. In the example above, the event trigger monitors if the health of a host’s hardware has changed. If there is a change in the health of the hardware, an alert is triggered. A trigger condition has also been configured to trigger the alert only if the host is in a datacenter named Training.
- #151: 424 In the Alarm Settings dialog box, use the Reporting tab to define a tolerance range and trigger frequency for condition or state triggers. (The Reporting tab is dimmed for event triggers.) Reporting further restricts when the condition or state trigger occurs. You can specify a range or a frequency: Range – The triggered alarm is repeated when the condition exceeds the range, which is a percentage above or below the limit. A zero value triggers and clears the alarm at the threshold point you configured. A nonzero value triggers the alarm only after the condition reaches an additional percentage above or below the threshold point. For example, if a virtual machine’s CPU usage is above 75 percent for 5 minutes, a warning is generated. If a range of 20 percent is set, the warning is repeated if the virtual machine’s CPU usage reach 90 percent (75 + (20% x 75): condition length + reporting range = trigger alarm). Frequency – The triggered alarm is repeated every so often (in minutes). The frequency sets the time period during which a triggered alarm is not reported again. When the time period has elapsed, the alarm will report again if thee condition or state is still true. For example, if a virtual machine’s heartbeat is equal to No Heartbeat, an alert is generated. If the frequency is set to 10 minutes, the alert is repeated if the virtual machine still has no heartbeat after 10 minutes have passed.
- #152: 425 Alarms are comprised of a trigger and an action. An action is the operation that occurs in response to the trigger. For example, you can have an email notification sent to one or more administrator when an alarm is triggered. In the Alarm Settings dialog box, use the Actions tab to specify actions to take when the alarm is triggered. Colors and shares are used to denote the alarm’s severity: a green circle is normal. A yellow triangle is warning, and red diamond is an alert. You can set alarms to trigger when the state changes from green circle to yellow triangle, from yellow triangle to read diamond, from red diamond to yellow triangle, and from yellow triangle to green circle. For every action you can specify one of three options for each transition: Empty, Once, or Repeat. Empty indicates no interest in the transition. Once instructs vCenter Server to fire the action only one time. Repeat instructs vCenter Server is repeat the action until another color change occurred. The default is five minutes; the maximum is two days. Every alarm type has the following actions: send a notification e-mail; send a notification trap; run a command. Virtual machine alarms and host alarms have additional actions, such as power on a virtual machine, power off a virtual machine, suspend a virtual machine, reboot host, and shutdown a host.
- #153: 426 You must configure the email address of the sender account in order to enable vCenter Server operations like sending email notifications as alarm actions. You can configure up to four receivers of SNMP traps, they must be configured in numerical order. Each SNMP trap requires a corresponding host name, port, and community. To display the vCenter Server Settings dialog box, in the menu bar of the vSphere Client, choose Administration > vCenter Server Settings. Modify the Mail and SNMP settings.
- #154: 574 Update Manager compares the operating system and applications running in your vSphere environment against a set of standard update and patches. Update you specify can be applied to operating systems and applications on scanned ESX/ESXi hosts and virtual machines.
- #155: 575 Update Manager uses a set of operations to ensure effective patch and upgrade management. This process begins by downloading information about a set of security patches. One or more of these patches are aggregated to form a baseline. Multiple baselines can be added to a baseline group. You can use baseline groups to combine different types of baselines and then scan and remediate an inventory object against all of them as a whole. If a baseline group contains both upgrade and patch baselines, the upgrade executes first. A collection of virtual machines, virtual appliances, and ESX/ESXi hosts can be scanned for compliance with a baseline or a baseline group and remediated (updated or upgraded). These processes can be initiated manually or through schedule tasks.
- #156: 576 Here are the major components of Update Manager: Update Manager server – The Update Manager server can be installed directly on the vCenter Server system or on a separate system. This can be either a physical or a virtual machine. Patch database – You can use the same database server that vCenter Server is using. But it will require a unique database with a DSN system ODBC connection already configured. If you do not specify an existing database server, the software will install SQL Server2005 Express. Guest agents – Guest agents are installed into virtual machines from the Update manager server and are used in the scanning the remediation operations. Optional download server – If your Update Manager server does not have direct access to the Internet, you can create a download server outside the internal network for downloading patches, then load them onto the Update Manager server using portable media, such as DVDs Content servers – Patch content comes from two locations: ESX/ESXi patches come from VMware.com. Patches and updates for operating systems and applications come from Shavlik. Update Manager is compatible with other vCenter Server add-ons, such as VMware vCenter Converter.
- #157: 577 You can install Update Manger on the same computer as vCenter Server or on a different computer. Update Manager runs on Windows XP SP2, Windows Server 2003, and Windows Server 2008. Before installing Update manager, you must create a database instance and configure it to ensure that all Update manager database tables are placed in it. If you are using Microsoft SQL Server 2005 Express, you install and configure the database when you install Update manager. SQL Server 2005 Express is used for small deployments of up to five hosts and 50 virtual machines. The Update manager database supports SQL Server 2005, SQL Server 2005 Express, SQL 2008 and version of Oracle 10g and Oracle 11g. The Update Manager disk storage requirements vary depending on your deployment. Make sure you have at least 20GB of free space in which to store patch data on your machine. To install, Update Manager, launch the VMware vCenter Installer, then click the vCenter Update Manager link. For details on the installation and supported database formats, see the vCenter Update Manager Administration Guide at http://www.vmware.com/support/pubs . For database sizing information, see the VMware vCenter Update Manager Sizing Estimator at http://www.vmware.com/support/pubs .
- #158: 578 During the Update Manager installation, you have to register the Update Manager server with the vCenter Server system and set it up to work correctly. Gather information about the environment into which you are installing Update Manager, including the following: Networking information about the vCenter Server system that Update Manager will work with. Defaults are provided in some cases, but you might want to ensure that you have the correct information, including: IP address. Port number. In most cases, the Web service ports (80 and 443 by default) are used. Administrative credentials required to complete the installation, including: The user name for an account with sufficient privileges. This is often Administrator. The password for the account that will be used for the installation. The system DNS name, plus the user name and password for the database that Update Manager will work with. During the installation, you can configure Update manager to work with an Internet proxy server.
- #159: 579 The Update manager client (the Update Manager user interface component) is delivered as a plug-in for the vSphere Client. The Update Manager functionality is an integral part of vCenter server. After installing Update Manager, you must install the Update Manager plug-in on any vSphere Client that you will use to manage Update Manager. To do this, in the vSphere Client menu bar, choose Plug-ins > Manage Plug-ins. In the Plug-in Manager window, click Download and Install for the Update manager plug-in. After the plug-in is installed, it will appear in the Installed Plug-ins section.
- #160: 580 You can modify the administrative settings for Update manager before beginning to use this plug-in. The administrative settings determine the following: Networking Connectivity – Update Manager network settings. Patch Download Settings – Where to obtain patches and where to configure the proxy settings. Patch Download Schedule – how frequently to download patches. This setting has no effect on an optional download server, which is separate from the Update Manager server. Virtual Machine Settings – Whether or not to snapshot the virtual machines before remediation to enable rollback and how long to keep these snapshots. ESX Host Settings – How update Manager responds to a failure that might occur when placing an ESX/ESXi host in maintenance mode. vApp Settings – Enable or disable smart reboot of virtual appliances after remediation. To configure Update Manager settings, go to Home > Solutions and Applications > Update Manager, then click the Configuration tab.
- #161: 581 Baselines contain a collection of one or more updates, such as service packs, patches, upgrades, and bug fixes. Baseline groups are assembled from existing baselines. When you scan hosts, virtual machines, and virtual appliances, you evaluate them against baselines to determine their level of compliance. Administrators can create, edit , delete, attach, or detach baselines and baseline groups. For large organizations with different groups or divisions, each group can define its own baselines. Administrators can filter the list of baselines by searching for a particular string or by clicking the headers for each column to sort by those attributes. To create a baseline, go to Home > Solutions and Applications > Update Manager, then click the Baselines and Groups tab. Click the Create link.
- #162: 582 Clicking the Create link starts the New Baseline wizard. Enter a name and description for your baseline, then choose a baseline type. Update Manager provides the following type of baselines for hosts, virtual machines, and virtual appliances: Upgrade Baseline – Defines what version a particular host, virtual machine hardware, VMware Tools, or virtual appliance should be Patch Baseline – Defines a minimum level of updates that must be applied to a given host or virtual machine Also, in the wizard, choose a patch option, dynamic or fixed: Dynamic – The contents of a dynamic baseline are determined in relation to available updates that meet the specified criteria. As the set of available updates changes, dynamic baselines are updated as well. You can explicitly include or exclude any updates. Fixed – The user manually specifies all updates included in the baseline from the total set of patches available in Update Manger. Fixed updates are typically used to check whether systems are prepared to deal with particular issue. For example, you might use fixed baselines to check for compliance with patches to prevent a worm like Blaster.
- #163: 583 Fixed baselines consist of a particular set of patches that do not change as patch availability changes. In the New Baseline wizard, under Baseline Type, select either Host Patch or VM Patch. Select Fixed for the type of baseline. When you create a patch baseline, you can filter the updates to find specific patches to include in the baseline.
- #164: 585 To scan and remediate objects in the inventory against specific baselines and baseline groups, you must first attach existing baselines and baseline groups to these objects. Although you can attach baselines and baseline groups to individual objects, it is more efficient to attach them to container objects, such as folders, hosts, clusters, and datacenters. Attaching a baseline to a container object transitively attaches the baseline to all objects in the container. To attach baselines to virtual machines, templates, and virtual appliances, go to the VMs and Templates inventory view. To attach baselines to ESX/ESXi hosts, go to the Hosts and Clusters inventory view. Select the object, then click the Update Manager tab. Click Attach, then select the baselines or baseline group that you want to attach to the object.
- #165: 591 Scanning ESX/ESXi hosts is like scanning virtual machines. Make sure that you are in the Hosts and Clusters view in the inventory in order to use Update Manager with ESX/ESXi hosts. Before you begin your scan, create and attach baselines. It is best to attach the baselines to folders or clusters, rather than to individual ESX/ESXi hosts. Scans can be run while virtual machines are powered on and in use. To scan hosts, go to the Hosts and Clusters inventory view. Right-click your host, or right-click the folder or cluster in which your hosts are located. Then choose Scan for Updates.
- #166: 588 You can remediate virtual machines, virtual appliances, and hosts using either user-initiated remediation or regularly scheduled remediation. For ESX/ESXi hosts in a cluster, the remediation process is sequential. When you remediate a cluster of hosts and one of the hosts fails to enter maintenance mode, Update Manager reports an error and the process fails. The hosts in the cluster that did get remediated stay at the updated level. The ones that were to be remediated after the failed host are not updated. Templates are a type of virtual machine, so they can be remediated. Take snapshots of templates before remediation, especially if the templates are sealed. A template that is sealed is stopped before the operating system installation is completed, and special registry keys are used so that virtual machines created from this template start in setup mode. When such a virtual machine starts, the user completes the final steps in the setup process, allowing for final customization. Virtual machines are rebooted at the end of the patch remediation process, if a reboot is required. A dialog box tells the users logged in to the remediated machines of the upcoming shutdown. 588
- #167: 361 The authorization to perform tasks in VMware vCenter Server is governed by an access control system. This system allows the vCenter Server administrator to specify in great detail which users or groups can perform which tasks on which objects. It is defined using the following concepts: Privilege – The ability to perform a specific action or read a specific property. Examples include powering on a virtual machine and creating an alarm Role – A collection of privileges. Roles provide a way to aggregate all the individual privileges that are required to perform a higher-level task, such as administering a virtual machine. Object – An entity upon which actions are performed. Windows user/group – A Windows user or Windows group on the vCenter Server system who can perform the action. Together, a role, plus a user/group, plus an object, equals a permission.
- #168: 362 vCenter Server depends upon the users and groups defined in your Active Directory environment or on the local Windows system on which vCenter Server runs. Users and groups indicate who can perform actions in vCenter Server. A key point: a VMware ESX/ESXi host can have its own set of users and groups that is independent of the Active Directory users and groups. If you are using vCenter Server, you should avoid defining any users on the ESX/ESXi host beyond those that are created by default. This approach provides better manageability because there is no need to synchronize the two lists if a user or group is added or updated on one of the systems. It also improves security because it makes it possible for all permissions to be managed in one place.
- #169: 363 A role is a set of one or more privileges. A privilege allows access to a specific take and is grouped with other privileges related to it. For examples, the Virtual machine user role consists of several privileges in categories such as Global, Scheduled task, and Virtual machine. A role is assigned to a user or group and determines the level of access of that user or group. To display the list of roles, go to Home > Administration > Roles. To display the privileges associated with an existing role, right-click the role, then choose Edit Role. Roles are not hierarchically organized. In other words, a role is neither superior to nor subordinate to another role. All roles are independent of each other.
- #170: 364 A user or group indicates who can perform the action, and the object is the target of the action. Each combination of user or group, role, and object must be specified. That is, the administrator first selects an object from the overall vCenter Server inventory, then selects a role to be assigned to that object, and then selects the user or group to which this permission pertains. A permission can be assigned to any object in the vCenter Server inventory.
- #171: 365 To assign a permission, select the object in the inventory, then click the Permissions tab. Right-click anywhere in the Permissions tab viewing area, then choose Add Permission. For certain objects such as hosts and virtual machines, for example, another way to assign a permission is to right-click the object in the inventory, then choose Add Permission. Either method will display the Assign Permissions dialog box. In the left pane of the dialog box, select a user or group by clicking Add. Then, in the right pane, select a role in the role list. You can also choose to propagate the permission to all child objects. Role propagation is the act of passing along permissions. A role can be propagated to its child objects in the inventory. For each permission, you can decide whether the permission propagates down the object hierarchy to all subobjects or if it applies only to that immediate object. For example you can grant a user very limited permission (for example, read-only) from the datacenter level on down, then grant more permissive role on certain subobjects; for example, a folder of virtual machines.
- #172: 366 For any role, you can view all of the objects to which that role has been assigned and all of the users or groups who have been granted the role. To view this information, go to Home > Administration > Roles. Select a role in the role list. The information panel displays each object to which the role is assigned and the users and groups who have been granted the role. In the example above, the Administrator role has been granted to the user named vcadmin01a and the group name administrators. The user/group-plus-role combination has been applied at the vCenter Server level, which means this permission is allowed on all datacenters in the vCenter Server inventory.
- #173: 367 In addition to specifying whether permissions propagate downward, you can override In addition to specifying whether permissions propagate downward, you can override permissions set at a higher level by explicitly setting different permissions for a lower-level object. In the example above, user Greg is given the Administrator role at the “hq” datacenter. This role is propagated to all child object except one, the virtual machine “nw41-auth”.For this virtual machine, Greg has No Access, instead.
- #174: 368 If a user is a member of multiple groups, and these groups have permission on the same object in the inventory, then the user is assigned to the union of privileges assigned to the groups for that object. In the example above, there are two groups: Group1 and Group2. Group 1 is assigned the VM_Power_On role, a custom role that contains only one privilege, the ability to power on a virtual machine. Group2 is assigned the Take_Snapshots role, another custom role that contains the privileges to create and remove snapshots. Both roles propagate to the child objects. Assume that Greg belongs to both group1 and Group2. If this is the case, then Greg gets both VM_Power_On and Take_Snapshot privileges for all objects within the Training Datacenter.
- #175: 369 If a user is a member of multiple groups and has permissions on different object in the inventory, then for each object on which the group has permissions, the same permissions apply as if they were granted to the user directly. Also, remember that you can override permissions set at a higher-level object by explicitly setting different permissions for a lower-level object. In the example above, there are two groups: Group1 and Group2. Group1 is assigned the Administrator role at the Training datacenter and Group2 is assigned the Read-only role on the virtual machine object, “eG manager”. Both roles propagate to their child objects. Assume that user Greg is a member of both Group1 and Group2. If this is the case, then Greg gets Administrator privileges on the entire Training datacenter (the higher-level object), except for the virtual machine named “eG manager” (the lower-level object). For this particular object, Greg gets Read-only access.
- #176: 370 Permissions defined explicitly for the user on an object take precedence over a user’s group permissions on that same object. In the example above, three permissions are assigned to the Training datacenter: Groupo1 is assigned the VM_Power_On role, Group2 is assigned the Take_Snapshots role, and user Greg is assigned the Read-only role. Assume that Greg is a member of both Group1 and Grouop2. Let’s also assum that propagation to child objects is enabled on all roles. In this case, even through Greg is a member of both Group1 and Group2, Greg gets the Read-only privilege to the Training datacenter and all objects under it. This is because explicit user permissions on an object take precedence over all group permissions on that same object.
- #177: 549 Consider backing up the following items in the vSphere environment: ESX service console – The service console is a modified distribution of Linux. It provides tools and a command prompt for more direct management of an ESX host. During its lifetime, the service console does not experience any major changes other than periodic upgrades or the installation of management agents. In case of a failure, you can recover the state of your service console by reinstalling the ESX host as well as any management agents running on it. ESXi configuration data – After you configure an ESXi host, it is important to back up your configuration. You perform the backup by using the vicfg-cfgbackup command, which you run from the vSphere Command-Line Interface (vCLI). Virtual machine data – The virtual machine data you back up can include virtual disks or raw device mappings (RDMs), configuration files, and so on. As with physical machines, virtual machine data must be backed up periodically to prevent its corruption and loss due to human or technical errors. To back up virtual machines, use Consolidated Backup or Data Recovery.
- #178: 551 After you configure an ESXi host, it is important to back up your configuration. Always back up your host configuration after you change the configuration or upgrade the ESXi image. When you perform a configuration backup, the serial number is backed up with the configuration and is restored when you restore the configuration. However, the serial number is not preserved when you run the recovery CD (ESXi Embedded) or perform the repair operation (ESXi Installation). For this reason, the recommended procedure is to first back up the configuration, run the recovery CD or repair operation if needed, and then restore the configuration. You perform the backup by using the vicfg-cfgbackup command, which you run from the vCLI. You can install the vCLI on your Windows or Linux system or import the vSphere Management Assistant. For information about importing or installing the vCLI, see the vSphere Command-Line Interface Installation and Reference Guide at http://www.vmware.com/support/pubs . The recovery CD or the repair operation (on the ESXi Installable installation CD) can be used if the host does not boot up because the file partitions or master boot record on the installation disk might be corrupted. Perform this recovery procedure when directed to do so by VMware Customer Service.
- #179: 552 Storing data in separate physical disks not only makes backup more flexible, it also allows for more flexible deployment from templates. You can configure the applications in your templates to keep their data on separate disk drives and then provide a new blank disk for data whenever the virtual machine is deployed.
- #180: 553 Use Consolidated Backup along with supported third-party software to perform backups of virtual machines disks. Consolidated Backup centralizes backup on the Consolidated Backup proxy server, which can be used to protect many virtual machines. One of the key features of Consolidated Backup is that most major backup applications integrate with it, providing you with a fast and efficient way of backing up data in virtual machines. Consolidated Backup eliminates the need for having a backup agent installed in each virtual machine that you want to protect. Consolidated Backup can read virtual disk data directly from your SAN storage (Fibre Channel or iSCSI) or over the network, using a network connection to an ESX host to access virtual disk data. Consolidated Backup can run in a virtual machine. It supports file-level full and incremental backups for virtual machines running supported Windows guest operating systems and image-level backups for virtual machines running any supported guest operating system.
- #181: 554 Data Recovery is a backup-and-recovery tool for virtual machines and is designed for small-to-medium-sized organizations. This tool is a Linux virtual appliance. Its management user interface is provided by a VMware vSphere Client plug-in. Data Recovery is an agentless, disk-based solution, allowing for faster restores over solutions that write to backup tape. Multiple restore points for each virtual machine are displayed so that you can easily select a copy to restore form a specific point in time. The management UI for Data Recovery is wizard-driven and allows you to create, configure, and schedule jobs for backing up virtual machines and restoring virtual machines. Data Recovery is intended for vSphere administrators who use vCenter Server to manage their vSphere environment, who want to simple user interface with minimal options, and who want to leverage their disk, specially shared storage, as the destination for their virtual machine backups.
- #182: 555 There are several steps to set up the Data Recovery appliance: Add the appliance to the vCenter Server inventory. The Data Recovery appliance is deployed as an OVF template. You must add the appliance to the vCenter Server inventory by deploying the Data Recovery OVF template. Configure the appliance networking and the appliance time zone the appliance is set with Network Time Protocol and will automatically set the time. Add the destination storage device to the appliance. To do this, edit the settings of the appliance (the virtual machine). Add a second disk to the appliance, sizing it appropriately. Install the Data Recovery plug-in into the vSphere Client by running the Data Recovery plug-in installer. Then log in to vCenter Server and launch the Plug-in Manager. Enable the Data Recovery plug-in. Access the management UI in the vSphere Client by going to Home > Solutions and Applications > Data Recovery. The first time you access the appliance, you must enter a user name and password that Data Recovery will use the authenticate you.
- #183: 556 Backup jobs can be created using the vSphere Client. A backup job consists of the following components: what virtual machines to backup (the source), the storage on which to hold the backup (the destination), a backup window, and a retention policy. These backup job components will be discussed next. Here are some things to note about backup jobs: Each appliance supports a maximum of 100 backup jobs. Each backup job can have a maximum of two destinations. The same source and destination can be specified in multiple backup jobs. Each virtual machine selected by a backup job is backed up once every 24 hours within its backup window. The first backup of a virtual machine is a full backup. All subsequent backups of that virtual machine are incremental. The backup job configuration is stored in the appliance but backed up to the destination after the backup of any virtual machine. The configuration can then be restored when a new appliance is deployed and the destination is mounted in the new appliance.
- #184: 557 The Backup Job wizard displays the inventory in a view similar to the Hosts and Clusters in inventory view, except that the wizard also shows a virtual machine’s disks. Any changes made to the inventory can be seen in the inventory displayed by the wizard. For example, if a disk is added to a virtual machine, the virtual machine has to be collapsed and expanded manually in order to update the virtual machine’s disks in the inventory. The backup source can be selected at any level in the inventory, such as the root (vCenter Server), a datacenter, folder, host, resource pool, virtual machine, or even a disk. If a container object, such as a host, resource pool, folder, or virtual machine, is selected for backup, any new virtual machines or virtual machines’ disks in that container object will be automatically selected for backup. The management UI will warn the user if the virtual machine is not on a licensed host. The management UI will also warn the user if more than 100 virtual machines are selected for backup.
- #185: 558 Destination storage is the storage used to hold the backups. Destination storage can be a .vmdk file located on a VMFS datastore or NFS datastore, or it can be an RDM. To create destination storage, one or more virtual disks must be manually added to the appliance. Destination storage can also be a Windows Common Internet File System (CIFS) share. Use the management UI to add the CIFS share. Each backup job can use a maximum of two destinations. The destination storage must be formatted as deduplicated storage before it can be used. Deduplicated storage allows Data Recovery to make efficient use of disk space when storing backups. Deduplication eliminates duplicate storage blocks as backup data is streamed to disk. Therefore, you can maintain multiple point-in-time copies of virtual machines while using only a fraction of the storage. To efficiently utilize the backup window and available resources, the deduplication operation occurs as the virtual machine backup is stored to disk. All backed-up virtual machines are stored in a compressed form in deduplicated storage.
- #186: 559 The backup window defines the times during the week then the backup can run. The backup window is also used for applying the retention policy. Virtual machines are stored in ascending order based on the last backup time. This means that virtual machines not backed up for the longest time have to highest priority. This is a global priority applied across all the backup jobs.
- #187: 560 The retention policy allows you to specify the backup to retain. The backups not meeting the policy are removed. The retention policy page of the Backup wizard allows you to choose from predefined policies or to create your own custom policy. You can lock backups so that they never get deleted when the retention policy is applied. Or you can identify that a certain backup be deleted the next time the retention policy is applied. If a virtual machine is in more than one backup job, and each backup job has a different retention policy, Data Recovery uses the retention policy that has higher values (weeks, months, quarters, years) in its policy details. If the deduplicated storage is 80 percent full and has less than 250GB free space, the retention policy is applied once a day. Otherwise, it is applied once a week. If it has been more than a day since the last retention policy, application of the retention policy takes precedence over backups. New backups will not be allowed until the retention policy runs. Backups are not allowed when retention policy is being applied, but restore are.
- #188: 561 Data Recovery can be used to do the following: Restore a virtual machine that has been deleted or corrupted. Restore a virtual machine to a different host, resource pool, or datastore. Restore one of a virtual machine’s disks Roll back a virtual disk or virtual machine to an earlier state. To create a restore job, click the Restore tab in the Data Recovery management UI, then click the Restore link. The Restore wizard allows you to perform the restore operation. In the Restore wizard, select the source. The source is one or more objects that you want to restore, such as multiple virtual machines or a single disk of a virtual machine. Data Recovery provides means to test how a virtual machine would be restored and to actually carry out restore operation. Restore rehearsals create virtual machines from restore points. Virtual machines from restore rehearsals do not replace current virtual machines, but virtual machines created through restore rehearsals do provide a way to ensure that virtual machine backups are being created as excepted and that they can be successfully restored. Actually restoring virtual machines returns specified virtual machines to a selected previous state. For both restore rehearsals and restores, the Restore Virtual Machines wizard provides pages that allow you to configure from where and to where virtual machines are restored.
- #189: 562 In the Restore wizard, choose the destination. The destination can be the original location of the virtual machine or virtual machine’s disk being restored. It can also be a different host, resource pool, or datastore a maximum of eight restore jobs can run simultaneously. If you attempt to restore more than eight virtual machines simultaneously, the first eight restore jobs will start immediately, and each remaining job will start as a restore finishes.