Getting started with ibm tivoli workload scheduler v8.3 sg247237
3 likes7,362 views

This document provides an overview and introduction to installing and migrating to IBM Tivoli Workload Scheduler V8.3. It covers prerequisites, a new installation process using a wizard, upgrading from previous versions, and new features such as an improved infrastructure using WebSphere and DB2/Oracle databases. The document is intended to help users get started with V8.3 and provide best practices for installation and migration.


![(C) Copyright IBM Corp 1998,2001
US Government User Restricted Rights
Use, duplication or disclosure restricted by GSA ADP Schedule Contract
with IBM Corp.
$
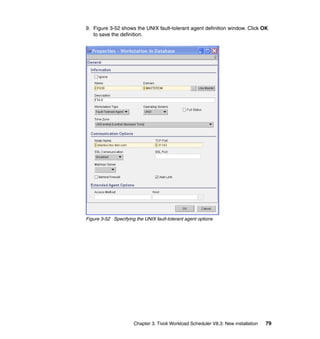
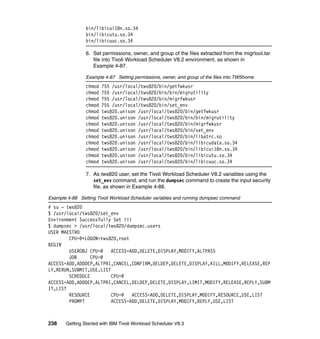
9. As root user, run the migrfwkusr script as follows:
# migrfwkusr -in input_security_file -out output_security_file [-cpu
workstation] [-hostname local_hostname]
Example 4-10 shows the migrfwkusr script output.
Example 4-10 Running the migrfwkusr script
# /Tivoli/tws81/set_env
Environment Successfully Set !!!
# /Tivoli/tws81/migrfwkusr -in /Tivoli/tws81/dumpsec.users -out
/Tivoli/tws81/framework.users -cpu prov008 -hostname prov008
Tivoli Workload Scheduler (UNIX)/GETFWKUS V8.3 (1.5) Licensed Materials - Property of
IBM(R)5698-WSH
(C) Copyright IBM Corp 1998, 2006 All rights reserved.
US Government User Restricted Rights
Use, duplication or disclosure restricted by GSA ADP Schedule Contract with IBM Corp.
IBM is a registered trademark of International Business Machines
Corporation in the United States, other countries, or both.
GETFWKUS:Starting user MAESTRO [/Tivoli/tws81/dumpsec.users (#2)]
GETFWKUS:Done with /Tivoli/tws81/dumpsec.users, 0 errors (0 Total)
In Example 4-10:
– input_security_file is the file created using the dumpsec command.
– output_security_file is the security file that is created by the migrfwkusr
script.
– workstation is the name of the local workstation where the login data
added by the tool is defined. If you do not specify a workstation, the data is
taken from a localopts file, if it is present in the same directory where the
migrfwkusr script is located. If there is no localopts file, the workstation is
set to the first eight characters of the local host name.
– local_hostname is the fully qualified host name of the Tivoli Management
Framework users to be extracted. Login data for users with this host name,
or with this host name and domain name and the host name valid for all
computers are extracted. If you do not specify the local host name,
migrfwkusr retrieves the host name from the local computer and matches
login data for computers with that host name and any domain name.
126 Getting Started with IBM Tivoli Workload Scheduler V8.3](https://image.slidesharecdn.com/gettingstartedwithibmtivoliworkloadschedulerv8-3sg247237-120524011828-phpapp02/85/Getting-started-with-ibm-tivoli-workload-scheduler-v8-3-sg247237-162-320.jpg)

![Use, duplication or disclosure restricted by GSA ADP Schedule Contract
with IBM Corp.
IBM is a registered trademark of International Business Machines
Corporation in the United States, other countries, or both.
$ cat /Tivoli/tws83/dumpsec.users.tws83
USER MAESTRO CPU=@+LOGON=tws83,root
BEGIN
USEROBJ CPU=@ ACCESS=ADD,DELETE,DISPLAY,MODIFY,ALTPASS,UNLOCK
JOB CPU=@
ACCESS=ADD,ADDDEP,ALTPRI,CANCEL,CONFIRM,DELDEP,DELETE,DISPLAY,KILL,MODI
FY,RELEASE,REPLY,RERUN,SUBMIT,USE,LIST,UNLOCK
SCHEDULE CPU=@
ACCESS=ADD,ADDDEP,ALTPRI,CANCEL,DELDEP,DELETE,DISPLAY,LIMIT,MODIFY,RELE
ASE,REPLY,SUBMIT,LIST,UNLOCK
RESOURCE CPU=@
ACCESS=ADD,DELETE,DISPLAY,MODIFY,RESOURCE,USE,LIST,UNLOCK
PROMPT ACCESS=ADD,DELETE,DISPLAY,MODIFY,REPLY,USE,LIST,UNLOCK
FILE NAME=@ ACCESS=BUILD,DELETE,DISPLAY,MODIFY,UNLOCK
CPU CPU=@
ACCESS=ADD,CONSOLE,DELETE,DISPLAY,FENCE,LIMIT,LINK,MODIFY,SHUTDOWN,STAR
T,STOP,UNLINK,LIST,UNLOCK
PARAMETER CPU=@ ACCESS=ADD,DELETE,DISPLAY,MODIFY,UNLOCK
CALENDAR ACCESS=ADD,DELETE,DISPLAY,MODIFY,USE,UNLOCK
END
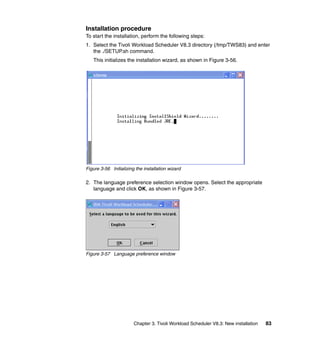
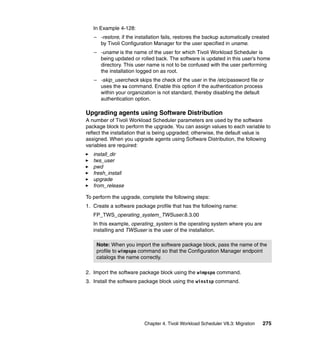
3. As tws83 user, run makesec output_security_file to add new users in the
security file of the new Tivoli Workload Scheduler V8.3, as shown in
Example 4-13.
Example 4-13 Running makesec to add new users in the security file
# su - tws83
$ makesec /Tivoli/tws81/framework.users
Tivoli Workload Scheduler (UNIX)/MAKESEC V8.3 (9.3.1.1) Licensed
Materials - Property of IBM(R)5698-WSH
(C) Copyright IBM Corp 1998, 2006 All rights reserved.
US Government User Restricted Rights
Use, duplication or disclosure restricted by GSA ADP Schedule Contract
with IBM Corp.
IBM is a registered trademark of International Business Machines
Corporation in the United States, other countries, or both.
MAKESEC:Starting user MAESTRO [/Tivoli/tws81/framework.users (#3)]
MAKESEC:Done with /Tivoli/tws81/framework.users, 0 errors (0 Total)
MAKESEC:Security file installed as /Tivoli/tws83/Security
Chapter 4. Tivoli Workload Scheduler V8.3: Migration 129](https://image.slidesharecdn.com/gettingstartedwithibmtivoliworkloadschedulerv8-3sg247237-120524011828-phpapp02/85/Getting-started-with-ibm-tivoli-workload-scheduler-v8-3-sg247237-165-320.jpg)


![enDbAudit / da = 0
enEmptySchedsAreSucc / es = NO
enListSecChk / sc = NO
enLogonBatch / lb = NO
enPlanAudit / pa = 0
enPreventStart / ps = YES
enRetainNameOnRerunFrom / rr = NO
enStrEncrypt / se = NO
enSwFaultTol / sw = NO
enTimeZone / tz = NO
extRecPrompt / xp = 1000
ignoreCals / ic = NO
logmanMinMaxPolicy / ln = BOTH
logmanSmoothPolicy / lt = -1
maxLen / xl = 14
minLen / ml = 8
startOfDay / sd = 0600
statsHistory / sh = 10
AWSJCL050I Command "ls" completed successfully.
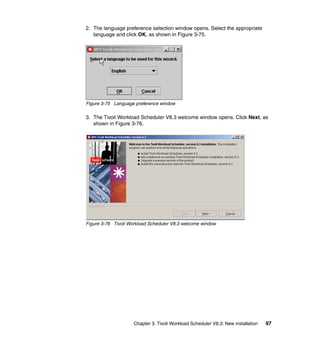
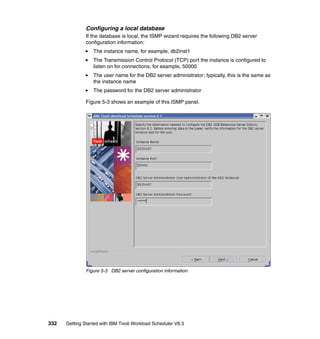
7. As tws83 user, run the datamigrate command to import the data from the
dumped files, as shown in Example 4-20 on page 135.
Notes:
If you want to import the data directly from the existing files in the
mozart directory, see “Importing object data directly from the mozart
directory” on page 137.
If you want to perform a complete import of the data as a block, see
“Importing object data as a block” on page 138.
# su - tws83
$ datamigrate
-topology topology_filename [-tmppath temporary_path]
-prompts prompts_filename [-tmppath temporary_path]
-calendars calendars_filename [-tmppath temporary_path]
-parms parms_filename [-tmppath temporary_path]
-resources resources_filename [-tmppath temporary_path]
-users users_filename [-tmppath temporary_path]
-jobs jobs_filename [-tmppath temporary_path]
-scheds scheds_filename [-tmppath temporary_path]
134 Getting Started with IBM Tivoli Workload Scheduler V8.3](https://image.slidesharecdn.com/gettingstartedwithibmtivoliworkloadschedulerv8-3sg247237-120524011828-phpapp02/85/Getting-started-with-ibm-tivoli-workload-scheduler-v8-3-sg247237-170-320.jpg)


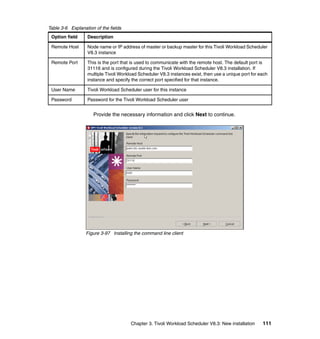
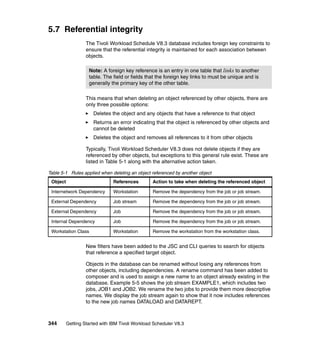
![11.As tws83 user, delete the FINAL job stream related to the previous cpuname
from the new Tivoli Workload Scheduler V8.3 definition, as shown in
Example 4-24.
Example 4-24 Deleting FINAL job stream related to the previous cpuname
# su - tws83
$ composer delete sched=old_cpuname#FINAL
12.As tws83 user, delete Jnextday job related to the previous cpuname from the
new Tivoli Workload Scheduler V8.3 definition, as shown in Example 4-25.
Example 4-25 Deleting Jnextday job related to the previous cpuname
# su - tws83
$ composer delete job=old_cpuname#Jnextday
13.As tws83 user, delete the previous cpuname from the new Tivoli Workload
Scheduler V8.3 definition, as shown in Example 4-26.
Example 4-26 Deleting the previous cpuname from the new Tivoli Workload Scheduler
Version 8.3
# su - tws83
$ composer delete cpu=old_cpuname
Importing object data directly from the mozart directory
To import data directly from the existing files in the mozart directory, as tws83
user, run the datamigrate command, as shown in Example 4-27.
$ datamigrate object_type -path TWS_8.x.x_main_dir [-tmppath
temporary_path]
Example 4-27 Running the datamigrate command
# su - tws83
$ mkdir /Tivoli/tws83/migratedata
$ datamigrate -topology -path /Tivoli/tws81 -tmppath
/Tivoli/tws83/migratedata
$ datamigrate -prompts -path /Tivoli/tws81 -tmppath
/Tivoli/tws83/migratedata
$ datamigrate -calendars -path /Tivoli/tws81 -tmppath
/Tivoli/tws83/migratedata
$ datamigrate -parms -path /Tivoli/tws81 -tmppath
/Tivoli/tws83/migratedata
$ datamigrate -resources -path /Tivoli/tws81 -tmppath
/Tivoli/tws83/migratedata
Chapter 4. Tivoli Workload Scheduler V8.3: Migration 137](https://image.slidesharecdn.com/gettingstartedwithibmtivoliworkloadschedulerv8-3sg247237-120524011828-phpapp02/85/Getting-started-with-ibm-tivoli-workload-scheduler-v8-3-sg247237-173-320.jpg)
![$ datamigrate -users -path /Tivoli/tws81 -tmppath
/Tivoli/tws83/migratedata
$ datamigrate -jobs -path /Tivoli/tws81 -tmppath
/Tivoli/tws83/migratedata
$ datamigrate -scheds -path /Tivoli/tws81 -tmppath
/Tivoli/tws83/migratedata
In Example 4-27:
object_type is the type of object that you are importing. The possible values
are:
– -topology
– -prompts
– -calendars
– -parms
– -resources
– -users
– -jobs
– -scheds
TWS_8.x.x_main_dir indicates the root directory of the previous Tivoli
Workload Scheduler version.
temporary_path is the temporary path where datamigrate command stores
the files during the migration process.
Note: When the Tivoli Workload Scheduler is on another workstation, on the
Tivoli Workload Scheduler V8.3 environment, mount the directory of the
version 8.x.x environment. To do this, the two workstations must have the
same system byte order.
Importing object data as a block
To import data as a block, as tws83 user, use the datamigrate command, as
shown in Example 4-28.
$ datamigrate -path TWS_8.x.x_main_dir [-tmppath temporary_path]
Example 4-28 Running the datamigrate command
# su - tws83
$ mkdir /Tivoli/tws83/migratedata
$ datamigrate -path /Tivoli/tws81 -tmppath /Tivoli/tws83/migratedata
138 Getting Started with IBM Tivoli Workload Scheduler V8.3](https://image.slidesharecdn.com/gettingstartedwithibmtivoliworkloadschedulerv8-3sg247237-120524011828-phpapp02/85/Getting-started-with-ibm-tivoli-workload-scheduler-v8-3-sg247237-174-320.jpg)


![7. As tws83 user, run conman sbs to submit the FINAL job stream in the new
master domain manager database, as shown in Example 4-35.
Example 4-35 Running conman sbs to submit the new FINAL job stream
# su - tws83
$ conman “sbs FINAL”
Tivoli Workload Scheduler (UNIX)/CONMAN V8.3 (1.36.2.22) Licensed Materials -
Property of IBM(R)5698-WSH
(C) Copyright IBM Corp 1998, 2006 All rights reserved.
US Government User Restricted Rights
Use, duplication or disclosure restricted by GSA ADP Schedule Contract with IBM Corp.
IBM is a registered trademark of International Business Machines
Corporation in the United States, other countries, or both.
Installed for user "tws83".
Locale LANG set to the following: "en"
Scheduled for (Exp) 05/16/06 (#5) on M83. Batchman LIVES. Limit: 0, Fence: 0, Audit
Level: 0
sbs final
Submitted M83#FINAL to batchman as M83#FINAL[(1543 05/16/06),(0AAAAAAAAAAAAACT)]
8. As tws83 user, run conman ss to see the FINAL job stream in the new master
domain manager database, as shown in Example 4-36.
Example 4-36 Running conman ss to see the FINAL job stream
# su - tws83
$ conman ss
Tivoli Workload Scheduler (UNIX)/CONMAN V8.3 (1.36.2.22) Licensed Materials -
Property of IBM(R)5698-WSH
(C) Copyright IBM Corp 1998, 2006 All rights reserved.
US Government User Restricted Rights
Use, duplication or disclosure restricted by GSA ADP Schedule Contract with IBM Corp.
IBM is a registered trademark of International Business Machines
Corporation in the United States, other countries, or both.
Installed for user "tws83".
Locale LANG set to the following: "en"
Scheduled for (Exp) 05/16/06 (#5) on M83. Batchman LIVES. Limit: 0, Fence: 0, Audit
Level: 0
ss
(Est) (Est) Jobs Sch
CPU Schedule SchedTime State Pr Start Elapse # OK Lim
M83 #FINAL 1543 05/16 HOLD 10(05/17) 4 0 [Carry]
146 Getting Started with IBM Tivoli Workload Scheduler V8.3](https://image.slidesharecdn.com/gettingstartedwithibmtivoliworkloadschedulerv8-3sg247237-120524011828-phpapp02/85/Getting-started-with-ibm-tivoli-workload-scheduler-v8-3-sg247237-182-320.jpg)
![9. As tws83 user, run conman sj to see the jobs of the new FINAL job stream in
the new master domain manager database, as shown in Example 4-37.
Example 4-37 Running conman sj to see the jobs of the FINAL job stream
# su - tws83
$ conman sj
Tivoli Workload Scheduler (UNIX)/CONMAN V8.3 (1.36.2.22) Licensed Materials -
Property of IBM(R)5698-WSH
(C) Copyright IBM Corp 1998, 2006 All rights reserved.
US Government User Restricted Rights
Use, duplication or disclosure restricted by GSA ADP Schedule Contract with IBM Corp.
IBM is a registered trademark of International Business Machines
Corporation in the United States, other countries, or both.
Installed for user "tws83".
Locale LANG set to the following: "en"
Scheduled for (Exp) 05/16/06 (#5) on M83. Batchman LIVES. Limit: 0, Fence: 0, Audit
Level: 0
sj
(Est) (Est)
CPU Schedule SchedTime Job State Pr Start Elapse RetCode Deps
M83 #FINAL 1543 05/16 ******** HOLD 10(05/17) [Carry]
MAKEPLAN HOLD 10
SWITCHP+ HOLD 10 MAKEPLAN
CREATEP+ HOLD 10 SWITCHP+
UPDATES+ HOLD 10 SWITCHP+
4.4.7 Upgrading the backup master domain manager
This section describes how to upgrade the backup master domain manager on
AIX v.5.3.0.0 system. You can upgrade the backup master domain manager
using the following installation methods:
“Upgrading the backup master domain manager using the ISMP”; see the
following section
“Upgrading the backup master domain manager using a silent installation” on
page 164
Chapter 4. Tivoli Workload Scheduler V8.3: Migration 147](https://image.slidesharecdn.com/gettingstartedwithibmtivoliworkloadschedulerv8-3sg247237-120524011828-phpapp02/85/Getting-started-with-ibm-tivoli-workload-scheduler-v8-3-sg247237-183-320.jpg)


![3. Run the setup for the operating system on which you are upgrading:
– On Windows operating systems:
WINDOWSSETUP.exe -silent -options <local_dir>response_file.txt
– On UNIX and Linux operating systems (see Example 4-56):
./SETUP.bin -options <local_dir>/response_file.txt
Example 4-56 Running SETUP.bin -options
# /cdrom/AIX/SETUP.bin -options /tmp/TWS_UPGRADE_Agent.txt
4. Review the installation messages in the summary.log file to check whether the
installation is successful.
5. After you upgrade the FTA, perform step 11 on page 179, described in
“Upgrading Windows 2000 agent using the installation wizard” on page 171.
Upgrading agents using the twsinst script
Use this procedure to upgrade on Tier 1 and Tier 2 operating systems. It also
installs all supported language packs. This procedure uses the command line
twsinst script to upgrade. For a list of supported Tier 1 and Tier 2 operating
systems, refer to IBM Tivoli Workload Scheduler Release Notes v8.3,
SC32-1277. To upgrade agents using the twsinst script, perform the following
steps:
1. As root user, choose the appropriate installation CD and mount it.
2. As root user, change your directory to TWShome, as shown in Example 4-57.
Example 4-57 Changing the directory to TWShome
# cd /Tivoli/tws81
3. Locate the directory of the operating system where you want to install, and
run the twsinst script as follows:
twsinst -update -uname username [-inst_dir install_dir] [-backup_dir
backup_dir] [-nobackup_dir][-lang lang-id] [-create_link]
[-skip_usercheck] [-reset_perm]
Example 4-58 shows the twsinst script output.
Example 4-58 Running the twsinst script
# /cdrom/AIX/twsinst -update -uname tws81 -inst_dir /Tivoli/tws81
-backup_dir /Tivoli/tws81/tws81.bkp -skip_usercheck
190 Getting Started with IBM Tivoli Workload Scheduler V8.3](https://image.slidesharecdn.com/gettingstartedwithibmtivoliworkloadschedulerv8-3sg247237-120524011828-phpapp02/85/Getting-started-with-ibm-tivoli-workload-scheduler-v8-3-sg247237-226-320.jpg)

![– -restore, if the installation fails, restores the backup automatically created
by Tivoli Configuration Manager for the user specified in uname.
– -create_link creates the symbolic link between /usr/bin/mat and
TWShome/bin/at.
– -skip_usercheck skips the check of the user in the /etc/password file or
using the su command. Enable this option if the authentication process
within your organization is not standard, thereby disabling the default
authentication option.
– -reset_perm resets the permissions of the libatrc library.
Example 4-60 shows a sample twsinst script.
Example 4-60 Sample twsinst script
# /cdrom/AIX/twsinst -update -uname twsuser
4. To roll back to a previous instance, run the following command, as shown in
Example 4-61.
twsinst -restore -uname username [-skip_usercheck]
Example 4-61 Rolling back to a previous instance
# /cdrom/AIX/twsinst -restore -uname tws81 -skip_usercheck
In Example 4-61:
– -restore, if the installation fails, restores the backup automatically created
by IBM Tivoli Configuration Manager for the user specified in uname.
– -uname is the name of the user for which Tivoli Workload Scheduler is
being updated or rolled back. The software is updated in this user’s home
directory. This user name is not to be confused with the user performing
the installation logged on as root.
– -skip_usercheck skips the check of the user in the /etc/password file or
using the su command. Enable this option if the authentication process
within your organization is not standard, thereby disabling the default
authentication option.
192 Getting Started with IBM Tivoli Workload Scheduler V8.3](https://image.slidesharecdn.com/gettingstartedwithibmtivoliworkloadschedulerv8-3sg247237-120524011828-phpapp02/85/Getting-started-with-ibm-tivoli-workload-scheduler-v8-3-sg247237-228-320.jpg)


![stop @!@;wait;noask
AWSBHU013I ROME already stopped.
Tivoli Workload Scheduler (UNIX)/STAGEMAN V8.3 (1.4) Licensed Materials - Property of
IBM(R)
5698-WSH
(C) Copyright IBM Corp 1998, 2006 All rights reserved.
US Government User Restricted Rights
Use, duplication or disclosure restricted by GSA ADP Schedule Contract with IBM
Corp.
IBM is a registered trademark of International Business Machines
Corporation in the United States, other countries, or both.
Installed for user "tws81".
Locale LANG set to the following: "en"
STAGEMAN:AWSBHV033I Job stream #FINAL[(0600 05/25/06),(FINAL)] is carried
STAGEMAN:forward. The new id is CF06144AAAAAAAAA.
STAGEMAN:AWSBHV025I The old Symphony file renamed
STAGEMAN:/Tivoli/tws81/schedlog/M200605250048
STAGEMAN:AWSBHV030I The new Symphony file is installed.
STAGEMAN:AWSBHV036I Multi-workstation Symphony file copied to
STAGEMAN:/Tivoli/tws81/Sinfonia
STAGEMAN:AWSBHV078I Current plan audit level is 0.
Tivoli Workload Scheduler (UNIX)/PLANMAN V8.3 (1.0) Licensed Materials - Property of
IBM(R)
5698-WSH
(C) Copyright IBM Corp 1998, 2006 All rights reserved.
US Government User Restricted Rights
Use, duplication or disclosure restricted by GSA ADP Schedule Contract with IBM
Corp.
IBM is a registered trademark of International Business Machines
Corporation in the United States, other countries, or both.
Installed for user "tws81".
Locale LANG set to the following: "en"
AWSJCL065I Run number has been successfully updated.
Tivoli Workload Scheduler (UNIX)/CONMAN V8.3 (1.36.2.22) Licensed Materials -
Property of IBM(R)
5698-WSH
(C) Copyright IBM Corp 1998, 2006 All rights reserved.
US Government User Restricted Rights
Use, duplication or disclosure restricted by GSA ADP Schedule Contract with IBM
Corp.
IBM is a registered trademark of International Business Machines
Corporation in the United States, other countries, or both.
Installed for user "tws81".
Locale LANG set to the following: "en"
Scheduled for (Exp) 05/25/06 (#3) on ROME. Batchman down. Limit: 0, Fence: 0,
Chapter 4. Tivoli Workload Scheduler V8.3: Migration 225](https://image.slidesharecdn.com/gettingstartedwithibmtivoliworkloadschedulerv8-3sg247237-120524011828-phpapp02/85/Getting-started-with-ibm-tivoli-workload-scheduler-v8-3-sg247237-261-320.jpg)


![7. As tws81 user, run conman cs to cancel the FINAL job stream in the new
master domain manager database, as shown in Example 4-77.
Example 4-77 Running conman cs to cancel the FINAL job stream
# su - tws81
$ conman cs final
Tivoli Workload Scheduler (UNIX)/CONMAN V8.3 (1.36.2.22) Licensed Materials -
Property of IBM(R)
5698-WSH
(C) Copyright IBM Corp 1998, 2006 All rights reserved.
US Government User Restricted Rights
Use, duplication or disclosure restricted by GSA ADP Schedule Contract with IBM Corp.
IBM is a registered trademark of International Business Machines
Corporation in the United States, other countries, or both.
Installed for user "tws81".
Locale LANG set to the following: "en"
Scheduled for (Exp) 05/25/06 (#3) on ROME. Batchman LIVES. Limit: 0, Fence: 0,
Audit Level: 0
cs final
Command forwarded to batchman for ROME#FINAL[(0600 05/25/06),(CF06144AAAAAAAAA)]
8. As tws81 user, run conman sbs to submit the new FINAL job stream in the
new master domain manager database, as shown in Example 4-78.
Example 4-78 Running conman sbs to submit the new FINAL job stream
# su - tws81
$ conman “sbs FINAL”
Tivoli Workload Scheduler (UNIX)/CONMAN V8.3 (1.36.2.22) Licensed Materials -
Property of IBM(R)
5698-WSH
(C) Copyright IBM Corp 1998, 2006 All rights reserved.
US Government User Restricted Rights
Use, duplication or disclosure restricted by GSA ADP Schedule Contract with IBM Corp.
IBM is a registered trademark of International Business Machines
Corporation in the United States, other countries, or both.
Installed for user "tws81".
Locale LANG set to the following: "en"
Scheduled for (Exp) 05/25/06 (#3) on ROME. Batchman LIVES. Limit: 0, Fence: 0,
Audit Level: 0
sbs FINAL
Submitted ROME#FINAL to batchman as ROME#FINAL[(0058 05/25/06),(0AAAAAAAAAAAAAAP)]
Chapter 4. Tivoli Workload Scheduler V8.3: Migration 231](https://image.slidesharecdn.com/gettingstartedwithibmtivoliworkloadschedulerv8-3sg247237-120524011828-phpapp02/85/Getting-started-with-ibm-tivoli-workload-scheduler-v8-3-sg247237-267-320.jpg)
![9. As tws81 user, run conman ss to see the new FINAL job stream in the new
master domain manager database, as shown in Example 4-79.
Example 4-79 Running conman ss to see the new FINAL job stream
# su - tws81
$ conman ss
Tivoli Workload Scheduler (UNIX)/CONMAN V8.3 (1.36.2.22) Licensed Materials -
Property of IBM(R)
5698-WSH
(C) Copyright IBM Corp 1998, 2006 All rights reserved.
US Government User Restricted Rights
Use, duplication or disclosure restricted by GSA ADP Schedule Contract with IBM
Corp.
IBM is a registered trademark of International Business Machines
Corporation in the United States, other countries, or both.
Installed for user "tws81".
Locale LANG set to the following: "en"
Scheduled for (Exp) 05/25/06 (#3) on ROME. Batchman LIVES. Limit: 10, Fence: 0,
Audit Level: 0
ss
(Est) (Est) Jobs Sch
CPU Schedule SchedTime State Pr Start Elapse # OK Lim
ROME #FINAL 0600 05/25 HOLD 10(05:59) 1 0 [05/24/06];
[Cancelled]
ROME #FINAL 0058 05/25 HOLD 10(05/26) 4 0 [Carry]
10.As tws81 user, run conman sj to see the jobs in the new master domain
manager database, as shown in Example 4-80.
Example 4-80 Running conman sj to see the jobs
# su - tws81
$ conman sj
Tivoli Workload Scheduler (UNIX)/CONMAN V8.3 (1.36.2.22) Licensed Materials -
Property of IBM(R)
5698-WSH
(C) Copyright IBM Corp 1998, 2006 All rights reserved.
US Government User Restricted Rights
Use, duplication or disclosure restricted by GSA ADP Schedule Contract with IBM
Corp.
232 Getting Started with IBM Tivoli Workload Scheduler V8.3](https://image.slidesharecdn.com/gettingstartedwithibmtivoliworkloadschedulerv8-3sg247237-120524011828-phpapp02/85/Getting-started-with-ibm-tivoli-workload-scheduler-v8-3-sg247237-268-320.jpg)
![IBM is a registered trademark of International Business Machines
Corporation in the United States, other countries, or both.
Installed for user "tws81".
Locale LANG set to the following: "en"
Scheduled for (Exp) 05/25/06 (#3) on ROME. Batchman LIVES. Limit: 10, Fence: 0,
Audit Level: 0
sj
(Est) (Est)
CPU Schedule SchedTime Job State Pr Start Elapse RetCode Deps
ROME #FINAL 0058 05/25 ******** HOLD 10(05/26) [Carry]
MAKEPLAN HOLD 10
SWITCHP+ HOLD 10 MAKEPLAN
CREATEP+ HOLD 10 SWITCHP+
UPDATES+ HOLD 10 SWITCHP+
4.5.4 Upgrading the backup master domain manager
Perform the procedure described in 4.4.7, “Upgrading the backup master domain
manager” on page 147.
4.5.5 Importing the migrated security file in the Tivoli Workload
Scheduler V8.3 environment
Perform the procedure described in 4.4.4, “Importing the migrated security file in
the Tivoli Workload Scheduler V8.3 environment” on page 128.
4.5.6 Upgrading agents
Perform the procedure described in 4.4.8, “Upgrading agents” on page 170.
4.5.7 Installing the Job Scheduling Console
Perform the procedure described in 3.2.2, “Installing the Job Scheduling
Console” on page 61.
Chapter 4. Tivoli Workload Scheduler V8.3: Migration 233](https://image.slidesharecdn.com/gettingstartedwithibmtivoliworkloadschedulerv8-3sg247237-120524011828-phpapp02/85/Getting-started-with-ibm-tivoli-workload-scheduler-v8-3-sg247237-269-320.jpg)


![FILE NAME=@ ACCESS=CLEAN,DELETE,DISPLAY,MODIFY
CPU CPU=@
ACCESS=ADD,CONSOLE,DELETE,DISPLAY,FENCE,LIMIT,LINK,MODIFY,SHUTDOWN,START,STOP,UNLINK,
LIST
PARAMETER CPU=@ ACCESS=ADD,DELETE,DISPLAY,MODIFY
CALENDAR ACCESS=ADD,DELETE,DISPLAY,MODIFY,USE
END
8. As root user, run the migrfwkusr script as follows:
# migrfwkusr -in input_security_file -out output_security_file [-cpu
workstation] [-hostname local_hostname]
Example 4-89 shows the migrfwkusr script output.
Example 4-89 Running the migrfwkusr script
# /usr/local/tws820/set_env
Environment Successfully Set !!!
# /usr/local/tws820/migrfwkusr -in /usr/local/tws820/dumpsec.users -out
/usr/local/tws820/framework.users -cpu edinburg -hostname edinburg
Tivoli Workload Scheduler (UNIX)/GETFWKUS V8.3 (1.5) Licensed Materials - Property of
IBM(R)
5698-WSH
(C) Copyright IBM Corp 1998, 2006 All rights reserved.
US Government User Restricted Rights
Use, duplication or disclosure restricted by GSA ADP Schedule Contract with IBM Corp.
IBM is a registered trademark of International Business Machines
Corporation in the United States, other countries, or both.
GETFWKUS:Starting user MAESTRO [/usr/local/tws820/dumpsec.users (#2)]
GETFWKUS:Done with /usr/local/tws820/dumpsec.users, 0 errors (0 Total)
In Example 4-89:
– input_security_file is the file that is created using the dumpsec command.
– output_security_file is the security file that is created by the migrfwkusr
script.
– workstation is the name of the local workstation where the login data
added by the tool is defined. If you do not specify a workstation, the data is
taken from a localopts file, if present in the same directory where the
migrfwkusr script is located. If there is no localopts file, the workstation is
set to the first eight characters of the local host name.
– local_hostname is the fully qualified host name of the Tivoli Management
Framework users to be extracted. Login data for users with this host name,
or with this host name and domain name and the host name valid for all
computers are extracted. If you do not specify the local host name,
Chapter 4. Tivoli Workload Scheduler V8.3: Migration 239](https://image.slidesharecdn.com/gettingstartedwithibmtivoliworkloadschedulerv8-3sg247237-120524011828-phpapp02/85/Getting-started-with-ibm-tivoli-workload-scheduler-v8-3-sg247237-275-320.jpg)


![Use, duplication or disclosure restricted by GSA ADP Schedule Contract with IBM Corp.
IBM is a registered trademark of International Business Machines
Corporation in the United States, other countries, or both.
$ cat /usr/local/tws830/dumpsec.users.tws83
USER MAESTRO
CPU=@+LOGON=tws820,root
BEGIN
USEROBJ CPU=@ ACCESS=ADD,DELETE,DISPLAY,MODIFY,ALTPASS
JOB CPU=@
ACCESS=ADD,ADDDEP,ALTPRI,CANCEL,CONFIRM,DELDEP,DELETE,DISPLAY,KILL,MODIFY,RELEASE,REP
LY,RERUN,SUBMIT,USE,LIST
SCHEDULE CPU=@
ACCESS=ADD,ADDDEP,ALTPRI,CANCEL,DELDEP,DELETE,DISPLAY,LIMIT,MODIFY,RELEASE,REPLY,SUBM
IT,LIST
RESOURCE CPU=@ ACCESS=ADD,DELETE,DISPLAY,MODIFY,RESOURCE,USE,LIST
PROMPT ACCESS=ADD,DELETE,DISPLAY,MODIFY,REPLY,USE,LIST
FILE NAME=@ ACCESS=CLEAN,DELETE,DISPLAY,MODIFY
CPU CPU=@
ACCESS=ADD,CONSOLE,DELETE,DISPLAY,FENCE,LIMIT,LINK,MODIFY,SHUTDOWN,START,STOP,UNLINK,
LIST
PARAMETER CPU=@ ACCESS=ADD,DELETE,DISPLAY,MODIFY
CALENDAR ACCESS=ADD,DELETE,DISPLAY,MODIFY,USE
END
3. As tws830 user, run makesec output_security_file to add new users in the
security file of the new Tivoli Workload Scheduler V8.3, as shown in
Example 4-92.
Example 4-92 Running makesec to add new users in the security file
# su - tws830
$ makesec /usr/local/tws820/framework.users
Tivoli Workload Scheduler (UNIX)/MAKESEC V8.3 (9.3.1.1) Licensed Materials - Property
of IBM(R)
5698-WSH
(C) Copyright IBM Corp 1998, 2006 All rights reserved.
US Government User Restricted Rights
Use, duplication or disclosure restricted by GSA ADP Schedule Contract with IBM Corp.
IBM is a registered trademark of International Business Machines
Corporation in the United States, other countries, or both.
MAKESEC:Starting user MAESTRO [dumpsec.users (#2)]
MAKESEC:Done with framework.users, 0 errors (0 Total)
MAKESEC:Security file installed as /usr/local/tws820/Security
242 Getting Started with IBM Tivoli Workload Scheduler V8.3](https://image.slidesharecdn.com/gettingstartedwithibmtivoliworkloadschedulerv8-3sg247237-120524011828-phpapp02/85/Getting-started-with-ibm-tivoli-workload-scheduler-v8-3-sg247237-278-320.jpg)


![enStrEncrypt / se = NO
enSwFaultTol / sw = NO
enTimeZone / tz = NO
extRecPrompt / xp = 1000
ignoreCals / ic = NO
logmanMinMaxPolicy / lm = BOTH
logmanSmoothPolicy / lt = -1
maxLen / xl = 14
minLen / ml = 8
startOfDay / sd = 0600
statsHistory / sh = 10
AWSJCL050I Command "ls" completed successfully.
7. As tws830 user, run the datamigrate command to import the data from the
dumped files, as shown in Example 4-99.
Notes:
If you want to import the data directly from the existing files in the
mozart directory, see “Importing object data directly from the mozart
directory” on page 250.
If you want to perform a complete import of data as a block, see
“Importing object data as a block” on page 251.
# su - tws830
$ datamigrate
-topology topology_filename [-tmppath temporary_path]
-prompts prompts_filename [-tmppath temporary_path]
-calendars calendars_filename [-tmppath temporary_path]
-parms parms_filename [-tmppath temporary_path]
-resources resources_filename [-tmppath temporary_path]
-users users_filename [-tmppath temporary_path]
-jobs jobs_filename [-tmppath temporary_path]
-scheds scheds_filename [-tmppath temporary_path]
Example 4-99 Running the datamigrate command
# su - tws830
$ mkdir /usr/local/tws830/tmp
$ datamigrate -topology /usr/local/tws820/dumpdata/topology -tmppath
/usr/local/tws830/tmp
$ datamigrate -prompts /usr/local/tws820/dumpdata/prompts -tmppath
/usr/local/tws830/tmp
$ datamigrate -calendars /usr/local/tws820/dumpdata/calendars -tmppath
/usr/local/tws830/tmp
Chapter 4. Tivoli Workload Scheduler V8.3: Migration 247](https://image.slidesharecdn.com/gettingstartedwithibmtivoliworkloadschedulerv8-3sg247237-120524011828-phpapp02/85/Getting-started-with-ibm-tivoli-workload-scheduler-v8-3-sg247237-283-320.jpg)


![13.As tws830 user, delete the previous cpuname from the new Tivoli Workload
Scheduler V8.3 definition, as shown in Example 4-105.
Example 4-105 Deleting the previous cpuname from the new Tivoli Workload Scheduler
Version 8.3
# su - tws830
$ composer delete cpu=old_cpuname
Importing object data directly from the mozart directory
To import data directly from the existing files in the mozart directory, as tws830
user, run the datamigrate command, as shown in Example 4-106.
$ datamigrate object_type -path TWS_8.x.x_main_dir [-tmppath
temporary_path]
Example 4-106 Running the datamigrate command
# su - tws830
$ mkdir /usr/local/tws830/migratedata
$ datamigrate -topology -path /usr/local/tws820 -tmppath
/usr/local/tws830/migratedata
$ datamigrate -prompts -path /usr/local/tws820 -tmppath
/usr/local/tws830/migratedata
$ datamigrate -calendars -path /usr/local/tws820 -tmppath
/usr/local/tws830/migratedata
$ datamigrate -parms -path /usr/local/tws820 -tmppath
/usr/local/tws830/migratedata
$ datamigrate -resources -path /usr/local/tws820 -tmppath
/usr/local/tws830/migratedata
$ datamigrate -users -path /usr/local/tws820 -tmppath
/usr/local/tws830/migratedata
$ datamigrate -jobs -path /usr/local/tws820 -tmppath
/usr/local/tws830/migratedata
$ datamigrate -scheds -path /usr/local/tws820 -tmppath
/usr/local/tws830/migratedata
In Example 4-106:
object_type is the type of object that you are importing. The possible values
are:
– -topology
– -prompts
– -calendars
– -parms
– -resources
250 Getting Started with IBM Tivoli Workload Scheduler V8.3](https://image.slidesharecdn.com/gettingstartedwithibmtivoliworkloadschedulerv8-3sg247237-120524011828-phpapp02/85/Getting-started-with-ibm-tivoli-workload-scheduler-v8-3-sg247237-286-320.jpg)
![– -users
– -jobs
– -scheds
TWS_8.x.x_main_dir indicates the root directory of the previous Tivoli
Workload Scheduler version.
temporary_path is the temporary path where the datamigrate command
stores the files during the migration process.
Note: When the Tivoli Workload Scheduler is on another workstation, on the
Tivoli Workload Scheduler V8.3 environment, mount the directory of the
version 8.x.x environment. To do this, the two workstations must have the
same system byte order.
Importing object data as a block
To import data as a block, as tws830 user, use the datamigrate command, as
shown in Example 4-107.
$ datamigrate -path TWS_8.x.x_main_dir [-tmppath temporary_path]
Example 4-107 Running the datamigrate command
# su - tws830
$ mkdir /usr/local/tws830/migratedata
$ datamigrate -path /usr/local/tws820 -tmppath
/usr/local/tws830/migratedata
In Example 4-107:
TWS_8.x.x_main_dir indicates the root directory of the previous Tivoli
Workload Scheduler version.
temporary_path is the temporary path where the datamigrate command
stores the files during the migration process.
Note: When the Tivoli Workload Scheduler is on another workstation, on the
Tivoli Workload Scheduler V8.3 environment, mount the directory of the
version 8.x.x environment. To do this, the two workstations must have the
same system byte order.
Chapter 4. Tivoli Workload Scheduler V8.3: Migration 251](https://image.slidesharecdn.com/gettingstartedwithibmtivoliworkloadschedulerv8-3sg247237-120524011828-phpapp02/85/Getting-started-with-ibm-tivoli-workload-scheduler-v8-3-sg247237-287-320.jpg)


![Installed for user "tws830".
Locale LANG set to the following: "en"
Scheduled for (Exp) 05/16/06 (#5) on EDINBURG. Batchman LIVES. Limit: 10, Fence: 0,
Audit Level: 0
sbs final
Submitted EDINBURG#FINAL to batchman as EDINBURG#FINAL[(1543
05/16/06),(0AAAAAAAAAAAAACT)]
8. As tws830 user, run conman ss to see the new FINAL job stream in the new
master domain manager database, as shown in Example 4-115.
Example 4-115 Running conman ss to see the new FINAL job stream
# su - tws830
$ conman ss
Tivoli Workload Scheduler (UNIX)/CONMAN V8.3 (1.36.2.22) Licensed Materials -
Property of IBM(R)5698-WSH
(C) Copyright IBM Corp 1998, 2006 All rights reserved.
US Government User Restricted Rights
Use, duplication or disclosure restricted by GSA ADP Schedule Contract with IBM Corp.
IBM is a registered trademark of International Business Machines
Corporation in the United States, other countries, or both.
Installed for user "tws830".
Locale LANG set to the following: "en"
Scheduled for (Exp) 05/16/06 (#5) on EDINBURG. Batchman LIVES. Limit: 10, Fence: 0,
Audit Level: 0
ss
(Est) (Est) Jobs Sch
CPU Schedule SchedTime State Pr Start Elapse # OK Lim
EDINBURG #FINAL 1543 05/16 HOLD 10(05/17) 4 0 [Carry]
9. As tws830 user, run conman sj to see the jobs of the new FINAL job stream in
the new master domain manager database, as shown in Example 4-116.
Example 4-116 Running conman sj to see the jobs of the new FINAL job stream
# su - tws830
$ conman sj
Tivoli Workload Scheduler (UNIX)/CONMAN V8.3 (1.36.2.22) Licensed Materials -
Property of IBM(R)5698-WSH
(C) Copyright IBM Corp 1998, 2006 All rights reserved.
US Government User Restricted Rights
Use, duplication or disclosure restricted by GSA ADP Schedule Contract with IBM Corp.
IBM is a registered trademark of International Business Machines
Corporation in the United States, other countries, or both.
Installed for user "tws830".
Chapter 4. Tivoli Workload Scheduler V8.3: Migration 259](https://image.slidesharecdn.com/gettingstartedwithibmtivoliworkloadschedulerv8-3sg247237-120524011828-phpapp02/85/Getting-started-with-ibm-tivoli-workload-scheduler-v8-3-sg247237-295-320.jpg)
![Locale LANG set to the following: "en"
Scheduled for (Exp) 05/16/06 (#5) on EDINBURG. Batchman LIVES. Limit: 10, Fence: 0,
Audit Level: 0
sj
(Est) (Est)
CPU Schedule SchedTime Job State Pr Start Elapse RetCode Deps
EDINBURG #FINAL 1543 05/16 ******** HOLD 10(05/17) [Carry]
MAKEPLAN HOLD 10
SWITCHP+ HOLD 10 MAKEPLAN
CREATEP+ HOLD 10 SWITCHP+
UPDATES+ HOLD 10 SWITCHP+
4.6.7 Upgrading agents
This section describes how to upgrade agents. Before you upgrade agents,
ensure that you have performed the procedure described in 4.4.9, “Unlinking and
stopping Tivoli Workload Scheduler when upgrading agent workstations” on
page 194.
Note: If the upgrade procedure is successful, it is not possible to roll back to
the previous version. Rollback is only possible for upgrades that fail.
You can upgrade agents using the following installation methods:
“Upgrading Windows 2003 agent using the installation wizard”, as shown in
the following section
“Upgrading agents using a silent installation” on page 269
“Upgrading agents using the twsinst script” on page 272
“Upgrading agents using Software Distribution” on page 275
260 Getting Started with IBM Tivoli Workload Scheduler V8.3](https://image.slidesharecdn.com/gettingstartedwithibmtivoliworkloadschedulerv8-3sg247237-120524011828-phpapp02/85/Getting-started-with-ibm-tivoli-workload-scheduler-v8-3-sg247237-296-320.jpg)


![3. Locate the directory of the operating system where you want to install, and
run the twsinst script as follows:
twsinst -update -uname username [-inst_dir install_dir] [-backup_dir
backup_dir] [-nobackup_dir][-lang lang-id] [-create_link]
[-skip_usercheck] [-reset_perm]
Example 4-125 shows the twsinst script output.
Example 4-125 Running the twsinst script
# /cdrom/AIX/twsinst -update -uname tws820 -inst_dir /Tivoli/tws820
-backup_dir /Tivoli/tws820/tws820.bkp -skip_usercheck
In Example 4-125:
– -update upgrades an existing installation and installs all supported
language packs. Updating the software does not change the type of
databases used by Tivoli Workload Scheduler.
– -uname is the name of the user for which Tivoli Workload Scheduler is
being updated or rolled back. The software is updated in this user’s home
directory. This user name is not to be confused with the user performing
the installation logged on as root.
– -inst_dir is the directory of the Tivoli Workload Scheduler installation. This
path cannot contain blanks. If not specified, the path is set to the
username home directory.
– -backup_dir is an alternative directory (which you must create it manually)
as the destination for the backup copy of a previous version. If you do not
specify this option when running an upgrade, the following default value is
used:
$BACKUP_DIR = $INST_DIR_backup_$TWS_USER
In this example:
• $INST_DIR is the installation path (the user home directory on UNIX
and Linux).
• $TWS_USER is the user name.
Example 4-126 shows an example backup directory.
Example 4-126 Backup directory
$INST_DIR=/Tivoli/tws820
$TWS_USER=tws820
$BACKUP_DIR=/Tivoli/tws820_backup_tws820
$BACKUP_SUBDIR=/Tivoli/tws820_backup_tws820/tws820
Chapter 4. Tivoli Workload Scheduler V8.3: Migration 273](https://image.slidesharecdn.com/gettingstartedwithibmtivoliworkloadschedulerv8-3sg247237-120524011828-phpapp02/85/Getting-started-with-ibm-tivoli-workload-scheduler-v8-3-sg247237-309-320.jpg)
![Note: In the backup directory, you must also create a subdirectory to
include as the latest directory of the installation path.
– -nobackup_dir no backup is made
– -lang is the language in which the twsinst messages are displayed. If not
specified, the system LANG is used. If the related catalog is missing, the
default C language catalog is used.
Note: The -lang option does not relate to the supported language
packs. By default, all supported language packs are installed when you
install using the twsinst script.
– -restore, if the installation fails, restores the backup automatically created
by Tivoli Configuration Manager for the user specified in uname.
– -create_link creates the symlink between /usr/bin/mat and
TWShome/bin/at.
– -skip_usercheck skips the check of the user in the /etc/password file or
uses the su command. Enable this option if the authentication process
within your organization is not standard, thereby disabling the default
authentication option.
– -reset_perm reset the permissions of the libatrc library.
Example 4-127 shows a sample twsinst script.
Example 4-127 Sample twsinst script
# /cdrom/AIX/twsinst -update -uname tws820
4. To roll back to a previous instance, run the following command, as shown in
Example 4-128.
twsinst -restore -uname username [-skip_usercheck]
Example 4-128 Rolling back to a previous instance
# /cdrom/AIX/twsinst -restore -uname tws820 -skip_usercheck
274 Getting Started with IBM Tivoli Workload Scheduler V8.3](https://image.slidesharecdn.com/gettingstartedwithibmtivoliworkloadschedulerv8-3sg247237-120524011828-phpapp02/85/Getting-started-with-ibm-tivoli-workload-scheduler-v8-3-sg247237-310-320.jpg)


![7. As tws820 user, run conman cs to cancel the FINAL job stream in the new
master domain manager database, as shown in Example 4-138.
Example 4-138 Running conman cs to cancel the FINAL job stream
# su - tws820
$ conman cs final
Tivoli Workload Scheduler (UNIX)/CONMAN V8.3 (1.36.2.22) Licensed Materials -
Property of IBM(R)
5698-WSH
(C) Copyright IBM Corp 1998, 2006 All rights reserved.
US Government User Restricted Rights
Use, duplication or disclosure restricted by GSA ADP Schedule Contract with IBM Corp.
IBM is a registered trademark of International Business Machines
Corporation in the United States, other countries, or both.
Installed for user "tws820".
Locale LANG set to the following: "en"
Scheduled for (Exp) 05/25/06 (#10) on EDINBURG. Batchman LIVES. Limit: 10, Fence:
0, Audit Level: 0
cs final
Command forwarded to batchman for EDINBURG#FINAL[(0600 05/25/06),(CF06144AAAAAAAAB)]
8. As tws820 user, run conman sbs to submit the new FINAL job stream in the
new master domain manager database, as shown in Example 4-139.
Example 4-139 Running conman sbs to submit the new FINAL job stream
# su - tws820
$ conman “sbs FINAL”
Tivoli Workload Scheduler (UNIX)/CONMAN V8.3 (1.36.2.22) Licensed Materials -
Property of IBM(R)
5698-WSH
(C) Copyright IBM Corp 1998, 2006 All rights reserved.
US Government User Restricted Rights
Use, duplication or disclosure restricted by GSA ADP Schedule Contract with IBM Corp.
IBM is a registered trademark of International Business Machines
Corporation in the United States, other countries, or both.
Installed for user "tws820".
Locale LANG set to the following: "en"
Scheduled for (Exp) 05/25/06 (#10) on EDINBURG. Batchman LIVES. Limit: 10, Fence:
0, Audit Level: 0
sbs FINAL
Submitted EDINBURG#FINAL to batchman as EDINBURG#FINAL[(0120
05/25/06),(0AAAAAAAAAAAAACH)]
302 Getting Started with IBM Tivoli Workload Scheduler V8.3](https://image.slidesharecdn.com/gettingstartedwithibmtivoliworkloadschedulerv8-3sg247237-120524011828-phpapp02/85/Getting-started-with-ibm-tivoli-workload-scheduler-v8-3-sg247237-338-320.jpg)
![9. As tws820 user, run conman ss to see the new FINAL job stream in the new
master domain manager database, as shown in Example 4-140.
Example 4-140 Running conman ss to see the new job stream called FINAL
# su - tws820
$ conman ss
Tivoli Workload Scheduler (UNIX)/CONMAN V8.3 (1.36.2.22) Licensed Materials -
Property of IBM(R)
5698-WSH
(C) Copyright IBM Corp 1998, 2006 All rights reserved.
US Government User Restricted Rights
Use, duplication or disclosure restricted by GSA ADP Schedule Contract with IBM Corp.
IBM is a registered trademark of International Business Machines
Corporation in the United States, other countries, or both.
Installed for user "tws820".
Locale LANG set to the following: "en"
Scheduled for (Exp) 05/25/06 (#10) on EDINBURG. Batchman LIVES. Limit: 10, Fence:
0, Audit Level: 0
ss
(Est) (Est) Jobs Sch
CPU Schedule SchedTime State Pr Start Elapse # OK Lim
EDINBURG#FINAL 0600 05/25 HOLD 10(05:59) ( 0:01) 1 0 [05/24/06];
[Cancelled]
EDINBURG#FINAL 0129 05/25 HOLD 10(05/26) 1 0 [Carry]
10.As tws820 user, run conman sj to see the jobs in the new master domain
manager database, as shown in Example 4-141.
Example 4-141 Running conman sj to see the jobs
# su - tws820
$ conman sj
Tivoli Workload Scheduler (UNIX)/CONMAN V8.3 (1.36.2.22) Licensed Materials -
Property of IBM(R)
5698-WSH
(C) Copyright IBM Corp 1998, 2006 All rights reserved.
US Government User Restricted Rights
Use, duplication or disclosure restricted by GSA ADP Schedule Contract with IBM Corp.
IBM is a registered trademark of International Business Machines
Corporation in the United States, other countries, or both.
Installed for user "tws820".
Locale LANG set to the following: "en"
Chapter 4. Tivoli Workload Scheduler V8.3: Migration 303](https://image.slidesharecdn.com/gettingstartedwithibmtivoliworkloadschedulerv8-3sg247237-120524011828-phpapp02/85/Getting-started-with-ibm-tivoli-workload-scheduler-v8-3-sg247237-339-320.jpg)
![Scheduled for (Exp) 05/25/06 (#10) on EDINBURG. Batchman LIVES. Limit: 10, Fence:
0, Audit Level: 0
sj
(Est) (Est)
CPU Schedule SchedTime Job State Pr Start Elapse RetCode Deps
EDINBURG#FINAL 0129 05/25 ******** HOLD 10(05/26) [Carry]
JNEXTDAY HOLD 10
4.7.4 Upgrading the backup master domain manager
Perform the procedure described in 4.4.7, “Upgrading the backup master domain
manager” on page 147.
4.7.5 Importing the migrated security file in the Tivoli Workload
Scheduler V8.3 environment
Perform the procedure described in 4.4.4, “Importing the migrated security file in
the Tivoli Workload Scheduler V8.3 environment” on page 128.
4.7.6 Upgrading agents
Perform the procedure described in 4.4.8, “Upgrading agents” on page 170.
4.7.7 Installing the Job Scheduling Console
Perform the procedure described in 3.2.2, “Installing the Job Scheduling
Console” on page 61.
4.8 Upgrading Tivoli Workload Scheduler V8.2.1:
Parallel upgrade
This section describes how to upgrade the environment using a parallel upgrade
procedure. The parallel upgrade procedure consists of the following topics:
4.8.1, “Dumping existing objects from the database” on page 305
4.8.2, “Extracting Tivoli Framework user data from security file” on page 307
4.8.3, “Installing a new master domain manager” on page 310
304 Getting Started with IBM Tivoli Workload Scheduler V8.3](https://image.slidesharecdn.com/gettingstartedwithibmtivoliworkloadschedulerv8-3sg247237-120524011828-phpapp02/85/Getting-started-with-ibm-tivoli-workload-scheduler-v8-3-sg247237-340-320.jpg)


![3. Copy the migrtool.tar file to a directory on the Tivoli Workload Scheduler
V8.2.1 environment, as shown in Example 4-145.
C:copy CDn/operating_system/utilities/migrtool.tar TWShome
Example 4-145 Copying migrtool.tar file to the TWShome directory
c:copy D:WINDOWSutilitiesmigrtool.tar c:tws821m821
4. Make a backup of the files listed in migrtool.tar file, if they already exist on
Tivoli Workload Scheduler V8.2.1 environment, as shown in Example 4-146.
Example 4-146 Backup of the files listed in migrtool.tar file
c:tws821m821 copy catalogCunison.cat catalogCunison.cat.m821
c:tws821m821 copy catalogCmaestro.cat catalogCmaestro.cat.m821
c:tws821m821bin copy libatrc.dll libatrc.dll.m821
5. As Administrator user, extract the files from the migrtool.tar file into the Tivoli
Workload Scheduler V8.2.1 environment.
6. As m821 user, set the Tivoli Workload Scheduler V8.2.1 variables using the
set_env command and run the dumpsec command to create the input security
file, as shown in Example 4-147.
$TWShome/tws_env
dumpsec > $TWShome/tmp_file
Example 4-147 Setting Tivoli Workload Scheduler variables and running dumpsec command
C:TWS821m821>tws_env.cmd
Tivoli Workload Scheduler Environment Successfully Set !!!
C:TWS821m821>dumpsec > tws821sec.txt
Tivoli Workload Scheduler (Windows)/DUMPSEC V8.3 (9.3.1.1) Licensed
Materials - Property of IBM(R)
5698-WSH
(C) Copyright IBM Corp 1998, 2006 All rights reserved.
US Government User Restricted Rights
Use, duplication or disclosure restricted by GSA ADP Schedule Contract
with IBM Corp.
IBM is a registered trademark of International Business Machines
Corporation in the United States, other countries, or both.
7. As Administrator user, run the migrfwkusr script as follows:
migrfwkusr -in input_security_file -out output_security_file [-cpu
workstation] [-hostname local_hostname]
308 Getting Started with IBM Tivoli Workload Scheduler V8.3](https://image.slidesharecdn.com/gettingstartedwithibmtivoliworkloadschedulerv8-3sg247237-120524011828-phpapp02/85/Getting-started-with-ibm-tivoli-workload-scheduler-v8-3-sg247237-344-320.jpg)
![Note: The migrfwkusr script does not remove previous user definitions. If
you want to remove the previous users, do it manually before you run the
makesec command. After you run the migrfwkusr command, the
output_security_file contains the user definitions, which you can use in the
Tivoli Workload Scheduler V8.3 environment.
Example 4-148 shows the migrfwkusr script output.
Example 4-148 Running the migrfwkusr script
C:WINNTsystem32driversetcTivoli>setup_env.cmd
C:WINNTSYSTEM32DRIVERSETCTivolitmrset.txt
C:PROGRA~1TivolidbRolltide.dbregion.out
1 file(s) copied.
Tivoli environment variables configured.
C:WINNTsystem32driversetcTivoli>cd c:tws821m821
C:TWS821m821>dir tws821sec.txt
05/23/2006 06:17p 2,185 tws821sec.txt
1 File(s) 2,185 bytes
C:TWS821m821>bash -o vi
bash$ pwd
C:/TWS821/m821
bash$ migrfwkusr -in tws821sec.txt -out frmwrkusr.txt
Tivoli Workload Scheduler (Windows)/GETFWKUS V8.3 (1.5) Licensed
Materials - Property of IBM(R)
5698-WSH
(C) Copyright IBM Corp 1998, 2006 All rights reserved.
US Government User Restricted Rights
Use, duplication or disclosure restricted by GSA ADP Schedule Contract
with IBM Corp.
IBM is a registered trademark of International Business Machines
Corporation in the United States, other countries, or both.
GETFWKUS:Starting user MAESTRO [tws821sec.txt (#2)]
GETFWKUS:Starting user OPS [tws821sec.txt (#15)]
GETFWKUS:Starting user SCHED [tws821sec.txt (#28)]
GETFWKUS:Done with tws821sec.txt, 0 errors (0 Total)
Chapter 4. Tivoli Workload Scheduler V8.3: Migration 309](https://image.slidesharecdn.com/gettingstartedwithibmtivoliworkloadschedulerv8-3sg247237-120524011828-phpapp02/85/Getting-started-with-ibm-tivoli-workload-scheduler-v8-3-sg247237-345-320.jpg)


![2. As tws83a user, run the dumpsec command to back up the security file
definition of new Tivoli Workload Scheduler V8.3, as shown in
Example 4-150.
Example 4-150 Running dumpsec to back up security file
C:Program FilesIBMTWStws83a>
C:Program FilesIBMTWStws83a> dumpsec > $TWShomedumpsec.users.tws83
3. As tws83a user, run makesec output_security_file to add new users in the
security file of the new Tivoli Workload Scheduler V8.3, as shown in
Example 4-151.
Example 4-151 Running makesec to add new users in the security file
C:Program FilesIBMTWStws83a>makesec c:tws821m821frmwrkusr.txt
Tivoli Workload Scheduler (Windows)/MAKESEC V8.3 (9.3.1.1) Licensed
Materials - Property of IBM(R)
5698-WSH
(C) Copyright IBM Corp 1998, 2006 All rights reserved.
US Government User Restricted Rights
Use, duplication or disclosure restricted by GSA ADP Schedule Contract
with IBM Corp.
IBM is a registered trademark of International Business Machines
Corporation in the United States, other countries, or both.
MAKESEC:Starting user MAESTRO [c:tws821m821frmwrkusr.txt (#3)]
MAKESEC:Starting user OPS [c:tws821m821frmwrkusr.txt (#17)]
MAKESEC:Starting user SCHED [c:tws821m821frmwrkusr.txt (#31)]
MAKESEC:Done with c:tws821m821frmwrkusr.txt, 0 errors (0 Total)
MAKESEC:Security file installed as C:Program
FilesIBMTWStws83aSecurity
Note: output_security_file is the file that you obtain when you run the
procedure described in 4.8.2, “Extracting Tivoli Framework user data from
security file” on page 307.
4.8.5 Importing the object data
This section describes how to import object data from a previous Tivoli Workload
Scheduler version into the Tivoli Workload Scheduler V8.3 database. The
method you use to import object data by steps depends on whether you are:
Importing object data from dumped data files, as described in the following
section
“Importing object data as a block” on page 321
Chapter 4. Tivoli Workload Scheduler V8.3: Migration 313](https://image.slidesharecdn.com/gettingstartedwithibmtivoliworkloadschedulerv8-3sg247237-120524011828-phpapp02/85/Getting-started-with-ibm-tivoli-workload-scheduler-v8-3-sg247237-349-320.jpg)
![Note: The user who run the datamigrate command must have full access to
the database of the previous Tivoli Workload Scheduler environment.
The data that you import is created by the composer821 create command before
or during the upgrade. See 4.8.1, “Dumping existing objects from the database”
on page 305.
Importing object data from dumped data files
To import data from dumped data files in steps, perform the following steps:
1. Use the optman command to import the installation run number and global
options. The syntax of the command is as follows:
optman miggrunnb TWS_8.x.x_main_dir
optman miggopts TWS_8.x.x_main_dir
Here TWS_8.x.x_main_dir indicates the root directory of the previous Tivoli
Workload Scheduler version. When the Tivoli Workload Scheduler is on
another workstation, on V8.3 environment, mount the directory of the version
8.x.x environment. To do this, the two workstations must have the same
system byte order.
2. Use the datamigrate command to import the data from the dumped files, as
shown in Example 4-152.
Example 4-152 Syntax of the datamigrate command
datamigrate
-topology topology_filename [-tmppath temporary_path]
-prompts prompts_filename [-tmppath temporary_path]
-calendars calendars_filename [-tmppath temporary_path]
-parms parms_filename [-tmppath temporary_path]
-resources resources_filename [-tmppath temporary_path]
-users users_filename [-tmppath temporary_path]
-jobs jobs_filename [-tmppath temporary_path]
-scheds scheds_filename [-tmppath temporary_path]
3. As tws83a user, run the optman miggrunnb command to import the installation
run number into the DB2 database, as shown in Example 4-153.
Example 4-153 Running optman miggrunnb to import run number
C:Program FilesIBMTWStws83a>tws_env.cmd
Tivoli Workload Scheduler Environment Successfully Set !!!
C:Program FilesIBMTWStws83a>optman miggrunnb c:tws821m821
314 Getting Started with IBM Tivoli Workload Scheduler V8.3](https://image.slidesharecdn.com/gettingstartedwithibmtivoliworkloadschedulerv8-3sg247237-120524011828-phpapp02/85/Getting-started-with-ibm-tivoli-workload-scheduler-v8-3-sg247237-350-320.jpg)


![6. As tws83a user, use the datamigrate command to import the data from the
dumped files, as shown in Example 4-156 on page 319.
Notes:
If you want to import the data directly from the existing files in the
mozart directory, see “Importing object data directly from mozart
directory” on page 320.
If you want to perform a complete import of data as a block, see
“Importing object data as a block” on page 321.
$ datamigrate
-topology topology_filename [-tmppath temporary_path]
-prompts prompts_filename [-tmppath temporary_path]
-calendars calendars_filename [-tmppath temporary_path]
-parms parms_filename [-tmppath temporary_path]
-resources resources_filename [-tmppath temporary_path]
-users users_filename [-tmppath temporary_path]
-jobs jobs_filename [-tmppath temporary_path]
-scheds scheds_filename [-tmppath temporary_path]
The following list shows the parameters of the datamigrate command:
– topology_filename is the name of the topology file created during the
dump process.
– prompts_filename is the name of the prompts file created during the dump
process.
– calendars_filename is the name of the calendars file created during the
dump process.
– parms_filename is the name of the parameters file created during the
dump process.
– resources_filename is the name of the resources file created during the
dump process.
– users_filename is the name of the users file created during the dump
process.
– jobs_filename is the name of the jobs file created during the dump
process.
– scheds_filename is the name of the job streams file created during the
dump process.
– temporary_path is the temporary path where datamigrate command
stores the files during the migration process.
318 Getting Started with IBM Tivoli Workload Scheduler V8.3](https://image.slidesharecdn.com/gettingstartedwithibmtivoliworkloadschedulerv8-3sg247237-120524011828-phpapp02/85/Getting-started-with-ibm-tivoli-workload-scheduler-v8-3-sg247237-354-320.jpg)

![Example 4-160 Deleting Jnextday job related to the previous cpuname
c:Program FilesIBMTWStws83a
composer delete job=old_cpuname#Jnextday
11.Delete the previous cpuname from the new Tivoli Workload Scheduler V8.3
definition, as shown in Example 4-161.
Example 4-161 Deleting the previous cpuname from the new Tivoli Workload Scheduler
Version 8.3
c:Program FilesIBMTWStws83a
composer delete cpu=old_cpuname
Importing object data directly from mozart directory
To import data directly from the existing files in the mozart directory, as tws83a
user, use the datamigrate command, as shown in Example 4-162.
datamigrate object_type -path TWS_8.x.x_main_dir [-tmppath
temporary_path]
Example 4-162 Running the datamigrate command
c:Program FilesIBMTWStws83a
datamigrate -topology -path c:tws821m821
datamigrate -prompts -path c:tws821m821
datamigrate -calendars-path c:tws821m821
datamigrate -parms - path c:tws821m821
datamigrate -resources -path c:tws821m821
datamigrate -users -path c:tws821m821
datamigrate -jobs -path c:tws821m821
datamigrate -scheds-path c:tws821m821
In Example 4-162:
object_type is the type of object that you are importing. The possible values
are:
– -topology
– -prompts
– -calendars
– -parms
– -resources
– -users
– -jobs
– -scheds
320 Getting Started with IBM Tivoli Workload Scheduler V8.3](https://image.slidesharecdn.com/gettingstartedwithibmtivoliworkloadschedulerv8-3sg247237-120524011828-phpapp02/85/Getting-started-with-ibm-tivoli-workload-scheduler-v8-3-sg247237-356-320.jpg)
![TWS_8.x.x_main_dir indicates the root directory of the previous Tivoli
Workload Scheduler version.
temporary_path is the temporary path where the datamigrate command
stores the files during the migration process.
When the Tivoli Workload Scheduler is on another workstation, on the Tivoli
Workload Scheduler V8.3 environment, mount the directory of the version 8.x.x
environment. To do this, the two workstations must have the same system byte
order.
Importing object data as a block
To import data as a block, as tws83a user, use the datamigrate command, as
shown in Example 4-163.
datamigrate -path TWS_8.x.x_main_dir [-tmppath temporary_path]
Example 4-163 Running the datamigrate command
c:Program FilesIBMTWStws83a
>datamigrate -path c:tws821m821 -tmppath $TWShommigratedata
In Example 4-163:
TWS_8.x.x_main_dir indicates the root directory of the previous Tivoli
Workload Scheduler version.
temporary_path is the temporary path where the datamigrate command
stores the files during the migration process.
When the Tivoli Workload Scheduler is on another workstation, on the Tivoli
Workload Scheduler V8.3 environment, mount the directory of the version 8.x.x
environment. To do this, the two workstations must have the same system byte
order.
4.8.6 Switching a master domain manager
To switch from the previous master domain manager to the new one, perform the
following steps:
1. As m821 user, run the conman switchmgr command in the previous master
domain manager:
c:tws821m821
conman “switchmgr MASTERDM;new_master_cpu_name”
Here new_master_cpu_name is the name of the workstation where the new
master domain manager resides.
Chapter 4. Tivoli Workload Scheduler V8.3: Migration 321](https://image.slidesharecdn.com/gettingstartedwithibmtivoliworkloadschedulerv8-3sg247237-120524011828-phpapp02/85/Getting-started-with-ibm-tivoli-workload-scheduler-v8-3-sg247237-357-320.jpg)


![Trace mode Description
tws_utils All Tivoli Workload Scheduler utility communications are traced
tws_conn All Tivoli Workload Scheduler connector communications are traced
To set the tracing level to include all the Tivoli Workload Scheduler traces on a
UNIX or Linux system, change the directory to the TWShome/wastools directory,
and run the following command while the application server is running:
$ ./changeTraceProperties.sh -user username -password password -mode
tws_all
Example 5-15 shows the output produced by the changeTraceProperties.sh
script.
Example 5-15 Setting tracing level to tws_all
# ./changeTraceProperties.sh -user tws830 -password my_password -mode
tws_all
WASX7209I: Connected to process “server1” on node DefaultNode using
SOAP connector; The type of process is: UnManagedProcess
WASX7303I: The following options are passed to the scripting
environment and are available as argument that is stored in the argv
variable: “[server1, DefaultNode, TracingProps.properties, tws_all]”
entering getTraceValue
properties file value for tws_all is com.ibm.tws.*=all
Current trace specification is *=info
Current trace specification is now *=info:com.ibm.tws.*=all
#
You can find the trace file, trace.log, in the TWShome/appserver/profiles
/twsprofile/logs/server1 directory. To reset the tracing to its default level, run
changeTraceProperties.sh with -mode reset. For example:
$ ./changeTraceProperties.sh -user username -password password -mode
reset
5.11.5 Backing up the application server configuration
The Tivoli Workload Scheduler V8.3 administrator uses the scripts
TWShome/wastools/backupConfig.sh (UNIX or Linux) and
TWShomewastoolsbackupConfig.bat (Windows) to back up the configuration
files into a .zip archive. The saved configuration can be restored at a later date, if
required. For further details, see 5.11.6, “Restoring the application server
configuration” on page 362.
360 Getting Started with IBM Tivoli Workload Scheduler V8.3](https://image.slidesharecdn.com/gettingstartedwithibmtivoliworkloadschedulerv8-3sg247237-120524011828-phpapp02/85/Getting-started-with-ibm-tivoli-workload-scheduler-v8-3-sg247237-396-320.jpg)


![4. Switch to or log in as root:
$ su
5. Restart the application server. For further details, see 5.11.1, “Starting the
application server” on page 356.
# ./startWas.sh
Example 5-19 shows the output produced by
changeDataSourceProperties.sh.
Example 5-19 Changing data source properties
$ ./changeDataSourceProperties.sh ~/tmp/DataSourceProps.properties
WASX7357I: By request, this scripting client is not connected to any
server process. Certain configuration and application operations will
be available in local mode.
WASX7303I: The following options are passed to the scripting
environment and are available as argument that is stored in the argv
variable: “[/usr/local/tws830/tmp/DataSourceProps.properties]”
Using Property File: /usr/local/tws830/tmp/DataSourceProps.properties
Configuring DB2 Type2 DataSouce...
Configuring DB2 Type4 DataSouce...
Configuring JNDI Names...
Saving data...
$
5.11.9 Viewing the host properties
The IBM Tivoli Workload Scheduler V8.3 administrator uses the scripts
showHostProperties.sh (UNIX or Linux) and showHostProperties.bat (Windows)
to view the current application server properties such as host name of the server
where the application server is running and TCP/IP port configuration.
These scripts produce an output, which matches the format of the
TWShome/wastools/HostConfigProps.properties file as used by the
changeHostProperties.sh (UNIX or Linux) and changeHostProperties.bat
(Windows) scripts (see 5.11.10, “Changing the host properties” on page 368).
You can use the output as input to the changeHostProperties.sh and
changeHostProperties.bat scripts.
To view the host properties, run the following command from the
TWShome/wastools directory:
$ ./showHostProperties.sh
366 Getting Started with IBM Tivoli Workload Scheduler V8.3](https://image.slidesharecdn.com/gettingstartedwithibmtivoliworkloadschedulerv8-3sg247237-120524011828-phpapp02/85/Getting-started-with-ibm-tivoli-workload-scheduler-v8-3-sg247237-402-320.jpg)

![The steps are as follows:
1. Edit the host properties file, replacing the port number 0 that is currently
assigned to the parameters orbPort with 31120 and csiServerAuthPort with
31121:
orbPort=31120
csiServerAuthPort=31121
Ensure that neither of the ports 31120 or 31121 are already in use on your
system. If they are, then substitute these ports with alternative ports that are
not currently in use.
2. Stop the application server. For further details, see 5.11.2, “Stopping the
application server” on page 357.
$ cd TWShome/wastools
$ ./stopWas.sh -user username -password password
3. Update the application server host properties using the edited host properties
file:
$ ./changeHostProperties.sh properties_file
4. Switch to or log in as root:
$ su
5. Restart the application server. For further details, see 5.11.1, “Starting the
application server” on page 356.
# ./startWas.sh
Example 5-21 shows the output produced by
changeDataSourceProperties.sh.
Example 5-21 Changing host properties
$ ./changeHostProperties.sh ~/tmp/HostConfigProps.properties
WASX7357I: By request, this scripting client is not connected to any
server process. Certain configuration and application operations will
be available in local mode.
WASX7303I: The following options are passed to the scripting
environment and are available as argument that is stored in the argv
variable: “[/usr/local/tws830/tmp/HostConfigProps.properties]”
Property File: /usr/local/tws830/tmp/HostConfigProps.properties
Validation success. Configuration saved
$
Chapter 5. DB2, WebSphere, and Lightweight Directory Access Protocol: Considerations 369](https://image.slidesharecdn.com/gettingstartedwithibmtivoliworkloadschedulerv8-3sg247237-120524011828-phpapp02/85/Getting-started-with-ibm-tivoli-workload-scheduler-v8-3-sg247237-405-320.jpg)


![WASX7303I: The following options are passed to the scripting
environment and are available as argument that is stored in the argv
variable: “[/usr/local/tws830/tmp/SecurityProps.properties]”
Using Property File: /usr/local/tws830/tmp/SecurityProps.properties
Configuring Global Security
setting the authentication mechanism to
(cells/DefaultNode|security.xml#SWAMAuthentication_1)
Configuring SSL
Configuring LocalOS
Configuring Advanced J2C Auth
Configuring LDAP
Configuring Advanced LDAP
Active Authentication Mechanism is
(cells/DefaultNode|security.xml#SWAMAuthentication_1)
Active User Registry is
(cells/DefaultNode|security.xml#LocalOSUserRegistry)
LDAP User Registry type is IBM_DIRECTORY_SERVER
LDAP IgnoreCase is true
Validation success. Configuration saved
$
If you have changed the TWSusers password, then in addition to updating the
application server properties to reflect this change you might also have to change
the password used by the CLI. By default, the user credentials used by the CLI
are stored in the file TWShome/.TWS/useropts_TWSuser. The label ENCRYPT:
in the password field indicates that the specified password is encrypted, for
example:
PASSWORD = “ENCRYPT:A/JW9nGJq6s=”
To reset the password, set the password field equal to the unencrypted
password, for example:
PASSWORD = “new_password”
The password is automatically re-encrypted when composer exits the next time.
Therefore, to ensure that the password is not exposed longer than necessary, run
the following command immediately after you finish editing this file:
$ composer exit
If you examine the file again after composer has completed, you must see that
your password is replaced with the label ENCRYPT: and the encrypted version of
your new password.
374 Getting Started with IBM Tivoli Workload Scheduler V8.3](https://image.slidesharecdn.com/gettingstartedwithibmtivoliworkloadschedulerv8-3sg247237-120524011828-phpapp02/85/Getting-started-with-ibm-tivoli-workload-scheduler-v8-3-sg247237-410-320.jpg)


![import com.ibm.tws.objects.filter.*;
import com.ibm.websphere.security.auth.callback.WSCallbackHandlerImpl;
import com.ibm.ws.security.util.LoginHelper;
/**
* @author vbudi
*/
public class t2 {
static ConnPlan myPlan;
public static void main(String[] args) {
String hostname = "localhost";
String port = "31117";
try {
ConnProperties cp = new ConnProperties();
//cp.DEFAULT_HOST = hostname;
//cp.DEFAULT_PORT = port;
//cp.DEFAULT_SERVER = server;
cp.setProperty(ConnProperties.TYPE_KEY, ConnProperties.TYPE_REMOTE);
cp.setProperty(ConnProperties.DEFAULT_HOST, "localhost");
cp.setProperty(ConnProperties.DEFAULT_PORT, "31117");
cp.setProperty(ConnProperties.HOST_KEY, hostname);
cp.setProperty(ConnProperties.PORT_KEY, port);
cp.setProperty(ConnProperties.USER_KEY, "maestro");
cp.setProperty(ConnProperties.PASSWORD_KEY, "passw0rd");
ConnPlanEjbImpl cpei = new ConnPlanEjbImpl(cp);
//ConnFactory.getInstance().getPlan(cp);
try {
LoginContext lc = new LoginContext("ClientContainer",
new WSCallbackHandlerImpl("maestro","passw0rd"));
lc.login();
} catch (Exception e) {
e.printStackTrace();
}
myPlan = cpei.getClientRemote();
QueryFilter qf = new QueryFilter();
qf.setFilter(WorkstationInPlanFilters.WORKSTATION_NAME, "*");
QueryResult qr = myPlan.queryPlanObject(WorkstationInPlan.class, qf, 5,
null);
478 Getting Started with IBM Tivoli Workload Scheduler V8.3](https://image.slidesharecdn.com/gettingstartedwithibmtivoliworkloadschedulerv8-3sg247237-120524011828-phpapp02/85/Getting-started-with-ibm-tivoli-workload-scheduler-v8-3-sg247237-514-320.jpg)


![3. In these files, substitute the embedded variables with the values shown in
Table 11-1, or values of your choosing.
Table 11-1 Substitute embedded variables
@TWS_DB@ TWS
@TWS_USER@ db2inst1
@TWS_DATA_TS_PATH@ TWS_DATA
@TWS_TS_NAME@ TWS_DATA
@TWS_TEMP_TS_PATH@ TWS_TEMP
@COMPANY_NAME@ IBM (enclose in double quotation marks if the
company name contains spaces)
@MASTERDOM_ID@ Unique (or random) 32 hexadecimal character ID
@MASTERDOM_NAME@ MASTERDM
4. Run the script shown in Example 11-2. This script copies the database setup
scripts and substitutes the variables for you. It takes two command
arguments, the source directory (where the Tivoli Workload Scheduler engine
code is mounted) and the destination (a temporary directory for the SQL
files).
Example 11-2 Example script for copying the database setup scripts and substituting the
variables
#!/bin/sh
if [ $# != 2 ]
then
echo “Usage: mktwsdb source dest”
echo “ source is the TWS Engine install cd”
echo “ dest is the temporary directory to store SQL files”
exit 1
fi
SOURCE=$1
DEST=$2
OS=`uname -s`; export OS
case $OS in
AIX)
INST_INTERP=“AIX”; export INST_INTERP
;;
Linux)
case `uname -m` in
*390*)
INST_INTERP=“LINUX_S390”; export INST_INTERP
524 Getting Started with IBM Tivoli Workload Scheduler V8.3](https://image.slidesharecdn.com/gettingstartedwithibmtivoliworkloadschedulerv8-3sg247237-120524011828-phpapp02/85/Getting-started-with-ibm-tivoli-workload-scheduler-v8-3-sg247237-560-320.jpg)
![;;
*86*)
INST_INTERP=“LINUX_I386”; export INST_INTERP
;;
*)
INST_INTERP=“OTHER”; export INST_INTERP
;;
esac
;;
*)
INST_INTERP=“OTHER”; export INST_INTERP
;;
esac
if [ ! -d $SOURCE/$INST_INTERP ] ; then
echo “Source directory $SOURCE/$INST_INTERP does not exist”
exit 2
fi
if [ ! -d $DEST ] ; then
echo “Destination directory $DEST does not exist”
exit 2
fi
RANDOMID=`awk -v seed=$RANDOM '
BEGIN {
srand(seed)
for (n = 0; n < 32; ++n)
printf “%s”, ARGV[int(rand() * (ARGC - 1)) + 1]
print “”
exit
}' 0 1 2 3 4 5 6 7 8 9 a b c d e f`
echo Random ID is $RANDOMID
cd $DEST
for f in $SOURCE/$INST_INTERP/tws_tools/*sql
do
cat $f | sed -e 's/@TWS_DB@/TWS/g'
-e 's/@TWS_DATA_TS_PATH@/TWS_DATA/g'
-e 's/@TWS_TS_NAME@/TWS_DATA/g'
-e 's/@TWS_TEMP_TS_PATH@/TWS_TEMP/g'
-e 's/@COMPANY_NAME@/IBM/g'
-e 's/@TWS_USER@/db2inst1/g'
-e 's/@MASTERDOM_ID@/'${RANDOMID}'/'
-e 's/@MASTERDOM_NAME@/MASTERDM/' > `basename $f`
done
echo Done!
Chapter 11. Making Tivoli Workload Scheduler highly available with Tivoli System Automation 525](https://image.slidesharecdn.com/gettingstartedwithibmtivoliworkloadschedulerv8-3sg247237-120524011828-phpapp02/85/Getting-started-with-ibm-tivoli-workload-scheduler-v8-3-sg247237-561-320.jpg)
![5. Create the necessary nodes, databases, tables, and views for the Tivoli
Workload Scheduler HADR implementation. As DB2 user run:
su - db2inst1
6. Start DB2, as shown in Example 11-3.
Example 11-3 Starting DB2
[db2inst1@nodeA]: db2start
SQL1063N DB2START processing was successful.
7. Create the database:
db2 -t -f /var/tmp/tws/create_database.sql
8. For the following steps, connect to the database and perform additional
commands, as shown in Example 11-4.
Example 11-4 Connecting to the database
[db2inst1@nodeA]:db2 connect to TWS user db2inst1 using passw0rd
Database Connection Information
Database server = DB2/LINUX 8.2.2
SQL authorization ID = DB2INST1
Local database alias = TWS
9. Create the tables in the Tivoli Workload Scheduler database, then Tivoli
Workload Scheduler constraints, table data, indices, and views, as shown in
Example 11-5.
Example 11-5 Creating Tivoli Workload Scheduler tables
db2 -t -f /var/tmp/tws/create_tables.sql
db2 -t -f /var/tmp/tws/create_constraints.sql
db2 -t -f /var/tmp/tws/create_indexes.sql
db2 -t -f /var/tmp/tws/create_views.sql
db2 -t -f /var/tmp/tws/populate_tables.sql
db2 update db cfg for TWS using LOGRETAIN ON
526 Getting Started with IBM Tivoli Workload Scheduler V8.3](https://image.slidesharecdn.com/gettingstartedwithibmtivoliworkloadschedulerv8-3sg247237-120524011828-phpapp02/85/Getting-started-with-ibm-tivoli-workload-scheduler-v8-3-sg247237-562-320.jpg)
![10.Change the database configuration from circular logging to archive logging for
mirror. After the update command, you might receive a message similar to
Example 11-6. You can safely ignore it.
Example 11-6 Updating database configuration
[db2inst1@nodeA]: db2 update db cfg for TWS using LOGRETAIN ON
DB20000I The UPDATE DATABASE CONFIGURATION command completed
successfully.
SQL1363W One or more of the parameters submitted for immediate
modification were not changed dynamically. For these configuration
parameters, all applications must disconnect from this database before
the changes become effective.
11.Disconnect from the database:
db2 disconnect TWS
11.5 Installing and configuring Tivoli System
Automation
In this section, we describe the setup of Tivoli System Automation on our Tivoli
Workload Scheduler master and standby masters. In this scenario, we have two
nodes, node A and node B.
Installation
To install Tivoli System Automation on the Tivoli Workload Scheduler master and
standby masters, perform the following steps:
1. Install Tivoli System Automation 2.1 and the recent fix packs on each of the
nodes A and B:
a. On node A, run the commands shown in Example 11-7.
Example 11-7 Installing Tivoli System Automation on node A
[root@nodeA]# cd /media/cdrom/SAM2100Base
[root@nodeA]# ./installSAM
b. On node B, run the commands shown in Example 11-8.
Example 11-8 Installing Tivoli System Automation on node B
[root@nodeB] cd /media/cdrom/SAM2110Base
[root@nodeB] ./installSAM
Chapter 11. Making Tivoli Workload Scheduler highly available with Tivoli System Automation 527](https://image.slidesharecdn.com/gettingstartedwithibmtivoliworkloadschedulerv8-3sg247237-120524011828-phpapp02/85/Getting-started-with-ibm-tivoli-workload-scheduler-v8-3-sg247237-563-320.jpg)
![2. After installation, ensure that the variable CT_MANAGMENT_SCOPE is
always set to 2 in the shell. Consider inserting this into the system-wide shell
profile.
3. Install the fix packs in a similar manner.
a. On node A, run the commands shown in Example 11-9.
Example 11-9 Upgrading Tivoli System Automation on node A
[root@nodeA] CT_MANAGEMENT_SCOPE=2
[root@nodeA] export CT_MANAGEMENT_SCOPE
[root@nodeA] cd /usr/local/src/SAM2111Base
[root@nodeA] ./installSAM
b. On node B, run the commands shown in Example 11-10.
Example 11-10 Upgrading Tivoli System Automation on node B
[root@nodeB] CT_MANAGEMENT_SCOPE=2
[root@nodeB] export CT_MANAGEMENT_SCOPE
[root@nodeB] cd /usr/local/src/SAM2111Base
[root@nodeB] ./installSAM
4. Install the latest Tivoli System Automation policies, as shown in
Example 11-11. You can download them from the following Web site:
ftp://ftp.software.ibm.com/software/tivoli/products/sys-auto-linux/
Example 11-11 Installing Tivoli System Automation policies
[root@nodeA] rpm -ivh sam.policies-1.2.2.1-06212.i386.rpm
[root@nodeB] rpm -ivh sam.policies-1.2.2.1-06212.i386.rpm
Configuration
To configure Tivoli System Automation, perform the following steps:
1. Prepare both the nodes and create the cluster.
a. On node A, run the following command:
[root@nodeA] preprpnode nodeA nodeB
b. On node B, run the commands shown in Example 11-12.
Example 11-12 Preparing the Tivoli System Automation domain
[root@nodeB] preprpnode nodeA nodeB
[root@nodeB] mkrpdomain twsDomain nodeA nodeB
[root@nodeB] startrpdomain twsDomain
528 Getting Started with IBM Tivoli Workload Scheduler V8.3](https://image.slidesharecdn.com/gettingstartedwithibmtivoliworkloadschedulerv8-3sg247237-120524011828-phpapp02/85/Getting-started-with-ibm-tivoli-workload-scheduler-v8-3-sg247237-564-320.jpg)
![2. Wait for the domain to come online. You can view the status of the domain
using the lsrpdomain command, as shown in Example 11-13.
Example 11-13 Viewing Tivoli System Automation domain status
[root@nodeA]~ # lsrpdomain
Name OpState RSCTActiveVersion MixedVersions TSPort GSPort
twsDomain Online 2.4.4.4 No 12347 12348
3. Define a tie breaker. Tie breakers are necessary on clusters where there is an
even number of nodes. This is to ensure that the cluster remains operational
even when there is a total communication failure or node failure. The different
types of tie breakers and how to configure them are explained in IBM Tivoli
System Automation for Multiplatforms Base Component User's Guide,
SC33-8210. For more information, see Chapter 10, “Protecting your
resources - quorum support” of this guide. Use a network tie breaker that
points to the gateway used by both cluster nodes, as shown in
Example 11-14. Note that the keywords are case-sensitive.
Example 11-14 Creating the network tie breaker
[root@nodeA]# mkrsrc IBM.TieBreaker Type=“EXEC” Name=“netTieBrk”
DeviceInfo='PATHNAME=/usr/sbin/rsct/bin/samtb_net
Address=192.168.0.254 Log=1' PostReserveWaitTime=30
4. Activate the tie breaker with the following command:
[root@nodeA]# chrsrc -c IBM.PeerNode OpQuorumTieBreaker=“netTieBrk”
5. Define a netmon.cf file on each node. Create a file named netmon.cf in the
/usr/sbin/cluster directory. In this file, place the IP address of each network
interface's gateway, one address per line, as shown in Example 11-15.
Example 11-15 The netmon.cf file
192.168.0.254
6. Define an equivalency of network interfaces. The membership of this
equivalency is used to determine the interfaces to which the service IP can be
aliased. In this example, we assume that both nodes only have one interface
each (eth0). Run the following command on each node:
[root@nodex] mkequ -D “Name like 'eth0'” net-equ
IBM.NetworkInterface
Chapter 11. Making Tivoli Workload Scheduler highly available with Tivoli System Automation 529](https://image.slidesharecdn.com/gettingstartedwithibmtivoliworkloadschedulerv8-3sg247237-120524011828-phpapp02/85/Getting-started-with-ibm-tivoli-workload-scheduler-v8-3-sg247237-565-320.jpg)
![11.6 Configuring DB2 and Tivoli System Automation
Now we set up the Tivoli Workload Scheduler database so that it is available to
the standby node and managed by HADR. We can make the Tivoli Workload
Scheduler database available to the standby node by creating a backup image
on the primary node and restoring it to the standby node.
1. As the DB2 instance owner (su - db2inst1), perform the backup command:
[db2inst1@nodeA] db2 backup database TWS
2. The backup image is placed in the instance owner's home directory. Transfer
the image to the other node (for example, using scp).
[db2inst1@nodeA] scp backup_image db2inst1@nodeB
3. On the other node, restore the database:
[db2inst1@nodeB] db2 restore database TWS replace history file
Now we can configure the hot standby.
Configuring the HADR database
Allow Transmission Control Protocol/Internet Protocol (TCP/IP) communication
to both primary and standby instances.
1. As the DB2 instance owner (su - db2inst1), perform the commands shown in
Example 11-16 on both nodes.
Example 11-16 Running the db2set command
% db2set DB2COMM=tcpip
% db2 update dbm cfg using SVCENAME DB2_db2inst1
2. The /etc/services file on both nodes must contain an entry for the failover
instance on the other node, and an HADR service to ship the log buffers to
the other node. As root, on both nodes, edit the /etc/services file to contain
the values shown in Example 11-17.
Example 11-17 Editing the /etc/services file
DB2_db2inst160000/tcp
hadrinstp18819/tcp
hadrinsts18820/tcp
530 Getting Started with IBM Tivoli Workload Scheduler V8.3](https://image.slidesharecdn.com/gettingstartedwithibmtivoliworkloadschedulerv8-3sg247237-120524011828-phpapp02/85/Getting-started-with-ibm-tivoli-workload-scheduler-v8-3-sg247237-566-320.jpg)

![7. Specify the alternate server addresses for the database (on both primary and
secondary nodes), as shown in Example 11-21.
Example 11-21 Specifying the alternate server addresses
[db2inst1@nodeA]% db2 update alternate server for database TWS using
hostname nodeB port 60000
[db2inst1@nodeB]% db2 update alternate server for database TWS using
hostname nodeA port 60000
8. Now start the HADR services, as shown in Example 11-22. If you see a
message such as: Logindex build was not enabled before HADR was
started, you can safely ignore it. An important thing to keep in mind is to
always start HADR on the standby database before starting HADR on the
primary database.
Example 11-22 Starting HADR
[db2inst1@nodeB]% db2 start hadr on db TWS as standby
[db2inst1@nodeA]% db2 start hadr on db TWS as primary
9. Check that the HADR pair is in peer state with the following command (run on
both nodes):
% db2 get snapshot for db on TWS
Example 11-23 shows the database snapshot output.
Example 11-23 Database snapshot output
HADR Status
Role = Primary
State = Peer
Synchronization mode = Nearsync
Connection status = Connected, 09/01/2006 11:34:02.357398
Heartbeats missed = 0
Local host = nodeA
Local service = 18820
Remote host = nodeB
Remote service = 18819
Remote instance = db2inst1
timeout(seconds) = 120
Primary log position(file, page, LSN) = S0000002.LOG, 698,
0000000001A2A4E1
Standby log position(file, page, LSN) = S0000002.LOG, 698,
0000000001A2A4E1
Log gap running average(bytes) = 0
532 Getting Started with IBM Tivoli Workload Scheduler V8.3](https://image.slidesharecdn.com/gettingstartedwithibmtivoliworkloadschedulerv8-3sg247237-120524011828-phpapp02/85/Getting-started-with-ibm-tivoli-workload-scheduler-v8-3-sg247237-568-320.jpg)
![Registering HADR with Tivoli System Automation
In this step, we configure Tivoli System Automation to automatically monitor and
manage the DB2 failover. After this is in place, do not manually issue DB2
takeover commands. Instead, use the appropriate Tivoli System Automation
command to perform this function.
1. On both nodes, first the standby node, then the primary node, register the
DB2 instances with Tivoli System Automation using the command shown in
Example 11-24. The command is found in the /opt/IBM/db2/V8.1/ha/salinux
directory.
Example 11-24 Running the database registration script
[root@nodeB]# ./regdb2salin -a db2inst1 -r -s
[root@nodeA]# ./regdb2salin -a db2inst1 -r -s
2. Verify that the resource groups are registered and online by issuing the
following command:
# /usr/sbin/rsct/sapolicies/bin/getstatus
You see an output similar to Example 11-25.
Example 11-25 The getstatus output
-- Resource Groups and Resources --
Group Name Resources
---------- ---------
db2_db2inst1_nodeA_0-rg db2_db2inst1_nodeA_0-rs
db2_db2inst1_nodeB_0-rg db2_db2inst1_nodeB_0-rs
-- Resources --
Resource Name Node Name State
------------- --------- -----
db2_db2inst1_nodeA_0-rs nodeA Online
- - -
db2_db2inst1_nodeB_0-rs nodeB Online
- - -
Chapter 11. Making Tivoli Workload Scheduler highly available with Tivoli System Automation 533](https://image.slidesharecdn.com/gettingstartedwithibmtivoliworkloadschedulerv8-3sg247237-120524011828-phpapp02/85/Getting-started-with-ibm-tivoli-workload-scheduler-v8-3-sg247237-569-320.jpg)

![6. Create the Automation relationships between the HADR application, the
Service IP address, and the network equivalency (as root on both nodes), as
shown in Example 11-28. This ensures that the resources start and stop in
the correct order.
Example 11-28 Making dependency relationships
# mkrel -p dependson -S IBM.ServiceIP:db2hadr_TWS-rs_ip
-G IBM.Equivalency:net-equ ip_do_equ
# mkrel -p dependson -S IBM.Application:db2hadr_TWS-rs
-G IBM.ServiceIP:db2hadr_TWS-rs_ip app_do_ip
# lsrel
Displaying Managed Relations :
Name Class:Resource:Node[Source] ResourceGroup[Source]
ip_do_equ IBM.ServiceIP:db2hadr_TWS-rs_ip db2hadr_TWS-rg
app_do_ip IBM.Application:db2hadr_TWS-rs db2hadr_TWS-rg
7. Turn the HADR application back on with the following command:
# chrg -o online db2hadr_TWS-rg
8. Check the status of the resources with the getstatus command. Now you
have to tell DB2 that the Tivoli Workload Scheduler database lives on the
service IP (as db2inst1 on node A), as shown in Example 11-29.
Example 11-29 Cataloging the database nodes
$ db2 CATALOG TCPIP NODE LBNODE REMOTE 192.168.0.100 SERVER 50000
$ db2 CATALOG DB TWS AS TWS_DB AT NODE LBNODE
11.7 Installing and automating Tivoli Workload
Scheduler
We now install Tivoli Workload Scheduler 8.3 on both nodes node A and node B.
Start by creating a UNIX user and group, each having the same name and ID on
both nodes. The home directory for the user (where the Tivoli Workload Scheduler
code resides) must be in the same path on both systems. For our demonstration,
we created the user twsuser and the group twsuser (see Example 11-30).
Example 11-30 Preparing for Tivoli Workload Scheduler installation
# groupadd tws
# useradd -g tws -d /opt/IBM/tws83 twsuser
# passwd twsuser
Chapter 11. Making Tivoli Workload Scheduler highly available with Tivoli System Automation 535](https://image.slidesharecdn.com/gettingstartedwithibmtivoliworkloadschedulerv8-3sg247237-120524011828-phpapp02/85/Getting-started-with-ibm-tivoli-workload-scheduler-v8-3-sg247237-571-320.jpg)


Ad
More Related Content
What's hot (13)
Similar to Getting started with ibm tivoli workload scheduler v8.3 sg247237 (20)


Ad
More from Banking at Ho Chi Minh city (20)


Ad
Recently uploaded (20)


Getting started with ibm tivoli workload scheduler v8.3 sg247237
- 1. Front cover Getting Started with IBM Tivoli Workload Scheduler V8.3 Best Practices and Performance Improvements Experiment with Tivoli Workload Scheduler 8.3 migration scenarios Practice with Tivoli Workload Scheduler 8.3 performance tuning Learn new JSC architecture and DB2 based object database Vasfi Gucer Carl Buehler Matt Dufner Clinton Easterling Pete Soto Douglas Gibbs Anthony Yen Warren Gill Carlos Wagner Dias Natalia Jojic Doroti Almeida Dias Garcia Rick Jones ibm.com/redbooks
- 3. International Technical Support Organization Getting Started with IBM Tivoli Workload Scheduler V8.3: Best Practices and Performance Improvements October 2006 SG24-7237-00
- 4. Note: Before using this information and the product it supports, read the information in “Notices” on page xxvii. First Edition (October 2006) This edition applies to IBM Tivoli Workload Scheduler Version 8.3. © Copyright International Business Machines Corporation 2006. All rights reserved. Note to U.S. Government Users Restricted Rights -- Use, duplication or disclosure restricted by GSA ADP Schedule Contract with IBM Corp.
- 5. Contents Figures . . . . . . . . . . . . . . . . . . . . . . . . . . . . . . . . . . . . . . . . . . . . . . . . . . . . . . . xi Tables . . . . . . . . . . . . . . . . . . . . . . . . . . . . . . . . . . . . . . . . . . . . . . . . . . . . . . xvii Examples. . . . . . . . . . . . . . . . . . . . . . . . . . . . . . . . . . . . . . . . . . . . . . . . . . . . . xix Notices . . . . . . . . . . . . . . . . . . . . . . . . . . . . . . . . . . . . . . . . . . . . . . . . . . . . .xxvii Trademarks . . . . . . . . . . . . . . . . . . . . . . . . . . . . . . . . . . . . . . . . . . . . . . . . . xxviii Preface . . . . . . . . . . . . . . . . . . . . . . . . . . . . . . . . . . . . . . . . . . . . . . . . . . . . . xxix The team that wrote this redbook. . . . . . . . . . . . . . . . . . . . . . . . . . . . . . . . . . xxix Become a published author . . . . . . . . . . . . . . . . . . . . . . . . . . . . . . . . . . . . . .xxxii Comments welcome. . . . . . . . . . . . . . . . . . . . . . . . . . . . . . . . . . . . . . . . . . . xxxiii Chapter 1. Introduction to Tivoli Workload Scheduler V8.3 . . . . . . . . . . . . 1 1.1 In the beginning: Running computer tasks . . . . . . . . . . . . . . . . . . . . . . . . . 2 1.2 Introduction to Job Scheduler . . . . . . . . . . . . . . . . . . . . . . . . . . . . . . . . . . . 2 1.3 Common Job Scheduler terminology . . . . . . . . . . . . . . . . . . . . . . . . . . . . . 3 1.4 Overview of Tivoli Workload Scheduler. . . . . . . . . . . . . . . . . . . . . . . . . . . . 4 1.5 Tivoli Workload Scheduler strengths. . . . . . . . . . . . . . . . . . . . . . . . . . . . . . 5 1.6 New features in Tivoli Workload Scheduler V8.3 . . . . . . . . . . . . . . . . . . . . 6 1.6.1 Improved infrastructure with WebSphere and DB2 or Oracle . . . . . . . 6 1.6.2 New J2EE Web services API . . . . . . . . . . . . . . . . . . . . . . . . . . . . . . . 7 1.6.3 Advanced planning capabilities: JnextPlan replaces JNextDay . . . . . 7 1.6.4 Job Scheduling Console GUI enhancements . . . . . . . . . . . . . . . . . . . 8 1.6.5 Installation and upgrade facility. . . . . . . . . . . . . . . . . . . . . . . . . . . . . . 8 1.7 Conclusion. . . . . . . . . . . . . . . . . . . . . . . . . . . . . . . . . . . . . . . . . . . . . . . . . . 9 Chapter 2. Tivoli Workload Scheduler V8.3: Master prerequisites . . . . . . 11 2.1 Prerequisites for Tivoli Workload Scheduler V8.3 master on AIX . . . . . . . 12 2.1.1 Tivoli Workload Scheduler on AIX prerequisites . . . . . . . . . . . . . . . . 12 2.1.2 DB2 V8.2 on AIX prerequisites . . . . . . . . . . . . . . . . . . . . . . . . . . . . . 13 2.1.3 AIX prerequisites for WebSphere Application Server 6.0.2 Embedded Express . . . . . . . . . . . . . . . . . . . . . . . . . . . 15 2.2 Prerequisites for Tivoli Workload Scheduler V8.3 master on HP-UX . . . . 16 2.2.1 Tivoli Workload Scheduler on HP-UX prerequisites . . . . . . . . . . . . . 16 2.2.2 DB2 V8.2 on HP-UX prerequisites . . . . . . . . . . . . . . . . . . . . . . . . . . 17 2.2.3 HP-UX prerequisites for WebSphere Application Server 6.0.2 Embedded Express . . . . . . . . . . . . . . . . . . . . . . . . . . . . . . . . . . . . . 20 © Copyright IBM Corp. 2006. All rights reserved. iii
- 6. 2.3 Prerequisites for Tivoli Workload Scheduler V8.3 master on Solaris . . . . 21 2.3.1 Tivoli Workload Scheduler on Solaris prerequisites . . . . . . . . . . . . . 21 2.3.2 DB2 8.2 and 8.2.2 on Solaris prerequisites. . . . . . . . . . . . . . . . . . . . 22 2.3.3 Solaris prerequisites for WebSphere Application Server 6.0.2 Embedded Express . . . . . . . . . . . . . . . . . . . . . . . . . . . . . . . . . . . . . 24 2.4 Prerequisites for Tivoli Workload Scheduler V8.3 master on Linux . . . . . 25 2.4.1 Tivoli Workload Scheduler on Linux prerequisites . . . . . . . . . . . . . . 25 2.4.2 DB2 V8.2 on Linux prerequisites. . . . . . . . . . . . . . . . . . . . . . . . . . . . 27 2.4.3 Linux prerequisites for WebSphere Application Server 6.0.2 Embedded Express . . . . . . . . . . . . . . . . . . . . . . . . . . . 31 2.5 Prerequisites for Tivoli Workload Scheduler V8.3 master on Windows . . 32 2.5.1 DB2 8.2 on Windows prerequisites . . . . . . . . . . . . . . . . . . . . . . . . . . 33 2.5.2 Windows prerequisites for WebSphere Application Server 6.0.2 Embedded Express . . . . . . . . . . . . . . . . . . . . . . . . . . . . . . . . . . . . . 34 Chapter 3. Tivoli Workload Scheduler V8.3: New installation . . . . . . . . . . 35 3.1 Overview of the installation . . . . . . . . . . . . . . . . . . . . . . . . . . . . . . . . . . . . 36 3.2 Installing new UNIX master using installation wizard . . . . . . . . . . . . . . . . 36 3.2.1 Installation procedure . . . . . . . . . . . . . . . . . . . . . . . . . . . . . . . . . . . . 37 3.2.2 Installing the Job Scheduling Console . . . . . . . . . . . . . . . . . . . . . . . 61 3.2.3 Creating scheduling objects for the new master . . . . . . . . . . . . . . . . 67 3.3 Installing new UNIX fault-tolerant agent using installation wizard . . . . . . . 82 3.4 Installing a Windows fault-tolerant agent. . . . . . . . . . . . . . . . . . . . . . . . . . 95 3.5 Installing the Tivoli Workload Scheduler command line client. . . . . . . . . 107 Chapter 4. Tivoli Workload Scheduler V8.3: Migration . . . . . . . . . . . . . . 115 4.1 Prerequisites for the upgrade . . . . . . . . . . . . . . . . . . . . . . . . . . . . . . . . . 116 4.2 Overview of the upgrade . . . . . . . . . . . . . . . . . . . . . . . . . . . . . . . . . . . . . 117 4.3 Before the upgrade . . . . . . . . . . . . . . . . . . . . . . . . . . . . . . . . . . . . . . . . . 119 4.3.1 Data import methods. . . . . . . . . . . . . . . . . . . . . . . . . . . . . . . . . . . . 119 4.3.2 Extracting Tivoli Management Framework user data from the security file . . . . . . . . . . . . . . . . . . . . . . . . . . . . . . . . . . . . . . . . 120 4.3.3 Dumping existing objects from the database . . . . . . . . . . . . . . . . . 120 4.4 Upgrading Tivoli Workload Scheduler V8.1: Parallel upgrade . . . . . . . . 120 4.4.1 Dumping existing objects from the database . . . . . . . . . . . . . . . . . 121 4.4.2 Extracting Tivoli Framework user data from the security file. . . . . . 123 4.4.3 Installing a new master domain manager . . . . . . . . . . . . . . . . . . . . 127 4.4.4 Importing the migrated security file in the Tivoli Workload Scheduler V8.3 environment . . . . . . . . . . . . . . . . . . . . . . . . . . . . . . . . . . . . . . 128 4.4.5 Importing the object data. . . . . . . . . . . . . . . . . . . . . . . . . . . . . . . . . 130 4.4.6 Switching a master domain manager . . . . . . . . . . . . . . . . . . . . . . . 139 4.4.7 Upgrading the backup master domain manager . . . . . . . . . . . . . . . 147 4.4.8 Upgrading agents . . . . . . . . . . . . . . . . . . . . . . . . . . . . . . . . . . . . . . 170 iv Getting Started with IBM Tivoli Workload Scheduler V8.3
- 7. 4.4.9 Unlinking and stopping Tivoli Workload Scheduler when upgrading agent workstations . . . . . . . . . . . . . . . . . . . . . . . . . . . . . . . . . . . . . 194 4.5 Upgrading Tivoli Workload Scheduler V8.1: Direct upgrade . . . . . . . . . . 196 4.5.1 Upgrading a master domain manager. . . . . . . . . . . . . . . . . . . . . . . 197 4.5.2 Importing the object data. . . . . . . . . . . . . . . . . . . . . . . . . . . . . . . . . 221 4.5.3 Configuring the upgraded master domain manager . . . . . . . . . . . . 221 4.5.4 Upgrading the backup master domain manager . . . . . . . . . . . . . . . 233 4.5.5 Importing the migrated security file in the Tivoli Workload Scheduler V8.3 environment . . . . . . . . . . . . . . . . . . . . . . . . . . . . . . . . . . . . . . 233 4.5.6 Upgrading agents . . . . . . . . . . . . . . . . . . . . . . . . . . . . . . . . . . . . . . 233 4.5.7 Installing the Job Scheduling Console . . . . . . . . . . . . . . . . . . . . . . 233 4.6 Upgrading Tivoli Workload Scheduler V8.2: Parallel upgrade . . . . . . . . 234 4.6.1 Dumping existing objects from the database . . . . . . . . . . . . . . . . . 234 4.6.2 Extracting Tivoli Framework user data from the security file. . . . . . 236 4.6.3 Installing a new master domain manager . . . . . . . . . . . . . . . . . . . . 240 4.6.4 Importing the migrated security file in the Tivoli Workload Scheduler V8.3 environment . . . . . . . . . . . . . . . . . . . . . . . . . . . . . . . . . . . . . . 241 4.6.5 Importing the object data. . . . . . . . . . . . . . . . . . . . . . . . . . . . . . . . . 243 4.6.6 Switching a master domain manager . . . . . . . . . . . . . . . . . . . . . . . 252 4.6.7 Upgrading agents . . . . . . . . . . . . . . . . . . . . . . . . . . . . . . . . . . . . . . 260 4.6.8 Upgrading Windows 2003 agent using the installation wizard . . . . 261 4.7 Upgrading Tivoli Workload Scheduler V8.2: Direct upgrade . . . . . . . . . . 276 4.7.1 Upgrading a master domain manager. . . . . . . . . . . . . . . . . . . . . . . 277 4.7.2 Importing the object data. . . . . . . . . . . . . . . . . . . . . . . . . . . . . . . . . 294 4.7.3 Configuring the upgraded master domain manager . . . . . . . . . . . . 294 4.7.4 Upgrading the backup master domain manager . . . . . . . . . . . . . . . 304 4.7.5 Importing the migrated security file in the Tivoli Workload Scheduler V8.3 environment . . . . . . . . . . . . . . . . . . . . . . . . . . . . . . . . . . . . . . 304 4.7.6 Upgrading agents . . . . . . . . . . . . . . . . . . . . . . . . . . . . . . . . . . . . . . 304 4.7.7 Installing the Job Scheduling Console . . . . . . . . . . . . . . . . . . . . . . 304 4.8 Upgrading Tivoli Workload Scheduler V8.2.1: Parallel upgrade . . . . . . . 304 4.8.1 Dumping existing objects from the database . . . . . . . . . . . . . . . . . 305 4.8.2 Extracting Tivoli Framework user data from security file. . . . . . . . . 307 4.8.3 Installing a new master domain manager . . . . . . . . . . . . . . . . . . . . 310 4.8.4 Importing the migrated security file in the Tivoli Workload Scheduler V8.3 environment . . . . . . . . . . . . . . . . . . . . . . . . . . . . . . . . . . . . . . 311 4.8.5 Importing the object data. . . . . . . . . . . . . . . . . . . . . . . . . . . . . . . . . 313 4.8.6 Switching a master domain manager . . . . . . . . . . . . . . . . . . . . . . . 321 Chapter 5. DB2, WebSphere, and Lightweight Directory Access Protocol: Considerations . . . . . . . . . . . . . . . . . . . . . . . . . . . . . . . . . . . . . 323 5.1 An overview of DB2 Universal Database . . . . . . . . . . . . . . . . . . . . . . . . 324 5.1.1 Deployment topologies . . . . . . . . . . . . . . . . . . . . . . . . . . . . . . . . . . 325 Contents v
- 8. 5.1.2 Database objects . . . . . . . . . . . . . . . . . . . . . . . . . . . . . . . . . . . . . . 325 5.1.3 Parallelism. . . . . . . . . . . . . . . . . . . . . . . . . . . . . . . . . . . . . . . . . . . . 327 5.2 DB2 Universal Database installation considerations . . . . . . . . . . . . . . . . 328 5.3 Creating a DB2 Universal Database instance . . . . . . . . . . . . . . . . . . . . . 337 5.3.1 Preparing for an instance creation . . . . . . . . . . . . . . . . . . . . . . . . . 337 5.3.2 Creating the instance . . . . . . . . . . . . . . . . . . . . . . . . . . . . . . . . . . . 338 5.4 Creating a DB2 Universal Database . . . . . . . . . . . . . . . . . . . . . . . . . . . . 340 5.5 Backing up the database. . . . . . . . . . . . . . . . . . . . . . . . . . . . . . . . . . . . . 341 5.6 Restoring a backup of the database . . . . . . . . . . . . . . . . . . . . . . . . . . . . 342 5.7 Referential integrity . . . . . . . . . . . . . . . . . . . . . . . . . . . . . . . . . . . . . . . . . 344 5.8 Object and database locking . . . . . . . . . . . . . . . . . . . . . . . . . . . . . . . . . . 346 5.8.1 JSC locking features . . . . . . . . . . . . . . . . . . . . . . . . . . . . . . . . . . . . 347 5.8.2 Composer locking features . . . . . . . . . . . . . . . . . . . . . . . . . . . . . . . 349 5.9 DB2 maintenance . . . . . . . . . . . . . . . . . . . . . . . . . . . . . . . . . . . . . . . . . . 352 5.10 WebSphere Application Server . . . . . . . . . . . . . . . . . . . . . . . . . . . . . . . 354 5.11 Installing multiple application service instances . . . . . . . . . . . . . . . . . . 356 5.11.1 Starting the application server. . . . . . . . . . . . . . . . . . . . . . . . . . . . 356 5.11.2 Stopping the application server . . . . . . . . . . . . . . . . . . . . . . . . . . . 357 5.11.3 Checking the application server status . . . . . . . . . . . . . . . . . . . . . 358 5.11.4 Changing the trace properties. . . . . . . . . . . . . . . . . . . . . . . . . . . . 359 5.11.5 Backing up the application server configuration . . . . . . . . . . . . . . 360 5.11.6 Restoring the application server configuration . . . . . . . . . . . . . . . 362 5.11.7 Viewing the data source properties . . . . . . . . . . . . . . . . . . . . . . . . 363 5.11.8 Changing data source properties . . . . . . . . . . . . . . . . . . . . . . . . . 365 5.11.9 Viewing the host properties . . . . . . . . . . . . . . . . . . . . . . . . . . . . . . 366 5.11.10 Changing the host properties . . . . . . . . . . . . . . . . . . . . . . . . . . . 368 5.11.11 Viewing the security properties . . . . . . . . . . . . . . . . . . . . . . . . . . 370 5.11.12 Changing the security properties . . . . . . . . . . . . . . . . . . . . . . . . 372 5.11.13 Encrypting the profile properties . . . . . . . . . . . . . . . . . . . . . . . . . 375 5.12 Lightweight Directory Access Protocol . . . . . . . . . . . . . . . . . . . . . . . . . 376 5.12.1 Loading the user account details into the LDAP server . . . . . . . . 377 5.12.2 Creating the properties file . . . . . . . . . . . . . . . . . . . . . . . . . . . . . . 382 5.12.3 Updating the Tivoli Workload Scheduler security file . . . . . . . . . . 386 5.12.4 Using the Tivoli Workload Scheduler V8.3 command line utilities . . . . . . . . . . . . . . . . . . . . . . . . . . . . . . . . . . . 388 5.12.5 Using the Job Scheduling Console . . . . . . . . . . . . . . . . . . . . . . . . 389 5.13 Configuring the application server to start and stop without a password . . . . . . . . . . . . . . . . . . . . . . . . . . . . . . . . . . . . . 391 5.14 Network configuration for Job Scheduling Console. . . . . . . . . . . . . . . . 393 Chapter 6. Job Scheduling Console V8.3 . . . . . . . . . . . . . . . . . . . . . . . . . 395 6.1 Job Scheduling Console architecture . . . . . . . . . . . . . . . . . . . . . . . . . . . 396 6.2 Job Scheduling Console: Changes and new features. . . . . . . . . . . . . . . 399 vi Getting Started with IBM Tivoli Workload Scheduler V8.3
- 9. 6.2.1 Job Scheduling Console plan changes . . . . . . . . . . . . . . . . . . . . . . 400 6.2.2 Database object definitions changes . . . . . . . . . . . . . . . . . . . . . . . 401 6.3 Managing exclusive locking on database objects . . . . . . . . . . . . . . . . . . 412 6.4 Known problems and issues . . . . . . . . . . . . . . . . . . . . . . . . . . . . . . . . . . 413 Chapter 7. Planning your workload . . . . . . . . . . . . . . . . . . . . . . . . . . . . . . 415 7.1 Overview of production day. . . . . . . . . . . . . . . . . . . . . . . . . . . . . . . . . . . 416 7.1.1 Identifying the start of the production day . . . . . . . . . . . . . . . . . . . . 421 7.1.2 Identifying the length of the production day . . . . . . . . . . . . . . . . . . 424 7.2 Plan cycle versus run cycle . . . . . . . . . . . . . . . . . . . . . . . . . . . . . . . . . . . 429 7.3 Preproduction plan . . . . . . . . . . . . . . . . . . . . . . . . . . . . . . . . . . . . . . . . . 432 7.4 Schedtime . . . . . . . . . . . . . . . . . . . . . . . . . . . . . . . . . . . . . . . . . . . . . . . . 433 7.5 Creating the production day . . . . . . . . . . . . . . . . . . . . . . . . . . . . . . . . . . 434 Chapter 8. Tuning Tivoli Workload Scheduler for best performance . . . 437 8.1 Global options parameters . . . . . . . . . . . . . . . . . . . . . . . . . . . . . . . . . . . 438 8.2 Comparison of different versions of global options . . . . . . . . . . . . . . . . . 446 8.3 Local options parameters . . . . . . . . . . . . . . . . . . . . . . . . . . . . . . . . . . . . 447 8.4 Comparison of different versions of local options . . . . . . . . . . . . . . . . . . 465 8.5 Tivoli Workload Scheduler process flow . . . . . . . . . . . . . . . . . . . . . . . . . 467 8.6 Scenarios for this book . . . . . . . . . . . . . . . . . . . . . . . . . . . . . . . . . . . . . . 471 Chapter 9. Application programming interface . . . . . . . . . . . . . . . . . . . . 473 9.1 Introduction to application programming interfaces. . . . . . . . . . . . . . . . . 474 9.2 Getting started. . . . . . . . . . . . . . . . . . . . . . . . . . . . . . . . . . . . . . . . . . . . . 474 9.3 Starting with the basics . . . . . . . . . . . . . . . . . . . . . . . . . . . . . . . . . . . . . . 475 9.3.1 Finding the API . . . . . . . . . . . . . . . . . . . . . . . . . . . . . . . . . . . . . . . . 476 9.3.2 Web Services Description Language templates . . . . . . . . . . . . . . . 479 Chapter 10. Tivoli Workload Scheduler V8.3: Troubleshooting . . . . . . . 483 10.1 Upgrading your whole environment. . . . . . . . . . . . . . . . . . . . . . . . . . . . 484 10.2 Keeping up-to-date fix packs. . . . . . . . . . . . . . . . . . . . . . . . . . . . . . . . . 484 10.3 Built-in troubleshooting features . . . . . . . . . . . . . . . . . . . . . . . . . . . . . . 484 10.4 Installation logs . . . . . . . . . . . . . . . . . . . . . . . . . . . . . . . . . . . . . . . . . . . 485 10.4.1 InstallShield wizard installation and uninstallation logs . . . . . . . . . 485 10.4.2 TWSINST logs . . . . . . . . . . . . . . . . . . . . . . . . . . . . . . . . . . . . . . . 486 10.4.3 Software package block logs . . . . . . . . . . . . . . . . . . . . . . . . . . . . 486 10.4.4 DB2 installation logs . . . . . . . . . . . . . . . . . . . . . . . . . . . . . . . . . . . 486 10.4.5 Installation logs for embedded version of WebSphere Application Server - Express . . . . . . . . . . . . . . . . . . . . . . . . . . . . . . . . . . . . . . . 487 10.5 Recovering failed interactive InstallShield wizard installation . . . . . . . . 487 10.6 JnextPlan problems. . . . . . . . . . . . . . . . . . . . . . . . . . . . . . . . . . . . . . . . 502 Chapter 11. Making Tivoli Workload Scheduler highly available with Tivoli Contents vii
- 10. System Automation . . . . . . . . . . . . . . . . . . . . . . . . . . . . . . . . . 509 11.1 Introduction to IBM Tivoli System Automation for Multiplatforms . . . . . 510 11.2 High-availability scenarios. . . . . . . . . . . . . . . . . . . . . . . . . . . . . . . . . . . 510 11.2.1 Scenario 1: Passive-active failover . . . . . . . . . . . . . . . . . . . . . . . . 510 11.2.2 Scenario 2: Switching domain managers . . . . . . . . . . . . . . . . . . . 512 11.2.3 Scenario 3: Fault-tolerant agent . . . . . . . . . . . . . . . . . . . . . . . . . . 513 11.2.4 Scenario 4: Tivoli System Automation end-to-end managing multiple Tivoli Workload Scheduler clusters. . . . . . . . . . 514 11.2.5 Scenario 5: Tivoli Workload Scheduler Managing Tivoli System Automation end-to-end . . . . . . . . . . . . . . . . . . . . . . . . . . . . . . . . . . 514 11.3 Implementing high availability for the Tivoli Workload Scheduler master domain manager. . . . . . . . . . . . . . . . . . . . . . . . . . . . . . . . . . . . . . . . . . . 514 11.3.1 Prerequisites . . . . . . . . . . . . . . . . . . . . . . . . . . . . . . . . . . . . . . . . . 515 11.3.2 Overview of the installation . . . . . . . . . . . . . . . . . . . . . . . . . . . . . . 516 11.4 Installing and configuring DB2. . . . . . . . . . . . . . . . . . . . . . . . . . . . . . . . 516 11.5 Installing and configuring Tivoli System Automation . . . . . . . . . . . . . . . 527 11.6 Configuring DB2 and Tivoli System Automation . . . . . . . . . . . . . . . . . . 530 11.7 Installing and automating Tivoli Workload Scheduler . . . . . . . . . . . . . . 535 11.7.1 Installing Tivoli Workload Scheduler on the available environment . . . . . . . . . . . . . . . . . . . . . . . . . . . . . . . . . . . 536 11.7.2 Preparing Tivoli Workload Scheduler for failover . . . . . . . . . . . . . 539 11.7.3 Configuring Tivoli System Automation policies for Tivoli Workload Scheduler . . . . . . . . . . . . . . . . . . . . . . . . . . . . . . . . . . . . . . . . . . . . 543 11.8 Testing the installation. . . . . . . . . . . . . . . . . . . . . . . . . . . . . . . . . . . . . . 545 Appendix A. Tivoli Workload Scheduler Job Notification Solution . . . . 547 Solution design. . . . . . . . . . . . . . . . . . . . . . . . . . . . . . . . . . . . . . . . . . . . . . . . 548 Requirements . . . . . . . . . . . . . . . . . . . . . . . . . . . . . . . . . . . . . . . . . . . . . . 548 Event flow . . . . . . . . . . . . . . . . . . . . . . . . . . . . . . . . . . . . . . . . . . . . . . . . . 548 Solution deployment. . . . . . . . . . . . . . . . . . . . . . . . . . . . . . . . . . . . . . . . . . . . 551 Deploying the solution . . . . . . . . . . . . . . . . . . . . . . . . . . . . . . . . . . . . . . . . 551 Deploying directory structure . . . . . . . . . . . . . . . . . . . . . . . . . . . . . . . . . . 552 Solution schedules and jobs . . . . . . . . . . . . . . . . . . . . . . . . . . . . . . . . . . . 555 Solution configuration. . . . . . . . . . . . . . . . . . . . . . . . . . . . . . . . . . . . . . . . . . . 556 Creating the tws_event_mon.csv file . . . . . . . . . . . . . . . . . . . . . . . . . . . . 556 Configuring job abend notification . . . . . . . . . . . . . . . . . . . . . . . . . . . . . . . 561 Configuring job done notification . . . . . . . . . . . . . . . . . . . . . . . . . . . . . . . . 562 Configuring job deadline notification . . . . . . . . . . . . . . . . . . . . . . . . . . . . . 563 Configuring start deadline notification . . . . . . . . . . . . . . . . . . . . . . . . . . . . 565 Configuring job running long notification . . . . . . . . . . . . . . . . . . . . . . . . . . 569 Return code mapping . . . . . . . . . . . . . . . . . . . . . . . . . . . . . . . . . . . . . . . . 571 Solution monitoring. . . . . . . . . . . . . . . . . . . . . . . . . . . . . . . . . . . . . . . . . . . . . 571 Solution regression testing . . . . . . . . . . . . . . . . . . . . . . . . . . . . . . . . . . . . . . . 572 viii Getting Started with IBM Tivoli Workload Scheduler V8.3
- 11. CSV configuration . . . . . . . . . . . . . . . . . . . . . . . . . . . . . . . . . . . . . . . . . . . 572 TWSMD_JNS2 schedule . . . . . . . . . . . . . . . . . . . . . . . . . . . . . . . . . . . . . 573 TWSMD_JNS3-01 schedule . . . . . . . . . . . . . . . . . . . . . . . . . . . . . . . . . . . 575 Solution troubleshooting. . . . . . . . . . . . . . . . . . . . . . . . . . . . . . . . . . . . . . . . . 576 Tivoli Workload Scheduler infrastructure considerations . . . . . . . . . . . . . . . . 576 Tivoli Workload Scheduler production control considerations . . . . . . . . . . . . 579 Frequently asked questions . . . . . . . . . . . . . . . . . . . . . . . . . . . . . . . . . . . . . . 580 CSV configuration . . . . . . . . . . . . . . . . . . . . . . . . . . . . . . . . . . . . . . . . . . . . . 583 Scripts . . . . . . . . . . . . . . . . . . . . . . . . . . . . . . . . . . . . . . . . . . . . . . . . . . . . 584 Procedures . . . . . . . . . . . . . . . . . . . . . . . . . . . . . . . . . . . . . . . . . . . . . . . . 584 Solution procedures . . . . . . . . . . . . . . . . . . . . . . . . . . . . . . . . . . . . . . . . . . . . 585 Verifying notification completion. . . . . . . . . . . . . . . . . . . . . . . . . . . . . . . . . . . 586 Related publications . . . . . . . . . . . . . . . . . . . . . . . . . . . . . . . . . . . . . . . . . . 587 IBM Redbooks . . . . . . . . . . . . . . . . . . . . . . . . . . . . . . . . . . . . . . . . . . . . . . . . 587 Other publications . . . . . . . . . . . . . . . . . . . . . . . . . . . . . . . . . . . . . . . . . . . . . 587 Online resources . . . . . . . . . . . . . . . . . . . . . . . . . . . . . . . . . . . . . . . . . . . . . . 588 How to get IBM Redbooks . . . . . . . . . . . . . . . . . . . . . . . . . . . . . . . . . . . . . . . 589 Help from IBM . . . . . . . . . . . . . . . . . . . . . . . . . . . . . . . . . . . . . . . . . . . . . . . . 589 Index . . . . . . . . . . . . . . . . . . . . . . . . . . . . . . . . . . . . . . . . . . . . . . . . . . . . . . . 591 Contents ix
- 12. x Getting Started with IBM Tivoli Workload Scheduler V8.3
- 13. Figures 3-1 Setup command . . . . . . . . . . . . . . . . . . . . . . . . . . . . . . . . . . . . . . . . . . . . 38 3-2 Initializing the installation wizard . . . . . . . . . . . . . . . . . . . . . . . . . . . . . . . . 39 3-3 Language preference window . . . . . . . . . . . . . . . . . . . . . . . . . . . . . . . . . . 39 3-4 Tivoli Workload Scheduler V8.3 welcome window . . . . . . . . . . . . . . . . . . 40 3-5 License agreement window. . . . . . . . . . . . . . . . . . . . . . . . . . . . . . . . . . . . 40 3-6 Installing a new instance . . . . . . . . . . . . . . . . . . . . . . . . . . . . . . . . . . . . . . 41 3-7 Selecting the type of Tivoli Workload Scheduler instance V8.3 . . . . . . . . 41 3-8 Entering the Tivoli Workload Scheduler user name and password. . . . . . 42 3-9 Error message when Tivoli Workload Scheduler user does not exist . . . . 43 3-10 Configuring the workstation. . . . . . . . . . . . . . . . . . . . . . . . . . . . . . . . . . . 44 3-11 Tivoli Workload Scheduler instance port specifications . . . . . . . . . . . . . 45 3-12 The Tivoli Workload Scheduler installation directory . . . . . . . . . . . . . . . 47 3-13 Selecting the DB2 installation type . . . . . . . . . . . . . . . . . . . . . . . . . . . . . 48 3-14 DB2 users, password, and default port . . . . . . . . . . . . . . . . . . . . . . . . . . 49 3-15 Error message showing the port is in use by a service . . . . . . . . . . . . . . 50 3-16 DB2 instance options . . . . . . . . . . . . . . . . . . . . . . . . . . . . . . . . . . . . . . . 50 3-17 Warning message showing the DB2 user does not exist . . . . . . . . . . . . 51 3-18 Tivoli Workload Scheduler installation options summary . . . . . . . . . . . . 52 3-19 List of the operations to be performed . . . . . . . . . . . . . . . . . . . . . . . . . . 53 3-20 Default DB2 path window . . . . . . . . . . . . . . . . . . . . . . . . . . . . . . . . . . . . 54 3-21 DB2 software location path . . . . . . . . . . . . . . . . . . . . . . . . . . . . . . . . . . . 55 3-22 DB2 installation progress bar . . . . . . . . . . . . . . . . . . . . . . . . . . . . . . . . . 56 3-23 The Tivoli Workload Scheduler installation progress bar . . . . . . . . . . . . 56 3-24 Installation completed . . . . . . . . . . . . . . . . . . . . . . . . . . . . . . . . . . . . . . . 57 3-25 Example of a failed installation . . . . . . . . . . . . . . . . . . . . . . . . . . . . . . . . 58 3-26 Installation error log. . . . . . . . . . . . . . . . . . . . . . . . . . . . . . . . . . . . . . . . . 59 3-27 Reclassifying the step . . . . . . . . . . . . . . . . . . . . . . . . . . . . . . . . . . . . . . . 60 3-28 New step status and restarting the installation . . . . . . . . . . . . . . . . . . . . 61 3-29 Job Scheduling Console setup icon . . . . . . . . . . . . . . . . . . . . . . . . . . . . 62 3-30 Installation wizard initialization process . . . . . . . . . . . . . . . . . . . . . . . . . 62 3-31 Selecting the language . . . . . . . . . . . . . . . . . . . . . . . . . . . . . . . . . . . . . . 63 3-32 The Job Scheduling Console welcome window . . . . . . . . . . . . . . . . . . . 63 3-33 License agreement . . . . . . . . . . . . . . . . . . . . . . . . . . . . . . . . . . . . . . . . . 64 3-34 Specifying the Job Scheduling Console installation path . . . . . . . . . . . . 64 3-35 Selecting the Job Scheduling Console shortcut icons . . . . . . . . . . . . . . 65 3-36 The Job Scheduling Console installation path and disk space usage . . 65 3-37 The Job Scheduling Console installation progress bar . . . . . . . . . . . . . . 66 3-38 Job Scheduling Console installation completed . . . . . . . . . . . . . . . . . . . 66 © Copyright IBM Corp. 2006. All rights reserved. xi
- 14. 3-39 The Job Scheduling Console V8.3 icon . . . . . . . . . . . . . . . . . . . . . . . . . 67 3-40 Selecting Job Scheduling Console V8.3 icon from programs menu . . . . 68 3-41 The Job Scheduling Console splash window . . . . . . . . . . . . . . . . . . . . . 69 3-42 The load preferences files window . . . . . . . . . . . . . . . . . . . . . . . . . . . . . 69 3-43 The Job Scheduling Console welcome window . . . . . . . . . . . . . . . . . . . 70 3-44 Warning window stating the engine does not exist . . . . . . . . . . . . . . . . . 70 3-45 The default engine definition window . . . . . . . . . . . . . . . . . . . . . . . . . . . 71 3-46 Specifying the Job Scheduling Console engine options . . . . . . . . . . . . . 73 3-47 Message showing the JSC is unable to connect to the engine. . . . . . . . 73 3-48 Job Scheduling Console engine view . . . . . . . . . . . . . . . . . . . . . . . . . . . 74 3-49 Defining the new workstation . . . . . . . . . . . . . . . . . . . . . . . . . . . . . . . . . 75 3-50 Specifying the UNIX master workstation options . . . . . . . . . . . . . . . . . . 77 3-51 Specifying the Windows fault-tolerant agent options . . . . . . . . . . . . . . . 78 3-52 Specifying the UNIX fault-tolerant agent options . . . . . . . . . . . . . . . . . . 79 3-53 Workstation definitions on M83-Paris engine . . . . . . . . . . . . . . . . . . . . . 80 3-54 Windows user for Windows fault-tolerant agent F83A . . . . . . . . . . . . . . 81 3-55 Defining the new Windows user . . . . . . . . . . . . . . . . . . . . . . . . . . . . . . . 81 3-56 Initializing the installation wizard . . . . . . . . . . . . . . . . . . . . . . . . . . . . . . . 83 3-57 Language preference window . . . . . . . . . . . . . . . . . . . . . . . . . . . . . . . . . 83 3-58 Tivoli Workload Scheduler V8.3 welcome window . . . . . . . . . . . . . . . . . 84 3-59 License agreement window. . . . . . . . . . . . . . . . . . . . . . . . . . . . . . . . . . . 84 3-60 Installing a new instance . . . . . . . . . . . . . . . . . . . . . . . . . . . . . . . . . . . . . 85 3-61 Selecting the type of Tivoli Workload Scheduler V8.3 instance . . . . . . . 85 3-62 Entering the Tivoli Workload Scheduler user name and password. . . . . 86 3-63 Error message when Tivoli Workload Scheduler user does not exist . . . 87 3-64 Configuring the FTA workstation . . . . . . . . . . . . . . . . . . . . . . . . . . . . . . . 88 3-65 Tivoli Workload Scheduler installation directory . . . . . . . . . . . . . . . . . . . 89 3-66 Tivoli Workload Scheduler installation options summary . . . . . . . . . . . . 90 3-67 List of the operations to be performed . . . . . . . . . . . . . . . . . . . . . . . . . . 90 3-68 The Tivoli Workload Scheduler installation progress bar . . . . . . . . . . . . 91 3-69 Installation completed . . . . . . . . . . . . . . . . . . . . . . . . . . . . . . . . . . . . . . . 91 3-70 Example of a failed installation . . . . . . . . . . . . . . . . . . . . . . . . . . . . . . . . 92 3-71 Installation error log. . . . . . . . . . . . . . . . . . . . . . . . . . . . . . . . . . . . . . . . . 93 3-72 Reclassifying the step . . . . . . . . . . . . . . . . . . . . . . . . . . . . . . . . . . . . . . . 94 3-73 New step status and restarting the installation . . . . . . . . . . . . . . . . . . . . 95 3-74 Setup command . . . . . . . . . . . . . . . . . . . . . . . . . . . . . . . . . . . . . . . . . . . 96 3-75 Language preference window . . . . . . . . . . . . . . . . . . . . . . . . . . . . . . . . . 97 3-76 Tivoli Workload Scheduler V8.3 welcome window . . . . . . . . . . . . . . . . . 97 3-77 License agreement window. . . . . . . . . . . . . . . . . . . . . . . . . . . . . . . . . . . 98 3-78 Installing a new instance . . . . . . . . . . . . . . . . . . . . . . . . . . . . . . . . . . . . . 98 3-79 Selecting the type of Tivoli Workload Scheduler V8.3 instance . . . . . . . 99 3-80 Entering the Tivoli Workload Scheduler user name and password. . . . . 99 3-81 Configuring the FTA workstation . . . . . . . . . . . . . . . . . . . . . . . . . . . . . . 100 xii Getting Started with IBM Tivoli Workload Scheduler V8.3
- 15. 3-82 User required permissions . . . . . . . . . . . . . . . . . . . . . . . . . . . . . . . . . . 101 3-83 Tivoli Workload Scheduler installation directory . . . . . . . . . . . . . . . . . . 101 3-84 Tivoli Workload Scheduler installation summary. . . . . . . . . . . . . . . . . . 102 3-85 List of the operations to be performed . . . . . . . . . . . . . . . . . . . . . . . . . 102 3-86 The Tivoli Workload Scheduler installation progress bar . . . . . . . . . . . 103 3-87 Installation completed . . . . . . . . . . . . . . . . . . . . . . . . . . . . . . . . . . . . . . 103 3-88 Example of a failed installation . . . . . . . . . . . . . . . . . . . . . . . . . . . . . . . 104 3-89 Installation error log. . . . . . . . . . . . . . . . . . . . . . . . . . . . . . . . . . . . . . . . 105 3-90 Reclassifying the step . . . . . . . . . . . . . . . . . . . . . . . . . . . . . . . . . . . . . . 106 3-91 New step status and restarting the installation . . . . . . . . . . . . . . . . . . . 107 3-92 Setup command . . . . . . . . . . . . . . . . . . . . . . . . . . . . . . . . . . . . . . . . . . 108 3-93 Language preference window . . . . . . . . . . . . . . . . . . . . . . . . . . . . . . . . 108 3-94 Tivoli Workload Scheduler V8.3 welcome window . . . . . . . . . . . . . . . . 109 3-95 License agreement window. . . . . . . . . . . . . . . . . . . . . . . . . . . . . . . . . . 109 3-96 Selecting the command line client. . . . . . . . . . . . . . . . . . . . . . . . . . . . . 110 3-97 Installing the command line client . . . . . . . . . . . . . . . . . . . . . . . . . . . . . 111 3-98 Installation directory window . . . . . . . . . . . . . . . . . . . . . . . . . . . . . . . . . 112 3-99 Summary of the installation path and required disk space . . . . . . . . . . 112 3-100 List of the operations to be performed by the installation . . . . . . . . . . 113 3-101 Installation successful window . . . . . . . . . . . . . . . . . . . . . . . . . . . . . . 113 4-1 Lab environment for Tivoli Workload Scheduler V8.1 . . . . . . . . . . . . . . . 116 4-2 Lab environment for Tivoli Workload Scheduler V8.2 . . . . . . . . . . . . . . . 116 4-3 Lab environment for Tivoli Workload Scheduler V8.2.1 . . . . . . . . . . . . . 117 4-4 Selecting the installation wizard language . . . . . . . . . . . . . . . . . . . . . . . 148 4-5 Welcome information . . . . . . . . . . . . . . . . . . . . . . . . . . . . . . . . . . . . . . . 149 4-6 License agreement . . . . . . . . . . . . . . . . . . . . . . . . . . . . . . . . . . . . . . . . . 150 4-7 Previous instance and upgrading Tivoli Workload Scheduler . . . . . . . . . 151 4-8 Selecting Tivoli Workload Scheduler instance to be upgraded . . . . . . . . 152 4-9 Entering the password of the Tivoli Workload Scheduler user . . . . . . . . 153 4-10 Ports used by IBM WebSphere Application Server. . . . . . . . . . . . . . . . 154 4-11 Selecting the type of DB2 UDB installation . . . . . . . . . . . . . . . . . . . . . . 155 4-12 Information to configure DB2 UDB Administration Client version . . . . . 156 4-13 Specifying the DB2 UDB Administration Client directory . . . . . . . . . . . 157 4-14 Information data to create and configure Tivoli Workload Scheduler database. . . . . . . . . . . . . . . . . . . . . . . . . . . . . . . . . . . . . . . . . . . . . . . . . 158 4-15 Information about db2inst1 user . . . . . . . . . . . . . . . . . . . . . . . . . . . . . . 159 4-16 Installation settings information: Part 1 . . . . . . . . . . . . . . . . . . . . . . . . . 160 4-17 Installation settings information: Part 2 . . . . . . . . . . . . . . . . . . . . . . . . . 161 4-18 Installation completed successfully . . . . . . . . . . . . . . . . . . . . . . . . . . . . 162 4-19 Selecting the installation wizard language . . . . . . . . . . . . . . . . . . . . . . 171 4-20 Welcome information . . . . . . . . . . . . . . . . . . . . . . . . . . . . . . . . . . . . . . 172 4-21 License agreement . . . . . . . . . . . . . . . . . . . . . . . . . . . . . . . . . . . . . . . . 173 4-22 Previous instance and upgrading Tivoli Workload Scheduler . . . . . . . . 174 Figures xiii
- 16. 4-23 Type of Tivoli Workload Scheduler instance to be upgraded . . . . . . . . 175 4-24 Entering the password of the Tivoli Workload Scheduler user . . . . . . . 176 4-25 Installation settings . . . . . . . . . . . . . . . . . . . . . . . . . . . . . . . . . . . . . . . . 177 4-26 Installation completed successfully . . . . . . . . . . . . . . . . . . . . . . . . . . . . 178 4-27 Selecting the installation wizard language . . . . . . . . . . . . . . . . . . . . . . 180 4-28 Welcome information . . . . . . . . . . . . . . . . . . . . . . . . . . . . . . . . . . . . . . 180 4-29 License agreement . . . . . . . . . . . . . . . . . . . . . . . . . . . . . . . . . . . . . . . . 181 4-30 Previous instance and upgrading Tivoli Workload Scheduler . . . . . . . . 182 4-31 Type of Tivoli Workload Scheduler instance to be upgraded . . . . . . . . 183 4-32 Entering the password of the Tivoli Workload Scheduler user . . . . . . . 184 4-33 Installation settings . . . . . . . . . . . . . . . . . . . . . . . . . . . . . . . . . . . . . . . . 185 4-34 Installation completed successfully . . . . . . . . . . . . . . . . . . . . . . . . . . . . 186 4-35 Selecting the installation wizard language . . . . . . . . . . . . . . . . . . . . . . 198 4-36 Welcome information . . . . . . . . . . . . . . . . . . . . . . . . . . . . . . . . . . . . . . 198 4-37 License agreement . . . . . . . . . . . . . . . . . . . . . . . . . . . . . . . . . . . . . . . . 199 4-38 Previous instance and upgrading Tivoli Workload Scheduler . . . . . . . . 200 4-39 Type of Tivoli Workload Scheduler instance to be upgraded . . . . . . . . 201 4-40 Previous backup and export destination directory . . . . . . . . . . . . . . . . 202 4-41 Entering the password of the Tivoli Workload Scheduler user . . . . . . . 203 4-42 Ports used by IBM WebSphere Application Server. . . . . . . . . . . . . . . . 204 4-43 Specifying the type of DB2 UDB installation . . . . . . . . . . . . . . . . . . . . . 205 4-44 Information to configure DB2 UDB Enterprise Server Edition V8.2 . . . 206 4-45 DB2 UDB Enterprise Server Edition V8.2 directory . . . . . . . . . . . . . . . 207 4-46 Reviewing information to configure Tivoli Workload Scheduler . . . . . . 208 4-47 Information about db2inst1 user . . . . . . . . . . . . . . . . . . . . . . . . . . . . . . 209 4-48 Installation settings: Part 1 . . . . . . . . . . . . . . . . . . . . . . . . . . . . . . . . . . 210 4-49 Installation settings: Part 2 . . . . . . . . . . . . . . . . . . . . . . . . . . . . . . . . . . 211 4-50 Installation completed successfully . . . . . . . . . . . . . . . . . . . . . . . . . . . . 212 4-51 Selecting the installation wizard language . . . . . . . . . . . . . . . . . . . . . . 261 4-52 Welcome information . . . . . . . . . . . . . . . . . . . . . . . . . . . . . . . . . . . . . . 262 4-53 License agreement . . . . . . . . . . . . . . . . . . . . . . . . . . . . . . . . . . . . . . . . 263 4-54 Previous instance and upgrading Tivoli Workload Scheduler . . . . . . . . 264 4-55 Type of Tivoli Workload Scheduler instance to be upgraded . . . . . . . . 265 4-56 Entering the password of the Tivoli Workload Scheduler user . . . . . . . 266 4-57 Installation settings . . . . . . . . . . . . . . . . . . . . . . . . . . . . . . . . . . . . . . . . 267 4-58 Installation completed successfully . . . . . . . . . . . . . . . . . . . . . . . . . . . . 268 4-59 Selecting the installation wizard language . . . . . . . . . . . . . . . . . . . . . . 278 4-60 Welcome information . . . . . . . . . . . . . . . . . . . . . . . . . . . . . . . . . . . . . . 279 4-61 License agreement . . . . . . . . . . . . . . . . . . . . . . . . . . . . . . . . . . . . . . . . 280 4-62 Previous instance and upgrading Tivoli Workload Scheduler . . . . . . . . 281 4-63 Type of Tivoli Workload Scheduler instance to be upgraded . . . . . . . . 282 4-64 Previous backup and export destination directory . . . . . . . . . . . . . . . . 283 4-65 Entering the password of the Tivoli Workload Scheduler user . . . . . . . 284 xiv Getting Started with IBM Tivoli Workload Scheduler V8.3
- 17. 4-66 Ports used by IBM WebSphere Application Server. . . . . . . . . . . . . . . . 285 4-67 Specifying the type of DB2 UDB installation . . . . . . . . . . . . . . . . . . . . . 286 4-68 Information to configure DB2 UDB Enterprise Server Edition V8.2 . . . 287 4-69 DB2 UDB Enterprise Server Edition V8.2 directory . . . . . . . . . . . . . . . 288 4-70 Reviewing information to configure Tivoli Workload Scheduler . . . . . . 289 4-71 Information about db2inst1 user . . . . . . . . . . . . . . . . . . . . . . . . . . . . . . 290 4-72 Installation settings: Part 1 . . . . . . . . . . . . . . . . . . . . . . . . . . . . . . . . . . 291 4-73 Installation settings: Part 2 . . . . . . . . . . . . . . . . . . . . . . . . . . . . . . . . . . 292 4-74 Installation completed successfully . . . . . . . . . . . . . . . . . . . . . . . . . . . . 293 5-1 Choosing DB2 Universal Database installation action panel . . . . . . . . . 329 5-2 Specifying the location of the DB2 sqllib directory . . . . . . . . . . . . . . . . . 331 5-3 DB2 server configuration information . . . . . . . . . . . . . . . . . . . . . . . . . . . 332 5-4 DB2 client configuration information: Part 1 . . . . . . . . . . . . . . . . . . . . . . 334 5-5 DB2 client configuration information: Part 2 . . . . . . . . . . . . . . . . . . . . . . 335 5-6 Database configuration information . . . . . . . . . . . . . . . . . . . . . . . . . . . . 336 5-7 JSC action menu including browse and unlock options . . . . . . . . . . . . . 348 5-8 JSC all job definitions list showing JOB1 as locked . . . . . . . . . . . . . . . . 348 5-9 JSC object unlocked while being edited: Warning message. . . . . . . . . . 349 5-10 JSC engine properties panel. . . . . . . . . . . . . . . . . . . . . . . . . . . . . . . . . 390 6-1 Connection between JSC and Tivoli Workload Scheduler engine . . . . . 397 6-2 Tivoli Workload Scheduler environment with JSC . . . . . . . . . . . . . . . . . 398 6-3 Generating a new plan . . . . . . . . . . . . . . . . . . . . . . . . . . . . . . . . . . . . . . 400 6-4 Job scheduling instance plan view . . . . . . . . . . . . . . . . . . . . . . . . . . . . . 401 6-5 Defining a new job. . . . . . . . . . . . . . . . . . . . . . . . . . . . . . . . . . . . . . . . . . 402 6-6 Job stream definition: General properties . . . . . . . . . . . . . . . . . . . . . . . . 404 6-7 Job Stream definition: Dependency resolution . . . . . . . . . . . . . . . . . . . . 406 6-8 Job stream definition: Creating a weekly run cycle . . . . . . . . . . . . . . . . . 408 6-9 Job stream: Explorer view. . . . . . . . . . . . . . . . . . . . . . . . . . . . . . . . . . . . 409 6-10 Job Stream Editor: Multiple job selection . . . . . . . . . . . . . . . . . . . . . . . 410 6-11 Master domain manager definition . . . . . . . . . . . . . . . . . . . . . . . . . . . . 411 6-12 Exclusive locking and JSC options . . . . . . . . . . . . . . . . . . . . . . . . . . . . 413 7-1 Three-and-a-half calendar days. . . . . . . . . . . . . . . . . . . . . . . . . . . . . . . . 416 7-2 Default production day . . . . . . . . . . . . . . . . . . . . . . . . . . . . . . . . . . . . . . 417 7-3 Production day that follows calendar day . . . . . . . . . . . . . . . . . . . . . . . . 418 7-4 Production day that is shorter than 24-hour calendar day . . . . . . . . . . . 419 7-5 Production day that is longer than 24-hour calendar day . . . . . . . . . . . . 420 7-6 Relationship between production day and run cycle for production day matching calendar day . . . . . . . . . . . . . . . . . . . . . . . . . . . . . . . . . . . . . . 430 7-7 Determining job stream start after changing start of production day. . . . 431 7-8 Relationship between production day and run cycle for a 10-hour production day relationship . . . . . . . . . . . . . . . . . . . . . . . . . . . . . . . . . . . . . . . . . . . 433 7-9 Creating the production day on the master domain manager . . . . . . . . . 435 7-10 Relationship between JnextPlan, production control database, and Figures xv
- 18. production day . . . . . . . . . . . . . . . . . . . . . . . . . . . . . . . . . . . . . . . . . . . . 436 8-1 Tivoli Workload Scheduler process flow . . . . . . . . . . . . . . . . . . . . . . . . . 468 9-1 Integrating Tivoli Workload Scheduler with business processes through WebSphere Business Integration Modeler . . . . . . . . . . . . . . . . . . . . . . . 480 10-1 Wizard window after an installation failure . . . . . . . . . . . . . . . . . . . . . . 487 10-2 Step List window showing a failed step. . . . . . . . . . . . . . . . . . . . . . . . . 490 10-3 Step status tab . . . . . . . . . . . . . . . . . . . . . . . . . . . . . . . . . . . . . . . . . . . 492 10-4 Step properties tab . . . . . . . . . . . . . . . . . . . . . . . . . . . . . . . . . . . . . . . . 493 10-5 Step output tab . . . . . . . . . . . . . . . . . . . . . . . . . . . . . . . . . . . . . . . . . . . 494 11-1 Scenario 1 . . . . . . . . . . . . . . . . . . . . . . . . . . . . . . . . . . . . . . . . . . . . . . . 511 11-2 Scenario 2 . . . . . . . . . . . . . . . . . . . . . . . . . . . . . . . . . . . . . . . . . . . . . . . 513 11-3 DB2 setup . . . . . . . . . . . . . . . . . . . . . . . . . . . . . . . . . . . . . . . . . . . . . . . 517 11-4 Installing DB2 . . . . . . . . . . . . . . . . . . . . . . . . . . . . . . . . . . . . . . . . . . . . 517 11-5 Selecting the installation type . . . . . . . . . . . . . . . . . . . . . . . . . . . . . . . . 518 11-6 Selecting DB2 UDB Enterprise Server Edition . . . . . . . . . . . . . . . . . . . 518 11-7 Creating the DB2 Administration Server user . . . . . . . . . . . . . . . . . . . . 519 11-8 Creating a DB2 instance . . . . . . . . . . . . . . . . . . . . . . . . . . . . . . . . . . . . 519 11-9 Selecting the instance type . . . . . . . . . . . . . . . . . . . . . . . . . . . . . . . . . . 520 11-10 Instance owner, group, and home directory . . . . . . . . . . . . . . . . . . . . 520 11-11 Fenced user . . . . . . . . . . . . . . . . . . . . . . . . . . . . . . . . . . . . . . . . . . . . 521 11-12 Local contact list . . . . . . . . . . . . . . . . . . . . . . . . . . . . . . . . . . . . . . . . . 521 11-13 DB2 installation progress . . . . . . . . . . . . . . . . . . . . . . . . . . . . . . . . . . 522 11-14 Status report . . . . . . . . . . . . . . . . . . . . . . . . . . . . . . . . . . . . . . . . . . . . 523 11-15 Setup installer . . . . . . . . . . . . . . . . . . . . . . . . . . . . . . . . . . . . . . . . . . . 537 11-16 Configuring the agent . . . . . . . . . . . . . . . . . . . . . . . . . . . . . . . . . . . . . 537 11-17 Checking the database . . . . . . . . . . . . . . . . . . . . . . . . . . . . . . . . . . . . 538 11-18 Defining database tables. . . . . . . . . . . . . . . . . . . . . . . . . . . . . . . . . . . 539 A-1 Tivoli Workload Scheduler Notification Solution flow diagram . . . . . . . . 550 A-2 Job has been suspended . . . . . . . . . . . . . . . . . . . . . . . . . . . . . . . . . . . . 557 A-3 Job has been canceled. . . . . . . . . . . . . . . . . . . . . . . . . . . . . . . . . . . . . . 558 A-4 Job ended with an internal status of FAILED . . . . . . . . . . . . . . . . . . . . . 558 A-5 Job has continued. . . . . . . . . . . . . . . . . . . . . . . . . . . . . . . . . . . . . . . . . . 559 A-6 Job has been canceled. . . . . . . . . . . . . . . . . . . . . . . . . . . . . . . . . . . . . . 559 A-7 Configuring the termination deadline . . . . . . . . . . . . . . . . . . . . . . . . . . . 564 A-8 Configuring the Latest Start Time - Suppress. . . . . . . . . . . . . . . . . . . . . 566 A-9 Configuring the Latest Start Time - Continue . . . . . . . . . . . . . . . . . . . . . 567 A-10 Configuring the Latest Start Time - Cancel. . . . . . . . . . . . . . . . . . . . . . 568 A-11 Configuring the return code mapping . . . . . . . . . . . . . . . . . . . . . . . . . . 571 xvi Getting Started with IBM Tivoli Workload Scheduler V8.3
- 19. Tables 2-1 Tivoli Workload Scheduler Version 8.3 master installation requirements on AIX . . . . . . . . . . . . . . . . . . . . . . . . . . . . . . . . . . . . . . . . . . . . . . . . . . . . . . 12 2-2 AIX operating system prerequisites for IBM DB2 UDB Version 8.2 . . . . . 14 2-3 Tivoli Workload Scheduler Version 8.3 master installation requirements on HP-UX . . . . . . . . . . . . . . . . . . . . . . . . . . . . . . . . . . . . . . . . . . . . . . . . . . . 16 2-4 HP-UX operating system prerequisites for IBM DB2 UDB Version 8.2. . . 18 2-5 HP-UX recommended values for kernel configuration parameters . . . . . . 19 2-6 Tivoli Workload Scheduler Version 8.3 master installation requirements on Solaris. . . . . . . . . . . . . . . . . . . . . . . . . . . . . . . . . . . . . . . . . . . . . . . . . . . . 21 2-7 Solaris operating system prerequisites for IBM DB2 UDB Version 8.2 . . . 23 2-8 Tivoli Workload Scheduler Version 8.3 master installation requirements on Linux . . . . . . . . . . . . . . . . . . . . . . . . . . . . . . . . . . . . . . . . . . . . . . . . . . . . . 25 2-9 Tivoli Workload Scheduler Version 8.3 master installation requirements on Windows . . . . . . . . . . . . . . . . . . . . . . . . . . . . . . . . . . . . . . . . . . . . . . . . . . 32 2-10 Windows OS prerequisites for IBM DB2 UDB Version 8.2 . . . . . . . . . . . 33 3-1 Symbolic link variables and paths . . . . . . . . . . . . . . . . . . . . . . . . . . . . . . . 46 3-2 Job Scheduling Console new engine options . . . . . . . . . . . . . . . . . . . . . . 72 3-3 The workstation definition options. . . . . . . . . . . . . . . . . . . . . . . . . . . . . . . 75 3-4 Windows workstation definition options . . . . . . . . . . . . . . . . . . . . . . . . . . 80 3-5 Symbolic link variables and paths . . . . . . . . . . . . . . . . . . . . . . . . . . . . . . . 89 3-6 Explanation of the fields . . . . . . . . . . . . . . . . . . . . . . . . . . . . . . . . . . . . . 111 5-1 Rules applied when deleting an object referenced by another object . . . 344 5-2 WebSphere application server port numbers . . . . . . . . . . . . . . . . . . . . . 356 5-3 Trace modes . . . . . . . . . . . . . . . . . . . . . . . . . . . . . . . . . . . . . . . . . . . . . . 359 8-1 Valid internal job states . . . . . . . . . . . . . . . . . . . . . . . . . . . . . . . . . . . . . . 439 8-2 Global options parameters in Tivoli Workload Scheduler . . . . . . . . . . . . 446 8-3 Shortcuts for encryption ciphers . . . . . . . . . . . . . . . . . . . . . . . . . . . . . . . 458 8-4 Local options parameters in Tivoli Workload Scheduler . . . . . . . . . . . . . 465 8-5 Options for tuning job processing on a workstation . . . . . . . . . . . . . . . . 470 8-6 Maximum tweaked scenario . . . . . . . . . . . . . . . . . . . . . . . . . . . . . . . . . . 472 11-1 Substitute embedded variables. . . . . . . . . . . . . . . . . . . . . . . . . . . . . . . 524 A-1 Naming convention used by the tws_event_mon.pl script . . . . . . . . . . . 549 A-2 Format of the JRL files . . . . . . . . . . . . . . . . . . . . . . . . . . . . . . . . . . . . . . 554 A-3 Format of the current_timestamp file . . . . . . . . . . . . . . . . . . . . . . . . . . . 555 © Copyright IBM Corp. 2006. All rights reserved. xvii
- 20. xviii Getting Started with IBM Tivoli Workload Scheduler V8.3
- 21. Examples 2-1 Sample output from db2osconf -r . . . . . . . . . . . . . . . . . . . . . . . . . . . . . . . 24 2-2 Output from make install . . . . . . . . . . . . . . . . . . . . . . . . . . . . . . . . . . . . . . 29 2-3 Sample output from the ipcs -l command . . . . . . . . . . . . . . . . . . . . . . . . . 30 4-1 Copying CDn/operating_system/bin/composer81 to TWShome/bin . . . . 121 4-2 Setting permission, owner, and group of composer81 command . . . . . . 121 4-3 Dumping the data of Tivoli Workload Scheduler V8.1. . . . . . . . . . . . . . . 122 4-4 Copying the migrtool.tar file to TWShome directory . . . . . . . . . . . . . . . . 123 4-5 List of files in the migrtool.tar file and backups in TWShome . . . . . . . . . 123 4-6 Extracting the files from migrtool.tar into TWShome . . . . . . . . . . . . . . . . 124 4-7 Setting permissions, owner, and group of the files into TWShome. . . . . 124 4-8 Creating a symbolic link in /usr/lib directory . . . . . . . . . . . . . . . . . . . . . . 125 4-9 Setting Tivoli Workload Scheduler variables and running the dumpsec command . . . . . . . . . . . . . . . . . . . . . . . . . . . . . . . . . . . . . . . . . . . . . . . . 125 4-10 Running the migrfwkusr script . . . . . . . . . . . . . . . . . . . . . . . . . . . . . . . . 126 4-11 Removing the duplicated users and adding the tws83 user in output_security_file. . . . . . . . . . . . . . . . . . . . . . . . . . . . . . . . . . . . . . . . . 128 4-12 Running dumpsec to back up the security file. . . . . . . . . . . . . . . . . . . . 128 4-13 Running makesec to add new users in the security file . . . . . . . . . . . . 129 4-14 Creating a symbolic link in the /usr/lib directory . . . . . . . . . . . . . . . . . . 130 4-15 Copying /Tivoli/tws83/bin/libHTTP*.a to /Tivoli/tws81/bin directory. . . . 131 4-16 Changing group permission of all files in /Tivoli/tws81/mozart to read . 131 4-17 Running the optman miggrunnb command . . . . . . . . . . . . . . . . . . . . . . 131 4-18 Running the optman miggopts command . . . . . . . . . . . . . . . . . . . . . . . 132 4-19 Running the optman ls command . . . . . . . . . . . . . . . . . . . . . . . . . . . . . 133 4-20 Running the datamigrate command . . . . . . . . . . . . . . . . . . . . . . . . . . . 135 4-21 Running the composer display command . . . . . . . . . . . . . . . . . . . . . . . 136 4-22 Setting the new master domain manager properties . . . . . . . . . . . . . . 136 4-23 Checking jobs and job streams related to the previous cpuname. . . . . 136 4-24 Deleting FINAL job stream related to the previous cpuname . . . . . . . . 137 4-25 Deleting Jnextday job related to the previous cpuname . . . . . . . . . . . . 137 4-26 Deleting the previous cpuname from the new Tivoli Workload Scheduler Version 8.3 . . . . . . . . . . . . . . . . . . . . . . . . . . . . . . . . . . . . . . . . . . . . . . . 137 4-27 Running the datamigrate command . . . . . . . . . . . . . . . . . . . . . . . . . . . 137 4-28 Running the datamigrate command . . . . . . . . . . . . . . . . . . . . . . . . . . . 138 4-29 Running the conman switchmgr command . . . . . . . . . . . . . . . . . . . . . . 139 4-30 Running the optman chg cf=ALL command . . . . . . . . . . . . . . . . . . . . . 139 4-31 Running the optman ls command . . . . . . . . . . . . . . . . . . . . . . . . . . . . . 140 4-32 Running JnextPlan in new master domain manager to create a plan . . 141 © Copyright IBM Corp. 2006. All rights reserved. xix
- 22. 4-33 Running composer add to add the new job stream called FINAL . . . . . 143 4-34 Running composer display to see the new job stream called FINAL . . 144 4-35 Running conman sbs to submit the new FINAL job stream . . . . . . . . . 146 4-36 Running conman ss to see the FINAL job stream. . . . . . . . . . . . . . . . . 146 4-37 Running conman sj to see the jobs of the FINAL job stream . . . . . . . . 147 4-38 Running the SETUP.bin command . . . . . . . . . . . . . . . . . . . . . . . . . . . . 148 4-39 Removing the Symphony, Sinfonia, Symnew and *msg files . . . . . . . . 163 4-40 Running the StartUp command. . . . . . . . . . . . . . . . . . . . . . . . . . . . . . . 163 4-41 Running conman link cpu=bkm_cpuname . . . . . . . . . . . . . . . . . . . . . . 163 4-42 Running conman and providing Tivoli Workload Scheduler user and password . . . . . . . . . . . . . . . . . . . . . . . . . . . . . . . . . . . . . . . . . . . . . . . . 163 4-43 Copying TWS83_UPGRADE_BACKUP_BDM.txt. . . . . . . . . . . . . . . . . 164 4-44 Editing TWS83_UPGRADE_BACKUP_BDM.txt file . . . . . . . . . . . . . . . 164 4-45 Running SETUP.bin -options . . . . . . . . . . . . . . . . . . . . . . . . . . . . . . . . 170 4-46 Running the SETUP.exe command . . . . . . . . . . . . . . . . . . . . . . . . . . . 171 4-47 Removing the Symphony, Sinfonia, Symnew and *msg files . . . . . . . . 179 4-48 Running the StartUp command. . . . . . . . . . . . . . . . . . . . . . . . . . . . . . . 179 4-49 Running conman link cpu=fta_cpuname . . . . . . . . . . . . . . . . . . . . . . . . 179 4-50 Running the SETUP.bin command . . . . . . . . . . . . . . . . . . . . . . . . . . . . 179 4-51 Removing the Symphony, Sinfonia, Symnew and *msg files . . . . . . . . 186 4-52 Running the StartUp command. . . . . . . . . . . . . . . . . . . . . . . . . . . . . . . 187 4-53 Running conman link cpu=fta_cpuname . . . . . . . . . . . . . . . . . . . . . . . . 187 4-54 Copying TWS83_UPGRADE_Agent.txt . . . . . . . . . . . . . . . . . . . . . . . . 187 4-55 Editing TWS83_UPGRADE_Agent.txt file. . . . . . . . . . . . . . . . . . . . . . . 187 4-56 Running SETUP.bin -options . . . . . . . . . . . . . . . . . . . . . . . . . . . . . . . . 190 4-57 Changing the directory to TWShome . . . . . . . . . . . . . . . . . . . . . . . . . . 190 4-58 Running the twsinst script . . . . . . . . . . . . . . . . . . . . . . . . . . . . . . . . . . . 190 4-59 Backup directory . . . . . . . . . . . . . . . . . . . . . . . . . . . . . . . . . . . . . . . . . . 191 4-60 Sample twsinst script . . . . . . . . . . . . . . . . . . . . . . . . . . . . . . . . . . . . . . 192 4-61 Rolling back to a previous instance. . . . . . . . . . . . . . . . . . . . . . . . . . . . 192 4-62 Running the winstsp command . . . . . . . . . . . . . . . . . . . . . . . . . . . . . . . 194 4-63 Running the conman unlink command . . . . . . . . . . . . . . . . . . . . . . . . . 194 4-64 Running the conman stop command . . . . . . . . . . . . . . . . . . . . . . . . . . 194 4-65 Running the conman shut command . . . . . . . . . . . . . . . . . . . . . . . . . . 195 4-66 Running the SETUP.bin command . . . . . . . . . . . . . . . . . . . . . . . . . . . . 197 4-67 Message indicating that the data is imported . . . . . . . . . . . . . . . . . . . . 213 4-68 Copying TWS83_UPGRADE_MDM.txt . . . . . . . . . . . . . . . . . . . . . . . . . 213 4-69 Editing the TWS83_UPGRADE_MDM.txt file . . . . . . . . . . . . . . . . . . . . 213 4-70 Running SETUP.bin -options . . . . . . . . . . . . . . . . . . . . . . . . . . . . . . . . 220 4-71 Running the optman chg cf=ALL command . . . . . . . . . . . . . . . . . . . . . 221 4-72 Running the optman ls command . . . . . . . . . . . . . . . . . . . . . . . . . . . . . 221 4-73 Running JnextPlan in new master domain manager to create a plan . . 222 4-74 Running the optman chg cf=YES command . . . . . . . . . . . . . . . . . . . . . 228 xx Getting Started with IBM Tivoli Workload Scheduler V8.3
- 23. 4-75 Running composer add to add new job stream called FINAL . . . . . . . . 228 4-76 Running composer display to see new FINAL job stream . . . . . . . . . . 229 4-77 Running conman cs to cancel the FINAL job stream . . . . . . . . . . . . . . 231 4-78 Running conman sbs to submit the new FINAL job stream . . . . . . . . . 231 4-79 Running conman ss to see the new FINAL job stream . . . . . . . . . . . . . 232 4-80 Running conman sj to see the jobs . . . . . . . . . . . . . . . . . . . . . . . . . . . . 232 4-81 Copying CDn/operating_system/bin/composer821 to TWShome/bin . . 235 4-82 Setting permission, owner and group of composer821 command . . . . 235 4-83 Dumping data of Tivoli Workload Scheduler V8.2. . . . . . . . . . . . . . . . . 235 4-84 Copying the migrtool.tar file to TWShome directory . . . . . . . . . . . . . . . 237 4-85 List of files in the migrtool.tar file and backups in TWShome . . . . . . . . 237 4-86 Extracting files from migrtool.tar into TWShome . . . . . . . . . . . . . . . . . . 237 4-87 Setting permissions, owner, and group of the files into TWShome. . . . 238 4-88 Setting Tivoli Workload Scheduler variables and running dumpsec command . . . . . . . . . . . . . . . . . . . . . . . . . . . . . . . . . . . . . . . . . . . . . . . . 238 4-89 Running the migrfwkusr script . . . . . . . . . . . . . . . . . . . . . . . . . . . . . . . . 239 4-90 Removing duplicated users and adding tws830 user in the output_security_file. . . . . . . . . . . . . . . . . . . . . . . . . . . . . . . . . . . . . . . . . 241 4-91 Running dumpsec to back up the security file. . . . . . . . . . . . . . . . . . . . 241 4-92 Running makesec to add new users in the security file . . . . . . . . . . . . 242 4-93 Creating a symbolic link in /usr/lib directory . . . . . . . . . . . . . . . . . . . . . 243 4-94 Copying /usr/local/tws830/bin/libHTTP*.so to /usr/local/tws820/bin directory . . . . . . . . . . . . . . . . . . . . . . . . . . . . . . . . . . . . . . . . . . . . . . . . . 244 4-95 Changing group permission of all files in /usr/local/tws830/mozart. . . . 244 4-96 Running the optman miggrunnb command . . . . . . . . . . . . . . . . . . . . . . 244 4-97 Running the optman miggopts command . . . . . . . . . . . . . . . . . . . . . . . 245 4-98 Running the optman ls command . . . . . . . . . . . . . . . . . . . . . . . . . . . . . 246 4-99 Running the datamigrate command . . . . . . . . . . . . . . . . . . . . . . . . . . . 247 4-100 Running the composer display command . . . . . . . . . . . . . . . . . . . . . . 248 4-101 Setting the new master domain manager properties . . . . . . . . . . . . . 249 4-102 Checking jobs and job streams related to the previous cpuname. . . . 249 4-103 Deleting FINAL job stream related to the previous cpuname . . . . . . . 249 4-104 Deleting Jnextday job related to the previous cpuname . . . . . . . . . . . 249 4-105 Deleting the previous cpuname from the new Tivoli Workload Scheduler Version 8.3 . . . . . . . . . . . . . . . . . . . . . . . . . . . . . . . . . . . . . . . . . . . . . . . 250 4-106 Running the datamigrate command . . . . . . . . . . . . . . . . . . . . . . . . . . 250 4-107 Running the datamigrate command . . . . . . . . . . . . . . . . . . . . . . . . . . 251 4-108 Running the conman switchmgr command . . . . . . . . . . . . . . . . . . . . . 252 4-109 Running the optman cfg cf=ALL command . . . . . . . . . . . . . . . . . . . . . 252 4-110 Running the optman ls command . . . . . . . . . . . . . . . . . . . . . . . . . . . . 252 4-111 Running JnextPlan in new master domain manager to create a plan . 253 4-112 Running composer add to add the new job stream called FINAL . . . . 256 4-113 Running composer display to see the new job stream called FINAL . 257 Examples xxi
- 24. 4-114 Running conman sbs to submit new FINAL job stream . . . . . . . . . . . 258 4-115 Running conman ss to see the new FINAL job stream . . . . . . . . . . . . 259 4-116 Running conman sj to see the jobs of the new FINAL job stream . . . 259 4-117 Running the SETUP.bin command . . . . . . . . . . . . . . . . . . . . . . . . . . . 261 4-118 Removing the Symphony, Sinfonia, Symnew and *msg files . . . . . . . 269 4-119 Running the StartUp command. . . . . . . . . . . . . . . . . . . . . . . . . . . . . . 269 4-120 Running conman link cpu=fta_cpuname . . . . . . . . . . . . . . . . . . . . . . . 269 4-121 Copying TWS83_UPGRADE_Agent.txt . . . . . . . . . . . . . . . . . . . . . . . 269 4-122 Editing TWS83_UPGRADE_Agent.txt file. . . . . . . . . . . . . . . . . . . . . . 270 4-123 Running SETUP.bin -options . . . . . . . . . . . . . . . . . . . . . . . . . . . . . . . 272 4-124 Changing the directory to TWShome . . . . . . . . . . . . . . . . . . . . . . . . . 272 4-125 Running the twsinst script . . . . . . . . . . . . . . . . . . . . . . . . . . . . . . . . . . 273 4-126 Backup directory . . . . . . . . . . . . . . . . . . . . . . . . . . . . . . . . . . . . . . . . . 273 4-127 Sample twsinst script . . . . . . . . . . . . . . . . . . . . . . . . . . . . . . . . . . . . . 274 4-128 Rolling back to a previous instance. . . . . . . . . . . . . . . . . . . . . . . . . . . 274 4-129 winstsp command . . . . . . . . . . . . . . . . . . . . . . . . . . . . . . . . . . . . . . . . 276 4-130 Running the SETUP.bin command . . . . . . . . . . . . . . . . . . . . . . . . . . . 278 4-131 Message indicating that the data is imported . . . . . . . . . . . . . . . . . . . 294 4-132 Running the optman chg cf=ALL command . . . . . . . . . . . . . . . . . . . . 294 4-133 Running the optman ls command . . . . . . . . . . . . . . . . . . . . . . . . . . . . 295 4-134 Running JnextPlan in new master domain manager to create a plan . 296 4-135 Running the optman chg cf=YES command . . . . . . . . . . . . . . . . . . . . 299 4-136 Running composer add to add the new FINAL job stream . . . . . . . . . 300 4-137 Running composer display to see the new FINAL job stream . . . . . . 300 4-138 Running conman cs to cancel the FINAL job stream . . . . . . . . . . . . . 302 4-139 Running conman sbs to submit the new FINAL job stream . . . . . . . . 302 4-140 Running conman ss to see the new job stream called FINAL. . . . . . . 303 4-141 Running conman sj to see the jobs . . . . . . . . . . . . . . . . . . . . . . . . . . . 303 4-142 Copying CDn/operating_system/bin/composer81 to TWShome/bin . . 305 4-143 Setting permission, owner and group of composer821 command . . . 306 4-144 Dumping data of Tivoli Workload Scheduler V8.2.1 . . . . . . . . . . . . . . 306 4-145 Copying migrtool.tar file to the TWShome directory . . . . . . . . . . . . . . 308 4-146 Backup of the files listed in migrtool.tar file . . . . . . . . . . . . . . . . . . . . . 308 4-147 Setting Tivoli Workload Scheduler variables and running dumpsec command . . . . . . . . . . . . . . . . . . . . . . . . . . . . . . . . . . . . . . . . . . . . . . . . 308 4-148 Running the migrfwkusr script. . . . . . . . . . . . . . . . . . . . . . . . . . . . . . . 309 4-149 Removing the duplicated users and adding the tws83 user in output_security_file. . . . . . . . . . . . . . . . . . . . . . . . . . . . . . . . . . . . . . . . . 311 4-150 Running dumpsec to back up security file. . . . . . . . . . . . . . . . . . . . . . 313 4-151 Running makesec to add new users in the security file . . . . . . . . . . . 313 4-152 Syntax of the datamigrate command . . . . . . . . . . . . . . . . . . . . . . . . . 314 4-153 Running optman miggrunnb to import run number . . . . . . . . . . . . . . . 314 4-154 Running optman miggrunnb to import run number . . . . . . . . . . . . . . . 315 xxii Getting Started with IBM Tivoli Workload Scheduler V8.3
- 25. 4-155 Running optman ls . . . . . . . . . . . . . . . . . . . . . . . . . . . . . . . . . . . . . . . 317 4-156 Running the datamigrate command . . . . . . . . . . . . . . . . . . . . . . . . . . 319 4-157 Running the composer display command . . . . . . . . . . . . . . . . . . . . . . 319 4-158 Checking jobs and job streams related to the previous cpuname. . . . 319 4-159 Deleting the FINAL job stream related to the previous cpuname . . . . 319 4-160 Deleting Jnextday job related to the previous cpuname . . . . . . . . . . . 320 4-161 Deleting the previous cpuname from the new Tivoli Workload Scheduler Version 8.3 . . . . . . . . . . . . . . . . . . . . . . . . . . . . . . . . . . . . . . . . . . . . . . . 320 4-162 Running the datamigrate command . . . . . . . . . . . . . . . . . . . . . . . . . . 320 4-163 Running the datamigrate command . . . . . . . . . . . . . . . . . . . . . . . . . . 321 4-164 Running the JnextPlan command . . . . . . . . . . . . . . . . . . . . . . . . . . . . 322 5-1 Starting the new DB2 instance . . . . . . . . . . . . . . . . . . . . . . . . . . . . . . . . 339 5-2 The /etc/service entries created by db2icrt . . . . . . . . . . . . . . . . . . . . . . . 339 5-3 Making a backup copy of the Tivoli Workload Scheduler V8.3 database 342 5-4 Restoring the Tivoli Workload Scheduler database from a backup . . . . 343 5-5 Renaming database objects using composer rename . . . . . . . . . . . . . . 345 5-6 Locking a job using the composer lock command . . . . . . . . . . . . . . . . . 350 5-7 Unlocking a job using the composer unlock command . . . . . . . . . . . . . . 350 5-8 Forcing composer to unlock an object . . . . . . . . . . . . . . . . . . . . . . . . . . 351 5-9 Collecting current database statistics . . . . . . . . . . . . . . . . . . . . . . . . . . . 353 5-10 Reorganizing the database . . . . . . . . . . . . . . . . . . . . . . . . . . . . . . . . . . 353 5-11 Starting WebSphere Application Server Express . . . . . . . . . . . . . . . . . 356 5-12 Stopping WebSphere Application Server Express . . . . . . . . . . . . . . . . 357 5-13 Application server status when not running . . . . . . . . . . . . . . . . . . . . . 358 5-14 Application server status when running . . . . . . . . . . . . . . . . . . . . . . . . 359 5-15 Setting tracing level to tws_all. . . . . . . . . . . . . . . . . . . . . . . . . . . . . . . . 360 5-16 Backing up the application server configuration files . . . . . . . . . . . . . . 361 5-17 Restoring application server configuration files. . . . . . . . . . . . . . . . . . . 362 5-18 Viewing data source properties. . . . . . . . . . . . . . . . . . . . . . . . . . . . . . . 363 5-19 Changing data source properties . . . . . . . . . . . . . . . . . . . . . . . . . . . . . 366 5-20 Showing application server host properties . . . . . . . . . . . . . . . . . . . . . 367 5-21 Changing host properties . . . . . . . . . . . . . . . . . . . . . . . . . . . . . . . . . . . 369 5-22 Viewing security properties . . . . . . . . . . . . . . . . . . . . . . . . . . . . . . . . . . 370 5-23 Changing security properties . . . . . . . . . . . . . . . . . . . . . . . . . . . . . . . . 373 5-24 Encrypting passwords in the soap.client.props properties file . . . . . . . 376 5-25 User account definitions in LDIF format . . . . . . . . . . . . . . . . . . . . . . . . 378 5-26 Adding the DN suffix . . . . . . . . . . . . . . . . . . . . . . . . . . . . . . . . . . . . . . . 380 5-27 Importing the LDIF file. . . . . . . . . . . . . . . . . . . . . . . . . . . . . . . . . . . . . . 380 5-28 LDAP search results . . . . . . . . . . . . . . . . . . . . . . . . . . . . . . . . . . . . . . . 381 5-29 Security properties template configured for an LDAP server . . . . . . . . 384 5-30 Security file template example . . . . . . . . . . . . . . . . . . . . . . . . . . . . . . . 387 5-31 CLI useropts file . . . . . . . . . . . . . . . . . . . . . . . . . . . . . . . . . . . . . . . . . . 389 5-32 Stopping the application server. . . . . . . . . . . . . . . . . . . . . . . . . . . . . . . 391 Examples xxiii
- 26. 5-33 Editing the soap.client.props file . . . . . . . . . . . . . . . . . . . . . . . . . . . . . . 391 5-34 Editing the sas.client.props file . . . . . . . . . . . . . . . . . . . . . . . . . . . . . . . 391 5-35 Running the ./encryptProfileProperties.sh script . . . . . . . . . . . . . . . . . . 392 5-36 SOAP properties update . . . . . . . . . . . . . . . . . . . . . . . . . . . . . . . . . . . . 392 5-37 Updating the soap properties file . . . . . . . . . . . . . . . . . . . . . . . . . . . . . 392 7-1 Sourcing Tivoli Workload Scheduler environment variables (UNIX) . . . . 421 7-2 Sourcing Tivoli Workload Scheduler environment variables (Windows) . 421 7-3 Using the optman command to determine the start of the production day421 7-4 Using the composer command to verify the start of the production day . 422 7-5 Sourcing Tivoli Workload Scheduler environment variables (UNIX) . . . . 424 7-6 Sourcing Tivoli Workload Scheduler environment variables (Windows) . 424 7-7 Using composer command to identify length of the production day . . . . 424 7-8 Sample ON statement for production day longer than one day . . . . . . . 426 7-9 Sample ON statement for production day shorter than one day . . . . . . . 426 7-10 Determining location of MakePlan script . . . . . . . . . . . . . . . . . . . . . . . . 426 7-11 Portion of MakePlan script that calls planman in default installation. . . 427 7-12 Portion of the MakePlan script that calls planman in a 48-hour production day . . . . . . . . . . . . . . . . . . . . . . . . . . . . . . . . . . . . . . . . . . . . 428 7-13 Sample output from a successful planman run . . . . . . . . . . . . . . . . . . . 428 8-1 localopts syntax. . . . . . . . . . . . . . . . . . . . . . . . . . . . . . . . . . . . . . . . . . . . 447 8-2 Local options file example. . . . . . . . . . . . . . . . . . . . . . . . . . . . . . . . . . . . 462 9-1 Using the Tivoli Workload Scheduler API classes . . . . . . . . . . . . . . . . . 477 9-2 Querying Tivoli Workload Scheduler jobs using PHP . . . . . . . . . . . . . . . 481 11-1 The /etc/hosts file . . . . . . . . . . . . . . . . . . . . . . . . . . . . . . . . . . . . . . . . . 515 11-2 Example script for copying the database setup scripts and substituting the variables . . . . . . . . . . . . . . . . . . . . . . . . . . . . . . . . . . . . . . . . . . . . . . . . . 524 11-3 Starting DB2 . . . . . . . . . . . . . . . . . . . . . . . . . . . . . . . . . . . . . . . . . . . . . 526 11-4 Connecting to the database . . . . . . . . . . . . . . . . . . . . . . . . . . . . . . . . . 526 11-5 Creating Tivoli Workload Scheduler tables . . . . . . . . . . . . . . . . . . . . . . 526 11-6 Updating database configuration . . . . . . . . . . . . . . . . . . . . . . . . . . . . . 527 11-7 Installing Tivoli System Automation on node A . . . . . . . . . . . . . . . . . . . 527 11-8 Installing Tivoli System Automation on node B . . . . . . . . . . . . . . . . . . . 527 11-9 Upgrading Tivoli System Automation on node A. . . . . . . . . . . . . . . . . . 528 11-10 Upgrading Tivoli System Automation on node B. . . . . . . . . . . . . . . . . 528 11-11 Installing Tivoli System Automation policies . . . . . . . . . . . . . . . . . . . . 528 11-12 Preparing the Tivoli System Automation domain . . . . . . . . . . . . . . . . 528 11-13 Viewing Tivoli System Automation domain status. . . . . . . . . . . . . . . . 529 11-14 Creating the network tie breaker . . . . . . . . . . . . . . . . . . . . . . . . . . . . . 529 11-15 The netmon.cf file . . . . . . . . . . . . . . . . . . . . . . . . . . . . . . . . . . . . . . . . 529 11-16 Running the db2set command . . . . . . . . . . . . . . . . . . . . . . . . . . . . . . 530 11-17 Editing the /etc/services file. . . . . . . . . . . . . . . . . . . . . . . . . . . . . . . . . 530 11-18 Enabling HADR on the primary database . . . . . . . . . . . . . . . . . . . . . . 531 11-19 Enabling HADR on the standby database. . . . . . . . . . . . . . . . . . . . . . 531 xxiv Getting Started with IBM Tivoli Workload Scheduler V8.3
- 27. 11-20 Running commands on both nodes . . . . . . . . . . . . . . . . . . . . . . . . . . 531 11-21 Specifying the alternate server addresses . . . . . . . . . . . . . . . . . . . . . 532 11-22 Starting HADR. . . . . . . . . . . . . . . . . . . . . . . . . . . . . . . . . . . . . . . . . . . 532 11-23 Database snapshot output . . . . . . . . . . . . . . . . . . . . . . . . . . . . . . . . . 532 11-24 Running the database registration script. . . . . . . . . . . . . . . . . . . . . . . 533 11-25 The getstatus output . . . . . . . . . . . . . . . . . . . . . . . . . . . . . . . . . . . . . . 533 11-26 Running the /reghadrsalin command . . . . . . . . . . . . . . . . . . . . . . . . . 534 11-27 The getstatus output . . . . . . . . . . . . . . . . . . . . . . . . . . . . . . . . . . . . . . 534 11-28 Making dependency relationships. . . . . . . . . . . . . . . . . . . . . . . . . . . . 535 11-29 Cataloging the database nodes . . . . . . . . . . . . . . . . . . . . . . . . . . . . . 535 11-30 Preparing for Tivoli Workload Scheduler installation. . . . . . . . . . . . . . 535 11-31 Mounting Tivoli Workload Scheduler source . . . . . . . . . . . . . . . . . . . . 536 11-32 Changing application server configuration . . . . . . . . . . . . . . . . . . . . . 540 11-33 Before changing data sources . . . . . . . . . . . . . . . . . . . . . . . . . . . . . . 540 11-34 After changing data sources . . . . . . . . . . . . . . . . . . . . . . . . . . . . . . . . 540 11-35 Removing the first line. . . . . . . . . . . . . . . . . . . . . . . . . . . . . . . . . . . . . 540 11-36 Creating a new workstation in composer . . . . . . . . . . . . . . . . . . . . . . 541 11-37 Workstation definitions . . . . . . . . . . . . . . . . . . . . . . . . . . . . . . . . . . . . 541 11-38 Changed lines in Sfinal . . . . . . . . . . . . . . . . . . . . . . . . . . . . . . . . . . . . 542 11-39 The sa-tws.conf parameters . . . . . . . . . . . . . . . . . . . . . . . . . . . . . . . . 543 11-40 Configuration script . . . . . . . . . . . . . . . . . . . . . . . . . . . . . . . . . . . . . . . 543 11-41 Make configuration for Tivoli Workload Scheduler . . . . . . . . . . . . . . . 544 11-42 Output of getstatus -tree . . . . . . . . . . . . . . . . . . . . . . . . . . . . . . . . . . . 544 11-43 Manually moving the master . . . . . . . . . . . . . . . . . . . . . . . . . . . . . . . . 545 A-1 JRL file . . . . . . . . . . . . . . . . . . . . . . . . . . . . . . . . . . . . . . . . . . . . . . . . . . 549 A-2 JRL file that is used by the tws_jrl_mon.pl script . . . . . . . . . . . . . . . . . . 549 A-3 Example entries . . . . . . . . . . . . . . . . . . . . . . . . . . . . . . . . . . . . . . . . . . . 562 A-4 Example entries . . . . . . . . . . . . . . . . . . . . . . . . . . . . . . . . . . . . . . . . . . . 563 A-5 Schedule definition file example . . . . . . . . . . . . . . . . . . . . . . . . . . . . . . . 564 A-6 Schedule definition file example . . . . . . . . . . . . . . . . . . . . . . . . . . . . . . . 566 A-7 Schedule definition file example . . . . . . . . . . . . . . . . . . . . . . . . . . . . . . . 567 A-8 Schedule definition file example . . . . . . . . . . . . . . . . . . . . . . . . . . . . . . . 568 A-9 Example entries . . . . . . . . . . . . . . . . . . . . . . . . . . . . . . . . . . . . . . . . . . . 569 A-10 JNS/csv/tws_event_mon.csv file . . . . . . . . . . . . . . . . . . . . . . . . . . . . . 572 A-11 The tws_event_mon.csv entries . . . . . . . . . . . . . . . . . . . . . . . . . . . . . . 583 Examples xxv
- 28. xxvi Getting Started with IBM Tivoli Workload Scheduler V8.3
- 29. Notices This information was developed for products and services offered in the U.S.A. IBM may not offer the products, services, or features discussed in this document in other countries. Consult your local IBM representative for information on the products and services currently available in your area. Any reference to an IBM product, program, or service is not intended to state or imply that only that IBM product, program, or service may be used. Any functionally equivalent product, program, or service that does not infringe any IBM intellectual property right may be used instead. However, it is the user's responsibility to evaluate and verify the operation of any non-IBM product, program, or service. IBM may have patents or pending patent applications covering subject matter described in this document. The furnishing of this document does not give you any license to these patents. You can send license inquiries, in writing, to: IBM Director of Licensing, IBM Corporation, North Castle Drive Armonk, NY 10504-1785 U.S.A. The following paragraph does not apply to the United Kingdom or any other country where such provisions are inconsistent with local law: INTERNATIONAL BUSINESS MACHINES CORPORATION PROVIDES THIS PUBLICATION "AS IS" WITHOUT WARRANTY OF ANY KIND, EITHER EXPRESS OR IMPLIED, INCLUDING, BUT NOT LIMITED TO, THE IMPLIED WARRANTIES OF NON-INFRINGEMENT, MERCHANTABILITY OR FITNESS FOR A PARTICULAR PURPOSE. Some states do not allow disclaimer of express or implied warranties in certain transactions, therefore, this statement may not apply to you. This information could include technical inaccuracies or typographical errors. Changes are periodically made to the information herein; these changes will be incorporated in new editions of the publication. IBM may make improvements and/or changes in the product(s) and/or the program(s) described in this publication at any time without notice. Any references in this information to non-IBM Web sites are provided for convenience only and do not in any manner serve as an endorsement of those Web sites. The materials at those Web sites are not part of the materials for this IBM product and use of those Web sites is at your own risk. IBM may use or distribute any of the information you supply in any way it believes appropriate without incurring any obligation to you. Information concerning non-IBM products was obtained from the suppliers of those products, their published announcements or other publicly available sources. IBM has not tested those products and cannot confirm the accuracy of performance, compatibility or any other claims related to non-IBM products. Questions on the capabilities of non-IBM products should be addressed to the suppliers of those products. This information contains examples of data and reports used in daily business operations. To illustrate them as completely as possible, the examples include the names of individuals, companies, brands, and products. All of these names are fictitious and any similarity to the names and addresses used by an actual business enterprise is entirely coincidental. COPYRIGHT LICENSE: This information contains sample application programs in source language, which illustrates programming techniques on various operating platforms. You may copy, modify, and distribute these sample programs in any form without payment to IBM, for the purposes of developing, using, marketing or distributing application programs conforming to the application programming interface for the operating platform for which the sample programs are written. These examples have not been thoroughly tested under all conditions. IBM, therefore, cannot guarantee or imply reliability, serviceability, or function of these programs. You may copy, modify, and distribute these sample programs in any form without payment to IBM for the purposes of developing, using, marketing, or distributing application programs conforming to IBM's application programming interfaces. © Copyright IBM Corp. 2006. All rights reserved. xxvii
- 30. Trademarks The following terms are trademarks of the International Business Machines Corporation in the United States, other countries, or both: AIX 5L™ iSeries™ RS/6000® AIX® Lotus® Tivoli Enterprise Console® DB2 Universal Database™ MQSeries® Tivoli Enterprise™ DB2® NetView® Tivoli® developerWorks® Planet Tivoli® VisualAge® Domino® POWER™ WebSphere® eServer™ pSeries® xSeries® IBM® Redbooks (logo) ™ z/OS® Informix® Redbooks™ zSeries® The following terms are trademarks of other companies: SAP R/3, SAP, and SAP logos are trademarks or registered trademarks of SAP AG in Germany and in several other countries. ITIL, is a registered trademark, and a registered community trademark of the Office of Government Commerce, and is registered in the U.S. Patent and Trademark Office. Enterprise JavaBeans, EJB, Java, Java Naming and Directory Interface, Javadoc, JavaBeans, JavaServer, JavaServer Pages, JDBC, JSP, J2EE, Solaris, Sun, Sun ONE, and all Java-based trademarks are trademarks of Sun Microsystems, Inc. in the United States, other countries, or both. Active Directory, Excel, Microsoft, Windows Server, Windows, and the Windows logo are trademarks of Microsoft Corporation in the United States, other countries, or both. i386, Intel, Pentium, Intel logo, Intel Inside logo, and Intel Centrino logo are trademarks or registered trademarks of Intel Corporation or its subsidiaries in the United States, other countries, or both. UNIX is a registered trademark of The Open Group in the United States and other countries. Linux is a trademark of Linus Torvalds in the United States, other countries, or both. Other company, product, or service names may be trademarks or service marks of others. xxviii Getting Started with IBM Tivoli Workload Scheduler V8.3
- 31. Preface IBM® Tivoli® Workload Scheduler is an IBM strategic scheduling product that runs on different platforms including the mainframe. The new version of the product, IBM Tivoli Workload Scheduler V8.3, comes with some important enhancements, such as relational database management system (RDBMS) support, new advanced planning system, which allows the definition of plans that span more that 24 hours, removal of framework requirements, new application programming interface (API), Job Scheduling Console enhancements, and so on. This IBM Redbook documents the architecture, deployment, best practices, and migration scenarios for IBM Tivoli Workload Scheduler V8.3 on distributed environment. In addition, we cover IBM Tivoli Workload Scheduler V8.3 security, IBM DB2® and IBM WebSphere® considerations, troubleshooting, tuning for performance, application programming interface, and JnextPlan, which has replaced the JnextDay process in this release. Clients and Tivoli professionals who are responsible for installing, administering, maintaining, or using IBM Tivoli Workload Scheduler V8.3 will find this book a major reference. The team that wrote this redbook This redbook was produced by a team of specialists from around the world working at the International Technical Support Organization (ITSO), Austin Center. Vasfi Gucer is a Project Leader at the ITSO, Austin Center. He worked for IBM Turkey for 10 years and has been with the ITSO since January 1999. He has more than 10 years of experience in the areas of systems management, networking hardware, and software on mainframe and distributed platforms. He has worked on various Tivoli customer projects as a systems architect in Turkey and the U.S. He writes extensively and teaches IBM classes worldwide on Tivoli software. He is also an IBM Certified Senior IT Specialist. Doroti Almeida Dias Garcia is an IT Specialist working with Tivoli Customer Support in Brazil since 2000. She has experience with Tivoli products, focusing on IBM Tivoli Workload Scheduler and IBM Tivoli Identity Manager. She is Information Technology Infrastructure Library (ITIL®) Foundation certified. She holds a degree in mathematical science and has a master of business © Copyright IBM Corp. 2006. All rights reserved. xxix
- 32. administration degree in e-management information technology from Fundação Getúlio Vargas. Carl Buehler is an IBM Certified IT Specialist working in IBM Software Services for Tivoli. He joined IBM in 1987 and has been a software developer, software support engineer, and technical marketing demonstration developer in addition to his current role in services. He has worked with Tivoli Workload Scheduler since the early support program (ESP) for Version 8.2 in 2003 and has extensive experience deploying the product with customers. Matt Dufner is a member of Level 2 Support for Tivoli Workload Scheduler in Austin, Texas. Before working in technical support, Matt worked for six years on various Tivoli projects in a software verification role. Before working in verification, he worked as a contractor for IBM supporting the IBM AIX® operating system for two years. Clinton Easterling has been working with Tivoli Workload Scheduler for the past six years. Currently, he is the Technical Lead Engineer for the L2 Support team in Austin, Texas. Clint is a Tivoli Workload Scheduler Certified Deployment Specialist and he is also ITIL certified. Before working for Tivoli, Clint worked for IBM AIX L2 Support and served eight years in the U.S. Military. Clint's areas of expertise include installation and tuning, non-defect problem determination, and Tivoli Workload Scheduler for Applications PeopleSoft and SAP®. Clint is also a member of the Tivoli Workload Scheduler Users Conference (ASAP) group and technical presenter at conferences such as Tivoli Technical Users Conference and ASAP. Douglas Gibbs is working as the Tivoli Workload Scheduler and IBM Tivoli Workload Scheduler for z/OS® Product Evangelist in IBM. He is located in Austin, Texas. He has many years of experience with various Job Scheduling products. Warren Gill has been working with Tivoli Workload Scheduler on UNIX® and Windows® since 1993. He has held positions from Customer Support Engineer and Courseware Designer to Product Evangelist and Product Manager. Most recently, Warren was a Customer Solutions Engineer on the Software Advanced Technologies (SWAT) team, where he provided on-site technical support to the sales teams for clients proving IBM scheduling technology. Warren has co-authored several IBM Redbooks™ on various topics surrounding batch workloads. He is currently participating in an IBM Academy of Technology study of Enterprise Batch Computing Modernization to validate and develop recommendations for IBM software, services, and best practices for service-oriented architecture (SOA) batch systems using customer base studies. Warren holds a bachelor’s degree from Millikin University in Decatur, Illinois. He plays trombone in the IBM Austin Jazz Band. xxx Getting Started with IBM Tivoli Workload Scheduler V8.3
- 33. Natalia Jojic is a Certified Tivoli Consultant and instructor based in London, U.K. She is currently running a small consultancy company, KryptonIT Limited and working as an external consultant at IBM U.K. She is primarily engaged in client-based consulting on delivering IBM Tivoli Enterprise™ Management solutions, and design and development of Tivoli integration modules with other, non-Tivoli products (such as AlarmPoint). Natalia has a bachelor of engineering degree in computer systems engineering from City University, London, U.K. Rick Jones is currently an L2 Senior Software Engineer for IBM Tivoli Workload Scheduler. He has worked for IBM for eight years supporting IBM Tivoli Workload Scheduler. He has been using, administering, and supporting various flavors of UNIX for the past 20 years with considerable shell script and Practical Extraction and Report Language (PERL) experience. Pete Soto is currently the L2 Senior Software Engineer for IBM Tivoli Workload Scheduler. He has worked for IBM for nine years in training, implementing, and supporting IBM Tivoli Workload Scheduler. He also supported the Tivoli Software Distribution and Tivoli Inventory products. He is Tivoli Certified for Tivoli Framework, Tivoli Software Distribution, Tivoli Inventory, and Tivoli Workload Scheduler. He has a bachelor of business administration degree with a major in accounting and a minor in information systems from the University of Texas at San Antonio. Anthony Yen is a Senior IT Consultant with IBM Business Partner Automatic IT Corporation in Austin, Texas. He has delivered 20 projects involving 11 different IBM Tivoli products over the past six years. His areas of expertise include IBM Tivoli Enterprise Console®, Monitoring, Tivoli Workload Scheduler, Tivoli Configuration Manager, Remote Control, and IBM NetView®. He has given talks at IBM Planet Tivoli® and Automated Systems And Planning OPC and Tivoli Workload Scheduler Users Conference (ASAP), and has taught courses on IBM Tivoli Workload Scheduler. Before that, he worked in the IT industry for 10 years as a UNIX and Windows system administrator. He has been an IBM Certified Tivoli Consultant since 1998. Carlos Wagner Dias is an IT Specialist working for IBM Global Services Strategic Outsourcing/SDC Brazil on the Tivoli Support Team providing deployment and support in Tivoli systems for outsourcing customers in Brazil area with focus in Tivoli Monitoring. He has extensive experience with Tivoli products (Framework 4.x, Distributed Monitoring 3.x, IBM Tivoli Monitoring 5.1.x, IBM Tivoli Enterprise Console 3.x, Tivoli Configuration Manager 4.x, NetView, Tivoli Workload Scheduler). He has been involved in several projects implementing Tivoli solutions for important clients of IBM Brazil. He is an IBM Certified Deployment Professional, Tivoli Monitoring V5.1.1, and IBM Certified Deployment Professional, Tivoli Workload Scheduler V8.2. He had his degree as systems analyst (2002) from State University of Campinas, Brazil. Preface xxxi
- 34. Thanks to the following people for their contributions to this project: Budi Darmawan Arzu Gucer ITSO, Austin Center Creighton Hicks IBM U.S. Steve Thornhill IBM U.K. Susan Chen Elisabetta Flamini Antonio Gallotti Franco Mossotto Andrea Sadori Gabriella Santoro Federico Spiti IBM Italy Become a published author Join us for a two- to six-week residency program! Help write an IBM Redbook dealing with specific products or solutions, while getting hands-on experience with leading-edge technologies. You'll team with IBM technical professionals, Business Partners and/or customers. Your efforts will help increase product acceptance and customer satisfaction. As a bonus, you'll develop a network of contacts in IBM development labs, and increase your productivity and marketability. Find out more about the residency program, browse the residency index, and apply online at: ibm.com/redbooks/residencies.html xxxii Getting Started with IBM Tivoli Workload Scheduler V8.3
- 35. Comments welcome Your comments are important to us! We want our IBM Redbooks to be as helpful as possible. Send us your comments about this or other IBM Redbooks in one of the following ways: Use the online Contact us review redbook form found at: ibm.com/redbooks Send your comments in an email to: [email protected] Mail your comments to: IBM Corporation, International Technical Support Organization Dept. HYTD Mail Station P099 2455 South Road Poughkeepsie, NY 12601-5400 Preface xxxiii
- 36. xxxiv Getting Started with IBM Tivoli Workload Scheduler V8.3
- 37. 1 Chapter 1. Introduction to Tivoli Workload Scheduler V8.3 In this chapter, we discuss the necessity and history of running computer tasks efficiently and in the correct order, and introduce the concepts of a typical Job Scheduler. We also describe how IBM Tivoli Workload Scheduler provides a unique solution for automating workloads in today's enterprise environments. This chapter consists of the following sections: “In the beginning: Running computer tasks” on page 2 “Introduction to Job Scheduler” on page 2 “Common Job Scheduler terminology” on page 3 “Overview of Tivoli Workload Scheduler” on page 4 “Tivoli Workload Scheduler strengths” on page 5 “New features in Tivoli Workload Scheduler V8.3” on page 6 “Conclusion” on page 9 © Copyright IBM Corp. 2006. All rights reserved. 1
- 38. 1.1 In the beginning: Running computer tasks In the early days of data processing, computer operators were responsible for a relatively small workload. Decks of punched cards that defined a series of tasks to be performed by the computer were queued up in the hopper of a card reader in the order that they had to be run. Operators oversaw the execution of the tasks and manually intervened throughout the process by responding to a series of message prompts. Determining whether or not the computer tasks ran in the correct order required only a well-trained operator recognizing the proper flow of resource requests. Workflow could be monitored by watching resource requests such as tape mounts and understanding when jobs completed successfully by monitoring requests for special forms to be loaded into a line printer. Proper task execution and workflow management was largely done by a good computer operator who knew the necessary order of events by memory, and was able to ensure a successful day's workload with only an occasional glance at the operations department’s runbook. This is assuming that the operations department had a runbook; many did not. 1.2 Introduction to Job Scheduler As the years passed, computer workloads grew. The number of tasks and the number of computer systems in an organization increased dramatically. Correspondingly computer systems increased in capacity and were distributed throughout geographies. The vast size of a typical computer environment and the level of complexity have also grown exponentially. Today, it is virtually inconceivable to believe that any operator can manage a typical workload in today's enterprise without some type of workload scheduler and management tool. Many information technology (IT) organizations developed in-house tools for managing their workload. Many developed substantial systems and used them for several years. Ultimately independent software vendors saw the need for general purpose workload management systems and developed solutions and delivered them to market. The common name used to describe these management tools was a Job Scheduler. 2 Getting Started with IBM Tivoli Workload Scheduler V8.3
- 39. 1.3 Common Job Scheduler terminology All Job Scheduler solutions shared a common terminology. The following list shows some typical terms used in the course of scheduling computer-oriented tasks and their meaning. Job The smallest unit of work to be handled by the Job Scheduler. A job is typically an operating system command, executable program, or a script. In a mainframe environment, it is a set of job control language (JCL) that runs a single executable program. Job stream A collection of jobs that are logically related. A job stream is a series of jobs, which are usually run in a very specific order, and when viewed as a whole are considered a job stream. Predecessor A job or job stream that must be run before another job or job stream. A predecessor job generally has to be completed successfully before the dependent job can start. Successor A job or job stream that must be run after another job or job stream. A successor job generally does not start unless the job it depended on completed successfully. Resource A definition of a limited supply of an item required before a job or job stream can start. Some examples of a resource are a tape device, a specific file, or a database. When defining a resource, the number of available resources is described and subsequently jobs or job streams do not start unless the appropriate number of resources is available. Workstation A place where work can be performed. Typically, a workstation is the computer where a job or job stream can run. However, a workstation definition is often expanded to include a physical or logical location where a human being performs an action, such as the updating of a file with a run date or approving a final total on a general ledger report. Calendar A definition of days when jobs and job streams were supposed to run. A calendar usually defined run days and no-run days, but as Job Scheduler solutions matured and became more sophisticated, alternative methods were developed. Chapter 1. Introduction to Tivoli Workload Scheduler V8.3 3
- 40. Start time The time of day when a job or job stream is supposed to start assuming all predecessor jobs are complete and all the resources are available. End time The time of day when a job or job stream must be complete. This is often referred to as a deadline time or must complete by time. These terms, or minor variations of each, were used in virtually every Job Scheduler package on the market. It is interesting to note that even today, 30 years or more since the first Job Scheduler product was introduced, most of the products on the market still use these terms. All Job Scheduler products, no matter who the manufacturer, accomplished the goal of performing reliable job scheduling despite the fact that they used different means and different technologies. Therefore, as time went on Job Scheduler packages from software vendors, and not in-house written Job Scheduler applications, became the norm and not the exception. In short order, virtually every IT organization had purchased or licensed a Job Scheduler solution from a software vendor. 1.4 Overview of Tivoli Workload Scheduler Tivoli Workload Scheduler automates, monitors, and controls the flow of production work through an enterprise's entire IT infrastructure. From a single point of control, the solution analyzes the status of the production work and drives the processing of the workload according to business policies. It supports a multiple user environment enabling distributed processing. Tivoli Workload Scheduler is the Job Scheduler product from IBM. It consists of two separate products: IBM Tivoli Workload Scheduler IBM Tivoli Workload Scheduler for z/OS The first product is designed for scheduling workloads on distributed platforms such as UNIX, Linux®, Windows, and other open system environments. The second product is designed for managing workloads on IBM eServer™ zSeries® mainframes. Although the products are two individual solutions, they can be integrated together to provide a true end-to-end Job Scheduler solution. This solution can manage a production workload from a centralized single point of control and allow workloads to be controlled on virtually every platform found in today's IT environments. 4 Getting Started with IBM Tivoli Workload Scheduler V8.3
- 41. In addition to Tivoli Workload Scheduler's ability to provide a centralized point of view for the entire scheduled end-to-end environment, the product also focuses on other key strengths. Automated job processing Peak resource utilization The most important mission of a Job Scheduler is to provide a fully automated system, which efficiently uses system resources to process the production workload in the least amount of time and with virtually no wasted resources. Automated job processing controls job submission, job completion, and the handling of predecessor and successor relationships. Automation aids in avoiding mistakes associated with human error and works to process the workload correctly and in the proper order. Tivoli Workload Scheduler offers nearly lights out operation where an operator need not continuously be present and production work continues efficiently and without intervention. Peak resource utilization is another key objective of Tivoli Workload Scheduler, which aims to process as much work as possible within the limits of the available resources. The goal is to reach maximum system utilization by consistently and persistently maintaining the submission and flow of the production workload by effectively using resources to push as much work as possible through the production environment. 1.5 Tivoli Workload Scheduler strengths Tivoli Workload Scheduler has several features with capabilities that are considered unique to the IBM product: Fault tolerant architecture Performance Security Scalability The fault tolerant architecture is a unique feature. This Job Scheduler offers a workstation capable of resolving dependencies and continuing work when the network connection between the workstation and the server is severed. Fault tolerance is achieved by providing a copy of the current plan to every workstation that has a fault-tolerant agent installed. Chapter 1. Introduction to Tivoli Workload Scheduler V8.3 5
- 42. The performance of Tivoli Workload Scheduler’s job submission services is second to none. System security in Tivoli Workload Scheduler is role-based security and is capable of providing specific access authority to individuals. Tivoli Workload Scheduler has excellent scalability. Many customers have environments managing more than 100,000 jobs a day. 1.6 New features in Tivoli Workload Scheduler V8.3 Tivoli Workload Scheduler V8.3 is a major release of the product with important new features and enhancements. The following sections summarize these features. 1.6.1 Improved infrastructure with WebSphere and DB2 or Oracle Tivoli Workload Scheduler V8.3 no longer requires Tivoli framework. Security and communications services are provided by an embedded IBM WebSphere component that is installed transparently with the product. The WebSphere component adds support for several common Lightweight Directory Access Protocol (LDAP) security servers. IBM Tivoli Directory Server IBM z/OS Security Server IBM z/OSe Security Server Windows Active Directory® IBM Lotus® Domino® Enterprise Server Novell eDirectory Sun™ ONE™ Directory Server Note: To determine support for specific LDAP Security Server versions, see IBM Tivoli Workload Scheduler Release Notes v8.3, SC32-1277. The new infrastructure has replaced the mozart directory databases with a relational database management system (RDBMS). IBM DB2 Enterprise Server Edition and Oracle is currently supported. Important: Oracle Database Enterprise Edition is available in Fix Pack 1 (FP1) and available as of 4 August 4, 2006. You can download this Fix Pack at: ftp://ftp.software.ibm.com/software/tivoli_support/ 6 Getting Started with IBM Tivoli Workload Scheduler V8.3
- 43. 1.6.2 New J2EE Web services API Tivoli Workload Scheduler V8.3 has added public Java™ 2 Platform, Enterprise Edition (J2EE™) and Web service application programming interfaces (APIs) as a standard interface for accessing Tivoli Workload Scheduler scheduling capabilities. The Tivoli Workload Scheduler V8.3 architecture is based on J2EE, and this set of APIs provides clients with an easier way to interface with client business processes. Tivoli Workload Scheduler V8.3 architecture based on J2EE Enterprise JavaBeans™ (EJB™) remote interfaces accessible using standard Remote Method Invocation (RMI) connection Export APIs for remote job management and monitoring Access to all Tivoli Workload Scheduler functional areas – Distributed Tivoli Workload Scheduler database – Distributed Tivoli Workload Scheduler plan (including submit functions) – z/OS Tivoli Workload Scheduler database – z/OS Tivoli Workload Scheduler plan (including submit functions) Documented and supported Javadoc™ provided for both data model and connector 1.6.3 Advanced planning capabilities: JnextPlan replaces JNextDay Tivoli Workload Scheduler version V8.3 has new planning features and improved planning flexibility, which enable you to express more sophisticated rules for planning and choreographing the execution of jobs in an easier way. Some of the new features include the capability to: Define a scheduling plan that can span from one hour to several weeks Associate more than one scheduling rule for an activity Easily identify multiple instances of the same activity scheduled during a single day or over different days Define dependencies between activities that are scheduled to run on different days or even on different weeks Save an activity as a draft and optionally assign a date and time to become active Chapter 1. Introduction to Tivoli Workload Scheduler V8.3 7
- 44. 1.6.4 Job Scheduling Console GUI enhancements The new enhanced Job Scheduling Console V8.3 (JSC V8.3) user interface provides a superior interface to further aid in the effective and efficient management of workload jobs and job streams. Significant enhancements have been made to the graphical user interface (GUI) such as: New table, Explorer view, in the Job Stream (JS) Editor improves usability when working with a large number of jobs Reuse the same job definition more than once in the same job stream Create and edit job definitions while working with job streams Export facility for transferring tables into a comma-separated value (CSV) file for external use Improved SAP R/3® application support 1.6.5 Installation and upgrade facility Tivoli Workload Scheduler V8.3 has an improved easy-to-use installation capability with an automatic upgrade path from earlier versions of the product. The new version provides a seamless transition from Tivoli Workload Scheduler version 8.1 Fix Pack 11+ (FP11+), version 8.2 FP5+, or version 8.2.1. The installation procedure is designed to be a smooth, automated upgrade procedure, and no migration is necessary. The installation process includes an upgrade and data migration tool that can be run as part of the installation. Clients can perform an automated direct upgrade of their mozart databases. Alternatively, the clients can run the tool offline, after the installation if they require a parallel upgrade. Tivoli Workload Scheduler V8.x and Tivoli Workload Scheduler V8.3 environments can coexist and run in parallel. The installer has a choice of performing either a top-down installation (upgrading the domain managers first followed by fault-tolerant agents) or a bottom-up installation (fault-tolerant agents followed by domain managers). Clients can select the best product upgrade path for their situation to minimize impact on production. There is also a failsafe rollback capability to return to a previous configuration in case of installation problems. 8 Getting Started with IBM Tivoli Workload Scheduler V8.3
- 45. 1.7 Conclusion In the following chapters of this book, you find detailed information about installing, migrating, and maintaining the new Tivoli Workload Scheduler V8.3. As discussed in the previous section, Version 8.3 is a significant release with major changes to the product infrastructure. Despite the changes, a user moving from a previous release to the V8.3 release will not notice the infrastructure change. The product installs the new version transparently and the product functions in the same way, albeit with significant usability enhancements and functionality improvements. Chapter 1. Introduction to Tivoli Workload Scheduler V8.3 9
- 46. 10 Getting Started with IBM Tivoli Workload Scheduler V8.3
- 47. 2 Chapter 2. Tivoli Workload Scheduler V8.3: Master prerequisites The objective of this chapter is to provide a comprehensive list of operating system (OS) and hardware prerequisites for a fresh installation of the Tivoli Workload Scheduler V8.3 master domain manager. The information in this chapter goes above and beyond what is in the planning and installation guide and the release notes for Tivoli Workload Scheduler V8.3. The prerequisites are consolidated by platform. Each platform has essential requirements that you must consider before installing a Tivoli Workload Scheduler master with a DB2 server. Hardware, software, and system-specific settings are provided for Tivoli Workload Scheduler, DB2 server, and IBM WebSphere 6.0.2 Embedded Express. Meeting the prerequisites prevents unnecessary installation failures and unplanned reboots. © Copyright IBM Corp. 2006. All rights reserved. 11
- 48. This chapter comprises the following sections: “Prerequisites for Tivoli Workload Scheduler V8.3 master on AIX” on page 12 “Prerequisites for Tivoli Workload Scheduler V8.3 master on HP-UX” on page 16 “Prerequisites for Tivoli Workload Scheduler V8.3 master on Solaris” on page 21 “Prerequisites for Tivoli Workload Scheduler V8.3 master on Linux” on page 25 “Prerequisites for Tivoli Workload Scheduler V8.3 master on Windows” on page 32 2.1 Prerequisites for Tivoli Workload Scheduler V8.3 master on AIX Compared to other UNIX platforms, AIX operating systems have fewer requirements to consider before installation. 2.1.1 Tivoli Workload Scheduler on AIX prerequisites Table 2-1 summarizes the requirements to install a Tivoli Workload Scheduler V8.3 master domain manager. Table 2-1 Tivoli Workload Scheduler Version 8.3 master installation requirements on AIX Requirement Cumulative Tivoli Workload DB2 Embedded Scheduler WebSphere Application Server Users 4 users 1 TWSUser 3 DB2Users a 1 TWSUser Groups 4 groups 1 TWSGroup 3 DB2Groups 1 TWSGroup (See Footnote a.) Memory 1024 1024 MB/2048 MB 256 MB/512 MB 512 MB/1024 MB megabytes (MB)/ 2048 MB 12 Getting Started with IBM Tivoli Workload Scheduler V8.3
- 49. Requirement Cumulative Tivoli Workload DB2 Embedded Scheduler WebSphere Application Server Disk space 1375 MB 370 MB $HOME for 520 MB 142 MB TWSUser /usr/opt/db2_08_01 (included in Tivoli 480 MB $HOME for Workload DB2 Instance ownerb Scheduler’s 370 MB) $TEMP 170 MB 170 MB space Kernel Dynamic Dynamic parameters Operating system and patches IBM AIX 5L™ ML 6 ML 5 ML 6 ML 5 5.1 and 5.1.0c AIX 5L 5.2 ML 3 ML 2 or 3 ML 3 ML 2 or 3 AIX 5L 5.3 ML 1 ML 1 APAR IY58143 ML 1 APAR APAR IY58143 APAR IY58143 IY58143 a. If DB2 is not already installed, allow the DB2 installation to create the users and groups it requires. For details about user and group requirements for DB2, see Quick Beginnings for DB2 Servers, GC09-4836, “Creating group and user IDs for a DB2 UDB installation (UNIX)” in Chapter 9 “Prein- stallation tasks”. You can download this document at: ftp://ftp.software.ibm.com/ps/products/db2/info/vr82/pdf/en_US/db2ise81.pdf b. Tivoli Workload Scheduler data is stored in the DB2 instance owner’s $HOME directory. Plan for growth in this location. The 480 MB required for installation is the minimum space requirement. 2.1.2 DB2 V8.2 on AIX prerequisites To install DB2 V8.2 on AIX, you must meet the operating system, disk space, memory, and kernel setting requirements before you attempt a DB2 server installation. Chapter 2. Tivoli Workload Scheduler V8.3: Master prerequisites 13
- 50. DB2 V8.2 on AIX: Operating system prerequisites For the most up-to-date operating system information, see: http://www.ibm.com/software/data/db2/udb/sysreqs.html Table 2-2 shows the operating system prerequisites for IBM DB2 Universal Database™ (UDB) V8.2. Table 2-2 AIX operating system prerequisites for IBM DB2 UDB Version 8.2 AIX operating system Prerequisites for running DB2 UDB AIX 5.1 Maintenance Level 6 Requires a minimum C++ runtime level of: - xlC.rte 6.0.0.0 - xlC.aix50.rte 6.0.0.5 AIX 5.2 Maintenance Level 3 Requires a minimum C++ runtime level of: - xlC.rte 6.0.0.0 - xlC.aix50.rte 6.0.0.5 AIX 5.3 APAR IY58143 Requires a minimum C++ runtime level of: - xlC.rte 6.0.0.0 - xlC.aix50.rte 6.0.0.5 We recommend APAR IY58143. DB2 8.2 on AIX: Hardware prerequisites The following list provides the hardware prerequisites for DB2 8.2 on AIX. IBM RS/6000® and IBM eServer pSeries® 520 MB of free space in /usr/opt/db2_08_01 for DB2 binaries Tivoli Workload Scheduler data is stored in the DB2 instance owner’s $HOME directory. Plan for growth in this location. The 480 MB required for installation is the minimum space requirement. File system with 2 gigabytes (GB) of free space to contain the tar.Z or tar.gz file and the uncompressed installation image The DB2 image packaged for Tivoli Workload Scheduler on CD is a tar.Z. 14 Getting Started with IBM Tivoli Workload Scheduler V8.3
- 51. At a minimum, DB2 UDB requires 256 MB of RAM. If you use the graphical user interface (GUI) tools, we recommend 512 MB of RAM memory. Tivoli Workload Scheduler performs the compact DB2 installation, which does not include GUI tools. Ensure that you enable Asynchronous Input/Output (AIO). This is necessary for successfully installing DB2 UDB. You can enable and disable AIO at run time by issuing the db2set command. 2.1.3 AIX prerequisites for WebSphere Application Server 6.0.2 Embedded Express This section describes the minimum product levels that you must install before opening a problem report with the WebSphere Application Server support team. WebSphere Application Server 6.0.2 Express on AIX: Operating system and software prerequisites The operating system and software prerequisites for AIX WebSphere Application Server 6.0.2 Express are: IBM AIX 5L 5.1 with Recommended Maintenance package 5100-05 AIX 5L 5.2 with Recommended Maintenance package 5200-02 or 5200-03 AIX 5L 5.3 or 5.3 with Recommended Maintenance package 5300-01; AIX APAR IY58143 is required For more information about the software requirements for WebSphere Application Server 6.0.2, see: http://www-1.ibm.com/support/docview.wss?rs=180&uid=swg27007257 WebSphere Application Server 6.0.2 Express on AIX: Hardware prerequisites The hardware prerequisites for WebSphere Application Server 6.0.2 Express on AIX are: IBM Performance Optimization with Enhanced RISC (POWER™) family processors (AIX 5L). For details, see the following Web site: http://www-03.ibm.com/servers/aix/index.html Minimum 970 MB free disk space for installation (includes software development kit (SDK)) <TWSUser>/appserver has a disk usage of approximately 142 MB. Minimum 512 MB physical memory; we recommend 1 GB Chapter 2. Tivoli Workload Scheduler V8.3: Master prerequisites 15
- 52. For more information about the hardware requirements for WebSphere Application Server 6.0.2, see: http://www-1.ibm.com/support/docview.wss?rs=180&uid=swg27007250 2.2 Prerequisites for Tivoli Workload Scheduler V8.3 master on HP-UX To successfully install Tivoli Workload Scheduler V8.3 on Hewlett-Packard UNIX (HP-UX), you must consider the OS version, patches, and kernel parameters. Without the proper settings, both WebSphere and DB2 do not function as required. 2.2.1 Tivoli Workload Scheduler on HP-UX prerequisites Table 2-3 summarizes the requirements to install a Tivoli Workload Scheduler V8.3 master domain manager on HP-UX. Table 2-3 Tivoli Workload Scheduler Version 8.3 master installation requirements on HP-UX Requirement Cumulative Tivoli DB2 Embedded WebSphere Workload Application Server Scheduler Users 4 users 1 TWSUser 3 DB2Usersa 1 TWSUser Groups 4 groups 1 TWSGroup 3 DB2Groups 1 TWSGroup (See Footnote a.) Memory 1024 MB/ 1024 MB/ 256 MB/512 MB 512 MB/1024 MB 2048 MB 2048 MB Disk space 1595 MB 550MB 590MB 217MB $HOME for /opt/IBM/db2/V8.1 (included in Tivoli TWSUser 50MB $HOME for Workload Scheduler’s DB2 Instance ownerb 550 MB) $TEMP 170 MB 170MB space Kernel See See Table 2-5 on parameters Table 2-5 on page 19. page 19. 16 Getting Started with IBM Tivoli Workload Scheduler V8.3
- 53. Requirement Cumulative Tivoli DB2 Embedded WebSphere Workload Application Server Scheduler Operating system and patches HP-UX 11i v1 Quality Pack June 2003 HP-UX 11iv1 with Quality (11.11) of December GOLDBASE11i Pack of December 2004 2004 plus bundle plus required HP-UX required June 2003 patches for Java: HP-UX GOLDAPPS11i http://h18012.www1.hp.c patches for bundle om/java/patches/index.h Java Patches tml - PHSS_28871 - PHKL_28489 - PHCO_27434 - PHCO_29960 a. If DB2 is not already installed, allow the DB2 installation to create the users and groups it requires. For details on user and group requirements for DB2, see Quick Beginnings for DB2 Servers, GC09-4836, “Creating group and user IDs for a DB2 UDB installation (UNIX)” in Chapter 9 “Prein- stallation tasks”. You can download this document at: ftp://ftp.software.ibm.com/ps/products/db2/info/vr82/pdf/en_US/db2ise81.pdf b. Tivoli Workload Scheduler data is stored in the DB2 instance owner’s $HOME directory. Plan for growth in this location. The 450 MB required for installation is the minimum space requirement. 2.2.2 DB2 V8.2 on HP-UX prerequisites To install DB2 V8.2 on HP-UX, there are several operating system, disk space, memory, and kernel setting prerequisites that you must meet before attempting a DB2 server installation. DB2 V8.2 on HP-UX: Operating system prerequisites For the most up-to-date operating system information, see: http://www.ibm.com/software/data/db2/udb/sysreqs.html Chapter 2. Tivoli Workload Scheduler V8.3: Master prerequisites 17
- 54. Table 2-4 shows the HP-UX operating system prerequisites for DB2 UDB V8.2. Table 2-4 HP-UX operating system prerequisites for IBM DB2 UDB Version 8.2 HP-UX operating system Prerequisites for running DB2 UDB HP-UX 11i (B.11.11) for Precision Architecture June 2003 GOLDBASE11i bundle Reduced Instruction Set Computing (PA-RISC) June 2003 GOLDAPPS11i bundle 2.x-based (PA-8x00) Patches - PHSS_28871 - PHKL_28489 - PHCO_27434 - PHCO_29960 Patches for Java SDK http://www.hp.com/products1/unix/java/patch es/index.html DB2 V8.2 on HP-UX: Hardware prerequisites The hardware prerequisites for DB2 V8.2 on HP-UX are: HP 9000 Series 700 or 800 system HP Integrity Series server 590 MB of free space in /opt/IBM/db2/V8.1 DB2 binaries Tivoli Workload Scheduler data is stored in the DB2 instance owner’s $HOME directory. Plan for growth in this location. The 450 MB required for installation is the minimum space requirement. File system with 2 GB of free space to contain the tar.Z or tar.gz file and the uncompressed installation image The DB2 image packaged for Tivoli Workload Scheduler on CD is a tar.Z. At a minimum, DB2 UDB requires 256 MB of RAM. If you use the GUI tools, we recommend 512 MB of RAM memory. Tivoli Workload Scheduler performs the compact DB2 installation, which does not include GUI tools. DB2 V8.2 on HP-UX: Kernel prerequisites Before you install DB2 for HP-UX product, you might have to update your system’s kernel configuration parameters. Most kernel changes require a system reboot to take effect. As a user with root authority: 1. Enter the sam command to start the System Administration Manager (SAM) program. 2. Double-click the Kernel Configuration icon. 18 Getting Started with IBM Tivoli Workload Scheduler V8.3
- 55. 3. Double-click the Configurable Parameters icon. 4. Double-click the parameter that you want to change. In the Formula/Value field, type the new value. Click OK. 5. Repeat these steps for all of the kernel configuration parameters that you want to change. 6. When you finish setting all of the kernel configuration parameters, select Action Process New Kernel from the action menu bar. Use the db2osconf command to obtain the recommended parameters for a 64-bit DB2 instance. You can find this command in the DB2 installation image in the <image>/ese/db2/hpux/DB2V81CAE/client/opt/IBM/db2/V8.1/bin64/db2osconf directory. On the image, the db2osconf command is stored as a compressed file. To use this command, copy it to a temporary location, rename the file to db2osconf.gz and use the gunzip utility to make db2osconf available for execution. Note: Do not alter the db2osconf file in its original location. If this file is not in the expected compressed format, the DB2 installation will fail. For a 32-bit DB2 instance, use the values shown in Table 2-5 to set the youcorrect kernel parameters. Table 2-5 HP-UX recommended values for kernel configuration parameters Kernel parameters Physical memory 512 MB+ maxuprc 1500 maxfiles 256 nproc 2048 nflocks 8192 ninode 2048 nfile (4 * ninode) msgseg 32767a msgmnb 65535 msgmax 65535b msgtql 2048 Chapter 2. Tivoli Workload Scheduler V8.3: Master prerequisites 19
- 56. Kernel parameters Physical memory msgmap 2050 msgmni 1024 msgssz 16 semmni 2048 semmap 2050 semmns 4096 semmnu 1024 shmmax 268 435 456c shmmni 1000 a. Set the msgseg parameter no higher than 32 767. b. Set the msgmax parameter to 65 535. c. Set the shmmax parameter to 134 217 728 or 90% of the physical memory (in bytes), whichever is higher. For example, if you have 196 MB of physical memory in your system, set shmmax to 184 968 806 (196 x 1024 x 1024 x 0.9). 2.2.3 HP-UX prerequisites for WebSphere Application Server 6.0.2 Embedded Express These sections describe the minimum product levels that you must install before you open a problem report with the WebSphere Application Server support team. WebSphere Application Server 6.0.2 Express on HP-UX: operating system and software prerequisites The operating system and software prerequisites for WebSphere Application Server 6.0.2 Express on HP-UX are: HP-UX 11iv1 with Quality Pack of December June 2004 plus the required HP-UX patches for Java: HP-UX 11i product site: http://h20338.www2.hp.com/hpux11i/cache/324545-0-0-0-121.html HP-UX patches for Java: http://h18012.www1.hp.com/java/patches/index.html 20 Getting Started with IBM Tivoli Workload Scheduler V8.3
- 57. For more information about the software requirements for WebSphere Application Server 6.0.2, see: http://www-1.ibm.com/support/docview.wss?rs=180&uid=swg27007257 HP-UX WebSphere Application Server 6.0.2 Embedded Express hardware prerequisites The hardware prerequisites for WebSphere Application Server 6.0.2 Embedded Express on HP-UX are: PA-RISC processor Minimum 1100 MB free disk space for installation (includes SDK) <TWSUser>/appserver has a disk usage of approximately 217 MB. Minimum 512 MB physical memory; we recommend 1 GB For more information about the hardware requirements for WebSphere Application Server 6.0.2, see: http://www-1.ibm.com/support/docview.wss?rs=180&uid=swg27007250 2.3 Prerequisites for Tivoli Workload Scheduler V8.3 master on Solaris To install Tivoli Workload Scheduler V8.3 to Solaris™ successfully, you must consider the software and hardware requirements. You must also consider the kernel parameter settings required by DB2, which require a reboot to take effect. 2.3.1 Tivoli Workload Scheduler on Solaris prerequisites Table 2-6 summarizes the requirements to install a Tivoli Workload Scheduler V8.3 master domain manager. Table 2-6 Tivoli Workload Scheduler Version 8.3 master installation requirements on Solaris Requirement Cumulative Tivoli DB2 Embedded Workload WebSphere Scheduler Application Server Users 4 users 1 TWSUser 3 DB2Usersa 1 TWSUser Groups 4 groups 1 TWSGroup 3 DB2Groups 1 TWSGroup (See Footnote a.) Memory 1024 MB/ 1024 MB 256 MB/512 MB 512 MB/1024 MB 2048 MB Chapter 2. Tivoli Workload Scheduler V8.3: Master prerequisites 21
- 58. Requirement Cumulative Tivoli DB2 Embedded Workload WebSphere Scheduler Application Server Disk space 1525 MB 480 MB 590 MB 217 MB $HOME for /opt/IBM/db2/V8.1 (included in Tivoli TWSUser 450MB $HOME Workload for DB2 Instance Scheduler’s ownerb 480 MB) $TEMP space 170 MB 170MB Kernel db2osconf -r db2osconf -r parameters Operating system and patches Solaris 8 Recommended Recommended Recommended and See WebSphere Patch Cluster Patch Cluster of Security Patches + Application Server of June 2005 June 2005 108921-12 + 3 Express Tech Note Recommended 108940-24 + #1188129 before and Security 108434-03 and installation Patches + 108528-12 (http://www-1.ibm. 108921-12 + 3 com/support/docvie 108940-24 + w.wss?uid=swg21188 108434-03 and 129) 108528-12 Solaris 9 Solaris 2.9 Solaris 2.9 Solaris 2.9 Same as Solaris 2.8 Solaris 10 Solaris 10 Solaris 10 DB2 8.2.2 Solaris 10 a. If DB2 is not already installed, allow the DB2 installation to create the users and groups it requires. For details on user and group requirements for DB2, see Quick Beginnings for DB2 Servers, GC09-4836, “Creating group and user IDs for a DB2 UDB installation (UNIX)” in Chapter 9 “Prein- stallation tasks”. You can download this document at: ftp://ftp.software.ibm.com/ps/products/db2/info/vr82/pdf/en_US/db2ise81.pdf b. The Tivoli Workload Scheduler data is stored in the DB2 instance owner’s $HOME directory. Plan for growth in this location. The 450 MB required for installation is the minimum space requirement. 2.3.2 DB2 8.2 and 8.2.2 on Solaris prerequisites There are minimum requirements that you must meet before you install DB2 on Solaris. There are patches to consider, and minimum kernel parameter settings that you have to set for a functioning DB2 instance. 22 Getting Started with IBM Tivoli Workload Scheduler V8.3
- 59. DB2 8.2 and 8.2.2 on Solaris: Operating system prerequisites For up-to-date information about operating system requirements, see: http://www.ibm.com/software/data/db2/udb/sysreqs.html Table 2-7 shows the operating system prerequisites for DB2 UDB V8.2. Table 2-7 Solaris operating system prerequisites for IBM DB2 UDB Version 8.2 Solaris operating system Prerequisites for running DB2 Universal Database Solaris 8 Solaris 8 (32-bit) Recommended and Security Patches 108921-12 108940-24 108434-03 108528-12 Solaris 9 Solaris 9 Solaris 10 Solaris Operating Environment 10 is supported only starting from DB2 UDB Version 8.1.9 and 8.2.2. Note: You can obtain the recommended patches and security patches from the following Web site: http://sunsolve.sun.com In this Web site, from the left panel, click the Patches menu item. DB2 8.2 and 8.2.2 on Solaris: Hardware prerequisites The hardware prerequisites for DB2 8.2 and DB2 8.2.2 on Solaris are: 590 MB of free space in /opt/IBM/db2/V8.1 DB2 binaries Tivoli Workload Scheduler data is stored in the DB2 instance owner’s $HOME directory. Plan for growth in this location. The 450 MB required for installation is the minimum space requirement. File system with 2 GB of free space to contain the tar.Z or tar.gz file and the uncompressed installation image The DB2 image packaged for Tivoli Workload Scheduler on CD is a tar.Z. At a minimum, DB2 UDB requires 256 MB of RAM. If you use the GUI tools, we recommend 512 MB of RAM memory. Tivoli Workload Scheduler performs the compact DB2 installation, which does not include GUI tools. Chapter 2. Tivoli Workload Scheduler V8.3: Master prerequisites 23
- 60. DB2 8.2 and 8.2.2 on Solaris: Kernel prerequisites An executable is provided with the DB2 installation image. Use this to verify which kernel parameters have to be set and to what values. The executable is located in the DB2 installation image <db2image>/ese/db2/solaris/ db2cliv81/reloc/IBM/db2/$PRODVERS/bin/db2osconf 1. Run db2osconf -f to compare the current kernel settings to the recommendations for DB2. 2. Run db2osconf -r. Cut and paste the output to the /etc/system file. Example 2-1 shows the sample output from the db2osconf -r command. Example 2-1 Sample output from db2osconf -r set msgsys:msginfo_msgmax = 65535 set msgsys:msginfo_msgmnb = 65535 set msgsys:msginfo_msgmni = 2560 set msgsys:msginfo_msgtql = 2560 set semsys:seminfo_semmni = 3072 set semsys:seminfo_semmns = 6452 set semsys:seminfo_semmnu = 3072 set semsys:seminfo_semume = 240 set shmsys:shminfo_shmmax = 3755055513 set shmsys:shminfo_shmmni = 3072 set shmsys:shminfo_shmseg = 240 Important: The output from db2osconf is machine specific. 2.3.3 Solaris prerequisites for WebSphere Application Server 6.0.2 Embedded Express This section describes the minimum product levels that you must install before you open a problem report with the WebSphere Application Server support team. WebSphere Application Server 6.0.2 Express on Solaris: Operating system and software prerequisites The operating system and software prerequisites for WebSphere Application Server 6.0.2 Express on Solaris are: Solaris 8 with the Recommended Patch Cluster of June 2005 Solaris 9 with the Recommended Patch Cluster of June 2005 Solaris 10 24 Getting Started with IBM Tivoli Workload Scheduler V8.3
- 61. WebSphere Application Server 6.0.2 Express on Solaris: Hardware prerequisites The hardware prerequisites for WebSphere Application Server 6.0.2 Express on Solaris are: Solaris-compatible SPARC processor at 440 MHz, or faster Minimum 1000 MB free disk space for installation (includes SDK) <TWSUser>/appserver has a disk usage of approximately 217 MB. Minimum 512 MB physical memory; we recommend 1 GB For more information about the hardware requirements for WebSphere Application Server 6.0.2, see: http://www-1.ibm.com/support/docview.wss?rs=180&uid=swg27007250 2.4 Prerequisites for Tivoli Workload Scheduler V8.3 master on Linux Pay special attention to the sections related to installing required libraries that are necessary to successfully install Tivoli Workload Scheduler V8.3 with DB2 server. 2.4.1 Tivoli Workload Scheduler on Linux prerequisites Table 2-8 summarizes the requirements to install a Tivoli Workload Scheduler V8.3 master domain manager on Linux. Table 2-8 Tivoli Workload Scheduler Version 8.3 master installation requirements on Linux Requirement Cumulative Tivoli Workload DB2 Embedded Scheduler WebSphere Application Server Users 4 users 1 TWSUser 3 DB2Usersa 1 TWSUser Groups 4 groups 1 TWSGroup 3 DB2Groups 1 TWSGroup (See Footnote a.) Memory 1024 MB/ 1024 MB/ 256 MB/512 MB 512 MB/1024 2048 MB 2048 MB MB Chapter 2. Tivoli Workload Scheduler V8.3: Master prerequisites 25
- 62. Requirement Cumulative Tivoli Workload DB2 Embedded Scheduler WebSphere Application Server Disk space 1245 MB 420 MB $HOME for 370 MB Included in TWSUser /opt/IBM/db2/ Tivoli V8.1 Workload 450 MB Scheduler’s $HOME for 420 MB DB2 Instance ownerb $TEMP space 170 MB 170 MB Kernel parameters DB2 8.2 on DB2 8.2 on Linux: Linux: Kernel Kernel prerequisites prerequisites Operating system and patches Red Hat Enterprise Updates 2, 3, libstdc++-libc Linux AS and ES 3.0 or 4 6.1-2.so.3 AMD64 and libstdc++ libstdc++.so.5 EM64T based -libc6.1-2.so.3 libstdc++.so.6 systems Kernel libstdc++ libgcc_s.so.1 32 .so.5 IBM eServer libstdc++ iSeries™ .so.6 Kernel 64 libgcc_s.so.1 pSeries Kernel 64 zSeries, Kernel 32 Red Hat Enterprise Not supported as Not supported as a Linux AS 4.0 a master at this master at this time time SUSE Linux Service Enterprise Server 8 Pack 3 (SP3) IBM eServer or SP4 xSeries® (IA32) libstdc++ Kernel 32 .so.6.0.3 iSeries Kernel 64 zSeries Kernel 32 26 Getting Started with IBM Tivoli Workload Scheduler V8.3
- 63. Requirement Cumulative Tivoli Workload DB2 Embedded Scheduler WebSphere Application Server SUSE Linux SP1 libstdc++.so. Enterprise libstdc++-libc6. 6.0.3 Server 9 1-2.so.3 libstdc++.so.6 xSeries (IA32) libstdc++ libgcc_s.so.1 Kernel 32 .so.5 iSeries libstdc++ Kernel 64 .so.6 zSeries libgcc_s.so.1 Kernel 32 pSeries Kernel 64 AMD64 and EM64T based systems Kernel 32 a. If DB2 is not already installed, allow the DB2 installation to create the users and groups it requires. For details on user and group requirements for DB2, see Quick Beginnings for DB2 Servers, GC09-4836, “Creating group and user IDs for a DB2 UDB installation (UNIX)” in Chapter 9 “Prein- stallation tasks”. You can download this document at: ftp://ftp.software.ibm.com/ps/products/db2/info/vr82/pdf/en_US/db2ise81.pdf b. Tivoli Workload Scheduler data is stored in the DB2 instance owner’s $HOME directory. Plan for growth in this location. The 450 MB required for installation is the minimum space requirement. 2.4.2 DB2 V8.2 on Linux prerequisites Pay special attention to the kernel and library requirements for installing DB2 on Linux systems. DB2 V8.2 on Linux: Operating system prerequisites For Linux platforms, the following links provide up-to-date information about operating system requirements related to DB2 V8.2. DB2 9 for Linux, UNIX, and Windows http://www.ibm.com/software/data/db2/udb/sysreqs.html Support Environment - DB2 for Linux http://www-306.ibm.com/software/data/db2/linux/validate/platdist82.h tml Chapter 2. Tivoli Workload Scheduler V8.3: Master prerequisites 27
- 64. Installing Linux libraries To run Tivoli Workload Scheduler on Linux, you have to ensure that certain Linux libraries are on your system. These libraries are not distributed with Tivoli Workload Scheduler. You can obtain them from your Linux provider. Depending on your Linux vendor, the version of Linux that you are using, and the architecture of your system, these libraries can be obtained in various ways. A description of the methods to locate and install these libraries are provided in the following sections. To install Linux libraries for Red Hat Enterprise Linux, versions 3 and 4, and SUSE Linux Enterprise Server, version 9: 1. Search the media on which your copy of Linux was provided for the following relevant library. The libraries to locate are: – libstdc++-libc6.1-2.so.3 – libstdc++.so.5 or libstdc++.so.6 (or both, depending on the platform) – libgcc_s.so.1 Alternatively, search for their most recent compatible version. 2. If you cannot find them on the product media, the libraries might be available from your Linux vendor (Red Hat or SUSE). – The libraries are typically stored in packages (rpms). Select the package according to the Linux system and architecture where you are installing. For example, an RPM might have the name: libstdc++-mainline-4.0.2_20050720-0.1.i586.rpm. From the name you can determine the date that it was released (choose the most recent) and the architecture. In this case, i586 is correct for the supported platform SUSE Linux Enterprise Server 9 on IBM eServer xSeries (IA32) Kernel 32. – Check that the library you are looking for is contained in the package before downloading. 3. After you locate or obtain the correct package, install the library. If the installation finds an existing version of the library at a later level, it causes an error and stops. In this case, create a symlink to the later level version that the installation found. Note: Some Linux platforms running the 64-bit kernel (for example Red Hat Linux Enterprise 3.0 and 4.0 on IBM eServer iSeries and pSeries) install only the 64-bit runtime support. However, Tivoli Workload Scheduler V8.3 also requires the 32-bit runtime support. Therefore, install the 32-bit libraries as well. 28 Getting Started with IBM Tivoli Workload Scheduler V8.3
- 65. Linux libraries for SUSE Linux Enterprise Server version 8 To install Linux libraries for SUSE Linux Enterprise Server version 8: 1. Download the source file gcc-3.4.6.tar.gz (or a compatible version) from the following GNU Web site: http://www.gnu.org 2. Extract the source file as tar -zxvf gcc-3.4.6.tar.gz. 3. Change to the directory with the unpacked files: cd gcc-3.4.6. 4. Configure the compiler ./configure --prefix=/opt/gcc-3.4 --program-suffix=34. 5. Compile the libraries as make bootstrap. 6. Install the libraries, as shown in Example 2-2. Example 2-2 Output from make install make install The libraries are located in the directory /opt/gcc-3.4/lib: libstdc++.so.6.0.3 libstdc++.so.6 (soft link to libstdc++.so.6.0.3) libgcc_s.so.1 7. You can use these libraries in one of the following methods: – Copy them into the /usr/lib directory. – Add dir /opt/gcc-3.4/lib to the /etc/ld.so.conf file and run ldconfig. – Copy them into the <TWSHome>/bin directory. Note: Before you compile this package, you must install the appropriate compiler. Additionally, it is your sole responsibility to ensure that your usage of these Linux libraries complies with any applicable licence terms governing their use. DB2 8.2 on Linux: Hardware requirements The hardware prerequisites for DB2 8.2 on Linux are: On Linux the DB2 binaries are installed to /opt/IBM/db2/V8.1. The file system for the /opt/IBM/db2/V8.1 directory requires 370 MB of free space. In addition to the software disk requirements, you must have a file system with 2 GB of free space to contain the tar.Z or tar.gz file and the uncompressed installation image. Chapter 2. Tivoli Workload Scheduler V8.3: Master prerequisites 29
- 66. At a minimum, DB2 UDB requires 256 MB of RAM. If you use GUI tools, we recommend 512 MB of RAM memory. On Linux, we recommend a SWAP space of at least twice as large as your RAM, but it is not required. Tivoli Workload Scheduler performs the compact DB2 installation, which does not include GUI tools. Ensure that you enable AIO. This is necessary for successfully installing DB2 UDB. You can enable and disable AIO at run time by issuing the db2set command. DB2 8.2 on Linux: Kernel prerequisites Before you install DB2 UDB, you might want to update your Linux kernel parameters. DB2 UDB automatically raises the interprocess communication (IPC) limits where necessary. You might still want to raise these limits further depending on your particular requirements. Prerequisite: You must have root authority to modify kernel parameters. Procedure: To update kernel parameters, Red Hat and SUSE systems that use a 2.4.x series kernel have a default value for the message queue parameter (msgmni), which allows only a few simultaneous connections to DB2. You also have to change the semaphore array parameters for DB2 to run successfully. To check shared memory segment, semaphore array, and message queue limits, issue the ipcs -l command. Example 2-3 shows the output from the ipcs -l command. Example 2-3 Sample output from the ipcs -l command # ipcs -l ------ Shared Memory Limits -------- max number of segments = 4096 // SHMMNI max seg size (kbytes) = 32768 max total shared memory (kbytes) = 8388608 min seg size (bytes) = 1 ------ Semaphore Limits -------- max number of arrays = 1024 // SEMMNI max semaphores per array = 250 max semaphores system wide = 256000 max ops per semop call = 32 semaphore max value = 32767 30 Getting Started with IBM Tivoli Workload Scheduler V8.3
- 67. 2.4.3 Linux prerequisites for WebSphere Application Server 6.0.2 Embedded Express This section describes the minimum product levels that you must install before you open a problem report with the WebSphere Application Server support team. WebSphere Application Server 6.0.2 Express on Linux: Operating system and software prerequisites The operating system and software prerequisites for WebSphere Application Server 6.0.2 Express on Linux are: Red Hat Enterprise Linux AS 3.0 Update 2, 3, or 4 Red Hat Enterprise Linux ES 3.0 Update 2, 3, or 4 SUSE Linux Enterprise Server 8 SP3 or SP4 SUSE Linux Enterprise Server 9 or 9 SP1 WebSphere Application Server 6.0.2 Express on Linux: Hardware prerequisites The hardware prerequisites for WebSphere Application Server 6.0.2 Express on Linux are: For Linux on x86 (32-bit WebSphere Application Server): – Intel® Pentium® at 500 MHz or faster, AMD Opteron or Intel EM64T (32-bit kernel support only) – Minimum 995 MB free disk space for installation (includes SDK) <TWSUser>/appserver has a disk usage of approximately 200 MB. – Minimum 512 MB of physical memory; we recommend 1 GB For Linux on AMD Opteron and Intel EM64T (64-bit WebSphere Application Server): – AMD Opteron and Intel EM64T (64-bit kernel support only) – Minimum 995 MB free disk space for installation (includes SDK) <TWSUser>/appserver has a disk usage of approximately 200 MB. – A minimum of 1 GB physical memory For more information about hardware requirements including zSeries, iSeries, and pSeries on Linux for WebSphere Application Server 6.0.2, see: http://www-1.ibm.com/support/docview.wss?rs=180&uid=swg27007250 Chapter 2. Tivoli Workload Scheduler V8.3: Master prerequisites 31
- 68. 2.5 Prerequisites for Tivoli Workload Scheduler V8.3 master on Windows Table 2-9 summarizes the Windows requirements for Tivoli Workload Scheduler V8.3 master installation. Table 2-9 Tivoli Workload Scheduler Version 8.3 master installation requirements on Windows Requirement Cumulative Tivoli DB2 Embedded Workload WebSphere Scheduler Application Server Users 3 users TWSUser DB2 Administration TWSUser Server (DAS) user account DB2 instance user accounta Memory 1024/2048MB 1024 MB/ 256/512 MB 2048 MB Disk space 855 MB 241 MB 301 MB Binaries 141 MB of 241 MB 408 MB DB2 Tivoli Workload instance and Tivoli Scheduler is Workload Scheduler Embedded DB storage WebSphere Application Server $TEMP space 70 Kernel parameters Operating system and patches Microsoft® SP4 SP4 SP2 SP4 Windows 2000: Server, Advanced Server Microsoft SP1 Base or SP1 Windows Server® 2003: Standard, Enterprise, and Data Center a. Define the installation user account before you run the DB2 Setup wizard. You can define the set- up user accounts before installation or you can have the DB2 Setup program create them for you. For details about user and group requirements for DB2, see Quick Beginnings for DB2 Servers, GC09-4836, “DB2 server installation (Windows)” → “Required user accounts for installation of DB2 servers (Windows)” in Chapter 8. “Installation requirements”. You can download this document at: ftp://ftp.software.ibm.com/ps/products/db2/info/vr82/pdf/en_US/db2ise81.pdf 32 Getting Started with IBM Tivoli Workload Scheduler V8.3
- 69. 2.5.1 DB2 8.2 on Windows prerequisites This section discusses the operating system and hardware prerequisites for DB2 V8.2 on Windows. DB2 8.2 on Windows: Operating system prerequisites For up-to-date information about the operating system requirements, see: http://www.ibm.com/software/data/db2/udb/sysreqs.html Table 2-10 shows the Windows operating system prerequisites for DB2 UDB 8.2. Table 2-10 Windows OS prerequisites for IBM DB2 UDB Version 8.2 Windows operating system Prerequisites for running DB2 Universal Database Windows 2000 Standard Edition, Advanced Service Pack 2 or later is required for Edition, and Datacenter Edition Windows Terminal Server. Windows Server 2003 Standard Edition (32-bit and 64-bit), Enterprise Edition (32-bit and 64-bit), and Datacenter Edition (32-bit and 64-bit) DB2 8.2 on Windows: Hardware prerequisites The hardware prerequisites for DB2 8.2 on Windows are: A Pentium or Pentium-compatible central processor unit (CPU) is required. At a minimum, DB2 UDB requires 256 MB of RAM. If you use the GUI tools, we recommend 512 MB of RAM memory. Chapter 2. Tivoli Workload Scheduler V8.3: Master prerequisites 33
- 70. 2.5.2 Windows prerequisites for WebSphere Application Server 6.0.2 Embedded Express This section describes the minimum product levels that you must install before you open a problem report with the WebSphere Application Server support team. WebSphere Application Server 6.0.2 Express on Windows: Operating system and software prerequisites The operating system and software prerequisites for WebSphere Application Server 6.0.2 Express on Windows are: Windows 2000 Server and Advanced Server SP4 Windows 2003 or 2003 SP1 – DataCenter – Enterprise – Standard WebSphere Application Server 6.0.2 Express on Windows: Hardware prerequisites The hardware prerequisites for WebSphere Application Server 6.0.2 Express on Windows are: Intel Pentium at 500 MHz or faster, AMD Opteron or Intel EM64T (32-bit kernel support only) Minimum 990 MB free disk space for installation (includes SDK); 141 MB installed Minimum 512 MB physical memory; we recommend 1 GB 34 Getting Started with IBM Tivoli Workload Scheduler V8.3
- 71. 3 Chapter 3. Tivoli Workload Scheduler V8.3: New installation This chapter provides step-by-step instructions for the installation of Tivoli Workload Scheduler V8.3, DB2, and the Job Scheduling Console (JSC). This chapter has the following sections: “Overview of the installation” on page 36 “Installing new UNIX master using installation wizard” on page 36 “Installing new UNIX fault-tolerant agent using installation wizard” on page 82 “Installing a Windows fault-tolerant agent” on page 95 “Installing the Tivoli Workload Scheduler command line client” on page 107 © Copyright IBM Corp. 2006. All rights reserved. 35
- 72. 3.1 Overview of the installation We use the following products in the test environment: AIX 5.3 ML03 Windows 2003 Service Pack 3 (SP3) Red Hat Linux Server 3.0 Tivoli Workload Scheduler V8.3 DB2 8.2 Tivoli Workload Scheduler 8.2.1 Tivoli Workload Scheduler 8.2 3.2 Installing new UNIX master using installation wizard This section discusses the installation of the Tivoli Workload Scheduler V8.3 and Job Scheduling Console V8.3, and defines some of the scheduling objects necessary to start using the Tivoli Workload Scheduler. The installation process discusses a new Tivoli Workload Scheduler V8.3 instance, which installs DB2 Enterprise Server Edition, DB2 Administration Client Version 8.2, and WebSphere Application Server, Express Version 6.0.2. The installation prompts for the Tivoli Workload Scheduler user. Because the installation does not create the user, the Tivoli Workload Scheduler user must exist before initiating the installation. After you meet the requirements for DB2, Tivoli Workload Scheduler V8.3, WebSphere (Embedded Express), the operating system (OS) kernel parameters, patches, and disk space, you can proceed to install Tivoli Workload Scheduler V8.3. You require access to the original media for Tivoli Workload Scheduler V8.3. If the DB2 installation media is packaged in a tar file, then extract the DB2 tar file to a directory with sufficient disk space (2 gigabytes (GB) per DB2 release notes) for the installation to work correctly. If DB2 has not been installed previously, then use the Tivoli Workload Scheduler V8.3 installation to install DB2. This book discusses the installation procedures based on installation images that exist locally in the /tmp/TWS83 and /tmp/DB2 directories. 36 Getting Started with IBM Tivoli Workload Scheduler V8.3
- 73. Note: The Tivoli Workload Scheduler V8.3 installation requires approximately 450 megabytes (MB) of temporary disk space in the system temporary directory $TEMP (usually /tmp on UNIX). In our example, the installation uses software that is copied to the /tmp directory. The /tmp directory requires enough disk space to accommodate additional temporary files that are created by the installation. The directory where the Tivoli Workload Scheduler V8.3 installation image is copied to is called /tmp/_twscd. You can use the image copied to the /tmp/_twscd to install other instances on this system or on a different host of the same platform. If it is not required, remove this directory manually after the installation is complete because the installation wizard does not remove the directory. When you install on a UNIX or Linux operating system, and if you have space constraints in the /tmp directory of your system, you can launch the installation wizard with the -is flag and set an alternative temporary directory rather than change the size of the /tmp directory. For example, SETUP.sh -is:tempdir temporary_directory. For information about the various disk space requirements, see Chapter 2, “Tivoli Workload Scheduler V8.3: Master prerequisites” on page 11. 3.2.1 Installation procedure To start the installation, perform the following steps: 1. Select the Tivoli Workload Scheduler V8.3 directory (/tmp/TWS83) and enter the ./SETUP.sh command, as shown in Figure 3-1. Note: For master installations, run setup for the operating system on which you are installing: On Windows, use WINDOWSSETUP.exe. On UNIX and Linux, use the operating_system/SETUP.bin in all situations except in two situations. – On UNIX and Linux, the SETUP.sh install script copies the entire installation image to the hard drive and then launches the SETUP.bin binary. It is useful when the installation images for both Tivoli Workload Scheduler V8.3 and DB2 are located on CD. – If the Tivoli Workload Scheduler V8.3 installation temporary image is to be reused for installations on the same computer or even on other computers where you can map that directory. Chapter 3. Tivoli Workload Scheduler V8.3: New installation 37
- 74. If the installation is performed from CDs, you find an operating_system/SETUP.bin and a SETUP.sh script on the relevant installation CD. The SETUP.sh wrapper script copies the product images in a temporary directory and launches the SETUP.bin binary from that temporary location. When you install a DB2 database on a UNIX or Linux operating system as part of the Tivoli Workload Scheduler V8.3 installation, use the SETUP.sh script, which is located at the root of the relevant CD. The wrapper script moves the installation files to a local directory and launches the installation from there. This frees the CD-ROM drive, thereby allowing you to change to the DB2 CD when requested to do so by the installation. Alternatively, you can copy the DB2 files to a hard drive. The installation process accesses these files for the installation. After you run the SETUP.sh wrapper script, you can either delete the installation images from the temporary directory or use them for other installations on the same computer or even on other computers where you can map that directory. Figure 3-1 Setup command 38 Getting Started with IBM Tivoli Workload Scheduler V8.3
- 75. This initializes the installation wizard, as shown in Figure 3-2. Figure 3-2 Initializing the installation wizard 2. The language preference selection window opens. Select the appropriate language and click OK, as shown in Figure 3-3. Figure 3-3 Language preference window Chapter 3. Tivoli Workload Scheduler V8.3: New installation 39
- 76. 3. The Tivoli Workload Scheduler V8.3 welcome window opens. Click Next, as shown in Figure 3-4. Figure 3-4 Tivoli Workload Scheduler V8.3 welcome window 4. Select I accept the terms in the license agreement and click Next to proceed with the installation, as shown in Figure 3-5. Figure 3-5 License agreement window 40 Getting Started with IBM Tivoli Workload Scheduler V8.3
- 77. 5. Select Install an Instance of Tivoli Workload Scheduler, and click Next to proceed with the installation, as shown in Figure 3-6. Figure 3-6 Installing a new instance 6. Select Master Domain Manager and click Next to proceed with the installation, as shown in Figure 3-7. Figure 3-7 Selecting the type of Tivoli Workload Scheduler instance V8.3 Chapter 3. Tivoli Workload Scheduler V8.3: New installation 41
- 78. 7. Specify the Tivoli Workload Scheduler V8.3 user name and password (as shown in Figure 3-8) and click Next to proceed with the installation. Figure 3-8 Entering the Tivoli Workload Scheduler user name and password 42 Getting Started with IBM Tivoli Workload Scheduler V8.3
- 79. Note: If the user does not exist, you get an error message (see Figure 3-9). The Tivoli Workload Scheduler installation does not create the Tivoli Workload Scheduler user. This user must exist before you start the installation process. Click Back to go to the Tivoli Workload Scheduler user name and password window. You must create the Tivoli Workload Scheduler user before you click Next to proceed with the installation. Figure 3-9 Error message when Tivoli Workload Scheduler user does not exist Chapter 3. Tivoli Workload Scheduler V8.3: New installation 43
- 80. 8. Provide the workstation information in the window shown in Figure 3-10. The only required field is This Workstation Name. By default, the master domain manager name is MASTERDM and the port number is 31111. If multiple instances of the Tivoli Workload Scheduler exist on the local workstation, then adjust these fields to a unique workstation name, master domain manager name, and port number. Click Next to proceed with the installation. Figure 3-10 Configuring the workstation 9. The Tivoli Workload Scheduler V8.3 uses additional ports. These ports must also be unique for each installation instance. If this is the first instance, then no adjustment is required. If multiple masters exist on the local workstation, then all of the ports have to be unique, as shown in Figure 3-11. Though the Tivoli Workload Scheduler tries to use a range of ports that are not usually used, it is possible that other applications might already be using these ports. Verify that the default ports are not being used by another application by entering a netstat command specifying the port number to be checked. If the port number is returned, then it is being used by an application. You must provide another port, for example: netstat -a |grep 31117 44 Getting Started with IBM Tivoli Workload Scheduler V8.3
- 81. Note: You can determine the Tivoli Workload Scheduler ports that are used by the instance by viewing the file serverindex.xml in TWSuser_home/appserver/profiles/twsprofile/config/cells/DefaultNode/ nodes/DefaultNode and searching for BOOTSTRAP_ADDRESS. The line contains the port number assigned to BOOTSTRAP. Click Next to proceed with the installation. Figure 3-11 Tivoli Workload Scheduler instance port specifications 10.The installation directory window (Figure 3-12 on page 47) shows the Tivoli Workload Scheduler user home directory that is used as the location of the Tivoli Workload Scheduler V8.3 instance. Do not change this. If you are installing on a UNIX platform and you require a directory different from the Tivoli Workload Scheduler user home directory, then we recommend that you modify the Tivoli Workload Scheduler user to reflect the new home/install directory before proceeding with the installation. The Create Symbolic Links option is used to determine whether the installation creates symbolic links for the Tivoli Workload Scheduler commands. If you select this option, the commands (shown in Table 3-1) will exist in the /usr/bin/ directory and will be linked to the TWShome/bin directory binaries. Chapter 3. Tivoli Workload Scheduler V8.3: New installation 45
- 82. Do not select the Create Symbolic Links option if multiple Tivoli Workload Scheduler instances exist on the local workstation. Edit the Tivoli Workload Scheduler user’s profile (UNIX only) so that the PATH variable has the TWSHome directory as the first entry in the PATH statement. This ensures that when you enter a Tivoli Workload Scheduler command, the correct path for the instance is used. We recommend this for all Tivoli Workload Scheduler users who have to use the specific Tivoli Workload Scheduler instance. Table 3-1 Symbolic link variables and paths Variable Default value twshome/bin/at /usr/bin/mat twshome/bin/batch /usr/bin//mbatch twshome/bin/datecalc /usr/bin/datecalc twshome/bin/jobstdl /usr/bin/jobstdl twshome/bin/maestro /usr/bin/maestro twshome/bin/mdemon /usr/bin/mdemon twshome/bin/morestdl /usr/bin/morestdl twshome/bin/muser /usr/bin/muser twshome/bin/parms /usr/bin/parms 46 Getting Started with IBM Tivoli Workload Scheduler V8.3
- 83. After you verify the installation directory and the Create Symbolic Links option, click Next to proceed with the installation, as shown in Figure 3-12. Figure 3-12 The Tivoli Workload Scheduler installation directory Chapter 3. Tivoli Workload Scheduler V8.3: New installation 47
- 84. 11.This scenario implements DB2 on the same workstation as the Tivoli Workload Scheduler V8.3 master. Select Install DB2 UDB Enterprise Server Edition and Administration Client, version 8.2 and click Next to proceed with the installation, as shown in Figure 3-13. Figure 3-13 Selecting the DB2 installation type 48 Getting Started with IBM Tivoli Workload Scheduler V8.3
- 85. 12.The installation now displays the DB2 users who are created and port that is used, as shown in Figure 3-14. By default, the installation is to port 50000 for DB2. Enter a netstat command specifying port 50000 to determine whether the port number is used by an application or a previous DB2 installation, for example: netstat -a |grep 50000 Provide a password in this step. Make a note of this password before proceeding with the installation. Click Next. Figure 3-14 DB2 users, password, and default port 13.You might get an error message (see Figure 3-15) if a previous DB2 instance was uninstalled, but not all the components were removed by the uninstallation process. You have to verify that the DB2 software no longer exists on the workstation by using smit (AIX), sam (HP-UX), pkglist (Solaris), rpm (Linux), or other OS-specific utilities to determine whether the DB2 software is installed on the workstation. Verify that the DB2 entries in the /etc/services file no longer exist. Consult the UNIX administrator before modifying the /etc/services file. Chapter 3. Tivoli Workload Scheduler V8.3: New installation 49
- 86. You have to remove the previous DB2 instance, which includes adjusting the /etc/services file or specifying a different port number. Click OK to clear the error message. Figure 3-15 Error message showing the port is in use by a service 14.Accept the default options for the Database Name, Tablespace Name, and Tablespace Path fields, as shown in Figure 3-16. Click Next to proceed with the installation. Figure 3-16 DB2 instance options 50 Getting Started with IBM Tivoli Workload Scheduler V8.3
- 87. 15.A warning message is shown (see Figure 3-17) stating that the DB2 user does not exist and that the user will be created. Click Next to proceed with the installation. Figure 3-17 Warning message showing the DB2 user does not exist Chapter 3. Tivoli Workload Scheduler V8.3: New installation 51
- 88. 16.Figure 3-18 shows a summary of the installation options (user, path ports, and so on). Verify that all the information is correct before proceeding with the installation. Click Next. Figure 3-18 Tivoli Workload Scheduler installation options summary 52 Getting Started with IBM Tivoli Workload Scheduler V8.3
- 89. 17.A list of the operations that are preformed by the installation is shown, see Figure 3-19. Click Next to proceed with the installation. Figure 3-19 List of the operations to be performed Chapter 3. Tivoli Workload Scheduler V8.3: New installation 53
- 90. 18.The DB2 installation operation prompts for the location of the DB2 files. These files must already exist locally on the workstation and must be untarred. The window displayed can vary, Figure 3-20 is a sample. To view other directories, click the folder icon. Figure 3-20 Default DB2 path window 54 Getting Started with IBM Tivoli Workload Scheduler V8.3
- 91. To continue with the installation, navigate to the DB2 directory where the db2setup file exists (see Figure 3-21) and click Next. Figure 3-21 DB2 software location path Chapter 3. Tivoli Workload Scheduler V8.3: New installation 55
- 92. Figure 3-22 shows the DB2 installation progress. Figure 3-22 DB2 installation progress bar Figure 3-23 shows the Tivoli Workload Scheduler V8.3 installation progress. Figure 3-23 The Tivoli Workload Scheduler installation progress bar 56 Getting Started with IBM Tivoli Workload Scheduler V8.3
- 93. If the installation is successful, you will get a summary of the performed installation operations, as shown in Figure 3-24. Figure 3-24 Installation completed Chapter 3. Tivoli Workload Scheduler V8.3: New installation 57
- 94. 19.If any problems exist with the installation, a window opens showing the step number that failed, as shown in Figure 3-25. Figure 3-25 Example of a failed installation 58 Getting Started with IBM Tivoli Workload Scheduler V8.3
- 95. To view the log, right-click the failed step line, as shown in Figure 3-26. Review the log for a more detailed explanation of the installation error. Figure 3-26 Installation error log Chapter 3. Tivoli Workload Scheduler V8.3: New installation 59
- 96. 20.After resolving the issue, right-click the step line and select Set Status → Ready, as shown in Figure 3-27. This allows you to restart the installation from this step. Figure 3-27 Reclassifying the step 60 Getting Started with IBM Tivoli Workload Scheduler V8.3
- 97. 21.You have to click Run All to restart the installation from this step, as shown in Figure 3-28. Figure 3-28 New step status and restarting the installation If you get any errors, repeat the previous procedure until the installation is successful. If you are unable to resolve the errors, contact Tivoli Support for assistance. 3.2.2 Installing the Job Scheduling Console The Job Scheduling Console (JSC) version has changed to match the Tivoli Workload Scheduler version. This section explains the installation process for the Job Scheduling Console version V8.3. You can use the installation process to install the Job Scheduling Console V8.3 or repair an existing V8.3 version. The installation requires that you have access to the original media or path to the install the files. Chapter 3. Tivoli Workload Scheduler V8.3: New installation 61
- 98. Change to the drive or path where the Job Scheduling Console software exists. You can then change to the OS-specific directory. The following procedure demonstrates how to install the Job Scheduling Console V8.3 on a Windows workstation. To install the Job Scheduling Console, perform the following steps: 1. Run the setup.exe application, as shown in Figure 3-29. Figure 3-29 Job Scheduling Console setup icon The installation wizard initiates the installation process, as shown in Figure 3-30. Figure 3-30 Installation wizard initialization process 62 Getting Started with IBM Tivoli Workload Scheduler V8.3
- 99. 2. Specify the language and click OK to proceed with the installation, as shown in Figure 3-31. Figure 3-31 Selecting the language 3. In the Job Scheduling Console welcome window, click Next, as shown in Figure 3-32. Figure 3-32 The Job Scheduling Console welcome window Chapter 3. Tivoli Workload Scheduler V8.3: New installation 63
- 100. 4. Select I accept the terms of the license agreement and click Next to proceed with the installation process, as shown in Figure 3-33. Figure 3-33 License agreement 5. The installation prompts for the Job Scheduling Console directory that contains the application. Enter the location of the directory and click Next, as shown in Figure 3-34. Figure 3-34 Specifying the Job Scheduling Console installation path 64 Getting Started with IBM Tivoli Workload Scheduler V8.3
- 101. 6. The next window prompts for the icons and the shortcuts that will be placed on the desktop. Select the appropriate options and click Next to proceed with the installation, as shown in Figure 3-35. Figure 3-35 Selecting the Job Scheduling Console shortcut icons 7. Figure 3-36 shows the installation path and disk space used by the application for the Job Scheduling Console V8.3 installation. Click Next. Figure 3-36 The Job Scheduling Console installation path and disk space usage Chapter 3. Tivoli Workload Scheduler V8.3: New installation 65
- 102. Figure 3-37 shows the installation progress bar. Figure 3-37 The Job Scheduling Console installation progress bar Figure 3-38 shows the installation complete window. Figure 3-38 Job Scheduling Console installation completed 66 Getting Started with IBM Tivoli Workload Scheduler V8.3
- 103. 3.2.3 Creating scheduling objects for the new master After installing the Job Scheduling Console V8.3, the next task is to define the scheduling objects. In this section, we discuss the definition of a UNIX and a Windows workstation, defining the final job stream and necessary jobs, and the Tivoli Workload Scheduler user for the Windows fault-tolerant agent (FTA). 1. To start the Job Scheduling Console, click the Job Scheduling Console V8.3 icon, as shown in Figure 3-39. Figure 3-39 The Job Scheduling Console V8.3 icon Chapter 3. Tivoli Workload Scheduler V8.3: New installation 67
- 104. Alternatively, you can start it from the Programs menu. Select Program → Job Scheduling Console V8.3 → Job Scheduling Console V8.3, as shown in Figure 3-40. Figure 3-40 Selecting Job Scheduling Console V8.3 icon from programs menu 68 Getting Started with IBM Tivoli Workload Scheduler V8.3
- 105. Figure 3-41 shows the Job Scheduling Console V8.3 banner. Figure 3-41 The Job Scheduling Console splash window 2. The next window prompts for a Preferences file or an Engines file (see Figure 3-42). This allows you to load a predefined file that has either standardized or customized views. Because this is a new installation of the application, click Cancel to proceed with the Job Scheduling Console initialization. Figure 3-42 The load preferences files window Chapter 3. Tivoli Workload Scheduler V8.3: New installation 69
- 106. 3. Figure 3-43 shows the welcome window, select Dismiss this window and work on my own and click OK. Figure 3-43 The Job Scheduling Console welcome window 4. A warning is shown stating that the Job Scheduling Console did not find any defined engines, as shown in Figure 3-44. This is a normal message after the Job Scheduling Console is started for the first time after the initial installation. Click OK to proceed. Figure 3-44 Warning window stating the engine does not exist 70 Getting Started with IBM Tivoli Workload Scheduler V8.3
- 107. 5. Figure 3-45 shows the default engine definition window. Note: The port number shown in the new engine definition window is not the netman port used to link workstations. The requested port is one of the six new ports that was part of the Tivoli Workload Scheduler V8.3 installation, see Figure 3-11 on page 45. The port name is Bootstrap/RMI and by default is port 31117. Each engine instance on the same workstation must use a different port number. You can determine the Tivoli Workload Scheduler ports that are used by the instance by viewing the file serverindex.xml in TWSuser_home/appserver/profiles/twsprofile/config/cells/DefaultNode/ nodes/DefaultNode and searching for BOOTSTRAP_ADDRESS. The line contains the port number assigned to BOOTSTRAP. Figure 3-45 The default engine definition window Chapter 3. Tivoli Workload Scheduler V8.3: New installation 71
- 108. Table 3-2 describes each of the Job Scheduling Console new options. Table 3-2 Job Scheduling Console new engine options Option field Description Engine Name This required field is the label that is displayed for the engine. Engine Type This is a required field. Specify either Distributed or End to End. The default is Distributed. Host Name This is a required field. Specify the fully qualified node name or the Internet Protocol (IP) address of the workstations. Port Number This is a required field. This is the Bootstrap/RMI port number specified in the Job Scheduling Console V8.3 installation. The default is 31117. Remote Server Name This is an optional field. Remote server name is used for Tivoli Workload Scheduler z/OS Engine only to specify one of the remote Tivoli Workload Scheduler for z/OS Engine to which the z/OS Connector is connected. By default this field is blank. User Name This is a required field. This is the name of the user who connects to the engine using the Job Scheduling Console. The user specified must exist in the Tivoli Workload Scheduler security file. By default, the Tivoli Workload Scheduler user specified in the Tivoli Workload Scheduler installation and the root (UNIX) or administrator (Windows) user exists in the security file. Password This is an optional field. This is the password for the user specified in the previous row. If you have not enabled the Save Password option, you must provide the password each time the Job Scheduling Console is started. Save Password This is an optional field. If this is enabled, the password is not required when the Job Scheduling Console is started. If it is not enabled, you have to provide the password each time the Job Scheduling Console is started to manage the engine. By default, this field is not enabled. Periodic Refresh This is an optional field. This implements auto refresh. By default, it is not enabled. Period Seconds This is an optional field. This specifies the refresh rate. By default, it is not enabled. Buffer size for lists This is the size of each list. The default is 250. 72 Getting Started with IBM Tivoli Workload Scheduler V8.3
- 109. Provide the required information for the new engine definition and click OK to save the definition, as shown in Figure 3-46. Figure 3-46 Specifying the Job Scheduling Console engine options 6. If the Job Scheduling Console is not able to connect to the engine, it displays the following error message: Verify the host name, port number, user and password values. See Figure 3-47. Click OK to proceed. Figure 3-47 Message showing the JSC is unable to connect to the engine Chapter 3. Tivoli Workload Scheduler V8.3: New installation 73
- 110. Figure 3-48 shows the new engine definition. Figure 3-48 Job Scheduling Console engine view 74 Getting Started with IBM Tivoli Workload Scheduler V8.3
- 111. 7. After you define the engine, you must define the workstation. Click New Workstation to show the engine name, M83-Paris. Under New Definition, click M83-Paris to define the new workstation for this engine (see Figure 3-49). Figure 3-49 Defining the new workstation Table 3-3 describes each of the workstation definition options. Table 3-3 The workstation definition options Option field Description Ignore This is an optional field. Use this field to specify a workstation that is not active but might have defined scheduling objects. By default, it is not enabled. Name This is a required field. The workstation does not need to be the same name as the workstation node name. Domain This is a required field. This is the name of the domain that manages this workstation. The default is MASTERDM. Use Master Use this field to insert the domain name for the master in the Domain field. Clicking this icon inserts MASTERDM in the DOMAIN field if this is the domain name for master. Description This is an optional field. This is the description of the workstation. Chapter 3. Tivoli Workload Scheduler V8.3: New installation 75
- 112. Option field Description Workstation Type This is a required field. You must select Domain Manager, Fault Tolerant Agent, Extended Agent, or Standard Agent. The default is Fault Tolerant Agent. Operating System This is a required field. You must select the workstation OS: UNIX, Windows, or Other (for AS400, Oracle, PeopleSoft, or SAP). The default is UNIX. Full Status This is an optional field. Specify whether the workstation must receive updates on the status of the jobs that run on all other agents. Enabling this option increases the amount of messages that are sent to the workstations, thus increasing network traffic. This option must be reserved for backup master or backup domain manager. By default, it is not enabled. Time Zone This is an optional field, but it is highly recommended. Specify the time zone of the workstation. The time zone option exists in globalopts on the master workstation and the option is set to enabled by default. You must specify the time zone or jobs, otherwise, the workstations experience dead zone issue on job launches. By default, the time zone not specified. Node Name This is a required field. This is the node name or the IP address for the workstation. Transmission Control This is a required field. This is the netman port number that is used to Protocol (TCP) Port communicate with the other agents. This port must be unique for each Tivoli Workload Scheduler instance if multiple instances exist on a workstation. The default is 31111. SSL Communication This is an optional field. Use this field to implement more restrictive security measures in communicating between the central processing units (CPUs) behind a firewall. SSL Port This is an optional field. This is the port used by Secure Sockets Layer (SSL) for communications. If SSL is implemented, set this port to the value specified in localopts. Default must be 0 or blank. Mailman Server This is an optional field. Use this field to specify a mailman server process that manages a group of workstations with the same mailman server ID. This is used to limit the number of workstations that are affected if a workstation has problems. If a problem exists with a workstation, only the workstations with the same server ID are affected. By default it is not enabled. Behind Firewall This is an optional field. Use this field to specify if a firewall exists between this workstation and its domain manager. Enable this option any time a situation exists for communication to happen between the workstations. The default is not enabled. Auto Link This is an optional field. Use this field to specify that the master or the domain managers must try to link to a workstation if a link does not exist, provided an unlink command is not entered for the workstation. The default is enabled. 76 Getting Started with IBM Tivoli Workload Scheduler V8.3
- 113. Option field Description Access Method This is an optional field. Use this field to specify the access method for the extended agents. The methods can be mcmagent, psagent, r3batch, netmth, unixlocl, or unixrsh. By default this field is blank. Host This is a required field, if the workstation type is Extended Agent or Standard Agent; otherwise, it is optional. This is the host for an Extended Agent or a Standard Agent. The default is blank. Provide the required information for the new workstations. Figure 3-50 shows the UNIX master workstation definition window. Click OK to save the definition. Figure 3-50 Specifying the UNIX master workstation options Chapter 3. Tivoli Workload Scheduler V8.3: New installation 77
- 114. 8. Figure 3-51 shows the Windows fault-tolerant agent definition window. Click OK to save the definition. Figure 3-51 Specifying the Windows fault-tolerant agent options 78 Getting Started with IBM Tivoli Workload Scheduler V8.3
- 115. 9. Figure 3-52 shows the UNIX fault-tolerant agent definition window. Click OK to save the definition. Figure 3-52 Specifying the UNIX fault-tolerant agent options Chapter 3. Tivoli Workload Scheduler V8.3: New installation 79
- 116. Figure 3-53 shows the defined workstations for the M83-Paris engine. Figure 3-53 Workstation definitions on M83-Paris engine 10.After you define the Windows workstation, define the Tivoli Workload Scheduler user for the Windows workstation. To define a Windows user for a Windows workstation: a. Select New Workstation User and select the M83-Paris engine. Table 3-4 describes each of the workstation definition options. Note: This step is not required for Tivoli Workload Scheduler users on UNIX workstations. Table 3-4 Windows workstation definition options Option field Description User Name This is a required field. This is the valid user on the local Windows workstation or Windows domain. The user must exist on either the local workstation or in the Windows domain, but not on both. Windows Domain This is an optional field. Use this field to specify the Windows domain name. Windows Workstation This is a required field. This is the name of the Windows workstation. Password This is a required field. This is the password for the local or domain user. Confirmation This is a required field. This is the password for the local or domain user. 80 Getting Started with IBM Tivoli Workload Scheduler V8.3
- 117. b. Provide the required information as shown in Figure 3-54. Click OK to save the user definition. Figure 3-54 Windows user for Windows fault-tolerant agent F83A Figure 3-55 shows the new Windows user definition. Figure 3-55 Defining the new Windows user Chapter 3. Tivoli Workload Scheduler V8.3: New installation 81
- 118. 3.3 Installing new UNIX fault-tolerant agent using installation wizard This section describes the installation of the Tivoli Workload Scheduler V8.3 on a UNIX FTA. The installation prompts for the Tivoli Workload Scheduler user. Because the installation does not create the user, the Tivoli Workload Scheduler user must exist before initiating the installation. After you have met the disk space requirements for the Tivoli Workload Scheduler V8.3, proceed with the installation of Tivoli Workload Scheduler V8.3. You require access to the original media for the Tivoli Workload Scheduler V8.3 for the installation to work correctly. This book discusses the installation procedures based on installation images existing locally in the /tmp/TWS83 directory. Note: The Tivoli Workload Scheduler V8.3 installation requires approximately 450 MB of temporary disk space in the system temporary directory (/tmp). In our example, the installation uses software that is copied to the /tmp directory. The /tmp directory requires enough disk space to accommodate additional temporary files that are created by the installation. The temporary directory is called /tmp/_twscd. Remove this directory manually after the installation is complete because the installation wizard does not remove the directory. Additionally, when the installation is complete, remove the /tmp/tws83 directory, which contains some of the configuration files. 82 Getting Started with IBM Tivoli Workload Scheduler V8.3
- 119. Installation procedure To start the installation, perform the following steps: 1. Select the Tivoli Workload Scheduler V8.3 directory (/tmp/TWS83) and enter the ./SETUP.sh command. This initializes the installation wizard, as shown in Figure 3-56. Figure 3-56 Initializing the installation wizard 2. The language preference selection window opens. Select the appropriate language and click OK, as shown in Figure 3-57. Figure 3-57 Language preference window Chapter 3. Tivoli Workload Scheduler V8.3: New installation 83
- 120. 3. The Tivoli Workload Scheduler V8.3 welcome window opens. Click Next, as shown in Figure 3-58. Figure 3-58 Tivoli Workload Scheduler V8.3 welcome window 4. Select I accept the terms in the license agreement and click Next to proceed with the installation, as shown in Figure 3-59. Figure 3-59 License agreement window 84 Getting Started with IBM Tivoli Workload Scheduler V8.3
- 121. 5. Select Install an Instance of Tivoli Workload Scheduler, and click Next to proceed with the installation, as shown in Figure 3-60. Figure 3-60 Installing a new instance 6. Select Agent or Domain Manager and click Next to proceed with the installation, as shown in Figure 3-61. Figure 3-61 Selecting the type of Tivoli Workload Scheduler V8.3 instance Chapter 3. Tivoli Workload Scheduler V8.3: New installation 85
- 122. 7. Specify the Tivoli Workload Scheduler V8.3 user name and password, as shown in Figure 3-62. Click Next to proceed with the installation. Figure 3-62 Entering the Tivoli Workload Scheduler user name and password 86 Getting Started with IBM Tivoli Workload Scheduler V8.3
- 123. Note: If the user does not exist, you will get an error message (see Figure 3-63). The Tivoli Workload Scheduler installation does not create the Tivoli Workload Scheduler user, this user must exist before you start the installation process. Click Back to go to the Tivoli Workload Scheduler user name and password window. Create the Tivoli Workload Scheduler user before you click Next to proceed with the installation. Figure 3-63 Error message when Tivoli Workload Scheduler user does not exist 8. Provide the workstation information in the window shown in Figure 3-64 on page 88. The only required field is This Workstation Name. By default, the master domain manager name is MASTERDM and the port number is 31111. Each Tivoli Workload Scheduler V8.3 requires a unique port for each installation instance. If this is the first instance, then no adjustment is required. If multiple instances of the Tivoli Workload Scheduler exist on the local workstation, then adjust these fields to a unique workstation name, master domain manager name, and port number. Though the Tivoli Workload Scheduler tries to use a range of ports that are not normally used, it is possible that other applications might already be using these ports. Verify that the default ports are not being used by another application by entering a netstat command specifying the port number to be Chapter 3. Tivoli Workload Scheduler V8.3: New installation 87
- 124. checked. If the port number is returned, then it is being used by an application and you must provide another port, for example: netstat -a |grep 31117 Click Next to proceed with the installation. Figure 3-64 Configuring the FTA workstation 9. The installation directory window (Figure 3-65 on page 89) shows the Tivoli Workload Scheduler user home directory that is used as the location of the Tivoli Workload Scheduler V8.3 instance. Do not change this. If you are installing on a UNIX platform and you require a directory different from the Tivoli Workload Scheduler user home directory, then we recommend that you modify the Tivoli Workload Scheduler user to reflect the new home/install directory before proceeding with the installation. The Create Symbolic Links option is used to determine whether the installation creates symbolic links for the Tivoli Workload Scheduler commands. If you select this option, the commands (shown in Table 3-5 on page 89) will exist in the /usr/bin/ directory and will be linked to the TWShome/bin directory binaries. Do not select the Create Symbolic Links option if multiple Tivoli Workload Scheduler instances exist on the local workstation. Edit the Tivoli Workload Scheduler user’s profile (UNIX only) so that the PATH variable has the TWSHome directory as the first entry in the PATH statement. This ensures that when you enter a Tivoli Workload Scheduler command, the correct path 88 Getting Started with IBM Tivoli Workload Scheduler V8.3
- 125. for the instance is used. We recommend this for all Tivoli Workload Scheduler users who have to use the specific Tivoli Workload Scheduler instance. Table 3-5 Symbolic link variables and paths Variable Default value twshome/bin/at /usr/bin/mat twshome/bin/batch /usr/bin//mbatch twshome/bin/datecalc /usr/bin/datecalc twshome/bin/jobstdl /usr/bin/jobstdl twshome/bin/maestro /usr/bin/maestro twshome/bin/mdemon /usr/bin/mdemon twshome/bin/morestdl /usr/bin/morestdl twshome/bin/muser /usr/bin/muser twshome/bin/parms /usr/bin/parms After you verify the installation directory and the Create Symbolic Links option, click Next to proceed with the installation, as shown in Figure 3-65. Figure 3-65 Tivoli Workload Scheduler installation directory Chapter 3. Tivoli Workload Scheduler V8.3: New installation 89
- 126. 10.Figure 3-66 shows a summary of the installation options (user, path ports, and so on). Verify that all of the information is correct before you proceed with the installation. Click Next. Figure 3-66 Tivoli Workload Scheduler installation options summary 11.A list of the operations that are preformed by the installation is shown in Figure 3-67. Click Next to proceed with the installation. Figure 3-67 List of the operations to be performed 90 Getting Started with IBM Tivoli Workload Scheduler V8.3
- 127. Figure 3-68 shows the Tivoli Workload Scheduler V8.3 installation progress. Figure 3-68 The Tivoli Workload Scheduler installation progress bar If the installation is successful, you see a summary of the performed installation operations, as shown in Figure 3-69. Figure 3-69 Installation completed Chapter 3. Tivoli Workload Scheduler V8.3: New installation 91
- 128. 12.If any problems exist with the installation, a window opens showing the step number that failed. Figure 3-70 shows a sample view; all the steps listed in Figure 3-70 will not displayed. Figure 3-70 Example of a failed installation 92 Getting Started with IBM Tivoli Workload Scheduler V8.3
- 129. To view the log, right-click the failed step line, as shown in Figure 3-71. Review the log for a more detailed explanation of the installation error. Figure 3-71 Installation error log Chapter 3. Tivoli Workload Scheduler V8.3: New installation 93
- 130. 13.After you resolve the issue, right-click the step line and select Set Status → Ready, as shown in Figure 3-72. This allows you to restart the installation from this step. Figure 3-72 Reclassifying the step 94 Getting Started with IBM Tivoli Workload Scheduler V8.3
- 131. 14.You have to click Run All to restart the installation from this step, as shown in Figure 3-73. Figure 3-73 New step status and restarting the installation If you get any errors, repeat the previous procedure until the installation is successful. If you are unable to resolve the errors, contact Tivoli Support for assistance. 3.4 Installing a Windows fault-tolerant agent This section describes the installation of the Tivoli Workload Scheduler V8.3 on a Windows FTA. The installation prompts for the Tivoli Workload Scheduler user. Because the installation does not create the user, the Tivoli Workload Scheduler user must exist before initiating the installation. After you meet the disk space requirements for the Tivoli Workload Scheduler V8.3, proceed with the installation of Tivoli Workload Scheduler V8.3. You require access to the original media for the Tivoli Workload Scheduler V8.3 for the installation to work correctly. Chapter 3. Tivoli Workload Scheduler V8.3: New installation 95
- 132. This book discusses the installation procedures based on installation images existing locally in the c:tmpTWS83 directory. Note: The Tivoli Workload Scheduler V8.3 installation requires approximately 450 MB of temporary disk space in the system temporary directory (/tmp). In our example, the installation uses software that is copied to the /tmp directory. The /tmp directory needs enough disk space to accommodate additional temporary files that are created by the installation. If you create a directory for the installation image, remove it after the installation is complete. Installation procedure To start the installation, perform the following steps: 1. Select the Tivoli Workload Scheduler V8.3 directory (c:TWS83_imageWINDOWS) and click SETUP.exe application, as shown in Figure 3-74. Figure 3-74 Setup command This initializes the installation wizard. 96 Getting Started with IBM Tivoli Workload Scheduler V8.3
- 133. 2. The language preference selection window opens. Select the appropriate language and click OK, as shown in Figure 3-75. Figure 3-75 Language preference window 3. The Tivoli Workload Scheduler V8.3 welcome window opens. Click Next, as shown in Figure 3-76. Figure 3-76 Tivoli Workload Scheduler V8.3 welcome window Chapter 3. Tivoli Workload Scheduler V8.3: New installation 97
- 134. 4. Select I accept the terms in the license agreement and click Next to proceed with the installation, as shown in Figure 3-77. Figure 3-77 License agreement window 5. Select Install an Instance of Tivoli Workload Scheduler, and click Next to proceed with the installation, as shown in Figure 3-78. Figure 3-78 Installing a new instance 98 Getting Started with IBM Tivoli Workload Scheduler V8.3
- 135. 6. Select Agent or Domain Manager and click Next to proceed with the installation, as shown in Figure 3-79. Figure 3-79 Selecting the type of Tivoli Workload Scheduler V8.3 instance 7. Specify the Tivoli Workload Scheduler V8.3 user name and password, as shown in Figure 3-80. Click Next to proceed with the installation. Figure 3-80 Entering the Tivoli Workload Scheduler user name and password Note: If the user does not exist, the installation will create the user. Chapter 3. Tivoli Workload Scheduler V8.3: New installation 99
- 136. 8. Provide the workstation information in the window shown in Figure 3-81. The only required field is This Workstation Name. By default, the master domain manager name is MASTERDM and port number is 31111. Each Tivoli Workload Scheduler V8.3 requires a unique port for each installation instance. If this is the first instance, then no adjustment is required. If multiple instances of the Tivoli Workload Scheduler exist on this local workstation, then adjust these fields to a unique workstation name, master domain manager name, and port number. Though the Tivoli Workload Scheduler tries to use a range of ports that are not usually used, it is possible that other applications might already be using these ports. Verify that the default ports are not being used by another application by entering a netstat command specifying the port number to be checked. If the port number is returned, then it is being used by an application. You must provide another port, for example: netstat -a |grep 31117 Click Next to proceed with the installation. The installation verifies that the port is not being used. If the port is not available for use, it will request that a different port be defined. Figure 3-81 Configuring the FTA workstation 100 Getting Started with IBM Tivoli Workload Scheduler V8.3
- 137. 9. Figure 3-82 might be displayed if the user does not exist or if the user does not have the necessary permissions for the Tivoli Workload Scheduler V8.3 instance. Click Next to continue. Figure 3-82 User required permissions 10.The installation directory window prompts for the Tivoli Workload Scheduler installation directory. This is the location of the Tivoli Workload Scheduler V8.3 instance. After you verify the installation directory, click Next to proceed with the installation, as shown in Figure 3-83. Figure 3-83 Tivoli Workload Scheduler installation directory Chapter 3. Tivoli Workload Scheduler V8.3: New installation 101
- 138. 11.Figure 3-84 shows a summary of the installation path and the required disk space. Click Next to proceed with installation. Figure 3-84 Tivoli Workload Scheduler installation summary 12.A list of the operations that are preformed by the installation is shown in Figure 3-85. Click Next to proceed with the installation. Figure 3-85 List of the operations to be performed 102 Getting Started with IBM Tivoli Workload Scheduler V8.3
- 139. Figure 3-86 shows the Tivoli Workload Scheduler V8.3 installation progress. Figure 3-86 The Tivoli Workload Scheduler installation progress bar If the installation is successful, you see a summary of the performed installation operations, as shown in Figure 3-87. Figure 3-87 Installation completed Chapter 3. Tivoli Workload Scheduler V8.3: New installation 103
- 140. 13.If any problems exist with the installation, a window opens showing the step number that failed. Figure 3-88 shows a sample view; all the steps listed in Figure 3-88 will not displayed. Figure 3-88 Example of a failed installation 104 Getting Started with IBM Tivoli Workload Scheduler V8.3
- 141. To view the log, right-click the failed step line, as shown in Figure 3-89. Review the log for a more detailed explanation of the installation error. Figure 3-89 Installation error log Chapter 3. Tivoli Workload Scheduler V8.3: New installation 105
- 142. 14.After you resolve the issue, right-click the step line and select Set Status → Ready, as shown in Figure 3-90. This allows you to restart the installation from this step. Figure 3-90 Reclassifying the step 106 Getting Started with IBM Tivoli Workload Scheduler V8.3
- 143. 15.You have to click Run All to restart the installation from this step, as shown in Figure 3-91. Figure 3-91 New step status and restarting the installation If you get any errors, repeat the previous procedure until the installation is successful. If you are unable to resolve the errors, contact Tivoli Support for assistance. 3.5 Installing the Tivoli Workload Scheduler command line client This section discusses the installation of the Tivoli Workload Scheduler V8.3 command line client on a Windows FTA. The installation prompts for the Tivoli Workload Scheduler user. After you meet the disk space requirements for the Tivoli Workload Scheduler V8.3, proceed with the installation of Tivoli Workload Scheduler V8.3. You require access to the original media for the Tivoli Workload Scheduler V8.3 for the installation to work correctly. Chapter 3. Tivoli Workload Scheduler V8.3: New installation 107
- 144. This book discusses installation procedures based on installation images existing locally in the c:TWS83_imageWINDOWS directory. Installation procedure To start the installation, perform the following steps: 1. Select the Tivoli Workload Scheduler V8.3 directory (c:TWS83_imageWINDOWS) and click the SETUP.exe application, as shown in Figure 3-92. Figure 3-92 Setup command This initializes the installation wizard. 2. The language preference selection window opens. Select the appropriate language and click OK, as shown in Figure 3-93. Figure 3-93 Language preference window 108 Getting Started with IBM Tivoli Workload Scheduler V8.3
- 145. 3. The Tivoli Workload Scheduler V8.3 welcome window opens. Click Next, as shown in Figure 3-94. Figure 3-94 Tivoli Workload Scheduler V8.3 welcome window 4. Select I accept the terms in the license agreement and click Next to proceed with the installation, as shown in Figure 3-95. Figure 3-95 License agreement window Chapter 3. Tivoli Workload Scheduler V8.3: New installation 109
- 146. 5. Select Install the Command Line Client and click Next to proceed with the installation, as shown in Figure 3-96. Figure 3-96 Selecting the command line client 6. You must provide the master or backup master workstation information (see Table 3-6 on page 111) in the window shown in Figure 3-97 on page 111. This is the window that you connect to when you run the composer or planman (for trial plan and forecast plan options only) commands. Each Tivoli Workload Scheduler V8.3 instance requires a unique port number for the Remote Port field. This port number matches the port that is in the “HTTPS Transport (used by composer when HTTPS protocol is selected)” field during the Tivoli Workload Scheduler V8.3 installation. If this is the first instance, then no adjustment is required. If multiple instances of the Tivoli Workload Scheduler V8.3 exist on this local workstation, then adjust the Remote Port field to the unique port number specific for the instance. 110 Getting Started with IBM Tivoli Workload Scheduler V8.3
- 147. Table 3-6 Explanation of the fields Option field Description Remote Host Node name or IP address of master or backup master for this Tivoli Workload Scheduler V8.3 instance Remote Port This is the port that is used to communicate with the remote host. The default port is 31116 and is configured during the Tivoli Workload Scheduler V8.3 installation. If multiple Tivoli Workload Scheduler V8.3 instances exist, then use a unique port for each instance and specify the correct port specified for that instance. User Name Tivoli Workload Scheduler user for this instance Password Password for the Tivoli Workload Scheduler user Provide the necessary information and click Next to continue. Figure 3-97 Installing the command line client Chapter 3. Tivoli Workload Scheduler V8.3: New installation 111
- 148. 7. The installation directory window shows the installation directory. After you verify the installation directory, click Next to proceed with the installation, as shown in Figure 3-98. Figure 3-98 Installation directory window 8. Figure 3-99 shows a summary of the installation path and required disk space. Click Next to proceed with installation. Figure 3-99 Summary of the installation path and required disk space 112 Getting Started with IBM Tivoli Workload Scheduler V8.3
- 149. 9. A list of the operations that are performed by the installation is shown in Figure 3-100. Click Next to proceed with the installation. . Figure 3-100 List of the operations to be performed by the installation If the installation is successful, you see a summary of the performed installation operations and location of summary log file that has further details. See Figure 3-101. Figure 3-101 Installation successful window Chapter 3. Tivoli Workload Scheduler V8.3: New installation 113
- 150. 114 Getting Started with IBM Tivoli Workload Scheduler V8.3
- 151. 4 Chapter 4. Tivoli Workload Scheduler V8.3: Migration This chapter describes how to upgrade (direct and parallel upgrade) Tivoli Workload Scheduler V8.1, Tivoli Workload Scheduler V8.2, and Tivoli Workload Scheduler V8.2.1 to the Tivoli Workload Scheduler V8.3. It consists of the following sections: “Prerequisites for the upgrade” on page 116 “Overview of the upgrade” on page 117 “Before the upgrade” on page 119 “Upgrading Tivoli Workload Scheduler V8.1: Parallel upgrade” on page 120 “Upgrading Tivoli Workload Scheduler V8.1: Direct upgrade” on page 196 “Upgrading Tivoli Workload Scheduler V8.2: Parallel upgrade” on page 234 “Upgrading Tivoli Workload Scheduler V8.2: Direct upgrade” on page 276 “Upgrading Tivoli Workload Scheduler V8.2.1: Parallel upgrade” on page 304 © Copyright IBM Corp. 2006. All rights reserved. 115
- 152. 4.1 Prerequisites for the upgrade For the upgrade, we assume that Tivoli Workload Scheduler V8.1, Tivoli Workload Scheduler V8.2, and Tivoli Workload Scheduler V8.2.1 are installed and configured, have the required patches, and are working correctly. Figure 4-1 shows our lab environment for Tivoli Workload Scheduler V8.1. PROV008 AIX V.5.3 TWS V.8.1 + FP0011 MASTER DOMAIN MANAGER AMSTERDAM Ethernet BELFAST Windows 2000 AIX V.5.3 TWS V.8.1 + FP0011 TWS V.8.1 + FP0011 FTA FTA ACPD001 Red Hat Linux Server V.3.0 TWS V.8.1 + FP0011 FTA Figure 4-1 Lab environment for Tivoli Workload Scheduler V8.1 Figure 4-2 shows our lab environment for Tivoli Workload Scheduler V8.2. ACPD001 Red Hat Linux Server V.3.0 TWS V.8.2 + FP0006 MASTER DOMAIN MANAGER Ethernet AMSTERDAM PROV009 Windows 2000 AIX V.5.3 TWS V.8.2 + FP0006 TWS V.8.2 + FP0006 FTA FTA FLORENCE Windows 2003 TWS V.8.2 + FP0006 FTA Figure 4-2 Lab environment for Tivoli Workload Scheduler V8.2 116 Getting Started with IBM Tivoli Workload Scheduler V8.3
- 153. Figure 4-3 shows our lab environment for Tivoli Workload Scheduler V8.2.1. ROLLTIDE Windows 2000 TWS V.8.2.1 MASTER DOMAIN MANAGER TIDE Ethernet BAMA Windows 2003 Windows 2003 TWS V.8.2.1 TWS V.8.2.1 FTA FTA Figure 4-3 Lab environment for Tivoli Workload Scheduler V8.2.1 Software requirements We use the following products in our lab environment: AIX V5.3 ML00 Red Hat Linux Server V3.0 Windows 2000 Service Pack 4 Windows 2003 Standard Edition IBM Tivoli Workload Scheduler V8.1 + 8.1.0-TIV-TWS-FP0011 IBM Tivoli Workload Scheduler V8.2 + 8.2.0-TIV-TWS-FP0006 IBM Tivoli Workload Scheduler V8.2.1 DB2 Universal Database Enterprise Server Edition V8.2 IBM WebSphere Application Server - Express V6.0 (also called WebSphere Application Server Base) 4.2 Overview of the upgrade This section provides information that you have to consider before you upgrade an existing version of Tivoli Workload Scheduler. You can upgrade a Tivoli Workload Scheduler master domain manager, a domain manager, a fault-tolerant agent (FTA), and a standard agent from V8.1, V8.2, and V8.2.1 to V8.3. Chapter 4. Tivoli Workload Scheduler V8.3: Migration 117
- 154. If you are upgrading a Tivoli Workload Scheduler V8.1 master domain manager, you require fix pack 8.1.0-TIV-TWS-FP0011. If you are upgrading a Tivoli Workload Scheduler V8.2 master domain manager, you require fix pack 8.2.0-TIV-TWS-FP0005. Tivoli Workload Scheduler V8.3 is compatible with earlier versions. Therefore, you can upgrade your network gradually in no particular order. If you have Tivoli Workload Scheduler V8.1 FTAs and you upgrade the master domain manager first, some functions (such as firewall support and centralized security) do not work until the whole network is upgraded. If you want to maintain the integrity of your previous master domain manager until you are sure that the upgrade is successful, you can install a new instance of Tivoli Workload Scheduler V8.3, and import the data from the parallel instance. Otherwise, you can directly upgrade the existing master domain manager. Notes: For additional information about updating existing software, see IBM Tivoli Workload Scheduler Release Notes v8.3, SC32-1277. If you are upgrading a Tivoli Workload Scheduler V8.1, and if the components registry file is not located in TWShome/../unison/netman, Tivoli Workload Scheduler entries are not removed by the migration process. If you are migrating from a mounted file system in UNIX, mount the file system in read or write mode. During the upgrade of a master domain manager to Tivoli Workload Scheduler V8.3, you can choose to import the object data into the new relational database after the upgrade. If you choose this method, you must manually add the new master central processing unit (CPU) in the relational database. If you are migrating a database containing a large number of jobs or job streams using the manual step method, run the dbrunstats utility. If you are upgrading from Tivoli Workload Scheduler V8.2 or V8.2.1 and have a workstation class that has a list member longer than 128 bytes, the composer command truncates the line and two incorrect workstation classes are created. If you are upgrading in a Linux environment that uses the LD_ASSUME_KERNEL=2.4.1 environment variable, upgrade to Tivoli Workload Scheduler V8.3 in a shell that also uses the LD_ASSUME_KERNEL=2.4.1 environment variable. 118 Getting Started with IBM Tivoli Workload Scheduler V8.3
- 155. 4.3 Before the upgrade This section provides information about the data import method, retrieving Tivoli Management Framework user data from the security file, and dumping existing objects from the database. 4.3.1 Data import methods When you upgrade to Tivoli Workload Scheduler V8.3, you can choose one of the following methods of importing data. The method you choose depends on how closely you want to follow the import process. Manually importing data for both parallel and direct upgrade If you want to follow the data import process in detail, you can manually import the objects in steps, checking the success or failure of each object group before proceeding to the next step. When you manually import data, you can select the option to upgrade the existing instance using the installation wizard. However, before you begin the installation, you have to make copies of the data. If you do not want to follow the data import process in detail, but want it to run in the foreground, you can manually import all of the objects as a block, checking the status of the import after completion. Note: If you choose to import data from a parallel instance of Tivoli Workload Scheduler that is on the same computer, install the Tivoli Workload Scheduler V8.3 instance with a different user from the existing instance. Automatically importing for a direct upgrade If you do not want to follow the import process but want it to run in the background, you can select an automatic import option during the installation wizard upgrade. You can check the status of the import after completion using the log files located in the installation_dir/tmp directory. Note: During data import, the following log files are created in the installation_dir/tmp directory: datamigrate_object_nnnnn.log: This contains all the messages created during the import process, where object is the database object, and nnnnn is an identifier of each datamigrate run. datamigrate_object_nnnnn.err: This contains the error messages created during the data import process, where object is the database object and nnnnn is an identifier of each datamigrate run. Chapter 4. Tivoli Workload Scheduler V8.3: Migration 119
- 156. 4.3.2 Extracting Tivoli Management Framework user data from the security file If you have Tivoli Management Framework users registered in your security file, extract them before you begin the upgrade process. Tivoli Workload Scheduler provides a utility for extracting the users in operating_systemutilitiesmigrtool.tar on the relevant CD. 4.3.3 Dumping existing objects from the database When you are upgrading with the intention of manually importing the data into the new relational database in a parallel or direct upgrade scenario, a copy of the existing data objects must reside in your environment. If you are performing a parallel upgrade, you must manually perform a memory dump of the data. If you are performing a direct upgrade, the process automatically creates a memory dump of the data. In a parallel upgrade, depending on the environment that you are upgrading, when you perform a memory dump of the data, use the composer command line provided in the installation CD, which is related to the operating system where the Tivoli Workload Scheduler you are upgrading is installed. 4.4 Upgrading Tivoli Workload Scheduler V8.1: Parallel upgrade This section describes how to upgrade the environment using a parallel upgrade procedure. The parallel upgrade procedure consists of the following topics: 4.4.1, “Dumping existing objects from the database” on page 121 4.4.2, “Extracting Tivoli Framework user data from the security file” on page 123 4.4.3, “Installing a new master domain manager” on page 127 4.4.4, “Importing the migrated security file in the Tivoli Workload Scheduler V8.3 environment” on page 128 4.4.5, “Importing the object data” on page 130 4.4.6, “Switching a master domain manager” on page 139 4.4.7, “Upgrading the backup master domain manager” on page 147 4.4.8, “Upgrading agents” on page 170 4.4.9, “Unlinking and stopping Tivoli Workload Scheduler when upgrading agent workstations” on page 194 120 Getting Started with IBM Tivoli Workload Scheduler V8.3
- 157. 4.4.1 Dumping existing objects from the database In a parallel upgrade, you must manually perform a memory dump of the data, therefore, a copy of the existing data objects must reside in your environment. When you perform a memory dump of the data, use the composer command line provided in the installation CD related to the operating system where the Tivoli Workload Scheduler you are upgrading was installed. To dump the data using the composer command line provided in the installation CD, perform the following steps: 1. As root user, choose the appropriate installation CD and mount it. # mount /cdrom Note: For AIX operating system, the appropriate installation CD is CD1. 2. Copy the composer81 command into the directory where the previous composer is installed, as shown in Example 4-1. # cp CDn/operating_system/bin/composer81 /Tivoli/tws81/bin Example 4-1 Copying CDn/operating_system/bin/composer81 to TWShome/bin # cp /cdrom/AIX/bin/composer81 /Tivoli/tws81/bin Note: This section discusses Tivoli Workload Scheduler V8.1 parallel upgrade, therefore, you must use composer81 command. 3. Set the permission, owner, and group to composer81 with the same rights that the previous composer has, as shown in Example 4-2. Example 4-2 Setting permission, owner, and group of composer81 command # cd /Tivoli/tws81/bin # ls -l composer -r-s--s--x 1 tws81 unison 1391362 Jul 26 2004 composer # chmod u+s composer81 # chmod g+s composer81 # chmod g-r composer81 # chmod o-r composer81 # chown tws81.unison composer81 Chapter 4. Tivoli Workload Scheduler V8.3: Migration 121
- 158. 4. As tws81 user, use the composer81 create command to dump the data of Tivoli Workload Scheduler V8.1, as shown in Example 4-3. Example 4-3 Dumping the data of Tivoli Workload Scheduler V8.1 # su - tws81 $ mkdir /Tivoli/tws81/dumpdata $ cd /Tivoli/tws81/dumpdata $ /Tivoli/tws81/bin/composer81 - create topology_filename from cpu=@ - create prompts_filename from prompts - create calendar_filename from calendars - create parms_filename from parms - create resources_filename from resources - create users_filename from users=@#@ - create jobs_filename from jobs=@#@ - create scheds_filename from sched=@#@ The memory dump data of Tivoli Workload Scheduler V8.1 consists of the following files: – topology_filename is the name of the file that contains the topology data of the Tivoli Workload Scheduler that you are upgrading, where “from cpu=@” indicates all workstations, workstation classes, and domains. – prompts_filename is the name of the file that contains the prompts of the Tivoli Workload Scheduler that you are upgrading, where “from prompts” indicates all prompts. – calendar_filename is the name of the file that contains the calendars of the Tivoli Workload Scheduler that you are upgrading, where “from calendars” indicates all calendars. – parms_filename is the name of the file that contains the parameters of the Tivoli Workload Scheduler that you are upgrading, where “from parms” indicates all parameters. – resources_filename is the name of the file that contains the resources of the Tivoli Workload Scheduler that you are upgrading, where “from resources” indicates all resources. – users_filename is the name of the file that contains the users of the Tivoli Workload Scheduler that you are upgrading, where “from users=@#@” indicates all users. 122 Getting Started with IBM Tivoli Workload Scheduler V8.3
- 159. – jobs_filename is the name of the file that contains the jobs of the Tivoli Workload Scheduler that you are upgrading, where “from jobs=@#@” indicates all jobs. – scheds_filename is the name of the file that contains the job streams of the Tivoli Workload Scheduler that you are upgrading, where “from scheds=@#@” indicates all schedules. Use these files to import the data into the relational database. 4.4.2 Extracting Tivoli Framework user data from the security file To extract the Tivoli Management Framework users, perform the following steps: 1. As tws81 user, make sure the Tivoli Management Framework environment is set: # su - tws81 $ . /etc/Tivoli/setup_env.sh 2. Stop the Tivoli Workload Scheduler V8.1 processes: $ conman stop $ conman shutdown 3. Copy the migrtool.tar file in a directory on the Tivoli Workload Scheduler V8.1 environment, as shown in Example 4-4. Example 4-4 Copying the migrtool.tar file to TWShome directory $ cp /cdrom/AIX/utilities/migrtool.tar /Tivoli/tws81 4. Back up the files listed in the migrtool.tar file, if they already exist in Tivoli Workload Scheduler V8.1 environment, as shown in Example 4-5. Example 4-5 List of files in the migrtool.tar file and backups in TWShome $ tar -tvf /Tivoli/tws81/migrtool.tar -rw-r--r-- 0 0 16109 Mar 27 17:22:19 2006 catalog/C/unison.cat -rw-r--r-- 0 0 57395 Mar 27 17:22:27 2006 catalog/C/unison_trace.cat -rw-r--r-- 0 0 244563 Mar 27 17:22:58 2006 catalog/C/maestro.cat -rw-r--r-- 0 0 48859 Mar 27 17:23:15 2006 catalog/C/maestro_trace.cat -rwxr-xr-x 0 0 971455 Mar 27 17:53:22 2006 bin/getfwkusr -rwxr-xr-x 0 0 1093870 Mar 27 19:17:14 2006 bin/migrutility -rwxr-xr-x 0 0 1368 Mar 27 17:53:23 2006 migrfwkusr -rw-r--r-- 0 0 1441 Mar 27 17:53:24 2006 set_env -rwxr-xr-x 0 0 53916 Mar 27 19:17:02 2006 bin/libatrc.a -rwxr-xr-x 0 0 470 Mar 27 19:17:03 2006 bin/libicudata.a -rwxr-xr-x 0 0 470 Mar 27 19:17:03 2006 bin/libicudata34.a Chapter 4. Tivoli Workload Scheduler V8.3: Migration 123
- 160. -rwxr-xr-x 0 0 1028502 Mar 27 19:17:04 2006 bin/libicui18n.a -rwxr-xr-x 0 0 1028502 Mar 27 19:17:04 2006 bin/libicui18n34.a -rwxr-xr-x 0 0 90941 Mar 27 19:17:05 2006 bin/libicutu.a -rwxr-xr-x 0 0 90941 Mar 27 19:17:05 2006 bin/libicutu34.a -rwxr-xr-x 0 0 1272536 Mar 27 19:17:05 2006 bin/libicuuc.a -rwxr-xr-x 0 0 1272536 Mar 27 19:17:06 2006 bin/libicuuc34.a $ cp /Tivoli/tws81/catalog/C/unison.cat /Tivoli/tws81/catalog/C/unison.cat.tws81 $ cp /Tivoli/tws81/catalog/C/maestro.cat /Tivoli/tws81/catalog/C/maestro.cat.tws81 $ cp /Tivoli/tws81/bin/libatrc.a /Tivoli/tws81/bin/libatrc.a.tws81 5. As root user, extract the files from the migrtool.tar file into the Tivoli Workload Scheduler V8.1 environment, as shown in Example 4-6. Example 4-6 Extracting the files from migrtool.tar into TWShome # cd /Tivoli/tws81 # tar -xvf /Tivoli/tws81/migrtool.tar x catalog/C/unison.cat, 16109 bytes, 32 media blocks. x catalog/C/unison_trace.cat, 57395 bytes, 113 media blocks. x catalog/C/maestro.cat, 244563 bytes, 478 media blocks. x catalog/C/maestro_trace.cat, 48859 bytes, 96 media blocks. x bin/getfwkusr, 971455 bytes, 1898 media blocks. x bin/migrutility, 1093870 bytes, 2137 media blocks. x migrfwkusr, 1368 bytes, 3 media blocks. x set_env, 1441 bytes, 3 media blocks. x bin/libatrc.a, 53916 bytes, 106 media blocks. x bin/libicudata.a, 470 bytes, 1 media blocks. x bin/libicudata34.a, 470 bytes, 1 media blocks. x bin/libicui18n.a, 1028502 bytes, 2009 media blocks. x bin/libicui18n34.a, 1028502 bytes, 2009 media blocks. x bin/libicutu.a, 90941 bytes, 178 media blocks. x bin/libicutu34.a, 90941 bytes, 178 media blocks. x bin/libicuuc.a, 1272536 bytes, 2486 media blocks. x bin/libicuuc34.a, 1272536 bytes, 2486 media blocks. 6. Set permissions, owner, and group of the files extracted from the migrtool.tar file into the Tivoli Workload Scheduler V8.1 environment, as shown in Example 4-7. Example 4-7 Setting permissions, owner, and group of the files into TWShome # chmod 755 /Tivoli/tws81/migrfwkusr # chmod 755 /Tivoli/tws81/set_env # chmod 755 /Tivoli/tws81/bin/getfwkusr # chmod 755 /Tivoli/tws81/bin/migrutility # chown tws81.unison /Tivoli/tws81/migrfwkusr 124 Getting Started with IBM Tivoli Workload Scheduler V8.3
- 161. # chown tws81.unison /Tivoli/tws81/set_env # chown tws81.unison /Tivoli/tws81/catalog/C/unison.cat # chown tws81.unison /Tivoli/tws81/catalog/C/unison_trace.cat # chown tws81.unison /Tivoli/tws81/catalog/C/maestro.cat # chown tws81.unison /Tivoli/tws81/catalog/C/maestro_trace.cat # chown tws81.unison /Tivoli/tws81/bin/getfwkusr # chown tws81.unison /Tivoli/tws81/bin/migrutility # chown tws81.unison /Tivoli/tws81/bin/libatrc.a # chown tws81.unison /Tivoli/tws81/bin/libicudata.a # chown tws81.unison /Tivoli/tws81/bin/libicudata34.a # chown tws81.unison /Tivoli/tws81/bin/libicui18n.a # chown tws81.unison /Tivoli/tws81/bin/libicui18n34.a # chown tws81.unison /Tivoli/tws81/bin/libicutu.a # chown tws81.unison /Tivoli/tws81/bin/libicutu34.a # chown tws81.unison /Tivoli/tws81/bin/libicuuc.a # chown tws81.unison /Tivoli/tws81/bin/libicuuc34.a 7. Create a symbolic link in the /usr/lib directory, as shown in Example 4-8. Example 4-8 Creating a symbolic link in /usr/lib directory # cd /usr/lib # ln -s /Tivoli/tws81/bin/libatrc.a libatrc.a # ln -s /Tivoli/tws81/bin/libicudata.a libicudata.a # ln -s /Tivoli/tws81/bin/libicudata34.a libicudata34.a # ln -s /Tivoli/tws81/bin/libicui18n.a libicui18n.a # ln -s /Tivoli/tws81/bin/libicui18n34.a libicui18n34.a # ln -s /Tivoli/tws81/bin/libicutu.a libicutu.a # ln -s /Tivoli/tws81/bin/libicutu34.a libicutu34.a # ln -s /Tivoli/tws81/bin/libicuuc.a libicuuc.a # ln -s /Tivoli/tws81/bin/libicuuc34.a libicuuc34.a 8. As tws81 user, set the Tivoli Workload Scheduler V8.1 variables using the set_env command and run the dumpsec command to create the input security file, as shown in Example 4-9. Example 4-9 Setting Tivoli Workload Scheduler variables and running the dumpsec command $ /Tivoli/tws81/set_env Environment Successfully Set !!! $ dumpsec > /Tivoli/tws81/dumpsec.users TWS for UNIX (AIX)/DUMPSEC 8.1 (9.3.1.1) Licensed Materials Property of IBM 5698-WKB Chapter 4. Tivoli Workload Scheduler V8.3: Migration 125
- 162. (C) Copyright IBM Corp 1998,2001 US Government User Restricted Rights Use, duplication or disclosure restricted by GSA ADP Schedule Contract with IBM Corp. $ 9. As root user, run the migrfwkusr script as follows: # migrfwkusr -in input_security_file -out output_security_file [-cpu workstation] [-hostname local_hostname] Example 4-10 shows the migrfwkusr script output. Example 4-10 Running the migrfwkusr script # /Tivoli/tws81/set_env Environment Successfully Set !!! # /Tivoli/tws81/migrfwkusr -in /Tivoli/tws81/dumpsec.users -out /Tivoli/tws81/framework.users -cpu prov008 -hostname prov008 Tivoli Workload Scheduler (UNIX)/GETFWKUS V8.3 (1.5) Licensed Materials - Property of IBM(R)5698-WSH (C) Copyright IBM Corp 1998, 2006 All rights reserved. US Government User Restricted Rights Use, duplication or disclosure restricted by GSA ADP Schedule Contract with IBM Corp. IBM is a registered trademark of International Business Machines Corporation in the United States, other countries, or both. GETFWKUS:Starting user MAESTRO [/Tivoli/tws81/dumpsec.users (#2)] GETFWKUS:Done with /Tivoli/tws81/dumpsec.users, 0 errors (0 Total) In Example 4-10: – input_security_file is the file created using the dumpsec command. – output_security_file is the security file that is created by the migrfwkusr script. – workstation is the name of the local workstation where the login data added by the tool is defined. If you do not specify a workstation, the data is taken from a localopts file, if it is present in the same directory where the migrfwkusr script is located. If there is no localopts file, the workstation is set to the first eight characters of the local host name. – local_hostname is the fully qualified host name of the Tivoli Management Framework users to be extracted. Login data for users with this host name, or with this host name and domain name and the host name valid for all computers are extracted. If you do not specify the local host name, migrfwkusr retrieves the host name from the local computer and matches login data for computers with that host name and any domain name. 126 Getting Started with IBM Tivoli Workload Scheduler V8.3
- 163. Note: The migrfwkusr script does not remove previous user definitions. If you want to remove the previous users, do it manually before running the makesec command. After you run the migrfwkusr command, the output_security_file contains the user definitions, which you can use in the Tivoli Workload Scheduler V8.3 environment. For more details, see 4.4.4, “Importing the migrated security file in the Tivoli Workload Scheduler V8.3 environment” on page 128. 4.4.3 Installing a new master domain manager This section describes how to install a new master domain manager on UNIX system. Note: If the installation procedure is successful, it is not possible to roll back to the previous version. Rollback is only possible for installations that fail. Install a parallel master domain manager either on the same or on a different workstation where the existing master domain manager is installed. Define the new master domain manager as a full status agent in the domain of the master in the previous environment. You can install a new master domain manager using the following installation methods: Installing a new master domain manager using the installation wizard To install a new master domain manager using the installation wizard, perform the procedure described in 3.2, “Installing new UNIX master using installation wizard” on page 36. Installing a new master domain manager using the silent installation To install a new master domain manager using a silent installation, perform the silent installation procedure described in IBM Tivoli Workload Scheduler Planning and Installation Guide v8.3, SC32-1273. Chapter 4. Tivoli Workload Scheduler V8.3: Migration 127
- 164. 4.4.4 Importing the migrated security file in the Tivoli Workload Scheduler V8.3 environment To import the migrated security file in the Tivoli Workload Scheduler V8.3 environment, perform the following steps: 1. As tws81 user, remove the duplicated users and add tws83 user in the output_security_file, as shown in Example 4-11. Example 4-11 Removing the duplicated users and adding the tws83 user in output_security_file # su - tws81 $ vi /Tivoli/tws81/framework.users USER MAESTRO # CPU=@+LOGON=tws83,tws81,root,tws_op1,tws_op2,tws_op3,tws_op4,tws_op5 CPU=@,PROV008+LOGON=tws83,tws81,root,tws_op1,tws_op1,tws_op2,tws_op2,tw s_op3,tws_op3,tws_op4,tws_op4,tws_op5,tws_op5 BEGIN USEROBJ CPU=@ ACCESS=ADD,DELETE,DISPLAY,MODIFY,ALTPASS JOB CPU=@ ACCESS=ADD,ADDDEP,ALTPRI,CANCEL,CONFIRM,DELDEP,DELETE,DISPLAY,KILL,MODI FY,RELEASE,REPLY,RERUN,SUBMIT,USE SCHEDULE CPU=@ ACCESS=ADD,ADDDEP,ALTPRI,CANCEL,DELDEP,DELETE,DISPLAY,LIMIT,MODIFY,RELE ASE,REPLY,SUBMIT RESOURCE CPU=@ ACCESS=ADD,DELETE,DISPLAY,MODIFY,RESOURCE,USE PROMPT ACCESS=ADD,DELETE,DISPLAY,MODIFY,REPLY,USE FILE NAME=@ ACCESS=BUILD,DELETE,DISPLAY,MODIFY CPU CPU=@ ACCESS=ADD,CONSOLE,DELETE,DISPLAY,FENCE,LIMIT,LINK,MODIFY,SHUTDOWN,STAR T,STOP,UNLINK PARAMETER CPU=@ ACCESS=ADD,DELETE,DISPLAY,MODIFY CALENDAR ACCESS=ADD,DELETE,DISPLAY,MODIFY,USE END 2. As tws83 user, run the dumpsec command to back up the security file definition of the new Tivoli Workload Scheduler V8.3, as shown in Example 4-12. Example 4-12 Running dumpsec to back up the security file # su - tws83 $ dumpsec > /Tivoli/tws83/dumpsec.users.tws83 Tivoli Workload Scheduler (UNIX)/DUMPSEC V8.3 (9.3.1.1) Licensed Materials - Property of IBM(R)5698-WSH (C) Copyright IBM Corp 1998, 2006 All rights reserved. US Government User Restricted Rights 128 Getting Started with IBM Tivoli Workload Scheduler V8.3
- 165. Use, duplication or disclosure restricted by GSA ADP Schedule Contract with IBM Corp. IBM is a registered trademark of International Business Machines Corporation in the United States, other countries, or both. $ cat /Tivoli/tws83/dumpsec.users.tws83 USER MAESTRO CPU=@+LOGON=tws83,root BEGIN USEROBJ CPU=@ ACCESS=ADD,DELETE,DISPLAY,MODIFY,ALTPASS,UNLOCK JOB CPU=@ ACCESS=ADD,ADDDEP,ALTPRI,CANCEL,CONFIRM,DELDEP,DELETE,DISPLAY,KILL,MODI FY,RELEASE,REPLY,RERUN,SUBMIT,USE,LIST,UNLOCK SCHEDULE CPU=@ ACCESS=ADD,ADDDEP,ALTPRI,CANCEL,DELDEP,DELETE,DISPLAY,LIMIT,MODIFY,RELE ASE,REPLY,SUBMIT,LIST,UNLOCK RESOURCE CPU=@ ACCESS=ADD,DELETE,DISPLAY,MODIFY,RESOURCE,USE,LIST,UNLOCK PROMPT ACCESS=ADD,DELETE,DISPLAY,MODIFY,REPLY,USE,LIST,UNLOCK FILE NAME=@ ACCESS=BUILD,DELETE,DISPLAY,MODIFY,UNLOCK CPU CPU=@ ACCESS=ADD,CONSOLE,DELETE,DISPLAY,FENCE,LIMIT,LINK,MODIFY,SHUTDOWN,STAR T,STOP,UNLINK,LIST,UNLOCK PARAMETER CPU=@ ACCESS=ADD,DELETE,DISPLAY,MODIFY,UNLOCK CALENDAR ACCESS=ADD,DELETE,DISPLAY,MODIFY,USE,UNLOCK END 3. As tws83 user, run makesec output_security_file to add new users in the security file of the new Tivoli Workload Scheduler V8.3, as shown in Example 4-13. Example 4-13 Running makesec to add new users in the security file # su - tws83 $ makesec /Tivoli/tws81/framework.users Tivoli Workload Scheduler (UNIX)/MAKESEC V8.3 (9.3.1.1) Licensed Materials - Property of IBM(R)5698-WSH (C) Copyright IBM Corp 1998, 2006 All rights reserved. US Government User Restricted Rights Use, duplication or disclosure restricted by GSA ADP Schedule Contract with IBM Corp. IBM is a registered trademark of International Business Machines Corporation in the United States, other countries, or both. MAKESEC:Starting user MAESTRO [/Tivoli/tws81/framework.users (#3)] MAKESEC:Done with /Tivoli/tws81/framework.users, 0 errors (0 Total) MAKESEC:Security file installed as /Tivoli/tws83/Security Chapter 4. Tivoli Workload Scheduler V8.3: Migration 129
- 166. Note: output_security_file is the file you obtained when you run the procedure described in 4.4.2, “Extracting Tivoli Framework user data from the security file” on page 123. 4.4.5 Importing the object data This section describes how to import object data from a previous Tivoli Workload Scheduler version into the Tivoli Workload Scheduler V8.3 database. The method you use to import object data by steps depends on whether you are performing one of the following methods: “Importing object data from dumped data files in steps”, as shown in the following section “Importing object data as a block” on page 138 Note: The user who runs the datamigrate command must have full access to the database of the previous Tivoli Workload Scheduler environment. The data that you import is created by the composer81 create command before or during the upgrade. See 4.4.1, “Dumping existing objects from the database” on page 121. Importing object data from dumped data files in steps To import data from dumped data files in steps, perform the following tasks: 1. As root user, create a symbolic link in the /usr/lib directory, as shown in Example 4-14. Example 4-14 Creating a symbolic link in the /usr/lib directory # cd /usr/lib # ln -s /Tivoli/tws83/bin/libicudata34.a libicudata34.a # ln -s /Tivoli/tws83/bin/libicuuc.a libicuuc.a # ln -s /Tivoli/tws83/bin/libHTTPChannel.a libHTTPChannel.a # ln -s /Tivoli/tws83/bin/libHTTPSSLChannel.a libHTTPSSLChannel.a # ln -s /Tivoli/tws83/bin/libHTTPTransport.a libHTTPTransport.a # ln -s /Tivoli/tws83/bin/libtwscompilerjni.a libtwscompilerjni.a # ln -s /Tivoli/tws83/bin/libtwsplanjni.a libtwsplanjni.a # ln -s /Tivoli/tws83/bin/libtwssecurityjni.a libtwssecurityjni.a 130 Getting Started with IBM Tivoli Workload Scheduler V8.3
- 167. 2. As root user, copy /Tivoli/tws83/bin/libHTTP*.a to the /Tivoli/tws81/bin directory, as shown in Example 4-15. Example 4-15 Copying /Tivoli/tws83/bin/libHTTP*.a to /Tivoli/tws81/bin directory # cp /Tivoli/tws83/bin/libHTTP*.a /Tivoli/tws81/bin 3. As root user, change the group permission of all the files in the /Tivoli/tws81/mozart directory to read, as shown in Example 4-16. Example 4-16 Changing group permission of all files in /Tivoli/tws81/mozart to read # cd /Tivoli/tws81/mozart # chmod g+r * 4. As tws83 user, run the optman miggrunnb command to import the installation run number into DB2 database, as shown in Example 4-17. $ optman miggrunnb TWS_8.x.x_main_dir Example 4-17 Running the optman miggrunnb command # su - tws83 $ optman miggrunnb /Tivoli/tws81 Tivoli Workload Scheduler (UNIX)/OPTMAN V8.3 (1.0) Licensed Materials - Property of IBM(R)5698-WSH (C) Copyright IBM Corp 1998, 2006 All rights reserved. US Government User Restricted Rights Use, duplication or disclosure restricted by GSA ADP Schedule Contract with IBM Corp. IBM is a registered trademark of International Business Machines Corporation in the United States, other countries, or both. Installed for user "tws83". Locale LANG set to the following: "en" Importing 'run number' and 'confirm run number' from /Tivoli/tws81/mozart/runmsgno Loading property runNumber AWSJCL050I Command "chg" completed successfully. Loading property confirnRunNumber AWSJCL050I Command "chg" completed successfully. In Example 4-17, TWS_8.x.x_main_dir indicates the root directory of the previous Tivoli Workload Scheduler version. Chapter 4. Tivoli Workload Scheduler V8.3: Migration 131
- 168. 5. As tws83 user, run the optman miggopts command to import the global options into DB2 database, as shown in Example 4-18. $ optman miggopts TWS_8.x.x_main_dir Example 4-18 Running the optman miggopts command # su - tws83 $ optman miggopts /Tivoli/tws81 Tivoli Workload Scheduler (UNIX)/OPTMAN V8.3 (1.0) Licensed Materials - Property of IBM(R)5698-WSH (C) Copyright IBM Corp 1998, 2006 All rights reserved. US Government User Restricted Rights Use, duplication or disclosure restricted by GSA ADP Schedule Contract with IBM Corp. IBM is a registered trademark of International Business Machines Corporation in the United States, other countries, or both. Installed for user "tws83". Locale LANG set to the following: "en" AWSBEH117I Updating the database global options from data in the file "/Tivoli/tws81/mozart/globalopts". Converting globalopts property 'company' to optman property 'companyName'... AWSJCL050I Command "chg" completed successfully. Converting globalopts property 'automaticallygrantlogonasbatch' to optman property 'cnLogonBatch'... AWSJCL050I Command "chg" completed successfully. Converting globalopts property 'ignorecalendars' to optman property 'ignoreCals'... AWSJCL050I Command "chg" completed successfully. Converting globalopts property 'planauditlevel' to optman property 'cnPlanAudit'... AWSJCL050I Command "chg" completed successfully. Converting globalopts property 'databaseauditlevel' to optman property 'enDbAudit'... AWSJCL050I Command "chg" completed successfully. Converting globalopts property 'timezoneenable' to optman property 'cnTimeZone'... AWSJCL050I Command "chg" completed successfully. Converting globalopts property 'carryforward' to optman property 'enCarryForward'... AWSJCL050I Command "chg" completed successfully. Converting globalopts property 'start' to optman property 'startOfDay'... AWSJCL050I Command "chg" completed successfully. 132 Getting Started with IBM Tivoli Workload Scheduler V8.3
- 169. Converting globalopts property 'bnmsgbase' to optman property 'baseRecPrompt'... AWSJCL050I Command "chg" completed successfully. Converting globalopts property 'bnmsgdelta' to optman property 'extRecPrompt'... AWSJCL050I Command "chg" completed successfully. Converting globalopts property 'history' to optman property 'statsHistory'... AWSJCL050I Command "chg" completed successfully. Converting globalopts property 'retainrerunjobname' to optman property 'enRetainNameOnRerunFron'... AWSJCL050I Command "chg" completed successfully. In Example 4-18,TWS_8.x.x_main_dir indicates the root directory of the previous Tivoli Workload Scheduler version. Note: When the Tivoli Workload Scheduler is on another workstation, on the Tivoli Workload Scheduler V8.3 environment, mount the directory of the V8.x.x environment. To do this, the two workstations must have the same system byte order. 6. As tws83 user, run the optman ls command to check the last execution, as shown in Example 4-19. Example 4-19 Running the optman ls command # su - tws83 $ optman ls Tivoli Workload Scheduler (UNIX)/OPTMAN V8.3 (1.0) Licensed Materials - Property of IBM(R)5698-WSH (C) Copyright IBM Corp 1998, 2006 All rights reserved. US Government User Restricted Rights Use, duplication or disclosure restricted by GSA ADP Schedule Contract with IBM Corp. IBM is a registered trademark of International Business Machines Corporation in the United States, other countries, or both. Installed for user "tws83". Locale LANG set to the following: "en" baseRecPrompt / bp = 1000 carryStates / cs = null companyName / cn = IBM enCFInternetworkDeps / ci = YES enCFResourceQuantity / rq = YES enCarryForward / cf = YES enCentSec / ts = NO Chapter 4. Tivoli Workload Scheduler V8.3: Migration 133
- 170. enDbAudit / da = 0 enEmptySchedsAreSucc / es = NO enListSecChk / sc = NO enLogonBatch / lb = NO enPlanAudit / pa = 0 enPreventStart / ps = YES enRetainNameOnRerunFrom / rr = NO enStrEncrypt / se = NO enSwFaultTol / sw = NO enTimeZone / tz = NO extRecPrompt / xp = 1000 ignoreCals / ic = NO logmanMinMaxPolicy / ln = BOTH logmanSmoothPolicy / lt = -1 maxLen / xl = 14 minLen / ml = 8 startOfDay / sd = 0600 statsHistory / sh = 10 AWSJCL050I Command "ls" completed successfully. 7. As tws83 user, run the datamigrate command to import the data from the dumped files, as shown in Example 4-20 on page 135. Notes: If you want to import the data directly from the existing files in the mozart directory, see “Importing object data directly from the mozart directory” on page 137. If you want to perform a complete import of the data as a block, see “Importing object data as a block” on page 138. # su - tws83 $ datamigrate -topology topology_filename [-tmppath temporary_path] -prompts prompts_filename [-tmppath temporary_path] -calendars calendars_filename [-tmppath temporary_path] -parms parms_filename [-tmppath temporary_path] -resources resources_filename [-tmppath temporary_path] -users users_filename [-tmppath temporary_path] -jobs jobs_filename [-tmppath temporary_path] -scheds scheds_filename [-tmppath temporary_path] 134 Getting Started with IBM Tivoli Workload Scheduler V8.3
- 171. Example 4-20 Running the datamigrate command # su - tws83 $ mkdir /Tivoli/tws83/tmp $ datamigrate -topology /Tivoli/tws81/dumpdata/topology -tmppath /Tivoli/tws83/tmp $ datamigrate -prompts /Tivoli/tws81/dumpdata/prompts -tmppath /Tivoli/tws83/tmp $ datamigrate -calendars /Tivoli/tws81/dumpdata/calendars -tmppath /Tivoli/tws83/tmp $ datamigrate -parms /Tivoli/tws81/dumpdata/parms -tmppath /Tivoli/tws83/tmp $ datamigrate -resources /Tivoli/tws81/dumpdata/resources -tmppath /Tivoli/tws83/tmp $ datamigrate -users /Tivoli/tws81/dumpdata/users -tmppath /Tivoli/tws83/tmp $ datamigrate -jobs /Tivoli/tws81/dumpdata/jobs -tmppath /Tivoli/tws83/tmp $ datamigrate -scheds /Tivoli/tws81/dumpdata/scheds -tmppath /Tivoli/tws83/tmp In Example 4-20: – topology_filename is the name of the topology file created during the dump process. – prompts_filename is the name of the prompts file created during the dump process. – calendars_filename is the name of the calendars file created during the dump process. – parms_filename is the name of the parameters file created during the dump process. – resources_filename is the name of the resources file created during the dump process. – users_filename is the name of the users file created during the dump process. – jobs_filename is the name of the jobs file created during the dump process. – scheds_filename is the name of the job streams file created during the dump process. – temporary_path is the temporary path where the datamigrate command stores the files during the migration process. Chapter 4. Tivoli Workload Scheduler V8.3: Migration 135
- 172. 8. As tws83 user, run the composer display command to check the last execution, as shown in Example 4-21. Example 4-21 Running the composer display command # su - tws83 $ composer display cpu=@ $ composer display jobs=@ $ composer display sched=@ 9. Set the new master domain manager properties to the properties it had when it was linked as the FTA to the previous master domain manager. See Example 4-22. Example 4-22 Setting the new master domain manager properties cpuname MST83 node LAB134035 tcpadd 31111 secureaddr 41915 for maestro securitylevel on .... end Note: For example, if the new master domain manager was linked in Security Sockets Layer (SSL) mode to the previous master domain manager, specify the same properties for the new master domain manager. 10.As tws83 user, check whether there are jobs or job streams related to the previous cpuname in the new Tivoli Workload Scheduler V8.3 definition. If there are, then change them to the new cpuname or delete them, as shown in Example 4-23. Example 4-23 Checking jobs and job streams related to the previous cpuname # su - tws83 $ composer display jobs=old_cpuname#@ $ composer display sched=old_cpuname#@ 136 Getting Started with IBM Tivoli Workload Scheduler V8.3
- 173. 11.As tws83 user, delete the FINAL job stream related to the previous cpuname from the new Tivoli Workload Scheduler V8.3 definition, as shown in Example 4-24. Example 4-24 Deleting FINAL job stream related to the previous cpuname # su - tws83 $ composer delete sched=old_cpuname#FINAL 12.As tws83 user, delete Jnextday job related to the previous cpuname from the new Tivoli Workload Scheduler V8.3 definition, as shown in Example 4-25. Example 4-25 Deleting Jnextday job related to the previous cpuname # su - tws83 $ composer delete job=old_cpuname#Jnextday 13.As tws83 user, delete the previous cpuname from the new Tivoli Workload Scheduler V8.3 definition, as shown in Example 4-26. Example 4-26 Deleting the previous cpuname from the new Tivoli Workload Scheduler Version 8.3 # su - tws83 $ composer delete cpu=old_cpuname Importing object data directly from the mozart directory To import data directly from the existing files in the mozart directory, as tws83 user, run the datamigrate command, as shown in Example 4-27. $ datamigrate object_type -path TWS_8.x.x_main_dir [-tmppath temporary_path] Example 4-27 Running the datamigrate command # su - tws83 $ mkdir /Tivoli/tws83/migratedata $ datamigrate -topology -path /Tivoli/tws81 -tmppath /Tivoli/tws83/migratedata $ datamigrate -prompts -path /Tivoli/tws81 -tmppath /Tivoli/tws83/migratedata $ datamigrate -calendars -path /Tivoli/tws81 -tmppath /Tivoli/tws83/migratedata $ datamigrate -parms -path /Tivoli/tws81 -tmppath /Tivoli/tws83/migratedata $ datamigrate -resources -path /Tivoli/tws81 -tmppath /Tivoli/tws83/migratedata Chapter 4. Tivoli Workload Scheduler V8.3: Migration 137
- 174. $ datamigrate -users -path /Tivoli/tws81 -tmppath /Tivoli/tws83/migratedata $ datamigrate -jobs -path /Tivoli/tws81 -tmppath /Tivoli/tws83/migratedata $ datamigrate -scheds -path /Tivoli/tws81 -tmppath /Tivoli/tws83/migratedata In Example 4-27: object_type is the type of object that you are importing. The possible values are: – -topology – -prompts – -calendars – -parms – -resources – -users – -jobs – -scheds TWS_8.x.x_main_dir indicates the root directory of the previous Tivoli Workload Scheduler version. temporary_path is the temporary path where datamigrate command stores the files during the migration process. Note: When the Tivoli Workload Scheduler is on another workstation, on the Tivoli Workload Scheduler V8.3 environment, mount the directory of the version 8.x.x environment. To do this, the two workstations must have the same system byte order. Importing object data as a block To import data as a block, as tws83 user, use the datamigrate command, as shown in Example 4-28. $ datamigrate -path TWS_8.x.x_main_dir [-tmppath temporary_path] Example 4-28 Running the datamigrate command # su - tws83 $ mkdir /Tivoli/tws83/migratedata $ datamigrate -path /Tivoli/tws81 -tmppath /Tivoli/tws83/migratedata 138 Getting Started with IBM Tivoli Workload Scheduler V8.3
- 175. In Example 4-28: TWS_8.x.x_main_dir indicates the root directory of the previous Tivoli Workload Scheduler version. temporary_path is the temporary path where datamigrate command stores the files during the migration process. Note: When the Tivoli Workload Scheduler is on another workstation, on the Tivoli Workload Scheduler V8.3 environment, mount the directory of the version 8.x.x environment. To do this, the two workstations must have the same system byte order. 4.4.6 Switching a master domain manager To switch from the previous master domain manager to the new one, perform the following steps: 1. As tws81 user, run the conman switchmgr command in the previous master domain manager, as shown in Example 4-29. Example 4-29 Running the conman switchmgr command # su - tws81 $ conman “switchmgr MASTERDM;new_master_cpu_name” In Example 4-29, new_master_cpu_name is the name of the workstation where the new master domain manager resides. 2. As tws83 user, run the optman chg cf=ALL command in the new master domain manager to ensure that the carry forward option is set to all, as shown in Example 4-30. Example 4-30 Running the optman chg cf=ALL command # su - tws83 $ optman chg cf=ALL Tivoli Workload Scheduler (UNIX)/OPTMAN V8.3 (1.0) Licensed Materials - Property of IBM(R)5698-WSH (C) Copyright IBM Corp 1998, 2006 All rights reserved. US Government User Restricted Rights Use, duplication or disclosure restricted by GSA ADP Schedule Contract with IBM Corp. Chapter 4. Tivoli Workload Scheduler V8.3: Migration 139
- 176. IBM is a registered trademark of International Business Machines Corporation in the United States, other countries, or both. Installed for user "tws83". Locale LANG set to the following: "en" AWSJCL050I Command "chg" completed successfully. 3. As tws83 user, run the optman ls command in the new master domain manager to check the carry forward option, as shown in Example 4-31. Example 4-31 Running the optman ls command # su - tws83 $ optman ls Tivoli Workload Scheduler (UNIX)/OPTMAN V8.3 (1.0) Licensed Materials - Property of IBM(R)5698-WSH (C) Copyright IBM Corp 1998, 2006 All rights reserved. US Government User Restricted Rights Use, duplication or disclosure restricted by GSA ADP Schedule Contract with IBM Corp. IBM is a registered trademark of International Business Machines Corporation in the United States, other countries, or both. Installed for user "tws83". Locale LANG set to the following: "en" baseRecPrompt / bp = 1000 carryStates / cs = null companyName / cn = IBM enCFInternetworkDeps / ci = YES enCFResourceQuantity / rq = YES enCarryForward / cf = ALL enCentSec / ts = NO enDbAudit / da = 0 enEmptySchedsAreSucc / es = NO enListSecChk / sc = NO enLogonBatch / lb = NO enPlanAudit / pa = 0 enPreventStart / ps = YES enRetainNameOnRerunFrom / rr = NO enStrEncrypt / se = NO enSwFaultTol / sw = NO enTimeZone / tz = NO extRecPrompt / xp = 1000 ignoreCals / ic = NO logmanMinMaxPolicy / ln = BOTH logmanSmoothPolicy / lt = -1 maxLen / xl = 14 140 Getting Started with IBM Tivoli Workload Scheduler V8.3
- 177. minLen / ml = 8 startOfDay / sd = 0600 statsHistory / sh = 10 AWSJCL050I Command "ls" completed successfully. 4. As tws83, run the JnextPlan command in the new master domain manager to create a plan with 0 extension period, which begins at the end of the current plan, as shown in Example 4-32. $ su - tws83 $ JnextPlan -from start_time -for 0000 Example 4-32 Running JnextPlan in new master domain manager to create a plan # su - tws83 $ JnextPlan -from 05/17/2006 0600 -for 0000 Tivoli Workload Scheduler (UNIX)/JNEXTPLAN Licensed Materials - Property of IBM(R)5698-WSH (C) Copyright IBM Corp 1998, 2006 All rights reserved. US Government User Restricted Rights Use, duplication or disclosure restricted by GSA ADP Schedule Contract with IBM Corp. IBM is a registered trademark of International Business Machines Corporation in the United States, other countries, or both. Tivoli Workload Scheduler (UNIX)/MAKEPLAN Licensed Materials - Property of IBM(R)5698-WSH (C) Copyright IBM Corp 1998, 2006 All rights reserved. US Government User Restricted Rights Use, duplication or disclosure restricted by GSA ADP Schedule Contract with IBM Corp. IBM is a registered trademark of International Business Machines Corporation in the United States, other countries, or both. Tivoli Workload Scheduler (UNIX)/PLANMAN V8.3 (1.0) Licensed Materials - Property of IBM(R)5698-WSH (C) Copyright IBM Corp 1998, 2006 All rights reserved. US Government User Restricted Rights Use, duplication or disclosure restricted by GSA ADP Schedule Contract with IBM Corp. IBM is a registered trademark of International Business Machines Corporation in the United States, other countries, or both. Installed for user "tws83". Locale LANG set to the following: "en" AWSJPL503I The "planner" process has locked the database. AWSJPL708I During the creation of a production plan, the planner has detected that no preproduction plan exists. A preproduction plan will be created automatically. AWSJPL709I During the creation of a production plan, the planner has successfully created a new preproduction plan. AWSJPL504I The "planner" process has unlocked the database. AWSJCL058I The production plan (Symnew) has been successfully created. Chapter 4. Tivoli Workload Scheduler V8.3: Migration 141
- 178. Tivoli Workload Scheduler (UNIX)/REPTR Licensed Materials - Property of IBM(R)5698-WSH (C) Copyright IBM Corp 1998, 2006 All rights reserved. US Government User Restricted Rights Use, duplication or disclosure restricted by GSA ADP Schedule Contract with IBM Corp. IBM is a registered trademark of International Business Machines Corporation in the United States, other countries, or both. Tivoli Workload Scheduler (UNIX)/SYXTRACT V8.3 (1.9) Licensed Materials - Property of IBM(R)5698-WSH (C) Copyright IBM Corp 1998, 2006 All rights reserved. US Government User Restricted Rights Use, duplication or disclosure restricted by GSA ADP Schedule Contract with IBM Corp. IBM is a registered trademark of International Business Machines Corporation in the United States, other countries, or both. Installed for user "tws83". Locale LANG set to the following: "en" Tivoli Workload Scheduler (UNIX)/REPORTER V8.3 (1.6) Page 1 ... Page 2 ... Tivoli Workload Scheduler (UNIX)/SWITCHPLAN V8.3 Licensed Materials - Property of IBM(R)5698-WSH (C) Copyright IBM Corp 1998, 2006 All rights reserved. US Government User Restricted Rights Use, duplication or disclosure restricted by GSA ADP Schedule Contract with IBM Corp. IBM is a registered trademark of International Business Machines Corporation in the United States, other countries, or both. Tivoli Workload Scheduler (UNIX)/STAGEMAN V8.3 (1.4) Licensed Materials - Property of IBM(R)5698-WSH (C) Copyright IBM Corp 1998, 2006 All rights reserved. US Government User Restricted Rights Use, duplication or disclosure restricted by GSA ADP Schedule Contract with IBM Corp. IBM is a registered trademark of International Business Machines Corporation in the United States, other countries, or both. Installed for user "tws83". Locale LANG set to the following: "en" STAGEMAN:AWSBHV030I The new Symphony file is installed. STAGEMAN:AWSBHV036I Multi-workstation Symphony file copied to STAGEMAN:/Tivoli/tws83/Sinfonia STAGEMAN:AWSBHV078I Current plan audit level is 0. Tivoli Workload Scheduler (UNIX)/PLANMAN V8.3 (1.0) Licensed Materials - Property of IBM(R)5698-WSH (C) Copyright IBM Corp 1998, 2006 All rights reserved. US Government User Restricted Rights 142 Getting Started with IBM Tivoli Workload Scheduler V8.3
- 179. Use, duplication or disclosure restricted by GSA ADP Schedule Contract with IBM Corp. IBM is a registered trademark of International Business Machines Corporation in the United States, other countries, or both. Installed for user "tws83". Locale LANG set to the following: "en" AWSJCL065I Run number has been successfully updated. Tivoli Workload Scheduler (UNIX)/CONMAN V8.3 (1.36.2.22) Licensed Materials - Property of IBM(R)5698-WSH (C) Copyright IBM Corp 1998, 2006 All rights reserved. US Government User Restricted Rights Use, duplication or disclosure restricted by GSA ADP Schedule Contract with IBM Corp. IBM is a registered trademark of International Business Machines Corporation in the United States, other countries, or both. Installed for user "tws83". Locale LANG set to the following: "en" Scheduled for (Exp) 05/16/06 (#5) on M83. Batchman down. Limit: 0, Fence: 0, Audit Level: 0 start AWSBHU507I A start command was issued for M83. In Example 4-32, start_time is the date and time when the current plan ends. Note: If you run Jnextday, and the plan is created from today at 06:00 until tomorrow at 05:59, the start_time of the new plan must be tomorrow at the default time of 06:00. 5. As tws83 user, run composer add to add the new job stream called FINAL in the new master domain manager database, as shown in Example 4-33. Example 4-33 Running composer add to add the new job stream called FINAL # su - tws83 $ composer add Sfinal Tivoli Workload Scheduler (UNIX)/COMPOSER V8.3 (1.18.3.3) Licensed Materials - Property of IBM(R)5698-WSH (C) Copyright IBM Corp 1998, 2006 All rights reserved. US Government User Restricted Rights Use, duplication or disclosure restricted by GSA ADP Schedule Contract with IBM Corp. IBM is a registered trademark of International Business Machines Corporation in the United States, other countries, or both. Installed for user "tws83". Locale LANG set to the following: "en" User: tws83, Host:127.0.0.1, Port:31116 -add Sfinal Chapter 4. Tivoli Workload Scheduler V8.3: Migration 143
- 180. AWSBIA300I The scheduling language syntax has been successfully validated for object "M83#FINAL". AWSJCL003I The command "add" relating to object "jd=M83#MAKEPLAN" has completed successfully. AWSJCL003I The command "add" relating to object "jd=M83#SWITCHPLAN" has completed successfully. AWSJCL003I The command "add" relating to object "jd=M83#CREATEPOSTREPORTS" has completed successfully. AWSJCL003I The command "add" relating to object "jd=M83#UPDATESTATS" has completed successfully. AWSJCL003I The command "add" relating to object "jd=M83#FINAL" has completed successfully. AWSBIA302I No errors in Sfinal. AWSBIA288I Total objects updated: 5 Note: Because you are adding the new schedule FINAL, it is important that the previous schedule FINAL does not run. To avoid this, either delete the previous schedule FINAL from the database or set the priority to 0. To delete the previous schedule FINAL, run the following command: # su - tws83 $ composer del sched=old_master_cpuname#FINAL In this example, old_master_cpuname is the name of the workstation where the previous master domain manager resides. 6. As tws83 user, run composer display to see the definition of the new job stream called FINAL in the new master domain manager database, as shown in Example 4-34. Example 4-34 Running composer display to see the new job stream called FINAL # su - tws83 $ composer display sched=FINAL Tivoli Workload Scheduler (UNIX)/COMPOSER V8.3 (1.18.3.3) Licensed Materials - Property of IBM(R)5698-WSH (C) Copyright IBM Corp 1998, 2006 All rights reserved. US Government User Restricted Rights Use, duplication or disclosure restricted by GSA ADP Schedule Contract with IBM Corp. IBM is a registered trademark of International Business Machines Corporation in the United States, other countries, or both. Installed for user "tws83". Locale LANG set to the following: "en" User: tws83, Host:127.0.0.1, Port:31116 -display sched=final 144 Getting Started with IBM Tivoli Workload Scheduler V8.3
- 181. Workstation Job Stream Name Valid From Updated On Locked by ----------- --------------- ---------- ---------- --------- M83 FINAL - 05/16/2006 - #@(#) $Id: Sfinal.conf,v 7.56 1995/02/24 04:13:53 alanh viola_thunder $ # This is a sample schedule for doing pre and post production # processing. It assumes the start time is 6:00 a.m. # It is defined as CARRYFORWARD because it is executed acrosss # production periods. This ensures that job statistics will be # collected for the schedule. # All of the job statements that follow use auto-documentation # keywords so the jobs will be documented by composer when the # schedule is added or modified in the mastsked file. SCHEDULE M83#FINAL ON RUNCYCLE RULE1 "FREQ=DAILY;" AT 0559 CARRYFORWARD FOLLOWS M83#FINAL.@ PREVIOUS : M83#MAKEPLAN M83#SWITCHPLAN FOLLOWS MAKEPLAN M83#CREATEPOSTREPORTS FOLLOWS SWITCHPLAN # MakePlan creates tomorrow's production control file (Symnew). # Then it runs reporter to print pre-production reports. # The reports should be reviewed. # SwitchPlan stops batchman and runs stageman to: 1) carry forward incomplete schedules. # 2) log the old Symphony file, 3) create the new Symphony and Sinfonia # files. It then starts batchman. # CreatePostReports runs reporter to print post-production reports. # UpdateStats runs logman to log job statistics, and then # report8 to print the Job Histogram. M83#UPDATESTATS FOLLOWS SWITCHPLAN END AWSBIA291I Total objects: 1 Chapter 4. Tivoli Workload Scheduler V8.3: Migration 145
- 182. 7. As tws83 user, run conman sbs to submit the FINAL job stream in the new master domain manager database, as shown in Example 4-35. Example 4-35 Running conman sbs to submit the new FINAL job stream # su - tws83 $ conman “sbs FINAL” Tivoli Workload Scheduler (UNIX)/CONMAN V8.3 (1.36.2.22) Licensed Materials - Property of IBM(R)5698-WSH (C) Copyright IBM Corp 1998, 2006 All rights reserved. US Government User Restricted Rights Use, duplication or disclosure restricted by GSA ADP Schedule Contract with IBM Corp. IBM is a registered trademark of International Business Machines Corporation in the United States, other countries, or both. Installed for user "tws83". Locale LANG set to the following: "en" Scheduled for (Exp) 05/16/06 (#5) on M83. Batchman LIVES. Limit: 0, Fence: 0, Audit Level: 0 sbs final Submitted M83#FINAL to batchman as M83#FINAL[(1543 05/16/06),(0AAAAAAAAAAAAACT)] 8. As tws83 user, run conman ss to see the FINAL job stream in the new master domain manager database, as shown in Example 4-36. Example 4-36 Running conman ss to see the FINAL job stream # su - tws83 $ conman ss Tivoli Workload Scheduler (UNIX)/CONMAN V8.3 (1.36.2.22) Licensed Materials - Property of IBM(R)5698-WSH (C) Copyright IBM Corp 1998, 2006 All rights reserved. US Government User Restricted Rights Use, duplication or disclosure restricted by GSA ADP Schedule Contract with IBM Corp. IBM is a registered trademark of International Business Machines Corporation in the United States, other countries, or both. Installed for user "tws83". Locale LANG set to the following: "en" Scheduled for (Exp) 05/16/06 (#5) on M83. Batchman LIVES. Limit: 0, Fence: 0, Audit Level: 0 ss (Est) (Est) Jobs Sch CPU Schedule SchedTime State Pr Start Elapse # OK Lim M83 #FINAL 1543 05/16 HOLD 10(05/17) 4 0 [Carry] 146 Getting Started with IBM Tivoli Workload Scheduler V8.3
- 183. 9. As tws83 user, run conman sj to see the jobs of the new FINAL job stream in the new master domain manager database, as shown in Example 4-37. Example 4-37 Running conman sj to see the jobs of the FINAL job stream # su - tws83 $ conman sj Tivoli Workload Scheduler (UNIX)/CONMAN V8.3 (1.36.2.22) Licensed Materials - Property of IBM(R)5698-WSH (C) Copyright IBM Corp 1998, 2006 All rights reserved. US Government User Restricted Rights Use, duplication or disclosure restricted by GSA ADP Schedule Contract with IBM Corp. IBM is a registered trademark of International Business Machines Corporation in the United States, other countries, or both. Installed for user "tws83". Locale LANG set to the following: "en" Scheduled for (Exp) 05/16/06 (#5) on M83. Batchman LIVES. Limit: 0, Fence: 0, Audit Level: 0 sj (Est) (Est) CPU Schedule SchedTime Job State Pr Start Elapse RetCode Deps M83 #FINAL 1543 05/16 ******** HOLD 10(05/17) [Carry] MAKEPLAN HOLD 10 SWITCHP+ HOLD 10 MAKEPLAN CREATEP+ HOLD 10 SWITCHP+ UPDATES+ HOLD 10 SWITCHP+ 4.4.7 Upgrading the backup master domain manager This section describes how to upgrade the backup master domain manager on AIX v.5.3.0.0 system. You can upgrade the backup master domain manager using the following installation methods: “Upgrading the backup master domain manager using the ISMP”; see the following section “Upgrading the backup master domain manager using a silent installation” on page 164 Chapter 4. Tivoli Workload Scheduler V8.3: Migration 147
- 184. Upgrading the backup master domain manager using the ISMP To upgrade a backup master domain manager using the InstallShield Multiplatform (ISMP) wizard, perform the following steps: 1. Insert the installation CD related to the operating system. 2. Run the setup for the operating system on which you are upgrading: – On Windows operating systems: WINDOWSSETUP.exe – On UNIX and Linux operating systems (see Example 4-38): SETUP.bin Example 4-38 Running the SETUP.bin command # /cdrom/AIX/SETUP.bin -is:tempdir /temp 3. The installation wizard is launched. Select the installation wizard language, as shown in Figure 4-4. Click OK. Figure 4-4 Selecting the installation wizard language 148 Getting Started with IBM Tivoli Workload Scheduler V8.3
- 185. 4. Read the welcome information shown in Figure 4-5 and click Next. Figure 4-5 Welcome information Chapter 4. Tivoli Workload Scheduler V8.3: Migration 149
- 186. 5. Read and accept the license agreement shown in Figure 4-6 and click Next. Figure 4-6 License agreement 150 Getting Started with IBM Tivoli Workload Scheduler V8.3
- 187. 6. Select a previous instance of the product from the drop-down list and click Upgrade an instance of Tivoli Workload Scheduler, as shown in Figure 4-7. The instance can be identified by its group name. Click Next. Figure 4-7 Previous instance and upgrading Tivoli Workload Scheduler Chapter 4. Tivoli Workload Scheduler V8.3: Migration 151
- 188. 7. When you upgrade from Tivoli Workload Scheduler V8.1, select Backup Master Domain Manager, as shown in Figure 4-8. Ensure that you select the correct type of agent, otherwise the upgrade fails. Click Next. Figure 4-8 Selecting Tivoli Workload Scheduler instance to be upgraded 152 Getting Started with IBM Tivoli Workload Scheduler V8.3
- 189. 8. Type the password of the Tivoli Workload Scheduler user for which you want to upgrade the instance, as shown in Figure 4-9. Click Next. Figure 4-9 Entering the password of the Tivoli Workload Scheduler user Chapter 4. Tivoli Workload Scheduler V8.3: Migration 153
- 190. 9. In the window shown in Figure 4-10, specify the following application server port information: a. HTTP Transport: This is the port for the Hypertext Transfer Protocol (HTTP) transport. The default value is 31115. b. HTTPS Transport: This is the port for the secure HTTP transport. The default value is 31116. c. Bootstrap/RMI: This is the port for the bootstrap or Remote Method Invocation (RMI). The default value is 31117. d. SOAP Connector: This is the port for the application server protocol SOAP connector. The default value is 31118. e. Click Next. Figure 4-10 Ports used by IBM WebSphere Application Server 154 Getting Started with IBM Tivoli Workload Scheduler V8.3
- 191. 10.Specify the type of IBM DB2 Universal Database (UDB) installation, as shown in Figure 4-11. Click Next. Figure 4-11 Selecting the type of DB2 UDB installation Chapter 4. Tivoli Workload Scheduler V8.3: Migration 155
- 192. 11.Specify the relevant DB2 data in accordance with the database installation type or configuration that you are performing, as shown in Figure 4-12. Click Next. Figure 4-12 Information to configure DB2 UDB Administration Client version 156 Getting Started with IBM Tivoli Workload Scheduler V8.3
- 193. 12.Specify the directory to install DB2 UDB Administration Client, as shown in Figure 4-13. Click Next. Figure 4-13 Specifying the DB2 UDB Administration Client directory Chapter 4. Tivoli Workload Scheduler V8.3: Migration 157
- 194. 13.Review the information data to create and configure the Tivoli Workload Scheduler database, as shown in Figure 4-14. Click Next. Figure 4-14 Information data to create and configure Tivoli Workload Scheduler database 158 Getting Started with IBM Tivoli Workload Scheduler V8.3
- 195. 14.Review the information that the db2inst1 user does not exist and that this user will be created shown in Figure 4-15. Click Next. Figure 4-15 Information about db2inst1 user Chapter 4. Tivoli Workload Scheduler V8.3: Migration 159
- 196. 15.Review the installation settings shown in Figure 4-16 and Figure 4-17 on page 161. Click Next. Figure 4-16 Installation settings information: Part 1 160 Getting Started with IBM Tivoli Workload Scheduler V8.3
- 197. Figure 4-17 shows the rest of the installation settings information. Figure 4-17 Installation settings information: Part 2 Chapter 4. Tivoli Workload Scheduler V8.3: Migration 161
- 198. 16.If the installation is successful, you see a summary of the performed installation, as shown in Figure 4-18. Click Finish. Figure 4-18 Installation completed successfully Note: When the installation is successful, you see a panel with the successful installation message. In case of an unsuccessful installation, refer to IBM Tivoli Workload Scheduler Administration and Troubleshooting V8.3, SC32-1275. 162 Getting Started with IBM Tivoli Workload Scheduler V8.3
- 199. 17.After you upgrade the backup domain manager, perform the following procedure: a. On the backup domain manager, remove Symphony, Sinfonia, Symnew and *.msg files from the TWShome directory, and *msg files from the TWShome/pobox directory, as shown in Example 4-39. Example 4-39 Removing the Symphony, Sinfonia, Symnew and *msg files # su - tws81 $ rm Symphony Sinfonia Symnew *msg $ cd pobox $ rm *msg b. Run the StartUp command from the TWShome directory, as shown in Example 4-40. Example 4-40 Running the StartUp command # su - tws81 $ ./StartUp c. On the master domain manager, run conman link cpu=bkm_cpuname, as shown in Example 4-41. Example 4-41 Running conman link cpu=bkm_cpuname # su - tws83 $ conman link cpu=belfast d. On the backup domain manager, run the conman command, and provide the Tivoli Workload Scheduler user name and password to create the useropts file in the TWShome/.TWS directory, as shown in Example 4-42. Example 4-42 Running conman and providing Tivoli Workload Scheduler user and password # su - tws81 $ conman Tivoli Workload Scheduler (UNIX)/CONMAN V8.3 (1.36.2.22) Licensed Materials - Property of IBM(R) 5698-WSH (C) Copyright IBM Corp 1998, 2006 All rights reserved. US Government User Restricted Rights Use, duplication or disclosure restricted by GSA ADP Schedule Contract with IBM Corp. IBM is a registered trademark of International Business Machines Corporation in the United States, other countries, or both. Installed for user "tws81". Chapter 4. Tivoli Workload Scheduler V8.3: Migration 163
- 200. Locale LANG set to the following: "en" Scheduled for (Exp) 05/22/06 (#13) on BELFAST. Batchman LIVES. Limit: 10, Fence: 0, Audit Level: 0 AWSBEH005E The user is not defined in the connection configuration file or the supplied command parameters. AWSBHU610E The credentials to connect to the remote server have not been specified. Specify your user name account: tws81 Enter your password: Confirm your password: Do you want save the user name and password in your "useropts" file (enter "y" for yes, "n" for no)? y Upgrading the backup master domain manager using a silent installation To upgrade the backup master domain manager using a silent installation, use the response file templates provided in the CDs in the cdrom/RESPONSEFILES directory. The TWS83_UPGRADE_BACKUP_BDM.txt file includes all the information required by the installation program to run without user intervention. Instructions to customize the files are included in the file as commented text. For a silent installation, perform the following steps: 1. Copy the relevant response file to a local directory, as shown in Example 4-43. Example 4-43 Copying TWS83_UPGRADE_BACKUP_BDM.txt # cp /cdrom/RESPONSEFILES/TWS83_UPGRADE_BACKUP_BDM.txt /tmp 2. Edit the TWS83_UPGRADE_BACKUP_BDM.txt file to meet the requirements of your environment, as shown in Example 4-44. Example 4-44 Editing TWS83_UPGRADE_BACKUP_BDM.txt file # su - tws81 $ vi TWS83_UPGRADE_BACKUP_BDM.txt ##################################################################################### # This file can be used to configure the InstallShield SETUP program with the # options specified below when the SETUP is run with the "-options" command # line option. Read each setting's documentation for information on how to # change its value. # A common use of an options file is to run the wizard in silent mode. This # lets the options file author specify wizard settings without having to run # the wizard in graphical or console mode. To use this options file for silent 164 Getting Started with IBM Tivoli Workload Scheduler V8.3
- 201. # mode execution, use the following command line arguments when running the # wizard: # # -options "C:RESPONSEFILESTWS83_UPGRADE_BACKUP_MDM.txt" -silent # # This file contains settings for the upgrade of an Tivoli Workload # Scheduler Version V8.3 Backup Master Domain Manager (a.k.a. BKM). # A list of all settings that require customization for the installation of # this component follows: # # InstallationActions.twsUser # userWinCfgPanel.twsPassword (on Windows) # userUnixCfgPanel.twsPassword (on UNIX) # twsPortsPanel.portHTTP # twsPortsPanel.portHTTPS # twsPortsPanel.portRMI # twsPortsPanel.portSOAP # # The set of properties, among the following ones, that require customization # depends on the customer strategy about the prerequisite (DB2) management. # Look at the related sections below. # # db2InstallationActions.checkPrereq # db2InstallationActions.installDBComp # db2ServerCfg.instanceName # db2ServerCfg.instancePort # db2ServerCfg.db2AdminUser # db2ServerCfg.db2AdminPwd # db2ClientCfg.remoteNode # db2ClientCfg.remotePort # db2ClientCfg.twsDBUser # db2ClientCfg.twsDBPwd # db2ClientCfg.db2AdminUser # db2ClientCfg.db2AdminPwd # db2LocationPanel.directory # twsDBCfg.dbName # twsDBCfg.tablespaceName # twsDBCfg.tablespacePath # db2SilentInstaller.installerLocation # # ALL OF THE ABOVE PROPERTIES MUST BE CUSTOMIZED # (DEFAULT VALUES MAY BE LEFT AS WELL)! # ##################################################################################### Chapter 4. Tivoli Workload Scheduler V8.3: Migration 165
- 202. ##################################################################################### # This property specifies the type of installation operation: whether it is a # fresh install ("NEW"), # an add feature ("UPDATE"), # an upgrade ("UPGRADE"). # In this case the value is "NEW" # # DO NOT MODIFY THIS PROPERTY ! # -W InstallationActions.typeOfOperation="UPGRADE" ##################################################################################### # This property specifies the installation component. For the installation of # the MDM, the value is TWSINSTANCE # # DO NOT MODIFY THIS PROPERTY ! # -W InstallationActions.installComponent="TWSINSTANCE" ##################################################################################### # This property specifies the TWS user related to the instance for which the # upgrade action is to be executed. # # CUSTOMIZE THE FOLLOWING PROPERTY ! # -W InstallationActions.twsUser="tws81" ##################################################################################### # Uncomment the following property when upgrading a TWS 8.1 instance # # DO NOT MODIFY THIS PROPERTY ! # -W installationComponents.instanceType="BKM" ##################################################################################### # The following property specify the password for the twsuser. (Use the # property related to the platform, Windows or UNIX, by commenting / # uncommenting the other one) # # CUSTOMIZE THE FOLLOWING PROPERTIES ! # ###-W userWinCfgPanel.twsPassword="tws00tws" -W userUnixCfgPanel.twsPassword="itso05" 166 Getting Started with IBM Tivoli Workload Scheduler V8.3
- 203. ##################################################################################### # This section contains is used to specify customized values for the ports of # the application server. Default values are specified for the following ports. # The meaning of each property is explained below: # # portHTTP - this is the port for http connections # portHTTPS - this is the port for https connections # portRMI - this is the port for RMI / bootstrap connections # portSOAP - this is the port for SOAP connections # CUSTOMIZE THE FOLLOWING PROPERTIES -W twsPortsPanel.portHTTP="31115" -W twsPortsPanel.portHTTPS="31116" -W twsPortsPanel.portRMI="31117" -W twsPortsPanel.portSOAP="31118" ##################################################################################### # This sections contains the property used to specify if the database used by # the bakup Master Domain Manager is already present on the machine or a new # instance of the database must be installed (a DB2 V8.2 Administration Client) # # Uncomment the following line if an instance of DB2 V8.2 Enterprise Server or # DB2 V8.2 Administration Client is already present on the machine #-W db2InstallationActions.checkPrereq="true" # # Uncomment the following line if an instance of DB2 V8.2 Administration Client # must be installed on the machine -W db2InstallationActions.installDBComp="INSTALL_DBCLIENT" ##################################################################################### # This sections contains properties used to configure the installation of the # DB2 V8.2 Administration Client for the Backup Master Domain Manager. # Uncomment and customize the following lines if the property # db2InstallationActions.installDBComp is "INSTALL_DBCLIENT" # # Specify the information needed to configure the DB2 V8.2 Administration # Client -W db2ClientCfg.remoteNode="prov008" -W db2ClientCfg.remotePort="50000" -W db2ClientCfg.db2AdminUser="db2inst1" -W db2ClientCfg.db2AdminPwd="itso05" # Specify the TWS DB2 User (db2ClientCfg.twsDBUser) and his password if # different from the DB2 Server Administrator User (db2ClientCfg.db2AdminUser) Chapter 4. Tivoli Workload Scheduler V8.3: Migration 167
- 204. #-W db2ClientCfg.twsDBUser="db2user" #-W db2ClientCfg.twsDBPwd="db2user" # The following properties are related to the DB2 local Administrator User -W db2ClientCfg.db2LocalAdminUser="db2inst1" -W db2ClientCfg.db2LocalAdminPwd="itso05" # Specify the installation directory for DB2 V8.2 Administration Client #-W db2LocationPanel.directory="C:/apps/DB2" ## on Windows -W db2LocationPanel.directory="/usr/opt/db2_08_01" ## on Unix # Specify the information needed to create and configure the TWS database -W twsDBCfg.dbName="TWS" # Specify advanced configuration parameters for the TWS database (if not # specified default values will be used) # The path of the tablespace must contain path separators ("/" or "") # according to the platform type (WINDOWS / UNIX) of the machine where the DB2 # server is installed. -W twsDBCfg.tablespaceName="TWS_DATA" #-W twsDBCfg.tablespacePath="C:TWStwsuserTWS_DATA" ## on Windows -W twsDBCfg.tablespacePath="/usr/TWS/TWS_DATA" ## on Unix # Specify the path where images of DB2 V8.2 Administration Client are located #-W db2SilentInstaller.installerLocation="C:/images/DB2" ## on Windows -W db2SilentInstaller.installerLocation="/code/DB2/install/179_ESE_AIX5_3264_SBCS2/ese.s bcsaix2" ## on Unix ##################################################################################### # This sections contains properties used to check the connection to an # existing DB2 V8.2 Enterprise Server database. # Uncomment and customize the following lines if the property # db2InstallationActions.checkPrereq is "true" # # Specify the installation directory of the DB2 V8.2 Enterprise Server #-W db2CheckPrereqs.db2Directory="C:/apps/DB2" ## on Windows #-W db2CheckPrereqs.db2Directory="/opt/DB2" ## on Unix # Specify the information needed to configure the DB2 V8.2 Enterprise Server -W db2ServerCfg.instanceName="DB2" -W db2ServerCfg.instancePort="50000" -W db2ServerCfg.db2AdminUser="db2inst1" -W db2ServerCfg.db2AdminPwd="itso05" 168 Getting Started with IBM Tivoli Workload Scheduler V8.3
- 205. # Specify the information needed to create and configure the TWS database -W twsDBCfg.dbName="TWS" # Specify advanced configuration parameters for the TWS database (if not # specified default values will be used) # The path of the tablespace must contain path separators ("/" or "") # according to the platform type (WINDOWS / UNIX) of the machine where the DB2 # server is installed. #-W twsDBCfg.tablespaceName="TWS_DATA" #-W twsDBCfg.tablespacePath="C:TWStwsuserTWS_DATA" ## on Windows #-W twsDBCfg.tablespacePath="/usr/TWS/TWS_DATA" ## on Unix ##################################################################################### # This sections contains properties used to check the connection to an # existing DB2 V8.2 Administration Client database. # # Specify the installation directory of the DB2 V8.2 Administration Client #-W db2CheckPrereqs.db2Directory="C:/apps/DB2" ## on Windows #-W db2CheckPrereqs.db2Directory="/opt/DB2" ## on Unix # Specify the information needed to configure the DB2 V8.2 Administration Client #-W db2ClientCfg.remoteNode="TWSNODE" #-W db2ClientCfg.remotePort="50000" #-W db2ClientCfg.db2AdminUser="db2" #-W db2ClientCfg.db2AdminPwd="db201db2" # Specify the TWS DB2 User (db2ClientCfg.twsDBUser) and his password if different from the DB2 Server Administrator User (db2ClientCfg.db2AdminUser) #-W db2ClientCfg.twsDBUser="db2user" #-W db2ClientCfg.twsDBPwd="db2user" # The following properties are related to the DB2 local Administrator User #-W db2ClientCfg.db2LocalAdminUser="db2admin" #-W db2ClientCfg.db2LocalAdminPwd="db2admin01" # Specify the information needed to create and configure the TWS database #-W twsDBCfg.dbName="TWS" # Specify advanced configuration parameters for the TWS database (if not # specified default values will be used) # The path of the tablespace must contain path separators ("/" or "") # according to the platform type WINDOWS / UNIX) of the machine where the DB2 # server is installed. #-W twsDBCfg.tablespaceName="TWS_DATA" #-W twsDBCfg.tablespacePath="C:TWStwsuserTWS_DATA" ## on Windows #-W twsDBCfg.tablespacePath="/usr/TWS/TWS_DATA" ## on Unix Chapter 4. Tivoli Workload Scheduler V8.3: Migration 169
- 206. #################################################################################### # The following wizard beans aren't visited on silent installation. # # DO NOT MODIFY THE FOLLOWING PROPERTIES ! # -W fqdnErrorPanel.active="False" -W fqdnErrorGoto.active="False" -W NotEnoughSpaceForBobcatErrorPanel.active="False" -W userFoundInTWSRegistry.active="False" -W userFoundInTWSRegistryUnix.active="False" -W winUserErrorPanel.active="False" -W winUserErrorPanel2.active="False" -W winUserCorrectPwd.active="False" -W winUserBadPwd.active="False" -W unixUserErrorPanel.active="False" -W unixUserErrorPanel.active="False" -W db2SilentInstaller.what2Install="DB2V82" 3. Run the setup for the operating system on which you are upgrading: – On Windows operating systems: WINDOWSSETUP.exe -silent -options <local_dir>response_file.txt – On UNIX and Linux operating systems (see Example 4-45): ./SETUP.bin -options <local_dir>/response_file.txt Example 4-45 Running SETUP.bin -options # /cdrom/AIX/SETUP.bin -options /tmp/TWS83_UPGRADE_BACKUP_BDM.txt 4. Review the installation messages in the summary.log file to check whether installation is successful. 5. After you upgrade the backup domain manager, perform step 17 on page 163, described in “Upgrading the backup master domain manager using the ISMP” on page 148. 4.4.8 Upgrading agents This section describes how to upgrade agents on Windows 2000 and Red Hat Linux Server V3.0. Before you upgrade agents, ensure that you performed the procedure described in 4.4.9, “Unlinking and stopping Tivoli Workload Scheduler when upgrading agent workstations” on page 194. 170 Getting Started with IBM Tivoli Workload Scheduler V8.3
- 207. Note: If the upgrade procedure is successful it is not possible to roll back to the previous version. Rollback is only possible for upgrades that fail. This section describes the following installation methods: “Upgrading Windows 2000 agent using the installation wizard” on page 171 “Upgrading Red Hat Enterprise Linux agent using the installation wizard” on page 179 “Upgrading agents using a silent installation” on page 187 “Upgrading agents using the twsinst script” on page 190 “Upgrading agents using Software Distribution” on page 193 Upgrading Windows 2000 agent using the installation wizard To upgrade an agent using the installation wizard, perform the following steps: 1. Insert the installation CD related to the operating system. 2. Run the setup for the operating system on which you are upgrading: – On Windows operating systems (see Example 4-46): WINDOWSSETUP.exe – On UNIX and Linux operating systems: SETUP.bin Example 4-46 Running the SETUP.exe command # e:WINDOWSSETUP.exe 3. The installation wizard is launched. Select the installation wizard language, as shown in Figure 4-19. Click OK. Figure 4-19 Selecting the installation wizard language Chapter 4. Tivoli Workload Scheduler V8.3: Migration 171
- 208. 4. Read the welcome information shown in Figure 4-20 and click Next. Figure 4-20 Welcome information 172 Getting Started with IBM Tivoli Workload Scheduler V8.3
- 209. 5. Read and accept the license agreement shown in Figure 4-21and click Next. Figure 4-21 License agreement Chapter 4. Tivoli Workload Scheduler V8.3: Migration 173
- 210. 6. Select a previous instance of the product from the drop-down list and click Upgrade an instance of Tivoli Workload Scheduler, as shown in Figure 4-22. The instance can be identified by its group name. Click Next. Figure 4-22 Previous instance and upgrading Tivoli Workload Scheduler 174 Getting Started with IBM Tivoli Workload Scheduler V8.3
- 211. 7. When you upgrade from a Tivoli Workload Scheduler V8.1, select Agent or Domain Manager, as shown in Figure 4-23. Ensure that you select the correct type of agent, otherwise the upgrade fails. Click Next. Figure 4-23 Type of Tivoli Workload Scheduler instance to be upgraded Chapter 4. Tivoli Workload Scheduler V8.3: Migration 175
- 212. 8. Type the password of the Tivoli Workload Scheduler user for which you want to upgrade the instance, as shown in Figure 4-24. Click Next. Figure 4-24 Entering the password of the Tivoli Workload Scheduler user 176 Getting Started with IBM Tivoli Workload Scheduler V8.3
- 213. 9. Review the installation settings shown in Figure 4-25 and click Next. Figure 4-25 Installation settings Chapter 4. Tivoli Workload Scheduler V8.3: Migration 177
- 214. 10.If the installation is successful, you see a summary of the performed installation, as shown in Figure 4-26. Click Finish. Figure 4-26 Installation completed successfully Note: When the installation is successful, you see a panel with the successful installation message. In case of an unsuccessful installation, refer to IBM Tivoli Workload Scheduler Administration and Troubleshooting V8.3, SC32-1275. 178 Getting Started with IBM Tivoli Workload Scheduler V8.3
- 215. 11.After you upgrade an FTA, perform the following procedure: a. On the FTA, remove the Symphony, Sinfonia, Symnew and *.msg files from the TWShome directory, and the *msg files from the TWShome/pobox directory, as shown in Example 4-47. Example 4-47 Removing the Symphony, Sinfonia, Symnew and *msg files # su - tws81 $ rm Symphony Sinfonia Symnew *msg $ cd pobox $ rm *msg b. Run the StartUp command from the TWShome directory, as shown in Example 4-48. Example 4-48 Running the StartUp command # su - tws81 $ ./StartUp c. On the master domain manager, run conman link cpu=fta_cpuname, as shown in Example 4-49. Example 4-49 Running conman link cpu=fta_cpuname # su - tws83 $ conman link cpu=amsterdam Upgrading Red Hat Enterprise Linux agent using the installation wizard To upgrade an agent using the installation wizard, perform the following steps: 1. Insert the installation CD related to the operating system. 2. Run the setup for the operating system on which you are upgrading: – On Windows operating systems: WINDOWSSETUP.exe – On UNIX and Linux operating systems (see Example 4-50): SETUP.bin Example 4-50 Running the SETUP.bin command # /cdrom/LINUX-I386/SETUP.bin -is:tempdir /temp Chapter 4. Tivoli Workload Scheduler V8.3: Migration 179
- 216. 3. The installation wizard is launched. Select the installation wizard language, as shown in Figure 4-27. Click OK. Figure 4-27 Selecting the installation wizard language 4. Read the welcome information shown in Figure 4-28 and click Next. Figure 4-28 Welcome information 180 Getting Started with IBM Tivoli Workload Scheduler V8.3
- 217. 5. Read and accept the license agreement shown in Figure 4-29 and click Next. Figure 4-29 License agreement Chapter 4. Tivoli Workload Scheduler V8.3: Migration 181
- 218. 6. Select a previous instance of the product from the drop-down list and click Upgrade an instance of Tivoli Workload Scheduler, as shown in Figure 4-30. The instance can be identified by its group name. Click Next. Figure 4-30 Previous instance and upgrading Tivoli Workload Scheduler 182 Getting Started with IBM Tivoli Workload Scheduler V8.3
- 219. 7. When you upgrade from a Tivoli Workload Scheduler V8.1, select Agent or Domain Manager, as shown in Figure 4-31. Ensure that you select the correct type of agent, otherwise the upgrade fails. Click Next. Figure 4-31 Type of Tivoli Workload Scheduler instance to be upgraded Chapter 4. Tivoli Workload Scheduler V8.3: Migration 183
- 220. 8. Type the password of the Tivoli Workload Scheduler user for which you want to upgrade the instance, as shown in Figure 4-32. Click Next. Figure 4-32 Entering the password of the Tivoli Workload Scheduler user 184 Getting Started with IBM Tivoli Workload Scheduler V8.3
- 221. 9. Review the installation settings shown in Figure 4-33 and click Next. Figure 4-33 Installation settings Chapter 4. Tivoli Workload Scheduler V8.3: Migration 185
- 222. 10.If the installation is successful, you see a summary of the performed installation, as shown in Figure 4-34. Click Finish. Figure 4-34 Installation completed successfully Note: When the installation is successful, you see a panel with the successful installation message. In case of an unsuccessful installation, refer to IBM Tivoli Workload Scheduler V8.3 Administration and Troubleshooting. 11.After you upgrade an FTA, perform the following procedure: a. On the FTA, remove the Symphony, Sinfonia, Symnew and *.msg files from TWShome directory, and *msg files from TWShome/pobox directory, as shown in Example 4-51. Example 4-51 Removing the Symphony, Sinfonia, Symnew and *msg files # su - tws81 $ rm Symphony Sinfonia Symnew *msg $ cd pobox $ rm *msg 186 Getting Started with IBM Tivoli Workload Scheduler V8.3
- 223. b. Run the StartUp command from TWShome directory, as shown in Example 4-52. Example 4-52 Running the StartUp command # su - tws81 $ ./StartUp c. On the master domain manager, run conman link cpu=fta_cpuname, as shown in Example 4-53. Example 4-53 Running conman link cpu=fta_cpuname # su - tws83 $ conman link cpu=acpd001 Upgrading agents using a silent installation To upgrade an agent using a silent installation, use the response file templates provided on the CDs in the cdrom/RESPONSEFILES directory. The TWS83_UPGRADE_Agent.txt file includes all the information required by the installation program to run without user intervention. Instructions about how to customize the files are included in the file as commented text. For a silent installation, perform the following steps: 1. Copy the relevant response file to a local directory, as shown in Example 4-54. Example 4-54 Copying TWS83_UPGRADE_Agent.txt # cp /cdrom/RESPONSEFILES/TWS83_UPGRADE_AGENT.txt /tmp 2. Edit the TWS83_UPGRADE_Agent.txt file to meet the requirements of your environment, as shown in Example 4-55. Example 4-55 Editing TWS83_UPGRADE_Agent.txt file # su - tws81 $ vi TWS83_UPGRADE_Agent.txt ############################################################################### # # This file can be used to configure the InstallShield SETUP program with the # options specified below when the SETUP is run with the "-options" command # line option. Read each setting's documentation for information on how to # change its value. Chapter 4. Tivoli Workload Scheduler V8.3: Migration 187
- 224. # A common use of an options file is to run the wizard in silent mode. This # lets the options file author specify wizard settings without having to run # the wizard in graphical or console mode. To use this options file for silent # mode execution, use the following command line arguments when running the # wizard: # # -options "C:RESPONSEFILESTWS83_UPGRADE_Agent.txt" -silent # # This file contains settings for the upgrade of an Tivoli Workload # Scheduler Version 8.x agent to the version V8.3. These versions are eligible # for upgrade: 8.1, 8.2, 8.2.1 # A list of all settings that require customization for the execution of the # upgrade action follows: # # InstallationActions.twsUser # twsUpgradePanel.backupOldInstance # twsUpgradePanel.bckpDirectory # ############################################################################### ############################################################################## # This property specifies the type of installation operation: whether it is a # fresh install ("NEW"), # an add feature ("UPDATE"), # an upgrade ("UPGRADE"). # In this case the value is "NEW" # # DO NOT MODIFY THIS PROPERTY ! # -W InstallationActions.typeOfOperation="UPGRADE" ############################################################################### # This property specifies the installation component. For the installation of # the MDM, the value is TWSINSTANCE # # DO NOT MODIFY THIS PROPERTY ! # -W InstallationActions.installComponent="TWSINSTANCE" ############################################################################### # This property specifies the TWS user related to the instance for which the # upgrade action is to be executed. # # CUSTOMIZE THE FOLLOWING PROPERTY ! # -W InstallationActions.twsUser="tws81" 188 Getting Started with IBM Tivoli Workload Scheduler V8.3
- 225. ############################################################################### # Uncomment the following property when upgrading a TWS 8.1 instance # # DO NOT MODIFY THIS PROPERTY ! # -W installationComponents.instanceType="FTA" ############################################################################### # The following properties specify whether to backup the old TWS instance (the # default choice is not to backup) and where to place backup files. The second # property is effective when the first one is set true. # # CUSTOMIZE THE FOLLOWING PROPERTIES ! # -W twsUpgradePanel.backupOldInstance="true"## possible values are: true, false #-W twsUpgradePanel.bckpDirectory="C:TWStws821user_bckp" ## on Windows -W twsUpgradePanel.bckpDirectory="/Tivoli/tws81/tws81_bkp" ## on Unix ############################################################################### # The following property is only required when upgrading a TWS V8.1 FTA # on Windows. # # CUSTOMIZE THE FOLLOWING PROPERTIES #-W userWinCfgPanel.twsPassword="tws01tws" ################################################################################ # The following wizard beans aren't visited on silent installation. # # DO NOT MODIFY THE FOLLOWING PROPERTIES ! -W fqdnErrorPanel.active="False" -W fqdnErrorGoto.active="False" -W NotEnoughSpaceForBobcatErrorPanel.active="False" -W userFoundInTWSRegistry.active="False" -W userFoundInTWSRegistryUnix.active="False" -W winUserErrorPanel.active="False" -W winUserErrorPanel2.active="False" -W winUserCorrectPwd.active="False" -W winUserBadPwd.active="False" -W unixUserErrorPanel.active="False" -W unixUserErrorPanel.active="False" -W db2SilentInstaller.what2Install="DB2V82" Chapter 4. Tivoli Workload Scheduler V8.3: Migration 189
- 226. 3. Run the setup for the operating system on which you are upgrading: – On Windows operating systems: WINDOWSSETUP.exe -silent -options <local_dir>response_file.txt – On UNIX and Linux operating systems (see Example 4-56): ./SETUP.bin -options <local_dir>/response_file.txt Example 4-56 Running SETUP.bin -options # /cdrom/AIX/SETUP.bin -options /tmp/TWS_UPGRADE_Agent.txt 4. Review the installation messages in the summary.log file to check whether the installation is successful. 5. After you upgrade the FTA, perform step 11 on page 179, described in “Upgrading Windows 2000 agent using the installation wizard” on page 171. Upgrading agents using the twsinst script Use this procedure to upgrade on Tier 1 and Tier 2 operating systems. It also installs all supported language packs. This procedure uses the command line twsinst script to upgrade. For a list of supported Tier 1 and Tier 2 operating systems, refer to IBM Tivoli Workload Scheduler Release Notes v8.3, SC32-1277. To upgrade agents using the twsinst script, perform the following steps: 1. As root user, choose the appropriate installation CD and mount it. 2. As root user, change your directory to TWShome, as shown in Example 4-57. Example 4-57 Changing the directory to TWShome # cd /Tivoli/tws81 3. Locate the directory of the operating system where you want to install, and run the twsinst script as follows: twsinst -update -uname username [-inst_dir install_dir] [-backup_dir backup_dir] [-nobackup_dir][-lang lang-id] [-create_link] [-skip_usercheck] [-reset_perm] Example 4-58 shows the twsinst script output. Example 4-58 Running the twsinst script # /cdrom/AIX/twsinst -update -uname tws81 -inst_dir /Tivoli/tws81 -backup_dir /Tivoli/tws81/tws81.bkp -skip_usercheck 190 Getting Started with IBM Tivoli Workload Scheduler V8.3
- 227. In Example 4-58: – -update upgrades an existing installation and installs all supported language packs. Updating the software does not change the type of databases used by Tivoli Workload Scheduler. – -uname is the name of the user for which Tivoli Workload Scheduler is being updated or rolled back. The software is updated in this user’s home directory. This user name is not to be confused with the user performing the installation logged on as root. – -inst_dir is the directory of the Tivoli Workload Scheduler installation. This path cannot contain blanks. If not specified, the path is set to the username home directory. – -backup_dir is an alternative directory (which you must create manually) as the destination for the backup copy of a previous version. If you do not specify this option when running an upgrade, the following default value is used: $BACKUP_DIR = $INST_DIR_backup_$TWS_USER In this example: • $INST_DIR is the installation path (the user home directory on UNIX and Linux). • $TWS_USER is the user name. Example 4-59 shows an example backup directory. Example 4-59 Backup directory $INST_DIR=/Tivoli/tws81 $TWS_USER=tws81 $BACKUP_DIR=/Tivoli/tws81_backup_tws81 $BACKUP_SUBDIR=/Tivoli/tws81_backup_tws81/tws81 Note: In the backup directory, you must also create a subdirectory to include as the latest directory of the installation path. – -nobackup_dir no backup is made – -lang is the language in which the twsinst messages are displayed. If you do not specify this option, the system LANG is used. If the related catalog is missing, the default C language catalog is used. Note: The -lang option does not relate to the supported language packs. By default, all supported language packs are installed when you install using the twsinst script. Chapter 4. Tivoli Workload Scheduler V8.3: Migration 191
- 228. – -restore, if the installation fails, restores the backup automatically created by Tivoli Configuration Manager for the user specified in uname. – -create_link creates the symbolic link between /usr/bin/mat and TWShome/bin/at. – -skip_usercheck skips the check of the user in the /etc/password file or using the su command. Enable this option if the authentication process within your organization is not standard, thereby disabling the default authentication option. – -reset_perm resets the permissions of the libatrc library. Example 4-60 shows a sample twsinst script. Example 4-60 Sample twsinst script # /cdrom/AIX/twsinst -update -uname twsuser 4. To roll back to a previous instance, run the following command, as shown in Example 4-61. twsinst -restore -uname username [-skip_usercheck] Example 4-61 Rolling back to a previous instance # /cdrom/AIX/twsinst -restore -uname tws81 -skip_usercheck In Example 4-61: – -restore, if the installation fails, restores the backup automatically created by IBM Tivoli Configuration Manager for the user specified in uname. – -uname is the name of the user for which Tivoli Workload Scheduler is being updated or rolled back. The software is updated in this user’s home directory. This user name is not to be confused with the user performing the installation logged on as root. – -skip_usercheck skips the check of the user in the /etc/password file or using the su command. Enable this option if the authentication process within your organization is not standard, thereby disabling the default authentication option. 192 Getting Started with IBM Tivoli Workload Scheduler V8.3
- 229. Upgrading agents using Software Distribution A number of Tivoli Workload Scheduler parameters are used by the software package block to perform the upgrade. You can assign values to each variable to reflect the installation that is being upgraded. Otherwise, the default value is assigned. When you upgrade agents using Software Distribution, the following variables are required: install_dir tws_user pwd fresh_install upgrade from_release group when upgrading from Tivoli Workload Scheduler V8.1 To perform the upgrade, perform the following steps: 1. Create a software package profile that has the following name: FP_TWS_operating_system_TWSuser.8.3.00 Here operating_system is the operating system where you install, and TWSuser is the user of the installation. Note: When you import the software package block, you must pass the name of the profile to wimpspo command so that the Tivoli Configuration Manager endpoint catalogs the name correctly. 2. Import the software package block using the wimpspo command. 3. Install the software package block using the winstsp command. Note: When you upgrade using the winstsp command, make sure that you specify the install_dir variable. If you have installed the previous version in a directory other than the default and you do not specify install_dir, Tivoli Workload Scheduler is installed as a fresh installation. For detailed instructions about how to perform these tasks, refer to IBM Tivoli Configuration Manager Reference Manual for Software Distribution, SC23-4712, and IBM Tivoli Configuration Manager User’s Guide for Software Distribution v4, SC23-4711. Chapter 4. Tivoli Workload Scheduler V8.3: Migration 193
- 230. Example 4-62 shows an example of the settings required to upgrade a Tivoli Workload Scheduler V8.1 FTA to Tivoli Workload Scheduler V8.3 on a Windows workstation. Example 4-62 Running the winstsp command winstsp –D install_dir="c:win32apptws81" –D tws_user="tws81" –D this_cpu="saturn" –D tcp_port="31111" -D fresh_install="false" –D upgrade="true" -D from_release="8.1" –D backup="true" –D group="TWS81group" FP_TWS_WINDOWS_tws81.8.3.00 TWSep 4.4.9 Unlinking and stopping Tivoli Workload Scheduler when upgrading agent workstations Before you perform an upgrade on an agent workstation, ensure that all Tivoli Workload Scheduler processes and services are stopped. If you have jobs that are currently running, stop the related processes manually. Perform the following steps: 1. From the Job Scheduling Console, unlink the target workstation from the other workstations in the network. Otherwise, as tws81 user from the command line of the master domain manager, run the following command, as shown in Example 4-63. conman "unlink workstationname;noask" Example 4-63 Running the conman unlink command # su - tws81 $ conman “unlink belfast;noask” 2. From the Job Scheduling Console, stop the target workstation. Otherwise, as tws81 user from the command line of the master domain manager, perform the following command, as shown in Example 4-64. conman “stop;wait” Example 4-64 Running the conman stop command # su - tws81 $ conman “stop;wait” 194 Getting Started with IBM Tivoli Workload Scheduler V8.3
- 231. 3. From the command line (UNIX) or command prompt (Windows), stop the netman process as follows: – On UNIX, run the following command (see Example 4-65): conman “shut" Example 4-65 Running the conman shut command # su - tws81 $ conman “shut” Note: Do not use the UNIX kill command to stop Tivoli Workload Scheduler processes. – On Windows, run the shutdown.cmd command from the Tivoli Workload Scheduler home directory. 4. If you are updating an agent, remove (unmount) any NTFS mounted directories from the master domain manager. 5. If you are upgrading an installation that includes the Tivoli Workload Scheduler Connector, stop the Tivoli Workload Scheduler Connector. To verify whether any services and processes are still running, perform the following steps: – On UNIX, type the command: # ps -u TWSuser Verify that the following processes are not running: • Netman • Mailman • Batchman • Writer • Jobman – On Windows, type the command: <drive>unsupportedlistproc.exe Verify that the following processes are not running: • Netman • Mailman • Batchman • Writer • Jobmon • Jobman • tokensrv • batchup Chapter 4. Tivoli Workload Scheduler V8.3: Migration 195
- 232. Notes: Additionally, ensure that no system programs are accessing the directory or subdirectories, including the command prompt. Ensure that in Windows Explorer, the Administrative Tools.Services panel is not opened. If you are upgrading on a Windows environment, the Tivoli Token Server must be running. Before you upgrade, make sure that the conman command line is not running. 4.5 Upgrading Tivoli Workload Scheduler V8.1: Direct upgrade This section describes how to upgrade the environment using a direct upgrade procedure. The direct upgrade procedure consists of the following topics: 4.5.1, “Upgrading a master domain manager” on page 197 4.5.2, “Importing the object data” on page 221 4.5.3, “Configuring the upgraded master domain manager” on page 221 4.5.4, “Upgrading the backup master domain manager” on page 233 4.5.5, “Importing the migrated security file in the Tivoli Workload Scheduler V8.3 environment” on page 233 4.5.6, “Upgrading agents” on page 233 4.5.7, “Installing the Job Scheduling Console” on page 233 Notes: Start the upgrade by either migrating the agents or installing the master domain manager. After you install the master domain manager, it is important that you run the following procedures in this order: a. Importing object data b. Configuring the upgraded master domain manager c. Upgrading a backup master domain manager d. Importing the migrated security file in the Tivoli Workload Scheduler V8.3 environment We upgraded the master domain manager and the backup domain manager, and then the FTAs. 196 Getting Started with IBM Tivoli Workload Scheduler V8.3
- 233. 4.5.1 Upgrading a master domain manager This section describes how to upgrade a master domain manager on AIX v.5.3.0.0 system. Note: If the upgrade procedure is successful, it is not possible to roll back to the previous version. Rollback is only possible for upgrades that fail. You can upgrade a master domain manager using the following installation methods: “Upgrading the master domain manager using the ISMP”, as described in the following section “Upgrading the master domain manager using a silent installation” on page 213 Upgrading the master domain manager using the ISMP During the upgrade procedure, the installation wizard backs up all the master domain manager data and configuration information, installs the new product code, and automatically dumps previous scheduling data and configuration information. To upgrade a master domain manager using the installation wizard, perform the following steps: 1. Insert the installation CD related to the operating system. 2. Run the setup for the operating system on which you are upgrading: – On Windows operating systems: WINDOWSSETUP.exe – On UNIX and Linux operating systems (see Example 4-66): SETUP.bin Example 4-66 Running the SETUP.bin command # /cdrom/AIX/SETUP.bin Chapter 4. Tivoli Workload Scheduler V8.3: Migration 197
- 234. 3. The installation wizard is launched. Select the installation wizard language, as shown in Figure 4-35. Click OK. Figure 4-35 Selecting the installation wizard language 4. Read the welcome information shown in Figure 4-36 and click Next. Figure 4-36 Welcome information 198 Getting Started with IBM Tivoli Workload Scheduler V8.3
- 235. 5. Read and accept the license agreement shown in Figure 4-37 and click Next. Figure 4-37 License agreement Chapter 4. Tivoli Workload Scheduler V8.3: Migration 199
- 236. 6. Select a previous instance of the product from the drop-down list and click Upgrade an instance of Tivoli Workload Scheduler, as shown in Figure 4-38. The instance can be identified by its group name. Click Next. Figure 4-38 Previous instance and upgrading Tivoli Workload Scheduler 200 Getting Started with IBM Tivoli Workload Scheduler V8.3
- 237. 7. When you upgrade from a Tivoli Workload Scheduler V8.1, select Master Domain Manager, as shown in Figure 4-39. Make sure that you select the correct type of agent, otherwise the upgrade fails. Click Next. Figure 4-39 Type of Tivoli Workload Scheduler instance to be upgraded Chapter 4. Tivoli Workload Scheduler V8.3: Migration 201
- 238. 8. In the window shown in Figure 4-40, provide the following information to perform the upgrade: a. Backup the previous Tivoli Workload Scheduler instance: Select whether to back up the previous instance. b. Backup Destination Directory: When you select to back up the previous instance, specify the directory where the backup is located. c. Automatically import data from the version being updated: Clear this option when you want to manually import the object data into the DB2 database instance. d. Export Destination Directory: Specify the directory where you want the object data exported. e. Click Next. Figure 4-40 Previous backup and export destination directory Note: When you select to import the data at a later time, the upgraded master domain manager has no master workstation defined in the database and only composer works. 202 Getting Started with IBM Tivoli Workload Scheduler V8.3
- 239. 9. Type the password of the Tivoli Workload Scheduler user for which you want to upgrade the instance, as shown in Figure 4-41. Click Next. Figure 4-41 Entering the password of the Tivoli Workload Scheduler user Chapter 4. Tivoli Workload Scheduler V8.3: Migration 203
- 240. 10.In the window shown in Figure 4-42, specify the following application server port information: a. HTTP Transport: The port for the HTTP transport. The default value is 31115. b. HTTPS Transport: The port for the secure HTTP transport. The default value is 31116. c. Bootstrap/RMI: The port for the bootstrap or RMI. The default value is 31117. d. SOAP Connector: The port for the application server protocol SOAP connector. The default value is 31118. e. Click Next. Figure 4-42 Ports used by IBM WebSphere Application Server 204 Getting Started with IBM Tivoli Workload Scheduler V8.3
- 241. 11.Specify the type of DB2 UDB installation, as shown in Figure 4-43. Click Next. Figure 4-43 Specifying the type of DB2 UDB installation Chapter 4. Tivoli Workload Scheduler V8.3: Migration 205
- 242. 12.Specify the relevant DB2 data in accordance with the database installation type or configuration you are performing, as shown in Figure 4-44. Click Next. Figure 4-44 Information to configure DB2 UDB Enterprise Server Edition V8.2 206 Getting Started with IBM Tivoli Workload Scheduler V8.3
- 243. 13.Specify the directory to install DB2 UDB Enterprise Server Edition V8.2, as shown in Figure 4-45. Click Next. Figure 4-45 DB2 UDB Enterprise Server Edition V8.2 directory Chapter 4. Tivoli Workload Scheduler V8.3: Migration 207
- 244. 14.Review the information data to create and configure the Tivoli Workload Scheduler database shown in Figure 4-46. Click Next. Figure 4-46 Reviewing information to configure Tivoli Workload Scheduler 208 Getting Started with IBM Tivoli Workload Scheduler V8.3
- 245. 15.Review the information that db2inst1 user does not exist and that it will be created shown in Figure 4-47. Click Next. Figure 4-47 Information about db2inst1 user Chapter 4. Tivoli Workload Scheduler V8.3: Migration 209
- 246. 16.Review the installation settings shown in Figure 4-48 and Figure 4-49 on page 211. Click Next. Figure 4-48 Installation settings: Part 1 210 Getting Started with IBM Tivoli Workload Scheduler V8.3
- 247. Figure 4-49 shows the rest of the installation settings. Figure 4-49 Installation settings: Part 2 Chapter 4. Tivoli Workload Scheduler V8.3: Migration 211
- 248. 17.If the installation is successful, you see a summary of the performed installation, as shown in Figure 4-50. Click Finish. Figure 4-50 Installation completed successfully Note: If the installation is successful, you see a panel with the successful installation message. In case of an unsuccessful installation, see IBM Tivoli Workload Scheduler Administration and Troubleshooting V8.3, SC32-1275. 212 Getting Started with IBM Tivoli Workload Scheduler V8.3
- 249. 18.If you choose to import data automatically, a panel shows a message indicating that the data has been imported (see Example 4-67). For more information, check the /tmp/tws83/summary.log file and the log files in the /tmp/tws83/datamigration directory. Example 4-67 Message indicating that the data is imported 2006.05.24 23:28:22 - Import data from the previous Tivoli Workload Scheduler instance (rome) - Installation successfully completed /cdrom/AIX/tws_tools/migrateTWSDB.sh -twsRoot "/Tivoli/tws81" -twsOldRoot "/Tivoli/tws81" -tmpDir "/tmp/tws83/datamigration" -installerHome "/" -twsUser tws81 -twsPwd ******** Upgrading the master domain manager using a silent installation To upgrade a master domain manager using a silent installation, use the response file templates provided in the CDs in the cdrom/RESPONSEFILES directory. The TWS83_UPGRADE_MDM.txt file includes all the information required by the installation program to run without user intervention. Instructions about how to customize the files are included in the file as commented text. For a silent installation, perform the following steps: 1. Copy the relevant response file to a local directory, as shown in Example 4-68. Example 4-68 Copying TWS83_UPGRADE_MDM.txt # cp /cdrom/RESPONSEFILES/TWS83_UPGRADE_MDM.txt /tmp 2. Edit the TWS83_UPGRADE_MDM.txt file to meet the requirements of your environment, as shown in Example 4-69. Example 4-69 Editing the TWS83_UPGRADE_MDM.txt file # su - tws81 $ vi TWS83_UPGRADE_MDM.txt ################################################################################ # This file can be used to configure the InstallShield SETUP program with the # options specified below when the SETUP is run with the "-options" command # line option. Read each setting's documentation for information on how to # change its value. # # A common use of an options file is to run the wizard in silent mode. This # lets the options file author specify wizard settings without having to run # the wizard in graphical or console mode. To use this options file for silent Chapter 4. Tivoli Workload Scheduler V8.3: Migration 213
- 250. # mode execution, use the following command line arguments when running the wizard: # -options "C:RESPONSEFILESTWS83_UPGRADE_MDM.txt" -silent # # This file contains settings for the installation of an Tivoli Workload # Scheduler Version V8.3 Master Domain Manager (a.k.a. MDM). # A list of all settings that require customization for the execution of the # upgrade action follows: # # InstallationActions.twsUser # twsUpgradePanel.dumpDirectory # twsUpgradePanel.backupOldInstance # twsUpgradePanel.backupOldInstance # twsUpgradePanel.bckpDirectory # userWinCfgPanel.twsPassword (on Windows) # userUnixCfgPanel.twsPassword (on UNIX) # twsPortsPanel.portHTTP # twsPortsPanel.portHTTPS # twsPortsPanel.portRMI # twsPortsPanel.portSOAP # # The set of properties, among the following ones, that require customization # depends on the customer strategy about the prerequisite (DB2) management. # Look at the related sections below. # # db2InstallationActions.checkPrereq # db2InstallationActions.installDBComp # db2ServerCfg.instanceName # db2ServerCfg.instancePort # db2ServerCfg.db2AdminUser # db2ServerCfg.db2AdminPwd # db2ClientCfg.remoteNode # db2ClientCfg.remotePort # db2ClientCfg.twsDBUser # db2ClientCfg.twsDBPwd # db2ClientCfg.twsDBUser # db2ClientCfg.twsDBPwd # db2ClientCfg.db2AdminUser # db2ClientCfg.db2AdminPwd # db2LocationPanel.directory # twsDBCfg.dbName # twsDBCfg.tablespaceName # twsDBCfg.tablespacePath # db2SilentInstaller.installerLocation ################################################################################ 214 Getting Started with IBM Tivoli Workload Scheduler V8.3
- 251. ############################################################################### # This property specifies the type of installation operation: whether it is a # fresh install ("NEW"), # an add feature ("UPDATE"), # an upgrade ("UPGRADE"). # In this case the value is "NEW" # # DO NOT MODIFY THIS PROPERTY ! # -W InstallationActions.typeOfOperation="UPGRADE" ############################################################################### # This property specifies the installation component. For the installation of # the MDM, the value is TWSINSTANCE # # DO NOT MODIFY THIS PROPERTY ! # -W InstallationActions.installComponent="TWSINSTANCE" ############################################################################### # This property specifies the TWS user related to the instance for which the # upgrade action is to be executed. # # CUSTOMIZE THE FOLLOWING PROPERTY ! # -W InstallationActions.twsUser="tws81" ############################################################################### # Uncomment the following property when upgrading a TWS 8.1 instance # # DO NOT MODIFY THIS PROPERTY ! # -W installationComponents.instanceType="MDM" ################################################################################ # The following property specifies the directory where to place files with # object definitions taken from the database (a.k.a. mozart) of the TWS # instance to be upgraded. # # CUSTOMIZE THE FOLLOWING PROPERTY ! # #-W twsUpgradePanel.dumpDirectory="C:Temptws83datamigration" ## on Windows -W twsUpgradePanel.dumpDirectory="/tmp/tws83/datamigration" ## on Unix ############################################################################### # The following properties specify whether to backup the old TWS instance (the # default choice is not to backup) and where to place backup files. The second Chapter 4. Tivoli Workload Scheduler V8.3: Migration 215
- 252. # property is effective when the first one is set true. # # CUSTOMIZE THE FOLLOWING PROPERTIES ! # -W twsUpgradePanel.backupOldInstance="true" # possible values are: true, false #-W twsUpgradePanel.bckpDirectory="C:TWStws821user_bckp" ## on Windows -W twsUpgradePanel.bckpDirectory="/TWS/tws821user_bckp" ## on Unix ############################################################################### ############################################################################### # The following property specify the password for the twsuser. (Use the # property related to the platform, Windows or UNIX, by commenting / # uncommenting the other one) # # CUSTOMIZE THE FOLLOWING PROPERTIES ! # #-W userWinCfgPanel.twsPassword="tws00tws" -W userUnixCfgPanel.twsPassword="itso05" ############################################################################### # This section contains is used to specify customized values for the ports of # the application server. Default values are specified for the following ports. # The meaning of each property is explained below: # # portHTTP - this is the port for http connections # portHTTPS - this is the port for https connections # portRMI - this is the port for RMI / bootstrap connections # portSOAP - this is the port for SOAP connections # # CUSTOMIZE THE FOLLOWING PROPERTIES # -W twsPortsPanel.portHTTP="31115" -W twsPortsPanel.portHTTP="31115" -W twsPortsPanel.portHTTPS="31116" -W twsPortsPanel.portRMI="31117" -W twsPortsPanel.portSOAP="31118" ############################################################################### # This sections contains the property used to specify if the database used by # the Master Domain Manager is already present on the machine or a new instance # of the database must be installed (a DB2 V8.2 Enterprise Server or a DB2 V8.2 # Administration Client) 216 Getting Started with IBM Tivoli Workload Scheduler V8.3
- 253. # Uncomment the following line if an instance of DB2 V8.2 Enterprise Server or # DB2 V8.2 Administration Client is already present on the machine #-W db2InstallationActions.checkPrereq="true" # # Uncomment the following line if an instance of DB2 Enterprise Server V8.2 # must be installed on the machine -W db2InstallationActions.installDBComp="INSTALL_DBSERVER" # # Uncomment the following line if an instance of DB2 V8.2 Administration Client # must be installed on the machine #-W db2InstallationActions.installDBComp="INSTALL_DBCLIENT" ############################################################################### # This sections contains properties used to configure the installation of the # DB2 V8.2 Enterprise Server for the Master Domain Manager. # Uncomment and costomize the following lines if the property # db2InstallationActions.installDBComp is "INSTALL_DBSERVER" # # Specify the information needed to configure the DB2 V8.2 Enterprise Server -W db2ServerCfg.instanceName="DB2" -W db2ServerCfg.instancePort="50000" -W db2ServerCfg.db2AdminUser="db2inst1" -W db2ServerCfg.db2AdminPwd="itso05" # Specify the installation directory for DB2 V8.2 Enterprise Server #-W db2LocationPanel.directory="C:/apps/DB2" ## on Windows -W db2LocationPanel.directory="/opt/DB2" ## on Unix # Specify the information needed to create and configure the TWS database -W twsDBCfg.dbName="TWS" # Specify advanced configuration parameters for the TWS database (if not # specified default values will be used) # The path of the tablespace must contain path separators ("/" or "") # according to the platform type # (WINDOWS / UNIX) of the machine where the DB2 server is installed. -W twsDBCfg.tablespaceName="TWS_DATA" #-W twsDBCfg.tablespacePath="C:TWStwsuserTWS_DATA" ## on Windows -W twsDBCfg.tablespacePath="/usr/TWS/TWS_DATA" ## on Unix # Specify the path where images of DB2 V8.2 Enterprise Server are located #-W db2SilentInstaller.installerLocation="C:/images/DB2/ESE/WINDOWS" ## on Windows -W db2SilentInstaller.installerLocation="/images/DB2/ESE" ## on Unix ############################################################################### Chapter 4. Tivoli Workload Scheduler V8.3: Migration 217
- 254. # This sections contains properties used to configure the installation of the # DB2 V8.2 Administration Client for the Master Domain Manager. # Uncomment and costomize the following lines if the property # db2InstallationActions.installDBComp is "INSTALL_DBCLIENT" # # Specify the information needed to configure the DB2 V8.2 Administration # Client #-W db2ClientCfg.remoteNode="TWSNODE" #-W db2ClientCfg.remoteNode="TWSNODE" #-W db2ClientCfg.remotePort="50000" #-W db2ClientCfg.db2AdminUser="db2" #-W db2ClientCfg.db2AdminPwd="db201db2" # # Specify the TWS DB2 User (db2ClientCfg.twsDBUser) and his password if # different from the DB2 Server Administrator User (db2ClientCfg.db2AdminUser) #-W db2ClientCfg.twsDBUser="db2user" #-W db2ClientCfg.twsDBPwd="db2user" # The following properties are related to the DB2 local Administrator User #-W db2ClientCfg.db2LocalAdminUser="db2admin" #-W db2ClientCfg.db2LocalAdminPwd="db2admin01" # Specify the installation directory for DB2 V8.2 Administration Client #-W db2LocationPanel.directory="C:/apps/DB2" ## on Windows -W db2LocationPanel.directory="/usr/opt/db2_08_01" ## on Unix # Specify the information needed to create and configure the TWS database -W twsDBCfg.dbName="TWS" # Specify advanced configuration parameters for the TWS database (if not # specified default values will be used) # The path of the tablespace must contain path separators ("/" or "") # according to the platform type # (WINDOWS / UNIX) of the machine where the DB2 server is installed. # (WINDOWS / UNIX) of the machine where the DB2 server is installed. #-W twsDBCfg.tablespaceName="TWS_DATA" #-W twsDBCfg.tablespacePath="C:TWStwsuserTWS_DATA" ## on Windows #-W twsDBCfg.tablespacePath="/usr/TWS/TWS_DATA" ## on Unix # Specify the path where images of DB2 V8.2 Administration Client are located #-W db2SilentInstaller.installerLocation="C:/images/DB2/ESE/WINDOWS" ## on Windows -W db2SilentInstaller.installerLocation="/code/DB2/ESE" ## on Unix ############################################################################### # This sections contains properties used to check the connection to an # existing DB2 V8.2 Enterprise Server database. 218 Getting Started with IBM Tivoli Workload Scheduler V8.3
- 255. # Uncomment and costomize the following lines if the property # db2InstallationActions.checkPrereq is "true" # # Specify the installation directory of the DB2 V8.2 Enterprise Server #-W db2CheckPrereqs.db2Directory="C:/apps/DB2" ## on Windows #-W db2CheckPrereqs.db2Directory="/opt/DB2" ## on Unix # Specify the information needed to configure the DB2 V8.2 Enterprise Server #-W db2ServerCfg.instanceName="DB2" #-W db2ServerCfg.instancePort="50000" #-W db2ServerCfg.db2AdminUser="db2admin" #-W db2ServerCfg.db2AdminUser="db2admin" #-W db2ServerCfg.db2AdminPwd="db2admin" # Specify the information needed to create and configure the TWS database #-W twsDBCfg.dbName="TWS" # Specify advanced configuration parameters for the TWS database (if not # specified default values will be used) # The path of the tablespace must contain path separators ("/" or "") # according to the platform type # (WINDOWS / UNIX) of the machine where the DB2 server is installed. #-W twsDBCfg.tablespaceName="TWS_DATA" #-W twsDBCfg.tablespacePath="C:TWStwsuserTWS_DATA" ## on Windows #-W twsDBCfg.tablespacePath="/usr/TWS/TWS_DATA" ## on Unix ############################################################################### # This sections contains properties used to check the connection to an # existing DB2 V8.2 Administration Client database. # # Specify the installation directory of the DB2 V8.2 Administration Client #-W db2CheckPrereqs.db2Directory="C:/apps/DB2" ## on Windows #-W db2CheckPrereqs.db2Directory="/opt/DB2" ## on Unix # Specify the information needed to configure the DB2 V8.2 Administration # Client #-W db2ClientCfg.remoteNode="TWSNODE" #-W db2ClientCfg.remotePort="50000" #-W db2ClientCfg.db2AdminUser="db2" #-W db2ClientCfg.db2AdminPwd="db201db2" # Specify the TWS DB2 User (db2ClientCfg.twsDBUser) and his password if differen t from the DB2 Server Administrator User (db2ClientCfg.db2AdminUser) #-W db2ClientCfg.twsDBUser="db2user" #-W db2ClientCfg.twsDBPwd="db2user" # The following properties are related to the DB2 local Administrator User #-W db2ClientCfg.db2LocalAdminUser="db2admin" #-W db2ClientCfg.db2LocalAdminPwd="db2admin01" Chapter 4. Tivoli Workload Scheduler V8.3: Migration 219
- 256. # Specify the information needed to create and configure the TWS database #-W twsDBCfg.dbName="TWS" # Specify advanced configuration parameters for the TWS database (if not # specified default values will be used) # The path of the tablespace must contain path separators ("/" or "") # according to the platform type # (WINDOWS / UNIX) of the machine where the DB2 server is installed. #-W twsDBCfg.tablespaceName="TWS_DATA" # (WINDOWS / UNIX) of the machine where the DB2 server is installed. #-W twsDBCfg.tablespaceName="TWS_DATA" #-W twsDBCfg.tablespacePath="C:TWStwsuserTWS_DATA" ## on Windows #-W twsDBCfg.tablespacePath="/usr/TWS/TWS_DATA" ## on Unix ################################################################################ # The following wizard beans aren't visited on silent installation. # # DO NOT MODIFY THE FOLLOWING PROPERTIES ! -W fqdnErrorPanel.active="False" -W fqdnErrorGoto.active="False" -W NotEnoughSpaceForBobcatErrorPanel.active="False" -W userFoundInTWSRegistry.active="False" -W userFoundInTWSRegistryUnix.active="False" -W winUserErrorPanel.active="False" -W winUserErrorPanel2.active="False" -W winUserCorrectPwd.active="False" -W winUserBadPwd.active="False" -W unixUserErrorPanel.active="False" -W unixUserErrorPanel.active="False" -W db2SilentInstaller.what2Install="DB2V82" 3. Run the setup for the operating system on which you are upgrading: – On Windows operating systems: WINDOWSSETUP.exe -silent -options <local_dir>response_file.txt – On UNIX and Linux operating systems (see Example 4-70): ./SETUP.bin -options <local_dir>/response_file.txt Example 4-70 Running SETUP.bin -options # /cdrom/AIX/SETUP.bin -options /tmp/TWS83_UPGRADE_MDM.txt 4. Review the installation messages in the summary.log file to check whether the installation is successful. 220 Getting Started with IBM Tivoli Workload Scheduler V8.3
- 257. 4.5.2 Importing the object data If you did not choose to import data automatically, perform the procedure described in 4.4.5, “Importing the object data” on page 130. 4.5.3 Configuring the upgraded master domain manager To configure the upgrade master domain manager, perform the following steps: 1. As tws81 user, run the optman chg cf=ALL command in the new master domain manager to ensure that the carry forward option is set to all, as shown in Example 4-71. Example 4-71 Running the optman chg cf=ALL command # su - tws81 $ optman chg cf=ALL Tivoli Workload Scheduler (UNIX)/OPTMAN V8.3 (1.0) Licensed Materials - Property of IBM(R)5698-WSH (C) Copyright IBM Corp 1998, 2006 All rights reserved. US Government User Restricted Rights Use, duplication or disclosure restricted by GSA ADP Schedule Contract with IBM Corp. IBM is a registered trademark of International Business Machines Corporation in the United States, other countries, or both. Installed for user "tws81". Locale LANG set to the following: "en" AWSJCL050I Command "chg" completed successfully. 2. As tws81 user, run the optman ls command in the new master domain manager to check the carry forward option, as shown in Example 4-72. Example 4-72 Running the optman ls command # su - tws81 $ optman ls Tivoli Workload Scheduler (UNIX)/OPTMAN V8.3 (1.0) Licensed Materials - Property of IBM(R)5698-WSH (C) Copyright IBM Corp 1998, 2006 All rights reserved. US Government User Restricted Rights Use, duplication or disclosure restricted by GSA ADP Schedule Contract with IBM Corp. IBM is a registered trademark of International Business Machines Corporation in the United States, other countries, or both. Installed for user "tws81". Locale LANG set to the following: "en" baseRecPrompt / bp = 1000 carryStates / cs = null Chapter 4. Tivoli Workload Scheduler V8.3: Migration 221
- 258. companyName / cn = IBM enCFInternetworkDeps / ci = YES enCFResourceQuantity / rq = YES enCarryForward / cf = ALL enCentSec / ts = NO enDbAudit / da = 0 enEmptySchedsAreSucc / es = NO enListSecChk / sc = NO enLogonBatch / lb = NO enPlanAudit / pa = 0 enPreventStart / ps = YES enRetainNameOnRerunFrom / rr = NO enStrEncrypt / se = NO enSwFaultTol / sw = NO enTimeZone / tz = NO extRecPrompt / xp = 1000 ignoreCals / ic = NO logmanMinMaxPolicy / ln = BOTH logmanSmoothPolicy / lt = -1 maxLen / xl = 14 minLen / ml = 8 startOfDay / sd = 0600 statsHistory / sh = 10 AWSJCL050I Command "ls" completed successfully. 3. As tws81, run the JnextPlan command in the new master domain manager to create a plan with 0 extension period, which begins at the end of the current plan, as shown in Example 4-73. $ su - tws81 $ JnextPlan -from start_time -for 0000 Example 4-73 Running JnextPlan in new master domain manager to create a plan # su - tws81 $ JnextPlan -from 05/25/2006 0600 -for 0000 Tivoli Workload Scheduler (UNIX)/JNEXTPLAN Licensed Materials - Property of IBM(R) 5698-WSH (C) Copyright IBM Corp 1998, 2006 All rights reserved. US Government User Restricted Rights Use, duplication or disclosure restricted by GSA ADP Schedule Contract with IBM Corp. IBM is a registered trademark of International Business Machines Corporation in the United States, other countries, or both. Tivoli Workload Scheduler (UNIX)/MAKEPLAN 222 Getting Started with IBM Tivoli Workload Scheduler V8.3
- 259. Licensed Materials - Property of IBM(R) 5698-WSH (C) Copyright IBM Corp 1998, 2006 All rights reserved. US Government User Restricted Rights Use, duplication or disclosure restricted by GSA ADP Schedule Contract with IBM Corp. IBM is a registered trademark of International Business Machines Corporation in the United States, other countries, or both. Tivoli Workload Scheduler (UNIX)/CONMAN V8.3 (1.36.2.22) Licensed Materials - Property of IBM(R) 5698-WSH (C) Copyright IBM Corp 1998, 2006 All rights reserved. US Government User Restricted Rights Use, duplication or disclosure restricted by GSA ADP Schedule Contract with IBM Corp. IBM is a registered trademark of International Business Machines Corporation in the United States, other countries, or both. Installed for user "tws81". Locale LANG set to the following: "en" Scheduled for (Exp) 05/24/06 (#2) on ROME. Batchman down. Limit: 0, Fence: 0, Audit Level: 0 %continue %link @!@;noask AWSBHU072E There are no objects that match the selection you have entered. %Tivoli Workload Scheduler (UNIX)/PLANMAN V8.3 (1.0) Licensed Materials - Property of IBM(R) 5698-WSH (C) Copyright IBM Corp 1998, 2006 All rights reserved. US Government User Restricted Rights Use, duplication or disclosure restricted by GSA ADP Schedule Contract with IBM Corp. IBM is a registered trademark of International Business Machines Corporation in the United States, other countries, or both. Installed for user "tws81". Locale LANG set to the following: "en" AWSJPL207W The production plan does not exist and the planner creates it. AWSJPL503I The "planner" process has locked the database. AWSJPL708I During the creation of a production plan, the planner has detected that no preproduction plan exists. A preproduction plan will be created automatically. AWSJPL709I During the creation of a production plan, the planner has successfully created a new preproduction plan. AWSJPL504I The "planner" process has unlocked the database. AWSJCL062I The production plan (Symnew) has been successfully extended. Tivoli Workload Scheduler (UNIX)/REPTR Licensed Materials - Property of IBM(R) Chapter 4. Tivoli Workload Scheduler V8.3: Migration 223
- 260. 5698-WSH (C) Copyright IBM Corp 1998, 2006 All rights reserved. US Government User Restricted Rights Use, duplication or disclosure restricted by GSA ADP Schedule Contract with IBM Corp. IBM is a registered trademark of International Business Machines Corporation in the United States, other countries, or both. Tivoli Workload Scheduler (UNIX)/SYXTRACT V8.3 (1.9) Licensed Materials - Property of IBM(R) 5698-WSH (C) Copyright IBM Corp 1998, 2006 All rights reserved. US Government User Restricted Rights Use, duplication or disclosure restricted by GSA ADP Schedule Contract with IBM Corp. IBM is a registered trademark of International Business Machines Corporation in the United States, other countries, or both. Installed for user "tws81". Locale LANG set to the following: "en" Tivoli Workload Scheduler (UNIX)/REPORTER V8.3 (1.6) Page 1 ... Page 2 ... Tivoli Workload Scheduler (UNIX)/SWITCHPLAN V8.3 Licensed Materials - Property of IBM(R) 5698-WSH (C) Copyright IBM Corp 1998, 2006 All rights reserved. US Government User Restricted Rights Use, duplication or disclosure restricted by GSA ADP Schedule Contract with IBM Corp. IBM is a registered trademark of International Business Machines Corporation in the United States, other countries, or both. Tivoli Workload Scheduler (UNIX)/CONMAN V8.3 (1.36.2.22) Licensed Materials - Property of IBM(R) 5698-WSH (C) Copyright IBM Corp 1998, 2006 All rights reserved. US Government User Restricted Rights Use, duplication or disclosure restricted by GSA ADP Schedule Contract with IBM Corp. IBM is a registered trademark of International Business Machines Corporation in the United States, other countries, or both. Installed for user "tws81". Locale LANG set to the following: "en" Scheduled for (Exp) 05/24/06 (#2) on ROME. Batchman down. Limit: 0, Fence: 0, Audit Level: 0 224 Getting Started with IBM Tivoli Workload Scheduler V8.3
- 261. stop @!@;wait;noask AWSBHU013I ROME already stopped. Tivoli Workload Scheduler (UNIX)/STAGEMAN V8.3 (1.4) Licensed Materials - Property of IBM(R) 5698-WSH (C) Copyright IBM Corp 1998, 2006 All rights reserved. US Government User Restricted Rights Use, duplication or disclosure restricted by GSA ADP Schedule Contract with IBM Corp. IBM is a registered trademark of International Business Machines Corporation in the United States, other countries, or both. Installed for user "tws81". Locale LANG set to the following: "en" STAGEMAN:AWSBHV033I Job stream #FINAL[(0600 05/25/06),(FINAL)] is carried STAGEMAN:forward. The new id is CF06144AAAAAAAAA. STAGEMAN:AWSBHV025I The old Symphony file renamed STAGEMAN:/Tivoli/tws81/schedlog/M200605250048 STAGEMAN:AWSBHV030I The new Symphony file is installed. STAGEMAN:AWSBHV036I Multi-workstation Symphony file copied to STAGEMAN:/Tivoli/tws81/Sinfonia STAGEMAN:AWSBHV078I Current plan audit level is 0. Tivoli Workload Scheduler (UNIX)/PLANMAN V8.3 (1.0) Licensed Materials - Property of IBM(R) 5698-WSH (C) Copyright IBM Corp 1998, 2006 All rights reserved. US Government User Restricted Rights Use, duplication or disclosure restricted by GSA ADP Schedule Contract with IBM Corp. IBM is a registered trademark of International Business Machines Corporation in the United States, other countries, or both. Installed for user "tws81". Locale LANG set to the following: "en" AWSJCL065I Run number has been successfully updated. Tivoli Workload Scheduler (UNIX)/CONMAN V8.3 (1.36.2.22) Licensed Materials - Property of IBM(R) 5698-WSH (C) Copyright IBM Corp 1998, 2006 All rights reserved. US Government User Restricted Rights Use, duplication or disclosure restricted by GSA ADP Schedule Contract with IBM Corp. IBM is a registered trademark of International Business Machines Corporation in the United States, other countries, or both. Installed for user "tws81". Locale LANG set to the following: "en" Scheduled for (Exp) 05/25/06 (#3) on ROME. Batchman down. Limit: 0, Fence: 0, Chapter 4. Tivoli Workload Scheduler V8.3: Migration 225
- 262. Audit Level: 0 start AWSBHU507I A start command was issued for ROME. Tivoli Workload Scheduler (UNIX)/CREATEPOSTREPORTS Licensed Materials - Property of IBM(R) 5698-WSH (C) Copyright IBM Corp 1998, 2006 All rights reserved. US Government User Restricted Rights Use, duplication or disclosure restricted by GSA ADP Schedule Contract with IBM Corp. IBM is a registered trademark of International Business Machines Corporation in the United States, other countries, or both. Tivoli Workload Scheduler (UNIX)/REPTR Licensed Materials - Property of IBM(R) 5698-WSH (C) Copyright IBM Corp 1998, 2006 All rights reserved. US Government User Restricted Rights Use, duplication or disclosure restricted by GSA ADP Schedule Contract with IBM Corp. IBM is a registered trademark of International Business Machines Corporation in the United States, other countries, or both. Tivoli Workload Scheduler (UNIX)/SYXTRACT V8.3 (1.9) Licensed Materials - Property of IBM(R) 5698-WSH (C) Copyright IBM Corp 1998, 2006 All rights reserved. US Government User Restricted Rights Use, duplication or disclosure restricted by GSA ADP Schedule Contract with IBM Corp. IBM is a registered trademark of International Business Machines Corporation in the United States, other countries, or both. Installed for user "tws81". Locale LANG set to the following: "en" Tivoli Workload Scheduler (UNIX)/REPORTER V8.3 (1.6) Page 1 ... Page 2 ... Licensed Materials - Property of IBM(R) 5698-WSH (C) Copyright IBM Corp 1998, 2006 All rights reserved. US Government User Restricted Rights Use, duplication or disclosure restricted by GSA ADP Schedule Contract with IBM Corp. IBM is a registered trademark of International Business Machines Corporation in the United States, other countries, or both. 226 Getting Started with IBM Tivoli Workload Scheduler V8.3
- 263. Tivoli Workload Scheduler (UNIX)/REPORT8 V8.3 (1.8) Page 1 ... Page 2 ... Tivoli Workload Scheduler (UNIX)/UPDATESTATS Licensed Materials - Property of IBM(R) 5698-WSH (C) Copyright IBM Corp 1998, 2006 All rights reserved. US Government User Restricted Rights Use, duplication or disclosure restricted by GSA ADP Schedule Contract with IBM Corp. IBM is a registered trademark of International Business Machines Corporation in the United States, other countries, or both. Tivoli Workload Scheduler (UNIX)/LOGMAN V8.3 (8.3) Licensed Materials - Property of IBM(R) 5698-WSH (C) Copyright IBM Corp 1998, 2006 All rights reserved. US Government User Restricted Rights Use, duplication or disclosure restricted by GSA ADP Schedule Contract with IBM Corp. IBM is a registered trademark of International Business Machines Corporation in the United States, other countries, or both. Installed for user "tws81". Locale LANG set to the following: "en" AWSJCL066I The job statistics have been successfully collected. 0 Jobs Logged In Example 4-73, start_time is the date and time when the current plan ends. Note: If you run Jnextday, and the plan is created from today at 06:00 until tomorrow at 05:59, the start_time of the new plan must be tomorrow at the default time of 06:00. Chapter 4. Tivoli Workload Scheduler V8.3: Migration 227
- 264. 4. As tws81 user, run the optman chg cf=YES command in the new master domain manager to reset the carry forward option to the value that you assigned before you ran step 1. See Example 4-74. Example 4-74 Running the optman chg cf=YES command # su - tws81 $ optman chg cf=YES Tivoli Workload Scheduler (UNIX)/OPTMAN V8.3 (1.0) Licensed Materials - Property of IBM(R)5698-WSH (C) Copyright IBM Corp 1998, 2006 All rights reserved. US Government User Restricted Rights Use, duplication or disclosure restricted by GSA ADP Schedule Contract with IBM Corp. IBM is a registered trademark of International Business Machines Corporation in the United States, other countries, or both. Installed for user "tws810". Locale LANG set to the following: "en" AWSJCL050I Command "chg" completed successfully 5. As tws81 user, run composer add to add the new job stream called FINAL in the new master domain manager database, as shown in Example 4-75. Example 4-75 Running composer add to add new job stream called FINAL # su - tws81 $ composer add Sfinal Tivoli Workload Scheduler (UNIX)/COMPOSER V8.3 (1.18.3.3) Licensed Materials - Property of IBM(R) 5698-WSH (C) Copyright IBM Corp 1998, 2006 All rights reserved. US Government User Restricted Rights Use, duplication or disclosure restricted by GSA ADP Schedule Contract with IBM Corp. IBM is a registered trademark of International Business Machines Corporation in the United States, other countries, or both. Installed for user "tws81". Locale LANG set to the following: "en" User: tws81, Host:127.0.0.1, Port:31116 -add Sfinal AWSBIA300I The scheduling language syntax has been successfully validated for object "ROME#FINAL". AWSJCL003I The command "add" relating to object "jd=ROME#MAKEPLAN" has completed successfully. AWSJCL003I The command "add" relating to object "jd=ROME#SWITCHPLAN" has completed successfully. AWSJCL003I The command "add" relating to object "jd=ROME#CREATEPOSTREPORTS" has 228 Getting Started with IBM Tivoli Workload Scheduler V8.3
- 265. completed successfully. AWSJCL003I The command "add" relating to object "jd=ROME#UPDATESTATS" has completed successfully. AWSJCL015W The object "js=ROME#FINAL" already exists. AWSJCL016I Do you want to replace the object (enter "y" for yes, "n" for no)? y AWSJCL003I The command "update" relating to object "jd=ROME#MAKEPLAN" has completed successfully. AWSJCL003I The command "update" relating to object "jd=ROME#SWITCHPLAN" has completed successfully. AWSJCL003I The command "update" relating to object "jd=ROME#CREATEPOSTREPORTS" has completed successfully. AWSJCL003I The command "update" relating to object "jd=ROME#UPDATESTATS" has completed successfully. AWSJCL003I The command "update" relating to object "js=ROME#FINAL" has completed successfully. AWSBIA303W Total warnings in "Sfinal": 1. AWSBIA288I Total objects updated: 9 6. As tws81 user, run composer display to see the definition of the new FINAL job stream in the new master domain manager database, as shown in Example 4-76. Example 4-76 Running composer display to see new FINAL job stream # su - tws81 $ composer display sched=FINAL Tivoli Workload Scheduler (UNIX)/COMPOSER V8.3 (1.18.3.3) Licensed Materials - Property of IBM(R) 5698-WSH (C) Copyright IBM Corp 1998, 2006 All rights reserved. US Government User Restricted Rights Use, duplication or disclosure restricted by GSA ADP Schedule Contract with IBM Corp. IBM is a registered trademark of International Business Machines Corporation in the United States, other countries, or both. Installed for user "tws81". Locale LANG set to the following: "en" User: tws81, Host:127.0.0.1, Port:31116 -display sched=final Workstation Job Stream Name Valid From Updated On Locked By ---------------- ---------------- ---------- ---------- ---------------- ROME FINAL - 05/25/2006 - Chapter 4. Tivoli Workload Scheduler V8.3: Migration 229
- 266. #@(#) $Id: Sfinal.conf,v 7.56 1995/02/24 04:13:53 alanh viola_thunder $ # This is a sample schedule for doing pre and post production # processing. It assumes the start time is 6:00 a.m. # It is defined as CARRYFORWARD because it is executed across # production periods. This ensures that job statistics will be # collected for the schedule. # All of the job statements that follow use auto-documentation # keywords so the jobs will be documented by composer when the # schedule is added or modified in the mastsked file. SCHEDULE ROME#FINAL ON RUNCYCLE RULE1 "FREQ=DAILY;" AT 0559 CARRYFORWARD FOLLOWS ROME#FINAL.@ PREVIOUS : ROME#MAKEPLAN ROME#SWITCHPLAN FOLLOWS MAKEPLAN ROME#CREATEPOSTREPORTS FOLLOWS SWITCHPLAN # MakePlan creates tomorrow's production control file (Symnew). # Then it runs reporter to print pre-production reports. # The reports should be reviewed. # SwitchPlan stops batchman and runs stageman to: 1) carry forward incomplete schedules, # 2) log the old Symphony file, 3) create the new Symphony and Sinfonia # files. It then starts batchman. # CreatePostReports runs reporter to print post-production reports. # UpdateStats runs logman to log job statistics, and then # report8 to print the Job Histogram. ROME#UPDATESTATS FOLLOWS SWITCHPLAN END AWSBIA291I Total objects: 1 230 Getting Started with IBM Tivoli Workload Scheduler V8.3
- 267. 7. As tws81 user, run conman cs to cancel the FINAL job stream in the new master domain manager database, as shown in Example 4-77. Example 4-77 Running conman cs to cancel the FINAL job stream # su - tws81 $ conman cs final Tivoli Workload Scheduler (UNIX)/CONMAN V8.3 (1.36.2.22) Licensed Materials - Property of IBM(R) 5698-WSH (C) Copyright IBM Corp 1998, 2006 All rights reserved. US Government User Restricted Rights Use, duplication or disclosure restricted by GSA ADP Schedule Contract with IBM Corp. IBM is a registered trademark of International Business Machines Corporation in the United States, other countries, or both. Installed for user "tws81". Locale LANG set to the following: "en" Scheduled for (Exp) 05/25/06 (#3) on ROME. Batchman LIVES. Limit: 0, Fence: 0, Audit Level: 0 cs final Command forwarded to batchman for ROME#FINAL[(0600 05/25/06),(CF06144AAAAAAAAA)] 8. As tws81 user, run conman sbs to submit the new FINAL job stream in the new master domain manager database, as shown in Example 4-78. Example 4-78 Running conman sbs to submit the new FINAL job stream # su - tws81 $ conman “sbs FINAL” Tivoli Workload Scheduler (UNIX)/CONMAN V8.3 (1.36.2.22) Licensed Materials - Property of IBM(R) 5698-WSH (C) Copyright IBM Corp 1998, 2006 All rights reserved. US Government User Restricted Rights Use, duplication or disclosure restricted by GSA ADP Schedule Contract with IBM Corp. IBM is a registered trademark of International Business Machines Corporation in the United States, other countries, or both. Installed for user "tws81". Locale LANG set to the following: "en" Scheduled for (Exp) 05/25/06 (#3) on ROME. Batchman LIVES. Limit: 0, Fence: 0, Audit Level: 0 sbs FINAL Submitted ROME#FINAL to batchman as ROME#FINAL[(0058 05/25/06),(0AAAAAAAAAAAAAAP)] Chapter 4. Tivoli Workload Scheduler V8.3: Migration 231
- 268. 9. As tws81 user, run conman ss to see the new FINAL job stream in the new master domain manager database, as shown in Example 4-79. Example 4-79 Running conman ss to see the new FINAL job stream # su - tws81 $ conman ss Tivoli Workload Scheduler (UNIX)/CONMAN V8.3 (1.36.2.22) Licensed Materials - Property of IBM(R) 5698-WSH (C) Copyright IBM Corp 1998, 2006 All rights reserved. US Government User Restricted Rights Use, duplication or disclosure restricted by GSA ADP Schedule Contract with IBM Corp. IBM is a registered trademark of International Business Machines Corporation in the United States, other countries, or both. Installed for user "tws81". Locale LANG set to the following: "en" Scheduled for (Exp) 05/25/06 (#3) on ROME. Batchman LIVES. Limit: 10, Fence: 0, Audit Level: 0 ss (Est) (Est) Jobs Sch CPU Schedule SchedTime State Pr Start Elapse # OK Lim ROME #FINAL 0600 05/25 HOLD 10(05:59) 1 0 [05/24/06]; [Cancelled] ROME #FINAL 0058 05/25 HOLD 10(05/26) 4 0 [Carry] 10.As tws81 user, run conman sj to see the jobs in the new master domain manager database, as shown in Example 4-80. Example 4-80 Running conman sj to see the jobs # su - tws81 $ conman sj Tivoli Workload Scheduler (UNIX)/CONMAN V8.3 (1.36.2.22) Licensed Materials - Property of IBM(R) 5698-WSH (C) Copyright IBM Corp 1998, 2006 All rights reserved. US Government User Restricted Rights Use, duplication or disclosure restricted by GSA ADP Schedule Contract with IBM Corp. 232 Getting Started with IBM Tivoli Workload Scheduler V8.3
- 269. IBM is a registered trademark of International Business Machines Corporation in the United States, other countries, or both. Installed for user "tws81". Locale LANG set to the following: "en" Scheduled for (Exp) 05/25/06 (#3) on ROME. Batchman LIVES. Limit: 10, Fence: 0, Audit Level: 0 sj (Est) (Est) CPU Schedule SchedTime Job State Pr Start Elapse RetCode Deps ROME #FINAL 0058 05/25 ******** HOLD 10(05/26) [Carry] MAKEPLAN HOLD 10 SWITCHP+ HOLD 10 MAKEPLAN CREATEP+ HOLD 10 SWITCHP+ UPDATES+ HOLD 10 SWITCHP+ 4.5.4 Upgrading the backup master domain manager Perform the procedure described in 4.4.7, “Upgrading the backup master domain manager” on page 147. 4.5.5 Importing the migrated security file in the Tivoli Workload Scheduler V8.3 environment Perform the procedure described in 4.4.4, “Importing the migrated security file in the Tivoli Workload Scheduler V8.3 environment” on page 128. 4.5.6 Upgrading agents Perform the procedure described in 4.4.8, “Upgrading agents” on page 170. 4.5.7 Installing the Job Scheduling Console Perform the procedure described in 3.2.2, “Installing the Job Scheduling Console” on page 61. Chapter 4. Tivoli Workload Scheduler V8.3: Migration 233
- 270. 4.6 Upgrading Tivoli Workload Scheduler V8.2: Parallel upgrade This section describes how to upgrade the environment using a parallel upgrade procedure. The parallel upgrade procedure consists of the following topics: 4.6.1, “Dumping existing objects from the database”; see the following section 4.6.2, “Extracting Tivoli Framework user data from the security file” on page 236 4.6.3, “Installing a new master domain manager” on page 240 4.6.4, “Importing the migrated security file in the Tivoli Workload Scheduler V8.3 environment” on page 241 4.6.5, “Importing the object data” on page 243 4.6.6, “Switching a master domain manager” on page 252 4.6.7, “Upgrading agents” on page 260 4.6.8, “Upgrading Windows 2003 agent using the installation wizard” on page 261 4.6.1 Dumping existing objects from the database In a parallel upgrade, you must manually perform a memory dump of the data. Because of this, a copy of the existing data objects must reside in your environment. When you perform a memory dump of the data, use the composer command line provided in the installation CD, which is related to the operating system where the Tivoli Workload Scheduler you are upgrading is installed. To dump the data using the composer command line provided in the installation CD, perform the following steps: 1. As root user, choose the appropriate installation CD and mount it. # mount /cdrom Note: For Linux I386 operating system, the appropriate installation CD is CD5. 234 Getting Started with IBM Tivoli Workload Scheduler V8.3
- 271. 2. Copy the composer821 command into the directory where the previous composer is installed, as shown in Example 4-81. # cp /cdrom/operating_system/bin/composer821 /usr/local/tws820/bin Example 4-81 Copying CDn/operating_system/bin/composer821 to TWShome/bin # cp /cdrom/LINUX_I386/bin/composer821 /usr/local/tws820/bin Note: Because this section describes the Tivoli Workload Scheduler V8.2 parallel upgrade, you must use the composer821 command. This command is for Tivoli Workload Scheduler V8.2 and Tivoli Workload Scheduler V8.2.1. 3. Set permission, owner, and group to composer821 with the same rights that the previous composer has, as shown in Example 4-82. Example 4-82 Setting permission, owner and group of composer821 command # cd /usr/local/tws820/bin # ls -l composer -r-s--s--x 1 tws820 unison 1391362 Jul 26 2004 composer # chmod u+s composer821 # chmod g+s composer821 # chmod g-r composer821 # chmod o-r composer821 # chown tws820.unison composer821 4. As tws820 user, use the composer821 create command to dump the data of Tivoli Workload Scheduler V8.2, as shown in Example 4-83. Example 4-83 Dumping data of Tivoli Workload Scheduler V8.2 # su - tws820 $ mkdir /usr/local/tws820/dumpdata $ cd /usr/local/tws820/dumpdata $ /usr/local/tws820/bin/composer821 - create topology_filename from cpu=@ - create prompts_filename from prompts - create calendar_filename from calendars - create parms_filename from parms - create resources_filename from resources - create users_filename from users=@#@ - create jobs_filename from jobs=@#@ - create scheds_filename from sched=@#@ Chapter 4. Tivoli Workload Scheduler V8.3: Migration 235
- 272. The dump data of Tivoli Workload Scheduler V8.2 consists of the following files: – topology_filename is the name of the file that contains the topology data of the Tivoli Workload Scheduler you are upgrading, where “from cpu=@” indicates all workstations, workstation classes, and domains. – prompts_filename is the name of the file that contains the prompts of the Tivoli Workload Scheduler you are upgrading, where “from prompts” indicates all prompts. – calendar_filename is the name of the file that contains the calendars of the Tivoli Workload Scheduler you are upgrading, where “from calendars” indicates all calendars. – parms_filename is the name of the file that contains the parameters of the Tivoli Workload Scheduler you are upgrading, where “from parms” indicates all parameters. – resources_filename is the name of the file that contains the resources of the Tivoli Workload Scheduler you are upgrading, where “from resources” indicates all resources. – users_filename is the name of the file that contains the users of the Tivoli Workload Scheduler you are upgrading, where “from users=@#@” indicates all users. – jobs_filename is the name of the file that contains the jobs of the Tivoli Workload Scheduler you are upgrading, where “from jobs=@#@” indicates all jobs. – scheds_filename is the name of the file that contains the job streams of the Tivoli Workload Scheduler you are upgrading, where “from scheds=@#@” indicates all schedules. Use these files to import the data into the relational database. 4.6.2 Extracting Tivoli Framework user data from the security file To extract the Tivoli Management Framework users, perform the following steps: 1. As tws820 user, ensure that the Tivoli Management Framework environment is set. # su - tws820 $ . /etc/Tivoli/setup_env.sh 2. Stop the Tivoli Workload Scheduler V8.2 processes. $ conman stop $ conman shutdown 236 Getting Started with IBM Tivoli Workload Scheduler V8.3
- 273. 3. Copy the migrtool.tar file to a directory on the Tivoli Workload Scheduler V8.2 environment, as shown in Example 4-84. Example 4-84 Copying the migrtool.tar file to TWShome directory $ cp /cdrom/LINUX_I386/utilities/migrtool.tar /usr/local/tws820 4. Make a backup of the files listed in the migrtool.tar file, if they already exist on the Tivoli Workload Scheduler V8.2 environment, as shown in Example 4-85. Example 4-85 List of files in the migrtool.tar file and backups in TWShome $ tar -tvf /usr/local/tws820/migrtool.tar -rw-r--r-- 0/0 16109 2006-03-27 17:22:19 catalog/C/unison.cat -rw-r--r-- 0/0 57395 2006-03-27 17:22:27 catalog/C/unison_trace.cat -rw-r--r-- 0/0 244563 2006-03-27 17:22:58 catalog/C/maestro.cat -rw-r--r-- 0/0 48859 2006-03-27 17:23:15 catalog/C/maestro_trace.cat -rwxr-xr-x 0/0 615964 2006-03-27 18:18:19 bin/getfwkusr -rwxr-xr-x 0/0 791872 2006-03-27 19:04:39 bin/migrutility -rwxr-xr-x 0/0 1368 2006-03-27 18:18:19 migrfwkusr -rw-r--r-- 0/0 1441 2006-03-27 18:18:19 set_env -rwxr-xr-x 0/0 32932 2006-03-27 19:04:24 bin/libatrc.so -rwxr-xr-x 0/0 1432 2006-03-27 19:04:25 bin/libicudata.so.34 -rwxr-xr-x 0/0 958600 2006-03-27 19:04:27 bin/libicui18n.so.34 -rwxr-xr-x 0/0 83880 2006-03-27 19:04:27 bin/libicutu.so.34 -rwxr-xr-x 0/0 1132876 2006-03-27 19:04:28 bin/libicuuc.so.34 5. As root user, extract the files from the migrtool.tar file into the Tivoli Workload Scheduler V8.2 environment, as shown in Example 4-86. Example 4-86 Extracting files from migrtool.tar into TWShome # cd /usr/local/tws820 # tar -xvf /usr/local/tws820/migrtool.tar catalog/C/unison.cat catalog/C/unison_trace.cat catalog/C/maestro.cat catalog/C/maestro_trace.cat bin/getfwkusr bin/migrutility migrfwkusr set_env bin/libatrc.so bin/libicudata.so.34 Chapter 4. Tivoli Workload Scheduler V8.3: Migration 237
- 274. bin/libicui18n.so.34 bin/libicutu.so.34 bin/libicuuc.so.34 6. Set permissions, owner, and group of the files extracted from the migrtool.tar file into Tivoli Workload Scheduler V8.2 environment, as shown in Example 4-87. Example 4-87 Setting permissions, owner, and group of the files into TWShome chmod 755 /usr/local/tws820/bin/getfwkusr chmod 755 /usr/local/tws820/bin/bin/migrutility chmod 755 /usr/local/tws820/bin/migrfwkusr chmod 755 /usr/local/tws820/bin/set_env chmod tws820.unison /usr/local/tws820/bin/getfwkusr chmod tws820.unison /usr/local/tws820/bin/bin/migrutility chmod tws820.unison /usr/local/tws820/bin/migrfwkusr chmod tws820.unison /usr/local/tws820/bin/set_env chmod tws820.unison /usr/local/tws820/bin/libatrc.so chmod tws820.unison /usr/local/tws820/bin/libicudata.so.34 chmod tws820.unison /usr/local/tws820/bin/libicui18n.so.34 chmod tws820.unison /usr/local/tws820/bin/libicutu.so.34 chmod tws820.unison /usr/local/tws820/bin/libicuuc.so.34 7. As tws820 user, set the Tivoli Workload Scheduler V8.2 variables using the set_env command, and run the dumpsec command to create the input security file, as shown in Example 4-88. Example 4-88 Setting Tivoli Workload Scheduler variables and running dumpsec command # su - tws820 $ /usr/local/tws820/set_env Environment Successfully Set !!! $ dumpsec > /usr/local/tws820/dumpsec.users USER MAESTRO CPU=@+LOGON=tws820,root BEGIN USEROBJ CPU=@ ACCESS=ADD,DELETE,DISPLAY,MODIFY,ALTPASS JOB CPU=@ ACCESS=ADD,ADDDEP,ALTPRI,CANCEL,CONFIRM,DELDEP,DELETE,DISPLAY,KILL,MODIFY,RELEASE,REP LY,RERUN,SUBMIT,USE,LIST SCHEDULE CPU=@ ACCESS=ADD,ADDDEP,ALTPRI,CANCEL,DELDEP,DELETE,DISPLAY,LIMIT,MODIFY,RELEASE,REPLY,SUBM IT,LIST RESOURCE CPU=@ ACCESS=ADD,DELETE,DISPLAY,MODIFY,RESOURCE,USE,LIST PROMPT ACCESS=ADD,DELETE,DISPLAY,MODIFY,REPLY,USE,LIST 238 Getting Started with IBM Tivoli Workload Scheduler V8.3
- 275. FILE NAME=@ ACCESS=CLEAN,DELETE,DISPLAY,MODIFY CPU CPU=@ ACCESS=ADD,CONSOLE,DELETE,DISPLAY,FENCE,LIMIT,LINK,MODIFY,SHUTDOWN,START,STOP,UNLINK, LIST PARAMETER CPU=@ ACCESS=ADD,DELETE,DISPLAY,MODIFY CALENDAR ACCESS=ADD,DELETE,DISPLAY,MODIFY,USE END 8. As root user, run the migrfwkusr script as follows: # migrfwkusr -in input_security_file -out output_security_file [-cpu workstation] [-hostname local_hostname] Example 4-89 shows the migrfwkusr script output. Example 4-89 Running the migrfwkusr script # /usr/local/tws820/set_env Environment Successfully Set !!! # /usr/local/tws820/migrfwkusr -in /usr/local/tws820/dumpsec.users -out /usr/local/tws820/framework.users -cpu edinburg -hostname edinburg Tivoli Workload Scheduler (UNIX)/GETFWKUS V8.3 (1.5) Licensed Materials - Property of IBM(R) 5698-WSH (C) Copyright IBM Corp 1998, 2006 All rights reserved. US Government User Restricted Rights Use, duplication or disclosure restricted by GSA ADP Schedule Contract with IBM Corp. IBM is a registered trademark of International Business Machines Corporation in the United States, other countries, or both. GETFWKUS:Starting user MAESTRO [/usr/local/tws820/dumpsec.users (#2)] GETFWKUS:Done with /usr/local/tws820/dumpsec.users, 0 errors (0 Total) In Example 4-89: – input_security_file is the file that is created using the dumpsec command. – output_security_file is the security file that is created by the migrfwkusr script. – workstation is the name of the local workstation where the login data added by the tool is defined. If you do not specify a workstation, the data is taken from a localopts file, if present in the same directory where the migrfwkusr script is located. If there is no localopts file, the workstation is set to the first eight characters of the local host name. – local_hostname is the fully qualified host name of the Tivoli Management Framework users to be extracted. Login data for users with this host name, or with this host name and domain name and the host name valid for all computers are extracted. If you do not specify the local host name, Chapter 4. Tivoli Workload Scheduler V8.3: Migration 239
- 276. migrfwkusr retrieves the host name from the local computer and matches login data for computers with that host name and any domain name. Note: The migrfwkusr script does not remove the previous user definitions. If you want to remove the previous users, do it manually before you run the makesec command. After you run the migrfwkusr command, the output_security_file contains the user definitions, which you can use in the Tivoli Workload Scheduler V8.3 environment. For more details, refer to 4.6.4, “Importing the migrated security file in the Tivoli Workload Scheduler V8.3 environment” on page 241. 4.6.3 Installing a new master domain manager This section describes how to install a new master domain manager on Red Hat Linux Server V3.0 system. Note: If the installation procedure is successful, it is not possible to roll back to the previous version. Rollback is only possible for installations that fail. Install a parallel master domain manager either on the same or on a different workstation where the existing master domain manager is installed. Define the new master domain manager as a full status agent in the domain of the master in the previous environment. You can install a new master domain manager using the following installation methods: Installing a new master domain manager using the installation wizard To install a new master domain manager using the installation wizard, perform the procedure described in 3.2, “Installing new UNIX master using installation wizard” on page 36. Installing a new master domain manager using the silent installation To install a new master domain manager using a silent installation, perform the silent installation procedure described in IBM Tivoli Workload Scheduler Planning and Installation Guide v8.3, SC32-1273. 240 Getting Started with IBM Tivoli Workload Scheduler V8.3
- 277. 4.6.4 Importing the migrated security file in the Tivoli Workload Scheduler V8.3 environment To import the migrated security file in the Tivoli Workload Scheduler V8.3 environment, perform the following steps: 1. As tws820 user, remove the duplicated users and add tws830 user in the output_security_file, as shown in Example 4-90. Example 4-90 Removing duplicated users and adding tws830 user in the output_security_file # su - tws820 $ vi /usr/local/tws820/framework.users USER MAESTRO # CPU=@+LOGON=tws830,tws820,root,tws_op1,tws_op2,tws_op3,tws_op4,tws_op5 CPU=@,EDINBURG+LOGON=tws820,root,tws_op1,tws_op2,tws_op3,tws_op4,tws_op5 BEGIN USEROBJ CPU=@ ACCESS=ADD,DELETE,DISPLAY,MODIFY,ALTPASS JOB CPU=@ ACCESS=ADD,ADDDEP,ALTPRI,CANCEL,CONFIRM,DELDEP,DELETE,DISPLAY,KILL,MODIFY,RELEASE,REP LY,RERUN,SUBMIT,USE,LIST SCHEDULE CPU=@ ACCESS=ADD,ADDDEP,ALTPRI,CANCEL,DELDEP,DELETE,DISPLAY,LIMIT,MODIFY,RELEASE,REPLY,SUBM IT,LIST RESOURCE CPU=@ ACCESS=ADD,DELETE,DISPLAY,MODIFY,RESOURCE,USE,LIST PROMPT ACCESS=ADD,DELETE,DISPLAY,MODIFY,REPLY,USE,LIST FILE NAME=@ ACCESS=BUILD,DELETE,DISPLAY,MODIFY CPU CPU=@ ACCESS=ADD,CONSOLE,DELETE,DISPLAY,FENCE,LIMIT,LINK,MODIFY,SHUTDOWN,START,STOP,UNLINK, LIST PARAMETER CPU=@ ACCESS=ADD,DELETE,DISPLAY,MODIFY CALENDAR ACCESS=ADD,DELETE,DISPLAY,MODIFY,USE END 2. As tws830 user, run the dumpsec command to back up the security file definition of the new Tivoli Workload Scheduler V8.3, as shown in Example 4-91. Example 4-91 Running dumpsec to back up the security file # su - tws830 $ dumpsec > /usr/local/tws830/dumpsec.users.tws83 Tivoli Workload Scheduler (UNIX)/DUMPSEC V8.3 (9.3.1.1) Licensed Materials - Property of IBM(R) 5698-WSH (C) Copyright IBM Corp 1998, 2006 All rights reserved. US Government User Restricted Rights Chapter 4. Tivoli Workload Scheduler V8.3: Migration 241
- 278. Use, duplication or disclosure restricted by GSA ADP Schedule Contract with IBM Corp. IBM is a registered trademark of International Business Machines Corporation in the United States, other countries, or both. $ cat /usr/local/tws830/dumpsec.users.tws83 USER MAESTRO CPU=@+LOGON=tws820,root BEGIN USEROBJ CPU=@ ACCESS=ADD,DELETE,DISPLAY,MODIFY,ALTPASS JOB CPU=@ ACCESS=ADD,ADDDEP,ALTPRI,CANCEL,CONFIRM,DELDEP,DELETE,DISPLAY,KILL,MODIFY,RELEASE,REP LY,RERUN,SUBMIT,USE,LIST SCHEDULE CPU=@ ACCESS=ADD,ADDDEP,ALTPRI,CANCEL,DELDEP,DELETE,DISPLAY,LIMIT,MODIFY,RELEASE,REPLY,SUBM IT,LIST RESOURCE CPU=@ ACCESS=ADD,DELETE,DISPLAY,MODIFY,RESOURCE,USE,LIST PROMPT ACCESS=ADD,DELETE,DISPLAY,MODIFY,REPLY,USE,LIST FILE NAME=@ ACCESS=CLEAN,DELETE,DISPLAY,MODIFY CPU CPU=@ ACCESS=ADD,CONSOLE,DELETE,DISPLAY,FENCE,LIMIT,LINK,MODIFY,SHUTDOWN,START,STOP,UNLINK, LIST PARAMETER CPU=@ ACCESS=ADD,DELETE,DISPLAY,MODIFY CALENDAR ACCESS=ADD,DELETE,DISPLAY,MODIFY,USE END 3. As tws830 user, run makesec output_security_file to add new users in the security file of the new Tivoli Workload Scheduler V8.3, as shown in Example 4-92. Example 4-92 Running makesec to add new users in the security file # su - tws830 $ makesec /usr/local/tws820/framework.users Tivoli Workload Scheduler (UNIX)/MAKESEC V8.3 (9.3.1.1) Licensed Materials - Property of IBM(R) 5698-WSH (C) Copyright IBM Corp 1998, 2006 All rights reserved. US Government User Restricted Rights Use, duplication or disclosure restricted by GSA ADP Schedule Contract with IBM Corp. IBM is a registered trademark of International Business Machines Corporation in the United States, other countries, or both. MAKESEC:Starting user MAESTRO [dumpsec.users (#2)] MAKESEC:Done with framework.users, 0 errors (0 Total) MAKESEC:Security file installed as /usr/local/tws820/Security 242 Getting Started with IBM Tivoli Workload Scheduler V8.3
- 279. Note: output_security_file is the file you obtain when you run the procedure described in 4.6.2, “Extracting Tivoli Framework user data from the security file” on page 236. 4.6.5 Importing the object data This section describes how to import object data from a previous Tivoli Workload Scheduler version into the Tivoli Workload Scheduler V8.3 database. The method you use to import object data by steps depends on whether you are: “Importing object data from dumped data files in steps”, as described in the following section “Importing object data directly from the mozart directory” on page 250 “Importing object data as a block” on page 251 Note: The user who runs the datamigrate command must have full access to the database of the previous Tivoli Workload Scheduler environment. The data that you import is created by the composer821 create command before or during the upgrade. See 4.6.1, “Dumping existing objects from the database” on page 234. Importing object data from dumped data files in steps To import data from dumped data files in steps, perform the following tasks: 1. As root user, create a symbolic link in the /usr/lib directory, as shown in Example 4-93. Example 4-93 Creating a symbolic link in /usr/lib directory # cd /usr/lib # ln -s /usr/local/tws830/bin/libicudata.so.34 libicudata.so.34 # ln -s /usr/local/tws830/bin/libicuuc.so.34 libicuuc.so.34 # ln -s /usr/local/tws830/bin/libHTTPChannel.so libHTTPChannel.so # ln -s /usr/local/tws830/bin/libHTTPSSLChannel.so libHTTPSSLChannel.so # ln -s /usr/local/tws830/bin/libHTTPTransport.so libHTTPTransport.so # ln -s /usr/local/tws830/bin/libtwscompilerjni.so libtwscompilerjni.so # ln -s /usr/local/tws830/bin/libtwsplanjni.so libtwsplanjni.so # ln -s /usr/local/tws830/bin/libtwssecurityjni.so libtwssecurityjni.so Chapter 4. Tivoli Workload Scheduler V8.3: Migration 243
- 280. 2. As root user, copy /usr/local/tws830/bin/libHTTP*.so to the /usr/local/tws820/bin directory, as shown in Example 4-94. Example 4-94 Copying /usr/local/tws830/bin/libHTTP*.so to /usr/local/tws820/bin directory # cp /usr/local/tws830/bin/libHTTP*.so /usr/local/tws820/bin 3. As root user, change the group permission of all files in the /usr/local/tws830/mozart directory to read, as shown in Example 4-95. Example 4-95 Changing group permission of all files in /usr/local/tws830/mozart # cd /usr/local/tws830/mozart # chmod g+r * 4. As tws830 user, run the optman miggrunnb command to import the installation run number into DB2 database, as shown in Example 4-96. $ optman miggrunnb TWS_8.x.x_main_dir Example 4-96 Running the optman miggrunnb command # su - tws830 $ optman miggrunnb /usr/local/tws820 Tivoli Workload Scheduler (UNIX)/OPTMAN V8.3 (1.0) Licensed Materials - Property of IBM(R)5698-WSH (C) Copyright IBM Corp 1998, 2006 All rights reserved. US Government User Restricted Rights Use, duplication or disclosure restricted by GSA ADP Schedule Contract with IBM Corp. IBM is a registered trademark of International Business Machines Corporation in the United States, other countries, or both. Installed for user "tws830". Locale LANG set to the following: "en" Importing 'run number' and 'confirm run number' from /Tivoli/tws820/mozart/runmsgno Loading property runNumber AWSJCL050I Command "chg" completed successfully. Loading property confirnRunNumber AWSJCL050I Command "chg" completed successfully. In Example 4-96, TWS_8.x.x_main_dir indicates the root directory of the previous Tivoli Workload Scheduler version. 244 Getting Started with IBM Tivoli Workload Scheduler V8.3
- 281. 5. As tws830 user, run the optman miggopts command to import the global options into DB2 database, as shown in Example 4-97. $ optman miggopts TWS_8.x.x_main_dir Example 4-97 Running the optman miggopts command # su - tws830 $ optman miggopts /usr/local/tws820 Tivoli Workload Scheduler (UNIX)/OPTMAN V8.3 (1.0) Licensed Materials - Property of IBM(R)5698-WSH (C) Copyright IBM Corp 1998, 2006 All rights reserved. US Government User Restricted Rights Use, duplication or disclosure restricted by GSA ADP Schedule Contract with IBM Corp. IBM is a registered trademark of International Business Machines Corporation in the United States, other countries, or both. Installed for user "tws830". Locale LANG set to the following: "en" AWSBEH117I Updating the database global options from data in the file "/Tivoli/tws820/mozart/globalopts". Converting globalopts property 'company' to optman property 'companyName'... AWSJCL050I Command "chg" completed successfully. Converting globalopts property 'automaticallygrantlogonasbatch' to optman property 'cnLogonBatch'... AWSJCL050I Command "chg" completed successfully. Converting globalopts property 'ignorecalendars' to optman property 'ignoreCals'... AWSJCL050I Command "chg" completed successfully. Converting globalopts property 'planauditlevel' to optman property 'cnPlanAudit'... AWSJCL050I Command "chg" completed successfully. Converting globalopts property 'databaseauditlevel' to optman property 'enDbAudit'... AWSJCL050I Command "chg" completed successfully. Converting globalopts property 'timezoneenable' to optman property 'cnTimeZone'... AWSJCL050I Command "chg" completed successfully. Converting globalopts property 'carryforward' to optman property 'enCarryForward'... AWSJCL050I Command "chg" completed successfully. Converting globalopts property 'start' to optman property 'startOfDay'... AWSJCL050I Command "chg" completed successfully. Converting globalopts property 'bnmsgbase' to optman property 'baseRecPrompt'... AWSJCL050I Command "chg" completed successfully. Converting globalopts property 'bnmsgdelta' to optman property 'extRecPrompt'... AWSJCL050I Command "chg" completed successfully. Chapter 4. Tivoli Workload Scheduler V8.3: Migration 245
- 282. Converting globalopts property 'history' to optman property 'statsHistory'... AWSJCL050I Command "chg" completed successfully. Converting globalopts property 'retainrerunjobname' to optman property 'enRetainNameOnRerunFron'... AWSJCL050I Command "chg" completed successfully. In Example 4-97,TWS_8.x.x_main_dir indicates the root directory of the previous Tivoli Workload Scheduler version. Note: When the Tivoli Workload Scheduler is on another workstation, on the Tivoli Workload Scheduler V8.3 environment, mount the directory of the V8.x.x environment. To do this, the two workstations must have the same system byte order. 6. As tws830 user, run the optman ls command to check the last execution, as shown in Example 4-98. Example 4-98 Running the optman ls command # su - tws830 $ optman ls Tivoli Workload Scheduler (UNIX)/OPTMAN V8.3 (1.0) Licensed Materials - Property of IBM(R) 5698-WSH (C) Copyright IBM Corp 1998, 2006 All rights reserved. US Government User Restricted Rights Use, duplication or disclosure restricted by GSA ADP Schedule Contract with IBM Corp. IBM is a registered trademark of International Business Machines Corporation in the United States, other countries, or both. Installed for user "tws830". Locale LANG set to the following: "en" baseRecPrompt / bp = 1000 carryStates / cs = null companyName / cn = IBM enCFInterNetworkDeps / ci = YES enCFResourceQuantity / rq = YES enCarryForward / cf = YES enCentSec / ts = NO enDbAudit / da = 0 enEmptySchedsAreSucc / es = NO enListSecChk / sc = NO enLogonBatch / lb = NO enPlanAudit / pa = 0 enPreventStart / ps = YES enRetainNameOnRerunFrom / rr = NO 246 Getting Started with IBM Tivoli Workload Scheduler V8.3
- 283. enStrEncrypt / se = NO enSwFaultTol / sw = NO enTimeZone / tz = NO extRecPrompt / xp = 1000 ignoreCals / ic = NO logmanMinMaxPolicy / lm = BOTH logmanSmoothPolicy / lt = -1 maxLen / xl = 14 minLen / ml = 8 startOfDay / sd = 0600 statsHistory / sh = 10 AWSJCL050I Command "ls" completed successfully. 7. As tws830 user, run the datamigrate command to import the data from the dumped files, as shown in Example 4-99. Notes: If you want to import the data directly from the existing files in the mozart directory, see “Importing object data directly from the mozart directory” on page 250. If you want to perform a complete import of data as a block, see “Importing object data as a block” on page 251. # su - tws830 $ datamigrate -topology topology_filename [-tmppath temporary_path] -prompts prompts_filename [-tmppath temporary_path] -calendars calendars_filename [-tmppath temporary_path] -parms parms_filename [-tmppath temporary_path] -resources resources_filename [-tmppath temporary_path] -users users_filename [-tmppath temporary_path] -jobs jobs_filename [-tmppath temporary_path] -scheds scheds_filename [-tmppath temporary_path] Example 4-99 Running the datamigrate command # su - tws830 $ mkdir /usr/local/tws830/tmp $ datamigrate -topology /usr/local/tws820/dumpdata/topology -tmppath /usr/local/tws830/tmp $ datamigrate -prompts /usr/local/tws820/dumpdata/prompts -tmppath /usr/local/tws830/tmp $ datamigrate -calendars /usr/local/tws820/dumpdata/calendars -tmppath /usr/local/tws830/tmp Chapter 4. Tivoli Workload Scheduler V8.3: Migration 247
- 284. $ datamigrate -parms /usr/local/tws820/dumpdata/parms -tmppath /usr/local/tws830/tmp $ datamigrate -resources /usr/local/tws820/dumpdata/resources -tmppath /usr/local/tws830/tmp $ datamigrate -users /usr/local/tws820/dumpdata/users -tmppath /usr/local/tws830/tmp $ datamigrate -jobs /usr/local/tws820/dumpdata/jobs -tmppath /usr/local/tws830/tmp $ datamigrate -scheds /usr/local/tws820/dumpdata/scheds -tmppath /usr/local/tws830/tmp In Example 4-99: – topology_filename is the name of the topology file created during the dump process. – prompts_filename is the name of the prompts file created during the dump process. – calendars_filename is the name of the calendars file created during the dump process. – parms_filename is the name of the parameters file created during the dump process. – resources_filename is the name of the resources file created during the dump process. – users_filename is the name of the users file created during the dump process. – jobs_filename is the name of the jobs file created during the dump process. – scheds_filename is the name of the job streams file created during the dump process. – temporary_path is the temporary path where the datamigrate command stores the files during the migration process. 8. As tws830 user, run the composer display command to check the last execution, as shown in Example 4-100. Example 4-100 Running the composer display command # su - tws830 $ composer display cpu=@ $ composer display jobs=@ $ composer display sched=@ 248 Getting Started with IBM Tivoli Workload Scheduler V8.3
- 285. 9. Set the new master domain manager properties to the properties it had when it was linked as the FTA to the previous master domain manager, as shown in Example 4-101. Example 4-101 Setting the new master domain manager properties cpuname MST83 node LAB134035 tcpadd 31111 secureaddr 41915 for maestro securitylevel on .... end Note: For example, if the new master domain manager is linked in SSL mode to the previous master domain manager, specify the same properties for the new master domain manager. 10.As tws830 user, check if there are jobs or job streams related to the previous cpuname in the new Tivoli Workload Scheduler V8.3 definition, as shown in Example 4-102. If there are, then change them to the new cpuname or delete them. Example 4-102 Checking jobs and job streams related to the previous cpuname # su - tws830 $ composer display jobs=old_cpuname#@ $ composer display sched=old_cpuname#@ 11.As tws830 user, delete the FINAL job stream related to the previous cpuname from the new Tivoli Workload Scheduler V8.3 definition, as shown in Example 4-103. Example 4-103 Deleting FINAL job stream related to the previous cpuname # su - tws830 $ composer delete sched=old_cpuname#FINAL 12.As tws830 user, delete the Jnextday job related to the previous cpuname from the new Tivoli Workload Scheduler V8.3 definition, as shown in Example 4-104. Example 4-104 Deleting Jnextday job related to the previous cpuname # su - tws830 $ composer delete job=old_cpuname#Jnextday Chapter 4. Tivoli Workload Scheduler V8.3: Migration 249
- 286. 13.As tws830 user, delete the previous cpuname from the new Tivoli Workload Scheduler V8.3 definition, as shown in Example 4-105. Example 4-105 Deleting the previous cpuname from the new Tivoli Workload Scheduler Version 8.3 # su - tws830 $ composer delete cpu=old_cpuname Importing object data directly from the mozart directory To import data directly from the existing files in the mozart directory, as tws830 user, run the datamigrate command, as shown in Example 4-106. $ datamigrate object_type -path TWS_8.x.x_main_dir [-tmppath temporary_path] Example 4-106 Running the datamigrate command # su - tws830 $ mkdir /usr/local/tws830/migratedata $ datamigrate -topology -path /usr/local/tws820 -tmppath /usr/local/tws830/migratedata $ datamigrate -prompts -path /usr/local/tws820 -tmppath /usr/local/tws830/migratedata $ datamigrate -calendars -path /usr/local/tws820 -tmppath /usr/local/tws830/migratedata $ datamigrate -parms -path /usr/local/tws820 -tmppath /usr/local/tws830/migratedata $ datamigrate -resources -path /usr/local/tws820 -tmppath /usr/local/tws830/migratedata $ datamigrate -users -path /usr/local/tws820 -tmppath /usr/local/tws830/migratedata $ datamigrate -jobs -path /usr/local/tws820 -tmppath /usr/local/tws830/migratedata $ datamigrate -scheds -path /usr/local/tws820 -tmppath /usr/local/tws830/migratedata In Example 4-106: object_type is the type of object that you are importing. The possible values are: – -topology – -prompts – -calendars – -parms – -resources 250 Getting Started with IBM Tivoli Workload Scheduler V8.3
- 287. – -users – -jobs – -scheds TWS_8.x.x_main_dir indicates the root directory of the previous Tivoli Workload Scheduler version. temporary_path is the temporary path where the datamigrate command stores the files during the migration process. Note: When the Tivoli Workload Scheduler is on another workstation, on the Tivoli Workload Scheduler V8.3 environment, mount the directory of the version 8.x.x environment. To do this, the two workstations must have the same system byte order. Importing object data as a block To import data as a block, as tws830 user, use the datamigrate command, as shown in Example 4-107. $ datamigrate -path TWS_8.x.x_main_dir [-tmppath temporary_path] Example 4-107 Running the datamigrate command # su - tws830 $ mkdir /usr/local/tws830/migratedata $ datamigrate -path /usr/local/tws820 -tmppath /usr/local/tws830/migratedata In Example 4-107: TWS_8.x.x_main_dir indicates the root directory of the previous Tivoli Workload Scheduler version. temporary_path is the temporary path where the datamigrate command stores the files during the migration process. Note: When the Tivoli Workload Scheduler is on another workstation, on the Tivoli Workload Scheduler V8.3 environment, mount the directory of the version 8.x.x environment. To do this, the two workstations must have the same system byte order. Chapter 4. Tivoli Workload Scheduler V8.3: Migration 251
- 288. 4.6.6 Switching a master domain manager To switch from the previous master domain manager to the new one, perform the following steps: 1. As tws820 user, run the conman switchmgr command in the previous master domain manager, as shown in Example 4-108. Example 4-108 Running the conman switchmgr command # su - tws820 $ conman “switchmgr MASTERDM;new_master_cpu_name” In Example 4-108, new_master_cpu_name is the name of the workstation where the new master domain manager resides. 2. As tws830 user, run the optman chg cf=ALL command in the new master domain manager to ensure that the carry forward option is set to all, as shown in Example 4-109. Example 4-109 Running the optman cfg cf=ALL command # su - tws830 $ optman chg cf=ALL Tivoli Workload Scheduler (UNIX)/OPTMAN V8.3 (1.0) Licensed Materials - Property of IBM(R) 5698-WSH (C) Copyright IBM Corp 1998, 2006 All rights reserved. US Government User Restricted Rights Use, duplication or disclosure restricted by GSA ADP Schedule Contract with IBM Corp. IBM is a registered trademark of International Business Machines Corporation in the United States, other countries, or both. Installed for user "tws830". Locale LANG set to the following: "en" AWSJCL050I Command "chg" completed successfully. 3. As tws830 user, run the optman ls command in the new master domain manager to check the carry forward option, as shown in Example 4-110. Example 4-110 Running the optman ls command # su - tws830 $ optman ls Tivoli Workload Scheduler (UNIX)/OPTMAN V8.3 (1.0) Licensed Materials - Property of IBM(R) 5698-WSH (C) Copyright IBM Corp 1998, 2006 All rights reserved. US Government User Restricted Rights 252 Getting Started with IBM Tivoli Workload Scheduler V8.3
- 289. Use, duplication or disclosure restricted by GSA ADP Schedule Contract with IBM Corp. IBM is a registered trademark of International Business Machines Corporation in the United States, other countries, or both. Installed for user "tws830". Locale LANG set to the following: "en" baseRecPrompt / bp = 1000 carryStates / cs = null companyName / cn = IBM enCFInterNetworkDeps / ci = YES enCFResourceQuantity / rq = YES enCarryForward / cf = ALL enCentSec / ts = NO enDbAudit / da = 0 enEmptySchedsAreSucc / es = NO enListSecChk / sc = NO enLogonBatch / lb = NO enPlanAudit / pa = 0 enPreventStart / ps = YES enRetainNameOnRerunFrom / rr = NO enStrEncrypt / se = NO enSwFaultTol / sw = NO enTimeZone / tz = NO extRecPrompt / xp = 1000 ignoreCals / ic = NO logmanMinMaxPolicy / lm = BOTH logmanSmoothPolicy / lt = -1 maxLen / xl = 14 minLen / ml = 8 startOfDay / sd = 0600 statsHistory / sh = 10 AWSJCL050I Command "ls" completed successfully. 4. As tws830, run the JnextPlan command in the new master domain manager to create a plan with 0 extension period, which begins at the end of the current plan. See Example 4-111. $ su - tws830 $ JnextPlan -from start_time -for 0000 Example 4-111 Running JnextPlan in new master domain manager to create a plan # su - tws830 $ JnextPlan -from 05/17/2006 0600 -for 0000 Tivoli Workload Scheduler (UNIX)/JNEXTPLAN Licensed Materials - Property of IBM(R)5698-WSH (C) Copyright IBM Corp 1998, 2006 All rights reserved. Chapter 4. Tivoli Workload Scheduler V8.3: Migration 253
- 290. US Government User Restricted Rights Use, duplication or disclosure restricted by GSA ADP Schedule Contract with IBM Corp. IBM is a registered trademark of International Business Machines Corporation in the United States, other countries, or both. Tivoli Workload Scheduler (UNIX)/MAKEPLAN Licensed Materials - Property of IBM(R)5698-WSH (C) Copyright IBM Corp 1998, 2006 All rights reserved. US Government User Restricted Rights Use, duplication or disclosure restricted by GSA ADP Schedule Contract with IBM Corp. IBM is a registered trademark of International Business Machines Corporation in the United States, other countries, or both. Tivoli Workload Scheduler (UNIX)/PLANMAN V8.3 (1.0) Licensed Materials - Property of IBM(R)5698-WSH (C) Copyright IBM Corp 1998, 2006 All rights reserved. US Government User Restricted Rights Use, duplication or disclosure restricted by GSA ADP Schedule Contract with IBM Corp. IBM is a registered trademark of International Business Machines Corporation in the United States, other countries, or both. Installed for user "tws830". Locale LANG set to the following: "en" AWSJPL503I The "planner" process has locked the database. AWSJPL708I During the creation of a production plan, the planner has detected that no preproduction plan exists. A preproduction plan will be created automatically. AWSJPL709I During the creation of a production plan, the planner has successfully created a new preproduction plan. AWSJPL504I The "planner" process has unlocked the database. AWSJCL058I The production plan (Symnew) has been successfully created. Tivoli Workload Scheduler (UNIX)/REPTR Licensed Materials - Property of IBM(R)5698-WSH (C) Copyright IBM Corp 1998, 2006 All rights reserved. US Government User Restricted Rights Use, duplication or disclosure restricted by GSA ADP Schedule Contract with IBM Corp. IBM is a registered trademark of International Business Machines Corporation in the United States, other countries, or both. Tivoli Workload Scheduler (UNIX)/SYXTRACT V8.3 (1.9) Licensed Materials - Property of IBM(R)5698-WSH (C) Copyright IBM Corp 1998, 2006 All rights reserved. US Government User Restricted Rights Use, duplication or disclosure restricted by GSA ADP Schedule Contract with IBM Corp. IBM is a registered trademark of International Business Machines Corporation in the United States, other countries, or both. Installed for user "tws830". Locale LANG set to the following: "en" Tivoli Workload Scheduler (UNIX)/REPORTER V8.3 (1.6) 254 Getting Started with IBM Tivoli Workload Scheduler V8.3
- 291. Page 1 ... Page 2 ... Tivoli Workload Scheduler (UNIX)/SWITCHPLAN V8.3 Licensed Materials - Property of IBM(R)5698-WSH (C) Copyright IBM Corp 1998, 2006 All rights reserved. US Government User Restricted Rights Use, duplication or disclosure restricted by GSA ADP Schedule Contract with IBM Corp. IBM is a registered trademark of International Business Machines Corporation in the United States, other countries, or both. Tivoli Workload Scheduler (UNIX)/STAGEMAN V8.3 (1.4) Licensed Materials - Property of IBM(R)5698-WSH (C) Copyright IBM Corp 1998, 2006 All rights reserved. US Government User Restricted Rights Use, duplication or disclosure restricted by GSA ADP Schedule Contract with IBM Corp. IBM is a registered trademark of International Business Machines Corporation in the United States, other countries, or both. Installed for user "tws830". Locale LANG set to the following: "en" STAGEMAN:AWSBHV030I The new Symphony file is installed. STAGEMAN:AWSBHV036I Multi-workstation Symphony file copied to STAGEMAN:/usr/local/tws830/Sinfonia STAGEMAN:AWSBHV078I Current plan audit level is 0. Tivoli Workload Scheduler (UNIX)/PLANMAN V8.3 (1.0) Licensed Materials - Property of IBM(R)5698-WSH (C) Copyright IBM Corp 1998, 2006 All rights reserved. US Government User Restricted Rights Use, duplication or disclosure restricted by GSA ADP Schedule Contract with IBM Corp. IBM is a registered trademark of International Business Machines Corporation in the United States, other countries, or both. Installed for user "tws830". Locale LANG set to the following: "en" AWSJCL065I Run number has been successfully updated. Tivoli Workload Scheduler (UNIX)/CONMAN V8.3 (1.36.2.22) Licensed Materials - Property of IBM(R)5698-WSH (C) Copyright IBM Corp 1998, 2006 All rights reserved. US Government User Restricted Rights Use, duplication or disclosure restricted by GSA ADP Schedule Contract with IBM Corp. IBM is a registered trademark of International Business Machines Corporation in the United States, other countries, or both. Installed for user "tws830". Chapter 4. Tivoli Workload Scheduler V8.3: Migration 255
- 292. Locale LANG set to the following: "en" Scheduled for (Exp) 05/16/06 (#5) on EDINBURG. Batchman down. Limit: 10, Fence: 0, Audit Level: 0 start AWSBHU507I A start command was issued for EDINBURG. In Example 4-111, start_time is the date and time when the current plan ends. Note: If you run Jnextday, and the plan is created from today at 06:00 until tomorrow at 05:59, the start_time of the new plan must be tomorrow at the default time of 06:00. 5. As tws830 user, run the composer add to add the new job stream called FINAL in the new master domain manager database, as shown in Example 4-112. Example 4-112 Running composer add to add the new job stream called FINAL # su - tws830 $ composer add Sfinal Tivoli Workload Scheduler (UNIX)/COMPOSER V8.3 (1.18.3.3) Licensed Materials - Property of IBM(R)5698-WSH (C) Copyright IBM Corp 1998, 2006 All rights reserved. US Government User Restricted Rights Use, duplication or disclosure restricted by GSA ADP Schedule Contract with IBM Corp. IBM is a registered trademark of International Business Machines Corporation in the United States, other countries, or both. Installed for user "tws830". Locale LANG set to the following: "en" User: tws830, Host:127.0.0.1, Port:31116 -add Sfinal AWSBIA300I The scheduling language syntax has been successfully validated for object "EDINBURG#FINAL". AWSJCL003I The command "add" relating to object "jd=EDINBURG#MAKEPLAN" has completed successfully. AWSJCL003I The command "add" relating to object "jd=EDINBURG#SWITCHPLAN" has completed successfully. AWSJCL003I The command "add" relating to object "jd=EDINBURG#CREATEPOSTREPORTS" has completed successfully. AWSJCL003I The command "add" relating to object "jd=EDINBURG#UPDATESTATS" has completed successfully. AWSJCL003I The command "add" relating to object "jd=EDINBURG#FINAL" has completed successfully. AWSBIA302I No errors in Sfinal. AWSBIA288I Total objects updated: 5 256 Getting Started with IBM Tivoli Workload Scheduler V8.3
- 293. Note: Because you are adding a new schedule FINAL, it is important that the previous schedule FINAL does not run. To avoid this, either delete the previous schedule FINAL from the database or set the priority to 0. To delete the previous schedule FINAL, run the following command: # su - tws830 $ composer del sched=old_master_cpuname#FINAL In this example, old_master_cpuname is the name of the workstation where the previous master domain manager resides. 6. As tws830 user, run the composer display to see the definition of the new job stream called FINAL in the new master domain manager database, as shown in Example 4-113. Example 4-113 Running composer display to see the new job stream called FINAL # su - tws830 $ composer display sched=FINAL Tivoli Workload Scheduler (UNIX)/COMPOSER V8.3 (1.18.3.3) Licensed Materials - Property of IBM(R)5698-WSH (C) Copyright IBM Corp 1998, 2006 All rights reserved. US Government User Restricted Rights Use, duplication or disclosure restricted by GSA ADP Schedule Contract with IBM Corp. IBM is a registered trademark of International Business Machines Corporation in the United States, other countries, or both. Installed for user "tws830". Locale LANG set to the following: "en" User: tws830, Host:127.0.0.1, Port:31116 -display sched=final Workstation Job Stream Name Valid From Updated On Locked by ----------- --------------- ---------- ---------- --------- EDINBURG FINAL - 05/16/2006 - #@(#) $Id: Sfinal.conf,v 7.56 1995/02/24 04:13:53 alanh viola_thunder $ # This is a sample schedule for doing pre and post production # processing. It assumes the start time is 6:00 a.m. # It is defined as CARRYFORWARD because it is executed acrosss # production periods. This ensures that job statistics will be # collected for the schedule. # All of the job statements that follow use auto-documentation # keywords so the jobs will be documented by composer when the # schedule is added or modified in the mastsked file. Chapter 4. Tivoli Workload Scheduler V8.3: Migration 257
- 294. SCHEDULE EDINBURG#FINAL ON RUNCYCLE RULE1 "FREQ=DAILY;" AT 0559 CARRYFORWARD FOLLOWS EDINBURG#FINAL.@ PREVIOUS : EDINBURG#MAKEPLAN EDINBURG#SWITCHPLAN FOLLOWS MAKEPLAN EDINBURG#CREATEPOSTREPORTS FOLLOWS SWITCHPLAN # MakePlan creates tomorrow's production control file (Symnew). # Then it runs reporter to print pre-production reports. # The reports should be reviewed. # SwitchPlan stops batchman and runs stageman to: 1) carry forward incomplete schedules. # 2) log the old Symphony file, 3) create the new Symphony and Sinfonia # files. It then starts batchman. # CreatePostReports runs reporter to print post-production reports. # UpdateStats runs logman to log job statistics, and then # report8 to print the Job Histogram. EDINBURG#UPDATESTATS FOLLOWS SWITCHPLAN END AWSBIA291I Total objects: 1 7. As tws830 user, run conman sbs to submit the new FINAL job stream in the new master domain manager database, as shown in Example 4-114. Example 4-114 Running conman sbs to submit new FINAL job stream # su - tws830 $ conman “sbs FINAL” Tivoli Workload Scheduler (UNIX)/CONMAN V8.3 (1.36.2.22) Licensed Materials - Property of IBM(R)5698-WSH (C) Copyright IBM Corp 1998, 2006 All rights reserved. US Government User Restricted Rights Use, duplication or disclosure restricted by GSA ADP Schedule Contract with IBM Corp. IBM is a registered trademark of International Business Machines Corporation in the United States, other countries, or both. 258 Getting Started with IBM Tivoli Workload Scheduler V8.3
- 295. Installed for user "tws830". Locale LANG set to the following: "en" Scheduled for (Exp) 05/16/06 (#5) on EDINBURG. Batchman LIVES. Limit: 10, Fence: 0, Audit Level: 0 sbs final Submitted EDINBURG#FINAL to batchman as EDINBURG#FINAL[(1543 05/16/06),(0AAAAAAAAAAAAACT)] 8. As tws830 user, run conman ss to see the new FINAL job stream in the new master domain manager database, as shown in Example 4-115. Example 4-115 Running conman ss to see the new FINAL job stream # su - tws830 $ conman ss Tivoli Workload Scheduler (UNIX)/CONMAN V8.3 (1.36.2.22) Licensed Materials - Property of IBM(R)5698-WSH (C) Copyright IBM Corp 1998, 2006 All rights reserved. US Government User Restricted Rights Use, duplication or disclosure restricted by GSA ADP Schedule Contract with IBM Corp. IBM is a registered trademark of International Business Machines Corporation in the United States, other countries, or both. Installed for user "tws830". Locale LANG set to the following: "en" Scheduled for (Exp) 05/16/06 (#5) on EDINBURG. Batchman LIVES. Limit: 10, Fence: 0, Audit Level: 0 ss (Est) (Est) Jobs Sch CPU Schedule SchedTime State Pr Start Elapse # OK Lim EDINBURG #FINAL 1543 05/16 HOLD 10(05/17) 4 0 [Carry] 9. As tws830 user, run conman sj to see the jobs of the new FINAL job stream in the new master domain manager database, as shown in Example 4-116. Example 4-116 Running conman sj to see the jobs of the new FINAL job stream # su - tws830 $ conman sj Tivoli Workload Scheduler (UNIX)/CONMAN V8.3 (1.36.2.22) Licensed Materials - Property of IBM(R)5698-WSH (C) Copyright IBM Corp 1998, 2006 All rights reserved. US Government User Restricted Rights Use, duplication or disclosure restricted by GSA ADP Schedule Contract with IBM Corp. IBM is a registered trademark of International Business Machines Corporation in the United States, other countries, or both. Installed for user "tws830". Chapter 4. Tivoli Workload Scheduler V8.3: Migration 259
- 296. Locale LANG set to the following: "en" Scheduled for (Exp) 05/16/06 (#5) on EDINBURG. Batchman LIVES. Limit: 10, Fence: 0, Audit Level: 0 sj (Est) (Est) CPU Schedule SchedTime Job State Pr Start Elapse RetCode Deps EDINBURG #FINAL 1543 05/16 ******** HOLD 10(05/17) [Carry] MAKEPLAN HOLD 10 SWITCHP+ HOLD 10 MAKEPLAN CREATEP+ HOLD 10 SWITCHP+ UPDATES+ HOLD 10 SWITCHP+ 4.6.7 Upgrading agents This section describes how to upgrade agents. Before you upgrade agents, ensure that you have performed the procedure described in 4.4.9, “Unlinking and stopping Tivoli Workload Scheduler when upgrading agent workstations” on page 194. Note: If the upgrade procedure is successful, it is not possible to roll back to the previous version. Rollback is only possible for upgrades that fail. You can upgrade agents using the following installation methods: “Upgrading Windows 2003 agent using the installation wizard”, as shown in the following section “Upgrading agents using a silent installation” on page 269 “Upgrading agents using the twsinst script” on page 272 “Upgrading agents using Software Distribution” on page 275 260 Getting Started with IBM Tivoli Workload Scheduler V8.3
- 297. 4.6.8 Upgrading Windows 2003 agent using the installation wizard To upgrade an agent using the installation wizard, perform the following steps: 1. Insert the installation CD related to the operating system. 2. Run the setup for the operating system on which you are upgrading: – On Windows operating systems: WINDOWSSETUP.exe – On UNIX and Linux operating systems (see Example 4-117): SETUP.bin Example 4-117 Running the SETUP.bin command cdromWINDOWSSETUP.exe 3. The installation wizard is launched. Select the installation wizard language, as shown in Figure 4-51. Click OK. Figure 4-51 Selecting the installation wizard language Chapter 4. Tivoli Workload Scheduler V8.3: Migration 261
- 298. 4. Read the welcome information shown in Figure 4-52 and click Next. Figure 4-52 Welcome information 262 Getting Started with IBM Tivoli Workload Scheduler V8.3
- 299. 5. Read and accept the license agreement shown in Figure 4-53 and click Next. Figure 4-53 License agreement Chapter 4. Tivoli Workload Scheduler V8.3: Migration 263
- 300. 6. Select a previous instance of the product from the drop-down list and click Upgrade an instance of Tivoli Workload Scheduler, as shown in Figure 4-54. The instance can be identified by its group name. Click Next. Figure 4-54 Previous instance and upgrading Tivoli Workload Scheduler 264 Getting Started with IBM Tivoli Workload Scheduler V8.3
- 301. 7. When you upgrade from Tivoli Workload Scheduler V8.2, select Agent or Domain Manager, as shown in Figure 4-55. Ensure that you select the correct type of agent, otherwise the upgrade fails. Click Next. Figure 4-55 Type of Tivoli Workload Scheduler instance to be upgraded Chapter 4. Tivoli Workload Scheduler V8.3: Migration 265
- 302. 8. Type the password of the Tivoli Workload Scheduler user for which you want to upgrade the instance, as shown in Figure 4-56. Click Next. Figure 4-56 Entering the password of the Tivoli Workload Scheduler user 266 Getting Started with IBM Tivoli Workload Scheduler V8.3
- 303. 9. Review the installation settings shown in Figure 4-57 and click Next. Figure 4-57 Installation settings Chapter 4. Tivoli Workload Scheduler V8.3: Migration 267
- 304. 10.If the installation is successful, you see a summary of the performed installation, as shown in Figure 4-58. Click Finish. Figure 4-58 Installation completed successfully Note: When the installation is successful, you see a panel with the successful installation message. In case of an unsuccessful installation, see IBM Tivoli Workload Scheduler Administration and Troubleshooting V8.3, SC32-1275. 268 Getting Started with IBM Tivoli Workload Scheduler V8.3
- 305. 11.After you upgrade an FTA, perform the following procedure: a. On the FTA, remove the Symphony, Sinfonia, Symnew and *.msg files from the TWShome directory, and the *msg files from the TWShome/pobox directory, as shown in Example 4-118. Example 4-118 Removing the Symphony, Sinfonia, Symnew and *msg files cd c:win32apptws82 c:win32apptws82> del Symphony Sinfonia Symnew *msg c:win32apptws82> cd pobox c:win32apptws82> del *msg b. Run the StartUp command from the TWShome directory, as shown in Example 4-119. Example 4-119 Running the StartUp command c:win32apptws82> StartUp c. On master domain manager, run conman link cpu=fta_cpuname, as shown in Example 4-120. Example 4-120 Running conman link cpu=fta_cpuname # su - tws830 $ conman link cpu=florence Upgrading agents using a silent installation To upgrade an agent using a silent installation, use the response file templates provided on the CDs in the cdrom/RESPONSEFILES directory. The TWS83_UPGRADE_Agent.txt file include all the information required by the installation program to run without user intervention. Instructions for customizing the files are included in the file as commented text. For a silent installation, perform the following steps: 1. Copy the relevant response file to a local directory, as shown in Example 4-121. Example 4-121 Copying TWS83_UPGRADE_Agent.txt # cp /cdrom/RESPONSEFILES/TWS83_UPGRADE_AGENT.txt /usr/local/tws830/tmp Chapter 4. Tivoli Workload Scheduler V8.3: Migration 269
- 306. 2. Edit the TWS83_UPGRADE_Agent.txt file to meet the requirements of your environment, as shown in Example 4-122. Example 4-122 Editing TWS83_UPGRADE_Agent.txt file ################################################################################ # This file can be used to configure the InstallShield SETUP program with the # options specified below when the SETUP is run with the "-options" command # line option. Read each setting's documentation for information on how to # change its value. # # A common use of an options file is to run the wizard in silent mode. This # lets the options file author specify wizard settings without having to run # the wizard in graphical or console mode. To use this options file for silent # mode execution, use the following command line arguments when running the # wizard: # # -options "C:RESPONSEFILESTWS83_UPGRADE_Agent.txt" -silent # # This file contains settings for the upgrade of an Tivoli Workload # Scheduler Version 8.x agent to the version V8.3. These versions are eligible # for upgrade: 8.1, 8.2, 8.2.1 # A list of all settings that require customization for the execution of the # upgrade action follows: # # InstallationActions.twsUser # twsUpgradePanel.backupOldInstance # twsUpgradePanel.bckpDirectory # ############################################################################### ############################################################################### # This property specifies the type of installation operation: whether it is a # fresh install ("NEW"), # an add feature ("UPDATE"), # an upgrade ("UPGRADE"). # In this case the value is "NEW" # # DO NOT MODIFY THIS PROPERTY ! # -W InstallationActions.typeOfOperation="UPGRADE" ############################################################################### # This property specifies the installation component. For the installation of # the MDM, the value is TWSINSTANCE# 270 Getting Started with IBM Tivoli Workload Scheduler V8.3
- 307. # DO NOT MODIFY THIS PROPERTY ! # -W InstallationActions.installComponent="TWSINSTANCE" ############################################################################### # This property specifies the TWS user related to the instance for which the # upgrade action is to be executed. # # CUSTOMIZE THE FOLLOWING PROPERTY ! # -W InstallationActions.twsUser="tws820" ############################################################################### # Uncomment the following property when upgrading a TWS 8.1 instance # # DO NOT MODIFY THIS PROPERTY ! # -W installationComponents.instanceType="FTA" ############################################################################### # The following properties specify whether to backup the old TWS instance (the # default choice is not to backup) and where to place backup files. The second # property is effective when the first one is set true. # # CUSTOMIZE THE FOLLOWING PROPERTIES ! # -W twsUpgradePanel.backupOldInstance="true"## possible values are: true, false #-W twsUpgradePanel.bckpDirectory="C:TWStws821user_bckp" ## on Windows -W twsUpgradePanel.bckpDirectory="/usr/local/tws820/tws820_bkp" ## on Unix ############################################################################### # The following property is only required when upgrading a TWS V8.1 FTA # on Windows. # # CUSTOMIZE THE FOLLOWING PROPERTIES #-W userWinCfgPanel.twsPassword="tws01tws" ################################################################################ # The following wizard beans aren't visited on silent installation. # # DO NOT MODIFY THE FOLLOWING PROPERTIES ! -W fqdnErrorPanel.active="False" -W fqdnErrorGoto.active="False" -W NotEnoughSpaceForBobcatErrorPanel.active="False" -W userFoundInTWSRegistry.active="False" Chapter 4. Tivoli Workload Scheduler V8.3: Migration 271
- 308. -W userFoundInTWSRegistryUnix.active="False" -W winUserErrorPanel.active="False" -W winUserErrorPanel2.active="False" -W winUserCorrectPwd.active="False" -W winUserBadPwd.active="False" -W unixUserErrorPanel.active="False" -W unixUserErrorPanel.active="False" -W db2SilentInstaller.what2Install="DB2V82" 3. Run the setup for the operating system on which you are upgrading: – On Windows operating systems: WINDOWSSETUP.exe -silent -options <local_dir>response_file.txt – On UNIX and Linux operating systems (Example 4-123): ./SETUP.bin -options <local_dir>/response_file.txt Example 4-123 Running SETUP.bin -options # /cdrom/AIX/SETUP.bin -options /tmp/TWS_UPGRADE_BACKUP_BDM.txt 4. Review the installation messages in the summary.log file to check whether the installation is successful. 5. After you upgrade the FTA, perform step 11 on page 269, described in “Upgrading Windows 2003 agent using the installation wizard” on page 261. Upgrading agents using the twsinst script Use this procedure to upgrade on Tier 1 and Tier 2 operating systems. This procedure also installs all supported language packs. It uses the command line twsinst script to upgrade. For a list of the supported Tier 1 and Tier 2 operating systems, refer to IBM Tivoli Workload Scheduler Release Notes v8.3, SC32-1277. To upgrade agents using the twsinst script, perform the following steps: 1. As root user, choose the appropriate installation CD and mount it. 2. As root user, change your directory to TWShome, as shown in Example 4-124. Example 4-124 Changing the directory to TWShome # cd /Tivoli/tws820 272 Getting Started with IBM Tivoli Workload Scheduler V8.3
- 309. 3. Locate the directory of the operating system where you want to install, and run the twsinst script as follows: twsinst -update -uname username [-inst_dir install_dir] [-backup_dir backup_dir] [-nobackup_dir][-lang lang-id] [-create_link] [-skip_usercheck] [-reset_perm] Example 4-125 shows the twsinst script output. Example 4-125 Running the twsinst script # /cdrom/AIX/twsinst -update -uname tws820 -inst_dir /Tivoli/tws820 -backup_dir /Tivoli/tws820/tws820.bkp -skip_usercheck In Example 4-125: – -update upgrades an existing installation and installs all supported language packs. Updating the software does not change the type of databases used by Tivoli Workload Scheduler. – -uname is the name of the user for which Tivoli Workload Scheduler is being updated or rolled back. The software is updated in this user’s home directory. This user name is not to be confused with the user performing the installation logged on as root. – -inst_dir is the directory of the Tivoli Workload Scheduler installation. This path cannot contain blanks. If not specified, the path is set to the username home directory. – -backup_dir is an alternative directory (which you must create it manually) as the destination for the backup copy of a previous version. If you do not specify this option when running an upgrade, the following default value is used: $BACKUP_DIR = $INST_DIR_backup_$TWS_USER In this example: • $INST_DIR is the installation path (the user home directory on UNIX and Linux). • $TWS_USER is the user name. Example 4-126 shows an example backup directory. Example 4-126 Backup directory $INST_DIR=/Tivoli/tws820 $TWS_USER=tws820 $BACKUP_DIR=/Tivoli/tws820_backup_tws820 $BACKUP_SUBDIR=/Tivoli/tws820_backup_tws820/tws820 Chapter 4. Tivoli Workload Scheduler V8.3: Migration 273
- 310. Note: In the backup directory, you must also create a subdirectory to include as the latest directory of the installation path. – -nobackup_dir no backup is made – -lang is the language in which the twsinst messages are displayed. If not specified, the system LANG is used. If the related catalog is missing, the default C language catalog is used. Note: The -lang option does not relate to the supported language packs. By default, all supported language packs are installed when you install using the twsinst script. – -restore, if the installation fails, restores the backup automatically created by Tivoli Configuration Manager for the user specified in uname. – -create_link creates the symlink between /usr/bin/mat and TWShome/bin/at. – -skip_usercheck skips the check of the user in the /etc/password file or uses the su command. Enable this option if the authentication process within your organization is not standard, thereby disabling the default authentication option. – -reset_perm reset the permissions of the libatrc library. Example 4-127 shows a sample twsinst script. Example 4-127 Sample twsinst script # /cdrom/AIX/twsinst -update -uname tws820 4. To roll back to a previous instance, run the following command, as shown in Example 4-128. twsinst -restore -uname username [-skip_usercheck] Example 4-128 Rolling back to a previous instance # /cdrom/AIX/twsinst -restore -uname tws820 -skip_usercheck 274 Getting Started with IBM Tivoli Workload Scheduler V8.3
- 311. In Example 4-128: – -restore, if the installation fails, restores the backup automatically created by Tivoli Configuration Manager for the user specified in uname. – -uname is the name of the user for which Tivoli Workload Scheduler is being updated or rolled back. The software is updated in this user’s home directory. This user name is not to be confused with the user performing the installation logged on as root. – -skip_usercheck skips the check of the user in the /etc/password file or uses the su command. Enable this option if the authentication process within your organization is not standard, thereby disabling the default authentication option. Upgrading agents using Software Distribution A number of Tivoli Workload Scheduler parameters are used by the software package block to perform the upgrade. You can assign values to each variable to reflect the installation that is being upgraded; otherwise, the default value is assigned. When you upgrade agents using Software Distribution, the following variables are required: install_dir tws_user pwd fresh_install upgrade from_release To perform the upgrade, complete the following steps: 1. Create a software package profile that has the following name: FP_TWS_operating_system_TWSuser.8.3.00 In this example, operating_system is the operating system where you are installing and TWSuser is the user of the installation. Note: When you import the software package block, pass the name of the profile to wimpspo command so that the Configuration Manager endpoint catalogs the name correctly. 2. Import the software package block using the wimpspo command. 3. Install the software package block using the winstsp command. Chapter 4. Tivoli Workload Scheduler V8.3: Migration 275
- 312. Note: When you upgrade using the winstsp command, make sure to specify the install_dir variable. If you have installed the previous version in a directory other than the default and you do not specify install_dir, Tivoli Workload Scheduler is installed as a fresh installation. For detailed instructions about how to perform these tasks, refer to IBM Tivoli Configuration Manager Reference Manual for Software Distribution, SC23-4712, and IBM Tivoli Configuration Manager User’s Guide for Software Distribution v4, SC23-4711. Example 4-129 shows an example of the settings required to upgrade a Tivoli Workload Scheduler V8.2 FTA to Tivoli Workload Scheduler V8.3 on a Windows workstation. Example 4-129 winstsp command winstsp –D install_dir="d:Program FilesIBMTWSjuno" –D tws_user="juno" –D this_cpu="saturn" –D tcp_port="31111" -D fresh_install="false" –D upgrade="true" -D from_release="8.2" –D backup="true" –D group="TWS82group" FP_TWS_WINDOWS_juno.8.3.00 TWSep 4.7 Upgrading Tivoli Workload Scheduler V8.2: Direct upgrade This section describes how to upgrade the environment using a direct upgrade procedure. The direct upgrade procedure consists of the following topics: 4.7.1, “Upgrading a master domain manager” on page 277 4.7.2, “Importing the object data” on page 294 4.7.3, “Configuring the upgraded master domain manager” on page 294 4.7.4, “Upgrading the backup master domain manager” on page 304 4.7.5, “Importing the migrated security file in the Tivoli Workload Scheduler V8.3 environment” on page 304 4.7.6, “Upgrading agents” on page 304 4.7.7, “Installing the Job Scheduling Console” on page 304 276 Getting Started with IBM Tivoli Workload Scheduler V8.3
- 313. Notes: You can start the upgrade by either migrating the agents or installing master domain manager. After you install the master domain manager, it is important that you run the following procedures in this order: a. Importing object data b. Configuring the upgraded master domain manager c. Upgrading a backup master domain manager d. Importing the migrated security file in the Tivoli Workload Scheduler V8.3 environment We upgraded the master domain manager, and then the FTAs. 4.7.1 Upgrading a master domain manager This section describes how to upgrade a master domain manager on Red Hat Linux Server V3.0 system. Note: If the upgrade procedure is successful, it is not possible to roll back to the previous version. Rollback is only possible for upgrades that fail. You can upgrade a master domain manager using the following installation methods: “Upgrading the master domain manager using the ISMP”, as described in the following section Upgrading the master domain manager using a silent installation To upgrade the master domain manager using a silent installation, perform the silent installation procedure described in IBM Tivoli Workload Scheduler Planning and Installation Guide v8.3, SC32-1273. Chapter 4. Tivoli Workload Scheduler V8.3: Migration 277
- 314. Upgrading the master domain manager using the ISMP During the upgrade procedure, the installation wizard backs up all the master domain manager data and configuration information, installs the new product code, and automatically dumps previous scheduling data and configuration information. To upgrade a master domain manager using the installation wizard, perform the following steps: 1. Insert the installation CD related to the operating system. 2. Run the setup for the operating system on which you are upgrading: – On Windows operating systems: WINDOWSSETUP.exe – On UNIX and Linux operating systems (see Example 4-130): SETUP.bin Example 4-130 Running the SETUP.bin command # /cdrom/LINUX_I386/SETUP.bin 3. The installation wizard is launched. Select the installation wizard language, as shown in Figure 4-59. Click OK. Figure 4-59 Selecting the installation wizard language 278 Getting Started with IBM Tivoli Workload Scheduler V8.3
- 315. 4. Read the welcome information shown in Figure 4-60 and click Next. Figure 4-60 Welcome information Chapter 4. Tivoli Workload Scheduler V8.3: Migration 279
- 316. 5. Read and accept the license agreement shown in Figure 4-61. Click Next. Figure 4-61 License agreement 280 Getting Started with IBM Tivoli Workload Scheduler V8.3
- 317. 6. Select a previous instance of the product from the drop-down list and click Upgrade an instance of Tivoli Workload Scheduler, as shown in Figure 4-62. The instance can be identified by its group name. Click Next. Figure 4-62 Previous instance and upgrading Tivoli Workload Scheduler Chapter 4. Tivoli Workload Scheduler V8.3: Migration 281
- 318. 7. Select Master Domain Manager, as shown in Figure 4-63. Ensure that you select the correct type of agent, otherwise the upgrade fails. Click Next. Figure 4-63 Type of Tivoli Workload Scheduler instance to be upgraded 282 Getting Started with IBM Tivoli Workload Scheduler V8.3
- 319. 8. In the window shown in Figure 4-64, provide the following information to perform the upgrade: a. Backup the previous Tivoli Workload Scheduler instance: Select whether to back up the previous instance. b. Backup Destination Directory: When you select to back up the previous instance, specify the directory where the backup is located. c. Automatically import data from the version being updated: Clear this option when you want to manually import the object data into the DB2 database instance. d. Export Destination Directory: Specify the directory where you want the object data exported. e. Click Next. Figure 4-64 Previous backup and export destination directory Note: When you select to import the data at a later time, the upgraded master domain manager has no master workstation defined in the database and only composer works. Chapter 4. Tivoli Workload Scheduler V8.3: Migration 283
- 320. 9. Type the password of the Tivoli Workload Scheduler user for which you want to upgrade the instance, as shown in Figure 4-65. Click Next. Figure 4-65 Entering the password of the Tivoli Workload Scheduler user 284 Getting Started with IBM Tivoli Workload Scheduler V8.3
- 321. 10.In the window shown in Figure 4-66, specify the following application server port information: a. HTTP Transport: The port for the HTTP transport. The default value is 31115. b. HTTPS Transport: The port for the secure HTTP transport. The default value is 31116. c. Bootstrap/RMI: The port for the bootstrap or RMI. The default value is 31117. d. SOAP Connector: The port for the application server protocol SOAP connector. The default value is 31118. e. Click Next. Figure 4-66 Ports used by IBM WebSphere Application Server Chapter 4. Tivoli Workload Scheduler V8.3: Migration 285
- 322. 11.Specify the type of DB2 UDB installation, as shown in Figure 4-67. Click Next. Figure 4-67 Specifying the type of DB2 UDB installation 286 Getting Started with IBM Tivoli Workload Scheduler V8.3
- 323. 12.Specify the relevant DB2 data in accordance with the database installation type or configuration that you are performing, as shown in Figure 4-68. Click Next. Figure 4-68 Information to configure DB2 UDB Enterprise Server Edition V8.2 Chapter 4. Tivoli Workload Scheduler V8.3: Migration 287
- 324. 13.Specify the directory to install DB2 UDB Enterprise Server Edition V8.2, as shown in Figure 4-69. Click Next. Figure 4-69 DB2 UDB Enterprise Server Edition V8.2 directory 288 Getting Started with IBM Tivoli Workload Scheduler V8.3
- 325. 14.Review the information data to create and configure the Tivoli Workload Scheduler database shown in Figure 4-70. Click Next. Figure 4-70 Reviewing information to configure Tivoli Workload Scheduler Chapter 4. Tivoli Workload Scheduler V8.3: Migration 289
- 326. 15.Review the information that db2inst1 user does not exist and that it will be created shown in Figure 4-71. Click Next. Figure 4-71 Information about db2inst1 user 290 Getting Started with IBM Tivoli Workload Scheduler V8.3
- 327. 16.Review the installation settings shown in Figure 4-72 and Figure 4-73 on page 292. Click Next. Figure 4-72 Installation settings: Part 1 Chapter 4. Tivoli Workload Scheduler V8.3: Migration 291
- 328. Figure 4-73 shows the rest of the installation settings. Figure 4-73 Installation settings: Part 2 292 Getting Started with IBM Tivoli Workload Scheduler V8.3
- 329. 17.If the installation is successful, you see a summary of the performed installation, as shown in Figure 4-74. Click Finish. Figure 4-74 Installation completed successfully Note: When the installation is successful, you see a panel with the successful installation message. In case of an unsuccessful installation, see IBM Tivoli Workload Scheduler Administration and Troubleshooting V8.3, SC32-1275. Chapter 4. Tivoli Workload Scheduler V8.3: Migration 293
- 330. 18.If you choose to import data automatically, you see a panel with the message indicating that the data has been imported, as shown in Example 4-131. For more information, check the /tmp/tws83/summary.log file and log files in the /tmp/tws83/datamigration directory. Example 4-131 Message indicating that the data is imported 2006.05.24 17:49:01 - Import data from the previous Tivoli Workload Scheduler instance (edinburg) - Installation successfully completed /mnt/cdrom/LINUX_I386/tws_tools/migrateTWSDB.sh -twsRoot "/usr/local/tws820" -twsOldRoot "/usr/local/tws820" -tmpDir "/tmp/tws83/datamigration" -installerHome "/root" -twsUser tws820 -twsPwd ******** 4.7.2 Importing the object data If you did not choose to import data automatically, perform the procedure described in 4.6.5, “Importing the object data” on page 243. 4.7.3 Configuring the upgraded master domain manager To configure the upgrade master domain manager, perform the following steps: 1. As tws820 user, run the optman chg cf=ALL command in the new master domain manager to ensure that the carry forward option is set to all, as shown in Example 4-132. Example 4-132 Running the optman chg cf=ALL command # su - tws820 $ optman chg cf=ALL Tivoli Workload Scheduler (UNIX)/OPTMAN V8.3 (1.0) Licensed Materials - Property of IBM(R)5698-WSH (C) Copyright IBM Corp 1998, 2006 All rights reserved. US Government User Restricted Rights Use, duplication or disclosure restricted by GSA ADP Schedule Contract with IBM Corp. IBM is a registered trademark of International Business Machines Corporation in the United States, other countries, or both. Installed for user "tws820". Locale LANG set to the following: "en" AWSJCL050I Command "chg" completed successfully. 294 Getting Started with IBM Tivoli Workload Scheduler V8.3
- 331. 2. As tws820 user, run the optman ls command in the new master domain manager to check the carry forward option, as shown in Example 4-133. Example 4-133 Running the optman ls command # su - tws820 $ optman ls Tivoli Workload Scheduler (UNIX)/OPTMAN V8.3 (1.0) Licensed Materials - Property of IBM(R)5698-WSH (C) Copyright IBM Corp 1998, 2006 All rights reserved. US Government User Restricted Rights Use, duplication or disclosure restricted by GSA ADP Schedule Contract with IBM Corp. IBM is a registered trademark of International Business Machines Corporation in the United States, other countries, or both. Installed for user "tws820". Locale LANG set to the following: "en" baseRecPrompt / bp = 1000 carryStates / cs = null companyName / cn = IBM enCFInternetworkDeps / ci = YES enCFResourceQuantity / rq = YES enCarryForward / cf = ALL enCentSec / ts = NO enDbAudit / da = 0 enEmptySchedsAreSucc / es = NO enListSecChk / sc = NO enLogonBatch / lb = NO enPlanAudit / pa = 0 enPreventStart / ps = YES enRetainNameOnRerunFrom / rr = NO enStrEncrypt / se = NO enSwFaultTol / sw = NO enTimeZone / tz = NO extRecPrompt / xp = 1000 ignoreCals / ic = NO logmanMinMaxPolicy / ln = BOTH logmanSmoothPolicy / lt = -1 maxLen / xl = 14 minLen / ml = 8 startOfDay / sd = 0600 statsHistory / sh = 10 AWSJCL050I Command "ls" completed successfully. Chapter 4. Tivoli Workload Scheduler V8.3: Migration 295
- 332. 3. As tws820, run the JnextPlan command in the new master domain manager to create a plan with 0 extension period, which begins at the end of the current plan, as shown in Example 4-134. $ su - tws820 $ JnextPlan -from start_time -for 0000 Example 4-134 Running JnextPlan in new master domain manager to create a plan # su - tws820 $ JnextPlan -from 05/24/2006 0600 -for 0000 Tivoli Workload Scheduler (UNIX)/JNEXTPLAN Licensed Materials - Property of IBM(R) 5698-WSH (C) Copyright IBM Corp 1998, 2006 All rights reserved. US Government User Restricted Rights Use, duplication or disclosure restricted by GSA ADP Schedule Contract with IBM Corp. IBM is a registered trademark of International Business Machines Corporation in the United States, other countries, or both. Tivoli Workload Scheduler (UNIX)/MAKEPLAN Licensed Materials - Property of IBM(R) 5698-WSH (C) Copyright IBM Corp 1998, 2006 All rights reserved. US Government User Restricted Rights Use, duplication or disclosure restricted by GSA ADP Schedule Contract with IBM Corp. IBM is a registered trademark of International Business Machines Corporation in the United States, other countries, or both. link @!@;noask Command forwarded to batchman for AMSTERDAM Command forwarded to batchman for FLORENCE Command forwarded to batchman for PROV009 Tivoli Workload Scheduler (UNIX)/PLANMAN V8.3 (1.0) Licensed Materials - Property of IBM(R) 5698-WSH (C) Copyright IBM Corp 1998, 2006 All rights reserved. US Government User Restricted Rights Use, duplication or disclosure restricted by GSA ADP Schedule Contract with IBM Corp. IBM is a registered trademark of International Business Machines Corporation in the United States, other countries, or both. Installed for user "tws820". Locale LANG set to the following: "en" AWSJPL207W The production plan does not exist and the planner creates it. AWSJPL503I The "planner" process has locked the database. 296 Getting Started with IBM Tivoli Workload Scheduler V8.3
- 333. AWSJPL708I During the creation of a production plan, the planner has detected that no preproduction plan exists. A preproduction plan will be created automatically. AWSJPL709I During the creation of a production plan, the planner has successfully created a new preproduction plan. AWSJPL504I The "planner" process has unlocked the database. AWSJCL062I The production plan (Symnew) has been successfully extended. Tivoli Workload Scheduler (UNIX)/REPTR Licensed Materials - Property of IBM(R) 5698-WSH (C) Copyright IBM Corp 1998, 2006 All rights reserved. US Government User Restricted Rights Use, duplication or disclosure restricted by GSA ADP Schedule Contract with IBM Corp. IBM is a registered trademark of International Business Machines Corporation in the United States, other countries, or both. Tivoli Workload Scheduler (UNIX)/SYXTRACT V8.3 (1.9) Licensed Materials - Property of IBM(R) 5698-WSH (C) Copyright IBM Corp 1998, 2006 All rights reserved. US Government User Restricted Rights Use, duplication or disclosure restricted by GSA ADP Schedule Contract with IBM Corp. IBM is a registered trademark of International Business Machines Corporation in the United States, other countries, or both. Installed for user "tws820". Locale LANG set to the following: "en" Tivoli Workload Scheduler (UNIX)/REPORTER V8.3 (1.6) Page 1 ... Page 2 ... Tivoli Workload Scheduler (UNIX)/SWITCHPLAN V8.3 STAGEMAN:/usr/local/tws820/schedlog/M200605250055 STAGEMAN:AWSBHV030I The new Symphony file is installed. STAGEMAN:AWSBHV036I Multi-workstation Symphony file copied to STAGEMAN:/usr/local/tws820/Sinfonia STAGEMAN:AWSBHV078I Current plan audit level is 0. Tivoli Workload Scheduler (UNIX)/PLANMAN V8.3 (1.0) Licensed Materials - Property of IBM(R) 5698-WSH (C) Copyright IBM Corp 1998, 2006 All rights reserved. US Government User Restricted Rights Use, duplication or disclosure restricted by GSA ADP Schedule Contract with IBM Corp. Chapter 4. Tivoli Workload Scheduler V8.3: Migration 297
- 334. IBM is a registered trademark of International Business Machines Corporation in the United States, other countries, or both. Installed for user "tws820". Locale LANG set to the following: "en" AWSJCL065I Run number has been successfully updated. start AWSBHU507I A start command was issued for EDINBURG. Tivoli Workload Scheduler (UNIX)/CREATEPOSTREPORTS Licensed Materials - Property of IBM(R) 5698-WSH (C) Copyright IBM Corp 1998, 2006 All rights reserved. US Government User Restricted Rights Use, duplication or disclosure restricted by GSA ADP Schedule Contract with IBM Corp. IBM is a registered trademark of International Business Machines Corporation in the United States, other countries, or both. Tivoli Workload Scheduler (UNIX)/REPTR Licensed Materials - Property of IBM(R) 5698-WSH (C) Copyright IBM Corp 1998, 2006 All rights reserved. US Government User Restricted Rights Use, duplication or disclosure restricted by GSA ADP Schedule Contract with IBM Corp. IBM is a registered trademark of International Business Machines Corporation in the United States, other countries, or both. Tivoli Workload Scheduler (UNIX)/SYXTRACT V8.3 (1.9) Licensed Materials - Property of IBM(R) 5698-WSH (C) Copyright IBM Corp 1998, 2006 All rights reserved. US Government User Restricted Rights Use, duplication or disclosure restricted by GSA ADP Schedule Contract with IBM Corp. IBM is a registered trademark of International Business Machines Corporation in the United States, other countries, or both. Installed for user "tws820". Locale LANG set to the following: "en" Tivoli Workload Scheduler (UNIX)/REPORTER V8.3 (1.6) Page 1 ... Page 2 ... Tivoli Workload Scheduler (UNIX)/UPDATESTATS Licensed Materials - Property of IBM(R) 5698-WSH (C) Copyright IBM Corp 1998, 2006 All rights reserved. 298 Getting Started with IBM Tivoli Workload Scheduler V8.3
- 335. US Government User Restricted Rights Use, duplication or disclosure restricted by GSA ADP Schedule Contract with IBM Corp. IBM is a registered trademark of International Business Machines Corporation in the United States, other countries, or both. Tivoli Workload Scheduler (UNIX)/LOGMAN V8.3 (8.3) Licensed Materials - Property of IBM(R) 5698-WSH (C) Copyright IBM Corp 1998, 2006 All rights reserved. US Government User Restricted Rights Use, duplication or disclosure restricted by GSA ADP Schedule Contract with IBM Corp. IBM is a registered trademark of International Business Machines Corporation in the United States, other countries, or both. Installed for user "tws820". Locale LANG set to the following: "en" AWSJCL066I The job statistics have been successfully collected. In Example 4-134, start_time is the date and time when the current plan ends. Note: If you run Jnextday, and the plan is created from today at 06:00 until tomorrow at 05:59, the start_time of the new plan must be tomorrow at the default time of 06:00. 4. As tws820 user, run the optman chg cf=YES command in the new master domain manager to reset the carry forward option to the value you assigned before running step 1. See Example 4-135. Example 4-135 Running the optman chg cf=YES command # su - tws820 $ optman chg cf=YES Tivoli Workload Scheduler (UNIX)/OPTMAN V8.3 (1.0) Licensed Materials - Property of IBM(R)5698-WSH (C) Copyright IBM Corp 1998, 2006 All rights reserved. US Government User Restricted Rights Use, duplication or disclosure restricted by GSA ADP Schedule Contract with IBM Corp. IBM is a registered trademark of International Business Machines Corporation in the United States, other countries, or both. Installed for user "tws820". Locale LANG set to the following: "en" AWSJCL050I Command "chg" completed successfully Chapter 4. Tivoli Workload Scheduler V8.3: Migration 299
- 336. 5. As tws820 user, run composer add to add the new job stream called FINAL in the new master domain manager database, as shown in Example 4-136. Example 4-136 Running composer add to add the new FINAL job stream # su - tws820 $ composer add Sfinal Tivoli Workload Scheduler (UNIX)/COMPOSER V8.3 (1.18.3.3) Licensed Materials - Property of IBM(R) 5698-WSH (C) Copyright IBM Corp 1998, 2006 All rights reserved. US Government User Restricted Rights Use, duplication or disclosure restricted by GSA ADP Schedule Contract with IBM Corp. IBM is a registered trademark of International Business Machines Corporation in the United States, other countries, or both. Installed for user "tws820". Locale LANG set to the following: "en" User: tws820, Host:127.0.0.1, Port:31116 -add Sfinal AWSBIA300I The scheduling language syntax has been successfully validated for object "EDINBURG#FINAL". AWSJCL003I The command "add" relating to object "jd=EDINBURG#MAKEPLAN" has completed successfully. AWSJCL003I The command "add" relating to object "jd=EDINBURG#SWITCHPLAN" has completed successfully. AWSJCL003I The command "add" relating to object "jd=EDINBURG#CREATEPOSTREPORTS" has completed successfully. AWSJCL003I The command "add" relating to object "jd=EDINBURG#UPDATESTATS" has completed successfully. AWSJCL015W The object "js=EDINBURG#FINAL" already exists. AWSJCL016I Do you want to replace the object (enter "y" for yes, "n" for no)?y AWSBIA303W Total warnings in "Sfinal": 1. AWSBIA288I Total objects updated: 4 6. As tws820 user, run composer display to see the definition of the new FINAL job stream in the new master domain manager database, as shown in Example 4-137. Example 4-137 Running composer display to see the new FINAL job stream # su - tws820 $ composer display sched=FINAL Tivoli Workload Scheduler (UNIX)/COMPOSER V8.3 (1.18.3.3) Licensed Materials - Property of IBM(R) 5698-WSH (C) Copyright IBM Corp 1998, 2006 All rights reserved. 300 Getting Started with IBM Tivoli Workload Scheduler V8.3
- 337. US Government User Restricted Rights Use, duplication or disclosure restricted by GSA ADP Schedule Contract with IBM Corp. IBM is a registered trademark of International Business Machines Corporation in the United States, other countries, or both. Installed for user "tws820". Locale LANG set to the following: "en" User: tws820, Host:127.0.0.1, Port:31116 -display sched=final Workstation Job Stream Name Valid From Updated On Locked By ---------------- ---------------- ---------- ---------- ---------------- EDINBURG FINAL - 05/24/2006 - #@(#) $Id: Sfinal.conf,v 7.56 1995/02/24 04:13:53 alanh viola_thunder $ # This is a sample schedule for doing pre and post production # processing. It assumes the start time is 6:00 a.m. # It is defined as CARRYFORWARD because it is executed across # production periods. This ensures that job statistics will be # collected for the schedule. # All of the job statements that follow use auto-documentation # keywords so the jobs will be documented by composer when the # schedule is added or modified in the mastsked file. SCHEDULE EDINBURG#FINAL ON RUNCYCLE RULE1 "FREQ=DAILY;" AT 0559 CARRYFORWARD : # This job runs schedulr to select schedules for tomorrow and # create the prodsked file. # It then runs compiler to create tomorrow's # production control file (Symnew). Then it runs reporter to print # pre-production reports. # The reports should be reviewed. # Finally this stops # batchman and runs stageman to: 1) carry forward incomplete schedules, # 2) log the old Symphony file, 3) create the new Symphony and Sinfonia # files. It then starts batchman and runs reporter to print post- # production reports. It runs logman to log job statistics, and then # report8 to print the Job Histogram. EDINBURG#JNEXTDAY END AWSBIA291I Total objects: 1 Chapter 4. Tivoli Workload Scheduler V8.3: Migration 301
- 338. 7. As tws820 user, run conman cs to cancel the FINAL job stream in the new master domain manager database, as shown in Example 4-138. Example 4-138 Running conman cs to cancel the FINAL job stream # su - tws820 $ conman cs final Tivoli Workload Scheduler (UNIX)/CONMAN V8.3 (1.36.2.22) Licensed Materials - Property of IBM(R) 5698-WSH (C) Copyright IBM Corp 1998, 2006 All rights reserved. US Government User Restricted Rights Use, duplication or disclosure restricted by GSA ADP Schedule Contract with IBM Corp. IBM is a registered trademark of International Business Machines Corporation in the United States, other countries, or both. Installed for user "tws820". Locale LANG set to the following: "en" Scheduled for (Exp) 05/25/06 (#10) on EDINBURG. Batchman LIVES. Limit: 10, Fence: 0, Audit Level: 0 cs final Command forwarded to batchman for EDINBURG#FINAL[(0600 05/25/06),(CF06144AAAAAAAAB)] 8. As tws820 user, run conman sbs to submit the new FINAL job stream in the new master domain manager database, as shown in Example 4-139. Example 4-139 Running conman sbs to submit the new FINAL job stream # su - tws820 $ conman “sbs FINAL” Tivoli Workload Scheduler (UNIX)/CONMAN V8.3 (1.36.2.22) Licensed Materials - Property of IBM(R) 5698-WSH (C) Copyright IBM Corp 1998, 2006 All rights reserved. US Government User Restricted Rights Use, duplication or disclosure restricted by GSA ADP Schedule Contract with IBM Corp. IBM is a registered trademark of International Business Machines Corporation in the United States, other countries, or both. Installed for user "tws820". Locale LANG set to the following: "en" Scheduled for (Exp) 05/25/06 (#10) on EDINBURG. Batchman LIVES. Limit: 10, Fence: 0, Audit Level: 0 sbs FINAL Submitted EDINBURG#FINAL to batchman as EDINBURG#FINAL[(0120 05/25/06),(0AAAAAAAAAAAAACH)] 302 Getting Started with IBM Tivoli Workload Scheduler V8.3
- 339. 9. As tws820 user, run conman ss to see the new FINAL job stream in the new master domain manager database, as shown in Example 4-140. Example 4-140 Running conman ss to see the new job stream called FINAL # su - tws820 $ conman ss Tivoli Workload Scheduler (UNIX)/CONMAN V8.3 (1.36.2.22) Licensed Materials - Property of IBM(R) 5698-WSH (C) Copyright IBM Corp 1998, 2006 All rights reserved. US Government User Restricted Rights Use, duplication or disclosure restricted by GSA ADP Schedule Contract with IBM Corp. IBM is a registered trademark of International Business Machines Corporation in the United States, other countries, or both. Installed for user "tws820". Locale LANG set to the following: "en" Scheduled for (Exp) 05/25/06 (#10) on EDINBURG. Batchman LIVES. Limit: 10, Fence: 0, Audit Level: 0 ss (Est) (Est) Jobs Sch CPU Schedule SchedTime State Pr Start Elapse # OK Lim EDINBURG#FINAL 0600 05/25 HOLD 10(05:59) ( 0:01) 1 0 [05/24/06]; [Cancelled] EDINBURG#FINAL 0129 05/25 HOLD 10(05/26) 1 0 [Carry] 10.As tws820 user, run conman sj to see the jobs in the new master domain manager database, as shown in Example 4-141. Example 4-141 Running conman sj to see the jobs # su - tws820 $ conman sj Tivoli Workload Scheduler (UNIX)/CONMAN V8.3 (1.36.2.22) Licensed Materials - Property of IBM(R) 5698-WSH (C) Copyright IBM Corp 1998, 2006 All rights reserved. US Government User Restricted Rights Use, duplication or disclosure restricted by GSA ADP Schedule Contract with IBM Corp. IBM is a registered trademark of International Business Machines Corporation in the United States, other countries, or both. Installed for user "tws820". Locale LANG set to the following: "en" Chapter 4. Tivoli Workload Scheduler V8.3: Migration 303
- 340. Scheduled for (Exp) 05/25/06 (#10) on EDINBURG. Batchman LIVES. Limit: 10, Fence: 0, Audit Level: 0 sj (Est) (Est) CPU Schedule SchedTime Job State Pr Start Elapse RetCode Deps EDINBURG#FINAL 0129 05/25 ******** HOLD 10(05/26) [Carry] JNEXTDAY HOLD 10 4.7.4 Upgrading the backup master domain manager Perform the procedure described in 4.4.7, “Upgrading the backup master domain manager” on page 147. 4.7.5 Importing the migrated security file in the Tivoli Workload Scheduler V8.3 environment Perform the procedure described in 4.4.4, “Importing the migrated security file in the Tivoli Workload Scheduler V8.3 environment” on page 128. 4.7.6 Upgrading agents Perform the procedure described in 4.4.8, “Upgrading agents” on page 170. 4.7.7 Installing the Job Scheduling Console Perform the procedure described in 3.2.2, “Installing the Job Scheduling Console” on page 61. 4.8 Upgrading Tivoli Workload Scheduler V8.2.1: Parallel upgrade This section describes how to upgrade the environment using a parallel upgrade procedure. The parallel upgrade procedure consists of the following topics: 4.8.1, “Dumping existing objects from the database” on page 305 4.8.2, “Extracting Tivoli Framework user data from security file” on page 307 4.8.3, “Installing a new master domain manager” on page 310 304 Getting Started with IBM Tivoli Workload Scheduler V8.3
- 341. 4.8.4, “Importing the migrated security file in the Tivoli Workload Scheduler V8.3 environment” on page 311 4.8.5, “Importing the object data” on page 313 4.8.6, “Switching a master domain manager” on page 321 4.8.1 Dumping existing objects from the database In a parallel upgrade, you must manually perform a memory dump of the data. Because of this, a copy of the existing data objects must reside in your environment. When you perform the memory dump of the data, use the composer command line provided in the installation CD, which is related to the operating system where the Tivoli Workload Scheduler you are upgrading is installed. To dump the data using the composer command line provided in the installation CD, perform the following steps: 1. As root user, choose the appropriate installation CD and mount it. Note: For Windows operating system, the appropriate installation CD is CD4. 2. Copy the composer81 command into the directory where the previous composer is installed, as shown in Example 4-142. CDnoperating_systembincomposer821 c:win32appTWStws821bin Example 4-142 Copying CDn/operating_system/bin/composer81 to TWShome/bin c:copy CDnWINDOWSbincomposer821 c:win32appTWStws821bin Notes: In our lab environment, TWShome is c:tws821m821 directory. Because this section describes the Tivoli Workload Scheduler V8.2.1 parallel upgrade, use the composer821 command. Chapter 4. Tivoli Workload Scheduler V8.3: Migration 305
- 342. 3. Set permission, owner, and group to composer821 with the same rights that the previous composer has, as shown in Example 4-143. Example 4-143 Setting permission, owner and group of composer821 command C:TWS821m821bin>setown -d composer.exe Owner of File composer.exe is ROLLTIDEm821 Processed file composer.exe C:Program FilesIBMTWStws83abin>setown -d com* Owner of File composer821.exe is ROLLTIDEtws83a Processed file composer821.exe C:Program FilesIBMTWStws83abin>setown -u m821 composer821.exe Dir = C:Program FilesIBMTWStws83abin file=composer821.exe Processed file composer821.exe C:Program FilesIBMTWStws83abin>copy composer821.exe c:tws821m821bin 1 file(s) copied. 4. As m821 user, use the composer821 create command to dump the data of Tivoli Workload Scheduler V8.1, as shown in Example 4-144. Example 4-144 Dumping data of Tivoli Workload Scheduler V8.2.1 login: m821 C:TWS821m821>mkdir dumpdata C:TWS821m821>cd dumpdata C:TWS821m821dumpdata> /Tivoli/tws81/bin/composer81 - create topology_filename from cpu=@ - create prompts_filename from prompts - create calendar_filename from calendars - create parms_filename from parms - create resources_filename from resources - create users_filename from users=@#@ - create jobs_filename from jobs=@#@ - create scheds_filename from sched=@#@ 306 Getting Started with IBM Tivoli Workload Scheduler V8.3
- 343. The dump data of Tivoli Workload Scheduler V8.2.1 consists of the following files: – topology_filename is the name of the file that contains the topology data of the Tivoli Workload Scheduler you are upgrading, where “from cpu=@” indicates all workstations, workstation classes, and domains. – prompts_filename is the name of the file that contains the prompts of the Tivoli Workload Scheduler you are upgrading, where “from prompts” indicates all prompts. – calendar_filename is the name of the file that contains the calendars of the Tivoli Workload Scheduler you are upgrading, where “from calendars” indicates all calendars. – parms_filename is the name of the file that contains the parameters of the Tivoli Workload Scheduler you are upgrading, where “from parms” indicates all parameters. – resources_filename is the name of the file that contains the resources of the Tivoli Workload Scheduler you are upgrading, where “from resources” indicates all resources. – users_filename is the name of the file that contains the users of the Tivoli Workload Scheduler you are upgrading, where “from users=@#@” indicates all users. – jobs_filename is the name of the file that contains the jobs of the Tivoli Workload Scheduler you are upgrading, where “from jobs=@#@” indicates all jobs. – scheds_filename is the name of the file that contains the job streams of the Tivoli Workload Scheduler you are upgrading, where “from scheds=@#@” indicates all schedules. Use these files to import the data into the relational database. 4.8.2 Extracting Tivoli Framework user data from security file To extract the Tivoli Management Framework users, perform the following steps: 1. As m821 user, ensure that the Tivoli Management Framework environment is set: C:WINNTsystem32driversetcTivoli>setup_env.cmd 2. Stop the Tivoli Workload Scheduler V8.2.1 processes: c:tws821m821 -> conman “stop;wait” c:tws821m821 -> conman “shut;wait” c:tws821m821 -> shutdown Chapter 4. Tivoli Workload Scheduler V8.3: Migration 307
- 344. 3. Copy the migrtool.tar file to a directory on the Tivoli Workload Scheduler V8.2.1 environment, as shown in Example 4-145. C:copy CDn/operating_system/utilities/migrtool.tar TWShome Example 4-145 Copying migrtool.tar file to the TWShome directory c:copy D:WINDOWSutilitiesmigrtool.tar c:tws821m821 4. Make a backup of the files listed in migrtool.tar file, if they already exist on Tivoli Workload Scheduler V8.2.1 environment, as shown in Example 4-146. Example 4-146 Backup of the files listed in migrtool.tar file c:tws821m821 copy catalogCunison.cat catalogCunison.cat.m821 c:tws821m821 copy catalogCmaestro.cat catalogCmaestro.cat.m821 c:tws821m821bin copy libatrc.dll libatrc.dll.m821 5. As Administrator user, extract the files from the migrtool.tar file into the Tivoli Workload Scheduler V8.2.1 environment. 6. As m821 user, set the Tivoli Workload Scheduler V8.2.1 variables using the set_env command and run the dumpsec command to create the input security file, as shown in Example 4-147. $TWShome/tws_env dumpsec > $TWShome/tmp_file Example 4-147 Setting Tivoli Workload Scheduler variables and running dumpsec command C:TWS821m821>tws_env.cmd Tivoli Workload Scheduler Environment Successfully Set !!! C:TWS821m821>dumpsec > tws821sec.txt Tivoli Workload Scheduler (Windows)/DUMPSEC V8.3 (9.3.1.1) Licensed Materials - Property of IBM(R) 5698-WSH (C) Copyright IBM Corp 1998, 2006 All rights reserved. US Government User Restricted Rights Use, duplication or disclosure restricted by GSA ADP Schedule Contract with IBM Corp. IBM is a registered trademark of International Business Machines Corporation in the United States, other countries, or both. 7. As Administrator user, run the migrfwkusr script as follows: migrfwkusr -in input_security_file -out output_security_file [-cpu workstation] [-hostname local_hostname] 308 Getting Started with IBM Tivoli Workload Scheduler V8.3
- 345. Note: The migrfwkusr script does not remove previous user definitions. If you want to remove the previous users, do it manually before you run the makesec command. After you run the migrfwkusr command, the output_security_file contains the user definitions, which you can use in the Tivoli Workload Scheduler V8.3 environment. Example 4-148 shows the migrfwkusr script output. Example 4-148 Running the migrfwkusr script C:WINNTsystem32driversetcTivoli>setup_env.cmd C:WINNTSYSTEM32DRIVERSETCTivolitmrset.txt C:PROGRA~1TivolidbRolltide.dbregion.out 1 file(s) copied. Tivoli environment variables configured. C:WINNTsystem32driversetcTivoli>cd c:tws821m821 C:TWS821m821>dir tws821sec.txt 05/23/2006 06:17p 2,185 tws821sec.txt 1 File(s) 2,185 bytes C:TWS821m821>bash -o vi bash$ pwd C:/TWS821/m821 bash$ migrfwkusr -in tws821sec.txt -out frmwrkusr.txt Tivoli Workload Scheduler (Windows)/GETFWKUS V8.3 (1.5) Licensed Materials - Property of IBM(R) 5698-WSH (C) Copyright IBM Corp 1998, 2006 All rights reserved. US Government User Restricted Rights Use, duplication or disclosure restricted by GSA ADP Schedule Contract with IBM Corp. IBM is a registered trademark of International Business Machines Corporation in the United States, other countries, or both. GETFWKUS:Starting user MAESTRO [tws821sec.txt (#2)] GETFWKUS:Starting user OPS [tws821sec.txt (#15)] GETFWKUS:Starting user SCHED [tws821sec.txt (#28)] GETFWKUS:Done with tws821sec.txt, 0 errors (0 Total) Chapter 4. Tivoli Workload Scheduler V8.3: Migration 309
- 346. The following list shows the parameters of the migrfwkusr script: – input_security_file is the file created using the dumpsec command. – output_security_file is the security file which is created by the migrfwkusr script. – workstation is the name of the local workstation where the login data added by the tool is defined. If you do not specify a workstation, the data is taken from a localopts file, if present in the same directory where the migrfwkusr script is located. If there is no localopts file, the workstation is set to the first eight characters of the local host name. – local_hostname is the fully qualified host name of the Tivoli Management Framework users to be extracted. Login data for users with this host name, or with this host name and domain name and the host name valid for all computers are extracted. If you do not specify the local host name, migrfwkusr retrieves the host name from the local computer and matches login data for computers with that host name and any domain name. After you run the command, the output_security_file contains the user definitions, which you can use in the Tivoli Workload Scheduler V8.3 environment. 4.8.3 Installing a new master domain manager This section describes how to install a new master domain manager on Windows system. Note: If the installation procedure is successful it is not possible to roll back to the previous version. Rollback is only possible for installations that fail. Install a parallel master domain manager either on the same workstation or on a different workstation where the existing master domain manager is installed. Define the new master domain manager as a full status agent in the domain of the master in the previous environment. 310 Getting Started with IBM Tivoli Workload Scheduler V8.3
- 347. You can install a new master domain manager using the following installation methods: Installing a new master domain manager using the installation wizard To install a master domain manager using the installation wizard, perform the procedure described in 3.2, “Installing new UNIX master using installation wizard” on page 36. Installing a new master domain manager using the silent installation To install a new master domain manager using a silent installation, perform the silent installation procedure described in IBM Tivoli Workload Scheduler Planning and Installation Guide v8.3, SC32-1273. 4.8.4 Importing the migrated security file in the Tivoli Workload Scheduler V8.3 environment To import the migrated security file in the Tivoli Workload Scheduler V8.3 environment, perform the following steps: 1. As m821 user, remove duplicated users and add the tws83 user in the output_security_file, as shown in Example 4-149. Example 4-149 Removing the duplicated users and adding the tws83 user in output_security_file USER MAESTRO # CPU=@+LOGON=tws83a,m821,Administrator,TWS_m821,Root_rolltide-region CPU=@,BAMA+LOGON=tws83a,m821,Administrator,TWS_m821,Root_rolltide-region,m821,ROLLTID EAdministrator BEGIN USEROBJCPU=@ACCESS=ADD,DELETE,DISPLAY,MODIFY,ALTPASS JOBCPU=@ ACCESS=ADD,ADDDEP,ALTPRI,CANCEL,CONFIRM,DELDEP,DELETE,DISPLAY,KILL,MODIFY,RELEASE,REP LY,RERUN,SUBMIT,USE,LIST SCHEDULECPU=@ ACCESS=ADD,ADDDEP,ALTPRI,CANCEL,DELDEP,DELETE,DISPLAY,LIMIT,MODIFY,RELEASE,REPLY,SUBM IT,LIST RESOURCECPU=@ACCESS=ADD,DELETE,DISPLAY,MODIFY,RESOURCE,USE,LIST PROMPTACCESS=ADD,DELETE,DISPLAY,MODIFY,REPLY,USE,LIST FILENAME=@ACCESS=BUILD,DELETE,DISPLAY,MODIFY CPUCPU=@ ACCESS=ADD,CONSOLE,DELETE,DISPLAY,FENCE,LIMIT,LINK,MODIFY,SHUTDOWN,START,STOP,UNLINK, LIST PARAMETERCPU=@ACCESS=ADD,DELETE,DISPLAY,MODIFY CALENDARACCESS=ADD,DELETE,DISPLAY,MODIFY,USE END Chapter 4. Tivoli Workload Scheduler V8.3: Migration 311
- 348. USER OPS # CPU=@+LOGON=Ops CPU=@,BAMA+LOGON=Ops,doc,zoe,lucky,gabby BEGIN USEROBJCPU=@ACCESS=ADD,DELETE,DISPLAY,MODIFY,ALTPASS JOBCPU=@ ACCESS=ADD,ADDDEP,ALTPRI,CANCEL,CONFIRM,DELDEP,DELETE,DISPLAY,KILL,MODIFY,RELEASE,REP LY,RERUN,SUBMIT,USE,LIST SCHEDULECPU=@ ACCESS=ADD,ADDDEP,ALTPRI,CANCEL,DELDEP,DELETE,DISPLAY,LIMIT,MODIFY,RELEASE,REPLY,SUBM IT,LIST RESOURCECPU=@ACCESS=ADD,DELETE,DISPLAY,MODIFY,RESOURCE,USE,LIST PROMPTACCESS=ADD,DELETE,DISPLAY,MODIFY,REPLY,USE,LIST FILENAME=@ACCESS=BUILD,DELETE,DISPLAY,MODIFY CPUCPU=@ ACCESS=ADD,CONSOLE,DELETE,DISPLAY,FENCE,LIMIT,LINK,MODIFY,SHUTDOWN,START,STOP,UNLINK, LIST PARAMETERCPU=@ACCESS=ADD,DELETE,DISPLAY,MODIFY CALENDARACCESS=ADD,DELETE,DISPLAY,MODIFY,USE END USER SCHED # CPU=@+LOGON=Sched CPU=@,BAMA+LOGON=Sched,lauren,hannah,celina,ceasterl,clint BEGIN USEROBJCPU=@ACCESS=ADD,DELETE,DISPLAY,MODIFY,ALTPASS JOBCPU=@ ACCESS=ADD,ADDDEP,ALTPRI,CANCEL,CONFIRM,DELDEP,DELETE,DISPLAY,KILL,MODIFY,RELEASE,REP LY,RERUN,SUBMIT,USE,LIST SCHEDULECPU=@ ACCESS=ADD,ADDDEP,ALTPRI,CANCEL,DELDEP,DELETE,DISPLAY,LIMIT,MODIFY,RELEASE,REPLY,SUBM IT,LIST RESOURCECPU=@ACCESS=ADD,DELETE,DISPLAY,MODIFY,RESOURCE,USE,LIST PROMPTACCESS=ADD,DELETE,DISPLAY,MODIFY,REPLY,USE,LIST FILENAME=@ACCESS=BUILD,DELETE,DISPLAY,MODIFY CPUCPU=@ ACCESS=ADD,CONSOLE,DELETE,DISPLAY,FENCE,LIMIT,LINK,MODIFY,SHUTDOWN,START,STOP,UNLINK, LIST PARAMETERCPU=@ACCESS=ADD,DELETE,DISPLAY,MODIFY CALENDARACCESS=ADD,DELETE,DISPLAY,MODIFY,USE END 312 Getting Started with IBM Tivoli Workload Scheduler V8.3
- 349. 2. As tws83a user, run the dumpsec command to back up the security file definition of new Tivoli Workload Scheduler V8.3, as shown in Example 4-150. Example 4-150 Running dumpsec to back up security file C:Program FilesIBMTWStws83a> C:Program FilesIBMTWStws83a> dumpsec > $TWShomedumpsec.users.tws83 3. As tws83a user, run makesec output_security_file to add new users in the security file of the new Tivoli Workload Scheduler V8.3, as shown in Example 4-151. Example 4-151 Running makesec to add new users in the security file C:Program FilesIBMTWStws83a>makesec c:tws821m821frmwrkusr.txt Tivoli Workload Scheduler (Windows)/MAKESEC V8.3 (9.3.1.1) Licensed Materials - Property of IBM(R) 5698-WSH (C) Copyright IBM Corp 1998, 2006 All rights reserved. US Government User Restricted Rights Use, duplication or disclosure restricted by GSA ADP Schedule Contract with IBM Corp. IBM is a registered trademark of International Business Machines Corporation in the United States, other countries, or both. MAKESEC:Starting user MAESTRO [c:tws821m821frmwrkusr.txt (#3)] MAKESEC:Starting user OPS [c:tws821m821frmwrkusr.txt (#17)] MAKESEC:Starting user SCHED [c:tws821m821frmwrkusr.txt (#31)] MAKESEC:Done with c:tws821m821frmwrkusr.txt, 0 errors (0 Total) MAKESEC:Security file installed as C:Program FilesIBMTWStws83aSecurity Note: output_security_file is the file that you obtain when you run the procedure described in 4.8.2, “Extracting Tivoli Framework user data from security file” on page 307. 4.8.5 Importing the object data This section describes how to import object data from a previous Tivoli Workload Scheduler version into the Tivoli Workload Scheduler V8.3 database. The method you use to import object data by steps depends on whether you are: Importing object data from dumped data files, as described in the following section “Importing object data as a block” on page 321 Chapter 4. Tivoli Workload Scheduler V8.3: Migration 313
- 350. Note: The user who run the datamigrate command must have full access to the database of the previous Tivoli Workload Scheduler environment. The data that you import is created by the composer821 create command before or during the upgrade. See 4.8.1, “Dumping existing objects from the database” on page 305. Importing object data from dumped data files To import data from dumped data files in steps, perform the following steps: 1. Use the optman command to import the installation run number and global options. The syntax of the command is as follows: optman miggrunnb TWS_8.x.x_main_dir optman miggopts TWS_8.x.x_main_dir Here TWS_8.x.x_main_dir indicates the root directory of the previous Tivoli Workload Scheduler version. When the Tivoli Workload Scheduler is on another workstation, on V8.3 environment, mount the directory of the version 8.x.x environment. To do this, the two workstations must have the same system byte order. 2. Use the datamigrate command to import the data from the dumped files, as shown in Example 4-152. Example 4-152 Syntax of the datamigrate command datamigrate -topology topology_filename [-tmppath temporary_path] -prompts prompts_filename [-tmppath temporary_path] -calendars calendars_filename [-tmppath temporary_path] -parms parms_filename [-tmppath temporary_path] -resources resources_filename [-tmppath temporary_path] -users users_filename [-tmppath temporary_path] -jobs jobs_filename [-tmppath temporary_path] -scheds scheds_filename [-tmppath temporary_path] 3. As tws83a user, run the optman miggrunnb command to import the installation run number into the DB2 database, as shown in Example 4-153. Example 4-153 Running optman miggrunnb to import run number C:Program FilesIBMTWStws83a>tws_env.cmd Tivoli Workload Scheduler Environment Successfully Set !!! C:Program FilesIBMTWStws83a>optman miggrunnb c:tws821m821 314 Getting Started with IBM Tivoli Workload Scheduler V8.3
- 351. Tivoli Workload Scheduler (Windows)/OPTMAN V8.3 (1.0) Licensed Materials - Property of IBM(R) 5698-WSH (C) Copyright IBM Corp 1998, 2006 All rights reserved. US Government User Restricted Rights Use, duplication or disclosure restricted by GSA ADP Schedule Contract with IBM Corp. IBM is a registered trademark of International Business Machines Corporation in the United States, other countries, or both. Installed for user "ROLLTIDEtws83a". Locale LANG set to the following: "en" Importing 'run number' and 'confirm run number' from c:tws821m821mozartrunmsgno Loading property runNumber AWSJCL050I Command "chg" completed successfully. Loading property confirmRunNumber AWSJCL050I Command "chg" completed successful 4. As tws83 user, run optman miggopts command to import the global options into the DB2 database, as shown in Example 4-154. Example 4-154 Running optman miggrunnb to import run number C:Program FilesIBMTWStws83a>optman miggopts c:tws821m821 Tivoli Workload Scheduler (Windows)/OPTMAN V8.3 (1.0) Licensed Materials - Property of IBM(R) 5698-WSH (C) Copyright IBM Corp 1998, 2006 All rights reserved. US Government User Restricted Rights Use, duplication or disclosure restricted by GSA ADP Schedule Contract with IBM Corp. IBM is a registered trademark of International Business Machines Corporation in the United States, other countries, or both. Installed for user "ROLLTIDEtws83a". Locale LANG set to the following: "en" AWSBEH117I Updating the database global options from data in the file "c:tws821 m821mozartglobalopts". Converting globalopts property 'company' to optman property 'companyName'... AWSJCL050I Command "chg" completed successfully. Converting globalopts property 'automaticallygrantlogonasbatch' to optman property 'enLogonBatch'... AWSJCL050I Command "chg" completed successfully. Converting globalopts property 'ignorecalendars' to optman property 'ignoreCals' ... Chapter 4. Tivoli Workload Scheduler V8.3: Migration 315
- 352. AWSJCL050I Command "chg" completed successfully. Converting globalopts property 'centralizedsecurity' to optman property 'enCentS ec'... AWSJCL050I Command "chg" completed successfully. Converting globalopts property 'enablelistsecuritycheck' to optman property 'enL istSecChk'... AWSJCL050I Command "chg" completed successfully. Converting globalopts property 'enableswitchfaulttolerance' to optman property ' enSwFaultTol'... AWSJCL050I Command "chg" completed successfully. Converting globalopts property 'planauditlevel' to optman property 'enPlanAudit' ... AWSJCL050I Command "chg" completed successfully. Converting globalopts property 'databaseauditlevel' to optman property 'enDbAudit'... AWSJCL050I Command "chg" completed successfully. Converting globalopts property 'timezoneenable' to optman property 'enTimeZone'. .. AWSJCL050I Command "chg" completed successfully. Converting globalopts property 'carryforward' to optman property 'enCarryForward '... AWSJCL050I Command "chg" completed successfully. Converting globalopts property 'start' to optman property 'startOfDay'... AWSJCL050I Command "chg" completed successfully. Converting globalopts property 'bmmsgbase' to optman property 'baseRecPrompt'... AWSJCL050I Command "chg" completed successfully. Converting globalopts property 'bmmsgdelta' to optman property 'extRecPrompt'... AWSJCL050I Command "chg" completed successfully. Converting globalopts property 'history' to optman property 'statsHistory'... AWSJCL050I Command "chg" completed successfully. Converting globalopts property 'retainrerunjobname' to optman property 'enRetain NameOnRerunFrom'... AWSJCL050I Command "chg" completed successfully. Notes: TWS_8.x.x_main_dir indicates the root directory of the previous Tivoli Workload Scheduler version. When the Tivoli Workload Scheduler is on another workstation, on the Tivoli Workload Scheduler V8.3 environment, mount the directory of the V8.x.x environment. To do this, the two workstations must have the same system byte order. 316 Getting Started with IBM Tivoli Workload Scheduler V8.3
- 353. 5. Run the optman ls command to check the last execution, as shown in Example 4-155. Example 4-155 Running optman ls C:Program FilesIBMTWStws83a>optman ls Tivoli Workload Scheduler (Windows)/OPTMAN V8.3 (1.0) Licensed Materials - Property of IBM(R) 5698-WSH (C) Copyright IBM Corp 1998, 2006 All rights reserved. US Government User Restricted Rights Use, duplication or disclosure restricted by GSA ADP Schedule Contract with IBM Corp. IBM is a registered trademark of International Business Machines Corporation in the United States, other countries, or both. Installed for user "ROLLTIDEtws83a". Locale LANG set to the following: "en" baseRecPrompt / bp = 1000 carryStates / cs = null companyName / cn = TIVOLI enCFInterNetworkDeps / ci = YES enCFResourceQuantity / rq = YES enCarryForward / cf = YES enCentSec / ts = NO enDbAudit / da = 0 enEmptySchedsAreSucc / es = NO enListSecChk / sc = NO enLogonBatch / lb = NO enPlanAudit / pa = 0 enPreventStart / ps = YES enRetainNameOnRerunFrom / rr = NO enStrEncrypt / se = NO enSwFaultTol / sw = NO enTimeZone / tz = NO extRecPrompt / xp = 1000 ignoreCals / ic = NO logmanMinMaxPolicy / lm = BOTH logmanSmoothPolicy / lt = -1 maxLen / xl = 14 minLen / ml = 8 startOfDay / sd = 0600 statsHistory / sh = 10 AWSJCL050I Command "ls" completed successfully. Chapter 4. Tivoli Workload Scheduler V8.3: Migration 317
- 354. 6. As tws83a user, use the datamigrate command to import the data from the dumped files, as shown in Example 4-156 on page 319. Notes: If you want to import the data directly from the existing files in the mozart directory, see “Importing object data directly from mozart directory” on page 320. If you want to perform a complete import of data as a block, see “Importing object data as a block” on page 321. $ datamigrate -topology topology_filename [-tmppath temporary_path] -prompts prompts_filename [-tmppath temporary_path] -calendars calendars_filename [-tmppath temporary_path] -parms parms_filename [-tmppath temporary_path] -resources resources_filename [-tmppath temporary_path] -users users_filename [-tmppath temporary_path] -jobs jobs_filename [-tmppath temporary_path] -scheds scheds_filename [-tmppath temporary_path] The following list shows the parameters of the datamigrate command: – topology_filename is the name of the topology file created during the dump process. – prompts_filename is the name of the prompts file created during the dump process. – calendars_filename is the name of the calendars file created during the dump process. – parms_filename is the name of the parameters file created during the dump process. – resources_filename is the name of the resources file created during the dump process. – users_filename is the name of the users file created during the dump process. – jobs_filename is the name of the jobs file created during the dump process. – scheds_filename is the name of the job streams file created during the dump process. – temporary_path is the temporary path where datamigrate command stores the files during the migration process. 318 Getting Started with IBM Tivoli Workload Scheduler V8.3
- 355. Example 4-156 Running the datamigrate command c:Program FilesIBMTWStws83a datamigrate -topology c:tws821m821dumpdatatopology datamigrate -prompts c:tws821m821dumpdata datamigrate -calendars c:tws821m821dumpdatacalendars datamigrate -parms c:tws821m821dumpdataparms datamigrate -resources c:tws821m821dumpdataresources datamigrate -users c:tws821m821dumpdatausers datamigrate -jobs c:tws821m821dumpdatajobs datamigrate -scheds c:tws821m821dumpdatascheds Example: Sample with the tmppath option datamigrate -scheds c:tws821m821dumpdatascheds -tmppath c:tmp 7. Run the composer display command to check the last execution, as shown in Example 4-157. Example 4-157 Running the composer display command c:Program FilesIBMTWStws83a composer display cpu=@ composer display jobs=@ composer display sched=@ 8. Check whether there are jobs or job streams related to the previous cpuname in the new Tivoli Workload Scheduler V8.3 definition, as shown in Example 4-158. If there are, change them to the new cpuname or delete them. Example 4-158 Checking jobs and job streams related to the previous cpuname c:Program FilesIBMTWStws83a composer display jobs=old_cpuname#@ composer display sched=old_cpuname#@ 9. Delete the FINAL job stream related to the previous cpuname from the new Tivoli Workload Scheduler V8.3 definition, as shown in Example 4-159. Example 4-159 Deleting the FINAL job stream related to the previous cpuname c:Program FilesIBMTWStws83a composer delete sched=old_cpuname#FINAL 10.Delete the Jnextday job related to the previous cpuname from the new Tivoli Workload Scheduler V8.3 definition, as shown in Example 4-160. Chapter 4. Tivoli Workload Scheduler V8.3: Migration 319
- 356. Example 4-160 Deleting Jnextday job related to the previous cpuname c:Program FilesIBMTWStws83a composer delete job=old_cpuname#Jnextday 11.Delete the previous cpuname from the new Tivoli Workload Scheduler V8.3 definition, as shown in Example 4-161. Example 4-161 Deleting the previous cpuname from the new Tivoli Workload Scheduler Version 8.3 c:Program FilesIBMTWStws83a composer delete cpu=old_cpuname Importing object data directly from mozart directory To import data directly from the existing files in the mozart directory, as tws83a user, use the datamigrate command, as shown in Example 4-162. datamigrate object_type -path TWS_8.x.x_main_dir [-tmppath temporary_path] Example 4-162 Running the datamigrate command c:Program FilesIBMTWStws83a datamigrate -topology -path c:tws821m821 datamigrate -prompts -path c:tws821m821 datamigrate -calendars-path c:tws821m821 datamigrate -parms - path c:tws821m821 datamigrate -resources -path c:tws821m821 datamigrate -users -path c:tws821m821 datamigrate -jobs -path c:tws821m821 datamigrate -scheds-path c:tws821m821 In Example 4-162: object_type is the type of object that you are importing. The possible values are: – -topology – -prompts – -calendars – -parms – -resources – -users – -jobs – -scheds 320 Getting Started with IBM Tivoli Workload Scheduler V8.3
- 357. TWS_8.x.x_main_dir indicates the root directory of the previous Tivoli Workload Scheduler version. temporary_path is the temporary path where the datamigrate command stores the files during the migration process. When the Tivoli Workload Scheduler is on another workstation, on the Tivoli Workload Scheduler V8.3 environment, mount the directory of the version 8.x.x environment. To do this, the two workstations must have the same system byte order. Importing object data as a block To import data as a block, as tws83a user, use the datamigrate command, as shown in Example 4-163. datamigrate -path TWS_8.x.x_main_dir [-tmppath temporary_path] Example 4-163 Running the datamigrate command c:Program FilesIBMTWStws83a >datamigrate -path c:tws821m821 -tmppath $TWShommigratedata In Example 4-163: TWS_8.x.x_main_dir indicates the root directory of the previous Tivoli Workload Scheduler version. temporary_path is the temporary path where the datamigrate command stores the files during the migration process. When the Tivoli Workload Scheduler is on another workstation, on the Tivoli Workload Scheduler V8.3 environment, mount the directory of the version 8.x.x environment. To do this, the two workstations must have the same system byte order. 4.8.6 Switching a master domain manager To switch from the previous master domain manager to the new one, perform the following steps: 1. As m821 user, run the conman switchmgr command in the previous master domain manager: c:tws821m821 conman “switchmgr MASTERDM;new_master_cpu_name” Here new_master_cpu_name is the name of the workstation where the new master domain manager resides. Chapter 4. Tivoli Workload Scheduler V8.3: Migration 321
- 358. 2. As tws83a user, run the optman chg cf=ALL command in the new master domain manager to ensure that the carry forward option is set to all: c:Program FilesIBMTWStws83a optman chg cf=ALL 3. As tws83a user, run the optman ls command in the new master domain managerto check the carry forward option: c:Program FilesIBMTWStws83a optman ls 4. As tws83a user, run the JnextPlan command in the new master domain manager to create a plan with 0 extension period, which begins at the end of the current plan: c:Program FilesIBMTWStws83a JnextPlan -from start_time -for 0000 Example 4-164 shows the JnextPlan command. Example 4-164 Running the JnextPlan command c:Program FilesIBMTWStws83a JnextPlan -from 05/25/2006 0600 -for 0000 In Example 4-164, start_time is the date and time when the current plan ends. If you run Jnextday, and the plan is created from today at 06:00 until tomorrow at 05:59, the start_time of the new plan must be tomorrow at the default time of 06:00. 5. As tws83a user, run the composer add and conman sbs in the new master domain manager: c:Program FilesIBMTWStws83a composer add Sfinal composer display sched=FINAL conman “sbs FINAL” Notes: Because you are adding a new schedule FINAL, it is important that the previous schedule FINAL does not run. To avoid this, either delete the previous schedule FINAL from the database or set the priority to 0. To delete the previous schedule FINAL, run the following command: c:Program FilesIBMTWStws83a composer del sched=old_cpu_name#FINAL old_master_cpu_name is the name of the workstation where the previous master domain manager resides. 322 Getting Started with IBM Tivoli Workload Scheduler V8.3
- 359. 5 Chapter 5. DB2, WebSphere, and Lightweight Directory Access Protocol: Considerations One of the major changes for this release is the replacement of the proprietary mozart database with a repository of Tivoli Workload Scheduler objects maintained in a DB2 Universal Database (UDB) Enterprise Server Edition relational database. The information contained within the relational database includes workload definitions such as job streams, workstations, scheduling rules including calendars and run cycles, and the preproduction plan. A copy of the DB2 Universal Database Enterprise Server Edition is included in the Tivoli Workload Scheduler software bundle, but with a license for use with Tivoli Workload Scheduler only. Read/write access to database tables and other structures, such as the Symphony file and Mailbox.msg file, is now implemented within an embedded application server. In this case, the server is WebSphere Application Server Express, which also provides the connections for the Job Scheduling Console (JSC) and a new feature for this release, Remote Composer Command Line Interface (CLI). © Copyright IBM Corp. 2006. All rights reserved. 323
- 360. In this chapter, we provide an overview of the DB2 Universal Database and the embedded WebSphere Application Server Express, and how IBM Tivoli Workload Scheduler V8.3 integrates with them. We also discuss some of the considerations for using IBM Tivoli Workload Scheduler V8.3 in a security-sensitive environment. This chapter consists of the following sections: “An overview of DB2 Universal Database” on page 324 “DB2 Universal Database installation considerations” on page 328 “Creating a DB2 Universal Database instance” on page 337 “Creating a DB2 Universal Database” on page 340 “Backing up the database” on page 341 “Restoring a backup of the database” on page 342 “Referential integrity” on page 344 “Object and database locking” on page 346 “DB2 maintenance” on page 352 “WebSphere Application Server” on page 354 “Installing multiple application service instances” on page 356 “Lightweight Directory Access Protocol” on page 376 “Configuring the application server to start and stop without a password” on page 391 “Network configuration for Job Scheduling Console” on page 393 5.1 An overview of DB2 Universal Database DB2 UDB Enterprise Server Edition (ESE) is designed to meet the relational database server requirements of mid-size to large-size businesses. It can be deployed on Linux, UNIX, or Windows servers of any size, from one central processing unit (CPU) to hundreds of CPUs. DB2 ESE is an ideal foundation for building on-demand enterprise-wide solutions, such as large data warehouses of multiple terabyte size or high performing 24x7 available high-volume transaction processing business solutions, or Web-based solutions. It is the database back end of choice for industry-leading independent software vendors (ISVs) building enterprise solutions, such as business intelligence, content management, e-commerce, enterprise resource planning (ERP), customer relationship management (CRM), or supply chain management (SCM). Additionally, DB2 324 Getting Started with IBM Tivoli Workload Scheduler V8.3
- 361. Enterprise Server Edition offers connectivity, compatibility, and integration with other enterprise DB2 and IBM Informix® data sources. 5.1.1 Deployment topologies DB2 UDB Enterprise Server Edition can be used with a wide range of applications, whether they are developed in-house or prepackaged as is the case with IBM Tivoli Workload Scheduler V8.3. The applications can be deployed with DB2 using a number of configurations: Single-tier In this configuration, Tivoli Workload Scheduler V8.3 and the database reside on the same system. In enterprise environments, it might be rare to see such a configuration, because remote access to a database server is typically required. Nonetheless, this is quite common for development environments that can later be deployed transparently in a multi-tier DB2 environment without any changes. Client/server or 2-tier Tivoli Workload Scheduler V8.3 and the database reside on separate systems. The machines where the Tivoli Workload Scheduler V8.3 master and backup master run typically have a DB2 client installed, which communicates over the network to a database server. For Tivoli Workload Scheduler V8.3, the physical location of the data is transparent. Tivoli Workload Scheduler V8.3 communicates with the DB2 client using a standard interface and the DB2 client takes over the task of accessing the data over the network. DB2 provides exceptional flexibility for mixing and matching client and server platforms in a heterogeneous environment. DB2 client and server code is available for a wide variety of platforms. For example, the application can run on a Windows-based machine with a DB2 client for Windows, which can then access a DB2 database on a Linux server. Similarly, the Linux machine can act as a client and access data from UNIX servers or mainframes. 5.1.2 Database objects In this section, we introduce some of the DB2 objects and their relationship to each other. Instances An instance (sometimes called a database manager) is the DB2 code that manages data. It controls what can be done to the data, and manages system resources assigned to it. Each instance is a complete environment. It contains all the database partitions defined for a given parallel database system. An Chapter 5. DB2, WebSphere, and Lightweight Directory Access Protocol: Considerations 325
- 362. instance has its own databases (which other instances cannot access directly), and all its database partitions share the same system directories. It also has separate security from other instances on the same machine (system). This allows both production and development environments to be run on the same machine under separate DB2 instances without interfering with each other. Databases A relational database presents data as a collection of tables. A table consists of a defined number of columns and any number of rows. Each database includes a set of system catalog tables, which describes the logical and physical structure of the data, a configuration file containing the parameter values allocated for the database, and a recovery log. Database partition groups A database partition group is a set of one or more database partitions. Before you create tables for the database, you have to create the database partition group where the table spaces will be stored, and then create the table space where the tables will be stored. If a partition group is not specified, there is a default group where table spaces are allocated. In previous versions of DB2, database partition groups were known as nodegroups. In a non-partitioned environment, all the data resides in a single partition. Therefore, it is not necessary to consider partition groups. Table spaces A database is organized into parts called table spaces. A table space is a place to store tables. When you create a table, you can decide to have certain objects such as indexes and large object (LOB) data kept separately from the rest of the table data. A table space can also be spread over one or more physical storage devices. Table spaces reside in database partition groups. Table space definitions and attributes are recorded in the database system catalog. Containers are assigned to table spaces. A container is an allocation of physical storage (such as a file or a device). A table space can be either system-managed space (SMS), or database-managed space (DMS). For an SMS table space, each container is a directory in the file space of the operating system, and the operating system's file manager controls the storage space. For a DMS table space, each container is either a fixed size preallocated file, or a physical device such as a disk, and the database manager controls the storage space. Tables A relational database presents data as a collection of tables. A table consists of data that is logically arranged in columns and rows. All database and table data is assigned to table spaces. The data in the table is logically related, and relationships can be defined between tables. Data can be viewed and 326 Getting Started with IBM Tivoli Workload Scheduler V8.3
- 363. manipulated based on mathematical principles and operations called relations. Table data is accessed through Structured Query Language (SQL), which is a standardized language for defining and manipulating data in a relational database. A query is used in applications or by users to retrieve data from a database. The query uses SQL to create a statement in the form of: SELECT data_name FROM table_name Buffer pools A buffer pool is the amount of main memory allocated to cache table and index data pages as they are being read from disk, or being modified. The purpose of the buffer pool is to improve system performance. Data can be accessed much faster from memory than from disk. Therefore, the fewer times the database manager has to read from or write to a disk (input/output (I/O)), the better the performance. Note: You can create more than one buffer pool, although for most situations one is sufficient. The configuration of the buffer pool is the most important tuning area, because it enables you to reduce the delay caused by slow I/O. 5.1.3 Parallelism A system with a single processor and disk has limitations on the amount of data, users, and applications that it can handle. Parallel processing, which is key for enterprise workloads, involves spreading the load across several processors and disks, which facilitates large volumes of data and high transaction rates to be processed. In many environments, the data volumes are growing at a phenomenal rate. Therefore, a database management system has to easily scale to increased loads with the addition of more disks and CPUs. The parallel technology of DB2 enables highly scalable performance on large databases by breaking the processing into separate execution components, which can be run concurrently on multiple processors. Elapsed times for queries can be dramatically reduced by processing the individual queries in parallel. DB2 supports a scalable growth path to easily add more processing power to an existing system by either scaling up (Symmetric Multiprocessing (SMP)) or scaling out (Massive Multiprocessing (MPP)), or both. Chapter 5. DB2, WebSphere, and Lightweight Directory Access Protocol: Considerations 327
- 364. 5.2 DB2 Universal Database installation considerations When your required level of reliability, availability, and scalability are met by a locally installed database on the same machine as the Tivoli Workload Scheduler V8.3 master itself or even when dictated by a remote database, which might even be partitioned across a number of nodes in a cluster, DB2 Universal Database meets these requirements. The InstallShield Multiplatform (ISMP) wizard runs a number of shell scripts, which automatically create the Tivoli Workload Scheduler V8.3 database in one of two scenarios: Tivoli Workload Scheduler V8.3 Engine and DB2 Universal Database are installed on the same machine: In this case, the shell scripts connect to the local DB2 instance, check for the existence of the Tivoli Workload Scheduler database, and creates a new one if it does not exist. Tivoli Workload Scheduler V8.3 Engine and DB2 Universal Database are installed on separate machines: In this case, the shell scripts run on the same machine where the Tivoli Workload Scheduler V8.3 Engine is installed, but connect to the remote DB2 instance using a locally installed DB2 Administration Client to create the Tivoli Workload Scheduler database, cataloging it for remote access. Before creating the database, the ISMP wizard offers a number of options regarding the installation of DB2: Inspects an existing DB2 8.2 installation to determine whether it is suitable Installs DB2 Universal Database Enterprise Server release 8.2 Installs DB2 Administration Client release 8.2 328 Getting Started with IBM Tivoli Workload Scheduler V8.3
- 365. Figure 5-1 shows an example of the ISMP wizard panel. Figure 5-1 Choosing DB2 Universal Database installation action panel When installing either DB2 Universal Database or DB2 Administration Client, the ISMP wizard launches a silent installation using a response file created in $TEMP/tws83/DB2Response.rsp. However, any modifications made to this response file are not supported. Tip: Install the DB2 Universal Database or DB2 Administration Client before the Tivoli Workload Scheduler installation. Use the option to inspect an existing DB2 8.2 installation in preference to the ISMP wizard launching the silent DB2 installation. This approach makes it easier to diagnose and correct any problems encountered during the DB2 installation. Chapter 5. DB2, WebSphere, and Lightweight Directory Access Protocol: Considerations 329
- 366. Verifying an existing DB2 instance If you select the option to verify an existing DB2 installation, the DB2 instance that you intend IBM Tivoli Workload Scheduler V8.3 to use must already exist before you start the installation of your Tivoli Workload Scheduler V8.3 master. Typically, the first DB2 instance is created for you by the DB2 installation wizard. However, if you select the option to skip the instance creation phase during the DB2 installation or are already using the first instance for some other database and want Tivoli Workload Scheduler to have a DB2 instance of its own, you have to manually create the new instance before you start the installation of your Tivoli Workload Scheduler V8.3 master. We provide the steps required to manually create a new DB2 instance in 5.3, “Creating a DB2 Universal Database instance” on page 337. After you have created the DB2 instance, launched the ISMP wizard, and the wizard has determined that you are installing a Tivoli Workload Scheduler V8.3 master, the wizard starts to collect some configuration details specific to the DB2 installation and the Tivoli Workload Scheduler database that it has to create. The ISMP wizard first asks you to specify the fully qualified path to the sqllib directory of the DB2 instance installed on the local box, as shown in Figure 5-2. Typically, this is the $HOME directory of the DB2 instance owner if the DB2 server is installed locally, or the DB2 client administrator if the DB2 server is installed on a remote server and the DB2 Administration Client is installed locally. 330 Getting Started with IBM Tivoli Workload Scheduler V8.3
- 367. Figure 5-2 Specifying the location of the DB2 sqllib directory The ISMP wizard then inspects this directory and determines whether the locally installed version is the DB2 Universal Database Enterprise Server or the DB2 Administration Client. Note: For the inspection and validation to succeed, the locally installed DB2 must be release 8.2. The ISMP wizard first determines whether the DB2 database is local or remote, the DB2 Universal Database Enterprise Server is found, and the DB2 Administration Client is found. Then, it requests the information required by Tivoli Workload Scheduler V8.3 to establish a connection to the database server. Chapter 5. DB2, WebSphere, and Lightweight Directory Access Protocol: Considerations 331
- 368. Configuring a local database If the database is local, the ISMP wizard requires the following DB2 server configuration information: The instance name, for example, db2inst1 The Transmission Control Protocol (TCP) port the instance is configured to listen on for connections, for example, 50000 The user name for the DB2 server administrator; typically, this is the same as the instance name The password for the DB2 server administrator Figure 5-3 shows an example of this ISMP panel. Figure 5-3 DB2 server configuration information 332 Getting Started with IBM Tivoli Workload Scheduler V8.3
- 369. The data source properties of the application server are configured to use this information to access the IBM Tivoli Workload Scheduler V8.3 database. Note: When installing a Tivoli Workload Scheduler backup master, the installed instance points to the database of the Tivoli Workload Scheduler master. Configuring a remote database If the database is remote, the ISMP wizard requires the following DB2 client configuration information: The host name or Internet Protocol (IP) address of the remote database server The TCP port the instance is configured to listen on for connections, for example, 50000 The user name of the DB2 server administrator on the remote server The password for the remote DB2 server administrator The user name of the DB2 client administrator on the local server The password for the local DB2 client administrator Chapter 5. DB2, WebSphere, and Lightweight Directory Access Protocol: Considerations 333
- 370. Figure 5-4 shows an example of this ISMP wizard panel. Figure 5-4 DB2 client configuration information: Part 1 You can also use this ISMP panel to optionally specify a user other than the DB2 server administrator on the remote server, which Tivoli Workload Scheduler uses instead of the DB2 server administrator to access the database. 334 Getting Started with IBM Tivoli Workload Scheduler V8.3
- 371. See Figure 5-5 for an example of this section of the ISMP panel. Figure 5-5 DB2 client configuration information: Part 2 Note: To enter details into the DB2 Server User and DB2 Server User Password fields, select the check box just above the DB2 Server User field. Information required to create the database Regardless of whether you are creating a local or a remote database, when you have supplied the required DB2 connection configuration information, the ISMP wizard requires the following database configuration information: Database name Optionally, the following advanced configuration parameters: Table space name Table space path Chapter 5. DB2, WebSphere, and Lightweight Directory Access Protocol: Considerations 335
- 372. Figure 5-6 shows an example of the corresponding ISMP panel. Figure 5-6 Database configuration information Note: To modify the Tablespace Name and Tablespace Path details, select the check box just above the Tablespace Name field. After you specify the information in this panel, the ISMP wizard has all the required information to connect to the DB2 instance and create the Tivoli Workload Scheduler database. During the installation phase, the ISMP wizard creates the directories scripts and SQL under the temporary directory /tmp/tws83 on UNIX or Linux and C:Documents and SettingsusernameLocal SettingsTemptws83 on Windows. A number of customized SQL scripts are created in the sql directory. These SQL scripts are used by the dbsetup.sh (UNIX or Linux) and dbsetup.bat (Windows) scripts found in the scripts directory to create and populate the database. 336 Getting Started with IBM Tivoli Workload Scheduler V8.3
- 373. Tip: After a successful installation, make a backup copy of these customized SQL scripts and the dbsetup.sh/dbsetup.bat script. We recommend this because you can use them to re-create the database without having to reinstall the Tivoli Workload Scheduler master, if the database is damaged or lost, and a valid database backup is not available to restore. 5.3 Creating a DB2 Universal Database instance Before you install an IBM Tivoli Workload Scheduler V8.3 master, it is necessary to have an existing DB2 instance available for Tivoli Workload Scheduler to use. Typically, the DB2 installation wizard creates the first DB2 instance for you. However, you might have to manually create an instance. The following list provides some of the reasons: During the DB2 installation, the option to not create the initial instance is selected The initial instance created during the DB2 installation is already in use, and you want to keep the Tivoli Workload Scheduler database separate from an existing database in the initial instance The instance containing the Tivoli Workload Scheduler V8.3 database is damaged and a new instance has to be created to restore a backup of the Tivoli Workload Scheduler V8.3 database Before you create a new instance, you have to create users for the instance owner and fenced user (a user used to enter user-defined functions and stored procedures). 5.3.1 Preparing for an instance creation To create users for the instance owner and fenced user on a Linux system, perform the following steps: 1. Log on as root to the computer which has DB2 installed. 2. Create dedicated groups for both of the required users, for example, db2grp2 for the instance owner and db2fgrp2 for the fenced user: # groupadd -g 104 db2grp2 # groupadd -g 105 db2fgrp2 Chapter 5. DB2, WebSphere, and Lightweight Directory Access Protocol: Considerations 337
- 374. 3. Create a user who belongs to each group (created in the previous step) using the following commands: # useradd -u 104 -g db2grp2 -d /opt/IBM/db2inst2 db2inst2 # useradd -u 105 -g db2fgrp2 -d /opt/IBM/db2fenc2 db2fenc2 The home directory for db2inst2 is set as the instance home directory. 4. Set an initial password for each user by entering the following commands: # passwd db2inst2 # passwd db2fenc2 5. Add the db2inst2 user to the dasadm1 group. 6. Log off. 7. Log on as both users (db2inst2 and db2fenc2) in turn to test whether the user IDs and passwords are created correctly. 8. Log off. 5.3.2 Creating the instance Assuming that the necessary users and groups already exist for the new instance, you can create the instance by performing the following steps: 1. Log on as root. Note: Only the root user can create an instance. 2. Create the instance using the command: # /opt/IBM/db2/V8.1/instance/db2icrt -s ESE -u fenceuser owneruser In this command, fenceuser is the user name created previously for the fence user and owneruser is the user name created for the instance owner. The -s ESE switch specifies the type of instance, in this case, an instance for a database server with local and remote clients. Use the -s option only when you create an instance other than the default instance for your system. Note: On AIX, the DB2 installation directory is /usr/opt/db2_08_01, not /opt/IBM/db2/V8.1 as it is on the other UNIX or Linux platforms. 3. Switch to the instance owning user and check whether the instance can be started successfully by running the following command: # db2start 338 Getting Started with IBM Tivoli Workload Scheduler V8.3
- 375. If the instance starts correctly, you see an output similar to Example 5-1. Example 5-1 Starting the new DB2 instance # su - db2inst2 $ db2start 03/28/2006 08:00:00 0 0 SQL1063N DB2START processing was successful. SQL1063N DB2START processing was successful. $ 4. Enable client connections. To make a DB2 instance accept connections from database clients over Transmission Control Protocol/Internet Protocol (TCP/IP), you must update a registry variable and a database manager configuration parameter. a. As the instance owner, run the following db2set command to update the registry variable appropriately: $ db2set DB2COMM=TCPIP b. Update the database manager configuration by running the command: $ db2 update dbm cfg using SVCENAME servicename In this command, servicename is either a service name in /etc/services or a port number. We recommend that you register a service name such as db2c_db2inst2 in /etc/services (see Example 5-2), and use this name rather than a port number. Also ensure that this entry is duplicated on any remote computers that require access to this instance using the DB2 Administration Client, such as your Tivoli Workload Scheduler V8.3 master and backup master. Example 5-2 The /etc/service entries created by db2icrt db2c_db2inst250001/tcp 5. Stop and restart the instance for this configuration change to take effect: $ db2stop $ db2start The instance can now be used by the ISMP wizard installing a Tivoli Workload Scheduler V8.3 master to create the Tivoli Workload Scheduler V8.3 database. It can also be used to restore an existing Tivoli Workload Scheduler V8.3 database backup that is created using the db_backup.sh (UNIX or Linux) or db_backup.bat (Windows) utility. For further details about these topics, see 5.5, “Backing up the database” on page 341, and 5.6, “Restoring a backup of the database” on page 342. Chapter 5. DB2, WebSphere, and Lightweight Directory Access Protocol: Considerations 339
- 376. 5.4 Creating a DB2 Universal Database During the installation of an IBM Tivoli Workload Scheduler V8.3 master, the Tivoli Workload Scheduler V8.3 database is automatically created by the ISMP wizard within the DB2 instance specified during the information-gathering phase of the installation. See Figure 5-4 on page 334 for an example of the DB2 instance properties for a remote DB2 database. The Tivoli Workload Scheduler V8.3 database is also created automatically if a backup of an existing Tivoli Workload Scheduler V8.3 database is restored into a newly created or existing DB2 instance, as demonstrated in 5.6, “Restoring a backup of the database” on page 342. However, it is possible to manually create a new database for IBM Tivoli Workload Scheduler V8.3 using the dbsetup.sh (UNIX or Linux) or dbstetup.bat (Windows) script. Important: Do not run these scripts against a DB2 instance containing a working Tivoli Workload Scheduler V8.3 database, because this might damage or overwrite your existing database. After the successful installation of a Tivoli Workload Scheduler V8.3 master, customized versions of these scripts and the associated SQL scripts are found in the /tmp/tws83/scripts and /tmp/tws83/sql directories. Tip: After the successful installation of a Tivoli Workload Scheduler V8.3 master, make a backup copy of the scripts found in these two directories, and a copy of the /tmp/tws83/ItemConfigure_TWS_DBOut.xml file, which contains the command line with its arguments executed to create the database. If you have a copy of the scripts and SQL scripts created at installation time, then you can re-create the database easily. First, ensure that the scripts and SQL scripts are restored to their original locations under the TWShome/tmp directory. Then, run the command found between the <command> and </command> tags in the ItemConfigure_TWS_DBOut.xml file, substituting the token ******** with the appropriate password for the DB2 instance owner as root, for example: # /tmp/tws83/scripts/createdb_root.sh TWS FALSE TWS_ND edinburg 50000 db2inst1 my_password db2inst1 FALSE If you do not have copies of the customized scripts, the original scripts and SQL scripts are found in the Platform/tws_tools directory on the Tivoli Workload Scheduler V8.3 installation CD. However, you have to customize these scripts to match the local installation before you use them to re-create the database. 340 Getting Started with IBM Tivoli Workload Scheduler V8.3
- 377. 5.5 Backing up the database IBM Tivoli Workload Scheduler V8.3 includes the db_backup.sh (UNIX or Linux) and db_backup.bat (Windows) utilities, which you can use to make a backup copy of the Tivoli Workload Scheduler V8.3 database using the db2 backup database command. The db_backup.sh utility does a full offline backup. Therefore, run it only when there is no scheduling activity that requires the database. For example, do not run db_backup while FINAL is running, jobs or job streams are being submitted ad hoc, or while scheduling objects are being modified using composer or the JSC. When there is no database activity, run the following command to back up the IBM Tivoli Workload Scheduler V8.3 database: $ db_backup.sh database directory/device profile username password In this command: database is the alias of the database to back up. directory/device is a list of directory or tape device names. Specify the full path on which the directory resides. This target directory or device must exist on the database server. If you specify more than one target, ensure that the targets are comma-separated and the list is enclosed in quotation marks, for example, “target1, target2, target3”. The first target listed is opened first and the media header and special files (including the configuration file, table space, and history file) are placed in this target. All remaining targets are opened, and then used in parallel during the backup operation. profile is the path to the DB2 profile for the instance. username is the user name for the instance owner. password is the password for the instance owner. For example, the following command backs up a database with the alias Tivoli Workload Scheduler owned by the user db2inst1 to the directory /tmp/db_backup on the database server: $ db_backup.sh TWS /tmp/db_backup /home/db2inst1/sqllib/db2profile db2inst1 my_password Chapter 5. DB2, WebSphere, and Lightweight Directory Access Protocol: Considerations 341
- 378. Example 5-3 shows the resulting output. Example 5-3 Making a backup copy of the Tivoli Workload Scheduler V8.3 database $ db_backup.sh TWS /tmp/db_backup /home/db2inst1/sqllib/db2profile db2inst1 my_password Database Connection Information Database server = DB2/LINUX 8.2.0 SQL authorization ID = DB2INST1 Local database alias = TWS DB20000I The QUIESCE DATABASE command completed successfully. DB20000I The SQL command completed successfully. Starting the database backup... Backup successful. The timestamp for this backup image is : 20060328115926 Database Connection Information Database server = DB2/LINUX 8.2.0 SQL authorization ID = DB2INST1 Local database alias = TWS DB20000I The UNQUIESCE DATABASE command completed successfully. DB20000I The SQL command completed successfully. The TWS database has been successfully exported. $ 5.6 Restoring a backup of the database There is no utility command such as the db_backup.sh script to restore a database backup. However, you can use the DB2 restore database command to rebuild a damaged or corrupted database, which has been backed up using the IBM Tivoli Workload Scheduler V8.3 db_backup.sh script (see 5.5, “Backing up the database” on page 341) or the DB2 backup utility. When restoring to an existing database, you must not be connected to the database that is to be restored. The restore utility automatically establishes a connection to the specified database, and this connection is terminated at the 342 Getting Started with IBM Tivoli Workload Scheduler V8.3
- 379. completion of the restore operation. When restoring to a new database, an instance attachment is required to create the database. When restoring to a new remote database, you must first attach to the instance where the new database will reside, then create the new database, specifying the code page and the territory of the server. In the following example, we assume that you are performing the restore locally on the database server, and the instance exists already, either because you are restoring to an existing database, or are restoring to a new database in an existing instance. For instructions about how to create a new instance (if this is necessary), see 5.3.2, “Creating the instance” on page 338. Log on to the database server as the instance owner, and run the following command: $ db2 restore db database from directory/device taken at date-time In this command: database is the alias of the database to backup directory/device is the fully qualified path name of the directory or device on which the backup image resides This target directory or device must exist on the database server. date-time is the time stamp of the database backup image The time stamp is displayed after a successful completion of the backup operation, and is part of the path name for the backup image. It is specified in the form yyyymmddhhmmss. You can also specify a partial time stamp. For example, if two backup images with the time stamps 20060327063001 and 20060328063001 exist, specifying 20060328 causes the image with the time stamp 20060328063001 to be used. If you do not specify a value for this parameter, there must be only one backup image on the source media. For example: $ db2 restore db TWS from /tmp/db_backup taken at 20060329040208 Example 5-4 shows the output of a successful backup. Example 5-4 Restoring the Tivoli Workload Scheduler database from a backup $ db2 restore db TWS from /tmp/db_backup taken at 20060329040208 DB20000I The RESTORE DATABASE command completed successfully. $ Chapter 5. DB2, WebSphere, and Lightweight Directory Access Protocol: Considerations 343
- 380. 5.7 Referential integrity The Tivoli Workload Schedule V8.3 database includes foreign key constraints to ensure that the referential integrity is maintained for each association between objects. Note: A foreign key reference is an entry in one table that links to another table. The field or fields that the foreign key links to must be unique and is generally the primary key of the other table. This means that when deleting an object referenced by other objects, there are only three possible options: Deletes the object and any objects that have a reference to that object Returns an error indicating that the object is referenced by other objects and cannot be deleted Deletes the object and removes all references to it from other objects Typically, Tivoli Workload Scheduler V8.3 does not delete objects if they are referenced by other objects, but exceptions to this general rule exist. These are listed in Table 5-1 along with the alternative action taken. Table 5-1 Rules applied when deleting an object referenced by another object Object References Action to take when deleting the referenced object Internetwork Dependency Workstation Remove the dependency from the job or job stream. External Dependency Job stream Remove the dependency from the job or job stream. External Dependency Job Remove the dependency from the job or job stream. Internal Dependency Job Remove the dependency from the job or job stream. Workstation Class Workstation Remove the workstation from the workstation class. New filters have been added to the JSC and CLI queries to search for objects that reference a specified target object. Objects in the database can be renamed without losing any references from other objects, including dependencies. A rename command has been added to composer and is used to assign a new name to an object already existing in the database. Example 5-5 shows the job stream EXAMPLE1, which includes two jobs, JOB1 and JOB2. We rename the two jobs to provide them more descriptive names. We display the job stream again to show that it now includes references to the new job names DATALOAD and DATAREPT. 344 Getting Started with IBM Tivoli Workload Scheduler V8.3
- 381. Example 5-5 Renaming database objects using composer rename -display sched=example1 Workstation Job Stream Name Valid From Updated On Locked By ---------------- ---------------- ---------- ---------- ---------------- MASTER EXAMPLE1 - 04/10/2006 - SCHEDULE MASTER#EXAMPLE1 ON REQUEST CARRYFORWARD : MASTER#JOB1 MASTER#JOB2 FOLLOWS JOB1 END AWSBIA291I Total objects: 1 - -rename jd=job1 dataload AWSJCL003I The command “rename” relating to object “jd=MASTER#JOB1” has completed successfully. AWSBIA288I Total objects updated: 1 - -rename jd=job1 datarept AWSJCL003I The command “rename” relating to object “jd=MASTER#JOB2” has completed successfully. AWSBIA288I Total objects updated: 1 - -display sched=example1 Workstation Job Stream Name Valid From Updated On Locked By ---------------- ---------------- ---------- ---------- ---------------- MASTER EXAMPLE1 - 04/10/2006 - SCHEDULE MASTER#EXAMPLE1 ON REQUEST Chapter 5. DB2, WebSphere, and Lightweight Directory Access Protocol: Considerations 345
- 382. CARRYFORWARD : MASTER#DATALOAD AS JOB1 MASTER#DATAREPT AS JOB2 FOLLOWS JOB1 END AWSBIA291I Total objects: 1 - For further information about this topic, see the section “Referential Integrity Checks” in Chapter 7 of IBM Tivoli Workload Scheduler Reference Guide V8.3, SC32-1274. 5.8 Object and database locking IBM Tivoli Workload Scheduler V8.3 lock management is implemented within the application server’s Data Access Objects (DAO) subsystem. The DAO subsystem interface includes methods to request and release locks, but relies on the SQL language to apply any lock management checks with minimum impact on system performance. Within the DAO subsystem, there are three type of locks: Physical Row Locks Whenever database rows are read, modified, or deleted by SQL commands, DB2 takes care of acquiring and releasing transaction locks on the data structures involved, which allows multiple transactions to work concurrently on the same data. DB2 transaction locks are hidden from the Tivoli Workload Scheduler users. Logical Object Locks The Tivoli Workload Scheduler system allows users to acquire and release exclusive locks on business objects so that concurrent changes can be managed without loss of updates. These locks are managed by the DAO subsystem using lock information fields maintained for each object. Logical DB Lock The Tivoli Workload Scheduler system also provides a method to lock the entire contents of the database to prevent users from modifying business objects when the plan generation is in progress. To achieve this, a GLOBAL_LOCK property is maintained in a properties table 346 Getting Started with IBM Tivoli Workload Scheduler V8.3
- 383. (MPR_MODEL_PROPERTIES). This GLOBAL_LOCK property is normally set to OFF, but the Tivoli Workload Scheduler planner can change it to ON. Physical locks do not require recovery action because DB2 manages these internally. It ensures that no lock remains unreleased through deadlock detection and lock timeout features. However, logical locks are unknown to DB2 and are instead managed by Tivoli Workload Scheduler V8.3. Logical locks are never released until an unlock operation is explicitly issued to release the lock. Both the CLI interface and the JSC provide an unlock facility, which checks that the user requesting the object to be unlocked is the owner of the lock, or has the Tivoli Workload Scheduler security right UNLOCK for the specified object type. If the plan generation process fails during the production plan and preproduction plan creation or extension before the planner can unlock the database, use the following command to release the DB lock: $ planman unlock Note: The Tivoli Workload Scheduler implementation of database locking (DB Lock) is based on the assumption that checks of the GLOBAL_LOCK property can be postponed until the transaction is committed, because changes are not visible until this time. However, this means that the minimum transaction isolation level to be used by DB2 must be CURSOR STABILITY (READ COMMITTED), which is set by default at installation time. Changing the DB2 isolation level to something other than the recommended CURSOR STABILITY level might affect the performance and stability of Tivoli Workload Scheduler V8.3, and must never be changed to UNCOMMITTED READ under any circumstances. 5.8.1 JSC locking features Within the Job Scheduling Console, the new menu options Action Menu → Browse and Action Menu → Unlock have been added, as shown in Figure 5-7. You can view objects locked by other users or by other sessions of the same user using the Action Menu → Browse option. You can unlock locked objects using the Action Menu → Unlock option. An object is locked implicitly when you double-click it, and unlocked when the save is complete for create, extract, and replace operations. However, locked objects cannot be deleted. Chapter 5. DB2, WebSphere, and Lightweight Directory Access Protocol: Considerations 347
- 384. Figure 5-7 JSC action menu including browse and unlock options If an object is locked, the new columns Locked by and Locked on are populated by the name of the user who locked the object and when it was locked. Figure 5-8 shows that the job JOB1 is locked by the user tws830 at 16:38 on 22 May 2006. Figure 5-8 JSC all job definitions list showing JOB1 as locked 348 Getting Started with IBM Tivoli Workload Scheduler V8.3
- 385. If an object is explicitly unlocked while editing, the change is detected on save and the user is asked to overwrite the definition or to discard the change, as shown in Figure 5-9. Figure 5-9 JSC object unlocked while being edited: Warning message 5.8.2 Composer locking features The new features to the composer CLI for IBM Tivoli Workload Scheduler V8.3 are the composer lock and composer unlock commands. Also new are the ;lock and ;unlock options available on create, extract, and replace commands. Chapter 5. DB2, WebSphere, and Lightweight Directory Access Protocol: Considerations 349
- 386. Example 5-6 shows the composer lock command being used to lock job JOB1. Example 5-6 Locking a job using the composer lock command $ composer lock job=job1 Tivoli Workload Scheduler (UNIX)/COMPOSER V8.3 (1.18.3.3) Licensed Materials - Property of IBM(R) 5698-WSH (C) Copyright IBM Corp 1998, 2006 All rights reserved. US Government User Restricted Rights Use, duplication or disclosure restricted by GSA ADP Schedule Contract with IBM Corp. IBM is a registered trademark of International Business Machines Corporation in the United States, other countries, or both. Installed for user “tws830”. Locale LANG set to the following: “en” User: tws830, Host:127.0.0.1, Port:31116 -lock job=job1 AWSBIA307I Total objects locked: 1. $ Example 5-7 shows the composer unlock command being used to unlock JOB1. By using the lock and unlock operations the user is free to modify JOB1 as required, safe in the knowledge that other users will be informed that the job definition is being modified. Example 5-7 Unlocking a job using the composer unlock command $ composer unlock job=job1 Tivoli Workload Scheduler (UNIX)/COMPOSER V8.3 (1.18.3.3) Licensed Materials - Property of IBM(R) 5698-WSH (C) Copyright IBM Corp 1998, 2006 All rights reserved. US Government User Restricted Rights Use, duplication or disclosure restricted by GSA ADP Schedule Contract with IBM Corp. IBM is a registered trademark of International Business Machines Corporation in the United States, other countries, or both. Installed for user “tws830”. Locale LANG set to the following: “en” User: tws830, Host:127.0.0.1, Port:31116 -unlock job=job1 AWSBIA308I Total objects unlocked: 1. 350 Getting Started with IBM Tivoli Workload Scheduler V8.3
- 387. If after locking an object, the user terminates the current composer session and subsequently attempts to unlock the object using a different session, an error is reported and the object is not unlocked. In this case, the ;forced option is required for the object to be unlocked, as shown in Example 5-8. Example 5-8 Forcing composer to unlock an object $ composer unlock job=job1 Tivoli Workload Scheduler (UNIX)/COMPOSER V8.3 (1.18.3.3) Licensed Materials - Property of IBM(R) 5698-WSH (C) Copyright IBM Corp 1998, 2006 All rights reserved. US Government User Restricted Rights Use, duplication or disclosure restricted by GSA ADP Schedule Contract with IBM Corp. IBM is a registered trademark of International Business Machines Corporation in the United States, other countries, or both. Installed for user “tws830”. Locale LANG set to the following: “en” User: tws830, Host:127.0.0.1, Port:31116 -unlock job=job1 AWSJCL012E The object “jd=MASTER#JOB1” cannot be unlocked because it is locked by the user “tws830” in a different session. AWSBIA286E Total errors: 1. AWSBIA308I Total objects unlocked: 0. $ $ composer “unlock job=job1;forced” Tivoli Workload Scheduler (UNIX)/COMPOSER V8.3 (1.18.3.3) Licensed Materials - Property of IBM(R) 5698-WSH (C) Copyright IBM Corp 1998, 2006 All rights reserved. US Government User Restricted Rights Use, duplication or disclosure restricted by GSA ADP Schedule Contract with IBM Corp. IBM is a registered trademark of International Business Machines Corporation in the United States, other countries, or both. Installed for user “tws830”. Locale LANG set to the following: “en” User: tws830, Host:127.0.0.1, Port:31116 -unlock job=job1;forced AWSBIA308I Total objects unlocked: 1. $ Lock management is implicit when using the composer modify command with the objects being locked when the file is opened, and unlocked when it is closed. Chapter 5. DB2, WebSphere, and Lightweight Directory Access Protocol: Considerations 351
- 388. 5.9 DB2 maintenance Periodic maintenance activities are required on the Tivoli Workload Scheduler V8.3 database to ensure that no information is lost. It is also required to achieve the maximum performance from the DB2 server. Having accurate and complete database statistics is critical to efficient data access and optimal workload performance. To achieve this purpose, when the Tivoli Workload Scheduler V8.3 database is created, the following configuration options are set to ON to configure the database for automatic statistics collection: AUTO_MAINT AUTO_TBL_MAINT AUTO_RUNSTATS The optimizer uses the catalog tables from a database to obtain information about the database, the amount of data in it, and other characteristics. It uses this information to choose the best way to access the data. If current statistics are not available, the optimizer might choose an inefficient access plan based on inaccurate statistics. We recommend that you use the DB2 runstats command to collect current statistics on tables and indexes, especially if significant update activity has occurred since the last time the statistics was collected. The ModelTables/scripts directory on the Tivoli Workload Scheduler V8.3 installation CD has the dbrunstats.sh (UNIX or Linux) and dbrunstats.bat (Windows) scripts. You can use this script in conjunction with the ModelTables/sql/run_statistics.sql script to run the DB2 runstats command against all columns and all indexes for each of the tables that make up the Tivoli Workload Scheduler V8.3 database. To run dbrunstats.sh, mount the Tivoli Workload Scheduler V8.3 installation CD for your platform and switch to your DB2 user: $ su - db2inst1 Change directory to the ModelTables/scripts directory on the CD and run the dbrunstats.sh script as follows: $ ./dbrunstats.sh database user password 352 Getting Started with IBM Tivoli Workload Scheduler V8.3
- 389. Example 5-9 shows the resulting output. Example 5-9 Collecting current database statistics $ ./dbrunstats.sh TWS db2inst1 my_password Database Connection Information Database server = DB2/LINUX 8.2.0 SQL authorization ID = DB2INST1 Local database alias = TWS DB20000I The RUNSTATS command completed successfully. DB20000I The RUNSTATS command completed successfully. . . . DB20000I The RUNSTATS command completed successfully. DB20000I The SQL DISCONNECT command completed successfully. $ The dbreorg.sh (UNIX or Linux) script and the dbreorg.bat (Windows) script are also available in the ModelTables/scripts directory on the Tivoli Workload Scheduler V8.3 installation CD. Use this script in conjunction with the ModelTables/sql/reorganize_database.sql script to reorganize the Tivoli Workload Scheduler V8.3 database tables and indexes by compacting and reducing disk fragmentation. Reorganize the tables and indexes after a large delete operation. With your Tivoli Workload Scheduler V8.3 installation CD mounted and after logging on as the DB2 user, change the directory to the ModelTables/scripts directory as shown previously and run: $ ./dbreorg.sh database user password Example 5-10 shows the output produced while reorganizing the database. Example 5-10 Reorganizing the database $ ./dbreorg.sh TWS db2inst1 my_password Database Connection Information Database server = DB2/LINUX 8.2.0 SQL authorization ID = DB2INST1 Chapter 5. DB2, WebSphere, and Lightweight Directory Access Protocol: Considerations 353
- 390. Local database alias = TWS1 DB20000I The REORG command completed successfully. DB20000I The REORG command completed successfully. . . . DB20000I The REORG command completed successfully. DB20000I The REORG command completed successfully. DB20000I The SQL DISCONNECT command completed successfully. $ 5.10 WebSphere Application Server IBM Tivoli Workload Scheduler V8.3 shifts away from the Tivoli Management Framework infastructure, which is used to provide remote access connectivity from the JSC to the Tivoli Workload Scheduler Engine, to a new WebSphere Application Server based remote communications infastructure. To reduce the administration and configuration complexity, Tivoli Workload Scheduler V8.3 ships with the embedded version of WebSphere, also referred to as the Bobcat. Two new Java 2 Platform, Enterprise Edition (J2EE) applications, the Tivoli Workload Scheduler Modeling and Planning connector and the Tivoli Workload Scheduler Plan Management connector, provide the authentication and remote connectivity services to the Tivoli Workload Scheduler V8.3 JSC and the new remote CLI. Similarly, the Tivoli Workload Scheduler V8.3 JSC has been modified to use the new WebSphere Application Server infastructure to communicate with all the new J2EE applications using Java Remote Invocation technology run over Internet Inter-Orb Protocol (RMI-IIOP). It can also communicate through Hypertext Transfer Protocol-Secure (HTTPS) by using the new Web services interface. The RMI-IIOP communication enables better performance, and the HTTPS communication simplifies working in a environment with firewalls. 354 Getting Started with IBM Tivoli Workload Scheduler V8.3
- 391. The WebSphere Application Server is configured and started during the Tivoli Workload Scheduler V8.3 installation and no post-installation steps are required. However, during the product life cycle, you might have to change some configuration parameters for a number of reasons, including: The password of TWSuser or DB2 user has changed; see 5.11.12, “Changing the security properties” on page 372 and 5.11.13, “Encrypting the profile properties” on page 375 The DB2 server is changed; see 5.11.8, “Changing data source properties” on page 365 The user registry is moved on to a Lightweight Directory Access Protocol (LDAP) server; see 5.11.12, “Changing the security properties” on page 372 An application server trace is required by IBM support for problem determination purposes; see 5.11.4, “Changing the trace properties” on page 359 The TCP ports used by the application server has to be customized to cross a firewall; see 5.11.10, “Changing the host properties” on page 368 Generally, the scripts used to adjust the application server configuration can be run from any user ID if the application server administrator user ID and password are provided as command line parameters. The notable exception is startWas.sh, which must be run as root. These tools are documented in Appendix A, “Embedded version of WebSphere Application Server - Express utilities” of IBM Tivoli Workload Scheduler Planning and Installation Guide v8.3, SC32-1273. However, if you encounter permissions errors while attempting to run the scripts within the TWShome/wastools directory as root, run the following commands to correct the ownership of the application server property and log files: # cd TWShome/appserver/profiles/twsprofile # find . -exec chown TWSuser:TWSgroup {} ; -print Chapter 5. DB2, WebSphere, and Lightweight Directory Access Protocol: Considerations 355
- 392. 5.11 Installing multiple application service instances Multiple WebSphere Application Server Express installations can coexist on the same machine, each one associated with a specific Tivoli Workload Scheduler V8.3 master instance, provided no port conflicts arise due to this coexistence. See Table 5-2 for details of the ports that might require change. Table 5-2 WebSphere application server port numbers Description Port name Default value Bootstrap bootPort 31117 SOAP connector soapPort 31118 HTTP transport httpPort 31115 HTTPS transport httpsPort 31116 Admin HTTP transport adminPort 31119 Admin HTTPS transport adminSecurePort 31116 5.11.1 Starting the application server The Tivoli Workload Scheduler administrator starts the application server by using the scripts TWShome/wastools/startWas.sh (UNIX or Linux) and TWShomewastoolsstartWas.bat (Windows). To start the application server on a UNIX or Linux system, log in as root. Change the directory to TWShome/wastools and run the command: # ./startWas.sh Example 5-11 shows the resulting output. Note: It is possible to start the application server as a user other than root, for example, as the TWSuser, if the active user registry is an LDAP server rather than the local operating system. Example 5-11 Starting WebSphere Application Server Express # ./startWas.sh ADMU0116I: Tool information is being logged in file /usr/local/tws830/appserver/profiles/twsprofile/logs/server1/startServer.log ADMU0128I: Starting tool with the twsprofile profile ADMU3100I: Reading configuration for server: server1 356 Getting Started with IBM Tivoli Workload Scheduler V8.3
- 393. ADMU3200I: Server launched. Waiting for initialization status. ADMU3000I: Server server1 open for e-business; process id is 6761 # If the application server fails to start, you can find additional output and error messages in the various log files found in the TWShome/appserver /profiles/twsprofile/logs/server1/ directory. Tip: Optionally, startWas.bat on Windows also supports all the parameters that the startup script (startServer.bat) of WebSphere supports. 5.11.2 Stopping the application server The Tivoli Workload Scheduler V8.3 administrator uses the scripts TWShome/wastools/stopWas.sh (UNIX or Linux) and TWShomewastoolsstopWas.bat (Windows) to stop the application server. On Windows, the application server is installed as an operating system service with the user name and password stored in the service properties. Therefore, on Windows, it is not necessary to supply the user name and password for the application server when issuing the stop command as it is on UNIX or Linux. To stop the application server on a UNIX or Linux system, change the directory to TWShome/wastools and then run the following command: $ ./stopWas.sh -user username -password password Example 5-12 shows the resulting output. Example 5-12 Stopping WebSphere Application Server Express $ ./stopWas.sh -user tws830 -password my_password ADMU0116I: Tool information is being logged in file /usr/local/tws830/appserver/profiles/twsprofile/logs/server1/stopServer.log ADMU0128I: Starting tool with the twsprofile profile ADMU3100I: Reading configuration for server: server1 ADMU3201I: Server stop request issued. Waiting for stop status. ADMU4000I: Server server1 stop completed. $ Note: When you stop IBM Tivoli Workload Scheduler V8.3 using conman shut, the application server is not stopped. Chapter 5. DB2, WebSphere, and Lightweight Directory Access Protocol: Considerations 357
- 394. 5.11.3 Checking the application server status You can check whether the application server is running using the scripts serverStatus.sh (UNIX or Linux) and serverStatus.bat (Windows). Unlike most of the other applications server tools discussed in this chapter, these scripts are not found in the TWShome/wastools directory, but are instead found in the TWShome/appserver/profiles/twsprofile/bin directory. On a UNIX or Linux system, check the application server status by changing the directory to TWShome/appserver/profiles/twsprofile/bin. Then, run the command: $ ./serverStatus.sh server -user username -password password In most cases, the name of the application server is the default server name, which is server1. However, if you are not sure of the correct server name in your environment, instead of specifying the server name, use the -all switch. This returns the current status of any known application servers, as follows: $ ./serverStatus.sh -all -user username -password password Example 5-13 shows the status of the application server, server1, when the application server is not running. Example 5-13 Application server status when not running $ ./serverStatus.sh server1 -user wsadmin -password was4me ADMU0116I: Tool information is being logged in file /usr/local/tws830/appserver/profiles/twsprofile/logs/server1/serverStatus.log ADMU0128I: Starting tool with the twsprofile profile ADMU0500I: Retrieving server status for server1 ADMU0509I: The Application Server “server1” cannot be reached. It appears to be stopped. $ 358 Getting Started with IBM Tivoli Workload Scheduler V8.3
- 395. Example 5-14 shows the output from serverStatus.sh when the application server, server1, is up and running. Example 5-14 Application server status when running $ ./serverStatus.sh server1 -user wsadmin -password was4me ADMU0116I: Tool information is being logged in file /usr/local/tws830/appserver/profiles/twsprofile/logs/server1/serverStatus.log ADMU0128I: Starting tool with the twsprofile profile ADMU0500I: Retrieving server status for server1 ADMU0508I: The Application Server “server1” is STARTED $ 5.11.4 Changing the trace properties The IBM Tivoli Workload Scheduler administrator uses the scripts TWShome/wastools/changeTraceProperties.sh (UNIX) and TWShomewastoolschangeTraceProperties.bat (Windows) to adjust the application server trace settings. Run this script while the application server is running and use it to change the trace level for both the IBM Tivoli Workload Scheduler V8.3 and the application server code. This script uses the properties file TWShome/wastools/TracingProps.properties, which defines the trace modes, and enables traces of application server communications, either for the whole product or for the following specific features: Database Planner Command line Utilities Connector The feature <trace_mode> is one of the following modes described in Table 5-3. Table 5-3 Trace modes Trace mode Description tws_all All Tivoli Workload Scheduler communications are traced tws_db All Tivoli Workload Scheduler database communications are traced tws_planner All Tivoli Workload Scheduler planner communications are traced tws_cli All Tivoli Workload Scheduler command line communications are traced Chapter 5. DB2, WebSphere, and Lightweight Directory Access Protocol: Considerations 359
- 396. Trace mode Description tws_utils All Tivoli Workload Scheduler utility communications are traced tws_conn All Tivoli Workload Scheduler connector communications are traced To set the tracing level to include all the Tivoli Workload Scheduler traces on a UNIX or Linux system, change the directory to the TWShome/wastools directory, and run the following command while the application server is running: $ ./changeTraceProperties.sh -user username -password password -mode tws_all Example 5-15 shows the output produced by the changeTraceProperties.sh script. Example 5-15 Setting tracing level to tws_all # ./changeTraceProperties.sh -user tws830 -password my_password -mode tws_all WASX7209I: Connected to process “server1” on node DefaultNode using SOAP connector; The type of process is: UnManagedProcess WASX7303I: The following options are passed to the scripting environment and are available as argument that is stored in the argv variable: “[server1, DefaultNode, TracingProps.properties, tws_all]” entering getTraceValue properties file value for tws_all is com.ibm.tws.*=all Current trace specification is *=info Current trace specification is now *=info:com.ibm.tws.*=all # You can find the trace file, trace.log, in the TWShome/appserver/profiles /twsprofile/logs/server1 directory. To reset the tracing to its default level, run changeTraceProperties.sh with -mode reset. For example: $ ./changeTraceProperties.sh -user username -password password -mode reset 5.11.5 Backing up the application server configuration The Tivoli Workload Scheduler V8.3 administrator uses the scripts TWShome/wastools/backupConfig.sh (UNIX or Linux) and TWShomewastoolsbackupConfig.bat (Windows) to back up the configuration files into a .zip archive. The saved configuration can be restored at a later date, if required. For further details, see 5.11.6, “Restoring the application server configuration” on page 362. 360 Getting Started with IBM Tivoli Workload Scheduler V8.3
- 397. If started with no arguments, backupConfig.sh creates a new file, which includes the current date such as WebSphereConfig_2006-03-34.zip in the current directory. To back up the application server to a specific file without stopping the application server, run the following command from the TWShome/wastools directory: $ ./backupConfig.sh filename.zip -nostop In this command, filename.zip is the name of the file that contains the backup. Note that the TWSuser does not usually have the necessary permissions to write to the TWShome/wastools directory. Therefore, filename.zip must include a path to the directory where the TWSuser is permitted to create a file, for example, TWShome/tmp/wasBackup.zip. Example 5-16 shows an example of the resulting output. Example 5-16 Backing up the application server configuration files $ ./backupConfig.sh ~/tmp/wasBackup.zip -nostop ADMU0116I: Tool information is being logged in file /usr/local/tws830/appserver/profiles/twsprofile/logs/backupConfig.logAD MU0128I: Starting tool with the twsprofile profile ADMU5001I: Backing up config directory /usr/local/tws830/appserver/profiles/twsprofile/config to file /usr/local/tws830/tmp/wasBackup.zip ....................................................................... ....................................................................... ADMU5002I: 139 files successfully backed up $ Tip: On a UNIX or Linux environment, the backupConfig.sh command does not save file permissions or ownership information. The restoreConfig.sh command uses the current umask and effective user ID (EUID) to set the permissions and ownership when restoring a file. If the restored files must have the original permissions and ownership, use the tar(1) command (available on all UNIX or Linux systems) to back up and restore the configuration. The backupConfig.sh and backupConfig.bat scripts just call the equivalent WebSphere Application Server Express commands, which you can find in the TWShome/appserver/profiles/twsprofile/bin directory, and accept all the same parameters. Chapter 5. DB2, WebSphere, and Lightweight Directory Access Protocol: Considerations 361
- 398. 5.11.6 Restoring the application server configuration The scripts restoreConfig.sh (UNIX or Linux) and restoreConfig.bat (Windows) are a simple utility to restore the configuration of your application server after backing up the configuration using the backupConfig command. See 5.11.5, “Backing up the application server configuration” on page 360. By default, the application server is stopped before the configuration is restored. If the configuration directory already exists, it is renamed before the restoration occurs. To restore the application server using a .zip file created by a previous backupConfig.sh operation, run the following command from the TWShome/wastools directory: $ ./restoreConfig.sh filename.zip -user username -password password Example 5-17 shows the sample output. Example 5-17 Restoring application server configuration files $ ./restoreConfig.sh ~/tmp/wasBackup.zip -user tws830 -password my_password ADMU0116I: Tool information is being logged in file /usr/local/tws830/appserver/profiles/twsprofile/logs/restoreConfig.log ADMU0128I: Starting tool with the twsprofile profile ADMU0505I: Servers found in configuration: ADMU0506I: Server name: server1 ADMU2010I: Stopping all server processes for node DefaultNode ADMU0512I: Server server1 cannot be reached. It appears to be stopped. ADMU5502I: The directory /usr/local/tws830/appserver/profiles/twsprofile/config already exists; renaming to /usr/local/tws830/appserver/profiles/twsprofile/config.old_1 ADMU5504I: Restore location successfully renamed ADMU5505I: Restoring file /usr/local/tws830/tmp/wasBackup.zip to location /usr/local/tws830/appserver/profiles/twsprofile/config ..................................................................................... ..................................................................................... ADMU5506I: 139 files successfully restored ADMU6001I: Begin App Preparation - ADMU6009I: Processing complete. $ The application server is not restarted after you restore the configuration using this method. Therefore, manually restart the server after a successful restore, as discussed in 5.11.1, “Starting the application server” on page 356. Before extracting the .zip archive, restoreConfig.sh renames the existing configuration directory. Therefore, if the restore fails, you can return to the 362 Getting Started with IBM Tivoli Workload Scheduler V8.3
- 399. previous configuration by renaming or deleting the current (broken) configuration directory TWShome/appserver/profiles/twsprofile/config, and replace it with the copy. The name used for the previous configuration directory, for example, config.old_1 as shown in Example 5-17, is included in the output from the restoreConfig.sh script. Note: The restoreConfig.sh and restoreConfig.bat scripts just call the equivalent WebSphere Application Server Express commands, which are found in the TWShome/appserver/profiles/twsprofile/bin directory, and accept all the same parameters. 5.11.7 Viewing the data source properties The IBM Tivoli Workload Scheduler V8.3 administrator uses the scripts showDataSourceProperties.sh (UNIX or Linux) and showDataSourceProperties.bat (Windows) to view the current data source configuration properties. These scripts produce an output, which matches the format of the TWShome/wastools/DataSourceProps.properties file as used by the changeDataSourceProperties.sh and changeDataSourceProperties.bat scripts (see 5.11.8, “Changing data source properties” on page 365). You can use this output as input to the changeDataSourceProperties.sh and changeDataSourceProperties.bat scripts. To view the data source properties, run the following command from the TWShome/wastools directory: $ ./showDataSourceProperties.sh Example 5-18 shows the resulting output. Example 5-18 Viewing data source properties $ ./showDataSourceProperties.sh WASX7357I: By request, this scripting client is not connected to any server process. Certain configuration and application operations will be available in local mode. ################################################################ DB2 Type2 Resource Properties ################################################################ DB2Type2JndiName=jdbc/twsdb2 DB2Type2Description= DB2Type2ConnectionAttribute=cursorhold=0 DB2Type2EnableMultithreadedAccessDetection=false DB2Type2Reauthentication=false DB2Type2JmsOnePhaseOptimization=false DB2Type2DatabaseName=TWS_DB Chapter 5. DB2, WebSphere, and Lightweight Directory Access Protocol: Considerations 363
- 400. DB2Type2PreTestSQLString=SELECT 1 FROM SYSIBM.SYSDUMMY1 ################################################################ DB2 Type4 Resource Properties ################################################################ DB2Type4JndiName=jdbc/twsdb DB2Type4DatabaseName=TWS DB2Type4DriverType=4 DB2Type4ServerName=barcelona DB2Type4PortNumber=50001 DB2Type4Description= DB2Type4TraceLevel= DB2Type4TraceFile= DB2Type4FullyMaterializeLobData=true DB2Type4ResultSetHoldability=2 DB2Type4CurrentPackageSet= DB2Type4ReadOnly=false DB2Type4DeferPrepares=true DB2Type4CurrentSchema= DB2Type4CliSchema= DB2Type4RetrieveMessagesFromServerOnGetMessage=true DB2Type4ClientAccountingInformation= DB2Type4ClientApplicationInformation= DB2Type4ClientUser= DB2Type4ClientWorkstation= DB2Type4CurrentPackagePath= DB2Type4CurrentSQLID= DB2Type4KerberosServerPrincipal= DB2Type4LoginTimeout=0 DB2Type4SecurityMechanism= DB2Type4TraceFileAppend=false DB2Type4CurrentFunctionPath= DB2Type4CursorSensitivity= DB2Type4KeepDynamic= DB2Type4CurrentLockTimeout= DB2Type4EnableMultithreadedAccessDetection=false DB2Type4Reauthentication=false DB2Type4JmsOnePhaseOptimization=false DB2Type4PreTestSQLString=SELECT 1 FROM SYSIBM.SYSDUMMY1 DB2Type4DbFailOverEnabled=false DB2Type4ConnRetriesDuringDBFailover=100 DB2Type4ConnRetryIntervalDuringDBFailover=3000 $ 364 Getting Started with IBM Tivoli Workload Scheduler V8.3
- 401. To use the output from showDataSourceProperties.sh as a template for changeDataSourceProperties.sh, see 5.11.8, “Changing data source properties” on page 365. Redirect the output from showDataSourceProperties.sh to a temporary file as follows: $ ./showDataSourceProperties.sh |grep -v “^WASX7357I:” >properties_file The grep(1) command is required to prevent the warning message that is generated from being saved in the resulting properties file and causing errors if the template file is later used to change the data source properties. Also note that the TWSuser does not usually have write permissions for the TWShome/wastools directory. Therefore, the file name properties_file must include a path to a directory where the TWSuser is permitted to create files, for example, TWShome/tmp/DataSource.properties. 5.11.8 Changing data source properties The IBM Tivoli Workload Scheduler V8.3 administrator uses the scripts changeDataSourceProperties.sh (UNIX or Linux) and changeDataSourceProperties.bat (Windows) to change the data source properties for DB2 on a master or backup master. The most common data source properties that have to be changed are the database name, host name, and listening port number. Important: Stop the application server before making any changes to the data source properties. Export the current data source properties to a file, as demonstrated in 5.11.7, “Viewing the data source properties” on page 363. Then, change the database server port from 50000 to 50001 to switch to a different DB2 instance on the same database server. The steps are as follows: 1. Edit the data source properties file, replacing the original port number 50000 with the new port number 50001 for the DB2Type4PortNumber parameter: DB2Type4PortNumber=50001 2. Stop the application server. For further details, see 5.11.2, “Stopping the application server” on page 357. $ cd TWShome/wastools $ ./stopWas.sh -user username -password password 3. Update the application server data source properties using the edited data source properties file: $ ./changeDataSourceProperties.sh properties_file Chapter 5. DB2, WebSphere, and Lightweight Directory Access Protocol: Considerations 365
- 402. 4. Switch to or log in as root: $ su 5. Restart the application server. For further details, see 5.11.1, “Starting the application server” on page 356. # ./startWas.sh Example 5-19 shows the output produced by changeDataSourceProperties.sh. Example 5-19 Changing data source properties $ ./changeDataSourceProperties.sh ~/tmp/DataSourceProps.properties WASX7357I: By request, this scripting client is not connected to any server process. Certain configuration and application operations will be available in local mode. WASX7303I: The following options are passed to the scripting environment and are available as argument that is stored in the argv variable: “[/usr/local/tws830/tmp/DataSourceProps.properties]” Using Property File: /usr/local/tws830/tmp/DataSourceProps.properties Configuring DB2 Type2 DataSouce... Configuring DB2 Type4 DataSouce... Configuring JNDI Names... Saving data... $ 5.11.9 Viewing the host properties The IBM Tivoli Workload Scheduler V8.3 administrator uses the scripts showHostProperties.sh (UNIX or Linux) and showHostProperties.bat (Windows) to view the current application server properties such as host name of the server where the application server is running and TCP/IP port configuration. These scripts produce an output, which matches the format of the TWShome/wastools/HostConfigProps.properties file as used by the changeHostProperties.sh (UNIX or Linux) and changeHostProperties.bat (Windows) scripts (see 5.11.10, “Changing the host properties” on page 368). You can use the output as input to the changeHostProperties.sh and changeHostProperties.bat scripts. To view the host properties, run the following command from the TWShome/wastools directory: $ ./showHostProperties.sh 366 Getting Started with IBM Tivoli Workload Scheduler V8.3
- 403. Example 5-20 shows the sample output produced by this script. Example 5-20 Showing application server host properties $ ./showHostProperties.sh WASX7357I: By request, this scripting client is not connected to any server process. Certain configuration and application operations will be available in local mode. ################################################################ Host Configuration Panel ################################################################ oldHostname=localhost newHostname=localhost ################################################################ Ports Configuration Panel ################################################################ bootPort=31117 bootHost=edinburg soapPort=31118 soapHost=edinburg httpPort=31115 httpHost=* httpsPort=31116 httpsHost=* adminPort=31119 adminHost=* adminSecurePort=31116 adminSecureHost=* sasPort=0 sasHost=localhost csiServerAuthPort=0 csiServerAuthHost=localhost csiMuthualAuthPort=0 csiMuthualAuthHost=localhost orbPort=0 orbHost=localhost $ To use the output from showHostProperties.sh as a template for changeHostProperties.sh, redirect the output from showHostProperties.sh to a temporary file as follows: $ ./showHostProperties.sh |grep -v “^WASX7357I:” >properties_file Chapter 5. DB2, WebSphere, and Lightweight Directory Access Protocol: Considerations 367
- 404. The grep(1) command is required to prevent the warning message that is generated from being saved in the resulting properties file. When specifying the name of the target output file, note that the TWSuser does not usually have permissions to create files in the TWShome/wastools directory. Therefore, the properties_file must include the path to a directory that the TWSuser is permitted to create files in, for example, TWShome/tmp/Host.properties. 5.11.10 Changing the host properties The IBM Tivoli Workload Scheduler V8.3 administrator uses the scripts changeHostProperties.sh (UNIX or Linux) and changeHostProperties.bat (Windows) to change the following application server host properties: The host name or IP address of the machine where the application server is installed TCP ports used by the application server All of the properties listed in the properties template file are optional. However, the following restrictions apply: Both oldHostname and newHostname must be provided together When oldHostname and newHostname are provided, the host property related to each port is updated, and where a value is not specified for a particular port, the value currently defined for oldHostname is used. Port settings are updated only if they are provided in the properties file A port-specific host setting, such as httpHost is not updated if it is not specified, except when its current setting matches oldHostname An empty setting is considered as not provided Important: Stop the application server before making any changes to the host properties. Export the current host properties to a file, as demonstrated in 5.11.9, “Viewing the host properties” on page 366. Then, change the orbPort port from the default of 0, which means that the server assigns a random port to 31120. Similarly, change csiServerAuthPort port from the default of 0 to 31121. Perform this change so that these ports are permitted to pass through a firewall. For further details, see “Configuring JSC in an environment with firewall” on page 393. 368 Getting Started with IBM Tivoli Workload Scheduler V8.3
- 405. The steps are as follows: 1. Edit the host properties file, replacing the port number 0 that is currently assigned to the parameters orbPort with 31120 and csiServerAuthPort with 31121: orbPort=31120 csiServerAuthPort=31121 Ensure that neither of the ports 31120 or 31121 are already in use on your system. If they are, then substitute these ports with alternative ports that are not currently in use. 2. Stop the application server. For further details, see 5.11.2, “Stopping the application server” on page 357. $ cd TWShome/wastools $ ./stopWas.sh -user username -password password 3. Update the application server host properties using the edited host properties file: $ ./changeHostProperties.sh properties_file 4. Switch to or log in as root: $ su 5. Restart the application server. For further details, see 5.11.1, “Starting the application server” on page 356. # ./startWas.sh Example 5-21 shows the output produced by changeDataSourceProperties.sh. Example 5-21 Changing host properties $ ./changeHostProperties.sh ~/tmp/HostConfigProps.properties WASX7357I: By request, this scripting client is not connected to any server process. Certain configuration and application operations will be available in local mode. WASX7303I: The following options are passed to the scripting environment and are available as argument that is stored in the argv variable: “[/usr/local/tws830/tmp/HostConfigProps.properties]” Property File: /usr/local/tws830/tmp/HostConfigProps.properties Validation success. Configuration saved $ Chapter 5. DB2, WebSphere, and Lightweight Directory Access Protocol: Considerations 369
- 406. 5.11.11 Viewing the security properties The Tivoli Workload Scheduler V8.3 administrator uses the scripts showSecurityProperties.sh (UNIX or Linux) and showSecurityProperties.bat (Windows) to view the current application server security properties relating to Tivoli Workload Scheduler V8.3. These scripts produce an output, which matches the format of the TWShome/wastools/ SecurityProps_TEMPLANCE.properties file as used by the changeSecurityProperties.sh (UNIX/Linux) and changeSecurityProperties.bat (Windows) scripts (see 5.11.12, “Changing the security properties” on page 372). You can use the output as input to the changeSecurityProperties.sh and changeSecurityProperties.bat scripts. To view the security properties, run the following command from the TWShome/wastools directory: $ ./showSecurityProperties.sh Example 5-22 shows the sample output. Example 5-22 Viewing security properties $ ./showSecurityProperties.sh WASX7357I: By request, this scripting client is not connected to any server process. Certain configuration and application operations will be available in local mode. ################################################################ Global Security Panel ################################################################ enabled=true enforceJava2Security=false useDomainQualifiedUserNames=false cacheTimeout=600 issuePermissionWarning=true activeProtocol=CSI activeAuthMechanism=SWAM activeUserRegistry=LocalOS ################################################################ Local OS Registry ################################################################ LocalOSServerID=tws830 LocalOSServerpassword=my_password LocalOSServerREALM=TWSREALM 370 Getting Started with IBM Tivoli Workload Scheduler V8.3
- 407. ################################################################ LDAP Panel ################################################################ LDAPServerId=tws830 LDAPPassword=my_password LDAPServerType=IBM_DIRECTORY_SERVER LDAPHostName= LDAPPort= LDAPBaseDN= LDAPBindDN= LDAPBindPassword= LDAPsearchTimeout=120 LDAPreuseConnection=true LDAPIgnoreCase=true LDAPsslEnabled=false LDAPsslConfig=DefaultNode/DefaultSSLSettings ################################################################ Advanced LDAP Panel ################################################################ LDAPUserFilter=(&(uid=%v)(objectclass=ePerson)) LDAPGroupFilter=(&(cn=%v)(|(objectclass=groupOfNames)(objectclass=group OfUniqueNames)(objectclass=groupOfURLs))) LDAPUserIdMap=*:uid LDAPGroupIdMap=*:cn LDAPGroupMemberIdMap=ibm-allGroups:member;ibm-allGroups:uniqueMember LDAPCertificateFilter= LDAPCertificateMapMode=EXACT_DN ################################################################ SSL Panel ################################################################ alias=DefaultSSLSettings keyFileName=${USER_INSTALL_ROOT}/etc/TWSServerKeyFile.jks keyFilePassword=default keyFileFormat=JKS trustFileName=${USER_INSTALL_ROOT}/etc/TWSServerTrustFile.jks trustFilePassword=default trustFileFormat=JKS clientAuthentication=false securityLevel=HIGH enableCryptoHardwareSupport=false Chapter 5. DB2, WebSphere, and Lightweight Directory Access Protocol: Considerations 371
- 408. ################################################################ J2C Authentication Data Panel ################################################################ j2cAlias=db2 j2cUserid=db2inst1 j2cPassword=***** j2cDescription=TWS authentication data entry for DB2 $ To use the output from showSecurityProperties.sh as a template for changeSecurityProperties.sh, redirect the output from showSecurityProperties.sh to a temporary file as follows: $ ./showSecurityProperties.sh |grep -v “^WASX7357I:” >properties_file The grep(1) command is required to prevent the warning message that is generated from being saved in the resulting properties file. When specifying the name of the target output file, note that the TWSuser does not usually have permissions to create files in the TWShome/wastools directory. Therefore, the properties_file must include the path to a directory that the TWSuser is permitted to create files in, for example, TWShome/tmp/Security.properties. 5.11.12 Changing the security properties The Tivoli Workload Scheduler V8.3 administrator uses the scripts changeSecurityProperties.sh (UNIX or Linux) and changeSecurityProperties.bat (Windows) to change the application server security-related settings, such as: The user name and password for the application server administrator that are used by the application server itself and set to the TWSuser during the installation The user name and password for the DB2 user that are used by the application server to access the Tivoli Workload Scheduler V8.3 database Secure Sockets Layer (SSL) settings User registry configuration LDAP settings 372 Getting Started with IBM Tivoli Workload Scheduler V8.3
- 409. Important: Stop the application server before making any changes to the security properties. Note that if you are using a properties file created by showSecurityProperties.sh (UNIX or Linux) or showSecurityProperties.bat (Windows), some passwords are displayed, and others are replaced with a token such as “*****”. Before changing the security properties using this template, ensure that such tokens are replaced with the correct password, or the line is removed from or commented out of the properties template file. Export the current security properties to a file, as demonstrated in 5.11.11, “Viewing the security properties” on page 370. Then, change the application server user password to reflect a change to the TWSusers password. Note that in this example, we use a local operating system active user registry rather than an LDAP server. The steps are as follows: 1. Edit the security properties file replacing the old password for: LocalOSServerPassword=new_password 2. Stop the application server. For further details, see 5.11.2, “Stopping the application server” on page 357. $ cd TWShome/wastools $ ./stopWas.sh -user username -password password 3. Update the application server security properties using the edited security properties file: $ ./changeSecurityProperties.sh properties_file 4. Switch to or log in as root: $ su 5. Restart the application server. For further details, see 5.11.1, “Starting the application server” on page 356. # ./startWas.sh Example 5-23 shows the output produced by changeSecurityProperties.sh. Example 5-23 Changing security properties $ ./changeSecurityProperties.sh ~/tmp/SecurityProps.properties WASX7357I: By request, this scripting client is not connected to any server process. Certain configuration and application operations will be available in local mode. Chapter 5. DB2, WebSphere, and Lightweight Directory Access Protocol: Considerations 373
- 410. WASX7303I: The following options are passed to the scripting environment and are available as argument that is stored in the argv variable: “[/usr/local/tws830/tmp/SecurityProps.properties]” Using Property File: /usr/local/tws830/tmp/SecurityProps.properties Configuring Global Security setting the authentication mechanism to (cells/DefaultNode|security.xml#SWAMAuthentication_1) Configuring SSL Configuring LocalOS Configuring Advanced J2C Auth Configuring LDAP Configuring Advanced LDAP Active Authentication Mechanism is (cells/DefaultNode|security.xml#SWAMAuthentication_1) Active User Registry is (cells/DefaultNode|security.xml#LocalOSUserRegistry) LDAP User Registry type is IBM_DIRECTORY_SERVER LDAP IgnoreCase is true Validation success. Configuration saved $ If you have changed the TWSusers password, then in addition to updating the application server properties to reflect this change you might also have to change the password used by the CLI. By default, the user credentials used by the CLI are stored in the file TWShome/.TWS/useropts_TWSuser. The label ENCRYPT: in the password field indicates that the specified password is encrypted, for example: PASSWORD = “ENCRYPT:A/JW9nGJq6s=” To reset the password, set the password field equal to the unencrypted password, for example: PASSWORD = “new_password” The password is automatically re-encrypted when composer exits the next time. Therefore, to ensure that the password is not exposed longer than necessary, run the following command immediately after you finish editing this file: $ composer exit If you examine the file again after composer has completed, you must see that your password is replaced with the label ENCRYPT: and the encrypted version of your new password. 374 Getting Started with IBM Tivoli Workload Scheduler V8.3
- 411. Tip: The user and password contained in the TWShome/.TWS/useropes_TWSuser file are used not only by composer, but also by planman and optman. Failure to update this password results in the FINAL.MAKEPLAN job abend with the error AWSBEH021E: The user “tws830” is not authorized to access the server on host “127.0.0.1” using port “31116”. If you encounter this problem, update the password as described previously and rerun FINAL.MAKEPLAN. In addition, ensure that you update the user account details for all instances of the JSC connecting to the Tivoli Workload Scheduler V8.3 Engine. The account details are contained in the Engine Properties panel, which you can find by selecting Work with engines → Engine Instances, right-click Action Menu and select Properties. 5.11.13 Encrypting the profile properties The IBM Tivoli Workload Scheduler V8.3 administrator uses the scripts encryptProfileProperties.sh (UNIX or Linux) and encryptProfileProperties.bat (Windows) to encrypt passwords included in plain text form in any of the following application server properties files: TWShome/appserver/profiles/profile/properties/soap.client.props TWShome/appserver/profiles/profile/properties/sas.client.props TWShome/appserver/profiles/profile/properties/sas.stdclient.properties TWShome/appserver/profiles/profile/properties/sas.tools.properties Here profile can be twsprofile for the Tivoli Workload Scheduler V8.3 master, twsconnprofile for the Tivoli Workload Scheduler V8.3 distributed connector installed on a fault-tolerant agent (FTA), or twszconnprofile for a Tivoli Workload Scheduler z/OS connector. When the Tivoli Workload Scheduler administrator modifies the SSL keystore, the truststore password, or both, the new passwords are entered into these properties files in plain text format. Encrypt the passwords as follows: $ cd TWShome/wastools $ ./encryptProfileProperties.sh Chapter 5. DB2, WebSphere, and Lightweight Directory Access Protocol: Considerations 375
- 412. Example 5-24 shows how encryptProfileProperties.sh encrypts the updated passwords in the soap.client.props file. Warnings are issued for the other properties files, which indicate that they include passwords that are already encrypted. Example 5-24 Encrypting passwords in the soap.client.props properties file $ ./encryptProfileProperties.sh NOTE: all specified passwords already encoded in target file == /usr/local/tws830/wastools/../appserver/profiles/twsprofile/properties/ sas.client.props NOTE: all specified passwords already encoded in target file == /usr/local/tws830/wastools/../appserver/profiles/twsprofile/properties/ sas.stdclient.properties NOTE: all specified passwords already encoded in target file == /usr/local/tws830/wastools/../appserver/profiles/twsprofile/properties/ sas.tools.properties $ The new passwords only come into effect after the next restart of the application server. For instructions about how to stop and restart the application server, see 5.11.2, “Stopping the application server” on page 357, and 5.11.1, “Starting the application server” on page 356. 5.12 Lightweight Directory Access Protocol The JSC V8.3 and remote CLI users can be authenticated using an external LDAP server. Currently, the following LDAP servers are certified for use with Tivoli Workload Scheduler V8.3: IBM Tivoli Directory Server 5.1, 5.2, or 6.0 IBM z/OS Security Server 1.4, 1.5, or 1.6 IBM z/OSe Security Server 1.4, 1.5, or 1.6 Windows Active Directory 2000 or 2003 Important: WebSphere Application Server Express is also compatible with the following LDAP servers, which must work with Tivoli Workload Scheduler V8.3. However, they have not been certified and are therefore not supported at this time: Lotus Domino Enterprise Server 6.0.3, 6.0.5, 6.5.1, 6.5.4 Novell eDirectory 8.7.3 Sun ONE Directory Server 5.1 SP3 or 5.2 376 Getting Started with IBM Tivoli Workload Scheduler V8.3
- 413. In the following section, we demonstrate how to configure an LDAP server using the IBM Tivoli Directory Server 6.0 running on a remote Linux server. The section is divided into the following stages: “Loading the user account details into the LDAP server”, as described in the following section “Creating the properties file” on page 382 “Updating the Tivoli Workload Scheduler security file” on page 386 “Using the Tivoli Workload Scheduler V8.3 command line utilities” on page 388 “Using the Job Scheduling Console” on page 389 5.12.1 Loading the user account details into the LDAP server Install Tivoli Directory Server 6.0 on a Red Hat Enterprise Linux 4.0 AS system, create an instance, and complete the post-installation configuration. Confirm that the directory server starts successfully as per the Tivoli Directory Server 6.0 installation instructions. Now add the user accounts required by IBM Tivoli Workload Schedule V8.3. In this example, we use three users: wsbind Bind account: This account is used by the application server when it connects to the directory server. wsadmin WebSphere administrator, used to stop the application server, and by the other change properties scripts in the TWShome/wastools directory. This user is also used by the planman utility and the composer CLI, and effectively replaces the TWSuser. c0001 This is an account for a typical JSC user. The account details are loaded into the directory server database from an LDAP Data Interchange Format (LDIF) file. In this case, we use a slightly modified version of the example LDIF file included in Appendix A, “Embedded version of WebSphere Application Server - Express utilities” of IBM Tivoli Workload Scheduler Planning and Installation Guide v8.3, SC32-1273. Chapter 5. DB2, WebSphere, and Lightweight Directory Access Protocol: Considerations 377
- 414. Example 5-25 shows the complete LDIF file that is used. Example 5-25 User account definitions in LDIF format dn: dc=ibm,dc=com dc: ibm description: My company IBM. objectClass: dcObject objectClass: organization o: IBM, Inc. dn: ou=people,dc=ibm,dc=com ou: people description: All people in organization objectclass: organizationalunit dn: cn=roles,dc=ibm,dc=com objectclass: container objectclass: top cn: roles dn: uid=c0001,ou=people,dc=ibm,dc=com objectclass: ePerson objectclass: inetOrgPerson cn: Barbara Jensen displayName: Babs Jensen sn: Jensen givenName: Barbara initials: BJJ title: Billing manager uid: c0001 userpassword: changeit mail: [email protected] mail: [email protected] homephone: +1 999 222 3423 telephoneNumber: +1 999 555 1862 facsimileTelephoneNumber: +1 999 555 1992 mobile: +1 999 555 1941 roomNumber: 0209 carLicense: 6ABC246 o: ibm ou: Billing departmentNumber: 2604 registeredAddress: 348 Parkside Dr Anywhere, IL 23480 postalAddress: 347 Parkside Dr. Anywhere, IL 23480 378 Getting Started with IBM Tivoli Workload Scheduler V8.3
- 415. employeeNumber: 5234 employeeType: full time preferredLanguage: fr, en-gb;q=0.8, en;q=0.7 labeledURI: http://www-1.ibm.com/servers/eserver/iseries/ldap/schema/ telephonenumber: +1 999 243 2312 jpegphoto: http://www.ibm.com/photo/babs.jpg dn: uid=wsadmin,cn=roles,dc=ibm,dc=com userPassword: was4me objectclass: ePerson objectclass: inetOrgPerson objectclass: organizationalPerson objectclass: person objectclass: top sn: Administrator cn: WebSphere Administrator uid: wsadmin dn: uid=wsbind,cn=roles,dc=ibm,dc=com userPassword: was4me objectclass: ePerson objectclass: inetOrgPerson objectclass: organizationalPerson objectclass: person objectclass: top sn: Bind cn: WebSphere Bind Account uid: wsbind dn: cn=billingdept,dc=ibm,dc=com objectclass: groupOfNames objectclass: top member: uid=c0001,ou=people,dc=ibm,dc=com cn: billingdepts dn: cn=billingdeptmgr,dc=ibm,dc=com objectclass: groupOfNames objectclass: top member: uid=c0001,ou=people,dc=ibm,dc=com cn: billingdeptmgr Chapter 5. DB2, WebSphere, and Lightweight Directory Access Protocol: Considerations 379
- 416. To load the example database, perform the following steps: 1. Stop the directory server: # idsdirctl -D adminDN -w password stop In this command, adminDN is the administrator DN specified during the post-installation configuration of the directory, for example, cn=root, and password is the password assigned to the adminDN. 2. Use the idscfgsuf command to add the DN suffix that you intend to use, in this case, dc=ibm,dc=com. #idscfgsuf -s “dc=ibm,dc=com” When prompted, select option (1) Continue with the above action. Example 5-26 shows the complete output from this command. Example 5-26 Adding the DN suffix # idscfgsuf -s “dc=ibm,dc=com” You have chosen to perform the following actions: GLPCSF007I Suffix ‘dc=ibm,dc=com’ will be added to the configuration file of the directory server instance ‘ldap’. Do you want to.... (1) Continue with the above actions, or (2) Exit without making any changes:1 GLPCSF004I Adding suffix: ‘dc=ibm,dc=com’. GLPCSF005I Added suffix: ‘dc=ibm,dc=com’. # 3. Use the idsldif2db utility to import the data from the LDIF file: #idsldif2db -i redbook.ldif Example 5-27 shows the output from the idsldif2db command. Example 5-27 Importing the LDIF file # idsldif2db -i redbook.ldif GLPCOM022I The database plugin is successfully loaded from libback-config.so. GLPCTL113I Largest core file size creation limit for the process (in bytes): ‘2147483647’(Soft limit) and ‘2147483647’(Hard limit). GLPCTL114I Largest file size creation limit for the process (in bytes): ‘2147483647’(Soft limit) and ‘2147483647’(Hard limit). 380 Getting Started with IBM Tivoli Workload Scheduler V8.3
- 417. GLPCTL115I Maximum data segment limit for the process (in bytes): ‘2147483647’(Soft limit) and ‘2147483647’(Hard limit). GLPRDB002W ldif2db: 8 entries have been successfully added out of 8 attempted. # 4. With the data loaded, you can restart the directory server instance: a. Change the directory to the sbin subdirectory of the directory where you installed the IBM Directory Server. b. Launch the idsslapd command to start the directory server instance. A number of messages are displayed while the server is starting up. If the server starts successfully, you see the following message: IBM Tivoli Directory (SSL), 6.0 Server started. Note: If you have more than one directory server instance configured, you have to add the -I instance switch to both the idsldif2db and idsslapd command lines to specify the instance that you want to use. To confirm whether the user accounts included in the LDIF file are loaded into the directory successfully, issue the following command: # idsldapsearch -b “dc=ibm,dc=com” -o ibm-slapdDN “objectclass=person” ibm-slapdDN Example 5-28 shows the output produced by this command. Example 5-28 LDAP search results # idsldapsearch -b “dc=ibm,dc=com” -o ibm-slapdDN “objectclass=person” ibm-slapdDN uid=c0001,ou=people,dc=ibm,dc=com uid=wsadmin,cn=roles,dc=ibm,dc=com uid=wsbind,cn=roles,dc=ibm,dc=com # Chapter 5. DB2, WebSphere, and Lightweight Directory Access Protocol: Considerations 381
- 418. 5.12.2 Creating the properties file Generate a security properties template based on the current security properties. To do this, perform the following steps: 1. Run the following command from the TWShome/wastools directory: # ./showSecurityProperties.sh |grep “^WASX7357I:” >../tmp/LocalOSSec.props The location and name used for the resulting properties file is a personal preference. However, we suggest that you provide the properties file meaningful names related to their content. For further details, see 5.11.11, “Viewing the security properties” on page 370. 2. After you obtain a copy of the current security properties, make a copy of the file: # cd ../tmp # cp LocalOSSec.props LDAPSec.props This is because if you have problems configuring Tivoli Workload Scheduler V8.3 to use the LDAP server, you can easily restore the properties to their current values and revert to using the local operating system to authenticate users. Note: You have to modify the j2cPassword parameter within the original properties file (in our example, LocalOSSec.props). Replace the string ***** with the correct password for your DB2 user before attempting to restore the original properties file, if this is necessary. 3. Edit the copy you just made of the security properties file and change the following parameters: – activeUserRegistry Specifies whether the active user registry is the LocalOS or an LDAP server – LDAPServerId This is the LDAP user account to be used for application server administration. This user account replaces the TWSuser for operations such as stopping the application server, for example wsadmin, which is specified as uid=wsadmin,cn=roles,dc=ibm,dc=com. – LDAPPassword The password assigned to the user account specified in the LDAPServerId parameter 382 Getting Started with IBM Tivoli Workload Scheduler V8.3
- 419. – LDAPHostName Host name or IP address of the server on which the LDAP server is installed, for example, 9.3.5.50 – LDAPPort The listening port assigned to the LDAP server, for example, 389 – LDAPBaseDN The DN suffix that the LDAP accounts belong to, for example, db=ibm,dc=com – LDAPBindDN The user account name that is used by Tivoli Workload Scheduler V8.3 when connecting to the LDAP server. For example, wsbind, which is specified as uid=wsbind,cn=roles,dc=ibm,dc=com – LDAPBindPassword The password assigned to the user account specified in the LDAPBindDN parameter – j2cPassword Strictly speaking, this parameter is not related to the configuration of LDAP, but because the showSecurityProperties.sh script outputs the string *****, instead of the DB2 users password, it is necessary to reset this parameter to the correct password before running the changeSecurityProperties.sh script with this properties file. Failure to change this parameter results in Tivoli Workload Scheduler V8.3 not being able to access the DB2 database due to a password mismatch. When using the Tivoli Directory Server, the parameters in the advanced LDAP panel within the properties file are used. However, we did not find it necessary to change these from their default values. Optionally, you can set the useDomainQualifiedUserNames parameter to true. However, when you use an LDAP server, the application server realm name is no longer TWSREALM, but instead uses the format hostname:port, where hostname is the host name or IP address of the LDAP server, and port is the listening port assigned to the LDAP server, for example, 9.3.5.89:389. When useDomainQualifiedUserNames is set to true, it is important that the correct realm name is included when specifying users in the LOGON attribute and when modifying the Tivoli Workload Scheduler V8.3 security file. For further details, see the following section. Chapter 5. DB2, WebSphere, and Lightweight Directory Access Protocol: Considerations 383
- 420. Example 5-29 shows the completed security properties template file that is configured to use the LDAP server described in the previous section. Example 5-29 Security properties template configured for an LDAP server ################################################################ Global Security Panel ################################################################ enabled=true enforceJava2Security=false useDomainQualifiedUserNames=true cacheTimeout=600 issuePermissionWarning=true activeProtocol=CSI activeAuthMechanism=SWAM activeUserRegistry=LDAP ################################################################ Local OS Registry ################################################################ LocalOSServerID=tws830 LocalOSServerpassword=my_password LocalOSServerREALM=TWSREALM ################################################################ LDAP Panel ################################################################ LDAPServerId=uid=wsadmin,cn=roles,dc=ibm,dc=com LDAPPassword=was4me LDAPServerType=IBM_DIRECTORY_SERVER LDAPHostName=9.3.5.89 LDAPPort=389 LDAPBaseDN=dc=ibm,dc=com LDAPBindDN=uid=wsbind,cn=roles,dc=ibm,dc=com LDAPBindPassword=was4me LDAPsearchTimeout=120 LDAPreuseConnection=true LDAPIgnoreCase=true LDAPsslEnabled=false LDAPsslConfig= 384 Getting Started with IBM Tivoli Workload Scheduler V8.3
- 421. ################################################################ Advanced LDAP Panel ################################################################ LDAPUserFilter=(&(uid=%v)(objectclass=ePerson)) LDAPGroupFilter=(&(cn=%v)(|(objectclass=groupOfNames)(objectclass=group OfUniqueNames)(objectclass=groupOfURLs))) LDAPUserIdMap=*:uid LDAPGroupIdMap=*:cn LDAPGroupMemberIdMap= LDAPCertificateFilter=EXACT_DN LDAPCertificateMapMode= ################################################################ SSL Panel ################################################################ alias=DefaultSSLSettings keyFileName=${USER_INSTALL_ROOT}/etc/TWSServerKeyFile.jks keyFilePassword=default keyFileFormat=JKS trustFileName=${USER_INSTALL_ROOT}/etc/TWSServerTrustFile.jks trustFilePassword=default trustFileFormat=JKS clientAuthentication=false securityLevel=HIGH enableCryptoHardwareSupport=false ################################################################ J2C Authentication Data Panel ################################################################ j2cAlias=db2 j2cUserid=db2inst1 j2cPassword=my_password j2cDescription=TWS authentication data entry for DB2 4. With the new security template, you have to update the application server configuration. To do this, stop the application server: $ cd TWShome/wastools $ ./stopWas.sh -user tws830 -password my_password 5. After you stop the application server, you can update the security properties using the changeSecurityProperties.sh utility, as follows: $ ./changeSecrutiyProperties.sh ../tmp/LDAPSec.props Chapter 5. DB2, WebSphere, and Lightweight Directory Access Protocol: Considerations 385
- 422. 6. If you do not encounter any problems with the supplied template, and the properties are updated successfully, restart the application server. Unlike the scenario when using a LocalOS user registry, when you use an LDAP user registry, you must be able to start the application server as the TWSuser instead of as root. $ ./startWas.sh 7. You must now be able to stop the application server using the new LDAP user account (wsadmin) rather than the TWSuser (tws830) as demonstrated previously, for example: $ ./stopWas.sh -user wsadmin -password was4me If the application server fails to stop, then ensure that the properties file is correctly configured, and that the LDAP server is running and accepting connections from the Tivoli Workload Scheduler V8.3 master, for example, it is not being blocked by a firewall. When you can successfully stop the application server using the LDAP user account, you have to configure the Tivoli Workload Scheduler V8.3 security file. 5.12.3 Updating the Tivoli Workload Scheduler security file Update the Tivoli Workload Scheduler V8.3 security file to allow the LDAP user accounts to access Tivoli Workload Scheduler V8.3 objects. When you update the security file, it is important to know whether the application server security property useDomainQualifiedUserNames is set to true or false. If this property is set to false, include only the user account name in the security file LOGON attribute, for example: CPU=@+LOGON=wsadmin However, if the useDomainQualifiedUserNames is set to true, it is necessary to prefix the user account with the LDAP realm. The LDAP realm is made up of LDAPHostName:LDAPPort, and must match the values specified in the current security properties. Therefore, if your security properties contains a fully qualified domain name (FQDN), the LDAP realm must also contain the same FQDN. Similarly, if the LDAPHostName is set to an IP address, the LDAP realm must contain the same IP address. For example, if LDAPHostName is set to 9.3.5.89 and LDAPPort is set to 389, the LDAP realm 9.3.5.89:389 is included in the security file LOGON attribute as follows: CPU=@+LOGON=9.3.5.89:389/wsadmin 386 Getting Started with IBM Tivoli Workload Scheduler V8.3
- 423. Example 5-30 shows a security file template configured with two LDAP user accounts, wsadmin and c0001, with useDomainQualifiedUserNames set to true. Example 5-30 Security file template example USER MAESTRO CPU=@+LOGON=tws830,root,9.3.5.89:389/wsadmin BEGIN USEROBJCPU=@ACCESS=ADD,DELETE,DISPLAY,MODIFY,ALTPASS,UNLOCK JOBCPU=@ ACCESS=ADD,ADDDEP,ALTPRI,CANCEL,CONFIRM,DELDEP,DELETE,DISPLAY,KILL,MODI FY,RELEASE,REPLY,RERUN,SUBMIT,USE,LIST,UNLOCK SCHEDULECPU=@ ACCESS=ADD,ADDDEP,ALTPRI,CANCEL,DELDEP,DELETE,DISPLAY,LIMIT,MODIFY,RELE ASE,REPLY,SUBMIT,LIST,UNLOCK RESOURCECPU=@ ACCESS=ADD,DELETE,DISPLAY,MODIFY,RESOURCE,USE,LIST,UNLOCK PROMPTACCESS=ADD,DELETE,DISPLAY,MODIFY,REPLY,USE,LIST,UNLOCK FILENAME=@ACCESS=BUILD,DELETE,DISPLAY,MODIFY,UNLOCK CPUCPU=@ ACCESS=ADD,CONSOLE,DELETE,DISPLAY,FENCE,LIMIT,LINK,MODIFY,SHUTDOWN,STAR T,STOP,UNLINK,LIST,UNLOCK PARAMETERCPU=@ACCESS=ADD,DELETE,DISPLAY,MODIFY,UNLOCK CALENDARACCESS=ADD,DELETE,DISPLAY,MODIFY,USE,UNLOCK END USER JSCOPS CPU=@+LOGON=9.3.5.89:389/c0001 BEGIN USEROBJCPU=@ACCESS=DISPLAY,ALTPASS JOBCPU=@ ACCESS=ADDDEP,ALTPRI,CANCEL,CONFIRM,DELDEP,DISPLAY,KILL,RELEASE,REPLY,R ERUN,SUBMIT,USE,LIST SCHEDULECPU=@ ACCESS=ADDDEP,ALTPRI,CANCEL,DELDEP,DISPLAY,LIMIT,RELEASE,REPLY,SUBMIT,L IST RESOURCECPU=@ACCESS=DISPLAY,RESOURCE,USE,LIST PROMPTACCESS=DISPLAY,REPLY,USE,LIST FILENAME=@ACCESS=DISPLAY CPUCPU=@ ACCESS=CONSOLE,DISPLAY,FENCE,LIMIT,LINK,SHUTDOWN,START,STOP,UNLINK,LIST PARAMETERCPU=@ACCESS=DISPLAY CALENDARACCESS=DISPLAY,USE END Chapter 5. DB2, WebSphere, and Lightweight Directory Access Protocol: Considerations 387
- 424. After you add the necessary LDAP user accounts to the security file template, you can validate the template file syntax by running the command: $ makesec -v template If no errors are reported, install the template by running makesec again, this time without the -v switch: $ makesec template With the security file template in place, restart the application server by running startWas.sh as demonstrated previously. You can now test the LDAP user accounts, which were added to the security file, to check whether they can access the Tivoli Workload Scheduler V8.3 objects for which they have been granted the necessary rights. For example, using the composer CLI to list the CPU objects, run: $ composer -user wsadmin -password was4me disp cpu=@ You can test each LDAP user account added to the security file in this way by specifying the appropriate user and password values for each LDAP user account in turn. Note: If useDomainQualifiedUserNames is set to true, it is not necessary to qualify the users when using composer CLI or the JSC with the LDAP realm, just specify the user name itself, for example, -user c0001. After you determine that the LDAP user accounts are working correctly, you must change the default user used by the Tivoli Workload Scheduler V8.3 command line utilities including the composer CLI, as detailed in the following section. 5.12.4 Using the Tivoli Workload Scheduler V8.3 command line utilities After you enable LDAP authentication successfully, change the user and password that are used by the CLI tools. By default, the user credentials used by the CLI are stored in the file TWShome/.TWS/useropts_TWSuser. The label ENCRYPT: in the password field indicates that the specified password is encrypted, for example: PASSWORD = “ENCRYPT:A/JW9nGJq6s=” Replace the existing TWSuser with the LDAP application server administrator user account in the USERNAME field. To reset the password, set the PASSWORD field equal to the unencrypted password, for example: PASSWORD = “was4me” 388 Getting Started with IBM Tivoli Workload Scheduler V8.3
- 425. The password is automatically re-encrypted when composer exits the next time. Therefore, to ensure that the password is not exposed longer than necessary, run the following command immediately after you finish editing this file: $ composer exit If you examine the file again after composer has completed, you see that your password is replaced with the ENCRYPT: label. Example 5-31 shows the encrypted version of your password. Example 5-31 CLI useropts file # # TWS useropts file defines credential attributes of the remote Workstation. # USERNAME = wsadmin PASSWORD = “ENCRYPT:vkb6Y8rwoFM=” When implementing LDAP authentication, you have to update the user account used by the JSC when connecting to the application server. The required steps are described in the following section. 5.12.5 Using the Job Scheduling Console After you enable LDAP authentication successfully, change the user and password used by the JSC V8.3. Launch the JSC, and from the Work with engines panel, select the appropriate engine instance. From the action menu, right-click and select the Properties... option. In the Properties panel, replace the values in the User Name and Password fields with the appropriate LDAP user account and password, as shown in Figure 5-10. Click OK to activate the changes. Chapter 5. DB2, WebSphere, and Lightweight Directory Access Protocol: Considerations 389
- 426. Figure 5-10 shows the JSC engine properties panel. Figure 5-10 JSC engine properties panel 390 Getting Started with IBM Tivoli Workload Scheduler V8.3
- 427. 5.13 Configuring the application server to start and stop without a password In this section, we explain how to configure the application server to start and stop without a password. 1. As root, stop the application server by running the command shown in Example 5-32. Example 5-32 Stopping the application server /twshome/wastools/stopWas.sh -user twsuser -password twspass ADMU0116I: Tool information is being logged in file /twshome/appserver/profiles/twsprofile/logs/server1/stopServer.log ADMU0128I: Starting tool with the twsprofile profile ADMU3100I: Reading configuration for server: server1 ADMU3201I: Server stop request issued. Waiting for stop status. ADMU4000I: Server server1 stop completed. 2. Edit the soap.client.props file in twshome/appserver/ profiles/twsprofile/properties. Find the following configuration settings and change them, as shown in Example 5-33 (do not change any other settings). Example 5-33 Editing the soap.client.props file com.ibm.SOAP.securityEnabled=false com.ibm.SOAP.loginUserid=twsuser com.ibm.SOAP.loginPassword=passw0rd com.ibm.SOAP.loginSource=none 3. Edit the sas.client.props file in the same directory, as shown in Example 5-34. Example 5-34 Editing the sas.client.props file com.ibm.CORBA.loginSource=properties # RMI/IIOP user identity com.ibm.CORBA.loginUserid=twsuser com.ibm.CORBA.loginPassword=passw0rd Chapter 5. DB2, WebSphere, and Lightweight Directory Access Protocol: Considerations 391
- 428. 4. Change to the twshome/wastools directory and run the encryptProfileProperties.sh script, as shown in Example 5-35. Note: You can safely ignore messages regarding stdclient and tools properties files. Example 5-35 Running the ./encryptProfileProperties.sh script ./encryptProfileProperties.sh NOTE: all specified passwords already encoded in target file == twshome/wastools/../appserver/profiles/twsprofile/properties/sas.stdclient.properties NOTE: all specified passwords already encoded in target file == twshome/wastools/../appserver/profiles/twsprofile/properties/sas.tools.properties 5. If you see the message displayed in Example 5-36, you might have to update the soap properties file using the encoder utility directly, as shown in Example 5-37. Example 5-36 SOAP properties update NOTE: all specified passwords already encoded in target file == /opt/IBM/tws83/wastools/../appserver/profiles/twsprofile/properties/soap.client.props Example 5-37 Updating the soap properties file cd twshome/appserver/profiles/twsprofile/properties ../bin/PropFilePasswordEncoder.sh soap.client.props com.ibm.SOAP.loginPassword 6. After you perform this configuration, you must start the application server with the following command: twshome/appserver/bin/startServer.sh server1 7. To stop the application server, use the command: twshome/appserver/bin/stopServer.sh server1 Important: Repeat these steps whenever the Tivoli Workload Scheduler user's password changes. 392 Getting Started with IBM Tivoli Workload Scheduler V8.3
- 429. 5.14 Network configuration for Job Scheduling Console The JSC uses RMI/IIOP protocol to communicate with the WebSphere Application Server. The communication involves establishing a number of connections between the JSC and application server for Java Naming and Directory Interface™ (JNDI) and Object Request Broker (ORB) services. Configuring JSC in an environment with firewall If you are attempting to connect from the JSC V8.3 to an application server that crosses a firewall or similar device, particularly one which is performing network address translation (NAT) to establish the connection using the RMI-IIOP protocol, you have to modify the following parameters: bootHost This is the IP address or host name returned to the JSC and used to establish connections to the JNDI server. This address must be visible to the machine where the JSC is running. The default value is set during installation to the IP address or host name of the machine where the application server is installed. Set this value to the IP address or host name of the server where the application server is running as it is known on the JSC side of the NAT device. orbPort The default value is 0, which means that a random server allocated port is used. Change this value to a specific unused port, for example, 31120. csiServerAuthPort The default value is 0, which again means that the server allocates a random port. Change this value to a specific unused port, for example, 31121. To make these changes, perform the following steps: 1. Change the directory to the TWShome/wastools directory. 2. Export the existing host properties to a file as follows: $ ./showHostProperties.sh |grep -v “^WASX7357I:” >properties_file Note that the TWSuser does not usually have write access to the wastools directory. Therefore, the properties_file must be the path to a location that the TWSuser is able to write to, for example, TWShome/tmp/Host.properties. Chapter 5. DB2, WebSphere, and Lightweight Directory Access Protocol: Considerations 393
- 430. 3. Edit the host properties template file created in the previous step. Change the orbPort port from the default of 0, which means that the server assigns a random port, to 31120. Similarly, change the csiServerAuthPort port from the default of 0 to 31121. orbPort=31120 csiServerAuthPort=31121 Additionally, modify the bootHost parameter if the current host name or IP address defined does not meet the requirements described previously. 4. Stop the application server by running: $ ./stopWas.sh -user username -password password 5. Update the application server host properties using the edited host properties template file created in step 3 by running the command: $ ./changeHostProperties.sh properties_file 6. Switch to or log in as root: $ su 7. Restart the application server: # ./startWas.sh The ports that you specify for orbPort and csiServerAuthPort plus the bootPort, 31117 by default, have to be permitted to pass through the firewall from the machine running the JSC to the bootHost on any firewalls that the connection might cross. 394 Getting Started with IBM Tivoli Workload Scheduler V8.3
- 431. 6 Chapter 6. Job Scheduling Console V8.3 This chapter describes the new architecture of the Job Scheduling Console (JSC) and discusses new features and enhancements that have been added to the JSC in version 8.3. We cover the usage of new functions that have been introduced to the scheduling concepts and provide some examples of their usage. This chapter discusses the following topics: “Job Scheduling Console architecture” on page 396 “Job Scheduling Console: Changes and new features” on page 399 “Managing exclusive locking on database objects” on page 412 “Known problems and issues” on page 413 © Copyright IBM Corp. 2006. All rights reserved. 395
- 432. 6.1 Job Scheduling Console architecture JSC is a java-based remote graphical user interactive interface that can be used to create, modify, and delete scheduling objects in the Tivoli Workload Scheduler database. It can also be used for the monitoring and controlling of scheduling objects in the current production plan. There are some changes to the main JSC architecture, but the most drastic one is the exclusion of the Tivoli Framework and the introduction of WebSphere Application Server. Tivoli Framework and its components (Job Scheduling Service and Tivoli Workload Scheduler Connector) are no longer required for the running of the JSC. This also means that we do not have to create Tivoli administrators for users who run JSC. Instead, a light version of the WebSphere Application Server has been embedded into Tivoli Workload Scheduler. This provides the connection between the Tivoli Workload Scheduler engine and the graphical user interface (GUI), the console. This light version is the WebSphere Application Server Embedded Express, which is automatically installed during the installation. This architecture also includes Tivoli Workload Scheduler connector and connector instances, but all of these are embedded in the product and do not require separate installation and configuration (see Figure 6-1). 396 Getting Started with IBM Tivoli Workload Scheduler V8.3
- 433. Figure 6-1 Connection between JSC and Tivoli Workload Scheduler engine When a user logs on to the JSC, the logging process goes through the WebSphere Application Server on the master domain manager (or a relevant domain manager or a fault-tolerant agent (FTA)), and using the connector instance, information is retrieved from the Tivoli Workload Scheduler engine and displayed on the console. The WebSphere Application Server and Tivoli Workload Scheduler connectors are typically installed on the master domain manager and backup master. However, it is possible (in some cases) that a user wants to log on to a domain manager or an FTA directly. In such a scenario, WebSphere Application Server and connectors have to be installed on those servers (see Figure 6-2). Chapter 6. Job Scheduling Console V8.3 397
- 434. Figure 6-2 Tivoli Workload Scheduler environment with JSC Note: JSC V8.3 can coexist on the same machine as the versions of JSC 1.2, 1.3, and 1.4. The user preferences file is also migrated to the JSC V8.3. Job Scheduling Console components Job Scheduling Console uses Hypertext Transfer Protocol (HTTP) to connect to Tivoli Workload Scheduler engine. This is achieved by using the following components of the WebSphere Application Server: Bootstrap/RMI Remote Method Invocation (RMI) system, which provides remote communication between JSC and Tivoli Workload Scheduler engine; by default, it uses port 31117. SOAP connectors SOAP, which is used to manage the traffic between the JSC and the Job Schedulers; by default, it uses port 31118. 398 Getting Started with IBM Tivoli Workload Scheduler V8.3
- 435. HTTP Transport Standard WebSphere communication protocol; the default port is 31115. HTTPS Transport This is used by the composer when Hypertext Transfer Protocol-Secure (HTTPS) is used. By default, the port value is 31116. Note: All default ports used by the Tivoli Workload Scheduler and JSC are described in Chapter 3, “Tivoli Workload Scheduler V8.3: New installation” on page 35. 6.2 Job Scheduling Console: Changes and new features A number of changes and enhancements have been introduced in this version of the JSC. The changes and enhancements include the following features: JSC version is now the same as the Tivoli Workload Scheduler version, that is, V8.3 A possibility to have different job stream versions and their time limitations The “On Request” option is no longer used and the job stream draft option has been introduced Job stream dependency resolution Different task types in the job stream definitions are no longer managed as separate lists, but are included in the job definition Changes to the definition of run cycles Job stream editor changes include a new Explorer view Changes to the plan, which include the possibility of having different instances of the same job stream The addition of the forecast and trial plans Database object locking management Lightweight Directory Access Protocol (LDAP) security support This section describes the JSC changes and new additions, and provides some example of where and how to use them. For details about LDAP and security features, see 5.12, “Lightweight Directory Access Protocol” on page 376. Chapter 6. Job Scheduling Console V8.3 399
- 436. 6.2.1 Job Scheduling Console plan changes You can now create a production plan, which includes any period of time and not just 24 hours, as was the case previously. When a new plan is created, job stream names and dependencies are preserved for days. You can use a new option in the JSC Actions list to generate a new plan. There are two options available for this plan generation: Trial plan This option shows what a production plan is over a longer period of time. Forecast plan This option shows what a production plan looks like within a chosen time frame, for example, three days. Figure 6-3 shows an example of a new plan generation. Figure 6-3 Generating a new plan 400 Getting Started with IBM Tivoli Workload Scheduler V8.3
- 437. Other changes to the plan view include an improved view of job stream instances, which involve active job stream dates (see Figure 6-4). Figure 6-4 Job scheduling instance plan view Most of the changes to the JSC have been made for the creation and editing of scheduling objects in the database. 6.2.2 Database object definitions changes This section covers the changes to the database object definitions. Scheduling objects and changes to them are discussed with examples. Job definition When you define a new job, there is no longer a separate list for different task types. They still exist, but they are now included in the job definition section. You can change them after the job definition creation. The task types that are available are: Windows, UNIX, Other, and SAP. Figure 6-5 shows the new layout of the job definition panel. The choice of using a script or a command is now available in the Task tab as a radio button. In the Task tab, you have the option to make a job interactive. This is applicable for Windows jobs that run interactively on the Windows desktop. Job recovery options, login, and the command/script name remain the same as in previous versions. Chapter 6. Job Scheduling Console V8.3 401
- 438. Figure 6-5 shows the general properties window of the job definition. Figure 6-5 Defining a new job 402 Getting Started with IBM Tivoli Workload Scheduler V8.3
- 439. Job streams definition Defining job streams has been changed quite significantly. The “on request” option has been removed and the “valid from/to” date option has been added. It is also possible to define a job stream as a draft. Another new feature of V8.3 is the validity interval of a job stream, which defines the time interval within which the job stream definition is used. Job streams are selected to be included in the production plan if they fall within their defined interval. To create a new job stream, choose New Job Stream option from the Actions list of the JSC. In the General window, the following new options have been introduced: Valid From This option is the date of the first day when the job stream must become valid (active). Valid To This option is the date after which the job stream is no longer active. You can leave this field blank. Is Draft This option shows that the job stream is still in the draft stage and must not be in production. Notes: If you marking a job stream as a draft, then that job stream is not included in the production plan. It is not possible to define multiple draft versions for the same job stream. Chapter 6. Job Scheduling Console V8.3 403
- 440. Figure 6-6 shows the general properties window of the job stream definition. Figure 6-6 Job stream definition: General properties 404 Getting Started with IBM Tivoli Workload Scheduler V8.3
- 441. The summary of the available tabs include: General Comments Dependency Resolution Time Restrictions Resources Prompts Files Note: The comments field in the versions previous to V8.3 is now a separate tab and can include a longer description of what a job stream is supposed to do. New features in V8.3: Job stream versions and dependency resolution Multiple versions of the same job stream can now exist at the same time: Each one of them now has a user defined “valid from” and “valid to” date. Different versions share name, workstation, and lock status fields. Versions of referenced instances are resolved according to their scheduled time. The selection of the referenced instances follows the dependency resolution rule: Closest Preceding The job or job stream instance to resolve dependency is the one which is the closest in time before the instance that includes the dependency. Same Day The job or job stream instance to resolve the dependency is the closest one in the day within which the instance that includes the dependency is scheduled to run. Within a Relative Interval The job or job stream instance to resolve the dependency is the closest one in a time interval, which is defined relatively to the time that the instance which includes the dependency is scheduled to run. Within an Absolute Interval The job or job stream instance to resolve the dependency is the closest one in a time interval, defining the time of the day on which the interval starts and the time of the day on which it ends, whether within the same day of the instance that includes the dependency, or within a day defined relatively to this one. Chapter 6. Job Scheduling Console V8.3 405
- 442. Figure 6-7 shows the Dependency Resolution window. Figure 6-7 Job Stream definition: Dependency resolution Time restriction, resource, prompt, and file dependency tabs have not changed from previous versions of JSC. 406 Getting Started with IBM Tivoli Workload Scheduler V8.3
- 443. New features in V8.3: Run cycle definition changes Run cycle panels have been modified and changed, and new cycles have been added. The list of cycles available in this version of JSC include: Simple Calendar Daily Weekly Monthly by Date Monthly by Day Yearly Notes: Time restrictions have also been added to run cycle definition. You can define them for each run cycle independently and use them for handling different time dependencies for multiple job stream instances within the same day. Do not confuse run cycle time restrictions with job stream time restrictions. Chapter 6. Job Scheduling Console V8.3 407
- 444. Figure 6-8 shows the Run Cycle - Rule window. Figure 6-8 Job stream definition: Creating a weekly run cycle 408 Getting Started with IBM Tivoli Workload Scheduler V8.3
- 445. Note: Depending on the cycle that you select, different views are available for different run cycles. In JSC V8.3, a new view has been added in the Job Stream Editor: An Explorer view (see Figure 6-9). Explorer view allows selection of jobs from the list or from the tree on the left to work with job properties. Figure 6-9 Job stream: Explorer view Chapter 6. Job Scheduling Console V8.3 409
- 446. You can now add multiple jobs to the job stream. You can also add new job definitions on the fly with the Edit and New buttons (see Figure 6-10). Figure 6-10 Job Stream Editor: Multiple job selection The Actions menu of the job stream editor has the following options: Add Job - Job Definition/Multiple Job Definition Add Dependency - Internetwork/External Job/External Job Stream Add Link Set All Jobs - Monitored/Not Monitored 410 Getting Started with IBM Tivoli Workload Scheduler V8.3
- 447. Calendar definition Calendar definition has not changed with the new version of JSC. Workstations and workstation classes For information about how to create a new workstation, see Chapter 3, “Tivoli Workload Scheduler V8.3: New installation” on page 35. There is a new option within the workstation definition to create a domain manager. If you choose this option, the Full status section is automatically selected and locked, and cannot be changed. Domains and domain managers During the Tivoli Workload Scheduler installation, master domain (MASTERDM) is created automatically and master domain manager (MDM) is marked as the master with the “Is Master” option (see Figure 6-11). Figure 6-11 Master domain manager definition A domain is no longer allowed to reference a non-existing domain manager, but it can temporarily have no domain manager defined. The domain manager is defined when you create or modify a workstation definition, and select the Domain Manager option. Chapter 6. Job Scheduling Console V8.3 411
- 448. Windows users definition Defining Windows users is still the same as in previous versions of JSC, and is done by selecting a New Windows User option from the Actions list. Parameters, resources, and prompts Object definitions for prompts, parameters, and resources have not changed from the previous versions. The parameters database is now stored on the master domain manager and is no longer localized. This is the case when defining a global parameter, using the JSC. However, if a parameter is defined locally on a Tivoli Workload Scheduler workstation (not necessarily on the master) using the parameters command line utility, that parameter is stored locally in the local parameters file. Note: Parameters that are defined globally on the master are resolved when the plan is generated on the master, and can be used within job definitions (for example, user login, script path, and so on). Parameters that are defined locally are resolved at the job execution time on that workstation. 6.3 Managing exclusive locking on database objects The JSC has two new menu options: Browse and Unlock. When you right-click an object that has exclusive lock, these new options are available (see Figure 6-12). All scheduling objects now have “Locked by” and “Locked on” options in JSC. 412 Getting Started with IBM Tivoli Workload Scheduler V8.3
- 449. Figure 6-12 Exclusive locking and JSC options An object is locked when you double-click it, and is unlocked when you save it. The unlock option is used to force an unlock. 6.4 Known problems and issues There are no known major issues so far on the general availability (GA) release of the product. However, there are some observations that might be worth mentioning, just in case they are confusing for new users. If no engine is created at the startup of the JSC, only one item is displayed in the Actions List window, which is the New Engine item. This is expected. However, if the last engine in the “Work with engines” list is deleted, then the Actions List window does not revert to showing only the New Engine item. Instead, it shows all of the other items as well. On the Solaris version of the JSC, if all the engines are deleted and then a new one is created, the engine icon is displayed under the Common Default Plan Lists group. This is reordered into the usual display where the engine icons are displayed above the Common Default Plan Lists group, if the user quits the console and restarts it. This does not seem to happen in the Windows version of the JSC. Chapter 6. Job Scheduling Console V8.3 413
- 450. 414 Getting Started with IBM Tivoli Workload Scheduler V8.3
- 451. 7 Chapter 7. Planning your workload This chapter discusses the concepts and procedures to successfully plan an enterprise’s workload. Existing sites using Tivoli Workload Scheduler refer to the activities that use these concepts and procedures as scheduling. The staff members who perform these activities are called schedulers. New users of scheduling software such as Tivoli Workload Scheduler are introduced to scheduling as the activity that defines what jobs have to run under what conditions. This covers defining objects as diverse as the servers that the jobs run on (called workstations in Tivoli Workload Scheduler), what commands and arguments to these commands are called when a job starts executing (defined in a job object in Tivoli Workload Scheduler), to what time a job starts, and what other jobs must finish before it starts (defined in a job stream in Tivoli Workload Scheduler). Most of the daily activity of a scheduler revolves around creating and maintaining the scheduling object definitions such as workstations, jobs, and job streams. There is another set of activities that a scheduler is usually responsible for driving or assisting. These are not usually the bulk of daily activities for a scheduler, but they are key to a scheduler’s understanding of Tivoli Workload Scheduler. These activities are the design, creation, and management of the production process. Production process is the tasks that Tivoli Workload Scheduler performs to identify the jobs that have to run. It is also the structure that Tivoli Workload Scheduler uses to perform these tasks in an orderly and predictable manner. © Copyright IBM Corp. 2006. All rights reserved. 415
- 452. In this chapter, we describe the following topics: “Overview of production day”; see the following section “Plan cycle versus run cycle” on page 429 “Preproduction plan” on page 432 “Schedtime” on page 433 “Creating the production day” on page 434 7.1 Overview of production day A central concept in Tivoli Workload Scheduler master domain manager is the production day. Tivoli Workload Scheduler processes the jobs it has to run in regular cycles. Each cycle is called a production day. The two main attributes of a production day are: The start of the production day, also called the Start of Day (SOD) The length of the production day A production day is user definable. The cycle is called a production day for historical reasons. It does not have to correspond to a “wall clock day”. It can be shorter or longer than a single 24-hour day. By default, Tivoli Workload Scheduler is installed with a 24-hour production day that runs from 6 a.m. to 5:59 a.m. the next day in the time zone used by the master domain manager server’s operating system. The default production day fits the requirements of many sites that have a busy batch window during the early morning of the same time zone as the master domain manager. Figure 7-1 shows how we represent several days. Figure 7-1 Three-and-a-half calendar days. Tivoli Workload Scheduler represents time using the 24-hour clock, where 3 a.m. is 0300, noon is 1200, 6 p.m. is 1800, and midnight is 0000. A single calendar day is defined as the precise interval between 0000 (midnight) and 2359 inclusive. Figure 7-1 starts at 12 noon on Sunday and ends at midnight Thursday. Throughout this book, we use this basic representation without the noon and midnight labels when we discuss the production day and how it relates to other concepts. 416 Getting Started with IBM Tivoli Workload Scheduler V8.3
- 453. Jobs and job streams can be defined to start at any minute during the production day. The first possible time to schedule a job or job stream is the first minute of the production day (6 a.m. for the default production day), and the last possible time is on the last minute of the production day (5:59 a.m. the next calendar day for the default production day). If a job or job stream is scheduled at exactly the same time as another job or job stream, the order of job execution is in the same sequence that the job or job stream definitions are read from the database. We discuss more about the details of how job and job stream start times are related to the production day in the following sections of this chapter. The default production day is thus expressed in Tivoli Workload Scheduler as 0600 through 0559. Figure 7-2 shows the default production day configuration of 0600 through 0559 the next calendar day, and its relationship to the calendar day over several days in a week. Figure 7-2 Default production day However, some organizations have a batch window that is evenly spread throughout the day. That is, there is no specific part of the day that jobs are scheduled to start in, such as the early morning hours or late evening hours. This is common for organizations that manage jobs on servers spread around the world. For example, when the batch window for a set of servers closes in New York City, it might be just opening for some servers in Tokyo. In our experience, these sites typically choose a production day that follows the calendar (or wall Chapter 7. Planning your workload 417
- 454. clock) day. We discuss more about the details about selecting the start of the production day in the following sections of this chapter. Figure 7-3 shows a production day that follows the calendar day, starting at 0000 and ending at 1159. Figure 7-3 Production day that follows calendar day At the start of each production day, Tivoli Workload Scheduler runs a program that identifies all the job streams that have to run for that production day out of the database. The program then includes the uncompleted job streams from the previous production day into the current production day. All of the required information for a production day is placed into a production control database. The production control database is implemented as a file named Symphony. During the production day, the Symphony file is continuously updated to reflect the work that has to be performed, the work in progress, and the completed work. Copies of the Symphony file are distributed to all the subordinate domain manager and fault-tolerant agent (FTA) servers. When an operator makes a change in the day’s production through either the Job Scheduling Console (JSC) graphical user interface (GUI) or the command line, the change is made to the Symphony file. The Tivoli Workload Scheduler processes monitor the Symphony file and make calls to the operating system to launch jobs as required. The operating system 418 Getting Started with IBM Tivoli Workload Scheduler V8.3
- 455. runs the job and returns the job completion status to Tivoli Workload Scheduler. The success, failure, or in progress status information of the job is entered into the Symphony file to indicate to operators the status of the job. If the production day is defined as shorter than a calendar day (see Figure 7-4), the production plan is generated at an interval specified by the user in hours and minutes. In Figure 7-4, the sequence of production days start at 1200 midnight on Sunday, and thereafter each production day is 10 hours from the previous production day. The exact production day length is expressed as 1000 in Tivoli Workload Scheduler, meaning 10 hours and 00 minutes. Figure 7-4 Production day that is shorter than 24-hour calendar day When the production day is shorter than 24 hours, job streams might also have to include the time of day that they must be introduced upon during the days of their run cycles. This time of day attribute that we include in the job stream is called the schedule time or start time in Tivoli Workload Scheduler. This is discussed in more detail in 7.2, “Plan cycle versus run cycle” on page 429. The production day can also be longer than a calendar day. When this is chosen, it is typically in increments of 24 hours. For example, a production day of 48 hours or 72 hours is usually used, although other intervals longer than 24 hours can also be used. The longest possible production day is 999 hours and 99 minutes as governed by the -for argument to the JnextPlan script, or slightly Chapter 7. Planning your workload 419
- 456. more than 41 days. Figure 7-5 shows a production day of 48 hours, expressed in Tivoli Workload Scheduler as 4800. Figure 7-5 Production day that is longer than 24-hour calendar day This section has described in broad outline the life cycle of a production day. The remaining sections discuss the detailed processes that generate a production day, the advantages of a production day, and various architectural and implementation considerations of the production day. 420 Getting Started with IBM Tivoli Workload Scheduler V8.3
- 457. 7.1.1 Identifying the start of the production day If you already have Tivoli Workload Scheduler installed but do not know the start of the production day, perform the following steps to identify it. Most of the attributes of the production day are controlled through the command-line interface (CLI). 1. Log in as the TWSuser account on the master domain manager server. This account is also referred to as the maestro account. 2. Source in the environment variables for Tivoli Workload Scheduler. – UNIX: Enter the command as shown in Example 7-1. Example 7-1 Sourcing Tivoli Workload Scheduler environment variables (UNIX) $ . ./tws_env.sh Tivoli Workload Scheduler Environment Successfully Set !!! – Windows: Enter the command as shown in Example 7-2. Example 7-2 Sourcing Tivoli Workload Scheduler environment variables (Windows) C:win32appTWStws830> tws_env.cmd 3. Enter the optman command, as shown in Example 7-3, for UNIX master domain manager servers. Use the same command on both UNIX and Windows master domain manager servers. Example 7-3 Using the optman command to determine the start of the production day $ optman show startOfDay Tivoli Workload Scheduler (UNIX)/OPTMAN 8.3 (1.0) Licensed Materials - Property of IBM(R) 5698-WSH (C) Copyright IBM Corp 1998, 2006 All rights reserved. US Government User Restricted Rights Use, duplication or disclosure restricted by GSA ADP Schedule Contract with IBM Corp. IBM is a registered trademark of International Business Machines Corporation in the United States, other countries, or both. Installed for user "tws830". Locale LANG set to the following: "en" startOfDay / sd =0600 Description: Start time of day. Enter the start time of the Tivoli Workload Scheduler processing day in 24 hour format: "hhmm" (0000-2359). Chapter 7. Planning your workload 421
- 458. The default start time is "0600" (06:00 AM), and the default launch time of the "final" job stream is "0559" (05:59 AM). If you change this option, you must also change the launch time of the "final" job stream, which is usually set to one minute before the start time. The line that starts with startOfDay (highlighted in bold in Example 7-3) shows the start of the production day. In this example, the start of day is the default, 0559h, or 5:59 a.m. in the time zone of the master domain manager server. 4. Confirm that the launch time of the job stream named FINAL is one minute before the start of the production day. Enter the composer command, as shown in Example 7-4, for UNIX master domain manager servers. Use the same command on both UNIX and Windows master domain manager servers. Example 7-4 Using the composer command to verify the start of the production day $ composer "display sched=FINAL" Tivoli Workload Scheduler (UNIX)/COMPOSER 8.3 (1.18.3.3) Licensed Materials - Property of IBM(R) 5698-WSH (C) Copyright IBM Corp 1998, 2006 All rights reserved. US Government User Restricted Rights Use, duplication or disclosure restricted by GSA ADP Schedule Contract with IBM Corp. IBM is a registered trademark of International Business Machines Corporation in the United States, other countries, or both. Installed for user "tws830". Locale LANG set to the following: "en" User: tws830, Host:127.0.0.1, Port:31116 -display sched=FINAL Workstation Job Stream Name Valid From Updated On Locked By ---------------- ---------------- ---------- ---------- ---------------- MASTER FINAL - 05/24/2006 - #@(#) $Id: Sfinal.conf,v 7.56 1995/02/24 04:13:53 alanh viola_thunder $ # This is a sample schedule for doing pre and post production # processing. It assumes the start time is 6:00 a.m. # It is defined as CARRYFORWARD because it is executed across # production days. This ensures that job statistics will be # collected for the schedule. # All of the job statements that follow use auto-documentation # keywords so the jobs will be documented by composer when the # schedule is added or modified in the mastsked file. SCHEDULE MASTER#FINAL 422 Getting Started with IBM Tivoli Workload Scheduler V8.3
- 459. ON RUNCYCLE RULE1 "FREQ=DAILY;" AT 0559 CARRYFORWARD FOLLOWS MASTER#FINAL.@ PREVIOUS : MASTER#MAKEPLAN MASTER#SWITCHPLAN FOLLOWS MAKEPLAN MASTER#CREATEPOSTREPORTS FOLLOWS SWITCHPLAN # MakePlan creates tomorrow's production control file (Symnew). # Then it runs reporter to print pre-production reports. # The reports should be reviewed. # SwitchPlan stops batchman and runs stageman to: 1) carry forward incomplete schedules, # 2) log the old Symphony file, 3) create the new Symphony and Sinfonia # files. It then starts batchman. # CreatePostReports runs reporter to print post-production reports. # UpdateStats runs logman to log job statistics, and then # report8 to print the Job Histogram. MASTER#UPDATESTATS FOLLOWS SWITCHPLAN END AWSBIA291I Total objects: 1 Look for a line similar to the line AT 0559, which is highlighted in bold in Example 7-4. This indicates that the production day starts the FINAL job stream at 0559h, or 5:59 a.m. in the time zone of the master domain manager server. Note: If the FINAL job stream is not set to run one minute before the start of the production day, contact your IBM service provider or Tivoli Workload Scheduler administrator for further details about your site’s configuration. Chapter 7. Planning your workload 423
- 460. 7.1.2 Identifying the length of the production day You have to identify the length of the production day along with its start to know how to use it effectively. To determine the length of the production day, perform the following steps: 1. Log in as the TWSuser account on the master domain manager server. This account is also referred to as the maestro account. 2. Source in the environment variables for Tivoli Workload Scheduler. – UNIX: Enter the command, as shown in Example 7-5. Example 7-5 Sourcing Tivoli Workload Scheduler environment variables (UNIX) $ . ./tws_env.sh Tivoli Workload Scheduler Environment Successfully Set !!! – Windows: Enter the command as shown in Example 7-6. Example 7-6 Sourcing Tivoli Workload Scheduler environment variables (Windows) C:win32appTWStws830> tws_env.cmd 3. Inspect the run cycle of the job stream called FINAL. Enter the composer command, as shown in Example 7-7, for UNIX master domain manager servers. Use the same command on both UNIX and Windows master domain manager servers. Example 7-7 Using composer command to identify length of the production day $ composer "display sched=FINAL" Tivoli Workload Scheduler (UNIX)/COMPOSER 8.3 (1.18.3.3) Licensed Materials - Property of IBM(R) 5698-WSH (C) Copyright IBM Corp 1998, 2006 All rights reserved. US Government User Restricted Rights Use, duplication or disclosure restricted by GSA ADP Schedule Contract with IBM Corp. IBM is a registered trademark of International Business Machines Corporation in the United States, other countries, or both. Installed for user "tws830". Locale LANG set to the following: "en" User: tws830, Host:127.0.0.1, Port:31116 -display sched=FINAL Workstation Job Stream Name Valid From Updated On Locked By ---------------- ---------------- ---------- ---------- ---------------- MASTER FINAL - 05/24/2006 - 424 Getting Started with IBM Tivoli Workload Scheduler V8.3
- 461. #@(#) $Id: Sfinal.conf,v 7.56 1995/02/24 04:13:53 alanh viola_thunder $ # This is a sample schedule for doing pre and post production # processing. It assumes the start time is 6:00 a.m. # It is defined as CARRYFORWARD because it is executed across # production days. This ensures that job statistics will be # collected for the schedule. # All of the job statements that follow use auto-documentation # keywords so the jobs will be documented by composer when the # schedule is added or modified in the mastsked file. SCHEDULE MASTER#FINAL ON RUNCYCLE RULE1 "FREQ=DAILY;" AT 0559 CARRYFORWARD FOLLOWS MASTER#FINAL.@ PREVIOUS : MASTER#MAKEPLAN MASTER#SWITCHPLAN FOLLOWS MAKEPLAN MASTER#CREATEPOSTREPORTS FOLLOWS SWITCHPLAN # MakePlan creates tomorrow's production control file (Symnew). # Then it runs reporter to print pre-production reports. # The reports should be reviewed. # SwitchPlan stops batchman and runs stageman to: 1) carry forward incomplete schedules, # 2) log the old Symphony file, 3) create the new Symphony and Sinfonia # files. It then starts batchman. # CreatePostReports runs reporter to print post-production reports. # UpdateStats runs logman to log job statistics, and then # report8 to print the Job Histogram. MASTER#UPDATESTATS FOLLOWS SWITCHPLAN END AWSBIA291I Total objects: 1 Look for a line similar to the line that starts with ON RUNCYCLE, which is highlighted in bold in Example 7-7. This example indicates that the production day is one day long. Chapter 7. Planning your workload 425
- 462. However, it can be longer or shorter than a day. A production day that is three days long might use an ON statement (and associated AT statement), which starts the production day once every three days at 0559h. Example 7-8 shows a sample ON statement. Example 7-8 Sample ON statement for production day longer than one day # For production day that lasts three days ON RUNCYCLE THREEDAYS "FREQ=DAILY;INTERVAL=3" AT 0559 A production day that is 6 hours long might use a series of ON statement, as shown in Example 7-9. Example 7-9 Sample ON statement for production day shorter than one day ON RUNCYCLE SIXHOURS "FREQ=DAILY" ( SCHEDTIME 2359 ) ON RUNCYCLE SIXHOURS “FREQ=DAILY” ( SCHEDTIME 0559 ) ON RUNCYCLE SIXHOURS “FREQ=DAILY” ( SCHEDTIME 1159 ) ON RUNCYCLE SIXHOURS “FREQ=DAILY” ( SCHEDTIME 1759 ) 4. Verify that the length of the production day agrees with the length established by the job stream FINAL by inspecting the calls to the planman command in the MakePlan script. a. Determine the location of the MakePlan script called by the job MAKEPLAN in the job stream FINAL by entering a composer command, as shown in Example 7-10, for UNIX master domain manager servers. Use the same command on both UNIX and Windows master domain manager servers. Example 7-10 Determining location of MakePlan script $ composer display job=MAKEPLAN $ composer display job=MASTER#MAKEPLAN Tivoli Workload Scheduler (UNIX)/COMPOSER 8.3 (1.18.3.3) Licensed Materials - Property of IBM(R) 5698-WSH (C) Copyright IBM Corp 1998, 2006 All rights reserved. US Government User Restricted Rights Use, duplication or disclosure restricted by GSA ADP Schedule Contract with IBM Corp. IBM is a registered trademark of International Business Machines Corporation in the United States, other countries, or both. Installed for user "tws830". Locale LANG set to the following: "en" User: tws830, Host:127.0.0.1, Port:31116 -display job=MASTER#MAKEPLAN 426 Getting Started with IBM Tivoli Workload Scheduler V8.3
- 463. Workstation Job Definition Name Locked By ---------------- ---------------------------------------- ------------------ MASTER MAKEPLAN - MASTER#MAKEPLAN SCRIPTNAME "/tws/tws830/MakePlan" STREAMLOGON tws830 DESCRIPTION "Added by composer for job stream: MASTER#FINAL." TASKTYPE UNIX RCCONDSUCC "(RC=0) OR (RC=4)" RECOVERY STOP AWSBIA291I Total objects: 1 The line that starts with SCRIPTNAME (highlighted in bold in Example 7-10) indicates where to find the MakePlan script. In the example, the job MAKEPLAN calls a script in the path /tws/tws830/MakePlan. b. Finish the verification of the length of a production day by inspecting the calls to the planman command in the MakePlan script found in step a. Example 7-11 shows an excerpt of the script where planman is called. Example 7-11 Portion of MakePlan script that calls planman in default installation . . . `maestro`/bin/planman -timeout $TIMEOUT crt $* . . . `maestro`/bin/planman -timeout $TIMEOUT ext $* . . . Both calls to planman must use a production day length that agrees with the length determined in the previous steps of this procedure. By default, planman is called with the arguments shown in Example 7-11. The default does not use the -from, -to and -for flag options to set the production day length, leading planman to use the default of one day (24 hours), starting at whatever is set for the time reported by optman for the startOfDay global option. Chapter 7. Planning your workload 427
- 464. If the production day is 48 hours long, the calls to planman look similar to Example 7-12. Example 7-12 Portion of the MakePlan script that calls planman in a 48-hour production day . . . `maestro`/bin/planman -timeout $TIMEOUT -for 4800 crt $* . . . `maestro`/bin/planman -timeout $TIMEOUT -for 4800 ext $* . . . These calls extend the production plan for 48 hours, starting from the time that planman is started, by using the -for flag option, as highlighted in Example 7-12. Some sites might require the use of the -from and -to flag options to force the creation of a production plan to start on a certain day (and possibly also a certain time of day), and end on a particular day (and possibly time of day). Example 7-13 illustrates the kind of output to expect from a successful planman run. Example 7-13 Sample output from a successful planman run Tivoli Workload Scheduler (UNIX)/PLANMAN 8.3 (1.0) Licensed Materials - Property of IBM(R) 5698-WSH (C) Copyright IBM Corp 1998, 2006 All rights reserved. US Government User Restricted Rights Use, duplication or disclosure restricted by GSA ADP Schedule Contract with IBM Corp. IBM is a registered trademark of International Business Machines Corporation in the United States, other countries, or both. Installed for user "tws830". Locale LANG set to the following: "en" AWSJPL503I The "planner" process has locked the database. AWSJPL714I During the creation of a production plan, the planner has detected that the preproduction plan needs to be updated. The preproduction plan will be updated automatically. 428 Getting Started with IBM Tivoli Workload Scheduler V8.3
- 465. AWSJPL715I During the creation of a production plan, the planner has successfully updated the preproduction plan. . . . AWSJPL504I The "planner" process has unlocked the database. AWSJCL062I The production plan (Symnew) has been successfully extended. Production days that are shorter than the default 24 hours use planman in the same manner, but with different arguments passed to it than in the previous examples. If the production plan is 6 hours long, you might see the -for flag option passed to planman with the argument 0600, or the flag options -from and -to passed with arguments that explicitly specify the beginning and ending of the production plan. If you want to set or modify the production day attributes (whether the start or the length), see 7.1, “Overview of production day” on page 416. 7.2 Plan cycle versus run cycle New users of Tivoli Workload Scheduler must be aware of the difference in terminology between two concepts that sound similar and are related, but describe independent and distinct concepts. The production plan cycle (or plan cycle in short) is part of Tivoli Workload Scheduler processes similar to the run cycle, but they describe different parts of the process of running a job stream. Staff who fulfill the scheduling role must understand the difference to know how to properly create a job stream. The production plan cycle (or plan cycle) describes the production day as discussed in 7.1, “Overview of production day” on page 416. The process of creating and configuring the plan cycle is described in more detail in 7.5, “Creating the production day” on page 434. The start of the plan cycle interval is when the plan cycle interacts with the run cycle. A run cycle describes the calendar days when a job stream is scheduled to run. A run cycle can also possibly specify one or more times of day if the job stream must be scheduled several times in a single day. On these days, Tivoli Workload Scheduler includes the job stream in the production plan (also called the production control database). A run cycle is defined as part of a job stream. All job streams have one or more run cycles. Each run cycle selects one or more calendar days to include or exclude from the final set of days to schedule the job stream to run on. When Chapter 7. Planning your workload 429
- 466. combined together, the run cycles make up the set of calendar days that Tivoli Workload Scheduler selects the job stream for inclusion in a production day. At the start of a production plan cycle, Tivoli Workload Scheduler takes the current calendar day and compares it with each run cycle in every job stream defined in the database. All job streams with a run cycle that includes this calendar day are inserted into the production plan. This process that identifies which job streams from the database to insert into the production plan is called the selection phase. The production day comprises all of the job streams that are scheduled into the production plan for the length of the production day. When the production day length is an even multiple of 24 hours, we instruct Tivoli Workload Scheduler to select a job stream on certain days by just specifying a run cycle that identifies these days. This is sufficient to insert the job stream into the correct days. Figure 7-6 shows a production day that matches the calendar day (or wall clock day). It shows a job stream called ALPHA with a run cycle instructing Tivoli Workload Scheduler to schedule ALPHA to run every Monday, Tuesday, and Wednesday. Figure 7-6 Relationship between production day and run cycle for production day matching calendar day In the scenario shown in Figure 7-6, job stream ALPHA is selected and inserted into the production plan at 0000 (midnight) on Monday, Tuesday, and Wednesday. If there are no other dependencies defined for job stream ALPHA, it will also run at 0000, or as soon as Tivoli Workload Scheduler has finished processing the start of the production day. 430 Getting Started with IBM Tivoli Workload Scheduler V8.3
- 467. However, if job stream ALPHA is defined with a start time of 0300, it is still selected for the same day, but it starts running at 3 a.m. on Monday, Tuesday, and Wednesday rather than at 0000. In 7.4, “Schedtime” on page 433, we show how a job stream can also be selected for a specific time of day. For now, note that the selection of a job stream at the beginning of the production day determines whether it is inserted into the production plan and whether it appears in the production plan at all. This is distinct from the concept of what time of day the job stream is started at, which can be different from the time of day constraints placed upon the selection phase if time of day is specified by a job stream’s run cycles. If the production day length is an even multiple of 24 hours but does not line up with the calendar day, job stream selection works slightly differently from the preceding scenario where the production day and the calendar day start at the same time. This allows Tivoli Workload Scheduler to reconcile the time shift of the production day (that is, the plan cycle) with the job streams’ run cycle. Take the previous example where job stream ALPHA is defined with a run cycle that selects it for Monday, Tuesday, and Wednesday, and uses a start time of 0300. This job stream (from the previous example where the production day lines up with the calendar day) starts at 0300 on Monday, Tuesday, and Wednesday. If we change only the time when the production day starts to the installation default of 0600 from the 0000 start in the previous example, the job stream runs at 0300 on Tuesday, Wednesday, and Thursday. Changing just the start of the production day in this case moves the start of the job stream to one day later. A detailed examination of the selection phase on Monday explains why this happens, as illustrated in Figure 7-7. Figure 7-7 Determining job stream start after changing start of production day Chapter 7. Planning your workload 431
- 468. 1. At 0600 on Monday, the production day starts. A new plan cycle is generated for the new production day, and the production plan is updated for the time window specified by the production day start and length attributes. 2. The selection phase begins and looks in the database of scheduling objects for all job streams that have a run cycle that includes the calendar day Monday. 3. Job stream ALPHA has a run cycle that specifies Monday, Tuesday, and Wednesday. 4. Because this matches the current calendar day (Monday), job stream ALPHA is selected for insertion into the production plan. 5. As Tivoli Workload Scheduler processes the plan cycle by reading the assembled production plan and releasing job streams as their start conditions are satisfied, it notes that the start time of job stream ALPHA is 0300. 6. By definition, the production plan that the plan cycle reads from starts at 0600 on Monday and ends at 0559 on Tuesday. The start time of job stream ALPHA is interpreted within the context of the production day that is represented in the current production plan. This is 0300 on Tuesday. Thus, the processing for the production days that start at 0600 on Tuesday and Wednesday also pushes the job stream to the following day. Run cycles that are specified in terms of calendar days determine the calendar days when the selection phase recognizes job stream ALPHA for insertion into the production plan. The plan cycle determines when job stream ALPHA must start during the production day. 7.3 Preproduction plan The generation of the production plan database at the beginning of each production day might take a significant amount of time if there are a large number of job streams or even more each day, and if Tivoli Workload Scheduler must scan every job stream in the scheduling object database each time. Tivoli Workload Scheduler uses a mechanism called the preproduction plan to increase the performance of this task. The preproduction plan is automatically created and managed by Tivoli Workload Scheduler. You do not have to do anything to use the preproduction plan. The preproduction plan is used to identify the job stream instances ahead of time, and externally follows job stream dependencies that are used for a particular time window. It is created for the first time when planman is run with the crt argument. 432 Getting Started with IBM Tivoli Workload Scheduler V8.3
- 469. 7.4 Schedtime So far we have considered run cycles only in terms of calendar days. The schedtime feature allows us to specify run cycles by the time of day as well. When the production day length is not an even multiple of 24 hours, the production day can start at a time of day that is different on successive days. If we take a job stream from a Tivoli Workload Scheduler environment with a production day length that is an even multiple of 24 hours, and use it in the same environment but with a different production day length that is not an even multiple of 24 hours, the job stream is inserted into the production day at different times. This is shown in Figure 7-8 where the same job stream ALPHA, which is discussed in the previous scenario, is used under an environment with a production day that lasts 10 hours. Figure 7-8 Relationship between production day and run cycle for a 10-hour production day relationship In the scenario shown in Figure 7-8, the job stream ALPHA is selected and inserted into the production plan at many more points along the same time period than in the previous scenario. The start of each production day at the following times and days are when job stream ALPHA is scheduled to run: 0800 Monday, 2300 Monday, 0400 Tuesday, 1300 Tuesday, 0000 Wednesday, and 1000 Wednesday, and 2000 Wednesday (not shown in Figure 7-8). If we extend the time line further out than shown in Figure 7-8, we see that the production days in the following week do not even start on the same time of day for Monday, Tuesday, and Wednesday, as the week illustrated in the Figure 7-7 Chapter 7. Planning your workload 433
- 470. on page 431. Consider a scenario where we want job stream ALPHA to only be selected and inserted into the production plan database once for each calendar day. There is a method to convey to Tivoli Workload Scheduler that we want job stream ALPHA to get selected and inserted into the production plan database just once per calendar day at midnight (similar to the previous scenario shown in Figure 7-6 on page 430) and not every single time a production day starts. We do this by specifying the time of day when the job stream must be selected. This time of day specified in a job stream is called the start time in the JSC GUI, or schedtime in Tivoli Workload Scheduler’s composer command-line interface. When a job stream has a schedtime, it instructs Tivoli Workload Scheduler to insert the job stream into the production plan database at the time of day given by the schedtime argument. Note that schedtime is related to the run cycle, and not the production day. It controls where the job stream is placed in the production day so that it uses the production day. It only affects where the job stream is placed in the production plan. More specifically, schedtime only affects where the job stream is placed in the preproduction plan. If the production plan cycle lasts longer than a calendar day, or is 24 hours long but spans two calendar days, the particular job stream might be placed in the production plan multiple times, once for each calendar date, with an artificially added time dependency to prevent it from launching early. 7.5 Creating the production day After you select and configure the length of the production day (as described in 7.1.2, “Identifying the length of the production day” on page 424), you have to create the production day. This section describes the steps to create the production day, and the background details regarding the creation of a production day. The production day is created only on the master domain manager. It must be distributed to all other workstations in the scheduling network before it can be used. Creating the production day at the concrete level means generating a file called Sinfonia on the master domain manager. It is then automatically copied by Tivoli Workload Scheduler to the Symphony file. After Tivoli Workload Scheduler is installed for the first time, these files do not exist. 434 Getting Started with IBM Tivoli Workload Scheduler V8.3
- 471. Figure 7-9 illustrates the steps necessary to create these files, and thus create the production day. Figure 7-9 Creating the production day on the master domain manager If you are installing a new instance of Tivoli Workload Scheduler on the master domain manager server, be sure to first add the Sfinal job stream and set the central processing unit (CPU) limit as described in section “Configuring a master domain manager” of Chapter 6, “Configuring after installation” of IBM Tivoli Workload Scheduler Planning and Installation Guide v8.3, SC32-1273. If the Symphony file does not already exist in the TWShome directory of the master domain manager server, you can run JnextPlan manually. Background details The JnextPlan script on the master domain manager server is responsible for generating the production plan for an upcoming production day. The generation of the production plan creates the representation of the production day. The JnextPlan process has a physical counterpart in the JnextPlan script, and the production plan has a physical counterpart in the production control database. The production control database is one of the outputs of the JnextPlan script. The production day is the name for all of the activities that occur over a period of time, and is a concept represented by the production control database, as shown in Figure 7-10. Chapter 7. Planning your workload 435
- 472. Figure 7-10 Relationship between JnextPlan, production control database, and production day The JnextPlan script is located in the home directory of the user account assigned to Tivoli Workload Scheduler (called the TWSuser account) on the master domain manager server. The contents of the JnextPlan script are run in sequence in four unique jobs in the FINAL job stream at the end of every production day: MakePlan, SwitchPlan, CreatePostReports, and UpdateStats. The specific technical steps to create a production day are described in section “Plan management basic concepts” of Chapter 5, IBM Tivoli Workload Scheduler Reference Guide V8.3, SC32-1274. 436 Getting Started with IBM Tivoli Workload Scheduler V8.3
- 473. 8 Chapter 8. Tuning Tivoli Workload Scheduler for best performance After you install the Tivoli Workload Scheduler V8.3, you can customize it to fit your operational requirements. This chapter describes optional customization of the global options and local options for your Tivoli Workload Scheduler installation. The topics include: “Global options parameters” on page 438 “Comparison of different versions of global options” on page 446 “Local options parameters” on page 447 “Comparison of different versions of local options” on page 465 “Tivoli Workload Scheduler process flow” on page 467 “Scenarios for this book” on page 471 © Copyright IBM Corp. 2006. All rights reserved. 437
- 474. 8.1 Global options parameters Global options exist only on the master and backup master and affect how the plan (Symphony) is created. Global options replace the globalopts file in the previous releases of Tivoli Workload Scheduler. You can set global options using the optman command. Note that although optman command can be run from anywhere with a connection to the database, it is used by the planning processes to create the Symphony by the current master. To view the values of the global options, use the following syntax: optman ls Notes: Most of the options require that you run JnextPlan before they take effect. When it is not necessary, it is indicated in the option description. To show help information about an option, use the following syntax: optman chg {optionName | optionShortName} Here optionName or optionShortName is the option that you want to view. To change the values of an option, use the following syntax: optman chg {optionName | optionShortName} = value Here optionName or optionShortName can be the options that are listed in the following sections. baseRecPrompt | bp Specify the maximum number of prompts that can be displayed to the operator after a job abend occurs. The default value is 1000. carryStates | cs This is an option that affects how the stageman command manages jobs in carried forward job streams. This option’s setting determines the jobs (based on their state) that are to be included in job streams that are carried forward. For example: carryStates='abend exec hold' In this case, all of the jobs that are in the abend, exec, or hold states are included in the carried forward job streams. The default setting is: carryStates=null This means that all of the jobs are included regardless of their states. 438 Getting Started with IBM Tivoli Workload Scheduler V8.3
- 475. Table 8-1 lists the valid internal job states. Table 8-1 Valid internal job states abend abenp add done Exec fail hold intro pend ready Rjob sched skel succ succp susp Wait waitd An empty list is entered as follows: carryStates=null The default value is null. companyName | cn This is your company's name. The maximum length is 40 characters. If the name contains spaces, enclose it in quotation marks (“”). If you use the Japanese-Katakana language set, always enclose the name within single or double quotation marks. enCarryForward | cf This is an option that affects how the stageman command carries forward job streams. Its setting determines whether or not job streams that did not complete are carried forward from the previous to the new production plan. The available settings for enCarryForward are yes, no, and all. The default setting is all. Important: The default value for this option was “yes” in versions earlier than 8.3. That is, uncompleted job streams are carried forward only if the Carry Forward option is enabled in the job stream definition. This default option is changed to “all” in Tivoli Workload Scheduler V8.3. That is, uncompleted job streams are carried forward, regardless of the value of the Carry Forward option in the job stream definition. It is also important to note that even if the new default is all, the migration of globalopts preserves the old value that the user has defined in the previous installation. enCentSec | ts Define how the security file is used within the network. Note: Centralized security is not relevant to an end-to-end scheduling environment. Chapter 8. Tuning Tivoli Workload Scheduler for best performance 439
- 476. If it is set to yes, the security files of all the workstations of the network can be created and modified only on the master, and the Tivoli Workload Scheduler administrator is responsible for their production, maintenance, and distribution. If it is set to no, the security file of each workstation can be managed by its root user or administrator. The local user can run the makesec command to create or update the file. The default value is no. Notes: Centralized security has the benefit of preventing the risk of someone tampering with the security file on a workstation, but the administrator still has the job of distributing the security file on workstations. Therefore, it is a difficult task to maintain. If an administrator distributes a new security to a fault-tolerant agent (FTA), this must be followed by a relink of the FTA (to resend the Symphony file). Otherwise, this FTA cannot participate in the IBM Tivoli Workload Scheduler network until the next start of the day, because its Symphony file points to the previous security file. enCFinterNetworkDeps | ci Select whether to carry forward internetwork dependencies. The default value is yes. enCFResourceQuantity | rq This is an option that affects how the stageman command manages resources. When the production plan is extended, one of the following situations occurs: A resource not used by any of the job streams carried forward from the previous production plan is referenced by new job or job stream instances that are added to the new production plan. In this case, the quantity of the resource is obtained from the resource definition stored in the database. A resource used by one or more job streams carried forward from the previous production plan is not referenced by job or job stream instances that are added to the new production plan. In this case, the quantity of the resource is obtained from the old Symphony file. A resource used by one or more job streams carried forward from the previous production plan is referenced by job or job stream instances that are added to the new production plan. In this case, the quantity of the resource that is taken into account is based on the value assigned to the enCFResourceQuantity option. 440 Getting Started with IBM Tivoli Workload Scheduler V8.3
- 477. If enCFResourceQuantity is set to YES This determines the quantity of the resource that is obtained from the old Symphony file. If enCFResourceQuantity is set to NO The quantity of the resource is obtained from the resource definition stored in the database. The default setting is yes. enDbAudit | da Select whether to enable or disable database auditing. The valid values are 0 (zero) to disable database auditing, and 1 (one) to activate database auditing. Auditing information is logged to a flat file in the TWShome/audit/database directory. Each Tivoli Workload Scheduler workstation maintains its own log. For the database, only actions are logged in the auditing file, not the delta of the action. The default value is 0. Auditing is disabled by default when the product is installed. You can enable or disable the auditing feature by setting the value of global options: enDbAudit = 0|1 Tip: Auditing does not have much impact on performance, but it uses a lot of disk space. Therefore, ensure that you have sufficient disk space. To initiate database auditing, you must shut down Tivoli Workload Scheduler completely. When you restart Tivoli Workload Scheduler, the database audit log is initiated. Plan auditing takes effect when JnextPlan is run. enEmptySchedsAreSucc | es This option rules the behavior of job streams that do not contain jobs. The available settings are: Yes The jobs streams that do not contain jobs are marked as SUCC as their dependencies are resolved. No The jobs streams that do not contain jobs remain in READY state. enListSecChk | sc Enable list security check is an option that controls which objects in the plan the user is permitted to list when running a Job Scheduling Console (JSC) query or a conman show command. If set to yes, objects in the plan returned from a query or show command are shown to the user only if the user has been granted the list Chapter 8. Tuning Tivoli Workload Scheduler for best performance 441
- 478. permission in the security file. For the database, this option takes immediate effect. For the plan, JnextPlan must be run for this option to take effect. The default value is yes. Tip: If you set this option to yes, it affects the Job Scheduling Console functions for the users defined in the security file. Enabling list security affects performance slightly, therefore, use this option with caution. enLogonBatch | lb Automatically grant logon as batch. This is for Windows jobs only. If set to yes, the logon users for Windows jobs are automatically granted the right to log on as batch job. If set to no, or omitted, the right must be granted manually to each user or group. The right cannot be granted automatically for users running jobs on a Backup Domain Controller (BDC). Therefore, you must grant these rights manually. The default value is no. enPlanAudit | pa Select whether to enable or disable plan auditing. The valid values are 0 to disable plan auditing, and 1 to activate plan auditing. Auditing information is logged to a flat file in the TWShome/audit/plan directory. Each Tivoli Workload Scheduler workstation maintains its own log. For the plan, only actions are logged in the auditing file, not the success or failure of any action. The default value is 1. Auditing is disabled by default when the product is installed. You can enable or disable the auditing feature by setting the value of global options: enPlanAudit = 0|1 To initiate plan auditing, you must shut down Tivoli Workload Scheduler completely. When you restart Tivoli Workload Scheduler, the database audit log is initiated. Plan auditing takes effect when JnextPlan is run. enPreventStart | ps This is an option to manage, for multiple-day production plan, any job streams that does not have an at time constraint set. It is used to prevent job stream instances that are not time-dependent from starting all at the same time as the production plan is created or extended. 442 Getting Started with IBM Tivoli Workload Scheduler V8.3
- 479. The available settings are: Yes A job stream cannot start before the startOfDay of the day specified in its scheduled time even if it is free from dependencies. No A job stream can start immediately when the production plan starts if all its dependencies are resolved. The default setting is yes. enRetainNameOnRerunFrom | rr Retain rerun job name is a production option that affects the operation of batchman. The setting of this option determines whether or not jobs that are rerun with the conman rerun command retain their original job names. The default value is no. Tip: If you change the value to yes, it causes the job name to stay the same even if another person reruns a job with the From option. enStrEncrypt | se Select whether to enable strong encryption. The default value is no. enSwfaultTol | Sw Select whether to enable or disable the fault tolerant switch manager. The valid values are yes and no. The default value is no. Tip: If you change the value to yes, it causes all of the FTAs to send every message to every FULLSTATUS FTA in the same domain. Therefore, enabling this option increases the network traffic. enTimeZone | tz Select whether to enable or disable the time zone option. The valid values are yes to activate time zones in your network, and no to disable time zones in the network. For the database, this option takes effect immediately. The default value is yes. extRecPrompt | xp Specify an additional number of prompts for the value defined in baseRecPropmt for the case when a job is rerun after an abend and the limit specified in baseRecPropmt is reached. The default value is 1000. Chapter 8. Tuning Tivoli Workload Scheduler for best performance 443
- 480. ignoreCals | ic Ignore calendars is a preproduction option that affects the operation of the compiler command. The setting of this option determines whether or not user calendars are copied into the new production control file. Enter yes to prevent user calendars from being copied into the new production plan (Symphony file). The default value is no. Tip: If you change the value to yes, this slightly reduces the size of Symphony. However, you will not be able to use calendars in the datecalc command. logmanMinMaxPolicy | lm This option defines how the minimum and maximum job run times are logged and reported by logman. The available settings for the logmanMinMaxPolicy option are: elapsedtime The maximum and minimum run times and dates that are logged are based only on a job's elapsed time. Elapsed time (expressed in minutes) is affected by system activity. It includes both the amount of time a job used the central processing unit (CPU) and the time the job had to wait for other processes to release the CPU. For example, in periods of high system activity, a job might have a long elapsed time, and yet does not use more CPU time than in periods of low system activity. The values are updated only if the latest job run has an elapsed time greater than the existing maximum, or less than the existing minimum. cputime The maximum and minimum run times and dates that are logged are based only on a job's CPU time. The CPU time is a measure (expressed in seconds) of the time a job used the CPU, and it does not include the intervals when the job was waiting. The values are updated only if the latest job run has a CPU time greater than the existing maximum, or less than the existing minimum. both The elapsed time and CPU time values are updated independently to indicate their maximum and minimum extremes, but the run dates correspond only to the elapsed time values. In this case, no record is kept of the run dates for maximum and minimum CPU times. The default setting is both. 444 Getting Started with IBM Tivoli Workload Scheduler V8.3
- 481. logmanSmoothPolicy | lt Set the weighting factor that favors the most recent job run when calculating the normal (average) run time for a job. This is expressed as a percentage. For example, -smooth 40 applies a weighting factor of 40% to the most recent job run, and 60% to the existing average. The default value is -1. statsHistory | sh Enter the number of days for which you want to save job statistics. Statistics are discarded on a first-in, first-out basis. This has no effect on job standard list files, which you must remove with the rmstdlist command. For the database, this option takes effect immediately, although, for the next plan period. For information about the rmstdlist command, see IBM Tivoli Workload Scheduler Reference Guide V8.3, SC32-1274. The default value is 10. startOfDay | sd Enter the start time of the Tivoli Workload Scheduler processing day in 24-hour format: hhmm (0000-2359). The default value is 0600. Start of day is especially useful to specify which is the client business day, and to specify the night after a free day that is free and not to be considered as part of the next working days. This version of Tivoli Workload Scheduler introduces a method of managing time zones across the network. It enables applying the startOfDay, set on the master domain manager using the optman command line, on each workstation using the local time zone set on that workstation. In this version, it is no longer required to change the launch time of the FINAL job stream when you change this option. Tip: Set start of day to the time of the day where there is the least amount of scheduling activity, such as early in the morning or late in the afternoon. minLen | ml This is the minimum length (calculated in days) of the preproduction plan that is left, as a buffer, after the end of the newly generated production plan. The value assigned to this option is used when the script UpdateStats is run from within JnextPlan. The default setting for this property is the lowest value that can be assigned to it, that is, 8 days. maxLen | xl This is the maximum length (calculated in days) of the preproduction plan that is left, as a buffer, after the end of the newly generated production plan. The default is 14 days. maxLen must be greater than or equal to minLen and must be in the range of 14 to 365. Chapter 8. Tuning Tivoli Workload Scheduler for best performance 445
- 482. 8.2 Comparison of different versions of global options Table 8-2 lists the global options parameters in the different versions of the Tivoli Workload Scheduler. Table 8-2 Global options parameters in Tivoli Workload Scheduler Version 8.2 Version 8.2.1 Version 8.3 (optionName or optionShortName) 1 company company companyName | cn 2 master master Defined in local option (defaultws) 3 Start start startOfDay | sd 4 history history statsHistory | sh 5 carryforward carryforward enCarryForward | cf 6 Ignore calendars ignore calendars ignoreCals | ic 7 Batchman schedule a Batchman schedule (see - Footnote a) 8 retain rerun job name retain rerun job name enRetainNameOnRerunFrom | rr 9 automatically grant logon as automatically grant logon as enLogonBatch | lb batch batch 10 bmmsgbase bmmsgbase baseRecPrompt | bp 11 bmmsgdelta bmmsgdelta extRecPrompt | xp 12 Timezone enable Timezone enable enTimeZone | tz 13 Database audit level Database audit level enDbAudit | da 14 Plan audit level Plan audit level enPlanAudit | pa 15 Centralized security Centralized security enCentSec | ts 16 Enable list security check Enable list security check enListSecChk | sc 17 carry job states carry job states carryStates | cs 18 switch fault tolerance enSwfaultTol | Sw 19 enCFResourceQuantity | rq 20 enEmptySchedsAreSucc | es 21 enPreventStart | ps 446 Getting Started with IBM Tivoli Workload Scheduler V8.3
- 483. Version 8.2 Version 8.2.1 Version 8.3 (optionName or optionShortName) 22 enStrEncrypt | se 23 enCFinterNetworkDeps | ci 24 logmanMinMaxPolicy | lm 25 logmanSmoothPolicy | lt 26 minLen | ml 27 maxLen | xl a. If you are using a version of Tivoli Workload Scheduler that is earlier than V8.3, do not change batchman schedule to yes. This parameter was used for HP3000 MPE systems, and changing this to yes might break the Symphony creation process. This option has been removed in Tivoli Work- load Scheduler V8.3. 8.3 Local options parameters Change local options individually in each FTA. These changes affect the settings only on that system. Set local options in the localopts file. For the changes to take effect, stop and restart Tivoli Workload Scheduler. A template file containing the default settings is located in TWShome/config/localopts. Note: All of the Secure Sockets Layer (SSL) settings in the localopts file relate to the network communications and do not relate to the Job Scheduling Console or command line client SSL security. During the installation process, a working copy of the local options file is installed as TWShome/localopts unless you have specified a non-default location for netman. The localopts file is in TWShome. Update any options pertaining to netman in the localopts file in Netmanhome. Example 8-1 shows the localopts syntax. Example 8-1 localopts syntax # comment bm check file = seconds bm check status = seconds bm check until = seconds bm look = seconds bm read = seconds Chapter 8. Tuning Tivoli Workload Scheduler for best performance 447
- 484. bm stats = on|off bm verbose = on|off clisslcipher = string clisslserverauth = yes|no clisssservercertificate = filename clissltrusteddir = directory_name composer prompt = key conman prompt = keyy date format = integer defaultws = master_workstation host = host_name jm job table size = entries jm look = seconds jm nice = value jm no root = yes|no jm read = seconds merge logtrace = yes|no merge stdlists = yes|no mm cache mailbox = yes|no mm cache size = bytes mm resolve master = yes|no mm response = seconds mm retrylink = seconds mm sound off = yes|no mm unlink = seconds mozart directory = mozart_share nm mortal = yes|no nm port = port number nm read = seconds nm retry = seconds nm SSL port = value parameters directory = parms_share port = port number protocol = protocol proxy = proxy server SSL auth mode = caonly|string|cpu SSL auth string = string SSL CA certificate = *.crt SSL certificate = *.crt SSL certificate chain = *.crt SSL encryption cipher = shortcut SSL key = *.key SSL key pwd = *.sth SSL random seed = *.rnd stdlist width = columns 448 Getting Started with IBM Tivoli Workload Scheduler V8.3
- 485. sync level = low|medium|high switch sym prompt = key syslog local = facility tcp timeout = seconds thiscpu = wkstation timeout = timeout unison network directory = unison_share useropts = useropts_file wr read = seconds wr enable compression = yes|no wr unlink = seconds Note: The localopts syntax is not case-sensitive. The following sections describe the localopts syntax. # comment This option treats everything from the pound sign to the end of the line as a comment. bm check file Specify the minimum number of seconds that batchman waits before checking for the existence of a file that is used as a dependency. The default is 120 seconds. Chapter 8. Tuning Tivoli Workload Scheduler for best performance 449
- 486. Tip: If you use a lot of file dependencies in your job streams, decreasing the bm check file value might help speed up the file dependency resolution. But you must be careful because it is a trade-off between speed and CPU utilization. Unlike the other dependency checkings, file dependency checking is an external operation to Tivoli Workload Scheduler. Tivoli Workload Scheduler relies on the operating system to do the checking. For this reason, it is the most expensive operation in terms of resource usage. This is also evident from the fact that Tivoli Workload Scheduler attempts to check the existence of a file only after all of the dependencies (for example, predecessor, time, or prompt dependencies) are satisfied. Also related to this topic is to use qualified file checking for resolving multiple file dependencies. Multiple files dependencies are checked in the order that they are specified in either the job stream or job level of a job stream definition. If a file contains six file dependencies, with each one being followed by a “,” (comma), it checks for the first one. If the file exists, it then looks for the second one. If the first file does not exist, it keeps checking for the first file at the iteration specified in bm check. Tivoli Workload Scheduler does not look for any of the remaining seven files until the first file exists. This means that it is possible that files two through six can exist, but because file one does not exist, it does not check for the other files until file one is found. When file one exists, then it checks for each of the remaining files and it no longer checks for file one. For example, this means that if file one existed and is later removed, the job or job stream launches, even if file one no longer exists. To prevent this, you can use the qualifier with the “AND” modifier (a parameter when specifying the file dependency). For example, consider a case where you have a job waiting for six files: /var/tmp/incoming/file1 /var/tmp/incoming/file2 /var/tmp/incoming/file3 With the normal file dependency, it searches the first file found as described in the previous section. However, you can perform a qualified file dependency as follows: OPENS "/var/tmp/incoming" (-f %p/file1 -a -f %p/file2 -a -f %p/file3) This has two significant advantages: The dependency is not satisfied until all the six files exist at the same time. The checking is also more efficient, because one execution of the test command is done instead of six times as many. 450 Getting Started with IBM Tivoli Workload Scheduler V8.3
- 487. bm check status Specify the number of seconds that batchman waits between checking the status of an internetwork dependency. The default is 300 seconds. Tip: Set this number as very large if you have no internetwork dependencies. bm check until Specify the maximum number of seconds that batchman waits before reporting the expiration of an Until time for a job or job stream. The default is 300 seconds. Tip: If you specify a value lower than the default setting (300), this might overload the system. Setting it lower gives quicker status for missed start times, but takes away from other throughput gains. If you set it lower than the value of Local Option bm read, the value of bm read is used in its place. bm look Specify the minimum number of seconds that batchman waits before scanning and updating its production control file. The default is 15 seconds. For more information about this parameter, see 8.5, “Tivoli Workload Scheduler process flow” on page 467. bm read Specify the maximum number of seconds that batchman waits for a message in the INTERCOM.MSG message file. If no messages are in queue, batchman waits until the timeout expires or until a message is written to the file. The default is 10 seconds. For more information about this parameter, see 8.5, “Tivoli Workload Scheduler process flow” on page 467. bm stats Specify on to have batchman send its startup and shutdown statistics to its standard list file. Specify off to prevent batchman statistics from being sent to its standard list file. The default is off. Tip: The bm stats option must remain off unless you are debugging service problems. bm verbose Specify on to have batchman send all job status messages to its standard list file. Specify off to prevent the extended set of job status messages from being sent to the standard list file. The default is off. Chapter 8. Tuning Tivoli Workload Scheduler for best performance 451
- 488. Tip: The bm verbose must remain off unless you are debugging service problems. clisslcipher Specify the string that is used for the SSL authentication when the command line client and the server are using SSL authentication. clisslserverauth Specify yes if the command line client and the server use SSL authentication in their communication. The default is no. clisslservercertificate Specify the file that contains the SSL certificate when the command line client and the server use SSL authentication in their communication. clissltrusteddir Specify the directory that contains an SSL trusted certificate contained in files with hash (#) naming when the command line client and the server are using SSL authentication in their communication. When the directory path contains blanks, enclose it in quotation marks. composer prompt Specify a prompt for the composer command line. The prompt can be up to 10 characters in length. The default is dash (-). conman prompt Specify a prompt for the conman command line. The prompt can be of up to 8 characters in length. The default is percent (%). date format Specify the value that corresponds to the date format you want. The values can be: 0 corresponds to yy/mm/dd 1 corresponds to mm/dd/yy 2 corresponds to dd/mm/yy 3 indicates usage of native language support variables The default is 1. 452 Getting Started with IBM Tivoli Workload Scheduler V8.3
- 489. defaultws This is the default workstation when you are accessing using a remote command line. Specify the domain manager workstation. host This is the name or Internet Protocol (IP) address of the host when you are accessing using a remote command line. jm job table size Specify the size (in number of entries) of the job table used by jobman. The default is 1024 entries. Tip: It is not necessary to set this larger unless you have more than 1,000 jobs running concurrently on this workstation. jm look Specify the minimum number of seconds that jobman waits before looking for completed jobs and performing general job management tasks. The default is 300 seconds. For more information about this parameter, see 8.5, “Tivoli Workload Scheduler process flow” on page 467. jm nice For UNIX and Linux operating systems only, specify the nice value to be applied to jobs launched by jobman. The default is 0. Tip: Set to a negative number if you want all jobs that are run by Tivoli Workload Scheduler to run at a higher kernel priority than normal; set to a positive number to run at a lower priority. jm no root For UNIX and Linux operating systems only, specify yes to prevent jobman from launching root jobs. Specify no to allow jobman to launch root jobs. The default is no. jm read Specify the maximum number of seconds that jobman waits for a message in the COURIER.MSG message file. The default is 10 seconds. Tip: You can set this number as low as 1, keeping in mind that the jobman process runs as root, and consumes more CPU the lower the number is set. Chapter 8. Tuning Tivoli Workload Scheduler for best performance 453
- 490. merge logtrace Specify yes to merge the log and trace messages into a single log file. The default is no. merge stdlists Specify yes to have all of the Tivoli Workload Scheduler control processes, except netman, send their console messages to a single standard list file. The file is given the name TWSmerge. Specify no to have the processes send messages to separate standard list files. The default is yes. mm cache mailbox Use this option to enable mailman to use a reading cache for incoming messages. In such a case, not all messages are cached, only those that are not considered essential for network consistency. The default is no. Tip: Tivoli Workload Scheduler is able to read groups of messages from the mailbox and put them into a memory cache. Access to disk through cache is much faster than direct access to disk. The advantage is more relevant if you consider that traditional mailman requires at least two disk accesses for every mailbox message. You can get significant performance increase when networking is involved. A special mechanism ensures that messages considered essential are not put into a cache but are handled immediately. This prevents the loss of vital information in case of a mailman failure. mm cache size Specify this option if you also use mm cache mailbox. The default is 32. Use the default value for small and medium networks. Use larger values for large networks. Tip: You can set the cache size to the maximum especially for large networks. Note that the documentation says 512 is the maximum, but in our tests we found 32767 to work. mm resolve master When you set this option to yes, the $MASTER variable is resolved at the beginning of the production period. The host of any extended agent is switched after the next JnextPlan (long-term switch). When you set it to no, the $MASTER variable is not resolved at JnextPlan and the host of any extended agent can be switched after a conman switchmgr command (short-term switch and long-term switch). The default is yes. 454 Getting Started with IBM Tivoli Workload Scheduler V8.3
- 491. When you switch a master domain manager and the original has mm resolve master set to no and the backup has mm resolve master set to yes, after the switch, any extended agent that is hosted by $MASTER switches to the backup domain manager. When the backup domain manager restarts, the keyword $MASTER is locally expanded by mailman. Tip: Set this parameter to no if you have any agents with host set to $MASTER. You must keep the mm resolve master value the same for master domain managers and backup domain managers. mm response Specify the maximum number of seconds that mailman waits for a response before reporting that a workstation is not responding. The minimum wait time for a response is 90 seconds. The default is 600 seconds. Tip: The mm response and mm retrylink options (see the following section) determine how long mailman waits for a workstation response before flagging it as not linked and retrying the link. These do not affect the overall performance and must be left at the default setting. mm retrylink Specify the maximum number of seconds that mailman waits after unlinking from a non-responding workstation before it attempts to link to the workstation again. The default is 600 seconds. mm sound off Specify how mailman responds to a conman tellop ? command. Specify yes to have mailman show information about every task that it is performing. Specify no to have mailman send only its own status. The default is no. Tip: If you set this option to yes, it causes mailman to write more messages to the logs, and therefore consumes more disk, memory, and CPU. mm unlink Specify the maximum number of seconds that mailman waits before unlinking from a workstation that is not responding. The wait time must not be less than the response time specified for the local option nm response. The default is 960 seconds. Tip: Similar to response and retry, leave this setting at the default value. Chapter 8. Tuning Tivoli Workload Scheduler for best performance 455
- 492. mozart directory Define the name of the master's shared mozart directory. The default is none. nm mortal Specify yes to have netman quit when all of its child processes have stopped. Specify no to keep netman running even after its child processes have stopped. The default is no. Tip: If you set this option to yes, netman will die whenever batchman dies (and so will mailman, writer, and jobman). nm port Specify the Transmission Control Protocol (TCP) port number that netman responds to on the local computer. This must match the Transmission Control Protocol/Internet Protocol (TCP/IP) port in the computer's workstation definition. It must be an unsigned 16-bit value in the range 1 to 65535 (values between 0 and 1023 are reserved for services such as File Transfer Protocol (FTP), TELNET, Hypertext Transfer Protocol (HTTP), and so on). The default is 31111. nm read Specify the maximum number of seconds that netman waits for a connection request before checking its message queue for stop and start commands. The default is 10 seconds. nm retry Specify the maximum number of seconds that netman waits before retrying a connection that failed. The default is 800 seconds. Tip: The nm read and nm retry settings do not have much overall effect. They only change the timeouts of starting, stopping, and retrying lost connections. nm SSL port This is the port used to listen for incoming SSL connections. This value must match the one defined in the secureaddr attribute in the workstation definition in the database. It must be different from the nm port local option that defines the port used for normal communication. If you do not plan to use SSL, set the value to 0. The default is none. 456 Getting Started with IBM Tivoli Workload Scheduler V8.3
- 493. Tips: If you install multiple instances of Tivoli Workload Scheduler on the same computer, set all SSL ports to different values. In general, SSL encryption imposes a large processor usage in the communications over the network. Turn SSL on only for links that must be secure (but not for other links). parameters directory Define the name of the master's shared TWShome directory. The default is none. port This is the TCP/IP port number of the protocol used when accessing using a remote command line. The default is 31115. protocol This is the protocol used to connect to the host when accessing using a remote command line. proxy This is the name of the proxy server used when accessing using a remote command line. proxyport This is the TCP/IP port number of the proxy server used when accessing using a remote command line. SSL auth mode The behavior of Tivoli Workload Scheduler during an SSL handshake is based on the value of the following SSL auth mode options. caonly Tivoli Workload Scheduler checks the validity of the certificate and verifies that the peer certificate has been issued by a recognized certification authority (CA). Information contained in the certificate is not examined. The default is caonly. string Tivoli Workload Scheduler checks the validity of the certificate and verifies that the peer certificate has been issued by a recognized CA. It also verifies that the Common Name (CN) of the Certificate Subject matches the string specified in the SSL auth string option. Chapter 8. Tuning Tivoli Workload Scheduler for best performance 457
- 494. cpu Tivoli Workload Scheduler checks the validity of the certificate and verifies that the peer certificate has been issued by a recognized CA. It also verifies that the CN of the Certificate Subject matches the name of the CPU that requested the service. SSL auth string This option is used in conjunction with the SSL auth mode option when the string value is specified. The SSL auth string (ranges from 1 to 64 characters) is used to verify the certificate validity. The default is tws. SSL CA certificate In SSL authentication, this is the name of the file containing the trusted CA certificates required for authentication. The CAs in this file are also used to build the list of acceptable client CAs passed to the client when the server side of the connection requests a client certificate. This file is the concatenation, in order of preference, of the various Privacy Enhanced Mail (PEM)-encoded CA certificate files. The default is TWShome/ssl/TWSTrustedCA.crt. SSL certificate In SSL authentication, this is the name of the local certificate file. The default is TWShome/ssl/TWS.crt. SSL certificate chain In SSL authentication, this is the name of the file that contains the concatenation of the PEM-encoded certificates of certification authorities, which form the certificate chain of the workstation's certificate. This parameter is optional. The default is TWShome/ssl/TWScertificateChainCA.crt. SSL encryption cipher These are the ciphers that the workstation supports during an SSL connection. Use the shortcuts that are listed in Table 8-3. Table 8-3 Shortcuts for encryption ciphers Shortcut Encryption ciphers SSLv3 SSL version 3.0 TLSv Transport Layer Security (TLS) version 1.0 EXP Export EXPORT40 40-bit export 458 Getting Started with IBM Tivoli Workload Scheduler V8.3
- 495. Shortcut Encryption ciphers EXPORT56 56-bit export LOW Low strength (no export, single Data Encryption Standard (DES)) MEDIUM Ciphers with 128 bit encryption HIGH Ciphers using Triple-DES NULL Ciphers using no encryption The default is SSLv3. SSL key In SSL authentication, this is the name of the private key file. The default is TWShome/ssl/TWS.key. SSL key pwd In SSL authentication, this is the name of the file containing the password for the stashed key. The default is TWShome/ssl/TWS.sth. SSL random seed This is the pseudo random number file used by OpenSSL on some operating systems. Without this file, SSL authentication might not work correctly. The default is TWShome/ssl/TWS.rnd. stdlist width Specify the maximum width of the Tivoli Workload Scheduler console messages. You can specify a column number in the range of 1 to 255 and lines are wrapped at or before the specified column, depending on the presence of embedded carriage control characters. Specify a negative number or zero to ignore line width. On UNIX and Linux operating systems, you must ignore line width if you enable system logging with the syslog local option. The default is 0 column. syslog local This option enables or disables Tivoli Workload Scheduler system logging for UNIX and Linux operating systems only. Specify -1 to turn off system logging for Tivoli Workload Scheduler. Specify a number from 0 to 7 to turn on system logging and have Tivoli Workload Scheduler use the corresponding local facility (LOCAL0 through LOCAL7) for its messages. Specify any other number to turn on system logging and have Tivoli Workload Scheduler use the USER facility for its messages. The default is -1. Chapter 8. Tuning Tivoli Workload Scheduler for best performance 459
- 496. sync level Specify the rate at which Tivoli Workload Scheduler synchronizes the information written to disk. This option affects all mailbox agents and is applicable to UNIX and Linux operating systems only. The values can be: Low This value enables the operating system to handle the speed of write access. It speeds up all processes that use mailbox files. Disk usage is notably reduced. If the file system is reliable, the data integrity must be assured anyway. Medium This value makes an update to the disk after a transaction is completed. This setting can be a good trade-off between acceptable performance and high security against loss of data. Write is transaction-based, data written is always consistent. High This value makes an update every time data is entered. The default is low (high was the default setting until Tivoli Workload Scheduler V8.3. With Tivoli Workload Scheduler V8.3, the default setting has been changed to low.) Tip: If you change the value to low, this causes the processes to retain messages in memory rather than flushing them to disk after every write. We suggest that you use the low setting, because Tivoli Workload Scheduler is an input/output (I/O) intensive application and it is best to leave the handling of I/O to the operation system. Use medium if you are risk averse. High is the least performing value. switch sym prompt Specify a prompt for the conman command line after you have selected a different Symphony file with the setsym command. The maximum length is 8 characters. The default is <n>. tcp timeout With this attribute for the netman process, specify the maximum number of seconds that mailman and conman wait for the completion of a request “How long to wait for completion of a request” on an unlinked workstation (such as start, stop, link, so on) that is not responding. The default is 300 seconds. 460 Getting Started with IBM Tivoli Workload Scheduler V8.3
- 497. thiscpu Specify the Tivoli Workload Scheduler name of this workstation. When a switch is made between masters using the switchmgr command, the Symphony header value for thiscpu is overwritten by the thiscpu value in the localopts file. The default is thiscpu. timeout Specify the timeout in seconds when accessing using a remote command line. The default is 3600 seconds. unison network directory Define the name of the Unison network directory. The default is none. wr enable compression Use this option on fault-tolerant agents. Specify whether the fault-tolerant agent can receive the Symphony file in compressed form from the master domain manager. The default is no. Tip: Starting with Tivoli Workload Scheduler Version 7.0, domain managers can distribute the Sinfonia file to their FTAs in compressed form. Each Sinfonia record is compressed by mailman domain managers, sent, and then decompressed by writer FTA. The size of a compressed Sinfonia record is approximately seven times smaller. It can be particularly useful when the Symphony file is huge and the network connection between two nodes is slow or not reliable (wireless area network (WAN)). If there are FTAs in the network that have versions earlier than version 7.0 of Tivoli Workload Scheduler, the Tivoli Workload Scheduler domain managers can send Sinfonia files to these workstations in uncompressed form. We recommend that you set wr enable compression=yes if the Sinfonia file is 4 megabytes (MB) or higher and the network bandwidth is limited. Otherwise, the CPU time it takes to compress the file outweighs the benefits of compressing the file. wr read Specify the number of seconds that the writer process waits for an incoming message before checking for a termination request from netman. The default is 600 seconds. Chapter 8. Tuning Tivoli Workload Scheduler for best performance 461
- 498. Tip: Setting this value lower does not offer much benefit to overall performance. wr unlink Specify the number of seconds that the writer process waits before exiting if no incoming messages are received. The minimum is 120 seconds. The default is 180 seconds. Tip: Setting this value lower does not improve performance. Example 8-2 shows a sample local options file. Example 8-2 Local options file example # # TWS localopts file defines attributes of this Workstation. # #--------------------------------------------------------------------- # Attributes of this Workstation: # thiscpu =PIPPO3 merge stdlists =yes merge logtrace =no stdlist width =0 syslog local =-1 # #--------------------------------------------------------------------- # Attributes of this Workstation for TWS batchman process: # bm check file =120 bm check status =300 bm look =15 bm read =10 bm stats =off bm verbose =off bm check until =300 # #--------------------------------------------------------------------- # Attributes of this Workstation for TWS jobman process: # jm job table size =1024 jm look =300 jm nice =0 462 Getting Started with IBM Tivoli Workload Scheduler V8.3
- 499. jm no root =no jm read =10 # #--------------------------------------------------------------------- # Attributes of this Workstation for TWS mailman process: # mm response =600 mm retrylink =600 mm sound off =no mm unlink =960 mm cache mailbox =no mm cache size =32 mm resolve master =yes # #--------------------------------------------------------------------- # Attributes of this Workstation for TWS netman process: # nm mortal =no nm port =31111 nm read =10 nm retry =800 # #--------------------------------------------------------------------- # Attributes of this Workstation for TWS writer process: # wr read =600 wr unlink =120 wr enable compression =no # #--------------------------------------------------------------------- # Optional attributes of this Workstation for remote database files # # mozart directory = C:TWSpippo3/mozart # parameters directory = C:TWSpippo3 # unison network directory = C:TWSpippo3/../unison/network # #--------------------------------------------------------------------- # Custom format attributes # date format =1 # The possible values are 0-ymd, 1-mdy, 2-dmy, 3-NLS. composer prompt =- conman prompt = switch sym prompt = <n> #--------------------------------------------------------------------- Chapter 8. Tuning Tivoli Workload Scheduler for best performance 463
- 500. # Attributes for customization of I/O on mailbox files # sync level =low # #--------------------------------------------------------------------- # Network Attributes # tcp timeout =300 # #--------------------------------------------------------------------- # SSL Attributes # nm SSL port =0 SSL key =C:TWSargente83/ssl/TWS.key SSL certificate =C:TWSargente83/ssl/TWS.crt SSL key pwd =C:TWSargente83/ssl/TWS.sth SSL CA certificate =C:TWSargente83/ssl/TWSTrustedCA.crt SSL certificate chain =C:TWSargente83/ssl/TWSCertificateChain.crt SSL random seed =C:TWSargente83/ssl/TWS.rnd SSL Encryption Cipher =SSLv3 SSL auth mode =caonly SSL auth string =tws #--------------------------------------------------------------------- # Attributes for CLI connections # HOST = 127.0.0.1 # Master hostname used when attempting a connection. PROTOCOL = https # Protocol used to establish a connection with the Master. PORT = 31116 # Protocol port #PROXY = proxy.userlocal #PROXYPORT = 3333 TIMEOUT = 3600 # Timeout in seconds to wait a server response #CLISSLSERVERAUTH = yes #CLISSLCIPHER = MD5 #CLISSLSERVERCERTIFICATE = #CLISSLTRUSTEDDIR = DEFAULTWS = RENOIR USEROPTS = useropts_maestro 464 Getting Started with IBM Tivoli Workload Scheduler V8.3
- 501. 8.4 Comparison of different versions of local options Table 8-4 lists the local options parameters in different versions of the Tivoli Workload Scheduler. Table 8-4 Local options parameters in Tivoli Workload Scheduler Version 8.2 Version 8.2.1 Version 8.3 1 bm check deadline bm check deadline - 2 bm check file bm check file bm check file = seconds 3 bm check status bm check status bm check status = seconds 4 bm check until bm check until bm check until = seconds 5 bm look bm look bm look = seconds 6 bm read bm read bm read = seconds 7 bm stats bm stats bm stats = on|off 8 bm verbose bm verbose bm verbose = on|off 9 - - clisslcipher = string 10 - - clisslserverauth = yes|no 11 - - clisssservercertificate = filename 12 - - clissltrusteddir = directory_name 13 composer prompt composer prompt composer prompt = key 14 conman cli prompt conman cli prompt conman prompt = keyy 15 date format date format date format = integer 16 - - defaultws = master_workstation 17 db visible for gui db visible for gui - 18 - - host = host_name 19 jm job table size jm job table size jm job table size = entries 20 jm look jm look jm look = seconds 21 jm nice jm nice jm nice = value 22 jm no root jm no root jm no root = yes|no 23 jm read jm read jm read = seconds Chapter 8. Tuning Tivoli Workload Scheduler for best performance 465
- 502. Version 8.2 Version 8.2.1 Version 8.3 24 - - merge logtrace = yes|no 25 merge stdlists merge stdlists merge stdlists = yes|no 26 mm cache mailbox mm cache mailbox mm cache mailbox = yes|no 27 mm cache size mm cache size mm cache size = bytes 28 mm read mm read mm resolve master = yes|no 29 mm response mm response mm response = seconds 30 mm retry link mm retry link mm retrylink = seconds 31 mm sound off mm sound off mm sound off = yes|no 32 mm unlink mm unlink mm unlink = seconds 33 mozart directory mozart directory mozart directory = mozart_share 34 nm ipvalidate nm ipvalidate - 35 nm mortal nm mortal nm mortal = yes|no 36 nm port nm port nm port = port number 37 mm read mm read nm read = seconds 38 nm retry nm retry nm retry = seconds 39 nm SSL port nm SSL port nm SSL port = value 40 parameters directory parameters directory parameters directory = parms_share 41 - - port = port number 42 - - protocol = protocol 43 - - proxy = proxy server 44 SSL auth mode SSL auth mode SSL auth mode = caonly|string|cpu 45 SSL auth string SSL auth string SSL auth string = string 46 SSL CA certificate SSL CA certificate SSL CA certificate = *.crt 47 SSL certificate SSL certificate SSL certificate = *.crt 48 SSL certificate chain SSL certificate chain SSL certificate chain = *.crt 49 SSL encryption cipher SSL encryption cipher SSL encryption cipher = shortcut 50 SSL key SSL key SSL key = *.key 466 Getting Started with IBM Tivoli Workload Scheduler V8.3
- 503. Version 8.2 Version 8.2.1 Version 8.3 51 SSL key pwd SSL key pwd SSL key pwd = *.sth 52 SSL random seed SSL random seed SSL random seed = *.rnd 53 stdlist width stdlist width stdlist width = columns 54 sync level sync level sync level = low|medium|high 55 switch sym prompt switch sym prompt switch sym prompt = key 56 syslog local syslog local syslog local = facility 57 tcp timeout tcp timeout tcp timeout = seconds 58 thiscpu thiscpu thiscpu = wkstation 59 tcp timeout tcp timeout timeout = timeout 60 - - unison network directory = unison_share 61 - - useropts = useropts_file 62 wr read wr read wr read = seconds 63 wr enable compression wr enable compression wr enable compression = yes|no 64 wr unlink wr unlink wr unlink = seconds 8.5 Tivoli Workload Scheduler process flow To speed up job execution, perform some tuning to the parameters in the Tivoli Workload Scheduler localopts file. The purpose of this section is to explain how different options affect the Tivoli Workload Scheduler performance. Before you attempt to tune the Tivoli Workload Scheduler localopts parameters to speed up the launching of jobs and increase overall performance, it is necessary to understand the Tivoli Workload Scheduler process flow. Chapter 8. Tuning Tivoli Workload Scheduler for best performance 467
- 504. Figure 8-1 shows you the process flow to run jobs defined in the daily plan (as opposed to ad hoc jobs submitted after the creation of the plan). Symphony file BATCHMAN TWS 2 scan 13 read “bm look” “bm read” 1 job is Yes 3 executed ? Job 14 update 4 job can be executed job is completed ? “courier.msg” JOBMAN 5 read 6 job can be executed Yes Yes “jm read” 7 job is 8 launches the job completed? “jm look” job is completed job is completed 9 “mailbox.msg” “intercom.msg” MAILMAN 10 read 11 job is completed 12 “mm read” job is completed Figure 8-1 Tivoli Workload Scheduler process flow The following list provides the explanation of the steps in Figure 8-1: 1. Jobs that must be run on the current day are loaded into the Symphony file, which is created daily when Jnextplan runs. 2. Batchman periodically scans the Symphony file to determine which jobs are ready to be run. The scan period is determined by the localopts option bm look. 3. At this stage, batchman determines if a job can be run. 4. Batchman writes a message in the message queue courier.msg, which is read by jobman. 468 Getting Started with IBM Tivoli Workload Scheduler V8.3
- 505. 5. Jobman periodically reads the courier.msg queue. If the queue is empty, it waits for jm read seconds before trying a second time. 6. Jobman finds a message from batchman instructing it to run a job. 7. Jobman launches the job. 8. Jobman monitors it for the job completion status, checking every jm look seconds. 9. When jobman determines that a job has been completed, it writes a message into the mailbox.msg queue. 10.Mailman reads the mailbox.msg every mm read seconds. 11.Mailman passes this information to batchman by writing a message into the intercom.msg queue. Batchman then reads from the intercom.msg queue. 12.If there is no “job completed” message in the intercom.msg queue, batchman waits for bm read seconds before it times out. 13.If it finds a message, batchman processes it and update the Symphony file. This completes the cycle. Table 8-5 summarizes the roles of bm look, jm read, jm look, mm read, and bm read in optimizing the overall Tivoli Workload Scheduler performance. It shows the activities that you have to tune, the corresponding option that you can set in the localopts file, and how the changed value impacts performance. Chapter 8. Tuning Tivoli Workload Scheduler for best performance 469
- 506. Table 8-5 Options for tuning job processing on a workstation Activity Option Impact on performance Batchman periodically scans the bm look In all of these cases, a shorter time means more Symphony file for jobs ready to be frequent scans, using more CPU resources, and processed. impacting other processes that are running. However, it also means that for all activities, waiting Jobman accesses the Courier.msg jm read time is kept to a minimum. If throughput is important file to see whether there are jobs and the workstation has plenty of memory, try that have to be launched. shortening the times. After launching a job, jobman jm look A longer period between successive activities checks periodically for job means jobs take longer to run, because there are completion status. longer waits for each activity. However, the reduced Mailman looks periodically in the mm read frequency of the scans means that more memory is Mailbox.msg for completed jobs. available for jobs because less is being used by these monitoring activities. Batchman checks periodically in bm read Intercom.msg for jobs that are If your objective is to run the jobs as quickly as complete so that it can update the possible, and you are not concerned about how Symphony file. quickly the information about the completed jobs is distributed, you can reduce the wait periods for bm look and jm read, but increase the periods for the others. To speed up the overall job processing time (from initial job launch to the update with the completion status), you can also tune bm look, jm look, and mm read. If you decide to tune these settings, perform the following tasks: 1. Test the results in a test system before applying changes in your production environment. To get worthwhile results, the test environment must have the same characteristics as the production environment. 2. Modify only the parameters that are necessary. It is better to modify one at a time and thoroughly test the change in performance, rather than changing all at once. 3. Make a backup copy of the localopts file to ensure that you can revert to the default options, if necessary. 4. Stop and start the agent to activate the changes applied to the localopts file. 470 Getting Started with IBM Tivoli Workload Scheduler V8.3
- 507. 8.6 Scenarios for this book In our lab environment, we performed some tests to understand the effects of changing these parameters. In this section, we document the test results and our findings. Important: Note that these tests were specific to our environment, and that there is no guarantee that you will obtain the same results in your environment. We suggest that you limit the changes to the localopts parameters to only those that are necessary, and test the impact thoroughly on a test system before moving the changes to the production system. Results of the tests The following list provides the results of our tests: The most important parameter to tune to speed up just the launching of jobs is bm look. Reducing the value of bm look improves the time required to detect jobs that are ready to be launched. To speed up the overall execution time (from initial job launch to registering the completion status), tune either bm look, jm look, or mm read. This is because reducing the time too much can overload the system by requiring a greater amount of CPU or (I/O) time. First we performed a “maximum tweaked configuration test” with the lowest settings possible to understand the effects of these parameters and create a baseline. Table 8-6 shows the maximum tweaked values versus the standard ready-for-use configuration. The exception is that we used high for synclevel. However, the default in Tivoli Workload Scheduler was changed to low from high in previous versions. Note that this is not a realistic configuration in production environments due to the excessive resource utilization. Chapter 8. Tuning Tivoli Workload Scheduler for best performance 471
- 508. Table 8-6 Maximum tweaked scenario Parameters Maximum tweaked Standard bm look 1 15 bm read 1 10 jm look 1 300 jm read 1 10 mm cache mailbox yes no mm cache size 512 32 sync level low high In this scenario, we used 100 jobs running UNIX env command combined into one job stream, with single dependency on the previous job. In the standard configuration, the elapsed time from conman submit through the last job completion was 34 minutes, 4 seconds. With the maximum tweaked configuration, the elapsed time from conman submit through the last job completion was 3 minutes, 43 seconds. With the following set of values for bm look, bm read, and jm read, we obtained a good compromise between performance and resource utilization. This suggests that you can set bm look one second less than that of bm read and jm read: bm look = 4 bm read = 5 jm read = 5 472 Getting Started with IBM Tivoli Workload Scheduler V8.3
- 509. 9 Chapter 9. Application programming interface For the first time in this release, an application programming interface (API) for Tivoli Workload Scheduler is included in the product. Before the V8.3 release, programs could access Tivoli Workload Scheduler structures only through the command-line interfaces (CLIs). This chapter describes the nature and usage of these interfaces. This chapter discusses the following topics: “Introduction to application programming interfaces” on page 474 “Getting started” on page 474 “Starting with the basics” on page 475 © Copyright IBM Corp. 2006. All rights reserved. 473
- 510. 9.1 Introduction to application programming interfaces Beginning with Tivoli Workload Scheduler V8.3 and Tivoli Workload Scheduler for z/OS 8.2 (with the provided connector software), you can easily create your own interfaces to Tivoli Workload Scheduler objects and instances in the plan or the database using two new application interfaces. These interfaces are not used to manage the plan or global options: Along with the Tivoli Workload Scheduler software is a Java Enterprise Edition API that uses Enterprise JavaBeans (EJB) to interface with the product for the most commonly used tasks. Using the Java-based API, you can create your own programmatic interface, command-line interface, or graphical interface for many of the functions of Tivoli Workload Scheduler using EJB. You can perform all of the tasks performed by the Job Scheduling Console (the Job Scheduling Console itself uses the API for all its tasks). This includes all of the tasks performed by the command line programs composer and conman. The Web services interface provides a Web Services Description Language (WSDL) compliant SOAP interface to Tivoli Workload Scheduler interfaces written in many programming languages such as Java, Practical Extraction and Report Language (PERL), Hypertext Pre-Processor (PHP), or even ObjectREXX. 9.2 Getting started Programming in Java or other languages is beyond the scope of this book. We provide some of the documentation for the information presented in this chapter and suggest some ideas of what you can accomplish using these Tivoli Workload Scheduler interfaces. More information about how to write programs and applications to this type of API (though not Tivoli Workload Scheduler specifically) is available in the following IBM Redbooks: EJB 2.0 Development with WebSphere Studio Application Developer, SG24-6819 This book provides detailed information about how to effectively use WebSphere Studio Application Developer for the development of applications based on the EJB architecture, and deployment of such applications to a WebSphere Application Server. This book provides examples based on a simple banking application with an underlying relational database. It introduces EJB as a part of Java 2 Platform, Enterprise Edition (J2EE), and discusses the basic concepts and the architecture. It also provides best-practice guidelines for successful implementations of EJB. 474 Getting Started with IBM Tivoli Workload Scheduler V8.3
- 511. The book introduces a sample banking application and implements entity beans, session beans, and message-driven beans using WebSphere Studio Application Developer. Finder methods, different mapping strategies, and simple clients that use the EJBs are also implemented. It also provides instructions about how to deploy EJB applications to a WebSphere Application Server. Programming J2EE APIs with WebSphere Advanced, SG24-6124 This book provides examples of programming the new J2EE APIs using IBM VisualAge® for Java and deployment on WebSphere Advanced. Part 1 of this book introduces J2EE and the PiggyBank application scenario, which is an integrated application used to illustrate various principles and techniques for enterprise software development. Part 2 describes the depth the of EJB container of the J2EE specification, which includes transactional EJB, transactions, messaging with Java Message Service (JMS), WebSphere, and IBM MQSeries®. In Part 3, you find the latest servlet and JavaServer™ Pages™ (JSP™) specification with Web application concepts. Complete documentation for the API is provided on the Tivoli Workload Scheduler product CDs. Mount the Tivoli Workload Scheduler Engine CD for your platform and open the following file with your Internet browser: <CD_drive>/API/doc/index.html. 9.3 Starting with the basics If you are interested in starting to develop and deploy Java and Web services applications, you can find a complete suite of integrated development tools at the IBM developerWorks® Web site “Kick-start your Java apps”. From this Web site, you can download free software to begin building and deploying applications. This three-part, no-charge development, data management, and deployment environment includes an integrated development environment (IDE), a database server, and a Web server; everything that you require to get simple Web applications up and running. See the following Web site: http://www-128.ibm.com/developerworks/kickstart/?S_TACT=105AGX01&S_CMP= SIMPLE Chapter 9. Application programming interface 475
- 512. 9.3.1 Finding the API The API classes that you require to build your applications are in the following jar files in the <TWSUser>/appserver/profiles/twsprofile/installedApps/DefaultNode/ TWSEngineModel.ear directory. You can also find them on the Tivoli Workload Scheduler Engine CD for each platform in the <CD_drive>/API/bin/ directory. The Java jar files are: CommonServices.jar Base utility classes used by all other jars, such as TWSException and the implementation of trace and message loggers CommonObjects.jar Contains the definition of common classes shared by model and plan objects, query filters, and syntax validators ModelObjects.jar Contains the definition of Tivoli Workload Scheduler model objects, together with their query filters and syntax validators PlanObjects.jar Contains the definition of Tivoli Workload Scheduler plan objects, together with their query filters and other utilities related to plan objects ICalendar.jar Contains a base library of objects that you use to supply scheduling rules using the iCalendar standard. See the following Web site: http://www.ietf.org/rfc/rfc2445.txt RunCycles.jar Contains a set of classes to calculate the dates and times of scheduled job stream instances from run cycle definitions ConnInterfaces.jar Contains the definition of Java interfaces implemented by EJB and other base utility classes and exceptions ConnEngineEjb.jar Contains the interface and implementation of the J2EEConnEngine EJB for the distributed engine ConnModelEjb.jar Contains the interface and implementation of the J2EE ConnModel EJB for the distributed engine 476 Getting Started with IBM Tivoli Workload Scheduler V8.3
- 513. ConnPlanEjb.jar Contains the interface and implementation of the J2EE ConnPlan EJB for the distributed engine ZConnEngineEjb.jar Contains the interface and implementation of the J2EEConnEngine EJB for the z/OS engine ZConnModelEjb.jar Contains the interface and implementation of the J2EE ConnModel EJB for the z/OS engine ZConnPlanEjb.jar Contains the interface and implementation of the J2EE ConnPlan EJB for the z/OS engine Example 9-1 shows an example code where Tivoli Workload Scheduler API classes are used. This code lists all the workstations that exist in a Symphony file. Perform the following steps: 1. Connect to the Tivoli Workload Scheduler connector. 2. Find the Symphony file. 3. Log on to the Tivoli Workload Scheduler connector using the user ID maestro and password as password. 4. Use “*” for the workstation filter (this lists all the workstations) and list the workstations in the Symphony file. Example 9-1 Using the Tivoli Workload Scheduler API classes /* * Created on May 16, 2006 * * Copyright (c) V Budi Darmawan */ package vbd.twsapi; import java.rmi.RemoteException; import java.util.List; import javax.security.auth.login.LoginContext; import com.ibm.tws.conn.exception.ConnException; import com.ibm.tws.conn.exception.ConnInvalidPropertiesException; import com.ibm.tws.conn.plan.*; import com.ibm.tws.conn.util.*; import com.ibm.tws.objects.filter.QueryFilter; import com.ibm.tws.objects.plan.*; Chapter 9. Application programming interface 477
- 514. import com.ibm.tws.objects.filter.*; import com.ibm.websphere.security.auth.callback.WSCallbackHandlerImpl; import com.ibm.ws.security.util.LoginHelper; /** * @author vbudi */ public class t2 { static ConnPlan myPlan; public static void main(String[] args) { String hostname = "localhost"; String port = "31117"; try { ConnProperties cp = new ConnProperties(); //cp.DEFAULT_HOST = hostname; //cp.DEFAULT_PORT = port; //cp.DEFAULT_SERVER = server; cp.setProperty(ConnProperties.TYPE_KEY, ConnProperties.TYPE_REMOTE); cp.setProperty(ConnProperties.DEFAULT_HOST, "localhost"); cp.setProperty(ConnProperties.DEFAULT_PORT, "31117"); cp.setProperty(ConnProperties.HOST_KEY, hostname); cp.setProperty(ConnProperties.PORT_KEY, port); cp.setProperty(ConnProperties.USER_KEY, "maestro"); cp.setProperty(ConnProperties.PASSWORD_KEY, "passw0rd"); ConnPlanEjbImpl cpei = new ConnPlanEjbImpl(cp); //ConnFactory.getInstance().getPlan(cp); try { LoginContext lc = new LoginContext("ClientContainer", new WSCallbackHandlerImpl("maestro","passw0rd")); lc.login(); } catch (Exception e) { e.printStackTrace(); } myPlan = cpei.getClientRemote(); QueryFilter qf = new QueryFilter(); qf.setFilter(WorkstationInPlanFilters.WORKSTATION_NAME, "*"); QueryResult qr = myPlan.queryPlanObject(WorkstationInPlan.class, qf, 5, null); 478 Getting Started with IBM Tivoli Workload Scheduler V8.3
- 515. List l = qr.getList(); for (int i=0;i<l.size();i++) { WorkstationInPlan wip = (WorkstationInPlan) l.get(i); System.out.println(wip.getName()+":"+wip.getNodeName()); } System.exit(0); } catch (RemoteException e) { e.printStackTrace(); } catch (ConnInvalidPropertiesException e) { e.printStackTrace(); } catch (ConnException e) { e.printStackTrace(); } } } 9.3.2 Web Services Description Language templates The description files found in the appserver portion of the Tivoli Workload Scheduler installation contain the Web services descriptions of command functions, which can be performed through the SOAP protocol to Tivoli Workload Scheduler. You can find the Web services descriptions in the <twsuser>/ appserver/profiles/twsprofile/installedApps/DefaultNode/TWSEngineModel.ear/P lanServicesWeb.war/WEB-INF/wsdl directory where the Tivoli Workload Scheduler appserver is installed (usually on master domain manager). We provide two examples of what you can do with these templates. Figure 9-1 shows an example of how to integrate Tivoli Workload Scheduler with business processes through WebSphere Business Integration Modeler. WebSphere Business Modeler is an IBM product that helps organizations visualize, comprehend, and document their business processes. Chapter 9. Application programming interface 479
- 516. You can include a call to Tivoli Workload Scheduler Web services function in the WebSphere Business Integration Modeler. In Figure 9-1, the General Report process runs a Tivoli Workload Scheduler submitJob function to print a report. Figure 9-1 Integrating Tivoli Workload Scheduler with business processes through WebSphere Business Integration Modeler 480 Getting Started with IBM Tivoli Workload Scheduler V8.3
- 517. Example 9-2 shows how to create a Web graphical user interface (GUI) using PHP to connect to Tivoli Workload Scheduler Web services. Example 9-2 Querying Tivoli Workload Scheduler jobs using PHP <html> <head> <title>Query TWS Jobs using PHP</title> </head> <body> <h3>Query TWS Jobs using PHP</h3> <?php # the host and HTTP port of the TWS connector $twsHost = "localhost"; $twsPort = "31115"; $location = "http://" . $twsHost . ":" . $twsPort; $location = $location . "/PlanServicesWeb/services/SchedulingFactory"; # username and password $login = "maestro"; $password = "passw0rd"; # create a SOAP client of the TWS WSDL service # tracing and exception parameters are optional $client = new SoapClient(null, array('location' => $location, 'uri' => "http://services.ws.tws.ibm.com/TWS-Scheduling", 'login' => $login, 'password' => $password, 'trace' => 1, 'exceptions' => 0)); # the jobstream filter is an array # the SOAP variable would be filled in to filter which items are retrieved $filterType = new SoapVar("", SOAP_ENC_ARRAY); # capture any errors when calling the query function try { # using the TWS queryJobStreams function # engineName is blank for distributed engines $jobObject = $client->__soapCall('queryJobs', array( new SoapParam("", "engineName"), new SoapParam($filterType, "filter"))); #uncomment to print out the returned object #echo "<pre>"; #print_r($jobObject); #echo "</pre>"; } catch( SoapFault $exception ) { echo $exception; Chapter 9. Application programming interface 481
- 518. } print "<table border=1>n"; print "<tr><td>Workstation</td><td>JobStream</td><td>Job</td>’; print ‘<td>Number</td><td>Status</td></tr>n"; $jobArray = $jobObject->JobInstance; foreach ($jobArray as $jobObjectInstance => $jobItem) { print "<tr><td>$jobItem->workstationName</td><td>$jobItem->jobStreamName</td>’; print <td>$jobItem->jobName</td>"; print "<td>$jobItem->jobNumber</td><td>$jobItem->status</td></tr>n"; } print "</table>n"; #uncomment the next three lines to see the SOAP XML that is sent and retrieved #echo "<h3>Return from SOAP call</h3>n"; #echo "<br>Request :<hr><small>", htmlspecialchars($client->__getLastRequest()), "</small><p>"; #echo "Response :<hr><small>", htmlspecialchars($client->__getLastResponse()), "</small><br>"; ?> 482 Getting Started with IBM Tivoli Workload Scheduler V8.3
- 519. 10 Chapter 10. Tivoli Workload Scheduler V8.3: Troubleshooting This chapter provides troubleshooting information about the Tivoli Workload Scheduler V8.3 engine and its installation. The engine comprises the components of the Tivoli Workload Scheduler V8.3 that perform the workload scheduling activities, and the command line with which the user controls the components. We also provide troubleshooting information about the installation of the connector. This chapter discusses the following topics: “Upgrading your whole environment” on page 484 “Keeping up-to-date fix packs” on page 484 “Built-in troubleshooting features” on page 484 “Installation logs” on page 485 “Recovering failed interactive InstallShield wizard installation” on page 487 “JnextPlan problems” on page 502 © Copyright IBM Corp. 2006. All rights reserved. 483
- 520. 10.1 Upgrading your whole environment To avoid problems with the Tivoli Workload Scheduler, when you upgrade to a new version, ensure that you do so for your whole environment. The components of Tivoli Workload Scheduler Version 8.3 are compatible with the components of the previous versions (for more details, see IBM Tivoli Workload Scheduler Release Notes v8.3, SC32-1277). However, running the Tivoli Workload Scheduler in a mixed network increases the possibility of problems. This is because each new release of Tivoli Workload Scheduler not only adds functionality, but also improves the stability and reliability of the various components. Try not to run it in a mixed network for extended periods. 10.2 Keeping up-to-date fix packs To avoid problems with the Tivoli Workload Scheduler, install the latest fix packs. Fix packs contain fixes to problems that IBM, you, or other clients have identified. Install the latest fix pack each time it becomes available to avoid problems. 10.3 Built-in troubleshooting features Tivoli Workload Scheduler is supplied with the following features that assist you with troubleshooting: Informational messages that inform you of expected events Error and warning messages that inform you of unexpected events Message helps for the most commonly occurring messages A logging facility that writes all types of messages to log files, which you can use to monitor the progress of Tivoli Workload Scheduler activities A log analyzer that you can use to read, analyze, and compare logs An auditing facility that provides an audit trail of changes to the Tivoli Workload Scheduler database, which you can use for both progress-charting and troubleshooting A configuration snapshot facility that provides IBM Customer Support with first-failure data capture (FFDC) configuration information when unexpected events occur 484 Getting Started with IBM Tivoli Workload Scheduler V8.3
- 521. An autotrace facility that maintains a trace of the activities of all of the main components. It is operated by the user, under the control of IBM Software Support, to provide with useful information after unexpected events occur. A facility that automatically creates an FFDC software autotrace snapshot if a component failure is detected by its parent component 10.4 Installation logs Logs of the installation processes have a different naming convention, depending on the installation method. This section describes the logs and what to include if you have to package them for support. The topics are as follows: InstallShield wizard installation and uninstallation logs TWSINST logs Software package block logs DB2 installation logs Installation logs for the embedded version of WebSphere Application Server - Express Packaging logs for support 10.4.1 InstallShield wizard installation and uninstallation logs The InstallShield wizard log files are as follows: <temp>/tws83/twsismp.log (trace file) <temp>/tws83/summary.log (log file) <temp> is the user temporary directory, which can be one of the following options: – For UNIX: /tmp – For Windows: The default value is: C:Documents and Settings<installing_user>Local SettingsTemptws83 For multiple installations on the same workstation, the log header and footer indicate the user ID (<TWSuser>) for which the installation is performed. Chapter 10. Tivoli Workload Scheduler V8.3: Troubleshooting 485
- 522. 10.4.2 TWSINST logs The twsinst log file is as follows: <temp>/tws83/twsinst_<operating_system>_<TWSuser>^8.3.0.00.log <temp> is the user temporary directory, which can be one of the following options: For UNIX: /tmp For Windows: The default value is: C:Documents and Settings<installing_user>Local SettingsTemptws83 <operating_system> is the name of operating system and <TWSuser> is the name of the user for which the Tivoli Workload Scheduler is installed (as supplied in the installation program). 10.4.3 Software package block logs The IBM Tivoli Configuration Manager software package blocks log files are as follows: <temp>/FP_TWS_<operating_system>_<TWSuser>^8.3.0.00.log (agent SPB log file) <temp>/TWS_LP_<TWSuser>^8.3.0.00.log (agent NLS SPB log file) <temp> is the user temporary directory, which can be one of the following options: – For UNIX: /tmp – For Windows: The default value is: C:Documents and Settings<installing_user>Local SettingsTemptws83 <operating_system> is the name of operating system and <TWSuser> is the name of the user for which the Tivoli Workload Scheduler is installed (as supplied in the installation program). 10.4.4 DB2 installation logs The DB2 installation log is as follows: For UNIX: /tmp/DB2setup.log For Windows: C:Documents and Settings<installing_user>My DocumentsDB2LOG 486 Getting Started with IBM Tivoli Workload Scheduler V8.3
- 523. 10.4.5 Installation logs for embedded version of WebSphere Application Server - Express The application server installation has no log. You can find the log for the startup of the server at: <TWSHome>appserverprofilestwsprofilelogsstartServer.log 10.5 Recovering failed interactive InstallShield wizard installation This section describes how to recover a failed interactive installation. If an operation fails during installation, the wizard opens the window shown in Figure 10-1. Figure 10-1 Wizard window after an installation failure Attention: If you are using the interactive wizard, do not close the wizard panel by clicking the close icon. If you do so, the wizard cannot save the troubleshooting information that you require to resume the installation. If you want to quit the installation, select Quit installation. You can use the debug mode of the wizard to see which step or steps of the installation have failed. You can correct errors that have occurred and resume those installation steps that have not completed successfully, without leaving the Chapter 10. Tivoli Workload Scheduler V8.3: Troubleshooting 487
- 524. wizard. You can choose to do this as soon as the failure occurs, or close the window and recover the situation later. The procedure is described in the following sections. Deciding whether to resume or rerun the wizard The fact that the wizard has a facility that allows you to diagnose the problem, correct it, and resume it, does not necessarily mean that you must do so. There are a number of scenarios where it is quicker or safer to rerun the wizard. This section helps you to decide which is the best course of action. Attention: Diagnosing and resuming a failed installation is a process that must be guided, either by performing the instructions in the sections that follow in this manual, or by performing instructions from IBM Software Support. The facility to diagnose, correct, and resume a failed installation can be useful to you. However, if it is not done correctly, it can require more work than rerunning it. The following sections detail different installation scenarios and suggest the best way to proceed. Installing an agent or the command line client If you are installing an agent or the command line client, it is always easier to rerun, rather than resume, a failed installation. This is because the steps are few, and all of the steps can be rerun. Installing master domain manager, backup master domain manager, or connector If you are installing a master domain manager, a backup master domain manager, or the connector, consider the following possibilities: The reason for failure Fix the problem if it cannot be resolved by just changing the installation data values. The resolution of the problem might require you to rerun. For example, if there is a problem with the TWSUser, and you have to supply a different value, it is always better to rerun. The step in which the problem occurs 488 Getting Started with IBM Tivoli Workload Scheduler V8.3
- 525. Deciding when to resume the wizard If you have decided to diagnose, correct, and resume the wizard, you can choose to do so immediately, or you can quit the installation and resolve the problem later. Diagnose failure If you choose to diagnose the failure immediately, the Step List window is opened. Quit installation If you choose to quit the installation, a summary of the progress of the installation that has occurred so far is displayed, and the InstallShield wizard is closed. You can discover the reason for the failure by looking in the installation logs, correct the problem, and later perform a restart of the installation using the resume option. Attention: Do not close the panel by clicking the Close icon. If you do this, the wizard cannot save the troubleshooting information that you require when you resume the installation. If want to quit the installation, select Quit installation. The Step List window The Step List window is opened either when an installation fails, or when you are resuming an installation that has previously been stopped (see “Stopping and resuming an interactive installation” on page 497). Chapter 10. Tivoli Workload Scheduler V8.3: Troubleshooting 489
- 526. Figure 10-2 shows an example of the Step List window when an installation step has failed. Figure 10-2 Step List window showing a failed step The fields in the Step List window are as follows: Step # This field shows the installation sequence. Description This is the description of the installation step. The steps for the Tivoli Workload Scheduler installation are described in IBM Tivoli Workload Scheduler Planning and Installation Guide v8.3, SC32-1273. Target This is the workstation where the installation is being run. 490 Getting Started with IBM Tivoli Workload Scheduler V8.3
- 527. Status The Status field can show one of the following status: – Ready This indicates that the step is ready to be installed. – Successful This indicates that the step has been successfully completed. – Error This means that the step is complete, but errors have been detected. – Held This means that a step that is a prerequisite for another step has failed. Do not set this state. Run next This indicates starting the next step in the list that has a status set to Ready. Run all This indicates starting in sequence all of the steps in the list that have a status set to Ready. Stop Use this field to stop the step processing while a step is being processed. The step returns to the Ready status. Stop on error If you select this, it stops the processing of any step or steps that you run in the event of an error. Search by status Select the status that you want to view, then click Search. The step list displays the first step in the step list with the selected status. Status This indicates the status of the installation processing engine. It can be one of the following status: – Waiting This indicates that user action is required. – Running This indicates that installation of a step is in progress. Chapter 10. Tivoli Workload Scheduler V8.3: Troubleshooting 491
- 528. – Stopping This means that after the current step, the engine stops. – Searching This indicates that the engine is searching for product images. Details This displays the number of steps in a particular status. It also displays the total number of steps. For information about each individual step, double-click the step to open the step window. The step window If you double-click a step in the Step List window, the step window opens. It has three tabs: Status tab The Status tab shows the status of the installation step (Ready, Success, Error, or Held). You can change the status from Error to Ready if the condition that caused a step to fail has been removed. Figure 10-3 shows an example. Figure 10-3 Step status tab 492 Getting Started with IBM Tivoli Workload Scheduler V8.3
- 529. Properties tab The Properties tab shows the user the parameters that are required by the step. These might be the parameters that you have enter in the installation wizard, or values that the wizard has determined according to the logic of its operations. Figure 10-4 shows an example. Figure 10-4 Step properties tab Chapter 10. Tivoli Workload Scheduler V8.3: Troubleshooting 493
- 530. Output tab The Output tab shows the output and any errors that occurred during the installation step, and also the commands that were performed by the installation. Figure 10-5 shows an example. Figure 10-5 Step output tab 494 Getting Started with IBM Tivoli Workload Scheduler V8.3
- 531. The Output tab has the following entries: – Time Stamp This indicates the time that the command was run. – Return code This indicates the return code for the operation as follows: • 0: OK • 1 - 9:Error – DiagRecord This is a unique point of failure identification. You can quote this to IBM Software Support if you have to request assistance. – Command This indicates the command that failed. – Command output This indicates any output from the command (such as a return code, or an error message number). – Error log This shows a list of errors that occurred during the installation of the step. The following section describes the procedure for correcting a step that has failed and resuming the installation. Correcting a failed step and continuing the installation To correct a failed step and continue with the installation, perform the following steps: 1. Use the Output tab to determine the problem that has occurred. 2. Consult the sections in this chapter that describe how to resolve problems found during the installation, or see the solution that is displayed for the error message. 3. If the solution to the problem requires you to change one of the values that you entered in the installation wizard, select the Properties tab and make the required changes. Click Apply. Chapter 10. Tivoli Workload Scheduler V8.3: Troubleshooting 495
- 532. The error description might make a reference to a property that is not available for editing in the step that failed. In this case, you must do the following steps: a. Close the step window. b. Double-click the preceding step and check if the Properties tab contains the property that you require. If it does not, then close the step window and try the preceding step. Continue doing this until you locate the property to change. Alternatively, see Appendix B, “InstallShield wizard steps and parameters” of IBM Tivoli Workload Scheduler Administration and Troubleshooting V8.3, SC32-1275, for a list of the steps in which the given property is used according to your specific installation scenario. When you find the property, change its value and then continue with the rest of the steps in this procedure. Continue from the step that you have modified, not from the step that failed. Note: <TWSUser> ID: If the corrective action you have to take is to change the <TWS_user> user ID or password, we recommend that you quit the installation and rerun. Many of the steps have the <TWS_user> and its password as properties, and because many crucial factors in the installation are linked to the <TWS_user>, we recommend that you do not try to change the ID or its password and then resume. 4. Click the Status tab, change the Status to Ready, then click Apply. The step list is again displayed. 5. Refer to Appendix B, “InstallShield wizard steps and parameters” of IBM Tivoli Workload Scheduler Administration and Troubleshooting V8.3, SC32-1275, and determine which steps include the data item that you have changed. Double-click each of these steps in turn and click the Properties tab for the step. Change the value of the property accordingly and click Apply. This is necessary because the step properties are not interlinked. 6. If you want to run just the step that failed, for example, to ensure that the change you made has worked, click Run next. This runs the first step in the step list (in step number order) with a status of Ready. When the step finishes successfully, run the other steps in the installation in the same way, in sequence, or you can use Run all. 7. To resume the installation in one go, click Run all. The wizard attempts to complete all outstanding steps, starting with the step that you have modified. 496 Getting Started with IBM Tivoli Workload Scheduler V8.3
- 533. Example procedure for resolving a problem This section describes an example procedure for resolving a problem and finishing the installation. Assume that the “Create the TWSUser (Windows only)” step has failed. This can be due to a number of reasons. The procedure for resolving the problem starts when the installation stops and the Diagnose Failure window opens (see Figure 10-1 on page 487). 1. In the Diagnose Failure window, select Diagnose failure and click Next. 2. The Step List window opens (refer to Figure 10-2 on page 490). In the Step List window, double-click the step that has failed, in this case, the “Create the TWSUser (Windows only)” step. 3. Click the Output tab (see Figure 10-5 on page 494), and determine the cause of the problem. 4. Fix the problem. For this scenario, we assume that the password that you originally supplied to the installation wizard does not match the password stored in the Windows Users and Groups data. Click the Properties tab and change the <TWS_user> password to the valid value. Click Apply. 5. In the Status tab (refer to Figure 10-3 on page 492), change Status to Ready, and click Apply. 6. The Step List window opens again. This time the status of all the steps yet to be performed is set to Ready. Use the information in Appendix B, “InstallShield wizard steps and parameters” of IBM Tivoli Workload Scheduler Administration and Troubleshooting V8.3, SC32-1275, to determine which other steps also include the <TWSUser> password. For each of the affected steps, double-click the step and click the Properties tab. Change the password as you did for the failed “Create the TWSUser (Windows only)” step. Click Apply. 7. When you have checked the properties for the affected steps, click Run all. The installation wizard resumes and completes the installation. Stopping and resuming an interactive installation You can stop and resume an installation at any time. For example, you can do this in the following instances: The installation is running successfully, but you want to pause it. Stop it now and resume it later. The installation has failed and you have to reboot the computer to correct a problem Chapter 10. Tivoli Workload Scheduler V8.3: Troubleshooting 497
- 534. To stop an interactive installation that is running, click Stop. The wizard asks you if you want to quit the installation after the current step is completed. If you choose Yes, the installation completes the step that is being performed, and then displays a summary panel of the completed activities. Click Finish to exit. To stop an installation that has just failed, select Quit installation, click Next, and confirm your intention. To stop an installation that is on the Step List window, click Cancel, and confirm your intention. To resume the installation, enter the following command: <setup_file_name> -resume <setup_file_name> is one of the following values: For UNIX: setup.bin For Windows: setup.exe The InstallShield wizard recognizes that a previous installation has not completed, and the Step List window opens. From this window, you can resume the previous installation from the point at which it stopped. If the steps in the Step List window have no errors, you can resume the installation. Otherwise, you have to correct the error that caused the installation step or steps to fail, before you resume that step or steps. Recovering a failed silent InstallShield wizard installation If the silent wizard stops, perform the following steps: 1. Open the installation log and establish at what point the installation failed. The location of the installation logs is described in 10.4, “Installation logs” on page 485. The installation is performed in two distinct phases: a. Validation phase In this phase, the input parameters are validated, but no installation action is taken. In the log file, the validation of the input parameters are indicated by the validateFields command. b. Step Execution phase The installation is performed in a series of steps. In the log, each step starts with a message that begins with “Running step:”. 2. When you have discovered what the problem is, and at which phase it started, determine how to resolve it. You might have to correct a parameter or change something in the installation environment (for example, create more disk space). 3. When you have resolved the problem, you can rerun or resume the wizard. 498 Getting Started with IBM Tivoli Workload Scheduler V8.3
- 535. Rerunning the wizard You must rerun the wizard if the error is found in the validation phase. If the wizard is in the step execution phase, you can always rerun it, but you must consider the fact that the wizard attempts to redo each step. Therefore, you might have to clean up the installation environment after the failed installation before rerunning it. For more details, refer to the recovery notes for each step in resolving installation problems in the step-by-step procedure. For example, if the DB2 installation is successful, rerunning the installation might cause the reinstallation of DB2 to fail. Therefore, you must select the option in the response file to use the existing instance of DB2 that you have already installed. If you have to change an input parameter, edit the response file. Then, rerun the wizard by reissuing the silent wizard command as you issued it originally. Resuming the wizard You can only resume the wizard if the error is found in the step execution phase. The resume option uses the interactive wizard. You cannot resume the wizard silently, because it requires an interaction to resume the failed step. To resume the wizard, reissue the silent wizard command as you issued it originally, with the following changes: Add the -resume parameter. Remove the -silent parameter from when you ran it originally. You must remove it for the installation to resume. The Step List window of the interactive wizard is displayed. In this window, you can optionally change the values of the data input parameters, and resume the installation at the failed step. Recovery procedure on a master domain manager If the Symphony file is corrupted on a master domain manager, it can be regenerated using the backup master domain manager. The regeneration of the Symphony file causes some minor loss of data. The following procedure indicates what is lost. The prerequisite for the procedure is that you must have a backup master domain manager already available. A backup master domain manager is a fault-tolerant agent in the master domain with its full status attribute set to yes. Note: If you have not created a backup master domain manager already, the Symphony file cannot be recovered and the processing it contains is lost. Chapter 10. Tivoli Workload Scheduler V8.3: Troubleshooting 499
- 536. The procedure requires you to perform the following steps on either the master domain manager or the backup master domain manager. Each step description also identifies the workstation on which it must be performed. You must perform the following steps in order: 1. On the backup master domain manager, perform the following steps: a. Run the switchmgr command. b. Verify that the backup master domain manager is acting as the master domain manager. 2. On the original master domain manager, perform the following steps: a. Set the job limit on the old master to 0, using conman or the Job Scheduling Console. This prevents jobs from launching. b. Shut down all Tivoli Workload Scheduler processes on the old master domain manager. c. Rename the Sinfonia file and the corrupted Symphony file (any names). 3. On the current master domain manager (previously the backup master domain manager), perform the following steps: a. Verify that it is linked to all agents except the old master. b. Shut down all Tivoli Workload Scheduler processes (unlink from all agents). c. Rename Sinfonia to Sinfonia.orig. d. Copy Symphony to Sinfonia. You now have identical Symphony and Sinfonia files. 4. On the original master domain manager, perform the following steps: a. Run a StartUp from the operating system's command line to start the netman process. b. Verify that the process remains active. 5. On the current master domain manager (previously the backup master domain manager), perform the following steps: a. Run a StartUp from the operating system's command line to start the netman process. b. Issue a conman start or use the Job Scheduling Console to start the current master. c. Issue a link to the original master. This action sends the Symphony file to the original master domain manager. 500 Getting Started with IBM Tivoli Workload Scheduler V8.3
- 537. 6. On the original master domain manager, perform the following steps: a. Verify that the Symphony file is present and is the correct size (same as on the current master domain manager (previously the backup master domain manager)). b. Verify that all Tivoli Workload Scheduler processes are active. 7. On the current master domain manager (previously the backup master domain manager), verify that the original master domain manager is linked. 8. On the original master domain manager, perform the following steps: a. Set the job limit on the old master to the previous level, using conman or the Job Scheduling Console. Jobs can commence launching. b. Verify that the original master domain manager has the current job status for all agents. c. Run the switchmgr command to switch control back to the original master domain manager. After this procedure, some information is lost, in particular, any events that were suspended on the master domain manager when you started the recovery procedure. If you cannot perform this procedure, try using the procedure described in the following section, which is the alternative procedure for recovering the Symphony file on the master domain manager. Agents do not link to master domain manager after first JnextPlan After you have successfully installed the components of your network with the master domain manager on Hewlett-Packard UNIX (HP-UX), performed all the necessary steps to create a plan, and run your first JnextPlan, which appears to work correctly, the Symphony file is distributed to the agents. However, they cannot link to the master domain manager, even if you issue a specific link command for them. The conman error log shows that the agents cannot communicate with the master domain manager. Cause and solution One possible cause for this problem is that although on HP-UX host names are normally limited to eight characters, on some versions of this platform, you can define larger host names. The problem occurs if you define the master domain manager's host name as more than eight characters. When you install the master domain manager on this host, a standard operating system routine obtains the host name from the operating system, but either truncates it to eight characters before storing it in the database, or stores it as unknown. When you install the agents, you supply the longer master domain manager host name. Chapter 10. Tivoli Workload Scheduler V8.3: Troubleshooting 501
- 538. However, when the agents try to link to the master domain manager, they cannot match the host name. To resolve this problem, perform the following steps: 1. Change the workstation definition of the master domain manager to the correct host name. 2. Run ResetPlan -scratch. 3. Run JnextPlan. The agents now link. 10.6 JnextPlan problems You can encounter the following problems with JnextPlan: JnextPlan fails to start. JnextPlan fails with the DB2 message: The transaction log for the database is full. JnextPlan is slow. A remote workstation does not initialize after JnextPlan. A change in a resource quantity in the database is also not implemented in the plan after JnextPlan. JnextPlan fails to start In this scenario, JnextPlan fails to start. Cause and solution This error might be a symptom that your Tivoli Workload Scheduler network requires additional tuning. The default size of the pobox files is 10 megabytes (MB). You can increase the size according to the following criteria: The role (master, domain manager, or fault-tolerant agent) of the workstation in the network Higher hierarchical roles require larger pobox files due to the larger number of events that they must handle (because the total number of events that a workstation receives is proportional to the number of its connections). For a domain manager, the number of subdomains under its control also makes a difference. 502 Getting Started with IBM Tivoli Workload Scheduler V8.3
- 539. The average number of jobs in the plan The input/output (I/O) speed of the workstation (Tivoli Workload Scheduler is I/O-dependent) JnextPlan fails with the DB2 message “The transaction log for the database is full” You receive a message from JnextPlan, which includes the following DB2 message: The transaction log for the database is full. The JnextPlan message is probably the general database access error message AWSJDB801E. Cause and solution The problem is probably caused by the number of job stream instances that JnextPlan has to handle. The default DB2 transaction logs cannot handle more than the transactions generated by approximately 180,000 job stream instances. If JnextPlan is generating this many instances, you must change the log file creation parameters to ensure that more log space is created. You might also have to increase the Java heap size on the application server. JnextPlan fails with a Java out-of-memory error You receive the following messages from JnextPlan: AWSJCS011E An internal error has occurred. The error is the following: “java.lang.OutOfMemoryError”. Cause and solution The problem is probably caused by the number of jobs that JnextPlan has to handle. The default Java heap size in the application server cannot handle more than approximately 40,000 jobs. If JnextPlan is handling this many jobs, you must increase the Java heap size. Chapter 10. Tivoli Workload Scheduler V8.3: Troubleshooting 503
- 540. JnextPlan is slow You find that JnextPlan is slow. Cause and solution There are three possible causes for this problem: Too much autotrace information One possible cause is autotrace, which is providing too much trace information. There are two possible solutions: – Reduce the number of processes that autotrace is monitoring. – Stop autotrace while JnextPlan is running. To do this, issue the following command before it starts: atctl off TWS all Issue the following command to switch autotrace back on again: atctl on TWS all This can be automated within a script that launches JnextPlan. Application server tracing is set too high Database requires reorganizing Important: Another possible solution is to use DB2 8.2.4 (8.2 FP11) instead of the 8.2 general availability (GA). With some client databases, the DB2 8.2 GA makes an incorrect access plan during JnextPlan, which can be detected because DB2 starts to use more central processing unit (CPU) than normal. Remote workstation does not initialize after JnextPlan After you run JnextPlan, you notice that a remote workstation does not immediately initialize. The following message is seen: +++++++++++++++++++++++++++++++++++++++++++++++++++++++++++++++++++++++ + AWSBCW037E Writer cannot initialize this workstation because mailman + is still active. + ++++++++++++++++++++++++++++++++++++++++++++++++++++++++++++++++++++++ + AWSBCW039E Writer encountered an error opening the Mailbox.msg file. + The total cpu time used is as follows: 0 +++++++++++++++++++++++++++++++++++++++++++++++++++++++++++++++++++++++ 504 Getting Started with IBM Tivoli Workload Scheduler V8.3
- 541. Cause and solution If mailman is still running a process on the remote workstation, JnextPlan cannot download the Symphony file and initialize the next production period's activities. Instead, the domain manager issues a stop command to the workstation. The workstation reacts in the usual way to the stop command, completing the activities that it must complete, and stopping those activities that it can stop. After the interval is determined in the localopts parameter mm retrylink, the domain manager tries again to initialize the workstation. When it finds that the stop command has been implemented, it starts to initialize the workstation, downloading the Symphony file and starting the workstation's activities. Change in a resource quantity in the database not implemented in the plan after JnextPlan You make changes to the number of available resources in the database, but the number of available resources in the plan does not change. The global option enCFResourceQuantity is set to no. Cause and solution If the global option enCFResourceQuantity is set to yes, you might expect that any changes to the available quantity of a given resource in the database is not implemented in the plan, provided there is at least one job or job stream instance using that resource in the extended plan. Similarly, if the global option enCFResourceQuantity is set to no, you might expect that the available resource quantity changes after JnextPlan. However, this is not always true, depending on the quantity of the resource that is being used by jobs and job stream instances currently in the plan: If the usage of the resource by jobs and job stream instances is less than or equal to the new total of available resources in the database, the available quantity of the resource is changed in the plan. If the usage of the resource by jobs and job stream instances is greater than the new total of available resources in the database, the available quantity of the resource is not changed in the plan. To ensure that you update the quantity of resources in the plan, make available at least as many instances of the resource as are required by the jobs and job stream instances in the plan. Chapter 10. Tivoli Workload Scheduler V8.3: Troubleshooting 505
- 542. Conman problems On Windows operating system, when you run conman, you might encounter a problem and receive the AWSDEQ024E message. You receive the following error: +++++++++++++++++++++++++++++++++++++++++++++++++++++++++++++++++++++ + AWSDEQ024E Error owner is not of type user in TOKENUTILS.C;1178 +++++++++++++++++++++++++++++++++++++++++++++++++++++++++++++++++++++ Cause and solution This problem can have a variety of causes related to users and permissions. Check the following on the server: <TWS_user> password Make sure that the password you supplied for <TWS_user> is correct, that the account is not locked out, and that the password has not expired. Tokensrv service Ensure that the Tivoli Token Service (tokensrv) is started by the Tivoli Workload Scheduler administrative user (not the local system account). Verify this in the properties of that service in the Services panel. If the password for this user has changed on the workstation, also check that the password has been changed in the entry on the Services panel. File ownerships Check that the following ownerships are correct: – All .exe and .dll files in the TWShomebin directory are owned by <TWS_user> – All .cmd files are owned by administrator If necessary, alter the ownership of these files as follows: a. Stop any active Tivoli Workload Scheduler processes. b. Change to the <TWShome> directory. c. Issue the following commands: • setown -u <TWS_user> .bin*.exe • setown -u <TWS_user> .bin*.dll c:win32appmaestro> • setown -u administrator .bin*.cmd d. Issue a StartUp command on the affected server. e. On the Tivoli Workload Scheduler master domain manager, launch conman. 506 Getting Started with IBM Tivoli Workload Scheduler V8.3
- 543. f. After conman starts, run the following command sequence: link @!@;noask g. Keep issuing the sc command to ensure that all the servers relink. A server is considered linked if the state shows LTI JW. Advanced user rights Make sure that <TWS_user> has the correct advanced user rights, as documented in IBM Tivoli Workload Scheduler Planning and Installation Guide v8.3, SC32-1273. These are as follows: – Act as a part of the operating system – Increase quotas – Log on as a batch job – Log on as a service – Log on locally – Replace a process level token Resolving the problem by reinstalling If none of the suggestions provided previously resolve the problem, you might have to reinstall Tivoli Workload Scheduler. However, it might happen that the uninstallation fails to completely remove all of the registry keys from the previous installation. In this case, remove the registry keys performing the procedure in “Removing Windows registry keys” in Chapter 6, “Troubleshooting, installation, migration, and unistallation” of IBM Tivoli Workload Scheduler Administration and Troubleshooting V8.3, SC32-1275. Then, make a fresh installation from the product CD, and reapply the most recent fix pack, if any. Mismatch between job stream instances in Symphony file and preproduction plan You notice that there are job stream instances in the Symphony file that are not in the preproduction plan. Cause and solution Job streams are automatically deleted from the preproduction plan when they are completed. However, it is possible to set the carryStates global option (using optman) so that job streams with jobs in the SUCC status are carried forward. In this case, such job streams are carried forward to the new Symphony file when the plan is extended, but are deleted from the preproduction plan if the job streams have been successfully completed. This is not an error. These job streams can remain in the current plan (Symphony file) and can also be run again. Chapter 10. Tivoli Workload Scheduler V8.3: Troubleshooting 507
- 544. To resolve the situation for a given plan, use conman or the Job Scheduling Console to delete the job stream instances from the plan. To prevent the problem from reoccurring, consider why the carryStates global option is set so that job streams with jobs in the SUCC status are carried forward. If it has been set in error, or is no longer required, change the settings of the option (using optman) so that this no longer happens. 508 Getting Started with IBM Tivoli Workload Scheduler V8.3
- 545. 11 Chapter 11. Making Tivoli Workload Scheduler highly available with Tivoli System Automation In this chapter1, we describe high-availability scenarios for Tivoli Workload Scheduler, and how to implement high availability for the Tivoli Workload Scheduler master domain manager. This chapter discusses the following topics: “Introduction to IBM Tivoli System Automation for Multiplatforms” on page 510 “High-availability scenarios” on page 510 “Implementing high availability for the Tivoli Workload Scheduler master domain manager” on page 514 “Installing and configuring DB2” on page 516 “Installing and configuring Tivoli System Automation” on page 527 “Configuring DB2 and Tivoli System Automation” on page 530 “Installing and automating Tivoli Workload Scheduler” on page 535 “Testing the installation” on page 545 1 The content of this chapter is based on a white paper that was written by Warren Gill and Creighton Hicks from IBM U.S. © Copyright IBM Corp. 2006. All rights reserved. 509
- 546. 11.1 Introduction to IBM Tivoli System Automation for Multiplatforms Tivoli Workload Scheduler uses an architecture that is tolerant to network and systems failures among systems within the Tivoli Workload Scheduler network. By employing IBM Tivoli System Automation for Multiplatforms (we refer to it as Tivoli System Automation) to further improve availability of the underlying infrastructure and automate failover procedures, we can produce a complete system that approaches extremely high levels of availability for the online batch workload production. Tivoli System Automation is a high-availability product, which strives to provide the continuous operation of a system over time. It uses a policy-based automation approach to make the definition of resources, and relationships of resources to each other, as easy as possible. This chapter explains some of the more complicated concepts when dealing with Tivoli System Automation. These complexities are not engendered by Tivoli System Automation, but instead by the complexities that are inherit in any distributed computational environment. In any high-availability solution, consider and address the concepts that are presented in this chapter. 11.2 High-availability scenarios We constructed five high-availability scenarios where Tivoli System Automation can provide automated failover, switchover, and redundancy to Tivoli Workload Scheduler domain managers, master domain managers, and agents. We describe all five scenarios in this section. The remaining sections describe how to implement scenario 2, switching domain managers, with the focus being on the master domain manager. Important: The scenarios implemented in this chapter are based on Tivoli Workload Scheduler V8.3. They are not applicable to earlier versions of Tivoli Workload Scheduler, because they rely on capabilities of DB2 and WebSphere. 11.2.1 Scenario 1: Passive-active failover Scenario 1 is the simplest configuration (see Figure 11-1 on page 511). In this scenario, there is a single Tivoli System Automation cluster with one or more active master nodes and some amount of standby nodes. All nodes in the cluster can reach the same shared disk, or have a partition that is continuously 510 Getting Started with IBM Tivoli Workload Scheduler V8.3
- 547. replicated between them (for example, using Distributed Replicated Block Devices, or network Redundant Array of Independent Disks (RAID), on Linux). This shared storage is where Tivoli Workload Scheduler is installed. Each active node mounts the appropriate Tivoli Workload Scheduler installation, brings online a service Internet Protocol (IP), and starts the Tivoli Workload Scheduler daemons. The standby nodes have no resources online. When an active node fails, Tivoli Workload Scheduler automatically fails over to a standby node. In the case where no standby nodes are available, each node can have an active Tivoli Workload Scheduler instance, and in failure, that instance moves over to another active node, making that node have two or more active Tivoli Workload Scheduler instances residing on it. Figure 11-1 shows scenario 1. nodeA nodeB shared disc tws-mdm appserv db2 service IP Figure 11-1 Scenario 1 Chapter 11. Making Tivoli Workload Scheduler highly available with Tivoli System Automation 511
- 548. Pros From outside the cluster, a failover has no impact. Everything continues running with almost no impact on service. Cons The standby nodes are completely idle (from a Tivoli Workload Scheduler viewpoint) when all active nodes are operational. This scenario was tested on systems running Red Hat Enterprise Linux AS 4.0, and is applicable to most versions of Linux and AIX with only a few minor modifications. 11.2.2 Scenario 2: Switching domain managers In this scenario, which is shown in Figure 11-2 on page 513, there are no standby nodes. Instead, certain set of active Tivoli Workload Scheduler masters can be switched over to certain set of backup masters. The mirroring of the object databases is handled by the standard high availability disaster recovery (HADR) function provided in DB2 Universal Database V8.2 Enterprise Server Edition (ESE), which is included with Tivoli Workload Scheduler 8.3, and the switching of management functions is automated. 512 Getting Started with IBM Tivoli Workload Scheduler V8.3
- 549. Figure 11-2 shows scenario 2. nodeA nodeB tws-mdm tws-bdm appserv appserv service IP db2 db2 Figure 11-2 Scenario 2 Pros There are no idle standby nodes. Cons The switching function of Tivoli Workload Scheduler interrupts the job scheduling network to change the domain topology. 11.2.3 Scenario 3: Fault-tolerant agent This is a simple scenario where the Tivoli Workload Scheduler application running on a fault-tolerant agent (FTA) role is modeled as a Tivoli System Automation resource. However, to do this, there are several other issues such as shared disk, replication of job state, or both. Basically this is role one as stated Chapter 11. Making Tivoli Workload Scheduler highly available with Tivoli System Automation 513
- 550. previously, but instead of starting Tivoli Workload Scheduler as a master, it is started with a role of FTA. 11.2.4 Scenario 4: Tivoli System Automation end-to-end managing multiple Tivoli Workload Scheduler clusters Because it is possible to have several Tivoli System Automation clusters in Tivoli Workload Scheduler, it makes sense to use the end-to-end component of Tivoli System Automation to monitor and manage relationships between them. For instance, there can be one cluster for the Tivoli Workload Scheduler master, another for Tivoli Workload Scheduler domain masters, another for FTAs, and then a sysplex where Tivoli Workload Scheduler z/OS is running. Inter-cluster relations can be managed and enforced from the end-to-end component. 11.2.5 Scenario 5: Tivoli Workload Scheduler Managing Tivoli System Automation end-to-end Tivoli System Automation end-to-end can have several policies in the policy pool. These end-to-end policies can be used to start, stop, and maintain complex applications and services that span multiple platforms, locations, and clusters. Tivoli Workload Scheduler can have an agent to tell Tivoli System Automation end-to-end which policy to start or stop. Then Tivoli Workload Scheduler can send jobs to that newly started environment, if necessary. 11.3 Implementing high availability for the Tivoli Workload Scheduler master domain manager Though on its own Tivoli Workload Scheduler is fairly robust in its tolerance to network and subsystem failures, there are times when extended outages require the migration of master domain manager functions to a different server. The built-in switch manager function of Tivoli Workload Scheduler can serve to promote a properly configured Tivoli Workload Scheduler FTA to act as the domain manager. This function is usually run manually by an operator at the command line or Job Scheduling Console. Using Tivoli System Automation, we can automate the switch manager function, and provide a mechanism for making sure that the proper environment is in place for the resulting switch to be successful. By relocating the object repository and application server to the new system before performing the switch manager, we can ensure the proper sequencing of events and promote higher reliability. 514 Getting Started with IBM Tivoli Workload Scheduler V8.3
- 551. 11.3.1 Prerequisites We prepared the switch manager scenario on the following clustered environment: Two systems, each running Red Hat Enterprise Linux, one each for the Tivoli Workload Scheduler master and standby masters IBM Tivoli Workload Scheduler 8.3 Fix Pack 1 (including DB2 8.2) IBM Tivoli System Automation for Multiplatforms 2.1 Fix Pack 3 Note: Fix Pack 3 effectively makes IBM Tivoli System Automation for Multiplatforms V2.1.1.1. Tivoli Workload Scheduler-System Automation integration scripts and configuration files (provided) Use the same products and methodologies with SUSE Enterprise Linux and AIX 5.2 or 5.3. For prerequisite software on AIX such as Reliable Scalable Cluster Technology (RSCT) and C Compiler for AIX (XL C), see IBM Tivoli System Automation for Multiplatforms Release Notes, SC33-8214. Both nodes must be able to communicate with each other using host names and fixed IP addresses. Keep both nodes in the /etc/hosts file of both systems. In this manner, Domain Name System (DNS) server failures outside the cluster do not affect the high availability of the cluster. For our discussion, we use the nodes node A and node B. The IP address of nodeA is 192.168.0.98 and the IP address of node B is 192.168.0.99. In our case, the /etc/hosts file looks similar to Example 11-1. Example 11-1 The /etc/hosts file 127.0.0.1 localhost.localdomain localhost 192.168.0.98 nodeA.austin.ibm.com nodeA 192.168.0.99 nodeB.austin.ibm.com nodeB Chapter 11. Making Tivoli Workload Scheduler highly available with Tivoli System Automation 515
- 552. 11.3.2 Overview of the installation Installing the components for a highly available Tivoli Workload Scheduler departs in many ways from the usual Tivoli Workload Scheduler installation. We configure the underlying infrastructure components (database and application server) differently than in a typical installation, and the scheduling engine uses these customized configurations. In this scenario, we have two nodes, node A and node B. In general, these are the steps to provide a highly available Workload Scheduler master domain manager with two nodes. We describe each step in detail in the following sections: 1. Install and configure DB2 Universal Database 8.2, with high-availability disaster recovery on both nodes. 2. Install and configure Tivoli System Automation 2.1, then update System Automation with the latest fix packs. 3. Configure DB2 and System Automation to automate DB2 failover. 4. Install and configure Tivoli Workload Scheduler 8.3, including Fix Pack 1 on both nodes. 5. Configure System Automation to work with Tivoli Workload Scheduler. 6. Test failovers and confirm a successful deployment. 11.4 Installing and configuring DB2 The first step is to install DB2 Universal Database on both nodes. We can use the graphical installation for DB2, and for the most part use default selections. Installation To install DB2 Universal Database on both nodes, perform the following steps: 1. As root, install DB2 (run db2setup) from the media provided with Tivoli Workload Scheduler 8.3. Perform this step on both node A and node B. 2. Select Install Products, as shown in Figure 11-3. 516 Getting Started with IBM Tivoli Workload Scheduler V8.3
- 553. Figure 11-3 DB2 setup 3. Select DB2 UDB Enterprise Server Edition, as shown in Figure 11-4. Figure 11-4 Installing DB2 4. Accept the license agreement. Chapter 11. Making Tivoli Workload Scheduler highly available with Tivoli System Automation 517
- 554. 5. Select Typical installation type, as shown in Figure 11-5. Figure 11-5 Selecting the installation type 6. Select Install DB2 on this computer as the installation action. 7. Select Install DB2 UDB Enterprise Server Edition, as shown in Figure 11-6. Figure 11-6 Selecting DB2 UDB Enterprise Server Edition 518 Getting Started with IBM Tivoli Workload Scheduler V8.3
- 555. 8. For user information, use the same DB2 Administration Server (new user) (dasusr1, db2iadm1) with /opt/dasusr1 as the same home directories supplied, as shown in Figure 11-7. Remember the supplied passwords. Figure 11-7 Creating the DB2 Administration Server user 9. Select Create a DB2 instance, as shown in Figure 11-8. Figure 11-8 Creating a DB2 instance Chapter 11. Making Tivoli Workload Scheduler highly available with Tivoli System Automation 519
- 556. 10.Select Single-partition instance, as shown in Figure 11-9. Figure 11-9 Selecting the instance type 11.During the installation, create a single-partition DB2 instance with a new instance owner (db2inst1) instance group (db2iadm1), and home directory (/home/db2inst1), as shown in Figure 11-10. The Tivoli Workload Scheduler database resides in the home directory of the instance owner. Important: Use db2iadm1 instead of db2grp1 because this is what the Tivoli Workload Scheduler installer expects. Otherwise, if the installation fails on the database installation step, you can edit the DB2 response file and continue the installation. Figure 11-10 Instance owner, group, and home directory 520 Getting Started with IBM Tivoli Workload Scheduler V8.3
- 557. 12.Create the fenced user (db2fenc1) and fenced group (db2fadm1) during this process, with the home directory in /home/db2fenc1, as shown in Figure 11-11. Figure 11-11 Fenced user 13.Our installation does not require the DB2 tools catalog or an administration contact list, but you can optionally configure them according to your particular requirements, as shown in Figure 11-12. Figure 11-12 Local contact list Chapter 11. Making Tivoli Workload Scheduler highly available with Tivoli System Automation 521
- 558. Figure 11-13 shows the installation progress. Note: On SUSE Linux installations, we found that the DB2 ports 50000 (and 60000) were already declared in /etc/services but not used. If these documented services are not used on your system, comment these ports out of use in the /etc/services file. Figure 11-13 DB2 installation progress 522 Getting Started with IBM Tivoli Workload Scheduler V8.3
- 559. 14.Check the Status report tab on the final setup panel to ensure that your installation is complete and correct, as shown in Figure 11-14. Figure 11-14 Status report Configuration Now create the Tivoli Workload Scheduler databases and make them available. This is done only on node A (our primary node). These steps are normally done by the Tivoli Workload Scheduler installer program. However, in our case, we perform the function manually to configure and automate HADR properly, and ease the Tivoli Workload Scheduler installation points later. 1. Mount (or copy) the Tivoli Workload Scheduler Engine installation media for your platform (in our case Linux) to a local directory. 2. Copy the database setup scripts from twsinstdir/platform/tws_tools/*sql to a temporary directory. Here twsinstdir is the directory where the installation code resides, and platform is AIX or LINUX_I386 depending on your operating system, for example, /tmp/tws/LINUX_I386/tws_tools/*sql. Chapter 11. Making Tivoli Workload Scheduler highly available with Tivoli System Automation 523
- 560. 3. In these files, substitute the embedded variables with the values shown in Table 11-1, or values of your choosing. Table 11-1 Substitute embedded variables @TWS_DB@ TWS @TWS_USER@ db2inst1 @TWS_DATA_TS_PATH@ TWS_DATA @TWS_TS_NAME@ TWS_DATA @TWS_TEMP_TS_PATH@ TWS_TEMP @COMPANY_NAME@ IBM (enclose in double quotation marks if the company name contains spaces) @MASTERDOM_ID@ Unique (or random) 32 hexadecimal character ID @MASTERDOM_NAME@ MASTERDM 4. Run the script shown in Example 11-2. This script copies the database setup scripts and substitutes the variables for you. It takes two command arguments, the source directory (where the Tivoli Workload Scheduler engine code is mounted) and the destination (a temporary directory for the SQL files). Example 11-2 Example script for copying the database setup scripts and substituting the variables #!/bin/sh if [ $# != 2 ] then echo “Usage: mktwsdb source dest” echo “ source is the TWS Engine install cd” echo “ dest is the temporary directory to store SQL files” exit 1 fi SOURCE=$1 DEST=$2 OS=`uname -s`; export OS case $OS in AIX) INST_INTERP=“AIX”; export INST_INTERP ;; Linux) case `uname -m` in *390*) INST_INTERP=“LINUX_S390”; export INST_INTERP 524 Getting Started with IBM Tivoli Workload Scheduler V8.3
- 561. ;; *86*) INST_INTERP=“LINUX_I386”; export INST_INTERP ;; *) INST_INTERP=“OTHER”; export INST_INTERP ;; esac ;; *) INST_INTERP=“OTHER”; export INST_INTERP ;; esac if [ ! -d $SOURCE/$INST_INTERP ] ; then echo “Source directory $SOURCE/$INST_INTERP does not exist” exit 2 fi if [ ! -d $DEST ] ; then echo “Destination directory $DEST does not exist” exit 2 fi RANDOMID=`awk -v seed=$RANDOM ' BEGIN { srand(seed) for (n = 0; n < 32; ++n) printf “%s”, ARGV[int(rand() * (ARGC - 1)) + 1] print “” exit }' 0 1 2 3 4 5 6 7 8 9 a b c d e f` echo Random ID is $RANDOMID cd $DEST for f in $SOURCE/$INST_INTERP/tws_tools/*sql do cat $f | sed -e 's/@TWS_DB@/TWS/g' -e 's/@TWS_DATA_TS_PATH@/TWS_DATA/g' -e 's/@TWS_TS_NAME@/TWS_DATA/g' -e 's/@TWS_TEMP_TS_PATH@/TWS_TEMP/g' -e 's/@COMPANY_NAME@/IBM/g' -e 's/@TWS_USER@/db2inst1/g' -e 's/@MASTERDOM_ID@/'${RANDOMID}'/' -e 's/@MASTERDOM_NAME@/MASTERDM/' > `basename $f` done echo Done! Chapter 11. Making Tivoli Workload Scheduler highly available with Tivoli System Automation 525
- 562. 5. Create the necessary nodes, databases, tables, and views for the Tivoli Workload Scheduler HADR implementation. As DB2 user run: su - db2inst1 6. Start DB2, as shown in Example 11-3. Example 11-3 Starting DB2 [db2inst1@nodeA]: db2start SQL1063N DB2START processing was successful. 7. Create the database: db2 -t -f /var/tmp/tws/create_database.sql 8. For the following steps, connect to the database and perform additional commands, as shown in Example 11-4. Example 11-4 Connecting to the database [db2inst1@nodeA]:db2 connect to TWS user db2inst1 using passw0rd Database Connection Information Database server = DB2/LINUX 8.2.2 SQL authorization ID = DB2INST1 Local database alias = TWS 9. Create the tables in the Tivoli Workload Scheduler database, then Tivoli Workload Scheduler constraints, table data, indices, and views, as shown in Example 11-5. Example 11-5 Creating Tivoli Workload Scheduler tables db2 -t -f /var/tmp/tws/create_tables.sql db2 -t -f /var/tmp/tws/create_constraints.sql db2 -t -f /var/tmp/tws/create_indexes.sql db2 -t -f /var/tmp/tws/create_views.sql db2 -t -f /var/tmp/tws/populate_tables.sql db2 update db cfg for TWS using LOGRETAIN ON 526 Getting Started with IBM Tivoli Workload Scheduler V8.3
- 563. 10.Change the database configuration from circular logging to archive logging for mirror. After the update command, you might receive a message similar to Example 11-6. You can safely ignore it. Example 11-6 Updating database configuration [db2inst1@nodeA]: db2 update db cfg for TWS using LOGRETAIN ON DB20000I The UPDATE DATABASE CONFIGURATION command completed successfully. SQL1363W One or more of the parameters submitted for immediate modification were not changed dynamically. For these configuration parameters, all applications must disconnect from this database before the changes become effective. 11.Disconnect from the database: db2 disconnect TWS 11.5 Installing and configuring Tivoli System Automation In this section, we describe the setup of Tivoli System Automation on our Tivoli Workload Scheduler master and standby masters. In this scenario, we have two nodes, node A and node B. Installation To install Tivoli System Automation on the Tivoli Workload Scheduler master and standby masters, perform the following steps: 1. Install Tivoli System Automation 2.1 and the recent fix packs on each of the nodes A and B: a. On node A, run the commands shown in Example 11-7. Example 11-7 Installing Tivoli System Automation on node A [root@nodeA]# cd /media/cdrom/SAM2100Base [root@nodeA]# ./installSAM b. On node B, run the commands shown in Example 11-8. Example 11-8 Installing Tivoli System Automation on node B [root@nodeB] cd /media/cdrom/SAM2110Base [root@nodeB] ./installSAM Chapter 11. Making Tivoli Workload Scheduler highly available with Tivoli System Automation 527
- 564. 2. After installation, ensure that the variable CT_MANAGMENT_SCOPE is always set to 2 in the shell. Consider inserting this into the system-wide shell profile. 3. Install the fix packs in a similar manner. a. On node A, run the commands shown in Example 11-9. Example 11-9 Upgrading Tivoli System Automation on node A [root@nodeA] CT_MANAGEMENT_SCOPE=2 [root@nodeA] export CT_MANAGEMENT_SCOPE [root@nodeA] cd /usr/local/src/SAM2111Base [root@nodeA] ./installSAM b. On node B, run the commands shown in Example 11-10. Example 11-10 Upgrading Tivoli System Automation on node B [root@nodeB] CT_MANAGEMENT_SCOPE=2 [root@nodeB] export CT_MANAGEMENT_SCOPE [root@nodeB] cd /usr/local/src/SAM2111Base [root@nodeB] ./installSAM 4. Install the latest Tivoli System Automation policies, as shown in Example 11-11. You can download them from the following Web site: ftp://ftp.software.ibm.com/software/tivoli/products/sys-auto-linux/ Example 11-11 Installing Tivoli System Automation policies [root@nodeA] rpm -ivh sam.policies-1.2.2.1-06212.i386.rpm [root@nodeB] rpm -ivh sam.policies-1.2.2.1-06212.i386.rpm Configuration To configure Tivoli System Automation, perform the following steps: 1. Prepare both the nodes and create the cluster. a. On node A, run the following command: [root@nodeA] preprpnode nodeA nodeB b. On node B, run the commands shown in Example 11-12. Example 11-12 Preparing the Tivoli System Automation domain [root@nodeB] preprpnode nodeA nodeB [root@nodeB] mkrpdomain twsDomain nodeA nodeB [root@nodeB] startrpdomain twsDomain 528 Getting Started with IBM Tivoli Workload Scheduler V8.3
- 565. 2. Wait for the domain to come online. You can view the status of the domain using the lsrpdomain command, as shown in Example 11-13. Example 11-13 Viewing Tivoli System Automation domain status [root@nodeA]~ # lsrpdomain Name OpState RSCTActiveVersion MixedVersions TSPort GSPort twsDomain Online 2.4.4.4 No 12347 12348 3. Define a tie breaker. Tie breakers are necessary on clusters where there is an even number of nodes. This is to ensure that the cluster remains operational even when there is a total communication failure or node failure. The different types of tie breakers and how to configure them are explained in IBM Tivoli System Automation for Multiplatforms Base Component User's Guide, SC33-8210. For more information, see Chapter 10, “Protecting your resources - quorum support” of this guide. Use a network tie breaker that points to the gateway used by both cluster nodes, as shown in Example 11-14. Note that the keywords are case-sensitive. Example 11-14 Creating the network tie breaker [root@nodeA]# mkrsrc IBM.TieBreaker Type=“EXEC” Name=“netTieBrk” DeviceInfo='PATHNAME=/usr/sbin/rsct/bin/samtb_net Address=192.168.0.254 Log=1' PostReserveWaitTime=30 4. Activate the tie breaker with the following command: [root@nodeA]# chrsrc -c IBM.PeerNode OpQuorumTieBreaker=“netTieBrk” 5. Define a netmon.cf file on each node. Create a file named netmon.cf in the /usr/sbin/cluster directory. In this file, place the IP address of each network interface's gateway, one address per line, as shown in Example 11-15. Example 11-15 The netmon.cf file 192.168.0.254 6. Define an equivalency of network interfaces. The membership of this equivalency is used to determine the interfaces to which the service IP can be aliased. In this example, we assume that both nodes only have one interface each (eth0). Run the following command on each node: [root@nodex] mkequ -D “Name like 'eth0'” net-equ IBM.NetworkInterface Chapter 11. Making Tivoli Workload Scheduler highly available with Tivoli System Automation 529
- 566. 11.6 Configuring DB2 and Tivoli System Automation Now we set up the Tivoli Workload Scheduler database so that it is available to the standby node and managed by HADR. We can make the Tivoli Workload Scheduler database available to the standby node by creating a backup image on the primary node and restoring it to the standby node. 1. As the DB2 instance owner (su - db2inst1), perform the backup command: [db2inst1@nodeA] db2 backup database TWS 2. The backup image is placed in the instance owner's home directory. Transfer the image to the other node (for example, using scp). [db2inst1@nodeA] scp backup_image db2inst1@nodeB 3. On the other node, restore the database: [db2inst1@nodeB] db2 restore database TWS replace history file Now we can configure the hot standby. Configuring the HADR database Allow Transmission Control Protocol/Internet Protocol (TCP/IP) communication to both primary and standby instances. 1. As the DB2 instance owner (su - db2inst1), perform the commands shown in Example 11-16 on both nodes. Example 11-16 Running the db2set command % db2set DB2COMM=tcpip % db2 update dbm cfg using SVCENAME DB2_db2inst1 2. The /etc/services file on both nodes must contain an entry for the failover instance on the other node, and an HADR service to ship the log buffers to the other node. As root, on both nodes, edit the /etc/services file to contain the values shown in Example 11-17. Example 11-17 Editing the /etc/services file DB2_db2inst160000/tcp hadrinstp18819/tcp hadrinsts18820/tcp 530 Getting Started with IBM Tivoli Workload Scheduler V8.3
- 567. 3. On the primary database server (node A), as the DB2 instance owner (db2inst1), enable HADR using the commands shown in Example 11-18. You can optionally set them from the DB2 Control Center utility, db2cc. Example 11-18 Enabling HADR on the primary database % db2 update db cfg for TWS using HADR_LOCAL_HOST nodeA % db2 update db cfg for TWS using HADR_REMOTE_HOST nodeB % db2 update db cfg for TWS using HADR_LOCAL_SVC 18819 % db2 update db cfg for TWS using HADR_REMOTE_SVC 18820 % db2 update db cfg for TWS using HADR_REMOTE_INST db2inst1 4. On the standby database server (node B), as the DB2 instance owner (db2inst1), enable HADR using the commands, as shown in Example 11-19. Example 11-19 Enabling HADR on the standby database % db2 update db cfg for TWS using HADR_LOCAL_HOST nodeB % db2 update db cfg for TWS using HADR_REMOTE_HOST nodeA % db2 update db cfg for TWS using HADR_LOCAL_SVC 18820 % db2 update db cfg for TWS using HADR_REMOTE_SVC 18819 % db2 update db cfg for TWS using HADR_REMOTE_INST db2inst1 5. Set the synchronization mode in which the HADR pair runs. There are three modes from which to choose: synchronous, asynchronous, and near-synchronous. Near-synchronous mode provides more protection than asynchronous mode, but without the slow transaction times of synchronous modes. For Tivoli Workload Scheduler configurations, we choose near-synchronous mode. 6. Set the communication timeout (the number of seconds that HADR waits before it considers a communication attempt to have failed) to 30 seconds, and check the configurations. On both nodes, as the DB2 instance owner (db2inst1), run the commands shown in Example 11-20. Example 11-20 Running commands on both nodes % db2 update db cfg for TWS using HADR_SYNCMODE nearsync % db2 update db cfg for TWS using HADR_TIMEOUT 30 % db2 get db cfg for TWS Chapter 11. Making Tivoli Workload Scheduler highly available with Tivoli System Automation 531
- 568. 7. Specify the alternate server addresses for the database (on both primary and secondary nodes), as shown in Example 11-21. Example 11-21 Specifying the alternate server addresses [db2inst1@nodeA]% db2 update alternate server for database TWS using hostname nodeB port 60000 [db2inst1@nodeB]% db2 update alternate server for database TWS using hostname nodeA port 60000 8. Now start the HADR services, as shown in Example 11-22. If you see a message such as: Logindex build was not enabled before HADR was started, you can safely ignore it. An important thing to keep in mind is to always start HADR on the standby database before starting HADR on the primary database. Example 11-22 Starting HADR [db2inst1@nodeB]% db2 start hadr on db TWS as standby [db2inst1@nodeA]% db2 start hadr on db TWS as primary 9. Check that the HADR pair is in peer state with the following command (run on both nodes): % db2 get snapshot for db on TWS Example 11-23 shows the database snapshot output. Example 11-23 Database snapshot output HADR Status Role = Primary State = Peer Synchronization mode = Nearsync Connection status = Connected, 09/01/2006 11:34:02.357398 Heartbeats missed = 0 Local host = nodeA Local service = 18820 Remote host = nodeB Remote service = 18819 Remote instance = db2inst1 timeout(seconds) = 120 Primary log position(file, page, LSN) = S0000002.LOG, 698, 0000000001A2A4E1 Standby log position(file, page, LSN) = S0000002.LOG, 698, 0000000001A2A4E1 Log gap running average(bytes) = 0 532 Getting Started with IBM Tivoli Workload Scheduler V8.3
- 569. Registering HADR with Tivoli System Automation In this step, we configure Tivoli System Automation to automatically monitor and manage the DB2 failover. After this is in place, do not manually issue DB2 takeover commands. Instead, use the appropriate Tivoli System Automation command to perform this function. 1. On both nodes, first the standby node, then the primary node, register the DB2 instances with Tivoli System Automation using the command shown in Example 11-24. The command is found in the /opt/IBM/db2/V8.1/ha/salinux directory. Example 11-24 Running the database registration script [root@nodeB]# ./regdb2salin -a db2inst1 -r -s [root@nodeA]# ./regdb2salin -a db2inst1 -r -s 2. Verify that the resource groups are registered and online by issuing the following command: # /usr/sbin/rsct/sapolicies/bin/getstatus You see an output similar to Example 11-25. Example 11-25 The getstatus output -- Resource Groups and Resources -- Group Name Resources ---------- --------- db2_db2inst1_nodeA_0-rg db2_db2inst1_nodeA_0-rs db2_db2inst1_nodeB_0-rg db2_db2inst1_nodeB_0-rs -- Resources -- Resource Name Node Name State ------------- --------- ----- db2_db2inst1_nodeA_0-rs nodeA Online - - - db2_db2inst1_nodeB_0-rs nodeB Online - - - Chapter 11. Making Tivoli Workload Scheduler highly available with Tivoli System Automation 533
- 570. 3. On the primary node (node A), create a Tivoli System Automation resource group for the HADR pair, and check its status with the commands, as shown in Example 11-26. (192.168.0.100 is the service IP address to which you connect the Tivoli Workload Scheduler application server.) Example 11-26 Running the /reghadrsalin command # ./reghadrsalin -a db2inst1 -b db2inst1 -d TWS -i 192.168.0.100 # /usr/sbin/rsct/sapolicies/bin/getstatus You see an output similar to Example 11-27. Example 11-27 The getstatus output -- Resource Groups and Resources -- Group Name Resources ---------- --------- db2_db2inst1_nodeA_0-rg db2_db2inst1_nodeA_0-rs - - db2_db2inst1_nodeB_0-rg db2_db2inst1_nodeB_0-rs - - db2hadr_TWS-rg db2hadr_TWS-rs db2hadr_TWS-rg db2hadr_TWS-rs_ip - - -- Resources -- Resource Name Node Name State ------------- --------- ----- db2_db2inst1_nodeA_0-rs nodeA Online - - - db2_db2inst1_nodeB_0-rs nodeB Online - - - db2hadr_TWS-rs nodeA Online db2hadr_TWS-rs nodeB Offline - - - db2hadr_TWS-rs_ip nodeA Online db2hadr_TWS-rs_ip nodeB Offline - - - 4. Create service dependency relationships between the HADR database and the IP interfaces of the nodes. Before you configure these relationships, stop HADR (as root on both nodes): # chrg -o offline db2hadr_TWS-rg 5. You can repeat the getstatus command until the HADR resources change to Offline. 534 Getting Started with IBM Tivoli Workload Scheduler V8.3
- 571. 6. Create the Automation relationships between the HADR application, the Service IP address, and the network equivalency (as root on both nodes), as shown in Example 11-28. This ensures that the resources start and stop in the correct order. Example 11-28 Making dependency relationships # mkrel -p dependson -S IBM.ServiceIP:db2hadr_TWS-rs_ip -G IBM.Equivalency:net-equ ip_do_equ # mkrel -p dependson -S IBM.Application:db2hadr_TWS-rs -G IBM.ServiceIP:db2hadr_TWS-rs_ip app_do_ip # lsrel Displaying Managed Relations : Name Class:Resource:Node[Source] ResourceGroup[Source] ip_do_equ IBM.ServiceIP:db2hadr_TWS-rs_ip db2hadr_TWS-rg app_do_ip IBM.Application:db2hadr_TWS-rs db2hadr_TWS-rg 7. Turn the HADR application back on with the following command: # chrg -o online db2hadr_TWS-rg 8. Check the status of the resources with the getstatus command. Now you have to tell DB2 that the Tivoli Workload Scheduler database lives on the service IP (as db2inst1 on node A), as shown in Example 11-29. Example 11-29 Cataloging the database nodes $ db2 CATALOG TCPIP NODE LBNODE REMOTE 192.168.0.100 SERVER 50000 $ db2 CATALOG DB TWS AS TWS_DB AT NODE LBNODE 11.7 Installing and automating Tivoli Workload Scheduler We now install Tivoli Workload Scheduler 8.3 on both nodes node A and node B. Start by creating a UNIX user and group, each having the same name and ID on both nodes. The home directory for the user (where the Tivoli Workload Scheduler code resides) must be in the same path on both systems. For our demonstration, we created the user twsuser and the group twsuser (see Example 11-30). Example 11-30 Preparing for Tivoli Workload Scheduler installation # groupadd tws # useradd -g tws -d /opt/IBM/tws83 twsuser # passwd twsuser Chapter 11. Making Tivoli Workload Scheduler highly available with Tivoli System Automation 535
- 572. Note: In AIX environment, you usually have to set a temporary password, log in (do not su from root) as the user, and change the password on the first login attempt. You must be able to log in successfully as the twsuser before installing Tivoli Workload Scheduler. 11.7.1 Installing Tivoli Workload Scheduler on the available environment Because we have already configured the Tivoli Workload Scheduler databases and tables, we install a backup master on both node A and node B. We install the code on the primary node, then switch the HADR database primary to the standby node, and install the Tivoli Workload Scheduler code there. 1. To begin the rest of the Tivoli Workload Scheduler installation, mount the installation media and run the setup, as shown in Example 11-31. Example 11-31 Mounting Tivoli Workload Scheduler source # mount /cdrom # cd /cdrom/LINUX_I386 # SETUP.bin 2. This starts the installation wizard. Select the language for the installer. 3. Read the welcome message. Click Next. 4. Accept the license agreement. Click Next. 5. Select Install an Instance of Tivoli Workload Scheduler. Click Next. 536 Getting Started with IBM Tivoli Workload Scheduler V8.3
- 573. 6. Select the Backup Master Domain Manager installation, as shown in Figure 11-15. Click Next. Figure 11-15 Setup installer 7. Specify the user account and password. Click Next. 8. Specify the Company, Workstation Name, and TCP/IP Port Number (for node A specify nodeB as the master, and for node B specify nodeA as the master), as shown in Figure 11-16. The default values are satisfactory. Click Next. Figure 11-16 Configuring the agent Chapter 11. Making Tivoli Workload Scheduler highly available with Tivoli System Automation 537
- 574. 9. Specify the port information for the application server (the default values are satisfactory). Click Next. 10.Select Check that an existing instance of DB2 UDB satisfies the IBM Tivoli Workload Scheduler requirements, as shown in Figure 11-17. Click Next. Figure 11-17 Checking the database 11.Enter /home/db2inst1 as the home directory of the DB2 instance user. Click Next. 538 Getting Started with IBM Tivoli Workload Scheduler V8.3
- 575. 12.Specify the default databases previously defined, as shown in Figure 11-18. Click Next. Figure 11-18 Defining database tables 13.When the installation is complete on the primary node, switch the Tivoli Workload Scheduler HADR database to the standby node and run the installer there performing the same steps described previously. Switch the database using the following command: # rgreq -o move db2hadr_TWS-rg Now we configure the WebSphere application server code that installs with Tivoli Workload Scheduler to use the HADR database. 11.7.2 Preparing Tivoli Workload Scheduler for failover Prepare Tivoli Workload Scheduler for failover. These changes to the Tivoli Workload Scheduler database and application server are necessary to make the failover changes transparent to the user. Set the configuration of the embedded WebSphere Application Server to use Java Database Connectivity (JDBC™) Type 2 communication. In a type 2 configuration, the database authentication scheme is more robust. Chapter 11. Making Tivoli Workload Scheduler highly available with Tivoli System Automation 539
- 576. 1. As the root user, on both nodes, change to the wastools directory in the twsuser's home, and put the database configuration in a properties file with the commands shown in Example 11-32. Example 11-32 Changing application server configuration # cd ~twsuser/wastools # ./stopWas.sh -user twsuser -password passw0rd # showDataSourceProperties.sh > my.properties 2. Edit the properties file and change the JDBC driver from Type 4 to Type 2. Change the two lines shown in Example 11-33 to those shown in Example 11-34. Example 11-33 Before changing data sources DB2Type2JndiName=jdbc/twsdb2 DB2Type4JndiName=jdbc/twsdb Example 11-34 shows the lines after changing the data sources. Example 11-34 After changing data sources DB2Type2JndiName=jdbc/twsdb DB2Type4JndiName=jdbc/twsdb4 3. Remove the first line, which contains a message similar to Example 11-35. Example 11-35 Removing the first line WASX7357I: By request, this scripting client is not connected to any server process. Certain configuration and application operations will be available in local mode. 4. To make the changes effective, run the reconfiguration script in the ~twsuser/wastools directory: # ./changeDataSourceProperties.sh my.properties 5. Start the application server to activate the changes. # startWas.sh For long-term failovers, when the standby master has to create a new plan, we can create a workstation in the Tivoli Workload Scheduler database that handles the plan generation job streams before and after a failover event. The final job stream belongs to this new workstation. 540 Getting Started with IBM Tivoli Workload Scheduler V8.3
- 577. 6. As the twsuser, run the commands shown in Example 11-36 on the machine that has the database primary. This creates the new workstation and also tests the new WebSphere configuration. Example 11-36 Creating a new workstation in composer $ ~twsuser/bin/composer Installed for user “twsuser”. Locale LANG set to the following: “en” User: twsuser, Host:127.0.0.1, Port:31116 -new 7. This opens an editor session for you to create a new workstation or job stream definition. Create the master domain and workstations for the primary and backup masters, and a workstation that looks like Example 11-37 (note that the NODE and TCPADDR settings are not relevant). Example 11-37 Workstation definitions CPUNAME NODEA DESCRIPTION “Workload Scheduler Primary Master” OS UNIX NODE nodeA.austin.ibm.com TCPADDR 31111 DOMAIN MASTERDM FOR MAESTRO TYPE MANAGER AUTOLINK ON BEHINDFIREWALL OFF FULLSTATUS ON END CPUNAME NODEB DESCRIPTION “Workload Scheduler Standby Master” OS UNIX NODE nodeB.austin.ibm.com TCPADDR 31111 DOMAIN MASTERDM FOR MAESTRO TYPE FTA AUTOLINK ON BEHINDFIREWALL OFF FULLSTATUS ON END Chapter 11. Making Tivoli Workload Scheduler highly available with Tivoli System Automation 541
- 578. CPUNAME TWS-MDM DESCRIPTION “Workload Scheduler Virtual Master” OS OTHER NODE tws-mdm TCPADDR 31111 FOR MAESTRO HOST $MASTER ACCESS “unixlocl” TYPE X-AGENT AUTOLINK OFF BEHINDFIREWALL OFF FULLSTATUS OFF END DOMAIN MASTERDM MANAGER NODEA ISMASTER END Note: The TWS-MDM workstation is used only to process the preproduction planning cycle. The primary (or standby) domain manager workstation is the one that handles any dependency resolution, messaging, and so on. 8. Create the FINAL job stream to point to the new workstation. To do this, edit the text file name Sfinal that resides in the twsuser's home directory. Change the beginning of the file by inserting TWS-MDM# to qualify the job and job streams to the new workstation, as shown in Example 11-38. (The remainder of the file is unchanged.) Example 11-38 Changed lines in Sfinal SCHEDULE TWS-MDM#FINAL ON EVERYDAY AT 0559 CARRYFORWARD FOLLOWS TWS-MDM#FINAL.@ PREVIOUS 9. Add the job stream and job definitions to the database with the following command: $ composer add Sfinal 10.Create a new production plan and start the Tivoli Workload Scheduler network by running the JnextPlan script. $ ./JnextPlan 542 Getting Started with IBM Tivoli Workload Scheduler V8.3
- 579. 11.7.3 Configuring Tivoli System Automation policies for Tivoli Workload Scheduler To configure Tivoli System Automation to manage Tivoli Workload Scheduler, edit the provided configuration file and run the policy installation script to create the Tivoli System Automation configurations. Place the configurations and start, stop, and monitor scripts for Tivoli Workload Scheduler in /usr/rsct/sapolicies/tws. 1. Edit the sa-tws.conf file to match your configuration, as shown in Example 11-39. Example 11-39 The sa-tws.conf parameters # --directory for control scripts script_dir=“/usr/sbin/rsct/sapolicies/tws” # --prefix of all TWS resources prefix=“sa-tws-” # --list of nodes in the TWS cluster nodes=“nodeA nodeB” # --name of the tws user tws_user=“twsuser” # --name of the HADR instance (if any) # if there's no HADR instance, comment the following line hadr_resource=“db2hadr_TWS-rs” # --definition of the bobcat instance appserv_user=“twsuser” appserv_password=“passw0rd” 2. Run the make command to take your configuration and create Tivoli System Automation policies to manage them, as shown in Example 11-40. Example 11-40 Configuration script # cd /usr/sbin/rsct/sapolicies/tws # ./cfgtws 3. If the configuration step is successful, there will be several new def files and a new script called sa-tws-make in the /usr/sbin/rsct/sapolicies/tws directory. The definitions files contain the definition parameters for Tivoli System Automation resources that are created by the make script. You can review the definition files and make changes (such as timeout parameters) before implementing the resources. To create the Tivoli System Automation Chapter 11. Making Tivoli Workload Scheduler highly available with Tivoli System Automation 543
- 580. resources for the Tivoli Workload Scheduler engine, application server, and master domain manager, first stop the HADR resource group, wait for it to go offline, then run the make script, as shown in Example 11-41. Example 11-41 Make configuration for Tivoli Workload Scheduler # chrg -o offline db2hadr_TWS-rg # ./sa-tws-make 4. Check that your settings are in place using the getstatus command: # getstatus Note: After you have the Tivoli Workload Scheduler automation package in place, you must no longer use the Job Scheduling Console or the conman command to start, stop, or switch managers in the master domain. Instead, to stop the master on node A, use the following command: # chrg -o offline sa-tws-nodeA-rg To start the master, use the following command: # chrg -o online sa-tws-nodeA-rg 5. Set the Tivoli Workload Scheduler resources online by entering the following Tivoli System Automation command: # chrg -o online -s “Name like 'sa-tws-node%'” 6. Set the master domain manager resource online with the following command: # chrg -o online sa-tws-mdm-rg 7. When you run the getstatus command, you notice that only one of the resources in the sa-tws-mdm-rg resource group is online (the other is offline), as shown in Example 11-42. This corresponds to the node that is currently the Tivoli Workload Scheduler master domain manager. Example 11-42 Output of getstatus -tree Online IBM.ResourceGroup:sa-tws-mdm-rg Nominal=Online '- Online IBM.Application:sa-tws-mdm |- Online IBM.Application:sa-tws-mdm:nodeA '- Offline IBM.Application:sa-tws-mdm:nodeB 544 Getting Started with IBM Tivoli Workload Scheduler V8.3
- 581. 11.8 Testing the installation To test a failover manually, you can move the Tivoli System Automation resources for the master domain manager to the other node with the commands shown in Example 11-43. Example 11-43 Manually moving the master # rgreq -o move db2hadr_TWS-rg # rgreq -o move sa-tws-mdm-rg Use the getstatus command to see the outcome, and finally view the output of the Tivoli Workload Scheduler conman showcpus command to determine which machine is the master domain manager. Chapter 11. Making Tivoli Workload Scheduler highly available with Tivoli System Automation 545
- 582. 546 Getting Started with IBM Tivoli Workload Scheduler V8.3
- 583. A Appendix A. Tivoli Workload Scheduler Job Notification Solution This chapter provides information about the Tivoli Workload Scheduler Job Notification Solution, which you can use to generate events to provide notification about several Tivoli Workload Scheduler job conditions. These conditions include job abend, job deadline has passed, and so on. Note that this solution is provided on an as-is basis. This appendix covers the following topics: “Solution design” on page 548 “Solution configuration” on page 556 “Solution monitoring” on page 571 “Solution regression testing” on page 572 “Solution troubleshooting” on page 576 “Tivoli Workload Scheduler infrastructure considerations” on page 576 “Tivoli Workload Scheduler production control considerations” on page 579 “Frequently asked questions” on page 580 “CSV configuration” on page 583 “Solution procedures” on page 585 “Verifying notification completion” on page 586 © Copyright IBM Corp. 2006. All rights reserved. 547
- 584. Solution design This section provides an overview of the Tivoli Workload Scheduler Job Notification Solution. Requirements The Tivoli Workload Scheduler Job Notification Solution is designed and implemented to address the following requirements: Provide notification of the following Tivoli Workload Scheduler job conditions: – Job ABEND: Job ends with a bad return code – Job Deadline: Job has not completed within a specific time – Job Start Deadline: Job has not started at a specific time – Job Running Long: Job has run longer than a specified duration Provide notification using UNIX commands and scripts Event flow The event flow begins with the Tivoli Workload Scheduler application logging events into an event.log file, which is used by this solution (and any Tivoli Enterprise Console log file adapter solution) as a single source for all Tivoli Workload Scheduler generated event status (see item 1 in Table A-1). The tws_event_mon.pl script (see item 5 in Table A-1) uses the UNIX tail -f command to watch the event.log file for new events and processes each event as it is logged by Tivoli Workload Scheduler. Event processing is based on the contents of the tws_event_mon.csv configuration file (see item 3 in Table A-1), which provides the information necessary to identify specific events and the UNIX command string to run when the event is received. Job Running Long (JRL) notification is not a feature of Tivoli Workload Scheduler, therefore, a custom solution has been developed to address it. The JRL event flow process (Figure A-1 on page 550) begins with the receipt of a TWS_Job_Launch-103 event in event.log. If the tws_event_mon.csv file contains a TWS_Job_Running_Long-JRL configuration for the launching job, the tws_event_mon.pl script creates a JRL file using the naming convention listed in Table A-1. 548 Getting Started with IBM Tivoli Workload Scheduler V8.3
- 585. Table A-1 Naming convention used by the tws_event_mon.pl script 1 JRL= # Static text 2 <YYYYmmddHHMM> #Date and time stamp when the job is running long 3 - # Static text 4 <workstation> # Tivoli Workload Scheduler workstation that the job is running on 5 # # Static text 6 <schedule> # Tivoli Workload Scheduler schedule that the job is running on 7 . # Static text 8 <schedule_id> #Tivoli Workload Scheduler schedule's instance identifier 9 . # Static text 10 <job> #Tivoli Workload Scheduler job name 11 - # Static text 12 <PID> # UNIX process ID (pid) for the job Example A-1 shows a sample JRL file. Example: A-1 JRL file JRL=200605300712-M83#TWSMD_JNS2.0AAAAAAAAAAAAAY4.TWSM1_JRL-37302 Note: There is also a special JRL file that is used by the tws_jrl_mon.pl script to determine when files come due, as shown in Example A-2. Example: A-2 JRL file that is used by the tws_jrl_mon.pl script JRL=200605300711=current_timestamp=tws_jrl_mon Tip: The current_timestamp JRL file indicates when tws_jrl_mon.pl last checked for JRL files that have come due. Appendix A. Tivoli Workload Scheduler Job Notification Solution 549
- 586. If the tws_event_mon.pl script processes a TWS_Job_Abend-101, TWS_Job_Done-104, or TWS_Job_Cancel-107 event before the job running long, the JRL file is deleted. If the job runs long, then the tws_jrl_mon.pl script checks periodically (every 300 seconds) to see if there are any jobs running long, runs the command contained in the JRL file that has come due, and deletes the JRL file after the command it contains has been run. Figure A-1 shows the Tivoli Workload Scheduler Notification Solution flow diagram. TWS Notification Solution Flow Diagram 3. config file tws_event_mon.csv 4. Notification commands, JRL Limits, etc 10. JRL Limit? 8. 12. Logic in #5 Create JRL file 5. 1. 2. 14. Perl Script event.log events JRL file tws_event_mon.pl 9. 13. Logic in #5 Remove JRL file 11. 6. JRL Job End? Notification request: 15. 16. Job ABEND Check Execute/remove Job Deadline JRL file JRL file Job Start Deadline 18. 17. 7. Notification request Perl Script TelAlert JRL tws_jrl_mon.pl Figure A-1 Tivoli Workload Scheduler Notification Solution flow diagram 550 Getting Started with IBM Tivoli Workload Scheduler V8.3
- 587. Solution deployment This section details how to deploy the solution and other deployment-related information. Deploying the solution To deploy the Tivoli Workload Scheduler Notification Solution: 1. Log on to the Tivoli Workload Scheduler master domain manager (MDM) or backup master domain manager (BKM) that the solution is deployed on using the Tivoli Workload Scheduler user ID (tws83 on the our test system). 2. Copy the tws_jns.tar file into the <TWShome> directory. 3. Tar -xvf tws_jns.tar # and untar the installation file. 4. Change the directory to JNS/cvs. 5. Edit the tws_event_mon.csv file to replace M83 with the workstation name of the master domain manager or backup master domain manager in your environment. 6. If you are deploying on a backup master domain manager, set up the configuration file to disable notification: cp -p tws_event_mon.csv tws_event_mon.csv.0 head -1 tws_event_mon.csv > tws_event_mon.csv 7. Request the Tivoli Workload Scheduler infrastructure team to add the Tivoli Workload Scheduler schedule and job definitions for the Tivoli Workload Scheduler Notification Solution instance. These definitions are located in: – JNS/tws_defs/<workstation>#<sched_name_prefix>_scheds.txt – JNS/tws_defs/<workstation>#<job_name_prefix>_jobs.txt 8. Request the Tivoli Workload Scheduler infrastructure team to submit the following schedules: – TWSMD_JNS1 – TWSMD_JNS2 – TWSMD_JNS3-01 9. Request the Tivoli Workload Scheduler infrastructure team to verify the following features: – TWSM1_EVENT_MON is running – TWSM1_JRL_MON is running Appendix A. Tivoli Workload Scheduler Job Notification Solution 551
- 588. – Notifications from the TWSMD_JNS2 schedule; see “TWSMD_JNS2 schedule” on page 573. – Notifications from the TWSMD_JNS3-01 schedule; see “TWSMD_JNS3-01 schedule” on page 575 10.Request the Tivoli Workload Scheduler infrastructure team to verify that the expected regression test notifications are generated when the FINAL job stream runs the next morning. 11.Request the Tivoli Workload Scheduler infrastructure team to remove the TWSM1_111D job from the TWSMD_JNS2 job stream after Tivoli Workload Scheduler production control verifies that they have received a notification for the job ending in an internal status of FAIL. If this is not done, then the Tivoli Workload Scheduler production control team will receive this notification each morning after the FINAL job stream runs. Deploying directory structure This section describes the directory structure used by the Tivoli Workload Scheduler Notification Solution (the <TWShome> directory is included here because it is the staging area for the solution deployment tar file). With the exception of the <TWShome> directory, the permissions of each of the directories described in the following sections must be 750 so that scripts in the directories can be run by user IDs other than <TWSuser>. <TWShome>/tws_jns.tar This is the tar file used to deploy the solution. Each time a script, schedule, default solution file (such as the default comma-separated value (CSV) for each Tivoli Workload Scheduler master domain manager or backup master domain manager) is updated, you have to rebuild and stage this file here. To rebuild this tar file: 1. Log on to the master domain manager or backup master domain manager that contains your new golden copy of the solution scripts and files using the <TWSuser> user ID. 2. Run the following command: tar -cvf tws_jns.tar JNS/csv JNS/scripts JNS/tws_defs Note: The logs and monitors directories are not included in the tws_jns.tar file because they have only runtime content. <TWShome>/JNS/csv This directory contains the default configuration CSV file. 552 Getting Started with IBM Tivoli Workload Scheduler V8.3
- 589. <TWShome>/JNS/scripts This directory contains the scripts that IBM supports, uses, or supports and uses, for notification, and so on. The official contents of this directory when the solution was delivered are discussed in the following sections. chk4_tws_event_mon_csv.ksh This script is used by the TWSM1_CHK4_CSV job to call the JNS/scripts/notify_tws_production_control.ksh script if a JNS/csv/tws_event_mon.csv file is not present. sigterm.ksh This script is used by the TWSM1_JRL_SIGTERM job to send a SIGTERM to the JNS/scripts/tws_jrl_mon.pl script instance that is running using the TWSM1_JRL_MON job. This happens a minute before the FINAL job stream is started and results in the TWSM1_JRL_MON job successfully completing before FINAL starts. test_notification.ksh This script is used to send out notifications for Regression Testing, as described in “Solution regression testing” on page 572. job_cancels_self.ksh This script is used by the jobs TWSM1_107 and TWSM1_JRLC to cancel themselves so that CANCEL (107) events are generated for regression testing purposes. This script must be run by the <TWSuser> user ID because it runs a conman cj command. notify_by_app.pl This notification script parses the three-character application ID from the job name in the event message passed into the script. If the script is able to parse an application ID, it attempts to run a script called JNS/scripts/notify_<application_id>.ksh, passing the event message (and other text passed into notify_by_app.pl). notify_by_jobname.ksh This example script shows one way to generate notifications based on job names in event messages. notify_tws_infrastructure.ksh This script must be updated to page, e-mail, or page and e-mail the Tivoli Workload Scheduler infrastructure team and pass the script arguments as text to the notification method. Appendix A. Tivoli Workload Scheduler Job Notification Solution 553
- 590. notify_tws_production_control.ksh This script generates notifications to the Tivoli Workload Scheduler production control team, sending the parameters passed into the script as the notification text. <TWShome>/JNS/tws_defs This directory is used as a convenient storage place for the Tivoli Workload Scheduler schedule and job definitions for the Tivoli Workload Scheduler Notification Solution. <TWShome>/JNS/logs This directory contains the log files generated by the tws_event_mon.pl and tws_jrl_mon.pl scripts each time they are started. Note: Scripts clean up their own logs each time they are started. <TWShome>/JNS/monitors This directory is the place that JRL files are created. These files have the format listed in Table A-2. JRL=200605300712-M83#TWSMD_JNS2.0AAAAAAAAAAAAAY4.TWSM1_JRL-37302 Table A-2 Format of the JRL files JRL= # File prefix 200605300712 # Date and time that the job is running long - # Separator M83#TWSMD_JNS2. # Fully qualified job name 0AAAAAAAAAAAAAY4.TWSM1_JRL - # Separator 37302 # Jobman process ID, also known as Job Number in the Job Scheduling Console (JSC) # The file contains the command to be run when the job is running long 554 Getting Started with IBM Tivoli Workload Scheduler V8.3
- 591. The directory also contains a current_timestamp file (except when it is being re-created). This file has the format listed in Table A-3. JRL=200605300711=current_timestamp=tws_jrl_mon Table A-3 Format of the current_timestamp file JRL= # File prefix 200605300711 # Last time that tws_jrl_mon.pl processed JRL files =current_timestamp=tws_jrl_mon # File postfix Solution schedules and jobs This section details the Tivoli Workload Scheduler job stream and job definitions that are used to run the Tivoli Workload Scheduler Job Notification Solution. Note: The jobs described in this section are scheduled in the ?DTWMON01 schedule. TWSMD_JNS1 schedule This schedule starts and stops the Tivoli Workload Scheduler Notification Solution. TWSM1_EVENT_MON job This job starts the tws_event_mon.pl script and must be running except during FINAL processing. TWSM1_JRL_MON job This job starts the tws_jrl_mon.pl script and must be running except after TWSM1_JRL_SIGTERM runs before FINAL processing. TWSM1_JRL_SIGTERM job This job stops the tws_jrl_mon.pl script before FINAL processing. TWSM1_CHK4_CSV job This job sends a notification to the Tivoli Workload Scheduler production control team if there is no tws_event_mon.csv file in place for tws_event_mon.pl to use when it is restarted after FINAL processing. Appendix A. Tivoli Workload Scheduler Job Notification Solution 555
- 592. Solution configuration This section describes the format of the tws_event_mon.csv notification configuration file. It provides example file entries, and describes how to configure Tivoli Workload Scheduler jobs to generate the events necessary for deadline and start deadline notification. It also documents the impact of the Tivoli Workload Scheduler return code mapping on the generation of TWS_Job_Abend-101 and TWS_Job_Done-104 events. Creating the tws_event_mon.csv file The tws_event_mon.csv file is a CSV configuration file that is used to determine what action to take when specific Tivoli Workload Scheduler events are received. The tws_event_mon.pl script loads the file when it starts and checks for an updated file before processing each Tivoli Workload Scheduler event (an updated file is identified based on a change in the file size, modification date, or both). Attention: UNIX modification dates are configured to the current minute, not second. This means that if you change and save a file multiple times within the same minute, the modification date will not change after the first saved change. Tip: The easiest way to work with the tws_event_mon.csv file is to copy it using File Transfer Protocol (FTP) to a Windows workstation and open it using Excel®. This enables you to cut and paste rows, cells, and so on, so that you can easily create new notification configurations based on current ones. The tws_event_mon.csv file comprises four columns as identified in the first row (the column headings are ignored by tws_event_mon.pl). These columns are described in the following sections. The columns 1, 2, and 4 are required for all event notification entries, although column 3 only applies to TWS_Job_Abend-101, TWS_Job_Done-104, and TWS_Job_Running_Long-JRL event entries. Column 1: EventKey The EventKey identifies the specific job for which notification is being configured: M83#TWSMD_JNS2.TWSM1_105 556 Getting Started with IBM Tivoli Workload Scheduler V8.3
- 593. Column 2: EventName The EventName identifies the specific Tivoli Workload Scheduler event for which notification is being configured. EventNames currently supported by this solution are described in the following sections. TWS_Job_Abend-101 This event indicates that a job ended with an internal status of ABEND. These events contain the return code (0 - 254) from the job. TWS_Job_Failed-102 This event indicates that a job ended with an internal status of FAILED. This event seems to have been replaced by TWS_Job_Cant-111 (see “TWS_Job_Cant-111” on page 558) because it was not encountered during the our testing of the solution. TWS_Job_Launched-103 This event indicates that a job has been launched (job internal status of EXEC+). These events are used to determine when a job started for purposes of JRL monitoring. TWS_Job_Done-104 This event indicates that a job ended with an internal status of SUCC (successful). These events contain the return code (0 - 254) from the job. TWS_Job_Suspended-105 This event indicates that the job has been suspended (job status Waiting with internal status of HOLD with Suppress, Latest Start Time has passed in the information column) because its start deadline has passed. In the JSC, this event looks like Figure A-2 (see the highlighted row). Figure A-2 Job has been suspended Appendix A. Tivoli Workload Scheduler Job Notification Solution 557
- 594. TWS_Job_Cancel-107 This event indicates that the job has been canceled (job status varies depending on whether the job was running when canceled, and the information field shows the status Canceled). In the JSC, this event looks like Figure A-3. Figure A-3 Job has been canceled Attention: If you cancel a job that has not started, the job is set to a status of Canceled and its successor job dependencies will be released. If you cancel a job that is running, the job continues to run, but Tivoli Workload Scheduler sets its status to Canceled, releases any successor job dependencies, and no longer tracks the status of the job. If you have to stop a job that is running, end it (rather than cancel it) so that it is terminated by Tivoli Workload Scheduler sending the process a SIGTERM signal. This results in the job ending in an ABEND state and the generation of a TWS_Job_Abend-101 event. TWS_Job_Cant-111 This event indicates that a job ended with an internal status of FAILED. It indicates that Tivoli Workload Scheduler was not able to launch the job (generally a result of a missing script, script permissions, or a user ID problem). This event seems to have replaced TWS_Job_Failed-102. In the JSC, this event looks like Figure A-4. Figure A-4 Job ended with an internal status of FAILED 558 Getting Started with IBM Tivoli Workload Scheduler V8.3
- 595. TWS_Job_Late-120 This event indicates that the job is running after its termination deadline time. (The status Late might be shown in the information column of the JSC.) Note: Even if the status Late does not show in the information column of the JSC, Tivoli Workload Scheduler generates a job late event in the event.log. TWS_Job_Until_Cont-121 This event indicates that the job has continued (the status Continue is shown in the information column) because its start deadline has passed. In the JSC, this event looks like Figure A-5 (see the highlighted row). Figure A-5 Job has continued TWS_Job_Until_Canc-122 This event indicates that the job has been canceled (job status Canceled with internal status of HOLD with Cancel, Canceled in the information column) because its start deadline has passed. In the JSC, this event looks like Figure A-6 (see the highlighted row). Figure A-6 Job has been canceled TWS_Job_Running_Long-JRL Tivoli Workload Scheduler does not implement job running long monitoring, therefore, there is no status that shows in the JSC to indicate that a job is running long. Appendix A. Tivoli Workload Scheduler Job Notification Solution 559
- 596. Column 3: RC_or_Data This column is used to specify a specific return code (0 - 254 or * to indicate all the return codes that are not addressed by a specific entry in the configuration file) for TWS_Job_Abend-101 and TWS_Job_Done-104 events. For TWS_Job_Running_Long-JRL events, this field is used to specify the period after which the job is considered to be running long. This value is specified as a number followed by “m” for minutes or “h” for hours. 10m = 10 minutes 3h = 3 hours Column 4: EventCommand This column is used to specify a UNIX command string or script to run when an event that matches the information in columns 1 - 3 is processed. Security considerations The UNIX command string or script specified in the EventCommand column must be able to run using the authority of the <TWSuser> user ID. EventCommand requirements The Tivoli Workload Scheduler Job Notification custom scripts run the commands in the EventCommand column synchronously. Therefore, they can log the result of the command, and command execution threads cannot stack up. This means that it is imperative to test EventCommand command strings to ensure that they always return promptly. Tip: The EventCommand field must contain a command, therefore, if no notification is required, use a command such as “echo No notification required”. This meets the requirement to have a command, does not send a notification, and documents in the script logfile that no notification is required. EventCommand Use Although the EventCommand column allows entry of UNIX command strings and scripts, it is intended for notification use and not for automation. Reserved $evmsg variable If the $evmsg variable is included in an EventCommand command string, the command processing in the tws_event_mon.pl and tws_jrl_mon.pl scripts replaces it with a text string describing the event. Although this text string cannot be configured without modifying the “sub event_*” subroutines in tws_mon_subroutines.pl, it can be passed into a custom notification script that reformats it and sends a notification with the updated text. 560 Getting Started with IBM Tivoli Workload Scheduler V8.3
- 597. Configuring job abend notification This section describes the configuration necessary to generate notifications when TWS_Job_Abend-101 events (indicating that a job abend has occurred) are generated by Tivoli Workload Scheduler. Job definition considerations Job return code mapping determines whether a job ends with an internal status of ABEND (Tivoli Workload Scheduler generates a TWS_Job_Abend-101 event) or SUCC (Tivoli Workload Scheduler generates a TWS_Job_Done-104 event). See “Return code mapping” on page 571. Schedule definition considerations There are no schedule definitions to configure. tws_event_mon.csv considerations To configure notification when TWS_Job_Abend-101 events occur, create one or more rows (lines) in the configuration file for each EventKey. EventKey This has the format <workstation>#<schedule>.<job>. For example: M83#TWSMD_JNS2.TWSM1_1011 EventName This event has the format: TWS_Job_Abend-101. RC_or_Data A return code value from 0 - 254 or an asterisk (*) indicates any return code value that is not specified in another entry for the EventKey and EventName. For example 1 or *. EventCommand For information about EventCommand commands, see “Column 4: EventCommand” on page 560. Appendix A. Tivoli Workload Scheduler Job Notification Solution 561
- 598. Example Example A-3 shows the example entries that are seen if you run the cat command for the tws_event_mon.csv file. Example: A-3 Example entries M83#TWSMD_JNS2.TWSM1_1011,TWS_Job_Abend-101,1,JNS/scripts/test_notifica tion.ksh TEST $evmsg M83#TWSMD_JNS2.TWSM1_1010,TWS_Job_Abend-101,*,JNS/scripts/test_notifica tion.ksh TEST $evmsg Configuring job done notification This section describes the configuration necessary to generate notifications when TWS_Job_Done-104 events (indicating that a job completed successfully) are generated by Tivoli Workload Scheduler. Job definition considerations Job return code mapping determines whether a job ends with an internal status of ABEND (Tivoli Workload Scheduler generates a TWS_Job_Abend-101 event) or SUCC (Tivoli Workload Scheduler generates a TWS_Job_Done-104 event). For more information, see “Return code mapping” on page 571. Schedule definition considerations There are no schedule definitions to configure. tws_event_mon.csv considerations To configure notification when TWS_Job_Done-104 events occur, create one or more rows (lines) in the configuration file for each EventKey. EventKey This event has the format <workstation>#<schedule>.<job>. For example: M83#TWSMD_JNS2.TWSM1_1040 EventName This event has the format: TWS_Job_Done-104. RC_or_Data A return code value from 0 - 254 or an asterisk (*) indicates any return code value that is not specified in another entry for the EventKey and EventName. For example 0 or *. 562 Getting Started with IBM Tivoli Workload Scheduler V8.3
- 599. EventCommand For information about EventCommand commands, see “Column 4: EventCommand” on page 560. Example Example A-4 shows the example entries that are seen if you run the cat command for the tws_event_mon.csv file. Example: A-4 Example entries M83#TWSMD_JNS2.TWSM1_1040,TWS_Job_Done-104,0,JNS/scripts/test_notificat ion.ksh TEST $evmsg M83#TWSMD_JNS2.TWSM1_1041,TWS_Job_Done-104,*,JNS/scripts/test_notificat ion.ksh TEST $evmsg Configuring job deadline notification This section describes the configuration necessary to generate notifications when TWS_Job_Late-120 events (indicating that a job has not completed within a specific time) are generated by Tivoli Workload Scheduler. Timing considerations The bm check deadline parameter in the Tivoli Workload Scheduler local options file on each Tivoli Workload Scheduler agent determines how often Tivoli Workload Scheduler checks for late jobs. The best practice is to set this parameter to 300 seconds (5 minutes) because checking more frequently entails additional processing usage for Tivoli Workload Scheduler. It is important to understand that because Tivoli Workload Scheduler checks deadlines periodically, notification of a missed deadline can be delayed up to the period between status checks. This means that if you have to know at 5 p.m. that a job is late, set your deadline for 4:55 p.m. so that Tivoli Workload Scheduler generates a late event no later than 5 p.m. Another consequence of the checking interval is that if a job is late, but it ends before Tivoli Workload Scheduler runs the check and determines that the job is late, a late event will not be generated. Job definition considerations There are no job definitions to configure. Schedule definition considerations For Tivoli Workload Scheduler to generate an event when a job runs late, specify a termination deadline for the job when it is added to a schedule (job stream). Appendix A. Tivoli Workload Scheduler Job Notification Solution 563
- 600. In the JSC, the termination deadline looks like Figure A-7. Figure A-7 Configuring the termination deadline In a schedule definition file, this looks like Example A-5 (see text highlighted in bold). Example: A-5 Schedule definition file example *Generates a TWS_Job_Late-120 event M83#TWSM1_120 FOLLOWS TWSM1_JRL DEADLINE 0601 tws_event_mon.csv considerations To configure notification when TWS_Job_Late-120 events occur, create one row (line) in the configuration file per EventKey. EventKey This event has the format <workstation>#<schedule>.<job>. For example: M83#TWSMD_JNS2.TWSM1_120 RC_or_Data Leave this as blank. 564 Getting Started with IBM Tivoli Workload Scheduler V8.3
- 601. EventCommand For information about EventCommand commands, see “Column 4: EventCommand” on page 560. Example The following example shows the entries that are seen if you run the cat command for the tws_event_mon.csv file. M83#TWSMD_JNS2.TWSM1_120,TWS_Job_Late-120,,JNS/scripts/test_notificatio n.ksh TEST $evmsg Configuring start deadline notification This section describes the configuration necessary to generate notifications when TWS_Job_Suspended-105, TWS_Job_Until_Cont-121, or TWS_Job_Until_Canc-122 events (indicating that a job did not start at a specific time) are generated by Tivoli Workload Scheduler. Timing considerations The bm check until parameter in the Tivoli Workload Scheduler local options file on each Tivoli Workload Scheduler agent determines how often Tivoli Workload Scheduler checks for late jobs. The best practice is to set this parameter to 300 seconds (5 minutes) because checking more frequently entails additional processing usage for Tivoli Workload Scheduler. It is important to understand that because Tivoli Workload Scheduler checks deadlines periodically, notification of a missed deadline can be delayed up to the period between status checks. This means that if you have to know at 5 p.m. that a job is late, set your deadline for 4:55 p.m. so that Tivoli Workload Scheduler generates a late event no later than 5 p.m. Another consequence of the checking interval is that if a job is late, but ends before Tivoli Workload Scheduler run the check and determines that the job is late, a late event will not be generated. Job definition considerations There are no job definitions to configure. Appendix A. Tivoli Workload Scheduler Job Notification Solution 565
- 602. Schedule definition considerations For Tivoli Workload Scheduler to generate an event when a job runs late, specify a latest start deadline for the job when it is added to a schedule (job stream). The following sections show the possible options when you specify latest start time using the JSC, and when you specify using a schedule definition file. Suppress In the JSC setting, the latest start time - suppress looks like Figure A-8. Figure A-8 Configuring the Latest Start Time - Suppress In a schedule definition file, this looks like Example A-6 (see text highlighted in bold). Example: A-6 Schedule definition file example #Generates a TWS_Job_Suspended-105 event M83#TWSM1_105 UNTIL 0600 566 Getting Started with IBM Tivoli Workload Scheduler V8.3
- 603. Continue In the JSC setting, the latest start time - continue looks like Figure A-9. Figure A-9 Configuring the Latest Start Time - Continue In a schedule definition file, this looks like Example A-7 (see text highlighted in bold). Example: A-7 Schedule definition file example #Generates a TWS_Job_Until_Cont-121 event M83#TWSM1_121 UNTIL 0600 ONUNTIL CONT Appendix A. Tivoli Workload Scheduler Job Notification Solution 567
- 604. Cancel In the JSC setting, the latest start time - cancel looks like Figure A-10. Figure A-10 Configuring the Latest Start Time - Cancel In a schedule definition file, this looks like Example A-8 (see text highlighted in bold). Example: A-8 Schedule definition file example #Generates a TWS_Job_Until_Canc-122 event M83#TWSM1_122 UNTIL 0600 ONUNTIL CANC tws_event_mon.csv considerations Configuring notification when TWS_Job_Suspended-105, TWS_Job_Until_Cont-121, or TWS_Job_Until_Canc-122 events occur requires the creation of one row (line) in the configuration file per EventKey. EventKey This event has the <workstation>#<schedule>.<job> format. For example: M83#TWSMD_JNS2.TWSM1_121 568 Getting Started with IBM Tivoli Workload Scheduler V8.3
- 605. EventName The following list shows the supported event names: TWS_Job_Suspended-105 for start deadline with action of suspend TWS_Job_Until_Cont-121 for start deadline with action of continue TWS_Job_Until_Canc-122 for start deadline with action of cancel RC_or_Data Leave this as blank. EventCommand For information about EventCommand commands, see “Column 4: EventCommand” on page 560. Example Example A-9 shows the example entries that are seen if you run the cat command for the tws_event_mon.csv file. Example: A-9 Example entries M83#TWSMD_JNS2.TWSM1_105,TWS_Job_Suspended-105,,JNS/scripts/test_notifi cation.ksh TEST $evmsg M83#TWSMD_JNS2.TWSM1_121,TWS_Job_Until_Cont-121,,JNS/scripts/test_notif ication.ksh TEST $evmsg M83#TWSMD_JNS2.TWSM1_122,TWS_Job_Until_Canc-122,,JNS/scripts/test_notif ication.ksh TEST $evmsg Configuring job running long notification This section describes the configuration necessary to generate notifications when jobs run longer than a specified duration. Tivoli Workload Scheduler does not include JRL monitoring, therefore, these notifications are generated by a custom solution. Timing considerations The tws_jrl_mon.pl script checks for long running jobs every 300 seconds (5 minutes). This value is selected to coincide with the values for bm check deadline and bm check until in the Tivoli Workload Scheduler local options file on each Tivoli Workload Scheduler agent. The best practice is to set this parameter to 300 seconds (5 minutes) because checking more frequently entails additional processing usage for the script. Appendix A. Tivoli Workload Scheduler Job Notification Solution 569
- 606. It is important to understand that because tws_jrl_mon.pl checks for long running jobs periodically, notification of a long running job can be delayed up to the period between status checks. This means that if you have to know after 60 minutes that a job is running, set your expected duration for 55 minutes so that tws_jrl_mon.pl generates a job running long notification no later than 60 minutes after the job starts. Another consequence of the checking interval is that if a job is running long, but ends before tws_jrl_mon.pl runs the check and determines that the job is running long, job running long notification will not be generated. Job definition considerations There are no job definitions to configure. Schedule definition considerations There are no schedule definitions to configure. tws_event_mon.csv considerations To configure notification when jobs run long, create one row (line) in the configuration file per EventKey. EventKey This event has the format <workstation>#<schedule>.<job>. For example: M83#TWSMD_JNS2.TWSM1_JRL EventName This event has the format: TWS_Job_Running_Long-JRL. RC_or_Data JRL processing uses the RC_or_Data field for the expected duration of the job in minutes or hours. For example, 10 minutes or 3 hours. EventCommand For information about EventCommand commands, see “Column 4: EventCommand” on page 560. Example The following example shows the entries that are seen if you run the cat command for the tws_event_mon.csv file. M83#TWSMD_JNS2.TWSM1_JRL,TWS_Job_Running_Long-JRL,1m,JNS/scripts/test_n otification.ksh TEST $evmsg 570 Getting Started with IBM Tivoli Workload Scheduler V8.3
- 607. Return code mapping Tivoli Workload Scheduler V8.2 introduced return code mapping in job definitions. This enables schedulers to indicate specific return codes that indicate job success. If return code mapping is not used, a zero (0) return code results in a TWS_Job_Done-104 event indicating that the job is successful. A non-zero return code results in a TWS_Job_Abend-101 event indicating that a job abend has occurred. When you use return code mapping, the return codes specified in the job definition indicate success (TWS_Job_Done-104 event), and all other return codes indicate job abend (TWS_Job_Abend-101 event). Figure A-11 shows a sample return code mapping. Figure A-11 Configuring the return code mapping Solution monitoring This section describes the additional UNIX level monitoring that you must implement. File systems Monitor the space available in the <TWShome>/JNS directories because the log files in the logs directory grow in size as the number of jobs run using Tivoli Workload Scheduler increases. Appendix A. Tivoli Workload Scheduler Job Notification Solution 571
- 608. tws_event_mon.pl This script must be running except during daily FINAL processing and when it is stopped for maintenance, and so on. tws_jrl_mon.pl This script must be running except during daily FINAL processing and when it is stopped for maintenance, and so on. Solution regression testing In this section, we discuss solution regression testing. CSV configuration Example A-10 shows the JNS/csv/tws_event_mon.csv file that we used for testing the Tivoli Workload Scheduler V8.3 Job Notification Solution in our test environment. This file contains the configuration information that supports the solution regression test schedules and jobs detailed later in this section. Example: A-10 JNS/csv/tws_event_mon.csv file EventKey,EventName,RC_or_Data,EventCommand M83#FINAL.MAKEPLAN,TWS_Job_Done-104,*,JNS/scripts/test_notification.ksh TEST $evmsg M83#TWSMD_JNS2.TWSM1_1011,TWS_Job_Abend-101,1,JNS/scripts/test_notification.ksh TEST $evmsg M83#TWSMD_JNS2.TWSM1_1010,TWS_Job_Abend-101,*,JNS/scripts/test_notification.ksh TEST $evmsg M83#TWSMD_JNS2.TWSM1_103,TWS_Job_Launched-103,,JNS/scripts/test_notification.ksh TEST $evmsg M83#TWSMD_JNS2.TWSM1_1040,TWS_Job_Done-104,0,JNS/scripts/test_notification.ksh TEST $evmsg M83#TWSMD_JNS2.TWSM1_1041,TWS_Job_Done-104,*,JNS/scripts/test_notification.ksh TEST $evmsg M83#TWSMD_JNS2.TWSM1_105,TWS_Job_Suspended-105,,JNS/scripts/test_notification.ksh TEST $evmsg M83#TWSMD_JNS2.TWSM1_107,TWS_Job_Cancel-107,,JNS/scripts/test_notification.ksh TEST $evmsg M83#TWSMD_JNS2.TWSM1_111,TWS_Job_Cant-111,,JNS/scripts/test_notification.ksh TEST $evmsg M83#TWSMD_JNS2.TWSM1_120,TWS_Job_Late-120,,JNS/scripts/test_notification.ksh TEST $evmsg M83#TWSMD_JNS2.TWSM1_121,TWS_Job_Until_Cont-121,,JNS/scripts/test_notification.ksh TEST $evmsg 572 Getting Started with IBM Tivoli Workload Scheduler V8.3
- 609. M83#TWSMD_JNS2.TWSM1_122,TWS_Job_Until_Canc-122,,JNS/scripts/test_notification.ksh TEST $evmsg M83#TWSMD_JNS2.TWSM1_JRL,TWS_Job_Running_Long-JRL,1m,JNS/scripts/test_notification.ks h TEST $evmsg M83#TWSMD_JNS2.TWSM1_JRL0,TWS_Job_Running_Long-JRL,4m,JNS/scripts/test_notification.k sh TEST $evmsg M83#TWSMD_JNS2.TWSM1_JRL1,TWS_Job_Running_Long-JRL,4m,JNS/scripts/test_notification.k sh TEST $evmsg M83#TWSMD_JNS2.TWSM1_JRL1,TWS_Job_Abend-101,*,/usr/bin/echo Do Nothing M83#TWSMD_JNS2.TWSM1_JRLC,TWS_Job_Running_Long-JRL,4m,JNS/scripts/test_notification.k sh TEST $evmsg M83#TWSMD_JNS3-01.TWSM1_101A,TWS_Job_Abend-101,*,JNS/scripts/test_notification.ksh TEST $evmsg M83#TWSMD_JNS3-01.TWSM1_111A,TWS_Job_Cant-111,,JNS/scripts/test_notification.ksh TEST $evmsg EventKey,EventName,RC_or_Data,EventCommand default_action,TWS_Job_Abend-101,1,JNS/scripts/notify_by_app.pl 'TEST DEFAULT $evmsg' default_action,TWS_Job_Abend-101,*,JNS/scripts/notify_by_app.pl 'TEST DEFAULT $evmsg' #default_action,TWS_Job_Launched-103,,JNS/scripts/test_notification.ksh TEST $evmsg #default_action,TWS_Job_Done-104,0,JNS/scripts/test_notification.ksh TEST $evmsg #default_action,TWS_Job_Done-104,*,JNS/scripts/test_notification.ksh TEST $evmsg #default_action,TWS_Job_Suspended-105,,JNS/scripts/test_notification.ksh TEST $evmsg #default_action,TWS_Job_Cancel-107,,JNS/scripts/test_notification.ksh TEST $evmsg default_action,TWS_Job_Cant-111,,JNS/scripts/notify_tws_production_control.ksh TEST DEFAULT $evmsg #default_action,TWS_Job_Late-120,,JNS/scripts/test_notification.ksh TEST $evmsg #default_action,TWS_Job_Until_Cont-121,,JNS/scripts/test_notification.ksh TEST $evmsg #default_action,TWS_Job_Until_Canc-122,,JNS/scripts/test_notification.ksh TEST $evmsg #default_action,TWS_Job_Running_Long-JRL,1m,JNS/scripts/test_notification.ksh TEST $evmsg TWSMD_JNS2 schedule This schedule runs jobs that test notification for various events that are generated by Tivoli Workload Scheduler. These events are indicated in the schedule comments. TWSM1_1010 This is the test case for a job abend event with a return code of 0. Note that this requires the use of the Tivoli Workload Scheduler return code success condition feature (see “Return code mapping” on page 571). Appendix A. Tivoli Workload Scheduler Job Notification Solution 573
- 610. TWSM1_1011 This is the test case for a job abend event with a non-zero return code. TWSM1_101D This is the test case for the default notification action for a job abend event with a return code of 0. Note that this requires the use of the Tivoli Workload Scheduler return code success condition feature (see “Return code mapping” on page 571). TWSM1_103 This is the test case for a job launched event. TWSM1_1040 This is the test case for a job done (successful) event. TWSM1_1041 This is the test case for a job done (successful) event with a non-zero return code. Note that this requires the use of the Tivoli Workload Scheduler return code success condition feature (see “Return code mapping” on page 571). TWSM1_105 This is the test case for a job suspended event (generated by Tivoli Workload Scheduler when a job start deadline is exceeded and the suppress option is specified). See “TWSMD_JNS2 schedule” on page 573. TWSM1_105C This is the test case for a job suspended event when the job is canceled before the start deadline is exceeded. TWSM1_107 This is the test case for a job cancel event (generated when a job is canceled using either the JSC or conman). TWSM1_111 This is the test case for a job fail event. TWSM1_111D This is the test case for the default notification action for a job fail event. 574 Getting Started with IBM Tivoli Workload Scheduler V8.3
- 611. TWSM1_120 This is the test case for a job late event (generated when a job termination deadline is exceeded). TWSM1_121 This is the test case for a job until continue event (generated by Tivoli Workload Scheduler when a job start deadline is exceeded and the continue option is specified). See “TWSMD_JNS2 schedule” on page 573. TWSM1_122 This is the test case for a job until cancel event (generated by Tivoli Workload Scheduler when a job start deadline is exceeded and the cancel option is specified). See “TWSMD_JNS2 schedule” on page 573. TWSM1_JRL This is the test case for a job running long notification. This is the only TWSM1_JRL* event in the TWSMD_JNS2 schedule that must generate a JRL notification. TWSM1_JRL0 This is the test case for a job running long notification when the job completes successfully before it can run long. TWSM1_JRL1 This is the test case for a job running long notification when a job abend occurs before it can run long. TWSM1_JRLC This is the test case for a job running long notification when the job is canceled before it can run long. TWSMD_JNS3-01 schedule This schedule tests the ability of the Tivoli Workload Scheduler Notification Solution to handle job and schedule (job stream) aliases that follow the alias convention that has been adopted. TWSM1_101A-02 This is the test case for a job abend event (for a job with an aliased name) with a return code of 0. Note that this requires the use of the Tivoli Workload Scheduler return code success condition feature (see “Return code mapping” on page 571). Appendix A. Tivoli Workload Scheduler Job Notification Solution 575
- 612. TWSM1_111A-03 This is the test case for a job fail event (for a job with an aliased name). Solution troubleshooting This section provides some tips for troubleshooting the solution. General Whenever a change is made to the solution, run the regression test suite detailed in “Solution regression testing” on page 572. tws_event_mon.pl Check the script log file. tws_event_mon.csv Check the log file created by tws_event_mon.pl for CSV file related messages. For reasons why an expected notification is not generated, see “Frequently asked questions” on page 580. tws_jrl_mon.pl Check the script log file. tws_mon_subroutines.pl Check the log file for the script that encountered a problem with this subroutine include file. Tivoli Workload Scheduler infrastructure considerations This section provides information about notifications that are sent to the Tivoli Workload Scheduler infrastructure team by the Tivoli Workload Scheduler Notification Solution scripts. JNS/scripts/notify_tws_infrastructure.ksh This script is called by the Tivoli Workload Scheduler Notification Solution scripts when a notification has to be sent to the Tivoli Workload Scheduler infrastructure team. It is important to keep the contents of this script up to date so that the appropriate Tivoli Workload Scheduler infrastructure team personnel are notified. 576 Getting Started with IBM Tivoli Workload Scheduler V8.3
- 613. Default notifications The following sections describe the default notifications that are sent by the Tivoli Workload Scheduler Notification Solution scripts if they encounter a problem that requires a script change. These notifications are not expected to be generated unless there is a problem with a change to a script, or the format of a Tivoli Workload Scheduler event log entry is changed by Tivoli Workload Scheduler development. JNS/scripts/tws_event_mon.pl The following sections list the notifications generated by the script that are sent to the Tivoli Workload Scheduler infrastructure team. These notifications are not expected to be encountered, but if they are, promptly contact the team supporting the script to address them. Note: All “sub…” references are to subroutines in tws_mon_subroutines.pl. Constant definitions in tws_mon_subroutines.pl This indicates that an unexpected script error has been detected and that the script has exited. Contact the team supporting the script and request them to debug it. # Code that generates the notification… &error(">>> FATAL <<< SCRIPT ERROR Could not parse script name when setting $DEFAULT_LOGFILE in tws_mon_subroutines.pln"); &finish; sub create_jrl_file This indicates that an unexpected script error has been detected and that the script has continued using the current time rather than the time stamp in the event. The probable cause of this is a format change in a Tivoli Workload Scheduler event log entry. Contact the team supporting the script and request them to debug it. # Code that generates the notification… &error("JRL could not use event_timestamp so using current epoch time instead (1)n");' sub event_* This indicates that an unexpected script error has been detected and that the script has not generated a notification for the event. The probable cause of this is a Tivoli Workload Scheduler event log format change. Contact the team supporting the script and request them to debug it. # Code that generates the notification… &error("Unexpected event format for event $enum. Format = $eventn"); Appendix A. Tivoli Workload Scheduler Job Notification Solution 577
- 614. scripts/tws_jrl_mon.pl The following sections list the notifications generated by the script that are sent to the Tivoli Workload Scheduler infrastructure team. These notifications are not expected to be encountered, but if they are, promptly contact the team supporting the script to address them. Constant definitions in tws_mon_subroutines.pl This indicates that an unexpected script error has been detected and that the script has exited. Contact the team supporting the script and request them to debug it. # Code that generates the notification… &error(">>> FATAL <<< SCRIPT ERROR Could not parse script name when setting $DEFAULT_LOGFILE in tws_mon_subroutines.pln"); &finish; In tws_jrl_mon.pl This indicates that the JRL file format used by tws_event_mon.pl does not match the format expected by tws_jrl_mon.pl. Contact the team supporting the script and request them to debug it. # Code that generates the notification… &error(">>> FATAL <<< SCRIPT ERROR Could not parse JRL file name $jrl_filen"); &finish; In tws_jrl_mon.pl This indicates that the event notification method code has been modified. Currently only execute_commands is a valid option. Note: This is a feature that we could not fully implement due to time constraints, therefore, it was disabled. Contact the team supporting the script and request them to debug it. # Code that generates the notification… &error(">>> FATAL <<< SCRIPT ERROR $NOTIFICATION_METHOD set to invalid value = $NOTIFICATION_METHODn"); &finish; 578 Getting Started with IBM Tivoli Workload Scheduler V8.3
- 615. Tivoli Workload Scheduler production control considerations The following sections provide information that applies specifically to the Tivoli Workload Scheduler production control team. JNS/scripts/notify_tws_production_control.ksh Update this script to contain the commands to generate notifications. Default notifications Tivoli Workload Scheduler production control receives the following notifications, regardless of the tws_event_mon.csv configuration that is in place for specific scheduling environments. From tws_event_mon.pl This script only generates notifications to the Tivoli Workload Scheduler infrastructure team. From tws_jrl_mon.pl This script only generates notifications to the Tivoli Workload Scheduler infrastructure team. From TWSM1_CHK4_CSV job If the tws_event_mon.csv file for a Tivoli Workload Scheduler master domain manager is missing when this job runs at 5 a.m., a notification is sent to Tivoli Workload Scheduler production control. From notify_by_app.pl By default this script runs the JNS/scripts/notify_tws_production_control.ksh script to notify Tivoli Workload Scheduler production control when it cannot parse the application ID from an event message. When an unrecognized application ID is parsed, the script enters a warning message in the JNS/logs/tws_event_mon_<date-timestamp>.log file. From notify_by_jobname.ksh By default, this script runs the JNS/scripts/notify_tws_production_control.ksh script to notify Tivoli Workload Scheduler production control when it cannot find a JNS/scripts/notify_<jobname>.ksh script for a job that requires notification. Appendix A. Tivoli Workload Scheduler Job Notification Solution 579
- 616. Frequently asked questions This section provides questions and answers about the Tivoli Workload Scheduler Job Notification Solution. Who supports this solution? Clients who choose to deploy this solution assume all responsibility for supporting and extending it. This script is not supported by IBM Tivoli Workload Scheduler Support. What do I tell the helpdesk if I encounter a problem? For problems related to tws_event_mon.csv file configuration and failed notifications, request a call back from Tivoli Workload Scheduler production control. For problems related to tws_event_mon.pl script (see “How can I tell if tws_event_mon.pl is running?”), tws_jrl_mon.pl scripts (see “How can I tell if tws_jrl_mon.pl is running?”), or both these scripts not running, request that the problem be queued to the Tivoli Workload Scheduler infrastructure team and notify the team. How can I tell if tws_event_mon.pl is running? Verify that the TWSM1_EVENT_MON is running. How can I tell if tws_jrl_mon.pl is running? Verify that the TWSM1_JRL_MON is running. Why did not my notification go out? In most cases, a notification does not go out due to improper configuration in the tws_event_mon.csv file or a missing entry in a custom notification script. To determine what happened, check the appropriate script log (see “CSV configuration” on page 583) for the execution of the EventCommand associated with the event you expected a notification to go out for. The following list shows some typical configuration errors: There is no EventKey entry for the event that is expected to generate a notification The EventKey defined in the config file does not match the one for the event in the log A default_action is configured but the associated EventCommand is not able to send an appropriate notification The notification script that is run using the EventCommand does not include you in the generated notifications 580 Getting Started with IBM Tivoli Workload Scheduler V8.3
- 617. How are schedule and job aliases handled? The following naming convention extension is used to handle schedule and job aliases. If the notification handling for a schedule or job must be that of the base name of the schedule or job in an EventKey, the alias must be one of the following naming convention extension: <base_schedule_name>-<numeric_value> ex. TWSMD_JNS3-01 <base_job_name>-<numeric_value> ex. TWSM1_101A-02 The number of digits in <numeric_value> does not matter except that the total number of characters in a schedule (job stream) alias cannot exceed 16 and the total number of characters in a job alias cannot exceed 40. How can I set up a default_action for an EventName? Create a tws_event_mon.csv entry replacing the EventKey column value with the string default_action. For example: default_action,TWS_Job_Abend-101,1,JNS/scripts/notify_by_app.pl 'TEST DEFAULT $evmsg' It is important to note that the same EventCommand is run regardless of the event. Therefore, use a custom action script such as notify_by_app.pl. What is the precedence for specific and default_action commands? Regardless of the order of the entries in the tws_event_mon.csv configuration file, a specific event EventCommand is always run in preference to a default_action EventCommand. For example: default_action,TWS_Job_Abend-101,1,JNS/scripts/notify_by_app.pl 'TEST DEFAULT $evmsg' The previous line takes precedence over the following line, regardless of the relative placement of these lines in the configuration file: default_action,TWS_Job_Abend-101,*,JNS/scripts/notify_by_app.pl 'TEST DEFAULT $evmsg' What happens if there are multiple entries for the same EventKey in the tws_event_mon.csv file? The last entry for the same EventKey is used. How can I disable an entry in the tws_event_mon.csv file? Enter a hash (#) symbol at the beginning of the EventKey. Appendix A. Tivoli Workload Scheduler Job Notification Solution 581
- 618. What EventNames must production control be notified of? TWS_Job_Cant-111 events are of particular interest to production control because these events require job definition updates to resolve. What EventNames must developers be notified of? TWS_Job_Abend-101 events are of particular interest to developers because these events might require their intervention to resolve. What script monitoring is in place? The tws_event_mon.pl and tws_jrl_mon.pl scripts are instrumented to run the notify_tws_infrastructure.ksh and notify_tws_production_control.ksh scripts when specific errors are detected. Additionally, you can check the status of the TWSM1_EVENT_MON (tws_event_mon.pl) and TWSM1_JRL_MON (tws_jrl_mon.pl) jobs using the JSC. These jobs must be running except during FINAL processing. If they are not, contact the Tivoli Workload Scheduler infrastructure support team. How does the Tivoli Workload Scheduler Job Notification Solution prevent duplicate paging when it is restarted? See “tws_event_mon_YYYYmmddHHMMSS.log” on page 586. How can I determine when tws_jrl_mon.pl last checked for long running jobs? Each time the tws_jrl_mon.pl script checks for long running jobs, it creates a special file to determine which jobs are running long. The format of this file is: <TWShome>/JNS/monitors/JRL=200605300711=current_timestamp=tws_jrl_mon The time stamp 200605300711 indicates when the script last checked for long running jobs. Why did I not receive a notification for a job in the FINAL schedule? The tws_event_mon.pl script exits when it sees the FINAL.MAKEPLAN job launch. Therefore, it does not see any events generated by Tivoli Workload Scheduler after this. Note that the first thing that the FINAL job does is to stop new jobs from launching while it does its processing, therefore, the timing window for encountering this situation is small. 582 Getting Started with IBM Tivoli Workload Scheduler V8.3
- 619. CSV configuration Configuring the JNS/csv/tws_event_mon.csv file is a detail-oriented activity, therefore, review and test all file changes. Basic configuration To simplify the process of setting up TWS_Job_Abend-101 and TWS_Job_Cant-111 (FAIL) notifications, default_actions have been configured for these events. In the tws_event_mon.csv file, these entries are as shown in Example A-11. Example: A-11 The tws_event_mon.csv entries default_action,TWS_Job_Abend-101,1,JNS/scripts/notify_by_app.pl 'TEST DEFAULT $evmsg' default_action,TWS_Job_Abend-101,*,JNS/scripts/notify_by_app.pl 'TEST DEFAULT $evmsg' default_action,TWS_Job_Cant-111,,JNS/scripts/notify_tws_production_cont rol.ksh TEST DEFAULT $evmsg Based on these tws_event_mon.csv entries, no additional customization is required for Tivoli Workload Scheduler production control to be notified when a job ends in a FAIL internal status. For jobs that show ABEND, perform the following additional configuration based on the application that the job is associated with (as indicated in the job name per the naming convention). Tivoli Workload Scheduler jobs do not require the creation of an additional notification script because all notifications are handled by the JNS/scripts/notify_TWS.ksh script. Tip: It is a good idea to test new notification configurations. Advanced configuration Advanced configuration for job notifications is detailed in “Tivoli Workload Scheduler production control considerations” on page 579. This information source is provided to document how to configure specific notification options for specific jobs. Appendix A. Tivoli Workload Scheduler Job Notification Solution 583
- 620. Scripts Unless otherwise specified, all paths are relative to the <TWShome> directory. JNS/scripts/notify_by_app.pl This runs JNS/scripts/notify_<application_id>.ksh if it exists or logs a warning message in the logs/tws_event_mon_<date-timestamp>.log file. JNS/scripts/notify_TWS.ksh The sample version of this script e-mails a notification to the tws83 user ID. Procedures The following sections describe some of the notification-related procedures for your consideration. Configuring notification for a new job No additional configuration is required for Tivoli Workload Scheduler production control to receive a notification when a job ends with an internal status of FAIL. For information about configuring ABEND notification for a new job, see “Basic configuration” on page 583. To configure any other type of job notification: 1. Determine the type of notification that you have to configure and review the appropriate section in this document: – To configure job abend notification, see “Configuring job abend notification” on page 561. – To configure job done notification, see “Configuring job done notification” on page 562. – To configure job deadline notification, see “Configuring job deadline notification” on page 563. – To configure start deadline notification, see “Configuring start deadline notification” on page 565. – To configure job running long notification, see “Configuring job running long notification” on page 569. 2. (ABEND and DONE events only) Identify any specific return codes that require special notifications. 3. Determine what EventCommand has to be run for the specific notification that you are configuring. 4. Review the format of a similar configuration entry in the example tws_event_mon.csv file. 584 Getting Started with IBM Tivoli Workload Scheduler V8.3
- 621. 5. If the job has already run in the scheduling environment that the notification is being configured for, run grep for the JNS/logs/tws_event_mon*.log files for the job name and verify the specific fully qualified job name for the job. The following example shows a fully qualified job name: M83#TWSMD_JNS2+0AAAAAAAAAAAAAY4.TWSM1_1040 6. Verify that the expected notification results when the defined event occurs. Attention: During our acceptance testing of the solution, notifications were not generated due to errors in the information in the tws_event_mon.csv file. Removing notification for a job To remove notification for a job, remove any specific entries for the job in tws_event_mon.csv files and any JNS/scripts/notify_<jobname>.ksh scripts. Changing who gets notified To change who receives specific job notifications: 1. Determine who is getting the specific job notifications today. 2. Run grep -l <user_id> scripts/* to determine what job notifications the individual identified is receiving today. For example: grep -l cbuehler scripts/* 3. Update the scripts listed in the output of the grep as necessary. Solution procedures This section describes procedures for various operational situations. FINAL The stopping and restarting of the Tivoli Workload Scheduler Notification Solution during FINAL processing is handled by the TWSMD_JNS1 schedule (job stream) described in “TWSMD_JNS1 schedule” on page 555. Updating scripts/notify_by_app.pl If the scripts/notify_by_app.pl script has to support a new application ID, update the following line in the script to include the new application ID. elsif ($app=~/TWS|AP1/) { Appendix A. Tivoli Workload Scheduler Job Notification Solution 585
- 622. For example: New application id = CAB elsif ($app=~/TWS|AP1|CAB/) { Verifying notification completion Each event that is processed by a Tivoli Workload Scheduler Job Notification Solution script is documented in its log. Additionally, the result of each EventCommand is recorded in the script's log. These scripts are located in the <TWShome>/JNS/logs directory. These logs are retained for two or more days before they are removed when the scripts start. tws_event_mon_YYYYmmddHHMMSS.log Each time the tws_event_mon.pl script starts, it creates a new log file. The log file begins with a script start message, indicating the script version and subroutine version. The log file then documents each event that it processes, whether or not a notification command is run. This is necessary so that when the script is restarted and the Tivoli Workload Scheduler batchman process is not restarted (truncating the Tivoli Workload Scheduler event.log file), the script runs grep on its old logs to determine if it has already processed a specific event in the event.log. Notes: When the tws_event_mon.pl script is restarted, it takes approximately 1 second per old event in event.log to identify old events that have already been processed. This is not the case when the script gets restarted during FINAL processing, because this process truncates the event.log file, therefore, there are no old events that have to be checked. If old tws_event_mon_*.log files are deleted before the events that they processed are truncated from the Tivoli Workload Scheduler event.log file, duplicate event notifications can result. tws_jrl_mon_YYYYmmddHHMMSS.log Each time the tws_jrl_mon.pl script starts, it creates a new log file. The log file begins with a script start message, indicating the script version and subroutine version. 586 Getting Started with IBM Tivoli Workload Scheduler V8.3
- 623. Related publications The publications listed in this section are considered particularly suitable for a more detailed discussion of the topics covered in this redbook. IBM Redbooks For information about ordering these publications, see “How to get IBM Redbooks” on page 589. Some of the documents referenced here may be available only in softcopy. Programming J2EE APIs with WebSphere Advanced, SG24-6124 EJB 2.0 Development with WebSphere Studio Application Developer, SG24-6819 Other publications These publications are also relevant as further information sources: Quick Beginnings for DB2 Servers, GC09-4836 IBM Tivoli Configuration Manager User’s Guide for Software Distribution v4,