Instruction on creating a cluster on jboss eap environment
Download as DOCX, PDF2 likes4,045 views

The document describes setting up an active-passive JBoss EAP cluster configuration with two active nodes in one cluster and two passive nodes in another cluster. Key steps include: 1. Creating users on each node for management and application access. 2. Configuring the first node as the domain controller and defining server groups and profiles for the active and passive clusters. 3. Configuring the second active node and passive nodes to connect to the domain controller and join the appropriate cluster. 4. Installing Apache HTTP Server on a separate machine and configuring mod_cluster to load balance between the active clusters.


![• Enter “password1!” again to confirm, and press enter
What roles do you want this user to belong to? (Please enter a comma
separated list, or leave blank for none)[ ]:
• Press enter to leave this blank and continue
About to add user 'ejbcaller' for realm 'ApplicationRealm'
Is this correct yes/no? yes
• Type yes and press enter to continue
...[confirmation of user being added to files]
Is this new user going to be used for one AS process to connect to another
AS process?
e.g. for a slave host controller connecting to the master or for a Remoting
connection for server to server EJB calls.
yes/no? no
• Type no and press enter to complete user setup
At this point, all the required users have been created; move forward to making
minimal edits
to the server configuration files before starting the servers.
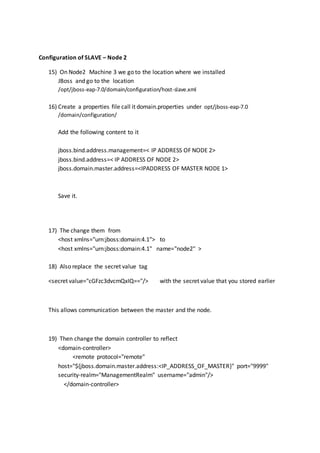
Domain Controller , MASTER: Node1 Manual Configuration
I have illustrated manual configuration below, the same can be achieved from the
cli command interface of JBOSS.
8) Go to node 1
Go to the host.xml file located under
/opt/jboss-eap-7.0/domain/configuration/host.xml
Change the hostname to
<host xmlns="urn:jboss:domain:4.1" name="node1">
9) Create a properties file call it domain.properties under opt/jboss-eap-7.0
/domain/configuration/
Add the following content to it
jboss.bind.address.management=< IP ADDRESS OF NODE 1>
jboss.bind.address =< IP ADDRESS OF NODE 1>
Save it.](https://image.slidesharecdn.com/instructiononcreatingaclusteronjbosseapenvironment-160718094033/85/Instruction-on-creating-a-cluster-on-jboss-eap-environment-7-320.jpg)


![Changes to be made on Master domain.xml to make SESSION REPLICATION work
29) Go to the location on Master node
/opt/jboss-eap-7.0/domain/configuration/domain.xml
In the subsystem jgroups
<subsystem xmlns="urn:jboss:domain:jgroups:4.0">
Change the channel stack to tcp
<channels default="ee">
<channel name="ee" stack="tcp"/>
</channels>
30) Now in the same subsystemmake changes to the stackname =tcp as below
<property name="initial_hosts"><IP_ADDRESS_OF
MASTER_NODE>[7600], <IP_ADDRESS_OF_SLAVE_NODE> [7600]</property>
<stack name="tcp">
<transport type="TCP" socket-binding="jgroups-tcp"/>
<protocol type="TCPPING">
<property
name="initial_hosts">10.50.35.73[7600],10.50.35.72[7600]</property>
<property name="num_initial_members">
2
</property>
<property name="port_range">
0
</property>
<property name="timeout">
3600
</property>
</protocol>
<protocol type="MERGE3"/>
<protocol type="FD_SOCK" socket-binding="jgroups-tcp-fd"/>
<protocol type="FD"/>](https://image.slidesharecdn.com/instructiononcreatingaclusteronjbosseapenvironment-160718094033/85/Instruction-on-creating-a-cluster-on-jboss-eap-environment-20-320.jpg)


Instruction on creating a cluster on jboss eap environment
- 1. Madhu Pisipati Creating a JBOSS EAP Cluster in an Active Passive configuration July 4 2016 EAP Cluster configuration for Simply Energy Version1.3
- 2. Overview of the cluster The cluster configuration that we are trying to achieve is an ACTIVE – PASSIVE configuration. We will be running 2 CLUSTERS as part of this configuration THE ACTIVE CLUSTER will have 2 ACTIVE NODES each running a single instance of JBOSS EAP 7.0.0 The two active nodes would be running on two different machines but would be grouped together as part of one server group active-cluster-server-group. The nodes will be configured with a domain controller in a Master slave configuration The configuration and deployment of the slaves would always be controlled from a single point called the Domain controller (Master) All the configuration and resources are controlled through a single profile full-ha-active for active cluster and a single profile called full-ha-passive for passive cluster. THE PASSIVE CLUSTER will have 2 PASSIVE NODES each running a single instance of JBOSS EAP. The two passive nodes would be running on two different machines but would be grouped together as part of one server group passive-cluster-server-group. There shall be one Machine running Apache HTTP Server for the software load balancer. The active and the passive clusters will be front ended with a software load balancer which in our case would be JBOSS Core Apache HTTP Server connecting to them on ports 6667 & 6668 respectively. 6667 pointing towards the active cluster group and 6668 pointing towards the passive cluster group. We will have the same instance of database to which both the clusters will be pointing to. Please Note: As of writing this document failover, load balancing and sticky sessions were achieved, however in EAP 7.0.0 the default configuration is not supporting session replication. It is observed that Session replication is only supported when two instances of EAP7.0 are run on the same node but on different ports. So session replication is still a topic of discussion which requires further study and investigation from the author.
- 3. HIGH LEVEL ARCHITECTURE OF THE EAP CLUSTERED ENVIRONMENT active-cluster-server-group DomainController LB UserRequest SessionReplication Failover MACHINE 1 JBCS APACHE HTTP SERVER LOAD BALANCER FOR ACTIVE CLUSTER PORT:80 PORT:6667 POR MACHINE 2 JBOSSEAP 7.0 MASTER: node1 ServerName: node1-active- server Port:8080 MACHINE 3 JBOSSEAP 7.0 SLAVE:node2 ServerName: node2-active- server Port:8080
- 4. HIGH LEVEL ARCHITECTURE OF THE EAP CLUSTERED ENVIRONMENT passive-cluster-server-group DomainController LB UserRequest SessionReplication Failover One commoninstance of the db for boththe clusters,boththe clustersconnecttothe same db. MACHINE 1 JBCS APACHE HTTP SERVER LOAD BALANCER FOR PASSIVE CLUSTER PORT:81 PORT:6668 MACHINE 4 JBOSSEAP 7.0 MASTER: node3 ServerName: node3-passive- server Port:8080 MACHINE 5 JBOSSEAP 7.0 SLAVE:node4 ServerName: node4-passive- server Port:8080
- 5. Detailed Instruction on setting up the environment. Pre requisite software on all the machines. JDK "1.8.0_72" Installation of Software Machine 1: Install Red Hat JBoss Core Services Apache HTTP Serverfor Linux (which ever flavour available) (L.B) Machine 2,3,4,5: Install Red Hat JBoss Enterprise Application Platform 7.0.0 I will discuss here the setup of the Active Cluster; passive cluster would be similar with differences in ports of mod cluster. 1) Go to the installation directory of JBoss on Machine 2. 2) This machine we would be converted as Domain Controller or the master node. 3) This machine is node1 4) On node 1 /opt/jboss-eap-7.0/bin/add-user.shadminpassword1! 5) On node2 (slave) – Machine 3 6) Just run /opt/jboss-eap-7.0/bin/add-user.sh No arguments What type of user do you wish to add? a) Management User (mgmt-users.properties) b) Application User (application-users.properties) (a): a • Simply press enter to accept the default selection of (a) Enter the details of the new user to add. Realm(ManagementRealm) : • Once again simply press enter to continue Username : node2 • Enter the username and press enter Password : password1! • Enter password1! as the password, and press enter
- 6. Re-enter Password : password1! • Enter password1! again to confirm, and press enter About to add user 'node2' for realm 'ManagementRealm' Is this correct yes/no? yes • Type yes and press enter to continue Is this new user going to be used for one AS process to connect to another AS process? e.g. for a slave host controller connecting to the master or for a Remoting connection for server to server EJB calls. yes/no? • Type yes and press enter To represent the user add the following to the server-identities definition <secret value="cGFzc3dvcmQxIQ==" /> • Copy and paste the provided secret hash into the notes. The host XML file of any servers that are not domain controllers need to provide this password hash along with the associated username to connect to the domain controller. 7) Add Application User An application user is also required on all 6 nodes to allow a remote Java class to authenticate and invoke a deployed EJB. Creating an application user requires the interactive mode so run add-user.sh and provide the following 2 times, once on each EAP 7 installation What type of user do you wish to add? a) Management User (mgmt-users.properties) b) Application User (application-users.properties) (a): b • Enter b and press enter to add an application user Enter the details of the new user to add. Realm(ApplicationRealm) : • Simply press enter to continue Username : ejbcaller • Enter the username as ejbcaller press enter Password : password1! • Enter “password1!” as the password, and press enter Re-enter Password : password1!
- 7. • Enter “password1!” again to confirm, and press enter What roles do you want this user to belong to? (Please enter a comma separated list, or leave blank for none)[ ]: • Press enter to leave this blank and continue About to add user 'ejbcaller' for realm 'ApplicationRealm' Is this correct yes/no? yes • Type yes and press enter to continue ...[confirmation of user being added to files] Is this new user going to be used for one AS process to connect to another AS process? e.g. for a slave host controller connecting to the master or for a Remoting connection for server to server EJB calls. yes/no? no • Type no and press enter to complete user setup At this point, all the required users have been created; move forward to making minimal edits to the server configuration files before starting the servers. Domain Controller , MASTER: Node1 Manual Configuration I have illustrated manual configuration below, the same can be achieved from the cli command interface of JBOSS. 8) Go to node 1 Go to the host.xml file located under /opt/jboss-eap-7.0/domain/configuration/host.xml Change the hostname to <host xmlns="urn:jboss:domain:4.1" name="node1"> 9) Create a properties file call it domain.properties under opt/jboss-eap-7.0 /domain/configuration/ Add the following content to it jboss.bind.address.management=< IP ADDRESS OF NODE 1> jboss.bind.address =< IP ADDRESS OF NODE 1> Save it.
- 8. 10) Edit the servers section in the host.xml file to contain only this <servers> <server name="node1-active-server" group="active-cluster-server-group" auto- start="true"> <system-properties> <property name="jboss.tx.node.id" value="111" boot-time="true"/> </system-properties> </server> </servers> 11) In the location /opt/jboss-eap-7.0/domain/configuration/domain.xml Open the domain.xml file. Copy the profile full- ha and create another profile with the name full-ha-active so your profiles section should look like <profiles> <profile name=" full-ha"> . . .</profile>
- 9. <profile name=" full-ha-active "> . . .</profile> 12) In the profile full-ha-active configure data source to represent the following. <datasource jta="false" jndi-name="java:/jdbc/cisDS" pool-name="CisDS" enabled="true" spy="true" use-ccm="false"> <connection- url>jdbc:oracle:thin:@hsndsd58z1.hsntech.int:1531:SERGN1D</connection-url> <driver-class>oracle.jdbc.OracleDriver</driver-class> <driver>oracle</driver> <pool> <min-pool-size>1</min-pool-size> <max-pool-size>4</max-pool-size> </pool> <security> <user-name>DEV01</user-name> <password>DEV01</password> </security> <validation> <validate-on-match>false</validate-on-match> <background-validation>false</background-validation> </validation> <statement> <share-prepared-statements>false</share-prepared-statements>
- 10. </statement> </datasource> <drivers> <driver name="oracle" module="oracle.jdbc"> <xa-datasource-class>oracle.jdbc.xa.client.OracleXADataSource</xa- datasource-class> </driver> <driver name="h2" module="com.h2database.h2"> <xa-datasource-class>org.h2.jdbcx.JdbcDataSource</xa-datasource-class> </driver> </drivers> 13) Make sure the server groups element in the domain.xml represent the following <server-groups> <server-group name="active-cluster-server-group" profile=" full-ha-active"> <jvm name="default"> <heap size="1000m" max-size="1000m"/> </jvm> <socket-binding-group ref="full-ha-sockets"/> </server-group> </server-groups>
- 11. 14) In the modules directory opt/jboss-eap-7.0/modules have the following oracle module expanded. oracle.zip This step concludes the configuration of the master. Now you can run the master server by executing the following command /opt/jboss-eap-7.0/bin/domain.sh --domain-config domain.xml --host-config=host.xml -P <path to domain.properties that you saved earlier> Or opt/jboss-eap-7.0/bin/domain.sh -b <IP_ADDRESS_OF NODE1> -Djboss.bind.address.management=<IP_ADDRESS_OF NODE1> -Djboss.bind.address=<IP_ADDRESS_OF NODE1> Check the server logs of the master make sure everything looks fine and no errors in the logs. Go to the Admin to see the server you have configured http://<IP_ADDRESS_OF MASTER>:9990/console/App.html#home user id :admin password:password1! Go to runtime -> server groups -> active-cluster->server-group-> and servers will be listed.
- 12. Configuration of SLAVE – Node 2 15) On Node2 Machine 3 we go to the location where we installed JBoss and go to the location /opt/jboss-eap-7.0/domain/configuration/host-slave.xml 16) Create a properties file call it domain.properties under opt/jboss-eap-7.0 /domain/configuration/ Add the following content to it jboss.bind.address.management=< IP ADDRESS OF NODE 2> jboss.bind.address=< IP ADDRESS OF NODE 2> jboss.domain.master.address=<IPADDRESS OF MASTER NODE 1> Save it. 17) The change them from <host xmlns="urn:jboss:domain:4.1"> to <host xmlns="urn:jboss:domain:4.1" name="node2" > 18) Also replace the secret value tag <secret value="cGFzc3dvcmQxIQ=="/> with the secret value that you stored earlier This allows communication between the master and the node. 19) Then change the domain controller to reflect <domain-controller> <remote protocol="remote" host="${jboss.domain.master.address:<IP_ADDRESS_OF_MASTER}" port="9999" security-realm="ManagementRealm" username="admin"/> </domain-controller>
- 13. 20) In the interfaces change the ip address <interfaces> <interface name="management"> <inet-address value="${jboss.bind.address.management:<IP_ADDRESS_OF _SLAVE>}"/> </interface> <interface name="public"> <inet-address value="${jboss.bind.address: :<IP_ADDRESS_OF _SLAVE>}"/> </interface> <interface name="unsecured"> <inet-address value=":<IP_ADDRESS_OF _SLAVE>" /> </interface> </interfaces> 21) Configure this node to be part of the server group that you created earlier Which would be to change <server name="node2-active-server" group="active-cluster-server-group" auto- start="true"> <system-properties> <property name="jboss.tx.node.id" value="222" boot-time="true"/> </system-properties> </server> Save it 22) In the modules directory opt/jboss-eap-7.0/modules has the following oracle module expanded. oracle.zip
- 14. Please note that there is no configuration of data source or any other resources will be required on the slave node and the profile of all the slave nodes will be controlled from a single point master. 23) Start the node2 –slave by executing the command domain -b <IP_ADDRESS_OF_SLAVE> -Djboss.domain.master.address=<IP_ADDRESS_OF_MASTER> --host-config=host- slave.xml Or opt/jboss-eap-7.0/bin/domain.sh --host-config=host-slave.xml -P <path to dmain.properties that you saved earlier> Check the server logs of the slave make sure everything looks fine and no errors in the logs. Go to the Admin to see the server you have configured is present http://<IP_ADDRESS_OF MASTER>:9990/console/App.html#home user id :admin password:password1! Go to runtime -> server groups -> active-cluster->server-group-> and servers will be listed.
- 16. Now the good part about the domain and the server group is that a single deployment artefact can be deployed to all nodes that belong to a server group in a single instance through the master domain controller. This is how you do it Go to admin console on Master/Domain Controller Go to Deployments->active-cluster-server-group-> deployments Add select the artefact and deploy and you can see it’s deployed on all nodes. Go to the individual address to check the deployment http://masternode:8080/context http://slavenode:8080/context
- 17. Configuring the load balancer for the EAP cluster. 24) On Machine 1 Go to the location where we installed opt/jbcs-httpd24-2.4/ The jbcs-httpd24-2.4/httpd directory created by extracting the ZIP archive is the top-level directory for Apache HTTP Server. This is referred to in this documentation as HTTPD_HOME. Follow this documentation for installation of ApacheHttpServer on linux https://access.redhat.com/documentation/en/red-hat-jboss-core-services-apache- http-server/2.4/apache-http-server-installation-guide/chapter-2-installing-jboss- core-services-apache-http-server-on-red-hat-enterprise-linux Go to the location The jbcs-httpd24-2.4/httpd And take a backup of the existing httpd.conf file. The following files need to be put in conf directory. These files should only be used as a reference as they are modified for windows environment. The linux installation will have a different set of params. common.conf httpd.conf The above files need to modified for Linux environment, as they were initially written for windows environment. For Eg Server root should be modified from ServerRoot "C:/jbcs-httpd24-2.4/etc/httpd" To linux env ServerRoot "opt/jbcs-httpd24-2.4/httpd" ServerAdmin Administrator@localhost to ServerAdmin root@localhost
- 18. 25) Once the load balancer is working and has no errors then configure mod_cluster on the Master controller. Go to the location on Master - node 1 /opt/jboss-eap-7.0/domain/configuration/domain.xml Open the domain.xml file Change the modcluster subsystemto reflect this in the active-full-ha profile. <subsystem xmlns="urn:jboss:domain:modcluster:2.0"> <mod-cluster-config advertise-socket="modcluster" proxies="my-proxy-one" balancer="mycluster" advertise="false" sticky-session-force="false" connector="ajp"> <dynamic-load-provider> <load-metric type="busyness"/> </dynamic-load-provider> </mod-cluster-config> </subsystem> 26) In the <socket-binding-groups> in the domain.xml under the same profile active-full- ha Add <outbound-socket-binding name="my-proxy-one"> <remote-destination host="<IP_ADDRESS_OF_MACHINE_1> " port="6667"/> </outbound-socket-binding> Save the file. Go to the admin console: Runtime->active-cluster-server-group-> node1-active-server: reload Runtime->active-cluster-server-group-> node2-active-server: reload
- 19. 27) Come back to Machine 1 where we have the load balancer installed. Access the url http:// <IP_ADDRESS_OF_MACHINE_1>:6667/mod_cluster_manager You should see something like below This concludes the configuration of EAP clusters. Now to test the load balancer, failover and sticky session’s part Deploy this test application on the server group using the EAP admin console cluster-demo.war 28) Go to the url http://<ip_address_of_machine_1>/cluster-demo it should open Hello world page for you and request would go to node1 or node2, Shutdown the node the request is going to from admin console of EAP and again access the url through LB http://<ip_address_of_machine_1>/cluster-demo it should still come up with hello world page without any hicks.
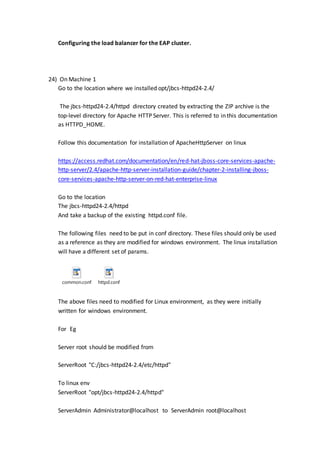
- 20. Changes to be made on Master domain.xml to make SESSION REPLICATION work 29) Go to the location on Master node /opt/jboss-eap-7.0/domain/configuration/domain.xml In the subsystem jgroups <subsystem xmlns="urn:jboss:domain:jgroups:4.0"> Change the channel stack to tcp <channels default="ee"> <channel name="ee" stack="tcp"/> </channels> 30) Now in the same subsystemmake changes to the stackname =tcp as below <property name="initial_hosts"><IP_ADDRESS_OF MASTER_NODE>[7600], <IP_ADDRESS_OF_SLAVE_NODE> [7600]</property> <stack name="tcp"> <transport type="TCP" socket-binding="jgroups-tcp"/> <protocol type="TCPPING"> <property name="initial_hosts">10.50.35.73[7600],10.50.35.72[7600]</property> <property name="num_initial_members"> 2 </property> <property name="port_range"> 0 </property> <property name="timeout"> 3600 </property> </protocol> <protocol type="MERGE3"/> <protocol type="FD_SOCK" socket-binding="jgroups-tcp-fd"/> <protocol type="FD"/>
- 21. <protocol type="VERIFY_SUSPECT"/> <protocol type="pbcast.NAKACK2"/> <protocol type="UNICAST3"/> <protocol type="pbcast.STABLE"/> <protocol type="pbcast.GMS"/> <protocol type="MFC"/> <protocol type="FRAG2"/> </stack> Save the file 31) NowStart the Master withthe followingcommand /opt/jboss-eap-7.0/bin/domain.sh -b<IP_ADDRESS_OF_MASTER> -Djboss.bind.address.management=<IP_ADDRESS_OF_MASTER> -Djboss.bind.address.private=<IP_ADDRESS_OF_MASTER> Or /opt/jboss-eap-7.0/bin/domain.sh --domain-config domain.xml --host-config=host.xml -P <path to domain.properties that you saved earlier> Make sure you add the property jboss.bind.address.private=<IP_ADDRESS_OF_MASTER> to that propertyfile. Similarly start the slave with following command domain -b <IP_ADDRESS_OF_SLAVE> -Djboss.domain.master.address=<IP_ADDRESS_OF_MASTER> --host-config=host- slave.xml -Djboss.bind.address.private=<IP_ADDRESS_OF_SLAVE> or opt/jboss-eap-7.0/bin/domain.sh --host-config=host-slave.xml -P <path to dmain.properties that you saved earlier>Make sure you add the property jboss.bind.address.private=<IP_ADDRESS_OF_SLAVE> tothat propertyfile. Clustering won’t happen until you start the master and slave nodes with the above commands.
- 22. 32) Now to test the session replication Do the following Go to the url http://<ip_address_of_machine_1>/cluster-demo it should open Hello world page for you Access the url http://<ip_address_of_machine_1>/cluster-demo/put.jsp You will see time now is 2:28PM and request would go to node1 or node2, Shutdown the node the request is going to from admin console of EAP and again access the url through LB http://<ip_address_of_machine_1>/cluster-demo/get.jsp You should be same message time now is 2:28PM This concludes EAP clustering on two nodes with load balancer, fail over, sticky session and session fail over (session replication). The same instructions need to be carried out for setting up passive cluster.