Interfacing to lcd with arduino
Download as odp, pdf0 likes1,306 views

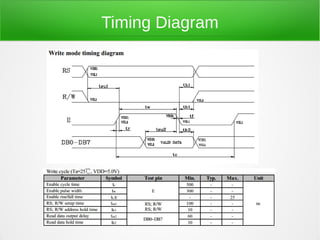
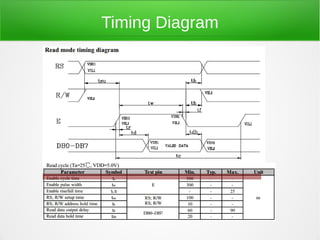
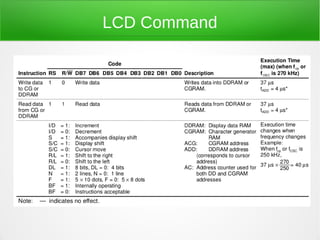
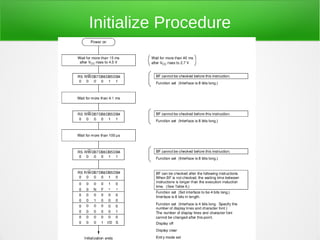
The document discusses interfacing with an LCD 16x2 display. It provides a block diagram, pin connections, timing diagrams and initialization procedures. It also includes Arduino code to initialize and write text to the LCD display using the LiquidCrystal library and by directly controlling the pins. The code shows setting up the LCD, sending command codes for setup and writing characters.


Interfacing to lcd with arduino
- 1. Interfacing to LCD 16x2 By [email protected]
- 2. You are free: to Share — to copy, distribute and transmit the work Under the following conditions: Attribution — You must attribute the work in the manner specified by the author or licensor (but not in any way that suggests that they endorse you or your use of the work). Noncommercial — You may not use this work for commercial purposes. No Derivative Works — You may not alter, transform, or build upon this work.
- 7. LCD Command
- 8. LCD Command
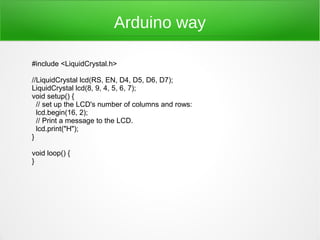
- 10. Arduino way #include <LiquidCrystal.h> //LiquidCrystal lcd(RS, EN, D4, D5, D6, D7); LiquidCrystal lcd(8, 9, 4, 5, 6, 7); void setup() { // set up the LCD's number of columns and rows: lcd.begin(16, 2); // Print a message to the LCD. lcd.print("H"); } void loop() { }
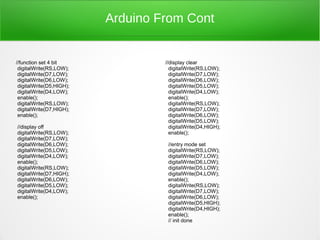
- 11. Arduino From Scratch int RS = 8; delay(5); //delay 4.1ms int En = 9; int D4 = 4; //function set 1 int D5 = 5; digitalWrite(RS,LOW); int D6 =6; digitalWrite(D7,LOW); int D7 =7 ; digitalWrite(D6,LOW); digitalWrite(D5,HIGH); void enable() digitalWrite(D4,HIGH); { enable(); digitalWrite(En,LOW); delay(1); delayMicroseconds(100); digitalWrite(En,HIGH); delay(1); //function set 1 digitalWrite(En,LOW); digitalWrite(RS,LOW); } digitalWrite(D7,LOW); // the setup routine runs once when you press reset: digitalWrite(D6,LOW); void setup() { digitalWrite(D5,HIGH); // initialize the digital pin as an output. digitalWrite(D4,HIGH); pinMode(RS, OUTPUT); enable(); pinMode(En, OUTPUT); pinMode(D4, OUTPUT); //bf can be check after following instruction pinMode(D5, OUTPUT); digitalWrite(RS,LOW); pinMode(D6, OUTPUT); digitalWrite(D7,LOW); pinMode(D7, OUTPUT); digitalWrite(D6,LOW); digitalWrite(D5,HIGH); delay(15); digitalWrite(D4,LOW); enable(); //function set 1 digitalWrite(RS,LOW); digitalWrite(D7,LOW); digitalWrite(D6,LOW); digitalWrite(D5,HIGH); digitalWrite(D4,HIGH); enable();
- 12. Arduino From Cont //function set 4 bit //display clear digitalWrite(RS,LOW); digitalWrite(RS,LOW); digitalWrite(D7,LOW); digitalWrite(D7,LOW); digitalWrite(D6,LOW); digitalWrite(D6,LOW); digitalWrite(D5,HIGH); digitalWrite(D5,LOW); digitalWrite(D4,LOW); digitalWrite(D4,LOW); enable(); enable(); digitalWrite(RS,LOW); digitalWrite(RS,LOW); digitalWrite(D7,HIGH); digitalWrite(D7,LOW); enable(); digitalWrite(D6,LOW); digitalWrite(D5,LOW); //display off digitalWrite(D4,HIGH); digitalWrite(RS,LOW); enable(); digitalWrite(D7,LOW); digitalWrite(D6,LOW); //entry mode set digitalWrite(D5,LOW); digitalWrite(RS,LOW); digitalWrite(D4,LOW); digitalWrite(D7,LOW); enable(); digitalWrite(D6,LOW); digitalWrite(RS,LOW); digitalWrite(D5,LOW); digitalWrite(D7,HIGH); digitalWrite(D4,LOW); digitalWrite(D6,LOW); enable(); digitalWrite(D5,LOW); digitalWrite(RS,LOW); digitalWrite(D4,LOW); digitalWrite(D7,LOW); enable(); digitalWrite(D6,LOW); digitalWrite(D5,HIGH); digitalWrite(D4,HIGH); enable(); // init done
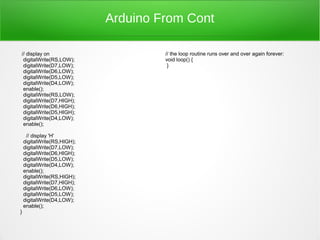
- 13. Arduino From Cont // display on // the loop routine runs over and over again forever: digitalWrite(RS,LOW); void loop() { digitalWrite(D7,LOW); } digitalWrite(D6,LOW); digitalWrite(D5,LOW); digitalWrite(D4,LOW); enable(); digitalWrite(RS,LOW); digitalWrite(D7,HIGH); digitalWrite(D6,HIGH); digitalWrite(D5,HIGH); digitalWrite(D4,LOW); enable(); // display 'H' digitalWrite(RS,HIGH); digitalWrite(D7,LOW); digitalWrite(D6,HIGH); digitalWrite(D5,LOW); digitalWrite(D4,LOW); enable(); digitalWrite(RS,HIGH); digitalWrite(D7,HIGH); digitalWrite(D6,LOW); digitalWrite(D5,LOW); digitalWrite(D4,LOW); enable(); }