SlideShare a Scribd company logo
LED Cube Presentation Slides
hundreds
One Cube


           O
           F
           POSSIBILITI
Making of


          VIDEO

FOR MORE VIDEOS: VISIT WWW.INSTRUCTABLES.COM
PARTS USED
        RESISTORS
(limit current flow in the circuit)

             LEDs
     (Light Emitting Diode)


            TRANSISTORS
             (serves as a switch)
0V                                   5V


                          220                                  220

                      +                                       +
                                LED                                  ( LED light up)
                                OFF
                      -                                       -
                 C                                        C
      22 K                                     22 K
             B             OFF                        B        Transistor
 0V                                     5V
                                                                   ON
                 E                                        E
                           transistor


When the transistor is OFF,                  When the transistor is ON,
LED turns OFF                                LED turns ON
LED 1         LED 2      LED 3      LED 4     LED 5     LED 6    LED 7     LED 8     LED 9

                       5V          5V         5V

                             220        220        220       220       220      220       220       220      220


                      +
                 ON           ON           ON
                       -
Level 1               C
          22 K
                 B                                    Common Cathode ( negative terminal)
 5V                          Transistor
                      E
                                 ON
Light stays
               off


      5V
            +              +   +


LOW

                     OFF
Light turns
                on

       5V
             +             +   +


HIGH

                      ON
   Apply 5V (logic high) at terminal LED1
   Apply 3.3V (logic high) at terminal Level 1 (LVL 1)
   Connect a jumper wire between two GND terminal


                                   5V


                                 3.3V
The Arduino board is a small micro-controller
board, which is a small circuit that contains a
whole computer on a small chip (Atmega 328),
the heart of the board.
Built in LED
connected to
pin13


                         Atmega 328
The Arduino board consists of the following I/O ports:
    14 digital IO pins (pins 0–13/ logic ‘High’- 5V, ‘Low’– 0V)
    6 analogue In pins (pins 0–5)
    6 analogue Out pins (pins 3, 5, 6, 9, 10, and 11)
   Arduino software is free, Open source
    programming plateform.

   Source code for Arduino is called a sketch.
   Directory: D:/ arduino-1.0/ double click arduino
            Upload


Verify
(compile)


                     Sketch Editor Window
LED Cube Presentation Slides
Verify
         Upload to I/O board


                               Core
                               program


    Your sketch goes here
   Arduino expects two functions to exist
    —one called setup() and one called loop().

   setup() {
        pinMode (13, Output)      - assign pin 13 as Output
    }

   loop() contains the core of your program.
        digitalWrite (13, High)   - turn on the built in LED connected to pin13
        delay (1000)              - wait for a secoond
        digitalWrite (13, LOW)    - turn off the LED
        delay (1000)              - wait for a second.
Upload
Verify


         Done compiling                  Done uploading


                          To display error message
const int LED1 = 1; // connect LED 1 to pin 1
const int L1= 10;   // connect Level 1 to pin 10

void setup()
{ pinMode (LED1, OUTPUT); // declare LED1 as an OUTPUT
  pinMode (L1, OUTPUT);   // declare Level 1 as an OUTPUT
}

void loop()
{
  digitalWrite (L1, HIGH);    // turn on Level 1 transistor
  digitalWrite (LED1, HIGH); // turn on LED1
  delay (200);                // delay for 200ms
  digitalWrite (LED1, LOW);   // turn off LED1
  delay(100);                // delay for 100ms
}
const int LED1 = 1;    // connect LED 1 to pin 1
const int LED2 = 2;    // connect LED 2 to pin 2
const int LED3 = 3;   // connect LED 1 to pin 3
const int L1= 10;     // connect Level 1 to pin 10

void setup()
{ pinMode (LED1, OUTPUT);       // declare LED1 as an OUTPUT
  pinMode (LED2, OUTPUT);       // declare LED2 as an OUTPUT
  pinMode (LED3, OUTPUT);       // declare LED3 as an OUTPUT
  pinMode (L1, OUTPUT);        // declare Level 1 as an OUTPUT
}

void loop()
{
  digitalWrite (L1, HIGH);    // turn on Level 1 transistor
  digitalWrite (LED1, HIGH); // turn on LED1
  delay (200);                // delay for 200ms
  digitalWrite (LED1, LOW); // turn off LED1
  delay(100);                // delay for 100ms
  -----------
   ----------
                          To be continued
}
   The for statement lets us do things over and over again, for a
    specified number of repetitions.

   The integer i is used to set the number of times that the loop will
    execute, running all the code inside the code block.


   In the for loop, as long as i is less than 10, it will continue looping,
    and each time the for loop is passed, i is incremented by 1.
Example:
int i ; // declare i as an integer
for(i = 0; i<5; i++) {          Execute Print
print(i);                       function when i
                                is 0 to 4
}

Or
for (int i=0; i<5; i++) {
Print(i);
}
void loop()
{                                       Specify 3 loops that
  for (int i = 0; i < 3; i ++)          core program will
  {                                     execute
        digitalWrite ( L1, HIGH );
        digitalWrite ( LED1, HIGH );
        delay (200);
        digitalWrite ( LED1, LOW) ;    Core program:
        delay (100);
        digitalWrite (LED2, HIGH );    LED 1, 2, 3 will turn
        delay (200);                   ON & OFF in
        digitalWrite ( LED2, LOW );    sequence
        delay (100);
        digitalWrite ( LED3, HIGH );
        delay (200);
        digitalWrite ( LED3, LOW );
        delay (100);
   }
                                        Turn off all LEDs for
  digitalWrite ( L1, LOW);
                                        1 sec
  delay (1000 ) ;
}
   An array contains one or more variables in a list.
   The array shown below is an array that holds three integer
    values: 1,2,3
Number of
                                variables

                int LevelPin [3] = { 10, 11, 12 };
Type of array
                    Name of                 List of variables
content
                    the array


                  i.e      LevelPin [0] = 10
                           LevelPin [1] = 11
                           LevelPin [2] = 12
Another great use of the for loop is to go through an array
and look at each item in the array:

for ( int level=0; level <3; level++)
     { pinMode (LevelPin[level], OUTPUT ); }

Each time the loop executes, level will be incremented using
the next integer in the Array[ ]
            pinMode (LevelPin[0], OUTPUT );

            pinMode (LevelPin[1], OUTPUT );

            pinMode (LevelPin[2], OUTPUT );
for (level=0; level< 3; level++)
 {
 digitalWrite ( LevelPin[level], HIGH );
 digitalWrite ( LED1, HIGH );
 digitalWrite ( LED2, HIGH );
                  :
                  :

 digitalWrite ( LED9, HIGH );
 delay (100);

 digitalWrite ( LED1, LOW );
 digitalWrite ( LED2, LOW );
                  :
                  :
 digitalWrite ( LED9, LOW );
 digitalWrite ( LevelPin[level], LOW );
 delay(50);
 }
LED Cube Presentation Slides

More Related Content

What's hot (20)

PDF
Water Level Indicator.pdf
MDSAZZADULALAM2
 
PPTX
DESIGN AND SIMULATION OF DIFFERENT 8-BIT MULTIPLIERS USING VERILOG CODE BY SA...
Saikiran Panjala
 
PDF
Smart traffic light controller using verilog
VaishaliVaishali14
 
PPTX
I o ports.ppt
Pradeep V Dev
 
PPTX
Tunnel diode
Sheikh Danish
 
PPT
Arduino presentation by_warishusain
student
 
PPTX
555 Timer integrated circuit and its applications
Mayank Raj Singh
 
PPTX
Oxidation--ABU SYED KUET
A. S. M. Jannatul Islam
 
PPT
Integrated Circuits
ANAND G
 
PDF
Digital logic families
Revathi Subramaniam
 
PPTX
a project on automatic traffic control using IC 555
jack990315
 
PPT
3.bipolar junction transistor (bjt)
firozamin
 
PPTX
3673 mosfet
vidhya DS
 
PDF
WATER LEVEL INDICATOR
Shahrukh Javed
 
PPTX
Fabrication of P-N Junction
Methnuwan Kariyawasam
 
DOCX
Packaging of vlsi devices
Ashu0711
 
PPT
Zener diodes
Touqeer Jumani
 
PPTX
Layouts
Sudhanshu Janwadkar
 
PPT
Basics Of VLSI
Avanish Agarwal
 
PPTX
basic vlsi ppt
Sidduzalaki143
 
Water Level Indicator.pdf
MDSAZZADULALAM2
 
DESIGN AND SIMULATION OF DIFFERENT 8-BIT MULTIPLIERS USING VERILOG CODE BY SA...
Saikiran Panjala
 
Smart traffic light controller using verilog
VaishaliVaishali14
 
I o ports.ppt
Pradeep V Dev
 
Tunnel diode
Sheikh Danish
 
Arduino presentation by_warishusain
student
 
555 Timer integrated circuit and its applications
Mayank Raj Singh
 
Oxidation--ABU SYED KUET
A. S. M. Jannatul Islam
 
Integrated Circuits
ANAND G
 
Digital logic families
Revathi Subramaniam
 
a project on automatic traffic control using IC 555
jack990315
 
3.bipolar junction transistor (bjt)
firozamin
 
3673 mosfet
vidhya DS
 
WATER LEVEL INDICATOR
Shahrukh Javed
 
Fabrication of P-N Junction
Methnuwan Kariyawasam
 
Packaging of vlsi devices
Ashu0711
 
Zener diodes
Touqeer Jumani
 
Basics Of VLSI
Avanish Agarwal
 
basic vlsi ppt
Sidduzalaki143
 

Viewers also liked (19)

PPTX
Led cube presentation
Karamveer Kumar
 
PPTX
Led cube
mohamed sarhan
 
DOCX
8TH FINAL REPORT PRINT
Anand Shah
 
PPTX
3d cube building cube by cube powerpoint presentation templates
SlideTeam.net
 
PDF
LED UV Cube presentation
iwanmanew
 
PDF
Translational R&D and Innovation Fund (TIF) - MoE
joserojasnus
 
PPT
self driven ca
Dibyajyoti Borah
 
PPTX
How to solve 3x3x3 cube
gkh8004
 
PDF
8x8x8 rgb led cube
smching
 
PDF
The Final 10%
John Sarik
 
PDF
Đồ án thi công mạch LED Cube 5x5x5
Mr Giap
 
PPTX
Avs nanotechnology and genetic engineering for plant pathology seminar 2015 a...
AMOL SHITOLE
 
PPTX
Nanotechnology
niharikackd
 
PPTX
Shreya ppt
Shreya Modi
 
DOC
93639430 additional-mathematics-project-work-2013
Rashmi R Rashmi R
 
PPTX
Nano technology in ervironmental engineering
Vishnu Raj
 
PPTX
Nanotechnology in water pollution treatment
University of Technology
 
PPTX
Presentation on project report
ramesh_x
 
PDF
State of the Word 2011
photomatt
 
Led cube presentation
Karamveer Kumar
 
Led cube
mohamed sarhan
 
8TH FINAL REPORT PRINT
Anand Shah
 
3d cube building cube by cube powerpoint presentation templates
SlideTeam.net
 
LED UV Cube presentation
iwanmanew
 
Translational R&D and Innovation Fund (TIF) - MoE
joserojasnus
 
self driven ca
Dibyajyoti Borah
 
How to solve 3x3x3 cube
gkh8004
 
8x8x8 rgb led cube
smching
 
The Final 10%
John Sarik
 
Đồ án thi công mạch LED Cube 5x5x5
Mr Giap
 
Avs nanotechnology and genetic engineering for plant pathology seminar 2015 a...
AMOL SHITOLE
 
Nanotechnology
niharikackd
 
Shreya ppt
Shreya Modi
 
93639430 additional-mathematics-project-work-2013
Rashmi R Rashmi R
 
Nano technology in ervironmental engineering
Vishnu Raj
 
Nanotechnology in water pollution treatment
University of Technology
 
Presentation on project report
ramesh_x
 
State of the Word 2011
photomatt
 
Ad

Similar to LED Cube Presentation Slides (20)

PDF
Arduino Basics
Jeremy Abbett
 
PDF
Programming arduino makeymakey
Industrial Design Center
 
PDF
Making things sense - Day 1 (May 2011)
markumoto
 
PDF
Arduino: Intro and Digital I/O
June-Hao Hou
 
PDF
publish manual
John Webster
 
PPT
Physical prototyping lab2-analog_digital
Tony Olsson.
 
PPT
Physical prototyping lab2-analog_digital
Tony Olsson.
 
PPTX
Ardui no
Amol Sakhalkar
 
PDF
arduinoworkshop-160204051621.pdf
AbdErrezakChahoub
 
KEY
Hello Arduino.
mkontopo
 
PPTX
Arduino slides
sdcharle
 
PPTX
Arduino Workshop Slides
mkarlin14
 
DOCX
Basic arduino sketch example
mraziff2009
 
PDF
Arduino learning
Anil Yadav
 
PPTX
Sensors and Actuators in Arduino, Introduction
BibekPokhrel13
 
PPTX
Robotics Session day 1
Afzal Ahmad
 
PPT
Intro2 Robotic With Pic18
Moayadhn
 
PDF
Hardware Hacking and Arduinos
Howard Mao
 
PPTX
Arduino Workshop (3).pptx
HebaEng
 
Arduino Basics
Jeremy Abbett
 
Programming arduino makeymakey
Industrial Design Center
 
Making things sense - Day 1 (May 2011)
markumoto
 
Arduino: Intro and Digital I/O
June-Hao Hou
 
publish manual
John Webster
 
Physical prototyping lab2-analog_digital
Tony Olsson.
 
Physical prototyping lab2-analog_digital
Tony Olsson.
 
Ardui no
Amol Sakhalkar
 
arduinoworkshop-160204051621.pdf
AbdErrezakChahoub
 
Hello Arduino.
mkontopo
 
Arduino slides
sdcharle
 
Arduino Workshop Slides
mkarlin14
 
Basic arduino sketch example
mraziff2009
 
Arduino learning
Anil Yadav
 
Sensors and Actuators in Arduino, Introduction
BibekPokhrel13
 
Robotics Session day 1
Afzal Ahmad
 
Intro2 Robotic With Pic18
Moayadhn
 
Hardware Hacking and Arduinos
Howard Mao
 
Arduino Workshop (3).pptx
HebaEng
 
Ad

Recently uploaded (20)

PDF
Deception Technology: The Cybersecurity Paradigm We Didn’t Know We Needed
GauriKale30
 
PDF
How is IMSLP Wagner Connected with Pachelbel & Shostakovich.pdf
SheetMusic International
 
PDF
Books on Display in the Library June 2025 - Matariki
NZSG
 
PPTX
Black life TeleHealth 3 (1).pptx Business Plan
mdthelackyboy
 
PDF
John Polit: Strategic Leadership & Growth Advisor for the Modern Business World
John Polit
 
PPTX
Vedanta’s Pivotal Role in India’s Growth with Record Vedanta Tax Contribution...
Vedanta Cases
 
PPTX
SolarSquare PPT-inside_sales_2025_pilot.pptx
sumitj8
 
PDF
GIÁO TRÌNH KINH DOANH QUỐC TẾ ĐẠI HỌC NGOẠI THƯƠNG
k622314115078
 
PPTX
Real Options Analysis in an Era of Market Volatility and Technological Disrup...
abakahmbeahvincent
 
PDF
Thane Stenner - A Leader In Extreme Wealth Management
Thane Stenner
 
PPTX
Essar at IEW 2025, Leading the Way to India’s Green Energy Transition.
essarcase
 
PDF
Haiti Educational System Le Floridien.pdf
LE FLORIDIEN
 
PPTX
Appreciations - June 25.pptxggggggghhhhhh
anushavnayak
 
PDF
MusicVideoTreatmentForFreebyParrisLaVon.pdf
gamilton
 
PDF
Natesan Thanthoni: The Agile Visionary Transforming Virbac IMEA (India, Middl...
red402426
 
PDF
CFG application - 2025 - Curtis Funding Group, LLC
Curt MacRae
 
PDF
The Best eSIM Provider for Europe in 2025
Airhub
 
PDF
REPORT WRITING for Internal Auditors (considering IIA's Global Internal Audit...
Abdullah Mohammed
 
PDF
Adnan Imam - A Dynamic Freelance Writer
Adnan Imam
 
PDF
Albaik Franchise All Information Update.pdf
AL-Baik Franchise
 
Deception Technology: The Cybersecurity Paradigm We Didn’t Know We Needed
GauriKale30
 
How is IMSLP Wagner Connected with Pachelbel & Shostakovich.pdf
SheetMusic International
 
Books on Display in the Library June 2025 - Matariki
NZSG
 
Black life TeleHealth 3 (1).pptx Business Plan
mdthelackyboy
 
John Polit: Strategic Leadership & Growth Advisor for the Modern Business World
John Polit
 
Vedanta’s Pivotal Role in India’s Growth with Record Vedanta Tax Contribution...
Vedanta Cases
 
SolarSquare PPT-inside_sales_2025_pilot.pptx
sumitj8
 
GIÁO TRÌNH KINH DOANH QUỐC TẾ ĐẠI HỌC NGOẠI THƯƠNG
k622314115078
 
Real Options Analysis in an Era of Market Volatility and Technological Disrup...
abakahmbeahvincent
 
Thane Stenner - A Leader In Extreme Wealth Management
Thane Stenner
 
Essar at IEW 2025, Leading the Way to India’s Green Energy Transition.
essarcase
 
Haiti Educational System Le Floridien.pdf
LE FLORIDIEN
 
Appreciations - June 25.pptxggggggghhhhhh
anushavnayak
 
MusicVideoTreatmentForFreebyParrisLaVon.pdf
gamilton
 
Natesan Thanthoni: The Agile Visionary Transforming Virbac IMEA (India, Middl...
red402426
 
CFG application - 2025 - Curtis Funding Group, LLC
Curt MacRae
 
The Best eSIM Provider for Europe in 2025
Airhub
 
REPORT WRITING for Internal Auditors (considering IIA's Global Internal Audit...
Abdullah Mohammed
 
Adnan Imam - A Dynamic Freelance Writer
Adnan Imam
 
Albaik Franchise All Information Update.pdf
AL-Baik Franchise
 

LED Cube Presentation Slides

  • 2. hundreds One Cube O F POSSIBILITI
  • 3. Making of VIDEO FOR MORE VIDEOS: VISIT WWW.INSTRUCTABLES.COM
  • 4. PARTS USED RESISTORS (limit current flow in the circuit) LEDs (Light Emitting Diode) TRANSISTORS (serves as a switch)
  • 5. 0V 5V 220 220 + + LED ( LED light up) OFF - - C C 22 K 22 K B OFF B Transistor 0V 5V ON E E transistor When the transistor is OFF, When the transistor is ON, LED turns OFF LED turns ON
  • 6. LED 1 LED 2 LED 3 LED 4 LED 5 LED 6 LED 7 LED 8 LED 9 5V 5V 5V 220 220 220 220 220 220 220 220 220 + ON ON ON - Level 1 C 22 K B Common Cathode ( negative terminal) 5V Transistor E ON
  • 7. Light stays off 5V + + + LOW OFF
  • 8. Light turns on 5V + + + HIGH ON
  • 9. Apply 5V (logic high) at terminal LED1  Apply 3.3V (logic high) at terminal Level 1 (LVL 1)  Connect a jumper wire between two GND terminal 5V 3.3V
  • 10. The Arduino board is a small micro-controller board, which is a small circuit that contains a whole computer on a small chip (Atmega 328), the heart of the board. Built in LED connected to pin13 Atmega 328
  • 11. The Arduino board consists of the following I/O ports:  14 digital IO pins (pins 0–13/ logic ‘High’- 5V, ‘Low’– 0V)  6 analogue In pins (pins 0–5)  6 analogue Out pins (pins 3, 5, 6, 9, 10, and 11)
  • 12. Arduino software is free, Open source programming plateform.  Source code for Arduino is called a sketch.
  • 13. Directory: D:/ arduino-1.0/ double click arduino Upload Verify (compile) Sketch Editor Window
  • 15. Verify Upload to I/O board Core program Your sketch goes here
  • 16. Arduino expects two functions to exist —one called setup() and one called loop().  setup() { pinMode (13, Output) - assign pin 13 as Output }  loop() contains the core of your program. digitalWrite (13, High) - turn on the built in LED connected to pin13 delay (1000) - wait for a secoond digitalWrite (13, LOW) - turn off the LED delay (1000) - wait for a second.
  • 17. Upload Verify Done compiling Done uploading To display error message
  • 18. const int LED1 = 1; // connect LED 1 to pin 1 const int L1= 10; // connect Level 1 to pin 10 void setup() { pinMode (LED1, OUTPUT); // declare LED1 as an OUTPUT pinMode (L1, OUTPUT); // declare Level 1 as an OUTPUT } void loop() { digitalWrite (L1, HIGH); // turn on Level 1 transistor digitalWrite (LED1, HIGH); // turn on LED1 delay (200); // delay for 200ms digitalWrite (LED1, LOW); // turn off LED1 delay(100); // delay for 100ms }
  • 19. const int LED1 = 1; // connect LED 1 to pin 1 const int LED2 = 2; // connect LED 2 to pin 2 const int LED3 = 3; // connect LED 1 to pin 3 const int L1= 10; // connect Level 1 to pin 10 void setup() { pinMode (LED1, OUTPUT); // declare LED1 as an OUTPUT pinMode (LED2, OUTPUT); // declare LED2 as an OUTPUT pinMode (LED3, OUTPUT); // declare LED3 as an OUTPUT pinMode (L1, OUTPUT); // declare Level 1 as an OUTPUT } void loop() { digitalWrite (L1, HIGH); // turn on Level 1 transistor digitalWrite (LED1, HIGH); // turn on LED1 delay (200); // delay for 200ms digitalWrite (LED1, LOW); // turn off LED1 delay(100); // delay for 100ms ----------- ---------- To be continued }
  • 20. The for statement lets us do things over and over again, for a specified number of repetitions.  The integer i is used to set the number of times that the loop will execute, running all the code inside the code block.  In the for loop, as long as i is less than 10, it will continue looping, and each time the for loop is passed, i is incremented by 1.
  • 21. Example: int i ; // declare i as an integer for(i = 0; i<5; i++) { Execute Print print(i); function when i is 0 to 4 } Or for (int i=0; i<5; i++) { Print(i); }
  • 22. void loop() { Specify 3 loops that for (int i = 0; i < 3; i ++) core program will { execute digitalWrite ( L1, HIGH ); digitalWrite ( LED1, HIGH ); delay (200); digitalWrite ( LED1, LOW) ; Core program: delay (100); digitalWrite (LED2, HIGH ); LED 1, 2, 3 will turn delay (200); ON & OFF in digitalWrite ( LED2, LOW ); sequence delay (100); digitalWrite ( LED3, HIGH ); delay (200); digitalWrite ( LED3, LOW ); delay (100); } Turn off all LEDs for digitalWrite ( L1, LOW); 1 sec delay (1000 ) ; }
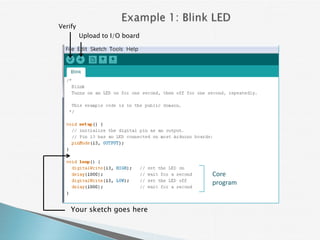
  • 23. An array contains one or more variables in a list.  The array shown below is an array that holds three integer values: 1,2,3
  • 24. Number of variables int LevelPin [3] = { 10, 11, 12 }; Type of array Name of List of variables content the array i.e LevelPin [0] = 10 LevelPin [1] = 11 LevelPin [2] = 12
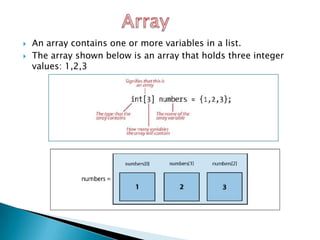
  • 25. Another great use of the for loop is to go through an array and look at each item in the array: for ( int level=0; level <3; level++) { pinMode (LevelPin[level], OUTPUT ); } Each time the loop executes, level will be incremented using the next integer in the Array[ ] pinMode (LevelPin[0], OUTPUT ); pinMode (LevelPin[1], OUTPUT ); pinMode (LevelPin[2], OUTPUT );
  • 26. for (level=0; level< 3; level++) { digitalWrite ( LevelPin[level], HIGH ); digitalWrite ( LED1, HIGH ); digitalWrite ( LED2, HIGH ); : : digitalWrite ( LED9, HIGH ); delay (100); digitalWrite ( LED1, LOW ); digitalWrite ( LED2, LOW ); : : digitalWrite ( LED9, LOW ); digitalWrite ( LevelPin[level], LOW ); delay(50); }

Editor's Notes

  • #10: Next, how do we turn on LED 2 ? And how to turn on LED at level 2 ?
  • #12: It contains everything needed to support the microcontroller ; simply connect it to a computer via USB cable or external supply ( 7– 12V). Digital input pins sense the presence and absence of voltage on a pin( High – 5V, LOW - 0V). Analog input pins measure a range of voltages on a pin.
  • #18: Change delay time from 1000 ms to 100 ms, observe the difference.
  • #19: Next, learn to turn on LED1, 2, 3 in sequence.