SlideShare a Scribd company logo
Veritas NetBackup™ 

Installation Guide


Windows


Release 6.5


12308334
NetBackup Installation Guide

           Copyright © 1998-2007 Symantec Corporation. All rights reserved.

           NetBackup 6.5

           Symantec, the Symantec logo, and NetBackup are trademarks or registered trademarks of
           Symantec Corporation or its affiliates in the U.S. and other countries. Other names may be
           trademarks of their respective owners.

           Portions of this software are derived from the RSA Data Security, Inc. MD5 Message-
           Digest Algorithm. Copyright 1991-92, RSA Data Security, Inc. Created 1991. All rights
           reserved.

           The product described in this document is distributed under licenses restricting its use,
           copying, distribution, and decompilation/reverse engineering. No part of this document
           may be reproduced in any form by any means without prior written authorization of
           Symantec Corporation and its licensors, if any.

           THIS DOCUMENTATION IS PROVIDED “AS IS” AND ALL EXPRESS OR IMPLIED
           CONDITIONS, REPRESENTATIONS AND WARRANTIES, INCLUDING ANY IMPLIED
           WARRANTY OF MERCHANTABILITY, FITNESS FOR A PARTICULAR PURPOSE OR NON
           INFRINGEMENT, ARE DISCLAIMED, EXCEPT TO THE EXTENT THAT SUCH
           DISCLAIMERS ARE HELD TO BE LEGALLY INVALID, SYMANTEC CORPORATION SHALL
           NOT BE LIABLE FOR INCIDENTAL OR CONSEQUENTIAL DAMAGES IN CONNECTION
           WITH THE FURNISHING, PERFORMANCE, OR USE OF THIS DOCUMENTATION. THE
           INFORMATION CONTAINED IN THIS DOCUMENTATION IS SUBJECT TO CHANGE
           WITHOUT NOTICE.

           The Licensed Software and Documentation are deemed to be “commercial computer
           software” and “commercial computer software documentation” as defined in FAR
           Sections 12.212 and DFARS Section 227.7202.

           Symantec Software Corporation
           20330 Stevens Creek Blvd.
           Cupertino, CA 95014
           www.symantec.com

           Printed in the United States of America.
Third-party legal notices

                 Third-party software may be recommended, distributed, embedded, or bundled
                 with this Veritas product. Such third-party software is licensed separately by its
                 copyright holder. All third-party copyrights associated with this product are
                 listed in the accompanying release notes.
                 AIX is a registered trademark of IBM Corporation.
                 HP-UX is a registered trademark of Hewlett-Packard Development Company, L.P.

                 Linux is a registered trademark of Linus Torvalds.

                 Solaris is a trademark of Sun Microsystems, Inc.

                 Windows is a registered trademark of Microsoft Corporation.

                 Oracle is a registered trademark of Oracle Corporation.


Licensing and registration
                 Veritas NetBackup is a licensed product. See the NetBackup Installation Guide
                 for license installation instructions.

Technical support
                 For technical assistance, visit http://entsupport.symantec.com and select phone
                 or email support. Use the Knowledge Base search feature to access resources
                 such as TechNotes, product alerts, software downloads, hardware compatibility
                 lists, and our customer email notification service.
Netbackup intallation guide
Contents


Chapter 1   Preparing for installation
            Pre-installation software requirements ............................................................. 9

                NetBackup license key requirements .......................................................... 9

                NetBackup supported platforms ................................................................10

                Contents of the NetBackup media kit .......................................................10

            Requirements for NetBackup server installation ...........................................13

                Requirements for local installations ........................................................13

                Notes for remote and cluster installations ..............................................15

                Notes for Private Branch Exchange (PBX) ................................................15

                Notes for NetBackup Access Control ........................................................16

            Configuring storage devices for the operating system ..................................16

                Locating supported robot types .................................................................17

                Configuring storage devices .......................................................................17


Chapter 2   Installing or upgrading NetBackup server software
            Sequence for installing or upgrading ...............................................................19

                Guidelines for upgrading to NetBackup 6.5 .............................................19

            Upgrading NetBackup Servers to NetBackup Enterprise Servers ...............21

            Installing or upgrading servers locally ............................................................22

            Installing or upgrading servers remotely ........................................................33

            Installing or upgrading servers in clustered environments .........................45

                Cluster installation requirements .............................................................45

                Before you perform a new installation in clustered environments .....46

                Before you perform an upgrade in clustered environments .................46

                Installing or upgrading servers in clustered environments .................47

                     Notes on NetBackup cluster environments .....................................62

                     Verifying cluster installations or upgrades .....................................62

            Installing NetBackup servers silently ...............................................................64

                System reboot after a silent installation ..................................................66


Chapter 3   Installing alternative administration interfaces
            About the NetBackup Remote Administration Console for Windows .........67

               Installing the NetBackup Remote Administration Console ..................68

                    Adding the NetBackup Remote Administration Console host to server 

                        lists .................................................................................................69
6 Contents


                 Adding remote servers to administer from an existing NetBackup Remote 

                      Administration Console ...................................................................... 70

              About the NetBackup-Java Administration Console ...................................... 71

                 Installing or removing multiple versions of the NetBackup-Java 

                      Administration Console on Windows ............................................... 71

                      Installing multiple versions of the NetBackup Administration Console 

                           on Windows .................................................................................. 71

                      Removing earlier versions of the NetBackup-Java Administration 

                           Console on Windows ................................................................... 73

              About the Java Windows Administration Console ......................................... 73

                 Installing the Java Windows Administration Console ........................... 74

                 Administering multiple versions of NetBackup servers ....................... 74

                      Earlier versions of the NetBackup-Java Administration Console on

                           UNIX platforms ............................................................................ 75

                      Earlier versions of the NetBackup-Java Administration Console on

                           Windows platforms ..................................................................... 75

                      Remote display-back from UNIX servers ......................................... 75

                      Remote display-back from Windows servers .................................. 75

                      At the console of the server with an earlier version of NetBackup 75


  Chapter 4   Removing and reinstalling NetBackup
              Removing NetBackup server software ............................................................. 77

              Removing NetBackup server software in a clustered environment ............ 79

              Notes on reinstalling NetBackup server software .......................................... 79


  Chapter 5   Installing clients
              Installing Microsoft Windows clients .............................................................. 81

                  Client installation overview ....................................................................... 81

                       Veritas volume snapshot provider on Windows ............................. 82

                       User-directed operations for Windows systems ............................. 82

                       Local and remote installations for Windows systems ................... 82

                       Silent installations for Windows systems ....................................... 83

                       New and upgrade installations for Windows clients ...................... 83

                  Windows client system requirements ...................................................... 84

                       Local installation requirements ........................................................ 84

                       Remote installation requirements .................................................... 84

                       NetBackup server requirements for Windows clients ................... 85

                  Installing Windows clients locally ............................................................ 85

                  Installing Windows clients remotely ........................................................ 86

                       Notes on Windows client remote installations ............................... 87

                  Installing Windows clients silently .......................................................... 89

                  Configuring NetBackup clients .................................................................. 89
Contents   7


                 Removing Windows clients ........................................................................90

             Installing UNIX clients ........................................................................................90

                 Installing UNIX clients locally ...................................................................92

                 Installing UNIX clients remotely ...............................................................93

                      Installing client software with the rsh method ..............................93

                      Installing client software with the ftp method ..............................95

                      Installing client software with the ssh method ..............................96

                      Installing client software with the sftp method ...........................97

                 Adding a UNIX client after initial server installation ............................98

                 Removing UNIX NetBackup client software ............................................99


Chapter 6    NetBackup licenses
             NetBackup license compatibility .....................................................................103

             Entering license keys .........................................................................................103

             Frequently asked questions .............................................................................104


Chapter 7    Configuring NetBackup servers
             Recommendations for configuring NetBackup .............................................109

             Configuring NetBackup .....................................................................................110

                 Configuring storage devices for NetBackup ..........................................111

                 Configuring volumes .................................................................................112

                 Configuring the catalog backup ...............................................................113

                 Creating a backup policy ..........................................................................114

             Testing the NetBackup installation ................................................................114


Appendix A   NetBackup LiveUpdate
             About NetBackup LiveUpdate ..........................................................................115

                  How NetBackup LiveUpdate works .........................................................116

             Setting up your NetBackup LiveUpdate server .............................................117

                  Installing on Windows systems ...............................................................117

                  Installing on UNIX systems ......................................................................121

                      Installing the agent on UNIX servers .............................................121

                      Installing the agent on UNIX clients ...............................................122

             Changing the NetBackup LiveUpdate configuration ...................................124

                  Changing the LiveUpdate configuration on Windows .........................125

                  Changing the LiveUpdate configuration on UNIX ................................125

             Downloading NetBackup release updates ......................................................125

             About LiveUpdate policies ................................................................................126

                  Creating a LiveUpdate policy ...................................................................127

             Updating servers and clients with NetBackup LiveUpdate .........................128

                  Updating master servers and media servers that run LiveUpdate policies 

                      128
8 Contents


                 Updating master severs and media servers that do not run LiveUpdate 

                     policies ................................................................................................. 129

                 Updating clients ......................................................................................... 130

             LiveUpdate logs .................................................................................................. 130

                 Retrieving logs remotely .......................................................................... 131

             Uninstalling NetBackup LiveUpdate .............................................................. 131

                 Uninstalling on Windows systems .......................................................... 131

                 Uninstalling on UNIX systems ................................................................ 132


  Index                                                                                                                      135
Chapter                           1
Preparing for installation
             This chapter includes the following topics:
             ■   “Pre-installation software requirements”
             ■   “Requirements for NetBackup server installation”
             ■   “Configuring storage devices for the operating system”


Pre-installation software requirements
             This release of NetBackup contains many changes and enhancements that have
             caused the software to become larger. You can read a brief description of these
             enhancements in the NetBackup Release Notes.
             Depending on the type of platform you install, the growth in the software may
             require you to mount more CDs than in earlier releases.


NetBackup license key requirements
             When you install a NetBackup master or media server, you must enter a 

             NetBackup base product license key. Check your release package to make sure 

             that you have license keys for all the NetBackup servers, options, and agents 

             that you requested.

             Enter all product license keys on the master server when you are prompted 

             during the installation.

             For more information about license keys, refer to “NetBackup licenses” on 

             page 103.

             For detailed information on how to administer NetBackup license keys, refer to 

             the Veritas NetBackup Administrator’s Guide, Volume I.
10 Preparing for installation
   Pre-installation software requirements


   NetBackup supported platforms
                            The NetBackup Release Notes document provides a “Supported Platforms and
                            Operating Systems” table that identifies which clients to install with which
                            operating systems.
                            You can run mixed versions of NetBackup between master and media servers.
                            This “back-level support” lets you upgrade NetBackup one server at a time,
                            which minimizes impact on overall system performance. Symantec supports
                            only certain combinations of servers and clients.
                            The following lists all of the configurations for which Symantec provides
                            support.

                             Master Server Version     Media Server Version            Client Version

                             NetBackup 6.5             6.5                             6.5

                             NetBackup 6.5             6.5                             6.0, 5.0MP4 (or later) or 5.1

                             NetBackup 6.5             6.0MP3 (or later), 5.0MP4 (or   6.0, 5.0MP4 (or later) or 5.1
                                                       later), or 5.1


                            Caution: Before you upgrade the NetBackup server software, you must back up
                            your NetBackup catalogs and verify that the catalog backup was successful.


   Contents of the NetBackup media kit
                            Starting with this release, Symantec is delivering NetBackup in both CD-ROM 

                            and DVD media formats. Starting with the next major release of NetBackup, the 

                            product will only be available on DVD media.

                            Your NetBackup media kit includes multiple CDs or DVDs. The label on each CD

                            and DVD provides a brief description of its contents.

                            NetBackup documentation is included on both CD and DVD, and accompanies 

                            each product order. The documentation is in Portable Document Format (PDF), 

                            for all NetBackup software products in a release. The documentation is 

                            organized into product groups. You can use Acrobat Reader to print the files you 

                            select.

                            If Autorun is enabled on your Windows system, you see a Web page that lists the 

                            documents that you can select to view. On UNIX or Linux systems, or if Autorun

                            is disabled on the Windows system, navigate to the CD drive to view the CD

                            contents. From that drive, you can select documents to view or copy them to a 

                            local drive.
Preparing for installation   11
                                                 Pre-installation software requirements


The following table lists the title of each NetBackup 6.5 CD along with a brief
description of its contents.


Note: Beginning with NetBackup 6.5, Veritas Security Services and its associated
acronym (VxSS) are replaced by Symantec Product Authentication and
Authorization.


NetBackup CD                Contents

Windows 32-bit              Server/Client/Options

Windows IA-64-bit           Server/Client/Options

Windows X64-bit             Server/Client/Options

Solaris SPARC               Server/Clients

Solaris x86-64-bit          Server/Clients

HP-UX PA-RISC               Server/Clients

HP-UX IA-64-bit             Server/Client

Linux 2.4                   Server/Client

Linux 2.6                   Red Hat Server/Client

Linux IA-64-bit 2.6         Red Hat and SuSE Servers/Clients

Linux 2.6                   SuSE Server/Client

AIX RS6000                  Server/Client

Tru64 (Alpha)               Server/Client

UNIX Client1                Tru64, all HP, and AIX

UNIX Client2                Mac and all Linux

UNIX Client3                Solaris, FreeBSD, and IRIX

BMR                         UNIX

UNIX Options                UNIX Options/Database Agents

NOM                         NetBackup Operations Manager

Storage Migrator            UNIX

NetBackup Document Set      Complete NetBackup documentation set in PDF format
12 Preparing for installation
   Pre-installation software requirements


                             NetBackup CD                  Contents (Continued)

                             NetBackup Infrastructure      Symantec Product Authentication & Authorization
                             Core Services (ICS for        installers for Windows 32-bit
                             Windows 32-bit)

                             ICS Windows IA-64-bit         Symantec Product Authentication & Authorization
                                                           installers for Windows IA-64-bit

                             ICS Windows X64-bit           Symantec Product Authentication & Authorization
                                                           installers for Windows X64-bit

                             ICS Solaris SPARC             Symantec Product Authentication & Authorization, and
                                                           PBX installers for Solaris SPARC

                             ICS Solaris x86-64-bit        Symantec Product Authentication & Authorization, and
                                                           PBX installers for Solaris x86-64-bit

                             ICS HP-UX                     Symantec Product Authentication & Authorization, and
                             PA-RISC/IA-64-bit             PBX installers for HP-UX PA-RISC/IA-64-bit

                             ICS Linux 2.4/2.6             Symantec Product Authentication & Authorization, and
                                                           PBX installers for Linux 2.4/2.6

                             ICS Linux 2.6 IA-64-bit       Symantec Product Authentication & Authorization, and
                                                           PBX installers for Linux 2.6 IA-64-bit

                             ICS AIX                       Symantec Product Authentication & Authorization, and
                                                           PBX installers for AIX

                             ICS Tru64                     Symantec Product Authentication & Authorization, and
                                                           PBX installers for Tru64


                            The following table lists the title of each NetBackup 6.5 DVD along with a brief
                            description of its contents.

                             NetBackup DVD       Contents

                             Windows 32-/        ■     Windows 32-bit Server/Client/Options
                             64-bit, ICS 32-     ■     Windows IA-64-bit Server/Client/Options
                             and 64-bit, and     ■     Windows X64-bit Server/Client/Options
                             UNIX clients        ■     ICS Windows 32-bit
                                                 ■     ICS Windows IA-64-bit
                                                 ■     ICS Windows X64-bit
                                                 ■     UNIX Client1 (Tru64, all HP and AIX)
                                                 ■     UNIX Client2 (Mac and all Linux)
                                                 ■     UNIX Client3 (Solaris's, FreeBSD and IRIX)
Preparing for installation   13
                                                          Requirements for NetBackup server installation


               NetBackup DVD       Contents (Continued)

               Solaris SPARC       ■   Solaris SPARC Server/Clients
               and x86-64,         ■   Solaris x86-bit Server/Client
               Linux, and ICS      ■   Linux 2.4 Server/Client
                                   ■   Linux 2.6 Red Hat Server/Client
                                   ■   Linux 2.6 IA-64-bit Red Hat/SuSE Servers/Clients
                                   ■   Linux 2.6 SuSE Server/Client
                                   ■   ICS Solaris SPARC
                                   ■   ICS Solaris x86-64-bit
                                   ■   ICS Linux 2.4/2.6 32-bit
                                   ■   ICS Linux 2.6 IA-64-bit

               HP, AIX, Tru64,     ■   HP-UX PA-RISC Server/Client
               and ICS             ■   HP-UX IA-64 Server/Client
                                   ■   AIX RS6000 Server/Client
                                   ■   Tru64 Server/Client
                                   ■   ICS HP-UX RISC/IA-64
                                   ■   ICS AIX
                                   ■   ICS Tru64

               BMR, UNIX           ■   BMR for UNIX
               Options, NOM,       ■   UNIX options
               Storage Migrator,   ■   NetBackup Operations Manager (UNIX and Windows)
               & NetBackup         ■   Storage Migrator
               Documentation
                                   ■   Complete NetBackup documentation set in PDF format
               Set


Requirements for NetBackup server installation
               The server software takes approximately 10 minutes to install. Additional time
               may be required to set up the product for your environment.


Requirements for local installations
               Before you install NetBackup, ensure that the following requirements are met:
               ■	   Remove any other vendor’s backup software currently configured on your
                    system. The backup software of another vendor can negatively affect how
                    NetBackup installs and functions.
               ■	   Before you install your NetBackup product, make sure that you have applied
                    the most current operating system patches and updates. If you are not
14 Preparing for installation
   Requirements for NetBackup server installation


                                 certain that your operating system is current, contact your operating system
                                 vendor and request the latest patches and upgrades.
                            ■	   Ensure that all NetBackup servers have a release level that is at least equal
                                 to the latest version that is installed on the clients. Earlier versions of server
                                 software can encounter problems with later versions of client software.
                            ■	   Ensure that you have all NetBackup installation CDs, appropriate license
                                 keys, and an administrator account and password for all servers.
                            ■	   Peripherals, such as robotic devices and stand-alone tape drives, must be
                                 installed according to the manufacturers’ instructions and recognized by
                                 the Windows software.
                            ■	   Network configuration that allows all servers and clients to recognize and
                                 communicate with one another. Generally, if you can reach the clients from
                                 a server by using the ping command, the setup works with NetBackup.
                            ■	   Server system configuration:
                                 ■	   An Intel Pentium system running Windows 2000 with a minimum of
                                      256 MB of memory and service pack 4 installed, or Windows 2003
                                      server.
                                 ■	   Internet Explorer 5.0 or later.
                                 ■	   Screen resolution configuration of at least 1024x768, 256 colors.
                            ■	   Disk space:
                                 ■	   An NTFS partition.
                                 ■	   At least 1 GB of storage space to accommodate the server software (512
                                      MB) and NetBackup catalogs (at least 512 MB).
                                      NetBackup catalogs contain information about your backups, which
                                      become larger as you use the product. The catalog disk space
                                      requirements depend primarily on the aspects of your backup
                                      configuration. For example, the number of files that are backed up, the
                                      frequency of your backups, and how long you retain your backup data.
                                 ■	   For upgrades, you must have an additional 500 MB of disk space on the
                                      drive where Windows is installed. After the upgrade is complete, this
                                      additional space is not needed.
                            ■	   Symantec does not support installation of NetBackup in an CIFS-mounted
                                 directory. File locking in CIFS-mounted file systems can be unreliable.
                            ■	   NetBackup services and port numbers must be the same across the network.
                                 Symantec suggests that you use the default port settings for NetBackup
                                 services and Internet service ports. If you modify the port numbers, they
                                 must be the same for all master servers, media servers, and clients. The port
                                 entries are in the following file:
Preparing for installation   15
                                                        Requirements for NetBackup server installation


                    %SYSTEMROOT%system32driversetcservices

                    To change the default settings, you must perform a Custom Installation of
                    NetBackup or manually edit the services file.
               ■	   For Remote Administration Console installation, you must provide the
                    names of the Remote Administration Console hosts during master server
                    installation.


Notes for remote and cluster installations
               In addition to the local installation requirements, the following guidelines apply
               to remote installations and cluster installations:
               ■	   The source system (or primary node) must run Windows 2000/2003 server.
               ■	   The destination PC (or clustered nodes) must have Windows 2000/2003
                    server.
               ■	   The installation account must have administrator privileges on all the
                    remote systems or on all nodes in the cluster.
               ■	   All nodes in a cluster must run the same operating system, service pack
                    level, and version of NetBackup. You cannot mix versions of server
                    operating systems.


Notes for Private Branch Exchange (PBX)
               NetBackup uses a Common Services Framework (CSF) called Private Branch 

               Exchange (PBX).

               PBX helps limit the number of TCP/IP ports that NetBackup uses. It also allows 

               all socket communication to take place while connecting through a single port.

               The PBX port number is 1556.

               For more information about PBX and how to configure NetBackup ports, refer to 

               the Veritas NetBackup Security and Encryption Guide.

               Because PBX is required for all NetBackup products, its installation is part of the 

               NetBackup installation procedure unless it is already present on the system.

               When you install NetBackup on a Windows server, the installation process 

               determines if a version of PBX is already installed on your system. Whether PBX 

               is already installed causes one of the following to happen:

               ■	   If a version of PBX exists, the installation process determines if the existing
                    version is newer than the NetBackup version. If NetBackup uses a newer
                    version, it is installed. Any existing default conditions are maintained. If
                    NetBackup uses an earlier version, no changes are made. The latest version
                    is always used.
16 Preparing for installation
   Configuring storage devices for the operating system


                                  If PBX exists, you cannot change the port number that it uses. If you change
                                  the port number, other Symantec products may fail.
                            ■	    If no version of PBX exists, one is installed silently with NetBackup. A
                                  default port number is used, along with a default configuration.
                                  If PBX did not previously exist on the server, you can change the port
                                  number that it uses.
                            When you remove (uninstall) NetBackup, PBX is removed if no other Symantec
                            product is dependent on it. If there is a dependency from another product, PBX
                            is not removed.


   Notes for NetBackup Access Control
                            Use the following guidelines if you want to use access control:
                            ■	    To use the access control features in NetBackup 6.5, you must install the
                                  Symantec Product Authentication and Authorization components.
                                  ■	   If access control is not installed in your current NetBackup
                                       environment, you must first upgrade to NetBackup 6.5. Then, you can
                                       install the access control components.
                                  ■	  If access control is already installed in your current NetBackup
                                      environment, you must install the new access control components
                                      before you upgrade to NetBackup 6.5.
                                  For NetBackup Access Control installation and upgrade instructions, see
                                  the Veritas NetBackup Security and Encryption Guide.


   Configuring storage devices for the operating
   system
                            Reliable use of NetBackup depends on the proper configuration of your storage
                            devices.
                            To ensure reliable backups and restores, you must configure devices to work
                            with the operating system. Use the instructions that the device vendor and
                            operating system vendor provide. Install and configure storage devices before
                            you install and configure NetBackup.


                            Warning: An improperly configured device may lead to loss of data during
                            restores.
Preparing for installation   17
                                                  Configuring storage devices for the operating system


Locating supported robot types
              You can find a list of the supported robot types in the NetBackup Release Notes.

              Symantec periodically adds new robots to this list. For your convenience, 

              Symantec updates the supported robots lists on the Symantec support Web site.


              To find the latest devices this release supports

              1    In a Web browser, open http://entsupport.symantec.com.

              2	   In the Product Lookup list, select either NetBackup Enterprise Server or
                   NetBackup Server.
              3	   In the new Web page in the Support for this product section, click
                   Compatibility List.
              4	   In the new Compatibility and Reference Web page from the appropriate
                   drop-down menus, select Compatibility > NetBackup 6.5, and the language
                   of your choice.
              5	   The lower section of the screen updates depending on what you select from
                   the drop-down menus. From the links on this section of the screen, select
                   the appropriate product level to check compatibility.
              6	   From the resulting page you can view device support information by
                   individual vendor, all support drives, libraries, or robot types.


Configuring storage devices
              Use the following guidelines to configure your storage devices:
              ■	   Configure your storage devices as described in the instructions that the
                   device vendor and operating system vendor provide.
              ■	   For new installations, Symantec recommends that you install and configure
                   the latest device drivers for your storage devices immediately before you
                   install the NetBackup software.
              ■	   After you have configured your storage devices, you can install NetBackup.
              ■	   For upgrades, you can install the latest device drivers before you upgrade
                   NetBackup.
              ■	   The Tape Device Driver Installation wizard that is included on the
                   NetBackup installation CD steps you through how to install the latest device
                   drivers.

                   Note: Complete this wizard before you configure NetBackup.
18 Preparing for installation

   Configuring storage devices for the operating system


                             ■	   If you do not have a NetBackup CD, you can download the NetBackup Tape
                                  Device Driver Installation software from the technical support Web site:
                                  http://entsupport.symantec.com

                             To start the tape device driver installation wizard

                             1    Log on as administrator to the system where you installed NetBackup.

                             2	   Insert the NetBackup CD in the drive.
                                  If Autorun is disabled, navigate to the CD drive and run Launch.exe.
                             3	   On the installation browser, click the link Additional Products > Additional
                                  Product Installations > NetBackup Tape Device Drivers.
                             4	   Complete the wizard to install the latest device drivers for your storage
                                  device.


                             Note: You can download the latest external device mapping files on the Updates
                             and Patches Web page on the support Web site: http://entsupport.symantec.com
Chapter                           2
Installing or upgrading
NetBackup server software
              This chapter includes the following topics:
              ■   “Installing or upgrading servers locally”
              ■   “Installing or upgrading servers remotely”
              ■   “Installing or upgrading servers in clustered environments”


Sequence for installing or upgrading
              Each procedure in this chapter is an independent process that you can use to
              perform the type of installation best suited to your environment. Each
              procedure includes the differences between a new installation and an upgrade.
              When you install or upgrade NetBackup server software, Symantec recommends
              the following sequence:
              1   Master servers
              2   Media servers, if any (NetBackup Enterprise Server only)
              3   NetBackup Remote Administration Console, if any
              4   NetBackup clients
              5   Any NetBackup add-on products
              Before you proceed with any installation procedure, be sure to review the
              “Requirements for NetBackup server installation” on page 13.


Guidelines for upgrading to NetBackup 6.5
              When you upgrade to NetBackup version 6.5, you must upgrade from the
              following versions:
20 Installing or upgrading NetBackup server software

   Sequence for installing or upgrading


                            ■	   Version 6.0
                                 The procedures for upgrading from 6.0 to 6.5 are included in this
                                 installation guide.
                                 ■	    Notes about logging changes when upgrading to NetBackup 6.5
                                       An upgrade to NetBackup 6.5 overwrites the nblog.conf file with a
                                       new file and resets two logging settings.
                                       The Logging Level feature was introduced in NetBackup 6.0 GA.
                                       Upgrading to 6.5 resets this feature to 1. To change the Logging Level
                                       to the desired setting after upgrading, refer to the Veritas NetBackup
                                       Administrator’s Guide, Volume I.
                                       The LogRecycle feature was introduced in NetBackup 6.0 MP4.
                                       Upgrading to 6.5 resets this feature to OFF. To change LogRecycle to
                                       the desired setting after upgrading, refer to the Veritas NetBackup
                                       Troubleshooting Guide. You should also refer to the information at the
                                       following Website:
                                       http://entsupport.symantec.com/docs/279590
                            ■	   Version 5.0MP4 (or later) or version 5.1
                                 The procedures for upgrading from 5.0MP4 (or later) or version 5.1 are not
                                 included in this guide.
                                 Before you can upgrade from 5.0MP4 (or later) or version 5.1, you must first
                                 prepare your current NetBackup environment for an upgrade to version 6.5.
                                 The upgrade instructions can be found as follows:
                                 ■     Go to the following Symantec Website:
                                       http://entsupport.symantec.com
                                 ■	    In the Product Lookup dialog box, enter NetBackup Enterprise Server
                                       and click on the arrow to the right.
                                       The next page that displays includes a Hot Topics section that provides
                                       a link to an upgrade portal.
                                       Following the procedures described in the linked documents at this
                                       Website help ensure a successful upgrade.

                                       Note: If you have a version earlier than 5.0MP4 installed (such as 4.5),
                                       you cannot upgrade directly to NetBackup 6.5. You must first upgrade
                                       to NetBackup 5.x and then upgrade to NetBackup 6.5.

                            Use the following guidelines if you want to use access control:
                            ■	   To use the access control features in NetBackup 6.5, you must install the
                                 Symantec Product Authentication and Authorization components.
                                 ■	    If access control is not installed in your current NetBackup
                                       environment, you must first upgrade to NetBackup 6.5. Then, you can
Installing or upgrading NetBackup server software   21
                                     Upgrading NetBackup Servers to NetBackup Enterprise Servers


                    install the Symantec Product Authentication and Authorization
                    components.
               ■	  If access control is already installed in your current NetBackup
                   environment, you must install the new Symantec Product
                   Authentication and Authorization components before you upgrade to
                   NetBackup 6.5.
               For NetBackup access control installation and upgrade instructions, see the
               Veritas NetBackup Security and Encryption Guide.


Upgrading NetBackup Servers to NetBackup
Enterprise Servers
          To upgrade from NetBackup Server to NetBackup Enterprise Server, you must
          enter the appropriate license key(s) in your current NetBackup Administration
          Console.

          To upgrade a NetBackup server to a NetBackup enterprise server
          1	   Locate your NetBackup Enterprise Server license key.
          2	   Open the NetBackup Administration Console and choose Help > License
               Keys. The NetBackup License Key dialog box appears.
          3	   Click the New icon.
          4	   Enter your license key in the New license key field and click Add.
               The new license key appears in the field in the lower part of the dialog box.
               ■	   For upgrades on Windows from a NetBackup server evaluation license
                    key to a permanent NetBackup Enterprise Server-based product license
                    key, restart the NetBackup services. When services are restarted, the
                    new license information is displayed when you select Help > About
                    NetBackup Administration Console.
               ■	   If you add, delete, or change any license keys, you must restart the
                    NetBackup Administration Console.
          5	   Reboot the system if you are prompted.
22 Installing or upgrading NetBackup server software
   Installing or upgrading servers locally


   Installing or upgrading servers locally


     Welcome
                         Veritas

       License Agreement
                             Veritas                             Custom installation
          Choose Installation
                                   Veritas

             Enter License Key               Select NetBackup   Select Port Numbers    Provide Startup
             Select Server Type              Features                                  Information for
                                                                                       NetBackup Services


                   Typical installation
                                                                                       Enter System Name


                                                                                       Enter EMM Server
                                                                                       Name

      Media server installation differences:

            The NetBackup Systems Name screen contains
            the Media Server Name field
                                                                                       Begin Installation

                                                                                       Monitor Progress


      Upgrade differences:

            No Enterprise Media Manager Host screen
            appears
                                                                                       New installation or
                                                                                       Upgrade from 6.0 =
                                                                                       Finished
Installing or upgrading NetBackup server software       23
                                                      Installing or upgrading servers locally


To install or upgrade NetBackup servers on a local system


Note: For upgrades: If you want to use NetBackup access control, refer to the
Veritas NetBackup Security and Encryption Guide for complete instructions.
Complete that procedure before you begin your NetBackup upgrade.

For new installations: Install NetBackup access control after you complete the
NetBackup installation.

1	   Log on to the system where you want to install NetBackup. Be sure to log on
     with administrator privileges.
2	   For upgrades only:
     ■	   Deactivate all policies
          For NetBackup Administration Console users
          ■	   On the master server, open the NetBackup Administration
               Console.
          ■	   From the tree on the left, select Policies.
          ■	   In the right pane, select all policies that appear.
          ■	   Right-click on the highlighted policies and select Deactivate.
          For command line users
          ■	 Enter the following command:
          install_pathNetBackupbinadmincmd

          bpplinfo policy_name -modify -inactive

     ■	  Deactivate disk staging storage units.
     For NetBackup Administration Console users:
          ■	   Open the NetBackup Administration Console on the master server.
          ■	   From the tree on the left, expand NetBackup Management >
               Storage Units.
          ■	   In the right pane, double-click on a disk staging storage unit.
          ■	   When the Change Storage Unit window appears, select Staging
               Schedule.
          ■	   When the Disk Staging Schedule window appears, click on the
               Exclude Dates tab.
          ■	   Select the date in the calendar that matches the date of the system
               upgrade.
          ■	   Repeat these tasks for each disk staging storage unit.
          For command-line users, enter the following command:
24 Installing or upgrading NetBackup server software
   Installing or upgrading servers locally


                                           install_pathnetbackupbinadmincmd

                                           bpschedulerep schedulename -excl mm/dd/yyyy

                                 ■	   Deactivate all media servers
                                      ■	   On the master server, open the NetBackup Administration
                                           Console.
                                      ■	   From the tree on the left, select Media and Device
                                           Management>Devices>Hosts.
                                      ■	   In the right pane, select all media servers that appear.
                                      ■	   Right-click on the highlighted servers and select Deactivate.
                                           For command line users
                                      ■	 Enter the following command:
                                      install_pathVolmgrbin

                                      vmoprcmd -deactivate_host -h device_host

                            3	   Insert the appropriate NetBackup installation CD or DVD in the drive. If
                                 Autorun is disabled, navigate to the CD or DVD drive and run Launch.exe.
                            4	   On the initial browser screen, click NetBackup Installation, and on the
                                 following screen, select Install Server Software.
                            5	   On the Welcome screen, click Next.
                            6	   On the License Agreement screen, accept the license agreement and click
                                 Next.
Installing or upgrading NetBackup server software       25
                                                   Installing or upgrading servers locally


7   On the Select where you want to install Veritas NetBackup screen, provide
    the following information:


    Computer           For a local installation, select Install to this computer only.

    Typical            Select Typical to install NetBackup default features and
                       settings.

    Custom             Select Custom to change how NetBackup features and settings
                       are installed.

    Click Next.
26 Installing or upgrading NetBackup server software

   Installing or upgrading servers locally


                            8	   On the NetBackup License Key and Server Type screen, provide the following
                                 information:


                                 License Key	           Enter the base product license key that you received with your
                                                        product.

                                 NetBackup Master       Select the icon next to the software type you want to install,
                                 Server                 such as NetBackup Master Server.
                                 NetBackup Media 	      For new installations, the license key that you provide
                                 Server	                determines which components you can select. For example,
                                                        you can click the icon next to NetBackup Master Server only
                                                        if you enter a master server license key.
                                                        For upgrades, the license used for the existing installation
                                                        type determines which components you can select.

                                 For Typical            If you selected Typical for the installation type (step 7 on
                                 installations only     page 25), go to step 10 on page 29.

                            9	   For custom installations:


                                 NetBackup Features	 Click on the drop-down icon next to any feature that you do
                                                     not want to install.
                                                        On the pop-up dialog box that appears, confirm that the
                                                        feature is not available for installation. A red “X” should
                                                        appear on the icon.
Installing or upgrading NetBackup server software       27
                                                 Installing or upgrading servers locally


NetBackup	             To change the folder destination where NetBackup is
installation location	 installed, click Change. When the Change Current Destination
                       Folder dialog box appears, browse to your preferred location
                       and designate a new or an existing folder.


Click Next.
■    On the NetBackup Port Numbers screen, you can change port numbers,
     if it is necessary in your configuration.
     You may want to change a port number if you encounter conflicts when
     NetBackup and another industry product try to share the same port.
     Another example is if a port conflict occurs with a company’s firewall,
     which may cause security issues.
     To change a port number, select the port number you want to replace
     and type the new number.
     Click Next.
■    On the NetBackup Services screen, provide the following startup
     account and startup type information for NetBackup services:


Use the built-in      Check this box to use the built-in system account.
system account

User name,            Enter the specific information for the system you want to use.
Password, Domain      Be sure to leave the Use the built-in system account check box
                      unchecked.

Startup               Select either Automatic or Manual start up.
28 Installing or upgrading NetBackup server software
   Installing or upgrading servers locally


                                 Start NetBackup       Check this box if you want to start the services after
                                 Server Services After installation. You can leave the box unchecked to prevent
                                 Install               services from starting after installation.

                                 Terminate             Check this box to prevent a reboot while you perform a remote
                                 NetBackup             installation. When you check this box, processes that use the
                                 processes             NetBackup executables and DLLs are stopped.

                                                       Caution: For Oracle users: If you select Terminate NetBackup
                                                       processes, you must take down your database before you
                                                       continue the installation.

                                 Terminate Windows     Check this box to prevent a reboot while you perform a remote
                                 processes             installation. When you check this box, processes that use the
                                                       Microsoft run-time DLLs are stopped.
                                                       For upgrades: You do not need this option because the
                                                       Microsoft run-time DLL is already at the correct level.

                                                       Caution: If you select Terminate Windows processes, it may
                                                       cause instability with other Windows applications,
                                                       particularly those applications that use run-time DLLs.

                                 Abort install if a    Check this box so that NetBackup can detect if the remote
                                 reboot is required    system requires a restart.
                                                       If a restart is required, this option ends the installation and
                                                       rolls the remote system back to its state at the beginning of
                                                       the installation.


                                 Click Next.
Installing or upgrading NetBackup server software       29
                                                    Installing or upgrading servers locally


10 On the NetBackup System Names screen, provide the following information:


    Master Server Name Enter the name of the master server.

    Additional Servers   Enter the names of any additional machines (servers) that are
                         allowed to access this server. If you enter more than one
                         name, separate each name with a comma.


    Install LiveUpdate   The LiveUpdate agent allows installation of NetBackup
    Agent                patches from a LiveUpdate server.
                         Even if you choose not to use LiveUpdate, agent installation
                         does not affect NetBackup installation, configuration, or
                         operation.
                         For complete information, refer to “About NetBackup
                         LiveUpdate” on page 115.

    Location of          The LiveUpdate server is the machine where you store
    LiveUpdate Server    NetBackup patches. The default server location is your
                         NetBackup master server.
                         If you want to designate a different machine as your
                         NetBackup LiveUpdate server, type the appropriate pathname
                         for that server here.

    Server Type          Select the protocol that is used by your LiveUpdate server
                         (LAN, HTTP, or HTTPS).
30 Installing or upgrading NetBackup server software
   Installing or upgrading servers locally


                                 For NetBackup          When you install media server software, this screen has an
                                 Enterprise media       additional line with the media server name shown as the local
                                 server installations   server. You must change the name to the master server name
                                 only                   to which the media server is configured.


                                 Click Next.
                            11	 On the NetBackup Enterprise Media Manager screen, enter the name of the
                                server where you want the EMM server installed.


                                 The EMM server contains all information about NetBackup volume
                                 configuration and device configuration. By default, the master server name
                                 appears where the EMM server software is set up for installation on the
                                 NetBackup master server. This is the preferred configuration.

                                 Note: Although installing the EMM on a media server is supported,
                                 Symantec recommends that you install the EMM on the master server. For
                                 instructions that describe EMM installation on a media server, please refer
                                 to TechNote 278175.


                                 Note: Symantec does not support installing the EMM on a CIFS-mount.

                                 ■	   This screen only appears in new installations or when you upgrade a
                                      client to a server. This screen does not appear if you upgrade from
                                      NetBackup 6.0 to NetBackup 6.5.
Installing or upgrading NetBackup server software       31
                                                                       Installing or upgrading servers locally


                      ■	   If the NetBackup system shares drives by using the Shared Storage
                           Option (SSO), all NetBackup servers must use the same host for storing
                           device information.
                      For more information on EMM servers and EMM databases, refer to the
                      NetBackup Administrator’s Guide for Windows, Volume 1.
                      Click Next.
                  12	 On the Ready to Install the Program screen, choose one of the following
                      options:


                      Install	             Click Install to initiate installation of the default (or custom)
                                           settings.

                      Back	                Click Back to view the previous screens and make any
                                           changes, then return to this screen and click on Install.

                      Cancel	              Click Cancel if you want to start the installation wizard again.

                      After you click Install, the installation process begins and a screen appears
                      that shows you the progress of the installation. This process may take
                      several minutes.
                      An installation log file provides detailed installation information and shows
                      whether any errors occurred.
                      ■	   Examine the installation log located under the user profile that
                           completed the install. The following is an example of the user
                           administrator that completed the install. This path may be hidden and
                           you may need to unhide hidden or system files to view the log.
C:Documents and SettingsadministratorLocal SettingsTempNetBackup Install...log

                      ■	   Search the installation log for the following string to determine if an
                           error has occurred.
                           "Return Value 3"
32 Installing or upgrading NetBackup server software

   Installing or upgrading servers locally


                            13	 On the Installation Complete screen, choose from the following options:


                                 Add Keys	              Symantec recommends that you enter additional license keys
                                                        now for any other NetBackup products you plan to install.
                                                        ■	   To enter additional license keys, click Add Keys.
                                                        ■	   When the list of Current License Keys appears, click the
                                                             Add Key icon to enter a new license key, then click Add.
                                                        ■	   After all license keys are entered, close the Current
                                                             License Keys window.

                                 Finish                 You have two ways to complete the installation as follows:
                                                        ■	   If you are done installing software on all servers, leave
                                                             the check mark next to Launch NetBackup
                                                             Administration Console now and click Finish.
                                                             The NetBackup Administration Console starts a
                                                             configuration wizard so that you can configure your
                                                             NetBackup environment.
                                                        ■	   If you have more server software to install, click the
                                                             check mark to remove it and click Finish.
                                                             You can move on to the next machine and install the
                                                             necessary server software.

                                 For new installations	 If you want to install NetBackup access control, refer to the
                                 only	                  Veritas NetBackup Security and Encryption Guide and
                                                        perform that procedure at this time.

                            14	 For upgrades from 6.0:
                                The server upgrade is complete.
Installing or upgrading NetBackup server software     33
                                                                                  Installing or upgrading servers remotely


Installing or upgrading servers remotely

                              ,


Welcome
                    Veritas

  License Agreement
                        Veritas

     Choose Installation
                              Veritas
                                                              Typical
                                                              installation
          Enter License Key
          Select Server Type            Custom installation


               Select Port Numbers         Provide Startup           Enter System Name         Enter EMM Server
                                           Information for                                     Name
                                           NetBackup Services


                                                     Enter Remote System Information
             Available Systems
             Add Remote
             Computer


             Select Destination          Enter Remote System       Remote Installation        Return to Remote
             Systems                     Login Credentials         Destination Folder         Features Dialog
                                                                                              Now Updated


                                                                                              Begin Installation >
 Media server installation differences:                                                       Monitor Progress

       The NetBackup Systems Name screen contains
       the Media Server Name field


 Upgrade differences:                                                                         New installation or
                                                                                              Upgrade from 6.0 =
       No Enterprise Media Manager Host screen                                                Finished
       appears
34 Installing or upgrading NetBackup server software

   Installing or upgrading servers remotely


                            To install or upgrade NetBackup servers over the network (remote
                            installation)


                            Note: For upgrades: If you want to use NetBackup access control, refer to the
                            Veritas NetBackup Security and Encryption Guide for complete instructions.
                            Complete that procedure before you begin your NetBackup upgrade.

                            1	   Log on to the system where you want to install NetBackup. Be sure to log on
                                 with administrator privileges.
                            2	   For upgrades only:
                                 ■	    Deactivate all policies
                                       For NetBackup Administration Console users
                                       ■	   On the master server, open the NetBackup Administration
                                            Console.
                                       ■	   From the tree on the left, select Policies.
                                       ■	   In the right pane, select all policies that appear.
                                       ■	   Right-click on the highlighted policies and select Deactivate.
                                       For command line users
                                       ■	 Enter the following command:
                                       install_pathNetBackupbinadmincmd

                                       bpplinfo policy_name -modify -inactive

                                 ■	  Deactivate disk staging storage units.
                                 For NetBackup Administration Console users:
                                       ■	   Open the NetBackup Administration Console on the master server.
                                       ■	   From the tree on the left, expand NetBackup Management >
                                            Storage Units.
                                       ■	   In the right pane, double-click on a disk staging storage unit.
                                       ■	   When the Change Storage Unit window appears, select Staging
                                            Schedule.
                                       ■	   When the Disk Staging Schedule window appears, click on the
                                            Exclude Dates tab.
                                       ■	   Select the date in the calendar that matches the date of the system
                                            upgrade.
                                       ■	   Repeat these tasks for each disk staging storage unit.
                                       For command-line users, enter the following command:
                                            install_pathnetbackupbinadmincmd

                                            bpschedulerep schedulename -excl mm/dd/yyyy

                                 ■	    Deactivate all media servers
Installing or upgrading NetBackup server software     35
                                                  Installing or upgrading servers remotely


         ■	   On the master server, open the NetBackup Administration
              Console.
         ■	   From the tree on the left, select Media and Device
              Management>Devices>Hosts.
         ■	   In the right pane, select all media servers that appear.
         ■	   Right-click on the highlighted servers and select Deactivate.
              For command line users
         ■	 Enter the following command:
         install_pathVolmgrbin

         vmoprcmd -deactivate_host -h device_host

3	   Insert the appropriate NetBackup installation CD or DVD in the drive. If
     Autorun is disabled, navigate to the CD drive and run Launch.exe.
4	   On the initial browser screen, click NetBackup Installation, and on the
     following screen, select Install Server Software.
5	   On the Welcome screen, click Next.
6	   On the License Agreement screen, accept the license agreement and click
     Next.
7	   On the Select where you want to install Veritas NetBackup screen, provide
     the following information:


     Computer            For a remote installation, click Select from available
                         computers on the network.
36 Installing or upgrading NetBackup server software
   Installing or upgrading servers remotely


                                 Typical               Select Typical to install NetBackup default features and
                                                       settings.

                                 Custom                Select Custom to change how NetBackup features and settings
                                                       are installed.


                                 Click Next.
                            8	   On the NetBackup License Key and Server Type screen, provide the following
                                 information:


                                 License Key	          Enter the base product license key that you received with your
                                                       product.

                                 NetBackup Master      Select the icon next to the software you want to install, such
                                 Server                as NetBackup Master Server.
                                 NetBackup Media 	     For new installations, the license key that you provide
                                 Server	               determines which components you can select. For example,
                                                       you can click the icon next to NetBackup Master Server only
                                                       if you enter a master server license key.
                                                       For upgrades, the license used for the existing installation
                                                       type determines which components you can select.

                                 For Typical           If you selected Typical for the installation type, go to step 10
                                 installations only    on page 38.

                            9	   For custom installations:
                                 ■	   On the NetBackup Port Numbers screen, you can change port numbers,
                                      if it is necessary in your configuration.
Installing or upgrading NetBackup server software     37
                                              Installing or upgrading servers remotely


     You may want to change a port number if you encounter conflicts when 

     NetBackup and another industry product try to share the same port. 

     Another example is if a port conflict occurs with a company’s firewall, 

     which may cause security issues.

     To change a port number, select the port number you want to replace 

     and type the new number.

     Click Next.

■	   On the NetBackup Services screen, provide the following startup
     account and startup type information for NetBackup services:


Use the built-in      Check this box to use the built-in system account.
system account

User name,            Enter the specific information for the system you want to use.
Password, Domain      Be sure to leave the Use the built-in system account check box
                      unchecked.

Startup               Select either Automatic or Manual start up.

Start NetBackup       Check this box if you want to start the services after
Server Services After installation. You can leave the box unchecked to prevent
Install               services from starting after installation.
38 Installing or upgrading NetBackup server software
   Installing or upgrading servers remotely


                                 Terminate             Check this box to prevent a reboot while you perform a remote
                                 NetBackup             installation. When you check this box, processes that use the
                                 processes             NetBackup executables and DLLs are stopped.

                                                       Caution: For Oracle users: If you select Terminate NetBackup
                                                       processes, you must take down your database before you
                                                       continue the installation.

                                 Terminate Windows     Check this box to prevent a reboot while you perform a remote
                                 processes             installation. When you check this box, processes that use the
                                                       Microsoft run-time DLLs are stopped.
                                                       For upgrades: You do not need this option because the
                                                       Microsoft run-time DLL is already at the correct level.

                                                       Caution: If you select Terminate Windows processes, it may
                                                       cause instability with other Windows applications,
                                                       particularly those applications that use run-time DLLs.

                                 Abort install if a    Check this box so that NetBackup can detect if the remote
                                 reboot is required    system requires a restart.
                                                       If a restart is required, this option ends the installation and
                                                       rolls the remote system back to its state at the beginning of
                                                       the installation.


                            10 On the NetBackup System Names screen, provide the following information:


                                 Master Server Name Enter the name of the master server.
Installing or upgrading NetBackup server software     39
                                               Installing or upgrading servers remotely


Additional Servers     Enter the names of any additional machines (servers) that are
                       allowed to access this server. If you enter more than one
                       name, separate each name with a comma.


Install LiveUpdate     The LiveUpdate agent allows installation of NetBackup
Agent                  patches from a LiveUpdate server.
                       Even if you choose not to use LiveUpdate, agent installation
                       does not affect NetBackup installation, configuration, or
                       operation.
                       For complete information, refer to “About NetBackup
                       LiveUpdate” on page 115.

Location of            The LiveUpdate server is the machine where you store
LiveUpdate Server      NetBackup patches. The default server location is your
                       NetBackup master server.
                       If you want to designate a different machine as your
                       NetBackup LiveUpdate server, type the appropriate pathname
                       for that server here.

Server Type            Select the protocol that is used by your LiveUpdate server
                       (LAN, HTTP, or HTTPS).

For NetBackup          When you install media server software, this screen has an
Enterprise media       additional line with the media server name shown as the local
server installations   server. You must change the name to the master server name
only                   to which the media server is configured.


Click Next.
40 Installing or upgrading NetBackup server software
   Installing or upgrading servers remotely


                            11 On the NetBackup Enterprise Media Manager screen, enter the name of the
                               server where you want the EMM server installed.


                                 The EMM server contains all information about NetBackup volume
                                 configuration and device configuration. By default, the master server name
                                 appears where the EMM server software is set up for installation on the
                                 NetBackup master server. This is the preferred configuration.

                                 Note: Although installing the EMM on a media server is supported,
                                 Symantec recommends that you install the EMM on the master server. For
                                 instructions that describe EMM installation on a media server, please refer
                                 to TechNote 278175.


                                 Note: Symantec does not support installing the EMM on a CIFS-mount.

                                 ■	   This screen only appears in new installations or when you upgrade a
                                      client to a server. This screen does not appear if you upgrade from
                                      NetBackup 6.0 to NetBackup 6.5.
                                 ■	  If the NetBackup system shares drives by using the Shared Storage
                                     Option (SSO), all NetBackup servers must use the same host for storing
                                     device information.
                                 For more information on EMM servers and EMM databases, refer to the
                                 Veritas NetBackup Administrator’s Guide for Windows, Volume 1.
Installing or upgrading NetBackup server software     41
                                               Installing or upgrading servers remotely


12	 On the NetBackup Remote Features screen, specify remote system
    information for installation on those machines.
    ■	   On the initial screen, right-click Windows Agent/Option. To install
         NetBackup on the remote computer, choose Add Remote Computer.


    ■    On the resulting Available Systems dialog box, select the computer that
         you want to add. Control-click to select multiple computers.


         Click Next after you have selected the computer(s).
42 Installing or upgrading NetBackup server software

   Installing or upgrading servers remotely


                                 ■	    On the Remote Computer Login Credentials dialog box, enter the user
                                       name, password, and domain that NetBackup is to use on the remote
                                       system(s).


                                       When you choose computers and provide login credentials, you specify 

                                       the remote systems where NetBackup is to be installed.

                                       Each time you choose a system, NetBackup verifies the remote system 

                                       for a server installation that matches the type that you selected.


                                       NetBackup not         Considers the remote to be verified.
                                       installed

                                       NetBackup already     Compares the installation type on that system to the
                                       installed             installation type that you request.

                                       Invalid combination   Notifies you of the problem and disallows the choice.
                                                             One example of an invalid combination is to try to
                                                             install a Remote Administration Console on a remote
                                                             system that already is a master server.

                                       Remote system not a Notifies you of the problem and disallows the choice.
                                       supported platform
                                       or level

                                       Each time you choose a system, NetBackup also verifies that you have
                                       proper administration credentials on the remote system that you
                                       chose.
Installing or upgrading NetBackup server software     43
                                                                     Installing or upgrading servers remotely


                           If you do not have administration credentials, the Enter Network
                           Password dialog box appears. You must enter the user name and
                           password that has the appropriate credentials.
                      ■	   On the Remote Destination Folder screen, accept the default or change
                           the folder on the remote server where NetBackup is to be installed.
                           After you have selected the installation folder, click OK.
                      ■	   On the NetBackup Remote Features screen, select the features that you
                           do not want installed on the remote NetBackup server.
                           ■	    Click on the drop-down icon next to any feature that you do not
                                 want to install.
                           ■	    On the pop-up dialog box that appears, confirm that the feature is
                                 not available for installation. A red “X” should appear on the icon.
                      ■	   Click Next.

                      Note: This step (12) repeats for each computer that you select. NetBackup
                      can remember the user name and password and only prompt you if the user
                      name or password is not valid on a server.

                  13	 On the Ready to Install the Program screen, choose one of the following
                      options:


                      Install	              Click Install to initiate installation of the default (or custom)
                                            settings.

                      Back	                 Click Back to view the previous screens and make any
                                            changes, then return to this screen and click on Install.

                      Cancel	               Click Cancel if you want to start the installation wizard again.

                      After you click Install, the installation process begins and a screen appears
                      that shows you the progress of the installation. This process may take
                      several minutes.
                      An installation log file provides detailed installation information and shows
                      whether any errors occurred.
                      ■	   Examine the installation log located under the user profile that
                           completed the install. The following is an example of the user
                           administrator that completed the install. This path may be hidden and
                           you may need to unhide hidden or system files to view the log.
C:Documents and SettingsadministratorLocal SettingsTempNetBackup Install...log

                      ■	   Search the installation log for the following string to determine if an
                           error has occurred.
                           "Return Value 3"
44 Installing or upgrading NetBackup server software

   Installing or upgrading servers remotely


                            14	 On the Installation Complete screen, choose from the following options:


                                 Add Keys	              Symantec recommends that you enter additional license keys
                                                        now for any other NetBackup products you plan to install.
                                                        ■	   To enter additional license keys, click Add Keys.
                                                        ■	   When the list of Current License Keys appears, click the
                                                             Add Key icon to enter a new license key, then click Add.
                                                        ■	   After all license keys are entered, close the Current
                                                             License Keys window.

                                 Finish                 You have two ways to complete the installation as follows:
                                                        ■	   If you are done installing software on all servers, leave
                                                             the check mark next to Launch NetBackup
                                                             Administration Console now and click Finish.
                                                             The NetBackup Administration Console starts a
                                                             configuration wizard so that you can configure your
                                                             NetBackup environment.
                                                        ■	   If you have more server software to install, click the
                                                             check mark to remove it and click Finish.
                                                             You can move on to the next machine and install the
                                                             necessary server software.

                                 For new installations	 If you want to install NetBackup access control, refer to the
                                 only	                  Veritas NetBackup Security and Encryption Guide and
                                                        perform that procedure at this time.

                            15	 For upgrades from 6.0:
                                The server upgrade is complete.
Installing or upgrading NetBackup server software   45
                                              Installing or upgrading servers in clustered environments


Installing or upgrading servers in clustered
environments
              You can install NetBackup in a clustered environment as a typical or a custom
              installation.


Cluster installation requirements
              In addition to the “Requirements for NetBackup server installation” on page 13,
              the following items apply to cluster installations:


              Warning: For Windows 2000 environments: Perform NetBackup initial
              installations and upgrade installations from the system console, not from a
              Remote Terminal Services session. If you perform the installation using Remote
              Terminal Services, an incomplete installation may result.

              ■	   The source and the destination systems must run Windows 2000/2003
                   server.
              ■	   To perform clustered installations, you must have administrator privileges
                   on all of the remote nodes in the cluster. Symantec recommends that you
                   keep a record of all nodes in the cluster and what software exists on which
                   nodes.
              ■	   Have the virtual name and IP address for NetBackup available. You must
                   provide this information during installation.
              ■	   All clustered nodes must be running the same operating system, service
                   pack level, and version of NetBackup. You cannot run mixed server versions
                   in a clustered environment.
              ■	   NetBackup cluster installations on Windows 64-bit systems cannot be
                   performed remotely or pushed. All NetBackup cluster installations for
                   Windows 64-bit are local only.
              ■	   For MSCS clusters:
                   ■	   Machine names cannot be longer than 15 characters.
              ■	   For VCS clusters:
                   ■	   (SFW-HA 4.1, SFW-HA 4.2): Make sure that the patch available through
                        Veritas technical note 278307 is installed before you install or upgrade
                        to NetBackup 6.5. The patch is available at the following Web page:
                        http://entsupport.symantec.com/docs/278307
                   ■    All disk resources used by NetBackup must be configured in Veritas
                        Enterprise Administrator (VEA) before you install NetBackup.
46 Installing or upgrading NetBackup server software
   Installing or upgrading servers in clustered environments


                             ■	   For upgrades: The ltid and the robotic daemons retrieve the device
                                  configuration for a particular cluster node from the EMM database. The
                                  cluster node name (provided by gethostname) stores or retrieves the device
                                  configuration in the EMM database. The cluster node name is used when
                                  any updates are made to the device configuration, including any drive status
                                  that ltid makes. The cluster node name is only used to indicate where a
                                  device is connected. The NetBackup virtual name is employed for other uses,
                                  such as the robot control host.


   Before you perform a new installation in clustered environments
                             For MSCS clusters:
                             ■	   The shared disk that the NetBackup Group uses must already be configured
                                  in the cluster and online on the active node.
                             ■	   Install NetBackup from the node with the shared disk (that is, the active
                                  node).


   Before you perform an upgrade in clustered environments
                             When you upgrade NetBackup in a clustered environment, you must first do the
                             following:
                             ■	   For MSCS clusters: Take all of the NetBackup group resources offline except
                                  for the disk. Refer to the Microsoft Cluster Administration documentation to
                                  determine how to take the NetBackup group resources offline through the
                                  cluster administrator interface.
                             ■	   For VCS clusters: Take the NetBackup resource offline and then freeze the
                                  NetBackup group so that migrations do not occur while the inactive nodes
                                  are upgraded. If you have already configured a VCS cluster, you can freeze
                                  the NetBackup group through the cluster manager interface or the
                                  command line.
Installing or upgrading NetBackup server software   47
                                                                              Installing or upgrading servers in clustered environments


Installing or upgrading servers in clustered environments

  Welcome
                        Veritas

      License Agreement
                              Veritas                               Custom installation
         Choose Installation
                                        Veritas
                                                        Select Port Numbers         Provide Startup
               Enter License Key                                                    Information for
               Select Server Type                                                                             Cluster Options
                                                                                    NetBackup Services


                                                  Typical
                                                  installation

                                                                                                              Enter System Names


                                                                                                              Enter EMM
                                                                                                              Server Name


                                                       Enter Remote System Information


             Available Systems                        Enter Remote System         Remote Installation        Return to Remote
                                                      Login Credentials           Destination Folder         Features Dialog Box
                                                                                                             Now Updated


 Media server installation differences:
                                                                                                              Begin Installation >
       The NetBackup Systems Name screen contains                                                             Monitor Progress
       the Media Server Name field


 Upgrade differences:
                                                                                                              New installation or
       No Enterprise Media Manager Host screen                                                                Upgrade from 6.0 =
       appears                                                                                                Finished
48 Installing or upgrading NetBackup server software

   Installing or upgrading servers in clustered environments


                             To install or upgrade NetBackup servers in clustered environments


                             Note: For upgrades: If you want to use NetBackup access control, refer to the
                             Veritas NetBackup Security and Encryption Guide for complete instructions.
                             Complete that procedure before you begin your NetBackup upgrade.

                             For new installations: Install NetBackup access control after you complete the
                             NetBackup installation.

                             1	   Log on to the system where you want to install NetBackup. Be sure to log on
                                  with administrator privileges.
                             2	   For upgrades only:
                                  ■	   Deactivate all policies
                                       For NetBackup Administration Console users
                                       ■	    On the master server, open the NetBackup Administration
                                             Console.
                                       ■	    From the tree on the left, select Policies.
                                       ■	    In the right pane, select all policies that appear.
                                       ■	   Right-click on the highlighted policies and select Deactivate.
                                       For command line users
                                       ■	 Enter the following command:
                                       install_pathNetBackupbinadmincmd

                                       bpplinfo policy_name -modify -inactive

                                  ■	  Deactivate disk staging storage units.
                                  For NetBackup Administration Console users:
                                       ■	    Open the NetBackup Administration Console on the master server.
                                       ■	    From the tree on the left, expand NetBackup Management >
                                             Storage Units.
                                       ■	    In the right pane, double-click on a disk staging storage unit.
                                       ■	    When the Change Storage Unit window appears, select Staging
                                             Schedule.
                                       ■	    When the Disk Staging Schedule window appears, click on the
                                             Exclude Dates tab.
                                       ■	    Select the date in the calendar that matches the date of the system
                                             upgrade.
                                       ■	   Repeat these tasks for each disk staging storage unit.
                                       For command-line users, enter the following command:
Installing or upgrading NetBackup server software   49
                                 Installing or upgrading servers in clustered environments


               install_pathnetbackupbinadmincmd

               bpschedulerep schedulename -excl mm/dd/yyyy

     ■	   Deactivate all media servers
          ■	   On the master server, open the NetBackup Administration
               Console.
          ■	   From the tree on the left, select Media and Device
               Management>Devices>Hosts.
          ■	   In the right pane, select all media servers that appear.
          ■	   Right-click on the highlighted servers and select Deactivate.
               For command line users
          ■	 Enter the following command:
          install_pathVolmgrbin

          vmoprcmd -deactivate_host -h device_host

3	   Insert the appropriate NetBackup installation CD or DVD in the drive. If
     Autorun is disabled, navigate to the CD or DVD drive and run Launch.exe.
4	   On the initial browser screen, click NetBackup Installation, and on the
     following screen, select Install Server Software.
5	   On the Welcome screen, click Next.
6	   On the License Agreement screen, accept the license agreement and click
     Next.
50 Installing or upgrading NetBackup server software

   Installing or upgrading servers in clustered environments


                             7	   On the Veritas NetBackup Installation Type screen, provide the following
                                  information:


                                  Computer               For a cluster installation, select Perform a clustered install of
                                                         Veritas NetBackup.
                                                         This option appears only if the installation process
                                                         determines that your system is configured for a Windows
                                                         MSCS or VCS clustered environment.

                                  Typical                Select Typical to install NetBackup default features and
                                                         settings.

                                  Custom                 Select Custom to change which NetBackup features are
                                                         installed, which port numbers to use, and which NetBackup
                                                         servers to start.
                                  Click Next.
Installing or upgrading NetBackup server software   51
                               Installing or upgrading servers in clustered environments


8   On the NetBackup License Key and Server Type screen, provide the following
    information:


    ■	   Enter the base product license key that you received with your product.
    ■	  Select the icon next to the software you want to install, such as
        NetBackup Master Server.
        For new installations, the license key that you provide determines
        which components you can select. For example, you can click the icon
        next to NetBackup Master Server only if you enter a master server
        license key.
        For upgrades, the license used for the existing installation type
        determines which components you can select.
        When you upgrade NetBackup, a new license key is not required.
        NetBackup uses your existing license key.
    During this installation process, the following occurs to ensure you have
    proper credentials to perform remote installations:
    ■	   When you select a clustered system for installation, NetBackup
         determines if you have proper administrator credentials on all nodes in
         the cluster. If you do not have the proper credentials, the system is not
         added to the list.
    ■	   If you have the proper credentials, NetBackup performs a second check
         to determine if a license key is needed. If a key is needed and one was
         not entered, the system cannot be added to the list. You must enter a
         valid license key to install on that node. If you enter an invalid license
         key, the NetBackup License Key and Server Type screen remains visible
         until a valid key is entered.
52 Installing or upgrading NetBackup server software
   Installing or upgrading servers in clustered environments


                                  Note: If you selected Typical on the installation type screen (step 7 on
                                  page 50), go to step 10 on page 53.

                             9	   For custom installations:
                                  ■	   On the NetBackup Port Numbers screen, you can change port numbers,
                                       if it is necessary in your configuration.
                                       You may want to change a port number if you encounter conflicts when
                                       NetBackup and another industry product try to share the same port.
                                       Another example is if a port conflict occurs with a company’s firewall,
                                       which may cause security issues.
                                       To change a port number, select the port number you want to replace
                                       and type the new number.
                                       Click Next.
                                  ■	   On the NetBackup Services screen, provide the following startup
                                       account and startup type information for NetBackup services:


                                  Use the built-in       Check this box (default) to use the built-in system account. Or
                                  system account         clear this box and fill in the three fields below it.

                                  User name,             Enter the specific information for the system you want to use.
                                  Password, Domain       Be sure to leave the Use the built-in system account check box
                                                         unchecked.

                                  Startup                Select either Automatic or Manual start up.
Installing or upgrading NetBackup server software   53
                                 Installing or upgrading servers in clustered environments


    Start NetBackup       Check this box if you want to start the services after
    Server Services After installation. You can leave the box unchecked to prevent
    Install               services from starting after installation.

    Terminate             Check this box to prevent a reboot while you perform a remote
    NetBackup             installation. When you check this box, processes that use the
    processes             NetBackup executables and DLLs are stopped.

                          Caution: For Oracle users: If you select Terminate NetBackup
                          processes, you must take down your database before you
                          continue the installation.

    Terminate Windows     Check this box to prevent a reboot while you perform a remote
    processes             installation. When you check this box, processes that use the
                          Microsoft run-time DLLs are stopped.
                          For upgrades: You do not need this option because the
                          Microsoft run-time DLL is already at the correct level.

                          Caution: If you select Terminate Windows processes, it may
                          cause instability with other Windows applications,
                          particularly those applications that use run-time DLLs.

    Abort install if a    Check this box so that NetBackup can detect if the remote
    reboot is required    system requires a restart.
                          If a restart is required, this option ends the installation and
                          rolls the remote system back to its state at the beginning of
                          the installation.


10	 On the Cluster Settings screen, you provide the virtual and physical network
    information.
    For new installations and upgrades:
54 Installing or upgrading NetBackup server software

   Installing or upgrading servers in clustered environments


                                  ■	   For each node in a cluster group, the configuration settings that you
                                       enter in the Cluster Settings dialog boxes must be identical.


                                  Enter the following information:

                                  NetBackup Cluster      The name that is used to identify a NetBackup service group
                                  Group Name             or resource group. The resources in any resource group are
                                                         related and interdependent.

                                  Virtual Host Name      The name by which NetBackup is known in the cluster. Enter
                                                         this name in the client’s server list. The server uses this name
                                                         when it communicates with the client nodes.

                                  Virtual IP address     The IP address to which the virtual server name should
                                                         resolve.

                                  Subnet Mask            Used to identify a subnetwork so that IP addresses can be
                                                         shared on a local area network. This number correlates
                                                         directly to the virtual IP address of the cluster.
Installing or upgrading NetBackup server software   55
                                  Installing or upgrading servers in clustered environments


    Path to Shared Data	 A directory on one of the shared disks in the cluster where
                         NetBackup stores configuration information. If the letter for
                         the disk (or drive) does not appear in the pull-down list, just
                         enter the letter.
                          ■	    For 64-bit cluster installations:
                                You must enter the drive letter and path exactly as it
                                appeared when you installed on the active node.

    Public Network	       For NetBackup clustered environments, choose one of the
                          public networks that is assigned to the node of the cluster.


Caution: You must not select a private network that is assigned to this cluster.

    Click Next.

11 On the NetBackup System Names screen, provide the following information:


    Master Server Name Enter the name of the master server.

    Additional Servers    Enter the names of any additional machines (servers) that are
                          allowed to access this server. If you enter more than one
                          name, separate each name with a comma. Be sure to add all
                          node names in the cluster group here.
56 Installing or upgrading NetBackup server software
   Installing or upgrading servers in clustered environments


                                  Install LiveUpdate     The LiveUpdate agent allows installation of NetBackup
                                  Agent                  patches from a LiveUpdate server.
                                                         Even if you choose not to use LiveUpdate, agent installation
                                                         does not affect NetBackup installation, configuration, or
                                                         operation.
                                                         For complete information, refer to “About NetBackup
                                                         LiveUpdate” on page 115.

                                  Location of            The LiveUpdate server is the machine where you store
                                  LiveUpdate Server      NetBackup patches. The default server location is your
                                                         NetBackup master server.
                                                         If you want to designate a different machine as your
                                                         NetBackup LiveUpdate server, type the appropriate pathname
                                                         for that server here.


                                  Click Next.
                             12	 On the NetBackup Enterprise Media Manager screen, enter the name of the
                                 server where you want the EMM server installed.


                                  The EMM server contains all information about NetBackup volume
                                  configuration and device configuration. By default, the master server name
                                  appears where the EMM server software is set up for installation on the
                                  NetBackup master server. This is the preferred configuration.
Installing or upgrading NetBackup server software   57
                              Installing or upgrading servers in clustered environments


    Note: Although installing the EMM on a media server is supported,
    Symantec recommends that you install the EMM on the master server. For
    instructions that describe EMM installation on a media server, please refer
    to TechNote 278175.


    Note: Symantec does not support installing the EMM on a CIFS-mount.

    ■	   This screen only appears in new installations or when you upgrade a
         client to a server. This screen does not appear when you upgrade from
         NetBackup 6.0 to NetBackup 6.5.
    ■	  If the NetBackup system shares drives with the Shared Storage Option
        (SSO), all NetBackup servers must use the same host for storing device
        information.
    For more information on EMM servers and EMM databases, refer to the
    Veritas NetBackup Administrator’s Guide for Windows, Volume 1.
13	 On the NetBackup Remote Features screen, specify remote system
    information for installation on those machines.

    Note: For Windows 64-bit cluster installations, this screen does not appear.

    ■    On the initial screen, right-click Windows Agent/Option and select Add
         Remote Computer.
58 Installing or upgrading NetBackup server software

   Installing or upgrading servers in clustered environments


                                  ■	   When the Available Systems dialog box appears, select the computer
                                       that you want to add. Control-click to select multiple computers.


                                       Click Next.
                                  ■	   On the Remote Computer Login Credentials dialog box, enter the user
                                       name, password, and domain that NetBackup is to use on the remote
                                       system(s).
                                       If you intend to add more remote computers, select the check box to
                                       remember user name and password.


                                       When you provide credentials, you select cluster nodes and add them to
                                       the Destination Systems list. These are the nodes on which you
                                       remotely install NetBackup. Make sure you select your local machine
                                       when you select systems to install.
Installing or upgrading NetBackup server software   59
                            Installing or upgrading servers in clustered environments


     Each time you choose a system, NetBackup performs system and
     license checks. It verifies the system for a server installation that
     matches the type that you selected, as follows:

■	   NetBackup not    Considers the remote to be verified.

     installed


■	   NetBackup        Compares the installation type on that system to the 

     already          installation type that you request.

     installed


■	   Invalid          Notifies you of the problem and disallows the choice. One
     combination	     example of an invalid combination is to try to install a
                      Remote Administration Console on a remote system that is
                      already a master server.

■	   Remote system Notifies you of the problem and disallows the choice.

     not a supported 

     platform or 

     level


■	   Remote system Notifies you of the problem and disallows the choice.

     is Windows ME 

     or earlier


     The installation procedure also verifies that you have proper
     administrator credentials on the remote system that you chose.
     If you do not have administrator credentials, the Enter Network
     Password screen appears and prompts you to enter the administrator’s
     user name and password.
Click OK, and continue selecting destination systems.

Note: This process repeats for each node that you select. You can elect to
retain the user name and password. In that case, you are prompted only
when the user name or password is not valid.

Note the following regarding the push-install process in a clustered
environment:
■	   You can install NetBackup on any number of nodes. The clustering
     service sets the only limit to the number of nodes in a cluster, not
     NetBackup.
■	   NetBackup add-on products cannot be installed with the push method.
     Add-on products must be installed on each individual node in the
     cluster group. For instructions on how to install these products, refer to
     the NetBackup documentation that supports each product.
60 Installing or upgrading NetBackup server software
   Installing or upgrading servers in clustered environments


                                  ■	   NetBackup pushes to the other nodes only the license key you enter at
                                       the beginning of the installation. Your license key may enable add-on
                                       products. If you push NetBackup to nodes that have an add-on product
                                       already installed, your key works for the add-on product(s).
                             14	 Click Install. The installation process begins to push the installation to all of
                                 the nodes you specified.
                                  ■	   A summary screen appears that shows you the progress of the
                                       installation on each system. Right-click on a system in the screen to see
                                       the installation status.
                                  ■	   If an installation fails on a particular system, you can obtain more
                                       information about the failure by viewing the remote installation log file
                                       (nbpinst.log). The file is located in the Windows temporary
                                       installation directory.
                                  ■	   When all nodes that you selected for NetBackup installation have
                                       completed successfully, click Next. A pop-up dialog box prompts you to
                                       proceed with NetBackup Cluster Configuration.
Installing or upgrading NetBackup server software   61
                                  Installing or upgrading servers in clustered environments


15 On the Installation Complete screen, choose from the following options:


    Add Keys	             Symantec recommends that you enter additional license keys
                          now for any other NetBackup products you plan to install.
                          ■	    To enter additional license keys, click Add Keys.
                          ■	    When the list of Current License Keys appears, click the
                                Add Key icon to enter a new license key, then click Add.
                          ■	    After all license keys are entered, close the Current
                                License Keys window.

    Finish	               You have two ways to complete the installation as follows:
                          ■	    If you are done installing software on all servers, leave
                                the check mark next to Launch NetBackup
                                Administration Console now and click Finish.
                                The NetBackup Administration Console starts a
                                configuration wizard so that you can configure your
                                NetBackup environment.
                          ■	    If you have more server software to install, click the
                                check mark to remove it and click Finish.
                                You can move on to the next machine and install the
                                necessary server software.

    For new installations If you want to install NetBackup access control, refer to
    only                  Veritas NetBackup Security and Encryption Guide and
                          perform that procedure at this time.

16 For upgrades from 6.0:
   The server upgrade is complete.
62 Installing or upgrading NetBackup server software
   Installing or upgrading servers in clustered environments


                             Notes on NetBackup cluster environments
                             ■	   You may need to reboot each of the cluster nodes after the installation is
                                  complete.
                             ■	   For MSCS and VCS clusters:
                                  Under normal circumstances, cluster configuration is one of the final steps
                                  when you install NetBackup in a cluster. If this step is not done or does not
                                  complete successfully, you can use the bpclusterutil command from the
                                  active node to perform this step. See the NetBackup High Availability
                                  Administrator ’s Guide for information on how to run bpclusterutil.
                             ■	   For VCS clusters:
                                  After the push-install completes, unfreeze the active node.
                             ■	   For MSCS clusters:
                                  The NetBackup resources that you took offline come back online
                                  automatically.
                             ■	   For new installations:
                                  If you want to install NetBackup access control, refer to Veritas NetBackup
                                  Security and Encryption Guide for complete instructions.


                             Verifying cluster installations or upgrades
                             The Cluster Administrator console lets you verify the installation or upgrade and
                             view your current system structure.

                             To verify a successful MSCS cluster installation or upgrade through the
                             Cluster Administrator console
                             1	   During a cluster installation, you can open the cluster administrator console
                                  to see your current structure.
Installing or upgrading NetBackup server software   63
                               Installing or upgrading servers in clustered environments


2   After you have completed the installation and the configuration process, the
    console shows the new cluster group configuration.


To verify a successful VCS cluster installation or upgrade through the Cluster
Manager console
1   During a cluster installation, you can open the cluster administrator console
    to see your current structure.
64 Installing or upgrading NetBackup server software
   Installing NetBackup servers silently


                            2    After you have completed the installation and the configuration process, the
                                 console shows the new cluster group configuration.


   Installing NetBackup servers silently
                            A silent installation avoids the need for interactive input in the same manner as
                            performing a remote installation. Silent installations of NetBackup are not
                            supported if you want to run the NetBackup services as a user rather than the
                            local system. If you want to install NetBackup under these circumstances, you
                            must use setup.

                            To install NetBackup server software silently
                            1	   Log on as administrator to the system from which you want to install
                                 NetBackup.
                            2	   Insert the NetBackup installation CD in the drive.
                            3	   Open Windows Explorer and copy the contents of the X86, X64, or IA64
                                 directory on the CD to a temporary directory on your hard drive. Choose the
                                 directory for the type of systems you intend to install.
Installing or upgrading NetBackup server software      65
                                                     Installing NetBackup servers silently


Note: The files on the NetBackup installation CD are read-only. Change the
permissions for these files on the hard drive to allow the update.

4   In that temporary directory, modify the appropriate script:
    ■	   To install a master server, edit silentmaster.cmd
    ■	   To install a media server, edit silentmedia.cmd
    ■	   To install a NetBackup Remote Administration Console, edit
         silentadmin.cmd

    These files have fields to help you understand how to configure a silent
    installation. From the file you can do the following:
    ■	   If only one server is to access the machine, remove the following line
         from the script:
         SET ADDITIONALSERVERS=media1,media2,media3

    ■	   You can also use these scripts to prevent reboots from occurring during
         an installation. You can elect to modify the script in any combination of
         these options to accomplish your needs.
         The following options are available:
         ■	   SET STOP_NBU_PROCESSES=0
              This option terminates any processes that use the NetBackup
              executables and DLLs.


Caution: For Oracle users: If you use the Terminate NetBackup processes option,
you must take down your database before you continue with this procedure.

         ■	   SET STOP_WINDOWS_PROCESSES=0
              This option looks for processes using Microsoft run-time DLLs and 

              terminates them.

              For upgrades: You do not need to use this option because the 

              Microsoft run-time DLL is already at the correct level.


Caution: Using this option may cause instability with other Windows
applications, particularly those applications that use Microsoft run-time DLLs.

         ■	   SET ABORT_REBOOT_INSTALL=0
              This option detects if a reboot is necessary. If you must reboot, this
              option cancels the installation and rolls back to the beginning of
              the installation process.
66 Installing or upgrading NetBackup server software
   Installing NetBackup servers silently


                                 An installation log file provides detailed installation information and shows 

                                 the progress of an installation.

                                 You can view the log file (called Install.log) in the Windows temporary 

                                 installation directory:

                            C:Documents and Settingsadministrator_useridLocal SettingsTemp


                                 If the log file is not in this directory, you can locate it by entering the
                                 following command at the command prompt:
                                 > echo %TEMP%
                            5    Save and run the script.


   System reboot after a silent installation
                            By default, a silent installation does not reboot the system.

                            Symantec recommends that when you upgrade or patch a client or server, 

                            ensure that no backup processes are currently running. In rare cases, a reboot 

                            may be required.

                            To determine if a reboot is necessary, open the NetBackup Install.log file 

                            after you run the ABORT_REBOOT_INSTALL script. Search for the string in

                            use. If files are listed as in use, a reboot is required.

                            To force a reboot when required during a silent installation, remove the 

                            following option from the silent installation command script (silent*.cmd):

                            REBOOT=”ReallySuppress”


                            Caution: If you remove this option, it causes a reboot of the server that you want
                            to install. The reboot happens with no warning to a user on the system.
Chapter                                3
Installing alternative
administration interfaces
          This chapter includes the following topics:
          ■   “About the NetBackup Remote Administration Console for Windows”
          ■   “About the NetBackup-Java Administration Console”
          ■   “About the Java Windows Administration Console”


About the NetBackup Remote Administration
Console for Windows
          If your NetBackup server has no graphics display capabilities, you must install
          an alternative administrative interface. It may also be desirable for various
          other configurations, such as mixed Windows and UNIX environments.


          Note: You can skip this section if you do not want or need to administer a
          NetBackup server remotely from a Windows NetBackup client.

          The NetBackup Remote Administration Console is an interface-only version of
          NetBackup for Windows that you can use to administer NetBackup servers from
          another machine.
          The following describes which interface to install, based on the operating
          system:

          Windows           NetBackup Remote Administration Console for Windows or
                            NetBackup-Java Administration Console for Windows
68 Installing alternative administration interfaces
   About the NetBackup Remote Administration Console for Windows


                           UNIX               NetBackup-Java Administration Console
                                              Multiple versions of the NetBackup-Java Administration Console


                           The following is a brief description of the NetBackup Remote Administration
                           Console operation:
                           ■	   The console lets you perform all NetBackup operations exactly like the
                                NetBackup Administration Console on a local Windows NetBackup server.
                                You can create backup policies, manage volumes, view status, monitor tape
                                drives, and perform other operations.
                           ■	   The console displays the name of the server it administers, rather than a
                                local host name.
                           ■	   The console can only administer other NetBackup servers. It cannot act as a
                                master or a media server.


   Installing the NetBackup Remote Administration Console
                           The NetBackup Remote Administration Console is supported on Windows
                           2000/XP/2003 Server. For additional information about the supported
                           platforms for this NetBackup release, refer to the Supported Platforms and
                           Peripherals chapter in the NetBackup Release Notes.
                           Installation is a two step process as follows:
                           ■	   Install the NetBackup Remote Administration Console
                           ■	   Add the NetBackup Remote Administration Console host to server lists

                           To install the NetBackup Remote Administration Console
                           1	   On the computer on which you want to install the NetBackup Remote
                                Administration Console, insert the CD that contains the NetBackup server
                                software for Windows.
                                ■	   On Windows systems with Autorun enabled, the installation browser
                                     starts automatically.
                                ■	   On Windows systems that have Autorun disabled, navigate to the CD
                                     drive and run Launch.exe.
                           2	   On the initial screen, click NetBackup Installation.
                           3	   On the Installation screen, click Install Server Software.
                           4	   On the Welcome screen, click Next.
                           5	   On the License Agreement screen, accept the terms of the license agreement
                                and click Next.
Installing alternative administration interfaces   69
                            About the NetBackup Remote Administration Console for Windows


6	   On the Installation Type screen, select Install to this computer only and
     Typical.
     Click Next.
7	   On the NetBackup License Key and Server Type screen, select NetBackup
     Remote Administration Console. You do not need a license key to install the
     Remote Administration Console.
8	   On the NetBackup System Names screen, provide the following information:

     Client Name	            Enter the name of the local machine where you are installing
                             the remote console. (The name should appear by default.)

     Master Server	          Enter the name of the NetBackup master server. (The name
                             should appear by default.)

     Additional Servers	     Enter the names of any additional machines (servers) that are
                             allowed to access this server. If you enter more than one
                             name, separate each name with a comma.

     Install LiveUpdate 	    Leave this box checked so that the agent is installed.
     Agent	                  LiveUpdate lets you download and install patches for
                             NetBackup.
                             Even if you choose not to use LiveUpdate, agent installation
                             does not affect NetBackup installation, configuration, or
                             operation.
                             For complete information on LiveUpdate, refer to “About
                             NetBackup LiveUpdate” on page 111.


9	   On the Ready to Install the Program screen, click Install.
10	 After the installation completes, you can either add license keys (click Add
    Keys) or click Finish.
    If you left the check box next to Launch NetBackup Administration Console
    now checked, the Remote Administration Console appears. If you removed
    the check, start the console by choosing Start > Programs > Veritas
    NetBackup > NetBackup Administration Console.


Adding the NetBackup Remote Administration Console host
to server lists
The following methods are available to add the NetBackup Remote
Administration Console host to the server list on a master or a media server:
■	   Use the NetBackup Administration Console for UNIX (if your system is
     Java-compatible)
■	   Edit the bp.conf file
70 Installing alternative administration interfaces

   About the NetBackup Remote Administration Console for Windows


                           To add the NetBackup Remote Administration Console host to the UNIX
                           server list of the remote server by using the NetBackup Administration
                           Console
                           1    In the left pane of the NetBackup Administration Console for UNIX, select
                                Host Properties > Master Servers.
                           2    In the Master Servers window in the right pane, right-click the name of the
                                host server and select Properties.
                           3    In the Master Server Properties window, click the Servers icon from the tree
                                in the left pane.
                           4    In the Servers window, click Add.
                           5    Enter the name of the host that is to run the NetBackup Remote
                                Administration Console.
                           6    Click Add. The name of the host appears in the Additional Servers list.
                           7    Click Close and OK.

                           To add the NetBackup Remote Administration Console host to the UNIX
                           server list of the remote server by editing the bp.conf file
                           1	   Log in to the UNIX master server as root.
                           2	   Edit /usr/openv/netbackup/bp.conf.
                                At the end of the SERVER = lines, add the following line:
                                SERVER = Remote-Administration-Console-machine-name

                                The Remote-Administration-Console-machine-name is the name of the
                                machine where you installed the NetBackup Remote Administration
                                Console.


   Adding remote servers to administer from an existing NetBackup
   Remote Administration Console
                           If you have an existing NetBackup Remote Administration Console installed and
                           you want to add a remote master server to administer, perform the following
                           steps.

                           To add a remote server to administer from an existing NetBackup Remote
                           Administration Console
                           1	   Log on to the server where the NetBackup Remote Administration Console is
                                installed, and open the console.
                           2	   In the left pane of the NetBackup Remote Administration Console, select
                                Host Properties > Master Server.
Installing alternative administration interfaces   71
                                                     About the NetBackup-Java Administration Console


              3	   In the Master Servers window in the right pane, right-click the name of the
                   host server and select Properties (Read/Write).
              4	   In the Master Server Properties window, click the Servers tab.
              5	   In the Global Operations field, in the Add to all lists field, enter the host
                   name. Make sure you enter the name of the host that is to run the
                   NetBackup Remote Administration Console.
              6	   Click the + button (the name of the host appears in the Additional Servers
                   list), then click OK.


About the NetBackup-Java Administration Console
              The NetBackup-Java Administration Console can be used to administer one or
              more UNIX or Windows NetBackup servers. It provides all of the standard
              NetBackup server interfaces. The console can be used on a remote NetBackup
              server to create backup policies, manage volumes, view status, monitor tape
              drives, and other operations.
              On Java-capable hosts (servers and clients), the administration console is
              installed when you install NetBackup on the host. For remote administration of
              any NetBackup server, specify the server name in the login dialog box.


Installing or removing multiple versions of the NetBackup-Java
Administration Console on Windows
              A NetBackup environment may contain servers of various NetBackup versions.
              This section describes how install and uninstall multiple versions.


              Installing multiple versions of the NetBackup Administration
              Console on Windows
              A number of methods can be used to administer servers in a mixed-version
              environment.
              One method is to install a relevant version of the NetBackup-Java
              Administration Console on a Windows desktop. Then you can use that console to
              administer all servers of the same version.
              Note the following points before you install multiple versions of this NetBackup
              interface:
              ■	   Only the most recently installed version of the NetBackup-Java
                   Administration Console can be patched.
              ■	   Only the most-recently-installed version can be removed (uninstalled) with
                   the standard Windows Add/Remove Programs utility.
72 Installing alternative administration interfaces

   About the NetBackup-Java Administration Console


                            ■	   The NetBackup-Java Capabilities Authorization configuration file
                                 (auth.conf), must always be located in install_pathjava. For
                                 example, in C:Program FilesVeritasjava). The file must exist
                                 there regardless of how many versions of the console are installed, or in
                                 which directories they are installed.
                                 The file is only relevant for administering NetBackup on this Windows host,
                                 and default settings exist if the file is not present. The defaults are
                                 discussed in the Veritas NetBackup Administrator’s Guide for Windows,
                                 Volume I, in the section on how to authorize NetBackup-Java users.
                            When you install multiple versions of the NetBackup-Java Administration
                            Console in a mixed environment, you must do the following:
                            ■	   Provide a unique string for the host name when asked (pre-6.0 versions).
                            ■	   Install each Java console version to a different folder.


                            Note: The NetBackup-Java Administration Console for the Windows platform is
                            not installed automatically.


                            To install earlier versions of the NetBackup-Java Administration Console
                            1    Insert the NetBackup Windows installation CD with the version of the
                                 NetBackup-Java Administration Console you want to install.
                            2	   Select one of the following consoles, based on the NetBackup version:
                                 ■	   For NetBackup 5.0 installations, select NetBackup Installation and click
                                      Install Java Administration Console.
                                 ■	   For NetBackup 5.1 installations, select NetBackup Installation and click
                                      Java Windows Display Console. Select whether you want to install the
                                      32-bit or the 64-bit console.
                                 ■	   For NetBackup 6.0 installations, select NetBackup Installation and click
                                      Install Java Administration Console. Select whether you want to install
                                      the 32-bit or the 64-bit console.
                            3	   If a different version of the Java console has already been installed, specify a
                                 different folder location to prevent overwriting the earlier installation.
                                 For example, specify C:Program FilesVeritasnbjava50 for
                                 version 5.0 Java consoles.
                            4	   The wizard asks you to enter the name of the host you want to manage. For
                                 ease of use, instead of entering a host name, enter a name that reflects the
                                 version of the console being installed. For example, 5.0GA.
                                 After the installation, the host name you entered appears in the following
                                 locations:
Installing alternative administration interfaces   73
                                                  About the Java Windows Administration Console


               ■	   As the default host name in the login screen of the NetBackup-Java
                    Administration Console dialog box.
                    The descriptive host name appears here only the first time the console
                    is opened. After you change the name to an actual host name in the
                    login dialog box:
                    ■	   Log in to the console.
                    ■    Exit from the console.

                    The actual host name becomes the default and appears the next time 

                    the console is started.

               ■	   On the Veritas NetBackup menu (Start > Programs > Veritas
                    NetBackup > NetBackup-Java Version 6.5 host_name).
               ■	   As a desktop shortcut icon.


          Removing earlier versions of the NetBackup-Java
          Administration Console on Windows
          If you want to remove earlier versions of the NetBackup-Java Administration
          Console, you do not run Add/Remove Programs.

          To uninstall earlier versions of the NetBackup-Java Administration Console
          1	   Remove the folder where the earlier version NetBackup-Java Administration
               Console is installed.
          2	   Remove the appropriate menu item from the Start > Programs > Veritas
               NetBackup menu.
          3	   Remove any relevant desktop shortcuts.
          4


About the Java Windows Administration Console
          Skip this section if you do not want to administer your UNIX NetBackup servers
          remotely, with the Java Windows Administration Console on a Windows
          platform.
          The Java Windows Administration Console lets you run the NetBackup Java
          Administration Console for UNIX interfaces on supported Windows platforms.
          This interface provides the same capabilities as the NetBackup Administration
          Console for Windows or UNIX.
74 Installing alternative administration interfaces

   About the Java Windows Administration Console


   Installing the Java Windows Administration Console
                             Use the following guidelines when you install the Java Windows Administration
                             Console:
                             ■	   You can install the Java Windows Administration Console from the
                                  NetBackup CD for Windows.
                             ■	   If you use NetBackup Access Control, the Symantec Product Authentication
                                  and Authorization client components must be installed on the Windows
                                  host before the Java Windows Administration Console. This order of
                                  installation ensures that the Java Windows Administration Console uses the
                                  Symantec Product Authentication and Authorization components correctly.
                             ■	   For the computer on which you want to run the Java Windows
                                  Administration Console, you should have at least 512 MB of physical
                                  memory.

                             To install the NetBackup Java Windows Administration Console
                             1	   On the machine where you perform the installation, insert the CD that
                                  contains NetBackup server software for Windows.
                                  On Windows systems with Autorun enabled, the installation starts
                                  automatically.
                                  On Windows systems with Autorun disabled, navigate to the CD directory
                                  and run Launch.exe.
                             2	   On the initial screen, select NetBackup Installation.
                             3	   On the Installation screen, select Install Java Windows Administration
                                  Console.
                             4	   On the Welcome screen, click Next.
                             5	   On the License Agreement screen, accept the agreement and click Next.
                             6	   On the NetBackup Installation Type screen, select Install to this computer
                                  only and Typical.
                             7	   On the Ready to Install the Program screen, click Install.
                             8	   On the System Validation Complete screen, click Finish.
                             9	   You can open the NetBackup-Java Windows Display Console by choosing
                                  Start > Programs > Veritas NetBackup > NetBackup Java version 6.5.


   Administering multiple versions of NetBackup servers
                             You can use one of the following methods to administer earlier versions of
                             NetBackup. The order of the listed methods does not imply any preference.
Installing alternative administration interfaces   75
                                       About the Java Windows Administration Console


Earlier versions of the NetBackup-Java Administration
Console on UNIX platforms
Use the earlier versions of the NetBackup-Java Administration Console installed
on the supported UNIX platform(s). The earlier versions available in a release
are all of those supported in a mixed version environment with the current
release. For example, all versions back to and including the last major release. In
the NetBackup 6.5 release, the 6.0, the 5.0MP4 (or later), and the 5.1 console
versions are available.


Earlier versions of the NetBackup-Java Administration
Console on Windows platforms
Use the earlier versions of the NetBackup-Java Administration Console installed
on the supported Windows platforms.
To install multiple versions of the NetBackup-Java console, see “Installing
multiple versions of the NetBackup Administration Console on Windows” on
page 71.


Remote display-back from UNIX servers
Use the UNIX remote display-back capabilities for UNIX servers that can run
NetBackup-Java, possibly with tools such as Exceed or VNC.


Remote display-back from Windows servers
Use the NetBackup Administration Console for Windows with the remote
display-back capabilities on Windows NetBackup servers with tools like
Windows Terminal Services or Remote Desktop.


At the console of the server with an earlier version of
NetBackup
Use the relevant NetBackup-Java Administration Console from the console of
the server with the earlier version of NetBackup.
76 Installing alternative administration interfaces
   About the Java Windows Administration Console
Chapter                             4
Removing and reinstalling
NetBackup
          This chapter includes the following topics:
          ■   “Removing NetBackup server software”
          ■   “Removing NetBackup server software in a clustered environment”
          ■   “Notes on reinstalling NetBackup server software”


Removing NetBackup server software
          The uninstall process deletes the Veritas/NetBackup directory from the server.
          In a typical installation, NetBackup add-on products and catalogs are installed
          and contained under this same directory and would also be deleted.
          If you intend to reinstall NetBackup, save the configuration, catalog, and log file
          information before proceeding. (See “To remove (uninstall) NetBackup servers
          and save catalog data” on page 78.)

          To remove (uninstall) NetBackup servers

          1   Select Start > Settings >Control Panel.

          2   From the Control Panel window, click the Add/Remove Programs icon.

          3   From the Currently Installed Programs list, select Veritas NetBackup.

          4   Click Remove.

          By default, all NetBackup configuration and catalog information is removed 

          when you click Remove. The following procedure explains the necessary steps to
          retain this information for future reinstallations.
78 Removing and reinstalling NetBackup

   Removing NetBackup server software


                           To remove (uninstall) NetBackup servers and save catalog data

                           1    Select Start > Settings >Control Panel.

                           2    From the Control Panel window, click Add/Remove Programs.

                           3    Select Veritas NetBackup from the Currently Installed Programs list.

                           4    Click Change. This action lets you modify, repair, or remove NetBackup.

                           5    On the Program Maintenance dialog box, select Remove.

                           6    Clear the check mark next to Remove all NetBackup Configuration, Catalog, 

                                and Log files to disable this function. (The box is checked by default.)
                           7    Click Remove.
                           8    If you enabled NetBackup access control, NetBackup placed several files on
                                clients and servers. These files can be divided into two categories:
                                ■	   NetBackup application temporary files
                                     These files are removed with NetBackup.
                                ■	 Individual user (cache) files
                                   Users’ cache files exist in their home directories, as follows:
                                userLocal SettingsApplication DataVERITASNetBackup


                                Note: Files are generated in the NetBackup directory by a single sign-on
                                operation of the NetBackup Administration Console on the host where the
                                console runs. The NetBackup Administration Console cleans these files
                                when an exit function is performed, so the directory does not always
                                contain temporary files. However, if a system crash were to occur, any files
                                in the directory may be left behind. With the console shutdown, you can
                                delete these files safely with no data loss.

                                NetBackup also creates cached certificates for client and server NetBackup
                                applications. These files reside within the NetBackup directory. These
                                files typically have a name that is consistent with a DNS entry for a network
                                interface, such as machine.company.com.
                                Example directory entries are as follows:
                           userLocal SettingsApplication DataVERITASNetBackuppc.comp.com
                           userLocal SettingsApplication DataVERITASNetBackupdhcp
                                These files are created with the command bpnbat -LoginMachine. If you
                                plan to reinstall NetBackup on the same machine at a later date, do one of
                                the following:
                                ■	   Preserve the certificates in the NetBackup directory.
                                ■	   If you do not preserve the certificates, you must provide the machine
                                     identity password as originally set on the Root+AB broker. As an
Removing and reinstalling NetBackup     79
                                    Removing NetBackup server software in a clustered environment


                   alternative, you can reset the password on the Root+AB broker when
                   you reinstall. See the Veritas NetBackup Security and Encryption Guide.

               Note: For more information on NetBackup access control, including how to
               uninstall it, see the Veritas NetBackup Security and Encryption Guide.


Removing NetBackup server software in a clustered
environment
          To remove (uninstall) NetBackup from a clustered environment
          1	   Follow the instructions in your cluster documentation for removing a
               group.
          2	   Remove NetBackup from each node in the cluster, as described in “To
               remove (uninstall) NetBackup servers” on page 77. No shortcut exists for
               removing NetBackup from multiple nodes at the same time.


Notes on reinstalling NetBackup server software
          You reinstall NetBackup with the same procedure you would use to complete a
          new installation.


          Note: You must reinstall NetBackup to the exact location as the previous
          installation. Using the same location ensures that your saved configuration,
          catalog, and log files function with the new product.

          For procedures to install NetBackup servers, refer to Chapter 2, “Installing or 

          upgrading NetBackup server software”.

          For procedures to install NetBackup clients, refer to Chapter 5, “Installing 

          clients”.

          You can re-install the software locally or from a remote computer.


          To locate the NetBackup installation log file if it is not in the default location
          1    Select Start > Programs > Accessories > Command Prompt.
          2    Enter echo %TEMP% and press Enter. Windows returns the location of your
               TEMP directory.
80 Removing and reinstalling NetBackup
   Notes on reinstalling NetBackup server software
Chapter                           5
Installing clients
               This chapter includes the following topics:
               ■   Installing Microsoft Windows clients
               ■   Installing UNIX clients


Installing Microsoft Windows clients
               By definition, your NetBackup server is also a NetBackup client. When you
               install the NetBackup server software, you install both the NetBackup server
               and the NetBackup client software on the server.


Client installation overview
               The NetBackup client installation program for Microsoft Windows lets you
               select the appropriate setup and installation options from a series of wizard
               screens. After you select options, the installation program displays a window
               that lets you verify your selections before you continue with the actual
               installation.
               While the installation is in progress, a dialog box provides details of the
               installation and the setup progress. When complete, a final window shows the
               installation results.


               Note: You cannot install NetBackup client software on PCs that currently have
               NetBackup server software. In these cases, you must first uninstall the
               NetBackup server software. See “Removing NetBackup server software” on
               page 77.
82 Installing clients
   Installing Microsoft Windows clients


                            Veritas volume snapshot provider on Windows
                            If you install the client software on a Windows client, during the installation
                            process you have the option to install Veritas Volume Snapshot Provider (VSP).
                            VSP establishes a point-in-time view, or snapshot, of the data that is selected for
                            backup on the volumes (or drives). NetBackup then backs up the selected files as
                            they exist at the time of the snapshot, regardless of file system activity. VSP
                            uses a file system cache to store the changes that occur during the backup. Each
                            volume for which a snapshot is created has a corresponding VSP cache file.
                            For information on the VSP parameters, please refer to the both volumes of the
                            NetBackup System Administrator’s Guide, Volume 1.


                            User-directed operations for Windows systems
                            By default on Windows 2000/XP/2003 Server systems, the Program Files
                            folder is not writable by users other than the administrator.
                            NetBackup writes log files and progress files to the folder
                            Program FilesVERITASNetBackupLogs.
                            To perform backups and restores with the Backup, Archive, and Restore
                            interface, users must have write permission to the Logs directory. Users
                            without write permission to this directory receive an error message, and the
                            backup or restore is canceled. The administrator account has write permission
                            by default, but you must ensure that users other than the administrator have
                            write permission.


                            Local and remote installations for Windows systems
                            You can use the NetBackup client installation program in the following ways:
                            ■	   Local installations
                                 The installation program installs the client software only on the machine
                                 where you start the installation.
                            ■	   Remote installations
                                 The installation program scans the network for available clients where you
                                 can install the client software. The source machine (the primary node in
                                 cluster environments) must run Windows 2000/XP/2003 Server. In
                                 addition, a remote installation requires system administrator privileges and
                                 is only available for Windows 2000/32-bit XP/32-bit 2003 Server.

                                 Note: You cannot install remotely from UNIX systems to
                                 Windows 2000/XP/2003 machines.
Installing clients   83
                                                   Installing Microsoft Windows clients


Silent installations for Windows systems
A silent installation is a process that does not require interactive input. It does,
however, require that you edit the silentclient.cmd file before you run the
file.


New and upgrade installations for Windows clients
The NetBackup Client Setup Wizard recognizes the following types of
installation:
■	   New installations
     The wizard does not detect that any NetBackup client software is currently
     installed. You can specify where you want the client software installed.
■	   Upgrade installations
     The wizard detects that a version of NetBackup client software already
     exists. You cannot change the installation location of the client software.
For new or upgrade installations, you can select one of the following types:
■	   Typical installation
     The wizard uses default settings that should work for most installations.
     You must provide the client, master, and additional server names.
■	   Custom installation
     The wizard lets you change the custom configuration options as needed for 

     your specific environment. These options are then used for all new client 

     installations.

     You must also provide the client, master, and additional server names.

The custom configuration options are divided among three wizard windows:
NetBackup Client Features, NetBackup Options, and NetBackup Services.
The following table describes the custom configuration options that you can
select for new or upgrade installations.

NetBackup Client             NetBackup Options            NetBackup Services
Features window              window                       window
NetBackup Documentation      Start the NetBackup Client   Use the built-in system
                             Service automatically (at    account or specify custom
                             system startup)              user name, password, and
                                                          domain.

Veritas Snapshot Provider    Start the NetBackup Client   Terminate NetBackup
(VSP)                        Job Tracker automatically    processes (at system
                             (at system startup)          startup)
84 Installing clients
   Installing Microsoft Windows clients


                             NetBackup Client           NetBackup Options             NetBackup Services
                             Features window            window                        window
                             NetBackup Debugger         Start the NetBackup Client    Terminate Windows
                             Symbols                    Service on the client after   processes (at system
                                                        installation is complete      startup)

                                                        Change the bpcd, bprd,        Abort install if reboot is
                                                        vnetd, and vopied port        required
                                                        numbers


   Windows client system requirements
                            This section describes the hardware and the software requirements for
                            successful installation of NetBackup client software.


                            Local installation requirements
                            To install NetBackup client software locally, the system must meet the following
                            configuration requirements.
                            ■	   Microsoft Windows 2000/XP (32- and 64-bit/2003 Server (32- and 64-bit)
                            ■	   An Intel Pentium or Itanium processor
                            ■	   Internet Explorer 5.5 or later
                            ■	   Any TCP/IP transport that is Windows Sockets compliant. (Use of the
                                 TCP/IP transport that comes with the server or the operating system is
                                 recommended.)
                            ■	   A network adapter that your TCP/IP transport supports


                            Remote installation requirements
                            To install NetBackup client software remotely, the system must meet the
                            following configuration requirements:
                            ■	   All the requirements for local installations must be met.
                            ■	   The source system must run Windows 2000/2003 Server.
                            ■	   The destination system must run Windows 2000/32-bit XP/32-bit 2003
                                 Server.
                            ■	   Administrator privileges are required for the person that performs remote
                                 installations.
Installing clients     85
                                                                                             Installing Microsoft Windows clients


               NetBackup server requirements for Windows clients
               The version of the NetBackup server software must be the same or newer than
               the version you install on the client.


Installing Windows clients locally
               Follow these instructions to install the NetBackup client software on your local
               Windows system. You can stop the installation process at any time by clicking
               Cancel or by clicking Back to return to the previous window.


               Note: After client installation, you may need to reboot the system for the
               changes to take effect.


               To install NetBackup client software locally on Windows systems

                              Symantec


                   Welcome
                                   Symantec

                                                                                Custom Installation
                    License
                    Agreement
                                      Symantec                       Symantec                       Symantec                  Symantec


                     Choose                              NetBackup                   NetBackup                 NetBackup
                     Installation                        Features                    Options                   Services
                     Type


                    Typical
                    Installation


                                              Symantec                            Symantec                         Symantec

                        Enter System                          Begin Installation >                  Finish Installation
                        Names                                 Monitor Progress


               1     Log in as administrator on the host or system server.
               2     Insert the NetBackup installation CD in the drive.
                     On systems with Autorun enabled, the installation starts automatically.
                     If Autorun is not enabled, navigate to the CD drive and double-click
                     Launch.exe.
               3     On the initial screen, select NetBackup Installation.
               4     On the installation screen, select Install Client Software.
86 Installing clients

   Installing Microsoft Windows clients


                             5	   On the Welcome screen, click Next.
                             6	   On the License Agreement screen, accept the terms of the agreement.
                             7	   On the Installation Type screen, select the following:
                                  ■	   Install to this computer only
                                  ■	   Either Typical or Custom installation.
                                       ■	   For typical installations, NetBackup uses the default port numbers
                                            and default service startup settings.
                                       ■	  For custom installations, NetBackup lets you set service startup
                                           settings, change port numbers, and specify the installation
                                           location. You can also choose whether to install NetBackup
                                           documentation, debug symbols, and VSP.
                                  Click Next.
                             8	   On the NetBackup System Names screen, provide the following information:

                                  Client Name	          Enter the name of the client machine on which you are logged
                                                        in.

                                  Master Server Name	 Enter the master server name here.

                                  Additional Servers	   Enter all the server names that you want this client to access.

                                  LiveUpdate	           ■    Install LiveUpdate Agent
                                                             To install the LiveUpdate agent, leave the check box
                                                             checked. Otherwise, click the check box to remove the
                                                             check to prevent agent installation.
                                                        ■	   Location of LiveUpdate Server
                                                             Enter the network path for the NetBackup LiveUpdate
                                                             server here.
                                                        ■    Server Type
                                                             Select the type of server (LAN, HTTP, or HTTPS) used for
                                                             the NetBackup LiveUpdate server.


                             9	   On the Ready to Install screen, click Install.
                             10	 On the System Validation Complete screen, click Finish.


   Installing Windows clients remotely
                             Use the following procedures to install NetBackup clients on your network (one
                             of these clients can be your local system). You can stop the installation process
                             at any time by clicking Cancel.
Installing clients     87
                                                                           Installing Microsoft Windows clients


Note: Review the installation “Windows client system requirements” on page 82
for remote installations before you start this procedure.


Notes on Windows client remote installations
■	     During installation, the client name is written to the registry in lowercase.
       For backups to work, the policies on the NetBackup server must specify the
       client names in lowercase.
■	     You must have administrator privileges on the remote client for the
       NetBackup install to complete successfully.
■	     The NetBackup client installation program cannot clean up after a canceled
       installation. If you interrupt the installation, any files that were successfully
       installed remain installed on the clients.
■	     You may need to reboot your PC or the remote systems for the changes to
       take effect.

To install the Windows NetBackup client software on remote computers

                Symantec


     Welcome
                   Symantec


      License                                                     Remote Custom
      Agreement                                                     Installation
                       Symantec                      Symantec                      Symantec                 Symantec


       Choose                            NetBackup                  NetBackup                 NetBackup
       Installation                      Features                   Options                   Services
       Type


        Remote
        Typical
        Installation

                              Symantec                          Symantec                         Symantec

          Enter System                       Begin Installation >                 Finish Installation
          Names                              Monitor Progress


1      Log in as administrator on the Windows system.

       Insert the NetBackup installation CD in the drive.On systems with Autorun 

       enabled, the installation starts automatically.
88 Installing clients

   Installing Microsoft Windows clients


                                  If Autorun is not enabled, navigate to the CD drive and double-click
                                  Launch.exe.
                             2	   On the initial screen, select NetBackup Installation.
                             3	   On the installation screen, select Install Client Software.
                             4	   On the Welcome screen, click Next.
                             5	   On the License Agreement screen, accept the terms of the agreement.
                             6	   On the Installation Type screen, select the following:
                                  ■    Select from available computers on the network
                                       The procedure does not install the client on the local machine unless
                                       you add it to the list of systems that you want to install.
                                  ■    Either Typical or Custom installation.
                                       ■	   For typical installations, NetBackup uses the default port numbers
                                            and default service startup settings.
                                       ■	  For custom installations, NetBackup lets you set service startup
                                           settings, change port numbers, and specify the installation
                                           location. You can also choose whether to install NetBackup
                                           documentation, debug symbols, and VSP.
                                  Click Next.
                             7	   On the NetBackup System Names screen, provide the following information:

                                  Master Server Name Enter the master server name here.

                                  Additional Servers   Enter all the server names that you want the clients to access.

                                  LiveUpdate           ■    Install LiveUpdate Agent
                                                            To install the LiveUpdate agent, leave the check box
                                                            checked. Otherwise, click the check box to remove the
                                                            check to prevent agent installation.
                                                       ■	   Location of LiveUpdate Server
                                                            Enter the network path for the NetBackup LiveUpdate
                                                            server here.
                                                       ■    Server Type
                                                            Select the type of server (LAN, HTTP, or HTTPS) used for
                                                            the NetBackup LiveUpdate server.


                             8	   On the Ready to Install screen, click Install.
                                  The client software is installed on the specified machines.
                                  If you click Cancel after you click Install, the installation does not stop
                                  immediately. The installation continues until it is finished on the remote
                                  system. At that point, no remote installations begin. NetBackup considers
Installing clients   89
                                                                 Installing Microsoft Windows clients


                    any remote installations that were complete when you clicked Cancel to be
                    successful.
               9    On the System Validation Complete screen, click Finish.


Installing Windows clients silently
               A silent installation process does not require interactive input. It does, however,
               require that you edit the silentclient.cmd file before you run the script.
               The following procedure performs a silent installation of NetBackup clients. One
               of the clients can be the system that runs the silentclient.cmd script.


               Note: Silent installations of NetBackup clients are not supported if you want to
               run the NetBackup services as a user rather than as a local administrator. To
               install NetBackup as a user, see “To install NetBackup client software locally on
               Windows systems” on page 83. Also see “To install the Windows NetBackup
               client software on remote computers” on page 84.


               To perform a silent installation on Windows
               1    Insert the NetBackup installation CD in the drive.
               2	   In a Microsoft Windows Explorer window, navigate to the CD drive.
               3	   Copy the contents of the PC_Clnt directory to a temporary folder on your
                    hard drive. For example, C:temp.
               4	   Since the files on the CD are read-only, change the permissions for these
                    files on the hard drive to allow the update.
               5	   In the temporary directory, use a text editor to edit the silentclient.cmd
                    file so the script installs the client software as needed.
                    Be sure to update the client, the master server, and additional servers to the
                    minimum required version of NetBackup.
               6	   Run the following script:
                    silentclient.cmd

               7	   Check the NetBackup installation log file in the following directory to verify
                    that the installation was successful:
                    C:Documents and SettingsuseridLocal Settingstemp


Configuring NetBackup clients
               You can configure NetBackup clients by performing one of the following actions:
90 Installing clients
   Installing UNIX clients


                             ■	   To add servers or media servers, start the Backup, Archive, and Restore
                                  interface and from the File menu, select Specify NetBackup Machines.
                             ■	   To display and change the client properties, start the Backup, Archive, and
                                  Restore interface.
                                  From the File menu, select NetBackup Client Properties.
                             ■	   To display and change the server properties, start the NetBackup
                                  Administration Console.
                                  Expand Host Properties and click on Clients.
                                  In the right pane, right-click on the client, and choose Properties.
                                  All NetBackup servers that require access to your Windows client must be
                                  listed on the Servers tab in the resulting dialog box.
                             For more information, refer to the NetBackup Backup, Archive, and Restore
                             Getting Started Guide.


                             Note: For NetBackup Novell NetWare Clients: The NetBackup Novell NetWare
                             Client System Administrator’s Guide describes how to use that client to back up
                             and restore the data on NetWare servers.


   Removing Windows clients
                             To remove (uninstall) the NetBackup client on Microsoft Windows clients
                             1    Open the Windows Control Panel (select Start > Settings > Control Panel).
                             2    Select Add/Remove Programs.
                             3    Select Veritas NetBackup Client.
                             4    Click Remove.


   Installing UNIX clients
                             By definition, your NetBackup server is also a NetBackup client. When you
                             install the NetBackup server software, you install both the NetBackup server
                             and the NetBackup client software on the server.
                             You can install UNIX clients either locally at the client computer or remotely
                             from your UNIX NetBackup server. To have the ability to include a client in a
                             policy, the client type software must first be installed on the UNIX master
                             server.
Installing clients   91
                                                                Installing UNIX clients


Note: Macintosh OS X10.3.x and OS X10.4.x clients are UNIX-based clients.
Follow the same UNIX client installation procedures in this section.

Use the following guidelines when you install UNIX clients:
■	   The gzip and the gunzip commands must be installed on each system. The
     directories where the commands are installed must be part of the root user’s
     PATH environment variable setting.
■	   For local installations:
     ■	   You must install the client software locally if remote installation is not
          possible. Remote installation is not possible if your NetBackup server
          runs Windows 2000/2003 Server. Firewalls can also prevent remote
          installation.
     ■	   To install clients to a location other than the default, you must create
          and link the directory before you install the client software. First create
          the directory where you want the software to reside, and then create
          /usr/openv as a link to that directory.
     ■	   On IBM zSeries Linux clients, you must transfer the NetBackup CD
          image contents to a location that is readable by the virtual Linux
          environment. You can transfer the image with FTP or NFS mounting
          commands.
■	   For remote installations:
     ■	   You can “push” the client software from your UNIX NetBackup server
          to your UNIX client computers. The preferred installation method is to
          push the client software.
     ■	   Before you can push to a UNIX client, you must first install the
          NetBackup client type software on the master server and create a
          policy that includes the client name. The UNIX client must be a true
          client and not a media or a master server. See “Adding a UNIX client
          after initial server installation” on page 95.
     ■	   Clients such as the IBM zSeries Linux may not have a locally mounted
          CD device, which makes it impossible to perform a standard local
          installation. To install NetBackup to clients with no local CD drive, you
          must push the NetBackup installation from a UNIX master or media
          server. See any of the following:
          “Installing client software with the ftp method” on page 92.
          “Installing client software with the rsh method” on page 90.
          “Installing client software with the ssh method” on page 93
          “Installing client software with the sftp method” on page 94
92 Installing clients
   Installing UNIX clients


                             To initiate a backup or a restore from a UNIX client, the following graphical
                             interfaces are available:
                             ■	   Clients that are compatible with NetBackup-Java may use the
                                  NetBackup-Java interface (jbpSA). Refer to the NetBackup Release Notes for
                                  a list of NetBackup-Java capable hosts.
                             ■	   Clients that are not compatible with NetBackup-Java can use the bp
                                  interface. They also support a login from any NetBackup 6.5 UNIX server’s
                                  NetBackup client console with the jbpSA command. Clients that are not
                                  compatible with NetBackup-Java are Macintosh OS X 10.3.x and OS X10.4.x,
                                  IBM zseries Linux, IRIX, and FreeBSD.


   Installing UNIX clients locally
                             The following procedure installs the NetBackup client software on a local
                             machine.

                             To install client software locally on a UNIX client
                             1	   Insert the NetBackup client CD into the drive on the client computer and
                                  mount it.
                             2	   Change your working directory to the CD directory if you have a CD, or to the
                                  directory that contains the downloaded files:
                                  cd /cd_mount_point

                                  The cd_mount_point is the path to the directory where you can access the 

                                  CD.

                                  For Macintosh OS X 10.3.x systems only: You can access the CD from the 

                                  following location:

                                  cd /volumes/cd name

                             3	   Enter the following command to execute the installation script:
                                  ./install

                                  The client binaries represent the operating system versions where the
                                  binaries were compiled. Often, the binaries function perfectly on later
                                  versions of the operating system. For example, Solaris 9 binaries also are
                                  used on the Solaris 10 level of the operating system. The installation
                                  procedure attempts to load the appropriate binaries for your system. If the
                                  script does not recognize the local operating system, it presents choices.
                             4    Follow the prompts to complete the installation.
                             5    After the installation is complete, unmount the client CD.
Installing clients   93
                                                                               Installing UNIX clients


Installing UNIX clients remotely
               You can push the client software from a UNIX master server to a client host by
               using the following methods:
               ■	   rsh
               ■	   ftp
               ■	   ssh
               ■	   sftp


               Note: For installation in clustered environments, enter the virtual name for the
               NetBackup server and not the actual local host name. You can only push client
               software from the active node.


               Installing client software with the rsh method
               Read the following statements before you proceed with this procedure:
               ■	   To use the rsh method, the UNIX client must have an entry for the server in
                    its /.rhosts file. The /.rhosts entries enable software installation, but
                    they are not necessary for correct operation of NetBackup software.
               ■	   If you want to install client software to a location other than the default, you
                    must first create and link the desired directory. Create the directory where
                    you want the client software to reside, and then create /usr/openv as a
                    link to that directory.
               ■	   Make sure the clients are assigned to a backup policy.
               ■	   For Macintosh OS X 10.3.x and OS X 10.4.x users:
                    By default, these operating system versions do not enable the remote shell
                    daemon (rshd). Run the following command to enable the daemon:
                          /sbin/service shell start


               To install client software from a UNIX master server to UNIX clients with the
               rsh method
               1	   Start the NetBackup Administration Console.
               2	   On the Login dialog box, provide the name of the NetBackup server that
                    contains the policy configuration with the clients.
                    You can install the client software only from the NetBackup server that you
                    specify in the Login dialog box when you start the interface. The clients
                    must be defined in a policy on this NetBackup server.
94 Installing clients
   Installing UNIX clients


                             3   In the NetBackup Administration Console window, click on the NetBackup
                                 Management icon to show the available options.
                             4   In the left pane, click Policies.
                             5   In the All Policies pane, select the master server.


                             6   Select Actions > Install UNIX Client Software.
                             .
Installing clients   95
                                                                 Installing UNIX clients


7	   In the Don’t install these clients list, select the clients you want to install
     and click Add >>.
     The clients are moved to the Install these clients list.
8	   To start the installation, click Install Client Software.
     Client software installation can take a minute or more per client. NetBackup
     writes messages in the Progress box as the installation proceeds.
     If the installation fails on a client, NetBackup notifies you but keeps the
     client in the policy.

     You cannot stop the installation after it has started.

     During installation, NetBackup does the following:

     ■	   Copies client software from /usr/openv/netbackup/client on the
          server to /usr/openv/netbackup on the client.
     ■	   Adds the appropriate entries to the client’s /etc/services and
          inetd.conf files or xinetd.d directory.
9	   After the installation is complete, click Close.


Installing client software with the ftp method
Read the following statements before you proceed with this procedure:
■	   If you want to install client software to a location other than the default, you
     must first create and link the desired directory. Create the directory where
     you want the software to reside, and then create /usr/openv as a link to
     that directory.
■	   Make sure the clients are assigned to a backup policy.
■	   For Macintosh OS X 10.3.x and OS X 10.4.x users:
     ■	   By default, these operating system versions do not enable the FTP
          daemon (ftpd), which is required. In the sharing pane of the System
          Preferences application, check Allow FTP access to enable ftpd.
     ■	   If you have a firewall that is enabled, you must enable FTP access.
          In the System Preferences sharing pane under Firewall, check FTP
          Access to allow FTP connections.

To install client software from a UNIX master server to UNIX clients with the
ftp method
1    Run the install_client_files script on the NetBackup server to move
     the client software from the server to the /tmp directory on the client.
     You must have a login ID and password that you can use to access the
     clients through FTP.
     ■	   To move software to only one client at a time, run the following
          command:
96 Installing clients
   Installing UNIX clients


                                  /usr/openv/netbackup/bin/install_client_files ftp client user
                                       The client is the host name of the client.
                                       The user is the login id that FTP requires on the client.
                                  ■	   To move software to all clients at once, run the following command:
                                  /usr/openv/netbackup/bin/install_client_files ftp ALL user
                                       The ALL option specifies that you want to install all clients that are
                                       configured in any backup policy on the server.
                                       The user is the login id required by FTP on the client.
                                       The install_client_files script prompts you for a password for
                                       each client if you do not have a .netrc file set up.
                             2	   After the install_client_files script runs, the root user on each client
                                  machine must run the following client_config script:
                                  sh /tmp/bp.pid/client_config
                                  The pid is the process ID. The client_config script installs the binaries
                                  and updates the /etc/services and inetd.conf files or the xinetd.d
                                  directory, as appropriate.


                             Installing client software with the ssh method
                             Read the following statements before you proceed with this procedure:
                             ■	   To use the ssh method, the UNIX client must have the SSH daemon (sshd)
                                  enabled and configured to allow root user logins.
                             ■	   If you want to install client software to a location other than the default, you
                                  must first create and link the desired directory. Create the directory where
                                  you want the client software to reside, and then create /usr/openv as a
                                  link to that directory.
                             ■	   Make sure the clients are assigned to a backup policy.
                             ■	   For Macintosh OS X 10.3.x and OS X 10.4.x users:
                                  ■	   By default, these operating system versions do not enable the SSH
                                       daemon (sshd). You must first enable this daemon in order to perform
                                       the following procedure successfully.
                                       In the System Preferences sharing pane, check Remote Login to enable
                                       sshd.
                                  ■	   If you have a firewall that is enabled, you must enable ssh connections.
                                       In the System Preferences sharing pane under Firewall, check Remote
                                       Login - SSH to allow SSH connections.

                             To install client software from a UNIX master server to UNIX clients with the
                             ssh method
                             ■	   Run the install_client_files script on the NetBackup server.
Installing clients   97
                                                                Installing UNIX clients


     ■	   To move software to only one client at a time, run the following
          command:
     /usr/openv/netbackup/bin/install_client_files ssh client

          The client is the host name of the client.

     ■	   To move software to all clients at once, run the following command:
     /usr/openv/netbackup/bin/install_client_files ssh ALL
          The ALL option specifies that you want to install all clients that are
          configured in any backup policy on the server.


Installing client software with the sftp method
Read the following statements before you proceed with this procedure:
■	   To use the sftp method, the UNIX client must have the SSH daemon (sshd)
     enabled and configured to allow root or non-root user logins.
■	   If you want to install client software to a location other than the default, you
     must first create and link the desired directory. Create the directory where
     you want the software to reside, and then create /usr/openv as a link to
     that directory.
■	   Make sure the clients are assigned to a backup policy.
■	   For Macintosh OS X 10.3.x and OS X 10.4.x users:
     ■	   By default, these operating system versions do not enable the ssh
          daemon (sshd). You must first enable this daemon in order to perform
          the following procedure successfully.
          In the System Preferences sharing pane, check Remote Login to enable
          sshd.
     ■	   If you have a firewall that is enabled, you must enable SSH connections.
          In the System Preferences sharing pane under Firewall, check Remote
          Login - SSH to allow SSH connections.

To install client software from a UNIX master server to UNIX clients with the
sftp method
1    Run the install_client_files script on the NetBackup server to move
     the client software from the server to the /tmp directory on the client.
     ■	   To move software to only one client at a time, run the following
          command:
     /usr/openv/netbackup/bin/install_client_files sftp client user
          The client is the host name of the client.
          The user is the login id that SSH requires on the client.
     ■	   To move software to all clients at once, run the following command:
     /usr/openv/netbackup/bin/install_client_files sftp ALL user
98 Installing clients
   Installing UNIX clients


                                      The ALL option specifies that you want to install all clients that are
                                      configured in any backup policy on the server.

                             2	   After the install_client_files script runs, the root user on each client
                                  machine must run the client_config script:
                                  sh /tmp/bp.pid/client_config
                                  The pid is the process ID. The client_config script installs the binaries
                                  and updates the /etc/services and inetd.conf files or the xinetd.d
                                  directory, as appropriate.


   Adding a UNIX client after initial server installation
                             You may want to add UNIX clients after the server installation if you forgot to 

                             select one during the installation. You may also add a new UNIX client type to 

                             your backup environment.

                             To install client software later, you must first install the NetBackup client

                             software onto the NetBackup server.

                             The client CD’s installation script lets you install the client software on the 

                             server for each of the UNIX client types that NetBackup supports. You can then

                             “push” this client software from the server to your UNIX clients.


                             To add UNIX client types to servers after initial installation

                             1    Mount the client CD to open a menu that displays the available client types.

                             2	   Change your working directory to the CD directory if you have a CD or to the
                                  directory that contains the downloaded files:
                                  cd /cd_mount_point

                                  The cd_mount_point is the path to the directory where you can access the
                                  CD.
                             3	   Enter the following command to execute the installation script:
                                  ./install

                                  The client binaries represent the operating system versions on which the
                                  binaries were compiled. Often the binaries function perfectly on later
                                  versions of the operating system. For example, Solaris 9 binaries also are
                                  used on the Solaris 10 level of the operating system. The installation
                                  procedure attempts to load the appropriate binaries for your system. If the
                                  script does not recognize the local operating system, it presents choices.
                             4	   Select the client type that you want to load and follow the prompts to install
                                  that client type. Repeat as necessary until all the client types you want are
                                  loaded.
Installing clients   99
                                                                           Installing UNIX clients


                  Make sure you load the software for all the UNIX client types you intend to
                  back up onto the server. Otherwise, you cannot add these client types to the
                  NetBackup policy configuration.
             5	   After the installation is complete, unmount the client CD.
             6	   Install the NetBackup client software on the clients you specified, as
                  described in “Installing UNIX clients remotely” on page 90.


Removing UNIX NetBackup client software
             If you remove NetBackup from a machine with the NetBackup-Java Display
             Console installed, the console is also removed.

             To remove UNIX NetBackup client software
             1    Log in to the client system as the root user.
             2	   Navigate to the /usr/openv directory.
                  ■	   If /usr/openv is a physical directory, run the following command:
                       rm -rf /usr/openv
                  ■	   If /usr/openv is a link, run the following commands:
                       cd /usr/openv
                       pwd

                       ls


                  Caution: Make sure you are at the proper location and verify that the
                  subdirectories are what you would expect them to be before continuing. You
                  do not want to remove the wrong directories. For this reason, the first
                  commands verify your current location and the files in that directory,
                  before removing files.

                       rm -rf *

                       cd /

                       rm -f /usr/openv


                  Warning: The rm -f /usr/openv command also removes any add-on
                  products that are installed on this machine.

             3	   Remove NetBackup entries in the client’s /etc/services file. Locate the
                  lines, marked by the following strings and delete them:
                  # NetBackup services#

                  .....

                  # End NetBackup services #


                  # Media Manager services #

                  .....

                  # End Media Manager services #
100 Installing clients
    Installing UNIX clients


                                   If you do not see these strings, it may be because you upgraded from an
                                   earlier release of NetBackup. You can also remove bpcd, bpjava-msvc,
                                   bprd, vnetd, and vopied without searching for the #End...# strings.
                                   You are not required to remove the strings from /etc/services. Any
                                   operations that access the file can function with or without the services
                                   being listed.

                                   Note: For Macintosh OS X 10.3.x systems: The NetBackup installation
                                   updates the /etc/services file with these entries. However, earlier
                                   NetBackup releases may have updated the /services directory of the
                                   NetInfo database. To remove NetBackup and its services, use the
                                   NetManager utility to delete the following files from the /services
                                   directory: bpcd, bpjava-msvc, bprd, vnetd, and vopied.

                              4	   Remove the NetBackup entries in the /etc/inetd.conf file by deleting
                                   the lines for bpcd, vnetd, vopied, and bpjava-msvc.
                              5	   Ensure that the inetd daemon reads the updated inetd.conf (or
                                   inetd.local) file.
                                   ■	   Determine the process ID of inetd. The ps command options vary
                                        from one UNIX operating system to another. Following are two
                                        examples.
                                        For most UNIX clients, run the following command:
                                        ps -ea | grep inetd

                                        For MacOS X 10.3.x and FreeBSD, run the following command:
                                        ps -ax | grep inetd
                                        The process ID is the first number displayed in the ps command
                                        output.
                                   ■	   HUP the inetd daemon, as follows.
                                        kill -1 process_ID
                                        The kill command option may vary from one client platform to
                                        another.
                              6	   For the NetBackup-Java capable clients that run the NetBackup
                                   Administration Console for UNIX, remove the NetBackup-Java state data, as
                                   follows:
                                   /bin/rm -rf /.nbjava

                                   /bin/rm -rf /.java/.userPrefs/vrts


                                   Warning: There should be no space between the slash “/” and the period “.”
                                   of “/.nbjava”. If you add a space between these characters, all files on this
                                   machine are removed.
Installing clients   101
                                                               Installing UNIX clients


7	   Inform users of NetBackup-Java that they can remove the $HOME/.nbjava
     and portions of the $HOME/.java directories.
     The $HOME/.nbjava and $HOME/.java directories contain application
     state information (such as table column order and size). This information is
     saved when the user exits NetBackup-Java applications. When you remove
     NetBackup, the process removes this directory for the root user only.
     The common subdirectory in $HOME/.java/.userPrefs/vrts can be
     removed.
8	   If you enabled NetBackup access control, NetBackup created new files on
     clients and servers that can be divided into two categories:
     ■	   Individual user files
          Individual user cache files exist in their home directories (for example,
          in $HOME/.vxss). Inform those users that they can remove the
          $HOME/.vxss directory.
     ■	  NetBackup application temporary files
         NetBackup temporary files are removed with NetBackup.
     For more information on NetBackup access control, please see the
     NetBackup System Administrator’s Guide, Volume II.
     For more information on Veritas Security Services and how to remove the
     software, see the Veritas Security Services Installation Guide.
102 Installing clients
    Installing UNIX clients
Chapter                            6
NetBackup licenses
           This chapter includes the following topics:
           ■   “NetBackup license compatibility”
           ■   “Entering license keys”
           ■   “Frequently asked questions”


NetBackup license compatibility
           To use your current NetBackup license keys to upgrade your servers, add-on
           products, and database agents to NetBackup 6.5, you must have the following:
           ■   NetBackup 5.x or 6.0 currently installed
           ■   A valid maintenance contract for all licensed NetBackup products


           Note: You cannot upgrade to NetBackup 6.5 if your current installed version is
           NetBackup 4.5. You must first upgrade to NetBackup 5.x, and then you can
           upgrade to NetBackup 6.5.

           Upgrade licenses and software may be obtained from the Symantec Licensing
           Portal at the following Web site:
           https://licensing.symantec.com/acctmgmt/index.jsp
           For detailed information and procedures on how to administer license keys,
           refer to the NetBackup Administrator’s Guide.


Entering license keys
           The easiest method for entering license keys is to enter all of them when you
           install NetBackup on a master server.
104 NetBackup licenses
    Frequently asked questions


                            After you install NetBackup, you can open the NetBackup Administration

                            Console and select Help > License Keys...

                            On UNIX servers, you can also run the following command:

                            /usr/openv/netbackup/bin/admincmd/get_license_key


                            Note: All product license keys must be entered on the master server.

                            For some features and products, license keys must also be installed on the media
                            server. The following features require license key installation on media servers
                            and master servers:
                            ■    NetBackup SharedDisk
                            ■    Library-based Tape Drives Feature
                            ■    NDMP


                            Note: You can log in to a NetBackup server from almost any server in a system to
                            view, enter, and administer license keys. When you administer license keys
                            remotely, ensure that you view the licenses of the system you intend to change.
                            You do not want to add or change a license key on the wrong server.


    Frequently asked questions
                            Symantec customers have asked the following questions about how to manage
                            license keys.
                            Is the license system for NetBackup the same as the license system in other Symantec
                            products?
                            NetBackup uses a common license system that other Symantec products also use. Please
                            remember, however, that the common license system provides flexibility in the license
                            features that each product implements. For example, NetBackup does not have a
                            node-locked license system, but some other products do.
                            Can I use NetBackup if all I have is a media/doc kit?
                            No. The media/doc kit by itself does not allow any access to NetBackup. You always need a
                            license key (either permanent or evaluation). License keys should always be delivered with
                            the media/doc kit, so you should never find yourself with a media/doc kit and no key.
                            What does the license key look like? What information does it contain?
                            The key is a multi-digit alphanumeric string (for example:
                            8EPP-ABCD-9XYZ-XYZ9-8881-VCF4-OIUF-AJDC). The key contains information on the
                            following:
                            ■    Whether the key is for NetBackup Server or NetBackup Enterprise Server
                            ■    Whether the key is for a server, a client, an agent, or an option (and which one)
                            ■    Whether the key is a permanent key or an evaluation key
NetBackup licenses    105
                                                                   Frequently asked questions


■    Information about how and where the key was generated
Is the license key serialized?
Yes, serialization information is embedded in the key.
Can I see reports on what license keys I have?
Yes. Information about license keys is stored on the master server.
To access the information, open the NetBackup Administration Console and select Help > 

License Keys....

On media servers, enter the master server name as the host name on the login screen.

On UNIX servers, you can also run the following command:

/usr/openv/netbackup/bin/admincmd/get_license_key

For more information on how to view reports, refer to the NetBackup Administrator’s
Guide.
How do I enable options and agents?
When you install NetBackup, you are prompted to enter the license keys for all options and 

agents.

If you purchase an agent or other add-on product at a later date, you can enter its license 

key manually. Open the NetBackup Administration Console and select Help > License

Keys....

On media servers, enter the master server name as the host name on the login screen.

On UNIX servers, you can also run the following command:

/usr/openv/netbackup/bin/admincmd/get_license_key

Many options and agents require that you have your original NetBackup CDs, because
additional binaries must be installed. You should always keep your NetBackup CDs in a safe
place.
Should I save license keys after they have been entered?
Yes. Always store copies of your license keys in a secure place.
What should I do if I have lost my license key(s)?
Symantec has a record of all license keys that are issued to customers. Customers who lose 

their license key(s) can call Order Management to get copies of their license keys.

For Americas, Japan, PacRim, Australia:

Tel: 650.318.4265 FAX: 650.335.8428

For Europe, Middle East and Africa:

Tel: 00.353.61.365232 FAX: 00.353.61.365223

If you have purchased NetBackup from a Symantec partner, you need to contact that 

partner for information on your key.

How are large volume orders handled?
Many NetBackup installations are very large, and the license keys are long. License keys
that you enter multiple times can be time-consuming. You can request a single license key
for each type of NetBackup component you purchase. For example, you can obtain one
license key for use with 50 Oracle agents. Site licenses enable unrestricted use for specific
NetBackup agents or options.
106 NetBackup licenses
    Frequently asked questions


                            Note: You still need a unique license key for each type of NetBackup component that you
                            purchase. Separate license keys are required for a NetBackup server, a Lotus Notes agent,
                            an NDMP option, a UNIX client, and so on.

                            What about license keys for customers with site licenses?
                            Site licenses are handled much like large volume orders are. The certificate for a site
                            license states that the license key is good for unlimited copies.
                            Do I need a license key to enable NetBackup Remote Administration Consoles?
                            No. NetBackup Remote Administration Consoles do not require special license keys. You
                            can install them on any computer with access to the master server.
                            Can a license key be used multiple times?
                            Yes. You can use your license keys multiple times. You are, however, legally bound to install
                            and use only the number of NetBackup servers, clients, agents, and options for which you
                            purchase licenses.
                            How do existing customers get license keys?
                            All NetBackup customers who have current maintenance contracts with Symantec
                            automatically receive the latest version of NetBackup. You receive the NetBackup
                            media/doc kit and license keys for every component for which you purchased licenses.
                            If your maintenance is through a Symantec partner, you upgrade through the partner.
                            Contact the partner for more details.
                            What if I do not get the right license keys?
                            If you believe that you received an incorrect license key, contact Order Management using
                            the number on your license key certificate.


                            Note: Technical Support does not issue permanent license keys. You can obtain license
                            keys only through Order Management. Technical Support can provide temporary
                            one-month license keys to you while issues regarding permanent license keys are
                            resolved.

                            What does an evaluation license key enable?
                            The evaluation license key enables unrestricted use of NetBackup, its agents, and its
                            options for a predetermined period of time.
                            Am I notified when an evaluation is about to expire?
                            To find out when a license key expires, open the NetBackup Administration Console and 

                            select Help > License Keys....

                            On media servers, enter the master server name as the host name on the login screen.

                            On UNIX servers, you can also run the following command:

                            /usr/openv/netbackup/bin/admincmd/get_license_key

                            What happens when an evaluation license key expires?
                            The NetBackup daemons are shut down. When you attempt to use the product you are
                            informed that its evaluation period has expired.
NetBackup licenses     107
                                                              Frequently asked questions


Does NetBackup save the backup configuration and catalog information when evaluation
license keys expire?
Yes. Customers who add a permanent license key to an evaluation version of NetBackup
have immediate access to their catalog information and configuration information.
How do I upgrade from an evaluation license to a permanent license?
It is easy. When you purchase a permanent license, you add that license to NetBackup. All
the configuration information and catalog data from your evaluation version is retained.
To enter your permanent license key, open the NetBackup Administration Console and
select Help > License Keys....
On media servers, enter the master server name as the host name on the login screen.
On UNIX servers, you can also run the following command:
/usr/openv/netbackup/bin/admincmd/get_license_key
108 NetBackup licenses
    Frequently asked questions
Chapter                            7
Configuring NetBackup
servers
          This chapter includes the following topics:
          ■	   “Recommendations for configuring NetBackup”
          ■	   “Configuring NetBackup”
          ■	   “Testing the NetBackup installation”


Recommendations for configuring NetBackup
          By default, the NetBackup Administration Console launches automatically
          following the installation. From this console you can configure NetBackup by
          using the Getting Started wizard. For detailed information about the NetBackup
          Administration Console, refer to the Veritas NetBackup Administrator’s Guide.
          For help while running a wizard, click Help in the wizard screen.
          The following lists some tips to follow before you configure NetBackup on your
          system.
          ■	   Ensure that you have physically attached the storage devices to the server.
               The devices must be configured as specified by the device and the operating
               system vendor. Install any required device drivers and software patches.
          ■	   After you have installed NetBackup server software, select the Getting
               Started wizard in the right pane of the NetBackup Administration Console.
               Follow the steps of each wizard until you have finished configuring
               NetBackup.
               If you have already configured NetBackup and you want to change a
               particular area, you can click on any of the wizards.
110 Configuring NetBackup servers
    Configuring NetBackup


                                 Note: You can open the NetBackup Administration Console by selecting
                                 Start Programs > Veritas NetBackup > NetBackup Administration Console.

                            ■	   For NetBackup Enterprise servers, the process for configuring a master
                                 server or a media server is very similar. Symantec recommends that you
                                 install the master server first, then install all media servers. You can then
                                 configure the master server and the media server information (such as
                                 storage devices and volumes) on the master. The configuration information
                                 that you provide ensures that the master server can properly administer
                                 the media server.

                                 Warning: Communication problems between the master server and the
                                 media server do not prevent you from running the configuration wizards.
                                 Therefore, do not run the wizards on the media server until the problems
                                 are corrected. If you run any of the wizards when a communication problem
                                 exists, the master server cannot recognize the information that you enter.
                                 You must first correct the problem. After you correct the problem, you
                                 should run the configuration wizards from the master server.


    Configuring NetBackup
                            To begin configuration, click on the Getting Started icon in the main window of
                            the NetBackup Administration Console. The Getting Started - Welcome to
                            NetBackup wizard launches. The wizard leads you through four specific areas to
                            configure the following:
                            ■	   Storage Devices
                            ■	   Volumes
                            ■	   Catalog Backups
                            ■    Backup Policies
                            For detailed information about the NetBackup Administration Console, see the
                            Veritas NetBackup Administrator’s Guide. For help while running a wizard, click
                            Help in the wizard screen.

                            To start the tape device driver install wizard


                            Note: Complete this wizard before you configure NetBackup.

                            1    Log on as administrator to the system from which you installed NetBackup.
Configuring NetBackup servers   111
                                                                             Configuring NetBackup


              2	   Insert the NetBackup CD in the drive.
                   If Autorun is disabled, navigate to the CD drive and run Launch.exe.
              3	   On the installation browser, click the link Additional Product Installations >
                   NetBackup Tape Device Driver.
              4	   Complete the wizard to install the latest device drivers for your storage
                   device.


              Note: You can download the latest external device mapping files on the Updates
              and Patches Web page on the following support Web site:
              http://entsupport.symantec.com


Configuring storage devices for NetBackup
              Before you can run any backups, you must define storage devices for NetBackup
              to use. Take the following into consideration while you complete device
              configuration:
              ■	   Make sure that you have correctly configured your storage devices for
                   Windows. NetBackup cannot function reliably unless devices are installed
                   and configured correctly.
              ■	   As part of the Device Configuration Wizard, in the Device Hosts window,
                   specify the hosts on which to auto-discover and configure devices. This step
                   applies to NetBackup Enterprise only.
              ■	   From the Backup Devices window, confirm the list of devices that is
                   displayed. If a known backup device does not appear in this list, do the
                   following:
                   ■	   Click the Cancel button and close out of this wizard.
                   ■	   Verify that the backup device is physically attached to the host.
                   ■	   Verify that all installation procedures from device and operating
                        system vendors have been performed successfully.
                        The Tape Device Driver Install wizard (on the NetBackup CD) steps you
                        through the installation of the latest device drivers. If you do not have a
                        NetBackup CD, you can download the Tape Device Driver Install wizard
                        from the technical support Web site.
                   ■	   Return to the NetBackup Administration Console and click the
                        Configure Storage Devices link and begin this process again.
112 Configuring NetBackup servers

    Configuring NetBackup


                            ■	   After the device configuration update completes, the Configure Storage
                                 Units window appears. Use this window to define storage units. When you
                                 enter a path name for a storage unit, the following rules apply:
                                 ■	   Use the correct path separators (/ and ).
                                 ■	   Use a colon (:) to specify a drive separation on Windows platforms.
                                 ■	   Use only the following characters:
                                      ■	   Alphabetic characters (ASCII A-X, a-z)
                                      ■	   Numeric characters (0-9)
                                      ■	   Miscellaneous characters: plus (+), minus (-), underscore (_), or
                                           period (.)
                            ■	   When you specify devices for NetBackup in a cluster, ensure that you
                                 perform a storage device configuration on each node. First perform a
                                 storage device configuration on the active node. Then move the NetBackup
                                 active node to another node and perform the storage device configuration
                                 on that node. Perform this procedure on each node of the cluster on which
                                 NetBackup runs.


    Configuring volumes
                            The Volume Configuration Wizard lets you initiate an inventory of each
                            configured robot. NetBackup automatically updates the volume database if it
                            finds new robotic media during the inventory. In addition, you can define new
                            volumes for use in stand-alone drives. For more detailed information about
                            volumes or volume configuration for stand-alone drives, refer the to Veritas
                            NetBackup Administrator’s Guide for Windows, Volume 1.
                            ■	   Select a robot to inventory or the drive type that you want to configure.
                            ■	   If you specify a stand-alone media, you can determine the number of
                                 volumes for your device and complete this process.
                            ■	   When you specify multiple drive types, the following is true:
                                 ■	   It may be that the media that is written in one drive of a robot cannot
                                      be read or written in any other drive. When this situation occurs,
                                      NetBackup considers the robot to have more than one type of drive.
                                 ■	   If the robot has more than one type of drive, the wizard cannot
                                      inventory the robot.
                            ■	   After the inventory completes, the software prompts you to identify which
                                 slots within your device contain cleaning media.
                                 If you do not designate cleaning media, NetBackup considers all media
                                 (including cleaning media) as typical media and tries to overwrite it.
Configuring NetBackup servers   113
                                                                             Configuring NetBackup


                   Note: If you upgraded to NetBackup 6.0 and you have pre-existing barcode
                   rules, the barcode reader automatically detects the slots that are designated
                   for cleaning media.

              ■	   This wizard does not let you configure cleaning tapes for stand-alone
                   drives.


Configuring the catalog backup
              After you have configured your storage devices and volumes, the Catalog
              Backup wizard leads you into configuration of the catalog backup. The
              NetBackup Catalog contains information about your configuration and about
              the files and folders that have been backed up.
              If a disk fails and your catalog is lost, a catalog backup makes it much easier to
              restore your data. Therefore, you must configure a catalog backup before
              backing up any other data.
              Be aware of the following tips as you complete the Catalog Backup wizard.
              ■	   Specify the media server that is to perform the backup.
              ■	   From the NetBackup Catalog Files window, you must verify that the master
                   server's catalog and each media server's catalogs are included in the list.
                   Verify that the full path names are correct and are in the correct format.
                   The catalog path names on the master server are automatically added
                   during installation. They generally require no action on your part other
                   than to ensure they are listed. However, if you have moved the location of
                   your catalog on your master server, you must specify the new location.
                   NetBackup does not automatically add path names to the NetBackup
                   catalog on media servers during installation. You must add them to the file
                   list. For more information on how to specify the path names, see the
                   Veritas NetBackup Administrator’s Guide for Windows, Volume 1.


              Caution: Ensure that no invalid paths exist in the list of catalog files to be backed
              up. Invalid paths can exist after moving catalog files, by deleting old paths, or by
              adding new paths to the catalog backup configuration. If NetBackup cannot find
              or follow a path, the entire catalog backup fails. If you have installed NetBackup
              in an MSCS, verify that the NetBackup Catalog Backup entries are correct. See
              the Veritas NetBackup Administrator’s Guide for Windows, Volume 1.

              ■    The Alternating Destinations window lets you specify a second location for
                   backing up the Catalog.
114 Configuring NetBackup servers

    Testing the NetBackup installation


    Creating a backup policy
                              After you have configured your catalog backup, run the Backup Policy
                              Configuration wizard to configure a backup policy. In this process you define a
                              backup policy for a group of one or more clients. A policy specifies when
                              backups occur, what data and what clients to back up, and other general
                              attributes that define how the backup is performed.
                              ■	   From the Client List window you can add, change, or delete clients to this
                                   policy. NetBackup backs up all clients in this list. You can click the check box
                                   next to Detect operating system when adding or changing a client. If
                                   NetBackup cannot determine the operating system, a drop-down box
                                   appears to help you select the correct operating system.
                              ■	   After you have successfully created a policy, you can elect to create
                                   additional policies by checking the Create another NetBackup Policy check
                                   box. Then click Next.
                              For additional information on how to create and administer policies, see the
                              Veritas NetBackup Administrator’s Guide for Windows, Volume 1.


    Testing the NetBackup installation
                              You can test your new configuration by backing up files.

                              To start a backup
                              1	   In the Getting Started wizard, click the check box next to Start an
                                   immediate backup of NetBackup server to verify the installation.
                                   Click Next.
                              2	   The Setup Is Complete window appears. You have installed and configured
                                   NetBackup.
                                   Click Finish.
                                   NetBackup begins the backup process according to your configuration.
                                   A help window appears and the Activity Monitor in the NetBackup
                                   Administration Console updates and monitors the status of your backup.
                              3	   Select the Activity Monitor from the left pane of the NetBackup
                                   Administration Console.
                              4	   Right-click the server icon in the Topology pane and select Job Details. The
                                   Job Details window appears and provides a status of your backup job.
Appendix                               A
NetBackup LiveUpdate
          This appendix includes the following topics:
          ■	   “About NetBackup LiveUpdate”
          ■	   “Setting up your NetBackup LiveUpdate server”
          ■	   “Changing the NetBackup LiveUpdate configuration”
          ■	   “About LiveUpdate policies”
          ■	   “Uninstalling NetBackup LiveUpdate”


About NetBackup LiveUpdate
          NetBackup 6.5 includes a new NetBackup LiveUpdate feature. NetBackup
          LiveUpdate provides a cross-platform, policy-driven method to distribute
          NetBackup Release Updates to NetBackup 6.5 clients.


          Note: This document describes LiveUpdate as it pertains to NetBackup.
          NetBackup LiveUpdate should not be confused with Symantec LiveUpdate. If
          you would like more information about Symantec LiveUpdate, go to the
          following Website: http://www.symantec.com

          The NetBackup LiveUpdate feature includes the following versions of Symantec
          LiveUpdate agents:
          ■	   For Windows:
               Windows LiveUpdate Agent version 3.2
          ■	   For UNIX:
               Java LiveUpdate Agent version 3.5
          With the agent installed, you can download updates from a designated
          NetBackup LiveUpdate server where the NetBackup updates reside.
116
      About NetBackup LiveUpdate


                            You can download and install NetBackup Release Updates, NetBackup add-on
                            products, and PBX. Only NetBackup versions 6.5 and later can be used with
                            NetBackup LiveUpdate.
                            NetBackup LiveUpdate features include the following:
                            ■	     Downloaded updates can be installed remotely to NetBackup servers and
                                   clients.
                            ■	     Cross-platform installation of updates is supported for both Windows and
                                   UNIX.
                            ■	     Updates can be downloaded and installed on Windows and UNIX clustered
                                   systems.
                            ■	     Using LiveUpdate for update installation does not require local
                                   administrator privileges on NetBackup installations, except on Windows
                                   clustered systems. However, you must have privileges to run NetBackup
                                   policies from the NetBackup master server.
                            NetBackup LiveUpdate is an additional method to obtain updates quickly and
                            more conveniently. The current program for customers to obtain updates
                            remains in place.


                            Note: NetBackup LiveUpdate only allows release update downloads. Major and
                            minor NetBackup releases cannot be downloaded.


      How NetBackup LiveUpdate works
                            The LiveUpdate process is managed manually to help you control which

                            machines are updated and when the updates occur.

                            The following describes how updates are downloaded and installed:

                            ■	     First, manually download NetBackup Release Update packages from a
                                   Symantec support site to your designated NetBackup LiveUpdate server.
                                   Update packages include two zipped files; one for Windows and one for
                                   UNIX.
                            ■	     Secondly, create and run a LiveUpdate policy on your NetBackup master
                                   server. The policy starts a LiveUpdate session with the clients in the policy.
                                   If you have media servers, the LiveUpdate process uses them to pass
                                   information between the master server and the clients.
                            ■	     Finally, the LiveUpdate agent on each client checks with the LiveUpdate
                                   server for any available updates. The agent then launches the NetBackup
                                   update installation scripts and installs the updates silently.
117
                                                       Setting up your NetBackup LiveUpdate server


Setting up your NetBackup LiveUpdate server

              Use the following guidelines to set up your NetBackup LiveUpdate server:
              ■	   Setting up your NetBackup LiveUpdate server does not require installation
                   of any special software.
              ■	   A NetBackup LiveUpdate server can be any Windows or UNIX host. It is not
                   necessary to have NetBackup software installed on your NetBackup
                   LiveUpdate server.
              ■	   If you have a local LiveUpdate server that is dedicated for other Symantec
                   products like Norton Anti-Virus, avoid conflicts by using one of the
                   following guidelines:
                   ■	   Download the NetBackup Release Updates to a different directory on
                        your local Symantec LiveUpdate server.
                   ■	   Designate a different machine as your NetBackup LiveUpdate server.
              ■	   Your NetBackup LiveUpdate server requires any one of the following:
                   ■	   A shared disk or partition that can be accessed by any NetBackup
                        LiveUpdate host (server or client)
                   ■	   HTTP or HTTPS server configuration

                        Note: HTTPS servers must use the certificate signed by a certificate
                        authority.


Installing on Windows systems
              You can install and configure NetBackup LiveUpdate agent on Windows systems
              with one of the following methods:
              ■	   Use the NetBackup installation wizard
                   When you install or upgrade NetBackup 6.5 server or client software, the
                   LiveUpdate agent software is installed by default. On the NetBackup System
                   Names window in the installation wizard, a LiveUpdate section lets you set
                   up the installation.
              ■	   Modify the LU_Install.bat file and run it


              Note: At a minimum, you must have the NetBackup client installed to use
              NetBackup LiveUpdate.
118
      Setting up your NetBackup LiveUpdate server


                              To install and configure NetBackup LiveUpdate with the NetBackup
                              installation wizard
                              1    Start the NetBackup installation wizard.
                                   Refer to Chapter 2, “Installing or upgrading NetBackup server software” or
                                   Chapter 5, “Installing clients”.
                              2    Select the installation type, either local or remote.
                              3    Follow the installation wizard instructions.
                              4    On the NetBackup System Names screen, provide the following information:


                                   Master Server Name	 Enter the name of the master server.

                                   Additional Servers	   Enter the names of any additional machines (servers) that are
                                                         allowed to access this server. If you enter more than one
                                                         name, separate each name with a comma.
                                                         If you plan to install the EMM server on a media server
                                                         instead of the master server, you must include that server
                                                         name here.

                                   Install LiveUpdate    The LiveUpdate agent allows installation of NetBackup
                                   Agent                 release updates from a LiveUpdate server.
                                                         Even if you choose not to use LiveUpdate, agent installation
                                                         does not affect NetBackup installation, configuration, or
                                                         operation.
119
                                              Setting up your NetBackup LiveUpdate server


    Location of 	          The LiveUpdate server is the machine where you store
    LiveUpdate Server	     NetBackup release updates. The default server location is
                           your NetBackup master server.
                           If you want to designate a different machine as your
                           NetBackup LiveUpdate server, type the appropriate pathname
                           for that server here.

    Server Type	           Select the protocol that is used by your LiveUpdate server
                           (LAN, HTTP, or HTTPS).

    For NetBackup          When you install media server software, this screen has an
    Enterprise media       additional line with the media server name shown as the local
    server installations   server. You must change the name to the master server name
    only                   to which the media server is configured.


5   For cluster systems, the NetBackup Client service must be set up to run as an
    administrator and not as a regular user. Change the privileges to
    administrator on the NetBackup Services screen. Provide the following
    startup account and startup type information for NetBackup services:


    Use the built-in       Clear this box and fill in the three fields below it.
    system account

    User name,             Enter the necessary information that allows administrator
    Password, Domain       privileges. Be sure to leave the Use the built-in system
                           account check box unchecked.

    Startup                Select either Automatic or Manual start up.
120
      Setting up your NetBackup LiveUpdate server


                                   Start NetBackup       Check this box if you want to start the services after
                                   Server Services After installation. You can leave the box unchecked to prevent
                                   Install               services from starting after installation.

                                   Terminate             Check this box to prevent a reboot while you perform a remote
                                   NetBackup             installation. When you check this box, processes that use the
                                   processes             NetBackup executables and DLLs are stopped.

                                                         Caution: For Oracle users: If you select Terminate NetBackup
                                                         processes, you must take down your database before you
                                                         continue the installation.

                                   Terminate Windows     Check this box to prevent a reboot while you perform a remote
                                   processes             installation. When you check this box, processes that use the
                                                         Microsoft run-time DLLs are stopped.
                                                         For upgrades: You do not need this option because the
                                                         Microsoft run-time DLL is already at the correct level.

                                                         Caution: If you select Terminate Windows processes, it may
                                                         cause instability with other Windows applications,
                                                         particularly those applications that use run-time DLLs.

                                   Abort install if a    Check this box so that NetBackup can detect if the remote
                                   reboot is required    system requires a restart.
                                                         If a restart is required, this option ends the installation and
                                                         rolls the remote system back to its state at the beginning of
                                                         the installation.


                              6	   Click next on the wizard screens that follow until you get to the Ready to
                                   Install Program screen, then click on Install.
                              7	   On the Installation Complete screen, click Finish.

                              To install and configure NetBackup LiveUpdate by modifying the
                              LU_Install.bat file
                              1	   Open the LU_Install.bat file in a text editor. The file is located on your
                                   NetBackup CD-ROM in the AddonsLiveUpdate directory.
                              2	   At the SET LU_SERVER= line, edit the line by entering the name of your
                                   LiveUpdate server.
                              3	   Make sure that the LuCheck.exe, LU_Registration.exe, and
                                   LUSetup.exe files are in the same directory.
                              4	   Save the changes and close the file.
                              5	   Run the LU_Install.bat file.
121
                                                        Setting up your NetBackup LiveUpdate server


Installing on UNIX systems
              The NetBackup LiveUpdate agent software is located on the NetBackup Options 

              CD and must be installed separately.

              The following describes the UNIX installation guidelines:

              ■	   Server installation requires that you load Java LiveUpdate software from the
                   NetBackup Options CD first, then run an installation script.
              ■	   Client installation can be done individually on each NetBackup client, or the
                   server can push the LiveUpdate agent software to all clients at once.
              ■	   NetBackup does not deliver Java JRE for the following UNIX platforms:
                   FreeBSD, IBMpSeries, IBMzSeries, MacIntosh, and SGI.
                   Before you install and use NetBackup LiveUpdate on these platforms, you
                   must do the following:
                   ■	   A minimum Java Runtime of 1.4.2 must be used to install Java
                        LiveUpdate. The JRE used should be enabled with JCE Unlimited
                        strength jurisdiction policy files. You can download the necessary files
                        from the Sun Microsystems Website.
                   ■	   Have the appropriate version of Java JRE installed.
                   ■	   Create the following directory:
                        mkdir –p /usr/openv/java/jre/bin

                   ■	   Run the following command to create a link to the directory you just
                        created:
                        ln –s <system java path> /usr/openv/java/jre/bin/java


              Installing the agent on UNIX servers
              Use these steps to load and install LiveUpdate agent software on a UNIX server.

              To load and install the NetBackup LiveUpdate agent software on a UNIX
              server
              1	   Log in to the server as root.
              2	   Insert the NetBackup Options CD and mount it.
              3	   Run the following script, which launches the NetBackup add-on product
                   software installation script:
                   cd_directory/install

                   The cd_directory is the path to the directory where you can access the
                   CD.
              4	   At the Installation Options prompt, select NetBackup Add-On
                   Product Software.
122
      Setting up your NetBackup LiveUpdate server


                              5    Select NetBackup LiveUpdate Agent.
                              6    Select Done Selecting Products.
                              7    At the Is this list correct? prompt, select y.
                              8    To load NetBackup LiveUpdate agents for platform other than the server
                                   platform, press enter to accept the default (y) or select n.
                                   If you selected (y) to load other platforms on the server, enter the
                                   LiveUpdate agent client platforms.
                              9    Select q to quit from the script.
                              10 Run the following script, which installs and configures the NetBackup
                                 LiveUpdate agent on the server:
                                   /usr/openv/netbackup/bin/install_nblu
                              11 When you are asked for the protocol and location to use for the NetBackup
                                 LiveUpdate server, enter the appropriate protocol and pathname.

                                   Note: Remember, the NetBackup LiveUpdate server is where the NetBackup
                                   release updates reside. You must download the updates to this server
                                   manually from a support Web site. When you run the NetBackup
                                   LiveUpdate policy, the NetBackup clients in the policy access this server for
                                   the update files.


                              Installing the agent on UNIX clients
                              Use one of the following procedures to install NetBackup LiveUpdate agent
                              software on a UNIX client. Choose either local UNIX client installation or push
                              to all clients from the server.

                              To install LiveUpdate agent software locally on a UNIX client
                              1    Log in to the client as root.
                              2	   Insert the NetBackup Options CD and mount it.
                              3	   Run the following script, which launches the NetBackup add-on product
                                   software installation script that installs the agent:
                                   cd_directory/install

                                   The cd_directory is the path to the directory where you can access the
                                   add-on products.
                              4	   When you are asked for the protocol and location to use for the NetBackup
                                   LiveUpdate server, enter the appropriate protocol and pathname.
123
                                                 Setting up your NetBackup LiveUpdate server


        Note: Remember, the NetBackup LiveUpdate server is where the NetBackup
        release updates reside. You must download the updates to this server
        manually from a support Web site. When you run the NetBackup
        LiveUpdate policy, the NetBackup clients in the policy access this server for
        the update files.


To install the LiveUpdate agent software remotely on all clients
1       Log in to the server as root.
        You must log in to the server where you loaded the LiveUpdate agent
        software for the selected platforms.
2	      Use the bpplclients command to create a file that contains a list of
        clients currently configured in the NetBackup database.
        Choose the correct command based on whether you push from a master
        server or from a media server, as follows:
        ■	   To push from the master server, run the following command:
        ./bpplclients -allunique -noheader > file

        ■	   To push from a media server, run the following command:
        ./bpplclients -allunique -noheader -M 

            m_server_name	> file


m_server_name	       Name of the NetBackup master server in this environment.

file	                Name of the file to contain the list of unique clients. If no clients have
                     been configured in the NetBackup database, file is empty. Create
                     file using the same format as that generated by bpplclients.


             The bpplclients command writes output to file in the following
             format:
             hardware os client

hardware	 The hardware name. For examples, run the ls command in directory
          /usr/openv/netbackup/client.

os	           The operating system name. For examples, run the ls command in directory
              /usr/openv/netbackup/client/hardware.

client	       The name of the client.


             The contents of file might look like the following example:
             Solaris Solaris8 machinename

        ■	   (Optional) Edit file.
124
      Changing the NetBackup LiveUpdate configuration


                                       Perform this step to change the contents of file. Edit file to contain only
                                       those NetBackup clients you want to update with LiveUpdate agent
                                       software.
                                       The host names of the clients must be the clients’ individual node
                                       names. They cannot be virtual names. The correct value for the
                                       individual node names is returned by the hostname and the
                                       domainname commands. The format can be either hostname or
                                       hostname.domainname.
                             3    Run the following command:
                                  /usr/openv/netbackup/bin/update_luagent -ClientList file

                                  The script requests the following information:
                                  There are N clients to upgrade.

                                  Enter the number of simultaneous updates you wish to take place. 

                                  [N - NN] (default: NN):

                                  Press Enter.
                                  The upgrade will likely take Y to Z minutes.
                                  Do you want to upgrade clients now? (y/n) [y]

                                  Answer y or n.
                                  What is the protocol and location to use for the 

                                  LiveUpdate server?

                                  Enter the appropriate protocol and pathname.
                                  You have specified this value for the question:

                                  Is this value correct? (y/n) [y]

                                  Answer either y or n.
                                  The progress and results are shown.


      Changing the NetBackup LiveUpdate configuration
                             This section describes how to update and change the LiveUpdate configuration 

                             settings after the initial installation and configuration.

                             These changes are necessary if any of the following occur:

                             ■    A new version of the LiveUpdate agent is available on the NetBackup server
                             ■    A different machine is designated as the NetBackup LiveUpdate server
                             ■    A NetBackup LiveUpdate agent installed on a NetBackup server or client has
                                  a problem
                             Keep your NetBackup LiveUpdate agent configuration current to ensure that
                             LiveUpdate policies run successfully.
125
                                                           Downloading NetBackup release updates


Changing the LiveUpdate configuration on Windows
              To make any changes after the initial installation, do one of the following:
              ■	   Launch the NetBackup installation wizard and repeat the steps in the
                   section “Installing on Windows systems”.
              ■	   Modify the LU_Install.bat file as described in the section “Installing on
                   Windows systems”.


Changing the LiveUpdate configuration on UNIX
              The following commands let you update and reconfigure your NetBackup
              LiveUpdate agent software remotely:
              ■	   update_luagent -ForceInstall
                   Use this command to force installation of the LiveUpdate agent to specified
                   clients. The command only pushes the agent software to the specified
                   clients. Configuration is not changed.
                   If the NetBackup LiveUpdate version being pushed from the server is the
                   same version on a specified client, you can continue or stop the forced
                   installation.
              ■	   update_luagent -ForceReconfig
                   Use this command to force installation and reconfiguration of the
                   LiveUpdate agent on specified clients. The command pushes the agent
                   software to the clients and reconfigures the protocol and NetBackup
                   LiveUpdate server designation on the clients.


Downloading NetBackup release updates
              Before you can run a LiveUpdate policy successfully, you must download the 

              release updates to your NetBackup LiveUpdate server.

              NetBackup release updates include a Windows .gzip file and a UNIX .gzip file.

              The files are available for manual download only from the customer support 

              site.

              Unlike Symantec LiveUpdate, NetBackup packages are not downloaded 

              automatically. Manual downloads respect customer sites that maintain strict

              change and update control policies.

              Use the following steps to download NetBackup release updates to your 

              NetBackup LiveUpdate server.
126
      About LiveUpdate policies


                              To download NetBackup release updates to your NetBackup LiveUpdate
                              server
                              1	   Log in to your NetBackup LiveUpdate server as the administrator.
                              2	   Open your internet browser and enter the following address:
                                   http:entsupport.symantec.com
                              3	   Select the release update to download.
                              4	   Verify the directory on your NetBackup LiveUpdate server where you want
                                   the package downloaded.
                              5	   Click Download.
                              6	   Extract the contents of one or both release updates to your NetBackup
                                   LiveUpdate server.
                              7	   Unzip the files.


      About LiveUpdate policies
                              A LiveUpdate policy lets you control which NetBackup servers and clients are
                              updated. The manual activation required to run the policy lets you control when
                              the updates occur.
                              Use the following guidelines when you create LiveUpdate policies:
                              ■	   LiveUpdate policies cannot include any clients that use NetBackup versions
                                   earlier than 6.5. LiveUpdate is only supported in NetBackup versions 6.5
                                   and later.
                              ■	   Create separate LiveUpdate policies for servers and clients.
                              ■	   Always run the servers policy before you run the clients policy. Clients
                                   cannot run a later version of NetBackup than the servers.

                              Important!
                              ■	   Since NetBackup services and daemons are shut down during release update
                                   installation, do not add the following servers to a LiveUpdate policy:
                                   ■	   The NetBackup master server that runs the LiveUpdate policy
                                   ■    Any media server involved with running the LiveUpdate policy
                                   These servers must be updated through the command line interface. See the
                                   section “Updating master servers and media servers that run LiveUpdate
                                   policies” on page 128” for complete details.
                              ■	   For UNIX systems, any media server name that you specify in a LiveUpdate
                                   policy must appear in the bp.conf file on the client.
127
                                                                          About LiveUpdate policies


              ■	   All nodes of a cluster must be updated, so make sure to include all actual
                   host names in a LiveUpdate policy. The best practice is to have a separate
                   policy for each clustered server and include all node hostnames in the policy
                   for that cluster.
                   In addition, the Limit jobs per policy attribute of the LU policy should be set
                   (at a minimum) to the number of nodes in the cluster. This helps ensure that
                   the nodes are updated simultaneously (or as close as possible), which lowers
                   the chance of failover in between updating the nodes. If a failover were to
                   occur before all nodes were updated, the NetBackup database and the
                   binaries on the active node could be mismatched.


Creating a LiveUpdate policy
              Use the following steps to create a LiveUpdate policy.

              To create a NetBackup LiveUpdate policy
              1    Launch the NetBackup Administration Console.
              2	   On the File menu, select LiveUpdate.
              3	   In the LiveUpdate policy window, click New.
              4	   Enter the name you want for the policy, then click OK.
              5	   On the Attributes tab of the new LiveUpdate Policy window, select the media
                   server that you want to run the policy.
                   ■	   For environments with no media server, select the master server that
                        you want to run the policy.
                   ■	   Limit jobs per policy lets you select the number of LiveUpdate jobs that
                        are active simultaneously, when you run the policy.

                   Note: If a firewall prevents communication between the master server and
                   clients, the LiveUpdate policy must specify the media server that can
                   communicate with the clients.

              6    Click on the Clients tab.

              7    Click New and enter the name of the first client, then press <enter>.


                   Note: You must enter only the names of client machines that have
                   NetBackup 6.5 installed with the NetBackup LiveUpdate agent installed and
                   configured.

              8    Repeat step 7 until all client names are entered.
              9    After all client names are entered, click OK.
128
      Updating servers and clients with NetBackup LiveUpdate


      Updating servers and clients with NetBackup
      LiveUpdate
                              After you have created LiveUpdate policies and downloaded release updates to
                              your NetBackup LiveUpdate server, you are ready to update your NetBackup
                              environment.
                              Before updating your NetBackup environment, there are three important tasks
                              you should perform as follows:

                              Before updating your NetBackup environment:
                              1	   Make sure that there are no NetBackup jobs running or queued to run on any
                                   NetBackup servers and clients.
                              2	   Deactivate all backup policies on all NetBackup master servers.
                              3	   Log in as a database user on the NetBackup hosts that run third-party
                                   database software and shut down all database instances.
                              When you are ready to update your NetBackup environment, update servers and
                              clients in the following order:
                              ■	   Master servers and media servers that run LiveUpdate policies
                              ■	   Master servers and media servers not involved in running LiveUpdate
                                   policies
                              ■	   Clients


      Updating master servers and media servers that run LiveUpdate
      policies
                              Use the nbliveup command to update NetBackup master servers and media
                              servers that run LiveUpdate policies. Do not use a LiveUpdate policy to update
                              these servers.
                              ■	   There is a known issue when using nbliveup on Windows IA64 and AMD64
                                   systems. Use nbliveup on these systems with one of the following
                                   methods:
                                   ■	   Method A—Local update
                                        You must log in as the console user to the desired machine locally or
                                        through a remote desktop session, by using the following command:
                                        mstsc -v:your.machine.name.com /F -console

                                        For complete details, go to the following link:
                                        http://support.microsoft.com/kb/278845

                                   ■	   Method B—Remote update
129
                                              Updating servers and clients with NetBackup LiveUpdate


                        Initiate the LiveUpdate session from a different NetBackup master
                        server.

              To update master servers and media servers that run LiveUpdate policies
              1	   Make sure there are no active backup or restore jobs on the master server
                   that runs LiveUpdate policies.
              2	   On the master servers or media servers that run NetBackup LiveUpdate
                   policies, run the following command:
                   ■	   On Windows systems:
                        NetBackupbinnbliveup

                   ■	   On UNIX systems:
                        /usr/openv/netbackup/bin/nbliveup

              3	   If any master servers or media servers that run LiveUpdate policies are
                   themselves clustered servers, run the nbliveup sequence as follows:
                   ■	   On Windows systems:
                        ■	   On the active node, run the following command:
                             NetBackupbinbpclusterutil –offline

                        ■	   On each inactive node in the cluster, run the following command:
                             NetBackupbinnbliveup

                        ■	   On the active node, run the following command:
                             NetBackupbinnbliveup

                   ■	   On UNIX systems:
                        ■	   On the active node, run the following command:
                             /usr/openv/netbackup/bin/bpclusterutil –freeze

                        ■	   On each node in the cluster, run the following command:
                             /usr/openv/netbackup/bin/nbliveup –c

                        ■	   On the active node, run the following command:
                             /usr/openv/netbackup/bin/bpclusterutil –unfreeze


Updating master severs and media servers that do not run
LiveUpdate policies
              To update these servers, use the servers LiveUpdate policy that you created.

              To update master servers and media servers that do not run LiveUpdate
              policies
              1	   Launch the NetBackup Administration Console.
              2	   On the File menu, select LiveUpdate.
130
      LiveUpdate logs


                        3    In the LiveUpdate policy window, select the servers LiveUpdate policy that
                             you created.
                        4    Click Run LiveUpdate Policy.
                        5    Check the Activity Monitor to verify that all LiveUpdate jobs complete.


      Updating clients
                        To update clients, use the clients LiveUpdate policy that you created.


                        To update clients

                        1    Launch the NetBackup Administration Console.

                        2	   On the File menu, select LiveUpdate.

                        3	   In the LiveUpdate policy window, select the clients LiveUpdate policy that
                             you created.
                        4	   Click Run LiveUpdate Policy.
                        5	   Check the Activity Monitor to verify that all LiveUpdate jobs complete.


      LiveUpdate logs
                        The following procedures describe how to use LiveUpdate logging on Windows 

                        and UNIX NetBackup systems.

                        On Windows servers and clients, the log directories are created when you install 

                        NetBackup LiveUpdate.

                        On UNIX clients, you must first create the necessary directories to enable 

                        logging.


                        To view LiveUpdate logs on Windows NetBackup servers and clients
                        1    To view NetBackup LiveUpdate logs, go to the following directory:
                             NetBackuplogsliveupdate

                        2	   To view nbliveup command logs, go to the following directory:
                             NetBackuplogsnbliveup
                        3	   To view NetBackup release update logs, go to the following directory:
                             NetBackuplogspatch


                        To enable LiveUpdate logging on UNIX NetBackup servers
                        ■	   Run the following command:
                             /usr/openv/netbackup/logs/mklogdir
131
                                                                Uninstalling NetBackup LiveUpdate


              To enable LiveUpdate logging on UNIX NetBackup clients
              1    Create the following directories:
                   /usr/openv/netbackup/logs/liveupdate

                   /usr/openv/netbackup/logs/nbliveup

                   /usr/openv/netbackup/logs/patch

              2	   To view NetBackup LiveUpdate logs, go to the following directory:
                   /usr/openv/netbackup/logs/liveupdate

              3	   To view nbliveup command logs, go to the following directory:
                   /usr/openv/netbackup/logs/nbliveup
              4	   To view NetBackup patch logs, go to the following directory:
                   /usr/openv/netbackup/logs/patch


Retrieving logs remotely
              You can retrieve LiveUpdate logs remotely from a master server by using the
              bpgetdebuglog command.
              The remote_program argument described in the command refers to the
              liveupdate, nbliveup, or patch directory.
              For complete details about the bpgetdebuglog command arguments, see the
              Veritas NetBackup Commands for UNIX and Linux or Veritas NetBackup
              Commands for Windows documents.

              To retrieve logs remotely
              ■	   For Windows systems, enter the following:
                   install_pathNetBackupbinadmincmdbpgetdebuglogremote_

                   machine remote_program mmddyy

              ■	   For UNIX systems, enter the following:
                   /usr/openv/netbackup/bin/admincmd/bpgetdebuglog 

                   remote_machine remote_program mmddyy


Uninstalling NetBackup LiveUpdate
              This section describes how to remove the NetBackup LiveUpdate agent and
              associated files. In some cases, you may need to remove directories and files
              manually.


Uninstalling on Windows systems
              Use the following procedures to remove LiveUpdate files on Windows systems.
132
      Uninstalling NetBackup LiveUpdate


                             To remove NetBackup LiveUpdate on Windows systems:
                             1    Select Start > Control Panel.
                             2    Select Add or Remove Programs.
                             3    Click on LiveUpdate and select Remove.


      Uninstalling on UNIX systems
                             Use the following procedures to remove LiveUpdate files on UNIX systems.

                             To remove NetBackup LiveUpdate components from NetBackup servers that
                             run on the Solaris platform
                             1	   You must first de-register all NetBackup products with LiveUpdate by using
                                  the following command:
                                  /usr/openv/netbackup/bin/nblu_registration -r

                             2	   To remove the NetBackup LiveUpdate agent, run the following command:
                                  pkgrm SYMCnblua

                             3	   To remove the associated LiveUpdate files, run the following commands:
                                  rm -rf /usr/openv/netbackup/logs/liveupdate

                                  rm -rf /usr/openv/netbackup/logs/nbliveup

                                  rm -rf /usr/openv/netbackup/logs/patch


                             To remove NetBackup LiveUpdate components from NetBackup servers and
                             clients that run on non-Solaris platforms
                             1    You must first de-register all NetBackup products with LiveUpdate by using
                                  the following command:
                                  /usr/openv/netbackup/bin/nblu_registration -r

                             2	   To remove the associated LiveUpdate files, run the following commands:
                                  rm -f /usr/openv/netbackup/bin/install_nblu

                                  rm -f /usr/openv/netbackup/bin/nbliveup

                                  rm -f /usr/openv/netbackup/.luagent.conf

                                  rm -f /usr/openv/netbackup/nblu.conf

                                  rm -f /usr/openv/netbackup/nblu.conf.template

                                  rm -f /usr/openv/share/version_luagent

                             3	   To remove the LiveUpdate agent software from the NetBackup server that
                                  was used to push agent software to clients, run the following command:
                                  rm -rf /usr/openv/netbackup/luagent
133
                                                Uninstalling NetBackup LiveUpdate


To remove Symantec LiveUpdate components from UNIX systems that run
NetBackup
■	   If NetBackup is the only Symantec product that currently uses LiveUpdate,
     run the following command:
     /opt/Symantec/LiveUpdate/uninstall.sh -a

■	   If LiveUpdate is the only product installed in /opt/Symantec, remove the
     following files:
     rm -f /etc/Symantec.conf
134
      Uninstalling NetBackup LiveUpdate
Index


A                                           configuring storage devices, Windows 16
access control 16

adding UNIX clients 98
                     D
additional product installations 18, 111
   daemons
administration console
                         signalling inetd 100

    starting 69
                            device configuration 16

administrator 14, 87
                       devices 18, 111

administrator account

    installing 18, 23, 34, 48, 64, 110

                                            F
                                            firewall 91

B                                           For 57

backlevel administration consoles 74

bpplclients command 123

                                            G
                                            Getting Started wizards
C                                                Configure Catalog Backup 113

catalogs, NetBackup 14
                          Configure Storage Devices 111

client installation
                             Configure Volumes 112

     definition 81, 90
                          Create a Backup Policy 114

client_config script 96, 98
                gunzip command

clients
                                         required for installation 91

     adding after initial install 98
       gzip command

     loading onto server 98
                     required for installation 91

     pushing software to 98

cluster group name 54

cluster installations 15
                   I

commands
                                   inetd daemon
     bpplclients 123
                            signalling 100

configuring
                                install

     NetBackup client
                           Java Windows Administration Console 74

          Windows 89
                            multiple versions of NetBackup Administration
configuring master servers
                          Console on Windows 71

     things to know 110
                         NetBackup Remote Administration Console 68

configuring NetBackup 109, 110
             install NetBackup clients

     catalog backups 113
                        locally 92

     create a backup policy 114
            install_client_files script 95, 96, 97

     storage devices 111
                   Installation

     volumes 112
                                silent install
configuring storage devices for Windows
               media server software 65

     storage device configuration 17
                  server software 64

     supported robot types 17
              installation
136 Index


        NetBackup Remote Administration Console 68
       NetBackup

        UNIX clients
                                         custom installation 15

             using rsh 93
                                    peripherals 14

        UNIX clients locally 92
                              port numbers 14

   installation log file
                                     silent installation 64

        Windows 2000 systems 79
                          NetBackup Access Control 74, 79, 101

   installing
                                            NetBackup Administration Console 109

        client software
                                  NetBackup client service 84

             Windows 85, 86, 89
                          NetBackup client software

        client software locally
                              add a UNIX client type 98

             Windows 85
                                      install locally 92

        clients remotely
                                 NetBackup Java Windows Administration Console

             Windows 86
                                      Install requirements 74

        clients silently
                                     installation 73

             Windows 89
                                  NetBackup Liveupdate

        overview
                                             how it works 116

             Windows 81
                                  NetBackup Remote Administration Console

        remotely
                                             installing 67, 71

             Windows 82, 84
                              NetBackup software

        requirements
                                         installation 19

             Windows 84
                                      installation requirements 13

   installing alternative administration interfaces 67
   NetBackup-Java Windows Administration Console

   Internet Explorer 14, 84
                                  installing 74

                                                          NTFS partition 14

   L
   launch.exe 68
                                         O
   license key 9
                                         OTM

   license keys 26, 36, 51, 103
                             Windows 82

   LiveUpdate

        changing UNIX configuration 125

        changing Windows configuration 125

                                                          P
        downloading patch packages 125
                   ping command 14

        installing on UNIX 121
                           polices

        installing on UNIX clients 122
                        LiveUpdate 126

        installing on UNIX servers 121
                   policies

        installing on Windows 117
                             creating LiveUpdate 127

        overview 115
                                     pre-installation requirements 9

        uninstalling 131
                                 private network 55

        uninstalling on UNIX systems 132
                 public network 55

        uninstalling on Windows systems 131
              pushing client software 98

   loading client types onto server 98

                                                          R
   M                                                      reinstalling NetBackup server software 79

   MSCS cluster administrator interface 62, 63
           Release 1

                                                          remote administration 67

                                                          remote administration console 71

   N                                                      remove

   NBAC 74
                                                    earlier versions of NetBackup-Java
Index   137


      Adminstration Console on Windows 73
      virtual IP address 54

removing software
                              Volume Snapshot Provider 82

     77
                                        VSP 82

    NetBackup clients 90, 99

    NetBackup server 77, 78

                                                W
                                                Windows
S                                                  client requirements 84

scripts
                                        Windows 2000 14

     client_config 96, 98
                      Windows Terminal Services 75

     install_client_files usin sftp 97

     install_client_files using ftp 95

     install_client_files using ssh 96

server

     administration, backlevel 74

server list

     adding NetBackup Remote Administration 

        console host 69

Shared Storage Option (SSO) 31, 40, 57

silent install

     administration interface 65

     media server software 65

     server software 64

Silent Installations 83

SSO 31, 40, 57

subnet mask 54

supported platforms

     Windows 84

system administrator

     task requires privileges 86


T
Tape Device Driver Install wizard 111

tape device driver install wizard 17

TCP/IP 84

testing NetBackup installation 114


U
UNIX client software

   install using ftp 95

   install using rsh 93

   install using sftp 97

   install using ssh 96

UNIX clients

   installing locally 92, 98


V
virtual host name 54
138
 Index
Ad

More Related Content

What's hot (15)

Positive Technologies WinCC Security Hardening Guide
Positive Technologies WinCC Security Hardening GuidePositive Technologies WinCC Security Hardening Guide
Positive Technologies WinCC Security Hardening Guide
qqlan
 
H61 m vs r2.0
H61 m vs r2.0H61 m vs r2.0
H61 m vs r2.0
Astiti Ermalena
 
PT - Siemens WinCC Flexible Security Hardening Guide
PT - Siemens WinCC Flexible Security Hardening GuidePT - Siemens WinCC Flexible Security Hardening Guide
PT - Siemens WinCC Flexible Security Hardening Guide
qqlan
 
H61 m dgs
H61 m dgsH61 m dgs
H61 m dgs
Daniela Caldyri
 
Dell Latitude 7310 Laptops Trần Phát
Dell Latitude 7310 Laptops Trần PhátDell Latitude 7310 Laptops Trần Phát
Dell Latitude 7310 Laptops Trần Phát
LAPTOP TRẦN PHÁT
 
Asrock
AsrockAsrock
Asrock
IVAN MONTES
 
Pda management with ibm tivoli configuration manager sg246951
Pda management with ibm tivoli configuration manager sg246951Pda management with ibm tivoli configuration manager sg246951
Pda management with ibm tivoli configuration manager sg246951
Banking at Ho Chi Minh city
 
EMC NetWorker Module for Microsoft SQL Server, Release 5.0
EMC NetWorker Module for Microsoft SQL Server, Release 5.0EMC NetWorker Module for Microsoft SQL Server, Release 5.0
EMC NetWorker Module for Microsoft SQL Server, Release 5.0
webhostingguy
 
Lenovo Thinkpad X270 - “chiến binh đường phố"
Lenovo Thinkpad X270 - “chiến binh đường phố"Lenovo Thinkpad X270 - “chiến binh đường phố"
Lenovo Thinkpad X270 - “chiến binh đường phố"
LAPTOP TRẦN PHÁT
 
CCTV Nu client user_manual
CCTV Nu client user_manualCCTV Nu client user_manual
CCTV Nu client user_manual
MAFANTIRI SELLO
 
TechBook: Using EMC VNX Storage with VMware vSphere
TechBook: Using EMC VNX Storage with VMware vSphereTechBook: Using EMC VNX Storage with VMware vSphere
TechBook: Using EMC VNX Storage with VMware vSphere
EMC
 
Using EMC VNX storage with VMware vSphereTechBook
Using EMC VNX storage with VMware vSphereTechBookUsing EMC VNX storage with VMware vSphereTechBook
Using EMC VNX storage with VMware vSphereTechBook
EMC
 
Guide server virtualization_deployment
Guide server virtualization_deploymentGuide server virtualization_deployment
Guide server virtualization_deployment
abanggeh
 
Flip4 Mac Wmv User Guide
Flip4 Mac Wmv User GuideFlip4 Mac Wmv User Guide
Flip4 Mac Wmv User Guide
millenniumproducts
 
Laptop Lenovo ThinkPad E470 - Laptop Doanh Nghiệp đáng mua
Laptop Lenovo ThinkPad E470 - Laptop Doanh Nghiệp đáng muaLaptop Lenovo ThinkPad E470 - Laptop Doanh Nghiệp đáng mua
Laptop Lenovo ThinkPad E470 - Laptop Doanh Nghiệp đáng mua
LAPTOP TRẦN PHÁT
 
Positive Technologies WinCC Security Hardening Guide
Positive Technologies WinCC Security Hardening GuidePositive Technologies WinCC Security Hardening Guide
Positive Technologies WinCC Security Hardening Guide
qqlan
 
PT - Siemens WinCC Flexible Security Hardening Guide
PT - Siemens WinCC Flexible Security Hardening GuidePT - Siemens WinCC Flexible Security Hardening Guide
PT - Siemens WinCC Flexible Security Hardening Guide
qqlan
 
Dell Latitude 7310 Laptops Trần Phát
Dell Latitude 7310 Laptops Trần PhátDell Latitude 7310 Laptops Trần Phát
Dell Latitude 7310 Laptops Trần Phát
LAPTOP TRẦN PHÁT
 
Pda management with ibm tivoli configuration manager sg246951
Pda management with ibm tivoli configuration manager sg246951Pda management with ibm tivoli configuration manager sg246951
Pda management with ibm tivoli configuration manager sg246951
Banking at Ho Chi Minh city
 
EMC NetWorker Module for Microsoft SQL Server, Release 5.0
EMC NetWorker Module for Microsoft SQL Server, Release 5.0EMC NetWorker Module for Microsoft SQL Server, Release 5.0
EMC NetWorker Module for Microsoft SQL Server, Release 5.0
webhostingguy
 
Lenovo Thinkpad X270 - “chiến binh đường phố"
Lenovo Thinkpad X270 - “chiến binh đường phố"Lenovo Thinkpad X270 - “chiến binh đường phố"
Lenovo Thinkpad X270 - “chiến binh đường phố"
LAPTOP TRẦN PHÁT
 
CCTV Nu client user_manual
CCTV Nu client user_manualCCTV Nu client user_manual
CCTV Nu client user_manual
MAFANTIRI SELLO
 
TechBook: Using EMC VNX Storage with VMware vSphere
TechBook: Using EMC VNX Storage with VMware vSphereTechBook: Using EMC VNX Storage with VMware vSphere
TechBook: Using EMC VNX Storage with VMware vSphere
EMC
 
Using EMC VNX storage with VMware vSphereTechBook
Using EMC VNX storage with VMware vSphereTechBookUsing EMC VNX storage with VMware vSphereTechBook
Using EMC VNX storage with VMware vSphereTechBook
EMC
 
Guide server virtualization_deployment
Guide server virtualization_deploymentGuide server virtualization_deployment
Guide server virtualization_deployment
abanggeh
 
Laptop Lenovo ThinkPad E470 - Laptop Doanh Nghiệp đáng mua
Laptop Lenovo ThinkPad E470 - Laptop Doanh Nghiệp đáng muaLaptop Lenovo ThinkPad E470 - Laptop Doanh Nghiệp đáng mua
Laptop Lenovo ThinkPad E470 - Laptop Doanh Nghiệp đáng mua
LAPTOP TRẦN PHÁT
 

Similar to Netbackup intallation guide (20)

vcs_srdf_install_emcSRDG agentguidecluster.pdf
vcs_srdf_install_emcSRDG agentguidecluster.pdfvcs_srdf_install_emcSRDG agentguidecluster.pdf
vcs_srdf_install_emcSRDG agentguidecluster.pdf
df3
 
Ws deployment guide
Ws deployment guideWs deployment guide
Ws deployment guide
KunKun Ng
 
hana_sps11_SUSE_Linux_Enterprise_Server_11_x_for_SAP_Applications_Configurati...
hana_sps11_SUSE_Linux_Enterprise_Server_11_x_for_SAP_Applications_Configurati...hana_sps11_SUSE_Linux_Enterprise_Server_11_x_for_SAP_Applications_Configurati...
hana_sps11_SUSE_Linux_Enterprise_Server_11_x_for_SAP_Applications_Configurati...
JessDavidGuzmnGalleg
 
Pc 811 troubleshooting_guide
Pc 811 troubleshooting_guidePc 811 troubleshooting_guide
Pc 811 troubleshooting_guide
makhaderms
 
Wind river linux_niosii_user_guide_r15_rev1
Wind river linux_niosii_user_guide_r15_rev1Wind river linux_niosii_user_guide_r15_rev1
Wind river linux_niosii_user_guide_r15_rev1
Abhinay Yadav
 
DDoS Secure: VMware Virtual Edition Installation Guide
DDoS Secure: VMware Virtual Edition Installation GuideDDoS Secure: VMware Virtual Edition Installation Guide
DDoS Secure: VMware Virtual Edition Installation Guide
Juniper Networks
 
vm-series-deployment.pdf
vm-series-deployment.pdfvm-series-deployment.pdf
vm-series-deployment.pdf
RajputNikhilManhas
 
Book Getting Started Src
Book Getting Started SrcBook Getting Started Src
Book Getting Started Src
Hussein Elmenshawy
 
Xen app getting-started-guide
Xen app getting-started-guideXen app getting-started-guide
Xen app getting-started-guide
hergamia
 
Onboard Deployment Guide 3.9.6
Onboard Deployment Guide 3.9.6Onboard Deployment Guide 3.9.6
Onboard Deployment Guide 3.9.6
Aruba, a Hewlett Packard Enterprise company
 
MK-99DF8208-03
MK-99DF8208-03MK-99DF8208-03
MK-99DF8208-03
Robert Marburg
 
Sap setup guide
Sap setup guideSap setup guide
Sap setup guide
Arnaldo Aguilar
 
Device net guide
Device net guideDevice net guide
Device net guide
ares111
 
ICM_NSX-T_V2.4_LAB
ICM_NSX-T_V2.4_LABICM_NSX-T_V2.4_LAB
ICM_NSX-T_V2.4_LAB
ThanhBinhNguyen78
 
Install
InstallInstall
Install
Said Chatir
 
Faronics Insight Tech Console User guide
Faronics Insight Tech Console User guideFaronics Insight Tech Console User guide
Faronics Insight Tech Console User guide
Faronics
 
OE Application Server Administratoion
OE Application Server AdministratoionOE Application Server Administratoion
OE Application Server Administratoion
tawatchai.psp
 
viom_addons_users_80_veritas operations manager .pdf
viom_addons_users_80_veritas operations manager .pdfviom_addons_users_80_veritas operations manager .pdf
viom_addons_users_80_veritas operations manager .pdf
df3
 
Client install
Client installClient install
Client install
mrt Londeh
 
RAC Attack 12c Installation Instruction
RAC Attack 12c Installation InstructionRAC Attack 12c Installation Instruction
RAC Attack 12c Installation Instruction
Yury Velikanov
 
vcs_srdf_install_emcSRDG agentguidecluster.pdf
vcs_srdf_install_emcSRDG agentguidecluster.pdfvcs_srdf_install_emcSRDG agentguidecluster.pdf
vcs_srdf_install_emcSRDG agentguidecluster.pdf
df3
 
Ws deployment guide
Ws deployment guideWs deployment guide
Ws deployment guide
KunKun Ng
 
hana_sps11_SUSE_Linux_Enterprise_Server_11_x_for_SAP_Applications_Configurati...
hana_sps11_SUSE_Linux_Enterprise_Server_11_x_for_SAP_Applications_Configurati...hana_sps11_SUSE_Linux_Enterprise_Server_11_x_for_SAP_Applications_Configurati...
hana_sps11_SUSE_Linux_Enterprise_Server_11_x_for_SAP_Applications_Configurati...
JessDavidGuzmnGalleg
 
Pc 811 troubleshooting_guide
Pc 811 troubleshooting_guidePc 811 troubleshooting_guide
Pc 811 troubleshooting_guide
makhaderms
 
Wind river linux_niosii_user_guide_r15_rev1
Wind river linux_niosii_user_guide_r15_rev1Wind river linux_niosii_user_guide_r15_rev1
Wind river linux_niosii_user_guide_r15_rev1
Abhinay Yadav
 
DDoS Secure: VMware Virtual Edition Installation Guide
DDoS Secure: VMware Virtual Edition Installation GuideDDoS Secure: VMware Virtual Edition Installation Guide
DDoS Secure: VMware Virtual Edition Installation Guide
Juniper Networks
 
Xen app getting-started-guide
Xen app getting-started-guideXen app getting-started-guide
Xen app getting-started-guide
hergamia
 
Device net guide
Device net guideDevice net guide
Device net guide
ares111
 
Faronics Insight Tech Console User guide
Faronics Insight Tech Console User guideFaronics Insight Tech Console User guide
Faronics Insight Tech Console User guide
Faronics
 
OE Application Server Administratoion
OE Application Server AdministratoionOE Application Server Administratoion
OE Application Server Administratoion
tawatchai.psp
 
viom_addons_users_80_veritas operations manager .pdf
viom_addons_users_80_veritas operations manager .pdfviom_addons_users_80_veritas operations manager .pdf
viom_addons_users_80_veritas operations manager .pdf
df3
 
Client install
Client installClient install
Client install
mrt Londeh
 
RAC Attack 12c Installation Instruction
RAC Attack 12c Installation InstructionRAC Attack 12c Installation Instruction
RAC Attack 12c Installation Instruction
Yury Velikanov
 
Ad

Recently uploaded (20)

SAP Modernization: Maximizing the Value of Your SAP S/4HANA Migration.pdf
SAP Modernization: Maximizing the Value of Your SAP S/4HANA Migration.pdfSAP Modernization: Maximizing the Value of Your SAP S/4HANA Migration.pdf
SAP Modernization: Maximizing the Value of Your SAP S/4HANA Migration.pdf
Precisely
 
Dev Dives: Automate and orchestrate your processes with UiPath Maestro
Dev Dives: Automate and orchestrate your processes with UiPath MaestroDev Dives: Automate and orchestrate your processes with UiPath Maestro
Dev Dives: Automate and orchestrate your processes with UiPath Maestro
UiPathCommunity
 
UiPath Community Berlin: Orchestrator API, Swagger, and Test Manager API
UiPath Community Berlin: Orchestrator API, Swagger, and Test Manager APIUiPath Community Berlin: Orchestrator API, Swagger, and Test Manager API
UiPath Community Berlin: Orchestrator API, Swagger, and Test Manager API
UiPathCommunity
 
How analogue intelligence complements AI
How analogue intelligence complements AIHow analogue intelligence complements AI
How analogue intelligence complements AI
Paul Rowe
 
IEDM 2024 Tutorial2_Advances in CMOS Technologies and Future Directions for C...
IEDM 2024 Tutorial2_Advances in CMOS Technologies and Future Directions for C...IEDM 2024 Tutorial2_Advances in CMOS Technologies and Future Directions for C...
IEDM 2024 Tutorial2_Advances in CMOS Technologies and Future Directions for C...
organizerofv
 
2025-05-Q4-2024-Investor-Presentation.pptx
2025-05-Q4-2024-Investor-Presentation.pptx2025-05-Q4-2024-Investor-Presentation.pptx
2025-05-Q4-2024-Investor-Presentation.pptx
Samuele Fogagnolo
 
Linux Professional Institute LPIC-1 Exam.pdf
Linux Professional Institute LPIC-1 Exam.pdfLinux Professional Institute LPIC-1 Exam.pdf
Linux Professional Institute LPIC-1 Exam.pdf
RHCSA Guru
 
AI and Data Privacy in 2025: Global Trends
AI and Data Privacy in 2025: Global TrendsAI and Data Privacy in 2025: Global Trends
AI and Data Privacy in 2025: Global Trends
InData Labs
 
Semantic Cultivators : The Critical Future Role to Enable AI
Semantic Cultivators : The Critical Future Role to Enable AISemantic Cultivators : The Critical Future Role to Enable AI
Semantic Cultivators : The Critical Future Role to Enable AI
artmondano
 
Manifest Pre-Seed Update | A Humanoid OEM Deeptech In France
Manifest Pre-Seed Update | A Humanoid OEM Deeptech In FranceManifest Pre-Seed Update | A Humanoid OEM Deeptech In France
Manifest Pre-Seed Update | A Humanoid OEM Deeptech In France
chb3
 
Rusty Waters: Elevating Lakehouses Beyond Spark
Rusty Waters: Elevating Lakehouses Beyond SparkRusty Waters: Elevating Lakehouses Beyond Spark
Rusty Waters: Elevating Lakehouses Beyond Spark
carlyakerly1
 
Special Meetup Edition - TDX Bengaluru Meetup #52.pptx
Special Meetup Edition - TDX Bengaluru Meetup #52.pptxSpecial Meetup Edition - TDX Bengaluru Meetup #52.pptx
Special Meetup Edition - TDX Bengaluru Meetup #52.pptx
shyamraj55
 
Designing Low-Latency Systems with Rust and ScyllaDB: An Architectural Deep Dive
Designing Low-Latency Systems with Rust and ScyllaDB: An Architectural Deep DiveDesigning Low-Latency Systems with Rust and ScyllaDB: An Architectural Deep Dive
Designing Low-Latency Systems with Rust and ScyllaDB: An Architectural Deep Dive
ScyllaDB
 
Procurement Insights Cost To Value Guide.pptx
Procurement Insights Cost To Value Guide.pptxProcurement Insights Cost To Value Guide.pptx
Procurement Insights Cost To Value Guide.pptx
Jon Hansen
 
Noah Loul Shares 5 Steps to Implement AI Agents for Maximum Business Efficien...
Noah Loul Shares 5 Steps to Implement AI Agents for Maximum Business Efficien...Noah Loul Shares 5 Steps to Implement AI Agents for Maximum Business Efficien...
Noah Loul Shares 5 Steps to Implement AI Agents for Maximum Business Efficien...
Noah Loul
 
HCL Nomad Web – Best Practices und Verwaltung von Multiuser-Umgebungen
HCL Nomad Web – Best Practices und Verwaltung von Multiuser-UmgebungenHCL Nomad Web – Best Practices und Verwaltung von Multiuser-Umgebungen
HCL Nomad Web – Best Practices und Verwaltung von Multiuser-Umgebungen
panagenda
 
Cyber Awareness overview for 2025 month of security
Cyber Awareness overview for 2025 month of securityCyber Awareness overview for 2025 month of security
Cyber Awareness overview for 2025 month of security
riccardosl1
 
Increasing Retail Store Efficiency How can Planograms Save Time and Money.pptx
Increasing Retail Store Efficiency How can Planograms Save Time and Money.pptxIncreasing Retail Store Efficiency How can Planograms Save Time and Money.pptx
Increasing Retail Store Efficiency How can Planograms Save Time and Money.pptx
Anoop Ashok
 
What is Model Context Protocol(MCP) - The new technology for communication bw...
What is Model Context Protocol(MCP) - The new technology for communication bw...What is Model Context Protocol(MCP) - The new technology for communication bw...
What is Model Context Protocol(MCP) - The new technology for communication bw...
Vishnu Singh Chundawat
 
Heap, Types of Heap, Insertion and Deletion
Heap, Types of Heap, Insertion and DeletionHeap, Types of Heap, Insertion and Deletion
Heap, Types of Heap, Insertion and Deletion
Jaydeep Kale
 
SAP Modernization: Maximizing the Value of Your SAP S/4HANA Migration.pdf
SAP Modernization: Maximizing the Value of Your SAP S/4HANA Migration.pdfSAP Modernization: Maximizing the Value of Your SAP S/4HANA Migration.pdf
SAP Modernization: Maximizing the Value of Your SAP S/4HANA Migration.pdf
Precisely
 
Dev Dives: Automate and orchestrate your processes with UiPath Maestro
Dev Dives: Automate and orchestrate your processes with UiPath MaestroDev Dives: Automate and orchestrate your processes with UiPath Maestro
Dev Dives: Automate and orchestrate your processes with UiPath Maestro
UiPathCommunity
 
UiPath Community Berlin: Orchestrator API, Swagger, and Test Manager API
UiPath Community Berlin: Orchestrator API, Swagger, and Test Manager APIUiPath Community Berlin: Orchestrator API, Swagger, and Test Manager API
UiPath Community Berlin: Orchestrator API, Swagger, and Test Manager API
UiPathCommunity
 
How analogue intelligence complements AI
How analogue intelligence complements AIHow analogue intelligence complements AI
How analogue intelligence complements AI
Paul Rowe
 
IEDM 2024 Tutorial2_Advances in CMOS Technologies and Future Directions for C...
IEDM 2024 Tutorial2_Advances in CMOS Technologies and Future Directions for C...IEDM 2024 Tutorial2_Advances in CMOS Technologies and Future Directions for C...
IEDM 2024 Tutorial2_Advances in CMOS Technologies and Future Directions for C...
organizerofv
 
2025-05-Q4-2024-Investor-Presentation.pptx
2025-05-Q4-2024-Investor-Presentation.pptx2025-05-Q4-2024-Investor-Presentation.pptx
2025-05-Q4-2024-Investor-Presentation.pptx
Samuele Fogagnolo
 
Linux Professional Institute LPIC-1 Exam.pdf
Linux Professional Institute LPIC-1 Exam.pdfLinux Professional Institute LPIC-1 Exam.pdf
Linux Professional Institute LPIC-1 Exam.pdf
RHCSA Guru
 
AI and Data Privacy in 2025: Global Trends
AI and Data Privacy in 2025: Global TrendsAI and Data Privacy in 2025: Global Trends
AI and Data Privacy in 2025: Global Trends
InData Labs
 
Semantic Cultivators : The Critical Future Role to Enable AI
Semantic Cultivators : The Critical Future Role to Enable AISemantic Cultivators : The Critical Future Role to Enable AI
Semantic Cultivators : The Critical Future Role to Enable AI
artmondano
 
Manifest Pre-Seed Update | A Humanoid OEM Deeptech In France
Manifest Pre-Seed Update | A Humanoid OEM Deeptech In FranceManifest Pre-Seed Update | A Humanoid OEM Deeptech In France
Manifest Pre-Seed Update | A Humanoid OEM Deeptech In France
chb3
 
Rusty Waters: Elevating Lakehouses Beyond Spark
Rusty Waters: Elevating Lakehouses Beyond SparkRusty Waters: Elevating Lakehouses Beyond Spark
Rusty Waters: Elevating Lakehouses Beyond Spark
carlyakerly1
 
Special Meetup Edition - TDX Bengaluru Meetup #52.pptx
Special Meetup Edition - TDX Bengaluru Meetup #52.pptxSpecial Meetup Edition - TDX Bengaluru Meetup #52.pptx
Special Meetup Edition - TDX Bengaluru Meetup #52.pptx
shyamraj55
 
Designing Low-Latency Systems with Rust and ScyllaDB: An Architectural Deep Dive
Designing Low-Latency Systems with Rust and ScyllaDB: An Architectural Deep DiveDesigning Low-Latency Systems with Rust and ScyllaDB: An Architectural Deep Dive
Designing Low-Latency Systems with Rust and ScyllaDB: An Architectural Deep Dive
ScyllaDB
 
Procurement Insights Cost To Value Guide.pptx
Procurement Insights Cost To Value Guide.pptxProcurement Insights Cost To Value Guide.pptx
Procurement Insights Cost To Value Guide.pptx
Jon Hansen
 
Noah Loul Shares 5 Steps to Implement AI Agents for Maximum Business Efficien...
Noah Loul Shares 5 Steps to Implement AI Agents for Maximum Business Efficien...Noah Loul Shares 5 Steps to Implement AI Agents for Maximum Business Efficien...
Noah Loul Shares 5 Steps to Implement AI Agents for Maximum Business Efficien...
Noah Loul
 
HCL Nomad Web – Best Practices und Verwaltung von Multiuser-Umgebungen
HCL Nomad Web – Best Practices und Verwaltung von Multiuser-UmgebungenHCL Nomad Web – Best Practices und Verwaltung von Multiuser-Umgebungen
HCL Nomad Web – Best Practices und Verwaltung von Multiuser-Umgebungen
panagenda
 
Cyber Awareness overview for 2025 month of security
Cyber Awareness overview for 2025 month of securityCyber Awareness overview for 2025 month of security
Cyber Awareness overview for 2025 month of security
riccardosl1
 
Increasing Retail Store Efficiency How can Planograms Save Time and Money.pptx
Increasing Retail Store Efficiency How can Planograms Save Time and Money.pptxIncreasing Retail Store Efficiency How can Planograms Save Time and Money.pptx
Increasing Retail Store Efficiency How can Planograms Save Time and Money.pptx
Anoop Ashok
 
What is Model Context Protocol(MCP) - The new technology for communication bw...
What is Model Context Protocol(MCP) - The new technology for communication bw...What is Model Context Protocol(MCP) - The new technology for communication bw...
What is Model Context Protocol(MCP) - The new technology for communication bw...
Vishnu Singh Chundawat
 
Heap, Types of Heap, Insertion and Deletion
Heap, Types of Heap, Insertion and DeletionHeap, Types of Heap, Insertion and Deletion
Heap, Types of Heap, Insertion and Deletion
Jaydeep Kale
 
Ad

Netbackup intallation guide

  • 1. Veritas NetBackup™ Installation Guide Windows Release 6.5 12308334
  • 2. NetBackup Installation Guide Copyright © 1998-2007 Symantec Corporation. All rights reserved. NetBackup 6.5 Symantec, the Symantec logo, and NetBackup are trademarks or registered trademarks of Symantec Corporation or its affiliates in the U.S. and other countries. Other names may be trademarks of their respective owners. Portions of this software are derived from the RSA Data Security, Inc. MD5 Message- Digest Algorithm. Copyright 1991-92, RSA Data Security, Inc. Created 1991. All rights reserved. The product described in this document is distributed under licenses restricting its use, copying, distribution, and decompilation/reverse engineering. No part of this document may be reproduced in any form by any means without prior written authorization of Symantec Corporation and its licensors, if any. THIS DOCUMENTATION IS PROVIDED “AS IS” AND ALL EXPRESS OR IMPLIED CONDITIONS, REPRESENTATIONS AND WARRANTIES, INCLUDING ANY IMPLIED WARRANTY OF MERCHANTABILITY, FITNESS FOR A PARTICULAR PURPOSE OR NON INFRINGEMENT, ARE DISCLAIMED, EXCEPT TO THE EXTENT THAT SUCH DISCLAIMERS ARE HELD TO BE LEGALLY INVALID, SYMANTEC CORPORATION SHALL NOT BE LIABLE FOR INCIDENTAL OR CONSEQUENTIAL DAMAGES IN CONNECTION WITH THE FURNISHING, PERFORMANCE, OR USE OF THIS DOCUMENTATION. THE INFORMATION CONTAINED IN THIS DOCUMENTATION IS SUBJECT TO CHANGE WITHOUT NOTICE. The Licensed Software and Documentation are deemed to be “commercial computer software” and “commercial computer software documentation” as defined in FAR Sections 12.212 and DFARS Section 227.7202. Symantec Software Corporation 20330 Stevens Creek Blvd. Cupertino, CA 95014 www.symantec.com Printed in the United States of America.
  • 3. Third-party legal notices Third-party software may be recommended, distributed, embedded, or bundled with this Veritas product. Such third-party software is licensed separately by its copyright holder. All third-party copyrights associated with this product are listed in the accompanying release notes. AIX is a registered trademark of IBM Corporation. HP-UX is a registered trademark of Hewlett-Packard Development Company, L.P. Linux is a registered trademark of Linus Torvalds. Solaris is a trademark of Sun Microsystems, Inc. Windows is a registered trademark of Microsoft Corporation. Oracle is a registered trademark of Oracle Corporation. Licensing and registration Veritas NetBackup is a licensed product. See the NetBackup Installation Guide for license installation instructions. Technical support For technical assistance, visit http://entsupport.symantec.com and select phone or email support. Use the Knowledge Base search feature to access resources such as TechNotes, product alerts, software downloads, hardware compatibility lists, and our customer email notification service.
  • 5. Contents Chapter 1 Preparing for installation Pre-installation software requirements ............................................................. 9 NetBackup license key requirements .......................................................... 9 NetBackup supported platforms ................................................................10 Contents of the NetBackup media kit .......................................................10 Requirements for NetBackup server installation ...........................................13 Requirements for local installations ........................................................13 Notes for remote and cluster installations ..............................................15 Notes for Private Branch Exchange (PBX) ................................................15 Notes for NetBackup Access Control ........................................................16 Configuring storage devices for the operating system ..................................16 Locating supported robot types .................................................................17 Configuring storage devices .......................................................................17 Chapter 2 Installing or upgrading NetBackup server software Sequence for installing or upgrading ...............................................................19 Guidelines for upgrading to NetBackup 6.5 .............................................19 Upgrading NetBackup Servers to NetBackup Enterprise Servers ...............21 Installing or upgrading servers locally ............................................................22 Installing or upgrading servers remotely ........................................................33 Installing or upgrading servers in clustered environments .........................45 Cluster installation requirements .............................................................45 Before you perform a new installation in clustered environments .....46 Before you perform an upgrade in clustered environments .................46 Installing or upgrading servers in clustered environments .................47 Notes on NetBackup cluster environments .....................................62 Verifying cluster installations or upgrades .....................................62 Installing NetBackup servers silently ...............................................................64 System reboot after a silent installation ..................................................66 Chapter 3 Installing alternative administration interfaces About the NetBackup Remote Administration Console for Windows .........67 Installing the NetBackup Remote Administration Console ..................68 Adding the NetBackup Remote Administration Console host to server lists .................................................................................................69
  • 6. 6 Contents Adding remote servers to administer from an existing NetBackup Remote Administration Console ...................................................................... 70 About the NetBackup-Java Administration Console ...................................... 71 Installing or removing multiple versions of the NetBackup-Java Administration Console on Windows ............................................... 71 Installing multiple versions of the NetBackup Administration Console on Windows .................................................................................. 71 Removing earlier versions of the NetBackup-Java Administration Console on Windows ................................................................... 73 About the Java Windows Administration Console ......................................... 73 Installing the Java Windows Administration Console ........................... 74 Administering multiple versions of NetBackup servers ....................... 74 Earlier versions of the NetBackup-Java Administration Console on UNIX platforms ............................................................................ 75 Earlier versions of the NetBackup-Java Administration Console on Windows platforms ..................................................................... 75 Remote display-back from UNIX servers ......................................... 75 Remote display-back from Windows servers .................................. 75 At the console of the server with an earlier version of NetBackup 75 Chapter 4 Removing and reinstalling NetBackup Removing NetBackup server software ............................................................. 77 Removing NetBackup server software in a clustered environment ............ 79 Notes on reinstalling NetBackup server software .......................................... 79 Chapter 5 Installing clients Installing Microsoft Windows clients .............................................................. 81 Client installation overview ....................................................................... 81 Veritas volume snapshot provider on Windows ............................. 82 User-directed operations for Windows systems ............................. 82 Local and remote installations for Windows systems ................... 82 Silent installations for Windows systems ....................................... 83 New and upgrade installations for Windows clients ...................... 83 Windows client system requirements ...................................................... 84 Local installation requirements ........................................................ 84 Remote installation requirements .................................................... 84 NetBackup server requirements for Windows clients ................... 85 Installing Windows clients locally ............................................................ 85 Installing Windows clients remotely ........................................................ 86 Notes on Windows client remote installations ............................... 87 Installing Windows clients silently .......................................................... 89 Configuring NetBackup clients .................................................................. 89
  • 7. Contents 7 Removing Windows clients ........................................................................90 Installing UNIX clients ........................................................................................90 Installing UNIX clients locally ...................................................................92 Installing UNIX clients remotely ...............................................................93 Installing client software with the rsh method ..............................93 Installing client software with the ftp method ..............................95 Installing client software with the ssh method ..............................96 Installing client software with the sftp method ...........................97 Adding a UNIX client after initial server installation ............................98 Removing UNIX NetBackup client software ............................................99 Chapter 6 NetBackup licenses NetBackup license compatibility .....................................................................103 Entering license keys .........................................................................................103 Frequently asked questions .............................................................................104 Chapter 7 Configuring NetBackup servers Recommendations for configuring NetBackup .............................................109 Configuring NetBackup .....................................................................................110 Configuring storage devices for NetBackup ..........................................111 Configuring volumes .................................................................................112 Configuring the catalog backup ...............................................................113 Creating a backup policy ..........................................................................114 Testing the NetBackup installation ................................................................114 Appendix A NetBackup LiveUpdate About NetBackup LiveUpdate ..........................................................................115 How NetBackup LiveUpdate works .........................................................116 Setting up your NetBackup LiveUpdate server .............................................117 Installing on Windows systems ...............................................................117 Installing on UNIX systems ......................................................................121 Installing the agent on UNIX servers .............................................121 Installing the agent on UNIX clients ...............................................122 Changing the NetBackup LiveUpdate configuration ...................................124 Changing the LiveUpdate configuration on Windows .........................125 Changing the LiveUpdate configuration on UNIX ................................125 Downloading NetBackup release updates ......................................................125 About LiveUpdate policies ................................................................................126 Creating a LiveUpdate policy ...................................................................127 Updating servers and clients with NetBackup LiveUpdate .........................128 Updating master servers and media servers that run LiveUpdate policies 128
  • 8. 8 Contents Updating master severs and media servers that do not run LiveUpdate policies ................................................................................................. 129 Updating clients ......................................................................................... 130 LiveUpdate logs .................................................................................................. 130 Retrieving logs remotely .......................................................................... 131 Uninstalling NetBackup LiveUpdate .............................................................. 131 Uninstalling on Windows systems .......................................................... 131 Uninstalling on UNIX systems ................................................................ 132 Index 135
  • 9. Chapter 1 Preparing for installation This chapter includes the following topics: ■ “Pre-installation software requirements” ■ “Requirements for NetBackup server installation” ■ “Configuring storage devices for the operating system” Pre-installation software requirements This release of NetBackup contains many changes and enhancements that have caused the software to become larger. You can read a brief description of these enhancements in the NetBackup Release Notes. Depending on the type of platform you install, the growth in the software may require you to mount more CDs than in earlier releases. NetBackup license key requirements When you install a NetBackup master or media server, you must enter a NetBackup base product license key. Check your release package to make sure that you have license keys for all the NetBackup servers, options, and agents that you requested. Enter all product license keys on the master server when you are prompted during the installation. For more information about license keys, refer to “NetBackup licenses” on page 103. For detailed information on how to administer NetBackup license keys, refer to the Veritas NetBackup Administrator’s Guide, Volume I.
  • 10. 10 Preparing for installation Pre-installation software requirements NetBackup supported platforms The NetBackup Release Notes document provides a “Supported Platforms and Operating Systems” table that identifies which clients to install with which operating systems. You can run mixed versions of NetBackup between master and media servers. This “back-level support” lets you upgrade NetBackup one server at a time, which minimizes impact on overall system performance. Symantec supports only certain combinations of servers and clients. The following lists all of the configurations for which Symantec provides support. Master Server Version Media Server Version Client Version NetBackup 6.5 6.5 6.5 NetBackup 6.5 6.5 6.0, 5.0MP4 (or later) or 5.1 NetBackup 6.5 6.0MP3 (or later), 5.0MP4 (or 6.0, 5.0MP4 (or later) or 5.1 later), or 5.1 Caution: Before you upgrade the NetBackup server software, you must back up your NetBackup catalogs and verify that the catalog backup was successful. Contents of the NetBackup media kit Starting with this release, Symantec is delivering NetBackup in both CD-ROM and DVD media formats. Starting with the next major release of NetBackup, the product will only be available on DVD media. Your NetBackup media kit includes multiple CDs or DVDs. The label on each CD and DVD provides a brief description of its contents. NetBackup documentation is included on both CD and DVD, and accompanies each product order. The documentation is in Portable Document Format (PDF), for all NetBackup software products in a release. The documentation is organized into product groups. You can use Acrobat Reader to print the files you select. If Autorun is enabled on your Windows system, you see a Web page that lists the documents that you can select to view. On UNIX or Linux systems, or if Autorun is disabled on the Windows system, navigate to the CD drive to view the CD contents. From that drive, you can select documents to view or copy them to a local drive.
  • 11. Preparing for installation 11 Pre-installation software requirements The following table lists the title of each NetBackup 6.5 CD along with a brief description of its contents. Note: Beginning with NetBackup 6.5, Veritas Security Services and its associated acronym (VxSS) are replaced by Symantec Product Authentication and Authorization. NetBackup CD Contents Windows 32-bit Server/Client/Options Windows IA-64-bit Server/Client/Options Windows X64-bit Server/Client/Options Solaris SPARC Server/Clients Solaris x86-64-bit Server/Clients HP-UX PA-RISC Server/Clients HP-UX IA-64-bit Server/Client Linux 2.4 Server/Client Linux 2.6 Red Hat Server/Client Linux IA-64-bit 2.6 Red Hat and SuSE Servers/Clients Linux 2.6 SuSE Server/Client AIX RS6000 Server/Client Tru64 (Alpha) Server/Client UNIX Client1 Tru64, all HP, and AIX UNIX Client2 Mac and all Linux UNIX Client3 Solaris, FreeBSD, and IRIX BMR UNIX UNIX Options UNIX Options/Database Agents NOM NetBackup Operations Manager Storage Migrator UNIX NetBackup Document Set Complete NetBackup documentation set in PDF format
  • 12. 12 Preparing for installation Pre-installation software requirements NetBackup CD Contents (Continued) NetBackup Infrastructure Symantec Product Authentication & Authorization Core Services (ICS for installers for Windows 32-bit Windows 32-bit) ICS Windows IA-64-bit Symantec Product Authentication & Authorization installers for Windows IA-64-bit ICS Windows X64-bit Symantec Product Authentication & Authorization installers for Windows X64-bit ICS Solaris SPARC Symantec Product Authentication & Authorization, and PBX installers for Solaris SPARC ICS Solaris x86-64-bit Symantec Product Authentication & Authorization, and PBX installers for Solaris x86-64-bit ICS HP-UX Symantec Product Authentication & Authorization, and PA-RISC/IA-64-bit PBX installers for HP-UX PA-RISC/IA-64-bit ICS Linux 2.4/2.6 Symantec Product Authentication & Authorization, and PBX installers for Linux 2.4/2.6 ICS Linux 2.6 IA-64-bit Symantec Product Authentication & Authorization, and PBX installers for Linux 2.6 IA-64-bit ICS AIX Symantec Product Authentication & Authorization, and PBX installers for AIX ICS Tru64 Symantec Product Authentication & Authorization, and PBX installers for Tru64 The following table lists the title of each NetBackup 6.5 DVD along with a brief description of its contents. NetBackup DVD Contents Windows 32-/ ■ Windows 32-bit Server/Client/Options 64-bit, ICS 32- ■ Windows IA-64-bit Server/Client/Options and 64-bit, and ■ Windows X64-bit Server/Client/Options UNIX clients ■ ICS Windows 32-bit ■ ICS Windows IA-64-bit ■ ICS Windows X64-bit ■ UNIX Client1 (Tru64, all HP and AIX) ■ UNIX Client2 (Mac and all Linux) ■ UNIX Client3 (Solaris's, FreeBSD and IRIX)
  • 13. Preparing for installation 13 Requirements for NetBackup server installation NetBackup DVD Contents (Continued) Solaris SPARC ■ Solaris SPARC Server/Clients and x86-64, ■ Solaris x86-bit Server/Client Linux, and ICS ■ Linux 2.4 Server/Client ■ Linux 2.6 Red Hat Server/Client ■ Linux 2.6 IA-64-bit Red Hat/SuSE Servers/Clients ■ Linux 2.6 SuSE Server/Client ■ ICS Solaris SPARC ■ ICS Solaris x86-64-bit ■ ICS Linux 2.4/2.6 32-bit ■ ICS Linux 2.6 IA-64-bit HP, AIX, Tru64, ■ HP-UX PA-RISC Server/Client and ICS ■ HP-UX IA-64 Server/Client ■ AIX RS6000 Server/Client ■ Tru64 Server/Client ■ ICS HP-UX RISC/IA-64 ■ ICS AIX ■ ICS Tru64 BMR, UNIX ■ BMR for UNIX Options, NOM, ■ UNIX options Storage Migrator, ■ NetBackup Operations Manager (UNIX and Windows) & NetBackup ■ Storage Migrator Documentation ■ Complete NetBackup documentation set in PDF format Set Requirements for NetBackup server installation The server software takes approximately 10 minutes to install. Additional time may be required to set up the product for your environment. Requirements for local installations Before you install NetBackup, ensure that the following requirements are met: ■ Remove any other vendor’s backup software currently configured on your system. The backup software of another vendor can negatively affect how NetBackup installs and functions. ■ Before you install your NetBackup product, make sure that you have applied the most current operating system patches and updates. If you are not
  • 14. 14 Preparing for installation Requirements for NetBackup server installation certain that your operating system is current, contact your operating system vendor and request the latest patches and upgrades. ■ Ensure that all NetBackup servers have a release level that is at least equal to the latest version that is installed on the clients. Earlier versions of server software can encounter problems with later versions of client software. ■ Ensure that you have all NetBackup installation CDs, appropriate license keys, and an administrator account and password for all servers. ■ Peripherals, such as robotic devices and stand-alone tape drives, must be installed according to the manufacturers’ instructions and recognized by the Windows software. ■ Network configuration that allows all servers and clients to recognize and communicate with one another. Generally, if you can reach the clients from a server by using the ping command, the setup works with NetBackup. ■ Server system configuration: ■ An Intel Pentium system running Windows 2000 with a minimum of 256 MB of memory and service pack 4 installed, or Windows 2003 server. ■ Internet Explorer 5.0 or later. ■ Screen resolution configuration of at least 1024x768, 256 colors. ■ Disk space: ■ An NTFS partition. ■ At least 1 GB of storage space to accommodate the server software (512 MB) and NetBackup catalogs (at least 512 MB). NetBackup catalogs contain information about your backups, which become larger as you use the product. The catalog disk space requirements depend primarily on the aspects of your backup configuration. For example, the number of files that are backed up, the frequency of your backups, and how long you retain your backup data. ■ For upgrades, you must have an additional 500 MB of disk space on the drive where Windows is installed. After the upgrade is complete, this additional space is not needed. ■ Symantec does not support installation of NetBackup in an CIFS-mounted directory. File locking in CIFS-mounted file systems can be unreliable. ■ NetBackup services and port numbers must be the same across the network. Symantec suggests that you use the default port settings for NetBackup services and Internet service ports. If you modify the port numbers, they must be the same for all master servers, media servers, and clients. The port entries are in the following file:
  • 15. Preparing for installation 15 Requirements for NetBackup server installation %SYSTEMROOT%system32driversetcservices To change the default settings, you must perform a Custom Installation of NetBackup or manually edit the services file. ■ For Remote Administration Console installation, you must provide the names of the Remote Administration Console hosts during master server installation. Notes for remote and cluster installations In addition to the local installation requirements, the following guidelines apply to remote installations and cluster installations: ■ The source system (or primary node) must run Windows 2000/2003 server. ■ The destination PC (or clustered nodes) must have Windows 2000/2003 server. ■ The installation account must have administrator privileges on all the remote systems or on all nodes in the cluster. ■ All nodes in a cluster must run the same operating system, service pack level, and version of NetBackup. You cannot mix versions of server operating systems. Notes for Private Branch Exchange (PBX) NetBackup uses a Common Services Framework (CSF) called Private Branch Exchange (PBX). PBX helps limit the number of TCP/IP ports that NetBackup uses. It also allows all socket communication to take place while connecting through a single port. The PBX port number is 1556. For more information about PBX and how to configure NetBackup ports, refer to the Veritas NetBackup Security and Encryption Guide. Because PBX is required for all NetBackup products, its installation is part of the NetBackup installation procedure unless it is already present on the system. When you install NetBackup on a Windows server, the installation process determines if a version of PBX is already installed on your system. Whether PBX is already installed causes one of the following to happen: ■ If a version of PBX exists, the installation process determines if the existing version is newer than the NetBackup version. If NetBackup uses a newer version, it is installed. Any existing default conditions are maintained. If NetBackup uses an earlier version, no changes are made. The latest version is always used.
  • 16. 16 Preparing for installation Configuring storage devices for the operating system If PBX exists, you cannot change the port number that it uses. If you change the port number, other Symantec products may fail. ■ If no version of PBX exists, one is installed silently with NetBackup. A default port number is used, along with a default configuration. If PBX did not previously exist on the server, you can change the port number that it uses. When you remove (uninstall) NetBackup, PBX is removed if no other Symantec product is dependent on it. If there is a dependency from another product, PBX is not removed. Notes for NetBackup Access Control Use the following guidelines if you want to use access control: ■ To use the access control features in NetBackup 6.5, you must install the Symantec Product Authentication and Authorization components. ■ If access control is not installed in your current NetBackup environment, you must first upgrade to NetBackup 6.5. Then, you can install the access control components. ■ If access control is already installed in your current NetBackup environment, you must install the new access control components before you upgrade to NetBackup 6.5. For NetBackup Access Control installation and upgrade instructions, see the Veritas NetBackup Security and Encryption Guide. Configuring storage devices for the operating system Reliable use of NetBackup depends on the proper configuration of your storage devices. To ensure reliable backups and restores, you must configure devices to work with the operating system. Use the instructions that the device vendor and operating system vendor provide. Install and configure storage devices before you install and configure NetBackup. Warning: An improperly configured device may lead to loss of data during restores.
  • 17. Preparing for installation 17 Configuring storage devices for the operating system Locating supported robot types You can find a list of the supported robot types in the NetBackup Release Notes. Symantec periodically adds new robots to this list. For your convenience, Symantec updates the supported robots lists on the Symantec support Web site. To find the latest devices this release supports 1 In a Web browser, open http://entsupport.symantec.com. 2 In the Product Lookup list, select either NetBackup Enterprise Server or NetBackup Server. 3 In the new Web page in the Support for this product section, click Compatibility List. 4 In the new Compatibility and Reference Web page from the appropriate drop-down menus, select Compatibility > NetBackup 6.5, and the language of your choice. 5 The lower section of the screen updates depending on what you select from the drop-down menus. From the links on this section of the screen, select the appropriate product level to check compatibility. 6 From the resulting page you can view device support information by individual vendor, all support drives, libraries, or robot types. Configuring storage devices Use the following guidelines to configure your storage devices: ■ Configure your storage devices as described in the instructions that the device vendor and operating system vendor provide. ■ For new installations, Symantec recommends that you install and configure the latest device drivers for your storage devices immediately before you install the NetBackup software. ■ After you have configured your storage devices, you can install NetBackup. ■ For upgrades, you can install the latest device drivers before you upgrade NetBackup. ■ The Tape Device Driver Installation wizard that is included on the NetBackup installation CD steps you through how to install the latest device drivers. Note: Complete this wizard before you configure NetBackup.
  • 18. 18 Preparing for installation Configuring storage devices for the operating system ■ If you do not have a NetBackup CD, you can download the NetBackup Tape Device Driver Installation software from the technical support Web site: http://entsupport.symantec.com To start the tape device driver installation wizard 1 Log on as administrator to the system where you installed NetBackup. 2 Insert the NetBackup CD in the drive. If Autorun is disabled, navigate to the CD drive and run Launch.exe. 3 On the installation browser, click the link Additional Products > Additional Product Installations > NetBackup Tape Device Drivers. 4 Complete the wizard to install the latest device drivers for your storage device. Note: You can download the latest external device mapping files on the Updates and Patches Web page on the support Web site: http://entsupport.symantec.com
  • 19. Chapter 2 Installing or upgrading NetBackup server software This chapter includes the following topics: ■ “Installing or upgrading servers locally” ■ “Installing or upgrading servers remotely” ■ “Installing or upgrading servers in clustered environments” Sequence for installing or upgrading Each procedure in this chapter is an independent process that you can use to perform the type of installation best suited to your environment. Each procedure includes the differences between a new installation and an upgrade. When you install or upgrade NetBackup server software, Symantec recommends the following sequence: 1 Master servers 2 Media servers, if any (NetBackup Enterprise Server only) 3 NetBackup Remote Administration Console, if any 4 NetBackup clients 5 Any NetBackup add-on products Before you proceed with any installation procedure, be sure to review the “Requirements for NetBackup server installation” on page 13. Guidelines for upgrading to NetBackup 6.5 When you upgrade to NetBackup version 6.5, you must upgrade from the following versions:
  • 20. 20 Installing or upgrading NetBackup server software Sequence for installing or upgrading ■ Version 6.0 The procedures for upgrading from 6.0 to 6.5 are included in this installation guide. ■ Notes about logging changes when upgrading to NetBackup 6.5 An upgrade to NetBackup 6.5 overwrites the nblog.conf file with a new file and resets two logging settings. The Logging Level feature was introduced in NetBackup 6.0 GA. Upgrading to 6.5 resets this feature to 1. To change the Logging Level to the desired setting after upgrading, refer to the Veritas NetBackup Administrator’s Guide, Volume I. The LogRecycle feature was introduced in NetBackup 6.0 MP4. Upgrading to 6.5 resets this feature to OFF. To change LogRecycle to the desired setting after upgrading, refer to the Veritas NetBackup Troubleshooting Guide. You should also refer to the information at the following Website: http://entsupport.symantec.com/docs/279590 ■ Version 5.0MP4 (or later) or version 5.1 The procedures for upgrading from 5.0MP4 (or later) or version 5.1 are not included in this guide. Before you can upgrade from 5.0MP4 (or later) or version 5.1, you must first prepare your current NetBackup environment for an upgrade to version 6.5. The upgrade instructions can be found as follows: ■ Go to the following Symantec Website: http://entsupport.symantec.com ■ In the Product Lookup dialog box, enter NetBackup Enterprise Server and click on the arrow to the right. The next page that displays includes a Hot Topics section that provides a link to an upgrade portal. Following the procedures described in the linked documents at this Website help ensure a successful upgrade. Note: If you have a version earlier than 5.0MP4 installed (such as 4.5), you cannot upgrade directly to NetBackup 6.5. You must first upgrade to NetBackup 5.x and then upgrade to NetBackup 6.5. Use the following guidelines if you want to use access control: ■ To use the access control features in NetBackup 6.5, you must install the Symantec Product Authentication and Authorization components. ■ If access control is not installed in your current NetBackup environment, you must first upgrade to NetBackup 6.5. Then, you can
  • 21. Installing or upgrading NetBackup server software 21 Upgrading NetBackup Servers to NetBackup Enterprise Servers install the Symantec Product Authentication and Authorization components. ■ If access control is already installed in your current NetBackup environment, you must install the new Symantec Product Authentication and Authorization components before you upgrade to NetBackup 6.5. For NetBackup access control installation and upgrade instructions, see the Veritas NetBackup Security and Encryption Guide. Upgrading NetBackup Servers to NetBackup Enterprise Servers To upgrade from NetBackup Server to NetBackup Enterprise Server, you must enter the appropriate license key(s) in your current NetBackup Administration Console. To upgrade a NetBackup server to a NetBackup enterprise server 1 Locate your NetBackup Enterprise Server license key. 2 Open the NetBackup Administration Console and choose Help > License Keys. The NetBackup License Key dialog box appears. 3 Click the New icon. 4 Enter your license key in the New license key field and click Add. The new license key appears in the field in the lower part of the dialog box. ■ For upgrades on Windows from a NetBackup server evaluation license key to a permanent NetBackup Enterprise Server-based product license key, restart the NetBackup services. When services are restarted, the new license information is displayed when you select Help > About NetBackup Administration Console. ■ If you add, delete, or change any license keys, you must restart the NetBackup Administration Console. 5 Reboot the system if you are prompted.
  • 22. 22 Installing or upgrading NetBackup server software Installing or upgrading servers locally Installing or upgrading servers locally Welcome Veritas License Agreement Veritas Custom installation Choose Installation Veritas Enter License Key Select NetBackup Select Port Numbers Provide Startup Select Server Type Features Information for NetBackup Services Typical installation Enter System Name Enter EMM Server Name Media server installation differences: The NetBackup Systems Name screen contains the Media Server Name field Begin Installation Monitor Progress Upgrade differences: No Enterprise Media Manager Host screen appears New installation or Upgrade from 6.0 = Finished
  • 23. Installing or upgrading NetBackup server software 23 Installing or upgrading servers locally To install or upgrade NetBackup servers on a local system Note: For upgrades: If you want to use NetBackup access control, refer to the Veritas NetBackup Security and Encryption Guide for complete instructions. Complete that procedure before you begin your NetBackup upgrade. For new installations: Install NetBackup access control after you complete the NetBackup installation. 1 Log on to the system where you want to install NetBackup. Be sure to log on with administrator privileges. 2 For upgrades only: ■ Deactivate all policies For NetBackup Administration Console users ■ On the master server, open the NetBackup Administration Console. ■ From the tree on the left, select Policies. ■ In the right pane, select all policies that appear. ■ Right-click on the highlighted policies and select Deactivate. For command line users ■ Enter the following command: install_pathNetBackupbinadmincmd bpplinfo policy_name -modify -inactive ■ Deactivate disk staging storage units. For NetBackup Administration Console users: ■ Open the NetBackup Administration Console on the master server. ■ From the tree on the left, expand NetBackup Management > Storage Units. ■ In the right pane, double-click on a disk staging storage unit. ■ When the Change Storage Unit window appears, select Staging Schedule. ■ When the Disk Staging Schedule window appears, click on the Exclude Dates tab. ■ Select the date in the calendar that matches the date of the system upgrade. ■ Repeat these tasks for each disk staging storage unit. For command-line users, enter the following command:
  • 24. 24 Installing or upgrading NetBackup server software Installing or upgrading servers locally install_pathnetbackupbinadmincmd bpschedulerep schedulename -excl mm/dd/yyyy ■ Deactivate all media servers ■ On the master server, open the NetBackup Administration Console. ■ From the tree on the left, select Media and Device Management>Devices>Hosts. ■ In the right pane, select all media servers that appear. ■ Right-click on the highlighted servers and select Deactivate. For command line users ■ Enter the following command: install_pathVolmgrbin vmoprcmd -deactivate_host -h device_host 3 Insert the appropriate NetBackup installation CD or DVD in the drive. If Autorun is disabled, navigate to the CD or DVD drive and run Launch.exe. 4 On the initial browser screen, click NetBackup Installation, and on the following screen, select Install Server Software. 5 On the Welcome screen, click Next. 6 On the License Agreement screen, accept the license agreement and click Next.
  • 25. Installing or upgrading NetBackup server software 25 Installing or upgrading servers locally 7 On the Select where you want to install Veritas NetBackup screen, provide the following information: Computer For a local installation, select Install to this computer only. Typical Select Typical to install NetBackup default features and settings. Custom Select Custom to change how NetBackup features and settings are installed. Click Next.
  • 26. 26 Installing or upgrading NetBackup server software Installing or upgrading servers locally 8 On the NetBackup License Key and Server Type screen, provide the following information: License Key Enter the base product license key that you received with your product. NetBackup Master Select the icon next to the software type you want to install, Server such as NetBackup Master Server. NetBackup Media For new installations, the license key that you provide Server determines which components you can select. For example, you can click the icon next to NetBackup Master Server only if you enter a master server license key. For upgrades, the license used for the existing installation type determines which components you can select. For Typical If you selected Typical for the installation type (step 7 on installations only page 25), go to step 10 on page 29. 9 For custom installations: NetBackup Features Click on the drop-down icon next to any feature that you do not want to install. On the pop-up dialog box that appears, confirm that the feature is not available for installation. A red “X” should appear on the icon.
  • 27. Installing or upgrading NetBackup server software 27 Installing or upgrading servers locally NetBackup To change the folder destination where NetBackup is installation location installed, click Change. When the Change Current Destination Folder dialog box appears, browse to your preferred location and designate a new or an existing folder. Click Next. ■ On the NetBackup Port Numbers screen, you can change port numbers, if it is necessary in your configuration. You may want to change a port number if you encounter conflicts when NetBackup and another industry product try to share the same port. Another example is if a port conflict occurs with a company’s firewall, which may cause security issues. To change a port number, select the port number you want to replace and type the new number. Click Next. ■ On the NetBackup Services screen, provide the following startup account and startup type information for NetBackup services: Use the built-in Check this box to use the built-in system account. system account User name, Enter the specific information for the system you want to use. Password, Domain Be sure to leave the Use the built-in system account check box unchecked. Startup Select either Automatic or Manual start up.
  • 28. 28 Installing or upgrading NetBackup server software Installing or upgrading servers locally Start NetBackup Check this box if you want to start the services after Server Services After installation. You can leave the box unchecked to prevent Install services from starting after installation. Terminate Check this box to prevent a reboot while you perform a remote NetBackup installation. When you check this box, processes that use the processes NetBackup executables and DLLs are stopped. Caution: For Oracle users: If you select Terminate NetBackup processes, you must take down your database before you continue the installation. Terminate Windows Check this box to prevent a reboot while you perform a remote processes installation. When you check this box, processes that use the Microsoft run-time DLLs are stopped. For upgrades: You do not need this option because the Microsoft run-time DLL is already at the correct level. Caution: If you select Terminate Windows processes, it may cause instability with other Windows applications, particularly those applications that use run-time DLLs. Abort install if a Check this box so that NetBackup can detect if the remote reboot is required system requires a restart. If a restart is required, this option ends the installation and rolls the remote system back to its state at the beginning of the installation. Click Next.
  • 29. Installing or upgrading NetBackup server software 29 Installing or upgrading servers locally 10 On the NetBackup System Names screen, provide the following information: Master Server Name Enter the name of the master server. Additional Servers Enter the names of any additional machines (servers) that are allowed to access this server. If you enter more than one name, separate each name with a comma. Install LiveUpdate The LiveUpdate agent allows installation of NetBackup Agent patches from a LiveUpdate server. Even if you choose not to use LiveUpdate, agent installation does not affect NetBackup installation, configuration, or operation. For complete information, refer to “About NetBackup LiveUpdate” on page 115. Location of The LiveUpdate server is the machine where you store LiveUpdate Server NetBackup patches. The default server location is your NetBackup master server. If you want to designate a different machine as your NetBackup LiveUpdate server, type the appropriate pathname for that server here. Server Type Select the protocol that is used by your LiveUpdate server (LAN, HTTP, or HTTPS).
  • 30. 30 Installing or upgrading NetBackup server software Installing or upgrading servers locally For NetBackup When you install media server software, this screen has an Enterprise media additional line with the media server name shown as the local server installations server. You must change the name to the master server name only to which the media server is configured. Click Next. 11 On the NetBackup Enterprise Media Manager screen, enter the name of the server where you want the EMM server installed. The EMM server contains all information about NetBackup volume configuration and device configuration. By default, the master server name appears where the EMM server software is set up for installation on the NetBackup master server. This is the preferred configuration. Note: Although installing the EMM on a media server is supported, Symantec recommends that you install the EMM on the master server. For instructions that describe EMM installation on a media server, please refer to TechNote 278175. Note: Symantec does not support installing the EMM on a CIFS-mount. ■ This screen only appears in new installations or when you upgrade a client to a server. This screen does not appear if you upgrade from NetBackup 6.0 to NetBackup 6.5.
  • 31. Installing or upgrading NetBackup server software 31 Installing or upgrading servers locally ■ If the NetBackup system shares drives by using the Shared Storage Option (SSO), all NetBackup servers must use the same host for storing device information. For more information on EMM servers and EMM databases, refer to the NetBackup Administrator’s Guide for Windows, Volume 1. Click Next. 12 On the Ready to Install the Program screen, choose one of the following options: Install Click Install to initiate installation of the default (or custom) settings. Back Click Back to view the previous screens and make any changes, then return to this screen and click on Install. Cancel Click Cancel if you want to start the installation wizard again. After you click Install, the installation process begins and a screen appears that shows you the progress of the installation. This process may take several minutes. An installation log file provides detailed installation information and shows whether any errors occurred. ■ Examine the installation log located under the user profile that completed the install. The following is an example of the user administrator that completed the install. This path may be hidden and you may need to unhide hidden or system files to view the log. C:Documents and SettingsadministratorLocal SettingsTempNetBackup Install...log ■ Search the installation log for the following string to determine if an error has occurred. "Return Value 3"
  • 32. 32 Installing or upgrading NetBackup server software Installing or upgrading servers locally 13 On the Installation Complete screen, choose from the following options: Add Keys Symantec recommends that you enter additional license keys now for any other NetBackup products you plan to install. ■ To enter additional license keys, click Add Keys. ■ When the list of Current License Keys appears, click the Add Key icon to enter a new license key, then click Add. ■ After all license keys are entered, close the Current License Keys window. Finish You have two ways to complete the installation as follows: ■ If you are done installing software on all servers, leave the check mark next to Launch NetBackup Administration Console now and click Finish. The NetBackup Administration Console starts a configuration wizard so that you can configure your NetBackup environment. ■ If you have more server software to install, click the check mark to remove it and click Finish. You can move on to the next machine and install the necessary server software. For new installations If you want to install NetBackup access control, refer to the only Veritas NetBackup Security and Encryption Guide and perform that procedure at this time. 14 For upgrades from 6.0: The server upgrade is complete.
  • 33. Installing or upgrading NetBackup server software 33 Installing or upgrading servers remotely Installing or upgrading servers remotely , Welcome Veritas License Agreement Veritas Choose Installation Veritas Typical installation Enter License Key Select Server Type Custom installation Select Port Numbers Provide Startup Enter System Name Enter EMM Server Information for Name NetBackup Services Enter Remote System Information Available Systems Add Remote Computer Select Destination Enter Remote System Remote Installation Return to Remote Systems Login Credentials Destination Folder Features Dialog Now Updated Begin Installation > Media server installation differences: Monitor Progress The NetBackup Systems Name screen contains the Media Server Name field Upgrade differences: New installation or Upgrade from 6.0 = No Enterprise Media Manager Host screen Finished appears
  • 34. 34 Installing or upgrading NetBackup server software Installing or upgrading servers remotely To install or upgrade NetBackup servers over the network (remote installation) Note: For upgrades: If you want to use NetBackup access control, refer to the Veritas NetBackup Security and Encryption Guide for complete instructions. Complete that procedure before you begin your NetBackup upgrade. 1 Log on to the system where you want to install NetBackup. Be sure to log on with administrator privileges. 2 For upgrades only: ■ Deactivate all policies For NetBackup Administration Console users ■ On the master server, open the NetBackup Administration Console. ■ From the tree on the left, select Policies. ■ In the right pane, select all policies that appear. ■ Right-click on the highlighted policies and select Deactivate. For command line users ■ Enter the following command: install_pathNetBackupbinadmincmd bpplinfo policy_name -modify -inactive ■ Deactivate disk staging storage units. For NetBackup Administration Console users: ■ Open the NetBackup Administration Console on the master server. ■ From the tree on the left, expand NetBackup Management > Storage Units. ■ In the right pane, double-click on a disk staging storage unit. ■ When the Change Storage Unit window appears, select Staging Schedule. ■ When the Disk Staging Schedule window appears, click on the Exclude Dates tab. ■ Select the date in the calendar that matches the date of the system upgrade. ■ Repeat these tasks for each disk staging storage unit. For command-line users, enter the following command: install_pathnetbackupbinadmincmd bpschedulerep schedulename -excl mm/dd/yyyy ■ Deactivate all media servers
  • 35. Installing or upgrading NetBackup server software 35 Installing or upgrading servers remotely ■ On the master server, open the NetBackup Administration Console. ■ From the tree on the left, select Media and Device Management>Devices>Hosts. ■ In the right pane, select all media servers that appear. ■ Right-click on the highlighted servers and select Deactivate. For command line users ■ Enter the following command: install_pathVolmgrbin vmoprcmd -deactivate_host -h device_host 3 Insert the appropriate NetBackup installation CD or DVD in the drive. If Autorun is disabled, navigate to the CD drive and run Launch.exe. 4 On the initial browser screen, click NetBackup Installation, and on the following screen, select Install Server Software. 5 On the Welcome screen, click Next. 6 On the License Agreement screen, accept the license agreement and click Next. 7 On the Select where you want to install Veritas NetBackup screen, provide the following information: Computer For a remote installation, click Select from available computers on the network.
  • 36. 36 Installing or upgrading NetBackup server software Installing or upgrading servers remotely Typical Select Typical to install NetBackup default features and settings. Custom Select Custom to change how NetBackup features and settings are installed. Click Next. 8 On the NetBackup License Key and Server Type screen, provide the following information: License Key Enter the base product license key that you received with your product. NetBackup Master Select the icon next to the software you want to install, such Server as NetBackup Master Server. NetBackup Media For new installations, the license key that you provide Server determines which components you can select. For example, you can click the icon next to NetBackup Master Server only if you enter a master server license key. For upgrades, the license used for the existing installation type determines which components you can select. For Typical If you selected Typical for the installation type, go to step 10 installations only on page 38. 9 For custom installations: ■ On the NetBackup Port Numbers screen, you can change port numbers, if it is necessary in your configuration.
  • 37. Installing or upgrading NetBackup server software 37 Installing or upgrading servers remotely You may want to change a port number if you encounter conflicts when NetBackup and another industry product try to share the same port. Another example is if a port conflict occurs with a company’s firewall, which may cause security issues. To change a port number, select the port number you want to replace and type the new number. Click Next. ■ On the NetBackup Services screen, provide the following startup account and startup type information for NetBackup services: Use the built-in Check this box to use the built-in system account. system account User name, Enter the specific information for the system you want to use. Password, Domain Be sure to leave the Use the built-in system account check box unchecked. Startup Select either Automatic or Manual start up. Start NetBackup Check this box if you want to start the services after Server Services After installation. You can leave the box unchecked to prevent Install services from starting after installation.
  • 38. 38 Installing or upgrading NetBackup server software Installing or upgrading servers remotely Terminate Check this box to prevent a reboot while you perform a remote NetBackup installation. When you check this box, processes that use the processes NetBackup executables and DLLs are stopped. Caution: For Oracle users: If you select Terminate NetBackup processes, you must take down your database before you continue the installation. Terminate Windows Check this box to prevent a reboot while you perform a remote processes installation. When you check this box, processes that use the Microsoft run-time DLLs are stopped. For upgrades: You do not need this option because the Microsoft run-time DLL is already at the correct level. Caution: If you select Terminate Windows processes, it may cause instability with other Windows applications, particularly those applications that use run-time DLLs. Abort install if a Check this box so that NetBackup can detect if the remote reboot is required system requires a restart. If a restart is required, this option ends the installation and rolls the remote system back to its state at the beginning of the installation. 10 On the NetBackup System Names screen, provide the following information: Master Server Name Enter the name of the master server.
  • 39. Installing or upgrading NetBackup server software 39 Installing or upgrading servers remotely Additional Servers Enter the names of any additional machines (servers) that are allowed to access this server. If you enter more than one name, separate each name with a comma. Install LiveUpdate The LiveUpdate agent allows installation of NetBackup Agent patches from a LiveUpdate server. Even if you choose not to use LiveUpdate, agent installation does not affect NetBackup installation, configuration, or operation. For complete information, refer to “About NetBackup LiveUpdate” on page 115. Location of The LiveUpdate server is the machine where you store LiveUpdate Server NetBackup patches. The default server location is your NetBackup master server. If you want to designate a different machine as your NetBackup LiveUpdate server, type the appropriate pathname for that server here. Server Type Select the protocol that is used by your LiveUpdate server (LAN, HTTP, or HTTPS). For NetBackup When you install media server software, this screen has an Enterprise media additional line with the media server name shown as the local server installations server. You must change the name to the master server name only to which the media server is configured. Click Next.
  • 40. 40 Installing or upgrading NetBackup server software Installing or upgrading servers remotely 11 On the NetBackup Enterprise Media Manager screen, enter the name of the server where you want the EMM server installed. The EMM server contains all information about NetBackup volume configuration and device configuration. By default, the master server name appears where the EMM server software is set up for installation on the NetBackup master server. This is the preferred configuration. Note: Although installing the EMM on a media server is supported, Symantec recommends that you install the EMM on the master server. For instructions that describe EMM installation on a media server, please refer to TechNote 278175. Note: Symantec does not support installing the EMM on a CIFS-mount. ■ This screen only appears in new installations or when you upgrade a client to a server. This screen does not appear if you upgrade from NetBackup 6.0 to NetBackup 6.5. ■ If the NetBackup system shares drives by using the Shared Storage Option (SSO), all NetBackup servers must use the same host for storing device information. For more information on EMM servers and EMM databases, refer to the Veritas NetBackup Administrator’s Guide for Windows, Volume 1.
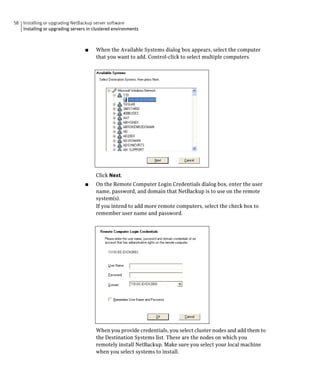
  • 41. Installing or upgrading NetBackup server software 41 Installing or upgrading servers remotely 12 On the NetBackup Remote Features screen, specify remote system information for installation on those machines. ■ On the initial screen, right-click Windows Agent/Option. To install NetBackup on the remote computer, choose Add Remote Computer. ■ On the resulting Available Systems dialog box, select the computer that you want to add. Control-click to select multiple computers. Click Next after you have selected the computer(s).
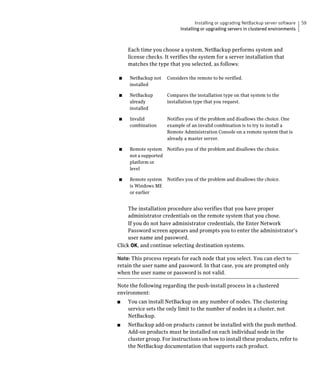
  • 42. 42 Installing or upgrading NetBackup server software Installing or upgrading servers remotely ■ On the Remote Computer Login Credentials dialog box, enter the user name, password, and domain that NetBackup is to use on the remote system(s). When you choose computers and provide login credentials, you specify the remote systems where NetBackup is to be installed. Each time you choose a system, NetBackup verifies the remote system for a server installation that matches the type that you selected. NetBackup not Considers the remote to be verified. installed NetBackup already Compares the installation type on that system to the installed installation type that you request. Invalid combination Notifies you of the problem and disallows the choice. One example of an invalid combination is to try to install a Remote Administration Console on a remote system that already is a master server. Remote system not a Notifies you of the problem and disallows the choice. supported platform or level Each time you choose a system, NetBackup also verifies that you have proper administration credentials on the remote system that you chose.
  • 43. Installing or upgrading NetBackup server software 43 Installing or upgrading servers remotely If you do not have administration credentials, the Enter Network Password dialog box appears. You must enter the user name and password that has the appropriate credentials. ■ On the Remote Destination Folder screen, accept the default or change the folder on the remote server where NetBackup is to be installed. After you have selected the installation folder, click OK. ■ On the NetBackup Remote Features screen, select the features that you do not want installed on the remote NetBackup server. ■ Click on the drop-down icon next to any feature that you do not want to install. ■ On the pop-up dialog box that appears, confirm that the feature is not available for installation. A red “X” should appear on the icon. ■ Click Next. Note: This step (12) repeats for each computer that you select. NetBackup can remember the user name and password and only prompt you if the user name or password is not valid on a server. 13 On the Ready to Install the Program screen, choose one of the following options: Install Click Install to initiate installation of the default (or custom) settings. Back Click Back to view the previous screens and make any changes, then return to this screen and click on Install. Cancel Click Cancel if you want to start the installation wizard again. After you click Install, the installation process begins and a screen appears that shows you the progress of the installation. This process may take several minutes. An installation log file provides detailed installation information and shows whether any errors occurred. ■ Examine the installation log located under the user profile that completed the install. The following is an example of the user administrator that completed the install. This path may be hidden and you may need to unhide hidden or system files to view the log. C:Documents and SettingsadministratorLocal SettingsTempNetBackup Install...log ■ Search the installation log for the following string to determine if an error has occurred. "Return Value 3"
  • 44. 44 Installing or upgrading NetBackup server software Installing or upgrading servers remotely 14 On the Installation Complete screen, choose from the following options: Add Keys Symantec recommends that you enter additional license keys now for any other NetBackup products you plan to install. ■ To enter additional license keys, click Add Keys. ■ When the list of Current License Keys appears, click the Add Key icon to enter a new license key, then click Add. ■ After all license keys are entered, close the Current License Keys window. Finish You have two ways to complete the installation as follows: ■ If you are done installing software on all servers, leave the check mark next to Launch NetBackup Administration Console now and click Finish. The NetBackup Administration Console starts a configuration wizard so that you can configure your NetBackup environment. ■ If you have more server software to install, click the check mark to remove it and click Finish. You can move on to the next machine and install the necessary server software. For new installations If you want to install NetBackup access control, refer to the only Veritas NetBackup Security and Encryption Guide and perform that procedure at this time. 15 For upgrades from 6.0: The server upgrade is complete.
  • 45. Installing or upgrading NetBackup server software 45 Installing or upgrading servers in clustered environments Installing or upgrading servers in clustered environments You can install NetBackup in a clustered environment as a typical or a custom installation. Cluster installation requirements In addition to the “Requirements for NetBackup server installation” on page 13, the following items apply to cluster installations: Warning: For Windows 2000 environments: Perform NetBackup initial installations and upgrade installations from the system console, not from a Remote Terminal Services session. If you perform the installation using Remote Terminal Services, an incomplete installation may result. ■ The source and the destination systems must run Windows 2000/2003 server. ■ To perform clustered installations, you must have administrator privileges on all of the remote nodes in the cluster. Symantec recommends that you keep a record of all nodes in the cluster and what software exists on which nodes. ■ Have the virtual name and IP address for NetBackup available. You must provide this information during installation. ■ All clustered nodes must be running the same operating system, service pack level, and version of NetBackup. You cannot run mixed server versions in a clustered environment. ■ NetBackup cluster installations on Windows 64-bit systems cannot be performed remotely or pushed. All NetBackup cluster installations for Windows 64-bit are local only. ■ For MSCS clusters: ■ Machine names cannot be longer than 15 characters. ■ For VCS clusters: ■ (SFW-HA 4.1, SFW-HA 4.2): Make sure that the patch available through Veritas technical note 278307 is installed before you install or upgrade to NetBackup 6.5. The patch is available at the following Web page: http://entsupport.symantec.com/docs/278307 ■ All disk resources used by NetBackup must be configured in Veritas Enterprise Administrator (VEA) before you install NetBackup.
  • 46. 46 Installing or upgrading NetBackup server software Installing or upgrading servers in clustered environments ■ For upgrades: The ltid and the robotic daemons retrieve the device configuration for a particular cluster node from the EMM database. The cluster node name (provided by gethostname) stores or retrieves the device configuration in the EMM database. The cluster node name is used when any updates are made to the device configuration, including any drive status that ltid makes. The cluster node name is only used to indicate where a device is connected. The NetBackup virtual name is employed for other uses, such as the robot control host. Before you perform a new installation in clustered environments For MSCS clusters: ■ The shared disk that the NetBackup Group uses must already be configured in the cluster and online on the active node. ■ Install NetBackup from the node with the shared disk (that is, the active node). Before you perform an upgrade in clustered environments When you upgrade NetBackup in a clustered environment, you must first do the following: ■ For MSCS clusters: Take all of the NetBackup group resources offline except for the disk. Refer to the Microsoft Cluster Administration documentation to determine how to take the NetBackup group resources offline through the cluster administrator interface. ■ For VCS clusters: Take the NetBackup resource offline and then freeze the NetBackup group so that migrations do not occur while the inactive nodes are upgraded. If you have already configured a VCS cluster, you can freeze the NetBackup group through the cluster manager interface or the command line.
  • 47. Installing or upgrading NetBackup server software 47 Installing or upgrading servers in clustered environments Installing or upgrading servers in clustered environments Welcome Veritas License Agreement Veritas Custom installation Choose Installation Veritas Select Port Numbers Provide Startup Enter License Key Information for Select Server Type Cluster Options NetBackup Services Typical installation Enter System Names Enter EMM Server Name Enter Remote System Information Available Systems Enter Remote System Remote Installation Return to Remote Login Credentials Destination Folder Features Dialog Box Now Updated Media server installation differences: Begin Installation > The NetBackup Systems Name screen contains Monitor Progress the Media Server Name field Upgrade differences: New installation or No Enterprise Media Manager Host screen Upgrade from 6.0 = appears Finished
  • 48. 48 Installing or upgrading NetBackup server software Installing or upgrading servers in clustered environments To install or upgrade NetBackup servers in clustered environments Note: For upgrades: If you want to use NetBackup access control, refer to the Veritas NetBackup Security and Encryption Guide for complete instructions. Complete that procedure before you begin your NetBackup upgrade. For new installations: Install NetBackup access control after you complete the NetBackup installation. 1 Log on to the system where you want to install NetBackup. Be sure to log on with administrator privileges. 2 For upgrades only: ■ Deactivate all policies For NetBackup Administration Console users ■ On the master server, open the NetBackup Administration Console. ■ From the tree on the left, select Policies. ■ In the right pane, select all policies that appear. ■ Right-click on the highlighted policies and select Deactivate. For command line users ■ Enter the following command: install_pathNetBackupbinadmincmd bpplinfo policy_name -modify -inactive ■ Deactivate disk staging storage units. For NetBackup Administration Console users: ■ Open the NetBackup Administration Console on the master server. ■ From the tree on the left, expand NetBackup Management > Storage Units. ■ In the right pane, double-click on a disk staging storage unit. ■ When the Change Storage Unit window appears, select Staging Schedule. ■ When the Disk Staging Schedule window appears, click on the Exclude Dates tab. ■ Select the date in the calendar that matches the date of the system upgrade. ■ Repeat these tasks for each disk staging storage unit. For command-line users, enter the following command:
  • 49. Installing or upgrading NetBackup server software 49 Installing or upgrading servers in clustered environments install_pathnetbackupbinadmincmd bpschedulerep schedulename -excl mm/dd/yyyy ■ Deactivate all media servers ■ On the master server, open the NetBackup Administration Console. ■ From the tree on the left, select Media and Device Management>Devices>Hosts. ■ In the right pane, select all media servers that appear. ■ Right-click on the highlighted servers and select Deactivate. For command line users ■ Enter the following command: install_pathVolmgrbin vmoprcmd -deactivate_host -h device_host 3 Insert the appropriate NetBackup installation CD or DVD in the drive. If Autorun is disabled, navigate to the CD or DVD drive and run Launch.exe. 4 On the initial browser screen, click NetBackup Installation, and on the following screen, select Install Server Software. 5 On the Welcome screen, click Next. 6 On the License Agreement screen, accept the license agreement and click Next.
  • 50. 50 Installing or upgrading NetBackup server software Installing or upgrading servers in clustered environments 7 On the Veritas NetBackup Installation Type screen, provide the following information: Computer For a cluster installation, select Perform a clustered install of Veritas NetBackup. This option appears only if the installation process determines that your system is configured for a Windows MSCS or VCS clustered environment. Typical Select Typical to install NetBackup default features and settings. Custom Select Custom to change which NetBackup features are installed, which port numbers to use, and which NetBackup servers to start. Click Next.
  • 51. Installing or upgrading NetBackup server software 51 Installing or upgrading servers in clustered environments 8 On the NetBackup License Key and Server Type screen, provide the following information: ■ Enter the base product license key that you received with your product. ■ Select the icon next to the software you want to install, such as NetBackup Master Server. For new installations, the license key that you provide determines which components you can select. For example, you can click the icon next to NetBackup Master Server only if you enter a master server license key. For upgrades, the license used for the existing installation type determines which components you can select. When you upgrade NetBackup, a new license key is not required. NetBackup uses your existing license key. During this installation process, the following occurs to ensure you have proper credentials to perform remote installations: ■ When you select a clustered system for installation, NetBackup determines if you have proper administrator credentials on all nodes in the cluster. If you do not have the proper credentials, the system is not added to the list. ■ If you have the proper credentials, NetBackup performs a second check to determine if a license key is needed. If a key is needed and one was not entered, the system cannot be added to the list. You must enter a valid license key to install on that node. If you enter an invalid license key, the NetBackup License Key and Server Type screen remains visible until a valid key is entered.
  • 52. 52 Installing or upgrading NetBackup server software Installing or upgrading servers in clustered environments Note: If you selected Typical on the installation type screen (step 7 on page 50), go to step 10 on page 53. 9 For custom installations: ■ On the NetBackup Port Numbers screen, you can change port numbers, if it is necessary in your configuration. You may want to change a port number if you encounter conflicts when NetBackup and another industry product try to share the same port. Another example is if a port conflict occurs with a company’s firewall, which may cause security issues. To change a port number, select the port number you want to replace and type the new number. Click Next. ■ On the NetBackup Services screen, provide the following startup account and startup type information for NetBackup services: Use the built-in Check this box (default) to use the built-in system account. Or system account clear this box and fill in the three fields below it. User name, Enter the specific information for the system you want to use. Password, Domain Be sure to leave the Use the built-in system account check box unchecked. Startup Select either Automatic or Manual start up.
  • 53. Installing or upgrading NetBackup server software 53 Installing or upgrading servers in clustered environments Start NetBackup Check this box if you want to start the services after Server Services After installation. You can leave the box unchecked to prevent Install services from starting after installation. Terminate Check this box to prevent a reboot while you perform a remote NetBackup installation. When you check this box, processes that use the processes NetBackup executables and DLLs are stopped. Caution: For Oracle users: If you select Terminate NetBackup processes, you must take down your database before you continue the installation. Terminate Windows Check this box to prevent a reboot while you perform a remote processes installation. When you check this box, processes that use the Microsoft run-time DLLs are stopped. For upgrades: You do not need this option because the Microsoft run-time DLL is already at the correct level. Caution: If you select Terminate Windows processes, it may cause instability with other Windows applications, particularly those applications that use run-time DLLs. Abort install if a Check this box so that NetBackup can detect if the remote reboot is required system requires a restart. If a restart is required, this option ends the installation and rolls the remote system back to its state at the beginning of the installation. 10 On the Cluster Settings screen, you provide the virtual and physical network information. For new installations and upgrades:
  • 54. 54 Installing or upgrading NetBackup server software Installing or upgrading servers in clustered environments ■ For each node in a cluster group, the configuration settings that you enter in the Cluster Settings dialog boxes must be identical. Enter the following information: NetBackup Cluster The name that is used to identify a NetBackup service group Group Name or resource group. The resources in any resource group are related and interdependent. Virtual Host Name The name by which NetBackup is known in the cluster. Enter this name in the client’s server list. The server uses this name when it communicates with the client nodes. Virtual IP address The IP address to which the virtual server name should resolve. Subnet Mask Used to identify a subnetwork so that IP addresses can be shared on a local area network. This number correlates directly to the virtual IP address of the cluster.
  • 55. Installing or upgrading NetBackup server software 55 Installing or upgrading servers in clustered environments Path to Shared Data A directory on one of the shared disks in the cluster where NetBackup stores configuration information. If the letter for the disk (or drive) does not appear in the pull-down list, just enter the letter. ■ For 64-bit cluster installations: You must enter the drive letter and path exactly as it appeared when you installed on the active node. Public Network For NetBackup clustered environments, choose one of the public networks that is assigned to the node of the cluster. Caution: You must not select a private network that is assigned to this cluster. Click Next. 11 On the NetBackup System Names screen, provide the following information: Master Server Name Enter the name of the master server. Additional Servers Enter the names of any additional machines (servers) that are allowed to access this server. If you enter more than one name, separate each name with a comma. Be sure to add all node names in the cluster group here.
  • 56. 56 Installing or upgrading NetBackup server software Installing or upgrading servers in clustered environments Install LiveUpdate The LiveUpdate agent allows installation of NetBackup Agent patches from a LiveUpdate server. Even if you choose not to use LiveUpdate, agent installation does not affect NetBackup installation, configuration, or operation. For complete information, refer to “About NetBackup LiveUpdate” on page 115. Location of The LiveUpdate server is the machine where you store LiveUpdate Server NetBackup patches. The default server location is your NetBackup master server. If you want to designate a different machine as your NetBackup LiveUpdate server, type the appropriate pathname for that server here. Click Next. 12 On the NetBackup Enterprise Media Manager screen, enter the name of the server where you want the EMM server installed. The EMM server contains all information about NetBackup volume configuration and device configuration. By default, the master server name appears where the EMM server software is set up for installation on the NetBackup master server. This is the preferred configuration.
  • 57. Installing or upgrading NetBackup server software 57 Installing or upgrading servers in clustered environments Note: Although installing the EMM on a media server is supported, Symantec recommends that you install the EMM on the master server. For instructions that describe EMM installation on a media server, please refer to TechNote 278175. Note: Symantec does not support installing the EMM on a CIFS-mount. ■ This screen only appears in new installations or when you upgrade a client to a server. This screen does not appear when you upgrade from NetBackup 6.0 to NetBackup 6.5. ■ If the NetBackup system shares drives with the Shared Storage Option (SSO), all NetBackup servers must use the same host for storing device information. For more information on EMM servers and EMM databases, refer to the Veritas NetBackup Administrator’s Guide for Windows, Volume 1. 13 On the NetBackup Remote Features screen, specify remote system information for installation on those machines. Note: For Windows 64-bit cluster installations, this screen does not appear. ■ On the initial screen, right-click Windows Agent/Option and select Add Remote Computer.
  • 58. 58 Installing or upgrading NetBackup server software Installing or upgrading servers in clustered environments ■ When the Available Systems dialog box appears, select the computer that you want to add. Control-click to select multiple computers. Click Next. ■ On the Remote Computer Login Credentials dialog box, enter the user name, password, and domain that NetBackup is to use on the remote system(s). If you intend to add more remote computers, select the check box to remember user name and password. When you provide credentials, you select cluster nodes and add them to the Destination Systems list. These are the nodes on which you remotely install NetBackup. Make sure you select your local machine when you select systems to install.
  • 59. Installing or upgrading NetBackup server software 59 Installing or upgrading servers in clustered environments Each time you choose a system, NetBackup performs system and license checks. It verifies the system for a server installation that matches the type that you selected, as follows: ■ NetBackup not Considers the remote to be verified. installed ■ NetBackup Compares the installation type on that system to the already installation type that you request. installed ■ Invalid Notifies you of the problem and disallows the choice. One combination example of an invalid combination is to try to install a Remote Administration Console on a remote system that is already a master server. ■ Remote system Notifies you of the problem and disallows the choice. not a supported platform or level ■ Remote system Notifies you of the problem and disallows the choice. is Windows ME or earlier The installation procedure also verifies that you have proper administrator credentials on the remote system that you chose. If you do not have administrator credentials, the Enter Network Password screen appears and prompts you to enter the administrator’s user name and password. Click OK, and continue selecting destination systems. Note: This process repeats for each node that you select. You can elect to retain the user name and password. In that case, you are prompted only when the user name or password is not valid. Note the following regarding the push-install process in a clustered environment: ■ You can install NetBackup on any number of nodes. The clustering service sets the only limit to the number of nodes in a cluster, not NetBackup. ■ NetBackup add-on products cannot be installed with the push method. Add-on products must be installed on each individual node in the cluster group. For instructions on how to install these products, refer to the NetBackup documentation that supports each product.
  • 60. 60 Installing or upgrading NetBackup server software Installing or upgrading servers in clustered environments ■ NetBackup pushes to the other nodes only the license key you enter at the beginning of the installation. Your license key may enable add-on products. If you push NetBackup to nodes that have an add-on product already installed, your key works for the add-on product(s). 14 Click Install. The installation process begins to push the installation to all of the nodes you specified. ■ A summary screen appears that shows you the progress of the installation on each system. Right-click on a system in the screen to see the installation status. ■ If an installation fails on a particular system, you can obtain more information about the failure by viewing the remote installation log file (nbpinst.log). The file is located in the Windows temporary installation directory. ■ When all nodes that you selected for NetBackup installation have completed successfully, click Next. A pop-up dialog box prompts you to proceed with NetBackup Cluster Configuration.
  • 61. Installing or upgrading NetBackup server software 61 Installing or upgrading servers in clustered environments 15 On the Installation Complete screen, choose from the following options: Add Keys Symantec recommends that you enter additional license keys now for any other NetBackup products you plan to install. ■ To enter additional license keys, click Add Keys. ■ When the list of Current License Keys appears, click the Add Key icon to enter a new license key, then click Add. ■ After all license keys are entered, close the Current License Keys window. Finish You have two ways to complete the installation as follows: ■ If you are done installing software on all servers, leave the check mark next to Launch NetBackup Administration Console now and click Finish. The NetBackup Administration Console starts a configuration wizard so that you can configure your NetBackup environment. ■ If you have more server software to install, click the check mark to remove it and click Finish. You can move on to the next machine and install the necessary server software. For new installations If you want to install NetBackup access control, refer to only Veritas NetBackup Security and Encryption Guide and perform that procedure at this time. 16 For upgrades from 6.0: The server upgrade is complete.
  • 62. 62 Installing or upgrading NetBackup server software Installing or upgrading servers in clustered environments Notes on NetBackup cluster environments ■ You may need to reboot each of the cluster nodes after the installation is complete. ■ For MSCS and VCS clusters: Under normal circumstances, cluster configuration is one of the final steps when you install NetBackup in a cluster. If this step is not done or does not complete successfully, you can use the bpclusterutil command from the active node to perform this step. See the NetBackup High Availability Administrator ’s Guide for information on how to run bpclusterutil. ■ For VCS clusters: After the push-install completes, unfreeze the active node. ■ For MSCS clusters: The NetBackup resources that you took offline come back online automatically. ■ For new installations: If you want to install NetBackup access control, refer to Veritas NetBackup Security and Encryption Guide for complete instructions. Verifying cluster installations or upgrades The Cluster Administrator console lets you verify the installation or upgrade and view your current system structure. To verify a successful MSCS cluster installation or upgrade through the Cluster Administrator console 1 During a cluster installation, you can open the cluster administrator console to see your current structure.
  • 63. Installing or upgrading NetBackup server software 63 Installing or upgrading servers in clustered environments 2 After you have completed the installation and the configuration process, the console shows the new cluster group configuration. To verify a successful VCS cluster installation or upgrade through the Cluster Manager console 1 During a cluster installation, you can open the cluster administrator console to see your current structure.
  • 64. 64 Installing or upgrading NetBackup server software Installing NetBackup servers silently 2 After you have completed the installation and the configuration process, the console shows the new cluster group configuration. Installing NetBackup servers silently A silent installation avoids the need for interactive input in the same manner as performing a remote installation. Silent installations of NetBackup are not supported if you want to run the NetBackup services as a user rather than the local system. If you want to install NetBackup under these circumstances, you must use setup. To install NetBackup server software silently 1 Log on as administrator to the system from which you want to install NetBackup. 2 Insert the NetBackup installation CD in the drive. 3 Open Windows Explorer and copy the contents of the X86, X64, or IA64 directory on the CD to a temporary directory on your hard drive. Choose the directory for the type of systems you intend to install.
  • 65. Installing or upgrading NetBackup server software 65 Installing NetBackup servers silently Note: The files on the NetBackup installation CD are read-only. Change the permissions for these files on the hard drive to allow the update. 4 In that temporary directory, modify the appropriate script: ■ To install a master server, edit silentmaster.cmd ■ To install a media server, edit silentmedia.cmd ■ To install a NetBackup Remote Administration Console, edit silentadmin.cmd These files have fields to help you understand how to configure a silent installation. From the file you can do the following: ■ If only one server is to access the machine, remove the following line from the script: SET ADDITIONALSERVERS=media1,media2,media3 ■ You can also use these scripts to prevent reboots from occurring during an installation. You can elect to modify the script in any combination of these options to accomplish your needs. The following options are available: ■ SET STOP_NBU_PROCESSES=0 This option terminates any processes that use the NetBackup executables and DLLs. Caution: For Oracle users: If you use the Terminate NetBackup processes option, you must take down your database before you continue with this procedure. ■ SET STOP_WINDOWS_PROCESSES=0 This option looks for processes using Microsoft run-time DLLs and terminates them. For upgrades: You do not need to use this option because the Microsoft run-time DLL is already at the correct level. Caution: Using this option may cause instability with other Windows applications, particularly those applications that use Microsoft run-time DLLs. ■ SET ABORT_REBOOT_INSTALL=0 This option detects if a reboot is necessary. If you must reboot, this option cancels the installation and rolls back to the beginning of the installation process.
  • 66. 66 Installing or upgrading NetBackup server software Installing NetBackup servers silently An installation log file provides detailed installation information and shows the progress of an installation. You can view the log file (called Install.log) in the Windows temporary installation directory: C:Documents and Settingsadministrator_useridLocal SettingsTemp If the log file is not in this directory, you can locate it by entering the following command at the command prompt: > echo %TEMP% 5 Save and run the script. System reboot after a silent installation By default, a silent installation does not reboot the system. Symantec recommends that when you upgrade or patch a client or server, ensure that no backup processes are currently running. In rare cases, a reboot may be required. To determine if a reboot is necessary, open the NetBackup Install.log file after you run the ABORT_REBOOT_INSTALL script. Search for the string in use. If files are listed as in use, a reboot is required. To force a reboot when required during a silent installation, remove the following option from the silent installation command script (silent*.cmd): REBOOT=”ReallySuppress” Caution: If you remove this option, it causes a reboot of the server that you want to install. The reboot happens with no warning to a user on the system.
  • 67. Chapter 3 Installing alternative administration interfaces This chapter includes the following topics: ■ “About the NetBackup Remote Administration Console for Windows” ■ “About the NetBackup-Java Administration Console” ■ “About the Java Windows Administration Console” About the NetBackup Remote Administration Console for Windows If your NetBackup server has no graphics display capabilities, you must install an alternative administrative interface. It may also be desirable for various other configurations, such as mixed Windows and UNIX environments. Note: You can skip this section if you do not want or need to administer a NetBackup server remotely from a Windows NetBackup client. The NetBackup Remote Administration Console is an interface-only version of NetBackup for Windows that you can use to administer NetBackup servers from another machine. The following describes which interface to install, based on the operating system: Windows NetBackup Remote Administration Console for Windows or NetBackup-Java Administration Console for Windows
  • 68. 68 Installing alternative administration interfaces About the NetBackup Remote Administration Console for Windows UNIX NetBackup-Java Administration Console Multiple versions of the NetBackup-Java Administration Console The following is a brief description of the NetBackup Remote Administration Console operation: ■ The console lets you perform all NetBackup operations exactly like the NetBackup Administration Console on a local Windows NetBackup server. You can create backup policies, manage volumes, view status, monitor tape drives, and perform other operations. ■ The console displays the name of the server it administers, rather than a local host name. ■ The console can only administer other NetBackup servers. It cannot act as a master or a media server. Installing the NetBackup Remote Administration Console The NetBackup Remote Administration Console is supported on Windows 2000/XP/2003 Server. For additional information about the supported platforms for this NetBackup release, refer to the Supported Platforms and Peripherals chapter in the NetBackup Release Notes. Installation is a two step process as follows: ■ Install the NetBackup Remote Administration Console ■ Add the NetBackup Remote Administration Console host to server lists To install the NetBackup Remote Administration Console 1 On the computer on which you want to install the NetBackup Remote Administration Console, insert the CD that contains the NetBackup server software for Windows. ■ On Windows systems with Autorun enabled, the installation browser starts automatically. ■ On Windows systems that have Autorun disabled, navigate to the CD drive and run Launch.exe. 2 On the initial screen, click NetBackup Installation. 3 On the Installation screen, click Install Server Software. 4 On the Welcome screen, click Next. 5 On the License Agreement screen, accept the terms of the license agreement and click Next.
  • 69. Installing alternative administration interfaces 69 About the NetBackup Remote Administration Console for Windows 6 On the Installation Type screen, select Install to this computer only and Typical. Click Next. 7 On the NetBackup License Key and Server Type screen, select NetBackup Remote Administration Console. You do not need a license key to install the Remote Administration Console. 8 On the NetBackup System Names screen, provide the following information: Client Name Enter the name of the local machine where you are installing the remote console. (The name should appear by default.) Master Server Enter the name of the NetBackup master server. (The name should appear by default.) Additional Servers Enter the names of any additional machines (servers) that are allowed to access this server. If you enter more than one name, separate each name with a comma. Install LiveUpdate Leave this box checked so that the agent is installed. Agent LiveUpdate lets you download and install patches for NetBackup. Even if you choose not to use LiveUpdate, agent installation does not affect NetBackup installation, configuration, or operation. For complete information on LiveUpdate, refer to “About NetBackup LiveUpdate” on page 111. 9 On the Ready to Install the Program screen, click Install. 10 After the installation completes, you can either add license keys (click Add Keys) or click Finish. If you left the check box next to Launch NetBackup Administration Console now checked, the Remote Administration Console appears. If you removed the check, start the console by choosing Start > Programs > Veritas NetBackup > NetBackup Administration Console. Adding the NetBackup Remote Administration Console host to server lists The following methods are available to add the NetBackup Remote Administration Console host to the server list on a master or a media server: ■ Use the NetBackup Administration Console for UNIX (if your system is Java-compatible) ■ Edit the bp.conf file
  • 70. 70 Installing alternative administration interfaces About the NetBackup Remote Administration Console for Windows To add the NetBackup Remote Administration Console host to the UNIX server list of the remote server by using the NetBackup Administration Console 1 In the left pane of the NetBackup Administration Console for UNIX, select Host Properties > Master Servers. 2 In the Master Servers window in the right pane, right-click the name of the host server and select Properties. 3 In the Master Server Properties window, click the Servers icon from the tree in the left pane. 4 In the Servers window, click Add. 5 Enter the name of the host that is to run the NetBackup Remote Administration Console. 6 Click Add. The name of the host appears in the Additional Servers list. 7 Click Close and OK. To add the NetBackup Remote Administration Console host to the UNIX server list of the remote server by editing the bp.conf file 1 Log in to the UNIX master server as root. 2 Edit /usr/openv/netbackup/bp.conf. At the end of the SERVER = lines, add the following line: SERVER = Remote-Administration-Console-machine-name The Remote-Administration-Console-machine-name is the name of the machine where you installed the NetBackup Remote Administration Console. Adding remote servers to administer from an existing NetBackup Remote Administration Console If you have an existing NetBackup Remote Administration Console installed and you want to add a remote master server to administer, perform the following steps. To add a remote server to administer from an existing NetBackup Remote Administration Console 1 Log on to the server where the NetBackup Remote Administration Console is installed, and open the console. 2 In the left pane of the NetBackup Remote Administration Console, select Host Properties > Master Server.
  • 71. Installing alternative administration interfaces 71 About the NetBackup-Java Administration Console 3 In the Master Servers window in the right pane, right-click the name of the host server and select Properties (Read/Write). 4 In the Master Server Properties window, click the Servers tab. 5 In the Global Operations field, in the Add to all lists field, enter the host name. Make sure you enter the name of the host that is to run the NetBackup Remote Administration Console. 6 Click the + button (the name of the host appears in the Additional Servers list), then click OK. About the NetBackup-Java Administration Console The NetBackup-Java Administration Console can be used to administer one or more UNIX or Windows NetBackup servers. It provides all of the standard NetBackup server interfaces. The console can be used on a remote NetBackup server to create backup policies, manage volumes, view status, monitor tape drives, and other operations. On Java-capable hosts (servers and clients), the administration console is installed when you install NetBackup on the host. For remote administration of any NetBackup server, specify the server name in the login dialog box. Installing or removing multiple versions of the NetBackup-Java Administration Console on Windows A NetBackup environment may contain servers of various NetBackup versions. This section describes how install and uninstall multiple versions. Installing multiple versions of the NetBackup Administration Console on Windows A number of methods can be used to administer servers in a mixed-version environment. One method is to install a relevant version of the NetBackup-Java Administration Console on a Windows desktop. Then you can use that console to administer all servers of the same version. Note the following points before you install multiple versions of this NetBackup interface: ■ Only the most recently installed version of the NetBackup-Java Administration Console can be patched. ■ Only the most-recently-installed version can be removed (uninstalled) with the standard Windows Add/Remove Programs utility.
  • 72. 72 Installing alternative administration interfaces About the NetBackup-Java Administration Console ■ The NetBackup-Java Capabilities Authorization configuration file (auth.conf), must always be located in install_pathjava. For example, in C:Program FilesVeritasjava). The file must exist there regardless of how many versions of the console are installed, or in which directories they are installed. The file is only relevant for administering NetBackup on this Windows host, and default settings exist if the file is not present. The defaults are discussed in the Veritas NetBackup Administrator’s Guide for Windows, Volume I, in the section on how to authorize NetBackup-Java users. When you install multiple versions of the NetBackup-Java Administration Console in a mixed environment, you must do the following: ■ Provide a unique string for the host name when asked (pre-6.0 versions). ■ Install each Java console version to a different folder. Note: The NetBackup-Java Administration Console for the Windows platform is not installed automatically. To install earlier versions of the NetBackup-Java Administration Console 1 Insert the NetBackup Windows installation CD with the version of the NetBackup-Java Administration Console you want to install. 2 Select one of the following consoles, based on the NetBackup version: ■ For NetBackup 5.0 installations, select NetBackup Installation and click Install Java Administration Console. ■ For NetBackup 5.1 installations, select NetBackup Installation and click Java Windows Display Console. Select whether you want to install the 32-bit or the 64-bit console. ■ For NetBackup 6.0 installations, select NetBackup Installation and click Install Java Administration Console. Select whether you want to install the 32-bit or the 64-bit console. 3 If a different version of the Java console has already been installed, specify a different folder location to prevent overwriting the earlier installation. For example, specify C:Program FilesVeritasnbjava50 for version 5.0 Java consoles. 4 The wizard asks you to enter the name of the host you want to manage. For ease of use, instead of entering a host name, enter a name that reflects the version of the console being installed. For example, 5.0GA. After the installation, the host name you entered appears in the following locations:
  • 73. Installing alternative administration interfaces 73 About the Java Windows Administration Console ■ As the default host name in the login screen of the NetBackup-Java Administration Console dialog box. The descriptive host name appears here only the first time the console is opened. After you change the name to an actual host name in the login dialog box: ■ Log in to the console. ■ Exit from the console. The actual host name becomes the default and appears the next time the console is started. ■ On the Veritas NetBackup menu (Start > Programs > Veritas NetBackup > NetBackup-Java Version 6.5 host_name). ■ As a desktop shortcut icon. Removing earlier versions of the NetBackup-Java Administration Console on Windows If you want to remove earlier versions of the NetBackup-Java Administration Console, you do not run Add/Remove Programs. To uninstall earlier versions of the NetBackup-Java Administration Console 1 Remove the folder where the earlier version NetBackup-Java Administration Console is installed. 2 Remove the appropriate menu item from the Start > Programs > Veritas NetBackup menu. 3 Remove any relevant desktop shortcuts. 4 About the Java Windows Administration Console Skip this section if you do not want to administer your UNIX NetBackup servers remotely, with the Java Windows Administration Console on a Windows platform. The Java Windows Administration Console lets you run the NetBackup Java Administration Console for UNIX interfaces on supported Windows platforms. This interface provides the same capabilities as the NetBackup Administration Console for Windows or UNIX.
  • 74. 74 Installing alternative administration interfaces About the Java Windows Administration Console Installing the Java Windows Administration Console Use the following guidelines when you install the Java Windows Administration Console: ■ You can install the Java Windows Administration Console from the NetBackup CD for Windows. ■ If you use NetBackup Access Control, the Symantec Product Authentication and Authorization client components must be installed on the Windows host before the Java Windows Administration Console. This order of installation ensures that the Java Windows Administration Console uses the Symantec Product Authentication and Authorization components correctly. ■ For the computer on which you want to run the Java Windows Administration Console, you should have at least 512 MB of physical memory. To install the NetBackup Java Windows Administration Console 1 On the machine where you perform the installation, insert the CD that contains NetBackup server software for Windows. On Windows systems with Autorun enabled, the installation starts automatically. On Windows systems with Autorun disabled, navigate to the CD directory and run Launch.exe. 2 On the initial screen, select NetBackup Installation. 3 On the Installation screen, select Install Java Windows Administration Console. 4 On the Welcome screen, click Next. 5 On the License Agreement screen, accept the agreement and click Next. 6 On the NetBackup Installation Type screen, select Install to this computer only and Typical. 7 On the Ready to Install the Program screen, click Install. 8 On the System Validation Complete screen, click Finish. 9 You can open the NetBackup-Java Windows Display Console by choosing Start > Programs > Veritas NetBackup > NetBackup Java version 6.5. Administering multiple versions of NetBackup servers You can use one of the following methods to administer earlier versions of NetBackup. The order of the listed methods does not imply any preference.
  • 75. Installing alternative administration interfaces 75 About the Java Windows Administration Console Earlier versions of the NetBackup-Java Administration Console on UNIX platforms Use the earlier versions of the NetBackup-Java Administration Console installed on the supported UNIX platform(s). The earlier versions available in a release are all of those supported in a mixed version environment with the current release. For example, all versions back to and including the last major release. In the NetBackup 6.5 release, the 6.0, the 5.0MP4 (or later), and the 5.1 console versions are available. Earlier versions of the NetBackup-Java Administration Console on Windows platforms Use the earlier versions of the NetBackup-Java Administration Console installed on the supported Windows platforms. To install multiple versions of the NetBackup-Java console, see “Installing multiple versions of the NetBackup Administration Console on Windows” on page 71. Remote display-back from UNIX servers Use the UNIX remote display-back capabilities for UNIX servers that can run NetBackup-Java, possibly with tools such as Exceed or VNC. Remote display-back from Windows servers Use the NetBackup Administration Console for Windows with the remote display-back capabilities on Windows NetBackup servers with tools like Windows Terminal Services or Remote Desktop. At the console of the server with an earlier version of NetBackup Use the relevant NetBackup-Java Administration Console from the console of the server with the earlier version of NetBackup.
  • 76. 76 Installing alternative administration interfaces About the Java Windows Administration Console
  • 77. Chapter 4 Removing and reinstalling NetBackup This chapter includes the following topics: ■ “Removing NetBackup server software” ■ “Removing NetBackup server software in a clustered environment” ■ “Notes on reinstalling NetBackup server software” Removing NetBackup server software The uninstall process deletes the Veritas/NetBackup directory from the server. In a typical installation, NetBackup add-on products and catalogs are installed and contained under this same directory and would also be deleted. If you intend to reinstall NetBackup, save the configuration, catalog, and log file information before proceeding. (See “To remove (uninstall) NetBackup servers and save catalog data” on page 78.) To remove (uninstall) NetBackup servers 1 Select Start > Settings >Control Panel. 2 From the Control Panel window, click the Add/Remove Programs icon. 3 From the Currently Installed Programs list, select Veritas NetBackup. 4 Click Remove. By default, all NetBackup configuration and catalog information is removed when you click Remove. The following procedure explains the necessary steps to retain this information for future reinstallations.
  • 78. 78 Removing and reinstalling NetBackup Removing NetBackup server software To remove (uninstall) NetBackup servers and save catalog data 1 Select Start > Settings >Control Panel. 2 From the Control Panel window, click Add/Remove Programs. 3 Select Veritas NetBackup from the Currently Installed Programs list. 4 Click Change. This action lets you modify, repair, or remove NetBackup. 5 On the Program Maintenance dialog box, select Remove. 6 Clear the check mark next to Remove all NetBackup Configuration, Catalog, and Log files to disable this function. (The box is checked by default.) 7 Click Remove. 8 If you enabled NetBackup access control, NetBackup placed several files on clients and servers. These files can be divided into two categories: ■ NetBackup application temporary files These files are removed with NetBackup. ■ Individual user (cache) files Users’ cache files exist in their home directories, as follows: userLocal SettingsApplication DataVERITASNetBackup Note: Files are generated in the NetBackup directory by a single sign-on operation of the NetBackup Administration Console on the host where the console runs. The NetBackup Administration Console cleans these files when an exit function is performed, so the directory does not always contain temporary files. However, if a system crash were to occur, any files in the directory may be left behind. With the console shutdown, you can delete these files safely with no data loss. NetBackup also creates cached certificates for client and server NetBackup applications. These files reside within the NetBackup directory. These files typically have a name that is consistent with a DNS entry for a network interface, such as machine.company.com. Example directory entries are as follows: userLocal SettingsApplication DataVERITASNetBackuppc.comp.com userLocal SettingsApplication DataVERITASNetBackupdhcp These files are created with the command bpnbat -LoginMachine. If you plan to reinstall NetBackup on the same machine at a later date, do one of the following: ■ Preserve the certificates in the NetBackup directory. ■ If you do not preserve the certificates, you must provide the machine identity password as originally set on the Root+AB broker. As an
  • 79. Removing and reinstalling NetBackup 79 Removing NetBackup server software in a clustered environment alternative, you can reset the password on the Root+AB broker when you reinstall. See the Veritas NetBackup Security and Encryption Guide. Note: For more information on NetBackup access control, including how to uninstall it, see the Veritas NetBackup Security and Encryption Guide. Removing NetBackup server software in a clustered environment To remove (uninstall) NetBackup from a clustered environment 1 Follow the instructions in your cluster documentation for removing a group. 2 Remove NetBackup from each node in the cluster, as described in “To remove (uninstall) NetBackup servers” on page 77. No shortcut exists for removing NetBackup from multiple nodes at the same time. Notes on reinstalling NetBackup server software You reinstall NetBackup with the same procedure you would use to complete a new installation. Note: You must reinstall NetBackup to the exact location as the previous installation. Using the same location ensures that your saved configuration, catalog, and log files function with the new product. For procedures to install NetBackup servers, refer to Chapter 2, “Installing or upgrading NetBackup server software”. For procedures to install NetBackup clients, refer to Chapter 5, “Installing clients”. You can re-install the software locally or from a remote computer. To locate the NetBackup installation log file if it is not in the default location 1 Select Start > Programs > Accessories > Command Prompt. 2 Enter echo %TEMP% and press Enter. Windows returns the location of your TEMP directory.
  • 80. 80 Removing and reinstalling NetBackup Notes on reinstalling NetBackup server software
  • 81. Chapter 5 Installing clients This chapter includes the following topics: ■ Installing Microsoft Windows clients ■ Installing UNIX clients Installing Microsoft Windows clients By definition, your NetBackup server is also a NetBackup client. When you install the NetBackup server software, you install both the NetBackup server and the NetBackup client software on the server. Client installation overview The NetBackup client installation program for Microsoft Windows lets you select the appropriate setup and installation options from a series of wizard screens. After you select options, the installation program displays a window that lets you verify your selections before you continue with the actual installation. While the installation is in progress, a dialog box provides details of the installation and the setup progress. When complete, a final window shows the installation results. Note: You cannot install NetBackup client software on PCs that currently have NetBackup server software. In these cases, you must first uninstall the NetBackup server software. See “Removing NetBackup server software” on page 77.
  • 82. 82 Installing clients Installing Microsoft Windows clients Veritas volume snapshot provider on Windows If you install the client software on a Windows client, during the installation process you have the option to install Veritas Volume Snapshot Provider (VSP). VSP establishes a point-in-time view, or snapshot, of the data that is selected for backup on the volumes (or drives). NetBackup then backs up the selected files as they exist at the time of the snapshot, regardless of file system activity. VSP uses a file system cache to store the changes that occur during the backup. Each volume for which a snapshot is created has a corresponding VSP cache file. For information on the VSP parameters, please refer to the both volumes of the NetBackup System Administrator’s Guide, Volume 1. User-directed operations for Windows systems By default on Windows 2000/XP/2003 Server systems, the Program Files folder is not writable by users other than the administrator. NetBackup writes log files and progress files to the folder Program FilesVERITASNetBackupLogs. To perform backups and restores with the Backup, Archive, and Restore interface, users must have write permission to the Logs directory. Users without write permission to this directory receive an error message, and the backup or restore is canceled. The administrator account has write permission by default, but you must ensure that users other than the administrator have write permission. Local and remote installations for Windows systems You can use the NetBackup client installation program in the following ways: ■ Local installations The installation program installs the client software only on the machine where you start the installation. ■ Remote installations The installation program scans the network for available clients where you can install the client software. The source machine (the primary node in cluster environments) must run Windows 2000/XP/2003 Server. In addition, a remote installation requires system administrator privileges and is only available for Windows 2000/32-bit XP/32-bit 2003 Server. Note: You cannot install remotely from UNIX systems to Windows 2000/XP/2003 machines.
  • 83. Installing clients 83 Installing Microsoft Windows clients Silent installations for Windows systems A silent installation is a process that does not require interactive input. It does, however, require that you edit the silentclient.cmd file before you run the file. New and upgrade installations for Windows clients The NetBackup Client Setup Wizard recognizes the following types of installation: ■ New installations The wizard does not detect that any NetBackup client software is currently installed. You can specify where you want the client software installed. ■ Upgrade installations The wizard detects that a version of NetBackup client software already exists. You cannot change the installation location of the client software. For new or upgrade installations, you can select one of the following types: ■ Typical installation The wizard uses default settings that should work for most installations. You must provide the client, master, and additional server names. ■ Custom installation The wizard lets you change the custom configuration options as needed for your specific environment. These options are then used for all new client installations. You must also provide the client, master, and additional server names. The custom configuration options are divided among three wizard windows: NetBackup Client Features, NetBackup Options, and NetBackup Services. The following table describes the custom configuration options that you can select for new or upgrade installations. NetBackup Client NetBackup Options NetBackup Services Features window window window NetBackup Documentation Start the NetBackup Client Use the built-in system Service automatically (at account or specify custom system startup) user name, password, and domain. Veritas Snapshot Provider Start the NetBackup Client Terminate NetBackup (VSP) Job Tracker automatically processes (at system (at system startup) startup)
  • 84. 84 Installing clients Installing Microsoft Windows clients NetBackup Client NetBackup Options NetBackup Services Features window window window NetBackup Debugger Start the NetBackup Client Terminate Windows Symbols Service on the client after processes (at system installation is complete startup) Change the bpcd, bprd, Abort install if reboot is vnetd, and vopied port required numbers Windows client system requirements This section describes the hardware and the software requirements for successful installation of NetBackup client software. Local installation requirements To install NetBackup client software locally, the system must meet the following configuration requirements. ■ Microsoft Windows 2000/XP (32- and 64-bit/2003 Server (32- and 64-bit) ■ An Intel Pentium or Itanium processor ■ Internet Explorer 5.5 or later ■ Any TCP/IP transport that is Windows Sockets compliant. (Use of the TCP/IP transport that comes with the server or the operating system is recommended.) ■ A network adapter that your TCP/IP transport supports Remote installation requirements To install NetBackup client software remotely, the system must meet the following configuration requirements: ■ All the requirements for local installations must be met. ■ The source system must run Windows 2000/2003 Server. ■ The destination system must run Windows 2000/32-bit XP/32-bit 2003 Server. ■ Administrator privileges are required for the person that performs remote installations.
  • 85. Installing clients 85 Installing Microsoft Windows clients NetBackup server requirements for Windows clients The version of the NetBackup server software must be the same or newer than the version you install on the client. Installing Windows clients locally Follow these instructions to install the NetBackup client software on your local Windows system. You can stop the installation process at any time by clicking Cancel or by clicking Back to return to the previous window. Note: After client installation, you may need to reboot the system for the changes to take effect. To install NetBackup client software locally on Windows systems Symantec Welcome Symantec Custom Installation License Agreement Symantec Symantec Symantec Symantec Choose NetBackup NetBackup NetBackup Installation Features Options Services Type Typical Installation Symantec Symantec Symantec Enter System Begin Installation > Finish Installation Names Monitor Progress 1 Log in as administrator on the host or system server. 2 Insert the NetBackup installation CD in the drive. On systems with Autorun enabled, the installation starts automatically. If Autorun is not enabled, navigate to the CD drive and double-click Launch.exe. 3 On the initial screen, select NetBackup Installation. 4 On the installation screen, select Install Client Software.
  • 86. 86 Installing clients Installing Microsoft Windows clients 5 On the Welcome screen, click Next. 6 On the License Agreement screen, accept the terms of the agreement. 7 On the Installation Type screen, select the following: ■ Install to this computer only ■ Either Typical or Custom installation. ■ For typical installations, NetBackup uses the default port numbers and default service startup settings. ■ For custom installations, NetBackup lets you set service startup settings, change port numbers, and specify the installation location. You can also choose whether to install NetBackup documentation, debug symbols, and VSP. Click Next. 8 On the NetBackup System Names screen, provide the following information: Client Name Enter the name of the client machine on which you are logged in. Master Server Name Enter the master server name here. Additional Servers Enter all the server names that you want this client to access. LiveUpdate ■ Install LiveUpdate Agent To install the LiveUpdate agent, leave the check box checked. Otherwise, click the check box to remove the check to prevent agent installation. ■ Location of LiveUpdate Server Enter the network path for the NetBackup LiveUpdate server here. ■ Server Type Select the type of server (LAN, HTTP, or HTTPS) used for the NetBackup LiveUpdate server. 9 On the Ready to Install screen, click Install. 10 On the System Validation Complete screen, click Finish. Installing Windows clients remotely Use the following procedures to install NetBackup clients on your network (one of these clients can be your local system). You can stop the installation process at any time by clicking Cancel.
  • 87. Installing clients 87 Installing Microsoft Windows clients Note: Review the installation “Windows client system requirements” on page 82 for remote installations before you start this procedure. Notes on Windows client remote installations ■ During installation, the client name is written to the registry in lowercase. For backups to work, the policies on the NetBackup server must specify the client names in lowercase. ■ You must have administrator privileges on the remote client for the NetBackup install to complete successfully. ■ The NetBackup client installation program cannot clean up after a canceled installation. If you interrupt the installation, any files that were successfully installed remain installed on the clients. ■ You may need to reboot your PC or the remote systems for the changes to take effect. To install the Windows NetBackup client software on remote computers Symantec Welcome Symantec License Remote Custom Agreement Installation Symantec Symantec Symantec Symantec Choose NetBackup NetBackup NetBackup Installation Features Options Services Type Remote Typical Installation Symantec Symantec Symantec Enter System Begin Installation > Finish Installation Names Monitor Progress 1 Log in as administrator on the Windows system. Insert the NetBackup installation CD in the drive.On systems with Autorun enabled, the installation starts automatically.
  • 88. 88 Installing clients Installing Microsoft Windows clients If Autorun is not enabled, navigate to the CD drive and double-click Launch.exe. 2 On the initial screen, select NetBackup Installation. 3 On the installation screen, select Install Client Software. 4 On the Welcome screen, click Next. 5 On the License Agreement screen, accept the terms of the agreement. 6 On the Installation Type screen, select the following: ■ Select from available computers on the network The procedure does not install the client on the local machine unless you add it to the list of systems that you want to install. ■ Either Typical or Custom installation. ■ For typical installations, NetBackup uses the default port numbers and default service startup settings. ■ For custom installations, NetBackup lets you set service startup settings, change port numbers, and specify the installation location. You can also choose whether to install NetBackup documentation, debug symbols, and VSP. Click Next. 7 On the NetBackup System Names screen, provide the following information: Master Server Name Enter the master server name here. Additional Servers Enter all the server names that you want the clients to access. LiveUpdate ■ Install LiveUpdate Agent To install the LiveUpdate agent, leave the check box checked. Otherwise, click the check box to remove the check to prevent agent installation. ■ Location of LiveUpdate Server Enter the network path for the NetBackup LiveUpdate server here. ■ Server Type Select the type of server (LAN, HTTP, or HTTPS) used for the NetBackup LiveUpdate server. 8 On the Ready to Install screen, click Install. The client software is installed on the specified machines. If you click Cancel after you click Install, the installation does not stop immediately. The installation continues until it is finished on the remote system. At that point, no remote installations begin. NetBackup considers
  • 89. Installing clients 89 Installing Microsoft Windows clients any remote installations that were complete when you clicked Cancel to be successful. 9 On the System Validation Complete screen, click Finish. Installing Windows clients silently A silent installation process does not require interactive input. It does, however, require that you edit the silentclient.cmd file before you run the script. The following procedure performs a silent installation of NetBackup clients. One of the clients can be the system that runs the silentclient.cmd script. Note: Silent installations of NetBackup clients are not supported if you want to run the NetBackup services as a user rather than as a local administrator. To install NetBackup as a user, see “To install NetBackup client software locally on Windows systems” on page 83. Also see “To install the Windows NetBackup client software on remote computers” on page 84. To perform a silent installation on Windows 1 Insert the NetBackup installation CD in the drive. 2 In a Microsoft Windows Explorer window, navigate to the CD drive. 3 Copy the contents of the PC_Clnt directory to a temporary folder on your hard drive. For example, C:temp. 4 Since the files on the CD are read-only, change the permissions for these files on the hard drive to allow the update. 5 In the temporary directory, use a text editor to edit the silentclient.cmd file so the script installs the client software as needed. Be sure to update the client, the master server, and additional servers to the minimum required version of NetBackup. 6 Run the following script: silentclient.cmd 7 Check the NetBackup installation log file in the following directory to verify that the installation was successful: C:Documents and SettingsuseridLocal Settingstemp Configuring NetBackup clients You can configure NetBackup clients by performing one of the following actions:
  • 90. 90 Installing clients Installing UNIX clients ■ To add servers or media servers, start the Backup, Archive, and Restore interface and from the File menu, select Specify NetBackup Machines. ■ To display and change the client properties, start the Backup, Archive, and Restore interface. From the File menu, select NetBackup Client Properties. ■ To display and change the server properties, start the NetBackup Administration Console. Expand Host Properties and click on Clients. In the right pane, right-click on the client, and choose Properties. All NetBackup servers that require access to your Windows client must be listed on the Servers tab in the resulting dialog box. For more information, refer to the NetBackup Backup, Archive, and Restore Getting Started Guide. Note: For NetBackup Novell NetWare Clients: The NetBackup Novell NetWare Client System Administrator’s Guide describes how to use that client to back up and restore the data on NetWare servers. Removing Windows clients To remove (uninstall) the NetBackup client on Microsoft Windows clients 1 Open the Windows Control Panel (select Start > Settings > Control Panel). 2 Select Add/Remove Programs. 3 Select Veritas NetBackup Client. 4 Click Remove. Installing UNIX clients By definition, your NetBackup server is also a NetBackup client. When you install the NetBackup server software, you install both the NetBackup server and the NetBackup client software on the server. You can install UNIX clients either locally at the client computer or remotely from your UNIX NetBackup server. To have the ability to include a client in a policy, the client type software must first be installed on the UNIX master server.
  • 91. Installing clients 91 Installing UNIX clients Note: Macintosh OS X10.3.x and OS X10.4.x clients are UNIX-based clients. Follow the same UNIX client installation procedures in this section. Use the following guidelines when you install UNIX clients: ■ The gzip and the gunzip commands must be installed on each system. The directories where the commands are installed must be part of the root user’s PATH environment variable setting. ■ For local installations: ■ You must install the client software locally if remote installation is not possible. Remote installation is not possible if your NetBackup server runs Windows 2000/2003 Server. Firewalls can also prevent remote installation. ■ To install clients to a location other than the default, you must create and link the directory before you install the client software. First create the directory where you want the software to reside, and then create /usr/openv as a link to that directory. ■ On IBM zSeries Linux clients, you must transfer the NetBackup CD image contents to a location that is readable by the virtual Linux environment. You can transfer the image with FTP or NFS mounting commands. ■ For remote installations: ■ You can “push” the client software from your UNIX NetBackup server to your UNIX client computers. The preferred installation method is to push the client software. ■ Before you can push to a UNIX client, you must first install the NetBackup client type software on the master server and create a policy that includes the client name. The UNIX client must be a true client and not a media or a master server. See “Adding a UNIX client after initial server installation” on page 95. ■ Clients such as the IBM zSeries Linux may not have a locally mounted CD device, which makes it impossible to perform a standard local installation. To install NetBackup to clients with no local CD drive, you must push the NetBackup installation from a UNIX master or media server. See any of the following: “Installing client software with the ftp method” on page 92. “Installing client software with the rsh method” on page 90. “Installing client software with the ssh method” on page 93 “Installing client software with the sftp method” on page 94
  • 92. 92 Installing clients Installing UNIX clients To initiate a backup or a restore from a UNIX client, the following graphical interfaces are available: ■ Clients that are compatible with NetBackup-Java may use the NetBackup-Java interface (jbpSA). Refer to the NetBackup Release Notes for a list of NetBackup-Java capable hosts. ■ Clients that are not compatible with NetBackup-Java can use the bp interface. They also support a login from any NetBackup 6.5 UNIX server’s NetBackup client console with the jbpSA command. Clients that are not compatible with NetBackup-Java are Macintosh OS X 10.3.x and OS X10.4.x, IBM zseries Linux, IRIX, and FreeBSD. Installing UNIX clients locally The following procedure installs the NetBackup client software on a local machine. To install client software locally on a UNIX client 1 Insert the NetBackup client CD into the drive on the client computer and mount it. 2 Change your working directory to the CD directory if you have a CD, or to the directory that contains the downloaded files: cd /cd_mount_point The cd_mount_point is the path to the directory where you can access the CD. For Macintosh OS X 10.3.x systems only: You can access the CD from the following location: cd /volumes/cd name 3 Enter the following command to execute the installation script: ./install The client binaries represent the operating system versions where the binaries were compiled. Often, the binaries function perfectly on later versions of the operating system. For example, Solaris 9 binaries also are used on the Solaris 10 level of the operating system. The installation procedure attempts to load the appropriate binaries for your system. If the script does not recognize the local operating system, it presents choices. 4 Follow the prompts to complete the installation. 5 After the installation is complete, unmount the client CD.
  • 93. Installing clients 93 Installing UNIX clients Installing UNIX clients remotely You can push the client software from a UNIX master server to a client host by using the following methods: ■ rsh ■ ftp ■ ssh ■ sftp Note: For installation in clustered environments, enter the virtual name for the NetBackup server and not the actual local host name. You can only push client software from the active node. Installing client software with the rsh method Read the following statements before you proceed with this procedure: ■ To use the rsh method, the UNIX client must have an entry for the server in its /.rhosts file. The /.rhosts entries enable software installation, but they are not necessary for correct operation of NetBackup software. ■ If you want to install client software to a location other than the default, you must first create and link the desired directory. Create the directory where you want the client software to reside, and then create /usr/openv as a link to that directory. ■ Make sure the clients are assigned to a backup policy. ■ For Macintosh OS X 10.3.x and OS X 10.4.x users: By default, these operating system versions do not enable the remote shell daemon (rshd). Run the following command to enable the daemon: /sbin/service shell start To install client software from a UNIX master server to UNIX clients with the rsh method 1 Start the NetBackup Administration Console. 2 On the Login dialog box, provide the name of the NetBackup server that contains the policy configuration with the clients. You can install the client software only from the NetBackup server that you specify in the Login dialog box when you start the interface. The clients must be defined in a policy on this NetBackup server.
  • 94. 94 Installing clients Installing UNIX clients 3 In the NetBackup Administration Console window, click on the NetBackup Management icon to show the available options. 4 In the left pane, click Policies. 5 In the All Policies pane, select the master server. 6 Select Actions > Install UNIX Client Software. .
  • 95. Installing clients 95 Installing UNIX clients 7 In the Don’t install these clients list, select the clients you want to install and click Add >>. The clients are moved to the Install these clients list. 8 To start the installation, click Install Client Software. Client software installation can take a minute or more per client. NetBackup writes messages in the Progress box as the installation proceeds. If the installation fails on a client, NetBackup notifies you but keeps the client in the policy. You cannot stop the installation after it has started. During installation, NetBackup does the following: ■ Copies client software from /usr/openv/netbackup/client on the server to /usr/openv/netbackup on the client. ■ Adds the appropriate entries to the client’s /etc/services and inetd.conf files or xinetd.d directory. 9 After the installation is complete, click Close. Installing client software with the ftp method Read the following statements before you proceed with this procedure: ■ If you want to install client software to a location other than the default, you must first create and link the desired directory. Create the directory where you want the software to reside, and then create /usr/openv as a link to that directory. ■ Make sure the clients are assigned to a backup policy. ■ For Macintosh OS X 10.3.x and OS X 10.4.x users: ■ By default, these operating system versions do not enable the FTP daemon (ftpd), which is required. In the sharing pane of the System Preferences application, check Allow FTP access to enable ftpd. ■ If you have a firewall that is enabled, you must enable FTP access. In the System Preferences sharing pane under Firewall, check FTP Access to allow FTP connections. To install client software from a UNIX master server to UNIX clients with the ftp method 1 Run the install_client_files script on the NetBackup server to move the client software from the server to the /tmp directory on the client. You must have a login ID and password that you can use to access the clients through FTP. ■ To move software to only one client at a time, run the following command:
  • 96. 96 Installing clients Installing UNIX clients /usr/openv/netbackup/bin/install_client_files ftp client user The client is the host name of the client. The user is the login id that FTP requires on the client. ■ To move software to all clients at once, run the following command: /usr/openv/netbackup/bin/install_client_files ftp ALL user The ALL option specifies that you want to install all clients that are configured in any backup policy on the server. The user is the login id required by FTP on the client. The install_client_files script prompts you for a password for each client if you do not have a .netrc file set up. 2 After the install_client_files script runs, the root user on each client machine must run the following client_config script: sh /tmp/bp.pid/client_config The pid is the process ID. The client_config script installs the binaries and updates the /etc/services and inetd.conf files or the xinetd.d directory, as appropriate. Installing client software with the ssh method Read the following statements before you proceed with this procedure: ■ To use the ssh method, the UNIX client must have the SSH daemon (sshd) enabled and configured to allow root user logins. ■ If you want to install client software to a location other than the default, you must first create and link the desired directory. Create the directory where you want the client software to reside, and then create /usr/openv as a link to that directory. ■ Make sure the clients are assigned to a backup policy. ■ For Macintosh OS X 10.3.x and OS X 10.4.x users: ■ By default, these operating system versions do not enable the SSH daemon (sshd). You must first enable this daemon in order to perform the following procedure successfully. In the System Preferences sharing pane, check Remote Login to enable sshd. ■ If you have a firewall that is enabled, you must enable ssh connections. In the System Preferences sharing pane under Firewall, check Remote Login - SSH to allow SSH connections. To install client software from a UNIX master server to UNIX clients with the ssh method ■ Run the install_client_files script on the NetBackup server.
  • 97. Installing clients 97 Installing UNIX clients ■ To move software to only one client at a time, run the following command: /usr/openv/netbackup/bin/install_client_files ssh client The client is the host name of the client. ■ To move software to all clients at once, run the following command: /usr/openv/netbackup/bin/install_client_files ssh ALL The ALL option specifies that you want to install all clients that are configured in any backup policy on the server. Installing client software with the sftp method Read the following statements before you proceed with this procedure: ■ To use the sftp method, the UNIX client must have the SSH daemon (sshd) enabled and configured to allow root or non-root user logins. ■ If you want to install client software to a location other than the default, you must first create and link the desired directory. Create the directory where you want the software to reside, and then create /usr/openv as a link to that directory. ■ Make sure the clients are assigned to a backup policy. ■ For Macintosh OS X 10.3.x and OS X 10.4.x users: ■ By default, these operating system versions do not enable the ssh daemon (sshd). You must first enable this daemon in order to perform the following procedure successfully. In the System Preferences sharing pane, check Remote Login to enable sshd. ■ If you have a firewall that is enabled, you must enable SSH connections. In the System Preferences sharing pane under Firewall, check Remote Login - SSH to allow SSH connections. To install client software from a UNIX master server to UNIX clients with the sftp method 1 Run the install_client_files script on the NetBackup server to move the client software from the server to the /tmp directory on the client. ■ To move software to only one client at a time, run the following command: /usr/openv/netbackup/bin/install_client_files sftp client user The client is the host name of the client. The user is the login id that SSH requires on the client. ■ To move software to all clients at once, run the following command: /usr/openv/netbackup/bin/install_client_files sftp ALL user
  • 98. 98 Installing clients Installing UNIX clients The ALL option specifies that you want to install all clients that are configured in any backup policy on the server. 2 After the install_client_files script runs, the root user on each client machine must run the client_config script: sh /tmp/bp.pid/client_config The pid is the process ID. The client_config script installs the binaries and updates the /etc/services and inetd.conf files or the xinetd.d directory, as appropriate. Adding a UNIX client after initial server installation You may want to add UNIX clients after the server installation if you forgot to select one during the installation. You may also add a new UNIX client type to your backup environment. To install client software later, you must first install the NetBackup client software onto the NetBackup server. The client CD’s installation script lets you install the client software on the server for each of the UNIX client types that NetBackup supports. You can then “push” this client software from the server to your UNIX clients. To add UNIX client types to servers after initial installation 1 Mount the client CD to open a menu that displays the available client types. 2 Change your working directory to the CD directory if you have a CD or to the directory that contains the downloaded files: cd /cd_mount_point The cd_mount_point is the path to the directory where you can access the CD. 3 Enter the following command to execute the installation script: ./install The client binaries represent the operating system versions on which the binaries were compiled. Often the binaries function perfectly on later versions of the operating system. For example, Solaris 9 binaries also are used on the Solaris 10 level of the operating system. The installation procedure attempts to load the appropriate binaries for your system. If the script does not recognize the local operating system, it presents choices. 4 Select the client type that you want to load and follow the prompts to install that client type. Repeat as necessary until all the client types you want are loaded.
  • 99. Installing clients 99 Installing UNIX clients Make sure you load the software for all the UNIX client types you intend to back up onto the server. Otherwise, you cannot add these client types to the NetBackup policy configuration. 5 After the installation is complete, unmount the client CD. 6 Install the NetBackup client software on the clients you specified, as described in “Installing UNIX clients remotely” on page 90. Removing UNIX NetBackup client software If you remove NetBackup from a machine with the NetBackup-Java Display Console installed, the console is also removed. To remove UNIX NetBackup client software 1 Log in to the client system as the root user. 2 Navigate to the /usr/openv directory. ■ If /usr/openv is a physical directory, run the following command: rm -rf /usr/openv ■ If /usr/openv is a link, run the following commands: cd /usr/openv pwd ls Caution: Make sure you are at the proper location and verify that the subdirectories are what you would expect them to be before continuing. You do not want to remove the wrong directories. For this reason, the first commands verify your current location and the files in that directory, before removing files. rm -rf * cd / rm -f /usr/openv Warning: The rm -f /usr/openv command also removes any add-on products that are installed on this machine. 3 Remove NetBackup entries in the client’s /etc/services file. Locate the lines, marked by the following strings and delete them: # NetBackup services# ..... # End NetBackup services # # Media Manager services # ..... # End Media Manager services #
  • 100. 100 Installing clients Installing UNIX clients If you do not see these strings, it may be because you upgraded from an earlier release of NetBackup. You can also remove bpcd, bpjava-msvc, bprd, vnetd, and vopied without searching for the #End...# strings. You are not required to remove the strings from /etc/services. Any operations that access the file can function with or without the services being listed. Note: For Macintosh OS X 10.3.x systems: The NetBackup installation updates the /etc/services file with these entries. However, earlier NetBackup releases may have updated the /services directory of the NetInfo database. To remove NetBackup and its services, use the NetManager utility to delete the following files from the /services directory: bpcd, bpjava-msvc, bprd, vnetd, and vopied. 4 Remove the NetBackup entries in the /etc/inetd.conf file by deleting the lines for bpcd, vnetd, vopied, and bpjava-msvc. 5 Ensure that the inetd daemon reads the updated inetd.conf (or inetd.local) file. ■ Determine the process ID of inetd. The ps command options vary from one UNIX operating system to another. Following are two examples. For most UNIX clients, run the following command: ps -ea | grep inetd For MacOS X 10.3.x and FreeBSD, run the following command: ps -ax | grep inetd The process ID is the first number displayed in the ps command output. ■ HUP the inetd daemon, as follows. kill -1 process_ID The kill command option may vary from one client platform to another. 6 For the NetBackup-Java capable clients that run the NetBackup Administration Console for UNIX, remove the NetBackup-Java state data, as follows: /bin/rm -rf /.nbjava /bin/rm -rf /.java/.userPrefs/vrts Warning: There should be no space between the slash “/” and the period “.” of “/.nbjava”. If you add a space between these characters, all files on this machine are removed.
  • 101. Installing clients 101 Installing UNIX clients 7 Inform users of NetBackup-Java that they can remove the $HOME/.nbjava and portions of the $HOME/.java directories. The $HOME/.nbjava and $HOME/.java directories contain application state information (such as table column order and size). This information is saved when the user exits NetBackup-Java applications. When you remove NetBackup, the process removes this directory for the root user only. The common subdirectory in $HOME/.java/.userPrefs/vrts can be removed. 8 If you enabled NetBackup access control, NetBackup created new files on clients and servers that can be divided into two categories: ■ Individual user files Individual user cache files exist in their home directories (for example, in $HOME/.vxss). Inform those users that they can remove the $HOME/.vxss directory. ■ NetBackup application temporary files NetBackup temporary files are removed with NetBackup. For more information on NetBackup access control, please see the NetBackup System Administrator’s Guide, Volume II. For more information on Veritas Security Services and how to remove the software, see the Veritas Security Services Installation Guide.
  • 102. 102 Installing clients Installing UNIX clients
  • 103. Chapter 6 NetBackup licenses This chapter includes the following topics: ■ “NetBackup license compatibility” ■ “Entering license keys” ■ “Frequently asked questions” NetBackup license compatibility To use your current NetBackup license keys to upgrade your servers, add-on products, and database agents to NetBackup 6.5, you must have the following: ■ NetBackup 5.x or 6.0 currently installed ■ A valid maintenance contract for all licensed NetBackup products Note: You cannot upgrade to NetBackup 6.5 if your current installed version is NetBackup 4.5. You must first upgrade to NetBackup 5.x, and then you can upgrade to NetBackup 6.5. Upgrade licenses and software may be obtained from the Symantec Licensing Portal at the following Web site: https://licensing.symantec.com/acctmgmt/index.jsp For detailed information and procedures on how to administer license keys, refer to the NetBackup Administrator’s Guide. Entering license keys The easiest method for entering license keys is to enter all of them when you install NetBackup on a master server.
  • 104. 104 NetBackup licenses Frequently asked questions After you install NetBackup, you can open the NetBackup Administration Console and select Help > License Keys... On UNIX servers, you can also run the following command: /usr/openv/netbackup/bin/admincmd/get_license_key Note: All product license keys must be entered on the master server. For some features and products, license keys must also be installed on the media server. The following features require license key installation on media servers and master servers: ■ NetBackup SharedDisk ■ Library-based Tape Drives Feature ■ NDMP Note: You can log in to a NetBackup server from almost any server in a system to view, enter, and administer license keys. When you administer license keys remotely, ensure that you view the licenses of the system you intend to change. You do not want to add or change a license key on the wrong server. Frequently asked questions Symantec customers have asked the following questions about how to manage license keys. Is the license system for NetBackup the same as the license system in other Symantec products? NetBackup uses a common license system that other Symantec products also use. Please remember, however, that the common license system provides flexibility in the license features that each product implements. For example, NetBackup does not have a node-locked license system, but some other products do. Can I use NetBackup if all I have is a media/doc kit? No. The media/doc kit by itself does not allow any access to NetBackup. You always need a license key (either permanent or evaluation). License keys should always be delivered with the media/doc kit, so you should never find yourself with a media/doc kit and no key. What does the license key look like? What information does it contain? The key is a multi-digit alphanumeric string (for example: 8EPP-ABCD-9XYZ-XYZ9-8881-VCF4-OIUF-AJDC). The key contains information on the following: ■ Whether the key is for NetBackup Server or NetBackup Enterprise Server ■ Whether the key is for a server, a client, an agent, or an option (and which one) ■ Whether the key is a permanent key or an evaluation key
  • 105. NetBackup licenses 105 Frequently asked questions ■ Information about how and where the key was generated Is the license key serialized? Yes, serialization information is embedded in the key. Can I see reports on what license keys I have? Yes. Information about license keys is stored on the master server. To access the information, open the NetBackup Administration Console and select Help > License Keys.... On media servers, enter the master server name as the host name on the login screen. On UNIX servers, you can also run the following command: /usr/openv/netbackup/bin/admincmd/get_license_key For more information on how to view reports, refer to the NetBackup Administrator’s Guide. How do I enable options and agents? When you install NetBackup, you are prompted to enter the license keys for all options and agents. If you purchase an agent or other add-on product at a later date, you can enter its license key manually. Open the NetBackup Administration Console and select Help > License Keys.... On media servers, enter the master server name as the host name on the login screen. On UNIX servers, you can also run the following command: /usr/openv/netbackup/bin/admincmd/get_license_key Many options and agents require that you have your original NetBackup CDs, because additional binaries must be installed. You should always keep your NetBackup CDs in a safe place. Should I save license keys after they have been entered? Yes. Always store copies of your license keys in a secure place. What should I do if I have lost my license key(s)? Symantec has a record of all license keys that are issued to customers. Customers who lose their license key(s) can call Order Management to get copies of their license keys. For Americas, Japan, PacRim, Australia: Tel: 650.318.4265 FAX: 650.335.8428 For Europe, Middle East and Africa: Tel: 00.353.61.365232 FAX: 00.353.61.365223 If you have purchased NetBackup from a Symantec partner, you need to contact that partner for information on your key. How are large volume orders handled? Many NetBackup installations are very large, and the license keys are long. License keys that you enter multiple times can be time-consuming. You can request a single license key for each type of NetBackup component you purchase. For example, you can obtain one license key for use with 50 Oracle agents. Site licenses enable unrestricted use for specific NetBackup agents or options.
  • 106. 106 NetBackup licenses Frequently asked questions Note: You still need a unique license key for each type of NetBackup component that you purchase. Separate license keys are required for a NetBackup server, a Lotus Notes agent, an NDMP option, a UNIX client, and so on. What about license keys for customers with site licenses? Site licenses are handled much like large volume orders are. The certificate for a site license states that the license key is good for unlimited copies. Do I need a license key to enable NetBackup Remote Administration Consoles? No. NetBackup Remote Administration Consoles do not require special license keys. You can install them on any computer with access to the master server. Can a license key be used multiple times? Yes. You can use your license keys multiple times. You are, however, legally bound to install and use only the number of NetBackup servers, clients, agents, and options for which you purchase licenses. How do existing customers get license keys? All NetBackup customers who have current maintenance contracts with Symantec automatically receive the latest version of NetBackup. You receive the NetBackup media/doc kit and license keys for every component for which you purchased licenses. If your maintenance is through a Symantec partner, you upgrade through the partner. Contact the partner for more details. What if I do not get the right license keys? If you believe that you received an incorrect license key, contact Order Management using the number on your license key certificate. Note: Technical Support does not issue permanent license keys. You can obtain license keys only through Order Management. Technical Support can provide temporary one-month license keys to you while issues regarding permanent license keys are resolved. What does an evaluation license key enable? The evaluation license key enables unrestricted use of NetBackup, its agents, and its options for a predetermined period of time. Am I notified when an evaluation is about to expire? To find out when a license key expires, open the NetBackup Administration Console and select Help > License Keys.... On media servers, enter the master server name as the host name on the login screen. On UNIX servers, you can also run the following command: /usr/openv/netbackup/bin/admincmd/get_license_key What happens when an evaluation license key expires? The NetBackup daemons are shut down. When you attempt to use the product you are informed that its evaluation period has expired.
  • 107. NetBackup licenses 107 Frequently asked questions Does NetBackup save the backup configuration and catalog information when evaluation license keys expire? Yes. Customers who add a permanent license key to an evaluation version of NetBackup have immediate access to their catalog information and configuration information. How do I upgrade from an evaluation license to a permanent license? It is easy. When you purchase a permanent license, you add that license to NetBackup. All the configuration information and catalog data from your evaluation version is retained. To enter your permanent license key, open the NetBackup Administration Console and select Help > License Keys.... On media servers, enter the master server name as the host name on the login screen. On UNIX servers, you can also run the following command: /usr/openv/netbackup/bin/admincmd/get_license_key
  • 108. 108 NetBackup licenses Frequently asked questions
  • 109. Chapter 7 Configuring NetBackup servers This chapter includes the following topics: ■ “Recommendations for configuring NetBackup” ■ “Configuring NetBackup” ■ “Testing the NetBackup installation” Recommendations for configuring NetBackup By default, the NetBackup Administration Console launches automatically following the installation. From this console you can configure NetBackup by using the Getting Started wizard. For detailed information about the NetBackup Administration Console, refer to the Veritas NetBackup Administrator’s Guide. For help while running a wizard, click Help in the wizard screen. The following lists some tips to follow before you configure NetBackup on your system. ■ Ensure that you have physically attached the storage devices to the server. The devices must be configured as specified by the device and the operating system vendor. Install any required device drivers and software patches. ■ After you have installed NetBackup server software, select the Getting Started wizard in the right pane of the NetBackup Administration Console. Follow the steps of each wizard until you have finished configuring NetBackup. If you have already configured NetBackup and you want to change a particular area, you can click on any of the wizards.
  • 110. 110 Configuring NetBackup servers Configuring NetBackup Note: You can open the NetBackup Administration Console by selecting Start Programs > Veritas NetBackup > NetBackup Administration Console. ■ For NetBackup Enterprise servers, the process for configuring a master server or a media server is very similar. Symantec recommends that you install the master server first, then install all media servers. You can then configure the master server and the media server information (such as storage devices and volumes) on the master. The configuration information that you provide ensures that the master server can properly administer the media server. Warning: Communication problems between the master server and the media server do not prevent you from running the configuration wizards. Therefore, do not run the wizards on the media server until the problems are corrected. If you run any of the wizards when a communication problem exists, the master server cannot recognize the information that you enter. You must first correct the problem. After you correct the problem, you should run the configuration wizards from the master server. Configuring NetBackup To begin configuration, click on the Getting Started icon in the main window of the NetBackup Administration Console. The Getting Started - Welcome to NetBackup wizard launches. The wizard leads you through four specific areas to configure the following: ■ Storage Devices ■ Volumes ■ Catalog Backups ■ Backup Policies For detailed information about the NetBackup Administration Console, see the Veritas NetBackup Administrator’s Guide. For help while running a wizard, click Help in the wizard screen. To start the tape device driver install wizard Note: Complete this wizard before you configure NetBackup. 1 Log on as administrator to the system from which you installed NetBackup.
  • 111. Configuring NetBackup servers 111 Configuring NetBackup 2 Insert the NetBackup CD in the drive. If Autorun is disabled, navigate to the CD drive and run Launch.exe. 3 On the installation browser, click the link Additional Product Installations > NetBackup Tape Device Driver. 4 Complete the wizard to install the latest device drivers for your storage device. Note: You can download the latest external device mapping files on the Updates and Patches Web page on the following support Web site: http://entsupport.symantec.com Configuring storage devices for NetBackup Before you can run any backups, you must define storage devices for NetBackup to use. Take the following into consideration while you complete device configuration: ■ Make sure that you have correctly configured your storage devices for Windows. NetBackup cannot function reliably unless devices are installed and configured correctly. ■ As part of the Device Configuration Wizard, in the Device Hosts window, specify the hosts on which to auto-discover and configure devices. This step applies to NetBackup Enterprise only. ■ From the Backup Devices window, confirm the list of devices that is displayed. If a known backup device does not appear in this list, do the following: ■ Click the Cancel button and close out of this wizard. ■ Verify that the backup device is physically attached to the host. ■ Verify that all installation procedures from device and operating system vendors have been performed successfully. The Tape Device Driver Install wizard (on the NetBackup CD) steps you through the installation of the latest device drivers. If you do not have a NetBackup CD, you can download the Tape Device Driver Install wizard from the technical support Web site. ■ Return to the NetBackup Administration Console and click the Configure Storage Devices link and begin this process again.
  • 112. 112 Configuring NetBackup servers Configuring NetBackup ■ After the device configuration update completes, the Configure Storage Units window appears. Use this window to define storage units. When you enter a path name for a storage unit, the following rules apply: ■ Use the correct path separators (/ and ). ■ Use a colon (:) to specify a drive separation on Windows platforms. ■ Use only the following characters: ■ Alphabetic characters (ASCII A-X, a-z) ■ Numeric characters (0-9) ■ Miscellaneous characters: plus (+), minus (-), underscore (_), or period (.) ■ When you specify devices for NetBackup in a cluster, ensure that you perform a storage device configuration on each node. First perform a storage device configuration on the active node. Then move the NetBackup active node to another node and perform the storage device configuration on that node. Perform this procedure on each node of the cluster on which NetBackup runs. Configuring volumes The Volume Configuration Wizard lets you initiate an inventory of each configured robot. NetBackup automatically updates the volume database if it finds new robotic media during the inventory. In addition, you can define new volumes for use in stand-alone drives. For more detailed information about volumes or volume configuration for stand-alone drives, refer the to Veritas NetBackup Administrator’s Guide for Windows, Volume 1. ■ Select a robot to inventory or the drive type that you want to configure. ■ If you specify a stand-alone media, you can determine the number of volumes for your device and complete this process. ■ When you specify multiple drive types, the following is true: ■ It may be that the media that is written in one drive of a robot cannot be read or written in any other drive. When this situation occurs, NetBackup considers the robot to have more than one type of drive. ■ If the robot has more than one type of drive, the wizard cannot inventory the robot. ■ After the inventory completes, the software prompts you to identify which slots within your device contain cleaning media. If you do not designate cleaning media, NetBackup considers all media (including cleaning media) as typical media and tries to overwrite it.
  • 113. Configuring NetBackup servers 113 Configuring NetBackup Note: If you upgraded to NetBackup 6.0 and you have pre-existing barcode rules, the barcode reader automatically detects the slots that are designated for cleaning media. ■ This wizard does not let you configure cleaning tapes for stand-alone drives. Configuring the catalog backup After you have configured your storage devices and volumes, the Catalog Backup wizard leads you into configuration of the catalog backup. The NetBackup Catalog contains information about your configuration and about the files and folders that have been backed up. If a disk fails and your catalog is lost, a catalog backup makes it much easier to restore your data. Therefore, you must configure a catalog backup before backing up any other data. Be aware of the following tips as you complete the Catalog Backup wizard. ■ Specify the media server that is to perform the backup. ■ From the NetBackup Catalog Files window, you must verify that the master server's catalog and each media server's catalogs are included in the list. Verify that the full path names are correct and are in the correct format. The catalog path names on the master server are automatically added during installation. They generally require no action on your part other than to ensure they are listed. However, if you have moved the location of your catalog on your master server, you must specify the new location. NetBackup does not automatically add path names to the NetBackup catalog on media servers during installation. You must add them to the file list. For more information on how to specify the path names, see the Veritas NetBackup Administrator’s Guide for Windows, Volume 1. Caution: Ensure that no invalid paths exist in the list of catalog files to be backed up. Invalid paths can exist after moving catalog files, by deleting old paths, or by adding new paths to the catalog backup configuration. If NetBackup cannot find or follow a path, the entire catalog backup fails. If you have installed NetBackup in an MSCS, verify that the NetBackup Catalog Backup entries are correct. See the Veritas NetBackup Administrator’s Guide for Windows, Volume 1. ■ The Alternating Destinations window lets you specify a second location for backing up the Catalog.
  • 114. 114 Configuring NetBackup servers Testing the NetBackup installation Creating a backup policy After you have configured your catalog backup, run the Backup Policy Configuration wizard to configure a backup policy. In this process you define a backup policy for a group of one or more clients. A policy specifies when backups occur, what data and what clients to back up, and other general attributes that define how the backup is performed. ■ From the Client List window you can add, change, or delete clients to this policy. NetBackup backs up all clients in this list. You can click the check box next to Detect operating system when adding or changing a client. If NetBackup cannot determine the operating system, a drop-down box appears to help you select the correct operating system. ■ After you have successfully created a policy, you can elect to create additional policies by checking the Create another NetBackup Policy check box. Then click Next. For additional information on how to create and administer policies, see the Veritas NetBackup Administrator’s Guide for Windows, Volume 1. Testing the NetBackup installation You can test your new configuration by backing up files. To start a backup 1 In the Getting Started wizard, click the check box next to Start an immediate backup of NetBackup server to verify the installation. Click Next. 2 The Setup Is Complete window appears. You have installed and configured NetBackup. Click Finish. NetBackup begins the backup process according to your configuration. A help window appears and the Activity Monitor in the NetBackup Administration Console updates and monitors the status of your backup. 3 Select the Activity Monitor from the left pane of the NetBackup Administration Console. 4 Right-click the server icon in the Topology pane and select Job Details. The Job Details window appears and provides a status of your backup job.
  • 115. Appendix A NetBackup LiveUpdate This appendix includes the following topics: ■ “About NetBackup LiveUpdate” ■ “Setting up your NetBackup LiveUpdate server” ■ “Changing the NetBackup LiveUpdate configuration” ■ “About LiveUpdate policies” ■ “Uninstalling NetBackup LiveUpdate” About NetBackup LiveUpdate NetBackup 6.5 includes a new NetBackup LiveUpdate feature. NetBackup LiveUpdate provides a cross-platform, policy-driven method to distribute NetBackup Release Updates to NetBackup 6.5 clients. Note: This document describes LiveUpdate as it pertains to NetBackup. NetBackup LiveUpdate should not be confused with Symantec LiveUpdate. If you would like more information about Symantec LiveUpdate, go to the following Website: http://www.symantec.com The NetBackup LiveUpdate feature includes the following versions of Symantec LiveUpdate agents: ■ For Windows: Windows LiveUpdate Agent version 3.2 ■ For UNIX: Java LiveUpdate Agent version 3.5 With the agent installed, you can download updates from a designated NetBackup LiveUpdate server where the NetBackup updates reside.
  • 116. 116 About NetBackup LiveUpdate You can download and install NetBackup Release Updates, NetBackup add-on products, and PBX. Only NetBackup versions 6.5 and later can be used with NetBackup LiveUpdate. NetBackup LiveUpdate features include the following: ■ Downloaded updates can be installed remotely to NetBackup servers and clients. ■ Cross-platform installation of updates is supported for both Windows and UNIX. ■ Updates can be downloaded and installed on Windows and UNIX clustered systems. ■ Using LiveUpdate for update installation does not require local administrator privileges on NetBackup installations, except on Windows clustered systems. However, you must have privileges to run NetBackup policies from the NetBackup master server. NetBackup LiveUpdate is an additional method to obtain updates quickly and more conveniently. The current program for customers to obtain updates remains in place. Note: NetBackup LiveUpdate only allows release update downloads. Major and minor NetBackup releases cannot be downloaded. How NetBackup LiveUpdate works The LiveUpdate process is managed manually to help you control which machines are updated and when the updates occur. The following describes how updates are downloaded and installed: ■ First, manually download NetBackup Release Update packages from a Symantec support site to your designated NetBackup LiveUpdate server. Update packages include two zipped files; one for Windows and one for UNIX. ■ Secondly, create and run a LiveUpdate policy on your NetBackup master server. The policy starts a LiveUpdate session with the clients in the policy. If you have media servers, the LiveUpdate process uses them to pass information between the master server and the clients. ■ Finally, the LiveUpdate agent on each client checks with the LiveUpdate server for any available updates. The agent then launches the NetBackup update installation scripts and installs the updates silently.
  • 117. 117 Setting up your NetBackup LiveUpdate server Setting up your NetBackup LiveUpdate server Use the following guidelines to set up your NetBackup LiveUpdate server: ■ Setting up your NetBackup LiveUpdate server does not require installation of any special software. ■ A NetBackup LiveUpdate server can be any Windows or UNIX host. It is not necessary to have NetBackup software installed on your NetBackup LiveUpdate server. ■ If you have a local LiveUpdate server that is dedicated for other Symantec products like Norton Anti-Virus, avoid conflicts by using one of the following guidelines: ■ Download the NetBackup Release Updates to a different directory on your local Symantec LiveUpdate server. ■ Designate a different machine as your NetBackup LiveUpdate server. ■ Your NetBackup LiveUpdate server requires any one of the following: ■ A shared disk or partition that can be accessed by any NetBackup LiveUpdate host (server or client) ■ HTTP or HTTPS server configuration Note: HTTPS servers must use the certificate signed by a certificate authority. Installing on Windows systems You can install and configure NetBackup LiveUpdate agent on Windows systems with one of the following methods: ■ Use the NetBackup installation wizard When you install or upgrade NetBackup 6.5 server or client software, the LiveUpdate agent software is installed by default. On the NetBackup System Names window in the installation wizard, a LiveUpdate section lets you set up the installation. ■ Modify the LU_Install.bat file and run it Note: At a minimum, you must have the NetBackup client installed to use NetBackup LiveUpdate.
  • 118. 118 Setting up your NetBackup LiveUpdate server To install and configure NetBackup LiveUpdate with the NetBackup installation wizard 1 Start the NetBackup installation wizard. Refer to Chapter 2, “Installing or upgrading NetBackup server software” or Chapter 5, “Installing clients”. 2 Select the installation type, either local or remote. 3 Follow the installation wizard instructions. 4 On the NetBackup System Names screen, provide the following information: Master Server Name Enter the name of the master server. Additional Servers Enter the names of any additional machines (servers) that are allowed to access this server. If you enter more than one name, separate each name with a comma. If you plan to install the EMM server on a media server instead of the master server, you must include that server name here. Install LiveUpdate The LiveUpdate agent allows installation of NetBackup Agent release updates from a LiveUpdate server. Even if you choose not to use LiveUpdate, agent installation does not affect NetBackup installation, configuration, or operation.
  • 119. 119 Setting up your NetBackup LiveUpdate server Location of The LiveUpdate server is the machine where you store LiveUpdate Server NetBackup release updates. The default server location is your NetBackup master server. If you want to designate a different machine as your NetBackup LiveUpdate server, type the appropriate pathname for that server here. Server Type Select the protocol that is used by your LiveUpdate server (LAN, HTTP, or HTTPS). For NetBackup When you install media server software, this screen has an Enterprise media additional line with the media server name shown as the local server installations server. You must change the name to the master server name only to which the media server is configured. 5 For cluster systems, the NetBackup Client service must be set up to run as an administrator and not as a regular user. Change the privileges to administrator on the NetBackup Services screen. Provide the following startup account and startup type information for NetBackup services: Use the built-in Clear this box and fill in the three fields below it. system account User name, Enter the necessary information that allows administrator Password, Domain privileges. Be sure to leave the Use the built-in system account check box unchecked. Startup Select either Automatic or Manual start up.
  • 120. 120 Setting up your NetBackup LiveUpdate server Start NetBackup Check this box if you want to start the services after Server Services After installation. You can leave the box unchecked to prevent Install services from starting after installation. Terminate Check this box to prevent a reboot while you perform a remote NetBackup installation. When you check this box, processes that use the processes NetBackup executables and DLLs are stopped. Caution: For Oracle users: If you select Terminate NetBackup processes, you must take down your database before you continue the installation. Terminate Windows Check this box to prevent a reboot while you perform a remote processes installation. When you check this box, processes that use the Microsoft run-time DLLs are stopped. For upgrades: You do not need this option because the Microsoft run-time DLL is already at the correct level. Caution: If you select Terminate Windows processes, it may cause instability with other Windows applications, particularly those applications that use run-time DLLs. Abort install if a Check this box so that NetBackup can detect if the remote reboot is required system requires a restart. If a restart is required, this option ends the installation and rolls the remote system back to its state at the beginning of the installation. 6 Click next on the wizard screens that follow until you get to the Ready to Install Program screen, then click on Install. 7 On the Installation Complete screen, click Finish. To install and configure NetBackup LiveUpdate by modifying the LU_Install.bat file 1 Open the LU_Install.bat file in a text editor. The file is located on your NetBackup CD-ROM in the AddonsLiveUpdate directory. 2 At the SET LU_SERVER= line, edit the line by entering the name of your LiveUpdate server. 3 Make sure that the LuCheck.exe, LU_Registration.exe, and LUSetup.exe files are in the same directory. 4 Save the changes and close the file. 5 Run the LU_Install.bat file.
  • 121. 121 Setting up your NetBackup LiveUpdate server Installing on UNIX systems The NetBackup LiveUpdate agent software is located on the NetBackup Options CD and must be installed separately. The following describes the UNIX installation guidelines: ■ Server installation requires that you load Java LiveUpdate software from the NetBackup Options CD first, then run an installation script. ■ Client installation can be done individually on each NetBackup client, or the server can push the LiveUpdate agent software to all clients at once. ■ NetBackup does not deliver Java JRE for the following UNIX platforms: FreeBSD, IBMpSeries, IBMzSeries, MacIntosh, and SGI. Before you install and use NetBackup LiveUpdate on these platforms, you must do the following: ■ A minimum Java Runtime of 1.4.2 must be used to install Java LiveUpdate. The JRE used should be enabled with JCE Unlimited strength jurisdiction policy files. You can download the necessary files from the Sun Microsystems Website. ■ Have the appropriate version of Java JRE installed. ■ Create the following directory: mkdir –p /usr/openv/java/jre/bin ■ Run the following command to create a link to the directory you just created: ln –s <system java path> /usr/openv/java/jre/bin/java Installing the agent on UNIX servers Use these steps to load and install LiveUpdate agent software on a UNIX server. To load and install the NetBackup LiveUpdate agent software on a UNIX server 1 Log in to the server as root. 2 Insert the NetBackup Options CD and mount it. 3 Run the following script, which launches the NetBackup add-on product software installation script: cd_directory/install The cd_directory is the path to the directory where you can access the CD. 4 At the Installation Options prompt, select NetBackup Add-On Product Software.
  • 122. 122 Setting up your NetBackup LiveUpdate server 5 Select NetBackup LiveUpdate Agent. 6 Select Done Selecting Products. 7 At the Is this list correct? prompt, select y. 8 To load NetBackup LiveUpdate agents for platform other than the server platform, press enter to accept the default (y) or select n. If you selected (y) to load other platforms on the server, enter the LiveUpdate agent client platforms. 9 Select q to quit from the script. 10 Run the following script, which installs and configures the NetBackup LiveUpdate agent on the server: /usr/openv/netbackup/bin/install_nblu 11 When you are asked for the protocol and location to use for the NetBackup LiveUpdate server, enter the appropriate protocol and pathname. Note: Remember, the NetBackup LiveUpdate server is where the NetBackup release updates reside. You must download the updates to this server manually from a support Web site. When you run the NetBackup LiveUpdate policy, the NetBackup clients in the policy access this server for the update files. Installing the agent on UNIX clients Use one of the following procedures to install NetBackup LiveUpdate agent software on a UNIX client. Choose either local UNIX client installation or push to all clients from the server. To install LiveUpdate agent software locally on a UNIX client 1 Log in to the client as root. 2 Insert the NetBackup Options CD and mount it. 3 Run the following script, which launches the NetBackup add-on product software installation script that installs the agent: cd_directory/install The cd_directory is the path to the directory where you can access the add-on products. 4 When you are asked for the protocol and location to use for the NetBackup LiveUpdate server, enter the appropriate protocol and pathname.
  • 123. 123 Setting up your NetBackup LiveUpdate server Note: Remember, the NetBackup LiveUpdate server is where the NetBackup release updates reside. You must download the updates to this server manually from a support Web site. When you run the NetBackup LiveUpdate policy, the NetBackup clients in the policy access this server for the update files. To install the LiveUpdate agent software remotely on all clients 1 Log in to the server as root. You must log in to the server where you loaded the LiveUpdate agent software for the selected platforms. 2 Use the bpplclients command to create a file that contains a list of clients currently configured in the NetBackup database. Choose the correct command based on whether you push from a master server or from a media server, as follows: ■ To push from the master server, run the following command: ./bpplclients -allunique -noheader > file ■ To push from a media server, run the following command: ./bpplclients -allunique -noheader -M m_server_name > file m_server_name Name of the NetBackup master server in this environment. file Name of the file to contain the list of unique clients. If no clients have been configured in the NetBackup database, file is empty. Create file using the same format as that generated by bpplclients. The bpplclients command writes output to file in the following format: hardware os client hardware The hardware name. For examples, run the ls command in directory /usr/openv/netbackup/client. os The operating system name. For examples, run the ls command in directory /usr/openv/netbackup/client/hardware. client The name of the client. The contents of file might look like the following example: Solaris Solaris8 machinename ■ (Optional) Edit file.
  • 124. 124 Changing the NetBackup LiveUpdate configuration Perform this step to change the contents of file. Edit file to contain only those NetBackup clients you want to update with LiveUpdate agent software. The host names of the clients must be the clients’ individual node names. They cannot be virtual names. The correct value for the individual node names is returned by the hostname and the domainname commands. The format can be either hostname or hostname.domainname. 3 Run the following command: /usr/openv/netbackup/bin/update_luagent -ClientList file The script requests the following information: There are N clients to upgrade. Enter the number of simultaneous updates you wish to take place. [N - NN] (default: NN): Press Enter. The upgrade will likely take Y to Z minutes. Do you want to upgrade clients now? (y/n) [y] Answer y or n. What is the protocol and location to use for the LiveUpdate server? Enter the appropriate protocol and pathname. You have specified this value for the question: Is this value correct? (y/n) [y] Answer either y or n. The progress and results are shown. Changing the NetBackup LiveUpdate configuration This section describes how to update and change the LiveUpdate configuration settings after the initial installation and configuration. These changes are necessary if any of the following occur: ■ A new version of the LiveUpdate agent is available on the NetBackup server ■ A different machine is designated as the NetBackup LiveUpdate server ■ A NetBackup LiveUpdate agent installed on a NetBackup server or client has a problem Keep your NetBackup LiveUpdate agent configuration current to ensure that LiveUpdate policies run successfully.
  • 125. 125 Downloading NetBackup release updates Changing the LiveUpdate configuration on Windows To make any changes after the initial installation, do one of the following: ■ Launch the NetBackup installation wizard and repeat the steps in the section “Installing on Windows systems”. ■ Modify the LU_Install.bat file as described in the section “Installing on Windows systems”. Changing the LiveUpdate configuration on UNIX The following commands let you update and reconfigure your NetBackup LiveUpdate agent software remotely: ■ update_luagent -ForceInstall Use this command to force installation of the LiveUpdate agent to specified clients. The command only pushes the agent software to the specified clients. Configuration is not changed. If the NetBackup LiveUpdate version being pushed from the server is the same version on a specified client, you can continue or stop the forced installation. ■ update_luagent -ForceReconfig Use this command to force installation and reconfiguration of the LiveUpdate agent on specified clients. The command pushes the agent software to the clients and reconfigures the protocol and NetBackup LiveUpdate server designation on the clients. Downloading NetBackup release updates Before you can run a LiveUpdate policy successfully, you must download the release updates to your NetBackup LiveUpdate server. NetBackup release updates include a Windows .gzip file and a UNIX .gzip file. The files are available for manual download only from the customer support site. Unlike Symantec LiveUpdate, NetBackup packages are not downloaded automatically. Manual downloads respect customer sites that maintain strict change and update control policies. Use the following steps to download NetBackup release updates to your NetBackup LiveUpdate server.
  • 126. 126 About LiveUpdate policies To download NetBackup release updates to your NetBackup LiveUpdate server 1 Log in to your NetBackup LiveUpdate server as the administrator. 2 Open your internet browser and enter the following address: http:entsupport.symantec.com 3 Select the release update to download. 4 Verify the directory on your NetBackup LiveUpdate server where you want the package downloaded. 5 Click Download. 6 Extract the contents of one or both release updates to your NetBackup LiveUpdate server. 7 Unzip the files. About LiveUpdate policies A LiveUpdate policy lets you control which NetBackup servers and clients are updated. The manual activation required to run the policy lets you control when the updates occur. Use the following guidelines when you create LiveUpdate policies: ■ LiveUpdate policies cannot include any clients that use NetBackup versions earlier than 6.5. LiveUpdate is only supported in NetBackup versions 6.5 and later. ■ Create separate LiveUpdate policies for servers and clients. ■ Always run the servers policy before you run the clients policy. Clients cannot run a later version of NetBackup than the servers. Important! ■ Since NetBackup services and daemons are shut down during release update installation, do not add the following servers to a LiveUpdate policy: ■ The NetBackup master server that runs the LiveUpdate policy ■ Any media server involved with running the LiveUpdate policy These servers must be updated through the command line interface. See the section “Updating master servers and media servers that run LiveUpdate policies” on page 128” for complete details. ■ For UNIX systems, any media server name that you specify in a LiveUpdate policy must appear in the bp.conf file on the client.
  • 127. 127 About LiveUpdate policies ■ All nodes of a cluster must be updated, so make sure to include all actual host names in a LiveUpdate policy. The best practice is to have a separate policy for each clustered server and include all node hostnames in the policy for that cluster. In addition, the Limit jobs per policy attribute of the LU policy should be set (at a minimum) to the number of nodes in the cluster. This helps ensure that the nodes are updated simultaneously (or as close as possible), which lowers the chance of failover in between updating the nodes. If a failover were to occur before all nodes were updated, the NetBackup database and the binaries on the active node could be mismatched. Creating a LiveUpdate policy Use the following steps to create a LiveUpdate policy. To create a NetBackup LiveUpdate policy 1 Launch the NetBackup Administration Console. 2 On the File menu, select LiveUpdate. 3 In the LiveUpdate policy window, click New. 4 Enter the name you want for the policy, then click OK. 5 On the Attributes tab of the new LiveUpdate Policy window, select the media server that you want to run the policy. ■ For environments with no media server, select the master server that you want to run the policy. ■ Limit jobs per policy lets you select the number of LiveUpdate jobs that are active simultaneously, when you run the policy. Note: If a firewall prevents communication between the master server and clients, the LiveUpdate policy must specify the media server that can communicate with the clients. 6 Click on the Clients tab. 7 Click New and enter the name of the first client, then press <enter>. Note: You must enter only the names of client machines that have NetBackup 6.5 installed with the NetBackup LiveUpdate agent installed and configured. 8 Repeat step 7 until all client names are entered. 9 After all client names are entered, click OK.
  • 128. 128 Updating servers and clients with NetBackup LiveUpdate Updating servers and clients with NetBackup LiveUpdate After you have created LiveUpdate policies and downloaded release updates to your NetBackup LiveUpdate server, you are ready to update your NetBackup environment. Before updating your NetBackup environment, there are three important tasks you should perform as follows: Before updating your NetBackup environment: 1 Make sure that there are no NetBackup jobs running or queued to run on any NetBackup servers and clients. 2 Deactivate all backup policies on all NetBackup master servers. 3 Log in as a database user on the NetBackup hosts that run third-party database software and shut down all database instances. When you are ready to update your NetBackup environment, update servers and clients in the following order: ■ Master servers and media servers that run LiveUpdate policies ■ Master servers and media servers not involved in running LiveUpdate policies ■ Clients Updating master servers and media servers that run LiveUpdate policies Use the nbliveup command to update NetBackup master servers and media servers that run LiveUpdate policies. Do not use a LiveUpdate policy to update these servers. ■ There is a known issue when using nbliveup on Windows IA64 and AMD64 systems. Use nbliveup on these systems with one of the following methods: ■ Method A—Local update You must log in as the console user to the desired machine locally or through a remote desktop session, by using the following command: mstsc -v:your.machine.name.com /F -console For complete details, go to the following link: http://support.microsoft.com/kb/278845 ■ Method B—Remote update
  • 129. 129 Updating servers and clients with NetBackup LiveUpdate Initiate the LiveUpdate session from a different NetBackup master server. To update master servers and media servers that run LiveUpdate policies 1 Make sure there are no active backup or restore jobs on the master server that runs LiveUpdate policies. 2 On the master servers or media servers that run NetBackup LiveUpdate policies, run the following command: ■ On Windows systems: NetBackupbinnbliveup ■ On UNIX systems: /usr/openv/netbackup/bin/nbliveup 3 If any master servers or media servers that run LiveUpdate policies are themselves clustered servers, run the nbliveup sequence as follows: ■ On Windows systems: ■ On the active node, run the following command: NetBackupbinbpclusterutil –offline ■ On each inactive node in the cluster, run the following command: NetBackupbinnbliveup ■ On the active node, run the following command: NetBackupbinnbliveup ■ On UNIX systems: ■ On the active node, run the following command: /usr/openv/netbackup/bin/bpclusterutil –freeze ■ On each node in the cluster, run the following command: /usr/openv/netbackup/bin/nbliveup –c ■ On the active node, run the following command: /usr/openv/netbackup/bin/bpclusterutil –unfreeze Updating master severs and media servers that do not run LiveUpdate policies To update these servers, use the servers LiveUpdate policy that you created. To update master servers and media servers that do not run LiveUpdate policies 1 Launch the NetBackup Administration Console. 2 On the File menu, select LiveUpdate.
  • 130. 130 LiveUpdate logs 3 In the LiveUpdate policy window, select the servers LiveUpdate policy that you created. 4 Click Run LiveUpdate Policy. 5 Check the Activity Monitor to verify that all LiveUpdate jobs complete. Updating clients To update clients, use the clients LiveUpdate policy that you created. To update clients 1 Launch the NetBackup Administration Console. 2 On the File menu, select LiveUpdate. 3 In the LiveUpdate policy window, select the clients LiveUpdate policy that you created. 4 Click Run LiveUpdate Policy. 5 Check the Activity Monitor to verify that all LiveUpdate jobs complete. LiveUpdate logs The following procedures describe how to use LiveUpdate logging on Windows and UNIX NetBackup systems. On Windows servers and clients, the log directories are created when you install NetBackup LiveUpdate. On UNIX clients, you must first create the necessary directories to enable logging. To view LiveUpdate logs on Windows NetBackup servers and clients 1 To view NetBackup LiveUpdate logs, go to the following directory: NetBackuplogsliveupdate 2 To view nbliveup command logs, go to the following directory: NetBackuplogsnbliveup 3 To view NetBackup release update logs, go to the following directory: NetBackuplogspatch To enable LiveUpdate logging on UNIX NetBackup servers ■ Run the following command: /usr/openv/netbackup/logs/mklogdir
  • 131. 131 Uninstalling NetBackup LiveUpdate To enable LiveUpdate logging on UNIX NetBackup clients 1 Create the following directories: /usr/openv/netbackup/logs/liveupdate /usr/openv/netbackup/logs/nbliveup /usr/openv/netbackup/logs/patch 2 To view NetBackup LiveUpdate logs, go to the following directory: /usr/openv/netbackup/logs/liveupdate 3 To view nbliveup command logs, go to the following directory: /usr/openv/netbackup/logs/nbliveup 4 To view NetBackup patch logs, go to the following directory: /usr/openv/netbackup/logs/patch Retrieving logs remotely You can retrieve LiveUpdate logs remotely from a master server by using the bpgetdebuglog command. The remote_program argument described in the command refers to the liveupdate, nbliveup, or patch directory. For complete details about the bpgetdebuglog command arguments, see the Veritas NetBackup Commands for UNIX and Linux or Veritas NetBackup Commands for Windows documents. To retrieve logs remotely ■ For Windows systems, enter the following: install_pathNetBackupbinadmincmdbpgetdebuglogremote_ machine remote_program mmddyy ■ For UNIX systems, enter the following: /usr/openv/netbackup/bin/admincmd/bpgetdebuglog remote_machine remote_program mmddyy Uninstalling NetBackup LiveUpdate This section describes how to remove the NetBackup LiveUpdate agent and associated files. In some cases, you may need to remove directories and files manually. Uninstalling on Windows systems Use the following procedures to remove LiveUpdate files on Windows systems.
  • 132. 132 Uninstalling NetBackup LiveUpdate To remove NetBackup LiveUpdate on Windows systems: 1 Select Start > Control Panel. 2 Select Add or Remove Programs. 3 Click on LiveUpdate and select Remove. Uninstalling on UNIX systems Use the following procedures to remove LiveUpdate files on UNIX systems. To remove NetBackup LiveUpdate components from NetBackup servers that run on the Solaris platform 1 You must first de-register all NetBackup products with LiveUpdate by using the following command: /usr/openv/netbackup/bin/nblu_registration -r 2 To remove the NetBackup LiveUpdate agent, run the following command: pkgrm SYMCnblua 3 To remove the associated LiveUpdate files, run the following commands: rm -rf /usr/openv/netbackup/logs/liveupdate rm -rf /usr/openv/netbackup/logs/nbliveup rm -rf /usr/openv/netbackup/logs/patch To remove NetBackup LiveUpdate components from NetBackup servers and clients that run on non-Solaris platforms 1 You must first de-register all NetBackup products with LiveUpdate by using the following command: /usr/openv/netbackup/bin/nblu_registration -r 2 To remove the associated LiveUpdate files, run the following commands: rm -f /usr/openv/netbackup/bin/install_nblu rm -f /usr/openv/netbackup/bin/nbliveup rm -f /usr/openv/netbackup/.luagent.conf rm -f /usr/openv/netbackup/nblu.conf rm -f /usr/openv/netbackup/nblu.conf.template rm -f /usr/openv/share/version_luagent 3 To remove the LiveUpdate agent software from the NetBackup server that was used to push agent software to clients, run the following command: rm -rf /usr/openv/netbackup/luagent
  • 133. 133 Uninstalling NetBackup LiveUpdate To remove Symantec LiveUpdate components from UNIX systems that run NetBackup ■ If NetBackup is the only Symantec product that currently uses LiveUpdate, run the following command: /opt/Symantec/LiveUpdate/uninstall.sh -a ■ If LiveUpdate is the only product installed in /opt/Symantec, remove the following files: rm -f /etc/Symantec.conf
  • 134. 134 Uninstalling NetBackup LiveUpdate
  • 135. Index A configuring storage devices, Windows 16 access control 16 adding UNIX clients 98 D additional product installations 18, 111 daemons administration console signalling inetd 100 starting 69 device configuration 16 administrator 14, 87 devices 18, 111 administrator account installing 18, 23, 34, 48, 64, 110 F firewall 91 B For 57 backlevel administration consoles 74 bpplclients command 123 G Getting Started wizards C Configure Catalog Backup 113 catalogs, NetBackup 14 Configure Storage Devices 111 client installation Configure Volumes 112 definition 81, 90 Create a Backup Policy 114 client_config script 96, 98 gunzip command clients required for installation 91 adding after initial install 98 gzip command loading onto server 98 required for installation 91 pushing software to 98 cluster group name 54 cluster installations 15 I commands inetd daemon bpplclients 123 signalling 100 configuring install NetBackup client Java Windows Administration Console 74 Windows 89 multiple versions of NetBackup Administration configuring master servers Console on Windows 71 things to know 110 NetBackup Remote Administration Console 68 configuring NetBackup 109, 110 install NetBackup clients catalog backups 113 locally 92 create a backup policy 114 install_client_files script 95, 96, 97 storage devices 111 Installation volumes 112 silent install configuring storage devices for Windows media server software 65 storage device configuration 17 server software 64 supported robot types 17 installation
  • 136. 136 Index NetBackup Remote Administration Console 68 NetBackup UNIX clients custom installation 15 using rsh 93 peripherals 14 UNIX clients locally 92 port numbers 14 installation log file silent installation 64 Windows 2000 systems 79 NetBackup Access Control 74, 79, 101 installing NetBackup Administration Console 109 client software NetBackup client service 84 Windows 85, 86, 89 NetBackup client software client software locally add a UNIX client type 98 Windows 85 install locally 92 clients remotely NetBackup Java Windows Administration Console Windows 86 Install requirements 74 clients silently installation 73 Windows 89 NetBackup Liveupdate overview how it works 116 Windows 81 NetBackup Remote Administration Console remotely installing 67, 71 Windows 82, 84 NetBackup software requirements installation 19 Windows 84 installation requirements 13 installing alternative administration interfaces 67 NetBackup-Java Windows Administration Console Internet Explorer 14, 84 installing 74 NTFS partition 14 L launch.exe 68 O license key 9 OTM license keys 26, 36, 51, 103 Windows 82 LiveUpdate changing UNIX configuration 125 changing Windows configuration 125 P downloading patch packages 125 ping command 14 installing on UNIX 121 polices installing on UNIX clients 122 LiveUpdate 126 installing on UNIX servers 121 policies installing on Windows 117 creating LiveUpdate 127 overview 115 pre-installation requirements 9 uninstalling 131 private network 55 uninstalling on UNIX systems 132 public network 55 uninstalling on Windows systems 131 pushing client software 98 loading client types onto server 98 R M reinstalling NetBackup server software 79 MSCS cluster administrator interface 62, 63 Release 1 remote administration 67 remote administration console 71 N remove NBAC 74 earlier versions of NetBackup-Java
  • 137. Index 137 Adminstration Console on Windows 73 virtual IP address 54 removing software Volume Snapshot Provider 82 77 VSP 82 NetBackup clients 90, 99 NetBackup server 77, 78 W Windows S client requirements 84 scripts Windows 2000 14 client_config 96, 98 Windows Terminal Services 75 install_client_files usin sftp 97 install_client_files using ftp 95 install_client_files using ssh 96 server administration, backlevel 74 server list adding NetBackup Remote Administration console host 69 Shared Storage Option (SSO) 31, 40, 57 silent install administration interface 65 media server software 65 server software 64 Silent Installations 83 SSO 31, 40, 57 subnet mask 54 supported platforms Windows 84 system administrator task requires privileges 86 T Tape Device Driver Install wizard 111 tape device driver install wizard 17 TCP/IP 84 testing NetBackup installation 114 U UNIX client software install using ftp 95 install using rsh 93 install using sftp 97 install using ssh 96 UNIX clients installing locally 92, 98 V virtual host name 54