Oracle demantra implementation guide part e22232 09
0 likes1,649 views

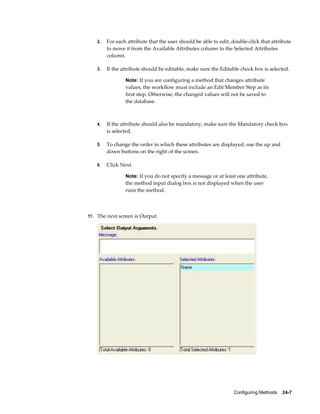
This document is an implementation guide for Oracle Demantra Release 12.2. It contains information about core Demantra concepts like worksheets, levels, combinations, and series. It also describes how Demantra calculates and stores data, supports multiple languages, and provides implementation tools. The guide is intended to help implementers understand Demantra's functionality and successfully set up a Demantra application.


![Series 7-5
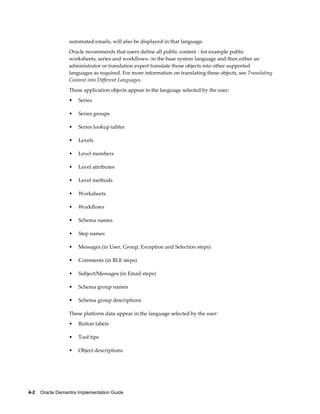
Naming Series
Series names are often included in client expressions and names that contain special
characters may prevent the expression from functioning as intended. Forbidden
characters within series names are:
• .
• +
• -
• |
•
• /
• *
• [ ]
• >
• <
• =
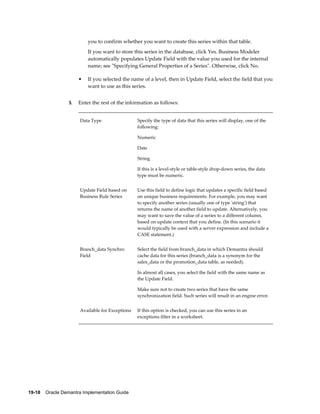
Update Field
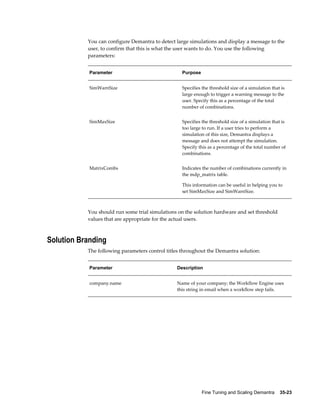
A series may or may not be stored in the database. If it is stored, its data is saved in the
series update field. This option is known as the update field because it refers to the field
that is updated when changes are saved to the database.
When you use the Business Modeler to configure a series, it automatically adds the
update field if needed.
Although you generally should avoid working directly in the database, when you
configure series, you need to write SQL expressions to aggregate data from the tables in
which the series are stored. Depending on the type of series, the update field is in one of
the following tables:
For sales series sales_data
matrix series mdp_matrix](https://image.slidesharecdn.com/oracledemantraimplementationguideparte22232-09-150517151115-lva1-app6892/85/Oracle-demantra-implementation-guide-part-e22232-09-109-320.jpg)


![Series 7-9
For more information on units, see "Introduction".
Series Calculation: Client Expressions
Expressions
A client expression uses Demantra functions. The client expression can be made up of
some or all of the following components:
• Constants and expressions that have numeric, date, true/false or null values.
Note: Enclose any literal negative constant within parentheses, as
in this example: (-0.33)
• Demantra functions.
• Operators such as +-*/.
• References to other series. To refer to a series, you use the name of the series.
• References to series at other time periods. Here, you use the following syntax:
series_name [relative-time-bucket]
An expression like this is sometimes called a vertical formula. For example: Sales
[-1] refers to the Sales series for the previous period. Sales [1] refers to the Sales
series for the next period. [0] is not allowed.
Here relative-time-bucket must be any of the following:
• An integer
• A series name
• A simple expression using integers, series names, and the basic mathematical
operators.
For information on the supported operators and functions, "Client Expression Functions
and Operators".
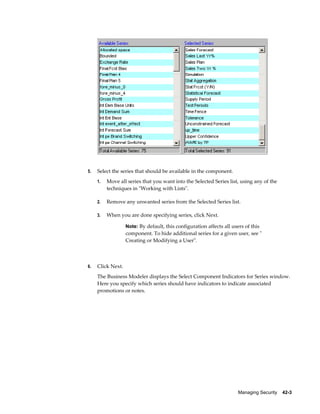
Time-Shifted Client Expressions (Vertical Formulas)
When a client expression includes a reference to another series, by default, Demantra
uses data from the same time bucket. You can refer to data from earlier or later time
buckets, however. The following example shows three series, each of which has a client
expression that refers to the Example series.](https://image.slidesharecdn.com/oracledemantraimplementationguideparte22232-09-150517151115-lva1-app6892/85/Oracle-demantra-implementation-guide-part-e22232-09-113-320.jpg)
![7-10 Oracle Demantra Implementation Guide
Notice that the series Shift1 is null for 11/25/3002. This is because this cell refers to the
Example series at a time bucket that is not displayed in the worksheet.
Null Sales Records and Time-Shifted Client Expressions
You do not typically have sales records for all combinations for all dates. This affects
client expressions that refer to series at other time buckets. When a client expression
refers to a time bucket that does not have sales data, Demantra automatically uses the
next available non-null sales data. The following figure shows an example:
Using Expressions to Refer to Time Buckets
The previous examples have used the simplest syntax for time-shifted client
expressions, in which you use an integer to refer to the relative time bucket. You can
instead use simple expressions that include series names, integers, and mathematical
operators. For example, if you have series A, B, C, and D, the client expression for D
could be something like the following: A[B+C]
For example, suppose you want to know how much inventory your warehouse will
contain on a given date. The date is determined relative to today based on both the](https://image.slidesharecdn.com/oracledemantraimplementationguideparte22232-09-150517151115-lva1-app6892/85/Oracle-demantra-implementation-guide-part-e22232-09-114-320.jpg)
![Series 7-11
production lead time and the transportation lead time. That is, you want to know
Inventory[Production lead time + Transportation lead time].
Precedence of Calculations for Client Expressions
The following rules apply for the recalculation order, and will be performed
recursively:
1. The system looks for vertical formulas, which use data in other time buckets. Such
as formulas either use a function such as FSUM or they reference data in time
buckets: Demand [2].
2. The system calculates the data series that are the source for those in the Step 1.
3. The system calculates the data series of Step 1.
4. The system calculates the series that use the series in Step 1 as source.
5. The system calculates the series that are the result of Step 4, and so on.
Series Calculation: Using Both Server and Client Expressions
It is important to understand how server and client expressions are used in
combination. All series must have a server expression, although the expression is not
always important. The client expression always takes precedence. That is, the client
expression, if present, is evaluated, displayed, and stored in the database, instead of the
server expression.
If a series has a client expression, the series should be configured in one of the following
ways:
• The server expression is trivial. For example, it is a constant such as 0. Because this
value is never meant to be seen or stored, the specific value is irrelevant.
• The server expression is meaningful and useful in some cases. In this case, the client
expression consists of a conditional expression of the following general form:
If (condition, client-expression-value, series-name)
Here series-name is a reference to the same series to which this client expression
applies. This reference directs Demantra to the server expression that this series
uses. Depending on whether the condition is true for a given cell, this expression
returns either the client expression value or server expression value.
Note: In some cases, it is useful for a client expression to null out data
in the worksheet table in situations where the data might be confusing.
There is another important difference between server and client expressions, as far as](https://image.slidesharecdn.com/oracledemantraimplementationguideparte22232-09-150517151115-lva1-app6892/85/Oracle-demantra-implementation-guide-part-e22232-09-115-320.jpg)


![12-6 Oracle Demantra Implementation Guide
underestimate the demand, because the overall level of demand has increased over the
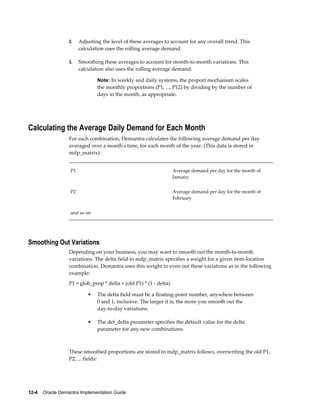
last year. Therefore, Demantra calculates the level-adjusted daily demand for January as
follows:
P1 = (smoothed P1) * (rolling average) * 12 / (sum of all average demand)
Here smoothed P1 is the average demand per day for January as calculated previously
and then smoothed as described in "Smoothing Out Variations". These level-adjusted, "
normalized" proportions are stored in mdp_matrix, overwriting the old P1, P2, ... fields:
P1 Level-adjusted, smoothed average daily
demand for the month of January
P2 Level-adjusted, smoothed average daily
demand for the month of February
and so on
Handling Data Issues
You can control how the proport mechanism handles various data issues.
Specifying How to Treat Null Data
You must specify how to treat missing dates, which can have a large effect on the
averages. If there are no sales for an item-location combination for a given month, that
can either mean there truly were zero sales or it can indicate a problem with the data.
You specify the proport_missing parameter as follows.
• If this parameter is equal to 0, dates with null data are treated as dates with zero
sales. That is, suppose that you have three months worth of data as follows: 30, null,
60. If proport_missing equals 0, the average of these three months is calculated as 30
(or [30+0+60]/3).
• If this parameter is equal to 1, dates with null data are ignored. Using the old
example, if proport_missing equals 1, the average of these three months is
calculated as 45 (or [30+60]/2). This is mathematically equivalent to assuming that
the missing month has average sales (45).
Similarly, suppose you have weekly sales data, but you do not have data for all the
weeks in a given month. If proport_missing equals 0, the weeks with null sales are
treated as having zero sales. If proport_missing equals 1, the weeks that have null sales
are considered as having average sales.
For data with many missing observations, it is likely that the null sales actually
represent no sales; in this case, it is suitable to specify proport_missing as 0.](https://image.slidesharecdn.com/oracledemantraimplementationguideparte22232-09-150517151115-lva1-app6892/85/Oracle-demantra-implementation-guide-part-e22232-09-204-320.jpg)


![Configuring Series and Series Groups 19-25
• Demantra functions.
• Operators such as +-*/.
• References to other series. To refer to a series, you use the name of the series.
• References to series at other time periods. Here, you use the following syntax:
series_name[relative-time-bucket]
An expression like this is sometimes called a vertical formula. For example: Sales [-1]
refers to the Sales series for the previous period. Sales [1] refers to the Sales series for the
next period. [0] is not allowed.
Here relative-time-bucket must be any of the following:
• An integer
• A series name
• A simple expression using integers, series names, and the basic mathematical
operators.
For information on the supported operators and functions, see "Client Expression
Functions and Operators."
Specifying Server and Client Expressions
Specifying a Server Expression:
To edit a server expression
1. Click Configuration > Configure Series or click the Configure Series button.
2. Right-click a series and then select Open > Expression Properties.](https://image.slidesharecdn.com/oracledemantraimplementationguideparte22232-09-150517151115-lva1-app6892/85/Oracle-demantra-implementation-guide-part-e22232-09-347-320.jpg)


![Configuring Series and Series Groups 19-29
• If it evaluates to false, the cell is left in its original state, which can be either editable
or not.
To create an edit-lock expression:
1. Click Configuration > Configure Series or click the Configure Series button.
2. Right-click a series and then select Open > Expression Properties.
3. Click the button to the right of the Edit Lock Expression field.
The Client Expression Editor appears.
4. Create an expression that evaluates to true or false; see "Syntax of Client
Expressions".
See also
"Client Expression Functions and Operators"
Creating a Color Expression
Any series can have a color expression, which controls only the appearance of the
series. For each editable cell in a series, a color expression evaluates to either a numeric
color value or null. This expression must have one of the following forms:
If condition, numeric-color-value
If condition, expression-with-numeric-value
Then for each cell in the series:
• If the expression evaluates to a number, the cell is displayed in the corresponding
color.
• If the expression evaluates to null, the color of the cell is left unchanged.
• In its basic form, a color expression returns one numeric color
value based on one condition. To return different color values
for multiple conditions, use the second form, and use an
If-Then-Else expression for the expression-with-numeric-value.
• A color expression cannot include time-shift expressions such
as [ - 1 ], Fpos, and Fsum.
To create a color expression:
1. Click Configuration > Configure Series or click the Configure Series button.](https://image.slidesharecdn.com/oracledemantraimplementationguideparte22232-09-150517151115-lva1-app6892/85/Oracle-demantra-implementation-guide-part-e22232-09-351-320.jpg)


![19-40 Oracle Demantra Implementation Guide
the particular series.
1. Enter the URL in a database column, for example using Oracle SQL Developer. You
can either create a new column or insert the URL into an existing column. The
column should be of Type VARCHAR2 (i.e., string or text) and be long enough to
store the full value.
For example:
• Table = SETTLEMENT
• Column = 'Link to Document'
• URL = '[http://www.oracle.com/|]'
The URL must be in the format: [DisplayText|URL|] where URL is required and
DisplayText is optional.
The value must start with a '[' (square bracket) and end with a '|]' (pipe character
followed by square bracket). Also, if DisplayText is included, then a '| ' (pipe
character) must separate the DisplayText from the URL.
Example: To display "Oracle" as the Series value in a worksheet and launch
http://www.oracle.com/ when the end user clicks the link, the URL should be:
[Oracle|http://www.oracle.com/|]
To display the URL as the series value, then omit DisplayText. For example:
[http://www.oracle.com/|]
If the value does not conform to the required format of [DisplayText|URL] then the
Series value will be displayed as normal text (no hyperlink).
2. Create a new series. The settings that are required for a series value to appear as a
link are described below. For details about all other settings, see 'Creating a Series'
In the Oracle Demantra Implementation Guide.
• In the Display Properties screen, set Display Format to 'Hyperlink'
• In the Data Properties screen:
• Set Data Table to the table where you defined the URL in step 1. (Do not
specify an 'Update Field'.)
• Set Data Type to 'String'.
• Set Aggregation Function to 'Max'
• In the Expression Properties screen, define the series' Server Expression.
Below are two examples of how to do this:](https://image.slidesharecdn.com/oracledemantraimplementationguideparte22232-09-150517151115-lva1-app6892/85/Oracle-demantra-implementation-guide-part-e22232-09-362-320.jpg)
![Configuring Series and Series Groups 19-41
a. Example where full syntax is stored in database column:
max(nvl(table_name.column_name,' '))
b. Example where the base URL is stored in a database column and full syntax is
concatenated in the expression:
max(concat(concat('[DisplayText|',table_name.column_name),'|]'))
3. Add the new series to a worksheet using Worksheet Designer.
Display Series as a Link
You can create a series that displays its value as a hyperlink. This allows you to call
your own external pages or documents that may provide information associated with
the particular series. See Creating a Series that Appears as a Link in the Oracle Demantra
Implementation Guide.
Configuring New Product Launches
Demantra's New Product Launch feature uses the NPI_SERIES_DATA table for copying
data. This table includes default values for Demand Management series, and does not
require any further setup. You should review the default configuration of this table and
make changes if necessary before running a New Product Launch process in Demand
Management, so that the process copies data from the correct source series and
populates the corresponding target series.
If you are using New Product Launch within Predictive Trade Planning (PTP) then
some setup of the PROMOTION_STATUS, SCENARIO, and PROMOTION_TYPE is
required. Administrators may modify tables using a database utility such as SQL
Developer.
For more information on New Product Launches, see "New Product Launch
Worksheet" in the Oracle Demantra Demand Management User's Guide.
Reviewing the NPI_SERIES_DATA Table:
1. Review the default definition of the NPI_SERIES_DATA table. If necessary, modify
the SOURCE_SERIES and TARGET_SERIES columns.. The source and target series
must exist in the same table (for example, SALES_DATA, MDP_MATRIX, and so
on).
Note: Two different definitions cannot have the same target series.
Only series defined on the following base tables are supported:
• MDP_MATRIX](https://image.slidesharecdn.com/oracledemantraimplementationguideparte22232-09-150517151115-lva1-app6892/85/Oracle-demantra-implementation-guide-part-e22232-09-363-320.jpg)


![23-10 Oracle Demantra Implementation Guide
then assigns it to a global variable that is visible in the application scope.
2. Parameter value: The parameter appserver_root exists by default in SYS_PARAMS
with a null value. If its value is non null, it will take precedence over the previously
calculated value.
3. Parameter description: The directory where the Demantra Web Application is
deployed. If it is NULL, the default is one folder above WEB-INF
4. Security: Regular users can read the parameter values in the Business Modeler, but
only consultants can modify them.
For example, the relative path: #appserver_root#optimization,
where #appserver_root# is defined as C:[demantra_install_directory]demantra
results in the physical path: C:[demantra_install_directory]demantraoptimization.
In this way, workflows can be pre-configured in an application independently of where
the application is eventually installed. In other words, C: drive versus D: drive, Oracle
folder versus demantra folder, and so on.
The appserver_root parameter can then be used by the executable step in a workflow
schema to run an executable file independently of where the application is eventually
installed, thus achieving functionality that is outside the prepackaged scope of the
Demantra platform.
For example: appserver_root='F:Program Files[demantra_install_directory]Custom'.
This takes precedence and every path that references the #appserver_root# token is
calculated relative to this parameter.
Note: This functionality works "out-of-the-box" on all Windows or
LINUX or UNIX files systems, provided Demantra is installed
cohesively, in other words, under one root folder. Any arrangement
deviating from that will require custom configuration.
Case 2: Using the application_root Parameter for Demantra Application
1. By default, this token takes its value from the existing installer-populated
parameter "AppServerLocation".
2. Parameter value: An additional parameter application_root in SYS_PARAMS. Its
default value is null. If its value is non null, it will take precedence over
AppServerLocation..
3. Parameter description: The directory where the Demantra Application is deployed.
If it is NULL, the value is taken from the AppServerLocation parameter setting.](https://image.slidesharecdn.com/oracledemantraimplementationguideparte22232-09-150517151115-lva1-app6892/85/Oracle-demantra-implementation-guide-part-e22232-09-430-320.jpg)
![Creating Workflows 23-11
4. Security: Regular users can read the parameter values in the Business Modeler, but
only consultants can modify them.
For example: application_root='F:Program
Files[demantra_install_directory]Custom'. This takes precedence and every path that
references the #application_root# token is calculated relative to this parameter.
Example
Example 1:
Assuming you have following path to Demantra WEB-INF:
F:[demantra_install_directory]CollaboratordemantraWEB-INF,
#appserver_root# will be dynamically assigned a value of:
F:[demantra_install_directory]Collaboratordemantra
Example
Example 2:
In order to run the Engine from an Exe Step, the following command line would be
leveraged:
#application_root#....Demand PlannerAnalytical
EnginesbinEngineManager.exe
• The .... path segment 'backs out' of the 'demantra' folder, and
then navigates to the appropriate Engine folder.
• Note that the workflow parameter is referenced as a token,
#application_root#.
Important: The selection of the value for the application_root parameter
must be such that all files referred to by the Workflow are in folders
below the common application_root.
Relative Path to Promotion Optimizer
To run Promotion Optimization in a new install, configure the parameters in the
OPLstep of the Call Promotion Optimizer workflow schema to leverage the
#application_root# parameter.
For example, the following parameters are passed to the OPLStep:
• Parameter: MODEL_PATH
• Value: #application_root#optimizationOPLpromoopt.opl
By default, the #application_root# parameter is left blank, or null. Therefore, if
Demantra is installed as C:[demantra_install_directory] with a virtual directory of](https://image.slidesharecdn.com/oracledemantraimplementationguideparte22232-09-150517151115-lva1-app6892/85/Oracle-demantra-implementation-guide-part-e22232-09-431-320.jpg)
![23-12 Oracle Demantra Implementation Guide
'demantra', this example parameter value results in the physical path:
C:[demantra_install_directory]CollaboratordemantraoptimizationOPLpromoop
t.opl
Deleting Workflow Schemas
You can delete any workflow schema that you created, as long as no instances of that
schema are currently running. You cannot delete schemas created by other users.
To delete a workflow schema:
1. Log onto the Workflow Editor as described in "Logging into the Workflow Manager
".
2. On the Workflow Management page, click Delete next to the schema.
3. Click OK to confirm the deletion.](https://image.slidesharecdn.com/oracledemantraimplementationguideparte22232-09-150517151115-lva1-app6892/85/Oracle-demantra-implementation-guide-part-e22232-09-432-320.jpg)


![29-2 Oracle Demantra Implementation Guide
Function Aggregating? Description Supported on
Decode (
expression, value1
[, return1, value2,
return2, ...],
defaultreturn)
No Matches
expression to the
test cases value1,
value2, and so
on, and returns
the return value
(return1, return2,
and so on) that
corresponds to
the matched
value.
No Yes
Lower (column) No Returns a string
in lower case.
Yes Yes
Ltrim (column) No Removes
characters from
the left side of
the string.
Yes Yes
Max (column) Yes* Returns the
maximum of the
values of a
group.
Yes Yes
Min (column) Yes* Returns the
minimum of the
values of a
group.
Yes Yes
Nvl (expression1,
expression2)
No If expression1 is
not null, returns
expression1.
Otherwise,
returns
expression2.
No Yes
Round (number [,
m])
No Rounds the
given number to
the specified
number m of
decimal places
(zero by default).
Yes Yes](https://image.slidesharecdn.com/oracledemantraimplementationguideparte22232-09-150517151115-lva1-app6892/85/Oracle-demantra-implementation-guide-part-e22232-09-556-320.jpg)
![Server Expression Functions and Operators 29-3
Function Aggregating? Description Supported on
Rtrim (column) No Removes
characters from
the right side of
the string.
Yes Yes
Safe_Division (
argument1,
argument2,
argument3)
No Custom function
created by
Oracle. This
function returns
argument1
divided by
argument2,
unless argument2
is null. If
argument2 is
null, then the
function returns
argument3.
Yes Yes
SubStr (
expression, start,
length)
No Returns the
substring of a
given length that
starts at the
given position.
No Yes
Sum (column) Yes** Returns the sum
of the values of a
group.
Yes Yes
Sysdate() No Returns the
current date and
time.
No Yes
To_char (date, [
format]) or
To_char (number,
[format])
No Returns the
input, a date or
number,
converted to a
string using the
given format.
No Yes
To_date (date, [
format])
No Returns a
formatted date.
No Yes](https://image.slidesharecdn.com/oracledemantraimplementationguideparte22232-09-150517151115-lva1-app6892/85/Oracle-demantra-implementation-guide-part-e22232-09-557-320.jpg)
![29-4 Oracle Demantra Implementation Guide
Function Aggregating? Description Supported on
To_number (date,
[format])
No Returns a
number.
No Yes
Upper (column) No Returns a string
in upper case.
Yes Yes
*If you use this function as the aggregating function for a series, the series should be
non-proportional. **If you use this function as the aggregating function for a series, the series
should be proportional. ***If you use this function as the aggregating function for a series, the
series should be non-editable.
Note: A server expression must be an aggregating expression that returns numeric, date,
string, or true/false values.
Note: If a series is going to be used within cached worksheets, its server expression cannot
return null or zero-length values. Use the expression to_number(null,0) to express null
values.
Note: In these reference sections, square brackets indicate optional parts of the syntax.
For details on these functions, consult the appropriate Oracle database documentation.
Operators in Server Expressions
You can use the following operators in a Oracle server expression:
• +
• -
• *
• /
• ()
• <
• <=](https://image.slidesharecdn.com/oracledemantraimplementationguideparte22232-09-150517151115-lva1-app6892/85/Oracle-demantra-implementation-guide-part-e22232-09-558-320.jpg)


![30-2 Oracle Demantra Implementation Guide
• Round
• RowCount
• Sqrt
• SummaryAVG
• SummaryCount
• SummaryMax
• SummaryMin
• SummarySum
• SummaryWAVG
• Today
• Truncate
• Year
• Z_Val
About This Reference
This appendix provides reference information for the operators and functions that are
allowed in client expressions.
• Edit-lock expressions must evaluate to true or false values.
• In these reference sections, square brackets indicate optional parts of the syntax.
Operators in Client Expressions
You can use the following operators in a client expression:
• +
• -
• *
• /
• ()
• []
• <](https://image.slidesharecdn.com/oracledemantraimplementationguideparte22232-09-150517151115-lva1-app6892/85/Oracle-demantra-implementation-guide-part-e22232-09-564-320.jpg)
![Client Expression Functions and Operators 30-3
• <=
• <>
• =
• >
• >=
• And
• Else
• In
• Not
• Or
• Then
• When
Precedence of calculations follows standard algebraic rules.
Finally, to specify a series, use either of the following syntaxes:
• series_name
• series_name[relative-time-bucket]
For example: Sales [ -1] refers to the previous period(column). Sales [ 1] refers to the next
period (column). [0] is not allowed.
Abs Function
Returns the absolute value of a number.
Syntax
• Abs (argument)
The value of argument must be either numeric or null.
• If argument is numeric, the function returns the absolute value of argument.
• If argument is null, the function returns null.](https://image.slidesharecdn.com/oracledemantraimplementationguideparte22232-09-150517151115-lva1-app6892/85/Oracle-demantra-implementation-guide-part-e22232-09-565-320.jpg)
![30-4 Oracle Demantra Implementation Guide
Case
Tests the values of a series or expression and returns values based on the results of the
test. If more than one WHEN clause matches the given input, the function returns the
result corresponding to the first matching one.
Syntax
• Case ( test WHEN value1 THEN result1 [ WHEN value2 THEN result2] [ additional
WHEN-THEN clauses] [ ELSE else ] )
The square brackets indicate optional parts of the syntax. The arguments are as follows:
• testis the series or expression whose values you want to test. You can use a column
name or a column number preceded by a pound sign (#).
• value1, value2, and so on are possible values that test can have. Each value can be
any of the following:
• A single value
• A list of values separated by commas (for example, 2, 4, 6, 8)
• IS followed by a relational operator and comparison value (for example, IS>5)
• Any combination of the preceding expressions, separated by commas (for
example, 1,3,5,7,9, IS>42)
In this case, the function implicitly behaves as if the expressions were combined
by a logical OR.
• result1, result2, and so on are the results to return for the possible values. For
example, if test evaluates to value1, then the function returns result1. All returned
values must have the same data type.
• else specifies the value to return if test does not equal any of the given cases (value1,
value2, and so on). The default for else is null.
Examples
The following expressions are valid uses of Case:
• Case ( Input1 When is > 1 Then 10 When 2 Then 20 Else 30 ) Case ( Input1 When is <
10 Then 5 When is < 20 Then 50 ) Case ( Input1 When is > 100, is < 0 Then 5 Else 30 )
Case ( Input1 When is > 1 Then 10 )
See also
• "If"](https://image.slidesharecdn.com/oracledemantraimplementationguideparte22232-09-150517151115-lva1-app6892/85/Oracle-demantra-implementation-guide-part-e22232-09-566-320.jpg)


![30-8 Oracle Demantra Implementation Guide
Date Inventory
(SupplyTinv)
Forecast
(SupplyTinvFinalFcs
t)
Third Series with
FPOS
April 6
Fpos = 5 + 4 + 6*0.5 = 2.5. The inventory (12) will cover the forecast for 2.5 periods.
Fsum
Returns a series that adds multiple future consecutive items from a given series. The
second argument, either a number or another series, specifies the number of time
periods to use for each sum.
Note: You cannot use this function in color expressions.
Syntax
• Fsum (series , count)
The arguments are as follows:
• Series should be an actual series name.
• Count should be either a numeric series or an actual integer between 1 and 15,
inclusively. If count is more than 15, the function returns null.
The parameters can be only the names of data series or actual values. It is not permitted
to enter other functions or [ ] brackets inside the FSUM function.
Examples
• Fsum (Series1, Series2)](https://image.slidesharecdn.com/oracledemantraimplementationguideparte22232-09-150517151115-lva1-app6892/85/Oracle-demantra-implementation-guide-part-e22232-09-570-320.jpg)


![31-12 Oracle Demantra Implementation Guide
Java Class Functions
The Java class should contain these two functions:
• public int executeStep() { write your code here }
setParameters(Hashtable params) { write your code here }
The workflow step executes the executeStep() function.
setParameters(Hashtable params) defines parameters for the class. This function is
called before execution.
Available Arguments
If a user has launched the workflow from within a worksheet, Demantra automatically
passes arguments to the workflow.
Example
• package com.demantra.workflow.step;
import com.demantra.workflow.parameters.*;
public class SampleCustomStep implements CustomStep
{
public SampleCustomStep() {}
public int executeStep(Parameter[] parms)
{
int i, length = parms != null ? parms.length : 0;
for(i=0; i<length; i++)
System.out.println("Parameter name : " + parms[i].getName() + " value: " +
parms[i].getValue());
// write your own logic here
// ......................
return LinkedStep.ST_COMPLETED;
}
}
Notes
If a step ends before the Check Finish After period, or during a Check Finish Every
period, then the Workflow Engine still waits for that counter to finish before checking if
the step has finished.
In timers, a month is measured as a calendar month.](https://image.slidesharecdn.com/oracledemantraimplementationguideparte22232-09-150517151115-lva1-app6892/85/Oracle-demantra-implementation-guide-part-e22232-09-596-320.jpg)


![Administering Demantra 41-7
table, in place of:
• frodo, pass the name of the Web server that runs the on which Oracle Demantra
Web software
• 8080, pass the port number that you are using
• demantra, pass the name of the virtual directory that is the root of the Oracle
Demantra Web software
After the table, there is an explanation of the parameters to use in each
Function Example URL
Collaborator Workbench http://
frodo:8080/demantra/portal/
directLogin.jsp?user=<username>&pa
ss=<password>
Demand Planner http://frodo:8080/demantra/portal/
partnerLogin.jsp[?user=<userID>&pa
ss=<password>&…]
This table lists the parameters that the Collaborator Workbench direct login function
uses. Both parameters are mandatory and neither has a default value.
Parameter Name Description
user Username
pass Password of the user account
This table lists the parameters that the Demand Planner direct function uses. All
parameters are optional and none have a default value.
Parameter Name Description
userID Username
pass Password of the user account
queryId ID of worksheet to open](https://image.slidesharecdn.com/oracledemantraimplementationguideparte22232-09-150517151115-lva1-app6892/85/Oracle-demantra-implementation-guide-part-e22232-09-799-320.jpg)


Ad
More Related Content
What's hot (20)
Viewers also liked (19)


Ad
Similar to Oracle demantra implementation guide part e22232 09 (20)


Ad
Recently uploaded (20)


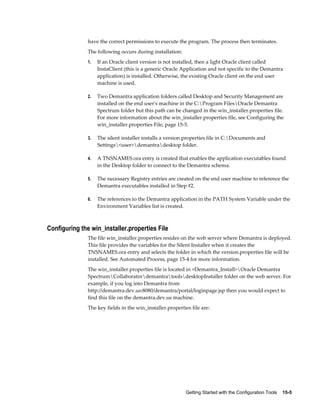
Oracle demantra implementation guide part e22232 09
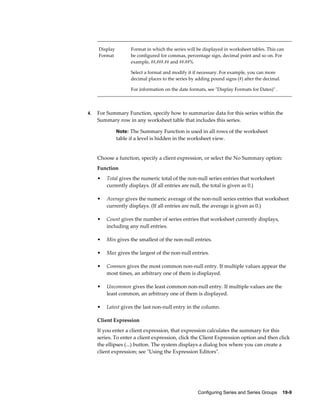
- 1. Oracle® Demantra Implementation Guide Release 12.2 Part No. E22232-09 August 2014
- 2. Oracle Demantra Implementation Guide, Release 12.2 Part No. E22232-09 Copyright © 2014, Oracle and/or its affiliates. All rights reserved. Primary Author: Greg Watkins Contributing Author: Kyle MacLean, Jason Lansdowne Oracle and Java are registered trademarks of Oracle and/or its affiliates. Other names may be trademarks of their respective owners. Intel and Intel Xeon are trademarks or registered trademarks of Intel Corporation. All SPARC trademarks are used under license and are trademarks or registered trademarks of SPARC International, Inc. AMD, Opteron, the AMD logo, and the AMD Opteron logo are trademarks or registered trademarks of Advanced Micro Devices. UNIX is a registered trademark of The Open Group. This software and related documentation are provided under a license agreement containing restrictions on use and disclosure and are protected by intellectual property laws. Except as expressly permitted in your license agreement or allowed by law, you may not use, copy, reproduce, translate, broadcast, modify, license, transmit, distribute, exhibit, perform, publish, or display any part, in any form, or by any means. Reverse engineering, disassembly, or decompilation of this software, unless required by law for interoperability, is prohibited. The information contained herein is subject to change without notice and is not warranted to be error-free. If you find any errors, please report them to us in writing. If this is software or related documentation that is delivered to the U.S. Government or anyone licensing it on behalf of the U.S. Government, the following notice is applicable: U.S. GOVERNMENT END USERS: Oracle programs, including any operating system, integrated software, any programs installed on the hardware, and/or documentation, delivered to U.S. Government end users are "commercial computer software" pursuant to the applicable Federal Acquisition Regulation and agency-specific supplemental regulations. As such, use, duplication, disclosure, modification, and adaptation of the programs, including any operating system, integrated software, any programs installed on the hardware, and/or documentation, shall be subject to license terms and license restrictions applicable to the programs. No other rights are granted to the U.S. Government. This software or hardware is developed for general use in a variety of information management applications. It is not developed or intended for use in any inherently dangerous applications, including applications that may create a risk of personal injury. If you use this software or hardware in dangerous applications, then you shall be responsible to take all appropriate fail-safe, backup, redundancy, and other measures to ensure its safe use. Oracle Corporation and its affiliates disclaim any liability for any damages caused by use of this software or hardware in dangerous applications. This software or hardware and documentation may provide access to or information on content, products, and services from third parties. Oracle Corporation and its affiliates are not responsible for and expressly disclaim all warranties of any kind with respect to third-party content, products, and services. Oracle Corporation and its affiliates will not be responsible for any loss, costs, or damages incurred due to your access to or use of third-party content, products, or services.
- 3. iii Contents Send Us Your Comments Preface Part 1 Concepts and Tools 1 Introduction to Demantra Demantra Platform and Applications.......................................................................................1-1 Extending your Demantra Application.....................................................................................1-2 Elements of a Demantra Solution............................................................................................. 1-2 Integration................................................................................................................................. 1-6 Workflow................................................................................................................................... 1-6 How the User Interfaces Can Be Configured........................................................................... 1-7 2 Core Concepts Worksheets................................................................................................................................ 2-1 The Basic Input Data................................................................................................................. 2-3 Time Resolution........................................................................................................................ 2-3 Levels......................................................................................................................................... 2-3 Combinations............................................................................................................................ 2-4 Series.......................................................................................................................................... 2-5 Filtering and Exceptions............................................................................................................2-6 Methods..................................................................................................................................... 2-8 Security...................................................................................................................................... 2-8 Forecasting................................................................................................................................. 2-9
- 4. iv 3 How Demantra Calculates and Stores Data How Data Is Stored................................................................................................................... 3-1 How Data Is Calculated at the Lowest Level............................................................................ 3-2 How Data Is Calculated at Higher Levels.................................................................................3-3 How Proportions Are Chosen................................................................................................... 3-5 How Proportions Are Used....................................................................................................... 3-6 How Splitting Handles Null Values.........................................................................................3-7 How Splitting Handles Zero Values.........................................................................................3-7 When and How Data Is Saved to the Database........................................................................ 3-8 4 Multiple Language Support Overview................................................................................................................................... 4-1 Loading Translations.................................................................................................................4-7 Using the Translation Utility.................................................................................................. 4-15 5 Implementation Tools and Process Overview of Tools..................................................................................................................... 5-1 Initial Phase of Implementation............................................................................................... 5-5 Middle Phase of Implementation............................................................................................. 5-5 End Phase of Implementation................................................................................................... 5-9 Hand-off Details........................................................................................................................ 5-9 6 Levels Introduction............................................................................................................................... 6-1 Level Terminology.................................................................................................................... 6-4 Hierarchy Variations................................................................................................................. 6-5 Types of Levels.......................................................................................................................... 6-6 Members.................................................................................................................................... 6-9 Member Identifiers................................................................................................................. 6-10 Introduction to the Data Model Wizard................................................................................. 6-12 Levels and the Forecast Tree................................................................................................... 6-13 Filtered Levels......................................................................................................................... 6-14 Other Concepts Related to Levels........................................................................................... 6-14 Configuration Notes................................................................................................................ 6-15 7 Series Introduction............................................................................................................................... 7-2 Main Series Options..................................................................................................................7-2
- 5. v Data Types of Series.................................................................................................................. 7-3 Types of Series.......................................................................................................................... 7-3 Naming Series........................................................................................................................... 7-5 Update Field.............................................................................................................................. 7-5 Editability.................................................................................................................................. 7-6 Series Calculation: Server Expressions..................................................................................... 7-6 Series Calculation: Client Expressions..................................................................................... 7-9 Series Calculation: Using Both Server and Client Expressions............................................. 7-11 Series Calculation: Proportionality Option............................................................................ 7-12 Summary of Calculation Options........................................................................................... 7-13 Display Properties................................................................................................................... 7-19 Color Expressions.................................................................................................................... 7-19 Display Precision and Format................................................................................................. 7-19 Display-Only Summaries........................................................................................................7-19 Configuring the Display-Only Summary...............................................................................7-21 Other Basic Series Options..................................................................................................... 7-23 Advanced Series Options........................................................................................................ 7-24 Preserving Promotional Data While Moving or Copying......................................................7-24 The Aggregated Base Level Option........................................................................................ 7-28 Extra From and Extra Where....................................................................................................7-29 Note and Promotion Indicators...............................................................................................7-30 Series Groups.......................................................................................................................... 7-30 Configuration Notes................................................................................................................ 7-31 8 Units, Indexes, and Exchange Rates Introduction............................................................................................................................... 8-1 Unit Conversion Data................................................................................................................8-2 How Units Are Used..................................................................................................................8-3 Time Units................................................................................................................................. 8-3 Viewing Calendar Months in a Weekly System...................................................................... 8-5 Enabling Calendar Month Support.......................................................................................... 8-8 Setting and Modifying the Base Time Unit............................................................................8-11 Unit-Level Association............................................................................................................ 8-13 Indexes and Exchange Rates................................................................................................... 8-13 Configuration Notes................................................................................................................ 8-13 9 Worksheets Introduction............................................................................................................................... 9-1 Main Worksheet Options.......................................................................................................... 9-2 Elements of a Worksheet View................................................................................................. 9-5
- 6. vi Level Layout in a View..............................................................................................................9-6 Filtering per View..................................................................................................................... 9-8 Level and Worksheet Association: Embedded Worksheets..................................................... 9-8 Worksheet and Layout Ownership........................................................................................... 9-9 Worksheet Caching................................................................................................................. 9-12 Configuration Notes................................................................................................................ 9-14 10 Methods and Workflow Introduction............................................................................................................................. 10-1 Overview of Method Types.................................................................................................... 10-3 Overview of Workflow Step Types........................................................................................ 10-6 Typical Step Properties......................................................................................................... 10-10 Passing Arguments to a Method........................................................................................... 10-11 Workflow Schema Examples................................................................................................ 10-15 Configuration Notes.............................................................................................................. 10-16 11 Security Data Security........................................................................................................................... 11-1 Feature Security....................................................................................................................... 11-4 Other Security Features........................................................................................................... 11-9 Program Groups.................................................................................................................... 11-10 Configuration Notes.............................................................................................................. 11-11 Password Policy..................................................................................................................... 11-11 12 Proport Overview................................................................................................................................. 12-1 How You Can Tune the Proport Mechanism..........................................................................12-3 Calculating the Rolling Average Demand..............................................................................12-3 Calculating the Monthly Proportions..................................................................................... 12-3 Calculating the Average Daily Demand for Each Month...................................................... 12-4 Handling Data Issues.............................................................................................................. 12-6 Which Combinations Are Affected.........................................................................................12-9 Other Notes on the Proport Mechanism............................................................................... 12-10 Proport when using Engine Profiles..................................................................................... 12-11 Proport When Forecasting on General Levels...................................................................... 12-11
- 7. vii Part 2 Integration 13 General Integration Guidelines "Open With" Worksheets........................................................................................................ 13-1 Worksheet Filters.....................................................................................................................13-1 Changing System Time Resolution........................................................................................ 13-2 Analytical Engine Guidelines................................................................................................. 13-4 DM application default users................................................................................................. 13-5 The SysAdmin User Account.................................................................................................. 13-6 Controlling System and Engine Max Sales Dates.................................................................. 13-7 14 Demantra Data Tables and Integration Processes Demantra Data Tables.............................................................................................................14-1 Data Assumptions and Requirements.................................................................................... 14-3 Loading Basic Data.................................................................................................................. 14-5 Loading Series and Promotions.............................................................................................. 14-6 Executing Integration Interfaces............................................................................................. 14-6 Configure Series Load and Purge Options........................................................................... 14-14 Loading Supplementary Data............................................................................................... 14-17 Exporting Data....................................................................................................................... 14-18 Configuration Notes.............................................................................................................. 14-19 Part 3 Basic Configuration 15 Getting Started with the Configuration Tools About Demantra Configuration Tools....................................................................................15-1 Illegal Characters in Demantra............................................................................................... 15-3 Automatic Installation of the Demand Planner and Business Modeler Applications..........15-4 Logging Onto the Business Modeler...................................................................................... 15-8 Refreshing the Data in the Business Modeler........................................................................ 15-8 Working with Lists.................................................................................................................. 15-8 Configuring Parameters.......................................................................................................... 15-9 Making Changes Available to Users.................................................................................... 15-10 Quitting Business Modeler................................................................................................... 15-11 Logging into the Workflow Manager................................................................................... 15-11 Quitting the Workflow Manager.......................................................................................... 15-11 Setting Browser Locale ......................................................................................................... 15-11
- 8. viii 16 Database Tools Creating a Table...................................................................................................................... 16-1 Modifying a Table................................................................................................................... 16-2 Recompiling the Database Functions and Procedures........................................................... 16-3 Viewing the Procedure Error Log........................................................................................... 16-3 Wrapping Database Procedures.............................................................................................. 16-5 Cleaning Up Temporary Tables..............................................................................................16-6 Monitoring Oracle Sessions.................................................................................................... 16-6 Index Adviser.......................................................................................................................... 16-6 17 Using the Data Model Wizard About the Data Model Wizard................................................................................................ 17-2 Before Using the Data Model Wizard.....................................................................................17-2 Getting Started with the Data Model Wizard........................................................................ 17-3 Describing the Staging Tables................................................................................................ 17-4 Specifying the Structure of the Staging Tables...................................................................... 17-6 Joining Multiple Source Files or Tables................................................................................. 17-8 Defining the Minimal Required Data Model.......................................................................17-10 Declaring the Sales Date....................................................................................................... 17-10 Declaring the Sales Quantity................................................................................................ 17-10 Defining an Item Level and a Location Level.......................................................................17-11 Saving the Data Model.......................................................................................................... 17-12 Defining Additional Elements..............................................................................................17-13 Declaring the Unit Price........................................................................................................ 17-13 Defining a Unit of Measure.................................................................................................. 17-14 Adding Higher Levels........................................................................................................... 17-14 Adding Level Attributes....................................................................................................... 17-15 Defining Other Values.......................................................................................................... 17-16 Impacts of Changing Levels, Series, and Units.................................................................... 17-16 Navigating the Data Model................................................................................................... 17-21 Building the Data Model.......................................................................................................17-22 Loading the Data into the Data Model................................................................................. 17-24 Manipulating Existing Data Models.....................................................................................17-24 18 Configuring Levels Before Configuring Levels...................................................................................................... 18-1 Creating a Level....................................................................................................................... 18-2 Filtering a Level....................................................................................................................... 18-4 Configuring an Existing Level................................................................................................ 18-6
- 9. ix Adding Attributes to a Level...................................................................................................18-9 Dropdown Security............................................................................................................... 18-12 Filtering an Attribute Drop-down List................................................................................. 18-14 Specifying Default Parents for a New Member................................................................... 18-15 Adding a Population Attribute to a General Level.............................................................. 18-18 Creating a time aggregation.................................................................................................. 18-21 Examples of General Level Data Preservation..................................................................... 18-22 Viewing the Members of a Level.......................................................................................... 18-22 Removing Levels................................................................................................................... 18-23 19 Configuring Series and Series Groups Before Configuring Series.......................................................................................................19-2 Creating a Series...................................................................................................................... 19-2 Creating a New Series Based on an Existing Series............................................................... 19-5 Specifying General Properties of a Series.............................................................................. 19-5 Specifying How to Display a Series....................................................................................... 19-8 Configuring a Dropdown-Style Series................................................................................. 19-12 Filtering a Series Drop-down List.........................................................................................19-14 Specifying Data Properties of a Series..................................................................................19-16 Using the Expression Editors................................................................................................ 19-22 Syntax of Server Expressions................................................................................................ 19-23 Syntax of Client Expressions.................................................................................................19-24 Specifying Server and Client Expressions............................................................................19-25 Creating an Edit-Lock Expression......................................................................................... 19-28 Creating a Color Expression.................................................................................................. 19-29 Controlling Access to Series..................................................................................................19-32 Configuring Desktop Group Expressions............................................................................ 19-33 Deleting a Series....................................................................................................................19-35 Enabling Series Caching By Item......................................................................................... 19-35 Specifying the Order of Series in Dynamic Open Link....................................................... 19-35 Creating or Modifying a Series Group................................................................................. 19-37 Deleting a Series Group........................................................................................................ 19-37 Viewing Dependencies Among Series................................................................................. 19-37 Creating a Series that Displays as a Link............................................................................. 19-39 Display Series as a Link........................................................................................................ 19-41 Configuring New Product Launches.................................................................................... 19-41 20 Configuring Units, Indexes, and Update-Lock Expressions Before Configuring Units and Indexes................................................................................... 20-1 Configuring Indexes and Exchange Rates.............................................................................. 20-1
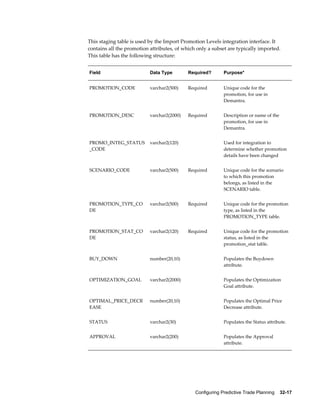
- 10. x Editing Values for Indexes and Exchange Rates.................................................................... 20-4 Configuring Units................................................................................................................... 20-5 Associating Units with Levels.................................................................................................20-8 Configuring Time Units........................................................................................................ 20-10 Configuring Update-Lock Expressions.................................................................................20-11 21 Series and Level Integration Before Using the Integration Interface Wizard...................................................................... 21-1 Creating or Modifying an Integration Interface.....................................................................21-2 Creating a Data Import Profile................................................................................................21-4 Creating a Data Export Profile.............................................................................................. 21-10 Specifying Series Data to Import or Export.......................................................................... 21-14 Creating an Export Profile for Any Level............................................................................. 21-19 Creating an Import Profile for a General Level....................................................................21-23 Deleting an Integration Interface..........................................................................................21-27 Details of the Staging Tables................................................................................................ 21-28 Executing an Integration Interface........................................................................................21-34 Checking the Integration Queue...........................................................................................21-35 22 Importing Supplementary Data Creating or Modifying a File Load Interface.......................................................................... 22-1 Deleting a File Load Interface................................................................................................. 22-2 Creating an Import Profile...................................................................................................... 22-2 Creating the Import Batch File................................................................................................ 22-4 23 Creating Workflows Creating or Editing Workflow Schemas................................................................................. 23-1 Parameters Used as Arguments for a Workflow.................................................................... 23-4 Deleting Workflow Schemas................................................................................................ 23-12 24 Configuring Methods Configuring a New Level Method.......................................................................................... 24-1 Passing Arguments to a Method............................................................................................. 24-9 Modifying a Level Method................................................................................................... 24-11 Deleting a Level Method....................................................................................................... 24-12 25 Using the Desktop BLE User Interface Overview of the Business Logic Engine................................................................................. 25-1
- 11. xi 26 Non-Engine Parameters About These Parameters......................................................................................................... 26-1 System Parameters...................................................................................................................26-1 27 Database Procedures Recommended Procedure Scheduling.................................................................................... 27-2 Data Load Procedures..............................................................................................................27-3 ANALYZE_SCHEMA..............................................................................................................27-4 API_CONFIG_SETTLEMENT................................................................................................ 27-4 APPPROC_CDP_LAUNCH_MGMT_VIEWS........................................................................ 27-4 APPPROC_SET_POPULATION_DATES.............................................................................. 27-4 APPPROC_REBUILD_CONTEXT_CACHES.........................................................................27-4 CHAINING............................................................................................................................. 27-6 CHECK_REORG..................................................................................................................... 27-6 CLEAN_ENGINE_PROFILES................................................................................................. 27-7 CLEAN_LOG_TABLES........................................................................................................... 27-9 COMPUTE_STD_ERR............................................................................................................ 27-9 CREATE_OPT_STRUCT......................................................................................................... 27-9 CREATE_PE_STRUCT.......................................................................................................... 27-10 DELETE_FORE_COL............................................................................................................ 27-10 DELETE_INVALID_GL_POPULATION............................................................................. 27-10 DROP_TEMP_TABLES......................................................................................................... 27-10 EP_LOAD_MAIN.................................................................................................................. 27-10 EP_LOAD_MDP_LEVEL.......................................................................................................27-11 EP_LOAD_ITEMS................................................................................................................. 27-14 EP_LOAD_LOCATIONS...................................................................................................... 27-17 EP_LOAD_SALES................................................................................................................. 27-20 EXECUTE_PROFILES........................................................................................................... 27-29 EXPOSE_PROMOTIONS..................................................................................................... 27-29 INSERT_UNITS.................................................................................................................... 27-29 MANUALS_INS.................................................................................................................... 27-31 MANUALS_INS_INTEGRATION....................................................................................... 27-31 MANUALS_INS_RECOVERY..............................................................................................27-31 MDP_ADD............................................................................................................................ 27-31 POP_ALL_MATCH_PROPOSAL......................................................................................... 27-40 POP_OI_MATCH_PROPOSAL............................................................................................ 27-40 PROPORT.............................................................................................................................. 27-41 PRE_LOGON......................................................................................................................... 27-41 REBUILD_INDEXES............................................................................................................. 27-41
- 12. xii REBUILD_SCHEMA............................................................................................................. 27-42 REBUILD_TABLES............................................................................................................... 27-42 REORG.................................................................................................................................. 27-42 REPLACE_APOSTROPHE_LEVELS.................................................................................... 27-44 SCHEDULED_CLEANUP_TASKS....................................................................................... 27-44 UPGRADE_TO_SHAPE_MODELLING.............................................................................. 27-44 Non-Engine parameters Related to Database Performance................................................. 27-46 28 Key Tables Sales_Data............................................................................................................................... 28-1 Mdp_matrix............................................................................................................................. 28-3 Promotion_Data.....................................................................................................................28-10 29 Server Expression Functions and Operators Supported SQL Functions....................................................................................................... 29-1 Operators in Server Expressions............................................................................................. 29-4 Oracle Tokens.......................................................................................................................... 29-5 30 Client Expression Functions and Operators About This Reference..............................................................................................................30-2 Operators in Client Expressions............................................................................................. 30-2 Abs Function............................................................................................................................30-3 Case.......................................................................................................................................... 30-4 CurrentRow............................................................................................................................. 30-5 Date.......................................................................................................................................... 30-6 Day........................................................................................................................................... 30-6 Exp........................................................................................................................................... 30-6 ForecastFirstRow..................................................................................................................... 30-7 Fpos.......................................................................................................................................... 30-7 Fsum.........................................................................................................................................30-8 GetRow.................................................................................................................................... 30-9 GetWorksheetLevelNumber................................................................................................. 30-10 If............................................................................................................................................. 30-12 Is_Modified........................................................................................................................... 30-12 IsNull..................................................................................................................................... 30-13 Mod........................................................................................................................................ 30-13 Month.................................................................................................................................... 30-13 Pi............................................................................................................................................ 30-14 Rand....................................................................................................................................... 30-14 Round.................................................................................................................................... 30-15
- 13. xiii RowCount.............................................................................................................................. 30-16 Sqrt.........................................................................................................................................30-16 SummaryAVG....................................................................................................................... 30-16 SummaryCount..................................................................................................................... 30-17 SummaryMax........................................................................................................................ 30-17 SummaryMin.........................................................................................................................30-17 SummarySum........................................................................................................................ 30-17 SummaryWAVG................................................................................................................... 30-18 Today..................................................................................................................................... 30-18 Truncate................................................................................................................................. 30-18 Year........................................................................................................................................ 30-19 Z_Val......................................................................................................................................30-20 31 Workflow Steps Specifying a Task.................................................................................................................... 31-2 BLE Step...................................................................................................................................31-3 Condition Step.........................................................................................................................31-5 Container Step......................................................................................................................... 31-7 Create Member Step................................................................................................................ 31-9 Custom Step...........................................................................................................................31-10 Delete Member Step..............................................................................................................31-13 Edit Member Step..................................................................................................................31-13 Email Step.............................................................................................................................. 31-14 Exception Step....................................................................................................................... 31-16 Executable Step......................................................................................................................31-19 Group Step.............................................................................................................................31-21 Launch Workflow Step......................................................................................................... 31-24 Message Step......................................................................................................................... 31-29 Paste Member Step................................................................................................................ 31-30 Population Attribute Step..................................................................................................... 31-31 Refresh Population Step....................................................................................................... 31-31 Selection Step........................................................................................................................ 31-33 Simulation Step..................................................................................................................... 31-36 Stored Procedure Step........................................................................................................... 31-39 Transfer Step......................................................................................................................... 31-41 Update Data Step...................................................................................................................31-42 User Access Control Step...................................................................................................... 31-42 User Step................................................................................................................................ 31-44 Wait Until Step...................................................................................................................... 31-47 Worksheet Cache Step...........................................................................................................31-50
- 14. xiv Worksheet Step......................................................................................................................31-53 Part 4 Configuring Specific Applications 32 Configuring Predictive Trade Planning Defining a Promotion Calendar..............................................................................................32-1 Overview of Promotion Effectiveness.................................................................................... 32-6 Overview of the Configuration Process..................................................................................32-7 Configuring Levels for Promotion Effectiveness................................................................... 32-7 Setting Parameters................................................................................................................... 32-7 Configuring the Activity Browser...........................................................................................32-8 Configuring the Application Server....................................................................................... 32-9 Configuring Promotion Statuses............................................................................................ 32-9 Loading Promotion Data....................................................................................................... 32-11 Reference: PE Levels..............................................................................................................32-11 PTP Data Needs..................................................................................................................... 32-13 Integration in PTP................................................................................................................. 32-15 Reference: Staging Tables..................................................................................................... 32-15 Reference: Integration Interfaces.......................................................................................... 32-21 Configuring the Default Promotion Start and Span............................................................ 32-22 Changing the Default Retailer Profile.................................................................................. 32-22 Configuring the Right-Click "Open With" Option.............................................................. 32-23 Removing Right-Click Menu Options..................................................................................32-25 Replacing Collaborator Workbench Graphics..................................................................... 32-25 Configuring Promotion Status Behavior.............................................................................. 32-26 Re-configuring Series if Syndicated Data Is Not Used........................................................ 32-28 Configuring Promotion Population Entry............................................................................ 32-32 33 Configuring Promotion Optimization for Predictive Trade Planning Overview of the Configuration Process..................................................................................33-1 Set Up Promotion Optimization Without Using the Installer............................................... 33-1 Configuring the Optimization Step........................................................................................33-2 Other Important Notes............................................................................................................ 33-8 34 Configuring Deductions and Settlement Management Overview of DSM................................................................................................................... 34-1 Data Flow in DSM................................................................................................................... 34-4 Overview of the Configuration Process..................................................................................34-5 Setting Up Database Structures.............................................................................................. 34-6
- 15. xv Configuring Promotions and Promotion Series..................................................................... 34-8 Identifying Key Promotion Series........................................................................................ 34-11 Configuring Settlement Matching........................................................................................ 34-11 Configuring Write-Offs.........................................................................................................34-12 Loading Initial Data and Creating Possible Matches...........................................................34-13 Describing Customer Relationships..................................................................................... 34-14 In Case of Problems...............................................................................................................34-14 Reference: DSM Levels......................................................................................................... 34-15 Reference: DSM Series.......................................................................................................... 34-23 Reference: DSM Integration Interfaces................................................................................ 34-23 Reference: Other DSM Tables.............................................................................................. 34-31 Part 5 Other Configuration 35 Fine Tuning and Scaling Demantra Overview................................................................................................................................. 35-1 Basic Parameters...................................................................................................................... 35-1 Application Server...................................................................................................................35-1 Collaborator Workbench......................................................................................................... 35-2 Database.................................................................................................................................. 35-5 Date/Time Formats................................................................................................................ 35-13 Email...................................................................................................................................... 35-15 Integration............................................................................................................................. 35-17 Item Aggregation................................................................................................................... 35-18 Logs and Old Data................................................................................................................. 35-19 Proport Mechanism............................................................................................................... 35-19 EngineOutputThreshold....................................................................................................... 35-22 Simulation............................................................................................................................. 35-22 Solution Branding................................................................................................................. 35-23 Threading.............................................................................................................................. 35-24 Workflow............................................................................................................................... 35-27 Worksheets............................................................................................................................ 35-28 Configuring User Productivity Kit (UPK) ........................................................................... 35-33 36 Customizing Demantra Web Pages Logging onto the Collaborator Workbench Administrator....................................................36-1 Configuring Menus in Collaborator Workbench................................................................... 36-2 Running Oracle Executables from Collaborator Menus........................................................ 36-6 Configuring the Panes.............................................................................................................36-7
- 16. xvi Specifying Content Pane Security........................................................................................ 36-10 Replacing Default Demantra Graphics................................................................................ 36-10 Customizing the Collaborator Workbench Login Page....................................................... 36-12 Configuring Links in Collaborator Workbench................................................................... 36-12 37 Configuring Rolling Data About Rolling Data................................................................................................................. 37-1 Creating or Modifying Rolling Data Profiles.........................................................................37-2 Executing Rolling Data Profiles.............................................................................................. 37-3 Creating Rolling Data Profile Groups.................................................................................... 37-4 38 GL Synchronization Overview................................................................................................................................. 38-1 39 Performing Constraint Profit Optimization About Constraint Profit Optimization....................................................................................39-1 Creating or Modifying an Optimization Profile.................................................................... 39-2 Deleting a Constraint Optimization Profile........................................................................... 39-8 Running a Constraint Optimization Profile........................................................................... 39-8 40 Creating a Demand Variability Process Creating a Demand Variability Process..................................................................................40-1 Part 6 Administration 41 Administering Demantra Keeping the System Running................................................................................................. 41-1 Periodic Maintenance Tasks................................................................................................... 41-2 Data Cleanup Script................................................................................................................ 41-3 Demantra URLs....................................................................................................................... 41-5 Log Files and Tables................................................................................................................ 41-9 Illegal Characters in Demantra............................................................................................. 41-10 Required Third-Party Software............................................................................................ 41-10 42 Managing Security Creating or Modifying a Component..................................................................................... 42-1 Deleting a Component.......................................................................................................... 42-10 Creating or Modifying a User............................................................................................... 42-10
- 17. xvii Copying a User...................................................................................................................... 42-16 Deleting a User...................................................................................................................... 42-17 Creating or Modifying a User Group....................................................................................42-17 Deleting a Group................................................................................................................... 42-20 Providing Access to the Workflow Editor............................................................................ 42-21 Logging onto the Collaborator Workbench Administrator..................................................42-22 Defining a Program Group................................................................................................... 42-22 Redefining a Program Group................................................................................................ 42-26 Deleting a Program Group.................................................................................................... 42-27 Specifying Permissions for Menu Items.............................................................................. 42-27 Logging Out Users.................................................................................................................42-30 43 Managing Workflows Viewing Workflow Status.......................................................................................................43-1 Starting Workflow Instances.................................................................................................. 43-3 Scheduling Workflow Instances............................................................................................. 43-3 Stopping Workflow Instances................................................................................................ 43-6 Creating or Editing a Schema Group...................................................................................... 43-7 Deleting a Schema Group....................................................................................................... 43-8 Viewing the Workflow Process Log....................................................................................... 43-9 Recovery and the Workflow Engine....................................................................................... 43-9 Web Services for Demantra Workflows............................................................................... 43-10 44 Managing Worksheets Viewing the Worksheets......................................................................................................... 44-1 Changing Worksheet Ownership........................................................................................... 44-2 Changing Worksheet Access................................................................................................... 44-2 Deleting a Worksheet.............................................................................................................. 44-3 45 Other Administration Other Web-based Administration Tools................................................................................ 45-1 Logging Messages of the Application Server......................................................................... 45-2 Managing Level Caching........................................................................................................ 45-3 Refreshing the Cache for Specific Levels............................................................................45-6 Viewing and Modifying Cache Properties............................................................................. 45-8 Changing the Default User Interface Settings......................................................................45-11 46 Using the Oracle Demantra Business Application Language Overview................................................................................................................................. 46-1
- 18. xviii Using the BAL Explorer...........................................................................................................46-3 BAL Explorer Screen Elements.......................................................................................... 46-3 Understanding Objects, Schemas, Folders, Files and Repositories..............................46-4 Schema Procedures............................................................................................................ 46-7 Folder Procedures............................................................................................................ 46-11 Using BAL to Upgrade when Running the Demantra Installer...........................................46-13 Overview......................................................................................................................... 46-13 Running the Business Modeler as Part of the Upgrade Process.......................................46-15 Defining Schema Object Exceptions.................................................................................46-15 Setting the Global Upgrade Preferences.......................................................................... 46-17 Upgrading the Objects in a Folder................................................................................... 46-28 Upgrading Schemas......................................................................................................... 46-29 Using BAL to Migrate Application Objects..........................................................................46-35 Building the BAL Repository........................................................................................... 46-35 Migrating Objects Using a Standard Upgrade Folder......................................................46-35 Migrating Objects using a Custom Upgrade Folder........................................................ 46-37 Loading and Saving BAL Packages................................................................................. 46-39 Validating Packages......................................................................................................... 46-39 Troubleshooting.................................................................................................................... 46-40 47 Tips and Troubleshooting Initial Logon to Demantra....................................................................................................... 47-1 About Demantra Configuration Settings............................................................................... 47-3 Key Settings Controlled by the Installer................................................................................ 47-3 Redirecting Demantra to a Different Database...................................................................... 47-6 Java Tips.................................................................................................................................. 47-6 Tomcat Tips............................................................................................................................. 47-8 Error Messages or Trouble Descriptions................................................................................ 47-9 A Key Tables T_SRC Tables............................................................................................................................ A-1 Index
- 19. xix Send Us Your Comments Oracle Demantra Implementation Guide, Release 12.2 Part No. E22232-09 Oracle welcomes customers' comments and suggestions on the quality and usefulness of this document. Your feedback is important, and helps us to best meet your needs as a user of our products. For example: • Are the implementation steps correct and complete? • Did you understand the context of the procedures? • Did you find any errors in the information? • Does the structure of the information help you with your tasks? • Do you need different information or graphics? If so, where, and in what format? • Are the examples correct? Do you need more examples? If you find any errors or have any other suggestions for improvement, then please tell us your name, the name of the company who has licensed our products, the title and part number of the documentation and the chapter, section, and page number (if available). Note: Before sending us your comments, you might like to check that you have the latest version of the document and if any concerns are already addressed. To do this, access the new Oracle E-Business Suite Release Online Documentation CD available on My Oracle Support and www.oracle.com. It contains the most current Documentation Library plus all documents revised or released recently. Send your comments to us using the electronic mail address: [email protected] Please give your name, address, electronic mail address, and telephone number (optional). If you need assistance with Oracle software, then please contact your support representative or Oracle Support Services. If you require training or instruction in using Oracle software, then please contact your Oracle local office and inquire about our Oracle University offerings. A list of Oracle offices is available on our Web site at www.oracle.com.
- 21. xxi Preface Intended Audience Welcome to Release 12.2 of the Oracle Demantra Implementation Guide. See Related Information Sources on page xxiv for more Oracle E-Business Suite product information. Documentation Accessibility For information about Oracle's commitment to accessibility, visit the Oracle Accessibility Program website at http://www.oracle.com/pls/topic/lookup?ctx=acc&id=docacc. Access to Oracle Support Oracle customers have access to electronic support through My Oracle Support. For information, visit http://www.oracle.com/pls/topic/lookup?ctx=acc&id=info or visit http://www.oracle.com/pls/topic/lookup?ctx=acc&id=trs if you are hearing impaired. Structure 1 Introduction to Demantra This chapter provides an overview of the Demantra platform. 2 Core Concepts This chapter explains worksheets and other basic concepts. 3 How Demantra Calculates and Stores Data As an implementer, you should understand how Demantra calculates and stores data, because this can affect how you set up your solution. This chapter provides an overview of most important details. 4 Multiple Language Support
- 22. xxii This chapter describes how to work with languages and internationalization in Demantra. 5 Implementation Tools and Process This chapter provides a quick overview of the implementation and hand-off processes and tools you use during these processes. 6 Levels This chapter describes levels and related concepts, outlines the primary configuration options, and summarizes the available tools. 7 Series 8 Units, Indexes, and Exchange Rates This chapter describes units and related concepts, outlines the primary configuration options, and summarizes the available tools. 9 Worksheets This chapter describes worksheets, outlines the primary configuration options, and summarizes the available tools. 10 Methods and Workflow This chapter describes options that you can use to create automated actions in your application, outlines the primary configuration options, and summarizes the available tools. 11 Security This chapter explains the Demantra security mechanisms. 12 Proport This chapter explains the proport mechanism. 13 General Integration Guidelines A pre-made model supports out-of-the-box integration of the Oracle e-Business Suite or EnterpriseOne applications with the Oracle Demantra Demand Management application. This model contains necessary definitions to support both Oracle e-Business Suite and EnterpriseOne applications and uses many common building blocks. The Oracle e-Business Suite model serves as the core best practice for Oracle Demantra Demand Management integration. Where EnterpriseOne information is missing, e-Business Suite documentation applies 14 Demantra Data Tables and Integration Processes 15 Getting Started with the Configuration Tools This chapter introduces the primary tools you use to configure Demantra, namely, Business Modeler and Workflow Manager. 16 Database Tools The Business Modeler provides a simple user interface for creating and modifying database tables that is useful during implementation. 17 Using the Data Model Wizard This chapter describes how to use the Data Model Wizard. 18 Configuring Levels This chapter describes how to configure levels with the Configure > Levels option.
- 23. xxiii 19 Configuring Series and Series Groups This chapter describes how to configure series and series groups. 20 Configuring Units, Indexes, and Update-Lock Expressions This chapter describes how to perform miscellaneous configuration tasks. 21 Series and Level Integration This chapter describes how to use the Integration Interface Wizard, which you use to import or export series data and level members. 22 Importing Supplementary Data This chapter describes how to import data into the Demantra database by using Tools > Import File. You use this tool to import supplementary data such as lookup tables. 23 Creating Workflows This chapter describes how to create Demantra workflows, which are automated or semi-automated processes that you can use for a wide variety of purposes. 24 Configuring Methods This chapter describes how to configure methods that the users can run within worksheets or within a Members Browser content pane.bp 25 Using the Desktop BLE User Interface This chapter describes how to configure and use the Business Logic Engine (BLE) to evaluate client expressions in worksheets. 26 Non-Engine Parameters This chapter describes parameters unrelated to the Analytical Engine and lists their default values, if any. As indicated, most parameters are visible to all users; a few are visible only if you log in as the owner of the component. 27 Database Procedures 28 Key Tables This chapter provides reference information for some of the most important tables in Demantra, especially the data fields used by or written by the Analytical Engine. Unless otherwise noted, this information applies to all Demantra products. 29 Server Expression Functions and Operators This appendix provides reference information for the operators and functions that are allowed in server expressions. 30 Client Expression Functions and Operators This appendix provides reference information for the operators and functions that are allowed in client expressions. 31 Workflow Steps This chapter provides reference information for the available workflow steps. 32 Configuring Predictive Trade Planning 33 Configuring Promotion Optimization for Predictive Trade Planning 34 Configuring Deductions and Settlement Management This chapter describes how to configure DSM and load an initial set of data. 35 Fine Tuning and Scaling Demantra 36 Customizing Demantra Web Pages
- 24. xxiv This chapter describes how to customize the Demantra Web pages. 37 Configuring Rolling Data This chapter describes how to roll selected data, saving a copy of the current version of that data. 38 GL Synchronization This chapter describes the GL synchronization feature and how to configure this feature. 39 Performing Constraint Profit Optimization This chapter describes how to use the Constraint Profit Optimizer. 40 Creating a Demand Variability Process This chapter describes the creation of a demand variability process. 41 Administering Demantra This chapter briefly introduces the tasks that the system administrator for Demantra would perform. It also lists all the URLs that Demantra uses. 42 Managing Security The Demantra data and features are secured, so that not all users have access to the same data and options. This chapter describes how to maintain security. 43 Managing Workflows This chapter describes how to use the Workflow Manager to start, stop, and view workflow instances and to manage schema groups. 44 Managing Worksheets Worksheets are created within the user interfaces, but you can manage them from the Business Modeler. 45 Other Administration Demantra provides a Web-based interface to perform other, less common administrative tasks, described here. 46 Using the Oracle Demantra Business Application Language 47 Tips and Troubleshooting For reference, the first section describes the first-time login procedure for Demantra applications, followed by several sections of tips. After that, this chapter lists possible errors that users may encounter and describes how to resolve them. The errors are listed alphabetically by message text or general description. See Also Oracle Demantra Release Notes Oracle Demantra Installation Guide A Key Tables Related Information Sources Oracle Demantra products share business and setup information with other Oracle Applications products. Therefore, refer to other user guides when you set up and use Oracle Demantra.
- 25. xxv User Guides Related to All Products: • Oracle Applications User Guide • Oracle Applications Developer's Guide • Oracle E-Business Suite Concepts User Guides Related to Oracle Demantra: • Oracle Demantra User's Guide • Oracle Demantra Installation Guide • Oracle Demantra Integration Guide • Oracle Demantra Analytical Engine Guide • Oracle Demantra Demand Management User's Guide • Oracle Demantra Deduction and Settlement Management User's Guide • Oracle Demantra Trade Promotion Planning User's Guide Integration Repository The Oracle Integration Repository is a compilation of information about the service endpoints exposed by the Oracle E-Business Suite of applications. It provides a complete catalog of Oracle E-Business Suite's business service interfaces. The tool lets users easily discover and deploy the appropriate business service interface for integration with any system, application, or business partner. The Oracle Integration Repository is shipped as part of the E-Business Suite. As your instance is patched, the repository is automatically updated with content appropriate for the precise revisions of interfaces in your environment. Users who are granted the Integration Analyst role can navigate to the Oracle Integration Repository through the Integration Repository responsibility. Users who have the Integration Developer role or the Integration Administrator role can access the Oracle Integration Repository through the Integrated SOA Gateway responsibility. Do Not Use Database Tools to Modify Oracle E-Business Suite Data Oracle STRONGLY RECOMMENDS that you never use SQL*Plus, Oracle Data Browser, database triggers, or any other tool to modify Oracle E-Business Suite data unless otherwise instructed. Oracle provides powerful tools you can use to create, store, change, retrieve, and maintain information in an Oracle database. But if you use Oracle tools such as
- 26. xxvi SQL*Plus to modify Oracle E-Business Suite data, you risk destroying the integrity of your data and you lose the ability to audit changes to your data. Because Oracle E-Business Suite tables are interrelated, any change you make using an Oracle E-Business Suite form can update many tables at once. But when you modify Oracle E-Business Suite data using anything other than Oracle E-Business Suite, you may change a row in one table without making corresponding changes in related tables. If your tables get out of synchronization with each other, you risk retrieving erroneous information and you risk unpredictable results throughout Oracle E-Business Suite. When you use Oracle E-Business Suite to modify your data, Oracle E-Business Suite automatically checks that your changes are valid. Oracle E-Business Suite also keeps track of who changes information. If you enter information into database tables using database tools, you may store invalid information. You also lose the ability to track who has changed your information because SQL*Plus and other database tools do not keep a record of changes.
- 27. Part 1 Concepts and Tools
- 29. Introduction to Demantra 1-1 1 Introduction to Demantra This chapter provides an overview of the Demantra platform. This chapter covers the following topics: • Demantra Platform and Applications • Extending your Demantra Application • Elements of a Demantra Solution • Integration • Workflow • How the User Interfaces Can Be Configured Demantra Platform and Applications The Demantra Platform provides a flexible data model on which we build the comprehensive business logic of our applications. The platform includes a number of services that are leveraged to provide out-of-the-box application functionality in four key areas: • Demand Management • Real Time Sales & Operations Planning • Trade Promotion Management • Deductions and Settlement Management These standard out-of-the-box applications can be tailored to reflect a customer's specific business logic in these business areas. Please see "Extending your Demantra Application."
- 30. 1-2 Oracle Demantra Implementation Guide Extending your Demantra Application There are many ways to extend your pre-configured Demantra Application. For example, most implementations will create additional worksheets to capture and review data in alternate formats. We provide the following guidelines around extensions to the data model: 1. Please review all documentation fully. It includes important details on the standard application configurations and how they support integration to other products in the Oracle family (for example, E-business Suite (EBS) or JD Edwards EnterpriseOne(E1)). 2. Wherever possible, please work within the standard application hierarchy. It has been pre-seeded with a comprehensive business hierarchy. In addition, there are a number of generic 'Category Code' levels in the item, location and Matrix hierarchies that can be leveraged to capture additional business levels in the hierarchy. This approach avoids the need to upgrade the model. If additional levels are required, please only add parent levels to the hierarchy. Do not add lowest levels as these fundamentally alter the data model. Sufficient lowest levels have been pre-seeded to capture many-to-many relationships. 3. Please review series details in the implementation guide before creating additional series. Comprehensive business logic has been configured for each of our applications and should be fully understood to avoid building extraneous series. Please try to avoid series modifications as this may affect other series referencing it. 4. Please review workflow and integration details in the implementation guide and within the workflow engine itself before creating additional logic. Comprehensive integration flows have been configured for each of our applications and should be fully understood to avoid building extraneous workflows. Note that workflows are generally grouped by the integration they are supporting (for example, "EBS Integration"). 5. Adding additional Levels or Series to the data model will require enhancements to pre-configured integration logic (with E-Business Suite or EnterpriseOne, for example) to populate these fields. Elements of a Demantra Solution Whether you use a Demantra application as-is or you use the Application Platform, a Demantra solution consists of the following elements:
- 31. Introduction to Demantra 1-3 • This figure is not meant to show specific hardware architecture. • A Demantra solution can also include a Citrix server or other software for terminal emulation, not shown here. • For information on supported databases, platforms, and configurations, see the Oracle Demantra Installation Guide. Clients A Demantra solution includes multiple client machines, each running a browser to access Demantra. Supported Web Browsers Demantra is compatible with Internet Explorer or Mozilla Firefox. Please refer to the Demantra Installation Guide for supported versions. Configuring the Firefox Browser When using the Firefox Web browser, if a Demantra user closes the browser using the "
- 32. 1-4 Oracle Demantra Implementation Guide X" icon, it is possible to restore the session by re-launching a new Firefox browser. In this scenario, the login page is not displayed and the user is not required to enter a username and password. Modify Firefox configuration settings as follows: 1. Select Tools > Options > Startup > Main tab 2. Verify that the "When Firefox starts" setting is *not* set to "Show my windows and tabs from last time." Change this setting, if required. 3. Navigate to the 'Security' tab, and then verify that "Remember password for sites' is *not* selected. 4. Save the changes. Application Server Any Web-based solution includes the Application Server: This server includes a Web server and a J2EE application server, which can be on the same or different machines; for supported software, see the Oracle Demantra Installation Guide. Within the J2EE server, Demantra runs the Oracle Demantra Web Platform Server, which includes the following: • Workflow Services
- 33. Introduction to Demantra 1-5 • DOL Services • Collaboration Services • GUI Services • APS (this is the main support layer and handles all communications with the database, as needed by the other services) Database Server Every Demantra solution includes a database server. Oracle Demantra Administrative Utilities The Oracle Demantra Administrative Utilities include the desktop configuration and maintenance utilities, as well as Member Management and Chaining Management tools. Administrative Utilities coordinate running the Analytical Engine, communicate with the database as needed, schedule database procedures, and run other background processes as needed. Analytical Engine Most Demantra solutions include the Analytical Engine. Note: In general, the documentation refers to either mode as the " Analytical Engine". Wherever the distinction is necessary, the documentation is more specific. Note: Oracle provides two different modes for the Analytical Engine: • In PE mode, the engine is suitable for use with Promotion Effectiveness. • In DP mode, the engine is suitable for use in demand planning applications. You may have access to the Distributed Engine (a mode in which the Analytical Engine automatically distributes its work across multiple machines). SSL Security The Demantra Web products can use either http or SSL protocol. You can deploy a Demantra solution in either of two ways:
- 34. 1-6 Oracle Demantra Implementation Guide • Use http for all pages • Use SSL for all pages (so that Web addresses start with https instead of http) Pure Desktop Solutions A desktop-based solution is different from a Web-based solution in two key ways: • Users access Demantra via the desktop Demand Planner, which communicates directly with the database. • There is no Application Server. Instead, you use the Stand-Alone Integration Tool (the aps.bat executable), which handles import and export. The Oracle Demantra Installation Guide assumes that most solutions are Web-based. Integration You can import and export data with core Demantra tools. Core Demantra Tools The core Demantra tools allow you to do the following: • Import lowest-level item, location, and sales data • Import or export series data at any aggregation level, with optional filtering • Import promotions and promotional series • Export members of any aggregation level • Import supplementary data into supporting tables as needed Workflow The Application Platform provides the Workflow Manager. A workflow is a logically connected set of steps. Each step can be automated or can require interaction from one or more users or groups. Workflows can do all the following kinds of actions: • Run integration interfaces. • Run stored database procedures. • Run external batch scripts and Java classes.
- 35. Introduction to Demantra 1-7 • Pause the workflow until a specific condition is met, possibly from a set of allowed conditions. For example, a workflow can wait for new data in a file or in a table. • Send tasks to users or groups; these tasks appear in the My Tasks module for those users, within Collaborator Workbench. A typical task is a request to examine a worksheet, make a decision, and possibly edit data. A task can also include a link to a Web page for more information. Special workflow steps programming logic. For example, one step type provides a user with a selection of choices to direct the continuation of the workflow instance. How the User Interfaces Can Be Configured Whether you start from a Demantra application as-is or from the Application Platform, you can configure the user interfaces in the following complementary ways: • You typically create worksheets to meet the needs of specific users. A worksheet is a working environment that shows specific data, aggregated and filtered as needed. Users can view, sort, edit, print, and so on. The next chapter, "Core Concepts", describes the elements of worksheets. • You can create methods that the users can execute from within worksheets. The methods appear in the worksheets as options on the right-click menu. Demantra also provides default methods that you can redefine or disable. These allow users to create, edit, and delete level members. • You create components that subdivide the data as needed for different organizational roles. Each component has an owner, who acts as the administrator of the component. In turn, the owner can log onto the Business Modeler and further restrict data access for particular users. • You apply security so that different users have access to different menu options. See "Managing Security". • You can configure the default layout of Collaborator Workbench, access to different elements of Collaborator Workbench, and the links and menus in Collaborator Workbench. You can also substitute custom graphics throughout the Web products. See "Customizing Demantra Web Pages" in this document..
- 37. Core Concepts 2-1 2 Core Concepts This chapter explains worksheets and other basic concepts. This chapter covers the following topics: • Worksheets • The Basic Input Data • Time Resolution • Levels • Combinations • Series • Filtering and Exceptions • Methods • Security • Forecasting Worksheets A worksheet (sometimes known as a query) is the primary user interface to Demantra data. A typical worksheet might look like this:
- 38. 2-2 Oracle Demantra Implementation Guide Within a worksheet, a user can examine and edit data as needed, view the forecast, run simulations, and save changes back to the database, for the benefit of other users and downstream operations. The precise details vary from application to application, but worksheets share the following characteristics: • Most of the worksheet data is usually based on imported data. • The data is organized in a set of multi dimensional hierarchies that enable users to slice and dice data in any way. These hierarchies are completely configurable and are easily extended. • A worksheet displays series of data, usually time-dependent data for specific items and locations. Some series are editable, and other are not. • A worksheet can display series at an aggregated level, based on any of the hierarchy levels in the system. • A user can zoom in and out in time, viewing data aggregated into different buckets of time. • At any given time, the worksheet uses a single unit of measure, which applies to some or all of the displayed series (some series do not include units). The worksheet can also use a financial index or exchange rate. The user who is working with the worksheet can switch to another unit of measure or another index as needed. • A worksheet can be filtered. In addition, users generally have access to only some of the data, and that filters the data further. • Multiple users can access the data, depending on their authorization.
- 39. Core Concepts 2-3 For details, see "Worksheets". The Basic Input Data When fully configured, Demantra imports the following data, at a minimum, from your enterprise systems: • Item data, which describes each product that you sell. • Location data, which describes each location to which you sell or ship your products. • Sales history, which describes each sale made at each location. Specifically this includes the items sold and the quantity of those items, in each sale. • For Promotion Effectiveness: Historical information about promotional activities. Demantra can import and use other data such as returned amounts, inventory data, orders, and settlement data. For details, see "Data Assumptions and Requirements". Time Resolution When sales data is imported into Demantra, it is automatically binned into time buckets corresponding to the base time unit. At that time each sale date is automatically changed to the start date of the appropriate time bucket. For example, suppose you use a weekly base time unit, starting on Monday. If a sale actually happened on Wednesday, May 7, the sale date in Demantra is changed to Monday, May 5. The base time unit is specified during configuration to a length that is appropriate for your planning cycle. Oracle provides three sizes of base time unit (day, week, or month). Oracle also provides larger time units for use in worksheets, and you can define additional time units. You specify the time unit to use in a given worksheet, and the worksheet shows data for the time buckets that correspond to that time unit. For details, see Time Units, page 8-3. Levels The first interesting feature of any worksheet view is the aggregation level or levels that it uses. For example, you might want to view data at the account or organization level. The worksheet might include a drop down list instead of this tree control. For example:
- 40. 2-4 Oracle Demantra Implementation Guide In either case, you can view data for any account. You can edit any data that is shown in white, such as the price and market plan. In generic terminology, the word member refers to a unit within a level. For example, CVS is a member of the account level. Levels are also used in import and export, security, and forecasting. For details, see "Levels". Combinations When users explore their sales data, they generally examine data associated with some item (or aggregation of items) at some location (or aggregation of locations). Each possible pairing of item and location is known as a combination. Note: In theory, some implementations may have more than two chief dimensions. For example, you might track sales for items, locations, and demand types. In this case, a combination is an item, a location, and a demand type. Combinations are central to Demantra. At any given time, a worksheet displays data for one combination at any aggregation level, for example: • Low fat items in Northeast stores • SKU PLLF202FCPB at CVS 0051 • Private Label Brand cookies at the account Retailer D • Ice cream, aggregated at all locations
- 41. Core Concepts 2-5 Selecting Combinations Apart from completely aggregated worksheets, each worksheet provides a way to select the combination to view. Demantra provides two equivalent mechanisms, as in the following examples. Members Browser (available only in Web worksheets) Drop down lists In either case, the selected combination is "Low fat products at the BJ account." The rest of the worksheet shows data for that combination. In some cases, you view data that is aggregated across one dimension. For example, if the worksheet contains only the product family level, and you select the Low Fat member, that means that you have selected the combination "Low fat products at all locations." Combination Status Not all items are sold at all locations. By default, Demantra stores only those combinations that have actual sales, and the Analytical Engine considers only those combinations. You can enable users to create new combinations, for simulation purposes; to do so, they use tools called Member Management and Chaining Management. The Analytical Engine also considers the relative age of each combination, as well as other combination-specific details. For the details, see "Combination-Specific Settings". Series A series is a set of data that represents some value that varies over time or that varies between item-location combinations (or most commonly, that varies in both ways). A worksheet displays the series data in a table, or in a graph, or both. The following shows an example of a worksheet table:
- 42. 2-6 Oracle Demantra Implementation Guide The example here shows series at the lowest level, but you can generally view data for any given series at any aggregation level. The definition of the series controls how the data is aggregated. Data can be aggregated in various ways, for example by totaling it, or by taking the maximum or the minimum value. Series have many properties, including the following: • It is editable or non editable. Some series are editable only within certain spans of time or when certain conditions are met. • The data type: numeric, string , or date. • The series type. Most series apply to sales data, which means that the series data can be different for each item-location combination at each time bucket. Demantra provides other types of series as well; see "Types of Series". • The series may or may not be stored in the database. • Its definition specifies how data for that series is to be calculated at any level or at any higher level time aggregation. The Analytical Engine directly populates the data used in some of the base series: • For Demand Management, Demand Planner, and Demand Replenisher, these series include information about the forecast and related information such as markers that indicate regime changes, outliers, and so on. • For Promotion Effectiveness, these series include information about the forecast and switching effects that describe the impact of various promotions. For details, see "Series". Filtering and Exceptions Both filters and exceptions both limit the members that users can see. Filters act directly, and exceptions act indirectly.
- 43. Core Concepts 2-7 Filters Filters specify the members that users can see. When you apply a filter, you specify the following: • An aggregation level. You can filter data at any level in any dimension. • Specific members of that aggregation level that are allowed through the filter; other members are not included. The net result is that a filter allows Demantra to display only certain item-location combinations. Demantra uses filters in various contexts. In all cases, it uses a standard user interface to display a filter. In the following example, the filter blocks data for all brands except for the Rainbow brand. As a result, the worksheet will display only those item-location combinations that are associated with the Rainbow brand. You can filter data at any level, whether or not it is chosen as an aggregation level of the worksheet. Exceptions Exceptions (or exception filters) indirectly control which members the users can see. When you apply an exception, you specify a true/false expression that specifies a series, an operator, and a value, for example: Sales > 50000. A combination is displayed only if this expression is true for at least some of the time buckets in the time range of interest. You can specify multiple expressions and relate them by logical AND or logical OR.
- 44. 2-8 Oracle Demantra Implementation Guide Methods You can define level methods, which the user sees as ordinary right-click menu options in Demantra (either in worksheets or in Members Browser content panes). Each level can have its own set of methods. Demantra provides a set of default methods (Create, Edit, and Delete) that you can redefine or disable as needed. Each method runs a workflow. In Demantra, a workflow is a logically connected set of steps. Each step can be automated or can require interaction from one or more users or groups. Demantra provides a set of workflow steps, each with predefined behavior. Workflows can also be used for general automation purposes. For details, see "Methods and Workflow". Security The Demantra data and menus are secured, so that not all users have access to the same data and options. The security model includes the following features: • The Oracle license controls which menus are secured, so that not all users have access to the same data and options. The security model includes the following features: • The data is partitioned into components, which generally correspond to organizational roles. In the definition of a component, you can control the following: • The levels that can be seen • The degree of access for members of each level: no access, read-only access, read/write access, or full control (including the ability to delete members) • The series that can be seen Each component has an owner, who acts as the administrator and who can create additional users: • Within a component, you can restrict each user to a subset of the data associated with that component. You can control the same data elements as previously described.
- 45. Core Concepts 2-9 • You can control access to menu items at the component level, the group level, or the user level. This includes both the menu bar and the right-click menu. • You can define program groups, or sets of menu items, and apply security at that level, for greater convenience. For details, see "Security". Forecasting The Analytical Engine reads data from the database, generates a forecast and performs other analyses, and writes the forecast to the database. This section provides a brief overview of the concepts. Demand and Causal Factors The forecast considers both the historical demand and the causal factors (such as seasons, price changes, and specific events such as promotions). In a Demantra solution, the demand data is ultimately imported from external systems. Typically, the data that is actually imported needs to be adjusted by the forecasters, as they apply their own knowledge to better describe the history. Causal factors provide information about historical events that are expected to recur in the future. Causal factors cause demand to deviate from a trend. More specifically, a causal factor is a time-varying quantity (such as promotions, price, season, or day of the week) that affects demand. Demantra requires historical data for causal factors, as well as future data that describes expected occurrences that will affect demand. In the case of Promotion Effectiveness, you also configure promotional causal factors, influence ranges, and influence groups, all of which control how the Analytical Engine determines the effects of promotions on the forecast. Engine Coefficients As a result of the forecasting process, the Analytical Engine calculates a set of coefficients that describe how each causal factor affects demand for each item-location combination, over time. The Analytical Engine then uses those coefficients, along with future values for the causal factors, to calculate the forecast. The Promotion Optimization module also makes use of these coefficients. Forecasting Models and the Forecast Tree The Analytical Engine uses a set of mathematical forecast models. When forecasting, the engine follows a specific process of examining the data, checking for outliers and so on, evaluating the usefulness of each model, and generating the forecast. In general, forecasting is most accurate when it can be performed at the lowest possible
- 46. 2-10 Oracle Demantra Implementation Guide allowed aggregation level. However, sometimes there is not enough data at that level for all combinations. For those combinations, the Analytical Engine aggregates the data to a higher level and tries to generate a forecast there. The purpose of the forecast tree is to organize data for this process. Each node in the forecast tree aggregates both by items and by locations. The following example shows a small part of a forecast tree. The bold boxes show the nodes at which the Analytical Engine is forecasting in this example. Parameters and Engine Profiles (PE) Demantra provides parameters to control both the theoretical models and the overall engine flow. The engine uses engine profiles, which are sets of engine parameters with specific values. Demantra provides some predefined profiles for different purposes, and you can define additional engine profiles, as needed. When you run the engine, you specify the engine profile to use. Batch and Simulation Modes The Analytical Engine runs in two modes: • When a forecast is made in the batch mode (in the background), the Analytical Engine creates a forecast for all item-location combinations within the forecast tree. You configure Demantra to run the Analytical Engine periodically, usually after importing new data. • If the Analytical Engine is running in simulation mode, it waits for simulation requests and then processes them. From within a worksheet, a user submits a simulation request to create a tentative forecast for a subset of the data. The user can then accept or reject the results of the simulation. In this mode, the user is usually performing a "what if" analysis. That is, he or she has made some changes within the worksheet and then performs the simulation to see whether those changes have the desired effect. See Also
- 47. Core Concepts 2-11 "Introduction to the Analytical Engine" in the Demantra Analytical Engine Guide.
- 49. How Demantra Calculates and Stores Data 3-1 3 How Demantra Calculates and Stores Data As an implementer, you should understand how Demantra calculates and stores data, because this can affect how you set up your solution. This chapter provides an overview of most important details. This chapter covers the following topics: • How Data Is Stored • How Data Is Calculated at the Lowest Level • How Data Is Calculated at Higher Levels • How Proportions Are Chosen • How Proportions Are Used • How Splitting Handles Null Values • How Splitting Handles Zero Values • When and How Data Is Saved to the Database How Data Is Stored In order to understand how Demantra works, you should be aware of two central facts about how Demantra stores data: • Demantra stores data only at the lowest possible level. • Demantra stores data only where the sales data is non-null. These facts have wide-ranging implications. The following subsections expand these two facts, and the sections after that provide further details. Data Is Stored at the Lowest Level Demantra stores data only at the lowest possible item level, lowest possible location level, and base time unit. This has the following implications:
- 50. 3-2 Oracle Demantra Implementation Guide • When data is viewed or exported at a higher level, that data must be calculated. • When data is edited or imported at any higher level, Demantra must calculate and then write the data for the appropriate lowest-level members. • If the Analytical Engine generates a forecast at a higher level, Demantra must split that forecast and write it into the appropriate lowest-level members. Data Is Stored Only Where the Sales Data Is Non-Null Theoretically there might be a very large number of item-location combinations, but some items just might not be sold at some locations. It would be incorrect for Demantra to assume that all items could be sold at all locations during any time buckets. If Demantra assumed that, the result would be a very inaccurate forecast. Instead, Demantra assumes (by default) that if there were no sales for a given combination during a specific time bucket, sales were not possible for that combination and time. Specifically, Demantra uses this assumption as follows: • The Demantra database does not, by default, contain records that represent null sales. That is, for a given item-location combination, if no sales occurred during a given time bucket, Demantra does not contain a record for that combination and time bucket. • If there is no sales record for a given combination and time bucket, Demantra ignores that combination and time bucket when performing various operations, such as forecasting. In some cases, however, a null value for sales really does mean zero sales. Depending on the context, you can force Demantra to treat null values as zero values. How Data Is Calculated at the Lowest Level In general, the definition of a series also specifies how to calculate data at the lowest level, in the case when data changes at a higher level. Data can potentially change at a higher level either when it is imported at a higher level or when users edit a series while displaying data at a higher level. Each series can be configured as proportional or non-proportional. • If a series is proportional, the parent value is split among the child members according to the proportions of those child members. • If a series is non-proportional, the value for each child member is set equal to value of parent. Other series are neither proportional nor non-proportional. Data for these series should not be changed except at the lowest level. For details, see "Summary of Calculation
- 51. How Demantra Calculates and Stores Data 3-3 Options". How Data Is Calculated at Higher Levels The definition of a series specifies how to calculate data at any level. A series can have either or both of the following expressions: • A server expression, which aggregates data from the lowest level in the database. • A client expression, which calculates the series data, based on other series at the same level. If a series has a client expression, that series is automatically made non editable. Server Expressions: Aggregation from Lower Levels A server expression is an SQL expression that calculates the series data at any level by aggregating the associated lowest-level data. A very common server expression has the following form: sum (table_name.update_column_name) Here table_name.update_column_name is the table and column that stores data for this series. If you view a combination at the lowest level, this expression reads the series value for one row in the given table. On the other hand, if you view a combination at a higher level, this expression sums the series values associated with all the rows that correspond to the child members. • Parent: muffins • Expected: 200 • Actual: 220 Note: The values for Expected and Actual series are calculated by aggregating from child members • Child: apple muffins • Expected: 100 • Actual: 110 • Child: blueberry muffins • Expected: 100
- 52. 3-4 Oracle Demantra Implementation Guide • Actual: 110 Similarly, if you view a combination at a larger time bucket, this expression sums the series values associated with all the rows that correspond to the smallest time buckets for the combination. A server expression can also aggregate by averaging or taking the minimum or maximum value of the child members. Client Expressions: Calculations within a Level A series can also have a client expression, which calculates data in a different way. In contrast to server expressions, a client expression always refers to data at the same level. You use client expressions to calculate numbers that cannot be calculated by aggregation from lowest-level data. For example, consider the following client expression for a hypothetical series called ErrorSquared: (Expected - Actual)*(Expected - Actual)/(Expected*Expected) For a given combination at a given time bucket, this expression calculates the ErrorSquared series directly in terms of the Expected and Actual series for the same combination at the same time bucket. As you can see from the following example, it would not be possible to compute this series by aggregating lowest-level members: • Parent: muffins • Expected: 200 • Actual: 220 • ErrorSquared: 0.0001 Note: The value for the ErrorSquared series is calculated at this level, not aggregated from child members • Child: apple muffins • Expected: 100 • Actual: 110 • ErrorSquared: 0.01 • Child: blueberry muffins • Expected: 100 • Actual: 110
- 53. How Demantra Calculates and Stores Data 3-5 • ErrorSquared: 0.01 In addition to formulas as these, you can use client expressions to perform the following kinds of computations, which are not possible with server expressions: • Conditional expressions, including nested conditional expressions • Expressions that refer to data at earlier or later time buckets Using Both Server and Client Expressions A series can have both a server expression and a client expression. The client expression always takes precedence. Therefore, if a series has both expressions, the client expression is usually of the following form: If (condition, client-expression-value, series-name) Here series-name is a reference to the same series to which this client expression applies. This reference directs Demantra to the server expression that this series uses. Depending on whether the condition is true for a given cell, this expression returns either the client expression value or server expression value. How Proportions Are Chosen Demantra provides three general ways to specify the relative proportions of different combinations: • Actual proportions. This option splits higher-level data according to the proportions of the Demand series. This is an option when importing data. • Proportions of a reference series. When you configure a series as proportional, you also specify a reference series (the Proportion Calculation series). You typically use one of the following series: • Demand (suitable for a historical series) • Final Plan (suitable for a forecast series) This option is available when you define a series and is used when data for that series is edited at an aggregated level. • Matrix proportions, which are stored proportions that Demantra calculates and saves. (The mechanism that performs the calculation is called proport.) The calculation is based upon the demand, but also considers recent average demand, month-to-month variations, and so on. See Chapter 12, "Proport". These proportions are available in multiple cases: • When importing data.
- 54. 3-6 Oracle Demantra Implementation Guide • Automatically used when forecast must be created at higher level. • When a user performs a chaining operation (data copy) at a higher level. A user performs chaining in order to use existing data for a given combination as a basis for a new combination. How Proportions Are Used The following figure shows an upper-level member, ABCD, and its four child members. It also shows a reference series (Sales), and it shows the value of that series for each child member, all within the same time bucket. Now suppose that series S is a proportional series that uses Sales as its reference series, and suppose that the value of S is changed to 350 for the parent member. In this case, the series S is split across the child members as follows:
- 55. How Demantra Calculates and Stores Data 3-7 How Splitting Handles Null Values Now consider a case where the reference series has a null value for one of the child member. The proport mechanism ignores that member, as follows: How Splitting Handles Zero Values Now let us consider two cases where child members have zero values. In the first case, the reference series is zero for one of the child members, but has non-zero numbers for other child members. Any member with 0 sales receives 0% of the split, as follows:
- 56. 3-8 Oracle Demantra Implementation Guide Notice that member A that has a null value for the reference series; for this member, the value of series S is null, rather than 0. In the second case, none of the child members has a non zero value. In a case like this, the parent value is split equally among all members that have zero values for the reference series. As always, if a child member has null for the reference series, the proport mechanism ignores that member entirely. When and How Data Is Saved to the Database A series may or may not be stored in the database. If it is stored, its data is saved in the series update field. Because you can potentially have different values from splitting at different levels, it is important to understand when and how Demantra saves data to the update field for a series. For a series that has an update field, Demantra saves data to that update field as
- 57. How Demantra Calculates and Stores Data 3-9 follows: • When you import data for that series, Demantra splits it down to the lowest level and saves it in the update field. • When a user edits data for that series, Demantra splits it down to the lowest level and saves it in the update field. If the user is working with the desktop products (Demand Planner or Demand Replenisher), the MANUALS_INS procedure performs the splitting and saving. If the user is working with the Web products, no database procedure is needed. If this user changes causes a change to the value of another series in the worksheet, Demantra splits that other series value down to the lowest level and saves it in the update field for that other series. Demantra ignores any series whose values have not been changed. If the series also has a client expression, Demantra also saves data to that update field as follows: • When a user runs a worksheet that contains the series, Demantra evaluates the client expression for that series, computing the values at that level. Demantra then splits it down to the lowest level and saves it in the update field. If the user is working with the desktop products (Demand Planner or Demand Replenisher), the MANUALS_INS procedure performs the splitting and saving. If the user is working with the Web products, no database procedure is needed. • When the Business Logic Engine evaluates a worksheet, Demantra evaluates the client expression for all series in that worksheet, computing the values at that level. Demantra then splits the values down to the lowest level and saves them in the update fields of the appropriate series. In this case, the MANUALS_POPULATE_INS procedure performs the splitting and saving. Caution: Demantra does not automatically launch the database procedures. Instead, you must make sure to schedule the procedures to run periodically or otherwise automate running them. Use the Workflow Engine. See "Workflows".
- 59. Multiple Language Support 4-1 4 Multiple Language Support This chapter describes how to work with languages and internationalization in Demantra. This chapter covers the following topics: • Overview • Loading Translations • Using the Translation Utility Overview Oracle Demantra is available in multiple languages and supports multiple languages in a single installation. By default, English is the default base system language. However you can select any of the supported languages to be the base system language when installing or upgrading the application. You can also choose to install one or more additional languages. For a list of all available languages, see the Oracle Demantra Installation Guide. Important: For non-ASCII languages, see the note regarding text editor capability in the section Logging Messages of the Application Server. The locale settings of the client machine determines the default language of the Languages dropdown.. (If that language is not supported or installed, then the base system language will be the default.) If cookies are enabled in the user's browser, then this will determine the default language for subsequent logins. All seeded content is available in the login language. Other content, which was added after application installation (such as series, levels, and members), must be translated manually before it is available in the login language. Alternately, users may be integrated from EBS, and in this case, the default language is inherited from the user integration and passed on using the single sign-on mechanism. For user's defined indirectly via EBS integration, the language of the EBS instance will be passed to Demantra. Workflow messages, such as those that appear in the 'My Tasks' section in Collaborator Workbench and
- 60. 4-2 Oracle Demantra Implementation Guide automated emails, will also be displayed in that language. Oracle recommends that users define all public content - for example public worksheets, series and workflows– in the base system language and then either an administrator or translation expert translate those objects into other supported languages as required. For more information on translating these objects, see Translating Content into Different Languages. These application objects appear in the language selected by the user: • Series • Series groups • Series lookup tables • Levels • Level members • Level attributes • Level methods • Worksheets • Workflows • Schema names • Step names • Messages (in User, Group, Exception and Selection steps) • Comments (in BLE steps) • Subject/Messages (in Email steps) • Schema group names • Schema group descriptions These platform data appear in the language selected by the user: • Button labels • Tool tips • Object descriptions
- 61. Multiple Language Support 4-3 • Menu items • Error messages • Online help (user guides only; all other documentation is available only in US English) You can edit worksheet data using the offline worksheet mechanism; however, you cannot edit its definition, for example, the displayed series, the applied filters, and the types of graphs. When you take a worksheet offline, you see its objects, for example, series, levels, and drop-down menus in the language selected by the user who exported it. For more information about working offline, see the Oracle Demantra User Guide. When you export a worksheet to Microsoft Excel, the data appears in the language selected by the user who exported it. Oracle recommends that you import item master data in the base system language. This includes both regular levels, for example, item and location, and general levels, for example, promotions, supply plans, and bills of material. However, there is no requirement that all of your item master data must be in one language. ASCII-only Fields in the Desktop Applications Most Business Modeler and Demand Planner fields work with non-ASCII characters, for example, characters in languages, Chinese, Japanese, Korean and Russian. However, some are only available for ASCII characters. Oracle Demantra indicates the fields that are only available for ASCII input by red field titles.
- 62. 4-4 Oracle Demantra Implementation Guide Date Display Oracle Demantra derives the default date display format from the operating system locale. Locale refers to the location where your instance conducts business. For example, you set the locale in Microsoft Windows in the Control Panel > Regional and Language Settings. The Display Format setting in the Configure Measures window (in Business Modeler) displays the same number of digits per date element across locales. However, the order of date elements and the separator will vary by locale. For example, you operate in a French locale. This table shows how the Business Modeler choice maps to the Web display. Business Modeler Format Localized Format MM/dd/yyyy dd.MM.yyyy MM/dd/yy dd.MM.yy MM-dd-yyyy dd.MM.yyyy dd.MM.yyyy dd.MM.yyyy dd.MM.yy dd.MM.yy dd/MM/yyyy dd.MM.yyyy
- 63. Multiple Language Support 4-5 Business Modeler Format Localized Format dd/MM/yy dd.MM.yy E, MMM. dd yyyy E, MMM. dd yyyy E MM/dd/yyyy E MM.dd.yyyy E MM-dd-yyyy E MM.dd.yyyy E dd/MM/yyyy E dd.MM.yyyy E dd.MM.yyyy E dd.MM.yyyy MM-dd-yy dd.MM.yy The base system language does not typically have an effect on the display of dates, times and numbers. To refine your date display, use Worksheet Designer, navigate to region Time, click Advanced, and modify the advanced time settings. Number and Currency Display Oracle Demantra derives the default number and currency display format from the operating system locale. The Business Modeler series display format for a number provides a representation of how it is displayed. For example, it provides the standard display formats to reflect the number of decimal places and uses this to determine the need for radix points and thousand separators. Locale controls the delimiters. If a series display property is #,####.##, it displays in: • North American locales as 1, 234.56 • European locales as either 1.234,56 or 1 234,56 However, determining the currency from the locale may not always be accurate, especially if you report in a currency different from the operating system locale. For example: • Your default language may be used in multiple areas with different currencies. You have an instance using language Chinese Simplified, but you could report currency in, for example, China Yuan Renminbi (CNY) or Singapore Dollars (SGD). • If you have a default language that corresponds to one currency, you may want to
- 64. 4-6 Oracle Demantra Implementation Guide report it in a different currency. Your language is French (Canada) that corresponds to currency Canadian Dollars (CAD), however, you want to report in United States Dollars (USD) If your business requires reporting in multiple currencies or a currency different from the locale, Oracle recommends that you: • Use series titles as a means of clarifying currency, for example, Budget (USD) instead of Budget $. • Display the currency without a currency indicator or symbol, for example, Budget (USD) = 2,000 instead of Budget = $2,000 Handling Customer-Specific Strings In order to correctly display customer-specific strings in non-English languages, the operating system client locale, and several database parameters, must be set appropriately. These user-defined strings may include worksheet names, workflow names and messages, and strings for Dynamic Open Link compatibility. Ensure the following parameters as set as listed below: • NLS_LENGTH_SEMANTICS = CHAR • NLS_CHARACTERSET = AL32UTF8 • NLS_LANG = language_territory.characterset For details about configuring Oracle to support Globalization, see Oracle Database Installation Guide for Microsoft Windows or the Oracle Database Globalization Support Guide. Workflows Workflows display in the user's language as defined in the user's Business Modeler profile. Translating Content into Different Languages Oracle recommends that all public or shared content (series, worksheets, workflows, methods, etc) be defined in the base system language and then be translated into other supported languages as required. You can import translated content into Demantra by using: • The translation API (MLS_INTEG_IMPORT) • A Web-based tool known as the Translation Utility "For more information about the translation API, see Loading Translations. For details
- 65. Multiple Language Support 4-7 about the Web-based tool, see Using the Translation Utility. Note: Demantra supports multilingual item master only when deployed as a standalone solution. That is, the same SKU can have multiple translated descriptions. This feature is not supported when Demantra is deployed as an integral part of the Oracle VCP planning server. All imports and exports from a Demantra MLS deployed solution are exported in the system base language. Loading Translations Demantra provides the following procedures that can be used to import translated content: • MLS_INTEG_IMPORT.MLS_DICT_LOAD for bulk loading translations, via a populated dictionary staging table. • MLS_INTEG_IMPORT.TRANSLATION_API for individual translations. Loading Translated Content from the Dictionary Staging Table (Bulk Load) Use the MLS_INTEG_IMPORT.MLS_DICT_LOAD procedure to import all translated content that has been entered in the Demantra dictionary staging table (I18N_DICTIONARY_STAGING) to the dictionary data table (I18N_DATA_DICTIONARY). This procedure can be executed: • Automatically, by running the seeded Language Translations Import workflow • Manually, from the command line (SQL> MLS_INTEG_IMPORT.MLS_DICT_LOAD) Before running this procedure, you must first load translation data into the I18N_DICTIONARY_STAGING dictionary staging table. This table must have the following entries: Column Name Description
- 66. 4-8 Oracle Demantra Implementation Guide LOCALE_ID Language indicator, which may be one of the following values: • fr_CA (Canadian French) • zh_CN (Chinese Simplified) • zh_TW (Chinese Traditional) • en_US (English) • ja_JP (Japanese) • ko_KR (Korean) • pt_BR (Brazilian Portuguese) • ru_RU (Russian) • es_AR (Spanish) • F (French) • G (German) • TR (Turkish)
- 67. Multiple Language Support 4-9 OBJECT_TYPE_CODE Object type, which may be one of the following values: • QUERIES • WF_SCHEMAS • COMPUTED_FIELDS • GROUP_TABLES • GROUP_ATTRIBUTES • WS_VIEWS • METHOD_LIST • SERIES_GROUPS • WF_SCHEMA_GROUPS • AUDIT_PROFILES • DROPDOWNLISTS • MENU_ITEMS • NOTES • LEVEL_MEMBER • LOOKUP_TABLE • DCM_PRODUCTS • DISPLAY_UNITS • TGROUP_RES • ENGINE_PROFILES • BASE_LEVEL • USER_SECURITY_GROUP
- 68. 4-10 Oracle Demantra Implementation Guide ATTRIBUTE_TYPE_CODE Attribute of an object, for objects that have secondary details, and may be one of the following values: • QUERY_NAME • NOTE • SCHEMA_NAME • TASK_MESSAGE • STEP_NAME • COMPUTED_TITLE • HINT_MESSAGE • ATTRIBUTE_LABEL • VIEW_NAME • METHOD_NAME • INPUT_MSG • OUTPUT_MSG • GROUP_NAME • GROUP_DESC • NAME • DESCRIPTION • PROFILE_NAME • PROFILE_DESC • DESCRIPTION • MENU_ITEM_NAME • MENU_ITEM_DESC
- 69. Multiple Language Support 4-11 • NOTE_DESC • MEMBER_DESC • LOOKUP_DESC • PRODUCT_NAME • DISPLAY_UNITS • TG_RES • ENGINE_PROFILE_NAME • BASE_LEVEL_DESC • USR_GROUP_NAME • USR_GROUP_DESC PARENT_OBJECT_NAME Parent of the object. For example, LEVEL is parent of members. This is the actual name of the object, so if the object is a Level then enter the Level name (for example, Item). ENTITY_NAME Name of the Demantra entity to be translated. For example, "My test worksheet". I18N_TEXT Translated text. Note: Object Type Code, Attribute Type Code, Parent Object Name, and Entity Name columns are all case sensitive. Loading Single Translation Entries to the Dictionary Table This procedure is run from the command line, and adds single translations to the Dictionary table. This procedure is run from the command line and is useful for storing translations for one or two entities in the Dictionary table without going through the standard import process. Use the following syntax when running this procedure: MLS_INTEG_IMPORT.TRANSLATION_API (locale_id, object_type_code, attribute_type_code, parent_object_name, entity_name, i18n_text)
- 70. 4-12 Oracle Demantra Implementation Guide For example: SQL> exec MLS_INTEG_IMPORT.TRANSLATION_API('es_AR','1','QUERY_NAME','My Test Worksheet','Mi Prueba de Hoja de Cálculo'); Parameter Description LOCALE_ID Language indicator, which may be one of the following values: • fr_CA (Canadian French) • zh_CN (Chinese Simplified) • zh_TW (Chinese Traditional) • en_US (English) • ja_JP (Japanese) • ko_KR (Korean) • pt_BR (Brazilian Portuguese) • ru_RU (Russian) • es_AR (Spanish) • F (French) • G (German) • TR (Turkish)
- 71. Multiple Language Support 4-13 OBJECT_TYPE_CODE Object type, which may be one of the following values: • QUERIES • WF_SCHEMAS • COMPUTED_FIELDS • GROUP_TABLES • GROUP_ATTRIBUTES • WS_VIEWS • METHOD_LIST • SERIES_GROUPS • WF_SCHEMA_GROUPS • AUDIT_PROFILES • DROPDOWNLISTS • MENU_ITEMS • NOTES • LEVEL_MEMBER • LOOKUP_TABLE • DCM_PRODUCTS • DISPLAY_UNITS • TGROUP_RES • ENGINE_PROFILES • BASE_LEVEL • USER_SECURITY_GROUP
- 72. 4-14 Oracle Demantra Implementation Guide ATTRIBUTE_TYPE_CODE Attribute of an object, for objects that have secondary details, and may be one of the following values: • QUERY_NAME • NOTE • SCHEMA_NAME • TASK_MESSAGE • STEP_NAME • COMPUTED_TITLE • HINT_MESSAGE • ATTRIBUTE_LABEL • VIEW_NAME • METHOD_NAME • INPUT_MSG • OUTPUT_MSG • GROUP_NAME • GROUP_DESC • NAME • DESCRIPTION • PROFILE_NAME • PROFILE_DESC • DESCRIPTION • MENU_ITEM_NAME • MENU_ITEM_DESC
- 73. Multiple Language Support 4-15 • NOTE_DESC • MEMBER_DESC • LOOKUP_DESC • PRODUCT_NAME • DISPLAY_UNITS • TG_RES • ENGINE_PROFILE_NAME • BASE_LEVEL_DESC • USR_GROUP_NAME • USR_GROUP_DESC PARENT_OBJECT_NAME Parent of the object. For example, LEVEL is parent of members. This is the actual name of the object, so if the object is a Level then enter the Level name (for example, Item). ENTITY_NAME Name of the Demantra entity to be translated. For example, "my test worksheet". I18N_TEXT Translated text. If errors are encountered during loading, the associated records are moved to the I18N_DICTIONARY_STAGING_ERR table, with an error message providing details. The error table captures the exact error message and indicates which input is invalid. In this case, the record is not actually inserted into the dictionary table in that case, only the _ERR table. Using the Translation Utility For new content created during an implementation, translations can be maintained using a web-based translation utility. You can create new objects and content (worksheets, workflow, series) in any of the supported languages and then translate these objects to additional supported languages - particularly when objects are shared across users and regions. The Translation Utility is also translated, so users can select their preferred language when logging in.
- 74. 4-16 Oracle Demantra Implementation Guide Note: The translation utility is only used to add translations in other active languages. You cannot use the translation utility to change values in the default system language. From within the Translation Utility, you can search for strings to translate using multiple criteria such as: • target translation language • whether Translations are missing, exist, or both • by Object Type, or by Parent Object Type • matching criteria on the attribute (for example, Worksheet Name LIKE Demand) To use the Translation Utility: 1. Log in to the Collaborator Workbench Administrator. For example: http://my_server/demantra/portal/adminLogin.jsp 2. Select Translation Utility from the options menu. The Translation Utility appears. 3. From the Target Translation Language drop-down list, choose the language in which the string you are searching for exists. 4. From the Translations drop-down list, choose one of: • Missing translations • Existing translations
- 75. Multiple Language Support 4-17 • All 5. In the Object Type field, choose from the list of available translatable Demantra objects. 6. In the Parent Object Type field, choose the type of parent object. Note: The Parent Object Type field is only available when the selected Object Type has a parent object. 7. In the Attribute Type field, choose the attribute belonging to the object that you want to translate. The contents of this field depends on the selected object type. 8. Choose the appropriate search operator and text string on which to search. Note: If the search field is left blank, Demantra returns a list of all relevant objects of this type. 9. Click Submit. The Translation Utility returns all strings that match the selected values.
- 76. 4-18 Oracle Demantra Implementation Guide 10. Update or fill in the translated text as required, and then click the Update button. Any changes you make will be available immediately in Demantra worksheets (restarting the application server is not necessary).
- 77. Implementation Tools and Process 5-1 5 Implementation Tools and Process This chapter provides a quick overview of the implementation and hand-off processes and tools you use during these processes. This chapter covers the following topics: • Overview of Tools • Initial Phase of Implementation • Middle Phase of Implementation • End Phase of Implementation • Hand-off Details Overview of Tools This section provides a brief overview of the tools you use during implementation. All these tools are available later for use by system administrators. Setup Scripts Some Demantra products, such as DSM, assume that your database contains specific levels, parameter settings, and other configuration options. Demantra provides setup scripts that perform all the required configuration for these products. See "Other Configuration". Business Modeler You use the Business Modeler for most configuration tasks, including the following tasks: • Defining all elements used in worksheets: levels, series, units of measure, indexes and exchange rates
- 78. 5-2 Oracle Demantra Implementation Guide • Defining level methods • Defining integration • Defining components and users • Setting parameters The Business Modeler is desktop-based and looks like this; this example shows the wizard for configuring series: Workflow Manager You use the Web-based Workflow Manager enables you to create and manage workflows or automated processes. The Workflow Manager looks like the following:
- 79. Implementation Tools and Process 5-3 For information on creating and managing workflows, "Creating Workflows" and " Managing Workflows". Analytical Engine The Analytical Engine reads data from the database, generates a forecast and performs other analyses, and writes the forecast to the database. You use the following tools to configure the Analytical Engine: • The Business Modeler, where you configure causal factors, the forecast tree, and parameters that control the engine. Here you can also define engine profiles. • The Engine Administrator, where you specify additional engine settings. You save the settings in an XML file for convenience. You can open and use settings files that you have previously saved. Some of the configuration details are different for the two engine versions (Promotion Effectiveness and demand planning), as noted in the engine manuals. You use the Engine Administrator to specify logging options, choose machines to run the engine (if you have the Distributed Engine), to choose batch or simulation mode, and to start the engine run. The Engine Administrator looks like the following:
- 80. 5-4 Oracle Demantra Implementation Guide For information on configuring and running the engine, see "Configuring and Running the Analytical Engine" in the Demantra Analytical Engine Guide. Business Logic Engine The Business Logic Engine evaluates client expressions in the background so that Demantra can update series that use client expressions. The main way to run the Business Logic Engine is to call it from within a workflow step. You specify the worksheet to be evaluated. See "BLE Step". Collaborator Workbench Administrator You can use the Web-based Collaborator Workbench Administrator to configure Collaborator Workbench as follows: • Specify the items on the Planning Applications and Tools and Applications menus. • Specify which of those menu items are available to each user. • Specify the default layout of the core content panes (such as My Tasks). • Specify which core modules are available to each user. The Collaborator Workbench Administrator looks like the following:
- 81. Implementation Tools and Process 5-5 See "Administration". Initial Phase of Implementation In the initial phase of an implementation, you gather information and perform groundwork. It is important to analyze the business and demand planning requirements of the enterprise. Generally, you complete a questionnaire that outlines the enterprise business model, products, workflow, sales data, and distribution channels. The information usually includes the following: • Sales history, including what was sold, where, the quantity and the dates on which an item was shipped • Other operational/logistics data relating to sales history • Item and location information • Information about the various item and location hierarchies that are meaningful to this organization • For Promotion Effectiveness: Information on sales promotions • Required lowest-level time resolution After gathering this information, you should create a detailed design document for later use during the implementation process. The design process itself is beyond the scope of the Demantra documentation. Middle Phase of Implementation The main implementation phase uses many tools. Here the steps are grouped loosely into three areas: • Configuring data and the engine
- 82. 5-6 Oracle Demantra Implementation Guide • Setting up integration and workflow • Setting up users; configuring and customizing the user interfaces Data and the Engine For any implementation, you typically perform all the following tasks: Task Tool used For details, see Build the data model. Business Modeler "Using the Data Model Wizard" Add more levels if needed. Business Modeler "Configuring Levels" Configure the series and groups of series. Business Modeler "Configuring Series and Series Groups" Configure units of measure, financial indexes, and conversion rates for use in series and worksheets. Business Modeler "Configuring Units, Indexes, and Update-Lock Expressions " Configure Promotion Effectiveness. Database setup scripts "Configuring Promotion Effectiveness" Configure DSM. Database setup scripts "Configuring DSM" Configure Promotion Optimization. Database setup scripts "Configuring Promotion Optimization for PTP"
- 83. Implementation Tools and Process 5-7 Task Tool used For details, see Configure the engine: • Set up causal factors • Set up the forecast tree • For Promotion Effectiveness: Configure the influence groups and influence ranges that affect how the engine works. • Tune the Analytical Engine Business Modeler "Configuring and Running the Analytical Engine" in the Demantra Analytical Engine Guide Run the Analytical Engine and check the results. Engine Administrator Specify additional engine settings and save them in an XML file for convenience. Set parameters that control Demantra behavior in many ways. Business Modeler "Configuring Parameters" Integration, Workflow, and Automation During a typical implementation, you typically perform at least some of the following tasks: Task Tool used For details, see Define import and export mechanisms. Business Modeler "Series and Level Integration" Load sample data and test the import and export processes.
- 84. 5-8 Oracle Demantra Implementation Guide Task Tool used For details, see Write database procedures to maintain data as needed. Text editor Outside the scope of this documentation Define workflows. Workflow Editor "Creating Workflows" Users and User Interfaces During a typical implementation, you typically perform at least some of the following tasks: Task Tool used For details, see Create components, or subdivisions of Demantra data Specify which levels and series are displayed in the each component Business Modeler "Creating or Modifying a Component" Create additional users for the components, as needed. Create user groups for collaboration. Business Modeler "Creating or Modifying a User " Define security for menu options. Collaborator Workbench Administrator "Specifying Permissions for Menu Items" Define worksheets. Worksheets are visible only within the component where they were defined. Worksheet designer Oracle Demantra Demand Management User's Guide or other user manual Define methods that the users can execute from within the worksheets; redefine or disable default methods. Business Modeler Workflow Editor "Configuring Methods" Optionally customize Collaborator Workbench. "Customizing Demantra Web Pages"
- 85. Implementation Tools and Process 5-9 End Phase of Implementation The end phase of an implementation includes the following general steps. Fine-Tuning After you define the data model and the components, it is often necessary to iterate by making adjustments to both the data model and the components. • You may need to use the Business Modeler for the following tasks: • Make series and levels available or unavailable • Further customize the components • You may need to adjust the worksheets. To do so, you use the worksheet wizard. See the Oracle Demantra Demand Management User's Guide or other user manual. Delivering the Solution To deliver the solution, you must perform the following general tasks: • Wrap the database procedures. See "Wrapping Database Procedures". • Make sure that all server machines are configured correctly. • Set up the client machines and verify that each can run the Demantra software. • Run the Analytical Engine, examine the results, and tune the Analytical Engine as needed. • Perform acceptance testing with the qualified users. • Train users and provide hand-off details. Here you must train end users and one or more designated administrators who will be responsible for maintaining the system in the future. Hand-off Details When the system goes online, you should provide the following information to the end users and one or more designated administrators who will be responsible for maintaining the system in the future. Hand-off Details for the Users When you hand off the solution to the users, be sure to provide details on the following
- 86. 5-10 Oracle Demantra Implementation Guide implementation-specific topics: • The worksheets that you have pre-configured for the solution: the purpose of each and intended users, as well as the levels, series, and other details that describe those worksheets. • The level hierarchies and the purpose of each level. Make particular note of the levels that are used in the forecast tree, as those affect the Analytical Engine. • The series and their interrelationships. • Which data each user can see. • How often new data is imported. • How often the engine runs. • Workflows that require user participation. Also, make sure that users are familiar with the basic concepts, as documented in the user manuals. In particular, make sure they know how to make and save changes in the worksheets, as well as understand why changes do not always immediately appear in the worksheets. Hand-off Details for the System Administrator When you hand off the solution to an administrator, be sure that the administrator understands how to keep the solution running. Depending on how Demantra is configured, it needs some or all of the following: Component When needed See Database Always Information for Oracle or SQL Server Workflow Engine If workflows are being used "Managing Workflows" Web server If solution uses any Web-based components Documentation for the Web server Possible other background processes Varies Contact the implementers of your Demantra system Also, be sure to provide details on the following implementation-specific topics: • The specific automated processes that the solution uses, including any database
- 87. Implementation Tools and Process 5-11 procedures that must be scheduled to run periodically • How often the Analytical Engine runs • Any workflows that are in the solution • How many components have been defined and who owns them; user IDs and initial passwords; permissions for each user • User groups, their memberships, and their purposes The administrator will probably have to add, remove, or change permissions for users, also described in "Managing Security".
- 89. Levels 6-1 6 Levels This chapter describes levels and related concepts, outlines the primary configuration options, and summarizes the available tools. This chapter covers the following topics: • Introduction • Level Terminology • Hierarchy Variations • Types of Levels • Members • Member Identifiers • Introduction to the Data Model Wizard • Levels and the Forecast Tree • Filtered Levels • Other Concepts Related to Levels • Configuration Notes Introduction Levels control how data is aggregated and organized. They are used in worksheets, in filters, in import and export, and in forecasting. In a worksheet, for example, you can display data at the account level, as follows:
- 90. 6-2 Oracle Demantra Implementation Guide The worksheet might include a drop down list instead of this tree control. For example: In either case, you can display data for any account. You can use multiple levels together, for example:
- 91. Levels 6-3 In generic terminology, the word member refers to a unit within a level. For example, CVS is a member of the account level. When the user hovers the mouse over a member, Demantra displays a hint indicating the name of the level to which that member belongs. Levels and Filtering Within Demantra, you generally apply filters by specifying a level and the members of that level to include. For example, the following filter includes only the Rainbow brand. You can apply multiple filters at the same time. For example, for the preceding worksheet, you could also filter by account. You can apply use filters in worksheets, in user security, and in import and export. Levels and Member Management Within a worksheet, a user can right-click and operate on a member. For example, a
- 92. 6-4 Oracle Demantra Implementation Guide user can edit a member, displaying a dialog box like the following: Here the user can edit attributes of the member, including its parent members. Most level members are imported from external systems, and users generally create or change members only if they expect the same change to occur in the imported data. You can disable or hide the right-click menu options that permit these activities. Custom Methods As the implementer, you can define custom methods to perform operations on a selected member, for users to access as an option on the right-click menu. You can apply security to your methods, just as you do with the core right-click actions. You can define a user security threshold for visibility of that method. For example, you can state the method should only be visible to users who have 'Full Control' of the member from which you launch the method. To control this, you log into the Business Modeler, select 'Configure > Configure Methods'. For 'Method Type'= Custom, you can select from the Security Threshold of Full Control, Read & Write or Read Only. For information on methods, see "Methods and Workflow". Level Terminology Demantra uses standard terminology to describe level hierarchies. The following figure shows an example of item levels:
- 93. Levels 6-5 This hierarchy corresponds to the following data: The Product Family level is the parent of the SKU level, and conversely, SKU is the child of Product Family. Hierarchy Variations Your application can include multiple, independent hierarchies. For example, you could include the following three independent hierarchies: The Product Family hierarchy is described above. The Brand hierarchy is as follows:
- 94. 6-6 Oracle Demantra Implementation Guide Note that this hierarchy is independent of the Product Family hierarchy. That is, there is not necessarily any relationship between brands and product families. The ABC hierarchy is not shown here, but is also independent of the other hierarchies. Each hierarchy can contain as many levels as needed. Some hierarchies are typically much more complex than others. Types of Levels Demantra supports the following types of levels, most of which are indicated with different icons: • Item levels, which group data according to characteristics of the items you sell. Item levels typically include brand, item type, product category, and so on. • Location levels, which group data according to characteristics of the locations where you sell. For example, location levels could describe a hierarchy of geographical places or of company organization. Another location hierarchy could organize the locations in some other manner, such as by type of store. • Combination levels, which group data according to time-independent characteristics of the item-location combinations. Combination levels are also known as matrix levels. • Time aggregations, which group data by sales date. You typically use time aggregations on the x-axis of a worksheet, instead of the predefined time units. • General levels, which group data by item, location, and date. General levels are provided as a modeling tool to be used as needed. Demantra does not provide a standard icon for this type of level, because the possible uses can vary a great deal. Demantra also provides special-purpose levels for use with specific products; see " Special-Purpose Levels".
- 95. Levels 6-7 Note: The desktop products (Demand Planner and Demand Replenisher) can display only item, location, and combination levels. The Web products can support all kinds of levels. Item and Location Levels Every application includes at least one item level and one location level. These are useful levels because generally our applications are interested in products and how those products perform at different locations. Item and location levels are also used in the forecast tree; see "Levels and the Forecast Tree". Combination Levels As noted earlier, combination (matrix) levels group data according to time-independent characteristics of the item-location combinations. For example, the following partial worksheet uses a combination level that groups data by a user-controlled flag that determines which combinations the Analytical Engine will forecast: Time Aggregations A time aggregation groups data by time and are often used for custom calendars. Your solution can use time aggregations, custom time units, or a combination of both. Use the following guidelines to determine which you need:
- 96. 6-8 Oracle Demantra Implementation Guide na Names Uses in worksheet time aggregation Each member can have a user-friendly name that you create. You can use a time aggregation like a level. For example, you can place it on a worksheet axis. time unit Each time bucket in the worksheet is automatically labeled with the start date of that bucket. You can use time units only on the x-axis (the time axis) of the worksheet. See also "Time Units". General Levels A general level groups data by the item, location, and time bucket. Promotion Effectiveness uses general levels to model marketing promotions, but they could be used in other ways. In addition to ordinary attributes, a general level can have a population attribute, which specifies a set of item-location combinations and consecutive time buckets with which the general level is associated; see "Population Attributes". Special-Purpose Levels Demantra also provides the following special-purpose levels: • Promotion levels, which are used by Promotion Effectiveness and which group data by sales promotions. Depending on how your needs, you may have a hierarchy of promotional levels (to organize the promotions), and the higher levels might use different icons. • Settlement levels, which are used only by DSM. In general, a settlement is an outstanding sum of money that needs to be resolved, related to a promotion. If you use a settlement level in a worksheet, you cannot use levels from any other hierarchy in that worksheet. • Check request levels, which are used only by DSM. A check request is an instruction to send a check to a customer or designated third party. Check requests are exported to the accounting systems that actually perform them. • Configure to Order levels, which support the display and forecasting of a base model's manufacturing components. • Service Parts Forecasting levels, which are used to support the integration between
- 97. Levels 6-9 EBS Service Parts Planning (SPP) and Demantra Demand Management. These levels support the display and forecasting of a base model's maintenance components. Members Each level includes a set of members, each with different characteristics. For example, the SKU level includes a set of members, each corresponding to a different value of SKU. Member Attributes A level can have attributes, which are descriptive properties associated with the level (and stored in the table associated with the level). Each member can have different values for each attribute. You use attributes in several different ways: • To provide extra information for the end users to view and edit, within the worksheets. To view attributes of a member, the user can right-click the member within a worksheet; see "Levels and Member Management". • To act as levels, that is, to provide a further subdivision of the level data. To do this, you add an attribute to a level and select an option to create it as a child level. For example, suppose you create an attribute called ABC. If ABC can have the values A, B, or C, and if you create this attribute as a level, then the ABC level would have three members: A, B, and C. The member A, for example, would consist of all the data that had the A value for this attribute, within the parent level. • For integration. • In the case of promotions, promotion attributes are converted into promotional causal factors for use by the Analytical Engine. See "Configuring Causal Factors" in the Demantra Analytical Engine Guide. You can have different types of attributes (numeric, character, or date), and you can specify a default value for each. Population Attributes As noted earlier, a general level can also have a population attribute, which specifies a set of item-location combinations and consecutive time buckets with which the general level is associated. Because it is more complex than an ordinary attribute, a population attribute is stored in several additional tables that Demantra automatically creates. Member Defaults
- 98. 6-10 Oracle Demantra Implementation Guide Users can create new members by using the right-click menu in a worksheet. To simplify this work, it is useful to provide default values for the attributes and for the parent members. For parent members, Demantra provides a predefined default member for each level, and that member is initially named Default level name. You can choose whether to display this member and you can rename it. This predefined default member is not normally associated with any data, however; it is provided for convenience. If you have data loaded in the system, you can instead choose an existing member to use as the default member. So, for example, you could use any of the following as the default member of the Brand level: • The predefined default member: Default Brand • The predefined default member, renamed by you: Unspecified Brand • An existing member: Acme A given level can have multiple parent levels. This means that you can specify a default within each of those parent levels. For example, in the default setup for Promotion Effectiveness, the Promotion level has three parents: Promotion Status, Promotion Type, and Scenario. When a user creates a new promotion, you may want the user to have a default value for each of these. Member Identifiers Whenever Demantra retrieves data for a worksheet, it uses the levels in that worksheet to determine how to group the database rows. For example, consider the following set of rows in a table of items. SKU SKU_DESC ... FAMILY ... RLF0013OR Rainbow LF Oatmeal Raisin ... Low Fat ... RLF0016CH Rainbow LF Chocolate ... Low Fat ... RLF0018VW Rainbow LF Vanilla Wafer ... Low Fat ... RLF0019CW Rainbow LF Chocolate Wafer ... Low Fat ...
- 99. Levels 6-11 SKU SKU_DESC ... FAMILY ... PLRG0209C Private Label Reg Chocolate Wafer ... Regular ... PLRG0210S Private Label Reg Strawberry Wafer ... Regular ... RLF0011CC Rainbow LF Chocolate Chip ... Low Fat ... RLF0012PB Rainbow LF Peanut Butter ... Low Fat ... RRG0007CN Rainbow Reg Cinnamon ... Regular ... RRG0008VW Rainbow Reg Vanilla Wafer ... Regular ... RRG0010SW Rainbow Reg Strawberry Wafer ... Regular ... RSP0021AC Rainbow Spc Animal Crackers ... Specialty ... Here the FAMILY field indicates the product family to which each SKU belongs. When aggregating to the family level, Demantra groups together all the rows with the same value of FAMILY. The field that can be used in this way is called the code field for the level. When you define a level, you identify the field that Demantra should use as the code field for that level. For each unique value of the code field, all records with that value are grouped together as one member. (The nature of the grouping is controlled by the series definitions, as described in "Series".) Code and Description Fields For each level, the enterprise data must have at least one unique field that can be used to distinguish level members; this is used as the code. In some cases, the enterprise may have two fields: an internal identifier and the corresponding user-friendly, "pretty name," to be used as the description field. The SKUs in the previous example have two
- 100. 6-12 Oracle Demantra Implementation Guide such fields: SKU and SKU_DESC. If the enterprise data includes only a single field that is unique to a given level, you use that field as the code and the description. ID Field Internally, Demantra generates and uses its own unique numeric ID, which is not meant to be exported to external systems. Code Display Field Within the Demantra user interface, users see and use two unique labels for each level member, the code display field and the description field: As the implementer, you can configure the code display field in three different ways. • The code display field can be equal to the internally generated numeric ID. • The code display field can be equal to the code field. • The code display field can be equal to the description field. Introduction to the Data Model Wizard Level definitions are generally coupled tightly with integration, because each level is defined by a code field, and most code fields are imported from corporate systems. Consider, for example, a level such as Brand. Any SKU belongs to a brand, and Demantra imports that information. Adding an item or location level usually requires a new field in the data, which also requires changes to the integration. The Data Model Wizard (in the Business Modeler) therefore has two related, primary purposes: • To create batch scripts to load the lowest level item, location, and sales data. • To create database procedures that define Demantra levels based on that data.
- 101. Levels 6-13 Note: The Data Model Wizard also performs other configuration tasks, not discussed here, that can be performed only within the Data Model Wizard. The Data Model Wizard prompts you for the location and format of the raw data. It helps you describe the contents of the staging tables so that the data can be moved into the Demantra internal tables. You then specify how to use the fields in the staging tables, generally using each field in a level definition or in a series definition. Demantra ignores any field for which you do not specify a use. The Data Model Wizard is discussed further in "Loading Basic Data". As a final result, the Data Model Wizard creates a batch script and database procedures. The script executes the procedures, which load the data into the Demantra internal tables and synchronize the tables as needed. Note: You can define additional levels later, outside of the Data Model Wizard, but you should do so only if you do not need a corresponding change in the load scripts. The Data Model Wizard automatically removes any levels that you define outside of the wizard. Levels and the Forecast Tree If your application uses the Analytical Engine, you will also need to consider what sort of forecast tree you will need. The forecast tree organizes data for use by the Analytical Engine. In this hierarchy, each node aggregates by both item and location. General levels can also be included in the forecast tree. Demantra supports multiple analytical engines, with associated forecast trees. Demantra supports multiple analytical engines, with associated forecast trees. Depending on which engine profile you choose, Demantra will apply different settings and can provide different forecasting results. For example, when using Booking Forecast profile, the forecast generated will be focused on bookings for an item. Similarly, the Forecast Spares Demand profile will generate a forecast for service parts. In general, forecasting is most accurate when it can be performed at the lowest possible allowed aggregation level. However, sometimes there is not enough data at that level for all combinations. For those combinations, the Analytical Engine aggregates the data to a higher level and tries to generate a forecast there. Consider the following example, showing a small part of a forecast tree.
- 102. 6-14 Oracle Demantra Implementation Guide The bold boxes show the nodes at which the Analytical Engine is forecasting. • In this example, there is enough data at the SKU-store level for SKU 001 and SKU 002; the Analytical Engine can generate a forecast at that level for those SKUs. • On the other hand, there is less data for SKU 003, so the Analytical Engine aggregates data for that SKU across all the stores in Region AA, generates the forecast for those SKUs at the SKU-region level, and then splits to the store level. See Proport When Forecasting on General Levels, page 12-11 for more information about how the proport handles supersessions. Filtered Levels By default, a level of a given type groups all the associated data; for example, an item-type level groups all the item data. You can, however, create filtered levels. A filtered level contains a filtered subset of the data. To create a filtered level, you join the underlying data to another table of your choice, and you then add an SQL WHERE clause to filter the data. To do this, you use the EXTRA FROM and EXTRA WHERE options for the level. Other Concepts Related to Levels After you configure levels, you associate them with several other kinds of Demantra objects. Levels and Units In Demantra, you associate each unit with the levels where it makes sense to use that unit. For example, a relatively small unit might make sense only at lower levels. Demantra uses this association within worksheets. If a worksheet contains three levels, for example, then only the units associated with those levels can be used in that worksheet. For information on units, see "Units, Indexes, and Exchange Rates".
- 103. Levels 6-15 Levels and Methods It is useful to be able to right-click a level member within a worksheet and perform some operation on it. With Demantra, you can define methods, which the user sees as an ordinary right-click menu options. Demantra also provides a set of default methods that you can redefine or disable as needed; these allow the users to view, edit, delete, and so on. Each method is associated with a specific level. Also, a method can be available in all worksheets or in a single specific worksheet. You can apply security to all methods. For information on methods, see "Methods". Level and Worksheet Association It is useful to be able to examine a level member more closely, to launch a worksheet from that member that is filtered to show only that member. But typically, a Demantra application includes a large number of worksheets, and most of those worksheets would not be useful in this way. So Demantra provides an option for associating each level with any number of worksheets. Demantra uses this association in two ways: • A user can start from a level member and launch a worksheet that is filtered to that member. To do so, the user right-clicks the member and clicks the Open or Open With option. Alternatively, this worksheet can show just the combination from which the user started. • A worksheet can include a sub tab worksheet that is associated with any of the levels in the main worksheet. Then when a user selects a member in the main worksheet, the sub tab shows the details. For information on worksheets, see "Worksheets". Configuration Notes This section contains configuration notes related to levels. Standard Levels Some Demantra products, such as DSM, assume that your database contains specific levels, parameter settings, and other configuration options. Demantra provides setup scripts that perform all the required configuration. See Part IV, "Other Configuration". Dependencies Before you can configure levels, you will need some sample data. Because level definitions are generally coupled tightly with integration, you typically
- 104. 6-16 Oracle Demantra Implementation Guide need to define levels at the same time as your basic loading scripts. For this, you use the Data Model Wizard. You can define additional levels later, outside of the Data Model Wizard, but you should do so only if you do not need a corresponding change in the load scripts. The wizard automatically removes any levels that you define outside of the wizard. Tools Demantra provides the following tools for creating and configuring levels and related objects: Tool Purpose/Notes Data Model Wizard* Defines levels (and other model elements) and creates a script to import data, particularly sales, item, and location data, at the lowest level. Configure > Levels option* Defines additional levels. CREATE_PE_STRUCT procedure Creates basic promotion levels needed by Promotion Effectiveness. You can customize these levels to some extent, after running the procedure. UPGRADE_TO_DSM procedure Creates the settlement and check request levels required by DSM. Configure > Units for Levels option* Associates units with levels. Configure > Methods option* Defines methods. Components > Open/Create Component option* Creates components, which define the associations between levels and worksheets. *These options are in the Business Modeler. For information on these tools, see Part II, "Basic Configuration".
- 105. Series 7-1 7 Series This chapter covers the following topics: • Introduction • Main Series Options • Data Types of Series • Types of Series • Naming Series • Update Field • Editability • Series Calculation: Server Expressions • Series Calculation: Client Expressions • Series Calculation: Using Both Server and Client Expressions • Series Calculation: Proportionality Option • Summary of Calculation Options • Display Properties • Color Expressions • Display Precision and Format • Display-Only Summaries • Configuring the Display-Only Summary • Other Basic Series Options • Advanced Series Options • Preserving Promotional Data While Moving or Copying • The Aggregated Base Level Option • Extra From and Extra Where
- 106. 7-2 Oracle Demantra Implementation Guide • Note and Promotion Indicators • Series Groups • Configuration Notes Introduction A series is a set of data that can be displayed in a worksheet table or graph, at any aggregation level. The following example shows several series displayed at the lowest level: Main Series Options When you define a series, you specify many options. To start, the following list gives an overview of the main, interrelated options: • An external and an internal identifier. The external identifier appears in worksheets, and you use the internal identifier when you refer to the series in server expressions. • The data type of the series. • An option that controls the type of series. For example, some series are associated with sales; these series potentially have different values for each time bucket and each item-location combination. (If you are familiar with database terminology, note that this property determines the primary key of the series.) • An option that controls whether the series is stored in the database or not. If a series is stored in the database, the series has an update field, which is the database column that stores the series data. • Options that control whether the series is editable, and if so, under what conditions. • Options that control how the series is calculated at any aggregation level and how
- 107. Series 7-3 series data is split to the lowest level. These options include the server expression, the client expression, the proportionality option, and the proportions reference series. The following sections discuss these options. Additional options are discussed later in the chapter. Data Types of Series Demantra supports the following data types for series: • Numeric • String • Date Note: The desktop products (Demand Planner and Demand Replenisher) can display only numeric series. Types of Series Demantra supports the following types of series: sales series Consists of time-dependent data for each item-location combination. That is, each data point in the series corresponds to a given item-location combination at a given point in time. This type of series is the most common. matrix series Consists of time-independent data for each item-location combination. That is, each data point in the series corresponds to a given item-location combination. You use matrix series to store and maintain information about item-location combinations. promotion series Consists of data for each promotion at each item-location combination, at each time bucket.
- 108. 7-4 Oracle Demantra Implementation Guide level series Stores data associated with a specific level. Each data point in the series corresponds to a given member of that level. For example, suppose that a level is the page size in a catalog, which lets you view and group items by their assigned page sizes. If you created an editable level series, you could easily reassign items to different page sizes. update-by series The Business Modeler allows for the creation of a series with server expressions that retrieve data from one of several columns, according to a CASE statement based on the combination's context. To better support this functionality, a non-fixed update field is required. This allows for an update to go to a dynamic, context-based column. Series that require this functionality must have an Update-By series specified. The series specified as the Update-By series must be of type String, and should return a specific column name. Updates generated from the updated series will be stored in the column string results of the Update-By series. The updated and Update-By series are handled as pairs, both in the retrieve process and the update process. For example: Series S1: Server expression= 'sum(case when Level_id = 1 then column1 when Level_id = 2 then column2 when Level_id = 3 then column3 else column4 end)' Update by series= S2. Series S2: Type=String Server expression= 'sum(case when Level_id = 1 then 'column1' when Level_id = 2 then 'column2' when Level_id = 3 then 'column3' else 'column4' end)' Note: Series S2 returns stings which match the actual column names. Note: The desktop products (Demand Planner and Demand Replenisher) can display only sales and matrix series.
- 109. Series 7-5 Naming Series Series names are often included in client expressions and names that contain special characters may prevent the expression from functioning as intended. Forbidden characters within series names are: • . • + • - • | • • / • * • [ ] • > • < • = Update Field A series may or may not be stored in the database. If it is stored, its data is saved in the series update field. This option is known as the update field because it refers to the field that is updated when changes are saved to the database. When you use the Business Modeler to configure a series, it automatically adds the update field if needed. Although you generally should avoid working directly in the database, when you configure series, you need to write SQL expressions to aggregate data from the tables in which the series are stored. Depending on the type of series, the update field is in one of the following tables: For sales series sales_data matrix series mdp_matrix
- 110. 7-6 Oracle Demantra Implementation Guide promotion series promotion_data (not promotion as implied by the Business Modeler) For level series Table associated with the level. Demantra provides an alias (branch_data), which you can use to refer to sales_data or promotion_data. Editability You control whether a series is editable in a combination of the following ways: • You can make an entire series editable or non-editable with a single setting. • You can control the time periods during which a series is editable. To do so, you specify whether the series is associated with history, forecast, or history and forecast. For an editable series: • If the series is configured as history, then it is editable only in the current time bucket and previous time buckets. • If the series is configured as forecast, then it is editable only in the current time bucket and future time buckets. • If the series is configured as history and forecast, then it is editable for all time buckets. • You can apply an edit-lock expression to the series to further restrict editing. An edi t-lock expression evaluates to true or false; for each cell where the expression is true, that cell is locked. Series Calculation: Server Expressions A server expression must be an aggregating SQL expression that returns to a value with length greater than zero for each element. (If you never plan to use the series within a cached worksheet, it can return null or a zero-length value; but you may not be able to prevent the series from being misused.) A server expression must have one of the following forms: aggregate_function (branch_data.database_column * #UNIT#) aggregate_function (branch_data.database_column) aggregate_function (mdp_matrix.database_column * #UNIT#) aggregate_function (mdp_matrix.database_column)
- 111. Series 7-7 aggregate_function (other_expression) Here: • aggregate_function is one of the SQL aggregating functions, most commonly sum. • database_column is a column of the branch_data or mdp_matrix table, most often the update field that corresponds to this series. That is, if SeriesA is associated with branch_data.SeriesA, then the server expression for SeriesA could be sum(branch_data.SeriesA) Note: branch_data is a synonym for the sales_data table or the promotion_data table. • #UNIT# represents the unit conversion factor. Within a worksheet, this token is automatically replaced by the conversion factor that corresponds to the unit that the worksheet is currently using. In turn, other_expression can be made up of some or all of the following components: • Other SQL functions. • Constants and expressions that have numeric, string, date, and true/false values. Note: Enclose any literal negative value within parentheses, as in this example: (-0.33) • Operators such as +-*/. • Demantra tokens such as #UNIT#. • Columns of the branch_data and mdp_matrix tables. Note: These column references must explicitly have the table name (or branch_data) included. You can use parentheses to control the precedence of calculations, according to standard algebraic rules. Caution: SQL expressions have a limit of 3000 characters. To avoid reaching this limit, use small field names. For information on the supported operators, tokens, and SQL functions, see "Server Expression Functions and Operators".
- 112. 7-8 Oracle Demantra Implementation Guide Forecast Versions Each time the Analytical Engine runs, it generates a forecast. Each forecast is associated to the engine profile used to create it. The default profile being used is the Batch profile. In addition, each forecast generated receives a forecast version. The most recent forecast is version 0, the previous one is version 1, and so on. Each series can be implicitly or explicitly associated with a specific forecast profile and version, or possibly with several. Typically, the large majority of series are associated with the most recent forecast generated using the base profile, but it is often useful to configure some series to capture information associated with a previous forecast, or to compare forecasts generated using different profiles. You can include forecast profiles and versions, if needed, in the server expression for the series. When you specify a server expression, you should specify the forecast version and engine profile used to generate it. To do so, you use the #FORE@<Version>@<Engine Profile># token. The worksheet mechanism will dynamically replace this token with the appropriate forecast. For example, #FORE@0@25# is replaced by the current forecast version generated by using engine profile 25, and #FORE@1@52# is replaced by the most recent previous forecast version generated using engine profile 52. If the engine profile is not designated in the token, the token will default to the base forecast profile. The server expression can refer to multiple forecast versions, for example, to compare them. In the case of Promotion Effectiveness, the forecast details are more complex, because the Analytical Engine decomposes the forecast into multiple effects. Therefore, Oracle Demantra provides tokens such as #SW_BRAND@<Version>@<Engine Profile># and #SW_CHANNEL@<Version>@<Engine Profile># for these separate effects. See "Server Expression Functions and Operators". Note: Within the hint message for a series, you can include the token #FDATE@<Version># to refer to the date on which a forecast version was generated. This can be very useful to the users of the worksheets. Units of Measure You can include the #UNIT# token, if needed, in the server expression for the series. At any time, a worksheet uses one unit of measure, which is used by most of the numeric series in that worksheet. The user can switch to another unit of measure, and all those series are correspondingly scaled by the appropriate conversion factors. Note: You can instead hard code the unit into a series definition, so that it expresses, for example, the buyback per case. Whatever your choice is, be sure to give useful names and hints to the series.
- 113. Series 7-9 For more information on units, see "Introduction". Series Calculation: Client Expressions Expressions A client expression uses Demantra functions. The client expression can be made up of some or all of the following components: • Constants and expressions that have numeric, date, true/false or null values. Note: Enclose any literal negative constant within parentheses, as in this example: (-0.33) • Demantra functions. • Operators such as +-*/. • References to other series. To refer to a series, you use the name of the series. • References to series at other time periods. Here, you use the following syntax: series_name [relative-time-bucket] An expression like this is sometimes called a vertical formula. For example: Sales [-1] refers to the Sales series for the previous period. Sales [1] refers to the Sales series for the next period. [0] is not allowed. Here relative-time-bucket must be any of the following: • An integer • A series name • A simple expression using integers, series names, and the basic mathematical operators. For information on the supported operators and functions, "Client Expression Functions and Operators". Time-Shifted Client Expressions (Vertical Formulas) When a client expression includes a reference to another series, by default, Demantra uses data from the same time bucket. You can refer to data from earlier or later time buckets, however. The following example shows three series, each of which has a client expression that refers to the Example series.
- 114. 7-10 Oracle Demantra Implementation Guide Notice that the series Shift1 is null for 11/25/3002. This is because this cell refers to the Example series at a time bucket that is not displayed in the worksheet. Null Sales Records and Time-Shifted Client Expressions You do not typically have sales records for all combinations for all dates. This affects client expressions that refer to series at other time buckets. When a client expression refers to a time bucket that does not have sales data, Demantra automatically uses the next available non-null sales data. The following figure shows an example: Using Expressions to Refer to Time Buckets The previous examples have used the simplest syntax for time-shifted client expressions, in which you use an integer to refer to the relative time bucket. You can instead use simple expressions that include series names, integers, and mathematical operators. For example, if you have series A, B, C, and D, the client expression for D could be something like the following: A[B+C] For example, suppose you want to know how much inventory your warehouse will contain on a given date. The date is determined relative to today based on both the
- 115. Series 7-11 production lead time and the transportation lead time. That is, you want to know Inventory[Production lead time + Transportation lead time]. Precedence of Calculations for Client Expressions The following rules apply for the recalculation order, and will be performed recursively: 1. The system looks for vertical formulas, which use data in other time buckets. Such as formulas either use a function such as FSUM or they reference data in time buckets: Demand [2]. 2. The system calculates the data series that are the source for those in the Step 1. 3. The system calculates the data series of Step 1. 4. The system calculates the series that use the series in Step 1 as source. 5. The system calculates the series that are the result of Step 4, and so on. Series Calculation: Using Both Server and Client Expressions It is important to understand how server and client expressions are used in combination. All series must have a server expression, although the expression is not always important. The client expression always takes precedence. That is, the client expression, if present, is evaluated, displayed, and stored in the database, instead of the server expression. If a series has a client expression, the series should be configured in one of the following ways: • The server expression is trivial. For example, it is a constant such as 0. Because this value is never meant to be seen or stored, the specific value is irrelevant. • The server expression is meaningful and useful in some cases. In this case, the client expression consists of a conditional expression of the following general form: If (condition, client-expression-value, series-name) Here series-name is a reference to the same series to which this client expression applies. This reference directs Demantra to the server expression that this series uses. Depending on whether the condition is true for a given cell, this expression returns either the client expression value or server expression value. Note: In some cases, it is useful for a client expression to null out data in the worksheet table in situations where the data might be confusing. There is another important difference between server and client expressions, as far as
- 116. 7-12 Oracle Demantra Implementation Guide end users are concerned. Server expressions are evaluated in the background and the resulting changes are not available instantly in the worksheets. Client expressions, on the other hand, are evaluated immediately. In many cases, a server expression and a client expression can be mathematically equivalent, but the client expression might be more user-friendly. Series Calculation: Proportionality Option When you define a series as proportional, you need to choose the proportional by series from a series dropdown. For a series to show up in the dropdown, it must have a non-zero/not null server expression It does not have to be proportional; a proportion by series does not need to be proportional itself. In general, the definition of a series also specifies how to calculate data at the lowest level, in the case when data changes at a higher level. Data can potentially change at a higher level either when it is imported at a higher level or when users edit a series while displaying data at a higher level. Each series can be configured as proportional or non-proportional. • If a series is proportional, the parent value is split among the child members according to the proportions of those child members. • If a series is non-proportional, the value for each child member is set equal to value of parent. When you configure a series as proportional, you also specify a proportions reference series. For best performance, Oracle recommends the following: • Proportions from the same table are better than proportions from a different table. • If the proportions are not in the same table that stores the series that uses those proportions, consider caching the proportions into the same table that stores the series. For example: create a cache of GLOB_PROP in sales_data and promotion_data. • Use PROPORTION_COLUMN when the proportions are from the same table and do not require a server expression. • Use a series that is not empty (most of the time) for the proportion reference. Supported Proportion Configuration The series available in the proportional series dropdown depend upon the table on which the series is defined. The series listed in the dropdown are also filtered by the table on which the proportional series exists:
- 117. Series 7-13 • Series on sales_data: Can be split by any series with Item or Location levels, for example, sales_data, and mdp_matrix, • Series on a data table: For example, promotion_data can be split by sales_data , mdp_matrix, Item or Location levels, and its own base level. • Series on level: All levels with the same base level as the level and lower or equal aggregation to the series level. • Series on mdp_matrix: Can be split by any series with Item or Location levels, for example, mdp_matrix except for sales_data, Summary of Calculation Options When you configure a series, you have many options to set, and not all the combinations are useful. This section summarizes the useful combinations of the most important series options. Combinations of Key Series Options The following table summarizes the combinations of the most important series options: Expression Update field Proportional Editable Server only or Server and client Yes Depends on the nature of the server expression Editable or non-editable* No Non-proportional only Probably should be non-editable. Client only (server expression is trivial and its value is never seen) Yes Depends on the nature of the client expression Non-editable only No Non-proportional only *Depending on how the series is configured, it may be necessary to ensure that data changes only at the lowest level. Apart from those cases, these series can be either editable or non-editable. For more information, see Series that Can be Changed at Any Level , page 7-16and Series that Must be Changed Only at the Lowest Level., page 7-17
- 118. 7-14 Oracle Demantra Implementation Guide When to Configure a Series as Proportional The following table indicates when to make a series proportional: Update field Form of expression* Proportional Editable If data changes at a higher level... Yes SERVER: sum (table_name.updat e_column_name) Should be proportional Editable or non-editable Lower levels are calculated by splitting the higher-level value according to the proportions in the Proportion Calculation series. SERVER: avg (table_name.updat e_column_name) max (table_name.updat e_column_name) or min (table_name.updat e_column_name) Should be non-proportional Editable or non-editable Value for each lower level is set equal to value of parent level. Any other expression Should be non-proportional Should not be editable except at lowest level Undesirable behavior occurs. CLIENT: Name of a proportional series Should be proportional Non-editable Lower levels are calculated by splitting the higher-level value according to the proportions in the Proportion Calculation series.
- 119. Series 7-15 Update field Form of expression* Proportional Editable If data changes at a higher level... CLIENT: Any other expression Should be non-proportional Non-editable Value for each lower level is set equal to value of parent level. No Any Must be non-proportional Non-editable Undesirable behavior occurs. *Where table_name.update_column_name is the update field for this series. In all cases, the expression can also include the token #UNIT#, which represents the unit conversion factor. For example: sum (table_name.update_column_name * #UNIT#) Useful Series Configurations For any series, data can safely be changed at the lowest level. Depending on how the series is configured, it may or may not be safe to change data at higher levels. The following table indicates which series configurations support data changes at higher levels: Update field Form of expression* Proportional If data changes at a higher level... Yes Server expression: sum (table_name.update_co lumn_name) Should be proportional Lower levels are calculated by splitting the higher-level value according to the proportions in the Proportion Calculation series.
- 120. 7-16 Oracle Demantra Implementation Guide Update field Form of expression* Proportional If data changes at a higher level... Server expression, any of the following: avg (table_name.update_co lumn_name) max (table_name.update_co lumn_name) or min (table_name.update_co lumn_name) Should be non-proportional Value for each lower level is set equal to value of parent level. Any other expression Should be non-proportional Undesirable behavior occurs. Client expression: Name of a proportional series Should be proportional Lower levels are calculated by splitting the higher-level value according to the proportions in the Proportion Calculation series. Client expression: Any other expression Should be non-proportional Value for each lower level is set equal to value of parent level. No Any Must be non-proportional Undesirable behavior occurs. *Where table_name.update_column_name is the update field for this series. In all cases, the expression can also include the token #UNIT#, which represents the unit conversion factor. For example: sum (table_name.update_column_name * #UNIT#) Series That Can Be Changed at Any Level For any series, data can safely be changed at the lowest level. Depending on how the series is configured, it may or may not be safe to change data at higher levels. The most common series are the ones that are configured so that the data can be changed at any level. Remember that data can change for many reasons, by editing within a worksheet, by importing changed data, or by changing data from which the series is derived.
- 121. Series 7-17 Update field Proportional Form of expression *If data changes at a higher level... Yes Proportional SERVER: sum ( table_name.update_colu mn_name) Where table_name.update_colu mn_name is the update field for this series. Lower levels are calculated by splitting the higher-level value according to the proportions in the Proportion Calculation series. CLIENT: Name of a proportional series Yes Non-proportional SERVER: avg ( table_name.update_colu mn_name) max ( table_name.update_colu mn_name) or min ( table_name.update_colu mn_name) Value for each lower level is set equal to value of parent level. CLIENT: Any other expression *Where table_name.update_column_name is the update field for this series. In all cases, the expression can also include the token #UNIT#, which represents the unit conversion factor. For example: sum (table_name.update_column_name * #UNIT#) Series That Must Be Changed Only at the Lowest Level If a series is configured in the following ways, it should be edited or changed only at the lowest level:
- 122. 7-18 Oracle Demantra Implementation Guide Update field Form of expression Proportional Yes Any expression other than the ones in "Series That Can Be Changed at Any Level". Should be non-proportional. Otherwise, undesirable behavior occurs. No Any Must be non-proportional. Calculating Data at Lower Levels For a series that has a server expression and that is stored in the database, Demantra needs to know how to calculate data at lower levels if data changes at a higher level. When you configure a series, you specify whether the series is proportional. The following table shows which series should be proportional and explains how these series behave. Form of server expression Proportional If data changes at a higher level... sum ( table_name.update_column_nam e) Where table_name.update_column_nam e is the update field for this series. Series should be proportional. Lower levels are calculated by splitting the higher-level value according to the proportions in the Proportion Calculation series. avg ( table_name.update_column_nam e) max ( table_name.update_column_nam e) or min ( table_name.update_column_nam e) Where table_name.update_column_nam e is the update field for this series. Series should be non-proportional. Value for each lower level is set equal to value of parent level. Any other expression Series should be non-proportional. Data should not be changed except at lowest level.
- 123. Series 7-19 Display Properties You can control how Demantra displays each series in a variety of ways. Color Expressions Any series can have a color expression, which controls the background color of the series when displayed in a worksheet table. Display Precision and Format For each numeric series, you can specify the format that worksheet tables should use when displaying the series. By specifying this format, you are also implicitly specifying the maximum possible size of numbers in the series. For example, if the display format of a series is ##,###.##, the maximum size of a number in this series is 99999.99. Display-Only Summaries Summary rows may appear in a worksheet as either rows or columns, or both as shown in the example below:
- 124. 7-20 Oracle Demantra Implementation Guide For each series, you also can specify a summary function or expression for use only within the worksheet. The following figure shows examples of Total and Average, in a worksheet: The summary is only for display and the results are not stored in the database. However, to avoid user confusion, you should probably summarize data in a manner consistent with the server or client expressions you define for this series; see "Series Calculation: Using Both Server and Client Expressions".
- 125. Series 7-21 For example, if you define this series by a server expression that sums data, the summary function should probably be Total. The worksheet table may also include subtotal rows. The following shows an example: A given series can be summarized in different ways within a single worksheet table, although that usually means that the series is useful only within that worksheet. Configuring the Display-Only Summary You can customize the summary line to provide flexibility in cross tabulating columns/rows, and reporting purposes. These customizations include: • Hiding or showing the summary • Freezing the summary in a particular place on the worksheet • Setting the summary location To toggle the Summary Line: It is often desirable to eliminate the summary line within a given section of the cross-tabulated worksheet. For example, you may not wish to see a summary of all promotions within a scenario because a separate view is used for this purpose.
- 126. 7-22 Oracle Demantra Implementation Guide 1. From the Collaborator Workbench, open the worksheet whose summary line you want to configure. 2. From the Worksheet menu, choose Layout Designer. The Worksheet Designer appears. 3. Click the Layout button. 4. Right-click on the series that you want to configure, and either enable or disable the Show Summary check box. 5. Click Ok. The worksheet is refreshed to show or hide the summary line. Freezing the Summary Line: If there are many rows in a table, it is useful to display the worksheet summary as the top row and then freeze that row so that it remains in position as you scroll down the page. Only the overall summary of a worksheet is freezable. The overall summary corresponds to the outermost summarized level. Only summary rows on the top row or left-most row can be frozen. Otherwise, the menu option is disabled. 1. From the Collaborator Workbench, open the worksheet whose summary line you want to configure. 2. From the View menu, choose Freeze Overall Summary.
- 127. Series 7-23 To set the Summary Line position: 1. 1. From the Collaborator Workbench, open the worksheet whose summary line you want to configure. 2. 2. From the Worksheet menu, choose Layout Designer. The Worksheet Designer appears. 3. Click the Layout button. 4. Do one of the following: 1. To set the summary row to the right or left of the worksheet, right-click on a series in the horizontal series list and then choose Summary Position> Left or Right. 2. To set the summary row to the top or bottom of the worksheet, right-click on a series in the vertical series list and then choose Summary Position> Top or Bottom. The worksheet refreshes to display the summary position in its new location. Other Basic Series Options This section discusses other basic options you can use when configuring series. Drop-down Lists A series can be configured as a drop-down list, which means that when the series is displayed in a worksheet, each series cell includes the same drop-down list of choices. When a user includes the series in a worksheet, he or she can set the value of a series element by selecting from the list, if the series is editable. Typically each list element is a text string that has a corresponding numeric value. When the user chooses a list element, Demantra finds the corresponding numeric value and sets the series value equal to that. To configure the drop-down list for a series, you can use any of the following: • A table that exists in the Demantra database. • A level. • A list that you enter directly in the Business Modeler for use by this series. All three variations behave in the same way.
- 128. 7-24 Oracle Demantra Implementation Guide Scaling If the series is numeric, it can be configured as scaled. At any time, a given worksheet uses a single scaling factor. The user chooses this factor and Demantra automatically divides all numbers in the worksheet by that factor, except for any series that are marked as "unscaled". Caching by Item A series can be cached (aggregated by item and cached in the branch_data_items table). This improves performance of worksheets that are aggregated across locations and that do not have any location or matrix filtering. Advanced Series Options On occasion, you may need to consider the more advanced options for series. Preserving Promotional Data While Moving or Copying When you copy and paste a promotional level, Demantra copies data for the promotional series, as well. The span of time for the new copy might not be the same as the original, so the definition of each series needs to specify how to perform the computation. Similarly, when a user changes the length of a promotion, Demantra adjusts the associated promotional series data. There are two preservation types: • Copy/Paste preservation type • Move preservation type The settings should be consistent with the rest of the settings for the series. The following guidelines are suggested:
- 129. Series 7-25 Option Meaning Suggested Series Type Suggested Aggregation Function As Is Preservation Demantra shifts the data to the new dates but makes no other changes. If the new date range is longer than the original date range, Demantra uses nulls for the dates at the end. If the new date range is shorter than the original date range, Demantra omits the "extra" dates. Any Any Do Nothing Demantra ignores the series during the copy/paste and move operations. Use this option to retain values of any price series of a promotion when using the Refresh Population method and workflow. Any, suggested Any Most Common Demantra ensures that the pasted data closely resembles the source data. Use this setting for any kind of series; the other settings apply only to numeric series. Any, but not usually appropriate for proportional numeric series Any function other than Sum None Demantra does not copy the data for this series. Any Any
- 130. 7-26 Oracle Demantra Implementation Guide Option Meaning Suggested Series Type Suggested Aggregation Function Percentage Preservation Demantra first aggregates the data according to the Aggregation Function of the series. It then ensures that the pasted data generally has the same level, over time, as the source data. Numeric; not proportional Any function other than Sum Volume Preservation Demantra first aggregates the data according to the Aggregation Function of the series. It then ensures that in the pasted data, the overall volume is the same (area under the curve) as the volume of the source data. Choose Volume Preservation for the Copy/Paste Preservation option when you use a Refresh Population method and workflow to realign promotion data after an item is moved from one promotion group to another. This option works in conjunction with the CopyPasteIntersect system parameter. Numeric; proportional Sum For most series, you will want to use the same setting for both options. However, for some series, it does not make sense to copy the data when you create a new promotion (so you would use the setting None for copy/paste), although it does make sense to preserve the data if you are just moving a promotion. In such cases, it is useful to have two separate options.
- 131. Series 7-27 The following figure shows examples of series that are configured with each of these preservation types: This worksheet table shows two promotions, Promo 1 and a copy which spans more time. Notice the following in the copy: • The Preserve As Is series contains the same numbers for the first five time buckets, which the length of the original promotion. After that, this series is null in the promotion copy. • For the Preserve Vol series, the level of this series is lower in the copy so that there is the same overall volume as in the original. • For Preserve Percent, the pasted data is at the same level as the original, and is extended for the length of the pasted promotion. • For Preserve None, there is no pasted data. • For Preserve Most Common, the pasted data mimics the original data in overall pattern. See Also • "System Parameters" for more information about the CopyPasteIntersect system parameter that works in conjunction with the Copy/Paste Preservation series configuration.
- 132. 7-28 Oracle Demantra Implementation Guide • "Specifying Data Properties of a Series Table" for additional information about configuring series. The Aggregated Base Level Option This option lets you specify how this series is aggregated in a worksheet that includes a promotion level: • If you choose sales_data, this series is aggregated by the items, locations, and dates selected in the worksheet. Most series are aggregated this way in a typical implementation. • If you choose promotion, this series is aggregated by the items, locations, dates, and promotions selected in the worksheet. That is, when the series is aggregated, any data that is not associated with a promotion is ignored. Within a worksheet that does not include a promotion, the series is aggregated based on the series setting; that is, it is aggregated by the items, locations, and dates if it aggregates by sales_data only, and additionally by promotions if aggregated by promotion. The following shows two series that are defined almost identically. The Orders series is aggregated by sales_data and the Orders for Promotions series is aggregated by promotion. This worksheet is aggregated to the Brand, Account, and Promotion levels. The worksheet is filtered to show only the Private Label brand and two specific BJs locations (these locations are children of the Account level): • BJ 0005 ran a promotion on all Private Label products during the time span of the worksheet. • BJ 0003 did not run any promotion. Notice that the values are greater for Orders than for Orders for Promotions. This is because only one of the locations ran the promotion.
- 133. Series 7-29 Extra From and Extra Where Normally the server expression can refer only to fields in the following tables: For sales and matrix series branch_data and mdp_matrix tables. Note that branch_data is a synonym for the sales_data table or the promotion_data table. For promotion series branch_data table. For level series Table associated with the level. In rare cases, you may need to refer to data in other tables. In such a case, use the Extra From field. In this field, specify an optional list of additional tables (separated by commas) that contain data relevant to this series. If you include a table here, the server expression can refer to columns in that table. Note: Internally, these tables are added to the From clause in the SQL query that retrieves data for this series. If you need to filter the data further, use the Extra Where field. The syntax of this field is as follows: table.column operator other_table.other_column Here operator is a comparison operator, one of the following := <> > >= < <= and table.column and other_table.other_column are key columns in the database. Note: Internally, the Extra Where field is added to the WHERE clause in the SQL query that retrieves data for this series.
- 134. 7-30 Oracle Demantra Implementation Guide Note and Promotion Indicators Within a worksheet, a user can attach a promotion (in the case of Promotion Effectiveness) or a note to a given item-location combination, at a given date. Depending on how the series was configured, the series will be displayed with an indicator in all worksheet cells that correspond to that item-location combination and date. You control these indicators when you define components, within the Business Modeler. Note: If your solution uses other types of general levels, you can associate an indicator for any general level that does not have child levels. Series Groups You can define optional groups of series, in order to make the lists of series more manageable, especially in cases where there are a large number of series. For example, the Worksheet Designer includes a screen like the following. Well-defined series groups can make it easier to place related series on a worksheet. A series can belong to any number of groups. You define, modify, and delete series groups in the Business Modeler. The series groups are visible in the Worksheet Designer, within in the Web-based products (Demand
- 135. Series 7-31 Planner Web, Promotion Effectiveness, and Settlement Management). Note: Series groups are not visible in the desktop products (Demand Planner and Demand Replenisher). Configuration Notes This section contains configuration notes related to series. Dependencies Before you can configure series, you will need to load some sample data for items, locations, and sales (and promotions, if you want to create promotion series). Before creating a dropdown-type series, you must consider where to look up the dropdown choices. You may need to create the table for the lookup data and then load that data (as indicated in "Loading Supplementary Data"). Or you can use an existing level or you can enter the choices directly in the Business Modeler. Series can be added fairly easily throughout implementation and later as needed. Tools Demantra provides the following tools for creating and configuring series: Tool* Purpose/Notes Data Model Wizard Can define series, although this wizard provides only a small subset of the series options. Configure > Series option Defines series. Configure > Series Group option Defines series groups. Components > Open/Create Component option Creates components. Among other things, a component defines the associations between series and indicators. *These options are in the Business Modeler.
- 137. Units, Indexes, and Exchange Rates 8-1 8 Units, Indexes, and Exchange Rates This chapter describes units and related concepts, outlines the primary configuration options, and summarizes the available tools. This chapter covers the following topics: • Introduction • Unit Conversion Data • How Units Are Used • Time Units • Viewing Calendar Months in a Weekly System • Enabling Calendar Month Support • Setting and Modifying the Base Time Unit • Unit-Level Association • Indexes and Exchange Rates • Configuration Notes Introduction At any time, a worksheet uses one unit of measure, which is used by most of the series in that worksheet. The user can switch to another unit of measure; any series that uses a unit of measure is correspondingly multiplied by the appropriate conversion factors. For example, a worksheet can express sales and forecast in units or in cases or dollar value. Note: You do not need to use units in this way. You can instead hard code the unit into a series definition, so that it always expresses, for example, the buyback per case. Whatever your choice is, be sure to give useful names and hints to the series.
- 138. 8-2 Oracle Demantra Implementation Guide Similarly, at any time, a worksheet can use one index or exchange rate, which is used by any series that express financial quantities. The user can switch to a different index (such as CPI) or exchange rate, and the worksheet automatically multiplies those series by the index or exchange rate. Unit Conversion Data The imported data contains the item quantity per sales record, expressed as the number of units sold. Note that you can rename units. The imported data also includes the unit price, which depends on the item, location, and date. You use the item price as a conversion unit, to represent monetary values. Typically, you define additional units of measure, of two general kinds: • Size units, which measure the size of a sale: cases, truckloads, and so on. When you define these units, you provide a conversion factor by which the base item quantity is automatically multiplied. This conversion factor does not have to be the same for all items. • Monetary units, which measure the value of a sale. When you define these units, you provide a conversion factor (the imported unit price), which depends on the item, location, and date. You can also specify time-dependent indexes and exchange rates that can be applied to monetary units within a worksheet. Size Units When you define a size unit, you specify the following: • A name, used on the vertical axis of worksheet graphs. • The table and data field that contains the associated conversion factor, which is generally different for different products. The unit conversion factors must be supplied in the imported data. For example, the t_ep_sku table might include a column that indicates the number of cases per unit, as follows: SKU ... Cases Pallets ... 109784 ... 0.01 0.001 ... 109785 ... 0.015 0.0015 ... 109786 ... 0.005 0.0005 ...
- 139. Units, Indexes, and Exchange Rates 8-3 SKU ... Cases Pallets ... ... ... ... ... ... This means that the SKU 109784 has 0.01 cases per unit, or inversely, 100 units per case. When you define the Case unit, you would specify the Cases column of t_ep_sku as the source of the conversion factor for this unit. Monetary Unit When you define a monetary unit, you specify the following: • A name, used on the vertical axis of worksheet graphs. • The table and data field that contain the price per unit. • An optional expression for the conversion factor, if the factor cannot be simply read from the table. • Optional time-dependent exchange rates and indexes that can be applied to this unit. How Units Are Used The token #UNIT# represents the unit conversion factor. You can include this token within the server expression for a series, which should have the following general form: quantity * #UNIT# Within a worksheet, this token is automatically replaced by the conversion factor that corresponds to the unit that the worksheet is currently using. For example, if the Demand was 1200 units, and if the worksheet is using cases instead, then Demand is displayed as 12 cases. To configure a series to use units, do either of the following: • Create a server expression with the form shown previously. • Create a client expression that refers to another series that uses units. Time Units Any Demantra solution has a base time unit, such as weeks or months. Demantra provides some larger predefined time units, and you can add others. In general, there
- 140. 8-4 Oracle Demantra Implementation Guide are two types of time units: • Simple time units (such as quarters) are simple multiples of the base time unit. For these, you just provide a scaling factor. For example, for a weekly system, a quarter consists of 13 time units. These time units are assumed to divide evenly into one year, and Demantra automatically figures out which base time bucket each date belongs to. • Data-dependent time units, such as 4-4-5 time units, require explicit data. That is, they must be assigned explicitly to each date in the system, in the Inputs table. Note that by default, in any worksheet, the date and label for a given bucket is the first date in that bucket. Within a worksheet, another date format can be used. Data-Dependent Time Units The following example represents rows in the Inputs table. It shows a set of dates from a weekly system and shows how those dates are mapped into quarters and 4-4-5 periods. (A 4-4-5 time system creates quarters that consist of a four-week "month," followed by another four-week "month," and then followed by a five-week" month." In practice, 4-4-5 calendars vary from company to company.) The second and third columns show the bucket numbers associated with each date, depending on the date system. Date Bucket number when quarters are used Bucket number when 4-4-5 periods are used 1/3/05 100 122 1/10/05 100 122 1/17/05 100 122 1/24/05 100 122 1/31/05 100 123 2/7/05 100 123 2/14/05 100 123 2/21/05 100 123 2/28/05 100 124
- 141. Units, Indexes, and Exchange Rates 8-5 Date Bucket number when quarters are used Bucket number when 4-4-5 periods are used 3/7/05 100 124 3/14/05 100 124 3/21/05 100 124 3/28/05 100 124 4/7/05 101 125 The first thirteen dates belong to a single quarter, and the last date belongs to the following quarter. The first four dates belong to the first 4-4-5 "month" and so on. Viewing Calendar Months in a Weekly System Each Oracle Demantra implementation has a core time resolution definition. This definition drives the resolution of data kept in the system, which in turn drives the granularity of data available to users and internal processes. This data granularity serves as the smallest building block upon which all time management and display is done. Available data granularities are day, week, or calendar month. For more information, see Time Units, page 8-3. If an organization wants to support both weeks and calendar months, then using the weekly time resolution is not suitable because weeks do not aggregate wholly into calendar months. To overcome this limitation, you may decide to upgrade the data model to support viewing weekly data aggregated by calendar month. Different worksheets display data in the selected aggregations, and allow for a variety of uses based on business roles. When you upgrade the data model to support weekly data by calendar month, the following changes occur: Note: To view calendar months in a weekly system, both new and existing users should run the upgrade procedure. • Weeks spanning more than one month are divided into two separate periods. • Historical sales are loaded and stored in sub-weekly periods. • Forecast generated and stored in sub-weekly periods. • Data may be viewed by week, fiscal month, calendar month, quarter or year.
- 142. 8-6 Oracle Demantra Implementation Guide • Data is updated in views using weeks, fiscal months, calendar months, fiscal quarters, calendar quarters, fiscal years and calendar years time aggregation. Note: Upgrading the data model will increase data rows in the system by approximately 20%. If your business is not interested in viewing weekly data by calendar month, then you may continue using the current data model without experiencing any additional overhead associated with calendar month support. Enabling Demantra to support viewing weekly data by calendar month is done using the UPGRADE_TO_CAL_MONTH procedure. For more information, see Enabling Calendar Month Support. Time Aggregations when Viewing Weekly Data by Calendar Month The following time aggregations are added when you upgrade the data model to support viewing monthly data in a weekly system: • Lowest Period: Sub week periods that are used to allocate data when weeks overlap a calendar month. • Calendar Month: Gregorian calendar month. • Calendar Quarter: Quarterly periods (January - March, April - June, July - September and October – December) based on the Gregorian calendar. • Calendar Year: Gregorian calendar year (January to December) Data is stored at an enhanced weekly aggregation, where weeks spanning multiple calendar months are split into periods. Worksheets with time aggregations of fiscal month, quarter, and year aggregate and display weekly data. Worksheets with the calendar month time aggregation will aggregate all weeks and periods belonging to each month. When data is split based on a proportional series, then data is allocated to each period within the week based on each period's proportions within the proportional series. Note: Use caution when using the Lowest Period time aggregation for forecasting. Demantra's forecasting engine assumes that historical and future periods have an approximately equal length, and views all periods in the same manner. To solve this limitation, the forecasting engine scales any period which is less than a whole week to match weeks. The scaling process modifies both historical demand and key causals for the period in order to approximate the period as a full week. When a forecast has been generated, the values for the Lowest Period time aggregation are scaled back to their original values. Scaling is controlled using the EngineScaleInput
- 143. Units, Indexes, and Exchange Rates 8-7 parameter. For more information, see System Parameters, page 26-1. Parameters and Dates Period-based parameters refer to the number of whole base time units. If you use a weekly time aggregation, then system parameters store values by weekly periods. If periods contain sub-weeks, then the analytical engine automatically converts system parameters to store these sub-week periods instead of weeks. For example, a weekly system has a lead of 52 weeks. These 52 weeks contain 63 sub-week periods, since some weeks are split among different calendar months. When calculating the forecast, Demantra automatically converts the Lead parameter to 63. All conversions are written to the engine log, so that you may view the original and resulting values. The following parameters are converted automatically by the engine to account for expanded forecasting periods: • AverageHorizon • DampPeriod • ForecastGenerationHorizon • HistoryLength • MetricsPeriod • MinLengthForDetect • ShiftActive • ShiftBaseCausals • ShiftPromoCausals • ShiftPromoMaxValue • StartAverage • TestPeriod • TrendDampPeriod • TrendPeriod • Lead • Season
- 144. 8-8 Oracle Demantra Implementation Guide • test_samp_len Disaggregation to Dates When an update occurs at a time aggregation higher than the base time aggregation, the update must then be allocated between different periods. Because some weeks are divided into unequal periods, each period uses a weighting to disaggregate the data between periods. For weekly systems, each period receives a weight based on the number of days in the period, resulting in values between one and seven. For daily systems, each period (day) receives a weighting of one. For monthly systems, each period (month) also receives a weight of one. Allocation Series The default method for allocating series between different time periods is determined by the number of days that fall in each period. This allocation method is set globally, but may be modified and contain local overrides. Demantra uses the following series to control the allocation between weeks. These series are non-proportional and should only be edited when viewing information at the Lowest Period time aggregation: • Period Allocation Global: stores the global weights that control allocation when updates are made at an aggregated time resolution. This series does not vary by item or location. Because of its location in the INPUTS table, this series value can only be modified by using PLSQL. In addition to this global series, each data table has a separate override column that allows individual items and locations to have their own allocation weights. • Period Allocation DM: Supports allocation of data between dates for series in the SALES_DATA table. This series is pre-populated with the number of days falling into the corresponding INPUTS entry. • Period Allocation PTP: Supports allocation of data between dates for series in the PROMOTION_DATA table. This series has a default value of NULL. • Period Allocation CTO: Supports allocation of data between dates for series in the T_EP_CTO_DATA table. This series has a default value of NULL. • Period Allocation SPF: Supports allocation of data between dates for series in the T_EP_SPF_DATA table. This series has a default value of NULL. Enabling Calendar Month Support Use the UPGRADE_TO_CAL_MONTH procedure to update the Demantra data model to support viewing weekly data by calendar month. This procedure locates weeks that
- 145. Units, Indexes, and Exchange Rates 8-9 fall within two months, and splits them into two rows in the database. It also splits existing sales data, general level data, and time dimension data (INPUTS table). Each row represents the portion of the week that falls within each month. For example, a schema row beginning Monday, 29th 2010 will be split into two periods: November 29th (containing two days) and December 1st (containing five). Before you Begin 1. Backup your Demantra schema. 2. Perform a manual review of the SPLIT_DATES_DATA_COLUMNS table and confirm whether or not you want to split each data column. 3. Use the UPGRADE_TO_CAL_MONTH procedure to populate the table SPLIT_DATES_DATA_COLUMNS: exec upgrade_to_cal_month.scan_data_table_columns; Note: This procedure should be run every time that the model is changed. 4. Once populated, the SPLIT_DATES_DATA_COLUMNS table contains numeric columns that directly relate to application series, plus any other numeric columns not identified as application columns. Whether or not a value gets split is determined by the value in the SPLIT_VALUE_Y_N column. Possible values are: • Y: (Yes) The upgrade procedure will split this value. • N: (No) The upgrade procedure will not split this value. • U: (Unknown) The upgrade procedure could not determine if the value should be split. Non-series numeric columns that have not been identified as application columns will have this value and are not split. Confirm the value for each table entry before proceeding to run the Upgrade procedure. Setting the Queue Size In order for the split process to work effectively the splitting is run in separate parallel jobs. The number of queues is controlled by the SpiltDataMaxQueues parameter. As an approximate guideline, the number of parallel queues should not exceed the number of CPUs in your Demantra deployment. To set the queue size: 1. Update the SplitDataMaxQueues parameter in the DB_PARAMS table. For more
- 146. 8-10 Oracle Demantra Implementation Guide information, see System Parameters., page 26-1 2. Run the Cal_Month_Split_Set_Queues procedure to distribute the queue to the data tables: exec upgrade_to_cal_month.cal_month_split_set_queues; Note: You do not need to rerun the full data column scan after setting the queue size. Running the Split Data Procedure Use the UPGRADE_TO_CAL_MONTH procedure to start the split process: exec upgrade_to_cal_month.main(start_date,end_date); Where start_date is the first date in the Inputs table that the procedure will split, and end_date is the last date in the Inputs table that the procedure will split. For example, the following command splits all data between January 1, 2010 and January 1, 2011: exec upgrade_to_cal_month.main('01-JAN-2010','01-JAN-2011'); Specifying "null" for the start_date tells Demantra to split all dates from the start of the database. Similarly, specifying "null" for the end_date tells Demantra to split all dates to the end of the database. For example, the following command splits the entire Inputs table: exec upgrade_to_cal_month.main(null,null); Note: The split dates process may be run multiple times for the same date ranges. can be repeated again for the same time ranges. Only unsplit data and dates are processed. Reviewing Split Procedure Results Use the following Demantra tables to verify the outcome of the split process: • DB_EXCEPTION_LOG: contains any errors that are encountered during the split process. • SPLIT_DATA_QUEUE_DISTRIBUTION: contains the split status per data table. • PARALLEL_SPLIT_DATES: contains the split status per date. • PARALLEL_SPLIT_DATA: contains the split status per data table and per date. The possible status values in these tables are:
- 147. Units, Indexes, and Exchange Rates 8-11 Status Code Explanation 1 Complete 2 Ready 3 Running 4 Failed 5 Timeout 6 Killed 7 Finalized Setting and Modifying the Base Time Unit The base time unit is used by the Data Model to aggregate the source data to the specified time bucket size. Allowed settings of the base time unit (time bucket size) are: • day • week • Gregorian month Impacts of Changing the Base Time Unit: If the time bucket is re-configured, the time aggregation set for all worksheets is modified to match the new time aggregation. A review of all worksheets is strongly recommended. See Worksheets, page 9-1. After making changes, the Data Model should be upgraded, not Rebuilt, with the Run Time Bucket option checked. See Building the Data Model, page 17-22 and Manipulating Existing Data Models, page 17-24.
- 148. 8-12 Oracle Demantra Implementation Guide The erased member and fact data in Demantra must then be downloaded again. See Loading the Data into the Data Model, page 17-24. Integration profiles are required to be redefined by the user, if the unit of time specified therein becomes invalid. For details, see Loading Series and Promotions, page 14-6. The following time aggregations are only available if the base time unit is set to weeks: • Lowest Period: displays weeks and sub week periods. • Calendar Months: displays all periods that fall within the Gregorian month. Calendar months are defined as the time period from the 1st of each month to the last day of the month. • Calendar Quarter: displays all periods falling within quarterly Gregorian month ranges. These quarters are defined as: • Q1: January, February, March • Q2: April, May, June • Q3: July, August, September • Q4: October, November, December • Calendar Year: displays all periods falling within the same Gregorian year. For example, "2010". Pre-configured calendars support dates from 1995 to 2030. For more information, see Viewing Weekly Data by Calendar Month. Common changes to the Base Time Unit: The Business Modeler allows the Demantra System Administrator to change the base time unit at any time after initial installation. Common changes include: • Setting the start date of the weekly time bucket from Monday to Sunday • Changing the base time unit to month or day from week To set or change the Base Time Unit: Prerequisite Install the Business Modeler. 1. Navigate to the data model. Business Modeler > Data Model > Open Data Model The Select Time Bucket window appears.
- 149. Units, Indexes, and Exchange Rates 8-13 2. Select the Base Time Unit from the time bucket list of values. The default value is: week 3. If the Time Bucket field is set to week, then choose the day that represents the starting day of the week from the First Day Of Week list of values. The default value is Monday. User may change the default but must then rebuild the model. 4. If the Time Bucket field is set to week, then select the Aggregation Method from the list of values to determine whether events that occur mid week are aggregated to the start date or the end date of the weekly time bucket. 5. Save your work. 6. Click OK. Unit-Level Association In Demantra, you associate each unit with the levels where it makes sense to use that unit. For example, a relatively small unit might make sense only at lower levels. Demantra uses this association within worksheets. If a worksheet contains three levels, for example, then only the units associated with those levels can be used in that worksheet. Indexes and Exchange Rates Monetary units of measure can use financial indexes and exchange rates. This means that when users display data in a worksheet, they can apply any of those associated indexes or exchange rates. Each index and exchange rate is stored in a different table, except for the placeholder index (constant, equals one for all dates). The placeholder index is used to switch a worksheet back to the same monetary units that are used in the imported data. By default this is called dollar $, because monetary values are usually imported in dollars. Configuration Notes This section contains configuration notes related to units, indexes, and exchange rates. Dependencies Before you can configure units, you will need to load some sample data for items, including unit conversion data. If a unit requires an index or exchange rate, you must configure that index or exchange
- 150. 8-14 Oracle Demantra Implementation Guide rate first. Tools Demantra provides the following tools for creating and configuring units: Tool Purpose/Notes Data Model Wizard* Can define units, although this wizard provides only a subset of the options. Configure > Display Units option* Defines units. Data Model > Global Factors option* Allows you to add columns and values to the Inputs table. Configure > Configure Units for Levels option* Allows you to associate units with levels. *These options are in the Business Modeler.
- 151. Worksheets 9-1 9 Worksheets This chapter describes worksheets, outlines the primary configuration options, and summarizes the available tools. This chapter covers the following topics: • Introduction • Main Worksheet Options • Elements of a Worksheet View • Level Layout in a View • Filtering per View • Level and Worksheet Association: Embedded Worksheets • Worksheet and Layout Ownership • Worksheet Caching • Configuration Notes Introduction Within Demantra, users work almost entirely within worksheets. A worksheet is a customized working environment where users can view and edit data. When users save changes back to the database, they become available to other users and to downstream operations. A worksheet consists of one or more views, usually displayed as tabs within the worksheet. Each view retrieves a set of data that is aggregated in a specific way and that may also be filtered. The following shows an example:
- 152. 9-2 Oracle Demantra Implementation Guide Views in this worksheet Use this tree to select data at some aggregation level The view aggregates series data to the specified level You can also display views as child windows of the worksheet. Main Worksheet Options This section provides a quick overview of the main worksheet options: • Levels in the worksheet • Series in the worksheet • Time resolution and time span • Optional filters • Optional exception filters • View definition and layout Levels in a Worksheet A worksheet usually includes aggregation levels. Based on the levels included in a worksheet, Demantra automatically determines which item-location combinations the worksheet should include. Depending on which combination you select, the worksheet displays series data associated with that combination. For example, if you select one location level (city) and one item level (SKU), the worksheet will contain series data associated with each city-SKU combination. On the other hand, if you select one location level (city) and you do not specify an item level, the worksheet aggregates data for all items. That is, the worksheet will contain series data associated with each city, aggregated for all products.
- 153. Worksheets 9-3 • If you do not specify any aggregation levels in a worksheet, the data is completely aggregated across all selected items and locations. • If you use a settlement level in a worksheet, you cannot use levels from any other hierarchy in that worksheet. Advanced Selection Options By default, if a worksheet includes a promotion level, the worksheet includes all the following types of combinations: • Combinations that have both sales data and promotions • Combinations that have sales data, but no promotions • Combinations that have promotions, but no sales data The worksheet displays placeholders for combinations that do not have promotions. For example: You can exclude some of these combinations. For example, you might want the worksheet to include only the combinations that have both sales and promotions, as follows: Series in a Worksheet Every worksheet must include at least one series. You can display series in the worksheet table, the graph, both, or neither. (It can be useful to add series to a
- 154. 9-4 Oracle Demantra Implementation Guide worksheet but leave them undisplayed, so that the series are available for any client expressions that depend on them.) Note: If you use a settlement level in a worksheet, all series in the worksheet must refer to tables used by the settlement hierarchy. Time Criteria Each worksheet selects data for a specified span of time and optionally aggregates it in time using a time unit. You can specify the span of time as a fixed range of dates, a time range relative to today, or a time range relative to the last sales date in the loaded data. To aggregate data in time, you can also include a time aggregation in the worksheet. Filters Within Demantra, you generally apply filters by specifying a level and the members of that level to include. For example, the following filter includes only the Rainbow brand. You can apply multiple filters at the same time. For example, for the preceding worksheet, you could also filter by account. In contrast to an exception filter ("Exception Filters"), this type of filter is static and behaves the same no matter how the data changes. Exception Filters See Applying Exception Filters in Oracle Demantra User's Guide. View Layout A worksheet contains one or more views, which the user can display either as tabs or as sub windows. For each view, you specify the following options:
- 155. Worksheets 9-5 • Name of the view • Elements to include in the view • Layout of levels and series in the view • Additional filtering of the view • Sub tab worksheets in the view The following sections provide more details on view layout. Elements of a Worksheet View For each worksheet view, you can control which of the following elements are included in that view: • The Members Browser or combination-selection lists. A worksheet view usually includes either a Members Browser or a set of drop down menus, with which the user chooses the data to display in the rest of the worksheet: • The worksheet table, which shows series data for the item-location combination that is currently selected in the view. Depending on how the layout is configured, this may appear as an ordinary table or it may appear as a cross tab; see "Level Layout in a View". By default, each row in the table corresponds to a point in time, and each column displays the data for a series. As noted earlier, the table also has a summary row. If the worksheet is in cross tab layout, the table also includes subtotal rows. • The graph, which displays data for the current selection. By default, the horizontal axis shows time, and the vertical axis shows one or more series. • The Notes/Attachments sub tab, which displays notes and attachments related to the selected combination. • The Activity Details sub tab, which displays promotions and the promotion hierarchy. The Activity Browser displays an expandable tree view of the promotions associated with the currently selected combination. The Gantt chart displays the promotions associated with the currently selected combination. • Sub tabs that contain related worksheets. When a selection is made in the worksheet, the related worksheet shows further details. This related worksheet potentially includes different series than the rest of the worksheet and may also be filtered further.
- 156. 9-6 Oracle Demantra Implementation Guide Level Layout in a View When you include levels in a worksheet, that means you can see data associated with each member of those level. In each view of a worksheet, you can use any of those levels in any of the following ways: • Use it within the Members Browser or combination-selection lists, as in the previous examples. • Use it on one of the worksheet axes, creating a crosstab layout. Each worksheet v iew has an x-axis and a y-axis. • In the graph, the x-axis is shown horizontally and the y-axis is shown vertically. • In the table, the x-axis is displayed vertically and the y-axis is displayed horizontally. (This way, the x-axis displays the same data in the table and in the graph.) • Hide it, causing Demantra to aggregate data to that level. Crosstab Layouts In a crosstab layout, you include a level on an axis. The table (also known as a pivot table) provides a cross tabulation of all the members. The following figure shows a worksheet table in crosstab layout, with a row for each SKU member within each time bucket: Notice that the Members Browser does not include the SKU level, because all SKUs are displayed at the same time. For another example, the worksheet could instead display the SKU members across the top of the table rather than down the side, as in the following example:
- 157. Worksheets 9-7 Other variations are possible. Hidden Levels Hidden Levels allow users to exclude worksheet selected levels from specific worksheet views. This allows flexibility of what individual worksheet tabs can show without having to use embedded worksheet functionality. When used, one or more levels are removed from a worksheet view this causes data to aggregate across the level. In order to support this aggregation the worksheet data will not be editable To hide a level: • Access Worksheet Designer -> Layout. • Navigate to the tab where the level should be hidden • Right click on any level • Navigate to Hide level and click on the desired level To show a hidden level: • Access Worksheet Designer -> Layout. • Navigate to the tab where the level should be hidden • Right click on any level • Navigate to Show level and click on the desired level Editing Data • Data in a view with hidden level will not be editable Advanced Analytics • Levels appearing in one or more view will be shown in the advanced analytics screen. Levels hidden in all views will not be shown
- 158. 9-8 Oracle Demantra Implementation Guide Information Retrieval • Notes and other information being retrieved or updated will include all filters on the worksheet and view. This includes filters applied to level which are subsequently hidden. • The ability to filter data based on level members is not affected by hiding a level. Open With • Levels not being displayed in the view being used to "open with" will not part of context used to the filter opened worksheet. Filtering per View In some cases, you create multiple views so that you can show different series in each view. In other cases, you might need to show different combinations in each view. You can separately filter each worksheet view. In this case, you filter a view by choosing a subset of the members of the levels included in the worksheet. DSM uses this feature to segregate settlements with different statuses. Settlements of each status are on a different worksheet tab. Level and Worksheet Association: Embedded Worksheets It is useful to be able to examine a level member more closely, to launch a worksheet from that member that is filtered to show only that member. But typically, a Demantra application includes a large number of worksheets, and most of those worksheets would not be useful in this way. So Demantra provides an option for associating each level with any number of worksheets. Demantra uses this association in two ways: • A user can start from a level member and launch a worksheet that is filtered to that member. To do so, the user right-clicks the member and clicks the Open or Open With option. Alternatively, this worksheet can show just the combination from which the user started. The worksheet appears in a new window. Note: Demantra indicates the filtering as follows: • If the worksheet is filtered by member, the name of the worksheet is preceded by the name of the member by which you are filtering it. • If the worksheet is filtered by combination (full context), the name of the worksheet is preceded by the word "Filtered".
- 159. Worksheets 9-9 • A worksheet can include an embedded worksheet that is associated with any of the levels in the main worksheet. Then when a user selects a member in the main worksheet, the embedded worksheet shows the details. The embedded worksheet is displayed in a sub tab. If you open a worksheet as an embedded worksheet: • It retrieves filters based on the parent worksheet selection. • The update does not filter unless you explicitly include the level in the embedded worksheet. Oracle Demantra treats the embedded worksheet as if you opened it independently; it filters the population to update only by the worksheet filters itself, and doesn't consider the parent worksheet filters If you open a worksheet as an embedded worksheet using Open With, Oracle Demantra retrieves and updates using both the worksheet filters and the parent worksheet filters. Worksheet and Layout Ownership In general, any worksheet is available as follows: • A private worksheet is available only to the user who created it. • A public worksheet is available to all users but can be changed only by the user who created it. In any case, Demantra automatically prevents any user from seeing data for which he or she does not have permissions. Worksheet Definition, Layout, and Local Adjustments As users work with a Demantra worksheet, they often sort columns, hide or display features, and make various other changes. It is useful to understand how these settings are saved. Base Demantra configuration These settings affect all users and all worksheets. • Display format for each series • Initial display width of series and levels • Colors and graph style for each series • Other display colors (generally dependent on a condition)
- 160. 9-10 Oracle Demantra Implementation Guide Worksheet definition These settings are saved through the File > Save Worksheet menu option. Only the worksheet owner can make these changes. • Initial number of views within the worksheet and their initial names • Initial elements (Members Browser, table, graph, and so on) in worksheet view • View synchronization setting • Aggregation levels used in worksheet and initial level layout; advanced selection options • Series used in worksheet and initial series layout • Time aggregation; time span; time formatting • Filtering and exception filtering • Unit of measure used in worksheet; overall scale used in worksheet, if any; index or exchange rate, if any Layout changes These settings are saved separately for each user if the user clicks File > Save Worksheet. Any user can save these changes, not just the worksheet owner. • Additional views in the worksheet • New names of worksheet views • Level layout: order of levels; placement on axes in each view; whether level is hidden in each view • Series layout: order of series; where each series is displayed (table, graph, both) • Hide/show time axis
- 161. Worksheets 9-11 Local adjustments These settings are saved automatically separately for each worksheet and each user. • Use of windows or tabs for views within a worksheet • Size and position of the Members Browser, table, graph, and so on in each view • Sorting in the worksheet table • Graph Type; Legend; Grid Lines; Graph Appearance (3D, Gradients, Outlines) • Hide/show empty rows setting • Hide/show empty columns setting • Wrap headers • Frame state (Hide/Show Frames, restored, minimized, etc.) • Calendar Time Level • Activity synchronization setting (Options menu) Not saved • Changes to column widths in the worksheet table • Initial view focus; focus in each worksheet view • Expansion state in the Members Browser and Activity Browser • Focus and scroll in all areas • Zoom setting in Gantt The auto run option (Options menu) is saved separately for each user, but applies to all worksheets that the user sees.
- 162. 9-12 Oracle Demantra Implementation Guide Worksheet Caching This describes: • Enabling Worksheet Caching • Creating a Workflow to Build Worksheet Caches Automatically Enabling Worksheet Caching Perform the following to enable worksheet caching: 1. Verify that the System Parameter EnableWorkSheetCaching is set to True ( Business Modeler > Parameters > System Parameters). 2. For each Worksheet that you want to cache, open Worksheet Designer (Display section) and then select Cache Worksheet Data. 3. Set Refresh Type to either Manual or Automatic: • Manual: Users must manually refresh the cache. • Automatic: Changes to source data will be detected when the worksheet is opened and the cache will automatically be refreshed as needed The Open Worksheet dialog displays an icon next to all worksheets that are cached. Default Worksheet Caching Behavior
- 163. Worksheets 9-13 By default, all users can create cached Worksheets. However, a system administrator can revoke this privilege for specific users. To do this, the administrator must modify the CAN_CREATE_CW column on the USER_ID table (this table contains one row for each User). This setting is not visible in Business Modeler; therefore it must be updated directly in the database. Set the CAN_CREATE_CW column to: • 1 to indicate that the user can create cached Worksheets (this is the default • 0 (or null) to indicate that the user cannot create cached Worksheets. See also Creating a Workflow to Build Worksheet Caches Automatically. Creating a Workflow to Build Worksheet Caches Automatically You can create a workflow that automatically creates caches for worksheets that can be opened via the Open With method from another worksheet. This workflow creates worksheet caches in a batch process thereby eliminating the need to build the cache the first time the user opens the worksheets. Create the workflow as follows: Note: This procedure supports building caches only for worksheets that are opened using Open With and where the Open With Context for the worksheet is set to Selected Member. It does not work for Base Levels. 1. Stored Procedure Step: This step runs the APPPROC_REBUILD_CONTEXT_CACHES procedure, passes the ID of the worksheet, the Open With Level, the User Group to be cached, and Run Mode equal to 1. For details about this stored procedure, see APPPROC_REBUILD_CONTEXT_CACHES, page 27-4. 2. Worksheet Cache Step: Specify the following settings: • Worksheet Name: The Worksheet to be cached (must match Worksheet ID from Step 1). • User/Group: The User Group to cache for the selected Worksheet (must match User Group Id from Step 1). • Cache Type: Open With Context. For details about this step, see Worksheet Cache Step, page 31-50. 3. Stored Procedure Step: This step runs the APPPROC_REBUILD_CONTEXT_CACHES procedure passing the same values as Step 1 for the ID of the worksheet, the Open With Level, and the User Group to be cached, but with a Run Mode equal to 2. The Worksheet, Open With Level, and User Group must be the same for each of the
- 164. 9-14 Oracle Demantra Implementation Guide steps listed above. Only one Worksheet/Open With Level/User Group combination can be processed in each group of these steps. Multiple combinations can be processed by repeating these steps in a single workflow or by creating separate workflows. Configuration Notes This section contains configuration notes related to worksheets. Dependencies Before you can create worksheets, you will need to load some sample data, create any needed levels, and create any needed series. Design Considerations • It is common practice to create a master worksheet, which is public and meant for multiple users. Different users typically have permission to see different subsets of the worksheet data, such as different accounts. In addition, users can launch the worksheet from a level member, to further filter the worksheet results. • For performance reasons, don't select too much data to view, unless there is no other choice. • If you receive a message saying "out of memory," try the following techniques to reduce the amount of memory that your worksheet selects: • Remove series if possible • Reduce the span of time • Apply filters • If you do need to select a large amount of data, use the levels to your advantage. Specifically, use the levels in the Members Browser or selector lists rather than moving them to a worksheet axis. If levels are in the Members Browser or selector lists, each combination in the worksheet is relatively smaller and will load more quickly. • Remember that you can filter the worksheet by any level, including levels that are not shown in the worksheet. For example, you might want to see data at the region level, but exclude any data that does not apply to the Acme territory. To do this, you would filter the worksheet to include only the Acme member of the Territory level, but you would select data at the Region level. • A multi-view worksheet is useful in following cases:
- 165. Worksheets 9-15 • If you need to edit data at one aggregation level and see easily how that affects higher aggregation levels. • If you need to display a large number of series without having to scroll to see each one. • To make sure that all client expressions in a worksheet are always evaluated correctly, make sure that the worksheet includes all series to which those client expressions refer. (Note that you can add series to a worksheet but leave them undisplayed.) Known issue regarding evaluating client side exceptions For series that contain both client and server expressions, filtering of exceptions occurs first on the server expression, causing it to take precedence over the client expression. Therefore, if the critical value is coming from the client side, you must configure the exception series with '0' as the server expression (thereby removing it). Tools Demantra provides the following tools for configuring worksheets and related objects: Tool Purpose/Notes See Worksheet wizard in the Web client (Demand Planner Web, Promotion Effectiveness, and Settlement Management) Define worksheets and Collaborator Workbench content panes. Oracle Demantra Demand Management User's Guide or other user guide Content wizard in Collaborator Workbench Define worksheets and Collaborator Workbench content panes. Oracle Demantra Demand Management User's Guide or other user guide Components > Open/Create Component option in the Business Modeler Creates components. Among other things, a component defines the associations between levels and worksheets. "Creating or Modifying a Component"
- 167. Methods and Workflow 10-1 10 Methods and Workflow This chapter describes options that you can use to create automated actions in your application, outlines the primary configuration options, and summarizes the available tools. This chapter covers the following topics: • Introduction • Overview of Method Types • Overview of Workflow Step Types • Typical Step Properties • Passing Arguments to a Method • Workflow Schema Examples • Configuration Notes Introduction Demantra provides two closely related options that you can use to create automated actions in your application: • A method is an object-specific action, which the user sees as an ordinary right-click menu option in a worksheet. With the method, the user can view or edit attributes of a level member and automatically launch any processing steps that you create. In Demantra, methods are typically used for any of the following purposes: • Viewing, editing, copying, pasting, or deleting level members. • Running the Promotion Optimization engine, from a selected promotion. • Performing custom processing as needed by the DSM product (for example, matching a settlement to a promotion).
- 168. 10-2 Oracle Demantra Implementation Guide • A workflow is an automated or semi-automated software process. In Demantra, a workflow can perform any kind of processing needed in a Demantra application. These are typically used for any of the following purposes: • To automate routine work such as loading data, running the Business Logic Engine, and maintaining the Demantra database. • To define activities that require organized participation from multiple users. Multiple users can participate in an automated workflow, receiving tasks at the appropriate times and sending tasks to others as needed. These two options are closely related because most methods actually include a workflow. Methods Each method is associated with a specific level. Also, a method can be available in all worksheets or in a single specific worksheet. Demantra provides a set of default methods that you can redefine or disable as needed. When you create a level, Demantra automatically creates the following default methods for it: • New level_name • Edit level_name • View level_name • Delete level_name • Copy (only for promotional levels) • Paste (only for promotional levels) • Paste from Clipboard (only for promotional levels) You can customize, disable, or delete these methods. You can add other methods as needed. Method Security Within the Collaborator Workbench Administrator, you can specify user access to all methods (as well as to all menu bar items). See "Specifying Permissions for Menu Items" . Workflows In Demantra, a workflow is a logically connected set of steps. Each step can be
- 169. Methods and Workflow 10-3 automated or can require interaction from one or more users or groups. Demantra provides a set of workflow steps, each with predefined behavior. A workflow is associated with one component, the component to which its creator belongs. A workflow can include any users of the component, as well as any groups (groups can be defined across multiple components). Caution: Access to the Workflow Manager, including the ability to add and edit a workflow, should only be provided to key users. Workflows are used to drive many administrative flows and critical behind-the-scene processes, including data loading, purging, and execution of the analytical engine. Overview of Method Types To execute a method, the user right-clicks a level member in a worksheet (or in a Members Browser content pane) and then selects the method name from the menu. The behavior after that depends on the type of method. Method Types Demantra provides the following method types: Constructor Prompts the user for values of the attributes of the new member and then adds the member in the database. Destructor Removes the member from the database. Edit Prompts the user for new values of the attributes for this member and then saves the changes. View Displays the values of the attributes for this member. Custom Optionally prompts the user for new values of the attributes for this member and then runs a workflow. Open Opens the default worksheet, filtered to the selected member. You specify a default worksheet when defining the method.
- 170. 10-4 Oracle Demantra Implementation Guide Open With Similar to Open, but enables the user to select from a list of available worksheets. Copy Copies the selected member to the clipboard. Valid only for promotional levels. Paste Pastes the member that was last copied to the clipboard. Before pasting, the user can modify the dates of the promotion or choose to derive them from the worksheet. This option is valid only for promotional levels. Paste From Clipboard Enables the user to specify which member to paste from the clipboard. Before pasting, the user can modify the dates of the promotion or choose to derive them from the worksheet. This option is valid only for promotional levels. Add Note Add a comment or additional information about the selected member. Constructor, Destructor, and Edit type methods can also run workflows. The workflow is run after the level member is created, removed, or edited. Constructor, Edit, and Custom Methods If the method type is Constructor, Edit, or Custom, the following occurs: 1. Depending on how the method is configured, Demantra may save the worksheet data immediately. 2. Demantra optionally displays a dialog box that prompts the user for values of attributes for this level member, as follows:
- 171. Methods and Workflow 10-5 For a Custom type method, this dialog box includes an additional check box at the bottom. With this, the user can specify whether to save the attribute changes to the database. You can customize the following: • Text at the top of the dialog box • Attributes to list and the order in which to show them. The possible attributes include Name, each parent of this level, and any additional attributes. You can specify which attributes are required and which are editable. Required attributes are shown in red. • Label on the OK button ("Create" in this example). 3. Demantra creates or edits the member as indicated, and saves the changes to the database. 4. If the method includes a workflow schema, Demantra continues as follows: 1. Demantra constructs the set of arguments to pass to the workflow in memory. Specifically, it constructs an array that consists of the following: 2. Name-value pairs of the attributes of the member, using the values that the user provided. Note: Demantra does not necessarily pass all the attribute values to the method itself. For a custom method, you specify which attributes should be passed to the workflow. 3. Additional name-value pairs that describe the context in which the method was
- 172. 10-6 Oracle Demantra Implementation Guide invoked; see "Passing Arguments to a Method". 4. Demantra runs the associated workflow. Within the Business Modeler, the method configuration may include additional parameters that control how the method behaves. See "Passing Arguments to a Method". If any of these parameters have the same name as the arguments that are passed to the method, the values that are passed in memory take precedence over the values in the method definition. For example, suppose the configuration for a given method includes a parameter called unit_cost and specifies the value for this parameter as 3.00. If the user invokes this method and specifies unit_cost as 3.50, then the value of 3.50 is saved in the database and is used in the method execution. On the other hand, if the user does not specify a value for unit_cost, the value of 3.00 is used in the method execution. 5. Demantra optionally displays an output dialog box. The output dialog box is similar to the input dialog box, except that the attributes are not editable. View Methods If the method type is View, Oracle Demantra does the following: 1. Oracle Demantra displays a dialog box that displays the values of attributes for this level member. This dialog box is a read-only version of the one shown in " Constructor, Edit, and Custom Methods". 2. When the user clicks OK, Oracle Demantra closes the dialog box. Destructor Methods If the method type is Destructor, Oracle Demantra does the following: 1. If the method includes an associated workflow, Oracle Demantra invokes that workflow. 2. It displays the standard deletion confirmation dialog box. 3. When the user clicks OK, Oracle Demantra closes the dialog box and removes the member from the database. Overview of Workflow Step Types When you create or edit a workflow schema, the Workflow Manager displays a list of the available kinds of steps:
- 173. Methods and Workflow 10-7 This section provides a brief overview of all the kinds of available steps, grouped into rough categories. Some kinds of steps fall into multiple categories. Synchronous and Asynchronous Workflows By default, Demantra workflows operate synchronously – that is, they wait for one step to complete before proceeding to the next step in the workflow. Synchronous communication works well for most types of Demantra workflow steps, although there are some cases where Asynchronous workflows are better suited. In asynchronous mode, workflow steps are not required to wait for the previous step to complete before executing. For example, workflow steps that notify users are best run asynchronously, so that workflows do not remain idle while waiting for user input. Asynchronous support is provided for the following types of workflow steps: • Launch Workflow Step • User Step • Group Step • Exception Step For more information on how these workflow steps operate in asynchronous mode, see "Workflow Steps". Responding to External Events A common use of workflows is to wait for specific conditions or external events and then launch actions. For example, a workflow could wait for a file to be updated and then import data into Demantra. The primary tool here is the Wait Until Step, which pauses the workflow until a specific condition is met, possibly from a set of allowed conditions. When the condition is true, the Workflow Engine continues with the next step in the workflow. In this step, the Workflow Engine can look for a specific file and wait until the file is created, or is modified, or reaches a certain size. Or the Workflow Engine can execute an SQL query repeatedly until it returns a new value (for example, when a price changes). You control the frequency of testing, as well as the time-out period and other timing properties. The Workflow Engine can also respond to user interaction. Several steps (User Step, Group Step, and Exception Step) send tasks to users and then wait until those users either mark the tasks as done or until the task times out. If the task times out, the workflow can continue with an alternative step. Finally, the Workflow Manager itself can be used to schedule workflows.
- 174. 10-8 Oracle Demantra Implementation Guide Sending Tasks and Email Some steps send tasks to users or groups; these tasks appear in the My Tasks module for those users, within Collaborator Workbench. A typical task is a request to examine a worksheet, make a decision, and possibly edit data. A task can also include a link to a Web page for more information. A task can be accompanied by email. Also, a workflow step can simply send email. The following kinds of workflow steps support tasks and email: • User Step sends tasks to a specific user, to ask the user to review and update a worksheet, or to prompt for a workflow decision. In synchronous mode, the User Step sends a task to the specified user or user group, and then waits for the users to make a workflow decision. In asynchronous mode, the User Step sends tasks to the specified user or user group, and then completes immediately without waiting for the user to mark the task as done. • Group Step sends tasks to a group of users using just one step instead of sending the task individually to each one. This allows you to coordinate your workflow processes with responses from whole groups of users. In synchronous mode, the Group Step sends a task to the specified users/user groups and then waits for the users to mark the tasks as done before proceeding to the next step. In asynchronous mode, the Group Step sends tasks to the specified users/user groups and then completes without waiting for the users to mark the task as done. • Email Step sends an email to a user that will arrive in the user's standard email application. This step allows integration with the organizational messaging system. • Exception Step runs a worksheet on which an exception has been defined. If the worksheet returns data, the step then sends tasks to users to resolve the exception. • Selection Step provides a user with a selection of choices to direct the continuation of the workflow instance. For instance, selection step can be used to obtain approval, rejection, or postponement of workflow activities, or selection of a priority from a list of activities. Integration The Transfer Step initiates transfer procedures for the import and export of data. This kind of step is associated with an integration interface, as defined within the Business Modeler. Managing Demantra Objects The following workflow steps should be used only as methods. Each of them uses arguments that are available when a user launches a method from a level member or a Members Browser:
- 175. Methods and Workflow 10-9 • Create Member Step creates the specified level member. • Edit Member Step makes changes to the specified level member. • Delete Member Step creates the specified level member. Other Demantra Actions The following specialized workflow steps perform actions that are specific to Demantra needs: • Stored Procedure Step runs a stored database procedure on the database that holds the Demantra data. Demantra provides a set of predefined database procedures, some of which must run regularly in any Demantra solution. See "Database Procedures". • BLE Step runs the Business Logic Engine directly on a worksheet to evaluate all the client expressions, split the resulting data to the lowest level, and save it to the database. This step automatically starts the Business Logic Engine if necessary. • Simulation Step runs simulations and then either automatically accepts the results or displays the results in a worksheet for review by a user. • Worksheet Cache Step refreshes the caches for specified worksheets, for some or all users. • Refresh Population Step refreshes the population of a promotion to ensure that the promotion data is aligned correctly when items or locations grouped in a promotion (and defined at the aggregate item or location level) change. For example, items can be grouped under a promotion group. If a promotion is defined for a given promotion group and an item grouped under this promotion group is moved to a different promotion group, then running the Refresh Population Step ensures that the promotion data for this promotion is realigned according to the current promotion group definition. Logic The following kinds of steps support programming logic within the workflow: • Selection Step, which was introduced previously, provides a user with a selection of choices to direct the continuation of the workflow instance. • Condition Step directs the course of the workflow instance depending on condition results obtained from worksheets run on the Demantra database. Instead of testing a worksheet, you can test an SQL query or a custom Java class. • Exception Step runs a worksheet on which an exception has been defined. If the
- 176. 10-10 Oracle Demantra Implementation Guide worksheet returns data, the step then sends tasks to users to resolve the exception. In synchronous mode, the Exception Step executes the worksheet specified by the user, calculates the exceptions, sends a task to the specified user ( or users) and when the user marks the task as done, the workflow continues to the next workflow step in the workflow definition. In asynchronous mode, the Exception Step performs all of the steps as above and sends tasks to the user, but does not wait for the user to mark the task as done. Instead, it will send a task to the user(s) and continue to the next workflow step in the workflow definition. • Container Step runs multiple steps in parallel and then proceeds when all are completed. • Wait Until Step waits until a specific condition is met before allowing the workflow to continue. The condition can be the existence or modification of a given file, or a change in a value in the database. External Functions Finally, other kinds of steps call external functions: • Executable Step runs executables such as Demantra executables (for example, the Analytical Engine), or external executable and batch files. This step allows interaction between Demantra and external software. • Custom Step runs a Java class and is typically used to define custom methods. If a workflow is configured as a method, then a user can launch it from within a worksheet. In that case, Demantra automatically passes arguments to the workflow, which Custom Step can use. Typical Step Properties This section provides an overview of the properties of a typical step. Connection Handles Each step has connection handles that you use to connect it to other steps. Common Properties When you add a step to a workflow, the Workflow Editor displays a popup page where you can specify properties for that step. Common properties include the following; not all steps have all these properties. • The User and Group properties specify users and groups, respectively, associated with the step. Generally, the Workflow Engine sends tasks to these users or groups. Some kinds of steps have both these properties, some have only the User property,
- 177. Methods and Workflow 10-11 and some have neither. In some cases, you can specify only a single user, while in other cases, multiple users are permitted. • The Worksheet Name property specifies an associated worksheet, from the set defined within Demantra. Different kinds of steps use worksheets in different ways. For example, BLE Step evaluates the client expressions in the worksheet. • Several properties specify built-in processing delays with short default values. For example, the Pause property specifies how long the Workflow Engine should wait after the step is completed, before starting the next step. In this way, you can coordinate workflow activities by making the engine wait for defined periods of time. • The Timeout>Timer property specifies when the step times out. For example, if the user does not mark a task as done before its due date, then the task will expire or time out. You use this property to prevent a step from stalling the workflow. If you specify a timeout period, you also specify an alternative following step that the Workflow Engine should execute. Note: When a step times out, the Workflow Engine executes the timeout step immediately without waiting for the pause counter to finish. • The Timeout>Alert Time property specifies when the step enters its alert phase. • The Recovery property specifies the recovery action for the Workflow Engine to use if the system crashes while performing this step. Passing Arguments to a Method Demantra can pass arguments in memory to the method. Considered as a group, these arguments are the context dictionary. For each argument, Demantra passes a variable name and its associated value. Available Arguments The available arguments fall into three general categories: • System information, for example, the ID of the worksheet from which the method was launched. • Member information, that is, information that indicates the member from which the method was launched. • User inputs, that is, all arguments shown on the Input dialog box. These arguments
- 178. 10-12 Oracle Demantra Implementation Guide are generally attributes of the member from which the method was launched. The following table lists the possible variables. Category Variable* Value Data Type System ws_id Identifier of the worksheet from which the method was launched. Java.util.String System worksheet_filter The filter population of the worksheet from which the method was launched. Represented as a list of pairs of level_id and member_id. java.util.String level_id,member_id; pairs separated by comas and semicolons. System view_name The name of the active view from which the method was called. java.util.String Member level_id Identifier of the level from which the method was launched. java.util.String Member member_id Identifier of the member from which the method was launched. java.util.String Member Combination_path The context of the selected member for the method. Will be represented as a list of pairs of level_id and member_id. java.util.String level_id,member_id
- 179. Methods and Workflow 10-13 Category Variable* Value Data Type Member population.filters (example) Applies only to promotion levels. The population attribute of the selected member. The name of this variable is based on the name of the population attribute as follows: population_attribute_n ame.filters Array of com.demantra.applic ationServer.metaData Objects.level.levelFilt ers.LevelFilterGetters Member population.from_date (example) Applies only to promotion levels. The from_date attribute of the selected member. The name of this variable is based on the name of the population attribute as follows: population_attribute_n ame.from_date java.util.Date Member population.to_date (example) Applies only to promotion levels. The to_date attribute of the selected member. The name of this variable is based on the name of the population attribute as follows: population_attribute_n ame.to_date java.util.Date
- 180. 10-14 Oracle Demantra Implementation Guide Category Variable* Value Data Type Inputs Attribute_column_na me Values of the attributes of the selected member that are specified as inputs to the method (all attributes on the Select Input Arguments screen). The name of each variable is the same as the name of the column in which the attribute is stored. java.util.Object Passing Arguments In order to pass arguments to the method, you must explicitly configure the variables that each workflow step should receive. To do so, you type the parameter names on the Parameters list for that step; see "Properties Used as Arguments for a Method". Note: The parameter names are case-sensitive. For the input variables, you also specify which variables to pass when you configure the method. Specifically you select the desired attributes on the Select Input Arguments screen. Properties Used as Arguments for a Method When you configure a workflow as a method, Demantra can pass arguments in memory to the method. Considered as a group, these arguments are the context dictionary. For each argument, Demantra passes a variable name and its associated value. In order to make these arguments available to a workflow step, you must explicitly configure the variables that each workflow step should receive. To do so, you type each variable name in the Name column of the Parameters list for that step, as follows:
- 181. Methods and Workflow 10-15 In this example, the first two arguments are standard member variables, from the table in "Available Arguments". These arguments can be used in any method. The remaining three arguments are input variables; these variables refer to attributes of the member. Specifically these are the names of the columns in which these attributes are stored (Product Family, Brand, and Name). Note: In the Parameters list: • The parameter names are case-sensitive. • The descriptions are not used by the method. • If a value is null in this table, then the value is taken from the member from which the method was launched. If the value is not null, then it is used instead of the value taken from that member. Workflow Schema Examples Workflows are very often used to import data. In the process of importing data, it is often necessary to perform various kinds of integrity checking and data cleanup, which you do within database procedures. As a consequence, many workflow schemas include the Stored Procedure Step in addition to the Transfer Step. Example 1 Example 2
- 182. 10-16 Oracle Demantra Implementation Guide Example 3 Configuration Notes This section contains configuration notes related to methods, workflows, and automation in general Dependencies Before you can configure a workflow, you may need to define the following elements that it might use: • Stored procedures • Java classes
- 183. Methods and Workflow 10-17 • Batch scripts • Worksheets Before you create a method, you may need to define the following elements that it might use: • Worksheets • Workflows Design Considerations Before you begin creating a workflow schema, you should have a clear idea of the intended purpose, flow, and users of the schema. Also, you should consider the following issues: • Remember that client expressions that are affected by data changes should not be used until the Business Logic Engine evaluates them. The Workflow Manager does provide a kind of step that submits worksheets to the Business Logic Engine. • A worksheet must be public in order to be visible from a task. Also, users must have the correct security privileges to view worksheet results. • Initiators of a workflow instance must have permissions to view worksheet results for all worksheets that the workflow schema includes. If the workflow instance is to be initiated by more than one user, the worksheet must be a public worksheet, and the users of the group must have permissions to view the worksheet results. • Properties of workflow steps cannot be changed within or by the workflow instance. If you make changes to a workflow schema, those changes do not affect any instances that are currently running. • Only the owner of a workflow schema can edit that schema. Anyone with login access to the Workflow Manager can launch it. Tools Demantra provides the following tools for creating and configuring methods and workflows: Tool Purpose/Notes Configure > Method option in the Business Modeler Defines methods.
- 184. 10-18 Oracle Demantra Implementation Guide Tool Purpose/Notes Workflow Manager Defines workflows.
- 185. Security 11-1 11 Security This chapter explains the Demantra security mechanisms. This chapter covers the following topics: • Data Security • Feature Security • Other Security Features • Program Groups • Configuration Notes • Password Policy Data Security Demantra data is secured as follows: • The data is partitioned into components, which generally correspond to organizational roles, which can overlap. Each component has an owner, who acts as the administrator and who can create additional users. (See "Creating or Modifying a Component" in this document.) • Each user is authorized for one component. In addition, you can further restrict a specific user's access to data by applying filters so that the user can see only specific level members as well as only certain series. • Users can belong to groups, and group members can collaborate, inside or outside of workflows. When a user creates a note, he or she can control access to that note by user or by group. The following table summarizes how Demantra controls access to data elements.
- 186. 11-2 Oracle Demantra Implementation Guide Data Element Options Controlled by Component Controlled by User Group Controlled by User ID Series Visible or not visible Yes No Yes Series indicators (which indicate the presence of a note or promotion within the worksheet table.) Visible or not visible Yes No No Levels Visible or not visible Yes No No Level members Full control, including ability to delete members Read/write existing members Read existing members No access Yes No Yes Units of measure Visible or not visible Yes No No Indexes and exchange rates Visible or not visible Yes No No Notes Similar to level member options No As specified by creator of note It is useful to remember that each user of a component sees a subset of the data associated with that component. You cannot give user access to data that is not contained in the component. Components Each component has the following properties:
- 187. Security 11-3 • Series, levels, units of measure, indexes, and exchange rates. For each level, you define permissions that the users have for the members of that level. The choices are as follows: • Full control, including ability to delete members • Read/write existing members • Read existing members • No access • An owner. This owner acts as the administrator of the component. • Possible additional users, created by the owner. The owner can also further restrict data access for particular users. Users User details are defined using the Business Modeler (Security > Create/Modify User). For more information about users see: Creating or Modifying a User, page 42-10 For users, you can specify the following details: • Overall permission level, which can enable the user to log onto Demantra administrative tools and modify the component. • Series that the user can access, generally a subset of the series included in the component. • Optional permissions to control which level members the user can see and edit. The choices are as follows: • Full control, including ability to delete members • Read/write existing members • Read existing members • No access (the members are filtered out entirely for this user) • Group or groups to which the user belongs. User Groups For user groups, you can specify the following details: • Which users are in the group.
- 188. 11-4 Oracle Demantra Implementation Guide • Whether this user group is also a collaboration group (for use by the Workflow Engine). • Whether users of this group can log into the Workflow Editor. Security for Deleting Members Most level members are created by integration and it would generally be undesirable to delete them. Most users, therefore, do not have delete access to these members. The exception is a user with System Manager permission; see "Permission Levels" in this document. Level members can be created directly within Demantra (through Member Management). For any these members, the user who created the member has permission to delete it. Data Security at Higher Levels When a user views data at an aggregation level that is higher than where the permissions are set, it is necessary to resolve how to aggregate editable members and uneditable members. Demantra uses the following rules: • If all lower-level members are editable (either as read/write or full control), the member is editable. • If some of the lower-level members are visible but read-only, the member is not editable. • If some of the lower-level members are not visible, those members are filtered out and do not affect the aggregation. The upper-level member may or may not be editable, depending on the preceding rules. Custom Methods As the implementer, you can define custom methods to perform operations on a selected member, for users to access as an option on the right-click menu. You can apply security to your methods, just as you do with the core right-click actions. You can define a user security threshold for visibility of that method. For example, you can state the method should only be visible to users who have 'Full Control' of the member from which you launch the method. To control this, you log into the Business Modeler, select 'Configure > Configure Methods'. For 'Method Type'= Custom, you can select from the Security Threshold of Full Control, Read & Write or Read Only. For information on methods, see "Methods and Workflow" in this document. Feature Security Demantra features are secured as follows:
- 189. Security 11-5 • Permission levels control access to administrative tools and to menu items. Demantra provides four predefined permission levels that you can customize. You can control access to all of the Demantra menus: • Menus on the Collaborator Workbench menu bar • Menus on the DSM menu bar • Menus on the Promotion Effectiveness menu bar • Menus on the Demand Management menu bar • Right-click menus associated with each level in your system • You can also control access to all the same menu items at the group and user ID level. For convenience, you control access to individual menu items, to predefined collections of menu items, or to your own collections of menu items (your own program groups). Permission Levels Demantra defines four permission levels, as follows: • System Manager • Supervisor • Power user • Casual user Note: Each Demantra software component (such as Demand Management or Sales & Operations Planning) has a component manager who has the highest permission level, and can assign all levels of permissions including system managers. The table below shows the default rights for these four permission levels. Note that only the System Manager has a different set of permissions from the other three. However, users with the System Manager permission level can utilize the Collaborator Workbench Administration tool to modify the access restrictions for specific menu items, or sets of menu items, thereby changing these defaults. See the section Specifying Permissions for Menu Items., page 42-27
- 190. 11-6 Oracle Demantra Implementation Guide Permission Level Business Modeler – login / change pwd Business Modeler – All Menus Collaborat or Workbench Administra tion tool Collaborat or Workbench - view public and own worksheets Collaborat or Workbench - view all worksheets Demand Planner - System menu System Manager X X X X X X Supervisor X - - X - - Power User X - - X - - Casual Supervisor X - - X - - Permission Hierarchies In order to understand how Demantra determines a given user's access to a given menu item, it is necessary to understand the permission hierarchies and how Demantra combines them. Demantra has two independent permission hierarchies. In the first hierarchy, each component includes groups, and each group includes users. A user can belong to multiple groups, provided that all those groups belong to the same component. In the second hierarchy, each component includes four permission levels, and each user has one permission level.
- 191. Security 11-7 Explicit and Implicit Permissions In Collaborator Workbench you can display or hide any menu item. You can also display but disable a menu item, which can provide a useful clue about advanced features that are available to other users. Each permission is either explicit or implicit (inherited). Note: For more information see:Logging into the Collaborator Workbench Administrator, page 42-22. You define permissions in an expandable hierarchy like the following. For now, let's focus on the three check boxes:
- 192. 11-8 Oracle Demantra Implementation Guide The following table describes how to use these check boxes: Desired outcome Hidden Disabled Inherited Permission Menu option is explicitly hidden Checked Irrelevant Unchecked Menu option is explicitly displayed but disabled Unchecked Checked Unchecked Menu option is explicitly displayed and enabled Unchecked Unchecked Unchecked Use implicit permissions for this menu item Unchecked Unchecked Checked How Demantra Combines Multiple Permissions For a given user and a given menu item, Demantra checks for all the following permission descriptions: • For the component • For each group to which the user belongs • For the permission level that the user has
- 193. Security 11-9 • For the user ID • For each program group to which the menu item belongs To determine whether a user has access to a given menu item, Demantra searches for and combines the permission descriptions as follows. 1. Demantra checks to see if the user has an explicit permission setting (for a given menu item). If so, that setting is used, and all others are disregarded. 2. If the user does not have an explicit permission setting for a given menu item, then Demantra looks at the settings for the groups to which the user belongs, the permission level that the user has, and each program group that the menu item is in. Here, the following rules apply: • An explicit permission takes precedence over an implicit permission. • Among explicit permissions, the most liberal permission takes precedence. • Among implicit permissions, the most liberal permission takes precedence. 3. If no explicit permission setting for the menu item has been found so far, then Demantra uses the permission setting at the component level, if any. 4. If there is no setting at the component level, Demantra displays and enables the menu item. See Also "Data Security" "Specifying Permissions for Menu Items" Other Security Features Note the following additional security features: • To access the Workflow Manager, a User Group must be assigned to the workflow.group parameter (in the Business Modeler). For details, refer to Providing Access to the Workflow Editor. • After adding a user to a Collaboration Group, the Web server must be restarted before that user can access the Workflow Manager. For more information about User Groups see: Creating of Modifying a User Group, page 42-17 • A user with the System Manager permission level can see all public worksheets and all private worksheets. Users with lower permission levels can see all public worksheets and all private worksheets created by themselves.
- 194. 11-10 Oracle Demantra Implementation Guide • A user with the System Manager permission level can see the System menu in the desktop Demand Planner, in addition to the other menus. • Any user can log onto the Business Modeler. If the user's permission level is lower than System Manager, the user can only change his or her own password, as documented in the user guides. Program Groups For more information about Program Groups see: Defining a Program Group, page 42- 22 Redefining a Program Group, page 42-26 Deleting a Program Group, page 42-27 A program group is a collection of menu items, typically related to each other in some way. You create program groups so that you can easily control access to all the menu items in the group. Demantra provides several predefined program groups, for convenience. These program groups contain only menu items from the right-click menus. Program group Menu items in this group, by default Add New member right-click menu option for every level in the system. Edit Edit member right-click menu option for every level in the system. Delete Delete member right-click menu option for every level in the system. View View member right-click menu option for every level in the system. Copy Copy, Paste, and Paste from Clipboard right-click menu options for every applicable level in the system. (Note that this option is available only for promotional-type levels.) Open Open and Open With right-click menu options for every level in the system.
- 195. Security 11-11 Configuration Notes The following table summarizes the Demantra security tools. Tool Purpose/Notes Components > Open/Create Component option* Creates components, which are usually created as part of basic implementation. Security > Create/Modify User option* Creates users and configures all information except for access to menu items. Security > Create/Modify Group option* Creates user groups and configures all information except for access to menu items. Collaborator Workbench Administrator Controls access to menu items; defines program groups. *These options are in the Business Modeler. Password Policy You can set up Demantra to enforce password policies and ensure that passwords are well-formed and are changed frequently. By default, Demantra password policies are enforced. An administrator can change this by modifying the system parameter .PasswordRulesEnforcedGlobal, page 26-29 For details about this parameter, see Non-Engine Parameters. Once enabled, the password polices are: • Password length must be 8 to 12 characters. • At least one character must be in UPPER CASE. • At least one digit or special character must be used in the password. • At least one digit or special character must be used in the password. • Password should NOT be a Security Dictionary Word (please contact your administrator for details). • Password should NOT be the same as User name. • Password should NOT be the same as current password.
- 196. 11-12 Oracle Demantra Implementation Guide If a user attempts to create a new password that does not follow these policies, a message notifies the user of the password policies. If the user attempts to login and fails, a message similar to the following appears: The number of tries allowed by the password policy is determined by the system parameter "AccountLockoutThreshold". (see System Parameters). If the user is locked out because of too many failed attempts, the following message appears: An administrator can unlock the user's account by logging into Business Modeler, navigating to Security > Create/Modify User, and then deselect the Locked check box. If the component owner is locked out, they can log into the Business Modeler and unlock themselves. If an administrator explicitly locks a user's account, a different message appears, saying that the account is locked and to please contact your system administrator. Note that this locking applies to Collaborator Workbench, Workflow Manager, Administrator Login, Demand Planner Web, Dynamic Open Link (DOL) , Demantra Anywhere.Locking does not apply to the Business Modeler, Member Management, or Chaining Management. When a user's password expiration date is within 10 days, a message displays prompting the user to change his password. For more information see these system parameters: • PasswordHistoryCount • PasswordRulesEnforcedGlobal • AccountLockoutThreshold • AccountLockoutDuration
- 199. Proport 12-1 12 Proport This chapter explains the proport mechanism. This chapter covers the following topics: • Overview • How You Can Tune the Proport Mechanism • Calculating the Rolling Average Demand • Calculating the Monthly Proportions • Calculating the Average Daily Demand for Each Month • Handling Data Issues • Which Combinations Are Affected • Other Notes on the Proport Mechanism • Proport when using Engine Profiles • Proport When Forecasting on General Levels Overview The proport mechanism computes and stores information about the average demand per day for each item-location combination. Demantra uses this information whenever it needs to split higher-level data across the relevant lowest-level members. For example, if one item-location combination had four times as many sales as another, the former combination should receive four times as much of the forecast. When Proportions Are Used In general, Demantra splits data whenever necessary, including the following occasions: • When the Analytical Engine generates a forecast at an aggregated level.
- 200. 12-2 Oracle Demantra Implementation Guide • When data is imported at an aggregated level. • When users perform chaining at an aggregated level. This chapter describes how matrix proportions are calculated. Kinds of Proportions Demantra provides three general ways to specify the relative proportions of different combinations: Kind of proportions Details When used Matrix proportions or stored proportions Proportions that Demantra calculates and stores for later use. The calculation is based upon the demand, but also considers recent average demand, month-to-month variations, and so on. Various parameters and combination-specific flags control exactly how proport works. These proportions are averages are and are not as good as actual proportions. Option when importing data Automatically used when forecast must be created at higher level Actual proportions Use the proportions of the Demand series. Option when importing data Proportions of a reference series Use the proportions of a reference series, typically: Demand (suitable for a historical series) Final Plan (suitable for a forecast series) When data is edited at an aggregated level SALES_DATA based proportion Proportion that Demantra uses for future forecast splits. This proportion is used when the SKUs have insufficient historical demand data, and the engine forecasts several SKUs aggregated together with older SKUs providing history for the SKUs in use. In nodes where all participants are marked for SALES_DATA based proportion, the engine splits the forecast using the lowest level value of the series called Future Proportions. When the future forecast is split based on configurations set by the users.
- 201. Proport 12-3 How You Can Tune the Proport Mechanism You can tune the proport mechanism as follows; • Tuning how the proport mechanism smooths data variations form month to month. You can tune these settings globally or separately for individual combinations. • Specifying how the proport mechanism handles null data and other data issues. • Specifying which combinations the proport mechanism should consider when it runs. The following sections describe how proport handles these steps. Calculating the Rolling Average Demand For each combination, Demantra computes a rolling average of the most recent demand over some span of time. This rolling average (glob_prop) depends on the following: hist_glob_prop Number of base time buckets to include when calculating the running average demand. Usually, you use one season's worth of data. Each combination can have a different value for this setting. quantity_form Expression that Demantra uses to calculate demand, based on sales data and various overrides. The default expression transforms negative values to zero and should be modified if business needs require negative demand. proport_missing Specifies what value to use for dates with null sales. See "Specifying How to Treat Null Data" . Calculating the Monthly Proportions After calculating the rolling average demand for each combination, Demantra calculates the average demand per day (P1, P2, ..., P12) averaged over a month's time. This calculation consists of three steps: 1. Calculating the average daily demand for each month of the year.
- 202. 12-4 Oracle Demantra Implementation Guide 2. Adjusting the level of these averages to account for any overall trend. This calculation uses the rolling average demand. 3. Smoothing these averages to account for month-to-month variations. This calculation also uses the rolling average demand. Note: In weekly and daily systems, the proport mechanism scales the monthly proportions (P1, ..., P12) by dividing by the number of days in the month, as appropriate. Calculating the Average Daily Demand for Each Month For each combination, Demantra calculates the following average demand per day averaged over a month's time, for each month of the year. (This data is stored in mdp_matrix): P1 Average demand per day for the month of January P2 Average demand per day for the month of February and so on Smoothing Out Variations Depending on your business, you may want to smooth out the month-to-month variations. The delta field in mdp_matrix specifies a weight for a given item-location combination. Demantra uses this weight to even out these variations as in the following example: P1 = glob_prop * delta + (old P1) * (1 - delta) • The delta field must be a floating-point number, anywhere between 0 and 1, inclusive. The larger it is, the more you smooth out the day-to-day variations. • The def_delta parameter specifies the default value for the delta parameter for any new combinations. These smoothed proportions are stored in mdp_matrix follows, overwriting the old P1, P2, ... fields:
- 203. Proport 12-5 P1 Smoothed, level-adjusted average daily demand for the month of January P2 Smoothed, level-adjusted average daily demand for the month of February and so on Adjusting the Level Starting with the average daily demands for each item-location combination for each month of the year, Demantra considers the change in level over the past year and adjusts the level of the proportions accordingly. For a simple example, consider the following historical daily demand, over the last year: Jan Feb Mar Apr May Jun Jul Aug Sep Oct Nov Dec 30 32 31 34 35 37 38 36 39 41 39 43 A slight upwards trend is fairly obvious, especially when this demand is graphed. To keep matters simple, suppose that we have only one year's worth of data. If we just used demand from last January (that is, 30) for the next January, we would
- 204. 12-6 Oracle Demantra Implementation Guide underestimate the demand, because the overall level of demand has increased over the last year. Therefore, Demantra calculates the level-adjusted daily demand for January as follows: P1 = (smoothed P1) * (rolling average) * 12 / (sum of all average demand) Here smoothed P1 is the average demand per day for January as calculated previously and then smoothed as described in "Smoothing Out Variations". These level-adjusted, " normalized" proportions are stored in mdp_matrix, overwriting the old P1, P2, ... fields: P1 Level-adjusted, smoothed average daily demand for the month of January P2 Level-adjusted, smoothed average daily demand for the month of February and so on Handling Data Issues You can control how the proport mechanism handles various data issues. Specifying How to Treat Null Data You must specify how to treat missing dates, which can have a large effect on the averages. If there are no sales for an item-location combination for a given month, that can either mean there truly were zero sales or it can indicate a problem with the data. You specify the proport_missing parameter as follows. • If this parameter is equal to 0, dates with null data are treated as dates with zero sales. That is, suppose that you have three months worth of data as follows: 30, null, 60. If proport_missing equals 0, the average of these three months is calculated as 30 (or [30+0+60]/3). • If this parameter is equal to 1, dates with null data are ignored. Using the old example, if proport_missing equals 1, the average of these three months is calculated as 45 (or [30+60]/2). This is mathematically equivalent to assuming that the missing month has average sales (45). Similarly, suppose you have weekly sales data, but you do not have data for all the weeks in a given month. If proport_missing equals 0, the weeks with null sales are treated as having zero sales. If proport_missing equals 1, the weeks that have null sales are considered as having average sales. For data with many missing observations, it is likely that the null sales actually represent no sales; in this case, it is suitable to specify proport_missing as 0.
- 205. Proport 12-7 For data with only a few missing observations, it may be more likely that the missing observations represent data problems. In this case, it would be better to specify proport_missing as 1 and ignore the missing observations. Determining Coverage of the Months of the Year For any given item-location combination, the sales may not include data for every month of the year. For example, for a given item-location combination, suppose that you have 24 months worth of data, but that there were no sales in November or December—for any year. This means that you have ten distinct months represented in the history. The proport_threshold parameter specifies the minimum number of distinct months that must be present in the sales data for any given item-location combination. For example, if you have data for three Januaries, that counts as one observation for January. Then: • If the history does contain enough distinct months, the averages are calculated as normal for the months that have non-null data. You must specify what values to use for the other months; see "Specifying How to Handle Missing Time Buckets". • If the history does not contain enough distinct months, Demantra checks the value of the proport_missing parameter and then does the following: • If proport_missing equals 0, Demantra sets the averages equal to the glob_prop * delta. • If proport_missing equals 1, Demantra sets all averages equal to the rolling average (glob_prop). In the preceding example, suppose that you have monthly data and suppose that proport_threshold is 11. In this case, this combination does not have data for enough distinct months, and all monthly proportions are equal to glob_prop. In contrast, suppose that proport_threshold equals 8 instead. In this case, the monthly averages are calculated as normal for the months with non-null data. Specifying How to Handle Missing Time Buckets You use the proport_spread parameter to specify what value to use for any bucket that has null data. Suppose that we have the following data for a given item-location combination:
- 206. 12-8 Oracle Demantra Implementation Guide Nov 2002 Dec 2002 Jan 2003 Feb 2003 Mar 2003 Apr 2003 May 2003 Jun 2003 Jul 2003 Aug 2003 7 no data before this month 0 1 5 9 3 2 null 1 no data yet Before we examine the proport_spread parameter, it is worthwhile to rearrange this information and identify which months are missing: P1 P2 P3 P4 P5 P6 P7 P8 P9 P10 P11 P12 1 5 9 3 2 missi ng 1 missi ng missi ng missi ng 7 0 The proport_spread parameter can equal any of the following values: • If proport_spread is 0, missing months receive 0 proportions. In this case, Demantra calculates the monthly averages as follows: P1 P2 P3 P4 P5 P6 P7 P8 P9 P10 P11 P12 1 5 9 3 2 0 1 0 0 0 7 0 • If proport_spread is 1, Demantra checks the value of the proport_missing parameter and then does the following: • If proport_missing equals 0, then missing months receive glob_prop*delta. In this case, Demantra calculates the monthly averages as follows: P1 P2 P3 P4 P5 P6 P7 P8 P9 P10 P11 P12 1 5 9 3 2 glob _pro p*de lta 1 glob _pro p*de lta glob _pro p*de lta glob _pro p*de lta 7 0
- 207. Proport 12-9 • If proport_missing equals 1, then missing months receive the rolling average (glob_prop). In this case, Demantra calculates the monthly averages as follows: P1 P2 P3 P4 P5 P6 P7 P8 P9 P10 P11 P12 1 5 9 3 2 glob _pro p 1 glob _pro p glob _pro p glob _pro p 7 0 • If proport_spread is 2, Demantra considers whether a missing month could have been included within the history. (This setting has an effect only if you have data for less than a full year as in our example.) First, Demantra uses 0 for missing months that could have been included within the partial year. For missing months that could not have been included, Demantra checks the value of the proport_missing parameter and then does the following: • If proport_missing equals 0, then missing months receive glob_prop*delta. • If proport_missing equals 1, then missing months receive the rolling average (glob_prop). In our example, the history started in November 2002 and continues through July 2003. That span of time does not include the months of August, September, and October, so those missing months receive glob_prop; the missing month of June, on the other hand, receives 0. In this case, Demantra calculates the monthly averages as follows (assuming that proport_missing does not equal 1) P1 P2 P3 P4 P5 P6 P7 P8 P9 P10 P11 P12 1 5 9 3 2 0 1 glob_ prop glob_ prop glob_ prop 7 0 Note: If you set proport_missing to consider omitted values as null, there is no reason to set the Run_full_matrix_proport parameter to 1. Which Combinations Are Affected By default, the proport mechanism loads only combinations with non-null values, and it recalculates proportions based only on the loaded combinations. In some cases, this is
- 208. 12-10 Oracle Demantra Implementation Guide correct; it may not be desirable to recompute proportions frequently if your data is intermittent. In other cases, however, a null value really does mean zero sales, and the split should be recalculated accordingly. Assume that proport is considering three months of history data (hist_glob_prop equals 3). Consider this example: Combination January February March April 1 (Product A at store A) 500 500 400 (null) 2 (Product A at store B) 50 60 40 70 In this case, if you calculated proportions in March, you would calculate the split between combination 1 and combination 2 as (500+500+400)/(50+60+40), which is appropriate. However, if you calculated proportions in April, you would not load new member data for combination 1. In this case, the system would calculate the split between combination 1 and combination 2 as (500+500+400)/(60+40+70), which means that combination 1 would receive most of the split, even though there were no sales of this product in this store in April. This is probably not what you want. The Run_full_matrix_proport parameter specifies whether to run the proport mechanism on all the item-location combinations. • If no (0), run proport only on the combinations that have newly loaded sales data or that have been flagged (prop_changes=1) in the database. • If yes (1), the proport mechanism calculates proportions for all nodes at loading time and assumes that null values represent zero. This takes longer (possibly much longer), but avoids the miscalculation outlined previously. • If equal to 2, the proport mechanism calculates proportions for all combinations that have new_member=1. The proport mechanism then recomputes the rolling average, individual monthly averages, and individual monthly proportions for each of those combinations, as described in "Calculating the Rolling Average Demand". Other Notes on the Proport Mechanism The proport mechanism considers only real combinations. That is, it ignores combinations for which is_fictive equals 1.
- 209. Proport 12-11 The proport mechanism calculates the prediction status of each combination, in addition to calculating the proportions. Proport when using Engine Profiles Proport supports all engine profiles. The proport procedure can be passed an engine profile id (the engine profile ID is a system-generated value generated when the user creates the engine profile). Users must query the DB table engine_profiles to determine the ID of the profile that they want to use (i.e. insert this value for the new 'ProportDefaultEngineProfile' system parameter described below). Proport then searches the corresponding parameter table for parameters currently used to drive proportion and prediction_status calculations. These parameters include but are not limited to: • Start_date • Quantity_form • Proport_threshold • Def_delta • Last_date • Last_date_backup • HistoryLength • Timeunit • Dying_time • Mature_age • Hist_glob_prop Any parameters not found in the profile specific parameter table will be retrieved from the base profile parameter table. In instances where proport is called from another process, including data load or data updates, the profile called will be based on the system parameter ProportDefaultEngineProfile. This parameter should be modified if the proport engine profile differs from the base profile. Proport When Forecasting on General Levels When determining which combinations require a forecast, general level-based
- 210. 12-12 Oracle Demantra Implementation Guide combinations behave differently than sales_data-based combinations. General Level (GL) combinations have an effectivity start and end date. Combinations are only forecast for dates when they are active. When the proport procedure is called, it is passed a profile_id to be used. Proport will first search for definitions on the init_params table matching the passed profile. Any engine parameters that are not found in this profile use the parameter values defined in init_params_0. In cases where the data and combination tables are not specified as SALES_DATA and MDP_MATRIX, proport will generate GL-relevant proportions and prediction_status values on the specified tables. If a supersession is detected by the use of the EngKeyDef_supersession parameter, then the proportion is split as follows: • Fit Split (Historical Forecast) • Forecast Split (Future Forecast) For both, the split is done according to the allocation rules from the forecast level down to the lowest GL level, defined by the lowest level of the forecast tree. Once the forecast is allocated down to the lowest GL level, any underlying combinations receive equal split. Note: When forecasting above the supersession level, each supersession group receives its part of the forecast based on historical volume proportions, similar to the split used for non-supersession groups. Fit Split When allocating the historical forecast to the lowest GL level, the split is done in the usual manner, using the historical demand values. For example: • End of history is defined for 12/1/2009 If fit forecast generated is 4000 per month, the forecast is allocated as follows based on historical values for each combination and month. CTO_ID 1 2 3 4 5 Date History 1/1/2009 1500
- 211. Proport 12-13 2/1/2009 700 3/1/2009 1200 4/1/2009 800 5/1/2009 300 1000 6/1/2009 500 1000 7/1/2009 800 1200 8/1/2009 1200 800 9/1/2009 900 1100 10/1/2009 400 1600 11/1/2009 200 800 12/1/2009 1000 1000 In the situation where there are multiple members under the GL level, the allocation of fit among those members should be based on an equal split. Forecast Split Splitting the forecast is driven by proportions. General level forecasting can be more complicated because of the requirement to respect effectivity start and end dates as well as product revisions logic. In addition, all members belonging to the same revision are defined by parameter EngKeyDef_Supersession. If this parameter is defined at the same aggregation level as the EngKeyDefPK parameter, then no supersessions are being used. If the EngKeyDef_Supersession parameter is defined above the EngKeyDefPK parameter, all nodes belonging to the same EngKeyDef_Supersession node are part of the supersession. Note: When enabled, split by series takes precedence over the split rules used below. Split from Supersession Level to GL Level When allocating a forecast generated at a supersession level, the forecast is allocated to dates that are defined as active for each member of the superssion. In this scenario,
- 212. 12-14 Oracle Demantra Implementation Guide when forecasting for a specific date to underlying combinations, two options are available: • Allocate forecast amongst all active revisions • Allocate forecast only to the latest active revisions When allocating the forecast amongst all active revisions, the forecast should be split equally among the GL members whose activity dates specify that the member is active during this period. Example: Using All Active Revisions • End of history defined as 12/1/2009 • Allocation in the supersession is set to All Active Revisions • Amount of history used to calculate proportions is 12 months A specific forecast node has five underlying combinations: Latest Revision Item Effectivity Start Effectivity End AA 1 1/1/2008 6/1/2009 AA 2 1/1/2009 12/1/2009 AA 3 5/1/2009 6/1/2010 AA 4 1/1/2010 10/1/2010 AA 5 6/1/2010 12/1/2011 The history is as follows: Item 1 2 3 4 5 History 500 1500 300 700
- 213. Proport 12-15 Item 1 2 3 4 5 800 1200 1200 800 700 300 1000 500 500 1000 800 1200 1200 800 900 1100 400 1600 200 800 1000 1000 A forecast of 4000 is generated for each period. The future one-year forecast is allocated equally among the revisions active at each date as follows: Proportion s Item 1 2 3 4 5 Date Active Revisions 1/1/2010 3,4 0 0 4000/2 4000/2 2/1/2010 3,4 0 0 4000/2 4000/2 3/1/2010 3,4 0 0 4000/2 4000/2
- 214. 12-16 Oracle Demantra Implementation Guide Proportion s 4/1/2010 3,4 0 0 4000/2 4000/2 5/1/2010 3,4 0 0 4000/2 4000/2 6/1/2010 3,4,5 0 0 4000/3 4000/3 4000/3 7/1/2010 4,5 0 0 0 4000/2 4000/2 8/1/2010 4,5 0 0 0 4000/2 4000/2 9/1/2010 4,5 0 0 0 4000/2 4000/2 10/1/2010 4,5 0 0 0 4000/2 4000/2 11/1/2010 5 0 0 0 0 4000 12/1/2010 5 0 0 0 0 4000 When the option of latest revision has been chosen, the forecast generated at a supersession level is only allocated to the latest revision active during that period. The latest revision is defined as the active GL member who has the latest effectivity start date. Example: Using Latest Revision • End of history defined as 12/1/2009 • GLPropSupsersessionMethod set to Latest Revision A specific forecast node has five underlying combinations: Latest Revision Item Efectivity Start Effectivity End AA 1 1/1/2008 6/1/2009 AA 2 1/1/2009 12/1/2009 AA 3 5/1/2009 6/1/2010 AA 4 1/1/2010 10/1/2010
- 215. Proport 12-17 Latest Revision Item Efectivity Start Effectivity End AA 5 6/1/2010 12/1/2011 The history is as follows: Item 1 2 3 4 5 Date History 1/1/2009 500 1500 2/1/2009 300 700 3/1/2009 800 1200 4/1/2009 1200 800 5/1/2009 700 300 1000 6/1/2009 500 500 1000 7/1/2009 800 1200 8/1/2009 1200 800 9/1/2009 900 1100 10/1/2009 400 1600 11/1/2009 200 800 12/1/2009 1000 1000 A forecast of 4000 is generated for each period. The future one-year forecast is allocated as follows:
- 216. 12-18 Oracle Demantra Implementation Guide Proportion s Item 1 2 3 4 5 Date Latest Revision 1/1/2010 4 0 0 0 4000 2/1/2010 4 0 0 0 4000 3/1/2010 4 0 0 0 4000 4/1/2010 4 0 0 0 4000 5/1/2010 4 0 0 0 4000 6/1/2010 5 0 0 0 4000 7/1/2010 5 0 0 0 4000 8/1/2010 5 0 0 0 4000 9/1/2010 5 0 0 0 4000 10/1/2010 5 0 0 0 4000 11/1/2010 5 0 0 0 4000 12/1/2010 5 0 0 0 4000 Note: In cases where supersessions exist, Oracle recommends that EngKeyDef_Supersession be set at a level aggregating the different supersession nodes together.
- 217. Part 2 Integration
- 219. General Integration Guidelines 13-1 13 General Integration Guidelines A pre-made model supports out-of-the-box integration of the Oracle e-Business Suite or EnterpriseOne applications with the Oracle Demantra Demand Management application. This model contains necessary definitions to support both Oracle e-Business Suite and EnterpriseOne applications and uses many common building blocks. The Oracle e-Business Suite model serves as the core best practice for Oracle Demantra Demand Management integration. Where EnterpriseOne information is missing, e-Business Suite documentation applies This chapter covers the following topics: • "Open With" Worksheets • Worksheet Filters • Changing System Time Resolution • Analytical Engine Guidelines • DM application default users • The SysAdmin User Account • Controlling System and Engine Max Sales Dates "Open With" Worksheets "Open With" worksheets should be unfiltered. If you wish to show a filtered version of the worksheet, you will need to create a duplicate for "My Worksheets". If you place a filter on a worksheet to be used by "Open With", the "Open With" filter will be applied to the already filtered population which may not provide a result set. For example, if the worksheet is filtered to Member 1 of Level 1, and "Open With" is launched from Member 2 of Level 1, the result set will be null. Worksheet Filters The Demand Management worksheets have a default filter. This filter is to ensure that
- 220. 13-2 Oracle Demantra Implementation Guide when first run in a large production environment, the worksheet will not attempt to run on the entire data population. The filter added is pointing to the default members of all levels configured as aggregation levels in the worksheet. When implementing, go into all the worksheets and their embedded worksheets, change the filters to match the business process and scope. Remember that very large worksheets are typically not representative of one user's business process and will typically be accompanied by degradation in performance. Changing System Time Resolution Demantra uses a base time resolution. All other time displayed in the system is an aggregation of this base time resolution. The default time of the Demand Management application is weekly beginning on Monday. There may be several business reasons to change this: • Starting your week on a different day. • Aggregating the week based on the ending day not the beginning day. • Daily or monthly base time. To change the base time: 1. Access the Business Modeler. 2. From the Data Model menu, choose Open Data Model. 3. Select the data model you want to modify and click next until the Time Bucket screen appears.
- 221. General Integration Guidelines 13-3 4. Complete the following fields: • Time Bucket • First Day of the Week • Aggregation Method Note: The day and month time unit do not designate the first day of the period. Months are assumed to begin on the first and end on the last day of the Gregorian month. 5. After your changes have been saved, the data model should be upgraded, not rebuilt using the Run Time Bucket option selected.
- 222. 13-4 Oracle Demantra Implementation Guide Note: If the time bucket is re-configured, the time aggregation set for all worksheets is modified to match the new time aggregation. A review of all used and embedded worksheets is strongly recommended. Changing time resolution and engine parameters: Many engine parameters set for a weekly system do not comprise best-practice setting in a monthly and daily system. A good source of default values can be found in init_params_0_daily and init_params_0_monthly tables. It is recommended that you review engine parameters and change time relevant parameters if you change the time bucket setting. Parameter MetricsPeriod defines the length of history for which accuracy is calculated as an engine output. Default for weekly system is 26. A monthly system is set to 24 while a daily system is set to 60. Analytical Engine Guidelines The batch engine generates a new forecast for a system-wide population or a line of business. It uses distributed processing, analyzes very large amounts of data at night
- 223. General Integration Guidelines 13-5 and on the weekends when users are not logged into the system. By contrast, the simulation engine is used to generate or regenerate a forecast for a very specific population subset. Simulations can be run on an as needed basis, and several users may run simulations concurrently. Due to the large amount of processing used by the batch engine and the fact that it typically regenerates the entire forecast, the batch and simulation engine are not enabled to run at the same time. The analytic engine outputs several accuracy metrics when running the batch engine. They are: • MAPE • BIAS • MRE • RMSE • And a number of historical observations used to calculate these metrics. The length of history serving as a basis for the first 4 metrics is set by INIT_PARAMS_0 parameter MetricsPeriod. This parameter defines the number of periods of history, starting with the last and moving backward when calculating the accuracy metrics. Since the accuracy metrics are based on comparison of a back-cast with history they can serve as indicators of likely accuracy but are not best practice calculations. Best practice calculations should be based on comparison of an archived forecast with actual history as it becomes available. These metrics are stored on table MDP_MATRIX and are generated by the engine at the level a node is forecast. This implies that nodes not receiving a forecast will not have these numbers and all MDP_MATRIX combinations under a specific node will have the same engine metric values. Additional out-of-sample error calculations can be done using a stand-alone error calculation process. For more details refer to Out of Sample Error Calculations, Analytical Engine Guide. DM application default users The DM application is pre-configured with template users. These are necessary to allow system administrator access as well as set up the default process workflows and notifications. Important: The password for the component owner, dm, is set during installation. After installation, the component owner must use the Business Modeler to unlock and set the passwords for each pre-seeded user listed below.
- 224. 13-6 Oracle Demantra Implementation Guide User name Permission Level Description dm System Manager Demand Management component owner. User necessary to add or delete users from component. Owns all DM workflows. Analyst1 Power Typical system day-to-day user Analyst2 Power Typical system day-to-day user Analyst3 Power Typical system day-to-day user Analyst4 Power Typical system day-to-day user Analyst5 Power Typical system day-to-day user Admin1 Power Typical system administrator. Will typically oversee download and upload process and should be notified of any issues Manager1 Power Manager of analysts. Notified when exceptions occur in forecast approval process The SysAdmin User Account The SysAdmin user is a predefined, highly secure user account that can be used to define new or additional Demantra components (similar to the seeded components, which include DM, AFDM, S&OP, and PTP). Demantra users only need this account when defining new Demantra components or need to change lost component passwords. The Permission Level for the 'SysAdmin' user is 'System Manager'. This is the same permission level for all Demantra component owners, including dm, sop, and ptp. Caution: The password for the SysAdmin user account should only be assigned to trusted administrators within the organization. By default, the SysAdmin user has access only to the following modules: • Demantra Administrative Tools • Security Management Oracle does not recommend adding other modules to this user account. It is meant to be
- 225. General Integration Guidelines 13-7 used only for these specific administrative roles. For more information about these modules, refer to "Creating or Modifying a User" in the Oracle Demantra Implementation Guide. Note: If necessary, a database administrator can change the SysAdmin user's password by connecting to the Demantra schema and then executing the following procedure: EXEC ENCRYPTION.UPDATE_SUPERUSER( 'newpassword' ); A password for this user must be entered when installing or upgrading to the Demantra version in which this user was added. Only the SysAdmin user can modify the SysAdmin user's account. To do this, log into the Business Modeler as SysAdmin and follow the instructions in "Creating or Modifying a User" in the Oracle Demantra Implementation Guide. Alternatively, log into the Business Modeler as the SysAdmin user, choose Components > Create/Open component, select a component, and navigate to the User Name screen. When the SysAdmin user's password expires, the user will be prompted to change it. Controlling System and Engine Max Sales Dates When loading future dates in the EP_LOAD process, it is important to populate a control parameter to determine how you would like the end of history populated. The control parameter can be found in the Business Modeler and is called MaxSalesGen. Note: In order for MaxSalesGen to take effect you must run the EBS Full Download workflow. Populating MaxSalesGen: 1. Access the Business Modeler. 2. From the Parameters menu choose System Parameter. 3. Click the System tab and scroll down until you find the MaxSalesGen parameter.
- 226. 13-8 Oracle Demantra Implementation Guide 4. For the MaxSalesGen parameter, enter the value you want. Some considerations: • Null. Leaving the parameter blank causes the system to continue to behave as it does today. The last date loaded into the system is compared to the current last system date, and the latest of the two set is the last date of history. It is recommended in cases where only historical dates are being loaded. • Sysdate. Entering Sysdate as the parameter causes the last date of history to be based on the period containing today's date (date in the DB server). In a weekly system with weeks beginning Monday, if run on February 16, 2007, the last date of history is set to the previous Monday February 12, 2007. For a monthly system run on the same date, the end of history is set to February 1, 2007. This option is good for a production environment where the system date should match the current date while allowing future information to be loaded. • 01-01-1900 00:00:00. Setting the parameter to this value sets the end of history to the last date in the sales_data table where the actual_quantity column>0. For very large systems, this could add time to loading availability. It is critical that the data used to drive the engine be stored in the actual_quantity column. • Any date other than 01-01-1900 00:00:00. Any other date will cause the last date of history to be based on the entered date. In a weekly system with weeks beginning Monday, if the date entered is January 16, 2007, the last date of history would be set to the previous Monday January 15, 2007. For a monthly system run with the same parameter setting, the end of history would be set to January 1, 2007. This option is ideal for testing systems where the desired end
- 227. General Integration Guidelines 13-9 of history date does not match the executed date. This allows users full control on dates assigned as end of history and beginning of forecast. Note: All dates must be entered in the MM-DD-YYY 00:00:00 format.
- 229. Demantra Data Tables and Integration Processes 14-1 14 Demantra Data Tables and Integration Processes Demantra Data Tables When you configure Demantra, it is not necessary to work directly with the database, except in minor ways such as creating standalone tables. Also, you should use the Demantra configuration tools as much as possible, to avoid making database changes that could damage your configuration. However, it is useful to have a general understanding of the Demantra table structure and its many interconnections. First, Demantra stores most of its basic data in the following internal tables: items Contains one record for each lowest-level item, with fields to indicate the membership of that item in every higher item-type level. location Contains one record for each lowest-level location, with fields to indicate the membership of that item in every higher location-type level. mdp_matrix Contains one record for each known combination of lowest-level item and lowest-level location. This includes all combinations that have had sales, as well as any combinations created manually in the user interfaces. Matrix series select data from this table. sales_data Contains one record for each lowest-level item, lowest-level location, and date—for all combinations and dates where sales actually occurred. Sales series select data from this table. promotion_data Contains one record for each lowest-level item, lowest-level location, promotion, and date—for all combinations, promotions, and dates where promotions actually occurred. Promotion series select data from this table.
- 230. 14-2 Oracle Demantra Implementation Guide Inputs Contains one record for each date, through a date in the far future. You use this table to store purely time-dependent information, such as 4-4-5 calendars and global causal factors. The Inputs table extends through the year 2030 for internally maintained records. The columns representing the time aggregations are not populated. The Inputs table includes the following holidays as observed in the USA: • Easter Monday • Easter Sunday • Father's Day • Mother's Day • Independence Day • Labor Day • Memorial Day • Thanksgiving Day • Christmas Day Demantra also has the following tables: • Several tables (promotion_dates, promotion_levels, and promotion_members) that indicate the combinations and dates to which each promotion applies. • A table (group_attributes) that lists all the levels defined in Demantra. • One table for each level, which lists the members of that level and their attributes. If you have defined series on this level, data for that series is also stored here. • A table that describes all the series defined in Demantra. For each series, this information includes details such as the table from which the series data should be retrieved. • Tables that describe causal factors that the Analytical Engine should use. As you can see, you should never directly edit any of these tables. These tables are interconnected and must be kept synchronized whenever new data is loaded or whenever structural changes are made.
- 231. Demantra Data Tables and Integration Processes 14-3 You can, however, add your own tables to use in drop-down series or other purposes. Data Assumptions and Requirements Demantra requires input data that describes the items, the locations at which the items are sold, and all sales of those items, at each location over time. It is important to understand the Demantra requirements for this data. Lowest-Level Item Data Demantra requires the following fields for each record in the item data: • A unique code that can be used as the identifier for any lowest-level item. • A unique description, which is a short string that serves as a user-friendly name of the item. If no description is available, use the code. • Additional codes that indicate the membership of this item within all levels of the item hierarchy. See "Member Identifiers". • Additional fields that describe this item, as needed. • Additional fields that specify unit conversion factors for this item, if needed. See " Unit Conversion Data". Also, it is useful to be able to display quantities in different units of measure. The default unit of measure is called units, which simply counts the number of individually packaged product units. Sometimes you need to convert quantities to another unit such as case, carton, or truckload. In order to do so, you need a conversion factor, and that can be different for different items. This means that the item data usually also includes unit conversion factors. Lowest-Level Location Data Demantra requires the following fields for each record in the location data: • A unique code that can be used as the identifier for any lowest-level location. • A unique description, which is a short string that serves as a user-friendly name of the location. If no description is available, use the code. • Additional codes that indicate the membership of this location within all levels of the location hierarchy. See "Member Identifiers" . • Additional fields that describe this location, as needed.
- 232. 14-4 Oracle Demantra Implementation Guide Sales Data Demantra requires the following fields for each record in the sales data: • The unique code of the item being sold. • The unique code of the location of the sale. • The date of the sale. • The number of units that were sold for this item, location, and date. This field must be numeric. See "Unit Conversion Data". • Price per unit for this item, at this location and date. This field must be numeric. " Unit Conversion Data". • Additional fields as needed. Aggregation in Time You must choose the smallest time unit that you will use within Demantra. Correspondingly, you must also specify the start of that time unit (such as the starting day of the week) and an aggregation method for Demantra to use when importing data (backwards or forwards). However, it is not necessary to pre-aggregate the raw data in time. The Demantra loading and integration tools can perform that aggregation if needed. That is, if you import multiple sales records for different dates for the same item-location combination, Demantra automatically sums them up into the time unit to which those dates belong. Note: Together, the item, location, and date will form the primary key for the sales record. That is, Demantra stores no more than one record for each combination of item, location, and date. Data Denormalization As you build the data model, you will probably import data from multiple sources in the enterprise. Some of these sources probably store data in a normalized manner. For example, one table would store the relationship between a product group and the product family, and another table would store the relationship between a product family and the marketing class. Before you import data into Demantra, you will need to denormalize the data and get it into the flattened formats described in this section.
- 233. Demantra Data Tables and Integration Processes 14-5 Loading Basic Data To load the basic data, you use the Data Model Wizard, which helps you describe the location, format, and structure of your raw data. The Raw Data Before you can build a Demantra data model, you must have some sample data. You then use the Data Model Wizard to describe that data so that the system can load it. This data can be in the form of either text files or database tables: • If you use text files, the files must be either comma-delimited or tab-delimited. • If you use database tables, you must create these tables before you start the Data Model Wizard. These tables must be within the same database user name as the Demantra database. The Data Model Wizard assumes that you have one, two, or three source tables or files as follows: Number of sources First source Second source Third source 1 sales, locations, and items 2 sales and locations items 3 sales locations items What the Data Model Wizard Does The Data Model Wizard prompts you for the location and format of the raw data, as well as the number of sources. If you have two or three sources, the wizard prompts you for details on how to join them. Then if your sources are text files, the wizard helps you map them into staging tables. If your sources are database tables, your tables are the staging tables. In either case, the wizard helps you describe the contents of the staging tables so that you can build a model on them. You specify how to use the fields in the staging tables, generally using each field in a level definition or in a series definition. Demantra ignores any field for which you do not specify a use. As a final result, the Data Model Wizard creates a batch script and database procedures.
- 234. 14-6 Oracle Demantra Implementation Guide The script executes the procedures, which load the data into the Demantra internal tables and synchronize the tables as needed. Loading Series and Promotions To load series and promotions, you use the Integration Interface Wizard, which provides a flexible way to import data into Demantra. (It also can be used to export data; see "Exporting Data".) Integration Interfaces Within the Integration Interface Wizard, you create integration interfaces. An integration interface consists of at least one of the following: • A data profile, which specifies how to import Demantra series, at the aggregation levels that you choose. You can import sales series, promotion series and other level series, but not matrix series. • A level profile, which specifies how to import promotions and their attributes. Note: When you import promotions, any existing promotions are not changed. Executing Integration Interfaces Once you have created an integration interface, you can execute it in either of two ways: • You can incorporate the integration interface in a workflow controlled by the Workflow Manager. See "Overview of Workflow Step Types". • You can use the separate Standalone Integration Tool, which is Demantra_root/Demand Planner/Integration/aps.bat. (This tool consists of a subset of the APS, packaged as an executable file.) API to Modify Integration Interface in Workflow Description When integrating data from a source instance into Demantra, there may be a need to modify an existing integration interface. For example: a pre-seeded integration profile is defined to import ten price lists by item. It is desired to use this pre-seeded integration profile, but to only import three of price lists. To accomplish this, the price list import workflow is triggered by collecting three price lists in APS Collections, modifying the integration interface such that the remaining seven price list series are set to 'No load' and 'No purge,' and then running the transfer step. The API provides control over the following data profiles:
- 235. Demantra Data Tables and Integration Processes 14-7 • Load options: • Override • Accumulate, or • No load • Purge options: • No purge • All dates • All dates within a time range • Time definitions • Time Filter: • Relative • Fixed • Date Range: • From • Until Setup Notify the Application Server that you've modified Integration Profiles so it refreshes its cache. API_NOTIFY_APS_INTEGRATION(ii_profile_id INT) The following procedural APIs can be leveraged within the workflow to modify a pre-defined integration interface: This is the API to modify an Integration Profile's Series Attributes: API_MODIFY_INTEG_SERIES_ATTR (ii_profile_id INT, ii_series_id INT, ii_load_option INT, ii_purge_option INT) Where, • ii_profile_id is transfer_query.id • ii_series_id is transfer_query_series.series_id (and also computed_fields.forecast_type_id)
- 236. 14-8 Oracle Demantra Implementation Guide • ii_load_option is: • "0" Override • "1" Accumulate • "2" No Load • ii_purge_option is: • "0" No Purge • "1" Purge All • "2" Purge Within This is the API to modify an Integration Profile's Fixed Date: API_MODIFY_INTEG_SERIES_FDATE (ii_profile_id INT, id_from_date DATE, id_until_date DATE) Where, • ii_profile_id is transfer_query.id • id_from_date is transfer_query.from_date • id_until_date is transfer_query.until_date This is the API to modify an Integration Profile's Relative Date: API_MODIFY_INTEG_SERIES_RDATE (ii_profile_id INT, id_rel_from_date INT, id_rel_until_date INT) Where, • id_rel_from_date is transfer_query.relative_from_date • id_rel_until_date is transfer_query.relative_until_date To configure and deploy APS on Unix/Linux: For this procedure, please refer to the latest Demantra Installation Guide. Maintaining Data Consistency If you import data using actual proportions (rather than matrix proportions), be sure to run the MANUALS_INS_INTEGRATION procedure after you run the integration interface. (Note that you can run database procedures from a workflow.) Depending on your database, it may be necessary to run additional database scripts.
- 237. Demantra Data Tables and Integration Processes 14-9 API to Create, Modify or Delete Users The API_CREATE_ORA_DEM_USER command is available to create, modify or delete users from the Demantra application using the command prompt or batch routine. In addition, you can add level filters to an existing user using the API_ADD_ORA_DEM_LEVEL_FILTERS command. This is a procedural API that can be leveraged either to create a new user, update an existing user's credentials, or recreate an existing user. In SSO implementations with external systems, this API can be leveraged to keep the Demantra user credentials in sync with the customer's source system which maintains the SSO user credentials for their enterprise. It can be called via a batch routine when new users are added or existing users are modified, replaced, or deleted in the customers source system. This API also refreshes the Demantra application server cache with the updated user credentials. For the cache refresh to be successful, the system parameter "AppServerURL" must be valid. All parameters are varchar. User name and Password are mandatory for all actions, and Component is mandatory only when adding a new user or replacing an existing one. API_CREATE_ORA_DEM_USER (User name, Password, Permission, First name, Last name, Company, Phone number, Fax number, Email, Language, User group, Component, Series group, Update action) Where, • User name is the Demantra user name (for example, jsmith) • Password is the user's password (for example, pw1234). • Permission is the user's permission level (for example, Casual). Possible permission categories are: Category Description Product Modules DM Demand Manager (casual user) 2, 3, 4 DMA Demand Management Administrator 1, 2, 3, 4 PTP Predictive Trade Planning user 2, 3, 4, 6 PTPA Predictive Trade Planning Administrator 1, 2, 3, 4, 6
- 238. 14-10 Oracle Demantra Implementation Guide Product modules are: 1 - Demantra Administrative Tools 2 - Demantra Demand Planner 3 - Demantra Demand Planner Web 4 - Demantra Collaborator Workbench 6 - Demantra Promotion Effectiveness • First name is the user's first name (for example, John). • Last name is the user's last name (for example, Smith). • Company is the company name (for example, ABC Ltd.). • Phone number is the user's phone number (for example, 012 3456789). • Fax number is the user's fax number (for example, 012 1111111). • Email is the user's email address (for example, [email protected]). • Language is the language preference of the user (for example, 0=English). Possible values for language are: Language Description 1 Canadian French 2 Chinese Simplified 3 Chinese Traditional 4 English 5 Japanese 6 Korean 7 Portuguese (Latin America) 8 Russian 9 Spanish (Latin America)
- 239. Demantra Data Tables and Integration Processes 14-11 • User group is the group to which the user is assigned (for example, p_portal). The user group resides in column "GROUP_NAME" of the table " USER_SECURITY_GROUP" in the Demantra application schema. If it's not provided, the system will try to default it to the 'p_portal' user group. • IS_COMPONENT is the product component (for example, 156=Demand Management) The Component can be either from column "PRODUCT_NAME" or " APPLICATION_ID" of table "DCM_PRODUCTS" in the Demantra application schema. • Series group provides the overriding allocation of series available to the user (for example, 204=Sales). It resides in column "GROUP_ID" of table "SERIES_GROUPS" in the Demantra application schema. Limitation: If a user requires access to multiple series groups, access must be provided via the Business Modeler tool. • Update action indicates whether the user is added, modified or deleted (for example, ADD) Options include: ADD - Used only to add users. An error message appears if the user already exists. UPDATE - Used to update existing user details. REPLACE - If the user already exists, then the user along with all related data is first deleted. Then the process uses the ADD method and the user is recreated. All parameters must have values. The three id values are all integer values. The User name and Password parameters are mandatory. API to Modify User Security Filters Procedural API "API_ADD_ORA_DEM_LEVEL_FILTERS" can be leveraged to add data security filters to an existing user. It requires the following inputs • API_ADD_ORA_DEM_LEVEL_FILTERS ( User name, Level Id, Member Id, Permission Id), where: • User name is the Demantra user name. • Level Id is the "group_table_id" column value of the corresponding level from " group_tables" in the Demantra schema. For example,. to set filters by Item level, input 424 as the level id, which is the group_table_id value of Item level in group_table.. SQL Query: Select group_table_id from group_tables where upper(table_label) = Level Name • Member Id is the internal member id (t_ep_xxxx_id column in t_ep_xxxx table)
- 240. 14-12 Oracle Demantra Implementation Guide value of the corresponding security level. For example, set security by Item level, then populate the t_ep_item_ep_id value of the level member from the t_ep_item table. • To get the level lookup table name for the relevant level you can either find it via Business Modeler > Configure Levels > Right Click on the Level > Select Data Properties option> Note the Table Name, or by an SQL Query: Select gtable from group_tables where upper(table_label) = Level Name • To find the internal member id of the level member, you can either find it via Business Modeler > Configure Levels > Right Click on the Level > Select Level Members option> Scroll the list to find the id of the concerned item description, or by sql query: select t_ep_xxxx_ep_id from t_ep_xxxx where xxxx_code = 'xxxxxx' • Permission id value options: 1. Not Visible 2. Read Only 3. Read & Write 4. Full Control • Limitations • If user requires access to multiple level members in a given level then this API has to be executed several times once for each level member • Application server has to be re-started after executing this API for changes to take effect. • Cannot handle multi level security for a given user. In such scenario, security filter via has to be set via Business Modeler tool Running the API_CREATE_ORA_DEM_USER procedure from the command prompt: EXEC API_CREATE_ORA_DEM_UESR ('jsmith', 'pw1234', 'DP', 'John', 'Smith', 'ABC Ltd.', '012 3456789', '012 111111111', '[email protected]', '0', 'p_portal', '4', NULL, 'ADD')
- 241. Demantra Data Tables and Integration Processes 14-13 Running the API_CREATE_ORA_DEM_USER procedure from a script: DECLARE IS_USER_NAME VARCHAR2(200); IS_PASSWORD VARCHAR2(200); IS_USER_PERMISSION VARCHAR2(200); IS_FIRST_NAME VARCHAR2(200); IS_LAST_NAME VARCHAR2(200); IS_COMPANY VARCHAR2(200); IS_PHONE_NUM VARCHAR2(200); IS_FAX_NUM VARCHAR2(200); IS_EMAIL VARCHAR2(200); IS_LANGUAGE VARCHAR2(200); IS_USER_SECURITY_GROUP VARCHAR2(200); IS_COMPONENT VARCHAR2(200); IS_SERIES_GROUP VARCHAR2(200); IS_UPDATE_ACTION VARCHAR2(200); BEGIN IS_USER_NAME := 'jsmith'; IS_PASSWORD := 'pw1234'; IS_USER_PERMISSION := 'DP'; IS_FIRST_NAME := 'John'; IS_LAST_NAME := 'Smith'; IS_COMPANY := 'ABC Ltd.'; IS_PHONE_NUM := '012 3456789'; IS_FAX_NUM := '012 1111111'; IS_EMAIL := '[email protected]'; IS_LANGUAGE := '0'; IS_USER_SECURITY_GROUP := 'p_portal'; IS_COMPONENT := '4'; IS_SERIES_GROUP := '1'; IS_UPDATE_ACTION := 'REPLACE'; API_CREATE_ORA_DEM_USER) IS_USER_NAME => IS_USER_NAME, IS_PASSWORD => IS_PASSWORD, IS_USER_PERMISSION => IS_USER_PERMISSION, IS_FIRST_NAME => IS_FIRST_NAME, IS_LAST_NAME => IS_LAST_NAME, IS_COMPANY => IS_COMPANY, IS_PHONE_NUM => IS_PHONE_NUM, IS_FAX_NUM => IS_FAX_NUM, IS_EMAIL => IS_EMAIL, IS_LANGUAGE => IS_LANGUAGE, IS_USER_SECURITY_GROUP => IS_USER_SECURITY_GROUP, IS_COMPONENT => IS_COMPONENT, IS_SERIES_GROUP => IS_SERIES_GROUP, IS_UPDATE_ACTION => IS_UPDATE_ACTION); END; / This is the API to add level filters to an existing user: API_ADD_ORA_DEM_LEVEL_FILTERS (User name, Level Id, Member Id, Permission Id) Where, • User name is the Demantra user name (for example, jsmith). • Level Id is the internal level id value (for example, 6)
- 242. 14-14 Oracle Demantra Implementation Guide • Member Id is the internal member id value (for example, 1) • Permission id is the permission id value (for example, 4) Permission id value options: 1 - Not Visible 2 - Read Only 3 - Read & Write 4 - Full Control Permission id values are derived from the table SECURITY_PERMISSION. Running API_ADD_ORA_DEM_LEVEL_FILTERS from the command prompt EXEC API_ADD_ORA_DEM_LEVEL_FILTERS ('jsmith', 6, 1, 4); Configure Series Load and Purge Options The Integration Interface provides the ability to set purge and load options for each series. This controls whether the import integration profile overrides, accumulates, or purges (nulls out) the data for the specified integration profile date range. The location of the Purge Data Before Import profile option within the integration profile wizard is shown: Selected Series: This list box displays the selected series in the profile that were checked on the Data Profile Series page. Load Option: The selected radio button indicates the load option for the series that is adjacent to the red check mark. The available load options are Override, Accumulate, or No Load. The default selection is Override.
- 243. Demantra Data Tables and Integration Processes 14-15 Purge Option: The selected radio button indicates the purge option for the series that is adjacent to the red check mark. The default selection is No Purge. Reset All: This button resets all series that appear in Selected Series list box to the default settings. Note: To maintain backwards compatibility with old profiles, when upgrading: • Set the Load Option to Override, and • Set the Purge Option to No Purge. Load Options Setting Description Override Override values on existing dates Accumulate Add values from the profile data to the values on existing dates No load Don't load data Purge Options Setting Description No purge Do not purge Purge (null out ) all data on existing dates Purge (null out ) all data on existing dates Purge (null out ) all data on existing dates Purge (null out ) all data on existing dates
- 244. 14-16 Oracle Demantra Implementation Guide Load and Purge Option Combinations Settings Option Explanation Results Override, No Purge Override values on existing dates. Do not purge. Loads data for series in the date range of the profile. Overrides values on existing dates. Inserts the dates and values that are in the profile data, but not in the system. Accumulate, No Purge Add values from the profile data to the values on existing dates. Do not purge. Loads data for series in the date range of the profile. Adds the values from the profile data to the values on existing dates. Inserts the dates and values that are not in the system. No Load, No Purge Don't load data. Do not purge. Does nothing to this series. Override, All Dates Without New Data, Within Profile's Time Range Override values on existing dates. Purge (null out) data within profile dates. Loads data for series in the date range of the profile. Overrides values on existing dates. Purges (null out) values for dates in the range of the profile that are not in the loading data. Accumulate, All Dates Without New Data, Within Profile's Time Range Add values from the profile data to the values on existing dates. Purge (null out) data within profile dates. Loads data for series in the date range of the profile. Adds the values from the profile data to the values on existing dates. Purges (null out) values for dates in the range of the profile that are not in the loading data. No Load, All Dates Without New Data, Within Profile's Time Range Don't load data. Purge (null out) data within profile dates. Purges (null out) all values in the system within the time range of the profile.
- 245. Demantra Data Tables and Integration Processes 14-17 Settings Option Explanation Results Override, All Dates Without New Data Override values on existing dates. Purge (null out) data within profile dates. Loads data for series in the date range of the profile. Overrides values on existing dates. Inserts the dates and values that are in the profile data, but not in the system. Purges (null out) values for all dates that are not in the loading data. Accumulate, All Dates Without New Data Add values from the profile data to the values on existing dates. Purge (null out) data within profile dates. Loads data for series in the date range of the profile. Adds the values from the profile data to the values on existing dates. Inserts the dates and values that are not in the system. Purges (null out) values for all dates that are not in the loading data. No Load, All Dates Without New Data Don't load data. Purge (null out) data within profile dates. Purges (null out) all values for all dates in the system. Caution: Only combinations with some data in the integration profile will be purged. Combinations with no data will not be purged or overridden. Loading Supplementary Data To load other data, such as lookup tables, you use the Demantra import tool (Tools > Import File). In contrast to the Integration Interface Wizard, this tool does not load the data into Demantra internal tables; it is inappropriate for importing series or levels. Nor does it provide a way to export data. Unlike the Data Model Wizard, this tool does not create the tables into which you are importing data. You must first create the tables.
- 246. 14-18 Oracle Demantra Implementation Guide Import Interfaces Within the import tool, you create import interfaces. An import interface consists of at least one profile. Each profile corresponds to one table; note that multiple files can be loaded into a single table. The import tool creates a batch script that executes the import interface. Executing Import Interfaces To execute an import interface, you run the corresponding batch script. If the data needs to be loaded only once, you can run the script manually. If the data needs periodic refreshing, you can run the batch script from a workflow controlled by the Workflow Manager. See "Overview of Workflow Step Types". Exporting Data To export series and level members, you use the Integration Interface Wizard, which is introduced in "Loading Series and Promotions". When you define an interface, you specify how that interface will be used: for import, for export, or for both import and export. You can execute the interface in a couple of ways; see "Executing Integration Interfaces". The Integration Interface Wizard provides slightly different functionality for export than for import: • You can export sales series, promotion series and other level series, but not matrix series. • You can export any kind of level, not just general levels. • You can export members and attributes of a general level, but you cannot export the population attributes of the members. (The population attributes specify the item-location combinations to which each promotion applies.) • You can define database hints to improve performance. For details, see Creating a Data Export Profile, page 21-10. Note that an export profile creates a database view, and the data in that view is then exported to the specified export file. The view is created when you run the export process, not before. Also note that if you want to export a series that uses a client expression, you must first run the Business Logic Engine to evaluate the expression, split the resulting data to the lowest level, and save it to the database. You can run the Business Logic Engine from within a workflow; see "Overview of Workflow Step Types".
- 247. Demantra Data Tables and Integration Processes 14-19 Configuration Notes This section contains configuration notes related to dependencies. Dependencies Before you can set up integration, you will need sample data. Tools The following table summarizes the core Demantra import and export tools: Data To import, use... To export, use... Lowest level item and location data; sales data Data Model Wizard* N/A Series data at any aggregation level Integration Interface Wizard* Integration Interface Wizard Sales promotions Integration Interface Wizard* Integration Interface Wizard Members and attributes of other levels N/A Integration Interface Wizard Other data, for example, lookup tables Demantra import tool* N/A *These options are in the Business Modeler.
- 251. Getting Started with the Configuration Tools 15-1 15 Getting Started with the Configuration Tools This chapter introduces the primary tools you use to configure Demantra, namely, Business Modeler and Workflow Manager. This chapter covers the following topics: • About Demantra Configuration Tools • Illegal Characters in Demantra • Automatic Installation of the Demand Planner and Business Modeler Applications • Logging Onto the Business Modeler • Refreshing the Data in the Business Modeler • Working with Lists • Configuring Parameters • Making Changes Available to Users • Quitting Business Modeler • Logging into the Workflow Manager • Quitting the Workflow Manager • Setting Browser Locale About Demantra Configuration Tools In an implementation, you typically perform the following tasks.
- 252. 15-2 Oracle Demantra Implementation Guide Task Tool used... For details, see... Define the basic levels and create a load script to load the data for them.* Business Modeler "Using the Data Model Wizard" Add more levels if needed. Business Modeler "Configuring Levels" Define series and series groups. Business Modeler "Configuring Series and Series Groups" Configure units of measure, financial indexes, and conversion rates for use in series and worksheets. Business Modeler "Configuring Units, Indexes, and Update-Lock Expressions " Define integration. Business Modeler "Series and Level Integration" Load supplementary data. Business Modeler "Importing Supplementary Create workflows. Workflow Manager "Creating Workflows" Define methods. Business Modeler "Configuring Methods" Define components to subdivide the data. Business Modeler (In previous releases, you used a separate utility, the Business Application Modeler.) "Creating or Modifying a Component" Configure the engine: • Set up causal factors. • Set up the forecast tree. • For Promotion Effectiveness: Configure the influence groups and influence ranges that affect how the engine works. • Tune the Analytical Engine. Business Modeler "Configuring and Running the Analytical Engine" in the Demantra Analytical Engine Guide
- 253. Getting Started with the Configuration Tools 15-3 Task Tool used... For details, see... Run the Analytical Engine and check the results. Engine Administrator Write database procedures to maintain data as needed. Text editor Outside the scope of this documentation Create additional users for the components, as needed. Create user groups for collaboration. Business Modeler (In previous releases, you used a separate utility, the Security Manager.) "Managing Security" Define security for menu options. Collaborator Workbench Administrator Define worksheets. Worksheet designer Oracle Demantra Demand Management User's Guide or other manual Optionally customize Collaborator Workbench. Text editor, graphics editor "Customizing Demantra Web Pages" * In some cases, you use database setup scripts instead of the Business Modeler. See the following chapters: • "Configuring Promotion Effectiveness" • "Configuring DSM" • "Configuring Promotion Optimization for PTP" Illegal Characters in Demantra Within Demantra, do not use the following special characters: • Single quote (') • Double quote (") • Ampersand (&) If you use these characters, unexpected results may occur.
- 254. 15-4 Oracle Demantra Implementation Guide Automatic Installation of the Demand Planner and Business Modeler Applications When a user accesses the Demand Planner application (Chaining Management and Members Management) and Business Modeler tools for the first time, or when the version has changed, the application initiator installs or updates these tools automatically from a common location provided by the Demantra Application server. This topic describes: • Automated Process • Configuring the win_installer.properties File • TNS Configuration Automated Process The automatic or silent install installs the following tools: • Business Modeler and Supporting DLL's • Demand Planner for Chaining and Members Management • Security Management (for DS.INI and DLL's) • Oracle 10g Instant Client • Dependencies, such as DLL's and environment variables The executable install.exe is located in Install_DirectoryCollaboratordemantratoolsdesktopInstaller. Note: To install Demand Planner or Business Modeler, Demantra must not be currently installed on the end user's machine. For details about uninstalling Demantra, contact your system administrator or Oracle Support. To automatically install the desktop tools, a user with either System Manager or Supervisor permission level logs into the Collaborator Workbench and then selects either Business Modeler, Member Management, or Chaining Management from the Planning Applications menu. A message appears stating that the installation is taking place. This is a one time event and might take a few minutes. After the selected application is installed successfully, the user will be prompted to re-enter their Demantra user password to log in. If the user doesn't have either System Manager or Supervisor permission level access, a message appears stating that the user does not
- 255. Getting Started with the Configuration Tools 15-5 have the correct permissions to execute the program. The process then terminates. The following occurs during installation: 1. If an Oracle client version is not installed, then a light Oracle client called InstaClient (this is a generic Oracle Application and not specific to the Demantra application) is installed. Otherwise, the existing Oracle client on the end user machine is used. 2. Two Demantra application folders called Desktop and Security Management are installed on the end user's machine in the C:Program FilesOracle Demantra Spectrum folder but this path can be changed in the win_installer.properties file. For more information about the win_installer.properties file, see Configuring the win_installer.properties File, page 15-5. 3. The silent installer installs a version.properties file in C:Documents and Settings<user>demantradesktop folder. 4. A TNSNAMES.ora entry is created that enables the application executables found in the Desktop folder to connect to the Demantra schema. 5. The necessary Registry entries are created on the end user machine to reference the Demantra executables installed in Step #2. 6. The references to the Demantra application in the PATH System Variable under the Environment Variables list is created. Configuring the win_installer.properties File The file win_installer.properties resides on the web server where Demantra is deployed. This file provides the variables for the Silent Installer when it creates the TNSNAMES.ora entry and selects the folder in which the version.properties file will be installed. See Automated Process, page 15-4 for more information. The win_installer.properties file is located in <Demantra_Install>Oracle Demantra SpectrumCollaboratordemantratoolsdesktopInstaller folder on the web server. For example, if you log into Demantra from http://demantra.dev.us:8080/demantra/portal/loginpage.jsp then you would expect to find this file on the demantra.dev.us machine. The key fields in the win_installer.properties file are:
- 256. 15-6 Oracle Demantra Implementation Guide Field Description USER_INSTALL_DIR The folder that is automatically created on the end user's machine which will then contain the Desktop and Security Manager folders and their associated executables. The default is C:Program FilesOracle Demantra Spectrum but if your end users' machines are not configured with a C drive then this will need to be changed WEB_SERVER_URL This should match the URL that you use to log into Demantra. So using the earlier example of http://demantra.dev.us:8080/demantra/portal/l oginpage.jsp then this value would be http://demantra.dev.us:8080 DBA_SERVER DBA name of the server. If you will be running Oracle Demantra on the Oracle 12c database, these parameters must refer to the pluggable database (PDB). DB_HOST The DB_HOST value reflects the FULL NAME of the machine where the Demantra schema is located. So for example, if your Demantra schema sits on the Oracle database located on a machine called DemantraOracle.us.com then the DB_HOST value should be DemantraOracle.us.com not just DemantraOracle. The DB_HOST can also be an IP address.If you will be running Oracle Demantra on the Oracle 12c database, these parameters must refer to the pluggable database (PDB). DB_PORT Specify the port number.If you will be running Oracle Demantra on the Oracle 12c database, these parameters must refer to the pluggable database (PDB). DB_SID Oracle SID or service name, often the same as the database name on the server.If you will be running Oracle Demantra on the Oracle 12c database, these parameters must refer to the pluggable database (PDB). If you modify the win_installer.properties file, you must restart the application server.
- 257. Getting Started with the Configuration Tools 15-7 Also, depending on your web deployment architecture, it may also be necessary to recreate and redeploy the WAR file. TNS Configuration A valid entry in the TNSNAMES.ORA file is required to launch the Demand Planner application or Business Modeler. Note: The TNS entry is created automatically, as detailed in Automated Process, page 15-4. The new entry should be like this sample: orcl11 = (DESCRIPTION=(ADDRESS=( PROTOCOL=TCP )( HOST= MYSERVER.MYCOMPANY.COM )( PORT=1234 )) ( CONNECT_DATA= ( SERVICE_NAME = orcl11 ) ) ) MY.SERVER.NAME should be the same as the corresponding value of "TNSName" in the APS_PARAMS table. Troubleshooting Tips: If after installation, the desktop applications do not initiate when the menu items are selected, add the path to the folder where Oracle Demantra applications are installed to the PATH environment variable. To define the PATH parameter, right click the My Computer icon, then select Properties > Advanced > Environment Variables. Oracle Demantra applications are installed in C:Program FilesOracle Demantra SpectrumDesktop. If automatic (silent) installation has occurred more than once on the same machine, each time a user switches between instances, he must run the installation again (specifically if the USER_INSTALL_DIR value in win_installer.properties remains "C:/Program Files/Oracle Demantra Spectrum" for both instances). The following must be done each time the used instance is changed: 1. Delete the "demantra" directory from "%UserProfile%" . 2. Delete the C:Program FilesOracle Demantra Spectrum directory (or the appropriate Demantra Silent Install directory). 3. Clear the Java cache. 4. Restart the server.
- 258. 15-8 Oracle Demantra Implementation Guide 5. Restart the Web browser and then launch the Desktop Applications or Business Modeler from Collaborator Workbench. Logging Onto the Business Modeler Prerequisites Ì Before starting the Business Modeler, make sure that the database is running. To log onto the Business Modeler: 1. On the Start menu, click Programs. 2. Click Demantra > Demantra Spectrum release > Business Modeler. A login window appears. 3. Enter your user name and password. 4. Click Login. Access to Business Modeler functions: Depending on your user name, you may not have access to all the functions of the Business Modeler. Refreshing the Data in the Business Modeler To refresh the display of data in the Business Modeler: 1. Click the Refresh button in the tool bar. Or click File > Refresh. Working with Lists Within the Business Modeler, you use screens that present two lists of elements, where you specify your selections. To make selections, you move elements from the left list to the right list. To move elements from one list to the other: 1. To move a single element, double-click it. Or click it and drag it to the other list. 2. To move all elements, right-click and then choose Select All Rows. Then hold down the Shift key and drag from one list to the other.
- 259. Getting Started with the Configuration Tools 15-9 3. To move several adjacent elements, click the first element, press Shift and click the last element. Then hold down the Shift key and drag from one list to the other. 4. To move several elements that are not adjacent, press Ctrl and click each element you want. Then hold down the Shift key and drag from one list to the other. Configuring Parameters During the implementation process, you often have to set values for parameters. You use the Business Modeler to configure almost all parameters, and the changes are recorded in the audit trail. See also: Non-Engine Parameters. To view and edit parameters in the Business Modeler: 1. Log onto the Business Modeler as described in "Logging onto the Business Modeler. " 2. Click Parameters > System Parameters. The System Parameters dialog box appears. This dialog box includes the following tabs: Tab Typical parameters on this tab Worksheet Maximum number of members on which a user can work at the same time Flag that switches on debug mode System Base time unit Database Database version Initial sizes of tablespaces Engine Maximum number of forecasts that are kept Parameters that control the proport mechanism Application Server Date format Server name
- 260. 15-10 Oracle Demantra Implementation Guide 3. Find the parameter of interest. The dialog box provides find, sort, and filter capabilities to help you with this. 4. To change the value of the parameter, click the Value field for that parameter. 5. Type the new value or select an allowed value from the drop-down menu. 6. Click Save to save your changes. 7. Click Close. See also Making Changes Available to Users When you make changes in the Business Modeler, those changes are not necessarily available to users immediately. To make changes available to users: 1. Save your changes within Business Modeler. To do so, click File > Save. 2. Make sure that the changes are included in the components in which the users work. See "Creating or Modifying a Component" . 3. Load the changes into the system. How you do this depends on which user interfaces the users are working with: • For the Web-based products, stop and restart the Web server. Information on this is beyond the scope of the Oracle documentation. • For Demand Planner or Demand Replenisher, either restart the user interface or use the System menu to reload the configuration. 4. If you have created a new series, make sure this series is included in the appropriate worksheets. See the Oracle Demantra Demand Management User's Guide or other user guides. Note: These steps are necessary when you make changes to series, levels, level attributes, units, indexes, level methods, integration interfaces, components, or users.
- 261. Getting Started with the Configuration Tools 15-11 Quitting Business Modeler To quit Business Modeler: 1. Click File > Exit. Or click the Exit button. Logging into the Workflow Manager To access the Workflow Manager, a User Group must be assigned to the workflow.group parameter (in the Business Modeler). For details, refer to Providing Access to the Workflow Editor.. For more information on User Groups see: Creating or Modifying a User Group, page 42-17 To log into the Workflow Manager: 1. Before logging onto the Workflow Manager, make sure that the database and the Web server are both running. Quitting the Workflow Manager To Quit the Workflow Manager: 1. Click Logout in the upper right of the screen. Setting Browser Locale If your users use Microsoft Internet Explorer, Oracle requires that you or they set the browser locale. The applet locale is based on the browser locale. Having browser locale set, Oracle Demantra can manage both the portal and applet. With client machine locale alone, Oracle Demantra can manage applets, but cannot determine the locale for portal parts. If an applet starts as standalone, Oracle Demantra uses the client machine locale. The instructions for setting the browser locale are in Oracle Demantra User's Guide > First Time Login.
- 263. Database Tools 16-1 16 Database Tools The Business Modeler provides a simple user interface for creating and modifying database tables that is useful during implementation. This chapter covers the following topics: • Creating a Table • Modifying a Table • Recompiling the Database Functions and Procedures • Viewing the Procedure Error Log • Wrapping Database Procedures • Cleaning Up Temporary Tables • Monitoring Oracle Sessions • Index Adviser Creating a Table To create a table: 1. Log onto the Business Modeler as described in "Logging onto the Business Modeler" . 2. Click Tools > Database > Create Table. 3. In the Table Name field, type a name for the new table. 4. In the Column Name field, enter the name of a column in the new table. 5. In the Column Type field, enter the column type (one of the standard data types supported by the database).
- 264. 16-2 Oracle Demantra Implementation Guide 6. If the selected column type contains a string of characters, select a width in the Width field. 7. In the Decimal field (if field is numeric), specify the number of positions that should appear after the decimal point. 8. In the Nulls field, specify whether this field is allowed to contain a null value. 9. If this field should be a primary key for this table, select the Primary Key check box. 10. When you have completed creating the field, click Add or press Tab to move to the next field. Repeat this process for any field you want to create for the table. Note: To delete a field, select it and then click Delete. The field cannot be deleted after the table has been created. 11. When you have completed creating all the fields for the new table, click Create to create the table, and then click Close. Modifying a Table To modify a table: 1. Click Tools > Database > Alter Table. The Select Table dialog box appears 2. Double-click the name of the table you want to modify. The Alter Table dialog box appears. Here, each row displays information about a field (column) of the table. You can modify the white columns: Width; Dec (number of decimal points), and Primary Key. 3. To add a column, click Add and enter the required information, as described in "To create a table". 4. To save modifications to the table, click Alter. 5. To close the dialog box, click Close. To delete a column: 1. Select the column. 2. Click Delete.
- 265. Database Tools 16-3 Note: A column cannot be deleted if you have modified it. Recompiling the Database Functions and Procedures To recompile the database functions and procedures: 1. Log onto the Business Modeler as described in "Logging onto the Business Modeler. " 2. Click Tools > Recompile. The database procedures and functions compilation dialog box appears. 3. Click Compile to compile the SQL procedures. 4. (Optional) Click Show Error to view possible expression errors. Click Print to print the errors. 5. Click Close to close the dialog box. Viewing the Procedure Error Log The procedure error log enables you to see error messages produced by procedures. For each error message, it displays the date and time of the message, the procedure name, and the text content of the message. To display the procedure error log: 1. Log onto the Business Modeler as described in "Logging onto the Business Modeler. " 2. Click Tools > Procedure Error Log. The Procedure Error Log screen appears. The most recent errors are displayed first. To display an error message: 1. Select an error from the procedure name and date list. The error message appears in the error message pane. To sort the list: 1. Right-click the list and then select Sort.
- 266. 16-4 Oracle Demantra Implementation Guide The sort screen appears. 2. To determine how the items will be sorted, click one or more required boxes in Columns Available for Sorting, and drag them to Sort Columns, or double-click the required boxes in Columns Available for Sorting. To reverse this process drag a box in the opposite direction, or double-click a box in Sort Columns. 3. To specify an ascending sort order, make sure Ascending is checked. For a descending order, clear the box. 4. Click OK. To find an item in the list: 1. Right-click the list and then select Find. 2. In the Find where box, select the type of element to find. 3. In the Find what box, type the text you want to find. 4. In the Search box, select Up or Down to specify the direction of the search. 5. (Optional) Select one or more of the check boxes: • Whole Word: Search for the exact match of a word. • Match Case: Search for the exact match of a word (case sensitive). • On Line Search: For immediate search results (even if only part of a word has been entered in the Find what box). 6. Click Find Next to begin (or continue) searching. To filter the list: 1. Right-click the list and then select Filter. The filter screen appears. 2. Select the required Column, Operator and Value. 3. (Optional) To add additional criteria, select the required Logical operator and click Add. 4. Click OK.
- 267. Database Tools 16-5 To copy the error message to the clipboard: 1. Click Copy. To clear (truncate) the list: 1. Click Truncate. A warning message appears. Caution: The truncate action cannot be reversed. 2. Click Yes to confirm the action. To refresh the list from the database: 1. Click Refresh. To close the Procedure Error Log screen: 1. Click Close. Wrapping Database Procedures So that you can more easily locate and resolve problems, the database procedures are provided in unwrapped form. When you go live, it is required that you wrap the procedures and compile them in wrap mode into the database. To wrap the database procedures: 1. Search the Demantra installation directory for a file called wrap30.bat. The location depends on which database you are using. 2. Create a directory, for example, wrap. 3. Inside this folder, create two subdirectories called, for example, source and target. 4. Copy this file into the folder: 5. Copy the database procedures into the source folder. 6. From the command line, execute the following command: wrap30 source_dirtarget_dir For example: wrap30 source target
- 268. 16-6 Oracle Demantra Implementation Guide After the execution is finished, the wrapped file will be in the target folder. 7. In the database, replace the unwrapped procedures with the new wrapped ones. Cleaning Up Temporary Tables Demantra provides an option for deleting its temporary tables. To clean up tables: 1. Log onto the Business Modeler as described in "Logging onto the Business Modeler. " 2. Click Tools > Maintain > Tables Cleanup. The Tables Clean Up dialog box appears, listing the Demantra temporary tables. 3. Click the appropriate check boxes for the tables you want to delete, and then click Delete. Monitoring Oracle Sessions The Oracle Sessions Monitor enables you to monitor Oracle sessions and their status. To monitor the Oracle sessions: 1. Log into the Business Modeler. 2. Click Tools > Oracle Sessions Monitor. The Oracle Sessions Monitor window appears. 3. Here, do any of the following: • To sort or filter sessions, right-click and then select the appropriate command from the pop-up menu. • To select all sessions, right-click and then click Select All. • To delete a session, right-click the session and then click Delete. • To terminate a session, select a session, and then click Kill a Session. Index Adviser The Index Adviser is a tool that automatically analyzes a Demantra database schema
- 269. Database Tools 16-7 and recommends what indexes should be added in order to optimize the performance of the Worksheets Run and Filter Executions (in the Worksheet wizard). The following procedure shows an example of how the tool could be used. 1. Access the program in your browser from the following url: http://localhost:8081/demantra/admin/indexAdvisor.jsp 2. Log in. 3. The Index Adviser screen appears: 4. Click 'Get List' in the 'Worksheets' section to display all worksheets. 5. From the Index Adviser screen, click 'Get List' in the 'Users' section to display all users below the Index Advisor screen.
- 270. 16-8 Oracle Demantra Implementation Guide 6. Select one or more users and worksheets. 7. 7. After selecting a set of Users and Worksheets, their corresponding UserIDs and WorksheetIDs appear in the Index Advisor screen, as shown below. 8. Click Execute. The schema is analyzed and the following Results page is displayed. This page shows Filter Indexes and Worksheet Indexes.
- 271. Database Tools 16-9 9. Check at least one index from the Filters (Users) or Worksheet Indexes, and click Create Script. An SQL script is generated for adding indexes to the schema. From this page click Open/Download to save the result to a file or to open an editor for viewing and modifying the script.
- 272. 16-10 Oracle Demantra Implementation Guide The DBA can refer to the report to manually create all or a sub-set of the recommended indexes in the database.
- 273. Using the Data Model Wizard 17-1 17 Using the Data Model Wizard This chapter describes how to use the Data Model Wizard. This chapter covers the following topics: • About the Data Model Wizard • Before Using the Data Model Wizard • Getting Started with the Data Model Wizard • Describing the Staging Tables • Specifying the Structure of the Staging Tables • Joining Multiple Source Files or Tables • Defining the Minimal Required Data Model • Declaring the Sales Date • Declaring the Sales Quantity • Defining an Item Level and a Location Level • Saving the Data Model • Defining Additional Elements • Declaring the Unit Price • Defining a Unit of Measure • Adding Higher Levels • Adding Level Attributes • Defining Other Values • Impacts of Changing Levels, Series, and Units • Navigating the Data Model • Building the Data Model • Loading the Data into the Data Model
- 274. 17-2 Oracle Demantra Implementation Guide • Manipulating Existing Data Models About the Data Model Wizard The Data Model Wizard helps you perform the following related tasks: • Describe the lowest item level and lowest location level in the system • Specify which data fields to use as the sales date and quantity • Specify the base time bucket in the system • Define additional levels of type item, location, or combination • Define series • Define units of measure and other elements of the data model • Create the EP_LOAD_MAIN procedure, which loads data into the data model from staging tables or from files, according to your choice. Note: Some of these tasks can be performed elsewhere in the Business Modeler. The Data Model Wizard, however, is the only tool that lets you specify certain basics such as the sales date, and quantity, and base time bucket. Before Using the Data Model Wizard Before you use the Data Model Wizard, be sure to do the following: • Read the "Levels" Chapter and make sure you understand the basic data requirements of Demantra. • Obtain some sample data for items, locations, and sales. Make sure that this data contains all the codes needed to define the desired item and location levels. This data can be in the form of either text files or database tables: • If you use text files, the files must be either comma-delimited or tab-delimited. • If you use database tables, create these tables before you start the wizard. These tables must be in the same database user as the Oracle database. • Carefully plan the levels you will configure. Caution: Because the Data Model Wizard automatically removes
- 275. Using the Data Model Wizard 17-3 any levels that are not defined within the wizard, you generally use the wizard only at the start of the implementation process. In some cases, you use database setup scripts instead of the Business Modeler. See "Configuring Promotion Effectiveness", " Configuring DSM", and "Configuring Promotion Optimization for PTP". Note: Building a new model will invalidate any procedures which are tied to the internal data model. Often these begin with APPPROC. When building or upgrading a data model, the Data Model wizard will display a message listing those procedures and functions that are invalid as a result of running the process. Since these procedures are no longer valid, any related errors that are displayed can be safely ignored. Getting Started with the Data Model Wizard A new data model can be based on an existing template or on an empty template. Note that a data model cannot be converted into a template. To start to build the data model: 1. Click Data Model > New Data Model. The Create Data Model/Template screen appears. 2. Click the Data Model or Template button radio button. 3. Click OK. 4. Click Next. The wizard prompts you for basic information about this data model. 5. Specify a unique name and an optional description. 6. Click Next. The wizard prompts you to specify the time unit for this data model.
- 276. 17-4 Oracle Demantra Implementation Guide 7. For Time Bucket, select one of the following base time units: Day, Week, or Month. 8. If you selected Weekly, fill in the other fields as follows: First Day of Week Select the day of the week to use as the first day of any week. For example, if you select Monday, then all weekly data will be aggregated and displayed on the Monday of each week. (Monthly time units are always aggregated on the first day of the month). Aggregation Method Select how to aggregate data in time, either backward or forward. Oracle recommends that you select Backward to start of previous week, so that the data will be aggregated to the beginning of the previous week. For example, all the sales records of the week June 07 to June 13 will be aggregated to June 07. Monthly time units are always aggregated backwards to the first of every month. For example, sales for June will be aggregated to June 01. Note: The settings you choose here also apply to integration. See " Series and Level Integration". Note that the Data Model Wizard is the only place where you can specify these settings. 9. Click Next. The wizard next prompts you for information about the source data. See " Describing the Staging Tables". Describing the Staging Tables If your sources are text files, the Data Model Wizard helps you map them into staging tables. If your sources are database tables, your tables are the staging tables. In either case, the wizard helps you describe the contents of the staging tables so that you can build a model on them.
- 277. Using the Data Model Wizard 17-5 To describe the staging tables: 1. In the Select Source Combination dialog box, you specify the number of source tables or files that you will use, as follows: Single Table Contains sales, items, and locations in a single file. Two Tables Contains sales and locations in the first file and items in the second file. Three Tables Contains sales, locations, and items in three separate files. 2. Click Next. The Data Model Wizard now displays the Tables or Text Files as Sources dialog box. 3. Specify whether the source data is in tables or text files: Oracle Tables Click if the data is in database tables. Text Files Click if the data is in text files. 4. Click Next. 5. The next step depends on whether the data is in the database or in text files: • If the source data is in the database, the wizard now displays the Choose User Defined Source Tables dialog box. This dialog box varies, depending on the number of source tables you specified. The tables shown in drop-down lists depend on what you have previously loaded into the Demantra database. For example, if your source is in three tables, fill in the fields as follows and then click Next:
- 278. 17-6 Oracle Demantra Implementation Guide Sales file definition Select the file where the sales history data is stored. Location file definition Select the file where the location data is stored. Item file name Select the table where the item data is stored. • If the source data is in files, the wizard now prompts you for information about the format of those files, and how to map the data into database staging tables. See "Specifying the Structure of the Staging Tables". 6. The next step depends on whether you specified multiple sources: • If you specified multiple tables or files, you must specify how to join them. See " Joining Multiple Source Files or Tables". • If you specified only a single table or file, you are ready to define the data model. See "Defining the Minimal Required Data Model". Specifying the Structure of the Staging Tables If you specified two or three tables or files, the wizard displays the Text File dialog box. Here, you describe each text file you are going to import, as well as the staging table that corresponds to that file. If you are using multiple source files, the wizard prompts you for information for each one, in a specific order. To specify the structure of the staging tables: 1. Read the title bar of the dialog box to make sure you know which data you are mapping. For example, if the wizard is expecting item data, the title includes "item." 2. In the upper part of the dialog box, describe the source file that you are using for this data, as follows: File Directory The location of the files. Log Path Path and filename of the log file that will store any load errors.
- 279. Using the Data Model Wizard 17-7 Delimiter Type Select the delimiter type from the drop-down list. Date Format Select the date format from the drop-down list. If this source file does not contain dates, this is optional. File Name Format Select more than one file through the use of a wildcard (*). For example, dcl_his*.* selects every file with the prefix dcl_his. Load Option Insert is the only option currently available. Column Delimiter Select the character used in this source file to delimit fields. No of lines to skip from begin If there is a header, this gives the number of lines to miss at the top of the table. 3. In the lower part of the screen, define the table structure of the table you are defining in the staging area. To add a new entry to this information, right-click and then click Add. Fill in the details of the table structure as follows: Name Field name Type Data type for this field; specify one of the data types supported by the database. Width Maximum width of field Dec Decimal point Default The default value of the field if it is null in the source data. Null Click yes to allow field value to be null. From Position Use if Fixed was selected as the Delimiter Type. This is the position in the source text file where the field starts.
- 280. 17-8 Oracle Demantra Implementation Guide To Position Use if Fixed was selected as the Delimiter Type. This is the position in the source text file where the field ends. Const Constant column width. If selected, the From Position and To Position fields are disabled for editing. 4. When you are done describing this source file and its corresponding staging table, click Next. If you are using multiple source files, Business Modeler displays a similar dialog box where you specify the next source file. 5. The next step depends on whether you specified multiple sources: • If you specified multiple tables or files, you must specify how to join them. See " Joining Multiple Source Files or Tables". • If you specified only a single table or file, you are ready to define the data model. See "Defining the Minimal Required Data Model". Note: This dialog box provides the following additional options: • The Create Load Batch button creates a batch file that will load the table. This button is only present in certain installations of the Business Modeler. • The Table Syntax button displays the SQL syntax used by the database and the Business Modeler to create the table in the staging area. Only experienced consultants should use this feature. • If you are using an Oracle database, Demantra uses the SQL*Loader tool (from Oracle) to load data. The Click CTL Syntax button displays the control file used by SQL*Loader. Only experienced consultants should use this feature. Joining Multiple Source Files or Tables If you specified two or three tables or files, the wizard displays the Join Sources dialog box. By defining the joins, you implicitly specify the primary keys in the data.
- 281. Using the Data Model Wizard 17-9 To join the source data: 1. For the first table or file to be joined, drag a field name from that table or file (on the left) to a blank space in the empty join structure on the right. 2. For the other field or file to be joined, drag a field name from the other table or file (on the left) to the remaining blank space in the join structure. 3. If you specified three tables or files as the source, you must create an additional join. To do so, right-click the right side of the dialog box and click New. A new, empty join appears in the right side. In the same way that you defined the previous join, create a join between the sales table and the remaining, non joined table. Note: While you are defining these joins, it may be helpful to toggle between the table descriptions and the table names. To do so, click the toggle button Show Table Description or Show Table Name. The result might look like this: 4. Click Next. The wizard now helps you define the data model. See "Defining the Minimal Required Data Model".
- 282. 17-10 Oracle Demantra Implementation Guide Defining the Minimal Required Data Model This section describes how to define enough of the data model so that you can save it for future work. Here you will declare the sales date and actual quantity, and you will define an item level and a location level; you can define these four things in any order. The following shows an example. In this stage, you specify how to use the fields in the staging tables, generally using each field in a level definition or in a series definition. Note: Demantra imports only the fields that you specify how to use. Declaring the Sales Date To declare the sales date: 1. In the left box, right-click and then click Create Sales Date. 2. Select the table and field that contains the sales date for any given sale. For example, in src_rainbow_sales, the s_date field might contain the sales date for each sales record. Declaring the Sales Quantity To declare the sales quantity: 1. In the left box, right-click and then click Create Sales Quantity. 2. Select the table and field that contains the item quantity for any given sale. For
- 283. Using the Data Model Wizard 17-11 example, in src_rainbow_sales, the orders field might contain the sales quantity for each sales record. 3. In Series Title, specify a user-friendly name for this series. 4. For Aggregate as, select the function to use when aggregating multiple records. Defining an Item Level and a Location Level The data model must include at least one item level and one location level. The first levels you define should be at the lowest desired level of aggregation. The lowest item level usually corresponds to specific SKUs, and the lowest location level usually corresponds to specific stores or ship-to locations. To define an item or location level: 1. In the left box, right-click and then click Create Location Dimension or Create Item Dimension. 2. Then specify the level as follows: 1. In the Table Name field, click a source table from the drop-down list. 2. In the Field Name field, click the field within that source table that stores the
- 284. 17-12 Oracle Demantra Implementation Guide unique codes that distinguish the members of this level. 3. In the Name field (in the Select Properties area), type a unique name of this level, for internal use. Demantra automatically uses this as the basis for the Internal table name, which is the table in which Demantra will store information for each member of this level. Within this table, the member codes will be stored in a field whose name is the Name that you specified. 3. In the left box, right click the level and then click Create Description. 4. Specify the level description as follows: 1. For Table Name, select the same table. 2. In Field Name, select the field that stores the descriptions of the members of this level. If the source data does not include a specific field that you can use as the member descriptions, then just use the field that stores the member identifiers. 3. In Level Title, type the name of this level, as it should be shown in the user interfaces. 4. In Enabled Level, specify whether you want the level to be disabled. If the level is disabled, it is effectively removed from the data model. However, it can be reactivated if required later. 5. To use the internal, auto-generated ID as the code display field, click the check box Use auto generated ID as code for filter. Otherwise, Demantra uses the code field as the code display field.au Saving the Data Model After defining the minimum required data model, you can save all the work that you have done within the Data Model Wizard. You can return and continue work later.
- 285. Using the Data Model Wizard 17-13 To save the data model: 1. Click Save. 2. To exit the Data Model Wizard now, click OK. You can return later and continue your work. Defining Additional Elements This section describes how to define additional elements of the data model. Declaring the Unit Price The price per item is generally different at different locations and over time. To declare the unit price: 1. In the left box, right-click and then click Create Item Price. 2. For Table Name and Field name, select the table and field that contains the unit price for an item, at a given location and time. For example, in src_rainbow_sales, the orders field might contain the sales quantity for each sales record. 3. For Unit Title, optionally modify the title, whose default is Price. 4. For Aggregate as, select the function to use when aggregating the price of multiple items. 5. If you selected wavg (weighted average), then specify a weight to use. For Dependent Field, select a field within the same table that Demantra should use as the weights.
- 286. 17-14 Oracle Demantra Implementation Guide Defining a Unit of Measure When you define a unit, you specify a set of conversion factors for that unit. The conversion factors can be different for different items. Note: There must be a one-to-one relationship between the unit values and the members in the level where the unit is configured. To define a unit: 1. In the left box, right-click and then click Create Unit. 2. For Table Name and Field name, select the table and field that contains the conversion factor for this unit, for each item. For example, in src_rainbow_item, the pallet field might contain the conversion factor for each item. The conversion factor for a unit X should give the number of Xs per base unit. For example, for a given SKU if a pallet consists of 100 items, then src_rainbow_item.pallet should be 0.01 for that SKU. 3. For Aggregate as, select the function to use when aggregating the unit count of multiple sales. You usually use Sum. See also "Configuring Units" Adding Higher Levels Note: As you define levels, it is important to consider what sort of forecast tree you will need, as described in "Configuring the Forecast Tree"
- 287. Using the Data Model Wizard 17-15 To create a higher level: 1. Right-click the level to which you want to add a higher level. Note that any level can have multiple parent levels. 2. Click Create Relation. 3. Specify the following items: Table Name Select a source table from the drop-down list Field Name Select the field within that source table that stores the unique identifiers for members of this level. Name Specify a unique name of this level, for internal use. As before, Demantra automatically creates a name for the internal table associated with this level. 4. Create a description for this dimension. See also "Creating a Level" Adding Level Attributes You can store additional level-specific information as attributes. Any number of attributes can be added to a level. Each attribute name must be unique within a given level. To view attributes of a member, the user can right-click the member within the Members Browser of a worksheet or in the Collaborator Workbench. To create level attributes: 1. In the left box, right-click a level and select Create Attributes. 2. Complete the fields as follows: Table name Table in which attribute data is stored. This should be the source table for this level.
- 288. 17-16 Oracle Demantra Implementation Guide Field name Field in table that stores this attribute. Name Unique internal name for this attribute. Attribute Title User-friendly name for this attribute. See also Adding Attributes to a Level Defining Other Values A value can be a causal factor or a data series. To define a value: 1. In the left box, right-click and then click Create Value. 2. Select the value item, and then give the value a field name, a name, and a series title. Impacts of Changing Levels, Series, and Units This section describes the impact of adding, removing, or modifying levels, series, and units. For more information about building or updating a model, see Building the Data Model, page 17-22. Adding a Level Consultants can add a 'Parentless' level only, in other words, they can add a parent level to an existing level or new branch only. Adding mid-tier levels is not an explicitly supported scenario. Levels can be renamed accordingly to reflect the insertion of a new level between existing levels. See "Creating a New Intermediate Level". When a new level is created, the upgrade process: • Creates default methods for this level including New, Edit, Delete, View • Add this level to loading procedures • Adds a line to the upgrade log file: 'Level XXX added to model'. For more information about upgrading a model by adding parent levels, see Creating a
- 289. Using the Data Model Wizard 17-17 New Top Level, Integration Guide. Removing a Level When a level is removed, any parent levels are also removed. The upgrade script: • Adds a line to the upgrade log file: 'Level XXX removed from model' • Regarding series on a removed level: • If the upgrade mechanism leaves the series in the model, in other words, the series is not deleted, the series is listed in the log file as needing reconfiguration. The upgrade log states: Series YYY refers to level XXX. Please reconfigure. This message appears after and indented from the 'Level XXX removed from model' message. All worksheets, workflows, integration profiles, and methods referring to this series on the removed level remain intact. Any worksheet that refers to this series will open with all other data intact. The series on the removed level shows no data. • If the current upgrade mechanism deletes this series, the upgrade log states: Series YYY referred to level XXX and was deleted. This message appears after and indented from the 'Level XXX removed from model' message. References to this series on the removed level are deleted for all worksheets, workflows, integration profiles, and methods that refer to the series. • All worksheets, workflows, integration profiles, user-created methods, 'Open With' and Embedded worksheets that contain this level remain intact. Users may need to manually reconfigure these objects. For example, a worksheet may need to refer to a different level. Worksheets open for editing purposes. The level reference is replaced by the child level. For example, if we have an Item > Brand hierarchy and remove the Brand level, worksheet references to 'Brand' are replaced with references to the 'Item' level. The upgrade log lists all objects affected by removing this level. • Log entries: Worksheet ZZZ referred to level XXX. It now refers to child level YYY. Please reconfigure as necessary. Integration interface ZZZ referred to level XXX. It now refers to child level YYY. Please reconfigure as necessary.
- 290. 17-18 Oracle Demantra Implementation Guide • All methods on this level are deleted, including default methods such as 'New' and 'Edit', and user-created methods. Any underlying workflows referenced in these methods are not deleted. • Level table: • If the upgrade mechanism deletes the table for the level, the Upgrade log states: Table XXX for level YYY has been deleted. • If the current upgrade mechanism does not delete the table for the level, the Upgrade log states: Table XXX for level YYY has not been deleted. Please delete manually if not required. • If the level was referenced in the forecast tree, a user warning appears in the Upgrade log file at the end of the upgrade: Level XXX was referenced in the forecast tree. Please reconfigure forecast tree. User security references to that level are removed and logged: User/Group XXX reference to level YYY has been removed. Modifying a Level When a level is modified, the upgrade script: • When adding an attribute – loading scripts are updated to include the new attribute. An attribute column is added to the level table. The consultant or user is responsible for manually modifying the source table to include the attribute column and values. • When Deleting an attribute – loading scripts are updated to remove this attribute. An attribute column is deleted from the level table. • Table references – specify what source column the level pulls data from. This has no impact on the existing model. The loading scripts are updated to reflect the new source column. Adding a Series All series that need to be part of the loading mechanism must be defined in the data model first in order to be reflected in the loading scripts. They can then be configured more fully by the consultant or user in 'Configure Series.' Consultants can add a series to the data model. The series should be added to the loading procedure and related internal tables (sales_data, or mdp_matrix).
- 291. Using the Data Model Wizard 17-19 Removing a Series The upgrade process does not remove an existing series from tables, for example, the computed_fields, table. Upgrade only removes the series from the data model, and then removes the series from the loading procedure. Therefore, removing a series will not invalidate objects because the series is still present. However, no data will be loaded to the removed series, so it becomes meaningless over time. Removing a series from the data model accomplishes the following: • Add a message to the upgrade log: Series XXX was removed from model. Please delete this series from the series list using the 'Configure Series' option. Oracle provides a reference list of objects affected by this deletion, such as worksheets, dependent series, and integration profiles that reference the series. Providing this output allows the user to go back and manually fix issues such as server expression references. • Remove the series from the loading procedures. The series is removed from internal tables, such as sales_data, computed_fields, and mdp_matrix, when the user deletes the series using the 'Configure Series' option. Deleting the series in this way removes references to the series in worksheets, workflows, integration profiles, and rolling profiles but does not remove or invalidate these objects. Some of these objects, such as worksheets, may require user re-configuration, but the worksheets will still open. • If this series is a causal factor, display a warning message in the upgrade log: Series XXX was a causal factor. Please reconfigure causal factors. • Remove user security references to this series. • Add the log message: Series XXX is used in components A, B, C. Please reconfigure these components. Modifying a Series If a series is modified, the upgrade process does the following: • Modifications of the source field are reflected in the loading procedure. • If the series aggregation has been modified, the loading procedure is updated. The new aggregation is not updated in computed fields, in case a custom client expression was configured. • Add a log entry:
- 292. 17-20 Oracle Demantra Implementation Guide Series XXX has been modified. Please review its configuration in 'Configure Series' after completing the upgrade. Adding a Unit Adding a unit has the following impacts: • Create reference in the level table • Log message to state the need to add the Unit to the component and link the Unit to the desired level. Removing a Unit Removing a unit has the following impacts: • Remove the Unit from the model • Delete the Unit from the model and the loading procedures • Log message to state the need to delete the Unit in the Business Modeler Modifying Time Aggregation If the time aggregation is modified, this process typically occurs early in an implementation, prior to loading substantial data. Caution: Any modification to the granularity of the model , whether more granular or less granular, will clear out all data. Reset all worksheets to the new model granularity. See Setting and Modifying the Base Time Unit, page 8-11. If a time granularity is modified, the upgrade process reflects the following changes: • Modify loading procedure to respect new time aggregation • Modify inputs table to respect new time buckets • Add log message: Time aggregation has changed. Please review all worksheets and modify time definitions appropriately. • Set Integration profiles and worksheets to new model granularity, and leave start and end date time range as is.
- 293. Using the Data Model Wizard 17-21 Note: Consultant needs to review and re-configure worksheets, workflows, and integration profiles to fully respect the new granularity. The default settings are intended to ensure the worksheets open after the upgrade. Modifying the First Day of Week If the First Day of Week is modified, this process typically occurs early in an implementation, prior to loading substantial data. Caution: Any modification to the First Day of the Week for a model will clear out all data. • Loading procedures change to reflect new start of week • Inputs table changes to reflect new start of week • Leave start and end dates of the worksheet and integration profiles. Note: The default settings are intended to ensure the worksheets open after the upgrade. Moving Weekly Bucket Aggregation Forward or Backward • Loading process changes to reflect new start of week • Change parameter in sys_params table • Data in the database is not cleared. Navigating the Data Model To navigate the data model: 1. Right-click the white background and then select one of the following options: Expand All Open the branches of a data model structure.
- 294. 17-22 Oracle Demantra Implementation Guide Collapse All Collapse the branches of data model structure to its root level. Refresh Tree Update the tree display, with changes since previous refresh. See also "Configuring Levels" Building the Data Model In the Finish Wizard dialog box, you build (or upgrade) the model itself. Here the Data Model Wizard creates all the internal structures that it needs for the data model you have specified. To build the data model: 1. To Remove Illegal Characters, click Yes to check the source data and remove unwanted characters. 2. Click Finish or click Build Model. If you click Finish, the Data Model Wizard closes. If you click Build Model, the Build/Upgrade dialog box appears. 3. Now you can select whether to completely replace the existing data model or just modify it:
- 295. Using the Data Model Wizard 17-23 • If you want to completely replace the existing data model, select one of the following options: Replace Series Click this to completely replace the existing series definitions. Keep Series Click this if you do not want to make any changes to the existing series. This option is suitable if you are in the process of working on the data model but do not want to spend the time updating the series definitions right now. Caution: In either case, any previously existing levels are completely removed, and the new levels are initialized. • Alternatively, if you are just modifying an existing data model, select Upgrade Existing Model. In this case, if you have made changes to the base time unit, select Run Time Bucket. Upgrade Model does not modify the source tables in any way. Any additions, modifications and deletions to these tables would be done manually by consultants. Any level extensions that must be reflected in the loading procedures are managed by the Data Model. Changes made in Series and Level configuration screens are not supported or synchronized. Note: There should be no conflicts with the data model definitions (file structures, file locations, and so on). Make sure that the customer's files include all the series and levels that you have configured. If there are series or levels that appear in the Business Modeler but that are not included in the components structure, a warning will recommend that you manually remove these objects. A log file is created with a list of the objects. Otherwise, the system will automatically identify the series and levels of the selected components and truncate (make empty) the objects that do not participate in the selected components. Only then can the Upgrade Model work. 4. Click OK. The process of building the data model begins. This may take a few minutes.
- 296. 17-24 Oracle Demantra Implementation Guide Business Modeler also creates the file load_data.bat. See Loading the Data into the Data Model, page 17-24. Loading the Data into the Data Model After completing the data model, you must load the data into it. To load the data: 1. Run the file load_data.bat, which is in the Demantra/Desktop directory. When the file is run, the script imports data from the source files into the staging area, and from there into the Demantra data model. The load_data.bat file contains several procedures to help you to load data into the data model. The prepare_data procedure is empty by default, and can be edited to carry out procedures which precede the data loading Caution: This should only be carried out by an experienced consultant. It is not recommended to edit the other procedures. To check for errors: 1. After loading the files, check the following files for error messages: • For a single source table (Item+Location+Sales): SRC_sales_err • For two source tables (Item, Location + Sales): SRC_loc_err • For three source tables (Item, Location, Sales): SRC_item_err Manipulating Existing Data Models To open an existing data model or template: 1. Click Data Model > Open Data Model. The Open Existing Data Model/Template screen appears. 2. Select Data Model or Template. 3. Select the button corresponding to the data model or template you want to modify and click OK. The Start Wizard window appears. See "Getting Started with the Data Model Wizard".
- 297. Using the Data Model Wizard 17-25 To save a data model or template under a different name: 1. Click Save As (on the Data Model/Template window). The Save As dialog box appears. 2. Type in the name of the data model or template. 3. Type in an optional description. 4. Click OK. To delete a data model or template: 1. Select the Data Model/Template button. 2. Click Delete. A warning window appears. 3. Click Yes to confirm the action. To import or export a data model or template: The import and export functions enable you to store a data model or template and share it with other users. Data models and templates are saved as database files with the suffix .dmw. 1. Select the Data Model/Template radio button. 2. Click Export. A database file is saved in the current directory. To import a data model or template: 1. Click Import. A browser window appears. 2. Navigate to the required .dmw file, and then click OK.
- 299. Configuring Levels 18-1 18 Configuring Levels This chapter describes how to configure levels with the Configure > Levels option. This chapter covers the following topics: • Before Configuring Levels • Creating a Level • Filtering a Level • Configuring an Existing Level • Adding Attributes to a Level • Dropdown Security • Filtering an Attribute Drop-down List • Specifying Default Parents for a New Member • Adding a Population Attribute to a General Level • Creating a time aggregation • Examples of General Level Data Preservation • Viewing the Members of a Level • Removing Levels Before Configuring Levels Before you use Configure > Levels option, be sure to do the following: • Read the "Levels" Chapter and make sure you understand the basic data requirements of Demantra. • If you are using Promotion Effectiveness, DSM, or Promotion Optimization, use the Demantra database procedures to set up an initial set of levels for those products; see "Configuring Promotion Effectiveness", "Configuring DSM", and "Configuring
- 300. 18-2 Oracle Demantra Implementation Guide Promotion Optimization for PTP". • Load some sample data for items, locations, and sales, by using the batch script created by the Data Model Wizard. Make sure that this data contains all the codes needed to define the desired item and location levels. • Carefully plan the levels you will configure. • Use the Data Model Wizard as much as possible before using Configure > Levels. Creating a Level To create a new level: 1. Click Configuration > Configure Levels. Or click the Configure Levels button. The system displays a screen showing the levels. The disabled levels are indicated by an X symbol. 2. Right-click the level button and then select New. The first screen is General Properties. 3. Complete the fields in this screen as follows: Title Level name. Type Type of level. Note that Product is an item level. Child Level Select the level that should be the child of the one you are creating. Create as attribute Check this if you want to create a lookup level attribute for the child level of the current level. For example: the current level is level B that has a child level A. In this case, if you check Create as attribute, the wizard will create a lookup level attribute for level A. This field is disabled at the lowest level. 4. If you are creating a general level, the following fields are also required:
- 301. Configuring Levels 18-3 Icon Path Path and filename for the GIF file that contains a graphic to represent this level in the desktop user interfaces. The path must be relative to the Demand PlannerDesktop directory, for example: bitmaps/location.bmp Icon URL Web address for the GIF file that contains a graphic to represent this level in the Web-based user interfaces. Indicator URL Web address for the GIF file that contains an indicator for this level. This option applies only to general levels that have no children. Worksheet tables use this graphic to indicate the combinations and times with which a member of this level is associated. Note: For other kinds of levels, Demantra has default icons. 5. Click Next. The Data Properties screen appears. 6. In Table Name, specify the name of the table in which Demantra should store information related to this level. As soon as you enter this name, Business Modeler automatically populates the following four fields.
- 302. 18-4 Oracle Demantra Implementation Guide Key Field Primary key of the table you have just created. Code Display Field Field containing the code display label for level members, as displayed in the filter window in the worksheet designer. This field accepts string values. Typically, you use one of the following: Field that stores the auto-generated ID for this level (same value as used in the Key Field) Field that stores the code for this level (same value used in the Code Field) Field that stores the description for this level (same value used in the Description Field). Description Field Field containing the description or pretty name for level members, as displayed in worksheets. Code Field Field containing the code for the level members. 7. If the level is to be unlinked, click Unlinked Level. Unlinked levels are used only for a special kind of series aggregation within worksheets. 8. Click Next. The General Attributes screen appears. If needed, add attributes as described in " Adding Attributes to a Level". 9. Click Next. The Defaults screen appears. If needed, specify the default parents of any manually created member of this level. See "Specifying Default Parents for a New Member". Filtering a Level Most levels span all the sales data; any sales record is associated with exactly one member of each level. You can, however, create filtered levels. A filtered level contains a filtered subset of the sales data.
- 303. Configuring Levels 18-5 To create a filtered level, you add an SQL WHERE clause to filter the data. You can also join the underlying data to another table of your choice. Each level internally has an SQL query. Normally this query can refer only to fields in the following tables: Level type Table where code field is found Item Items Location Location Combination mdp_matrix Time Inputs Specifying the "Extra From" Field for a Level In rare cases, you may need to refer to data in other tables. In such a case, use the Extra From field. In this field, specify an optional list of additional tables (separated by commas) that contain data relevant to this level. Specifying the "Extra Join" Field for a Level If you need to filter the level, use the Extra Join field. Internally, the Extra Join field is added to the WHERE clause in the SQL query that retrieves data for this level. The syntax of this field is as follows: table.column operator other_table.other_column Where, operator is a comparison operator that is one of the following: = <> > >= < <= And table.column and other_table.other_column are key columns in the database.
- 304. 18-6 Oracle Demantra Implementation Guide Configuring an Existing Level To configure an existing level: 1. Click Configuration > Configure Levels. Or click the Configure Levels button. The system displays a screen showing the levels. The disabled levels are indicated by an X symbol. 2. Double-click the level or right-click the level and then select Open > General Properties. The General Properties screen appears. 3. Make edits as needed to the following fields: Title Level name. Icon Path Path and filename for the GIF file that contains a graphic to represent this level in the desktop user interfaces. The path must be relative to the Demand PlannerDesktop directory, for example: bitmaps/location.bmp
- 305. Configuring Levels 18-7 Icon URL Web address for the GIF file that contains a graphic to represent this level in the Web-based user interfaces. Indicator URL Web address for the GIF file that contains an indicator for this level. This option applies only to general levels that have no children. Worksheet tables use this graphic to indicate the combinations and times with which a member of this level is associated. Status Level status: Enabled or Disabled. Determines if the level is available to end users. Create as attribute Check this if you want to create a lookup level attribute for the child level of the current level. For example: the current level is level B that has a child level A. In this case, if you check Create as attribute, the wizard will create a lookup level attribute for level A. The new level is added immediately. This option is disabled at the lowest level. Order This number determines where this level will be listed in filter and selection windows. (The lower the number, the closer the level appears to the top.)
- 306. 18-8 Oracle Demantra Implementation Guide Hint Message Add or modify a message for the level. Demantra will display this message when the pointer hovers in the Members Browser in a worksheet, as follows: Display Width on Worksheet Table Axis Specify the default display width for this level when this level is included in a worksheet table. Is Analytical Applies only to general levels. Check this if you are creating a general level for use with Promotion Effectiveness. Enable this option only at the lowest level in the promotions hierarchy; Demantra can contain only one analytical level. 4. Click Next. The Data Properties screen appears. 5. Make edits as needed to the following fields: Code Display Field Field containing the code display label to use in filters. Typically, you use one of the following: • Field that stores the autogenerated ID for this level (the value given in the Key Field) • Field that stores the code for this level (the value given in the Code Field) • Field that stores the description for this level (the value given in the Description Field). Extra From See "Specifying Extra From for a Level".
- 307. Configuring Levels 18-9 Extra Join See "Specifying Extra Where (Extra Join) for a Level". Unlinked Level Select if the level is to be unlinked. Unlinked levels are used only for a special kind of series aggregation, not documented here. 6. Click Next. The General Attributes screen appears. If needed, add attributes as described in "To add a new attribute to a level". 7. Click Finish. Or, if you are configuring a general level, click Next. The Population Attributes screen appears; see "Adding a Population Attribute to a General Level". Adding Attributes to a Level Attributes provide additional information about a level. When you add an attribute to a level, Demantra automatically adds a new column to the internal table that it uses for that level. To view attributes of a member, the user can right-click the member within the Members Browser of a worksheet. To add a new attribute to a level: 1. Click Configuration > Configure Levels. Or click the Configure Levels button. Business Modeler displays the Configure Levels screen. 2. Right-click the level and select Open > General Attributes. Business Modeler displays the attributes associated with this level.
- 308. 18-10 Oracle Demantra Implementation Guide 3. Right-click the empty space in the Attribute Name list and then select Add. A new row is added to the list. 4. In Attribute Name, enter the name for the attribute. 5. Specify the following general information for the attribute Column Name When you enter an attribute name, Business Modeler automatically generates a name to use for the column that it will add to the level table. You can enter a different column name, up to 30 characters long. The column name cannot include spaces. If you create a method on this level, this column name also serves as the name of a variable that can be passed to the method. Column Type Select the data type of this attribute from the drop-down list.
- 309. Configuring Levels 18-11 Default Value Specify the default value for this attribute, to be used when users manually create a new member of this level. If you click Create as level, do not use this setting, because it is ignored. Instead, see "Specifying Default Parents for a New Member ". Column Format Select the display format for this attribute from the drop-down list. Create as level Check this box if you want Business Modeler to automatically create a parent level that uses this attribute to distinguish different members. (The new level is added immediately.) Paste attribute values Check this box if you want Demantra to copy and paste the value of this attribute when a user copies and pastes and level member. 6. If this attribute should have a drop-down list, then do the following: • Select one of the following options for Lookup Type: • Select Table if the attribute values are in a table. • Select Level if the attribute values are members of a level. • If you selected Table, then complete values for this attribute as follows: Table Name Select a table containing the reference values from the drop-down list. Display Column Select the column that has the user-friendly attribute descriptions. Data Column Select the column that has the corresponding numeric code values for the attribute. • If you selected Level, then for Level Name, select the level that contains the attribute values. • For either Table or Level, optionally specify additional criteria to control the drop-down list
- 310. 18-12 Oracle Demantra Implementation Guide Extra From Comma-separated list of additional tables to include in the query that retrieves the drop-down list. See "Using Extra From for an Attribute" Extra Where True/false SQL expression that filters this list further. See "Using Extra Where for an Attribute". • If you selected "Level," the fields "Security" and "Minimum Privilege displayed" will become enabled. To configure these, refer to the section "Dropdown Security" at the end of this procedure. 7. Click Next. The Defaults screen appears. If needed, specify the default parents of any manually created member of this level. See "Specifying Default Parents for a New Member". To delete an attribute from a level: 1. In the Attribute Name list, right-click the attribute. 2. Click Delete. See also "Before Configuring Levels" Dropdown Security The fields "Security" and "Minimum Privilege Displayed" are enabled when Lookup Type is set to Level, or when Lookup Type is set to Table and the specified Table Name is a level table. Examples of level tables include Location, Items, Promotion, and Settlement. These control which level members a worksheet will be able to access. If the lookup type is set as 'Table' but the table name is a level table, as listed in GTABLE column of GROUP_TABLES, security will be applied as though the lookup was on a Level. Security This dropdown has the following four options: None (default) Dropdown security is turned off.
- 311. Configuring Levels 18-13 Direct Security will be respected on the level being looked up and its direct parent level. If security has been defined explicitly on the level (for example, Site) a user will see those Sites to which they have access. If security has been defined on the immediate parent (for example, Account), the user will see only those Sites they have access to, as inherited through Account restrictions. Uni-Dimensional Security will be respected within the complete dimensional hierarchy of the level being looked up—both the direct parent hierarchy and indirect sibling hierarchies within the single dimension (item, location or GL). For example, if security has been defined on the 'Customer' level and a Lookup is created on the 'Site' level, a user would be restricted to seeing only those Sites for which they have access, as inferred from 'Customer' security. Cross-dimensional Security will be inherited across hierarchies via matrix relationships. For example, if security has been defined on the 'Region' level and a dropdown is created to lookup on 'Item' level in the Item hierarchy, the user will be restricted to only those products selling into the Regions they have access to, as determined through mdp_matrix. Minimum Privilege Displayed When security is enabled (all but 'None' option), only those level members for which the user has Full Control or Read & Write access will be visible in the dropdown by default. If a user has no visibility or read-only visibility to a member, they will not be able to select that member as part of their planning process, particularly for hierarchical objects such as Accounts or Product Category. However, in some instances a member may be secured as Read Only but accessible. For example, Promotion Type. The user will be unable to change the value, but should be able to select it when planning a promotion. This access is controlled by the Minimum Privilege Displayed parameter, which has the following three options:
- 312. 18-14 Oracle Demantra Implementation Guide Read Only User can view all members of this level but cannot select or modify them. Read & Write (default) User can view, select, and edit members of this level but cannot delete members. Full Control User can view, select, edit, and delete members of this level. Filtering an Attribute Drop-down List Sometimes it is useful to filter the drop-down list of an attribute, and to filter this list in a context-specific way. For example, the value of one attribute sometimes should restrict the list of choices for another attribute. Demantra provides options to enable you to filter the drop-down list. Note: The MaxAvailableFilterMembers parameter specifies the maximum number of entries that a filtered drop-down list can display. Using Extra From for an Attribute For a drop-down attribute, the values are taken either from a table or from a level (which of course is also in a table). You can provide a comma-separated list of other tables that should be included in the query that returns the drop-down list. Using Extra Where for an Attribute For a drop-down attribute, you can specify a SQL expression that filters the drop-down list. The syntax of this expression is generally as follows: • table.column operator other_table.other_column Here operator is a comparison operator, one of the following: • = <> > >= < <= And table.column and other_table.other_column are key columns in the database. A user sees the drop-down list for an attribute within the member properties window
- 313. Configuring Levels 18-15 (right-click > Edit) of the Web client. Your Extra Where clause may need to refer to the value of an attribute (or population attribute) that is present in that window. To do so, you can include either of the following syntax elements in your Extra Where clause: #att.null-warning.attribute-name# #pop.null-warning.attribute-name.level-name# Here: att or pop Indicates the type of attribute that you are referring to: • pop (indicates a population attribute) • att (indicates a regular attribute) null-warning Indicates what to do if the attribute has a null value. Use one of the following keywords: • oknull (a null value is permitted for the attribute; the Extra Where clause will not throw an error) • nonull (if the attribute has a null value, do not execute the SQL of the Extra Where clause) Set this appropriately so that users do not see an error. attribute-name Name of the attribute to consider. Specifically: • For a population attribute, this should be the ATTRIBUTE_LABEL value in the GROUP_ATTRIBUTES_POPULATION table. • For a regular attribute, this should be the ATTRIBUTE_LABEL value in the GROUP_ATTRIBUTES table. level-name Name of the level (from the population attribute) whose member IDs will be accessed in this expression. For example, the syntax #pop.oknull.population.Selling Entity# refers to the Selling Entity member of a population attribute. Specifying Default Parents for a New Member When a user manually creates a new member of a given level, the user must specify the parents of that member. You can optionally specify the default parent members to be used in this case.
- 314. 18-16 Oracle Demantra Implementation Guide For each level, Demantra provides a predefined default member, which is initially named Default level name. You can choose whether to display this member and you can rename it. This predefined default member is not normally associated with any data, however. If you have data loaded in the system, you can instead choose an existing member to use as the default member. So, for example, you could use any of the following as the default member of the Brand level: • The predefined default member: Default Brand • The predefined default member, renamed by you: Unspecified Brand • An existing member: Acme Remember that a given level can have multiple parent levels. This means that you can specify a default within each of those parent levels. For example, in the demo, the Promotion level has three parents: Promotion Status, Promotion Type, and Scenario. When a user creates a new promotion, you may want the user to have a default value for each of these. To specify default parents: 1. Click Configuration > Configure Levels. Or click the Configure Levels button. Business Modeler displays the Configure Levels screen. 2. Right-click the level and select Open > Defaults. Business Modeler displays information about the parents of this level. For example, if you view the defaults for the Promotion level (in the demo), you will see the following:
- 315. Configuring Levels 18-17 3. For each parent level of this level, optionally do the following: • Select the parent level from Default Parent Level. The Default Member area then lists all the members of this parent level. • To indicate which member should be the default parent within this level, select
- 316. 18-18 Oracle Demantra Implementation Guide the check box next to that member. • If you are not using the predefined default member (shown in blue) as the default, you might want to hide this member. To do so, select Hide Predefined Default. • To rename the predefined default member, type a new name in Rename Predefined Default To and then click Update. You cannot rename this member if you have chosen to hide it. • When you are done specifying the default for this parent level, select another parent level from Default Parent Level, and then repeat the preceding steps. Adding a Population Attribute to a General Level A general level can have population attributes in addition to general attributes. A population attribute specifies a set of item-location combinations and consecutive time buckets with which the general level is associated. Note: General levels are not supported in Demand Planner and Demand Replenisher. To add a population attribute to a general level: 1. Click Configuration > Configure Levels. Or click the Configure Levels button. Business Modeler displays the Configure Levels screen. 2. Right-click a general level and select Open > Population Attributes. Business Modeler displays the population attributes associated with this level. 3. Right-click the Attribute Name list and then select Add. A new row is added to the list. 4. In Attribute Name, enter the name for the attribute. As soon as you move the cursor out of this field, the Business Modeler automatically generates names for the tables associated with this level. 5. If you want the attribute to be visible, select the Visible check box. If an attribute is visible, its properties are available for editing by the user in Demantra. It is recommended that an attribute be configured as non-visible when you do not wish the user to have the ability to edit the attributes. If the attribute is non-visible, it can be edited only in the database.
- 317. Configuring Levels 18-19 6. On the right side of the screen, complete the fields as follows: Population Type Select Searchable or Descriptive. A general level can have only one searchable population attribute and any number of descriptive population attributes. If a population attribute is searchable, then each member of the general level is directly linked with the associated item-location combinations and time buckets. Internally, Demantra automatically joins the data for use by the Analytical Engine. If a population attribute is descriptive, it is available to the users but is not available to the Analytical Engine. Indicator Specifies whether the cells in a worksheet table should display an indicator if a general level is associated with them. It is useful to enable this indicator for the benefit of users of the worksheet. This option is enabled only for the searchable population attribute.
- 318. 18-20 Oracle Demantra Implementation Guide Data Preservation Controls whether the selected General Level (GL) member's dates are preserved when either the member's 'from' and 'until' dates change, or the member's population changes. It also controls whether the series-level settings 'Copy/Paste Preservation Type' and 'Move Preservation Type' are respected when a member's dates or population changes. Note: This parameter is available only if the Population Type setting for the selected GL level is "Searchable" and the selected level has a Data table. Values include: • Disable: The GL member's data will not be shifted and the "preservation type" settings will be ignored (equivalent to setting Preservation Type to 'Do Nothing'). This is the default setting for all General Levels except 'Promotion'. • Enable for Manual Edit Only: Preservation Type settings are respected when the member's "from" and "until" date or population is changed by a manual edit in the worksheet, by Copy/Paste, or by Refresh Population. • Enable for Manual Edit and Integration: Preservation Type settings are respected when the member's "from" and "until" date or population is changed either by a manual edit in the worksheet, by Copy/Paste, by Refresh Population, or by data integration. This is the default setting for the Promotion level. For examples, see Examples of General Level Data Preservation. 7. When you are done adding population attributes, click Finish. Or, if you are configuring a general level at the lowest level, click Next. See " Configuring the Activity Browser".
- 319. Configuring Levels 18-21 To delete a population attribute from a general level: 1. In the Attribute Name list, right-click the attribute and then select Delete. See also "Before Configuring Levels" Creating a time aggregation A time aggregation aggregates data by time, and time aggregations are often used for custom calendars. Your solution can use time aggregations, custom time units, or a combination of both. Use the following guidelines to determine which you need: Names Uses in worksheet time aggregation Each member can have a user-friendly name that you create. You can use a time aggregation like any other level, such as placing it on a worksheet axis. time unit Each time bucket in the worksheet is automatically labeled with the start date of that bucket. You can use time units only on the x-axis (the time axis) of the worksheet. To create a time aggregation: 1. Within the database, either add either a column to the Inputs table or add an entire table to store the data. 2. Follow the procedure in "Creating a Level". Note: time aggregations are supported only in the Web products. For the equivalent functionality in the desktop products, create a group expression; see "Configuring Desktop Group Expressions". See also • "Configuring Time Units" Sorting the time aggregation: time aggregations are populated such that an alphabetical sort on code generates a chronological result in the description. In other words, instead of an alphabetical result:
- 320. 18-22 Oracle Demantra Implementation Guide April, August, December, February, March, and so on; the result is January, February, March, April, and so on. Please populate the code appropriately to generate the desired sort. The sort is controlled by an associated code, for example: Code Description 1 JAN-01 2 FEB-01 3 MAR-01 and so on . . . Examples of General Level Data Preservation A member's date or population may change when: • Reloading a member via an integration interface • Editing a member in a Worksheet • Copy/pasting a member • Running the "Refresh Population" method Following are a few examples: • Member's date range shifts: Old range = 10 weeks in 2011. New range = 10 weeks in 2012. • Member's date duration changes: Old duration = Brand A, 10 weeks in 2011. New duration = Brand A, 15 weeks in 2011 • Member's population changes: Old population = Brand A, 10 weeks in 2011. New population = Brand B, 10 weeks in 2011. Viewing the Members of a Level You can view the members of any level.
- 321. Configuring Levels 18-23 To view the members of a level: 1. Click Configuration > Configure Levels. Or click the Configure Levels button. 2. Right-click the level and select Level's Members. Business Modeler displays a screen like the following: Each row shows the code display field and description for one member of this level. The column headers show the name of the table fields that store these two labels. The same data is displayed in the standard filter user interface in Demand Management and other Demantra products. Removing Levels You can disable a level, removing it from visibility in the user interfaces. You can also delete levels. To disable a level: 1. Click Configuration > Configure Levels. Or click the Configure Levels button. The system displays a screen showing the levels. The disabled levels are indicated by an X symbol. 2. Double-click the level or right-click the level and then select Open > General Properties. The General Properties screen appears.
- 322. 18-24 Oracle Demantra Implementation Guide 3. Change the Status field to Disabled. 4. Click Next repeatedly until the Finish button is no longer grayed out. 5. Click Finish. You can enable the level later in much the same way. To delete a level: 1. Click Configuration > Configure Levels. Or click the Configure Levels button. The system displays a screen showing the levels. 2. Right-click the general level and then select Delete. This task applies to the Business Modeler. See "Logging onto the Business Modeler".
- 323. Configuring Series and Series Groups 19-1 19 Configuring Series and Series Groups This chapter describes how to configure series and series groups. This chapter covers the following topics: • Before Configuring Series • Creating a Series • Creating a New Series Based on an Existing Series • Specifying General Properties of a Series • Specifying How to Display a Series • Configuring a Dropdown-Style Series • Filtering a Series Drop-down List • Specifying Data Properties of a Series • Using the Expression Editors • Syntax of Server Expressions • Syntax of Client Expressions • Specifying Server and Client Expressions • Creating an Edit-Lock Expression • Creating a Color Expression • Controlling Access to Series • Configuring Desktop Group Expressions • Deleting a Series • Enabling Series Caching By Item • Specifying the Order of Series in Dynamic Open Link • Creating or Modifying a Series Group • Deleting a Series Group
- 324. 19-2 Oracle Demantra Implementation Guide • Viewing Dependencies Among Series • Creating a Series that Displays as a Link • Display Series as a Link • Configuring New Product Launches Before Configuring Series Before you use Configure > Series option, be sure to do the following: • Read the "Series" Chapter and make sure you understand how series are calculated and stored. • Load some sample data for items, locations, and sales, by using the batch script created by the Data Model Wizard. • If you are using DSM, use the Demantra database procedures to set up an initial set of series for that product; see "Configuring DSM". Creating a Series The following procedure describes the minimal set of steps needed to create a new series. To create a series: 1. Click Configuration > Configure Series or click the Configure Series button. 2. Click the New button. The series editor displays the General Properties screen, with a new series that has a default name and internal name. 3. Edit the Series name field as needed. This should be a user-friendly name, because it is displayed in the components. Series names are often included in client expressions and names that contain special characters may prevent the expression from functioning as intended. For a list of characters that should not be used when naming a series, see Naming Series, page 7-5. 4. Edit the Internal Name field as needed. Use a name that is easy to remember. The internal name cannot have spaces or special characters. Note: Business Modeler uses this name as the name of the column in which it stores the series data. When you create server
- 325. Configuring Series and Series Groups 19-3 expressions, you refer to those column names. 5. Click Next repeatedly until the Data Properties screen appears. 6. In the Data Table field, select the table in which data for this series should be stored, if you choose to store the data. The choice depends on how you want to use the series, as follows: sales_data Use for data that varies by item, location, and time. In this case, you are creating a sales series. mdp_matrix Use for data that varies by item and location, but does not vary by time. In this case, you are creating a combination or matrix series. promotion Use for data that varies by item, location, promotion ID, and time. In this case, you are creating a promotion series, which is supported only in Promotion Effectiveness. (Note that the series is added to the promotion_data table, rather than the Promotion table as stated in the Business Modeler.) Level name Use for data associated with a specific level; all levels that you have defined are listed here; see "Configuring Levels". In this case, you are creating a level series. Caution: If you change the selection in the Data Table field, Business Modeler automatically removes the existing data from the table where it had been originally stored. Business Modeler then creates a new, empty column in the newly selected table. 7. What happens next depends on the table you chose. • If you selected sales_data, mdp_matrix, or promotion, Business Modeler asks you to confirm whether you want to create this series within that table. If you want to store this series directly in the database, click Yes. Business Modeler automatically populates Update Field with the value you used for the internal name. Otherwise, click No.
- 326. 19-4 Oracle Demantra Implementation Guide • If you selected the name of a level, then in Update Field, select the field that you want to use as this series. Note: If you are familiar with database terminology, note that this option determines the primary key of the series. 8. At this point, you have entered enough information to save your work. About the series editor The series editor consists of a set of screens with different purposes. To move from screen to screen, click Next and Previous. Screen Purpose For details, see... General Properties Specify the series name and other basic information. "Specifying General Properties of a Series". Display Properties Specify how to display this series in tables and graphs; also specify numeric precision of series (number of decimal places). "Specifying How to Display a Series". Drop-down Properties Optionally configure the series elements as drop-down lists. "Configuring a Dropdown-Style Series". Data Properties Specify how this series will be stored in the database. "Specifying Data Properties of a Series". Expressions Properties Specify either a server expression, a client expression, or both, that calculate values for this series. "Specifying Server and Client Expressions". Optionally specify special-purpose expressions. "Creating an Edit-Lock Expression" "Creating a Color Expression" . Security Specify which users can access this series "Controlling Access to Series " .
- 327. Configuring Series and Series Groups 19-5 Creating a New Series Based on an Existing Series You can easily create a new series that has most of the properties of an existing series. This is useful when you need to define multiple series to use for multiple forecast versions or for use in rolling data sessions. To create a series based on an existing series: 1. Click Configuration > Configure Series or click the Configure Series button. 2. Right-click the series and click Create As. Business Modeler prompts you for the name and internal name of the new series. 3. For Series Name, specify a user-friendly name. This name is displayed in the worksheets. 4. For Internal Name, specify a unique name that has no spaces or special characters. 5. Click OK. • A new series is created, with everything copied from the original series, except for Update Field, on the Data Properties screen. 6. In the series list on the left side of the screen, right-click the series and then select Open > Data Properties. 7. For Update Field, select the field in which you want to store this series, if any. See also • "Creating a Series" "Configuring Rolling Data" Specifying General Properties of a Series To edit general properties of a series: 1. Click Configuration > Configure Series or click the Configure Series button. 2. Right-click a series and then select Open > General Properties.
- 328. 19-6 Oracle Demantra Implementation Guide 3. Specify the following information about the series: Series Name User-friendly name for the series. This is displayed in the worksheets and is used as a reference when configuring spreadsheet expressions. Internal Name Internal name that Demantra uses to refer to the series. Important: By default, Business Modeler uses this name as the name of the column in which it stores the series data. When you create server expressions, you refer to those column names. Show as Default in New Query Check if you want this series to appear by default as an option for a new worksheet.
- 329. Configuring Series and Series Groups 19-7 Period Association Select one of the following choices, to specify the time periods during which the series can be edited, if at all: History Forecast History and Forecast For an editable series: If the series is configured as history, then it is editable only in the current time bucket and previous time buckets. If the series is configured as forecast, then it is editable only in the current time bucket and future time buckets. If an edit-lock expression has been applied to this series, that can further restrict editing. See "Creating an Edit-Lock Expression" . Editable Specify whether the series will be editable. If the series has a client expression, it must be read-only. Hint Message Short description of the series and its purpose. Demantra will display this message when the pointer hovers over a series name in a worksheet table. You can include the token #FDATE@<Version># to refer to the date on which a forecast version was generated. This is particularly useful if the server expression refers to multiple forecast versions. Aggregated by Unlinked Level Optionally specifies an unlinked level that aggregates data for this series when displayed in a worksheet that contains that unlinked level. An unlinked level is a level that is flagged for use in this way.
- 330. 19-8 Oracle Demantra Implementation Guide Specifying How to Display a Series To specify the display properties: 1. Click Configuration > Configure Series or click the Configure Series button. 2. Right-click a series and then select Open > Display Properties. 3. Specify the following information about the series: Display Type Specify where the series will be displayed in worksheets: Table and Graph Table only Graph only Color Colors to use in the graph, both online and printed. Style Styles to use for lines in the graph, both online and printed. Symbol Symbols to use for data points in the graph, both online and printed.
- 331. Configuring Series and Series Groups 19-9 Display Format Format in which the series will be displayed in worksheet tables. This can be configured for commas, percentage sign, decimal point and so on. For example, ##,###.## and ##.##% Select a format and modify it if necessary. For example, you can more decimal places to the series by adding pound signs (#) after the decimal. For information on the date formats, see "Display Formats for Dates)" . 4. For Summary Function, specify how to summarize data for this series within the Summary row in any worksheet table that includes this series. Note: The Summary Function is used in all rows of the worksheet table if a level is hidden in the worksheet view. Choose a function, specify a client expression, or select the No Summary option: Function • Total gives the numeric total of the non-null series entries that worksheet currently displays. (If all entries are null, the total is given as 0.) • Average gives the numeric average of the non-null series entries that worksheet currently displays. (If all entries are null, the average is given as 0.) • Count gives the number of series entries that worksheet currently displays, including any null entries. • Min gives the smallest of the non-null entries. • Max gives the largest of the non-null entries. • Common gives the most common non-null entry. If multiple values appear the most times, an arbitrary one of them is displayed. • Uncommon gives the least common non-null entry. If multiple values are the least common, an arbitrary one of them is displayed. • Latest gives the last non-null entry in the column. Client Expression If you enter a client expression, that expression calculates the summary for this series. To enter a client expression, click the Client Expression option and then click the ellipses (...) button. The system displays a dialog box where you can create a client expression; see "Using the Expression Editors".
- 332. 19-10 Oracle Demantra Implementation Guide Note: If you use a client expression, the series is supported only in Web-based products, not in the desktop. You can also create a weighted average. To do so, enter an expression in the sum_func column in the computed_fields table in the database. For example, to create a weighted sum for two series called batch_for and final_for, use the following expression in the sum_func column: sum(cbatch_for for all) * sum(cfinal_for for all) Note: The series names are given the prefix c. Also note that "for" and "all" are protected names. No Summary No Summary gives a null value. 5. Specify the width of the columns in which to display this series in worksheet tables: DP Series Width Width of the column in the desktop. Each increment of 25 can display approximately one character, depending on the formatting. If the field width is 250, it can display about 9 characters. DP Web Series Width Width of the column in the Web-based products. Each increment of 2 can display approximately one character, depending on the formatting. If the field width is 25, it can display about 11 characters. See "Series Widths on the Web". Series Widths on the Web For Web worksheets, the following table provides common useful settings for DP Web Series Width:
- 333. Configuring Series and Series Groups 19-11 DP Web Series Width Sample Data of Maximum Displayable Width 5 $ 99 -$ 99 99% -99% 6 $0.99 $123 ($123) -$123 7 $99.99 -$99.99 8 $ 999.00 9 $99,999.00 10/10/2005 10 $ 999,999.00 11 $ 9,999,999.00 You should also consider the width needed to display the series title. Display Formats for Dates For a series that contains date values, you can use any of the following display formats. The date used in the examples is 28 January 1971. Format Example Name of format MM/dd/yyyy 01/28/1971 American slash MM/dd/yy 01/28/71 American slash 2-digit year
- 334. 19-12 Oracle Demantra Implementation Guide Format Example Name of format MM-dd-yyyy 01-28-1971 American dash MM-dd-yy 01-28-1971 American dash 2-digit year dd.MM.yyyy 28.01.1971 European dot dd.MM.yy 28.01.71 European dot 2-digit year dd/MM/yyyy 28/01/1971 European slash dd/MM/yy 28/01/71 European slash 2-digit year E, MMM. dd yyyy Thu, Jan. 28 1971 American text long E MM/dd/yyyy Thu 01/28/1971 American number slash long E MM-dd-yyyy Thu 01-28-1971 American number dash long E dd/MM/yyyy Thu 28/01/1971 European number slash long E dd.MM.yyyy Thu 28.01.1971 European number dot long Configuring a Dropdown-Style Series You can configure the elements in a series as drop-down lists. When a user includes the series in a worksheet, he or she can set the value of a series element by selecting from the list, if the series is editable. To specify a series as a dropdown-style series: 1. If you have not yet created the table or level that you want to use for series values, create the table or level. (A level is stored as a table, of course.) To create a table, use a database tool or an SQL script. For information on creating a level, see "Configuring Levels". 2. Click Configuration > Configure Series or click the Configure Series button. 3. Right-click a series and then select Open > Dropdown Properties.
- 335. Configuring Series and Series Groups 19-13 4. Specify the dropdown style, one of the following: List Use this option if the list of choices is not available in the database as a level or as a regular table. Table Use this option if the database includes a table that contains the choices you want to present in the user interface. Level Use this option if the database includes a level that contains the choices you want to present in the user interface. All three styles look the same to end users. 5. If you specified list style, click the Edit Dropdown List button. Then specify the list elements as follows: 1. Click Add. 2. For Code, type a numeric value. This is an actual possible value of the series. 3. For Description, type the string value to display when the corresponding
- 336. 19-14 Oracle Demantra Implementation Guide numeric code is selected. 4. Repeat as needed. When you are done, click OK. 6. If you specified table or level style, specify the following information: Table Name or Level Name Select the name of a table or a level, depending on the style you specified. Display Field Field that contains the values to display in the series drop-down list. Data Field Field that contains the values associated with the selected display field. The data field must contain numeric data. When the user selects a given display field, Demantra sets the series entry equal to the corresponding data field. Note that the Data Type for this series must also be numeric; see " Specifying Data Properties of a Series". Extra From Comma-separated list of additional tables to include in the query that retrieves the drop-down list. See "Using Extra From for a Series Dropdown". Extra Where True/false SQL expression that filters this list further. See "Using Extra Where for a Series Dropdown". 7. The dropdowns "Security" and "Minimum Privilege Displayed" are only enabled when the Dropdown Type is set to "Level." These fields enable you to specify which level members will be accessible by the series. For an explanation of these two fields, see the section "Dropdown Security" in the chapter "Configuring Levels." 8. (Optional) To see the syntax of the series, click the Show Syntax button, which appears after you have specified the required information. Then, to copy the syntax to the Windows clipboard, click Copy. This button appears after you click the Show Syntax button. Filtering a Series Drop-down List Sometimes it is useful to filter the dropdown list of a series, and to filter this list in a context-specific way. For example, the value of one series sometimes should restrict the list of choices for another series. Demantra provides options to enable you to filter the dropdown list.
- 337. Configuring Series and Series Groups 19-15 Note: The MaxAvailableFilterMembers parameter specifies the maximum number of entries that a filtered drop-down list can display. Note: You cannot add a series filter to user security at the base GL level, or any of its parents, without including a Population Attribute. A GL hierarchy without a Population Attribute is not supported. Using Extra From for a Series Dropdown For a dropdown-type series, the values are taken either from a table or from a level (which of course is also in a table). You can provide a comma-separated list of other tables that should be included in the query that returns the drop-down list. Using Extra Where for a Series Dropdown For a dropdown-type series, you can specify a SQL expression that filters the dropdown list. The syntax of this expression is generally as follows: table.column operator other_table.other_column Here operator is a comparison operator, one of the following: = <> > >= < <= And table.column and other_table.other_column are key columns in the database. A user sees the drop-down list for a series within a worksheet table in the Web client. Your Extra Where clause may need to refer to the value of a series or a level member that is present in that window. To do so, you can include either of the following syntax elements in your Extra Where clause: #series.null-warning.series-name# #level.null-warninglevel-name# Where:
- 338. 19-16 Oracle Demantra Implementation Guide series or level Indicates the type of object that you are referring to: • series (indicates a series) • level (indicates a level) null-warning Indicates what to do if the attribute has a null value. Use one of the following keywords: • oknull (a null value is permitted for the attribute; the Extra Where clause will not throw an error) • nonull (if the attribute has a null value, do not execute the SQL of the Extra Where clause) Set this appropriately so that users do not see an error. series-name or level-name Name of the series or level to consider. Specifically: For a series, this should be the COMPUTED_NAME value in the COMPUTED_FIELDS table. For a level, this should be the TABLE_LABEL value in the GROUP_TABLES table. For example, the syntax #pop.oknull.population.Selling Entity# refers to the Selling Entity member of a population attribute. Specifying Data Properties of a Series To specify the data properties of a series: 1. Click Configuration > Configure Series or click the Configure Series button. 2. Right-click a series and then select Open > Data Properties.
- 339. Configuring Series and Series Groups 19-17 3. In the Data Table field, select the table with which this series should be associated. (If you are familiar with database terminology, note that this option determines the primary key of the series.) The choices are as follows: sales_data Use for data that varies by item, location, and time. In this case, you are creating a sales series. mdp_matrix Use for data that varies by item and location, but does not vary by time. In this case, you are creating a combination or matrix series. promotion Use for data that varies by item, location, promotion ID, and time. In this case, you are creating a promotion series, which is supported only in the Web client. Level name Use for data associated with a specific level; all levels that you have defined are listed here; see "Configuring Levels". In this case, you are creating a level series, which is supported only in the Web client. Note: If you change the selection in the Data Table field, Business Modeler automatically removes the existing data from the table where it had been originally stored. Business Modeler then creates a new, empty column in the newly selected table. 4. For Update Field: • If you selected sales_data, mdp_matrix, or promotion, Business Modeler asks
- 340. 19-18 Oracle Demantra Implementation Guide you to confirm whether you want to create this series within that table. If you want to store this series in the database, click Yes. Business Modeler automatically populates Update Field with the value you used for the internal name; see "Specifying General Properties of a Series". Otherwise, click No. • If you selected the name of a level, then in Update Field, select the field that you want to use as this series. 5. Enter the rest of the information as follows: Data Type Specify the type of data that this series will display, one of the following: Numeric Date String If this is a level-style or table-style drop-down series, the data type must be numeric. Update Field based on Business Rule Series Use this field to define logic that updates a specific field based on unique business requirements. For example, you may want to specify another series (usually one of type 'string') that returns the name of another field to update. Alternatively, you may want to save the value of a series to a different column, based on update context that you define. (In this scenario it would typically be used with a server expression and include a CASE statement.) Branch_data Synchro Field Select the field from branch_data in which Demantra should cache data for this series (branch_data is a synonym for the sales_data or the promotion_data table, as needed). In almost all cases, you select the field with the same name as the Update Field. Make sure not to create two series that have the same synchronization field. Such series will result in an engine error. Available for Exceptions If this option is checked, you can use this series in an exceptions filter in a worksheet.
- 341. Configuring Series and Series Groups 19-19 Same Value Update The default value "0" (zero) means that if the value for a cell has been modified and then returned to the original value, do not send an update. If set to "1", (one) then send an update even if the cell's value has been returned to its original value. Ignore Scale Specifies whether the series is divided by the scaling factor in a worksheet. Demantra automatically divides all numbers in the worksheet by that factor, except for any series that are marked as unscaled. Most series are scaled. A series that calculates a fraction, however, should be unscaled. Proportional Specifies whether to split a series value, in cases where data is edited or imported at an aggregate level. A series should be proportional only if the server expression is of the following form: sum (table_name.update_column_name) Where table_name.update_column_name is the update field for this series. If a series is proportional, data for a given combination is divided among the child combinations according to the proportions given by the Proportion Calculation Series. Save Zero as Null If this option is checked, zero values are treated as null. That is, when a series value is set equal to zero and then saved, the value is automatically set equal to null. Proportion Calculation Series Select a reference series that you will use to calculate the proportions when splitting aggregated data for this series. The default series depends on whether the series is a historical series or a forecast series. In general, use a series that is stored in the same table as the series you are defining. For example, if you are defining a sales series, the Proportional Calculation Series should also be a sales series. See "Specifying a Proportions Reference Series". When defining a proportional series, only proportional series will be available in the "Proportion Calculation Series" drop down.
- 342. 19-20 Oracle Demantra Implementation Guide Aggregated Base Level Applies only to sales series. This option lets you specify how this series is aggregated in a worksheet that includes a promotion level. See "Using the Aggregated Base Level Option" . For most series, use sales_data. Aggregation Function Specifies how to aggregate data for this series during the following operations: import, export, copy and paste of a promotion, editing of the duration of a promotion. Choose one of the following functions: Sum Max Min Avg Wavg WAVG By Specify the series to use as the weights if you use Wavg for the preceding option. Copy/Paste preservation type This option applies only to promotional series, which store time-varying data associated with promotions. It specifies how to handle the series data if a user copies and pastes a promotion, or moves an item from one promotion group to another. When set to Preservation, this option works in conjunction with the CopyPasteIntersect system parameter which determines how volume is distributed when an item is moved from one promotion group to another. For examples, see "Series". See also "System Parameters" for more information about the CopyPasteIntersect system parameter. Move preservation Type This option applies only to promotional series, which store time-varying data associated with promotions. It specifies how to handle the series data if a user moves a promotion, changing its dates. For examples, see "Series". Using the Same Value Update Option Sometimes a user changes a worksheet cell value, and then changes the cell back to the original value without saving or rerunning the worksheet. This option lets you specify whether this series should send all modified cell values when updated, or send only the cells with changed values. Using the Aggregated Base Level Option This option lets you specify how this series is aggregated in a worksheet that
- 343. Configuring Series and Series Groups 19-21 includes a promotion level: • If you choose sales_data, this series is aggregated by the items, locations, and dates selected in the worksheet. Most series are aggregated this way in a typical implementation. • If you choose promotion, this series is aggregated by the items, locations, dates, and promotions selected in the worksheet. That is, when the series is aggregated, any data that is not associated with a promotion is ignored. Within a worksheet that does not include a promotion, the series is aggregated based on the series setting; that is, it is aggregated by the items, locations, and dates if it aggregates by sales_data only, and additionally by promotions if aggregated by promotion. Specifying a Proportions Reference Series For best performance, Oracle recommends the following: • Proportions from the same table are better than proportions from a different table. • If the proportions are not in the same table that stores the series that uses those proportions, consider caching the proportions into the same table that stores the series. For example: create a cache of GLOB_PROP in sales_data and promotion_data. • Use PROPORTION_COLUMN when the proportions are from the same table and do not require a server expression. • Use a series that is not empty (most of the time) for the proportion reference. • The series available in the proportional series drop-down depend upon the table on which the series is defined. • Series on Sales_Data can be split by series residing on Sales_Data, MDP_Matrix, Item or Location levels. • Series with a data table such as Promotion_Data or Settlement may only be split by series on the same table. • Series on a general level without population may be split by any series. • Series on MDP_Matrix may be split by any series on MDP_MATRIX, Item or Location levels but not on Sales_Data.
- 344. 19-22 Oracle Demantra Implementation Guide Using the Expression Editors For server and client expressions, you use the Business Modeler expression editors, which are similar for these two types of expressions. For example, the Client Expression Editor looks like this: This editor has been designed so that you can create expressions without using the keyboard, so that you can avoid introducing errors. The number buttons at the bottom of the screen, the Space button, and the Delete button support this. Note: You use the Color button only if you are creating a color expression; see "Creating a Color Expression". The Server Expression Editor is similar, with the following main differences: • The set of allowed functions is different. • Rather than a list of series, the editor provides a list of the allowed database columns. • The Server Expression Editor includes two extra fields, Extra From and Extra Where. For details, see "Specifying a Server Expression".
- 345. Configuring Series and Series Groups 19-23 To edit or create an expression: 1. To insert an element at the position of the cursor, click that element. For example, to insert a function, scroll to that function and then click it. 2. To replace an element (such as a placeholder like <Column>), highlight that element and then click the element you want to replace it with. 3. When you are done, click either OK or Verify. If the expression is not valid, you will receive the message "Expression is not valid." In that case, close the message box and correct the expression. See also "Syntax of Server Expressions" "Syntax of Client Expressions" "Specifying Server and Client Expressions" "Creating an Edit-Lock Expression" "Creating a Color Expression" Syntax of Server Expressions This section summarizes the allowed syntax for server expressions. For a more detailed discussion, see "Series". A server expression must be an aggregating SQL expression that returns to a value with length greater than zero for each element. (If you never plan to use the series within a cached worksheet, it can return null or a zero-length value; but you may not be able to prevent the series from being misused.) A server expression must have one of the following forms: aggregate_function (branch_data.database_column * #UNIT#) aggregate_function (branch_data.database_column) aggregate_function (mdp_matrix.database_column * #UNIT#) aggregate_function (mdp_matrix.database_column) aggregate_function (other_expression) Here: • aggregate_function is one of the SQL aggregating functions, most commonly sum. • database_column is a column of the branch_data or mdp_matrix table, most often the update field that corresponds to this series. That is, if SeriesA is associated with branch_data.SeriesA, then the server expression for SeriesA could be sum(branch_data.SeriesA) Note: branch_data is a synonym for the sales_data table or the
- 346. 19-24 Oracle Demantra Implementation Guide promotion_data table. • #UNIT# represents the unit conversion factor. Within a worksheet, this token is automatically replaced by the conversion factor that corresponds to the unit that the worksheet is currently using. In turn, other_expression can be made up of some or all of the following components: • Other SQL functions. • Constants and expressions that have numeric, string, date, and true/false values. Note: Enclose any literal negative value within parentheses, as in this example: (-0.33) • Operators such as +-*/. • Demantra tokens such as #UNIT#. Note that #UNIT# currently supports ONLY multiplication (*). • Columns of the branch_data and mdp_matrix tables. You can use parentheses to control the precedence of calculations, according to standard algebraic rules. Note: SQL expressions have a limit of 3000 characters. To avoid reaching this limit, use small field names. For information on the supported operators, tokens, and SQL functions, see "Server Expression Functions and Operators". Syntax of Client Expressions This section summarizes the allowed syntax for client expressions. For a more detailed discussion, see "Series". A client expression uses Demantra functions. The client expression can be made up of some or all of the following components: • Constants and expressions that have numeric, date, true/false or null values. Note: Enclose any literal negative constant within parentheses, as in this example: (-0.33)
- 347. Configuring Series and Series Groups 19-25 • Demantra functions. • Operators such as +-*/. • References to other series. To refer to a series, you use the name of the series. • References to series at other time periods. Here, you use the following syntax: series_name[relative-time-bucket] An expression like this is sometimes called a vertical formula. For example: Sales [-1] refers to the Sales series for the previous period. Sales [1] refers to the Sales series for the next period. [0] is not allowed. Here relative-time-bucket must be any of the following: • An integer • A series name • A simple expression using integers, series names, and the basic mathematical operators. For information on the supported operators and functions, see "Client Expression Functions and Operators." Specifying Server and Client Expressions Specifying a Server Expression: To edit a server expression 1. Click Configuration > Configure Series or click the Configure Series button. 2. Right-click a series and then select Open > Expression Properties.
- 348. 19-26 Oracle Demantra Implementation Guide 3. Click the button to the right of the Server Expression field. The Server Expression Editor is displayed. 4. In the Expression field, create an expression as described in "Using the Expression Editors". For information on the syntax to use, see "Syntax of Server Expressions". • Enclose any literal negative value within parentheses, as in this example: (-0.33) • If this series is going to be used within cached worksheets, it cannot return null or zero-length values. Use the expression to_number(null,0) to express null values that can be cached. • branch_data is a synonym for the sales_data table. 5. When you are done, click either OK or Verify. If the expression is not valid, you will receive the message "Expression is not valid." In that case, close the message box and correct the expression.
- 349. Configuring Series and Series Groups 19-27 See also "Server Expression Functions and Operators" Specifying Extra From for a Server Expression Normally the server expression can refer only to fields in the following tables: For sales and matrix series branch_data and mdp_matrix tables. Note that branch_data is a synonym for the sales_data table or the promotion_data table. For promotion series branch_data table. For level series Table associated with the level. In rare cases, you may need to refer to data in other tables. In such a case, use the Extra From field. In this field, specify an optional list of additional tables (separated by commas) that contain data relevant to this series. If you include a table here, the server expression can refer to columns in that table. Note: Internally, these tables are added to the From clause in the SQL query that retrieves data for this series. Specifying Extra Where for a Server Expression If you need to filter the data further, use the Extra Where field. The syntax of this field is as follows: table.column operator other_table.other_column Here operator is a comparison operator, one of the following: = <> > >= < <= And table.column and other_table.other_column are key columns in the database. Note: Internally, the Extra Where field is added to the WHERE clause in the SQL query that retrieves data for this series.
- 350. 19-28 Oracle Demantra Implementation Guide Specifying a Client Expression: To edit a client expression 1. Click Configuration > Configure Series or click the Configure Series button. 2. Right-click a series and then select Open > Expression Properties. 3. Click the button to the right of the Client Expression field. 4. In the Expression field, create an expression as described in "Using the Expression Editors". For information on the syntax to use, see "Syntax of Client Expressions". • Enclose any literal negative value within parentheses, as in this example: (-0.33) • To include a null value within a client expression, do the following: • Create a series named, for example, Null Value and give this series a server expression that evaluates to null. • Within the client expression, refer to the Null Value series. 5. When you are done, click either OK or Verify. If the expression is not valid, you will receive the message "Expression is not valid." In that case, close the message box and correct the expression. Verifying All Expressions: To verify all server and client expressions 1. Click the Verify Expressions button in the toolbar. Or click File > Verify All Expressions. See also "Client Expression Functions and Operators" Creating an Edit-Lock Expression An editable series can have an optional edit-lock expression, which can make series cells uneditable based on a condition. For each editable cell in a series, an edit-lock expression evaluates to true or false. • If the expression evaluates to true, the cell is automatically made uneditable.
- 351. Configuring Series and Series Groups 19-29 • If it evaluates to false, the cell is left in its original state, which can be either editable or not. To create an edit-lock expression: 1. Click Configuration > Configure Series or click the Configure Series button. 2. Right-click a series and then select Open > Expression Properties. 3. Click the button to the right of the Edit Lock Expression field. The Client Expression Editor appears. 4. Create an expression that evaluates to true or false; see "Syntax of Client Expressions". See also "Client Expression Functions and Operators" Creating a Color Expression Any series can have a color expression, which controls only the appearance of the series. For each editable cell in a series, a color expression evaluates to either a numeric color value or null. This expression must have one of the following forms: If condition, numeric-color-value If condition, expression-with-numeric-value Then for each cell in the series: • If the expression evaluates to a number, the cell is displayed in the corresponding color. • If the expression evaluates to null, the color of the cell is left unchanged. • In its basic form, a color expression returns one numeric color value based on one condition. To return different color values for multiple conditions, use the second form, and use an If-Then-Else expression for the expression-with-numeric-value. • A color expression cannot include time-shift expressions such as [ - 1 ], Fpos, and Fsum. To create a color expression: 1. Click Configuration > Configure Series or click the Configure Series button.
- 352. 19-30 Oracle Demantra Implementation Guide 2. Right-click a series and then select Open > Expression Properties. 3. Click the button to the right of the Color Expression field. The Client Expression Editor appears. 4. Construct an expression (using the If function) that evaluates to a numeric color value. For example, the following color expression makes the cell background red (red=255) if the absolute value of the order variance is greater than the order tolerance: if ( -order variance > order tolerance , 255) To insert a numeric color value, do the following: 1. Place the cursor where the numeric color value should appear in the expression. 2. Click Color to display the Color dialog box. 3. Select an existing color. Or click Define Custom Colors and define a color. See " To define a custom color". 4. Click OK. Demantra finds the numeric value that corresponds to the color you selected, and places that number into the expression. Standard Colors For reference, the following table lists the standard colors in numeric order. You can use this table to look up a color without having to use the Business Modeler user interface. This may be useful when you are working with unfamiliar client expressions. Color Description Color Description Color Description 0 black 4210816 brown 8454143 yellow 64 dark brown 4227072 green 10485760 dark blue 128 brown 4227200 olive green 12615680 steel blue 255 red 4227327 orange 12615808 blue 16384 dark green 4259584 bright green 12615935 pink 16512 brown 8388608 dark blue 12632256 gray
- 353. Configuring Series and Series Groups 19-31 Color Description Color Description Color Description 32768 green 8388672 purple 16711680 royal blue 32896 olive green 8388736 purple 16711808 purple 33023 orange 8388863 pink 16711935 pink 65280 bright green 8404992 dark blue 16744448 blue 65408 bright green 8421376 blue green 16744576 blue 65535 yellow 8421440 blue green 16744703 pink 4194304 very dark blue 8421504 gray 16776960 aqua 4194368 very dark purple 8421631 pink 16777088 aqua 4194432 brown 8453888 aqua 16777215 white 4210688 very dark green 8454016 light green Defining Custom Colors: To define a custom color 1. Click Define Custom Color in the Color dialog box. The Color dialog box expands to display a color palette.
- 354. 19-32 Oracle Demantra Implementation Guide 2. Click the color palette to select a color. 3. Drag the luminance pointer (on the right of the dialog box) up to the required luminance (according to the color/solid display). 4. Click Add to Custom Colors to add the color to the Custom Colors list. 5. Click OK. Controlling Access to Series When you create a series in the Business Modeler, Demantra automatically adds that series to your component. You can give access to this series to other users of your component. To control access to a series: 1. Click Configuration > Configure Series or click the Configure Series button. 2. To see which components include a specific series, click the plus sign (+) to the left of the series name. The display expands to list all the components that include this series:
- 355. Configuring Series and Series Groups 19-33 3. To make changes, right-click the series and then select Open > Expression Properties. 4. Click Next to access the Security page. 5. If you logged into Business Modeler with one of the internal Demantra passwords, you can select any component. Otherwise, you can make changes only within the component with which your ID is associated. 6. For each user of this component who needs access to this series, double-click the user name to move the user name from the Available list to the Selected Users list. Configuring Desktop Group Expressions Group expressions specify how to group data for display purposes, into different blocks of time such as quarters, months, or half years, when the user chooses to group data in that way. Note: Group expressions are supported only in Demand Planner and Demand Replenisher. For the equivalent functionality in the Web products, create a time aggregation; see "Creating a Time Aggregation". The following figure shows an example of a worksheet when it is ungrouped and also when it is grouped by month.
- 356. 19-34 Oracle Demantra Implementation Guide A group expression specifies the group (in time) to which each row belongs. It does not specify how the subtotals are calculated. The subtotals are calculated as specified by the summary function; see "Specifying How to Display a Series". Demantra provides a set of possible group expressions, which are all pre-configured. You can reconfigure these as needed. To configure a group expression: 1. Click Configuration > Configure Group Expressions. The Edit Group Expression screen appears. 2. Select an expression name from the list at the left. 3. In the Expression Description field, edit the name of this expression. This name appears in the list of choices when the user clicks Data > Define Group... (in Demand Planner or Demand Replenisher). 4. In the Expression field, edit the expression itself. 5. Click File > Save to save this change. 6. Click the close button at the top right of the window to close the dialog box.
- 357. Configuring Series and Series Groups 19-35 Deleting a Series To delete a series: 1. Right-click the series and click Delete. Business Modeler prompts you to confirm that you want to delete this series. 2. Click Yes. Deleting a series may take a couple of minutes, depending on the size of the database. 3. Click File > Save to save this change. Enabling Series Caching By Item You can cache series data that is aggregated by item, in the branch_data_items table; this improves performance. This technique can be used only in worksheets that meet certain conditions. To make sure cached data can be accessed from a worksheet: 1. Make sure that the DYNAMIC_SYNC procedure is scheduled to run. See "Database Procedures". This procedure updates branch_data_items based on changes elsewhere in the database. 2. Make sure that the worksheet is defined as follows: • It does not include filters of the location or matrix types. • It does not include levels of the location or matrix types. • It does not include contain any matrix series. 3. For the user who is running the worksheet, make sure that no security filters have been defined. see "Creating or Modifying a User". 4. Make sure that the UseItemsAggri parameter is set to Yes. For information on this parameter, see "Non-Engine Parameters". Specifying the Order of Series in Dynamic Open Link You can control the order in which series are displayed when linked into a third-party
- 358. 19-36 Oracle Demantra Implementation Guide tool through Dynamic Open Link (DOL). Note: This option controls the order of series in the worksheet wizard used by the following: • Default display order in the Desktop • Order of series exported via Demantra Dynamic Open Link • Default display order of Web client Worksheets To specify the order of series in the desktop: 1. Click File > Define Series Display Order. The Business Modeler displays the following screen: 2. To move a series, click it and then click the arrows to move the series to the beginning of the list, up one, down one, or to the end of the list. 3. Click OK.
- 359. Configuring Series and Series Groups 19-37 Creating or Modifying a Series Group To create or modify a series group: 1. Click Configuration > Configure Series Groups. 2. Next: • To create a new series group, double-click the New Group icon. Or click the icon and then click OK. • To edit a series group, double-click the icon corresponding to the series group. Or click the icon and then click OK. The Business Modeler displays the General Properties screen. 3. In Group Name, type a unique name for the new series group. 4. In Group Description, type an optional description for the new series group. 5. Click Next. The Business Modeler displays the Series screen. 6. To select the series to include in this series group, move series from the left list to the right list. 7. When you are done specifying series, click Finish. Deleting a Series Group To delete a series group: 1. Click Configuration > Configure Series Groups. 2. Click the icon corresponding to the series group. 3. Click Delete. 4. Click Yes to confirm the deletion. Viewing Dependencies Among Series The Business Modeler provides a simple tool you can use to check the dependencies among the series in your system. The results for a given series depend on whether that
- 360. 19-38 Oracle Demantra Implementation Guide series is editable. To view series dependencies: 1. Click Tools > Series Dependencies. The Business Modeler displays the Series Dependencies screen. 2. In Select Series, select a series. If the series is not editable, the Business Modeler updates the screen, as follows: These fields have the following meanings: Selected series depends on All the series on which the selected uneditable series depends, directly or indirectly, through its client expression. If this series does not have a client expression, this field is blank. Color Expression Series whose color expressions refer to the series you selected. Lock Expression Series whose edit-lock expressions refer to the series you selected.
- 361. Configuring Series and Series Groups 19-39 Summary Line Expression Series whose summary row expressions refer to the series you selected. However, if the series is editable, the screen is slightly different: Notice that the first field has a different label and meaning: Series depend on selected series All the series that depend on the selected editable series, directly or indirectly, through their client expressions. The other fields have the same meanings as in the other case. To export dependencies of all series: 1. Click Export All Dependencies. The Business Modeler generates the file Demantra_root/Demand Planner/Desktop/Dependencies.xls. Creating a Series that Displays as a Link You can create a series that displays its value as a hyperlink. This allows you to call your own external pages or documents that may provide information associated with
- 362. 19-40 Oracle Demantra Implementation Guide the particular series. 1. Enter the URL in a database column, for example using Oracle SQL Developer. You can either create a new column or insert the URL into an existing column. The column should be of Type VARCHAR2 (i.e., string or text) and be long enough to store the full value. For example: • Table = SETTLEMENT • Column = 'Link to Document' • URL = '[http://www.oracle.com/|]' The URL must be in the format: [DisplayText|URL|] where URL is required and DisplayText is optional. The value must start with a '[' (square bracket) and end with a '|]' (pipe character followed by square bracket). Also, if DisplayText is included, then a '| ' (pipe character) must separate the DisplayText from the URL. Example: To display "Oracle" as the Series value in a worksheet and launch http://www.oracle.com/ when the end user clicks the link, the URL should be: [Oracle|http://www.oracle.com/|] To display the URL as the series value, then omit DisplayText. For example: [http://www.oracle.com/|] If the value does not conform to the required format of [DisplayText|URL] then the Series value will be displayed as normal text (no hyperlink). 2. Create a new series. The settings that are required for a series value to appear as a link are described below. For details about all other settings, see 'Creating a Series' In the Oracle Demantra Implementation Guide. • In the Display Properties screen, set Display Format to 'Hyperlink' • In the Data Properties screen: • Set Data Table to the table where you defined the URL in step 1. (Do not specify an 'Update Field'.) • Set Data Type to 'String'. • Set Aggregation Function to 'Max' • In the Expression Properties screen, define the series' Server Expression. Below are two examples of how to do this:
- 363. Configuring Series and Series Groups 19-41 a. Example where full syntax is stored in database column: max(nvl(table_name.column_name,' ')) b. Example where the base URL is stored in a database column and full syntax is concatenated in the expression: max(concat(concat('[DisplayText|',table_name.column_name),'|]')) 3. Add the new series to a worksheet using Worksheet Designer. Display Series as a Link You can create a series that displays its value as a hyperlink. This allows you to call your own external pages or documents that may provide information associated with the particular series. See Creating a Series that Appears as a Link in the Oracle Demantra Implementation Guide. Configuring New Product Launches Demantra's New Product Launch feature uses the NPI_SERIES_DATA table for copying data. This table includes default values for Demand Management series, and does not require any further setup. You should review the default configuration of this table and make changes if necessary before running a New Product Launch process in Demand Management, so that the process copies data from the correct source series and populates the corresponding target series. If you are using New Product Launch within Predictive Trade Planning (PTP) then some setup of the PROMOTION_STATUS, SCENARIO, and PROMOTION_TYPE is required. Administrators may modify tables using a database utility such as SQL Developer. For more information on New Product Launches, see "New Product Launch Worksheet" in the Oracle Demantra Demand Management User's Guide. Reviewing the NPI_SERIES_DATA Table: 1. Review the default definition of the NPI_SERIES_DATA table. If necessary, modify the SOURCE_SERIES and TARGET_SERIES columns.. The source and target series must exist in the same table (for example, SALES_DATA, MDP_MATRIX, and so on). Note: Two different definitions cannot have the same target series. Only series defined on the following base tables are supported: • MDP_MATRIX
- 364. 19-42 Oracle Demantra Implementation Guide • SALES_DATA • PROMOTION • PROMOTION_DATA 2. 2. Populate the Apply_Copy_Perc column with either: • 0 - A scaling factor is not applied to the series during a data copy. This value is recommended for non-proportional series. • 1 - This applies a scaling factor to the series during a data copy. This value is recommended for proportional series. Note: The Price series is an example of a series where APPLY_COPY_PERC should be set to 0 (so the data copy will not scale the price value). Be sure to carefully evaluate all series that will be copied to ensure the copy settings are appropriate for your business requirements. 3. Run the Create - Launch Management Views workflow (located in the Launch Management workflow group). This workflow validates the NPI_SERIES_DATA definitions. If all the definitions are valid then it modifies and refreshes the Launch Management integration interfaces. After running the workflow, the NPI_SERIES_DATA table's Status column is set to either Valid or Invalid. If a series definition is invalid, the ERROR_MESSAGE column will provide details. For example, "Source and Target Series must have the same data table definition. Contact an Administrator to correct the Invalid NPI_SERIES_DATA definitions". If you are creating new product launches with the PTP component, you must identify which promotion statuses, types, and scenarios will be copied from the source to the target product. To do this, perform the following steps: 1. Update as required the LAUNCH_COPY column in the tables listed below. Specify a value of '1' for any members that you want to copy: • PROMOTION_STATUS • SCENARIO • PROMOTION_TYPE
- 365. Configuring Series and Series Groups 19-43 Note: Set LAUNCH_COPY to 1 only for promotion types that will drive Incremental Lift by the Analytical Engine. Set LAUNCH_COPY to 0 for the Sandbox scenario and any promotions with a status of "Unplanned"/"Draft". 2. f you modified the LAUNCH_COPY column for any of the tables listed in the previous step, then execute the procedure APPPROC_CDP_LAUNCH_MGMT_VIEWS. For details about this procedure, see Database Procedures, page 27-1.
- 367. Configuring Units, Indexes, and Update-Lock Expressions 20-1 20 Configuring Units, Indexes, and Update-Lock Expressions This chapter describes how to perform miscellaneous configuration tasks. This chapter covers the following topics: • Before Configuring Units and Indexes • Configuring Indexes and Exchange Rates • Editing Values for Indexes and Exchange Rates • Configuring Units • Associating Units with Levels • Configuring Time Units • Configuring Update-Lock Expressions Before Configuring Units and Indexes Before you configure units and indexes, be sure to do the following: • Read the "Units, Indexes, and Exchange Rates" Chapter and make sure you understand how unit conversion data and the #UNIT# token are used. • Load unit version data. Configuring Indexes and Exchange Rates Monetary units of measure can use financial indexes and exchange rates. Each index and exchange rate is stored in a different table, except for the placeholder index (constant, equals one for all dates). The placeholder index is used to switch a worksheet back to the same monetary units that are used in the imported data. By default this is called dollar $, because monetary
- 368. 20-2 Oracle Demantra Implementation Guide values are usually imported in dollars. To create an index or exchange rate: 1. Click Configuration > Configure Indexes. The Configure Indexes and Exchange Rates dialog box appears. 2. Click File > New. Or click the New button. 3. In Index Name, type the name of the index or exchange rate, as it should appear in worksheets. 4. In Table Name, type the name of the table in which Demantra should store information for this index or exchange rate. Demantra will automatically create this table. Note: For simplicity, use the same name as you used for the index or exchange rate. 5. For Calculation Type, click one of the radio buttons to indicate whether this is an index or an exchange rate. 6. If this should be a default option, click Set as default. 7. Click File > Save. 8. To enter data for this index or exchange rate: 1. Click the ellipsis (...) button next to the Table Name field.
- 369. Configuring Units, Indexes, and Update-Lock Expressions 20-3 Business Modeler displays the following window: 2. To add an entry, click Insert. 3. For Index Date, specify a date, using the date format required by the database. 4. For Index Value, specify the value that takes effect on the specified date. This value is multiplied by the base unit price. 5. Repeat as needed. When you are done, click Save. 6. Click Close. 9. The new index or exchange rate is not associated with any component. See " Creating or Modifying a Component". To edit an index or exchange rate: 1. In the left side of the dialog box, click the name of any component that includes the index or exchange rate. This expands the display so that you can see the indexes and exchange rates in that component. 2. Click the index or exchange rate.
- 370. 20-4 Oracle Demantra Implementation Guide 3. Modify as needed. 4. Click File > Save. To delete an index or exchange rate: 1. Select an index or exchange rate. 2. Click Delete. 3. Business Modeler prompts for confirmation. 4. Click OK. To see which indexes a component uses: 1. In the left side of the dialog box, click the plus sign (+) to the left of the component name. The hierarchy expands to display all the indexes and exchange rates that are used in this component. To assign indexes and exchange rates to a component, see "Creating or Modifying a Component". Editing Values for Indexes and Exchange Rates To edit values for the indexes: 1. Click System > Maintain > Edit Installed Indexes. The Installed Indexes List dialog box appears. 2. Click a table and then click OK.
- 371. Configuring Units, Indexes, and Update-Lock Expressions 20-5 A dialog box appears for the selected table. 3. To insert new values, click Insert and then type values in the new row that appears. 4. To update the list after inserting new values, click Update. Or, to reset the list to the original values, click Reset. Configuring Units If the database contains the appropriate unit conversion data, you can define two general kinds of units of measure to use in Demantra: • Size units, which measure the size of a sale: cases, truckloads, and so on. • Monetary units, which measure the value of a sale. You can also specify indexes and exchange rates associated with the unit. The procedure is slightly different for these two kinds of units. To create a size unit: 1. Click Configuration > Configure Display Units. • The Configure Display Units dialog box appears. 2. Click File > New. Or click the New button. 3. In Display Units, type the name of this unit of measure, as it should appear in worksheets.
- 372. 20-6 Oracle Demantra Implementation Guide 4. In Data Table, type the name of the table (such as t_ep_sku) in which Demantra contains conversion factors for this unit. Note: The conversion factors must be imported, because these factors are generally different for each SKU and may vary over time. 5. In Data Field, type the name of the field in this table that contains the conversion factors for this unit. 6. In Data Expression, type an expression that retrieves the conversion factors for this unit. 7. Click File > Save. 8. The new unit is not associated with any component. To make this unit available to users, see "Creating or Modifying a Component". To create a monetary unit: 1. Click Configuration > Configure Display Units. The Configure Display Units dialog box appears. 2. Click File > New. Or click the New button. 3. In Display Units, type the name of this unit of measure, as it should appear in worksheets. 4. In Data Table, type the name of the table in which Demantra contains conversion factors for this unit. 5. In Data Field, type the name of the field in this table that contains the conversion factors for this unit. 6. In Data Expression, type an expression that retrieves the conversion factors for this unit. 7. For each index and exchange rates by which this unit could potentially be multiplied, drag the index/exchange rate from the left list to the right list. Within a worksheet, the user will be able to select one of these at a time. 8. Click File > Save. 9. The new unit is not associated with any component. To make this unit available to users, see "Creating or Modifying a Component".
- 373. Configuring Units, Indexes, and Update-Lock Expressions 20-7 To edit a unit: 1. Click Configuration > Configure System Units. The Configure Display Units dialog box appears. 2. In the left side of the dialog box, click the name of any component that includes the unit. This expands the display so that you can see the units in that component. 3. Select a unit. 4. Modify as needed. 5. Click File > Save. To delete a unit: 1. Click Configuration > Configure System Units. The Configure Display Units dialog box appears. 2. In the left side of the dialog box, click the name of any component that includes the unit. This expands the display so that you can see the units in that component. 3. Select a unit. 4. Click File > Delete. • Business Modeler prompts for confirmation. 5. Click OK. To see which units a component uses: 1. Click Configuration > Configure System Units. The Configure Display Units dialog box appears. 2. In the left side of the dialog box, click the plus sign (+) to the left of the component name. The hierarchy expands to display all the units that are used in this component.
- 374. 20-8 Oracle Demantra Implementation Guide To assign units to a component, see "Creating or Modifying a Component". Associating Units with Levels Before users can access a unit of measure, you must associate that unit of measure with each aggregation level with which it could conceivably be used. Within a worksheet, the user will be able to select any unit associated with any aggregation level that the worksheet uses. There are two equivalent approaches you can use: • You can use an option that associates a unit with all existing levels, and then you can make further changes for any levels that should not use this unit. • You can associate the unit with each level one at a time. The approach you choose depends on how many levels you have and how many of them should use a given unit. To associate a unit with all levels: 1. Click Configuration > Configure System Units. The Configure Display Units dialog box appears. 2. In the left side of the dialog box, click the name of any component that includes the unit. This expands the display so that you can see the units in that component. 3. Select a unit. 4. Click Link Unit to All Levels. 5. Optionally remove this unit from specific levels, if needed, as described below.
- 375. Configuring Units, Indexes, and Update-Lock Expressions 20-9 To associate a unit with a level: 1. Click Configuration > Configure Units for Levels. The system then displays the following list, which includes one line for each existing level-unit association. 2. Click Add. 3. In the Group column, select the level. 4. Do one of the following: • Click the corresponding cell in the Group Unit column and select a unit value. • Click the appropriate cell in the Group Unit column and modify its value. 5. Click Save to save the configuration. 6. Click Close to close the dialog box. To remove a unit from a level: 1. Click Configuration > Configure Units for Levels.
- 376. 20-10 Oracle Demantra Implementation Guide The system then lists all the existing level-unit associations. 2. Click the line that corresponds to the association you want to remove. 3. Click Delete. 4. Click Save to save the configuration. 5. Click Close to close the dialog box. Configuring Time Units Any Demantra solution has a base time unit (often weeks or months). Demantra provides some larger predefined time units, and you can add others. In general, there are two types of time units: • Simple time units (such as quarters) are simple multiples of the base time unit. For these, you just provide a scaling factor. For example, for a weekly system, a quarter consists of 13 time units. These time units are assumed to divide evenly into one year, and Demantra automatically figures out which base time bucket each date belongs to. • Data-dependent time units (such as 4-4-5 time units) require explicit data. That is, they must be assigned explicitly to each date in the system, within the Inputs table. For an example, see "Units, Indexes, and Exchange Rates". To configure a simple time unit: 1. Click Tools > Maintain > Edit Time Resolution. 2. Click Insert. 3. In the Description column, type a name for the time unit. 4. In the Time Scale column, type the number of base time units in this new time unit. Ignore the Inputs Column field. 5. To save changes, click Save. Or to exit without saving changes, click Cancel. To configure a data-dependent time unit: 1. Using a database tool, add a column to the Inputs table that indicates how to group the base time buckets. 2. Within the Business Modeler, click Tools > Maintain > Edit Time Resolution. 3. Click Insert.
- 377. Configuring Units, Indexes, and Update-Lock Expressions 20-11 4. In the Description column, type a name for the time unit. 5. In the Inputs Column field, select the column from Inputs that contains the data for this time unit. Ignore the Time Scale column. 6. To save changes, click Save. Or to exit without saving changes, click Cancel. To delete a time unit: 1. Click Tools > Maintain > Edit Time Resolution. 2. Click a row in the Time Resolution screen. 3. Click Delete. 4. To save changes, click Save. Or to exit without saving changes, click Cancel. See also "Creating a Time Aggregation" Configuring Update-Lock Expressions An update-lock expression checks to see if a condition is met for each combination and if so, and prevents users from updating the database (saving the changes to the combination). This expression evaluates to either true or false. If the expression evaluates to true, then when the user tries to save the combination, a message is displayed and the worksheet data is not saved. The user must correct the data before the worksheet can be saved. To configure an update-lock expression: 1. Click Configuration > Configure Update Locks. The Edit Update-Lock Expressions dialog box appears.
- 378. 20-12 Oracle Demantra Implementation Guide 2. Click the New button. 3. In the Lock Description field, add or edit the title of the expression. 4. Click the Lock Condition field. The Client Expression Editor appears. 5. Create or edit an expression that evaluates to either true or false. See "Specifying Server and Client Expressions". Note: Be sure that any constant values are expressed as the correct type of data (numeric, string, or date) for the expression you use. For example, be sure to use double quotes around constant string values if your expression uses a string-type series. 6. In the Message Text field, create or edit the message to be displayed when the update-lock expression returns true. This message should be as informative as possible so that the user knows which of his or her edits is responsible for the update-lock condition. 7. Click the Save button. To delete the contents of a field: 1. Click the Delete button. To refresh data from the database: 1. Click the Retrieve button.
- 379. Series and Level Integration 21-1 21 Series and Level Integration This chapter describes how to use the Integration Interface Wizard, which you use to import or export series data and level members. This chapter covers the following topics: • Before Using the Integration Interface Wizard • Creating or Modifying an Integration Interface • Creating a Data Import Profile • Creating a Data Export Profile • Specifying Series Data to Import or Export • Creating an Export Profile for Any Level • Creating an Import Profile for a General Level • Deleting an Integration Interface • Details of the Staging Tables • Executing an Integration Interface • Checking the Integration Queue Before Using the Integration Interface Wizard Before you use the Integration Interface Wizard, be sure to do the following: • Read the "Integration" Chapter and make sure you understand the different options for importing and exporting data. • Define the series and levels that you plan to import or export. • If you are importing data, make sure you know what database procedures to run in order to keep the Demantra tables synchronized.
- 380. 21-2 Oracle Demantra Implementation Guide • Consider the following option provided by the Business Modeler: When you create an integration interface, the Business Modeler can automatically create a database user/schema that is pre-filtered to display only the data selected in that integration interface. This database user is provided for convenience and can be used within the Demantra solution or elsewhere. Demantra does not use this database user directly. If you choose to create this user; the Business Modeler automatically uses the user name and password that you used to log into the Business Modeler. This means that you must use the following overall process for each integration interface you want to create: 1. Decide what database user name and password you want to associate with that integration interface. Note: Make sure that the database does not yet 'contain a user with this name. The Business Modeler will not change an existing user. 2. Log onto the Business Modeler as a component owner. Create the user. 3. Log into the Business Modeler as that user. 4. Within the Business Modeler, create the integration interface. Be sure to enable the option Create DB User for Interface Objects. Note: Whenever the Demantra user's password is changed, the database user's password must also be changed (if the user is an interface database user). Creating or Modifying an Integration Interface Before you perform data import or export, you define a reusable integration interface. This will contain any number of data profiles and level profiles. The profiles define the details of the integration. To create or modify an integration interface: 1. Click Tools > Integration Interface. The Create/Modify Integration Interface screen appears. 2. Do one of the following: • Click New Integration Interface and then click OK. Or double-click New
- 381. Series and Level Integration 21-3 Integration Interface. • Click the button corresponding to the integration interface that you want to edit. The Integration Interface Details screen appears. 1. Specify or edit the name and description for this integration interface. 2. Select or clear the Create DB User for Interface Objects check box. If selected, you will create a database user who can view only the data as configured in this integration interface. Note: The new database user will receive the username and password with which you logged into the Business Modeler. If the database user already exists, it is not changed. 3. Click Next. Or click Cancel and proceed to the next stage without saving changes. The Integration Interface Selection screen appears. Here you define data profiles and level profiles within this integration interface.
- 382. 21-4 Oracle Demantra Implementation Guide 4. To display the profiles in list format instead, click the list format icon on the upper right. 5. Do at least one of the following: • Define a data profile, as described in "Creating a Data Import Profile" or " Creating a Data Export Profile" . • Define a level profile, as described in "Creating an Import Profile for a General Level". 6. Click Finish. See also Making Changes Available to Users Creating a Data Import Profile A data import profile describes how to import series data aggregated to a specific aggregation level or levels, with optional filtering. You can include sales series or promotion series, but not matrix series. Important: Create import integration profiles using the Business Modeler installed on the server where Oracle Demantra is installed, and not using Business Modeler installed on the client personal computer.
- 383. Series and Level Integration 21-5 In the case where the E-Business Suite Administrator navigates to the Collaborator Workbench > Planning Applications > Business Modeler, this deploys the silent install of the Business Modeler locally on C:Program FilesOracle Demantra Spectrum. See Desktop and Business Modeler Automatic Install, page 15-4. When the user creates an Integration Profile, the system creates a batch file on the machine from which Business Modeler is initiated. An executable step of the corresponding workflow references the batch file location on the server. In order for the workflow to process the batch file, the path to the batch file in the executable step of the workflow needs to reference the correct location (on the server). In the case where the user launches Business Modeler from the client PC, the workflow errors, because it looks for the batch file on the server, while it exists on the client PC. To create a data import profile: 1. Open the integration interface, as described in "Creating or Modifying an Integration Interface". 2. Click Next to display the Define Data/Levels Profile screen. 3. Click New Data Profile and then click Create/Modify. Or double-click New Data Profile. The Integration Interface Wizard displays the following screen. 4. Specify the following details for the data profile.
- 384. 21-6 Oracle Demantra Implementation Guide Name Unique name for the data profile. Description Optional description. Presentation Type Specifies how level members are identified in the profile: If you select Description, each member is identified by its description field. If you select Code, each member is identified by its code field. Integration Type Import. For information on export profiles, see Creating a Data Export Profile, page 21-10. Create Worksheet Select this check box if you want Demantra to create a worksheet that you can use to view the data. Import from file Select this check box if you are importing data from a file. Or leave this check box deselected if you are importing data from a table that is in the Demantra database. Create Workflow Select this check box to automatically create a workflow schema that uses this data profile. This option is available only if your system includes the Workflow module. Workflow Group Specify the schema group that this workflow should belong to. This option is available only if your system includes the Workflow module. 5. If your system does not include the Workflow module, then the preceding screen includes the following field: Create Process Batch Select this check box to automatically create a batch file that uses this data profile. The name of the batch file is given in the final step of the wizard. 6. Click Next. 7. In the next set of screens, the Integration Interface Wizard prompts you for information about the data to import. This process is similar to creating worksheets. If you are not familiar with that process, see Specifying Series Data to Import or Export, page 21-14
- 385. Series and Level Integration 21-7 8. After you specify the data to import, the Integration Interface Wizard prompts you for additional import details. 9. Specify the following information: Insert New Combinations If selected, all new combinations will be imported into Demantra. The Insert New Combinations process creates new combinations in the MDP_MATRIX table only when both the item and location are provided in the data import. For example, if the Location part of the combination is missing, the process will be unable to create a new matrix combination for that record. Populate Forecast Horizon Inserts new forecast records into the sales_data table for the entire forecast horizon data for the new combinations. This option is available only if you selected Insert New Combinations. Split Proportions (ignored if you import at the lowest level) This option is relevant only if you are importing data at an aggregated level. Select one of the following: Matrix Proportions - Uses the precalculated proportions that are stored in the mdp_matrix table. This means that if your aggregate data is imported at a weekly granularity, the split at the lowest level will be based on the corresponding monthly proportions. This option shortens the calculation process before any split action. Also, if you use this option, you will not need to run the MANUALS_INS_INTEGRATION procedure. Actual Proportions - Calculates proportions based on historical data. This option splits the aggregate data down to the lowest level based on sales or forecast values at the lowest level in the time bucket of interest. If no sales or forecast data exists, matrix proportions will be used.
- 386. 21-8 Oracle Demantra Implementation Guide Table Name The meaning of this field depends on whether you are importing data from a file: If you are importing data from a file, this field specifies the name of the internal staging table into which Demantra will import this data. If you are instead importing data from a table in the database, this field specifies the name of that table. In either case, Demantra creates the table for you. If you change this name, it must not include spaces. Note: Make a note of the name of the staging table. For an introduction, see "Details of the Staging Tables". 10. Click Next. 11. If you are importing data from a staging table rather than a file, skip ahead to Step 17. 12. If you are importing data from a file, the Integration Interface Wizard prompts you for details about that file. 13. Specify the following information:
- 387. Series and Level Integration 21-9 File Directory Directory that contains the source file. Log Path Directory and filename of the log file into which Demantra will write any messages when you execute this integration profile. File Format The name of the file from which you want to import data. Delimiter Type Choose either Fixed Width or Delimiter. Column Delimiter Choose the delimiter that separates columns of data. This option is enabled only if Delimiter Type is Delimiter. Number of Lines to Skip Specify the number of lines at the top of this file that Demantra should ignore. For example, if the file contains a single header line, specify 1. Load Option Choose one of the following: Insert—use this to add new rows to the staging table Replace—use this to replace existing rows in the staging table 14. Click Next. 15. If you are importing from a file, the Integration Interface Wizard displays a screen that shows additional details of the imported data. This screen shows one row for each field that the imported data contains. 1. Specify which columns to import. By default, all columns are imported; to prevent a column from being imported, select the Active check box. 2. Specify the order of the fields. To move a field, click the field and then click the up or down arrows until the field has reached the appropriate location. 3. If you chose the fixed width option earlier, you must now specify the widths of each of these fields. To do so, enter the starting and ending column position.
- 388. 21-10 Oracle Demantra Implementation Guide 16. Click Next. 17. The Integration Interface Wizard displays a screen that reviews your selections. 18. Review the displayed information and do one of the following: • To make further edits, click Back. • To finish the data profile, click Finish. The Integration Interface Selection screen appears. See "Creating or Modifying an Integration Interface". Creating a Data Export Profile A data export profile describes how to export series data aggregated to a specific aggregation level or levels, with optional filtering. You can include sales series or promotion series, but not matrix series. If you want to export a series that uses a client expression, you must first run the Business Logic Engine to evaluate the expression, split the resulting data to the lowest level, and save it to the database. If you are exporting data within a workflow, you use the BLE step type for this purpose. You can define Integration Interface hints from the Data Profile Export Properties page of the Integration Interface wizard. Integration Interface hints are not validated and may contain any text. These hints are stored in the table PROFILE_HINTS. Each Data Profile (Transfer_Query) can have a Data hint and Population hint. To create a data export profile: 1. Open the integration interface, as described in "Creating or Modifying an Integration Interface". 2. Click Next to display the Define Data/Levels Profile screen. 3. Click New Data Profile and then click Create/Modify. Or double-click New Data Profile. The Integration Interface Wizard displays a screen where you name the new data profile. 4. Specify the following details for the data profile. Name Unique name for the data profile.
- 389. Series and Level Integration 21-11 Description Optional description. Presentation Type Specifies how level members are identified in the profile: If you select Description, each member is identified by its description field. If you select Code, each member is identified by its code field. Integration Type Export. For information on import profiles, see " Creating a Data Import Profile". Export Data Select one of the following options: Full - use this to export all data Incremental - use this to export only changed data Create Worksheet Select this check box if you want Demantra to create a worksheet that you can use to view the data. Create Workflow Select this check box to automatically create a workflow schema that uses this data profile. This option is available only if your system includes the Workflow module. Workflow Group Specify the schema group that this workflow should belong to. This option is available only if your system includes the Workflow module. 5. If your system does not include the Workflow module, then the preceding screen includes the following field: Create Process Batch Select this check box to automatically create an external batch file that uses this data profile. The name of the batch file is given in the final step of the wizard.
- 390. 21-12 Oracle Demantra Implementation Guide 6. Click Next. 7. In the next set of screens, the Integration Interface Wizard prompts you for information about the data to export. See Specifying Series Data to Import or Export, page 21-14. 8. After you specify the data to export, the Integration Interface Wizard prompts you for additional export details. 9. Specify the following information: File Name Full directory path and filename of the file to which you are exporting data. Note that Demantra appends a unique time stamp to the end of the file so that you can export multiple times and see each result. Fixed Width Select if you want to export data in fixed width format. Leave this option unselected if you want to specify a field delimiter instead. Column Delimiter Choose the delimiter that Demantra should use between fields when it exports the data. This option is enabled only if Fixed Width is not selected.
- 391. Series and Level Integration 21-13 Select Type of View for Export Choose one of the following: View - Retrieves data from the database. Materialized view - Saves data as a cube allowing quick and flexible analysis. (This option is enabled only for Oracle.) Note that export integration interfaces cannot export a series where the "Dropdown Type" setting is "List" when "Materialized View" is selected. View Name Name of internal table into which Demantra will export this data. If you change this name, it must not include spaces. Also, the view is created only after you run the export process. The columns in the view are not necessarily in the same order as in the exported file. Data Hint Determines how the exported data is processed when it is inserted into Demantra's data tables. Population Hint Determines how the exported data is processed when it is inserted into Demantra's population tables. 10. Click Next. The Integration Interface Wizard prompts you to specify the fields to export. 1. For each field that you want to export, click that field in the left list and then click the right-pointing arrow. 2. To change the order of the fields, click a field and then click the up or down arrow.
- 392. 21-14 Oracle Demantra Implementation Guide 3. Click Next. 11. If you chose the fixed width option earlier, you must now specify the widths of each of these fields. The Integration Interface Wizard displays the following screen. 1. For each field, specify a numeric field width. 2. Click Next. 12. The Integration Interface Wizard displays a screen that reviews your selections. 13. Review the displayed information and do one of the following: • To make further edits, click Back. • To finish the data profile, click Finish. The Integration Interface Selection screen appears. See "Creating or Modifying an Integration Interface". Specifying Series Data to Import or Export When you define a data profile for import or export (or both), a series of screens prompt you for information about the data. Tip: It is generally good to import data at the lowest level possible. If you need to load both sales series and promotion series, you probably should define separate data profiles for the two sets. You would likely want to import the promotion series at the promotion level, while you would import the sales series at some other level. To specify series data for import or export: 1. The Integration Interface Wizard prompts you for the series to import or export in this data profile.
- 393. Series and Level Integration 21-15 2. Click each series you want to include so that it appears with a check mark. Note: Be sure to select only series that have an update field. 3. Click Next. The Integration Interface Wizard prompts you for information about the time resolution and span of time to include in this data profile. 4. In the Time Scale box, specify the time resolution of the data to import or export. 5. In the Time Filter box, choose one of the following: • Choose Relative if you always want the import or export to use a time range relative to the date when you run the integration profile. • Choose Fixed if you always want the import or export to use a specific time range, regardless of when you run the integration profile.
- 394. 21-16 Oracle Demantra Implementation Guide 6. In the From Date and To Date boxes, enter values depending on the time filter you have chosen, as follows: Time Filter Box Action Relative From Date/ To Date Specify periods in both From and To with the current (computer) date as the reference point. For example: If the Time Scale is Month, and you want data starting from six months before today until six months after, enter -6 (negative) in From Date, and 6 in To Date. Fixed From Date Enter a specific date as a starting point. This is enabled only from the calendar. To Date Specify the number of periods you want to include, starting from the From date. The unit period is what you selected in Time Scale. For example: If the Time Scale is Year, From Date is 01/01/96, and you want data from then until 12/31/98, enter 3 in To Date. 7. Click Next. The Integration Interface Wizard prompts you for the levels at which the imported or exported data should be aggregated. For example, in the data profile shown here, data is imported for SKU-Ship to combinations.
- 395. Series and Level Integration 21-17 8. Double-click each level you want to use, so that it appears in the right column. 9. Optionally move a selected level to an earlier or later position in the right column. Note: The order in which the levels are listed in the right column controls the order of the fields in the staging table that Demantra creates for this data profile. 1. In the Scale Units by box, specify the factor by which all data in the import or export is to be divided. 2. In the Unit Type box, select the unit of measure to use in the imported or exported data. 3. If the Index box is displayed, choose an index from the drop-down list. 4. The Index menu lists all the time-dependent indexes and exchange rates that are associated with this unit. 5. Optionally click the Advanced button in the lower right. Oracle displays a dialog box with additional options.
- 396. 21-18 Oracle Demantra Implementation Guide 6. Select or deselect these check boxes as needed, and then click OK. 7. Click Next. 10. Now you can optionally filter the imported or exported data. 1. Find the aggregation level at which you want to filter data and move it from the Available Filter Levels list into the Selected Filter Levels list, 2. In the Available Members list, find a member that you want to include in the imported or exported data and move it into the Selected Members list. 3. Continue to move members from the Available Members list into the Selected Members list, until the latter list includes all the members you want. 4. Click Next.
- 397. Series and Level Integration 21-19 11. If you are defining an export integration profile, optionally define one or more exceptions. 1. Click Add. 2. In the new row, click the arrow to the right of the series box and select a series from the dropdown list. Note: Not all series are necessarily available for exceptions, depending upon the series definition. See "Available for Exceptions". 3. Click the arrow to the right of the operator box and select an operator from the dropdown list. 4. In the number box, type the required number. 5. You can apply additional exceptions. Select the AND or the OR radio button to specify that the relationship between the exceptions. 6. Click Next. 12. Continue to define the data profile as in the following topics. • Creating a Data Import Profile: Step 8 • Creating a Data Export Profile: Step 8 Creating an Export Profile for Any Level You can define a profile that describes how to export the members and attributes of any level.
- 398. 21-20 Oracle Demantra Implementation Guide Note: An export profile creates a database view, and the data in that view is then exported to the specified export file. The view is created only after you run the export process. To create a level export profile for any level: 1. In the Integration Interface Selection screen, double-click the New Level button. 2. Specify a name and description for the level profile. Name Unique name for the level profile. Description Optional description. Presentation Type Specifies how level members are identified in the profile: If you select Description, each member is identified by its description field. If you select Code, each member is identified by its code field. Integration Type Export. For information on level import.export profiles, see "Creating an Import Profile for a General Level".
- 399. Series and Level Integration 21-21 Export Data Select one of the following options: Full—use this to export all data Incremental—use this to export only changed data Create Workflow Select this check box to automatically create a workflow schema that uses this data profile. This option is available only if your system includes the Workflow module. Workflow Group Specify the schema group that this workflow should belong to. This option is available only if your system includes the Workflow module. 3. Click Next. • The Integration Interface Wizard displays a screen like the following. 4. Click the level to import or export. 5. Specify information about the file to export to, as follows. This file does not have to exist beforehand:
- 400. 21-22 Oracle Demantra Implementation Guide File Name Specify the path and filename of the export file. Fixed Width If selected, each data item will be trimmed or filled to a specific field width, as specified later. Delimiter A symbol used to separate the data elements in the file. Use this option only if you do not check Fixed Width. 6. Click Next. The Integration Interface Wizard displays a screen that lists the columns you can export for this level. In general, these columns correspond to identifiers and attributes of members of this level. 1. For each field that you want to export or import, click that field in the left list and then click the right-pointing arrow. 2. To change the order of the fields, click a field and then click the up or down arrow. 3. Click Next. 7. If you chose the fixed width option earlier, you must now specify the widths of each field of the export file. The Integration Interface Wizard displays the following screen.
- 401. Series and Level Integration 21-23 8. In the Field Width box, enter the required width of each field, in characters. 9. Click Preview Structure. The Integration Interface Wizard displays a screen that reviews your selections. 10. Review the displayed information, and then do one of the following: • To make further edits, click Back. • To finish the data profile, click Finish. The Integration Interface Selection screen appears. See "Creating or Modifying an Integration Interface". Creating an Import Profile for a General Level For a general level, you can define a profile that you can use to import or export the members and attributes of the level. • You can export members and attributes of a general level, but you cannot export the population attributes of the members. (The population attributes specify the item-location combinations to which each promotion applies.) • An export profile creates a database view, and the data in that view is then exported to the specified export file. The view is created only after you run the export process. • This import/export profile addresses only the members and attributes of the level. In the case of promotions, you generally also need to import or export the associated promotion series. To do so, create a data profile that includes the promotion series; see " Creating a Data Import Profile". • When you import a member that already exists, Demantra updates the member with the new attribute values. • You can define database hints to improve performance. For details,
- 402. 21-24 Oracle Demantra Implementation Guide see Creating a Data Export Profile. To create a level profile for an integration interface: 1. In the Integration Interface Selection screen, double-click the New Level button. 2. Specify a name and description for the level profile. Name Unique name for the level profile Description Optional description Presentation Type Specifies how level members are identified in the profile: If you select Description, each member is identified by its description field. If you select Code, each member is identified by its code field. Integration Type Import. For information on level export profiles, see "Creating an Import Profile for a General Level". Create Workflow Select this check box to automatically create a workflow schema that uses this data profile. This option is available only if your system includes the Workflow module.
- 403. Series and Level Integration 21-25 Workflow Group Specify the schema group that this workflow should belong to. This option is available only if your system includes the Workflow module. Insert Matrix Combinations This option specifies whether to create the combinations of the associated population attribute, if those combinations do not already exist. 3. Click Next. • The Integration Interface Wizard displays a screen like the following. 4. Click a general level. 5. If you want to export this general level, specify the following: File Name Specify the path and filename of the export file. This is the file to which the members and attributes of the general level will be exported. The associated population attributes are not exported. Fixed Width If selected, each data item will be trimmed or filled to a specific field width, as specified later.
- 404. 21-26 Oracle Demantra Implementation Guide Delimiter A symbol used to separate the data elements in the file. Use this option only if you do not check Fixed Width. 6. Click Next. 7. If you specified an export file, the Integration Interface Wizard displays a screen where you specify the columns in the file. In general, these columns correspond to identifiers and general attributes of members of this general level. Population attributes are not shown. For each field that you want to export or import, click that field in the left list and then click the right-pointing arrow. 8. To change the order of the fields, click a field and then click the up or down arrow. Click Next. If you chose the fixed width option earlier, the Integration Interface Wizard displays the following screen. 9. In the Field Width box, enter the required width of each field, in characters. Click
- 405. Series and Level Integration 21-27 Next. The Integration Interface Wizard displays a screen where you specify the staging table or tables for this level. You will import data into or export data from these tables. These tables have the following meaning: Members Table Table that contains the members of this general level Attribute Table Typically applies only at the lowest general level. This table contains the population attributes for each member. This table is used only for import and is ignored for export. Note: Make a note of the names of the staging tables. For an introduction, see "Details of the Staging Tables". 10. Click Preview Structure. The Integration Interface Wizard displays a screen that reviews your selections. 11. If you are importing data from a staging table rather than a file, click Create to create that staging table. 12. Review the displayed information and do one of the following: • To make further edits, click Back. • To finish the data profile, click Finish. The Integration Interface Selection screen appears. See "Creating or Modifying an Integration Interface". Deleting an Integration Interface To delete an integration interface: 1. Click Tools > Integration Interface.
- 406. 21-28 Oracle Demantra Implementation Guide The Create/Modify Integration Interface screen appears. 2. Click the button corresponding to the integration interface that you want to delete. 3. Click Delete. Details of the Staging Tables It is critical to understand the structure and purpose of the staging tables generated by this tool, especially as you will have to share this information with other groups or organizations who will provide the data to load. Demantra generates three kinds of staging tables, each with its own structure. This section describes the general rules that Demantra uses to create these tables. Note: It is outside the scope of this documentation to describe how to load data into the staging tables. Introduction Oracle Demantra automatically creates staging tables as follows: • For a data import profile, Oracle Demantra creates a staging table to contain the series data aggregated to the specified level or levels. • For a general level import profile, Oracle Demantra creates a staging table to contain the level members that will be added. If the general level also includes a population attribute (as in the case of promotions), then Oracle Demantra creates an additional staging table to contain the population associated with each level member. The Integration Interface Wizard initializes the names of these staging tables, but you can rename the tables within the wizard if needed. The default names start with biio_, but you should make a note of the names of your tables, as displayed within the Integration Interface Wizard. You will also have examine the structure of your staging tables, to ensure that the correct data is loaded into them. The SQL command desc tablename is useful for this task; see your database documentation. The following sections provide guidelines for understanding the fields in these tables. For each staging table, the Integration Interface Wizard also creates an error table. The error table has the same structure as the corresponding staging table, with the addition of a new column that is meant to contain any error message associated with that record. The error table has the same name as the corresponding staging table, with _err appended to the end.
- 407. Series and Level Integration 21-29 Staging Table for a Data Profile The staging table associated with a data profile is intended to contain one row for a given date and combination. For that date and combination, this row contains data for each series that is being loaded. The staging table has the following fields: 1. The first field (Sdate) is meant to contain the date for the data you are loading. This can be any bucket date that lies within the span of time specified by the data profile; see Step 2. A bucket date is the calendar date of the first day within a given bucket. For example, if you are using a weekly system starting on Monday, all dates must fall on Mondays. 2. The next fields (Level1, Level2, and so on) are meant to contain either the codes or the descriptionsfor each member to which this data applies. These are character fields and are required. • Pay attention to the Presentation Type used in the data profile. If the Presentation Type is Code, then these fields should contain the codes of the parent members. Likewise, if the Presentation Type is Description, then these fields should contain the descriptions. • As you can see, these fields are not labeled to indicate the level to which they refer. Demantra considers the order in which you listed the levels within the integration wizard; see Step 3. The Level1 field contains the first level, Level2 contains the second level, and so on. 3. The rest of the fields are meant to contain the values for each series for the selected member(s) and date. The following rules apply: • These fields are not required. • The name of each field is the same as the update field name that you specified for the series. (See "Specifying Data Properties of a Series".) This can be confusing if your series names and update field names are not the similar. • Except in the case of dropdown series, each of these fields has the same data type as the series itself. • For a drop-down series, the import field is expecting to contain the value that is shown within the drop-down list in the worksheet (rather than the internal value that is instead stored). Oracle Demantra automatically converts the imported value to the appropriate internal value.
- 408. 21-30 Oracle Demantra Implementation Guide For example, consider a drop-down series that uses the Promotion Type Level as a lookup: This series stores the values shown in the left column but displays the values shown in the right. When loading data for this series, you would provide values as shown in the right column. Oracle Demantra looks up the value that you provide, finds the corresponding internal value, and imports the internal value into the database. If Oracle Demantra cannot find the value that you provide, this record is not imported and Oracle Demantra writes an error to the corresponding error table. Main Staging Table for a Level Profile The main staging table associated with a level profile is intended to contain one row for each member. That staging table has the following fields. For all these fields, field names depend on the level you are loading. 1. The first field is meant to contain the codes of the members that you are loading. This is a character field and is required. 2. The second field is meant to contain the descriptions of the members that you are loading. This is a longer character field and is required. 3. The next fields are meant to contain the values for each immediate parent. If the Presentation Type of the Level Profile is "Code" then the values should be those of the Code field of the Parent Level. If the Presentation Type of the Level Profile is " Description" then the values should be those of the Description field of the Parent Level. In either case, these are character fields and are required. 4. The rest of the fields are meant to contain the attribute values for each member that you are loading. The following rules apply: • None of these fields are required.
- 409. Series and Level Integration 21-31 Note: If you omit values for these fields, Demantra leaves the corresponding attributes as null. Oracle Demantra does not use any level or attribute defaults during import. • The name of each field is the same as the column name that you specified for the attribute. This can be confusing if your attribute names and column names are not the same. • Except in the case of lookup attributes, each of these fields has the same data type as the attribute itself. • For a lookup attribute that is not an immediate parent level, the import field is always a character field. • For a lookup attribute of type table, the import field is meant to contain the same data as used in the display column of the table, as specified in the level editor here: For example, suppose that the approval_status table is as follows: Code DESCR 1 Submit 2 Submitted 3 Approved 4 Re-Review In this case, the staging table is expecting to receive the description fields, such as "Submit." Oracle Demantra uses the lookup table, finds the corresponding codes, and inserts those into the level table. If Oracle Demantra cannot find the given field in the lookup table, the promotion is not imported and Oracle Demantra writes an error to the corresponding error table.
- 410. 21-32 Oracle Demantra Implementation Guide • For a lookup attribute of type level that is not an immediate parent level, the import field is meant to contain the description field of the member, as displayed in the right side of the Level Members screen: For example, you would load the data "Feature" into the field for this level-type attribute. Oracle Demantra looks up this description in the level table, finds the corresponding code, and inserts that into the level table for the member that you are importing. If Oracle Demantra cannot find the given description, the promotion is not imported and Oracle Demantra writes an error to the corresponding error table. Population Staging Table for a Level Profile If you define an import profile for a promotion or other general level, Oracle Demantra also creates a staging table (for example, biio_population) to hold the population of the promotions that you are loading. This staging table describes the population of each promotion. Specifically, it contains the same information as this window:
- 411. Series and Level Integration 21-33 For each promotion, the table can contain multiple rows. Each row specifies a level and a member of that level, just as the preceding screen does (the previous screen shows that this promotion is associated with the Low Fat member of the Product Family). This table has the following structure: Field Data Type Purpose LEVEL_MEMBER varchar2 (40) Code of the promotion (or other general level) member that you are loading. FROM_date date Start date for this promotion member. UNTIL_date date End date for this promotion member. FILTER_LEVEL varchar2 (50) Name of a level, for example " Product Family" or "SKU".
- 412. 21-34 Oracle Demantra Implementation Guide Field Data Type Purpose LEVEL_ORDER number (15) Use 1 for a location-type level or 2 for an item-type level. FILTER_MEMBER varchar2 (50) Description of a member of this level, for example "Low Fat". Executing an Integration Interface Once you have created an integration interface, you can use it in either of two ways: • You can incorporate the integration interface in a workflow controlled by the Workflow Manager. To automate import or export, you add the appropriate integration interface to the workflow or workflows that you have defined for the users. You use the workflow step Transfer Step to initiate the import/export process. Internally, in this case, the APS layer performs the integration. • You can use the separate Standalone Integration Tool, which is Demantra_root/Demand Planner/Integration/aps.bat. (This tool consists of a subset of the APS, packaged as an executable file.) To use this tool, open a shell, change to the directory in which the tool resides, and enter the following command: aps.bat option "integration interface name" "profile name" Here, option must be one of the following options, to specify what to import or export: • EXPORT_DATA • IMPORT_DATA • EXPORT_LEVEL • IMPORT_LEVEL Also, integration interface name must be the name of an integration interface that has already been defined, and profile name is the name of a data profile or level profile within that interface The double quotes are needed only if there are spaces within the interface name or the profile name.
- 413. Series and Level Integration 21-35 Note: If you are importing data, and if the data profile specifies actual proportions (rather than matrix proportions), be sure to run the MANUALS_INS_INTEGRATION procedure after you run the integration interface. Checking the Integration Queue You can check the status of the integration tasks. To view the integration queue: 1. Start Demand Planner or Demand Replenisher. 2. Click Window > Integration Queue Monitor. The Integration Queue Monitor window appears. The window shows the Oracle Demantra tasks initiated for the integrated application. You can see the following information: Timestamp Date where the task was created. ACTCODE Codes specifying tasks to be performed in the integrating application. PARAMSTRING Parameter that is connected to the task. Status Status of the task, indicating the phase that the task is in. Last Refresh Time when this point of the process was reached.
- 415. Importing Supplementary Data 22-1 22 Importing Supplementary Data This chapter describes how to import data into the Demantra database by using Tools > Import File. You use this tool to import supplementary data such as lookup tables. This chapter covers the following topics: • Creating or Modifying a File Load Interface • Deleting a File Load Interface • Creating an Import Profile • Creating the Import Batch File Creating or Modifying a File Load Interface An import interfaces consists of one or more profiles. Each profile corresponds to one table; note that multiple files can be loaded into a single table. To create or modify a file load interface: 1. Click Tools > Import File. 2. The Configure Loading Text Files screen appears.
- 416. 22-2 Oracle Demantra Implementation Guide 3. Next: • To create a new interface, click File > New. Or click the New button in the toolbar. A new file load interface is displayed in the left side of the dialog box. • To edit an existing interface, click the interface. 4. Specify a name and description. 5. Make sure the interface includes at least one import profile. See "Creating an Import Profile". Deleting a File Load Interface To delete a file load interface: 1. In the tree pane, right-click the interface and then select Delete Import Interface. Creating an Import Profile Each file load interface must include at least one import profile, which describes how to import data into a single table. To create an import profile: 1. In the tree pane, right-click the interface and then select Create Import Profile. A new import profile is added to the tree. The right side of the dialog box prompts
- 417. Importing Supplementary Data 22-3 you for details on this profile. 2. Complete the fields as follows: Profile Name Specify a unique name for this import profile. File Directory The location of the files. Log Path Path and filename of the log file that will store any load errors. Load Option Select Insert to add the imported data after the last row in the table. Or select Replace to replace all the data in the table. Table The name of the existing table into which you want to load the text file data. File Format The file name, which can include wild cards. Delimiter Type Select either fixed length or delimiter. Column Delimiter Select the character used in this source file to delimit fields.
- 418. 22-4 Oracle Demantra Implementation Guide Date Format Select the date format from the drop-down box. If this source file does not contain dates, this is optional. File Name Format Select more than one file through the use of a wildcard (*). For example, dcl_his*.* selects every file with the prefix dcl_his. Number of lines to skip from begin If there is a header, this gives the number of lines to miss at the top of the table. If fixed length was selected as the delimiter type, the table column pane is activated. 3. To specify table columns (where fixed length columns have been selected), complete the fields as follows: From Pos Position in the source text file where the field starts. To Pos Position in the source text file where the field ends. Const Constant column width. If selected, the From Pos and To Pos fields are disabled for editing. 4. Click File > Save. Or click the Save button. Creating the Import Batch File To use a file load interface, you create and run a batch file that imports the data as described in the interface.
- 419. Importing Supplementary Data 22-5 To create an import batch file: 1. Select a file load interface in the tree pane. 2. Click Create Load Batch. The system displays a message is displayed when it creates the batch file. The batch file is named load_text_file_model_name.bat Note: You can also view the CTL syntax, which is the control file that SQL*Loader uses to map data into the database. Only experienced consultants should use this feature. To view the CTL syntax, click Show CTL Syntax.
- 421. Creating Workflows 23-1 23 Creating Workflows This chapter describes how to create Demantra workflows, which are automated or semi-automated processes that you can use for a wide variety of purposes. This chapter covers the following topics: • Creating or Editing Workflow Schemas • Parameters Used as Arguments for a Workflow • Deleting Workflow Schemas Creating or Editing Workflow Schemas You can edit any workflow schema that you created, but you cannot edit schemas created by other users. When you edit a schema, the changes will be used in any new instances of the workflow schema. Any instances of the schema that are currently running are unaffected. Note: If you are configuring a method that changes attribute values, the workflow must include an Edit Member Step as its first step. Otherwise, the changed values will not be saved to the database. Note: You do not have to create the whole schema in one editing session. You can save your changes and then return to edit the schema. Note: You can mark a schema as archived, which prevents it from being used. It is good practice to archive any schema that is not yet finalized, to prevent it from being used before it is ready.
- 422. 23-2 Oracle Demantra Implementation Guide To create or edit a workflow schema: 1. Log onto the Workflow Editor as described in "Logging into the Workflow Manager." 2. Do one of the following: • To create a new schema, click New Schema at the bottom of the page. • To edit a schema, click Edit in the row corresponding to that schema. Or click the schema name. The Workflow Editor appears. This screen has three panes: • The left pane lists all the available steps that you can include in the workflow. • The right pane shows the definition of the workflow itself. • The message pane at the bottom of the window contains information, such as a warning of a failed validation or confirmation of a successful save. 3. Do one of the following:
- 423. Creating Workflows 23-3 • To make the schema to be available for use, select the Live check box. • To make the schema unavailable, clear the Live check box. 4. Add the required steps to the workflow. To add a step to the workflow: 1. In the left pane, double-click the icon corresponding to the step. The Workflow Editor displays a popup window that prompts you for information about the step. 2. Specify the step properties. The properties depend on the kind of step you are adding. For details, see "Workflow Steps". 3. Click OK. The step is added to the right pane. 4. Within the right pane, optionally reposition the step icon to improve readability. 5. Connect the steps in the required order. To link two steps, click the outgoing connection handle of the first step and drag to the incoming connection handle of the next steps. Note the following rules: • An outgoing connection handle can be linked to only one following step. The Container Step is the exception. • A step that is contained within a Container Step cannot have any of its outgoing connection handles connected to other steps. • The Selection Step has multiple outgoing steps. To define the outgoing connection handles and to add the links, you use the properties dialog box. See
- 424. 23-4 Oracle Demantra Implementation Guide "Defining and Linking to Selections". 6. To specify which step starts the workflow, right-click the step and then select Set as Start step. This step is labeled with a yellow star. If a different step had previously been marked as the starting step, that mark is cleared automatically. Each schema must specify a step from which the execution starts. 7. To save your workflow to the database, click Save. Or click Back to cancel your changes. Note: When you save a schema, it is automatically checked for validity. You cannot save an invalid schema. Click Verify to verify before saving. 8. Click Back to return to the main screen. To edit an existing step: 1. Right-click the step and then click Properties. 2. To delete a step Click the step and press Delete. 3. To delete a link Click the link and press Delete. See also "Managing Workflows" Parameters Used as Arguments for a Workflow When you configure a workflow as a method, Demantra can pass arguments in memory to any method. Considered as a group, these arguments are the context dictionary for the method. For each argument, Demantra passes a variable name and its associated value. The available arguments generally fall within three categories: • System information, such as the ID of the worksheet from which the method was launched • Member information, such as the unique identifier of the member • User inputs, such as specific, keyed-in details provided in the method input dialog
- 425. Creating Workflows 23-5 box. For example, a maximum budget can be supplied to the Optimization method. In order to make these arguments available to a workflow step, you must explicitly configure the variables that each workflow step should receive. To do so, you type each variable name in the Name column of the Parameters list for that step, as follows: In this example, the first two arguments are standard member variables, from the table in "Available Arguments". These arguments can be used in any method. The remaining three arguments are input variables; these variables refer to attributes of the member. Specifically these are the names of the columns in which these attributes are stored (Product Family, Brand, and Name). Note: In the Parameters list: • The parameter names are case-sensitive. • The descriptions are not used by the method. • If a value is null in this table, then the value is taken from the member from which the method was launched. • If the value is not null, then it is used instead of the value taken from that member. Dictionary Step Functionality to update member attributes as part of a Workflow process can be beneficial: • As part of a Workflow to load new data from an external data source, such as a Supply Plan from Strategic Network Optimization. For example, set the status of Supply Plan members to 'Load In Process' to indicate to users who are viewing data that this data is being updated. • As part of a Workflow to approve a Supply Plan. For example, set the status of the Supply Plan members to 'Approved'.
- 426. 23-6 Oracle Demantra Implementation Guide The dictionary allows you to get and set capabilities on member attributes. A custom step called the 'DictionaryStep' (com.demantra.workflow.step.DictionaryStep) allows users to specify an attribute name, and a value to assign to that attribute. To accomplish this, two parameters must be specified: • Name – Attribute name. This is the name of the parameter on the dictionary that will be modified. When a level method is executed, it places all the level attributes as parameters on the dictionary. The attribute names are the internal column name in uppercase letters. The reference is case insensitive. To support passing parameters between steps, the dictionary also adds the parameter to the dictionary, if the attribute does not already exist on the member. • Value – Attribute value. This is the value that the attribute receives. The dictionary step modifies the value only if the attribute type matches the value. In other words, if the name is of type "character," it can be updated with any numeric and alphanumeric character. If the name is of type "number," it will only allow numeric updates. Values can also reference a different attribute, in this case you enclose the reference attribute internal name with parenthesis {}. Protected attributes. The dictionary step assumes the following attributes as protected because of dangerous side effects in modifying them: • member_id • current_worksheet • METHOD_STATUS • appserver_root • application_root • create_combinations_param • default_filters • combination_path • view_name • user_id • worksheet_filter • level_id • ws_id
- 427. Creating Workflows 23-7 The reference to the attribute value can be one of the following: • A fixed varchar or numerical value, such as Approved or 10,000. Strings do not require quotes around them. • A lookup on another attribute value. These are indicated using parenthesis {}, such as {other_attribute}. If a token is used, the step will look up the value of {other_attribute} and apply that value to the attribute named, such as {attribute_name}. In this case, the attributes must be of the same type, such as varchar, number, or date. • Lookups on other tables. For complex situations such as attributes that are lookups on another table, the value itself is stored in Oracle Demantra as an integer that maps to a value, such as 'Unplanned', 'Planned', 'Closed'. The dictionary step works in such a way that the value can be specified as the lookup value, such as 'Unplanned" and not the integer. This makes workflows easier to review and understand. In other words, it is easier to parse a workflow in which a step sets the status to 'Planned' than one that sets the status to '1' – the internal id of the 'Planned' status. If the attribute is defined as a lookup on a set of values, Status = {Unplanned, Planned, Closed}, the set value must be one from this set. Otherwise an exception will be thrown. • A date attribute. Broader lookups are not supported. This means the value cannot be a SQL query, such as: value = "select name from TABLE_A where x=y" The DictionaryStep ensures the value is an acceptable value for the attribute named. For example, if the attribute is of type 'number', the value must be a number. If the attribute is a lookup on a set of values, the value must be one from this set. The value is set in the dictionary. In order to ensure the value is saved to the dictionary, the final step in the workflow must be an 'Edit Member' step to ensure the dictionary context of the level method is saved back to the database. Logging is handled by removing the comment "appserver.workflow.general" in the logconf.lcf file. In case there are conflicts of parameter names a properties file (" DictionaryStep.properties") in conjunction with DictionaryStep in Common.jar that controls the name, value parameters. To leverage the Dictionary Step functionality: 1. Login to Workflow Manager. 2. Create a New Schema by selecting New Schema.
- 428. 23-8 Oracle Demantra Implementation Guide 3. On the left hand side, select Custom Step from the list of available steps. 4. Give the step a unique identifying name. Specify the class name as com.demantra.workflow.step.DictionaryStep. Also specify the name of the attribute the step will set and the value; rows are added to the parameters table by selecting Add on the right hand side. Example In the example below, the DictionaryStep will look up the attribute/parameter " scenario_status" on the dictionary, and then set it to "approved". Important: In order for methods to be able to save values to the database there should always be an "EditMemberStep" preceding the DictionaryStep. ## ## DictionaryStep properties ## # the step parameter name-token used for DictionaryStep step.param.name=name # the step parameter value-token used for DictionaryStep step.param.value=value # the step parameter reference tokens step.param.refrence.left={ step.param.refrence.right=} # log4j logger category to use logger.category=appserver.workflow.general
- 429. Creating Workflows 23-9 Level Methods. The ability to set an attribute value through a level method continues. This functionality supports workflow-based setting of member attributes, such as setting values implicitly through a workflow, versus explicitly through a user-initiated method. Relative Path Requirements Some workflows contain executable (.exe) steps that point to specific batch files to be executed. Since those paths are absolute, there is a need to correct paths to the executable files for each installation. In order to remedy the use of an absolute path in workflow steps, Oracle Demantra provides support for a relative path to files or applications referenced by workflow steps in the Demantra Workflow Manager. This parameter is automatically assigned to every launched workflow dictionary. It can be used to define a physical root path to a folder containing key files or executables leveraged by Workflow schemas in the Workflow Manager. Relative path requirements fall under two cases: • Case 1: Relative to web application folder structure, in other words, one folder above the WEB-INF folder • Case 2: Relative to the Demantra application folder, in other words, the folders in which the engine, Demand Planner desktop, Business Modeler and the integration standalone aps.bat are installed. To accommodate these two relative path requirements, two new path tokens are provided. Every running workflow schema will have these parameters in their dictionary. They will be automatically assigned by the Workflow process creator. Using these parameters eliminates the need to change workflow steps that run external files. In most cases, the reference to these files can now be relative to the install folder. Case 1: Using the appserver_root Parameter for Web Application The appserver_root parameter, located within the sys_params table, provides support for a relative path to files or applications referenced by workflow steps in the Demantra Workflow Manager. If the appserver_root parameter is null, or empty, then its default value is one folder above the WEB-INF folder of the Demantra application install. Note: Typically the folder located directly above WEB-INF is labeled as the 'demantra' folder, but this name can be changed during installation. Workflow token #appserver_root# 1. By default, this token is calculated dynamically from the context of the Demantra WEB APPLICATION, in other words, one folder above the WEB-INF folder. When the Oracle Demantra application server starts, a servlet is executed that calculates the physical path to the root of the virtual folder where Demantra is installed, and
- 430. 23-10 Oracle Demantra Implementation Guide then assigns it to a global variable that is visible in the application scope. 2. Parameter value: The parameter appserver_root exists by default in SYS_PARAMS with a null value. If its value is non null, it will take precedence over the previously calculated value. 3. Parameter description: The directory where the Demantra Web Application is deployed. If it is NULL, the default is one folder above WEB-INF 4. Security: Regular users can read the parameter values in the Business Modeler, but only consultants can modify them. For example, the relative path: #appserver_root#optimization, where #appserver_root# is defined as C:[demantra_install_directory]demantra results in the physical path: C:[demantra_install_directory]demantraoptimization. In this way, workflows can be pre-configured in an application independently of where the application is eventually installed. In other words, C: drive versus D: drive, Oracle folder versus demantra folder, and so on. The appserver_root parameter can then be used by the executable step in a workflow schema to run an executable file independently of where the application is eventually installed, thus achieving functionality that is outside the prepackaged scope of the Demantra platform. For example: appserver_root='F:Program Files[demantra_install_directory]Custom'. This takes precedence and every path that references the #appserver_root# token is calculated relative to this parameter. Note: This functionality works "out-of-the-box" on all Windows or LINUX or UNIX files systems, provided Demantra is installed cohesively, in other words, under one root folder. Any arrangement deviating from that will require custom configuration. Case 2: Using the application_root Parameter for Demantra Application 1. By default, this token takes its value from the existing installer-populated parameter "AppServerLocation". 2. Parameter value: An additional parameter application_root in SYS_PARAMS. Its default value is null. If its value is non null, it will take precedence over AppServerLocation.. 3. Parameter description: The directory where the Demantra Application is deployed. If it is NULL, the value is taken from the AppServerLocation parameter setting.
- 431. Creating Workflows 23-11 4. Security: Regular users can read the parameter values in the Business Modeler, but only consultants can modify them. For example: application_root='F:Program Files[demantra_install_directory]Custom'. This takes precedence and every path that references the #application_root# token is calculated relative to this parameter. Example Example 1: Assuming you have following path to Demantra WEB-INF: F:[demantra_install_directory]CollaboratordemantraWEB-INF, #appserver_root# will be dynamically assigned a value of: F:[demantra_install_directory]Collaboratordemantra Example Example 2: In order to run the Engine from an Exe Step, the following command line would be leveraged: #application_root#....Demand PlannerAnalytical EnginesbinEngineManager.exe • The .... path segment 'backs out' of the 'demantra' folder, and then navigates to the appropriate Engine folder. • Note that the workflow parameter is referenced as a token, #application_root#. Important: The selection of the value for the application_root parameter must be such that all files referred to by the Workflow are in folders below the common application_root. Relative Path to Promotion Optimizer To run Promotion Optimization in a new install, configure the parameters in the OPLstep of the Call Promotion Optimizer workflow schema to leverage the #application_root# parameter. For example, the following parameters are passed to the OPLStep: • Parameter: MODEL_PATH • Value: #application_root#optimizationOPLpromoopt.opl By default, the #application_root# parameter is left blank, or null. Therefore, if Demantra is installed as C:[demantra_install_directory] with a virtual directory of
- 432. 23-12 Oracle Demantra Implementation Guide 'demantra', this example parameter value results in the physical path: C:[demantra_install_directory]CollaboratordemantraoptimizationOPLpromoop t.opl Deleting Workflow Schemas You can delete any workflow schema that you created, as long as no instances of that schema are currently running. You cannot delete schemas created by other users. To delete a workflow schema: 1. Log onto the Workflow Editor as described in "Logging into the Workflow Manager ". 2. On the Workflow Management page, click Delete next to the schema. 3. Click OK to confirm the deletion.
- 433. Configuring Methods 24-1 24 Configuring Methods This chapter describes how to configure methods that the users can run within worksheets or within a Members Browser content pane.bp This chapter covers the following topics: • Configuring a New Level Method • Passing Arguments to a Method • Modifying a Level Method • Deleting a Level Method Configuring a New Level Method Note: For information on setting the Security Threshold for a method, see the section Custom Methods in the chapter Levels. You can choose whether a level method's action appears as an icon in the toolbar. By default, all seeded methods except Custom, Open, and 'Paste from Clipboard' appear as toolbar icons. The following settings appear in the General Properties screen in the Level Method wizard (Business Modeler > Configuration > Configure Methods). • Enable Toolbar Display: Indicates whether the selected method appears as a toolbar icon in all worksheets in which the method is available. For custom methods, this option is not selected by default. • Toolbar Icon Path: Path to the location of the icon you want to display on the toolbar which will be associated with this method. This field is enabled, and required, when Enable Toolbar Display is selected. To configure a level method: 1. Define a workflow schema to use as the method. See "Creating or Editing Workflow
- 434. 24-2 Oracle Demantra Implementation Guide Schemas." Note: If you are configuring a method that changes attribute values, the workflow must include an Edit Member Step as its first step. Otherwise, the changed values will not be saved to the database. 2. If the workflow includes a Custom Step, create the Java class that the step should invoke. 3. If this method should be available only within a specific worksheet, define that worksheet. See the Oracle Demantra Demand Management User's Guide or other user manual. If the method applies to all worksheets, this step is not necessary. 4. Log into the Business Modeler. 5. Click Configuration > Configure Methods. The system displays a screen showing the existing methods, including all the predefined methods. 6. Optionally click the Detail Style icon to re-display this screen with the full method names: 7. Optionally click a level name in the drop down list at the top of the screen. The screen is re-displayed with only the methods associated with that level.
- 435. Configuring Methods 24-3 8. Click the New Method icon and then click OK. Or double-click New Method. The first screen is General Properties. You can choose whether a level method's action appears as an icon in the toolbar. By default, all seeded methods except Custom, Open, and 'Paste from Clipboard' appear as toolbar icons. The following settings appear in the General Properties screen in the Level Method wizard (Business Modeler > Configuration > Configure Methods). • Enable Toolbar Display: Indicates whether the selected method appears as a toolbar icon in all worksheets in which the method is available. For custom methods, this option is not selected by default. • Toolbar Icon Path: Path to the location of the icon you want to display on the toolbar which will be associated with this method. This field is enabled, and required, when Enable Toolbar Display is selected. These settings are global and apply to all users and worksheets that access the selected Method. 9. Complete the fields in this screen as follows:
- 436. 24-4 Oracle Demantra Implementation Guide Constructor Prompts the user for values of the attributes of the new member and then adds the member in the database. Destructor Removes the member from the database. Edit Prompts the user for new values of the attributes for this member and then saves the changes. View Displays the values of the attributes for this member. Custom Optionally prompts the user for new values of the attributes for this member and then runs a workflow. Name Name of this method, to display in the right-click menu of the worksheet. The method will be visible only in the Web-based worksheets. Level Level at which this method will be available. Enabled at Specifies where this method will be available. All to make this method available in all worksheets. Worksheet to make this method available in a single worksheet. No to make this method unavailable. Worksheet Worksheet where this method will be available. Workflow The workflow that will be executed when users run this method. This field is required for methods of type Custom. Display in menu Deselect this check box if you want to hide this method or leave it selected to have it displayed in the right-click menu, as specified. Synchronous WF Specifies whether this workflow should be run synchronously or asynchronously. If the workflow runs synchronously, that means that before doing anything else, the user must wait until the workflow has completed.
- 437. Configuring Methods 24-5 Refresh Cache Specifies whether this method should refresh the local members cache. Dialog invoke button label When the user selects this method from the right-click menu, the worksheet displays a dialog box that asks the user to confirm whether to proceed or not. This option specifies the text on the "OK" option. Action when initiated Specifies what Demantra will do when the method is initiated. The choices are as follows: Do nothing (typically setting) Save Data (immediately saves the worksheet data, automatically) Ask to Save (displays a dialog box to ask if the user wants to save the worksheet data immediately) Explanation: Level methods operate on the server. If you create a level method that does something based on client expressions in the worksheet, it is necessary to save the worksheet data before launching that method. The Save Data setting is useful in such a case. In other cases, you may want to give users the option of saving data before running the method. For these cases, use the Ask to Save setting. Action when complete Specifies what Demantra will do when the method has completed its execution. The choices are as follows: Reload (reruns the worksheet) Reload and Message (reruns the worksheet and displays the output dialog box) Message and Ask (displays the output dialog box and asks if the user wants to rerun the worksheet) None (displays the output dialog box) The output dialog box is not displayed unless you have specified a message or at least one attribute to display on it. Method type For a list of Method Types see the Methods and Workflows, page 10-3 chapter. Constructor, Destructor, and Edit type methods can also run workflows. The workflow is run after the level member is created, removed, or edited.
- 438. 24-6 Oracle Demantra Implementation Guide Destructor type Applies to destructor methods. This option specifies the type of deletion: Delete member only. This deletes the member from the level table but does not delete data related to that member. Note that when parent members are deleted, their child members will be deleted as well. Delete member and data. This deletes the member from the level table and all related history/forecast data. Specifically, it deletes associated data in the MDP_MATRIX and SALES_DATA tables. Execute client class Indicates the Java class that Demantra runs when a user executes this method. Display population Controls the style of user interface to use for the population attribute, if the member has a population attribute. See "Presentation Styles for Population Attributes". 10. Click Next. The next screen is Input. Here you specify the appearance of the input screen of the method. 1. Optionally specify a message to display at the top of the input screen.
- 439. Configuring Methods 24-7 2. For each attribute that the user should be able to edit, double-click that attribute to move it from the Available Attributes column to the Selected Attributes column. 3. If the attribute should be editable, make sure the Editable check box is selected. Note: If you are configuring a method that changes attribute values, the workflow must include an Edit Member Step as its first step. Otherwise, the changed values will not be saved to the database. 4. If the attribute should also be mandatory, make sure the Mandatory check box is selected. 5. To change the order in which these attributes are displayed, use the up and down buttons on the right of the screen. 6. Click Next. Note: If you do not specify a message or at least one attribute, the method input dialog box is not displayed when the user runs the method. 11. The next screen is Output.
- 440. 24-8 Oracle Demantra Implementation Guide Here you specify the appearance of the output screen of the method. 1. Optionally specify a message to display at the top of the output screen. 2. For each attribute to display, double-click that attribute to move it from the Available Attributes column to the Selected Attributes column. 3. To change the order in which these attributes are displayed, use the up and down buttons on the right of the screen. Note: If you do not specify a message or at least one attribute, the method output dialog box is not displayed when the user runs the method. 12. Click Finish. See also "Making Changes Available to Users" Presentation Styles for Population Attributes: You can choose the presentation style for the population attribute of any level that has this kind of attribute. A population attribute is a set of item-location combinations and a range of dates. Promotions, for example, have population attributes. Other general levels could also have population attributes. Detail Style: With this style, part of the method input dialog box summarizes the item-location combinations and shows the range of dates, as follows: Here, when the user clicks Edit, Demantra displays a screen where the user can select the levels and the members of those levels. Simple Style: With this style, the method input dialog box does not summarize the population
- 441. Configuring Methods 24-9 attribute; instead it displays just the Define (or Edit) button: When the user clicks this button, Demantra displays a screen with two tabs. On one tab, the user can select the levels and the members of those levels. On the other tab, the user can specify the range of dates. Passing Arguments to a Method Demantra can pass arguments in memory to the method. Considered as a group, these arguments are the context dictionary. For each argument, Demantra passes a variable name and its associated value. Available Arguments The available arguments are as follows. Variable * Value Data Type ws_id Identifier of the worksheet from which the method was launched. Java.util.String _filter The filter population of the worksheet from which the method was launched. Represented as a list of pairs of level_id and member_id. java.util.String level_id,member_id; pairs separated by comas and semicolons. view_name The name of the active view from which the method was called. java.util.String level_id Identifier of the level from which the method was launched. java.util.String member_id Identifier of the member from which the method was launched. java.util.String
- 442. 24-10 Oracle Demantra Implementation Guide Variable * Value Data Type Combination_path The context of the selected member for the method. Will be represented as a list of pairs of level_id and member_id. java.util.String level_id,member_id population.filters (example) Applies only to promotion levels. The population attribute of the selected member. The name of this variable is based on the name of the population attribute as follows: population_attribute_name .filters Array of: com.demantra.applicationSer ver.metaDataObjects.level.lev elFilters.LevelFilterGetters population.from_date (example) Applies only to promotion levels. The from_date attribute of the selected member. The name of this variable is based on the name of the population attribute as follows: population_attribute_name .from_date java.util.Date population.to_date (example) Applies only to promotion levels. The to_date attribute of the selected member. The name of this variable is based on the name of the population attribute as follows: population_attribute_name .to_date java.util.Date
- 443. Configuring Methods 24-11 Variable * Value Data Type Attribute_column_name Values of the attributes of the selected member that are specified as inputs to the method (all attributes on the Select Input Arguments screen). The name of each variable is the same as the name of the column in which the attribute is stored. java.util.Object Passing Arguments In order to pass arguments to the method, you must explicitly configure the variables that each workflow step should receive. To do so, you type the parameter names on the Parameters list for that step; see "Properties Used as Arguments for a Method". Note: The parameter names are case-sensitive. For the input variables, you also specify which variables to pass when you configure the method. Specifically you select the desired attributes on the Select Input Arguments screen. Modifying a Level Method To modify a level method: 1. If necessary, redefine the workflow schema that you are using within the method. See "Creating or Editing Workflow Schemas". 2. Log into the Business Modeler. 3. Click Configuration > Configure Methods. The system displays a screen showing the existing methods, including all the predefined methods. 4. Optionally click a level name in the drop-down list at the top of the screen. The screen is re-displayed with only the methods associated with that level. 5. Click the method icon and then click OK. Or double-click the method name. 6. Make changes as needed and click Finish.
- 444. 24-12 Oracle Demantra Implementation Guide Deleting a Level Method To delete a level method: 1. Click Configuration > Configure Methods. The system displays a screen showing the existing methods, including all the predefined methods. 2. Optionally click a level name in the drop-down list at the top of the screen. The screen is re-displayed with only the methods associated with that level. 3. Click the method icon and then click Delete. 4. Click OK. 5. If the workflow schema is not used elsewhere, delete it. See "Deleting Workflow Schemas".
- 445. Using the Desktop BLE User Interface 25-1 25 Using the Desktop BLE User Interface This chapter describes how to configure and use the Business Logic Engine (BLE) to evaluate client expressions in worksheets. This chapter covers the following topics: • Overview of the Business Logic Engine Overview of the Business Logic Engine Purpose of the Business Logic Engine Typically many of your series use client expressions. When users run a worksheet, the client expressions are evaluated. The worksheet re-evaluates the client expressions whenever the user changes data in the worksheet. If the worksheet is at an aggregated level, Demantra Spectrum then splits the values to the lowest level (for example, SKU-store), and writes them to the database. However, when you change data in the database (for example, by importing new data), the client expressions are not automatically re-evaluated. This can be an issue if you need to use the resulting data without first opening a worksheet. For example, suppose you want to import data and then export other data calculated from the imported data. In such a case, you need to force Demantra Spectrum to evaluate the relevant client expressions. To do so, you use the Business Logic Engine, which evaluates the client expressions in a given worksheet. Running the Business Logic Engine To call the Business Logic Engine, define a workflow that includes the BLE Step. This workflow step starts the Business Logic Engine and evaluates the client expressions in the worksheet specified in the BLE Step. Note: For more information see the BLE Step section in the Workflow
- 446. 25-2 Oracle Demantra Implementation Guide Steps chapter.
- 447. Non-Engine Parameters 26-1 26 Non-Engine Parameters This chapter describes parameters unrelated to the Analytical Engine and lists their default values, if any. As indicated, most parameters are visible to all users; a few are visible only if you log in as the owner of the component. This chapter covers the following topics: • About These Parameters • System Parameters About These Parameters To access these parameters within Business Modeler, click Parameters > System Parameters. The parameters listed on the Database, System, and Worksheet tabs are in the sys_params table in the database. The parameters listed on the App Server tabs are in the aps_params table in the database. System Parameters Parameter Location Default Details A
- 448. 26-2 Oracle Demantra Implementation Guide Parameter Location Default Details AccountLockoutDuration System 60 Represents the number of seconds a user is locked out of system after 'AccountLockoutThreshold' has been reached. Value = -1: the account will be locked out until administrator unlocks it; Value >= 0 : the account will be locked for number of seconds specified. AccountLockoutThreshol d System from -1 to 3 Controls the number of failed login attempts by the user before locking user account. Value = -1 : the account will not be locked after failed login attempts. Value >= 0 : the account will be locked after failed login attempts according to this value. accumulatedOrUpdate System update For integration, this parameter specifies how to handle existing data. Use one of the following values: accumulate: Add the new data to the existing data. update: Overwrite the existing data. active_forecasts_versions System 5 Specifies how many forecast versions the Demantra database should store. Use a positive integer. AlignNumericSeries System Paramete rs > Workshe et right This parameter controls alignment of numeric series only (i.e. not date or string series). Feasible values are (left, center, right).
- 449. Non-Engine Parameters 26-3 Parameter Location Default Details align_sales_data_levels_i n_loading Database no Visible only to owner. Specifies whether to maintain matrix information (combination information that is time-independent) within the sales_data table. If the matrix information is within the sales_data table, then the Analytical Engine can use that table directly instead of internally creating the sales_data_engine table. Use one of the following values: no: Do not adjust the sales_data table for direct use by the engine. yes: Adjust the sales_data table for direct use by the engine, so that the engine can run more quickly. This adjustment is made when data is added through loading, integration, or other mechanisms. If you set this parameter to yes, it is also necessary to rewrite some database procedures. For configuration steps, see " Reconfiguring the sales_data_engine Table " . AllowUpdatesfromCalen dar Business Modeler => Paramete rs => System Paramete rs => Applicati on Server Tab => Dp Web Tab No If "Allow Updates from Calendar"="No", then users cannot move or resize boxes on any Promotion Calendars. If "Allow Updates from Calendar"="Yes", then users can update dates by moving or resizing boxes on any Promotion Calendars. applicationDateFormat Applicati on Server> App.Serv er mm-dd- yyyy The system date format.
- 450. 26-4 Oracle Demantra Implementation Guide Parameter Location Default Details applicationDateTimeFor mat Applicati on Server> App.Serv er mm-dd- yyyy hh:mm:s s The system date/time format, used where both a date and time are displayed. application_root Provides support for a relative path to files or applications referenced by workflow steps in Workflow Manager. See Parameters Used as Arguments for a Method, page 23-4. ApprovalProcessScope System "0" indicates approval scope as Global to maintain backwar ds compatib ility Approval process refers to Forecast approval process, which in turn locks approved combinations. This parameter determines the scope of the approval process. When set to '0' the scope is said to be global and causes the Approval series to be added to every worksheet in the application, thus enforcing the approval process everywhere. When set to '1' the scope is said to be specific to SALES_DATA. In this case, approval process series is added to a particular worksheet only if other SALES_DATA series are selected in the worksheet, either explicitly or through a client expression. SALES_DATA series are also referred to as "BASE 0" series. AppServerLocation System Visible only to owner. Path of the directory that contains the Web Platform Server; this is the directory that contains the Web_inf subdirectory. AppServerSupport System Do not change this parameter; this is for internal use only.
- 451. Non-Engine Parameters 26-5 Parameter Location Default Details AppServerURL System http://loc alhost:80 80/dema ntra Visible only to owner. URL of the Web Platform Server. In some cases, external notifications, such as simulation and security changes, are missed because the Web server is overloaded. If you are using IIS and JRun, you can work around this by pointing all the external notifications to the internal JRun web server rather than to the IIS and JRun connector. To do so, set the AppServerURL parameter to use the default JRun port (8100). For example: http://frodo:8100/demantra See the Oracle Demantra Installation Guide. audit_history_length System 12 Number of months of audit data to keep. Used by the CLEAN_LOG_TABLES procedure. AuditMailAddress Applicati on Server> DP Web Visible only to owner. Mail address of the BCC (blind carbon copy) recipient of Demantra email messages. AuditManual Business Modeler > System (tab) 1 (insert records to the audit tables) This parameter turns the audit trail functionality on and off. Set to 1 to enable, 0 to disable.
- 452. 26-6 Oracle Demantra Implementation Guide Parameter Location Default Details AutoRunMode Workshe et false Specifies whether Demantra automatically runs worksheets. This applies to all worksheets, in Demand Planner Web, Promotion Effectiveness, and Settlement Management as well as Demand Planner and Demand Replenisher. Use one of the following values: true: Demantra automatically runs any worksheet as soon as it is opened. It will not rerun automatically if changes are made to the data, for example, after clicking the update button. Also, it will not rerun automatically if changes are made in the wizard (apart from the Layout Designer). false: Demantra does not automatically run worksheets B . bce_log_parm Database 100 Ignore this parameter. BLEThreadPoolSize Applicati on Server> App.Serv er 4 Visible only to owner. Number of threads that the Business Logic Engine can use. BLETimeOut Applicati on Server> App.Serv er 5000 Visible only to owner. Length of time, in milliseconds, before an idle thread (of the Business Logic Engine) times out. buildNumber Applicati on Server> Collabora tor Read-only. Current build number of Demantra. C .
- 453. Non-Engine Parameters 26-7 Parameter Location Default Details ChangedDataIndicator Applicati on Server> DpWeb 1 Controls whether or not changed combinations and series values are highlighted in the worksheet. This indicator applies to unsaved changes in the worksheet (either via manual user edits or import from Excel) and serves to highlight edits before they are saved. Valid values are: • 1: display the changed data indicator • 2: Do not display the changed data indicator client.lookAndFeel.newIc ons Applicati on Server > App Server tab 1 (Yes) Controls whether the default icons are used in Demantra worksheets. Set this parameter to '0' to use icons from previous versions. System-wide setting, affects all users. Requires application server restart. client.dropdownCache.li mit APS_PA RAMS table 50 The number of dropdown lists for series that the client can cache in memory. This is an internal client implementation parameter. Client Dropdown Cache is implemented in an LRU manner so that when the limit is reached, the oldest entry will be deleted from the client cache memory. When the system needs to access this deleted dropdown list, it will be reloaded again from the server. Changing this parameter may have an effect on client memory consumption as well as on client performance. This parameter originally prevented an OutOfMemory exception on a client with huge dropdown lists. client.ssl.authentication System Paramete rs > Applicati on Server > DP Web false This parameter controls two-way (mutual) SSL authentication.
- 454. 26-8 Oracle Demantra Implementation Guide Parameter Location Default Details client.uilimitations.maxco mbs.ws Applicati on Server > Collabora tor 2000 The maximum amount of combinations that can be retrieved for a single worksheet client.uilimitations.maxce lls.ws System Paramete rs > Collabora tor 100,000 This parameter determines the maximum number of cells that will be retrieved in a single worksheet. client.uilimitations.maxce lls System Paramete rs > Collabora tor 300,000 This parameter determines the maximum number of worksheet cells that will be retrieved for a single client machine. The value is based on the total number of cells in all open worksheets. . client.uilimitations.maxdi skspace System Paramete rs > Collabora tor 200,000 This parameter sets the maximum disk space that a single client machine will allow per worksheet (in KB). It should not be necessary to change this parameter unless there is a disk space issue. client.uilimitations.warni ng Applicati on Server > Collabora tor 80 The percentage of the allowable maximum combinations, cells, or disk space at which to display to a warning message. For example, if maxcombs is 1000 and this value is 80, then a warning message will be displayed after loading 800 combinations (80% of max). If user has entered 0, it is ignored and the default value is used instead. If this value is 100, then no warnings will be displayed, since the error messages will occur at the same charsetEncoding Applicati on Server> DP Web UTF-8 The encoding character set for the XML. check_validity_installatio n Database yes Visible only to owner. Specifies whether to check the validity of the installation.
- 455. Non-Engine Parameters 26-9 Parameter Location Default Details client.en ableOpenNoteWithDoubl eClick Double-click within the worksheet table to specify whether users can access the notes dialog box by . Use one of the following values: 0 = false (users cannot use double-click to access this dialog box) 1 = true In any case, it is always possible to access this dialog box by using the right-click menu, as in Microsoft Excel. client.JREMaxMemory Applicati on Server> DP Web Visible only to owner. Maximum amount of memory (in MB) that JRE can use. The Web worksheets (Demand Planner Web, Promotion Effectiveness, and Settlement Management) use JRE. client.lookAndFeel Applicati on Server> DP Web com.dem antra.co mmon.ui .lnf.Dem antraLoo kAndFee l Specifies the user interface style. Do not change this. client.Ma xCombsLoadChunkSize Applicati on Server> DP Web 20 Visible only to owner. Maximum number of combinations to load each time the user chooses to rerun a worksheet. client.task.attachments.se curity.filetypes Applicati on Server > Collabora tor empty Defines which file types are allowed as Task attachments. default value is empty - meaning all file types are blocked. Each added extension is separated by comma. Need to add a file extension to this parameter in order to allow it as a task attachment. Example: *.html,*.htm,*.xml . *.* - means all files are allowed (mainly for backward compatibility use).
- 456. 26-10 Oracle Demantra Implementation Guide Parameter Location Default Details client.worksheet.privateA ccessType Applicati on Server> DP Web Visible only to owner. Specifies the default setting of the public/private option in the worksheet designer (used by the Web products). ClientDDCacheCapacity 10 Specifies the maximum number of distinct drop-down lists per worksheet that any client should cache. These caches are cleared when the worksheet is closed. collaborator.supportURL APS_PA RAMS table URL of the Support link, relative to http://server name/virtual directory/portal/. This link is in the upper right corner of Collaborator Workbench. collaborator.searchURL APS_PA RAMS table URL of the Search link, relative to http://server name/virtual directory/portal/. This link is in the upper right corner of Collaborator Workbench. company.name Applicati on Server> Workflo w Demantr a Name of your company; the Workflow Engine uses this string when it sends email messages when a workflow step fails. ColorCodingLevel Workshe et PE only; visible only to owner. Specifies the ID of the level that will be used to color code promotions. CopiedMembersPerProce ss Database Specifies the maximum number of members that can be copied in a single copy/paste process.
- 457. Non-Engine Parameters 26-11 Parameter Location Default Details CopyPasteIntersect Database 0 Specifies whether the total volume is preserved when an item is removed from a promotion group. This is a global parameter that applies to the entire application installation. This parameter works in conjunction with the Copy/Paste preservation Type setting on the series configuration when it is set to Volume Preservation. Valid values: • 0 - Total volume of the promotion is preserved and distributed among the remaining items in that promotion as defined by the proportionality configuration of the series. • 1 - Total value of the promotion is reduced by the volume of the item removed from the promotion if the promotion was defined at an item or aggregation level. The volume of the individual items in the promotion is retained. Important: Ensure that the proportionality of the volume series is set to the desired proportions so that volume is distributed correctly. It is recommended that you set the volume series to be proportional to itself in the series configuration. CTO_Enable_Worksheet_ Calculations System Paramete rs > System Yes This parameters controls whether planning percentages are automatically calculated when a worksheet is updated. CTO_Calc_PP_Forecast System Paramete rs > System No This parameters controls whether to forecast planning percentages.
- 458. 26-12 Oracle Demantra Implementation Guide Parameter Location Default Details CTO_HISTORY_PERIOD S System Paramete rs > System 52 This parameter specifies the number of history periods to use when calculating planning percentages based on the history of the options. CTO_PLANNING_PERC ENTAGE_CHOICE System Paramete rs > System Existing This parameters specifies the planning percentage to use when series Planning Percentage Choice calculates the dependent information in Forecast Dependent Demand. Setting this to "Existing" means to use the downloaded planning percentages from Oracle e-Business Suite that are in series Planning Percentages - Existing. The other option is to have Oracle Demantra calculate planning percentages based on history and forecast of options. D DatabaseEncoding Applicati on Server> DP Web Visible only to owner. Encoding style for Oracle Web products. For a list of possible encoding sets, see http://java.sun.com/j2se/1.4.1/docs/guide/i ntl/encoding.doc.html. Use the "Canonical Name for java.io and java.lang API." DBConnectionTimeout Applicati on Server> App.Serv er 5000 The database connection time-out period, in milliseconds. DBDateFormat Applicati on Server> App.Serv er {call pre_logo n()} The date format used in the database. DBHintProport_SalesMin SalesDate Applicati on Server> App.Serv er The database hint added by PROPORT when generating the SQL queries to find the minimum SALES_DATE for a combination.
- 459. Non-Engine Parameters 26-13 Parameter Location Default Details DBIdleTimeOut Applicati on Server> App.Serv er 1800000 The connection idle time-out period, in milliseconds. DBName Applicati on Server> App.Serv er The meaning of this parameter depends on the database used: For Oracle databases, this is the Oracle SID. See the Oracle Demantra Installation Guide. DBPassword Applicati on Server> App.Serv er Password of the database user in which the Demantra data schema resides. See the Oracle Demantra Installation Guide. DBPort Applicati on Server> App.Serv er The port number of the database server. See the Oracle Demantra Installation Guide. DBType Applicati on Server> App.Serv er oracle Indicates the type of database that Demantra is using. DBUser Applicati on Server> App.Serv er . Database user in which the Demantra data schema resides. See the Oracle Demantra Installation Guide.
- 460. 26-14 Oracle Demantra Implementation Guide Parameter Location Default Details Debug Workshe et false Applies to the desktop product. Visible only to owner. Specifies the debug mode, if any, in which the Demantra application server should run. In debug mode, the application server writes debug messages to the console. Use one of the following values: false (0): Do not write any debug messages at all. true (1): Write debug messages from all possible causes. Use this setting sparingly, because it generates a large number of messages.sql (2): Write SQL syntax from all database interactions. You can then copy and execute the SQL statements outside of the application to verify that desired results are achieved by the statements. mem (3): Write messages related to memory usage. Specifically it provides information about memory consumption at various stages of the application. You can use this information to find memory leaks. init(4): Write messages related to object initialization. This information helps you see which objects come into being as the application is working on various tasks. synch (5): Write notifications related to synchronization. Use this information to see if the various parts of the application are synchronized with one another. It is often useful to eliminate the issue of synchronicity as the source of whatever problem is being investigated. update (6): Write messages related to data updates, so that you can see what updates are passing through the system. If you are updating but do not see expected results, use this debug setting to verify first that the update has passed through in the correct way through the internal libraries.
- 461. Non-Engine Parameters 26-15 Parameter Location Default Details ts; visible only to owner. Specifies whether Demand Planner or Demand Replenisher runs in debug mode. In debug mode, these products pop up debug windows when errors occur. DebugMode Applicati on Server> App.Serv er off . DefaultContentSecurityA ccess System Specifies the default security access per member, as seen in the Security menu options. Use one of the following values: 1 (no access) 2 (read access) 3 (read/write access) 4 (full control; includes delete access) DefaultLevelSecurityAcce ss System Specifies the default security access per member, as seen in the Component menu options. Use any of the values listed for DefaultContentSecurityAccess. DeskTopNotification System http notificati on Applies to the desktop products; visible only to owner. Use one of the following values: http notification db notification dir.onlineHelp Applicati on Server> Collabora tor URL of the Help link, relative to http://server name/virtual directory/portal/. This link is in the upper right corner of Collaborator Workbench.
- 462. 26-16 Oracle Demantra Implementation Guide Parameter Location Default Details Display Graph Type Menu Applicati on Server > Dp Web no Controls whether or not the Graph Type menu is displayed on Graphs. Graph Type can be changed via a right-click menu on Graphs. Setting this parameter to "yes" will also display a menu of graph types on the left-hand side of all graphs. DSMAllShipDateDifferen ce System DSM only. Specifies the window of time that Demantra uses to search for a promotion that matches a given settlement. Express this as the number of time buckets between the promotion end date and the deduction date. The promotion end date is given by the series specified by the DSMPEShipDateSeries parameter. DSMOICheckProduct System Not used. DSMOIPercentDifference System DSM only. The maximum percent difference (of monetary amount) permitted when matching an off-invoice settlement to possible promotions. DSMOIShipDateDifferenc e System DSM only. Specifies the window of time that Demantra uses to search for a promotion that matches a given off-invoice settlement. Express this as the number of time buckets between the promotion end date and the settlement date. The promotion end date is given by the series specified by the DSMPEShipDateSeries parameter. DSMPEOIAmountSeries System DSM only. Specifies the ID of the series that stores the monetary off-invoice amounts for the promotions. This series must have an aggregating server expression. DSMPEShipDateSeries System DSM only. Specifies the ID of the series that stores the ship dates of the promotions. This series must have an aggregating server expression.
- 463. Non-Engine Parameters 26-17 Parameter Location Default Details DSM PromotionBudgetSeries System DSM only; parameter is visible only to owner. Specifies the ID of the promotion budget series to which adjustments will be made when settlements are matched to a promotion. DSMWriteOffThreshold System DSM only. Specifies the monetary amount below which Demantra automatically writes off a settlement. See "Configuring DSM" for information on configuring the writeoff process. E EnableIncrementalLoadin g System true Enables the Demantra incremental loading feature, for faster worksheet reruns. There is no user impact apart from performance. EngineBaseUrl System http://ser ver:port/ EngineM anager/ Parameter defining path to web-based analytical engine. Server:port should be modified to match application server details EnginePlatform System 1 Parameter indicates whether engine will be executed on Linux (1=default) or Windows (0) environment EnableWorksheetCaching System true Specifies whether Demantra can cache the Web worksheets. Ep_Load_Sales_LoadNull ActualQty System false When the ACTUAL_QTY field (in the T_SRC_SALES table) is null, then this parameter determines whether or not the null is loaded as valid data. If TRUE, the null value is loaded into sales data. If FALSE, the entire row is copied to the T_SRC_SALES_TMPL_ERR table and then deleted from the T_SRC_SALES table. execution.shell Applicati on Server> Workflo w Applies to the Executable Step. This parameter specifies any prefix that is needed in order to run executable steps. For example, you may need to specify the following for Unix: "./" (i.e. dot slash).
- 464. 26-18 Oracle Demantra Implementation Guide Parameter Location Default Details ExternalLogoutURL System none The URL that points to the landing page after logging out from a remote system, such as the Oracle E-Business Suite. F Controls engine scaling of demand and causals when using the Lowest Period time aggregation. If set to "No" (0), then no scaling is done. If set to "Yes" (1), then demand periods and causals are scaled (as necessary) by the engine. FillValueExportToExcel System Paramete rs > Applicati on Sever> DpWeb 0 Controls whether all rows or columns are labeled with combination information, or only one label at the first row of data per combination. Enabling this parameter allows the user to more easily create reports, such as pivot tables, within Excel. Valid values are: • 1: Fill all rows or columns with combination details. • 0: Displays combination information only once. FIRSTDAYINWEEK Database Monday First day of week to use when binning sales data into base time buckets. format.dates.longFormat Applicati on Server> Collabora tor mm/dd/y y hh:mm:s s a Long date format. format.dates.shortFormat Applicati on Server> Collabora tor mm/dd/y y Short date format. G
- 465. Non-Engine Parameters 26-19 Parameter Location Default Details GatherStatisticsThreshold Workshe et 2000 For a temporary table, minimum number of rows needed in order to automatically run Analyze Table. Used by the ANALYZE_TABLE_TMP procedure. general.copyright Applicati on Server> Collabora tor Copyrig ht Demantr a; 2005 Visible only to owner. Copyright notice displayed in lower left of the Collaborator Workbench window. general.homepage.title Applicati on Server> Collabora tor My Demand Collabor ator Title of the Collaborator Workbench home page, as used within the Collaborator Workbench title bar. general.title.text Applicati on Server> Collabora tor Demand Collabor ator Title of the browser window when it displays Collaborator Workbench. general.userList.tasks Applicati on Server> Collabora tor true Not used. general.userList.whoisonl ine Applicati on Server> Collabora tor true Specifies whether the Who's Online module is displayed. general.userList.workshe ets Applicati on Server> Collabora tor true Not used.
- 466. 26-20 Oracle Demantra Implementation Guide Parameter Location Default Details Graph.MaxLabelWidth Applicati on Server> Collabora tor 20 Maximum width of labels in graphs in Collaborator Workbench, Demand Management, and Promotion Effectiveness. If a label is longer than this width, the last characters of the label are represented by three periods (...). HintDisplayTime Paramete rs > System Paramete rs > DP Web 4 seconds Global parameter controlling duration of hint visibility when user places mouse over any object that supports tooltips, measured in seconds. Set to -1 to display the hint as long as the mouse is over the object. Set to 0 if you do not want to display hints. ImportBlockSize Applicati on Server> App.Serv er 5000 The number of rows for each commit, used during import. ImportFromFileDefaultM ode Applicati on Server> App.Serv er 0 Controls the default mode for importing data. Valid values are: • 1 - The radio button for bulk upload of all values is enabled as default. • 0 - The radio button for Upload to Worksheet and View before Saving is enabled. IncludeSummaryExportT oFile Applicati on Server> App.Serv er 1 This parameter controls whether or not a summary line is included when exporting data to a worksheet and toggles the Include Summary Line check box in the Export Data dialog. Valid values are: 4 • 1 - Summary lines are included in the export. • 0 - Summary lines are excluded from the export.
- 467. Non-Engine Parameters 26-21 Parameter Location Default Details indexspace Database TS_FOR ECAST_ X Database table space that stores the forecast table indexes, as specified during installation. indicator.synchronizeSale sData Applicati on Server> Collabora tor yes Controls the synchronization of the general level indicators in the sales_data table. initial_param Database 20M Default initial size of system table spaces. See also next_param. InsertDateTimeFormat Applicati on Server> App.Serv er MM-dd- yyyy 00:00:00 The date-time format that Demantra uses when writing to the database. When you enter dates in a worksheet, Demantra converts them to this format before writing them to the database. Insertmissingvalues Workshe et yes Not used. J L Legend.MaxLegendItem Width Applicati on Server> Collabora tor 30 Maximum width (in characters) of the legend in a graph-type content pane in Collaborator Workbench. If any lines of the legend are too longer, the last characters of those lines are represented by three periods (...). License.ExpirationMessag e Applicati on Server> App.Serv er Your Security License File has expired. Please contact support. Visible only to owner. Message shown when the system license has expired.
- 468. 26-22 Oracle Demantra Implementation Guide Parameter Location Default Details Line Chart Width Applicati on Server > Dp Web 3.00 Determines the width of lines displayed on Line Charts. LinkedDataAutoCopy System 1 - continue copy Specifies whether to continue linking source and target data after initial link. If active, the linking process continues until the launch date is reached. Possible values are: (0) do not copy or (1) continue copy. LoadDataStop System yes Specifies whether Demantra should stop loading data when it finds an error in the data. LockTimeout Database 10 Specifies the period (in seconds) between killing a database session and releasing the lock for that session. log.history Applicati on Server> Workflo w 1 The number of days for which workflow history is kept. M mail Applicati on Server> DP Web on Specifies whether Demantra is enabled to automatically send email, as specified within a workflow. Use one of the following values: yes: no: You can set this parameter during installation or later. See the Oracle Demantra Installation Guide. mail.outgoing.server APS_PA RAMS table
- 469. Non-Engine Parameters 26-23 Parameter Location Default Details mail.server Applicati on Server> Collabora tor Name or IP address of the SMTP mail server that Demantra should use when it sends email. For example: mayflower.demantra.net You can set this parameter during installation or later. For details, see the Oracle Demantra Installation Guide. mail.strings.from.system Applicati on Server> Workflo w See details. Visible only to owner. Specifies the title of the sender of Demantra email messages, for example "Demantra Solution Manager". Default: Demantra Solution mail.strings.internalerror. message Applicati on Server> Workflo w See details. Text of email message sent in case of internal error. Default: Internal error: please check database and network connections mail.strings.internalerror. subject Applicati on Server> Workflo w See details. Subject of email message sent in case of internal error. Default: Workflow internal error mail.strings.processfailur esubject Applicati on Server> Workflo w See details. Text of email message sent by a Fail-To-Execute Step. Default: Error in Process Execution mail.strings.processtermi nated Applicati on Server> Workflo w See details. Message sent when a process is terminated. Default: The following process is terminated
- 470. 26-24 Oracle Demantra Implementation Guide Parameter Location Default Details mail.strings.recovery Applicati on Server> Workflo w See details. String included in recovery email message. Default: Please handle recovery for the following process: mail.strings.taskfailuresu bject Applicati on Server> Workflo w See details. Subject of email message sent by a Fail-To-Execute Step. Default: Workflow process has failed mail.strings.taskstimedou tsubject Applicati on Server> Workflo w See details. Message sent when a task is timed out. Default: Task(s) timed out in workflow mail.strings.timeout.grou p Applicati on Server> Workflo w See details. Message sent when a task is timed out in a group step. Default: Treatment period for this task(s) was finished and one or more of the group members haven't responded. The process moved to alternative treatment. mail.strings.timeout.user Applicati on Server> Workflo w See details. Message sent when a task is timed out in a user step. Default: Treatment period for this task(s) was finished and the process moved to alternative treatment mail-password APS_PA RAMS table Visible only to owner. Password of the administrator account; this is also usually the network username of the administrator. You can set this parameter during installation or later. For details, see the Oracle Demantra Installation Guide.
- 471. Non-Engine Parameters 26-25 Parameter Location Default Details mail_recipient System no send Specifies where to send a message when error is found during data load. Use one of the following values: no send send to administrator and changer send to administrator mail-username APS_PA RAMS table Visible only to owner. Username of the administrator account from which Demantra sends email; this is usually the network username of the administrator. For example: admin You can set this parameter during installation or later. For details, see the Oracle Demantra Installation Guide. mailAddress Applicati on Server> DP Web The email address of the administrator email account. For example: [email protected] You can set this parameter during installation or later. For details, see the Oracle Demantra Installation Guide. mailProtocol Applicati on Server> DP Web mail.smt p.host Server for sending email. Demantra only supports SMTP servers. ManualRefreshAsDefault System true Visible only to owner. Specifies the default setting of the Refresh Type caching option in the worksheet designer. This parameter has an effect only if worksheet caching is enabled (through EnableWorksheetCaching). Also see WorksheetCachingAsDefault.
- 472. 26-26 Oracle Demantra Implementation Guide Parameter Location Default Details MatrixCombs Read-only. Indicates the number of lowest-level combinations in the mdp_matrix table. For use in helping you set SimMaxSize and SimWarnSize. MaxAvailableFilterMemb ers Specifies the maximum number of members that can be retrieved in the worksheet filter screen. If the user selects more members than allowed, a message asks the user to add further filtering. This limit is also applied to dropdown lists for series and attributes. MaxBackgroundLoad Applicati on Server> DP Web 20 Maximum number of worksheets that can be loaded in the background. MaxDBConnections Applicati on Server> App.Serv er 50 The maximum number of database connections for the Demantra database user. Recommended: the number of concurrent users multiplied by 2. max_fore_sales_date System Visible only to owner; read-only. The latest possible forecast sales date. max_initial_members Workshe et 100 Applies to Member Management in Demand Planner. Specifies how many members to display immediately when clicking on a parent member. max_records_for_commit Database 10000 The number of records that Demantra will insert into the database before performing a COMMIT operation. If you increase this number, the insertion will run more quickly, but you risk losing all uncommitted records in case of a crash. max_sales_date Workshe et The latest sales date loaded as history in the system.
- 473. Non-Engine Parameters 26-27 Parameter Location Default Details MaxSaleVal System 99999999 9 Maximum allowed sale value within Demantra, for any possible unit of measure. MaxSqlInExpressionToke ns Applicati on Server> App.Serv er 250 Maximum number of arguments allowed in an SQL IN clause. Valid arguments are from 1-1000. MaxUpdateThreads Applicati on Server> App.Serv er 2 The maximum number of threads to use for the update mechanism. Must be an integer and should equal the number of database CPUs plus one. MinDBConnections Applicati on Server> App.Serv er 4 The minimum number of database connections for the Demantra database user. min_numrows_for_reorg Business Modeler > System Paramete rs > Database 1000000 Only tables with at least this many rows of data will be considered by the quick or thorough check processes. min_fore_sales_date System Visible only to owner; read-only. The earliest possible forecast sales date. min_sales_date System Earliest possible sales date. mix_max_members Workshe et 50 The maximum number of members that a user will be allowed to work on. N
- 474. 26-28 Oracle Demantra Implementation Guide Parameter Location Default Details navBarContentProvider.a ddNewContentLink.Text Applicati on Server> Collabora tor New Text of the New link, which is shown at the top of the Contents menu in Collaborator Workbench. navBarContentProvider.i nterpriseContent.text Applicati on Server> Collabora tor Interpris eContent Not used. next_param Database 20M Incremental amount of storage that is added to a table space when more space is needed. See also initial_param. NpiUseWsFilter Workshe et No Specifies whether or not worksheet filters are used when executing the Find Similar, Edit Lifecycle Definitions and Remove Combinations workflows. Choose one of the following values: No (0): Do not apply worksheet filters. Yes (1): Apply worksheet filters. O OpenFileAfterExport Applicati on Server> DP Web 1 Determines if the file exported by the Export Data option is automatically opened after export. This parameter also determines if the Open File After Export check box in the Export Data dialog is selected by default. The application used to open the file is determined by the 'Opens with' application associated with files of type .xls. Valid values are: • 1- The file is automatically opened after the export data process completes. • 0 - The file is not opened after the export data process completes.
- 475. Non-Engine Parameters 26-29 Parameter Location Default Details OpenWithContext Workshe et Selected member Specifies the default setting of the Open With Context setting of the worksheet designer. Choose one of the following values: Selected member (filters only to the selected member) Selected context (filters to the selected member and any additional context where the user clicks within the Members Browser) Full Context (for Sub-Tab worksheets, this generates the full context for all Levels in the calling worksheet. For Open-With worksheets, this is the same as "Selected Context") P PasswordHistoryCount System 5 Represents the number of historical passwords which cannot be used when resetting the password. Value = -1: do not restrict reuse of historical passwords; value > 0 : restrict password reuse to specified number of passwords. PasswordResetTime System 90 Frequency with which passwords must be reset, measured in days. Warnings will be sent within 10 days of the reset deadline. Users who do not reset passwords prior to expiration will require administrator support to regain access to the application. Default reset interval is set to -1 to emulate no reset. Otherwise, should set to number of days between resets. PasswordRulesEnforcedG lobal System Yes Controls whether the system enforces password policies. For details, see Password Policies. parts_factor_source System bom_fact or.factor Visible only to owner. Table and column of BOM factor.
- 476. 26-30 Oracle Demantra Implementation Guide Parameter Location Default Details pct_increase_for_analyze Database 10 Visible only to owner. Percentage of data increase for a given table, beyond which Demantra automatically increases the table size. phase_in_out System 1 Visible only to owner. Population Date Levels Applicati on Server > Workflo w Null This parameter specifies which Levels the workflow step "Population Attribute Step" operates on. portalVersion Applicati on Server> Collabora tor Read-only. Current version number of Demantra. PromoDefaultSpan Workshe et PE only; parameter is visible only to owner. Specifies the default length of time for promotions created within a worksheet. PromoDefaultStart Workshe et start date of the workshe et PE only; parameter is visible only to owner. Specifies the default start date for promotions created within a worksheet. Use one of the following values: today (0) last loaded sales date (1) start date of the worksheet (2) ProportDefaultEnginePro file Database 0 Engine profile to be used when executing the proport procedure as part of data load or update process. 0 (default) points to the base engine profile. Value should be modified if a different engine profile is to serve as basis for proportion calculations. Q
- 477. Non-Engine Parameters 26-31 Parameter Location Default Details Query.MaxCombinations Applicati on Server> Collabora tor 10 Maximum number of combinations that can be displayed in a graph-type content pane in Collaborator Workbench, when you display a single series plotted for multiple combinations. The user receives an error if a content pane contains more than this number of combinations. Query.MaxSeries Applicati on Server> Collabora tor 10 Maximum number of series that can be displayed in a graph-type content pane in Collaborator Workbench. The user receives an error if a content pane contains more than this number of series. Query.TopBottom.MaxCo mbinations Applicati on Server> Collabora tor 30 Maximum number of combinations that can be displayed in a Collaborator Workbench content pane that contains a stacked bar chart or pie chart. The user receives an error if a content pane contains more than this number of combinations. QueryMechanisimTimeO ut Applicati on Server> App. Server 5000 Visible only to owner. The time-out period for the query notification listener, in milliseconds. The APS uses this parameter. QueryRunMaximumThre adUser ds.ini quick_check_interval Business Modeler > System Paramete rs > Database 1 This sets the interval in days between quick database health checks. The parameter is numeric, cannot be null, and has an allowable range of 1 - 7. Any value outside this range is treated as a 1. quick_check_timeout Business Modeler > System Paramete rs > Database 20 This sets a maximum running time for the quick check process, in seconds. The parameter is numeric, cannot be null, and ranges from 20 to 600.
- 478. 26-32 Oracle Demantra Implementation Guide Parameter Location Default Details R Rebuild_Sales_Table Database yes Oracle only; visible only to owner. Controls the REBUILD_TABLES procedure. Use one of the following values: yes: The REBUILD_TABLES procedure rebuilds the sales_data table. no: The procedure ignores this table. ReceiveCollaborationMes sages Workshe et true Applies to the desktop products. Specifies whether desktop users should receive messages when data is changed. Use one of the following values: yes: Users receive messages when the currently displayed data has been changed by another user (who is logged onto either the desktop or the Web products). no: Users do not receive these messages. This parameter has no effect on the Web products. RefreshTimer Workshe et 10 Applies to the desktop products. Idle event interval in seconds. RestartOnFailureInterval System 20 Ignore this parameter. Run_full_matrix_proport Database no Visible only to owner. Specifies whether to run the proport mechanism on all the item-location combinations. Use one of the following values: all combinations: Run proport on all combinations in mdp_matrix. only flagged combinations: Run proport only on the combinations that have prop_changes=1. all new combinations (2), run proport on all combinations that have new_member=1.
- 479. Non-Engine Parameters 26-33 Parameter Location Default Details RunProportInMdp_add Database yes Visible only to owner. Specifies whether to call the proport mechanism from the MDP_ADD procedure. Use one of the following values: yes: The MDP_ADD procedure runs the proport mechanism. no S SafeguardSimLock Workshe et Yes Determines if users may save manual changes to worksheet data while the Simulation, Accept Simulation, or Reject Simulation processes are running. This parameter also determines if users may execute simulations while data changes are being saved. When set to Yes, this parameter reduces the chance of system conflicts and locks between listed processes. When set to No, users may make changes to data while the simulation is running. It is recommended to only use the No value if users are not executing simulation processes on the same population with which they are interacting. sales_data_engine_index_ space Database TS_FOR ECAST_ X Database table space that stores indexes for the sales_data_engine table, as specified during installation. sales_data_engine_space Database TS_FOR ECAST_ Database table space that stores the sales_data_engine table, as specified during installation. SecurityFromSystem Workshe et false When starting the system it will try to log as the O.S user with password "system"
- 480. 26-34 Oracle Demantra Implementation Guide Parameter Location Default Details server.generalurl Applicati on Server> Workflo w URL for the workflow server, not including the portal/workflow directory. Server.SessionExpiration Applicati on Server> Collabora tor 1200 Specifies how long (in seconds) before an idle Collaborator Workbench session expires. Does not affect worksheet sessions. ServerName Applicati on Server> App.Serv er Database server name (host machine or IP address on which database resides). For example: @wysiwyg See the Oracle Demantra Installation Guide. SettlementLocationExtens ion DSM only. Specifies the internal identifier of the location-type level with which settlements should be associated. This generally represents the entity that is being billed or refunded. To set this parameter, use the installer. See the Oracle Demantra Installation Guide. SettlementProductExtensi on DSM only. Specifies the internal identifier of the item-type level with which settlements should be associated. This generally represents a promoted product or a product group. To set this parameter, use the installer. See the Oracle Demantra Installation Guide. show_legend Workshe et no Applies to the desktop products. Specifies whether to display the display the legend in new worksheets.
- 481. Non-Engine Parameters 26-35 Parameter Location Default Details SimMaxSize System 0.1 Specifies the threshold size of a simulation that is too large to run. If a user tries to perform a simulation of this size, Demantra displays a message and does not attempt the simulation. Specify this as a percentage of the total number of combinations in the mdp_matrix table. Also see SimWarnSize. The MatrixCombs parameter displays the number of combinations currently contained in this table. SimNotification System True Determines if Demantra displays a message for simulations that have not yet been accepted or rejected and already exist for the current worksheet. If set to True, when a user tries to create a new simulation Demantra displays a message indicating that a simulation already exists. If set to False, Demantra does not display a message and automatically accepts or rejects the simulation based on the user's privileges. SimWarnSize System 0.03 Specifies the threshold size of a simulation that is large enough to trigger a warning message to the user. Specify this as a percentage of the total number of combinations in the mdp_matrix table. Also see SimMaxSize. Note that the MatrixCombs parameter displays the number of combinations currently contained in this table. simulationindexspace Database TS_FOR ECAST_ X Database table space that stores indexes for the simulation tables, as specified during installation. simulationspace Database TS_FOR ECAST Database table space that stores the simulation tables, as specified during installation.
- 482. 26-36 Oracle Demantra Implementation Guide Parameter Location Default Details SortMemberbyCodeinFilt er Applicati on Server> App.Serv er 1 Controls the order in which the Worksheet Manager displays the level members on the filter screen. sortSeriesByDisplayOrder Applicati on Server> App.Serv er 1 Controls the order in which Worksheet Designer displays series If sortSeriesByDisplayOrder is 1, display the series by display_order. If sortSeriesByDisplayOrder is 0, display the series alphabetically. SPF_Default_Profile System 1 Default profile ID for SPF Failure Rate calculation. If listing more than one profile ID, separate with commas. SPF_Enable_Worksheet_ Calculations System Yes Automatically calculates planning percentages during worksheet updates. Updates to relevant series trigger BOM tree propagation if set to yes. Note: Enabling this parameter may negatively affect worksheet performance. When set to No (disabled), propagation occurs when the user modifies worksheet values. However, the new planning percentages are only displayed after the end user reruns the worksheet. SPF_History_Periods System 26 Periods of history used for to calculate planning percentages.
- 483. Non-Engine Parameters 26-37 Parameter Location Default Details SplitDataMaxQueue Database 8 The number of job queues used by the procedure UPGRADE_TO_CAL_MONTH for the data date split process. The default is eight. Valid values are from one up to double the number of CPUs used in your Demantra implementation. Note: The JOB_QUEUE_PROCESSES database parameter overrides this setting if its set smaller than SplitDataMaxQueues. Note: If you change the value of this parameter, you must re-run CAL_MONTH_SPLIT_SET_QUEUES procedure. This procedure distributes the queue to the data tables. SplitDataTimeout Database 86400 The maximum time (in seconds) that the UPGRADE_TO_CAL_MONTH procedure will wait for the job queue to complete. The default is one day (86400 seconds). START_OR_END_WEEK Visible only to owner. Specifies whether data is aggregated forward or backward in time, when loaded into Demantra through any Demantra loading mechanism. StartUpdateQueue Applicati on Server> App.Serv er yes Visible only to owner. Specifies whether to start the manual update listener. The APS uses this parameter.
- 484. 26-38 Oracle Demantra Implementation Guide Parameter Location Default Details SynchRangeStart System 1/1/1900 will be automati cally substitut ed by first period in future horizon. Controls beginning of date range to be copied from GL data to Sales_Data. SynchRangeEnd System 1/1/1900 will be automati cally substitut ed by last period in future horizon. Controls end of date range to be copied from GL data to Sales_Data. SynchDefaultProfile System 1 The default profiles for GL synchronization. (Example default profiles: "1", "2", "1,2,3", "1,3") SynchEnableBatch System Yes Enable GL synchronization in batch mode, if set to NO GL synchronization will not copy data when called. SynchEnableAdHoc System Yes Enable ad hoc GL synchronization, if set to NO ad-hoc synchronization will not copy data when called. sysadmin_email_address System Not used. sysadmin_password System Not used. sysadmin_username System Not used.
- 485. Non-Engine Parameters 26-39 Parameter Location Default Details SystemStatus Database enabled Read-only. Indicates the status of the system, according to the sessions monitor: enabled read-only mode disabled T . . . tablespace Database TS_FOR ECAST Database table space that stores the system tables, as specified during installation. task.default.option Applicati on Server> Collabora tor Select Option The default option for a selection task. task.message.length Applicati on Server> Collabora tor 254 Maximum length of task description field in characters. task.message.taskadded Applicati on Server> Collabora tor A task has been added to your tasklist Do not change. tasklist.showTimeoutTas ks Applicati on Server> Collabora tor yes Specifies whether Collaborator Workbench should show tasks that are past their due date. Possible values are 1 (show tasks that are overdue) and 0 (don't show such tasks). Default value is 1. thorough _check_interval Business Modeler > System Paramete rs > Database 30 This sets the interval in days between thorough database health checks. The parameter is numeric, cannot be null, and ranges from 7 to 60. Any value outside this range is treated as a 1.
- 486. 26-40 Oracle Demantra Implementation Guide Parameter Location Default Details thorough_check_timeout Business Modeler > System Paramete rs > Database 18000 (5 hours) This sets a maximum running time for the thorough check process, in seconds. The parameter is numeric, cannot be null, and ranges from 3600 to 36000 (1 to 10 hours). threadpool.attributesUpd ate.per_comb Maximum number of threads that a single thread can use. threadpool.attributesUpd ate.size Maximum number of allowed threads for this thread pool. This should be less than MaxDBConnections. threadpool.attributesUpd ate.timeout Idle time-out period. This specifies how long (in milliseconds) a thread is left unused before it is ended automatically. threadpool.copy_paste.pe r_process Applicati on Server> App.Serv er Visible only to owner. Maximum number of allowed threads for the copy/paste mechanism in any given process. Must be an integer and should be less than MaxDBConnections. threadpool.copy_paste.si ze Applicati on Server> App.Serv er Visible only to owner. Maximum number of allowed threads for the copy/paste mechanism. Must be an integer and should be less than MaxDBConnections. Also be sure to leave room for system processes. threadpool.copy_paste.ti meout Applicati on Server> App.Serv er Visible only to owner. Idle time out period. This specifies how long (in milliseconds) a copy/paste thread is left unused before it is ended automatically. threadpool.default.size Applicati on Server> App.Serv er 10 Visible only to owner. Not used.
- 487. Non-Engine Parameters 26-41 Parameter Location Default Details threadpool.default.timeo ut Applicati on Server> App.Serv er 10000 Visible only to owner. Not used threadpool.level_method. block Applicati on Server> App.Serv er wait Visible only to owner. Specifies how the level methods should access this thread pool. Use one of the following values: wait: Wait for a free thread. abort: Do not wait for a free thread. threadpool.level_method. size Applicati on Server> App.Serv er Visible only to owner. Maximum number of allowed threads for the level method mechanism. Must be an integer and should be less than MaxDBConnections. Also be sure to leave room for system processes. threadpool.level_method. timeout Applicati on Server> App.Serv er Visible only to owner. Idle time out period. This specifies how long (in milliseconds) a level method thread is left unused before it is ended automatically. Recommended setting: 300000 (5 minutes) threadpool.query_run.siz e Applicati on Server> App.Serv er Visible only to owner. Maximum number of allowed threads that Demantra can use to run a worksheet. If this number is missing or negative, the worksheet run mechanism does not use threads. Must be an integer. Should be less than MaxDBConnections. Also be sure to leave room for system processes. threadpool.query_run.tim eout Applicati on Server> App.Serv er 180000 Visible only to owner. Idle time out period. This specifies how long (in milliseconds) a worksheet thread is left unused before it is ended automatically. This parameter is ignored if threadpool.query_run.size is negative or missing.
- 488. 26-42 Oracle Demantra Implementation Guide Parameter Location Default Details threadpool.update.size Applicati on Server> App.Serv er 10 Visible only to owner. Maximum number of allowed threads for the update mechanism. Must be an integer and should be less than MaxDBConnections. Also be sure to leave room for system processes. threadpool.update.timeo ut Applicati on Server> App.Serv er 10000 Visible only to owner. Idle time out period. This specifies how long (in milliseconds) an update thread is left unused before it is ended automatically. Timeresolution System week Read-only. The base time unit. That is, the smallest possible unit of time visible in Demantra: day, week, month Read-only. The base time unit. That is, the smallest possible unit of time visible in Demantra: day, week, month TrendDampPeriod System 0 The number of time periods used in application of residual dampening. The last group of periods is not dampened with previous groups dampened in an exponential manner. When set to 0 no dampening is applied. U update_dead_comb Workshe et "1" If this parameter is set to 1, then all combinations, even those with a prediction_status of 99 (dead), will be updated; i.e. they will be allocated a forecast. If this parameter is set to 0, then any combinations with a status of 99 that have historical values will be updated. If this parameter is set to 2, then any combinations with a status of 99 will not be updated.
- 489. Non-Engine Parameters 26-43 Parameter Location Default Details update_units_by_items Database by items Specifies how to update units for the INSERT_UNITS procedure. Use one of the following values: by items: The procedure operates item by item. This is faster but less accurate. by combinations: The procedure operates on individual combinations. This is slower but accurate. UpdateAudit Database no Visible only to owner. Specifies whether the MANUALS_INS_INTEGRATION procedure updates the audit tables. This procedure is used when data is imported at an aggregated level. UpdateQueueTimeout Applicati on Server> App.Serv er 5000 Visible only to owner. The time-out period for the manual update listener, in milliseconds. The APS uses this parameter. UpdateThreadTimeout Applicati on Server> App.Serv er 5000 The time-out period for the update threads, in milliseconds. The APS uses this parameter. UseDateRangeMatrix This parameter controls whether the worksheet mechanism uses internal data structures can improve the performance of worksheets that include promotions. You can control whether worksheets use these structures; the system uses them automatically for other purposes. If you enable this option, the largest benefit occurs in cases where promotions are long (and have many rows of data). This affects only worksheets that include general levels that have population attributes.
- 490. 26-44 Oracle Demantra Implementation Guide Parameter Location Default Details useGLExceptions Applicati on Server> Collabora tor true Visible only to owner. Specifies whether Demantra respects worksheet exceptions that refer to promotion series. Use one of the following values: true: Demantra does consider worksheet exceptions that refer to promotion series. This affects the behavior of the worksheet and of the BLE Step. The worksheet behavior, however, is not intuitive; the Members Browser displays all the combinations. When the user clicks on a combination that does not meet the criteria, the worksheet then displays a message saying that the combination is empty. false: Demantra ignores worksheet exceptions that refer to promotion series. This means that such exceptions are useless, but the worksheets behave more intuitively. UseItemsAggri Workshe et no Specifies whether to use data from the branch_data_items rather than the usual table. The branch_data_items table aggregates data by item, for improved performance in worksheets or within the Business Logic Engine. You can use this table only when you do not need to view specific locations or filter by location. Use one of the following values: yes: Whenever possible, Demantra uses data from the branch_data_items. In this case, the first time the engine runs, there will be a long update of all rows in sales_data. Also make sure that the DYNAMIC_SYNC procedure runs periodically to keep the branch_data_items table current. no: Demantra uses the usual tables.
- 491. Non-Engine Parameters 26-45 Parameter Location Default Details UserListContentProvider. commontitle Applicati on Server> Collabora tor Who's Online The title of the Who's Online pane in Collaborator Workbench. UserTitleContentProvider .TimeToSleep Applicati on Server> Collabora tor 10000 To update the Who's Online pane in Collaborator Workbench, Demantra polls at regular intervals to see which users are online. This parameter specifies the length of time (in milliseconds) between successive polls. V VisibleUserName User Name Determines how a user is identified in Demantra. This parameter is only available to administrators. Possible values are: User Name First Name Last Name . W workflow.group Applicati on Server> Workflo w Comma-separated list of groups whose users are authorized to log into the Workflow Editor. Use the group names as specified in the Business Modeler. In order to log into the Workflow Editor, these users also must have System Manager permission level. See "Providing Access to the Workflow Editor". worksheet.data.comb.blo ck_size Applicati on Server > App.Serv er 1 Indicates whether we want to retrieve all WS Combinations in one sql (value=0) or with a block of Combinations in the sql (value>0).
- 492. 26-46 Oracle Demantra Implementation Guide Parameter Location Default Details WorksheetBeanContentPr ovider. memberCombinationsLi mit Applicati on Server> Collabora tor 4 Maximum number of combinations in a worksheet. WorksheetCachingAsDef ault System Specifies the default setting for the Cache Worksheet Data check box in the worksheet designer. This parameter has an effect only if worksheet caching is enabled (through EnableWorksheetCaching). Also see ManualRefreshAsDefault. WorksheetDefaultDateCh oiceMethod Workshe et relative to today Visible only to owner. Controls the default start date for Web worksheets, as seen in the worksheet designer. Use one of the following values: relative to today (0) relative to last loaded sales date (1) WorksheetDefaultSpan Workshe et 104 (for a weekly system) Visible only to owner. Specifies the default length of time for a Web worksheet, in base time units. Must be an even number, 2 or greater. Worksheet Focus on Refresh Business Modeler > Paramete rs > System Paramete rs > Applicati on Server > Dp Web Members Browser This parameter determines which area of the worksheet will have the cursor focus after making changes to the worksheet and re-running it. Available values are "Members Browser" (the default) and "Crosstab" (cursor focus will be in the table).
- 493. Database Procedures 27-1 27 Database Procedures This chapter covers the following topics: • Recommended Procedure Scheduling • Data Load Procedures • ANALYZE_SCHEMA • API_CONFIG_SETTLEMENT • APPPROC_CDP_LAUNCH_MGMT_VIEWS • APPPROC_SET_POPULATION_DATES • APPPROC_REBUILD_CONTEXT_CACHES • CHAINING • CHECK_REORG • CLEAN_ENGINE_PROFILES • CLEAN_LOG_TABLES • COMPUTE_STD_ERR • CREATE_OPT_STRUCT • CREATE_PE_STRUCT • DELETE_FORE_COL • DELETE_INVALID_GL_POPULATION • DROP_TEMP_TABLES • EP_LOAD_MAIN • EP_LOAD_MDP_LEVEL • EP_LOAD_ITEMS • EP_LOAD_LOCATIONS • EP_LOAD_SALES
- 494. 27-2 Oracle Demantra Implementation Guide • EXECUTE_PROFILES • EXPOSE_PROMOTIONS • INSERT_UNITS • MANUALS_INS • MANUALS_INS_INTEGRATION • MANUALS_INS_RECOVERY • MDP_ADD • POP_ALL_MATCH_PROPOSAL • POP_OI_MATCH_PROPOSAL • PROPORT • PRE_LOGON • REBUILD_INDEXES • REBUILD_SCHEMA • REBUILD_TABLES • REORG • REPLACE_APOSTROPHE_LEVELS • SCHEDULED_CLEANUP_TASKS • UPGRADE_TO_SHAPE_MODELLING • Non-Engine parameters Related to Database Performance Recommended Procedure Scheduling The following table lists the most important predefined procedures provided by Demantra. You should schedule all these procedures to run periodically from workflows. Procedure Recommended to run... ANALYZE_SCHEMA run after the first import, and then once per week (for example, by running the Scheduled Cleanup Tasks workflow) run after running REBUILD_INDEXES and REBUILD_TABLES CHAINING every 10 seconds
- 495. Database Procedures 27-3 Procedure Recommended to run... COMPUTE_STD_ERR once a week, if you are performing standard error calculations* DROP_TEMP_TABLES once per week (for example, by running the Scheduled Cleanup Tasks workflow) MANUALS_INS every 10 seconds, if you are using the desktop products (Demand Planner and Demand Replenisher) REBUILD_INDEXES** once a week, on a weekend day* REBUILD_TABLES** run after the first import run once a week, on a weekend day* SCHEDULED_CLEANUP_TASKS once a week, on Saturdays (this is the default) *It is recommended that you run each of these procedures at off hours and at staggered times to avoid deadlock issues. **These procedures require tablespace equal in size to the current tablespace. Data Load Procedures This section describes specific rules for the data load procedures. The data load procedures are: • EP_LOAD_MAIN • EP_LOAD_MDP_LEVEL • EP_LOAD_ITEMS • EP_LOAD_LOCATIONS • EP_LOAD_SALES • MDP_ADD The parameters that affect these procedures are located in the DB_PARAMS table. After modifying any of these parameters, the script "call_dm_build_procedures" must be run. To do this, a system administrator can connect to the Demantra schema using Oracle
- 496. 27-4 Oracle Demantra Implementation Guide SQL developer and enter: execute call_dm_build_procedures ANALYZE_SCHEMA Oracle only. Analyzes all the tables in the schema. By default, this procedure runs once a week as part of the Scheduled Cleanup Tasks workflow. API_CONFIG_SETTLEMENT DSM associates settlements with an item and a location level and is shipped pre-configured to an existing item and location level. If you want to change this information, run the procedure API_CONFIG_SETTLEMENT. This procedure: • Updates the item and location levels with which settlements should be associated • Upgrades the Settlement Location alias level to point to the new location level • Ensures that all standard procedures reflect the new settlement levels For details, see "Setting up Database Structures" in the Configuring DSM chapter. APPPROC_CDP_LAUNCH_MGMT_VIEWS This procedure recreates the launch management views with updated database parallel hints. Use this procedure if any of the parallel hint parameters used in the views are modified. APPPROC_SET_POPULATION_DATES This stored-procedure is called from the "Population Attribute Step" workflow step. It is used to set Population Dates on Population Attributes. It can be customized if the pre-seeded logic does not meet the business requirements. APPPROC_REBUILD_CONTEXT_CACHES The APPPROC_REBUILD_CONTEXT_CACHES stored procedure automates the creation of caches for worksheets that use the Open With functionality and where the Open With Context for the worksheet is set to Selected Member. This procedure simulates the user open with action which allows worksheet caches to be created in a batch process thereby eliminating the need to build the cache the first time the user opens the worksheets.
- 497. Database Procedures 27-5 Note: This procedure improves the efficiency of building common caches by creating a cache for one user and copying it to other users instead of creating the cache for each user. This is accomplished by specifying a User Group. When common caches are detected, the cache is created for one of the Users in the User Group and copied to other Users in the User Group that require the same cache. This procedure checks User security only on the Open With Level when creating and copying caches. It is important to structure the User Groups to be used by this procedure so that all Users have common security for all levels other than the Open With Level of the Worksheet that the cache is being built for. This procedure must be incorporated into a workflow that also runs the Worksheet Cache Step. See Worksheet Caching, page 9-12 > Creating a Workflow to Build Worksheet Caches Automatically. The APPPROC_REBUILD_CONTEXT_CACHES stored procedure has the following requirements: • Worksheet • Level • User Group The worksheet to be cached: • Must be a public worksheet • Must have caching enabled • Must be selected as a Worksheet for Levels in the Component definition in the Business Modeler The level • Must be selected for Open With on the worksheet • Must contain an attribute named CAN_CREATE_CW which must be set to 1 for all members to build caches for. For details, see Identifying the Members of the Open With Level to Cache in this section. In addition, a User Group must exist that contains all of the Users for which caches are to be built. Following are the parameters for the APPPROC_REBUILD_CONTEXT_CACHES stored procedure. You set these parameters in the Stored Procedure Step Properties dialog in Workflow Manager: • WORKSHEET_ID: The internal ID of the worksheet to be cached
- 498. 27-6 Oracle Demantra Implementation Guide • LEVEL_ID: The internal ID of the Open With level for the worksheet • GROUP_ID: The internal ID of the User Group containing the Users for which caches will be created • RUN_MODE: • 1: Pre-process called before the Worksheet Cache Step to create master caches for the first User in the User Group and Level members • 2: Post-process called after the Worksheet Cache Step to create copies of master caches for remaining Users in the User Group Identifying the Members of the Open With Level to Cache For each Member of the Open With Level for the Worksheet being cached, the APPPROC_REBUILD_CONTEXT_CACHES stored procedure requires a flag to indicate whether or not the member should be cached. To set this up, perform the following: 1. In Business Modeler (Configure > Configure Levels), on the Open With level for the worksheet that you want to cache, create an attribute named CAN_CREATE_CW. 2. Set the value of the CAN_CREATE_CW attribute to 1 for all Level Members that you want to build caches for. You can set this value through any method you select such as a worksheet, data load process, or database procedure. This setting applies to all worksheets that are cached using the APPPROC_REBUILD_CONTEXT_CACHES stored procedure for the particular Open With level. CHAINING Checks the chaining queue for any pending chaining operations; performs those operations. By default, this procedure runs once a week as part of the Scheduled Cleanup Tasks workflow. CHECK_REORG This procedure accepts the level of the check (quick or thorough) and then runs a check of the database tables (see Database Health Check, ).
- 499. Database Procedures 27-7 Description This determines whether a quick or thorough database check will be performed. The quick check usually takes less than 20 seconds (depending on data size), whereas the thorough check can take several hours. Values "Q" (for quick) or "T" (for thorough) Default Value (None) This procedure is included in the package TABLE_REORG. CLEAN_ENGINE_PROFILES This procedure removes rows from all general level (GL) tables in which the IS_SELF column is 0. A table name can be passed in as a parameter. If no table name is passed, the procedure will operate on all GL tables in which IS_SELF=0. The workflow "Clean Engine Profiles" calls the CLEAN_ENGINE_PROFILES procedure. This workflow does not run automatically by default; Oracle recommends that you schedule it to run once every two weeks. The hints that control how this procedure functions are described in the table below.
- 500. 27-8 Oracle Demantra Implementation Guide Parameter Location Default Engine mode Details Tuning EngineHintCl eanupIsSelf Parameters>S ystem>Syste m + parallel(@TBL _NAME@ 2) PE Only This is a hint for the DELETE statement which can improve system performance. Specify the desired number of concurrent cores that can be used for a parallel operation. The hint applies to DELETE portions of a statement as well as to the table scan portion. Using the default value will improve performance of the delete operation. Global setting only
- 501. Database Procedures 27-9 Parameter Location Default Engine mode Details Tuning EngineClean upIsSelfCond ition Parameters>S ystem>Syste m null PE Only The DELETE statement deletes rows from all general level tables where IS_SELF =0. To add another condition, you can specify it in the EngineClean upIsSelfCond ition field (multiple conditions can be specified, separate each condition using the SQL 'AND' operator). Global setting only CLEAN_LOG_TABLES Removes old data from the db_exception_log and audit_trail tables. To determine which data to keep, this procedure checks the value of the audit_history_length parameter, which you can access in the Business Modeler. By default, this procedure runs once a week as part of the Scheduled Cleanup Tasks workflow. COMPUTE_STD_ERR Performs any pending standard error calculations. CREATE_OPT_STRUCT Creates the default database structures needed for the Promotion Optimization module. The installer runs this procedure, if you choose to set up a default Promotion Optimization environment.
- 502. 27-10 Oracle Demantra Implementation Guide For details, see "Other Configuration for PTP". CREATE_PE_STRUCT Creates the default database structures needed for Promotion Effectiveness. Demantra provides the Promotion Effectiveness (PE) structures by default. Therefore, the CREATE_PE_STRUCT procedure should be run only after creating a new or custom data model from scratch. This is not common or recommended. Only in this scenario would these structures not already be in place. To determine whether PE structures exist, search the DB for table names containing %PROMOTION%. For details, see "Configuring Promotion Effectiveness". DELETE_FORE_COL Deletes all the history data from the current forecast column, for all combinations for which prediction_status equals 1. The procedure deletes history, starting at the date given by max_sales_date - ForecastGenerationHorizon. ForecastGenerationHorizon is an engine parameter; see Engine Parameters, Analytical Engine Guide. DELETE_INVALID_GL_POPULATION Checks the promotion_data table for invalid records and deletes them. DROP_TEMP_TABLES Deletes temporary database tables that are created, for example, when modifying worksheets, launching integration profiles, or running the Analytical Engine. By default, this procedure runs once a week as part of the Scheduled Cleanup Tasks workflow. EP_LOAD_MAIN Performs the data loading described in the Data Model Wizard. Specifically, this procedure loads data from the staging tables specified within the Data Model Wizard and writes records in sales_data and other internal tables as needed. This procedure is created by the Data Model Wizard and thus is different in different implementations. Note: After modifying any of the parameters in this section, you must
- 503. Database Procedures 27-11 run a script that will regenerate this procedure and allow the changes to take effect. For details, see Data Load Procedures, page 27-3. EP_LOAD_MDP_LEVEL EP_LOAD_MDP_LEVEL is the main method of populating matrix levels. During data load, information from sales master that is not time dependant can be loaded to these levels. The following parameters are used with the EP_LOAD_MDP_LEVEL procedure: Ep_Load_Mdp_LevelUseParallelDML Description If you run DML statements, any objects with a parallel degree configured will be run in parallel. Individual parallel hints setting will supersede this setting. Values TRUE - LOAD_MDP_LEVEL should use PARALLEL DML on objects that are set as parallel. FALSE - LOAD_MDP_LEVEL should not use PARALLEL DML on objects that are set as parallel. Default Value FALSE Ep_Load_Mdp_LevelUseParallel Description Set this parameter to FALSE when you do not want to use parallel hints in the EP_LOAD_MDP_LEVEL script. It should be set to FALSE when database resources may be limited. Values TRUE - MDP_ADD will use PARALLEL hints. FALSE - MDP_ADD will not use PARALLEL hints. Default Value TRUE
- 504. 27-12 Oracle Demantra Implementation Guide Ep_Load_Mdp_LevelUseOneCommit Description Set this parameter to FALSE if the database is relatively small and has smaller rollback segments. If your database is powerful and thus sufficient resources are available, then set this parameter to TRUE. Values TRUE - EP_LOAD_MDP_LEVEL executes only one commit. FALSE - EP_LOAD_MDP_LEVEL executes multiple commits. Default Value FALSE Ep_Load_Mdp_LevelSetProp_Changes Description This parameter determines whether the MDP_ADD process will set PROP_CHANGES to 1. PROP_CHANGES are used to calculate status and proportions of MDP_MATRIX combinations. This parameter should be set to FALSE if another process calls the PROPORT procedure or status and proportions are defined during a different process. Values TRUE - Set PROP_CHANGES = 1 during EP_LOAD_MDP_LEVEL.FALSE - Do not set PROP_CHANGES = 1 during EP_LOAD_MDP_LEVEL. Default Value FALSE Ep_Load_Mdp_LevelDisableEnableIndexes Description Controls whether to drop indexes on a table when loading MDP_LEVEL information. MDP indexes are rebuilt after execution.
- 505. Database Procedures 27-13 Values TRUE - Disable and then enable (rebuild) indexes. FALSE - Indexes remain in place during the updates. Default Value FALSE Ep_Load_Mdp_LevelIndexRebuildDegree Description If rebuilding indexes using Ep_Load_Mdp_LevelDisableEnableIndexes, this parameter specifies which degree to use. Values --- Default Value 4 Ep_Load_Mdp_LevelUseMerge Description This parameter controls the MDP_MATRIX update method. Choose either Merge or Cursor .For larger data sets, with appropriate database resources, MERGE should be faster. Values TRUE - Use the MERGE update method.FALSE - Use the CURSOR update method. Default Value TRUE Details DELETE mdp_matrix WHERE NOT EXISTS (SELECT ... SALES_DATA s) AND NOT EXISTS (SELECT hint PROMOTION_DATA s))
- 506. 27-14 Oracle Demantra Implementation Guide DBHintEp_Load_Mdp_LevelMerge Description SQL hint to use when Ep_Load_Mdp_LevelUseMerge is set to MERGE. This parameter defines the degree used during the Merge. Values TRUE - Use the MERGE update for the MDP_MATRIX cache columns - FROM_DATE and UNTIL_DATE.FALSE - Use a cursor loop. Default Value + full (a) parallel (a 20) Details Example: MERGE hint UPDATE INTO MDP_MATRIX Note: After modifying any of the parameters in this section, you must run a script that will regenerate this procedure and allow the changes to take effect. For details, see Data Load Procedures, page 27-3. EP_LOAD_ITEMS The EP_LOAD_ITEMS procedure is the main method by which items are loaded into Demantra internal tables. The procedure validates item hierarchy compliance and uploads all item dimension information into internal tables. The following parameters can be used with the EP_LOAD_ITEMS procedure: Ep_Load_ItemsUseParallelDML Description If you run DML statements, any objects with a parallel degree configured will be run in parallel. Individual parallel hints setting will supersede this setting. Values Default Value FALSE
- 507. Database Procedures 27-15 Ep_Load_ItemsUseParallel Description Set this parameter to FALSE when you do not want to use parallel hints in the EP_LOAD_ITEMS script. This parameter should be set to FALSE if your database has limited resources. Values TRUE - EP_LOAD_ITEMS will use parallel hints. FALSE - EP_LOAD_ITEMS does will not use parallel hints. Default Value TRUE Ep_Load_ItemsUseOneCommit Description Set this parameter to FALSE if your database is relatively small and has smaller rollback segments. If your database is powerful and thus sufficient resources are available, then set this parameter to TRUE. Values TRUE - EP_LOAD_ITEMS executes only one commit. FALSE - EP_LOAD_ITEMS may execute more than one commit. Default Value FALSE DBHintEp_Load_ItemsMergeMDP Description Hint for sub-select in merge statement with MDP_MATRIX. Used in the same statement with hint DBHintEp_Load_ItemsMergeMDP. The total degree of both hints should not exceed number of database CPUs. Values --- Default Value + parallel (a4)
- 508. 27-16 Oracle Demantra Implementation Guide Details MERGE INTO mdp_matrix (SELECT hint ) Ep_Load_ItemsDisableEnableMDPIndexes Description This parameter disables indexes before performing the update on MDP_MATRIX and then rebuilds them when the update is complete. This parameter should be used only if the customer data set is very large and rebuilding indexes is faster than updates with indexes enabled. Note: This parameter is not currently used. Values TRUE - Indexes on columns updated in the MDP_MATRIX MERGE update are disabled before the update and are rebuilt after the update. FALSE - Indexes remain during the update. Default Value FALSE Details This parameter is not currently used. Ep_Load_ItemsIndexRebuildDegree Description If EP_LOAD_ITEMS rebuilds indexes, this parameter controls what parallel degree to use. The value of this parameter should not exceed the number of available CPUs. Values --- Default Value 4 Details This parameter is not currently used. Note: After modifying any of the parameters in this section, you must
- 509. Database Procedures 27-17 run a script that will regenerate this procedure and allow the changes to take effect. For details, see Data Load Procedures, page 27-3. EP_LOAD_LOCATIONS The EP_LOAD_LOCATIONS procedure is the main method by which locations are loaded into Demantra internal tables. The procedure validates location hierarchy compliance and uploads all Location Dimension information into internal tables. The following parameters can be used with the EP_LOAD_LOCATIONS procedure: Ep_Load_LocationsUseParallelDML Description If you run DML statements, any objects with a parallel degree configured will be run in parallel. Individual parallel hints setting will supersede this setting. Values TRUE - EP_LOAD_LOCATIONS should use PARALLEL DML on objects that are set as parallel. FALSE - EP_LOAD_LOCATIONS should not use PARALLEL DML on objects that are set as parallel. Default Value FALSE Ep_Load_LocationsUseParallel Description Set this parameter to FALSE when you do not want to use parallel hints in the EP_LOAD_LOCATIONS script. Set this parameter to FALSE if your database has limited resources. Values TRUE - EP_LOAD_LOCATIONS will use parallel hints. FALSE - EP_LOAD_LOCATIONS will not use parallel hints. Default Value TRUE
- 510. 27-18 Oracle Demantra Implementation Guide Ep_Load_LocationsUseOneCommit Description Set this parameter to FALSE if your database is relatively small and has smaller rollback segments. If your database is powerful and thus sufficient resources are available, then set this parameter to TRUE. Values TRUE - EP_LOAD_LOCATIONS executes only one commit. FALSE - EP_LOAD_LOCATIONS may execute more than one commit. Default Value FALSE DBHintEp_Load_LocationsMergeMDP Description Hint for merge statement with MDP_MATRIX. Used in the same statement with hint DBHintEp_Load_Locations_MergeMDP_GLO B. The total degree of both hints should not exceed number of database CPUs. Values --- Default Value + parallel (m4) Details MERGE (hint) INTO mdp_matrix (SELECT) DBHintEp_Load_LocationsMergeMDP_GLOB Description Hint for sub-select in merge statement with MDP_MATRIX. Used in the same statement with hint DBHintEp_Load_LocationsMergeMDP. The total degree of both hints should not exceed number of database CPUs. Values ---
- 511. Database Procedures 27-19 Default Value + parallel (a4) Details MERGE INTO mdp_matrix (SELECT hint) Ep_Load_LocationsDisableEnableMDPIndexes Description This parameter disables indexes before performing the update on MDP_MATRIX and then rebuilds them when the update is complete. This parameter should be used only if your data set is very large and rebuilding indexes is faster than updates with indexes enabled. Note: This parameter is not currently used. Values TRUE - EP_LOAD_LOCATIONS disables indexes on columns updated in the MDP_MATRIX MERGE update. FALSE - EP_LOAD_LOCATIONS does not disable indexes on columns updated in the MDP_MATRIX MERGE update. Default Value FALSE Ep_Load_LocationsIndexRebuildDegree Description If EP_LOAD_LOCATIONS rebuilds indexes, this parameter controls what parallel degree to use. The value of this parameter should not exceed the number of available CPUs. Note: This parameter is not currently used. Values --- Default Value 4
- 512. 27-20 Oracle Demantra Implementation Guide Note: After modifying any of the parameters in this section, you must run a script that will regenerate this procedure and allow the changes to take effect. For details, see Data Load Procedures, page 27-3. EP_LOAD_SALES The EP_LOAD_SALES procedure loads lowest level time-dependant information into the Demantra SALES_DATA table. This information includes historical data as well as other time-varying information such as price, booking, and shipments. The following parameters can be used with the EP_LOAD_SALES procedure. DBHintEp_Load_SalesUseParallelDML Description If you run DML statements, any objects with a parallel degree configured will be run in parallel. Individual parallel hints setting will supersede this setting. Values TRUE - EP_LOAD_SALES will use PARALLEL DML on objects that are set as parallel. FALSE - EP_LOAD_SALES will not use PARALLEL DML on objects that are set as parallel. Default Value FALSE DBHintEp_Load_SalesUseParallel Description Set this parameter to FALSE when you do not want to use parallel hints in the EP_LOAD_SALES script. Should be set to FALSE when database resources are limited. Values TRUE - EP_LOAD_SALES will use PARALLEL hints. FALSE - EP_LOAD_SALES will not use PARALLEL hints. Default Value TRUE
- 513. Database Procedures 27-21 DBHintEp_Load_SalesInsertErr Description When checking data for errors. EP_LOAD_SALES will send invalid rows to error tables. This parameter enables hints on the SELECT statement to determine if there is an error. If loading very large source tables, providing a hint is recommended. Values --- Default Value + parallel (@T_SRC_SALES@ 4) full(@T_SRC_SALES@) Details Example: INSERT INTO ... SELECT hint ... MINUS SELECT hint ... Note: Leave the token @T_SRC_SALES@ to be used for the real T_SRC sales table. DBHintEp_Load_SalesInsertLd Description Use this parameter when data from a staging table is aggregated to match internal time resolution. The hint defines the degree used during insert for aggregation. Values --- Default Value + parallel (@T_SRC_SALES@ 4) Details Example Usage: INSERT EP_(t_src_sales)_LD... This is the insert statement from the T_SRC_SALES table to the EP_T_SRC_SALES_LD table. Note: Leave the token @T_SRC_SALES@ to be used for the real T_SRC sales table.
- 514. 27-22 Oracle Demantra Implementation Guide DBHintEp_Load_SalesMergeMDP_LA Description When inserting information into MDP_MATRIX_LOAD_ASSIST, this hint defines the degree used in the subselect statement. Values --- Default Value + parallel (@T_SRC_SALES_LD@ 4) full (@T_SRC_SALES_LD@) Details Example Usage: MERGE INTO mdp_load_assist USING (SELECT hint ... FROM EP_ (t_src_sales)LD ... Note: Leave the token @T_SRC_SALES_LD@ to be used for the real T_SRC Load sales table. DBHintEp_Load_SalesMergeSALES_DATA Description When merging data into SALES_DATA table, this hint defines the degree used in the sub-select from intermediate data table. Values --- Default Value + parallel (@T_SRC_SALES_LD@ 4) full (@T_SRC_SALES_LD@) Details Example: MERGE INTO SALES_DATA USING (SELECT hint ... FROM EP_ (t_src_sales)LD ... Note: Leave the token @T_SRC_SALES_LD@ to be used for the real T_SRC Load sales table.
- 515. Database Procedures 27-23 Ep_Load_Sales_IgnoreNullActualQty Description This parameter is used when inserting a row into the MDP_MATRIX table based on historical demand records. Set this parameter to FALSE if you are loading all rows in sales history. Set this parameter to True if you want to ignore rows where historical demand is null. Setting of FALSE is typically faster. Values TRUE - Ignore/do not process for NULL values. FALSE - Process NULL values. Default Value FALSE Details --- Ep_Load_Sales_MDP_LOAD_ASSIST_GatherStatsIfNoStats Description Gathering statistics can be very slow in large environments. Initially, you would want to gather statistics but subsequently you may not want to gather statistics to improve performance. Parameter controls whether statistics are gathered on the MDP_LOAD_ASSIST table. When set to FALSE, statistics are always gathered. When set to TRUE statistics are gathered only if none exist. Values TRUE - Gather statistics ONLY if MDP_LOAD_ASSIST has no table statistics. FALSE - Always gather statistics for MDP_LOAD_ASSIST. Default Value FALSE Details ---
- 516. 27-24 Oracle Demantra Implementation Guide Ep_Load_Sales_MDP_LOAD_ASSIST_GatherStats_1 Description Gather statistics for MDP_LOAD_ASSIST. Gathering executed first merge into MDP_LOAD_ASSIST. Values TRUE - Gather statistics after the first merge into MDP_LOAD_ASSIST if no statistics are available. FALSE - Always gather statistics for MDP_LOAD_ASSIST after the first merge. Default Value TRUE Ep_Load_Sales_MDP_LOAD_ASSIST_GatherStats_2 Description Gather statistics for MDP_LOAD_ASSIST. Will be executed after second merge into MDP_LOAD_ASSIST. Values TRUE - Gather statistics after the second merge into MDP_LOAD_ASSIST if no statistics are available. FALSE - Always gather statistics for MDP_LOAD_ASSIST after the second merge. Default Value TRUE Ep_Load_Sales_MDP_LOAD_ASSIST_GatherStats_3 Description Gather statistics for MDP_LOAD_ASSIST. Will be executed later in code, after delete from MDP_LOAD_ASSIST. This parameter will not be used if delete duplicates is not used (see Ep_Load_Sales_MDP_LOAD_ASSIST_DelDu plicates ).
- 517. Database Procedures 27-25 Values TRUE - Gather statistics after deleting duplicates from MDP_LOAD_ASSIST if no statistics are available. FALSE - Always gather statistics for MDP_LOAD_ASSIST after deleting duplicates. Default Value TRUE Ep_Load_Sales_MDP_LOAD_ASSIST_DelDuplicates Description Controls whether MDP_LOAD_ASSIST deletes any duplicates found in MDP_LOAD_ASSIST. Should be enabled if rows frequently are added to MDP_LOAD_ASSIST from a variety of sources. Values TRUE - Delete duplicates from MDP_LOAD_ASSIST. FALSE - Do not delete duplicates from MDP_LOAD_ASSIST. Default Value TRUE Ep_Load_Sales_Run_CHANGE_IS_FICTIVE Description Controls whether the procedure CHANGE_IS_FICTIVE is executed. This parameter must be set to TRUE if you are using Members Management or Chaining. Values TRUE - Run CHANGE_IS_FICTIVE. FALSE - Do not run CHANGE_IS_FICTIVE. Default Value TRUE
- 518. 27-26 Oracle Demantra Implementation Guide Ep_Load_Sales_SALES_DATA_Merge_InOneMerge Description Controls whether rows are inserted into SALES_DATA from staging table in one MERGE or using a loop. Should be set to FALSE for smaller environments, with smaller database and rollback settings. For more powerful environments, setting this parameter to TRUE will improve performance. Values TRUE - Use a single MERGE into SALES_DATA. FALSE - Merge is run in a location level loop. Default Value FALSE Ep_Load_Sales_SALES_DATA_Merge_LoopControl Description The cursor control override column used in the SALES_DATA MERGE in EP_LOAD_SALES. Default NULL. Can be any T_SRC_SALES_.. or SALES_DATA PK column. Effective when Ep_Load_Sales_SALES_DATA_Merge_InOne Merge=FALSE Values --- Default Value ---
- 519. Database Procedures 27-27 Ep_Load_Sales_LoadNullActualQty Description If set to FALSE, then NULL values in the ACTUAL_QTY field of the T_SRC_SALES table will not be loaded (ex. UPDATE db_params set pval = 'FALSE' WHERE pname = Ep_Load_Sales_LoadNullActualQty; ). Note: When set to FALSE, EP_LOAD considers any records with ACTUAL_QTY = NULL as errors and writes them to the _ERR table. Whether this parameter is set to TRUE or FALSE, combinations with ACTUAL_QTY = NULL will still be added to MDP_MATRIX. If you want to load both sales with ACTUAL_QTY = NULL and sales with ACTUAL_QTY not NULL, use the following statement: UPDATE db_params set pval = 'TRUE' WHERE pname = 'Ep_Load_Sales_LoadNullActualQty'; COMMIT; Values TRUE or FALSE Default Value FALSE Ep_Load_Sales_LoadFromStagingTableDirectly Description When set to FALSE, EP_LOAD_SALES copies the staging table to a loading table. When set to TRUE, the EP_LOAD_SALES procedure will load sales directly from the sales staging table. This setting improves performance since the staging table is not copied to a loading table. Values TRUE or FALSE Default Value TRUE
- 520. 27-28 Oracle Demantra Implementation Guide Ep_Load_Sales_DisableEnableTriggers Description When set to TRUE, the EP_LOAD_SALES procedure will identify enabled seeded triggers on SALES_DATA and disable them. When sales are loaded, the triggers will then be re-enabled. These triggers are used to synchronize specific series between SALES_DATA and PROMOTION_DATA. Preventing these triggers from being invoked can improve performance of the EP_LOAD_SALES procedure . If these seeded triggers have been customized, you may want to set this parameter to FALSE. Values TRUE or FALSE Default Value TRUE Note: After modifying any of the parameters in this section, you must run a script that will regenerate this procedure and allow the changes to take effect. For details, see Data Load Procedures, page 27-3. Ep_Load_Sales_ReportNullActualQty Description Report error sales when Ep_Load_Sales_LoadNullActualQty = FALSE. This parameter allows you to load ACTUAL_QTY = NULL into SALES_DATA. When Ep_Load_Sales_LoadNullActualQty is FALSE, it treats ACTUAL_QTY = NULL as error sales , reporting them via the T_SRC_SALE_TMPL_ERR table. Having the default setting (Ep_Load_Sales_LoadNullActualQty = FALSE, Ep_Load_Sales_ReportNullActualQty = FALSE) allows ACTUAL_QTY = NULL sales to be loaded to MDP_MATRIX and not reported as errors. Values TRUE of FALSE Default Value TRUE
- 521. Database Procedures 27-29 EXECUTE_PROFILES Executes all the active rolling data profiles in the system. These are defined through the Business Modeler and are stored in the rolling_profiles table. A profile is active if it is selected in the Configure Rolling Session dialog box. For each active profile, Business Modeler copies the source data into the target series. Data for any given time bucket is copied into the same time bucket in the target series. The profiles are executed in the order in which they are listed in the Configure Rolling Session dialog box. EXPOSE_PROMOTIONS Iterates through the promotions listed in the promotion table, checks the status of each (the status field), and does the following: • If the current status is 3 (planned) and if the current date is after the from_date of the promotion, change the status to 4 (committed). • If the current status is 4 (committed) and if the current date is after the until_date of the promotion, change the status to 5 (executed). For details, see "Configuring Promotion Effectiveness". INSERT_UNITS INSERT_UNITS is the mechanism by which future rows are inserted into the SALES_DATA table. Before each engine task is executed, all combinations belonging to the task which will receive a forecast are evaluated and future rows are inserted where appropriate. Ensuring the appropriate rows are available enables the engine output to be written quickly and efficiently. The Analytical Engine calls this procedure at the start of an engine run. For performance reasons, Insert_Units automatically runs as a distributed process. No setup is required. This procedure is controlled by the RunInsertUnits parameter and can do several things, depending on the value of that parameter: Makes sure the engine has rows to write into when generating the forecast. In particular, for all non-dead combinations, this procedure does the following: • Checks to see if the database contains records for this combination for all dates in the span of time from max_sales_date to max_sales_date + lead. • For any dates when the combination does not have records, this procedure inserts records with zero sales, into which the Analytical Engine can then write
- 522. 27-30 Oracle Demantra Implementation Guide the forecast. • Records with dates in the past are ignored. • Runs the EXECUTE_PROFILES procedure, which executes the active rolling data profiles. This procedure is usually executed as part of a batch engine run. To ensure that it runs, set the engine parameter RunInsertUnits to either "run insert_units" or "run insert_units without rolling profiles". During an engine run, if the engine detects missing future rows, the engine log will state "WARNING EngNewSystemProcessor::FillMissingDates() detected missing future dates rows. Either INSERT_UNITS was not run at all or failed to run correctly". Note: INSERT_UNITS only sets price and other defined unit values for newly inserted future rows that it creates. If you need it to update unit values for existing future rows, those will need to be updated manually, loading the data using an integration interface or through a custom process. RunInsertUnits and lead are engine parameters; see "Engine Parameters" The following parameters can be used with both the INSERT_UNITS and the DYN_INSERT_UNITS_BRANCH_ID procedures: iu_do_commits Description Should be set to TRUE for smaller databases or those with limited resources and smaller rollback segments. For larger databases with sufficient resources, set to FALSE. Values TRUE – The EP_LOAD procedure will do commits as needed. FALSE – Use only one commit per run of a DYN_INSERT_UNITS_BRANCH_ID procedure. Default Value TRUE
- 523. Database Procedures 27-31 ep_load_do_commits Description Used with the EP_LOAD_SALES procedure. Defines whether the procedure will commit as needed or wait until the entire process is complete. When DB resources may be limited, set this parameter to False. Values TRUE - EP_LOAD will use the commit control and issue commits per n transitions. (Where n = SYS_PARAMS setting max_records_for_commit) FALSE - Use only one commit should be used per ep_load procedure. Default Value TRUE MANUALS_INS Updates all the appropriate database tables after a user makes a change in a worksheet. You use this procedure only if you are using the desktop product (Demand Planner and Demand Replenisher) rather than the Web products. The Web products (Demand Planner Web, Promotion Effectiveness, and Settlement Management) use a Java-based mechanism to update the same tables. MANUALS_INS_INTEGRATION Updates all the appropriate database tables after data has been imported. Make sure you run this procedure after running an import integration interface. MANUALS_INS_RECOVERY Performs a recovery if MANUALS_INS or MANUALS_POPULATE_INS has failed. This procedure retrieves the temporary records that were written to the update_batch_trai_err and update_batch_values_err tables and completes the processing. MDP_ADD The MDP_ADD procedure is the main method by which Item/Location combinations are created in Demantra. Combinations are created and maintained based on Item/Location combinations existing in the SALES_DATA table. MDP_ADD also
- 524. 27-32 Oracle Demantra Implementation Guide populates and maintains hierarchy information which is stored on MDP_MATRIX and executes the PROPORT procedure. This procedure is run automatically when needed. It is responsible for maintaining the mdp_matrix table. If the Analytical Engine fails with an error ("node not found in map"), you can correct the error by setting the align_sales_data_levels_in_loading parameter to true and then manually running the MDP_ADD procedure. Depending on the setting of the RunProportInMdp_add parameter, this procedure may or may not call the proport mechanism when it runs. The following parameters can be used with the MDP_ADD procedure: Mdp_AddUpdateIs_Fictive Description Defines whether the Is_fictive column is to be maintained. Is_fictive is used only in Chaining and Members Management. If you are using Chaining and Members Management, this parameter should be set to TRUE. If you are not using these features, performance may improve by setting this parameter to FALSE. Values TRUE - MDP_ADD should update IS_FICTIVE. FALSE - MDP_ADD should not update IS_FICTIVE. Default Value TRUE Mdp_AddUpdateIs_Linked Description Defines whether the Is_linked column is to be maintained. Is_fictive is used only in Chaining and Members Management. If you are using Chaining and Members Management, this parameter should be set to TRUE. If you are not using these features, performance may improve by setting this parameter to FALSE. Values TRUE - MDP_ADD should update IS_LINKED. FALSE - MDP_ADD should not update IS_LINKED.
- 525. Database Procedures 27-33 Default Value TRUE Mdp_AddDeleteUnlinkedMdp_Matrix Description This parameter controls whether MDP_MATRIX combinations not found in historical data tables are removed from the matrix. Setting depends on functionality. In large implementations substantial saving can be achieved by setting this parameter to FALSE. Values TRUE - MDP_ADD should DELETE MDP_MATRIX rows not linked with SALES_DATA. In a PE schema, the delete also includes rows not linked with PROMOTION_DATA.FALSE - MDP_ADD should not DELETE MDP_MATRIX rows not linked with SALES_DATA. Default Value FALSE DBHintMdp_AddUseParallelDML Description If you run DML statements, any objects with a parallel degree configured will be run in parallel. Individual parallel hints setting will supersede this setting. Values TRUE - Use PARALLEL DML on objects that are set as parallel. FALSE - Do not use PARALLEL DML on objects that are set as parallel. Default Value FALSE
- 526. 27-34 Oracle Demantra Implementation Guide DBHintMdp_AddUseParallel Description Set this parameter to FALSE if you want to use parallel hints in the MDP_ADD script. This parameter should be set to FALSE when DB resources may be limited. Values TRUE - EP_LOAD_ITEMS will use parallel hints. FALSE - EP_LOAD_ITEMS will not use parallel hints. Default Value TRUE DBHintMdp_AddInsert Description Controls the degree used during the MDP_ADD insert statement when inserting rows into MDP_MATRIX. Used in the same statement as hint DBHintMdp_AddInsertSelect. The combined value of both parameters should not exceed the number of available CPUs. Values + parallel(mdp_matrix 4) append Default Value --- Details INSERT hint INTO mdp_matrix DBHintMdp_AddInsertSelect Description Controls the degree used during the internal select of the MDP_ADD insert statement when inserting rows into MDP_MATRIX. Used in the same statement as hint DBHintMdp_AddInsert. The combined value of both parameters should not exceed the number of available CPUs. Values ---
- 527. Database Procedures 27-35 Default Value + parallel (@TBL_NAME@ 2) parallel (location 2) parallel (items 2) Details INSERT INTO mdp_matrix SELECT hint. Note: Leave the token @TBL_NAME@ unchanged as it is to be used for the real table, usually MDP_LOAD_ASSIST. DBHintMdp_AddMdpInsInMdpUseIn Description If this parameter is set to TRUE, the MDP_ADD procedure checks if a row already exists before inserting to MDP_MATRIX. This parameter also controls whether the statement uses IN or NOT EXISTS. If set to TRUE the statement uses IN; otherwise it uses NOT EXISTS. Values --- Default Value TRUE Details The default setting (TRUE) was chosen for backwards compatibility. However, setting this parameter to FALSE may improve performance. DBHintMdp_AddMdpInsInTbl Description SQL hint for inserting into MDP_MATRIX when choosing the IN mechanism via DBHintMdp_AddMdpInsInMdpUseIn. Used with hint DBHintMdp_AddMdpInsInMdp. The combined value of both parameters should not exceed the number of available CPUs.
- 528. 27-36 Oracle Demantra Implementation Guide Values TRUE - EP_LOAD_LOCATIONS should use PARALLEL DML on objects that are set as parallel. FALSE - EP_LOAD_LOCATIONS should use PARALLEL DML on objects that are set as parallel. Default Value + parallel (a 2 ) Details INSERT INTO mdp_matrix SELECT ... WHERE ... IN (SELECT hint mdp_load_assist ...) DBHintMdp_AddMdpInsInMdp Description Controls minus sub-select of insert into MDP_MATRIX statement when choosing the IN mechanism. Used with DBHintMdp_AddMdpInsInTbl. The combined value of both parameters should not exceed the number of available CPUs. Values --- Default Value + parallel (b 2) Details INSERT into mdp_matrix SELECT ... WHERE ... IN (SELECT mdp_load_assist MINUS SELECT hint mdp_matrix) DBHintMdp_AddMdpCount Description SQL hint on select count from MDP. This hint should be used in environments that have a large amount of data. This parameter should not be set to a value that exceeds the number of available CPUs. Values --- Default Value + full (MDP_MATRIX) parallel (MDP_MATRIX 4)
- 529. Database Procedures 27-37 Details SELECT hint COUNT (*) FROM mdp_matrix DBHintMdp_AddUpdateIs_Fictive0MDP Description If updating Is_fictive, set degree parallel when updating MDP_MATRIX IS_FICTIVE value to 0. If you are not using Is_fictive, then this parameter is not used. Values --- Default Value --- Details UPDATE hint mdp_matrix SET is_fictive =... DBHintMdp_AddUpdateIs_Fictive0SD Description This parameter is used in the subselect for updating Is_fictive value in MDP_MATRIX to 0. The degree set for this parameter, combined with DBHintMdp_AddUpdateIs_Fictive0MDP, should not exceed the number of available CPUs. Values --- Default Value + parallel(s 2 ) Details UPDATE mdp_matrix SET is_fictive = 0 EXISTS (SELECT hint FROM sales_data ...) AND is_fictive = 2
- 530. 27-38 Oracle Demantra Implementation Guide DBHintMdp_AddUpdateIs_Fictive2SD Description Used in the subselect for updating Is_fictive value in MDP_MATRIX to 0. The degree set in this parameter combined with DBHintMdp_AddUpdateIs_Fictive0MDP should not exceed the number of available CPUs. Values --- Default Value + parallel(s 2 ) Details UPDATE mdp_matrix SET is_fictive = 2 NOT EXISTS (SELECT hint FROM sales_data ...) AND is_fictive = 0 DBHintMdp_AddDeleteMdp Description If deleting MDP_MATRIX rows, use this parameter to set the degree used in delete. Used together with hints DBHintMdp_AddDeleteMdpNotInSD and DBHintMdp_AddDeleteMdpNotInPD. Total values of hints should not exceed number of available CPUs. Values --- Default Value + parallel(s 2) DBHintMdp_AddDeleteMdpNotInSD Description Hint used in the sub-select of delete population when viewing SALES_DATA. Used together with hints DBHintMdp_AddDeleteMdp and DBHintMdp_AddDeleteMdpNotInPD. Total values of hints should not exceed number of available CPUs.
- 531. Database Procedures 27-39 Values --- Default Value + parallel(s 2) Details DELETE mdp_matrix WHERE NOT EXISTS (SELECT hint FROM SALES_DATA s...)) DBHintMdp_AddDeleteMdpNotInPD Description Hint on the subselect of delete population when viewing promotion_data. Only used in environments that support promotions. Used together with hints DBHintMdp_AddDeleteMdp and DBHintMdp_AddDeleteMdpNotInSD. The total value of hints should not exceed the number of available CPUs Values --- Default Value + parallel (p 2) Details DELETE mdp_matrix WHERE NOT EXISTS (SELECT ... SALES_DATA s) AND NOT EXISTS (SELECT hint PROMOTION_DATA s)) DBHintMdp_AddUseMdpCacheMerge Description When updating from_date and until_date in MDP_MATRIX, the process be done via a single merge or a cursor loop. The Merge statement should be faster if there is a large amount of data with sufficient database capacity. Values TRUE - Use the MERGE update for the MDP_MATRIX cache columns - FROM_DATE and UNTIL_DATE. FALSE - Use a cursor loop.
- 532. 27-40 Oracle Demantra Implementation Guide Default Value TRUE Note: After modifying any of the parameters in this section, you must run a script that will regenerate this procedure and allow the changes to take effect. For details, see Data Load Procedures, page 27-3. POP_ALL_MATCH_PROPOSAL Only for DSM. This procedure iterates through all settlements (except for off-invoice settlements), finds promotions that meet all the match criteria, and writes a record into the proposed_match table for each match. This procedure performs the following comparisons, which are controlled by parameters: • It compares the promotion date (DSMPEShipDateSeries) to the settlement date. Only promotions with close enough dates are considered possible matches. The DSMAllShipDateDifference parameter specifies the window of time that Demantra uses to search for a promotion that matches a given settlement. Express this as the number of time buckets between the promotion end date and the deduction date. • It compares the promotion budget (DSMPromotionBudgetSeries) to the monetary settlement amount. A promotion is a possible match only if its remaining budget is at least as large as the settlement amount. POP_OI_MATCH_PROPOSAL Only for DSM. This procedure iterates through all off-invoice settlements, finds promotions that meet all the match criteria, and writes a record into the proposed_match table for each match. This procedure performs the following comparisons, which are controlled by parameters: • It compares the promotion budget (DSMPromotionBudgetSeries) to the off-invoice amount. For this comparison, the DSMOIPercentDifference parameter specifies the maximum percent difference (of monetary amount) permitted when matching an off-invoice settlement to possible promotions. • It compares the promotion date (DSMPEShipDateSerie) to the off-invoice date. Only promotions with close enough dates are considered possible matches. You use the DSMOIShipDateDifference parameter to specify the closeness of these dates.
- 533. Database Procedures 27-41 • It can also check that the off-invoice settlement and the possible promotions use the same product. To control this check, you use the DSMOICheckProduct parameter. PROPORT The PROPORT procedure determines the status that item and locations receive: Active, Do Zero Forecast, Young, or Inactive. PROPORT also calculates global and monthly proportions to be used by the analytical engine as well as update mechanisms. This procedure is called automatically during data load by the MDP_ADD procedure. As part of this automated process each combination in MDP_MATRIX is evaluated and a status is set in the PREDICTION_STATUS column. For additional information about the PROPORT procedure, please refer to the Proport, page 12-1 chapter. The following parameter can be used with the PROPORT procedure: DBHINTPROPORT_SALESMINSALESDATE Description This parameter, which is included in the DB_PARAMS table, is used by PROPORT when generating the SQL queries that calculate the minimum SALES_DATE for a combination. The parameter DBHintProport_SalesMinSalesDate is added as a DB hint. Values --- Default Value --- Details PROPORT SQL Hint : SELECT <hint> ... MIN(sales_date) ... PRE_LOGON Sets the database date and time formats. Many other predefined procedures automatically call this procedure. REBUILD_INDEXES Oracle only. Rebuilds table indexes, a necessary maintenance task for the database.
- 534. 27-42 Oracle Demantra Implementation Guide Note: This procedure requires additional space (equal to the current tablespace) and can take a long time. REBUILD_SCHEMA Rebuilds all tables, a necessary maintenance task for Oracle databases. Note: This procedure requires additional space (equal to the current tablespace) and can take a long time. REBUILD_TABLES Oracle only. Rebuilds the sales_data and mdp_matrix tables, a necessary maintenance task for Oracle databases. Note: This procedure requires additional space (equal to the current tablespace) and can take a long time. Arguments This procedure has the following optional positional arguments: • The first argument indirectly specifies which tables to rebuild. If null, the procedure rebuilds tables according to the Rebuild_Sales_Table parameter. If this argument is 1, the procedure rebuilds the sales_data table. If this parameter is 0, the procedure skips the sales_data. • If the second argument is 0, the procedure rebuilds the sales_data (if permitted by the previous argument), mdp_matrix, items and location tables. If this parameter is 1, the procedure rebuilds all tables listed in user_tables that need to be rebuilt. REORG This procedure reorganizes a table for optimum performance. Oracle recommends running it by using the wrapping script (see Running the Table Reorganization Utility), but it can be manually run by providing the arguments listed below. The reorg procedure will reorganize the table's data structure (and columns if 'C' is specified for is_reorg_level) to improve database performance. is_dem_user
- 535. Database Procedures 27-43 Description Demantra's database schema name. Values Must be a valid schema name. Default Value (None) is_table_name Description This identifies the table that will be reorganized. Values A valid table name Default Value (None) is_reorg_level Description This determines whether row or column reorganization will be done (see Database Health Check, ). Values "R" (for row reorganization) or "C" (for column reorganization). Default Value (None) ii_pct_free Description The minimum percentage of a data block to be reserved as free space (see Running the Table Reorganization Utility). Values 0 - 100 Default Value 20 ii_parallel_degree
- 536. 27-44 Oracle Demantra Implementation Guide Description Determines the degree of parallelism used by the reorg process. Values (number of database server CPUs) Default Value 4 This procedure is included in the package TABLE_REORG. REPLACE_APOSTROPHE_LEVELS Iterates through the level tables and replaces any apostrophes in the column names with underscore characters. SCHEDULED_CLEANUP_TASKS Runs the Analyze Schema, Drop Temp Tables, Clean Log Tables, and Rebuild Tables workflows. By default this procedure runs once a week, on Saturdays. UPGRADE_TO_SHAPE_MODELLING Creates samples for activity shape modeling. Specifically this procedure does the following: • Creates two sample activity causal factors: Product_launch and Price_change. • It creates four editable series for the benefit of end users, described in the following table.
- 537. Database Procedures 27-45 Series Name Data Association Series Purpose Price_change Sales Lets the user indicate the start and duration of the price change shape associated with a specific combination. Within this series, for each date, the user chooses "Start" or "Active" from a drop-down menu to specify the promotion start and continuation dates. The default is "None," meaning no promotion. The user identifies past activities and marks where future activities will occur. Price_change_QAD Combination Controls whether the Analytical Engine re-scales the generated shape to align with the amplitude of the most recent observed instance of this shape, for a given combination. Specify the number of buckets for which the shape alignment should occur, starting with the beginning of the shape. Typically you use either 0 or the length of the shape. Product_launch Sales Like Price_change, but applies to the product launch shape instead of the price change shape. Product_launch_QAD Combination Like Price_change_QAD, but applies to the product launch shape instead of the price change shape. See "About Activity Shape Modeling".
- 538. 27-46 Oracle Demantra Implementation Guide Non-Engine parameters Related to Database Performance Parameter Location Default Details SYSTEM_PRIMARY_ KEY Business Modeler > System Parameters > Database SALES_DATE,ITEM_ ID,LOCATION_ID A comma-delimited list of columns specifying the optimal primary key order. This parameter is used by the Table Reorganization Procedure for optimizing the order of columns. MIN_NUMROWS_F OR_REORG Business Modeler > System Parameters > Database 1000000 Only tables with at least this many rows of data will be considered by the quick or thorough check processes. QUICK_CHECK_TIM EOUT Business Modeler > System Parameters > Database 20 This sets a maximum running time for the quick check process, in seconds. The parameter is numeric, cannot be null, and ranges from 20 thru 600. THOROUGH _CHECK_INTERVAL Business Modeler > System Parameters > Database 30 Sets the interval, in days, that determines when a reminder to run the thorough check will appear in the log_table_reorg table after running the quick check. The parameter is numeric, cannot be null, and ranges from 7 thru 60. Any value outside this range is treated as a 1.
- 539. Database Procedures 27-47 THOROUGH_CHEC K_TIMEOUT Business Modeler > System Parameters > Database 18000 (5 hours) This sets a maximum running time for the thorough check process, in seconds. The parameter is numeric, cannot be null, and ranges from 3600 thru 36000 (1 to 10 hours).
- 541. Key Tables 28-1 28 Key Tables This chapter provides reference information for some of the most important tables in Demantra, especially the data fields used by or written by the Analytical Engine. Unless otherwise noted, this information applies to all Demantra products. This chapter covers the following topics: • Sales_Data • Mdp_matrix • Promotion_Data Sales_Data The following table lists the most important fields in the sales_data table. The Analytical Engine reads from and writes to some of these fields, which you use mainly to create series. Field Name Use Field Purpose item_id Read-only Unique identifier for the item. Together, item_id, location_id, and sales_date form the primary key for rows in the sales_data table. location_id Read-only Unique identifier for the location. sales_date Read-only Date for this record.
- 542. 28-2 Oracle Demantra Implementation Guide Field Name Use Field Purpose item_price Read-only (imported) Price for this item, at this location, on this date. actual_quantity manual_fact manual_stat salesplus Read-only (imported) The demand used by the Analytical Engine. orders FORE_0, FORE_1, FORE_2, ... Read-only The forecasts generated by the Analytical Engine. The Analytical Engine cycles through these columns. Each time, it writes the current forecast into one column (overwriting the oldest forecast). The Analytical Engine then adds a row to the forecast_history table that describes this forecast and that indicates which column it is stored in. OBS_ERROR_STD User input Specifies how the Analytical Engine should consider this observation when fitting each engine model. Specify a positive number, to be used as a weight for this observation. Use 1 to treat this observation as a standard observation. This field is ignored unless UseWeightedRegression is specified as yes (1). UseWeightedRegression is an engine parameter; see "Engine Parameters" .
- 543. Key Tables 28-3 Field Name Use Field Purpose outlier Read-only Indicates whether the Analytical Engine has marked this row as an outlier. regime_change Read-only Indicates whether the Analytical Engine has marked this combination as an regime change. approve User input final approve User input batch Read-only PD1, PD2, PD3, PD4, PD5, PD6, PD7 No Available only in a daily system. Daily proportions for this combination, for different days of the week. PW1, PW2, PW3, PW4, PW5, PW6 No Available only in a weekly or daily system. Weekly proportions for this combination, for different weeks of a month. When calculating these proportions, Demantra factors in the number that this week has. Mdp_matrix The following table lists the most important fields in the mdp_matrix table. You can use these fields to create series or levels that provide information about different combinations or that enable the user to manipulate different combinations. Field Name Use Field Purpose CONSUMPTION_DEMAND User input (see Note below) Indicates availability of consumption demand streams. 1=Yes, 0=No. Default=0
- 544. 28-4 Oracle Demantra Implementation Guide Field Name Use Field Purpose ITEM_ID Read-only Unique identifier for the item. Together, item_id and location_id form the primary key for rows in the mdp_matrix table. LOCATION_ID Read-only Unique identifier for the location. AGGRI_98 User input Specifies whether to aggregate demand for this item-location combination, if this combination is young. See "prediction_status". AGGRI_99 User input Specifies whether to aggregate demand for this item-location combination, if this combination is dead. See "prediction_status". DELTA User input Used in the proport calculation as in the following example: P1 = glob_prop * delta + (monthly demand) * (1 - delta) DELTA_D User input Specifies the day-to-day smoothing of the daily proportions, which are calculated as in the following example: D1 = (actual average for day 1) *delta_d + (weekly proportion) * (1- delta_d) Here D1 is the proportion for the combination for the first day of the week. DELTA_W User input Specifies the week-to-week smoothing of the weekly proportions, which are calculated as in the following example: PW1 = (actual average for week 1) * delta_w + (monthly proportion) * (1 - delta_w) Here PW1 is the proportion for the combination for the first week of the month. DO_AGGRI User input Specifies whether to perform aggregation on this item-location combination. Choose one of the following values: 0—Will Not Be Used in Aggregation 1—Will Use Aggregation
- 545. Key Tables 28-5 Field Name Use Field Purpose DO_FORE User input Specifies whether to perform forecasting on this item-location combination. Choose one of the following values: 0—Do Not Do Forecast. 1—Do Forecast (the default). 2—Do Zero Forecast. This combination is not used in aggregation. DYING_TIME Yes If no sales occurred during the length of time specified by dying_time, the combination will be marked as dead. If this field is null for a given combination, Demantra uses the dying_time parameter instead. (This parameter is located in the MDP_MATRIX_BASE table, not MDP_MATRIX.) GLOB_PROP Read-only Rolling average demand for this combination, averaged over the recent past, as specified by the length of time given by the hist_glob_prop setting. HIST_GLOB_PROP User input Number of base time buckets worth of data to use to calculate the rolling average, glob_prop, for this combination. If this field is null for a given combination, Demantra uses the hist_glob_prop parameter instead.
- 546. 28-6 Oracle Demantra Implementation Guide Field Name Use Field Purpose IS_FICTIVE Read-only Indicates whether this combination is real or fictive. This field is set automatically by Demantra. It has one of the following values: 1 means that the combination was created through Member Management and no data has been loaded for it yet. 0 means that there are sales for this combination. 2 means that there are no sales for this combination. 3 means that an error occurred while loading this combination or while redefining this combination. (When Demantra loads a new combination or changes the definition of a combination, it temporarily sets is_fictive equal to 3. When Demantra finishes the action, it then resets is_fictive equal to 0 or 2.) The engine does not consider the is_fictive setting. MISSING_ALL_SOURCES Read-only Used during chaining. Indicates whether the source data for this combination is complete. For each combination, this field has one of the following values: Yes means that there is no data for this combination. Partial means that there is data for this combination only for some of the dates. No means that there is data for this combination for all dates. MISSING_SOME_SOURCES Read-only Used during chaining. For each combination, this field indicates one of the following: Yes means that there is no data for one of the items in the combination. Partial means that there is data for this combination only for some of the dates.
- 547. Key Tables 28-7 Field Name Use Field Purpose MODELS Read-only Indicates the engine models that the Analytical Engine used when forecasting this combination, during the most recent engine run. Demantra uses a single letter to indicate each model: A: ARLOGISTIC B: BWINT C: CMREGR D: DMULT E: ELOG F: FCROST G: LOGISTIC H: HOLT K: ICMREGR J: IREGR L: LOG M: MRIDGE N: NAIVE R: REGR T: NAIVE HOLT V: ARIX X: ARX To specify multiple models, Demantra concatenates the letters together. For example, BDF means the BWINT, DMULT, and FCROST models. For information on engine models, see "Theoretical Engine Models" . NEW_MEMBER Read-only Specifies whether to run proport on this combination; used by the Run_full_matrix_proport parameter.
- 548. 28-8 Oracle Demantra Implementation Guide Field Name Use Field Purpose OUTLIER Read-only Indicates whether the Analytical Engine has marked this combination as an outlier, for any time bucket. P1, P2, P3, P4, P5, P6, P7, P8, P9, P10, P11, P12 Read-only Monthly proportions for this combination. Each proportion represents the level-adjusted sales for this combination, for each month of the year, as averaged over multiple years PD1, PD2, PD3, PD4, PD5, PD6, PD7 No Available only in a daily system. Daily proportions for this combination, for different days of the week. POST_EFFECT User input PE only. For each combination, specifies how the Analytical Engine should search for the effects of any given promotion, after the end of that promotion. Specify this as the number of base time buckets after the end of a promotion. Null is treated as zero. Searching for post-promotional effects can slow the engine down, so Oracle recommends doing this only for a few combinations. For those combinations, Oracle recommends specifying a value of 2–4, to avoid possible overlaps between different promotions. PRE_EFFECT User input PE only. For each combination, specifies how the Analytical Engine should search for the effects of any given promotion, before the start of that promotion. Specify this as the number of base time buckets before the start of a promotion. Null is treated as zero. Searching for pre-promotional effects can slow the engine down, so Oracle recommends doing this only for a few combinations. For those combinations, Oracle recommends specifying a value of 2–4, to avoid possible overlaps between different promotions.
- 549. Key Tables 28-9 Field Name Use Field Purpose PREDICTION_STATUS Read-only Controls how the Analytical Engine uses this combination. Each combination has one of the following prediction status values: 96 (No Forecast) — This status means that the Analytical Engine will completely ignore this combination. 97 (Create Zero Forecast) — A user has set do_fore equal to 2 manually. This status means that the Analytical Engine will insert a zero forecast for this combination but otherwise ignore it. 98 (Young) — Sales for this combination are too new to be used for prediction. 99 (Dead) — Sales for this combination are not recent enough to be used for prediction. 1 (Live or Active—Neither young nor dead. The Analytical Engine ignores any young or dead combinations, except when it is necessary to aggregate. In case of aggregation, Demantra considers the do_aggri, aggri_98, or aggri_99 flag of the combination. Demantra sets the prediction_status indicator as follows. For fictive combinations (is_fictive = 1), Demantra automatically sets the prediction status to 98. For real combinations (is_fictive equal to 0 or 2), Demantra uses the following rules: If do_fore is 0, then prediction_status will be 99. If do_fore is 1, then prediction_status is set as follows: If the combination is dead because of the dying_time parameter, then prediction_status is set to 99. If the combination is young because of the mature_age parameter, then prediction_status is set to 98.
- 550. 28-10 Oracle Demantra Implementation Guide Field Name Use Field Purpose Otherwise, the prediction_status is set to 1. If do_fore is 2, then prediction_status will be 97. dying_time and mature_age are engine parameters; see "Non-Engine Parameters". PROP_CHANGES Read-only Specifies whether to run proport on this combination; used by the Run_full_matrix_proport parameter. PW1, PW2, PW3, PW4, PW5, PW6 No Available only in a weekly or daily system. Weekly proportions for this combination, for different weeks of a month. When calculating these proportions, Demantra factors in the number that this week has. SHIPMENT_DEMAND User input (see Note below) Indicates availability of shipment demand streams. 1=Yes, 0=No. Default=1 LEVEL_ID Read-only The strategy of the forecast tree where the forecast for this combination was generated. ITEM_NODE Read-only Item member in that level. LOC_NODE Read-only Location member in that level. Note: The SHIPMENT_DEMAND and CONSUMPTION_DEMAND flags can be set using the SHIP_CONS_PROC_SET_FLAGS database stored-procedure or another custom procedure. Refer to the "Oracle Demantra Enhanced Support for Shipment and Consumption Planning " White Paper for more information. Promotion_Data PE only. The following table lists the most important fields in the promotion_data table. The Analytical Engine reads from and writes to some of these fields, which you use mainly to create series that show the forecast results.
- 551. Key Tables 28-11 Field Name Use Field Purpose item_id Read-only Unique identifier for the item. Together, item_id, location_id, sales_date, and promotion_id form the primary key for rows in the promotion_data table. location_id Read-only Unique identifier for the location. sales_date Read-only Date for this record. promotion_id Read-only Unique identifier for a promotion. is_self Read-only Equals 1 if the lifts in this row (uplift, pre- and post-effect, and switching effects) are associated with the promotion and date of this row. See " Is_Self". fore_0_uplift Read-only Basic lift due to this promotion, during the dates of the promotion. fore_0_sw_channel Read-only Effects of channel switching as described in "Switching Effects". fore_0_store Read-only Effects of store switching. fore_0_product Read-only Effects of store switching. fore_0_brand Read-only Effects of brand or category switching. fore_0_pre_effect Read-only Pre-promotional effect due to this promotion. fore_0_post_effect Read-only Post-promotional effect due to this promotion.
- 552. 28-12 Oracle Demantra Implementation Guide Field Name Use Field Purpose *norm* Read-only Normalized versions of the forecast data, if requested via the NormalizeResults parameter. When the Analytical Engine normalizes its results, it re-scales the historical engine results so that the observed baseline values are preserved. NormalizeResults is an engine parameter; see "Engine Parameters". Is_Self In any given row of the promotion_data, the Analytical Engine uses the is_self field to indicate whether the lifts in that row are associated with the promotion and date of that row. (Specifically, this refers to the uplift, pre and post-effect, and switching effects.) Consider the following example, with a combination that has a promotion (Promotion A) on it for some dates. For simplicity, this graph shows just the uplift on this combination due to the promotion. Each time point in this graph corresponds to a row in promotion_data. The notes at the bottom of the figure show the value of is_self for different times. As you can see, during the dates of the promotion itself, is_self is 1. Outside those dates, is_self is 0 because these dates fall outside the promotion. Now consider another combination and the same period of time. The sales for this other
- 553. Key Tables 28-13 combination were lifted, even though the promotion was not applied to this combination. The following graph shows the uplift on this combination, due to Promotion A (which ran only on the other combination). Again, each time point corresponds to a row in promotion_data: For all these rows in promotion_data, is_self is 0 because these lifts are due to a promotion that did not run on this combination.
- 555. Server Expression Functions and Operators 29-1 29 Server Expression Functions and Operators This appendix provides reference information for the operators and functions that are allowed in server expressions. This chapter covers the following topics: • Supported SQL Functions • Operators in Server Expressions • Oracle Tokens Supported SQL Functions You can use the following SQL functions in a Oracle server expression: Function Aggregating? Description Supported on Yes Yes Avg (column) Yes* Returns the average of the values of a group. Yes Yes Count (column) Yes*** Returns the number of members of a group. Yes Yes
- 556. 29-2 Oracle Demantra Implementation Guide Function Aggregating? Description Supported on Decode ( expression, value1 [, return1, value2, return2, ...], defaultreturn) No Matches expression to the test cases value1, value2, and so on, and returns the return value (return1, return2, and so on) that corresponds to the matched value. No Yes Lower (column) No Returns a string in lower case. Yes Yes Ltrim (column) No Removes characters from the left side of the string. Yes Yes Max (column) Yes* Returns the maximum of the values of a group. Yes Yes Min (column) Yes* Returns the minimum of the values of a group. Yes Yes Nvl (expression1, expression2) No If expression1 is not null, returns expression1. Otherwise, returns expression2. No Yes Round (number [, m]) No Rounds the given number to the specified number m of decimal places (zero by default). Yes Yes
- 557. Server Expression Functions and Operators 29-3 Function Aggregating? Description Supported on Rtrim (column) No Removes characters from the right side of the string. Yes Yes Safe_Division ( argument1, argument2, argument3) No Custom function created by Oracle. This function returns argument1 divided by argument2, unless argument2 is null. If argument2 is null, then the function returns argument3. Yes Yes SubStr ( expression, start, length) No Returns the substring of a given length that starts at the given position. No Yes Sum (column) Yes** Returns the sum of the values of a group. Yes Yes Sysdate() No Returns the current date and time. No Yes To_char (date, [ format]) or To_char (number, [format]) No Returns the input, a date or number, converted to a string using the given format. No Yes To_date (date, [ format]) No Returns a formatted date. No Yes
- 558. 29-4 Oracle Demantra Implementation Guide Function Aggregating? Description Supported on To_number (date, [format]) No Returns a number. No Yes Upper (column) No Returns a string in upper case. Yes Yes *If you use this function as the aggregating function for a series, the series should be non-proportional. **If you use this function as the aggregating function for a series, the series should be proportional. ***If you use this function as the aggregating function for a series, the series should be non-editable. Note: A server expression must be an aggregating expression that returns numeric, date, string, or true/false values. Note: If a series is going to be used within cached worksheets, its server expression cannot return null or zero-length values. Use the expression to_number(null,0) to express null values. Note: In these reference sections, square brackets indicate optional parts of the syntax. For details on these functions, consult the appropriate Oracle database documentation. Operators in Server Expressions You can use the following operators in a Oracle server expression: • + • - • * • / • () • < • <=
- 559. Server Expression Functions and Operators 29-5 • <> • = • > • >= • And • Else • In • Not • Or • Then • When Calculations follow standard algebraic rules of precedence. Oracle Tokens You can use the following special-purpose tokens in a Oracle server expression: Note: If the engine profile is not designated in the token, the token will default to the batch forecast profile. Token Allowed in Automatically replaced by #CONFIDENCE_LEVEL# Server expressions Confidence level associated with the forecast. Not supported in the Web user interfaces. #FDATE@<Version>@<Profile _id># Series hint messages Date of the specified engine profile's forecast version*. For example, #FDATE@0@25# is replaced by the date on which current forecast for engine profile 25 was generated.
- 560. 29-6 Oracle Demantra Implementation Guide Token Allowed in Automatically replaced by #FORE@<Version>@<Profile_i d># Server expressions The specified forecast version*. For example: #FORE@1@25# is replaced by the second most current forecast version generated using engine profile 25. #POST_EFFECT@<Version>@ <Profile_id># PE server expressions The post-promotional effect associated with the specified forecast version generated using a specified engine profile. * #PRE_EFFECT@<Version>@<P rofile_id># PE server expressions The pre-promotional effect associated with the specified forecast version generated using a specified engine profile. * #SIMULATION_TABLE# Server expressions . #SW_BRAND@<Version>@<P rofile_id># PE server expressions The brand switching associated with the specified forecast version generated using a specified engine profile. * #SW_CHANNEL@<Version> @<Profile_id># PE server expressions The channel switching associated with the specified forecast version generated using a specified engine profile * #SW_PRODUCT@<Version>@ <Profile_id># PE server expressions The product switching associated with the specified forecast version. * #SW_STORE@<Version>@<Pr ofile_id># PE server expressions The store switching associated with the specified forecast version generated using a specified engine profile. *.
- 561. Server Expression Functions and Operators 29-7 Token Allowed in Automatically replaced by #UNIT# Server expressions The unit conversion factor that corresponds to the unit used in the worksheet. See " Configuring Units, Indexes, and Update-Lock Expressions ". #UPLIFT@<Version>@<Profile _id># PE server expressions The uplift associated with the specified forecast version generated using a specified engine profile. * * The most recent forecast is 0, the previous forecast is 1, and so on.
- 563. Client Expression Functions and Operators 30-1 30 Client Expression Functions and Operators This appendix provides reference information for the operators and functions that are allowed in client expressions. This chapter covers the following topics: • About This Reference • Operators in Client Expressions • Abs Function • Case • CurrentRow • Date • Day • Exp • ForecastFirstRow • Fpos • Fsum • GetRow • GetWorksheetLevelNumber • If • Is_Modified • IsNull • Mod • Month • Pi • Rand
- 564. 30-2 Oracle Demantra Implementation Guide • Round • RowCount • Sqrt • SummaryAVG • SummaryCount • SummaryMax • SummaryMin • SummarySum • SummaryWAVG • Today • Truncate • Year • Z_Val About This Reference This appendix provides reference information for the operators and functions that are allowed in client expressions. • Edit-lock expressions must evaluate to true or false values. • In these reference sections, square brackets indicate optional parts of the syntax. Operators in Client Expressions You can use the following operators in a client expression: • + • - • * • / • () • [] • <
- 565. Client Expression Functions and Operators 30-3 • <= • <> • = • > • >= • And • Else • In • Not • Or • Then • When Precedence of calculations follows standard algebraic rules. Finally, to specify a series, use either of the following syntaxes: • series_name • series_name[relative-time-bucket] For example: Sales [ -1] refers to the previous period(column). Sales [ 1] refers to the next period (column). [0] is not allowed. Abs Function Returns the absolute value of a number. Syntax • Abs (argument) The value of argument must be either numeric or null. • If argument is numeric, the function returns the absolute value of argument. • If argument is null, the function returns null.
- 566. 30-4 Oracle Demantra Implementation Guide Case Tests the values of a series or expression and returns values based on the results of the test. If more than one WHEN clause matches the given input, the function returns the result corresponding to the first matching one. Syntax • Case ( test WHEN value1 THEN result1 [ WHEN value2 THEN result2] [ additional WHEN-THEN clauses] [ ELSE else ] ) The square brackets indicate optional parts of the syntax. The arguments are as follows: • testis the series or expression whose values you want to test. You can use a column name or a column number preceded by a pound sign (#). • value1, value2, and so on are possible values that test can have. Each value can be any of the following: • A single value • A list of values separated by commas (for example, 2, 4, 6, 8) • IS followed by a relational operator and comparison value (for example, IS>5) • Any combination of the preceding expressions, separated by commas (for example, 1,3,5,7,9, IS>42) In this case, the function implicitly behaves as if the expressions were combined by a logical OR. • result1, result2, and so on are the results to return for the possible values. For example, if test evaluates to value1, then the function returns result1. All returned values must have the same data type. • else specifies the value to return if test does not equal any of the given cases (value1, value2, and so on). The default for else is null. Examples The following expressions are valid uses of Case: • Case ( Input1 When is > 1 Then 10 When 2 Then 20 Else 30 ) Case ( Input1 When is < 10 Then 5 When is < 20 Then 50 ) Case ( Input1 When is > 100, is < 0 Then 5 Else 30 ) Case ( Input1 When is > 1 Then 10 ) See also • "If"
- 567. Client Expression Functions and Operators 30-5 CurrentRow Returns the number of the worksheet row that currently has the focus, that is, the worksheet row that the user has selected. This function is easiest to use in color expressions. Within the main client expression for a series, you can use this function to find the relative position of a row, in relation to another row. For example, you can use it indirectly to find the last row number. Note: Remember that apart from the color expression and the edit-lock expression, the worksheet does not reevaluate client expressions until a value changes in the worksheet. That is, the action of moving the cursor does not force the main client expressions to be reevaluated. Note: This means that if you use this function within the main client expression for a series, the expression should also refer to a series that the user will change. If the function fails, it returns 0. Syntax • CurrentRow () Notes When used in a general client expression (that is, neither a color expression nor an edit-lock expression), this function always returns 1. When used in a color or edit-lock expression, this function returns the number that corresponds to the row that currently has the focus, that is, the row that the user has currently highlighted. You can use this function in an edit-lock expression, but the GetRow function is a better choice. For example, consider the following possible edit-lock expressions: • CurrentRow() < ForecastFirstRow() GetRow() < ForecastFirstRow() Both expressions make it impossible to edit the series for the rows before the start of the forecast. However, if you use the former expression, all the cells will appear editable if the user selects a row before the start of the forecast, which would be very confusing. See also • "ForecastFirstRow" "GetRow"
- 568. 30-6 Oracle Demantra Implementation Guide Date Given a string argument, returns a date. This function works only in the desktop. Syntax • Date (string) See also • "Day" "Month" "Today" "Year" Day Returns an integer indicating the day of the month of the given date value. Syntax • Day (argument) The value of argument must be either a date or null. • If argument is a date, the function returns an integer representing the day (1–31) of the month in that date. • If argument is null, the function returns null. Exp Returns the number e raised to the specified power. Syntax • Exp (argument) The value of argument must be either numeric or null. • If argument is numeric, the function returns the number e raised to the power of argument. • If argument is null, the function returns null. Example This expression returns 7.38905609893065: • Exp(2) These statements convert a natural logarithm (base e) back to a regular number. When executed, Exp sets value to 200:
- 569. Client Expression Functions and Operators 30-7 • double value, x = log(200) value = Exp(x) ForecastFirstRow Returns the number of the row in the current worksheet where the forecast begins. It refers to the batch forecast. Syntax • ForecastFirstRow() See also • "CurrentRow" "GetRow" Fpos Periods of supply. Checks the period of the first arguments against the period (from the next period) of the second argument. This function works only on the forecast data. Note: You cannot use this function in color expressions. Syntax • Fpos (series1,series2) Each argument should be a series. Examples • If (GetRow() >= ForecastFirstRow() Fpos(SupplyTinv, SupplyTinvFinalFcst) Null) The section that uses "GetRow() >= ForecastFirstRow()" is essential because the expression works only in forecast. Date Inventory (SupplyTinv) Forecast (SupplyTinvFinalFcs t) Third Series with FPOS January 12 5 2.5 February 5 March 4
- 570. 30-8 Oracle Demantra Implementation Guide Date Inventory (SupplyTinv) Forecast (SupplyTinvFinalFcs t) Third Series with FPOS April 6 Fpos = 5 + 4 + 6*0.5 = 2.5. The inventory (12) will cover the forecast for 2.5 periods. Fsum Returns a series that adds multiple future consecutive items from a given series. The second argument, either a number or another series, specifies the number of time periods to use for each sum. Note: You cannot use this function in color expressions. Syntax • Fsum (series , count) The arguments are as follows: • Series should be an actual series name. • Count should be either a numeric series or an actual integer between 1 and 15, inclusively. If count is more than 15, the function returns null. The parameters can be only the names of data series or actual values. It is not permitted to enter other functions or [ ] brackets inside the FSUM function. Examples • Fsum (Series1, Series2)
- 571. Client Expression Functions and Operators 30-9 Date Series1 Series2 =Fsum Note about this entry Jan 100 3 360 Series2 for Jan is 3, so the function finds the next 3 time periods within Series 1; that is, 110, 130, and 120. The sum of those numbers is 360. Feb 110 2 250 Series2 for Feb is 2, so the function finds the next 2 time periods within Series 1; that is, 130 and 120. The sum of those numbers is 250. March 130 2 290 Series2 for March is 2, so the function finds the next 2 time periods within Series 1; that is, 120 and 170. The sum of those numbers is 290. April 120 2 ... May 170 3 ... April ... GetRow Returns the number of the worksheet row. You generally use this function in edit-lock
- 572. 30-10 Oracle Demantra Implementation Guide expressions that lock worksheet rows depending on position. If the function fails, it returns 0. Syntax • GetRow ( ) See also • "CurrentRow" "ForecastFirstRow" GetWorksheetLevelNumber Returns an integer that indicates the relative level of the summary row where this function is used. Note: This function is available only for use within the summary row of a series. Syntax • GetWorksheetLevelNumber ( ) You use this function to achieve different kinds of summaries for a series in different contexts in a given worksheet. Specifically, when a worksheet uses one or more levels on the x-axis, the worksheet table includes intermediate summary rows, for example: By default, the final summary row and all the intermediate summary rows are calculated in exactly the same way. The GetWorksheetLevelNumber function provides a way to distinguish each summary row, so that you can create a different summary functions as needed, at each of those levels. To determine the relative aggregation level of the summary rows, the function
- 573. Client Expression Functions and Operators 30-11 considers the layout of the worksheet. The following figure relates the summary levels to the x-axis layout: For level 1 in the worksheet, GetWorksheetLevelNumber returns 1, and so on. If there are n levels on the x-axis of the worksheet, the function returns n+1 for the final summary. Example Suppose that you want to display only the intermediate summary but not the final summary, as follows: To achieve this, you could use a summary row expression of the following form: • If ( GetWorksheetLevelNumber() =1, SummaryMax ( Sample Max ) , Null Value ) Note: If you configure a series with a context-sensitive summary row like this, be careful to use that series only within worksheets that have the appropriate layout. You may want to add a usage note to the series hint message to guide users.
- 574. 30-12 Oracle Demantra Implementation Guide If Tests a true/false expression and returns one of two possible values based on the results of the test. Syntax • IF (test , trueresult) IF (test , trueresult, falseresult) • The arguments are as follows: • testis the series or expression that has true or false values. • trueresult is the result to return if test equals true. • falseresult is the result to return if test equals false. The default for falseresult is null. That is, if you do not specify this argument, the function returns null. Note: Within a color expression, only the first syntax variant is allowed. That is, a color expression cannot include falseresult. Examples This expression returns 7 if Retail_history is greater than Retail_model; otherwise it returns Demand: • If (Retail_History > Retail_Model, 7, Demand) See also • "Case" Is_Modified Returns true or false depending on whether a given series has been edited since the last time data was saved. Syntax • Is_Modified (series) Here series should be an editable series. The function does not detect whether a calculated series has been changed by having its inputs edited. Examples The following expression returns the Inventory series if Pseudo has been modified and returns the Safety series if Pseudo has not been modified:
- 575. Client Expression Functions and Operators 30-13 • If (Is_Modified(Pseudo), Inventory, Safety ) IsNull Returns true or false depending on whether a given series equals null. Syntax • IsNull(series) Mod Returns the remainder (modulus) of a division operation. Note: The results of this function take slightly longer to display than for other functions. Syntax • Mod (argument1, argument2 ) The value of argument1 and argument2 must be either numeric or null. • If both argument1 and argument2 are numeric, the function returns the remainder (modulus) of a division operation. Specifically, it returns the following result: argument2 - round(argument2/argument1) where round(argument2/argument1) equals argument2/argument1 rounded to the nearest integer. The returned value is the data type of whichever argument has the more precise data type. • If argument2 or argument2 is null, the function returns null. • If argument2 is 0, the function returns null. Examples • Mod(20, 6) returns 2 Mod(25.5, 4) returns 1.5 Mod(25, 4.5) returns 2.5 Month Returns an integer indicating the month of the given date value. This can be used to show or use dates in calculations. Also, a planning process can be
- 576. 30-14 Oracle Demantra Implementation Guide maintained, while the locking expression is based dynamically on dates. For example, override is allowed only in the first two weeks of the month. Syntax • Month (argument) The value of argument must be either a date or null. • If argument is a date, the function returns an integer (1 to 12) representing the month in that date. • If argument is null, the function returns null. Pi Returns the number pi multiplied by a specified number. Syntax • Pi (argument) The value of argument must be either numeric or null. • If argument is numeric, the function returns the number pi multiplied by argument. • If argument is null, the function returns null. The function returns -1 if an error occurs. Examples You can use this function to convert angles to and from radians. For example, because pi equals 180 degrees, you can convert 60 degrees to radians as follows: • 60 * 180 / pi(1) Rand Returns a random integer between 1 and a specified upper limit. Note: This function does not generate true random numbers. If you repeatedly call this function, you will receive a pseudo random sequence. Syntax • Rand ( argument ) • The value of argument must be either numeric or null. If numeric, the argument
- 577. Client Expression Functions and Operators 30-15 must have a value between 1 and 32767, inclusive. • If argument is a number greater than or equal to 1, the function returns a random integer between 1 and argument, inclusive. • If argument is null, the function returns null. Examples The following expression returns a random whole number between 1 and 10: • Rand(10) Round Returns a number rounded to a specified number of decimal places. Syntax • Round (argument1, argument2) • The value of argument1 and argument2 must be either numeric or null. If numeric, argument2 should be a non negative integer between 0 to 18, inclusive. • If argument1 is numeric and argument2 is a non negative integer, the function returns the value of argument1, rounded to the number of decimal places specified by argument2. • If argument1 or argument2 is null, the function returns null. • If the function fails, it returns null. Examples The following expression returns 9.62: • Round(9.624, 2) The following expression returns 9.63: • Round(9.625, 2) The following expression returns 9.600: • Round(9.6, 3) The following expression returns -9.63: • Round(-9.625, 2) see also
- 578. 30-16 Oracle Demantra Implementation Guide • "Truncate" RowCount Returns the numbers of rows in the worksheet where this function is used. Syntax • RowCount ( ) See also • "ForecastFirstRow" "GetRow" Sqrt Returns the square root of a non negative number. Syntax • Sqrt (argument) The value of argument must be either a non negative number or null. • If argument is a non negative number, the function returns the square root of argument. • If argument is null, the function returns null. Examples This expression returns 1.414213562373095. • Sqrt(2) This expression results in an error at execution time. • Sqrt(-2) SummaryAVG Returns the average value of the displayed rows of the specified series. Note: This function is available only for the summary row of a series. Syntax • SummaryAvg( argument )
- 579. Client Expression Functions and Operators 30-17 Here argument is the name of a series that has a numeric value. Any null value is treated as zero. SummaryCount Returns the total count of the displayedrows of the specified series. Note: This function is available only for the summary row of a series. Syntax • SummaryCount( argument) Here argument is the name of a series that has a numeric value. SummaryMax Returns the maximum value of the displayed rows of the specified series. Note: This function is available only for the summary row of a series. Syntax • SummaryMax( argument ) Here argument is the name of a series that has a numeric value. Any null value is treated as zero. SummaryMin Returns the minimum value of the displayed rows of the specified series. Note: This function is available only for the summary row of a series. Syntax • SummaryMin( argument ) Here argument is the name of a series that has a numeric value. Any null value is treated as zero. SummarySum Returns the sum of the displayed rows of the specified series.
- 580. 30-18 Oracle Demantra Implementation Guide Note: This function is available only for the summary row of a series. Syntax • SummarySum( argument ) Here argument is the name of a series that has a numeric value. Any null value is treated as zero. SummaryWAVG Returns the weighted average of the displayed rows. Note: This function is available only for the summary row of a series. Syntax • SummaryWavg( argument1 , argument2 ) Here argument1 and argument2 are the name of series that have a numeric value. Tis function performs a weighted average of the values in argument1, using the values in argument2 as the weights. Any null value is treated as zero. Today Returns the current system date. This can be used to show or use dates in calculations. Also a planning process can be maintained, while the locking expression is based dynamically on dates. For example, override is allowed only in the first two weeks of the month, and so on. Syntax • Today () Truncate Returns a number truncated to a specified number of decimal places. Syntax • Truncate ( argument1, argument2) The value of argument1 and argument2 must be either numeric or null. If numeric, argument2 should be a non negative integer between 0 to 18, inclusive.
- 581. Client Expression Functions and Operators 30-19 • If argument1 is numeric and argument2 is a non negative integer, the function returns the value of argument1, truncated to the number of decimal places specified by argument2. • If argument2 or argument2 is null, the function returns null. • If the function fails, it returns null. Examples The following expression returns 9.2: • Truncate(9.22, 1) The following expression returns -9.2: • Truncate(-9.29, 1) See also • "Round" Year Returns a four-digit integer indicating the year of the given date value. This can be used to show or use dates in calculations. Also a planning process can be maintained, while the locking expression is based dynamically on dates. For example, override is allowed only in the first two weeks of the month, and so on. Syntax • Year ( argument ) The value of argument must be either a date or null. • If argument is a date that includes a four-digit year, the function returns a four-digit integer representing the year. • If argument is a date that includes a two-digit year, the function returns a four-digit integer representing the year, as follows: • If the two-digit year is between 00 to 49, Demantra assumes 20 as the first two digits. • If the two-digit year is between 50 and 99, Demantra assumes 19. • If argument is null, the function returns null. • If an error occurs, the function returns 1900.
- 582. 30-20 Oracle Demantra Implementation Guide Demantra handles years from 1000 to 3000 inclusive. If your data includes date before 1950, such as birth dates, always specify a four-digit year so that Year and other functions, such as Sort, interpret the date as intended. Z_Val Z_val is used in safety stock calculation. Given a specified service level, this function returns a value to use in the safety stock calculation, by looking up values in a table. Syntax • Z_Val (argument) The value of argument must be either numeric or null. • If argument is less than or equal to 0, the function returns null. • If argument is greater than 0 but less than the largest max_value, the function returns the z_val from the following table. • If argument is greater than the largest max_value, the function returns null. • If argument is null, the function returns null. Z_Val Table If the argument is... The function returns this z_val... greater than the min_level and less than or equal to the max_level 0 0.85 1.04 0.85 0.86 1.09 0.86 0.87 1.13 0.87 0.88 1.18 0.88 0.89 1.23 0.89 0.9 1.282 0.9 0.91 1.34
- 583. Client Expression Functions and Operators 30-21 If the argument is... The function returns this z_val... greater than the min_level and less than or equal to the max_level 0.91 0.92 1.41 0.92 0.93 1.48 0.93 0.94 1.56 0.94 0.95 1.645 0.95 0.96 1.75 0.96 0.97 1.88 0.97 0.98 2.06 0.98 0.99 2.33 0.99 0.995 2.576 0.995 0.999 3.09 0.999 0.9995 3.291 0.9995 0.99995 3.891 0.99995 0.999995 4.417 Example If we select a service level of 95.5% then the expression will look at the table at the following line, because this lies between 0.95 and 0.96 (the minimum and maximum values in the range). A z_val value of 1.75 is returned. min_level max_level z_val 0.95 0.96 1.75
- 585. Workflow Steps 31-1 31 Workflow Steps This chapter provides reference information for the available workflow steps. This chapter covers the following topics: • Specifying a Task • BLE Step • Condition Step • Container Step • Create Member Step • Custom Step • Delete Member Step • Edit Member Step • Email Step • Exception Step • Executable Step • Group Step • Launch Workflow Step • Message Step • Paste Member Step • Population Attribute Step • Refresh Population Step • Selection Step • Simulation Step • Stored Procedure Step • Transfer Step
- 586. 31-2 Oracle Demantra Implementation Guide • Update Data Step • User Access Control Step • User Step • Wait Until Step • Worksheet Cache Step • Worksheet Step Specifying a Task Several of the step types include a task or list of tasks, for use in Collaborator Workbench. A task consists of a set of properties, described here. Each user who logs onto Collaborator Workbench sees an individualized list of tasks in a module called My Tasks on the Collaborator Workbench page. Each task in the My Tasks module has a subject line which can be a link to a URL, and a description that explains more about the purpose of the task. The subject line link can refer to a worksheet, a file, a URL that initiates an external application, or any other URL. Task Properties (in a Workflow Step) Property Description Message Message to include in My Tasks. It is also used in the email message, if you use that option. URL Optionally specify a URL, including the prefix http://. For example, http://www.acme.com/page.html If you do not include the prefix http:// then the URL is read relative to the local host's Workflow Engine root directory. For example, buyer/start.html is read as: http://localhost/demantra/Portal/buyer/start.ht ml You must specify either a URL or a worksheet to open.
- 587. Workflow Steps 31-3 Property Description Worksheet to open Optionally select a worksheet, from the list of public worksheets defined in Demantra. This worksheet is listed in My Tasks. If you use the email option, the subject line of the message includes a link to this worksheet. You must specify either a URL or a worksheet to open. Source name Optionally specify the originator of this task. Description Optionally specify a longer description of this task, up to 255 characters. This text will show in the Description field in My Tasks. It is also used in the email message, if you use that option. File Optionally specify a local file to send to the task recipient. Specify a full path and filename that is accessible to the Workflow Manager, on the machine that is running that software. Send as email as well Select this check box if the system should also send an email message containing this task. Make sure that each user has an email address. You use the Business Modeler to configure email addresses for the users. See " Creating or Modifying a User". See also • Oracle Demantra Demand Management User's Guide BLE Step This kind of step submits a worksheet to the Business Logic Engine queue. The worksheet is run when its turn is reached. The Business Logic Engine then evaluates all the client expressions, splits the resulting data to the lowest level, and saves it to the database. Note: The BLE Step starts the Business Logic Engine if necessary. End Conditions
- 588. 31-4 Oracle Demantra Implementation Guide This step is completed when the Business Logic Engine finishes processing the specified worksheet. Properties Properties Description Default Step ID Unique identifier for the step. Worksheet Name Select the worksheet to evaluate. The list of worksheets includes all public worksheets and all worksheets that you own. Comments Optional comments. Recovery Specify what the Workflow Engine should do if the system crashes while performing this step: Ask—the engine follows a Fail-To-Execute procedure for the step. Retry—the engine executes the step again. Continue—the engine continues with the next step. Abort—the engine terminates the workflow instance. Ask Check Finish After Specify how long to wait after starting the step and before first checking to see if the end conditions have been met. 0 seconds Check Finish Every The Workflow Engine checks periodically to see whether or not the end conditions have been met. This property specifies how long to wait between two successive checks. 60 seconds
- 589. Workflow Steps 31-5 Properties Description Default Pause Specify how long to wait after a step has been completed, before starting the next step. 0 seconds Timeout>Timer Specify a timeout for the step. never Timeout>Alert Time Specify the alert phase that can occur just before the step times out. During the alert phase, the task due date is displayed in red in the user's My Task module. never Notes If a step ends before the Check Finish After period, or during a Check Finish Every period, then the Workflow Engine still waits for that counter to finish before checking if the step has finished. In timers, a month is measured as a calendar month. If this step times out, the worksheet request is not deleted from the Business Logic Engine queue. You must manually delete the worksheet request from the Business Logic Engine queue. Condition Step This kind of step tests a worksheet, an SQL statement, or a Java class, and proceeds to either the True step or the False step, based on the result of that test. The Workflow Engine continues with the True step in any of the following cases: 1. If the worksheet contains data 2. If the SQL statement returns data 3. If the Java class returns the True value The Workflow Engine continues with the False step in any of the following cases: • If the worksheet is empty • If the SQL statement returns no data • If the Java class returns the False value
- 590. 31-6 Oracle Demantra Implementation Guide End Conditions This step is completed when the test has successfully been performed. Properties Properties Description Default Step ID Unique identifier for the step. Pause Specify how long to wait after a step has been completed, before starting the next step. 0 seconds Worksheet Name Select the worksheet to test. The list of worksheets includes all public worksheets and all worksheets that you own. SQL Specify an SQL statement. Class name Specify a custom Java class that returns either True or False. Recovery Specify what the Workflow Engine should do if the system crashes while performing this step: Ask—the engine follows a Fail-To-Execute procedure for the step. Retry—the engine executes the step again. Abort—the engine terminates the workflow instance. Ask
- 591. Workflow Steps 31-7 Properties Description Default Population Specifies the population attribute that further filters the worksheet used by this step. Specify the following: Name—specify the name of the population attribute, as given in GROUP_ATTRIBUTES_POP ULATION.ATTRIBUTE_LAB EL. In the demo, this attribute is named Population. The Value field is not used. This property is useful when you use a workflow as a method; otherwise it has no effect. Container Step This kind of step is used to execute multiple single steps simultaneously and independently. The Container step is completed when all steps in it are completed. Note: In order to run a sequence of steps from within a Container step, you can use an Executable step that initiates a workflow instance that itself contains the required series of steps. However, you should remember that new workflow instance is run separately and does not affect the time-out, fail-to-execute, or end conditions of the original Container step. Included Steps A Container step can contain any number of steps. All the steps proceed independently of each other. The steps do not have to be for the same user. You cannot include the following kinds of steps: • Condition Step • Container Step • Exception Step
- 592. 31-8 Oracle Demantra Implementation Guide Also, the order in which the steps are included is not relevant to their processing. End Conditions This step is completed when all the steps that it contains are completed. Properties Properties Description Default Step ID Unique identifier for the step. Check Finish After Specify how long to wait after starting the step and before first checking to see if the end conditions have been met. 0 seconds Check Finish Every The Workflow Engine checks periodically to see whether or not the end conditions have been met. This property specifies how long to wait between two successive checks. 60 seconds Pause Specify how long to wait after a step has been completed, before starting the next step. 0 seconds Recovery Specify what the Workflow Engine should do if the system crashes while performing this step: Ask—the engine follows a Fail-To-Execute procedure for the step. Retry—the engine executes the step again. Abort—the engine terminates the workflow instance. Ask Fail-To-Execute If any of the steps in a container step fail to execute, the engine waits until all other steps have either finished before performing a Fail-To-Execute procedure on the entire container step.
- 593. Workflow Steps 31-9 An email notification is sent to the process initiator and shows which specific steps failed to execute. For example: • Subject: Failure in Process execution. Message Text: Process ID: 19 Schema ID: 7 Step ID: ContainerStep Error description: Invalid user name: Brian, internal step in container step: 'Action Required Activities'. Schema name: 'Check for Action Required', step name: 'Notify user of Action Required' See also "Fail-To-Execute Step". Timeout If an individual step included within a Container step times out, it does not continue to its own time-out step. The time-out procedure is executed but the time-out step is not activated. Notes If a step ends before the Check Finish After period, or during a Check Finish Every period, then the Workflow Engine still waits for that counter to finish before checking if the step has finished. In timers, a month is measured as a calendar month. Create Member Step This kind of step should be used only as a method. It uses the passed arguments, and creates the specified level member. End Conditions This step is completed when the member has been created. Properties Properties Description Default Step ID Unique identifier for the step.
- 594. 31-10 Oracle Demantra Implementation Guide Properties Description Default Recovery Specify what the Workflow Engine should do if the system crashes while performing this step: Ask—the engine follows a Fail-To-Execute procedure for the step. Retry—the engine executes the step again. Continue—the engine continues with the next step. Abort—the engine terminates the workflow instance. Ask Pause Specify how long to wait after a step has been completed, before starting the next step. 0 seconds See also • "Delete Member Step" "Edit Member Step" Custom Step This kind of step executes a Java class from within a workflow instance. You can use this kind of step to add functionality to your workflow or interact with external applications without having to change the workflow structure itself. For example, you can use Custom Step to update member attributes as part of a workflow process. Incorporate this step in workflow processes to which you want to pass member attribute values. Add attribute names and values as properties of the step. If a user has launched the workflow from within a worksheet, Demantra automatically passes arguments to the workflow, which Custom Step can use. See Parameters Used as Arguments for a Workflow, page 23-4. End Conditions This step is completed when the executed Java class is completed. Properties
- 595. Workflow Steps 31-11 Properties Description Default Step ID Unique identifier for the step. Class Name The Java class to execute. Parameters Any input parameters that are needed by the Java class. For each parameter, specify the parameter name and value, as well as an optional description. Recovery Specify what the Workflow Engine should do if the system crashes while performing this step: Ask—the engine follows a Fail-To-Execute procedure for the step. Retry—the engine executes the step again. Continue—the engine continues with the next step. Abort—the engine terminates the workflow instance. Ask Check Finish After Specify how long to wait after starting the step and before first checking to see if the end conditions have been met. 0 seconds Check Finish Every The Workflow Engine checks periodically to see whether or not the end conditions have been met. This property specifies how long to wait between two successive checks. 60 seconds Pause Specify how long to wait after a step has been completed, before starting the next step. 0 seconds
- 596. 31-12 Oracle Demantra Implementation Guide Java Class Functions The Java class should contain these two functions: • public int executeStep() { write your code here } setParameters(Hashtable params) { write your code here } The workflow step executes the executeStep() function. setParameters(Hashtable params) defines parameters for the class. This function is called before execution. Available Arguments If a user has launched the workflow from within a worksheet, Demantra automatically passes arguments to the workflow. Example • package com.demantra.workflow.step; import com.demantra.workflow.parameters.*; public class SampleCustomStep implements CustomStep { public SampleCustomStep() {} public int executeStep(Parameter[] parms) { int i, length = parms != null ? parms.length : 0; for(i=0; i<length; i++) System.out.println("Parameter name : " + parms[i].getName() + " value: " + parms[i].getValue()); // write your own logic here // ...................... return LinkedStep.ST_COMPLETED; } } Notes If a step ends before the Check Finish After period, or during a Check Finish Every period, then the Workflow Engine still waits for that counter to finish before checking if the step has finished. In timers, a month is measured as a calendar month.
- 597. Workflow Steps 31-13 Delete Member Step This kind of step should be used only as a method. It deletes the specified level member. End Conditions This step is completed when the level member has been removed from the database. Properties Properties Description Default Step ID Unique identifier for the step. Recovery Specify what the Workflow Engine should do if the system crashes while performing this step: Ask—the engine follows a Fail-To-Execute procedure for the step. Retry—the engine executes the step again. Continue—the engine continues with the next step. Abort—the engine terminates the workflow instance. Ask Pause Specify how long to wait after a step has been completed, before starting the next step. 0 seconds See also • "Create Member Step" "Edit Member Step" Edit Member Step This kind of step should be used only as a method. It uses the passed arguments, and modifies the specified level member. Note: If you are configuring a method that changes attribute values, the
- 598. 31-14 Oracle Demantra Implementation Guide workflow must include an Edit Member Step as its first step. Otherwise, the changed values will not be saved to the database. End Conditions This step is completed when the level member has been edited. Properties Properties Description Default Step ID Unique identifier for the step. Recovery Specify what the Workflow Engine should do if the system crashes while performing this step: Ask—the engine follows a Fail-To-Execute procedure for the step. Retry—the engine executes the step again. Continue—the engine continues with the next step. Abort—the engine terminates the workflow instance. Ask Check Finish After Specify how long to wait after starting the step and before first checking to see if the end conditions have been met. 0 seconds Pause Specify how long to wait after a step has been completed, before starting the next step. 0 seconds See also • "Create Member Step" "Delete Member Step" Email Step This kind of step is used to send an email message to a user. This step allows a connection to the installed messaging application using SMTP protocol.
- 599. Workflow Steps 31-15 End Conditions This step is completed when the email message is successfully delivered to the installed messaging system. Note: This step does not check if or when the message is read. Properties Properties Description Default Step ID Unique identifier for the step. Pause Specify how long to wait after a step has been completed, before starting the next step. 0 seconds To User Select the user who should receive the email. The list of possible users includes all users defined within this component. Subject The subject line of the email message Message The email message text Recovery Specify what the Workflow Engine should do if the system crashes while performing this step: Ask—the engine follows a Fail-To-Execute procedure for the step. Retry—the engine executes the step again. Continue—the engine continues with the next step. Abort—the engine terminates the workflow instance. Ask Note Make sure that both the workflow creator and end user has a valid email address.
- 600. 31-16 Oracle Demantra Implementation Guide You use the Business Modeler to configure email addresses for the users. See "Creating or Modifying a User". Exception Step This kind of step sends tasks to users depending on specific conditions in the Demantra database. This step runs a worksheet, normally a worksheet in which an exception condition has been defined. (If you attach an exception to a worksheet, Demantra checks the values of the worksheet data and displays only the combinations that meet the exception criteria.) If the worksheet returns data, then the Workflow Engine sends a task to each specified user. When all users have marked as this task as done, the workflow continues to the next step. Exception steps operate in both synchronous and asynchronous mode. In synchronous mode, the Exception Step executes the worksheet specified by the user, calculates the exceptions, sends a task to the specified user (or users) and when the user marks the task as done, the workflow continues to the next workflow step in the workflow definition. In asynchronous mode, the Exception Step performs all of the steps as above and sends tasks to the user, but waits for the user to mark the task as done. For more information, see Overview of Workflow Step Types, page 10-6. End Conditions This step is completed when all users mark the task as Done. Properties Properties Description Default Step ID Unique identifier for the step. Worksheet Name Select the worksheet to test, normally a worksheet in which an exception condition has been defined. The list of worksheets includes all public worksheets and all worksheets that you own. Be sure to select a public worksheet for this step. Task Specify a task. See "Specifying a Task".
- 601. Workflow Steps 31-17 Properties Description Default User Select the user or users who should receive tasks in the case of this exception. Press and hold down the Ctrl or Shift key while selecting multiple users. The list of possible users includes all users defined within this component. Group Select the group or groups who should receive tasks in the case of this exception. Press and hold down the Ctrl or Shift key while selecting multiple users. The list of possible groups includes all users defined in Demantra. Workflow Completion Condition Specifies when the workflow should be considered complete. Options are: When the users mark the task as complete (synchronous mode) When the users receive the task (asynchronous mode) When the users mark the task as complete Recovery Specify what the Workflow Engine should do if the system crashes while performing this step: Ask—the engine follows a Fail-To-Execute procedure for the step. Retry—the engine executes the step again. Continue—the engine continues with the next step. Abort—the engine terminates the workflow instance. Ask
- 602. 31-18 Oracle Demantra Implementation Guide Properties Description Default Check Finish After Specify how long to wait after starting the step and before first checking to see if the end conditions have been met. 0 seconds Check Finish Every The Workflow Engine checks periodically to see whether or not the end conditions have been met. This property specifies how long to wait between two successive checks. 60 seconds Pause Specify how long to wait after a step has been completed, before starting the next step. 0 seconds Timeout>Timer Specify a time-out for the step. never Timeout>Alert Time Specify the alert phase that can occur just before the step times out. During the alert phase, the task due date is displayed in red in the user's My Task module. never Population Specifies the population attribute that further filters the worksheet used by this step. Specify the following: Name—specify the name of the population attribute, as given in GROUP_ATTRIBUTES_POP ULATION.ATTRIBUTE_LAB EL. In the demo, this attribute is named Population. The Value field is not used. This property is useful when you use a workflow as a method; otherwise it has no effect.
- 603. Workflow Steps 31-19 Fail-To-Execute Aside from the expected cases of Fail-To-Execute such as an invalid worksheet ID, you should take care to avoid the following circumstances which will also cause a Fail-To-Execute: • Workflow Initiator does not have privileges to execute the condition worksheet. • An invalid Group id or User id in the ExceptionStep. This applies if a Group contains an invalid User id or any individual User id listed to receive the Exception step task is invalid. Exception step will Fail-To-Execute even if all other Group ids or User ids are in the Exception step are valid. In the event of a Fail-To-Execute, none of the user groups or users listed in the Exception step receive the Exception step task. Notes If a step ends before the Check Finish After period, or during a Check Finish Every period, then the Workflow Engine still waits for that counter to finish before checking if the step has finished. In timers, a month is measured as a calendar month. Exception steps take advantage of these two performance enhancing features: 1. Exceptions run off of cached worksheet data when the cache is enabled for a worksheet. 2. Exceptions on combinations are evaluated until the first exception value is found. That is, no further evaluation of series values is done once one a violation has been found for a combination. Executable Step This kind of step runs applications from within the workflow instance. The applications can be external executable files such as .exe and batch files, or Demantra executables (such as the Analytical Engine). End Conditions This step is completed when the executed program ends and sends an interrupt to the Workflow Engine. The Workflow Engine then continues with the workflow instance. Properties Properties Description Default Step ID Unique identifier for the step.
- 604. 31-20 Oracle Demantra Implementation Guide Properties Description Default Pause Specify how long to wait after a step has been completed, before starting the next step. 0 seconds Command Line The location of the network of the file to be executed, and its full name. (Must be in double quotes). Specify the full path to the file. Note: The file location is always from the server's view. Recovery Specify what the Workflow Engine should do if the system crashes while performing this step: Ask—the engine follows a Fail-To-Execute procedure for the step. Retry—the engine executes the step again. Continue—the engine continues with the next step. Abort—the engine terminates the workflow instance. Ask Notes The Workflow Engine executes the command that you specified for the Command Line option. For this reason, you can only run files that can be opened by using a single DOS prompt instruction. This is important if you are accessing files over a network. Also, if you are invoking a batch file, be sure to do the following within that batch file: • Enclose all paths within double quotes • Use complete paths and file names For information on running the Analytical Engine from the command line, see " Running the Engine from the Command Line". When executing batch files, Fail-to-Execute is triggered only if there is an error when executing the batch file. If the batch file fail after execution, then Fail-to-Execute will not
- 605. Workflow Steps 31-21 be triggered. To run a .bat file from the Workflow Engine, do the following: Example: 1. Create the .bat file. Within this file, ensure that all paths are enclosed in double quotes. For example: • cd "E:DemantraSpectrum610scripts_vtkBiio_load_proms" IF EXIST "E:DemantraSpectrum610scripts_vtkBiio_load_promscust_prom_flag.da t" (exit) ELSE (myplus vk_check_file) • Within the Workflow Manager, create a new workflow. • Insert an Executable Step. • In the Command Line option of this step, put the full path to the location of the file you wish to run. Group Step This kind of step sends tasks to a user group or groups. Tasks are shown in My Tasks in Collaborator Workbench, and a task is usually associated with a worksheet. The purpose of a task is typically to draw attention to exceptions, or to request that the user review and possibly edit the worksheet. In contrast to the User Step, this step includes the Manager property, which specifies the user who is in charge of or manages the process. You can use this step to send a worksheet to users with different security permissions. Each user is then presented with a worksheet, with contents filtered by the user's permissions. The Group workflow step may run in either synchronous or asynchronous mode. In synchronous mode, the Group Step sends a task to the specified users/user groups and then waits for the users to mark the tasks as done. In asynchronous mode, the Group Step sends tasks to the specified users/user groups and then completes without waiting for the users to mark the task as done. You can also configure the step to automatically send email notification of the new task. Important: If you do so, make sure that each user has an email address. You use the Business Modeler to configure email addresses for the users. See "Creating or Modifying a User". End Conditions This step is completed when all the users mark all the tasks as Done.
- 606. 31-22 Oracle Demantra Implementation Guide Properties Properties Description Default Step ID Unique identifier for the step. User Select the user or users who should receive this task or tasks. Press and hold down the Ctrl or Shift key while selecting multiple users. The list of possible users includes all users defined within this component. Group Select the group or groups who should receive this task or tasks. Press and hold down the Ctrl or Shift key while selecting multiple users. The list of possible groups includes all users defined in Demantra. Tasks Specify one or more tasks. See "Specifying a Task". Recovery Specify what the Workflow Engine should do if the system crashes while performing this step: Ask—the engine follows a Fail-To-Execute procedure for the step. Retry—the engine executes the step again. Continue—the engine continues with the next step. Abort—the engine terminates the workflow instance. Ask
- 607. Workflow Steps 31-23 Properties Description Default Workstep Completion Condition Specifies when the workflow should be considered complete. Options are: When the users mark the task as complete (synchronous mode) When the users receive the task (asynchronous mode) When the users mark the task as complete Check Finish After Specify how long to wait after starting the step and before first checking to see if the end conditions have been met. 0 seconds Check Finish Every The Workflow Engine checks periodically to see whether or not the end conditions have been met. This property specifies how long to wait between two successive checks. 60 seconds Pause Specify how long to wait after a step has been completed, before starting the next step. 0 seconds Manager Specify the user who is in charge of or manages the process. In the event of a timeout, this user is notified by email. This notification is in addition to the timeout notification email that is sent to each user whose task has timed out and the timeout step that is executed. Timeout>Timer Specify a timeout for the step. never
- 608. 31-24 Oracle Demantra Implementation Guide Properties Description Default Timeout>Alert Time Specify the alert phase that can occur just before the step times out. During the alert phase, the task due date is displayed in red in the user's My Task module. never Timeout A group task times out if one or more of the users in the group do not mark the task as done before the response period has ended. The timeout procedure is as follows: A user who is responsible for the relevant task receives an email message notification of all the users within the group that have not marked the task as done. For example, this may be the group manager, or a supporting job function. 1. The task stays in the My Tasks module of the users who have not marked it as done. 2. The Workflow Engine continues with an alternative procedure that has been defined within the workflow for this circumstance. Notes If a step ends before the Check Finish After period, or during a Check Finish Every period, then the Workflow Engine still waits for that counter to finish before checking if the step has finished. In timers, a month is measured as a calendar month. For easy maintenance and flexibility, it is recommended to use the Group property instead of User whenever possible. Using Group allows you to change the defined user name for a job function within a workflow instance without editing the workflow schema itself. If any of the specified Group is empty or contains an invalid user name, then this step will Fail-To-Execute. See also • For information on tasks, see the Oracle Demantra Demand Management User's Guide. Launch Workflow Step This work step allows another workflow to be encapsulated within a single step. The two workflows are then linked. When the process flow in the calling workflow reaches
- 609. Workflow Steps 31-25 this step, the called workflow executes. This step can function either synchronously (the two workflows cannot execute simultaneously), or asynchronously (the two workflows can execute together). In synchronous mode, the calling workflow waits for the called workflow to complete its work, then resumes execution at the next work step. In asynchronous mode, the workflow that is being called will not wait for the called workflow to complete. Instead, after starting the called workflow, the main workflow will just proceed on to the next workflow step in its definition. The capability to call another workflow adds significant flexibility for designing efficient workflows. For example, you define a Daily Workflow, and a Weekly Workflow that includes the work of the Daily Workflow plus some extra tasks. The Weekly Workflow can just call the Daily Workflow as one of its work steps. It does not need to redefine those tasks. Creating a Work Step to Call Another Workflow 1. Double click on the Launch Workflow Step icon to bring up the work step dialog. 2. In the Step Id text field, enter an appropriate work step name. 3. In the Workflow Schema Group dropdown you may select a group by which the items in the second dropdown are filtered.
- 610. 31-26 Oracle Demantra Implementation Guide 4. In the Workflow dropdown, select which workflow will be called by this work step. 5. In the Workstep completion condition section, select one of the following: • When the launched workflow completes: to run the workflow in synchronous mode, or • When the launched workflow is started: to run the workflow in asynchronous mode 6. In the Recovery dropdown, select what action to take upon recovery if a server crash takes place during this work step. Editing Linked Workflows When two workflow are linked, future modifications can alter both of their behaviors, and this may not be immediately apparent to a user editing the workflow without being alerted to this fact. So when a user clicks on 'Edit' for a workflow that is linked to another workflow (it either calls another workflow, or is called by another workflow), the system displays a warning message that identifies the name(s) of the linked workflow(s). Ask The engine follows a Fail-To-Execute procedure for the step. Abort The engine executes the step again. Retry The engine continues with the next step. Continue The engine terminates the workflow instance. Note: For the Launch Workflow Step, the recommended recovery setting is "Ask." You may optionally set a pause that will occur between this work step and the beginning of the next one. Select the "Time" tab, then configure the text boxes in the
- 611. Workflow Steps 31-27 Pause section (Years, Hours, etc.). Note that only workflows that are directly linked are named. So if the calling scenario is: wf A > wf B > wf C, when a user starts to edit workflow A, the warning message will provide the name of workflow B, but not workflow C, because it is not directly linked to workflow A. Note: If a linked workflow is deleted, then the other workflows that were linked to it become invalid. They must now be modified so that they no longer make calls to it or expect to be called by it. Workflow Recovery When a server that is running linked workflows crashes, then on recovery, the outer workflow (the calling workflow) is restarted from the current step. For example, if it was at work step C when the crash occurred, then upon recovery execution would begin again at work step C, not work step A. An inner workflows (a called workflow) however, is simply terminated and must start from the beginning again. So if the outer workflow was at step C, and step C was a call to an inner workflow, and the inner workflow was in the middle of its execution during the crash, then upon server recovery, the inner workflow would always be terminated and the outer workflow would recover step C again per its recovery setting Since the inner workflow is always terminated upon recovery (if running at the time of the crash), this recovery situation allows the possibility for an inner workflow to be re-run on an unknown state of data caused by the previous run of the inner workflow. In order to mitigate this situation, the user may want to set the recovery setting of the
- 612. 31-28 Oracle Demantra Implementation Guide calling workstep of the outer workflow be set to a value of: 'Ask.' On recovery, before calling the inner workflow the system will display a dialog asking the user to choose whether to Retry, Continue, or Abort calling the inner workflow. This provides an opportunity for the user to validate the state of the data caused by the incomplete run of the inner workflow and take any necessary steps before re-running the inner workflow Workflow Recursion The ability to launch another workflow from a workflow step may lead to a condition that causes recursion among the workflows. For example: Two workflows can call each other recursively. For example: workflow A calls workflow B, and workflow B calls workflow A. Since, this could potentially lead to an infinite loop, there is a new system parameter that controls the upper limit of the number of recursive calls that the workflow engine will allow. The parameter is described as follows: PNAME PTYPE VALUE_NUMB ER DEFAULT_NU MBER DESCRIPTION workflow.recursi ve.limit 0 2 2 Controls the upper limit on the number of recursive calls during run-time of a workflow. Upon reaching this upper limit, the system will not initiate any more workflows instances that are part of the recursive call. The user who initiated the workflow will be sent a relevant message to the " My Task" pane. Caution: It is generally recommended not to configure recursive workflows as it results in constant running of the workflows. Recursive workflows should therefore be configured and used only if the business need warrants it.
- 613. Workflow Steps 31-29 Message Step This step sends a notification to all users, specific users, or selected User Groups. It may be used, for example, to let users know that the system will be temporarily down for maintenance. The notification appears as a pop-up window for any selected users who are logged into Demantra from either Collaborator Workbench or Demantra Anywhere. Note: This workflow step may be used before the User Access Control step, which locks users out of the system to allow routine maintenance. If you are not notifying all users, make sure the list of selected users matches the list of users that will be locked out by the User Access Control step. End Conditions This step is completed when the pause period has expired. Properties Description Default Users Use this list to select individual users to be notified. All Users Check this box to notify all users. Groups Use this list to select user groups to be notified. Message Enter the notification message here. Send as email as well Check this box to send individual email messages as well as displaying a pop-up notification. When this option is selected, the Email Subject field will be enabled and the user will be required to enter text in that field. For details about setting up email with Oracle Demantra, see Email, page 35-15.
- 614. 31-30 Oracle Demantra Implementation Guide Email Subject Enter text here that will show up in the subject box of email messages. Recovery Specify what the Workflow Engine should do it the system crashes while performing this step: Ask-the engine follows a Fail-To-Execute procedure for the step. Retry-the engine executes the step again. Continue-the engine continues with the next step. Abort-the engine terminates the workflow instance. Ask Pause Specify how long to wait after a step has completed before starting the next step. Note: The time entered cannot be less than 1 minute, or 60 seconds. If it is less than 60 seconds, the workflow step definition will be invalid. Paste Member Step This kind of step should be used only as a method. It uses the arguments passed from the Copy or Cut step and pastes the level member into the location specified. The step is used by the Paste workflow and works in conjunction with either the Cut workflow or the Copy workflow. (Note these are default workflows called by menu functions of the same name). When an object has been copied to memory by the Copy function, then this step is used to paste the object to a new location. The copy-paste functionality works only on General levels (such as Promotion), not item levels or location levels. For example, in Predictive Trade Planning you can copy and paste promotions within a scenario. However, the cut-paste functionality can work also on members of Promotions. End Conditions This step is completed when the member has been created.
- 615. Workflow Steps 31-31 Properties Description Default Step ID Unique identifier for the step. --- Recovery Specify what the WorkflowEngine should do if the system crashes while performing this step: Ask— the engine follows a Fail-To-Execute procedure for the step. Retry—the engine executes the step again. Continue—the engine continues with the next step. Abort—the engine terminates the workflow instance. Ask Pause Specify how long to wait after a step has been completed, before starting the next step. 0 seconds Population Attribute Step This workflow step is used to set Population Dates on Population Attributes. It supports both "Searchable" and "Descriptive" Population Attributes. It references the System Parameter "Population Date Levels" to determine which General Levels it should operate on. It calls the stored-procedure APPPROC_SET_POPULATION_DATES which contains the logic for setting the population dates. This stored-procedure can be customized if the pre-seeded logic does not meet the business requirements. This step should be run prior to a Create Member, Edit Member, or Update Data workflow step. Refresh Population Step 'Promotions can be defined at an aggregate item or location level. When the items or groups in these aggregate levels change, the Refresh Population Step can be used to refresh the population of the promotion to ensure the promotion data is aligned correctly. The Refresh Population Step can either be run against: • A single promotion via a method. Create a workflow containing only the Refresh Population workflow step. Then create a new method called "Refresh Population" on the Promotion level that is linked to the newly created workflow and isn't
- 616. 31-32 Oracle Demantra Implementation Guide configured with any input or output arguments. When the Refresh Population method is run against a promotion, it launches the Refresh Population workflow step which refreshes the population data for the promotion. • All promotions in the system in batch mode. Execute a workflow containing the Refresh Population workstep from the Workflow Manager. Running the Refresh Population Step refreshes the population data, realigning the data for either a single promotion or all promotions (Promotion_data table) according to the current promotion population definition(s). The Refresh Population workflow step does not consider any historical records on a promotion. It only considers current/future records on a given promotion and realigns data in that promotion according to the current promotion group definition. The historical records are left intact in the promotion associated with the original promotion population. The Refresh Population workflow step can be run against promotions that are in any promotion status except the "Closed" status, when the promotion is in a read-only state. Caution: Define specific item and location levels associated with each promotion. Doing so will ensure that the Refresh Population workflow step adheres to the population definition when run. Properties Description Default Step ID Unique identifier for the step. User Select the user who can run this workflow step. Refresh Population refreshes the population of the promotions in the application according to the security definition of the user specified. This parameter is applicable only when the Refresh Population workflow is executed in batch mode to refresh all promotions in the system. GL Base Level Select the GL base level to which this workflow applies. This workflow only applies to the Promotion level. Promotion
- 617. Workflow Steps 31-33 Properties Description Default Recovery Specify what the Workflow Engine should do if the system crashes while performing this step: Ask—the engine follows a Fail-To-Execute procedure for the step. Retry—the engine executes the step again. Continue—the engine continues with the next step. Abort—the engine terminates the workflow instance. Abort Parameters Select the parameters you want to run during this workflow step. The Refresh_From_Date parameter appears by default. When the value field is left blank, then the data is refreshed for all records within the promotion from this date forward. If desired, you can enter a value to refresh data from a future date. Refresh_From_Date See also • For information on running the Refresh Population method, see "To reassign a promotion to a different item or location" in the Oracle Demantra Predictive Trade Planning User's Guide. Selection Step This kind of step sends a selection task to a user. A selection task includes a list of options, each of which specifies a different branch for the workflow to follow. Like other tasks, this task is shown in My Tasks in Collaborator Workbench. This task can also be associated with a worksheet. Defining and Linking to Selections
- 618. 31-34 Oracle Demantra Implementation Guide When you first add a Selection step to a workflow, it does not contain any options and therefore does not have any connectors that lead from those options. For example, suppose that you have created a Selection step and two other steps that you want to use as options: Within the properties of the Selection step, you can add the options. When you add an option, you specify a user-friendly name and you choose the corresponding step from the list of existing steps as follows: As you add each option, the Workflow Editor automatically creates a connection handle for that option and automatically links that to the appropriate step, as follows: You may enter as many options as you like into a selection step. End Conditions This step is completed when the user makes a selection and marks the selection task as
- 619. Workflow Steps 31-35 Done. Properties Properties Description Default Step ID Unique identifier for the step. Option Name The Name of the Option. This is the text that shows for each option in the selection list presented by the selection task. User Select the user who should receive this list of options. The list of possible users includes all users defined within this component. Task This is the task that the Selection Step sends. Recovery Specify what the Workflow Engine should do if the system crashes while performing this step: Ask—the engine follows a Fail-To-Execute procedure for the step. Retry—the engine executes the step again. Abort—the engine terminates the workflow instance. Ask Check Finish After Specify how long to wait after starting the step and before first checking to see if the end conditions have been met. 0 seconds
- 620. 31-36 Oracle Demantra Implementation Guide Properties Description Default Check Finish Every The Workflow Engine checks periodically to see whether or not the end conditions have been met. This property specifies how long to wait between two successive checks. 60 seconds Pause Specify how long to wait after a step has been completed, before starting the next step. 0 seconds Timeout>Timer Specify a timeout for the step. never Timeout>Alert Time Specify the alert phase that can occur just before the step times out. During the alert phase, the task due date is displayed in red in the user's My Task module. never Notes If a step ends before the Check Finish After period, or during a Check Finish Every period, then the Workflow Engine still waits for that counter to finish before checking if the step has finished. In timers, a month is measured as a calendar month. Simulation Step This kind of step submits a worksheet to the Simulation Engine and then displays the worksheet and the simulation results to a specific user. The user can either accept or reject the simulation. This kind of step works the same as running a simulation in the user applications. Note: The Simulation Step does not start the Simulation Engine. You must make sure that the engine is running before a step of this kind is launched; otherwise the step will fail. You can start the Simulation Engine by using an Executable Step. Note: You must take care not to initiate the Simulation Engine twice.
- 621. Workflow Steps 31-37 Note: The Simulation Engine and Analytical Engine cannot run simultaneously. You must take care not to initiate the Simulation Engine if the Analytical Engine is running. Note: Before running the simulation, the Workflow Engine checks to see if a simulation is running or has already run for this worksheet. If a simulation has been scheduled but has not yet run, the Workflow Engine waits until the simulation completes and then continues to the next step in the workflow schema. If a simulation has already run but has not been accepted or rejected, the Workflow Engine rejects it and executes the workflow simulation step. End Conditions This step is completed when the Simulation Engine finishes processing the simulation request. Properties Properties Description Default Step ID Unique identifier for the step. User Select the user who should receive this simulation worksheet. The list of possible users includes all users defined within this component.
- 622. 31-38 Oracle Demantra Implementation Guide Properties Description Default Auto Accept Specify whether to accept the results of the simulation automatically: If Yes, the results of the simulation are saved directly as valid forecast data. If No, the results of the simulation are first made available for review by a user. To review the results of a simulation, the assigned user can open the worksheet from a task. The user can then decide whether or not to save them. Yes Query Name Select the worksheet on which to run the simulation. The list of worksheets includes all public worksheets and all worksheets that you own. Recovery Specify what the Workflow Engine should do if the system crashes while performing this step: Ask—the engine follows a Fail-To-Execute procedure for the step. Retry—the engine executes the step again. Continue—the engine continues with the next step. Abort—the engine terminates the workflow instance. Ask Check Finish After Specify how long to wait after starting the step and before first checking to see if the end conditions have been met. 0 seconds
- 623. Workflow Steps 31-39 Properties Description Default Check Finish Every The Workflow Engine checks periodically to see whether or not the end conditions have been met. This property specifies how long to wait between two successive checks. 60 seconds Pause Specify how long to wait after a step has been completed, before starting the next step. 0 seconds Timeout>Timer Specify a timeout for the step. never Timeout>Alert Time Specify the alert phase that can occur just before the step times out. During the alert phase, the task due date is displayed in red in the user's My Task module. never Notes If a step ends before the Check Finish After period, or during a Check Finish Every period, then the Workflow Engine still waits for that counter to finish before checking if the step has finished. In timers, a month is measured as a calendar month. In the event of a timeout or a major system failure, the simulation request remains in the Simulation Engine queue. You must remove it manually from the queue. See also • For information on simulation, see the Oracle Demantra Demand Management User's Guide or other user manuals. Also see "Batch and Simulation Modes". Stored Procedure Step This kind of step runs a stored database procedure, such as MDP_ADD or REBUILD_INDEXES. For information on creating database procedures, see the Oracle database documentation. End Conditions
- 624. 31-40 Oracle Demantra Implementation Guide This step is completed when the database procedure finishes. Properties Properties Description Default Step ID Unique identifier for the step. Pause Specify how long to wait after a step has been completed, before starting the next step. 0 seconds Procedure Name Name of the stored procedure. Parameters Any input parameters that are needed by the database procedure. List the parameter s in the order that they are needed by the procedure. Recovery Specify what the Workflow Engine should do if the system crashes while performing this step: Ask—the engine follows a Fail-To-Execute procedure for the step. Retry—the engine executes the step again. Continue—the engine continues with the next step. Abort—the engine terminates the workflow instance. Ask see also • For information on the predefined Demantra database procedures, see "Database Procedures". Passing level_id and member_id Values When passing level_id and member_id parameter values within a stored procedure step, you must enclose the parameter in # signs. For example, #level_id# and
- 625. Workflow Steps 31-41 #member_id#. Transfer Step This kind of step executes an import or export integration interface. You create integration interfaces within the Business Modeler. See "Series and Level Integration" Note: To execute a file load interface within a workflow, create a batch script that executes the interface, and then use an Executable Step to run the script. End Conditions This step is completed when the interface has been executed. Properties Properties Description Default Step ID Unique identifier for the step. Type Specify the type of data transfer: Import or Export. Profile Select the integration interface from the drop-down list. See " Series and Level Integration". Pause Specify how long to wait after a step has been completed, before starting the next step. 0 seconds
- 626. 31-42 Oracle Demantra Implementation Guide Properties Description Default Recovery Specify what the Workflow Engine should do if the system crashes while performing this step: Ask—the engine follows a Fail-To-Execute procedure for the step. Retry—the engine executes the step again. Continue—the engine continues with the next step. Abort—the engine terminates the workflow instance. Ask Update Data Step This step is called when data is updated in the worksheet. It is not typically included in user-defined workflows. Properties Dialog for Update Data Step User Access Control Step This step can be used to automatically log out users from the system or prevent them
- 627. Workflow Steps 31-43 from logging in from Collaborator Workbench or Demantra Anywhere. It can be used, for example, to ensure users are not working in Oracle Demantra during routine system maintenance or while running other resource-intensive processes (for example, running the analytical engine). It can also be used to allow selected users to regain access to the system. Any users and User Groups that are not selected in the User Access Control step will continue to have full access to Demantra worksheets. Tip: You may want to precede this step with the Message Step to warn users before they are logged out and Demantra becomes unavailable. If a user included in this step has changes pending in a worksheet, then they will be prompted to save them before being logged out of Demantra. Also, if a long-running process is currently running, that process will be allowed to continue until it completes successfully. At that point the user will be logged out of Demantra. Examples of such processes include saving data, importing or exporting data, and running a simulation. Important: Demantra does not verify that the users selected in each step is the same for the Message Step or the 'disable' and 'enable' steps. Therefore, when defining a workflow that contains these steps, ensure that the selected users and user groups are the same in each case. If the selected users and groups are not the same, then some users may continue to be locked out of the system when the workflow ends. End Condition This step is completed when the pause period has expired. Properties Description Default User Access Set to "Disable" to log out or prevent selected users from logging in to Collaborator Workbench or Demantra Anywhere. Set to "Enable" to allow selected users or user groups to log in. Disable Users Use this list to select individual users that will be affected by the "User Access" setting above. None selected
- 628. 31-44 Oracle Demantra Implementation Guide All Users Check this box to apply the User Access setting, above, to all Demantra users. Unchecked Groups Use this list to apply the User Access setting, above, to all Demantra users. None selected Recovery Specify what the Workflow Engine should do it the system crashes while performing this step: Ask-the engine follows a Fail-To-Execute procedure for the step. Retry-the engine executes the step again. Continue-the engine continues with the next step. Abort-the engine terminates the workflow instance. Ask Pause Specify how long to wait after a step has completed before starting the next step. 0 seconds Note: You can re-enable access to Demantra before the lockout period has expired by terminating the workflow in which this step is defined. Note: If the User Access setting is set to 'Disable', then the time entered cannot be less than 1 minute, or 60 seconds. If it is less than 60 seconds, the workflow step definition will be invalid. There is no restriction when User Access is set to "Enable". User Step This kind of step sends tasks to a user. Tasks are shown in My Tasks in Collaborator Workbench, and a task is usually associated with a worksheet. The purpose of a task is typically to draw attention to exceptions, or to request that the user review and possibly edit the worksheet. The User workflow step may run in synchronous or asynchronous mode. In synchronous mode, the User Step sends a task to the specified user or user group, and then waits for the users to mark the workflow as Done. In asynchronous mode, the User
- 629. Workflow Steps 31-45 Step sends tasks to the specified user or user group, and then completes immediately without waiting for the user to mark the task as done. You can also configure the step to automatically send email notification of the new task. If you do so, make sure that the user has an email address. You use the Business Modeler to configure email addresses for the users. See "Creating or Modifying a User". End Conditions This step is completed when the user marks all tasks as Done. Properties Properties Description Default Step ID Unique identifier for the step. User Select the user who should receive this list of options. The list of possible users includes all users defined within this component. Task Specify one or more tasks. See "Specifying a Task". Workstep Completion Condition Specifies when the workflow should be considered complete. Options are: When the users mark the task as complete (synchronous mode) When the users receive the task (asynchronous mode) When the users mark the task as complete
- 630. 31-46 Oracle Demantra Implementation Guide Properties Description Default Recovery Specify what the Workflow Engine should do if the system crashes while performing this step: Ask—the engine follows a Fail-To-Execute procedure for the step. Retry—the engine executes the step again. Continue—the engine continues with the next step. Abort—the engine terminates the workflow instance. Ask Check Finish After Specify how long to wait after starting the step and before first checking to see if the end conditions have been met. 0 seconds Check Finish Every The Workflow Engine checks periodically to see whether or not the end conditions have been met. This property specifies how long to wait between two successive checks. 60 seconds Pause Specify how long to wait after a step has been completed, before starting the next step. 0 seconds Timeout>Timer Specify a timeout for the step. never Timeout>Alert Time Specify the alert phase that can occur just before the step times out. During the alert phase, the task due date is displayed in red in the user's My Task module. never Timeout A user task times out if the user does not mark the task as done before the response
- 631. Workflow Steps 31-47 period has ended. The timeout procedure for a user task is as follows: The user is sent an email notification that the task has timed out. 1. The task is removed from the user's task list. 2. The Workflow Engine continues with an alternative procedure that has been defined within the workflow for this circumstance. Notes If a step ends before the Check Finish After period, or during a Check Finish Every period, then the Workflow Engine still waits for that counter to finish before checking if the step has finished. In timers, a month is measured as a calendar month. See also • For information on tasks, see the Oracle Demantra Demand Management User's Guide. Wait Until Step This kind of step pauses the workflow until a specific condition is met. When the condition is true, the Workflow Engine continues with the next step in the workflow. You can specify a condition in either of the following general ways: • You can instruct the Workflow Engine to look for a specific file and wait until the file is created, or is modified, or reaches a certain size. • You can specify an SQL query to execute. The Workflow Engine runs repeatedly until it returns a value that is different from the original returned value. With this option, you pause a workflow until, for example, a price changes. You can specify multiple wait conditions. If you do, they are combined with a logical OR. For example, if you select both Created and Modified, the Workflow Engine waits until either a new file has been created or an existing file has been modified. End Conditions This step is completed when the condition is met. Properties Properties Description Default Step ID Unique identifier for the step.
- 632. 31-48 Oracle Demantra Implementation Guide Properties Description Default File Full path and filename for the file to be checked. The path and filename can include wildcards, for example: c:dat*.dat The Workflow Engine ignores the case of the path and filename. Wait Until Specify the file state to wait for: Created—wait until this file is created. If you use a wildcard in the filename, then wait until at least one new file that matches the given name is created. Exists—wait until this file exists. If you use a wildcard in the filename, then wait until at least one new file that matches the given name is created. In contrast to the Created option, this option creates a condition that can be true even for the first time the file is checked. Modified—wait until the timestamp on this file has been changed. If you use a wildcard in the filename, then wait until the timestamp on at least one matching file is changed. Size is bigger than—wait until the file is larger than the given size, in kB. If you use a wildcard in the filename, then wait until at least one of the matching files exceeds the given size.
- 633. Workflow Steps 31-49 Properties Description Default SQL Specify an SQL statement. Every time period, the Workflow Engine will execute this statement. When the result of this statement is different than it was before, the step condition has been met, and the workflow continues. Check Finish Every The Workflow Engine checks periodically to see whether or not the specified conditions have been met. This property specifies how long to wait between two successive checks. 60 seconds Recovery Specify what the Workflow Engine should do if the system crashes while performing this step: Ask—the engine follows a Fail-To-Execute procedure for the step. Retry—the engine executes the step again. Continue—the engine continues with the next step. Abort—the engine terminates the workflow instance. Ask Check Finish After Specify how long to wait after starting the step and before first checking to see if the end conditions have been met. 0 seconds Pause Specify how long to wait after a step has been completed, before starting the next step. 0 seconds Timeout>Timer Specify a timeout for the step. never
- 634. 31-50 Oracle Demantra Implementation Guide Properties Description Default Timeout>Alert Time Specify the alert phase that can occur just before the step times out. During the alert phase, the task due date is displayed in red in the user's My Task module. never Note If a step ends before the Check Finish After period, or during a Check Finish Every period, then the Workflow Engine still waits for that counter to finish before checking if the step has finished. In timers, a month is measured as a calendar month. Worksheet Cache Step This kind of step automatically refreshes the caches of the specified worksheets in batch mode for the specified users. Users can also refresh manually. This step refreshes existing worksheet caches based on the latest source data. This step does not create new worksheet caches. End Conditions This step is completed when all the specified caches are refreshed. Properties Properties Description Default Step ID Unique identifier for the step.
- 635. Workflow Steps 31-51 Properties Description Default Worksheet Name - Select All to refresh caches for all worksheets that have the Cache Worksheet Data option selected. - Select a specific worksheet to refresh the cache for only that worksheet. Note that only worksheets that have the Cache Worksheet Data option selected are listed. User/Group - Select All to refresh the cache for the selected worksheet (or All worksheets) for all users. - Select a specific User to refresh the cache for the selected worksheet (or All worksheets) for just that User. Note that only Users that have the CAN_CREATE_CW option selected are listed. For details, see Worksheet Caching, page 9-12 > Enabling Worksheet Caching. - Select a User Group to refresh the cache for the selected worksheet (or All worksheets) for all Users that belong to the selected User Group The drop-down list displays individual Users first followed by User Groups. Users are identified by a single person icon and User Groups are identified by a two person icon.
- 636. 31-52 Oracle Demantra Implementation Guide Properties Description Default Check Finish Every The Workflow Engine checks periodically to see whether or not the specified conditions have been met. This property specifies how long to wait between two successive checks. 60 seconds Check Finish After Specify how long to wait after starting the step and before first checking to see if the end conditions have been met. 1 minute Pause Specify how long to wait after a step has been completed, before starting the next step. 0 seconds Timeout>Timer Specify a timeout for the step. never Timeout>Alert Time Specify the alert phase that can occur just before the step times out. never Cache Type - Select Full Worksheet to refresh the cache for when the worksheet is opened directly ( File > Open) - Select Open With Context to refresh the cache for when the worksheet is opened via an Open With. -
- 637. Workflow Steps 31-53 Worksheet Step The worksheet step runs a worksheet for a specific user and retrieves data for all combinations. It was created as a tool for helping administrators and DBA's tune application server and database performance, by simulating concurrent users opening worksheets. A user can set up several workflows with a set of commonly used worksheets, then launch several of these workflows in parallel to simulate concurrent users. In this way it could be used to load test the system prior to a go-live. Properties Properties Description Default Worksheet Name Dropdown that lists all worksheets. Select the desired worksheet. None
- 638. 31-54 Oracle Demantra Implementation Guide Recovery Specify what the Workflow Engine should do if the system crashes while performing this step: Ask—the engine follows a Fail-To-Execute procedure for the step. Retry—the engine executes the step again. Continue—the engine continues with the next step. Abort—the engine terminates the workflow instance. Ask Pause Specify how long to wait after a step has been completed, before starting the next step. 0 Below is the first page of the dialog that appears when creating this workflow step. Here is where you select the worksheet to call, define the recovery behavior. The Time tab allows you to set the Pause criteria.
- 639. Part 4 Configuring Specific Applications
- 641. Configuring Predictive Trade Planning 32-1 32 Configuring Predictive Trade Planning Defining a Promotion Calendar A Promotion Calendar allows Demantra Predictive Trade Planning (PTP) users to view and optionally edit promotions in a format that resembles a calendar. This view enables users to easily see all promotions that are planned for a selected population, such as account, product group, or time period. In a Promotion Calendar, each promotion appears in a separate color-coded "box" with the series values displayed in each. The number of Series displayed in the Calendar Box is configurable, based on the value of MAX_CALENDAR_SERIES in the CALENDAR_VIEW_DEF table (see table definition below). Promotions appear in the same row unless their start and end dates overlap. When promotions overlap, they are displayed in separate rows. This section describes how to define a Promotion Calendar. For details about viewing and using a Promotion Calendar in a PTP worksheet, see the Oracle Demantra Predictive Trade Planning User's Guide. Promotion Calendars use two tables, CALENDAR_VIEW_DEF and CALENDAR_SERIES_DEF. To create a Promotion Calendar you must enter data directly into these tables using a tool such as SQL Developer. You define a Promotion Calendar by a two-step process: 1. Define general information about the Promotion calendar, in CALENDAR_VIEW_DEF. 2. Define the series that will appear in the Promotion Calendar, in CALENDAR_SERIES_DEF. The following table descriptions will assist the implementer in this process. Note: If a Promotion Calendar is defined on an invalid level, an error
- 642. 32-2 Oracle Demantra Implementation Guide message will be written to the application server log file. CALENDAR_VIEW_DEF Each row in the table contains the definitions for a Promotion Calendar View. Column Description CALENDAR_VIEW_ID Unique ID (number) for the Promotion Calendar. This is a required field and does not get automatically populated. CALENDAR_LEVEL_ID The internal ID of the level on which the Promotion Calendar is defined. For example, for the Promotion level, enter 232. A Promotion Calendar can be defined on any General Level with attributes that can be used as start and end dates. To determine the Level ID for any General Level, query the GROUP_TABLES database table. The GTABLE column stores the name of the General Level and the GROUP_TABLE_ID stores the corresponding Level Id. Use the GROUP_TABLE_ID value as the CALENDAR_LEVEL_ID. CALENDAR_VIEW_NAME User-defined name for the calendar. For example: "FY2012 Promotion Calendar." MAX_EVENTS_OVERLAPPING The number of overlapping promotions that can occur in the calendar without displaying the overlap indicator. For example: 3. If the number of overlapping promotions exceeds this value, an overlap indicator displays in the calendar. Clicking on this indicator expands the row to display all overlapping promotions. Also, the collapse icon displays, allowing you to return to the original view.
- 643. Configuring Predictive Trade Planning 32-3 COLOR_EXPRESSION_SERIES_ID The unique ID of a specific series that you want the Promotion Calendar to use as the background color expression for the promotion in the calendar (the color of the 'block' or region that identifies the promotion). The color expression of the chosen series will then be used to define the background color of each member's area in the graph. (The Series ID is available in the Business Modeler or by querying the COMPUTED_FIELDS database table where the FORECAST_TYPE_ID column contains the Series ID value). LOCK_EXPRESSION_SERIES_ID The unique ID of a specific series that you want the Promotion Calendar to use as the Edit Lock expression defined for a referenced series (optional). The Edit Lock Expression of the specified Series determines if the promotion can be edited on the Calendar. BASE_TIME_LEVEL_ID The default time level that the Promotion Calendar time will display when opened. Set to 1 to display Days within Weeks, 2 for Weeks within Calendar Months, 3 for Calendar Months within Years, and 4 for Years. START_DATE_SERIES_ID A required field. The unique ID of a specific series that you want the Promotion Calendar to use as the calendar's start date (for example, to have promotion start date based on series 'Start Event', enter '1815') END_DATE_SERIES_ID A required field. Same as above, but for the end date. APPLICATION_ID Not user defined, populated by the system (unique ID for Promotion Calendar) MAX_CALENDAR_SERIES Defines the number of series to display in each calendar box. If the number of series defined for the calendar view in the CALENDAR_SERIES_DEF table exceeds this number, then the additional series will not be displayed in the box but will displayed in a pop-up when the user hovers the mouse over the box.
- 644. 32-4 Oracle Demantra Implementation Guide Note: Series that are defined in this table, but are not included in the worksheet, will not show on the calendar. CALENDAR_SERIES_DEF This table defines the series that appear in a Promotion Calendar View. Column Description CALENDAR_VIEW_ID Unique ID of the Promotion Calendar (from CALENDAR_VIEW_DEF table). SERIES_ID Unique ID of the series you want to display in the calendar (for example, '1815'). A particular series should only be listed once per CALENDAR_VIEW_ID SERIES_ORDER Sequence in which each Series appears in a Calendar box, or when the end user hovers over the box to view the full list (top to bottom). DISPLAY_LABEL Set to 0 if you don't want a label for the series, or set to 1 to display the series name. If want to display text other than the series name, set to 1 and then enter that text in LABEL_VALUE. LABEL_VALUE Text that you want to display as the series label, when DISPLAY_LABEL is set to '1'. APPLICATION_ID Not user defined, populated by the system. Note: The number of visible series in each promotion 'box' is determined by MAX_CALENDAR_SERIES. If the number of series defined exceeds the setting for the MAX_CALENDAR_SERIES setting on the CALENDAR_VIEW_DEF table, then the additional series will not be shown in the Calendar Box but will appear in alt text/popup when the user places the cursor over the box. Predefined Promotion Calendar The following tables describe the seeded values of the predefined Promotion Calendar
- 645. Configuring Predictive Trade Planning 32-5 view. For more information about the columns in this table, please refer to the section "Defining a Promotion Calendar, page 32-1". CALENDAR_VIEW_DEF Table Column Value Comments CALENDAR_VIEW _ID 1 CALENDAR_LEVE L_ID 232 This is the GROUP_TABLE_ID value from GROUP_TABLES for the Promotion Level. CALENDAR_VIEW _NAME Promotion Calendar MAX_EVENTS_OV ERLAPPING 3 COLOR_EXPRESSI ON_SERIES_ID The Series ID for the Calendar View Settings series LOCK_EXPRESSIO N_SERIES_ID The Series ID for the Calendar Edit Lock Setting series BASE_TIME_LEVEL _ID 2 START_DATE_SERI ES_ID 1815 This is the FORECAST_TYPE_ID value from COMPUTED_FIELDS for the Start Event series. END_DATE_SERIES _ID 3903 This is the FORECAST_TYPE_ID value from COMPUTED_FIELDS for the End Event series. APPLICATION_ID System Assigned MAX_CALENDAR_ SERIES 4
- 646. 32-6 Oracle Demantra Implementation Guide CALENDAR_SERIES_DEF Table SERIES_ID SERIES_ORDER DISPLAY_LABEL Series Name 3766 1 0 Promotion Desc 1806 2 0 Promotion Tactics 1818 3 1 Sale Price 1865 4 1 Evt Spend 1815 5 1 Start Event 3903 6 1 End Event 1813 7 1 Start Ship 1814 8 1 End Ship 1829 9 1 Lift 1926 10 1 Incr Mfg Prft Note: The following columns are included in the CALENDAR_SERIES_DEF database table, but are not shown in the table above: • CALENDAR_VIEW_ID: Matches the CALENDAR_VIEW_ID on CALENDAR_VIEW_DEF. Is the same value for all rows on CALENDAR_SERIES_DEF. • LABEL_VALUE: Null for all rows • APPLICATION_ID: System assigned Overview of Promotion Effectiveness Promotion Effectiveness is a configurable Web-based product that analyzes the effectiveness of your marketing promotions, in particular trade promotions. In addition to base forecasting and forecasting lift due to promotions, Promotion Effectiveness can analyze the effects of different items on the sales patterns of others.
- 647. Configuring Predictive Trade Planning 32-7 Promotion Effectiveness uses the same Web client that is used for Demand Management and DSM. For Promotion Effectiveness, the Analytical Engine provides a greater breakdown of details than does the engine for demand planning. Overview of the Configuration Process These steps assume that you have already set up the basic Demantra implementation. This means that your implementation already contains the item levels and location levels that are meaningful in the designated environment. To configure Promotion Effectiveness, the general steps are as follows: 1. Create the levels required by Promotion Effectiveness and then optionally customize them; see "Configuring Levels for Promotion Effectiveness". 2. Set values of parameters that control the behavior of the Web client, as it relates to Promotion Effectiveness. See "Setting Parameters". 3. Optionally configure the Activity Browser, if the default configuration is not suitable. See "Configuring the Activity Browser". 4. Decide if you are going to use the default promotion life cycle provided by Demantra. Configure this life cycle as described in "Configuring Promotion Statuses". 5. Load promotions and promotion data as described in "Loading Promotion Data". 6. Configure the Analytical Engine for use with Promotion Effectiveness. See "Configuring and Running the Analytical Engine" in the Demantra Analytical Engine Guide. Note: Deductions and Settlement Management functionality can be disabled for a given user by restricting access to the Settlement Level to 'No Access" in the user's permissions. For details, please see Data Security, page 11-1. Configuring Levels for Promotion Effectiveness The Demantra installer sets up the Promotion Effectiveness (PE) structures by default. You can customize these levels to some extent. See "Reference: PE Levels". Setting Parameters To configure Promotion Effectiveness, specify values for the following parameters:
- 648. 32-8 Oracle Demantra Implementation Guide Parameter Description ColorCodingLevel Specifies the ID of the level that will be used to color code promotions. PromoDefaultStart Specifies the default start date for promotions created within a worksheet: the current date, the last loaded sales date, or the worksheet start. PromoDefaultSpan Specifies the default length of time for promotions created within a worksheet, in base time units. For additional parameters, see "Engine Parameters" See also • "Configuring Parameters" Configuring the Activity Browser The CREATE_PE_STRUCT procedure configures the Activity Browser in the Activity Details sub tab in worksheets. You can re-configure the Activity Browser as needed. To configure the Activity Browser 1. Click Configuration > Configure Levels. Or click the Configure Levels button. Business Modeler displays the Configure Levels screen. 2. Right-click a general level and select Open > Activity Browser. 3. For each general level to include in the Activity Browser, click the left arrow to
- 649. Configuring Predictive Trade Planning 32-9 move that general level from the left list to the right list. Or drag and drop general levels between the two lists as needed. 4. To specify the order of levels in the right side of the screen, select a level and click the up or down buttons. 5. When you are done, click Finish. Configuring the Application Server Note: To configure the Promotion Optimization engine for Tomcat running on Linux you must include the following in the .bash_profile file: • export ILJCONFIG="HandleTableSize=1" • export ODMS_JVM_LIBRARY_OVERRIDE=/lib/i386/server/libjvm.so • export LD_LIBRARY_PATH=$LD_LIBRARY_PATH:demantr_install_dire ctory/optimization/dll Configuring Promotion Statuses Demantra provides a default set of promotion statuses and structures to support a typical promotion life cycle.statuses to support a typical promotion life cycle. The IDs have default names and specific hardcoded behaviors meanings, as follows: promotion.status field Default status name* Hardcoded behavior 1 Unplanned Analytical Engine ignores this promotion. A user can manually change the promotion status to 1, 2, or 3. 2 Cancelled A user can manually change the promotion status to 1, 2, or 3.
- 650. 32-10 Oracle Demantra Implementation Guide promotion.status field Default status name* Hardcoded behavior 3 Planned A user can manually change the promotion status to 1, 2, or 3. 4 Committed User cannot change the status. (An optional procedure can be used to advance the status; see below.) User cannot edit the promotion. 5 Executed User can change the status to 6, but cannot otherwise edit the promotion. 6 Closed User cannot change the status and cannot edit the promotion in other ways. *The status names are in the promotion_status_lookup table. Automatic Advancement of Promotion Status Demantra provides a tool to automatically advance the status of promotions based on their starting dates. The EXPOSE_PROMOTIONS procedure iterates through the promotions listed in the promotion table, checks the status field of each, and does the following: • If the current status is 3 (planned) and if the current date is after the from_date of the promotion, change the status to 4 (committed). • If the current status is 4 (committed) and if the current date is after the until_date of the promotion, change the status to 5 (executed). You should schedule this procedure to run periodically either within the Workflow Engine. Customizing the Promotion Status Behavior Depending on how suitable the default behavior is, you have several options: • Give a new name to each status, for example:
- 651. Configuring Predictive Trade Planning 32-11 Status ID Possible Status Names 1 Unplanned 2 Planned 3 Committed 4 Executed 5 Closed 6 Canceled This system provides flexibility until promotions are committed. • If you do not mind the Analytical Engine using all promotions, you can create your own status series and your own procedure to advance the status as needed. • If you do want the Analytical Engine to ignore unplanned promotions but prefer to use different rules to control promotion editability, you can create a new status series that uses the same database field and update that field in the background. Also write your own procedure to advance the status as needed. Loading Promotion Data To load promotions (which are general levels), create and use an integration interface that includes a level profile. Demantra does not provide a predefined interface for this, because promotions vary in nature. To load promotional data (promotion-type series), create and use an integration interface that includes a data profile that includes the desired series. See "Series and Level Integration". Reference: PE Levels The CREATE_PE_STRUCT procedure adds the following levels to your database:
- 652. 32-12 Oracle Demantra Implementation Guide Note:Demantra provides the Promotion Effectiveness (PE) structures by default. Therefore, the CREATE_PE_STRUCT procedure should be run only after creating a new or custom data model from scratch. This is not common or recommended. Only in this scenario would these structures not already be in place. To determine whether PE structures exist, search the DB for table names containing %PROMOTION%. The following sections provide details on these levels: • Promotion • Promotion Type • Scenarios • Plans Promotion This level contains the details for promotions. This is a general level with the following attributes: Attribute Column Name Data Type Purpose Population Attribute n/a n/a Allows you to associate the promotion with combinations and dates. Status status Number ID of the status of this promotion. This is a lookup attribute of type table; it uses the promotion_status_loo kup table. See " Configuring Promotion Statuses". Promotion Type This level contains the default promotion types. This is a general level with no attributes. You can redefine this level as needed. Scenarios This level groups the promotions. This is a general level with the following attributes:
- 653. Configuring Predictive Trade Planning 32-13 Attribute Column Name Data Type Purpose Name SCENARIO_DESC Character Name of this scenario. Plans PLAN_ID Number ID of the plan to which this scenario belongs. This is a lookup attribute based on the Plans level. You can redefine this level as needed. Plans This level groups the scenarios. This is a general level with one attribute: Attribute Column Name Data Type Purpose Name PLAN_DESC Character Name of this plan. You can redefine this level as needed. PTP Data Needs Without going into details of the specific formats (given later), this section lists the data needs for PTP. Always Required Every PTP system must have the following data: • Basic sales data: the total quantity sold of each SKU at each ship-to location over the course of each week, and the regular retail price paid by the customer. • The manufacturer's cost of goods (COG) for each item. • The list price paid by the retailer for each item. • Information on how each SKU fits into the item hierarchy and information on how each ship-to location fits into the location hierarchies.
- 654. 32-14 Oracle Demantra Implementation Guide • Basic data for historical or future promotions: for each promotion, the start and end dates, the items and locations to which the promotion applies, and the sale price per unit. • Additional details for the promotions: promotion type, slotting costs, buydown allowance per item, and total vehicle costs. Nice to Have By default, PTP assumes that additional data is also available, but you can reconfigure PTP to work if it is not. • Syndicated data that includes the following breakdowns: • Base sales quantity (items sold if there had been no promotions) • Incremental sales quantity (additional items sold because of promotions) • Base sales dollars • Incremental sales dollars Note: If this data is not available, see "Reconfiguring Series if Syndicated Data Is Not Used". • Syndicated ACV data, which measures the number of stores that ran each kind of promotion, weighted by store size: • % ACV ANY PROMO • % ACV DISP • % ACV FEAT • % ACV FEAT&DISPLAY • % ACV FREQSHOPPER • % ACV TPR Note: The ACV data is required if promotion data is unavailable. Purely Optional Other data is purely optional: • Additional details for promotions: consumer overlays, start and end shipping dates,
- 655. Configuring Predictive Trade Planning 32-15 and settlement payment type. • Additional sales data: number of units shipped from the manufacturer to the retailer. Integration in PTP To understand integration in PTP, it is useful to review how the Demantra platform handles integration. Data Loading and Integration in the Platform Demantra provides the following tools for data loading and integration: • The Data Model Wizard defines the basic levels and sales series in a data model and creates the ep_load_sales procedure, which handles data loading for those levels and series. The wizard also creates a batch script for running that procedure. The Data Model Wizard does not load promotions or promotion data. • The Integration Interface Wizard creates integration interfaces that can load promotions and promotion data. You execute the integration interfaces from within Workflow Manager or aps.bat. In both cases, the wizards create staging tables, which usually serve as the starting point for data loading. These tools are documented in the Part titled: "Basic Configuration". Data Loading and Integration in PTP Because the PTP model is already defined, PTP provides an ep_load_sales procedure and integration interfaces that all work with the PTP model. It is not necessary to use the Data Model Wizard or the Integration Interface Wizard. The required staging tables already exist as well. To facilitate data loading, PTP offers two options. • Population of staging tables into database, or • Population of comma delimited files. Based on the decision made, review the Data Model Wizard as well as Integration Interface Wizard to verify that current settings match selections. Default settings for the Data Model Wizard are for loading through database tables. Promotional information loaded through integration profiles is set as a default for text files. Reference: Staging Tables Internally, PTP uses the following staging tables:
- 656. 32-16 Oracle Demantra Implementation Guide • BIIO_IMP_PROMO_DATA • BIIO_Promotion • BIIO_Population The information here is provided for reference and debugging purposes. BIIO_IMP_PROMO_DATA This staging table is used by the Import Promotion Data2 integration interface and has the following structure: Field Data Type Required? Purpose* Sdate date Sales date. LEVEL1 varchar2(500) Code of the promotion member to which this data applies. PROMO_PRICE number(20,10) Sale price per unit at shelf. Used by the Sale Price series. SLOTTING_SPEND number(20,10) Planned spend associated with slotting costs. Used by the Slotting $ series. CASE_BUYDOWN number(20,10) Buydown allowance per unit, for this promotion. Can be used for off-invoice deductions or bill-back. Used by the Buydown series. VEHICLE_SPEND number(20,10) Total planned vehicle costs for this promotion. Used by the Loading Veh $ series. ALLOWANCE_TY PE varchar2(50) Description of the pay type of this promotion, as listed in the pay_type_lookup table. Use the pay_type_desc field, rather than the code or ID field. Used by the Pay Type series. IS_SELF number(20,10) Specify as "1" for all records. Used for internal purposes. * For details on these series, see "Series". BIIO_Promotion
- 657. Configuring Predictive Trade Planning 32-17 This staging table is used by the Import Promotion Levels integration interface. It contains all the promotion attributes, of which only a subset are typically imported. This table has the following structure: Field Data Type Required? Purpose* PROMOTION_CODE varchar2(500) Required Unique code for the promotion, for use in Demantra. PROMOTION_DESC varchar2(2000) Required Description or name of the promotion, for use in Demantra. PROMO_INTEG_STATUS _CODE varchar2(120) Used for integration to determine whether promotion details have been changed SCENARIO_CODE varchar2(500) Required Unique code for the scenario to which this promotion belongs, as listed in the SCENARIO table. PROMOTION_TYPE_CO DE varchar2(500) Required Unique code for the promotion type, as listed in the PROMOTION_TYPE table. PROMOTION_STAT_CO DE varchar2(120) Required Unique code for the promotion status, as listed in the promotion_stat table. BUY_DOWN number(20,10) Populates the Buydown attribute. OPTIMIZATION_GOAL varchar2(2000) Populates the Optimization Goal attribute. OPTIMAL_PRICE_DECR EASE number(20,10) Populates the Optimal Price Decrease attribute. STATUS varchar2(30) Populates the Status attribute. APPROVAL varchar2(200) Populates the Approval attribute.
- 658. 32-18 Oracle Demantra Implementation Guide Field Data Type Required? Purpose* SHIP_DATE date Populates the Start Ship attribute with the date on which shipments will start for this promotion. CONS_PROMO varchar2(50) Populates the Cons Promo attribute, which indicates any associated consumer overlay. OPTI_PROMOTION_TYP E_ID varchar2(2000) Populates the Optimal Type attribute. MAX_BUDGET number(20,10) Populates the Max Budget attribute. Maximum allowed budget for this promotion. SPEND number(20,10) Populates the Optimal Budget attribute. ROI number(20,10) Populates the Return on Investment (ROI) attribute. PROFIT number(20,10) Populates the Optimal Profit attribute. TOTAL_LIFT_U number(20,10) Populates the Optimal Lift attribute. TOTAL_LIFT_D number(20,10) Populates the Optimal Revenue attribute. PROMOTION_TYPE_ID1 varchar2(2000) Populates the Promotion Type1 attribute. STATUS_ID1 varchar2(30) Populates the Promotion Status attribute. END_SHIP date Populates the End Ship attribute. METHOD_STATUS varchar2(200) Populates the method_status attribute.
- 659. Configuring Predictive Trade Planning 32-19 Field Data Type Required? Purpose* OPTIMIZATION_STATU S varchar2(50) Populates the Optimization Status attribute. PROMOTION_BUDGET number(20,10) Promotional budget updated by DSM MIN_RTL_MARGIN_OV ERRIDE number(20,10) Populates the Min Rtl Margin Override attribute. FIXED_BUYDOWN_YN varchar2(100) Populates the Fixed Buydown attribute. MAX_BUYDOWN number(20,10) Populates the Max Buydown attribute. OPTIMIZATION_RANGE _START date Populates the Optimization Range Start attribute. OPTIMIZATION_RANGE _END date Populates the Optimization Range End attribute. OPTIMIZATION_COUNT number(20,10) For internal use only. START_EVENT Date Populates the Start Event attribute. The starting date for the consumption activity on the promotion. END_EVENT Date Populates the End Event attribute. The ending date for the consumption activity on the promotion. * For details on these attributes, see "Promotion". BIIO_Population This staging table is used by the Import Promotion Levels integration interface. It describes the population of each promotion. Specifically, it contains the same information as this window:
- 660. 32-20 Oracle Demantra Implementation Guide For each promotion, the table can contain multiple rows. Each row specifies a level and a member of that level, just as the preceding screen does (the previous screen shows that this promotion is associated with the Low Fat member of the Product Family). This table has the following structure: Field Data Type Required? Purpose LEVEL_MEMBE R varchar2(40) Required Code of the promotion that you are loading. FROM_date date Required Start date for this promotion. UNTIL_date date Required End date for this promotion. FILTER_LEVEL varchar2(50) Required Name of a level, for example "Product Family" or "SKU". LEVEL_ORDER number(15) Required Use "1" for a location-type level or "2" for an item-type level.
- 661. Configuring Predictive Trade Planning 32-21 Field Data Type Required? Purpose FILTER_MEMBE R varchar2(50) Required Description of a member of this level, for example "Low Fat". Reference: Integration Interfaces The information here is provided for reference and debugging purposes. Oracle Demantra provides the following integration interfaces. Import Promotion Levels This integration interface is defined as follows: Type: Import Description: Imports rows from a staging table and adds the new members to the Promotion level. If the new promotions refer to combinations that are not yet present in this database, this interface creates those combinations as well. Also imports rows from another staging table, which contains the population of these promotions. Staging Tables: BIIO_Promotion stores the promotion members. Edit this table before editing BIIO_Population. BIIO_Population stores the populations of the promotions. Import Promotion Data2 This integration interface is defined as follows: Type: Import Description: Imports rows from a staging table and updates the promotion series data in the appropriate internal tables.
- 662. 32-22 Oracle Demantra Implementation Guide Staging Table: BIIO_IMP_PROMO_DATA Configuring the Default Promotion Start and Span To configure the default promotion start and span: 1. In the Business Modeler, click Parameters > System Parameters. 2. Click the Worksheet tab. 3. Edit the following parameters: PromoDefaultStart Specifies the default start date for promotions created within a worksheet: the current date, the last loaded sales date, or the worksheet start. PromoDefaultSpan Specifies the default length of time for promotions created within a worksheet. 4. Click Save. 5. Click Close. Changing the Default Retailer Profile Predefined Behavior For any given retailer, the user can specify attributes or can instead use the default retailer profile. The CopyRetailerDefaults workflow checks for any retailers that use the default profile, and it copies the default details to those retailers. You should run this workflow each time you change a retailer to use the default profile and each time you change the default profile. Possible Changes You can change the default retailer profile, as follows: 1. In the Business Modeler, click Configuration > Configure Levels. 2. Right-click the Retailer level and select Open > General Attributes. Business Modeler displays the default attributes for the retailer level. Together, these constitute the "default retailer profile."
- 663. Configuring Predictive Trade Planning 32-23 3. Click a retailer attribute on the left. 4. In the right area, change Default Value. 5. Continue with other attributes as needed. 6. When you are done, click Next and then click Finish. 7. Restart the Application Server to make the changes available to the users. Configuring the Right-Click "Open With" Option By default, when users right-click a promotion, scenario, or retailer within PTP, they can use the Open and Open With menu options to open a worksheet that is filtered to that selection (the Open option opens the default worksheet). This is configurable within the Business Modeler. To configure the "Open With" menu option: 1. In the Business Modeler, click Components > Create/Open Component. Or click the Create/Open Component button. 2. Click Oracle PTP, and then click OK. 3. Click Next repeatedly until the Select Component Queries for Levels screen is displayed. This screen allows you to associate public worksheets with levels.
- 664. 32-24 Oracle Demantra Implementation Guide This association is used in two ways: • Within the Members Browser, a user can use the right-click menu to open any of these associated worksheets directly from a member of the level (via the Open With menu option). In this case, Demantra opens the associated worksheet. The worksheet is filtered to show only data relevant to the member. • Within the worksheet designer, users can add a sub tab to a worksheet; the sub tab shows details for a given member. The sub tab can display any of the worksheets that are associated with a level included in the main worksheet. The sub tab is filtered to show only data relevant to the member. 4. To associate a worksheet with a level, do the following: 1. Click the level in the Select Level drop down menu. 2. Double-click the worksheet in Available Queries list, which moves it to the Selected Queries list. 3. Move other worksheets from the Available Queries list to the Selected Queries list, as needed. 4. Decide which worksheet in the Selected Queries list should be the default worksheet for this level. For that worksheet, click the Default check box. When the user right-clicks and selects Open, this is the worksheet that will be used. 5. When you are done on this screen, click OK.
- 665. Configuring Predictive Trade Planning 32-25 Removing Right-Click Menu Options The options on the right-click menu are Oracle methods. You can remove these options if needed; for example, if your system is not using optimization, you might want to remove the optimization options. To modify a level method: 1. In the Business Modeler, click Configuration > Configure Methods. The system displays a screen showing the existing methods, including all the predefined methods. 2. Optionally click a level name (such as Promotion, Scenario, or Retailer) in the drop-down list at the top of the screen. The screen is re-displayed with only the methods associated with that level. 3. To hide this menu option, deselect the Display in menu check box. 4. Click Finish. Replacing Collaborator Workbench Graphics The Web-based Demantra products contain default images that you can replace with your organization's own designs. To do so, just back up the default images and substitute your own image files, giving them the same filenames as listed here. The graphic files are in the following directory: Demantra_root/Collaborator/portal/images You can replace any of the graphics files in this directory. If you replace the default graphics with other graphics that have the same width and height, those graphics will fit on the page without the need for any further editing. Collaborator Workbench Splash Screen The splash screen uses the graphic collaborator_splash.gif. Collaborator Workbench Login Page On the login page, the most commonly replaced images are the following: On the login page, the most commonly replaced images are the following: • customerLogo.gif • customerTxt.gif • customerPics.gif
- 666. 32-26 Oracle Demantra Implementation Guide • collaboratorTitle.gif • collaboratorTxt.gif Collaborator Workbench Main Page Collaborator Workbench Main Page On the main page, the most commonly replaced images are as follows: • customer_logo.jpg • collaborator_logo.gif Configuring Promotion Status Behavior You can redefine the behavior of the promotion statuses in PTP. Caution: You should not do this unless you are familiar with series definitions and with the Business Modeler. Predefined Behavior Demantra provides predefined promotion statuses (the Status attribute) and behavior,
- 667. Configuring Predictive Trade Planning 32-27 which PTP uses indirectly. PTP internally uses the Demantra predefined statuses but instead displays its own set of statuses (the Evt Status series). Specifically the Status series maps the PTP statuses to the internal statuses. To do this mapping, this series has a client expression as follows: if ( (evt status = 1), 1, if ( (evt status < 7), 2, 6)) This expression checks the value of the Evt Status series and decides the internal status value to which it maps. The resulting value is saved to the update field for the Status series, which is promotion.status. This is the field that controls whether a promotion is editable. The following table lists the PTP status, the internal hardcoded statuses and their behavior, and explains the added TPMO behavior: Evt Status series Promotion.Stat us field Hardcoded behavior Additional Trade Promotions behavior 1 (a. Unplanned) 1 (Unplanned) Analytical Engine ignores this promotion. Promotion does not affect fund balances or the forecast. 2 (b. Planned) 2 (Cancelled) . The cost of the promotion is deducted from the available balance of funds. 3 (c. Approved) . 4 (d. Committed) . Via a PTP procedure, PTP takes a snapshot of the current state of the promotion, for use in later analysis. The committed promotions are included in all projections. 5 (e. Partial Paid) . 6 (f. Paid) . .
- 668. 32-28 Oracle Demantra Implementation Guide Evt Status series Promotion.Stat us field Hardcoded behavior Additional Trade Promotions behavior 3 (Planned) 4 (Committed) 5 (Executed) PTP does not use these hard coded status values. See "Automatic Advancement of Promotion Status". . 7 (g. Closed) 6 (Closed) User cannot edit the promotion. . Notes • Because of the way that PTP handles status, users must save worksheet data and rerun the worksheet whenever they change the status of a promotion. Otherwise, the status change is not reflected in the worksheet series. • PTP currently includes extraneous status attributes (Event Status and Promotion Status), which you should ignore. • You should not redefine series unless you are familiar with series definitions and with the Business Modeler. Possible Changes • You can change the drop-down choices of the Evt Status series. • You can change the client expression of the Evt Status series, to map the statuses differently to the hardcoded statuses. Re-configuring Series if Syndicated Data Is Not Used Demantra uses syndicated data that includes the following breakdowns: • Base sales quantity (items sold if there had been no promotions) • Incremental sales quantity (additional items sold because of promotions) • Base sales dollars
- 669. Configuring Predictive Trade Planning 32-29 • Incremental sales dollars If this data is not available, it is necessary to reconfigure some PTP series. You may also need to modify some PTP procedures and triggers. Caution: You should not do this unless you are thoroughly familiar with the Demantra platform. Series to Reconfigure The following series directly use the syndicated breakdowns via client expressions: • Base Evt $ Rtl • Incr Evt Vol • Incr Evt $ Rtl Each of these series has a client expression of the following form: if past end date = 1, use syndicated data; otherwise, use engine data (For each promotion, the Past End Date series equals 1 if the promotion is past or equals 0 otherwise.) For example, the client expression for Base Evt $ Rtl is as follows: if(past end date = 0, if( isnull(Base Evt $ Rtl Fut),0, Base Evt $ Rtl Fut ), if(isnull( Base Evt $ Rtl Act ),0, Base Evt $ Rtl Act )) The Base Evt $ Rtl Act contains the syndicated data. You can reconfigure these series by rewriting this client expression so that the series always uses engine data. Or you can modify the actuals series to contain different data, depending on your needs. Also, several series refer directly to the syndicated incremental volume via server expressions. These include BDF Exp Ttl Act, Incr COGS $ Act, Incr Evt $ Act, and MDF Exp Ttl Act. Data Synchronization If you reconfigure any of these series, you should understand how PTP maintains the data for these series. PTP loads this data into sales_data. For performance reasons, this information is needed in the promotion_data table instead, so PTP uses procedures and triggers to copy this data to that table. The following section gives the details.
- 670. 32-30 Oracle Demantra Implementation Guide Syndicated Data in PTP The following table summarizes where the syndicated data is loaded, where that data is synchronized, and what series use this data in the sales_data and promotion_data tables, respectively. For completeness, this table lists all the syndicated data, including required data and data that is not synchronized. Information In the sales_data table In the promotion_data table Field* Series Field** Series Average retail price, always required item_price Avg Rtl sd avg_rtl_pd Avg Rtl Cost of goods, always required sdata7 COGS sd cogs_pd COGS List price, always required sdata8 List Price sd list_price_pd List Price Shelf price, always required shelf_price_sd Shelf Price sd ed_price Shelf Price Total volume, always required actual_quantit y Actuals Ttl Base volume sdata5 Actuals Base volume_base_t tl*** Many series volume_bas e_ttl Many series Base dollars BASE_EVT_D OL_RTL Base Evt $ Rtl sd base_evt_d_ rtl_act Base Evt $ Rtl Act Incremental volume sdata6 Actuals Incr incr_evt_vol _act Incr Evt Vol Act Incremental dollars INCR_EVT_D OL_RTL Incr Evt $ Rtl sd incr_evt_d_r tl_act Incr Evt $ Rtl Act % ACV ANY PROMO sdata9 % ACV ANY PROMO % ACV DISP sdata10 % ACV DISP
- 671. Configuring Predictive Trade Planning 32-31 Information In the sales_data table In the promotion_data table Field* Series Field** Series %ACV FEAT sdata11 % ACV FEAT %ACV FEAT&DISPLAY sdata12 % ACV FEAT&DISPLAY %ACV TPR sdata13 % ACV TPR %ACV FREQSHOPPER sdata14 % ACV FREQSHOPPER *These fields in sales_data are loaded. **These fields in promotion_data are maintained by procedures and triggers. ***This field in sales_data is maintained by procedures and triggers. For information on procedures and triggers, see "Procedures". Parameters Affecting Goal Function Determine Optimization Focus (GOAL_FOCUS) • 0=Manufacturer • 1=Retailer Determine Optimization Goal (OPTIMIZATION_GOAL) • 0=Revenue • 1=Profit • 2=Units Choosing between these three goal functions will affect the formulation of the expression that the optimization is maximizing. If Units is chosen, optimization will look for valid promotions which will generate the most lift while not exceeding constraints such as maximum budget and minimum margins. If Revenue is chosen, the expression will incorporate the price paid for each unit sold. The price used will depend on whether the optimization is focused on a retailer or manufacturer. When choosing Profit the optimized expression will include both incoming revenues and costs associated with the product and promotion.
- 672. 32-32 Oracle Demantra Implementation Guide Determine Buydown Behavior • Fixed • Calculated Configuring Promotion Population Entry Note: For additional details and required configuration tasks, refer to the Oracle Demantra Enhanced Support for Shipment and Consumption Planning white paper on My Oracle Support (support.oracle.com). Configuring the Population Dates label Population Attribute definitions are stored in the GROUP_ATTRIBUTES_POPULATION database table. The DATES_LABEL column specifies the label to display on the UI for the Population Dates. The default value is "Dates". To update this value use a database utility such as Oracle SQL Developer. Configuring the height of the Population Panel Population Attribute definitions are stored in the GROUP_ATTRIBUTES_POPULATION database table. The POPULATION_WIN_HEIGHT specifies the height to use on the UI for the Population Panel. The default value is 100. To update this value use a database utility such as Oracle SQL Developer. CConfiguring Available Filter Levels In many instances, promotions are created on a subset of all available Item and Location levels. However, in certain circumstances, listing all of the available Item and Location levels in the Edit Population window could make it cumbersome to find the specific levels you want. To make it easier to enter promotions, you can configure which Item and Location levels to display in the Available Filter Levels for Population list. For example, you might have access to Item, Brand, and Category levels, but you might never create a promotion on an entire Category. Note: Populations can only be defined on Item and Location levels. If the configured Available Filters Levels contains a General Level that is not an Item or Location level, the filter is not applied and all Item and Location levels are displayed. To configure the Available Filter Levels, use a database utility such as Oracle SQL Developer to populate the POPU_ATTR_VALID_FILTER_LEVELS database table. You need to insert one row into this table for each Level that you want listed as an Available Filter Level for a Population Attribute.
- 673. Configuring Predictive Trade Planning 32-33 This POPU_ATTR_VALID_FILTER_LEVELS database table has the following columns: • ATTRIBUTE_ID – The ATTRIBUTE_ID value corresponding to the row in the GROUP_ATTRIBUTES_POPULATION table for the Population Attribute. • FILTER_LEVEL_ID – The GROUP_ID value from the GROUP_TABLES table for the Filter Level. There should be one row for each Level that should be listed as an Available Filter Level for the Population Attribute. • MANDATORY – Indicates whether or not the Level is a required selection for the Population. Use 1 for Yes. Use 0 for No. • MAX_MEMBERS – Indicates the maximum number of members that can be selected for the Level. 0 or null indicates that there is no limit. The POPU_ATTR_VALID_FILTER_LEVELS database table is empty when initially installed. If there are no entries in this table for a Population Attribute, then all levels that the user has security to will be listed as Available Filter Levels. Configuring Required Filter Levels You determine whether a Filter Level is required by modifying the MANDATORY column of the POPU_ATTR_VALID_FILTER_LEVELS. A value of 1 means the Filter Level is required. A value of 0 means it is not. To configure the Required Filter Levels, use a database utility such as Oracle SQL Developer. Configuring the Maximum Members than can be selected for a Filter Level You determine the maximum number of members that can be selected for a Filter Level by modifying the MAX_MEMBERS column of the POPU_ATTR_VALID_FILTER_LEVELS table. To configure the Maximum Members, use a database utility such as Oracle SQL Developer.
- 675. Configuring Promotion Optimization for Predictive Trade Planning 33-1 33 Configuring Promotion Optimization for Predictive Trade Planning Overview of the Configuration Process To configure Promotion Optimization, you use the following general process: 1. First do one of the following: • Run the Demantra installer, choosing the option to install Promotion Optimization. • Or manually do the same work that the installer does; see "Setting Up PO Without Using the Installer". 2. Then see "Configuring the Optimization Step". 3. Before using Promotion Optimization for the first time, run the Analytical Engine in batch mode so that your machine has access to the engine's cached results. See "Using the Engine Administrator and Running the Engine" in the Demantra Analytical Engine Guide. Set Up Promotion Optimization Without Using the Installer If you did not use the Demantra installer to set up Promotion Optimization, complete the steps in this section. Setting Environment Variables Promotion Optimization requires the following Windows environment variable be set:
- 676. 33-2 Oracle Demantra Implementation Guide PATH Must include the directory Demantra_rootCollaborator virtual_directoryoptimizationdll For example: F:Demantra SpectrumCollaboratordemantraoptimizationdll Registering the Analytical Engine The installer registers the engine. If you do not use the installer, you may need to register the engine manually. To do so, double-click the batch file Demantra_root/Demand Planner/Analytical Engines/binRegEngine.bat. Configuring the Optimization Step For Promotion Optimization, the primary configurable element is the Optimization step. Because this requires details about your installation location, you must configure this step manually. To configure the optimization step 1. Browse to the following case-sensitive URL: http://server name/virtual directory/workflow/login.jsp A login page appears. 2. Enter the PTP component owner's user name and password and click Log on. Note: Only this user can make changes to the optimization workflow. 3. In the row for the Call Promotion Optimizer workflow, click Edit. 4. Right-click the Call Promotion Optimizer step, and then choose Properties. 5. In the Parameters section, review the following parameters in case any changes are necessary. Typically, these parameters do not require modification. This step is required in order to make optimization work in your environment.
- 677. Configuring Promotion Optimization for Predictive Trade Planning 33-3 Parameter Name Purpose MODEL_PATH Complete path and filename of the promoopt.opl file. dbms_type The database type, one of the following: odbc oracle81 The database type information is automatically received from the application server. dbms_connect Database connection information in the form database_user/database_password@databasename . For example: demantra/d@alexish The dbms_connect parameter is automatically received from the application server but modifications may be required if the servername and dbname are not the same. JAR_FILE Relative Path of OPLtoJava.jar file. DRIVER_JAR Relative Path of ojdbc14.jar file 6. Optionally edit the following parameters. Caution: Do not edit parameters that are not listed in this chapter. Parameter Name Purpose opti_level_item Name of the item level for optimization. This is case-sensitive. For example: SKU opti_level_location Name of the location level for optimization. This is case-sensitive. For example: Ship to
- 678. 33-4 Oracle Demantra Implementation Guide Parameter Name Purpose opti_level_promo Name of the promotion level for optimization. This is case-sensitive. For example: Promotion promo_max_budget_attr Name of the field in the Promotion table that stores the maximum budget. promo_used_budget_attr Name of the field in the Promotion table to which the method writes the optimized budget. opti_value_steps Number of variations of the causal factors that the optimizer should try. Use a value from 29 to 500. 29 is the default. MAX_PROMO_ON_PROD_ACC Maximum number of concurrent promotions on a given account. Suggested value: 1. MAX_LENGTH_OF_PROMO Maximum permitted length of any promotion, measured in base time buckets. MIN_RET_MARGIN SQL expression that returns the margin that the retailer requires. Do not set equal to 0. Promotion Optimization computes the retailer margin as follows: (sale price + buydown)/list price - 1 MIN_MAN_MARGIN SQL expression that returns the minimum margin that the manufacturer requires. Do not set equal to 0. Promotion Optimization computes the manufacturer margin as follows: (list price - buydown)/cost of goods - 1 MAX_BUY_DOWN Maximum permitted buydown. Use a very large number such as 100000. RET_CONSUMER_PRICE_EXPRES SION SQL expression that returns the everyday price seen by the consumer.
- 679. Configuring Promotion Optimization for Predictive Trade Planning 33-5 Parameter Name Purpose MAN_LIST_PRICE_EXPRESSION SQL expression that returns the list price seen by the retailer. MAN_COGS_EXPRESSION SQL expression that returns the cost of goods to the manufacturer. MAN_VEHICLE_COST_EXPRESSI ON SQL expression that returns any fixed costs associated with running the promotion. See also Other Important Notes > Vehicle Cost Expression and Event Cost Columns. FIXED_BUYDOWN_YN Specifies whether to use buydown as an input (1) or to calculate the optimal buydown (0). Use 1. BUYDOWN_EXPRESSION SQL expression that returns the buydown per unit. MIN_RET_REVENUE Minimum retailer revenue for any promotion. MIN_RET_DEMAND Minimum retailer demand (unit count) for any promotion. MIN_MAN_PROFIT Minimum manufacturer profit for any promotion. MIN_RET_INC_PROFIT Minimum retailer incremental profit for any promotion. MIN_RET_INC_REVENUE Minimum retailer incremental revenue for any promotion. STATUS_OPTI_CHANGE_ANY If the promotion status is below this level, the optimizer modifies the promotion. Set this value to be the same as parameter STATUS_OPTI_LOCKED. STATUS_OPTI_LOCKED If the promotion status is at this level or higher, the optimizer does not modify the promotion. Set it to the number of a status_id..
- 680. 33-6 Oracle Demantra Implementation Guide Parameter Name Purpose USE_FINANCIAL_CONSTRAINTS Turn certain financial constraints on and off. Valid values are: - 0 = Off (default) - 1 = On When you set this to 0, these constraints are off: - MIN_RET_REVENUE - MIN_RET_INC_REVENUE - MIN_RET_DEMAND - MIN_RET_INC_PROFIT - MIN_MAN_PROFIT - MIN_INC_DEMAND - MIN_RET_MARGIN - MAX_BUY_DOWN If you turn on these financial constraints, review them to make sure that the optimizer can find a solution In some cases, incremental profit or retailer revenue receive negative values. The promotion is profitable and meets retailer margin constraints but is less profitable for the retailer than not running the promotion. If you want the optimizer to ignore these constraints, set them to large negative numbers. BASE_DEMAND_EXPRESSION If you want the optimizer to accept and include manual overrides to the baseline forecast, set this expression to include any override columns that you want. For example, sum(nvl(branch_data.fcst_override,branch_data.#F ORE#)). Use this if you allow the optimization to change promotion dates, the optimizer needs to pick up any baseline overrides for the adjusted date range. If you do not want it to, set this expression to sum(nvl(branch_data.#FORE#,0)).
- 681. Configuring Promotion Optimization for Predictive Trade Planning 33-7 Parameter Name Purpose GOAL_FOCUS Specifies if Promotion Optimization should optimize from the manufacturer's perspective (0; recommended) or the retailer's perspective (1). COEFFICIENT_RANGE_FACTOR Controls the range of possible coefficient values to be searched. For any given causal factor, Promotion Optimization by default tests a discrete set of coefficient values, ranging from 0 to the largest value observed in history. This parameter specifies the additional percentage to add to that range of values. For example, to allow Promotion Optimization to search values 20% larger than historically seen, set this parameter to 0.20. DEFAULT_RET_MARGIN SQL expression that returns the default retailer margin. DEFAULT_MAN_MARGIN SQL expression that returns the default manufacturer margin. RETAILER_LEVEL_ID ID of the level (from group_tables) that corresponds to the retailers. OPTI_BUYDOWN_COLUMN Defines which column the optimized buydown is written to. Refers to a column on the promotion_data table. OPTIMIZATION_RANGE_START SQL expression that returns the start of the date range which is considered by optimization. Expression references promotion table. OPTIMIZATION_RANGE_END SQL expression that returns the end of the date range which is considered by optimization. Expression references promotion table. BUYDOWN_EXPRESSION SQL expression that returns the actual buydown for promotion being optimized. Expression references promotion_data table. As a default, it incorporates bill back, off invoice and scan values.
- 682. 33-8 Oracle Demantra Implementation Guide Other Important Notes The Promotion Optimization module uses certain fields in the Promotion and promotion_data tables; do not change the names of any fields. Also, the Promotion Optimization methods do not check for all the required inputs. In particular, you must make sure that the following information is available before running these methods: • List price • Buydown Additional information regarding degrees of freedom The actual possible solutions the optimization engine will evaluate depend on the status of the promotion being optimized. The internal ID of the promotion's status will be compared with the system parameter PromotionOptiStatusThreshold. • If Promotion Status < PromotionOptiStatusThreshold, the optimizer can modify the promotion's timing, promotion type and values of promotional causals. • If Promotion Status = PromotionOptiStatusThreshold, the optimizer can modify the promotion type and values of promotional causals. • If Promotion Status > PromotionOptiStatusThreshold, the optimizer can modify the values of promotional causals only. Since the comparison is based on whether the status is above or below the parameter, it is strongly recommended that promotion statuses be ordered with increasing internal IDs from least fixed to most fixed promotions. Note: The optimization engine only evaluates the direct effects generated by causal factors. Therefore, optimization results are focused on providing an optimized outcome for the direct effect of the promotion and not the indirect affect. The indirect effects of the promotion can be viewed by accepting the optimized promotion and then executing a simulation. Solution Exclusion Rules Use solution exclusion rules when you have a set of conditions and you don't want them to occur together in an optimized promotion. You can: • Make as many rules as you need • Put as many conditions in each rule as the number of Oracle Predictive Trade Planning analytical engine causal factors that are in the engine profile configuration
- 683. Configuring Promotion Optimization for Predictive Trade Planning 33-9 To define the rules and conditions, manually insert rows into table TPO_EXCLUSION_RULES table. Each table row has the rule name and the condition. There is not one table for the rule name and another table for the conditions. These are the table columns: Column Description RULE_ID The name of the rule. Unique for each set of rows defining a rule. CAUSAL_ID Causal_ID from m3_causal_factors, for example, the causal_id for Promotion Type. TRANSPOSE_ID A specific value of the transpose_function from the m3_causal_factors table transpose_column sql-expression, for example TPR. If the causal has no transpose, then define this as 0. MIN_VAL and MAX_VAL The optimizer makes sure that the variable is outside the ranges defined. If these parameters are 0, the optimizer excludes all values for the causal. LOC_DIM_ID Location dimension ID. For each rule, make this the same value for every condition of the rule.Valid values are: - NULL - A valid ID from the members of the level in parameter opti_level_location. Find the IDs in workflow Call Promotion Optimizer, step OPLStep. If you: - Set a value, the optimizer restricts the rule to any combination having that ID for the opti_level_location dimension - Don't set a value, the exclusion rule is global across all locations.
- 684. 33-10 Oracle Demantra Implementation Guide ITEM_DIM_ID Dimension ID. Make it the same value for every row of a rule.Valid values are: - NULL - A valid ID from the members in the opti_level_item parameter. Find the IDs in workflow Call Promotion Optimizer, step OPLStep. If you: - Set a value, the optimizer restricts the rule to any combination having that ID for the opti_level_item dimension - Don't set a value, it is global across all items. This example shows rows of table TPO_EXCLUSION_RULES that tell the optimizer: • As location above, never combine (1) causal with ID 105 and transpose value 46 and (2) causal with ID 125 and transpose value 16. This could represent the rule of never having a promotion with type TPR and a promotion with an Ad Type, since TPR type promotions are price reductions. • To exclude discounts in the range of 0.15 to 0.30 INSERT INTO "SPECIAL_CUSTOMER"."TPO_EXCLUSION_RULES" (RULE_ID, CAUSAL_ID, TRANSPOSE_ID, MIN_VAL, MAX_VAL, LOC_DIM_ID, ITEM_DIM_ID) VALUES ('1', '105', '46', '0', '0', NULL, NULL) INSERT INTO "SPECIAL_CUSTOMER"."TPO_EXCLUSION_RULES" (RULE_ID, CAUSAL_ID, TRANSPOSE_ID, MIN_VAL, MAX_VAL, LOC_DIM_ID, ITEM_DIM_ID) VALUES ('1', '125', '16', '0', '0', NULL, NULL) INSERT INTO "SPECIAL_CUSTOMER"."TPO_EXCLUSION_RULES" (RULE_ID, CAUSAL_ID, TRANSPOSE_ID, MIN_VAL, MAX_VAL, LOC_DIM_ID, ITEM_DIM_ID) VALUES ('1', '115', '0', '0.15', '0.30', NULL, NULL) Optimized Buydown When you optimize a promotion, you can specify either a fixed buydown or calculated buydown. Buydown is the list price discount that the manufacturer needs to offer to the retailer during the promoted period. When you select calculated buydown, you instruct the optimizer to minimize costs, for example buydown and vehicle, but not to override retailer constraints, for example minimum margin, or manufacturer constraints, for example, maximum buydown allowed. It saves the result in the optimizer buydown result. Valid values are:
- 685. Configuring Promotion Optimization for Predictive Trade Planning 33-11 • Maximize revenue • Maximize profit • Maximize units See also Configuring the Optimization Steps, page 33-2 > To configure the optimization steps > parameter opti_value_steps. Vehicle Cost Expression and Event Cost Columns Use the vehicle_cost expression (parameter MAN_VEHICLE_COST_EXPRESSION) to specify retailer event cost overrides per causal and as well as per transpose. A procedure creates the columns on the Retailer level. You define this parameter in workflow Call Promotion Optimizer, step OPLStep. The default expression uses a case statement to map event costs stored on promotion_data: MAN_VEHICLE_COST_EXPRESSION = "avg(nvl((case #TRANSPOSE# when 25 then branch_data.FIXED_COST_OVER_1 else branch_data.FIXED_COST_OVER end) ,nvl(t_ep_lr2a.EVENT_COSTS_#TRANSPOSE#,0)))"; To conserve columns, the configuration of the SQL Expression handles the mapping between causal/transpose and promotion_data cost override. Modify the expression based on the availability of vehicle cost information and its actual location. Optimizer Log The optimizer logs its activity to the collaborator log. If you want it to log to a file instead, go to workflow Call Promotion Optimizer, step OPLStep, and set at least one of the debug parameters' value to FILE. The optimizer writes the file to directory <Demantra_Collaborator_Home>/optimization/opl.
- 687. Configuring Deductions and Settlement Management 34-1 34 Configuring Deductions and Settlement Management This chapter describes how to configure DSM and load an initial set of data. This chapter covers the following topics: • Overview of DSM • Data Flow in DSM • Overview of the Configuration Process • Setting Up Database Structures • Configuring Promotions and Promotion Series • Identifying Key Promotion Series • Configuring Settlement Matching • Configuring Write-Offs • Loading Initial Data and Creating Possible Matches • Describing Customer Relationships • In Case of Problems • Reference: DSM Levels • Reference: DSM Series • Reference: DSM Integration Interfaces • Reference: Other DSM Tables Overview of DSM Oracle Demantra Deduction and Settlement Management (DSM) is a Web-based, configurable tool to help users at a manufacturing company resolve settlements with customers (usually retailers) who have run promotions, sold products, and now need
- 688. 34-2 Oracle Demantra Implementation Guide reconciliation. Users view the promotional events that DSM provides as possible matches, and then select one and finalize the match. Users can then attach proof of performance for the promotion, approve the match, and request a check to be sent to the customer (if appropriate). Users can also mark a settlement as a duplicate, split a settlement (typically to match only part of it), or deny a settlement. Often, a third party (a broker) has negotiated the terms. Demantra system may be set up to enable users to collaborate with outside brokers, for example, to acquire extra information if needed. Types of Settlements DSM organizes settlements into two groups: trade and non-trade. For trade settlements, DSM recognizes three general types of settlements: • A claim is a request from a customer for payment. In these cases, the customer has run the promotion and is requesting to be reimbursed, based on an agreement with the customer. If a user approves the claim, DSM sends a request to the A/P department to send a check to this customer or to the broker, as applicable. • A deduction is a short payment on an invoice. In these cases, the customer has run the promotion and has made a short payment on an invoice. By permitting this short payment, the user is reimbursing the customer for running the promotion. • An off-invoice settlement represents the case where the customer was billed a lower amount (that is, "off invoice") for the products, as compensation for running the promotion. In this kind of settlement, the settlement amount was negotiated ahead of time. User Actions and Settlement Stages Within DSM, a settlement can go through the following stages:
- 689. Configuring Deductions and Settlement Management 34-3 In general, claims come into DSM through the accounts payable (A/P) department. Deductions and off-invoice settlements come into DSM through in the accounts receivable (A/R) department. In all cases, the settlement is loaded into DSM automatically. Then, in most cases, the processing is as follows: 1. When a user receives a new settlement, he or she takes ownership of it. At this point, the settlement is In Progress. 2. Then the user reviews the possible promotions to which the settlement may apply. Oracle Demantra Deductions and Settlement Management displays suitable possible matches. 3. If the user finds a matching promotion, he or she matches the settlement and validate the proof of performance. Usually, the user scans in a document that shows that the promotion was actually run as required, and then uploads that as an attachment to the settlement. 4. The user then approves the settlement. In some organizations, the customer service department (CSD) representative has authority to approve a settlement. In others, a manager does that job. 5. If the settlement is a claim, the user issues a check request to your company's A/P
- 690. 34-4 Oracle Demantra Implementation Guide department, to send a check to the customer or to the broker as needed. Note: Within user security, the user must have New Check Request and Edit Settlement methods enabled for the user to link to or enter a check request. In other cases, the user may find that the settlement is a duplicate or you may find another reason to deny it, per the company's policies and practices. When the user denies a settlement, the A/P system may enter a chargeback to the customer. Also, a user can also split the settlement and match only part of it, as appropriate. Customers and Check Recipients If a user issues a check request, it is necessary to determine the recipient of that check. The matched event is associated with a particular customer, but the check itself might need to go to a different recipient, depending on the customer's business relationships. For example, suppose the matched event was associated with Acme Foods. Acme Foods may have created the event with the help of a broker, and it might be appropriate to make the check payable to Acme but send it to the broker, who hand-delivers it as a customer-service gesture. For another example, the manufacturer might receive an invoice from an indirect customer, who funded and planned the event with Acme (who then ran the event). In this case, it would be suitable to make the check payable to and send it to the indirect customer. As a result of all this complexity, when an event is matched to a given location A, it is necessary to consider all the other locations that are related to location A in various ways. The user will view these locations and direct the check appropriately. Data Flow in DSM DSM works with external systems such as accounts payable and accounts receivable. Ultimately, those systems own most the data; DSM is responsible only for matching settlements to promotions and performing the associated record keeping. At a high level, the overall flow of data is as follows: 1. Within DSM, an automated workflow imports settlement data from external corporate systems. 2. The same automated workflow then runs database procedures that iterate through the settlements and identify possible matches for each. The procedures write the results to an internal table for later use. Optionally, another database procedure iterates through the settlements and writes off any that fall below a specified threshold.
- 691. Configuring Deductions and Settlement Management 34-5 3. A typical user, who is responsible for a subset of the locations (possibly an account), opens a DSM worksheet and displays settlements associated with those locations. 4. For each unresolved settlement, the worksheet lists possible promotions that could match that settlement. Here, DSM uses the internal table that contains all possible matches. 5. For each settlement, the user does one or more of the following: • Linking the settlement to a promotion. If the settlement is a claim, the user can next specify details for a check request. The same user or another user with higher permission then approves the settlement. • Denying a settlement, because it is a duplicate or for another reason. • Splitting the settlement, creating a new settlement in the process. A user usually splits a settlement in order to link part of it to a promotion. 6. Within DSM, an automated workflow exports details to the external systems. The details vary by implementation but may include the following, for each settlement: • Settlement status, as set by DSM and its users • Changes to the G/L (general ledger) code, as set by DSM users • Current amount of the settlement, if only part of the settlement was valid The workflow also exports check requests (as specified within DSM) and chargebacks (if only part of the settlement was valid). Overview of the Configuration Process These steps assume that you have already set up the basic Demantra implementation. This means that your implementation already contains the item levels, location levels, and promotion levels that are meaningful in the designated environment. To configure DSM, the general steps are as follows: 1. Identify item and location levels associated with settlements. Then run a database script to set up DSM database structures, using that information. See "Setting Up Database Structures". This script also creates the canned DSM worksheets, all series used in those worksheets, methods (right-click actions) for use in DSM worksheets, all associated workflows, and an integration workflow suitable for use with DSM. 2. Customize your existing promotion level to include a budget, and configure series
- 692. 34-6 Oracle Demantra Implementation Guide to store that data. See "Configuring Promotions and Promotion Series". 3. Indicate how to use your promotion series. See "Identifying Key Promotion Series". 4. Specifying tolerance windows to control how closely to match settlements and promotions. See "Configuring Settlement Matching". 5. Configure the automatic write-off mechanism, if needed. See "Configuring Write-Offs". 6. Load the G/L codes, an initial set of invoices, and an initial set of settlements. See " Loading Initial Data and Creating Possible Matches". 7. Populate two tables that list the types of relationships between retailers and other entities, so that DSM can look up all locations related to the matched location. 8. Optionally customize the DSM worksheets. At a minimum, you may want to create a Promotion Effectiveness worksheet and use that within DSM (as a sub tab worksheet). 9. Customize the integration so that new settlements are loaded periodically. Each time settlements are loaded, be sure to run the DSM procedures in order to create proposed matches. Setting Up Database Structures DSM associates settlements with an item and a location level and is shipped pre-configured to an existing item and location level. If you want to change this information, run the procedure API_CONFIG_SETTLEMENT. Internally, this association is represented in complex tables. The association can be different in different implementations, and performing the steps described below sets up the needed database structures. This procedure: • Updates the item and location levels with which settlements should be associated (by updating the parameters SettlementLocationExtension and SettlementProductExtension) • Upgrades the Settlement Location alias level to point to the new location level • Ensures that all standard procedures reflect the new settlement levels Note: The parameters SettlementLocationExtension and SettlementProductExtension are not visible in Business Modeler.
- 693. Configuring Deductions and Settlement Management 34-7 To set up the DSM database structures: 1. Using PLSQL, query the table SYS_PARAMS and determine the values of SettlementLocationExtension and SettlementProductExtension. Change these values as necessary. Parameter Description SettlementLocationExtension Specifies the internal identifier of the location-type level with which settlements should be associated. This generally represents the entity that is being billed or refunded. SettlementProductExtension Specifies the internal identifier of the item-type level with which settlements should be associated. This generally represents a promoted product or a product group. 2. If you want to change the values of Item and Location levels that are associated with the DSM settlement hierarchy, perform the steps below. Otherwise, go to step 3. 1. Run the procedure API_CONFIG_SETTLEMENT. 2. Import DSM data. 3. Verify the following parameters (in the SYS_PARAMS table) are set correctly for your installation: • DSMPromotionBudgetSeries • DSMPEShipDateSeries • DSMALLShipDateDifference • DSMOIPercentDifference • DSMOIShipDateDifference • DSMOICheckProduct • DSMPEOIAmountSeries • DSMWriteOffThreshold 3. Run the following procedures:
- 694. 34-8 Oracle Demantra Implementation Guide • POP_ALL_MATCH_PROPOSAL.SQL • POP_OI_MATCH_PROPOSAL.SQL These procedures use the values of the parameters listed in step 2 as input. These procedures are described in the "Database Procedures" chapter. Tip: You can run API_CONFIG_SETTLEMENT by creating a workflow consisting of a Stored Procedure step. When defining the stored procedure's parameters, enter the Location level ID as the first value and the Item level ID as the second. For example: Configuring Promotions and Promotion Series In order to extend your existing promotion levels to work with DSM, do the following: 1. Create series as follows, if you do not yet have series similar to them: • A promotion budget series as follows:
- 695. Configuring Deductions and Settlement Management 34-9 Editability: Non-editable Data Table: Promotion level Data Type: Numeric Update Field: Promotion_budget (for example) Server Expression: max(promotion.promotion_budget) (for example) Proportionality: Proportional Tip: You might want to create two budget series: one that is editable and the other, non-editable. They both would use the same update field. • A series to store the monetary off-invoice amounts for the promotions, for cases when that is applicable. Data Table: Promotion level Data Type: Numeric Update Field: offinvoice (for example) Server Expression: max(promotion.offinvoice) (for example) Proportionality: Proportional • A series to store the ending date of each promotion, typically the date on which shipments end. This is the date that you will compare to the settlement dates, for the purpose of matching settlements to promotions. Editability: Non-editable Data Table: Promotion level
- 696. 34-10 Oracle Demantra Implementation Guide Data Type: Date Update Field: endship (for example) Server Expression: max(promotion.until_date) (for example) Extra From: promotion_dates, promotion (for example) Extra Where promotion.promotion_id=promotion_dat es.promotion_id Proportionality: Non-proportional Note: This series must have extra from and extra where expressions, or else the POP_ALL_MATCH_PROPOSAL will fail. • An optional series to store the starting date of each promotion, typically the date on which shipments for the promotion start. Editability: Non-editable Data Table: Promotion level Data Type: Date Update Field: startship (for example) Server Expression: max(promotion.from_date) (for example) Extra From: promotion_dates, promotion (for example) Extra Where promotion.promotion_id=promotion_dates.pro motion_id Proportionality: Non-proportional 2. Make a note of the IDs of these series, as shown in the Business Modeler.
- 697. Configuring Deductions and Settlement Management 34-11 3. Add a budget attribute to your existing promotion level. For Column Name, specify the column that stores the budget series that you just defined. See also • "Creating a Series" • "Adding Attributes to a Level" Identifying Key Promotion Series To connect DSM to your promotions and promotion series, you set the following parameters: • DSMPromotionBudgetSeries should be the ID of the promotion budget series. When a settlement is matched to a promotion, DSM adjusts this budget as appropriate. • DSMPEOIAmountSeries should be the ID of the series that stores the monetary off-invoice amounts for the promotions. • DSMPEShipDateSeries is the ID of the series that stores the appropriate promotion date, to be compared with settlement dates. Configuring Settlement Matching To configure the matching process for DSM, you must specify values for the following additional parameters: • DSMAllShipDateDifference • DSMOIPercentDifference • DSMOIShipDateDifference The matching process is different for off-invoice settlements than it is for claims and deductions. The following sections provide the details. Claims and Deductions To find promotions to match to a claim or deduction, DSM performs two comparisons: • DSM compares the promotion date to the settlement date. Only promotions with close enough dates are considered possible matches. The DSMAllShipDateDifference parameter specifies the window of time that Demantra uses to search for a promotion that matches a given settlement. Express this as the number of time buckets between the promotion end date (DSMPEShipDateSeries) and the settlement date.
- 698. 34-12 Oracle Demantra Implementation Guide • DSM compares the promotion budget (DSMPromotionBudgetSeries) to the monetary settlement amount. A promotion is a possible match only if its remaining budget is at least as large as the settlement amount. These parameters are used by the POP_ALL_MATCH_PROPOSAL procedure, which you should execute every time you load settlement data. Off-Invoice Settlements An off-invoice settlement must be handled slightly differently. This kind of settlement can occur only if there was an agreement to bill the customer below the invoice rate. Typically, the settlement amount was decided at that time and less variation is anticipated than with other kinds of settlements. You specify a tolerance window to use when comparing the settlement amount to promotion amounts. For flexibility, you can specify a different tolerance for date comparison as well. It is expected that each off-invoice settlement will be matched to only one promotion or possibly to a small number of promotions, in contrast to other kinds of settlements. To find promotions to match to an off-invoice settlement, DSM performs the following comparisons: • DSM compares the promotion budget to the off-invoice amount. For this comparison, the DSMOIPercentDifference parameter specifies the maximum percent difference (of monetary amount) permitted when matching an off-invoice settlement to possible promotions. The promotion budget is controlled by DSMPromotionBudgetSeries. • DSM compares the promotion date to the off-invoice date. Only promotions with close enough dates are considered possible matches. You use the DSMOIShipDateDifference parameter to specify the closeness of these dates. The promotion date is controlled by DSMPEShipDateSeries. These parameters are used by the POP_OI_MATCH_PROPOSAL procedure, which you should execute every time you load settlement data. Configuring Write-Offs If a settlement is below a certain size, DSM can automatically write it off without user intervention. This process changes the settlement status to Write Off. If your implementation requires write-offs, do the following: 1. Create a workflow to automatically run the Java class com.demantra.workflow.step.CustomWriteOffStep each time you load settlement data. 2. Set a value for the DSMWriteOffThreshold parameter, which specifies the monetary amount below which Demantra automatically writes off a settlement.
- 699. Configuring Deductions and Settlement Management 34-13 Loading Initial Data and Creating Possible Matches The recommended way to load an initial set of data is to use the integration interfaces that are provided with DSM. The UPGRADE_TO_DSM procedure creates these integration interfaces. After loading the data, you should create the possible matches for use within the DSM worksheets. This section describes how to quickly get started with an initial set of data; it does not discuss integration or automation in any detail. The overall procedure is as follows: 1. In the Business Modeler, open each of the import integration interfaces, click Next until you reach the last screen (the preview screen), and click Create in order to create the staging table for that interface. In this step, you create the following staging tables: • BIIO_GL_Code • BIIO_Settlement_Import • BIIO_Invoice 2. Load data into these staging tables: • For G/L codes, see "G/L Code Import". • For settlements, see "Settlement Import". • For invoices, see "Invoice Import". 3. Be sure to commit the changes. 4. Create and run a workflow or a set of workflows that execute these integration interfaces. Note: Because settlements refer to G/L codes and invoices, you should load G/L codes and invoices first. It is also good practice to check the results of that step before executing the interface to load settlements. You can use the Business Modeler to verify that the G/L, settlement, and invoice levels contain the members that you imported; see "Viewing the Members of a Level". 5. Execute the POP_ALL_MATCH_PROPOSAL and POP_OI_MATCH_PROPOSAL procedures, either from within a workflow or from a SQL command line. Verify that the new tentative matches are written into the proposed_match table.
- 700. 34-14 Oracle Demantra Implementation Guide 6. Optionally create and run a workflow to run the Java class com.demantra.workflow.step.CustomWriteOffStep. See also "Creating or Editing Workflow Schemas" Describing Customer Relationships DSM uses two tables to describe relationships such as those between a customer and a broker, so that the user can have an appropriate choice of ways to direct the check. You should populate these tables according to the requirements of the implementation. To describe the customer relationships: 1. Populate the Customer_Type table to list all the customer types, such as the following example set: • Direct customer • Indirect customer • Broker • Other 2. Second, the Customer_Type_Relation table describes all the relationships between the customer locations (specifically, at the location level you have associated with settlements). Each row consists of three fields: • CUSTOMER_LHS is the ID of a customer (for example, A). • RELATION_TYPE is the ID of a type of customer, which we use here as a type of relationship (for example, Broker). • CUSTOMER_RHS is the ID of a related customer (for example, B). This row means that A is a Broker for B. In Case of Problems See the Oracle Demantra Release Notes for notes on adjustments or corrections to make, in case the UPGRADE_TO_DSM procedure has any defects.
- 701. Configuring Deductions and Settlement Management 34-15 Reference: DSM Levels You should not modify these levels without consulting Oracle. Note: For technical reasons, the following restrictions apply: • If you use a settlement level in a worksheet, you cannot use levels from any other hierarchy in that worksheet, either to aggregate or to filter. This means that the only location level you can use is the aliased one that is inside the settlement hierarchy. • If you use a settlement level in a worksheet, all series in the worksheet must refer to tables used by the settlement hierarchy. The following sections provide details on these levels: • Check Request • Settlement • GL Code • Invoice • Invoiced Billto • Linked Promotion • Status • Type • SettlementAlias
- 702. 34-16 Oracle Demantra Implementation Guide Check Request This level contains the details for check requests, which are exported to the accounting systems that actually perform them. A check request is an instruction to send a check to a customer or designated third party. This is a general level with the following attributes: Attribute Column Name Data Type Purpose Address line 1 CUST_ADDR_LN1 Character Address of this customer, for use in this check request.Address line 2 CUST_ADDR_LN2 Character Address line 3 CUST_ADDR_LN3 Character Address line 4 CUST_ADDR_LN4 Character Amount CHECK_REQUEST_ AMOUNT Number Monetary amount of the check request. BK Address line 1 BK_ADDR_LN1 Character Address of the broker, if applicable. BK Address line 2 BK_ADDR_LN2 Character BK Address line 3 BK_ADDR_LN3 Character BK Address line 4 BK_ADDR_LN4 Character BK Attn BK_ATTN Character Addressee of the broker. BK City BK_CITY Character City of the broker, for use in the address. BK Company BK_COMPANY Character Name of the broker's company, for use in the address. BK Country BK_COUNTRY Character Country of the broker, for use in the address.
- 703. Configuring Deductions and Settlement Management 34-17 Attribute Column Name Data Type Purpose BK State BK_STATE Character State of the broker, for use in the address. BK Zip BK_ZIP Character Postal code of the broker, for use in the address. Check Request # CHECK_REQUEST_ NUM Number Number of the check request. Check Requested FOR CHECK_REQUEST_ REASON_ID Number Reason code associated with this check request. Customer City CUST_CITY Character City of the customer, for use in the address. Customer Country CUST_COUNTRY Character Country of the customer, for use in the address. Customer Reference CR_CUSTOMER_RE FERENCE Character Customer State CUST_STATE Character State of the customer, for use in the address. Customer Type CUSTOMER_TYPE Number Customer Zip CUST_ZIP Character Postal code of the customer, for use in the address. Date Issued CHECK_REQUEST_ DATE_ISSUED Date Date on which the check request was issued. Date Requested CHECK_REQUEST_ DATE Date Date of the check request.
- 704. 34-18 Oracle Demantra Implementation Guide Attribute Column Name Data Type Purpose Invoice INVOICE_ID Number ID of the invoice with which this check request is associated. Mail To Broker MAIL_TO_BK Number Name CHECK_REQUEST_ DESC Character Description of the check request. Note CHECK_REQUEST_ NOTE Character Note entered when check request was made. Payee PAYEE Character Person or entity to whom the check should be written. Promo Description CR_PROMOTION_I D Character ID of the promotion with which this check request is associated. Settlement ID SETTLEMENT_ID Number ID of the associated settlement. For information on importing or exporting this level, see "Check Request Import and Export". Settlement The Settlement level aggregates settlement data. In general, a settlement is an outstanding sum of money that needs to be resolved, related to a promotion. This is a general level with the following attributes.
- 705. Configuring Deductions and Settlement Management 34-19 Attribute Column Name Data Type Purpose Account t_ep_lr2_EP_ID Number Description of the customer with which this settlement is associated. This must be the description field as listed in the level table, for the location level that is associated with settlements. Amount To Link LINKED_AMOUNT Number Monetary amount that has been matched to promotions. Cust Check Date CUSTOMER_CHECK _DATE Date Applies only to deductions and off-invoice settlements. This is the date of the check from the customer. Customer Check # CUSTOMER_CHECK _NUM Number Applies only to deductions and off-invoice settlements. This is the number of the check from the customer for this settlement. Uses the customer's check numbering system. Date Posted DATE_POSTED Date Date when the settlement was posted. Event Product promoted_product Number Code of the associated item, as listed in the Demantra tables.
- 706. 34-20 Oracle Demantra Implementation Guide Attribute Column Name Data Type Purpose GL Code GL_CODE_ID Number Code of the associated G/L code, as listed in the Demantra tables. Link Date LINK_DATE Date Date on which this settlement was linked to a promotion. Linked Promotion PROMOTION_ID Number ID of the associated promotion, as listed in the Demantra tables. Method Status METHOD_STATUS Number For internal use only. Name SETTLEMENT_DESC Character Description of the settlement. Open Amount OPEN_AMOUNT Number Remaining amount of the settlement that has not yet been matched to any promotions. Related WS RELATED_WS Number Demantra ID of the worksheet that is associated, by default, with settlements. Settlement # SETTLEMENT_NUM BER Number Number for the settlement, as given in the enterprise systems. Settlement Action SETTLEMENT_ACTI ON_ID Number Settlement Amount SETTLEMENT_AMO UNT Number Total monetary amount of the settlement.
- 707. Configuring Deductions and Settlement Management 34-21 Attribute Column Name Data Type Purpose Settlement Invoice INVOICE_ID Number ID of the associated invoice, as listed in the Demantra tables. Settlement Owner SETTLEMENT_OWN ER Number DSM user who has claimed responsibility for this settlement. Settlement Type SETTLEMENT_TYPE _ID Number Type of the settlement. This should be one of the IDs of the Type level; see "Type". Split Settlement ID SPLIT_SETTLEMENT _ID Number ID of the settlement that was split off from this settlement, if any. Status SETTLEMENT_STAT US_ID Number Status of the settlement. This should be one of the IDs of the Status level; see "Status". Supplier Check # SUPPLIER_CHECK_ NUM Number Applies only to claims. Date of the check to the customer. Supplier Check Date SUPPLIER_CHECK_ DATE Date Applies only to claims. This is the number of the check that reimburses the customer for this claim. For information on loading settlements into DSM, see "Settlement Import". GL Code This level contains the G/L codes that you loaded from the other corporate systems. This is a general level with no attributes. For information on loading G/L codes, see "G/L Code Import".
- 708. 34-22 Oracle Demantra Implementation Guide Invoice This level contains the invoices that you loaded from the other corporate systems. This is a general level with the following attributes. Attribute Column Name Data Type Purpose Invoice # INVOICE_NUM Number Invoice number, as used in the corporate systems. Invoice Date INVOICE_DATE Date Date of the invoice. Invoiced Bill To t_ep_lr2_EP_ID Number ID of the customer to whom this invoice was issued. Name INVOICE_DESC Character Description. Can be identical to the invoice codes. For information on loading invoices, see "Invoice Import". Invoiced Billto This level is an alias to the actual location level that you associated with settlements. Demantra creates, maintains, and uses this alias for technical reasons, and you should not make changes to it. Linked Promotion This level is an alias to the lowest promotion level. Demantra creates, maintains, and uses this alias for technical reasons, and you should not change it. Status This level contains the predefined settlement statuses: • New • In Progress • Unapproved
- 709. Configuring Deductions and Settlement Management 34-23 • Approved • Duplicate • Denied • Write Off These statuses can not be customized. Do not change this level in any way. Type This level contains the predefined settlement types: • Claim • Off-invoice • Deduction • Non-Trade • Claim resulting from an original claim split • Deduction resulting from an original deduction split These types can not be customized. Do not change this level in any way. SettlementAlias This level is an alias to the settlement level. Demantra creates, maintains, and uses this alias for technical reasons, and you should not change it. Reference: DSM Series For information on the predefined series, see the Oracle Demantra Deduction and Settlement Management User's Guide. Reference: DSM Integration Interfaces The UPGRADE_TO_DSM procedure automatically creates integration interfaces to help you import or export the following: • G/L codes • Invoices
- 710. 34-24 Oracle Demantra Implementation Guide • Settlements • Check requests This section provides details on these integration interfaces. G/L Code Import Interface Name: Reason Code Integration INTERFACE Type: Import Description: Imports rows from a staging table and adds the new members to the GL Code level. Staging Table: BIIO_GL_Code BIIO_GL_Code This staging table has the following structure: Field Data Type Purpose GL_CODE_CODE varchar2(120) Cannot be null. Short version of the general ledger codes, as used in the enterprise system. Example: SPOILED GL_CODE_DESC varchar2(2000) Cannot be null. Longer description of the codes. In some cases, these are identical to the codes. Invoice Import Interface Name: Invoice Integration INTERFACE Type: Import Description: Imports rows from a staging table and adds the new members to the Invoice level. Staging Table: BIIO_Invoice BIIO_Invoice
- 711. Configuring Deductions and Settlement Management 34-25 This staging table has the following structure: Field Data Type Purpose INVOICE_CODE varchar2(120) Cannot be null. Unique code for the invoice, for use in Demantra. INVOICE_DESC varchar2(2000) Cannot be null. Description. Can be identical to the invoice codes. LR2 varchar2(120) Cannot be null. Code of the customer with which this invoice is associated. This must be the code field as listed in the level table, for the location level that is associated with settlements. INVOICE_NUM number(20,10) Invoice number, as used in the corporate systems. INVOICE_DATE date Date of the invoice. T_EP_LR2_EP_ID varchar2(2000) Description of the customer with which this invoice is associated. This must be the description field as listed in the level table, for the location level that is associated with settlements. Settlement Import Interface Name: SETTLEMENT LEVEL import Type: Import Description: Imports rows from a staging table and adds the new members to the Settlement level. Staging Table: BIIO_Settlement_Import BIIO_Settlement_Import This staging table has the following structure:
- 712. 34-26 Oracle Demantra Implementation Guide Field Data Type Purpose SETTLEMENT_CODE varchar2(500) Cannot be null. Unique code for the settlement, for use in Demantra. SETTLEMENT_DESC varchar2(2000) Cannot be null. Description of the settlement. INVOICE_CODE varchar2(120) Cannot be null. Code of the associated invoice, as listed in the Demantra tables. GL_CODE_CODE varchar2(120) Cannot be null. Code of the associated G/L code, as listed in the Demantra tables. SETTLEMENT_STATU S_CODE varchar2(120) Cannot be null. Status of the settlement. This should be one of the codes of the Status level; see "Status". SETTLEMENT_TYPE_ CODE varchar2(120) Cannot be null. Type of the settlement. This should be one of the codes of the Type level; see "Type". PROMOTION_CODE varchar2(120) Cannot be null. Code of the associated promotion, as listed in the Demantra tables. SETTLEMENT_OWNE R varchar2(50) DSM user who has claimed responsibility for this settlement. DATE_POSTED date Should not be null. Date when the settlement was posted. CUSTOMER_CHECK_ NUM number(20,10) Applies only to deductions and off-invoice settlements. This is the number of the check from the customer for this settlement. Uses the customer's check numbering system. CUSTOMER_CHECK_ DATE date Applies only to deductions and off-invoice settlements. This is the date of the check from the customer. SETTLEMENT_AMOU NT number(20,10) Total monetary amount of the settlement.
- 713. Configuring Deductions and Settlement Management 34-27 Field Data Type Purpose SUPPLIER_CHECK_N UM number(20,10) Applies only to claims. This is the number of the check that reimburses the customer for this claim. SUPPLIER_CHECK_D ATE date Applies only to claims. Date of the check to the customer. SETTLEMENT_TYPE_I D varchar2(2000) Type of the settlement. This should be one of the IDs of the Type level; see "Type". SETTLEMENT_ACTIO N_ID varchar2(255) LINKED_AMOUNT number(20,10) Monetary amount that has been matched to promotions. OPEN_AMOUNT number(20,10) Remaining amount of the settlement that has not yet been matched to any promotions. INVOICE_ID varchar2(2000) ID of the associated invoice, as listed in the Demantra tables. T_EP_LR2_EP_ID varchar2(2000) Description of the customer with which this settlement is associated. This must be the description field as listed in the level table, for the location level that is associated with settlements. GL_CODE_ID varchar2(2000) ID of the associated G/L code, as listed in the Demantra tables. SETTLEMENT_STATU S_ID varchar2(2000) Status of the settlement. This should be one of the IDs of the Status level; see " Status". PROMOTION_ID varchar2(2000) ID of the associated promotion, as listed in the Demantra tables. PROMOTED_PRODU CT varchar2(2000) Description field of the associated item, as listed in the level table for the appropriate level.
- 714. 34-28 Oracle Demantra Implementation Guide Field Data Type Purpose LINK_DATE date Date on which this settlement was linked to a promotion. METHOD_STATUS varchar2(200) For internal use only. SPLIT_SETTLEMENT_ ID number(20,10) ID of the settlement that was split off from this settlement, if any. RELATED_WS number(20,10) Demantra ID of the worksheet that is associated, by default, with settlements. SETTLEMENT_number number(20,10) Number for the settlement, as given in the enterprise systems. Settlement Export Interface Name: SETTLEMENT LEVEL export Type: Export Description: Exports members of the Settlement level. Performs full export (not incremental) to TEMPIntegrationDIRExport_Settlement.T XT. Staging Table: N/A Check Request Import and Export Interface Name: CHECK Request Integration INTERFACE Type: Import & Export
- 715. Configuring Deductions and Settlement Management 34-29 Description: When used for import: imports rows from a staging table and adds the new members to the Check Request level. When used for export: performs full export (not incremental) to TEMPIntegrationDIRExport_CheckReque st.TXT Staging Table: BIIO_CheckRequest BIIO_CheckRequest This staging table has the following structure: Field Data Type Purpose CHECK_REQUEST_COD E varchar2(120) Cannot be null. Unique code for the check request, for use in Demantra. CHECK_REQUEST_DES C varchar2(2000) Cannot be null. Description of the check request. INVOICE_ID varchar2(2000) ID of the invoice with which this check request is associated. CHECK_REQUEST_NU M number(20,10) Number of the check request. CHECK_REQUEST_AM OUNT number(20,10) Monetary amount of the check request. CHECK_REQUEST_DAT E date Date of the check request. CHECK_REQUEST_DAT E_ISSUED date Date on which the check request was issued. CHECK_REQUEST_REA SON_ID varchar2(255) Reason code associated with this check request. CHECK_REQUEST_NOT E varchar2(200) Note entered when the check request was created.
- 716. 34-30 Oracle Demantra Implementation Guide Field Data Type Purpose CR_CUSTOMER_REFER ENCE varchar2(200) CR_PROMOTION_ID varchar2(2000) ID of the promotion with which this check request is associated. CUSTOMER_TYPE number(20,10) ID of a customer type, from the Customer_Type table. See "Reference: Other DSM Tables". PAYEE varchar2(200) Person or entity to whom the check should be written. CUST_ADDR_LN1 varchar2(200) Address of this customer, for use in this check request. CUST_ADDR_LN2 varchar2(200) CUST_ADDR_LN3 varchar2(200) CUST_ADDR_LN4 varchar2(200) CUST_CITY varchar2(200) CUST_STATE varchar2(200) CUST_ZIP varchar2(200) CUST_COUNTRY varchar2(200) MAIL_TO_BK number(20,10) BK_COMPANY varchar2(200) Name of the associated broker, if any, for use in this check request. BK_ATTN varchar2(200) Addressee of the broker. BK_ADDR_LN1 varchar2(200) Address of the broker. BK_ADDR_LN2 varchar2(200) BK_ADDR_LN3 varchar2(200)
- 717. Configuring Deductions and Settlement Management 34-31 Field Data Type Purpose BK_ADDR_LN4 varchar2(200) BK_CITY varchar2(200) BK_STATE varchar2(200) BK_ZIP varchar2(200) BK_COUNTRY varchar2(200) SETTLEMENT_ID number(20,10) ID of the associated settlement. Reference: Other DSM Tables DSM uses the following additional tables; see "Describing Customer Relationships". Customer_Type This table has the following structure: Field Data Type Purpose CUSTOMER_TYPE_ID number(10) Cannot be null. Unique ID for the customer type, for use in Demantra. CUSTOMER_TYPE_CODE varchar2(240) Cannot be null. Unique code for the customer type, for use in Demantra. CUSTOMER_TYPE_DESC varchar2(1000) Description of the customer type. FICTIVE_CHILD number(10) Ignore this field. IS_FICTIVE number(1) Ignore this field. LAST_UPDATE_DATE date Ignore this field. Customer_Type_Relation
- 718. 34-32 Oracle Demantra Implementation Guide This table has the following structure: Field Data Type Purpose CUSTOMER_LHS number(10) Cannot be null. ID of a customer, specifically a member of the location level with which settlements are associated, in this implementation. RELATION_TYPE number(10) Cannot be null. ID of a customer type, from the Customer_Type table. CUSTOMER_RHS number(10) Cannot be null. ID of a customer, specifically a member of the location level with which settlements are associated, in this implementation. If CUSTOMER_LHS refers to Customer A, RELATION_TYPE refers to the Broker type, and CUSTOMER_RHS refers to Customer B, then this row means that Customer A is a Broker for Customer B.
- 721. Fine Tuning and Scaling Demantra 35-1 35 Fine Tuning and Scaling Demantra Overview Typically you adjust parameters to control your solution's global behavior, including various defaults and performance settings. This chapter provides an overview of most of the parameters, grouped into specific areas. Basic Parameters For reference, Demantra stores basic configuration information in the following parameters. Unless otherwise noted, you should not change these parameters after going live: Parameter Description active_forecasts_versions Specifies how many forecast versions the Demantra database should store. You can change this parameter after going live. FIRSTDAYINWEEK First day of week to use when binning sales data into base time buckets, in a weekly system. It is not generally safe to change this parameter after going live. Application Server The APS queue uses the following parameters:
- 722. 35-2 Oracle Demantra Implementation Guide Parameter Description QueryMechanisimTimeOut The timeout period for the query notification listener, in milliseconds. StartUpdateQueue Specifies whether to start the manual update listener. UpdateQueueTimeout The timeout period for the manual update listener, in milliseconds. Collaborator Workbench The following parameters control Collaborator Workbench. Also see "Solution Branding" for parameters that control Collaborator Workbench titles. General The following parameters control Collaborator Workbench in general: Parameter Description collaborator.supportURL URL of the Support link, relative to http://server name/virtual directory/portal/. This link is in the upper right corner of Collaborator Workbench. collaborator.searchURL URL of the Search link, relative to http://server name/virtual directory/portal/. This link is in the upper right corner of Collaborator Workbench. dir.onlineHelp URL of the online help, relative to http://server name/virtual directory/portal/. This link is in the upper right corner of Collaborator Workbench. navBarContentProvider.addNewContentL ink.Text Text of the New link, which is shown at the top of the Contents menu.
- 723. Fine Tuning and Scaling Demantra 35-3 Parameter Description Server.SessionExpiration This is the time interval (in seconds) between which the current page automatically refreshes itself. If an idle Collaborator Workbench session has expired, the current page will not reflect this until the next refresh event, at which time it will automatically redirect itself to the expiration page.expires. Also see "Customizing Demantra Web Pages". My Tasks The following parameter affects the My Tasks pane of Collaborator Workbench: Parameter Description general.userList.tasks Specifies whether the My Tasks module displays the Create Task button: Who's Online The following parameters control the Who's Online pane of Collaborator Workbench: Parameter Description general.userList.whoisonline Specifies whether the Who's Online module is displayed. UserListContentProvider.commontitle The title of the Who's Online pane. UserTitleContentProvider.TimeToSleep The time to wait polling user status for the Who's Online pane. Content Panes The following parameters control the default behavior of graph-type content panes:
- 724. 35-4 Oracle Demantra Implementation Guide Parameter Description Graph.MaxLabelWidth Maximum width of labels in graph-type content panes in Collaborator Workbench. If a label is too longer, the last characters are represented by three periods (...). Legend.MaxLegendItemWidth Maximum width (in characters) of the legend in a graph-type content pane in Collaborator Workbench. If any lines of the legend are too longer, the last characters of those lines are represented by three periods (...), as follows: Query.MaxCombinations Maximum number of combinations that can be displayed in a graph-type content pane in Collaborator Workbench, when you display a single series plotted for multiple combinations. The user receives an error if a content pane contains more than this number of combinations. Query.MaxSeries Maximum number of series that can be displayed in a graph-type content pane in Collaborator Workbench. The user receives an error if a content pane contains more than this number of series. Query.TopBottom.MaxCombinations Maximum number of combinations that can be displayed in a content pane that contains a stacked bar chart or pie chart. The user receives an error if a content pane contains more than this number of combinations. See also "Email" "Workflow" "Worksheets"
- 725. Fine Tuning and Scaling Demantra 35-5 Database The following parameters control how Demantra connects to and uses the Demantra database. For additional parameters that specify which database Demantra connects to, see the Oracle Demantra Installation Guide. General Database Settings Parameter Description DBDateFormat Controls the date format used in the database. LockTimeout Specifies the period (in seconds) between killing a database session and releasing the lock for that session. Rebuild_Sales_Table Specifies whether the REBUILD_TABLES procedure should rebuild the sales_data table. Applies only to Oracle. Database Connections The following parameters control Oracle Demantra's database connections: Parameter Description AdditionalConnectionsExpression New for 7.0) Ignore this parameter for now. DBConnectionTimeout The database connection timeout period. DBIdleTimeOut The connection idle timeout period. Recommended: 300000 (5 minutes) MaxDBConnections The maximum number of database connections for the Demantra database user. Recommended: the number of concurrent users multiplied by 2.
- 726. 35-6 Oracle Demantra Implementation Guide Parameter Description MinDBConnections The minimum number of database connections for the Demantra database user. Oracle Tablespaces For Oracle databases, Demantra writes to multiple tablespaces, as specified during installation. The tablespace assignments are controlled by parameters, which you can edit through the Business Modeler. Make sure that these parameters refer to tablespaces within the appropriate database user, and make sure each has enough storage. Additional parameters control the default initial sizes and how much storage is added. Parameter Description initial_param Default initial size of system tablespaces. next_param Incremental amount of storage that is added to a tablespace when more space is needed. tablespace* Tablespace used for the sales table. indexspace* Database index space that stores the forecast table indexes, as specified during installation. simulationspace* Tablespace used for simulation data. simulationindexspace* Tablespace used for simulation index data. sales_data_engine_index_space* Tablespace used for the index of sales_data_engine. sales_data_engine_space* Tablespace used for sales_data_engine table. * You set these parameters during installation. Oracle recommends that you use the standard names for these tablespaces, as documented in the Oracle Demantra Installation Guide. Then it is easier for you to share your database with Oracle Support Services in case of problems. Demantra provides a database procedure that you can run at regular intervals that checks tables for missing primary keys, unoptimized ordering of null columns, and other conditions that may negatively impact database performance. You can set a
- 727. Fine Tuning and Scaling Demantra 35-7 threshold determining the minimum number of rows a table must have before it is checked. You can also set the frequency at which a reminder to run the thorough check will appear in the 'log_table_reorg' table after running the quick check. For each finding identified by the check, a corresponding message is logged in the 'log_table_reorg' table. The message specifies the table with the particular problem, In some cases a finding can be a recommendation to reorganize a table. For that you can run a sql script on the table that will reorganize and optimize it for better performance. There are two types of database checks: 1) a quick check that normally runs in less than 20 seconds, and 2) a more thorough one that, depending on system data volume, can run up to several hours. Both the quick check and the thorough checks can be launched manually using PLSQL by running the procedure TABLE_REORG.check_reorg, and specifying a parameter of 'T' to run the thorough check, or 'Q' to run the quick check. For example, enter CHECK_REORG('Q') to run the quick check. This script is located in the Demantra installation directory, under Demand PlannerDatabase ObjectsOracle Serveradmin. You can also run the script by defining a workflow that contains the 'Stored Procedure' workflow step. Specify 'TABLE_REORG.check_reorg' as the procedure name and either 'T' or 'Q' as the parameter. All activity of the checks and reorg operation are logged in detail in the log_table_reorg table. Please review this table when troubleshooting (order by log_time) for detailed error output and comments. Technical Settings The following parameters should be adjusted only by someone experienced with databases: Parameter Description max_records_for_commit The number of records that Demantra will insert into the database before performing a COMMIT operation. If you increase this number, the insertion will run more quickly, but you risk losing all uncommitted records in case of a crash. oracle_optimization_mode* Oracle only. Optimization mode of the database, either cost-based (most common) or rule-based. pct_increase_for_analyze Percentage of data increase for a given table, beyond which Demantra automatically increases the table size.
- 728. 35-8 Oracle Demantra Implementation Guide Parameter Description set_rb* (Oracle 8i only) Set Rollback Segment command. This is database dependent. See your database documentation. *For these parameters, see "Engine Parameters" in the Demantra Analytical Engine Guide. See also "Integration" Overview of Database Health Check Demantra provides a database procedure that you can run at regular intervals that checks tables for missing primary keys, unoptimized ordering of null columns, and other conditions that may negatively impact database performance. You can set a threshold determining the minimum number of rows a table must have before it is checked. You can also set the frequency at which a reminder to run the thorough check will appear in the 'log_table_reorg' table after running the quick check. For each finding identified by the check, a corresponding message is logged in the 'log_table_reorg' table. The message specifies the table with the particular problem, In some cases a finding can be a recommendation to reorganize a table. For that you can run a sql script on the table that will reorganize and optimize it for better performance. There are two types of database checks: 1) a quick check that normally runs in less than 20 seconds, and 2) a more thorough one that, depending on system data volume, can run up to several hours. Both the quick check and the thorough checks can be launched manually using PLSQL by running the procedure TABLE_REORG.check_reorg, and specifying a parameter of 'T' to run the thorough check, or 'Q' to run the quick check. For example, enter CHECK_REORG('Q') to run the quick check. This script is located in the Demantra installation directory, under Demand PlannerDatabase ObjectsOracle Serveradmin. You can also run the script by defining a workflow that contains the 'Stored Procedure' workflow step. Specify 'TABLE_REORG.check_reorg' as the procedure name and either 'T' or 'Q' as the parameter. All activity of the checks and reorg operation are logged in detail in the log_table_reorg table. Please review this table when troubleshooting (order by log_time) for detailed error output and comments. Health Check System Parameters The system parameters listed below control the behavior of this database procedure. For
- 729. Fine Tuning and Scaling Demantra 35-9 details about each parameter, see Non-Engine Parameters, page 26-1. SYSTEM_PRIMARY_KEY MIN_NUMROWS_FOR_REORG QUICK_CHECK_TIMEOUT THOROUGH _CHECK_INTERVAL THOROUGH_CHECK_TIMEOUT Thorough Database Health Check The "Thorough Database Health Check" is used to launch the thorough health check procedure. It writes output to the log_table_reorg table. This procedure requires more time than the quick check but provides greater accuracy. At the end of the thorough check, purging is done to keep only 2 months of information in the log table. If it recommends reorganizing the database tables, then run the table reorganization utility described below. You should run the thorough check after major changes in data volume, such as large engine runs or changes to table metadata. An example of this would be creating or deleting a series that affects column modification in the table. Note: In order to run the table reorg, additional privileges are required for the Demantra schema. These privileges can be obtained by running the grant_table_reorg.sql script. This script is located in the Demantra installation directory, under Demand PlannerDatabase ObjectsOracle Serveradmin.To revoke these privileges, run revoke_table_reorg.sql (same location as the 'grant' script). For information regarding database privileges that may impact the Table Reorganization Utility, see the sys_grants.sql section of the Demantra Installation Guide. Running the Table Reorganization Utility There are several ways to run this utility, including: • Running Table Reorganization SQL Script • Calling the TABLE_REORG.REORG stored procedure • Running a workflow You can use SQL*Plus to run the SQL script or to run the TABLE_REORG.REORG stored procedure. In both cases you need to log into the Demantra schema as described below. 1. Be sure you have a complete and valid backup of the database. 2. Login with SQL*Plus as SYS (sqlplus sys/demantra@orcl where 'sys' is the system
- 730. 35-10 Oracle Demantra Implementation Guide username, 'demantra' is the schema name and 'orcl' is the database name) 3. Grant Demantra schema the required privileges to run the reorg. For example, run grant_table_reorg.sql in the Demantra installation directory under Demantra_installationDemand PlannerDatabase ObjectsOracle Serveradmin. 4. Login with SQL*Plus as the Demantra database schema name (for example: sqlplus demantra/dem1@orcl) Note: Shutting down the application server is not required. However, running this process during a heavy load will slow down production operations. Running the Table Reorganization SQL Script After logging in with SQL*Plus, perform the following steps: 1. Call the run_table_reorg.sql script (for example: SQL> @run_table_reorg.sql) 2. Enter the name of the table you want to reorganize. 3. Enter reorg type 'R' or 'C'. Entering 'R' causes a row reorg. Entering 'C' also causes a row reorg, but additionally re-sequences columns so that null columns come after columns with data. 4. Enter the value for PCTFREE (see note below). The default value is 20%. 5. Enter the degree of parallelism. This determines the number of worker threads running. The default value is 4. 6. Hit any key to start the reorg process (or Ctrl C to abort). Note: The PCTFREE parameter sets the minimum percentage of a data block to be reserved as free space for possible updates to rows that already exist in that block. For example, setting PCTFREE to 10 causes 10% of each data block in the table's data segment to be kept free and available for possible updates to existing rows. However, this value is considered low and could cause "row chaining." Row chaining occurs when data for a single row must span more than one data block, which slows database performance. At the other end of the spectrum, a value such as 50 would likely prevent row chaining, but also consumes more disk space. Calling the TABLE_REORG.REORG Stored Procedure This is another way of performing the reorg process. After logging in with SQL*Plus, execute the table_reorg.reorg procedure, passing in arguments for the REORG
- 731. Fine Tuning and Scaling Demantra 35-11 procedure. For details refer to the Database Procedures chapter in the Oracle Demantra Implementation Guide. For example: BEGIN table_reorg.reorg('DEMANTRA','SALES_DATA','C',10,4); END; This example executes a column reorganization as defined by the following parameters: Schema: DEMANTRA Table: SALES_DATA Row or Column Reorganization Column Min % reserved free space (PCTFREE 10 Degree of parallelism (Num of parallel slaves) 4 After Running the Script or Stored Procedure 1. After the process completes successfully, verify that the reorganized table is valid by running a worksheet with many series that are related to that table. For example, if the process ran on the PROMOTION_DATA table, you could open the Promotion Comparison worksheet. 2. After confirming the table is valid, you can drop the original table which the process renames to RDFDDHHMISS$-original table name (where DDHHMISS is date format Day,Month,Hour. The table name is truncated to 30 characters, and the hour format is 24). 3. If grants were given by running the grant_table_reorg.sql script, revoke the privileges you granted earlier by connecting to SQL*Plus again as SYS and running revoke_table_reorg.sql located in the same directory. Running the Table Reorganization Procedure Using a Workflow If desired, the table reorganization procedure can be run using a workflow. If you are implementing the Oracle In-Memory Consumption Driven Planning (CDP) module, the table reorganization procedure TABLE_REORG.REORG can be set up to run periodically using the predefined workflow "CDP Weekly Data Tables Maintenance." The workflow is set up to reorganize the T_EP_CDP_DATA and SALES_DATA tables by default. Each run of the REORG procedure is logged in a dedicated log table named LOG_TABLE_REORG. For details about this workflow, refer to the Oracle In-Memory Consumption-Driven Planning User's Guide.
- 732. 35-12 Oracle Demantra Implementation Guide To enable this workflow to run periodically, select the 'Enable automated table reorganization' checkbox in the "DBA Details" screen when installing or upgrading Demantra. This check box appears in the 'DBA Details' Installer screen and can be selected even if you are not implementing CDP. However, the CDP Weekly Data Tables Maintenance workflow will not be enabled nor will it be set up to run automatically unless CDP is installed. If you are not installing CDP, you can either define a workflow to automate the process of running the TABLE_REORG procedure or you can run it manually. When defining a workflow to run the procedure, use the "Stored Procedure" workflow step and specify the table_reorg.reorg procedure, and then enter the Demantra schema name, the table name, reorg level, PCTFREE and degree of parallelism in the Parameters. These parameters are listed in "Calling the TABLE_REORG.REORG stored procedure." For details about running the procedure manually, see "Running the Table Reorganization Utility." Note: If this option is selected, then a new database role will be created (DEM_SECURE) with additional privileges that are required to reorganize a table. This role is not enabled by default and is password protected. When the REORG procedure is executed, it enables the role, reorganizes the table and then revokes the role so the session has the extra privileges only during the reorganization process. Database Partitioning To use the data partitioning tool, in the Business Modeler go to Tools > Database > Create Partitions. Profile Selection screen This window displays the "New" icon and all profiles already existing in the system. The list can be displayed as large icons or as a list by pressing either one of the two buttons to the right of the list area. Double clicking any icon starts the wizard by opening the first wizard screen - "Profile Details". To create a new profile, select the " New Partition Profile" icon. Profile Details screen • Name- This is a mandatory text field with a maximum limit of 30 characters. Spaces are not allowed in this field. • Description – This is a text area with a limit of 2000 Characters. • Last Update Date – This displays the last time this profile was updated. • Last Executed Date - This displays the last time this profile was executed. Time-Dimension Partitioning screen
- 733. Fine Tuning and Scaling Demantra 35-13 The next screen allows the user to define partitioning of the time dimension. Two different modes can be used: partitioning via an existing time dimension, or partitioning by a custom definition. • Time Level Panel - The time level panel allows the user to define time dimension partitions based on time levels already defined in the system, such as Fiscal Month, Fiscal Quarter, Fiscal Week, and Fiscal Year. After selecting a time level, Add/Delete buttons will appear. You can then add time partitions by grouping different periods together into a partition. • Custom Panel – The custom panel allows for the definition of custom time ranges that are not related to any specific Time level. The panel includes a table area for defining partitions and two buttons (Add/Delete) for controlling the content of the table. This table allows the user to define custom time partitions by giving the partition a name and specifying the maximum date value of the partition. The table consists of two columns Level-based Sub-partitions screen This screen allows the user to define the sub-partition scheme by selecting a location or product dimension for partitioning. The components of this screen are identical to the components available in the previous screen for time level selection. Final review and execution screen This screen displays the partitioning profile definition as well as the load distribution for the selected partitioning scheme. • Time Partition and Level Sub-partition Columns – these columns display the partition scheme as defined in the previous two stages. • Table Name percentage Column – Displays the proportion of the table in the sub-partitions and partitions according the selected partitioning scheme. • Create Button – Use this button to initiate a database process that will create stored procedures and scripts that will partition the selected table. • Revert Button – Reverts a partition setup back to an non-partitioned state. Date/Time Formats The following parameters control the formats of date and date/time values throughout Demantra: Parameter Description applicationDateFormat The system date format.
- 734. 35-14 Oracle Demantra Implementation Guide Parameter Description applicationDateTimeFormat The system date/time format, used where both a date and time are displayed. DBDateFormat Controls the date format used in the database. format.dates.longFormat Long date format. format.dates.shortFormat Short date format, used in the title bar of Collaborator Workbench. InsertDateTimeFormat The date-time format that Demantra uses when writing to the database. When you enter dates in a worksheet or import dates, Demantra converts them to this format before writing them to the database. Adding a New Date Format If the date format you want in a worksheet is not available be default, a custom Java-compatible date format can be defined. This can be done by an administrator, by defining the format in the TIME_FORMAT table and restarting the application server. To add a new date format: 1. Review existing date formats in Demantra. For example: 1. Open Collaborator Workbench. 2. Open any worksheet. 3. Select 'Time' from the toolbar or the Worksheet menu. 4. Click on the Advanced button. 5. Review the available date formats. 2. Using a tool such as SQL Developer, add any Java-compatible date format to the TIME_FORMAT table. For example: FORMAT_ID DATE_FORMA T FORMAT_ACT IVE IS_DEFAULT APPLICATION _ID
- 735. Fine Tuning and Scaling Demantra 35-15 9 MMMM: dd yyyy 1 1 My_NEW_FOR MAT If FORMAT_ACTIVE is '1' then the format is enabled and available for use in Demantra worksheets. If you do not want end users to see a date format in Worksheet Designer, set FORMAT_ACTIVE to '0'. If IS_DEFAULT is '1' then the format will be the default in all new worksheets. 3. Restart the application server. 4. Log into Collaborator Workbench and open any worksheet. 5. Select 'Time' from the toolbar or the Worksheet menu. 6. Click Advanced. 7. Review the available date formats. 8. Select the new format and then click OK. 9. Re-run the worksheet and verify that the new time format appears as expected. Please note the following: • Incorrect date formats will be rejected when restarting the application server and will appear in the Collaborator Workbench log file • If no format is specified as the default, MM/dd/yy will be used • If multiple formats are specified as defaults, the one with lowest internal ID will be used Email If you are using any of the Demantra Web-based software, Demantra can automatically send email on specific occasions, for example, within workflows. To enable this, first set up an administrator email account on an SMTP server; this account will be the originator of all Demantra's automatic messages. You will probably need the help of the IT department to get this account configured correctly, depending on the network security. Then use the parameters in this section to specify that email account for use by Demantra.
- 736. 35-16 Oracle Demantra Implementation Guide Configuring Demantra Email First, the following parameters specify the email account from which Demantra Web-based software will send email. Parameter Description mail* Controls whether email is enabled. Can be set with the Business Modeler at: Parameters > System Parameters > Application Server (tab) > Dp Web (tab). mail.server* SMTP server that is hosting the email application to be used by Demantra. Can be set with the Business Modeler at: Parameters > System Parameters > Application Server (tab) > Collaborator (tab). mailAddress* Mail address of the designated Demantra administrator. Can be set with the Business Modeler at: Parameters > System Parameters > Application Server (tab) > Dp Web (tab). mailProtocol Server used for sending email. Demantra supports only SMTP servers. mail.strings.from.system Specifies the title of the sender of Demantra email messages, for example "Demantra Solution Manager". Can be set with the Business Modeler at: Parameters > System Parameters > Application Server (tab) > Workflow (tab). AuditMailAddress Mail address of the BCC recipient of Demantra email messages. Can be set with the Business Modeler at: Parameters > System Parameters > Application Server (tab) > Workflow (tab). *These can be set via the Demantra installer or later. See the Oracle Demantra Installation Guide. Strings Used in Demantra Email In addition, the following parameters control the strings used in the email messages
- 737. Fine Tuning and Scaling Demantra 35-17 that Demantra sends. Parameter Description company.name Name of your company; the Workflow Engine uses this string in email when a workflow step fails. mail.strings.internalerror.message Text of email message sent in case of error. mail.strings.internalerror.subject Subject of email message sent in case of error. mail.strings.from.system Message sent in a fail-to-execute task description. mail.strings.processfailuresubject Message sent when a process is terminated. mail.strings.processterminated String included in recovery email message. mail.strings.recovery Message sent in a fail-to-execute task subject. mail.strings.taskfailuresubject Message sent when a task is timed out. mail.strings.taskstimedoutsubject Message sent when a task is timed out in a group step. mail.strings.timeout.group Message sent when a task is timed out in a user step. mail.strings.timeout.user Text of email message sent in case of error. Integration The following parameters control import and integration in Demantra. These parameters apply only to the core Demantra tools Parameter Description accumulatedOrUpdate For integration, this parameter specifies whether the system adds to the existing data (accumulate) or overwrites the existing data (update).
- 738. 35-18 Oracle Demantra Implementation Guide Parameter Description align_sales_data_levels_in_loadi ng Specifies whether to maintain matrix information (combination information that is time-independent) within the sales_data table. If requested, this adjustment is made when data is added via loading, integration, or other mechanisms. If you set this parameter to yes, it is also necessary to rewrite some database procedures. For additional configuration steps, see Part , "Reconfiguring the sales_data_engine Table". ImportBlockSize The number of rows for each commit, used during import. InsertDateTimeFormat The date/time format that Demantra uses when writing to the database. When you enter dates in the worksheet wizard, Demantra converts them to this format. Insertmissingvalues Specifies whether to insert zero values for dates that have null values. LoadDataStop Specifies whether Demantra should stop loading data when it finds an error in the data. RunProportInMdp_add Specifies whether to call the proport mechanism from the MDP_ADD procedure. UpdateAudit Specifies whether the MANUALS_INS_INTEGRATION procedure updates the audit tables. update_units_by_items Specifies how to update units for the INSERT_UNITS procedure. • By items (faster but less accurate) • By combinations (slower but accurate) Item Aggregation For improved performance, you can configure Demantra to aggregate data by items and use that aggregated data whenever possible. In this case, Demantra maintains the branch_data_items table in addition to the usual tables. Demantra uses this table whenever possible; it does not use the table whenever you need to view specific locations or filter by location. To configure Demantra in this manner, set the
- 739. Fine Tuning and Scaling Demantra 35-19 UseItemsAggri parameter. Note: Also be sure the DYNAMIC_SYNC is scheduled to run periodically to keep the branch_data_items table up to date. Logs and Old Data The following parameters control how long Demantra keeps various kinds of historical data: Parameter Description audit_history_length Number of months of audit data to keep. log.history The number of days for which workflow history is kept. Also see "Logging Messages of the Application Server". Proport Mechanism Parameters That Control Behavior Parameter Purpose hist_glob_prop Specifies the maximum number of base time buckets to use in calculating glob_prop, the running average demand for any given item-location combination. def_delta Specifies the default value for the delta field in the mdp_matrix table. If delta equals null for a given combination, the system uses the value of this parameter instead. In turn, the delta field specifies the month-to-month smoothing of the weekly proportions. proport_missing Specifies what value to use for dates with null sales (zero or average).
- 740. 35-20 Oracle Demantra Implementation Guide Parameter Purpose proport_threshold Specifies the number of distinct months needed to compute P1, ... P12 in the usual way. proport_spread Specifies what value to use for any month that has null data. last_date Last date of actual sales, to be used by the Analytical Engine and the proport mechanism. No dates after this are used towards the forecast or the proport calculation. quantity_form Expression that the Analytical Engine uses to select the historical demand from the sales_data table; the result of this expression is the data that the engine uses as input. The default expression transforms negative values to zero and should be modified if business needs require negative demand. mature_age Controls the mature_date, which is calculated backwards from the current date using the mature_age parameter. A combination is young (rather than active) if it does not have any non-zero sales data for dates on or before the mature_date. dying_time If no sales occurred during the length of time specified by dying_time, the combination will be marked as dead (0 forecast will be issued). *For these parameters, see "Engine Parameters" in the Demantra Analytical Engine Guide. Parameters That Affect Performance Parameter Purpose add_zero_combos_to_mdp* If true, add combinations to mdp_matrix even if their historical data consists of zeros. This parameter is used by the proport mechanism.
- 741. Fine Tuning and Scaling Demantra 35-21 Parameter Purpose Run_full_matrix_proport Specifies whether to run the proport mechanism on all the item-location combinations. • If no (0), run proport only on the combinations that have prop_changes=1. • If yes (1), run proport on all combinations in mdp_matrix. • If 2, run proport on all combinations that have new_member=1. * For these parameters, see "Engine Parameters" in the Demantra Analytical Engine Guide. Proport Parallelization Proport handles large amount of data processing and can require a substantial amount of time and system resources. It is possible to improve run time performance using parallelization and by grouping the Proport process into several iterations. To do this, define the following parameters in the init_params table for each engine profile: Parameter Description ProportParallelJobs The number of parallel jobs used when running Proport calculations. This parameter's value should not exceed the number of CPUs on the database server. ProportTableLabel The name of the level by which the process is broken down. The total number of members in this level is divided into equally sized groups, and one group is processed each time Proport is run. ProportRunsInCycle The number of groups that the Proport process is broken down into. Example: ProportTableLabel = 'Item' ProportRunsInCycle = 10
- 742. 35-22 Oracle Demantra Implementation Guide ProportParallelJobs = 2 When running Proport with these settings in the example above, processing occurs for all combinations associated with 1/10 of the Item level members. Each execution invokes 2 parallel jobs in the DBMS_JOB queue. Proport is called ten times before all combinations have been processed. Use caution when choosing the level by which Proport will be broken into separate tasks. The process will treat each member as equal and will not be aware that some members contain far more data than others. Selecting an inappropriate level could result in an uneven processing time between different session runs. Example: ProportTableLabel = 'Segment' ProportRunsInCycle = 5 ProportParallelJobs = 4 If there are 10 segments, then each Proport process will execute on 2 (10/5) segments and use 4 parallel processes. If a specific segment contains a much larger number of items than other segments, then processing of this specific segment require more time to run. EngineOutputThreshold The forecast for certain combinations may not change significantly between runs, this typically occurs for steady sellers, or extremely slow moving items. Writing out a new forecast in this case would have only marginal benefit to the supply chain. However, it would add cost in: 1. Engine I/O processing 2. The noise of minute variations in the production forecast The parameter "EngineOutputThreshold" provides control over whether to write the forecast for a combination that has changed very little. Example: If the new value is 3% larger than the old value, and the EngineOutputThreshold is 5%, then the engine will not output the new value, and the old value will remain. In this case the new value would need to be at least 5% larger or smaller than the old value before it replaces the existing forecast value. Note that if either the old value or new value is zero, then the difference will be calculated as 100% (unless they're both zero, in which case the difference would be 0%). Simulation When a user starts a large simulation, it is useful to check the size of that simulation and provide a warning if it will take a long time to run. You may also want to prevent simulations that are too long from being run at all.
- 743. Fine Tuning and Scaling Demantra 35-23 You can configure Demantra to detect large simulations and display a message to the user, to confirm that this is what the user wants to do. You use the following parameters: Parameter Purpose SimWarnSize Specifies the threshold size of a simulation that is large enough to trigger a warning message to the user. Specify this as a percentage of the total number of combinations. SimMaxSize Specifies the threshold size of a simulation that is too large to run. If a user tries to perform a simulation of this size, Demantra displays a message and does not attempt the simulation. Specify this as a percentage of the total number of combinations. MatrixCombs Indicates the number of combinations currently in the mdp_matrix table. This information can be useful in helping you to set SimMaxSize and SimWarnSize. You should run some trial simulations on the solution hardware and set threshold values that are appropriate for the actual users. Solution Branding The following parameters control titles throughout the Demantra solution: Parameter Description company.name Name of your company; the Workflow Engine uses this string in email when a workflow step fails.
- 744. 35-24 Oracle Demantra Implementation Guide Parameter Description general.homepage.title Title of the Collaborator Workbench home page, as used within the Collaborator Workbench title bar, as follows: general.title.text Title of the browser window when it displays Collaborator Workbench. For example: Threading Demantra uses threading mechanisms in multiple places. Threading is a general mechanism that uses system resources more effectively to run several tasks in parallel. • "Threading for the Attribute Update Mechanism" • "Threading for the Update Mechanism" • "Threading for Updating Parallel Values" • "Threading for Promotion Copy/Paste" • "Threading for Methods" • "Threading in the Web Worksheets" • "Threading in the Business Logic Engine" Threading for the Attribute Update Mechanism This thread pool uses the following parameters:
- 745. Fine Tuning and Scaling Demantra 35-25 Parameter Description threadpool.attributesUpdate.per_comb Maximum number of threads that a single thread can use. threadpool.attributesUpdate.size Maximum number of allowed threads for this thread pool. This should be less than MaxDBConnections. threadpool.attributesUpdate.time-out Idle time-out period. This specifies how long (in milliseconds) a thread is left unused before it is ended automatically. Threading for the Update Mechanism The update mechanism saves data to the database. This thread pool uses the following parameters: Parameter Description MaxUpdateThreads Maximum number of allowed threads for the update mechanism. You should set this equal to the number of database server CPUs plus 1. UpdateThreadtime-out Idle time-out period. This specifies how long (in milliseconds) a thread is left unused before it is ended automatically. Threading for Updating Parallel Values This thread pool uses the following parameters: Parameter Description threadpool.update.size Maximum number of allowed threads for this thread pool. This should be less than MaxDBConnections. threadpool.update.time-out Idle time-out period. This specifies how long (in milliseconds) a thread is left unused before it is ended automatically. Threading for Promotion Copy/Paste Another thread pool handles copying and pasting promotions. This thread pool uses
- 746. 35-26 Oracle Demantra Implementation Guide the following parameters: Parameter Description threadpool.copy_paste.per_process Maximum number of allowed threads for the copy/paste mechanism in any given process. threadpool.copy_paste.size Maximum number of allowed threads for the copy/paste mechanism. This should be less than MaxDBConnections. threadpool.copy_paste.time-out Idle time-out period. This specifies how long (in milliseconds) a copy/paste thread is left unused before it is ended automatically. Threading for Methods Another thread pool handles level methods. This thread pool uses the following parameters: Parameter Description threadpool.level_method.size Maximum number of allowed threads for methods. This should be less than MaxDBConnections. threadpool.level_method.time-out Idle time-out period. This specifies how long (in milliseconds) a method thread is left unused before it is ended automatically. Recommended: 300000 (5 minutes). threadpool.level_method.block Specifies how the level methods should access this thread pool, either: wait (wait for a free thread) abort (do not wait for a free thread) Threading in the Web Worksheets The Web worksheets also use threading
- 747. Fine Tuning and Scaling Demantra 35-27 Parameter Description threadpool.query_run.size Maximum number of allowed threads that Demantra can use to run a Web worksheet. If this number is missing or negative, the worksheet run mechanism does not use threads. This should be less than MaxDBConnections. Also be sure to leave room for system processes. threadpool.query_run.time-out Idle time-out period. This specifies how long (in milliseconds) a worksheet thread is left unused before it is ended automatically. Threading in the Business Logic Engine The Business Logic Engine uses threading as follows: The thread pool specifies the number of parallel BLE tasks, each of which loads a different combination of the worksheet, runs the calculation engine on it, and saves the data back to the database. The number of threads in the pool is affected by the system resources, mainly the number of CPUs that the machine has (each thread runs on a different CPU). The following parameters control this threading mechanism: Parameter Description BLEThreadPoolSize Maximum number of allowed threads for the Business Logic Engine. BLEtime-out Idle time-out period. This specifies how long (in milliseconds) a BLE thread is left unused before it is ended automatically. Workflow The following parameters control the Workflow module: Parameter Description company.name Name of your company; the Workflow Engine uses this string in email when a workflow step fails.
- 748. 35-28 Oracle Demantra Implementation Guide Parameter Description execution.shell Applies to the Executable Step. This parameter specifies any prefix that is needed in order to run executable steps. For example, you may need to specify the following for Unix: ./ log.history The number of days for which workflow history is kept. server.generalurl URL for the workflow server, not including the portal/workflow directory. workflow.group Comma-separated list of groups whose users are authorized to log into the Workflow Editor. Use the group names as specified in the Business Modeler. In order to log into the Workflow Editor, these users also must have System Manager permission level. See "Providing Access to the Workflow Editor". See also "Solution Branding" "Collaborator Workbench" "Email" Worksheets The following parameters affect the Web-based worksheets. They are grouped into several areas: • "General Worksheet Behavior" • "Worksheet Performance" • "Worksheet Designer" For another way to improve performance, see also "Managing Level Caching". General Worksheet Behavior The following parameters control the default behavior of the Web-based worksheets
- 749. Fine Tuning and Scaling Demantra 35-29 Parameter Description AutoRunMode Specifies whether a worksheet automatically reruns after any change in its definition. This parameter also specifies whether a worksheet is automatically run when it is opened in any way. client.enableOpenNoteWithDoubleClick Specifies whether users can access the notes dialog box by double-clicking within the worksheet table. In any case, it is always possible to access this dialog box by using the right-click menu, as in Microsoft Excel. Worksheet Performance The following parameters affect the performance of the Web client: Parameter Description ClientDDCacheCapacity Specifies the maximum number of distinct dropdown lists per worksheet that any client should cache. These caches are cleared when the worksheet is closed. EnableWorksheetCaching Enables or disables the worksheet caching feature. EnableIncrementalLoading Enables the Demantra incremental loading feature, for faster worksheet reruns. There is no user impact apart from performance. client.JREMaxMemory Maximum amount of memory (in MB) that JRE can use. The Web worksheets (Demand Planner Web, Promotion Effectiveness, and Settlement Management) use JRE. client.MaxCombsLoadChunkSize Maximum number of combinations to load each time the user chooses to rerun a worksheet.
- 750. 35-30 Oracle Demantra Implementation Guide Parameter Description UseDateRangeMatrix Controls whether the system will use new internal data structures to improve the performance of worksheets that include promotions (or other general levels that have population attributes). If you enable this option, the largest benefit occurs in cases where promotions are long (and have many rows of data). The system uses these structures automatically for other purposes. Worksheet Designer The following parameters control the defaults in the worksheet/content designer Parameter Description OpenWithContext Specifies the default setting of the Open With Context setting of the worksheet designer. client.worksheet.privateAccessType Specifies the default setting of the public/private option in the worksheet designer. WorksheetDefaultDateChoiceMethod Controls the default start date for worksheets, either relative to today or relative to last loaded sales date. WorksheetDefaultSpan Specifies the default length of time for a worksheet, in base time units. Must be a positive, even number, 2 or greater. ManualRefreshAsDefault Specifies the default setting of the Refresh Type caching option in the worksheet designer. WorksheetCachingAsDefault Specifies the default setting of the Cache Worksheet Data check box in the worksheet designer. PromoDefaultSpan Specifies the default length of time for promotions created within a worksheet.
- 751. Fine Tuning and Scaling Demantra 35-31 Parameter Description PromoDefaultStart Specifies the default start date for promotions created within a worksheet. Use one of the following values: • today (0) • last loaded sales date (1) • start date of the worksheet (2) MaxAvailableFilterMembers Specifies the maximum number of members that can be retrieved in the worksheet filter screen. If the user selects more members than allowed, a message asks the user to add further filtering. This limit helps to prevent users from creating worksheets with too many members (which can adversely affect performance). SPF_Enable_Worksheet_Calculations Automatically calculates planning percentages during worksheet updates. Updates to relevant series trigger BOM tree propagation if set to yes. Note: Enabling this parameter may negatively affect worksheet performance. When set to No (disabled), propagation occurs when the user modifies worksheet values. However, the new planning percentages are only displayed after the end user reruns the worksheet. See also "Collaborator Workbench" Parallel Hints for Worksheets Some worksheets access a large amount of data which can cause them render slowly. A parallel hint can be implemented to improve performance for such worksheets. A hint specifies the number of threads used by the worksheet query and can be applied to two parts of the worksheet: generation of the combinations and retrieval of data to be displayed in the worksheet. Warning: Use caution when implementing worksheet hints. When a
- 752. 35-32 Oracle Demantra Implementation Guide large number of users simultaneously access the database, too many hints can overwhelm the database connection pool and substantially decrease performance. Setting a hint requires manually adding a row to the WORKSHEET_HINTS table; this task should be performed only by an experienced system or database administrator. The WORKSHEET¬_HINTS table contains the columns in the table below. QUERY_ID USER_ID CONTEXT_ID POPULATION_ HINT DATA_HINT Q 0 0 The hint to be used for worksheet Q with any user and any context in the Population SQL The hint to be used for worksheet Q with any user and any context in the Population SQL Q U 0 The hint to be used for worksheet Q with user U and any context in the Population SQL. For all other users besides U, the generic hint defined above is used, if one exists. The hint to be used for worksheet Q with user U and any context in the Data SQL. For all other users beyond U, the generic hint defined above is used.
- 753. Fine Tuning and Scaling Demantra 35-33 QUERY_ID USER_ID CONTEXT_ID POPULATION_ HINT DATA_HINT Q U C The hint to be used for worksheet Q with user U and context C in the Population SQL. For all other contexts and for the same user U, the above row is used. For all other users, the generic hint is used, if one exists. The hint to be used for worksheet Q with user U and context C in the Data SQL. For all other contexts and for the same user U, the hint in the row above is used. For all other users, the generic hint is used. The POPULATION_HINT and DATA_HINT columns contain the actual hint as an SQL string. For example, to specify that the query should use 8 threads when accessing the branch_data table, this field would be "parallel(branch_data 8)". The QUERY_ID, USER_ID, and CONTEXT_ID columns specify the circumstances when this hint would be used. QUERY_ID specifies the internal ID of the worksheet for which the hint should be applied. USER_ID specifies for which user the hint will apply when opening the worksheet. When this field is set to zero, the hint will apply to all users. CONTEXT_ID specifies the level member name; it corresponds to the level member that is selected when a worksheet is opened with the "Open With" menu option. If the CONTEXT_ID is zero, then the hint will apply to all contexts. If the worksheet is opened without "Open With," this setting is ignored. Configuring User Productivity Kit (UPK) If you have licensed and installed UPK, perform the following to launch UPK from Oracle Demantra Web help. 1. Install and configure UPK on a Web server. Refer to UPK documentation for details. 2. Launch Business Modeler, and then locate the LaunchUPK parameter. 3. In the Value field, enter a valid URL to launch UPK.
- 754. 35-34 Oracle Demantra Implementation Guide For example: http://server name/virtual directory name/index.html 4. Save the changes. 5. Log in to Demantra, and then click Help from Collaborator Workbench, Workflow Manager, or from within a worksheet. 6. Click the "UPK" link. The Player should launch successfully.
- 755. Customizing Demantra Web Pages 36-1 36 Customizing Demantra Web Pages This chapter describes how to customize the Demantra Web pages. This chapter covers the following topics: • Logging onto the Collaborator Workbench Administrator • Configuring Menus in Collaborator Workbench • Running Oracle Executables from Collaborator Menus • Configuring the Panes • Specifying Content Pane Security • Replacing Default Demantra Graphics • Customizing the Collaborator Workbench Login Page • Configuring Links in Collaborator Workbench Logging onto the Collaborator Workbench Administrator You use the Collaborator Workbench Administrator to control access to menu items. To log onto the Collaborator Workbench Administrator: 1. Open the administration login page: http://server name/virtual directory/portal/adminLogin.jsp For example: http://frodo/demantra/portal/adminLogin.jsp 2. Enter the user name and password and click Log on. Demantra displays the Administration page, which includes the following choices:
- 756. 36-2 Oracle Demantra Implementation Guide See also "Customizing Demantra Web Pages" Configuring Menus in Collaborator Workbench You can configure the Planning Applications and Tools and Applications menus, which are in the tool bar at the top of the Collaborator Workbench page. To configure Collaborator Workbench menus: 1. Log into the Collaborator Workbench Administrator. See "Logging onto the Collaborator Workbench Administrator". 2. Click Define Menus. The system displays a page showing the current contents of Planning Applications and Tools and Applications menus:
- 757. Customizing Demantra Web Pages 36-3 To add a menu item: 1. Within either the Planning Applications or Tools and Applications section, click the Add button. A page appears prompting you for information about the item to add.
- 758. 36-4 Oracle Demantra Implementation Guide 2. In the Item Title field, specify the title of the menu item as it should appear in the menu. 3. For Type, choose one of the following options: Planning Applications Starts a Demantra desktop product. Program Initiation Starts an ordinary executable. Web link Opens a Web page. Encrypted User/PWD Starts a product with encrypted user name and password. Do not use for a product installed on a Citrix Metafile server. Special Citrix Starts a product installed on the Citrix Metafile server. Sends an encrypted user name and password. 4. Complete the rest of the fields as follows:
- 759. Customizing Demantra Web Pages 36-5 Description Optional description of this menu item. Program Path and filename of a file to be executed. This field is hidden if the type is Web link. See "Running Oracle Executables from Collaborator Menus" for options. Target A URL. This field is visible only if the type is Web link. Parameters Any command line arguments that the executable file accepts. For example, suppose that the executable is SPM.exe and it accepts arguments to bypass the login, as follows: SPM.exe /autologin userid=username pwd=password In this case, specify Program as SPM.exe and use the following parameter string: /autologin userid=username pwd=password For the syntax to run specific Demantra executables, see "Running Oracle Executables from Collaborator Menus". 5. Click OK to close the popup page and save your changes. To edit a menu item: 1. Check the check box next to the menu item. 2. Click the Edit button. A page appears prompting you for information about the item to change. 3. Complete the fields as in "To add a menu item". 4. Click OK to close the popup page and save your changes. To delete a menu item: 1. Check the check box next to the menu item. 2. Click the Delete button. A warning message appears.
- 760. 36-6 Oracle Demantra Implementation Guide 3. Click OK to confirm the deletion. To change the order of the items in a menu: 1. In the section corresponding to that menu, click the Order button. The system displays a popup page where you can change the order of the items. 2. Select an item and click an arrow button to move the item up or down in the list. 3. When you are done, click OK. See also "Running Oracle Executables from Collaborator Menus" Running Oracle Executables from Collaborator Menus When you configure the Planning Applications and Tools and Applications menus, you typically add menu items that launch Demantra executables. This section lists the basic syntax needed in common situations.
- 761. Customizing Demantra Web Pages 36-7 Executable to launch Settings to use in Menu Item dialog box* Program Parameters/Notes Member Management Path and filename of the dp.exe file in your installation tools/member management Chaining Management Path and filename of the dp.exe file in your installation tools/chaining management Demand Planner, bypassing login screen Path and filename of the dp.exe file in your installation /autologin userid=user pwd= password Here user is the user ID and password is the corresponding password. Promotion Effectiveness Analytical Engine Path and filename of the EngineManager.exe file in your installation mode profile_ID Here, mode is either: 1=batch mode 99=simulation And profile_ID specifies the engine profile to use. For additional parameters, see "Engine Parameters". * In all cases, Type should be Planning Applications. For information on how to add menu items to Collaborator Workbench, see "Configuring Menus in Collaborator Workbench." Configuring the Panes To specify your pane configuration: 1. Log into the Collaborator Workbench Administrator. See "Logging onto the Collaborator Workbench Administrator". Oracle Demantra displays the Administration page, which includes the following choices:
- 762. 36-8 Oracle Demantra Implementation Guide 2. Click Default Pane Layout. The Personalize - Modules page appears. This page contains two lists: one for items that can be displayed in the wide pane and one for items that can be displayed in the narrow pane. These lists include the following: • My Tasks and My Worksheets, which can be displayed only in the wide pane • Who's Online, which can be displayed only in the narrow pane • Worksheets that have been defined as content and to which you have access. When a worksheet is defined as content, it is defined as belonging to the wide pane or the narrow pane.
- 763. Customizing Demantra Web Pages 36-9 3. In each list, use the check boxes to select or deselect the modules that you want to see. 4. Click Next. The Personalize - Order page appears. Like the previous page, this page has one list for the wide pane and one for the narrow pane. 5. Select a module and then click the up or down buttons to change its position in the list. The order here is the order in which these modules are shown in Collaborator Workbench. 6. Click Next. The next page summarizes your choices. You can return to the previous pages to make further alterations.
- 764. 36-10 Oracle Demantra Implementation Guide 7. Click Finish to save your changes. Or click Back to go back to the previous pages. See also "Specifying Content Pane Security" Specifying Content Pane Security You can control access to the different Collaborator Workbench panes (My Tasks, My Worksheets, and Who's Online). To specify access to Collaborator Workbench panes: 1. Log into the Collaborator Workbench Administrator. See "Logging onto the Collaborator Workbench Administrator". The Administration page appears. 2. Click Define Content Security. The system displays a table with one row for each user. Here you specify which panes to make available to each user. 3. Do one of the following: • Check the check box for a pane to grant user access to the user. • Clear the check box for a pane to deny access to the user. 4. Click Finish. See also "Configuring the Pane Configuration" Replacing Default Demantra Graphics The Web-based Demantra products contain default images that you can replace with
- 765. Customizing Demantra Web Pages 36-11 your organization's own designs. To do so, just back up the default images and substitute your own image files, giving them the same filenames as listed here. The graphic files are in the following directory: Demantra_root/Collaborator/portal/images You can replace any of the graphics files in this directory. If you replace the default graphics with other graphics that have the same width and height, those graphics will fit on the page without the need for any further editing. If your graphics files have different dimensions, you may need to edit the corresponding page to accommodate them. Collaborator Workbench Splash Screen The splash screen uses the graphic collaborator_splash.gif. Collaborator Workbench Login Page On the login page, the most commonly replaced images are the following: • customerLogo.gif • customerTxt.gif • customerPics.gif • collaboratorTitle.gif • collaboratorTxt.gif Collaborator Workbench Main Page On the main page, the most commonly replaced images are as follows:
- 766. 36-12 Oracle Demantra Implementation Guide • customer_logo.jpg • collaborator_logo.gif Customizing the Collaborator Workbench Login Page The login page is Demantra_root/Collaborator/portal/loginpage.jsp You can edit this page and you can redesign the layout and design as you wish. Caution: A basic knowledge of HTML is required to perform this task. However, the following code must be retained, because this provides the login functionality: <TD> <!-- The login area (username, password, language, login)--> <%@ include file="loginarea.jsp" %> </TD> Configuring Links in Collaborator Workbench The main Collaborator Workbench page provides a set of default links, some of which are configurable. These links are located on the second toolbar. To configure these links, edit the file secondbar.jsp. Caution: A basic knowledge of HTML is required to perform this task. Links can be added, but the layout of the page must not be changed. Configurable links are marked by href = "#".
- 767. Customizing Demantra Web Pages 36-13 Link Comments Personalize Must not be changed. Vital functionality depends on this link Site Map This is an empty link that can be customized or removed as required. Search This is an empty link that can be customized or removed as required. Home This performs a logout and redirects to the login page. This would typically be reconfigured to link to the customers' home page. Support This is an empty link that can be customized or removed as required. This would typically be used to provide an email link to the webmaster. Also see "Collaborator Workbench".
- 769. Configuring Rolling Data 37-1 37 Configuring Rolling Data This chapter describes how to roll selected data, saving a copy of the current version of that data. This chapter covers the following topics: • About Rolling Data • Creating or Modifying Rolling Data Profiles • Executing Rolling Data Profiles • Creating Rolling Data Profile Groups About Rolling Data It is often useful to be able to see older data and possibly compare it with the current data. In the case of forecasts, the Analytical Engine automatically saves older versions. If you need access to older versions of other data, however, you must explicitly instruct Demantra to save the data. To do so, you use the Business Modeler to make a copy of the original data (usually a series) for later use. You define one or more rolling data profiles, each of which associates a source series (or a server expression) with a target series. • The target series must already exist. • The target series should usually be configured almost the same way as the source series (except for the hint message and so on). See "Creating a New Series Based on an Existing Series." • The target series must have an update field in the same table as the source series; see "Specifying Data Properties of a Series." • You can use any kind of series (numeric, date, or string), but the
- 770. 37-2 Oracle Demantra Implementation Guide target and source series must be of the same type. Then you configure a rolling data session, which specifies a set of rolling data profiles to run. The rolling data session specifies which profiles are active. You can execute the active profiles from within the Business Modeler or from a workflow. Creating or Modifying Rolling Data Profiles To create or modify a rolling data profile: 1. Log into the Business Modeler. 2. From the Configuration menu, select Configure Rolling Profiles. The Rolling Data Profile Group wizard appears. The screen displays a check mark next to the profile that you are editing. 3. Do one of the following: • To select an existing profile, click the profile in the Profiles list. • To create a new profile, click Insert. • To create or modify a Rolling Profile Group, click Configure Session. For details, see Creating Rolling Data Profile Groups.
- 771. Configuring Rolling Data 37-3 4. If you choose to create a new rolling profile group, type a unique name and an optional description for the profile. 5. Click the Active Profile check box to activate the profile. 6. In the Source area, do one of the following: • Select a source series from the Series drop-down list. Note: If the server expression for the series uses the round function, note that the rounding occurs before the data is rolled forward. In this case, you might have slight errors at aggregated levels. • Type a server expression into the Server Expression field. In this case, click Verify Expression to check the expression. The expression must be an aggregating SQL expression; see "Syntax of Server Expressions". 7. Specify the period association of this data source by selecting an option from Source's Period. 8. In the Target area, select a series from the Series Name drop-down box. Make sure that the target series is of the same data type as the source series or the source expression. 9. Click Save. To delete a rolling data profile: 1. Click the profile in the Profiles list. 2. Click Delete. 3. Click OK to confirm the deletion. See also "About Rolling Data" Executing Rolling Data Profiles To specify the active rolling data profiles: 1. Select Engine > Rolling Data. 2. Click Configure.
- 772. 37-4 Oracle Demantra Implementation Guide The Configure Rolling Session screen appears. 3. To include a profile to run, drag it from the left list to the right list. Or to exclude a profile from the next session, drag it from the right list to the left list. 4. To change the order in which the profiles should be executed, drag the profiles up or down within the left list as required. 5. Click Save. To execute the active rolling data profiles: You can execute the active profiles in several different ways: • You can execute the active profiles from within the Business Modeler. To do so, select Engine > Rolling Data. Then click Execute. Demantra immediately starts running the profiles that are currently listed in the Configure Rolling Session window. • You run the EXECUTE_PROFILES procedure from within a workflow. • You can run the INSERT_UNITS procedure. Depending on the value of the RunInsertUnits engine parameter, this procedure runs the EXECUTE_PROFILES procedure. In any case, they are executed in the order in which they are listed in the Configure Rolling Session dialog box. For each active profile, Business Modeler copies the source data into the target series. Data for any given time bucket is copied into the same time bucket in the target series. See also "About Rolling Data" "Preparing the Database" Creating Rolling Data Profile Groups Rolling profiles enable archiving or copying older data and comparing it with current data. (See About Rolling Data, page 37-1). Rolling Profile Groups facilitate data maintenance, by allowing you to organize profiles into business-relevant groups.
- 773. Configuring Rolling Data 37-5 You define, modify, and delete rolling data profile groups in the Business Modeler. Rolling profiles may belong to more than one profile group. Typically, the rolling data process is embedded in a forecast approval process, such as when running the Forecast Approval workflow. This workflow can be modified to include one or more Rolling Data Profile groups. Defining Rolling Data Profile Groups Rolling Profile Groups are configured using the Create/Modify Rolling Profile Groups wizard in the Business Modeler. From this wizard you can also update or delete existing profile groups. Deleting a Profile Group does not delete the rolling data profiles contained within the group. Instead, the profiles remain available for inclusion in other Rolling Data Profile Groups. If a Rolling Data Profile is deleted, that profile will also be deleted from any profile groups to which it belongs. To define a rolling data profile group: 1. Log in to the Business Modeler. 2. From the Configuration menu, choose Configure Rolling Profile Groups. The Create/Modify Rolling Profile Groups wizard appears. 3. Double-click the New Group folder. The General Properties page of the Create/Modify Rolling Profile Groups wizard appears. 4. Enter a name and description for the rolling profile group in the Group Name and Group Description fields. New group names must be unique. 5. To make this group active, ensure that the Active Group check box is enabled. When you execute an active profile group, only the active profiles within the group are executed. 6. Click Next. The Rolling Data Profiles page of the Create/Modify Rolling Profile Groups wizard appears. 7. Use the Rolling Data Profiles page to add or remove profiles from the group. Double-click a profile to move it between the Available and Selected Rolling Data Profiles column. 8. Groups may include profiles defined on multiple dimensions. For example, a group may include rolling profiles from both the sales_data and promotion_data dimensions.
- 774. 37-6 Oracle Demantra Implementation Guide Click Next. 9. Click Finish to complete the profile group creation process.
- 775. GL Synchronization 38-1 38 GL Synchronization This chapter describes the GL synchronization feature and how to configure this feature. This chapter covers the following topics: • Overview Overview The GL synchronization feature allows for the automatic synchronization (copying) of data from a GL source data series to a sales_data target series. Synchronization is needed to support export of those series which previously had elements of multiple data tables, and to support some configure-to-order calculations. This functionality aggregates data across the gl dimension for each item, location, and sales date combination. The source series server definition determines which aggregation function is used: sum, average, min, max, etc. The aggregated data is then copied into the target sales_data series. Note: All procedures listed in this section are contained within the SYNCH package. GL Synchronization Configuration 1. Configure the SERIES_SYNCH table with source series, target series and profile ids. The source series and target series columns contain values of the computed_name field of the computed_fields table. Information from the source series will be copied into target series. 2. The profile id column holds a number that is used to group series for synchronization. Determining which synchronization profiles can called is achieved by setting the SynchDefaultProfile system parameter. The following example shows how to configure the SERIES_SYNCH table:
- 776. 38-2 Oracle Demantra Implementation Guide SOURCE_SERIES (sales_data) TARGET_SERIES (GL or sales_data) PROFILE_ID (number) indirect_lift indirect_lift_sd 1 direct_lift direct_lift_sd 1 evt_cost evt_cost_sd 1 CTO_DEP_DEM_EXIST dep_demand_exist_sd 2 fcst_consensus fcst_consensus_copy 3 Note that in this example profile 1 copies series from promotion_data to sales_data, profile 2 copies series from cto_data to sales_data, and profile 3 copies series from sales_data to sales_data. It is possible for a profile's source series to belong to different GL tables. 3. Run the procedure synch.update_synch_objects after updating the table SERIES_SYNCH. Executing this procedure is required to update objects used for synchronization. Make sure to rerun synch.update_synch_objects every time changes are made to the SERIES_SYNCH table. 4. No series may appear more than once in the TARGET_SERIES column. A series may appear multiple times in the SOURCE_SERIES column. Note: It is recommended that the target series is marked as not editable in Business Modeler. Synchronization Touchpoints Synchronization may require a variety of activation points due to the many ways in which data can be modified in Demantra. Below is a partial list of touch points and recommendations on how to execute synchronization. Regardless of the touch point, synchronization will run as a net change. Combinations which do not require synchronization will not have data copied to Sale_data. Batch Synchronization This will typically be called from a workflow which will include a step calling the procedure synch_run_batch. • Procdure will execute batch synchronization. • Calls to the procedure will have syntax synch.run_batch(profile_id, num_jobs)
- 777. GL Synchronization 38-3 • The profile_id parameter controls which synchronization profiles are synched. This parameter is a comma-separated list. If no parameters are passed, the value in parameter SynchDefaultProfile will be used instead. • The num_jobs parameter determines how many parallel jobs are created for each GL that synchronized. The default is 4. • Batch synchronization will execute on all item location combinations for which the relevant data has changed since the last synchronization. Worksheet Synchronization This should be added for cases where worksheet updates should trigger a synchronization process. • Is disabled by setting SynchEnableAdHoc parameter to No • Adds the custom step com.demantra.workflow.step.SynchUpdateHook to end of the "update data" workflow • The worksheet hook will run GL Synchronization when combinations are updated using manual updates. • Synchronization profile will be based on SynchDefaultProfile parameter Accept Simulation Synchronization • Is triggered when user Accepts Simulation • Runs a GL Synchronization on data that was changed as a result of simulation • Is disabled by setting SynchEnableAdHoc parameter to No • The synchronization profile is based on SynchDefaultProfile parameter Level Method Synchronization Is applied when executing a level method will necessitate synchronization of the information affected by the level member on which method is run. • Adds a procedure step to the workflow being executed by the method • Step follows other steps in workflow • Step executes the procedure synch.post_method_synch • Procedure is passed parameters (level_id, member_id, profile_id) • The parameters level_id, and member_id can be passed from the workflow using #level_id# and #member_id# notation.
- 778. 38-4 Oracle Demantra Implementation Guide • The profile_id parameter determines which profiles the method will run on. If no value is specified, the sys_param SynchDefaultProfile will be used. Delete Method Synchronization Is applied when synchronization needs to run when members are deleted. If a GL member is deleted, that GL member's population needs to be resynched to sales_data.. • Adds a procedure step to run the procedure synch.pre_delete_synch before delete step • The procedure will have the following syntax pre_delete_sycnh( level_id, member_id, profile_id ) • The parameters level_id, and member_id can be passed from the workflow using #level_id# and #member_id# notation. • The profile_id parameter determines which profiles the method will run on. If no value is specified, the sys_param SynchDefaultProfile will be used. Edit Member Method Synchronization Is applied when editing a level member should trigger synchronization. This solution incorporates the solutions used for Level Method Synchronization and Delete Method synchronization • Adds a procedure step to run the procedure synch.pre_delete_synch before delete step • The procedure will have the following syntax pre_delete_sycnh( level_id, member_id, profile_id ) • Add procedure step to run the procedure synch.pre_delete_synch before delete step • The procedure will have the following syntax pre_delete_sycnh( level_id, member_id, profile_id ) • The parameters level_id, and member_id can be passed from the workflow using #level_id# and #member_id# notation. • The profile_id parameter determines which profiles the method will run on. If no value is specified, the sys_param SynchDefaultProfile will be used. Duplicate Promotion and Copy/Paste Synchronization The synchronization of Duplicate Promotion and Copy/Paste will depend greatly on the levels and members for which this is executed. In cases where these processes require synchronization, custom configuration will be required.
- 779. Performing Constraint Profit Optimization 39-1 39 Performing Constraint Profit Optimization This chapter describes how to use the Constraint Profit Optimizer. This chapter covers the following topics: • About Constraint Profit Optimization • Creating or Modifying an Optimization Profile • Deleting a Constraint Optimization Profile • Running a Constraint Optimization Profile About Constraint Profit Optimization Within the Business Modeler, the Constraint Profit Optimizer enables distributors and retailers to make the most effective use of available storage and display space throughout the supply chain. Demand forecasts for specific products are linked to space available, stock on hand, predetermined minimum and maximum levels, and profit scales to calculate the most profitable mix of products. Note: In this example, a retail store is given as an example. However, constraint profit optimization can be applied to any stage of the supply chain, such as warehouses and distribution centers. To achieve the best plan in a retail environment, it may be necessary to consider the following restraints, in addition to sales data and causal factors: • Available space in store fixtures • Available space in the store altogether • Minimum and maximum facing required for a particular product in the store The Constraint Profit Optimizer identifies sale opportunities, and fills the existing shelf space with products that have the highest probability of selling.
- 780. 39-2 Oracle Demantra Implementation Guide If the Optimizer discovers that a store has available or badly exploited shelf space, an alert is displayed. For example, if the minimum predetermined quantity for a product in a particular store is 10, but the Optimizer calculates its optimized inventory to be 3, the user is alerted. Similarly, an alert will be displayed if the maximum predetermined quantity for a product is 15 but the optimized inventory is calculated as 20. The Optimizer considers the profitability of the products (not service levels). For each item, the client must give a figure on a scale of one to ten. The system uses constraint dimensions (for example display/storage space) and a mix dimensions (for example item). If a shelf has space which is less than can hold the maximum amounts for each product, so the Optimizer will determine the optimum stocking levels for maximum profit. When the stock level reaches the maximum number for the most profitable product, the system then starts stocking the next profitable product. Creating or Modifying an Optimization Profile You can create and save any number of optimization profiles. To create or modify an optimization profile: 1. Select Parameters > Constraint Optimization. The Constraint Profit Optimization Wizard appears. 2. Do one of the following: • To create new profile, click the New Optimization Profile button. • To modify a profile, click the profile button. The New Optimization Profile - Details screen appears 3. Type a name and optional description for the profile. 4. Click Next. The Time and Analytical Selections screen appears.
- 781. Performing Constraint Profit Optimization 39-3 5. Complete the fields as follows. Time Mode Choose one of the following: • Relative—specifies the time relative to the date of execution. • Fixed—specifies a fixed span of time, starting with the Start Date field and spans the periods specified in the Lead field Start Date Select a date for the optimization process to calculate from. Start After Specify the number of time buckets after which to start the optimization relative to execution date. For example, if the number is 2 and the day of execution is today, then the optimization output will be calculated starting from 2 days from today. Lead Specify the number of time buckets to use in the optimization process.
- 782. 39-4 Oracle Demantra Implementation Guide Bounding Choose one of the following: • Bounded—Calculates the optimal stock according to both the constraint on space and product boundaries (min and max). • Unbounded—Calculate optimal stock according to the constraint on space only. • Both—Calculates optimal stock according to both options above. Include Stock Specifies whether to include existing stock levels in the calculation. Statistical Model Choose one of the following: • Normal—Recommended when there is a large amount of data. • Poisson—Recommended when there is a limited amount of data. Update Review Flag If this option is checked, the profile updates the review flags for the combinations. If you are not using these flags, deselect this option for better performance. Use Prediction Status Constraint If this option is checked, the profile considers only those combinations that have prediction_status equal to 1 (live combinations). 6. Click Next. The Populations screen appears.
- 783. Performing Constraint Profit Optimization 39-5 It is generally a good idea to specify the scope of the optimization by filtering the data. By doing so, you increase performance; otherwise the optimization process will run on the whole database. 7. Double-click a level in the Available Filter Levels box. The selected level appears in the Selected Filter Levels box. The bottom left side of the screen, below Available Filter Levels, now displays members that the optimization will run on. 8. Click a member in the list, and then click the right arrow button. Or double-click the member you want to remove from the optimization process. Business Modeler moves the selected values to the members list under the Selected Filter Levels box. Note: The right list cannot include more than 200 members. 9. Continue filtering the data. When you are done filtering, click Next. The Base Dimensions screen appears.
- 784. 39-6 Oracle Demantra Implementation Guide 10. Complete the fields as follows. Maximum Constraint Select a level or mdp_matrix series. Volume Unit The unit used to measure the items. 11. Click Next. The Input/Output Mapping screen appears.
- 785. Performing Constraint Profit Optimization 39-7 12. Here you specify the series containing the input and output data. Complete the fields (input series) as follows. Be sure to use only numeric series, not string or date series: Bounds Minimum Constraint The lower boundary constraint Bounds Maximum Constraint The upper boundary constraint. Profit Scale A customer defined scale of numbers specifying profitability. Tolerance Every time an item is added to the shelf, its profitability is reduced. This specifies the lowest boundary of profitability. Initial Stock Stock at start of optimization process. 13. Complete the field (output series) as follows: Free Space Available display/storage space. 14. Click Finish. Or to exit without saving, click Exit. 15. Click Execute to execute the optimization profile.
- 786. 39-8 Oracle Demantra Implementation Guide Deleting a Constraint Optimization Profile To delete a constraint profit optimization profile: 1. In Business Modeler, navigate: Select Parameters > Constraint Optimization. The Constraint Profit Optimization Wizard appears. 2. Click an existing profile. 3. Click Delete. Running a Constraint Optimization Profile To run a constraint profit optimization profile: 1. In Business Modeler, navigate: Select Parameters > Constraint Optimization. The Constraint Profit Optimization Wizard appears. 2. Click an existing profile. 3. Click Execute. • In the Workflow Manager, execute the optimization programmatically. Specifically, create an executable step (within a workflow) that executes the optimization program. • Create a workflow to call the optimization executable, passing a parameter string that is the name of the constraint optimization profile. Note: Depending on your options, the Constraint Profit Optimizer can affect only combinations that have a prediction status equal to 1 (live).
- 787. Creating a Demand Variability Process 40-1 40 Creating a Demand Variability Process This chapter describes the creation of a demand variability process. This chapter covers the following topics: • Creating a Demand Variability Process Creating a Demand Variability Process Overview A demand variability process is a database procedure (named COMPUTE_STD_ERR) that calculates the demand variability (or standard error) between two specified series, at specified aggregation levels. You run this procedure from a Workflow using the Stored Procedure Step that runs COMPUTE_STD_ERR. Use the demand variability process as an input to a safety stock calculation, or to determine what safety stock levels are needed to meet demand according to a predefined service level and replenishment cycle. Aggregation Levels Used in Demand Variability Calculation When you calculate demand variability, you specify two aggregation levels. The demand variability is calculated for each combination of those two levels. You can use the following combinations of levels: • Item level and location level • Item level and matrix level • Location level and matrix level • Matrix level and another matrix level The target series (which you define to display the result of the calculation) must be
- 788. 40-2 Oracle Demantra Implementation Guide defined on the corresponding dimension in the mdp_matrix table. To create a demand variability profile 1. Start the Business Modeler. 2. From the Configuration menu, choose Configure Demand Variability Calculation. The wizard displays a screen where you specify the aggregation levels where the demand variability is to be calculated. This screen displays two lists of aggregation levels. The left list contains all the item levels and all the matrix levels. The right list contains all the location levels and all the matrix levels. 3. Specify the levels as follows: • Drag a level from each list to the Selected Base Levels field at the bottom of the screen. • To remove a level from the Selected Base Levels field, right-click and then select Delete the Level. 4. Click Next. The wizard displays a screen where you specify the range of dates for which the demand variability is to be calculated.
- 789. Creating a Demand Variability Process 40-3 5. Specify dates as follows: • In the From Date spin box, select the number of base time buckets by which to go back. This is the date from which demand variability is to be calculated. • In the To Date spin box, select the number of base time buckets by which to go back. This is the date to which demand variability is to be calculated. 6. Click Next. The wizard displays a screen where you specify the series to use in the calculation. 7. Specify the forecast series as follows: • In Series Parameter 1, select the series to use as Series Parameter 1 in the standard error formula. • In Series Parameter 2, select the series to use as Series Parameter 2 in the standard error formula. • In Covariance Series, select the mdp_matrix series to use as the standard error calculated for the combination. 8. Click Next. The wizard displays a screen where you can review your choices.
- 790. 40-4 Oracle Demantra Implementation Guide 9. Do one of the following: • To change a setting, click Back repeatedly until you reach the screen that has the setting. Then change it as needed. • When you are finished, click Finish. The wizard then creates a database procedure named COMPUTE_STD_ERR. You must run this procedure from a Workflow (use the Stored Procedure Workflow step). • To cancel without saving changes, click Cancel. Generating Safety Stock Once calculated, the demand variability can be used to drive a simple safety stock calculation in Demantra. A series can combine the demand variability with a desired service level and the replenishment time associated with the time and generate a suggested safety stock. An example for such a series in a weekly system would have the expression: • consensus plan * z_val ( service level) * demand variability * sqrt ( ( repl cycle / 7 ) ) where consensus plan, service level, demand variability and, replenishment cycle are all series. If the requirement calls for a more complicated safety stock calculation, Oracle Inventory Optimization can be used.
- 793. Administering Demantra 41-1 41 Administering Demantra This chapter briefly introduces the tasks that the system administrator for Demantra would perform. It also lists all the URLs that Demantra uses. This chapter covers the following topics: • Keeping the System Running • Periodic Maintenance Tasks • Data Cleanup Script • Demantra URLs • Log Files and Tables • Illegal Characters in Demantra • Required Third-Party Software Keeping the System Running Depending on how Demantra is configured, it needs some or all of the following items to be running: Component When needed Details Database Always Consult Oracle database documentation. Web server* If solution uses any Web-based components See documentation for the Web server. Workflow Engine If workflows are being used See "Managing Workflows".
- 794. 41-2 Oracle Demantra Implementation Guide Component When needed Details Database procedures listed in "Recommended Procedure Scheduling" Always Usually run from within workflows; see "Managing Workflows" Possible other background processes Varies Contact the implementers of your Demantra system. *For best performance, run the server without any logging. You should also make sure you have details on the following topics: • The specific automated processes that the solution uses • How often the Analytical Engine runs • Any workflows that are in the solution • How many components have been defined and who owns them Periodic Maintenance Tasks You may periodically need to make adjustments in the following areas: Area Tool used See Maintaining users and user groups Business Modeler "Managing Security" Maintaining security of menus in all Web-based products Collaborator Workbench Administrator "Managing Security" Managing workflows Workflow Manager "Managing Workflows" Changing ownership of worksheets and deleting unused worksheets Business Modeler "Managing Worksheets" Note: For information on tuning the performance of the Analytical
- 795. Administering Demantra 41-3 Engine, see "Tuning the Analytical Engine". Note: For information on other software configuration settings that affect performance, see the Oracle Demantra Installation Guide. Data Cleanup Script The data cleanup script can be used perform a full cleanout of demonstration or test data from a pre-configured schema in a testing environment. Warning: This procedure is intended only for use by experienced consultants and should never be run on a production schema. When a cleanup is performed with this script, configuration data (series, worksheets, levels, etc.) is preserved. Objects potentially affected by this process include data tables (mdp_matrix, sales data, GL data tables) and level members (mostly by cascade from the data tables). Most levels should and will be purged of their members, with the exception of default level members. After running the cleanup script, be sure to perform full functional end-to-end testing to ensure the application functions as expected. Before running the package: • Make sure to do a complete database backup before cleaning out data. • Make sure there are no active connections to the schema before executing these procedures. • Make sure the application server is shutdown before executing these procedures. After running the package: • Issue a COMMIT to make sure all transactions are committed. Notes about running the package: • Alias levels may create infinite loops on the level tree; currently the process will stop deleting data once it looped more times than the number of levels in the system. • There are some levels that are protected from being deleted, see the PROTECTED_OBJECTS table in the schema. • Objects that are not currently cleaned up are Worksheets, Users, Groups, Integration Profiles, Series, Series Groups, and Workflows.
- 796. 41-4 Oracle Demantra Implementation Guide Cleaning Up Temporary Objects Notes This also calls clean_schema_int. Procedure DATA_CLEANUP.clean_schema_temps( commit_point NUMBER DEFAULT DEFAULT_COMMIT_POINT ); Objects Affected DB_EXCEPTION_LOG, INTEG_STATUS, AUDIT_PROFILES, AUDIT_TRAIL, AUDIT_PROFILE_USERS, E1_SALES, E1_BRANCH, E1_CUSTOMER, E1_ITEM, E1_ITEM_BRANCH, T_SRC_ITEM_TMPL, T_SRC_ITEM_TMPL_ERR, T_SRC_LOC_TMPL, T_SRC_LOC_TMPL_ERR, T_SRC_SALES_TMPL, T_SRC_LOC_TMPL_ERR Description DROP_TEMPS(0) is the standard procedure to drop temporary tables created by worksheet runs. See additional objects in clean_schema_int. Command EXECUTE DATA_CLEANUP.CLEAN_SCHEMA_TEMP S;COMMIT; Cleaning Up Level Data Notes This should not delete the default member 0 in each level. Procedure DATA_CLEANUP.clean_level_data( commit_point NUMBER DEFAULT DEFAULT_COMMIT_POINT ); Objects Affected SALES_DATA, MDP_MATRIX and the General Level data and matrix tables PROMOTION, PROMOTION_DATA and PROMOTION_MATRIX
- 797. Administering Demantra 41-5 Description Recursively deletes all members for level data except protected levels in PROTECTED_OBJECTS table and the default member . Command EXECUTE DATA_CLEANUP.CLEAN_LEVEL_DATA;C OMMIT; Cleaning Up Integration-Related Settings Notes These are mainly created by Oracle EBS collections: Procedure DATA_CLEANUP.clean_schema_int( commit_point NUMBER DEFAULT DEFAULT_COMMIT_POINT ); Objects Affected DISPLAY_UNITS, REAL_VALUES (only update), DCM_PRODUCTS_UNITS, DCM_PRODUCTS_INDEX, INDEXES_FOR_UNITS, AVAIL_UNITS Description Deletes levels from TGROUP_RES and removes the column from INPUTS. Command EXECUTE DATA_CLEANUP.CLEAN_SCHEMA_INT;C OMMIT; Demantra URLs Anyone can log into any Web-based Demantra product if they have the uniform resource locator (URL) and the appropriate access. These URLs are based upon information that you provide during installation. Make sure all your users know the URLs that they will need. This table shows the URLs to use to access Oracle Demantra functions. When you use this table, in place of: • frodo, pass the name of the Web server that runs the on which Oracle Demantra Web software
- 798. 41-6 Oracle Demantra Implementation Guide • 8080, pass the port number that you are using • demantra, pass the name of the virtual directory that is the root of the Oracle Demantra Web software Function Example URL Collaborator Workbench http://frodo:8080/demantra/portal/ loginpage.jsp Demand Planner Web Client http://frodo:8080/demantra/portal/ partnerLogin.jsp Workflow Manager http://frodo:8080/demantra/workflo w/login.jsp Demantra Anywhere Version of Collaborator Workbench (Thin Client) http://frodo:8080/demantra/portal/ remoteloginpage.jsp Demantra Anywhere Version of Web Client http://frodo:8080/demantra/portal/ anywhereLogin.jsp Collaborator Workbench Administration http://frodo:8080/demantra/portal/ adminLogin.jsp Dynamic Open Link (DOL) access for third-party reporting tools http://frodo:8080/demantra/portal/ DOLLogin.jsp Offline Access to Demantra Worksheets http://frodo:8080/demantra/portal/ launchDPWeb.jsp User Management http://frodo:8080/demantra/portal/ userManagement.jsp Technical Administration http://frodo:8080/demantra/admin/a dminManagement.jsp Direct Logins You can log in directly to Oracle Demantra Collaborator Workbench and Demand Planner. Use this method, for example: • For internal integrations: For example, Oracle Advanced Planning Command Center. • When you want to embed Oracle Demantra within a web portal This table shows the URLs to use to access direct login functions. When you use this
- 799. Administering Demantra 41-7 table, in place of: • frodo, pass the name of the Web server that runs the on which Oracle Demantra Web software • 8080, pass the port number that you are using • demantra, pass the name of the virtual directory that is the root of the Oracle Demantra Web software After the table, there is an explanation of the parameters to use in each Function Example URL Collaborator Workbench http:// frodo:8080/demantra/portal/ directLogin.jsp?user=<username>&pa ss=<password> Demand Planner http://frodo:8080/demantra/portal/ partnerLogin.jsp[?user=<userID>&pa ss=<password>&…] This table lists the parameters that the Collaborator Workbench direct login function uses. Both parameters are mandatory and neither has a default value. Parameter Name Description user Username pass Password of the user account This table lists the parameters that the Demand Planner direct function uses. All parameters are optional and none have a default value. Parameter Name Description userID Username pass Password of the user account queryId ID of worksheet to open
- 800. 41-8 Oracle Demantra Implementation Guide Parameter Name Description combination Additional filter for the worksheet. It contains the level ID. The separator between: - Member ID pairs is a semicolon - Level and member ID is a comma. This is an example of the parameters portion of a Demand Planner URL that passes all of the parameters ?user=mjackson&pass=thriller&queryId=11100&combination=424,3;492 ,4 If you pass: • No parameters: A page appears asking for the username and password • user and pass: The function automatically logs you on • user, pass, and queryID: The function automatically logs you on and opens the worksheet • All parameters: The function automatically logs you on, opens the worksheet, and filters the data using the member and level IDs specified Running the Worksheets Window Applet as Standalone Use this command line for running the Worksheets Window Applet as a standalone application. <java_executable> -classpath <collaborator_jar_path> -Dname=<user_name> -Dpassword=<password> -Djava.security.policy=<policy_path> -DcodeBase=<server_codebase> -Xmx256M com.demantra.partner.client.main.PartnerApplet For example C:j2sdk1.4.2_04binjavaw -classpath "D:BuildsCollaborator623-devBuildWebFilesdemantraportalco llaborator.jar" -Dname=dp -Dpassword=dp -Djava.security.policy=C:/java.policy -DcodeBase=http://frodo:8080/demantra/portal/ -Xmx256M com.demantra.partner.client.main.PartnerApplet This table lists the parameters that the Worksheets Window Applet as Standalone function uses. All parameters are optional and none have a default value.
- 801. Administering Demantra 41-9 Parameter Name Description -Dname Username -Dpassword Password of the user account –DsessionId Session ID If you pass: • No parameters: A page appears asking for the username and password • -Dname and -Dpassword: The function automatically logs you on • –DsessionId : The function binds to the existing session. You can pass the correct -Dname and -Dpassword for the session, but you do not have to. Use executable javaw to suppress the black console window. Log Files and Tables For your reference, Demantra writes the following log files and tables: Table or file Purpose import.log Information on the import process of the dump file. DB_EXCEPTIONS_LOG Errors detected when stored procedures are run; this information is displayed in the Business Modeler. build_procedure.log Information on the loading of the procedures into the new user. upgrade.log Information on the database upgrade process. logconf.lcf This file configures logging. collaboration.log This is a logging output file.
- 802. 41-10 Oracle Demantra Implementation Guide Table or file Purpose bal_log.txt Contains logging output that is located during an update procedure. This file is located in the rootDemantra PlannerBALLogs directory. For more information, see Viewing Log Files, page 46-41. You can modify the default location of log files when running the Demantra Installer. Click "Configure Log" after launching the installer enables you to specify the log level, the log filename, and the directory to where log files are written. The default location of these files is (Demantra_root)DemandPlannerDatabase ObjectsOracle. If you are using JRun as the Web server, note that all the JRun logs are in the directory JRun4logs. All Demantra exceptions are written to default-err.log. You should delete all these log files before restarting the application server. You may want to back up the files first to another folder. Note: If the server is running, you will not be able to delete some of the files because they are in use. You can instead clear the log files as follows: open each file, select all text with ctrl+A, and delete the text and save the file. Illegal Characters in Demantra Within Demantra, do not use the following special characters: Single quote (') Double quote (") Ampersand (&) If you use these characters, unexpected results may occur. Required Third-Party Software The Oracle Demantra Installation Guide lists third-party software with which Demantra works. It may be useful to review this information.
- 803. Managing Security 42-1 42 Managing Security The Demantra data and features are secured, so that not all users have access to the same data and options. This chapter describes how to maintain security. This chapter covers the following topics: • Creating or Modifying a Component • Deleting a Component • Creating or Modifying a User • Copying a User • Deleting a User • Creating or Modifying a User Group • Deleting a Group • Providing Access to the Workflow Editor • Logging onto the Collaborator Workbench Administrator • Defining a Program Group • Redefining a Program Group • Deleting a Program Group • Specifying Permissions for Menu Items • Logging Out Users Creating or Modifying a Component To create or modify a component: 1. Click Components > Create/Open Component. Or click the Create/Open Component button.
- 804. 42-2 Oracle Demantra Implementation Guide Note: This option may not be available, depending on the user name with which you logged onto Business Modeler. The Create/Open Component dialog box appears. 2. Now do one of the following: • To create a new component, click the New Component button and then click OK. Or double-click the New Component icon. Note: This option is available only if you log into Business Modeler as the user with the highest permission. • To open an existing component, double-click the icon corresponding to the component. Or click the icon and then click OK. The Component Configuration Wizard displays its first dialog box. 3. Enter or edit general information for the user interface, as follows: Component Name Unique name for this component. Component Description Description About Window Description Optional description to include in the About page of this component. 4. Click Next. The Business Modeler displays the Available Series and Selected Series lists.
- 805. Managing Security 42-3 5. Select the series that should be available in the component. 1. Move all series that you want into the Selected Series list, using any of the techniques in "Working with Lists". 2. Remove any unwanted series from the Selected Series list. 3. When you are done specifying series, click Next. Note: By default, this configuration affects all users of this component. To hide additional series for a given user, see " Creating or Modifying a User". 6. Click Next. The Business Modeler displays the Select Component Indicators for Series window. Here you specify which series should have indicators to indicate associated promotions or notes.
- 806. 42-4 Oracle Demantra Implementation Guide Within a worksheet, a user can attach a promotion (in the case of Promotion Effectiveness) or a note to a given item-location combination, at a given date. If a series has been configured as using an indicator for that particular promotion or note, the series will be displayed with an indicator in all worksheet cells that correspond to that item-location combination and date. • You can associate an indicator for any general level at the lowest level (that is, any general level that do not have child levels). • The default associations are different for different kinds of series. Sales series have notes indicators by default. Promotion series have both notes and promotion indicators by default. • This configuration affects all users of this component. No further fine tuning is possible. 7. To associate indicators with different series, do the following for each general level: 1. In Select Indicator, select the general level, either Note or Promotion. 2. Move all series that should use the associated indicator into the Selected Series list, using any of the techniques in "Working with Lists". 3. Remove any unwanted series from the Selected Series list.
- 807. Managing Security 42-5 8. Click Next. The system displays all the levels and indicates the current permission settings in this component. The following icons indicate the permissions: FC Full control (including permission to delete members) W Read/write access R Read access X No access 9. For each level that you want to change, right-click the level and select the appropriate permission: • No Access (the user does not have access to this member; this option is equivalent to not including this member in the filter) • Read Only (the user can view this member but cannot make any changes) • Write (the user can view or edit this member) • Full Control (user can view, edit, create, and delete within this member) • System Default (use the default permission controlled by the DefaultLevelSecurityAccess parameter.
- 808. 42-6 Oracle Demantra Implementation Guide Note: By default, this configuration affects all users of this component. To fine tune permissions for a given user, see " Creating or Modifying a User". 10. Click Next. The system displays the Available Units and Selected Units lists. 11. Select the units of measure that should be available in the component. 1. Move all units that you want into the Selected Units list, using any of the techniques in "Working with Lists". 2. Remove any unwanted units from the Selected Units list. Note: This configuration affects all users of this component. No further fine tuning is possible. 12. Click Next. • The system displays the Available Indexes and Exchange Rates and Selected Indexes and Exchange Rates lists.
- 809. Managing Security 42-7 13. Select the indexes and exchange rates that should be available in the component. 1. Move all indexes and exchange rates that you want into the Selected Indexes and Exchange Rates list, using any of the techniques in "Working with Lists". 2. Remove any unwanted indexes and exchange rates from the Selected Indexes and Exchange Rates list. Note: This configuration affects all users of this component. No further fine tuning is possible. 14. Click Next. The next dialog box allows you to associate public worksheets with levels.
- 810. 42-8 Oracle Demantra Implementation Guide This association is used in two ways: • Within the Members Browser, a user can use the right-click menu to open any of these associated worksheets directly from a member of the level (via the Open With menu option). In this case, Demantra opens the associated worksheet. The worksheet is filtered to show only data relevant to the member. • A worksheet can include an embedded worksheet that shows details for the member that is currently selected in the worksheet. Specifically, within the worksheet designer, users can add a subtab to a worksheet. The subtab consists of any of the worksheets that are associated with a level included in the main worksheet. The embedded worksheet is filtered to show only data relevant to the member. Note: This configuration affects all users of this component. No further fine tuning is possible. 15. At this point, do one of the following: • To continue without associating any worksheets and levels, click Next. • To associate a worksheet with a level, do the following: 1. Click the level in the Select Level dropdown menu. 2. Double-click the worksheet in Available Queries list, which moves it to the Selected Queries list. 3. Move other worksheets from the Available Queries list to the Selected Queries list, as needed. 4. Decide which worksheet in the Selected Queries list should be the default worksheet for this level. For that worksheet, click the Default check box. When the user right-clicks and selects Open, this is the worksheet that will be used. 5. When you are done on this screen, click Next. If you are using the PE Analytical Engine, the system displays engine profiles that could potentially be used within this component. The Business Modeler displays the Available Engine Profiles and Selected Engine Profiles lists.
- 811. Managing Security 42-9 16. Select the engine profiles that should be available in the component. Profiles can be used only with the Promotion Effectiveness engine. 1. Move all profiles that you want into the Selected Engine Profiles list, using any of the techniques in "Working with Lists". 2. Remove any unwanted profiles from the Selected Engine Profiles list. 1. When you are done specifying profiles, click Next. Note: This configuration affects all users of this component. No further fine tuning is possible. In the next step, you specify the user name and password of the user who owns the component. This user will be able to log into the Business Modeler and create additional users for this component. 17. To specify the owner of the component: • In the User Name box, type the user name.
- 812. 42-10 Oracle Demantra Implementation Guide • In the User Password box, type the user password. 18. To exit and save the configuration, click OK. 19. Modify the newly created user so that it has access to the appropriate Demantra modules. To do so, use the Security menu; see "Creating or Modifying a User". Deleting a Component To delete a component: 1. Click Components > Create/Open Component. Or click the Create/Open Component button. Note: This option may not be available, depending on the user name with which you logged onto Business Modeler. The Create/Open Component dialog box appears. 2. Click the icon corresponding to the component. 3. Click Delete. 4. Click Yes to confirm the deletion. Creating or Modifying a User You can create additional users to work within the component you own. Warning: When passing sensitive information (uid/password) to new users, be sure to use a secure mechanism (not just email). To create or modify a user: 1. Log on to the Business Modeler as described in "Logging onto the Business Modeler ". 2. Click Security > Create/Modify User. Or click the Create/Modify User button. The Create/Modify User dialog box appears. 3. Next: • To create a new user, click the New User button, and then click OK.
- 813. Managing Security 42-11 • To modify a user, click the button of that user then click OK. Or double-click the icon of the user whose details you want to modify. The User Details dialog box appears. 4. Specify basic user details as follows: • Under Enter User Details, type the following information in the appropriate boxes (or select from the drop down lists): • The user name, password, permission level, and the language in which the system will be operated. Each user name must be unique within your Demantra implementation. • The first and last name of the user, the company name, phone and fax number, and the email address. If you set up automated email within workflows, it is important to make sure the email address is correct here. 1. For Permission Level, see "Permission Levels". 2. Click Next. The User Modules dialog box appears. Here you specify which Demantra user interfaces this user can access.
- 814. 42-12 Oracle Demantra Implementation Guide 5. Click the check box next to each module that the user needs. Then click Next. If you are logged in as the component owner and the user's permission level is 'System Manager', then the following two options will be enabled for selection (otherwise, they will be disabled): • Demantra Administrative Tools – Select this option if you want the user to be able to access the Engine Administrator, Chaining Management, and Member Management applications as well as all functions in the Business Modeler except the Security function. • Security Management - Select this option if you want the user to be able to access the Security function within the Business Modeler. The Security function is used to create new, or modify existing, users and user groups. Note that only component owners can grant access to the Security Management and Administrative Tools modules and that these modules can only be granted to Users with a Permission Level of System Manager Users with access to the 'Security Management' module will be able to: • Maintain (create, copy, modify, and delete) any users with the same or lower module access then they have themselves. For example, if User A does not have access to the Demand Management module, then that user will not be able to maintain other users that do have access to that module. • Maintain Series, User Filters, and User Groups for the Users that they can maintain. This is true regardless of the Series, User Filters, and User Groups that they have access to. For example, even if User A does not have access to the Series "Mfg Profit," User A can still grant access to that series to other Users. The New User - Select User Series dialog box appears. This dialog box allows you to
- 815. Managing Security 42-13 determine what data series will be active for the new user, from the entire set of series in this component. Each list is a collapsible list of series groups and the series in them. If a User does not have access to either the Demantra Administrative Tools module or the Security Management module, then they can login to Business Modeler, but can only change their password. If a series is not active for a user, it is not available when the user creates worksheets and is not viewable in existing worksheets to which the user has access. 6. Specify the series that a user can see, as follows: 1. Move all series that you want into the Selected Series list. To do so, either double-click each series or drag and drop it. 2. Remove any unwanted series from the Selected Series list. Note: You can also move an entire series group from one list to the other in the same way. 3. When you are done specifying series, click Next. The New User - Select User Filters dialog box appears. This dialog box lets you filter the data that the user can see; specifically, you control which levels and which members of those levels the user can see.
- 816. 42-14 Oracle Demantra Implementation Guide 7. Filter the data that the user can see, as follows: 1. Click a level in the left side of the dialog box and drag it to the box on the right. Or double-click a level in the left side. 2. Now specify which members of this level the user can see. To do so, click a member in the list, and then click the right arrow button. Or double-click the member you want to filter out. The system moves the selected members to the box on the lower right side, as in this example:
- 817. Managing Security 42-15 8. Now the user can see only the selected members of this level. In the preceding example, the user can see only data that is associated with the Rainbow brand. Note: The Selected Members list cannot include more than 200 members. In the lower right, refine the security settings that control the access that the user has to each member. To do so, in the Access column, click one of the following: 1. Full Control (user can view, edit, create, and delete within this member) 2. Read & Write (the user can view or edit this member) 3. Read only (the user can view this member but cannot make any changes) 4. No access (the user does not have access to this member; this option is equivalent to not including this member in the filter) 5. System Default (use the default permission controlled by the DefaultContentSecurityAccess parameter) 9. Repeat the preceding steps for each filter you want to add. Each filter automatically limits the choices available in subsequent filters. When you have appropriately filtered data for the user, click Next. The New User - Select User Groups dialog box appears. This dialog box allows you to select the group or groups to which the new user will belong.
- 818. 42-16 Oracle Demantra Implementation Guide 10. Specify the collaboration groups to which a user belongs, as follows: 1. Move all groups to which the user should belong into the Selected Groups list. To do so, either double-click each group or drag and drop it. Note: You can also select and move multiple groups with the standard Ctrl+click or Shif