SlideShare a Scribd company logo
Oracle Order Management Implementation Manual
Release 12.1                                                Contents Previous Next
Part Number E13406-04


Oracle Order Management Setup
This chapter covers the following topics:

      Overview of Setup
      Setup Steps
      Oracle Order Management Recommended Implementation
      Order Management Setup Steps
      Setup Steps Defined in Detail
      Multi-Org Access Control
      Profile Options
      Order Management Profile Option Descriptions and Settings
      Selected Oracle Application Profile Option Descriptions
      Setting OM System Parameters
      Defining Parameters
      Setting Parameter Values
      Seeded System Parameters
      Accessing the Installation Details form
      Define Tax Features
      Define QuickCodes
      Viewing Notifications
      Define Document Sequences for Order Numbering
      Define Order Management Transaction Types
      Define Order Import Sources
      Defining Processing Constraints
      Defining Validation Templates
      Defining Record Sets
      Define Defaulting Rules
      Define Credit Checking Rules
      Defining Credit Check Rules
      Deactivating Credit Checking
      Oracle Payments Processing
      Define Automatic Holds
      Define Attachments
      Defining Documents in Advance
      Defining Attachment Addition Rules
      Defining Document Categories
      Define Freight and Special Charge Types
      Setting up Freight Rates and Charges
      Overview of Shipping Tolerances
Defining Shipping Tolerances
       Release Management Integration Setup for Sales Agreements
       Scheduling Across Orders Setup
       Gross Margin
       User Item Description
       Setup for Related Items
       Setup of Recurring Charges
       Trading Community Usage Within Order Management

Overview of Setup
This chapter explains how to set up and implement Oracle Order Management. The
Oracle Order Management Application provides many flexible features enabling you to
set up your system to begin processing order information. You must define your
business order policies, such as how you classify your orders, as well as various control
features prior to processing orders within the application.

Please refer to the Oracle Applications Multiple Organizations Implementation Guide for
more information on setting up multi-org access control.

In addition to reading this chapter, please refer to the Using Oracle Workflow in Oracle
Order Management manual for setup and implementation details for Order Management
workflows.

Setup Steps
       Oracle Order Management Recommended Implementation
       Order Management Setup Steps
       Setup Steps Defined in Detail
       Profile Options

Oracle Order Management Recommended Implementation
Implementation involves several phases, including setting up other integrated
applications, which include Multi-Org Access Control (MOAC), Oracle General Ledger,
Oracle Receivables, and Oracle Inventory. Some setup steps are optional, depending on
whether you have the integrating applications installed and whether you use the
associated feature. For example, if your business supports drop shipments, you should
also set up Oracle Purchasing. If you sell models and kits, set up Oracle Bills of Material
and Oracle Configurator.

If you are using a multiple organization structure, your system administrator must set
the parameter OM: Item Validation Organization. This enables Order Management to
default code and revenue account information accurately.
Set Up Oracle Applications Technology

The setup steps in this chapter tell you how to implement the parts of Oracle
Applications specific to Oracle Order Management. This includes:

       Performing system-wide setup tasks, such as configuring concurrent managers
       and printers
       Managing data security, which includes setting up responsibilities to enable
       access to a specific set of business data and transactions, and assigning
       individual users to one or more of these responsibilities

Also, if your product uses Oracle Workflow, for example, to manage the approval of
business documents or derive Accounting flexfield values via the Account Generator,
you need to set up Oracle Workflow.

Order Management Setup Steps
The following table displays a list of all the implementation steps for Oracle Order
Management and a reference to documentation that can help to accomplish the steps.

                                                                          Optional or
Step                                       Document                       Required
1.Define multiple organizations in Oracle Oracle Inventory User's         required
Inventory                                 Guide
2. Setup Multi-Org (Multiple               Oracle Applications Multiple   optional
Organization) Access Control               Organizations
                                           Implementation Guide
3. Define key and descriptive flexfields   Oracle Order Management        required under
                                           Implementation Manual          certain
                                                                          conditions
4. Define inventory organizations          Oracle Inventory User's        required
(warehouses), parameters,                  Guide
subinventories, and picking rules in
Oracle Inventory
5. Define Profiles                         Oracle Order Management        required
                                           Implementation Manual
6. Setting OM System Parameters            Oracle Order Management        required
                                           Implementation Manual
7. Define invoicing information            Oracle Order Management        required under
                                           UserGuide                      certain
conditions
8. Define your sales representatives     Oracle Receivables          optional
                                         Implementation Guide
9. Define Tax Features                   Current, Oracle Receivable's required
                                         User's Guide
10. Define Quickcodes                    Oracle Order Management     required under
                                         Implementation Manual       certain
                                                                     conditions
11. Define header and line processing    Oracle Order Management     required
flows
12. Define Document Sequences for        Oracle Order Management     required
Order Numbering                          Implementation Manual
13. Define Order Import Sources          Oracle Order Management     required under
                                         Implementation Manual       certain
                                                                     conditions
14. Define the units of measure          Oracle Inventory User's     required
                                         Guide
15. Define item information              Oracle Inventory User's     required
                                         Guide
16. Define the items that you sell       Oracle Inventory User's     required
                                         Guide
17. Define the configurations that you   Oracle Bills of Material    required under
sell                                     User's Guide                certain
                                                                     conditions
18. Define price lists                   Oracle Advanced Pricing     required
                                         Implementation Manual
19. Define customer profile classes      Oracle Receivables          required under
                                         Implementation Guide        certain
                                                                     conditions
20.Define information on your            Oracle Receivables          required
customers                                Implementation Guide
21. Define item cross references         current, Oracle Inventory   required under
                                         User's Guide                certain
                                                                     conditions
22. Define your sourcing rules           Oracle Advanced Planning    optional
                                         and Scheduling User's Guide
23. Define Order Management                 Oracle Order Management         required
Transaction Types                           Implementation Manual
24. Set up Cost of Goods Sold               Order Inventory User's          required under
Accounting flexfield combination            Guide                           certain
                                                                            conditions
25. Define Processing Constraints           Oracle Order Management         optional
                                            Implementation Manual
26. Define Defaulting Rules                 Oracle Order Management         optional
                                            Implementation Manual
27.Define Credit Checking Rules             Oracle Order Management         required under
                                            Implementation Manual           certain
                                                                            conditions
28. Define Automatic Holds                  Oracle Order Management         required under
                                            Implementation Manual           certain
                                                                            conditions
29. Define Attachments                      Oracle Order Management         optional
                                            Implementation Manual
30. Define Freight and Special Charge       Oracle Order Management         optional
Types                                       Implementation Manual
31. Define shipping parameters              Oracle Shipping Execution       required
                                            User's Guide


Setup Steps Defined in Detail
The following is a list of each setup step defined in detail.

Step 1: Multiple Organizations

Define multiple organizations in Oracle Inventory. This step is required.

Step 2: Multi-Org Access Control

The Multi-Org Access Control (MOAC) feature enables users to access to one or more
Operating Units within one user responsibility. Please refer to the Oracle Applications
Multiple Organizations Implementation Guide for more information.

Step 3: Flexfields
Define key and descriptive flexfields to capture additional information about orders and
transactions.

This step is required for Key Flexfields, and optional if you plan on using the
functionality surrounding Descriptive Flexfields. Several defaulting values are provided.

Step 4: Inventory Organizations

Define inventory organizations (warehouses), parameters, subinventories, and picking
rules in Oracle Inventory.

You must define at least one item validation organization and at least one organization
that acts as an inventory source for orders fulfilled internally. If you plan to drop ship
some orders, you must also define at least one logical organization for receiving
purposes. Your item validation organization can be the same as your inventory source
or your logical receiving organization, but you cannot use one organization for all three
purposes. See Step 5 for setting your item validation organization.

This step is required.

Step 5: Profile Options

Define profile options to specify certain implementation parameters, processing options,
and system options.

This step is required.

Step 6: Parameters

Set your Order Management System Parameters to validate items, enable customer
relationships, and operating unit defaults.

This step is required.

Step 7: Invoicing

Define invoicing information, including payment terms, invoicing and accounting rules,
Autoaccounting parameters, territories, and invoice sources.

This step is required if you plan on transferring invoicing information to Oracle
Receivables. Several defaulting values are provided.

Step 8: Salespersons
Define information on your sales representatives.

This step is optional.

Step 9: Tax

Define tax features, such as codes, rates, exceptions, and exemptions.

This step is required.

Step 10: QuickCodes

Define QuickCodes that provide custom values for many lists of values throughout
Order Management.

This step is required if you plan on creating user defined Quickcodes for utilization
within Order Management. Defaulting values are provided.

Step 11: Workflow

Define header and line processing flows to meet different header and line type
requirements.

This step is required.

Step 12: Document Sequences (Order Numbering)

Define Document Sequences for automatic or manual numbering of orders.

This step is required.

Step 13: Order Import Sources

Define sources for importing orders into Order Management.

This step is required if you plan on importing orders or returns into Order Management.

Step 14: Units of Measure

Define the units of measure in which you supply items.

This step is required.

Step 15: Item Information
Define item information, including item attribute controls, categories, and statuses.

This step is required.

Step 16: Items

Define the items that you sell, as well as container items.

This step is required.

Step 17: Configurations

Define the configurations that you sell.

This step is required if you plan on generating orders or returns for configured items.
Several defaulting values are provided.

Step 18: Pricing

Define price lists for each combination of item and unit of measure that you sell.
Optionally, you can define pricing rules and parameters to add flexibility.

For more information about pricing setup and implementation, refer to the Oracle
Advanced Pricing Implementation Manual.

This step is required.

Step 19: Customer Classes

Define customer profile classes.

This step is required if you plan on using the functionality surrounding Customer
Profiles. Several defaulting values are provided.

Step 20: Customers

Define information on your customers.

This step is required.

Step 21: Item Cross References

Define item cross references for ordering by customer part number, UPC, or any generic
item number.
This step is required if you plan on using the functionality surrounding item cross
referencing. Several defaulting values have been provided.

Step 22: Sourcing

Define your sourcing rules for scheduling supply chain ATP functions.

This step is optional.

Step 23: Order Management Transaction Types (Sales Documents)

Define Order Management transaction types to classify sales documents. For each order
type, you can assign a default price list, defaulting rules, order lines, return lines, line
types, workflow assignments, payment terms, and freight terms.

Note: Order Management provides NO seeded OM transaction types. For existing
Oracle Order Entry customers, Order Management will update existing Order Types to
OM transaction type during the upgrade process.

This step is required.

Step 24: Cost of Goods Sold (COGS)

Set up your Cost of Goods Sold Accounting Flexfield combination (COGS Account) in
Oracle Inventory.

This step is required if you plan on utilizing the functionality surrounding COGS.

Step 25: Processing Constraints

Define processing constraints to prevent users from adding updating, deleting, splitting
lines, and cancelling sales documents information beyond certain points in your
business flows. Use the constraints Order Management provides, which prevent data
integrity violations, or create your own.

This step is optional. Several default values for processing constraints have been
defined.

Step 26: Defaulting Rules

Define defaulting rules to determine the source and prioritization for defaulting order
information to reduce the amount of information you must enter manually in the Sales
Orders window.
This step is optional. Several Defaulting rules and corresponding values for have been
defined.

Step 27: Credit Checking

Define your credit checking rules.

This step is required if you plan on performing any type of order credit checking.

Step 28: Holds

Define automatic holds to apply to orders and returns.

This step is required if you plan on performing automatic hold for orders or returns.

Step 29: Attachments

Define standard documents to attach automatically to sales documents.

This step is optional.

Step 30: Freight Charges and Carriers

Define freight charges and freight carriers to specify on orders.

This step is required if you plan on charging customers for freight or additional order
charges.

Step 31: Shipping

Define shipping parameters in Oracle Shipping Execution.

This step is required.

Oracle Training Administration Users

Please refer to the Oracle Training Administration User's Guide for additional Order
Management Setup Steps.

Oracle Process Manufacturing Users

Please refer to the Oracle Process Manufacturing guides for additional Order
Management Setup Steps.
Related Documents

   1.   Oracle Shipping Execution User‘s Guide
   2.   Oracle Inventory User‘s Guide
   3.   Oracle Receivables User Guide
   4.   Oracle Receivables Implementation Guide
   5.   Oracle Receivables Reference Guide
   6.   Oracle Bills of Material User‘s Guide
   7.   Oracle Order Management User‘s Guide
   8.   Oracle Applications Multiple Organizations Implementation Guide
   9.   Using Oracle Training Administration

Related Topics

Holds and Releases

Profile Options

Setting OM System Parameters

Define Credit Checking Rules

Credit Checking

Define Defaulting Rules

Defaulting Rules

Define Processing Constraints

Processing Constraints

Define Order Management Transaction Types

Transaction Types

Setting up the Supply Chain

Setting Up Basic Pricing

Order Import

Define Document Sequences for Order Numbering

Using Workflow in Order Management
Define QuickCodes

Multi-Org Access Control
Please refer to the Oracle Applications Multiple Organizations Implementation Guide for
general MOAC setup details.

To support Multi-Org Access Control the Operating Unit has been added to many of the
Order Management windows. If you are enabling MOAC functionality for your
implementation and you want to give your users the ability to enter and search sales
order documents across Operating Units then you need to enable (make the field
visible) the Operating Unit field in the various Order Management forms that are folder
enabled.

It is recommended that the Operating Unit field should be the first visible field on a
form, or the first field before an Operating Unit sensitive field. To make the hidden
Operating Unit field visible in OA Framework (HTML) pages, you need to use the OA
Framework Personalization feature.

The windows / OA pages where the Operating Unit is seeded as hidden:

      Order Information Portal:
         o Sales Order Advanced Search and Results page
         o Order Status page
         o Deliveries Advanced Search
         o Delivery page
      Sales Orders windows:
         o Sales Order window
         o Order Organizer Find window (All tabs)
         o Order Summary
         o Quick Sales Order window
         o Quick Sales Order Organizer
         o Quick Order Summary
         o Quote window
         o Quote Organizer
         o Quote Summary
         o Find Customer window
      Sales Agreements windows:
         o Sales Agreements window
         o Sales Agreements Organizer
         o Sales Agreements Summary
      Other windows:
         o Scheduling Organizer window
         o Pricing and Availability window
o   Order Import Corrections window
            o   Open Interface Tracking window
            o   Retrobill Organizer window, Retrobill Requests tab

The Order Management windows where the Operating Unit is added as visible:

         Audit History Find, Audit History
         Add Customer window
         Apply Holds (Criteria tab) window
         Approvals (to display Operating Unit of Transaction Type)
         Export Compliance Find, Export Compliance Workbench
         Order Import Corrections Find window
         Open Interface Tracking Find window
         Process Messages Find, Process Messages window
         Payment Types
         System Parameters
         Shipping Tolerances (to display Operating Unit of Customer Address)
         Transaction Types

In the windows where the Operating Unit can be specified, the list of values for the
Operating Unit field is determined by the profile MO: Security Profile. The field will have
a default value based on the profile MO: Default Operating Unit. For details on MOAC
setup please refer to the Oracle Applications Multiple Organizations Implementation
Guide.

Profile Options
During implementation, you set a value for each user profile option to specify how
Order Management controls access to and processes data. This is step four of the Order
Management Setup Steps.

Generally, the system administrator sets and updates profile values. See: Setting Profile
Options, Oracle E-Business Suite System Administrator's Guide - Maintenance.

Profile Categories

In the current release, profiles have been categorized so that they can be easily
classified or grouped. The following table displays the profile categories and the profile
options that belong to each one. Some profile options belong to more than one
category and are indicated in the table below.

Profile Category
Name                      Profile Option(s)
Configurations         OM:   Allow model fulfillment without configuration;
                       OM:   Configuration Quick Save;
                       OM:   Copy Model DFF to child lines;
                       OM:   Included Item Freeze Method;
                       OM:   Party Totals Currency;
                       OM:   Use Configurator;
Customer Usage         OM:   Add Customer;
                       OM:   Add Customer (Order Import);
                       OM:   Create Account Information;
                       OM:   E-Mail Required on New Customers;
                       OM:   Party Totals Currency;
                       OM:   Sales Order Form: Restrict Customers
Debug                  OM: Debug Log Directory;
                       OM: Debug Level;
                       OM: Generate Diagnostics for Error Activities;
Deployment             OM:   DBI Installation;
                       OM:   Orders Purge Per Commit;
                       OM:   New EDI Acknowledgment Framework;
                       OM:   Printed Document Extension Class Name;
                       OM:   Use Configurator;
Electronic Messaging   OM:   Change SO Response Required;
                       OM:   Electronic Message Integration Event Sources
                       OM:   New EDI Acknowledgment Framework;
                       OM:   Order Accept State for XML;
                       OM:   Run Order Import for XML;
                       OM:   Send Acknowledgment for Change PO Response;
Forms UI               OM:   Add Customer;
                       OM:   Administer Public Queries;
                       OM:   Automatically Open Related Items Window;
                       OM:   Contact Center Actions Menu Name;
                       OM:   Cust Item Shows Matches;
                       OM:   Display Actions Button vs. Poplist;
                       OM:   Display Current Selections in Pricing/Availability;
                       OM:   Enable Related Items and Manual Substitutions;
                       OM:   Item View Method;
                       OM:   Quick Sales Order Form: Auto Refresh;
                       OM:   Quick Sales Order Form: Defer Pricing;
                       OM:   Sales Order Form: Cascade Header Changes to Line;
                       OM:   Sales Order Form: Refresh Method (Query Coordination);
                       OM:   Sales Order Form: Restrict Customers;
                       OM:   Sales Order navigation from Pricing/Availability form;
OM:   Sales Orders Form preference;
               OM:   Scheduling Role;
               OM:   Show Line Details;
               OM:   Show Process Messages Flag;
               OM:   Use Configurator;
               OM:   View Cancel Lines;
               OM:   View Closed Lines;
               OM:   View Pricing & Availability Information in Related Items;
Fulfillment    OM:   Allow model fulfillment without configuration;
               OM:   Included Item Freeze Method;
               OM:   Over Return Tolerance;
               OM:   Over Shipment Tolerance;
               OM:   Population Of Buyer Code For Dropship Lines;
               OM:   Source Code;
               OM:   Under Return Tolerance;
               OM:   Under Shipment Tolerance;
               OM:   Automatically Interface Lines to IB on Fulfillment
Holds          OM: Modify Seeded Holds;
               OM: Prevent Booking for Line Generic Holds;
Invoicing      OM: Interface freight tax code from line;
               OM: Invoice Numbering Method;
               OM: Set Receivables Transaction Date as Current Date for Non-
               Shippable Lines;
               OM: View Intercompany AR Invoice
Item Usage     OM:   Customer Item Shows Matches;
               OM:   Enable Related Items and Manual Substitutions;
               OM:   Item Flexfield;
               OM:   Restrict Customer Items for Line Level Ship To Address;
Logistics      OM: Sequence for TP Ship/Deliver Deadline;
               OM: Source for TP Early Ship/Deliver Date;
Order Import   OM: Add Customer (Order Import);
               OM: Import Multiple Shipments;
               OM: Unique Order Source, Orig Sys Document Ref Combination
               For Each Customer;
Payments       OM: Commitment Sequencing;
               OM: Credit Card Privileges;
               OM: Preserve External Credit Balances
Portal UI      OM: Customer Service Feedback;
               OM: Customer Service Report Defect;
OM: Records On Summary Page For External Users;
Pricing      OM: Charges For Backorders;
             OM: Charges for included item;
             OM: Charging Privilege;
             OM: Discounting Privileges;
             OM: Enable Group pricing for DSP lines;
             OM: Item Change Honors Frozen Price;
             OM: List Price Override Privilege;
             OM: Negative Pricing;
             OM: Promotion Limit Violation Action;
             OM: Send Changed Lines to Pricing;
             OM:Unit Price Precision Type;
             OM: UOM Class for Charge Periodicity;
             OM: Price Adjustment Modifier for AIA Order Lines
Returns      OM:   Customer Service Feedback;
             OM:   Customer Service Report Defect;
             OM:   Over Return Tolerance;
             OM:   Notification Approver;
             OM:   Return Item Mismatch Action;
             OM:   Return Unfulfilled Referenced Line Action;
             OM:   Under Return Tolerance;
Scheduling   OM:   Assign New Set For Each Line;
             OM:   Authorized To Override ATP;
             OM:   Auto Push Group Date;
             OM:   AutoSchedule;
             OM:   Enforce Shipping Method for Ship Sets;
             OM:   Schedule ATO Item Without BOM;
             OM:   Scheduling Role;
Security     OM:   Add Customer;
             OM:   Add Customer (Order Import);
             OM:   Administer Public Queries;
             OM:   Authorized To Override ATP;
             OM:   Cascade Service;
             OM:   Charging Privilege;
             OM:   Create Account Information;
             OM:   Credit Card Privileges;
             OM:   Discounting Privileges;
             OM:   List Price Override Privilege;
             OM:   Modify Seeded Holds;
             OM:   Scheduling Role;
             OM:   Authorized To Override ATP;
Service                 OM: Cascade Service;
Transaction Entry       OM: Apply Automatic Attachments;
                        OM: Cascade Service;
                        OM: Configuration Quick Save;
                        OM: Copy Model dff to child lines;
                        OM: Default Blanket Agreement Type;
                        OM: Default Blanket Transaction Phase;
                        OM: Default Sales Transaction Phase;
                        OM: Default Salesrep;
                        OM: Display New Order After Copy
                        OM:Enforce check for duplicate Purchase Orders;
                        OM: Generic Update Constraints Apply to DFF?;
                        OM: Prevent Booking for Line Generic Holds;
                        OM: Return Item Mismatch Action;
                        OM: Return Unfulfilled Referenced Line Action;
Upgrade                 OM: Context Responsibility for Upgraded Orders;
                        OM: Notification Approver;

Implementing Profile Options Summary

The following table indicates whether you can view or update the profile option and at
which System Administrator level the profile options can be updated. The System
Administrator level includes User, Responsibility, Application, and Site levels.

The table also displays if the profile option is Optional or Required:

       Required: Requires you to provide a value
       Optional: A default value is provided, so you only need to change it if you do not
       want to accept the default
       If the profile option from the table is prefaced with an application short code,
       you can find additional information surrounding the profile option usage in the
       related Application User Guide.

The table also uses the following values to describe profile option controls for columns
User, System Admin User, System Admin Resp, System Admin App, and System Admin
Site:

       Yes: You can update the profile option.
       View Only: You can view the profile option value in the Profiles window, but you
       cannot change it.
       No: You cannot view or change the profile option value.
For the profile options table below, the following codes are used to denote profile
options used within Order Management that are defined within other Oracle
Applications. See the appropriate User Guide for additional details.

      (AR) Oracle Receivables
      (BOM) Oracle Bills of Material
      (FND) Oracle Applications Foundations
      (GL) Oracle General Ledger
      (INV) Oracle Inventory
      (QP) Oracle Advanced Pricing
      (WSH) Oracle Shipping Execution
      (OKC) Oracle Sales Contracts

The following table is a more in-depth description of each of the profile options.

                                      Profile Options
                          Syst
                 Syst     em     Syst    Syst
                 em       Adm    em      em                                      Profile
Profile          Adm      in.    Adm     Adm                                     Categor
Option       Use in.      Res    in.     in.  Requi                              y
Name         r   User     p.     App.    Site red?  Default Value                Names
OM: Add      View Yes     Yes - Yes      Yes - Requir   NULL                     Custome
Customer     Only         defa           defa ed                                 r Usage,
                          ult is         ult is                                  Security,
                          None           None                                    Forms
                                                                                 UI
OM: Add      View Yes     Yes    Yes     Yes   Option NULL                       Custome
Customer     Only                              al                                r Usage,
(Order                                                                           Security,
Import)                                                                          Order
                                                                                 Import
OM:        No      Yes    Yes    Yes     Yes   Requir   No                       Forms
Administer                                     ed                                UI,
Public                                                                           Security
Queries
OM: Allow No       No     No     No      Yes   Option No                         Fulfillme
Model                                          al                                nt,
Fulfillment                                                                      Configur
Without                                                                          ations
Configurati
on
OM: Apply View No      Yes   Yes   Yes   Option Yes                    Transact
Automatic Only                           al                            ion Entry
Attachmen
ts
OM: Assign No    No    No    No    Yes   Option NULL                   Scheduli
New Set                                  al                            ng
For Each
Line
OM:         View Yes   Yes   No    Yes   Option NULL                   Scheduli
Authorized Only                          al                            ng,
to Override                                                            Security
ATP
OM:         No   No    No    No    Yes   Option Yes                    Fulfillme
Automatica                               al                            nt
lly
Interface
Lines to IB
on
Fulfillment
OM:        Yes   Yes   Yes   Yes   Yes   Option No                     Forms
Automatica                               al                            UI
lly Open
Related
Items
Window
OM: Auto   View No     Yes   No    Yes   Option NULL                   Scheduli
schedule   Only                          al                            ng
OM: Auto   View No     Yes   No    Yes   Option NULL                   Scheduli
Push       Only                          al                            ng
Group
Date
OM:        View View View Yes      Yes   Option Null - equivalent to   Service,
Cascade    Only Only Only                al     Yes                    Transact
Service                                                                ion Entry
OM:       View View View View Yes                                      Electroni
Change SO Only Only Only Only                                          c
Response                                                               Messagi
Required                                                               ng
OM:        View No     No    No    Yes   Option NULL            Pricing
Charges    Only                          al
for
Backorders
OM:         View No    No    No    Yes   Option NULL            Pricing
Charges     Only                         al
for
included
item
OM:         View Yes   Yes   Yes   Yes   Option NULL            Pricing,
Charging    Only                         al                     Security
Privilege
OM:       No     No    No    No    Yes   Option No              Payment
Commitme                                 al                     s
nt
Sequencin
g
OM:         No   No    No    No    Yes   Option No              Transact
Configurati                              al                     ion
on Quick                                                        Entry,
Save                                                            Configur
                                                                ations
OM:         View Yes   Yes   Yes   Yes   No    ONT_CONTACT_CENT Forms
Contact     Only                               ER_SUB_MNU       UI
Center
Actions
Menu
Name
OM:         View View Yes    View View Option No Default        Upgrade
Context     Only Only        Only Only al
Responsibil
ity for
Upgraded
Orders
OM: Copy    No   No    No    Yes   Yes   Option No              Transact
Model DFF                                al                     ion
To Child                                                        Entry,
Lines                                                           Configur
                                                                ations
OM: Create View Yes      Yes   Yes   Yes   Option None   Custome
Account    Only                            al            r Usage,
Informatio                                               Security
n
OM: Credit View View Yes       Yes   Yes   Option None   Payment
Card       Only Only                       al            s,
Privileges                                               Security
OM: Cust     View No     Yes   No    Yes                 Item
Item         Only                                        Usage,
Shows                                                    Forms
Matches                                                  UI
OM:          View Yes    Yes   Yes   Yes   Option NULL   Returns,
Customer     Only                          al            Portal UI
Service
Feedback
OM:          View Yes    Yes   Yes   Yes   Option N      Returns,
Customer     Only                          al            Portal UI
Service
Report
Defect
OM: DBI      View Yes    Yes   Yes   Yes                 Deploym
Installation Only                                        ent
OM: Debug Yes      Yes   Yes   Yes   Yes   Option 0      Debug
Level                                      al
OM: Debug View No        Yes   Yes   Yes   Option NULL   Debug
log                                        al
Directory
OM:          Yes   Yes   Yes   No    Yes          NULL   Transact
Default                                                  ion Entry
Sales
Transactio
n Phase
OM:       No       No    Yes   No    Yes   Option NULL   Transact
Default                                    al            ion Entry
Blanket
Agreement
Type
OM:          Yes   Yes   Yes   No    Yes   Option NULL   Transact
Default                                      al             ion Entry
Blanket
Agreement
Transactio
n Phase
OM:            Yes   Yes   Yes   Yes   Yes   Option NULL    Transact
Default                                      al             ion Entry
Salesrep
OM:          No      Yes   Yes   Yes   No    Option NULL    Pricing,
Discountin                                   al             Security
g Privileges
OM:            Yes   Yes   Yes   Yes   Yes   Yes   Button   Forms
Display                                                     UI
Actions
Button vs.
Pop list
OM:            Yes   Yes   Yes   Yes   Yes   Option No      Forms
Display                                      al             UI
Current
Selections
in Pricing
and
Availability
OM:        Yes       Yes   Yes   Yes   Yes   Option No      Transact
Display                                      al             ion Entry
New Order
After Copy
OM:         View View View View Yes                XML      Electroni
Electronic Only Only Only Only                              c
Message                                                     Messagi
Integration                                                 ng
Event
Sources
OM: E-Mail View No         No    No    Yes   Option No      Custome
Required   Only                              al             r Usage
On New
Customers
OM:            View Yes    Yes   Yes   Yes                  Pricing
Enable         Only
Group
Pricing for
DSP Lines
OM:         View Yes      Yes   Yes   Yes   Option No                     Item
Enable      Only                            al                            Usage,
Related                                                                   Forms
Items and                                                                 UI
Manual
Substitutio
ns
OM:           View Yes    Yes   Yes   Yes   Requir   Yes                  Transact
Enforce       Only                          ed                            ion Entry
Check For
Duplicate
Purchase
Order
OM:        No       No    No    No    Yes   Option NULL                   Scheduli
Enforce                                     al                            ng
Shipping
Method for
Ship Sets
OM:         View No       No    No    Yes   No       No                   Debug
Generate    Only
Diagnostics
for Error
Activities
OM:         View No       No    No    Yes   Option NULL                   Transact
Generic     Only                            al                            ion Entry
Update
Constraints
Apply to
DFF?
OM:           Yes   Yes   Yes   Yes   Yes   Option Null - equivalent to No Order
Import                                      al                             Import
Multiple
Shipments
OM:           View No     No    No    Yes   Requir   NULL                 Fulfillme
Included      Only                          ed                            nt,
Item                                                                      Configur
Freeze                                                                    ations
Method
OM:          No     No      No      No      Yes   Option No                    Invoicing
Interface                                         al
Freight Tax
Classificati
on Code
From Line
OM:       No        No      No      No      Yes   Requir   Automatic           Invoicing
Invoice                                           ed
Numbering
Method
OM: Item    View Yes        Yes     Yes     Yes   Option NULL                  Pricing
Change      Only                                  al
Honors
Frozen
Price
OM: Item    No      No      No      No      Yes   Requir   System items        Item
Flexfield                                         ed                           Usage
OM: Item    Yes     Yes     Yes     Yes     Yes   Option NULL                  Forms
View                                              al                           UI
method
OM: List    No      Yes     Yes     No      No    Option NULL                  Pricing,
Price                                             al                           Security
Override
Privilege
OM:         Inter   Inter   Inter   Inter   Inter Intern   Internal Use Only   Holds,
Modify      nal     nal     nal     nal     nal   al Use                       Security
Seeded      Use     Use     Use     Use     Use Only
Holds       Only    Only    Only    Only    Only
OM:         View No         No      Yes     Yes   Option NULL                  Pricing
Negative    Only                                  al
Pricing
OM: New   No        Yes     Yes     Yes     Yes   Option No                    Deploym
EDI                                               al                           ent,
Acknowled                                                                      Electroni
gment                                                                          c
Framework                                                                      Messagi
                                                                               ng
OM:          View Yes   Yes   Yes   Yes   Option NULL                   Upgrade
Notification Only                         al                            ,
Approver                                                                Returns
OM: Order    View View View View Yes      Option Null - equivalent to   Electroni
Accept       Only Only Only Only          al     Entered                c
State For                                                               Messagi
XML                                                                     ng
OM:          View No    No    No    Yes   Option 100                    Deploym
Orders       Only                         al                            ent
Purge Per
Commit
OM: Over     View No    No    No    Yes   Requir   0                    Returns,
Return       Only                         ed                            Fulfillme
Tolerance                                                               nt
OM: Over     View No    No    No    Yes   Requir   0                    Fulfillme
Shipment     Only                         ed                            nt
Tolerance
OM: Party    View No    No    No    Yes   Requir   US Dollars           Custome
Totals       Only                         ed                            r Usage
Currency
OM:          No   No    No    No    Yes   Option NULL                   Fulfillme
Population                                al                            nt
Of Buyer
Code For
Dropship
OM:          No   No    No    No    Yes   Yes      Yes                  Payment
Preserve                                                                s
External
Credit
Balances
OM:          No   No    No    No    Yes   Option NULL                   Holds,
Prevent                                   al                            Transact
Booking                                                                 ion Entry
for Line
Generic
Holds
OM: Price No      No    No    No    Yes   Option NULL                   Pricing
Adjustment                                al
Modifier
for AIA
Order
Lines
OM:          View No     No    No    Yes   Option NULL          Deploym
Printed      Only                          al                   ent
Document
Extension
Class
Name
OM:          View No     No    No    Yes   Option NULL          Pricing
Promotion    Only                          al
Limit
Violation
Action
OM: Quick Yes      Yes   Yes   Yes   Yes   Option Application   Forms
Sales                                      al                   UI
Order
Form: Auto
Refresh
OM: Quick    Yes   Yes   Yes   Yes   Yes   Option No            Forms
Sales                                      al                   UI
Order
Form:
Defer
Pricing
OM:        Yes     Yes   Yes   Yes   Yes   Option NULL          Portal UI
Records on                                 al
Summary
Page for
External
Users
OM:          No    No    No    No    Yes   Option NULL          Item
Restrict                                   al                   Usage
Customer
Items for
Line Level
Ship To
Address
OM:          View Yes    Yes   Yes   Yes   Option NULL          Returns,
Return       Only                          al                   Transact
Item                                                                      ion Entry
Mismatch
Action
OM:         View Yes     Yes   Yes   Yes   Option NULL                    Returns,
Return      Only                           al                             Transact
Unfulfilled                                                               ion Entry
Referenced
Line Action
OM: Run      View View View View Yes       Option NULL                    Electroni
Order        Only Only Only Only           al                             c
Import for                                                                Messagi
XML                                                                       ng
OM: Sales No       Yes   Yes   View View Option Null                      Forms
Order                          Only Only al                               UI
Form:
Cascade
Header
Changes to
Line
OM: Sales Yes      Yes   Yes   Yes   Yes   Option Sales Orders            Forms
Order                                      al                             UI
Form
Preference
OM: Sales Yes      Yes   Yes   Yes   Yes   Option Null - equivalent to    Forms
Order                                      al     Automatic Refresh       UI
Form:                                             with Repositioning of
Refresh                                           Cursor
Method
(Query Co-
ordination)
OM: Sales    View View Yes     Yes   Yes   Option Global                  Forms
Order        Only Only                     al                             UI,
Form:                                                                     Custome
Restrict                                                                  r Usage
Customers
OM: Sales    Yes   Yes   Yes   Yes   Yes   Option ASK                     Forms
Order                                      al                             UI
Navigation
From P&A
form
OM:        No    No    No    No    Yes   Option No                      Scheduli
Schedule                                 al                             ng
ATO Item
Without
BOM
OM:        No    Yes   Yes   No    No    Option NULL                    Scheduli
Scheduling                               al                             ng,
Role                                                                    Forms
                                                                        UI,
                                                                        Security
OM: Send View View View View Yes         Option Null - equivalent to No Electroni
Acknowled Only Only Only Only            al                             c
gment for                                                               Messagi
Change PO                                                               ng
Response
OM: Send   View No     No    No    Yes   Option Yes                     Pricing
Changed    Only                          al
Lines to
Pricing
OM:         No   No    No    No    Yes   Option Null                    Logistics
Sequence                                 al
for TP
Ship/Delive
r Deadline
OM: Set    View No     No    No    Yes   Option No                      Invoicing
Receivable Only                          al
s
Transactio
n Date as
Current
Date for
Non-
Shippable
lines
OM: Show   Yes   Yes   Yes   Yes   Yes   Option NULL                    Forms
Line                                     al                             UI
Details
OM: Show   Yes   Yes   Yes   Yes   Yes   Option NULL                    Forms
Process                                  al                             UI
Messages
Flag
OM:          No   No   No   No   Yes   Requir   ORDER ENTRY   Fulfillme
Source                                 ed                     nt
Code
OM:          No   No   No   No   Yes   Option NULL            Logistics
Source for                             al
TP Early
Ship /
Deliver
Date
OM: Use      No   No   No   No   Yes   Option Yes             Deploym
Configurat                             al                     ent,
or                                                            Forms
                                                              UI,
                                                              Transact
                                                              ion
                                                              Entry,
                                                              Configur
                                                              ations
OM: Use     No    No   No   No   Yes   Yes      No            Fulfillme
Materialize                                                   nt
d View for
Items LoV
(Honours
Item
Orderabilit
y Rules)
OM: Under View No      No   No   Yes   Requir   0             Returns,
Return    Only                         ed                     Fulfillme
Tolerance                                                     nt
OM: Under View No      No   No   Yes   Requir   0             Fulfillme
Shipment  Only                         ed                     nt
Tolerance
OM:          View View View View Yes   Option NULL            Order
Unique       Only Only Only Only       al                     Import
Order
Source,
Orig Sys
Document
Ref
Combinatio
n For Each
Customer
OM: Unit      Yes   Yes   Yes   Yes   Yes   Option NULL     Pricing
Price                                       al
Precision
Type
OM: UOM       View View View View Yes                       Pricing
Class For     Only Only Only Only
Charge
Periodicity
OM: View      Yes   Yes   Yes   Yes   Yes   Option Yes      Forms
Cancel                                      al              UI
Lines
OM: View      Yes   Yes   Yes   Yes   Yes   Option Yes      Forms
Closed                                      al              UI
Lines
OM: View      Yes   Yes   Yes   Yes   Yes   Option No       Invoicing
Intercomp                                   al
any AR
invoice
OM: View Yes        Yes   Yes   Yes   Yes   Option Both     Forms
Pricing/Ava                                 al              UI
ilability
Informatio
n in
Related
Items
AR: Credit    No    No    Yes   Yes   Yes
Limit
Selection
AR: Item  Yes       Yes   Yes   Yes   Yes   Requir   NULL
Flexfield                                   ed
Mode (AR)
AR: Use    View Yes       Yes   Yes   Yes   Requir   No
Invoice    Only                             ed
Accounting
for Credit
Memos
(AR)
HZ:          Yes   Yes   Yes   Yes   Yes   Requir   NULL - equivalent to
Generate                                   ed       Yes
Contact
Number
(AR)
HZ:          Yes   Yes   Yes   Yes   Yes   Requir   NULL - equivalent to
Generate                                   ed       Yes
Party
Number
(AR)
HZ:          Yes   Yes   Yes   Yes   Yes   Requir   NULL - equivalent to
Generate                                   ed       Yes
Party Site
Number
(AR)
Tax: Allow   View Yes    Yes   Yes   Yes   Requir   NULL
Ad Hoc       Only                          ed
Tax
Changes
(AR)
Tax: Allow   View Yes    Yes   Yes   Yes   Requir   NULL
Manual       Only                          ed
Tax Lines
(AR)
EBTax:      View Yes     Yes   Yes   Yes   Requir   NULL
Allow       Only                           ed
Override of
Customer
Exemption
s (AR)
Tax: Allow View Yes      Yes   Yes   Yes   Requir   NULL
Override of Only                           ed
Tax
Classificati
on Code
(AR)
Tax:         View No     Yes   Yes   Yes   Option NULL
Calculate    Only                          al
Tax on
Credit
Memos
(AR)
Tax: Use     View No     Yes   Yes   Yes            No
Tax          Only
PL/SQL
Vendor
(AR)
Tax: Use     View No     Yes   Yes   Yes   Requir   No
Tax          Only                          ed
Vendor
(AR)
BOM:        View No      No    No    Yes   Option No
Check for Only                             al
Duplicate
Configurati
on (BOM)
BOM:      Yes      Yes   Yes   Yes   Yes   Option 10
Componen                                   al
t Item
Sequence
Increment
(BOM)
BOM:         Yes   Yes   Yes   Yes   Yes   Requir
Configurat                                 ed
or URL of
UI
Manager
(BOM)
BOM:         Yes   Yes   Yes   Yes   Yes   Option No
Default Bill                               al
of Material
Levels
(BOM)
Sequential View No       Yes   Yes   Yes   Requir
Numbering Only                             ed
(FND)
Default      Yes   Yes   Yes   Yes   Yes   Requir   NULL
Country                                     ed
(FND)
Flexfields:   Yes   Yes   Yes   Yes   Yes   Option Yes
Open                                        al
Descr
Window
(FND)
Journals:     Yes   Yes   Yes   Yes   Yes   Option At site level
Display                                     al
Inverse
Rate (GL)
INV:       Yes      Yes   No    No    Yes   Option NULL
Capable to                                  al
Promise
(INV)
OKC:          No    No    No    Yes   Yes   Option NULL
Enable                                      al
Sales
Contracts
(OKC)
QP:       View No         No    Yes   Yes   Option No Default
Accrual   Only                              al
UOM Class
(QP)
QP: Blind     View No     No    Yes   Yes   Requir   Yes
Discount      Only                          ed
Option
(QP)
QP: Item    View No       Yes   No    Yes   Requir   No Default
Validation Only                             ed
Organizatio
n (QP)
QP: High   No       No    No    No    Yes
Volume
Order
Processing
Complianc
e (QP)
QP: Line      View No     No    Yes   Yes   Option No Default
Volume       Only                           al
UOM Code
(QP)
QP: Line     View No      No    Yes   Yes   Option No Default
Weight       Only                           al
UOM Code
(QP)
QP:          View No      No    Yes   Yes   Requir   No Default
Negative     Only                           ed
Pricing
(QP)
QP: Return Yes      Yes   Yes   Yes   Yes
Manual
Discounts
(QP)
QP: Source No       No    No    Yes   Yes   Requir   No Default
System                                      ed
Code (QP)
QP: Unit     No     No    No    Yes   Yes   Requir   Standard
Price                                       ed
Precision
Type (QP)
QP: Verify   No     No    No    No    Yes   Requir   No
GSA                                         ed
Violations
(QP)
WSH:         Yes    No    No    No    No    Option NULL
Internet                                    al
Proxy URL
(WSH)


Order Management Profile Option Descriptions and Settings
OM: Add Customer

ONT_ADD_CUSTOMER

This profile option determines which users who can access the Order Management Add
Customer window to enter customers, customer addresses, and customer contact
information. Select from:
All: Users can create new customers, customer addresses, and customer
       contacts.
       None: User cannot create new customers, customer addresses, and customer
       contacts.
       Address and Contact only: Users can access the Add Customer window to create
       both new customer addresses and/or customer contacts for existing customers
       only

The default for this profile option is None.

Note: You cannot update existing customer information from the Add Customer
window. However, if the e-mail address field is NULL for a customer and/or customer
contact, you can update these fields.

Note: Oracle Trading Community Architecture provides a model for managing
information about entities such as customers. The TCA Data Sharing and Security (DSS)
feature allows you to define rules around who can create, update or delete customer
data.For more information please refer to the Oracle Trading Community Architecture
Administration Guide.

OM: Add Customer (Order Import)

ONT_ADD_CUSTOMER_OI

This profile option determines which users can create new customers and customer
details when importing order using the Order Import concurrent program. Select from:

       All: Users can create new customers, customer addresses, and customer
       contacts.
       None: User cannot create new customers, customer addresses, and customer
       contacts.
       Address and Contact only: Users can access the Add Customer window to create
       both new customer addresses and/or customer contacts for existing customers
       only

The default for this profile option is None.

Note: Oracle Trading Community Architecture provides a model for managing
information about entities such as customers. The TCA Data Sharing and Security (DSS)
feature allows you to define rules around who can create, update or delete customer
data. For more information please refer to the Oracle Trading Community Architecture
Administration Guide.

OM: Administer Public Queries
ONT_ADMINISTER_PUBLIC_QUERIES

This profile option determines which responsibility is able to create and update public
queries within Order Management windows.

OM: Apply Automatic Attachments

OE_APPLY_AUTOMATIC_ATCHMT

This profile option determines whether rule-based attachments are applied without user
intervention.

OM: Allow model fulfillment without configuration

ONT_ALLOW_MODEL_FULFILL_WITHOUT_CONFIG

In order to enable you to progress model lines which do not have child lines attached,
the profile option OM: Allow Model Fulfillment without Configuration has been
introduced. When you set this profile option to Yes, you are allowed to progress the
model line and not wait at fulfillment any longer, even if you do not have a child line
attached to it. If you set this profile option to No, which is the default value, the current
functionality will be carried out: the model line will get fulfilled only if it does not have
any child lines attached to it. If the model line is not configured, i.e. if it does not have
any child lines attached to it, then the model line waits at fulfillment thus giving the
user a chance to configure the model.

OM: Assign New Set For Each Line

ONT_CHECK_WAIT_TO_FULFILL_LINE

The default is set to ―N‖ which creating ONE Ship/Arrival Set per order. Set to 'Y' which
creates a separate ship/arrival set per line, resulting in enforcing that each line is
shipped complete.

OM: Authorized to Override ATP

ONT_OVERRIDE_ATP

This profile option controls which responsibilities or users have the authority to perform
the ATP override. If YES, then the user or responsibility can override the ATP Schedule
Date. Null is interpreted as No. This can be set at the site, responsibility, or user level.

OM: Automatically Interface Lines to IB on Fulfillment
ONT_AUTO_INTERFACE_LINES_TO_IB

This profile option enables you to control the interfacing of non-shippable items to
Install Base (IB). The default value is Yes and if you have not set any value for this
profile, then the application assumes the value to be Yes. The value Yes ensures that all
non-shippable lines that reach fulfillment are automatically interfaced to IB. If you set
No as the value, then the non-shippable items are not interfaced to IB automatically.

OM: Automatically Open Related Items Window

ONT_OPEN_RELATED_ITEMS

This profile option allows the user who does high volume up-selling and cross-selling to
have the Related Items window open automatically for all items which have
relationships defined. Options are Yes or No (default).

OM: Auto Push Group Date

ONT_AUTO_PUSH_GRP_DATE

This profile option controls scheduling when a new line is inserted into an existing set.
If the new line cannot be scheduled on the same date as the rest of the set, this profile
is used. Select from:

      Yes: The entire set will be automatically rescheduled.
      No or NULL: An error will occur. You can change the dates or quantities to make
      scheduling succeed.

This profile option can be overridden for a parameter specific to customers or customer
sites by setting a value in the Customer window.

The default is NULL.

OM: AutoSchedule

ONT_AUTOSCHEDULE

This profile option determines the default setting for autoscheduling orders, and also
controls the display of the Availability window within the Sales Order Lines window.
Please note that autoscheduling orders is only supported for orders that contain
standard line items, not models or kits.

Select from:
Yes: Order lines are scheduled automatically at the time of entry. Automatically
       display the Availability window within the Sales Order window when entering
       order line details.
       No or NULL: Order lines are not scheduled automatically at the time of entry.
       Does not automatically display the Availability window within the Sales Order
       window when entering order line details.

       Note: If the item or model is a standard item or has the item ATP flag enabled,
       ATP inquiry will automatically be performed on the item or model once it has
       been entered on an order line and a user exits the item field.

The Line Generic workflow process sequences the line scheduling action to occur after
you book the order. However, even if you have set this profile option to No and you
indicate ship set or arrival set on a order line, the order entry processing schedules the
line and sets the Visible Demand Flag.

To group lines into ship sets and arrival sets, order entry processing uses the
warehouse, scheduled shipment date, ship to location, shipment priority, and shipment
method. Therefore, it schedules the order lines with ship set values to obtain scheduled
shipment date.

If you want the Line Generic workflow process to schedule an order line, you cannot
specify a ship set or arrival set for it.

OM: Cascade Service

ONT_CASCADE_SERVICE

If set to No, services will not be automatically cascaded from model to its options.
When a service is added to a model, depending on the profile value the application will
or will not automatically cascade the service to the options.

OM: Change SO Response Required

This profile option determines if a response is required to an outbound Change SO XML
message. If a response is required, the order is put on hold until a response is received
from the customer.

OM: Charges for Backorders

This profile option controls the setting of the Calculate Price Flag when backorder lines
are created.

Select from:
No or NULL: The Calculate Price Flag will be set to Freeze, and the pricing engine will
not apply charges. Yes: The Calculate Price Flag will be set to Partial to enable charges
to be calculated when the backordered item ultimately ships.

OM: Charges for included item

ONT_CHARGES_FOR_INCLUDED_ITEM

This profile option determines if Order Management will calculate and return charges
for included items. The profile option setting does not control the pricing of included
items, only the calculation and return of charges associated with an order line
containing an included item.

Select from:

       Yes: Calculate and return charges for included items.
       No: Do not calculate charges for included items.

OM: Charging Privilege

OE_CHARGING_PRIVILEGE

This profile option controls your ability to manually apply freight and special charges on
an order or order line.

Select from:

       Full Access: You can modify and apply charges, but you cannot modify non-
       overridable charges.
       View Only Access: You can only view charges.
       Unlimited Access: You can modify and apply all charges including the non-
       overridable charges.

OM: Configuration Quick Save

ONT_CONFIG_QUICK_SAVE

This profile option determines how Order Management will save option or model class
lines for unbooked sales orders from within the Sales Order window only.

If you set this profile option to Y, class lines will be saved by a direct database insert
call with a minimum of order line defaulting values, unless the value of the Order
Management profile option OM: Included Item Freeze Method is set to Entry. If the
value of OM: Included Item Freeze Method is set to Entry, you cannot perform direct
database inserts of model or class order lines with a minimum of defaulting.

OE: Commitment Balance Checking

OE_COMMITMENT_BAL_CHECK

This profile option is obsolete and no longer used by Order Management.

OM: Commitment Sequencing

OE_COMMITMENT_SEQUENCING

This profile option determines whether or not Oracle Order Management calculates and
stores the amount of the line that can be paid using the commitment, and if
commitments will be applied in Oracle Receivables in the same sequence that they are
applied in Order Management. Select from:

      Yes: Order Management populates the commitment applied and then will
      interface the applied commitment amount to Oracle Receivables.

      Note: If you set this profile option to Yes, and you have not installed Bills
      Receivables for Oracle Receivables, Order Management will not capture the
      applied commitment amount and therefore will not relay commitment applied
      amounts to Oracle Receivables; no Warning or Error message is displayed.

      No: Order Management does not calculate the exact commitment applied
      amount for an order line. Instead, the extended amount of the line is shown in
      the commitment applied field within the Sales Order Line, Pricing Tab window.

OM: Contact Center Actions Menu Name

ONT_AGENT_ACTION_PROFILE

Agent actions are defined as functions. Depending on the functions that have been
mapped to menus, the corresponding associated agent actions are available from the
Line Items sub-tab page. This profile option holds the name of that menu. The default
value will be the value of the Order Management seeded menu
‗ONT_CONTACT_CENTER_SUB_MNU‘.

OM: Context Responsibility for Upgraded Orders

OE_RESP_FOR_WF_UPGRADE
This profile option is used to flag certain responsibilities to be used when setting the
applications context for deferred activities for upgraded orders and order lines. It is
used for customers who are upgrading and only needs to be set if a user, who has
created orders, (created_by column in Order Management schema) has multiple
responsibilities that point to a single operating unit.

This profile option can only be set at the Responsibility level.

OM: Copy Model DFF to child lines.

This profile option enables copying of all flexfields to the lines from the model line.
Context sensitive flexfields are more popular; you may not want the same flexfields
copied to all the child lines of a model. The default value is No. Set this parameter to
'Yes' in order for the values to copy.

OM: Create Account Information

ONT_CREATE_ACCOUNT_INFORMATION

This profile option is used to set the user's permissions to create accounts, sites, and
contacts. It can be set at the Site, Application, Responsibility, and User levels.

The seeded profile values are:

       All: The user is permitted to create Accounts, Account Sites, Account Contracts,
       and related information
       Account Site and Account Contact Only: The user is permitted to create Account
       Sites, Account Contracts, and related information only
       None: The user is not permitted to create any of the above

The default value is None.

The Create Account Layer API will check this profile and create the account layer only if
the user has the correct permissions. The calling application can pass a profile value to
the API. It is useful if the calling application has already determined the user's
privileges.

OM: Credit Card Privileges

ONT_CREDIT_CARD_PRIVILEGES

This profile option is used for controlling the entry of new credit card details, updating
existing details, and allowing for manual authorization. The valid values for this profile
option are Yes and No. This profile option has been modified, it's previous valid values
were All, Limited and None and in the previous release, this profile option would
additionally be used for controlling the card number display. The masking / display
function for the credit card number is now controlled from Oracle Payments. Please visit
Oracle Payments Implementation Manual for more details.

OM: Cust Item Shows Matches

OE_CUST_ITEM_SHOW_MATCHES

This profile option is obsolete.

OM: Customer Service Feedback

ONT_FEEDBACK_PROFILE

This profile option indicates the Customer contact that a workflow notification will be
sent to for RMA requests entered via the Order Information Portal. The values for the
LOV for this profile option is all users defined to Oracle Applications via the System
Administrator responsibility having no customer contacts.

The default for this profile option is Null.

OM: Customer Service Report Defect

ONT_REPORTDEFECT_PROFILE

This profile option indicates the Customer contact that will receive a workflow
notification for any Report Defects submitted via the Order Information Portal. The
values for the LOV for this profile option is all users defined to Oracle Applications via
the System Administrator responsibility having no customer contacts.

The default for this profile option is Null.

OM: DBI Installation

ONT_DBI_INSTALLED

This profile option is used to flag whether DBI has been installed. If the profile option is
set to Yes, then data is collected for DBI usage. If the profile option is set to No, then
data is not collected for DBI.

OM: Debug Level

ONT_DEBUG_LEVEL
This profile option is used to store debug messages to assist in problem identification.
The OM: Debug profile option controls which debug messages get written to the debug
log based on their assigned level. The directory to be specified for this profile should be
available in utl_file_dir parameter of the init.ora file (or check v$parameter) of the
application database instance.

Assigning a value greater than 0 or NULL causes debugging to be turned on. The value
of this option determines the level of debug messages printed within a log file. For
example, if OM: Debug Level has a current value of 3, all debugging messages with a
level of 1,2 or 3 will be spooled out to the debug log.

Valid values for this profile option are:

NULL: Do not print any debug messages

1:Level 1; Print a limited subset of debug messages (level 1)

2:Level 2; Print a limited subset of debug messages, including level 1

3:Level 3; Print a limited subset of debug messages, including levels 1,2

4:Level 4; Print a limited subset of debug messages, including levels 1,2 3

5:Level 5; Print all debug messages

If you set this profile option to a value other than NULL, system performance may be
affected, because creating and updating a debug log is a task that will consume a lot of
system resources as you enter higher debug levels.

Order Management recommends you set this profile option only if you are attempting to
gather additional details for unexpected application issues and then reset the value
back to NULL once you have gathered the necessary debug details.

The default for this profile option is NULL.

OM: Debug Log directory

OE_DEBUG_LOG_DIRECTORY

This profile option determines the default directory used to store log file outputs when
performing Order Management debugging.

OM: Default Sales Agreement Type

OE_DEFAULT_BLANKET_ORDER_TYPE
This profile is the first preference to default the transaction phase, negotiation or
fulfilment on Sales Agreements. This profile should be allowed to setup only at the
responsibility and site level.

OM: Default Sales Agreement Transaction Phase

ONT_DEF_BSA_TRANSACTION_PHASE

This profile to defaults the order type to generate sales agreement number. This profile
should be allowed to setup only at the responsibility and site level.

OM: Default Salesrep

ONT_DEFAULT_PERSON_ID

A profile to default the dummy salesrep for the Telesales Order. The Telesales team will
pass the salesrep_id for the order if that information is available in the eBusiness
Center. If no salesrep is passed to the Sales Orders form, then Order Management will
default the salesrep value from the profile setup in Order Management. Integration with
TeleSales is available with a TeleSales license.

OM: Default Sales Transaction Phase

ONT_DEF_TRANSACTION_PHASE

A default source for the transaction phase on the Quote Sales Order. The default is null
for negotiation and fulfillment.

OM: Delay Scheduling

When the value of this profile option is set to Yes, then the scheduling of a line is
performed only when the changes made are committed to the database, as opposed to
simply navigating out of the line record.

OM: Discounting Privilege

ONT_DISCOUNTING_PRIVILEGE

This profile option provides the choice of controlling user's ability to apply discounts on
an order or order line.

Select from:
Full: Ability to apply any valid discount against an order or order line, as long as
       the order type of the order does not enforce list prices. (Default value).
       Non-Overridable Only: Ability to apply only non-overridable discounts against an
       order or order line.
       Unlimited: Ability to apply any valid discount against any order or order line,
       regardless of whether the order type of the order enforces list prices.
       None: No privileges, view-only access.

       Note: A Null value for this profile option is handled as if you selected the value
       FULL.

OM: Display Actions Button vs. Poplist

Controls whether the traditional button for Actions or a pop list will be used to display
available Actions. Valid values are: Button and Pop list. The default value will be Button
for backward compatibility.

OM: Display Current Selections in Pricing and Availability

ONT_PANDA_DISPLAY

Yes or No - default is No. Determines whether or not to show the saved selections
section of the P&A form

OM: Display New Order After Copy

You can choose to display the newly copied order depending on the value of this profile
option. If the value of the profile option is set to Yes, the box Display New Order after
copy on the Copy Orders window (Quick Copy tab) will be selected and you can view an
order that has been copied in the sales orders window. If the value of the profile option
is set to No, the box Display New Orders after copy will be unselected and the newly
copied order will not display automatically in the sales orders window, you will need to
query for it. However, you can override the selection of the check box Display New
Order after Copy in the Copy window while copying.

OM: Electronic Message Integration Event Sources

ONT_EM_INTEG_SOURCES

Order Sources enabled for Integration Business Event. Based on the source, you can
enable the History which will be maintained for that source in the Electronic Messaging
history table.

OM: E-Mail Required on New Customers
ONT_MANDATE_CUSTOMER_EMAIL

This profile option determines whether the field E-mail address is required for any
customer or customer contact you define within Order Management. Select from:

      Yes: E-mail address is required, for both the customer and customer contact,
      when defining or updating a customer or customer contact.
      No or NULL (the default): E-mail address is not required when defining or
      updating either a customer or customer contact.

OM: Enable Group Pricing For DSP Lines

ONT_GRP_PRICE_FOR_DSP

When demand interface appends order lines to an existing order, this profile option
controls whether other unchanged order lines should be sent to the Pricing Engine for
repricing. Setting this profile option to No improves demand interface performance. The
default value is No. You should only set this profile option to Yes when you want your
orders created by demand interface qualify for Promotional Goods, Other Item
Discounts or other line group level modifiers defined in Advanced Pricing.

OM: Enable Related Items and Manual Substitutions

ONT_OPEN_RELATED_ITEMS

Values: Yes or No

Default Value: No

Usage: This option enables you to turn on Related Items. APS users should not turn on
Related Items because the forecast demand consumption would be incorrect. Options
are Yes or No (default).

Default Levels: Viewable and updatable at all levels.

OM: Enforce Check For Duplicate Purchase Order

ONT_ENFORCE_DUP_PO

When this profile option is set to Yes or is blank, a check will be made to verify if the
entered PO number is duplicate or not. It will display a warning if a duplicate number is
found. When the profile option is set to No, a check to verify for duplicate PO number
will not be carried out.
OM: Enforce Shipping Method for Ship Sets

ONT_SHIP_METHOD_FOR_SHIP_SET

Determines whether Shipping Method is a set attribute. If set to Yes, all lines in a set
must have the same Shipping Method. Site level only.

OM: Estimated Authorization Validity Period

ONT_EST_AUTH_VALID_DAYS

This profile is no longer used . The associated functionality is now controlled by Oracle
Payments. Please refer to the Oracle Payments Implementation Guide for more details.

OM: Generate Diagnostics for Error Activities

This profile determines whether the OM Standard Error Process with Retry workflow
process automatically triggers the Diagnostics: OM Order Information concurrent
program.

Possible values are No (default) or Yes

OM: Generic Update Constraints Apply to DFF?

This profile option determines whether you can update processing-constrained
descriptive flexfield attributes on closed orders. There is a seeded processing constraint
against updating closed order lines; this profile option does not control order line fields
other than the flexfield attributes. Select from:

       Yes: (the default): you cannot update processing-constrained flexfield attributes
       on closed orders.
       No: you can update processing-constrained flexfield attributes on closed orders.

This profile option is updatable at the site level.

Regardless of this profile option, you can set up constraints specific to flexfield attribute
constraints.

OM: Import Multiple Shipments

This profile option is used to import multiple shipments via Order Import. If this profile
option is set to Yes, the orig_sys_shipment_ref will also be used in determining the
uniqueness of the line record in combination with order_source_id,
orig_sys_document_ref and orig_sys_line_ref.
OM: Included Item Freeze Method

ONT_INCLUDED_ITEM_FREEZE_METHOD

This profile option determines the date and time Order Management uses to determine
when included items for a configuration's bill of material are added as lines on the
order. Included items for a PTO Model/Class/Kit will also be exploded based on the
profile option.

Select from:

      Ready to Pick/ Purchase Release: If the value for this profile option is set to
      Ready to Pick / Purchase Release, both the Inventory Interface and Purchase
      Release workflow activities will explode the included items when processed
      during pick release and purchase release, respectively.
      Entry: If the value for this profile option is set to Entry, included items will
      explode on the sales order when moving to a new line or performing a save.

      Note: If the Order Management profile option OM: Configuration Quick Save is
      set to Yes, you should not set the value of this profile option to Entry. If you do,
      the Quick Save functionality for streamlining model class order lines will be
      unavailable.

      Booking: If the value for this profile option is set to Booking, The Booking
      Activity will explode included items when processed.
      None: When the profile is set to this value, the included items will not be
      processed. Even if the model has included items defined in its BOM, these will
      not be reflected in Order Management. This value should not be used if you have
      included items defined in your BOM for models.

Note: When the value of the profile option is Booking or Ready to Pick / Purchase
Release, security-invoked behavior (Versioning, Audit Trail, Acknowledgements) will not
take place.

OM: Interface freight tax classification code from line

ONT_TAX_CODE_FOR_FREIGHT

The default value set at site level is No (so that existing customers are not impacted
due to the change). Tax_code is now interfaced to AR for freight lines that are
interfaced as revenue lines when the profile is set to Yes. Tax code is populated in the
same way as the sales order line along with which this freight line is interfaced.

OM: Invoice Numbering Method
WSH_INVOICE_NUMBERING_METHOD

This profile option determines whether or not the Invoicing activity generates invoice
numbers based on the delivery name or automatically.

Select from:

      Automatic: Choose this value if you want to create invoices with automatic
      numbering. Transaction numbering is controlled automatically by the Receivables
      AutoInvoice concurrent program. If you set the profile option to this value, you
      must use an invoice source with automatic transaction numbering.
      Delivery Name: Choose this value if you want to create invoices for all shippable
      lines based on Delivery Name. If you process order lines in a delivery in more
      than one batch, then this function modifies the delivery name with a number to
      create a unique transaction number.

      If you set the profile option to this value, you must use an invoice source without
      automatic transaction numbering.

      Note: Delivery based invoicing is not supported if order lines within the delivery
      belong to different operating units.

      Note: In some cases, you will require both options to be enabled as you may
      have both invoice source and non-delivery invoice source. Use the Transaction
      Type "Invoice Order" to specify both. You are allowed to choose invoice source
      regardless of the setting of the OM: Invoice Numbering Method, to allow for
      those users who have customizations around invoice numbering.

OM: Item Change Honors Frozen Price

ONT_HONOR_ITEM_CHANGE

This profile option determines whether Order Management will change the value of
calculate price flag when an item is changed on an unbooked order line.

Select from:

      Yes: Order Management will not change the value of the calculate price flag,
      whose original value is honored; the original value will control whether the order
      line gets repriced.
      No: Order management will set the calculate price flag to Y, and the order line
      will be repriced.

OM: Item Flexfield
OE_ID_FLEX_CODE

This profile option determines the structure of the Item Flexfield (System Items) used
by Order Management. This structure should be the same across all applications in the
same database.

OM: Item View Method

ONT_ITEM_VIEW_METHOD

This profile option determines the display method of data retrieved within the LOV for
the Item field within the Order Management Options Window. Valid values are:

       1:   Only return item descriptions, with child indentations.
       2:   Only return item description without child indentations.
       3:   Display the concatenated item segment values with child indentations.
       4:   Display the concatenated segment values without indentation.

OM: Level of Credit Checking

This profile option is obsolete and no longer used.

OM: List Price Override Privilege

ONT_LIST_PRICE_OVERRIDE_PRIV

View Only is the default value. If set to this value, the current behavior is retained,
which means unit list price field is protected. Unlimited Privilege: If set to this value,
you can override the unit list price field from the main tab and immediately see selling
price adjusted accordingly.

OM: Log Directory for Generated Packages

This profile option is no longer used by Oracle Order Management.

OM: Manual Linegroup Adjustment

This profile is no longer used by Oracle Order Management.

OM: Modify Seeded Holds

ONT_MODIFY_SEEDED_HOLDS
Internal Use Only. Enables you to modify seeded hold attributes. Options are Yes or No.
The default is No or Null.

OM: Negative Pricing

ONT_NEGATIVE_PRICING

This profile option controls whether Order Management allows a negative list price or
negative selling price to be determined by the Pricing Engine or to be entered as an
override by a user on a sales order.

The profile option QP: Negative Pricing is used for price lists, and controls whether a
negative unit price can be entered on a price list

OM: New EDI Acknowledgment Framework

ONT_NEW_EDI_ACK_FWK

The new framework is used to generate EDI Acknowledgments. When this profile
option is set to Yes, the derivation of the values for the ids for the EDI
acknowledgement will be postponed. If you use EDI Transactions (855 and 856) and
set this profile option to Yes, there will be better performance of the process order.

OM: Notification Approver

OE_NOTIFICATION_APPROVER

This profile option is used during upgrading Order Entry Order Cycle History to Order
Management Workflow History.

This profile option can be optionally set. Valid values for this profile are based upon a
Value Set that uses the seeded view WF_ROLES. The seeded Return Approval flow also
sends approval notifications to the role set by this profile.

If the profile option is NULL, then notifications for this role value will go to the user
SYSADMIN.

Note: The application retrieves the value for this profile option based on the
applications context (User, Responsibility, Application) that was in effect when the
transaction was created.

All upgraded approvals are sent to this role value of this Profile option.

OM: Number of Days to Backdate Bank Account Creation
This profile is no longer used by Oracle.

OM Order Accept State For XML

ONT_XML_ACCEPT_STATE

OM: Order Information Regulatory logging

This profile is no longer used by Oracle Order Management.

OM: Orders Purge Per Commit

OM_ORDERS_PURGE_PER_COMMIT

This profile option determines how many orders the purge process should purge before
performing a commit to the database.

OM: Over Return Tolerance

OM_OVER_RETURN_TOLERANCE

This profile option indicates the percentage by which a return line can be over-received.
Any value greater than or equal to zero (0) is a valid value. This profile option is set at
the site level. Default value is zero (0).

OM: Over Shipment Tolerance

OM_OVER_SHIPMENT_TOLERANCE

This profile option indicates the percentage by which an order line can be over-shipped.
Any value greater than or equal to zero (0) is a valid value. This profile option is set at
the site level. Default value is zero (0).

This profile is also applicable to Inbound Lines (RMA).

OM: Preserve External Credit Balances

ONT_PRESERVE_EXT_CR_BAL

If this is set to Yes ,external exposure data is not deleted during Intialize Credit
Summaries concurrent program. The value of the profile option can be Yes or No,
Initialize Credit Summaries program will use to decide whether to use DELETE or
TRUNCATE. The profile can be at site level, and the default value is Yes. With the
default value, there will not be any change in behavior as the application will use delete
and preserve external credit exposure. When this profile is set to 'No', application will
truncate the table before populating the credit exposure.

OM: Price Adjustment Modifier for AIA Order Lines

ONT_O2C_MANUAL_MODIFIER

This profile assumes significance in installations where you have configured Order
Management to provide fulfillment services via Oracle Order To Cash Process
Integration Pack.

If you are not implementing Order To Cash Process Integration Pack, then you need not
set this profile. If you are implementing Oracle Order To Cash Integration pack, and in
case your business scenarios include importing order lines with differing unit list price
and unit selling price, then set this profile value to a manual, over-rideable, line level,
amount based pricing modifier defined in Oracle Pricing. It may be noted that this
modifier continues to be effective, irrespective of the date range specified on the
modifier definition user interface.

OM: Party Totals Currency

OM_CUST_TOTAL_CURRENCY

This profile option determines the currency used by the Calculate Party Totals current
program which sums order totals by Party. Order Management recommends that you
set this profile option at the Site level only.

OM: Payment method for Credit Card Transactions

This profile is no longer used by Oracle.

OM: Population Of Buyer Code For Dropship

ONT_POPULATE_BUYER

This profile option is used to control how Order Management will populate buyer details
when sending sales order data to Oracle Purchasing for requisition processing during
requisition import. Select from:

       Order Creator: The suggested_buyer_id field in the po_requisitions_interface
       table is populated with the buyer details (the employee_id of the person who
       enters the sales order). Your sales people must be defined as a buyer in Oracle
       Purchasing.
NULL: Oracle Purchasing will perform the Get_Suggested_Buyer_Id function
       (retrieve the buyer information from the master item)

       Note: If you set the value of this profile option to NULL, you will be unable to
       select the value Buyer for the input parameter Group prior to submission of the
       Oracle Purchasing Requisition Import concurrent program.

OM: Prevent Booking for Line Generic Holds

ONT_PREVENT_BOOKING

If a generic hold has been applied the transaction will fail booking.

OM: Printed Document Extension Class Name

ONT_PRINT_CUSTOMER_EXTN_OBJECT

This profile allows you to update with a custom java code class path that would have
been created to print user hooks. The printing API reads the profile class path and
executes the java function. Example: You have a custom table and would like data from
this table to appear on the Ordering Document.

OM: Promotion Limit Violation Action

ONT_PROMOTION_LIMIT_VIOLATION_ACTION

This system level profile option determines the hold action Order Management will take
when encountering a initial promotional hold returned by the pricing engine. If the
pricing engine returns a possible promotional hold for an order or order line, Order
Management will use the value of this profile option to determine the course of action
for the order or line. Messages are generated and can be viewed within the Process
Messages Window.

Select from:

       Place holds where violated (either Line or Order): If the pricing engine returns an
       initial promotional hold, place a hold for the corresponding order or order line.
       No holds applied: If the pricing engine returns an initial promotional hold, do not
       apply a hold for either an order or order line. Allow the order or order line to
       continue processing within its associated workflow.
       Place order on hold when any violation occurs (both Line and Order): If the
       pricing engine returns an initial promotional hold, irrespective of the hold level,
       place the order on hold, in addition to any order lines that may be marked for
       promotional hold.
This profile option is optional, and the default is Null.

OM: Process Payment Immediately at Booking

This profile is no longer used by Oracle.

OM: Quick Sales Order Form: Auto Refresh

ONT_QUICK_OE_AUTO_REFRESH

This profile allows you to control if the active line detail region displays data instantly
corresponding to the line when navigating between lines and without the detail blocks
instantiated/navigated. Also, with the toggle query coordination check box unchecked,
you have to navigate to the detail regions to display the information corresponding to
each of the detail regions. When a new session begins, the value will be read from the
profile to control the instant automatic refresh of the form when changes have
occurred.

Values for LOV: Line/Line Details/Both - Site, Application, Responsibility, User.

OM: Quick Sales Order Form: Defer Pricing

OE_UI_DEFER_PRICING

This profile will control the default setting although users will be able to activate it from
the form. When a new session begins value will be read from the profile.

The default value is No.

OM: Defer Pricing. Values: Yes/No

Values at Site, Applications, Responsibility, and User Level.

OM: Records on Summary Page for External Users

ONT_ICP_DEFAULT_RECORDS

This profile option indicates the default query (for external users) called when a user
requests either the Orders or Delivery summary pages available from the Order
Information Portal. Valid values for this option are any positive, whole integer.

For external users, if you set this profile option to some value other than zero, the
Order Information Home page and the Order Status page in Order Information will run
a default query to show most recent open orders based upon the numeric value of the
profile option. If you set the profile option to zero, the default query is not executed
when displaying the Order Information Home page or the Order Status page.

OM: Restrict Customer items for Line Level Ship To Address

ONT_RESTRICT_CUST_ITEMS

This profile option enables users to either use the current functionality or use of the
new enhancement to view the Customer Items LOV. If the profile Option is set to YES,
then the line level Ship To address displays only the customer items pertaining to that
address. If the profile is set to NO, then all customer items are displayed.

OM: Return Item Mismatch Action

ONT_RETURN_ITEM_MISMATCH_ACTION

This profile option controls what should occur if you try to change the item ID of a
referenced return line. Select from:

       Reject: Line processing is halted with an error message.
       Warning: Line processing is continued with a warning.
       Allow: Line processing continues with no warning or error.

The default for this profile option is Allow.

OM: Return Unfulfilled Referenced Line Action

ONT_RETURN_FULFILLED_LINE_ACTION

This profile option is used for returns to control return of unfulfilled lines. Default value
is Allow.

Select from:

       Reject: Do not create return line if the reference line is non-fulfilled.
       Warning: Create return line with Warning if the referenced line is non-fulfilled.
       Allow: Create return line without Warning if the referenced line is non-fulfilled.

OM: Risk Factor Threshold for Electronic Payments

ONT_RISK_FAC_THRESHOLD
This profile has been obsoleted and the associated functionality is now controlled by
Oracle Payments. Please refer to the Oracle Payments Implementation Guide for details
on setting up risk factor threshold.

OM: Round Unit Selling Price

This profile option is no longer used within Order Management and is obsolete. It has
been replaced with the Pricing profile option QP: Selling Price Rounding Options.

OM: Run Order Import for XML

ONT_TRANSACTION_PROCESSING

This profile option determines if the Oracle Order Import concurrent program is
automatically submitted after the successful import of XML data into Order Management
interface tables. Select from:

       Asynchronous: Order Import will not automatically be submitted for execution
       once XML data has been interfaced. You must manually submit the concurrent
       program after XML data has been interfaced to Order Management.
       Synchronous: Order Import will automatically be submitted for execution once
       XML data has been interfaced to Order Management.

The default for this option is NULL.

Note: A NULL value for this profile option is equivalent to setting the profile option to
Asynchronous.

OM: Sales Agreement Default Order Type

OE_DEFAULT_BLANKET_ORDER_TYPE

If you plan to use the Sales Agreements feature, then create a sales agreement sales
order and set the profile option to default the above setup order type. This will be used
to generate Sales Agreement number. This is not mandatory. The user can select order
type from the list of values on the Sales Agreement form.

OM: Sales Order Form: Cascade Header Changes to Line

OM_UI_CASCADE_HEADER_ATTRIBUTES

A predefined list of attributes will cascade from the sales order header to the line when
a change is made during data entry. The profile option has three possible values:
Automatic - the system will cascade the header attributes to lines whenever a
       header attribute is cascaded.
       Askme - you have a choice to cascade or not.
       Manual - you will need to manually change the values on the lines as the
       changes from header to lines are not cascaded.

OM: Sales Orders Form Preference

ONT_SALES_ORDER_FORM_REFERENCE

Order Management will provide two wrapper functions which will be packaged in a form
library and do not have other dependencies. External products like TeleSales can
determine which Sales Order UI to be invoked based on the return value from the
function. The wrapper function will look at a OM profile to be seeded by OM and will
call the classic Sales Order window or the new Quick Sales Order window. This profile
can be set at all levels. The default value is Classic Sales Order window.

OM: Sales Order Form: Refresh Method (Query Coordination)

OM_UI_REFRESH_METHOD

This profile option determines whether the screen is refreshed after every save. There
are four options available:

       Automatic Refresh with Repositioning of Cursor: When the profile is set to this
       option then screen is refreshed and also the cursor is repositioned to the original
       line from which the save operation was performed.
       Automatic Refresh Without Repositioning Of Cursor: When the profile is set to
       this option then screen is refreshed and the cursor is always positioned on the
       first line.
       Manual: With this option, users have to explicitly requery to see the latest
       changes. User are also not prompted with a message.
       Askme: A dialog box is prompted for the users to decide whether they want to
       refresh the screen to see the new data. If the user selects yes, then the screen is
       refreshed. If the user selects No then screen is not refreshed.

OM: Sales Order Form: Restrict Customers

ONT_UI_RESTRICT_CUSTOMERS

The value of this profile option determines if all customers are displayed within the
Customer field on the Sales Order Header, Main Tab or only customers who have
addresses in the organization the order is defined for. This profile is applicable only for
the Sales Order Header Main Tab.
Customers are visible across all operating units; Customer Addresses are Organization
specific.

The default for this profile option is Global.

OM: Sales Order Navigation From Pricing/Availability Form

Controls navigation to the Sales Order form. Based on the value (Always, Ask, Never)
the user is always, asked, or never navigated to the Sales Order form when an order is
created.

OM: Schedule ATO Item without BOM

You now have the option to schedule ATO items even without a Bill of Materials (BOM)
attached to the ATO item, either in the Ship From warehouse or in the item validation
organization. Formerly the ATO Items required an attached Bill of Materials in either the
Ship-from organization or the item validation organization for performing scheduling
actions on them in Operational Data Store (ODS) mode.The profile related to this
functionality is enabled at the site level. When set to Yes, the profile enables scheduling
actions on ATO items where there is no BOM attached. When set to No, a check for the
BOM is made. The default value for the profile is No.

Note: This applies only when the mode is set to ODS (Profile INV: Capable to Promise
set to ATP based on collected data). For Planning Data Store (PDS) mode OM: Schedule
ATO Item Without BOM has no effect. For ATO-Buy Items, no BOM is required in the
warehouse or item validation organization regardless of the mode (ODS or PDS) or OM:
Schedule ATO Item Without BOM.

OM: Scheduling Role

ONT_SCHEDULING_ROLE

Values are CSR Only, CSR and Scheduler, Scheduler Only

Values can be set at Responsibility or User Level.

Only System Administrator can set this at the user level, Not user controlled.

OM: Send Acknowledgment For Change PO Response

This profile option determines whether an acknowledgement will be sent for the Change
PO Response.

OM: Send Changed Lines to Pricing
ONT_SEND_CHANGED_LINES_PRICING

When this profile option is set to Yes, this would mean send only changed lines to
Pricing when a line is changed. Otherwise, send all lines. The default is Yes. (This used
to be an internal only profile option.)

OM: Sequence for TP Ship/Deliver Deadline

This profile populates the Latest Ship Date field for the delivery. This value maps to the
late pick-up date field on the order release of Oracle Transportation Management.

Values:

      Latest Acceptable/Promise/Schedule Date (Ship or Arrival): Uses the latest
      acceptable date from Oracle Order Management; however, if that value is null,
      then the promise date is used. If that value is also null, then the Schedule Date
      (Ship or Arrival) populates the Latest Ship Date field for the delivery which then
      populates the Late Pick Up date on the order release of Oracle Transportation
      Manager.
      Promise Date/Schedule Date (Ship or Arrival): Uses the promise date, but if that
      value is null, the Schedule Date (Ship or Arrival) populates the latest ship date on
      the delivery which in turn populates the Late Pick Up date on the order release of
      Oracle Transportation Management.
      Schedule Date (Ship or Arrival): Uses the schedule date (ship or arrival dates) to
      populate the latest ship date for the delivery; this value then populates the late
      pick up date on the order release of Oracle Transportation Management.

OM: Set Receivables Transaction Date as Current Date for Non-
Shippable lines

OE_RECEIVABLES_DATE_FOR_NONSHIP_LINES

This profile option determines if the Oracle Receivables transaction date will be
populated with the system date (SYSDATE) for non-shippable order or return lines.

Select from:

      Yes: Populate the Oracle Receivables transaction date for non-shippable order or
      return lines with the current system date.
      No: Do not populate the Oracle Receivables transaction date for non-shippable
      order or return lines with the current system date. Populate the Oracle
      Receivables transaction date for non-shippable order or return lines with the
      corresponding line order date or line return date.
This profile option is optional, and the default is NO.

OM: Show Line Details

ONT_SHOW_LINE_DETAILS

This profile option determines whether the line details of a model are displayed in the
Sales Orders window. You can also toggle the display of line details using the Tools
menu from the Sales Orders window.

OM: Show Process Messages Flag

This profile can be used to view which orders have associated Process Messages. By
setting the above profile to Y, the Messages check box will be checked in the Order
Summary Window, if there are any messages associated for the queried order.

OM: Source Code

ONT_SOURCE_CODE

This profile option identifies the source code that Order Management passes to Oracle
Inventory during scheduling. The source code should be defined as the third segment
of the Sales Order Flexfield to guarantee that each transaction is unique.

OM: Source for TP Early Ship/Deliver Date

This profile option populates the Earliest Ship Date on the delivery and maps to the
Early Pick Up Date field on the Release Sales Order window.

Values:

       Earliest Acceptable Date: Uses the earliest acceptable date entered for the order
       lines. If that value is null, then the latest pick-up date (the Latest Ship Date
       value calculated from the profile option OM: Sequence for TP Ship/Deliver
       Deadline) populates the Earliest Ship Date for the delivery which in turn updates
       the Early Pick Up date on the Order Transportation Manager Order Release
       window.

Same Date as Ship / Deliver Deadline: Uses the earliest ship date from the order lines
or the latest pick-up date (the Latest Ship Date value calculated from the profile option
OM: Sequence for TP Ship/Deliver Deadline above) to populate the Earliest Ship Date
on the delivery. This value populates the Early Pick Up date on the Order Transportation
Manager Order Release window.
OM: Unique Order Source, Orig Sys Document Ref Combination For
Each Customer

This profile option determines if customer information is to be included in the order
import key. If it is set to Yes, then Order Import will check the uniqueness based on
customer number, order_source_id and orig_sys_document_ref, otherwise customer
information will not be included in the order import key.

OM: UOM Class For Charge Periodicity

This profile option determines what domain will be used to hold the allowable charge
periodicities. The domain is a UOM class in Inventory. Inventory has seeded a UOM
class called ‗Period‘ that will hold UOMs: Daily, Weekly, Monthly, Quarterly and so on.
The profile option is seeded with the value ‗Period‘. Inventory has further seeded a
value set INV_CHARGE_PERIODICITY that will hold UOMs: Weekly, Monthly, Quarterly,
Yearly and so on.

OM: Use Configurator

ONT_USE_CONFIGURATOR

This profile option indicates which Oracle application software is launched to enter
configuration information when selecting the Configurator button from the Sales Order
window. Valid values are:

       Yes: Use the Oracle Configurator application to enter you configurations via
       Oracle Configurator user interfaces. Oracle Configurator should be installed and
       setup if you chose this value. See: Oracle Configurator Installation Guide.
       No: Use the Oracle Order Management application to enter your configurations
       via the Options window

The default for this profile option is No.

       If you set this profile option value to Yes and do not have the Oracle
       Configurator product installed, Order Management automatically displays the
       Order Management Options window when selecting the Configurator button from
       the Sales Order Pad.
       Do not switch the value of this profile option when working with existing orders.
       For example; If a sales order that contains configurations is created while the
       profile value is set to Yes, do not change your profile option value to No and
       then attempt to update the sales order via the Configurator button. Update the
       configuration information through the same options window as the order was
       created in, or update via the Sales Order window.
OM: Under Return Tolerance

OM_UNDER_RETURN_TOLERANCE

This profile option indicates the percentage by which a return line can be under-
received for it to be considered fulfilled. Any value between zero (0) and 100 (both
inclusive) is a valid value. This profile option is set at the site level. Default value is zero
(0).

OM: Under Shipment Tolerance

OM_UNDER_SHIPMENT_TOLERANCE

This profile option indicates the percentage by which an order line can be under-
shipped for it to be considered fulfilled. Any value between zero (0) and 100 (both
inclusive) is a valid value. This profile option can be set only at the site level. Default
value is zero (0).

For additional information on profile option descriptions and setting for products other
than Order Management, please refer to the product specific users guide.

OM: Unit Price Precision Type

ONT_UNIT_PRICE_PRECISION_TYPE

This profile option controls the display of Unit Selling Price field for sales order lines
only.

Select from:

       Standard: You will see at least two decimal places, up to a total of 20 decimal
       places.
       Extended: You see at least five decimal places, up to a total of 20 decimal
       places.

The QP: Unit Price Precision profile controls how many decimal points you can use on a
Price List for a rounding factor.

OM: Use Materialized View for Items LOV (Honours Item Orderability
Rules)

If the value of the profile option is set to No, then Items LOV will list all the items
available in the item Validation Organization of the current operating unit irrespective of
any item orderability rules defined.
If the value of the profile option is set to Yes, then Items LOV will be intelligent enough
to display only those items which the current context is eligible to order: The Items LOV
is dynamically built based on the item orderability rules and the current attribute values
on the line.

This profile can be set to Yes or No at site level only. The default value is No.

OM: View Cancel Lines

ONT_SHOW_CANCEL_LINES

This profile option controls the default value of the Cancel check box when sorting sales
order lines within the Sales Order Lines Tab, Sort window. The default value is Yes.
Select from:

       Yes: The Cancel check box will be automatically selected when sorting sales
       order lines within the Sales Order Lines Tab, Sort window. Cancelled order lines
       will not be displayed once the sort completes.
       No: The Cancel check box will not be selected when sorting sales order lines
       within the Sales Order window, Lines Tab sort window. Cancelled order lines will
       be displayed once the sort completes if you do not manually select the check
       box.

OM: View Closed Lines

ONT_VIEW_CLOSED_LINES

This profile option controls the default value of the Closed check box when sorting sales
order lines within the Sales Order Lines Tab, Sort window. The default value is Yes.
Select from:

       Yes: The Closed check box will be automatically selected when sorting sales
       order lines within the Sales Order Lines Tab, Sort window. Closed order lines will
       not be displayed once the sort completes.
       No: The Closed check box will not be selected when sorting sales order lines
       within the Sales Order window, Lines Tab sort window. Closed order lines will be
       displayed once the sort completes if you do not manually select the check box.

OM: View Intercompany AR invoice

If this profile option is set to Yes, you will be able to view Intercompany invoices for
internal sales orders. The other options are No or Null.

OM: View Pricing/Availability Information in Related Items
This profile option controls the amount of information shown in the Related Items and
Manual Substitutions window. The available options are: Pricing only, Availability only.
Pricing and Availability, and None.

OKC: Enable Sales Contracts

OKC_ENABLE_SALES_CONTRACTS

In order to leverage the functionality of Sales Contracts with Order Management, Sales
Contracts must be installed and this profile must be set to YES. This profile can be set
at the Application or Site levels.

QP: High Volume Order Processing Compliance

The value is set programmatically, and cannot be updated by users. If No, the pricing
setup uses modifiers that will prevent using the optimized pricing code path. If Yes, the
pricing setup is suitable for HVOP optimized pricing code. However, you should ensure
that custom sourcing rules do not directly access G_HDR or G_LINE. If they do, modify
the custom sourcing rules so that directly accessed fields are passed as parameters.

Related Topics

Oracle Workflow User's Guide

Oracle E-Business Suite System Administrator's Guide Documentation Set

Using Workflow in Oracle Order Management

Selected Oracle Application Profile Option Descriptions
(General Ledger) Journals: Display Inverse Rate

DISPLAY_INVERSE_RATE

      If the profile option Journal: Display Inverse Rate is set to Yes, then the value
      entered for the conversion rate field in the Sales Order window should be
      entered from Base to Foreign currency (user must enter the conversion rate in
      functional currency to foreign currency).
      If the profile Journals: Display Inverse Rate is set to No, then the value entered
      for the conversion rate field in the Sales Order window should be entered from
      Foreign to Base currency (user must enter the conversion rate in foreign
      currency to functional currency).
Please note, however, that the system will always store the currency rate in Foreign to
Base format irrespective of the profile.

For example, suppose the base currency is USD and the foreign currency is CAD.

      If the profile option Journal: Display Inverse Rate is set to Yes, the following
      message is displayed when the users navigate to the conversion rate field on the
      Sales Order window:

      Please Enter the Rate for USD to CAD.

      If the profile option Journal: Display Inverse Rate is set to No, the following
      message is displayed when the users navigate to the conversion rate field on the
      Sales Orders window:

      Please Enter the Rate for CAD to USD.

(Inventory) INV: Capable to Promise

      INV_CTP

This profile option determines which planning data store availability checking is
performed against when submitting an ATP inquiry. Select from:

      Enable PL/SQL based ATP with planning output: This option enables ATP inquiry
      against the Planning Data Store (PDS) within the Advanced Planning and
      Scheduling (APS) database. For a PDS ATP inquiry, you can perform Basic ATP,
      Single-Level Supply Chain ATP, Multilevel Supply Chain ATP. Only supply and
      demand of the plan selected is considered during an ATP Inquiry in this mode.

      When an ATP inquiry is submitted within Order Management, Oracle Global
      Available To Promise determines which plan within the PDS is used to determine
      availability. The item instance/organization combination of the inquiry is sent to
      Oracle Global Available To Promise, enabling plan selection based upon the
      following:

          o   Inactive On: Within the APS Supply Chain Plan Names window, the
              Inactive On (date) determines if a plan should be considered as a source
              for availability data. If the field contains a date, then the date must be
              prior to the availability check date.
          o   Enable ATP Check Box: Within the APS Supply Chain Plan Names window,
              the Enable ATP check box determines if a plan should be considered for
              availability data. The check box must be selected in order for the plan to
              be considered as a source for availability data.
o   PLAN_ID: If the item instance/organization combination of the inquiry
             resides in the PDS for multiple plans not inactive and enabled for ATP, the
             plan definition with the lowest PLAN_ID is used as the source for
             availability checking.

             For example, Profile Option INV: Capable to promise = ATP/CTP Based
             upon Planning Output, and you have the following plans within the PDS,
             with each plan enabling ATP.

      PLAN_ID=100; Inactive on 20-FEB-2003; Item AS54888; Instance/Organization
      NEW/M1, NEW/V1
      PLAN_ID=105; Inactive on 20-FEB-2001; Items AS54888; AS544432,
      Instance/Organization NEW/M1, NEW/M2, NEW/V1
      PLAN_ID=202; Inactive on 20-FEB-2005; Item AS54888; Instance/Organization
      NEW/M1, NEW/M2, NEW/V1
         1. When you perform an ATP inquiry for item AS54888 on 18-FEB-2001,
            while within instance/organization combination NEW/V1, then ATP results
            displayed are based upon planning data within the PDS for PLAN_ID=100

             Item AS54888 is currently defined for instance/organization combination
             NEW/M1 within the PDS for PLAN_ID=100, PLAN_ID=105, and
             PLAN_ID=202.

             PLAN_ID=100 is active and has the lowest numeric value, so the data
             within the PDS for PLAN_ID=100 is used to check availability.

         2. When you perform an ATP Inquiry for item AS54888 on 25-MAR-2002
            while within instance/organization combination NEW/M2, then ATP results
            displayed are based upon planning data for PLAN_ID=202.

             Item AS54888 is currently defined for instance/organization combination
             New/M2 within the PDS for PLAN_ID=105 and PLAN_ID=202

             PLAN_ID=105 is the lowest numeric value, but is Inactive as of 20-FEB-
             2001, so the data within the PDS for PLAN_ID=202 is used to check
             availability.

       Enable PL/SQL based ATP without planning output: This option enables ATP
inquiry against the Operation Data Store (ODS) within the Advanced Planning and
Scheduling (APS) database.

      The ODS consists of all of the data that has been collected, including any
      incremental refreshes. Data is loaded into the ODS when you submit the APS
      ATP Data Collections Request Set. For ODS based ATP inquiry, you can currently
      only perform Basic ATP & Single level Supply Chain ATP. The ATP Rule is used to
specify the time fence options and supply and demand sources to use during
      order promising inquiry.

Operating Unit

In Order Management, the Operating Unit profile MO: Operating Unit determines the
operating unit the transaction gets created in. If you enable Multi-Org Access Control,
then you can specify the Operating Unit (from those that are accessible to you via your
MO: Security Profile) in the various transaction forms.

Setting OM System Parameters
Parameters in the Oracle Order Management Parameters window can be functionally
grouped, and you can define controls as easily as defining profile options. OM System
Parameters allows you to define new parameters and setting up the values for the
parameters using different sources like SQL and constant values. This is step five of the
Order Management Setup Steps.

Defining Parameters
Create and define parameters using the following attributes:

      Parameter Code: Unique code for the new parameter
      Name: Name of the parameter
      Description: Description of the parameter
      Category: Category the parameter belongs to. The category is controlled using
      the lookup type ―OM_PARAMETER_CATEGORY.‖ To create a new category, add
      the lookup code in the lookup type ―OM_PARAMETER_CATEGORY‖ and then
      enter that lookup type in your parameter definition window.
      Value Set: Value Set associated as the source of values. The possible value sets
      can have validation types of NONE or TABLE. For seeded parameters please
      make sure that you use a value set that begins with ―ONT.‖
      Open Orders Check: Provides a control to allow or restrict changes to the
      parameter value once it is set for a given operating unit.
      Enabled: Controls the availability of the parameter. For seeded parameters this
      field is active for internal users.
      Seeded: Indicates whether the parameter is seeded or user-defined. This is only
      active for internal users.

To define Order Management system parameters:

   1. Navigate to the Define OM System Parameters window. Order Management >
      Setup > System Parameters > Define
Define OM System Parameters


     Warning: You cannot have any open orders when performing updates to Order
     Management Parameters. If open orders are found, a warning message displays.
     Select the OK button to ignore the Warning or select the Cancel button to not
     commit changes.

2. Enter a unique code in the Parameter Code field.
3. Enter a name for the parameter in the Name field.
4. Enter a description of the parameter in the Description field.
5. Select the category from the Category field that the parameter belongs to. This is
   controlled with a lookup. To create a new category, add the lookup code in the
   lookup type ―OM_PARAMETER_CATEGORY‖ and then enter that lookup type in
   the parameter definition window.
6. In the Value Set field, enter a value set associated as the source of values. The
   possible value sets can have validation types of NONE or TABLE. For seeded
   parameters, use a value set that begins with ―ONT.‖
7. Select a value from the Open Orders Check field. This provides a control to allow
   or restrict changes to the parameter value once it is set for a given operating
   unit. Available options are Allow, Give error, or Give warning.
8. When the Enabled box is selected the parameter is available to use. For seeded
   parameters this field is active only for internal users.
9. The Seeded check box indicates if the parameter is a seeded parameter or a user
       defined parameter. This is active only for internal users.
   10. Save your changes and click OK. To cancel without saving any changes, click
       Cancel.

Setting Parameter Values
You can set up parameter values at the operating unit level by specifying following
attributes:

      Operating Unit: Select the operating unit from the available list of values for
      which parameter values are to be set.
      Category: Select the category. On selection all the parameters for the selected
      category display.
      Show All: Check this to see all the parameters of all the categories.
      Parameter: Displays the name of the parameter for the selected category.
      Value: Parameter value of the parameter. This field shows a list of values based
      on value set attached with the parameter definition.
      Description: Displays description of the parameter currently selected.

Note: If Multi-Org Access Control is enabled, you can manage System Parameter
values across all Operating Units accessible to you via your MO: Security Profile.

To set up Order Management system parameter values:

   1. Navigate to the Define OM System Parameters window. Order Management >
      Setup > System Parameters > Values

      OM System Parameters Values
2. Select the operating unit from the available list of values. The Operating Unit
      field displays your default Operating Unit, however you can pick a different one
      from the list of values to manage parameters in it.
   3. The Category field identifies the category to which the parameter belongs. The
      available parameters and their currently selected values display. Select the Show
      All check box to display all the parameters for all categories.
   4. In the value field next to the parameter you want to set, select a value. The
      Value field displays a list of values available for each respective parameter. The
      Description field describes the currently selected parameter.
   5. Save your changes and click OK. To cancel without saving any changes, click
      Cancel.

Please refer to the sections Processing Constraints and Multiple and Partial Payments
for more information.

Seeded System Parameters
Approval Parameters

No Response From The Approver
By default, if an approver does not respond, the transaction will be rejected. When the
parameter is set to continue, the transaction will progress to the next approver. The
approval notification process waits for three days and then sends a reminder. It waits
for another three days after the reminder before rejecting/continuing.

Default value: Blank

Alternate values: Reject (same as Blank) or Continue

Note: If the approver is the final approver on the list and does not respond, the
transaction will be rejected regardless of the parameter value.

Copy Parameters

Call line DFF extension API in COPY

Default value is No

Drop Shipment Parameters

Requestor For Drop Ship Orders Created By External Users

This system parameter replaces the profile OM: Employee For Self-Service Orders. It
indicates the employee who will be the requestor on the requisition generated to fulfill
drop-ship orders that have been created by external users (eg: via iStore).

Generic Parameters

Audit Trail

The audit trail parameter is used in order to capture audit history at either order entry
or booking. You can select either Disable, Enable when Order is Entered or Enable when
Order is Booked. The default is Null - Disabled. When the default is set, then the you
can also capture cancellation history of entered orders. Previously, the processing
constraint used to maintain a history of cancellations of orders when the Require
Reason action was selected.

Cascade hold to Option Items for Non SMC models

If the value of this parameter is Yes, then the option item is put on hold if the top
model is placed on hold. If the value of this parameter is No, then only the top model is
put on hold, The Cascaded Hold box in the sales orders line thus remains unselected.

Customer Relationships
The default value is Single Customer.

Customer Relationship Parameter Setting Examples

The table below lists sample customers, their sites and business purposes.

Sample Customers, Sites, and Business Purpose
Customer        Site Bill-to   Ship-to     Deliver-to
A               X    Yes       Yes         Yes
B               Y    Yes       No          No
B               Z    No        Yes         Yes
C               W    Yes       Yes         Yes

The table below lists the relationships that exist between these sample customers. The
data within the table will be used to describe how each of the profile option settings
control the list of values for available for order data fields when placing an order.

                     Relationships Between Sample Customers
         Related To                  Bill To Relationship      Ship To Relationship
Customer Customer                    Flag                      Flag
A           None
B           A                        Yes                       Yes
C           None

If the parameter for Customer Relationships is set to Single, using the data within the
second table, when placing an order for Customer A:

      The eligible Bill To, Ship To, and Deliver To location is Customer A, Site X

If the parameter for Customer Relationships is set to Related Customers, using the data
within the second table, when placing an order for Customer A:

      The eligible Ship To and Deliver To locations are Customer A, Site X and
      Customer B, Site Z
      The eligible Bill To locations are Customer A, Site X and Customer B, Site Y

If the parameter for Customer Relationships is set to All Customers, when placing an
order for Customer A:
The eligible Ship To, and Deliver To locations are all customers and all of their
       ship-to sites and deliver-to sites respectively, within the first table.
       The eligible Bill To locations are all customers and all of their Bill To sites within
       the first table.

Customer Relationships (Service)

If the value of the parameter is set to Single Customer, the shippable products
originally installed for the sold-to-customer of the service line is displayed in the LOVs
of the fields Service Reference Customer Product and Service Ref Order Number.

If the value of the parameter is set to Related Customers, the shippable products
installed for the sold-to-customer in addition to the ones installed for the related
customers of sold-to-customer is displayed in the LOVs of the fields Service Ref Cust
Product and Service Ref Order Number.

If the value of the parameter is set to All Customers, the shippable products installed
for all customers is displayed in the LOVs of the fields Service Ref Cust Product and
Service Ref Order Number.

Default Hint for Pricing and Availability

Enable Freight Ratings

The default value is No.

Enable Ship Method

The default value is Yes.

Item Validation Organization

In Order Management, the Item Validation Organization parameter indicates the Oracle
Manufacturing organization against which items are validated. Organization is
synonymous with warehouse in Order Management. You set the Item Validation
Organization parameter in the Parameters window, and can only set the value to the
operating unit associated with your current sign on responsibility. You must also define
all transactable items in this organization.

Note: Before setting this parameter, you should first setup values for: HR: Security
Profile HR: Business Group profile options. Valid inventory master organizations will be
available based on values of HRMS profile settings.

For further information on these profiles please refer to Configuring, Reporting and
System Administration in Oracle HRMS.
For a list of item attributes, please refer to the appendix Item Attributes.

Margin Calculation

The default value is Price Based.

Configuration Effective Dates

This system parameter is set at the organization (OU) level and decides which date is
used to filter effective components in the model BOM. It has the following options:

1. Model Line creation date: If you set this value then model line creation date will be
used as the configuration effective date.

2. System Date until Booking: If you set this value then system date until the order is
booked will be used as the configuration effective date.

3. System Date till Pick Release: If you set this value then system date until the order is
pick released will be used as the configuration effective date.

Default value of Null retains existing behavior as seen in prior releases.

Enable Fulfillment Acceptance

This system parameter is used to enable the customer acceptance functionality. The
possible values are Yes or No. The default value is No. Once this parameter is enabled,
you call the Accounts Receivables API to invoke the rules engine to validate customer
acceptance on every order line

Transaction Date for Inventory Interface Non Ship Process

You can select one of the following dates as the Transaction Date for order lines using
Bill Only Inventory Interface flow:

1. Ordered Date

2. Current Date (sysdate)

3. Schedule Ship Date (Requirement Date)

Invoicing Parameters

Credit Memo Transaction Type
This value is transferred to Receivables if no value is defined for the credit memo
Receivables transaction type associated with the Inbound Order Line OM transaction
type and either: The Order Header has an OM transaction type of Mixed or The
Receivables transaction type associated with the Order Header OM transaction type is
NULL.

Credit Salesperson For Freight On Sales

This parameter determines whether to credit the Salesperson on the invoicing line or
order header for freight charges when the freight charges are treated as revenue. The
default value is No.

GSA Discount Violation Action

This parameter determines how you want the user notified when you define a discount
that results in an item price less than the price on a GSA discount for the same price
list. Select from:

      Error: Provide error message
      Warning: Provide a warning message

Inventory Item For Freight

This parameter is used only when the freight item is passed as revenue line. If you set
the value to Inventory Item then the Invoicing module passes this item for freight
charges, which will be treated as revenue lines.

Invoice Freight As Revenue

If the Receivables profile option TAX: Allow Tax Code Override is set to YES, and this
parameter value is also set to YES, then freight charges are treated as revenue lines,
and the Invoicing module will pass VAT tax and associated sales credits for processing.
The default value is No.

Invoice Source

This parameter value is transferred to Receivables if the Invoice Source value is null for
your transaction type at Order Line and null at the Order Header level.

Invoice Transaction Type

This parameter value is transferred to Receivables if no value is defined for the
Receivables transaction type associated with the Outbound OM order line transaction
type and OM order Header transaction type.
Non-Delivery Invoice Source

This system parameter value is transferred to Receivables if the OM: Invoice Numbering
Method profile option is set to Delivery and the line is non-shippable.

Over Shipment Invoice Basis

This parameter determines whether to invoice the ordered quantity or the shipped
quantity for an over shipment. This parameter can be overridden for the parameter
specific to customers or customer sites by setting a value in the Customer window.

If the value of the parameter is Invoice Shipped Quantity, and if original (outbound)
Sales Order is not invoiced, then the ordered quantity for RMA is the ordered quantity
of the original (outbound) Sales Order. If the original (outbound) sales order has been
invoiced, then the ordered quantity for RMA is the shipped quantity of the original
(outbound) sales order.

If the value of the parameter is set to Invoice Ordered Quantity, the ordered quantity
for RMA is the ordered quantity of the original (outbound) Sales Order.

Show Discount Details On Invoice

This parameter determines whether the discount details are passed to Oracle
Receivables for printing on an invoice. Default value is No. If you set this parameter to
No, then Extended Amounts will includes discounts.

Payments Parameters

Credit Hold Sequence for Order Lines

This parameter is effective for line level credit checking at Picking/Packing. This system
parameter has five options:

   1. All Lines (Default )
   2. The sequence in which lines will be taken into consideration for placing on hold
      are: Schedule Ship Date / Request Date, Shipment Priority Code, Line Number
   3. The sequence in which lines will be taken into consideration for placing on hold
      are: Shipment Priority Code, Schedule Ship Date / Request Date, Line Number
   4. Uninvoiced line amount ascending
   5. Uninvoiced line amount descending

Enable Multiple Payments

This parameter is always set to Yes by default and it is not visible in the System
Parameters window. It allows multiple payments per order AND to use the full/partial
down payment feature. Enables navigation to the Payments window from the Sale
Order form using the Payments Action.

Installment Options

This system parameter has three options:

Authorize First InstallmentOnly the first installment of a payment is authorized.

In this case amount authorized will be total of the first installment less down payment,
if applicable.

Enable Pay Now:The entire amount of the order is authorized.

Payment Due with Order functionality is enabled.

None:

The entire order amount will be authorized.

Default value for this parameter is None (same as Null).

Retrobilling Parameters

Default Order Type

The default value is Mixed.

Enable Retrobilling

The default value is No.

Retrobill Reason Code

The default value is Credit and Rebill.

Scheduling Parameters

Allow Partial Reservation

Set to yes if you want right-mouse reserving and the reservation time fence to support
partial reservations. The default value is No.

Auto Schedule Sets
The value of this system parameter decides whether lines, which are getting added to a
set, should be automatically scheduled or not, at the time of set creation. If the system
parameter value is set to No, then the lines are not scheduled automatically, when they
are added to a new set. However, you can schedule the lines manually whenever it is
required. If you set the value to Yes, then the lines are scheduled as and when they are
added to a set. The default value of the system parameter is Yes and the application
treats no value as Yes.

Firm Demand Events

If you are publishing Plan results to Order Management, this parameter allows you to
firm demanded lines at different event points within the line flow. Once firmed, ASCP
cannot update the warehouse.

Schedule. Lines are firmed when scheduled.

Shipping Interfaced. Lines are firmed be when interfaced to shipping.

None/Null. Lines are not firmed by an event. Default value.

Latest Acceptable Date

System scheduling always honors the Latest Acceptable Date . This parameter provides
choices for using the Latest Acceptable Date with manual scheduling. You can control
whether manual scheduling honors the Latest Acceptable Date, ignores the Latest
Acceptable Date but provide a warning, or ignores the Latest Acceptable Date without
warning (default value).

Promise Date Setup

The parameter allows you to control the behavior of the Promise Date.

First Request Date - Select this if you want the Promise Date to be the first Request
Date.

First Schedule Ship / Arrival Date - Select this if you want the Promise Date to be the
first Schedule Ship / Arrival Date.

Manual Entry - This allows you to enter manually or to default the Promise Date.
Default value.

Request Date - Select this if you want the Promise Date to be dependent on the
Request Date. If the Request Date is changed, the Promise Date will also change.
Schedule Ship / Arrival Date - Select this if you want the Promise Date to be dependent
on the Schedule Ship / Arrival Date. If the Schedule Ship / Arrival Date changes, the
Promise Date will also change.

Reschedule with Request Date Change

Set this parameter to No if you do not want a line to reschedule if the Request Date is
changed. The default value is Yes.

Reschedule with Ship Method Change

Setting this parameter to No allows you to change the Ship Method without triggering
rescheduling. The default value is Yes. Recommendation: do not set to No if using lead
time scheduling.

Reservation Time Fence

This parameter controls automatic reservations during scheduling. The parameter
represents the number of days into the future that scheduling will reserve. The default
value is NULL which means that scheduling will not automatically reserve. This
parameter is used during autoscheduling and also by the scheduling workflow activity
and concurrent program to perform reservations.

Schedule Lines On Hold

This parameter controls whether scheduling will attempt to schedule lines that are on
hold. The default value is NULL, which is the equivalent to Yes.

Accessing the Installation Details form
If you need access the Installation Detail form in Order Management, you will now need
to attach it to the Actions menu by using the user-defined menu option. If you do not
attach the form, you will get an Forms Error Message "This function is not available for
your responsibility".

   1. Using the System Administrator responsibility, go to Application > Menu and
      query for the ONT_SUPER_USER menu.
   2. Insert a new record keeping the Prompt and Submenu fields blank.
   3. In the Function field, select Installation Details from the LOV (the actual function
      name in the LOV is ASOCSINS). The Description field should have Installation
      Details Form.
   4. Save your work and verify that the Installation Details option is available through
      the Actions menu of the sales order window and that it opens up the Installation
      Details window.
Define Tax Features
Order Management enables you to quote an estimated tax for orders at the time of
order entry. This is step eight of the Order Management Setup Steps. The tax estimate
can be based on the tax status; address information, and VAT (Value Added Tax) codes
assigned to items, ship to sites, and customers. The actual tax value that appears on
the customer's invoice in Oracle Receivables may vary.

See: Oracle Receivables Implementation Guide.

Credit Check

Tax amount for each line will be stored on the order line. You can control whether the
tax amount is included in credit checking while specifying the credit checking rules.

Multiple Tax Amounts on an Order Line

You can specify a tax group for an order line. You can view multiple taxes applied to an
order line at the time of entry and query, or on the acknowledgement and notification
of shipment. Oracle Receivables allows each invoice line to be taxed automatically with
one or more taxes.

Tax Related Processing Constraints

Through the use of seeded processing constraints, Order Management does not allow a
user to:

      Enter/Change Tax Classification Code on Order Line if the profile option EBTax:
      Allow Override of Tax Code is set to NO.
      Enter/Change Tax Handling, Tax Exemption Number and Tax Exemption Reason
      when the profile option EBTax: Allow Override of Customer Exemptions is set to
      NO.
      Update Tax Exempt Number, Reason, or any other tax related fields once an
      invoice has been generated.

If your business process allows tax information to be updated after an invoice has been
created, you must modify the seeded processing constraints that affect updating tax
information.

Tax Calculation

You can calculate tax by selecting a Tax Date to base your tax rates on, choosing the
tax, the tax schedule, requested, promise, and system dates. You cannot set a value for
the Tax Date field within the Sales Order window, but you can decide to change or
update the existing seeded Defaulting Rule for Tax Date.

Tax calculation in Order Management can occur at one of the following events:

      Entry
      Booking
      Invoicing

Tax calculation for the above events can only be controlled at the order level (not at the
order line level). You specify when to calculate the tax for an entire order when you
create Order Types within the Order Management Transaction Types window.

The default value for Tax Calculation Event Code is null. Null Tax Calculation Event is
same as Entry. For payment verification purposes (to include tax in the total authorized
amount), specify Entry or Booking as your Tax Event.

Note: The Copy Order functionality does not copy tax amounts; tax is recalculated for
the new order.

For return orders (referenced or non-referenced returns), tax calculation occurs at the
tax event defined for the associated Order Management transaction type. To calculate
tax at any time, select Calculate Tax from the Actions button menu within the Sales
Order or Order Organizer windows.

Tax amounts are displayed:

      Within the Sales Orders window, Main Tab. This is value is the current total order
      tax
      Within the Sales Orders Lines window, Pricing tab. This tax value is for each
      taxable order line

Additionally, tax is always recalculated when tax-dependent attributes change on the
order line.

Tax Calculation at Entry

With tax calculation at Entry, tax is calculated as each order line is entered. This tax
calculation is used, for example, in businesses that requires the user performing order
entry to view the total of the order, including tax, so it can be quoted to a customer.

To include tax in Commitment Applied Amount, set the tax event to Entry.

Tax Calculation at Booking
When tax calculation occurs at Booking, tax is calculated on each of the booked order
lines. This tax calculation option is used, for example, in business that require tax
visibility for booked orders, but who want to increase order entry input times by not
calculating tax at entry.

Tax Calculation at Invoicing

When tax calculation occurs at Invoicing, no tax calculations will occur within Order
Management. Tax calculation will occur in Oracle Receivables when the order or order
line is invoiced.

For maximum performance, set the Tax Event as Invoicing.

Inclusive Taxes

When you create your tax codes, you can specify that the taxes are inclusive taxes (the
tax amounts are already included in the price of the item).

When the Tax Engine is called to calculate taxes, it will return inclusive taxes as well as
exclusive taxes. Any inclusive taxes returned are not added to the extended amount of
the order line or displayed within the Tax column of an order line. Order Management
displays the estimated tax amount based on the tax date on the order line. However,
inclusive taxes are displayed when you View Tax Details from the Action button menu
within the Sales Orders Lines window.

You can perform a credit check including or excluding the estimated tax amount.

Tax Method Options

Order Management enables you to specify the tax method for your company or
installation as a Oracle Receivables system option. The tax method determines how
taxes are calculated. Tax methods include the following:

       Sales Tax

       For sales tax, taxes are based on different components of the customer's
       shipping address. Order Management provides you with a default sales tax
       location flexfield structure composed of the State, County, and City.

       Value Added Tax (VAT)

       For value added tax, taxes are based on tax rates assigned to user- defined
       codes. These codes are assigned to specific items, customers, and customers
       business locations.
Note: Tax codes are used for value added taxes or location-based taxes such as
       a sales tax).

Tax Security

Order Management enables you to update the tax security information on an order or
return by setting the eBTax: Allow Override of Customer Exemption profile option. This
profile option controls the modification of the Tax Handling Status, Reason & Certificate
fields at the order header and order line levels. Standard tax calculations can be
overridden by setting the profile option to Yes. The eBTax: Allow Override of Tax
Classification Code profile option determines whether the defaulted tax classification
code on an order line can be updated.

Non-Taxable Transaction Types

Order Management enables you to define whether Oracle Receivables will automatically
calculate taxes for a given OM order line type. You will need to associate a Receivables
Transaction Type with the OM Transaction Type for this to occur.

This will determine if tax is required on an order. This option (tax calculation flag) is set
in Oracle Receivables. You can specify whether a transaction type is taxable in the
Receivables Transaction Types window. See: Transaction Types, Oracle Receivables
User's Guide.

Related Topics

Oracle Receivables User Guide

Oracle Receivables Implementation Guide

Define QuickCodes
You can create QuickCodes for Order Management. QuickCode types that you can
define include:

       Cancellation Codes
       Credit Cards
       Freight Terms
       Hold Types
       Note Usage Formats
       Release Reasons
       Sales Channels
       Shipment Priorities
       Cascading - line attributes that will be updated as a result of header changes
You can create as many quickcodes as you need. You can also disable QuickCodes.

The Access Level toggles display whether you can define new Lookup Codes. You can
modify User and Extensible Lookup Codes, however, system code cannot be modified.
Contact your system administrator.

To define quickcodes:

   1. Navigate to the Oracle Order Management Lookups window. Order Management
      > Setup > QuickCodes > Order Management.

        Order Management Lookups


   2.   Query the Lookup Code Type.
   3.   Enter the Access Level - User, Extensible, System.
   4.   Select the Application you want to use to define QuickCodes.
   5.   Enter a description of the code.
   6.   Enter the effective dates for the Lookup Code.
   7.   Check Enabled to activate the Lookup Code.
   8.   To inactivate the Lookup Code, deselect the Enabled box.
9. Save your work.

Related Topics

Lookups - Defining Receivables Lookups, Oracle Receivables Implementation Guide.

Viewing Notifications
Single Notification Viewer

You can use a single mechanism for receiving all of your notifications, as opposed to
different review facilities for different types of messages. This viewer is provided with
Oracle Workflow.

Customizable Notification Viewer

You can view notifications and take the appropriate action to resolve each one quickly
and easily. You can define selection and sorting criteria that let you manage your
notification list so you see the most critical notifications first or can view different types
of notifications on demand.

Notification Context

Given this universal Inbox of exceptions, you can see the context of each notification.
For notifications where you need no additional information, you can choose a button to
take the suitable action.

If you require additional information, you can open the appropriate Order Management
window. For example, if you must approve or reject an order, you can view the order
header and lines easily. The notification can either be a URL message or an attachment.

Related Topics

Using Oracle Workflow in Oracle Order Management

Exception Management
Function Security Options

Sales Orders: View Open Messages

Function: ONT_OEXOEORD_PROCESS_MESSAGES

Description: View Open Messages
This function seeds a new Action available from the Sales Orders windows. The action is
accessed from the Actions button or the mouse right-click menu.

Sales Orders: Retry Activities in Error

Function: ONT_OEXOEORD_RETRY_WF

Description: Retry Activities in Error

This function seeds a new Action available from the Sales Orders windows. The action is
accessed from the Actions button or the mouse right-click menu.

Exception Management Setup

To setup Exception Management

   1. Set the profile OM: Show Process Messages Flag to Yes to enable the Open Flag
      to be populated in the Order Organizer.
   2. Set the profile OM: Generate Diagnostics for Error Activities to Yes to enable the
      Diagnostics: OM Order Information concurrent program to be run automatically
      when there is an error in a workflow activity. Currently Exception Management
      automatically submits the Diagnostics: OM Order Information concurrent
      program via the Order Management Error flow if the profile option OM: Generate
      Diagnostics for Error Activities is set to Yes. In the event that activities are
      retried and failed multiple times, the concurrent program does not run again and
      again as this could result in performance issues.
   3. Define any custom message statuses desired by editing the seeded lookup type
      ONT_MESSAGE_STATUS.

Error Messages

These messages display when you try to launch the Process Messages window with no
open messages:

OE_NO_ERROR_MESSAGES

There are no open messages. This message displays when you try to view the workflow
activities in error, but the transaction does not have any activities in error.

OE_NO_ERRORED_ACTIVITIES

There are no workflow activities in error for this transaction. Please see the Workflow
Monitor or status window for more information.

ONT_CONC_MSG
Diagnostic: OM Order Information Request ID: Message displayed if there are any error
messages on the stack.

OE_WF_ACTIVITY_ERROR

Workflow activity has failed. Please fix the errors and retry the activity from the Order
window or the Workflow Monitor. Message displays if there are no error messages on
the stack.

OE_WF_ACTIVITY_UNEXP_ERROR

Workflow activity has failed due to an unexpected error. Please retry the activity from
the Order window or the Workflow Monitor. If it fails again, then contact your System
Administrator. Message used to display the concatenated line number in the workflow
notification for normal orders.

OE_WF_CONCAT_LINE

Message displays the concatenated line number in the workflow notification for return
orders.

OE_WF_CONCAT_RETURN_LINE

Message displayed after an activity in error is retried successfully.

OE_RETRY_SUCCESSFUL

Retrying the activity in error completed successfully. Please look at the flow status or
workflow monitor for more information.

OE_EM_NO_WF

There is no workflow associated with this transaction.

Define Document Sequences for Order Numbering
Order Management uses AOL Document Sequence functionality for order numbering.
This is step eleven of the Order Management Setup Steps. You can define document
sequences that automatically generate numbers for your sales documents as you enter
them. You can define a single document sequence to assign unique consecutive
numbers to all your sales documents, or you can define multiple document sequences
that are assigned to different order types. In the latter case, an order or return is
uniquely identified by its type and its number, since sales documents of different types
may share numbers. Sales document numbers cannot contain alphabetic characters.
Gapless Order Number Source

Many countries have legal and audit requirements for order numbers to be contiguous.
You can set up a document sequence as gapless through the Define Documents
Sequences window. You can set up a gapless sequence for quotes, sales orders and
Sales Agreements. In addition, Order Management prevents deletion of orders that
have been numbered using the gapless numbering sequence. The application uses locks
to ensure gapless numbering. If you are using gapless sequences, please save your
changes frequently to minimize lock contention issues.

Note: Transactions may be gapless, however if all quotes do not become orders, the
order numbers will not appear gapless.

Manual Order Numbers

Order Management enables you to enter the order numbers for certain types of orders.
You can define a document sequence as manual and assign it to a desired order type.
This order type can be used on orders that you want to manually enter order numbers.
When an order number is specified for such an order, Order Management validates that
it is unique for a given order type.

Prerequisites

      Set the profile option Sequential Numbering to Always Used at the Order
      Management Application level.
      Set your document sequences to Automatic, Gapless, or Manual.

To define document sequences for order numbering:

   1. Navigate to the Document Sequences window. Order Management > Setup >
      Documents > Define.

      Order Management Document Sequences Window
2. You can define the sequence to be Automatic, Gapless or Manual.
      o Automatic: The system automatically increment document numbers.
         Automatic sequences do not guarantee contiguous numbering.
      o Gapless: The system guarantees that the numbers returned are
         contiguous.
      o Manual: The user must specify a unique document number.

   For all types of numbering, Order Management validates that the number
   specified by you is unique for a given order type.

   For more information on AOL Document Sequences, see the Oracle E-Business
   Suite System Administrator‘s Guide - Configuration, Document Sequences.

3. Enter a name for the document sequence. Specify Oracle Order Management as
   the Application.
4. Enter a starting number.
5. Optionally, enter effective dates for the document sequence.
6. Save your work.

   Note: When sales document Types are defined, a corresponding Document
   Sequence Category will automatically be created for order types and not for line
   types. The category created has the same name as the order type. You must
   navigate to the AOL Assign Document Sequence window to assign a sequence to
   the newly created category. If the Document Descriptive Flexfield is enabled, you
   need to specify the governing ledger. The Document Method code should be left
   blank.
Related Topics

Profile Options

Define Order Management Transaction Types
Define Order Management transaction types to classify sales documents. As an
example, for each order type, you can assign a default price list, defaulting rules, order
lines, return lines, line types, workflow assignments, payment terms, and freight terms.
This is step twenty-two of the Order Management Setup Steps.

Prerequisites

      Review seeded sales document flows.
      Define all lookups.
      Define freight carriers. See: Oracle Shipping Execution User's Guide.
      Define organizations.
      Define document sequences.
      Define defaulting rules. See Define Defaulting Rules.
      Define price lists. See Oracle Pricing Setup
      Define credit check rules, (not applicable for SA). See Define Credit Checking
      Rules.
      Define currencies and currency types. See: Defining Currencies, Oracle E-
      Business Suite System Administrator's Guide - Configuration.
      Set up your cost of goods sold account flexfield segments. See: Defining Key
      Flexfield Segments, Oracle E-Business Suite Flexfields Guide.

      Note: You must first define any OM Line Transaction Types so that they can be
      assigned when defining your OM Order transaction types.

Defining Order Management Transaction Types

If Multi-Org Access Control is enabled, you can manage Transaction Types across all
Operating Units accessible to you via your MO: Security Profile.

To define transaction types:

   1. Navigate to the Transaction Types window.

      Order Management Transaction Types Window
2. In the Operating Unit field, select an operating unit from the list of values. The
   field displays your default Operating Unit, however you can pick any other value
   from the LOV. Operating Unit sensitive fields on the form are disabled until an
   Operating Unit is specified. If you specify values for these fields and then change
   the Operating Unit, those fields will be cleared.
3. Enter the name of the transaction type in the Transaction Type field.
4. Enter a description in the Description field.
5. In the Sales Document Type field, select Sales Agreement or Sales Order from
   the list of values (for Quotes, Returns and Releases, choose Sales Order).
6. In the Order Category field, select a category from the list of values. For Order
   Types, you can specify a value of Order, Return, or Mixed. For Line Types you
   can specify Order or Return. When an order type is assigned to an order, the
   category determines whether both order and return lines can go on the order. A
category of Mixed enables an order to have both kinds of lines. For Sales
   Agreements, select Order.

   For Order Lines, the Sales Orders window automatically sets the category to
   Order. Order Management seeds defaulting rules to get the appropriate default
   outbound or inbound line transaction type from an order type to a line based on
   its category code.

7. In the Transaction Type Code field, select order or line from the list of values to
    specify whether this is an order or line transaction type. Select "order" for Sales
    Agreements.
8. In the Fulfillment Flow field, select a flow from the list of values. See Using
    Workflow in Order Management, Negotiation in Order Management, and Sales
    Agreements for more information on Fulfillment Flows.
9. If a negotiation flow is needed, select it in the Negotiation Flow field from the list
    of values. See Negotiation in Order Management and Sales Agreements.
10. Enter an effective date for the transaction type in the Effective Dates field.
11. Select the default transaction phase, Fulfillment or Negotiation, in the Default
    Transaction Phase field from the list of values. Transaction phase determines
    where in the workflow the transaction begins, and can be used in defaulting
    rules. This field defaults to Fulfillment—a fulfillment phase must be defined;
    Negotiation is optional.
12. Enter a value in the Layout Templates field. This field is optional. See Preview
    and Print Sales Documents for more information.
13. Enter a value in the Contract Template field. This field is optional. See Authoring
    and Negotiating Contract Terms for more information.
14. In order for the Quote number to become the Sales Order number, check the
    Retain Document Number box. This is not applicable for Sales Orders or Sales
    Agreements. If the transaction type is associated with both a negotiation flow
    and fulfillment flow, the document number can be retained when the document
    transitions to fulfillment. See Negotiation in Order Management for more
    information.
15. On the Main Tab in the Document Region:

   In the Agreement Type field, select a pricing agreement type from the list of
   values. This field is optional.

   If you enter an agreement type here, you can choose only agreements with this
   agreement type when using this order type. Define agreement types using Order
   Management QuickCodes. See Define QuickCodes.

16. In the Default Return Line Type field, select a return line type from the list of
    values.
17. In the Default Order Line Type field, select an order line type from the list of
    values.
18. Select the Agreement Required check box if a pricing agreement is required. This
    is only applicable to order transaction types.
19. Select the Purchase Order Required check box check to require purchase order
    numbers during order entry for orders and returns with this Order type. This is
    only applicable to order transaction types.
20. On the Main Tab in the Pricing Region:

   Select the Enforce List Price check box to prevent discounts and overriding the
   selling price. If this is selected, you cannot apply discounts to the order line list
   price when you use this order type and you cannot override the selling price,
   unless the profile option OM: Discounting Privilege is set at the appropriate level.

21. In the Price List field select a price list from the list of values to serve as a
    defaulting source. The list of values displays global price lists and price lists
    defined for the Operating Unit selected.
22. Enter a minimum margin in the Minimum Margin Percent field. This field is
    optional.
23. On the Main Tab in the Credit Check Rule Region:

   In the Ordering field, select an ordering credit check rule from the list of values.
   This field is optional.

24. In the Packing field, select a packing credit check rule from the list of values.
25. In the Picking/Purchase Release field, select a picking credit check rule from the
    list of values. .
26. In the Shipping field, select a shipping credit check rule from the list of values.
    This field is optional.

   Select credit check rules to use when performing checking credit at either
   Booking, Pick Release and Purchase Release (for drop shipments), Packing, or
   Shipping within the corresponding Credit Check Rule fields.

   You can select a credit check rule for each field within the Credit Check Rule
   region, or choose to select combinations that suit your business purposes. For
   example, you can choose to select a credit check rule for booking only, or
   booking and shipping.

   If you leave any of the Credit Check Rule fields blank, no credit checking will
   occur when an order or order line reaches the corresponding workflow activity
   within the order or line flow, using the order or order line type specified.

   Note: When a transaction is created, Order Management automatically creates a
   Document Sequence Category of the same name for you. You can then go and
assign a document sequence that you have defined for order numbering to this
     document sequence category. Document sequence categories are not MLS
     Compliant. Order Management recommends that you create your transaction
     types in the base language of your installation to minimize potential confusion.
     Two document sequence categories are created - one, with the same name as
     that of the transaction type and the other with the same name as transaction
     type but appended with the string '-quote.'

     Note: Workflow assignments are required for order types to support the creation
     of quotes and sales orders as well as for types to support the creation of Sales
     Agreements.

To define Shipping Related Attributes for Order Management order and
line transaction types:

  1. Navigate to the Transaction Types window. Order Management > Setup >
     Transaction Types > Define

     Note: None of the fields in the Shipping tab are applicable to Sales Agreements.

     Order Management Transaction Types Window Shipping Tab
2. Select the Shipping tab.
3. Warehouses are synonymous with inventory organizations in Oracle
   Manufacturing.
4. Select the appropriate Shipping Method from the list of values.
5. The Shipment Priority field gets its values from Quick Codes.
6. Freight Terms are defined using Order Management QuickCodes.
7. In the FOB field, enter the FOB point. Define FOB points using Receivables
   QuickCodes.
8. In the Shipping Source Type field, select the ship source type, internal or
   external, from the list of values. This determines if the order line is sourced
   externally through Drop Shipment, or sourced internally. This field is optional and
   applicable only to Line Transaction Types.
9. In the Demand Class field, select a region from the list of values. Define demand
      classes using Manufacturing QuickCodes. See Define QuickCodes.
  10. In the Scheduling Level field, select one of the following options from the list of
      values:
          o Inactive Demand without Reservations
          o Inactive Demand with Reservations
          o ATP Only
          o Allow all scheduling actions
          o No Reservations

             Note: If you do not specify a value for an Order Transaction type, the
             application interprets the null value as Complete Scheduling. If you do not
             specify a value for a Line Transaction Type the application uses the value
             from the Order Type on the Order.

  11. Select the Inspection Required check box if an inspection is necessary. This is
      applicable only to return line transaction types.
  12. Select the Auto Schedule check box if you want automatic scheduling for this
      order type. This is applicable only to order transaction types.
  13. In the Line Set field, select Arrival or Ship from the list of values. This field is
      optional. See Line Sets: Ship/Arrival in Scheduling.
  14. Select the Fulfillment Set check box to apply a fulfillment set. Selecting this
      enables fulfilling all of the lines of an order at the same time. If you put the lines
      in a fulfillment set, you cannot fulfill (invoice) the lines until all of the lines are
      ready.

To define Financial attributes for Order Management order or line transaction
types

  1. Navigate to the Transaction Types window.

     Note: None of the fields on the Finance tab are applicable to Sales Agreements,
     the regions are Rule, Source and Credit Method For.

     Oracle Order Management Transaction Types Window Finance Tab
2. Select the Finance tab.

   In the Rule region on the Finance Tab:

3. The Invoicing Rule controls the amount and timing of your invoices.
4. An Accounting Rule controls the amount and timing of when you recognize
   revenue for this order.
5. In the Source Region on the Finance tab, within the Invoice Source field, select a
   Source from the list of values.
6. In the Non Delivery Invoice Source field, select a source from the list of values.
7. In the Credit Method For region on the Finance tab, select a credit method for
   invoices from the Invoices With Rules pop up menu.
Oracle Receivables uses these accounting credit methods when adjusting the
   revenue account assignments of invoices using multi-period invoicing and
   accounting rules. See: Crediting Transactions, Oracle Receivables
   Implementation Guide.

       o  LIFO (Last In First Out): Backs out revenue starting with the last general
          ledger period, and reverses all prior periods until it has used up the credit
          memo
      o Prorate: Credits an equal percentage to all account assignments for that
          invoice
      o Unit: Reverses the revenue for the number of units you specify from an
          original line of the invoice
8. Select a credit method for invoices from the Split Term Invoices pop up menu.

   Oracle Receivables uses the following the Invoicing credit methods when
   crediting the installments of invoices that have multiple installments (split term
   invoices). Crediting Transactions, Oracle Receivables Implementation Guide.

       o   LIFO (Last In First Out): Credits the last installment to be credited first
           and then credits all prior installments until all of the credit is used
       o   FIFO (First In First Out): Credits the first installment first and then credits
           all subsequent installments until all of the credit is used
       o   Prorate: Prorates the credit received by the installments of invoices by the
           amount remaining on their installments

   Also on the Finance Tab:

   In the Receivables Transaction Type, select a value from the list of values. This is
   applicable if you use Oracle Receivables. Invoice types designate invoice status,
   invoice printing options, credit memo type, and whether the invoice posts to
   General Ledger or creates an open receivable. Ensure the Tax Calculation Flag
   for the Receivables transaction type you choose is set accordingly as this will
   determine whether Tax is calculated for the order line.

9. The Tax Event determines when Order Management calculates the estimated tax
    amount for a transaction.
10. In the Cost of Goods Sold Account field, select and account from the list of
    values

   This is applicable only for order transaction types.

11. In the Conversion Type field, select a conversion from the list of values. In the
    Currency field, select a currency from the list of values. If you choose User as
    the currency conversion type, the Sales Orders window requires you to enter the
    conversion rate and date. This is applicable only for order transaction types.
To assign workflows to transaction types:

Use this procedure to assign workflows to line transaction types. The combination of
the order type, the line type, and the item type determines the line workflow.

Line flows are required for Sales Orders but not for quotes. Once you have created a
document using an order type you cannot change the existing line workflow
assignments. Instead, enter an end date for the existing assignment and enter a new
assignment for the for the new workflow.

Note: This is not applicable to Sales Agreements.

   1. Navigate to the Transaction Types window and query the desired transaction
      type.
   2. Click Assign Line Flows.

      Line Workflow Assignments Window
3. In this window, select the order type/line type/item type combination to which
     you want to assign a workflow.

     If you leave Item Type blank, the workflow applies to all item types for the line
     type (unless they have a specific assignment in this form).

     If you use line type ATO Models, use item type Configured Item and return line
     types use item type Standard even if they are for configurations.

  4. In Process Name, select the workflow that Oracle Order Management should use
     for the order type/line type/item type combination.

     If you do not assign a workflow to a configured item type, the configured item
     does not use a workflow.

  5. In Start Date and End Date, select the time period during which the assignment
     is effective.
  6. Save your work.

Defining Approvals

To define Order Management Approvals:

  1. Navigate to the Approvals window.

     Order Management Approvals Window
2. Enter a name in the List Name field.
   3. Enter a description of the approval in the Description field. This field is optional.
   4. In the Transaction Type field, select the transaction type that the approval
      applies to, from the list of values. You can pick a Transaction Type from any of
      the Operating Units you have access to via your MO: Security Profile.
   5. In the Transaction Phase field, select Negotiation or Fulfillment from the list of
      values. Ensure that the workflow assigned to the transaction includes the
      Approval activity and the phase assigned corresponds. For example, Workflow:
      Negotiation with Approval; Transaction Phase: Negotiation.
   6. Select an effective date in the Effective Dates fields.
   7. In the List Members region, select the members in the Role fields, assign a
      sequence, and indicate if they are active by selecting the Active check box next
      to their name.
   8. Save your work.

Related Topics

Transaction Types
Negotiation in Order Management

Define Defaulting Rules

Oracle Receivables User Guide.

Define Order Import Sources
You can define Order Import Sources from which to import order information. You can
import historical orders, orders from other quote or sales systems, and changes to
orders. Oracle Order Management recommends that you define a unique name for each
source of order information you are importing. When you run the Order Import
program, you can enter the source or sources for each execution. You can run Order
Import for multiple sources at one time. This is step twelve of the Order Management
Setup Steps.

Internal Sales Orders

If you are importing internal sales orders from Oracle Purchasing, you need to define an
Order Import source to be used when you transfer the internal requisition information
from Oracle Purchasing to create an internal sales order in Order Management.

You need to choose an Order Import source for internal requisitions/internal sales
orders when you define purchasing options in Oracle Purchasing. You choose this same
Order Import source as a parameter when you run the Order Import program in Order
Management. See: Integrating Oracle Order Management Using Order Import, Oracle
Manufacturing, Distribution, Sales and Service Open Interfaces Manual.

To define an Order Import source:

   1. Navigate to the Order Import Sources window.

      Order Import Sources Window
2. Enter the Order Import source name and a description.
   3. Check Enabled to activate the Order Import source.
   4. Save your work.

Defining Processing Constraints
Processing constraints are rules that control who can change what and when they can
change it. Processing constraints can prevent certain changes, but can also be set up to
perform actions based on those changes. They can define actions that can result from
these changes, such as requiring a reason for the change, triggering an action in Audit
Trail or Versioning, or raising an Integration Event. This is step twenty-four of the Order
Management Setup Steps.

This section describes how to set up your processing constraints based on validation
conditions in validation templates (for example, Booked = Yes) which are evaluated for
groups of records (record sets).

Prerequisites

Become familiar with the Processing Constraints that are delivered with the Order
Management Application.

Note: After updating constraints and/or conditions, close and reopen the Sales
Agreements or Sales Orders window for the updated constraints to apply correctly.

To set up processing constraints:
1. Navigate to the Define Processing Constraints window.

   Order Management Processing Constraints Window


2. Query Application for Oracle Order Management and Entity for the entity for
   which you want the processing constraint, for example, Order Header or Order
   Line.
3. Move to Constraints. In the top area of the region, enter each constraint in a
   line.
4. In Operation, select the operation that you want to constrain.
5. Select an Attribute to constraint, based upon the operation selected.
       o If you select the value UPDATE for the Operation field and you do not
          select an Attribute value, the constraint allows no update to any field of
          the entity, by any user.
6. In User Action, select one of the following:
       o Not Allowed: You cannot perform the constrained operation
o    Require Reason and History: You can perform the operation only if you
            enter a reason. Use this with Operation CANCEL, Operation UPDATE if the
            constrained attribute is Ordered Quantity only, and for recording Audit
            Trail history when requiring a reason for an attribute change
        o Requires History: You can perform the operation and will not be prompted
            to enter a Reason. You still have the option to enter both a Reason and
            Comment, and if you do so, the information is recorded. Use the value for
            enabling Audit Trail history to be recorded without a reason for an
            attribute change
7. Select a value for the System Changes field. The value selected in this field
    determines if system changes are allowed, despite the constraint. Choose from:
        o Always: System changes allowed
        o Never after Insert: System changes allowed if the entry has not been
            saved to the database
8. Select a value for the User Changes Field. Choose from:
        o Never: The user is always constrained
        o Never after Insert: The user is constrained after the entry is saved to the
            database
9. The Enabled field indicates whether the current constraint is active. This allows
    constraints to be temporarily disabled if necessary.
10. System check box - If a Constraint has the System check box selected, you
    cannot update the constraint definition.
11. Move to the Conditions tab. Enter a constraining condition for the selected
    constraint. The selected constraint is determined by the previous cursor position
    prior to moving to the Conditions tab region.
12. In the Group Number field, enter a numeric value according to the following
    principles:
        o For conditions that should together evaluate to TRUE (AND conditions),
            enter the same group number. The constraint applies if the entity in
            question meets all of the conditions defined.
        o For conditions that should together evaluate to OR (OR conditions), enter
            a different number for each record. The constraint applies if the entity in
            question meets any one of the conditions defined.
13. In Scope, if the record set applies to multiple records, indicate the scope of
    evaluation of the record set for this condition. An example of a record set that
    applies to multiple records is the record set of all of the lines of a sales order.
    Select one of the following:
        o Any: The condition is satisfied if one of the records meets it, for example,
            the condition is satisfied if one of the sales order lines is booked
        o All: The condition is satisfied if all of the records meet it, for example, the
            condition is satisfied if all of the sales order lines are booked
14. In Validation Entity, enter the entity for which the condition is validated. You can
    enter the same entity as the constraint (at the top of the Constraints region) or
you can enter an entity related to the constraint. For example, if the constraint is
    against Order Header, Validation Entity can be Order Line.
15. In Record Set, select the record set that corresponds to the entities to which the
    constraints process should apply the condition. For example, if you enter the
    order line record set Line, the condition is evaluated against the order line in
    question. If you enter the order line record set Order, the condition is evaluated
    against any or all (depending on the scope) lines of the order in question.

   If Validation Entity is different from Entity (at the top of the form), you can only
   select record sets based on the primary key of the validation entity.

16. Select the Not check box (the negative condition modifier) to direct the
    constraints processing to evaluate the NOT condition of Validation Template. For
    example, if you expect to select Validation Template Booked, selecting NOT
    creates the condition of not booked for the constraint.
17. In Validation, select a validation template. This item specifies the condition being
    evaluated.
18. Enabled- The Enabled field indicates whether the current constraint is active.
    This allows constraints to be temporarily disabled if necessary.
19. System check box:
       o If a Constraint has the seeded check box selected, and the constraint
            condition check box is also selected, you cannot update the constraint
            condition.
       o If a Constraint has the seeded check box selected, and the constraint
            condition check box is not selected, you can update the constraint
            condition.
20. In User Message, enter the trailing portion of the error message that the
    constraint processing should display when the user violates the constraint.

   For example, if the constraint was to not allow an update of the item field on the
   order line if the line has been previously booked, constraints processing displays
   the error message You are not allowed to update the item; the item is booked.

21. Move to the Applicable To tab and specify who the constraint applies to.

   Processing Constraints Window
22. Select one of the following:
       o All responsibilities: The constraint applies to all responsibilities.
       o Authorized responsibilities: The constraint applies to all responsibilities
           except ones that you specify. Specify the excepted responsibilities in the
           untitled lines below your selection.
       o Constrained responsibilities: The constraint applies to the responsibilities
           that you specify. Specify the excepted responsibilities in the untitled lines
           below your selection.
23. Save your work.

   Note: Please ensure that when you are creating or updating Processing
   Constraints, the window that will be using the constraints (e.g. Sales Order,
   Sales Agreement) is closed. The constraints are cached and if they are updated
   while a sales transaction window is open, the updated constraints may not
   function according to the updates. Therefore it is advisable to close all sales
   transaction windows before updating Processing Constraints.
Processing Constraints Example

       To set up a processing constraint that forbids update of the sales order header
       order type when there are order lines created or when the order is booked, do
       the following after navigating to the Define Processing Constraints form:

          o   Query in the top of the form:
                  Application: Oracle Order Management
                  Entity: Order Header
          o   Enter on a new line at top of the Constraints region:
                  Operation: Update
                  Attribute: Order Type
                  User Action: Not allowed
                  Leave System Changes, User Changes blank
                  Clear Seeded check box
          o   Enter in the first line of the Conditions tabbed region:
                  Group Number: 1
                  Scope: Any
                  Validation Entity: Order Header
                  Record Set: Order
                  Clear NOT check box
                  Validation Template: Booked
                  Clear Seeded check box
                  User Message: the order is booked
          o   Enter in the second line of the Conditions tabbed region:
                  Group Number 2
                  Scope: Any
                  Validation Entity: Order Header
                  Record Set: Order
                  Clear NOT check box
                  Validation Template: Lines Exist
                  Clear Seeded check box
                  User Message: the order has lines

Processing Constraints Usage

As you use Order Management, processing constraints are evaluated for any entity you
try to cancel, delete, create, split, or update. If you are trying to modify an order line,
Order Management evaluates the processing constraints for the Line entity.

Using Processing Constraints

Versioning
To set up Automatic Versioning, you must set up processing constraints to enable a
select attribute update to autogenerate versioning

Defining Validation Templates
Order Management provides you the ability to define your own validation conditions by
the use of validation templates. A validation template names a condition and defines
the semantics of how to validate that condition. Validation templates can be used in the
processing constraints framework to specify the constraining conditions for a given
constraint. These conditions are based on:

       Where the entity is in its workflow
       The state of attributes on an entity
       Any other validation condition that cannot be modeled using the above methods

API based validation templates are not available if constrained entity is different from
the entity for which the validation template has been defined (or the Validation
templates are not available even if the record set being used is anything other than the
primary key record set).

For example, API based Validation template Pick Released has been set up for entity
Order Line. If you set up a constraint for attribute Ship To on Order Line, the validation
template Pick Released is available but for a constraint on attribute Ship To on Order
Header, Pick Released will not be available.

For attribute Ship To on Order Line, if the constraint condition uses any record set (ATO
Configuration, for example) other than the primary key record set Order Line, the
validation template Pick Released will not be available.

To define a validation template:

   1. Navigate to the Validation Templates window.

       Validation Templates Window
2.   Select an entity the condition is defined for in the Entity field.
3.   Enter a Template Name for the condition.
4.   Enter a name in the Short Name field for the condition.
5.   Optionally, enter a Description for the constraint condition.
6.   Select the Validation Type to be performed by the condition. Select from:
        a. WF: (validation is based on the workflow status of this entity):
        o Select the Activity for the condition
        o Select the Activity Status for the condition. Select from: Active, Complete,
            Error, Notified, and Suspended
        o Select the activity Result for the condition
        o Save your work
        f. API (validation is completed through an Application Program
            Interface):
        o Select the PL/SQL Package you wish to interface with the constraint
            condition
        o Enter the Procedure name of the API
        o Save your work
        j. TBL (validation is based on the values of database columns on
            this entity):
o   Select the Attribute Column name on the entity for the constraint
              condition
          o   Select the Validation Operation for the constraint condition. Select from: =
              (Equal To), <> (Not Equal To), Is NULL, Is Not NULL
          o   Select the Value String you want to validate against the value of the
              column

       Note: You can add more than one attribute, value pair, otherwise all pairs will
       be added together in the validation.

        Save your work.
        When you have created new validation templates or record sets, you will need to
submit the Create Validation Packages concurrent program from the Tools menu to
submit a concurrent request to create a validation package for all new or modified
validation templates and record sets that may constitute a permitted validation
combination. After the request completes, all validation templates that processed
successfully will be visible in the list of values in the Processing Constraints window.

       For information on Seeded validation templates, please see appendix E for a
       complete listing.

Defining Record Sets
The Records Sets feature in Order Management is used to define and maintain record
set definitions for processing constraints. A record set is a set of records that are bound
by common attributes such as ship sets. You can define constraining conditions and
specify a record set to be validated for a given condition as defined by its validation
template.

To define a record set:

   1. Navigate to the Record Sets window.

       Order Management Record Sets
2. Select the Entity for which you are defining a record set.

   The Seeded check box is enabled if the system automatically defines the name of
   the record set. This check box is non updatable.

3. Enter the name of the Record Set.
4. Enter the Short Name for the record set.

   Note: You cannot modify the Short Name once it has been entered.

5. Optionally, enter a Description for the record set.

   The Based On Primary Key check box is used to indicate the record set that is
   based on the primary key columns for the entity. There can only be one primary
   record set per entity. These records are seeded and cannot be updated.

6. Select the name of the columns that should be matched from the validated
   record in the Matched Columns For Record Selection region.
For example, if you define a Ship Set record set, the matching columns will be
       the Header ID and the Ship Set number.

   7. Save your work.
   8. Select the Create Validation Packages concurrent program from the Tools menu
      to submit a concurrent request to create a validation package for all modified
      validation templates and record sets that may constitute a permitted validation
      combination.

       Only after the request completes, the created validation template is visible in the
       list of values in the Processing Constraints window.

   9. Save your work.

Define Defaulting Rules
You can create and modify defaulting rules to improve the efficiency and accuracy with
which you enter orders. You can define the rules to determine the source and
prioritization for defaulting order information to reduce the amount of information you
must enter manually in the Sales Orders window. For most fields, you can assign one or
more defaulting sources in a priority sequence, or, if the default is always the same,
you can define a constant value. This is step twenty-five of the Order Management
Setup Steps.

Updates to defaulting rules take effect once the Defaulting Generator concurrent
program has been submitted for the application and the program successfully
completes for the entity combination modified. Existing orders are only affected by
updates to defaulting rules if you update an attribute on an order that was included in
the modified defaulting rule. If you do not perform a change to an existing order that
uses the modified defaulting rules, thus activating validation of defaulting, the order is
not affected by the modification.

Note: Seeded defaulting rules can be disabled, but not modified.

If you wish to modify a seeded defaulting rule, disable the seeded defaulting rule
condition, and then create a copy of the seeded defaulting rule and include your
changes in the copied defaulting rule.

To query entities and attributes:

   1. Navigate to the Defaulting Setup - Entity Attributes window.

       Defaulting Setup-Entity Attributes Window
Entity Region

2. Application: The Application field displays the application context for the entity
   displayed. For Oracle Order Management, the value is ―Oracle Order
   Management‖. This field is non updatable.
3. Entity: The Entity field displays the name of the object for which defaulting rules
   and conditions are being defined such as the order line. For Order Management
   you have the following options:
      o Order Header
              Order Line
              Sales Agreement Header
              Sales Agreement Line
              Order Payment
              Line Payment

          Note: Defaulting rule creation is not supported for the sales credit entity
          and the price adjustment entity.
4. Note, defaulting rules can be created for Releases only. Sales Agreements have
     several hard coded defaults in place but currently does not support the
     defaulting framework.
  5. Attribute Region
  6. The Attributes Region displays all the entity attributes for which defaulting rules
     can be defined. You are NOT allowed to enter new records here.
  7. The Defaulting Sequence field enables a user to assign the sequence (priority)
     number in which this attribute should be defaulted.

     Note: Attributes with identical sequence numbers are defaulted in alphabetical
     order.

     e.g. If the attribute Contact has a sequence number of 1 and the price list has a
     sequence number of 1, then the Contact defaults before the price list.

  8. The Attribute field stores the name of available attributes. Values are currently
     displayed based upon the entity selected.
  9. The Include in Building Defaulting Conditions check box indicates whether an
     attribute can be used in defining conditions for the entity selected.

     Note: The Include in Building Defaulting Conditions check box is for display
     purposes only, and is non-updateable.

  10. Save your work.

     The Defaulting Condition Templates button enables you to define defaulting
     template and conditions for the application/entity combination displayed on the
     defaulting rules setup window. Selecting this button will take you to the
     Defaulting Condition Validation Templates window.

     The Defaulting Rules button enables users to define defaulting rules for the
     attribute selected. Selecting this button will take you to the Attribute Defaulting
     Rules window. For more information on defining or updating defaulting sourcing
     rules, see the Define Defaulting Rules section.

     Select the Defaulting Condition Templates button to define the defaulting
     condition for this entity.

     Note: The template that appears after selecting the Default Condition Template
     button is based upon current values displayed in the Application and Entity field
     on the Defaulting Setup window.

To define Defaulting Condition Templates:

  1. Navigate to the Defaulting Conditions Validation Templates window.
Defaulting Condition Validation Templates Window


2. Defaulting conditions enable you to define conditions that can be used to dictate
   when an attribute is sourced and defaulted. Select an existing condition name if
   you wish to update the associated validation rules or add a new condition name
   with associated validation rules.
3. In the Description field, enter a brief description of the condition.

   Note: A generic condition of Always is seeded for each entity. Use this condition
   to define generic defaulting rules

4. The Seeded check box will be checked for seeded conditions. This field is
   protected against update. You cannot update seeded conditions or validation
   rules associated with seeded conditions, however, you can disable seeded
   conditions and create your own.

   In the Validation Rules Region, enter the validation rules based on the attribute
   values of the above entity. For example, standard orders could have the order
   type Standard. Order type = Standard.
5. In the Group Number field:
         o For conditions that should together evaluate to TRUE (AND conditions),
            enter the same group number
         o For conditions that should together evaluate to OR (OR conditions), enter
            a different number for each record
  6. Select the Attribute name, such as Contact.
  7. Select the validation operation: Select from:
         o (>) Greater Than
         o (<) Less Than
         o (>=) Greater than or Equal to
         o (<=) Less than or Equal to
         o (=) Equal
         o (!=) Not Equal
  8. Enter the Value String of the attribute that you want to validate against.
  9. Navigate to the Defaulting Setup - Entity Attributes window.

     The Attribute name displays in the Attribute field. Descriptive Flexfield attributes
     will not be displayed.

  10. Save your work.

     Select the Defaulting Rules button to define your defaulting rules.

To define defaulting rules:

  1. Navigate to the Attribute Defaulting Rules window.

     Attribute Defaulting Rules Window
Defaulting Conditions Region

2. Enter a value in the Precedence field to determine the precedence when
   resolving multiple TRUE defaulting conditions.

   Note: If more than one defaulting condition is valid, the conflict is resolved by
   internally ranking conditions using the Precedence value.

   For example, defaulting condition Standard Order has a precedence value of two
   and Copied Order has a precedence value of one. If an order is standard and a
   copied order, then the defaulting condition with higher priority, Copied Order, is
   used initially. If your conditions for Copy Order do not return a default,
   conditions for Standard Order will be evaluated.

3. Select a Defaulting Condition from the List of Values and then enter the
   defaulting rules to be used if this defaulting condition is TRUE.
Note: The Always condition should be the last in this sequence as it would
   always evaluate to True and no other defaulting conditions would be evaluated.

4. Select the Enable check box if you wish to enable the defaulting condition. If this
   check box is not selected, the defaulting condition is disabled and the rules and
   condition associated with this condition are not used in default possessing.
5. The check box for the field Seeded cannot be updated. This value is seeded by
   Order Management. For seeded Order Management defaulting conditions, you
   are unable to update or delete any fields except:
      o The Precedence field on the defaulting rule condition
      o The Enable check box. You can disable seeded Order Management
          defaulting rules.
6. Within the Default Sourcing Rules region, select the priority sequence in which
   you want to retrieve the default for this attribute.

   The defaulting process searches for a default for your attribute by evaluating
   defaulting rules in ascending order.

7. Select the defaulting source type. The defaulting source type determines data
   entry in the Default Source/Value field.
8. Based on the default source type selected, either select the default sources or
   enter default values in the Default Source/Value field.

   The table below describes Order Management Source Types and the appropriate
   action required by a user.

                  Order Management Source Types and Actions
   Source
   Type           Action required
   Constant       Enter the default constant value.
   Value
   Application    Select the profile option from where you want to retrieve the
   Profile        default value.
   Same Record Select the attribute on the same record from where you want to
               retrieve the default value.
   Related        Object--Select the related object.
   Record         Attribute--Select the attribute on the related object from where
                  you want to retrieve the default value.
   System         Expression--Enter the system expression to be evaluated to
   Variable       obtain the default value. (E.g. System Date.)
PL/SQL API     You can write a custom API to obtain a default value if the value
                      cannot be obtained using other source types such as, the default
                      order number from a sequence.
                      Package--Enter the PL/SQL package name.
                      Function--Enter the function name.
                      Object--Optionally, enter the name of an object to be passed to
                      this API.
                      Attribute--Optionally, you can also enter the name of an attribute
                      to be passed to this API. (See the PL/SQL API Procedure below.)
       WAD            Attribute
       WAD            Object Attribute

   9. Save your work.

Caution

If defaulting rules or conditions are updated, the Defaulting Generator concurrent
program must be run to generate new defaulting packages.

       If you update an existing defaulting rule or condition from within the Defaulting
       Rules window and the update is saved, a pop up window will display a note
       reminding you to submit the Defaulting Generator concurrent program.
       Choose to submit the program by selecting Defaulting Generator from the Tools
       menu while within the Defaulting Rules window, or from the Order Management
       SRS window.
       To generate the Defaulting Generator concurrent program for an entity, you
       must go to the Requests form and select your entity.

You may execute the Defaulting Generator concurrent program while users are still on
the system, although the defaulting package may not generate successfully. This can be
due to the package currently being called by other users who are processing orders on
the system. Common errors within the output log file for this concurrent program may
contain text that a time-out occurred while waiting to lock object.

If defaulting packages do not generate successfully, you must choose to run the
program at a later time, or to have users briefly log off the system while defaulting
packages are regenerated.

Defaulting Rule Example

Here is an example of a defaulting rule that you can define so that a specific Price List
will default to the Sales Order Header window. You may also define a sequence
(priority) in which you want Order Management to search for a Price List.
The default sequence can also be complex.

For example, look on an Agreement for a Price List, followed by the Invoice To
Location, then the Ship To Location, then the Customer, and finally, the Order Type. If
Order Management still does not find a price list for any of the source locations listed
(Invoice-To, Ship To, Customer, Order Type), you can have a Constant Value default,
such as 1998 USA Prices, which you enter in the Value field of the Attribute Defaulting
Rules window.

The table below corresponds to the example stated above.

          Example of Complex Default Sequence
Sequence Defaulting Sources Source Field or Value
1           Related Record         Agreement.Price List
2           Related Record         Invoice To Location.Price List
3           Related Record         Ship To Location.Price List
4           Related Record         Customer.Price List
5           Related Record         Order Type.Price List
6           Constant Value         1998 USA Prices

Note: Oracle Order Management does not recommend that you define any overly
complex or recurring defaulting rules.

PL/SQL API Procedure

The signature of the PL/SQL API is:

    (p_database_object_name VARCHAR2

,p_attribute_code VARCHAR2)

return VARCHAR2


The table below describes Order Management entities, their associated entity code, and
the database object called when the entity is processed within Order Management.

Order Management Entities, Entity Code, and Database Objects Called
Entity               Entity Code          Database Object
Order Header         HEADER               OE_AK_ORDER_HEADERS_V
Order Line           LINE                 OE_AK_ORDER_LINES_V

For example:

Function to default order number from a sequence based on the order type:

Function Get_Order_Number(p_database_object_name IN VARCHAR2,

p_attribute_code IN VARCHAR2)

return varchar2

IS

l_header_rec OE_AK_ORDER_HEADERS_V%ROWTYPE;

BEGIN

-- Getting the defaulting global record

l_header_rec: <= ONT_Header_Def_Hdlr.g_record;

-- for internal orders, use this sequence but for all other order types use the --
sequence for STANDARD orders.

if l_header_rec.order_type_id = 1 then

return to_char(OE_INTERNAL_ORDERS_S.nextval);

else

return to_char(OE_STANDARD_ORDERS_S.nextval);

end if;

END;

Note: The PL/SQL API should only access global record for entity being defaulted else
rules might not work as expected. For e.g. API should not access values on
ONT_Header_Def_Hdlr.g_record if rule is for an order line attribute. Instead reference
values from ONT_Line_Def_Hdlr.g_record.
Deleted Seeded Defaulting Rules

In a multi-org environment, you can no longer specify Order Type and Salesrep at the
Customer Account using the Receivables Customer Form. The multi-org upgrade copies
the values for these attributes from the customer account to the site use (provided
there is no value there) and clears them from the account level.

Therefore Order Management seeded defaulting rules which defaulted Order Type and
Salesrep from the Customer are deleted. The sources (Customer.Order Type and
Customer.Salesrep) are now disabled. To view the deleted defaulting rules, run the
Upgrade Script Report, ontexc16.sql, to get the ontexc16.lst output.

Related Topics

Defaulting Rules

Cascading

Define Credit Checking Rules
Define your credit checking rules. This is required if you plan on performing any type of
order credit checking. This is step twenty-six of the Order Management Setup Steps.

Defining Credit Profiles

Organization Credit Profiles are a set of criteria that define an operating unit's credit
policy for credit control and order credit checking. Credit Profiles include the credit limit
and pertinent data needed to determine total credit exposure for orders undergoing
credit checking.

Credit Profile Limits Hierarchy when performing credit checking:

       Customer Site Profile
       Customer Credit Profile
       Operating Unit Default Credit Profile

       Note: Item Category Credit Profiles are used if you enable Item Category Credit
       Check for a credit check rule.

The Credit Profile window enables users to create and maintain credit information for
Operating Units and Item Categories.

Operating Unit Default Credit Profiles can assist in further defining your credit policies
by providing global defaults if no other information is present during credit checking.
To create a new credit profile, users must specify what type of credit profile to create,
and depending on the credit profile type chosen, appropriate fields within the window
become updatable or non-updatable.

       You cannot define Credit Profiles for Customer or Customer Site by directly
       navigating to the Credit Profile window.
       Credit Profiles for Customer and Customer Sites are initially defined when
       entering credit information in the Credit section of the Profile-Transactions tab of
       the Customer and Customer Site windows. See Oracle Receivables, Customers.
       You must then assign a Credit Usage Rule to your Customer or Customer Site if
       you want to enable multi currency credit check.

Credit Profile Types

       Customer: Enables you to define credit limits by currency for Customers.
       Customer Site: Enables you to define credit limits by currency for Customer Sites.
       Operating Unit Default: Enables you to set credit limits and terms, by currency,
       within a given operating unit
       Operating Unit Default Credit Profiles enable you to effectively enforce a formal
       credit checking process for all order transactions/currencies from any customer,
       provided you define an Operating Unit Default Credit Profile for each currency
       you process order transactions for. For example, if a transaction is entered and
       no credit limits exist at the customer or customer site levels for the specified
       order currency, the Operating Unit Default Credit Profile for the
       transaction/currency entered will be used to determine credit availability.

       Note: The Operating Unit Credit Profile is used as the default profile for all
       customers that do not have an individual credit profile either at customer or site
       level.

       Item Category: Enables you to set order credit limits, by currency, for one or
       more Item Categories. This type of profiles enables you to specify limits for the
       maximum amount on each order for an item category irrespective of a customer
       or site

       Note: Only categories associated with the default category set for the Order
       Management functional area are supported.

       Unlike the Operating Unit Default Credit Profile that defines credit limits for
       specific operating units, Item Category Credit Profiles are applicable across
       operating units. Item Category profiles are global credit profiles and are
       transaction currency based: the credit limits defined for an item category are for
       individual transactions (orders) only. There is no overall system credit limit for a
       category.
Item Categories enable you to set order credit limits/profiles for one or more
     item category (applicable for all customers). For example, an Item Category
     Credit Profile can specify that the maximum order value cannot exceed $10,000
     USD for any order lines that contain an item associated with the Item Category
     Computers. This is extremely useful if your business practice requires item-based
     insurance coverage.

To Define Credit Profiles:

  1. Navigate to the Define Credit Profiles window.

     Credit Profiles Window


  2. . Valid Values for Credit Profile Type are:
         o Item Category
         o Operating Unit Default
Based upon the Credit Profile Type you chose, certain fields become protected or
non-updatable.

Note: If Credit Profile Type = Operating Unit Default, the Item Category field is
disabled.

If Credit Profile Type = Item Category, the Overall Credit Limit field is disabled.

Enter remaining fields that require a value, or update any fields that contain a
default value based upon the Credit Profile Type selected:

   o   Operating Unit:

       Select an Operating Unit name from a list of values if you are defining a
       Operating Unit Default Credit Profile.

   o   Item Category:

       Select an Item Category name from a list of values if you are defining an
       Item Category Credit Profile.

   o   Effective Date From/ Effective Date To:

       Select the Effective Date From and Effective Date To for your Credit
       Profile.

       Note: When defining Credit Profiles for Operating Unit Default and Item
       Category, the Effective Dates From/To cannot overlap previously defined
       Credit Profiles for the same Operating Unit Default or Item Category,
       regardless of the currency.

   o   Tolerance:

       Enter a numeric value in the Tolerance field. Tolerance values are used to
       calculate extended exposure limits during credit checking.

       For example, supposed you enter a value of 5 for Tolerance, and an Credit
       Limit of $10,000 USD. During credit checking, the exposure credit limit
       would actually be $10,500 USD. ((Tolerance + 100)* Credit Limit / 100).

   o   Currency:

       Select a value in the Currency field to limit the Credit Profile to a specific
       currency.
o   Order Credit Limit:

              Enter a value in the Order Credit Limit field, based upon the Credit Profile
              Type. New orders may not exceed the value entered in the Order Credit
              Limit field if the checking processing defaults to the operating unit level.

          o   Overall Credit Limit: Enter a value in the Overall Credit Limit field for a
              Operating Unit Default Credit Profile Type. Total exposure within an
              operating unit for the particular customer may not exceed the value
              entered in the Overall Credit Limit field if credit checking processing
              defaults to the operating unit level.

      The following fields are for future use and are for information purposes only.
      Values that are ignored during the credit checking process are:

          o  Credit Check
          o  Credit Hold
          o  Credit Rating
          o  Next Review Date
   3. If you wish to enable multi currency credit check, you must assign Credit Usage
      Rule Sets to your Credit Profile. Select the Assign Rule Set button. The Assign
      Rule Set button is only enabled for the following Credit Profile Types:
          o Item Category
          o Operating Unit Default

      To assign Credit Usage Rules to Customer or Customer Sites Credit Profile Types,
      you must use the Assign Credit Usage Rules window.

   4. Save your work.

Defining Credit Usage Rule Sets

The Define Credit Usage Rules window enables a user to create and maintain credit
usage rule sets that can be assigned to Credit Profiles.

Credit Usage Rule Sets define the set of currencies that will share a predefined credit
limit during the credit checking process, and enable the grouping of currencies for
global credit checking. Usage Rules Sets ensure that if credit checking is enabled, that
all transactions for specified currencies go through the currency conversion process and
are summarized by currency prior to the credit checking process.

      You can define a usage rule set for a single currency or multiple currencies
      You can choose to assign a global usage rule (all currencies) and then exclude
      one or more currencies from the rule set
You can choose to define multiple usage rules for multiple currencies within the
      usage rule set
      You can choose to add or delete new Currency records for an existing Usage
      Rule Set

Usage rule sets consist of at least one usage rule/currency combination, and once a rule
set is assigned to an Oracle Entity, the rule set provides processing defaults for
determining credit availability during multiple currency credit checking processing
routines.

To define credit usage rule sets:

   1. Navigate to the Define Credit Usage Rules window.

      Define Credit Check Usage Rules Window


   2. Enter a name for your rule set in the Usage Rule Set Name field.
   3. Select the Global Exposure box if you wish to enable the Usage Rule Set for
      global exposure (across operating units). By default, this box is unchecked (do
      not enable Global Exposure for the usage rule set).
If you are unable to select the Global Exposure check box, submit the Credit
      Limit Usages Report. Review the report output and un-assign any usage rule sets
      with different Global Exposure options for the same credit profile.

   4. Select the value Currency in the Usage Type field.
   5. Enter a currency in the Currency field.

      The Currency field can contain any Currency Code currently defined. The
      Currency field may also use the lookup All Currencies to indicate the usage rule is
      for all currencies defined.

   6. Chose to exclude a specific currency for your usage rule by selecting the Exclude
      check box. The default is unchecked, or No.

      Note: If the field Currency has value of All, the Exclude check box is non-
      updateable.

   7. Save your work.

Warning: Given a customer with the following credit profiles:

      FRF (french francs) credit limit
      EUR (euro) credit limit assigned to a european set of currencies that includes FRF
      (using the new multicurrency feature - usage rule sets)

The credit checking process for a transaction in FRF is determined by the credit check
engine; perform multi-currency credit check if a Credit Usage Rule Set assignment has
been defined.

Assigning Credit Usage Rule Sets

The Assign Credit Usage Rules window enables a user to assign credit usage rules sets
for multiple currency credit checking to Credit Profiles.

To assign credit usage rules:

   1. Navigate to the Assign Usage Rules window. Order Management > Setup >
      Credit > Assign Usage Rules.

      Find Credit Profiles Window
Find Credit Profiles Window

Before you can assign a Usage Rule Set to a Credit Profile, you must first select
the Credit Profile Type and then locate the corresponding Credit Profiles.

Certain query processing logic has been disabled within the Find Credit Profiles
window;

   o   If the value of the Credit Profile Type field is Profile Class, then the
       Operating Unit, Customer, Bill To Site, and Item Category fields are
       disabled.
   o   If the value of the Credit Profile Type field is Customer, then the Profile
       Class, Operating Unit, and Item Category fields are disabled.
   o   If the value of the Credit Profile Type field is Operating Unit Default, then
       the Profile Class, Customer, Bill To Site, and Item Category fields are
       disabled.
   o   If the value of the Credit Profile Type field is Item Category, then the
       Profile Class, Operating Unit, Customer, Bill To Site, and Overall Credit
       Limit fields are disabled.

Once you have entered your search criteria, select the Find button to either
locate your existing credit profile usage rules or to define new usage rules for an
existing profile.
Assign Credit Usage Rules Window


2. The data appearing in the upper region of the window defaults from the Credit
   Profile you have queried. This information is protected against update.
3. The multi-row section of the Assign Usage Rules widow enables you to select
   Credit Usage Rule Sets to use with the credit profile.

   You select a Name from the List of Values, and the included and excluded
   currencies fields will display currencies that the usage rule set consists of. These
   values are protected against update from this window.

   For detailed field information, see Defining Credit Profiles, Step 3 and 4.

4. Save your work.
Upon saving your usage rule assignments, a message is displayed to ask if you
      wish to cascade changes to usage rule assignments for existing customers with
      the Customer Profile Class you are saving.
      New customers created using Customer Profile Classes with previously defined
      credit usage rules do not automatically inherit the Customer Profile Class usage
      rule assignments. You must manually create these assignments.

Defining Credit Check Rules
Overview

Order Management credit check rules enable you to determine what credit checking
criteria is used when determining credit exposure during the credit checking process.
Order Management transaction types determine when credit checking actually occurs,
and when used in conjunction with credit checking rules, define your credit checking
process.

For example, you can define credit checking rules that utilize pre-calculated exposure
information to use when comparing a customer's current order amount against their
overall exposure; if the order transaction type utilizes this rule, and the order fails
during the credit check process, it is automatically placed on credit check hold. You can
define as many credit checking rules as you need, and if you inactivate a credit
checking rule, you also must remove it from any order types that use it.

Additionally, you can include in or exclude from your credit check rule some or all of
your open accounts receivable balances, and some or all of your uninvoiced orders.

Order Management uses the currency of the order you are credit checking to determine
which credit limits to use in credit checking calculations. Order Management only
includes orders and invoices in the same currency as the order you are credit checking
when calculating a customer's outstanding credit balance, unless you have set up
multiple currency credit checking.

You can also include/exclude returns based on your credit check rule definition.
However this should be used only if you are using return lines with credit memos.

Besides defining your credit exposure composition, the credit check rule also
determines:

      Credit check level (order or line)
      Credit Hold level (order or line)
      Conversion type used when you enable multi-currency credit check
      Use of item category credit check
      Send hold notifications to the sales order creator
Use of pre-calculated exposure

Credit Limits for Credit Checking and Rules Summary

   1. When the Credit Check flag is turned off at the site level that pertains to the Bill-
      To address, there will be no credit checking for orders for this Bill-To site. It
      doesn't roll up to the next level to get the credit limits.
   2. If the Credit Check flag is turned on at the site level, and both overall credit
      limits and order credit limits are all NULL/BLANK, then the limits for a customer
      who owns that bill to site will be automatically considered .
   3. If the Credit Check flag is turned on at the customer level, and both overall credit
      limits and order credit limits are all NULL/BLANK, roll up to the next level in the
      party hierarchy (if any). Otherwise, use the Operating Unit Credit profile. Note
      that party profiles are used only if Credit Management is setup. If not, from the
      customer level we go directly to the Operating Unit.
   4. If the Credit Check flag is turned on at each level, and there is only one field left
      NULL/BLANK (for example, order limit is null but overall exposure is some
      number), then this NULL/BLANK field is treated as unlimited and it does not
      rollup to next level.
   5. If the last level reached with the Credit Check flag enabled has both overall and
      order credit limits set as NULL/BLANK, it means no credit checking should be
      performed. IF the Credit Check flag is enabled and order credit limit is not
      NULL/BLANK, then a credit check will be performed at the item category level.
   6. If the Credit Check flag is disabled for item category or if the Credit Check flag is
      enabled and both order credit limit and overall credit limit are all NULL/BLANK for
      item category, then credit checking will not happen at the item category level,
      but credit checking will still be performed for the site-customer-(party)-OU level
      based on the rules discussed. IF the Credit Check flag is enabled and at least one
      of the order credit limit and overall credit limit fields are not NULL/BLANK, then a
      credit check will be performed at the item category level.

Performance Note

In order to improve performance you can enable the use of pre-calculated exposure.
Utilizing this option, the credit check engine will use summary balance details stored in
a periodically updated summary table.

The update is done by running a concurrent program which accesses Order
Management and Account Receivable transactional tables. This program should be
scheduled to run periodically based on your specific business needs. You should also
run this concurrent program when you have done major changes in your set up or
transactional data (merge customers, incorporate transactions from external systems,
change transaction status using customized programs, etc.).
To define a credit check rule:

  1. Navigate to the Credit Check Rules window.

     Credit Check Rules Window


  2. Enter a name for your credit check rule.
  3. Optionally, enter the Effective Dates for your rule.

     Options Tab

  4. Select the entity to perform credit checking against for your rule. Select from:
        o Sales Order
        o Sales Order Line
Note: If you select Sales Order Line as your credit check level, the Use
           Pre-calculated Exposure check box will be checked and protected against
           update

           If you choose to perform credit checking at the Sales Order level, you are
           limited to the system generating header level credit holds only. The Credit
           Hold Level field will default to Sales Order and is protected against
           update.

5. Select the Credit Hold Level for your credit rule. Select from:
      o Sales Order: Sales Order (order level) credit check is performed for the
          header Bill To site. Sales Order level credit checking provides backward
          compatibility with previous credit check versions. When credit checking
          rules are defining using Sales Order as the credit check level, the credit
          check engine will examine order totals and evaluate credit exposure
          against the credit profile attached at header level.

           Holds will be always applied at header level.

           Use order level credit check when order lines always have the same Bill To
           Site as the Order Header.

       o   Sales Order Line: Sales Order Line (line level) credit check is performed
           against order line Bill To Sites. The credit check engine will group all order
           lines belonging to the same Bill To Site and check available credit for each
           specific Bill To Site. When an order line fails credit check, any remaining
           lines grouped with the same Bill To Site are placed on hold.

           Holds can be placed at either the order or order line level when you use
           line level credit checking.

           Use line level credit check when sales order lines are attached to different
           Bill To Sites and you want to use the credit profile defined at that level.
           Additionally, you can use line level credit check when you have defined
           customer relationships within your system and actively use them within
           Order Management. Using customer relationships, you can create sales
           orders with order lines attached to different Bill To Sites owned by
           different customers.

           Order Header level credit checking uses header level information ignoring
           different bill-to sites detailed at the line. Credit Check uses the credit
           profile attached to the customer Bill-to site defined at order (header)
           level. Credit checking at the Order Header level will use order totals and
           will evaluate credit exposure against the credit profile attached at header
           level, and holds are always applied at header level.
6. Special Considerations for Credit Hold Level
      o If you update the Credit Hold Level from Sales Order to Sales Order Line,
          a pop up dialog box will display a message indicating that existing sales
          order credit holds will need to be released manually. Select Yes to
          continue or No to not commit the update.
      o If you update the Credit Hold Level from Sales Order Line to Sales Order,
          a pop up dialog box will display a message indicating that existing sales
          order line credit holds will not be released automatically. Select Yes to
          continue or No to not commit the update.
7. Override Manual Release check box: This check box enables an order or line
   which had failed credit checking and then was subsequently manually released to
   be eligible for additional credit check processing. Select from:
      o Yes: Manual Released Holds will be overridden. You must also enter a
          value within the Days to Honor Manual Release field.
      o No: Manual Released Holds will be honored. The field Days to Honor
          Manual Release will be non-updatable.
8. Days to Honor Manual Release: The field is used in conjunction with the Override
   Manual Release check box. If you enable the Override Manual Release check
   box, you must enter a numeric value greater than zero within this field.

   Manual Released Holds (Credit Checking Procedures)

   Each time a credit check failure occurs for order or order line, the corresponding
   order or order line is placed on credit check hold. However, prior to the credit
   check holds actually being applied, the credit check process determines:

      o   If a manually released credit check hold exists and
      o   If your credit check rule enables override of manually released holds (in
          conjunction with the value for Days to Honor Manual Release).

   If Override Manual Release is not enabled for your credit check rule, then
   manually released holds are honored and no additional credit checking will occur.

   If Override Manual Release is enabled, the credit checking process will validate if
   the release date is within the interval defined by the value of Days to Honor
   Manual Release. If the value is within the range defined, then manually released
   holds will be honored and additional credit checking is not performed. If the
   value is not within the range defined, credit checking can occur again and credit
   check holds can be applied if the order or lines fails the credit check process.

   Note: The value of OE_HOLD_RELEASES.CREATION_ DATE is used by the credit
   check process to determine if the duration defined for the credit check rule is
   within range for additional credit checking: when any hold is released for an
   order or line, Order Management inserts a record within OE_HOLD_RELEASES.
9. Select the conversion type to use when performing credit checking using your
    credit rule. The LOV for this field is limited to the values you define within the
    Oracle General Ledger Conversion Rate Types window.
10. Select the Check Item Categories check box for your credit rule if you wish to
    perform credit checking for sales orders by Item Categories defined for Order
    Management.
11. Select the Send Hold Notifications check box if you wish to send hold
    notifications whenever a credit hold is placed for a sales order or order line. The
    notification is sent to the creator of the order.

   Determine the type of credit exposure to use when defining your credit check
   rules by selecting the Exposure Tab within the Define Credit Check Rules
   window.

   Exposure tab in the Credit Check Rules Window


   Exposure Tab
12. Select the Use Pre-calculated Exposure check box for your credit rule if you wish
    to perform credit checking against pre-calculated exposure summary tables.
        o When the first credit check rule that has the Use Pre-Calculated Exposure
           check box checked is successfully saved, the following message will
           display:

          This credit check rule uses pre-calculated exposure. Please run the
          Initialize Credit Summaries program to update the pre-calculated data.

      o    If the Use Pre-calculated Exposure check box is checked and the Include
           Open Receivables balance check box is checked, then Open Receivables
           Days is protected against update and is NULL.
       o If the Use Pre-calculated Exposure check box is checked and the Include
           Uninvoiced Orders check box is checked, then Shipping Horizon Days is
           protected against update and is NULL.
13. Select the Include External Credit Exposure check box if you wish to include
    external exposure details imported into Order Management during the credit
    checking process.

   When an Oracle Order Management sales order is credit checked, the exposure
   data from the external system is included in the overall exposure check. The
   default value for this check box is un-checked (exclude external exposure details
   when performing credit checking).

   Receivables Balance Region

14. Select the Open Receivables Balance check box for your credit rule if you wish to
    include open receivables balances.

   You must enable either the Include Open Receivables Balance check box or the
   Include Uninvoiced Orders check box in your credit check rule. You can activate
   both, but you cannot toggle both off.

   If you select both the Pre-calculated Exposure and Open Receivables Balance
   check boxes, you are unable to specify Open Receivables Days.

15. If you enabled Include Open Receivables Balance in your credit check rule, you
    can indicate whether to Include Payments at Risk when calculating a customer's
    outstanding balance.

   Receipts at risk are remitted receipts that have not been cleared, or discounted
   (factored) receipts that have not been risk eliminated. If the performance of
   credit checking requires improvement you can toggle off this option.
16. If you enabled Include Open Receivables Balance, enter a value to indicate the
    range of dates for open receivables you wish to include for your credit check
    rule.
        o Negative Number: Includes past due, current, and future open receivables
           up to X days beyond the current date
        o Positive Number: Includes open receivables with invoice dates X days
           earlier than the current date
        o No Value: Includes all open receivables

   Uninvoiced Orders Region

   Note: If you do not select the Include Uninvoiced Orders check box, you cannot
   select any check boxes within the region.

   Important: If an order line has been interfaced to the Receivables interface
   table but hasn't been invoiced yet, the Order Management credit check engine
   will include this line amount as part of the uninvoiced order amount. If your
   system enables credit checking and your Receivables Interface table can
   potentially contain large volume of data, it is recommended that you create a
   custom index on RA_INTERFACE_LINES_ALL table
   ORIG_SYSTEM_BILL_CUSTOMER_ID column.

17. Select the Include Uninvoiced Orders check box if you wish to include uninvoiced
    orders for your credit rule.

   If you enabled Include Uninvoiced Orders:

      o   Indicate whether to include Freight and Special Charges for uninvoiced
          orders when performing credit checking.

          Select the Freight and Special charges check box to include Freight and
          Special Charges.

      o   Indicate whether to include Tax information for uninvoiced orders when
          performing credit checking

          Select the Tax check box to include Tax information for uninvoiced orders.
          Credit checking calculations on open receivables always include tax
          amounts and are not affected by the Include Tax option. If the
          performance of credit checking requires improvement you can toggle off
          this option.

      o   Indicate the number of scheduled shipping horizon days for your credit
          rule for uninvoiced orders to be included in your total credit exposure
          when performing credit checking.
For example, if you enter 45, the total exposure includes only uninvoiced
               orders scheduled to ship within 45 days of the current date. Orders
               scheduled to ship after 45 days are not included when calculating
               exposure.

               Note: If the Use Pre-calculated Exposure check box is checked,
               Scheduled Shipping Horizon Days is protected against update.

          o   Indicate whether to Include Orders Currently On hold. Select the Include
              Orders Currently On hold check box to include orders on hold within the
              exposure calculation for your credit rule.
   18. Indicate the Maximum Days Past Due.

      The Maximum Days Past Due field value specifies the number of day that you
      will allow an invoice to be past due before holding the customers orders. During
      the credit checking process, Order Management will verify that no invoices for
      the customer have been past due beyond the number of days you specified with
      this field. If there are any such past due invoices, the order is placed on credit
      hold.

   19. Save your work.

Deactivating Credit Checking
There are three ways to deactivate Credit Checking on an order:

      Use an order type that does not have an assigned credit rule
      Define the Customer Profile so that the Credit Check box is not selected
      Use payment terms for which the Credit Check box is not selected

Deactivating Credit Checking does not automatically release orders previously on credit
hold. However, the next time you attempt to Book, Pick Release or Purchase Release
(for drop shipments), Pack, or Ship Confirm an order which utilizes a Order
Management Transaction type that enables credit checking to occur at the specified
order points, or you perform an order change that trigger credit checking in the Sales
Orders window, Order Management will releases the credit check hold if the order or
line meets the requirements for successful credit check.

Related Topics

Payment

Sales Orders
Holds and Releases

Oracle Payments Processing
Order Management provides you with the ability to record credit card information
through the Sales Orders window and obtain authorizations for credit card transactions
using Oracle Payments. You can also set up the security feature to mask confidential
card holder information.

Order Management tracks the following credit card information at the order header:

       Credit card numbers
       Credit type
       Credit card holder's names
       Expiration dates
       Payment types and methods
       Authorization codes and amounts

Warning: Oracle Payments processing can only occur if you are using an order type
that has a credit checking rule and the rule will perform the authorization at Booking or
Shipping.

Risk Management

Oracle Payments offers a risk management feature to identify high risk transactions by
Oracle Risk Management. This feature enables merchants and e-commerce service
providers to manage the risk when processing transaction through the internet. Oracle
Risk Management enables you to define any number of risk factors to verify the identity
of your customers, assess their credit rating, and manage risk in a secure on-line
environment.

You will receive the customer's risk score, which is based on the risk factors, scores,
and formulas that are setup in Oracle Risk Management.

If the risk factor score exceeds the risk score threshold, the order is automatically
placed on hold. High risk holds include credit card authorization and high risk failures. If
a customer's transaction receives both authorization failures, the authorization failure
hold will be applied. Both hold types can be removed manually and the order will
continue through the order cycle process.

Order Management authorizations use the default risk formula that you have set up in
Oracle Payments. Below is a list of risk factors that can be used by Oracle Payments:

       Payment amount
Time of purchase
       Payment history
       Frequency of payments
       Transaction amount limit
       Ship To and Bill To addresses

Quantity Changes and Cancellations

Authorizations occur at the sales order header for the total order amount less any
amounts covered by commitments. Return lines are not included in the order amount to
be authorized.

When an authorized order is changed, Oracle Payments Processing re-authorizes the
credit card if the existing authorization has expired. Estimated expiration of the
authorization is calculated by Oracle Payments. Actual expiration of authorization varies
by card issuer. Because these incremental amounts may not be authorized, you might
not be able to collect those funds.

To perform authorization of these incremental amounts, do either of the following:

       Enter a new order for the additional items or quantities.
       Use action Authorize Payment. This process reauthorizes the full order amount
       and may result in a understating of the customer's open to buy balance on their
       credit card.

Manual and Online Authorizations

You can choose to obtain manual authorizations and enter the authorization code in the
Authorization Code field in the Sales Orders window.

Security

Order Management enables you to mask cardholder information including credit card
numbers and authorization codes by setting the OM: Credit Card Privileges profile
option. Only the last four digits of the credit card number are displayed if the profile
option is set to Limited or None. If the profile option is set to All, the full credit card
number is displayed.

Drop Shipments

Order Management provides the ability to obtain credit card authorizations for drop
shipments. Authorizations are obtained at the booking and purchase release activity of
the drop shipment order.
Related Topics

Drop Shipments

Payment

Define Automatic Holds
You can define holds to halt processing of your sales documents as well as order and
return lines. This is step twenty-seven of the Order Management Setup Steps. Because
orders and returns are not affected by holds until they are applied, you can define all
the holds you use in your business at once. You can define holds that are effective only
at certain steps of the order or line workflow and holds that apply regardless of the
stage in the order's flow.

For example, you may want to apply an item hold to prevent order lines for a particular
item to be released for shipment. Any orders that are not ready for shipment or any
orders that have already been shipped are not affected by this hold. You can also
define a hold that affects all orders, no matter where the order is in its flow. When this
type of hold is applied, it is effective regardless of the order's position in the flow.

For each hold, you can specify hold security by responsibility to control which
responsibilities have authority to apply and/or remove the holds you define. Holds can
be defined to be specific to pick, pack, ship, or invoice interface activities.

Order Management Hold database tables are striped by organization ID. Therefore, you
will need to define holds for each operating unit within your enterprise structure.
However, hold type quickcodes only need to be defined once.

The table below describes Order Management seeded Hold Names, the associated Hold
Type, and a description of the hold source.

    Order Management Seeded Hold Names and Associated Hold Type and
                       Description of the Source
Hold Name               Hold Type          Description
Configurator            Configurator       Automatically applied to order lines that fail
Validation Hold         Validation         Configurator Validation.
Credit Card             Electronic         Automatically applied to orders if credit card
Authorization Failure   Payment            authorization request to Oracle Payment fails.
Credit Card High Risk Electronic           Automatically applied to orders if risk score
                      Payment              determined by Oracle Payments is greater
                                           than the value of the risk factor threshold.
Credit Check Failure   Credit Check       Automatically placed if credit check rule
                                          evaluation fails on orders setup to be credit
                                          checked.
Credit Check Failure   Credit Check       Automatically placed if the Credit Hold box is
                                          selected on the customer record in AR.
GSA Violation          GSA Violation      Automatically placed on orders which are in
                                          violation of GSA.
NO pre-defined hold    Order              Reserved for you to define administration
name for this hold     Administration     holds based on your business processes.
type                   Hold
ePayment Failure       Electronic         This is for expected errors returned by Oracle
Hold                   Payment            Payments like invalid data
ePayment server        Electronic         This is for unexpected errors returned by
Failure Hold           Payment            Oracle Payments, for example a failure to
                                          connect to the server.
Export Compliance      Import/Export      This hold is applied when an order fails
Hold                   Compliance         export compliance screening.
Pending Process        Electronic         This is applied when process payments is
Payment Hold           Payment            deferred.
Promotional Line       Promotional Hold Automatically placed on lines which exceed a
                                        soft modifier promotional limit.
Promotional Order      Promotional Hold Automatically placed on orders which exceed
                                        a soft modifier promotional limit.

Note: Promotional Line/Order Holds functionality is only available if you have licensed
and installed Oracle Advanced Pricing.

To define a generic hold:

   1. Navigate to the Holds window. Order Management > Setup > Orders > Holds

      Holds Window
Generic holds are placed at the order level. Order lines are considered implicitly
   on hold for an order that has a generic hold against it.

   You will not see hold information for generic holds at the order line level, only at
   the order header. A new check box "Apply to Order And Line" has been
   introduced on holds definition form, which will be enabled only if a line level
   workflow activity is entered in the hold definition. If the check box is checked,
   then this line level hold is applicable at the header also. The default value of this
   check box is unchecked so that existing behavior is maintained.

2. Enter the Name and Description for the hold you want to create.
3. Select a valid Hold Type. Hold Types are defined using the Order Management
   Quickcodes window. See: Quickcodes
4. Workflow Item: Leave this field blank for generic holds.
5. Workflow Activity: Leave this field blank for generic holds.
6. Optionally, enter the Effective Dates for the hold to control when you can use
   this hold.
7. Optionally, determine which user responsibilities have authority to apply and/or
      release holds by entering combinations of responsibilities, authorized actions,
      and effective dates.

      You can give some responsibilities the authority to apply a hold, other
      responsibilities the authority to release it, and others the authority to do both. If
      you do not specify a responsibility for a hold, any responsibility can apply or
      release it.

   8. Save your work.

To define an activity-specific hold

   1. Navigate to the Holds window. Order Management > Setup > Orders > Holds
   2. Enter the Name and Description of the activity-specific hold you want to create.
   3. Select a valid activity-specific hold Type.

      Order Management provides two standard hold types that are used for the GSA
      and Credit Checking features: GSA Violation Failure and Credit Check Failure.
      Order Management also provides the Configurator Validation hold type, which is
      used if you invalidate a configuration after booking and an order administration
      hold. Hold types are also provided for import/export compliance, ePayment and
      promotional limits. Define other hold types using quickcodes.

   4. Select the Workflow Activity for the hold.

      The workflow activity determines where in the order process the hold will be
      applied. At the line level, All other lines will be processed except for the line for
      which the hold is effective.

      The LOV for this field is determined by the value selected for the field Workflow
      Item. This field is required if you have entered or selected a value within the
      Workflow Item field only.

      For example, you can define a hold that prevents an order line from being
      released for picking by entering Pick Release in this field. The hold takes effect
      as soon as an order line that meets your hold criteria is eligible for Pick Release.

   5. If you want included items of a configurations option class the included items
      may have had a hold placed against it to be included in the applied hold. This is
      an optional feature based on your specific business requirements.
   6. Optionally, enter the Effective Dates for the activity-specific hold to control when
      you can use this hold.
7. Optionally, determine which user responsibilities have authority to apply or
      release activity-specific holds by entering combinations of responsibilities,
      authorized actions, and effective dates.

      You can give some responsibilities the authority to apply a hold, other
      responsibilities the authority to release it, and others the authority to do both. If
      you do not specify a responsibility for an activity-specific hold, anyone can apply
      or release it.

   8. You can choose to progress the workflow if you select the Progress Workflow on
      Release checkbox. In such a situation, the workflow activity is progressed for
      single order lines that are released and it is deferred for multiple order lines. For
      multiple order lines, you can use the Workflow Background Process to progress
      the lines in batch.
   9. Save your work.

Define Attachments
Order Management provides you with attachments features to:

      Include attachments with orders and order lines
      Include attachments with order returns and order return lines
      Add free form text to the Sales Order Acknowledgement Report
      SA header includes attachments
      Quote header and lines include attachments

This is step twenty-eight of the Order Management Setup Steps.

Defining Documents for use by the Attachment feature

Using standard Oracle Application Attachment functionality, you can define and set up
standard or one time documents with or without attachment addition rules. These
documents can later be attached to your sales documents using the Attachments
window or automatically by specifying attachment addition rules. You can add free form
text to your orders, order lines, returns, and return lines as attachments, and you can
also copy standard documents and modify them into one time document attachments.
You may also translate documents to the language of your choice.

Applying Attachments

You can automatically apply standard attachments to orders and returns based on the
attachment addition rules you define. You can also apply attachments manually by
selecting the Actions button and then selecting Apply Automatic Attachments within the
Sales Orders or Order Organizer window.
If you wish to enable the automatic attachment functionality, you must set profile
option OM: Apply Automatic Attachments to Yes. However, if an order or return is
modified, attachments must be reapplied manually, by the method mentioned above.

Editing Attachments

You can edit existing attachments by the following methods:

      Via the Sales Orders or Order Organizer window by choosing the Attachments
      icon from the Toolbar, and then modifying existing attachments (provided the
      attachment has been enabled for edit) or
      Via the Documents window by first locating your document, and then performing
      your edit.

Viewing Attachments

You can view the attached documents in the Order Organizer, Sales Orders, Sales
Agreement Organizer, Sales Agreement, Quick Sales Orders, Quick Order Organizer,
Quote, and Quick Quote windows. Within these windows, you can view attachments in
either of the following manners:

      From the View menu, select Attachments or
      Select the Allotment icon (paperclip) from the Toolbar

Copying Orders

You can copy document attachments to a new order or return when you copy an order
by using the Copy orders feature. When performing a order copy, within the Copy
Orders window, select either the option of including or excluding manual attachments
when copying orders, order lines, returns, and return lines. Note: Sales Agreements do
not copy attachments or contract documents.

Order Import

Once an order has been imported through Order Import into Order Management, you
can apply your attachments. You can automatically apply attachments to imported
orders based on your attachment addition rules. When creating the order or order line
through Order Import, automatic attachments are applied if the profile option OM:
Apply Automatic Attachments is set to Yes.

Report Assignment

Order Management currently utilizes Oracle Attachments functionality for the Sales
Order Acknowledgement Report. You can choose to attach a document of type Text to
be printed on the report output for either the Order Header, Order Body, or Order
Footer entity.

Security

When viewing order and returns, you can specify which user responsibility can apply
and update or simply view attachments. The function security feature available from the
Oracle System Administrator responsibility also applies attachments. If you set the
function security to view orders and returns, you will only be able to view attachments
without the ability to apply or update the attachment.

Application Object Library Profile Option setting for Attachments

Attachment File Directory

ATTACHMENT_FILE_DIRECTORY

The directory in which file type attachments data is stored. The system administrator
sets this profile option during the install process. Users can view, but not update this
profile option.

This profile option is visible and updatable at all levels.

                     Attachment File Directory
Profile Level Setting                   Visible Allow user Update?
System Administrator: Site              Yes       Yes
System Administrator: Application       Yes       Yes
System Administrator: Responsibility Yes          Yes
System Administrator: User              Yes       Yes
User                                    Yes       No

Indicate Attachments

ATCHMT_SET_INDICATOR.

This profile option allows you to turn off indication of attachments when querying
records (for performance reasons). Users can see and update this profile option.

This profile option is visible and updatable at all four levels.
Indicate Attachments
Profile Level Setting                   Visible Allow user Update?
System Administrator: Site              Yes      Yes
System Administrator: Application       Yes      Yes
System Administrator: Responsibility Yes         Yes
System Administrator: User              Yes      Yes
User                                    Yes      Yes


Defining Documents in Advance
You can predefine standard, template, and one-time documents to attach to your
orders or returns and additionally, order and return lines, also Quote and Quote lines as
well as Sales Agreements (not for SA lines).

The only prerequisite is to define your document categories.

Defining Attachment Addition Rules
Using standard Oracle Attachment functionality, you can specify rules for automatically
attaching of all types of documents to orders and order lines. You can specify that
documents be applied to orders or lines for a certain customer, Bill To customer, Ship
To customer, item, order type, and/or purchase order. For Order Management, you can
specify attachment addition rules at the order level for the following attributes for
orders, quotes, or returns:

       Customer
       Customer PO
       Invoice To
       Order Category
       Order Type
       Ship To

At the order line level, you can specify your attachment addition rules by specifying
values for the following attributes on the order, order line, quote line, or return line:

       Customer
       Inventory Item
       Invoice To
       Line Category
       Line Type
Purchase Order
      Ship To

Note: SA does not support rule based attachments.

Defining Document Categories
Using the functionality of Document Categories within the Oracle Applications
Documents feature, you specify document categories to define Order Management
attachment definition rules. You can choose to use the following Document types as
attachments:

      Document Reference
      File
      Long Text
      Short Text
      Web Page

Once you have defined your document Category, you can then perform Category
Assignments to enable Oracle Applications functionality for the following entities:

      Oracle Forms
      Oracle Application Functions
      Oracle Reports that have been enabled for usage with Attachments.

To define document categories:

   1. Navigate to the Document Categories window.

      Document Categories Window
Note: Ensure that you navigate to the Document Categories window available
     from the Order Management Super User Responsibility, Attachments submenu
     (Setup->Sales Order/Returns->Attachments->Document Categories) when
     defining attachments for Order Management reports or windows.

     The Document Categories window available from the Order Management Super
     User Responsibility, Documents submenu (Setup->Documents->Categories) is
     for creating document categories to assign document sequence rules.

  2. Enter a value for your category name in the Category field.
  3. Select the default attachment datatype in the Default Datatype field.

     The default Datatype can be overridden when you create documents. If you are
     creating a document category for Order Management reports, you must choose
     either Short Text or Long Text.

  4. Optionally, enter an effective date range for your attachment category.
  5. Save your work.

To assign document categories to functions, forms, or report

  1. Navigate to the Document Categories window. Order Management > Setup >
     Documents > Categories
2. Either enter a new Document Category and save your work, or select a
   Document Category previously defined, and click Assignments.

   Category Assignments Window


3. Select the entity type you wish to enable document category attachments for.
   Select from:
      o Forms
      o Functions
      o Reports

          Order Management enables Oracle Application Attachment functionality
          for the following entities:

      o   The Sales Order and Order Organizer Window (form)
      o   The Sales Order Acknowledgement Report

          If you choose to include an Attachment for printing on the Sales Order
          Acknowledgement Report, you are currently limited to selecting a data
          type of Short or Long Text. Additionally, order-level attachments print only
          at the order header or order footer within the output, and order line-level
          attachments print only in the report body (within the body of each record
          displayed).

          You can associate as many reports as you need with a single category. If
          you customize your own reports to include documents, you can specify
your own as well as Order Management's default reports in this field. Only
             text documents can print on reports.

             Oracle Shipping Execution enables Oracle Application Attachment
             functionality for entities such as Bill of Lading, Commercial Invoice, Pack
             Slip, and Pick Slip. See Oracle Shipping Execution User's Guide.

             Oracle Pricing enables Oracle Application Attachment functionality for
             entities such as Agreements and Price Lists. See Oracle Advanced Pricing
             User's Guide.

   4. Select a Format. Select from:
         o Header
         o Body
         o Footer

             The Format value determines where documents in this category will
             appear on the report. You can add your own formats for selection within
             the Category Assignment window by adding values to the Order
             Management QuickCode NOTE_FORMAT type. However, standard reports
             support only the seeded format of Header, Body, and Footer.

   5. Warning: In standard reports, order-level notes print only at the header and
      footer levels; line-level notes print only in the report body.
   6. Save your work.

Related Topics

Oracle E-Business Suite User's Guide.

Define Freight and Special Charge Types
Order Management enables you to charge for freight and special charges to meet your
business needs. The full charge to your customer is visible at the time of order entry
and can be communicated to the customer. The freight and special charge amounts can
be estimated or final. The actual costs incurred are captured at Ship Confirmation and
can be converted to charges based on freight terms and other rules you define. Freight
and Special Charges are created and enabled using pricing Modifiers. This is step
twenty-nine of the Order Management Setup Steps.

Order Management captures the freight and special charges information and Shipping
Execution captures all costs incurred on the shipment of goods. Once ship confirmation
completes, the costs are transferred to Order Management and may be used to convert
the costs into charges. You can set up your different freight costs in Shipping Execution.
Order Management's freight and special charge feature enables you to:

       Capture the charges at the time of order entry
       Change the freight and special charges until invoicing
       Capture the freight and special charge information at any point in the order flow
       Create various freight and special charge types
       Support charges at various levels (order and line)
       Specify the controls for refunds

Freight Terms

You can choose the freight terms for an order line depending on the Customer
Contracts (agreements), Customer, Ship To, and Ship-From locations. Freight Terms
can be used as Qualifiers to apply freight & special charges, although no such
functionality is seeded with the application. Freight terms can include the following:

Prepaid

You (the shipper) take responsibility for paying the freight costs. The costs are recorded
in Shipping Execution.

Prepay and add with fixed charges

You can prepay the freight costs and charge your customer a fixed amount. The costs
are recorded in Shipping Execution and transferred to Order Management.

Prepay and add with cost converted to charge

You can prepay the freight costs and pass it on to your customer as a charge with a
markup or markdown or a direct pass through. The costs are recorded in Shipping
Execution and transferred to Order Management.

A pricing formula and pricing modifier are used to calculate the markup/markdown and
apply the charge to the customer invoice.

Collect

The freight carrier bills the customer directly; not you. The costs are not recorded in
Shipping Execution or Order Management.

Third Party Billing

The freight carrier bills a third party, not the seller or buyer. The costs are not recorded
in Shipping Execution or Order Management.
Freight and Special Charge Types

Order Management provides you with the ability to setup and capture different charge
types and sub type including (but not limited to):

      Duty
      Handling
      Insurance
      Export
      Freight
      Administration
      Miscellaneous

Grouping of Freight and Special Charges

You can setup different sub-types under a give charge type, such as, if the freight or
special charge type is Miscellaneous, you can group the following different charges:

      Late penalty charges
      Restocking charges
      Negotiations and legal fees
      Foreign agent commissions

The following Charge Types and sub-types have been predefined by Oracle Advanced
Pricing under the Oracle Shipping Execution lookup for FREIGHT_COST_TYPE:

      Insurance
      Export
      Duty
      Freight
      Administration
      Handling

Order Management shares these Freight Cost Types with Shipping Execution for the
COST to CHARGE conversion.

Note: You cannot define sub-types for the Shipping Execution Charge Types lookups.

Additionally, you can only receive cost to charge conversions for auto configured items.

Additionally, Oracle Advanced Pricing has its own lookup type, also called
FREIGHT_CHARGES_TYPE. You are allowed to add charge types codes to the Advanced
Pricing lookup FREIGHT_CHARGES_TYPE. The following charge type code is predefined
for this lookup:
Miscellaneous

      You can define sub-types for the Oracle Advanced Pricing Charge Type Code of
      FREIGHT_CHARGES_TYPE. The following sub-types are predefined for the
      Advanced Pricing FREIGHT CHARGE TYPE = Miscellaneous:

          o   Penalty
          o   Restocking
          o   Return Fees

Definition Data Elements

You can define different attributes for setting your charges including the following
elements:

      Charge Currency: The currency for the Charge amount setup at list level
      Charge Name: Charge Name picked from the pre-defined setup in pricing
      Level: Order Level or Line level charges
      Calculation Method: Percentage (%), Amt (Per pricing unit), Lumpsum amount
      Formula based
      Refundable: Whether the charge is refundable
      Automatic: Whether the charge is automatic or manual
      Overridable: Whether the charge is overridable after it is applied
      Start/End Dates: Active date range
      Qualifiers: Qualifiers to apply charges conditionally

Calculation Method

Various common methods of calculating charges are supported. Examples of calculation
methods include:

      Fixed amount
      Percentage of line or order amount
      Fixed rate per pricing unit of measure
      Simple pass of a cost
      Percentage markup or markdown of a cost
      User-defined formula for a given charge type. The formula can be constructed
      using the pricing attributes, constant values, or function returning a value.

Qualifier /Pricing Attributes for Freight and Special charges

The tables indicate both Qualifier Attributes and Pricing Attributes that have been
predefined for Freight and Special Charges.
Note: You can also make use of any other Qualifier / Pricing Attributes setup in the
Pricing for freight and special charges

Freight and Special Charges Qualifier Attributes
Context       Attribute
ORDER         SHIPPABLE_FLAG
ORDER         SHIPPED_FLAG
ORDER         FREIGHT_COST_TYPE_CODE
VOLUME        LINE_WEIGHT
VOLUME        LINE_VOLUME
Freight and Special Charges Pricing Attributes
Context                   Attribute
PRICING ATTRIBUTES        INSURANCE_COST
PRICING ATTRIBUTES        HANDLING_COST
PRICING ATTRIBUTES        DUTY_COST
PRICING ATTRIBUTES        EXPORT_COST
PRICING ATTRIBUTES        FREIGHT_COST
PRICING ATTRIBUTES        ADMINISTRATIVE_COST

For more information on Freight and Special Charges using qualifiers within Order
Management, refer to the Oracle Order Management Implementation Manual, Freight
and Special Charges Examples.

Application of Charges

You can have freight and special charges applied to an order in the following ways:

      Manually Applied
      Open Interface
      Automatically based on the qualifier setup

      Note: Any freight charge modifier's you wish to define for ATO configuration
      items should use a phase that is included in the Order Management workflow
      'SHIP' event.

Order or Order Line Charges
You can enter charges for order or order line levels. The Freight and Special Charges
are returned by the Pricing Engine and if there are multiple automatic charges of same
charge type and subtype then Order Management applies the one with Maximum
amount. If the user wants the charge to be applied in preference then they may need
to set them up with incompatibility group and precedence as described in the Modifier
Setup section.

Note: If there is an applied charge of a Charge Type/Subtype then the LOV for Charge
Name field in Charges window will not show any manual charges for the same
type/subtype. The Charge Name is always derived from the meaning for the charge
sub-type lookup code. If the charge sub-type is NULL then the name is derived from the
meaning for the charge type lookup code

Estimate or Actual

The estimated or fixed charge is displayed in the Charges user interface. You can set
the amount as Estimated or Fixed.

Note: You can set estimated or fixed charges only after a charge has been applied on
an order or order line.

Multiple Unlimited Charges

You can enter an unlimited number of charges at each level with unique combination of
Charge Type and Charge Sub-Type.

Timing of Charges Entry

You can enter freight and special charges at any event point or activity, up to the point
where the order and line is invoiced. At the point of invoicing the charge will be fixed
and no more charges can be added after the line is invoiced.

Changing and Deleting of Charges

Based on your processing constraints, you have the ability to manually change the
amount, delete, or cancel charges applied to an order or order line until invoicing. You
can enter a reason code if the charge is being changed, however, the history will not be
maintained. In addition, you can add processing constraints to prevent charges from
deletion or cancellation after a user-definable point in the order's process.

Freight Charges and Included Items

In order to apply any eligible freight charges for an Included Item, the profile option
OM: Charges for Included Item should be set to Y.
When this profile option is set to Y, and the calculate price flag of the order line with an
included item is either Calculate Price (Y) or Partial Price (P), then the eligible freight
charges are applied to the order line.

For backordered lines within Included Items, both the profile options OM: Charges for
backorders and OM: Charges for Included Item need to be set to Y to view and apply
any freight charges.

Any freight charge modifiers you define for included item should be within a pricing
phase that is included within the Order Management 'LINE' or 'SHIP' workflow event.

Freight charges for Backordered Lines

The Order Management profile option OM: Charges for backorders controls how the
system will set the value of the calculate price flag for backordered lines.

       If the profile option   is set to Y, the system will set the calculate price flag to P
       and freight charges     are calculated for backorder lines
       If the profile option   is set to N, the system will set the calculate price flag to 'N'
       and freight charges     are not calculated for backorder lines

Rounding of Freight charges

The Oracle Advanced Pricing profile option QP: Selling Price Rounding Options
determines if your freight charges are rounded. See: Oracle Advance Pricing
Implementation Guide, Profile Options.

To define Order Management Freight Cost Type Names

   1. Navigate to the Oracle Order Management Freight Cost Types window. Order
      Management > Setup > Shipping > Freight Carriers, Cost Types > Freight Cost
      Types.

       Order Management Freight Cost Types Window
2. Enter a name for your Freight Cost type in the Name field.

      The value entered in this field is the value a Shipping Clerk will see on within the
      Oracle Shipping Execution Transactions window when entering Freight Costs
      during the shipping process.

   3. Choose a type for your Freight Cost Name from the LOV in the Type field.
   4. Select a currency that the Freight Cost Type will use in the Currency field.
   5. Enter the default value for your Freight Cost Type in the Amount field. The
      amount will be defaulted in the Freight Cost window when you enter or select
      the Freight Cost Name during the shipping process.
   6. Enter effective dates for you Freight Cost Name in the Effective Date From/To
      fields.
   7. Save your work.

Setting up Freight Rates and Charges
Oracle Order Management displays the freight rates and charges for shippable and non-
shippable items. For example, when you choose ship method for an ‗assemble to order‘
(ATO) item using the Sales Order window, the application displays the ship method rate
and calculates the charges based on the pricing setup.
Note: You must have Oracle Advanced Pricing installed to set up freight rates and
charges.

To set up freight rates and charges

   1. Navigate to the Advanced Pricing – Pricing Transaction Entity – Attribute Linking
      window (Pricing -> Setup -> Attribute Management -> Attribute Linking and
      Mapping).
   2. Select Order Fulfillment as the pricing transaction entity and Pricing Context as
      the context type. The application displays a list of contexts.
   3. Select Pricing Attribute and click Link Attributes to open the Link Attributes
      window.
   4. Select the Estimated Transportation Price (ESTIMATED_FTEPRICE) attribute and
      click Attribute Mapping to open the Attribute Mapping window.
   5. Select the request type with the following details:
          o Application Name: Advanced Pricing
          o Request Type: ONT
          o Description: Order Management Order
   6. Optionally, replace the default user value string in the line level section as
      follows: Replace ‗OE_FREIGHT_RATING_UTIL.GET_ESTIMATED_COST_AMOUNT
      ('FTEPRICE')‘ with
      ‗OE_FREIGHT_RATING_UTIL.GET_ESTIMATED_COST_AMOUNT_NS('FTEPRICE')‘

      Note: The default value only considers shippable items for freight rates and
      charge calculation. If you need to include the non-shippable lines also for the
      calculations, then you must replace the default user value string.

   7. Save the changes.
   8. Without closing this window, click the Tools option on the top menu bar.
   9. Click Build Attribute Mapping Rules to generate the attribute mapping rule. The
      application displays a message indicating the successful generation of the
      attribute mapping rule. The application uses this attribute mapping rule to
      calculate and display the freight rates and charges for shippable and non
      shippable items as applicable.

Overview of Shipping Tolerances
Oracle Order Management provides you with the ability to capture shipping tolerance
levels for over and under shipments recorded during ship confirmation. The shipping
tolerance feature enables you to define various shipping tolerance levels for ordered
and expected return quantities. Order Management shipping tolerances are used to
validate the percentage of the ordered quantity. Once shipping tolerances have been
defined, Order Management then automatically fulfills order lines using the tolerances
you defined.
Order Management's shipping tolerances feature captures the following:

      Over and under shipments and returns percentages at the system, customer,
      site, item, site-item, and customer item levels
      Different tolerances for ordered and returned quantities
      Defaulted tolerances from various sources based on your defaulting rules
      Automatic fulfillment of total shipped quantities for order lines within the under
      tolerance limit
      Tolerances levels that enable you to over ship at the time of ship confirmation

Over Shipments

When Oracle Shipping Execution attempts to over ship an order, Order Management
processes the order based on the shipping tolerances you define. In order to perform
an over shipment, Order Management:

      Determines if the ship quantity is within the defined over shipment tolerance
      levels you defined by setting the OM: Overshipment Tolerance profile option or
      setting your shipment tolerances in Order Management.
      Notifies the appropriate personnel when an over shipment is above the set
      shipping tolerance.
      Issues the material for any unpicked or unreserved quantity.

Under Shipments

When Oracle Shipping Execution attempts to under ship an order, Order Management
processes the order based on the shipping tolerances you define. In order to perform
an under shipment, you must:

      Ship confirm the quantity at the time of closing the delivery
      Determine if the total quantity shipped is within the under shipment tolerances
      you defined. Any remaining shipment allocations are removed

      Note: If the total quantity shipped is under the shipment tolerances, Order
      Management will split the original shipment line. The shipment will be shipped as
      a partial shipment.

Under Shipment tolerances greater than 100% are treated as the equivalent of a 100%
tolerance; to close order lines a shipment of a non-zero quantity is required, even if the
under shipment tolerance is set to 100%.

Note: If a zero quantity is entered at shipment, the system will process the transaction.
However, zero quantity shipments are not allowed; Order Management will therefore
perform a backorder for the zero quantity shipment line at ship confirm.
Note: A shipment of a quantity other than zero is needed in order to enable order lines
to progress to closure.

Over Shipments Report

Oracle Shipping Execution provides the Over Shipments Report for displaying shipping
tolerances. This report displays shipping tolerance information based on the customer,
site, item, warehouse, ship date, and order type.

Related Topics

Profile Options

Oracle Shipping Execution User's Guide

Defining Shipping Tolerances
Defining shipping tolerances are based on your customers and items or your customer
site and item tolerances.

Prerequisites

      Set up your customer and customer site tolerances in the Customer window
      Set up your tolerances for items in the Master Items window

To define shipping tolerances for orders or returns:

   1. Navigate to the Setup Tolerance window.

      Setup Tolerance Window
2. Select the Customer name for the shipping tolerance.
3. Select the customer Address for the shipping tolerance. You can pick a customer
   address in any Operating Unit accessible to you via your MO: Security Profile.
4. Select the Item Number for the shipping tolerance.
5. Enter the Over Shipment Tolerance percentage.

   The over shipment tolerance percentage determines the amount of the shipment
   you can exceed at the time of ship confirmation.

6. Enter the Under Shipment Tolerance percentage.

   The under shipment tolerance percentage determines the minimums amount of
   the shipment at the time of ship confirmation. If you enter more than 100, the
   shipping process will use 100.

   Note: Order Management currently does not support over and under shipment
   tolerances for ATOs (Model, Kit and all children). Updates to shipment tolerances
   for PTOs is currently not allowed.

   If you have defined non-zero tolerances within either the Item Form, Customer
   Form, Shipping Tolerances Form, or the profile option value, the values are
   ignored for PTOs; the over and under shipment tolerance for PTOs will always
   default to 0.

   If the tolerances are defined with unequal values for a combination of Ship_To
   with an item, the Ship_To field is not updated.

7. Enter the Over Return Tolerance percentage for return receipts.
The over return tolerance percentage determines the amount of the return you
      can accept above.

   8. Enter the Under Return Tolerance percentage for return receipts.

      The under return tolerance percentage determines the amount of the return you
      can accept below.

   9. Save your work.

Release Management Integration Setup for Sales
Agreements
Oracle Release Management

Oracle Release Management locates the releases against a Sales Agreement, and uses
this information to determine the current picture of demand. In the past, Release
Management looked at only one sales order to determine demand (this sales order is
identified in the Release Management Processing Rules). Release Management uses the
Sales Agreement number in the processing rules, and determines all releases against
the Sales Agreements to define the current demand.

See the Oracle Release Management User's Guide, Oracle Release Management
Implementation Manual, and Sales Agreements in the Oracle Order Management User's
Guide and Implementation Manual.

Scheduling Across Orders Setup
Setting Up

You can control access for the appropriate role.

To set up for the appropriate role:

   1. Set the profile option OM: Scheduling Role:
         o CSR only: Will not be able to access the Scheduling Find tab and
             Scheduling Organizer window. All other functionality for the Order
             Organizer and Sales Order Pad will remain unchanged.
         o Scheduler only: Will be able to access Scheduling Find tab and Scheduling
             Organizer window, but not other tabs within the Order Organizer, i.e.
             Order Information, Line Information, Advanced, and Holds Information.
Note: Scheduler-only users should have their own Menu which should not
             have access to functionality such as the Sales Orders window, Price Lists,
             etc.

         o  CSR and Scheduler: Will be able to access both the Order tabs (Order
            Information, Line Information, Advanced, and Holds Information) and the
            Scheduling tab within the Find Orders window as well as the Scheduling
            Organizer window.
   2. Save your work.

Gross Margin
To Set up for Gross Margin:

   1. Navigate to the Order Management Parameters window. The default for
      Calculate Margin is No. To use margin, you must enable Calculate Margin control.
      Choose whether to do the calculation based on Price or Cost. Save your work.
   2. Decide if you want to hold orders that do not meet minimum margin
      percentages. If you do, decide which order types you want to do this for. Go to
      the Order Management Transaction Type window and query up each Order Type
      record and enter the minimum margin percentage. Save each record.
   3. Determine which responsibilities do NOT need to be able to see Gross Margin
      information in the Sales Orders window and the Pricing & Availability window.
      Using the System Administrator responsibility, navigate to Applications >
      Responsibility, define or query up a responsibility with ―Orders, Returns Main
      Menu‖ attached, and exclude the View Margin function from those
      responsibilities.
   4. Create a folder for the Sales Orders window, Order Information tab, Other sub-
      tab to display both or either Margin Amount and Order Margin %, and a folder
      for the Line Items tab to display any or all of the Cost, Margin Amount and
      Margin % fields on the Main sub-tab or the Pricing sub-tab. Assign that folder to
      be the default folder for those responsibilities who can see margin.

      Create a folder for the Pricing & Availability window Pricing tab to display any or
      all of the Cost, Margin Amount and Margin % fields and assign that folder for
      those responsibilities who are allowed to see margin.

User Item Description
To set up the User Item Description:

To set up the Order Management system to use the User Item Description for invoicing
purposes or for ad hoc item entry, do the following:
1. Create a folder for the Line Items tab to show the User Item Description on the
      Main sub-tab. Assign that folder to be the default folder for those responsibilities
      who need to be able to key or view the User Item Description. Save your work.
   2. To create a generic item to be used for drop shipping miscellaneous items that
      you do not typically sell or stock, create a dummy item in the Inventory Master
      Items window. Set the item attribute Default Source Type to External, so the
      item will be always drop shipped. Set the item attribute 'Allow Description
      Update' on the Purchasing tab to checked, so that PO will not reject the user
      item description.

Setup for Related Items
To set up the Related Items feature:

Set the profile OM: Enable Related Items and Manual Substitutions to Yes. Setup for
Scheduling Usability Enhancements Across Orders.

Note: APS customers should not use this feature as there is an impact on collections
and forecast consumption which APS will take up in next release

To set up the Item Relationships using Oracle Inventory:

   1. Navigate to the Item Relationships window.
   2. Define the relationships between items by selecting the Type of relationship, the
      most commonly used relationship types are:

      Substitute: One item is a substitute for another (alternate item)

      Superseded: One item is replacing another, probably older version

      Up-sell: Selling an improved version of the item originally ordered

      Cross-Sell: Selling additional items that go along with the item originally
      ordered

      Item Relationships Window
In the above window, the item ‗AS54888' is setup with different related items of
different relationship types like Cross-sell, Up-sell, Supersede, Substitute. This
window can be accessed from Inventory > Items > Item Relationships.

Current Relationship Types

   o   Related
   o   Substitute
   o   Cross-Sell
   o   Up-Sell
   o   Service
   o   Prerequisite
   o   Collateral
   o   Superseded
   o   Complimentary
   o   Impact
   o   Conflict
   o   Mandatory Charge
   o   Optional Charge
   o   Promotional Upgrade
o   Split
          o   Merge
          o   Migration

              Note: The relationship type 14 (Promotional Upgrade) is used by
              Advanced Pricing for Item Upgrade setup. So on the Related Items
              window, the items that are setup with relationship type 14 are not shown.

   3. Save your work.

Setup of Recurring Charges
Charges are classified into 3 types: One-time, Recurring, and Usage for service items.
Order Management now provides the Recurring Charges functionality to order and price
products with recurring and one-time charges. The MACD (Move Add Change
Disconnect) feature of Order Management has been enhanced with the addition of the
Recurring Charges functionality, and is now referred to as TSO (Telecommunications
Service Ordering).

The following are the setup steps to be carried out for Recurring Charges:

If MACD is already installed, you only need to set up the following:

       Profile option OM: UOM Class for Charge Periodicity. It determines what domain
       will be used to hold the allowable charge periodicities. The domain is a UOM
       class in Inventory. Inventory has seeded a UOM class called ‗Period‘ that will hold
       UOMs: Daily, Weekly, Monthly, Quarterly and so on. The profile option is seeded
       with the value ‗Period‘. Inventory has further seeded a value set
       INV_CHARGE_PERIODICITY that will hold UOMs: Weekly, Monthly, Quarterly,
       Yearly and so on.
       System Parameter Enable Recurring Charges should be set to Yes. The default
       value is No. This is a one-time enabling process and cannot be reversed.
       Defaulting rule for retrieving the correct charge periodicity defined for the item in
       Item Master.

If MACD is not installed, you require to install it first and then setup the Recurring
Charges features.

Trading Community Usage Within Order Management
In general, previous releases of Order Applications and initial releases of Oracle CRM
products utilized the Oracle Receivables Customer Model for storing and retrieving
customer information.
You can model customers and customer details using Oracle's Trading Community
model. Oracle's Trading Community customer model is a powerful customer
architectural design, building on the Receivables Customer model, enabling users to
now define and maintain customer hierarchies and relationships between customers
and sites. If a CRM or ERP application maintains customer information, the application
is using the Trading Community customer model.

Trading Community enables you to:

      Separate entities you enter into a relationship with, from the business
      relationship itself
      Provide a common location entity that can be shared, enabling greater
      optimization for distributed planning
      Maintain businesses and people as different entity types
      Enables multiple customer relationships to be established for one common entity

Terminology

Trading Community

      Party: This is a generic term for any entity which can have any type of
      relationship with your company. The three primary party types are:
          o Person: This party type is typically used when you are creating an entity
             that operates within a business to customer environment.
          o Organization: This party type is typically used when you are creating an
             entity that operates within a business to business environment.
          o Party Relationship: This party type represents a binary relationship
             between two parties such as a partnership. Party relationship types can be
             seeded or user-defined. A party relationship is optionally a party itself,
             meaning certain party relationships can enter into relationships
             themselves (currently not supported within Order Management).
      Party Site: Party Site represents the link between a party and a location (a valid
      location for the party. Typically, your organizational hierarchy is used when
      modeling using party relationships.
      Account: An account represents a relationship between your company and a
      party in the Trading Community model who is your customer. Accounts contain
      the attributes of the selling relationship between your organization and a party.
      Account attributes do not describe a party; they only exist when a selling
      relationship is present between the your organization and a party. The
      information which is used for processing orders and receivables transactions is
      part of the account information.
      Account Site: A party site address that is used within the context of an account.
Account Site Usage: An account site created for specific usage; for example,
      billing or shipping purposes. If a new account site usage is created for a
      Customer, then that Account Site Usage will be marked as Primary.

Mapping Order Management terminology to Trading Community terminology

      Customer Site, Customer Location, Customer Address: These terms, within Order
      Management equate to Trading Community Account Sites.
      Bill To, Ship To, Deliver To: These terms, within Order Management, equate to
      Trading Community Account Sites Usages.

The following figure describes the conceptual usage of the Trading Community model
as utilized currently within Order Management.

Trading Community Model


The figure above conceptually represents the Trading Community customer model and
how Trading Community has been integrated within the Order Management Application.
When defining a customer, you are defining a Trading Community account, which can
be linked to a new or existing Party. Accounts have at least one address and each
address may have one or more site uses. You can also create new relationships among
accounts across parties.

Within Order Management, each account belongs to a party. These parties may have
additional relationships and details defined, but Order Management currently only
utilizes a limited subset of the party data (accounts, addresses, and sites usages).
The Trading Community model includes all the information which was previously stored
in the Receivables customer model. This includes information such as:

      Customers
      Customer addresses and site uses
      Profile amounts
      Customer relationships

In order to maintain backward compatibility for the Oracle Receivables customer model,
Order Management currently accesses data stored in Trading Community database
tables via Order Management database views. Future development projects are in
progress to update Order Management applications code to retrieve Trading Community
details directly from Trading Community base tables rather than utilizing Order
Management views.

As Order Management adds new features and additional functionality to its core
application, users will begin to see Trading Community terminology incorporated into
Order Management Forms (windows), Reports, Concurrent Programs, and product
documentation. Until these project are completed, Order Management forms will
continue to use names of entities as they existed in the Receivables customer database
tables. The following table provides a mapping of these field names.

         Mapping of Entities in Receivables Customer Database Tables
Order Management Form (window)                Trading Community Base Table
Entity Name                                   Entity Name
Customer Number                               Account Number
Customer Name                                 Party Name

For more information on Trading Community and the new Trading Community customer
model, see :Oracle Receivables User Guide, Customers.
Ad

More Related Content

What's hot (20)

Oracle Inventory – Types of Move Orders
Oracle Inventory – Types of Move OrdersOracle Inventory – Types of Move Orders
Oracle Inventory – Types of Move Orders
Boopathy CS
 
Oracle R12.1.3 Costing Overview
Oracle R12.1.3 Costing OverviewOracle R12.1.3 Costing Overview
Oracle R12.1.3 Costing Overview
Pritesh Mogane
 
Oracle R12 Apps - Order Management Tables & Descriptions
Oracle R12 Apps - Order Management Tables & DescriptionsOracle R12 Apps - Order Management Tables & Descriptions
Oracle R12 Apps - Order Management Tables & Descriptions
Boopathy CS
 
Technical architecture for order management
Technical architecture for order managementTechnical architecture for order management
Technical architecture for order management
Mohit kumar Gupta
 
R12 inventory features
R12 inventory featuresR12 inventory features
R12 inventory features
Suresh Mishra
 
Oracle R12 Order Management - Back to Back (B2B) Order Flow:
Oracle R12 Order Management - Back to Back (B2B) Order Flow:Oracle R12 Order Management - Back to Back (B2B) Order Flow:
Oracle R12 Order Management - Back to Back (B2B) Order Flow:
Boopathy CS
 
Elshayeb Expense Subinventory And Items Scenario
Elshayeb Expense Subinventory And Items ScenarioElshayeb Expense Subinventory And Items Scenario
Elshayeb Expense Subinventory And Items Scenario
Ahmed Elshayeb
 
Oracle R12 Landed Cost Management (lcm)
Oracle R12 Landed Cost Management (lcm)Oracle R12 Landed Cost Management (lcm)
Oracle R12 Landed Cost Management (lcm)
Spiro (Stuart) Patsos
 
EBS-OPM Costing.docx
EBS-OPM Costing.docxEBS-OPM Costing.docx
EBS-OPM Costing.docx
Mina Lotfy
 
Oracle Purchasing Internal Requisition
Oracle Purchasing Internal RequisitionOracle Purchasing Internal Requisition
Oracle Purchasing Internal Requisition
Ahmed Elshayeb
 
How to configure LCM After receiving
How to configure LCM After receivingHow to configure LCM After receiving
How to configure LCM After receiving
Ahmed Elshayeb
 
Pick pack and ship confirm process in oracle apps
Pick pack and ship confirm process in oracle appsPick pack and ship confirm process in oracle apps
Pick pack and ship confirm process in oracle apps
shravan kumar chelika
 
Oracle R12 SCM Functional Interview Questions - Order Management,
Oracle R12 SCM Functional Interview Questions - Order Management, Oracle R12 SCM Functional Interview Questions - Order Management,
Oracle R12 SCM Functional Interview Questions - Order Management,
Boopathy CS
 
Standard Cost Accounting in Oracle ERP
Standard Cost Accounting in Oracle ERPStandard Cost Accounting in Oracle ERP
Standard Cost Accounting in Oracle ERP
Larry Sherrod
 
Oracle Order Management & Shipping Execution – Sales Order Line Status Flow &...
Oracle Order Management & Shipping Execution – Sales Order Line Status Flow &...Oracle Order Management & Shipping Execution – Sales Order Line Status Flow &...
Oracle Order Management & Shipping Execution – Sales Order Line Status Flow &...
Boopathy CS
 
Basics of Oracle Order Management
Basics of Oracle Order ManagementBasics of Oracle Order Management
Basics of Oracle Order Management
shravan kumar chelika
 
R12 Intercompany Flow
R12 Intercompany FlowR12 Intercompany Flow
R12 Intercompany Flow
ravisagaram
 
1.overview of advanced pricing
1.overview of advanced pricing1.overview of advanced pricing
1.overview of advanced pricing
Nazmul Alam
 
Oracle EBS: Intercompany Invoicing
Oracle EBS: Intercompany InvoicingOracle EBS: Intercompany Invoicing
Oracle EBS: Intercompany Invoicing
Eric Guether
 
Ame how to diagnose issues with the default approver list in purchasing when ...
Ame how to diagnose issues with the default approver list in purchasing when ...Ame how to diagnose issues with the default approver list in purchasing when ...
Ame how to diagnose issues with the default approver list in purchasing when ...
Abdul Rahman Fouad Thabit
 
Oracle Inventory – Types of Move Orders
Oracle Inventory – Types of Move OrdersOracle Inventory – Types of Move Orders
Oracle Inventory – Types of Move Orders
Boopathy CS
 
Oracle R12.1.3 Costing Overview
Oracle R12.1.3 Costing OverviewOracle R12.1.3 Costing Overview
Oracle R12.1.3 Costing Overview
Pritesh Mogane
 
Oracle R12 Apps - Order Management Tables & Descriptions
Oracle R12 Apps - Order Management Tables & DescriptionsOracle R12 Apps - Order Management Tables & Descriptions
Oracle R12 Apps - Order Management Tables & Descriptions
Boopathy CS
 
Technical architecture for order management
Technical architecture for order managementTechnical architecture for order management
Technical architecture for order management
Mohit kumar Gupta
 
R12 inventory features
R12 inventory featuresR12 inventory features
R12 inventory features
Suresh Mishra
 
Oracle R12 Order Management - Back to Back (B2B) Order Flow:
Oracle R12 Order Management - Back to Back (B2B) Order Flow:Oracle R12 Order Management - Back to Back (B2B) Order Flow:
Oracle R12 Order Management - Back to Back (B2B) Order Flow:
Boopathy CS
 
Elshayeb Expense Subinventory And Items Scenario
Elshayeb Expense Subinventory And Items ScenarioElshayeb Expense Subinventory And Items Scenario
Elshayeb Expense Subinventory And Items Scenario
Ahmed Elshayeb
 
Oracle R12 Landed Cost Management (lcm)
Oracle R12 Landed Cost Management (lcm)Oracle R12 Landed Cost Management (lcm)
Oracle R12 Landed Cost Management (lcm)
Spiro (Stuart) Patsos
 
EBS-OPM Costing.docx
EBS-OPM Costing.docxEBS-OPM Costing.docx
EBS-OPM Costing.docx
Mina Lotfy
 
Oracle Purchasing Internal Requisition
Oracle Purchasing Internal RequisitionOracle Purchasing Internal Requisition
Oracle Purchasing Internal Requisition
Ahmed Elshayeb
 
How to configure LCM After receiving
How to configure LCM After receivingHow to configure LCM After receiving
How to configure LCM After receiving
Ahmed Elshayeb
 
Pick pack and ship confirm process in oracle apps
Pick pack and ship confirm process in oracle appsPick pack and ship confirm process in oracle apps
Pick pack and ship confirm process in oracle apps
shravan kumar chelika
 
Oracle R12 SCM Functional Interview Questions - Order Management,
Oracle R12 SCM Functional Interview Questions - Order Management, Oracle R12 SCM Functional Interview Questions - Order Management,
Oracle R12 SCM Functional Interview Questions - Order Management,
Boopathy CS
 
Standard Cost Accounting in Oracle ERP
Standard Cost Accounting in Oracle ERPStandard Cost Accounting in Oracle ERP
Standard Cost Accounting in Oracle ERP
Larry Sherrod
 
Oracle Order Management & Shipping Execution – Sales Order Line Status Flow &...
Oracle Order Management & Shipping Execution – Sales Order Line Status Flow &...Oracle Order Management & Shipping Execution – Sales Order Line Status Flow &...
Oracle Order Management & Shipping Execution – Sales Order Line Status Flow &...
Boopathy CS
 
R12 Intercompany Flow
R12 Intercompany FlowR12 Intercompany Flow
R12 Intercompany Flow
ravisagaram
 
1.overview of advanced pricing
1.overview of advanced pricing1.overview of advanced pricing
1.overview of advanced pricing
Nazmul Alam
 
Oracle EBS: Intercompany Invoicing
Oracle EBS: Intercompany InvoicingOracle EBS: Intercompany Invoicing
Oracle EBS: Intercompany Invoicing
Eric Guether
 
Ame how to diagnose issues with the default approver list in purchasing when ...
Ame how to diagnose issues with the default approver list in purchasing when ...Ame how to diagnose issues with the default approver list in purchasing when ...
Ame how to diagnose issues with the default approver list in purchasing when ...
Abdul Rahman Fouad Thabit
 

Viewers also liked (19)

Oracle apps order-management
Oracle apps order-managementOracle apps order-management
Oracle apps order-management
swedin
 
Oracle Applications - Sales Order Entering,Booking,Picking And Shipping Made ...
Oracle Applications - Sales Order Entering,Booking,Picking And Shipping Made ...Oracle Applications - Sales Order Entering,Booking,Picking And Shipping Made ...
Oracle Applications - Sales Order Entering,Booking,Picking And Shipping Made ...
Bala Murugan
 
Order Management Overview
Order Management OverviewOrder Management Overview
Order Management Overview
Robert Ransom
 
Order management, provisioning and activation
Order management, provisioning and activationOrder management, provisioning and activation
Order management, provisioning and activation
VijayIndra Shekhawat
 
Oracle Apps INVENTORY
Oracle Apps INVENTORY Oracle Apps INVENTORY
Oracle Apps INVENTORY
Manu MK
 
Oracle EBS R12 Sales order personalization
Oracle EBS R12 Sales order personalizationOracle EBS R12 Sales order personalization
Oracle EBS R12 Sales order personalization
Ahmed Elshayeb
 
Oracle AP Cycle
Oracle AP CycleOracle AP Cycle
Oracle AP Cycle
Joselito Perez
 
Oracle Payable Complete Business flows
Oracle Payable Complete Business flowsOracle Payable Complete Business flows
Oracle Payable Complete Business flows
Adil Arshad
 
Oracle Fixed assets ivas
Oracle Fixed assets ivasOracle Fixed assets ivas
Oracle Fixed assets ivas
Ali Ibrahim
 
Oracle General ledger ivas
Oracle General ledger ivasOracle General ledger ivas
Oracle General ledger ivas
Ali Ibrahim
 
Oracle Inventory Complete Implementation Setups.
Oracle Inventory Complete Implementation Setups.Oracle Inventory Complete Implementation Setups.
Oracle Inventory Complete Implementation Setups.
Muhammad Mansoor Ali
 
Oracle Purchasing ivas
Oracle Purchasing ivasOracle Purchasing ivas
Oracle Purchasing ivas
Ali Ibrahim
 
Oracle Payables R12 ivas
Oracle Payables R12 ivasOracle Payables R12 ivas
Oracle Payables R12 ivas
Ali Ibrahim
 
Oracle Receivables ivas
Oracle Receivables ivasOracle Receivables ivas
Oracle Receivables ivas
Ali Ibrahim
 
Telecom OSS/BSS Overview
Telecom OSS/BSS OverviewTelecom OSS/BSS Overview
Telecom OSS/BSS Overview
magidg
 
Klabs Conference 2009
Klabs Conference 2009Klabs Conference 2009
Klabs Conference 2009
Sigma Systems
 
Verax OSS/BSS Suite
Verax OSS/BSS SuiteVerax OSS/BSS Suite
Verax OSS/BSS Suite
Nick (Mikolaj) Zmierczak
 
Tables
TablesTables
Tables
Nawaz Sk
 
Order Fulfillment Services- A Business.com Guide
Order Fulfillment Services- A Business.com GuideOrder Fulfillment Services- A Business.com Guide
Order Fulfillment Services- A Business.com Guide
Business.com
 
Oracle apps order-management
Oracle apps order-managementOracle apps order-management
Oracle apps order-management
swedin
 
Oracle Applications - Sales Order Entering,Booking,Picking And Shipping Made ...
Oracle Applications - Sales Order Entering,Booking,Picking And Shipping Made ...Oracle Applications - Sales Order Entering,Booking,Picking And Shipping Made ...
Oracle Applications - Sales Order Entering,Booking,Picking And Shipping Made ...
Bala Murugan
 
Order Management Overview
Order Management OverviewOrder Management Overview
Order Management Overview
Robert Ransom
 
Order management, provisioning and activation
Order management, provisioning and activationOrder management, provisioning and activation
Order management, provisioning and activation
VijayIndra Shekhawat
 
Oracle Apps INVENTORY
Oracle Apps INVENTORY Oracle Apps INVENTORY
Oracle Apps INVENTORY
Manu MK
 
Oracle EBS R12 Sales order personalization
Oracle EBS R12 Sales order personalizationOracle EBS R12 Sales order personalization
Oracle EBS R12 Sales order personalization
Ahmed Elshayeb
 
Oracle Payable Complete Business flows
Oracle Payable Complete Business flowsOracle Payable Complete Business flows
Oracle Payable Complete Business flows
Adil Arshad
 
Oracle Fixed assets ivas
Oracle Fixed assets ivasOracle Fixed assets ivas
Oracle Fixed assets ivas
Ali Ibrahim
 
Oracle General ledger ivas
Oracle General ledger ivasOracle General ledger ivas
Oracle General ledger ivas
Ali Ibrahim
 
Oracle Inventory Complete Implementation Setups.
Oracle Inventory Complete Implementation Setups.Oracle Inventory Complete Implementation Setups.
Oracle Inventory Complete Implementation Setups.
Muhammad Mansoor Ali
 
Oracle Purchasing ivas
Oracle Purchasing ivasOracle Purchasing ivas
Oracle Purchasing ivas
Ali Ibrahim
 
Oracle Payables R12 ivas
Oracle Payables R12 ivasOracle Payables R12 ivas
Oracle Payables R12 ivas
Ali Ibrahim
 
Oracle Receivables ivas
Oracle Receivables ivasOracle Receivables ivas
Oracle Receivables ivas
Ali Ibrahim
 
Telecom OSS/BSS Overview
Telecom OSS/BSS OverviewTelecom OSS/BSS Overview
Telecom OSS/BSS Overview
magidg
 
Klabs Conference 2009
Klabs Conference 2009Klabs Conference 2009
Klabs Conference 2009
Sigma Systems
 
Order Fulfillment Services- A Business.com Guide
Order Fulfillment Services- A Business.com GuideOrder Fulfillment Services- A Business.com Guide
Order Fulfillment Services- A Business.com Guide
Business.com
 
Ad

Similar to Oracle order management implementation manual (20)

Aso115ig
Aso115igAso115ig
Aso115ig
Maanasaslide
 
Csd115ig
Csd115igCsd115ig
Csd115ig
Krishna Nayak
 
oracle apps scm online training in usa
oracle apps scm online training in usaoracle apps scm online training in usa
oracle apps scm online training in usa
sapehsit
 
Locator control in oracle inventory
Locator control in oracle inventoryLocator control in oracle inventory
Locator control in oracle inventory
sheshito
 
Oracle CPQ Online Training .pdf
Oracle CPQ Online Training .pdfOracle CPQ Online Training .pdf
Oracle CPQ Online Training .pdf
Rudra IT Solutions
 
Oracle identity & access management online training
Oracle identity & access management online trainingOracle identity & access management online training
Oracle identity & access management online training
Glory IT Technologies Pvt. Ltd.
 
Bpf Workflow
Bpf WorkflowBpf Workflow
Bpf Workflow
jmartinez19682
 
oracle enterprise manager training | oracle enterprise manager course | orac...
oracle enterprise manager training | oracle enterprise manager course |  orac...oracle enterprise manager training | oracle enterprise manager course |  orac...
oracle enterprise manager training | oracle enterprise manager course | orac...
Nancy Thomas
 
Soa admin training
Soa admin trainingSoa admin training
Soa admin training
Anil Ncodeit
 
Soa admin training
Soa admin trainingSoa admin training
Soa admin training
Anil Ncodeit
 
Soa admin training
Soa admin trainingSoa admin training
Soa admin training
Anil Ncodeit
 
Java Spring framework, Dependency Injection, DI, IoC, Inversion of Control
Java Spring framework, Dependency Injection, DI, IoC, Inversion of ControlJava Spring framework, Dependency Injection, DI, IoC, Inversion of Control
Java Spring framework, Dependency Injection, DI, IoC, Inversion of Control
Arjun Thakur
 
Aia 11g-performance-tuning-1915233
Aia 11g-performance-tuning-1915233Aia 11g-performance-tuning-1915233
Aia 11g-performance-tuning-1915233
Juan de Dios Salvado Iruegas Perez
 
Sustainable Compliance For PCI DSS Standard
Sustainable Compliance For PCI DSS StandardSustainable Compliance For PCI DSS Standard
Sustainable Compliance For PCI DSS Standard
Christian Frahm
 
Oracle ebs r12 eam module-upk
Oracle ebs r12 eam module-upkOracle ebs r12 eam module-upk
Oracle ebs r12 eam module-upk
jcvd12
 
Wodm or ilog jrules online training in chennai
Wodm or ilog jrules online training in chennaiWodm or ilog jrules online training in chennai
Wodm or ilog jrules online training in chennai
GoLogica Technologies
 
Oracle Audit Vault Training | Audit Vault - Oracle Trainings
Oracle Audit Vault Training | Audit Vault - Oracle TrainingsOracle Audit Vault Training | Audit Vault - Oracle Trainings
Oracle Audit Vault Training | Audit Vault - Oracle Trainings
OracleTrainings
 
R12 purchasing presentation oa
R12 purchasing presentation oaR12 purchasing presentation oa
R12 purchasing presentation oa
Suresh Mishra
 
Oracle R12 Apps - Purchasing Module Setup Steps
Oracle R12 Apps - Purchasing Module Setup Steps Oracle R12 Apps - Purchasing Module Setup Steps
Oracle R12 Apps - Purchasing Module Setup Steps
Boopathy CS
 
Oracle 11i Work In Process Training Presentation.ppt
Oracle 11i Work In Process Training Presentation.pptOracle 11i Work In Process Training Presentation.ppt
Oracle 11i Work In Process Training Presentation.ppt
appsloader
 
oracle apps scm online training in usa
oracle apps scm online training in usaoracle apps scm online training in usa
oracle apps scm online training in usa
sapehsit
 
Locator control in oracle inventory
Locator control in oracle inventoryLocator control in oracle inventory
Locator control in oracle inventory
sheshito
 
Oracle CPQ Online Training .pdf
Oracle CPQ Online Training .pdfOracle CPQ Online Training .pdf
Oracle CPQ Online Training .pdf
Rudra IT Solutions
 
oracle enterprise manager training | oracle enterprise manager course | orac...
oracle enterprise manager training | oracle enterprise manager course |  orac...oracle enterprise manager training | oracle enterprise manager course |  orac...
oracle enterprise manager training | oracle enterprise manager course | orac...
Nancy Thomas
 
Soa admin training
Soa admin trainingSoa admin training
Soa admin training
Anil Ncodeit
 
Soa admin training
Soa admin trainingSoa admin training
Soa admin training
Anil Ncodeit
 
Soa admin training
Soa admin trainingSoa admin training
Soa admin training
Anil Ncodeit
 
Java Spring framework, Dependency Injection, DI, IoC, Inversion of Control
Java Spring framework, Dependency Injection, DI, IoC, Inversion of ControlJava Spring framework, Dependency Injection, DI, IoC, Inversion of Control
Java Spring framework, Dependency Injection, DI, IoC, Inversion of Control
Arjun Thakur
 
Sustainable Compliance For PCI DSS Standard
Sustainable Compliance For PCI DSS StandardSustainable Compliance For PCI DSS Standard
Sustainable Compliance For PCI DSS Standard
Christian Frahm
 
Oracle ebs r12 eam module-upk
Oracle ebs r12 eam module-upkOracle ebs r12 eam module-upk
Oracle ebs r12 eam module-upk
jcvd12
 
Wodm or ilog jrules online training in chennai
Wodm or ilog jrules online training in chennaiWodm or ilog jrules online training in chennai
Wodm or ilog jrules online training in chennai
GoLogica Technologies
 
Oracle Audit Vault Training | Audit Vault - Oracle Trainings
Oracle Audit Vault Training | Audit Vault - Oracle TrainingsOracle Audit Vault Training | Audit Vault - Oracle Trainings
Oracle Audit Vault Training | Audit Vault - Oracle Trainings
OracleTrainings
 
R12 purchasing presentation oa
R12 purchasing presentation oaR12 purchasing presentation oa
R12 purchasing presentation oa
Suresh Mishra
 
Oracle R12 Apps - Purchasing Module Setup Steps
Oracle R12 Apps - Purchasing Module Setup Steps Oracle R12 Apps - Purchasing Module Setup Steps
Oracle R12 Apps - Purchasing Module Setup Steps
Boopathy CS
 
Oracle 11i Work In Process Training Presentation.ppt
Oracle 11i Work In Process Training Presentation.pptOracle 11i Work In Process Training Presentation.ppt
Oracle 11i Work In Process Training Presentation.ppt
appsloader
 
Ad

More from Nawaz Sk (8)

Sql task answers
Sql task answersSql task answers
Sql task answers
Nawaz Sk
 
Sql task
Sql taskSql task
Sql task
Nawaz Sk
 
Plsql task answers
Plsql task answersPlsql task answers
Plsql task answers
Nawaz Sk
 
Plsql task
Plsql taskPlsql task
Plsql task
Nawaz Sk
 
Forall & bulk binds
Forall & bulk bindsForall & bulk binds
Forall & bulk binds
Nawaz Sk
 
R12 Shipping Execution User guide
R12 Shipping Execution User guideR12 Shipping Execution User guide
R12 Shipping Execution User guide
Nawaz Sk
 
121poug
121poug121poug
121poug
Nawaz Sk
 
121ontapi
121ontapi121ontapi
121ontapi
Nawaz Sk
 
Sql task answers
Sql task answersSql task answers
Sql task answers
Nawaz Sk
 
Plsql task answers
Plsql task answersPlsql task answers
Plsql task answers
Nawaz Sk
 
Plsql task
Plsql taskPlsql task
Plsql task
Nawaz Sk
 
Forall & bulk binds
Forall & bulk bindsForall & bulk binds
Forall & bulk binds
Nawaz Sk
 
R12 Shipping Execution User guide
R12 Shipping Execution User guideR12 Shipping Execution User guide
R12 Shipping Execution User guide
Nawaz Sk
 

Recently uploaded (20)

Handling Multiple Choice Responses: Fortune Effiong.pptx
Handling Multiple Choice Responses: Fortune Effiong.pptxHandling Multiple Choice Responses: Fortune Effiong.pptx
Handling Multiple Choice Responses: Fortune Effiong.pptx
AuthorAIDNationalRes
 
The ever evoilving world of science /7th class science curiosity /samyans aca...
The ever evoilving world of science /7th class science curiosity /samyans aca...The ever evoilving world of science /7th class science curiosity /samyans aca...
The ever evoilving world of science /7th class science curiosity /samyans aca...
Sandeep Swamy
 
CBSE - Grade 8 - Science - Chemistry - Metals and Non Metals - Worksheet
CBSE - Grade 8 - Science - Chemistry - Metals and Non Metals - WorksheetCBSE - Grade 8 - Science - Chemistry - Metals and Non Metals - Worksheet
CBSE - Grade 8 - Science - Chemistry - Metals and Non Metals - Worksheet
Sritoma Majumder
 
Niamh Lucey, Mary Dunne. Health Sciences Libraries Group (LAI). Lighting the ...
Niamh Lucey, Mary Dunne. Health Sciences Libraries Group (LAI). Lighting the ...Niamh Lucey, Mary Dunne. Health Sciences Libraries Group (LAI). Lighting the ...
Niamh Lucey, Mary Dunne. Health Sciences Libraries Group (LAI). Lighting the ...
Library Association of Ireland
 
Presentation of the MIPLM subject matter expert Erdem Kaya
Presentation of the MIPLM subject matter expert Erdem KayaPresentation of the MIPLM subject matter expert Erdem Kaya
Presentation of the MIPLM subject matter expert Erdem Kaya
MIPLM
 
Geography Sem II Unit 1C Correlation of Geography with other school subjects
Geography Sem II Unit 1C Correlation of Geography with other school subjectsGeography Sem II Unit 1C Correlation of Geography with other school subjects
Geography Sem II Unit 1C Correlation of Geography with other school subjects
ProfDrShaikhImran
 
Vitamins Chapter-7, Biochemistry and clinical pathology, D.Pharm 2nd year
Vitamins Chapter-7, Biochemistry and clinical pathology, D.Pharm 2nd yearVitamins Chapter-7, Biochemistry and clinical pathology, D.Pharm 2nd year
Vitamins Chapter-7, Biochemistry and clinical pathology, D.Pharm 2nd year
ARUN KUMAR
 
One Hot encoding a revolution in Machine learning
One Hot encoding a revolution in Machine learningOne Hot encoding a revolution in Machine learning
One Hot encoding a revolution in Machine learning
momer9505
 
Studying Drama: Definition, types and elements
Studying Drama: Definition, types and elementsStudying Drama: Definition, types and elements
Studying Drama: Definition, types and elements
AbdelFattahAdel2
 
Timber Pitch Roof Construction Measurement-2024.pptx
Timber Pitch Roof Construction Measurement-2024.pptxTimber Pitch Roof Construction Measurement-2024.pptx
Timber Pitch Roof Construction Measurement-2024.pptx
Tantish QS, UTM
 
Anti-Depressants pharmacology 1slide.pptx
Anti-Depressants pharmacology 1slide.pptxAnti-Depressants pharmacology 1slide.pptx
Anti-Depressants pharmacology 1slide.pptx
Mayuri Chavan
 
Odoo Inventory Rules and Routes v17 - Odoo Slides
Odoo Inventory Rules and Routes v17 - Odoo SlidesOdoo Inventory Rules and Routes v17 - Odoo Slides
Odoo Inventory Rules and Routes v17 - Odoo Slides
Celine George
 
Understanding P–N Junction Semiconductors: A Beginner’s Guide
Understanding P–N Junction Semiconductors: A Beginner’s GuideUnderstanding P–N Junction Semiconductors: A Beginner’s Guide
Understanding P–N Junction Semiconductors: A Beginner’s Guide
GS Virdi
 
Envenomation---Clinical Toxicology. pptx
Envenomation---Clinical Toxicology. pptxEnvenomation---Clinical Toxicology. pptx
Envenomation---Clinical Toxicology. pptx
rekhapositivity
 
How to Customize Your Financial Reports & Tax Reports With Odoo 17 Accounting
How to Customize Your Financial Reports & Tax Reports With Odoo 17 AccountingHow to Customize Your Financial Reports & Tax Reports With Odoo 17 Accounting
How to Customize Your Financial Reports & Tax Reports With Odoo 17 Accounting
Celine George
 
How to Subscribe Newsletter From Odoo 18 Website
How to Subscribe Newsletter From Odoo 18 WebsiteHow to Subscribe Newsletter From Odoo 18 Website
How to Subscribe Newsletter From Odoo 18 Website
Celine George
 
Exploring-Substances-Acidic-Basic-and-Neutral.pdf
Exploring-Substances-Acidic-Basic-and-Neutral.pdfExploring-Substances-Acidic-Basic-and-Neutral.pdf
Exploring-Substances-Acidic-Basic-and-Neutral.pdf
Sandeep Swamy
 
Stein, Hunt, Green letter to Congress April 2025
Stein, Hunt, Green letter to Congress April 2025Stein, Hunt, Green letter to Congress April 2025
Stein, Hunt, Green letter to Congress April 2025
Mebane Rash
 
YSPH VMOC Special Report - Measles Outbreak Southwest US 4-30-2025.pptx
YSPH VMOC Special Report - Measles Outbreak  Southwest US 4-30-2025.pptxYSPH VMOC Special Report - Measles Outbreak  Southwest US 4-30-2025.pptx
YSPH VMOC Special Report - Measles Outbreak Southwest US 4-30-2025.pptx
Yale School of Public Health - The Virtual Medical Operations Center (VMOC)
 
Ultimate VMware 2V0-11.25 Exam Dumps for Exam Success
Ultimate VMware 2V0-11.25 Exam Dumps for Exam SuccessUltimate VMware 2V0-11.25 Exam Dumps for Exam Success
Ultimate VMware 2V0-11.25 Exam Dumps for Exam Success
Mark Soia
 
Handling Multiple Choice Responses: Fortune Effiong.pptx
Handling Multiple Choice Responses: Fortune Effiong.pptxHandling Multiple Choice Responses: Fortune Effiong.pptx
Handling Multiple Choice Responses: Fortune Effiong.pptx
AuthorAIDNationalRes
 
The ever evoilving world of science /7th class science curiosity /samyans aca...
The ever evoilving world of science /7th class science curiosity /samyans aca...The ever evoilving world of science /7th class science curiosity /samyans aca...
The ever evoilving world of science /7th class science curiosity /samyans aca...
Sandeep Swamy
 
CBSE - Grade 8 - Science - Chemistry - Metals and Non Metals - Worksheet
CBSE - Grade 8 - Science - Chemistry - Metals and Non Metals - WorksheetCBSE - Grade 8 - Science - Chemistry - Metals and Non Metals - Worksheet
CBSE - Grade 8 - Science - Chemistry - Metals and Non Metals - Worksheet
Sritoma Majumder
 
Niamh Lucey, Mary Dunne. Health Sciences Libraries Group (LAI). Lighting the ...
Niamh Lucey, Mary Dunne. Health Sciences Libraries Group (LAI). Lighting the ...Niamh Lucey, Mary Dunne. Health Sciences Libraries Group (LAI). Lighting the ...
Niamh Lucey, Mary Dunne. Health Sciences Libraries Group (LAI). Lighting the ...
Library Association of Ireland
 
Presentation of the MIPLM subject matter expert Erdem Kaya
Presentation of the MIPLM subject matter expert Erdem KayaPresentation of the MIPLM subject matter expert Erdem Kaya
Presentation of the MIPLM subject matter expert Erdem Kaya
MIPLM
 
Geography Sem II Unit 1C Correlation of Geography with other school subjects
Geography Sem II Unit 1C Correlation of Geography with other school subjectsGeography Sem II Unit 1C Correlation of Geography with other school subjects
Geography Sem II Unit 1C Correlation of Geography with other school subjects
ProfDrShaikhImran
 
Vitamins Chapter-7, Biochemistry and clinical pathology, D.Pharm 2nd year
Vitamins Chapter-7, Biochemistry and clinical pathology, D.Pharm 2nd yearVitamins Chapter-7, Biochemistry and clinical pathology, D.Pharm 2nd year
Vitamins Chapter-7, Biochemistry and clinical pathology, D.Pharm 2nd year
ARUN KUMAR
 
One Hot encoding a revolution in Machine learning
One Hot encoding a revolution in Machine learningOne Hot encoding a revolution in Machine learning
One Hot encoding a revolution in Machine learning
momer9505
 
Studying Drama: Definition, types and elements
Studying Drama: Definition, types and elementsStudying Drama: Definition, types and elements
Studying Drama: Definition, types and elements
AbdelFattahAdel2
 
Timber Pitch Roof Construction Measurement-2024.pptx
Timber Pitch Roof Construction Measurement-2024.pptxTimber Pitch Roof Construction Measurement-2024.pptx
Timber Pitch Roof Construction Measurement-2024.pptx
Tantish QS, UTM
 
Anti-Depressants pharmacology 1slide.pptx
Anti-Depressants pharmacology 1slide.pptxAnti-Depressants pharmacology 1slide.pptx
Anti-Depressants pharmacology 1slide.pptx
Mayuri Chavan
 
Odoo Inventory Rules and Routes v17 - Odoo Slides
Odoo Inventory Rules and Routes v17 - Odoo SlidesOdoo Inventory Rules and Routes v17 - Odoo Slides
Odoo Inventory Rules and Routes v17 - Odoo Slides
Celine George
 
Understanding P–N Junction Semiconductors: A Beginner’s Guide
Understanding P–N Junction Semiconductors: A Beginner’s GuideUnderstanding P–N Junction Semiconductors: A Beginner’s Guide
Understanding P–N Junction Semiconductors: A Beginner’s Guide
GS Virdi
 
Envenomation---Clinical Toxicology. pptx
Envenomation---Clinical Toxicology. pptxEnvenomation---Clinical Toxicology. pptx
Envenomation---Clinical Toxicology. pptx
rekhapositivity
 
How to Customize Your Financial Reports & Tax Reports With Odoo 17 Accounting
How to Customize Your Financial Reports & Tax Reports With Odoo 17 AccountingHow to Customize Your Financial Reports & Tax Reports With Odoo 17 Accounting
How to Customize Your Financial Reports & Tax Reports With Odoo 17 Accounting
Celine George
 
How to Subscribe Newsletter From Odoo 18 Website
How to Subscribe Newsletter From Odoo 18 WebsiteHow to Subscribe Newsletter From Odoo 18 Website
How to Subscribe Newsletter From Odoo 18 Website
Celine George
 
Exploring-Substances-Acidic-Basic-and-Neutral.pdf
Exploring-Substances-Acidic-Basic-and-Neutral.pdfExploring-Substances-Acidic-Basic-and-Neutral.pdf
Exploring-Substances-Acidic-Basic-and-Neutral.pdf
Sandeep Swamy
 
Stein, Hunt, Green letter to Congress April 2025
Stein, Hunt, Green letter to Congress April 2025Stein, Hunt, Green letter to Congress April 2025
Stein, Hunt, Green letter to Congress April 2025
Mebane Rash
 
Ultimate VMware 2V0-11.25 Exam Dumps for Exam Success
Ultimate VMware 2V0-11.25 Exam Dumps for Exam SuccessUltimate VMware 2V0-11.25 Exam Dumps for Exam Success
Ultimate VMware 2V0-11.25 Exam Dumps for Exam Success
Mark Soia
 

Oracle order management implementation manual

  • 1. Oracle Order Management Implementation Manual Release 12.1 Contents Previous Next Part Number E13406-04 Oracle Order Management Setup This chapter covers the following topics: Overview of Setup Setup Steps Oracle Order Management Recommended Implementation Order Management Setup Steps Setup Steps Defined in Detail Multi-Org Access Control Profile Options Order Management Profile Option Descriptions and Settings Selected Oracle Application Profile Option Descriptions Setting OM System Parameters Defining Parameters Setting Parameter Values Seeded System Parameters Accessing the Installation Details form Define Tax Features Define QuickCodes Viewing Notifications Define Document Sequences for Order Numbering Define Order Management Transaction Types Define Order Import Sources Defining Processing Constraints Defining Validation Templates Defining Record Sets Define Defaulting Rules Define Credit Checking Rules Defining Credit Check Rules Deactivating Credit Checking Oracle Payments Processing Define Automatic Holds Define Attachments Defining Documents in Advance Defining Attachment Addition Rules Defining Document Categories Define Freight and Special Charge Types Setting up Freight Rates and Charges Overview of Shipping Tolerances
  • 2. Defining Shipping Tolerances Release Management Integration Setup for Sales Agreements Scheduling Across Orders Setup Gross Margin User Item Description Setup for Related Items Setup of Recurring Charges Trading Community Usage Within Order Management Overview of Setup This chapter explains how to set up and implement Oracle Order Management. The Oracle Order Management Application provides many flexible features enabling you to set up your system to begin processing order information. You must define your business order policies, such as how you classify your orders, as well as various control features prior to processing orders within the application. Please refer to the Oracle Applications Multiple Organizations Implementation Guide for more information on setting up multi-org access control. In addition to reading this chapter, please refer to the Using Oracle Workflow in Oracle Order Management manual for setup and implementation details for Order Management workflows. Setup Steps Oracle Order Management Recommended Implementation Order Management Setup Steps Setup Steps Defined in Detail Profile Options Oracle Order Management Recommended Implementation Implementation involves several phases, including setting up other integrated applications, which include Multi-Org Access Control (MOAC), Oracle General Ledger, Oracle Receivables, and Oracle Inventory. Some setup steps are optional, depending on whether you have the integrating applications installed and whether you use the associated feature. For example, if your business supports drop shipments, you should also set up Oracle Purchasing. If you sell models and kits, set up Oracle Bills of Material and Oracle Configurator. If you are using a multiple organization structure, your system administrator must set the parameter OM: Item Validation Organization. This enables Order Management to default code and revenue account information accurately.
  • 3. Set Up Oracle Applications Technology The setup steps in this chapter tell you how to implement the parts of Oracle Applications specific to Oracle Order Management. This includes: Performing system-wide setup tasks, such as configuring concurrent managers and printers Managing data security, which includes setting up responsibilities to enable access to a specific set of business data and transactions, and assigning individual users to one or more of these responsibilities Also, if your product uses Oracle Workflow, for example, to manage the approval of business documents or derive Accounting flexfield values via the Account Generator, you need to set up Oracle Workflow. Order Management Setup Steps The following table displays a list of all the implementation steps for Oracle Order Management and a reference to documentation that can help to accomplish the steps. Optional or Step Document Required 1.Define multiple organizations in Oracle Oracle Inventory User's required Inventory Guide 2. Setup Multi-Org (Multiple Oracle Applications Multiple optional Organization) Access Control Organizations Implementation Guide 3. Define key and descriptive flexfields Oracle Order Management required under Implementation Manual certain conditions 4. Define inventory organizations Oracle Inventory User's required (warehouses), parameters, Guide subinventories, and picking rules in Oracle Inventory 5. Define Profiles Oracle Order Management required Implementation Manual 6. Setting OM System Parameters Oracle Order Management required Implementation Manual 7. Define invoicing information Oracle Order Management required under UserGuide certain
  • 4. conditions 8. Define your sales representatives Oracle Receivables optional Implementation Guide 9. Define Tax Features Current, Oracle Receivable's required User's Guide 10. Define Quickcodes Oracle Order Management required under Implementation Manual certain conditions 11. Define header and line processing Oracle Order Management required flows 12. Define Document Sequences for Oracle Order Management required Order Numbering Implementation Manual 13. Define Order Import Sources Oracle Order Management required under Implementation Manual certain conditions 14. Define the units of measure Oracle Inventory User's required Guide 15. Define item information Oracle Inventory User's required Guide 16. Define the items that you sell Oracle Inventory User's required Guide 17. Define the configurations that you Oracle Bills of Material required under sell User's Guide certain conditions 18. Define price lists Oracle Advanced Pricing required Implementation Manual 19. Define customer profile classes Oracle Receivables required under Implementation Guide certain conditions 20.Define information on your Oracle Receivables required customers Implementation Guide 21. Define item cross references current, Oracle Inventory required under User's Guide certain conditions 22. Define your sourcing rules Oracle Advanced Planning optional and Scheduling User's Guide
  • 5. 23. Define Order Management Oracle Order Management required Transaction Types Implementation Manual 24. Set up Cost of Goods Sold Order Inventory User's required under Accounting flexfield combination Guide certain conditions 25. Define Processing Constraints Oracle Order Management optional Implementation Manual 26. Define Defaulting Rules Oracle Order Management optional Implementation Manual 27.Define Credit Checking Rules Oracle Order Management required under Implementation Manual certain conditions 28. Define Automatic Holds Oracle Order Management required under Implementation Manual certain conditions 29. Define Attachments Oracle Order Management optional Implementation Manual 30. Define Freight and Special Charge Oracle Order Management optional Types Implementation Manual 31. Define shipping parameters Oracle Shipping Execution required User's Guide Setup Steps Defined in Detail The following is a list of each setup step defined in detail. Step 1: Multiple Organizations Define multiple organizations in Oracle Inventory. This step is required. Step 2: Multi-Org Access Control The Multi-Org Access Control (MOAC) feature enables users to access to one or more Operating Units within one user responsibility. Please refer to the Oracle Applications Multiple Organizations Implementation Guide for more information. Step 3: Flexfields
  • 6. Define key and descriptive flexfields to capture additional information about orders and transactions. This step is required for Key Flexfields, and optional if you plan on using the functionality surrounding Descriptive Flexfields. Several defaulting values are provided. Step 4: Inventory Organizations Define inventory organizations (warehouses), parameters, subinventories, and picking rules in Oracle Inventory. You must define at least one item validation organization and at least one organization that acts as an inventory source for orders fulfilled internally. If you plan to drop ship some orders, you must also define at least one logical organization for receiving purposes. Your item validation organization can be the same as your inventory source or your logical receiving organization, but you cannot use one organization for all three purposes. See Step 5 for setting your item validation organization. This step is required. Step 5: Profile Options Define profile options to specify certain implementation parameters, processing options, and system options. This step is required. Step 6: Parameters Set your Order Management System Parameters to validate items, enable customer relationships, and operating unit defaults. This step is required. Step 7: Invoicing Define invoicing information, including payment terms, invoicing and accounting rules, Autoaccounting parameters, territories, and invoice sources. This step is required if you plan on transferring invoicing information to Oracle Receivables. Several defaulting values are provided. Step 8: Salespersons
  • 7. Define information on your sales representatives. This step is optional. Step 9: Tax Define tax features, such as codes, rates, exceptions, and exemptions. This step is required. Step 10: QuickCodes Define QuickCodes that provide custom values for many lists of values throughout Order Management. This step is required if you plan on creating user defined Quickcodes for utilization within Order Management. Defaulting values are provided. Step 11: Workflow Define header and line processing flows to meet different header and line type requirements. This step is required. Step 12: Document Sequences (Order Numbering) Define Document Sequences for automatic or manual numbering of orders. This step is required. Step 13: Order Import Sources Define sources for importing orders into Order Management. This step is required if you plan on importing orders or returns into Order Management. Step 14: Units of Measure Define the units of measure in which you supply items. This step is required. Step 15: Item Information
  • 8. Define item information, including item attribute controls, categories, and statuses. This step is required. Step 16: Items Define the items that you sell, as well as container items. This step is required. Step 17: Configurations Define the configurations that you sell. This step is required if you plan on generating orders or returns for configured items. Several defaulting values are provided. Step 18: Pricing Define price lists for each combination of item and unit of measure that you sell. Optionally, you can define pricing rules and parameters to add flexibility. For more information about pricing setup and implementation, refer to the Oracle Advanced Pricing Implementation Manual. This step is required. Step 19: Customer Classes Define customer profile classes. This step is required if you plan on using the functionality surrounding Customer Profiles. Several defaulting values are provided. Step 20: Customers Define information on your customers. This step is required. Step 21: Item Cross References Define item cross references for ordering by customer part number, UPC, or any generic item number.
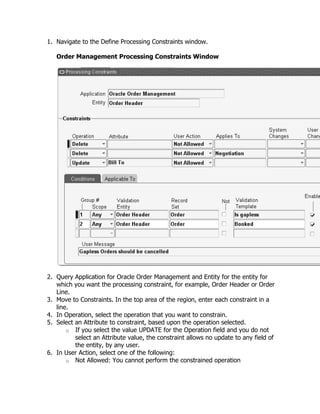
  • 9. This step is required if you plan on using the functionality surrounding item cross referencing. Several defaulting values have been provided. Step 22: Sourcing Define your sourcing rules for scheduling supply chain ATP functions. This step is optional. Step 23: Order Management Transaction Types (Sales Documents) Define Order Management transaction types to classify sales documents. For each order type, you can assign a default price list, defaulting rules, order lines, return lines, line types, workflow assignments, payment terms, and freight terms. Note: Order Management provides NO seeded OM transaction types. For existing Oracle Order Entry customers, Order Management will update existing Order Types to OM transaction type during the upgrade process. This step is required. Step 24: Cost of Goods Sold (COGS) Set up your Cost of Goods Sold Accounting Flexfield combination (COGS Account) in Oracle Inventory. This step is required if you plan on utilizing the functionality surrounding COGS. Step 25: Processing Constraints Define processing constraints to prevent users from adding updating, deleting, splitting lines, and cancelling sales documents information beyond certain points in your business flows. Use the constraints Order Management provides, which prevent data integrity violations, or create your own. This step is optional. Several default values for processing constraints have been defined. Step 26: Defaulting Rules Define defaulting rules to determine the source and prioritization for defaulting order information to reduce the amount of information you must enter manually in the Sales Orders window.
  • 10. This step is optional. Several Defaulting rules and corresponding values for have been defined. Step 27: Credit Checking Define your credit checking rules. This step is required if you plan on performing any type of order credit checking. Step 28: Holds Define automatic holds to apply to orders and returns. This step is required if you plan on performing automatic hold for orders or returns. Step 29: Attachments Define standard documents to attach automatically to sales documents. This step is optional. Step 30: Freight Charges and Carriers Define freight charges and freight carriers to specify on orders. This step is required if you plan on charging customers for freight or additional order charges. Step 31: Shipping Define shipping parameters in Oracle Shipping Execution. This step is required. Oracle Training Administration Users Please refer to the Oracle Training Administration User's Guide for additional Order Management Setup Steps. Oracle Process Manufacturing Users Please refer to the Oracle Process Manufacturing guides for additional Order Management Setup Steps.
  • 11. Related Documents 1. Oracle Shipping Execution User‘s Guide 2. Oracle Inventory User‘s Guide 3. Oracle Receivables User Guide 4. Oracle Receivables Implementation Guide 5. Oracle Receivables Reference Guide 6. Oracle Bills of Material User‘s Guide 7. Oracle Order Management User‘s Guide 8. Oracle Applications Multiple Organizations Implementation Guide 9. Using Oracle Training Administration Related Topics Holds and Releases Profile Options Setting OM System Parameters Define Credit Checking Rules Credit Checking Define Defaulting Rules Defaulting Rules Define Processing Constraints Processing Constraints Define Order Management Transaction Types Transaction Types Setting up the Supply Chain Setting Up Basic Pricing Order Import Define Document Sequences for Order Numbering Using Workflow in Order Management
  • 12. Define QuickCodes Multi-Org Access Control Please refer to the Oracle Applications Multiple Organizations Implementation Guide for general MOAC setup details. To support Multi-Org Access Control the Operating Unit has been added to many of the Order Management windows. If you are enabling MOAC functionality for your implementation and you want to give your users the ability to enter and search sales order documents across Operating Units then you need to enable (make the field visible) the Operating Unit field in the various Order Management forms that are folder enabled. It is recommended that the Operating Unit field should be the first visible field on a form, or the first field before an Operating Unit sensitive field. To make the hidden Operating Unit field visible in OA Framework (HTML) pages, you need to use the OA Framework Personalization feature. The windows / OA pages where the Operating Unit is seeded as hidden: Order Information Portal: o Sales Order Advanced Search and Results page o Order Status page o Deliveries Advanced Search o Delivery page Sales Orders windows: o Sales Order window o Order Organizer Find window (All tabs) o Order Summary o Quick Sales Order window o Quick Sales Order Organizer o Quick Order Summary o Quote window o Quote Organizer o Quote Summary o Find Customer window Sales Agreements windows: o Sales Agreements window o Sales Agreements Organizer o Sales Agreements Summary Other windows: o Scheduling Organizer window o Pricing and Availability window
  • 13. o Order Import Corrections window o Open Interface Tracking window o Retrobill Organizer window, Retrobill Requests tab The Order Management windows where the Operating Unit is added as visible: Audit History Find, Audit History Add Customer window Apply Holds (Criteria tab) window Approvals (to display Operating Unit of Transaction Type) Export Compliance Find, Export Compliance Workbench Order Import Corrections Find window Open Interface Tracking Find window Process Messages Find, Process Messages window Payment Types System Parameters Shipping Tolerances (to display Operating Unit of Customer Address) Transaction Types In the windows where the Operating Unit can be specified, the list of values for the Operating Unit field is determined by the profile MO: Security Profile. The field will have a default value based on the profile MO: Default Operating Unit. For details on MOAC setup please refer to the Oracle Applications Multiple Organizations Implementation Guide. Profile Options During implementation, you set a value for each user profile option to specify how Order Management controls access to and processes data. This is step four of the Order Management Setup Steps. Generally, the system administrator sets and updates profile values. See: Setting Profile Options, Oracle E-Business Suite System Administrator's Guide - Maintenance. Profile Categories In the current release, profiles have been categorized so that they can be easily classified or grouped. The following table displays the profile categories and the profile options that belong to each one. Some profile options belong to more than one category and are indicated in the table below. Profile Category Name Profile Option(s)
  • 14. Configurations OM: Allow model fulfillment without configuration; OM: Configuration Quick Save; OM: Copy Model DFF to child lines; OM: Included Item Freeze Method; OM: Party Totals Currency; OM: Use Configurator; Customer Usage OM: Add Customer; OM: Add Customer (Order Import); OM: Create Account Information; OM: E-Mail Required on New Customers; OM: Party Totals Currency; OM: Sales Order Form: Restrict Customers Debug OM: Debug Log Directory; OM: Debug Level; OM: Generate Diagnostics for Error Activities; Deployment OM: DBI Installation; OM: Orders Purge Per Commit; OM: New EDI Acknowledgment Framework; OM: Printed Document Extension Class Name; OM: Use Configurator; Electronic Messaging OM: Change SO Response Required; OM: Electronic Message Integration Event Sources OM: New EDI Acknowledgment Framework; OM: Order Accept State for XML; OM: Run Order Import for XML; OM: Send Acknowledgment for Change PO Response; Forms UI OM: Add Customer; OM: Administer Public Queries; OM: Automatically Open Related Items Window; OM: Contact Center Actions Menu Name; OM: Cust Item Shows Matches; OM: Display Actions Button vs. Poplist; OM: Display Current Selections in Pricing/Availability; OM: Enable Related Items and Manual Substitutions; OM: Item View Method; OM: Quick Sales Order Form: Auto Refresh; OM: Quick Sales Order Form: Defer Pricing; OM: Sales Order Form: Cascade Header Changes to Line; OM: Sales Order Form: Refresh Method (Query Coordination); OM: Sales Order Form: Restrict Customers; OM: Sales Order navigation from Pricing/Availability form;
  • 15. OM: Sales Orders Form preference; OM: Scheduling Role; OM: Show Line Details; OM: Show Process Messages Flag; OM: Use Configurator; OM: View Cancel Lines; OM: View Closed Lines; OM: View Pricing & Availability Information in Related Items; Fulfillment OM: Allow model fulfillment without configuration; OM: Included Item Freeze Method; OM: Over Return Tolerance; OM: Over Shipment Tolerance; OM: Population Of Buyer Code For Dropship Lines; OM: Source Code; OM: Under Return Tolerance; OM: Under Shipment Tolerance; OM: Automatically Interface Lines to IB on Fulfillment Holds OM: Modify Seeded Holds; OM: Prevent Booking for Line Generic Holds; Invoicing OM: Interface freight tax code from line; OM: Invoice Numbering Method; OM: Set Receivables Transaction Date as Current Date for Non- Shippable Lines; OM: View Intercompany AR Invoice Item Usage OM: Customer Item Shows Matches; OM: Enable Related Items and Manual Substitutions; OM: Item Flexfield; OM: Restrict Customer Items for Line Level Ship To Address; Logistics OM: Sequence for TP Ship/Deliver Deadline; OM: Source for TP Early Ship/Deliver Date; Order Import OM: Add Customer (Order Import); OM: Import Multiple Shipments; OM: Unique Order Source, Orig Sys Document Ref Combination For Each Customer; Payments OM: Commitment Sequencing; OM: Credit Card Privileges; OM: Preserve External Credit Balances Portal UI OM: Customer Service Feedback; OM: Customer Service Report Defect;
  • 16. OM: Records On Summary Page For External Users; Pricing OM: Charges For Backorders; OM: Charges for included item; OM: Charging Privilege; OM: Discounting Privileges; OM: Enable Group pricing for DSP lines; OM: Item Change Honors Frozen Price; OM: List Price Override Privilege; OM: Negative Pricing; OM: Promotion Limit Violation Action; OM: Send Changed Lines to Pricing; OM:Unit Price Precision Type; OM: UOM Class for Charge Periodicity; OM: Price Adjustment Modifier for AIA Order Lines Returns OM: Customer Service Feedback; OM: Customer Service Report Defect; OM: Over Return Tolerance; OM: Notification Approver; OM: Return Item Mismatch Action; OM: Return Unfulfilled Referenced Line Action; OM: Under Return Tolerance; Scheduling OM: Assign New Set For Each Line; OM: Authorized To Override ATP; OM: Auto Push Group Date; OM: AutoSchedule; OM: Enforce Shipping Method for Ship Sets; OM: Schedule ATO Item Without BOM; OM: Scheduling Role; Security OM: Add Customer; OM: Add Customer (Order Import); OM: Administer Public Queries; OM: Authorized To Override ATP; OM: Cascade Service; OM: Charging Privilege; OM: Create Account Information; OM: Credit Card Privileges; OM: Discounting Privileges; OM: List Price Override Privilege; OM: Modify Seeded Holds; OM: Scheduling Role; OM: Authorized To Override ATP;
  • 17. Service OM: Cascade Service; Transaction Entry OM: Apply Automatic Attachments; OM: Cascade Service; OM: Configuration Quick Save; OM: Copy Model dff to child lines; OM: Default Blanket Agreement Type; OM: Default Blanket Transaction Phase; OM: Default Sales Transaction Phase; OM: Default Salesrep; OM: Display New Order After Copy OM:Enforce check for duplicate Purchase Orders; OM: Generic Update Constraints Apply to DFF?; OM: Prevent Booking for Line Generic Holds; OM: Return Item Mismatch Action; OM: Return Unfulfilled Referenced Line Action; Upgrade OM: Context Responsibility for Upgraded Orders; OM: Notification Approver; Implementing Profile Options Summary The following table indicates whether you can view or update the profile option and at which System Administrator level the profile options can be updated. The System Administrator level includes User, Responsibility, Application, and Site levels. The table also displays if the profile option is Optional or Required: Required: Requires you to provide a value Optional: A default value is provided, so you only need to change it if you do not want to accept the default If the profile option from the table is prefaced with an application short code, you can find additional information surrounding the profile option usage in the related Application User Guide. The table also uses the following values to describe profile option controls for columns User, System Admin User, System Admin Resp, System Admin App, and System Admin Site: Yes: You can update the profile option. View Only: You can view the profile option value in the Profiles window, but you cannot change it. No: You cannot view or change the profile option value.
  • 18. For the profile options table below, the following codes are used to denote profile options used within Order Management that are defined within other Oracle Applications. See the appropriate User Guide for additional details. (AR) Oracle Receivables (BOM) Oracle Bills of Material (FND) Oracle Applications Foundations (GL) Oracle General Ledger (INV) Oracle Inventory (QP) Oracle Advanced Pricing (WSH) Oracle Shipping Execution (OKC) Oracle Sales Contracts The following table is a more in-depth description of each of the profile options. Profile Options Syst Syst em Syst Syst em Adm em em Profile Profile Adm in. Adm Adm Categor Option Use in. Res in. in. Requi y Name r User p. App. Site red? Default Value Names OM: Add View Yes Yes - Yes Yes - Requir NULL Custome Customer Only defa defa ed r Usage, ult is ult is Security, None None Forms UI OM: Add View Yes Yes Yes Yes Option NULL Custome Customer Only al r Usage, (Order Security, Import) Order Import OM: No Yes Yes Yes Yes Requir No Forms Administer ed UI, Public Security Queries OM: Allow No No No No Yes Option No Fulfillme Model al nt, Fulfillment Configur Without ations Configurati
  • 19. on OM: Apply View No Yes Yes Yes Option Yes Transact Automatic Only al ion Entry Attachmen ts OM: Assign No No No No Yes Option NULL Scheduli New Set al ng For Each Line OM: View Yes Yes No Yes Option NULL Scheduli Authorized Only al ng, to Override Security ATP OM: No No No No Yes Option Yes Fulfillme Automatica al nt lly Interface Lines to IB on Fulfillment OM: Yes Yes Yes Yes Yes Option No Forms Automatica al UI lly Open Related Items Window OM: Auto View No Yes No Yes Option NULL Scheduli schedule Only al ng OM: Auto View No Yes No Yes Option NULL Scheduli Push Only al ng Group Date OM: View View View Yes Yes Option Null - equivalent to Service, Cascade Only Only Only al Yes Transact Service ion Entry OM: View View View View Yes Electroni Change SO Only Only Only Only c Response Messagi Required ng
  • 20. OM: View No No No Yes Option NULL Pricing Charges Only al for Backorders OM: View No No No Yes Option NULL Pricing Charges Only al for included item OM: View Yes Yes Yes Yes Option NULL Pricing, Charging Only al Security Privilege OM: No No No No Yes Option No Payment Commitme al s nt Sequencin g OM: No No No No Yes Option No Transact Configurati al ion on Quick Entry, Save Configur ations OM: View Yes Yes Yes Yes No ONT_CONTACT_CENT Forms Contact Only ER_SUB_MNU UI Center Actions Menu Name OM: View View Yes View View Option No Default Upgrade Context Only Only Only Only al Responsibil ity for Upgraded Orders OM: Copy No No No Yes Yes Option No Transact Model DFF al ion To Child Entry, Lines Configur ations
  • 21. OM: Create View Yes Yes Yes Yes Option None Custome Account Only al r Usage, Informatio Security n OM: Credit View View Yes Yes Yes Option None Payment Card Only Only al s, Privileges Security OM: Cust View No Yes No Yes Item Item Only Usage, Shows Forms Matches UI OM: View Yes Yes Yes Yes Option NULL Returns, Customer Only al Portal UI Service Feedback OM: View Yes Yes Yes Yes Option N Returns, Customer Only al Portal UI Service Report Defect OM: DBI View Yes Yes Yes Yes Deploym Installation Only ent OM: Debug Yes Yes Yes Yes Yes Option 0 Debug Level al OM: Debug View No Yes Yes Yes Option NULL Debug log al Directory OM: Yes Yes Yes No Yes NULL Transact Default ion Entry Sales Transactio n Phase OM: No No Yes No Yes Option NULL Transact Default al ion Entry Blanket Agreement Type OM: Yes Yes Yes No Yes Option NULL Transact
  • 22. Default al ion Entry Blanket Agreement Transactio n Phase OM: Yes Yes Yes Yes Yes Option NULL Transact Default al ion Entry Salesrep OM: No Yes Yes Yes No Option NULL Pricing, Discountin al Security g Privileges OM: Yes Yes Yes Yes Yes Yes Button Forms Display UI Actions Button vs. Pop list OM: Yes Yes Yes Yes Yes Option No Forms Display al UI Current Selections in Pricing and Availability OM: Yes Yes Yes Yes Yes Option No Transact Display al ion Entry New Order After Copy OM: View View View View Yes XML Electroni Electronic Only Only Only Only c Message Messagi Integration ng Event Sources OM: E-Mail View No No No Yes Option No Custome Required Only al r Usage On New Customers OM: View Yes Yes Yes Yes Pricing Enable Only
  • 23. Group Pricing for DSP Lines OM: View Yes Yes Yes Yes Option No Item Enable Only al Usage, Related Forms Items and UI Manual Substitutio ns OM: View Yes Yes Yes Yes Requir Yes Transact Enforce Only ed ion Entry Check For Duplicate Purchase Order OM: No No No No Yes Option NULL Scheduli Enforce al ng Shipping Method for Ship Sets OM: View No No No Yes No No Debug Generate Only Diagnostics for Error Activities OM: View No No No Yes Option NULL Transact Generic Only al ion Entry Update Constraints Apply to DFF? OM: Yes Yes Yes Yes Yes Option Null - equivalent to No Order Import al Import Multiple Shipments OM: View No No No Yes Requir NULL Fulfillme Included Only ed nt, Item Configur Freeze ations
  • 24. Method OM: No No No No Yes Option No Invoicing Interface al Freight Tax Classificati on Code From Line OM: No No No No Yes Requir Automatic Invoicing Invoice ed Numbering Method OM: Item View Yes Yes Yes Yes Option NULL Pricing Change Only al Honors Frozen Price OM: Item No No No No Yes Requir System items Item Flexfield ed Usage OM: Item Yes Yes Yes Yes Yes Option NULL Forms View al UI method OM: List No Yes Yes No No Option NULL Pricing, Price al Security Override Privilege OM: Inter Inter Inter Inter Inter Intern Internal Use Only Holds, Modify nal nal nal nal nal al Use Security Seeded Use Use Use Use Use Only Holds Only Only Only Only Only OM: View No No Yes Yes Option NULL Pricing Negative Only al Pricing OM: New No Yes Yes Yes Yes Option No Deploym EDI al ent, Acknowled Electroni gment c Framework Messagi ng
  • 25. OM: View Yes Yes Yes Yes Option NULL Upgrade Notification Only al , Approver Returns OM: Order View View View View Yes Option Null - equivalent to Electroni Accept Only Only Only Only al Entered c State For Messagi XML ng OM: View No No No Yes Option 100 Deploym Orders Only al ent Purge Per Commit OM: Over View No No No Yes Requir 0 Returns, Return Only ed Fulfillme Tolerance nt OM: Over View No No No Yes Requir 0 Fulfillme Shipment Only ed nt Tolerance OM: Party View No No No Yes Requir US Dollars Custome Totals Only ed r Usage Currency OM: No No No No Yes Option NULL Fulfillme Population al nt Of Buyer Code For Dropship OM: No No No No Yes Yes Yes Payment Preserve s External Credit Balances OM: No No No No Yes Option NULL Holds, Prevent al Transact Booking ion Entry for Line Generic Holds OM: Price No No No No Yes Option NULL Pricing Adjustment al Modifier
  • 26. for AIA Order Lines OM: View No No No Yes Option NULL Deploym Printed Only al ent Document Extension Class Name OM: View No No No Yes Option NULL Pricing Promotion Only al Limit Violation Action OM: Quick Yes Yes Yes Yes Yes Option Application Forms Sales al UI Order Form: Auto Refresh OM: Quick Yes Yes Yes Yes Yes Option No Forms Sales al UI Order Form: Defer Pricing OM: Yes Yes Yes Yes Yes Option NULL Portal UI Records on al Summary Page for External Users OM: No No No No Yes Option NULL Item Restrict al Usage Customer Items for Line Level Ship To Address OM: View Yes Yes Yes Yes Option NULL Returns, Return Only al Transact
  • 27. Item ion Entry Mismatch Action OM: View Yes Yes Yes Yes Option NULL Returns, Return Only al Transact Unfulfilled ion Entry Referenced Line Action OM: Run View View View View Yes Option NULL Electroni Order Only Only Only Only al c Import for Messagi XML ng OM: Sales No Yes Yes View View Option Null Forms Order Only Only al UI Form: Cascade Header Changes to Line OM: Sales Yes Yes Yes Yes Yes Option Sales Orders Forms Order al UI Form Preference OM: Sales Yes Yes Yes Yes Yes Option Null - equivalent to Forms Order al Automatic Refresh UI Form: with Repositioning of Refresh Cursor Method (Query Co- ordination) OM: Sales View View Yes Yes Yes Option Global Forms Order Only Only al UI, Form: Custome Restrict r Usage Customers OM: Sales Yes Yes Yes Yes Yes Option ASK Forms Order al UI Navigation From P&A form
  • 28. OM: No No No No Yes Option No Scheduli Schedule al ng ATO Item Without BOM OM: No Yes Yes No No Option NULL Scheduli Scheduling al ng, Role Forms UI, Security OM: Send View View View View Yes Option Null - equivalent to No Electroni Acknowled Only Only Only Only al c gment for Messagi Change PO ng Response OM: Send View No No No Yes Option Yes Pricing Changed Only al Lines to Pricing OM: No No No No Yes Option Null Logistics Sequence al for TP Ship/Delive r Deadline OM: Set View No No No Yes Option No Invoicing Receivable Only al s Transactio n Date as Current Date for Non- Shippable lines OM: Show Yes Yes Yes Yes Yes Option NULL Forms Line al UI Details OM: Show Yes Yes Yes Yes Yes Option NULL Forms Process al UI Messages
  • 29. Flag OM: No No No No Yes Requir ORDER ENTRY Fulfillme Source ed nt Code OM: No No No No Yes Option NULL Logistics Source for al TP Early Ship / Deliver Date OM: Use No No No No Yes Option Yes Deploym Configurat al ent, or Forms UI, Transact ion Entry, Configur ations OM: Use No No No No Yes Yes No Fulfillme Materialize nt d View for Items LoV (Honours Item Orderabilit y Rules) OM: Under View No No No Yes Requir 0 Returns, Return Only ed Fulfillme Tolerance nt OM: Under View No No No Yes Requir 0 Fulfillme Shipment Only ed nt Tolerance OM: View View View View Yes Option NULL Order Unique Only Only Only Only al Import Order Source, Orig Sys Document Ref
  • 30. Combinatio n For Each Customer OM: Unit Yes Yes Yes Yes Yes Option NULL Pricing Price al Precision Type OM: UOM View View View View Yes Pricing Class For Only Only Only Only Charge Periodicity OM: View Yes Yes Yes Yes Yes Option Yes Forms Cancel al UI Lines OM: View Yes Yes Yes Yes Yes Option Yes Forms Closed al UI Lines OM: View Yes Yes Yes Yes Yes Option No Invoicing Intercomp al any AR invoice OM: View Yes Yes Yes Yes Yes Option Both Forms Pricing/Ava al UI ilability Informatio n in Related Items AR: Credit No No Yes Yes Yes Limit Selection AR: Item Yes Yes Yes Yes Yes Requir NULL Flexfield ed Mode (AR) AR: Use View Yes Yes Yes Yes Requir No Invoice Only ed Accounting for Credit Memos
  • 31. (AR) HZ: Yes Yes Yes Yes Yes Requir NULL - equivalent to Generate ed Yes Contact Number (AR) HZ: Yes Yes Yes Yes Yes Requir NULL - equivalent to Generate ed Yes Party Number (AR) HZ: Yes Yes Yes Yes Yes Requir NULL - equivalent to Generate ed Yes Party Site Number (AR) Tax: Allow View Yes Yes Yes Yes Requir NULL Ad Hoc Only ed Tax Changes (AR) Tax: Allow View Yes Yes Yes Yes Requir NULL Manual Only ed Tax Lines (AR) EBTax: View Yes Yes Yes Yes Requir NULL Allow Only ed Override of Customer Exemption s (AR) Tax: Allow View Yes Yes Yes Yes Requir NULL Override of Only ed Tax Classificati on Code (AR) Tax: View No Yes Yes Yes Option NULL Calculate Only al
  • 32. Tax on Credit Memos (AR) Tax: Use View No Yes Yes Yes No Tax Only PL/SQL Vendor (AR) Tax: Use View No Yes Yes Yes Requir No Tax Only ed Vendor (AR) BOM: View No No No Yes Option No Check for Only al Duplicate Configurati on (BOM) BOM: Yes Yes Yes Yes Yes Option 10 Componen al t Item Sequence Increment (BOM) BOM: Yes Yes Yes Yes Yes Requir Configurat ed or URL of UI Manager (BOM) BOM: Yes Yes Yes Yes Yes Option No Default Bill al of Material Levels (BOM) Sequential View No Yes Yes Yes Requir Numbering Only ed (FND) Default Yes Yes Yes Yes Yes Requir NULL
  • 33. Country ed (FND) Flexfields: Yes Yes Yes Yes Yes Option Yes Open al Descr Window (FND) Journals: Yes Yes Yes Yes Yes Option At site level Display al Inverse Rate (GL) INV: Yes Yes No No Yes Option NULL Capable to al Promise (INV) OKC: No No No Yes Yes Option NULL Enable al Sales Contracts (OKC) QP: View No No Yes Yes Option No Default Accrual Only al UOM Class (QP) QP: Blind View No No Yes Yes Requir Yes Discount Only ed Option (QP) QP: Item View No Yes No Yes Requir No Default Validation Only ed Organizatio n (QP) QP: High No No No No Yes Volume Order Processing Complianc e (QP) QP: Line View No No Yes Yes Option No Default
  • 34. Volume Only al UOM Code (QP) QP: Line View No No Yes Yes Option No Default Weight Only al UOM Code (QP) QP: View No No Yes Yes Requir No Default Negative Only ed Pricing (QP) QP: Return Yes Yes Yes Yes Yes Manual Discounts (QP) QP: Source No No No Yes Yes Requir No Default System ed Code (QP) QP: Unit No No No Yes Yes Requir Standard Price ed Precision Type (QP) QP: Verify No No No No Yes Requir No GSA ed Violations (QP) WSH: Yes No No No No Option NULL Internet al Proxy URL (WSH) Order Management Profile Option Descriptions and Settings OM: Add Customer ONT_ADD_CUSTOMER This profile option determines which users who can access the Order Management Add Customer window to enter customers, customer addresses, and customer contact information. Select from:
  • 35. All: Users can create new customers, customer addresses, and customer contacts. None: User cannot create new customers, customer addresses, and customer contacts. Address and Contact only: Users can access the Add Customer window to create both new customer addresses and/or customer contacts for existing customers only The default for this profile option is None. Note: You cannot update existing customer information from the Add Customer window. However, if the e-mail address field is NULL for a customer and/or customer contact, you can update these fields. Note: Oracle Trading Community Architecture provides a model for managing information about entities such as customers. The TCA Data Sharing and Security (DSS) feature allows you to define rules around who can create, update or delete customer data.For more information please refer to the Oracle Trading Community Architecture Administration Guide. OM: Add Customer (Order Import) ONT_ADD_CUSTOMER_OI This profile option determines which users can create new customers and customer details when importing order using the Order Import concurrent program. Select from: All: Users can create new customers, customer addresses, and customer contacts. None: User cannot create new customers, customer addresses, and customer contacts. Address and Contact only: Users can access the Add Customer window to create both new customer addresses and/or customer contacts for existing customers only The default for this profile option is None. Note: Oracle Trading Community Architecture provides a model for managing information about entities such as customers. The TCA Data Sharing and Security (DSS) feature allows you to define rules around who can create, update or delete customer data. For more information please refer to the Oracle Trading Community Architecture Administration Guide. OM: Administer Public Queries
  • 36. ONT_ADMINISTER_PUBLIC_QUERIES This profile option determines which responsibility is able to create and update public queries within Order Management windows. OM: Apply Automatic Attachments OE_APPLY_AUTOMATIC_ATCHMT This profile option determines whether rule-based attachments are applied without user intervention. OM: Allow model fulfillment without configuration ONT_ALLOW_MODEL_FULFILL_WITHOUT_CONFIG In order to enable you to progress model lines which do not have child lines attached, the profile option OM: Allow Model Fulfillment without Configuration has been introduced. When you set this profile option to Yes, you are allowed to progress the model line and not wait at fulfillment any longer, even if you do not have a child line attached to it. If you set this profile option to No, which is the default value, the current functionality will be carried out: the model line will get fulfilled only if it does not have any child lines attached to it. If the model line is not configured, i.e. if it does not have any child lines attached to it, then the model line waits at fulfillment thus giving the user a chance to configure the model. OM: Assign New Set For Each Line ONT_CHECK_WAIT_TO_FULFILL_LINE The default is set to ―N‖ which creating ONE Ship/Arrival Set per order. Set to 'Y' which creates a separate ship/arrival set per line, resulting in enforcing that each line is shipped complete. OM: Authorized to Override ATP ONT_OVERRIDE_ATP This profile option controls which responsibilities or users have the authority to perform the ATP override. If YES, then the user or responsibility can override the ATP Schedule Date. Null is interpreted as No. This can be set at the site, responsibility, or user level. OM: Automatically Interface Lines to IB on Fulfillment
  • 37. ONT_AUTO_INTERFACE_LINES_TO_IB This profile option enables you to control the interfacing of non-shippable items to Install Base (IB). The default value is Yes and if you have not set any value for this profile, then the application assumes the value to be Yes. The value Yes ensures that all non-shippable lines that reach fulfillment are automatically interfaced to IB. If you set No as the value, then the non-shippable items are not interfaced to IB automatically. OM: Automatically Open Related Items Window ONT_OPEN_RELATED_ITEMS This profile option allows the user who does high volume up-selling and cross-selling to have the Related Items window open automatically for all items which have relationships defined. Options are Yes or No (default). OM: Auto Push Group Date ONT_AUTO_PUSH_GRP_DATE This profile option controls scheduling when a new line is inserted into an existing set. If the new line cannot be scheduled on the same date as the rest of the set, this profile is used. Select from: Yes: The entire set will be automatically rescheduled. No or NULL: An error will occur. You can change the dates or quantities to make scheduling succeed. This profile option can be overridden for a parameter specific to customers or customer sites by setting a value in the Customer window. The default is NULL. OM: AutoSchedule ONT_AUTOSCHEDULE This profile option determines the default setting for autoscheduling orders, and also controls the display of the Availability window within the Sales Order Lines window. Please note that autoscheduling orders is only supported for orders that contain standard line items, not models or kits. Select from:
  • 38. Yes: Order lines are scheduled automatically at the time of entry. Automatically display the Availability window within the Sales Order window when entering order line details. No or NULL: Order lines are not scheduled automatically at the time of entry. Does not automatically display the Availability window within the Sales Order window when entering order line details. Note: If the item or model is a standard item or has the item ATP flag enabled, ATP inquiry will automatically be performed on the item or model once it has been entered on an order line and a user exits the item field. The Line Generic workflow process sequences the line scheduling action to occur after you book the order. However, even if you have set this profile option to No and you indicate ship set or arrival set on a order line, the order entry processing schedules the line and sets the Visible Demand Flag. To group lines into ship sets and arrival sets, order entry processing uses the warehouse, scheduled shipment date, ship to location, shipment priority, and shipment method. Therefore, it schedules the order lines with ship set values to obtain scheduled shipment date. If you want the Line Generic workflow process to schedule an order line, you cannot specify a ship set or arrival set for it. OM: Cascade Service ONT_CASCADE_SERVICE If set to No, services will not be automatically cascaded from model to its options. When a service is added to a model, depending on the profile value the application will or will not automatically cascade the service to the options. OM: Change SO Response Required This profile option determines if a response is required to an outbound Change SO XML message. If a response is required, the order is put on hold until a response is received from the customer. OM: Charges for Backorders This profile option controls the setting of the Calculate Price Flag when backorder lines are created. Select from:
  • 39. No or NULL: The Calculate Price Flag will be set to Freeze, and the pricing engine will not apply charges. Yes: The Calculate Price Flag will be set to Partial to enable charges to be calculated when the backordered item ultimately ships. OM: Charges for included item ONT_CHARGES_FOR_INCLUDED_ITEM This profile option determines if Order Management will calculate and return charges for included items. The profile option setting does not control the pricing of included items, only the calculation and return of charges associated with an order line containing an included item. Select from: Yes: Calculate and return charges for included items. No: Do not calculate charges for included items. OM: Charging Privilege OE_CHARGING_PRIVILEGE This profile option controls your ability to manually apply freight and special charges on an order or order line. Select from: Full Access: You can modify and apply charges, but you cannot modify non- overridable charges. View Only Access: You can only view charges. Unlimited Access: You can modify and apply all charges including the non- overridable charges. OM: Configuration Quick Save ONT_CONFIG_QUICK_SAVE This profile option determines how Order Management will save option or model class lines for unbooked sales orders from within the Sales Order window only. If you set this profile option to Y, class lines will be saved by a direct database insert call with a minimum of order line defaulting values, unless the value of the Order Management profile option OM: Included Item Freeze Method is set to Entry. If the
  • 40. value of OM: Included Item Freeze Method is set to Entry, you cannot perform direct database inserts of model or class order lines with a minimum of defaulting. OE: Commitment Balance Checking OE_COMMITMENT_BAL_CHECK This profile option is obsolete and no longer used by Order Management. OM: Commitment Sequencing OE_COMMITMENT_SEQUENCING This profile option determines whether or not Oracle Order Management calculates and stores the amount of the line that can be paid using the commitment, and if commitments will be applied in Oracle Receivables in the same sequence that they are applied in Order Management. Select from: Yes: Order Management populates the commitment applied and then will interface the applied commitment amount to Oracle Receivables. Note: If you set this profile option to Yes, and you have not installed Bills Receivables for Oracle Receivables, Order Management will not capture the applied commitment amount and therefore will not relay commitment applied amounts to Oracle Receivables; no Warning or Error message is displayed. No: Order Management does not calculate the exact commitment applied amount for an order line. Instead, the extended amount of the line is shown in the commitment applied field within the Sales Order Line, Pricing Tab window. OM: Contact Center Actions Menu Name ONT_AGENT_ACTION_PROFILE Agent actions are defined as functions. Depending on the functions that have been mapped to menus, the corresponding associated agent actions are available from the Line Items sub-tab page. This profile option holds the name of that menu. The default value will be the value of the Order Management seeded menu ‗ONT_CONTACT_CENTER_SUB_MNU‘. OM: Context Responsibility for Upgraded Orders OE_RESP_FOR_WF_UPGRADE
  • 41. This profile option is used to flag certain responsibilities to be used when setting the applications context for deferred activities for upgraded orders and order lines. It is used for customers who are upgrading and only needs to be set if a user, who has created orders, (created_by column in Order Management schema) has multiple responsibilities that point to a single operating unit. This profile option can only be set at the Responsibility level. OM: Copy Model DFF to child lines. This profile option enables copying of all flexfields to the lines from the model line. Context sensitive flexfields are more popular; you may not want the same flexfields copied to all the child lines of a model. The default value is No. Set this parameter to 'Yes' in order for the values to copy. OM: Create Account Information ONT_CREATE_ACCOUNT_INFORMATION This profile option is used to set the user's permissions to create accounts, sites, and contacts. It can be set at the Site, Application, Responsibility, and User levels. The seeded profile values are: All: The user is permitted to create Accounts, Account Sites, Account Contracts, and related information Account Site and Account Contact Only: The user is permitted to create Account Sites, Account Contracts, and related information only None: The user is not permitted to create any of the above The default value is None. The Create Account Layer API will check this profile and create the account layer only if the user has the correct permissions. The calling application can pass a profile value to the API. It is useful if the calling application has already determined the user's privileges. OM: Credit Card Privileges ONT_CREDIT_CARD_PRIVILEGES This profile option is used for controlling the entry of new credit card details, updating existing details, and allowing for manual authorization. The valid values for this profile option are Yes and No. This profile option has been modified, it's previous valid values
  • 42. were All, Limited and None and in the previous release, this profile option would additionally be used for controlling the card number display. The masking / display function for the credit card number is now controlled from Oracle Payments. Please visit Oracle Payments Implementation Manual for more details. OM: Cust Item Shows Matches OE_CUST_ITEM_SHOW_MATCHES This profile option is obsolete. OM: Customer Service Feedback ONT_FEEDBACK_PROFILE This profile option indicates the Customer contact that a workflow notification will be sent to for RMA requests entered via the Order Information Portal. The values for the LOV for this profile option is all users defined to Oracle Applications via the System Administrator responsibility having no customer contacts. The default for this profile option is Null. OM: Customer Service Report Defect ONT_REPORTDEFECT_PROFILE This profile option indicates the Customer contact that will receive a workflow notification for any Report Defects submitted via the Order Information Portal. The values for the LOV for this profile option is all users defined to Oracle Applications via the System Administrator responsibility having no customer contacts. The default for this profile option is Null. OM: DBI Installation ONT_DBI_INSTALLED This profile option is used to flag whether DBI has been installed. If the profile option is set to Yes, then data is collected for DBI usage. If the profile option is set to No, then data is not collected for DBI. OM: Debug Level ONT_DEBUG_LEVEL
  • 43. This profile option is used to store debug messages to assist in problem identification. The OM: Debug profile option controls which debug messages get written to the debug log based on their assigned level. The directory to be specified for this profile should be available in utl_file_dir parameter of the init.ora file (or check v$parameter) of the application database instance. Assigning a value greater than 0 or NULL causes debugging to be turned on. The value of this option determines the level of debug messages printed within a log file. For example, if OM: Debug Level has a current value of 3, all debugging messages with a level of 1,2 or 3 will be spooled out to the debug log. Valid values for this profile option are: NULL: Do not print any debug messages 1:Level 1; Print a limited subset of debug messages (level 1) 2:Level 2; Print a limited subset of debug messages, including level 1 3:Level 3; Print a limited subset of debug messages, including levels 1,2 4:Level 4; Print a limited subset of debug messages, including levels 1,2 3 5:Level 5; Print all debug messages If you set this profile option to a value other than NULL, system performance may be affected, because creating and updating a debug log is a task that will consume a lot of system resources as you enter higher debug levels. Order Management recommends you set this profile option only if you are attempting to gather additional details for unexpected application issues and then reset the value back to NULL once you have gathered the necessary debug details. The default for this profile option is NULL. OM: Debug Log directory OE_DEBUG_LOG_DIRECTORY This profile option determines the default directory used to store log file outputs when performing Order Management debugging. OM: Default Sales Agreement Type OE_DEFAULT_BLANKET_ORDER_TYPE
  • 44. This profile is the first preference to default the transaction phase, negotiation or fulfilment on Sales Agreements. This profile should be allowed to setup only at the responsibility and site level. OM: Default Sales Agreement Transaction Phase ONT_DEF_BSA_TRANSACTION_PHASE This profile to defaults the order type to generate sales agreement number. This profile should be allowed to setup only at the responsibility and site level. OM: Default Salesrep ONT_DEFAULT_PERSON_ID A profile to default the dummy salesrep for the Telesales Order. The Telesales team will pass the salesrep_id for the order if that information is available in the eBusiness Center. If no salesrep is passed to the Sales Orders form, then Order Management will default the salesrep value from the profile setup in Order Management. Integration with TeleSales is available with a TeleSales license. OM: Default Sales Transaction Phase ONT_DEF_TRANSACTION_PHASE A default source for the transaction phase on the Quote Sales Order. The default is null for negotiation and fulfillment. OM: Delay Scheduling When the value of this profile option is set to Yes, then the scheduling of a line is performed only when the changes made are committed to the database, as opposed to simply navigating out of the line record. OM: Discounting Privilege ONT_DISCOUNTING_PRIVILEGE This profile option provides the choice of controlling user's ability to apply discounts on an order or order line. Select from:
  • 45. Full: Ability to apply any valid discount against an order or order line, as long as the order type of the order does not enforce list prices. (Default value). Non-Overridable Only: Ability to apply only non-overridable discounts against an order or order line. Unlimited: Ability to apply any valid discount against any order or order line, regardless of whether the order type of the order enforces list prices. None: No privileges, view-only access. Note: A Null value for this profile option is handled as if you selected the value FULL. OM: Display Actions Button vs. Poplist Controls whether the traditional button for Actions or a pop list will be used to display available Actions. Valid values are: Button and Pop list. The default value will be Button for backward compatibility. OM: Display Current Selections in Pricing and Availability ONT_PANDA_DISPLAY Yes or No - default is No. Determines whether or not to show the saved selections section of the P&A form OM: Display New Order After Copy You can choose to display the newly copied order depending on the value of this profile option. If the value of the profile option is set to Yes, the box Display New Order after copy on the Copy Orders window (Quick Copy tab) will be selected and you can view an order that has been copied in the sales orders window. If the value of the profile option is set to No, the box Display New Orders after copy will be unselected and the newly copied order will not display automatically in the sales orders window, you will need to query for it. However, you can override the selection of the check box Display New Order after Copy in the Copy window while copying. OM: Electronic Message Integration Event Sources ONT_EM_INTEG_SOURCES Order Sources enabled for Integration Business Event. Based on the source, you can enable the History which will be maintained for that source in the Electronic Messaging history table. OM: E-Mail Required on New Customers
  • 46. ONT_MANDATE_CUSTOMER_EMAIL This profile option determines whether the field E-mail address is required for any customer or customer contact you define within Order Management. Select from: Yes: E-mail address is required, for both the customer and customer contact, when defining or updating a customer or customer contact. No or NULL (the default): E-mail address is not required when defining or updating either a customer or customer contact. OM: Enable Group Pricing For DSP Lines ONT_GRP_PRICE_FOR_DSP When demand interface appends order lines to an existing order, this profile option controls whether other unchanged order lines should be sent to the Pricing Engine for repricing. Setting this profile option to No improves demand interface performance. The default value is No. You should only set this profile option to Yes when you want your orders created by demand interface qualify for Promotional Goods, Other Item Discounts or other line group level modifiers defined in Advanced Pricing. OM: Enable Related Items and Manual Substitutions ONT_OPEN_RELATED_ITEMS Values: Yes or No Default Value: No Usage: This option enables you to turn on Related Items. APS users should not turn on Related Items because the forecast demand consumption would be incorrect. Options are Yes or No (default). Default Levels: Viewable and updatable at all levels. OM: Enforce Check For Duplicate Purchase Order ONT_ENFORCE_DUP_PO When this profile option is set to Yes or is blank, a check will be made to verify if the entered PO number is duplicate or not. It will display a warning if a duplicate number is found. When the profile option is set to No, a check to verify for duplicate PO number will not be carried out.
  • 47. OM: Enforce Shipping Method for Ship Sets ONT_SHIP_METHOD_FOR_SHIP_SET Determines whether Shipping Method is a set attribute. If set to Yes, all lines in a set must have the same Shipping Method. Site level only. OM: Estimated Authorization Validity Period ONT_EST_AUTH_VALID_DAYS This profile is no longer used . The associated functionality is now controlled by Oracle Payments. Please refer to the Oracle Payments Implementation Guide for more details. OM: Generate Diagnostics for Error Activities This profile determines whether the OM Standard Error Process with Retry workflow process automatically triggers the Diagnostics: OM Order Information concurrent program. Possible values are No (default) or Yes OM: Generic Update Constraints Apply to DFF? This profile option determines whether you can update processing-constrained descriptive flexfield attributes on closed orders. There is a seeded processing constraint against updating closed order lines; this profile option does not control order line fields other than the flexfield attributes. Select from: Yes: (the default): you cannot update processing-constrained flexfield attributes on closed orders. No: you can update processing-constrained flexfield attributes on closed orders. This profile option is updatable at the site level. Regardless of this profile option, you can set up constraints specific to flexfield attribute constraints. OM: Import Multiple Shipments This profile option is used to import multiple shipments via Order Import. If this profile option is set to Yes, the orig_sys_shipment_ref will also be used in determining the uniqueness of the line record in combination with order_source_id, orig_sys_document_ref and orig_sys_line_ref.
  • 48. OM: Included Item Freeze Method ONT_INCLUDED_ITEM_FREEZE_METHOD This profile option determines the date and time Order Management uses to determine when included items for a configuration's bill of material are added as lines on the order. Included items for a PTO Model/Class/Kit will also be exploded based on the profile option. Select from: Ready to Pick/ Purchase Release: If the value for this profile option is set to Ready to Pick / Purchase Release, both the Inventory Interface and Purchase Release workflow activities will explode the included items when processed during pick release and purchase release, respectively. Entry: If the value for this profile option is set to Entry, included items will explode on the sales order when moving to a new line or performing a save. Note: If the Order Management profile option OM: Configuration Quick Save is set to Yes, you should not set the value of this profile option to Entry. If you do, the Quick Save functionality for streamlining model class order lines will be unavailable. Booking: If the value for this profile option is set to Booking, The Booking Activity will explode included items when processed. None: When the profile is set to this value, the included items will not be processed. Even if the model has included items defined in its BOM, these will not be reflected in Order Management. This value should not be used if you have included items defined in your BOM for models. Note: When the value of the profile option is Booking or Ready to Pick / Purchase Release, security-invoked behavior (Versioning, Audit Trail, Acknowledgements) will not take place. OM: Interface freight tax classification code from line ONT_TAX_CODE_FOR_FREIGHT The default value set at site level is No (so that existing customers are not impacted due to the change). Tax_code is now interfaced to AR for freight lines that are interfaced as revenue lines when the profile is set to Yes. Tax code is populated in the same way as the sales order line along with which this freight line is interfaced. OM: Invoice Numbering Method
  • 49. WSH_INVOICE_NUMBERING_METHOD This profile option determines whether or not the Invoicing activity generates invoice numbers based on the delivery name or automatically. Select from: Automatic: Choose this value if you want to create invoices with automatic numbering. Transaction numbering is controlled automatically by the Receivables AutoInvoice concurrent program. If you set the profile option to this value, you must use an invoice source with automatic transaction numbering. Delivery Name: Choose this value if you want to create invoices for all shippable lines based on Delivery Name. If you process order lines in a delivery in more than one batch, then this function modifies the delivery name with a number to create a unique transaction number. If you set the profile option to this value, you must use an invoice source without automatic transaction numbering. Note: Delivery based invoicing is not supported if order lines within the delivery belong to different operating units. Note: In some cases, you will require both options to be enabled as you may have both invoice source and non-delivery invoice source. Use the Transaction Type "Invoice Order" to specify both. You are allowed to choose invoice source regardless of the setting of the OM: Invoice Numbering Method, to allow for those users who have customizations around invoice numbering. OM: Item Change Honors Frozen Price ONT_HONOR_ITEM_CHANGE This profile option determines whether Order Management will change the value of calculate price flag when an item is changed on an unbooked order line. Select from: Yes: Order Management will not change the value of the calculate price flag, whose original value is honored; the original value will control whether the order line gets repriced. No: Order management will set the calculate price flag to Y, and the order line will be repriced. OM: Item Flexfield
  • 50. OE_ID_FLEX_CODE This profile option determines the structure of the Item Flexfield (System Items) used by Order Management. This structure should be the same across all applications in the same database. OM: Item View Method ONT_ITEM_VIEW_METHOD This profile option determines the display method of data retrieved within the LOV for the Item field within the Order Management Options Window. Valid values are: 1: Only return item descriptions, with child indentations. 2: Only return item description without child indentations. 3: Display the concatenated item segment values with child indentations. 4: Display the concatenated segment values without indentation. OM: Level of Credit Checking This profile option is obsolete and no longer used. OM: List Price Override Privilege ONT_LIST_PRICE_OVERRIDE_PRIV View Only is the default value. If set to this value, the current behavior is retained, which means unit list price field is protected. Unlimited Privilege: If set to this value, you can override the unit list price field from the main tab and immediately see selling price adjusted accordingly. OM: Log Directory for Generated Packages This profile option is no longer used by Oracle Order Management. OM: Manual Linegroup Adjustment This profile is no longer used by Oracle Order Management. OM: Modify Seeded Holds ONT_MODIFY_SEEDED_HOLDS
  • 51. Internal Use Only. Enables you to modify seeded hold attributes. Options are Yes or No. The default is No or Null. OM: Negative Pricing ONT_NEGATIVE_PRICING This profile option controls whether Order Management allows a negative list price or negative selling price to be determined by the Pricing Engine or to be entered as an override by a user on a sales order. The profile option QP: Negative Pricing is used for price lists, and controls whether a negative unit price can be entered on a price list OM: New EDI Acknowledgment Framework ONT_NEW_EDI_ACK_FWK The new framework is used to generate EDI Acknowledgments. When this profile option is set to Yes, the derivation of the values for the ids for the EDI acknowledgement will be postponed. If you use EDI Transactions (855 and 856) and set this profile option to Yes, there will be better performance of the process order. OM: Notification Approver OE_NOTIFICATION_APPROVER This profile option is used during upgrading Order Entry Order Cycle History to Order Management Workflow History. This profile option can be optionally set. Valid values for this profile are based upon a Value Set that uses the seeded view WF_ROLES. The seeded Return Approval flow also sends approval notifications to the role set by this profile. If the profile option is NULL, then notifications for this role value will go to the user SYSADMIN. Note: The application retrieves the value for this profile option based on the applications context (User, Responsibility, Application) that was in effect when the transaction was created. All upgraded approvals are sent to this role value of this Profile option. OM: Number of Days to Backdate Bank Account Creation
  • 52. This profile is no longer used by Oracle. OM Order Accept State For XML ONT_XML_ACCEPT_STATE OM: Order Information Regulatory logging This profile is no longer used by Oracle Order Management. OM: Orders Purge Per Commit OM_ORDERS_PURGE_PER_COMMIT This profile option determines how many orders the purge process should purge before performing a commit to the database. OM: Over Return Tolerance OM_OVER_RETURN_TOLERANCE This profile option indicates the percentage by which a return line can be over-received. Any value greater than or equal to zero (0) is a valid value. This profile option is set at the site level. Default value is zero (0). OM: Over Shipment Tolerance OM_OVER_SHIPMENT_TOLERANCE This profile option indicates the percentage by which an order line can be over-shipped. Any value greater than or equal to zero (0) is a valid value. This profile option is set at the site level. Default value is zero (0). This profile is also applicable to Inbound Lines (RMA). OM: Preserve External Credit Balances ONT_PRESERVE_EXT_CR_BAL If this is set to Yes ,external exposure data is not deleted during Intialize Credit Summaries concurrent program. The value of the profile option can be Yes or No, Initialize Credit Summaries program will use to decide whether to use DELETE or TRUNCATE. The profile can be at site level, and the default value is Yes. With the default value, there will not be any change in behavior as the application will use delete
  • 53. and preserve external credit exposure. When this profile is set to 'No', application will truncate the table before populating the credit exposure. OM: Price Adjustment Modifier for AIA Order Lines ONT_O2C_MANUAL_MODIFIER This profile assumes significance in installations where you have configured Order Management to provide fulfillment services via Oracle Order To Cash Process Integration Pack. If you are not implementing Order To Cash Process Integration Pack, then you need not set this profile. If you are implementing Oracle Order To Cash Integration pack, and in case your business scenarios include importing order lines with differing unit list price and unit selling price, then set this profile value to a manual, over-rideable, line level, amount based pricing modifier defined in Oracle Pricing. It may be noted that this modifier continues to be effective, irrespective of the date range specified on the modifier definition user interface. OM: Party Totals Currency OM_CUST_TOTAL_CURRENCY This profile option determines the currency used by the Calculate Party Totals current program which sums order totals by Party. Order Management recommends that you set this profile option at the Site level only. OM: Payment method for Credit Card Transactions This profile is no longer used by Oracle. OM: Population Of Buyer Code For Dropship ONT_POPULATE_BUYER This profile option is used to control how Order Management will populate buyer details when sending sales order data to Oracle Purchasing for requisition processing during requisition import. Select from: Order Creator: The suggested_buyer_id field in the po_requisitions_interface table is populated with the buyer details (the employee_id of the person who enters the sales order). Your sales people must be defined as a buyer in Oracle Purchasing.
  • 54. NULL: Oracle Purchasing will perform the Get_Suggested_Buyer_Id function (retrieve the buyer information from the master item) Note: If you set the value of this profile option to NULL, you will be unable to select the value Buyer for the input parameter Group prior to submission of the Oracle Purchasing Requisition Import concurrent program. OM: Prevent Booking for Line Generic Holds ONT_PREVENT_BOOKING If a generic hold has been applied the transaction will fail booking. OM: Printed Document Extension Class Name ONT_PRINT_CUSTOMER_EXTN_OBJECT This profile allows you to update with a custom java code class path that would have been created to print user hooks. The printing API reads the profile class path and executes the java function. Example: You have a custom table and would like data from this table to appear on the Ordering Document. OM: Promotion Limit Violation Action ONT_PROMOTION_LIMIT_VIOLATION_ACTION This system level profile option determines the hold action Order Management will take when encountering a initial promotional hold returned by the pricing engine. If the pricing engine returns a possible promotional hold for an order or order line, Order Management will use the value of this profile option to determine the course of action for the order or line. Messages are generated and can be viewed within the Process Messages Window. Select from: Place holds where violated (either Line or Order): If the pricing engine returns an initial promotional hold, place a hold for the corresponding order or order line. No holds applied: If the pricing engine returns an initial promotional hold, do not apply a hold for either an order or order line. Allow the order or order line to continue processing within its associated workflow. Place order on hold when any violation occurs (both Line and Order): If the pricing engine returns an initial promotional hold, irrespective of the hold level, place the order on hold, in addition to any order lines that may be marked for promotional hold.
  • 55. This profile option is optional, and the default is Null. OM: Process Payment Immediately at Booking This profile is no longer used by Oracle. OM: Quick Sales Order Form: Auto Refresh ONT_QUICK_OE_AUTO_REFRESH This profile allows you to control if the active line detail region displays data instantly corresponding to the line when navigating between lines and without the detail blocks instantiated/navigated. Also, with the toggle query coordination check box unchecked, you have to navigate to the detail regions to display the information corresponding to each of the detail regions. When a new session begins, the value will be read from the profile to control the instant automatic refresh of the form when changes have occurred. Values for LOV: Line/Line Details/Both - Site, Application, Responsibility, User. OM: Quick Sales Order Form: Defer Pricing OE_UI_DEFER_PRICING This profile will control the default setting although users will be able to activate it from the form. When a new session begins value will be read from the profile. The default value is No. OM: Defer Pricing. Values: Yes/No Values at Site, Applications, Responsibility, and User Level. OM: Records on Summary Page for External Users ONT_ICP_DEFAULT_RECORDS This profile option indicates the default query (for external users) called when a user requests either the Orders or Delivery summary pages available from the Order Information Portal. Valid values for this option are any positive, whole integer. For external users, if you set this profile option to some value other than zero, the Order Information Home page and the Order Status page in Order Information will run a default query to show most recent open orders based upon the numeric value of the
  • 56. profile option. If you set the profile option to zero, the default query is not executed when displaying the Order Information Home page or the Order Status page. OM: Restrict Customer items for Line Level Ship To Address ONT_RESTRICT_CUST_ITEMS This profile option enables users to either use the current functionality or use of the new enhancement to view the Customer Items LOV. If the profile Option is set to YES, then the line level Ship To address displays only the customer items pertaining to that address. If the profile is set to NO, then all customer items are displayed. OM: Return Item Mismatch Action ONT_RETURN_ITEM_MISMATCH_ACTION This profile option controls what should occur if you try to change the item ID of a referenced return line. Select from: Reject: Line processing is halted with an error message. Warning: Line processing is continued with a warning. Allow: Line processing continues with no warning or error. The default for this profile option is Allow. OM: Return Unfulfilled Referenced Line Action ONT_RETURN_FULFILLED_LINE_ACTION This profile option is used for returns to control return of unfulfilled lines. Default value is Allow. Select from: Reject: Do not create return line if the reference line is non-fulfilled. Warning: Create return line with Warning if the referenced line is non-fulfilled. Allow: Create return line without Warning if the referenced line is non-fulfilled. OM: Risk Factor Threshold for Electronic Payments ONT_RISK_FAC_THRESHOLD
  • 57. This profile has been obsoleted and the associated functionality is now controlled by Oracle Payments. Please refer to the Oracle Payments Implementation Guide for details on setting up risk factor threshold. OM: Round Unit Selling Price This profile option is no longer used within Order Management and is obsolete. It has been replaced with the Pricing profile option QP: Selling Price Rounding Options. OM: Run Order Import for XML ONT_TRANSACTION_PROCESSING This profile option determines if the Oracle Order Import concurrent program is automatically submitted after the successful import of XML data into Order Management interface tables. Select from: Asynchronous: Order Import will not automatically be submitted for execution once XML data has been interfaced. You must manually submit the concurrent program after XML data has been interfaced to Order Management. Synchronous: Order Import will automatically be submitted for execution once XML data has been interfaced to Order Management. The default for this option is NULL. Note: A NULL value for this profile option is equivalent to setting the profile option to Asynchronous. OM: Sales Agreement Default Order Type OE_DEFAULT_BLANKET_ORDER_TYPE If you plan to use the Sales Agreements feature, then create a sales agreement sales order and set the profile option to default the above setup order type. This will be used to generate Sales Agreement number. This is not mandatory. The user can select order type from the list of values on the Sales Agreement form. OM: Sales Order Form: Cascade Header Changes to Line OM_UI_CASCADE_HEADER_ATTRIBUTES A predefined list of attributes will cascade from the sales order header to the line when a change is made during data entry. The profile option has three possible values:
  • 58. Automatic - the system will cascade the header attributes to lines whenever a header attribute is cascaded. Askme - you have a choice to cascade or not. Manual - you will need to manually change the values on the lines as the changes from header to lines are not cascaded. OM: Sales Orders Form Preference ONT_SALES_ORDER_FORM_REFERENCE Order Management will provide two wrapper functions which will be packaged in a form library and do not have other dependencies. External products like TeleSales can determine which Sales Order UI to be invoked based on the return value from the function. The wrapper function will look at a OM profile to be seeded by OM and will call the classic Sales Order window or the new Quick Sales Order window. This profile can be set at all levels. The default value is Classic Sales Order window. OM: Sales Order Form: Refresh Method (Query Coordination) OM_UI_REFRESH_METHOD This profile option determines whether the screen is refreshed after every save. There are four options available: Automatic Refresh with Repositioning of Cursor: When the profile is set to this option then screen is refreshed and also the cursor is repositioned to the original line from which the save operation was performed. Automatic Refresh Without Repositioning Of Cursor: When the profile is set to this option then screen is refreshed and the cursor is always positioned on the first line. Manual: With this option, users have to explicitly requery to see the latest changes. User are also not prompted with a message. Askme: A dialog box is prompted for the users to decide whether they want to refresh the screen to see the new data. If the user selects yes, then the screen is refreshed. If the user selects No then screen is not refreshed. OM: Sales Order Form: Restrict Customers ONT_UI_RESTRICT_CUSTOMERS The value of this profile option determines if all customers are displayed within the Customer field on the Sales Order Header, Main Tab or only customers who have addresses in the organization the order is defined for. This profile is applicable only for the Sales Order Header Main Tab.
  • 59. Customers are visible across all operating units; Customer Addresses are Organization specific. The default for this profile option is Global. OM: Sales Order Navigation From Pricing/Availability Form Controls navigation to the Sales Order form. Based on the value (Always, Ask, Never) the user is always, asked, or never navigated to the Sales Order form when an order is created. OM: Schedule ATO Item without BOM You now have the option to schedule ATO items even without a Bill of Materials (BOM) attached to the ATO item, either in the Ship From warehouse or in the item validation organization. Formerly the ATO Items required an attached Bill of Materials in either the Ship-from organization or the item validation organization for performing scheduling actions on them in Operational Data Store (ODS) mode.The profile related to this functionality is enabled at the site level. When set to Yes, the profile enables scheduling actions on ATO items where there is no BOM attached. When set to No, a check for the BOM is made. The default value for the profile is No. Note: This applies only when the mode is set to ODS (Profile INV: Capable to Promise set to ATP based on collected data). For Planning Data Store (PDS) mode OM: Schedule ATO Item Without BOM has no effect. For ATO-Buy Items, no BOM is required in the warehouse or item validation organization regardless of the mode (ODS or PDS) or OM: Schedule ATO Item Without BOM. OM: Scheduling Role ONT_SCHEDULING_ROLE Values are CSR Only, CSR and Scheduler, Scheduler Only Values can be set at Responsibility or User Level. Only System Administrator can set this at the user level, Not user controlled. OM: Send Acknowledgment For Change PO Response This profile option determines whether an acknowledgement will be sent for the Change PO Response. OM: Send Changed Lines to Pricing
  • 60. ONT_SEND_CHANGED_LINES_PRICING When this profile option is set to Yes, this would mean send only changed lines to Pricing when a line is changed. Otherwise, send all lines. The default is Yes. (This used to be an internal only profile option.) OM: Sequence for TP Ship/Deliver Deadline This profile populates the Latest Ship Date field for the delivery. This value maps to the late pick-up date field on the order release of Oracle Transportation Management. Values: Latest Acceptable/Promise/Schedule Date (Ship or Arrival): Uses the latest acceptable date from Oracle Order Management; however, if that value is null, then the promise date is used. If that value is also null, then the Schedule Date (Ship or Arrival) populates the Latest Ship Date field for the delivery which then populates the Late Pick Up date on the order release of Oracle Transportation Manager. Promise Date/Schedule Date (Ship or Arrival): Uses the promise date, but if that value is null, the Schedule Date (Ship or Arrival) populates the latest ship date on the delivery which in turn populates the Late Pick Up date on the order release of Oracle Transportation Management. Schedule Date (Ship or Arrival): Uses the schedule date (ship or arrival dates) to populate the latest ship date for the delivery; this value then populates the late pick up date on the order release of Oracle Transportation Management. OM: Set Receivables Transaction Date as Current Date for Non- Shippable lines OE_RECEIVABLES_DATE_FOR_NONSHIP_LINES This profile option determines if the Oracle Receivables transaction date will be populated with the system date (SYSDATE) for non-shippable order or return lines. Select from: Yes: Populate the Oracle Receivables transaction date for non-shippable order or return lines with the current system date. No: Do not populate the Oracle Receivables transaction date for non-shippable order or return lines with the current system date. Populate the Oracle Receivables transaction date for non-shippable order or return lines with the corresponding line order date or line return date.
  • 61. This profile option is optional, and the default is NO. OM: Show Line Details ONT_SHOW_LINE_DETAILS This profile option determines whether the line details of a model are displayed in the Sales Orders window. You can also toggle the display of line details using the Tools menu from the Sales Orders window. OM: Show Process Messages Flag This profile can be used to view which orders have associated Process Messages. By setting the above profile to Y, the Messages check box will be checked in the Order Summary Window, if there are any messages associated for the queried order. OM: Source Code ONT_SOURCE_CODE This profile option identifies the source code that Order Management passes to Oracle Inventory during scheduling. The source code should be defined as the third segment of the Sales Order Flexfield to guarantee that each transaction is unique. OM: Source for TP Early Ship/Deliver Date This profile option populates the Earliest Ship Date on the delivery and maps to the Early Pick Up Date field on the Release Sales Order window. Values: Earliest Acceptable Date: Uses the earliest acceptable date entered for the order lines. If that value is null, then the latest pick-up date (the Latest Ship Date value calculated from the profile option OM: Sequence for TP Ship/Deliver Deadline) populates the Earliest Ship Date for the delivery which in turn updates the Early Pick Up date on the Order Transportation Manager Order Release window. Same Date as Ship / Deliver Deadline: Uses the earliest ship date from the order lines or the latest pick-up date (the Latest Ship Date value calculated from the profile option OM: Sequence for TP Ship/Deliver Deadline above) to populate the Earliest Ship Date on the delivery. This value populates the Early Pick Up date on the Order Transportation Manager Order Release window.
  • 62. OM: Unique Order Source, Orig Sys Document Ref Combination For Each Customer This profile option determines if customer information is to be included in the order import key. If it is set to Yes, then Order Import will check the uniqueness based on customer number, order_source_id and orig_sys_document_ref, otherwise customer information will not be included in the order import key. OM: UOM Class For Charge Periodicity This profile option determines what domain will be used to hold the allowable charge periodicities. The domain is a UOM class in Inventory. Inventory has seeded a UOM class called ‗Period‘ that will hold UOMs: Daily, Weekly, Monthly, Quarterly and so on. The profile option is seeded with the value ‗Period‘. Inventory has further seeded a value set INV_CHARGE_PERIODICITY that will hold UOMs: Weekly, Monthly, Quarterly, Yearly and so on. OM: Use Configurator ONT_USE_CONFIGURATOR This profile option indicates which Oracle application software is launched to enter configuration information when selecting the Configurator button from the Sales Order window. Valid values are: Yes: Use the Oracle Configurator application to enter you configurations via Oracle Configurator user interfaces. Oracle Configurator should be installed and setup if you chose this value. See: Oracle Configurator Installation Guide. No: Use the Oracle Order Management application to enter your configurations via the Options window The default for this profile option is No. If you set this profile option value to Yes and do not have the Oracle Configurator product installed, Order Management automatically displays the Order Management Options window when selecting the Configurator button from the Sales Order Pad. Do not switch the value of this profile option when working with existing orders. For example; If a sales order that contains configurations is created while the profile value is set to Yes, do not change your profile option value to No and then attempt to update the sales order via the Configurator button. Update the configuration information through the same options window as the order was created in, or update via the Sales Order window.
  • 63. OM: Under Return Tolerance OM_UNDER_RETURN_TOLERANCE This profile option indicates the percentage by which a return line can be under- received for it to be considered fulfilled. Any value between zero (0) and 100 (both inclusive) is a valid value. This profile option is set at the site level. Default value is zero (0). OM: Under Shipment Tolerance OM_UNDER_SHIPMENT_TOLERANCE This profile option indicates the percentage by which an order line can be under- shipped for it to be considered fulfilled. Any value between zero (0) and 100 (both inclusive) is a valid value. This profile option can be set only at the site level. Default value is zero (0). For additional information on profile option descriptions and setting for products other than Order Management, please refer to the product specific users guide. OM: Unit Price Precision Type ONT_UNIT_PRICE_PRECISION_TYPE This profile option controls the display of Unit Selling Price field for sales order lines only. Select from: Standard: You will see at least two decimal places, up to a total of 20 decimal places. Extended: You see at least five decimal places, up to a total of 20 decimal places. The QP: Unit Price Precision profile controls how many decimal points you can use on a Price List for a rounding factor. OM: Use Materialized View for Items LOV (Honours Item Orderability Rules) If the value of the profile option is set to No, then Items LOV will list all the items available in the item Validation Organization of the current operating unit irrespective of any item orderability rules defined.
  • 64. If the value of the profile option is set to Yes, then Items LOV will be intelligent enough to display only those items which the current context is eligible to order: The Items LOV is dynamically built based on the item orderability rules and the current attribute values on the line. This profile can be set to Yes or No at site level only. The default value is No. OM: View Cancel Lines ONT_SHOW_CANCEL_LINES This profile option controls the default value of the Cancel check box when sorting sales order lines within the Sales Order Lines Tab, Sort window. The default value is Yes. Select from: Yes: The Cancel check box will be automatically selected when sorting sales order lines within the Sales Order Lines Tab, Sort window. Cancelled order lines will not be displayed once the sort completes. No: The Cancel check box will not be selected when sorting sales order lines within the Sales Order window, Lines Tab sort window. Cancelled order lines will be displayed once the sort completes if you do not manually select the check box. OM: View Closed Lines ONT_VIEW_CLOSED_LINES This profile option controls the default value of the Closed check box when sorting sales order lines within the Sales Order Lines Tab, Sort window. The default value is Yes. Select from: Yes: The Closed check box will be automatically selected when sorting sales order lines within the Sales Order Lines Tab, Sort window. Closed order lines will not be displayed once the sort completes. No: The Closed check box will not be selected when sorting sales order lines within the Sales Order window, Lines Tab sort window. Closed order lines will be displayed once the sort completes if you do not manually select the check box. OM: View Intercompany AR invoice If this profile option is set to Yes, you will be able to view Intercompany invoices for internal sales orders. The other options are No or Null. OM: View Pricing/Availability Information in Related Items
  • 65. This profile option controls the amount of information shown in the Related Items and Manual Substitutions window. The available options are: Pricing only, Availability only. Pricing and Availability, and None. OKC: Enable Sales Contracts OKC_ENABLE_SALES_CONTRACTS In order to leverage the functionality of Sales Contracts with Order Management, Sales Contracts must be installed and this profile must be set to YES. This profile can be set at the Application or Site levels. QP: High Volume Order Processing Compliance The value is set programmatically, and cannot be updated by users. If No, the pricing setup uses modifiers that will prevent using the optimized pricing code path. If Yes, the pricing setup is suitable for HVOP optimized pricing code. However, you should ensure that custom sourcing rules do not directly access G_HDR or G_LINE. If they do, modify the custom sourcing rules so that directly accessed fields are passed as parameters. Related Topics Oracle Workflow User's Guide Oracle E-Business Suite System Administrator's Guide Documentation Set Using Workflow in Oracle Order Management Selected Oracle Application Profile Option Descriptions (General Ledger) Journals: Display Inverse Rate DISPLAY_INVERSE_RATE If the profile option Journal: Display Inverse Rate is set to Yes, then the value entered for the conversion rate field in the Sales Order window should be entered from Base to Foreign currency (user must enter the conversion rate in functional currency to foreign currency). If the profile Journals: Display Inverse Rate is set to No, then the value entered for the conversion rate field in the Sales Order window should be entered from Foreign to Base currency (user must enter the conversion rate in foreign currency to functional currency).
  • 66. Please note, however, that the system will always store the currency rate in Foreign to Base format irrespective of the profile. For example, suppose the base currency is USD and the foreign currency is CAD. If the profile option Journal: Display Inverse Rate is set to Yes, the following message is displayed when the users navigate to the conversion rate field on the Sales Order window: Please Enter the Rate for USD to CAD. If the profile option Journal: Display Inverse Rate is set to No, the following message is displayed when the users navigate to the conversion rate field on the Sales Orders window: Please Enter the Rate for CAD to USD. (Inventory) INV: Capable to Promise INV_CTP This profile option determines which planning data store availability checking is performed against when submitting an ATP inquiry. Select from: Enable PL/SQL based ATP with planning output: This option enables ATP inquiry against the Planning Data Store (PDS) within the Advanced Planning and Scheduling (APS) database. For a PDS ATP inquiry, you can perform Basic ATP, Single-Level Supply Chain ATP, Multilevel Supply Chain ATP. Only supply and demand of the plan selected is considered during an ATP Inquiry in this mode. When an ATP inquiry is submitted within Order Management, Oracle Global Available To Promise determines which plan within the PDS is used to determine availability. The item instance/organization combination of the inquiry is sent to Oracle Global Available To Promise, enabling plan selection based upon the following: o Inactive On: Within the APS Supply Chain Plan Names window, the Inactive On (date) determines if a plan should be considered as a source for availability data. If the field contains a date, then the date must be prior to the availability check date. o Enable ATP Check Box: Within the APS Supply Chain Plan Names window, the Enable ATP check box determines if a plan should be considered for availability data. The check box must be selected in order for the plan to be considered as a source for availability data.
  • 67. o PLAN_ID: If the item instance/organization combination of the inquiry resides in the PDS for multiple plans not inactive and enabled for ATP, the plan definition with the lowest PLAN_ID is used as the source for availability checking. For example, Profile Option INV: Capable to promise = ATP/CTP Based upon Planning Output, and you have the following plans within the PDS, with each plan enabling ATP. PLAN_ID=100; Inactive on 20-FEB-2003; Item AS54888; Instance/Organization NEW/M1, NEW/V1 PLAN_ID=105; Inactive on 20-FEB-2001; Items AS54888; AS544432, Instance/Organization NEW/M1, NEW/M2, NEW/V1 PLAN_ID=202; Inactive on 20-FEB-2005; Item AS54888; Instance/Organization NEW/M1, NEW/M2, NEW/V1 1. When you perform an ATP inquiry for item AS54888 on 18-FEB-2001, while within instance/organization combination NEW/V1, then ATP results displayed are based upon planning data within the PDS for PLAN_ID=100 Item AS54888 is currently defined for instance/organization combination NEW/M1 within the PDS for PLAN_ID=100, PLAN_ID=105, and PLAN_ID=202. PLAN_ID=100 is active and has the lowest numeric value, so the data within the PDS for PLAN_ID=100 is used to check availability. 2. When you perform an ATP Inquiry for item AS54888 on 25-MAR-2002 while within instance/organization combination NEW/M2, then ATP results displayed are based upon planning data for PLAN_ID=202. Item AS54888 is currently defined for instance/organization combination New/M2 within the PDS for PLAN_ID=105 and PLAN_ID=202 PLAN_ID=105 is the lowest numeric value, but is Inactive as of 20-FEB- 2001, so the data within the PDS for PLAN_ID=202 is used to check availability. Enable PL/SQL based ATP without planning output: This option enables ATP inquiry against the Operation Data Store (ODS) within the Advanced Planning and Scheduling (APS) database. The ODS consists of all of the data that has been collected, including any incremental refreshes. Data is loaded into the ODS when you submit the APS ATP Data Collections Request Set. For ODS based ATP inquiry, you can currently only perform Basic ATP & Single level Supply Chain ATP. The ATP Rule is used to
  • 68. specify the time fence options and supply and demand sources to use during order promising inquiry. Operating Unit In Order Management, the Operating Unit profile MO: Operating Unit determines the operating unit the transaction gets created in. If you enable Multi-Org Access Control, then you can specify the Operating Unit (from those that are accessible to you via your MO: Security Profile) in the various transaction forms. Setting OM System Parameters Parameters in the Oracle Order Management Parameters window can be functionally grouped, and you can define controls as easily as defining profile options. OM System Parameters allows you to define new parameters and setting up the values for the parameters using different sources like SQL and constant values. This is step five of the Order Management Setup Steps. Defining Parameters Create and define parameters using the following attributes: Parameter Code: Unique code for the new parameter Name: Name of the parameter Description: Description of the parameter Category: Category the parameter belongs to. The category is controlled using the lookup type ―OM_PARAMETER_CATEGORY.‖ To create a new category, add the lookup code in the lookup type ―OM_PARAMETER_CATEGORY‖ and then enter that lookup type in your parameter definition window. Value Set: Value Set associated as the source of values. The possible value sets can have validation types of NONE or TABLE. For seeded parameters please make sure that you use a value set that begins with ―ONT.‖ Open Orders Check: Provides a control to allow or restrict changes to the parameter value once it is set for a given operating unit. Enabled: Controls the availability of the parameter. For seeded parameters this field is active for internal users. Seeded: Indicates whether the parameter is seeded or user-defined. This is only active for internal users. To define Order Management system parameters: 1. Navigate to the Define OM System Parameters window. Order Management > Setup > System Parameters > Define
  • 69. Define OM System Parameters Warning: You cannot have any open orders when performing updates to Order Management Parameters. If open orders are found, a warning message displays. Select the OK button to ignore the Warning or select the Cancel button to not commit changes. 2. Enter a unique code in the Parameter Code field. 3. Enter a name for the parameter in the Name field. 4. Enter a description of the parameter in the Description field. 5. Select the category from the Category field that the parameter belongs to. This is controlled with a lookup. To create a new category, add the lookup code in the lookup type ―OM_PARAMETER_CATEGORY‖ and then enter that lookup type in the parameter definition window. 6. In the Value Set field, enter a value set associated as the source of values. The possible value sets can have validation types of NONE or TABLE. For seeded parameters, use a value set that begins with ―ONT.‖ 7. Select a value from the Open Orders Check field. This provides a control to allow or restrict changes to the parameter value once it is set for a given operating unit. Available options are Allow, Give error, or Give warning. 8. When the Enabled box is selected the parameter is available to use. For seeded parameters this field is active only for internal users.
  • 70. 9. The Seeded check box indicates if the parameter is a seeded parameter or a user defined parameter. This is active only for internal users. 10. Save your changes and click OK. To cancel without saving any changes, click Cancel. Setting Parameter Values You can set up parameter values at the operating unit level by specifying following attributes: Operating Unit: Select the operating unit from the available list of values for which parameter values are to be set. Category: Select the category. On selection all the parameters for the selected category display. Show All: Check this to see all the parameters of all the categories. Parameter: Displays the name of the parameter for the selected category. Value: Parameter value of the parameter. This field shows a list of values based on value set attached with the parameter definition. Description: Displays description of the parameter currently selected. Note: If Multi-Org Access Control is enabled, you can manage System Parameter values across all Operating Units accessible to you via your MO: Security Profile. To set up Order Management system parameter values: 1. Navigate to the Define OM System Parameters window. Order Management > Setup > System Parameters > Values OM System Parameters Values
  • 71. 2. Select the operating unit from the available list of values. The Operating Unit field displays your default Operating Unit, however you can pick a different one from the list of values to manage parameters in it. 3. The Category field identifies the category to which the parameter belongs. The available parameters and their currently selected values display. Select the Show All check box to display all the parameters for all categories. 4. In the value field next to the parameter you want to set, select a value. The Value field displays a list of values available for each respective parameter. The Description field describes the currently selected parameter. 5. Save your changes and click OK. To cancel without saving any changes, click Cancel. Please refer to the sections Processing Constraints and Multiple and Partial Payments for more information. Seeded System Parameters Approval Parameters No Response From The Approver
  • 72. By default, if an approver does not respond, the transaction will be rejected. When the parameter is set to continue, the transaction will progress to the next approver. The approval notification process waits for three days and then sends a reminder. It waits for another three days after the reminder before rejecting/continuing. Default value: Blank Alternate values: Reject (same as Blank) or Continue Note: If the approver is the final approver on the list and does not respond, the transaction will be rejected regardless of the parameter value. Copy Parameters Call line DFF extension API in COPY Default value is No Drop Shipment Parameters Requestor For Drop Ship Orders Created By External Users This system parameter replaces the profile OM: Employee For Self-Service Orders. It indicates the employee who will be the requestor on the requisition generated to fulfill drop-ship orders that have been created by external users (eg: via iStore). Generic Parameters Audit Trail The audit trail parameter is used in order to capture audit history at either order entry or booking. You can select either Disable, Enable when Order is Entered or Enable when Order is Booked. The default is Null - Disabled. When the default is set, then the you can also capture cancellation history of entered orders. Previously, the processing constraint used to maintain a history of cancellations of orders when the Require Reason action was selected. Cascade hold to Option Items for Non SMC models If the value of this parameter is Yes, then the option item is put on hold if the top model is placed on hold. If the value of this parameter is No, then only the top model is put on hold, The Cascaded Hold box in the sales orders line thus remains unselected. Customer Relationships
  • 73. The default value is Single Customer. Customer Relationship Parameter Setting Examples The table below lists sample customers, their sites and business purposes. Sample Customers, Sites, and Business Purpose Customer Site Bill-to Ship-to Deliver-to A X Yes Yes Yes B Y Yes No No B Z No Yes Yes C W Yes Yes Yes The table below lists the relationships that exist between these sample customers. The data within the table will be used to describe how each of the profile option settings control the list of values for available for order data fields when placing an order. Relationships Between Sample Customers Related To Bill To Relationship Ship To Relationship Customer Customer Flag Flag A None B A Yes Yes C None If the parameter for Customer Relationships is set to Single, using the data within the second table, when placing an order for Customer A: The eligible Bill To, Ship To, and Deliver To location is Customer A, Site X If the parameter for Customer Relationships is set to Related Customers, using the data within the second table, when placing an order for Customer A: The eligible Ship To and Deliver To locations are Customer A, Site X and Customer B, Site Z The eligible Bill To locations are Customer A, Site X and Customer B, Site Y If the parameter for Customer Relationships is set to All Customers, when placing an order for Customer A:
  • 74. The eligible Ship To, and Deliver To locations are all customers and all of their ship-to sites and deliver-to sites respectively, within the first table. The eligible Bill To locations are all customers and all of their Bill To sites within the first table. Customer Relationships (Service) If the value of the parameter is set to Single Customer, the shippable products originally installed for the sold-to-customer of the service line is displayed in the LOVs of the fields Service Reference Customer Product and Service Ref Order Number. If the value of the parameter is set to Related Customers, the shippable products installed for the sold-to-customer in addition to the ones installed for the related customers of sold-to-customer is displayed in the LOVs of the fields Service Ref Cust Product and Service Ref Order Number. If the value of the parameter is set to All Customers, the shippable products installed for all customers is displayed in the LOVs of the fields Service Ref Cust Product and Service Ref Order Number. Default Hint for Pricing and Availability Enable Freight Ratings The default value is No. Enable Ship Method The default value is Yes. Item Validation Organization In Order Management, the Item Validation Organization parameter indicates the Oracle Manufacturing organization against which items are validated. Organization is synonymous with warehouse in Order Management. You set the Item Validation Organization parameter in the Parameters window, and can only set the value to the operating unit associated with your current sign on responsibility. You must also define all transactable items in this organization. Note: Before setting this parameter, you should first setup values for: HR: Security Profile HR: Business Group profile options. Valid inventory master organizations will be available based on values of HRMS profile settings. For further information on these profiles please refer to Configuring, Reporting and System Administration in Oracle HRMS.
  • 75. For a list of item attributes, please refer to the appendix Item Attributes. Margin Calculation The default value is Price Based. Configuration Effective Dates This system parameter is set at the organization (OU) level and decides which date is used to filter effective components in the model BOM. It has the following options: 1. Model Line creation date: If you set this value then model line creation date will be used as the configuration effective date. 2. System Date until Booking: If you set this value then system date until the order is booked will be used as the configuration effective date. 3. System Date till Pick Release: If you set this value then system date until the order is pick released will be used as the configuration effective date. Default value of Null retains existing behavior as seen in prior releases. Enable Fulfillment Acceptance This system parameter is used to enable the customer acceptance functionality. The possible values are Yes or No. The default value is No. Once this parameter is enabled, you call the Accounts Receivables API to invoke the rules engine to validate customer acceptance on every order line Transaction Date for Inventory Interface Non Ship Process You can select one of the following dates as the Transaction Date for order lines using Bill Only Inventory Interface flow: 1. Ordered Date 2. Current Date (sysdate) 3. Schedule Ship Date (Requirement Date) Invoicing Parameters Credit Memo Transaction Type
  • 76. This value is transferred to Receivables if no value is defined for the credit memo Receivables transaction type associated with the Inbound Order Line OM transaction type and either: The Order Header has an OM transaction type of Mixed or The Receivables transaction type associated with the Order Header OM transaction type is NULL. Credit Salesperson For Freight On Sales This parameter determines whether to credit the Salesperson on the invoicing line or order header for freight charges when the freight charges are treated as revenue. The default value is No. GSA Discount Violation Action This parameter determines how you want the user notified when you define a discount that results in an item price less than the price on a GSA discount for the same price list. Select from: Error: Provide error message Warning: Provide a warning message Inventory Item For Freight This parameter is used only when the freight item is passed as revenue line. If you set the value to Inventory Item then the Invoicing module passes this item for freight charges, which will be treated as revenue lines. Invoice Freight As Revenue If the Receivables profile option TAX: Allow Tax Code Override is set to YES, and this parameter value is also set to YES, then freight charges are treated as revenue lines, and the Invoicing module will pass VAT tax and associated sales credits for processing. The default value is No. Invoice Source This parameter value is transferred to Receivables if the Invoice Source value is null for your transaction type at Order Line and null at the Order Header level. Invoice Transaction Type This parameter value is transferred to Receivables if no value is defined for the Receivables transaction type associated with the Outbound OM order line transaction type and OM order Header transaction type.
  • 77. Non-Delivery Invoice Source This system parameter value is transferred to Receivables if the OM: Invoice Numbering Method profile option is set to Delivery and the line is non-shippable. Over Shipment Invoice Basis This parameter determines whether to invoice the ordered quantity or the shipped quantity for an over shipment. This parameter can be overridden for the parameter specific to customers or customer sites by setting a value in the Customer window. If the value of the parameter is Invoice Shipped Quantity, and if original (outbound) Sales Order is not invoiced, then the ordered quantity for RMA is the ordered quantity of the original (outbound) Sales Order. If the original (outbound) sales order has been invoiced, then the ordered quantity for RMA is the shipped quantity of the original (outbound) sales order. If the value of the parameter is set to Invoice Ordered Quantity, the ordered quantity for RMA is the ordered quantity of the original (outbound) Sales Order. Show Discount Details On Invoice This parameter determines whether the discount details are passed to Oracle Receivables for printing on an invoice. Default value is No. If you set this parameter to No, then Extended Amounts will includes discounts. Payments Parameters Credit Hold Sequence for Order Lines This parameter is effective for line level credit checking at Picking/Packing. This system parameter has five options: 1. All Lines (Default ) 2. The sequence in which lines will be taken into consideration for placing on hold are: Schedule Ship Date / Request Date, Shipment Priority Code, Line Number 3. The sequence in which lines will be taken into consideration for placing on hold are: Shipment Priority Code, Schedule Ship Date / Request Date, Line Number 4. Uninvoiced line amount ascending 5. Uninvoiced line amount descending Enable Multiple Payments This parameter is always set to Yes by default and it is not visible in the System Parameters window. It allows multiple payments per order AND to use the full/partial
  • 78. down payment feature. Enables navigation to the Payments window from the Sale Order form using the Payments Action. Installment Options This system parameter has three options: Authorize First InstallmentOnly the first installment of a payment is authorized. In this case amount authorized will be total of the first installment less down payment, if applicable. Enable Pay Now:The entire amount of the order is authorized. Payment Due with Order functionality is enabled. None: The entire order amount will be authorized. Default value for this parameter is None (same as Null). Retrobilling Parameters Default Order Type The default value is Mixed. Enable Retrobilling The default value is No. Retrobill Reason Code The default value is Credit and Rebill. Scheduling Parameters Allow Partial Reservation Set to yes if you want right-mouse reserving and the reservation time fence to support partial reservations. The default value is No. Auto Schedule Sets
  • 79. The value of this system parameter decides whether lines, which are getting added to a set, should be automatically scheduled or not, at the time of set creation. If the system parameter value is set to No, then the lines are not scheduled automatically, when they are added to a new set. However, you can schedule the lines manually whenever it is required. If you set the value to Yes, then the lines are scheduled as and when they are added to a set. The default value of the system parameter is Yes and the application treats no value as Yes. Firm Demand Events If you are publishing Plan results to Order Management, this parameter allows you to firm demanded lines at different event points within the line flow. Once firmed, ASCP cannot update the warehouse. Schedule. Lines are firmed when scheduled. Shipping Interfaced. Lines are firmed be when interfaced to shipping. None/Null. Lines are not firmed by an event. Default value. Latest Acceptable Date System scheduling always honors the Latest Acceptable Date . This parameter provides choices for using the Latest Acceptable Date with manual scheduling. You can control whether manual scheduling honors the Latest Acceptable Date, ignores the Latest Acceptable Date but provide a warning, or ignores the Latest Acceptable Date without warning (default value). Promise Date Setup The parameter allows you to control the behavior of the Promise Date. First Request Date - Select this if you want the Promise Date to be the first Request Date. First Schedule Ship / Arrival Date - Select this if you want the Promise Date to be the first Schedule Ship / Arrival Date. Manual Entry - This allows you to enter manually or to default the Promise Date. Default value. Request Date - Select this if you want the Promise Date to be dependent on the Request Date. If the Request Date is changed, the Promise Date will also change.
  • 80. Schedule Ship / Arrival Date - Select this if you want the Promise Date to be dependent on the Schedule Ship / Arrival Date. If the Schedule Ship / Arrival Date changes, the Promise Date will also change. Reschedule with Request Date Change Set this parameter to No if you do not want a line to reschedule if the Request Date is changed. The default value is Yes. Reschedule with Ship Method Change Setting this parameter to No allows you to change the Ship Method without triggering rescheduling. The default value is Yes. Recommendation: do not set to No if using lead time scheduling. Reservation Time Fence This parameter controls automatic reservations during scheduling. The parameter represents the number of days into the future that scheduling will reserve. The default value is NULL which means that scheduling will not automatically reserve. This parameter is used during autoscheduling and also by the scheduling workflow activity and concurrent program to perform reservations. Schedule Lines On Hold This parameter controls whether scheduling will attempt to schedule lines that are on hold. The default value is NULL, which is the equivalent to Yes. Accessing the Installation Details form If you need access the Installation Detail form in Order Management, you will now need to attach it to the Actions menu by using the user-defined menu option. If you do not attach the form, you will get an Forms Error Message "This function is not available for your responsibility". 1. Using the System Administrator responsibility, go to Application > Menu and query for the ONT_SUPER_USER menu. 2. Insert a new record keeping the Prompt and Submenu fields blank. 3. In the Function field, select Installation Details from the LOV (the actual function name in the LOV is ASOCSINS). The Description field should have Installation Details Form. 4. Save your work and verify that the Installation Details option is available through the Actions menu of the sales order window and that it opens up the Installation Details window.
  • 81. Define Tax Features Order Management enables you to quote an estimated tax for orders at the time of order entry. This is step eight of the Order Management Setup Steps. The tax estimate can be based on the tax status; address information, and VAT (Value Added Tax) codes assigned to items, ship to sites, and customers. The actual tax value that appears on the customer's invoice in Oracle Receivables may vary. See: Oracle Receivables Implementation Guide. Credit Check Tax amount for each line will be stored on the order line. You can control whether the tax amount is included in credit checking while specifying the credit checking rules. Multiple Tax Amounts on an Order Line You can specify a tax group for an order line. You can view multiple taxes applied to an order line at the time of entry and query, or on the acknowledgement and notification of shipment. Oracle Receivables allows each invoice line to be taxed automatically with one or more taxes. Tax Related Processing Constraints Through the use of seeded processing constraints, Order Management does not allow a user to: Enter/Change Tax Classification Code on Order Line if the profile option EBTax: Allow Override of Tax Code is set to NO. Enter/Change Tax Handling, Tax Exemption Number and Tax Exemption Reason when the profile option EBTax: Allow Override of Customer Exemptions is set to NO. Update Tax Exempt Number, Reason, or any other tax related fields once an invoice has been generated. If your business process allows tax information to be updated after an invoice has been created, you must modify the seeded processing constraints that affect updating tax information. Tax Calculation You can calculate tax by selecting a Tax Date to base your tax rates on, choosing the tax, the tax schedule, requested, promise, and system dates. You cannot set a value for
  • 82. the Tax Date field within the Sales Order window, but you can decide to change or update the existing seeded Defaulting Rule for Tax Date. Tax calculation in Order Management can occur at one of the following events: Entry Booking Invoicing Tax calculation for the above events can only be controlled at the order level (not at the order line level). You specify when to calculate the tax for an entire order when you create Order Types within the Order Management Transaction Types window. The default value for Tax Calculation Event Code is null. Null Tax Calculation Event is same as Entry. For payment verification purposes (to include tax in the total authorized amount), specify Entry or Booking as your Tax Event. Note: The Copy Order functionality does not copy tax amounts; tax is recalculated for the new order. For return orders (referenced or non-referenced returns), tax calculation occurs at the tax event defined for the associated Order Management transaction type. To calculate tax at any time, select Calculate Tax from the Actions button menu within the Sales Order or Order Organizer windows. Tax amounts are displayed: Within the Sales Orders window, Main Tab. This is value is the current total order tax Within the Sales Orders Lines window, Pricing tab. This tax value is for each taxable order line Additionally, tax is always recalculated when tax-dependent attributes change on the order line. Tax Calculation at Entry With tax calculation at Entry, tax is calculated as each order line is entered. This tax calculation is used, for example, in businesses that requires the user performing order entry to view the total of the order, including tax, so it can be quoted to a customer. To include tax in Commitment Applied Amount, set the tax event to Entry. Tax Calculation at Booking
  • 83. When tax calculation occurs at Booking, tax is calculated on each of the booked order lines. This tax calculation option is used, for example, in business that require tax visibility for booked orders, but who want to increase order entry input times by not calculating tax at entry. Tax Calculation at Invoicing When tax calculation occurs at Invoicing, no tax calculations will occur within Order Management. Tax calculation will occur in Oracle Receivables when the order or order line is invoiced. For maximum performance, set the Tax Event as Invoicing. Inclusive Taxes When you create your tax codes, you can specify that the taxes are inclusive taxes (the tax amounts are already included in the price of the item). When the Tax Engine is called to calculate taxes, it will return inclusive taxes as well as exclusive taxes. Any inclusive taxes returned are not added to the extended amount of the order line or displayed within the Tax column of an order line. Order Management displays the estimated tax amount based on the tax date on the order line. However, inclusive taxes are displayed when you View Tax Details from the Action button menu within the Sales Orders Lines window. You can perform a credit check including or excluding the estimated tax amount. Tax Method Options Order Management enables you to specify the tax method for your company or installation as a Oracle Receivables system option. The tax method determines how taxes are calculated. Tax methods include the following: Sales Tax For sales tax, taxes are based on different components of the customer's shipping address. Order Management provides you with a default sales tax location flexfield structure composed of the State, County, and City. Value Added Tax (VAT) For value added tax, taxes are based on tax rates assigned to user- defined codes. These codes are assigned to specific items, customers, and customers business locations.
  • 84. Note: Tax codes are used for value added taxes or location-based taxes such as a sales tax). Tax Security Order Management enables you to update the tax security information on an order or return by setting the eBTax: Allow Override of Customer Exemption profile option. This profile option controls the modification of the Tax Handling Status, Reason & Certificate fields at the order header and order line levels. Standard tax calculations can be overridden by setting the profile option to Yes. The eBTax: Allow Override of Tax Classification Code profile option determines whether the defaulted tax classification code on an order line can be updated. Non-Taxable Transaction Types Order Management enables you to define whether Oracle Receivables will automatically calculate taxes for a given OM order line type. You will need to associate a Receivables Transaction Type with the OM Transaction Type for this to occur. This will determine if tax is required on an order. This option (tax calculation flag) is set in Oracle Receivables. You can specify whether a transaction type is taxable in the Receivables Transaction Types window. See: Transaction Types, Oracle Receivables User's Guide. Related Topics Oracle Receivables User Guide Oracle Receivables Implementation Guide Define QuickCodes You can create QuickCodes for Order Management. QuickCode types that you can define include: Cancellation Codes Credit Cards Freight Terms Hold Types Note Usage Formats Release Reasons Sales Channels Shipment Priorities Cascading - line attributes that will be updated as a result of header changes
  • 85. You can create as many quickcodes as you need. You can also disable QuickCodes. The Access Level toggles display whether you can define new Lookup Codes. You can modify User and Extensible Lookup Codes, however, system code cannot be modified. Contact your system administrator. To define quickcodes: 1. Navigate to the Oracle Order Management Lookups window. Order Management > Setup > QuickCodes > Order Management. Order Management Lookups 2. Query the Lookup Code Type. 3. Enter the Access Level - User, Extensible, System. 4. Select the Application you want to use to define QuickCodes. 5. Enter a description of the code. 6. Enter the effective dates for the Lookup Code. 7. Check Enabled to activate the Lookup Code. 8. To inactivate the Lookup Code, deselect the Enabled box.
  • 86. 9. Save your work. Related Topics Lookups - Defining Receivables Lookups, Oracle Receivables Implementation Guide. Viewing Notifications Single Notification Viewer You can use a single mechanism for receiving all of your notifications, as opposed to different review facilities for different types of messages. This viewer is provided with Oracle Workflow. Customizable Notification Viewer You can view notifications and take the appropriate action to resolve each one quickly and easily. You can define selection and sorting criteria that let you manage your notification list so you see the most critical notifications first or can view different types of notifications on demand. Notification Context Given this universal Inbox of exceptions, you can see the context of each notification. For notifications where you need no additional information, you can choose a button to take the suitable action. If you require additional information, you can open the appropriate Order Management window. For example, if you must approve or reject an order, you can view the order header and lines easily. The notification can either be a URL message or an attachment. Related Topics Using Oracle Workflow in Oracle Order Management Exception Management Function Security Options Sales Orders: View Open Messages Function: ONT_OEXOEORD_PROCESS_MESSAGES Description: View Open Messages
  • 87. This function seeds a new Action available from the Sales Orders windows. The action is accessed from the Actions button or the mouse right-click menu. Sales Orders: Retry Activities in Error Function: ONT_OEXOEORD_RETRY_WF Description: Retry Activities in Error This function seeds a new Action available from the Sales Orders windows. The action is accessed from the Actions button or the mouse right-click menu. Exception Management Setup To setup Exception Management 1. Set the profile OM: Show Process Messages Flag to Yes to enable the Open Flag to be populated in the Order Organizer. 2. Set the profile OM: Generate Diagnostics for Error Activities to Yes to enable the Diagnostics: OM Order Information concurrent program to be run automatically when there is an error in a workflow activity. Currently Exception Management automatically submits the Diagnostics: OM Order Information concurrent program via the Order Management Error flow if the profile option OM: Generate Diagnostics for Error Activities is set to Yes. In the event that activities are retried and failed multiple times, the concurrent program does not run again and again as this could result in performance issues. 3. Define any custom message statuses desired by editing the seeded lookup type ONT_MESSAGE_STATUS. Error Messages These messages display when you try to launch the Process Messages window with no open messages: OE_NO_ERROR_MESSAGES There are no open messages. This message displays when you try to view the workflow activities in error, but the transaction does not have any activities in error. OE_NO_ERRORED_ACTIVITIES There are no workflow activities in error for this transaction. Please see the Workflow Monitor or status window for more information. ONT_CONC_MSG
  • 88. Diagnostic: OM Order Information Request ID: Message displayed if there are any error messages on the stack. OE_WF_ACTIVITY_ERROR Workflow activity has failed. Please fix the errors and retry the activity from the Order window or the Workflow Monitor. Message displays if there are no error messages on the stack. OE_WF_ACTIVITY_UNEXP_ERROR Workflow activity has failed due to an unexpected error. Please retry the activity from the Order window or the Workflow Monitor. If it fails again, then contact your System Administrator. Message used to display the concatenated line number in the workflow notification for normal orders. OE_WF_CONCAT_LINE Message displays the concatenated line number in the workflow notification for return orders. OE_WF_CONCAT_RETURN_LINE Message displayed after an activity in error is retried successfully. OE_RETRY_SUCCESSFUL Retrying the activity in error completed successfully. Please look at the flow status or workflow monitor for more information. OE_EM_NO_WF There is no workflow associated with this transaction. Define Document Sequences for Order Numbering Order Management uses AOL Document Sequence functionality for order numbering. This is step eleven of the Order Management Setup Steps. You can define document sequences that automatically generate numbers for your sales documents as you enter them. You can define a single document sequence to assign unique consecutive numbers to all your sales documents, or you can define multiple document sequences that are assigned to different order types. In the latter case, an order or return is uniquely identified by its type and its number, since sales documents of different types may share numbers. Sales document numbers cannot contain alphabetic characters.
  • 89. Gapless Order Number Source Many countries have legal and audit requirements for order numbers to be contiguous. You can set up a document sequence as gapless through the Define Documents Sequences window. You can set up a gapless sequence for quotes, sales orders and Sales Agreements. In addition, Order Management prevents deletion of orders that have been numbered using the gapless numbering sequence. The application uses locks to ensure gapless numbering. If you are using gapless sequences, please save your changes frequently to minimize lock contention issues. Note: Transactions may be gapless, however if all quotes do not become orders, the order numbers will not appear gapless. Manual Order Numbers Order Management enables you to enter the order numbers for certain types of orders. You can define a document sequence as manual and assign it to a desired order type. This order type can be used on orders that you want to manually enter order numbers. When an order number is specified for such an order, Order Management validates that it is unique for a given order type. Prerequisites Set the profile option Sequential Numbering to Always Used at the Order Management Application level. Set your document sequences to Automatic, Gapless, or Manual. To define document sequences for order numbering: 1. Navigate to the Document Sequences window. Order Management > Setup > Documents > Define. Order Management Document Sequences Window
  • 90. 2. You can define the sequence to be Automatic, Gapless or Manual. o Automatic: The system automatically increment document numbers. Automatic sequences do not guarantee contiguous numbering. o Gapless: The system guarantees that the numbers returned are contiguous. o Manual: The user must specify a unique document number. For all types of numbering, Order Management validates that the number specified by you is unique for a given order type. For more information on AOL Document Sequences, see the Oracle E-Business Suite System Administrator‘s Guide - Configuration, Document Sequences. 3. Enter a name for the document sequence. Specify Oracle Order Management as the Application. 4. Enter a starting number. 5. Optionally, enter effective dates for the document sequence. 6. Save your work. Note: When sales document Types are defined, a corresponding Document Sequence Category will automatically be created for order types and not for line types. The category created has the same name as the order type. You must navigate to the AOL Assign Document Sequence window to assign a sequence to the newly created category. If the Document Descriptive Flexfield is enabled, you need to specify the governing ledger. The Document Method code should be left blank.
  • 91. Related Topics Profile Options Define Order Management Transaction Types Define Order Management transaction types to classify sales documents. As an example, for each order type, you can assign a default price list, defaulting rules, order lines, return lines, line types, workflow assignments, payment terms, and freight terms. This is step twenty-two of the Order Management Setup Steps. Prerequisites Review seeded sales document flows. Define all lookups. Define freight carriers. See: Oracle Shipping Execution User's Guide. Define organizations. Define document sequences. Define defaulting rules. See Define Defaulting Rules. Define price lists. See Oracle Pricing Setup Define credit check rules, (not applicable for SA). See Define Credit Checking Rules. Define currencies and currency types. See: Defining Currencies, Oracle E- Business Suite System Administrator's Guide - Configuration. Set up your cost of goods sold account flexfield segments. See: Defining Key Flexfield Segments, Oracle E-Business Suite Flexfields Guide. Note: You must first define any OM Line Transaction Types so that they can be assigned when defining your OM Order transaction types. Defining Order Management Transaction Types If Multi-Org Access Control is enabled, you can manage Transaction Types across all Operating Units accessible to you via your MO: Security Profile. To define transaction types: 1. Navigate to the Transaction Types window. Order Management Transaction Types Window
  • 92. 2. In the Operating Unit field, select an operating unit from the list of values. The field displays your default Operating Unit, however you can pick any other value from the LOV. Operating Unit sensitive fields on the form are disabled until an Operating Unit is specified. If you specify values for these fields and then change the Operating Unit, those fields will be cleared. 3. Enter the name of the transaction type in the Transaction Type field. 4. Enter a description in the Description field. 5. In the Sales Document Type field, select Sales Agreement or Sales Order from the list of values (for Quotes, Returns and Releases, choose Sales Order). 6. In the Order Category field, select a category from the list of values. For Order Types, you can specify a value of Order, Return, or Mixed. For Line Types you can specify Order or Return. When an order type is assigned to an order, the category determines whether both order and return lines can go on the order. A
  • 93. category of Mixed enables an order to have both kinds of lines. For Sales Agreements, select Order. For Order Lines, the Sales Orders window automatically sets the category to Order. Order Management seeds defaulting rules to get the appropriate default outbound or inbound line transaction type from an order type to a line based on its category code. 7. In the Transaction Type Code field, select order or line from the list of values to specify whether this is an order or line transaction type. Select "order" for Sales Agreements. 8. In the Fulfillment Flow field, select a flow from the list of values. See Using Workflow in Order Management, Negotiation in Order Management, and Sales Agreements for more information on Fulfillment Flows. 9. If a negotiation flow is needed, select it in the Negotiation Flow field from the list of values. See Negotiation in Order Management and Sales Agreements. 10. Enter an effective date for the transaction type in the Effective Dates field. 11. Select the default transaction phase, Fulfillment or Negotiation, in the Default Transaction Phase field from the list of values. Transaction phase determines where in the workflow the transaction begins, and can be used in defaulting rules. This field defaults to Fulfillment—a fulfillment phase must be defined; Negotiation is optional. 12. Enter a value in the Layout Templates field. This field is optional. See Preview and Print Sales Documents for more information. 13. Enter a value in the Contract Template field. This field is optional. See Authoring and Negotiating Contract Terms for more information. 14. In order for the Quote number to become the Sales Order number, check the Retain Document Number box. This is not applicable for Sales Orders or Sales Agreements. If the transaction type is associated with both a negotiation flow and fulfillment flow, the document number can be retained when the document transitions to fulfillment. See Negotiation in Order Management for more information. 15. On the Main Tab in the Document Region: In the Agreement Type field, select a pricing agreement type from the list of values. This field is optional. If you enter an agreement type here, you can choose only agreements with this agreement type when using this order type. Define agreement types using Order Management QuickCodes. See Define QuickCodes. 16. In the Default Return Line Type field, select a return line type from the list of values.
  • 94. 17. In the Default Order Line Type field, select an order line type from the list of values. 18. Select the Agreement Required check box if a pricing agreement is required. This is only applicable to order transaction types. 19. Select the Purchase Order Required check box check to require purchase order numbers during order entry for orders and returns with this Order type. This is only applicable to order transaction types. 20. On the Main Tab in the Pricing Region: Select the Enforce List Price check box to prevent discounts and overriding the selling price. If this is selected, you cannot apply discounts to the order line list price when you use this order type and you cannot override the selling price, unless the profile option OM: Discounting Privilege is set at the appropriate level. 21. In the Price List field select a price list from the list of values to serve as a defaulting source. The list of values displays global price lists and price lists defined for the Operating Unit selected. 22. Enter a minimum margin in the Minimum Margin Percent field. This field is optional. 23. On the Main Tab in the Credit Check Rule Region: In the Ordering field, select an ordering credit check rule from the list of values. This field is optional. 24. In the Packing field, select a packing credit check rule from the list of values. 25. In the Picking/Purchase Release field, select a picking credit check rule from the list of values. . 26. In the Shipping field, select a shipping credit check rule from the list of values. This field is optional. Select credit check rules to use when performing checking credit at either Booking, Pick Release and Purchase Release (for drop shipments), Packing, or Shipping within the corresponding Credit Check Rule fields. You can select a credit check rule for each field within the Credit Check Rule region, or choose to select combinations that suit your business purposes. For example, you can choose to select a credit check rule for booking only, or booking and shipping. If you leave any of the Credit Check Rule fields blank, no credit checking will occur when an order or order line reaches the corresponding workflow activity within the order or line flow, using the order or order line type specified. Note: When a transaction is created, Order Management automatically creates a Document Sequence Category of the same name for you. You can then go and
  • 95. assign a document sequence that you have defined for order numbering to this document sequence category. Document sequence categories are not MLS Compliant. Order Management recommends that you create your transaction types in the base language of your installation to minimize potential confusion. Two document sequence categories are created - one, with the same name as that of the transaction type and the other with the same name as transaction type but appended with the string '-quote.' Note: Workflow assignments are required for order types to support the creation of quotes and sales orders as well as for types to support the creation of Sales Agreements. To define Shipping Related Attributes for Order Management order and line transaction types: 1. Navigate to the Transaction Types window. Order Management > Setup > Transaction Types > Define Note: None of the fields in the Shipping tab are applicable to Sales Agreements. Order Management Transaction Types Window Shipping Tab
  • 96. 2. Select the Shipping tab. 3. Warehouses are synonymous with inventory organizations in Oracle Manufacturing. 4. Select the appropriate Shipping Method from the list of values. 5. The Shipment Priority field gets its values from Quick Codes. 6. Freight Terms are defined using Order Management QuickCodes. 7. In the FOB field, enter the FOB point. Define FOB points using Receivables QuickCodes. 8. In the Shipping Source Type field, select the ship source type, internal or external, from the list of values. This determines if the order line is sourced externally through Drop Shipment, or sourced internally. This field is optional and applicable only to Line Transaction Types.
  • 97. 9. In the Demand Class field, select a region from the list of values. Define demand classes using Manufacturing QuickCodes. See Define QuickCodes. 10. In the Scheduling Level field, select one of the following options from the list of values: o Inactive Demand without Reservations o Inactive Demand with Reservations o ATP Only o Allow all scheduling actions o No Reservations Note: If you do not specify a value for an Order Transaction type, the application interprets the null value as Complete Scheduling. If you do not specify a value for a Line Transaction Type the application uses the value from the Order Type on the Order. 11. Select the Inspection Required check box if an inspection is necessary. This is applicable only to return line transaction types. 12. Select the Auto Schedule check box if you want automatic scheduling for this order type. This is applicable only to order transaction types. 13. In the Line Set field, select Arrival or Ship from the list of values. This field is optional. See Line Sets: Ship/Arrival in Scheduling. 14. Select the Fulfillment Set check box to apply a fulfillment set. Selecting this enables fulfilling all of the lines of an order at the same time. If you put the lines in a fulfillment set, you cannot fulfill (invoice) the lines until all of the lines are ready. To define Financial attributes for Order Management order or line transaction types 1. Navigate to the Transaction Types window. Note: None of the fields on the Finance tab are applicable to Sales Agreements, the regions are Rule, Source and Credit Method For. Oracle Order Management Transaction Types Window Finance Tab
  • 98. 2. Select the Finance tab. In the Rule region on the Finance Tab: 3. The Invoicing Rule controls the amount and timing of your invoices. 4. An Accounting Rule controls the amount and timing of when you recognize revenue for this order. 5. In the Source Region on the Finance tab, within the Invoice Source field, select a Source from the list of values. 6. In the Non Delivery Invoice Source field, select a source from the list of values. 7. In the Credit Method For region on the Finance tab, select a credit method for invoices from the Invoices With Rules pop up menu.
  • 99. Oracle Receivables uses these accounting credit methods when adjusting the revenue account assignments of invoices using multi-period invoicing and accounting rules. See: Crediting Transactions, Oracle Receivables Implementation Guide. o LIFO (Last In First Out): Backs out revenue starting with the last general ledger period, and reverses all prior periods until it has used up the credit memo o Prorate: Credits an equal percentage to all account assignments for that invoice o Unit: Reverses the revenue for the number of units you specify from an original line of the invoice 8. Select a credit method for invoices from the Split Term Invoices pop up menu. Oracle Receivables uses the following the Invoicing credit methods when crediting the installments of invoices that have multiple installments (split term invoices). Crediting Transactions, Oracle Receivables Implementation Guide. o LIFO (Last In First Out): Credits the last installment to be credited first and then credits all prior installments until all of the credit is used o FIFO (First In First Out): Credits the first installment first and then credits all subsequent installments until all of the credit is used o Prorate: Prorates the credit received by the installments of invoices by the amount remaining on their installments Also on the Finance Tab: In the Receivables Transaction Type, select a value from the list of values. This is applicable if you use Oracle Receivables. Invoice types designate invoice status, invoice printing options, credit memo type, and whether the invoice posts to General Ledger or creates an open receivable. Ensure the Tax Calculation Flag for the Receivables transaction type you choose is set accordingly as this will determine whether Tax is calculated for the order line. 9. The Tax Event determines when Order Management calculates the estimated tax amount for a transaction. 10. In the Cost of Goods Sold Account field, select and account from the list of values This is applicable only for order transaction types. 11. In the Conversion Type field, select a conversion from the list of values. In the Currency field, select a currency from the list of values. If you choose User as the currency conversion type, the Sales Orders window requires you to enter the conversion rate and date. This is applicable only for order transaction types.
  • 100. To assign workflows to transaction types: Use this procedure to assign workflows to line transaction types. The combination of the order type, the line type, and the item type determines the line workflow. Line flows are required for Sales Orders but not for quotes. Once you have created a document using an order type you cannot change the existing line workflow assignments. Instead, enter an end date for the existing assignment and enter a new assignment for the for the new workflow. Note: This is not applicable to Sales Agreements. 1. Navigate to the Transaction Types window and query the desired transaction type. 2. Click Assign Line Flows. Line Workflow Assignments Window
  • 101. 3. In this window, select the order type/line type/item type combination to which you want to assign a workflow. If you leave Item Type blank, the workflow applies to all item types for the line type (unless they have a specific assignment in this form). If you use line type ATO Models, use item type Configured Item and return line types use item type Standard even if they are for configurations. 4. In Process Name, select the workflow that Oracle Order Management should use for the order type/line type/item type combination. If you do not assign a workflow to a configured item type, the configured item does not use a workflow. 5. In Start Date and End Date, select the time period during which the assignment is effective. 6. Save your work. Defining Approvals To define Order Management Approvals: 1. Navigate to the Approvals window. Order Management Approvals Window
  • 102. 2. Enter a name in the List Name field. 3. Enter a description of the approval in the Description field. This field is optional. 4. In the Transaction Type field, select the transaction type that the approval applies to, from the list of values. You can pick a Transaction Type from any of the Operating Units you have access to via your MO: Security Profile. 5. In the Transaction Phase field, select Negotiation or Fulfillment from the list of values. Ensure that the workflow assigned to the transaction includes the Approval activity and the phase assigned corresponds. For example, Workflow: Negotiation with Approval; Transaction Phase: Negotiation. 6. Select an effective date in the Effective Dates fields. 7. In the List Members region, select the members in the Role fields, assign a sequence, and indicate if they are active by selecting the Active check box next to their name. 8. Save your work. Related Topics Transaction Types
  • 103. Negotiation in Order Management Define Defaulting Rules Oracle Receivables User Guide. Define Order Import Sources You can define Order Import Sources from which to import order information. You can import historical orders, orders from other quote or sales systems, and changes to orders. Oracle Order Management recommends that you define a unique name for each source of order information you are importing. When you run the Order Import program, you can enter the source or sources for each execution. You can run Order Import for multiple sources at one time. This is step twelve of the Order Management Setup Steps. Internal Sales Orders If you are importing internal sales orders from Oracle Purchasing, you need to define an Order Import source to be used when you transfer the internal requisition information from Oracle Purchasing to create an internal sales order in Order Management. You need to choose an Order Import source for internal requisitions/internal sales orders when you define purchasing options in Oracle Purchasing. You choose this same Order Import source as a parameter when you run the Order Import program in Order Management. See: Integrating Oracle Order Management Using Order Import, Oracle Manufacturing, Distribution, Sales and Service Open Interfaces Manual. To define an Order Import source: 1. Navigate to the Order Import Sources window. Order Import Sources Window
  • 104. 2. Enter the Order Import source name and a description. 3. Check Enabled to activate the Order Import source. 4. Save your work. Defining Processing Constraints Processing constraints are rules that control who can change what and when they can change it. Processing constraints can prevent certain changes, but can also be set up to perform actions based on those changes. They can define actions that can result from these changes, such as requiring a reason for the change, triggering an action in Audit Trail or Versioning, or raising an Integration Event. This is step twenty-four of the Order Management Setup Steps. This section describes how to set up your processing constraints based on validation conditions in validation templates (for example, Booked = Yes) which are evaluated for groups of records (record sets). Prerequisites Become familiar with the Processing Constraints that are delivered with the Order Management Application. Note: After updating constraints and/or conditions, close and reopen the Sales Agreements or Sales Orders window for the updated constraints to apply correctly. To set up processing constraints:
  • 105. 1. Navigate to the Define Processing Constraints window. Order Management Processing Constraints Window 2. Query Application for Oracle Order Management and Entity for the entity for which you want the processing constraint, for example, Order Header or Order Line. 3. Move to Constraints. In the top area of the region, enter each constraint in a line. 4. In Operation, select the operation that you want to constrain. 5. Select an Attribute to constraint, based upon the operation selected. o If you select the value UPDATE for the Operation field and you do not select an Attribute value, the constraint allows no update to any field of the entity, by any user. 6. In User Action, select one of the following: o Not Allowed: You cannot perform the constrained operation
  • 106. o Require Reason and History: You can perform the operation only if you enter a reason. Use this with Operation CANCEL, Operation UPDATE if the constrained attribute is Ordered Quantity only, and for recording Audit Trail history when requiring a reason for an attribute change o Requires History: You can perform the operation and will not be prompted to enter a Reason. You still have the option to enter both a Reason and Comment, and if you do so, the information is recorded. Use the value for enabling Audit Trail history to be recorded without a reason for an attribute change 7. Select a value for the System Changes field. The value selected in this field determines if system changes are allowed, despite the constraint. Choose from: o Always: System changes allowed o Never after Insert: System changes allowed if the entry has not been saved to the database 8. Select a value for the User Changes Field. Choose from: o Never: The user is always constrained o Never after Insert: The user is constrained after the entry is saved to the database 9. The Enabled field indicates whether the current constraint is active. This allows constraints to be temporarily disabled if necessary. 10. System check box - If a Constraint has the System check box selected, you cannot update the constraint definition. 11. Move to the Conditions tab. Enter a constraining condition for the selected constraint. The selected constraint is determined by the previous cursor position prior to moving to the Conditions tab region. 12. In the Group Number field, enter a numeric value according to the following principles: o For conditions that should together evaluate to TRUE (AND conditions), enter the same group number. The constraint applies if the entity in question meets all of the conditions defined. o For conditions that should together evaluate to OR (OR conditions), enter a different number for each record. The constraint applies if the entity in question meets any one of the conditions defined. 13. In Scope, if the record set applies to multiple records, indicate the scope of evaluation of the record set for this condition. An example of a record set that applies to multiple records is the record set of all of the lines of a sales order. Select one of the following: o Any: The condition is satisfied if one of the records meets it, for example, the condition is satisfied if one of the sales order lines is booked o All: The condition is satisfied if all of the records meet it, for example, the condition is satisfied if all of the sales order lines are booked 14. In Validation Entity, enter the entity for which the condition is validated. You can enter the same entity as the constraint (at the top of the Constraints region) or
  • 107. you can enter an entity related to the constraint. For example, if the constraint is against Order Header, Validation Entity can be Order Line. 15. In Record Set, select the record set that corresponds to the entities to which the constraints process should apply the condition. For example, if you enter the order line record set Line, the condition is evaluated against the order line in question. If you enter the order line record set Order, the condition is evaluated against any or all (depending on the scope) lines of the order in question. If Validation Entity is different from Entity (at the top of the form), you can only select record sets based on the primary key of the validation entity. 16. Select the Not check box (the negative condition modifier) to direct the constraints processing to evaluate the NOT condition of Validation Template. For example, if you expect to select Validation Template Booked, selecting NOT creates the condition of not booked for the constraint. 17. In Validation, select a validation template. This item specifies the condition being evaluated. 18. Enabled- The Enabled field indicates whether the current constraint is active. This allows constraints to be temporarily disabled if necessary. 19. System check box: o If a Constraint has the seeded check box selected, and the constraint condition check box is also selected, you cannot update the constraint condition. o If a Constraint has the seeded check box selected, and the constraint condition check box is not selected, you can update the constraint condition. 20. In User Message, enter the trailing portion of the error message that the constraint processing should display when the user violates the constraint. For example, if the constraint was to not allow an update of the item field on the order line if the line has been previously booked, constraints processing displays the error message You are not allowed to update the item; the item is booked. 21. Move to the Applicable To tab and specify who the constraint applies to. Processing Constraints Window
  • 108. 22. Select one of the following: o All responsibilities: The constraint applies to all responsibilities. o Authorized responsibilities: The constraint applies to all responsibilities except ones that you specify. Specify the excepted responsibilities in the untitled lines below your selection. o Constrained responsibilities: The constraint applies to the responsibilities that you specify. Specify the excepted responsibilities in the untitled lines below your selection. 23. Save your work. Note: Please ensure that when you are creating or updating Processing Constraints, the window that will be using the constraints (e.g. Sales Order, Sales Agreement) is closed. The constraints are cached and if they are updated while a sales transaction window is open, the updated constraints may not function according to the updates. Therefore it is advisable to close all sales transaction windows before updating Processing Constraints.
  • 109. Processing Constraints Example To set up a processing constraint that forbids update of the sales order header order type when there are order lines created or when the order is booked, do the following after navigating to the Define Processing Constraints form: o Query in the top of the form:  Application: Oracle Order Management  Entity: Order Header o Enter on a new line at top of the Constraints region:  Operation: Update  Attribute: Order Type  User Action: Not allowed  Leave System Changes, User Changes blank  Clear Seeded check box o Enter in the first line of the Conditions tabbed region:  Group Number: 1  Scope: Any  Validation Entity: Order Header  Record Set: Order  Clear NOT check box  Validation Template: Booked  Clear Seeded check box  User Message: the order is booked o Enter in the second line of the Conditions tabbed region:  Group Number 2  Scope: Any  Validation Entity: Order Header  Record Set: Order  Clear NOT check box  Validation Template: Lines Exist  Clear Seeded check box  User Message: the order has lines Processing Constraints Usage As you use Order Management, processing constraints are evaluated for any entity you try to cancel, delete, create, split, or update. If you are trying to modify an order line, Order Management evaluates the processing constraints for the Line entity. Using Processing Constraints Versioning
  • 110. To set up Automatic Versioning, you must set up processing constraints to enable a select attribute update to autogenerate versioning Defining Validation Templates Order Management provides you the ability to define your own validation conditions by the use of validation templates. A validation template names a condition and defines the semantics of how to validate that condition. Validation templates can be used in the processing constraints framework to specify the constraining conditions for a given constraint. These conditions are based on: Where the entity is in its workflow The state of attributes on an entity Any other validation condition that cannot be modeled using the above methods API based validation templates are not available if constrained entity is different from the entity for which the validation template has been defined (or the Validation templates are not available even if the record set being used is anything other than the primary key record set). For example, API based Validation template Pick Released has been set up for entity Order Line. If you set up a constraint for attribute Ship To on Order Line, the validation template Pick Released is available but for a constraint on attribute Ship To on Order Header, Pick Released will not be available. For attribute Ship To on Order Line, if the constraint condition uses any record set (ATO Configuration, for example) other than the primary key record set Order Line, the validation template Pick Released will not be available. To define a validation template: 1. Navigate to the Validation Templates window. Validation Templates Window
  • 111. 2. Select an entity the condition is defined for in the Entity field. 3. Enter a Template Name for the condition. 4. Enter a name in the Short Name field for the condition. 5. Optionally, enter a Description for the constraint condition. 6. Select the Validation Type to be performed by the condition. Select from: a. WF: (validation is based on the workflow status of this entity): o Select the Activity for the condition o Select the Activity Status for the condition. Select from: Active, Complete, Error, Notified, and Suspended o Select the activity Result for the condition o Save your work f. API (validation is completed through an Application Program Interface): o Select the PL/SQL Package you wish to interface with the constraint condition o Enter the Procedure name of the API o Save your work j. TBL (validation is based on the values of database columns on this entity):
  • 112. o Select the Attribute Column name on the entity for the constraint condition o Select the Validation Operation for the constraint condition. Select from: = (Equal To), <> (Not Equal To), Is NULL, Is Not NULL o Select the Value String you want to validate against the value of the column Note: You can add more than one attribute, value pair, otherwise all pairs will be added together in the validation. Save your work. When you have created new validation templates or record sets, you will need to submit the Create Validation Packages concurrent program from the Tools menu to submit a concurrent request to create a validation package for all new or modified validation templates and record sets that may constitute a permitted validation combination. After the request completes, all validation templates that processed successfully will be visible in the list of values in the Processing Constraints window. For information on Seeded validation templates, please see appendix E for a complete listing. Defining Record Sets The Records Sets feature in Order Management is used to define and maintain record set definitions for processing constraints. A record set is a set of records that are bound by common attributes such as ship sets. You can define constraining conditions and specify a record set to be validated for a given condition as defined by its validation template. To define a record set: 1. Navigate to the Record Sets window. Order Management Record Sets
  • 113. 2. Select the Entity for which you are defining a record set. The Seeded check box is enabled if the system automatically defines the name of the record set. This check box is non updatable. 3. Enter the name of the Record Set. 4. Enter the Short Name for the record set. Note: You cannot modify the Short Name once it has been entered. 5. Optionally, enter a Description for the record set. The Based On Primary Key check box is used to indicate the record set that is based on the primary key columns for the entity. There can only be one primary record set per entity. These records are seeded and cannot be updated. 6. Select the name of the columns that should be matched from the validated record in the Matched Columns For Record Selection region.
  • 114. For example, if you define a Ship Set record set, the matching columns will be the Header ID and the Ship Set number. 7. Save your work. 8. Select the Create Validation Packages concurrent program from the Tools menu to submit a concurrent request to create a validation package for all modified validation templates and record sets that may constitute a permitted validation combination. Only after the request completes, the created validation template is visible in the list of values in the Processing Constraints window. 9. Save your work. Define Defaulting Rules You can create and modify defaulting rules to improve the efficiency and accuracy with which you enter orders. You can define the rules to determine the source and prioritization for defaulting order information to reduce the amount of information you must enter manually in the Sales Orders window. For most fields, you can assign one or more defaulting sources in a priority sequence, or, if the default is always the same, you can define a constant value. This is step twenty-five of the Order Management Setup Steps. Updates to defaulting rules take effect once the Defaulting Generator concurrent program has been submitted for the application and the program successfully completes for the entity combination modified. Existing orders are only affected by updates to defaulting rules if you update an attribute on an order that was included in the modified defaulting rule. If you do not perform a change to an existing order that uses the modified defaulting rules, thus activating validation of defaulting, the order is not affected by the modification. Note: Seeded defaulting rules can be disabled, but not modified. If you wish to modify a seeded defaulting rule, disable the seeded defaulting rule condition, and then create a copy of the seeded defaulting rule and include your changes in the copied defaulting rule. To query entities and attributes: 1. Navigate to the Defaulting Setup - Entity Attributes window. Defaulting Setup-Entity Attributes Window
  • 115. Entity Region 2. Application: The Application field displays the application context for the entity displayed. For Oracle Order Management, the value is ―Oracle Order Management‖. This field is non updatable. 3. Entity: The Entity field displays the name of the object for which defaulting rules and conditions are being defined such as the order line. For Order Management you have the following options: o Order Header  Order Line  Sales Agreement Header  Sales Agreement Line  Order Payment  Line Payment Note: Defaulting rule creation is not supported for the sales credit entity and the price adjustment entity.
  • 116. 4. Note, defaulting rules can be created for Releases only. Sales Agreements have several hard coded defaults in place but currently does not support the defaulting framework. 5. Attribute Region 6. The Attributes Region displays all the entity attributes for which defaulting rules can be defined. You are NOT allowed to enter new records here. 7. The Defaulting Sequence field enables a user to assign the sequence (priority) number in which this attribute should be defaulted. Note: Attributes with identical sequence numbers are defaulted in alphabetical order. e.g. If the attribute Contact has a sequence number of 1 and the price list has a sequence number of 1, then the Contact defaults before the price list. 8. The Attribute field stores the name of available attributes. Values are currently displayed based upon the entity selected. 9. The Include in Building Defaulting Conditions check box indicates whether an attribute can be used in defining conditions for the entity selected. Note: The Include in Building Defaulting Conditions check box is for display purposes only, and is non-updateable. 10. Save your work. The Defaulting Condition Templates button enables you to define defaulting template and conditions for the application/entity combination displayed on the defaulting rules setup window. Selecting this button will take you to the Defaulting Condition Validation Templates window. The Defaulting Rules button enables users to define defaulting rules for the attribute selected. Selecting this button will take you to the Attribute Defaulting Rules window. For more information on defining or updating defaulting sourcing rules, see the Define Defaulting Rules section. Select the Defaulting Condition Templates button to define the defaulting condition for this entity. Note: The template that appears after selecting the Default Condition Template button is based upon current values displayed in the Application and Entity field on the Defaulting Setup window. To define Defaulting Condition Templates: 1. Navigate to the Defaulting Conditions Validation Templates window.
  • 117. Defaulting Condition Validation Templates Window 2. Defaulting conditions enable you to define conditions that can be used to dictate when an attribute is sourced and defaulted. Select an existing condition name if you wish to update the associated validation rules or add a new condition name with associated validation rules. 3. In the Description field, enter a brief description of the condition. Note: A generic condition of Always is seeded for each entity. Use this condition to define generic defaulting rules 4. The Seeded check box will be checked for seeded conditions. This field is protected against update. You cannot update seeded conditions or validation rules associated with seeded conditions, however, you can disable seeded conditions and create your own. In the Validation Rules Region, enter the validation rules based on the attribute values of the above entity. For example, standard orders could have the order type Standard. Order type = Standard.
  • 118. 5. In the Group Number field: o For conditions that should together evaluate to TRUE (AND conditions), enter the same group number o For conditions that should together evaluate to OR (OR conditions), enter a different number for each record 6. Select the Attribute name, such as Contact. 7. Select the validation operation: Select from: o (>) Greater Than o (<) Less Than o (>=) Greater than or Equal to o (<=) Less than or Equal to o (=) Equal o (!=) Not Equal 8. Enter the Value String of the attribute that you want to validate against. 9. Navigate to the Defaulting Setup - Entity Attributes window. The Attribute name displays in the Attribute field. Descriptive Flexfield attributes will not be displayed. 10. Save your work. Select the Defaulting Rules button to define your defaulting rules. To define defaulting rules: 1. Navigate to the Attribute Defaulting Rules window. Attribute Defaulting Rules Window
  • 119. Defaulting Conditions Region 2. Enter a value in the Precedence field to determine the precedence when resolving multiple TRUE defaulting conditions. Note: If more than one defaulting condition is valid, the conflict is resolved by internally ranking conditions using the Precedence value. For example, defaulting condition Standard Order has a precedence value of two and Copied Order has a precedence value of one. If an order is standard and a copied order, then the defaulting condition with higher priority, Copied Order, is used initially. If your conditions for Copy Order do not return a default, conditions for Standard Order will be evaluated. 3. Select a Defaulting Condition from the List of Values and then enter the defaulting rules to be used if this defaulting condition is TRUE.
  • 120. Note: The Always condition should be the last in this sequence as it would always evaluate to True and no other defaulting conditions would be evaluated. 4. Select the Enable check box if you wish to enable the defaulting condition. If this check box is not selected, the defaulting condition is disabled and the rules and condition associated with this condition are not used in default possessing. 5. The check box for the field Seeded cannot be updated. This value is seeded by Order Management. For seeded Order Management defaulting conditions, you are unable to update or delete any fields except: o The Precedence field on the defaulting rule condition o The Enable check box. You can disable seeded Order Management defaulting rules. 6. Within the Default Sourcing Rules region, select the priority sequence in which you want to retrieve the default for this attribute. The defaulting process searches for a default for your attribute by evaluating defaulting rules in ascending order. 7. Select the defaulting source type. The defaulting source type determines data entry in the Default Source/Value field. 8. Based on the default source type selected, either select the default sources or enter default values in the Default Source/Value field. The table below describes Order Management Source Types and the appropriate action required by a user. Order Management Source Types and Actions Source Type Action required Constant Enter the default constant value. Value Application Select the profile option from where you want to retrieve the Profile default value. Same Record Select the attribute on the same record from where you want to retrieve the default value. Related Object--Select the related object. Record Attribute--Select the attribute on the related object from where you want to retrieve the default value. System Expression--Enter the system expression to be evaluated to Variable obtain the default value. (E.g. System Date.)
  • 121. PL/SQL API You can write a custom API to obtain a default value if the value cannot be obtained using other source types such as, the default order number from a sequence. Package--Enter the PL/SQL package name. Function--Enter the function name. Object--Optionally, enter the name of an object to be passed to this API. Attribute--Optionally, you can also enter the name of an attribute to be passed to this API. (See the PL/SQL API Procedure below.) WAD Attribute WAD Object Attribute 9. Save your work. Caution If defaulting rules or conditions are updated, the Defaulting Generator concurrent program must be run to generate new defaulting packages. If you update an existing defaulting rule or condition from within the Defaulting Rules window and the update is saved, a pop up window will display a note reminding you to submit the Defaulting Generator concurrent program. Choose to submit the program by selecting Defaulting Generator from the Tools menu while within the Defaulting Rules window, or from the Order Management SRS window. To generate the Defaulting Generator concurrent program for an entity, you must go to the Requests form and select your entity. You may execute the Defaulting Generator concurrent program while users are still on the system, although the defaulting package may not generate successfully. This can be due to the package currently being called by other users who are processing orders on the system. Common errors within the output log file for this concurrent program may contain text that a time-out occurred while waiting to lock object. If defaulting packages do not generate successfully, you must choose to run the program at a later time, or to have users briefly log off the system while defaulting packages are regenerated. Defaulting Rule Example Here is an example of a defaulting rule that you can define so that a specific Price List will default to the Sales Order Header window. You may also define a sequence (priority) in which you want Order Management to search for a Price List.
  • 122. The default sequence can also be complex. For example, look on an Agreement for a Price List, followed by the Invoice To Location, then the Ship To Location, then the Customer, and finally, the Order Type. If Order Management still does not find a price list for any of the source locations listed (Invoice-To, Ship To, Customer, Order Type), you can have a Constant Value default, such as 1998 USA Prices, which you enter in the Value field of the Attribute Defaulting Rules window. The table below corresponds to the example stated above. Example of Complex Default Sequence Sequence Defaulting Sources Source Field or Value 1 Related Record Agreement.Price List 2 Related Record Invoice To Location.Price List 3 Related Record Ship To Location.Price List 4 Related Record Customer.Price List 5 Related Record Order Type.Price List 6 Constant Value 1998 USA Prices Note: Oracle Order Management does not recommend that you define any overly complex or recurring defaulting rules. PL/SQL API Procedure The signature of the PL/SQL API is: (p_database_object_name VARCHAR2 ,p_attribute_code VARCHAR2) return VARCHAR2 The table below describes Order Management entities, their associated entity code, and the database object called when the entity is processed within Order Management. Order Management Entities, Entity Code, and Database Objects Called
  • 123. Entity Entity Code Database Object Order Header HEADER OE_AK_ORDER_HEADERS_V Order Line LINE OE_AK_ORDER_LINES_V For example: Function to default order number from a sequence based on the order type: Function Get_Order_Number(p_database_object_name IN VARCHAR2, p_attribute_code IN VARCHAR2) return varchar2 IS l_header_rec OE_AK_ORDER_HEADERS_V%ROWTYPE; BEGIN -- Getting the defaulting global record l_header_rec: <= ONT_Header_Def_Hdlr.g_record; -- for internal orders, use this sequence but for all other order types use the -- sequence for STANDARD orders. if l_header_rec.order_type_id = 1 then return to_char(OE_INTERNAL_ORDERS_S.nextval); else return to_char(OE_STANDARD_ORDERS_S.nextval); end if; END; Note: The PL/SQL API should only access global record for entity being defaulted else rules might not work as expected. For e.g. API should not access values on ONT_Header_Def_Hdlr.g_record if rule is for an order line attribute. Instead reference values from ONT_Line_Def_Hdlr.g_record.
  • 124. Deleted Seeded Defaulting Rules In a multi-org environment, you can no longer specify Order Type and Salesrep at the Customer Account using the Receivables Customer Form. The multi-org upgrade copies the values for these attributes from the customer account to the site use (provided there is no value there) and clears them from the account level. Therefore Order Management seeded defaulting rules which defaulted Order Type and Salesrep from the Customer are deleted. The sources (Customer.Order Type and Customer.Salesrep) are now disabled. To view the deleted defaulting rules, run the Upgrade Script Report, ontexc16.sql, to get the ontexc16.lst output. Related Topics Defaulting Rules Cascading Define Credit Checking Rules Define your credit checking rules. This is required if you plan on performing any type of order credit checking. This is step twenty-six of the Order Management Setup Steps. Defining Credit Profiles Organization Credit Profiles are a set of criteria that define an operating unit's credit policy for credit control and order credit checking. Credit Profiles include the credit limit and pertinent data needed to determine total credit exposure for orders undergoing credit checking. Credit Profile Limits Hierarchy when performing credit checking: Customer Site Profile Customer Credit Profile Operating Unit Default Credit Profile Note: Item Category Credit Profiles are used if you enable Item Category Credit Check for a credit check rule. The Credit Profile window enables users to create and maintain credit information for Operating Units and Item Categories. Operating Unit Default Credit Profiles can assist in further defining your credit policies by providing global defaults if no other information is present during credit checking.
  • 125. To create a new credit profile, users must specify what type of credit profile to create, and depending on the credit profile type chosen, appropriate fields within the window become updatable or non-updatable. You cannot define Credit Profiles for Customer or Customer Site by directly navigating to the Credit Profile window. Credit Profiles for Customer and Customer Sites are initially defined when entering credit information in the Credit section of the Profile-Transactions tab of the Customer and Customer Site windows. See Oracle Receivables, Customers. You must then assign a Credit Usage Rule to your Customer or Customer Site if you want to enable multi currency credit check. Credit Profile Types Customer: Enables you to define credit limits by currency for Customers. Customer Site: Enables you to define credit limits by currency for Customer Sites. Operating Unit Default: Enables you to set credit limits and terms, by currency, within a given operating unit Operating Unit Default Credit Profiles enable you to effectively enforce a formal credit checking process for all order transactions/currencies from any customer, provided you define an Operating Unit Default Credit Profile for each currency you process order transactions for. For example, if a transaction is entered and no credit limits exist at the customer or customer site levels for the specified order currency, the Operating Unit Default Credit Profile for the transaction/currency entered will be used to determine credit availability. Note: The Operating Unit Credit Profile is used as the default profile for all customers that do not have an individual credit profile either at customer or site level. Item Category: Enables you to set order credit limits, by currency, for one or more Item Categories. This type of profiles enables you to specify limits for the maximum amount on each order for an item category irrespective of a customer or site Note: Only categories associated with the default category set for the Order Management functional area are supported. Unlike the Operating Unit Default Credit Profile that defines credit limits for specific operating units, Item Category Credit Profiles are applicable across operating units. Item Category profiles are global credit profiles and are transaction currency based: the credit limits defined for an item category are for individual transactions (orders) only. There is no overall system credit limit for a category.
  • 126. Item Categories enable you to set order credit limits/profiles for one or more item category (applicable for all customers). For example, an Item Category Credit Profile can specify that the maximum order value cannot exceed $10,000 USD for any order lines that contain an item associated with the Item Category Computers. This is extremely useful if your business practice requires item-based insurance coverage. To Define Credit Profiles: 1. Navigate to the Define Credit Profiles window. Credit Profiles Window 2. . Valid Values for Credit Profile Type are: o Item Category o Operating Unit Default
  • 127. Based upon the Credit Profile Type you chose, certain fields become protected or non-updatable. Note: If Credit Profile Type = Operating Unit Default, the Item Category field is disabled. If Credit Profile Type = Item Category, the Overall Credit Limit field is disabled. Enter remaining fields that require a value, or update any fields that contain a default value based upon the Credit Profile Type selected: o Operating Unit: Select an Operating Unit name from a list of values if you are defining a Operating Unit Default Credit Profile. o Item Category: Select an Item Category name from a list of values if you are defining an Item Category Credit Profile. o Effective Date From/ Effective Date To: Select the Effective Date From and Effective Date To for your Credit Profile. Note: When defining Credit Profiles for Operating Unit Default and Item Category, the Effective Dates From/To cannot overlap previously defined Credit Profiles for the same Operating Unit Default or Item Category, regardless of the currency. o Tolerance: Enter a numeric value in the Tolerance field. Tolerance values are used to calculate extended exposure limits during credit checking. For example, supposed you enter a value of 5 for Tolerance, and an Credit Limit of $10,000 USD. During credit checking, the exposure credit limit would actually be $10,500 USD. ((Tolerance + 100)* Credit Limit / 100). o Currency: Select a value in the Currency field to limit the Credit Profile to a specific currency.
  • 128. o Order Credit Limit: Enter a value in the Order Credit Limit field, based upon the Credit Profile Type. New orders may not exceed the value entered in the Order Credit Limit field if the checking processing defaults to the operating unit level. o Overall Credit Limit: Enter a value in the Overall Credit Limit field for a Operating Unit Default Credit Profile Type. Total exposure within an operating unit for the particular customer may not exceed the value entered in the Overall Credit Limit field if credit checking processing defaults to the operating unit level. The following fields are for future use and are for information purposes only. Values that are ignored during the credit checking process are: o Credit Check o Credit Hold o Credit Rating o Next Review Date 3. If you wish to enable multi currency credit check, you must assign Credit Usage Rule Sets to your Credit Profile. Select the Assign Rule Set button. The Assign Rule Set button is only enabled for the following Credit Profile Types: o Item Category o Operating Unit Default To assign Credit Usage Rules to Customer or Customer Sites Credit Profile Types, you must use the Assign Credit Usage Rules window. 4. Save your work. Defining Credit Usage Rule Sets The Define Credit Usage Rules window enables a user to create and maintain credit usage rule sets that can be assigned to Credit Profiles. Credit Usage Rule Sets define the set of currencies that will share a predefined credit limit during the credit checking process, and enable the grouping of currencies for global credit checking. Usage Rules Sets ensure that if credit checking is enabled, that all transactions for specified currencies go through the currency conversion process and are summarized by currency prior to the credit checking process. You can define a usage rule set for a single currency or multiple currencies You can choose to assign a global usage rule (all currencies) and then exclude one or more currencies from the rule set
  • 129. You can choose to define multiple usage rules for multiple currencies within the usage rule set You can choose to add or delete new Currency records for an existing Usage Rule Set Usage rule sets consist of at least one usage rule/currency combination, and once a rule set is assigned to an Oracle Entity, the rule set provides processing defaults for determining credit availability during multiple currency credit checking processing routines. To define credit usage rule sets: 1. Navigate to the Define Credit Usage Rules window. Define Credit Check Usage Rules Window 2. Enter a name for your rule set in the Usage Rule Set Name field. 3. Select the Global Exposure box if you wish to enable the Usage Rule Set for global exposure (across operating units). By default, this box is unchecked (do not enable Global Exposure for the usage rule set).
  • 130. If you are unable to select the Global Exposure check box, submit the Credit Limit Usages Report. Review the report output and un-assign any usage rule sets with different Global Exposure options for the same credit profile. 4. Select the value Currency in the Usage Type field. 5. Enter a currency in the Currency field. The Currency field can contain any Currency Code currently defined. The Currency field may also use the lookup All Currencies to indicate the usage rule is for all currencies defined. 6. Chose to exclude a specific currency for your usage rule by selecting the Exclude check box. The default is unchecked, or No. Note: If the field Currency has value of All, the Exclude check box is non- updateable. 7. Save your work. Warning: Given a customer with the following credit profiles: FRF (french francs) credit limit EUR (euro) credit limit assigned to a european set of currencies that includes FRF (using the new multicurrency feature - usage rule sets) The credit checking process for a transaction in FRF is determined by the credit check engine; perform multi-currency credit check if a Credit Usage Rule Set assignment has been defined. Assigning Credit Usage Rule Sets The Assign Credit Usage Rules window enables a user to assign credit usage rules sets for multiple currency credit checking to Credit Profiles. To assign credit usage rules: 1. Navigate to the Assign Usage Rules window. Order Management > Setup > Credit > Assign Usage Rules. Find Credit Profiles Window
  • 131. Find Credit Profiles Window Before you can assign a Usage Rule Set to a Credit Profile, you must first select the Credit Profile Type and then locate the corresponding Credit Profiles. Certain query processing logic has been disabled within the Find Credit Profiles window; o If the value of the Credit Profile Type field is Profile Class, then the Operating Unit, Customer, Bill To Site, and Item Category fields are disabled. o If the value of the Credit Profile Type field is Customer, then the Profile Class, Operating Unit, and Item Category fields are disabled. o If the value of the Credit Profile Type field is Operating Unit Default, then the Profile Class, Customer, Bill To Site, and Item Category fields are disabled. o If the value of the Credit Profile Type field is Item Category, then the Profile Class, Operating Unit, Customer, Bill To Site, and Overall Credit Limit fields are disabled. Once you have entered your search criteria, select the Find button to either locate your existing credit profile usage rules or to define new usage rules for an existing profile.
  • 132. Assign Credit Usage Rules Window 2. The data appearing in the upper region of the window defaults from the Credit Profile you have queried. This information is protected against update. 3. The multi-row section of the Assign Usage Rules widow enables you to select Credit Usage Rule Sets to use with the credit profile. You select a Name from the List of Values, and the included and excluded currencies fields will display currencies that the usage rule set consists of. These values are protected against update from this window. For detailed field information, see Defining Credit Profiles, Step 3 and 4. 4. Save your work.
  • 133. Upon saving your usage rule assignments, a message is displayed to ask if you wish to cascade changes to usage rule assignments for existing customers with the Customer Profile Class you are saving. New customers created using Customer Profile Classes with previously defined credit usage rules do not automatically inherit the Customer Profile Class usage rule assignments. You must manually create these assignments. Defining Credit Check Rules Overview Order Management credit check rules enable you to determine what credit checking criteria is used when determining credit exposure during the credit checking process. Order Management transaction types determine when credit checking actually occurs, and when used in conjunction with credit checking rules, define your credit checking process. For example, you can define credit checking rules that utilize pre-calculated exposure information to use when comparing a customer's current order amount against their overall exposure; if the order transaction type utilizes this rule, and the order fails during the credit check process, it is automatically placed on credit check hold. You can define as many credit checking rules as you need, and if you inactivate a credit checking rule, you also must remove it from any order types that use it. Additionally, you can include in or exclude from your credit check rule some or all of your open accounts receivable balances, and some or all of your uninvoiced orders. Order Management uses the currency of the order you are credit checking to determine which credit limits to use in credit checking calculations. Order Management only includes orders and invoices in the same currency as the order you are credit checking when calculating a customer's outstanding credit balance, unless you have set up multiple currency credit checking. You can also include/exclude returns based on your credit check rule definition. However this should be used only if you are using return lines with credit memos. Besides defining your credit exposure composition, the credit check rule also determines: Credit check level (order or line) Credit Hold level (order or line) Conversion type used when you enable multi-currency credit check Use of item category credit check Send hold notifications to the sales order creator
  • 134. Use of pre-calculated exposure Credit Limits for Credit Checking and Rules Summary 1. When the Credit Check flag is turned off at the site level that pertains to the Bill- To address, there will be no credit checking for orders for this Bill-To site. It doesn't roll up to the next level to get the credit limits. 2. If the Credit Check flag is turned on at the site level, and both overall credit limits and order credit limits are all NULL/BLANK, then the limits for a customer who owns that bill to site will be automatically considered . 3. If the Credit Check flag is turned on at the customer level, and both overall credit limits and order credit limits are all NULL/BLANK, roll up to the next level in the party hierarchy (if any). Otherwise, use the Operating Unit Credit profile. Note that party profiles are used only if Credit Management is setup. If not, from the customer level we go directly to the Operating Unit. 4. If the Credit Check flag is turned on at each level, and there is only one field left NULL/BLANK (for example, order limit is null but overall exposure is some number), then this NULL/BLANK field is treated as unlimited and it does not rollup to next level. 5. If the last level reached with the Credit Check flag enabled has both overall and order credit limits set as NULL/BLANK, it means no credit checking should be performed. IF the Credit Check flag is enabled and order credit limit is not NULL/BLANK, then a credit check will be performed at the item category level. 6. If the Credit Check flag is disabled for item category or if the Credit Check flag is enabled and both order credit limit and overall credit limit are all NULL/BLANK for item category, then credit checking will not happen at the item category level, but credit checking will still be performed for the site-customer-(party)-OU level based on the rules discussed. IF the Credit Check flag is enabled and at least one of the order credit limit and overall credit limit fields are not NULL/BLANK, then a credit check will be performed at the item category level. Performance Note In order to improve performance you can enable the use of pre-calculated exposure. Utilizing this option, the credit check engine will use summary balance details stored in a periodically updated summary table. The update is done by running a concurrent program which accesses Order Management and Account Receivable transactional tables. This program should be scheduled to run periodically based on your specific business needs. You should also run this concurrent program when you have done major changes in your set up or transactional data (merge customers, incorporate transactions from external systems, change transaction status using customized programs, etc.).
  • 135. To define a credit check rule: 1. Navigate to the Credit Check Rules window. Credit Check Rules Window 2. Enter a name for your credit check rule. 3. Optionally, enter the Effective Dates for your rule. Options Tab 4. Select the entity to perform credit checking against for your rule. Select from: o Sales Order o Sales Order Line
  • 136. Note: If you select Sales Order Line as your credit check level, the Use Pre-calculated Exposure check box will be checked and protected against update If you choose to perform credit checking at the Sales Order level, you are limited to the system generating header level credit holds only. The Credit Hold Level field will default to Sales Order and is protected against update. 5. Select the Credit Hold Level for your credit rule. Select from: o Sales Order: Sales Order (order level) credit check is performed for the header Bill To site. Sales Order level credit checking provides backward compatibility with previous credit check versions. When credit checking rules are defining using Sales Order as the credit check level, the credit check engine will examine order totals and evaluate credit exposure against the credit profile attached at header level. Holds will be always applied at header level. Use order level credit check when order lines always have the same Bill To Site as the Order Header. o Sales Order Line: Sales Order Line (line level) credit check is performed against order line Bill To Sites. The credit check engine will group all order lines belonging to the same Bill To Site and check available credit for each specific Bill To Site. When an order line fails credit check, any remaining lines grouped with the same Bill To Site are placed on hold. Holds can be placed at either the order or order line level when you use line level credit checking. Use line level credit check when sales order lines are attached to different Bill To Sites and you want to use the credit profile defined at that level. Additionally, you can use line level credit check when you have defined customer relationships within your system and actively use them within Order Management. Using customer relationships, you can create sales orders with order lines attached to different Bill To Sites owned by different customers. Order Header level credit checking uses header level information ignoring different bill-to sites detailed at the line. Credit Check uses the credit profile attached to the customer Bill-to site defined at order (header) level. Credit checking at the Order Header level will use order totals and will evaluate credit exposure against the credit profile attached at header level, and holds are always applied at header level.
  • 137. 6. Special Considerations for Credit Hold Level o If you update the Credit Hold Level from Sales Order to Sales Order Line, a pop up dialog box will display a message indicating that existing sales order credit holds will need to be released manually. Select Yes to continue or No to not commit the update. o If you update the Credit Hold Level from Sales Order Line to Sales Order, a pop up dialog box will display a message indicating that existing sales order line credit holds will not be released automatically. Select Yes to continue or No to not commit the update. 7. Override Manual Release check box: This check box enables an order or line which had failed credit checking and then was subsequently manually released to be eligible for additional credit check processing. Select from: o Yes: Manual Released Holds will be overridden. You must also enter a value within the Days to Honor Manual Release field. o No: Manual Released Holds will be honored. The field Days to Honor Manual Release will be non-updatable. 8. Days to Honor Manual Release: The field is used in conjunction with the Override Manual Release check box. If you enable the Override Manual Release check box, you must enter a numeric value greater than zero within this field. Manual Released Holds (Credit Checking Procedures) Each time a credit check failure occurs for order or order line, the corresponding order or order line is placed on credit check hold. However, prior to the credit check holds actually being applied, the credit check process determines: o If a manually released credit check hold exists and o If your credit check rule enables override of manually released holds (in conjunction with the value for Days to Honor Manual Release). If Override Manual Release is not enabled for your credit check rule, then manually released holds are honored and no additional credit checking will occur. If Override Manual Release is enabled, the credit checking process will validate if the release date is within the interval defined by the value of Days to Honor Manual Release. If the value is within the range defined, then manually released holds will be honored and additional credit checking is not performed. If the value is not within the range defined, credit checking can occur again and credit check holds can be applied if the order or lines fails the credit check process. Note: The value of OE_HOLD_RELEASES.CREATION_ DATE is used by the credit check process to determine if the duration defined for the credit check rule is within range for additional credit checking: when any hold is released for an order or line, Order Management inserts a record within OE_HOLD_RELEASES.
  • 138. 9. Select the conversion type to use when performing credit checking using your credit rule. The LOV for this field is limited to the values you define within the Oracle General Ledger Conversion Rate Types window. 10. Select the Check Item Categories check box for your credit rule if you wish to perform credit checking for sales orders by Item Categories defined for Order Management. 11. Select the Send Hold Notifications check box if you wish to send hold notifications whenever a credit hold is placed for a sales order or order line. The notification is sent to the creator of the order. Determine the type of credit exposure to use when defining your credit check rules by selecting the Exposure Tab within the Define Credit Check Rules window. Exposure tab in the Credit Check Rules Window Exposure Tab
  • 139. 12. Select the Use Pre-calculated Exposure check box for your credit rule if you wish to perform credit checking against pre-calculated exposure summary tables. o When the first credit check rule that has the Use Pre-Calculated Exposure check box checked is successfully saved, the following message will display: This credit check rule uses pre-calculated exposure. Please run the Initialize Credit Summaries program to update the pre-calculated data. o If the Use Pre-calculated Exposure check box is checked and the Include Open Receivables balance check box is checked, then Open Receivables Days is protected against update and is NULL. o If the Use Pre-calculated Exposure check box is checked and the Include Uninvoiced Orders check box is checked, then Shipping Horizon Days is protected against update and is NULL. 13. Select the Include External Credit Exposure check box if you wish to include external exposure details imported into Order Management during the credit checking process. When an Oracle Order Management sales order is credit checked, the exposure data from the external system is included in the overall exposure check. The default value for this check box is un-checked (exclude external exposure details when performing credit checking). Receivables Balance Region 14. Select the Open Receivables Balance check box for your credit rule if you wish to include open receivables balances. You must enable either the Include Open Receivables Balance check box or the Include Uninvoiced Orders check box in your credit check rule. You can activate both, but you cannot toggle both off. If you select both the Pre-calculated Exposure and Open Receivables Balance check boxes, you are unable to specify Open Receivables Days. 15. If you enabled Include Open Receivables Balance in your credit check rule, you can indicate whether to Include Payments at Risk when calculating a customer's outstanding balance. Receipts at risk are remitted receipts that have not been cleared, or discounted (factored) receipts that have not been risk eliminated. If the performance of credit checking requires improvement you can toggle off this option.
  • 140. 16. If you enabled Include Open Receivables Balance, enter a value to indicate the range of dates for open receivables you wish to include for your credit check rule. o Negative Number: Includes past due, current, and future open receivables up to X days beyond the current date o Positive Number: Includes open receivables with invoice dates X days earlier than the current date o No Value: Includes all open receivables Uninvoiced Orders Region Note: If you do not select the Include Uninvoiced Orders check box, you cannot select any check boxes within the region. Important: If an order line has been interfaced to the Receivables interface table but hasn't been invoiced yet, the Order Management credit check engine will include this line amount as part of the uninvoiced order amount. If your system enables credit checking and your Receivables Interface table can potentially contain large volume of data, it is recommended that you create a custom index on RA_INTERFACE_LINES_ALL table ORIG_SYSTEM_BILL_CUSTOMER_ID column. 17. Select the Include Uninvoiced Orders check box if you wish to include uninvoiced orders for your credit rule. If you enabled Include Uninvoiced Orders: o Indicate whether to include Freight and Special Charges for uninvoiced orders when performing credit checking. Select the Freight and Special charges check box to include Freight and Special Charges. o Indicate whether to include Tax information for uninvoiced orders when performing credit checking Select the Tax check box to include Tax information for uninvoiced orders. Credit checking calculations on open receivables always include tax amounts and are not affected by the Include Tax option. If the performance of credit checking requires improvement you can toggle off this option. o Indicate the number of scheduled shipping horizon days for your credit rule for uninvoiced orders to be included in your total credit exposure when performing credit checking.
  • 141. For example, if you enter 45, the total exposure includes only uninvoiced orders scheduled to ship within 45 days of the current date. Orders scheduled to ship after 45 days are not included when calculating exposure. Note: If the Use Pre-calculated Exposure check box is checked, Scheduled Shipping Horizon Days is protected against update. o Indicate whether to Include Orders Currently On hold. Select the Include Orders Currently On hold check box to include orders on hold within the exposure calculation for your credit rule. 18. Indicate the Maximum Days Past Due. The Maximum Days Past Due field value specifies the number of day that you will allow an invoice to be past due before holding the customers orders. During the credit checking process, Order Management will verify that no invoices for the customer have been past due beyond the number of days you specified with this field. If there are any such past due invoices, the order is placed on credit hold. 19. Save your work. Deactivating Credit Checking There are three ways to deactivate Credit Checking on an order: Use an order type that does not have an assigned credit rule Define the Customer Profile so that the Credit Check box is not selected Use payment terms for which the Credit Check box is not selected Deactivating Credit Checking does not automatically release orders previously on credit hold. However, the next time you attempt to Book, Pick Release or Purchase Release (for drop shipments), Pack, or Ship Confirm an order which utilizes a Order Management Transaction type that enables credit checking to occur at the specified order points, or you perform an order change that trigger credit checking in the Sales Orders window, Order Management will releases the credit check hold if the order or line meets the requirements for successful credit check. Related Topics Payment Sales Orders
  • 142. Holds and Releases Oracle Payments Processing Order Management provides you with the ability to record credit card information through the Sales Orders window and obtain authorizations for credit card transactions using Oracle Payments. You can also set up the security feature to mask confidential card holder information. Order Management tracks the following credit card information at the order header: Credit card numbers Credit type Credit card holder's names Expiration dates Payment types and methods Authorization codes and amounts Warning: Oracle Payments processing can only occur if you are using an order type that has a credit checking rule and the rule will perform the authorization at Booking or Shipping. Risk Management Oracle Payments offers a risk management feature to identify high risk transactions by Oracle Risk Management. This feature enables merchants and e-commerce service providers to manage the risk when processing transaction through the internet. Oracle Risk Management enables you to define any number of risk factors to verify the identity of your customers, assess their credit rating, and manage risk in a secure on-line environment. You will receive the customer's risk score, which is based on the risk factors, scores, and formulas that are setup in Oracle Risk Management. If the risk factor score exceeds the risk score threshold, the order is automatically placed on hold. High risk holds include credit card authorization and high risk failures. If a customer's transaction receives both authorization failures, the authorization failure hold will be applied. Both hold types can be removed manually and the order will continue through the order cycle process. Order Management authorizations use the default risk formula that you have set up in Oracle Payments. Below is a list of risk factors that can be used by Oracle Payments: Payment amount
  • 143. Time of purchase Payment history Frequency of payments Transaction amount limit Ship To and Bill To addresses Quantity Changes and Cancellations Authorizations occur at the sales order header for the total order amount less any amounts covered by commitments. Return lines are not included in the order amount to be authorized. When an authorized order is changed, Oracle Payments Processing re-authorizes the credit card if the existing authorization has expired. Estimated expiration of the authorization is calculated by Oracle Payments. Actual expiration of authorization varies by card issuer. Because these incremental amounts may not be authorized, you might not be able to collect those funds. To perform authorization of these incremental amounts, do either of the following: Enter a new order for the additional items or quantities. Use action Authorize Payment. This process reauthorizes the full order amount and may result in a understating of the customer's open to buy balance on their credit card. Manual and Online Authorizations You can choose to obtain manual authorizations and enter the authorization code in the Authorization Code field in the Sales Orders window. Security Order Management enables you to mask cardholder information including credit card numbers and authorization codes by setting the OM: Credit Card Privileges profile option. Only the last four digits of the credit card number are displayed if the profile option is set to Limited or None. If the profile option is set to All, the full credit card number is displayed. Drop Shipments Order Management provides the ability to obtain credit card authorizations for drop shipments. Authorizations are obtained at the booking and purchase release activity of the drop shipment order.
  • 144. Related Topics Drop Shipments Payment Define Automatic Holds You can define holds to halt processing of your sales documents as well as order and return lines. This is step twenty-seven of the Order Management Setup Steps. Because orders and returns are not affected by holds until they are applied, you can define all the holds you use in your business at once. You can define holds that are effective only at certain steps of the order or line workflow and holds that apply regardless of the stage in the order's flow. For example, you may want to apply an item hold to prevent order lines for a particular item to be released for shipment. Any orders that are not ready for shipment or any orders that have already been shipped are not affected by this hold. You can also define a hold that affects all orders, no matter where the order is in its flow. When this type of hold is applied, it is effective regardless of the order's position in the flow. For each hold, you can specify hold security by responsibility to control which responsibilities have authority to apply and/or remove the holds you define. Holds can be defined to be specific to pick, pack, ship, or invoice interface activities. Order Management Hold database tables are striped by organization ID. Therefore, you will need to define holds for each operating unit within your enterprise structure. However, hold type quickcodes only need to be defined once. The table below describes Order Management seeded Hold Names, the associated Hold Type, and a description of the hold source. Order Management Seeded Hold Names and Associated Hold Type and Description of the Source Hold Name Hold Type Description Configurator Configurator Automatically applied to order lines that fail Validation Hold Validation Configurator Validation. Credit Card Electronic Automatically applied to orders if credit card Authorization Failure Payment authorization request to Oracle Payment fails. Credit Card High Risk Electronic Automatically applied to orders if risk score Payment determined by Oracle Payments is greater than the value of the risk factor threshold.
  • 145. Credit Check Failure Credit Check Automatically placed if credit check rule evaluation fails on orders setup to be credit checked. Credit Check Failure Credit Check Automatically placed if the Credit Hold box is selected on the customer record in AR. GSA Violation GSA Violation Automatically placed on orders which are in violation of GSA. NO pre-defined hold Order Reserved for you to define administration name for this hold Administration holds based on your business processes. type Hold ePayment Failure Electronic This is for expected errors returned by Oracle Hold Payment Payments like invalid data ePayment server Electronic This is for unexpected errors returned by Failure Hold Payment Oracle Payments, for example a failure to connect to the server. Export Compliance Import/Export This hold is applied when an order fails Hold Compliance export compliance screening. Pending Process Electronic This is applied when process payments is Payment Hold Payment deferred. Promotional Line Promotional Hold Automatically placed on lines which exceed a soft modifier promotional limit. Promotional Order Promotional Hold Automatically placed on orders which exceed a soft modifier promotional limit. Note: Promotional Line/Order Holds functionality is only available if you have licensed and installed Oracle Advanced Pricing. To define a generic hold: 1. Navigate to the Holds window. Order Management > Setup > Orders > Holds Holds Window
  • 146. Generic holds are placed at the order level. Order lines are considered implicitly on hold for an order that has a generic hold against it. You will not see hold information for generic holds at the order line level, only at the order header. A new check box "Apply to Order And Line" has been introduced on holds definition form, which will be enabled only if a line level workflow activity is entered in the hold definition. If the check box is checked, then this line level hold is applicable at the header also. The default value of this check box is unchecked so that existing behavior is maintained. 2. Enter the Name and Description for the hold you want to create. 3. Select a valid Hold Type. Hold Types are defined using the Order Management Quickcodes window. See: Quickcodes 4. Workflow Item: Leave this field blank for generic holds. 5. Workflow Activity: Leave this field blank for generic holds. 6. Optionally, enter the Effective Dates for the hold to control when you can use this hold.
  • 147. 7. Optionally, determine which user responsibilities have authority to apply and/or release holds by entering combinations of responsibilities, authorized actions, and effective dates. You can give some responsibilities the authority to apply a hold, other responsibilities the authority to release it, and others the authority to do both. If you do not specify a responsibility for a hold, any responsibility can apply or release it. 8. Save your work. To define an activity-specific hold 1. Navigate to the Holds window. Order Management > Setup > Orders > Holds 2. Enter the Name and Description of the activity-specific hold you want to create. 3. Select a valid activity-specific hold Type. Order Management provides two standard hold types that are used for the GSA and Credit Checking features: GSA Violation Failure and Credit Check Failure. Order Management also provides the Configurator Validation hold type, which is used if you invalidate a configuration after booking and an order administration hold. Hold types are also provided for import/export compliance, ePayment and promotional limits. Define other hold types using quickcodes. 4. Select the Workflow Activity for the hold. The workflow activity determines where in the order process the hold will be applied. At the line level, All other lines will be processed except for the line for which the hold is effective. The LOV for this field is determined by the value selected for the field Workflow Item. This field is required if you have entered or selected a value within the Workflow Item field only. For example, you can define a hold that prevents an order line from being released for picking by entering Pick Release in this field. The hold takes effect as soon as an order line that meets your hold criteria is eligible for Pick Release. 5. If you want included items of a configurations option class the included items may have had a hold placed against it to be included in the applied hold. This is an optional feature based on your specific business requirements. 6. Optionally, enter the Effective Dates for the activity-specific hold to control when you can use this hold.
  • 148. 7. Optionally, determine which user responsibilities have authority to apply or release activity-specific holds by entering combinations of responsibilities, authorized actions, and effective dates. You can give some responsibilities the authority to apply a hold, other responsibilities the authority to release it, and others the authority to do both. If you do not specify a responsibility for an activity-specific hold, anyone can apply or release it. 8. You can choose to progress the workflow if you select the Progress Workflow on Release checkbox. In such a situation, the workflow activity is progressed for single order lines that are released and it is deferred for multiple order lines. For multiple order lines, you can use the Workflow Background Process to progress the lines in batch. 9. Save your work. Define Attachments Order Management provides you with attachments features to: Include attachments with orders and order lines Include attachments with order returns and order return lines Add free form text to the Sales Order Acknowledgement Report SA header includes attachments Quote header and lines include attachments This is step twenty-eight of the Order Management Setup Steps. Defining Documents for use by the Attachment feature Using standard Oracle Application Attachment functionality, you can define and set up standard or one time documents with or without attachment addition rules. These documents can later be attached to your sales documents using the Attachments window or automatically by specifying attachment addition rules. You can add free form text to your orders, order lines, returns, and return lines as attachments, and you can also copy standard documents and modify them into one time document attachments. You may also translate documents to the language of your choice. Applying Attachments You can automatically apply standard attachments to orders and returns based on the attachment addition rules you define. You can also apply attachments manually by selecting the Actions button and then selecting Apply Automatic Attachments within the Sales Orders or Order Organizer window.
  • 149. If you wish to enable the automatic attachment functionality, you must set profile option OM: Apply Automatic Attachments to Yes. However, if an order or return is modified, attachments must be reapplied manually, by the method mentioned above. Editing Attachments You can edit existing attachments by the following methods: Via the Sales Orders or Order Organizer window by choosing the Attachments icon from the Toolbar, and then modifying existing attachments (provided the attachment has been enabled for edit) or Via the Documents window by first locating your document, and then performing your edit. Viewing Attachments You can view the attached documents in the Order Organizer, Sales Orders, Sales Agreement Organizer, Sales Agreement, Quick Sales Orders, Quick Order Organizer, Quote, and Quick Quote windows. Within these windows, you can view attachments in either of the following manners: From the View menu, select Attachments or Select the Allotment icon (paperclip) from the Toolbar Copying Orders You can copy document attachments to a new order or return when you copy an order by using the Copy orders feature. When performing a order copy, within the Copy Orders window, select either the option of including or excluding manual attachments when copying orders, order lines, returns, and return lines. Note: Sales Agreements do not copy attachments or contract documents. Order Import Once an order has been imported through Order Import into Order Management, you can apply your attachments. You can automatically apply attachments to imported orders based on your attachment addition rules. When creating the order or order line through Order Import, automatic attachments are applied if the profile option OM: Apply Automatic Attachments is set to Yes. Report Assignment Order Management currently utilizes Oracle Attachments functionality for the Sales Order Acknowledgement Report. You can choose to attach a document of type Text to
  • 150. be printed on the report output for either the Order Header, Order Body, or Order Footer entity. Security When viewing order and returns, you can specify which user responsibility can apply and update or simply view attachments. The function security feature available from the Oracle System Administrator responsibility also applies attachments. If you set the function security to view orders and returns, you will only be able to view attachments without the ability to apply or update the attachment. Application Object Library Profile Option setting for Attachments Attachment File Directory ATTACHMENT_FILE_DIRECTORY The directory in which file type attachments data is stored. The system administrator sets this profile option during the install process. Users can view, but not update this profile option. This profile option is visible and updatable at all levels. Attachment File Directory Profile Level Setting Visible Allow user Update? System Administrator: Site Yes Yes System Administrator: Application Yes Yes System Administrator: Responsibility Yes Yes System Administrator: User Yes Yes User Yes No Indicate Attachments ATCHMT_SET_INDICATOR. This profile option allows you to turn off indication of attachments when querying records (for performance reasons). Users can see and update this profile option. This profile option is visible and updatable at all four levels.
  • 151. Indicate Attachments Profile Level Setting Visible Allow user Update? System Administrator: Site Yes Yes System Administrator: Application Yes Yes System Administrator: Responsibility Yes Yes System Administrator: User Yes Yes User Yes Yes Defining Documents in Advance You can predefine standard, template, and one-time documents to attach to your orders or returns and additionally, order and return lines, also Quote and Quote lines as well as Sales Agreements (not for SA lines). The only prerequisite is to define your document categories. Defining Attachment Addition Rules Using standard Oracle Attachment functionality, you can specify rules for automatically attaching of all types of documents to orders and order lines. You can specify that documents be applied to orders or lines for a certain customer, Bill To customer, Ship To customer, item, order type, and/or purchase order. For Order Management, you can specify attachment addition rules at the order level for the following attributes for orders, quotes, or returns: Customer Customer PO Invoice To Order Category Order Type Ship To At the order line level, you can specify your attachment addition rules by specifying values for the following attributes on the order, order line, quote line, or return line: Customer Inventory Item Invoice To Line Category Line Type
  • 152. Purchase Order Ship To Note: SA does not support rule based attachments. Defining Document Categories Using the functionality of Document Categories within the Oracle Applications Documents feature, you specify document categories to define Order Management attachment definition rules. You can choose to use the following Document types as attachments: Document Reference File Long Text Short Text Web Page Once you have defined your document Category, you can then perform Category Assignments to enable Oracle Applications functionality for the following entities: Oracle Forms Oracle Application Functions Oracle Reports that have been enabled for usage with Attachments. To define document categories: 1. Navigate to the Document Categories window. Document Categories Window
  • 153. Note: Ensure that you navigate to the Document Categories window available from the Order Management Super User Responsibility, Attachments submenu (Setup->Sales Order/Returns->Attachments->Document Categories) when defining attachments for Order Management reports or windows. The Document Categories window available from the Order Management Super User Responsibility, Documents submenu (Setup->Documents->Categories) is for creating document categories to assign document sequence rules. 2. Enter a value for your category name in the Category field. 3. Select the default attachment datatype in the Default Datatype field. The default Datatype can be overridden when you create documents. If you are creating a document category for Order Management reports, you must choose either Short Text or Long Text. 4. Optionally, enter an effective date range for your attachment category. 5. Save your work. To assign document categories to functions, forms, or report 1. Navigate to the Document Categories window. Order Management > Setup > Documents > Categories
  • 154. 2. Either enter a new Document Category and save your work, or select a Document Category previously defined, and click Assignments. Category Assignments Window 3. Select the entity type you wish to enable document category attachments for. Select from: o Forms o Functions o Reports Order Management enables Oracle Application Attachment functionality for the following entities: o The Sales Order and Order Organizer Window (form) o The Sales Order Acknowledgement Report If you choose to include an Attachment for printing on the Sales Order Acknowledgement Report, you are currently limited to selecting a data type of Short or Long Text. Additionally, order-level attachments print only at the order header or order footer within the output, and order line-level attachments print only in the report body (within the body of each record displayed). You can associate as many reports as you need with a single category. If you customize your own reports to include documents, you can specify
  • 155. your own as well as Order Management's default reports in this field. Only text documents can print on reports. Oracle Shipping Execution enables Oracle Application Attachment functionality for entities such as Bill of Lading, Commercial Invoice, Pack Slip, and Pick Slip. See Oracle Shipping Execution User's Guide. Oracle Pricing enables Oracle Application Attachment functionality for entities such as Agreements and Price Lists. See Oracle Advanced Pricing User's Guide. 4. Select a Format. Select from: o Header o Body o Footer The Format value determines where documents in this category will appear on the report. You can add your own formats for selection within the Category Assignment window by adding values to the Order Management QuickCode NOTE_FORMAT type. However, standard reports support only the seeded format of Header, Body, and Footer. 5. Warning: In standard reports, order-level notes print only at the header and footer levels; line-level notes print only in the report body. 6. Save your work. Related Topics Oracle E-Business Suite User's Guide. Define Freight and Special Charge Types Order Management enables you to charge for freight and special charges to meet your business needs. The full charge to your customer is visible at the time of order entry and can be communicated to the customer. The freight and special charge amounts can be estimated or final. The actual costs incurred are captured at Ship Confirmation and can be converted to charges based on freight terms and other rules you define. Freight and Special Charges are created and enabled using pricing Modifiers. This is step twenty-nine of the Order Management Setup Steps. Order Management captures the freight and special charges information and Shipping Execution captures all costs incurred on the shipment of goods. Once ship confirmation completes, the costs are transferred to Order Management and may be used to convert the costs into charges. You can set up your different freight costs in Shipping Execution.
  • 156. Order Management's freight and special charge feature enables you to: Capture the charges at the time of order entry Change the freight and special charges until invoicing Capture the freight and special charge information at any point in the order flow Create various freight and special charge types Support charges at various levels (order and line) Specify the controls for refunds Freight Terms You can choose the freight terms for an order line depending on the Customer Contracts (agreements), Customer, Ship To, and Ship-From locations. Freight Terms can be used as Qualifiers to apply freight & special charges, although no such functionality is seeded with the application. Freight terms can include the following: Prepaid You (the shipper) take responsibility for paying the freight costs. The costs are recorded in Shipping Execution. Prepay and add with fixed charges You can prepay the freight costs and charge your customer a fixed amount. The costs are recorded in Shipping Execution and transferred to Order Management. Prepay and add with cost converted to charge You can prepay the freight costs and pass it on to your customer as a charge with a markup or markdown or a direct pass through. The costs are recorded in Shipping Execution and transferred to Order Management. A pricing formula and pricing modifier are used to calculate the markup/markdown and apply the charge to the customer invoice. Collect The freight carrier bills the customer directly; not you. The costs are not recorded in Shipping Execution or Order Management. Third Party Billing The freight carrier bills a third party, not the seller or buyer. The costs are not recorded in Shipping Execution or Order Management.
  • 157. Freight and Special Charge Types Order Management provides you with the ability to setup and capture different charge types and sub type including (but not limited to): Duty Handling Insurance Export Freight Administration Miscellaneous Grouping of Freight and Special Charges You can setup different sub-types under a give charge type, such as, if the freight or special charge type is Miscellaneous, you can group the following different charges: Late penalty charges Restocking charges Negotiations and legal fees Foreign agent commissions The following Charge Types and sub-types have been predefined by Oracle Advanced Pricing under the Oracle Shipping Execution lookup for FREIGHT_COST_TYPE: Insurance Export Duty Freight Administration Handling Order Management shares these Freight Cost Types with Shipping Execution for the COST to CHARGE conversion. Note: You cannot define sub-types for the Shipping Execution Charge Types lookups. Additionally, you can only receive cost to charge conversions for auto configured items. Additionally, Oracle Advanced Pricing has its own lookup type, also called FREIGHT_CHARGES_TYPE. You are allowed to add charge types codes to the Advanced Pricing lookup FREIGHT_CHARGES_TYPE. The following charge type code is predefined for this lookup:
  • 158. Miscellaneous You can define sub-types for the Oracle Advanced Pricing Charge Type Code of FREIGHT_CHARGES_TYPE. The following sub-types are predefined for the Advanced Pricing FREIGHT CHARGE TYPE = Miscellaneous: o Penalty o Restocking o Return Fees Definition Data Elements You can define different attributes for setting your charges including the following elements: Charge Currency: The currency for the Charge amount setup at list level Charge Name: Charge Name picked from the pre-defined setup in pricing Level: Order Level or Line level charges Calculation Method: Percentage (%), Amt (Per pricing unit), Lumpsum amount Formula based Refundable: Whether the charge is refundable Automatic: Whether the charge is automatic or manual Overridable: Whether the charge is overridable after it is applied Start/End Dates: Active date range Qualifiers: Qualifiers to apply charges conditionally Calculation Method Various common methods of calculating charges are supported. Examples of calculation methods include: Fixed amount Percentage of line or order amount Fixed rate per pricing unit of measure Simple pass of a cost Percentage markup or markdown of a cost User-defined formula for a given charge type. The formula can be constructed using the pricing attributes, constant values, or function returning a value. Qualifier /Pricing Attributes for Freight and Special charges The tables indicate both Qualifier Attributes and Pricing Attributes that have been predefined for Freight and Special Charges.
  • 159. Note: You can also make use of any other Qualifier / Pricing Attributes setup in the Pricing for freight and special charges Freight and Special Charges Qualifier Attributes Context Attribute ORDER SHIPPABLE_FLAG ORDER SHIPPED_FLAG ORDER FREIGHT_COST_TYPE_CODE VOLUME LINE_WEIGHT VOLUME LINE_VOLUME Freight and Special Charges Pricing Attributes Context Attribute PRICING ATTRIBUTES INSURANCE_COST PRICING ATTRIBUTES HANDLING_COST PRICING ATTRIBUTES DUTY_COST PRICING ATTRIBUTES EXPORT_COST PRICING ATTRIBUTES FREIGHT_COST PRICING ATTRIBUTES ADMINISTRATIVE_COST For more information on Freight and Special Charges using qualifiers within Order Management, refer to the Oracle Order Management Implementation Manual, Freight and Special Charges Examples. Application of Charges You can have freight and special charges applied to an order in the following ways: Manually Applied Open Interface Automatically based on the qualifier setup Note: Any freight charge modifier's you wish to define for ATO configuration items should use a phase that is included in the Order Management workflow 'SHIP' event. Order or Order Line Charges
  • 160. You can enter charges for order or order line levels. The Freight and Special Charges are returned by the Pricing Engine and if there are multiple automatic charges of same charge type and subtype then Order Management applies the one with Maximum amount. If the user wants the charge to be applied in preference then they may need to set them up with incompatibility group and precedence as described in the Modifier Setup section. Note: If there is an applied charge of a Charge Type/Subtype then the LOV for Charge Name field in Charges window will not show any manual charges for the same type/subtype. The Charge Name is always derived from the meaning for the charge sub-type lookup code. If the charge sub-type is NULL then the name is derived from the meaning for the charge type lookup code Estimate or Actual The estimated or fixed charge is displayed in the Charges user interface. You can set the amount as Estimated or Fixed. Note: You can set estimated or fixed charges only after a charge has been applied on an order or order line. Multiple Unlimited Charges You can enter an unlimited number of charges at each level with unique combination of Charge Type and Charge Sub-Type. Timing of Charges Entry You can enter freight and special charges at any event point or activity, up to the point where the order and line is invoiced. At the point of invoicing the charge will be fixed and no more charges can be added after the line is invoiced. Changing and Deleting of Charges Based on your processing constraints, you have the ability to manually change the amount, delete, or cancel charges applied to an order or order line until invoicing. You can enter a reason code if the charge is being changed, however, the history will not be maintained. In addition, you can add processing constraints to prevent charges from deletion or cancellation after a user-definable point in the order's process. Freight Charges and Included Items In order to apply any eligible freight charges for an Included Item, the profile option OM: Charges for Included Item should be set to Y.
  • 161. When this profile option is set to Y, and the calculate price flag of the order line with an included item is either Calculate Price (Y) or Partial Price (P), then the eligible freight charges are applied to the order line. For backordered lines within Included Items, both the profile options OM: Charges for backorders and OM: Charges for Included Item need to be set to Y to view and apply any freight charges. Any freight charge modifiers you define for included item should be within a pricing phase that is included within the Order Management 'LINE' or 'SHIP' workflow event. Freight charges for Backordered Lines The Order Management profile option OM: Charges for backorders controls how the system will set the value of the calculate price flag for backordered lines. If the profile option is set to Y, the system will set the calculate price flag to P and freight charges are calculated for backorder lines If the profile option is set to N, the system will set the calculate price flag to 'N' and freight charges are not calculated for backorder lines Rounding of Freight charges The Oracle Advanced Pricing profile option QP: Selling Price Rounding Options determines if your freight charges are rounded. See: Oracle Advance Pricing Implementation Guide, Profile Options. To define Order Management Freight Cost Type Names 1. Navigate to the Oracle Order Management Freight Cost Types window. Order Management > Setup > Shipping > Freight Carriers, Cost Types > Freight Cost Types. Order Management Freight Cost Types Window
  • 162. 2. Enter a name for your Freight Cost type in the Name field. The value entered in this field is the value a Shipping Clerk will see on within the Oracle Shipping Execution Transactions window when entering Freight Costs during the shipping process. 3. Choose a type for your Freight Cost Name from the LOV in the Type field. 4. Select a currency that the Freight Cost Type will use in the Currency field. 5. Enter the default value for your Freight Cost Type in the Amount field. The amount will be defaulted in the Freight Cost window when you enter or select the Freight Cost Name during the shipping process. 6. Enter effective dates for you Freight Cost Name in the Effective Date From/To fields. 7. Save your work. Setting up Freight Rates and Charges Oracle Order Management displays the freight rates and charges for shippable and non- shippable items. For example, when you choose ship method for an ‗assemble to order‘ (ATO) item using the Sales Order window, the application displays the ship method rate and calculates the charges based on the pricing setup.
  • 163. Note: You must have Oracle Advanced Pricing installed to set up freight rates and charges. To set up freight rates and charges 1. Navigate to the Advanced Pricing – Pricing Transaction Entity – Attribute Linking window (Pricing -> Setup -> Attribute Management -> Attribute Linking and Mapping). 2. Select Order Fulfillment as the pricing transaction entity and Pricing Context as the context type. The application displays a list of contexts. 3. Select Pricing Attribute and click Link Attributes to open the Link Attributes window. 4. Select the Estimated Transportation Price (ESTIMATED_FTEPRICE) attribute and click Attribute Mapping to open the Attribute Mapping window. 5. Select the request type with the following details: o Application Name: Advanced Pricing o Request Type: ONT o Description: Order Management Order 6. Optionally, replace the default user value string in the line level section as follows: Replace ‗OE_FREIGHT_RATING_UTIL.GET_ESTIMATED_COST_AMOUNT ('FTEPRICE')‘ with ‗OE_FREIGHT_RATING_UTIL.GET_ESTIMATED_COST_AMOUNT_NS('FTEPRICE')‘ Note: The default value only considers shippable items for freight rates and charge calculation. If you need to include the non-shippable lines also for the calculations, then you must replace the default user value string. 7. Save the changes. 8. Without closing this window, click the Tools option on the top menu bar. 9. Click Build Attribute Mapping Rules to generate the attribute mapping rule. The application displays a message indicating the successful generation of the attribute mapping rule. The application uses this attribute mapping rule to calculate and display the freight rates and charges for shippable and non shippable items as applicable. Overview of Shipping Tolerances Oracle Order Management provides you with the ability to capture shipping tolerance levels for over and under shipments recorded during ship confirmation. The shipping tolerance feature enables you to define various shipping tolerance levels for ordered and expected return quantities. Order Management shipping tolerances are used to validate the percentage of the ordered quantity. Once shipping tolerances have been defined, Order Management then automatically fulfills order lines using the tolerances you defined.
  • 164. Order Management's shipping tolerances feature captures the following: Over and under shipments and returns percentages at the system, customer, site, item, site-item, and customer item levels Different tolerances for ordered and returned quantities Defaulted tolerances from various sources based on your defaulting rules Automatic fulfillment of total shipped quantities for order lines within the under tolerance limit Tolerances levels that enable you to over ship at the time of ship confirmation Over Shipments When Oracle Shipping Execution attempts to over ship an order, Order Management processes the order based on the shipping tolerances you define. In order to perform an over shipment, Order Management: Determines if the ship quantity is within the defined over shipment tolerance levels you defined by setting the OM: Overshipment Tolerance profile option or setting your shipment tolerances in Order Management. Notifies the appropriate personnel when an over shipment is above the set shipping tolerance. Issues the material for any unpicked or unreserved quantity. Under Shipments When Oracle Shipping Execution attempts to under ship an order, Order Management processes the order based on the shipping tolerances you define. In order to perform an under shipment, you must: Ship confirm the quantity at the time of closing the delivery Determine if the total quantity shipped is within the under shipment tolerances you defined. Any remaining shipment allocations are removed Note: If the total quantity shipped is under the shipment tolerances, Order Management will split the original shipment line. The shipment will be shipped as a partial shipment. Under Shipment tolerances greater than 100% are treated as the equivalent of a 100% tolerance; to close order lines a shipment of a non-zero quantity is required, even if the under shipment tolerance is set to 100%. Note: If a zero quantity is entered at shipment, the system will process the transaction. However, zero quantity shipments are not allowed; Order Management will therefore perform a backorder for the zero quantity shipment line at ship confirm.
  • 165. Note: A shipment of a quantity other than zero is needed in order to enable order lines to progress to closure. Over Shipments Report Oracle Shipping Execution provides the Over Shipments Report for displaying shipping tolerances. This report displays shipping tolerance information based on the customer, site, item, warehouse, ship date, and order type. Related Topics Profile Options Oracle Shipping Execution User's Guide Defining Shipping Tolerances Defining shipping tolerances are based on your customers and items or your customer site and item tolerances. Prerequisites Set up your customer and customer site tolerances in the Customer window Set up your tolerances for items in the Master Items window To define shipping tolerances for orders or returns: 1. Navigate to the Setup Tolerance window. Setup Tolerance Window
  • 166. 2. Select the Customer name for the shipping tolerance. 3. Select the customer Address for the shipping tolerance. You can pick a customer address in any Operating Unit accessible to you via your MO: Security Profile. 4. Select the Item Number for the shipping tolerance. 5. Enter the Over Shipment Tolerance percentage. The over shipment tolerance percentage determines the amount of the shipment you can exceed at the time of ship confirmation. 6. Enter the Under Shipment Tolerance percentage. The under shipment tolerance percentage determines the minimums amount of the shipment at the time of ship confirmation. If you enter more than 100, the shipping process will use 100. Note: Order Management currently does not support over and under shipment tolerances for ATOs (Model, Kit and all children). Updates to shipment tolerances for PTOs is currently not allowed. If you have defined non-zero tolerances within either the Item Form, Customer Form, Shipping Tolerances Form, or the profile option value, the values are ignored for PTOs; the over and under shipment tolerance for PTOs will always default to 0. If the tolerances are defined with unequal values for a combination of Ship_To with an item, the Ship_To field is not updated. 7. Enter the Over Return Tolerance percentage for return receipts.
  • 167. The over return tolerance percentage determines the amount of the return you can accept above. 8. Enter the Under Return Tolerance percentage for return receipts. The under return tolerance percentage determines the amount of the return you can accept below. 9. Save your work. Release Management Integration Setup for Sales Agreements Oracle Release Management Oracle Release Management locates the releases against a Sales Agreement, and uses this information to determine the current picture of demand. In the past, Release Management looked at only one sales order to determine demand (this sales order is identified in the Release Management Processing Rules). Release Management uses the Sales Agreement number in the processing rules, and determines all releases against the Sales Agreements to define the current demand. See the Oracle Release Management User's Guide, Oracle Release Management Implementation Manual, and Sales Agreements in the Oracle Order Management User's Guide and Implementation Manual. Scheduling Across Orders Setup Setting Up You can control access for the appropriate role. To set up for the appropriate role: 1. Set the profile option OM: Scheduling Role: o CSR only: Will not be able to access the Scheduling Find tab and Scheduling Organizer window. All other functionality for the Order Organizer and Sales Order Pad will remain unchanged. o Scheduler only: Will be able to access Scheduling Find tab and Scheduling Organizer window, but not other tabs within the Order Organizer, i.e. Order Information, Line Information, Advanced, and Holds Information.
  • 168. Note: Scheduler-only users should have their own Menu which should not have access to functionality such as the Sales Orders window, Price Lists, etc. o CSR and Scheduler: Will be able to access both the Order tabs (Order Information, Line Information, Advanced, and Holds Information) and the Scheduling tab within the Find Orders window as well as the Scheduling Organizer window. 2. Save your work. Gross Margin To Set up for Gross Margin: 1. Navigate to the Order Management Parameters window. The default for Calculate Margin is No. To use margin, you must enable Calculate Margin control. Choose whether to do the calculation based on Price or Cost. Save your work. 2. Decide if you want to hold orders that do not meet minimum margin percentages. If you do, decide which order types you want to do this for. Go to the Order Management Transaction Type window and query up each Order Type record and enter the minimum margin percentage. Save each record. 3. Determine which responsibilities do NOT need to be able to see Gross Margin information in the Sales Orders window and the Pricing & Availability window. Using the System Administrator responsibility, navigate to Applications > Responsibility, define or query up a responsibility with ―Orders, Returns Main Menu‖ attached, and exclude the View Margin function from those responsibilities. 4. Create a folder for the Sales Orders window, Order Information tab, Other sub- tab to display both or either Margin Amount and Order Margin %, and a folder for the Line Items tab to display any or all of the Cost, Margin Amount and Margin % fields on the Main sub-tab or the Pricing sub-tab. Assign that folder to be the default folder for those responsibilities who can see margin. Create a folder for the Pricing & Availability window Pricing tab to display any or all of the Cost, Margin Amount and Margin % fields and assign that folder for those responsibilities who are allowed to see margin. User Item Description To set up the User Item Description: To set up the Order Management system to use the User Item Description for invoicing purposes or for ad hoc item entry, do the following:
  • 169. 1. Create a folder for the Line Items tab to show the User Item Description on the Main sub-tab. Assign that folder to be the default folder for those responsibilities who need to be able to key or view the User Item Description. Save your work. 2. To create a generic item to be used for drop shipping miscellaneous items that you do not typically sell or stock, create a dummy item in the Inventory Master Items window. Set the item attribute Default Source Type to External, so the item will be always drop shipped. Set the item attribute 'Allow Description Update' on the Purchasing tab to checked, so that PO will not reject the user item description. Setup for Related Items To set up the Related Items feature: Set the profile OM: Enable Related Items and Manual Substitutions to Yes. Setup for Scheduling Usability Enhancements Across Orders. Note: APS customers should not use this feature as there is an impact on collections and forecast consumption which APS will take up in next release To set up the Item Relationships using Oracle Inventory: 1. Navigate to the Item Relationships window. 2. Define the relationships between items by selecting the Type of relationship, the most commonly used relationship types are: Substitute: One item is a substitute for another (alternate item) Superseded: One item is replacing another, probably older version Up-sell: Selling an improved version of the item originally ordered Cross-Sell: Selling additional items that go along with the item originally ordered Item Relationships Window
  • 170. In the above window, the item ‗AS54888' is setup with different related items of different relationship types like Cross-sell, Up-sell, Supersede, Substitute. This window can be accessed from Inventory > Items > Item Relationships. Current Relationship Types o Related o Substitute o Cross-Sell o Up-Sell o Service o Prerequisite o Collateral o Superseded o Complimentary o Impact o Conflict o Mandatory Charge o Optional Charge o Promotional Upgrade
  • 171. o Split o Merge o Migration Note: The relationship type 14 (Promotional Upgrade) is used by Advanced Pricing for Item Upgrade setup. So on the Related Items window, the items that are setup with relationship type 14 are not shown. 3. Save your work. Setup of Recurring Charges Charges are classified into 3 types: One-time, Recurring, and Usage for service items. Order Management now provides the Recurring Charges functionality to order and price products with recurring and one-time charges. The MACD (Move Add Change Disconnect) feature of Order Management has been enhanced with the addition of the Recurring Charges functionality, and is now referred to as TSO (Telecommunications Service Ordering). The following are the setup steps to be carried out for Recurring Charges: If MACD is already installed, you only need to set up the following: Profile option OM: UOM Class for Charge Periodicity. It determines what domain will be used to hold the allowable charge periodicities. The domain is a UOM class in Inventory. Inventory has seeded a UOM class called ‗Period‘ that will hold UOMs: Daily, Weekly, Monthly, Quarterly and so on. The profile option is seeded with the value ‗Period‘. Inventory has further seeded a value set INV_CHARGE_PERIODICITY that will hold UOMs: Weekly, Monthly, Quarterly, Yearly and so on. System Parameter Enable Recurring Charges should be set to Yes. The default value is No. This is a one-time enabling process and cannot be reversed. Defaulting rule for retrieving the correct charge periodicity defined for the item in Item Master. If MACD is not installed, you require to install it first and then setup the Recurring Charges features. Trading Community Usage Within Order Management In general, previous releases of Order Applications and initial releases of Oracle CRM products utilized the Oracle Receivables Customer Model for storing and retrieving customer information.
  • 172. You can model customers and customer details using Oracle's Trading Community model. Oracle's Trading Community customer model is a powerful customer architectural design, building on the Receivables Customer model, enabling users to now define and maintain customer hierarchies and relationships between customers and sites. If a CRM or ERP application maintains customer information, the application is using the Trading Community customer model. Trading Community enables you to: Separate entities you enter into a relationship with, from the business relationship itself Provide a common location entity that can be shared, enabling greater optimization for distributed planning Maintain businesses and people as different entity types Enables multiple customer relationships to be established for one common entity Terminology Trading Community Party: This is a generic term for any entity which can have any type of relationship with your company. The three primary party types are: o Person: This party type is typically used when you are creating an entity that operates within a business to customer environment. o Organization: This party type is typically used when you are creating an entity that operates within a business to business environment. o Party Relationship: This party type represents a binary relationship between two parties such as a partnership. Party relationship types can be seeded or user-defined. A party relationship is optionally a party itself, meaning certain party relationships can enter into relationships themselves (currently not supported within Order Management). Party Site: Party Site represents the link between a party and a location (a valid location for the party. Typically, your organizational hierarchy is used when modeling using party relationships. Account: An account represents a relationship between your company and a party in the Trading Community model who is your customer. Accounts contain the attributes of the selling relationship between your organization and a party. Account attributes do not describe a party; they only exist when a selling relationship is present between the your organization and a party. The information which is used for processing orders and receivables transactions is part of the account information. Account Site: A party site address that is used within the context of an account.
  • 173. Account Site Usage: An account site created for specific usage; for example, billing or shipping purposes. If a new account site usage is created for a Customer, then that Account Site Usage will be marked as Primary. Mapping Order Management terminology to Trading Community terminology Customer Site, Customer Location, Customer Address: These terms, within Order Management equate to Trading Community Account Sites. Bill To, Ship To, Deliver To: These terms, within Order Management, equate to Trading Community Account Sites Usages. The following figure describes the conceptual usage of the Trading Community model as utilized currently within Order Management. Trading Community Model The figure above conceptually represents the Trading Community customer model and how Trading Community has been integrated within the Order Management Application. When defining a customer, you are defining a Trading Community account, which can be linked to a new or existing Party. Accounts have at least one address and each address may have one or more site uses. You can also create new relationships among accounts across parties. Within Order Management, each account belongs to a party. These parties may have additional relationships and details defined, but Order Management currently only utilizes a limited subset of the party data (accounts, addresses, and sites usages).
  • 174. The Trading Community model includes all the information which was previously stored in the Receivables customer model. This includes information such as: Customers Customer addresses and site uses Profile amounts Customer relationships In order to maintain backward compatibility for the Oracle Receivables customer model, Order Management currently accesses data stored in Trading Community database tables via Order Management database views. Future development projects are in progress to update Order Management applications code to retrieve Trading Community details directly from Trading Community base tables rather than utilizing Order Management views. As Order Management adds new features and additional functionality to its core application, users will begin to see Trading Community terminology incorporated into Order Management Forms (windows), Reports, Concurrent Programs, and product documentation. Until these project are completed, Order Management forms will continue to use names of entities as they existed in the Receivables customer database tables. The following table provides a mapping of these field names. Mapping of Entities in Receivables Customer Database Tables Order Management Form (window) Trading Community Base Table Entity Name Entity Name Customer Number Account Number Customer Name Party Name For more information on Trading Community and the new Trading Community customer model, see :Oracle Receivables User Guide, Customers.