


![13-2 Oracle Trading Community Architecture Administration Guide
• a service implementation bean, or service bean, that implements the Java service
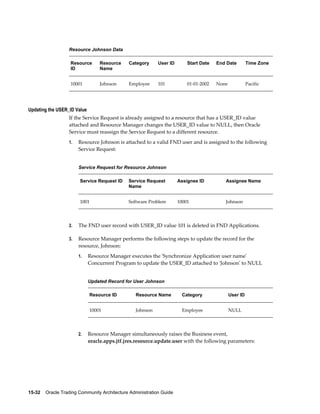
interface, and,
• one or more deployment descriptors that associate the WSDL, the Java interface,
and the service bean together.
Services are self-describing, standalone components that can be deployed as Web
services, EJB session beans or as co-located Java APIs, i.e., the APIs are deployed in the
same Java Virtual Machine [JVM] as any client that uses them.
Service interfaces are categorized based on their intended usage.
Business Object Service
A business object is a representation of an object in the business domain. A business
object service provides access to, and operations on, business objects. A business object
service may support a single or many business objects. A business object service can be
a document, a place, a person, or a thing. It contains one or more view objects (VOs)
that are mapped to underlying entities (EOs). A major difference between the view
object and the underlying entity object is the presence of foreign attributes on the view
object, such as the supplier name on the purchase order.
Application Service
Application services are components that include data and operations. An application
service is optimized for a specific end user task whose user interface can be
implemented in any technology.
Application services are analogous to a root UI application module in a traditional OA
Framework application and they might both provide access to business objects and
share the same underlying entity objects.
A major difference between business object services and application services is the kind
of data objects and tasks they support. A business object service manages core
transaction data designed to be accessed by a remote system. An application service is
optimized for a specific task, or group or tasks and also includes display values for
presentation to a user. The application service will also include supplemental data
objects to be used for lists, list of values and other UI-specific components.
Web Services Framework
A web service is a standalone software program that can be run on the Internet. While a
Web service can be very small (an application that lets you get the current time, for
example), or large and complex, all Web services leverage the standard technologies
that together enable dynamic discovery and interaction.
The Oracle Web service framework operates in a manner in which automated,
decentralized services can be defined, deployed, manipulated and evolved. The](https://image.slidesharecdn.com/33a53626-44c9-491f-950f-b92debbce52d-150610200743-lva1-app6892/85/Oracle-Trading-Community-Architecture-246-320.jpg)


Ad
More Related Content
What's hot (20)
Viewers also liked (10)


Ad
Similar to Oracle® Trading Community Architecture (20)


Ad
Oracle® Trading Community Architecture
- 1. Oracle® Trading Community Architecture Administration Guide Release 12.1 Part No. E13568-04 August 2010
- 2. Oracle Trading Community Architecture Administration Guide, Release 12.1 Part No. E13568-04 Copyright © 2003, 2010, Oracle and/or its affiliates. All rights reserved. Primary Author: Ashita Mathur Contributor: Ajai Singh, Amy Wu, Anish Stephen, Avinash Jha, Harikrishnan Radhakrishnan, Leela Krishna, Nishant Singhai, Ramanasudhir Gokavarapu, Shankar Bharadwaj Oracle is a registered trademark of Oracle Corporation and/or its affiliates. Other names may be trademarks of their respective owners. This software and related documentation are provided under a license agreement containing restrictions on use and disclosure and are protected by intellectual property laws. Except as expressly permitted in your license agreement or allowed by law, you may not use, copy, reproduce, translate, broadcast, modify, license, transmit, distribute, exhibit, perform, publish or display any part, in any form, or by any means. Reverse engineering, disassembly, or decompilation of this software, unless required by law for interoperability, is prohibited. The information contained herein is subject to change without notice and is not warranted to be error-free. If you find any errors, please report them to us in writing. If this software or related documentation is delivered to the U.S. Government or anyone licensing it on behalf of the U.S. Government, the following notice is applicable: U.S. GOVERNMENT RIGHTS Programs, software, databases, and related documentation and technical data delivered to U.S. Government customers are "commercial computer software" or "commercial technical data" pursuant to the applicable Federal Acquisition Regulation and agency-specific supplemental regulations. As such, the use, duplication, disclosure, modification, and adaptation shall be subject to the restrictions and license terms set forth in the applicable Government contract, and, to the extent applicable by the terms of the Government contract, the additional rights set forth in FAR 52.227-19, Commercial Computer Software License (December 2007). Oracle USA, Inc., 500 Oracle Parkway, Redwood City, CA 94065. This software is developed for general use in a variety of information management applications. It is not developed or intended for use in any inherently dangerous applications, including applications which may create a risk of personal injury. If you use this software in dangerous applications, then you shall be responsible to take all appropriate fail-safe, backup, redundancy and other measures to ensure the safe use of this software. Oracle Corporation and its affiliates disclaim any liability for any damages caused by use of this software in dangerous applications. This software and documentation may provide access to or information on content, products and services from third parties. Oracle Corporation and its affiliates are not responsible for and expressly disclaim all warranties of any kind with respect to third party content, products and services. Oracle Corporation and its affiliates will not be responsible for any loss, costs, or damages incurred due to your access to or use of third party content, products or services.
- 3. iii Contents Send Us Your Comments Preface 1 Overview Introduction to Administration................................................................................................ 1-1 2 Implementation General Implementation........................................................................................................... 2-1 Assigning Responsibilities to Users..................................................................................... 2-1 Customer Text Data Creation and Indexing ....................................................................... 2-2 Running Migration and Upgrade Requests......................................................................... 2-3 Setting Up Business Events.................................................................................................. 2-4 Defining the Business Event Types to Raise.................................................................. 2-6 Defining How Business Events Are Raised................................................................... 2-9 Preserving Event Information..................................................................................... 2-10 Event Raising...............................................................................................................2-10 Event Subscription...................................................................................................... 2-11 Impact and Alternatives of Not Raising Granular Business Events............................ 2-11 Setting Up Workflow Directory Synchronization.............................................................. 2-12 Incremental Workflow Directory Synchronization..................................................... 2-18 Bulk Workflow Directory Synchronization................................................................. 2-19 Defining Administration Access........................................................................................ 2-21 Feature-Specific Implementation............................................................................................2-21 Setting Up Batch Address Validation................................................................................ 2-22 Setting Up Batch Duplicate Identification..........................................................................2-23
- 4. iv Setting Up Bulk Import...................................................................................................... 2-24 Bulk Import De-Duplication Processes........................................................................2-26 Setting Up Customer Interface...........................................................................................2-29 Setting Up Customer Merge.............................................................................................. 2-30 Setting Up eLocations Spatial Data Integration................................................................. 2-31 Locations Spatial Index Rebuild.................................................................................. 2-32 Setting Up Party Merge......................................................................................................2-32 Setting Up Real-Time Address Validation......................................................................... 2-33 Setting Up Relationship Manager...................................................................................... 2-36 Setting Up Third Party Data Integration............................................................................2-36 3 Relationships Administering Relationships.................................................................................................... 3-1 Searching for Relationship Types.............................................................................................3-3 Creating Relationship Types.................................................................................................... 3-4 Viewing and Converting Relationship Types.......................................................................... 3-5 Copying Relationship Types.................................................................................................... 3-6 Adding Relationship Phrase and Role Pairs to Relationship Types....................................... 3-7 Assigning Relationship Phrases and Roles to Relationship Groups.......................................3-9 4 Classifications Classifications Overview.......................................................................................................... 4-1 Administering Classifications.................................................................................................. 4-4 Searching for an Existing Class Category................................................................................. 4-5 Creating a Class Category......................................................................................................... 4-6 Assigning Entities to a Class Category..................................................................................... 4-8 Creating a Class Code................................................................................................................4-8 Assigning Parent Class Codes..............................................................................................4-9 Updating a Class Category...................................................................................................... 4-10 Updating a Class Code............................................................................................................ 4-11 Viewing a Class Code Hierarchy............................................................................................ 4-12 Copying a Class Category....................................................................................................... 4-12 Refresh of Classification Denormalization............................................................................ 4-13 5 Data Quality Management Data Quality Management Overview.......................................................................................5-2 Major Features..................................................................................................................... 5-2 Data Quality Management Examples.................................................................................. 5-6 Data Quality Management Process...................................................................................... 5-8 Administering Data Quality Management.............................................................................5-11
- 5. v DQM Administration Overview Page............................................................................... 5-11 Word Replacements.................................................................................................................5-13 Creating and Updating Word Replacement Lists.............................................................. 5-15 Word Replacements Tips................................................................................................... 5-17 Creating Custom Word Replacement Conditions..............................................................5-19 Attributes for DQM.................................................................................................................5-21 Transformations Overview..................................................................................................... 5-22 Defining Attributes and Transformations..............................................................................5-23 Creating Custom Attributes............................................................................................... 5-25 Creating Custom Transformations.....................................................................................5-26 Attribute and Transformation Tips.................................................................................... 5-28 Match Rules Overview............................................................................................................ 5-28 The Matching Process........................................................................................................ 5-30 Search Matching Process............................................................................................. 5-31 Expanded Duplicate Identification Matching Process.................................................5-32 Bulk Duplicate Identification Matching Process..........................................................5-34 Integration Services Duplicate Identification Matching Process................................. 5-36 Defining Single Match Rules..................................................................................................5-38 Entering Match Rule Details.............................................................................................. 5-39 Selecting Attributes and Defining Usage........................................................................... 5-40 Assigning Scores, Transformations, and Thresholds......................................................... 5-43 Match Rule Example.......................................................................................................... 5-47 Defining Match Rule Sets....................................................................................................... 5-52 DQM Compile All Rules Program..........................................................................................5-54 Quality Adjusted Search Results............................................................................................ 5-54 Creating Logic for Quality Adjusted Search Results..........................................................5-56 Viewing Match Rules.............................................................................................................. 5-58 Staged Schema......................................................................................................................... 5-59 DQM Staging Program...................................................................................................... 5-61 DQM Index Optimization Program................................................................................... 5-63 DQM Synchronization Method..........................................................................................5-64 DQM Synchronization Program.................................................................................. 5-64 Merge Dictionary Overview................................................................................................... 5-65 Maintaining the Merge Dictionary.....................................................................................5-66 Creating Custom Merge Master Party Defaulting Method....................................................5-69 Automerge............................................................................................................................... 5-72 DQM Diagnostic Reports........................................................................................................5-73 6 Data Sharing and Security Data Sharing and Security Overview....................................................................................... 6-1
- 6. vi Administering Data Sharing and Security............................................................................... 6-2 Administration Process........................................................................................................ 6-3 Creating a Data Sharing Group................................................................................................ 6-4 Updating a Data Sharing Group............................................................................................... 6-7 Assigning Privileges to Access a Data Sharing Group.............................................................6-8 7 Adapters Adapters Overview....................................................................................................................7-1 Administering Adapters............................................................................................................7-2 Configuring Adapters.......................................................................................................... 7-3 Creating Address Validation Adapters.....................................................................................7-6 8 Phones Administering Phones...............................................................................................................8-1 Defining Time Zones for Phones..........................................................................................8-1 Defining Phone Formats...................................................................................................... 8-2 9 Extensions Administering Extensions......................................................................................................... 9-1 Extensions Process............................................................................................................... 9-2 Extensions Example............................................................................................................. 9-3 Copying Extensions Data for Profile Versioning................................................................. 9-9 10 Source System Management Source System Management Overview.................................................................................. 10-1 Administering Source System Management.......................................................................... 10-2 Source Systems Overview....................................................................................................... 10-3 Administering Source Systems............................................................................................... 10-5 Setting Up Flexfields for Source Systems........................................................................... 10-6 Creating and Updating Source Systems.............................................................................10-6 Viewing Source Systems.................................................................................................... 10-7 Single Source of Truth Overview........................................................................................... 10-7 Attribute Groups..............................................................................................................10-10 Single Source of Truth Example for Rank Display Method............................................. 10-12 Attribute Groups Example for Rank Display Method...............................................10-16 Administering Single Source of Truth................................................................................. 10-19 Setting Up Display Rules................................................................................................. 10-19 Third Party Data Integration Update Program..........................................................10-20 Setting Up User Overwrite Rules.....................................................................................10-21
- 7. vii Data Security for Other Entities............................................................................................10-22 Setting Up User Create and Update Rules....................................................................... 10-23 11 Geography Hierarchy Geography Hierarchy Overview............................................................................................. 11-1 Administering Geography Hierarchy..................................................................................... 11-3 Defining Country Structures.................................................................................................. 11-6 Viewing and Defining Geographies.......................................................................................11-7 Updating Geographies............................................................................................................ 11-8 Managing Validations........................................................................................................... 11-10 Geography Name Referencing Process.................................................................................11-14 12 Certification Administering Certification.................................................................................................... 12-1 13 Web Services Implementation Overview Oracle Service Bean Framework............................................................................................. 13-1 Web Services Framework........................................................................................................ 13-2 Oracle Integration Repository (iRep)......................................................................................13-3 Implementing the Web Service...............................................................................................13-3 Business Object APIs.............................................................................................................. 13-4 DQM Search............................................................................................................................ 13-7 Party Merge..............................................................................................................................13-9 Account Merge.......................................................................................................................13-10 14 Resource Manager Implementation Overview Overview................................................................................................................................. 14-1 Installation Verification.......................................................................................................... 14-6 Application Procedures..................................................................................................... 14-7 Resource Manager Dependencies......................................................................................... 14-22 Phase I: Setting Up Resource Manager................................................................................. 14-23 Phase II: Managing Resources with Resource Manager...................................................... 14-27 Resource Manager Concurrent Programs............................................................................. 14-32 15 Phase I: Setting Up Resource Manager Overview of Setting Up Resource Manager........................................................................... 15-2 Mass Importing Resources From Other Applications in the E-Business Suite..................... 15-4 Importing Resources From Legacy Applications Using APIs................................................ 15-5 Importing Individual Resources............................................................................................. 15-5
- 8. viii Creating a Resource Manually in Forms.................................................................................15-7 Creating a Salesperson Automatically..................................................................................15-12 Creating a Salesperson of Type Other and To Be Hired in HTML......................................15-18 Creating a Salesperson in Multiple Organizations.............................................................. 15-19 Defining Role Types............................................................................................................. 15-21 Defining Roles in Forms ...................................................................................................... 15-22 Defining Roles in HTML...................................................................................................... 15-23 Specifying Role Attributes....................................................................................................15-24 Defining Skill Levels in HTML............................................................................................ 15-26 Assigning a Numeric Value to a Skill Rating.......................................................................15-26 Changing the Name of a Skill Rating................................................................................... 15-27 Publishing Workflow Business Events................................................................................ 15-27 16 Phase II: Managing Resources Overview of Managing Resources.......................................................................................... 16-2 Finding a Resource in Forms...................................................................................................16-5 Finding and Changing a Resource in HTML..........................................................................16-6 Configuring Resource Fields for Updates.............................................................................. 16-7 Assigning Additional Resource Attributes............................................................................ 16-8 Synchronizing End Dates for Partner and Employee Resources........................................... 16-9 Creating Groups in Forms.....................................................................................................16-11 Creating Groups in HTML.................................................................................................... 16-14 Defining Dynamic Groups in Forms.................................................................................... 16-15 Defining Dynamic Groups in HTML................................................................................... 16-17 Viewing Group Hierarchy in Forms..................................................................................... 16-18 Viewing Role Details............................................................................................................ 16-19 Assigning Roles to Resources............................................................................................... 16-20 Assigning Resources to Groups............................................................................................ 16-21 Defining Teams in Forms......................................................................................................16-21 Defining Teams in HTML.....................................................................................................16-23 Configuring Group and Team Member Notifications......................................................... 16-24 Moving a Group of Salespersons from One Compensation Analyst to Another................16-35 Running a Group Audit Report............................................................................................ 16-36 Viewing an Audit Report...................................................................................................... 16-37 Running a Group Structure Report.......................................................................................16-38 Viewing a Group Structure Report....................................................................................... 16-39 Running Resource Skills Report...........................................................................................16-40 Viewing Resource Skills Report........................................................................................... 16-41
- 9. ix 17 Troubleshooting Resource Manager Common Implementation Errors............................................................................................ 17-1 Error Messages.........................................................................................................................17-8 Frequently Asked Questions (FAQs)....................................................................................17-13 A Reports and Processes B Oracle Trading Community Architecture Profile Options and Categories Profile Options and Profile Option Categories Overview...................................................... B-1 Profile Option Category and Profile Options Descriptions.................................................... B-5 Address Formatting Deployment Category........................................................................ B-6 Address Validation Deployment Category......................................................................... B-8 Bulk Import Deployment Category................................................................................... B-11 Bulk Import Setup Category..............................................................................................B-13 Customer Interface Deployment Category........................................................................ B-15 Customer Merge Deployment Category............................................................................B-16 Data Sharing and Security Category................................................................................. B-17 DQM Deployment Category............................................................................................. B-18 DQM Fuzzy Key Generation Category..............................................................................B-24 Geography Hierarchy Deployment Category....................................................................B-25 Party Import Setup Category.............................................................................................B-26 Party Merge Deployment Category...................................................................................B-27 Party Merge Setup Category............................................................................................. B-28 Source System Management Setup Category.................................................................... B-30 Spatial Deployment Category............................................................................................B-31 TCA Deployment Category............................................................................................... B-32 Third Party Deployment Category.................................................................................... B-36 Unused or Internal Profile Options................................................................................... B-37 C Resource Manager Profile Options and Categories Profile Options and Profile Option Categories Overview...................................................... C-1 Profile Option Category and Profile Options Descriptions.................................................... C-2 Resource Security Category.................................................................................................C-2 Resource Setup Category.................................................................................................... C-4 D Customizing Trading Community Architecture Trading Community Architecture Admin-Personalizable Pages............................................D-1
- 10. x E Customizing Resource Manager Extending Resource Manager BC4J Objects.............................................................................E-1 F Standard Navigation Paths Standard Navigation Paths....................................................................................................... F-1 Index
- 11. xi Send Us Your Comments Oracle Trading Community Architecture Administration Guide, Release 12.1 Part No. E13568-04 Oracle welcomes customers' comments and suggestions on the quality and usefulness of this document. Your feedback is important, and helps us to best meet your needs as a user of our products. For example: • Are the implementation steps correct and complete? • Did you understand the context of the procedures? • Did you find any errors in the information? • Does the structure of the information help you with your tasks? • Do you need different information or graphics? If so, where, and in what format? • Are the examples correct? Do you need more examples? If you find any errors or have any other suggestions for improvement, then please tell us your name, the name of the company who has licensed our products, the title and part number of the documentation and the chapter, section, and page number (if available). Note: Before sending us your comments, you might like to check that you have the latest version of the document and if any concerns are already addressed. To do this, access the new Oracle E-Business Suite Release Online Documentation CD available on My Oracle Support and www.oracle.com. It contains the most current Documentation Library plus all documents revised or released recently. Send your comments to us using the electronic mail address: [email protected] Please give your name, address, electronic mail address, and telephone number (optional). If you need assistance with Oracle software, then please contact your support representative or Oracle Support Services. If you require training or instruction in using Oracle software, then please contact your Oracle local office and inquire about our Oracle University offerings. A list of Oracle offices is available on our Web site at www.oracle.com.
- 13. xiii Preface Intended Audience Welcome to Release 12.1 of the Oracle Trading Community Architecture Administration Guide. This guide assumes you have a working knowledge of the following: • The principles and customary practices of your business area. • Computer desktop application usage and terminology. If you have never used Oracle E-Business Suite, we suggest you attend one or more of the Oracle E-Business Suite training classes available through Oracle University. See Related Information Sources on page xvi for more Oracle E-Business Suite product information. Deaf/Hard of Hearing Access to Oracle Support Services To reach Oracle Support Services, use a telecommunications relay service (TRS) to call Oracle Support at 1.800.223.1711. An Oracle Support Services engineer will handle technical issues and provide customer support according to the Oracle service request process. Information about TRS is available at http://www.fcc.gov/cgb/consumerfacts/trs.html, and a list of phone numbers is available at http://www.fcc.gov/cgb/dro/trsphonebk.html. Documentation Accessibility Our goal is to make Oracle products, services, and supporting documentation accessible to all users, including users that are disabled. To that end, our documentation includes features that make information available to users of assistive technology. This documentation is available in HTML format, and contains markup to facilitate access by
- 14. xiv the disabled community. Accessibility standards will continue to evolve over time, and Oracle is actively engaged with other market-leading technology vendors to address technical obstacles so that our documentation can be accessible to all of our customers. For more information, visit the Oracle Accessibility Program Web site at http://www.oracle.com/accessibility/. Accessibility of Code Examples in Documentation Screen readers may not always correctly read the code examples in this document. The conventions for writing code require that closing braces should appear on an otherwise empty line; however, some screen readers may not always read a line of text that consists solely of a bracket or brace. Accessibility of Links to External Web Sites in Documentation This documentation may contain links to Web sites of other companies or organizations that Oracle does not own or control. Oracle neither evaluates nor makes any representations regarding the accessibility of these Web sites. Structure 1 Overview This chapter provides an overview of administering Oracle Trading Community Architecture. 2 Implementation This chapter describes how to implement Oracle Trading Community Architecture. 3 Relationships This chapter describes setting up for relationships, including creating, copying, and converting relationship types, adding new relationship phrase and role pairs to existing types, and assigning phrase and role pairs to relationship groups. 4 Classifications This chapter describes administering classifications, including creating and updating class categories and codes. 5 Data Quality Management This chapter describes administering Data Quality Management (DQM), including setting up word replacements, defining attributes and transformations, defining match rules, maintaining the staged schema, maintaining the Merge Dictionary, and diagnosing DQM setup. 6 Data Sharing and Security This chapter describes administering Data Sharing and Security, including creating, updating, and viewing data sharing groups as well as assigning access privileges. 7 Adapters This chapter describes administering adapters, including defining, updating, and
- 15. xv viewing adapter configurations. 8 Phones This chapter describes administering phone numbers, including time zone information and phone formats. 9 Extensions This chapter describes administering extensions, setting up custom attributes to extend the TCA Registry. 10 Source System Management This chapter describes administering Source System Management, including source systems, Single Source of Truth, and data security for Other entities. 11 Geography Hierarchy This chapter describes administering the Geography Hierarchy, to establish master geographical information for address validation and other purposes. 12 Certification This chapter describes administering certification, including managing certification levels and reasons. 13 Web Services Implementation Overview This chapter describes implementation of Web services, including an overview of the Oracle Service Bean framework, Oracle Web services framework, Oracle Integration Repository, deployment of the Web services and business object APIs. 14 Resource Manager Implementation Overview This chapter offers an overview of implementing Resource Manager including installation verification, application procedures, Resource Manager dependencies, setting up and managing resources and concurrent programs. 15 Phase I: Setting Up Resource Manager This chapter describes setting up Resource Manager, including mass import of resources from other applications, manually creating resources in forms, defining role types and roles in HTML and Forms, defining skill levels in HTML and publishing workflow business events. 16 Phase II: Managing Resources This chapter describes the steps involved in managing resources using Resource Manager including finding and changing resources, configuring resource field for updates, assigning additional resource attributes, creating and defining dynamic groups, viewing role details, assigning roles and resources, defining teams and viewing reports. 17 Troubleshooting Resource Manager This section lists common implementation errors, error messages and frequently asked questions in troubleshooting Resource Manager. A Reports and Processes This section lists the reports and processes, including relevant request sets, that are seeded in Standard Request Submission for the Trading Community Manager responsibility.
- 16. xvi B Oracle Trading Community Architecture Profile Options and Categories This appendix describes the profile options that affect the operation of Oracle Trading Community Architecture. C Resource Manager Profile Options and Categories This appendix describes the profile options that affect the operation of Resource Manager. D Customizing Trading Community Architecture This appendix describes the admin-personalizable pages of Oracle Trading Community Architecture. E Customizing Resource Manager This appendix describes the customization information of Resource Manager. F Standard Navigation Paths This appendix describes standard navigation paths for administering Oracle Trading Community Architecture. Related Information Sources You can choose from many sources of information, including online documentation, training, and support services, to increase your knowledge and understanding of Oracle Trading Community Architecture. Integration Repository The Oracle Integration Repository is a compilation of information about the service endpoints exposed by the Oracle E-Business Suite of applications. It provides a complete catalog of Oracle E-Business Suite's business service interfaces. The tool lets users easily discover and deploy the appropriate business service interface for integration with any system, application, or business partner. The Oracle Integration Repository is shipped as part of the E-Business Suite. As your instance is patched, the repository is automatically updated with content appropriate for the precise revisions of interfaces in your environment. Online Documentation All Oracle E-Business Suite documentation is available online (HTML or PDF). • PDF - See the Oracle E-Business Suite Documentation Library for current PDF documentation for your product with each release. The Oracle E-Business Suite Documentation Library is also available on My Oracle Support and is updated frequently • Online Help - Online help patches (HTML) are available on My Oracle Support. • Release Notes - For information about changes in this release, including new
- 17. xvii features, known issues, and other details, see the release notes for the relevant product, available on My Oracle Support. • Oracle Electronic Technical Reference Manual - The Oracle Electronic Technical Reference Manual (eTRM) contains database diagrams and a detailed description of database tables, forms, reports, and programs for each Oracle E-Business Suite product. This information helps you convert data from your existing applications and integrate Oracle E-Business Suite data with non-Oracle applications, and write custom reports for Oracle E-Business Suite products. The Oracle eTRM is available on My Oracle Support. Guides Related to All Products Oracle E-Business Suite User's Guide This guide explains how to navigate, enter data, query, and run reports using the user interface (UI) of Oracle E-Business Suite. This guide also includes information on setting user profiles, as well as running and reviewing concurrent programs. You can access this guide online by choosing "Getting Started with Oracle Applications" from any Oracle E-Business Suite product help file. Guides Related to This Product Oracle Common Application Calendar Implementation Guide This guide describes how to define tasks and note types, set up task statuses and status transition rules, define task priorities, set up data security, and map notes and references to source objects such as a sales lead to Task Manager. In addition, it describes how to create users and run concurrent programs to retrieve new and updated tasks. Oracle Common Application Calendar User Guide Oracle Common Application Calendar enables you to manage daily tasks and appointments, create and maintain notes, and schedule resources. It provides a central place to store and view resource schedules, utilization, and availability. It also enables you to synchronize your calendar with external calendars such as Microsoft Outlook or handheld devices. Oracle Customer Data Librarian Implementation Guide Oracle Customer Data Librarian includes all of the functionality of Oracle Customers Online with the additional features of maintaining the quality of customer data. Therefore, you must first implement Oracle Customers Online fully. Then, use this guide to assign responsibilities and access to users and set the necessary profile options
- 18. xviii for data librarian deployment, data import, mapping, search and duplication removal, and data security. Oracle Customer Data Librarian User Guide Oracle Customer Data Librarian enables you to import customer information from external systems into the Oracle Trading Community Architecture Registry and manage the quality of this information. Quality includes data consolidation and completeness and the removal or merge of duplicate and unnecessary information. In addition, Oracle Customer Data Librarian contains all of the features in Oracle Customers Online, including purchasing information from D&B to enrich your customer data and mapping customer records to their source systems. Oracle Customers Online Implementation Guide This guide describes how to set up customer accounts, set up additional display attributes, set up data quality management, define the source systems for customer data and map customers to the source system. Before you can use Oracle Customers Online, you must implement Oracle Common Application Calendar, Oracle Customer Interaction History, and Oracle Trading Community Architecture. Oracle Customers Online features and data come from the marketing and sales applications and the additional applications of Oracle Order Management, Oracle Credit Management, and Oracle Receivables. Oracle Customers Online User Guide Oracle Customers Online enables you to view, create, and maintain customer or party information, create customer relationships and hierarchies, manage tasks and employees for your organization, and use reports to view customer profile trends and data quality information. You can import customer data from external sources, and administer and control the usage of this data across the Oracle E-Business Suite. Oracle Financials Implementation Guide This guide describes how to implement the Oracle Financials E-Business Suite. It takes you through the steps of setting up your organizations, including legal entities, and their accounting, using the Accounting Setup Manager. You can find information on intercompany accounting and sequencing of accounting entries with relevant examples. Oracle General Ledger User's Guide This guide provides you with information on how to use Oracle General Ledger. Use this guide to learn how to create and maintain ledgers, ledger currencies, budgets, and journal entries. This guide also includes information about running financial reports. Oracle HRMS Documentation Set This set of guides explains how to define your employees, so you can give them
- 19. xix operating unit and job assignments. It also explains how to set up an organization (operating unit). Even if you do not install Oracle HRMS, you can set up employees and organizations using Oracle HRMS windows. Specifically, the following manuals will help you set up employees and operating units: • Oracle HRMS Enterprise and Workforce Management Guide This user guide explains how to set up and use enterprise modeling, organization management, and cost analysis. • Oracle HRMS Workforce Sourcing, Deployment, and Talent Management Guide Use this guide to find out about setting up employees and managing your people resources. Oracle Inventory User's Guide This guide enables you to configure the Oracle Inventory structure to best represent your company's inventory sites and business units after you have defined your required ledger and key flexfields. You can also learn about centralized and decentralized inventory structures, and controls and reference options for using and maintaining inventory items such as categories, commodity codes, attributes, statuses, relationships, and picking rules. Oracle Order Management User's Guide This guide provides information on how to use Oracle Order Management. Use this guide to learn how to enter and update sales orders, maintain sales agreements, combine sales orders with procurement orders, and process orders. In addition, this guide describes how you can authorize and manage returns, schedule across orders, apply charges and discounts, enter shipping information for orders, raise order invoices and process invoices and payments. Oracle Purchasing User's Guide This guide describes how to create and approve purchasing documents, including requisitions, different types of purchase orders, quotations, RFQs, and receipts. This guide also describes how to manage your supply base through agreements, sourcing rules, and approved supplier lists. In addition, this guide explains how you can automatically create purchasing documents based on business rules through integration with Oracle Workflow technology, which automates many of the key procurement processes. Oracle Receivables Implementation Guide This guide provides you with information on how to implement Oracle Receivables for your business activities. It helps you to set up your accounting distributions, your accounting structure, and various rules used to process transactions for accounting, charges, payments, and collections. You can learn how to use descriptive flexfields,
- 20. xx Receivables system options, lookups, and profiles options to customize application behavior and define comprehensive defaults that Receivables uses to make data entry more efficient and accurate. Oracle Receivables Reference Guide This guide describes the APIs and open interfaces that Oracle Receivables provides. You can use these to extend Oracle Receivables functionality. For example, you can learn how to use AutoLockbox to create and apply receipts and AutoInvoice to import and validate transactions from other systems. You can also learn how to archive and purge Receivables data. Oracle Receivables User Guide This guide provides you with information on how to use Oracle Receivables. Use this guide to learn how to create and maintain transactions and bills receivable, enter and apply receipts, enter customer information, and manage revenue. This guide also includes information about accounting in Receivables. Use the Standard Navigation Paths appendix to find out how to access each Receivables window. Oracle Trading Community Architecture Reference Guide This guide provides information including a comprehensive glossary to supplement the documentation for Oracle Trading Community Architecture and to help you understand products in the Oracle Customer Data Management family. It describes customer interface tables and the interface tables used for bulk import of data from external sources, and D&B data elements. In addition, you can learn about available relationship types, available replacement words and attributes for Data Quality Management data, available matching rules for various TCA administration tasks, and the results and impact of the party and account merge processes initiated in Oracle E-Business suites applications. Oracle Trading Community Architecture Technical Implementation Guide This guide provides technical information on the various integration features such as APIs and business events that you can avail to connect into external systems and transact data between these systems through a data hub using the Trading Community Architecture data model. This means that you can create or update in one system and ensure that the change is reflected in the other systems. You can manipulate data at the granular Oracle Trading Community Architecture entity level such as party site or party relationship or at the higher business object level such as person. Use this guide to learn about available APIs, their functions, parameters, and validations and how to use them. You can also find details on the business events and how to subscribe to them. Oracle Trading Community Architecture User Guide Oracle Trading Community Architecture (TCA) maintains information including relationships about parties, customers, organizations, and locations that belong to your
- 21. xxi commercial community in the TCA Registry. This guide enables you to use the features and user interfaces provided by TCA and by other Oracle E-Business Suite applications to view, create, and update Registry information. For example, you can import batches of party data in bulk from external source systems into the TCA Registry, merge duplicate parties, sites, and customer accounts, generate time zones for phones and locations, and run various customer reports. Installation and System Administration Maintaining Oracle E-Business Suite Documentation Set This documentation set provides maintenance and patching information for the Oracle E-Business Suite DBA. Oracle E-Business Suite Maintenance Procedures provides a description of the strategies, related tasks, and troubleshooting activities that will help ensure the continued smooth running of an Oracle E-Business Suite system. Oracle E-Business Suite Maintenance Utilities describes the Oracle E-Business Suite utilities that are supplied with Oracle E-Business Suite and used to maintain the application file system and database. It also provides a detailed description of the numerous options available to meet specific operational requirements. Oracle E-Business Suite Patching Procedures explains how to patch an Oracle E-Business Suite system, covering the key concepts and strategies. Also included are recommendations for optimizing typical patching operations and reducing downtime. Oracle Alert User's Guide This guide explains how to define periodic and event alerts to monitor the status of your Oracle E-Business Suite data. Oracle E-Business Suite Concepts This book is intended for all those planning to deploy Oracle E-Business Suite Release 12, or contemplating significant changes to a configuration. After describing the Oracle E-Business Suite architecture and technology stack, it focuses on strategic topics, giving a broad outline of the actions needed to achieve a particular goal, plus the installation and configuration choices that may be available. Oracle E-Business Suite CRM System Administrator's Guide This manual describes how to implement the CRM Technology Foundation (JTT) and use its System Administrator Console. Oracle E-Business Suite Developer's Guide This guide contains the coding standards followed by the Oracle E-Business Suite development staff. It describes the Oracle Application Object Library components needed to implement the Oracle E-Business Suite user interface described in the Oracle E-Business Suite User Interface Standards for Forms-Based Products. It also provides
- 22. xxii information to help you build your custom Oracle Forms Developer forms so that they integrate with Oracle E-Business Suite. In addition, this guide has information for customizations in features such as concurrent programs, flexfields, messages, and logging. Oracle E-Business Suite Installation Guide: Using Rapid Install This book is intended for use by anyone who is responsible for installing or upgrading Oracle E-Business Suite. It provides instructions for running Rapid Install either to carry out a fresh installation of Oracle E-Business Suite Release 12, or as part of an upgrade from Release 11i to Release 12. The book also describes the steps needed to install the technology stack components only, for the special situations where this is applicable. Oracle E-Business Suite System Administrator's Guide Documentation Set This documentation set provides planning and reference information for the Oracle E-Business Suite System Administrator. Oracle E-Business Suite System Administrator's Guide - Configuration contains information on system configuration steps, including defining concurrent programs and managers, enabling Oracle Applications Manager features, and setting up printers and online help. Oracle E-Business Suite System Administrator's Guide - Maintenance provides information for frequent tasks such as monitoring your system with Oracle Applications Manager, administering Oracle E-Business Suite Secure Enterprise Search, managing concurrent managers and reports, using diagnostic utilities including logging, managing profile options, and using alerts. Oracle E-Business Suite System Administrator's Guide - Security describes User Management, data security, function security, auditing, and security configurations. Oracle E-Business Suite User Interface Standards for Forms-Based Products This guide contains the user interface (UI) standards followed by the Oracle E-Business Suite development staff. It describes the UI for the Oracle E-Business Suite products and tells you how to apply this UI to the design of an application built by using Oracle Forms. Other Implementation Documentation Oracle Applications Multiple Organizations Implementation Guide This guide describes how to set up multiple organizations and the relationships among them in a single installation of an Oracle E-Business Suite product such that transactions flow smoothly through and among organizations that can be ledgers, business groups, legal entities, operating units, or inventory organizations. You can use this guide to assign operating units to a security profile and assign this profile to responsibilities such that a user can access data for multiple operation units from a single responsibility. In addition, this guide describes how to set up reporting to generate reports at different levels and for different contexts. Reporting levels can be ledger or operating unit while reporting context is a named entity in the selected reporting level.
- 23. xxiii Oracle Approvals Management Implementation Guide This guide describes transaction attributes, conditions, actions, and approver groups that you can use to define approval rules for your business. These rules govern the process for approving transactions in an integrated Oracle application. You can define approvals by job, supervisor hierarchy, positions, or by lists of individuals created either at the time you set up the approval rule or generated dynamically when the rule is invoked. You can learn how to link different approval methods together and how to run approval processes in parallel to shorten transaction approval process time. Oracle Diagnostics Framework User's Guide This guide contains information on implementing, administering, and developing diagnostics tests for Oracle E-Business Suite using the Oracle Diagnostics Framework. Oracle E-Business Suite Flexfields Guide This guide provides flexfields planning, setup and reference information for the Oracle E-Business Suite implementation team, as well as for users responsible for the ongoing maintenance of Oracle E-Business Suite product data. This guide also provides information on creating custom reports on flexfields data. Oracle E-Business Suite Integrated SOA Gateway Implementation Guide This guide explains the details of how integration repository administrators can manage and administer the entire service enablement process based on the service-oriented architecture (SOA) for both native packaged public integration interfaces and composite services - BPEL type. It also describes how to invoke Web services from Oracle E-Business Suite by working with Oracle Workflow Business Event System, manage Web service security, and monitor SOAP messages. Oracle E-Business Suite Integrated SOA Gateway User's Guide This guide describes how users can browse and view the integration interface definitions and services that reside in Oracle Integration Repository. Oracle e-Commerce Gateway Implementation Manual This guide describes implementation details, highlighting additional setup steps needed for trading partners, code conversion, and Oracle E-Business Suite. It also provides architecture guidelines for transaction interface files, troubleshooting information, and a description of how to customize EDI transactions. Oracle e-Commerce Gateway User's Guide This guide describes the functionality of Oracle e-Commerce Gateway and the necessary setup steps in order for Oracle E-Business Suite to conduct business with trading partners through Electronic Data Interchange (EDI). It also describes how to run
- 24. xxiv extract programs for outbound transactions, import programs for inbound transactions, and the relevant reports. Oracle iSetup User's Guide This guide describes how to use Oracle iSetup to migrate data between different instances of the Oracle E-Business Suite and generate reports. It also includes configuration information, instance mapping, and seeded templates used for data migration. Oracle Product Lifecycle Management Implementation Guide This guide describes how you can define hierarchies of items using structure types, catalogs, and catalog categories, and define change categories and configure them for revised items or request lines. Oracle Product Lifecycle Management provides several predefined catalogs such as the Product Catalog, Asset Catalog, and the Service Catalog and predefined change categories such as change orders and ideas. Use this guide to learn how to define additional catalogs for browsing and reporting purposes and new change categories specific to your business needs. You can then learn how to set up users and responsibilities that provide or restrict access to these catalogs, catalog items, and change management objects. Oracle Product Lifecycle Management User Guide This guide describes how to create and manage catalogs, create and maintain product attributes and attribute values, and manage item statuses and lifecycle phases. You can learn how to create change categories, create task templates for change orders, and create change management reports. In addition, you can use this guide to create roles, map roles to privileges, and maintain these roles. Oracle Web Applications Desktop Integrator Implementation and Administration Guide Oracle Web Applications Desktop Integrator brings Oracle E-Business Suite functionality to a spreadsheet, where familiar data entry and modeling techniques can be used to complete Oracle E-Business Suite tasks. You can create formatted spreadsheets on your desktop that allow you to download, view, edit, and create Oracle E-Business Suite data, which you can then upload. This guide describes how to implement Oracle Web Applications Desktop Integrator and how to define mappings, layouts, style sheets, and other setup options. Oracle Workflow Administrator's Guide This guide explains how to complete the setup steps necessary for any Oracle E-Business Suite product that includes workflow-enabled processes. It also describes how to manage workflow processes and business events using Oracle Applications Manager, how to monitor the progress of runtime workflow processes, and how to administer notifications sent to workflow users.
- 25. xxv Oracle Workflow Developer's Guide This guide explains how to define new workflow business processes and customize existing workflow processes embedded in Oracle E-Business Suite. It also describes how to define and customize business events and event subscriptions. Oracle Workflow User's Guide This guide describes how Oracle E-Business Suite users can view and respond to workflow notifications and monitor the progress of their workflow processes. Oracle XML Gateway User's Guide This guide describes Oracle XML Gateway functionality and each component of the Oracle XML Gateway architecture, including Message Designer, Oracle XML Gateway Setup, Execution Engine, Message Queues, and Oracle Transport Agent. It also explains how to use Collaboration History that records all business transactions and messages exchanged with trading partners. The integrations with Oracle Workflow Business Event System, and the Business-to-Business transactions are also addressed in this guide. Oracle XML Publisher Administration and Developer's Guide Oracle XML Publisher is a template-based reporting solution that merges XML data with templates in RTF or PDF format to produce outputs to meet a variety of business needs. Outputs include: PDF, HTML, Excel, RTF, and eText (for EDI and EFT transactions). Oracle XML Publisher can be used to generate reports based on existing Oracle E-Business Suite report data, or you can use Oracle XML Publisher's data extraction engine to build your own queries. Oracle XML Publisher also provides a robust set of APIs to manage delivery of your reports via e-mail, fax, secure FTP, printer, WebDav, and more. This guide describes how to set up and administer Oracle XML Publisher as well as how to use the Application Programming Interface to build custom solutions. This guide is available through the Oracle E-Business Suite online help. Oracle XML Publisher Report Designer's Guide Oracle XML Publisher is a template-based reporting solution that merges XML data with templates in RTF or PDF format to produce a variety of outputs to meet a variety of business needs. Using Microsoft Word or Adobe Acrobat as the design tool, you can create pixel-perfect reports from the Oracle E-Business Suite. Use this guide to design your report layouts. This guide is available through the Oracle E-Business Suite online help.
- 26. xxvi Training and Support Training Oracle offers a complete set of training courses to help you master your product and reach full productivity quickly. These courses are organized into functional learning paths, so you take only those courses appropriate to your job or area of responsibility. You have a choice of educational environments. You can attend courses offered by Oracle University at any of our many Education Centers, you can arrange for our trainers to teach at your facility, or you can use Oracle Learning Network (OLN), Oracle University's online education utility. In addition, Oracle training professionals can tailor standard courses or develop custom courses to meet your needs. For example, you may want to use your organization structure, terminology, and data as examples in a customized training session delivered at your own facility. Support From on-site support to central support, our team of experienced professionals provides the help and information you need to keep your product working for you. This team includes your Technical Representative, Account Manager, and Oracle's large staff of consultants and support specialists with expertise in your business area, managing an Oracle server, and your hardware and software environment. Do Not Use Database Tools to Modify Oracle E-Business Suite Data Oracle STRONGLY RECOMMENDS that you never use SQL*Plus, Oracle Data Browser, database triggers, or any other tool to modify Oracle E-Business Suite data unless otherwise instructed. Oracle provides powerful tools you can use to create, store, change, retrieve, and maintain information in an Oracle database. But if you use Oracle tools such as SQL*Plus to modify Oracle E-Business Suite data, you risk destroying the integrity of your data and you lose the ability to audit changes to your data. Because Oracle E-Business Suite tables are interrelated, any change you make using an Oracle E-Business Suite form can update many tables at once. But when you modify Oracle E-Business Suite data using anything other than Oracle E-Business Suite, you may change a row in one table without making corresponding changes in related tables. If your tables get out of synchronization with each other, you risk retrieving erroneous information and you risk unpredictable results throughout Oracle E-Business Suite. When you use Oracle E-Business Suite to modify your data, Oracle E-Business Suite automatically checks that your changes are valid. Oracle E-Business Suite also keeps track of who changes information. If you enter information into database tables using database tools, you may store invalid information. You also lose the ability to track who has changed your information because SQL*Plus and other database tools do not keep a
- 27. xxvii record of changes.
- 29. Overview 1-1 1 Overview This chapter provides an overview of administering Oracle Trading Community Architecture. This chapter covers the following topics: • Introduction to Administration Introduction to Administration Oracle Trading Community Architecture (TCA) administration features let you set up, control, and manage functionality that affect data in the TCA Registry. You can administer these TCA tools and features to best fit your business needs. See: Introduction to Oracle Trading Community Architecture, Oracle Trading Community Architecture User Guide. Most of the administration features are available in the Administration tab, a one-stop access for TCA administration, in the Trading Community Manager responsibility. This tab is also available in Oracle Customers Online and Oracle Customer Data Librarian. TCA administration includes: • Relationships: Manage the relationship types that can be used to create relationships among entities in the TCA Registry. See: Administering Relationships, page 3-1. • Classifications: Manage the class categories and codes that can be used to classify entities in the TCA Registry. See: Administering Classifications, page 4-4. • Data Quality Management: Set up Data Quality Management, which provides powerful search and duplicate identification functionality. See: Administering Data Quality Management, page 5-11. • Security: Manage data sharing groups and control how specific entities in the TCA Registry can be accessed depending on user and responsibility privileges. See: Administering Data Sharing and Security, page 6-2.
- 30. 1-2 Oracle Trading Community Architecture Administration Guide • Adapters: Configure third party or custom-made adapters that are used to process data in the TCA Registry. See: Administering Adapters, page 7-2. • Phones: Specify time zone information for phones, and define phone formats. See: Administering Phones, page 8-1. • Extensions: Extend the TCA Registry by creating user-defined attributes. See: Administering Extensions, page 9-1. • Source System Management: Define the source systems, such as legacy or third party systems, that provide data for specific TCA entities, and control how data from various sources is used and displayed. See: Administering Source System Management, page 10-2. • Certification: Define certification levels and reasons, and manage the display of levels. See: Administering Certification, page 12-1. Many of the administration steps are also performed as part of implementing TCA. See: General Implementation, page 2-1 and Feature-Specific Implementation, page 2-21.
- 31. Implementation 2-1 2 Implementation This chapter describes how to implement Oracle Trading Community Architecture. This chapter covers the following topics: • General Implementation • Feature-Specific Implementation General Implementation These general implementation steps apply to setting up TCA for using the Trading Community Manager responsibility: • Assign responsibilities to users, page 2-1. • Index customer account data, page 2-2. • Run migration and upgrade requests as needed, page 2-3. • Set up business events, page 2-4. • Set up workflow directory synchronization, page 2-12. • Optionally define access to the Administration tab, page 2-21. • Set Trading Community Architecture profile options, page B-1. You can also perform any of the administration steps as part of implementation, for example setting up Data Quality Management. See: Introduction to Administration, page 1-1. To implement specific features in the Trading Community Manager responsibility, see: Feature-Specific Implementation, page 2-21. Assigning Responsibilities to Users Set up individual users of Oracle Trading Community Architecture. Two
- 32. 2-2 Oracle Trading Community Architecture Administration Guide responsibilities are available for TCA users: • Trading Community Manager: Access to all TCA features, with view-only privileges for Data Sharing and Security (DSS) administration. • TCA Data Security Administrator: Administration privileges for Data Sharing and Security. Assign this responsibility along with Trading Community Manager to users who need to administer DSS. This table describes the menus and access available to each responsibility. Responsibility Menu Access Menu Exclusion Trading Community Manager TCA Main Menu Trading Community, Content Access and Integration, Data Quality Management, Setup, Control None TCA Data Security Administrator HZ Security Main Menu View, create, update, and delete privileges for Data Sharing and Security administration None Procedure Responsibility: System Administrator See: Users Window, Oracle Applications System Administrator's Guide - Security. Related Topics General Implementation, page 2-1 Customer Text Data Creation and Indexing Use the Customer text data creation and indexing program to index customer account information, including account sites, contacts, and contact points. The program creates and updates an interMedia index on the HZ_CUST_ACCT_SITES_ALL table. You create the index when you run this program for the first time. Schedule the program to periodically run, to ensure that the customer account data is up to date for searches on the index. Base the frequency on your business needs, for example, how often customer data is updated or searched.
- 33. Implementation 2-3 Program Parameter Important: Use this parameter only for the first time that you run this program. • Build Compact Index: Specify if you want to build a compact index that does not include contact information for customer accounts and customer account sites. Related Topics General Implementation, page 2-1 Running Migration and Upgrade Requests Run the following program as needed as part of your implementation or upgrade. Source System - Migrate Party Level Source System References Run this program once, when you first implement or upgrade from a release earlier than 11i.HZ.K mini-pack. Run this program only if you used the ORIG_SYSTEM_REFERENCE column before upgrade and want to use source systems after upgrade. See: Source Systems Overview, page 10-3. In the program parameter, specify the batch size, or number of records to process for each commit. The Source System - Migrate Party Level Source System References program migrates nonunique source IDs, or references, from these party level tables to the HZ_ORIG_SYSTEM_REFERENCES table: • HZ_CONTACT_POINTS • HZ_LOCATIONS • HZ_ORG_CONTACT_ROLES • HZ_ORG_CONTACTS • HZ_PARTIES • HZ_PARTY_SITES Along with the migrated source IDs, the program assigns a corresponding UNKNOWN source system because the source system is usually not captured for all existing data. In addition, existing source IDs in party level tables are not unique, so multiple party level records can use the same source ID. The UNKNOWN source system allows the same source ID to point to multiple records for all party level tables that are enabled for Source System Management.
- 34. 2-4 Oracle Trading Community Architecture Administration Guide Related Topics General Implementation, page 2-1 Setting Up Business Events Oracle Trading Community Architecture (TCA) provides business events to signal the creation or update of information in the TCA Registry. You can attach your own callout subscriptions to the events to perform additional business logic without modifying TCA. This infrastructure is based on the Oracle Workflow Business Event System. Several Oracle E-Business Suite products provide additional functionality using the same callout infrastructure. Business Event Types Oracle Trading Community Architecture provides two types of business events. • Granular Events: These events are raised at physical table or entity level, which is the lowest, most granular level. All TCA granular (V2, or Version 2) API calls raise one such event. For example, when an organization record is created, the oracle.apps.ar.hz.Organization.create event is raised. Later, if that organization name is modified, a relationship for the organization is created, and two contact points are added, then four separate events are raised: • One oracle.apps.ar.hz.Organization.update event • One oracle.apps.ar.hz.Relationship.create event • Two oracle.apps.ar.hz.ContactPoint.create events See: Trading Community Architecture Business Object Events, Oracle Trading Community Architecture Technical Implementation Guide. • Business Object Events: These events are raised at the business object level. A business object is a hierarchical collection of physical entities pertaining to a logical business-oriented object. For example, an Organization business object includes the organization's profile information, addresses, contacts, contact points, relationships, and so on. Business object events include: • Persons Created - oracle.apps.ar.hz.personBO.create • Persons Updated - oracle.apps.ar.hz.personBO.update
- 35. Implementation 2-5 • Person Customers Created - oracle.apps.ar.hz.CustBO.create • Person Customers Updated - oracle.apps.ar.hz.CustBO.update • Organizations Created - oracle.apps.ar.hz.orgBO.create • Organizations Updated - oracle.apps.ar.hz.orgBO.update • Organizations Customers Created - oracle.apps.ar.hz.orgCustBO.create • Organizations Customers Updated - oracle.apps.ar.hz.orgCustBO.update Creating any entity within a business object is considered as one update to the business object. Like the example for granular events, when the organization is first created, the oracle.apps.ar.hz.orgBO.create event is raised. However, for the update and additional creation of relationship and contact points, only one business object event is raised: oracle.apps.ar.hz.orgBO.update. See: Trading Community Architecture Business Object Events, Oracle Trading Community Architecture Technical Implementation Guide. Business Event Setup Process Business event setup involves: • Setting profile options for the business objects events infrastructure. When setting the profile options, consider the requirements of your installation and the ways in which other Oracle E-Business Suite applications use TCA events. Profile option for granular events and business object events: • HZ: Raise API Events. See: Defining the Business Event Types to Raise, page 2- 6. Profile options for business object events only: • HZ: Format Business Object Business Events as Bulk. See: Defining How Business Events Are Raised, page 2-9. • HZ: Number of Days to Preserve Business Object Business Event Information. See: Preserving Event Information, page 2-10. • Executing specific Oracle E-Business Suite functions that use TCA granular (V2) business events, even when those events are disabled. See: Schedule Event Raising and Impact and Alternatives of Not Raising Granular Business Events, page 2-11. • Subscribing to business object events. This is done for both granular events and business object events. See: Event Subscription, page 2-11. • For business object events, schedule concurrent programs. See: Events Raising, page
- 36. 2-6 Oracle Trading Community Architecture Administration Guide 2-10. Related Topics General Implementation, page 2-1 Defining the Business Event Types to Raise Use the HZ: Raise API Events profile option to enable or disable either of the TCA business event types. See: Business Event Types, page 2-4 and Profile Options and Profile Option Categories, page B-1. Note: You must set this profile option before working with data in order to determine how to capture business events. Available settings for the profile option are: • All Events Disabled: Neither granular nor business object events are raised. • Only Granular (V2) Events Enabled: Only granular events are raised. Business object events are disabled. • Only Business Object Events Enabled: Only business object events are raised. Granular events are disabled. • All Events Enabled: Both granular and business object events are raised. Important: Set the HZ: Raise API Events profile option appropriately based on your installation's requirements and the presence of any custom solutions using TCA business events. Enable either or both of the business event types only if you are using the corresponding TCA business events. If not, set the profile option to All Events Disabled, to avoid unnecessary overhead to your system. Your setting of the HZ: Raise API Events profile option also depends on: • Oracle E-Business Suite applications that use TCA Business Events. See: How Oracle E-Business Suite Applications Use TCA Business Events, page 2-7. • High volume loads of data into the TCA Registry, for which all events should be disabled. See: Specific Situations to Disable Business Events For, page 2-8. Business events will not be raised even if you set the HZ: Raise API Events profile option to enable events, when either of the following conditions exists: • Business events are disabled.
- 37. Implementation 2-7 • Business events are enabled but there is no activity. • No enabled subscriptions exist for business events. How Oracle E-Business Suite Applications Use TCA Business Events Several Oracle E-Business Suite applications leverage the TCA business events infrastructure to provide additional functionality in respective product areas. For these features to properly function, set the HZ: Raise API Events profile option to Only Granular (V2) Events Enabled or All Events Enabled. See: Defining the Business Event Types to Raise, page 2-6. Oracle E-Business Suite applications do not use business object events. You might need to enable business object events, however, if you have custom integrations with other systems using business object events, a likely scenario in a data hub implementation. This table lists Oracle E-Business Suite applications and the respective features that leverage TCA granular business events. Refer to product-specific documentation for details on the features and related setup steps. Oracle E-Business Suite Application Feature That Uses TCA Granular Business Events Oracle Advanced Collections Territory assignment Oracle Partner Management Channel team assignment Oracle Sales Territory assignment Oracle Shipping Consolidation of TCA and HRMS locations for shipping activity Oracle Student System Workflow notification to administrator on change of address Oracle Telecommunications Billing Integrator Publication of information to third party billing systems Oracle Trading Community Architecture Workflow Directory synchronization In some situations, all TCA business events must be disabled, including granular events. See: Specific Situations to Disable Business Events For, page 2-8. You can take alternative actions so that specific Oracle E-Business Suite functions that leverage TCA business events are still performed. See: Impact and Alternatives of Not Raising Granular Business Events, page 2-11.
- 38. 2-8 Oracle Trading Community Architecture Administration Guide Specific Situations to Disable Business Events For You should disable all Oracle Trading Community Architecture business events whenever a high volume of records is loaded into the TCA Registry. Set the HZ: Raise API Events profile option to All Events Disabled so that no events are raised. See: Defining the Business Event Types to Raise, page 2-6. Disable business events for these situations: • Custom code using TCA APIs to load high volume data: Set the profile option to disable all events before you run your custom program to load data. Alternatively, you can code the profile option setting into your custom program, so that events are disabled every time you load data. • Oracle E-Business Suite products loading high volume data: Several E-Business Suite applications load high volume data into TCA. These programs automatically set the profile option to All Events Disabled. After the programs complete, they set the profile option value back to what it was before the run. This table shows the programs and the corresponding E-Business Suite application. Oracle E-Business Suite Application Program Oracle iStore Lead Import Oracle Marketing • Event Registration • Lead Import • List Import Oracle Order Management Order Import Oracle Payables Supplier Import Oracle Sales Lead Import Oracle Site Management Retail Site Creation
- 39. Implementation 2-9 Oracle E-Business Suite Application Program Oracle Student System • Admission Import • Bulk User Assignment • Institution Import • ISIR Import Oracle Trading Community Architecture • Customer Interface • D&B Import Adapter • Import Batch to TCA Registry This table shows programs that can load high volume data into TCA, but do not automatically set the profile option to All Events Disabled. Important: If you are loading high volume data using these programs, you are strongly recommended to disable the events before running the programs. Oracle E-Business Suite Application Program Oracle Human Resources Data Pump Oracle Transportation Upload Supplier Ship-from Location Related Topics Setting Up Business Events, page 2-4 Defining How Business Events Are Raised Granular business events are raised only by V2 API calls. Business object events can be raised by: • V2 and business object API calls. • TCA Business Objects Events: Raise Events Program
- 40. 2-10 Oracle Trading Community Architecture Administration Guide Set the HZ: Format Business Object Business Events as Bulk profile option to Yes to format business object events as bulk events. This profile option does not apply to granular events. TCA tracks and collects business events as they occur but raises them as a group the next time you run the Raise Events concurrent program. This program determines which business objects were created or updated for the time period and raises each of the eight business object events at most only once. For example, the Raise Events program raises a single Organizations Created business event for all Organization business objects created since the last time the programs ran. This is true for all eight business events. If you set this profile option to No, then each business object API call raises one equivalent business event per business object. Set this profile option only if you use business object events. It has no default setting. Preserving Event Information Use the HZ: Number of Days to Preserve Business Object Business Event Information profile option to determine how long business object business event details will be preserved in the system before being discarded. This determines how long you can call the event-specific object extraction procedure after the business event has been scheduled. If you call the event-specific object extraction procedures after this number of days, then you will trigger an error. The default for this profile option is 10 days. Event Raising To raise business object events, run the following programs: • The TCA Business Objects Events: Generate Infrastructure Packages Program dynamically generates the appropriate underlying infrastructure packages to determine and raise business object events. You must run this program at least once before scheduling the TCA Business Object Events: Raise Events Program. • The TCA Business Object Events: Raise Events Program raises bulk business object events for all events that have been tracked and collected since the last time the program was run. Scheduling this program determines how frequently to raise business object events. You must schedule and run this program periodically even if you raise business object events using business object APIs as they occur. This is particularly important if you use V2 public APIs. Note: Run this concurrent program only if you use business object events. • TCA Business Object Events: Cleanse Infrastructure Program cleans up the underlying infrastructure of the Business Object Events system. When TCA events are fired, a transactional table stores the data corresponding to that event so that a
- 41. Implementation 2-11 user subscription can access the data when the event is raised. This program deletes all events that no longer need to be tracked by the system based on the setting in the HZ: Number of Days to Preserve Business Object Events Information profile option. Event Subscription Subscribe to business events to perform an action or custom logic when an event is raised. 1. Log on to Oracle Applications using the Workflow Administrator Web Application responsibility. 2. Navigate to Business Events and search for a business event. 3. Click Create Subscription. 4. Enter the action and other parameters as needed. For more information on subscribing to events, see: Oracle Workflow User's Guide. Impact and Alternatives of Not Raising Granular Business Events Oracle Trading Community Architecture (TCA) granular (V2) business events are not raised when the HZ: Raise API Events profile option is set to All Events Disabled or Only Business Object Events Enabled, either from a manual setting or by programs that load high volume data into TCA. See: Specific Situations to Disable Business Events For, page 2-8. If TCA granular business events are not raised, then specific Oracle E-Business Suite functions that leverage TCA events are not performed for that data set. See: How Oracle E-Business Suite Applications Use TCA Business Events, page 2-7. To perform specific E-Business Suite functions even when granular events are disabled, run synchronization programs from the corresponding application. This table shows the applications and the respective features that leverage TCA events, as well as the programs to run if business events are disabled. Refer to product-specific documentation for details on these programs. Oracle E-Business Suite Application Feature That Uses TCA Granular Business Events Program Oracle Advanced Collections Territory assignment IEX: Territory Assignment Oracle Sales Territory assignment Assign Territory Access for Total Mode
- 42. 2-12 Oracle Trading Community Architecture Administration Guide Oracle E-Business Suite Application Feature That Uses TCA Granular Business Events Program Oracle Shipping Consolidation of TCA and HRMS locations for shipping activity Import Shipping Locations Oracle Trading Community Architecture Workflow Directory synchronization Synchronize WF LOCAL tables Related Topics Setting Up Business Events, page 2-4 Setting Up Workflow Directory Synchronization As Oracle Trading Community Architecture (TCA) is a source of Oracle Workflow user and role information, the information stored in the TCA tables must be synchronized with the denormalized information in the Workflow local tables. TCA stores information regarding people in the Workflow Directory Services (WFDS) from the TCA data model. The data is kept in synchronization with the actual TCA tables using the Business Event system and internal functionality. The Workflow local synchronization APIs are used to perform this synchronization. There are two methods of synchronization. • Incremental Workflow Directory Synchronization, page 2-18 • Bulk Workflow Directory Synchronization, page 2-19 For more information, see: Setting Up an Oracle Workflow Directory Service, Oracle Workflow Administrator's Guide. Attribute Mapping for Workflow Roles Workflow Directory role attributes are mapped with Oracle Trading Community Architecture (TCA) attributes in the Workflow Directory Services synchronization. Role Mapping for Person Parties Workflow Table: HZ_PARTY_WF_ROLES_V Related TCA Entity Tables: • HZ_PARTIES • HZ_CONTACT_POINTS
- 43. Implementation 2-13 • HZ_PERSON_LANGUAGE This table displays the columns in the related TCA Bulk Synchronization view (HZ_PARTY_WF_ROLES_V). Column Person Party Name Person Party ID (HZ_PARTY) Display Name Person Party Name Description Person Party Name E-mail Address Person Party Primary E-mail Address Notification Preference From Person Party Primary E-mail Contact Point If there is no e-mail format mentioned for the primary e-mail address or if there is no e-mail address, the notification preference is set to Query. Language Person Party Primary Language Territory From Primary Language Fax Null Original System Ref HZ_PARTY Original System Ref ID Person Party ID Status Person Party Status Start Date NULL Expiration Date NULL User Flag Y Note: The Person Party Primary E-mail Address entity is denormalized onto the HZ_PARTIES from HZ_CONTACT_POINTS tables. For Person Party Status, A is treated as ACTIVE, while any other letter
- 44. 2-14 Oracle Trading Community Architecture Administration Guide is considered as INACTIVE. Note: As the role mappings is done for person parties, a user record is simply a role record with user_flag set to Y. Role Mapping for Contacts Contacts are Person parties that represent other Person or Organization parties. Workflow Table: HZ_PARTY_WF_ROLES_V Related TCA Entity Tables: • HZ_PARTIES • HZ_CONTACT_POINTS • HZ_PERSON_LANGUAGE This table displays the columns in the related TCA Bulk Synchronization view (HZ_PARTY_WF_ROLES_V). Column Contact Name Relationship Party ID (HZ_PARTY) Display Name Person Party Name (Subject) Description Relationship Party Name E-mail Address Relationship Party Primary E-mail Address Notification Preference From Relationship Party Primary E-mail Contact Point If there is no e-mail format mentioned for the primary e-mail address or if there is no e-mail address, the notification preference is set to Query. Language Subject Party Primary Language Territory From Primary Language of Subject Party Fax NULL
- 45. Implementation 2-15 Column Contact Original System Ref HZ_PARTY Original System Ref ID Relationship Party ID Status Relationship Party Status Start Date Relationship Start Date Expiration Date Relationship End Date User Flag Y Note: The Relationship Party Primary E-mail Address entity is denormalized onto the HZ_PARTIES from HZ_CONTACT_POINTS tables. For Relationship Party Status, A is treated as ACTIVE, while any other letter is considered as INACTIVE. Note: As the role mappings is done for contacts, a user record is simply a role record with user_flag set to Y. Role Mapping for Group Parties Workflow Table: HZ_GROUP_WF_ROLES_V Related TCA Entity Tables: • HZ_PARTIES • HZ_CONTACT_POINTS • HZ_PERSON_LANGUAGE This table displays the columns in the related TCA Bulk Synchronization view (HZ_GROUP_WF_ROLES_V). Column Group Party Name Group Party ID (HZ_GROUP)
- 46. 2-16 Oracle Trading Community Architecture Administration Guide Column Group Party Display Name Group Party Name Description Group Party Mission Statement E-mail Address Group Party Primary E-mail Address Notification Preference From Group Party Primary E-mail Contact Point If there is no e-mail format mentioned for the primary e-mail address or if there is no e-mail address, the notification preference is set to Query. Language Group Party Primary Language Territory From Primary Language Fax NULL Original System Ref HZ_PARTY Original System Ref ID Group Party ID Status Group Party Status Start Date NULL Expiration Date NULL User Flag N Note: The Group Party Primary E-mail Address entity is denormalized onto the HZ_PARTIES from HZ_CONTACT_POINTS tables. For Group Party Status, A is treated as ACTIVE, while any other letter is considered as INACTIVE. Attribute Mapping for Workflow User Roles The Workflow (WF) User Roles represent the mappings between Workflow Users and Workflow Roles. For example, the various persons forming a Group party represent the User Roles for
- 47. Implementation 2-17 that Group party. Each user in the role receives a separate copy of the notification when Expand Roles is checked on a Workflow Notification. Note: Workflow Users participate in their own roles. The WF_USER_ROLES table has a record for TCA Person Parties, since they are created with the User Flag set to Y. User Role Mapping for Group Parties Related TCA Entity Tables: • HZ_PARTIES • HZ_RELATIONSHIPS This table displays the columns in the related TCA Bulk Synchronization view (HZ_GROUP_WF_USER_ROLES_V). Column Person Party User Name Person Party ID (HZ_PARTY) User Orig System HZ_PARTY User Orig System ID Person Party ID Role Name Relationship Party ID (HZ_GROUP) Role Orig System HZ_GROUP Role Orig System ID Group's Party ID Start Date NULL Expiration Date NULL Note: The subject party is a Person and the object party is a Group. User Role Mapping for Person and Contact Parties Related TCA Entity Tables: HZ_PARTIES This table displays the columns in the related TCA Bulk Synchronization view (HZ_PARTY_WF_USER_ROLES_V).
- 48. 2-18 Oracle Trading Community Architecture Administration Guide Column Person Party User Name Party ID (HZ_PARTY) User Orig System HZ_PARTY User Orig System ID Party ID Role Name Party ID (HZ_PARTY) Role Orig System HZ_PARTY Role Orig System ID Party ID Start Date Relationship Start Date Expiration Date Relationship End Date Incremental Workflow Directory Synchronization Oracle Workflow (WF) automatically performs an initial synchronization of the user and role information in all the related originating systems during installation. Subsequently, you must continue synchronizing the user and role information from the source modules with the Workflow local tables. For Oracle Trading Community Architecture (TCA), a patch automatically synchronizes that information with the information in the Workflow local tables on an incremental basis, using the Workflow local synchronization APIs. For more information on APIs, see: Directory Service APIs, Oracle Workflow API Reference. Oracle Workflow references user and role information through three views based on the database tables that make up the Workflow Directory repository. • WF_USERS • WF_ROLES • WF_USER_ROLES These views are based on local tables that are initially loaded by the WF directory's Synchronize WF LOCAL Tables concurrent program. WF_USERS is a view on top of WF_ROLES, which only returns roles that have the User flag set to Y. Users participate in their own roles, so an entry is created as a User Role for each user. For more information, see: Synchronizing Workflow User and Role Information, in Setting Up an Oracle Workflow Directory Service, Oracle Workflow Administrator's Guide.
- 49. Implementation 2-19 Bulk Workflow Directory Synchronization Run the Synchronize WF LOCAL Tables program to perform synchronization in bulk. This periodically refreshes the information in the Workflow local tables for Oracle Trading Community Architecture (TCA). Use this concurrent program as an interim method to synchronize the Workflow local tables with the user and role information stored in the TCA tables until TCA performs the synchronization automatically. The Synchronize Workflow LOCAL Tables request set contains ten instances of the Synchronize WF Local Tables program, one for each originating system. You can use this request set to submit requests for all the originating systems at once. Note: Each request is defined as a separate stage and the stages will run sequentially because this program is incompatible with itself. By default, this request set runs once a day to provide a minimal level of synchronization. You can modify the schedule for the request set to perform synchronization more frequently. For more information, see: Synchronizing Workflow User and Role Information, in Setting Up an Oracle Workflow Directory Service, Oracle Workflow Administrator's Guide. Trading Community Architecture Entity to Workflow Directory Mappings This diagram illustrates how the Workflow Directory Services interact with both their populating views as well as the data that is synchronized with TCA.
- 50. 2-20 Oracle Trading Community Architecture Administration Guide Trading Community Architecture Views for Bulk Synchronization with Workflow The Workflow views are views on two Workflow tables: WF_LOCAL_ROLES and WF_LOCAL_USER_ROLES. For TCA views, both bulk and incremental synchronizations write to these Workflow tables. For bulk synchronization, TCA provides four views that populate data to the Workflow tables. The Workflow Directory views then capture the information present in the Workflow local tables. This diagram illustrates how the four TCA bulk synchronization views are mapped to the Workflow tables.
- 51. Implementation 2-21 Defining Administration Access You can access the Administration tab as a whole, with all available functions, from the Trading Community Manager responsibility and from other Oracle applications. For example, you get the tab in Oracle Customers Online if you have the Oracle Customers Online Superuser responsibility, and in Oracle Customer Data Librarian with the Oracle Customer Data Librarian Superuser responsibility. To restrict and manage access to the Administration tab, you can assign specific Administration functions to other responsibilities. For example, you can create a Relationships Administrator responsibility with access to administer only relationships. Procedure Responsibility: System Administrator See: Implementing Function Security, Oracle Applications System Administrator's Guide - Security. Related Topics General Implementation, page 2-1 Introduction to Administration, page 1-1 Feature-Specific Implementation For features in the Trading Community Manager responsibility, you can set up:
- 52. 2-22 Oracle Trading Community Architecture Administration Guide • Batch address validation, page 2-22 • Batch duplicate identification, page 2-23 • Bulk Import, page 2-24 • Customer Interface, page 2-29 • Customer Merge, page 2-30 • eLocations Spatial Data Integration, page 2-31 • Party Merge, page 2-32 • Real-time address validation, page 2-33 • Relationship Manager, page 2-36 • Third Party Data Integration, page 2-36 You can also perform any of the administration steps as part of implementation, for example setting up Data Quality Management. See: Introduction to Administration, page 1-1. For general implementation steps, see: General Implementation, page 2-1. Setting Up Batch Address Validation TCA batch address validation, which validates existing addresses in bulk, uses a central XML open-standards based "black box" that allows integration with third party service providers and custom solutions, through adapters that you or the third party provides. Callers such as the Address Validation program or the TCA Bulk Import process invoke the black box, which sends and receives the address data to and from the address validation adapters. The adapters validate TCA addresses against the standard addresses in the adapter's associated databases. Procedure 1. If you are using third party address validation services, install and configure their software and adapters according to their instructions. You can optionally develop your own address validation adapters. See: Creating Address Validation Adapters, page 7-6. 2. Administer third party or custom adapters by defining address validation adapter configurations. See: Administering Adapters, page 7-2 and Configuring Adapters, page 7-3. 3. Set these profile options:
- 53. Implementation 2-23 • HZ: Allow Update to Standardized Address • HZ: Create Log for Adapters • HZ: Default Location Service Adapter • HZ: Maintain Location History • HZ: Timeout Limit for Address Validation See: Profile Options and Profile Option Categories, page B-1. • ECX: Log File Path See: Define System Profile Options, Oracle XML Gateway User's Guide. Related Topics Batch Address Validation, Oracle Trading Community Architecture User Guide Adapters Overview, page 7-1 Feature-Specific Implementation, page 2-21 Setting Up Batch Duplicate Identification Batch duplicate identification involves creating batches of potential duplicate parties in the TCA Registry, using Data Quality Management tools. Based on a specified match rule, the process determines duplicate candidates, which can be designated for merge. Procedure 1. Set up Data Quality Management, page 5-11. Optionally create match rules with the Expanded Duplicate Identification or Bulk Duplicate Identification purpose, page 5-38. You can allow Automerge for the match rule and enter an automatic merge threshold. Any party with a score that exceeds the automatic merge threshold is defaulted in the Duplicate Identification: Batch Review window to be merged. The Automerge program itself does not run. 2. Optionally set the DQM Match Rule for Batch Duplicate Identification profile option if you want to default a match rule in the Submit Duplicate Identification Batch window. See: Profile Options and Profile Option Categories, page B-1. 3. Optionally use the DUP_BATCH_RESTRICTION_LIST Receivables lookup to define the list of attributes that appear in the Submit Duplicate Identification Batch window. You can add any attribute from the HZ_PARTIES table to the list. These attributes are used as restriction criteria for creating duplicate identification batches.
- 54. 2-24 Oracle Trading Community Architecture Administration Guide See: Defining Receivables Lookups, Oracle Receivables Implementation Guide. Related Topics Batch Duplicate Identification Overview, Oracle Trading Community Architecture User Guide Feature-Specific Implementation, page 2-21 Data Quality Management Overview, page 5-2 Setting Up Bulk Import TCA Bulk Import allows for importing batches of data from external sources into the TCA Registry. Procedure • Define and map legacy and other source systems to entities in the TCA Registry. Perform this step for all source systems you plan to import from. See: Administering Source Systems, page 10-5. • You can provide the option of resolving duplicates for import: • Batch de-duplication: Resolving duplicates within the interface tables. • Registry de-duplication: Resolving duplicates between the interface tables and the TCA Registry. Import de-duplication involves Data Quality Management (DQM) bulk duplicate identification. See: Bulk Import De-Duplication Processes, page 2-26. 1. Administer Data Quality Management, page 5-11. You must define and designate attributes and transformations for bulk duplicate identification acquisition. 2. Optionally create match rules for import de-duplication, which must have the Bulk Duplicate Identification purpose. For match rules you create for Registry de-duplication, allow for Automerge if you want to automatically merge parties with the highest probability of being duplicates. When you create the match rules, take note of the match and automatic merge thresholds. If a record: • Does not exceed the match threshold, then it is not a duplicate. In Registry de-duplication, the record is inserted as a new party into the TCA Registry.
- 55. Implementation 2-25 • Reaches or exceeds the match threshold but not the automatic merge threshold, then it is a potential duplicate. In batch de-duplication, based on the action that the user specifies for duplicates, the record is dealt with in the interface tables, before import. In Registry de-duplication, the record is inserted as a new party, but is also included in a System Duplicate Identification batch in Oracle Customer Data Librarian for further evaluation. See: System Duplicate Identification, Oracle Customer Data Librarian User Guide. • Reaches or exceeds the automatic merge threshold, then it is inserted as a new party and then automatically merged with its duplicates. This threshold applies only to Registry de-duplication, and only if the match rule is allowed for Automerge. • For providing the option of validating addresses before importing them into the TCA Registry, use or create adapters that can provide address validation services, and define the adapter configurations. See: Configuring Adapters, page 7-3. • For providing the option of applying Data Sharing and Security to the import process: 1. Administer Data Sharing and Security, page 6-2. 2. Set the HZ: Use Data Sharing and Security During Import profile option. • Set these profile options: • HZ: Allow Import of Records with Disabled Lookups • HZ: Allow Updates of Address Records During Import • HZ: Character Value to Indicate NULL During Import • HZ: Date Value (DD-MM-YYYY) to Indicate NULL During Import • HZ: Error Limit for Import • HZ: Import Batch De-Duplication Match Rule • HZ: Import Registry De-Duplication Match Rule • HZ: Number of Workers for Import • HZ: Numeric Value to Indicate NULL During Import • HZ: Use HR Security During Import
- 56. 2-26 Oracle Trading Community Architecture Administration Guide • HZ: Validate Flexfields During Import • HZ: Work Unit Size for Import See: Profile Options and Profile Option Categories Overview, page B-1. Related Topics Bulk Import Overview, Oracle Trading Community Architecture User Guide Feature-Specific Implementation, page 2-21 Data Quality Management Overview, page 5-2 Bulk Import De-Duplication Processes The batch and Registry de-duplication are separate processes that run at different times, either with the same or different match rules. For illustration purposes, this diagram describes both de-duplication processes:
- 57. Implementation 2-27 1. TCA Registry attributes are transformed for the staged schema. The attributes to include in the schema, as well as the transformations to use on each attribute, are defined in the Define Attributes and Transformations page. Also defined are the attribute and transformation combinations to be used for bulk duplicate identification. The staged schema includes B-Tree indexes only for the transformed attributes marked for bulk duplicate identification. 2. The user specifies a match rule with Bulk Duplicate Identification purpose for the de-duplication. 3. When the de-duplication process starts, the acquisition and scoring transformations are applied to the attributes in the interface tables, based on the selected match rule. 4. The transformed interface table records are mapped and loaded into the interface search tables, a set of temporary staged tables with B-Tree indexes. • HZ_SRCH_PARTIES
- 58. 2-28 Oracle Trading Community Architecture Administration Guide • HZ_SRCH_PSITES • HZ_SRCH_CONTACTS • HZ_SRCH_CPTS 5. To find duplicates within the TCA interface tables: • The interface search tables are joined with themselves. • The acquisition match criteria of the same match rule is applied to compare each record against all other records in the same staged table simultaneously. For example, an acquisition criterion is the D-U-N-S Number attribute with the Exact transformation. All D-U-N-S Numbers, as transformed by the Exact transformation, would be compared against one another. To find duplicates between the TCA interface tables and the TCA Registry: • The interface search tables are joined with the staged schema. The two sets of staged tables have the same columns. This table shows the mapping between the interface search and staged schema tables: Entity Interface Search Table Staged Schema Table Party HZ_SRCH_PARTIES HZ_STAGED_PARTIES Address HZ_SRCH_PSITES HZ_STAGED_PARTY_SITES Contact HZ_SRCH_CONTACTS HZ_STAGED_CONTACTS Contact Point HZ_SRCH_CPTS HZ_STAGED_CONTACT_POINTS • The acquisition match criteria of the same match rule is applied to compare all records in each interface search table against all records in the staged schema using only B-Tree indexes. 6. Matched acquisition attribute values determine the most relevant subset of records from the interface search tables to form the work unit. 7. Using the scoring criteria in the match rule, each record in the work unit is compared to all other work unit records in the same staging table. 8. A score is calculated for each record in the work unit, and scores for all entities are added together for determining duplicate parties.
- 59. Implementation 2-29 9. The score of each work unit record is compared against the match and automatic merge thresholds defined in the match rule. • Records with scores above the match threshold are selected as potential duplicates and resolved accordingly. • For Registry de-duplication, records with scores that also exceed the automatic merge threshold are automatically merged after import, if the match rule is allowed for Automerge. Related Topics Setting Up Bulk Import, page 2-24 Bulk Duplicate Identification, page 5-9 Setting Up Customer Interface Customer Interface lets you import and validate current or historical party and customer account information from other systems into your database. Although Customer Interface imports both party and customer account information, it does so in a row-by-row manner and is slower than Bulk Import. However, you cannot use Bulk Import to import accounts; it can be used only to import parties. Therefore, for optimal performance, you should import parties using Bulk Import and use Customer Interface to import the associated accounts. Note: Customer Interface runs independently and does not regard party level information already loaded into your database using Bulk Import. If you plan to use Customer Interface to import accounts that are associated with parties that have already been imported using Bulk Import, you must ensure that the source ID alone is unique across all source systems in the bulk import process. While Bulk Import requires source IDs to be unique only within an identified source system, customer interface does not recognize the source system and therefore requires that the source ID is unique across all sources systems. See: • Bulk Import Overview, Oracle Trading Community Architecture User Guide. • Loading Data into the Interface Tables, Oracle Trading Community Architecture User Guide. • Unique Source IDs for Importing Associated Accounts, Oracle Trading Community Architecture User Guide.
- 60. 2-30 Oracle Trading Community Architecture Administration Guide Procedure • Review the validation rules for each column of the Customer Interface tables. See: Customer Interface Validation Rules, Oracle Trading Community Architecture User Guide. • Perform all required set up steps preceding customer entry to ensure that values exist in your system for the columns of the Customer Interface tables that require predefined values. See: Overview of Setting Up, Oracle Trading Community Architecture Reference Guide. • Write an import program to transfer customer information from an external system. • Validate customer addresses (if you are using US Sales Tax). See: Preparing for Import, Oracle Trading Community Architecture User Guide. • Set these profile options: • HZ: Gather Table Stats • HZ: Number of Workers Used by Customer Interface See: Customer Interface Deployment Category, page B-15. Related Topics Feature-Specific Implementation, page 2-21 Setting Up Customer Merge Customer Merge lets you: • Merge customer (either individual or organization) accounts that are confirmed as duplicates in the Duplicate Customer Report. • Merge customer (either individual or organization) accounts or customer accounts sites for the same or different customers to transfer site use activity from a customer or site that is no longer active. • Merge an individual customer account with organization customer account, and vice versa. Procedure • Generate the Duplicate Customer Report to see a list of all duplicate customers before you initiate the customer merge program. This report tries to match duplicate customer names based on the search criteria that you specify. See:
- 61. Implementation 2-31 Duplicate Customer Report, Oracle Receivables User Guide. • Complete Auto Invoice processing. This minimizes the number of rows to be merged in the interface tables. The merge process can then run more efficiently. • Generate the Customer Listing report to see detailed information about the customer and site uses. See: Customer Listing Detail and Summary Reports, Oracle Receivables User Guide. • Create a map that shows the site uses you want to merge and the sites you want to maintain. Check that you are merging like site uses (for example, Bill-To's merged with Bill-To's). • Determine whether to inactivate or delete old site use information. • Set these profile options: • AR: Customer Merge Commit Size • HZ: Audit Customer Account Merge • HZ: Location Updatable • HZ: Log Customer Merge See: Customer Merge Deployment Category, page B-16. Related Topics Merging Customers, Oracle Trading Community Architecture User Guide Feature-Specific Implementation, page 2-21 Setting Up eLocations Spatial Data Integration eLocations Spatial Data Integration allows for retrieving spatial information from Oracle eLocations and storing the longitude and latitude data for addresses in the TCA Registry. Procedure • Set profile options. • HZ: Detailed Concurrent Program Output • These three profile options are for the HTTP post to eLocations. They determine the URL, proxy host, and proxy port to use.
- 62. 2-32 Oracle Trading Community Architecture Administration Guide • HZ: Spatial Provider URL • Applications Server-Side Proxy Host And Domain • Applications Proxy Port See: Profile Options and Profile Option Categories, page B-1. • Submit the Locations Spatial Index Rebuild program to create and periodically rebuild the spatial index on the HZ_LOCATIONS table. See: Locations Spatial Index Rebuild, page 2-32. Related Topics eLocations Spatial Data Integration, Oracle Trading Community Architecture User Guide Feature-Specific Implementation, page 2-21 Locations Spatial Index Rebuild Use the Locations Spatial Index Rebuild program to rebuild the spatial index on the HZ_LOCATIONS table. You should periodically rebuild the spatial index to optimize performance and accuracy for queries on the spatial data in this table. You can schedule this program to run on a periodic basis. If possible, rebuild the index when users are not querying spatial data because the Locations Spatial Index Rebuild program interferes with user spatial operations. Note: You cannot run the Locations Spatial Index Rebuild program if the Spatial Information for Locations Batch Update program is running. If the HZ: Detailed Concurrent Program Output profile option is set to Yes, then you can view a detailed report about the records that the Locations Spatial Index Rebuild program processed. Related Topics Setting Up eLocations Spatial Data Integration, page 2-31 Setting Up Party Merge Party Merge involves merging parties that are confirmed as duplicates, either from a duplicate identification batch or a manually created merge batch. Procedure • Define any custom entities and merge procedures.
- 63. Implementation 2-33 • Define the Merge Dictionary to determine the entities and procedures that must be processed to merge party entities. You can set up the Merge Dictionary for all Oracle Applications that you use to interact with parties. See: Maintaining the Merge Dictionary, page 5-66. • You can optionally set up any merge procedure registered with the Merge Dictionary to prevent the deletion of records, if your company's business rules require that parties cannot be deleted. To prevent deletion, a merge procedure must call the HZ_PARTY_MERGE. veto_delete procedure. At the end of the merge process, if none of the merge procedures has vetoed the deletion of the merge-from parties, then those party records are deleted. • If you are using Party Merge along with Oracle Credit Management and experiencing bad performance for Party Merge, then create nonunique indexes on the PHONE_ID column of both the AR_CUSTOMER_CALLS_ALL and AR_CUSTOMER_CALL_TOPICS_ALL tables. Related Topics Party Merge Overview, Oracle Trading Community Architecture User Guide Feature-Specific Implementation, page 2-21 Setting Up Real-Time Address Validation Real-time address validation validates addresses during address entry. See: Real-Time Address Validation, Oracle Trading Community Architecture User Guide. Most of the address validation setup involves Geography Hierarchy. See: Administering Geography Hierarchy, page 11-3. Real-time address validation can work alongside Flexible Address Formatting (FAF), if both are set up. If you do not need to use validation for a country, then you can set up and use only Flexible Address Formatting. See: Flexible Addresses, Oracle Receivables Implementation Guide. Likewise, you can set up real-time address validation without setting up and using FAF. Note: Before setting up real-time address validation, verify that valid location data exists from your data sources such as Receivables, a content provider, or manual data entry. Synchronizing FAF and Geography Mapping When setting up Flexible Address Formatting and real-time address validation, make sure they are consistent with your Geography Hierarchy setup. • Geography types in your defined country structure must match the address
- 64. 2-34 Oracle Trading Community Architecture Administration Guide elements in the Flexible Address Formatting address style assigned to that country. For example, if the US country structure has City, State, and Country, then the address style assigned to United States should also have those address elements. See: Defining Country Structures, page 11-6. • Geographies that you define for this country must match any value sets defined for address elements in the address style, if the geography type is mapped to the address element for that style. For example, for the US address style, the State address element is mapped to the State geography type. If this address style has a defined list of states for the State address element, then do not define a different set of states for the State geography type. See: Viewing and Defining Geographies, page 11-7 and Managing Validations, page 11-10. • (Recommended but optional) Address elements defined as mandatory in the address style should be mapped for geography validation. For example, if State is defined as a mandatory element in the US address style, then map the State geography type to the HZ_LOCATIONS source table and select the Geography Validation usage. See: Managing Validations, page 11-10. See: Address Formatting, Oracle Trading Community Architecture User Guide. Procedure: Note: Perform these steps for each country that you need to validate addresses for. 1. Set up the country structure in Geography Hierarchy. This structure determines the available geography types, which corresponds to address elements, for address validation. See: Defining Country Structures, page 11-6. 2. Define geographies for each geography type in the country structure. Address values are validated against the defined geographies. See: Defining Geographies, page 11-7 and Updating Geographies, page 11-8. Note: If an address has values that you defined as alternate geography names or codes, those values are still valid, but the primary name or code is saved and subsequently displayed to the user. 3. Select HZ_LOCATIONS as the table to map the country structure against. This initial setup is not for a specific address style, so you see No Style. 4. Map each geography type in the country structure to the appropriate HZ_LOCATIONS column and select the Geography Validation usage. This mapping and usage assignment determine the address elements that must be
- 65. Implementation 2-35 entered and valid for the address to be considered valid. See: Managing Validations, page 11-10. 5. Specify the address, or geography, validation level for the country. See: Managing Validations, page 11-10. 6. After you set up validations for No Style, and if you have a Flexible Address Formatting address style assigned to this country, then optionally repeat steps 4 and 5 with the FAF address style selected. Important: If changes are later made to the Flexible Address Formatting address style assigned to this country, then you should make equivalent changes to your mapping and usage assignments for that address style, if defined. See: Managing Validations, page 11-10. 7. Set up profile options. • HZ: Address Validation Level for Application - to set different address validation levels by applications, if needed. • HZ: Batch Size for committing records in Geography Name Referencing process. • HZ: Maintain Location History. • HZ: Number of workers for a given Geography Name Referencing request. • HZ: Reference Territory - to set the default territory (country) used to determine the locale for name and address formatting. • HZ: Default Flexible Address Format - to set the default style for address entry when no flexible address format is defined for a country. • HZ: Default Address Style - to set the default format for address display. 8. Run the Geography Name Referencing process to map addresses in location tables to master reference geographies. See: Geography Name Referencing Process, page 11-14. Related Topics Geography Hierarchy Overview, page 11-1
- 66. 2-36 Oracle Trading Community Architecture Administration Guide Setting Up Relationship Manager Relationship Manager allows users to manage relationships among existing parties in the TCA Registry. Relationship Manager uses the relationship types that you administer. See: Administering Relationships, page 3-1. You can also set up Data Quality Management (DQM) for the party search in Relationship Manager. DQM provides powerful search functionality, based on a match rule that determines which search criteria are available and how to select and rank the results. You can use a seeded search match rule or create new rules. Relationship Manager's party search uses the rule that is assigned to the HZ: Match Rule for Relationship Manager Search profile option. If you do not set up DQM, Relationship Manager provides a basic set of search criteria and uses standard search functionality. Procedure 1. Administer Data Quality Management, page 5-11. Optionally create one or more match rules with the Search purpose. • When defining match rule thresholds, remember that a record's score must meet or exceed the match threshold to be displayed in the search results. • If you define a match rule set, remember that the superset of all attributes in the set is displayed as search criteria. 2. Assign the match rule that you want to use for the party search to the HZ: Match Rule for Relationship Manager Search profile option. See: Profile Options and Profile Categories, page B-1. Related Topics Searching for Parties and Viewing Results, Oracle Trading Community Architecture User Guide Data Quality Management Overview, page 5-2 Feature-Specific Implementation, page 2-21 Setting Up Third Party Data Integration Third Party Data Integration allows for acquiring information from D&B for the TCA Registry. To enable purchase of D&B data, you must integrate with D&B. Without third party data, there is no need to use or administer Third Party Data Integration. After you set up Third Party Data Integration with D&B, you can optionally administer Source System Management to control how the D&B and user-entered data are used
- 67. Implementation 2-37 and displayed. See Administering Source System Management, page 10-2. Procedure 1. Establish a contract with D&B for its Data Rationalization Service. Contact your D&B relationship manager to contract for the services that meet your data requirements. If you do not have a relationship manager assigned to your company, contact D&B's Global Service Center at (888) 243-4566, e-mail [email protected], or visit http://www.dnb.com. You can also contact D&B for information to interpret credit ratings and other information that D&B provides. 2. D&B provides information that you need to access the D&B database from Third Party Data Integration: • D&B HTTPS URL, which is https://toolkit.dnb.com/access/scripts • D&B user name • D&B password Tip: You can request multiple user names and passwords if you want to assign different ones to your users, for example, to track D&B transactions by user. Important: The DNB online purchasing toolkit is not compatible with IBM platform. 3. Enter the provided D&B URL, user names, and passwords in the configuration for the seeded Dun & Bradstreet adapter. See: Configuring Adapters, page 7-3. 4. Set the HZ: D&B User Name profile option with the user names that D&B provided, same as what you enter for the adapter. 5. Contact your information technology department or organization for information about your web server. • Servlet agent URL • If you use a proxy server: • Web server proxy host name • Web server proxy port
- 68. 2-38 Oracle Trading Community Architecture Administration Guide 6. Use the information from your information technology organization to set up the profile options listed in this table. Note: Set the Applications Proxy Port and Applications Server-Side Proxy Host And Domain profile options only if you use a proxy server. Profile Option Value Apps Servlet Agent Servlet agent URL Applications Server-Side Proxy Host And Domain Web server proxy host name Applications Proxy Port Web server proxy port See: Profile Options and Profile Option Categories, page B-1. 7. For batch loading D&B data into the Registry: • Set up Bulk Import. See: Setting Up Bulk Import, page 2-24. • Manually create a directory object on the same environment as your TCA database. A directory object is a database object that stores the absolute path of a physical directory on the database node. Name this object HZ_DNB_SOURCE_DIR, and make sure the database server can read and write from the location identified by the directory object. For example, create the directory object in APPS as follows: CREATE or replace DIRECTORY HZ_DNB_SOURCE_DIR AS '/emslog/dnb' If the object is not in APPS, you must also grant access to APPS: GRANT READ ON DIRECTORY HZ_DNB_SOURCE_DIR TO apps; GRANT WRITE ON DIRECTORY HZ_DNB_SOURCE_DIR TO apps; • Optionally create a request set with the D&B Import Adapter request set and the Import Batch to TCA Registry program. Users can run the new request set to batch load into interface tables and import into TCA Registry in one step. This table shows the recommended settings for automating D&B batch load import after loading into interface tables.
- 69. Implementation 2-39 Import Parameter Default for D&B Batch Load Run Batch De-Duplication No Batch De-Duplication Match Rule None Run Address Validation No Run Registry De-Duplication Yes Registry De-Duplication Match Rule Custom match rule with heavy weights on Address attributes Related Topics Third Party Data Integration Overview, Oracle Trading Community Architecture User Guide Feature-Specific Implementation, page 2-21
- 71. Relationships 3-1 3 Relationships This chapter describes setting up for relationships, including creating, copying, and converting relationship types, adding new relationship phrase and role pairs to existing types, and assigning phrase and role pairs to relationship groups. This chapter covers the following topics: • Administering Relationships • Searching for Relationship Types • Creating Relationship Types • Viewing and Converting Relationship Types • Copying Relationship Types • Adding Relationship Phrase and Role Pairs to Relationship Types • Assigning Relationship Phrases and Roles to Relationship Groups Administering Relationships Set up relationship types and relationship phrase and role pairs that can be used to create relationships among entities in the TCA Registry. These relationships are shared throughout the Oracle E-Business Suite. See: Relationships Overview, Oracle Trading Community Architecture User Guide. Oracle Trading Community Architecture provides seeded relationship types and phrase and role pairs, but you can create new ones as needed. See: Seeded Relationship Types, Phrases, and Roles, Oracle Trading Community Architecture Reference Guide. Relationships administration lets you: • Create relationship types, including a relationship phrase and role pair for each new type, page 3-4. • Convert nonhierarchical relationship types into hierarchical types, page 3-5.
- 72. 3-2 Oracle Trading Community Architecture Administration Guide • Copy relationship types and, optionally, also the relationships, page 3-6. • Add phrase and role pairs to existing seeded or user-created relationship types, page 3-7. Note: You cannot update the definition of existing relationship types. You can only add phrase and role pairs to them. • Assign phrase and role pairs to relationship groups, page 3-9. Administration Process This diagram describes the process flow of setting up relationship types as well as phrase and role pairs. 1. Search for a relationship type that you want to view, or to make sure that the relationship type you want to create does not already exist. See: Searching for Relationship Types, page 3-3. 2. If you do not see the relationship type that you want in the search results, you can create a new type. Otherwise, select a relationship type from the results and view its details.
- 73. Relationships 3-3 3. If you are creating a new relationship type, you: 1. Define and create the relationship type. 2. Create a relationship phrase and role pair for the relationship type. 3. Review and confirm your definitions. 4. Return to search for another relationship type or view details of the type that you just created. See: Creating Relationship Types, page 3-4. 4. If you are viewing details for a selected or newly created relationship type, you can: • Convert the relationship type, if it is nonhierarchical, into a hierarchical type, or copy the relationship type to create a new type. See: • Viewing and Converting Relationship Types, page 3-5. • Copying Relationship Types, page 3-6. After you convert or copy a relationship type, you return to the Relationship Type page. • Add a relationship phrase and role pair to the type or to assign phrases and roles from this relationship type to relationship groups. See: • Adding Relationship Phrase and Role Pairs to Relationship Types, page 3- 7. • Assigning Relationship Phrases and Roles to Relationship Groups, page 3- 9. After you add a phrase and role pair or assign to relationship groups, you return to view the details of your relationship type. Related Topics Introduction to Administration, page 1-1 Searching for Relationship Types Use the Relationship Type page to search for the relationship type that you want to view, copy, convert, add relationship phrase and role pairs to, or assign to relationship groups. You also search to make sure that the relationship type you want to create does not already exist. The search results display not only the relationship type name but also whether it is a
- 74. 3-4 Oracle Trading Community Architecture Administration Guide hierarchical relationship type or not and whether circular relationships are allowed or not. You also see when and by whom the relationship type was created. Note: If the relationship type is seeded, the Created By column displays ORACLE and the Creation Date column shows the date that the relationship type record is created in your database. You can view concurrent requests for the processes of copying or converting relationship types. Related Topics Administering Relationships, page 3-1 Creating Relationship Types Use the Create Relationship Type pages to create a new relationship type along with a relationship phrase and role pair for the new type. After you search for the relationship type to make sure that it does not already exist, you follow a three-step process to create a new type. You also specify whether the new type would create hierarchical relationships or not. If you create a nonhierarchical relationship type, you also determine if circular relationships are allowed with this relationship type or not. To create a new relationship type: 1. Search for the relationship type to make sure that it does not already exist. See: Searching for Relationship Types, page 3-3. 2. Click Create after you verify that the relationship type is not in the search results. 3. In the Create Relationship Type page, enter the name of your relationship type and determine the relationship type's definition for hierarchical and circular relationships. 4. Create a relationship phrase and role pair for this relationship type. See steps 3 to 5 in Adding Relationship Phrase and Role Pairs to Relationship Types, page 3-7. 5. Review your relationship type and phrase and role pair definitions. 6. Go back to make any necessary changes. Otherwise, click Finish. 7. From the confirmation page, you can choose to: • View details of the relationship type that you just created, page 3-5 (start at
- 75. Relationships 3-5 step 3). • Search for or create another relationship type, page 3-3. Related Topics Administering Relationships, page 3-1 Viewing and Converting Relationship Types Use the Overview page to view the definition of a relationship type and its included relationship phrase and role pairs. For each relationship phrase and role pair, the Relationship Phrase and Role Pairs table displays: • The subject role and phrase • The subject and object type, for example Organization or Person You can convert the relationship type into a hierarchical type, only if the relationship type is not: • Already hierarchical • Seeded • Circular, with phrase and role pairs that contain the same values for both the subject and object Important: The conversion process fails if there are existing circular relationships using the relationship type. You can access the concurrent request for the conversion process in the Relationship Type page. See: Searching for Relationship Types, page 3-3. To view the details of a relationship type: 1. Search for the relationship type that you want to view. See: Searching for Relationship Types, page 3-3. 2. In the Search Results table, click the relationship type that you want to view details for. Note: You can also navigate to the Overview page after you create a new relationship type. See: Creating Relationship Types, page 3-4.
- 76. 3-6 Oracle Trading Community Architecture Administration Guide 3. View the relationship type details. You can choose to: • Convert the relationship type from nonhierarchical to hierarchical if you need to create hierarchies with this type. • Copy the relationship type, page 3-6. • Add a relationship phrase and role pair to this relationship type, page 3-7. • Assign any of the displayed phrases and roles to relationship groups, page 3- 9. Related Topics Administering Relationships, page 3-1 Copying Relationship Types Copy existing relationship types to create new relationship types, which would have the same relationship type definition except for the name. The relationship phrase and role pairs are also copied over, but you need to append a prefix or suffix to each copied role to keep all roles unique. You can also copy all relationships along with the relationship type. For example, the relationship that Joe is the employee of Oracle exists for the Oracle Employment relationship type. You copy the relationship type, name it OracleHQ Employment, and prefix the relationship roles with HQ. If you also copy the relationships, you would get this relationship with the OracleHQ Employment type: Joe is the HQ employee of Oracle. Before you define the new relationship type in the Copy Relationship Type page, you first find and view the relationship type that you want to copy from. See: Viewing and Converting Relationship Types, page 3-5. Instead of using the Copy of Relationship Type page, you can also run the Copy Relationship Type and All Relationships program, if available to you. Program Parameters Enter these parameters to run the Copy Relationship Type and All Relationships program from Standard Request Submission. • Source Relationship Type: Enter the relationship type you are copying from. • Target Relationship Type: Enter the name of the new relationship type, which cannot be the same as the source relationship type name. • Target Relationship Type Role Prefix: Enter the prefix for the copied relationship
- 77. Relationships 3-7 roles. You can only enter either a prefix or suffix, not both. • Target Relationship Type Role Suffix: Enter the suffix for the copied relationship roles. You can only enter either a prefix or suffix, not both. • Relationship Valid Date: Enter the start date for all copied relationships. You do not copy relationships along with the relationship type unless you enter this date. Related Topics Administering Relationships, page 3-1 Adding Relationship Phrase and Role Pairs to Relationship Types Use the Add Relationship Phrase and Role Pair pages to add a relationship phrase and role pair to an existing relationship type. Similarly, you also define a phrase and role pair when you create a new relationship type. For the subject and object of the relationship phrase and role pair, you define: • The type, for example Person or Organization • The relationship phrase, either an existing one from another relationship type or a new user-defined phrase • The singular and plural relationship role What you define for the subject and object also determines the phrases, roles, and types for the reciprocal direction of the pair. For example, if you enter: • Subject type: Organization • Subject phrase: Employer Of • Subject role: Employer and Employers • Object type: Person • Object phrase: Employee Of • Object role: Employee and Employees, then the relationship phrase and role pair is defined as shown in this table:
- 78. 3-8 Oracle Trading Community Architecture Administration Guide Subject Role Subject Type Subject Phrase Object Type Employer Organization Employer Of Person Employee Person Employee Of Organization To add a relationship phrase and role pair to a relationship type: 1. View the relationship type that you want to add phrase and role pairs to. See: Viewing and Converting Relationship Types, page 3-5. 2. Click Add Relationship Phrase and Role Pair. Note: Adding a phrase and role pair is also part of the relationship type creation process. See: Creating Relationship Types, page 3-4. 3. Enter the subject type and subject relationship phrase. It does not matter which phrase is defined as the subject phrase, for example, Wife Of or Husband Of. For hierarchical relationship types, however, the defined subject is the parent, which ranks above the object, or child. For example, you would enter Employer Of and not Employee Of as the subject phrase to imply that the employer ranks above the employee. The employee, of course, is still the subject of the relationship when viewed from his or her perspective, for example, Joe as the employee of Oracle. Important: You cannot reuse phrases that are already defined in the same relationship type with the same subject and object type combination. For example, if Parent and Child are already defined with subject and object type Person in the Family relationship type, you cannot create phrase pairs such as Parent and Son, or Mother and Child, in the Family relationship type with Person subject and object types. 4. Enter the singular and plural relationship roles that describe the subject. The roles can be a combination of the relationship type and phrase. For example, if the type is Oracle Employment and the phrase is Employee Of, the role can be Oracle Employee. This method of defining roles helps you keep roles unique and differentiate between roles of similar relationship types. For example, if you have another relationship type called Elcaro Employment, you would define Elcaro Employee as
- 79. Relationships 3-9 the role. You cannot have duplicate roles such as Employee for both relationship types. 5. Enter the corresponding information for the object. 6. Click Apply. 7. The confirmation takes you back to view the relationship type with your phrase and role pair added. See: Viewing and Converting Relationship Types, page 3-5. Related Topics Administering Relationships, page 3-1 Assigning Relationship Phrases and Roles to Relationship Groups Use the Assign to Relationship Groups page to assign relationship phrases and roles to relationship groups. You can assign each phrase within a relationship phrase pair and type to a different set of groups. The phrase assignment automatically determines the assignment of the corresponding role. For example, you can assign the relationship phrase Employer Of to a set of groups that differ from the assignments for Employee Of. The corresponding relationship role Employer would have the assignments of Employer Of, and likewise Employee with assignments of Employee Of. Relationship groups are mainly used to determine which user interfaces in Oracle applications each phrase and role is available in. Each relationship group corresponds to one or more Oracle Applications user interfaces. Examples of groups include Customer Account Information, Party Families, Party Contacts, Party Corporation Hierarchy, and Party Customers. For example, you would assign phrases for customer relationships to the Party Customers group. These phrases and their corresponding roles would then be available in Oracle Applications user interfaces with customer related functionality. To assign a relationship phrase and role to relationship groups: 1. View the relationship type with the phrase and role that you want to assign to relationship groups. See: Viewing and Converting Relationship Types, page 3-5. 2. Click Assign to Relationship Groups. 3. In the Assign to Relationship Groups page, select the phrase that you want to assign and click Go. The Assign Relationship Phrase to Groups region displays the current assignments for the selected phrase.
- 80. 3-10 Oracle Trading Community Architecture Administration Guide 4. Move relationship groups between the two boxes as needed. The relationship phrase and its corresponding relationship role are assigned only to the relationship groups in the Assigned Relationship Groups box. 5. Click Apply. The confirmation takes you back to view the same relationship type. See: Viewing and Converting Relationship Types, page 3-5. Related Topics Administering Relationships, page 3-1
- 81. Classifications 4-1 4 Classifications This chapter describes administering classifications, including creating and updating class categories and codes. This chapter covers the following topics: • Classifications Overview • Administering Classifications • Searching for an Existing Class Category • Creating a Class Category • Assigning Entities to a Class Category • Creating a Class Code • Updating a Class Category • Updating a Class Code • Viewing a Class Code Hierarchy • Copying a Class Category • Refresh of Classification Denormalization Classifications Overview The TCA Classifications model provides a flexible tool that you can use to categorize entities, which can include parties, projects, tasks, orders, and so on. Classifications can use different paradigms and does not restrict you to a single way to classify an entity. This enables you to classify an entity, such as a party, in a way that the rest of the world sees it, in addition to the way it is referenced within your organization. This is extremely helpful when you map the internal representation of a company's environment to the way that the outside world models it. The major components of the TCA Classifications model are:
- 82. 4-2 Oracle Trading Community Architecture Administration Guide • Class category: A broad subject area within which you can classify parties. A class category is a logical grouping of one or more class codes and allows for rules to be defined for how the category code structure is set up, as well as which entities can be assigned to these categories. You can define class categories to meet the needs of your organization. For example, you can define class categories consistent with special business considerations, pricing arrangements, or terms for a party. • Class code: A specific value of the class category. These class codes can be organized in a hierarchical fashion. Class codes are grouped together into categories. For example, if you want to specify the industry sector to which a party belongs, you can use a predefined class category, such as SIC 1987, which includes the 1987 version of US Standard Industrial Classification (SIC) codes. For example, within the SIC 1987 class category, you could assign the class code Software to a party in the software industry. All classifications are made up of two key components: a class category and class code. In the user interface, the classification scheme you create is called a class category or classification. The individual values within the classification scheme are called class codes. • Classification rules: The Classifications model allows class categories to have rules and characteristics which define how classifications can be assigned to entities. When you set up class categories, you can create specific rules such as allowing for multiple parents for the codes in the category. For example, a Hardware class category could include the tangible components of a computer system. Entities with multiple classifications can have the classifications ranked in order of importance for the particular entity. A party can have multiple class codes associated with it. A ranking of these codes could be useful. For example, Oracle could have databases and applications linked to it as separate codes. If you are part of an organization interested in databases, you might rank the Database class code higher than the Application class code. • Class code hierarchy: A hierarchy of class codes within a class category. For example, you could set up the High Tech class category, and the class codes associated with the High Tech class category are: Software, Hardware, Applications, PCs, Printers, and Consulting. These codes are set up in a hierarchical manner by assigning the parent codes to the appropriate children. High Tech • Software • Applications
- 83. Classifications 4-3 • ERP applications • CRM applications • Consulting • Hardware • PCs • Printers • Consulting When you create a class code hierarchy, three options are available to administer the hierarchy. You can: • Assign one or more parents to a code. As shown in the example above, Consulting can be found under both the Hardware and Software parent class codes. • Allow one or more codes to be assigned to an entity. Using the schema above, both Applications and Printers could be assigned to an Organization party. • Allow the assignment of higher level codes to an entity, not just the lowest level code. With the schema above, for example, a company could be assigned the Software code, even though that code is not at the lowest level, or leaf, node. The Create Class Category and Update Class Category pages provide a list of the valid entities that the class codes within a class category can be assigned to. Standard and Custom Classification Schema A classification schema can be built using standards such as the NAICS (North American Industrial Classification System), NACE (European Union's Statistical Classification of Economic Activity), or SIC (Standard Industrial Classification) classification schema, or on user-defined classifications based on your organization's business needs. For example, you can define a class category to determine if there is a special business consideration, special pricing arrangement, or special term for a customer. If you use the seeded standard classification schema, then you do not have to set up user-defined categories and codes. The Oracle Trading Community Classifications model includes the following standard class categories and class codes: • SIC 1987: The 1987 version of the US SIC schema. This is the most popular
- 84. 4-4 Oracle Trading Community Architecture Administration Guide industrial classification in U.S. • NACE: The industrial classification schema used in European countries. • NAICS: Introduced in 1997 to replace the SIC schema. • SIC 1972: The 1972 version of the US SIC schema. Used by Dun & Bradstreet for classifying companies in Canada. • SIC 1977: The 1977 version of the US SIC schema. Used by Dun & Bradstreet for classifying companies in European countries. Administering Classifications Administration for seeded or user-defined classifications includes: • Searching for an existing class category, page 4-5 • Creating a class category, page 4-6 • Copying a class category, page 4-12 • Assigning an entity to a class category, page 4-8 • Updating a class category, page 4-10 • Creating a class code, page 4-8 • Updating a class code, page 4-11 • Assigning a parent class code, page 4-9 • Refreshing the classifications data, page 4-13 To create your own system of classification for customers, you must design the system first and should have a printout ready before you start this procedure. You should know the parents and children of each classification node in the class code hierarchy before you create them. You might want to name your class codes in a way that will help you find all of the child nodes for each level of the class code hierarchy. If the names for class codes at the same level share the same characters, then you can find and add them as children all at the same time. To administer classifications: 1. Search for class categories to update or to confirm that the class category you want
- 85. Classifications 4-5 to create does not already exist. 2. Define class categories, including assigning entities to and creating class codes for the category. 3. Optionally, define the hierarchy of class codes within a category. Assign the parent codes to the appropriate children codes, for example: • Software is the a parent of Applications. • Applications is the parent of ERP applications. Related Topics Classifications Overview, page 4-1 Searching for an Existing Class Category Use the Classifications page search for a class category to view and update or to confirm that a class category does not already exist before you create a new category. In the Search region of the Classifications page, you can enter several criteria to search the existing class codes. Your initial search should be broad enough to find class categories that may be similar to the one you plan to create. Note: You can search for class categories. However, to be able to use a class category and assign it to an entity, the class category must be in the compiled state. To search for a class category: 1. Navigate to the Classifications page. 2. Enter search criteria for the class category or the class code in the appropriate fields of the Search region. You can also select Yes or No in the Compiled poplist to filter the results by whether or not the class category or class code is compiled. Note: You must enter at least some of the search criteria to search for the class category. 3. Click the Go button to start your search. 4. View the results. 5. If the appropriate class category is not found, click the Create Class Category button
- 86. 4-6 Oracle Trading Community Architecture Administration Guide to create a class category. See: Creating a Class Category, page 4-6. Related Topics Administering Classifications, page 4-4 Creating a Class Category Use the Create Class Category page to define class categories. When you create a class category you must provide required information that identifies and describes the class category. • Assign a name, meaning, and description to a category, for example, High Tech. • Define rules for using the class category. • Allow single or multiple parent codes. For example, class codes in a High Tech category can have multiple parent codes. • Allow single or multiple parent code assignments. For example, you can assign the Hardware, PCs, or both to Vision Corporation. • Allow parent class code assignments. For example, you can assign class codes to Vision Corporation at any level of the hierarchy, Hardware or PCs, not just the lowest level of PCs. • Define what types of entities use the class codes. A seeded list of tables restricts the use of class codes. For example, the SIC Code categories are restricted to Organization parties. You also assign at least one entity to the class category and create at least one class code for the new category. To create a class category that is similar to an existing one, you can copy the existing category. See: Copying a Class Category, page 4-12. To create a class category: 1. In the Classifications page, make sure that the class category you want to create does not already exist and click the Create Class Category button. See: Searching for an Existing Class Category, page 4-5. 2. Enter the required information in the appropriate fields. 3. Select any of the optional attributes for this class category: • Allow Multiple Parent Codes: You can select this check box to allow any node
- 87. Classifications 4-7 in your hierarchy to have more than one parent. Clearing this check box restricts the class category to only one parent. • Allow Parent Code Assignment: You can select this check box to allow the assignment of parent nodes in the class code hierarchy. Clearing this check box requires that you must use leaf nodes, nodes that have no children, for the class category. • Allow Multiple Class Code Assignments: You can select this check box to allow a user to classify a customer, opportunity, or other entity using more than one class code from this class category. Clearing this check box prevents users from assigning more than one class code to an entity. 4. In the Assign Entities region, you can assign entities to this class category. Select the appropriate entities identified by the table and column names. 5. Optionally enter, edit, or delete a condition defined with an SQL Where clause. 6. Click the Add New Entity Assignment button to add a new entity. For more information, see: Assigning Entities to a Class Category, page 4-8. 7. Click the Apply and Create Class Codes button to apply and create new class codes for this category. See: Creating a Class Code, page 4-8. To use a class category, you must first compile it. A class category should be complied when it is created and whenever it is updated. Class categories must be compiled before their classification codes can be associated with parties. Only active classification codes can be associated to parties. To compile class categories: 1. Navigate to the Classifications page. 2. Enter the search criteria. 3. Select No in the Compiled poplist. 4. Click the Go button to start your search for all uncompiled class categories. 5. Click the Compile Class Categories button. Related Topics Administering Classifications, page 4-4
- 88. 4-8 Oracle Trading Community Architecture Administration Guide Assigning Entities to a Class Category Use the Assign Entities page or Entity Assignment region to assign entities to a class categories. You must assign an entity by entering the name of the table and the column for the appropriate entity. You can also optionally create a condition, using an SQL Where clause, to select a subset of the entities in your database. To assign an entity to a class category: 1. Navigate to the Assign Entities page or Entity Assignment region. • From the Create Class Category page, click the Add New Entity Assignment button and then enter the entity information in the Assign Entities page. See: Creating a Class Category, page 4-6. • If you have created a copy of an existing class category, then in the Create Class Category page enter the entity information in the Entity Assignment region. See: Copying a Class Category, page 4-12. • From the Update Class Category page that displays an existing class category, click the Add Another Entity Assignment button and enter the entity information in the Entity Assignment region. See: Updating a Class Category, page 4-10. 2. Enter the required entity information: • Table name, such as HZ_PARTIES • Column name, such as PARTY_ID You can use the list of values to search for the table and column name. 3. Enter an optional condition in the Condition field. The condition is expressed as an SQL Where statement, such as: PARTY_TYPE='ORGANIZATION' Related Topics Administering Classifications, page 4-4 Creating a Class Code Use the Create Class Codes page to create the appropriate class codes for class categories. When you create the class codes you specify the name of each class code, a meaning, a description, the date when the code becomes active, and an optional date
- 89. Classifications 4-9 when the code is not active. You can immediately enable a class code or enable it at a later time. To create a class code: 1. Click the Apply and Create Class Codes button in the Create Class Category page, after you have created a class category. See: Creating a Class Category, page 4-6. 2. Enter the characteristics of the class code in the Class Codes region of the Create Class Codes page: • Name • Meaning • Description • Start date active • End date active 3. Check the Enabled check box to make the class code effective, or leave the check box clear until you are ready to enable it. You can use the Enabled check box, along with the Start and End active dates, to control the availability of a class code. For example, you can create and enable a class code with a start date in the future. On that start date, the class code automatically becomes available for use. You can immediately make an active class code unavailable by clearing the Enable check box. Or you can inactivate a class code by specifying an end date on some day in the future. 4. Optionally assign a parent class code to at least one of the class codes. See: Assigning Parent Class Codes, page 4-9. Related Topics Administering Classifications, page 4-4 Assigning Parent Class Codes Use the Assign Class Codes page, after you have created a class category and its class codes, to make one class code the parent of another class code in a class code hierarchy. This option structures class categories and class codes in parent-child hierarchal relationships. The assignment of parent class codes is restricted by the options available for the class category. When you create or update a class category, you can check or clear the Allow Multiple Parent Codes check box, which allows or prevents a class code from having
- 90. 4-10 Oracle Trading Community Architecture Administration Guide more than one parent class code. You can update class code definitions, including parent codes, in the Update Class Code page. See: Updating a Class Code, page 4-11. To assign a parent class code to a new class code: 1. Create new class codes for a new category. See: Creating a Class Code, page 4-8. 2. In the Class Codes region, select the child class code of the parent-child relationship that you are creating. 3. Click the Assign Parent Class Codes button to navigate to the Assign Class Codes page. 4. Select a parent class code, or one or more if allowed. • If the Allow Multiple Parent Codes option is selected, then you can select one or more class codes. • If the Allow Multiple Parent Codes option is not selected, then you can only select one class code. 5. Click the Assign button. Updating a Class Category Use the Update Class Category page to update the information associated with an existing class category, such as the meaning, description, delimiter, and entity assignment for a class category. To update an existing class category: 1. Search for the class category that you want to update. See: Searching for an Existing Class Category, page 4-5. 2. In the Results region, click the appropriate class category. 3. In the Update Class Category page, you can update the information about the class category in the Class Category Details region and the Entity Assignment region. See: Creating a Class Category, page 4-6 and Assigning Entities to a Class Category, page 4-8. 4. Click the Compile button to save your work. For user-defined class codes, you can navigate to the Update Class codes page from this page to revise information about class codes. For more information, see: Updating a
- 91. Classifications 4-11 Class Code, page 4-11. Related Topics Administering Classifications, page 4-4 Updating a Class Code Use the Update Class Codes page to update the information associated with existing class codes, such as the meaning, description, parent, end date, and whether the class code is enabled or disabled. To update an existing class code: 1. Search for the class category with the class codes that you want to update. See: Searching for an Existing Class Category, page 4-5. 2. In the Classifications page, click the Update Class Codes icon for the class category with the class codes that you want to update. 3. In the Update Class Codes page, revise the information about the class codes, as necessary. You can revise the information in the following fields: • Meaning • Description • Parent Class Code • End Date Active Note: The Start Date Active date cannot be changed. 4. Check or clear the Enabled check box to enable or disable the class code. 5. Save your work. If the class code that you want to update is not found, then you must create the class code. For more information, see: Creating a Class Code, page 4-8. Related Topics Administering Classifications, page 4-4
- 92. 4-12 Oracle Trading Community Architecture Administration Guide Viewing a Class Code Hierarchy You can access the class code hierarchy for viewing by clicking the View Class Code Hierarchy button on the Update Class Codes page to bring up the View Class Code Hierarchy page. See: Updating a Class Code, page 4-11. On the Update Class Category page you can also view the class code hierarchy. See: Updating a Class Category, page 4-10. For each class code you can view: • Class code meaning • Class code • Description • Start date active • End date active To update the class code hierarchy, see: Updating a Class Code, page 4-11. Related Topics Administering Classifications, page 4-4 Copying a Class Category Use the Copy Classification feature on the Classifications page to create similar class categories. You can copy an existing class category and then edit the information about that class category to create similar class categories. Although class codes are associated with a class category, you cannot edit the class codes for a copy of a class category in the Create Class Category page. You must edit the copy of a class category and then, if necessary, edit the class codes in the Update Class Codes page. To copy a class category: 1. Search for the class category that you want to copy. See: Searching for an Existing Class Category, page 4-5. 2. Click the Copy Classification icon for the class category that you want to copy. 3. In the Create Class Category copy page, edit the class category details and entity assignments as necessary. See: Creating a Class Category, page 4-6 and Assigning
- 93. Classifications 4-13 Entities to a Class Category, page 4-8. 4. To update the class codes for the category, see Updating a Class Code. Related Topics Administering Classifications, page 4-4 Refresh of Classification Denormalization Use the Refresh of Classification Denormalization program to perform a data refresh to populate the HZ_CLASS_CODE_DENORM denormalization table. This table is populated from these source tables: • FND_LOOKUP_TYPES_TL • FND_LOOKUP_VALUES • HZ_CLASS_CATEGORIES • HZ_CLASS_CATEGORY_USES • HZ_CLASS_CODE_RELATIONS You should schedule this program to periodically run, but manually run the program under the following circumstances: • The first time you install a patch which contains the classification feature. • Every time you enter or update classification related data outside of the Administration tab. For example, run the program if you enter or update lookups in Oracle Receivables. • Every time you install a HZ or FND patch that has added more seeded data for classifications. Important: In order to see the changes you have made, you must bounce the middle tier. Program Parameters • Class Category: Enter the class category that you want to refresh data for. If you leave this parameter blank, the entire HZ_CLASS_CODE_DENORM denormalization table is refreshed.
- 94. 4-14 Oracle Trading Community Architecture Administration Guide • Debug: Specify if you want to run the program in debug mode or not. • SQL Trace: Specify if you want to do SQL statement tracing or not. Related Topics Administering Classifications, page 4-4
- 95. Data Quality Management 5-1 5 Data Quality Management This chapter describes administering Data Quality Management (DQM), including setting up word replacements, defining attributes and transformations, defining match rules, maintaining the staged schema, maintaining the Merge Dictionary, and diagnosing DQM setup. This chapter covers the following topics: • Data Quality Management Overview • Administering Data Quality Management • Word Replacements • Attributes for DQM • Transformations Overview • Defining Attributes and Transformations • Match Rules Overview • Defining Single Match Rules • Defining Match Rule Sets • DQM Compile All Rules Program • Quality Adjusted Search Results • Viewing Match Rules • Staged Schema • Merge Dictionary Overview • Creating Custom Merge Master Party Defaulting Method • Automerge • DQM Diagnostic Reports
- 96. 5-2 Oracle Trading Community Architecture Administration Guide Data Quality Management Overview Oracle Trading Community Architecture Data Quality Management (DQM) is a set of tools and features that provide powerful searching and matching functionality for search, duplicate identification, duplicate prevention, and other data management features. With a sophisticated matching mechanism, DQM can determine records that match specified search criteria, or records that are potential duplicates of another record. TCA and other Oracle applications integrate Data Quality Management functionality for various purposes, including: • Searches for parties, addresses, contacts, and contact points in the TCA Registry. • Prevention of duplicate entry into the Registry when records are created or updated. • Identifying possible duplicates that currently exist in the Registry. For the purposes of matching records, DQM takes into account that records can contain typographical errors, spelling errors, or incomplete data. DQM copies the data into staged tables separate from the TCA Registry, and transforms and standardizes the staged records. With fuzzy searches through the transformed data in the staged tables, a set of possible matches in the TCA Registry is established. For resolving duplicates, DQM also lets you define a repository of the entities and procedures that are processed when parties are merged. DQM also provides an Automerge feature to automatically merge records that exceed a specified threshold. Note: If you have information from source systems in the TCA Registry, DQM uses the Single Source of Truth record for each party. See: Single Source of Truth Overview, page 10-7. Related Topics Major Features, page 5-2 Data Quality Management Examples, page 5-6 Data Quality Management Process, page 5-8 Administering Data Quality Management, page 5-11 Major Features Data Quality Management provides various features that work together as a powerful and flexible data transformation and matching tool. These features are integrated with TCA and can be used by any Oracle E-Business Suite application to search and identify
- 97. Data Quality Management 5-3 duplicates. Attribute Search in Entities DQM uses attributes in these four entities, which are a subset of the TCA Registry, to search and identify matches: • Party • Address • Contact • Contact Point Most of the attributes correspond to a table column in the TCA Registry tables. For example, party name is an attribute of the party entity, and the value for this attribute is obtained from the HZ_PARTIES table. The party name can be one attribute that you use to evaluate if two parties are duplicates or matches, for example John Smith and Jon Smith. You can add custom attributes if the predefined attributes do not meet your needs. These custom attributes, along with special seeded logical attributes, do not correspond to a TCA Registry column. See: Attributes for DQM, page 5-21. Predefined and Customizable Search and Match Functionality You can use predefined transformations and match rules to search and identify matching records. Transformations transform party, address, contact, and contact point attribute values into standardized representations for high quality matching. In addition to the seeded transformations, DQM provides seeded word replacement lists in American English that transformations can optionally call upon. Match rules determine and evaluate the results of the matching process. You can define and implement custom transformations to optimize the match rules for your environment and application. You can also set up your match rules to meet your business needs. Transformations and Word Replacements Transformations transform data into representations that are more similar for matching purposes. For example, transformations can replace double letters with only one of the letters, as well as remove nonalphanumeric characters and vowels. A transformation that removes vowels would change, for example, both values for an address attribute, 123 Main Rd and 123 Mane Road, into 123 MN RD. This transformation allows the two attributes to be determined a match, minimizing the effects of potential spelling errors, such as Mane, and data entry inconsistencies, such as Rd versus Road. Transformations use word replacement lists which create synonyms that are treated as
- 98. 5-4 Oracle Trading Community Architecture Administration Guide equivalents for searching and matching. You can use word replacements to standardize certain portions of your party data to minimize the effect of data entry inconsistencies on searches. For example, a word replacement transformation can replace California, Calif, and ca with CA. See: Word Replacements, page 5-13 and Transformations Overview, page 5-22. Match Rules Match rules determine whether two parties should be identified as a match or potential duplicate. DQM match rules can be applied, for example, when you: • Search for TCA Registry information using search interfaces. • Run a duplicate identification process. • Enter or update party information through user interfaces, import interfaces, or APIs, for duplicate prevention. Match rules support score-based matching and consist of two parts, acquisition and scoring criteria. Acquisition provides an initial set of possible matches, and scoring assigns scores to attributes to further filter matches and rank the results. When you define match rules, you can specify which attributes are important for matching and configure how the attributes should be evaluated. For example, you can define a match rule so that only records with the same transformed party name and party number attribute values are considered matches. You can also determine how matching or similar attributes are scored to produce a total score that you can use to evaluate a record. To each attribute that you use in a match rule, you also assign transformations. See: Match Rules Overview, page 5-28. Staged Schema The staged schema is a mirror of a portion of the TCA Registry and contains data that transformations have cleansed and standardized. Matches are determined by comparing an input record against the transformed records in the staged schema, which is separate from the TCA Registry. The Registry itself is not transformed or searched at any time. The staged schema is shared across all Oracle E-Business Suite applications. Searches through the staged schema are actually searches against the interMedia or B-Tree indexes that index the schema and speed up the search process. During the acquisition phase of matching, the indexes quickly limit the number of parties to evaluate for scoring. You can run programs in DQM to generate or update the staged schema and the indexes. For accurate searches, the staged schema can be automatically synchronized with the TCA Registry when records in the Registry are created or updated through user interfaces or TCA import. See: Staged Schema, page 5-59.
- 99. Data Quality Management 5-5 Merge Dictionary The Merge Dictionary contains the entities and procedures that are processed during party merges. You define how duplicate parties are to be merged and in what order. See: Merge Dictionary Overview, page 5-65. Automerge Automerge is a process that can be implemented as part of duplicate identification. Based on the setup, Automerge automatically merges records that exceed a specified threshold. See: Automerge, page 5-72. Duplicate records can be identified when a Create or a Save Web service (create operation) is invoked. Automerge is run based on the criteria specified in the match rule Data quality is enabled based on the profile HZ: Enable DQM for Integration. When a Create or Save Web service (create operation) is invoked, 1. If data quality is enabled, then duplicate identification is based on the Match Threshold and the Automerge Threshold values specified in the match rule. 2. When an organization or person (party) is created in Customer Data Hub, the parties are merged based on the following criteria: • If the match score is less than the Match Threshold value, then the newly created party is retained. • If the match score is more than or equal to the Match Threshold value, but less than the Automerge Threshold value, then a merge request is created to merge an existing party and the newly created party. • If the match score is more than or equal to the Automerge Threshold value, then the existing party and the new party are automatically merged. Globalization Various features support using DQM in different countries and languages, including: • Nondelimited word replacements for languages in which words are not defined as consecutive characters separated by spaces. • Word replacements that occur only if specific conditions are met. For example, the word is replaced only if it occurs at the beginning or end of the string. • Seeded transformations that support data from most Latin-based languages. • Match rule sets that contain multiple match rules, with conditions to determine which rule is used, for example conditions based on the Country attribute.
- 100. 5-6 Oracle Trading Community Architecture Administration Guide Related Topics Data Quality Management Overview, page 5-2 Data Quality Management Examples These examples illustrate using Data Quality Management to identify existing duplicates, search for parties, or prevent duplicate entries. Identifying Duplicate Parties For a party called International Party Duplicates, the party name could have been entered in different ways, such as International Party Duplicates, Inc. or IPD. You use a transformation to remove all nonalphanumeric characters and terms such as Corp and Inc, and then normalize party names into three-letter acronyms in the staged schema. Define match rules and search for duplicates. As a result, the entries in this table are displayed as possible duplicates: Original Value Transformed Value in Staged Schema IPD IPD I.P.D. IPD IPD Corp. IPD Intl Party Duplicates IPD International Party Duplicates IPD International Party Duplicates, Inc. IPD Searching for Parties An Oracle application has implemented DQM to create a search interface that you enter search criteria in. Transformations were created, including one that uses the DQM PL/SQL function Soundex, and the results were populated into the staged schema. You want to search for parties of type Person with the last name Smyth who are located in California. The last name could have been misspelled and entered in different ways, such as Smith or Smythe. You enter Smyth and California in the search interface, and the Oracle application applies a match rule that includes a filter for the state of California and searches through the staged schema for search results. This table shows the original entries in your TCA Registry.
- 101. Data Quality Management 5-7 Name Location Smith, James Redwood Shores, California Smith, Virginia Seattle, Washington Smyth, Edward Los Angeles, California Smyth, Helen New York City, New York Smythe, Joseph Los Angeles, California This table shows the Soundex representation for these names: Name Soundex Representation Smith S260 Smyth S260 Smythe S260 The search finds the entries in this table as possible matches: Name Location Smith, James Redwood Shores, California Smyth, Edward Los Angeles, California Smythe, Joseph Los Angeles, California Preventing Duplicate Entries DQM was implemented to enforce the policy that no duplicates are allowed for matches on the combination of cleansed party name and address. Transformations were defined that remove all vowels and double letters, and a match rule was also defined that best expresses the policy. As a result, you avoid populating the duplicate entries in the TCA Registry, shown in this table, because their transformed records are identical:
- 102. 5-8 Oracle Trading Community Architecture Administration Guide Original Record Transformed Record Allison Byrne, 123 S. Main Str. 11111 ALSN BRN, 123 MAIN, 11111 Alisen Burn, 123 South Main Street, 11111 ALSN BRN, 123 MAIN, 11111 Related Topics Data Quality Management Overview, page 5-2 Data Quality Management Process This diagram illustrates how the different features of Data Quality Management work together to find matches and duplicates. 1. The TCA Registry contains party information that could have been entered with typographical errors, spelling errors, and aliases. 2. You run the DQM Staging program to transform and standardize the attribute values, such as party name and number, in a copy of the Registry, the staged schema. The attributes to include in the schema, as well as the transformations to use on each attribute, are defined in the Define Attributes and Transformations page. 3. The staged schema stores the transformed attribute values, separate from the original Registry.
- 103. Data Quality Management 5-9 4. Input records come in when you enter or search for party information, or run a duplicate identification process. 5. The transformations in a match rule transform the attribute values in the input record. 6. The same match rule is applied to compare the transformed input record attributes against the attributes in the staged schema. 7. Based on how the attributes match up, potential matches from the staged schema are identified for the input record. If the match rule contains scoring criteria, the selected records from the staged schema are also scored. Bulk Duplicate Identification Bulk duplicate identification is a particular DQM process to identify duplicates for a large number of records within the TCA Registry. The process involves: • B-Tree indexes in the staged schema. • Match rules with the Bulk Duplicate Identification purpose, which include acquisition attributes and transformations that are defined for bulk duplicate identification. Instead of comparing against the staged schema one at a time for each input record, as with simple duplicate identification, bulk duplicate identification compares the whole set of input records at once through a join procedure in the staged schema. This diagram illustrates the bulk duplicate identification process:
- 104. 5-10 Oracle Trading Community Architecture Administration Guide 1. TCA Registry attributes are transformed for the staged schema. The attributes to include in the schema, as well as the transformations to use on each attribute, are defined in the Define Attributes and Transformations page. Also defined are the attribute and transformation combinations to be used for bulk duplicate identification. The staged schema includes B-Tree indexes only for the transformed attributes marked for bulk duplicate identification. 2. A duplicate identification process is started, either for a subset of records in the TCA Registry or for the entire Registry. The transformed version of that set of input records is already represented in the staged schema. 3. A match rule with the Bulk Duplicate Identification purpose is applied, and the input set within the staged schema is joined with the staged schema. Each record in the input set is simultaneously compared against all other records in the same staged table using only B-Tree indexes. 4. Based on how the attributes match up, potential duplicates from the staged schema are identified. If the match rule contains scoring criteria, the selected records from the staged schema are also scored. Related Topics Data Quality Management Overview, page 5-2
- 105. Data Quality Management 5-11 Administering Data Quality Management To utilize and implement Data Quality Management (DQM) functionality, you must set up and administer the DQM tools. These tools are integrated with TCA and can be used by any Oracle Applications E-Business Suite application to search the TCA Registry and identify or prevent duplicates. To administer Data Quality Management: 1. Review information about the current DQM setup. See: DQM Administration Overview Page, page 5-11. 2. Create word replacements, page 5-15. 3. Define attributes and transformations, page 5-23. 4. Generate the staged schema and indexes, page 5-61. 5. Define and compile match rules, page 5-38. 6. Synchronize the staged schema with the TCA Registry, page 5-64. 7. Maintain the Merge Dictionary, page 5-66. 8. Define DQM profile options, page B-1. Note: To set the HZ: Merge Master Party Defaulting profile option to User Hook, you must create a custom user hook. See: Creating Custom Merge Master Party Defaulting Method, page 5-69. 9. At any time, you can run Diagnostic reports to get comprehensive details about the current DQM setup. See: DQM Diagnostic Reports, page 5-73. Related Topics Data Quality Management Overview, page 5-2 Introduction to Administration, page 1-1 DQM Administration Overview Page The DQM Administration Overview page provides basic information about the current Data Quality Management setup. For each possibly displayed informational message, these tables tell you where to go for more details.
- 106. 5-12 Oracle Trading Community Architecture Administration Guide General Information Informational Message See One or more TCA records failed to synchronize. Run the DQM Setup - Detailed diagnostic report for more information. DQM Diagnostic Reports, page 5-73 TCA data has not been staged. Set up attributes, transformations, and word replacement lists, and run the DQM Staging Program with the Stage All Data staging command. • Creating and Updating Word Replacement Lists, page 5-15 • Defining Attributes and Transformations, page 5-23 • DQM Staging Program, page 5- 61 The DQM synchronization method is set to: <method>. DQM Synchronization Method, page 5-64 Changed Setup Informational Message See The transformations <transformation names> have been added to this attribute: <attribute name>. Defining Attributes and Transformations, page 5-23 Values were added or removed for these word replacement lists: <word list name>. Creating and Updating Word Replacement Lists, page 5-15 Related Topics Administering Data Quality Management, page 5-11
- 107. Data Quality Management 5-13 Word Replacements With word replacement, you can identify words that act like synonyms of other words for the purpose of searching and matching. Transformations can use word replacements. Word replacement is a particularly useful technique for standardizing certain portions of your party information to minimize the effect of data entry inconsistencies on searches. You can use these word replacements in the development of transformations. In the PL/SQL functions used in transformations, code can be written to call a word replacement list. Word replacement lists contain word pairs, each pair with an original and replacement word. The replacement word is used when the original word is identified and any specified conditions are met. Aside from using seeded conditions, you can also create your own conditions. See Creating Custom Word Replacement Conditions, page 5-19. For example, this table displays possible original words for a replacement word in a word list for a specified language. Word List Name Language Original Word Replacement Word Person Name American English Bob Robert Person Name American English Rob Robert Person Name American English Robbie Robert Person Name American English Roberto Robert Person Name American English Bobby Robert When you enter Rob as the value for a first name attribute of a search, the search returns records in which the first name attribute matches to the replacement word for Rob. The result of your search would return records containing Bob, Robbie, Roberto, Bobby, and Robert as well as Rob. Seeded and Custom Word Replacement Pairs DQM provides word replacement lists containing over 3,000 word replacement pairs in American English. The included word lists are: • ADDRESS_DICTIONARY • DOMAIN_NAME_DICTIONARY (used for e-mail and URLs)
- 108. 5-14 Oracle Trading Community Architecture Administration Guide • EXPANDED_PERSON_NAME_DICTIONARY • KEY MODIFIERS • ORGANIZATION_NAME_DICTIONARY • PERSON_NAME_DICTIONARY • US_STATE_DICTIONARY See: Seeded Word Replacement Lists, Oracle Trading Community Architecture Reference Guide. You can add to the lists of seeded word replacement pairs in American English or create lists in any other languages supported by Oracle Applications. Administering Word Replacements This table describes some terms in the pages used for this procedure. Selected Terminology Term Description Identification Method The method that the original word in a word pair is identified by: • Delimited: As astring of alphanumeric characters preceded and followed by blank spaces • Nondelimited: As a string anywhere. Data Source Source of the word list, for example Seeded for seeded lists. To administer word replacement lists, you can: • Create, update, or copy word lists. See: Creating and Updating Word Replacement Lists, page 5-15. • Delete word lists only if they are not seeded. Related Topics Data Quality Management Overview, page 5-2
- 109. Data Quality Management 5-15 Creating and Updating Word Replacement Lists Although DQM provides over 3,000 word replacement pairs in American English, you can modify the provided lists or create lists of word replacement pairs with words that users often enter with errors or as shortcuts. The fuzzy key generation program uses only the following 3 word lists for fuzzy search 1. ADDRESS_DICTIONARY – for address 2. ORGANIZATION_NAME_DICTIONARY – for organization 3. PERSON_NAME_DICTIONARY – for person You cannot create your own replacement list, but must update any of the applicable lists listed above, for fuzzy search. Important: A new word list is not used until you create custom transformations that use the list. See: Creating Custom Transformations, page 5-26. Procedure to Select the Word Identification Method When you create or copy a word list, you must specify the word identification method. You cannot change the method when you update a list. Note: The Nondelimited method is usually used for relevant non-English languages, such as Japanese, that are based on characters, not words separated by spaces. Example John is the original word, Jonathan is the replacement word, and the attribute value is John Johnson. If the word replacement with the Delimited method is applied, then the attribute value becomes Jonathan Johnson, because only John surrounded by spaces is replaced. If with Nondelimited, then the value becomes Jonathan Jonathanson, because John is replaced no matter where it appears. Procedure to Enter Word List Information This table describes some terms in the pages used for this procedure.
- 110. 5-16 Oracle Trading Community Architecture Administration Guide Selected Terminology Term Description Condition Criterion that must be met for the word replacement to occur. Conditions are particularly useful for country-specific word replacements. For example, in the UK, LTD or Limited is a common organization name suffix. You can specify to replace either word with a blank space only if it appears at the end of a string. 1. Enter a unique word list name, and optionally define the source of the list, for example to identify a list that you created or obtained from a third party. When you update an existing list, you can change the name and source, but not the language. 2. Define word replacement pairs. • No matter which word identification method is selected, do not enter original words with spaces. • For original and replacement words, you can enter not only whole words, but also abbreviations, word fragments, and numeric characters. For example, you can create a word replacement pair by entering 1 as the original word and one as the replacement word. If a user enters 1 to perform a search, then one is used to search your party information. • Replacement words do not have to be unique and can be left blank. You cannot, however, use the same word as both an original and replacement word in the same word list. For example, you cannot have Street to be replaced by St. in a word pair, and also St. to be replaced by Saint in another word pair. You can create several word replacement pairs that have different unique original words with the same replacement word. This table shows an example: Original Word Replacement Word Bob Robert Rob Robert Robbie Robert
- 111. Data Quality Management 5-17 Original Word Replacement Word Roberto Robert Bobby Robert 3. For any word pair, optionally enter a condition. You can use the same original word multiple times in a list only if the replacement words and conditions are different. For example, you can enter St. twice as an original word to be replaced by the replacement words Street and Saint, with a condition for each case. Important: If you use original words multiple times, the conditions are applied in the order defined, and a word is replaced according to the first condition that is met. For example, if the St. and Street word pair is defined first, and that condition is met, then the word replacement occurs. The condition for the St. and Saint word pair is skipped. 4. You must enter a value after the condition if the field is not disabled. If multiple values are possible, for example for the seeded If Country Equals condition, separate each value by a comma. 5. After you add or modify word replacement pairs, run the DQM Staging program to update the staged schema to include the new or revised word replacement pairs. In the Original Word column, Staging Required indicates the word pairs that still need to be staged. For any record that you add to or update in the TCA Registry, the word replacement pairs become immediately effective after the DQM Staging program finishes. See: DQM Staging Program, page 5-61. Related Topics Word Replacements, page 5-13 Word Replacements Tips, page 5-17 Word Replacements Tips When you create and use word replacements, consider these issues: • Avoid recursive word replacement pairs that can generate inconclusive results.
- 112. 5-18 Oracle Trading Community Architecture Administration Guide For example, you need to create word replacements for common variations of a name such as Caroline, Carolyn, Carolan, Carole, and Carol. This table shows an example of effective word replacement pairings of original and replacement words. Effective Word Replacement Pairs Original Word Replacement Word Caroline Carol Carolyn Carol Carolan Carol Carole Carol This table shows an example of ineffective word pairings using recursive word replacement. Ineffective Word Replacement Pairs Original Word Replacement Word Caroline Carolyn Carolyn Carolan Carolan Carole Carole Carol • Create word replacement pairs consistent with the type of party information in the word lists for person names, addresses, organization names, or states. For example, if you apply a word replacement pair for a person name to an organization name, Jonathan Deere might be used as a replacement for the company name, John Deere. • Create a limited number of word replacement pairs between person names and organization names. Because some organizations are named after people, a limited number of common word replacements of person names to organization names can be appropriate. For
- 113. Data Quality Management 5-19 example, your organization has regular contact with a group of professional firms such as accountants and lawyers. You can create word replacement pairs specifically for these organizations that would match person names to organization names. Word replacement pairs between different types of party information should be limited to reduce inappropriate matches. • Create a limited number of word replacement pairs between address-related words and organization names. Because some organizations are named after geographical locations, a limited number of word replacements of address elements to organization names can be appropriate. For example, your organization has regular contact with the Main Street Cafe. You can create a word replacement pair specifically for this organization that would match an address element to the organization name. Word replacement pairs between different types of party information should be limited to reduce inappropriate matches. • Consider replacing the original word, or symbol, & with the replacement word and. Several of the seeded transformations remove symbols such as &, that are not alphanumeric characters. If some form of conjunction is important to your searches, you should replace & with and. You can also avoid or customize the seeded transformations that remove &. • Consider mapping generic address-related words such as street, avenue, and so on to a blank Replacement Word field. People often know the proper name for an address but might not know the generic portion of the address. For example, you can broaden the search criteria so that both Market Street and Market Avenue are included in the search results as possible matches. By mapping the words street and avenue to a blank Word Replacement field, you would broaden the possible matches. See: Seeded Word Replacement Lists, Oracle Trading Community Architecture Reference Guide. Creating Custom Word Replacement Conditions Create custom conditions to use with word replacement pairs. You have a lot of flexibility, so make sure that the conditions you create make sense and work correctly. Each condition includes a defined function and possible user-defined values. For example, the user must specify at least one value, such as Argentina, when defining a word pair with the seeded If Country Equals condition. If the record being evaluated has Argentina as the Country attribute, then the word replacement occurs. On the other hand, the seeded End of String condition and does not require a user-defined value. If the original word is at the end of a string and the replacement word does not cause the entire string to be null, then the word replacement occurs.
- 114. 5-20 Oracle Trading Community Architecture Administration Guide Procedure 1. Write a custom function with this signature: FUNCTION <custom function>( p_input_str IN VARCHAR2, p_token_str IN VARCHAR2, p_condition_id IN NUMBER, p_condition_val IN VARCHAR2) RETURN BOOLEAN; The tca_eval_condition_rec function is used for all seeded conditions. Instead of defining a new function, you can use the seeded one and write custom code in the if/elseif block for the condition_id, as shown in this example: IS BEGIN if condition_id = 1 get_gbl_condition_rec_value( 'PARTY_SITES', 'COUNTRY' ) = 'US' do this and return true/false ; elsif condition_id = 2 get_gbl_condition_rec_value( 'PARTY_SITES', 'ZIPCODE' ) = 'xxxxxx' do this and return true/false ; else return true ; END ; 2. Insert a new row in the HZ_WORD_RPL_CONDS_B table and populate the columns. • CONDITION_FUNCTION: The custom function that you define for the condition. • CONDITION_VAL_FORMAT: How many user-defined values the condition can take. This table provides examples of how the possible column values are used. CONDITION_VAL_FORMAT Value Condition Reason None Start of String Condition does not apply to specific values Single Party Type Equals Condition requires only one party type value Multiple In Country Condition requires at least one country value
- 115. Data Quality Management 5-21 Note: It is possible to implement a condition that applies to multiple attributes, for example a Party Type Equals and In Country condition. Single attribute conditions, however, are recommended. Related Topics Word Replacements, page 5-13 Attributes for DQM Attributes make up the four entities used in DQM: Party, Address, Contact, and Contact Point. Each attribute in the entities is derived from a specific column in one of the TCA Registry tables. These four entities make up the staged schema. For example, the Party entity in DQM is named HZ_STAGED_PARTIES and contains attributes from the TCA Registry tables: • HZ_PARTIES • HZ_ORGANIZATION_PROFILES • HZ_PERSON_PROFILES Examples of attributes in the Party entity include: • PARTY_NUMBER from HZ_PARTIES • DUNS_NUMBER from HZ_ORGANIZATION_PROFILES • MARITAL_STATUS from HZ_PERSON_PROFILES Attributes in the staged schema contain values from the TCA Registry tables that have been transformed into representations that are more alike for the purposes of matching. Attributes, therefore, are used to search for possible matches between an input record and the TCA Registry data. If needed, you can use up to 30 CUSTOM_ATTRIBUTE columns in each entity to store additional attributes. See: Creating Custom Attributes, page 5-25 and Seeded Attributes, Oracle Trading Community Architecture Reference Guide. Related Topics Defining Attributes and Transformations, page 5-23 Data Quality Management Overview, page 5-2
- 116. 5-22 Oracle Trading Community Architecture Administration Guide Transformations Overview Your raw party information can include typographical errors, spelling errors, inconsistent formats, and abbreviations due to input errors. For this reason, searches performed on raw values often are inconclusive or miss potential matches. Transformations transform attribute values in the staged schema so that the values are more similar and useful for the purpose of matching records. Transformations neutralize the effects of data errors on your searches. For example, a transformation that removes all of the double letters in a party name transforms a name such as Allied Freight into Alied Freight. This transformation makes it easier to match to a party if a typographical error, such as a missing double letter, exists. After your raw data has been transformed and populated into the staged schema, match rules can use the transformed data to score each record to determine if the record is considered alike enough to be a match to an input value. DQM includes several standard, or seeded, transformations. You can also develop your own transformations. Seeded Transformations DQM provides several predefined transformations, such as Cleanse and Exact. The Exact transformation accomodates various characters in non-English languages. See: Seeded Transformations, Oracle Trading Community Architecture Reference Guide. For example, the Cleanse transformation performs these actions: 1. Capitalizes all letters. Zannardi-Montoya is transformed to ZANNARDI-MONTOYA. 2. Removes nonalphanumeric characters. ZANNARDI-MONTOYA is transformed to ZANNARDI MONTOYA. 3. Reduces any white space to one space. 4. Removes double letters, retaining only one of the double letters. ZANNARDI MONTOYA is transformed to ZANARDI MONTOYA. 5. Removes vowels except initial vowels. ZANARDI MONTOYA is transformed to ZNRD MNTY. The final result from the Cleanse transformation is ZNRD MNTY. This result would be populated into the staged schema. All seeded transformations are available in packages. Not all seeded transformations are automatically populated into the staged schema. During the installation of DQM,
- 117. Data Quality Management 5-23 you can decide if you want to use all of the available transformations. To ensure that a seeded transformation is populated into the staged schema, you must define the transformation and then run the DQM Staging program. See: Defining Attributes and Transformations, page 5-23 and DQM Staging Program, page 5-61. Related Topics Defining Attributes and Transformations, page 5-23 Creating Custom Transformations, page 5-26 Data Quality Management Overview, page 5-2 Defining Attributes and Transformations Specify the attributes to use for matching, and assign transformations to each attribute. Only active attribute and transformation combinations that you define in the Define Attributes and Transformations page can be used in the staged schema and in match rules. You define attributes and transformations for each entity used in DQM: Party, Address, Contact, Contact Point. Attributes are transformed by their assigned transformations in the staged schema. For address, contact, and contact point attributes, you can optionally denormalize the attribute to the party level. The transformed value would be stored in the HZ_STAGED_PARTIES table instead of the staging table for the entity. You should denormalize only attributes that have a limited number of possible values, such as the Country attribute. Denormalization improve performance, but you cannot denormalize all attributes. Procedure This table describes some terms in the pages used for this procedure. Selected Terminology Term Description Uniqueness The uniqueness of an attribute value with respect to other attributes for identifying an entity. For example, for an address, the Postal Code attribute provides a more unique value, across records, than the State attribute. This uniqueness information is used for DQM searches.
- 118. 5-24 Oracle Trading Community Architecture Administration Guide Term Description Bulk Acquisition Option indicating that the attribute and transformation combination can be used in acquisition for match rules with the Bulk Duplicate Identification purpose. The attribute value, as transformed by the transformation, would be indexed with B-Tree indexes, which are used only for bulk duplicate identification. See: Bulk Duplicate Identification, page 5-9. 1. Select an attribute name and enter a user-defined name. Search interfaces that use DQM generally display the user-defined names, not the attribute names, as the search criteria. If you are defining one of the 30 custom attributes, enter the name of the custom PL/SQL procedure that DQM uses to obtain the custom attribute. See: Creating Custom Attributes, page 5-25. 2. Indicate the uniqueness of the attribute with respect to other attributes for the entity. 3. To view or update the transformations assigned to an attribute, click Transformation Details for the appropriate attribute to display the transformations below. Note: You cannot remove attributes that are seeded for the entity or used in seeded match rules. 4. To assign a seeded transformation, just enter the transformation name. For custom transformations, you must also enter a description as well as the PL/SQL function that is called to transform the attribute values and to return a formatted result. See: Creating Custom Transformations, page 5-26. 5. Default: Specify if the transformation is also selected by default when the corresponding attribute is selected to be used in a new match rule. See: Assigning Scores, Transformations, and Thresholds, page 5-43. 6. Bulk Acquisition: Specify if the attribute and transformation combination can be used in acquisition for match rules with the Bulk Duplicate Identification purpose. Note: For performance reasons, select this option only when necessary. You cannot deselect Bulk Acquisition for transformations that are used, for acquisition, in seeded match rules of Bulk Duplicate
- 119. Data Quality Management 5-25 Identification purpose. 7. Active: To use the transformation, you must activate the transformation for the selected attribute. You cannot inactivate seeded transformations if they are used in seeded match rules. You can, however, activate inactive transformations to use in custom match rules. Note: You cannot remove transformations that are seeded for the attribute or used in seeded match rules. 8. Use Up and Down to order the transformations. For example, the CLEANSE transformation alters the original attribute value more than EXACT does. You would order EXACT before CLEANSE because the transformed value is closer to the original and provides a more precise match. If multiple transactions have Default selected, then this order is reflected when the corresponding attribute is selected for new match rules with the Search purpose. 9. Before you can use new or updated attributes and transformations, you must generate or update your staged schema. See: DQM Staging Program, page 5-61. Related Topics Attributes for DQM, page 5-21 Transformations Overview, page 5-22 Attribute and Transformation Tips, page 5-28 Creating Custom Attributes You can define custom attributes for the entities used in DQM: Party, Address, Contact, and Contact Point. Up to 30 custom attributes are available in each entity. Note: Before creating new attributes, verify that none of the seeded attributes satisfy your needs. Many seeded attributes are inactive, so be sure to check the list of inactive attributes before creating custom attributes. Procedure 1. Write a custom procedure that obtains the custom attribute.
- 120. 5-26 Oracle Trading Community Architecture Administration Guide When a CUSTOM_ATTRIBUTE column needs information about a party, address, contact, or contact point, DQM calls a procedure with this signature: FUNCTION <custom_attribute_proc> p_record_id IN NUMBER, p_entity_name IN VARCHAR2, p_attrib_name IN VARCHAR2, p_context IN VARCHAR2) RETURN VARCHAR2; • p_record_id: The p_record_id value in the signature is the primary key of the table where the CUSTOM_ATTRIBUTE_PROCEDURE is defined. This table displays the appropriate p_record_id value for each entity attribute. Entity Attribute p_record_id Party PARTY_ID Address PARTY_SITE_ID Contact ORG_CONTACT_ID Contact Point ORG_CONTACT_POINT_ID • p_context: The p_context value, STAGE or SEARCH, indicates whether the attribute is to be used in the context of staging or searches. 2. Define the custom attribute using one of the available CUSTOM ATTRIBUTE values. Enter your custom PL/SQL procedure and define transformations for the attribute. See: Defining Attributes and Transformations, page 5-23. Note: If you do not plan to transform the party information for a custom attribute, then use an Exact transformation. Related Topics Attributes for DQM, page 5-21 Creating Custom Transformations You can create transforms to transform any of the TCA Registry attributes in the entities used in DQM: Party, Address, Contact, and Contact Point.
- 121. Data Quality Management 5-27 Procedure 1. Create a PL/SQL function for transforming a TCA table column. Create the transformation in the APPS schema as a PL/SQL function that conforms to the following standard signature: FUNCTION <transformation_function_name> p_original_value IN <ATTRIBUTE_DATATYPE> p_language IN VARCHAR2, p_attribute_name IN VARCHAR2, p_entity_name IN VARCHAR2, p_context IN VARCHAR2 DEFAULT NULL) RETURN VARCHAR2; • p_original_value: The data type of the parameter p_original_value depends on the data type of the attribute that the parameter is transforming. The return value, however, must be VARCHAR2. This table shows an example of p_original_value data types for different attributes. Attribute Name Attribute Code Data Type of p_original_value Party Name PARTY_NAME VARCHAR2 Person Name PERSON_NAME VARCHAR2 Last Update Date LAST_UPDATE_DATE DATE Date of Birth DATE_OF_BIRTH DATE • p_language: You must include this parameter, but cannot use it. • p_context_value: The p_context value, STAGE or SEARCH, indicates whether the transformation is to be used in the context of staging or searches. You can use any PL/SQL procedure that adheres to the above signature as a transformation. 2. Assign your custom PL/SQL function to a transformation. To use the transformation, you must also assign the transformation to at least one attribute. See: Defining Attributes and Transformations, page 5-23. Related Topics Transformations Overview, page 5-22
- 122. 5-28 Oracle Trading Community Architecture Administration Guide Attribute and Transformation Tips When you create and use transformations, consider these issues: • Design and create as many attributes and transformations as possible before populating or updating the staged schema. After defining any new transformations for any attribute, you must run the DQM Staging program to generate or update the staged schema. Processing the staged schema can require significant computing resources and time. If you are uncertain about initially adding a transformation or an attribute with the initial group of transformations and attributes, the best strategy is to add the transformation. • Do not transform lookups. Lookups have a predetermined or known set of values, so you cannot transform them. • Remember that word replacements are called within a transformation. • Consider the possibility that your party information might contain compound names that were entered with the modifier following a comma. For example, The New Datsonville could have been entered into your party information as Datsonville, The New. You can create a transformation that reverses the text before and after the comma in any city name. • If the Domain attribute has only domain values, use the Core Domain Extraction transformation. If the attribute has e-mail addresses, use either the Core Domain Extraction or Full Domain extraction transformation. You can modify or add codes to the: • E-Mail Domain Suffixes (HZ_DOMAIN_SUFFIX_LIST) lookup type, which the Core Domain Extraction transformation uses to identify core domains. • ISP E-Mail Domains (HZ_DOMAIN_ISP_LIST) lookup type, which both transformations use to remove ISP e-mail domains from the matching process. The transformation compares against the code, not lookup meaning or description. See: Defining Receivables Lookups, Oracle Receivables Implementation Guide. Important: Before you can use new or updated lookups, you must generate or update your staged schema. See: DQM Staging Program, page 5-61. Match Rules Overview Match rules determine whether two records should be identified as a match. A match
- 123. Data Quality Management 5-29 rule has one of these purposes: • Search: Mainly for search user interfaces, but also for duplicate prevention. These match rules support matching by evaluating a series of criteria, with the ones yielding the most precise matches first, to return search results with corresponding match percentage. • Bulk Duplicate Identification: For identifying duplicates for a large number of records at one time, using simple logic for fast processing. • Expanded Duplicate Identification: For identifying or preventing duplicates, using more precise and complex logic than Bulk Duplicate Identification. • Integration Services: For identifying duplicates when creating customers using the Create or Save (create operation) Web services. Match rules with Bulk or Expanded Duplicate Identification purpose support score-based matching and consist of two parts, acquisition and scoring. Acquisition provides an initial set of possible matches, and scoring assigns scores to attributes to further filter matches and rank the results. A match rule can be of type: • Single: Contains a single match rule. • Set: Contains multiple match rules and conditions to determine which rule in the set to use. All rules in a set have the same purpose, either Search or Expanded Duplicate Identification. Match rule sets are particularly useful for country-specific processes or entities. For example, countries use different address attributes. You can define a set that has match rules with different address attributes. The conditions would determine which match rule to use, based on the country attribute. Administering Match Rules • Creating, Updating, or Copying Match Rules: Aside from letting you create new custom match rules, DQM provides seeded match rules. See: Seeded Match Rules, Oracle Trading Community Architecture Reference Guide. You can copy and update match rules to meet your specific requirements, or to test variations of an existing custom match rule before you improve or modify the original rule. See: Defining Single Match Rules, page 5-38 and Defining Match Rule Sets, page 5- 52. • Compiling Match Rules: After you initially install DQM, you must compile all the seeded match rules before you can use them, even if just to use them for copying.
- 124. 5-30 Oracle Trading Community Architecture Administration Guide You also need to compile match rules that you create, update, or copy. • Compiled: PL/SQL code for the match rule has been generated. The match rule is locked against changes, but available for use. The lock ensures that the match rule and its compiled PL/SQL code are always synchronized. • Uncompiled: Match rule is previously saved, but now unlocked. An uncompiled match rule cannot be used until it is compiled. You can use the Match Rules page to compile individual or all match rules, or run the DQM Compile All Rules program to compile all rules. See: DQM Compile All Rules Program, page 5-54. Tip: Compile match rules outside of your organization's operational business hours, or at times when no DQM logic is used. Match rules cannot be compiled when DQM is being used for any process, for example to search for records or identify duplicates. Before you can compile any match rule, make sure that the staged schema is generated, or run the DQM Staging program. See: DQM Staging Program, page 5- 61. Note: You cannot change a match rule's purpose after the match rule has been compiled at least once. • Viewing Match Rules: Click the match rule name to view the match rule definition. See: Viewing Match Rules, page 5-58. • Deleting Match Rules: Use the Match Rules page to delete any compiled, custom match rules. Before deleting a match rule, you should make sure that it is not used anywhere. If the rule is in use, replace it with another match rule or consider the consequences of deleting the rule. Related Topics The Matching Process, page 5-30 Data Quality Management Overview, page 5-2 The Matching Process The matching process depends on the purpose of the involved match rule. See: • Search Matching Process, page 5-31. • Expanded Duplicate Identification Matching Process, page 5-32.
- 125. Data Quality Management 5-31 • Bulk Duplicate Identification Matching Process, page 5-34. Related Topics Match Rules Overview, page 5-28 Search Matching Process This diagram describes the DQM matching process involving match rules with the Search purpose. 1. The staged schema stores the transformed TCA Registry attribute values for comparison in the matching process. The included attributes and the transformations applied to each are defined in the Define Attributes and Transformations page. 2. Input records come in when you enter party information or search criteria. 3. The attributes in the match rule assigned the highest level of uniqueness, as defined in the Define Attributes and Transformations page, are transformed by the transformations ordered first in the match rule based on match precision. This combination represents criteria for the most exact matches. For example, the Address 1 attribute provides a more unique value, across records, than the City attribute. The EXACT transformation, which modifies values less than the CLEANSE transformation, would provide more precise matches based on the
- 126. 5-32 Oracle Trading Community Architecture Administration Guide transformed values. So Address 1, defined as the most unique attribute for the Address element, is first transformed by EXACT. 4. The attribute values in the input record that are transformed by the transformations in the match rule are compared against the attribute values in the staged schema to determine matches. Note: In order for an attribute to be shown to the user during search, the attribute must be set for acquisition or both scoring and acquisition. It should not be set at scoring only as the attributes will not be displayed on the UI. 5. For each entity, steps 3 through 4 are repeated in sequence of attribute uniqueness and transformation order. 6. When a maximum number of matches is reached, the match results are returned. Search results from the first sequence, with the most exact criteria, would have the highest match percentages. Related Topics The Matching Process, page 5-30 Expanded Duplicate Identification Matching Process This diagram describes the DQM matching process involving match rules with the Expanded Duplicate Identification purpose.
- 127. Data Quality Management 5-33 1. The staged schema stores the transformed TCA Registry attribute values for comparison in the matching process. The included attributes and the transformations applied to each are defined in the Define Attributes and Transformations page. 2. Input records come in when you enter party information, or run a duplicate identification process. 3. Transformations from the acquisition and scoring phases of the match rule transform the input record, one entity at a time, for the attributes defined in the match rule. 4. The attribute values in the input record that are transformed by the acquisition transformations in the match rule are compared against the attribute values in the staged schema. Matched acquisition attribute values determine the most relevant subset of records from the staged schema to form the work unit. 5. The work unit consists of all records from the staged schema with attribute values that match the transformed acquisition attribute values of the input record.
- 128. 5-34 Oracle Trading Community Architecture Administration Guide The work unit saves you time and resources because this relevant subset of records, not the entire staged schema, can be compared against the input record for scoring. 6. The attribute values in the input record that are transformed by the scoring transformations in the match rule are compared against the attribute values in the work unit. Based on the match rule, a score is calculated for each record in the work unit. 7. Steps 3 through 6 are repeated for each entity. 8. Scores from all entities are added together for each record. 9. The score of each work unit record is compared against the match and Automerge thresholds defined in the match rule. • Records with scores that reach the match threshold are selected as matches for the input record. • Records with scores that also reach the Automerge threshold are automatically merged if Automerge is implemented and the match rule is designated for use with Automerge. Related Topics The Matching Process, page 5-30 Bulk Duplicate Identification Matching Process This diagram describes the bulk duplicate identification process, involving match rules with the Bulk Duplicate Identification purpose.
- 129. Data Quality Management 5-35 1. The staged schema stores the transformed TCA Registry attribute values for comparison in the matching process. The included attributes and the transformations applied to each are defined in the Define Attributes and Transformations page. Also defined are the attribute and transformation combinations to be used for bulk duplicate identification. The staged schema includes B-Tree indexes only for the transformed attributes marked for bulk duplicate identification. 2. A duplicate identification process is started, either for a subset of records in the TCA Registry or for the entire Registry. The transformed version of that set of input records is already represented in the staged schema. 3. With the Bulk Duplicate Identification purpose, the match rule specified for the duplicate identification is applied to the staged schema, which is joined with the input set for bulk comparison. 1. Using the acquisition criteria in the match rule, each record in the input set is compared to all other records in the same staged table.
- 130. 5-36 Oracle Trading Community Architecture Administration Guide For example, an acquisition criterion is the D-U-N-S Number attribute with the Exact transformation. All D-U-N-S Numbers, as transformed by the Exact transformation, would be compared against one another. 2. Matched acquisition attribute values determine the most relevant subset of records from the staged schema to form the work unit. 3. Using the scoring criteria in the match rule, each record in the work unit is compared to all other work unit records in the same staged table. 4. A score is calculated for each record in the work unit, and scores for all entities are added together for determining duplicate parties. 4. The score of each work unit record is compared against the match and automatic merge thresholds defined in the match rule. • Records with scores above the match threshold are selected as potential duplicates. • Records with scores that also exceed the Automerge threshold are automatically merged, if Automerge is implemented and the match rule is designated for use with Automerge. Related Topics Bulk Duplicate Identification, page 5-9. The Matching Process, page 5-30 Integration Services Duplicate Identification Matching Process This diagram describes the duplicate identification process, involving match rules with the Integration Services purpose.
- 131. Data Quality Management 5-37 1. When a person or organization is created in Customer Data Hub, the duplicate identification process checks if HZ: Enable DQM for Integration Services profile option is set to Yes. 2. If data quality is enabled, the DQM Organization/Person Search API uses the following logic to identify if the new organization or person: • If the match score is less than the Match Threshold value then the new organization or person is retained. • If the match score is more than or equal to the Match Threshold value but less than the Automerge Threshold value, then a merge request is created to merge the existing organization or person and the new organization or person. • If the match score is more than or equal to the Automerge Threshold value then an Automerge request is created to merge the existing organization or person and the new organization or person. 3. If more than one existing organization or person is retrieved as a potential match
- 132. 5-38 Oracle Trading Community Architecture Administration Guide for the new organization or person, then the matching process is executed for the record with the highest match score. This rules applies to both, the Automerge and Create Merge request processes. 4. If more than one existing organization or person is retrieved as a potential match for the new organization or person, and all records have the same high match score, then the matching process is executed for the record with the most recent last update date. This rules applies to both, the Automerge and Create Merge request processes. Defining Single Match Rules You define a match rule when you create a custom rule, update an existing custom rule, or copy an existing seeded or custom rule. You cannot update a seeded match rule. When you define match rules, you can specify which attributes are important for matching and configure how the attributes should be evaluated. For each attribute that you use in a match rule, you also assign one or more transformations. For example, you can define a match rule so that only records with the same transformed party name and party number attribute values are considered matches. You can also determine how matching or similar attributes are evaluated to provide meaningful search results or duplicate candidates. For your business needs, you do not need to use all of the functions of match rules with the Expanded Duplicate Identification, Bulk Duplicate Identification, or the Integration Services purpose. • For the simplest type of matching, use only acquisition. • For ranking your results, use scoring. • For filtering results based on the scores, use thresholds. Procedure 1. Enter the basic information for the match rule. See: Entering Match Rule Details, page 5-39. 2. Select attributes for the match rule. See: Selecting Attributes and Defining Usage, page 5-40. 3. (Match rules with Bulk Duplicate Identification and Expanded Duplicate Identification purpose only) Define the usage of the attributes. See: Selecting Attributes and Defining Usage, page 5-40. 4. Assign transformations. For match rules with Bulk Duplicate Identification,
- 133. Data Quality Management 5-39 Expanded Duplicate Identification, and Integration Services purpose only, also define scores and thresholds. Submit the match rule. See: Assigning Scores, Transformations, and Thresholds, page 5-43. 5. Compile the match rule. See: Compiling Match Rules, page 5-29. Related Topics Match Rules Overview, page 5-28 The Matching Process, page 5-30 Match Rule Example, page 5-47 Entering Match Rule Details Note: The match rule purpose that you select determines various aspects of defining the match rule, for this as well as subsequent procedures. Procedure 1. Enter the basic information for the match rule, including its name and purpose. Note: You cannot change a match rule's purpose after the match rule has been saved. 2. For match rules with Expanded Duplicate Identification, Bulk Duplicate Identification, or Integration Services purpose, specify for the search operator if a record must match any or all acquisition attributes to be considered a match. Even if you select Match Any, a record still must match all acquisition attributes within the same entity, except Party. For example, for acquisition, you have only the Party Name and D-U-N-S Number attributes from the Party entity, and City and State from the Address entity. If a record matches only D-U-N-S Number, it is considered a match. If it matches only State, it is not considered a match. Because City is also from the Address entity, the record would need to match both City and State. 3. For match rules with Expanded Duplicate Identification, Bulk Duplicate Identification, or Integration Services purpose, indicate if the Allow Automerge check box must be selected. See: Automerge, page 5-72. Caution: You cannot undo automatic merges. For Automerge, use
- 134. 5-40 Oracle Trading Community Architecture Administration Guide only match rules that provide exact matches. 4. For match rules with Search purpose, indicate if the match rule can be used to identify existing records that are possible duplicates of a new record, to prevent duplicates from being saved. Related Topics Defining Single Match Rules, page 5-38 Selecting Attributes and Defining Usage After you have entered basic details for the match rule you are creating, you select attributes to include in the match rule and, for match rules with Expanded Duplicate Identification or Bulk Duplicate Identification purpose, define the usage of each attribute. After this procedure, assign transformations and, for match rules with Expanded Duplicate Identification or Bulk Duplicate Identification purpose, optionally scores and thresholds. See: Assigning Scores, Transformations, and Thresholds, page 5-43. Procedure 1. Select attributes, from the Party, Address, Contact, and Contact Point entities, that help you obtain all relevant matches. For example, if you want to find records that have matching names, include the Party Name attribute in the match rule. Note: Only defined attributes are available for you to select. See: Defining Attributes and Transformations, page 5-23. If this match rule has the Bulk Duplicate Identification purpose, and you plan to use this rule for bulk import, then do not select user-defined custom attributes. See: Bulk Import Overview, Oracle Trading Community Architecture User Guide. If you are defining a match rule with the Search purpose, the selected attributes determine the search criteria that appear in the user interface. The actual prompt that appears for each criterion is the user defined name. See: Defining Attributes and Transformations, page 5-23. 2. (Bulk Duplicate Identification, Expanded Duplicate Identification or Integration Services only) Define the usage of the selected attributes in the match rule.. • Acquisition: Used for comparing an input record to the records in the staged
- 135. Data Quality Management 5-41 schema, to obtain an initial set of matched records. If you specify more than one acquisition attribute in the match rule, the search operator that you defined for the match rule determines whether all or any attribute must match to determine if the input record is a match to a record in the staged schema. See: Defining Single Match Rules, page 5-38. Do not be too restrictive with your acquisition if you want fairly loose matches. For example, if you use the Address, City, and State attributes for acquisition, with the Match All search operator, then a record must have the same combination of address, city, and state to match. If you use just City and State, however, you will have more potential matches, and can still use address as a match criterion by including Address as a scoring attribute. The initial set of matched records obtained by acquisition is called the work unit. A work unit includes all records with acquisition attribute values, transformed using the transformations, that match attribute values of the input record. The work unit can be the final set of matches or used for scoring. If you only want to consider this initial set of matched records, you do not have to define scoring attributes and specify thresholds or scores. You would have a match rule that requires that a record matches any or all acquisition attributes you have selected. • Filter: Used in acquisition so that the attribute must be a match in the work unit. The search engine groups filter attributes of the same entity under a match-all condition, even the Party entity. Note: If the attribute's type is Lookup, then the DQM search engine defaults that attribute as a filter because the values of the attribute are usually not unique across records. For example, this table displays a set of acquisition attributes: Attribute Name Entity Type Filter Default as Filter Party Name Party Yes No D-U-N-S Number Party Yes No CEO Name Party No No Address 1 Address No No
- 136. 5-42 Oracle Trading Community Architecture Administration Guide Attribute Name Entity Type Filter Default as Filter Country Address Lookup Yes Yes Phone Number Contact Point No No If the match rule's search operator is Match Any, then all of the returned records will match either of the following criteria: • Party Name and D-U-N-S Number • Address 1 and Country Even though the search operator is Match Any, and Address 1 is not a filter, all acquisition attributes within the same entity, other than Party, must be a match. In this case, because they are filters within the same entity, party attributes Party Name and D-U-N-S Number both also must match. See: Defining Single Match Rules, page 5-38. Note: Attributes used as filters are only used in acquisition, not scoring, because all records must contain these filter attributes. • Scoring: Used to score the records in the work unit. With the scoring component of a match rule, records that do not exactly match the values of the acquisition attributes values can still be considered a match. Note: Scoring attributes do not have to be the same as the acquisition attributes, and you can use more attributes for scoring. For best results with match rules with the Search purpose, however, use the same attributes for both acquisition and scoring. You must have acquisition attributes from each entity that has scoring attributes in the same match rule. For example, if you have scoring attributes from the Party and Contact Point entities, you must also have acquisition attributes from those two entities, even if not the exact same attributes. Related Topics Defining Single Match Rules, page 5-38 The Matching Process, page 5-30
- 137. Data Quality Management 5-43 Assigning Scores, Transformations, and Thresholds After you have selected attributes for the match rule and defined their usage, assign transformations for each attribute. For match rules with Bulk Duplicate Identification or Expanded Duplicate Identification purpose, you also define the scores and weights used to calculate the match score for each record in the work unit. The match score for the entire record is the sum of the actual weighted attribute scores. This match score is the value that is compared to the match rule thresholds to evaluate the record in the work unit. Procedure for Match Rules with Search Purpose 1. To specify the order in which attributes appear as search criteria, assign a number to every attribute. Use positive integers greater than 0. The numbering does not have to be gapless. For example, if you have four attributes, the first row of displayed search criteria contains attribute 1 and 2, from left to right. The second row contains attribute 3 and 4, from left to right. All attributes without an assigned number are displayed last. 2. Assign at least one transformation for each attribute. You can choose more than one transformation for each of the attributes in the match rule. Tip: Use the fewest transformations possible in your match rule. Using more transformations than necessary could affect the time required for staging and the performance of your search. Transformations that appear by default were selected to do so, in the specified order, on the Define Attributes and Transformations page. See: Defining Attributes and Transformations, page 5-23. 3. Use Up and Down to order the transformations. For example, the CLEANSE transformation alters the original attribute value more than EXACT does. You would order EXACT before CLEANSE because the transformed value is closer to the original and provides a more precise match. This order determines how the search is processed. See: Search Matching Process, page 5-31. 4. You can save the match rule definition and compile it later. A new or updated match rule cannot be used until it is compiled. See: Compiling Match Rules, page 5- 29.
- 138. 5-44 Oracle Trading Community Architecture Administration Guide Procedure for Match Rules with Bulk Duplicate Identification or Expanded Duplicate Identification Purpose This table describes some terms in the pages used for this procedure. Selected Terminology Term Description Score A numeric value awarded to a record if the attribute is evaluated as a match. If the attribute does not match, then a score of zero is assigned. This score is then multiplied by the weight percentage of the attribute, if any, to determine the final weighted attribute score that counts toward the match score of the record. Weight A percentage used to determine a weighted score. If a transformed attribute value is a match, the weight is multiplied by the attribute score to determine the weighted score of the attribute. If an attribute is assigned more than one transformation, the highest weighted score is awarded to the record for the attribute. For example, you assign the Party Type scoring attribute a score of 50, and assign the transformations Exact and Cleanse to that attribute. You give Exact a 80% weight and Cleanse 50%. If the Party Type attribute is a match with both transformations, the attribute's weighted score would be 40. Adjusted Score The attribute score multiplied by the weight percentage for the attribute and transformation combination. Match Threshold A threshold that must be met for records to be considered a match. The Match Threshold for search rules is expressed as a percentage. Automerge Threshold A threshold that must be reached for Automerge. A record with a score equal to or above the Automerge threshold is marked by default as a candidate for merge without manual intervention. The record will be automatically merged if Automerge is implemented.
- 139. Data Quality Management 5-45 Term Description Similarity An algorithm that compares the transformed attribute value of the input record to the corresponding attribute value from the work unit record and assigns a percentage for the extent of similarity. This similarity percentage is the edit distance between two strings, or groups of text, computed as follows: 1. Determine the edit distance, or the number of changes required to make the longer string match the shorter string. For example, for Smythe and Smith, the edit distance is two. 2. Subtract the edit distance from the number of characters in the longest string. Following the example above: 6 - 2 = 4. 3. Divide the amount calculated in step 2 by the number of characters in the longest string. Continuing the example: 4/6 = 0.6666. 4. Express the result as an integer. In this example the result would be a similarity score of 67. If two strings are identical, then the similarity percentage equals 100. If no characters in the two strings are the same, then the similarity percentage is zero. 1. Rank your scoring attributes in order of importance by assigning scores in the form of integers. Assign the highest score to the attribute that you consider the most important for a match. 2. Assign at least one transformation for each acquisition, filter, and scoring attribute. DQM applies the selected transformations to that attribute before the input record is compared to the record in the work unit. You can choose more than one transformation for each of the attributes in the match rule. Tip: Use the fewest transformations possible in your match rule. Using more transformations than necessary could affect the time required for staging and the performance of your search. If the match rule has the Bulk Duplicate Identification purpose, then only transformations marked for Bulk Acquisition on that page are available for the corresponding attribute. See: Defining Attributes and Transformations, page 5-23.
- 140. 5-46 Oracle Trading Community Architecture Administration Guide 3. For scoring attributes, optionally assign weights and, available through personalization, similarity matching. You also specify if the attribute and transformation combination is used in acquisition or scoring processes when the match rule runs. • Weight: Assign percentage weights to the transformations depending on how similar the transformed value of the attribute would be to the original values of the attribute. For example, you should assign more weight to the Exact transformation than to the Cleanse transformation because Exact makes fewer changes to the original data. • Similarity: The Similarity matching option does not require an exact match, letting you create fuzzier matches by applying the similarity algorithm to transformed attribute values. The similarity algorithm compensates for unanticipated errors that the transformations do not catch. If the computed percentage is greater than or equal to the similarity percentage that you define in the match rule, the attribute is considered a match. If you select the Similarity option, you must enter this similarity percentage. Note: The Similarity option requires additional computing resources and time. 4. Define match rule thresholds. Note: Make sure that: • You do not set any thresholds too low. Low thresholds might let combinations of attributes pass as matches that are not significant. • Each threshold is less than the sum of the possible scores of all attributes. • Match Threshold: To compute what you should enter, determine the minimum set of attributes required for a match. The total of the attribute scores of this minimum set is the maximum value of the match threshold. • Automerge Threshold: You can enter this threshold only if the match rule is allowed for Automerge. See: Defining Single Match Rules, page 5-38. To compute the Automerge threshold, determine the minimum set of attributes required for considering two parties for merge. The total of the attribute scores of this minimum set is the maximum value for the Automerge threshold. The automatic merge threshold must be more than or equal to the match
- 141. Data Quality Management 5-47 threshold. Caution: You cannot unmerge records that are automatically merged. Set the automatic merge threshold high enough to prevent merging records that are not definite duplicates. 5. You can save the match rule definition and compile it later. A new or updated match rule cannot be used until it is compiled. See: Compiling Match Rules, page 5- 29. Related Topics Defining Single Match Rules, page 5-38 The Matching Process, page 5-30 Match Rule Example This section provides an example of how you can develop a match rule. This example focuses on the scoring and threshold components, detailing the thought process you might take to create an effective match rule. Preparing for the Match Rule 1. Create a list of all of the attributes that should match between two matching records. This list should include attributes that are really important as well as attributes that are just good to have as matches. For this example, this table shows the following list of attributes: Attribute Name Entity Type Party Name Party Phone Number Contact Point Address1 Address Country Address Lookup Postal Code Address Contact Last Name Address 2. Rank the order of importance of the attributes, as shown in this table:
- 142. 5-48 Oracle Trading Community Architecture Administration Guide Rank Attribute Name Entity Type 1 Party Name Party 2 Phone Number Contact Point 3 Contact Last Name Contact 4 Address1 Address 5 Country Address Lookup 6 Postal Code Address This ranking indicates that the attribute score you assign to party name is the highest and the scores are lower or stay the same as you go down the ranking. 3. Identify the minimum sets of attributes you require to match for records to be considered matches, for example: • Only the party name • Only the phone number This requirement indicates that your acquisition attributes should at least include party name and phone number and that you should select the Match Any search operator. 4. Identify the sets of attributes that by themselves are not good enough to indicate that you have matching records, but which, if they were close enough matches, might give additional credence to a match on the minimum set of party name and phone number. • Only address • Only country • Only postal code • Only address and country • Only address and postal code • Only country and postal code
- 143. Data Quality Management 5-49 • Only contact last name This selection determines the attributes that you need to include as scoring attributes. Selecting Attributes and Assigning Scores 1. You should select the Match Any search operator because you have two sets in step 3 of Preparing for the Match Rule. 2. Choose attributes from step 1 of Preparing for the Match Rule that would get you all of the possible matches. You must include the attributes from step 3 of Preparing for the Match Rule. For this example, you select: • Party Name • Phone Number • Contact Last Name 3. Select attributes from step 1 of Preparing for the Match Rule that you want to use to score the records. You must include the attributes from step 4 of Preparing for the Match Rule. This table shows the scoring attributes. Attribute Name Entity Type Party Name Party Phone Number Contact Point Address1 Address Country Address Lookup Postal Code Address Contact Last Name Contact 4. Assign scores to the scoring attributes following the ranking in step 2 of Preparing for the Match Rule. The most important attributes receive the highest scores. For this example, the score assignments should reflect the following: • Matches on party name provide the best match results, so you assign the highest score to party name.
- 144. 5-50 Oracle Trading Community Architecture Administration Guide • Matches on a phone number might be the second best matching criterion, so you assign the next highest score to phone number. • Combinations of the address components and contact last name are the third best, so you assign scores by relative importance. • The contact last name attribute is estimated to have about the same value as the address1 attribute. For this example, the scores in this table are assigned to the scoring attributes. Scoring Attributes Scores Party Name 40 Phone Number 30 Address1 15 Country 10 Postal Code 10 Contact Last Name 15 The total score for the attributes in this table is 120. Setting the Match Threshold 1. Obtain minimum sets from step 3 of Preparing for the Match Rule and total attribute scores from step 4 of Selecting Attributes and Assigning Scores. • For Party Name the total attribute score is 40. • For Phone Number the total attribute score is 30. 2. Set your match threshold based on the lower score of the two minimum sets, in this example, 30. With the match threshold at 30, you can interpret scoring as follows: • If only the phone number is a match, the record is a match because the score equals the match threshold of 30. • If only the party name is a match, then the record is a match because the score exceeds the match threshold of 30.
- 145. Data Quality Management 5-51 • If the country, postal code, and contact last name are a match, then the record is a match because the attributes' combined score of 35 exceeds the match threshold of 30. • If the address1, country, and postal code are a match, then the record is a match because the attributes' combined score is 35, which exceeds the match threshold of 30. With the match threshold at 30, this table shows results of possible matches: Possible Matches Cumulative Score Match Party Name 40 Yes Phone Number 30 Yes County, Postal Code, and Contact Last Name 35 Yes Address1, Country, and Postal Code 35 Yes Party Name and Phone Number 70 Yes Phone Number and Country 40 Yes Address1 and Country 25 No Country and Postal Code 20 No Party Name, Address1, and Contact Last Name 70 Yes Considering the Impact of Transformations on Your Thresholds If you have transformation weights other than 100%, then you might need to tune your threshold. With weights other than 100%, the total score for the record can be lower than the match threshold that you assigned. The total score is the sum of attribute scores that are multiplied by the weight. For example, a minimum set of attributes required for match consists of party name. The following table shows the transformations and weights assigned to the Party Name attribute, as well as the weighted attribute scores calculated for each transformation. Party Name Attribute with Attribute Score 40
- 146. 5-52 Oracle Trading Community Architecture Administration Guide Transformation Weight % Weighted Attribute Score Calculation Exact 100 100% * 40 = 40 Reverse 80 80% * 40 = 32 Cleanse 50 50% * 40 = 20 Depending on the transformations, a matching party name can have a weighted attribute score below 40. With a weighted score of 20, for example, this minimum set might not exceed the match threshold of 30. If you want all possible matches that originate from any of the transformations, you might want to adjust some of your values. You have three options: 1. Decrease the match threshold to the lowest possible weighted attribute score. Performing this option might affect the scores of other attributes and thresholds. 2. Increase the weight of the transformations so that the lowest possible weighted attribute score exceeds the match threshold. This option might not always be possible because weights must be less than or equal to 100. 3. Increase the attribute score so that the lowest possible weighted attribute score exceeds the match threshold. For example, you can increase the Party Name attribute score to 60 and the Cleanse transformation weight to 70%. This table shows the adjusted assignments with each possible weighted attribute score exceeding the match threshold of 30. Party Name Attribute with Attribute Score 60 Transformation Weight % Weighted Attribute Score Exact 100 60 Reverse 80 48 Cleanse 70 42 Defining Match Rule Sets You define a match rule set when you create a set, as well as update or copy an existing
- 147. Data Quality Management 5-53 set. Procedure 1. Enter the basic information for the match rule set, including its name and the purpose of all match rules in the set. The Bulk Duplicate Identification purpose is not used in match rule sets because bulk duplicate identification processes in bulk. For match rule sets to function effectively, the records must be processed row by row. Note: After a set is first created and compiled, you cannot change the purpose when you later update or copy the match rule set. 2. Specify a fallback match rule, at least one match rule to include in the set, and the conditions under which to use each match rule. All combinations of the condition components must be unique. Note: If a match rule set with Search purpose is used to render search UI, then the superset of all attributes in the set is the displayed search criteria. For example, to run a match rule for Australian addresses, you define the condition as: • Entity: Address • Attribute: Country • Operation: Equals • Value: Australia Note: The value is not case sensitive. 3. Define the order in which the match rule set conditions are evaluated. The first condition to be met determines which match rule runs. You can save the match rule set definition and compile it later. A new or updated match rule set cannot be used until it is compiled. See: Compiling Match Rules, page 5-29. Related Topics Match Rules Overview, page 5-28
- 148. 5-54 Oracle Trading Community Architecture Administration Guide DQM Compile All Rules Program Use the DQM Compile All Rules program when you initially install DQM to compile the seeded match rules provided by TCA. You can also use this program to compile all of the match rules that you create or update. You can compile selected match rules in the Match Rules page, while this program always compiles all rules. The program attempts to compile all match rules even if certain match rules fail to compile. Match rules that are already compiled remain compiled, and match rules that can be successfully compiled are compiled. Match rules that fail to compile are left uncompiled. You can see the compile status of each match rule in the Match Rules page. Prerequisites Before you can compile your match rules, you must run the DQM Staging program. For more information, see: DQM Staging Program, page 5-61. Related Topics Compiling Match Rules, page 5-29 Quality Adjusted Search Results The Quality Adjusted Search Results feature takes a record's match percentage, as determined by a match rule, and adjusts it based on what you define as quality. This feature applies only to searches, or matching processes using match rules of type Search, and only to records with scores that reach the match rule's match threshold percentage value. You get search results that are based on both similarity to search criteria and quality, sorted by the quality adjusted match percentage. If the HZ: Enable Quality Weighting for DQM Match Scores profile option is set to Yes, then DQM applies two user hook procedures to search results that reach the match threshold. The first procedure determines the quality weighting, or the percentage of the final adjusted match percentage that should be based on quality. The second determines the quality score, which represents the user-defined quality of a record, with 100 as the highest possible. To set up, you must: • Set the HZ: Enable Quality Weighting for DQM Match Scores profile option to Yes. See: DQM Deployment Category, page B-18. • Create two user hook procedures for determining quality weighting and quality scores. See: Creating Logic for Quality Adjusted Search Results, page 5-56.
- 149. Data Quality Management 5-55 Example This table shows the records that a match rule has identified as search results, with the match percentages that the match rule has calculated. Record Match Percentage A 70% B 67% C 65% D 62% The first user hook procedure determines that the quality weighting is 20%, and the second procedure calculates the quality scores as shown in this table. Record Match Percentage Quality Score A 70% 50 B 67% 20 C 65% 60 D 62% 80 If 20% of the final adjusted match percentage is from the quality score, then 80% is from the original match percentage. The match percentage must be adjusted to be out of 80%, not 100%. This adjustment, for the weighted match percentage, is calculated as: Weighted Match Percentage = Match Percentage * (100 - Quality Weighting) / 100 The quality score must also be adjusted based on the quality weighting of 20%. The weighted quality percentage is calculated as: Weighted Quality Percentage = Quality Score * Quality Weighting / 100 This table shows the weighted match percentages and weighted quality percentages, with quality weighting of 20%.
- 150. 5-56 Oracle Trading Community Architecture Administration Guide Record Match Percentage Weighted Match Percentage Quality Score Weighted Quality Percentage A 70% 56% 50 10% B 67% 53.6% 20 4% C 65% 52% 60 12% D 62% 49.6% 80 16% The final quality adjusted match percentage is calculated by adding the weighted match percentage and the weighted quality percentage. This table shows the search results, sorted by the quality adjusted percentages. Record Weighted Match Percentage Weighted Quality Percentage Quality Adjusted Match Percentage A 56% 10% 66% D 49.6% 16% 65.6% C 52% 12% 64% B 53.6% 4% 57.6% Note how the order of the records have changed when quality is taken into account. Creating Logic for Quality Adjusted Search Results For the logic to use in calculating quality adjusted search results, you must write two user hook procedures for the HZ_DQM_QUALITY_UH_PKG package: get_quality_weighting and get_quality_score. These procedures let you implement the logic to use, according to your organization's needs and definitions of quality. The template code for the HZ_DQM_QUALITY_UH_PKG package is present in the file $AR_TOP/patch/115/sql/ARHDQUHB.pls, which has dummy implementations for the user hook procedures. Copy this file and provide actual implementations for the quality weighting and scoring procedures.
- 151. Data Quality Management 5-57 get_quality_weighting • Input: The ID of the match rule used for the search • Output: A number that represents the quality weighting for calculating the quality adjusted match percentage, based on the input match rule In the get_quality_weighting procedure, include all the possible search match rules that are used for quality adjusted search results. You can assign different quality weighting to the match rules. Example FUNCTION get_quality_weighting(p_match_rule_id IN NUMBER) RETURN NUMBER IS l_quality_weighting NUMBER := 0; BEGIN IF (p_match_rule_id = 8) THEN l_quality_weighting := 20; ELSIF (p_match_rule_id = 10) THEN l_quality_weighting := 25; END IF; RETURN l_quality_weighting; EXCEPTION WHEN OTHERS THEN RAISE; END get_quality_weighting; For example, a search is run using the match rule with the ID of 10. The get_quality_weighting procedure would determine that 25% of the quality adjusted match percentage is based on the quality score. The remaining 75% is based on the original match percentage. get_quality_score • Input: An entire record, including all the column values from the HZ_PARTIES table, and the ID of the match rule used for the search • Output: A number that represents the quality score for the input record, indicating its quality level, with 100 as the highest In the get_quality_score procedure, include all the possible search match rules that are used for quality adjusted search results. The logic in this procedure can be as simple or complex as you need. You can base the logic only on record values passed to the procedure, for example the certification level or whether a DUNS Number exists or not. For a more complex approach, you can instead take the passed values and use them to join to any number of tables to determine quality, or to call other procedures, APIs, programs, and so on. Caution: The more complex the procedure, the more the performance might be negatively affected.
- 152. 5-58 Oracle Trading Community Architecture Administration Guide Example FUNCTION get_quality_score(p_match_rule_id IN NUMBER, p_hz_party_rec IN HZ_PARTIES%ROWTYPE) RETURN NUMBER IS l_quality_score NUMBER := 0; BEGIN IF (p_match_rule_id = 8) THEN IF p_hz_party_rec.duns_number IS NOT NULL THEN l_quality_score := 50; END IF; ELSIF (p_match_rule_id = 10) THEN IF p_hz_party_rec.duns_number IS NOT NULL THEN l_quality_score := 35; END IF; END IF; RETURN l_quality_score; EXCEPTION WHEN OTHERS THEN RAISE; END get_quality_score; For example, a search is run using the match rule with the ID of 10, and the record that is evaluated has a DUNS Number. The get_quality_score procedure would assign this record a score of 75. Related Topics Quality Adjusted Search Results, page 5-54 Viewing Match Rules View the details of match rules of type Single or Set. • Single: • Match Rule Definition: The match rule details entered in the first step of defining a match rule. See: Entering Match Rule Details, page 5-39. • Attributes and Transformations (match rules with Search purpose) or Attributes, Transformations, and Scores (match rules with Expanded Duplicate Identification and Bulk Duplicate Identification purpose): • The attributes selected for the match rule. See: Selecting Attributes and Defining Usage, page 5-40. • The transformations defined for each attribute. See: Assigning Scores, Transformations, and Thresholds, page 5-43. • The thresholds defined for the match rule, if any. See: Assigning Scores, Transformations, and Thresholds, page 5-43. • Set: The details entered for defining a match rule set. See: Defining Match Rule Sets,
- 153. Data Quality Management 5-59 page 5-52. Related Topics Match Rules Overview, page 5-28 Staged Schema The staged schema is a separate set of database tables with a portion of the data from the TCA Registry that transformations have standardized for improved matching. During matching, the input record is compared against the records in the staged schema instead of the original Registry. To enable efficient searches, the staged schema is indexed using Oracle interMedia and B-Tree indexes. DQM searches against the indexes to take advantage of high performance capabilities in searching through large quantities of data. Staged Schema Features Each table in the staged schema contains attribute values for each entity: Party, Address, Contact, and Contact Point, and can include up to 30 custom attributes. In the Define Attributes and Transformations page, you define the attributes that you want in the staged schema as well as the transformations to apply to each attribute value. See: Defining Attributes and Transformations, page 5-23. For example, for the Party entity, you can include the party name attribute and specify two transformations to transform the party names. Each attribute, in essence, corresponds to a column in a TCA Registry table that stores the attribute value, and the staged schema contains the transformed version of those values. See: Seeded Attributes, Oracle Trading Community Architecture Reference Guide. This table shows the mapping of the TCA Registry to the staged schema. The staged schema table that is used depends on the program you run to stage data. See: Administering the Staged Schema, page 5-60. Entity TCA Registry Table Staged Schema Table Party HZ_PARTIES HZ_STAGED_PARTIES Address HZ_PARTY_SITES HZ_STAGED_PARTY_SITES_SHA DOW HZ_STAGED_PARTY_SITES Contact HZ_CONTACTS HZ_STAGED_CONTACTS
- 154. 5-60 Oracle Trading Community Architecture Administration Guide Entity TCA Registry Table Staged Schema Table Contact Point HZ_CONTACT_POINTS HZ_STAGED_CONTACT_POINTS Administering the Staged Schema Data Quality Management lets you: • Create and update the staged schema. See: DQM Staging Program, page 5-61. • Synchronize the staged schema with the TCA Registry. See: DQM Synchronization Method, page 5-64. interMedia Indexes interMedia indexes speed up the acquisition phase of the matching process by quickly limiting the number of parties to evaluate for scoring. interMedia indexes are built using inverted indexes, a structure that differs from normal indexes. DQM provides four inter Media indexes, one for each entity. You can: • Create and update interMedia indexes. See: DQM Staging Program, page 5-61. • Optimize interMedia indexes. See: DQM Index Optimization Program, page 5-63. • Synchronize interMedia indexes with TCA Registry data. See: DQM Synchronization Method, page 5-64. B-Tree Indexes B-Tree indexes are created in the staged schema only for attributes that were transformed for bulk duplicate identification. These indexes provide increased performance over interMedia indexes, and are used only for matching processes that involve match rules with the Bulk Duplicate Identification purpose. See: Bulk Duplicate Identification, page 5-9. You can: • Create and update B-Tree indexes. See: DQM Staging Program, page 5-61. • Synchronize B-Tree indexes with TCA Registry data. See: DQM Synchronization Method, page 5-64.
- 155. Data Quality Management 5-61 Related Topics Data Quality Management Overview, page 5-2 DQM Staging Program Use the DQM Staging program to create the staged schema, B-Tree, and interMedia indexes. This program applies transformations to a portion of the data contained in the TCA Registry and generates a separate schema with the transformed and standardized data. When you specify in the Staging Command parameter to create indexes, the DQM Index Creation program automatically runs to generate interMedia and B-Tree indexes for the staged schema. Invoke the DQM Index Creation program not just to create indexes for the first time, but also to reindex the entire staged schema whenever necessary. Tip: You can use the HZ: DQM Index Creation Memory profile option to override the default amount of memory that is allocated for creating interMedia indexes. See: Profile Options and Profile Option Categories, page B-1. The time that the program takes to create the staged schema depends on the size of your database and the number of attributes and transformations that you defined. To decrease the amount of time, you can specify how many parallel workers to use when you run the DQM Staging program. Workers are processes that run at the same time to complete a task that would otherwise take longer with a single process. The DQM Staging program invokes the DQM Stage Worker, which spins off parallel workers for staging the data. Aside from creating the entire staged schema and the interMedia indexes, you can also run the DQM Staging program to: • Stage data using only new transformations • Generate only mapping procedures, which map attributes to the source columns of the attribute values • Regenerate only missing or invalid interMedia indexes • Estimate the table disk space needed to stage all data and create indexes You should estimate the disk space first before actually staging data. The report output displays, in megabytes, the space required to stage each entity and create all indexes, as well as the total for all entities and indexes.
- 156. 5-62 Oracle Trading Community Architecture Administration Guide Note: Run the DQM Staging program every time that you add or modify attributes or transformations. See: Defining Attributes and Transformations, page 5-23. Prerequisites Before you submit the DQM Staging program, you must define attributes and transformations. See: Defining Attributes and Transformations, page 5-23. Program Parameters • Number of Parallel Staging Workers: Enter the number of parallel staging workers, between one and ten, that you want to use to create the staged schema, or leave the parameter blank. The DQM Stage Worker runs with one worker if you leave the parameter blank. • Staging Command: Enter what you want the program to accomplish. This table shows the options. Staging Command Description CREATE_INDEXES Create Indexes: To invoke the DQM Index Creation program to generate indexes for the staged schema. CREATE_MISSING_INVALID_INDEXES Recreate Missing and Invalid DQM Indexes: To invoke the DQM Index Creation program to regenerate missing or invalid indexes ESTIMATE_SIZE Estimate Disk Size for Staging: To estimate the disk space required to stage all data and create indexes. GENERATE_MAP_PROC Generate mapping procedures: To generate only mapping procedures. STAGE_ALL_DATA Stage all data, create indexes, and generate map procedures: To stage all data, create indexes, and generate mapping procedures. STAGE_NEW_TRANSFORMATIONS Stage new transformations: To stage data using only new or modified transformations.
- 157. Data Quality Management 5-63 Staging Command Description STAGE_NEW_TRANSFORMATIONS_NO_ INDEXING Stage new transformations with no indexing: To stage data using only new or modified transformations without rebuilding indexes. • Continue previous execution: Enter Yes to continue running a previous DQM Staging program that did not finish. Enter No to run a new DQM Staging program. • Index Creation Tablespace: Enter the table space where the interMedia indexes are to be created in. • Index Creation: Enter PARALLEL to generate multiple indexes at the same time, based on the number of parallel workers that you specified. Enter SERIAL to create indexes one after another, even if you specified parallel workers. Related Topics Staged Schema, page 5-59 DQM Index Optimization Program Use the DQM Index Optimization program to optimize interMedia indexes. You can schedule this program to run on a periodic basis. In general, you can run the DQM Index Optimization program less frequently than the DQM Synchronization program. The DQM Index Optimization program improves the performance of interMedia searches, which gradually degrades over time. You should run this program once in a while, but frequent optimization is not mandatory. The DQM Synchronization program, however, synchronizes data between the TCA Registry and the staged schema, so you should run this program as often as possible to keep the search results accurate. See: DQM Synchronization Program, page 5-64. Prerequisites Before you submit the DQM Index Optimization program, you must make sure that both the staged schema and interMedia indexes exist. Related Topics Staged Schema, page 5-59
- 158. 5-64 Oracle Trading Community Architecture Administration Guide DQM Synchronization Method Select either the Automatic or Batch synchronization method, or Disable for no synchronization between the staged schema and the TCA Registry. Synchronization ensures that any new or updated data in the TCA Registry is reflected in the staged schema, and interMedia and B-Tree indexes. • Automatic: When data is inserted or updated in the TCA Registry through: • User interfaces or APIs, the staged schema is immediately synchronized. • Bulk Import or Customer Interface, the staged schema is synchronized in a controlled manner, given the potentially large volume of records. A queue is created, and a maximum of 100 records are synchronized at one time. See: Bulk Import Overview, Oracle Trading Community Architecture User Guide or Customer Interface, Oracle Trading Community Architecture User Guide. Optionally enable search on records with interMedia indexes that are not yet synchronized. Caution: Enabling this option can cause decrease in search performance. • Batch: Schedule the DQM Synchronization program to periodically run. See: DQM Synchronization Program, page 5-64. Related Topics Staged Schema, page 5-59 DQM Synchronization Program Use the DQM Synchronization program to synchronize an existing staged schema with the TCA Registry. The program: • Includes Registry records of any source, updated and created through user interfaces, APIS, or batch loading. • Updates interMedia and B-Tree indexes after updating the staged schema. You can schedule the DQM Synchronization program to be run on a periodic basis. The frequency that you want to submit this program with depends on: • How often the information in the TCA Registry usually changes • How often you search against the TCA Registry
- 159. Data Quality Management 5-65 • How much processing power you have If you run the program frequently, the data in the staged schema and indexes are sooner updated for your searches. The interMedia indexes, however become less optimal and slower to use. To optimize the interMedia indexes, see: DQM Index Optimization Program, page 5-63. Prerequisites • Select Batch as the synchronization method if you are scheduling the program to periodically run. See: DQM Synchronization Method, page 5-64. • Make sure that both the staged schema and indexes exist. Program Parameter Number of Workers: Enter the number of parallel workers, between one and ten, that you want to use to synchronize the staged schema, or leave the parameter blank. The synchronization runs with one worker if you leave the parameter blank. Related Topics Staged Schema, page 5-59 Merge Dictionary Overview The Merge Dictionary stores the entities and procedures that must be processed to merge party entities for any Oracle application. During the merge process, each procedure sequentially executes for the entities defined in the Dictionary. Merge programs use the information in the Merge Dictionary to recognize which entities to merge, and they recognize the foreign keys and procedures without the need to recompile or regenerate the application code. Each Oracle application maintains its own tables to store the information required to complete its business functions. During a merge process, all registered applications must be able to access the data for the appropriate entity that is related to the TCA Registry. If a merge procedure attempts to access a deleted party, the transaction, attributes, and other information for the party cannot be merged. To maintain how Oracle applications are affected by the merge process, you register the entities, for example Accounts, Organization Contacts, and Party Sites, foreign keys, and procedures for specific Oracle applications in the Merge Dictionary. See: Maintaining the Merge Dictionary, page 5-66. For example, if your company enters into a service contract with one of the parties in your Registry, you would use Oracle Receivables to send invoices and statements to that party and Oracle Service to administer that service contract. If that party is acquired by another party, is identified as a duplicate of another party, or has sites that must be consolidated, you must merge those parties or party sites. This party merge
- 160. 5-66 Oracle Trading Community Architecture Administration Guide affects customer accounts and attributes of the parties in Oracle Receivables, Oracle Service, and other Oracle Applications. The registration specifies the names of the procedures required to merge the entities that interact with the party entities. These entities can be identified using the foreign key attributes that they contain. If any entity contains an attribute that is a foreign key to any of the TCA entities, these entities should be part of the Merge Dictionary and a procedure should be created to handle the records in this entity during the merge process. Some Oracle Applications, along with their party entities, are automatically registered at installation. If you have installed any of these applications, when you perform a merge, the entities associated with the parties in these applications are merged as well. See: Party and Account Merge Impact, Oracle Trading Community Architecture Reference Guide. Related Topics Data Quality Management Overview, page 5-2 Maintaining the Merge Dictionary With the Merge Dictionary, you determine the sequence of entities to merge, as well as view, update, and add seeded or custom entities. You add entities as a child of another entity. The parent entity is merged before the child, and the foreign key of the child points to the parent. You can delete custom entities from the Merge Dictionary. The data from deleted entities will not be merged during any merge process, and all child entities under the deleted entity will also be deleted. See: Customizing the Merge Dictionary, page 5-67. Prerequisites Before you add any Oracle application to the Merge Dictionary, you must: • Identify any entities that have foreign keys in the TCA Registry. • Create merge procedures by identifying the foreign keys for those entities. Entity Details This table describes the details of the entity that you are viewing, updating, or adding. What you can update depends on whether the entity is seeded or custom.
- 161. Data Quality Management 5-67 Detail Description Entity The name of the table that has a foreign key to the HZ_PARTIES table or a related table such as HZ_PARTY_SITES or HZ_CONTACT_POINTS. Application The Oracle application affected by the merge process. Sequence The order in which the entity is to be processed during a merge. Parent Entity The name of the table that the foreign key of the entity refers to. Primary Key The name of the primary key column for the entity. Foreign Key The name of the foreign key column which links the entity to its parent entity. Description A description of the entity, for example Party for HZ_PARTIES. Description Columns The name of the columns used to generate a description for the record, for example, PARTY_NAME for the HZ_PARTIES table. You can alternatively enter a complex concatenation or decode expression. The description columns are used in reports and logs. Procedure Name The name of the merge procedure, which must conform to the standard merge procedure signature. Merge Records in Bulk Whether or not the merge procedure is called once for every record or for all records in the table that references the merged party. If records are merged in bulk, you cannot assign child entities to this entity. Additional Query Clause A SQL clause that is used to specify additional filtering conditions for joining the table to the related parent entity. Batch Merge Routine Whether or not the merge procedure is a routine that should be processed in batch, for performance reasons. Generally, you should use this option if the table that this merge routine is created for has multiple foreign key references to TCA. This option lets you create one batch routine instead of a number of regular routines for each foreign key. Customizing the Merge Dictionary You can customize the Merge Dictionary by including your own custom entities as part of the merge process, so that custom entities can be merged using standard merge rules or custom rules. You must develop the code to customize the merge procedures used by your custom applications and entities. Your custom merge procedure should:
- 162. 5-68 Oracle Trading Community Architecture Administration Guide • Perform any required validations before you run the merge process. • Meet the processing requirements of your range of business activities. • Conform to the standard merge procedure signature. This table shows the parameters. Parameter Usage Data Type Description p_entity_name IN VARCHAR2 Name of the entity being merged. p_from_id IN NUMBER Primary key ID of the merge-from record. p_to_id IN / OUT NUMBER • IN: Primary key ID of the merge-to record. • OUT: Primary key ID of the merge-to record if the record is identified as part of the duplicate check. p_from_fk_id IN NUMBER Foreign key ID of the merge-from record. p_to_fk_id IN NUMBER Foreign key ID of the merge-to record. p_parent_entitiy_nam e IN VARCHAR2 Name of the parent entity. p_batch_id IN NUMBER Batch ID. p_batch_party_id IN NUMBER ID that uniquely identifies the batch and party record being merged. Use this ID to reference batch information. x_return_status IN / OUT VARCHAR2 Status of the call. Returned values are: • FND_API.G_RET_STS_SUCCESS: Success • FND_API.G_RET_STS_ERROR: Expected Error • FND_API.G_RET_UNEXP_ERROR: Unexpected Error If the relationship between the parent and child entities involve more than one foreign key or is complex, you can enter an additional join condition in the merge procedure.
- 163. Data Quality Management 5-69 For example, the HZ_CONTACT_POINTS table can be associated with either a party or party sites based on the value of the owner_table_name. To associate HZ_CONTACT_POINTS with: • The HZ_PARTIES table • Enter the join condition as hz_contact_points.owner_table_name = HZ_PARTIES. • Define the foreign key as owner_table_id. • The HZ_PARTY_SITE table • Enter the join condition as hz_contact_points.owner_table_name = HZ_PARTY_SITE. • Define the foreign key as owner_table_id. Related Topics Merge Dictionary Overview, page 5-65 Creating Custom Merge Master Party Defaulting Method The merge master party is the party in a duplicate set that remains in the TCA Registry after a merge. The HZ: Merge Master Party Defaulting profile option setting determines the method to use for defaulting the master for each duplicate set. You can define a custom user hook and set the profile option to User Hook to use your method. See: DQM Deployment Category, page B-18. Parameters The parameters for the custom user hook are: • Input p_dup_set_id (duplicate set identifier) • Output • x_master_party_id • x_master_party_name • x_return_status • x_msg_count • x_msg_data
- 164. 5-70 Oracle Trading Community Architecture Administration Guide User Hook Example
- 165. Data Quality Management 5-71 /* Use OSO party as master party, if it doesn't exist, use any party id in the dup set*/ procedure default_master_user_hook( p_dup_set_id IN NUMBER, x_master_party_id OUT NOCOPY NUMBER, x_master_party_name OUT NOCOPY VARCHAR2, x_return_status OUT NOCOPY VARCHAR2, x_msg_count OUT NOCOPY NUMBER, x_msg_data OUT NOCOPY VARCHAR2 ) is cursor get_OSOPartyId_csr is SELECT PP.PARTY_ID, PP.PARTY_NAME FROM HZ_PARTIES PP,HZ_DUP_SETS DS, HZ_DUP_SET_PARTIES DSP, HZ_DUP_BATCH DB WHERE PP.PARTY_ID =DSP.DUP_PARTY_ID AND DB.DUP_BATCH_ID = DS.DUP_BATCH_ID AND DS.DUP_SET_ID = DSP.DUP_SET_ID AND DSP.DUP_SET_ID= p_dup_set_id AND PP.CREATED_BY_MODULE = 'OSO_CUSTOMER' AND NVL(DSP.MERGE_FLAG,'Y') <> 'N' AND ROWNUM = 1; cursor get_RandomPartyId_csr is SELECT PP.PARTY_ID, PP.PARTY_NAME FROM HZ_PARTIES PP,HZ_DUP_SETS DS, HZ_DUP_SET_PARTIES DSP, HZ_DUP_BATCH DB WHERE PP.PARTY_ID =DSP.DUP_PARTY_ID AND DB.DUP_BATCH_ID = DS.DUP_BATCH_ID AND DS.DUP_SET_ID = DSP.DUP_SET_ID AND DSP.DUP_SET_ID= p_dup_set_id AND NVL(DSP.MERGE_FLAG,'Y') <> 'N' AND ROWNUM = 1; begin -- Initialize return status to SUCCESS x_return_status := FND_API.G_RET_STS_SUCCESS; open get_OSOPartyId_csr; fetch get_OSOPartyId_csr into x_master_party_id,x_master_party_name; close get_OSOPartyId_csr; if x_master_party_id is null /* OSO party doesn't exist */ then open get_RandomPartyId_csr; fetch get_RandomPartyId_csr into x_master_party_id,x_master_party_name; close get_RandomPartyId_csr; end if; EXCEPTION WHEN OTHERS THEN x_return_status := FND_API.G_RET_STS_UNEXP_ERROR; FND_MESSAGE.SET_NAME('AR', 'HZ_API_OTHERS_EXCEP'); FND_MESSAGE.SET_TOKEN('ERROR' ,SQLERRM); FND_MSG_PUB.ADD; FND_MSG_PUB.Count_And_Get( p_encoded => FND_API.G_FALSE,
- 166. 5-72 Oracle Trading Community Architecture Administration Guide p_count => x_msg_count, p_data => x_msg_data); end; Related Topics Data Quality Management Overview, page 5-2 Automerge Automerge automatically merges records that exceed a specified threshold during duplicate identification. The Automerge program only runs if the match rule specified for the duplicate identification process is designated for Automerge. Note: Automerge is always implemented as part of a duplicate identification process. You can manually run Automerge only to resubmit an automatic run that resulted in error. The Automerge program evaluates records against the match and automatic merge thresholds set in that match rule. The program: • Automatically merges records that meet or exceed the automatic merge threshold. • Creates a System Duplicate Identification (SDI) batch containing records that exceed the match threshold but not the automatic merge threshold. The SDI batch is available in Oracle Customer Data Librarian for merge consideration. If a party is to be automatically merged, but already exists in a merge request in Oracle Customer Data Librarian, then an error is recorded in the Automerge log, and that party is not merged with its duplicates. The program continues and merges other parties that do not incur errors. See: De-Duplication Overview, Oracle Customer Data Librarian User Guide. Rules for Automerge In each duplicate set, two or more duplicate candidates are automatically merged into one merge master record. You can control aspects of the merge through profile options. • The HZ: Merge Master Party Defaulting profile option setting determines which party in each duplicate set is the master. • The HZ: Default Profile Attributes for Merge Mapping and HZ: Default Secondary Profile Attributes for Merge Mapping profile option settings determine which party profile attributes remain after the merge. • The HZ: Use DQM Suggested Groupings for Automerge profile option determines
- 167. Data Quality Management 5-73 if addresses and relationships are merged based on DQM suggestions, or are just transferred from duplicate candidates to the master. See: DQM Deployment Category, page B-18. Other rules of Automerge are: • For attributes other than party profile attributes, if the master already has a value, then that value survives the merge. If not, then the value is transferred from the duplicate candidate with the latest creation date and an attribute value. • For relationships, If the subject party Registry ID for the merge master and duplicate candidates are the same, and the relationship type is the same, then Automerge merges the relationship records. See: Relationships Overview, Oracle Trading Community Architecture User Guide. • If the party sites for the merge master and duplicate candidates have the same location ID, then the party sites are merged instead of transferred. • All transactions and accounts are transferred from the duplicate candidates to the merge master. Program Parameters Run this program from Standard Request Submission only to resubmit an Automerge that resulted in error. • Batch: Enter the batch number to rerun Automerge for. Only previously failed batches are available. • Number of Workers: Enter the number of workers for the process. The recommended number is four, and the maximum number is ten. Related Topics Data Quality Management Overview, page 5-2 DQM Diagnostic Reports Use DQM diagnostic reports to evaluate your DQM setup and understand how and why DQM processes are working as they are. You create a report to generate a report output that provides details of your DQM setup at the time of report submission. You can resubmit a report to regenerate the output using the same report parameters, but also to capture DQM setup details at a different time. Note: The output from a resubmitted report replaces the previous
- 168. 5-74 Oracle Trading Community Architecture Administration Guide output. To avoid this override, create a new report instead. There are two types of DQM diagnostic reports: • DQM Setup - Basic • DQM Setup - Detailed The DQM Setup - Detailed report provides all the information that the DQM Setup - Basic report does, plus additional details. • General DQM Staging Information. See: Staged Schema, page 5-59. • DQM Staging Program Results. See: DQM Staging Program, page 5-61. • Index Statistics. See: interMedia Indexes, page 5-60 and B-Tree Indexes, page 5-60. • Synchronization Status. See: DQM Synchronization Method, page 5-64. • Match Rules (DQM Setup - Detailed only). See: Match Rules Overview, page 5-28. • Attributes and Transformations (DQM Setup - Detailed only). See: Defining Attributes and Transformations, page 5-23. • DQM Related Profile Options (DQM Setup - Detailed only). See: DQM Deployment Category, page B-18, DQM Fuzzy Key Generation Category, page B-24, and Data Librarian Import Setup Category, Oracle Customer Data Librarian Implementation Guide. DQM : Generate XML Data for the Diagnostic Reports The DQM : Generate XML Data for the Diagnostic Reports program runs when you create a DQM diagnostic report from the DQM Diagnostics page. You can also run this program from Standard Request Submission to resubmit a previously run report, exactly the same as resubmitting from the DQM Diagnostics page. See: DQM Diagnostic Reports, page 5-73. Program Parameter Select the name of the DQM diagnostic report to resubmit. Related Topics Administering Data Quality Management, page 5-11 Data Quality Management Overview, page 5-2
- 169. Data Sharing and Security 6-1 6 Data Sharing and Security This chapter describes administering Data Sharing and Security, including creating, updating, and viewing data sharing groups as well as assigning access privileges. This chapter covers the following topics: • Data Sharing and Security Overview • Administering Data Sharing and Security • Creating a Data Sharing Group • Updating a Data Sharing Group • Assigning Privileges to Access a Data Sharing Group Data Sharing and Security Overview Oracle Trading Community Architecture provides a model for managing information about entities such as customers. The TCA Data Sharing and Security (DSS) feature provides the capability to manage who can create, modify, and delete information about TCA data model entities across the applications in the Oracle E-Business Suite. You can configure applications in the E-Business Suite to implement the data sharing and security rules required by your organization's internal policies and procedures, as well those required by governmental regulations and laws. For example, you can establish security rules so that only healthcare workers can change personal information about patients. The DSS feature registers data security rules in a central repository using the security features of Oracle's Application Object Library (AOL). Because E-Business Suite applications use the TCA public application programming interfaces (APIs) to create, update, and manage party information, data security rules are encoded in these APIs to enforce consistent behavior across the E-Business Suite. With the DSS feature, you can control access to the following TCA data model entities: • Parties
- 170. 6-2 Oracle Trading Community Architecture Administration Guide • Person parties • Organization parties • Relationships • Classification code assignments • Party addresses • Party contact points • Party site contact points Administering Data Sharing and Security To secure information about entities, a TCA data security administrator must define the data sharing groups that specify the criteria used to determine the data to be secured. Security criteria can be one or more of the following characteristics: • Classification • Relationship • E-Business Suite module used to create the data After defining a data sharing group, the TCA data security administrator can assign access privileges to users who create, update, or delete information secured by the data sharing group. You can assign access privileges to users at the following levels: • Global or public (all users) • Responsibility • Individual user Note: You cannot use the DSS feature to restrict users of an application from viewing information created and maintained in that application. The DSS feature limits the ability of users to create, update, or delete information that is secured based on that data sharing group definition. For more information see the Oracle Applications System Administrator Guide Documentation Set and the user guides for the applications in the E-Business Suite. Two responsibilities can access the Security Administration pages:
- 171. Data Sharing and Security 6-3 • Trading Community Manager: The Trading Community Manager responsibility, allows users to create a setup or update data sharing and security. To get the Trading Community Manager responsibility users have to get the TCA Data Security Administrator responsibility. • TCA Data Security Administrator: The TCA Data Security Administrator responsibility alone, does not allow users to modify data sharing and security setup data. To create a setup or update data sharing and security, users must have both the TCA Data Security Administrator and Trading Community Manager responsibilities. Example Consider the case of a hospital implementing Oracle applications powered by TCA. In this situation, the hospital could define different data sharing groups to secure patient information as well as hospital employee information. A security conflict might occur if a hospital employee falls ill and becomes a patient at the same hospital. Which privilege assignment scheme controls access to this entity? The DSS feature addresses this issue by allowing administrators to create a third data sharing group that defines the privileges associated with creating, updating, and deleting records of parties that are both employees and patients. For the appropriate privilege assignment to take place, this third data sharing group must be assigned a rank that is higher than the rank assigned to the Employee Only or the Patient Only groups. Seeded Data Sharing Groups You can use the seeded data sharing groups listed in this table, in addition to the ones that you create. Group Name Group Code Public PUBLIC Related Topics Data Sharing and Security Overview, page 6-1 Introduction to Administration, page 1-1 Administration Process A TCA data security administrator creates and updates data sharing groups, enables or disables data sharing groups, and assigns access privileges to responsibilities and users.
- 172. 6-4 Oracle Trading Community Architecture Administration Guide Note: To create, update, or delete data sharing groups you must have the TCA Data Security Administrator responsibility. The Data Sharing and Security Administration page provides a starting point for a TCA data security administrator to define security rules and to assign access privileges for information modeled by the Oracle Trading Community Architecture. • To create a new data sharing group, click the Create button. See: Creating a Data Sharing Group, page 6-4. • To assign the privilege to access a data sharing group to a responsibility or an individual user, click the Assign Privileges icon for the appropriate data sharing group. See: Assigning Privileges to Access a Data Sharing Group, page 6-8. • To view and update a data sharing group, click the data sharing group name. See: Updating a Data Sharing Group, page 6-7. The Trading Community Manager responsibility can only view information. Only the TCA Data Security Administrator responsibility can also update the data sharing group information. When you define a data sharing group, you must explicitly assign access privileges to the information secured by the data sharing groups. If an entity is secured by a data sharing group, then explicit assignments must be made to the appropriate users or responsibilities to define their access privileges. If privilege assignments are not made, then no one will have access to the information. If an entity is not covered by any defined data sharing group, you can use the HZ: Default Data Sharing Group profile option to designate the default group that would be assigned to that entity. To control the release of Data Sharing and Security, TCA data security administrators can use the HZ: Data Sharing and Security Enabled profile option to limit TCA security features to a specific user before generally releasing the functionality to ensure a controlled release. Furthermore, data sharing groups can be set up, but not enabled until the desired security is ready to be enforced. See: Profile Options and Profile Option Categories, page B-1. Related Topics Administering Data Sharing and Security, page 6-2 Creating a Data Sharing Group This process enables a TCA data security administrator to define data sharing groups by specifying information that identifies the data sharing group and the criteria that define the group: classifications, relationships, source modules, and specific TCA data
- 173. Data Sharing and Security 6-5 model entities supported by the DSS feature. Note: A TCA data security administrator can only set table or row level security. Specific attributes such as a person's date of birth cannot be secured. However, the entire person profile can be secured using the Create Data Sharing Group page. This page can only be accessed with a TCA Data Security Administrator responsibility. To create a data sharing group: 1. Click the Create button in the Data Sharing and Security Administration page. See: Administration Process, page 6-3. 2. Enter a name for this group in the Data Sharing Group Name field. The name should be descriptive of the secured data and of the users, responsibilities, and public that you assign the privilege of accessing this data sharing group. 3. Enter a code for this group in the Data Sharing Group Code field. This code must be a unique identifier. The code cannot be updated, although other attributes can be. 4. Enter a description for this group in the Data Sharing Group Description field. 5. You can specify the rank of this group that will be used to resolve conflicting security rules between groups and to order the display of this group with other groups on the Data Sharing and Security Administration page. Rank controls the order in which data sharing groups are evaluated to determine which sharing group applies to data. For example, you can set up two data sharing groups, one for patients and one for employees. If the Patient group is ranked higher than the Employee group, then information about an employee who is a patient would be secured as part of the Patient group. • Select the Last option to place this data sharing group at the end of the list. • Select the Before option and a data sharing group to place the new data sharing group before the selected existing data sharing group. 6. Check or clear the Enable Data Sharing Group check box. 7. In the Classifications region, add class categories to be included in this data sharing group.
- 174. 6-6 Oracle Trading Community Architecture Administration Guide 8. Enter the name of a classification, or class code, associated with each class category. The Class Path column displays the hierarchical position of class codes in the class code hierarchy of a class category. For more information on classifications, see: Classifications Overview, page 4-1 and Administering Classifications, page 4-4. 9. Check or clear the Enabled check box to enable or disable the class category and classification. 10. Add relationship roles, such as Employee, Patient, Customers, and so on in the Relationships region. 11. Check or clear the Enabled check box to enable or disable the relationship role. For more information on relationships, see: Administering Relationships, page 3-1. 12. In the Created By Module region, enter a source application or module that stores and maintains the information secured by this data sharing group. This section displays a list of the applications and modules, secured by a TCA data security administrator, that created the entity within the TCA registry. For example, to only allow Oracle Healthcare application users to create a particular person entity called Patient, then the TCA data security administrator may secure the Patient relationship in the Relationships region, the Business Function of Patient in the Classifications region, and the Oracle Healthcare Applications (OHC) in the Created By Module region to specify the business rules needed to secure patient information. 13. Check or clear the Enabled check box to enable or disable the created by module. 14. Check or clear the check boxes, in the Entities region, for the entities secured by this data sharing group. The DSS feature encapsulates the following entities modeled within TCA: • Parties • Person parties • Organization parties • Relationships • Classification code assignments • Party addresses • Party contact points
- 175. Data Sharing and Security 6-7 • Party site contact points 15. Click the Apply button to create this data sharing group. Related Topics Administering Data Sharing and Security, page 6-2 Updating a Data Sharing Group This process enables a TCA data security administrator to update existing data sharing groups by modifying the classifications, relationship roles, and entities of previously defined data sharing groups. You can modify or update existing criteria based on changes in the application used to create and manage the information a TCA data security administrator secures. For example, if an enterprise plans to use Customers Online, in addition to its Oracle TeleService call center, the TCA data security administrator could modify an existing data sharing group used to protect customer information to include Customers Online, so that only users of the two applications can create, update or delete customer information modeled within TCA. This page can only be accessed with the TCA Data Security Administrator responsibility. To update the information about a data sharing group: 1. Click the name of a data sharing group in the Data Sharing and Security Administration page. See: Administration Process, page 6-3. 2. Modify the details of the data sharing group, as necessary, in the Update Data Sharing Group page. In response to changes in their organization's business policies or requirements, TCA data security administrators can: • Enable or disable an existing classification, relationship, or created-by module from the data sharing group. • Edit or add classifications, relationships, or created-by modules. See: Creating a Data Sharing Group, page 6-4. 3. Click the Apply button.
- 176. 6-8 Oracle Trading Community Architecture Administration Guide Related Topics Administering Data Sharing and Security, page 6-2 Assigning Privileges to Access a Data Sharing Group This process enables TCA data security system administrators to assign specific users, responsibilities, or all users (public) to specific data sharing groups. A data sharing group assignment is a special entity that associates any entity with a data sharing group. Due to the configurable nature of the Data Sharing and Security solution, not all TCA entities are directly associated with a data sharing group, but only those that require protection. When you assign data sharing group privileges, those users, responsibilities, or groups can access the information protected by that data sharing group. To assign data sharing and security access privileges to a responsibility or user: 1. On the Data Sharing and Security Administration page, click the Assign Privileges icon for a data sharing group. See: Administration Process, page 6-3. 2. On the Assign Privileges page, select the type of grantee: • Public: All users • Group: Responsibility • User: Individual user 3. Enter the user or responsibility name of the grantee in the Name field, or use the list of values to find and select a user or responsibility name set up by the system administrator. 4. Check the appropriate check boxes to give create, update, or delete privileges to a grantee. 5. Click the Apply button. Related Topics Administering Data Sharing and Security, page 6-2
- 177. Adapters 7-1 7 Adapters This chapter describes administering adapters, including defining, updating, and viewing adapter configurations. This chapter covers the following topics: • Adapters Overview • Administering Adapters • Creating Address Validation Adapters Adapters Overview Adapters allow for data integration services between the Oracle Trading Community Architecture (TCA) Registry and a third party or deploying company data source. TCA uses adapters for D&B integration and address validation. Adapters and D&B Integration TCA provides a seeded Dun & Bradstreet adapter for integration with D&B. After proper configuration, this adapter enables online purchasing of D&B data through Oracle E-Business Suite applications. See: Online Purchasing, Oracle Trading Community Architecture User Guide. Adapters and Address Validation Address validation is the process of comparing a raw or user-entered address against a verified or authorized database to determine if the address is recognized and factually correct according to the source database. An outcome of address validation is address correction, in which a user-entered address is evaluated, corrected, completed, and returned for further processing. The TCA address validation feature uses a central XML open-standards based "black box" that allows integration with third party service providers and custom solutions, through adapters that you or the third party provide. The black box can accept requests
- 178. 7-2 Oracle Trading Community Architecture Administration Guide from callers, such as the Address Validation program, and integrate with adapters to process those requests. An example of this process is: 1. The Address Validation program sends requests with address data to the address validation black box. 2. The black box invokes the appropriate vendor adapter based on adapter configuration settings, and passes an XML message request to the appropriate third party or custom adapter. 3. Utilizing an XML message format, the adapter generates an outbound XML document and passes a location service request to a vendor solution that allows single or bulk synchronous transaction requests using a synchronous HTTP v1.1 Post connection. 4. The vendor solution interprets these transaction requests, validates the addresses against the vendor's location libraries, and sends an XML response back to the adapter. 5. The adapter returns an XML response to the Address Validation program. Through this process, addresses are validated in the TCA Registry against the standard address information that the adapter is linked to, resulting in a validated, corrected, enriched, or geocoded address in the TCA Registry. This solution is optimized for synchronous processing of bulk requests. It is not intended for asynchronous processing of single interactive requests such as when users enter data through a user interface. Related Topics Setting Up Address Validation, page 2-22 Administering Adapters, page 7-2 Creating Address Validation Adapters, page 7-6 Administering Adapters To use a third party, custom-made, or seeded Dun and Bradstreet adapter with TCA, you must define and administer adapter configurations. For each third party or custom adapter, you specify information such as the adapter name and description, the method used to invoke the adapter, and the XML message format that the adapter uses. First you search for the adapter to administer, by name or, for address validation adapters, the country that the adapters support. You can then: • View adapter configurations.
- 179. Adapters 7-3 • Update adapter configurations. • Create adapter configurations after you verify from the search results that the adapters do not already exist. See: Configuring Adapters, page 7-3. Note: Only enabled adapters can be used to process data from the TCA Registry. Related Topics Adapters Overview, page 7-1 Introduction to Administration, page 1-1 Configuring Adapters When you view, create, or update adapter configurations, the information displayed or to be entered is the same. After you view an adapter, you can optionally update its configuration. Adapter configuration is the same for all third party or custom address validation adapters, but different for the seeded Dun and Bradstreet adapter. D&B adapter configuration is part of the D&B integration setup. See: Setting Up Third Party Data Integration, page 2-36. Procedure to Configure the Seeded Dun and Bradstreet Adapter: This table describes some terms in the pages used for this procedure. Selected Terminology Term Description Host Address The D&B HTTPS URL which D&B provides for access to the D&B database. User Name The user ID that D&B provides for users to log in to the D&B database. Password The password that D&B provides for users to log in to the D&B database. 1. Update the default host address only if D&B provides you a different URL.
- 180. 7-4 Oracle Trading Community Architecture Administration Guide 2. Register all users who need access to purchase D&B data online. Note: The user names you enter become the available values for the HZ: D&B User Name profile option. As part of D&B integration, this profile option must be set with all the available values. If there are multiple user names, then all values are set at the User level. Procedure to Configure Third Party or Custom Adapters: This table describes some terms in the pages used for this procedure. Selected Terminology Term Description Invoke Method The method used to communicate with the adapter, for example HTTP V1.1 Post. Host Address The host address of the adapter, applicable only if the invoke method is HTTP. Default Batch Size The default number of records the adapter can handle in one batch. This number is used if the maximum batch size is not defined. Maximum Batch Size The maximum number of records the adapter can handle in one batch. This number must be greater than or equal to 1. Message Format The XML message format that the adapter uses. Default Replace Status Code For adapters used with address validation, the default code that must be reached or exceeded for an address to be updated with data from the adapter service. This default code is used if the caller to address validation adapters does not specify a code. For example, if the code is 2, the service linked to the adapter must validate a TCA address up to at least the street or thoroughfare level before updating that address with the service's standard address. Addresses with validation status 0, 1, or 2 would be updated.
- 181. Adapters 7-5 This table describes the available status codes. Default Replace Status Codes Status Meaning Description 0 Valid Address The highest level of validation. The address has been certified deliverable based on postal authority certifications. 1 Multiple or Ambiguous Address Address has been validated to the street level, but there is ambiguity to locate the specific address. 2 Street or Thoroughfare Match Address has been validated to the street level, but no further. 3 Municipality Match Address has been validated to the city or town level, but no further. 4 Administrative Subdivision Match Address has been validated to be within the country's main administrative subdivision, such as province or state, but no further. 5 Country Match Address has only been validated to the country level, but no further. 6 No Match Address could not be validated in any way. 1. Enter the adapter details. 2. For adapters used with address validation, specify the countries that the adapter supports. For example, if an adapter can validate only addresses from France and Australia, only those two countries should be listed. 3. Enable the adapter to process addresses for specific countries. Note: If an adapter is used to set the HZ: Default Location Service Adapter profile option, you cannot disable that adapter unless you set the profile option with another adapter. See: Address Validation Deployment Category, page B-8. 4. Indicate if the adapter is the default to use for specific countries. Only one adapter can be the default for each country. For example, if the Gorman adapter is already the default for Italian addresses, and you try to set Elcaro as the default adapter,
- 182. 7-6 Oracle Trading Community Architecture Administration Guide you can either stay with Gorman or switch to Elcaro. Related Topics Administering Adapters, page 7-2 Creating Address Validation Adapters To communicate with the TCA Registry in the Oracle E-Business Suite, your adapter must meet the following technical requirements. Communication Protocol HTTP v1.1 Post is the only communication protocol currently supported. Because communication failures may occur during the HTTP request, a default timeout is set in TCA for 300 seconds after which the program terminates execution. You can modify this default timeout by changing the HZ: Timeout Limit for Address Validation profile option. See: Address Validation Deployment, page B-8. XML Message Format Mandatory XML Message Format The following XML message format is mandatory for address validation communication with the TCA Registry: <?xml version="1.0"?> <LocationService> <ADAPTERCONTENTSOURCE></ADAPTERCONTENTSOURCE> <OVERWRITETHRESHOLD></OVERWRITETHRESHOLD> <REQUESTTYPE></REQUESTTYPE> <Location> <Id></Id> <Address> <AddressLine index="1"></AddressLine> <AddressLine index="2"></AddressLine> <AddressLine index="3"></AddressLine> <AddressLine index="4"></AddressLine> <City></City> <County></County> <CountrySubEntity></CountrySubEntity> <Country></Country> <PostalCode></PostalCode> </Address> <UserArea> <LocationService.Location.UserArea> <LocationService.Status></LocationService.Status> </LocationService.Location.UserArea> </Location> </LocationService>
- 183. Adapters 7-7 Modifiable Elements In general, you can modify the data within the <Location> </Location> tag except for the ID tag. Important: You must never modify the <Id></Id> tag. This tag is the internal identifier from the TCA Registry for the specific record. The elements you can change are: <Address> <AddressLine index="1"></AddressLine> <AddressLine index="2"></AddressLine> <AddressLine index="3"></AddressLine> <AddressLine index="4"></AddressLine> <City></City> <County></County> <CountrySubEntity></CountrySubEntity> <Country></Country> <PostalCode></PostalCode> </Address> <UserArea> <LocationService.Location.UserArea> <LocationService.Status></LocationService.Status> </LocationService.Location.UserArea> </UserArea> Required Tags The <LocationService.Status></LocationService.Status> tag is a mandatory part of the XML response message returned from the vendor adapter to the TCA Registry. This tag is defined as a standardized status code in TCA, which describes the results of the address validation. You must map your solution's return statuses for each record validated to one and only one of these statuses. You must return a status for each address validated. Because these status codes are vendor-independent, all vendor result codes must be mapped to these TCA status codes. The mappings between the vendor codes and the TCA statuses are not stored in the TCA Registry. Any configuration or remapping of the vendor codes to the TCA statuses must be done outside of TCA, for example, either in the vendor adapter or in the vendor's product itself. The acceptable status values and the definition for each are listed in the following table below. Code Meaning Description 0 Valid Address The highest level of validation. The address has been certified deliverable based on postal authority certifications.
- 184. 7-8 Oracle Trading Community Architecture Administration Guide Code Meaning Description 1 Multiple or Ambiguous Address The address has been validated to the street level, but there is ambiguity to locate the specific address. 2 Street or Thoroughfare Match The address has been validated to the street level, but no further. 3 Municipality Match The address has been validated to the city or town level, but no further. 4 Administrative Subdivision Match The address has been validated to be within the country's main administrative subdivision such as province or state, but no further. 5 Country Match The address has only been validated to the country level, but no further. 6 No Match The address could not be validated in any way whatsoever. Additional Information Extra information such as delivery route, census block, tax map key, and so on, that is related to a particular address could be useful to the caller for mailing industry demographic analysis or marketing campaigns. For this type of information, or for other information for which no specific tag exists, you may add new tags to return this information back between the <LocationService.Location.UserArea> and </LocationService.Location.UserArea> tags. Caution: Never remove or alter any existing tags listed in the <LocationService.Location.UserArea>. TCA's bulk import process uses these tags. Nonaddress Information Handling If an address passed to your adapter for validation contains a line of nonaddress elements such as "Attn.: Mr. ..." or "C/O" or "Care of: ...", you must store the data in that line. Your adapter must return it to the original address line. For example:
- 185. Adapters 7-9 <Address> <AddressLine index="1">Attn: Joe Smith</AddressLine> <AddressLine index="2">500 Main Street</AddressLine> <AddressLine index="3"></AddressLine> <AddressLine index="4"></AddressLine> <City>Redwood Shores</City> <County>San Mateo</County> <CountrySubEntity>CA</CountrySubEntity> <Country>US</Country> <PostalCode>94065</PostalCode> </Address> Sending Multiple Addresses For Validation If your adapter receives multiple addresses in a single transmission, you may use the same structure from the <Location></Location> tab downward to respond. For example, if two addresses are being passed for processing (500 Main Street, Redwood Shores, CA, and 123 Easy Street, Mountain View, CA) the message would look like this: <Location> <Id>1001</Id> <Address> <AddressLine index="1">500 Main Street</AddressLine> <AddressLine index="2"></AddressLine> <AddressLine index="3"></AddressLine> <AddressLine index="4"></AddressLine> <City>Redwood Shores</City> <County>San Mateo</County> <CountrySubEntity>CA</CountrySubEntity> <Country>US</Country> <PostalCode>94065</PostalCode> </Address> <UserArea> <LocationService.Location.UserArea> <LocationService.Status></LocationService.Status> </LocationService.Location.UserArea> </UserArea> </Location> <Location> <Id>1123</Id> <Address> <AddressLine index="1">123 Easy Street</AddressLine> <AddressLine index="2"></AddressLine> <AddressLine index="3"></AddressLine> <AddressLine index="4"></AddressLine> <City>Mountain View</City> <County>Santa Clara</County> <CountrySubEntity>CA</CountrySubEntity> <Country>US</Country> <PostalCode>94022</PostalCode> </Address> <UserArea> <LocationService.Location.UserArea> <LocationService.Status></LocationService.Status> </LocationService.Location.UserArea> </UserArea> </Location>
- 186. 7-10 Oracle Trading Community Architecture Administration Guide XML Message Example The following is an example of an XML message: <?xml version="1.0"?> <LocationService> <ADAPTERCONTENTSOURCE>2</ADAPTERCONTENTSOURCE> <OVERWRITETHRESHOLD>2</OVERWRITETHRESHOLD> <REQUESTTYPE>Validate</REQUESTTYPE> <Location> <Id>1001</Id> <Address> <AddressLine index="1">500 Main Street</AddressLine> <AddressLine index="2"></AddressLine> <AddressLine index="3"></AddressLine> <AddressLine index="4"></AddressLine> <City>Redwood Shores</City> <County>San Mateo</County> <CountrySubEntity>CA</CountrySubEntity> <Country>US</Country> <PostalCode>94065</PostalCode> </Address> <UserArea> <LocationService.Location.UserArea> <LocationService.Status></LocationService.Status> </LocationService.Location.UserArea> </UserArea> </Location> </LocationService> Related Topics Adapters Overview, page 7-1
- 187. Phones 8-1 8 Phones This chapter describes administering phone numbers, including time zone information and phone formats. This chapter covers the following topics: • Administering Phones Administering Phones In the TCA Registry, phones numbers can be of type telephone, fax, pager, or voice mail. For phone numbers, you can: • Define time zone information for phone numbers based on country or area code, page 8-1. • Define phone formats for parsing and displaying phone numbers, page 8-2. Related Topics Introduction to Administration, page 1-1 Defining Time Zones for Phones For phone numbers in a country, you can define time zone information based on the country or its area codes. Countries with multiple time zones should not have a country time zone, but rather multiple area code time zones. You can set either a country time zone or area code time zones, but not both types. Note: The time zone information is not for mobile phone numbers or pagers. When you set a time zone at the country level, you permanently delete all area code time zones, if any exist, for that country. If you want to switch from a country time zone
- 188. 8-2 Oracle Trading Community Architecture Administration Guide to area code time zones, you must first delete the country time zone. To define area code time zones, you create or update area codes for the country. The area code description is usually the city or region that the area code encompasses. Multiple area codes can have the same time zone. If you want to switch from area code time zones to a single country time zone, just set the country time zone. Related Topics Administering Phones, page 8-1 Defining Phone Formats Use the Define Phone Formats window to set up phone formats for parsing and displaying phone numbers. This window lets you define country-specific components of phone numbers, display format styles, and area codes. You can also specify country-specific mobile prefixes to determine if a phone number is mobile or not. To display the phone number based on the phone formats that you define in this window, a user interface must call the parsing routine of the Phone Number Parsing API and the display routine of the Phone Number Formatting API. Parsing occurs only if the territory code is always specified as an input parameter for the Phone Number Parsing API. See: • Phone Number Parsing API, Oracle Trading Community Architecture Technical Implementation Guide • Phone Number Formatting API, Oracle Trading Community Architecture Technical Implementation Guide In the Define Phone Formats window, you must set up phone formats for each country that you enter phone numbers for. The Phone Number Parsing API uses the phone formats to correctly parse phone numbers into these segments: phone country code, area code, and subscriber number. Phone formats also determine the correct format style for displaying phone numbers in user interfaces. For example, for the US phone format, you define the phone country code as 01, the fixed area code as three numbers in length, the subscriber number as seven digits in length, and the format style as 999-999-9999. The Phone Number Parsing and Phone Number Formatting APIs parse and format phone numbers accordingly into three components. 1234567890 would be 01 phone country code, 123 area code, and 456-7890 subscriber number, and display as 123-456-7890. To define phone formats: 1. Navigate to the Define Phone Formats window. 2. Query the two-letter country code for the country that you want to define phone formats for.
- 189. Phones 8-3 3. Enter country-specific phone information: • Phone code: The phone country code, for example 1 for the US • International prefix: The code to dial before international numbers when calling from the country that you are setting up, for example 011 for the US • Trunk prefix: The code to dial before long distance numbers within the country, for example 1 for the US • Phone length and area code length: The number of digits in the subscriber number and area code for this country, only if either is fixed 4. Define phone format styles in the Formats tabbed region: • In the Style field, use 9 to represent digits in the area code and subscriber number, and enter other characters as separators, for example, (999) 999-9999. Note: You can set up only one phone format style for each area code length. If a country has area code lengths of two three digits, you can set up two styles, for example, (99) 9999-9999 and (999) 999-9999. • In the Area Code Size field, enter the number of digits in the area code for each style. 5. Define area codes that you want to use for this country in the Area Codes tabbed region. 6. Define mobile prefixes that you want to use for this country in the Mobile Prefixes tabbed region. Mobile prefixes contain the area code and possible prefixes of the subscriber number. For example, the mobile prefix of 650506 consists of the 650 area code and the 506 subscriber number prefix. Note: Mobile prefixes work only in countries where subscriber prefixes are based on area codes. Related Topics Administering Phones, page 8-1
- 191. Extensions 9-1 9 Extensions This chapter describes administering extensions, setting up custom attributes to extend the TCA Registry. This chapter covers the following topics: • Administering Extensions Administering Extensions Extend the Oracle Trading Community Architecture (TCA) Registry by creating an unlimited number of user-defined attributes. TCA extensions use the extensibility framework and features from Oracle Product Lifecycle Management (PLM). See: User-Defined Attributes, Oracle Product Lifecycle Management User's Guide. You can create groups of extended attributes for these objects, the TCA entities: • Locations (HZ_LOCATIONS) • Organization Profiles (HZ_ORGANIZATION_PROFILES) • Party Sites (HZ_PARTY_SITES) • Person Profiles (HZ_PERSON_PROFILES) Associate functions and actions with attribute groups to use custom logic and determine end user interaction. Assign attribute groups to pages so that the attributes are displayed in specific UI pages. Note: TCA extensions administration does not use the PLM security model or TCA Data Sharing and Security. TCA attributes that you extend can be used only in Oracle Customers Online. If you also use profile versioning, schedule programs to periodically synchronize the extensions data with organization or person profile records. See: Copying Extensions
- 192. 9-2 Oracle Trading Community Architecture Administration Guide Data for Profile Versioning, page 9-9. Related Topics Extensions Process, page 9-2 Extensions Example, page 9-3 Introduction to Administration, page 1-1 Extensions Process Prerequisites Create detailed plans of user-defined attributes and their usage in user interfaces, as well as any functions. Procedure 1. Select the entity that you want to extend. 2. Value Sets: Create value sets for attributes validation, if needed. See: • Creating Value Sets, Oracle Product Lifecycle Management User's Guide • Defining Table Value Sets, Oracle Product Lifecycle Management User's Guide • Creating Independent Values, Oracle Product Lifecycle Management User's Guide 3. Attribute Groups: Create the attribute group and add attributes to the group, including any corresponding value sets. See: User-Defined Attributes, Oracle Product Lifecycle Management User's Guide. Important: The PLM view and edit privileges are not used for extending TCA attributes. Note: After you save attributes, you cannot change the data type. You also cannot delete the attributes from the TCA Registry. You can, however, disable them so that they are not displayed in user interfaces. 4. Functions: Define functions, if needed. See: Creating User-Defined Functions, Oracle Product Lifecycle Management User's Guide. To add parameters to the function after it is created, click the name of the function in the main Functions page. You open the function details, which includes
- 193. Extensions 9-3 parameters and usages. 5. Associations: Click Add Attribute Groups and select the group, with the entity as the data level. This association is needed before you can assign the groups to pages. If needed, back in the main Associations page, click Update Actions for the attribute group and create actions to link functions to the attribute group and entity combination. After the action is created, map function parameters to attributes by clicking the action name in the Actions page. You open the action details, including the function mappings. Important: The PLM security privileges are not used for extending TCA attributes. 6. Pages: Create a page and add the attribute group for the group to be used in user interfaces that leverage the page. Note: The attribute group and page are automatically associated with the Administrator Defined classification. Related Topics Administering Extensions, page 9-1 Extensions Example, page 9-3 Extensions Example You need to store eye color, hair color, and body measurements for persons in the TCA Registry, for a UI in which users can update person profiles. You also need to let users calculate the body mass index based on the entered weight and height. Prerequisites 1. Plan out the attributes, including data type, range of values, specific values, and UI display method. These tables show the planning for this example.
- 194. 9-4 Oracle Trading Community Architecture Administration Guide Physical Characteristics Attribute Group Attribute Data Type Values Range Values Display Required Eye Color Character None • Black • Brown • Blue • Green • Violet List of Values No Hair Color Character None • Black • Brown • Blonde • Gray • Red • Other List of Values No Body Measurements Attribute Group Attribute Data Type Values Range Values Display Required Height Number 1 - 100 None Text No Weight Number 1 - 1000 None Text No Body Mass Index Number 1 - 100 None Text No 2. Plan out the function and action for calculating the body mass index. This table shows the questions and answers for this example.
- 195. Extensions 9-5 Question Answer for This Example Which attributes are functions of other attributes? The Body Mass Index attribute is a function of the Height and Weight attributes. What type of function is this: Java, PL/SQL, or URL? PL/SQL. Procedure 1. Select Person Profiles as the entity to extend. 2. Create value sets for the attributes. This table shows what you define for this example. Value Set Name Data Type Maximum Size Validation Type Display Type Value Range EyeColor Char 6 Independent List of Values Not Applicable HairColor Char 6 Independent List of Values Not Applicable Height Number 3 None <Not Applicable> Minimum Value: 1 Maximum Value: 100 Weight Number 4 None <Not Applicable> Minimum Value: 1 Maximum Value: 1000 This table shows what you add as specific values for the HairColor value set. You would accordingly enter values for EyeColor, based on your plan. Value Enabled Sequence Start Date Black Yes 1 <System date>
- 196. 9-6 Oracle Trading Community Architecture Administration Guide Value Enabled Sequence Start Date Brown Yes 2 <System date> Blonde Yes 3 <System date> Gray Yes 4 <System date> Red Yes 5 <System date> Other Yes 6 <System date> 3. Create the attribute groups. This table shows what you define for this example. Internal Name Display Name Multi-Row PHYSICAL_CHAR Physical Characteristics No BODY_MEASURE Body Measurements No Add attributes to each group, as presented in these tables. Attributes in Physical Characteristics Attribute Group Internal Name Display Name Sequen ce Data Type Column Enabled Required Display As Value Set Default Value EYE_CO LOR Eye Color 1 Char C_EXT_ ATTR1 Yes No Text Field EyeColo r Brown HAIR_C OLOR Hair Color 2 Char C_EXT_ ATTR2 Yes No Text Field HairCol or Brown
- 197. Extensions 9-7 Attributes in Body Measurements Attribute Group Internal Name Display Name Sequen ce Data Type Column Enabled Required Display As Value Set Default Value HEIGHT Height 1 Number N_EXT_ ATTR1 Yes No Text Field Height None WEIGHT Weight 2 Number N_EXT_ ATTR2 Yes No Text Field Weight None BMI Body Mass Index 3 Number N_EXT_ ATTR3 Yes No Text Field None None 4. Create a function to calculate the body mass index. 1. Write the custom PL/SQL for the calculation. For this example: PACKAGE XX_EXT_TEST AS FUNCTION CALC_BMI (p_weight in NUMBER, p_height in NUMBER) RETURN NUMBER; END XX_EXT_TEST; PACKAGE BODY XX_EXT_TEST AS FUNCTION CALC_BMI (p_weight in NUMBER, p_height in NUMBER) RETURN NUMBER IS l_bmi number; BEGIN l_bmi := trunc((p_weight*703) / (p_height*p_height)); dbms_output.put_line('BMI = '||l_bmi); -- for testing return l_bmi; END; END XX_EXT_TEST; 2. Run the PL/SQL package in your custom schema and create a synonym for this package in the APPS schema. 3. Define the function in the extensions administration. • Internal Name: CALC_BMI • Display Name: Calculate BMI • Function Type: PL/SQL
- 198. 9-8 Oracle Trading Community Architecture Administration Guide • Package: XX_EXT_TEST • Procedure: CALC_BMI 4. Enter function parameters as shown in this table. Sequence Internal Name Display Name Data Type Parameter Type 1 p_weight Weight Number Input 2 p_height Height Number Input 3 x_bmi Body Mass Index Number Return Value 5. Add both attribute groups and associate them with the Person Profiles data level. For the Body Measurements attribute group, create an action for calculating the body mass index: • Sequence: 1 • Action Name: Calculate BMI • Function: Calculate BMI • Execution Method: User Action • Display Style: Button • Prompt Application: Customers Online • Prompt Message Name: XX_CALC_BMI_MSG Note: You need to define the message to use as the prompt, in this case, the text that appears on the button. See: Define Your Messages, Oracle Applications Developer's Guide. • Visible: Yes Important: The PLM security privileges are not used for extending TCA attributes.
- 199. Extensions 9-9 Map the function parameters to attributes, as shown in this table. Parameter Name Mapped To Mapped Attribute Weight Attribute Group Weight Height Attribute Group Height Body Mass Index Attribute Group Body Mass Index 6. Create a page and assign both attribute groups to it. For this example, you enter: • Display Name: Person Physical Information • Internal Name: PERSON_PHYSICAL_INFO • Sequence: 10 • Data Level: Person Profiles • Attribute Groups • Sequence: 10, Display Name: Physical Characteristics • Sequence: 20, Display Name: Body Measurements Related Topics Administering Extensions, page 9-1 Extensions Process, page 9-2 Copying Extensions Data for Profile Versioning Use the Copy Organization Extensions Data for Profile Versioning and Copy Person Extensions Data for Profile Versioning programs to synchronize organization or person profile extensions with the corresponding party profile records. If the HZ: Profile Version Method for Updates profile option is set to New Version or One Day Version, when party profiles are updated, the existing profile record can be set with an end date, and a new profile record created with the newly entered information. In the extensions tables, the programs copy extensions data associated with the old profile ID and create new rows associated with the new profile record. For example, the old organization profile ID is 123, and there are five rows in the HZ_ORG_PROFILES_EXT tables with extended attribute values for that profile. For
- 200. 9-10 Oracle Trading Community Architecture Administration Guide those five rows, the ORGANIZATION_PROFILE_ID column value is 123. The user updates the profile record and creates a new version with identifier 456. The extensions data, however, is still linked to record 123. When the Copy Organization Extensions Data for Profile Versioning program runs, it copies the extensions data for 123 and creates new extensions records with ORGANIZATION_PROFILE_ID column as 456. If the profile option is set to New Version or One Day Version, run these programs after: • Bulk Import, including D&B batch loading and import in Oracle Customers Online and Oracle Customer Data Librarian. See: • Bulk Import Overview, Oracle Trading Community Architecture User Guide • Import Overview, Oracle Customers Online User Guide • Import Overview, Oracle Customer Data Librarian User Guide • Running Customer Interface. See: Customer Interface, Oracle Trading Community Architecture User Guide. • Running the Third Party Data Integration Update program. See: Third Party Data Integration Update Program, page 10-20. • You update party profiles with other methods and notice that the extensions data is not synchronized. You do not need to run these programs when party profiles are directly updated through the user interface in any application. Prerequisites • Set the HZ: Profile Version Method for Updates profile option to New Version or One Day Version. See: Profile Options and Profile Option Categories, page B-1. • Set up extended attributes for organization or person profiles. See: Extensions Process, page 9-2. Program Parameters • Batch Size: Enter the number of records to process at one time. • Number of Workers: Enter the number of parallel workers that you want to use for this program. Workers are processes that run at the same time to complete a task that would otherwise take longer with a single process. Related Topics Administering Extensions, page 9-1
- 201. Source System Management 10-1 10 Source System Management This chapter describes administering Source System Management, including source systems, Single Source of Truth, and data security for Other entities. This chapter covers the following topics: • Source System Management Overview • Administering Source System Management • Source Systems Overview • Administering Source Systems • Single Source of Truth Overview • Administering Single Source of Truth • Data Security for Other Entities Source System Management Overview Use Source System Management (SSM) to manage source systems that provide data for the TCA Registry, and determine how that data is displayed and used. The key features of SSM are: • Source Systems: Define the source systems you use to import data into the TCA Registry. The definition not only enables tracking between a TCA record and its data sources, but also provides operational links whereby updates can be sent and received in both directions between the TCA record and the source systems. See: Source Systems Overview, page 10-3. • Single Source of Truth (SST): Data from multiple content sources, including source systems and end users, can coexist in the TCA Registry. Set up the SST record, in which attribute values within a record can come from different data sources. Oracle applications display and use the SST record for party profile entities. For the SST record, you also define privileges for users to overwrite data from source systems,
- 202. 10-2 Oracle Trading Community Architecture Administration Guide and for source systems to overwrite user-entered data. See: Single Source of Truth Overview, page 10-7. • Security for Other Entities: Define user privileges to create user-entered records and update data from source systems. These rules apply only to specific entities other than those used in SST. See: Data Security for Other Entities, page 10-22. Related Topics Administering Source System Management, page 10-2 Introduction to Administration, page 1-1 Administering Source System Management Tip: You should perform these administration steps when no users are logged into Oracle Applications. It is recommended that you do not frequently change the setup. Prerequisites Ì Perform the necessary technical and functional implementation to use your source systems with the TCA Registry. For example, to use D&B as a source system, you must integrate with D&B. See: Setting Up Third Party Data Integration, page 2-36. 1. Define the source system. See: Creating and Updating Source Systems, page 10-6. 2. If you have at least one source system enabled for Single Source of Truth, set up display rules to determine the SST record. See: Setting Up Display Rules, page 10- 19. 3. Run the Third Party Data Integration Update program to regenerate the SST record. See: Third Party Data Integration Update Program, page 10-20. 4. Define user privileges to overwrite data from source systems in the SST record. See: Setting Up User Overwrite Rules, page 10-21. Note: Perform this step only for attributes that have display rules with the Rank method and at least one source system ranked above User Entered. Assign user overwrite rules using the HZ: User Overwrite Rules profile option. See:
- 203. Source System Management 10-3 Profile Options and Profile Option Categories, page B-1. 5. Whether you have source systems enabled for SST or not, you can define user privileges to create and update data in Other entities. See: Setting User Create and Update Rules, page 10-23. Assign user create and update rules using the HZ: User Create and Update Rules for Other Entities profile option. See: Profile Options and Profile Option Categories, page B-1. 6. Ask your system administrator to restart Apache or the Web server after you perform any of the setup steps so that your changes take effect. Related Topics Source System Management Overview, page 10-1 Source Systems Overview Source System Management maintains references between the TCA Registry and any defined source system, such as a legacy or third party system, that loads data into the Registry. The source ID, or ID of the record in that external system, is mapped to the Registry ID of the TCA record, such as the party or contact point. For example, you load a record with the ID 12345 from the Gorman system into the TCA Registry. That record is assigned the Registry ID 100 in the TCA Registry. The source ID, 12345, is referenced to Registry ID 100. Note: By defining source systems, you ensure that when you load data from that system, a mapping record is created to maintain the reference between the source ID and the Registry ID. Source System Management allows multiple source system references to one Registry ID. Examples of TCA entities that support multiple source references include the Party, Location, and Customer Account entities. The mappings can be between one Registry ID and source IDs from multiple source systems, or, if enabled, between one Registry ID and multiple source IDs from the same source system. For example, Registry ID 100 is mapped to source ID 12345 from the Gorman system and source ID 99999 from the Elcaro system. If multiple references from the same source is allowed for the entity, Registry ID 100 can be mapped to source IDs 12345 and 67890 from the same Gorman system. By mapping the IDs from the sources of your customer data to the TCA Registry IDs, your source systems can continue to operate, sending updates to and receiving updates from TCA. This operational mapping between the TCA Registry and multiple source systems allows you to:
- 204. 10-4 Oracle Trading Community Architecture Administration Guide • Consolidate multiple customer databases, stored in various applications across different platforms, into the TCA Registry. • Create, maintain, share, and leverage an operational, single view of your customer information, or customer hub, across your enterprise. Related Topics Administering Source Systems, page 10-5 Source System Management Overview, page 10-1 Source Systems Example This example shows how you can implement and use source systems. 1. You define a source system, for example, Gorman. 2. You load data from an external system into the TCA Registry, specifying both the source system name and source ID. For example, you load a record for a party named Joe Smith from Gorman. You specify that the source system name is Gorman and that the source ID, or ID of Joe Smith in Gorman, is 12345. Note: If you specify only the source ID, the mapping is only inserted for customer account level entities with unique references, with the source system name defaulted to UNKNOWN. 3. Users of an application that has implemented SSM can specify the source system name and source ID when they create or update records in the TCA Registry. They can also query records in the Registry using the source system name and source ID. For example, the user enters a record for the party named Joe Smith and specify that the source system is Gorman and the source ID is 12345. Then, the user can query for Joe Smith using 12345 as the source ID and Gorman as the source system name. 4. You can encounter additional situations, for example: • When a source system is no longer used to provide data to one or more entities, you update the source system definition from Step 1 to indicate that the source system is inactive. This inactivation prevents additional mapping records from being created for that source system and all TCA entities. Existing mappings to the source system remain active.
- 205. Source System Management 10-5 For example, you do not want to continue maintaining mappings between the Gorman source system and the TCA Registry for any new loaded data. You inactivate the Gorman system. The mappings between the Joe Smith record in the TCA Registry and the Joe Smith record in Gorman remain untouched. • When a party record is inactivated in the source system, the reference between the source ID and the Registry ID is not affected. For example, the Joe Smith record in the Gorman system is inactivated. The mapping between Gorman 12345 and Joe Smith's Registry ID remains unchanged. • When a party record is inactivated in the TCA Registry, the reference between the source ID and the Registry ID is not affected. A BES callout for the party record inactivation is raised and applications that subscribe to the event are notified of the inactivation. For example, the Joe Smith record in the HZ_PARTIES table is inactivated. The mapping between Gorman 12345 and Joe Smith's Registry ID remains unchanged. A BES callout from HZ_PARTIES is raised due to the inactivation, notifying subscribing applications. Related Topics Source Systems Overview, page 10-3 Administering Source Systems To administer source systems, you can: • Set up flexfields to store additional information, page 10-6. • Create and update source systems, page 10-6. • View source system definitions, page 10-7. Source systems can be one of these types: • Spoke: A spoke system, such as a legacy system. • Purchased: A third party data provider, such as D&B, that you need to purchase data from. Source system references are maintained only for active source systems. Only source systems defined as enabled for Single Source of Truth are available to provide data for the SST record. See: Single Source of Truth Overview, page 10-7.
- 206. 10-6 Oracle Trading Community Architecture Administration Guide Related Topics Source Systems Overview, page 10-3 Setting Up Flexfields for Source Systems The HZ_ORIG_SYS_MAPPING table stores information about source systems and the TCA entities that the systems can provide data for. The HZ_ORIG_SYSTEM_REFERENCES table stores information about the references between source IDs and TCA Registry IDs. For both tables, you can set up flexfields to store additional information. Flexfields are additional data fields that can be customized for your organization's business needs. You must compile the flexfield Source System Entity Mapping (HZ_ORIG_SYS_MAPPING) for the Receivables (AR) application before using it. See: Overview of Setting Up Flexfields, Oracle Applications Flexfields Guide. Flexfields for Defining Entities If flexfields in the HZ_ORIG_SYS_MAPPING table are set up, you can enter flexfield values when you define entity settings as part of creating or updating source systems. For example, you set up a First Import Date flexfield to store the date when the source system is first used to import data. You then create a source system, select First Import Date for additional details, and enter a date for specific entities. See: Creating and Updating Source Systems, page 10-6. Related Topics Administering Source Systems, page 10-5 Creating and Updating Source Systems Source System Header Even though you cannot enter nonalphanumeric characters for the source system code, you can for the source system name and description. Use the name and description to provide information that is more descriptive than the code. Alternatively, you can enter the same value for the source system code and name. Source system codes are used in the mapping records, for references between source IDs and Registry ID, for example to query mapping records. Users should enter the source system code when they load data into the TCA Registry. Important: You cannot update the source system code or type after you first define them.
- 207. Source System Management 10-7 You can specify the status of the source system only when you update, not create, it. Single Source of Truth See: Single Source of Truth Overview, page 10-7. Enabled Entities The source system can provide data for all displayed entities. Optionally select the type of additional details to enter for the entities. Aside from the seeded Source System Table Name, other additional details are available if flexfields are set up. See: Flexfields for Defining Entities, page 10-6. Note: For any entity, you cannot allow multiple references from the D&B source system to one TCA record. Related Topics Administering Source Systems, page 10-5 Viewing Source Systems The overview provides information about the source system and settings for entities. You can update most of this information. See: Creating and Updating Source Systems, page 10-6. Related Topics Administering Source Systems, page 10-5 Single Source of Truth Overview Data from source systems coexist with user-entered data as separate records in the TCA Registry. For the party profile entities, Organization Profile and Person Profile, you can set up a Single Source of Truth (SST) record for a single view of the most accurate party profile information across data sources. The attributes in the SST record can contain information from different data sources, depending on the defined display rules. Note: If the TCA Registry does not contain data from source systems, then you do not need to set up Single Source of Truth. Oracle applications display and use the Single Source of Truth record for organization and person party profile information. If SST is not set up, or if the setup does not allow for data from source systems, then Oracle applications always use the user-entered information.
- 208. 10-8 Oracle Trading Community Architecture Administration Guide Note: Even though source system data, for example all purchased data from D&B, are stored in TCA tables, some information might not appear in user interfaces, based on SST display rules. Display Rules Display rules determine how the Single Source of Truth record gets its attribute values. For each attribute, you define the rule based on a display method: • Rank: Attribute value is from the highest ranked data source that contains data. For example, D&B is ranked as the highest source for the D-U-N-S Number attribute, followed by user entered. For party 1, if both D&B and user-entered records have a D-U-N-S Number attribute value, then the SST record takes the value from D&B. If party 2 has only a user-entered record, then the user-entered D-U-N-S Number is used. Note: If no data source has a value for a specific attribute, Oracle applications display nothing and the user can enter a value for that attribute. • Date: Attribute value is from the data source with the most recently updated value. For each party in the TCA Registry, Oracle applications uses the SST display rule for each attribute to determine the value to display in user interfaces. Overwrite Rules for Attributes with Rank Method To maintain accurate information in the TCA Registry, you can define rules that control data overwrite in the SST record. Overwrite rules do not apply to attributes defined with the Date display method. Note: Only source systems ranked higher than User Entered can be included in these rules. • User overwrite rules: Determine user privileges to overwrite data from source systems in the SST record. For example, data sources are ranked as follows for the Last Name attribute: 1. D&B 2. User Entered 3. Gorman
- 209. Source System Management 10-9 For a specific party, the user-entered value is Smyth, and the D&B value is Smith. Due to the ranking, Smith is used as the SST value in Oracle applications. Only D&B, ranked higher than User Entered, is available for user overwrite rules, and a rule is defined to allow users to overwrite last names from D&B. If this rule is assigned to Joe, then he can overwrite the SST last name Smith with Smythe in an Oracle application. The user-entered and SST records now have Smythe, and the D&B record remains with Smith. Important: If a user is not assigned to a user overwrite rule, then the default behavior allows him to overwrite all SST values, even those from a data source ranked higher than User Entered. To enforce the data source ranking, you must create and assign a user overwrite rule that prevents overwrite of all data sources ranked higher than User Entered. For example, you can create one user overwrite rule that prevents overwrite of all data sources, for all attributes with the Rank display method. Essentially, the rule mirrors and enforces the display rule for all those attributes. Assign this rule to the site level, so that it applies to all users by default. For the above example, this rule would prevent overwrite of D&B values for the Last Name attribute. If you want to allow overwrite for specific users, you can then define additional user overwrite rules as desired, and assign the rules at the user or responsibility level. For the above example, you would create a rule that allows overwrite of last names from D&B, and assign the rule to Joe or his responsibilities. • Source system overwrite rules: Determine which source systems can provide new data and overwrite existing user-entered data in the SST record. The rules apply only to user-entered data that previously overwrote source system data, according to user overwrite rules. For example, Joe has overwritten the D&B value for the Last Name attribute in the SST record, as the user overwrite rule assigned to him allows. Only D&B, ranked higher than User Entered, is available for the source system overwrite rule, and the rule for Last Name grants D&B overwrite privileges. If a new last name, Smeeth, is acquired from D&B for that party, then Smeeth will overwrite Joe's value, Smythe in the SST record, and replace Smith in the D&B record. The user-entered record with Smythe is untouched. If source system overwrite is not allowed for D&B, then Smeeth replaces only Smith in the D&B record. The SST and user-entered record remain with Smythe.
- 210. 10-10 Oracle Trading Community Architecture Administration Guide Note: The source system value does not overwrite the user-entered value if the source system value has not changed, for example, if the newly acquired D&B data still has Smith as the last name. Related Topics Attribute Groups, page 10-10 Single Source of Truth Example for Rank Display Method, page 10-12 Administering Single Source of Truth, page 10-19 Source System Management Overview, page 10-1 Attribute Groups Some of the attributes in the party profile entities are grouped and displayed together, separated by slashes, for example CEO Name / CEO Title. You apply the same display and overwrite rules to the entire group. Each attribute group has a primary attribute. When the Single Source of Truth record is regenerated after you run the Third Party Data Integration Update program, all nonprimary attributes in each group are populated from the same data source as their primary attribute, even if that source gives the nonprimary attributes a null value. See: Third Party Data Integration Update Program, page 10-20. This functionality applies to both the Rank and Date display methods. If the highest ranked source has no data for the primary attribute, then the SST record takes the value from the next highest ranked source that does. If none of the data sources has data for the primary attribute, the other attributes in the group are treated like regular individual attributes in the SST record. Even though the same overwrite rule applies to the entire group, an attribute can be updated without requiring the other attributes in the group to be also updated by the same data source. Important: The SIC Code and SIC Type group has additional validations. These attributes must always have values from the same data source, and both must have values or none at all. The SST record uses the data source that meets both of these requirements: • Is the highest ranked or has the last updated value for the primary SIC Code attribute • Has values for both attributes
- 211. Source System Management 10-11 Organization Profile Attribute Groups This table shows the Organization Profile attribute groups, including the primary attributes and the other attributes in each group. Primary Attribute Other Attributes in Group CEO Name CEO Title D-U-N-S Number Displayed D-U-N-S Party Identifier Enquiry D-U-N-S Number Headquarters or Branch Indicator Branch Indicator Local Activity Code Local Activity Code Type Local Business Identifier Local Business Identifier Type Minority Owned Indicator Minority Owned Type Organization Name Phonetic Organization Name Principal Name Principal Title SIC Code SIC Code Type Person Profile Attribute Groups This table shows the Person Profile attribute groups, including the primary attributes and the other attributes in each group. Primary Attribute Other Attributes in Group Person Identifier Number Person Identifier Type Related Topics Attribute Groups Example for Rank Display Method, page 10-16 Single Source of Truth Overview, page 10-7
- 212. 10-12 Oracle Trading Community Architecture Administration Guide Single Source of Truth Example for Rank Display Method This example shows how the Single Source of Truth setup for some party profile attributes affect the functionality in Oracle applications. Some of these attributes are primary attributes that belong to attribute groups, but the example treats the primary attributes as if on their own. For an example of attribute group setup, see: Attribute Groups Example for Rank Display Method, page 10-16. Display Rules For the Organization Profile entity, you set up display rules with the Rank method for the attributes shown in this table. This table also shows the available records for a specific party and the values that populate the Single Source of Truth record based on the setup. Attribute Data Source Ranking User-Entered Value D&B Value SST Value Organization Name 1. D&B 2. User Entered Company A Company A Company A Year Established 1. D&B 2. User Entered 1992 1990 1990 CEO Name 1. D&B 2. User Entered Joe Lee <Not Available> Joe Lee Total Employees 1. User Entered 2. D&B <Not Available> 100 100 SIC Code 1. User Entered 2. D&B 2520 2521 2520 User Overwrite Rule This table shows a user overwrite rule for the five attributes. Attribute Source Systems That Users Can Overwrite Organization Name <None.> Year Established D&B.
- 213. Source System Management 10-13 Attribute Source Systems That Users Can Overwrite CEO Name D&B. Total Employees <None. The rule cannot be defined because D&B is not ranked higher than User Entered.> SIC Code <None. The rule cannot be defined because D&B is not ranked higher than User Entered.> User Enters Data This table describes what happens when a user, who is assigned the above user overwrite rule, tries to enter data. The table shows the SST values from above, the data sources of each value, the highest ranked data sources, as well as the new user-entered values and the new SST values, whether the user updated them or not. Attribute Highest Ranked Data Source Current SST Data Source Current SST Value New User Entered Value New SST Value Organization Name D&B D&B Company A Company B Company A Year Established D&B D&B 1990 1992 1992 CEO Name D&B User Entered Joe Lee Joey Lee Joey Lee Total Employees User Entered D&B 100 1000 1000 SIC Code User Entered User Entered 2520 2522 2522 The user overwrite rule applies only to attribute values that have D&B as the current SST and highest ranked data source. This table describes which attributes the rule applies to.
- 214. 10-14 Oracle Trading Community Architecture Administration Guide Attribute Rule Definition Rule Is Applied Description Organization Name Prevent Overwrite Yes The user overwrite rule prevents the user-entered value from overwriting the highest ranked D&B value in SST record. Year Established Allow Overwrite of D&B Yes The user overwrite rule allows the user-entered value to overwrite the highest ranked D&B value. CEO Name Allow Overwrite of D&B No The current SST data source is already user entered, and data still does not exist for the highest ranked D&B source, so the user can modify the user-entered record and accordingly update the SST record, regardless of the user overwrite rule. Total Employees Prevent Overwrite No, D&B is not ranked higher than User Entered, so the rule is not defined Even though the current SST value is from D&B, the user can overwrite it because user entered is the highest ranked source. SIC Code Allow Overwrite of D&B No, D&B is not ranked higher than User Entered, so the rule is not defined The current SST data source is already user entered, and the highest ranked source is user entered, so the user can definitely update the SST value. Source System Overwrite Rule This table shows the source system overwrite rule for the five attributes. Attribute Source Systems That Can Overwrite User-Entered Data Organization Name <None> Year Established D&B CEO Name <None> Total Employees <None. The rule cannot be defined because D&B is not ranked higher than User Entered.>
- 215. Source System Management 10-15 Attribute Source Systems That Can Overwrite User-Entered Data SIC Code <None. The rule cannot be defined because D&B is not ranked higher than User Entered.> New D&B Data is Acquired This table shows what happens when D&B data is subsequently acquired. The table shows the SST values from above, the data sources of each value, the previous data sources, the highest ranked data sources, as well as the new D&B values and the new SST values, whether D&B updated them or not. Attribute Highest Ranked Data Source Previous Data Source Current SST Data Source Current SST Value New D&B Value New SST Value Organizati on Name D&B D&B D&B Company A Company AA Company AA Year Established D&B D&B User Entered 1992 1991 1991 CEO Name D&B User Entered User Entered Joey Lee Joseph Lee Joseph Lee Total Employees User Entered D&B User Entered 1000 2000 1000 SIC Code User Entered User Entered User Entered 2522 2520 2522 The third party overwrite rule applies only to attributes that have a current user-entered value that previously overwrote a highest ranked D&B value. This table describes which attributes the rule applies to. Attribute Rule Definition Rule Applies Description Organization Name Prevent Overwrite No The SST record always had a D&B value, which is highest ranked, so the new D&B value updates the SST record.
- 216. 10-16 Oracle Trading Community Architecture Administration Guide Attribute Rule Definition Rule Applies Description Year Established Allow D&B to Overwrite Yes The current user-entered value previously overwrote a highest ranked D&B value in the SST record. The rule allows the new D&B value to overwrite the user-entered value. CEO Name Prevent Overwrite No Even though the current SST value is user entered and the highest ranked source is D&B, the current SST value did not previously overwrite a D&B value. The new D&B value can overwrite the user-entered value because D&B is the highest ranked source. Total Employees Prevent Overwrite No, D&B is not ranked higher than User Entered, so the rule is not defined Even though the current SST value is user entered and previously overwrote a D&B value, D&B is not the highest ranked source. The new D&B value cannot overwrite the user-entered value because the highest ranked source is user entered. SIC Code Prevent Overwrite D&B is not ranked higher than User Entered, so the rule is not defined The SST record always had a user-entered value, which is highest ranked, so the new D&B value cannot update the SST record. Attribute Groups Example for Rank Display Method This example shows how attribute groups in the SST record are populated and subsequently updated. For more information, see: Attribute Groups, page 10-10. Example This table shows the primary attribute and the other attribute in the group. Primary Attribute Other Attribute in Group CEO Name CEO Title SIC Code SIC Code Type Display Rules This table shows the available records for a specific party and the values that populate the Single Source of Truth record based on display rules with the Rank method. The
- 217. Source System Management 10-17 setup for the primary attribute determines the setting for the other attribute in the group. Attribute Data Source Ranking User-Entered Value D&B Value SST Value CEO Name 1. D&B 2. User Entered Jennie Lee Jennifer Lee Jennifer Lee CEO Title 1. D&B 2. User Entered CEO <Not Available> <None> SIC Code 1. User Entered 2. D&B <Not Available> 2952 2952 SIC Code Type 1. User Entered 2. D&B <Not Available> 1977 SIC 1977 SIC Primary attributes in the SST record are populated like individual attributes, but the other attributes in the group are populated based on the primary attributes' data source. For example, the CEO title attribute takes the D&B value, which is nothing, because the primary attribute, CEO name, takes a D&B value. Important: The SIC Code and SIC Type group has additional validations. At all times, they both must have values from the same data source or none at all. User Overwrite Rule This table shows a user overwrite rule for the four attributes. The setup for the primary attribute determines the setting for the other attribute in the group. Attribute Source Systems That Users Can Overwrite CEO Name D&B CEO Title D&B SIC Code <None> SIC Code Type <None>
- 218. 10-18 Oracle Trading Community Architecture Administration Guide User Enters Data This table describes what happens when a user, who is assigned the above user overwrite rule, tries to enter data. The table shows the SST values from above, the data sources of each value, the highest ranked data sources, as well as the new user-entered values and the new SST values, whether the user updated them or not. Attribute Highest Ranked Data Source Current SST Data Source Current SST Value New User Entered Value New SST Value CEO Name D&B D&B Jennifer Lee <No Action> Jennifer Lee CEO Title D&B D&B <None> CEO CEO SIC Code User Entered D&B 2952 2999 2999 SIC Code Type User Entered D&B 1977 SIC 1987 SIC 1987 SIC The user overwrite rule applies only to attribute values that have D&B as the current SST and highest ranked data source. This table describes which attributes the rule applies to and how attributes within a group can be updated separately except for the SIC code and type group. Attribute Rule Definition Rule Applies Description New SST Data Source CEO Name Allow Overwrite of D&B Yes The user does nothing and leaves the D&B value in the SST record. D&B CEO Title Allow Overwrite of D&B Yes Even though the primary attribute, CEO name, is still a D&B value, the user can overwrite the D&B CEO title in the SST record. User Entered SIC Code Prevent Overwrite No Even though the current SST value is from D&B, the user can overwrite it because user entered is the highest ranked source. User Entered SIC Code Type Prevent Overwrite No The user must also overwrite the D&B SIC code type in the SST record because SIC code and type must always have the same data source. User Entered
- 219. Source System Management 10-19 Administering Single Source of Truth To administer Single Source of Truth: • Define and update display rules for Organization Profile and Person Profile entities. See: Setting Up Display Rules, page 10-19. • If the display method is Rank, you can define source system overwrite rules for the same attributes that you define display rules for. • For display rules changes to take effect, you must run the Third Party Data Integration Update program. You can run the program immediately after defining display rules, or submit the program at any time. See: Third Party Data Integration Update Program, page 10-20. • Define and update user overwrite rules. See: Setting Up User Overwrite Rules, page 10-21. Related Topics Single Source of Truth Overview, page 10-7 Setting Up Display Rules To define Single Source of Truth display and source system overwrite rules: 1. View attributes for the entity you want to work on. 2. Select the attributes to update display rules for. You can define the same rule for all or some attributes, or use a different rule for every attribute. 3. Select the SST display method. 4. Select data sources. See: Selecting Data Sources, page 10-20. 5. For the Rank display method, also define the source system overwrite rule. See: Overwrite Rules for Attributes with Rank Method, page 10-8. 6. Run the Third Party Data Integration Update program. See: Third Party Data Integration Update Program, page 10-20. Note: Multiple attributes separated by slashes belong to the same attribute group. The same display and source system overwrite rules apply to all attributes in the group. See: Attribute Groups, page 10-10.
- 220. 10-20 Oracle Trading Community Architecture Administration Guide Selecting Data Sources Select data sources for either the Rank or Date display method. Note: For both methods, the User Entered data source must always be selected for SST. For the Rank method, you must also rank the selected sources. Ranking Data Sources (Rank Display Method Only) For the data source ranking, only sources in the Ranked Data Sources box are considered for the Single Source of Truth record, with the uppermost as the highest ranked. The ranking not only determines the SST attribute values, but also: • Which source systems can potentially overwrite user-entered data in the SST record. For the selected attributes, you can define the source system overwrite rule only with systems ranked higher than User Entered. • The overwrite rule between source systems for the selected attributes. For example, for D-U-N-S Number, D&B is ranked above the Gorman legacy system, and the SST record currently has a D-U-N-S Number from Gorman. If you later acquire a D-U-N-S Number from D&B for this party, then the D&B value overwrites the Gorman value in SST because D&B is ranked higher. Related Topics Creating and Updating Source Systems, page 10-6 Administering Single Source of Truth, page 10-19 Single Source of Truth Overview, page 10-7 Third Party Data Integration Update Program Use the Third Party Data Integration Update program to regenerate the Single Source of Truth record for all parties in the TCA Registry. The new SST values are based only on the display rules and the existing availability of data. It does not matter which data sources the current SST values come from, and none of the overwrite rules apply. Run this program at the end of the display rule update process, or at a later time from Standard Request Submission. Your display rule changes do not take effect in Oracle applications until you run this program. Note: You do not need to run this program after updating only overwrite rules. Updated overwrite rules automatically apply to new
- 221. Source System Management 10-21 records, user actions, or data import from source systems. Prerequisite Define display rules for the first time or update display rules. See: Setting Up Display Rules, page 10-19. Program Parameters • Commit Size: Enter the number of new or updated records to be included in each commit to the database. • Number of Workers: Enter the number of parallel workers that you want to use for this program. Workers are processes that run at the same time to complete a task that would otherwise take longer with a single process. • Run Mode: Select the mode in which the program is to be run, either Regenerate Single Source of Truth for all parties, or Generate underlying infrastructure packages only. Select Generate underlying infrastructure packages only to generate only the packages. Selecting this option does not regenerate the SST record. Setting Up User Overwrite Rules Define as many user overwrite rules as needed. Each rule includes all attributes from the party profile entities. You can give the same setting to all or some attributes, or use a different setting for every attribute. See: Overwrite Rules for Attributes with Rank Method, page 10-8. Note: Multiple attributes separated by slashes belong to the same attribute group. The same user overwrite privilege applies to all attributes in the group. See: Attribute Groups, page 10-10. Note: A seeded rule specifies that the user can never overwrite a D-U-N-S Number from the D&B data source. You cannot modify this rule, and the D-U-N-S Number attribute is not available for you to include in other user overwrite rules. Use the HZ: User Overwrite Rule profile option to assign rules. See: Profile Options and Profile Option Categories, page B-1. If you are assigning only at the site level, you need to define only one user overwrite rule. If you do not define nor assign any rules, the default functionality allows user overwrite of all attributes. You can delete user overwrite rules at any time. If you delete a rule that is assigned to users, the rule from the next assigned level would then apply to these users. For example, rules are assigned at the user, application, and site levels. If you delete the
- 222. 10-22 Oracle Trading Community Architecture Administration Guide user level rule, the application level rule takes effect. Related Topics Administering Single Source of Truth, page 10-19 Single Source of Truth Overview, page 10-7 Data Security for Other Entities Other entities are entities other than the party profile entities used in Single Source of Truth. This table maps the Other entities to their relevant tables. Other Entity Table Address HZ_LOCATIONS and HZ_PARTY_SITES Contact Point HZ_CONTACT_POINTS Credit Rating HZ_CREDIT_RATINGS Financial Report HZ_FINANCIAL_REPORTS and HZ_FINANCIAL_NUMBERS Relationship HZ_RELATIONSHIPS User create and update rules determine user privileges to create new data for each Other entity, and to update Other entity data from source systems. Even if no data currently exists for an Other entity, users cannot create data for that entity if their assigned rule prevents it. Users can always update existing user-entered records for all Other entities. Note: For location-based tax validation purposes, an address cannot be updated when transactions are associated with the address, or party site. When you acquire new address information from source systems, if the new address significantly differs from the existing address, the old address would be deactivated. The new, active third party address replaces the previous address for the party site. Related Topics Source System Management Overview, page 10-1 Administering Source System Management, page 10-2
- 223. Source System Management 10-23 Setting Up User Create and Update Rules Define as many user create and update rules as needed. Each rule includes all Other entities, and you set create and update privileges at the entity level. Use the HZ: User Create and Update Rule for Other Entities profile option to assign rules. See Profile Options and Profile Option Categories, page B-1. If you are assigning only at the site level, you need to define only one user create and update rule. If you do not define nor assign any rules, the default functionality for all Other entities allows users to create data and but not to update any source systems data. You can delete rules at any time. If you delete a rule that is assigned to users, the rule at the next assigned level would then apply to these users. For example, rules are assigned at the user, application, and site levels. If you delete the user level rule, the application level rule takes effect. Related Topics Data Security for Other Entities, page 10-22
- 225. Geography Hierarchy 11-1 11 Geography Hierarchy This chapter describes administering the Geography Hierarchy, to establish master geographical information for address validation and other purposes. This chapter covers the following topics: • Geography Hierarchy Overview • Administering Geography Hierarchy • Defining Country Structures • Viewing and Defining Geographies • Updating Geographies • Managing Validations • Geography Name Referencing Process Geography Hierarchy Overview Geography Hierarchy is a data model that lets you establish conceptual parent-child relationships between geographies. A geography, such as Tokyo or Peru, describes a boundary on the surface of the earth. Applications can extrapolate information based on this network of hierarchical geographical relationships. For example, in Geography Hierarchy, the state of California is defined as the parent of San Mateo county, which is the parent of Redwood City, which is the parent of the postal code 94065. If you enter just 94065, the application can determine that the postal code is in California, or that the corresponding city is Redwood City. Oracle Trading Community Architecture (TCA) and other Oracle E-Business Suite applications can leverage Geography Hierarchy for various uses related to locations, such as real-time address validation and tax calculation. The geography information is centrally located in TCA and shared among all the applications. Note: TCA does not provide seeded geography information, but the
- 226. 11-2 Oracle Trading Community Architecture Administration Guide data model and features to set up and store that information. Concepts and Definitions The top level of Geography Hierarchy is Country, so the hierarchy essentially contains countries and their child geographies. Other aspects of Geography Hierarchy include: • Geography Type: A divisional grouping of geographies, either geopolitical (for example, City, Province, and District) or physical (for example, Island, Mountain, and Continent). • Geography: A physical space with boundaries that is a defined instance of a geography type. For example, San Jose is a geography of the City geography type. • Country Structure: A hierarchical grouping of geography types for a country. For example, the structure for United States is: State, County, City, then Postal Code. • Geography Usage: A classification of a set of geography types to indicate the purpose and usage of that data, for example for taxation. For example, the State, County, and City geography types can be used for calculating US sales tax. • Master Reference Geography Hierarchy: The Geography Hierarchy data considered as the single source of truth. It is all the data, including geography types and geographies, that you define and maintain in TCA Geography Hierarchy administration. The geography usage for the entire hierarchy is Master Reference, and defined geography types and geographies are considered master reference geography types and geographies. For example, Country is a universally recognized geography type, and United States is considered a master geography. Master Reference Geography Hierarchy data is used as the source for validating addresses, and for creating user-defined geography hierarchies, which include boundaries, or zones, for business-specific uses. So while the Master Reference Geography Hierarchy is the source of truth for geography data, for example with all the US states defined, user-defined geography hierarchies contain entities with arbitrary boundaries, namely, tax zones that encompass various US states in each zone. • User-Defined Geography Hierarchy: A classification of geographical data, created from master reference data or manually entered, for tax purposes. A user-defined geography hierarchy can have: • Zones: User-defined geographical boundaries for the specific geography usage, based on Master Reference Geography Hierarchy data. For example, a Tax geography usage can have the San Jose Tax zone, and a Sales geography usage the Southwest Sales Region zone. The boundaries of the Southwest Sales Region
- 227. Geography Hierarchy 11-3 zone would enclose various master reference states, for example California, Arizona, Nevada, Utah, and New Mexico. • Zone Type: A layer or grouping of zones, for example, Income Tax and Sales Regions zone types. The Sales Regions zone type would contain zones such as Southwest Sales Region, Midwest Sales Region, and so on. • Geography Name Referencing is the process of validating and mapping address elements of existing location table records against master reference geographies. For example, for a specific address record, the CA value in the STATE column of the HZ_LOCATIONS table is mapped to the master reference geography of CA. Related Topics Administering Geography Hierarchy, page 11-3 Administering Geography Hierarchy Set up and maintain the Master Reference Geography Hierarchy, which can: • Be used across the Oracle E-Business Suite for various purposes and tasks related to locations, for example address validation. • Provide the underlying structure from which administrators create tax zones for user-defined geography hierarchies. Note: You perform setup tasks for user-defined geography hierarchies outside of Geography Hierarchy administration. To create and update tax zones and zone types, you use Oracle E-Business Tax. See: Geography Hierarchy Overview, page 11-1. From the Geography Hierarchy: Countries page, you can access the various features for administering each country in the Master Reference Geography Hierarchy. The original list of available countries comes from the FND_TERRITORIES table. After you initially define the hierarchy for a country, you can continue to maintain it using the same administration functionality. Prerequisites Optionally use Receivables lookups to add and manage the code types and data providers available for defining geographies. This table shows the lookup types.
- 228. 11-4 Oracle Trading Community Architecture Administration Guide Geography Attribute Lookup Type Lookup Meaning Code Type (for geography codes, such as FIPS Code or ISO Country Code) HZ_GEO_IDENTIFIER_SUBT YPE Geography Identifier Subtype Data Provider (source of geography information) HZ_GEO_DATA_PROVIDER Geo Data Provider See: Defining Receivables Lookups, Oracle Receivables Implementation Guide. Administration Process 1. Structure: • Define country structures of geography types to establish how geographies within the country are hierarchically related. • Create geography types as needed. See: Defining Country Structures, page 11-6. Important: You must define the country structure before you can define specific geographies for a geography type within that structure. You should define a complete and accurate country structure the first time around, because you cannot insert new levels between existing levels after geographies are defined. You can add new levels below the lowest level in a structure. For example, you want to use Geography Hierarchy for United States address validation. For the US country structure, you define the geography type Country as the parent of State, State as parent of County, County as parent of City, and City as parent of Postal Code. 2. View Details: • View and define the list of geographies for a specific geography type in the country structure. See: Viewing and Defining Geographies, page 11-7. For example, for the United States, you first define all the states for the State geography type, then the counties in each state, the cities in each county, and the postal codes in each city. • For each geography in the list, you can also click Update to enter additional details.
- 229. Geography Hierarchy 11-5 Tip: Access to View Details (for the list of geographies) and the corresponding Update (for information specific to a geography) is available in a hierarchical manner, based on your country structure. On each View Details page, you can access the list of geographies for the geography type one level down. For example, when you click View Details for United States in the Geography Hierarchy: Countries page, you get a list of states within the US. For each state, you can click View Details to get the list of counties within that state, or click Update for that state. So, if you want to update information for Redwood City, the navigation path is: View Details for United States > View Details for California > View Details for San Mateo > Update for Redwood City. 3. Update: Maintain information specific to a geography. See: Updating Geographies, page 11-8. For example, while you define a specific state in the US, you can enter alternative names or codes for that state. 4. Manage Validations: Specify geography validation level and address styles at the country level, and map geography types in country structures to location table attributes for address or tax validation purposes. See: Managing Validations, page 11-10. 5. Run the Geography Name Referencing process to map addresses in location tables to master reference geographies. This mapping is used for tax calculation. See: Geography Name Referencing Process, page 11-14. Tip: Set these related profile options: • HZ: Batch Size for committing records in Geography Name Referencing process • HZ: Number of workers for a given Geography Name Referencing request See: Profile Options and Profile Option Categories, page B-1. Important: If you are also using Flexible Address Formatting and have an address style assigned to the country that you are administering, then make sure that your Geography Hierarchy setup is consistent. See: Address Formatting, Oracle Trading Community Architecture User Guide.
- 230. 11-6 Oracle Trading Community Architecture Administration Guide Defining Country Structures For the selected country, define the hierarchical structure of geography types to establish: • How geographies can be related. • The types of geographies you can define for that country. • The geography types available for geography or tax validation. With the Country geography type implicitly at the top of the structure, the subsequent levels are numbered with 1 as the next level after Country. Caution: After you first define a country structure, you cannot later insert levels. You can only add geography types below the current lowest level, and delete geography types without defined geographies. This setup is usually a one-time procedure, so make sure that you define a complete and accurate country structure the first time. You must add a geography type as a level in the country structure before you can define a geography for that geography type in a country. For example, before defining the state of California, the State geography type must be added to the United States country structure. Prerequisites Ì The country you want to define a structure for must be in the FND_TERRITORIES table. Procedure: This table describes some terms in the pages used for this procedure. Selected Terminology Term Description Geography Exists at Level Indicates if at least one geography is defined for the geography type at this level. For example, if the geography type is State, and California is already added as a geography for State, then a geography exists at this level. At this point, you cannot make changes to this level, including deletion.
- 231. Geography Hierarchy 11-7 1. If the country structure is completely undefined, then optionally copy the structure from another country. 2. The application provides you with a set of available master reference geography types. If needed, you can create a unique geography type before adding it to this or any other country structure. Important: To ensure that Oracle E-Business Suite applications leveraging Geography Hierarchy can allow users to enter or search a range of postal code values, use the seeded Postal Code geography type. Do not create a new type, for example called Zip Code. 3. Add geography types as needed. Each geography type is added right below the current lowest level. You can delete geography types only if geographies do not exist at that level. If the geography type is not the lowest level in the country structure, then you delete not only that level but all levels below it. Note: If you delete a geography type, then all associated validation mappings and usage for this level are also deleted. See: Managing Validations, page 11-10. Related Topics Administering Geography Hierarchy, page 11-3 Geography Hierarchy Overview, page 11-1 Viewing and Defining Geographies View the list of geographies for a specific geography type in the selected country, and add geographies as needed. For example, for the State geography type in the United States, you would define the list of US states. Prerequisites Ì The geography type for the geographies that you want to view and define must be already added to the country structure. See: Defining Country Structures, page 11-6. Procedure: 1. Add geographies that are not already on the list. The entered name and code are, by
- 232. 11-8 Oracle Trading Community Architecture Administration Guide default, the primary name and code for that geography. Primary names and codes are displayed to users. Note: Specify a code type, if known, and leave User Entered as the data provider, as you are manually entering in the geographies. If you currently have no geographies to enter for this geography type, but do have geographies for any lower level in the country structure, then select Geographies Unknown for This Level and go to Step 4. 2. Update specific geographies to provide more information, for example to enter additional names or code, or select another as primary. See: Updating Geographies, page 11-8. 3. As needed, delete geographies to inactivate them, only if the geography does not have active geographies in the subsequent level of the country structure. Note: All child geographies of the geography that you are inactivating are no longer valid. You cannot view or update those geographies. For example, inactivating a county invalidates all its cities and postal codes, as well as any user-defined zones within that county. 4. If there is a subsequent level in the country structure, click View Details to view and define geographies for the next geography type. For example, State is a parent of County in the United States country structure, and you are currently viewing the list of states. You can click View Details for California for the list of counties within that state. Related Topics Geography Name Referencing Process, page 11-14 Administering Geography Hierarchy, page 11-3 Geography Hierarchy Overview, page 11-1 Updating Geographies Update a specific geography, for example the city San Francisco or the country United States, and specify details such as the geography's date range, primary and alternate names and codes, and parent geographies.
- 233. Geography Hierarchy 11-9 Prerequisites Ì The geography you want to update must be already defined. See: Defining Geographies, page 11-7. If you want to update a specific country, it must be in the FND_TERRITORIES table. Procedure: This table describes some terms in the pages used for this procedure. Selected Terminology Term Description Data Provider The source of the geography name or code. The data provider is User Entered if the name or code was manually added to the list of geographies. See: Defining Geographies, page 11-7. Time Zone The time zone that the geography is in. 1. Update general information for the geography. 2. Update primary and alternate names and codes. Names must be unique, and codes unique within a code type. • An example of primary and alternate name usage is in real-time address validation. For example, the primary name is CA and alternate names are Cal and Calif. If the user enters Cal or Calif, then the application considers that valid and saves the value to the HZ_LOCATIONS table as CA. • You cannot delete a primary name or code until another name or code is selected as primary. • If you select a different name or code as primary, that change is reflected when you revisit the View Details page. 3. Add geographies, from one level above in the country structure, that are parents of the geography you are updating. When this geography was first defined, a parent-child relationship was already established. For example, when defining Humboldt county, you added Gilmore City as a city, so Humboldt is the parent of Gilmore City. Gilmore City, however, is also in Pocahontas county, so when you update Gilmore City, you add Pocahontas as a parent. When you define or view details for Pocahontas county, Gilmore City would already be displayed as a city within that county. See: Defining Geographies,
- 234. 11-10 Oracle Trading Community Architecture Administration Guide page 11-7. Related Topics Geography Name Referencing Process, page 11-14 Administering Geography Hierarchy, page 11-3 Geography Hierarchy Overview, page 11-1 Managing Validations Geography Hierarchy information can be used for geography validation, which ensures that addresses have valid geographic information, such as the correct combination of city, state, and postal code. Because street level data is not included, however, this validation does not ensure that addresses pass postal validation and can have postal deliveries to those locations. The real-time address validation in Oracle Trading Community Architecture and other Oracle E-Business Suite applications leverage geography validation based on the information set up in Geography Hierarchy. See: Real-Time Address Validation, Oracle Trading Community Architecture User Guide. Oracle E-Business Tax validation and calculation also leverages Geography Hierarchy. Use the Manage Validations page to perform tasks that are part of the address or tax validation setup. See: Setting Up Real-Time Address Validation, page 2-33. For address validation, specify the validation level for the country. If the level is not No Validation, then map the country structure to HZ_LOCATIONS source table attributes, and mark the mapping with Geography Validation usage. If you also use Flexible Address Formatting for this country, then do the mapping using the address style assigned to the country as a guide. Prerequisites Ì The country structure must be already defined if you want to map geography types to location table attributes for geography or tax validation purposes. See: Defining Country Structures, page 11-6. Ì (Optional) The address styles used in this setup are from Flexible Address Formatting (FAF) for HZ_LOCATIONS source table, or HR address formatting for HR_LOCATIONS_ALL source table. If none of the seeded address styles fit your needs, then create custom styles and assign to countries. See: Setting Up Flexible Addresses, Oracle Receivables Implementation Guide, or Descriptive Flexfields and Address Styles, Oracle Human Resources Management Systems Configuring, Reporting, and System Administration Guide and Changing Default National Address Styles, Oracle Human Resources Management Systems Configuring, Reporting, and System Administration Guide.
- 235. Geography Hierarchy 11-11 Procedure: This table describes some terms in the pages used for this procedure. Selected Terminology Term Description Address Style The address style element from Flexible Address Formatting or HR address formatting. Geography Validation Level for Country • Error: Only completely valid addresses can be saved, with all mandatory address elements entered. • Mandatory Fields Only: Invalid addresses can be saved without warning users, but only if users enter a value for all mandatory addresses elements, as defined by the geography types selected for Geography Validation usage. • No Validation: All addresses can be saved including incomplete and invalid addresses.. • Warning: Invalid addresses are saved after warning users. Maps to Attribute Column from the source table. Source Table The table that addresses are stored in, either HZ_LOCATIONS or HR_LOCATIONS_ALL. 1. Enter the source table first, as that determines the available address styles. The first time you set up for either the HZ_LOCATIONS or HR_LOCATIONS_ALL source table, you select a source table but not an address style because you must first set up a default address mapping. Note: No Style represents the default validation mapping, which is used if: • A country is not associated with an address style. • An application is not set up with Flexible Address Formatting. • The FAF or HR address style used in a particular situation is not set up here with a dedicated validation mapping.
- 236. 11-12 Oracle Trading Community Architecture Administration Guide As long as you set up validation mapping for No Style, you ensure that geography or tax validation can be performed for any address in this country, based on your setup. After No Style is set up for the respective source table, you can define additional mapping for specific address styles: • If you do use Flexible Address Formatting for this country, select HZ_LOCATIONS and the FAF address style assigned to this country. • For HR_LOCATIONS_ALL, you can select from any HR address style. Tip: Set up geography mapping and validation for only HR address styles that are potentially used for this country. Note: Additional mapping after No Style for either source table is optional, even if you do use FAF for this country. 2. For address styles other than No Style, then select the source table and address style combination to display the address style mapping. Use the style information to help you map the address for validation purposes, in the next step. 3. Map geography types from the country structure to attributes from the source table. You can map different types to the same attribute for different address styles, but not for the same style. Tip: Map only geography types that you want to use for geography or tax validation purposes. For example, the mapping determines which address elements are part of the address validation process. Only mapped elements are processed when the Geography Name Referencing runs. See: Geography Name Referencing Process, page 11-14. 4. For any mapped geography type and attribute combination, optionally select at least one validation usage, tax or geography. The address elements corresponding to the geography types must be correct for the address to be considered valid for the selected usage. Note: If an address element is mapped to a geography type, but not selected for geography validation usage, then suggested values can be provided for that address element during address entry, but that element is not validated. Geography validation applies only to the HZ_LOCATIONS table.
- 237. Geography Hierarchy 11-13 • Geography Validation: For example, for the United States, you specified the North America address style for HZ_LOCATIONS addresses. Then for that combination, you map the US country structure to HZ_LOCATIONS attributes, and specify that Country, State, and Postal Code values are used for geography validation. When the user enters a US address using this address style, the address must have the correct country, state, and postal code combination, based on Geography Hierarchy data, to be considered geographically valid. Use the Geography Validation check box to specify which address elements are mandatory during address entry, based on the geography validation level for country selected. The Geography Validation Level for Country can be: • Error • Warning • Mandatory Fields Only • No Validation Note: The Geography Validation usage determines which address elements are mandatory during address entry, based on the geography validation level selected. For example, if the validation level is Mandatory Fields Only, then users must enter address elements that have Geography Validation usage, but the address can still be saved if values are invalid. • Tax Validation: For example, for the United States, you had specified the North America address style for HR_LOCATIONS_ALL. Then for that combination, you map the US country structure to HR_LOCATIONS_ALL attributes, and specify that County, State, and City are used for tax validation. When a sales transaction involves an address with the North America address style, the address must have the correct county, state, and city combination, based on Geography Hierarchy data, to be considered valid for tax calculation. Important: For either usage, do not skip more than one consecutive level unless you are certain that the selected geography types can uniquely identify geographies. For example, the country structure is: State, County, City, and Postal Code, and you want to select just State and Postal Code for geography or tax validation. However, for the combination of California and 94065, the city can be either Redwood Shores or Redwood City. In this case, you should also select at least City for geography or tax validation.
- 238. 11-14 Oracle Trading Community Architecture Administration Guide 5. (Geography validation only) Specify the validation level for this country, if at least one mapping is selected for geography validation usage. Note: If you select Mandatory Fields Only, Geography Validation will change to Mandatory in the Geography Mapping and Validations section. Related Topics Geography Name Referencing Process, page 11-14 Administering Geography Hierarchy, page 11-3 Geography Hierarchy Overview, page 11-1 Geography Name Referencing Process Run the Geography Name Referencing process to validate address elements in location tables, such as HZ_LOCATIONS and HR_LOCATIONS_ALL, against geographies in the Master Reference Geography Hierarchy. For each address, or location record, the program identifies which master reference geography an address element maps to, if any. Oracle E-Business Tax uses this mapping information for business-specific purposes such as tax calculation. Geography Name Referencing is based on Geography Hierarchy validations data and setup. See: Managing Validations, page 11-10. Geography Name Referencing Process and Usage Example This table describes the validation mapping of the United States country structure to the HZ_LOCATIONS table, for the North America address style. Geography Type Maps to Attribute Tax Validation Geography Validation Country COUNTRY Yes Yes State STATE Yes Yes County COUNTY Yes No City CITY Yes Yes Postal Code POSTAL_CODE No Yes
- 239. Geography Hierarchy 11-15 An address in HZ_LOCATIONS has address elements as shown in this table. HZ_LOCATIONS Column Address Element Value ADDRESS1 500 Oracle Parkway CITY Redwood City COUNTY Santa Clara STATE POSTAL_CODE 94065 COUNTRY United States The Geography Name Referencing process runs on the HZ_LOCATIONS table and processes this address. The program: 1. Checks for the address style associated with this address, for this example, the North America address style. The program can use the corresponding validation mapping setup from Geography Hierarchy for the next step. 2. Compares each address element, or HZ_LOCATIONS attribute, that is mapped to a geography type in the US country structure, against the corresponding master reference geography defined in Geography Hierarchy. This table describes the results of this comparison for each element in the above address. Geography Type HZ_LOCATIONS Column Address Element Value Master Reference Geography Result Country COUNTRY US United States Address element is validated and mapped to the master reference geography, because the address value is a defined code or alternate name. State STATE CA Based on the other entered address elements, the program can extrapolate and map to CA as the state if CA is the only possible value. For example, there are no other states with the San Mateo county and Redwood City combination.
- 240. 11-16 Oracle Trading Community Architecture Administration Guide Geography Type HZ_LOCATIONS Column Address Element Value Master Reference Geography Result County COUNTY Santa Clara San Mateo Address element is not valid and therefore not mapped to the master reference geography. Mapping status is Error. However, if the program can find a unique correct value, as with the state, then the address element is corrected and mapped accordingly. City CITY Redwood City Redwood City Address element is validated and mapped to the master reference geography. Postal Code POSTAL_CODE 94065 The master reference geography value is not available, so the mapping status is Error. 3. Provides the results for this and all other processed addresses in the concurrent program log. The log specifies mapping status and explains why records receive the Error status. As indicated in the Geography Hierarchy validation mapping, the Country, State, County, and City geography types are used for tax validation. For any address, tax is calculated based on the master reference geographies that each address element is mapped to, as a result of Geography Name Referencing. For the address in this example, if the State and County address elements cannot be mapped, then tax validation and calculation cannot occur for State and County tax, but can for Country and City tax because those address elements are validated and mapped. Prerequisites • For the countries that you run Geography Name Referencing for: • Define the Geography Hierarchy country structure. See: Defining Country Structures, page 11-6. • Define geographies for each geography type in the country structure. See: Viewing and Defining Geographies, page 11-7 and Updating Geographies, page 11-8. • Map geography types in the country structure to location table attributes, and specify geography usage. See: Managing Validations, page 11-10.
- 241. Geography Hierarchy 11-17 • Set these profile options: • HZ: Batch Size for committing records in Geography Name Referencing process • HZ: Number of workers for a given Geography Name Referencing request Tip: If performance of the Geography Name Referencing process seems low, check with your database administrator about increasing the number of workers. See: Profile Options and Profile Option Categories, page B-1. Program Parameters • Location Table Name: Select the table with the address records that you want to process, either HZ_LOCATIONS or HR_LOCATIONS. • Run Type: Specify to process all records, only records that previously resulted in error, or only new records that this program has never processed. • Address Usage: Specify to run the program for either the tax or geography validation usage, or both. The program provides results that correspond to address elements and geography types with the selected usage. • Country: Enter the country to process addresses for. • Location ID From and Location ID To: Enter a range of location IDs to identify the addresses to process. • Start Date and End Date: Enter a date range to process only addresses that are active within this range. Related Topics Administering Geography Hierarchy, page 11-3 Geography Hierarchy Overview, page 11-1
- 243. Certification 12-1 12 Certification This chapter describes administering certification, including managing certification levels and reasons. This chapter covers the following topics: • Administering Certification Administering Certification Certification is used to classify parties by standards that your organization sets. You can assign certification levels to parties of type Organization or Person. These levels can be used, for example, in search results to determine which party records are better qualified, given equal match scores. Along with the level, a corresponding certification reason can also be assigned to indicate why the party is assigned a specific level. Each party can have only one certification level and reason. Oracle Trading Community Architecture provides seeded certification levels and reasons for assignment. You can, however, use the following Receivables lookups to manage levels and reasons, including modifying the seeded values or adding new ones. • HZ_PARTY_CERT_LEVEL for certification levels • HZ_PARTY_CERT_REASON for certification reasons See: Defining Receivables Lookups, Oracle Receivables Implementation Guide. You can assign certification levels and reasons to parties using only Oracle Customer Data Librarian. See: Assigning Certifications, Oracle Customer Data Librarian User Guide. To display certification levels in Oracle E-Business Suite applications that implemented certification, set the HZ: Display Certification Level profile option to Yes.
- 244. 12-2 Oracle Trading Community Architecture Administration Guide Related Topics Introduction to Administration, page 1-1
- 245. Web Services Implementation Overview 13-1 13 Web Services Implementation Overview This chapter describes implementation of Web services, including an overview of the Oracle Service Bean framework, Oracle Web services framework, Oracle Integration Repository, deployment of the Web services and business object APIs. This chapter covers the following topics: • Oracle Service Bean Framework • Web Services Framework • Oracle Integration Repository (iRep) • Implementing the Web Service • Business Object APIs • DQM Search • Party Merge • Account Merge Oracle Service Bean Framework Java service beans are a key component in the Oracle E-Business Suite's cohesive architecture for developing, testing, cataloging and securing public and private interfaces. A single set of implementation instructions and guidelines are used to create service beans, which are automatically published to a centralized interface repository when the code is source controlled. The automatic technology-specific generators read from the interface repository service bean definitions to create Web service session beans. When creating a Web service, the following files are used: • a WSDL document that describes the Web service's interface in XML, • the service endpoint interface (SEI) that defines the Web service interface in the Java language,
- 246. 13-2 Oracle Trading Community Architecture Administration Guide • a service implementation bean, or service bean, that implements the Java service interface, and, • one or more deployment descriptors that associate the WSDL, the Java interface, and the service bean together. Services are self-describing, standalone components that can be deployed as Web services, EJB session beans or as co-located Java APIs, i.e., the APIs are deployed in the same Java Virtual Machine [JVM] as any client that uses them. Service interfaces are categorized based on their intended usage. Business Object Service A business object is a representation of an object in the business domain. A business object service provides access to, and operations on, business objects. A business object service may support a single or many business objects. A business object service can be a document, a place, a person, or a thing. It contains one or more view objects (VOs) that are mapped to underlying entities (EOs). A major difference between the view object and the underlying entity object is the presence of foreign attributes on the view object, such as the supplier name on the purchase order. Application Service Application services are components that include data and operations. An application service is optimized for a specific end user task whose user interface can be implemented in any technology. Application services are analogous to a root UI application module in a traditional OA Framework application and they might both provide access to business objects and share the same underlying entity objects. A major difference between business object services and application services is the kind of data objects and tasks they support. A business object service manages core transaction data designed to be accessed by a remote system. An application service is optimized for a specific task, or group or tasks and also includes display values for presentation to a user. The application service will also include supplemental data objects to be used for lists, list of values and other UI-specific components. Web Services Framework A web service is a standalone software program that can be run on the Internet. While a Web service can be very small (an application that lets you get the current time, for example), or large and complex, all Web services leverage the standard technologies that together enable dynamic discovery and interaction. The Oracle Web service framework operates in a manner in which automated, decentralized services can be defined, deployed, manipulated and evolved. The
- 247. Web Services Implementation Overview 13-3 framework provides a structure for integration and foundation for protocols that will support the needs of service-oriented applications. The Oracle Web services framework provides the control infrastructure within the middle-tier to authenticate, validate, serialize or de-serialize and ultimately invoke the service bean layer within the OA framework to process a client Web service call or request. The new Web services are described by a Web Service Description Language (WSDL) file that you can discover, download and consume using Web service tools of your choice to invoke the new services. The document-style Web services are loosely coupled and document-driven. The client sends the parameter to the Web service as XML document, instead of discrete set of parameter values to the Web Service. The input XML document can also be described in the WSDL. The Web Service receives entire document, processes it and returns a response message. The protocol places no constraint on how the document needs to be structured, which is totally handled at the application level. Oracle Integration Repository (iRep) The Integration Repository, an integral part of Oracle E-Business Suite, is a central store of interface data for Oracle customers, partners, and internal departments. It also includes a catalog of services that the client may invoke to perform a business function or operation. The iRep provides a complete catalog of Oracle E-Business Suite's business interfaces, and a comprehensive view of the interface mechanisms available. You can use this tool to easily discover and deploy the appropriate business interface from the catalog for integration with any system, application, or business partner. Related Topics Oracle Integration Repository User Guide Implementing the Web Service Implementing the Web service involves deploying the Web service on a server, assigning privileges to users who can access the Web service, and invoking the Web service from a Web service invocation client. Deploying the Web Service Use the following steps to deploy the Web service on a server. You must have the Integration Repository Administrator role to deploy a Web service. 1. Navigate to Integration Repository. 2. Select Interface Type from the View By list.
- 248. 13-4 Oracle Trading Community Architecture Administration Guide 3. Select Web Service > Financials > Receivables. Click each service. 4. Click Deploy Web Service. Assigning Privileges to Users Use the following steps to assign privileges to users. 1. Navigate to Integration Repository. 2. Select Interface Type from the View By list. 3. Select Web Service > Financials > Receivables. Click each service. 4. Click Select All under Methods. 5. Click Create Grant. 6. Select the type of grant from the Grantee Type list. 7. Select the Grantee Name to add a user who will access the Web service. 8. Click Apply. Invoking the Web Service Enter the appropriate values for the parameters to invoke the Web service. The parameters can be specified using any Web service invocation client (such as BPEL and Apache-Axis). You can also create invocation methods based on your requirements. Business Object APIs The following table lists the APIs you can access through the respective service beans : Service Bean Object Business Object Equivalent API Procedure
- 249. Web Services Implementation Overview 13-5 Organization CreateOrganization UpdateOrganization SaveOrganization GetOrganization getOrganizationsCrea ted getOrganizationsUpd ated HZ_ORGANIZATIO N_BO_PUB create_organization_b o update_organization_ bo save_organization_bo get_organization_bo get_organizations_cre ated_bo get_organizations_up dated_bo Organization Customer CreateOrganizationC ustomer UpdateOrganization Customer SaveOrganizationCus tomer GetOrganizationCust omer GetOrganizatonCusto merCreated GetOrganizationCust omerUpdated HZ_ORG_CUST_BO_ PUB create_org_cust_bo update_org_cust_bo save_org_cust_bo get_org_cust_bo get_org_cust_created _bo get_org_cust_update d_bo Person CreatePerson UpdatePerson SavePerson GetPerson GetPersonCreated GetPersonUpdated HZ_PERSON_BO_PU B create_person_bo update_person_bo save_person_bo get_person_bo get_person_created_b o get_person_updated_ bo
- 250. 13-6 Oracle Trading Community Architecture Administration Guide Person Customer CreatePersonCustom er UpdatePersonCustom er SavePersonCustomer GetPersonCustomer getPersonCustomerC reated getPersonCustomeer Updated HZ_PERSON_CUST_ BO_PUB create_person_cust_b o update_person_cust_ bo save_person_cust_bo get_person_cust_bo get_person_cust_creat ed_bo get_person_cust_upd ated_bo Party Site CreatePartySite UpdatePartySite SavePartySite GetPartySite HZ_PARTY_SITE_BO _PUB create_party_site_bo update_party_site_bo save_party_site_bo get_party_site_bo Organization Contact CreateOrgContact UpdateOrgContact SaveOrgContact GetOrgContact HZ_ORG_CONTACT _BO_PUB create_org_contact_b o update_org_contact_ bo save_org_contact_bo get_org_contact_bo Phone CreatePhone UpdatePhone SavePhone GetPhone HZ_CONTACT_POI NT_BO_PUB create_phone_bo update_phone_bo save_phone_bo get_phone_bo E-mail CreateEmail UpdateEmail SaveEmail GetEmail HZ_CONTACT_POI NT_BO_PUB create_email_bo update_email_bo save_email_bo get_email_bo
- 251. Web Services Implementation Overview 13-7 Website CreateWeb UpdateWeb SaveWeb GetWeb HZ_CONTACT_POI NT_BO_PUB create_web_bo update_web_bo save_web_bo get_web_bo Location CreateLocation UpdateLocation SaveLocation GetLocation HZ_LOCATION_BO _PUB create_location_bo update_location_bo save_location_bo get_location_bo Relationship CreateRelationship UpdateRelationship SaveRelationship GetRelationship HZ_PARTY_BO_PVT create_relationship_o bj uodate_relationship_ obj save_relationship_obj get_relationship_obj Oracle Trading Community Architecture Technical Implementation Guide DQM Search You can search for a list of parties of type Organizations, or Persons, that match a configurable set of search criteria defined in a DQM match rule within the Oracle Trading Community infrastructure using the SearchParty service bean. However, you cannot use the DQM search service to search for a party contact. The following signature should be used to specify the input and output associated with the searchParty service: Input Search Type A match rule ID along with the attributes and values. Match Rule ID A technical identifier that uniquely identifies every match rule created within an Oracle Customer Data Hub (CDH) or Oracle Customer Data Librarian (CDL) instance. Search Attributes The attribute name and value pairs of all search parameters. A maximum of 20 search
- 252. 13-8 Oracle Trading Community Architecture Administration Guide attributes can be specified at any given time to allow Oracle Data Quality Management (DQM) to successfully execute a search operation. Output This data object captures the results of a search including a list of parties (party name), match score, registry IDs and the, related source system name and the original system reference IDs corresponding to search hits. Search Result Data Objects The following table lists the search result data objects that are created as part of the searchParty service bean: Column Description Column Name Data Type Length Party ID PARTY_ID Number Match Score MATCH_SCORE Number Registry ID PARTY_NUMBER VARCHAR2 30 Party Name PARTY_NAME VARCHAR2 360 Party Type PARTY_TYPE VARCHAR2 30 Organization/Person Address1 (Primary) ADDRESS1 VARCHAR2 240 Organization/Person Address2 (Primary) ADDRESS2 VARCHAR2 240 Organization/Person Address3 (Primary) ADDRESS3 VARCHAR2 240 Organization/Person Address4 (Primary) ADDRESS4 VARCHAR2 240 Organization/Person City (Primary) CITY VARCHAR2 60 Organization/Person State (Primary) STATE VARCHAR2 60
- 253. Web Services Implementation Overview 13-9 Organization/Person Country (Primary) COUNTRY VARCHAR2 60 Organization/Person Country Code (Primary) PRIMARY_PHONE_ COUNTRY_CODE VARCHAR2 10 Organization/Person Area Code (Primary) PRIMARY_PHONE_ AREA_CODE VARCHAR2 10 Organization/Person Phone Number (Primary) PRIMARY_PHONE_ NUMBER VARCHAR2 40 Organization/Person Email (Primary) PRIMARY_EMAIL VARCHAR2 2000 Original System Object Reference ORIG_SYS_OBJS HZ_ORIG_SYS_REF_ OBJ_TBL Party Merge A spoke application can use this Web service to create a request to merge two or more parties. A spoke application can use this Web service to retrieve details about a party merge request. This Web service has two operations – Create Party Merge Request and Get Party Merge Details. Create Party Merge Request You can use this Web service to create a request to merge parties. Input • Duplicate ID Object: The data object oracle.apps.ar.hz.service.party.DuplicateParty contains the list of potential duplicate IDs and/or a combination of the source system and the source system IDs provided by the user. • Initialized Message List: The list that indicates if the FND message stack within the API is initialized. • Note: The note for the merged text Output • Merge Request ID: The output is the ID of the merge request that will be shown in
- 254. 13-10 Oracle Trading Community Architecture Administration Guide the Create Party Merge Request Payload XML document. Get Party Merge Details You can use this Web service to retrieve details about a party merge that has already taken place in the Customer Data Hub. Input • Batch ID: The party merge batch identifier. • Merge to Party ID:The master party identifier. • Get Merge Details Flag: The flag that indicates if the historical merge party details from the HZ_Merge_Party_History table and associated source system mapping details are retrieved as part of the object. • Initialized Message List:The list that indicates if FND message stack within the API is initialized. By default the FND message stack is not initialized. Output • Party Merge Object: The output is the PL/SQL table of records structure that contains the party merge result information. Account Merge You can use this Web service to retrieve details about the account merge for a merge that has already taken place. This Web service has one operation - Get Account Merge Details. Input • Customer Merge Header ID: The header ID displays the customer merge header numbers. • Initialized Message List: The list that indicates if FND message stack within the API is initialized. By default, the FND message stack is not initialized. • Get Merge Details Flag: The flag that indicates if the historical merge account details from history tables and associated source system mapping details are retrieved as part of the object. Output • Account Merge Object V2: The output is the data object oracle.apps.ar.hz.service.account.AcctMergeObj. It returns the account merge information, which is shown in the Get Account Merge Details Payload XML
- 255. Web Services Implementation Overview 13-11 document.
- 257. Resource Manager Implementation Overview 14-1 14 Resource Manager Implementation Overview This chapter offers an overview of implementing Resource Manager including installation verification, application procedures, Resource Manager dependencies, setting up and managing resources and concurrent programs. This chapter covers the following topics: • Overview • Installation Verification • Resource Manager Dependencies • Phase I: Setting Up Resource Manager • Phase II: Managing Resources with Resource Manager • Resource Manager Concurrent Programs Overview Resource Manager is used with other applications in the E-Business Suite to define, access, and maintain different categories of resources including employees, supplier contacts, parties, and partners. You can also define a Resource of type Other that is not a salesperson, but an individual or an object. Resource Manager enables you to perform these functions in a single application without having to access multiple repositories within the E-Business Suite on an individual basis. Implementing Resource Manager takes place in two phases. In the first phase, you set up Resource Manager by importing resources from other E-Business applications, optionally defining roles and role types, setting profile options, configuring resource fields for update, and defining skill levels. In the second phase, you manage resources by finding and viewing resources, assigning roles and role types to resources, creating groups and teams to which resources can be assigned, and viewing resource reports. In addition to successfully completing these phases, you can troubleshoot any problems with Resource Manager as required. Before implementing Resource Manager, it is necessary to understand the definition of
- 258. 14-2 Oracle Trading Community Architecture Administration Guide resources, how Resource Manager operates with other E-Business suite applications, and the functionality of both the Forms-based and HTML versions of the product. Resources Resources are individuals or objects that are identified by categories based on the business function they perform. These categories include employees, parties, partners, and supplier contacts each of which is initially created and maintained in a specific E-Business application database. They also include resource of type other that can be objects such as items, assets, equipment, or property such as meals, audio/visual equipment, overhead projectors, and furniture. Resource Manager typically mass imports different types of resources from the E-Business application databases listed in the following table: E-Business Suite Application Resources Resource Description E-Business Application Employee A person hired to work for a company. Human Resource Management System (HRMS) Party An entity that can enter into a business relationship. Trading Community Architecture (TCA) Partner One of two or more people who contribute capital to establish or maintain a commercial venture and who usually share in the risks and profits. TCA Supplier Contact The contact information for a person or agency that sells raw material or goods. Purchasing (PO) Other Objects such as items, assets, equipment, or property. Examples include meals, audio/visual equipment, and furniture. Oracle Property Manager Resource Manager Functionality within the E-Business Suite Resource Manager imports data from the HRMS, TCA, and PO databases and provides the resulting resource information to other E-Business applications. The following
- 259. Resource Manager Implementation Overview 14-3 diagram illustrates Resource Manager interactions within E-Business and core applications. This diagram is explained in the table that follows. Interaction with Other E-Business and Core Applications The following table describes Resource Manager Interactions with other E-Business Suite applications:
- 260. 14-4 Oracle Trading Community Architecture Administration Guide Interaction with Other E-Business and Core Applications Application Type Resource Manager Interaction Partners Online E-Business Partners Online uses Resource Manager to setup partners, parties, and relationships from TCA. Contracts E-Business Contracts uses Resource Manager to tie contracts to employees. For example, a service contract may be tied to one or more preferred engineers. TeleSales E-Business TeleSales uses Resource Manager to set up a sales hierarchy. Receivables E-Business Salesreps defined in Resource Manager are used by Receivables. Marketing EBusiness Marketing uses Resource Manager to set up marketing groups, identify approvers, and execute marketing campaigns. Service E-Business Service uses group and team lists of resources from Resource Manager for service request assignments. iSupport E-Business iSupport uses Resource Manager to set up support groups to fulfill service and support needs. Incentive Compensation E-Business Incentive Compensation uses Resource Manager to set up sales representatives and sales compensation group hierarchies.
- 261. Resource Manager Implementation Overview 14-5 Application Type Resource Manager Interaction Call Center E-Business Call Center uses Resource Manager for call center routing. Sales Online E-Business Sales Online uses Resource Manager to set up a sales hierarchy. Calendar E-Business Calendar uses Resource Manager to track the availability of resources. Interaction History Common Application Calendar Interaction History uses Resource Manager to provide touch points. Assignment Manager Common Application Calendar Assignment Manager uses Resource Manager to provide a list of qualified resources. Territory Manager Common Application Calendar Territory Manager uses Resource Manager to select the resources for a particular territory. Task Manager Common Application Calendar Task Manager uses Resource Manager to provide single, group, and team lists of resources for task assignments. Trading Community Architecture (TCA) E-Business Resources of category Party and Partner can be imported from Accounts Receivables (AR) to Resource Manager and subsequently defined as E-Business Suite resources. Purchasing E-Business Resources of category Supplier Contact can be imported as resources from Purchasing (PO).
- 262. 14-6 Oracle Trading Community Architecture Administration Guide Application Type Resource Manager Interaction Human Resource Management Systems (HRMS) E-Business Resources of category Employee can be imported as resources from Oracle Human Resource Management System (HRMS). Forms-based and HTML Versions of Resource Manager Resource Manager was initially a Forms-based application and was subsequently expanded to include an HTML version. A number of features are available in both versions of Resource Manager, however some features are available in only Forms or HTML. The HTML version of Resource Manager, has additional implementation requirements such as setting the necessary profile options for the application. Installation Verification Before attempting to run Oracle E-Business Suite applications, first verify that you can perform the tasks outlined in the following table. The listed tasks are generic tasks that are typical of all users of the E-Business Suite. Depending on your business processes, and the modules that you are installing, not every listed task is applicable to your installation. The following table describes the tasks that need to be performed before implementing Resource Manager. Table 2-1 Application Dependency Checklist Application Task Application Object Library 1. Create an FND user, page 14-7 2. Assign AOL responsibility to the user, page 14-8 3. Set profile option, page 14-9 Oracle Human Resources Create an employee, page 14-10 Oracle Human Resources Create a new business unit, page 14-11
- 263. Resource Manager Implementation Overview 14-7 Application Task Oracle Receivables 1. Create a customer, page 14-12 2. Create a new organization, page 14-13 Oracle Workflow Create a workflow with notifications, page 14-14 Oracle Inventory 1. Define categories, page 14-16 2. Define products and platforms, page 14-17 3. Define unit of measure, page 14-18 4. Define unit of measure classes, page 14-18 Oracle Purchasing Create a supplier contact, page 14-19 Oracle Order Management Define sales credit types, page 14-20 Oracle General Ledger Set up descriptive accounting flexfields, page 14- 21 Application Procedures You must be able to complete each of the following non-E-Business Suite tasks successfully for your E-Business Suite applications to work properly. If you are unable to complete a task successfully, then correct the problem before continuing. Creating an FND User Perform the following steps to create a FND user in the Application Object Library. Reference Oracle Application Object Library Security, Oracle Applications System Administrator's Guide - Security Prerequisites None Responsibility System Administrator Navigation Navigate to Security > User > Define.
- 264. 14-8 Oracle Trading Community Architecture Administration Guide Steps 1. In the User window, enter a new user name in the User Name field. 2. Enter a password in the Password field. 3. Re-enter the password for verification. 4. Select the employee's name from the list of Values (LOV) in the Person Field. 5. In the Responsibilities sub-tab, select the CRM HTML Administration responsibility from the drop-down list of values. 6. Save the new user. To verify that the user setup is successful, perform the following steps: 1. Login to your Personal Home Page as the newly created user. 2. Enter your new password when prompted. You should now be able to access the Personal Home Page for this user. Note: For this user to have access to HTML applications, you must set additional profile options. See: Resource Security Category, page C-2 and Resource Setup Category, page C-4. Assigning AOL Responsibilities to the User A responsibility defines an application user's current privileges while working with Oracle Applications. When an application user signs on, they select a responsibility that grants certain privileges, specifically: • The functions that the user may access. Functions are determined by the menu assigned to the responsibility. • The concurrent programs, such as reports, that the user may run. • The application database accounts to which forms, concurrent programs, and reports connect. You cannot delete a responsibility because this information helps to provide an audit trail. You can deactivate a user's responsibility at any time by setting the End Date to the current date. If you wish to reactivate the responsibility for the user, change the End Date to a date after the current date, or clear the End Date. After creating the FND User, perform the following steps to assign the user AOL responsibilities.
- 265. Resource Manager Implementation Overview 14-9 Reference People Management, Oracle Human Resources Management Systems Workforce Sourcing, Deployment, and Talent Management Guide Prerequisites None Responsibility System Administrator Navigation Navigate to Security > User > Define. Steps 1. With the user information populated in the window, select the Responsibility field in the Responsibilities tab. 2. Select the necessary responsibility from the List of Values (LOV). 3. Define the Effective dates. 4. Save your work. Setting Profile Options A user profile is a set of changeable options that affect the way your application looks and behaves. As System Administrator, you control how Oracle Applications operate by setting user profile options to the values you want. You can set user profile options at four different levels: site, application, responsibility, and user. After creating the FND User, perform the following steps to set profile options. Reference People Management, Oracle Human Resources Management Systems Workforce Sourcing, Deployment and Talent Management. User Profiles, Oracle Human Resources Management Systems Configuring, Reporting, and Administration Guide. Prerequisites None Responsibility System Administrator Navigation Navigate to Security >Profile > System. Steps 1. In the Find System Profile Values window, select an appropriate check box for the profile option that you want to set before clicking Find. The System Profile Values window opens with the profile option you searched for.
- 266. 14-10 Oracle Trading Community Architecture Administration Guide 2. Set an appropriate value for your profile option if the checkbox is selected: 1. Set the Site value. This field displays the current value, if set, for all users at the installation site. 2. Set the Application value. This field displays the current value, if set, for all users working under responsibilities owned by the application identified in the Find Profile Values block. 3. Set the Responsibility value. This field displays the current value, if set, for all users working under the responsibility identified in the Find Profile Values block. 4. Set the User value. This field displays the current value, if set, for the application user identified in the Find Profile Values block. You should set site-level default values for any required options after installation of an application. If you do not assign a particular profile option at any of the four levels, that option does not have a default value and may cause errors when you use forms, run reports, or run concurrent requests. 3. Save your work. Creating an Employee To successfully run most of the E-Business Suite products, you must first create employee resources within the ERP Human Resource Management System (HRMS) application. Perform the following steps to define an employee for minimal functionality. Note: If Oracle HRMS is not installed, then you must enter a new employee using the Enter Person form by navigating to Resource Manager > Maintain Employee > Employee. Reference People Management, Oracle Human Resources Management Systems Workforce Sourcing, Deployment, and Talent Management Guide Prerequisites None Responsibility US HRMS Manager or US Super HRMS Manager Navigation Navigate to People > Enter and Maintain. Steps 1. Click New In the find window.
- 267. Resource Manager Implementation Overview 14-11 The People window opens. 2. Enter the following employee information in the appropriate form fields: • Last Name • First Name • Title 3. Select the person's gender from the drop-down list. 4. Select Employee from the type drop-down list. 5. Enter the person's social security number. 6. Save you work. Creating a New Business Unit A Business Group is a special class of organization. Every Business Group can have its own set of default values, with its own internal organizations, grades, jobs, positions, payrolls, employees, applicants, compensations and benefits. Organizations are the basic work structure of any enterprise. They usually represent the functional, management, or reporting groups which exist within a Business Group. Perform the following steps to create a new business unit. Reference Creating an Organization, Oracle Human Resources Management Systems Enterprise and Workforce Management Guide Prerequisites None Responsibility US HRMS Manager or US Super HRMS Manager Navigation Navigate to Work Structures > Organization > Description. Steps 1. Click New in the Find Organization window. 2. Enter the name for the Organization 3. Select Business Unit from the list of values (LOV) in the Type field. The current date populates the From Date field. 4. Enter the Organization location details from the LOV.
- 268. 14-12 Oracle Trading Community Architecture Administration Guide 5. Save your work. 6. In the Organization Classification region, select the classification from the LOV. 7. Select the Enabled check box. 8. Save your work. 9. Click Others for additional information on the classification you selected. 10. Save your work. Creating a Customer Perform the following steps to create a new customer, with an address and contact information in the Oracle Receivables. Reference Creating a Customer, Oracle Receivables User Guide Prerequisites None Responsibility Receivables Manager Navigation Navigate to Customers > Standard. Steps 1. In the Find/Enter Customers window, select Person from the Customer Type drop-down list. 2. Enter the name of the customer in the Name column. 3. Click Find to ascertain if the customer already exists. As this customer does not exist, the New button is enabled in the Decisions window. 4. Click New. The Customer-Standard window opens. 5. On the Address tab, click New to create a new address. The Customer Addresses window opens. 6. Fill in the necessary information. Yellow fields are mandatory. 7. On the Business Purpose tab, fill in the Usage, Location and select the Primary check box. For example:
- 269. Resource Manager Implementation Overview 14-13 • Usage: Marketing • Location: 6op9 • Primary: Yes 8. On the Contacts: Telephones tab, enter a new contact and phone number. 9. Save your work. Verify Your Information To verify that the process worked properly, perform the following steps. 1. Open the Customer-Standard window again. 2. Enter the company name you entered above. 3. Click Find to query for the record you created in the Match Results window. 4. If the record is found, click the Contacts: Telephone tab. 5. Place the cursor in the Last Name field. 6. From the menu, navigate to View > Queryby Example > Enter. 7. Enter the contacts last name as the search criteria. 8. Select View > Query by Example > Run. If the record for your contact name is populated, then you have successfully created a customer with an address and a contact person for the customer. Creating a New Organization Perform the following steps to create a new organization, with an address and contact information in the Oracle ERP Accounts Receivables application. Reference Creating a Customer, Oracle Receivables User Guide Customers Prerequisites None Responsibility Receivables Manager Navigation Navigate to Customers > Standards. Steps 1. In the Find/Enter Customer window, select Organization from the Customer Type
- 270. 14-14 Oracle Trading Community Architecture Administration Guide drop-down list. 2. Enter the name of a test corporation in the Name field. 3. Click Find to ascertain if the customer already exists. As this customer does not exist, the New button is enabled. 4. Click New. The Customer-Standard window opens. 5. On the Address tab, click New to create a new address. The Customer Addresses window opens displaying the same business purpose table as on the first tab. 6. Fill in the necessary information. Yellow fields are mandatory. 7. On the Business Purpose tab, fill in the Usage, Location and select the Primary check box. For example: • Usage: Marketing • Location: 6op9 • Primary: Yes 8. On the Contacts: Telephones sub-tab, enter a new contact and phone number. 9. Save your work. Creating a Workflow With Notifications Perform the following steps to create and run a workflow with notifications. Reference Defining a Workflow Process and Defining Workflow Process Components, Oracle Workflow Developer's Guide Prerequisites None Responsibility Workflow Administrator Navigation Navigate to Workflow > Launch Processes. Steps 1. In the Launch Processes window, In the Item Type column, click Document Management. If you have renamed the item types, this option appears in the
- 271. Resource Manager Implementation Overview 14-15 Internal Name column as WFDM. The Initiate Workflow-WFDM page opens. 2. Enter values in the following fields: • Item Key: Enter your name plus a sequence number (for example, jdoe1001) • User Key: You may copy the value in the Item Key field • Process Name: Enter Document Review • Process Owner: Your logged in user name populates automatically • Send Document: Leave blank • Document Owner: Select a valid resource name • Document Reviewer: Choose one from the list of values • Comments: Enter Workflow Verification • Response Document: Leave blank 3. Click OK. The Activities List page opens to show workflow statuses. The status of the workflow you just initiated should be Active. 4. If the status of the workflow is Error, click Exception in the Result column to see an explanation of the error. 5. Click View Diagram to see a graphical representation of the workflow process. Leave the View Diagram window open as you continue to check the workflow. 6. Save your work. To Review the Progress of a Workflow Use the following procedure to verify that the Workflow notification is sent. Steps 1. Login to your Personal Home Page. 2. In the list of Self Service Apps, choose the Workflow User Web Application responsibility. 3. In the Navigator, choose Workflow >Find Notifications. The Find Notifications page opens.
- 272. 14-16 Oracle Trading Community Architecture Administration Guide 4. In the Type field, enter Document Management. In the To field, enter the document reviewer. 5. Click Find. The Worklist window opens. 6. Click Subject to open the notification. If you see the notification, then workflow is set up correctly. 7. Click Approve to return to the Worklist window. Further Verification You may go back to the View Diagram window that you opened earlier. Click Reload in the browser window to refresh the contents of the window. After the workflow process completes successfully, you can see a green line from the Start icon to the End (Approve) icon. Defining Categories You can use categories and category sets to group items for various reports and programs. Perform the following steps to define categories. Note: Category sets may be used as a means to develop custom lists of items on which to report and sort. You can also create other category sets such as John's Priority or Jane's Priority, with categories like high, medium, and low. Reference Defining Categories, Oracle Inventory User's Guide Prerequisites The categories you assign to a category set must have the same flexfield structure as the set itself. This is true even if you choose not to validate the category list. Responsibility Inventory Navigation Navigate to Setup > Items > Categories > Category Sets. Steps 1. Select the appropriate organization name in the Organization window, if necessary. 2. In the Category Sets window, enter a unique category set name and description information. 3. Enter a flexfield structure.
- 273. Resource Manager Implementation Overview 14-17 4. Select a control level. • Master Level: Item assigned to this category set has the same category value in all organizations where it is assigned. • Org Level: Item assigned to this category set may have a different category value in each organization where it is assigned. 5. Select a default category. This is the default category used when assigning an item to the category set. For example, a category set may have a default category called New. After an item is assigned to New, you can override the default category and choose another relevant category for each item. 6. Decide whether or not an item can be assigned to multiple categories within this category set. • Enable: You can assign an item to multiple categories within a category set. For example, you may define a Hazard category set. In this case, an item may be assigned to both the Poison and Corrosive categories. • Not Enable: You can assign an item to exactly one category. For example, you may define a Web Display category set. In this case, an item can be assigned to only one default display category. 7. Decide whether or not to enforce the list of valid categories. • Enable: You can assign an item only to those categories defined as valid categories for this category set. For Oracle Purchasing, this check box is not applicable, and you can assign items only to categories defined as valid for this category set. • Not Enable: You can assign an item to any defined category that uses the same flexfield structure as this category set. 8. Select a list of valid categories. The list of values here includes only categories that use the same flexfield structure as the category set you are defining. 9. Save your work. Defining Products and Platforms You define and rate products and platforms in Oracle Inventory in order to set resource skill levels in the HTML Resource Manager. See the Oracle Inventory User's Guide for more information on how to define products and platforms.
- 274. 14-18 Oracle Trading Community Architecture Administration Guide Reference Items, Oracle Inventory User's Guide Defining Unit of Measure Classes Perform the following steps to define a unit of measure class. Reference Defining Units of Measure Classes, Oracle Inventory User's Guide Prerequisites None Responsibility Inventory Navigation Navigate to Setup > Units of Measure > Classes. Steps 1. In the Units of Measure Classes window, select File > New. 2. Enter a unique name for the unit of measure class. 3. Enter a description for the UOM class. 4. Define the base unit of measure for this class. 5. Enter a unique abbreviation for the unit of measure with a maximum length of three characters. Examples include, EA for each or HRS for hours. 6. Select the "inactive on" date from the date picker. 7. Save your work. Defining Units of Measure Units of measure are used by a variety of functions and transactions to express the quantity of items. The values defined in the Units of Measure window provide the list of values available in unit of measure fields in other windows. Units of measure are not organization–specific. Perform the following steps to define units of measure. Reference Defining Units of Measure, Oracle Inventory User's Guide Prerequisites At least one unit of measure class must exist. Responsibility Inventory Navigation Navigate to Setup > Units of Measure > Units of Measure.
- 275. Resource Manager Implementation Overview 14-19 Steps 1. With the Units of Measure window open, select File > New. 2. Enter a unique name for the unit of measure. 3. Enter a unique abbreviation for the unit of measure with a maximum length of three characters. Examples include, EA for each or HRS for hours. 4. Enter a Description for the UOM. 5. Select the check box if this is the base unit of measure for the unit of measure class. 6. Enter a unit of measure class. 7. Select an "inactive on" date from the date picker. 8. Save your work. Creating a Supplier Contact Set up suppliers in the Suppliers window to record information about individuals and organizations from whom you purchase goods and services. You can also enter employees whom you reimburse for expense reports. When you enter a supplier that does business from multiple locations, you store supplier information only once, and enter supplier sites for each location. You can designate supplier sites as pay sites, purchasing sites, RFQ only sites, or procurement card sites. For example, for a single supplier, you can buy from several different sites and send payments to several different sites. Most supplier information automatically defaults to all supplier sites to facilitate supplier site entry. However, you can override these defaults and have unique information for each site. The system uses information you enter for suppliers and supplier sites to enter default values when you later enter transactions for a supplier site. Most information you enter in the Suppliers window is used only to enter defaults in the Supplier Sites window. When the system enters that information in a later transaction, it only uses supplier site information as a default, even if the supplier site value is null and the supplier has a value. If you update information at the supplier level, existing supplier sites are not updated. When you enter a supplier, you can also record information for your own reference, such as names of contacts or the customer number your supplier has assigned to you. Perform the following steps to create a supplier contact. Reference Supply Base Management, Oracle Purchasing User's Guide Prerequisites • Verify that the supplier does not exist in the system. Use the Suppliers Report and Supplier Audit Report.
- 276. 14-20 Oracle Trading Community Architecture Administration Guide • Define the following lookups in the Oracle Purchasing Lookups window: Pay Group, Supplier Type, Minority Group. • Define Supplier Types in the Oracle Payables Lookups window. • If you have installed Purchasing, complete Purchasing setup. • If you use Oracle Purchasing, define Supplier Types in the Oracle Payables Lookups window. • If you use Oracle Purchasing, define FOB codes, Minority Groups, and Freight Terms codes in the Oracle Purchasing Lookups window. • If you use Oracle Purchasing, define Ship Via codes in the Defining Freight Carriers window. Responsibility Purchasing Navigation Navigate to Supply Base > Suppliers. Steps 1. In the Suppliers window, enter a unique Supplier Name. 2. If the Supplier Number Entry option in the Financials Options window is set to Automatic, Payables automatically enters a Supplier Number for you. If this option is set to Manual, you must enter a unique Supplier Number. 3. (Optional) Enter the supplier's tax identification number in the Taxpayer ID field; for example, an individual's social security number, or a corporation or partnership's federal identification number/federal tax ID. 4. (Optional) Enter the value-added tax (VAT) registration number in the Tax Registration Number field if you are entering a VAT supplier. If you want to prevent invoice or purchase order entry for this supplier after a certain date, then enter the date in the Inactive On field. 5. Enter supplier information in the appropriate tabs of the Suppliers window. 6. In the Suppliers window, choose the Sites button to navigate to the Supplier Sites window. Enter at least one supplier site name and address. 7. Save your work. Defining Sales Credit Types Order Management uses sales credit types to determine if the sales credit for an order is
- 277. Resource Manager Implementation Overview 14-21 a quota or non-quota amount. Perform the following steps to define sales credit types. Reference Setting Up, Oracle Order Management Implementation Manual Prerequisites None Responsibility Order Management Super User Navigation Navigate to Setup > Sales > Credit Types. Steps 1. Navigate to the Sales Credit Types window. 2. In the Sales Credit Type window, enter the Credit Type Name and Description for the credit type. 3. Select the Quota check box if the sales credit type applies to revenue quota sales credit that you assign to salespeople. 4. Select the Enabled check box to activate the sales credit type. 5. Save your work. Setting Up Accounting Flexfields Use descriptive flexfields to tailor General Ledger to fit your unique information needs. For example, you may want to collect additional information on budget organizations, such as the manager and the size of the organization. You can even define context– sensitive flexfields that prompt you for additional information based on your previous entries. Perform the following steps to set up accounting flexfields. Note: You only need to set up accounting flexfields if you are using the Freight, Revenue, or Receivables Account fields, in the Resource Manager Receivables tab. Reference Defining Descriptive Flexfields for General Ledger, Oracle General Ledger Implementation Guide Prerequisites Use the Value Sets window to define any value sets you need. Responsibility General Ledger Super User Navigation Navigate to Setup > Financials > Flexfields > Descriptive > Segments.
- 278. 14-22 Oracle Trading Community Architecture Administration Guide Steps Consult the following manuals for more information: • Oracle General Ledger Implementation Guide • Oracle Applications Flexfields Guide Resource Manager Dependencies Report Manager integrates with other Oracle applications in the e-Business Suite to provide and extend its functionality. Some are mandatory and some are optional. You must set up the mandatory modules before the Resource Manager can run. Setting up the optional modules is not required; however, if they are not set up, then the additional functionality provided by these modules is not available. Many of these modules are included in your general installation. The following list of modules or applications is included with your installation but if you have not licensed the entire suite, you will only have access to the functionalities and tables. In other words, you will not be able to access the user interface (UI) or APIs for the application. Note: The exception to the previous paragraph is that some UIs are shared. An example of this is in Oracle HRMS which will "share" some of it's Forms if you do not have HRMS set up. Resource Manager Mandatory Dependencies • Oracle Application Object Library (AOL): Resource Manager uses AOL to manage responsibilities that are used in various modules, and set application profile options. (Required) • Oracle Human Resources: Resource Manager uses Oracle Human Resources to create employee resources so that the employee resources can be imported into Resource Manager. In addition, business units used in multi-organization are also created in Oracle Human Resources. (Required) • Oracle Purchasing: Resource Manager uses Oracle Purchasing to create supplier contacts. (Required) • Oracle Inventory: HTML-based Resource Manager users rate their skills based on the product and platforms defined in Oracle Inventory. (Required) • Oracle Receivables: Resource Manager uses Oracle Receivables to create customers that are of party or partner resource type. In addition, new organizations used in multi-organization are also created in Oracle Receivables. (Required) • Oracle Workflow: Resource Manager uses Oracle Workflow to send workflow
- 279. Resource Manager Implementation Overview 14-23 notifications. (Required) Phase I: Setting Up Resource Manager Implementing Resource Manager takes place in two phases. In the first phase, you set up Resource Manager by defining and configuring required components. In the second phase, you use Resource Manager to manage your resources. This section summarizes the basic steps for Phase I: Setting up Resource Manager. Detailed instructions for these steps can be found in Overview of Setting Up Resource Manager, page 15-2. Before performing these steps, you should first determine that Resource Manager is installed and configured properly to work with other applications in the E-Business Suite. Defining Resources The first step in implementing Resource Manager is to define resources. Typically this is accomplished by mass importing resources from other Oracle E-Business applications or from legacy systems. In some cases, however, you may want to define an individual resources by importing it from the relevant E-Business application or by creating it directly in Resource Manager. Mass Import Resource From Other E-Business Applications Mass importing resources is the most common method of defining resources that are stored in E-Business applications such as HRMS, TCA, or Purchasing. This is accomplished using concurrent programs to synchronize data between Resource Manager and the HRMS, TCA, and Purchasing databases. Import Resources From Legacy Applications Using APIs APIs are required to import resources from legacy HRMS, PO, or AR systems into Resource Manager. To accomplish this, you must use the APIs of your legacy system and the Resource Manager public Published APIs. Import Individual Resources From Other E-Business Applications An individual resource can be imported into Resource Manager by logging in with the CRM Administrator responsibility, and selecting Resource Manager > Maintain Resources > Import Resources. Create Individual Resources in Resource Manager You can create one of the following in the Forms-based version of Resource Manager: • An employee that is defined as a salesperson in the Forms-based version of Resource Manager • A resource of type Other that is either an individual who is not a salesperson, or an object such as a hospital bed.
- 280. 14-24 Oracle Trading Community Architecture Administration Guide When you create Resources of these types in Resource Manager the information is written directly to the HRMS tables. If you want to create individual resources of other types, you must first create them in the appropriate application and then import them into Resource Manager. Optionally Defining Roles Types and Roles Resource Manager comes with seeded role types and roles that are used to better organize your resources. If you do not wish to use the seeded role types and roles, you can optionally create your own in Resource Manager. Role Types A role type is a broad descriptive category such as "Sales" that contains one or more detailed descriptive categories such as "Sales Representative" or "Sales Manager". Sales, TeleSales, Marketing, Sales Compensation, Support, and Call Center are all examples of role types that are seeded by the different modules that access Resource Manager. You can also define custom role types for your business needs. Role Types Example Roles Roles are detailed descriptive categories that are grouped together within role types. A role can encompass one or more job descriptions and job titles that are used to assign responsibilities to resources, groups, and teams. For example, the Sales role type can encompass several roles including Sales Manager and Sales Representative. A resource named Linda who is a Sales manager can be assigned the Sales Manager Role while sales representatives, John, Mark, and Carol are assigned the Sales Representative role.
- 281. Resource Manager Implementation Overview 14-25 Roles Example Role Attributes When a role is created, it is associated with a specific role attribute. This enables different roles to be grouped together when defining a resource reporting hierarchy. The hierarchy is used in sales product families to control data access privileges, sales forecast rollups, and incentive compensation plans. It is also used for workflow notifications and escalations. When defining a role, you must also specify its attribute by selecting one of the Resource Manager seeded role attributes: • Member: This is the attribute for group members and is the default attribute for any group. • Lead: This is the attribute for the team lead within a group. • Admin: This attribute enables group members with the associated role to view and modify information about other group members. In the HTML Resource Manager, only a user in a group with either the Administrator or Manager group member role can update group member and group hierarchy information. • Manager: This attribute is used to set up the group reporting hierarchy. For example, all the forecasts for a group of sales representatives will roll up to the person with the Manager role attribute in that group. If Linda is a sales manager who is assigned the Sales Manager role that is associated with the Manager attribute, then only Linda will receive forecasts for the group. In addition, a user with the Manager group member role can update the group member and group hierarchy information in the HTML Resource Manager.
- 282. 14-26 Oracle Trading Community Architecture Administration Guide Role Attributes Example Modifying Resource Fields in HTML In the HTML version of Resource Manager, the appropriate users or system administrators with the Resource Self Service Administrator responsibility must set up the Define Resource Fields for Update window. This determines which fields for the resource's personal information can be updated and how the update should occur. Defining Skill Levels in HTML In the HTML version of Resource Manager, the appropriate users or system administrators with the Resource Self Service Administrator responsibility must set up the Define Skill Levels window. This determines the name of the skill level and its associated numeric value. Once this is specified, an individual resource can select an appropriate skill level from the LOV of the Level field in the Rate Skill window to rate their technical skills. These skill levels are standard regardless of whether the resource is rated at category, product, platform, or problem level. The numeric values for the related skill levels can be a part of the calculation when selecting the optimal individual for a service request. Configuring Group and Team Member Notifications Resource Manager enables group and Team members to receive Workflow notifications. This is particularly useful when important communications are sent to a group or team that require immediate dissemination to all of the their members. For example, if a support group or team receives a high priority service request then all members of the group or team can simultaneously be notified to ensure that immediate action is taken. Resource Manager accomplishes this by integrating resources, groups, group members, teams, and team members with Workflow roles. When a resource is created or updated, its information, including relevant attributes, is stored in both
- 283. Resource Manager Implementation Overview 14-27 Resource Manager and the corresponding Workflow role tables. Notifications can only be sent to all group or team members if the group-to-membership or team-to-membership relationship information stored in Resource Manager is in sync with the data stored in the corresponding Workflow role tables. To accomplish this, Resource Manager administrators must run the Synchronize Workflow Roles concurrent program on a periodic basis. Publishing Business Events Resource Manager publishes events such as creating and importing resources, updating resources, and deleting resources using the Oracle Workflow Business Event System. Applications that contain data directly affected by these events can subscribe to them and synchronize or modify their data accordingly. For example if a resource that is assigned to a Task is deleted, this action is published or "raised" as a business event. Task Manager, can consequently subscribe to this event and reassign the task to an available resource. Phase II: Managing Resources with Resource Manager After successfully setting up Resource Manager in Phase I, you can proceed to Phase II: Managing Resources with Resource Manager. In this phase, you can optionally find and view resources, modify resources with roles and role types, create groups and teams, view resource reports, synchronize imported resources with updated records in their database of origin, and troubleshoot Resource Manager if required. Finding and Viewing Resources After importing a resource into Resource Manager, you can find and view the resource and manage it by performing any of the actions described in the remainder of this chapter. Defining Groups A group is a unit of organization based on the similar function or roles of its members. It can consist of individual resources and resource groups and any resource can belong to multiple groups. For example, a manufacturing company has sales groups for different product models. A sales manager named Linda, leads the Model A Sales Group and has three sales representatives, John, Mark and, Carol who report directly to her. The Model A Sales Group can also contain another resource group, Key Accounts West Group that handle sales in the west region for model A, and whose members also report to Linda.
- 284. 14-28 Oracle Trading Community Architecture Administration Guide Groups Example Group Member Roles Roles and responsibilities can be associated with all members of a resource group. For example, Linda is a sales manager; John, Mark, and Carol are sales representatives. The Sales Manager and the Sales Representative are job roles assigned to the Model A Sales Group. Each member can have multiple roles defined within a group or among groups. If the Key Accounts West Group only contains two resources, one of them can perform two roles, sales manager and field sales agent Or while Linda, the manager in the Model A Group, may also be a member of a group called Model B Group. Dynamic Groups Instead of assigning each individual or group resource to an existing group, you can create a dynamic group based on the criteria you define in SQL statements. For example, Oracle Interaction Center's Telephony Manager uses Dynamic Groups for skill-based routing. In active mode, Oracle Telephony Manager routes calls according to defined rules. The active mode is the default mode of operation. In active mode, Oracle Telephony Manager uses skill-based routing, a dynamic call routing intelligence that delivers inbound calls to an agent who is appropriately skilled to meet the needs of the caller. When inbound calls arrive at the switch, the switch issues a routing request. Oracle Telephony Manager monitors the routing request, then applies skill-based routing rules, and identifies suitably skilled agents. Meanwhile, a representation of the call waits in the virtual queue within Oracle Telephony Manager. When a suitable agent becomes available, Oracle Telephony Manager responds to the routing request and instructs the switch to deliver the call to the agent's extension through the Universal Work Queue (UWQ), where more specific pre-defined rules may apply in directing the call. In a dynamic group, the database automatically updates information about individual group members (dynamic routing executes the workflow/procedure to get an agent list).
- 285. Resource Manager Implementation Overview 14-29 Group Hierarchy Because individual resources can be assigned to a group, and a group can belong to another group or to multiple groups, resources can be organized in a group hierarchy with a parent-child relationship. Important: A group can belong to multiple groups but only one parent at a given point of time. For example, Jack William and Frank Nelson are sales representatives who belong to the Product A group and report directly to Pat Smith, the sales manager of Product A; but they report indirectly to Jeff Walsh who leads the Field Sales group as field sales manager. The Field Sales group and the Product A group have a parent-child relationship. You can use the group hierarchy to view direct reporting or all reporting information for a resource. For example, you can search for direct reporting information for the employee Jeff Walsh based on the above group hierarchy. You can see Pat Smith and Jim Breen listed as the results for direct reporting. Jack William and Frank Nelson are added to the list if it is for all the reporting information due to the parent-child relationship between these groups.
- 286. 14-30 Oracle Trading Community Architecture Administration Guide Group Hierarchy Example Group Member Notifications You can configure groups to receive notifications to ensure that important communications reach all group members. Managing Roles and Groups You can manage roles and groups by viewing role details, assigning roles to resources, or assigning resources to groups. Defining Teams A team is a collection of groups and resources that is organized to accomplish a specific task or objective. Team members are chosen on the basis of their availability, qualifications, and location. For example, a manufacturing company wants to develop a new model that has the same features of a model called Model B. To accomplish this, the company sets up a new model development team can be established to have a new product development group, a sales manager for model B, and a support engineer who specializes in model B.
- 287. Resource Manager Implementation Overview 14-31 Teams Example Team Member Roles Each team member, whether it is an individual resource or a resource group, has a member role assigned to it. For example, the new model development group (a group resource) and the support engineer (an individual resource) can both have a development member team role. The Development Member role must be one of the group roles that have been assigned to the New Model Development Group. Like a group member, a team member can have multiple roles assigned to a team. Team Roles You can assign multiple roles to a team. For example, the New Model Development Team will play a Development Member role, and a Support Manager role at the same time. Team Usage Specify the usage of your team. For example, the New Model Development Team can be used in Support, TeleSales, and Service.
- 288. 14-32 Oracle Trading Community Architecture Administration Guide Team Member Notifications You can configure teams to receive notifications to ensure that important communications reach all team members. Running Reports Resource Manager enables you to run Group Audit and Group Structure reports. Group Audit Report Resource Manager supports the ability to run an audit report detailing changes to resources and resource groups created within a date range. For example, any changes made to new members of a group are defined, but role change information is not. This provides an audit trail of the actions taken for specific groups, and resources. For example, a sales manager can use the Group Audit Report to verify and trace a specific sales group for its group members' (sales representatives) change history information based on a specific time range. From the report, you can easily identify that Lisa Jones with her resource number has been changed from Key Accounts Central Group (group number 54) to Key Accounts Group (group number 43). This information can be an audit record for sales credits or compensation distribution. Only the movement of a resource from a given group to another group is tracked. Resources changing roles within the same group are not reported in the Audit Report. Group Structure Report Resource Manager supports the ability to run a Group Structure Report. It displays only the group hierarchy and structure information. For example, you can use the Group Structure Report to view the group hierarchy information for a specific group, such as Key Accounts Group. The group member's name and its resource category information (such as employee resource), child group name (Key Accounts Central), and numbers of level down from the selected group (such as the Key Accounts Central child group is one level down from the selected Key Accounts Group) and effective date information are all visible in the report. Resource Manager Concurrent Programs Resource Manager uses the following concurrent programs. The table describes the types of seeded programs, their use, and the frequency in which you need to run them.
- 289. Resource Manager Implementation Overview 14-33 Resource Manager Concurrent Programs Name Description Frequency Notes Build Reporting Manager This program is redundant, and, has been replaced with the "Synchronize Reporting Managers", and "Populate Reporting Manager" concurrent programs. Run only when data is modified None
- 290. 14-34 Oracle Trading Community Architecture Administration Guide Name Description Frequency Notes Synchronize Employees This program is used to synchronize employee data in Human Resources. Note the difference in employee parameters: Get New Employees. When this parameter is set to Yes, the concurrent program: • Synchronizes all the employees that currently exist in Resource Manager. • Imports all new active employees in Human Resources. • Displays the Create Sales Person parameter. When set to No, the program synchronizes only the employees that currently exist in the Resource Manager and does not display the Create Sales Person parameter. Create Sales Person. When set to Yes, the concurrent program: • Automatically creates a salesperson from the imported resource. • Displays the Sales Credit Type parameter. When set to No (default value), the concurrent program does not automatically create a salesperson. Sales Credit Type. The concurrent program only displays this parameter if the Create Sales person parameter is set to yes. For the above condition, the User must always pass a value for the 'Sales Credit Type' parameter, from the LOV provided. Sales Credit Type information is required for creating Salesperson. Other. A resource of type Other is not required to be a salesperson. Maps Job Roles. When job role mapping between Oracle HRMS jobs and Resource Manager roles is established, the Synchronize Employees Concurrent Program imports the Daily For about 100,000 employees, this concurrent program should take about 10 minutes to run. It can be scheduled to run as a nightly process.
- 291. Resource Manager Implementation Overview 14-35 Name Description Frequency Notes employee's job from HRMS and stores it as an associated role in Resource Manager. Effective Start Date. The resource role start date is synchronized with the Oracle HRMS job assignment start date that is also the effective start date (ESD). Rehires. If an employee is rehired to perform its previous job/role, then it is reassigned its original hire date. No new record of the employee start date is created. Preferred Name. The preferred name in Resource Manager is synchronized with the alias name from Oracle HRMS. If no alias is specified in Oracle HRMS, then the preferred name is synchronized with the full name in Oracle HRMS. This only takes place if the user has not changed its full name in resource manager prior to the execution of the synchronization process. Flatten Employee Hierarchy This concurrent program is ONLY meant to populate data in resource manager internal tables in order to expedite the data display in "Organization" link for Employee hierarchy. Daily Run this program after running Synchronize Employees For about 100,000 employees, this program takes about 2-3 minutes to run. So, it can be scheduled as a nightly process. Flatten Group Hierarchy This program is used to denormalize the Resource Group hierarchy structure into a flat structure for fast and easy data access. Daily Run this program after Synchronize Groups Denorm. For about 4000 groups, and average of 10 level hierarchy structure, this program takes about 10-15 minutes. It can be scheduled as a nightly process.
- 292. 14-36 Oracle Trading Community Architecture Administration Guide Name Description Frequency Notes Synchronize Parties and Partners This program keeps the Party Resource Name in Resource Manager in sync with information in TCA. Daily For 1 million party records in HZ_PARTIES, this concurrent program should take about 20 minutes to run. If the business is using a lot of Party type of resource, then this program can be scheduled to run on a nightly basis. Synchronize Supplier Contacts This program is used to synchronize supplier contacts of type person in Purchasing. Daily For 100,000 supplier contact records in PO_VENDOR_CONT ACTS, this program should take about 20 minutes to run. If the business is using a lot of Supplier Contact type of resource, then the program can be scheduled to run every night. Synchronize Application User Name This program is used to synchronize the FND user name and resource table. Daily In a system comprising 50000 users, this concurrent program should take about 5 minutes to run. It can also be scheduled as a nightly process.
- 293. Resource Manager Implementation Overview 14-37 Name Description Frequency Notes Synchronize Groups Denorm This program is used to denormalize the Resource Group hierarchy structure into a flat structure for fast and easy data access. The application runs this automatically For about 4000 groups, and average of 10 level hierarchy structure, this program takes about 10-15 minutes. It can be scheduled as a nightly process. This program achieves the same results as "Flatten Group Hierarchy". The only difference between the two is that this program is kicked off automatically from the UIs where as the latter is used for cases where the data may have been created using Resource Manager APIs. Group Audit Report This program is used to obtain audit information for a particular resource group. You can optionally include descriptive flexfield information with this report. As needed For a group, it should take no more than 1-2 minutes assuming normal system load and resource availability. Group Structure Report This program is used to obtain group structure information for a particular resource group. Given a group, it displays all the child groups, as well as all the immediate level members of the group. This information can also be obtained online through Resource Manager HTML windows. You can optionally include descriptive flexfield information with this report. As needed For a group, it should take no more than 1-2 minutes assuming normal system load and resource availability. Resource Manager Diagnostics This concurrent program is a diagnostic tool to be used for troubleshooting in case of some undesirable behavior. It generates an output containing various critical file versions that comprise the resource manager functionality. As needed None
- 294. 14-38 Oracle Trading Community Architecture Administration Guide Name Description Frequency Notes Populate Reporting Manager This program is used to populate data into an internal resource manager table which is accessed by Oracle Incentive Compensation team. This program should be used when Resource Group Membership data has not been entered through Resource Manager UIs, but, APIs instead. As needed In a system with 150,000 resources, and about 4000 groups, this program takes about 10-15 minutes. It can be scheduled as a nightly process if a lot of changes around Resource Group Membership is made daily. Synchronize Reporting Managers This program is used to populate data into an internal resource manager table which is accessed by the Oracle Incentive Compensation team. It is launched automatically from Resource Manager UIs. As needed In a system with 150,000 resources, and about 4000 groups, this program takes about 10-15 minutes. It can be scheduled as a nightly process if a lot of changes around Resource Group Membership is made daily.
- 295. Resource Manager Implementation Overview 14-39 Name Description Frequency Notes Synchronize Workflow Roles This program synchronizes all attributes and records in the workflow wf_local_* tables with the mismatching records in Resource manager. As needed This program should be run as follows: • The first time group notification functionality is implemented in Resource Manager. • When groups or resources that were not active at the time of their creation have become activated. • If online transactions encounter a Workflow error. • When the Synchronize Employees concurrent program is run. • When the Synchronize Parties and Partners concurrent program is run. • When the Synchronize Supplier Contact concurrent program is run.
- 296. 14-40 Oracle Trading Community Architecture Administration Guide Name Description Frequency Notes Resource Skills Report This program generates skill reports for resources reporting to a manager and for group members. As needed This program contains the following parameters: • Manager. When this parameter is entered, the program displays a hierarchical skills rating report for all resources that report to the manager including direct and indirect reports. • Group. When this parameter is entered, the program displays skill ratings for all group members. It does not display skill ratings for any child groups.
- 297. Resource Manager Implementation Overview 14-41 Name Description Frequency Notes Synchronize Active Group Membership Populates the table JTF_RS_ACTIVE_GRP_MBRS with active group members . Daily The table JTF_RS_ACTIVE_GRP _MBRS eliminates performance problems created by searching though an increasing volume of historical records that include active and inactive group members. This table only stores active group members including new or existing members and excluding deleted ones. Running the concurrent program on a daily basis ensures that the table contains the most up-to-date records and optimizes performance by eliminating unnecessary historical records such as deleted group members. Update Primary Groups for Salespersons Populates the primary sales group for all the salesreps defined in JTF_RS_SALESREPS table. Primary groups can be selected from within the date range 01-JAN-1900 to 31-DEC-4712. If no primary group is found, the 'Unassigned' Group (group ID= -1) is allocated as primary group. As Needed Eliminates the return of multiple groups for a salesperson when that salesperson is queried in the table JTF_RS_SRP_GROUPS. Instead, the query resturns a single primary sales group for the salesperson. Note: It is strongly recommended that an employee, party, partner, or supplier contact not have more than one entry in FND_USERS. If an employee linked to two or more FND_USERS is imported into Resource Manager, then the USER_ID column in JTF_RS_RESOURCE_EXTNS table randomly picks a value from FND_USERS for that resource.
- 299. Phase I: Setting Up Resource Manager 15-1 15 Phase I: Setting Up Resource Manager This chapter describes setting up Resource Manager, including mass import of resources from other applications, manually creating resources in forms, defining role types and roles in HTML and Forms, defining skill levels in HTML and publishing workflow business events. This chapter covers the following topics: • Overview of Setting Up Resource Manager • Mass Importing Resources From Other Applications in the E-Business Suite • Importing Resources From Legacy Applications Using APIs • Importing Individual Resources • Creating a Resource Manually in Forms • Creating a Salesperson Automatically • Creating a Salesperson of Type Other and To Be Hired in HTML • Creating a Salesperson in Multiple Organizations • Defining Role Types • Defining Roles in Forms • Defining Roles in HTML • Specifying Role Attributes • Defining Skill Levels in HTML • Assigning a Numeric Value to a Skill Rating • Changing the Name of a Skill Rating • Publishing Workflow Business Events
- 300. 15-2 Oracle Trading Community Architecture Administration Guide Overview of Setting Up Resource Manager Resource Manager is implemented in two phases. In the first phase, you set up Resource Manager by defining and configuring required components. In the second phase, you use Resource Manager to manage your resources. This section summarizes the steps to set up Resource Manager. Detailed instructions for these steps are provided in the subsequent sections. Defining Resources You can define resource by either importing it into Resource Manager and then modifying it or by creating it in Resource Manager. Importing Resources Instructions to import resources are contained in the following sections: • Mass Importing Resources From Other E-Business Applications, page 15-4 • Importing Resources From Legacy Applications, page 15-5 • Importing Individual Resources, page 15-5 Creating Resources in Forms You can create a salesperson in the Forms-based version of Resource Manager and designate it as type Other or TBH (To Be Hired). Resources of this type are written directly to the Resource Manager tables and do not appear in the HRMS tables. You can also create a resource such as a salesperson in Forms by first creating the resource in HRMS and then importing the resource into resource manager and modifying it as required. If you have not licensed HRMS, you can create a resource using the Form windows that are shared with HRMS and then using Resource Manager to import the resource. Detailed instructions for these steps are provided in the following sections: • Creating a Salesperson in Forms, page 15-7 • Creating Salespersons in Multiple Organizations, page 15-19 Optionally Defining Role Types and Roles After defining resource, you can organize them with roletypes and roles. A role type is a broad descriptive category such as "Sales" that contains one or more roles. A role is a more detailed descriptive categories such as "Sales Representative" or "Sales Manager". When a role is created, it is associated with a specific role attribute. This enables different roles to be grouped together when defining a resource reporting hierarchy. Detailed instructions for creating role types and roles and for assigning attributes to roles are provided in the following sections:
- 301. Phase I: Setting Up Resource Manager 15-3 • Defining Role Types, page 15-21 • Defining Roles in Forms, page 15-22 • Defining Roles in HTML, page 15-23 • Specifying Role Attributes, page 15-24 Defining Skill Levels in HTML The final step in setting up Resource Manager is to define skill levels in the HTML version of Resource Manager. In the HTML version of Resource Manager, the appropriate users or system administrators with the Resource Self Service Administrator responsibility must set up the Define Skill Levels window. Instructions for performing this step are contained in the Defining Skill Levels in HTML section, page 15-26. Configuring Group and Team Member Notifications Resource Manager enables group and team members to receive Workflow notifications. This is particularly useful when important communications are sent to a group or team that require immediate dissemination to all of their members. For example, if a support group or team receives a high priority service request then all members of the group or team can simultaneously be notified to ensure that immediate action is taken. Resource Manager accomplishes this by integrating resources, groups, group members, teams, and team members with Workflow roles. When a resource is created or updated, its information, including relevant attributes, is stored in both Resource Manager and the corresponding Workflow role tables. Notifications can only be sent to all group or team members if the group-to-membership or team-to-membership relationship information stored in Resource Manager is in sync with the data stored in the corresponding Workflow role tables. To accomplish this, Resource Manager administrators must run the Synchronize Workflow Roles concurrent program on a periodic basis. Instructions for performing this step are contained in the Configuring Group and Team Member Notifications section, page 16-24. Note: In addition to enabling group and team member notification, Resource Manager integration with Workflow roles also provides a framework for task security. Publishing Workflow Business Events Resource Manager uses event subscriptions to publish events such as creating, updating, and deleting resources to enable resource manager users to subscribe to these events and perform their required business processes. An event subscription is a registration indicating that a particular event is significant to a particular system and
- 302. 15-4 Oracle Trading Community Architecture Administration Guide specifying which processing to perform when the triggering event occurs. Instructions for performing this step are contained in the Publishing Business Events section, page 15-27. Mass Importing Resources From Other Applications in the E-Business Suite Mass importing resources is the most common method of defining resources that are stored in E-Business applications such as HRMS, TCA, or PO. This is accomplished using concurrent programs listed in the following table to synchronize data between Resource Manager and the HRMS, TCA, and PO databases. Oracle recommends that the system administrator run the concurrent programs, listed in the following table, on a regular basis, to synchronize data between the Resource Manager and other applications and to maintain data integrity. Importing Contingent Workers from Oracle HRMS You can import contingent workers that are defined in HRMS into Resource Manager by using public APIs. Resource Manager does not differentiate between imported contingent workers and employees and exposes both as employee resources. You cannot maintain contingent workers in Resource Manager but can do so in Oracle HRMS. Prerequisites None Responsibility CRM Administrator or System Administrator Navigation Navigate to the Navigator - CRM Administrator window, or Navigate to the Navigator - System Administrator window Steps Run the Resource Manager concurrent programs listed in Resource Manager Concurrent Programs, page 14-32. Instructions for running the concurrent programs are contained in this section. Note: Oracle strongly recommends that an employee, or party, or supplier contact not have more than one application user.
- 303. Phase I: Setting Up Resource Manager 15-5 Note: If a resource (employee, party, or supplier contact) is linked to two or more application users, and imported into Resource Manager, then one application user is selected at random and associated with that resource. Importing Resources From Legacy Applications Using APIs You can import resource from legacy application using the Resource Manager public published APIs. To accomplish this you must first use the APIs of your legacy system to import the legacy data into either the HRMS, TCA, or PO databases. Once this is accomplished, create a batch program that calls the Resource Manager public published APIs and uses them to transfer data from HRMS, TCA, or PO, to Resource Manager. See the Resource Manager Public APIs, Oracle Trading Community Architecture Technical Implementation Guide for more information about Resource Manager public published APIs. Importing Individual Resources In some cases, you may want to import individual resources from different application databases. You can accomplish this by selecting a resource based on its category and then identifying its role and eligibility dates before saving it to Resource Manager. You can import Employees, Parties, Partners, and Supplier Contacts into Resource Manager from Oracle HRMS, Purchasing and TCA, depending on the resource category you select. The only resource that you can create, but not import through the Resource window, is with category of Other, or To Be Hired in Forms. Perform the following steps to import a resource. • If Oracle HRMS is installed and you have a license for it, then you must create a resource in that application first before importing it. • If you do not have HRMS installed and licensed, then create a resource using "shared" forms that the HRMS application uses. The navigation path to create a resource is: Maintain Employee > Employee. • Whether or not you use HRMS, the data is written to the HRMS tables. • For further details, consult the Oracle HRMS documentation. Prerequisites None
- 304. 15-6 Oracle Trading Community Architecture Administration Guide Responsibility • CRM Administrator for Forms • CRM Resource Self Service Administrator or • CRM Application Foundation User for HTML Navigation In the Navigator window select Resource Manager > Maintain Resources > Import Resources. Steps 1. Use the Select Resources to Import window to search for the resource you wish to import. 2. Choose a resource from the search results. 3. Optionally modify any of the default values. For example, you can automatically create a sales person when importing a resource by selecting the Create Salesperon Automatically checkbox and by choosing a value from the resulting Sales Credit Type field. 4. Save the resource. 5. Optionally define additional resource information such as roles, group or team membership by clicking the Details button and using the resulting forms as required. Guidelines Before importing an individual resource, you should understand the following: • Resource Manager does not require transaction numbers to import a resource. • The Comments field in the Selected Resources window indicates whether or not the resource entry is a new record, duplicate record, or has a new role definition. • When synchronizing an employee resource imported from HR using the Synchronize Employees concurrent program, the end date will not be modified. To synchronize the end date in Resource Manager, you must modify it manually with the correct information. If you have imported a large number of employees and do not want to end date them manually, you can write a script that calls the Update_Resource API and passes the required value to the p_end_date_active parameter.
- 305. Phase I: Setting Up Resource Manager 15-7 See Also Synchronize Employees, page 14-34 Creating a Resource Manually in Forms Using the Resource window, you can manually designate a resource either as Other or as a salesperson of type Other or To Be Hired. Resources that are designated as Other can be individuals who are not salespeople or can be objects such as a hospital bed. When you designate a resource as a salesperson of type Other, then it must be associated with a specific organization however, resources are generally not associated with specific organizations. Resource Window You define a resource as a salesperson in the Resource window. This window contains a Resource section in which you provide basic information about the resource and a series of tabs that enable you to provide more detailed information about the resource. The Identification Num field of the Resource section enables you to specify a resource of type Other that is not a salesperson. The following table describes the available functions in the Resource window tabs: Resource Tab Descriptions Tab Description Roles Use this tab to view, assign, and modify information about roles and role types. The role type is the actual role a resource plays, for example, Administrator or Contractor. These roles, role types, and role attributes check boxes are defined in the Setup window. The Start Date default is the current date, and it can be modified. Groups Use this tab to view, assign, and modify information about groups. Groups are not necessarily one person, and a resource can belong to more than one group. The Groups tab reveals in detail which groups the resource belongs to, and the role in the group. Resources can play multiple roles in a group. Click the group name to display the group member roles if this resource has group member roles assigned.
- 306. 15-8 Oracle Trading Community Architecture Administration Guide Tab Description Teams Use this tab to view, assign, and modify information about teams. Teams can comprise multiple groups and combinations of groups and individuals. Click the team name to view the Team Member Roles. Service Use this tab to define the Agent Time Zone information and the Support Site where the resource works. Interaction Center Use this tab to view, assign, and modify the email addresses and the Agent ID numbers of resources associated with the eMail Center or Call Center modules. This tab is used primarily by the Call Center and eMail Center modules. All fields are read-only. If the resource is not associated with either center, these fields are blank. (Optional) Enter the Scripting Agent Login if the employee uses Oracle Scripting. Use the Telephony Parameters region to enter middleware configuration, parameters, and values for the agent. Which telephony parameters are required and which values to specify depend on the types of switch and CTI middleware used in the Call Center. Compensation Use this tab to view or define the Currency Type corresponding to the Cost per Hour listed on the Service tab. Receivables Use this tab to define a salesperson and to assign a territory. Miscellaneous Use this tab to view personal information about the resource. The fields in this tab are read-only. Receivables Tab Some of the required functions for defining a resource as a salesperson are performed in the Receivables tab of the Resource window. The following table describes the available functions in the Receivables tab fields:
- 307. Phase I: Setting Up Resource Manager 15-9 Field Descriptions for the Receivables tab in the Resource Window Field Description Date Active Enter the range of dates that this salesperson is to be active. Date Active (start date) is a required field, the Date Active (end date) is optional. If you do not enter an end date, this salesperson is active indefinitely. Geo Override and Inside City Limits The Geo Override value associates the salesperson with a unique tax jurisdiction. Both fields are available only if you have installed a sales tax vendor of type Taxware Sales. Oracle recommends you use Tax System or Vertex Quantum. Accounting Flexfield (Forms) The accounting flexfield includes Revenue, Freight, and Receivable Accounts. Receivables can use this information, along with your AutoAccounting rules, to determine the revenue, freight, and receivable accounts for invoices that you assign to this salesperson. Territory Flexfield (Forms) If you want to assign a territory to this salesperson, then enter the range of dates that this territory is to be assigned to this salesperson. The Start Date defaults as the current date, but you can change it. If you do not enter an End Date, this territory is active for this salesperson infinitely. Perform the following steps to create a salesperson. Steps 1. Log on to the system with the CRM Administrator or CRM Resource Manager reponsibility and in the Navigator, select Resource Manager > Maintain Resources > Resources. 2. Click New in the Find Resource window. 3. Select either TBH or Other for the Category. 4. To create a salesperson, you must enter a valid value for the Salesperson Number. Although it can accept a 0 value, it is not recommended.
- 308. 15-10 Oracle Trading Community Architecture Administration Guide 5. Enter the name of the resource in the Name field. If the resource is an object such as a hospital bed, enter the name of the object in this field. 6. Enter a Start Date for the resource. You must enter at least a start date here. The end date defaults to an open end data and is optional. 7. (Optional) If the resource is type Other and is not a salesperson, enter the reference number for the resource in the Reference Num field. 8. Select the Receivables tab and perform the following: 1. Enter the range of dates that this resource is to be active. The Date Active (start date) is a required field and defaults as the current date. However, you can change it by accessing the calendar through the list of values (LOV). If you do not enter a Date Active (end date), this salesperson is active indefinitely. The Date Active cannot precede the Start Date. If the resource's status is Active but the transaction date that you enter is not within this date range, Receivables does not display this salesperson in the LOV in the Transactions window. 2. (Optional) Enter the resource's Email address. 3. (Optional) Enter a Geo Override value for the resource. This value associates the resource with a unique tax jurisdiction. The Geo Override and Inside City Limits fields are available only if you have installed a sales tax vendor of type Taxware Sales/Use Tax System or Vertex Quantum. If you entered a value in the Geo Override field and the tax jurisdiction for this address is within city limits, select the Inside City Limits check box. This check box is enabled only if your sales tax vendor is Vertex Quantum. For additional information, see the following: Oracle E-Business Tax: Vertex Q-Series and Taxware Sales/Use Tax System Implementation Guide. 4. Check the Active for Receivables check box to indicate that this resource is an active salesperson for use in Oracle Receivables. 5. Enter a quota Sales Credit Type. Oracle Order Management uses this information to determine if the sales credit for an order is a quota or non-quota amount. You can define additional sales credit types in Oracle Order Management. However, you can only assign Sales Credit Types that are of type 'Quota' to salespersons in Receivables.
- 309. Phase I: Setting Up Resource Manager 15-11 6. (Optional) Enter the Accounting Flexfield for your Revenue, Freight, and Receivable Accounts. Receivables can use this information, along with AutoAccounting rules, to determine the revenue, freight, and receivable accounts for invoices you assign to this salesperson. 7. (Optional) Assign a territory to this resource. The Territory Flexfield must be set up before an assignment is made. 8. (Optional) If you assigned a territory to this resource, then enter the range of dates that this territory is to be assigned to this salesperson. The Start Date defaults as the current date, but you can change it. If you do not enter an End Date, this salesperson is active indefinitely, or as long as the territory is active. 9. (Optional) Enter more information in the other tabs to further specify the resource. You can simultaneously end date a resource's roles, group member roles, team member roles, and sales person records. 10. Choose File > Save to save your work. This action populates the Resource Number field with the automatically generated resource tracking number. Guidelines You can only create a resource of category Other, or To Be Hired, through the Resource window. If the resource is of any other category, it must be imported. You can create a resource of type Other or a salesperson of type Other or To Be Hired. To create a resource of type Other, you can enter the identification number. A resource of type Other that is not a salesperson can be an individual or an object. If a salesperson is defined with category To Be Hired, then this salesperson is not visible within Accounts Receivable. A Salesperson defined in this manner can be viewed only within CRM. Users are not allowed to create a new user that is associated with a resource/employee. It is only the first time during the "Create Employee" process that user can specify a non-existing user name. If you make any changes to an employee in HRMS, then you must run the Synchronize Employee concurrent program to synchronize resource information. See the chapter on Concurrent Programs in the Implementation Guide appendix. If a resource (who first was a salesperson with a salesperson's number) changes jobs within the same company (and is no longer a salesperson), you must end date the first resource and create a new resource with new settings. You cannot delete a salesperson's
- 310. 15-12 Oracle Trading Community Architecture Administration Guide number once it is assigned, but in such cases you end date the salesperson record instead of the resource. You can create a resource of type Other or To Be Hired and you can create a corresponding salesperson record for either. Creating a Salesperson Automatically You can automatically create a salesperson when importing resources by using either the Import Resource form or the Synchronize Employees concurrent program. You can also set up job role mappings that are associated with resources when they are automatically created as a salesperson. Using the Import Resource Form The Import Resource form imports selected resources, based on filtering criteria from HRMS, TCA, and Purchasing into Resource Manager. To create a salesperson automatically using the Import Resource form, you must perform the steps listed in the following table. Create Salesperson Automatically Using the Import Resource Form Step Required Action Create Salesperson Perform the required steps for Importing Individual Resources, page 15-5 As part of this process, select the Create Salesperson check box in the default values window of Import Resources form. Provide Sales Credit Type Information Continue to perform the required steps for Importing Individual Resources, page 15-5. As part of this process, select a value from the Sales Credit Type field in the default values window of the Import Resources form.
- 311. Phase I: Setting Up Resource Manager 15-13 Step Required Action Determine mode of salesperson creation number To determine the mode for creating the salesperson number, set the required value for the Profile Option JTFRS: Mode of Salesperson Number Creation: • Employee Number. The salesperson number is identical to the employee number. • Sequence Generated. The salesperson number is auto-generated by a newly created Sequence. • Manually. The salesperson number is manually entered by the implementor. If no salesperson number is specified for the selected resources then the import process fails. Using the Synchronize Employees Concurrent Program The Synchronize Employee concurrent program imports resources in bulk from HRMS into Resource Manager by synchronizing resource information with its corresponding employee information. The "Get New Employees" parameter can be used to import newly created employees from HRMS. To create a salesperson automatically using the Synchronize Employees concurrent program, you must perform the steps listed in the following table. Note: When using the Synchronize Employees concurrent program for bulk import, the sales person numbers can only be Employee Numbers or Sequence Generated numbers and cannot be entered manually. Create Salesperson Automatically Using the Synchronize Employees Concurrent Program Step Required Action Create Sales Person Run the Synchronize Employees concurrent program, page 14-34. Select Yes from the Create Salesperson field.
- 312. 15-14 Oracle Trading Community Architecture Administration Guide Step Required Action Provide Sales Credit Type Information Select a value from the Sales Credit Type field In the Synchronize Employees concurrent program, page 14-34. Automatically Creating Resource Roles for Job-role Mapping When importing employees from HRMS to Resource Mangager, the Import Resource form and the Synchronize Employees concurrent program automatically create resource rolls based on the employees' jobs. When importing Employees from HRMS to Resource Manager, all of the roles associated with their jobs are automatically created as Resource Roles. Examples The following examples demonstrate how to use the Import Resource form and the Synchronize Employees concurrent program to automatically create or modify a resource role that is mapped to a job role in HRMS. In each of these examples, a major retail store is adding new temporary sales representatives to its workforce to cover its annual sale. The company hires two-hundred temporary employees and enters their data into its HRMS application. Note: For examples that use the Import Resource form, see also: • Defining Roles in Forms, page 15-22 • Importing Individual Resources, page 15-5 Mapping a Single Job to a Single Role (Import Resource Form) An implementor or system administrator for the retail store performs the following: 1. Defines a job roll, "Floor Sales Rep II" in HRMS and assigns it to the two hundred temporary employees when their data is entered in that application. 2. Defines a new role, "Sales Rep Floor", in Resource Manager. 3. Maps the role in Resource Manager to the job roll in HRMS. 4. Imports the two hundred temporary employees from HRMS to Resource Manager. During this process, they are automatically assigned the resource role, "Sales Rep Floor".
- 313. Phase I: Setting Up Resource Manager 15-15 Mapping a Single Job to Many Roles (Import Resource Form) An implementor or system administrator for the retail store performs the following: 1. Defines job role, "Floor Sales Rep I" in HRMS and assigns it to the two hundred temporary employees when their data is entered in that application. 2. Defines three new roles in Resource Manager, "Sales Rep I", "Sales Rep Merchandise" and "Sales Rep III". 3. Maps the Human Resources job role, "Floor Sales Rep I" to the newly defined resource roles. 4. Imports the two hundred temporary employees from HRMS to Resource Manager. During this process, they are automatically assigned the resource rolls "Sales Rep I", "Sales Rep Merchandise", and "Sales Rep III". Mapping Multiple Jobs to a Single Role (Import Resource Form) An implementor or system administrator for the retail store performs the following: 1. Defines three jobs in HRMS: "Floor Sales Rep I", "Floor Sales Rep II" and "Floor Sales Rep III". 2. Defines a role, "Sales Rep Floor" in Resource Manager. 3. Maps the three HRMS job roles to the resource role. 4. Imports the two hundred temporary employees from HRMS to Resource Manager. During this process, they are automatically assigned the role, "Sales Rep Floor". Mapping One or More Jobs to No Roll (Import Resource Form) When HRMS jobs are not mapped to a resource roll, no roll is assigned to these employee resources when they are automatically imported in Resource Manager. Users can, however, assign them manually. Oracle HRMS Job Change with No Existing Roll (Synchronize Employees Concurrent Program) For its annual sale, the retail store decides to place its stock room employees on the sales floor to work with the two hundred temporary employees: 1. A member of the Human Resources staff changes the "Stock Room Clerk" job roll to "Floor Sales Rep II" in HRMS. 2. The implementor or system administrator runs the Synchronize Employees concurrent program to synchronize changes in HRMS with data in Resource Manager. As a result, the stock room employees are automatically assigned the "Sales Rep Floor" role in Resource Manager.
- 314. 15-16 Oracle Trading Community Architecture Administration Guide 3. When the sale is finished, the stock room employees resume their original jobs. To end date the "Sales Rep Floor" role , a new role must be associated with the "Stock Room Clerk" job roll in HRMS, otherwise it will continue to be associated with the "Sales Rep Floor" role in Resource Manager . 1. To accomplish this, a member of the Human Resources staff defines a new 'dummy' role in Resource Manager called "Store Clerk" and maps it to the Human Resources job roll, "Stock Room Clerk". 2. The implementor or system administrator runs the 'Synchronize Employees' concurrent program. Consequently, the "Sales Rep Floor" roll is end dated and the new role, "Store Clerk" is associated with the resource. After running the concurrent program, no job roles will be changed in Resource Manager if a job changes in Oracle HRMS with no existing role mapping for both old and new jobs. Human Resources Job Change with an Existing Role Where One-to-one Mapping Occurs (Synchronize Employees Concurrent Program) For its annual sale, the retail store decides to place its line manager employees on the sales floor with the two hundred temporary employees: 1. A member of the Human Resources staff changes the job roll from "Line Manager I" to "Floor Sales Rep I" in HRMS. 2. The implementor or system administrator runs the Synchronize Employees concurrent program to synchronize employee data in HRMS with Resource Manager. As a result, the "Sales Manager" roll is end dated for the line manager employees and they are subsequently assigned the "Sales Rep Floor" roll. 3. When the sale is concluded, the line managers resume their original jobs. When the implementor or system administrator runs the Synchronize Employees concurent program, the "Sales Rep Floor" roll is end dated and the "Sales Manager" role is once again associated with the line managers. Human Resources Job Change with an Existing Role Where One-to-many Mapping Occurs (Synchronize Employees Concurrent Program) For its annual sale, the retail store decides to place its line manager employees on the sales floor with the two hundred temporary employees: 1. A member of the Human Resources staff changes the job roll from "Line Manager I" to "Floor Sales Rep II" in HRMS. 2. The implementor or system administrator runs the Synchronize Employees concurrent program to synchronize employee data in HRMS with Resource Manager. As a result, the "Sales Manager" roll is end dated for the line manager employees and they are subsequently assigned the "Sales Rep I", "Sales Rep
- 315. Phase I: Setting Up Resource Manager 15-17 Merchandise", and "Sales Rep III" rolls. 3. When the sale is concluded, the line managers resume their original jobs. When the implementor or system administrator runs the Synchronize Employees concurent program, the "Sales Rep I", "Sales Rep Merchandise", and "Sales Rep III" rolls are end dated and the "Sales Manager" role is once again associated with the line managers. Business Rules This section discusses business rules for creating a sales person automatically and for creating roles for job role mapping. Creating a Salesperson Automatically The following rules apply to creating a new Salesperson when importing resources from HRMS into Resource Manager: Rule1 If the salesperson number already exists in the Salesreps table, based on the value chosen for the Profile Option 'JTFRS: Mode of Salesperson Number Creation', the following rules apply If Profile Value is 'Employee Number' or 'Manually Entered': • In the Import Resource form, an error message indicates that the salesperson number already exists. • When running the Synchronize Employees concurrent program, a log of error messages for all employees appears in the concurrent program log. If Profile Value is 'Sequence Generated': The sequence will continue to generate next number until it produces a value that does not already exist as salesperson number in the Salesreps table. This number is used as salesperson number to create the new salesperson Rule2 If the user chooses to create Salesperson, during bulk import, using Synchronize Employees concurrent program, a value for the new parameter "Sales Credit Type" must be chosen. If not, the import resource process will stop, and corresponding error message will be displayed in the concurrent program log. Creating Roles for Job Role Mapping Rule 1 When importing an employee from HRMS application into Resource Manager, new
- 316. 15-18 Oracle Trading Community Architecture Administration Guide Resource Roles are automatically created for all the imported Resources, if the corresponding employees' job title has job-role mappings, set up in Resource Manager. Rule 2 If an Employees' Job Title has changed in HRMS and if there is at least one corresponding Role associated with the current Job Title of the Employee, in the Resource Job Roles Setup, the Synchronize Employees concurrent program will do the following: • Attempt to terminate all the Active Roles associated with the previous job title of the employee with end date as Sysdate - 1. • Create new roles, for job-role mappings in Resource Manager, corresponding to the current job title of the employee, with the start date as Sysdate. If any of the business validation fails when terminating the roles associated with the previous job title of the employee, the end-dating process does not occur and the corresponding error messages are displayed in the concurrent program log. Creating a Salesperson of Type Other and To Be Hired in HTML You can use the HTML version of Resource Manager to create and modify resources whose category is Other and To Be Hired. You can additionally view their sales credit type, group membership, and role details. You cannot delete any resources in the HTML version of Resource Manager. However, you can allocate an end date for the resource that will render it inactive on the set date. Prerequisites None Responsibility Resource Self Service Administrator Navigation In HTML version of Resource Manager, select the People tab, and then select Others or To Be Hired from the sub navigation menu. Steps for Creating Salespersons of Other or To Be Hired 1. In the Others or To Be Hired window, click Create. 2. Enter required information such as Name, Salesperson Number, and Sales Credit Type for the resource. You can also optionally enter additional information such as Active Date (from and to).
- 317. Phase I: Setting Up Resource Manager 15-19 3. Click the Active Roles, Group Membership, and Compensation links to define, role, group membership, and compensation information for the resource. Steps for Modifying Salespersons of Other or To Be Hired 1. Search your resource in the Others or To Be Hired Resource window. 2. Modify the resource information as required and save your changes. Creating a Salesperson in Multiple Organizations A business unit such as a corporation can have multiple separate organizations within its structure that are also known as MULTI-ORGS. A salesperson can cover areas in multiple organizations. In order to receive the appropriate compensation from each organization, the salesperson must belong to both organizations. The salesperson has one employee number, but multiple salesperson numbers that correspond to each organization that the salesperson belongs to. To add a salesperson to another organization requires two steps: 1. First set the multiple organization profile option MO: Operating Unit to the appropriate organization using the drop down menu provided in the Responsibility field. Use the System Administrator responsibility and select Profile > System. In the Find System Profile Values window, select the appropriate Responsibility and enter the MO: Operating Unit profile option. Save your work and log in using your user ID. 2. Query the resource in Resource Manager and assign a salesperson's number as well as the other required actions outlined in the following steps. Example Business World Enterprises is a global company consisting of several organizations including Business World, USA, and Business World, Canada. You are a salesperson for Business World, USA. Your coverage encompasses parts of Western Canada and Mexico. In order to receive financial compensation in both US and Canadian dollars, as well as Mexican pesos, you must be a salesperson for Business World, USA, Business World, Canada, and Business World, Mexico. Your employee number is #0001 and your salesperson number in Business World USA is #0001US. Your employee number for Business World, Canada is #0001CAN and for Business World, Mexico #0001MEX. Any changes pertaining to your Canadian and Mexican compensation packages can be handled by the Resource Administrators in Business World, Canada and Business World, Mexico. In other words, regional changes that affect you are handled by that organization. Changes that affect you on a global level, such as if you receive a promotion and become a Senior Salesperson, will be handled by the parent company, Business World Enterprises. The following table lists the sample data.
- 318. 15-20 Oracle Trading Community Architecture Administration Guide Example Data Country MO: Operating Unit Salesperson ID Number United States Vision Corporation 0001US Canada Vision Canada 0001CAN Mexico Vision Mexico 0001MEX Perform the following steps in Forms to make an existing salesperson visible from one organization to another organization. Prerequisites • The salesperson must exist in one organization in Resource Manager. • The profile value for the administrator (for example, the profile value at the user level) for 'MO: Operating Unit' must correspond to the targeted organization before you set the salesperson in that organization. Set the profile option before using Resource Manager. Responsibility • CRM Administrator or • CRM Resource Administrator Navigation Navigate to the Define Resource window. Steps 1. Query the imported resource for the selected employee. 2. Click Resource Details . The Resource window opens and is populated with your selection. 3. Specify a salesperson number for the resource. Since you have changed your profile option, it is empty. 4. In the Receivables tab, verify that the default Date Active is the correct one.
- 319. Phase I: Setting Up Resource Manager 15-21 5. Enter the information for Sales Credit type. 6. Save your work. The employee is a salesperson in both organizations. Guidelines You can also create a salesperson in multiple organizations using the HTML-based Resource Manager, but you first must set your profile option in Forms. Defining Role Types A role type is a broad descriptive category such as "Sales" that contains one or more roles. A role is a more detailed descriptive categories such as "Sales Representative" or "Sales Manager". Resource Manager is delivered with many predefined Role Types. Perform the following steps to define additional custom Role Types for your company. Make sure that a role type exists with which you can associate the new role. Prerequisites None Responsibility • CRM Administrator or • CRM Resource Manager Navigation Navigate to the Navigator - CRM (or CRM Resource Manager) Administrator window. Steps 1. Select Resource Manager > Setup > Role Types. The Application Object Library: JTF_RS_ROLE_TYPES Lookups window displays existing Role Types. 2. Use the down arrow to scroll to the bottom of the list of Role Types. 3. Select the last entry in the record and choose File > New to add a blank field. 4. Enter the name of the new Role Type in the blank field at the bottom of the list. 5. In the Meaning field, enter the CRM module for which this Role Type is created.
- 320. 15-22 Oracle Trading Community Architecture Administration Guide 6. Choose File > Save to complete the Role Type definition. Defining Roles in Forms A Role may encompass one or more job descriptions and job titles. Use Roles to assign responsibilities to resources, resource groups and resource teams. Resource Manager is delivered with pre-defined Roles for all CRM modules. Perform the following steps in Forms to define additional custom Roles for your enterprise. Prerequisites Make sure that a Role Type exists with which you can associate the new Role. Note: When a sales role is associated with a resource that is attached to a group with no group member role, the OIC application may provide the sales representative with incorrect compensation and may incorrectly roll up the hierarchy. Responsibility • CRM Administrator or • CRM Resource Manager Navigation Navigate to the Navigator - CRM (or CRM Resource Manager) Administrator window. Steps 1. Select Resource Manager > Setup > Roles. 2. Enter your values in the Code and Name fields. Choose a Role Type from the list of values (LOV). The role code can only be entered in upper case. 3. Select the Active box to make the Role active. Select one or more of the role attribute check boxes–Member, Lead, Admin, Manager–to associate the Role to a responsibility. See the Resource Roles Attributes table in the Guidelines section for descriptions of these role attributes. 4. Select one or more Job names in the job region to map the reource roll to a job roll in HRMS. 5. Select File > Save to complete the Role definition.
- 321. Phase I: Setting Up Resource Manager 15-23 The new role name registers in the Role Name field in Resource Manager. The following table describes resource role attributes. Guidelines The following table describes resource role attributes used in the Resource Manager. Resource Role Attributes Check Box Action Member Identifies the role name as a member of the role. Lead Identifies the role name as a lead for the role. Active Identifies the role as active. Admin Identifies the role as administrative. Manager Identifies the role as managerial. Seeded (Read-only) Identifies the role as seeded. Defining Roles in HTML A Role Type is a category of roles associated with a particular CRM module. Resource Manager is delivered with pre-defined Role Types for all CRM modules. Perform the following steps in HTML to define additional custom Roles for your enterprise. Ensure that a role type exists with which you can associate the new role. Responsibility Resource Self Service Administrator Steps to Create Role in HTML 1. Navigate to the Setup tab, click the Roles subtab and then click the Create button. 2. In the Create Role page, enter the required information in the Role Name and Role Code fields and select a role type from the drop-down list. 3. Select the required role attributes from the drop-down lists and then click the
- 322. 15-24 Oracle Trading Community Architecture Administration Guide Apply button. Steps to Modify Role in HTML 1. Navigate to the Setup tab, click Roles subtab, enter search criteria and click Go. 2. Click Update link associated to the role you wish to modify. 3. Modify the required information and then click the Apply button. Specifying Role Attributes Attributes aid in grouping different roles together when defining a resource reporting hierarchy. This hierarchy is used in sales product families, such as Oracle Sales Online and Oracle TeleSales, to control the data access privilege (customer, sales lead, and sales opportunity) as well as sales forecast rollup and incentive compensation plan. It is also used for workflow notifications and escalations. You can have more than one attribute such as Admin and Manager as each has different functions. However, you would not select Lead and Manager, for example, because Lead is a subset of Manager. Example You set up an escalation for service requests and tasks, notifications for members of groups go to the manager. Therefore, besides defining a role, you also need to specify the role attribute information for this new role by selecting the following seeded role attribute check boxes: • Member: Default when another attribute is not chosen (Lead, Administrator, Manager). • Lead: Used in the context of team lead. • Admin: Used to view and modify information about other group members. In the HTML Resource Manager, only a user in a group with either the Administrator or Manager group member role can update group member and group hierarchy information. • Manager: Used to set up the group reporting hierarchy. For example, all the forecasts for a group of sales representatives roll up to the person with the Manager role attribute in that group. In addition, a user with the Manager group member role can update the group member and group hierarchy information in the HTML Resource Manager. Perform the following steps to view roles and role attributes. Prerequisites A role must exist before it can be viewed.
- 323. Phase I: Setting Up Resource Manager 15-25 Responsibility • CRM Administrator or • CRM Resource Manager Navigation Navigate to the Navigator - CRM (or CRM Resource Manager) Administrator window. Steps 1. Select Resource Manager > Setup > Roles. 2. On the application tool bar, click View > Find All. Information populates the window. 3. Use the up and down arrows to move through the various role definitions. As the role type changes, you can also view the responsibilities associated with each role. Guidelines You can also specify role attributes using the HTML-based Resource Manager. Responsibility • Resource Self Service Administrator Navigation Navigate to the Navigator - Resource Self Service Administrator. Steps 1. Select Resource Manager > Setup > Roles. 2. Enter search criteria and click Go. 3. Click Update associated to the role you wish to modify attributes of. 4. The drop-down lists linked to the role attributes allows you to modify change you can change the attributes of the selected role.
- 324. 15-26 Oracle Trading Community Architecture Administration Guide Important: Seeded roles and their attributes cannot be modified. Defining Skill Levels in HTML Defining skill levels in HTML is accomplished by assigning a numeric value to a skill rating and changing the value of the skill rating if required. Instruction for performing these steps are contained in the following sections: • Assigning a Numeric Value to a Skill Rating, page 15-26 • Changing Skill Rating Values, page 15-27 Assigning a Numeric Value to a Skill Rating Use the Define Skill Levels window in HTML to enter the name of the skill level and its associated numeric value. Once this is specified, an individual resource can select an appropriate skill level from the list of values of the Level field in the Rate Skill window to rate his technical skills. These skill levels are standard regardless of whether or not the resource is rated at product, platform, or problem code level. The numeric values for the related skill levels can be a part of the calculation when selecting the optimal individual for a service request. Use the following rules to define skill level information: • No two skill ratings can have the same numeric value or the same name. • Only positive integers are acceptable in the Numeric Value field. • There is no change to the numeric value of "Not Applicable" (N/A). • The sorting order depends on the numbers assigned to the values. Perform the following steps to assign a numeric value to a skill rating. Responsibility Resource Self Service Administrator Steps 1. Navigate to the Setup tab and click the Skill Levels subtab. 2. Enter a numeric value in the skill rating you want to modify. 3. Click Apply to modify the information.
- 325. Phase I: Setting Up Resource Manager 15-27 Note: Possible combinations for defining skills include: • Product • Category • Product and component • Product and problem code • Problem code • Problem code and category • Platform • Platform and Category • Product and category • Category, product, and component Changing the Name of a Skill Rating The skill levels are editable, but you cannot delete any of them without entering a new name or value. Otherwise, an error message occurs saying "Level Name cannot be null" or "Numeric Value cannot be null." Perform the following steps to change the name of a skill rating. Responsibility Resource Self Service Administrator Steps 1. Navigate to the Setup tab and click the Skill Levels subtab. 2. Select the skills rating you want to modify and enter a new name in the text field. 3. Click Apply to modify the information. Publishing Workflow Business Events Resource Manager publishes Workflow business events such as creating and importing resources, updating resources, and end dating resources using the Oracle Workflow
- 326. 15-28 Oracle Trading Community Architecture Administration Guide Business Event System. Applications that contain data directly affected by these events can subscribe to them and synchronize or modify their data accordingly. For example if a resource that is assigned to a Task is end dated, this action is published or "raised" as a business event. Task Manager, can consequently subscribe to this event and reassign the task to another resource. The Oracle Workflow Business Event System The Oracle Workflow Business Event System is an application service that leverages the Oracle Advanced Queuing (AQ) infrastructure to communicate business events between systems. The Business Event System consists of the Event Manager and workflow process event activities. The Event Manager contains a registry of business events, systems, named communication agents within those systems, and subscriptions indicating that an event is significant to a particular system. Events can be raised locally or received from an external system or the local system through AQ. When a local event occurs, the subscribing code is executed in the same transaction as the code that raised the event, unless the subscriptions are deferred. Resource Manager Events When a resource is created, imported, updated, or deleted, the Resource Manager APIs call wrapper APIs that raise the events shown in the following table: Resource Manager Events Event Description Resource Create This event is raised for all newly created and imported resources. Resource Update User This event is raised for resources whose USER_ID data has changed. Resource Update dateEffectivity This event is raised for all resources that have a modified start date active or end date active.
- 327. Phase I: Setting Up Resource Manager 15-29 Event Description Resource Update Attribute This event is raised for all the resources that have a changes in the following attributes: • RESOURCE_NAME • TIME_ZONE • COST_PER_HR • PRIMARY_LANGUAGE • SECONDARY_LANGUAGE • IES_AGENT_LOGIN • SERVER_GROUP_ID • ASSIGNED_TO_GROUP_ID • COST_CENTER • CHARGE_TO_COST_CENTER • COMPENSATION_CURRENCY_CODE • COMMISSIONABLE_FLAG • HOLD_REASON_CODE • HOLD_PAYMENT • COMP_SERVICE_TEAM_ID • SUPPORT_SITE_ID Resource Delete This event is raised for deleted resources. Assign new role to resources This event assigns new roles to resources Assign new role to resources within a resource group or team This event assigns new roles to resources within a resource group or team
- 328. 15-30 Oracle Trading Community Architecture Administration Guide Event Description Update existing role for a resource This event updates existing roles for a resource Update existing role for a resource This event updates existing roles for a resource within a resource group or team Delete role from a resource This event deletes roles from resources Delete role from a resource within a resource group or team This event deletes roles from resources within a resource group or team Merge resources This event merges resources Example: Importing a Resource In this example, the Oracle Mobile Field Sales team wants to populate its temporary table with all newly imported/created resources in Resource Manager. This process is accomplished as follows: 1. A new employee is hired to fill an open position within the organization. 2. Resource Manager conducts its weekly import of new resources from HRM. 3. The new employee is imported into Resource Manager and a new record is created as an employee resource in the table JTF_RS_RESOURCE_EXTNS_VL. The following table shows the new record. Imported Resource Johnson Record Resource ID Resource Name Category User ID 10001 Johnson Employee 101 4. Importing the resources into Resource Manager raises the following Resource Create event in the Oracle workflow event Manager:
- 329. Phase I: Setting Up Resource Manager 15-31 Resource Create Event Event Name Event Key oracle.apps.jtf.jres.resource.create oracle.apps.jtf.jres.resource.create-1001 5. Oracle Mobile Field Sales subscribes to the Resource Create event, every time a user syncs from a remote location to determine whether any new records have been created in Resource Manager. Because the field sales application is used mostly offline, new resource records may not be replicated into the local database, there fore, by subscribing to the event, field sales can get up to date records when a user syncs to replicate the online database. Subscription for Resource Create Event Event Filter Phase Status Rule Function oracle.apps.jtf.jres.re source.create >100 Enabled OracleMobileFieldSa les.ResourceCreated The Oracle Mobile Field Sales team owns the rule function, OracleMobileFieldSales.ResourceCreated, and has the logic to populate their temporary table with all newly imported or newly created resources in Resource Manager. 1. The sales manager with the open position syncs the sales manager's laptop to replicate its data with the system's data using the temporary table. After completing the sync, the sales manager sees the new employee record and is able to assign the open opportunities to the new salesrep as well as adding the new salesrep to the manager's sales group. Example: Updating a Resource In this example, Oracle Service only assigns the following resources to a Service Request if the resource is attached to an FND user:
- 330. 15-32 Oracle Trading Community Architecture Administration Guide Resource Johnson Data Resource ID Resource Name Category User ID Start Date End Date Time Zone 10001 Johnson Employee 101 01-01-2002 None Pacific Updating the USER_ID Value If the Service Request is already assigned to a resource that has a USER_ID value attached and Resource Manager changes the USER_ID value to NULL, then Oracle Service must reassign the Service Request to a different resource. 1. Resource Johnson is attached to a valid FND user and is assigned to the following Service Request: Service Request for Resource Johnson Service Request ID Service Request Name Assignee ID Assignee Name 1001 Software Problem 10001 Johnson 2. The FND user record with USER_ID value 101 is deleted in FND Applications. 3. Resource Manager performs the following steps to update the record for the resource, Johnson: 1. Resource Manager executes the 'Synchronize Application user name' Concurrent Program to update the USER_ID attached to 'Johnson' to NULL Updated Record for User Johnson Resource ID Resource Name Category User ID 10001 Johnson Employee NULL 2. Resource Manager simultaneously raises the Business event, oracle.apps.jtf.jres.resource.update.user with the following parameters:
- 331. Phase I: Setting Up Resource Manager 15-33 Resource Update Event Parameter Name Parameter Value RESOURCE_ID 10001 CATEGORY EMPLOYEE OLD_USER_ID 101 NEW_USER_ID NULL 4. The service request subscribes to the resource update event with the following details: Subscription for Resource Update Event Event Filter Phase Status Rule Function oracle.apps.jtf.jres.re source.update.user >100 Enabled OracleService.Resou rceUserUpdated Oracle Service owns the rule function OracleService.ResourceUserUpdated that contains the logic to reassign the resource to a resource that has a valid USER_ID attached. When START_DATE_ACTIVE and/or End_DATE_ACTIVE is Changed In this example, Oracle Service only assigns the resources to a Service Request if the resource is valid in Resource Manager because the service request assignment period exists within the Resource start date and end date. If the Service Request is already assigned to a resource and Resource Manager changes the date effectivity of that resource, Oracle Service must reassign the Service Request to some other resource. 1. Resource Johnson is assigned to the following Service Request from 08-01-2002 to 08-01-2003:
- 332. 15-34 Oracle Trading Community Architecture Administration Guide Service Request for Resource Johnson Service Request ID Service Request Name Assignee ID Start Date End Date 1001 Software Problem 10001 08-01-2002 08-01-2003 2. The Resource Johnson is updated and a business event is raised. 1. Resource, Johnson is end dated in Resource Manager with the end date, 08-01-2002: Modified Record for Resource Johnson Resource ID Resource Name Category Start Date End Date 10001 Johnson Employee 01-01-2002 08-01-2002 2. Resource Manager raises the event, oracle.apps.jtf.jres.resource.update.effectivedate with the following parameters: Resource Update Event Parameter Name Parameter Value RESOURCE_ID 10001 CATEGORY EMPLOYEE RESOURCE_NAME Johnson OLD_START_DATE_ACTIVE 01-01-2002 OLD_END_DATE_ACTIVE NULL NEW_START_DATE_ACTIVE 01-01-2002
- 333. Phase I: Setting Up Resource Manager 15-35 Parameter Name Parameter Value NEW_END_DATE_ACTIVE 08-01-2002 3. Service request subscribes to the resource update event with the following details. Subscription for Resource Update Event Event Filter Phase Status Rule Function oracle.apps.jtf.jres.re source.update.effecti vedate >100 Enabled OracleService.Resou rceDateUpdated Oracle Service owns the rule function OracleService.ResourceDateUpdated and has the logic to reassign the resource to a resource with a valid date effectivity. When Resource Time Zone is Changed In this example, Oracle Service assigns the resources to a service request that depends on the time zone of the resource. If the Service Request is already assigned to a resource and Resource Manager changes the time zone of that resource, Oracle Service must reassign the Service Request to some other resource. 1. Resource Johnson is assigned to the following Service Request that has a time zone 'Pacific': Service Request Assignment Service Request ID Service Request Name Assignee ID Time Zone 1001 Software Problem 10001 Pacific 2. The resource is modified as follows: 1. Time zone for the resource, Johnson is changes from 'Pacific' to 'Central':
- 334. 15-36 Oracle Trading Community Architecture Administration Guide Modified Service Request Assignment Service Request ID Service Request Name Assignee ID Time Zone 1001 Software Problem 10001 Central 2. Resource Manager simultaneously raises the Business event, oracle.apps.jtf.jres.resource.update.attributes with the following parameters: Resource Update Event Parameter Name Parameter Value RESOURCE_ID 10001 CATEGORY EMPLOYEE RESOURCE_NAME Johnson OLD_ TIME_ZONE Pacific NEW_ TIME_ZONE Central 3. Service request subscribes to the resource update event with the following details: Subscription to Resource Update Event Event Filter Phase Status Rule Function oracle.apps.jtf.jres.re source.update.attrib utes >100 Enabled OracleService.Resou rceTimeoneUpdated Oracle Service owns the rule function, OracleService.ResourceTimeoneUpdated that contains the logic to reassign the resource to a resource that has a required time zone.
- 335. Phase I: Setting Up Resource Manager 15-37 Example: Deleting a Resource In this example, only Resource of type 'TBH' such as the following resource can be deleted using the delete resource API: Resource Abraham Example Resource ID Resource Name Category User ID Start Date End Date 10002 Abraham Other NULL 01-01-2002 NULL Task Manager assigns the resources to a Task only if that resource exists in Resource manager. If the Task is already assigned to a resource and Resource Manager deletes that resource, Task Manager needs to reassign that Task to some other existing resource. 1. Resource Abraham is assigned to the following Task from 08-01-2002 to 08-01-2003: Task Assignment Task ID Task Name Resource ID Resource Name Start Date End Date 1002 Product Presentation 10002 Abraham 08-01-2002 08-01-2003 2. Resource, Abraham is deleted using the API Resource Public API jtf_rs_resource_pub.delete_resource. 3. Because resource, Abraham is deleted, Task Manager must reassign the task to a different resource. To accomplish this, Resource Manager raises the Business event, oracle.apps.jtf.jres.resource.delete with the following parameters: Resource Delete Event Parameter Name Parameter Value RESOURCE_ID 10001 4. Task Manager subscribes to the resource update event with the following details:
- 336. 15-38 Oracle Trading Community Architecture Administration Guide Resource Delete Event Subscription Event Filter Phase Status Rule Function oracle.apps.jtf.jres.re source.delete >100 Enabled TaskManager.Resou rceDeleted Task Manager owns the rule function, TaskManager.ResourceDeleted is the Rule function that contains the logic to reassign the resource to an existing resource. Steps This section provides instructions for publishing Resource Manager business events. Create Resource Perform the following to raise a business event using the jtf_rs_wf_event_pub.create_resource wrapper API: 1. Add the following parameters into the parameter list using wf_event.AddParameterToList: • RESOURCE_ID • RESOURCE_NAME • CATEGORY • USER_ID • START_DATE_ACTIVE • END_DATE_ACTIVE 2. Event_key will be 'oracle.apps.jtf.jres.resource.create-'||jtf_rs_wf_event_guid_s.nextval. 3. Raise the event, oracle.apps.jtf.jres.resource.create, using the workflow API, Wf_event.Raise. Update Resource Perform the following to raise a business event using the jtf_rs_wf_event_pub.update_resource API:
- 337. Phase I: Setting Up Resource Manager 15-39 When the user_id is updated 1. Add the following parameters into the parameter list using wf_event.AddParameterToList: • RESOURCE_ID • CATEGORY • RESOURCE_NAME • OLD_USER_ID • NEW_USER_ID 2. Event_key will be 'oracle.apps.jtf.jres.resource.update.user-'||jtf_rs_wf_event_guid_s.nextval. 3. Raise the event, oracle.apps.jtf.jres.resource.update.user, using the workflow API, Wf_event.Raise. When Start Date Active or End Date Active is changed 1. Add the following parameters into the parameter list using wf_event.AddParameterToList: • RESOURCE_ID • CATEGORY • RESOURCE_NAME • OLD_START_DATE_ACTIVE • OLD_END_DATE_ACTIVE • NEW_START_DATE_ACTIVE • NEW_END_DATE_ACTIVE 2. Event_key will be 'oracle.apps.jtf.jres.resource.update.effectivedate-'|| jtf_rs_wf_event_guid_s.nextval. 3. Raise the event, oracle.apps.jtf.jres.resource.update.effectivedate, using the workflow API, Wf_event.Raise.
- 338. 15-40 Oracle Trading Community Architecture Administration Guide When any of the following attributes changed • RESOURCE_NAME • TIME_ZONE • COST_PER_HR • PRIMARY_LANGUAGE • SECONDARY_LANGUAGE • IES_AGENT_LOGIN • SERVER_GROUP_ID • ASSIGNED_TO_GROUP_ID • COST_CENTER • CHARGE_TO_COST_CENTER • COMPENSATION_CURRENCY_CODE • COMMISSIONABLE_FLAG • HOLD_REASON_CODE • HOLD_PAYMENT • COMP_SERVICE_TEAM_ID • SUPPORT_SITE_ID • Add the following parameters into the parameter list using wf_event.AddParameterToList: • RESOURCE_ID • CATEGORY • OLD_RESOURCE_NAME • OLD_TIME_ZONE • OLD_COST_PER_HR • OLD_PRIMARY_LANGUAGE
- 339. Phase I: Setting Up Resource Manager 15-41 • OLD_SECONDARY_LANGUAGE • OLD_IES_AGENT_LOGIN • OLD_SERVER_GROUP_ID • OLD_ASSIGNED_TO_GROUP_ID • OLD_COST_CENTER • OLD_CHARGE_TO_COST_CENTER • OLD_COMPENSATION_CURRENCY_CODE • OLD_COMMISSIONABLE_FLAG • OLD_HOLD_REASON_CODE • OLD_HOLD_PAYMENT • OLD_COMP_SERVICE_TEAM_ID • OLD_SUPPORT_SITE_ID • NEW_RESOURCE_NAME • NEW_TIME_ZONE • NEW _COST_PER_HR • NEW _PRIMARY_LANGUAGE • NEW _SECONDARY_LANGUAGE • NEW _IES_AGENT_LOGIN • NEW _SERVER_GROUP_ID • NEW _ASSIGNED_TO_GROUP_ID • NEW _COST_CENTER • NEW _CHARGE_TO_COST_CENTER • NEW_COMPENSATION_CURRENCY_CODE • NEW _COMMISSIONABLE_FLAG
- 340. 15-42 Oracle Trading Community Architecture Administration Guide • NEW _HOLD_REASON_CODE • NEW _HOLD_PAYMENT • NEW _COMP_SERVICE_TEAM_ID • NEW _SUPPORT_SITE_ID • Event_key will be 'oracle.apps.jtf.jres.resource.update.attributes-'|| jtf_rs_wf_event_guid_s.nextval. • Raise the event, oracle.apps.jtf.jres.resource.update.attributes, using the workflow API, Wf_event.Raise. Delete Resource Perform the following to raise a business event using the jtf_rs_wf_event_pub.delete_resource API. 1. Add the RESOURCE_ID parameter into the parameter list using wf_event.AddParameterToList 2. Event_key will be 'oracle.apps.jtf.jres.resource.delete-' || jtf_rs_wf_event_guid_s.nextval. 3. Raise the Event, oracle.apps.jtf.jres.resource.delete using the workflow API, Wf_event.Raise. 4. Only Resource of 'TBH' can be deleted using the delete resource API.
- 341. Phase II: Managing Resources 16-1 16 Phase II: Managing Resources This chapter describes the steps involved in managing resources using Resource Manager including finding and changing resources, configuring resource field for updates, assigning additional resource attributes, creating and defining dynamic groups, viewing role details, assigning roles and resources, defining teams and viewing reports. This chapter covers the following topics: • Overview of Managing Resources • Finding a Resource in Forms • Finding and Changing a Resource in HTML • Configuring Resource Fields for Updates • Assigning Additional Resource Attributes • Synchronizing End Dates for Partner and Employee Resources • Creating Groups in Forms • Creating Groups in HTML • Defining Dynamic Groups in Forms • Defining Dynamic Groups in HTML • Viewing Group Hierarchy in Forms • Viewing Role Details • Assigning Roles to Resources • Assigning Resources to Groups • Defining Teams in Forms • Defining Teams in HTML • Configuring Group and Team Member Notifications • Moving a Group of Salespersons from One Compensation Analyst to Another
- 342. 16-2 Oracle Trading Community Architecture Administration Guide • Running a Group Audit Report • Viewing an Audit Report • Running a Group Structure Report • Viewing a Group Structure Report • Running Resource Skills Report • Viewing Resource Skills Report Overview of Managing Resources Implementing Resource Manager takes place in two phases. In the first phase, you set up Resource Manager by defining and configuring required components. In the second phase, you use Resource Manager to manage your resources. This chapter provides detailed instructions for Phase II: Managing Resources. This section contains a summary of the steps for managing resources with Resource Manager. Detailed instructions for these steps are provided in the subsequent sections. Finding and Viewing Resources After importing a resource into Resource Manager, you can find and view the resource and manage it by performing any of the actions described in the remainder of this chapter. Instructions for finding and viewing resources are contained in the following sections: • Finding a Resource in Forms, page 16-5 • Finding a Resource in HTML, page 16-6 Modifying Resources You can modify resources by configuring resource fields for updates in HTML, assigning additional attributes to resources in Forms, or synchronizing end dates for partner relationship resources in Forms. You can also modify some resource information by searching for a resource and then changing the resource's data as required. Configuring Resource Fields for Updates If you are using the HTML version of Resource Manager, then the appropriate users or system administrators with the Resource Self Service Administrator responsibility must set up the Define Resource Fields for Update window. This is used to determine which fields for the resource's personal information can be updated and how the update should occur. Instructions for performing this step are contained in the Configuring Resource Fields for Updates section, page 16-7.
- 343. Phase II: Managing Resources 16-3 Assigning Additional Resource Attributes In the Forms-based version of Resource Manager, you can add additional attribute information if the resource is used by one of the following e-Business applications: • Service • Interaction Center • Compensation • Receivables Instructions for performing this step are contained in the Assigning Additional Resource Attributes, page 16-8 section. Synchronizing End Dates for Partner Relationship Resources Resource Manager enables you to synchronize the end date of an imported partner relationship resource with the end date of the partner relationship resource from which it was imported. For instance, if you import a partnership resource from an application such as OSO and the end date for that partnership resource is subsequently changed in OSO, you must reflect this change in the imported resource. Instructions for pilfering this step are contained in the Synchronizing End Dates for Partner Relationship Resources section, page 16-9. Defining Groups You can organize and manage your resources by defining groups to which they can be assigned. You can create groups in the Forms-based or HTML versions of Resource Manager, define dynamic groups, and view group hierarchy. Creating Groups in Forms The Forms-based version of Resource Manager enables you to create groups, to assign them roles, and to use the exclusive flag feature. You can only assign existing roles to a resource group in Forms. Instructions for this step are contained in the Creating Groups in Forms section, page 16-11. Creating Groups in HTML The HTML version of Resource Manager enables you to create groups and to assign new or existing roles to those groups. You cannot, however use the exclusive flag feature in HTML. Instructions for this step are contained in the Creating Groups in HTML section, page 16-14. Defining Dynamic Groups You can define a dynamic group based on criteria specified in a SQL statement. Instructions for this step are contained in the Defining Dynamic Groups section, page
- 344. 16-4 Oracle Trading Community Architecture Administration Guide 16-15. Viewing Group Hierarchy Resource Manager enables you to view group hierarchy including managers and subordinates for a group or resource. Instructions for this step are contained in the Viewing Group Hierarchy section, page 16-18. Managing Roles and Groups You can manage roles and groups by viewing role details, assigning roles and group membership to resources, and setting up group member notification. Viewing Role Details Instructions for this step are contained in the Viewing Role Details section, page 16-19. Assigning Roles to Resources In HTML, you can attach a roles to resources. A Role is comprised of a Role Type, a Role, and a start and end date. Instructions for this step are contained in the Assigning Roles to Resources section, page 16-20. Assigning Resources to Groups In HTML, you can assign resources to a Group. Group membership is comprised of a Group, Role Type, Role, and a start and end date. Instructions for this step are contained in the Assigning Resources to Groups section, page 16-21. Defining Teams You can organize resource and groups by organizing them in teams. A team is a collection of groups and resources that is organized to accomplish a specific task or objective. Instructions for this step are contained in the Defining Teams section, page 16-21. Running Reports Resource Manager enables you to obtain a variety of information about resources, groups and skills by running the following reports: • Running an Audit Report, page 16-36 • Viewing an Audit Report, page 16-37 • Running a Group Structure Report, page 16-xiv • Viewing a Group Structure Report, page 16-39
- 345. Phase II: Managing Resources 16-5 • Running Resource Skills Report, page 16-40 • Viewing Resource Skills Report, page 16-41 Finding a Resource in Forms In Forms, use the Find Resources window to perform the following actions: • Defining a search criteria to find one or more resource summaries • Defining a Salesperson You can search for a resource on any single or combination of fields. Perform the following steps to find one or more resource summaries. Prerequisites Create or Import a Resource Steps 1. Log on to the system with the CRM Administrator or CRM Resource Manager responsibility and in the navigator, navigate to the Navigator - CRM (or CRM Resource Manager) Administrator window. 2. Select Resource Manager > Maintain Resources > Resources. 3. Search for the resource using any required parameters including the following. You can search for resources using partial characters such as "johnso" instead of "johnson": • Number • Category • Transaction Number • Name 4. (Optional) Enter the required dates for the resource in the Start Date and End Date fields. 5. Click Find. The Resource Search Results window opens with a list of resources that met your criteria. 6. Select your resource and click Resource Details.
- 346. 16-6 Oracle Trading Community Architecture Administration Guide The Resource window opens. From here, you can select the appropriate tab to view more details for the selected resource. Finding and Changing a Resource in HTML You can use the HTML version of Resource Manager to find and modify resources whose category is Employee, Party, Partner or Supplier Contact. Responsibility • CRM Application Foundation User • Resource Self Service Administrator (for administrative purposes) Steps 1. Navigate to the Resources tab and click the appropriate subtab depending on the type of resource you wish to locate. Resource categories include: • Employees • Parties • Partners • Supplier Contacts 2. Enter the resource name in the Resource Name field and click the Go button. 3. In the search results page, you can optionally view the resource's manager, organization information, and skills, or Update information by clicking the appropriate icon next to the resource. 4. To view resource details click the resource in the search results page. Resource details include: • The resource's picture (if available) • Phone/Email • Work Address • Compensation Related Details • Sales Related Details • Service Related Details
- 347. Phase II: Managing Resources 16-7 • Active Roles • Group Membership • Team Membership 5. You can optionally modify some resource information such as Personal Details, Compensation Related Details, Sales Related Details, and Service Related Details. You can also assign or revoke resource roles, add resource to or remove them from groups and add or remove teams. Some resource information such as Phone, Fax, Email, and Address is imported from HRMS and cannot be modified. Configuring Resource Fields for Updates Administrators can set up resource fields for to be updated as follows: • Full Update: Anyone can update the field without approval or workflow notification. • Update With Notification: Anyone can update the field but it requires that a workflow notification be sent to the appropriate individual. • Update With Approval: Anyone can update the field but it requires an approval first. • No Update: No one can ever update the field. By using the previous four update options, administrators can define the following specific fields that can and cannot be changed, as well as how those fields can be modified (with approval or with notification only): • Preferred Name: Resources can enter and maintain their full name information. • Resource Address: Resources can enter and maintain their work address information. • Work Phone Number: Resources can enter and maintain their work phone number. • E-mail Address: Resources can enter and maintain their e-mail address information. Perform the following steps to add or modify field updates for a resource. Prerequisites You must have the Resource Self Service Administrator responsibility.
- 348. 16-8 Oracle Trading Community Architecture Administration Guide Responsibility Resource Self Service Administrator Steps 1. Navigate to the Setup tab and click the Resources subtab. 2. Modify preferences for each field by selecting the option button for the type of update you want to define. 3. Click the Update button and then click the Edit Details to return to the Define Resource Fields for Update window. Guidelines Users with the Resource Self Service Administrator responsibility can determine which fields (preferred name, resource address, work phone number, and e-mail address) can be updated and how the update should occur, such as full update, update with notification, update with approval, or no update. Assigning Additional Resource Attributes In Forms, you can assign or view additional resource information if the resource is used by other applications. In the following tabs you can add additional information: • Service: You define the time zone for resources and cost per hour. You can enter or view the Support Site information. This information populates automatically in the Assignment Manager if the resource is selected. Note that you define the currency type in the Compensation tab. • Interaction Center: You can view the e-mail addresses and the agent IDs of resources associated with the eMail Center or Interaction Center modules here. This tab is used primarily by the Interaction Center and eMail Center modules. Optionally, enter the Scripting Agent Login if the employee uses Oracle Scripting. Use the Telephony Parameters region to enter middleware configuration, parameters, and values for the agent. Which telephony parameters are required and which values to specify depend on the types of switch and CTI middleware used in the Interaction Center. Optionally, use the Email Parameters region to specify the Interaction Center Agent's e-mail account, parameter, and value if the agent uses Oracle eMail Center to work with e-mail work items. All fields are read-only. If the resource is not associated with either center, these fields are blank. • Compensation: Either view or define the Currency Type corresponding to the Cost per Hour listed on the Service tab. This information is primarily used by the Sales application.
- 349. Phase II: Managing Resources 16-9 • Receivables: Identify a salesperson by entering additional information in the Receivables tab. The attributes defined here are used by Oracle Receivables. You can view only personal information about the resource in the Miscellaneous tab. You can search for a resource on any single or combination of fields. Perform the following steps to find one or more resource summaries. Prerequisites A Resource has been created or imported. Responsibility • CRM Administrator or • CRM Resource Manager Navigation Navigate to the Navigator - CRM (or CRM Resource Manager) Administrator window. Steps 1. Select Resource Manager > Maintain Resources > Resources. 2. Choose one or more parameters upon which to search. 3. Click Find. The Resource Search Results window opens with a list of resources that met your criteria. 4. Select your resource and Click Resource Details. The Resource window opens. From here, you can select the appropriate tab to add more details for the selected resource. 5. Save your work. Guidelines For complete instructions, refer to Configuring Agent Telephony Parameters, Oracle Advanced Inbound Telephony Implementation Guide. Synchronizing End Dates for Partner and Employee Resources This section provides instructions for synchronizing the end date of an imported
- 350. 16-10 Oracle Trading Community Architecture Administration Guide partnership or employee resource in Resource Manager with the original partnership or employee resource in the application from which it was imported. The synchronization process also enables you to augment the end date with a unit of time specified in the appropriate profile option. This provides additional time to process the termination of the partnership or employee resource instead of doing so on the end date. Prerequisites A partner or employee relationship must be created in an environment such as OSO and imported by Resource Manager. The partner or employee relationship must subsequently be end dated in the application from which it was imported, either by specifying an end date or by making the partner relationship resource inactive. Responsibility CRM Administrator Resource Self Service Administrator Navigation Log in to the Forms interface and access the navigator. Steps 1. Navigate to Resource Manager > Others > Profile and select the "Resource active days after termination of relationship" profile option. 2. Specify the number of days after the end date that you want to terminate the partner or employee relationship, and save your work. 3. Navigate to Resource Manager > Others > Requests > Run and select the option for running a single request. 4. Locate and run the appropriate concurrent program: • For partnership resources run the "Synchronize Parties and Partners" concurrent program. • For employee resources, run the "Synchronize Employees" concurrent program. 5. Check the partner or employee relationship resource to ensure that the end date has been synchronized according. See Also • Importing Individual Resources, page 15-5
- 351. Phase II: Managing Resources 16-11 • Mass Importing Resources from other e-Business Applications, page 15-4 • Profile Options and Profile Categories Overview, page C-1 • Resource Manager Concurrent Programs, page 14-32 Creating Groups in Forms In this Forms-based procedure, an individual or group resource can belong to more than one group. Either search for an existing group or create a new group; then define the group's members, roles, usages, and relations. Perform the following steps to define a resource group. Note: To view a group in HTML that was created in Forms, you must specify a member role. Steps 1. Navigate to the Navigator - CRM (or CRM Resource Manager) Administrator window. using either the CRM Administrator or CRM Resource Manager responsibility. 2. Select Resource Manager > Maintain Resources > Groups. 3. (Optional) To find an existing resource group, use this procedure. 1. On the application tool bar, click View > Find. 2. In the Find Group window, select a group name from the list of values (LOV) in the Group Name field and click Find. The application populates the Results region with the group name search results. 3. Select a group name in the Results table and click OK. 4. To create a new resource group, then use this procedure. 1. Enter a group name in the Name field. 2. . Select a time zone for the group. 3. Enter a brief description of the group in the Description field. 4. Enter the effective dates for the team in the Start and End fields.
- 352. 16-12 Oracle Trading Community Architecture Administration Guide 5. (Optional) Select the Exclusive Flag check box to assign resources to this group with a particular member role and usage that is not assigned to any other exclusive group with the same member role and usage, in the same time frame. 6. In the Members tab, select a resource category and member number from the LOV in the Category and Number fields. The application populates the Name field with the member's name and affiliated organization. 7. (Optional) Select a member name and click one of the available buttons. For a detailed description of the group member button options, see the Resource Group Member Buttons table in the Guidelines section. 8. In the Roles tab, select a role type and role name from the LOV in the Role Type and Role fields. The roles relationship to its category is indicated by the role attributes check box selections. 9. In the Used In tab, select one or more usage descriptions from the LOV in the Usage field. 10. Choose File > Save. 11. Select either the Parent Group or Child Group tab depending on the relation type. 12. Select a group number from the LOV in the Group Number field of the selected tab. The application populates the Group Name field of the Parent Group or Child Group tab. 13. Select effective dates for the relation from the LOV in the Start and End Date fields. If the group contains group member, group roles, or parent/child group hierarchies whose end date exceeds the group's expiration date, you can optionally select Yes when prompted to update all active roles and parent/child group hierarchies with the group's end date. Selecting No reverts the end date for members, roles, or group hierarchies to their previous value and requires you to manually end date them when you end date the group. 14. Choose File > Save to save the group definition. The new group is accessible from the Group tab in the Resource window. Note: If the reporting hierarchy needs to be changed, it is better to delete a group member role rather than end dating it.
- 353. Phase II: Managing Resources 16-13 Guidelines The following table describes the Resource Group member buttons. Resource Group Member UI Components Button or checkbox Action Member Details button Opens the main Resource window and record of the member. Move Member button Opens the Move Member window, where you can assign the member to another group and can move member roles to another group. Member Roles Opens the Member Roles window, where you can define the member role type, name, and effective dates. The following table describes the Define Group tabs. Define Group Tab Descriptions Tab Description Members Use this tab to define the member category and member number of the group.You can also view a members details, assign the member to another group, and view a members role type in this tab. Roles Use this tab to define roles and role types for the group. Usages Use this tab to determine what CRM modules use the group. Parent Group Use this tab to define a group as a parent group. Child Group Use this tab to define a group as a child group.
- 354. 16-14 Oracle Trading Community Architecture Administration Guide Creating Groups in HTML A group is a collection of resources or other groups that is based on the similar functionality or roles of its members. Example Vision Motor Corporation has several sales groups for different models. Linda, as a sales manager, leads the Vision Model A Sales Group. She has three sales representatives, John, Mark, and Carol, directly working for her. This Vision Model A Sales Group can also consist of another resource group, Key Accounts West Group, to handle sales in the west region for model A. A resource can belong to multiple groups. For example, as a sales manager for model A, Linda may belong to another sales group to provide model A information. You can then create a new resource group, identify parent group name and group usage, as well as assign group member information. Perform the following steps in HTML to create a Group resource. • If the row contains a Remove check box, you can select the check box and update the window to delete the record. If the row contains a Remove icon, click it to clear the row. • You should not modify an HTML Calendar in the Resource Manager or add either Calendar Group usages (PUBLIC CALENDAR or HTML GROUP CALENDAR) to a new or existing Resource Manager Group. • Only one parent record can be specified for a specific period of time. However, several child records can be active at once. • Group role functionality is defined in the Forms version only. The group role is particularly useful when a group is assigned to a team. Prerequisites The JTFRS: Group Update Access profile must be set to "None." Responsibility Resource Self Service Administrator Steps 1. Navigate to the Resources tab, click the Groups subtab and then click the Create button.
- 355. Phase II: Managing Resources 16-15 2. Enter the required information in the Create Groups window including the name of the group and the date from which it becomes active. 3. Optionally enter the following information for the group: • Description. A description of the group. • Email. The group's email address. • Time Zone. Select the time zone for the group. • Parent Group. If you are creating a child group, use the search tool to locate the parent group to which it belongs. • Active To. The date on which the group is no longer active. 4. Optionally configure group membership information: • Add members. To add group members, click the Members icon, click the Add Members button and use the search window to locate and select the desired resources. • Assign roles to members. Click the search icon next to each group member to locate and assign it the appropriate role. • Dates active. Use the Active To and Active From fields next to each member to optionally specify when it is active. The Active To field is required. • Remove members. Click the Remove icon next to each group member that you wish to remove. 5. Optionally specify the applications in which the group is used by clicking the Used In icon and entering the required information. 6. Optionally specify any child groups that belong to this group by clicking the Child Group icon and entering the required information. A child group cannot have overlapping date ranges with its parent group. Defining Dynamic Groups in Forms You can create dynamic groups in the Forms-based and HTML versions of Resource Manager. Dynamic groups use SQL statements to derive group members based on specific requirements and cannot be hierarchical. Dynamic groups can have the same name as resource groups and can contain the same members. With dynamic groups, however, membership is derived exclusively from the SQL statement and members cannot be added in the same manner as they are to resource groups.
- 356. 16-16 Oracle Trading Community Architecture Administration Guide After entering group name and usage information, you can then enter SQL statements in the SQL Statement field. Click the Check Syntax button to check your code for syntax errors before saving your work. This action creates a dynamic group, but not an actual group which you would find in the list of values. Example Interaction Center's Telephony Manager uses Dynamic Groups for skill-based routing. In active mode, Oracle Telephony Manager routes calls according to defined rules. The active mode is the default mode of operation. In active mode, Oracle Telephony Manager uses skill-based routing, a dynamic call routing intelligence that delivers inbound calls to an agent who is appropriately skilled to meet the needs of the caller. When inbound calls arrive at the switch, the switch issues a routing request. Oracle Telephony Manager monitors the routing request, then applies skill-based routing rules, and identifies suitably skilled agents. Meanwhile, a representation of the call waits in the virtual queue within Oracle Telephony Manager. When a suitable agent becomes available, Oracle Telephony Manager responds to the routing request and instructs the switch to deliver the call to the agent's extension through the Universal Work Queue, where more specific pre-defined rules may apply in directing the call. In a dynamic group, the database automatically updates information about individual group members. The following code example shows how a dynamic group is created and the type of information returned, which is the dynamic routing executes the workflow/procedure to get an agent list. Select Resource_ID from JTF_IH_INTERACTIONS where Party_ID=:CUSTOMER_ID order by Last_update_date desc Note: Oracle Interaction Center's Telephony Manager commonly uses dynamic groups for skill-based routing. Perform the following steps to define a dynamic group. Prerequisites Resource Manager must be configured with Call Center usage. Responsibility • CRM Administrator or • CRM Resource Manager
- 357. Phase II: Managing Resources 16-17 Navigation Navigate to the Navigator - CRM (or CRM Resource Manager) Administrator window. Steps 1. Select Resource Manager > Maintain Resources > Dynamic Groups. 2. In the Dynamic Groups window, enter a group name in the Name field. 3. Select a group usage from the Usage field. 4. Select the effective dates for the group from the list of values (LOV) in the Start and End fields. 5. Enter a brief description of the group name and usage in the Description field. 6. Enter the SQL statement to define a group. 7. Click Check Syntax to check the code for syntax errors. 8. Choose File > Save to save the group. The new group name registers in the Group Name field in Resource Manager. Defining Dynamic Groups in HTML You can create dynamic groups in the Forms-based and HTML versions of Resource Manager. Dynamic groups use SQL statements to derive group members based on specific requirements and cannot be hierarchical. Dynamic groups can have the same name as resource groups and can contain the same members. With dynamic groups, however, membership is derived exclusively from the SQL statement and members cannot be added in the same manner as they are to resource groups. Note: This feature is not exposed for the Resource Manager and Resource Self Service Administrator responsibilities. Steps for Defining Dynamic Groups in HTML 1. In the Dynamic Groups window, click Create. 2. Enter required information such as Name, Used In, and Active Dates. and click Apply.
- 358. 16-18 Oracle Trading Community Architecture Administration Guide Steps for Modifying Dynamic Groups in HTML 1. Select Dynamic Groups from the Quick Find menu, enter the name of the dynamic group you wish to locate and click Go. 2. Select the dynamic group you wish to modify from list of search results. Modify the resource information as required and click Update. Viewing Group Hierarchy in Forms You can use the group hierarchy feature in Forms to view the reporting structure for a resource as well as the placement of a group within a group hierarchy. The first feature enables you to view resources that are direct reports, or those that report to a specific individual, however it does not identify a resource's manager or subordinates. You can restrict your view by resource category. The second feature enables you to obtain more detailed information about a group including its members, roles, usages, as well as hierachical information such as its parent and child groups. Prerequisites None Responsibility • CRM Administrator or • CRM Resource Manager Navigation In the navigator, select Resource Manager > Maintain Resources > Group Hierarchy Viewing Reporting Structure Steps 1. In the Group Hierarchy window, select a resource from the list of values (LOV) in the Resource Name field and click View to view the groups of a particular resource member. 2. Select a resource category from the Category LOV and click View to view the groups and members of a resource category. 3. Select All from the Category LOV and click View if you want to view all the resource groups and members in the database.
- 359. Phase II: Managing Resources 16-19 Viewing Group Hierarchy Steps 1. In the Group Hierarchy window, select a resource from the list of values (LOV) in the Resource Name field and click View to view the groups of a particular resource member. 2. In the Groups area, click the hyperlinked name of the group whose hierarchy you wish to view. 3. Click the following tabs for specific group hierarchy information: • Members • Roles • Usages • Parent Groups • Child Groups Viewing Reporting Structure Guidelines Selecting Reports Directly from the LOV in the View By field searches the database for members that report directly to a specific resource. Viewing Role Details The Role Details window provides information on a selected role such as the code, name, type, description, and the selected attributes. Attributes aid in grouping different roles together when defining a resource reporting hierarchy. This hierarchy is used in sales product families, such as Oracle Sales Online and Oracle TeleSales, to control the data access privilege (customer, sales lead, and sales opportunity) as well as sales forecast rollup and incentive compensation plan. It is also used for workflow notifications and escalations. You can have more than one attribute such as Admin and Manager as each has different functions. However, you would not select Lead and Manager, for example, because Lead is a subset of Manager. Perform the following steps to view a role's details. Prerequisites A role must exist before it can be viewed. Responsibility Resource Self Service Administrator
- 360. 16-20 Oracle Trading Community Architecture Administration Guide Steps 1. Navigate to the Setup tab and click the Roles subtab. 2. Enter the Role Name and click Go. 3. The search results will display the requested details. Clicking Cancel will revert to the Simple Search page. 4. Click Advanced Search to narrow your search criteria by entering values in the Role Code, Role Name, Active, Seeded, Role Type, Manager, Admin, Member, Leads field. You can search all fields, or just one. You can also use wildcards to aid your search. 5. Click Go and then click the hyperlink of your preferred role. 6. Clicking the Create button redirects to the Create Role page. Each row in the result has an associated Update and Remove link that can be used to update or remove an existing Role. 7. You can Save Search for future reference. Important: Seeded roles and their attributes cannot be modified. Assigning Roles to Resources Perform the following steps, in HTML, to attach a Role to a resource. Prerequisites Make sure that a Role Type exists with which you can associate the new Role. Responsibility Resource Self Service Administrator Steps 1. Navigate to the Resources tab and click the appropriate subtab depending on the resource to which you wish to assign roles. Resource categories include: • Employees • Parties • Partners
- 361. Phase II: Managing Resources 16-21 • Supplier Contacts 2. Use the Simple Search page to locate the resource to which you want to add roles. On the search results page, click the Update icon next to the resource. 3. Use the Active Roles section to select the role types, roles, and active dates for each and then click the Update button. Assigning Resources to Groups Perform the following to assign a resource to a group. Responsibility Resource Self Service Administrator Steps 1. Navigate to the Resources tab and click the Groups subtab. 2. Use the Simple Search page to locate the group to which you want to add resources and then click the Update icon next to the resource in the search results page. 3. Click the Members icon and then click the Add Members button. 4. Search for and select the members you wish to add to the group and then click the Apply button. Defining Teams in Forms You can create a team in the Forms-based and HTML version of Resource Manager. For example, you can specify exclusive flag and descriptive flexfield information in the HTML version of Resource Manager but cannot do so in Forms. Perform the following steps to define a team in Forms. Prerequisites You must define a resource group. Responsibility • CRM Administrator or • CRM Resource Manager
- 362. 16-22 Oracle Trading Community Architecture Administration Guide Navigation Navigate to the Navigator - CRM (or CRM Resource Manager) Administrator window. Steps 1. Select Resource Manager > Maintain Resources > Teams. 2. (Optional) Use the following procedure to find an existing resource team. 1. On the application tool bar, click View > Find. 2. In the Find Team window, select a team name from the list of values (LOV) in the Name field and click Find. The application populates the Results region with the team name search results. 3. Select a team name in the Results table and click OK. The application populates the Define Teams window with the group information. 3. Enter a team name in the Name field. 4. (Optional) Select the Exclusive Flag check box to assign resources to this team with a particular member role and team usage that is not assigned to any other exclusive team with the same role and usage, in the same time frame. 5. Enter a brief description of the team in the Description field. 6. Enter the effective dates for the team in the Start and End fields. If the team contains team member, team roles whose end date exceeds the team's expiration date, you can optionally select Yes when prompted to update all active members and roles with the team's end date. Selecting No reverts the end date for members, or roles to their previous value and requires you to manually end date them when you end date the team. 7. In the Members tab, select a category and member from the LOV in Category, and Number fields. For a detailed description of the group member button options, see the Resource Group Member Buttons table in the Guidelines section. The application populates the Name field with the member's name. 8. (Optional) Click Member Roles to assign team member roles to a team. 9. (Optional) Select a member name and click Member Details to view specific member information.
- 363. Phase II: Managing Resources 16-23 10. In the Roles tab, select from the LOV in the Role Type and Role fields. The roles relationship to its category is indicated by the role attributes check box selections. 11. In the Usages tab, select from the LOV in the Name field. 12. Choose File > Save to save the team definition. The new team is accessible from the Team tab in the Resource window. Guidelines The following table gives a description of the tabs located in the Define Team window. Define Team Tab Descriptions Tab Description Members Use this tab to define members of a team. Roles Use this tab to define the team roles and role types. Usages Use this tab to determine what CRM modules use the team. Defining Teams in HTML You can use the HTML version of Resource Manager to create and modify resource teams. You can additionally view their usage and membership details. However, creating teams in the HTLM version of Resource Manager is not as extensive as the Forms-based version. For example, you cannot specify exclusive flag or descriptive flexfield information in the HTML version of Resource Manager. Although you can provide role information for team members in the HTML version of Resource Manager, you cannot do so for teams themselves. Responsibility Resource Self Service Administrator Steps for Creating Teams in HTML 1. Navigate to the Resources tab, click the Teams subtab and , click the Create button.
- 364. 16-24 Oracle Trading Community Architecture Administration Guide 2. Enter required information such as Name and the date from which the team becomes active. You can optionally enter additional information such as the date at which the team is no longer active, its email address and description. 3. Optionally specify resources that belong to the team by expanding the Members node and entering the required information. 4. Optionally specify groups that belong to the team by expanding the Member Groups node and entering the required information. 5. Optionally specify the applications in which the team is used by expanding the Used In node and entering the required information. Steps for Modifying Teams in HTML 1. Navigate to the Resources tab, click the Teams subtab and use the quick find menu to search for team you wish to modify. 2. Click the Update icon next to the team you wish to modify, enter the required information, and click the Update button. Configuring Group and Team Member Notifications Resource Manager enables Workflow notifications to be sent to group and team members integrating groups, teams, and their members with workflow roles. The Synchronize Workflow Roles concurrent program must be run on a periodic basis to ensure that the group-to-membership and team-to-membership relationship information stored in Resource Manager is in sync with the data stored in the corresponding Workflow role tables. Group Example The integration of resources, groups, and group members with Workflow roles can be demonstrated by creating a sample group with four members. When the sample group and its members are created in Resource Manager, the Resource Manager APIs call wrapper APIs that subsequently populates the corresponding Workflow tables with the required information. Step 1: Creating a Group Begin by creating a sample group called My Group. Information for this group is stored in the JTF_RS_GROUPS_VL table in Resource Manager. Assume that creating this group generates a group ID number 10011 as shown in the table below.
- 365. Phase II: Managing Resources 16-25 Group Information Group ID Group Name 10011 My Group When you create a group with the preceding information, the wrapper APIs create new records in the Workflow WF_LOCAL_ROLES and WF_LOCAL_USER_ROLES tables. These records, shown in the following tables, contain the original group information and additional data required by Workflow. Group Information Stored in WF_LOCAL_ROLES table Role Name Orig System Orig System JRES_GRP:10011 JRES_GRP 10011 Group Information Stored in the WF_LOCAL_USER_ROLES table User Name User Orig System User Orig System ID Role Name Role Orig System Role Orig System ID JRES_GRP:10 011 JRES_GRP 10011 JRES_GRP:10 011 JRES_GRP 10011 Step 2: Defining Resources to Add to the Group Next, you must define the four resources that you will subsequently add to the group as group members, as shown in the table below. Information for these resources will be stored differently in the Workflow tables depending on their category and whether or not their user ID is null. Resources To Be Added to My Group Resource ID Resource Name Category User ID 10001 johnson employee 101
- 366. 16-26 Oracle Trading Community Architecture Administration Guide Resource ID Resource Name Category User ID 10002 jones employee null 10003 lewis other null 10004 smith party null Resource Johnson. To define the resource "Johnson" as an employee first create a new record in HRMS using the Define Employee screen. Then create an FND_USER employee using the Define User screen whose user ID is 101 and user name is "johnson". Import this employee in to Resource Manager using the Import Resource form. Resource Manager will not create a corresponding record for this employee in the Workflow tables since the WF_USERS table will already contain a record corresponding to the one in FND_USER. The FND_USER information will be stored in the Workflow tables shown in the following tables: Resource Johnson Information Stored in WF_LOCAL_ROLES table Role Name Orig System Orig System ID johnson FND_USER 101 Resource Johnson Information Stored in the WF_LOCAL_USER_ROLES table User Name User Orig System User Orig System ID Role Name Role Orig System Role Orig System ID johnson FND_USER 101 johnson FND_USER 101 Resource Jones. To define the resource "Jones" as an employee, first create a new record in HRMS using the Define Employee screen, then import it into Resource Manager using Import Resource form. Information for the resource "jones" will be stored in the Workflow tables as shown in the following tables, since the user ID is null.
- 367. Phase II: Managing Resources 16-27 Resource Jones Information Stored in WF_LOCAL_ROLES table Role Name Orig System Orig System ID JRES_IND:10002 JRES_IND 10002 Resource Jones Information Stored in the WF_LOCAL_USER_ROLES table User Name User Orig System User Orig System ID Role Name Role Orig System Role Orig System ID JRES_IND:10 002 JRES_IND 10002 JRES_IND:10 002 JRES_IND 10002 Resource Lewis. To define a resource "Lewis" as a resource of type Other, create a new resource in Resource Manager using the Define Resource form. Information for the resource "lewis" will be stored in the Workflow tables as shown in the following tables since the resource is of type Other. Resource Lewis Information Stored in WF_LOCAL_ROLES table Role Name Orig System Orig System ID JRES_IND:10003 JRES_IND 10003 Resource Lewis Information Stored in the WF_LOCAL_USER_ROLES table User Name User Orig System User Orig System ID Role Name Role Orig System Role Orig System ID JRES_IND:10 003 JRES_IND 10003 JRES_IND:10 003 JRES_IND 10003 Resource Smith. To define a resource "Smith" as a party, first create a new record in TCA and then import in into Resource Manager using the Import Resource form. Information for the resource "smith" will be stored in the Workflow tables as shown in the following tables since the user ID is null.
- 368. 16-28 Oracle Trading Community Architecture Administration Guide Resource Smith Information Stored in WF_LOCAL_ROLES table Role Name Orig System Orig System ID JRES_IND:10004 JRES_IND 10004 Resource Smith Information Stored in the WF_LOCAL_USER_ROLES table User Name User Orig System User Orig System ID Role Name Role Orig System Role Orig System ID JRES_IND:10 004 JRES_IND 10004 JRES_IND:10 004 JRES_IND 10004 Step 3: Adding Resources to the Group After creating the required resources, you must add them to My Group. To accomplish this, query up "My Group" in the Define Groups form and add all the above members in the member region. Information for the group members will be stored in the Workflow tables as shown in the following table since the user id is null for this resource: Group Member Information Stored in the WF_LOCAL_USER_ROLES table User Name User Orig System User Orig System ID Role Name Role Orig System Role Orig System ID JOHNSON FND_USER 101 JRES_GRP:10 011 JRES_GRP 10011 JRES_IND:10 002 JRES_IND 10002 JRES_GRP:10 011 JRES_GRP 10011 JRES_IND:10 003 JRES_IND 10003 JRES_GRP:10 011 JRES_GRP 10011 JRES_IND:10 004 JRES_IND 10004 JRES_GRP:10 011 JRES_GRP 10011
- 369. Phase II: Managing Resources 16-29 Team Example The integration of resources, teams, and team members with Workflow roles can be demonstrated by a sample team with three individual members and one group member. When the sample team and its members are created in Resource Manager, the Resource Manager APIs call wrapper APIs that subsequently populates the corresponding Workflow tables with the required information. Step 1: Creating a Team Begin by creating a sample team called My Team. Information for this team is stored in the JTF_RS_TEAMS_VL table in Resource Manager. Assume that creating this team generates a team ID number 10011, as shown in the tables below: Team Information Team ID Team Name 10011 My Team Team Information Stored in WF_LOCAL_ROLES table Role Name Orig System Orig System JRES_TEAM:10011 JRES_TEAM 10011 Team Information Stored in the WF_LOCAL_USER_ROLES table User Name User Orig System User Orig System ID Role Name Role Orig System Role Orig System ID JRES_TEAM: 10011 JRES_TEAM 10011 JRES_TEAM: 10011 JRES_TEAM 10011 Step 2: Defining Resources and a Group to Add to the Team Next, you must define the three resources and one group that you will subsequently add to the team as team members as shown in the table below. Information for the resources and group will be stored differently in the Workflow tables depending on their category and whether or not their user ID is null.
- 370. 16-30 Oracle Trading Community Architecture Administration Guide Resources To Be Added to My Team Resource ID Resource Name Category User ID 10001 johnson employee 101 10002 jones employee null 10003 lewis other null Resource Johnson. To define the resource "Johnson" as an employee first create a new record in HRMS using the Define Employee screen. Then create an FND_USER employee using the Define User screen whose user ID is 101 and user name is "johnson". Import this employee in to Resource Manager using the Import Resource form. Resource Manager will not create a corresponding record for this employee in the Workflow tables since the WF_USERS table will already contain a record corresponding to the one in FND_USER. The FND_USER information will be stored in the following Workflow tables as shown in the tables below: Resource Johnson Information Stored in WF_LOCAL_ROLES table Role Name Orig System Orig System ID johnson FND_USER 101 Resource Johnson Information Stored in the WF_LOCAL_USER_ROLES User Name User Orig System User Orig System ID Role Name Role Orig System Role Orig System ID johnson FND_USER 101 johnson FND_USER 101 Resource Jones. To define the resource "Jones" as an employee, first create a new record in HRMS using the Define Employee screen, then import it into Resource Manager using Import Resource form. Information for the resource "jones" will be stored in the Workflow tables as shown in the following tables since the user ID is null.
- 371. Phase II: Managing Resources 16-31 Resource Jones Information Stored in WF_LOCAL_ROLES table Role Name Orig System Orig System ID JRES_IND:10002 JRES_IND 10002 Resource Jones Information Stored in the WF_LOCAL_USER_ROLES table User Name User Orig System User Orig System ID Role Name Role Orig System Role Orig System ID JRES_IND:10 002 JRES_IND 10002 JRES_IND:10 002 JRES_IND 10002 Resource Lewis. To define a resource "Lewis" as a resource of type Other, create a new resource in Resource Manager using the Define Resource form. Information for the resource "lewis" will be stored in the Workflow tables as shown in the following tables since the resource is of type Other. Resource Lewis Information Stored in WF_LOCAL_ROLES table Role Name Orig System Orig System ID JRES_IND:10003 JRES_IND 10003 Resource Lewis Information Stored in the WF_LOCAL_USER_ROLES table User Name User Orig System User Orig System ID Role Name Role Orig System Role Orig System ID JRES_IND:10 003 JRES_IND 10003 JRES_IND:10 003 JRES_IND 10003 Resource Smith. To define a resource "Smith" as a party, first create a new record in TCA and then import in into Resource Manager using the Import Resource form. Information for the resource "smith" will be stored in the Workflow tables, as shown in the table below, since the user ID is null.
- 372. 16-32 Oracle Trading Community Architecture Administration Guide Resource Smith Information Stored in WF_LOCAL_ROLES Table Role Names Orig System Orig System ID JRES_IND:10004 JRES_IND 10004 Group My Group. Next, create a sample group called "My Group". Information for this group is stored in the JTF_RS_GROUPS_VL table in Resource Manager. Assume that creating this group generates a group ID number 10012 as shown in the table below. Group to be added to My Team Group ID Group Name 10012 My Group When you create a group with the preceding information, the wrapper APIs create new records in the Workflow WF_LOCAL_ROLES and WF_LOCAL_USER_ROLES tables as shown in the tables below. These records contain the original group information and additional data required by Workflow. Group Information Stored in WF_LOCAL_ROLES table Role Name Orig System Orig System JRES_GRP:10012 JRES_GRP 10012 Group Information Stored in the WF_LOCAL_USER_ROLES table User Name User Orig System User Orig System ID Role Name Role Orig System Role Orig System ID JRES_GRP:10 012 JRES_GRP 10012 JRES_GRP:10 012 JRES_GRP 10012 Step 3: Adding the Group and Resources to the Team After creating the required group and resources, you must add them to My Team. To accomplish this, query up "My Team" in the Define Teams form and add all the above
- 373. Phase II: Managing Resources 16-33 members in the member region. Information for the team members will be stored in the Workflow tables, as shown in the table below, since the user ID is null for this resource: Group Member Information Stored in the WF_LOCAL_USER_ROLES table User Name User Orig System User Orig System ID Role Name Role Orig System Role Orig System ID JOHNSON FND_USER 101 JRES_TEAM: 1001 JRES_TEAM 10011 JRES_IND:10 002 JRES_IND 10002 JRES_TEAM: 1001 JRES_TEAM 10011 JRES_IND:10 003 JRES_IND 10003 JRES_TEAM: 1001 JRES_TEAM 10011 JRES_GRP:10 012 JRES_GRP 10012 JRES_TEAM: 1001 JRES_TEAM 10011 Prerequisites None Responsibility CRM Administrator or System Administrator Navigation Navigate to the Navigator - CRM Administrator window, or Navigate to the Navigator - System Administrator window Steps To run the following concurrent program, follow the steps listed in Resource Manager Concurrent Programs, page 14-32. Choose the appropriate parameter depending on whether you are synchronizing groups and group members, teams and team members or both with Workflow roles. The table below describes the parameters.
- 374. 16-34 Oracle Trading Community Architecture Administration Guide Synchronize Workflow Roles Concurrent Programs Name Description Frequency Notes Synchronize Workflow Roles This program synchronizes all attributes and records in the workflow wf_local_* tables with the mismatching records in Resource manager. The Synchronize Workflow For parameter enables you specify which of the following Resource Manager entities you wish to synchronize with Workflow roles: • Groups and Group Members synchronizes Resource Manager groups and group members with the appropriate Workflow roles tables. • Teams and Team Members synchronizes Resource Manager teams and team members with the appropriate Workflow roles tables. • All synchronizes Resource Manager groups, As needed This program should be run as follows: • The first time group or team notification functionality is implemented in Resource Manager. • When groups, teams, or resources that were not active at the time of their creation have become activated. • If online transactions encounter a Workflow error. • When the Synchronize Employees concurrent program is run. • When the Synchronize Parties and Partners concurrent program is run. • When the Synchronize Supplier Contact concurrent program is run.
- 375. Phase II: Managing Resources 16-35 Name Description Frequency Notes group members, teams, and team members with the appropriate Workflow roles tables. Moving a Group of Salespersons from One Compensation Analyst to Another The Move Salespersons window enables you to move groups of salespersons from one analyst to another. Typically, this feature is used when one analyst replaces another, and the salespeople assigned to the previous analyst must be reassigned to the new one. The Move Salespersons window provides a feature for accomplishing this task in bulk instead of querying and modifying a large number of resources on an individual basis. Important: If you Move the salesperson from one group to another, the credit of the existing sales opportunities will be moved to the group where the salesperson is moved to. Prerequisites None Responsibility CRM Administrator CRM Resource Manager Navigation In the navigator, select Maintain Rersources>Move Salespersons Steps 1. Select the name of the analyst from which you want to move the salespersons in the Analyst Name field. 2. Select the checkbox adjacent to the reources you wish to move.
- 376. 16-36 Oracle Trading Community Architecture Administration Guide 3. Select the analyst to which you wish to move the salespersons in the Move to Analyst field and click Move. Running a Group Audit Report Use Resource Manager to run audit reports detailing changes to resources and resource groups created within a defined date. For example, any changes made to new members of a group are defined, but role change information is not. This provides an audit trail of the actions taken for specific groups and resources. Perform the following steps to run an Audit Report. Note: Only the movement of a resource from a given group to another group is tracked. Resources changing roles within the same group are not reported in the Audit Report. Prerequisites None Responsibility CRM Administrator Navigation Navigate to the Navigator - CRM Administrator window. Steps 1. Select Resource Manager > Others > Requests > Run. 2. Select Single Request and click OK. 3. Use the Name list of values (LOV) to select a report. 4. In the Reports window, select Group Audit Report from the list of reports and click OK. 5. Enter parameters for the report. In order for an Audit Report to run successfully, it is necessary to define both Report Based On and Date Range/No. of Days for the report. The report runs based on the information you enter for the following criteria. • Report Based On
- 377. Phase II: Managing Resources 16-37 • Group • Resource • Updated By • Date Range/No. of Days • Start Date • End Date • Number of Days for 6. (Optional) Change the time frame the report is suppose to run by clicking Schedule. 7. Select the time frame when you want the report to run: • As soon as possible • Once • Periodically • On specific days 8. Click OK. 9. (Optional) Click Options to determine who should be notified when the report is complete and where you want to print the output to. 10. Click Submit. 11. A dialog opens confirming your request was submitted. Viewing an Audit Report You can monitor the status of an audit report to verify completion. Perform the following steps to view an Audit report. Prerequisites A Group Audit Report must run successfully.
- 378. 16-38 Oracle Trading Community Architecture Administration Guide Responsibility CRM Administrator Navigation Navigate to the Navigator - CRM Administrator window. Steps 1. Select Requests > Run > View. 2. In the Find Requests window, select the All My Requests option button and click Find. 3. In the Requests window, select a Group Audit Report to view. 4. Click View Logto display the results of the report. The report details opens in an HTML window along with a log file for the report. Running a Group Structure Report Use Resource Manager to run a Group Structure report detailing any changes made to a specific Parent or Child relationship of a resource group. The report details a reliable audit trail of the actions taken for a specific group. Group name changes, or any resource changes within the same group, are not detailed in this report. Perform the following steps to run a Group Structure report. Prerequisites None Responsibility CRM Administrator Navigation Navigate to the Navigator - CRM Administrator window. Steps 1. Select Resource Manager > Others > Requests > Run. 2. Select Single Request and click OK. 3. Use the Name list of values (LOV) to select a report.
- 379. Phase II: Managing Resources 16-39 4. In the Reports window, select Group Structure Report from the list of reports and click OK. 5. Select the group you want to run the report on from the list of values (LOV) and click OK. 6. (Optional) Change the time frame the report runs by clicking Schedule. The Schedule window opens. 7. Select the time frame when you want the report to run: • As soon as possible • Once • Periodically • On specific days 8. ClickOK. 9. (Optional) Click Options to determine who should be notified when the report is complete and where you want to print the output. 10. Click Submit. Viewing a Group Structure Report You can monitor the status of an audit report to verify completion. Perform the following steps to view your Group Structure report. Prerequisites You must first run a Group Structure Report successfully. Responsibility CRM Administrator Navigation Navigate to the Navigator - CRM Administrator window. Steps 1. Select Requests > Run > View.
- 380. 16-40 Oracle Trading Community Architecture Administration Guide 2. Select the All My Requests option button. 3. Click Find. 4. In the Requests window, select the Group Structure Report. 5. Click View Logto display the results of the report. The report details opens in an HTML window along with a log file for the report. Running Resource Skills Report This report displays the skills a resource has listed using the HTML-based Resource Manager. You can run a Skills Report either by resource or group. If you choose to run a Skills Report by resource, then any direct reports under the resource will be included in the report. If you choose to run a Skills Report by group, then the entire group's skill set will be displayed. Prerequisites Your resources must have: 1. Skills listed using the HTML-based Resource Manager 2. Have a manager listed if you are running a report based on resource. Responsibility CRM Administrator Navigation Navigate to the CRM Administrator window. Steps 1. Select Resource Manager > Others > Requests > Run. 2. Select Single Request and click OK. 3. Use the Name list of values (LOV) to select the Resource Skills Report and click OK. 4. Use the LOV in the Report Type field to select either Resource or Group and click OK. 5. Depending on your choice, use the LOV in the corresponding Resource or Group field to find your selection.
- 381. Phase II: Managing Resources 16-41 6. (Optional) If you do not want the report to run as soon as possible, click Schedule to change the time frame when you want the report to run. 7. (Optional) Click Options to determine who should be notified when the report is complete and where you want to print the output. 8. Click Submit. Viewing Resource Skills Report You can monitor the status of an audit report to see when it has been successfully completed. Perform the following steps to view your Resource Skills report. Prerequisites You must first run the Resource Skills Report successfully. Responsibility CRM Administrator Navigation Navigate to the CRM Administrator window. Steps 1. Select Requests > Run > View. 2. Select the All My Requests option button. 3. Click Find. 4. Select your Group Structure Report and click View Log.
- 383. Troubleshooting Resource Manager 17-1 17 Troubleshooting Resource Manager This section lists common implementation errors, error messages and frequently asked questions in troubleshooting Resource Manager. This chapter covers the following topics: • Common Implementation Errors • Error Messages • Frequently Asked Questions (FAQs) Common Implementation Errors Note: The Oracle CRM Diagnostic Tool is useful in pinpointing problems with the setup and configuration of the many CRM modules. It is available through the CRM System Administration Console. This section contains information on some of the common implementation errors associated with implementing Resource Manager. Unable to Import a Resource Action: Perform the following procedures: 1. Run the concurrent program "Resource Manager Diagnostics" available under CRM Administrator Responsibility. If it is not available, then perform the following: 2. Log on using the System Administrator responsibility. 3. In the "Executable" option, under "Concurrent Program", query for "Resource Manager Diagnostics." 4. Enable it by checking the checkbox.
- 384. 17-2 Oracle Trading Community Architecture Administration Guide 5. After the concurrent program completes, view the log file generated by pressing the "View Log" button. See if any errors are reported. 6. Correct any errors as reported in the concurrent program log. Then, import again. Unable to Import a Resource From Human Resources Cause: Form JTFRSSEC does not compile after applying the latest patch. Action: Compile the Form based on following steps. cd $AU_TOP/forms/us f60gen module=JTFRSSEC.fmb userid=apps/apps mv JTFRSSEC.fmx $JTF_TOP/forms/US cd $AU_TOP/resource/US f60gen module=JTFRSSEC.pll userid=apps/apps module_type=library chmod 755 JTFRSSEC.plx Unable to See Resource Name Cause: This problem can occur in the CRM or Common Application Calendar modules, the LOVs, and in other similar items. Action: In SQL*Plus, connecting as apps/apps, enter the following: SQL> select count(*) from jtf_rs_resource_extns where source_name is null; If count(*) is non-zero then run the concurrent program "Synchronize Employees" using the CRM Administrator responsibility. Cannot Invoke Salesperson Form from AR Menu Cause: This problem occurs when invoking the Salesperson form from the Accounts Receivables menu. It occurs under the following circumstances: (Navigation path: Setup > Transactions > Salesperson) • Double click from the navigator menu and a small blue window with a red bar(row) is received with no legible fields or label markings. • Press the Tab or Enter key and a calendar window appears also with no legible fields/label markings. In either case, the user is unable to close the form or application unless the File > Close or Exit toolbar menu option is used. Action: apply patch 1799597. Read the README mentioned in the patch. Accounting Flexfield LOV Display Parent Values Action: Perform the following steps to define the accounting flexfield:
- 385. Troubleshooting Resource Manager 17-3 1. Navigate to the General Ledger module: GL > Setup > Financials > Flexfields > Key > Values. In Find form, check for find values by Key flexfield. In the Title Field, choose from the list of values "accounting flexfield" and click Find. There is an extensive list of values. To the right, there is a box called "Effective" title. Check for it's other title "Hierarchy, Qualifiers." A parent check box is checked for some of the values and not checked for others. 2. You can add values and check them as parent but this is not necessary, you can simply write down a few values that are checked as parents. (For example, the first value 1000- Total asset is checked as one.) 3. Navigate to Accounts Receivables: Setup > Transactions > Autoinvoice > Salespersons. Receivables uses the general ledger accounts that you enter there in combination with your AutoAccounting rules to determine the default revenue, freight, and receivable accounts for your invoices. 4. Create a new salesperson. Enter a name and a sales credit type from the list. In the next three fields enter the Accounting Flexfield for your Revenue, Freight, and Receivables Accounts. If you open the list and see account aliases, click OK. A form in which you can enter a department value and an account value appears. In the account values list, verify the parent values observed in step 2. (For example, the first value might be 1000- Total asset.) 5. You can choose this value and save the transaction. It must be emphasized again that the parent values should not appear in the list and you should not be able to select them. These are only summary accounts and not accounts you can use for regular processes, which means you cannot enter amounts to accounts which are checked as parents. List of Values (LOV) Are Not Populated in the Hold Reasons Field Cause: Incentive Compensation uses Resource Manager to set up sales representatives and sales compensation group hierarchies. If the Hold Reason field is not populated in the Compensation tab, then create a lookup type. Action: Perform the following steps: 1. Navigate to the Application Object Library Lookups window. 2. Enter in the type field: "JTF_RS_HOLD_REASON_TYPE" 3. In the User Name field, enter the same value again.
- 386. 17-4 Oracle Trading Community Architecture Administration Guide 4. In the Application field, select CRM Foundation from the LOV. 5. In the Access Level radio group, select User. 6. In the detail block, enter suitable values for Code, Meaning, and Description fields. Note that what you enter in the Meaning field is what the LOV for Hold Reason field in the Define Resource form will display. List of Values (LOV) Are Not Populated in the Support Site Fields Cause: Support site information, which displays in Assignment Manager, is actually attached to a resource in Resource Manager. You can attach the information from an LOV in either the HTML or Forms-based module. The List of values are populated from several sources including TeleService with the Customer Support responsibility. Action: Add support sites based on previously defined addresses. The city of the address will populate the LOVs. Perform the following: 1. Navigate to the Navigator > Customer Support window. 2. Select Customer Management > Contact Center. 3. In the Caller Type field, select either Organization or Person. 4. In the Organization field, select your organization. 5. Select the Address tab. 6. In the Status column, select Active. 7. In the Address1 column, select the appropriate address from the LOV. The City field automatically populates. 8. In the Usage field, select SupportSite. 9. Select Active in the Usage Status field. 10. Save your work. JTF-Post Vertical User Hook Cause: This error occurs when attaching a role type of Sales Compensation to a resource. Action: First determine whether or not the resource has been saved. If the result is: • No, then save the resource, then try again.
- 387. Troubleshooting Resource Manager 17-5 • Yes, then assign a different role type such as Service, or, Sales and TeleSales to the resource, and confirm whether or not you are able to save. If you are able to assign a role other than Sales Compensation to a "saved" resource, but, are unable to assign the Sales Compensation role, then log a bug against Oracle Sales Compensation application. Same Resource Showing Twice in Define Resource Form Cause: In this case, both resources have the same transaction number, but one record displays the salesperson number, and the other does not. To verify this problem, perform the following steps: 1. In the Define Resource form, note the resource number for both the records. 2. If the resource number is the same (for example, 10015), then run the following query: SQL> select res.resource_id,sr.salesrep_id,sr.org_id from jtf_rs_resource_extns res,jtf_rs_salesreps sr where res.resource_id = sr.resource_id and res.resource_number = 10015; 3. If the output of this query results in two or more records with the same resource_id, and the same org_id, but, different salesrep_id then it is bad data. For example, the sample output following would be considered bad data; RESOURCE_ID SALESREP_ID ORG_ID ----------------- ----------------- ---------- 100000016 100000019 2 100000016 100000054 2 100000016 100000054 2 This type of data can never be created using the Define Resource form, or any of the Resource Manager public APIs. Action: To clean up the data, perform the following steps: 1. There are two records, one, for example, with a salesrep number non NULL value and other with a NULL value. Identify which is the one you want to remove. To Identify the IDs, run the following statement: SQL> select res.resource_id,sr.salesrep_id,sr.org_id, sr.salesrep_number from jtf_rs_resource_extns res,jtf_rs_salesreps sr where res.resource_id = sr.resource_id and res.resource_number = 10015; This will return two records. Note down the resource_id, salesrep_id, and the org_id of the record which you want to delete. 2. Run the following delete statement. Assuming, you decided to delete record with salesrep_id 100000019, org_id 2, it would look like:
- 388. 17-6 Oracle Trading Community Architecture Administration Guide SQL> delete from jtf_rs_salesreps where salesrep_id = 100000019 and org_id = 2 and resource_id = 100000016; This should cleanup all bad data. Warning: You are actually deleting physical records from the database. This has the RISK of leaving behind dangling foreign keys in other tables in other applications. Confirm the check for FOREIGN KEYS before deleting records as suggested above. Otherwise, you may end up corrupting your database. Contact Oracle Support in case of any doubt. JTF_RS_TERR_EDDT_GRTR_SRP_EDDT Cause: This is a data problem. This error occurs when the territory Start and End dates are out of range with salesperson dates. Action: Perform the following steps: 1. Find out the maximum Start_date_active value and minimum End_date_active value for a salesrep_id across all org_id from JTF_RS_SALESREPS table. (Be aware that the end_date_active value can be NULL.) 2. For the salesrep_id in step 1, find the Start_date_active and End_Date_active from RA_SALESREP_TERRITORIES table. (Be aware that the Start_date_active and end_date_active values can be NULL.) You may get multiple records. 3. For every record in step 2, verify whether or not the dates fall within the dates in Step 1. • If yes, then no further action required. • If no, then: • Update the Start_date_active, End Date_active in RA_SALESREP_TERRITORIES Table with the Dates from Step1. • Repeat Steps 1 through 4 for all the salesrep_id in JTF_RS_SALESREPS table. Invalid User Error Invalid User- Resource link, Contact Your System Administrator This problem has been observed in the Service Request form, however, it could occur in other places too. While creating or updating a Service Request in the "Owner" field, it is possible to pick a resource from the LOV, and get the "Invalid User - Resource link"
- 389. Troubleshooting Resource Manager 17-7 error. Cause: This problem occurs if the currently logged in user (as defined in FND_USER), is not mapped to a proper resource who you are trying to update the SR with. Action: Ensure that the user ID of the resource that you select in the LOV matches with the one that the user is currently logged in as. This restriction is due to the fact that in trying to create interactions, there is a validation that the user must be a resource. Product Name Displays Improperly When selecting a product, the product appears as "X" instead of displaying the product name. Cause: When setting up Inventory, the item flexfield segment was not compiled. Action: Compile the item flexfield segment by performing the following: 1. Log in to the Forms interface with System Administrator responsibility. 2. Select Flexfield > Key > Segments. 3. Run a query for Application "Oracle Inventory" and Flexfield Title "System Items" by performing the following: 1. Select View > Query by Example > Enter. 2. In the newly highlighted Application and Flexfield Title fields enter "Oracle Inventory" and System Items". 3. Select View > Query by Example > Run. 4. In the Structures menu, select "SYSTEM_ITEMS" and click the Compile button. Performance Issue When Selecting the Resource Details Button Cause: When selecting the Resource Details button, forms do not display for up to thirty minutes. Action: A fix for this problem is available in a patch release. Details about this patch and its availability are found on the metalink Web site. As an interim solution, you can run the Synchronize Employees concurrent program and set the Get New Employees parameter to "Yes". Synchronize Employee Concurrent Program Does not End Date Resources Cause: End date for terminated resources does not display properly when running the Synchronize Employees Concurrent program. Action: A fix for this problem is available in a patch release. Details about this patch
- 390. 17-8 Oracle Trading Community Architecture Administration Guide and its availability are found on the metalink Web site. When running the Synchronize Employees concurrent program, you must run the concurrent program when the employee is no longer active. For example, if the employee is today and inactive starting tomorrow, you must run the concurrent program tomorrow, to end date the resource in Resource Manager. If the Employee is end dated in HR with a previous date, then run the concurrent program today, resource will be end dated with sysdate-1. Error Messages This section contains information on some of the error messages associated with implementing Resource Manager. APP-FND-00668 Routine FDFBKS found no row in FND_ID_FLEX_SEGMENT. Cause: This is a flexfield issue. Action: 1. Define the Territory Flex field. 2. Recompile. APP-FND-01934: ORA-01400 Cannot insert NULL into ("CN"."CN_ROLE_QUOTA_CATES"."ROLE_MODEL_ID") in Package CN_ROLE_QUOTA_CATE_PVT Cause: This error can occur when trying to save a new role. Procedure Create_Role_Quota_Cate Action: 1. Verify whether or not CN_ROLE_QUOTA_CATE_PVT is valid in the database. 2. Select status, owner, object_type from dba_objects where object_name='CN_ROLE_QUOTA_CATE_PVT '; 3. If invalid, compile it and try again. 4. If valid then, make ROLE_MODEL_ID column null in the following tables: • CN_ROLE_QUOTA_CATES • CN_SRP_QUOTA_CATES_ALL • CN_SRP_ROLE_DTLS_ALL
- 391. Troubleshooting Resource Manager 17-9 5. Recompile and re-run. Note: If this error continues, refer to the OIC (Oracle Incentive Compensation) Implementation documentation for additional troubleshooting under the topic: Assign Resources to Roles and Groups. APP-PER-50022 APP-PER-50022: Oracle HR could not retrieve a value for the User Type profile option. Cause: This error occurs when pressing the "View" Button in Define Resource Form. Action: Verify that it is set properly for your responsibility. Ensure that the current resource is of type "Employee." Update the profile "HR: User Type" at the application level by selecting a valid value from the LOV. If you select "HR User", then verify that the user currently logged in has the "US HRMS Manager" responsibility. APP-PER-500022 Cause: This error can occur when trying to access employee information: APP-PER-500022 Oracle Human Resources could not retrieve a value for the user type profile option. Action: Ensure that the profile option HR: User Type is set correctly for your responsibility. This occurs when there is a shared installation of HR, and the value for profile option HR:User Type in corresponding responsibility level is not properly set. Set up profile option HR: User Type to HR user in responsibility level. If the profile option cannot be updated in responsibility level, then update it in the responsibility level from application developer responsibility. HTTP 404 Cause: This error occurs while trying to log in to an HTML application. It is an environment issue. Perform the following steps to correct the problem. Action: 1. Close Netscape. 2. Remove fat.db, netscape.hst, and cookies.txt. 3. Clear disk cache and memory cache. 4. Log in again.
- 392. 17-10 Oracle Trading Community Architecture Administration Guide ORA-01422 Cause: This error can also occur when invoking the Accounts Receivables forms. • FRM-40735: PRE-FORM Trigger Raised Unhandled Exception ORA-01422 • ORA-01422: Exact fetch returns more than requested number of rows. Action: Perform the following procedures: 1. In SQL*Plus, connecting as apps/apps, enter the following: SQL> set pages 999 SQL> set long 9999 SQL> select text from dba_views where view_name = 'RA_SALESREPS'; Check to see if the results of the FROM clause in the view definition list any of the following tables or views: • RA_SALESREPS_ALL RA • AS_SALESFORCE ASF • RA_CUSTOMERS RACUS • PER_PEOPLE_X HR • AS_LOOKUPS ASL If so, then log a bug against Accounts Receivable. 2. In SQL*Plus, connecting as apps/apps, enter the following: SQL> select table_name from all_synonyms where synonym_name ='RA_SALESREPS_ALL' and owner = 'APPS'; • If the result of this query returns RA_SALESREPS_ALL, then Salesperson migration has not happened. If you do want the migration to happen, then apply the following patches: • 1638958 • 1757827 or else, log a bug against Accounts Receivable. • If the result of this query returns JTF_RS_SALESREPS, then the salesperson migration has occurred. In this case, run the following in SQL*Plus connected as apps/apps: SQL> delete from jtf_rs_salesreps where salesrep_id=-3 and org_id is null;
- 393. Troubleshooting Resource Manager 17-11 • If the previous command deletes one record, then perform a COMMIT, otherwise, perform a ROLLBACK operation. Warning: You are actually deleting physical records from the database. This has the RISK of leaving behind dangling foreign keys in other tables in other applications. Confirm the check for FOREIGN KEYS before deleting records as suggested above. Otherwise, you may end up corrupting your database. Warning: Contact Oracle Support if you have any questions. ORA-01422 ORA-01422: Exact fetch returns more than requested numbers of rows. Cause: This occurs while adding a group role to a resource in Define Resource Form, and indicates that an unexpected error was encountered in INSERT_REP_MANAGER. Action: To resolve this, contact your system administrator. Alternate Cause: This problem can occur when there is more than one snapshot view log on JTF_RS_REP_MANAGERS table. Alternate Action: To confirm, run the following query in SQL*Plus, connected as apps/apps: SQL> insert into rep_temp (denorm_mgr_id, resource_id, person_id, category, manager_person_id, group_id, hierarchy_type, created_by, creation_date, last_updated_by, last_update_date, last_update_login, reports_to_flag, par_role_relate_id, start_date_active, end_date_active, child_role_relate_id, object_version_number) values (-9, 1, 1, 'employee', null, 1, 'x', -1, sysdate, -1, sysdate, -1, 'y', sysdate, null, -1, -1, 1); If the result is: ORA-01422: Exact fetch returns more than requested numbers of rows, then more than one snapshot log exists. There should be only one snapshot log on the
- 394. 17-12 Oracle Trading Community Architecture Administration Guide table MLOG$_JTF_RS_REP_MANAGERS. Verify if there are more, and drop them. If after ensuring that there is only one snapshots of log MLOG$_JTF_RS_REP_MANAGERS, and the error still occurs, log a bug against Oracle Sales. ORA-20002 Cause: There are several issues that can affect migration of salesperson data. Errors can occur when accessing the following Accounts Receivables forms: • ARXTWMAI Transaction Entry: FRM-40735 Pre-form trigger raised unhandled exception ORA-20002. • ARXRWMAI Receipt Entry: FRM-40735 New form instance trigger raised unhandled exception ORA-20002. • ARXCWMAI Account Detail: FRM-40735 WHEN-NEW-FORM-INSTANCE trigger raised unhandled exception ORA-20002. Action: To diagnose and resolve, perform the following checks: 1. In SQL*Plus, connecting as apps/apps, enter the following: SQL> set pages 999 SQL> set long 9999 SQL> select text from dba_views where view_name = 'RA_SALESREPS'; Check to see if the results of the FROM clause in the view definition list any of the following tables or views: • RA_SALESREPS_ALL RA • AS_SALESFORCE ASF • RA_CUSTOMERS RACUS • PER_PEOPLE_X HR • AS_LOOKUPS ASL If so, then log a bug against Accounts Receivable. 2. In SQL*Plus, connecting as apps/apps, enter the following: SQL>select table_name from all_synonyms where synonym_name ='RA_SALESREPS_ALL' and owner = 'APPS';
- 395. Troubleshooting Resource Manager 17-13 If the result of this query is RA_SALESREPS_ALL, then the salesperson migration has not happened. If you do want the migration to happen, then you must apply the following patches: • 1638958 • 1757827 or else, log a bug against Accounts Receivable. ORA-4062 ORA-4062: Signature of package "APPS.JTF_RS_RESOURCE_PVT" has been changed. Cause: This is an environment error in which the package body and spec are out of sync. Action: Recompile all JTF forms and libraries. This process will not work if directories contain invalid characters. Problem: Ran the API Jtf_Rs_Role_Relate_Pub.create_resource_role_relate and it stops with an error: ORA-20000 The API JTF_RS_ROLE_RELATE_PUB.CREATE_RESOURCE_ROLE_RELATE, generates the following error message: ORA-20000 buffer overflow. Cause: This error is caused by the table space being full. Action: A future release will contain more specific error message such as the following: ORA 01653: Unable to extend table CN.CN_SRP_QUOTA RULES_ALL by 515 in tablespace CND Frequently Asked Questions (FAQs) The following are frequently asked questions. Answers to these questions may help you in troubleshooting problems with the Resource Manager. Does JTF_RS_REP_MANAGERS Table Denormalize RESOURCE_ID? Answer: Yes, in the PARENT_RESOURCE_ID column in this table. How Are Role Types Associated with the Applications? Where do you define the role type? In the Meaning field for defining the Role Type? If yes, how is this controlled as the field doesn't contain an LOV and it is a free form entry.
- 396. 17-14 Oracle Trading Community Architecture Administration Guide Also should the customer use one of the defined meanings for the application/Role Type association? Answer: Navigation steps to define a Role Type: With the CRM Administrator responsibility, select Resource Manager > Setup > Role Types. The content in the "Meaning" field is what is displayed in all LOV for Role Type. When you invoke the "Role Types" form, you see a numerous records. Many of them are shipped out-of-the-box as seeded values. Customer can add new Role Types, or, change the Meaning, Description, or Dates of the seeded ones. But, customers cannot delete seeded values. To determine which ones are seeded, and which ones are added by the Customer, navigate to each Role Type record, and see if the "Delete" option in the tool bar is enabled. It is enabled for new records, not for seeded values. How is the Role Associated with the Application? Is this done by the Type (Role Type) on the Roles definition form? Answer: Roles are associated one-to-many with a Role Type. Just like Role Type, we ship quite a few Roles for each Role Type out-of-the-box. Individual Applications use both Role Type and Role. Some applications use it as a filter mechanism, while some use it for reporting. Example: If you have 100,000 Employee Resources in the system, and you are only interested in the subgroup Salespersons, then an application such as Oracle Sales and Marketing assigns a Role of type Oracle Sales to the those resources and write logic to only display those salespersons in their application LOVs. There is no association necessarily between Role Type and an Application; except that the names of the Role Types appear like Application Names. Are Resources Org Striped? How about Salespersons? Answer: Resources are NOT org striped, but salespersons are. Example: If you have an Employee Resource R1 who is a Salesrep in multiple orgs (lets say org_id 100, 200, 300), then in the Define Resource window, when you query the Resource in the context of Org 100, you see the Resource information, and the Salesrep information for Org 100. However, if you are in the context of Org 150, then only the Resource displays, but none of the Salesrep information such as Salesrep Number or Sales Credit Type displays in the header and the Receivables tab. The same is true with all other types of Resources like Party, Partner, Supplier Contact, Other, and To-Be-Hired.
- 397. Troubleshooting Resource Manager 17-15 IS There a One to One Mapping Between an FND_USER and Resource? Answer: Use the "Define User" window in AOL to assign an Employee, Party, and Supplier Contact to the same FND User. What Can I Import into Resource Manager? Answer: Even though its possible to attach an Employee, Party, Supplier, or Contact to the SAME FND User, you cannot import all of them into Resource Manager. You can only import one: Employee, Party, or Supplier Contact. How Do I Send Notifications? I've attached a Resource Group to a Task. How can I send notifications to all members of this group? Resource Groups are not tied to Workflow groups. So, when a workflow is in setup, for example, in Task Manager, to send notification to the Task Owner, how can I ensure that if a Resource Group is assigned an owner to the Task, then the notification will be sent to all the members of that Resource Group automatically? Answer: Examine the example of Task Manager. Decide which workflow process to launch by defining a new workflow process under the workflow item: JTFTASK (User name for seeded workflow: Workflow for Task Manager.) Within the new workflow process, call a workflow (and PL/SQL) function in a loop, which retrieves the members of the group and send the notification to all the members. An example of SQL code to get all the GROUPS and RESOURCES, under one GROUP (one hierarchical level): SELECT group_id group_id, resource_id group_resource_id, 'INDIVIDUAL' resource_type FROM jtf_rs_group_members UNION SELECT rgm.group_id group_id, rgr.group_id group_resource_id, 'GROUP' resource_type FROM jtf_rs_group_members rgm, jtf_rs_grp_relations rgr WHERE rgm.group_id = rgr.related_group_id; • The query results appear like the following: GROUP_IDGROUP_RESOURCE_IDRESOURCE_TYPE 5 15 GROUP 5 21 INDIVIDUAL 5 175 GROUP 5 199 INDIVIDUAL 15 1 INDIVIDUAL
- 398. 17-16 Oracle Trading Community Architecture Administration Guide 15 5 GROUP 15 689 INDIVIDUAL Note: The GROUP_RESOURCE_ID stores RESOURCE_ID for Resource_type = 'INDIVIDUAL', and Group_ID for Resource_type = 'GROUP'). Why Are Party and Partner Treated Differently? Why are Party, and Partner treated as separate Resource Categories in Resource Manager?Should they not be combined into just one category? Answer: The parties of party_type 'PARTY_RELATIONSHIP' can be imported as a resource of category 'PARTY' or 'PARTNER'. But there are some other party types that can be brought in only as category PARTY (for example, PERSON) and those that can be brought in only as PARTNER (for example, Organization.) The categories need to exist independently rather than being merged. What is the Geo Override and Inside City Limits Fields? What is the significance of fields "Geo Override", and "Inside City Limits"? How should these fields be used in the Define Resource window when defining a Salesperson? Answer: The Geo Override value associates the salesperson with a unique tax jurisdiction. Both fields should normally be used if you have installed a sales tax vendor of type Vertex Taxware Sales. Oracle recommends you use Tax System or Vertex Quantu. If you entered a value in the Geo Override field and the tax jurisdiction for this address is within city limits, select the "Inside City Limits" check box. This check box should typically be enabled only if your sales tax vendor is Vertex Quantum. Geocodes are used by tax engine to identify taxing jurisdiction. A geocode is typically needed when the state, zip, and city fields of an address do not uniquely identify the exact taxing jurisdiction. For example, same city and zip can be found in multiple counties. Inside city limits adds more to that geocodes. For example a city has different tax rates for city limit, in this case the city will have two different jurisdictions: one inner city and another that is outer city. The tax will be calculated accordingly. Third party tax engines like vertex and taxware recognize such complicated geocode. For additional information, see the following: • Integrating Oracle Receivables with Taxware Sales/Use Tax System, Release 11i. • Integrating Oracle Receivables with Vertex Quantum, Release 11i.
- 399. Troubleshooting Resource Manager 17-17 Where Can I Set Up Sales Credit Types? In the Define Resource Form, under "Receivables" tab, there is a field labeled "Sales Credit Type". Where do values in the LOV for this field come from and how to I populate the LOV if it contains no values? Answer: The Sales Credit Type field values come from Order Management. To populated the LOV with values, navigate to: Order Management > Set up > Sales > Credit Types and use the forms accordingly. What are the Attributes of an Employee Resource? What are the attributes of an Employee Resource that are kept in SYNC with HR? What is the list of all HR denormalized columns in Resource Manager. Answer: SOURCE_ID (mapped to Person ID in HR) MANAGING_EMPLOYEE_ID SOURCE_NAME SOURCE_NUMBER SOURCE_JOB_TITLE SOURCE_EMAIL SOURCE_PHONE SOURCE_ORG_ID SOURCE_ORG_NAME SOURCE_ADDRESS1 SOURCE_ADDRESS2 SOURCE_ADDRESS3 SOURCE_ADDRESS4 SOURCE_CITY SOURCE_POSTAL_CODE SOURCE_STATE SOURCE_PROVINCE SOURCE_COUNTY SOURCE_COUNTRY SOURCE_MGR_ID SOURCE_MGR_NAME SOURCE_BUSINESS_GRP_ID SOURCE_BUSINESS_GRP_NAME SOURCE_FIRST_NAME SOURCE_MIDDLE_NAME SOURCE_LAST_NAME SOURCE_CATEGORY SOURCE_STATUS SOURCE_OFFICE SOURCE_LOCATION SOURCE_MAILSTOP What Are the Responsibilities Associated With Resource Manager? What are the responsibilities associated with Resource Self Service (HTML) functionality? What are the Responsibility names for "Super User", and "Regular User"?
- 400. 17-18 Oracle Trading Community Architecture Administration Guide Answer: • Super User: Resource Self Service Administrator • Regular User: CRM Application Foundation User How Does the Employee Button in the Resource Summary Page Appear? Answer: If the user is logged in with "Resource Self Service Administrator" responsibility, and if the value of the profile "JTFRS: Employee Resource Update Access" is set to "ANY," then, the Create button for Employee will appear in the Resource Summary page. How Does the Create Button in the Groups Summary Page Appear? Answer: If the user is logged in with "Resource Self Service Administrator" responsibility, AND if the value of the profile "JTFRS: Group Update Access is set to "ALL" then, the Create button for Groups will appear in the Resource Groups Summary page. How are Supplier Contact Type Resources Set Up? Explain the detailed steps in defining a supplier contact resource such that it can be imported in Resource Manager. Answer: Perform the following steps. Responsibility: Purchasing, Vision Operations (USA) Navigation: Supply Base > Suppliers Steps: 1. When the appropriate supplier record has been found, select the 'Supplier' icon at the bottom right hand corner. 2. In the 'Contacts' tab, enter the supplier contact name, telephone number and their email address in the Mail Stop field. 3. Switch responsibility to CRM Administrator. 4. Select Resource Manager > Maintain Resources > Import Resources -> Select Resource category. 5. Supplier Contact > choose Contact as previously created. Find, then Create resource. View using Resource details.
- 401. Troubleshooting Resource Manager 17-19 How are Support Site IDs in Resources Set Up? Explain the detailed steps in defining a support site such that it can be associated to a Resource Manager. Answer: Perform the following steps. Responsibility: Customer Support. Navigation: Customer Management > Contact Center Steps: 1. In the Caller Type field, select either Organization or Person. 2. In the Organization field, select your organization. 3. Select the Address tab. 4. In the Status column, select Active. 5. In the Address1 column, select the appropriate address from the LOV. 6. The City field automatically populates. 7. In the Usage field, select Support Site. 8. Select Active in the Usage Status field. 9. Save your work. How is Data in JTF_RS_GROUPS_DENORM Populated? Explain the detailed steps by which resource group hierarchy information is denormalized / flattened in this table. Answer: The following example illustrates the answer. Example: • Group G1 is a parent of group G2 • Group G2 is a parent of group G3 • Group G3 is a parent of group G4 • Group G1 is a parent of group G5 • Group G5 is a parent of group G6 The following table depicts group information.
- 402. 17-20 Oracle Trading Community Architecture Administration Guide Group Information Group Name Group ID G1 100000001 G2 100000002 G3 100000003 G4 100000004 G5 100000005 G6 100000006 How Are Records Populated? How are records populated in JTF_RS_GROUPS_DENORM table for the previous example? Answer: Group Data Group_ID Parent_Group_ID Immediate_parent_fl ag Denorm_Level 100000001 100000001 N 0 100000002 100000002 N 0 100000003 100000003 N 0 100000004 100000004 N 0 100000005 100000005 N 0 100000006 100000006 N 0 100000002 100000001 Y 1
- 403. Troubleshooting Resource Manager 17-21 Group_ID Parent_Group_ID Immediate_parent_fl ag Denorm_Level 100000003 100000002 Y 1 100000003 100000001 N 2 100000004 100000003 Y 1 100000004 100000002 N 2 100000004 100000001 N 3 100000005 100000001 Y 1 100000006 100000005 Y 1 100000006 100000001 N 2 Note: DENORM_LEVEL column is new in our current release. It DOES NOT exist in CRM 11.5.6 Family Pack. How Can Employee Number Generation Be Controlled? Explain the steps by which Employee Number can be manually entered while creating an Employee Resource. Answer: Perform the following steps: Responsibility: US HRMS Navigation: Work Structures > Organization > Description. Steps: 1. Query the Business Group you want to control the generation of Employee number. 2. In the Organization Classification section Select "Business Group" 3. Click on Others Button. 4. Chose Business Group info. This will invoke a Flex Field. In the flexfield one segment is defined as Employee number generation. Depending on the value of this segment the system decides whether or not the number needs to be
- 404. 17-22 Oracle Trading Community Architecture Administration Guide manually entered/or be automatically generated. Can I Use Netscape's Back Button in Resource Manager? There is a bug in the Netscape browser that can affect Resource Manager. Do not use the Back button, as you may loose your data. It is recommended that you use the Resource Manager user interface (UI). The Internet Explorer browser does not have this issue. How Many Contacts Can Be Imported For a Supplier Site? Can you import contacts for just one supplier site? Answer: If you want to import a supplier contact, you must enter the supplier name and site. In the Payables Supplier Form, you can specify contacts for each supplier site. Responsibility: Customer Support Navigation: Resource Management > Maintain Resources > Import Resources Steps: 1. Select Supplier Contact from the Resource Category field. 2. Select your chosen name from the list of values (LOVs). 3. Select your chosen address from the LOVs. 4. Select your chosen Supplier Contact from the LOVs. If there are multiple addresses and supplier contacts, then you can only select one to import into Resource Manager at a time. Required fields are Supplier Name and Supplier Site. How Can I Import Salesrep Information? How can I import Salesrep information from a legacy or third party system? Answer: Use the API of your HR system and Resource Manager public API, JTF_RS_RESOURCE_PUB. Create_Resource ( ), to import employees if you want to import employee data from a legacy HR system. For details of Resource Manager public APIs, see Trading Community Architecture Implementation Guide. Which API Returns all Workflow Roles for a Specific Resource ID? Which API Returns all Workflow roles for a resource when provided with a specific resource ID? Answer: The get_wf_role procedure in package JTF_RS_WF_INTEGRATION_PUB returns all workflow roles for a resource when provided with a specific resource ID.
- 405. Troubleshooting Resource Manager 17-23 This procedure contains the following function: FUNCTION get_wf_role(p_resource_id IN number) RETURN varchar2 IS l_role_name wf_local_roles.name%TYPE; l_orig_system wf_local_roles.orig_system%TYPE; l_orig_system_id wf_local_roles.orig_system_id%TYPE; When the user ID is provided as an input value, the function returns the name of the Workflow role, its original system, and its original system identification. How do I display Flexfields in a JSP/HTML page within Resource Manager: What are the steps to display a flexfield in a JSP/HTML page within the HTML version of Resource Manager? Answer: You cannot perform this action because the HTML version of Resource Manager does not support Flexfields. Which Partner Categories Are Terminated in Resource Manager? Which partner categories are terminated in Resource Manager after running the Number of Days profile option? Answer: The Number of Days profile option terminates resources in Resource Manager a specified number of days after they have been terminated in Human Resources. This profile option only terminates the partner category of resources. How do I Enable Flexfields for the HTML Version of Resource Manager? Is there a different set of steps to enable flexfields for the HTML version of Resource Manager? Enabled flexfields in the 'Groups' and 'Employees' region of Resource Manager. When user navigates to the Groups and Employees regions in the Forms-based interface, enabled flexfields are displayed. However, they are not displayed under the Employee and Groups tab of the JSP generated HTML page. Answer: Resource Manager HTML currently does not support Flexfields. However, this feature will be available in a future release. Why does the Synchronize Employee Concurrent Program Always update every record's last_update_date parameter? The Synchronize Employee concurrent program updates every record's last_update_date even if the record is not changed. Is this a bug? Answer: No. The program is designed that way to update the entire set using a single SQL command, which results in the observed behavior.
- 406. 17-24 Oracle Trading Community Architecture Administration Guide Error Encountered When Running the Synchronize Employee Concurrent Program The Synchronize employee concurrent program imports new employees into Resource Manager. When attempting to modify the new resource encountered error: " Resource End Date out of range for the salesperson related End dates of the resource" The new resource cannot be modified until the 31-DEC-4712 has been manually removed. Answer: There are two answers to this problem: 1. When running the concurrent program, use the mass import by organization function since it does not populate the date field. 2. If you cannot delete all the imported records, then nullify the 31-DEC-4712 date in the JTF_RS_RESOURCE_EXTNS table. Deactivated Role Still Appears Why does a role that is made inactive still appear as a valid role with no end date on the resource record? Resolution: Currently the resource role is not affected when a role is made inactive. A future release will address the issue of preventing inactive roles from being specified for resources when adding resources to groups. What is the Correct Public API Sequence for Creating a Sales Rep? What is the correct sequence for using pubic published Resource Manager APIs to create a sales rep? Answer: To create a salesrep, must first create it as a resource using JTF_RS_RESOURCE_PUB API. Then, create a salesrep using JTF_RS_SALESREPS_PUB API. How do I set the org_context to Properly Call the Create_Salesrep and Update_Salesrep APIs using SQL*Plus What are the requirements for setting the org context and passing the org_id as a parameter when using SQL*Plus to call the Create_Salesrep and Update_Salesrep APIs? Answer: Use the following command in your scripts when setting the org_context to call the Create_Salesrep and Update_Salesrep APIs: mo_global.set_org_context(999, NULL); where 999 is the org_id parameter value to which the context is set. This should be done
- 407. Troubleshooting Resource Manager 17-25 every time you call the Create_Salesrep and Update_Salesrep APIs.
- 409. Reports and Processes A-1 A Reports and Processes This section lists the reports and processes, including relevant request sets, that are seeded in Standard Request Submission for the Trading Community Manager responsibility. Some reports and programs can be submitted in multiple ways, but these descriptions are for running them from Standard Request Submission. Reports Customer Listing - Detail Provides detail information about customers. See: Customer Listing Detail and Summary Reports, Oracle Receivables User Guide. Customer Listing - Summary Provides summary information about customers. See: Customer Listing Detail and Summary Reports, Oracle Receivables User Guide. Customer Profiles Report Provides customer profile information for customers or customer sites. See: Customer Profiles Report, Oracle Receivables User Guide Customer Relationships Listing Provides customer relationships information. See: Customer Relationships Listing, Oracle Receivables User Guide. DNB Global Data Products Request Report Provides details about the D&B information purchased within a specified date range. See: D&B Global Data Products Request Report, Oracle Trading Community Architecture User Guide.
- 410. A-2 Oracle Trading Community Architecture Administration Guide Duplicate Customer Report Lists possible duplicate customers. See: Duplicate Customer Report, Oracle Receivables User Guide. Duplicate DUNS Report Lists parties in the TCA Registry with the same D-U-N-S Number. See: Duplicate DUNS Report, Oracle Trading Community Architecture User Guide. HZ Upgrade Script Report Provides details on scripts that were run during upgrade. Import Batch De-Duplication Report Provides batch de-duplication results, or a preview if you run it before the actual import. See: Import Batch De-Duplication Report, Oracle Trading Community Architecture User Guide. TCA Import Error Report Displays errors from bulk imports. See: Resolving Import Errors, Oracle Trading Community Architecture User Guide. Processes Account to Party Relationships Migration Program Migrates account relationships to party relationships after upgrade. . Address Validation Validates addresses against known or authorized data sources. See: Batch Address Validation, Oracle Trading Community Architecture User Guide. Automerge Resubmits previous Automerge processes that resulted in error. See: Automerge, page 5-72. Copy Organization Extensions Data for Profile Versioning Copies organization profile extensions data and creates new extensions records for new organization profile versions. See: Copying Extensions Data for Profile Versioning, page 9-9.
- 411. Reports and Processes A-3 Copy Person Extensions Data for Profile Versioning Copies person profile extensions data and creates new extensions records for new person profile versions. See: Copying Extensions Data for Profile Versioning, page 9-9. Create Merge Batch Resubmits previous merge batch creations that resulted in error. See: Creating Merge Batches, Oracle Trading Community Architecture User Guide. Customer Interface Imports customer and account information. See: Importing Customers Using Customer Interface, Oracle Trading Community Architecture User Guide. Customer Interface Master Conc Program Imports customer and account information using parallel workers. See: Importing Customers Using Customer Interface, Oracle Trading Community Architecture User Guide. Customer Merge Merges duplicate customers and account information. See: Submitting the Merge Process, Oracle Trading Community Architecture User Guide. Customer text data creation and indexing Indexes customer account data. See: Customer Text Data Creation and Indexing, page 2- 2. DQM : Generate XML Data for the Diagnostic Reports Generates a DQM diagnostic report. See: DQM: Generate XML Data for the Diagnostic Reports, page 5-74. D&B Import Adapter Loads D&B information in batches. This is a request set. See: D&B Import Adapter, Oracle Trading Community Architecture User Guide. DQM Compile All Rules Compiles all DQM match rules. See: DQM Compile All Rules Program, page 5-54. DQM Index Optimization Program Optimizes interMedia indexes in the DQM staged schema. See: DQM Index Optimization Program, page 5-63.
- 412. A-4 Oracle Trading Community Architecture Administration Guide DQM Staging Program Creates or updates the DQM staged schema. See: DQM Staging Program, page 5-61. DQM Synchronization Program Synchronizes the DQM staged schema with the TCA Registry. See: DQM Synchronization Program, page 5-64. Generate key for fuzzy match Generates keys for fuzzy search. Generate Request List for DNB Batch Load Generates a list of parties that you want to purchase and batch load D&B information for. See: Generate Request List for D&B Batch Load, Oracle Trading Community Architecture User Guide. Generate Time Zone for Locations Creates or updates time zone information for locations. See: Generate Time Zone for Locations, Oracle Trading Community Architecture User Guide. Generate Time Zone for Phone Numbers Creates or updates time zone information for phone numbers. See: Generate Time Zone for Phone Numbers, Oracle Trading Community Architecture User Guide. Import Batch to TCA Registry Imports parties from interface tables into the TCA Registry. See: Import Batch to TCA Registry, Oracle Trading Community Architecture User Guide. Load D&B Data (8i Implementation) Loads D&B information that was purchased online and corrected due to errors. See: Load D&B Data, Oracle Trading Community Architecture User Guide. Locations Spatial Index Rebuild Rebuilds the spatial index on the HZ_LOCATIONS table. See: Locations Spatial Index Rebuild, page 2-32. Party Merge Resubmits previous party merges that resulted in error. See: Processing Merge Batches, Oracle Trading Community Architecture User Guide.
- 413. Reports and Processes A-5 Person Names Migration Program Migrates person names after upgrade. Refresh of Classification Denormalization Populates and refreshes the HZ_CLASS_CODE_DENORM denormalization table. See: Refresh of Classification Denormalization, page 4-13. Remove Protected HR Person Data From TCA Tables Removes protected Oracle Human Resources person data from the TCA tables. Source System – Migrate Party Level Source System References Migrates source system information. See: Administering Source System Management, page 10-2. Spatial Information for Locations Batch Update Acquires latitude and longitude values for locations in the TCA Registry. See: Spatial Information for Locations Batch Update, Oracle Trading Community Architecture User Guide. TCA Business Object Events: Cleanse Infrastructure Program Maintains the TCA Business Object Event System by deleting unnecessary event data based on the HZ: Number of Days to Preserve Business Object Event Information profile option setting. See: Event Raising, page 2-10. TCA Business Object Events: Generate Infrastructure Packages Program Dynamically generates infrastructure packages to determine and raise business object events. See: Event Raising, page 2-10. TCA Business Object Events: Raise Events Program Raises business object events based on business object definition and TCA data. See: Event Raising, page 2-10. TCA Import Batch Purge Purges batches from the import interface tables. See: TCA Import Batch Purge, Oracle Trading Community Architecture User Guide. TCA Import Postprocessing Resubmits TCA Import Postprocessing runs that resulted in error. See: Postimport Processes, Oracle Trading Community Architecture User Guide.
- 414. A-6 Oracle Trading Community Architecture Administration Guide Third Party Data Integration Update Regenerates the Single Source of Truth record. See: Third Party Data Integration Update Program, page 10-20.
- 415. Oracle Trading Community Architecture Profile Options and Categories B-1 B Oracle Trading Community Architecture Profile Options and Categories This appendix describes the profile options that affect the operation of Oracle Trading Community Architecture. This appendix covers the following topics: • Profile Options and Profile Option Categories Overview • Profile Option Category and Profile Options Descriptions Profile Options and Profile Option Categories Overview During implementation, set a value for each Oracle Trading Community Architecture profile option to specify how Trading Community Architecture controls access to and processes data. See: Setting User Profile Options, Oracle Applications System Administrator's Guide - Maintenance Profile options are grouped into one or more profile option categories enabling you to view only the profile options that pertain to your application or function. Trading Community Architecture Categories • Address Formatting Deployment, page B-6 • Address Validation Deployment, page B-8 • Bulk Import Deployment, page B-11 • Bulk Import Setup, page B-13 • Customer Interface Deployment, page B-15 • Customer Merge Deployment, page B-16
- 416. B-2 Oracle Trading Community Architecture Administration Guide • Data Sharing and Security, page B-17 • DQM Deployment, page B-18 • DQM Fuzzy Key Generation, page B-24 • Geography Hierarchy Deployment, page B-25 • Party Import Setup, page B-26 • Party Merge Deployment, page B-27 • Party Merge Setup, page B-28 • Source System Management Setup, page B-30 • Spatial Deployment, page B-31 • TCA Deployment, page B-32 • Third Party Deployment, page B-36 Trading Community Architecture Profile Options • Application Server-Side Proxy Host And Domain, page B-37 • Applications Proxy Port, page B-37 • AR: Customer Merge Commit Size, page B-16 • ECX: Log File Path, page B-9 • HZ: Address Key Length, page B-24 • HZ: Address Validation Level for Application, page B-9 • HZ: Allow Import of Records with Disabled Lookups, page B-14 • HZ: Allow Update to Standardized Address, page B-9 • HZ: Allow Updates of Address Records During Import, page B-12 • HZ: Allow User to Update Third Party Data, page B-31 • HZ: Apps Servlet Agent, page B-37 • HZ: Audit Customer Account Merge, page B-17 • HZ: Automerge Master Party Selection, page B-28
- 417. Oracle Trading Community Architecture Profile Options and Categories B-3 • HZ: Batch Size for committing records in Geography Name Referencing process, page B-25 • HZ: Character Value to Indicate NULL During Import, page B-14 • HZ: Cleanse Fuzzy Key, page B-24 • HZ: Create Log for Adapters, page B-10 • HZ: Data Sharing and Security Enabled, page B-18 • HZ: Date Value (DD-MM-YYYY) to Indicate NULL During Import, page B-14 • HZ: Default Address Style, page B-7 • HZ: Default Data Sharing Group, page B-18 • HZ: Default Flexible Address Format, page B-7 • HZ: Default Location Service Adapter, page B-10 • HZ: Default Name Style, page B-7 • HZ: Default Party Type, page B-34 • HZ: Default Phone Number Purpose, page B-34 • HZ: Detailed Concurrent Program Output, page B-32 • HZ: Do not use contact addresses and contact points for DQM Duplicate identification, page B-20 • HZ: DQM Index Creation Memory, page B-21 • HZ: DQM Match Rule for Batch Duplicate Identification, page B-21 • HZ: DQM Maximum Index Optimization Time, page B-21 • HZ: Error Limit for Import, page B-12 • HZ: Format Business Object Business Events as Bulk, page B-34 • HZ: Gather Table Stats, page B-15 • HZ: Generate Contact Number, page B-34 • HZ: Generate Party Number, page B-34
- 418. B-4 Oracle Trading Community Architecture Administration Guide • HZ: Generate Party Site Number, page B-35 • HZ: Import Batch De-Duplication Match Rule, page B-27 • HZ: Import Registry De-Duplication Match Rule, page B-27 • HZ: Key Word Count, page B-25 • HZ: Language for Country Display, page B-7 • HZ: Location Updatable, page B-17 • HZ: Maintain Location History, page B-10 • HZ: Match Rule for Relationship Manager Search, page B-35 • HZ: Maximum Number of Match Results, page B-23 • HZ: Merge Master Party Defaulting, page B-29 • HZ: Name/Address Backwards Compatibility, page B-35 • HZ: Number of Days to Preserve Business Object Business Event Information, page B-35 • HZ: Number of Workers for a given Geography Name Referencing request, page B- 26 • HZ: Number of Workers for DQM Duplicate Identification Program, page B-23 • HZ: Number of Workers for Import, page B-13 • HZ: Number of Workers Used by Customer Interface, page B-16 • HZ: Number of Workers Used by Party Merge Program, page B-28 • HZ: Numeric Value to Indicate NULL During Import, page B-14 • HZ: Postal Code Key Length, page B-25 • HZ: Profile Version Method for Updates, page B-35 • HZ: Raise API Events, page B-36 • HZ: Reference Language, page B-7 • HZ: Reference Territory, page B-7
- 419. Oracle Trading Community Architecture Profile Options and Categories B-5 • HZ: Report Error on Obsolete Columns, page B-36 • HZ: Show Address Mapping Suggestions, page B-30 • HZ: Show Relationship Mapping Suggestions, page B-30 • HZ: Spatial Provider URL, page B-32 • HZ: Timeout Limit for Address Validation, page B-10 • HZ: Use Data Sharing and Security During Import, page B-13 • HZ: Use DQM Suggested Groupings for Automerge, page B-30 • HZ: Use HR Security During Import, page B-13 • HZ: User Create and Update Rule for Other Entities, page B-31 • HZ: User Overwrite Rule, page B-31 • HZ: Validate Flexfields During Import, page B-15 • IMC: Import Run Address Validation, page B-27 • IMC: Import Run Batch De-Duplication, page B-27 • IMC: Import Run Registry Match, page B-27 Important: Some profile options are set with a match rule. Make sure that all seeded or custom match rules you assign to profile options are compiled. See: Compiling Match Rules, page 5-29. Related Topics Introduction to Administration, page 1-1 Profile Option Category and Profile Options Descriptions This section describes profile options by category. The tables in this section provide profile option information as follows: • The Default column displays either the default profile option value in italics, or No Default if none exists. • The User Access column indicates whether you can view or update the profile
- 420. B-6 Oracle Trading Community Architecture Administration Guide option. • The System Administration: Site, Application, Responsibility, and User columns indicate at which levels the system administrator can update these profile options. The key for each table is: • Update: You can update the profile option. • View Only: You can view the profile option but cannot change it. • No Access: You cannot view or change the profile option value. Address Formatting Deployment Category The table below lists the profile options that are used for address formatting deployment. Address Formatting Deployment Category Profile Option Default User Access System Administration: Site System Administration: Application System Administration: Responsibility System Administration: User HZ: Default Address Style, page B-7 Postal Address Update Update Update Update Update HZ: Default Flexible Address Format, page B- 7 United States Address Style No Access Update Update Update No Access HZ: Default Name Style, page B-7 Concaten ated Name Update Update Update Update Update HZ: Language for Country Display, page B- 7 No Default Update Update Update Update Update HZ: Reference Language, page B-7 No Default Update Update Update Update Update
- 421. Oracle Trading Community Architecture Profile Options and Categories B-7 Profile Option Default User Access System Administration: Site System Administration: Application System Administration: Responsibility System Administration: User HZ: Reference Territory, page B-7 No Default Update Update Update Update HZ: Default Address Style Specify the default style that the Address Formatting API uses when the caller does not pass a style. HZ: Default Flexible Address Format For flexfield-based address formatting, determine the default format to use if no format is assigned to the selected country. See: Flexible Addresses, Oracle Receivables Implementation Guide. HZ: Default Name Style Specify the style to be used to construct the PARTY_NAME column for a person name in the HZ_PARTIES table. This style is also the default that the Name Formatting API uses when the caller does not pass a style. HZ: Language for Country Display Specify the default language that the country name should be displayed in. If this profile option is left blank, then the country name is translated using the current session's NLS Language setting. HZ: Reference Language Specify the default language used in determining the appropriate name style formats. If this profile option is left blank, then the current session's NLS Language setting is used. HZ: Reference Territory Specify the default territory used in determining the appropriate address style format. This profile option also controls whether an address is considered domestic or foreign, for showing or hiding the country name. This profile option is used if the ICX: Territory profile option is left blank. If HZ: Reference Territory is also left blank, then the current session's NLS Territory setting is used.
- 422. B-8 Oracle Trading Community Architecture Administration Guide Address Validation Deployment Category The table below lists the profile options that are used for address validation deployment. Address Validation Deployment Category Profile Option Default User Access System Administration: Site System Administration: Application System Administration: Responsibility System Administration: User ECX: Log File Path, page B-9 No Default No Access No Access No Access No Access No Access HZ: Address Validation Level for Application, page B-9 No Default No Access No Access Update No Access No Access HZ: Address Validation Level for Site, page B- 9 No Default No Access No Access Update No Access No Access HZ: Allow Update to Standardized Address, page B- 9 Yes Update Update No Access No Access No Access HZ: Create Log for Adapters, page B-10 No Update Update No Access No Access No Access HZ: Default Location Service Adapter, page B- 10 No Default Update Update No Access No Access No Access HZ: Maintain Location History, page B- 10 Yes Update Update No Access No Access No Access
- 423. Oracle Trading Community Architecture Profile Options and Categories B-9 Profile Option Default User Access System Administration: Site System Administration: Application System Administration: Responsibility System Administration: User HZ: Timeout Limit for Address Validation, page B-10 300 Update Update No Access No Access No Access HZ: Validate First 5 Digits of US ZIP Code, page B-10 Yes Update Update No Access No Access No Access Applications Server-Side Proxy Host and Domain, page B- 10 No Default Update Update Update Update Update Application Proxy Port , page B-11 No Default Update Update Update Update Update Applications Proxy Bypass Domains , page B-11 No Default Update Update Update Update Update ECX: Log File Path See: Define System Profile Options, Oracle XML Gateway User's Guide. HZ: Address Validation Level for Application Specify the address validation level for applications. HZ: Address Validation Level for Site Specify the address validation level for sites. HZ: Allow Update to Standardized Address Specify whether or not users or programs can update addresses that were standardized by address validation adapters. Even if this profile option is set to Yes, updates are allowed only if they do not violate other validations, such as tax validation rules. If a
- 424. B-10 Oracle Trading Community Architecture Administration Guide standardized address is updated, it becomes eligible for revalidation in future address validation processes. HZ: Create Log for Adapters Specify whether or not to create log entries in the HZ_ADAPTER_LOGS table for adapter processes, for example, address validation through an address validation adapter. In the HZ_ADAPTER_LOGS table, the OUT_DOC column stores the outbound XML documents and log files, and the IN_DOC column stores the inbound XML documents and logs. HZ: Default Location Service Adapter Specify the system-wide default address validation adapter to use, if you want to use only one adapter for all address validations. If no country-specific default adapter is selected by the user for a specific import or address validation process, this default adapter is also used. HZ: Maintain Location History Specify whether or not to track the history of location and location profile records. If location history is maintained, then every update to a location's supported address elements is tracked in the HZ_LOCATION_PROFILES table for all content sources in the HZ_LOCATIONS table. Supported address elements include the four address lines, city, state, county, and country. HZ: Timeout Limit for Address Validation Specify the number of seconds that the address validation "black box" should wait for a response from the address validation adapter before timing out. The adapter receives the XML file that the black box sends, and should send a corresponding response to validate the addresses. HZ: Validate First 5 Digits of US ZIP Code Use this profile option to validate the first five digits of the US postal code. The first five digits of the US postal code are validated if the profile value is Yes, else the complete postal code is validated. If you do not specify any value, the first five digits of the US postal code are validated You can update this profile option only at the site level. Internal Name: HZ_VAL_FIRST_5_DIGIT_US_ZIP Applications Server-Side Proxy Host and Domain Use this profile option to specify the host name, if your organization uses a proxy server.
- 425. Oracle Trading Community Architecture Profile Options and Categories B-11 This profile option is required. You can update this profile option only at the site level. Internal Name: WEB_PROXY_HOST Application Proxy Port Use this profile option to specify the proxy port number, if your organization uses a proxy server. This profile option is required if you specified a host name for the proxy server. You can update this profile option only at the site level. Internal Name: WEB_PROXY_PORT Applications Proxy Bypass Domains Use this profile option to avoid requests to be passed through the proxy server, and minimize performance lag during address validation. If you do not want to access address validation servers set outside the firewall, but have set values for profiles: Applications Server-Side Proxy Host and Domain and Applications Proxy Port, then you can specify the domain address of the address validation server. This profile option is optional. You can update this profile option only at the site level. Internal Name: WEB_PROXY_BYPASS_DOMAINS Related Topics Adapters Overview, page 7-1 Third Party Deployment Category, page B-36 Oracle Applications System Administrator's Guide – Configuration Bulk Import Deployment Category The table below lists the profile options that are used for bulk import deployment.
- 426. B-12 Oracle Trading Community Architecture Administration Guide Bulk Import Deployment Category Profile Option Default User Access System Administration: Site System Administration: Application System Administration: Responsibility System Administration: User HZ: Allow Updates of Address Records During Import, page B-12 Yes Update Update View Only View Only View Only HZ: Error Limit for Import, page B-12 10000 Update Update View Only View Only View Only HZ: Number of Workers for Import, page B- 13 1 Update Update Update Update Update HZ: Use Data Sharing and Security During Import, page B- 13 No Update Update View Only View Only View Only HZ: Use HR Security During Import, page B- 13 No Update Update View Only View Only View Only HZ: Work Unit Size for Import, page B-13 10000 Update Update Update Update Update HZ: Allow Updates of Address Records During Import Specify whether or not address records can be updated during the import if the existing address is not the same as the imported address. HZ: Error Limit for Import Enter the number of errors allowed for an import before stopping the process. This functionality lets you limit the processing time for imports that have too many errors. However, errors arising from invalid party IDs in a batch are not considered as
- 427. Oracle Trading Community Architecture Profile Options and Categories B-13 validation errors. HZ: Number of Workers for Import Determine the number of parallel workers to use for the import process. Workers are processes that run at the same time to complete a task that would otherwise take longer with a single process. HZ: Use Data Sharing and Security During Import Specify whether or not to apply Data Sharing and Security (DSS) for record updates during import. DSS does not affect record inserts, even if this profile option is set to Yes. See: Data Sharing and Security Overview, page 6-1. HZ: Use HR Security During Import Specify whether or not to apply HR security during import. HR security checks the interface tables and prevents updates to parties with HR information. If there are any records with a source system of DEFAULT and source ID of PER%, the import process would result in error. See: Source Systems Overview, page 10-3. HZ: Work Unit Size for Import Determine the work unit size used during TCA import. Bulk Import Setup Category The table below lists the profile options that are used for bulk import setup. Bulk Import Setup Category Profile Option Default User Access System Administration: Site System Administration: Application System Administration: Responsibility System Administration: User HZ: Allow Import of Records with Disabled Lookups, page B-14 Yes Update Update View Only View Only View Only HZ: Character Value to Indicate NULL During Import, page B- 14 ! Update Update View Only View Only View Only
- 428. B-14 Oracle Trading Community Architecture Administration Guide Profile Option Default User Access System Administration: Site System Administration: Application System Administration: Responsibility System Administration: User HZ: Date Value (DD-MM-YYYY) to Indicate NULL During Import, page B- 14 01-01- 4000 Update Update View Only View Only View Only HZ: Numeric Value to Indicate NULL During Import, page B- 14 -9999 Update Update View Only View Only View Only HZ: Validate Flexfields During Import, page B-15 No Update Update View Only View Only View Only HZ: Allow Import of Records with Disabled Lookups Specify whether or not data that reference disabled lookups are allowed to be imported in the TCA Registry. Normally, data can be loaded only if validated against enabled lookups. HZ: Character Value to Indicate NULL During Import Specify the character value in the interface tables that, when imported into the TCA tables, would make the corresponding TCA character column null. If an interface table column is null, the corresponding TCA column, empty or not, is not affected by the import. HZ: Date Value (DD-MM-YYYY) to Indicate NULL During Import Specify the date value in the interface tables that, when imported into the TCA tables, would make the corresponding TCA date column null. Use the date format DD-MM-YYYY. If an interface table column is null, the corresponding TCA column, empty or not, is not affected by the import. HZ: Numeric Value to Indicate NULL During Import Specify the numeric value in the interface tables that, when imported into the TCA tables, would make the corresponding numeric TCA column null. If an interface table
- 429. Oracle Trading Community Architecture Profile Options and Categories B-15 column is null, the corresponding TCA column, empty or not, is not affected by the import. HZ: Validate Flexfields During Import Specify whether or not flexfields are validated during the import process. These tables have flexfields: • HZ_PARTIES • HZ_CONTACT_POINTS • HZ_LOCATIONS • HZ_RELATIONSHIPS Customer Interface Deployment Category The table below lists the profile options that are used for customer interface deployment. Customer Interface Deployment Category Profile Option Default User Access System Administration: Site System Administration: Application System Administration: Responsibility System Administration: User HZ: Gather Table Stats, page B-15 Yes Update Update Update Update Update HZ: Number of Workers Used by Customer Interface, page B-16 No Default Update Update Update Update Update HZ: Gather Table Stats Use this profile option to determine if the Customer Interface program analyzes the interface tables before processing the records. If the profile option is set to Yes, then Customer Interface gathers statistics for all the interface tables before processing the records. You can access these statistics form the FND_STATS_HIST table.
- 430. B-16 Oracle Trading Community Architecture Administration Guide HZ: Number of Workers Used by Customer Interface Use this profile option to define the number of parallel workers that process data at the same time when you run the Customer Interface Master concurrent program. Customer Merge Deployment Category The table below lists the profile options that are used for customer merge deployment. Customer Merge Deployment Category Profile Option Default User Access System Administration: Site System Administration: Application System Administration: Responsibility System Administration: User AR: Customer Merge Commit Size, page B-16 1000 View Only Update Update Update No Access HZ: Audit Customer Account Merge, page B-17 No View Only Update No Access No Access No Access HZ: Location Updatable, page B-17 No Update Update Update Update Update AR: Customer Merge Commit Size This profile option determines how many site uses are included in a merge set when you run the Customer Merge program from the Standard Request Submission windows. This profile is not used when you submit the program from the Customers Merge window. A merge set contains one or more pairs of customer accounts to merge and is created based on these two rules, with the first rule taking precedence: • Site uses for a customer account cannot be split between two merge sets. • The number of site uses in a merge set is as close to the profile option value as possible without violating the first rule. For example, you leave the profile option at the default value of 1000, and you have three groups of customer accounts to merge. Each merge involves 100 addresses with 20 site uses per address, so each of the three merges has 2000 site uses that must belong to the same merge set. With the profile option set to 1000, the Customer Merge program runs three merge sets, each with 2000 site uses.
- 431. Oracle Trading Community Architecture Profile Options and Categories B-17 If you set the profile option to 3000, the program runs two merge sets. After processing the first 2000 site uses, the Customer Merge program checks that the profile option is not yet reached and processes another 2000 for a merge set of 4000 total site uses. With the profile option already reached in the first merge set, the program creates another merge set and processes the last 2000 site uses. When you set this profile option, consider the number of site uses of the merge-from customers. If you set the value too low, a small number of records are saved in each merge set. If you set the profile option too high, indexes might not be properly used. In addition, if you set the profile option to less than 1000, 1000 is the value that the program uses. For more information about the Customer Merge program, see Merging in Batch Process, Oracle Trading Community Architecture User Guide. HZ: Audit Customer Account Merge This profile option causes the creation of a log file when customer accounts are merged. If this option is set to Yes, an audit log file is generated. The default value for this profile option is No. HZ: Location Updatable Set this profile option to Yes or No to determine whether the Location field for the merge-to customer in the Customers Merge window can be updated or not. See: Merging Different Customers, Oracle Trading Community Architecture User Guide. The default value for this profile option is No. Data Sharing and Security Category The table below lists the profile options that are used for data sharing and security. Data Sharing and Security Category Profile Option Default User Access System Administration: Site System Administration: Application System Administration: Responsibility System Administration: User HZ: Data Sharing and Security Enabled, page B- 18 No No Access Update Update Update Update
- 432. B-18 Oracle Trading Community Architecture Administration Guide Profile Option Default User Access System Administration: Site System Administration: Application System Administration: Responsibility System Administration: User HZ: Default Data Sharing Group, page B- 18 No Default No Access Update View Only View Only View Only HZ: Data Sharing and Security Enabled Enter Yes or No to enable or disable the Data Sharing and Security feature. You can also limit TCA security features to a specific user by setting the profile option to Yes at the User level before generally releasing the functionality to ensure a controlled release. This profile option lets the system administrator control whom Data Sharing and Security applies to. HZ: Default Data Sharing Group Enter the default data sharing group that should be assigned to any entity that does not match any of the defined data sharing group criteria. Make sure that the default group has proper privileges that can apply to any record. Otherwise, you might get Data Sharing and Security errors. DQM Deployment Category The table below lists the profile options that are used for DQM deployment. DQM Deployment Category Profile Option Default User Acces s System Administratio n: Site System Administration : Application System Administratio n: Responsibility System Administration : User HZ: Do not use contact addresses and contact points for DQM Duplicate identification, page B-20 No Default Update Update Update Update Update
- 433. Oracle Trading Community Architecture Profile Options and Categories B-19 Profile Option Default User Acces s System Administratio n: Site System Administration : Application System Administratio n: Responsibility System Administration : User HZ: DQM Index Creation Memory, page B-21 No Default Update Update Update Update Update HZ: DQM Match Rule for Batch Duplicate Identification, page B-21 No Default Update Update Update Update Update HZ: DQM Maximum Index Optimization Time, page B-21 No Default Update Update Update Update Update HZ: DQM Resolution for Party Name Searches that Exceed Maximum Number of Results, page B-21 Prompt User for Additiona l Search Criteria Update Update Update Update Update HZ: DQM Synchronization Method, page B-21 No Default Update Update Update Update Update HZ: DQM Text Index Build Type, page B-22 OPTIMA L Update Update Update Update Update HZ: Enable DQM Merge Suggestion, page B-22 Yes Update Update Update Update Update HZ: Enable DQM for Integration Services, page B-22 No No Access Update Update Update Update
- 434. B-20 Oracle Trading Community Architecture Administration Guide Profile Option Default User Acces s System Administratio n: Site System Administration : Application System Administratio n: Responsibility System Administration : User HZ: Enable Quality Weighting for DQM Match Scores, page B-23 No Default Update Update Update Update Update HZ: Match Rule for Organization Services, page B-23 Integrati on Services: Identical Organiza tions No Access Update Update Update No Access HZ: Match Rule for Person Services, page B-23 Integrati on Services: Identical Persons No Access Update Update Update No Access HZ: Maximum Number of Match Results, page B-23 200 Update Update Update Update Update HZ: Number of Workers for DQM Duplicate Identification Program, page B-23 3 Update Update Update Update Update HZ: Stop Scoring After Reaching DQM Automerge Threshold, page B- 24 No Default Update Update Update Update Update HZ: Do not use contact addresses and contact points for DQM Duplicate identification By default, Data Quality Management includes addresses and contact points of contacts for duplicate identification. If this profile option is not set, the default functionality prevails. Set the profile option to Yes if you do not want to include these entities for identifying duplicates.
- 435. Oracle Trading Community Architecture Profile Options and Categories B-21 HZ: DQM Index Creation Memory Use the HZ: DQM Index Creation Memory profile option to override the default amount of memory for the DQM Index Creation program to use to generate interMedia and B-Tree indexes. Enter the amount of memory in megabytes. HZ: DQM Match Rule for Batch Duplicate Identification Use the DQM Match Rule for Batch Duplicate Identification profile option to store the default match rule to use for batch duplicate identification. This match rule defaults in the Match Rule field of the Submit Duplicate Identification Batch window and can be overridden. HZ: DQM Maximum Index Optimization Time Enter the maximum processing time, in minutes, allowed for the DQM Index Optimization program to optimize interMedia indexes, not B-Tree indexes. The specified time limit could prevent the optimization of all interMedia indexes. HZ: DQM Resolution for Party Name Searches that Exceed Maximum Number of Results Determine the action to take if search results exceed the number that is set in the HZ: Maximum Number of Match Results profile option. The selected resolution applies only if the user entered party name as one of the search criteria. • Prompt User for Additional Search Criteria: Require the user to enter different or additional search criteria until the number of search results does not exceed the set maximum. • Perform Standard SQL Search: Perform a search with the originally entered search criteria, but without using DQM search functionality. No additional user input is required. HZ: DQM Synchronization Method Determine how the staged schema is synchronized with new and updated records in the TCA Registry. You can set this profile option at times that suit your needs, without modifying your Oracle Workflow agent listener setup. • Real Time: Events are generated for automatic synchronization as soon as records are created or updated. The Oracle Workflow agent listener picks up these events to start the synchronization. • Batch: Synchronization occurs only after you run the DQM Synchronization program, which updates the staged schema with all TCA Registry changes since the last run. • Disable: Use this setting if you are not using DQM, for performance reasons.
- 436. B-22 Oracle Trading Community Architecture Administration Guide HZ: DQM Text Index Build Type Specify how the DQM Staging program builds indexes in the staged schema. The OPTIMAL method is more efficient, but new indexes cannot be queried until the all indexes are completely rebuilt. The INCREMENTAL WITH NO DOWNTIME method is less efficient, but new indexes are available for query sooner. To the user, there is no downtime between querying existing and new staged data. HZ: Enable DQM Merge Suggestion Use this profile option to turn off DQM for merge suggestion. The merge process uses DQM for default suggestions during pre-processing due to which the Create Merge Batch process takes a longer time to complete. Select No to disable DQM at the time of merge suggestion so that the Create Merge batch program runs faster. This also disables the Change Grouping list in the Address Mapping and Relationship-Mapping window. Select Yes / Null to enable DQM to suggest duplicate address and relationships automatically. The Change Grouping option is enabled if you select Yes. The default value for this option is Yes. HZ: Enable DQM for Integration Services Use this profile option to enable DQM for the Integration Services rule type. The default value is No. This profile option is used in the following BO APIs: • hz_person_bo_pub.create_person_bo • hz_person_bo_pub.save_person_bo • hz_organization_bo_pub.create_organization_bo • hz_organization_bo_pub.save_organization_bo • hz_person_cust_bo_pub.create_person_cust_bo • hz_person_cust_bo_pub .save_person_cust_bo • hz_org_cust_bo_pub.create_org_cust_bo • hz_org_cust_bo_pub.save_org_cust_bo It is also used in the following Web services: • Create Organization
- 437. Oracle Trading Community Architecture Profile Options and Categories B-23 • Create Person • Create Organization Customer • Create Person Customer • Save Organization (Create Operation) • Save Person (Create Operation) • Save Organization Customer (Create Operation) • Save Person Customer (Create Operation) HZ: Enable Quality Weighting for DQM Match Scores Specify if quality adjusted matching is enabled to provide quality adjusted match percentages for search results. Leaving the profile option blank is the same as setting it to No. HZ: Match Rule for Organization Services Use this profile option to store the match rule of Integration Services rule type to enable DQM for an organization customer. This profile option is used if the HZ: Enable DQM for Integration Services profile option is set to Yes. The value for this profile is the match rule name; the default value is Integration Services: Identical Organizations. HZ: Match Rule for Person Services Use this profile option to store the match rule of Integration Services rule type to enable DQM for a person customer. This profile option is used if the HZ: Enable DQM for Integration Services profile option is set to Yes. The value for this profile is the match rule name; the default value is Integration Services: Identical Persons. HZ: Maximum Number of Match Results Enter the maximum number of matching records that can be returned for a DQM online search process. If the acquisition portion of the DQM matching process provides more than this number of records, then the process that is using the match rule would prompt the user to enter more search criteria. HZ: Number of Workers for DQM Duplicate Identification Program Determine the number of parallel workers to use for the DQM Duplicate Identification program. Workers are processes that run at the same time to complete a task that would otherwise take longer with a single process.
- 438. B-24 Oracle Trading Community Architecture Administration Guide HZ: Stop Scoring After Reaching DQM Automerge Threshold Specify whether or not to stop scoring a record after its score reaches the automatic merge threshold. The score for such a record is the same as the automatic merge threshold, even if the score would be higher if scoring did not stop at the threshold. Set this profile option to Yes if you are concerned with performance and do not need exact record scores. Otherwise, select No or leave the profile option blank. DQM Fuzzy Key Generation Category The table below lists the profile options that are used for DQM fuzzy key generation. DQM Fuzzy Key Generation Category Profile Option Default User Access System Administration: Site System Administration: Application System Administration: Responsibility System Administration: User HZ: Address Key Length, page B-24 No Default No Access Update No Access No Access No Access HZ: Cleanse Fuzzy Key, page B-24 Yes Update No Access No Access No Access No Access HZ: Key Word Count, page B- 25 No Default No Access Update No Access No Access No Access HZ: Postal Code Key Length, page B-25 No Default No Access Update No Access No Access No Access HZ: Address Key Length Specify the number of characters from the address line that are included in the address key. HZ: Cleanse Fuzzy Key Determine whether or not internal and trailing vowels, not leading vowels, as well as double letters are removed in a word when creating name and address fuzzy keys.
- 439. Oracle Trading Community Architecture Profile Options and Categories B-25 HZ: Key Word Count Specify the number of words to include in the organization or group name fuzzy key. TCA uses this profile option during the creation of keys that allow fuzzy search. HZ: Postal Code Key Length Specify the number of characters from the postal code to include in the address key. TCA uses this profile option during the creation of keys that allow fuzzy search. Geography Hierarchy Deployment Category The table below lists the profile options that are used for geography hierarchy deployment. Geography Hierarchy Deployment Category Profile Option Default User Access System Administration: Site System Administration: Application System Administration: Responsibility System Administration: User HZ: Batch Size for committing records in Geography Name Referencing process, page B- 25 1000 Update Update Update Update Update HZ: Number of workers for a given Geography Name Referencing request, page B- 26 1 Update Update Update Update Update HZ: Batch Size for committing records in Geography Name Referencing process Enter the number of records to be saved at one time as the Geography Name Referencing process runs. See: Geography Name Referencing Process, page 11-14.
- 440. B-26 Oracle Trading Community Architecture Administration Guide HZ: Number of workers for a given Geography Name Referencing request Determine the number of parallel workers to use for the Geography Name Referencing process. Workers are processes that run at the same time to complete a task that would otherwise take longer with a single process. See: Geography Name Referencing Process, page 11-14. Party Import Setup Category The table below lists the profile options that are used for party import setup. Party Import Setup Category Profile Option Default User Access System Administration: Site System Administration: Application System Administration: Responsibility System Administration: User HZ: Import Batch De-Duplication Match Rule, page B-27 No Default Update Update Update Update Update HZ: Import Registry De-Duplication Match Rule, page B-27 No Default Update Update Update Update Update IMC: Import Run Address Validation, page B-27 No Default Update Update Update Update Update IMC: Import Run Batch De-Duplication, page B-27 No Default Update Update Update Update Update IMC: Import Run Registry Match, page B- 27 No Default Update Update Update Update Update
- 441. Oracle Trading Community Architecture Profile Options and Categories B-27 HZ: Import Batch De-Duplication Match Rule Specify the default match rule to use for batch de-duplication. This profile option determines the default for the Batch De-Duplication Match Rule parameter of the Import Batch to TCA Registry program. HZ: Import Registry De-Duplication Match Rule Specify the default match rule to use for Registry de-duplication. This profile option determines the default for the Registry De-Duplication Match Rule parameter of the Import Batch to TCA Registry program. IMC: Import Run Address Validation Determine whether or not to run address validation for import. IMC: Import Run Batch De-Duplication Determine whether or not to run batch de-duplication. IMC: Import Run Registry Match Determine whether or not to run registry de-duplication. Party Merge Deployment Category The table below lists the profile options that are used for party merge deployment. Party Merge Deployment Category Profile Option Default User Access System Administration: Site System Administration: Application System Administration: Responsibility System Administration: User HZ: Automerge Master Party Selection, page B-28 No Default Update Update Update Update Update HZ: Number of Workers Used by Party Merge Program, page B-28 No Default Update Update Update Update Update
- 442. B-28 Oracle Trading Community Architecture Administration Guide Profile Option Default User Access System Administration: Site System Administration: Application System Administration: Responsibility System Administration: User HZ: Return User Name in GET APIs, page B-28 Yes Update Update Update Update Update HZ: Automerge Master Party Selection Determine how the merge master is selected during Automerge upon System Duplicate Identification. HZ: Number of Workers Used by Party Merge Program Determine the number of parallel workers to use for the Party Merge program when invoked by Automerge to automatically merge duplicates. Workers are processes that run at the same time to complete a task that would otherwise take longer with a single process. This profile option does not apply to running the Party Merge program outside of Automerge. HZ: Return User Name in GET APIs Specify whether to return the user name or the user ID. Enter Yes to return the user name, and No to return the user ID. Party Merge Setup Category The table below lists the profile options that are used for party merge setup. Party Merge Setup Category Profile Option Default User Access System Administration: Site System Administration: Application System Administration: Responsibility System Administration: User HZ: Merge Master Party Defaulting, page B-29 Party with Most Accounts View Only Update No Access No Access No Access
- 443. Oracle Trading Community Architecture Profile Options and Categories B-29 Profile Option Default User Access System Administration: Site System Administration: Application System Administration: Responsibility System Administration: User HZ: Show Address Mapping Suggestions, page B-30 No Default Update Update Update Update Update HZ: Show Relationship Mapping Suggestions, page B-30 No Default Update Update Update Update Update HZ: Use DQM Suggested Groupings for Automerge, page B-30 No Update Update Update Update Update HZ: Merge Master Party Defaulting Specify the method to use to select a party as the default merge master for new merge requests that contain multiple parties. For Automerge, the default master is automatically the party that remains after merge. If multiple parties fulfill the condition for these methods: • Party with Highest Certification • Party with Most Accounts • Party with Most Addresses • Party with Most Relationships then the party with the latest update date is selected. For example, the profile option is set to Party with Highest Certification. If five parties in the merge request have the highest certification, then the party among the five with the latest update date is the master. The certification validation is based on the highest seeded certification level. If you want to change the highest seeded level, then update the lookup meaning of the level and update or create lower levels. See: Administering Certification, page 12-1.
- 444. B-30 Oracle Trading Community Architecture Administration Guide Important: If you select the User Hook method to use a custom defaulting process, then you must have the user hook defined. See: Creating Custom Merge Master Party Defaulting Method, page 5-69. HZ: Show Address Mapping Suggestions Specify if you want to show suggested address mapping on UI when a merge request is created. HZ: Show Relationship Mapping Suggestions Specify if you want to show suggested relationship mapping on UI when a merge request is created. HZ: Use DQM Suggested Groupings for Automerge Specify if Automerge uses DQM suggested groupings to merge duplicate addresses and relationships. The match rules assigned to the following profile options determine which relationships or addresses to merge together: • HZ: Match Rule for Relationship Mapping Suggestions • HZ: Match Rule for Address Mapping Suggestions If you want to automatically merge either relationships or addresses, but not both, you can leave the corresponding match rule profile option blank. Addresses or relationships would then be transferred from duplicate candidates to the merge master party, not merged. If you set the HZ: Use DQM Suggested Groupings for Automerge profile option to No, then addresses and relationships are just transferred from duplicate candidates to the master. Source System Management Setup Category The table below lists the profile options that are used for source system management setup.
- 445. Oracle Trading Community Architecture Profile Options and Categories B-31 Source System Management Setup Category Profile Option Default User Access System Administration: Site System Administration: Application System Administration: Responsibility System Administration: User HZ: Allow User to Update Third Party Data, page B-31 No Default View Only Update Update Update Update HZ: User Create and Update Rule for Other Entities, page B- 31 No Default View Only Update Update Update Update HZ: User Overwrite Rule, page B-31 No Default View Only Update Update Update Update HZ: Allow User to Update Third Party Data Determine whether or not you can update third party data. HZ: User Create and Update Rule for Other Entities Enter the user create and update rule that you want to assign at any of the profile option levels. For each Other entity, the rule determines whether or not the user can create or update records. HZ: User Overwrite Rule Enter the user overwrite rule that you want to assign at any of the profile option levels. For each attribute in the Single Source of Truth record, the rule determines whether user-entered data can overwrite third party data or not. Spatial Deployment Category The table below lists the profile options that are used for spatial deployment.
- 446. B-32 Oracle Trading Community Architecture Administration Guide Spatial Deployment Category Profile Option Default User Access System Administration: Site System Administration: Application System Administration : Responsibility System Administration: User HZ: Detailed Concurrent Program Output, page B-32 No Default Update Update Update Update Update HZ: Spatial Provider URL, page B-32 http://eloc ation.orac le.com/elo cation/lbs Update Update Update Update Update HZ: Detailed Concurrent Program Output Specify if a detailed output report is generated when the Locations Spatial Index Rebuild runs. Set this profile option to Yes if you want users to access details about the records that the Locations Spatial Index Rebuild program processes and updates. Leaving the profile option blank is the same as setting it to No. HZ: Spatial Provider URL This profile option stores the URL to use for HTTP posts to eLocations: http://elocation.oracle.com/elocation/lbs. TCA Deployment Category The table below lists the profile options that are used for TCA deployment. TCA Deployment Category Profile Option Default User Access System Administration: Site System Administration: Application System Administration: Responsibility System Administration: User HZ: Default Party Type, page B-34 Organizat ion Update Update Update Update Update
- 447. Oracle Trading Community Architecture Profile Options and Categories B-33 Profile Option Default User Access System Administration: Site System Administration: Application System Administration: Responsibility System Administration: User HZ: Default Phone Number Purpose, page B- 34 Business Update Update Update Update Update HZ: Format Business Object Business Events as Bulk, page B- 34 No default Update Update Update Update Update HZ: Generate Contact Number, page B- 34 No Default Update Update Update Update Update HZ: Generate Party Number, page B-34 No Default Update Update Update Update Update HZ: Generate Party Site Number, page B- 35 No Default Update Update Update Update Update HZ: Match Rule for Relationship Manager Search, page B-35 No Default Update Update Update Update Update HZ: Name/Address Backwards Compatibility, page B-35 No Default Update Update Update Update Update HZ: Number of Days to Preserve Business Object Business Event Information, page B-35 10 Update Update Update Update Update
- 448. B-34 Oracle Trading Community Architecture Administration Guide Profile Option Default User Access System Administration: Site System Administration: Application System Administration: Responsibility System Administration: User HZ: Profile Version Method for Updates, page B-35 No Default View Only Update View Only View Only View Only HZ: Raise API Events, page B- 36 No Default Update Update Update Update Update HZ: Report Error on Obsolete Columns, page B-36 No Default View Only Update No Access No Access No Access HZ: Default Party Type Specify the more common party type in your TCA Registry, Organization or Person. In certain user interfaces for both organizations and persons, the selected party type presented as the default. For example, Organization is the selected type, so a UI that lets users select either type to search for would default to organization search. HZ: Default Phone Number Purpose Specify the default purpose to be displayed and used for phone numbers, as well as similar contact point types such as fax and mobile. The user can override this default in the user interface, where available. HZ: Format Business Object Business Events as Bulk Determines if Business Object business events are formatted as bulk events. HZ: Generate Contact Number Specify whether or not TCA automatically generates a contact number when the relevant API is used or called from a user interface to create a contact for an organization. If the profile option is set to Yes or left blank, then users cannot enter the contact number when creating the contact. If set to No, users must enter the number. HZ: Generate Party Number Specify whether or not TCA automatically generates a Registry ID, or party number,
- 449. Oracle Trading Community Architecture Profile Options and Categories B-35 when the relevant API is used or called from a user interface to create a party of type Organization or Person. If the profile option is set to Yes or left blank, then users cannot enter the Registry ID when creating the party. If set to No, users must enter the number. HZ: Generate Party Site Number Specify whether or not TCA automatically generates a party site number when the relevant API is used or called from a user interface to create a party of type Organization or Person. If the profile option is set to Yes or left blank, then users cannot enter the party site number when creating the party. If set to No, users must enter the number. HZ: Match Rule for Relationship Manager Search Specify the seeded or user-defined match rule that Relationship Manager uses to determine the search criteria and results for the DQM party search. You can use the RM SEARCH RULE match rule, which was seeded specifically for the Relationship Manager search. Note: If you select a match rule set, the displayed search criteria are the superset of all attributes in the set. HZ: Name/Address Backwards Compatibility Determine whether or not TCA and AR name and address formatting should use TCA formatting. If Yes is given, then it does not use the TCA routines, else TCA formatting routines are used. HZ: Number of Days to Preserve Business Object Business Event Information Determines the number of days that Business Objects business event details are preserved after scheduling the event. HZ: Profile Version Method for Updates Determine the type of person or organization profile versioning to use, if any. This profile option controls whether entering new information for an existing organization or person record updates that record, creates a new record, or only creates a new record if current system date and the last update date are different. • No Version: When new data is entered about an organization or person profile, the existing organization or person profile record is updated with the new data. Entering new data does not create a new profile record. • New Version: When new data is entered about an existing organization or person
- 450. B-36 Oracle Trading Community Architecture Administration Guide profile, a new organization or person profile record is created using the existing record and the newly entered data. This option is useful in environments that require the maintenance of detailed historical records, such as in healthcare applications. • One Day Version: When new data is entered about an existing organization or person profile, the current system date and the last update date are compared. If these dates are the same, the existing profile record is updated. If the dates are different, a new organization or person profile record is created using the existing record and the newly entered data. This is the default behavior. HZ: Raise API Events Determines which type of business object events to raise. • All Events Disabled: Neither granular or business object events are raised. • Only Granular (V2) Events Enabled: Only granular events are raised. Business object events are disabled. • Only Business Object Business Events Enabled: Only business objects events are raised. Granular (V2) events are disabled. • All Events Enabled: Both granular or business object events are raised. HZ: Report Error on Obsolete Columns Determine whether internal APIs used in TCA report an error when users try to enter a value for an obsolete column. This profile option does not apply to public TCA APIs. Leaving this profile option blank is the same as setting it to No. Third Party Deployment Category The table below lists the profile options that are used for third party deployment. Third Party Deployment Category Profile Option Default User Access System Administration: Site System Administration: Application System Administration: Responsibility System Administration: User Application Server-Side Proxy Host And Domain, page B- 37 No Default Update Update Update Update Update
- 451. Oracle Trading Community Architecture Profile Options and Categories B-37 Profile Option Default User Access System Administration: Site System Administration: Application System Administration: Responsibility System Administration: User Applications Proxy Port, page B-37 No Default Update Update Update Update Update HZ: Apps Servlet Agent, page B-37 No Default Update Update Update Update Update Applications Server-Side Proxy Host And Domain If your organization uses a proxy server, enter the host name that your information technology group provides. Applications Proxy Port If your organization uses a proxy server, enter the proxy port number that your information technology group provides. HZ: Apps Servlet Agent This profile option identifies the servlet agent URL (Apache listener) for your Oracle Applications instance. This URL is used to construct URLs for SERVLET and JSP type functions and has the format http://:/. For example, http://ap999us.oracle.com:8000/servlet_zone. Unused or Internal Profile Options These profile options are either internally used by Oracle Trading Community Architecture or not used at all. You should not modify their settings in any way. • HZ: Address Key Index • HZ: Bank Branch Contact Point Validation Procedure • HZ: Bank Branch Contact Validation Procedure • HZ: Bank Branch Location Validation Procedure • HZ: Bank Branch Site Validation Procedure • HZ: Bank Branch Validation Procedure
- 452. B-38 Oracle Trading Community Architecture Administration Guide • HZ: Bank Contact Point Validation Procedure • HZ: Bank Contact Validation Procedure • HZ: Bank Location Validation Procedure • HZ: Bank Site Validation Procedure • HZ: Bank Validation Procedure • HZ: Banking Group Member Validation Procedure • HZ: Banking Group Validation Procedure • HZ: Clearinghouse Assignment Validation Procedure • HZ: Created By Module • HZ: D&B Policy Function Exists • HZ: Display Certification Status • HZ: DQM Synchronization Method • HZ: Special Characters Enabled • HZ: Third Party Data Integration Set Up for Organization Profile Entity • HZ: Third Party Data Integration Set Up for Person Profile Entity
- 453. Resource Manager Profile Options and Categories C-1 C Resource Manager Profile Options and Categories This appendix describes the profile options that affect the operation of Resource Manager. This appendix covers the following topics: • Profile Options and Profile Option Categories Overview • Profile Option Category and Profile Options Descriptions Profile Options and Profile Option Categories Overview During implementation, set a value for each Resource Manager profile option to specify how Resource Manager controls access to and processes data. See: Setting User Profile Options, Oracle Applications System Administrator's Guide - Maintenance Profile options are grouped into one or more profile option categories enabling you to view only the profile options that pertain to your application or function. Resource Manager Categories • Resource Security, page C-2 • Resource Setup, page C-4 Resource Manager Profile Options • JTFRS: Business Group for Synchronizing Employees Link to descriptions in the next section., page C-5 • JTFRS: Cascade Skill Rating Rules, page C-5 • JTFRS: Employee Resource Update Access, page C-3
- 454. C-2 Oracle Trading Community Architecture Administration Guide • JTFRS: Group Update Access, page C-3 • JTFRS: Hide Sensitive HR Data, page C-4 • JTFRS: Mode of Salesperson Number Creation, page C-6 • JTFRS: Resource active days after termination of source, page C-6 • JTFRS: Resource Lookup Audience, page C-4 • JTFRS: Restrict Group Update, page C-4 • JTFRS: Role Update Access, page C-4 • JTFRS: Server Group Check Flag, page C-6 • JTFRS: Synchronize Employees as of date (MM/DD/YYYY), page C-6 Profile Option Category and Profile Options Descriptions This section describes profile options by category. The tables in this section provide profile option information as follows: • The Default column displays either the default profile option value in italics, or No Default if none exists. • The User Access column indicates whether you can view or update the profile option. • The System Administration: Site, Application, Responsibility, and User columns indicate at which levels the system administrator can update these profile options. The key for each table is: • Update: You can update the profile option. • View Only: You can view the profile option but cannot change it. • No Access: You cannot view or change the profile option. Resource Security Category The table below lists the profile options that control the security features of Resource Manager.
- 455. Resource Manager Profile Options and Categories C-3 Resource Security Category Profile Option Default User Access System Administration: Site System Administration: Application System Administration: Responsibility System Administration: User JTFRS: Employee Resource Update Access Self View Only Update Update Update Update JTFRS: Group Update Access None View Only Update Update Update Update JTFRS: Hide Sensitive HR Data Yes Update Update Update Update Update JTFRS: Resource Lookup Audience Admin Update Update Update Update Update JTFRS: Restrict Group Update No Update Update Update Update Update JTFRS: Role Update Access None View Only Update Update Update Update JTFRS: Employee Resource Update Access This profile option sets the security around updating employee information in the Resource Manager. If set to Self, only the employee can update their own information. If set to Any, others, including a System Administrator, can update the employee information, including overriding any previous values in the profile option: Resource Lookup Audience. JTFRS: Group Update Access This profile option sets the security around updating groups, including hierarchies. If set to None, then only the Administrator or manager can update their group and any other group following their group in the hierarchy. If set to All, then the user can update any group hierarchy in the site.
- 456. C-4 Oracle Trading Community Architecture Administration Guide JTFRS: Hide Sensitive HR Data This profile option is used to optionally hide sensitive and sometimes confidential employee resource data such as the home address information. This information appears in the Miscellaneous tab of the Define Resource Form and when clicking the View button in that form. When set to Yes, sensitive employee resource information does not appear in the Miscellaneous tab of the Define Resource Form and when clicking the View button in that form. When set to No, sensitive employee resource information is exposed to those portions of the Resource Manager UI. JTFRS: Resource Lookup Audience This profile option controls what the user views in the Resource Details window and in the Advanced Search. If set to Admin, then the user can query in the Advanced Search using the additional fields of Resource number and Salesperson number. If set to General, then the user is sees and searches on limited fields. JTFRS: Restrict Group Update Use this profile option to restrict group update access. It is used in HTML Resource Manager only. If it is changed to Yes, then a group member with Manager or Admin member role cannot update group header and usage information in the HTML Update Group page. JTFRS: Role Update Access This profile is used to control the access to the Role HTML windows. The Resource Self Service Administrator responsibility level is set to the All value. If set to None, then it is Read-Only access to the Role windows. You can search and view all the roles. If set to All, then the user can create, update non-seeded roles, delete non-seeded roles, search, and view roles. Resource Setup Category The table below lists the profile options that control the Resource Manager setup features.
- 457. Resource Manager Profile Options and Categories C-5 Resource Setup Category Profile Option Default User Access System Administration: Site System Administration: Application System Administration: Responsibility System Administration: User JTFRS: Business Group for Synchronizing Employees All Update Update Update Update Update JTFRS: Cascade Skill Rating Rules Only_Cat Update Update Update Update Update JTFRS: Mode of Salesperson Number Creation Employee Number Update Update Update Update Update JTFRS: Resource active days after termination of source 30 days Update Update Update Update Update JTFRS: Server Group Check Flag Yes Update Update Update Update Update JTFRS: Synchronize Employees as of date (MM/DD/YYYY) None Update Update Update Update Update JTFRS: Business Group for Synchronizing Employees Use this profile option to determine whether to synchronize employees from all or only in the current business groups. If it is set to Current, then it will synchronize the employees only in the current business groups which are derived from the profile option "HR: Business Group". JTFRS: Cascade Skill Rating Rules This profile is provided the rules that will be used to cascade the skills from top level to botton. For example when a employee rates the skill at category level, it can create the
- 458. C-6 Oracle Trading Community Architecture Administration Guide ratings for the to all the product under the category, depending on the profile value. JTFRS: Mode of Salesperson Number Creation This profile option specifies the mode used to generate a salesperson number during the automatic creation of a sales person. When Employee Number is selected the salesperson number is identical to the employee number. When Sequence Generated is selected, the salesperson number is autogenerated by a newly created Sequence. When Manually is selected, the implementor must manually enter the salesperson number. If no creation number is specified for the selected resources, then the import process fails. JTFRS: Resource active days after termination of source This profile is used when end dating a resource of type Partner or employee. It allows a set period of days for the resource to stay active after termination. Set at Site level. When set to x days the resource has that many days to stay active in the system. JTFRS: Server Group Check Flag This profile is used to identify tables for Email Center (product) which should be used to validate the type for the value of the resource parameter. If value is 'No' then iem_email_accounts table is used, otherwise, jtf_rs_email_accounts_v and jtf_rs_resource_params are used. JTFRS: Synchronize Employees as of date (MM/DD/YYYY) Synchronization for update employees will be based on this profile option. If it is not set (Null), then the program assumes the value as sysdate. System administrators must enter the date in MM/DD/YYYY format; otherwise, the synchronization will fail. Additionally, the profile value should be greater than the previous run date such as 01-01-2005 to 01-02-2005, but it cannot be a future date. If an employee is not active in Oracle HRMS as of sysdate, Resource Manager will end date the employee resource. System administrators need to run the Synchronize Employee concurrent program as of sysdate to synchronize all other attributes with latest details.
- 459. Customizing Trading Community Architecture D-1 D Customizing Trading Community Architecture This appendix describes the admin-personalizable pages of Oracle Trading Community Architecture. This appendix covers the following topics: • Trading Community Architecture Admin-Personalizable Pages Trading Community Architecture Admin-Personalizable Pages Admin-personalizable pages are pages that may be personalized by a system or personalization administrator. All OA Framework-based pages may be admin-personalizable. To personalize a page, you must first log in as a user or with a responsibility for which the Personalize Self-Service Defn profile option is set to Yes. You can then choose the Personalize Page global button that renders on each page to create your personalizations. Note: Please refer to the discussions about Profile Options Used By OA Personalization Framework, Oracle Application Framework Personalization Guide and Administrative-Level Personalizations, Oracle Application Framework Personalization Guide. All pages from Trading Community Architecture are admin-personalizable Note: It is possible for regions within a page to not be admin-personalizable. This occurs if Oracle sets the region's Admin Personalization property to False. This section also identifies those pages whose regions are not admin-personalizable. When you personalize a page, keep in mind that you can create new UI elements in the page, using the Create Item page in the Admin-Personalization UI. You may also
- 460. D-2 Oracle Trading Community Architecture Administration Guide personalize SPEL (Simplest Possible Expression Language)-supporting properties in a region to bind the property to a view object attribute or to a function name for function security. Note: Please refer to the separate discussions about Personalizing SPEL-supporting Properties, Oracle Application Framework Personalization Guide, the Create Item page, Oracle Application Framework Personalization Guide, and the Personalize page, Oracle Application Framework Personalization Guide.
- 461. Customizing Resource Manager E-1 E Customizing Resource Manager This appendix describes the customization information of Resource Manager. This appendix covers the following topics: • Extending Resource Manager BC4J Objects Extending Resource Manager BC4J Objects OA Framework provides support for programmatically extending Oracle E-Business Suite application functionality. You can refer to the Extending OA Framework Applications discussion in the Oracle Application Framework Developer's Guide for general instructions on how to extend an Oracle E-Business Suite application. Some applications may contain "final" BC4J objects that are not safe to extend. The following BC4J object in Resource Manager should not be extended or at least discuss with Oracle before you do: Expert mode ViewObject - The following is a list of extendable view objects in expert mode. Subclassing an expert mode view object is inherently fragile; if the base class SQL SELECT statement changes, your subclass may break after an upgrade. If you choose to extend an expert mode view object, please test the extension carefully after each upgrade. • oracle.apps.jtf.resource.server.JtfRsCompensationVO.xml • oracle.apps.jtf.resource.server.JtfRsCompensationVO.xml • oracle.apps.jtf.resource.server.JtfRsSalesrepsVO.xml • oracle.apps.jtf.resource.server.JtfRsGroupHierarchyVO.xml • oracle.apps.jtf.resource.server.JtfRsRoleDetailsVO.xml • oracle.apps.jtf.resource.server.JtfRsGrpMemberRoleVO.xml
- 463. Standard Navigation Paths F-1 F Standard Navigation Paths This appendix describes standard navigation paths for administering Oracle Trading Community Architecture. This appendix covers the following topics: • Standard Navigation Paths Standard Navigation Paths Although your system administrator may have customized your navigator, typical navigation paths are shown in this table. Access all of these features through the Trading Community Manager responsibility. Feature Functionality Navigation Path Adapters All Trading Community > Administration > Adapters Classifications All Trading Community > Administration > Classifications Data Quality Management Attributes and Transformations Trading Community > Administration > DQM > Setup > Attributes and Transformations Data Quality Management Diagnostic Reports Trading Community > Administration > DQM > Diagnostics > Reports
- 464. F-2 Oracle Trading Community Architecture Administration Guide Feature Functionality Navigation Path Data Quality Management Match Rules Trading Community > Administration > DQM > Setup > Match Rules Data Quality Management Merge Dictionary Trading Community > Administration > DQM > Setup > Merge Dictionary Data Quality Management Overview Trading Community > Administration > DQM > Overview Data Quality Management Word Replacements Trading Community > Administration > DQM > Setup > Word Replacements Data Sharing and Security All Trading Community > Administration > Security > Data Sharing Groups Extensions All Trading Community > Administration > Extensions Phones All Trading Community > Administration > Phones Phone Formats Define Phone Formats Setup > Define Phone Formats Relationships All Trading Community > Administration > Relationships Source System Management Security for Other Entities Trading Community > Administration > Source System Management > Security for Other Entities Source System Management Single Source of Truth (SST) Trading Community > Administration > Source System Management > Single Source of Truth (SST) Source System Management Source Systems Trading Community > Administration > Source System Management > Source Systems
- 465. Standard Navigation Paths F-3 Related Topics Introduction to Administration, page 1-1
- 467. Index-1 Index A access privileges assigning to data sharing groups, 6-8 accounts Automerge, 5-72 acquisition attributes, 5-40 adapters administering and overview, 7-2 communication protocol, 7-6 configuring, 7-3 creating for address validation, 7-6 setting up for batch address validation, 2-22 XML message format, 7-6 address correction, 7-1 Address entity, 10-22 corresponding tables, 10-22 in Data Quality Management, 5-3 interface search and staged schema tables, 2- 28 tax location validation, 10-22 addresses validating and mapping to geographies, 11-14 Address Formatting API, B-7 address keys, B-24 address styles setting default, B-7 setting up for validations, 11-10 address validation, 11-10 adapter overview, 7-1 creating adapters, 7-6 setting up batch validation, 2-22 setting up Bulk Import, 2-25 setting up real-time validation, 2-33 XML message format, 7-6 Address Validation program, 2-22, 7-1 Administration tab defining access to, 2-21 description, 1-1 APIs Address Formatting, B-7 Name Formatting, B-7 Phone Number Formatting, 8-2 Phone Number Parsing, 8-2 Application Proxy Port profile option, B-11 Applications Proxy Bypass Domains profile option, B-11 Applications Proxy Port profile option, 2-32, 2-38 , B-37 Applications Server-Side Proxy Host and Domain profile option, B-10 Applications Server-Side Proxy Host And Domain profile option, 2-32, 2-38, B-37 Apps Servlet Agent profile option, 2-38 AR_CUSTOMER_CALL_TOPICS_ALL table, 2- 33 AR_CUSTOMER_CALLS_ALL table, 2-33 AR: Customer Merge Commit Size profile option, B-16 area code time zones description, 8-1 assigning responsibilities to users general implementation, 2-1 attribute groups overview, 10-10
- 468. Index-2 Single Source of Truth example, 10-16 attributes, 9-1 Bulk Import de-duplication processes, 2-27 creating custom, 5-25 defining for Bulk Import de-duplication, 2-24 defining in Data Quality Management, 5-23 in Data Quality Management, 5-3, 5-21 scoring in match rules, 5-44 selecting and defining for match rules, 5-40 tips for Data Quality Management, 5-28 attribute scores match rules, 5-44 automatic D&B import setting up, 2-38 automatic merge thresholds batch duplicate identification, 2-23 Bulk Import de-duplication processes, 2-24, 2- 29 automatic synchronization description, 5-59 Automerge, 5-5 description, 5-5, 5-72 Registry de-duplication, 2-24 Automerge program description, 5-72 not running for batch duplicate identification, 2-23 parameters, 5-73 Automerge thresholds defining, 5-47 B batch de-duplication process details, 2-26 setting up, 2-24 batch duplicate identification setting up, 2-23 BES callouts, 10-4 black boxes description, 7-1 B-Tree indexes Bulk Import de-duplication processes, 2-27 creating and updating, 5-61 description, 5-4 overview, 5-60 synchronizing with TCA Registry, 5-64 bulk duplicate identification description, 5-9 matching process, 5-34 process, 5-9 Bulk Import de-duplication processes, 2-26 setting up, 2-24 setting up for D&B batch load, 2-38 synchronizing extensions data, 9-10 business events, 2-4 defining types to raise, 2-6 setting up, 2-4 setup process, 2-5 situations to disable for, 2-8 types, 2-4 usage in Oracle E-Business Suite, 2-7 business object business events description, 2-4 See also business events business objects description, 2-4 C callers description, 7-1 CDL See Oracle Customer Data Librarian (CDL) certification administering, 12-1 managing levels, 12-1 managing reasons, 12-1 circular relationships defining in relationship types, 3-4 class categories assigning entities to, 4-8 copying, 4-12 creating, 4-6 description, 4-1 searching for, 4-5 updating, 4-10 class code hierarchies description, 4-1 updating, 4-9 viewing, 4-12 class codes creating, 4-8
- 469. Index-3 description, 4-1 updating, 4-11 classification rules defining, 4-6 description, 4-1 classifications administering, 4-4 overview, 4-1 classification schema description, 4-1 standard and seeded, 4-3 Contact entity in Data Quality Management, 5-3 interface search and staged schema tables, 2- 28 contact numbers generating, B-34 Contact Point entity, 10-22 corresponding table, 10-22 in Data Quality Management, 5-3 interface search and staged schema tables, 2- 28 Copy Organization Extensions Data for Profile Versioning program description, 9-9 parameters, 9-10 Copy Person Extensions Data for Profile Versioning program description, 9-9 parameters, 9-10 Copy Relationship Type and All Relationships program, 3-6 country names setting default language, B-7 country structures defining, 11-6 description, 11-1 mapping to location table attributes, 11-10 country time zones description, 8-1 Credit Rating entity, 10-22 See also Other entities corresponding table, 10-22 customer accounts indexing, 2-2 customer interface setting up, 2-29 Customer Interface synchronizing extensions data, 9-10 Customer Interface program disabling business events, 2-9 customer merge setting up, 2-30 customers AR: Customer Merge Commit Size profile option, B-16 Customer text data creation and indexing program description, 2-2 parameter, 2-3 D D&B, 2-36 See also Third Party Data Integration adapter overview, 7-1 configuring adapter, 7-3 contact information, 2-37 setting up automatic import, 2-38 setting up batch load, 2-38 setting up integration, 2-36 D&B Import Adapter request set, 2-38 disabling business events, 2-9 database objects HZ_DNB_SOURCE_DIR, 2-38 Data Quality Management (DQM) administering, 5-11 examples, 5-6 globalization, 5-5 major features, 5-2 matching process, 5-30 overview, 5-2 overview of current setup, 5-11 process, 5-8 setting up batch duplicate identification, 2-23 setting up Bulk Import, 2-24 setting up Relationship Manager, 2-36 Data Sharing and Security (DSS) administering, 6-2 assigning administration privileges, 2-2 enabling, 6-4 overview, 6-1 setting up Bulk Import, 2-25 data sharing groups
- 470. Index-4 assigning access privileges to, 6-8 creating, 6-4 description, 6-2 seeded, 6-3 updating, 6-7 viewing only, 6-4 data sources attribute groups example, 10-16 party profiles example, 10-12 de-duplication processes Bulk Import, 2-26 display rules attribute groups example, 10-16 example, 10-12 setting up for party profile entities, 10-19 Single Source of Truth, 10-8 DQM See Data Quality Management (DQM) DQM : Generate XML Data for the Diagnostic Reports program description, 5-74 parameters, 5-74 DQM Compile All Rules program compiling match rules, 5-29 description, 5-54 DQM diagnostic reports, 5-73 DQM Duplicate Identification program defining number of workers, B-23 DQM Index Creation program description, 5-61 setting default memory to use, B-21 DQM Index Optimization program description, 5-63 prerequisites, 5-63 setting maximum processing time, B-21 DQM Match Rule for Batch Duplicate Identification profile option, 2-23 DQM search Web service implementation, 13-7 DQM Stage Worker, 5-61 DQM Staging program description, 5-61 parameters, 5-62 prerequisites, 5-62 prerequisite to compiling all match rules, 5-54 updating transformations, 5-22 updating word replacements, 5-13, 5-15 DQM Synchronization program compared to DQM Index Optimization program, 5-63 description, 5-64 prerequisites, 5-65 DSS See Data Sharing and Security (DSS) DUP_BATCH_RESTRICTION_LIST Receivables lookup, 2-23 duplicate identification example, 5-6 duplicate prevention example, 5-7 E ECX: Log File Path profile option, 2-23, B-9 eLocations Spatial Data Integration rebuilding HZ_LOCATIONS index, 2-32 setting up, 2-31 entities adding and deleting in Merge Dictionary, 5-66 administering relationships, 3-1 assigning to class categories, 4-8 controlling with Data Sharing and Security, 6- 1 defining custom, 2-32 in Data Quality Management, 5-3 registering in Merge Dictionary, 5-65 examples attribute groups setup for Single Source of Truth, 10-16 Data Quality Management, 5-6 extensions, 9-3 get_quality_score procedure, 5-58 get_quality_weighting procedure, 5-57 match rule, 5-47 quality adjusted search results, 5-55 Single Source of Truth, 10-12 source systems, 10-4 XML message for address validation adapters, 7-10 extensions, 9-1 administering, 9-1 copying for profile versioning, 9-9 example, 9-3 process, 9-2
- 471. Index-5 F filters match rules, 5-40 Financial Report entity, 10-22 See also Other entities corresponding tables, 10-22 flexfields for defining entities, 10-6 source systems, 10-6 Flexible Address Formatting address styles, 11-10 FND_LOOKUP_TYPES_TL table, 4-13 FND_LOOKUP_VALUES table, 4-13 FND_TERRITORIES table Geography Hierarchy, 11-3 fuzzy keys See address keys See name keys G general implementation assigning responsibilities to users, 2-1 geographies description, 11-1 updating, 11-8 viewing and defining, 11-7 Geography Hierarchy administering, 11-3 overview, 11-1 setting up real-time address validation, 2-33 Geography Name Referencing process description, 11-14 Geography Hierarchy administration, 11-5 parameters, 11-17 prerequisites, 11-16 setting up real-time address validation, 2-35 geography types creating, 11-6 description, 11-1 mapping to location table attributes, 11-10 geography usage description, 11-1 geography validation setting up, 11-10 geography validation levels assigning to countries, 11-10 get_quality_score user hook procedure, 5-57 get_quality_weighting user hook procedure, 5-57 granular business events description, 2-4 See also business events impact and alternatives of not raising, 2-11 H hierarchical relationship types converting to, 3-5 defining, 3-4 HR_LOCATIONS_ALL defining address styles and validations, 11-10 Geography Name Referencing, 11-14 HZ_ADAPTER_LOGS table, B-10 HZ_CLASS_CATEGORIES table, 4-13 HZ_CLASS_CODE_DENORM denormalization table, 4-13 HZ_CLASS_CODE_RELATIONS table, 4-13 HZ_CONTACT_POINTS table, 2-3, 5-60, 10-22, B-15 HZ_CONTACTS table, 5-59 HZ_CUST_ACCT_SITES_ALL table, 2-2 HZ_DNB_SOURCE_DIR directory object, 2-38 HZ_DOMAIN_ISP_LIST Receivables lookup, 5- 28 HZ_DOMAIN_SUFFIX_LIST Receivables lookup, 5-28 HZ_DQM_QUALITY_UH_PKG package, 5-56 HZ_FINANCIAL_NUMBERS table, 10-22 HZ_FINANCIAL_REPORTS table, 10-22 HZ_LOCATION_PROFILES table, B-10 HZ_LOCATIONS table, 2-3 corresponding entity, 10-22 defining address styles and validations, 11-10 extending, 9-1 Geography Name Referencing, 11-14 maintaining location history, B-10 rebuilding spatial index, 2-32, 2-32 validating flexfields during import, B-15 HZ_ORG_CONTACT_ROLES table, 2-3 HZ_ORG_CONTACTS table, 2-3 HZ_ORGANIZATION_PROFILES table, 9-1 HZ_ORIG_SYS_MAPPING table, 10-6, 10-6 HZ_ORIG_SYSTEM_REFERENCES table, 2-3,
- 472. Index-6 10-6 HZ_PARTIES table, 2-3 corresponding staged schema table, 5-59 criteria for duplicate identification batches, 2- 23 default person name style, B-7 input records for get_quality_score procedure, 5-57 validating flexfields during import, B-15 HZ_PARTY_CERT_LEVEL Receivables lookup, 12-1 HZ_PARTY_CERT_REASON Receivables lookup, 12-1 HZ_PARTY_SITES table, 2-3, 5-59, 10-22 HZ_PERSON_PROFILES table, 9-1 HZ_RELATIONSHIPS table, 10-22, B-15 HZ_SRCH_CONTACTS table, 2-28 HZ_SRCH_CPTS table, 2-28 HZ_SRCH_PARTIES table, 2-27 HZ_SRCH_PSITES table, 2-28 HZ_STAGED_CONTACT_POINTS table, 2-28, 5- 60 HZ_STAGED_CONTACTS table, 2-28, 5-59 HZ_STAGED_PARTIES table, 2-28, 5-59 HZ_STAGED_PARTY_SITES table, 2-28, 5-59 HZ_WORD_RPL_CONDS_B table, 5-20 HZ: Address Key Index profile option, B-37 HZ: Address Key Length profile option, B-24 HZ: Address Validation Level for Application profile option, 2-35, B-9 HZ: Address Validation Level for Site profile option, B-9 HZ: Allow Import of Records with Disabled Lookups profile option, 2-25, B-14 HZ: Allow Updates of Address Records During Import profile option, 2-25, B-12 HZ: Allow Update to Standardized Address profile option, 2-23, B-9 HZ: Allow User to Update Third Party Data profile option, B-31 HZ: Apps Servlet Agent profile option, B-37 HZ: Audit Customer Account Merge profile option, B-17 HZ: Automerge Master Party Selection profile option, B-28 HZ: Bank Branch Contact Point Validation Procedure profile option, B-37 HZ: Bank Branch Contact Validation Procedure profile option, B-37 HZ: Bank Branch Location Validation Procedure profile option, B-37 HZ: Bank Branch Site Validation Procedure profile option, B-37 HZ: Bank Branch Validation Procedure profile option, B-37 HZ: Bank Contact Point Validation Procedure profile option, B-38 HZ: Bank Contact Validation Procedure profile option, B-38 HZ: Banking Group Member Validation Procedure profile option, B-38 HZ: Banking Group Validation Procedure profile option, B-38 HZ: Bank Location Validation Procedure profile option, B-38 HZ: Bank Site Validation Procedure profile option, B-38 HZ: Bank Validation Procedure profile option, B- 38 HZ: Batch Size for committing records in Geography Name Referencing process profile option, 2-35, B-25 HZ: Character Value to Indicate NULL During Import profile option, 2-25, B-14 HZ: Cleanse Fuzzy Key profile option, B-24 HZ: Clearinghouse Assignment Validation Procedure profile option, B-38 HZ: Created By Module profile option, B-38 HZ: Create Log for Adapters profile option, 2-23, B-10 HZ: D&B Policy Function Exists profile option, B-38 HZ: D&B User Name profile option, 2-37 HZ: Data Sharing and Security Enabled, 6-4 HZ: Data Sharing and Security Enabled profile option, B-18 HZ: Date Value (DD-MM-YYYY) to Indicate NULL During Import profile option, B-14 HZ: Date Value to Indicate NULL During Import profile option, 2-25 HZ: Default Address Style profile option, 2-35, B- 7 HZ: Default Data Sharing Group profile option, 6-4, B-18
- 473. Index-7 HZ: Default Flexible Address Format profile option, 2-35, B-7 HZ: Default Location Service Adapter profile option, 2-23, 7-5, B-10 HZ: Default Name Style profile option, B-7 HZ: Default Party Type profile option, B-34 HZ: Default Phone Number Purpose profile option, B-34 HZ: Default Profile Attributes for Merge Mapping profile option, 5-72 HZ: Default Secondary Profile Attributes for Merge Mapping profile option, 5-72 HZ: Detailed Concurrent Program Output profile option, 2-31, 2-32, B-32 HZ: Display Certification Level profile option, 12-1 HZ: Display Certification Status profile option, B-38 HZ: Do not use contact addresses and contact points for DQM Duplicate identification profile option, B-20 HZ: DQM Index Creation Memory profile option, 5-61, B-21 HZ: DQM Match Rule for Batch Duplicate Identification profile option, B-21 HZ: DQM Maximum Index Optimization Time profile option, B-21 HZ: DQM Resolution for Party Name Searches that Exceed Maximum Number of Results profile option, B-21 HZ: DQM Synchronization Method profile option, B-21, B-38 HZ: DQM Text Index Build Type profile option, B-22 HZ: Enable DQM for Integration Services, B-22 HZ: Enable DQM Merge Suggestion, B-22 HZ: Enable Quality Weighting for DQM Match Scores profile option, 5-54, B-23 HZ: Error Limit for Import profile option, 2-25, B-12 HZ: Format Business Object Business Events as Bulk profile option, 2-5, 2-9, B-34 HZ: Gather Table Stats profile option, B-15 HZ: Generate Contact Number profile option, B- 34 HZ: Generate Party Number profile option, B-34 HZ: Generate Party Site Number profile option, B-35 HZ: Import Batch De-Duplication Match Rule profile option, 2-25, B-27 HZ: Import Registry De-Duplication Match Rule profile option, 2-25, B-27 HZ: Key Word Count profile option, B-25 HZ: Language for Country Display profile option, B-7 HZ: Location Updatable profile option, B-17 HZ: Maintain Location History profile option, 2- 23, 2-35, B-10 HZ: Match Rule for Organization Services, B-23 HZ: Match Rule for Person Services, B-23 HZ: Match Rule for Relationship Manager Search profile option, 2-36, B-35 HZ: Maximum Number of Match Results profile option, B-23 HZ: Merge Master Party Defaulting profile option, 5-69, 5-72, B-29 HZ: Name/Address Backwards Compatibility profile option, B-35 HZ: Number of Days to Preserve Business Object Business Event Information profile option, 2-5, 2- 10, B-35 HZ: Number of workers for a given Geography Name Referencing request profile option, 2-35, B- 26 HZ: Number of Workers for DQM Duplicate Identification Program profile option, B-23 HZ: Number of Workers for Import profile option, 2-25, B-13 HZ: Number of Workers Used by Customer Interface profile option, B-16 HZ: Number of Workers Used by Party Merge Program profile option, B-28 HZ: Numeric Value to Indicate NULL During Import profile option, 2-25, B-14 HZ: Postal Code Key Length profile option, B-25 HZ: Profile Version Method for Updates profile option, 9-9, B-35 HZ: Raise API Events profile option, 2-5, 2-6, 2-7, 2-8, 2-11, B-36 HZ: Reference Language profile option, B-7 HZ: Reference Territory profile option, 2-35, B-7 HZ: Report Error on Obsolete Columns profile option, B-36 HZ: Return User Name in GET APIs profile
- 474. Index-8 option, B-28 HZ: Show Address Mapping Suggestions profile option, B-30 HZ: Show Relationship Mapping Suggestions profile option, B-30 HZ: Spatial Provider URL profile option, 2-32, B- 32 HZ: Special Characters Enabled profile option, B- 38 HZ: Stop Scoring After Reaching DQM Automerge Threshold profile option, B-24 HZ: Third Party Data Integration Set Up for Organization Profile Entity profile option, B-38 HZ: Third Party Data Integration Set Up for Person Profile Entity profile option, B-38 HZ: Timeout Limit for Address Validation profile option, 2-23, 7-6, B-10 HZ: Use Data Sharing and Security During Import profile option, 2-25, B-13 HZ: Use DQM Suggested Groupings for Automerge profile option, 5-73, B-30 HZ: Use HR Security During Import profile option, 2-25, B-13 HZ: User Create and Update Rule for Other Entities profile option, 10-23, B-31 HZ: User Overwrite Rule profile option, 10-21, B- 31 HZ: Validate First 5 Digits of US ZIP Code profile option, B-10 HZ: Validate Flexfields During Import profile option, 2-26, B-15 HZ: Work Unit Size for Import profile option, 2- 26, B-13 HZ Security Main Menu, 2-2 I IMC: Import Run Address Validation profile option, B-27 IMC: Import Run Batch De-Duplication profile option, B-27 IMC: Import Run Registry Match profile option, B-27 implementation feature specific, 2-21 general, 2-1 implementing Web services Web service implementation, 13-3 Import Batch to TCA Registry program disabling business events, 2-9 setting default for Batch De-Duplication Match Rule parameter, B-27 setting default for Registry De-Duplication Match Rule parameter, B-27 setting up D&B batch load, 2-38 input record, 5-40 Integration Services matching process, 5-36 interface search tables, 2-27 interMedia indexes creating and updating, 5-61 description, 5-4 optimizing, 5-63 overview, 5-60 synchronizing with TCA Registry, 5-64 J JTFRS: Business Group for Synchronizing Employees profile option, C-5 JTFRS: Cascade Skill Rating Rules profile option, C-5 JTFRS: Employee Resource Update Access profile option, C-3 JTFRS: Group Update Access profile option, C-3 JTFRS: Hide Sensitive HR Data profile option, C- 4 JTFRS: Mode of Salesperson Number Creation profile option, C-6 JTFRS: Resource active days after termination of source profile option, C-6 JTFRS: Resource Lookup Audience profile option, C-4 JTFRS: Restrict Group Update, C-4 JTFRS: Role Update Access profile option, C-4 JTFRS: Server Group Check Flag profile option, C-6 JTFRS: Synchronize Employees as of date (MM/DD/YYYY) profile option, C-6 L languages country name display, B-7 setting default for determining name style
- 475. Index-9 formats, B-7 Locations Spatial Index Rebuild program description, 2-32 setting up eLocations Spatial Data Integration, 2-32 lookups DUP_BATCH_RESTRICTION_LIST, 2-23 HZ_DOMAIN_ISP_LIST, 5-28 HZ_DOMAIN_SUFFIX_LIST, 5-28 HZ_PARTY_CERT_LEVEL, 12-1 HZ_PARTY_CERT_REASON, 12-1 M master records See merge masters match percentages adjusting for quality, 5-54 match rules, 5-52 adjusting search results for quality, 5-54 assigning scores, transformations, and thresholds, 5-43 batch duplicate identification, 2-23 Bulk Import de-duplication processes, 2-24, 2- 27 compiling, 5-29 defining, 5-38 deleting, 5-30 description, 5-4 entering details, 5-39 example, 5-47 including in get_quality_score procedure, 5-57 including in get_quality_weighting procedure, 5-57 matching processes, 5-30 matching process for Bulk Duplicate Identification purpose, 5-34 matching process for Expanded Duplicate Identification purpose, 5-32 matching process for Integration Services purpose, 5-36 matching process for Search purpose, 5-31 overview, 5-28 Relationship Manager, 2-36 RM SEARCH RULE, B-35 selecting attributes and defining usage, 5-40 types, 5-28 viewing, 5-58 match rule sets defining, 5-52 match thresholds Bulk Import de-duplication processes, 2-24, 2- 29 defining, 5-46 Relationship Manager, 2-36 menus HZ Security Main Menu, 2-2 TCA Main Menu, 2-2 Merge Dictionary customizing, 5-67 description, 5-5 maintaining, 5-66 overview, 5-65 setting up Party Merge, 2-33 merge masters Automerge, 5-72 creating custom defaulting method, 5-69 defaulting, B-29 merge procedures defining custom, 2-32 HZ_PARTY_MERGE. veto_delete, 2-33 merging AR: Customer Merge Commit Size profile option, B-16 N NACE (European Union's Statistical Classification of Economic Activity), 4-3 NAICS (North American Industrial Classification System), 4-3 Name Formatting API, B-7 name keys, B-24 See also fuzzy search navigation paths See standard navigation paths O OCO See Oracle Customers Online (OCO) Oracle Advanced Collections alternatives when business events are disabled , 2-11 using TCA business events, 2-7
- 476. Index-10 Oracle Application Object Library, 6-1 Oracle Credit Management using with Party Merge, 2-33 Oracle Customer Data Librarian (CDL) Administration tab, 1-1, 2-21 assigning certification levels and reasons, 12-1 System Duplicate Identification batches from Automerge, 5-72 System Duplicate Identification batches from Registry de-duplication, 2-24 Oracle Customer Data Librarian Superuser responsibility, 2-21 Oracle Customers Online (OCO) Administration tab, 1-1, 2-21 using extensions, 9-1 Oracle Customers Online Superuser responsibility, 2-21 Oracle eLocations, 2-31 Oracle Human Resources disabling TCA business events, 2-9 Oracle Integration Repository iRep, 13-3 Oracle iStore disabling TCA business events, 2-8 Oracle Marketing disabling TCA business events, 2-8 Oracle Order Management disabling TCA business events, 2-8 Oracle Partner Management using TCA business events, 2-7 Oracle Payables disabling TCA business events, 2-8 Oracle Product Lifecycle Management (PLM) extensibility features and framework, 9-1 Oracle Sales alternatives when business events are disabled , 2-11 disabling TCA business events, 2-8 using TCA business events, 2-7 Oracle Service Bean framework, 13-1 Oracle Shipping alternatives when business events are disabled, 2-12 using TCA business events, 2-7 Oracle Site Management disabling TCA business events, 2-8 Oracle Student System disabling TCA business events, 2-9 using TCA business events, 2-7 Oracle Telecommunications Billing Integrator using TCA business events, 2-7 Oracle Trading Community Architecture (TCA) administering, 1-1 implementing, 2-1 Oracle Transportation disabling TCA business events, 2-9 Oracle Workflow Business Event System, 2-4 Oracle Workflow listener starting automatic synchronization, 5-59 organization profiles See party profile entities original words word replacement pairs, 5-15 Other entities data security overview, 10-22 description, 10-22 user create and update rules, 10-23 P Party entity in Data Quality Management, 5-3 interface search and staged schema tables, 2- 28 Party Merge setting up, 2-32 Party Merge program defining number of workers for Automerge, B-28 party numbers See Registry IDs party profile entities attribute groups, 10-10 description, 10-7 setting up display rules, 10-19 setup example, 10-12 user overwrite rules, 10-21 party site numbers generating, B-35 party sites Automerge, 5-72 person name style setting default, B-7
- 477. Index-11 person profiles See party profile entities phone formats defining, 8-2 Phone Number Formatting API, 8-2 Phone Number Parsing API, 8-2 phone numbers administering, 8-1 defining time zones, 8-1 description, 8-1 profile option categories Address Formatting Deployment, B-6 Address Validation Deployment, B-8 Bulk Import Deployment, B-11 Bulk Import Setup, B-13 Customer Interface Deployment, B-15 Customer Merge Deployment, B-16 Data Sharing and Security, B-17 description, B-5, C-2 DQM Deployment, B-18 DQM Fuzzy Key Generation, B-24 Geography Hierarchy Deployment, B-25 overview, B-1, C-1 Party Import Setup, B-26 Party Merge Deployment, B-27 Party Merge Setup, B-28 Resource Security, C-2 Resource Setup, C-4 Source System Management Setup, B-30 Spatial Deployment, B-31 TCA Deployment, B-32 Third Party Deployment, B-36 profile options Application Proxy Port, B-11 Applications Proxy Bypass Domains, B-11 Applications Proxy Port, 2-32, 2-38, B-37 Applications Server-Side Proxy Host and Domain, B-10 Applications Server-Side Proxy Host And Domain, 2-32, 2-38, B-37 Apps Servlet Agent, 2-38 AR: Customer Merge Commit Size, B-16 descriptions, B-5, C-2 DQM Match Rule for Batch Duplicate Identification, 2-23 ECX: Log File Path, 2-23, B-9 Enable DQM for Integration Services, B-22 Enable DQM Merge Suggestion, B-22 HZ: Address Key Index, B-37 HZ: Address Key Length, B-24 HZ: Address Validation Level for Application, 2-35, B-9 HZ: Address Validation Level for Site, B-9 HZ: Allow Import of Records with Disabled Lookups, 2-25, B-14 HZ: Allow Updates of Address Records During Import, 2-25, B-12 HZ: Allow Update to Standardized Address, 2-23, B-9 HZ: Allow User to Update Third Party Data, B-31 HZ: Apps Servlet Agent, B-37 HZ: Audit Customer Account Merge, B-17 HZ: Automerge Master Party Selection, B-28 HZ: Bank Branch Contact Point Validation Procedure, B-37 HZ: Bank Branch Contact Validation Procedure, B-37 HZ: Bank Branch Location Validation Procedure, B-37 HZ: Bank Branch Site Validation Procedure, B- 37 HZ: Bank Branch Validation Procedure, B-37 HZ: Bank Contact Point Validation Procedure, B-38 HZ: Bank Contact Validation Procedure, B-38 HZ: Banking Group Member Validation Procedure, B-38 HZ: Banking Group Validation Procedure, B- 38 HZ: Bank Location Validation Procedure, B-38 HZ: Bank Site Validation Procedure, B-38 HZ: Bank Validation Procedure, B-38 HZ: Batch Size for committing records in Geography Name Referencing process, 2-35, B-25 HZ: Character Value to Indicate NULL During Import, 2-25, B-14 HZ: Cleanse Fuzzy Key, B-24 HZ: Clearinghouse Assignment Validation Procedure, B-38 HZ: Created By Module, B-38 HZ: Create Log for Adapters, 2-23, B-10 HZ: D&B Policy Function Exists, B-38
- 478. Index-12 HZ: D&B User Name, 2-37 HZ: Data Sharing and Security Enabled, B-18 HZ: Data Sharing and Security Enabled profile option, 6-4 HZ: Date Value (DD-MM-YYYY) to Indicate NULL During Import, 2-25, B-14 HZ: Default Address Style, 2-35, B-7 HZ: Default Data Sharing Group, 6-4, B-18 HZ: Default Flexible Address Format, 2-35, B- 7 HZ: Default Location Service Adapter, 2-23, 7- 5, B-10 HZ: Default Name Style, B-7 HZ: Default Party Type, B-34 HZ: Default Phone Number Purpose, B-34 HZ: Default Profile Attributes for Merge Mapping, 5-72 HZ: Default Secondary Profile Attributes for Merge Mapping, 5-72 HZ: Detailed Concurrent Program Output, 2- 31, 2-32, B-32 HZ: Display Certification Level, 12-1 HZ: Display Certification Status, B-38 HZ: Do not use contact addresses and contact points for DQM Duplicate identification, B-20 HZ: DQM Index Creation Memory, 5-61, B-21 HZ: DQM Match Rule for Batch Duplicate Identification, B-21 HZ: DQM Maximum Index Optimization Time, B-21 HZ: DQM Resolution for Party Name Searches that Exceed Maximum Number of Results, B- 21 HZ: DQM Synchronization Method, B-21, B-38 HZ: DQM Text Index Build Type, B-22 HZ: Enable Quality Weighting for DQM Match Scores, 5-54, B-23 HZ: Error Limit for Import, 2-25, B-12 HZ: Format Business Object Business Events as Bulk, 2-5, 2-9, B-34 HZ: Gather Table Stats, B-15 HZ: Generate Contact Number, B-34 HZ: Generate Party Number, B-34 HZ: Import Batch De-Duplication Match Rule, 2-25, B-27 HZ: Import Registry De-Duplication Match Rule, 2-25, B-27 HZ: Key Word Count, B-25 HZ: Language for Country Display, B-7 HZ: Location Updatable, B-17 HZ: Maintain Location History, 2-23, 2-35, B- 10 HZ: Match Rule for Organization Services, B- 23 HZ: Match Rule for Person Services, B-23 HZ: Match Rule for Relationship Manager Search, 2-36, B-35 HZ: Maximum Number of Matching Results, B-23 HZ: Merge Master Party Defaulting, 5-69, 5-72 , B-29 HZ: Name/Address Backwards Compatibility, B-35 HZ: Number of Days to Preserve Business Object Business Event Information, 2-5, 2-10, B-35 HZ: Number of workers for a given Geography Name Referencing request, 2-35, B-26 HZ: Number of Workers for DQM Duplicate Identification Program, B-23 HZ: Number of Workers for Import, 2-25, B-13 HZ: Number of Workers Used by Customer Interface, B-16 HZ: Number of Workers Used by Party Merge Program, B-28 HZ: Numeric Value to Indicate NULL During Import, 2-25, B-14 HZ: Postal Code Key Length, B-25 HZ: Profile Version Method for Updates, 9-9, B-35 HZ: Raise API Events, 2-5, 2-6, 2-7, 2-8, 2-11, B- 36 HZ: Reference Language, B-7 HZ: Reference Territory, 2-35, B-7 HZ: Report Error on Obsolete Columns, B-36 HZ: Return User Name in GET APIs, B-28 HZ: Show Address Mapping Suggestions, B- 30 HZ: Show Relationship Mapping Suggestions, B-30 HZ: Spatial Provider URL, 2-32, B-32 HZ: Special Characters Enabled, B-38 HZ: Stop Scoring After Reaching DQM
- 479. Index-13 Automerge Threshold, B-24 HZ: Third Party Data Integration Set Up for Organization Profile Entity, B-38 HZ: Third Party Data Integration Set Up for Person Profile Entity, B-38 HZ: Timeout Limit for Address Validation, 2- 23, 7-6, B-10 HZ: Use Data Sharing and Security During Import, 2-25, B-13 HZ: Use DQM Suggested Groupings for Automerge, 5-73, B-30 HZ: Use HR Security During Import, 2-25, B- 13 HZ: User Create and Update Rule for Other Entities, 10-23, B-31 HZ: User Overwrite Rule, 10-21, B-31 HZ: Validate First 5 Digits of US ZIP Code, B- 10 HZ: Validate Flexfields During Import, 2-26, B-15 HZ: Work Unit Size for Import, 2-26, B-13 IMC: Import Run Address Validation, B-27 IMC: Import Run Batch De-Duplication, B-27 IMC: Import Run Registry Match, B-27 JTFRS: Business Group for Synchronizing Employees, C-5 JTFRS: Cascade Skill Rating Rules, C-5 JTFRS: Employee Resource Update Access, C- 3 JTFRS: Group Update Access, C-3 JTFRS: Hide Sensitive HR Data, C-4 JTFRS: Mode of Salesperson Number Creation, C-6 JTFRS: Resource active days after termination of source, C-6 JTFRS: Resource Lookup Audience, C-4 JTFRS: Restrict Group Update, C-4 JTFRS: Role Update Access, C-4 JTFRS: Server Group Check Flag, C-6 JTFRS: Synchronize Employees as of date (MM/DD/YYYY), C-6 overview, B-1, C-1 profile versioning, B-35 extensions, 9-9 programs Address Validation, 2-22, 7-1 Automerge, 2-23, 5-72 Copy Organization Extensions Data for Profile Versioning, 9-9 Copy Person Extensions Data for Profile Versioning, 9-9 Copy Relationship Type and All Relationships, 3-6 Customer Interface, 2-9 Customer text data creation and indexing, 2-2 DQM : Generate XML Data for the Diagnostic Reports, 5-74 DQM Compile All Rules, 5-29, 5-54 DQM Duplicate Identification, B-23 DQM Index Creation, 5-61, B-21 DQM Index Optimization, 5-63, B-21 DQM Stage Worker, 5-61 DQM Staging, 5-54, 5-61 DQM Synchronization, 5-63, 5-64 Geography Name Referencing, 2-35, 11-14 Import Batch to TCA Registry, 2-9, 2-38, B-27, B-27 list of, A-1 Locations Spatial Index Rebuild, 2-32, 2-32 migration and upgrade, 2-3 Party Merge, B-28 Refresh of Classification Denormalization, 4- 13 Source System - Migrate Party Level Source System References, 2-3 Spatial Information for Locations Batch Update, 2-32 TCA Business Object Events: Cleanse Infrastructure Program, 2-10 TCA Business Object Events: Generate Infrastructure Packages Program, 2-10 TCA Business Object Events: Raise Events Program, 2-10 Third Party Data Integration Update, 10-20 Q quality adjusted match percentage calculating, 5-55 Quality Adjusted Search Results creating logic for, 5-56 description, 5-54 quality score description, 5-54
- 480. Index-14 quality weighting description, 5-54 R Receivables lookups DUP_BATCH_RESTRICTION_LIST, 2-23 HZ_DOMAIN_ISP_LIST, 5-28 HZ_DOMAIN_SUFFIX_LIST, 5-28 HZ_PARTY_CERT_REASON, 12-1 Refresh of Classification Denormalization program description, 4-13 parameters, 4-13 Registry de-duplication process details, 2-26 setting up, 2-24 Registry IDs generating, B-34 mapping to source IDs, 10-3 Relationship entity, 10-22 See also Other entities corresponding table, 10-22 relationship groups assigning phrases and roles to, 3-9 description and list of, 3-9 Relationship Manager setting up, 2-36 relationship phrase and role pairs adding to relationship types, 3-7 viewing, 3-5 relationship phrase pairs See relationship phrase and role pairs relationship phrases assigning to relationship groups, 3-9 relationship role pairs See relationship phrase and role pairs relationship roles assigning to relationship groups, 3-9 relationships administering, 3-1 administration process, 3-2 Automerge, 5-72 copying, 3-6 overview, 3-1 relationship types adding phrase and role pairs to, 3-7 converting to hierarchical, 3-5 copying, 3-6 creating, 3-4 searching for, 3-3 viewing, 3-5 viewing concurrent requests, 3-3 replacement words word replacement pairs, 5-15 reports DQM diagnostic reports, 5-73 list of, A-1 request sets D&B Import Adapter, 2-9, 2-38 responsibilities Oracle Customer Data Librarian Superuser, 2- 21 Oracle Customers Online Superuser, 2-21 System Administrator, 2-2 TCA Data Security Administrator, 2-2, 6-3, 6-4 Trading Community Manager, 1-1, 2-1, 2-2, 2- 21, 2-21, 6-3, 6-4, F-1 RM SEARCH RULE match rule, B-35 S scoring attributes, 5-40 SDI batches See System Duplicate Identification (SDI) batches search for parties example, 5-6 search operator, 5-39, 5-40 security criteria, 6-2 setting up customer interface, 2-29 customer merge, 2-30 SIC (Standard Industrial Classification), 4-3 similarity algorithm, 5-45 Similarity option match rules, 5-45 Single Source of Truth (SST) administering, 10-19 attribute groups, 10-10 attribute groups example, 10-16 display rules, 10-19 example, 10-12 in Data Quality Management, 5-2
- 481. Index-15 overview, 10-7 regenerating SST record, 10-20 user overwrite rules, 10-21 source IDs example, 10-4 mapping to Registry IDs, 10-3 Source System Management (SSM), 10-1 administering, 10-2 overview, 10-1 setting up Bulk Import, 2-24 Source System - Migrate Party Level Source System References program description, 2-3 source system overwrite rules description, 10-9 example, 10-14 source systems administering, 10-5 creating and updating, 10-6 example, 10-4 migrating data, 2-3 overview, 10-3 viewing, 10-7 Spatial Information for Locations Batch Update program, 2-32 spoke systems, 10-5 SSM See Source System Management (SSM) SST See Single Source of Truth (SST) staged schema Bulk Import de-duplication processes, 2-27 creating and updating, 5-61 defining attributes and transformations, 5-23 description, 5-4 installing seeded transformations, 5-22 mapping to TCA Registry tables, 5-59 overview, 5-59 synchronizing with TCA Registry, 5-64 transformed attributes, 5-22 staged schema tables mapping to interface search tables, 2-28 standard navigation paths, F-1 System Administrator responsibility assigning users to responsibilities, 2-2 defining access to Administration tab, 2-21 System Duplicate Identification (SDI) batches from Automerge, 5-72 from Registry de-duplication, 2-24 T tables AR_CUSTOMER_CALL_TOPICS_ALL, 2-33 AR_CUSTOMER_CALLS_ALL, 2-33 FND_LOOKUP_TYPES_TL, 4-13 FND_LOOKUP_VALUES, 4-13 FND_TERRITORIES, 11-3 HR_LOCATIONS_ALL, 11-10, 11-14 HZ_ADAPTER_LOGS, B-10 HZ_CLASS_CATEGORIES, 4-13 HZ_CLASS_CODE_DENORM, 4-13 HZ_CLASS_CODE_RELATIONS, 4-13 HZ_CONTACT_POINTS, 2-3, 5-60, 10-22, B-15 HZ_CONTACTS, 5-59 HZ_CREDIT_RATINGS, 10-22 HZ_CUST_ACCT_SITES_ALL, 2-2 HZ_FINANCIAL_NUMBERS, 10-22 HZ_FINANCIAL_REPORTS, 10-22 HZ_LOCATION_PROFILES, B-10 HZ_LOCATIONS, 2-3, 2-32, 2-32, 10-22, 11-10, 11-14, B-10, B-15 HZ_ORG_CONTACT_ROLES, 2-3 HZ_ORG_CONTACTS, 2-3 HZ_ORGANIZATION_PROFILES, 9-1 HZ_ORIG_SYS_MAPPING, 10-6, 10-6 HZ_ORIG_SYSTEM_REFERENCES, 2-3, 10-6 HZ_PARTIES, 2-3, 2-23, 5-57, 5-59, B-7, B-15 HZ_PARTY_SITES, 2-3, 5-59, 10-22 HZ_PERSON_PROFILES, 9-1 HZ_RELATIONSHIPS, 10-22, B-15 HZ_SRCH_CONTACTS, 2-28 HZ_SRCH_CPTS, 2-28 HZ_SRCH_PARTIES, 2-28 HZ_SRCH_PSITES, 2-28 HZ_STAGED_CONTACT_POINTS, 2-28, 5-60 HZ_STAGED_CONTACTS, 2-28, 5-59 HZ_STAGED_PARTIES, 2-28, 5-59 HZ_STAGED_PARTY_SITES, 2-28, 5-59 HZ_WORD_RPL_CONDS_B, 5-20 in staged schema, 5-59 tax validation setting up, 11-10 TCA
- 482. Index-16 See Oracle Trading Community Architecture (TCA) TCA Business Object Events: Cleanse Infrastructure Program, 2-10 TCA Business Object Events: Generate Infrastructure Packages Program, 2-10 TCA Business Object Events: Raise Events Program, 2-10 TCA Data Security Administrator responsibility assigning users to, 2-2 Data Sharing and Security access, 6-3, 6-4 TCA Main Menu, 2-2 TCA Registry administering, 1-1 extending, 9-1 territories setting default for determining address style formats, B-7 Third Party Data Integration setting up, 2-36 setting up batch load, 2-38 Third Party Data Integration Update program description, 10-20 parameters, 10-21 prerequisite, 10-21 synchronizing extensions data, 9-10 thresholds match rules, 5-46 time zones defining for phone numbers, 8-1 Trading Community Architecture See Oracle Trading Community Architecture (TCA) Trading Community Manager responsibility Administration tab, 1-1 assigning users to, 2-2 Data Sharing and Security access, 6-3, 6-4 defining access to Administration tab, 2-21 feature-specific implementation, 2-21 general implementation, 2-1 standard navigation paths, F-1 transactions Automerge, 5-72 transformations Bulk Import de-duplication processes, 2-27 creating custom, 5-26 defining, 5-23 defining for Bulk Import de-duplication, 2-24 defining in match rules, 5-43, 5-45 description, 5-3 installing in staged schema, 5-22 lookups, 5-28 ordering for Search match rules, 5-43 overview, 5-22 seeded, 5-22 tips, 5-28 using word replacements, 5-13 U upgrades running requests, 2-3 user create and update rules description, 10-22 setting up, 10-23 user hooks creating for merge master party defaulting, 5- 69 get_quality_score, 5-57 get_quality_weighting, 5-57 user overwrite rules attribute groups example, 10-17 description, 10-8 example, 10-12 setting up, 10-21 V V2 business events See granular business events validation status codes, 7-5, 7-7 W Web service implementation business object APIs, 13-4 Web services framework, 13-2 implementation, 13-1 Web services implementation Account Merge, 13-10 party merge, 13-9 weight match rules, 5-44 weighted match percentage
- 483. Index-17 calculating, 5-55 weighted quality percentage calculating, 5-55 word replacement lists creating, updating, and copying, 5-15 word replacement pairs creating and updating, 5-15 word replacements creating, updating, and copying lists, 5-15 creating custom conditions, 5-19 description, 5-3 overview, 5-13 seeded word replacement pairs, 5-13 tips, 5-17 Workflow Directory synchronization alternatives when business events are disabled, 2-12 using granular business events, 2-7 work unit Bulk Import de-duplication processes, 2-28 description, 5-40