Programming windows
Download as doc, pdf2 likes1,340 views

This document contains an author's note and table of contents for a book about Windows programming. The author's note thanks people involved in the project and indicates the author's website for updates. The table of contents shows the book is divided into sections and chapters covering basics of the Windows environment, Unicode, windows and messages, and other core Windows programming topics.


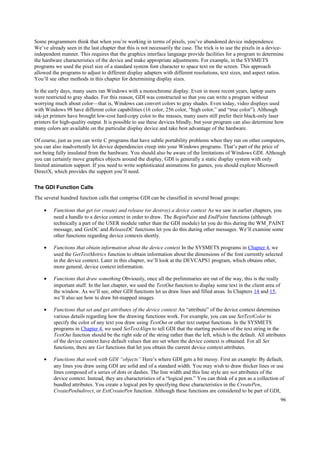
![Code for Information Interchange (7-Bit ASCII),” published by the American National Standards Institute. Figure 2-
1 shows ASCII (for the zillionth time), very similar to how it appears in the ANSI document.
0- 1- 2- 3- 4- 5- 6- 7-
0 NUL DLE SP 0 @ P ‘ p
1 SOH DC1 ! 1 A Q a q
2 STX DC2 “ 2 B R b r
3 ETX DC3 # 3 C S c s
4 EOT DC4 $ 4 D T d t
5 ENQ NAK % 5 E U e u
6 ACK SYN & 6 F V f v
7 BEL ETB ‘ 7 G W g w
8 BS CAN ( 8 H X h x
9 HT EM ) 9 I Y I y
A LF SUB * : J Z j z
B VT ESC + ; K [ k {
C FF FS , < L l |
D CR GS - = M ] m }
E SO RS . > N ^ n ~
F SI US / ? O _ o DEL
Figure 2-1. The ASCII character set.
There are a lot of good things you can say about ASCII. The 26 letter codes are contiguous, for example. (This is not
the case with EBCDIC.) Uppercase letters can be converted to lowercase and back by flipping one bit. The codes for
the 10 digits are easily derived from the value of the digits. (In BCDIC, the code for the character “0” followed the
code for the character “9”!)
Best of all, ASCII is a very dependable standard. No other standard is as prevalent or as ingrained in our keyboards,
video displays, system hardware, printers, font files, operating systems, and the Internet.
The World Beyond
The big problem with ASCII is indicated by the first word of the acronym. ASCII is truly an American standard, and
it isn’t even good enough for other countries where English is spoken. Where is the British pound symbol (£), for
instance?
English uses the Latin (or Roman) alphabet. Among written languages that use the Latin alphabet, English is
unusual in that very few words require letters with accent marks (or “diacritics”). Even for those English words
where diacritics are traditionally proper, such as coöperate or résumé, the spellings without diacritics are perfectly
acceptable.
But north and south of the United States and across the Atlantic are many countries and languages where diacritics
are much more common. These accent marks originally aided in adopting the Latin alphabet to the differences in
spoken sounds among these languages. Journey farther east or south of Western Europe, and you’ll encounter
languages that don’t use the Latin alphabet at all, such as Greek, Hebrew, Arabic, and Russian (which uses the
Cyrillic alphabet). And if you travel even farther east, you’ll discover the ideographic Han characters of Chinese,
which were also adopted in Japan and Korea.
The history of ASCII since 1967 is mostly a history of attempts to overcome its limitations and make it more
applicable to languages other than American English. In 1967, for example, the International Standards Organization
(ISO) recommended a variant of ASCII with codes 0x40, 0x5B, 0x5C, 0x5D, 0x7B, 0x7C, and 0x7D “reserved for
national use” and codes 0x5E, 0x60, and 0x7E labeled as “may be used for other graphical symbols when it is
necessary to have 8, 9, or 10 positions for national use.” This is obviously not the best solution to
internationalization because there’s no guarantee of consistency. But it indicates how desperate people were to
successfully code symbols necessary to various languages.
Extending ASCII
By the time the early small computers were being developed, the 8-bit byte had been firmly established. Thus, if a
25](https://image.slidesharecdn.com/programmingwindows-140823083916-phpapp02/85/Programming-windows-25-320.jpg)
![byte were used to store characters, 128 additional characters could be invented to supplement ASCII. When the
original IBM PC was introduced in 1981, the video adapters included a ROM-based character set of 256 characters,
which in itself was to become an important part of the IBM standard.
The original IBM extended character set included some accented characters and a lowercase Greek alphabet (useful
for mathematics notation), as well as some block-drawing and line-drawing characters. Additional characters were
also assigned to the code positions of the ASCII control characters, because the bulk of these control characters were
not required.
This IBM extended character set was burned into countless ROMs on video boards and in printers, and it was used
by numerous applications to decorate their character-mode displays. However, this character set did not include
enough accented letters for all Western European languages that used the Latin alphabet, and it was not quite
appropriate for Windows. Windows didn’t need line-drawing characters because it had an entire graphics system.
In Windows 1.0 (released in November 1985), Microsoft didn’t entirely abandon the IBM extended character set,
but it was relegated to secondary importance. The native Windows character set was called the “ANSI character set”
because it was based on a draft ANSI and ISO standard, which eventually became ANSI/ISO 885911987,
“American National Standard for Information Processing—8-Bit Single-Byte Coded Graphic Character Sets—Part
1: Latin Alphabet No 1.” This is also known more simply as “Latin 1.”
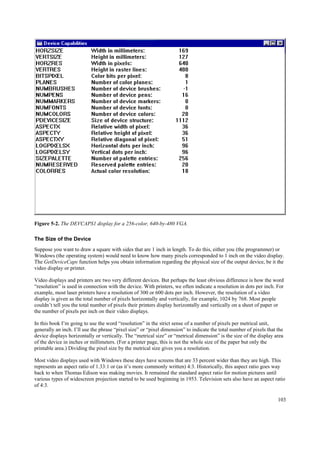
The original version of the ANSI character set as printed in the Windows 1.0 Programmer’s Reference is shown in
Figure 2-2.
0- 1- 2- 3- 4- 5- 6- 7- 8- 9- A- B- C- D- E- F-
0 * * 0 @ P ‘ p * * ° À Ð à ð
1 * * ! 1 A Q a q * * ¡ ± Á Ñ á ñ
2 * * “ 2 B R b r * * ¢ ² Â ò â ò
3 * * # 3 C S c s * * £ ³ Ã ó ã ó
4 * * $ 4 D T d t * * ¤ ´ Ä ô ä ô
5 * * % 5 E U e u * * ¥ µ Å õ å õ
6 * * & 6 F V f v * * ¦ ¶ Æ ö æ ö
7 * * ‘ 7 G W g w * * § · Ç * ç *
8 * * ( 8 H * h * * * ¨ ¸ È ø è ø
9 * * ) 9 I Y I y * * © ¹ É Ù é ù
A * * * : J Z j z * * ª º Ê Ú ê ú
B * * + ; K [ k { * * « » Ë Û ë û
C * * , < L l | * * ¬ ¼ Ì Ü ì ü
D * * - = M ] m } * * ½ Í Ý í ý
E * * . > N ^ n ~ * * ® ¾ Î Þ î þ
F * * / ? * _ o DEL * * ¯ ¿ Ï ß ï ÿ
* - not applicable
Figure 2-2. The Windows ANSI character set (based on ANSI/ISO 8859-1).
The hollow rectangles indicate codes for which characters are not defined. This is close to how ANSI/ISO 8859-1
was ultimately defined. ANSI/ISO 8859-1 shows only graphic characters, not control characters, so it does not
define the DEL. In addition, code 0xA0 is defined as a nonbreaking space (which means that it’s a space that
shouldn’t be used to break a line when formatting), and code 0xAD is a soft hyphen (which means that it shouldn’t
be displayed unless it’s used to break a word at the end of a line). Also, ANSI/ISO 8859-1 defines codes 0xD7 as a
multiplication sign (×) and 0xF7 as a division sign (÷). Some fonts in Windows also define some of the characters
from 0x80 through 0x9F, but these are not part of the ANSI/ISO 8859-1 standard.
MS-DOS 3.3 (released in April 1987) introduced the concept of code pages to IBM PC users, a concept that was
also carried over to Windows. A code page defines a mapping of character codes to characters. The original IBM
character set became known as code page 437, or “MS-DOS Latin US.” Code page 850 is “MS-DOS Latin 1,”
which replaces some of the line-drawing characters with additional accented letters (but which is not the Latin 1
ISO/ANSI standard shown in Figure 2-2 above). Other code pages were defined for other languages. The lower 128
codes are always the same; the higher 128 codes depend on the language for which the code page is defined.
Under MS-DOS, if a user sets the PC’s keyboard, video display, and printer to a specific code page and then creates,
26](https://image.slidesharecdn.com/programmingwindows-140823083916-phpapp02/85/Programming-windows-26-320.jpg)


![char * p ;
Because Windows is a 32-bit operating system, the pointer variable p requires 4 bytes of storage. You can also
initialize a pointer to a character string:
char * p = “Hello!” ;
The variable p still requires 4 bytes of storage as before. The character string is stored in static memory and uses 7
bytes of storage—the 6 bytes of the string in addition to a terminating 0.
You can also define an array of characters, like this:
char a[10] ;
In this case, the compiler reserves 10 bytes of storage for the array. The expression sizeof (a) will return 10. If the
array is global (that is, defined outside any function), you can initialize an array of characters by using a statement
like so:
char a[] = “Hello!” ;
If you define this array as a local variable to a function, it must be defined as a static variable, as follows:
static char a[] = “Hello!” ;
In either case, the string is stored in static program memory with a 0 appended at the end, thus requiring 7 bytes of
storage.
Wider Characters
Nothing about Unicode or wide characters alters the meaning of the char data type in C. The char continues to
indicate 1 byte of storage, and sizeof (char) continues to return 1. In theory, a byte in C can be greater than 8 bits,
but for most of us, a byte (and hence a char) is 8 bits wide.
Wide characters in C are based on the wchar_t data type, which is defined in several header files, including
WCHAR.H, like so:
typedef unsigned short wchar_t ;
Thus, the wchar_t data type is the same as an unsigned short integer: 16 bits wide.
To define a variable containing a single wide character, use the following statement:
wchar_t c = ‘A’ ;
The variable c is the two-byte value 0x0041, which is the Unicode representation of the letter A. (However, because
Intel microprocessors store multibyte values with the least-significant bytes first, the bytes are actually stored in
memory in the sequence 0x41, 0x00. Keep this in mind if you examine memory storage of Unicode text.)
You can also define an initialized pointer to a wide-character string:
wchar_t * p = L”Hello!” ;
Notice the capital L (for long) immediately preceding the first quotation mark. This indicates to the compiler that the
string is to be stored with wide characters—that is, with every character occupying 2 bytes. The pointer variable p
requires 4 bytes of storage, as usual, but the character string requires 14 bytes—2 bytes for each character with 2
bytes of zeros at the end.
Similarly, you can define an array of wide characters this way:
static wchar_t a[] = L”Hello!” ;
The string again requires 14 bytes of storage, and sizeof (a) will return 14. You can index the a array to get at the
individual characters. The value a[1] is the wide character ‘e’, or 0x0065.
Although it looks more like a typo than anything else, that L preceding the first quotation mark is very important,
and there must not be space between the two symbols. Only with that L will the compiler know you want the string
to be stored with 2 bytes per character. Later on, when we look at wide-character strings in places other than
29](https://image.slidesharecdn.com/programmingwindows-140823083916-phpapp02/85/Programming-windows-29-320.jpg)


![int printf (const char * szFormat, ...) ;
The first argument is a formatting string that is followed by a variable number of arguments of various types
corresponding to the codes in the formatting string.
The sprintf function is defined like this:
int sprintf (char * szBuffer, const char * szFormat, ...) ;
The first argument is a character buffer; this is followed by the formatting string. Rather than writing the formatted
result in standard output, sprintf stores it in szBuffer. The function returns the length of the string. In character-mode
programming,
printf (“The sum of %i and %i is %i”, 5, 3, 5+3) ;
is functionally equivalent to
char szBuffer [100] ;
sprintf (szBuffer, “The sum of %i and %i is %i”, 5, 3, 5+3) ;
puts (szBuffer) ;
In Windows, you can use MessageBox rather than puts to display the results.
Almost everyone has experience with printf going awry and possibly crashing a program when the formatting string
is not properly in sync with the variables to be formatted. With sprintf, you still have to worry about that and you
also have a new worry: the character buffer you define must be large enough for the result. A Microsoft-specific
function named _snprintf solves this problem by introducing another argument that indicates the size of the buffer in
characters.
A variation of sprintf is vsprintf, which has only three arguments. The vsprintf function is used to implement a
function of your own that must perform printf-like formatting of a variable number of arguments. The first two
arguments to vsprintf are the same as sprintf: the character buffer for storing the result and the formatting string. The
third argument is a pointer to an array of arguments to be formatted. In practice, this pointer actually references
variables that have been stored on the stack in preparation for a function call. The va_list, va_start, and va_end
macros (defined in STDARG.H) help in working with this stack pointer. The SCRNSIZE program at the end of this
chapter demonstrates how to use these macros. The sprintf function can be written in terms of vsprintf like so:
int sprintf (char * szBuffer, const char * szFormat, ...)
{
int iReturn ;
va_list pArgs ;
va_start (pArgs, szFormat) ;
iReturn = vsprintf (szBuffer, szFormat, pArgs) ;
va_end (pArgs) ;
return iReturn ;
}
The va_start macro sets pArg to point to the variable on the stack right above the szFormat argument on the stack.
So many early Windows programs used sprintf and vsprintf that Microsoft eventually added two similar functions to
the Windows API. The Windows wsprintf and wvsprintf functions are functionally equivalent to sprintf and vsprintf,
except that they don’t handle floating-point formatting.
Of course, with the introduction of wide characters, the sprintf functions blossomed in number, creating a
thoroughly confusing jumble of function names. Here’s a chart that shows all the sprintf functions supported by
Microsoft’s C run-time library and by Windows.
ASCII Wide-Character Generic
Variable Number
of Arguments
Standard Version sprintf swprintf _stprintf
Max-Length Version _snprintf _snwprintf _sntprintf
35](https://image.slidesharecdn.com/programmingwindows-140823083916-phpapp02/85/Programming-windows-35-320.jpg)
![Windows Version wsprintfA wsprintfW wsprintf
Standard Version vsprintf vswprintf _vstprintf
Max-Length Version _vsnprintf _vsnwprintf _vsntprintf
Windows Version wvsprintfA wvsprintfW wvsprintf
In the wide-character versions of the sprintf functions, the string buffer is defined as a wide-character string. In the
wide-character versions of all these functions, the formatting string must be a wide-character string. However, it’s
up to you to make sure that any other strings you pass to these functions are also composed of wide characters.
A Formatting Message Box
The SCRNSIZE program shown in Figure 2-3 shows how to implement a MessageBoxPrintf function that takes a
variable number of arguments and formats them like printf.
Figure 2-3. The SCRNSIZE program.
SCRNSIZE.C
/*-----------------------------------------------------
SCRNSIZE.C—Displays screen size in a message box
© Charles Petzold, 1998
-----------------------------------------------------*/
#include <windows.h>
#include <tchar.h>
#include <stdio.h>
int CDECL MessageBoxPrintf (TCHAR * szCaption, TCHAR * szFormat, ...)
{
TCHAR szBuffer [1024] ;
va_list pArgList ;
// The va_start macro (defined in STDARG.H) is usually equivalent to:
// pArgList = (char *) &szFormat + sizeof (szFormat) ;
va_start (pArgList, szFormat) ;
// The last argument to wvsprintf points to the arguments
_vsntprintf (szBuffer, sizeof (szBuffer) / sizeof (TCHAR),
szFormat, pArgList) ;
// The va_end macro just zeroes out pArgList for no good reason
va_end (pArgList) ;
return MessageBox (NULL, szBuffer, szCaption, 0) ;
}
int WINAPI WinMain (HINSTANCE hInstance, HINSTANCE hPrevInstance,
PSTR szCmdLine, int iCmdShow)
{
int cxScreen, cyScreen ;
36](https://image.slidesharecdn.com/programmingwindows-140823083916-phpapp02/85/Programming-windows-36-320.jpg)


![/*------------------------------------------------------------
HELLOWIN.C—Displays “Hello, Windows 98!” in client area
© Charles Petzold, 1998
------------------------------------------------------------*/
#include <windows.h>
LRESULT CALLBACK WndProc (HWND, UINT, WPARAM, LPARAM) ;
Int WINAPI WinMain (HINSTANCE hInstance, HINSTANCE hPrevInstance,
PSTR szCmdLine, int iCmdShow)
{
static TCHAR szAppName[] = TEXT (“HelloWin”) ;
HWND hwnd ;
MSG msg ;
WNDCLASS wndclass ;
wndclass.style = CS_HREDRAW | CS_VREDRAW ;
wndclass.lpfnWndProc = WndProc ;
wndclass.cbClsExtra = 0 ;
wndclass.cbWndExtra = 0 ;
wndclass.hInstance = hInstance ;
wndclass.hIcon = LoadIcon (NULL, IDI_APPLICATION) ;
wndclass.hCursor = LoadCursor (NULL, IDC_ARROW) ;
wndclass.hbrBackground = (HBRUSH) GetStockObject (WHITE_BRUSH) ;
wndclass.lpszMenuName = NULL ;
wndclass.lpszClassName = szAppName ;
if (!RegisterClass (&wndclass))
{
MessageBox (NULL, TEXT (“This program requires Windows NT!”),
szAppName, MB_ICONERROR) ;
return 0 ;
}
hwnd = CreateWindow (szAppName, // window class name
TEXT (“The Hello Program”), // window caption
WS_OVERLAPPEDWINDOW, // window style
CW_USEDEFAULT, // initial x position
CW_USEDEFAULT, // initial y position
CW_USEDEFAULT, // initial x size
CW_USEDEFAULT, // initial y size
NULL, // parent window handle
NULL, // window menu handle
hInstance, // program instance handle
NULL) ; // creation parameters
ShowWindow (hwnd, iCmdShow) ;
UpdateWindow (hwnd) ;
while (GetMessage (&msg, NULL, 0, 0))
{
TranslateMessage (&msg) ;
DispatchMessage (&msg) ;
}
return msg.wParam ;
}
LRESULT CALLBACK WndProc (HWND hwnd, UINT message, WPARAM wParam, LPARAM lParam)
{
HDC hdc ;
PAINTSTRUCT ps ;
40](https://image.slidesharecdn.com/programmingwindows-140823083916-phpapp02/85/Programming-windows-40-320.jpg)


![you’re allocating memory. Well, many Windows functions need to allocate some memory. For example,
RegisterClass needs to allocate memory to store information about the window class. So you should be checking the
function regardless. On the other hand, if RegisterClass fails because it can’t allocate the memory it needs, Windows
has probably already ground to a halt.
I do a minimum of error checking in the sample programs in this book. This is not because I don’t think error
checking is a good idea, but because it would distract from what the programs are supposed to illustrate.
Finally, a historical note: In some sample Windows programs, you might see the following code in WinMain:
if (!hPrevInstance)
{
wndclass.cbStyle = CS_HREDRAW | CS_VREDRAW ;
[other wndclass initialization]
RegisterClass (&wndclass) ;
}
This comes under the category of “old habits die hard.” In 16-bit versions of Windows, if you started up a new
instance of a program that was already running, the hPrevInstance parameter to WinMain would be the instance
handle of the previous instance. To save memory, two or more instances were allowed to share the same window
class. Thus, the window class was registered only if hPrevInstance was NULL, indicating that no other instances of
the program were running.
In 32-bit versions of Windows, hPrevInstance is always NULL. This code will still work properly, but it’s not
necessary to check hPrevInstance.
Creating the Window
The window class defines general characteristics of a window, thus allowing the same window class to be used for
creating many different windows. When you go ahead and create a window by calling CreateWindow, you specify
more detailed information about the window.
Programmers new to Windows are sometimes confused about the distinction between the window class and the
window and why all the characteristics of a window can’t be specified in one shot. Actually, dividing the
information in this way is quite convenient. For example, all push-button windows are created based on the same
window class. The window procedure associated with this window class is located inside Windows itself, and it is
responsible for processing keyboard and mouse input to the push button and defining the button’s visual appearance
on the screen. All push buttons work the same way in this respect. But not all push buttons are the same. They
almost certainly have different sizes, different locations on the screen, and different text strings. These latter
characteristics are part of the window definition rather than the window class definition.
While the information passed to the RegisterClass function is specified in a data structure, the information passed to
the CreateWindow function is specified as separate arguments to the function. Here’s the CreateWindow call in
HELLOWIN.C, complete with comments identifying the fields:
hwnd = CreateWindow (szAppName, // window class name
TEXT (“The Hello Program”), // window caption
WS_OVERLAPPEDWINDOW, // window style
CW_USEDEFAULT, // initial x position
CW_USEDEFAULT, // initial y position
CW_USEDEFAULT, // initial x size
CW_USEDEFAULT, // initial y size
NULL, // parent window handle
NULL, // window menu handle
hInstance, // program instance handle
NULL) ; // creation parameters
At this point I won’t bother to mention that there are actually a CreateWindowA function and a CreateWindowW
function, which treat the first two parameters to the function as ASCII or Unicode, respectively.
The argument marked “window class name” is szAppName, which contains the string “HelloWin”—the name of the
50](https://image.slidesharecdn.com/programmingwindows-140823083916-phpapp02/85/Programming-windows-50-320.jpg)


![Processing the Messages
Every message that a window procedure receives is identified by a number, which is the message parameter to the
window procedure. The Windows header file WINUSER.H defines identifiers beginning with the prefix WM
(“window message”) for each type of message.
Generally, Windows programmers use a switch and case construction to determine what message the window
procedure is receiving and how to process it accordingly. When a window procedure processes a message, it should
return 0 from the window procedure. All messages that a window procedure chooses not to process must be passed
to a Windows function named DefWindowProc. The value returned from DefWindowProc must be returned from the
window procedure.
In HELLOWIN, WndProc chooses to process only three messages: WM_CREATE, WM_PAINT, and
WM_DESTROY. The window procedure is structured like this:
switch (iMsg)
{
case WM_CREATE :
[process WM_CREATE message]
return 0 ;
case WM_PAINT :
[process WM_PAINT message]
return 0 ;
case WM_DESTROY :
[process WM_DESTROY message]
return 0 ;
}
return DefWindowProc (hwnd, iMsg, wParam, lParam) ;
It is important to call DefWindowProc for default processing of all messages that your window procedure does not
process. Otherwise behavior regarded as normal, such as being able to terminate the program, will not work.
Playing a Sound File
The very first message that a window procedure receives—and the first that HELLOWIN’s WndProc chooses to
process—is WM_CREATE. WndProc receives this message while Windows is processing the CreateWindow
function in WinMain. That is, when HELLOWIN calls CreateWindow, Windows does what it has to do and, in the
process, Windows calls WndProc with the first argument set to the window handle and the second argument set to
WM_CREATE (the value 1). WndProc processes the WM_CREATE message and returns controls back to
Windows. Windows can then return to HELLOWIN from the CreateWindow call to continue further progress in
WinMain.
Often a window procedure performs one-time window initialization during WM_CREATE processing. HELLOWIN
chooses to process this message by playing a waveform sound file named HELLOWIN.WAV. It does this using the
simple PlaySound function, which is described in /Platform SDK/Graphics and Multimedia Services/Multimedia
Audio/Waveform Audio and documented in /Platform SDK/Graphics and Multimedia Services/Multimedia
Reference/Multimedia Functions.
The first argument to PlaySound is the name of a waveform file. (It could also be a sound alias name defined in the
Sounds section of the Control Panel or a program resource.) The second argument is used only if the sound file is a
resource. The third argument specifies a couple of options. In this case, I’ve indicated that the first argument is a
filename and that the sound is to be played asynchronously—that is, the PlaySound function call is to return as soon
as the sound file starts playing without waiting for it to complete. That way the program can continue with its
initialization.
WndProc concludes WM_CREATE processing by returning 0 from the window procedure.
54](https://image.slidesharecdn.com/programmingwindows-140823083916-phpapp02/85/Programming-windows-54-320.jpg)


![Windows applications generally use two methods for getting a device context handle in preparation for painting the
screen.
Getting a Device Context Handle: Method One
You use this method when you process WM_PAINT messages. Two functions are involved: BeginPaint and
EndPaint. These two functions require the handle to the window, which is passed to the window procedure as an
argument, and the address of a structure variable of type PAINTSTRUCT, which is defined in the WINUSER.H
header file. Windows programmers usually name this structure variable ps and define it within the window
procedure like so:
PAINTSTRUCT ps ;
While processing a WM_PAINT message, the window procedure first calls BeginPaint. The BeginPaint function
generally causes the background of the invalid region to be erased in preparation for painting. The function also fills
in the fields of the ps structure. The value returned from BeginPaint is the device context handle. This is commonly
saved in a variable named hdc. You define this variable in your window procedure like so:
HDC hdc ;
The HDC data type is defined as a 32-bit unsigned integer. The program may then use GDI functions, such as
TextOut, that require the handle to the device context. A call to EndPaint releases the device context handle.
Typically, processing of the WM_PAINT message looks like this:
case WM_PAINT:
hdc = BeginPaint (hwnd, &ps) ;
[use GDI functions]
EndPaint (hwnd, &ps) ;
return 0 ;
The window procedure must call BeginPaint and EndPaint as a pair while processing the WM_PAINT message. If a
window procedure does not process WM_PAINT messages, it must pass the WM_PAINT message to
DefWindowProc, which is the default window procedure located in Windows. DefWindowProc processes
WM_PAINT messages with the following code:
case WM_PAINT:
BeginPaint (hwnd, &ps) ;
EndPaint (hwnd, &ps) ;
return 0 ;
The sequence of BeginPaint and EndPaint calls with nothing in between validates the previously invalid region.
But don’t do this:
case WM_PAINT:
return 0 ; // WRONG !!!
Windows places a WM_PAINT message in the message queue because part of the client area is invalid. Unless you
call BeginPaint and EndPaint (or ValidateRect), Windows will not validate that area. Instead, Windows will send
you another WM_PAINT message, and another, and another, and another….
The Paint Information Structure
Earlier I mentioned a “paint information structure” that Windows maintains for each window. That’s what
PAINTSTRUCT is. The structure is defined as follows:
typedef struct tagPAINTSTRUCT
{
HDC hdc ;
BOOL fErase ;
RECT rcPaint ;
BOOL fRestore ;
BOOL fIncUpdate ;
BYTE rgbReserved[32] ;
63](https://image.slidesharecdn.com/programmingwindows-140823083916-phpapp02/85/Programming-windows-63-320.jpg)

![The rcPaint rectangle in PAINTSTRUCT is not only the invalid rectangle; it is also a “clipping” rectangle. This
means that Windows restricts painting to within the clipping rectangle. More precisely, if the invalid region is not
rectangular, Windows restricts painting to within that region.
To paint outside the update rectangle while processing WM_PAINT messages, you can make this call:
InvalidateRect (hwnd, NULL, TRUE) ;
before calling BeginPaint. This invalidates the entire client area and causes BeginPaint to erase the background. A
FALSE value in the last argument will not erase the background. Whatever was there will stay.
It is usually most convenient for a Windows program to simply repaint the entire client area whenever it receives a
WM_PAINT message, regardless of the rcPaint structure. For example, if part of the display output in the client
area includes a circle but only part of the circle falls within the invalid rectangle, it makes little sense to draw only
the invalid part of the circle. Draw the whole circle. When you use the device context handle returned from
BeginPaint, Windows will not paint outside the rcPaint rectangle anyway.
In the HELLOWIN program in Chapter 2, we didn’t care about invalid rectangles when processing the WM_PAINT
message. If the area where the text was displayed happened to be within the invalid rectangle, DrawText restored it.
If not, then at some point during processing of the DrawText call Windows determined it didn’t need to write
anything on the display. But this determination takes time. A programmer concerned about performance and speed
(and that includes all of us, I hope) will want to use the invalid rectangle during processing of the WM_PAINT
message to avoid unnecessary GDI calls. This is particularly important if painting requires accessing disk files such
as bitmaps.
Getting a Device Context Handle: Method Two
Although it is best to structure your program so that you can update the entire client area during the WM_PAINT
message, you may also find it useful to paint part of the client area while processing messages other than
WM_PAINT. Or you may need a device context handle for other purposes, such as obtaining information about the
device context.
To get a handle to the device context of the client area of the window, you call GetDC to obtain the handle and
ReleaseDC after you’re done with it:
hdc = GetDC (hwnd) ;
[use GDI functions]
ReleaseDC (hwnd, hdc) ;
Like BeginPaint and EndPaint, the GetDC and ReleaseDC functions should be called in pairs. When you call
GetDC while processing a message, you should call ReleaseDC before you exit the window procedure. Do not call
GetDC in one message and ReleaseDC in another.
Unlike the device context handle returned from BeginPaint, the device context handle returned from GetDC has a
clipping rectangle equal to the entire client area. You can paint on any part of the client area, not merely on the
invalid rectangle (if indeed there is an invalid rectangle). Unlike BeginPaint, GetDC does not validate any invalid
regions. If you need to validate the entire client area, you can call
ValidateRect (hwnd, NULL) ;
Generally, you’ll use the GetDC and ReleaseDC calls in response to keyboard messages (such as in a word
processing program) or mouse messages (such as in a drawing program). This allows the program to draw on the
client area in prompt reaction to the user’s keyboard or mouse input without deliberately invalidating part of the
client area to generate WM_PAINT messages. However, even if you paint during messages other than WM_PAINT,
your program must still accumulate enough information to be able to update the display whenever you do receive a
WM_PAINT message.
A function similar to GetDC is GetWindowDC. While GetDC returns a device context handle for writing on the
client area of the window, GetWindowDC returns a device context handle that lets you write on the entire window.
For example, your program can use the device context handle returned from GetWindowDC to write on the
65](https://image.slidesharecdn.com/programmingwindows-140823083916-phpapp02/85/Programming-windows-65-320.jpg)


![we’ll work with TrueType fonts, which are defined by scaleable outlines.) To a certain extent, the size of the
characters in the system font is based on the size of the video display. The system font is designed to allow at least
25 lines of 80-character text to fit on the screen.
The Size of a Character
To display multiple lines of text by using the TextOut function, you need to know the dimensions of characters in
the font. You can space successive lines of text based on the height of the characters, and you can space columns of
text across the client area based on the average width of the characters.
What is the height and average width of characters in the system font? Well, I’m not going to tell you. Or rather, I
can’t tell you. Or rather, I could tell you, but I might be wrong. The problem is that it all depends on the pixel size of
the video display. Windows requires a minimum display size of 640 by 480, but many users prefer 800 by 600 or
1024 by 768. In addition, for these larger display sizes, Windows allows the user to select different sized system
fonts.
Just as a program can determine information about the sizes (or “metrics”) of user interface items by calling the
GetSystemMetrics function, a program can determine font sizes by calling GetTextMetrics. GetTextMetrics requires
a handle to a device context because it returns information about the font currently selected in the device context.
Windows copies the various values of text metrics into a structure of type TEXTMETRIC defined in WINGDI.H.
The TEXTMETRIC structure has 20 fields, but we’re interested in only the first seven:
typedef struct tagTEXTMETRIC
{
LONG tmHeight ;
LONG tmAscent ;
LONG tmDescent ;
LONG tmInternalLeading ;
LONG tmExternalLeading ;
LONG tmAveCharWidth ;
LONG tmMaxCharWidth ;
[other structure fields]
}
TEXTMETRIC, * PTEXTMETRIC ;
The values of these fields are in units that depend on the mapping mode currently selected for the device context. In
the default device context, this mapping mode is MM_TEXT, so the dimensions are in units of pixels.
To use the GetTextMetrics function, you first need to define a structure variable, commonly called tm:
TEXTMETRIC tm ;
When you need to determine the text metrics, you get a handle to a device context and call GetTextMetrics:
hdc = GetDC (hwnd) ;
GetTextMetrics (hdc, &tm) ;
ReleaseDC (hwnd, hdc) ;
You can then examine the values in the text metric structure and probably save a few of them for future use.
Text Metrics: The Details
The TEXTMETRIC structure provides various types of information about the font currently selected in the device
context. However, the vertical size of a font is defined by only five fields of the structure, four of which are shown
in Figure 4-3.
68](https://image.slidesharecdn.com/programmingwindows-140823083916-phpapp02/85/Programming-windows-68-320.jpg)

![Formatting Text
Because the dimensions of the system font do not change during a Windows session, you need to call
GetTextMetrics only once when your program executes. A good place to make this call is while processing the
WM_CREATE message in the window procedure. The WM_CREATE message is the first message the window
procedure receives. Windows calls your window procedure with a WM_CREATE message when you call
CreateWindow in WinMain.
Suppose you’re writing a Windows program that displays several lines of text running down the client area. You’ll
want to obtain values for the character width and height. Within the window procedure you can define two variables
to save the average character width (cxChar) and the total character height (cyChar):
static int cxChar, cyChar ;
The prefix c added to the variables names stands for “count,” and in this case means a count of (or number of)
pixels. In combination with x or y, the prefix refers to a width or height. These variables are defined as static
because they must be valid when the window procedure processes other messages, such as WM_PAINT. Or you can
define the variables globally outside of any function.
Here’s the WM_CREATE code to obtain the width and height of characters in the system font:
case WM_CREATE:
hdc = GetDC (hwnd) ;
GetTextMetrics (hdc, &tm) ;
cxChar = tm.tmAveCharWidth ;
cyChar = tm.tmHeight + tm.tmExternalLeading ;
ReleaseDC (hwnd, hdc) ;
return 0 ;
Notice that I’ve included the tmExternalLeading field in the calculation of cyChar. Even though this field is 0 in the
system fonts I’ve seen lately, it should be included if it’s ever nonzero because it makes for more readable line
spacing. Each successive line of text is displayed cyChar pixels further down the window.
You’ll often find it necessary to display formatted numbers as well as simple character strings. As I discussed in
Chapter 2, you can’t use the traditional tool for this job (the beloved printf function), but you can use sprintf and the
Windows version of sprintf, wsprintf. These functions work just like printf except that they put the formatted string
into a character string. You can then use TextOut to write the string to the display. Very conveniently, the value
returned from sprintf and wsprintf is the length of the string. You can pass that value to TextOut as the iLength
argument. This code shows a typical wsprintf and TextOut combination:
int iLength ;
TCHAR szBuffer [40] ;
[ other program lines ]
iLength = wsprintf (szBuffer, TEXT (“The sum of %i and %i is %i”),
iA, iB, iA + iB) ;
TextOut (hdc, x, y, szBuffer, iLength) ;
For something as simple as this, you could dispense with the iLength definition and combine the two statements into
one:
TextOut (hdc, x, y, szBuffer,
wsprintf (szBuffer, TEXT (“The sum of %i and %i is %i”),
iA, iB, iA + iB)) ;
It ain’t pretty, but it works.
Putting It All Together
Now we seem to have everything we need to write a simple program that displays multiple lines of text on the
screen. We know how to get a handle to a device context during the WM_PAINT message, how to use the TextOut
function, and how to space text based on the size of a single character. The only thing left for us to do is to display
something interesting.
70](https://image.slidesharecdn.com/programmingwindows-140823083916-phpapp02/85/Programming-windows-70-320.jpg)
![In the previous chapter, we took a little peek at the interesting information available from the Windows
GetSystemMetrics function. The function returns information about the size of various graphical items in Windows,
such as icons, cursors, title bars, and scroll bars. These sizes vary with the display adapter and driver.
GetSystemMetrics is an important function for achieving device-independent graphical output in your program.
The function requires a single argument called an “index.” The index is one of 75 integer identifiers defined in the
Windows header files. (The number of identifiers has increased with each release of Windows; the programmer’s
documentation in Windows 1.0 listed only 26 of them.) GetSystemMetrics returns an integer, usually the size of the
item specified in the argument.
Let’s write a program that displays some of the information available from the GetSystemMetrics calls in a simple
one-line-per-item format. Working with this information is easier if we create a header file that defines an array of
structures containing both the Windows header-file identifiers for the GetSystemMetrics index and the text we want
to display for each value returned from the call. This header file is called SYSMETS.H and is shown in Figure 4-4.
Figure 4-4. The SYSMETS.H file.
SYSMETS.H
/*-----------------------------------------------
SYSMETS.H—System metrics display structure
-----------------------------------------------*/
#define NUMLINES ((int) (sizeof sysmetrics / sizeof sysmetrics [0]))
struct
{
int iIndex ;
TCHAR * szLabel ;
TCHAR * szDesc ;
}
sysmetrics [] =
{
SM_CXSCREEN, TEXT (“SM_CXSCREEN”),
TEXT (“Screen width in pixels”),
SM_CYSCREEN, TEXT (“SM_CYSCREEN”),
TEXT (“Screen height in pixels”),
SM_CXVSCROLL, TEXT (“SM_CXVSCROLL”),
TEXT (“Vertical scroll width”),
SM_CYHSCROLL, TEXT (“SM_CYHSCROLL”),
TEXT (“Horizontal scroll height”),
SM_CYCAPTION, TEXT (“SM_CYCAPTION”),
TEXT (“Caption bar height”),
SM_CXBORDER, TEXT (“SM_CXBORDER”),
TEXT (“Window border width”),
SM_CYBORDER, TEXT (“SM_CYBORDER”),
TEXT (“Window border height”),
SM_CXFIXEDFRAME, TEXT (“SM_CXFIXEDFRAME”),
TEXT (“Dialog window frame width”),
SM_CYFIXEDFRAME, TEXT (“SM_CYFIXEDFRAME”),
TEXT (“Dialog window frame height”),
SM_CYVTHUMB, TEXT (“SM_CYVTHUMB”),
TEXT (“Vertical scroll thumb height”),
SM_CXHTHUMB, TEXT (“SM_CXHTHUMB”),
TEXT (“Horizontal scroll thumb width”),
SM_CXICON, TEXT (“SM_CXICON”),
TEXT (“Icon width”),
71](https://image.slidesharecdn.com/programmingwindows-140823083916-phpapp02/85/Programming-windows-71-320.jpg)


![Figure 4-5. Most of the code should look familiar by now. The code in WinMain is virtually identical to that in
HELLOWIN, and much of the code in WndProc has already been discussed.
Figure 4-5. SYSMETS1.C.
SYSMETS1.C
/*----------------------------------------------------
SYSMETS1.C—System Metrics Display Program No. 1
© Charles Petzold, 1998
----------------------------------------------------*/
#include <windows.h>
#include “sysmets.h”
LRESULT CALLBACK WndProc (HWND, UINT, WPARAM, LPARAM) ;
int WINAPI WinMain (HINSTANCE hInstance, HINSTANCE hPrevInstance,
PSTR szCmdLine, int iCmdShow)
{
static TCHAR szAppName[] = TEXT (“SysMets1”) ;
HWND hwnd ;
MSG msg ;
WNDCLASS wndclass ;
wndclass.style = CS_HREDRAW | CS_VREDRAW ;
wndclass.lpfnWndProc = WndProc ;
wndclass.cbClsExtra = 0 ;
wndclass.cbWndExtra = 0 ;
wndclass.hInstance = hInstance ;
wndclass.hIcon = LoadIcon (NULL, IDI_APPLICATION) ;
wndclass.hCursor = LoadCursor (NULL, IDC_ARROW) ;
wndclass.hbrBackground = (HBRUSH) GetStockObject (WHITE_BRUSH) ;
wndclass.lpszMenuName = NULL ;
wndclass.lpszClassName = szAppName ;
if (!RegisterClass (&wndclass))
{
MessageBox (NULL, TEXT (“This program requires Windows NT!”),
szAppName, MB_ICONERROR) ;
return 0 ;
}
hwnd = CreateWindow (szAppName, TEXT (“Get System Metrics No. 1”),
WS_OVERLAPPEDWINDOW,
CW_USEDEFAULT, CW_USEDEFAULT,
CW_USEDEFAULT, CW_USEDEFAULT,
NULL, NULL, hInstance, NULL) ;
ShowWindow (hwnd, iCmdShow) ;
UpdateWindow (hwnd) ;
while (GetMessage (&msg, NULL, 0, 0))
{
TranslateMessage (&msg) ;
DispatchMessage (&msg) ;
}
return msg.wParam ;
}
74](https://image.slidesharecdn.com/programmingwindows-140823083916-phpapp02/85/Programming-windows-74-320.jpg)
![LRESULT CALLBACK WndProc (HWND hwnd, UINT message, WPARAM wParam, LPARAM lParam)
{
static int cxChar, cxCaps, cyChar ;
HDC hdc ;
int i ;
PAINTSTRUCT ps ;
TCHAR szBuffer [10] ;
TEXTMETRIC tm ;
switch (message)
{
case WM_CREATE:
hdc = GetDC (hwnd) ;
GetTextMetrics (hdc, &tm) ;
cxChar = tm.tmAveCharWidth ;
cxCaps = (tm.tmPitchAndFamily & 1 ? 3 : 2) * cxChar / 2 ;
cyChar = tm.tmHeight + tm.tmExternalLeading ;
ReleaseDC (hwnd, hdc) ;
return 0 ;
case WM_PAINT :
hdc = BeginPaint (hwnd, &ps) ;
for (i = 0 ; i < NUMLINES ; i++)
{
TextOut (hdc, 0, cyChar * i,
sysmetrics[i].szLabel,
lstrlen (sysmetrics[i].szLabel)) ;
TextOut (hdc, 22 * cxCaps, cyChar * i,
sysmetrics[i].szDesc,
lstrlen (sysmetrics[i].szDesc)) ;
SetTextAlign (hdc, TA_RIGHT | TA_TOP) ;
TextOut (hdc, 22 * cxCaps + 40 * cxChar, cyChar * i, szBuffer,
wsprintf (szBuffer, TEXT (“%5d”),
GetSystemMetrics (sysmetrics[i].iIndex))) ;
SetTextAlign (hdc, TA_LEFT | TA_TOP) ;
}
EndPaint (hwnd, &ps) ;
return 0 ;
case WM_DESTROY :
PostQuitMessage (0) ;
return 0 ;
}
return DefWindowProc (hwnd, message, wParam, lParam) ;
}
Figure 4-6 shows SYSMETS1 running on a standard VGA. As you can see from the first two lines in the program’s
client area, the screen width is 640 pixels and the screen height is 480 pixels. These two values, as well as many of
the other values shown by the program, may be different for different types of video displays.
75](https://image.slidesharecdn.com/programmingwindows-140823083916-phpapp02/85/Programming-windows-75-320.jpg)


![As you’ll note, the WINUSER.H header files includes notification codes of SB_TOP, SB_BOTTOM, SB_LEFT,
and SB_RIGHT, indicating that the scroll bar has been moved to its minimum or maximum position. However, you
will never receive these notification codes for a scroll bar created as part of your application window.
Although it’s not common, using 32-bit values for the scroll bar range is perfectly valid. However, the high word of
wParam, which is only a 16-bit value, cannot properly indicate the position for SB_THUMBTRACK and
SB_THUMBPOSITION actions. In this case, you need to use the function GetScrollInfo (described later in this
chapter) to get this information.
Scrolling SYSMETS
Enough explanation. It’s time to put this stuff into practice. Let’s start simply. We’ll begin with vertical scrolling
because that’s what we desperately need. The horizontal scrolling can wait. SYSMET2 is shown in Figure 4-10.
This program is probably the simplest implementation of a scroll bar you’ll want in an application.
Figure 4-10. The SYSMETS2 program.
SYSMETS2.C
/*----------------------------------------------------
SYSMETS2.C—System Metrics Display Program No. 2
© Charles Petzold, 1998
----------------------------------------------------*/
#include <windows.h>
#include “sysmets.h”
LRESULT CALLBACK WndProc (HWND, UINT, WPARAM, LPARAM) ;
int WINAPI WinMain (HINSTANCE hInstance, HINSTANCE hPrevInstance,
PSTR szCmdLine, int iCmdShow)
{
static TCHAR szAppName[] = TEXT (“SysMets2”) ;
HWND hwnd ;
MSG msg ;
WNDCLASS wndclass ;
wndclass.style = CS_HREDRAW | CS_VREDRAW ;
wndclass.lpfnWndProc = WndProc ;
wndclass.cbClsExtra = 0 ;
wndclass.cbWndExtra = 0 ;
wndclass.hInstance = hInstance ;
wndclass.hIcon = LoadIcon (NULL, IDI_APPLICATION) ;
wndclass.hCursor = LoadCursor (NULL, IDC_ARROW) ;
wndclass.hbrBackground = (HBRUSH) GetStockObject (WHITE_BRUSH) ;
wndclass.lpszMenuName = NULL ;
wndclass.lpszClassName = szAppName ;
if (!RegisterClass (&wndclass))
{
MessageBox (NULL, TEXT (“This program requires Windows NT!”),
szAppName, MB_ICONERROR) ;
return 0 ;
}
hwnd = CreateWindow (szAppName, TEXT (“Get System Metrics No. 2”),
WS_OVERLAPPEDWINDOW | WS_VSCROLL,
83](https://image.slidesharecdn.com/programmingwindows-140823083916-phpapp02/85/Programming-windows-83-320.jpg)
![CW_USEDEFAULT, CW_USEDEFAULT,
CW_USEDEFAULT, CW_USEDEFAULT,
NULL, NULL, hInstance, NULL) ;
ShowWindow (hwnd, iCmdShow) ;
UpdateWindow (hwnd) ;
while (GetMessage (&msg, NULL, 0, 0))
{
TranslateMessage (&msg) ;
DispatchMessage (&msg) ;
}
return msg.wParam ;
}
LRESULT CALLBACK WndProc (HWND hwnd, UINT message, WPARAM wParam, LPARAM lParam)
{
static int cxChar, cxCaps, cyChar, cyClient, iVscrollPos ;
HDC hdc ;
int i, y ;
PAINTSTRUCT ps ;
TCHAR szBuffer[10] ;
TEXTMETRIC tm ;
switch (message)
{
case WM_CREATE:
hdc = GetDC (hwnd) ;
GetTextMetrics (hdc, &tm) ;
cxChar = tm.tmAveCharWidth ;
cxCaps = (tm.tmPitchAndFamily & 1 ? 3 : 2) * cxChar / 2 ;
cyChar = tm.tmHeight + tm.tmExternalLeading ;
ReleaseDC (hwnd, hdc) ;
SetScrollRange (hwnd, SB_VERT, 0, NUMLINES - 1, FALSE) ;
SetScrollPos (hwnd, SB_VERT, iVscrollPos, TRUE) ;
return 0 ;
case WM_SIZE:
cyClient = HIWORD (lParam) ;
return 0 ;
case WM_VSCROLL:
switch (LOWORD (wParam))
{
case SB_LINEUP:
iVscrollPos -= 1 ;
break ;
case SB_LINEDOWN:
iVscrollPos += 1 ;
break ;
case SB_PAGEUP:
iVscrollPos -= cyClient / cyChar ;
break ;
case SB_PAGEDOWN:
iVscrollPos += cyClient / cyChar ;
break ;
case SB_THUMBPOSITION:
84](https://image.slidesharecdn.com/programmingwindows-140823083916-phpapp02/85/Programming-windows-84-320.jpg)
![iVscrollPos = HIWORD (wParam) ;
break ;
default :
break ;
}
iVscrollPos = max (0, min (iVscrollPos, NUMLINES - 1)) ;
if (iVscrollPos != GetScrollPos (hwnd, SB_VERT))
{
SetScrollPos (hwnd, SB_VERT, iVscrollPos, TRUE) ;
InvalidateRect (hwnd, NULL, TRUE) ;
}
return 0 ;
case WM_PAINT:
hdc = BeginPaint (hwnd, &ps) ;
for (i = 0 ; i < NUMLINES ; i++)
{
y = cyChar * (i - iVscrollPos) ;
TextOut (hdc, 0, y,
sysmetrics[i].szLabel,
lstrlen (sysmetrics[i].szLabel)) ;
TextOut (hdc, 22 * cxCaps, y,
sysmetrics[i].szDesc,
lstrlen (sysmetrics[i].szDesc)) ;
SetTextAlign (hdc, TA_RIGHT | TA_TOP) ;
TextOut (hdc, 22 * cxCaps + 40 * cxChar, y, szBuffer,
wsprintf (szBuffer, TEXT (“%5d”),
GetSystemMetrics (sysmetrics[i].iIndex))) ;
SetTextAlign (hdc, TA_LEFT | TA_TOP) ;
}
EndPaint (hwnd, &ps) ;
return 0 ;
case WM_DESTROY:
PostQuitMessage (0) ;
return 0 ;
}
return DefWindowProc (hwnd, message, wParam, lParam) ;
}
The new CreateWindow call adds a vertical scroll bar to the window by including the WS_VSCROLL window style
in the third argument:
WS_OVERLAPPEDWINDOW | WS_VSCROLL
WM_CREATE message processing in the WndProc window procedure has two additional lines to set the range and
initial position of the vertical scroll bar:
SetScrollRange (hwnd, SB_VERT, 0, NUMLINES - 1, FALSE) ;
SetScrollPos (hwnd, SB_VERT, iVscrollPos, TRUE) ;
The sysmetrics structure array has NUMLINES lines of text, so the scroll bar range is set to 0 through NUMLINES -
1. Each position of the scroll bar corresponds to a line of text displayed at the top of the client area. If the scroll bar
thumb is at position 0, the first line will be positioned at the top of the client area. For positions greater than zero,
other lines appear at the top. When the position is NUMLINES - 1, the last line of text appears at the top of the
client area.
85](https://image.slidesharecdn.com/programmingwindows-140823083916-phpapp02/85/Programming-windows-85-320.jpg)


![PSTR szCmdLine, int iCmdShow)
{
static TCHAR szAppName[] = TEXT (“SysMets3”) ;
HWND hwnd ;
MSG msg ;
WNDCLASS wndclass ;
wndclass.style = CS_HREDRAW | CS_VREDRAW ;
wndclass.lpfnWndProc = WndProc ;
wndclass.cbClsExtra = 0 ;
wndclass.cbWndExtra = 0 ;
wndclass.hInstance = hInstance ;
wndclass.hIcon = LoadIcon (NULL, IDI_APPLICATION) ;
wndclass.hCursor = LoadCursor (NULL, IDC_ARROW) ;
wndclass.hbrBackground = (HBRUSH) GetStockObject (WHITE_BRUSH) ;
wndclass.lpszMenuName = NULL ;
wndclass.lpszClassName = szAppName ;
if (!RegisterClass (&wndclass))
{
MessageBox (NULL, TEXT (“Program requires Windows NT!”),
szAppName, MB_ICONERROR) ;
return 0 ;
}
hwnd = CreateWindow (szAppName, TEXT (“Get System Metrics No. 3”),
WS_OVERLAPPEDWINDOW | WS_VSCROLL | WS_HSCROLL,
CW_USEDEFAULT, CW_USEDEFAULT,
CW_USEDEFAULT, CW_USEDEFAULT,
NULL, NULL, hInstance, NULL) ;
ShowWindow (hwnd, iCmdShow) ;
UpdateWindow (hwnd) ;
while (GetMessage (&msg, NULL, 0, 0))
{
TranslateMessage (&msg) ;
DispatchMessage (&msg) ;
}
return msg.wParam ;
}
LRESULT CALLBACK WndProc (HWND hwnd, UINT message, WPARAM wParam, LPARAM lParam)
{
static int cxChar, cxCaps, cyChar, cxClient, cyClient, iMaxWidth ;
HDC hdc ;
int i, x, y, iVertPos, iHorzPos, iPaintBeg, iPaintEnd ;
PAINTSTRUCT ps ;
SCROLLINFO si ;
TCHAR szBuffer[10] ;
TEXTMETRIC tm ;
switch (message)
{
case WM_CREATE:
hdc = GetDC (hwnd) ;
GetTextMetrics (hdc, &tm) ;
cxChar = tm.tmAveCharWidth ;
cxCaps = (tm.tmPitchAndFamily & 1 ? 3 : 2) * cxChar / 2 ;
cyChar = tm.tmHeight + tm.tmExternalLeading ;
ReleaseDC (hwnd, hdc) ;
90](https://image.slidesharecdn.com/programmingwindows-140823083916-phpapp02/85/Programming-windows-90-320.jpg)


![si.fMask = SIF_POS ;
SetScrollInfo (hwnd, SB_HORZ, &si, TRUE) ;
GetScrollInfo (hwnd, SB_HORZ, &si) ;
// If the position has changed, scroll the window
if (si.nPos != iHorzPos)
{
ScrollWindow (hwnd, cxChar * (iHorzPos - si.nPos), 0,
NULL, NULL) ;
}
return 0 ;
case WM_PAINT :
hdc = BeginPaint (hwnd, &ps) ;
// Get vertical scroll bar position
si.cbSize = sizeof (si) ;
si.fMask = SIF_POS ;
GetScrollInfo (hwnd, SB_VERT, &si) ;
iVertPos = si.nPos ;
// Get horizontal scroll bar position
GetScrollInfo (hwnd, SB_HORZ, &si) ;
iHorzPos = si.nPos ;
// Find painting limits
iPaintBeg = max (0, iVertPos + ps.rcPaint.top / cyChar) ;
iPaintEnd = min (NUMLINES - 1,
iVertPos + ps.rcPaint.bottom / cyChar) ;
for (i = iPaintBeg ; i <= iPaintEnd ; i++)
{
x = cxChar * (1 - iHorzPos) ;
y = cyChar * (i - iVertPos) ;
TextOut (hdc, x, y,
sysmetrics[i].szLabel,
lstrlen (sysmetrics[i].szLabel)) ;
TextOut (hdc, x + 22 * cxCaps, y,
sysmetrics[i].szDesc,
lstrlen (sysmetrics[i].szDesc)) ;
SetTextAlign (hdc, TA_RIGHT | TA_TOP) ;
TextOut (hdc, x + 22 * cxCaps + 40 * cxChar, y, szBuffer,
wsprintf (szBuffer, TEXT (“%5d”),
GetSystemMetrics (sysmetrics[i].iIndex))) ;
SetTextAlign (hdc, TA_LEFT | TA_TOP) ;
}
EndPaint (hwnd, &ps) ;
return 0 ;
case WM_DESTROY :
PostQuitMessage (0) ;
return 0 ;
}
return DefWindowProc (hwnd, message, wParam, lParam) ;
}
93](https://image.slidesharecdn.com/programmingwindows-140823083916-phpapp02/85/Programming-windows-93-320.jpg)


![Chapter 18.
• Regions A region is a complex area of any shape and is generally defined as a Boolean combination of
simpler regions. More complex regions can be stored internally in GDI as a series of scan lines derived
from the original definition of the region. You can use regions for outlining, filling, and clipping.
• Paths A path is a collection of straight lines and curves stored internally in GDI. Paths can be used for
drawing, filling, and clipping. Paths can also be converted to regions.
• Clipping Drawing can be restricted to a particular section of the client area. This is known as clipping. The
clipping area can be rectangular or nonrectangular, generally specified as a region or a path.
• Palettes The use of a customized palette is generally restricted to displays that show 256 colors. Windows
reserves only 20 of these colors for use by the system. You can alter the other 236 colors to accurately
display the colors of real-world images stored in bitmaps. I’ll discuss palettes in Chapter 16.
• Printing Although this chapter is restricted to the video display, almost everything you learn here can be
applied to printing. I discuss printing in Chapter 13.
The Device Context
Before we begin drawing, let’s examine the device context with more rigor than we did in Chapter 4.
When you want to draw on a graphics output device such as the screen or printer, you must first obtain a handle to a
device context (or DC). In giving your program this handle, Windows is giving you permission to use the device.
You then include the handle as an argument to the GDI functions to identify to Windows the device on which you
wish to draw.
The device context contains many “attributes” that determine how the GDI functions work on the device. These
attributes allow GDI functions to have just a few arguments, such as starting coordinates. The GDI functions do not
need arguments for everything else that Windows needs to display the object on the device. For example, when you
call TextOut, you need specify in the function only the device context handle, the starting coordinates, the text, and
the length of the text. You don’t need to specify the font, the color of the text, the color of the background behind
the text, or the intercharacter spacing. These are all attributes that are part of the device context. When you want to
change one of these attributes, you call a function that does so. Subsequent TextOut calls to that device context use
the new attribute.
Getting a Device Context Handle
Windows provides several methods for obtaining a device context handle. If you obtain a video display device
context handle while processing a message, you should release it before exiting the window procedure. After you
release the handle, it is no longer valid. For a printer device context handle, the rules are not as strict. Again, we’ll
look at printing in Chapter 13.
The most common method for obtaining a device context handle and then releasing it involves using the BeginPaint
and EndPaint calls when processing the WM_PAINT message:
hdc = BeginPaint (hwnd, &ps) ;
[other program lines]
EndPaint (hwnd, &ps) ;
The variable ps is a structure of type PAINTSTRUCT. The hdc field of this structure is the same handle to the
device context that BeginPaint returns. The PAINSTRUCT structure also contains a RECT (rectangle) structure
named rcPaint that defines a rectangle encompassing the invalid region of the window’s client area. With the device
context handle obtained from BeginPaint you can draw only within this region. The BeginPaint call also validates
this region.
98](https://image.slidesharecdn.com/programmingwindows-140823083916-phpapp02/85/Programming-windows-98-320.jpg)
![Windows programs can also obtain a handle to a device context while processing messages other than WM_PAINT:
hdc = GetDC (hwnd) ;
[other program lines]
ReleaseDC (hwnd, hdc) ;
This device context applies to the client area of the window whose handle is hwnd. The primary difference between
the use of these calls and the use of the BeginPaint and EndPaint combination is that you can draw on your entire
client area with the handle returned from GetDC. However, GetDC and ReleaseDC don’t validate any possibly
invalid regions of the client area.
A Windows program can also obtain a handle to a device context that applies to the entire window and not only to
the window’s client area:
hdc = GetWindowDC (hwnd) ;
[other program lines]
ReleaseDC (hwnd, hdc) ;
This device context includes the window title bar, menu, scroll bars, and frame in addition to the client area.
Applications programs rarely use the GetWindowDC function. If you want to experiment with it, you should also
trap the WM_NCPAINT (“nonclient paint”) message, which is the message Windows uses to draw on the nonclient
areas of the window.
The BeginPaint, GetDC, and GetWindowDC calls obtain a device context associated with a particular window on
the video display. A much more general function for obtaining a handle to a device context is CreateDC:
hdc = CreateDC (pszDriver, pszDevice, pszOutput, pData) ;
[other program lines]
DeleteDC (hdc) ;
For example, you can obtain a device context handle for the entire display by calling
hdc = CreateDC (TEXT (“DISPLAY”), NULL, NULL, NULL) ;
Writing outside your window is generally impolite, but it’s convenient for some unusual applications. (Although this
fact is not documented, you can also retrieve a device context for the entire screen by calling GetDC with a NULL
argument.) In Chapter 13, we’ll use the CreateDC function to obtain a handle to a printer device context.
Sometimes you need only to obtain some information about a device context and not do any drawing. In these cases,
you can obtain a handle to an “information context” by using CreateIC. The arguments are the same as for the
CreateDC function. For example,
hdc = CreateIC (TEXT (“DISPLAY”), NULL, NULL, NULL) ;
You can’t write to the device by using this information context handle.
When working with bitmaps, it can sometimes be useful to obtain a “memory device context”:
hdcMem = CreateCompatibleDC (hdc) ;
[other program lines]
DeleteDC (hdcMem) ;
You can select a bitmap into the memory device context and use GDI functions to draw on the bitmap. I’ll discuss
these techniques in Chapter 14.
I mentioned earlier that a metafile is a collection of GDI function calls encoded in binary form. You can create a
metafile by obtaining a metafile device context:
hdcMeta = CreateMetaFile (pszFilename) ;
[other program lines]
hmf = CloseMetaFile (hdcMeta) ;
During the time the metafile device context is valid, any GDI calls you make using hdcMeta are not displayed but
become part of the metafile. When you call CloseMetaFile, the device context handle becomes invalid. The function
returns a handle to the metafile (hmf). I’ll discuss metafiles in Chapter 18.
99](https://image.slidesharecdn.com/programmingwindows-140823083916-phpapp02/85/Programming-windows-99-320.jpg)
![Getting Device Context Information
A device context usually refers to a physical display device such as a video display or a printer. Often, you need to
obtain information about this device, including the size of the display, in terms of both pixels and physical
dimensions, and its color capabilities. You can get this information by calling the GetDeviceCap (“get device
capabilities”) function:
iValue = GetDeviceCaps (hdc, iIndex) ;
The iIndex argument is one of 29 identifiers defined in the WINGDI.H header file. For example, the iIndex value of
HORZRES causes GetDeviceCaps to return the width of the device in pixels; a VERTRES argument returns the
height of the device in pixels. If hdc is a handle to a screen device context, that’s the same information you can get
from GetSystemMetrics. If hdc is a handle to a printer device context, GetDeviceCaps returns the height and width
of the printer display area in pixels.
You can also use GetDeviceCaps to determine the device’s capabilities of processing various types of graphics. This
is usually not important for dealing with the video display, but it becomes more important with working with
printers. For example, most pen plotters can’t draw bitmapped images and GetDeviceCaps can tell you that.
The DEVCAPS1 Program
The DEVCAPS1 program, shown in Figure 5-1, displays some (but not all) of the information available from the
GetDeviceCaps function using a device context for the video display. In Chapter 13, I’ll present a second, expanded
version of this program, called DEVCAPS2, that gets information for the printer.
Figure 5-1. The DEVCAPS1 program.
DEVCAPS1.C
/*---------------------------------------------------------
DEVCAPS1.C—Device Capabilities Display Program No. 1
© Charles Petzold, 1998
---------------------------------------------------------*/
#include <windows.h>
#define NUMLINES ((int) (sizeof devcaps / sizeof devcaps [0]))
struct
{
int iIndex ;
TCHAR * szLabel ;
TCHAR * szDesc ;
}
devcaps [] =
{
HORZSIZE, TEXT (“HORZSIZE”), TEXT (“Width in millimeters:”),
VERTSIZE, TEXT (“VERTSIZE”), TEXT (“Height in millimeters:”),
HORZRES, TEXT (“HORZRES”), TEXT (“Width in pixels:”),
VERTRES, TEXT (“VERTRES”), TEXT (“Height in raster lines:”),
BITSPIXEL, TEXT (“BITSPIXEL”), TEXT (“Color bits per pixel:”),
PLANES, TEXT (“PLANES”), TEXT (“Number of color planes:”),
NUMBRUSHES, TEXT (“NUMBRUSHES”), TEXT (“Number of device brushes:”),
NUMPENS, TEXT (“NUMPENS”), TEXT (“Number of device pens:”),
NUMMARKERS, TEXT (“NUMMARKERS”), TEXT (“Number of device markers:”),
NUMFONTS, TEXT (“NUMFONTS”), TEXT (“Number of device fonts:”),
NUMCOLORS, TEXT (“NUMCOLORS”), TEXT (“Number of device colors:”),
100](https://image.slidesharecdn.com/programmingwindows-140823083916-phpapp02/85/Programming-windows-100-320.jpg)
![PDEVICESIZE, TEXT (“PDEVICESIZE”), TEXT (“Size of device structure:”),
ASPECTX, TEXT (“ASPECTX”), TEXT (“Relative width of pixel:”),
ASPECTY, TEXT (“ASPECTY”), TEXT (“Relative height of pixel:”),
ASPECTXY, TEXT (“ASPECTXY”), TEXT (“Relative diagonal of pixel:”),
LOGPIXELSX, TEXT (“LOGPIXELSX”), TEXT (“Horizontal dots per inch:”),
LOGPIXELSY, TEXT (“LOGPIXELSY”), TEXT (“Vertical dots per inch:”),
SIZEPALETTE, TEXT (“SIZEPALETTE”), TEXT (“Number of palette entries:”),
NUMRESERVED, TEXT (“NUMRESERVED”), TEXT (“Reserved palette entries:”),
COLORRES, TEXT (“COLORRES”), TEXT (“Actual color resolution:”)
} ;
LRESULT CALLBACK WndProc (HWND, UINT, WPARAM, LPARAM) ;
int WINAPI WinMain (HINSTANCE hInstance, HINSTANCE hPrevInstance,
PSTR szCmdLine, int iCmdShow)
{
static TCHAR szAppName[] = TEXT (“DevCaps1”) ;
HWND hwnd ;
MSG msg ;
WNDCLASS wndclass ;
wndclass.style = CS_HREDRAW | CS_VREDRAW ;
wndclass.lpfnWndProc = WndProc ;
wndclass.cbClsExtra = 0 ;
wndclass.cbWndExtra = 0 ;
wndclass.hInstance = hInstance ;
wndclass.hIcon = LoadIcon (NULL, IDI_APPLICATION) ;
wndclass.hCursor = LoadCursor (NULL, IDC_ARROW) ;
wndclass.hbrBackground = (HBRUSH) GetStockObject (WHITE_BRUSH) ;
wndclass.lpszMenuName = NULL ;
wndclass.lpszClassName = szAppName ;
if (!RegisterClass (&wndclass))
{
MessageBox (NULL, TEXT (“This program requires Windows NT!”),
szAppName, MB_ICONERROR) ;
return 0 ;
}
hwnd = CreateWindow (szAppName, TEXT (“Device Capabilities”),
WS_OVERLAPPEDWINDOW,
CW_USEDEFAULT, CW_USEDEFAULT,
CW_USEDEFAULT, CW_USEDEFAULT,
NULL, NULL, hInstance, NULL) ;
ShowWindow (hwnd, iCmdShow) ;
UpdateWindow (hwnd) ;
while (GetMessage (&msg, NULL, 0, 0))
{
TranslateMessage (&msg) ;
DispatchMessage (&msg) ;
}
return msg.wParam ;
}
LRESULT CALLBACK WndProc (HWND hwnd, UINT message, WPARAM wParam, LPARAM lParam)
{
static int cxChar, cxCaps, cyChar ;
TCHAR szBuffer[10] ;
HDC hdc ;
int i ;
PAINTSTRUCT ps ;
TEXTMETRIC tm ;
101](https://image.slidesharecdn.com/programmingwindows-140823083916-phpapp02/85/Programming-windows-101-320.jpg)
![switch (message)
{
case WM_CREATE:
hdc = GetDC (hwnd) ;
GetTextMetrics (hdc, &tm) ;
cxChar = tm.tmAveCharWidth ;
cxCaps = (tm.tmPitchAndFamily & 1 ? 3 : 2) * cxChar / 2 ;
cyChar = tm.tmHeight + tm.tmExternalLeading ;
ReleaseDC (hwnd, hdc) ;
return 0 ;
case WM_PAINT:
hdc = BeginPaint (hwnd, &ps) ;
for (i = 0 ; i < NUMLINES ; i++)
{
TextOut (hdc, 0, cyChar * i,
devcaps[i].szLabel,
lstrlen (devcaps[i].szLabel)) ;
TextOut (hdc, 14 * cxCaps, cyChar * i,
devcaps[i].szDesc,
lstrlen (devcaps[i].szDesc)) ;
SetTextAlign (hdc, TA_RIGHT | TA_TOP) ;
TextOut (hdc, 14 * cxCaps + 35 * cxChar, cyChar * i, szBuffer,
wsprintf (szBuffer, TEXT (“%5d”),
GetDeviceCaps (hdc, devcaps[i].iIndex))) ;
SetTextAlign (hdc, TA_LEFT | TA_TOP) ;
}
EndPaint (hwnd, &ps) ;
return 0 ;
case WM_DESTROY:
PostQuitMessage (0) ;
return 0 ;
}
return DefWindowProc (hwnd, message, wParam, lParam) ;
}
As you can see, this program is quite similar to the SYSMETS1 program shown in Chapter 4. To keep the code
short, I didn’t include scroll bars because I knew the information would fit on one screen. The results for a 256-
color, 640-by-480 VGA are shown in Figure 5-2.
102](https://image.slidesharecdn.com/programmingwindows-140823083916-phpapp02/85/Programming-windows-102-320.jpg)


![Background Color White SetBkColor GetBkColor
Text Color Black SetTextColor GetTextColor
Drawing Mode R2_COPY
PEN
SetROP2 GetROP2
Stretching Mode BLACKO
NWHITE
SetStretchBltMode GetStretchBltMode
Polygon Fill Mode ALTERN
ATE
SetPolyFillMode GetPolyFillMode
Intercharacter Spacing 0 SetTextCharacterExtra GetTextCharacterE
xtra
Brush Origin (0, 0) SetBrushOrgEx GetBrushOrgEx
Clipping Region None SelectObject
SelectClipRgn
IntersectClipRgn
OffsetClipRgn
ExcludeClipRect
SelectClipPath
GetClipBox
Saving Device Contexts
Normally when you call GetDC or BeginPaint, Windows gives you a device context with default values for all the
attributes. Any changes you make to the attributes are lost when the device context is released with the ReleaseDC
or EndPaint call. If your program needs to use nondefault device context attributes, you’ll have to initialize the
device context every time you obtain a new device context handle:
case WM_PAINT:
hdc = BeginPaint (hwnd, &ps) ;
[initialize device context attributes]
[paint client area of window]
EndPaint (hwnd, &ps) ;
return 0 ;
Although this approach is generally satisfactory, you might prefer that changes you make to the attributes be saved
when you release the device context so that they will be in effect the next time you call GetDC or BeginPaint. You
can accomplish this by including the CS_OWNDC flag as part of the window class style when you register the
window class:
wndclass.style = CS_HREDRAW | CS_VREDRAW | CS_OWNDC ;
Now each window that you create based on this window class will have its own private device context that continues
to exist when the window is destroyed. When you use the CS_OWNDC style, you need to initialize the device
context attributes only once, perhaps while processing the WM_CREATE message:
case WM_CREATE:
hdc = GetDC (hwnd) ;
[initialize device context attributes]
ReleaseDC (hwnd, hdc) ;
110](https://image.slidesharecdn.com/programmingwindows-140823083916-phpapp02/85/Programming-windows-110-320.jpg)


![Windows, coordinates are 32-bit values. Because the 32-bit versions of C do not define a 64-bit integral data type,
this change meant that MoveTo could no longer indicate the previous current position in its return value. Although
the return value from MoveTo was almost never used in real-life programming, a new function was required, and
this was MoveToEx.
The last argument to MoveToEx is a pointer to a POINT structure. On return from the function, the x and y fields of
the POINT structure will indicate the previous current position. If you don’t need this information (which is almost
always the case), you can simply set the last argument to NULL as in the example shown above.
And now the caveat: Although coordinate values in Windows 98 appear to be 32-bit values, only the lower 16 bits
are used. Coordinate values are effectively restricted to -32,768 to 32,767. In Windows NT, the full 32-bit values are
used.
If you ever need the current position, you can obtain it by calling
GetCurrentPositionEx (hdc, &pt) ;
where pt is a POINT structure.
The following code draws a grid in the client area of a window, spacing the lines 100 pixels apart starting from the
upper left corner. The variable hwnd is assumed to be a handle to the window, hdc is a handle to the device context,
and x and y are integers:
GetClientRect (hwnd, &rect) ;
for (x = 0 ; x < rect.right ; x+= 100)
{
MoveToEx (hdc, x, 0, NULL) ;
LineTo (hdc, x, rect.bottom) ;
}
for (y = 0 ; y < rect.bottom ; y += 100)
{
MoveToEx (hdc, 0, y, NULL) ;
LineTo (hdc, rect.right, y) ;
}
Although it seems like a nuisance to be forced to use two functions to draw a single line, the current position comes
in handy when you want to draw a series of connected lines. For instance, you might want to define an array of 5
points (10 values) that define the outline of a rectangle:
POINT apt[5] = { 100, 100, 200, 100, 200, 200, 100, 200, 100, 100 } ;
Notice that the last point is the same as the first. Now you need only use MoveToEx for the first point and LineTo for
the successive points:
MoveToEx (hdc, apt[0].x, apt[0].y, NULL) ;
for (i = 1 ; i < 5 ; i++)
LineTo (hdc, apt[i].x, apt[i].y) ;
Because LineTo draws from the current position up to (but not including) the point in the LineTo function, no
coordinate gets written twice by this code. While overwriting points is not a problem with a video display, it might
not look good on a plotter or with some drawing modes that I’ll discuss later in this chapter.
When you have an array of points that you want connected with lines, you can draw the lines more easily using the
Polyline function. This statement draws the same rectangle as in the code shown above:
Polyline (hdc, apt, 5) ;
The last argument is the number of points. We could also have represented this value by sizeof (apt) / sizeof
(POINT). Polyline has the same effect on drawing as an initial MoveToEx followed by multiple LineTo functions.
However, Polyline doesn’t use or change the current position. PolylineTo is a little different. This function uses the
current position for the starting point and sets the current position to the end of the last line drawn. The code below
draws the same rectangle as that last shown above:
MoveToEx (hdc, apt[0].x, apt[0].y, NULL) ;
PolylineTo (hdc, apt + 1, 4) ;
113](https://image.slidesharecdn.com/programmingwindows-140823083916-phpapp02/85/Programming-windows-113-320.jpg)
![Although you can use Polyline and PolylineTo to draw just a few lines, the functions are most useful when you need
to draw a complex curve. You do this by using hundreds or even thousands of very short lines. If they’re short
enough and there are enough of them, together they’ll look like a curve. For example, suppose you need to draw a
sine wave. The SINEWAVE program in Figure 5-6 shows how to do it.
Figure 5-6. The SINEWAVE program.
SINEWAVE.C
/*-----------------------------------------
SINEWAVE.C—Sine Wave Using Polyline
© Charles Petzold, 1998
-----------------------------------------*/
#include <windows.h>
#include <math.h>
#define NUM 1000
#define TWOPI (2 * 3.14159)
LRESULT CALLBACK WndProc (HWND, UINT, WPARAM, LPARAM) ;
int WINAPI WinMain (HINSTANCE hInstance, HINSTANCE hPrevInstance,
PSTR szCmdLine, int iCmdShow)
{
static TCHAR szAppName[] = TEXT (“SineWave”) ;
HWND hwnd ;
MSG msg ;
WNDCLASS wndclass ;
wndclass.style = CS_HREDRAW | CS_VREDRAW ;
wndclass.lpfnWndProc = WndProc ;
wndclass.cbClsExtra = 0 ;
wndclass.cbWndExtra = 0 ;
wndclass.hInstance = hInstance ;
wndclass.hIcon = LoadIcon (NULL, IDI_APPLICATION) ;
wndclass.hCursor = LoadCursor (NULL, IDC_ARROW) ;
wndclass.hbrBackground = (HBRUSH) GetStockObject (WHITE_BRUSH) ;
wndclass.lpszMenuName = NULL ;
wndclass.lpszClassName = szAppName ;
if (!RegisterClass (&wndclass))
{
MessageBox (NULL, TEXT (“Program requires Windows NT!”),
szAppName, MB_ICONERROR) ;
return 0 ;
}
hwnd = CreateWindow (szAppName, TEXT (“Sine Wave Using Polyline”),
WS_OVERLAPPEDWINDOW,
CW_USEDEFAULT, CW_USEDEFAULT,
CW_USEDEFAULT, CW_USEDEFAULT,
NULL, NULL, hInstance, NULL) ;
ShowWindow (hwnd, iCmdShow) ;
UpdateWindow (hwnd) ;
while (GetMessage (&msg, NULL, 0, 0))
114](https://image.slidesharecdn.com/programmingwindows-140823083916-phpapp02/85/Programming-windows-114-320.jpg)
![{
TranslateMessage (&msg) ;
DispatchMessage (&msg) ;
}
return msg.wParam ;
}
LRESULT CALLBACK WndProc (HWND hwnd, UINT message, WPARAM wParam, LPARAM lParam)
{
static int cxClient, cyClient ;
HDC hdc ;
int i ;
PAINTSTRUCT ps ;
POINT apt [NUM] ;
switch (message)
{
case WM_SIZE:
cxClient = LOWORD (lParam) ;
cyClient = HIWORD (lParam) ;
return 0 ;
case WM_PAINT:
hdc = BeginPaint (hwnd, &ps) ;
MoveToEx (hdc, 0, cyClient / 2, NULL) ;
LineTo (hdc, cxClient, cyClient / 2) ;
for (i = 0 ; i < NUM ; i++)
{
apt[i].x = i * cxClient / NUM ;
apt[i].y = (int) (cyClient / 2 * (1 - sin (TWOPI * i / NUM))) ;
}
Polyline (hdc, apt, NUM) ;
return 0 ;
case WM_DESTROY:
PostQuitMessage (0) ;
return 0 ;
}
return DefWindowProc (hwnd, message, wParam, lParam) ;
}
The program has an array of 1000 POINT structures. As the for loop is incremented from 0 through 999, the x fields
of the POINT structure are set to incrementally increasing values from 0 to cxClient. The program sets the y fields of
the POINT structure to sine curve values for one cycle and enlarged to fill the client area. The whole curve is drawn
using a single Polyline call. Because the Polyline function is implemented at the device driver level, it is faster than
calling LineTo 1000 times. The results are shown in Figure 5-7.
115](https://image.slidesharecdn.com/programmingwindows-140823083916-phpapp02/85/Programming-windows-115-320.jpg)


![Figure 5-13. A figure drawn using the Pie function.
For the Arc function, Windows is now finished, because the arc is an elliptical line rather than a filled area. For the
Chord function, Windows connects the endpoints of the arc. For the Pie function, Windows connects each endpoint
of the arc with the center of the ellipse. The interiors of the chord and pie-wedge figures are filled with the current
brush.
You may wonder about this use of starting and ending positions in the Arc, Chord, and Pie functions. Why not
simply specify starting and ending points on the circumference of the ellipse? Well, you can, but you would have to
figure out what those points are. Windows’ method gets the job done without requiring such precision.
The LINEDEMO program shown in Figure 5-14 draws a rectangle, an ellipse, a rectangle with rounded corners, and
two lines, but not in that order. The program demonstrates that these functions that define closed areas do indeed fill
them, because the lines are hidden behind the ellipse. The results are shown in Figure 5-15.
Figure 5-14. The LINEDEMO program.
LINEDEMO.C
/*--------------------------------------------------
LINEDEMO.C—Line-Drawing Demonstration Program
© Charles Petzold, 1998
--------------------------------------------------*/
#include <windows.h>
LRESULT CALLBACK WndProc (HWND, UINT, WPARAM, LPARAM) ;
int WINAPI WinMain (HINSTANCE hInstance, HINSTANCE hPrevInstance,
PSTR szCmdLine, int iCmdShow)
{
static TCHAR szAppName[] = TEXT (“LineDemo”) ;
HWND hwnd ;
MSG msg ;
WNDCLASS wndclass ;
120](https://image.slidesharecdn.com/programmingwindows-140823083916-phpapp02/85/Programming-windows-120-320.jpg)


![Since then, the two-dimensional form of the Bezier spline has shown itself to be the most useful curve (after the
straight line and ellipse) for computer graphics. In PostScript, the Bezier spline is used for all curves—even
elliptical lines are approximated from Beziers. Bezier curves are also used to define the character outlines of
PostScript fonts. (TrueType uses a simpler and faster form of spline.)
A single two-dimensional Bezier spline is defined by four points—two end points and two control points. The ends
of the curve are anchored at the two end points. The control points act as “magnets” to pull the curve away from the
straight line between the two end points. This is best illustrated by an interactive program, called BEZIER, which is
shown in Figure 5-16.
Figure 5-16. The BEZIER program.
BEZIER.C
/*---------------------------------------
BEZIER.C—Bezier Splines Demo
© Charles Petzold, 1998
---------------------------------------*/
#include <windows.h>
LRESULT CALLBACK WndProc (HWND, UINT, WPARAM, LPARAM) ;
int WINAPI WinMain (HINSTANCE hInstance, HINSTANCE hPrevInstance,
PSTR szCmdLine, int iCmdShow)
{
static TCHAR szAppName[] = TEXT (“Bezier”) ;
HWND hwnd ;
MSG msg ;
WNDCLASS wndclass ;
wndclass.style = CS_HREDRAW | CS_VREDRAW ;
wndclass.lpfnWndProc = WndProc ;
wndclass.cbClsExtra = 0 ;
wndclass.cbWndExtra = 0 ;
wndclass.hInstance = hInstance ;
wndclass.hIcon = LoadIcon (NULL, IDI_APPLICATION) ;
wndclass.hCursor = LoadCursor (NULL, IDC_ARROW) ;
wndclass.hbrBackground = (HBRUSH) GetStockObject (WHITE_BRUSH) ;
wndclass.lpszMenuName = NULL ;
wndclass.lpszClassName = szAppName ;
if (!RegisterClass (&wndclass))
{
MessageBox (NULL, TEXT (“Program requires Windows NT!”),
szAppName, MB_ICONERROR) ;
return 0 ;
}
hwnd = CreateWindow (szAppName, TEXT (“Bezier Splines”),
WS_OVERLAPPEDWINDOW,
CW_USEDEFAULT, CW_USEDEFAULT,
CW_USEDEFAULT, CW_USEDEFAULT,
NULL, NULL, hInstance, NULL) ;
ShowWindow (hwnd, iCmdShow) ;
UpdateWindow (hwnd) ;
while (GetMessage (&msg, NULL, 0, 0))
{
123](https://image.slidesharecdn.com/programmingwindows-140823083916-phpapp02/85/Programming-windows-123-320.jpg)
![TranslateMessage (&msg) ;
DispatchMessage (&msg) ;
}
return msg.wParam ;
}
void DrawBezier (HDC hdc, POINT apt[])
{
PolyBezier (hdc, apt, 4) ;
MoveToEx (hdc, apt[0].x, apt[0].y, NULL) ;
LineTo (hdc, apt[1].x, apt[1].y) ;
MoveToEx (hdc, apt[2].x, apt[2].y, NULL) ;
LineTo (hdc, apt[3].x, apt[3].y) ;
}
LRESULT CALLBACK WndProc (HWND hwnd, UINT message, WPARAM wParam, LPARAM lParam)
{
static POINT apt[4] ;
HDC hdc ;
int cxClient, cyClient ;
PAINTSTRUCT ps ;
switch (message)
{
case WM_SIZE:
cxClient = LOWORD (lParam) ;
cyClient = HIWORD (lParam) ;
apt[0].x = cxClient / 4 ;
apt[0].y = cyClient / 2 ;
apt[1].x = cxClient / 2 ;
apt[1].y = cyClient / 4 ;
apt[2].x = cxClient / 2 ;
apt[2].y = 3 * cyClient / 4 ;
apt[3].x = 3 * cxClient / 4 ;
apt[3].y = cyClient / 2 ;
return 0 ;
case WM_LBUTTONDOWN:
case WM_RBUTTONDOWN:
case WM_MOUSEMOVE:
if (wParam & MK_LBUTTON || wParam & MK_RBUTTON)
{
hdc = GetDC (hwnd) ;
SelectObject (hdc, GetStockObject (WHITE_PEN)) ;
DrawBezier (hdc, apt) ;
if (wParam & MK_LBUTTON)
{
apt[1].x = LOWORD (lParam) ;
apt[1].y = HIWORD (lParam) ;
}
if (wParam & MK_RBUTTON)
{
apt[2].x = LOWORD (lParam) ;
apt[2].y = HIWORD (lParam) ;
124](https://image.slidesharecdn.com/programmingwindows-140823083916-phpapp02/85/Programming-windows-124-320.jpg)


![The PS_INSIDEFRAME style has another peculiarity when used with functions that define a filled area. For all pen
styles except PS_INSIDEFRAME, if the pen used to draw the outline is greater than 1 pixel wide, then the pen is
centered on the border so that part of the line can be outside the bounding box. For the PS_INSIDEFRAME pen
style, the entire line is drawn inside the bounding box.
You can also create a pen by setting up a structure of type LOGPEN (“logical pen”) and calling CreatePenIndirect.
If your program uses a lot of different pens that you initialize in your source code, this method is probably more
efficient.
To use CreatePenIndirect, first you define a structure of type LOGPEN:
LOGPEN logpen ;
This structure has three members: lopnStyle (an unsigned integer or UINT) is the pen style, lopnWidth (a POINT
structure) is the pen width in logical units, and lopnColor (COLORREF) is the pen color. Windows uses only the x
field of the lopnWidth structure to set the pen width; it ignores the y field.
You create the pen by passing the address of the structure to CreatePenIndirect:
hPen = CreatePenIndirect (&logpen) ;
Note that the CreatePen and CreatePenIndirect functions do not require a handle to a device context. These
functions create logical pens that have no connection with a device context until you call SelectObject. You can use
the same logical pen for several different devices, such as the screen and a printer.
Here’s one method for creating, selecting, and deleting pens. Suppose your program uses three pens—a black pen of
width 1, a red pen of width 3, and a black dotted pen. You can first define static variables for storing the handles to
these pens:
static HPEN hPen1, hPen2, hPen3 ;
During processing of WM_CREATE, you can create the three pens:
hPen1 = CreatePen (PS_SOLID, 1, 0) ;
hPen2 = CreatePen (PS_SOLID, 3, RGB (255, 0, 0)) ;
hPen3 = CreatePen (PS_DOT, 0, 0) ;
During processing of WM_PAINT (or any other time you have a valid handle to a device context), you can select
one of these pens into the device context and draw with it:
SelectObject (hdc, hPen2) ;
[ line-drawing functions ]
SelectObject (hdc, hPen1) ;
[ line-drawing functions ]
During processing of WM_DESTROY, you can delete the three pens you created:
DeleteObject (hPen1) ;
DeleteObject (hPen2) ;
DeleteObject (hPen3) ;
This is the most straightforward method of creating selecting, and deleting pens, but obviously your program must
know what pens will be needed. You might instead want to create the pens during each WM_PAINT message and
delete them after you call EndPaint. (You can delete them before calling EndPaint, but you have to be careful not to
delete the pen currently selected in the device context.)
You might want to create pens on the fly and combine the CreatePen and SelectObject calls in the same statement:
SelectObject (hdc, CreatePen (PS_DASH, 0, RGB (255, 0, 0))) ;
Now when you draw lines, you’ll be using a red dashed pen. When you’re finished drawing the red dashed lines,
you can delete the pen. Whoops! How can you delete the pen when you haven’t saved the pen handle? Recall that
SelectObject returns the handle to the pen previously selected in the device context. This means that you can delete
the pen by selecting the stock BLACK_PEN into the device context and deleting the value returned from
SelectObject:
DeleteObject (SelectObject (hdc, GetStockObject (BLACK_PEN))) ;
129](https://image.slidesharecdn.com/programmingwindows-140823083916-phpapp02/85/Programming-windows-129-320.jpg)


![If you want to draw the outline of the figure without filling in the interior, select the NULL_BRUSH into the device
context:
SelectObject (hdc, GetStockobject (NULL_BRUSH) ;
You can also create customized brushes just as you can create customized pens. We’ll cover that topic shortly.
The Polygon Function and the Polygon-Filling Mode
I’ve already discussed the first five area-filling functions. Polygon is the sixth function for drawing a bordered and
filled figure. The function call is similar to the Polyline function:
Polygon (hdc, apt, iCount) ;
The apt argument is an array of POINT structures, and iCount is the number of points. If the last point in this array
is different from the first point, Windows adds another line that connects the last point with the first point. (This
does not happen with the Polyline function.) The PolyPolygon function looks like this:
PolyPolygon (hdc, apt, aiCounts, iPolyCount) ;
The function draws multiple polygons. The number of polygons it draws is given as the last argument. For each
polygon, the aiCounts array gives the number of points in the polygon. The apt array has all the points for all the
polygons. Aside from the return value, PolyPolygon is functionally equivalent to the following code:
for (i = 0, iAccum = 0 ; i < iPolyCount ; i++)
{
Polygon (hdc, apt + iAccum, aiCounts[i]) ;
iAccum += aiCounts[i] ;
}
For both Polygon and PolyPolygon, Windows fills the bounded area with the current brush defined in the device
context. How the interior is filled depends on the polygon-filling mode, which you can set using the
SetPolyFillMode function:
SetPolyFillMode (hdc, iMode) ;
By default, the polygon-filling mode is ALTERNATE, but you can set it to WINDING. The difference between the
two modes is shown in Figure 5-19.
Figure 5-19. Figures drawn with the two polygon-filling modes: ALTERNATE (left) and WINDING (right).
At first, the difference between alternate and winding modes seems rather simple. For alternate mode, you can
imagine a line drawn from a point in an enclosed area to infinity. The enclosed area is filled only if that imaginary
133](https://image.slidesharecdn.com/programmingwindows-140823083916-phpapp02/85/Programming-windows-133-320.jpg)

![int WINAPI WinMain (HINSTANCE hInstance, HINSTANCE hPrevInstance,
PSTR szCmdLine, int iCmdShow)
{
static TCHAR szAppName[] = TEXT (“AltWind”) ;
HWND hwnd ;
MSG msg ;
WNDCLASS wndclass ;
wndclass.style = CS_HREDRAW | CS_VREDRAW ;
wndclass.lpfnWndProc = WndProc ;
wndclass.cbClsExtra = 0 ;
wndclass.cbWndExtra = 0 ;
wndclass.hInstance = hInstance ;
wndclass.hIcon = LoadIcon (NULL, IDI_APPLICATION) ;
wndclass.hCursor = LoadCursor (NULL, IDC_ARROW) ;
wndclass.hbrBackground = (HBRUSH) GetStockObject (WHITE_BRUSH) ;
wndclass.lpszMenuName = NULL ;
wndclass.lpszClassName = szAppName ;
if (!RegisterClass (&wndclass))
{
MessageBox (NULL, TEXT (“Program requires Windows NT!”),
szAppName, MB_ICONERROR) ;
return 0 ;
}
hwnd = CreateWindow (szAppName, TEXT (“Alternate and Winding Fill Modes”),
WS_OVERLAPPEDWINDOW,
CW_USEDEFAULT, CW_USEDEFAULT,
CW_USEDEFAULT, CW_USEDEFAULT,
NULL, NULL, hInstance, NULL) ;
ShowWindow (hwnd, iCmdShow) ;
UpdateWindow (hwnd) ;
while (GetMessage (&msg, NULL, 0, 0))
{
TranslateMessage (&msg) ;
DispatchMessage (&msg) ;
}
return msg.wParam ;
}
LRESULT CALLBACK WndProc (HWND hwnd, UINT message, WPARAM wParam, LPARAM lParam)
{
static POINT aptFigure [10] = { 10,70, 50,70, 50,10, 90,10, 90,50,
30,50, 30,90, 70,90, 70,30, 10,30 };
static int cxClient, cyClient ;
HDC hdc ;
int i ;
PAINTSTRUCT ps ;
POINT apt[10] ;
switch (message)
{
case WM_SIZE:
cxClient = LOWORD (lParam) ;
cyClient = HIWORD (lParam) ;
return 0 ;
case WM_PAINT:
hdc = BeginPaint (hwnd, &ps) ;
135](https://image.slidesharecdn.com/programmingwindows-140823083916-phpapp02/85/Programming-windows-135-320.jpg)
![SelectObject (hdc, GetStockObject (GRAY_BRUSH)) ;
for (i = 0 ; i < 10 ; i++)
{
apt[i].x = cxClient * aptFigure[i].x / 200 ;
apt[i].y = cyClient * aptFigure[i].y / 100 ;
}
SetPolyFillMode (hdc, ALTERNATE) ;
Polygon (hdc, apt, 10) ;
for (i = 0 ; i < 10 ; i++)
{
apt[i].x += cxClient / 2 ;
}
SetPolyFillMode (hdc, WINDING) ;
Polygon (hdc, apt, 10) ;
EndPaint (hwnd, &ps) ;
return 0 ;
case WM_DESTROY:
PostQuitMessage (0) ;
return 0 ;
}
return DefWindowProc (hwnd, message, wParam, lParam) ;
}
The coordinates of the figure—scaled to an arbitrary 100-unit-by-100-unit area—are stored in the aptFigure array.
These coordinates are scaled based on the width and height of the client area. The program displays the figure twice,
once using the ALTERNATE filling mode and then using WINDING. The results are shown in Figure 5-22.
136](https://image.slidesharecdn.com/programmingwindows-140823083916-phpapp02/85/Programming-windows-136-320.jpg)


![This means that the logical point (-cxClient/2, -cyClient/2) is mapped to the device point (cxClient/2, cyClient/2),
giving you a coordinate system that looks like this:
You can obtain the current viewport and window origins from these functions:
GetViewportOrgEx (hdc, &pt) ;
GetWindowOrgEx (hdc, &pt) ;
where pt is a POINT structure. The values returned from GetViewportOrgEx are in device coordinates; the values
returned from GetWindowOrgEx are in logical coordinates.
You might want to change the viewport or window origin to shift display output within the client area of your
window—for instance, in response to scroll bar input from the user. For example, in the SYSMETS2 program in
Chapter 4, we used the iVscrollPos value (the current position of the vertical scroll bar) to adjust the y-coordinates
of the display output:
case WM_PAINT:
hdc = BeginPaint (hwnd, &ps) ;
for (i = 0 ; i < NUMLINES ; i++)
{
y = cyChar * (i - iVscrollPos) ;
[display text]
}
EndPaint (hwnd, &ps) ;
return 0 ;
We can achieve the same result using SetWindowOrgEx:
case WM_PAINT:
hdc = BeginPaint (hwnd, &ps) ;
SetWindowOrgEx (hdc, 0, cyChar * iVscrollPos) ;
for (i = 0 ; i < NUMLINES ; i++)
{
y = cyChar * i ;
[display text]
}
EndPaint (hwnd, &ps) ;
return 0 ;
Now the calculation of the y-coordinate for the TextOut functions doesn’t require the iVscrollPos value. This means
that you can put the text output calls in a separate function and not have to pass the iVscrollPos value to the
function, because the display is adjusted by changing the window origin.
If you have some experience working with rectangular (or Cartesian) coordinate systems, moving the logical point
(0, 0) to the center of the client area as we did earlier may have seemed a reasonable action. However, there’s a
slight problem with the MM_TEXT mapping mode. Usually a Cartesian coordinate system defines values on the y-
axis as increasing as you move up the axis, whereas MM_TEXT defines the values to increase as you move down
the axis. In this sense, MM_TEXT is an oddity, and the next five mapping modes do it correctly.
144](https://image.slidesharecdn.com/programmingwindows-140823083916-phpapp02/85/Programming-windows-144-320.jpg)


![Of course, such a coordinate system makes logical units much larger than physical units. Everything you draw on
the device will have coordinate values that map to an increment of 1/16 inch. You cannot draw two horizontal lines
that are 1/32 inch apart because that would require a fractional logical coordinate.
MM_ANISOTROPIC: Stretching the Image to Fit
When you set the viewport and window extents in the MM_ISOTROPIC mapping mode, Windows adjusts the
values so that logical units on the two axes have the same physical dimensions. In the MM_ANISOTROPIC
mapping mode, Windows makes no adjustments to the values you set. This means that MM_ANISOTROPIC does
not necessarily maintain the correct aspect ratio.
One way you can use MM_ANISOTROPIC is to have arbitrary coordinates for the client area, as we did with
MM_ISOTROPIC. This code sets the point (0, 0) at the lower left corner of the client area with the x and y axes
ranging from 0 to 32,767:
SetMapMode (hdc, MM_ANISOTROPIC) ;
SetWindowExtEx (hdc, 32767, 32767, NULL) ;
SetViewportExtEx (hdc, cxClient, -cyClient, NULL) ;
SetViewportOrgEx (hdc, 0, cyClient, NULL) ;
With MM_ISOTROPIC, similar code caused part of the client area to be beyond the range of the axes. With
MM_ANISOTROPIC, the upper right corner of the client area is always the point (32767, 32767), regardless of its
dimensions. If the client area is not square, logical x and y units will have different physical dimensions.
In the previous section on the MM_ISOTROPIC mapping mode, I discussed how you might draw a round clock in
the client area where the x and y axes ranged from -1000 to 1000. You can do something similar with
MM_ANISOTROPIC:
SetMapMode (hdc, MM_ANISOTROPIC) ;
SetWindowExtEx (hdc, 1000, 1000, NULL) ;
SetViewportExtEx (hdc, cxClient / 2, -cyClient / 2, NULL) ;
SetViewportOrgEx (hdc, cxClient / 2, cyClient / 2, NULL) ;
The difference with MM_ANISOTROPIC is that in general the clock would be drawn as an ellipse rather than a
circle.
Another way to use MM_ANISOTROPIC is to set x and y units to fixed but unequal values. For instance, if you
have a program that displays only text, you may want to set coarse coordinates based on the height and width of a
single character:
SetMapMode (hdc, MM_ANISOTROPIC) ;
SetWindowExtEx (hdc, 1, 1, NULL) ;
SetViewportExtEx (hdc, cxChar, cyChar, NULL) ;
Of course, I’ve assumed that cxChar and cyChar are the width and height of characters in that font. Now you can
specify coordinates in terms of character rows and columns. For instance, the following statement displays text three
characters from the left and two character rows from the top of the client area:
TextOut (hdc, 3, 2, TEXT (“Hello”), 5) ;
This might be more appropriate if you’re using a fixed-point font, as in the upcoming WHATSIZE program.
When you first set the MM_ANISOTROPIC mapping mode, it always inherits the extents of the previously set
mapping mode. This can be very convenient. One way of thinking about MM_ANISTROPIC is that it “unlocks” the
extents; that is, it allows you to change the extents of an otherwise fully-constrained mapping mode. For instance,
suppose you want to use the MM_LOENGLISH mapping mode because you want logical units to be 0.01 inch. But
you don’t want the values along the y-axis to increase as you move up the screen—you prefer the MM_TEXT
orientation, where y values increase moving down. Here’s the code:
SIZE size ;
[other program lines]
SetMapMode (hdc, MM_LOENGLISH) ;
SetMapMode (hdc, MM_ANISOTROPIC) ;
GetViewportExtEx (hdc, &size) ;
151](https://image.slidesharecdn.com/programmingwindows-140823083916-phpapp02/85/Programming-windows-151-320.jpg)
![SetViewportExtEx (hdc, size.cx, -size.cy, NULL) ;
We first set the mapping mode to MM_LOENGLISH. Then we liberate the extents by setting the mapping mode to
MM_ANISOTROPIC. The GetViewportExtEx function obtains the viewport extents in a SIZE structure. Then we
call SetViewportExtEx with the extents, except that the y extent is made negative.
The WHATSIZE Program
A little Windows history: The first how-to-program-for-Windows article appeared in the December 1986 issue of
Microsoft Systems Journal. The sample program in that article was called WSZ (“what size”), and it displayed the
size of a client area in pixels, inches, and millimeters. A simplified version of that program is WHATSIZE, shown in
Figure 5-24. The program shows the dimensions of the window’s client area in terms of the five metric mapping
modes.
Figure 5-24. The WHATSIZE program.
WHATSIZE.C
/*-----------------------------------------
WHATSIZE.C—What Size is the Window?
© Charles Petzold, 1998
-----------------------------------------*/
#include <windows.h>
LRESULT CALLBACK WndProc (HWND, UINT, WPARAM, LPARAM) ;
int WINAPI WinMain (HINSTANCE hInstance, HINSTANCE hPrevInstance,
PSTR szCmdLine, int iCmdShow)
{
static TCHAR szAppName[] = TEXT (“WhatSize”) ;
HWND hwnd ;
MSG msg ;
WNDCLASS wndclass ;
wndclass.style = CS_HREDRAW | CS_VREDRAW;
wndclass.lpfnWndProc = WndProc ;
wndclass.cbClsExtra = 0 ;
wndclass.cbWndExtra = 0 ;
wndclass.hInstance = hInstance ;
wndclass.hIcon = LoadIcon (NULL, IDI_APPLICATION) ;
wndclass.hCursor = LoadCursor (NULL, IDC_ARROW) ;
wndclass.hbrBackground = (HBRUSH) GetStockObject (WHITE_BRUSH) ;
wndclass.lpszMenuName = NULL ;
wndclass.lpszClassName = szAppName ;
if (!RegisterClass (&wndclass))
{
MessageBox (NULL, TEXT (“This program requires Windows NT!”),
szAppName, MB_ICONERROR) ;
return 0 ;
}
hwnd = CreateWindow (szAppName, TEXT (“What Size is the Window?”),
WS_OVERLAPPEDWINDOW,
CW_USEDEFAULT, CW_USEDEFAULT,
CW_USEDEFAULT, CW_USEDEFAULT,
NULL, NULL, hInstance, NULL) ;
152](https://image.slidesharecdn.com/programmingwindows-140823083916-phpapp02/85/Programming-windows-152-320.jpg)
![ShowWindow (hwnd, iCmdShow) ;
UpdateWindow (hwnd) ;
while (GetMessage (&msg, NULL, 0, 0))
{
TranslateMessage (&msg) ;
DispatchMessage (&msg) ;
}
return msg.wParam ;
}
void Show (HWND hwnd, HDC hdc, int xText, int yText, int iMapMode,
TCHAR * szMapMode)
{
TCHAR szBuffer [60] ;
RECT rect ;
SaveDC (hdc) ;
SetMapMode (hdc, iMapMode) ;
GetClientRect (hwnd, &rect) ;
DPtoLP (hdc, (PPOINT) &rect, 2) ;
RestoreDC (hdc, -1) ;
TextOut (hdc, xText, yText, szBuffer,
wsprintf (szBuffer, TEXT (“%-20s %7d %7d %7d %7d”), szMapMode,
rect.left, rect.right, rect.top, rect.bottom)) ;
}
LRESULT CALLBACK WndProc (HWND hwnd, UINT message, WPARAM wParam, LPARAM lParam)
{
static TCHAR szHeading [] =
TEXT (“Mapping Mode Left Right Top Bottom”) ;
static TCHAR szUndLine [] =
TEXT (“------------ ---- ----- --- ------“) ;
static int cxChar, cyChar ;
HDC hdc ;
PAINTSTRUCT ps ;
TEXTMETRIC tm ;
switch (message)
{
case WM_CREATE:
hdc = GetDC (hwnd) ;
SelectObject (hdc, GetStockObject (SYSTEM_FIXED_FONT)) ;
GetTextMetrics (hdc, &tm) ;
cxChar = tm.tmAveCharWidth ;
cyChar = tm.tmHeight + tm.tmExternalLeading ;
ReleaseDC (hwnd, hdc) ;
return 0 ;
case WM_PAINT:
hdc = BeginPaint (hwnd, &ps) ;
SelectObject (hdc, GetStockObject (SYSTEM_FIXED_FONT)) ;
SetMapMode (hdc, MM_ANISOTROPIC) ;
SetWindowExtEx (hdc, 1, 1, NULL) ;
SetViewportExtEx (hdc, cxChar, cyChar, NULL) ;
TextOut (hdc, 1, 1, szHeading, lstrlen (szHeading)) ;
TextOut (hdc, 1, 2, szUndLine, lstrlen (szUndLine)) ;
153](https://image.slidesharecdn.com/programmingwindows-140823083916-phpapp02/85/Programming-windows-153-320.jpg)


![in the WM_PAINT message. Sure, it will work, but the program will effectively prevent itself from processing other
messages. The program cannot be exited or minimized.
One acceptable alternative is setting a Windows timer to send WM_TIMER messages to your window function. (I’ll
discuss the timer in Chapter 8.) For each WM_TIMER message, you obtain a device context with GetDC, draw a
random rectangle, and then release the device context with ReleaseDC. But that takes some of the fun out of the
program, because the program can’t draw the random rectangles as quickly as possible. It must wait for each
WM_TIMER message, and that’s based on the resolution of the system clock.
There must be plenty of “dead time” in Windows—time during which all the message queues are empty and
Windows is just sitting around waiting for keyboard or mouse input. Couldn’t we somehow get control during that
dead time and draw the rectangles, relinquishing control only when a message is added to a program’s message
queue? That’s one of the purposes of the PeekMessage function. Here’s one example of a PeekMessage call:
PeekMessage (&msg, NULL, 0, 0, PM_REMOVE) ;
The first four parameters (a pointer to a MSG structure, a window handle, and two values indicating a message
range) are identical to those of GetMessage. Setting the second, third, and fourth parameters to NULL or 0 indicates
that we want PeekMessage to return all messages for all windows in the program. The last parameter to
PeekMessage is set to PM_REMOVE if the message is to be removed from the message queue. You can set it to
PM_NOREMOVE if the message isn’t to be removed. This is why PeekMessage is a “peek” rather than a “get”—it
allows a program to check the next message in the program’s queue without actually removing it.
GetMessage doesn’t return control to a program unless it retrieves a message from the program’s message queue.
But PeekMessage always returns right away regardless whether a message is present or not. When there’s a message
in the program’s message queue, the return value of PeekMessage is TRUE (nonzero) and the message can be
processed as normal. When there is no message in the queue, PeekMessage returns FALSE (0).
This allows us to replace the normal message loop, which looks like this:
while (GetMessage (&msg, NULL, 0, 0))
{
TranslateMessage (&msg) ;
DispatchMessage (&msg) ;
}
return msg.wParam ;
with an alternative message loop like this:
while (TRUE)
{
if (PeekMessage (&msg, NULL, 0, 0, PM_REMOVE))
{
if (msg.message == WM_QUIT)
break ;
TranslateMessage (&msg) ;
DispatchMessage (&msg) ;
}
else
{
[other program lines to do some work]
}
}
return msg.wParam ;
Notice that the WM_QUIT message is explicitly checked. You don’t have to do this in a normal message loop,
because the return value of GetMessage is FALSE (0) when it retrieves a WM_QUIT message. But PeekMessage
uses its return value to indicate whether a message was retrieved, so the check of WM_QUIT is required.
If the return value of PeekMessage is TRUE, the message is processed normally. If the value is FALSE, the program
can do some work (such as displaying yet another random rectangle) before returning control to Windows.
(Although the Windows documentation notes that you can’t use PeekMessage to remove WM_PAINT messages
from the message queue, this isn’t really a problem. After all, GetMessage doesn’t remove WM_PAINT messages
157](https://image.slidesharecdn.com/programmingwindows-140823083916-phpapp02/85/Programming-windows-157-320.jpg)
![from the queue either. The only way to remove a WM_PAINT message from the queue is to validate the invalid
regions of the window’s client area, which you can do with ValidateRect, ValidateRgn, or a BeginPaint and
EndPaint pair. If you process a WM_PAINT message normally after retrieving it from the queue with PeekMessage,
you’ll have no problems. What you can’t do is use code like this to empty your message queue of all messages:
while (PeekMessage (&msg, NULL, 0, 0, PM_REMOVE)) ;
This statement removes and discards all messages from your message queue except WM_PAINT. If a WM_PAINT
message is in the queue, you’ll be stuck inside the while loop forever.)
PeekMessage was much more important in earlier versions of Windows than it is in Windows 98. This is because
the 16-bit versions of Windows employed nonpreemptive multitasking (which I’ll discuss in Chapter 20). The
Windows Terminal program used a PeekMessage loop to check for incoming data from a communications port. The
Print Manager program used this technique for printing, and Windows applications that printed also generally used a
PeekMessage loop. With the preemptive multitasking of Windows 98, programs can create multiple threads of
execution, as we’ll see in Chapter 20.
Armed only with the PeekMessage function, however, we can write a program that relentlessly displays random
rectangles. The program, called RANDRECT, is shown in Figure 5-26.
RANDRECT.C
/*------------------------------------------
RANDRECT.C—Displays Random Rectangles
© Charles Petzold, 1998
------------------------------------------*/
#include <windows.h>
#include <stdlib.h> // for the rand function
LRESULT CALLBACK WndProc (HWND, UINT, WPARAM, LPARAM) ;
void DrawRectangle (HWND) ;
int cxClient, cyClient ;
int WINAPI WinMain (HINSTANCE hInstance, HINSTANCE hPrevInstance,
PSTR szCmdLine, int iCmdShow)
{
static TCHAR szAppName[] = TEXT (“RandRect”) ;
HWND hwnd ;
MSG msg ;
WNDCLASS wndclass ;
wndclass.style = CS_HREDRAW | CS_VREDRAW ;
wndclass.lpfnWndProc = WndProc ;
wndclass.cbClsExtra = 0 ;
wndclass.cbWndExtra = 0 ;
wndclass.hInstance = hInstance ;
wndclass.hIcon = LoadIcon (NULL, IDI_APPLICATION) ;
wndclass.hCursor = LoadCursor (NULL, IDC_ARROW) ;
wndclass.hbrBackground = (HBRUSH) GetStockObject (WHITE_BRUSH) ;
wndclass.lpszMenuName = NULL ;
wndclass.lpszClassName = szAppName ;
if (!RegisterClass (&wndclass))
{
MessageBox (NULL, TEXT (“This program requires Windows NT!”),
szAppName, MB_ICONERROR) ;
158](https://image.slidesharecdn.com/programmingwindows-140823083916-phpapp02/85/Programming-windows-158-320.jpg)


![CLOVER.C
/*--------------------------------------------------
CLOVER.C—Clover Drawing Program Using Regions
© Charles Petzold, 1998
--------------------------------------------------*/
#include <windows.h>
#include <math.h>
#define TWO_PI (2.0 * 3.14159)
LRESULT CALLBACK WndProc (HWND, UINT, WPARAM, LPARAM) ;
int WINAPI WinMain (HINSTANCE hInstance, HINSTANCE hPrevInstance,
PSTR szCmdLine, int iCmdShow)
{
static TCHAR szAppName[] = TEXT (“Clover”) ;
HWND hwnd ;
MSG msg ;
WNDCLASS wndclass ;
wndclass.style = CS_HREDRAW | CS_VREDRAW ;
wndclass.lpfnWndProc = WndProc ;
wndclass.cbClsExtra = 0 ;
wndclass.cbWndExtra = 0 ;
wndclass.hInstance = hInstance ;
wndclass.hIcon = LoadIcon (NULL, IDI_APPLICATION) ;
wndclass.hCursor = LoadCursor (NULL, IDC_ARROW) ;
wndclass.hbrBackground = (HBRUSH) GetStockObject (WHITE_BRUSH) ;
wndclass.lpszMenuName = NULL ;
wndclass.lpszClassName = szAppName ;
if (!RegisterClass (&wndclass))
{
MessageBox (NULL, TEXT (“This program requires Windows NT!”),
szAppName, MB_ICONERROR) ;
return 0 ;
}
hwnd = CreateWindow (szAppName, TEXT (“Draw a Clover”),
WS_OVERLAPPEDWINDOW,
CW_USEDEFAULT, CW_USEDEFAULT,
CW_USEDEFAULT, CW_USEDEFAULT,
NULL, NULL, hInstance, NULL) ;
ShowWindow (hwnd, iCmdShow) ;
UpdateWindow (hwnd) ;
while (GetMessage (&msg, NULL, 0, 0))
{
TranslateMessage (&msg) ;
DispatchMessage (&msg) ;
}
return msg.wParam ;
}
LRESULT CALLBACK WndProc (HWND hwnd, UINT iMsg, WPARAM wParam, LPARAM lParam)
{
162](https://image.slidesharecdn.com/programmingwindows-140823083916-phpapp02/85/Programming-windows-162-320.jpg)
![static HRGN hRgnClip ;
static int cxClient, cyClient ;
double fAngle, fRadius ;
HCURSOR hCursor ;
HDC hdc ;
HRGN hRgnTemp[6] ;
int i ;
PAINTSTRUCT ps ;
switch (iMsg)
{
case WM_SIZE:
cxClient = LOWORD (lParam) ;
cyClient = HIWORD (lParam) ;
hCursor = SetCursor (LoadCursor (NULL, IDC_WAIT)) ;
ShowCursor (TRUE) ;
if (hRgnClip)
DeleteObject (hRgnClip) ;
hRgnTemp[0] = CreateEllipticRgn (0, cyClient / 3,
cxClient / 2, 2 * cyClient / 3) ;
hRgnTemp[1] = CreateEllipticRgn (cxClient / 2, cyClient / 3,
cxClient, 2 * cyClient / 3) ;
hRgnTemp[2] = CreateEllipticRgn (cxClient / 3, 0,
2 * cxClient / 3, cyClient / 2) ;
hRgnTemp[3] = CreateEllipticRgn (cxClient / 3, cyClient / 2,
2 * cxClient / 3, cyClient) ;
hRgnTemp[4] = CreateRectRgn (0, 0, 1, 1) ;
hRgnTemp[5] = CreateRectRgn (0, 0, 1, 1) ;
hRgnClip = CreateRectRgn (0, 0, 1, 1) ;
CombineRgn (hRgnTemp[4], hRgnTemp[0], hRgnTemp[1], RGN_OR) ;
CombineRgn (hRgnTemp[5], hRgnTemp[2], hRgnTemp[3], RGN_OR) ;
CombineRgn (hRgnClip, hRgnTemp[4], hRgnTemp[5], RGN_XOR) ;
for (i = 0 ; i < 6 ; i++)
DeleteObject (hRgnTemp[i]) ;
SetCursor (hCursor) ;
ShowCursor (FALSE) ;
return 0 ;
case WM_PAINT:
hdc = BeginPaint (hwnd, &ps) ;
SetViewportOrgEx (hdc, cxClient / 2, cyClient / 2, NULL) ;
SelectClipRgn (hdc, hRgnClip) ;
fRadius = _hypot (cxClient / 2.0, cyClient / 2.0) ;
for (fAngle = 0.0 ; fAngle < TWO_PI ; fAngle += TWO_PI / 360)
{
MoveToEx (hdc, 0, 0, NULL) ;
LineTo (hdc, (int) ( fRadius * cos (fAngle) + 0.5),
(int) (-fRadius * sin (fAngle) + 0.5)) ;
}
EndPaint (hwnd, &ps) ;
return 0 ;
case WM_DESTROY:
DeleteObject (hRgnClip) ;
PostQuitMessage (0) ;
163](https://image.slidesharecdn.com/programmingwindows-140823083916-phpapp02/85/Programming-windows-163-320.jpg)
![return 0 ;
}
return DefWindowProc (hwnd, iMsg, wParam, lParam) ;
}
Figure 5-27. The CLOVER program.
Figure 5-28. The CLOVER display, drawn using a complex clipping region.
Because regions always use device coordinates, the CLOVER program has to recreate the region every time it
receives a WM_SIZE message. Years ago, the machines that ran Windows took several seconds to redraw this
figure. Today’s fast machines draw it nearly instantaneously.
CLOVER begins by creating four elliptical regions that are stored as the first four elements of the hRgnTemp array.
Then the program creates three “dummy” regions:
hRgnTemp [4] = CreateRectRgn (0, 0, 1, 1) ;
hRgnTemp [5] = CreateRectRgn (0, 0, 1, 1) ;
hRgnClip = CreateRectRgn (0, 0, 1, 1) ;
The two elliptical regions at the left and right of the client area are combined:
CombineRgn (hRgnTemp [4], hRgnTemp [0], hRgnTemp [1], RGN_OR) ;
Similarly, the two elliptical regions at the top and bottom of the client area are combined:
CombineRgn (hRgnTemp [5], hRgnTemp [2], hRgnTemp [3], RGN_OR) ;
Finally these two combined regions are in turn combined into hRgnClip:
CombineRgn (hRgnClip, hRgnTemp [4], hRgnTemp [5], RGN_XOR) ;
The RGN_XOR identifier is used to exclude overlapping areas from the resultant region. Finally the six temporary
164](https://image.slidesharecdn.com/programmingwindows-140823083916-phpapp02/85/Programming-windows-164-320.jpg)
![regions are deleted:
for (i = 0 ; i < 6 ; i++)
DeleteObject (hRgnTemp [i]) ;
The WM_PAINT processing is simple, considering the results. The viewport origin is set to the center of the client
area (to make the line drawing easier), and the region created during the WM_SIZE message is selected as the
device context’s clipping region:
SetViewportOrg (hdc, xClient / 2, yClient / 2) ;
SelectClipRgn (hdc, hRgnClip) ;
Now all that’s left is drawing the lines—360 of them, spaced 1 degree apart. The length of each line is the variable
fRadius, which is the distance from the center to the corner of the client area:
fRadius = hypot (xClient / 2.0, yClient / 2.0) ;
for (fAngle = 0.0 ; fAngle < TWO_PI ; fAngle += TWO_PI / 360)
{
MoveToEx (hdc, 0, 0, NULL) ;
LineTo (hdc, (int) ( fRadius * cos (fAngle) + 0.5),
(int) (-fRadius * sin (fAngle) + 0.5)) ;
}
During processing of WM_DESTROY, the region is deleted:
DeleteObject (hRgnClip) ;
This is not the end of graphics programming in this book. Chapter 13 looks at printing, Chapters 14 and 15 at
bitmaps, Chapter 17 at text and fonts, and Chapter 18 at metafiles.
165](https://image.slidesharecdn.com/programmingwindows-140823083916-phpapp02/85/Programming-windows-165-320.jpg)


![© Charles Petzold, 1998
----------------------------------------------------*/
#include <windows.h>
#include “sysmets.h”
LRESULT CALLBACK WndProc (HWND, UINT, WPARAM, LPARAM) ;
int WINAPI WinMain (HINSTANCE hInstance, HINSTANCE hPrevInstance,
PSTR szCmdLine, int iCmdShow)
{
static TCHAR szAppName[] = TEXT (“SysMets4”) ;
HWND hwnd ;
MSG msg ;
WNDCLASS wndclass ;
wndclass.style = CS_HREDRAW | CS_VREDRAW ;
wndclass.lpfnWndProc = WndProc ;
wndclass.cbClsExtra = 0 ;
wndclass.cbWndExtra = 0 ;
wndclass.hInstance = hInstance ;
wndclass.hIcon = LoadIcon (NULL, IDI_APPLICATION) ;
wndclass.hCursor = LoadCursor (NULL, IDC_ARROW) ;
wndclass.hbrBackground = (HBRUSH) GetStockObject (WHITE_BRUSH) ;
wndclass.lpszMenuName = NULL ;
wndclass.lpszClassName = szAppName ;
if (!RegisterClass (&wndclass))
{
MessageBox (NULL, TEXT (“Program requires Windows NT!”),
szAppName, MB_ICONERROR) ;
return 0 ;
}
hwnd = CreateWindow (szAppName, TEXT (“Get System Metrics No. 4”),
WS_OVERLAPPEDWINDOW | WS_VSCROLL | WS_HSCROLL,
CW_USEDEFAULT, CW_USEDEFAULT,
CW_USEDEFAULT, CW_USEDEFAULT,
NULL, NULL, hInstance, NULL) ;
ShowWindow (hwnd, iCmdShow) ;
UpdateWindow (hwnd) ;
while (GetMessage (&msg, NULL, 0, 0))
{
TranslateMessage (&msg) ;
DispatchMessage (&msg) ;
}
return msg.wParam ;
}
LRESULT CALLBACK WndProc (HWND hwnd, UINT message, WPARAM wParam, LPARAM lParam)
{
static int cxChar, cxCaps, cyChar, cxClient, cyClient, iMaxWidth ;
HDC hdc ;
int i, x, y, iVertPos, iHorzPos, iPaintBeg, iPaintEnd ;
PAINTSTRUCT ps ;
SCROLLINFO si ;
TCHAR szBuffer[10] ;
TEXTMETRIC tm ;
switch (message)
{
case WM_CREATE:
hdc = GetDC (hwnd) ;
176](https://image.slidesharecdn.com/programmingwindows-140823083916-phpapp02/85/Programming-windows-176-320.jpg)


![si.cbSize = sizeof (si) ;
si.fMask = SIF_POS ;
GetScrollInfo (hwnd, SB_VERT, &si) ;
iVertPos = si.nPos ;
// Get horizontal scroll bar position
GetScrollInfo (hwnd, SB_HORZ, &si) ;
iHorzPos = si.nPos ;
// Find painting limits
iPaintBeg = max (0, iVertPos + ps.rcPaint.top / cyChar) ;
iPaintEnd = min (NUMLINES - 1,
iVertPos + ps.rcPaint.bottom / cyChar) ;
for (i = iPaintBeg ; i <= iPaintEnd ; i++)
{
x = cxChar * (1 - iHorzPos) ;
y = cyChar * (i - iVertPos) ;
TextOut (hdc, x, y,
sysmetrics[i].szLabel,
lstrlen (sysmetrics[i].szLabel)) ;
TextOut (hdc, x + 22 * cxCaps, y,
sysmetrics[i].szDesc,
lstrlen (sysmetrics[i].szDesc)) ;
SetTextAlign (hdc, TA_RIGHT | TA_TOP) ;
TextOut (hdc, x + 22 * cxCaps + 40 * cxChar, y, szBuffer,
wsprintf (szBuffer, TEXT (“%5d”),
GetSystemMetrics (sysmetrics[i].iIndex))) ;
SetTextAlign (hdc, TA_LEFT | TA_TOP) ;
}
EndPaint (hwnd, &ps) ;
return 0 ;
case WM_DESTROY:
PostQuitMessage (0) ;
return 0 ;
}
return DefWindowProc (hwnd, message, wParam, lParam) ;
}
Character Messages
Earlier in this chapter, I discussed the idea of translating keystroke messages into character messages by taking shift-
state information into account. I warned you that shift-state information is not enough: you also need to know about
country-dependent keyboard configurations. For this reason, you should not attempt to translate keystroke messages
into character codes yourself. Instead, Windows does it for you. You’ve seen this code before:
while (GetMessage (&msg, NULL, 0, 0))
{
TranslateMessage (&msg) ;
DispatchMessage (&msg) ;
}
This is a typical message loop that appears in WinMain. The GetMessage function fills in the msg structure fields
with the next message from the queue. DispatchMessage calls the appropriate window procedure with this message.
180](https://image.slidesharecdn.com/programmingwindows-140823083916-phpapp02/85/Programming-windows-180-320.jpg)


![Esc 0x1B Ctrl-[
The rightmost column shows the escape code defined in ANSI C to represent the character codes for these
keys.
Windows programs sometimes use the Ctrl key in combination with letter keys for menu accelerators (which I’ll
discuss in Chapter 10). In this case, the letter keys are not translated into character messages.
Control Character Processing
The basic rule for processing keystroke and character messages is this: If you need to read keyboard character input
in your window, you process the WM_CHAR message. If you need to read the cursor keys, function keys, Delete,
Insert, Shift, Ctrl, and Alt, you process the WM_KEYDOWN message.
But what about the Tab key? Or Enter or Backspace or Escape? Traditionally, these keys generate ASCII control
characters, as shown in the preceding table. But in Windows they also generate virtual key codes. Should these keys
be processed during WM_CHAR processing or WM_KEYDOWN processing?
After a decade of considering this issue (and looking back over Windows code I’ve written over the years), I seem to
prefer treating the Tab, Enter, Backspace, and Escape keys as control characters rather than as virtual keys. My
WM_CHAR processing often looks something like this:
case WM_CHAR:
[other program lines]
switch (wParam)
{
case ‘b’: // backspace
[other program line
break ;
case ‘t’: // tab
[other program lines]
break ;
case ‘n’: // linefeed
[other program lines]
break ;
case ‘r’: // carriage return
[other program lines]
break ;
default: // character codes
[other program lines]
break ;
}
return 0 ;
Dead-Character Messages
Windows programs can usually ignore WM_DEADCHAR and WM_SYSDEADCHAR messages, but you should
definitely know what dead characters are and how they work.
On some non-U.S. English keyboards, certain keys are defined to add a diacritic to a letter. These are called “dead
keys” because they don’t generate characters by themselves. For instance, when a German keyboard is installed, the
key that is in the same position as the +/= key on a U.S. keyboard is a dead key for the grave accent (‘) when shifted
and the acute accent (´) when unshifted.
When a user presses this dead key, your window procedure receives a WM_DEADCHAR message with wParam
equal to ASCII or Unicode code for the diacritic by itself. When the user then presses a letter key that can be written
with this diacritic (for instance, the A key), the window procedure receives a WM_CHAR message where wParam
183](https://image.slidesharecdn.com/programmingwindows-140823083916-phpapp02/85/Programming-windows-183-320.jpg)
![is the ANSI code for the letter ‘a’ with the diacritic.
Thus, your program does not have to process the WM_DEADCHAR message because the WM_CHAR message
gives the program all the information it needs. The Windows logic even has built-in error handling: If the dead key
is followed by a letter that can’t take a diacritic (such as ‘s’), the window procedure receives two WM_CHAR
messages in a row—the first with wParam equal to the ASCII code for the diacritic by itself (the same wParam
value delivered with the WM_DEADCHAR message) and the second with wParam equal to the ASCII code for the
letter ‘s’.
Of course, the best way to get a feel for this is to see it in action. You need to load a foreign keyboard that uses dead
keys, such as the German keyboard that I described earlier. You do this in the Control Panel by selecting Keyboard
and then the Language tab. Then you need an application that shows you the details of every keyboard message a
program can receive. That’s the KEYVIEW1 program coming up next.
Keyboard Messages and Character Sets
The remaining sample programs in this chapter have flaws. They will not always run correctly under all versions of
Windows. Their flaws are not something I deliberately introduced into the code; indeed, you might never notice
them. These problems—I hesitate to call them “bugs”—reveal themselves only when switching among certain
different keyboard languages and layouts, and when running the programs under Far Eastern versions of Windows
that use multibyte character sets.
However, the programs will work much better when compiled for Unicode and run under Windows NT. This is the
promise I made in Chapter 2, and it demonstrates why Unicode is so important in simplifying the work involved in
internationalization.
The KEYVIEW1 Program
The first step in understanding keyboard internationalization issues is to examine the contents of the keyboard and
character messages that Windows delivers to your window procedure. The KEYVIEW1 program shown in Figure 6-
3 will help. This program displays in its client area all the information that Windows sends the window procedure
for the eight different keyboard messages.
Figure 6-3. The KEYVIEW1 program.
KEYVIEW1.C
/*--------------------------------------------------------
KEYVIEW1.C—Displays Keyboard and Character Messages
© Charles Petzold, 1998
--------------------------------------------------------*/
#include <windows.h>
LRESULT CALLBACK WndProc (HWND, UINT, WPARAM, LPARAM) ;
int WINAPI WinMain (HINSTANCE hInstance, HINSTANCE hPrevInstance,
PSTR szCmdLine, int iCmdShow)
{
static TCHAR szAppName[] = TEXT (“KeyView1”) ;
HWND hwnd ;
MSG msg ;
WNDCLASS wndclass ;
wndclass.style = CS_HREDRAW | CS_VREDRAW ;
184](https://image.slidesharecdn.com/programmingwindows-140823083916-phpapp02/85/Programming-windows-184-320.jpg)
![wndclass.lpfnWndProc = WndProc ;
wndclass.cbClsExtra = 0 ;
wndclass.cbWndExtra = 0 ;
wndclass.hInstance = hInstance ;
wndclass.hIcon = LoadIcon (NULL, IDI_APPLICATION) ;
wndclass.hCursor = LoadCursor (NULL, IDC_ARROW) ;
wndclass.hbrBackground = (HBRUSH) GetStockObject (WHITE_BRUSH) ;
wndclass.lpszMenuName = NULL ;
wndclass.lpszClassName = szAppName ;
if (!RegisterClass (&wndclass))
{
MessageBox (NULL, TEXT (“This program requires Windows NT!”),
szAppName, MB_ICONERROR) ;
return 0 ;
}
hwnd = CreateWindow (szAppName, TEXT (“Keyboard Message Viewer #1”),
WS_OVERLAPPEDWINDOW,
CW_USEDEFAULT, CW_USEDEFAULT,
CW_USEDEFAULT, CW_USEDEFAULT,
NULL, NULL, hInstance, NULL) ;
ShowWindow (hwnd, iCmdShow) ;
UpdateWindow (hwnd) ;
while (GetMessage (&msg, NULL, 0, 0))
{
TranslateMessage (&msg) ;
DispatchMessage (&msg) ;
}
return msg.wParam ;
}
LRESULT CALLBACK WndProc (HWND hwnd, UINT message, WPARAM wParam, LPARAM lParam)
{
static int cxClientMax, cyClientMax, cxClient, cyClient, cxChar, cyChar ;
static int cLinesMax, cLines ;
static PMSG pmsg ;
static RECT rectScroll ;
static TCHAR szTop[] = TEXT (“Message Key Char “)
TEXT (“Repeat Scan Ext ALT Prev Tran”) ;
static TCHAR szUnd[] = TEXT (“_______ ___ ____ “)
TEXT (“______ ____ ___ ___ ____ ____”) ;
static TCHAR * szFormat[2] = {
TEXT (“%-13s %3d %-15s%c%6u %4d %3s %3s %4s %4s”),
TEXT (“%-13s 0x%04X%1s%c %6u %4d %3s %3s %4s %4s”) } ;
static TCHAR * szYes = TEXT (“Yes”) ;
static TCHAR * szNo = TEXT (“No”) ;
static TCHAR * szDown = TEXT (“Down”) ;
static TCHAR * szUp = TEXT (“Up”) ;
static TCHAR * szMessage [] = {
TEXT (“WM_KEYDOWN”), TEXT (“WM_KEYUP”),
TEXT (“WM_CHAR”), TEXT (“WM_DEADCHAR”),
TEXT (“WM_SYSKEYDOWN”), TEXT (“WM_SYSKEYUP”),
TEXT (“WM_SYSCHAR”), TEXT (“WM_SYSDEADCHAR”) } ;
HDC hdc ;
int i, iType ;
PAINTSTRUCT ps ;
TCHAR szBuffer[128], szKeyName [32] ;
TEXTMETRIC tm ;
185](https://image.slidesharecdn.com/programmingwindows-140823083916-phpapp02/85/Programming-windows-185-320.jpg)
![switch (message)
{
case WM_CREATE:
case WM_DISPLAYCHANGE:
// Get maximum size of client area
cxClientMax = GetSystemMetrics (SM_CXMAXIMIZED) ;
cyClientMax = GetSystemMetrics (SM_CYMAXIMIZED) ;
// Get character size for fixed-pitch font
hdc = GetDC (hwnd) ;
SelectObject (hdc, GetStockObject (SYSTEM_FIXED_FONT)) ;
GetTextMetrics (hdc, &tm) ;
cxChar = tm.tmAveCharWidth ;
cyChar = tm.tmHeight ;
ReleaseDC (hwnd, hdc) ;
// Allocate memory for display lines
if (pmsg)
free (pmsg) ;
cLinesMax = cyClientMax / cyChar ;
pmsg = malloc (cLinesMax * sizeof (MSG)) ;
cLines = 0 ;
// fall through
case WM_SIZE:
if (message == WM_SIZE)
{
cxClient = LOWORD (lParam) ;
cyClient = HIWORD (lParam) ;
}
// Calculate scrolling rectangle
rectScroll.left = 0 ;
rectScroll.right = cxClient ;
rectScroll.top = cyChar ;
rectScroll.bottom = cyChar * (cyClient / cyChar) ;
InvalidateRect (hwnd, NULL, TRUE) ;
return 0 ;
case WM_KEYDOWN:
case WM_KEYUP:
case WM_CHAR:
case WM_DEADCHAR:
case WM_SYSKEYDOWN:
case WM_SYSKEYUP:
case WM_SYSCHAR:
case WM_SYSDEADCHAR:
// Rearrange storage array
for (i = cLinesMax - 1 ; i > 0 ; i--)
{
pmsg[i] = pmsg[i - 1] ;
}
// Store new message
186](https://image.slidesharecdn.com/programmingwindows-140823083916-phpapp02/85/Programming-windows-186-320.jpg)
![pmsg[0].hwnd = hwnd ;
pmsg[0].message = message ;
pmsg[0].wParam = wParam ;
pmsg[0].lParam = lParam ;
cLines = min (cLines + 1, cLinesMax) ;
// Scroll up the display
ScrollWindow (hwnd, 0, -cyChar, &rectScroll, &rectScroll) ;
break ; // i.e., call DefWindowProc so Sys messages work
case WM_PAINT:
hdc = BeginPaint (hwnd, &ps) ;
SelectObject (hdc, GetStockObject (SYSTEM_FIXED_FONT)) ;
SetBkMode (hdc, TRANSPARENT) ;
TextOut (hdc, 0, 0, szTop, lstrlen (szTop)) ;
TextOut (hdc, 0, 0, szUnd, lstrlen (szUnd)) ;
for (i = 0 ; i < min (cLines, cyClient / cyChar - 1) ; i++)
{
iType = pmsg[i].message == WM_CHAR ||
pmsg[i].message == WM_SYSCHAR ||
pmsg[i].message == WM_DEADCHAR ||
pmsg[i].message == WM_SYSDEADCHAR ;
GetKeyNameText (pmsg[i].lParam, szKeyName,
sizeof (szKeyName) / sizeof (TCHAR)) ;
TextOut (hdc, 0, (cyClient / cyChar - 1 - i) * cyChar, szBuffer,
wsprintf (szBuffer, szFormat [iType],
szMessage [pmsg[i].message - WM_KEYFIRST],
pmsg[i].wParam,
(PTSTR) (iType ? TEXT (“ “) : szKeyName),
(TCHAR) (iType ? pmsg[i].wParam : ‘ ‘),
LOWORD (pmsg[i].lParam),
HIWORD (pmsg[i].lParam) & 0xFF,
0x01000000 & pmsg[i].lParam ? szYes : szNo,
0x20000000 & pmsg[i].lParam ? szYes : szNo,
0x40000000 & pmsg[i].lParam ? szDown : szUp,
0x80000000 & pmsg[i].lParam ? szUp : szDown)) ;
}
EndPaint (hwnd, &ps) ;
return 0 ;
case WM_DESTROY:
PostQuitMessage (0) ;
return 0 ;
}
return DefWindowProc (hwnd, message, wParam, lParam) ;
}
KEYVIEW1 displays the contents of each keystroke and character message that it receives in its window procedure.
It saves the messages in an array of MSG structures. The size of the array is based on the size of the maximized
window size and the fixed-pitch system font. If the user resizes the video display while the program is running (in
which case KEYVIEW1 gets a WM_DISPLAYCHANGE message), the array is reallocated. KEYVIEW1 uses the
standard C malloc function to allocate memory for this array.
Figure 6-4 shows the KEYVIEW1 display after the word “Windows” has been typed. The first column shows the
keyboard message. The second column shows the virtual key code for keystroke messages followed by the name of
the key. This is obtained by using the GetKeyNameText function. The third column (labeled “Char”) shows the
hexadecimal character code for character messages followed by the character itself. The remaining six columns
187](https://image.slidesharecdn.com/programmingwindows-140823083916-phpapp02/85/Programming-windows-187-320.jpg)


![SYSTEM_FONT System VGASYS.FON 8514SYS.FON
SYSTEM_FIXED_FONT FixedSys VGAFIX.FON 8514FIX.FON
OEM_FIXED_FONT Terminal VGAOEM.FON 8514OEM.FON
In the file names, “VGA” refers to the Video Graphics Array, the video adapter that IBM introduced in 1987. It was
IBM’s first PC video adapter to have a pixel display size of 640 by 480. If you select Small Fonts from the Display
applet in the Control Panel (meaning that you want Windows to assume that the video display has a resolution of 96
dpi), Windows uses the filenames beginning with “VGA” for these three fonts. If you select Large Fonts (meaning
that you want a resolution of 120 dpi), Windows uses the filenames beginning with “8514.” The 8514 was another
video adapter that IBM introduced in 1987, and it had a maximum display size of 1024 by 768.
Windows does not want you to see these files. The files have the system and hidden file attributes set, and if you use
the Windows Explorer to view the contents of your FONTS subdirectory, you won’t see them at all, even if you’ve
elected to view system and hidden files. Use the Find option from the Tools menu to search for files with a
specification of *.FON. From there, you can double-click the filename to see what the font characters look like.
For many standard controls and user interface items, Windows doesn’t use the System font. Instead, it uses a font
with the typeface name MS Sans Serif. (MS stands for Microsoft.) This is also a bitmap font. The file (named
SSERIFE.FON) contains fonts based on a 96-dpi video display, with point sizes of 8, 10, 12, 14, 18, and 24. You
can get this font by using the DEFAULT_GUI_FONT identifier in GetStockObject. The point size Windows uses
will be based on the display resolution you’ve selected in the Display applet of the Control Panel.
So far, I’ve mentioned four of the identifiers you can use with GetStockObject to obtain a font for use in a device
context. There are three others: ANSI_FIXED_FONT, ANSI_VAR_FONT, and DEVICE_DEFAULT_FONT. To
begin approaching the problem of the keyboard and character displays, let’s take a look at all the stock fonts in
Windows. The program that displays the fonts is named STOKFONT and is shown in Figure 6-5.
Figure 6-5. The STOKFONT program.
STOKFONT.C
/*-----------------------------------------
STOKFONT.C—Stock Font Objects
© Charles Petzold, 1998
-----------------------------------------*/
#include <windows.h>
LRESULT CALLBACK WndProc (HWND, UINT, WPARAM, LPARAM) ;
int WINAPI WinMain (HINSTANCE hInstance, HINSTANCE hPrevInstance,
PSTR szCmdLine, int iCmdShow)
{
static TCHAR szAppName[] = TEXT (“StokFont”) ;
HWND hwnd ;
MSG msg ;
WNDCLASS wndclass ;
wndclass.style = CS_HREDRAW | CS_VREDRAW ;
wndclass.lpfnWndProc = WndProc ;
wndclass.cbClsExtra = 0 ;
wndclass.cbWndExtra = 0 ;
wndclass.hInstance = hInstance ;
191](https://image.slidesharecdn.com/programmingwindows-140823083916-phpapp02/85/Programming-windows-191-320.jpg)
![wndclass.hIcon = LoadIcon (NULL, IDI_APPLICATION) ;
wndclass.hCursor = LoadCursor (NULL, IDC_ARROW) ;
wndclass.hbrBackground = (HBRUSH) GetStockObject (WHITE_BRUSH) ;
wndclass.lpszMenuName = NULL ;
wndclass.lpszClassName = szAppName ;
if (!RegisterClass (&wndclass))
{
MessageBox (NULL, TEXT (“Program requires Windows NT!”),
szAppName, MB_ICONERROR) ;
return 0 ;
}
hwnd = CreateWindow (szAppName, TEXT (“Stock Fonts”),
WS_OVERLAPPEDWINDOW | WS_VSCROLL,
CW_USEDEFAULT, CW_USEDEFAULT,
CW_USEDEFAULT, CW_USEDEFAULT,
NULL, NULL, hInstance, NULL) ;
ShowWindow (hwnd, iCmdShow) ;
UpdateWindow (hwnd) ;
while (GetMessage (&msg, NULL, 0, 0))
{
TranslateMessage (&msg) ;
DispatchMessage (&msg) ;
}
return msg.wParam ;
}
LRESULT CALLBACK WndProc (HWND hwnd, UINT message, WPARAM wParam, LPARAM lParam)
{
static struct
{
int idStockFont ;
TCHAR * szStockFont ;
}
stockfont [] = { OEM_FIXED_FONT, “OEM_FIXED_FONT”,
ANSI_FIXED_FONT, “ANSI_FIXED_FONT”,
ANSI_VAR_FONT, “ANSI_VAR_FONT”,
SYSTEM_FONT, “SYSTEM_FONT”,
DEVICE_DEFAULT_FONT, “DEVICE_DEFAULT_FONT”,
SYSTEM_FIXED_FONT, “SYSTEM_FIXED_FONT”,
DEFAULT_GUI_FONT, “DEFAULT_GUI_FONT” } ;
static int iFont, cFonts = sizeof stockfont / sizeof stockfont[0] ;
HDC hdc ;
int i, x, y, cxGrid, cyGrid ;
PAINTSTRUCT ps ;
TCHAR szFaceName [LF_FACESIZE], szBuffer [LF_FACESIZE + 64] ;
TEXTMETRIC tm ;
switch (message)
{
case WM_CREATE:
SetScrollRange (hwnd, SB_VERT, 0, cFonts - 1, TRUE) ;
return 0 ;
case WM_DISPLAYCHANGE:
InvalidateRect (hwnd, NULL, TRUE) ;
return 0 ;
case WM_VSCROLL:
switch (LOWORD (wParam))
192](https://image.slidesharecdn.com/programmingwindows-140823083916-phpapp02/85/Programming-windows-192-320.jpg)
![{
case SB_TOP: iFont = 0 ; break ;
case SB_BOTTOM: iFont = cFonts - 1 ; break ;
case SB_LINEUP:
case SB_PAGEUP: iFont -= 1 ; break ;
case SB_LINEDOWN:
case SB_PAGEDOWN: iFont += 1 ; break ;
case SB_THUMBPOSITION: iFont = HIWORD (wParam) ; break ;
}
iFont = max (0, min (cFonts - 1, iFont)) ;
SetScrollPos (hwnd, SB_VERT, iFont, TRUE) ;
InvalidateRect (hwnd, NULL, TRUE) ;
return 0 ;
case WM_KEYDOWN:
switch (wParam)
{
case VK_HOME: SendMessage (hwnd, WM_VSCROLL, SB_TOP, 0) ; break ;
case VK_END: SendMessage (hwnd, WM_VSCROLL, SB_BOTTOM, 0) ; break ;
case VK_PRIOR:
case VK_LEFT:
case VK_UP: SendMessage (hwnd, WM_VSCROLL, SB_LINEUP, 0) ; break ;
case VK_NEXT:
case VK_RIGHT:
case VK_DOWN: SendMessage (hwnd, WM_VSCROLL, SB_PAGEDOWN, 0) ; break ;
}
return 0 ;
case WM_PAINT:
hdc = BeginPaint (hwnd, &ps) ;
SelectObject (hdc, GetStockObject (stockfont[iFont].idStockFont)) ;
GetTextFace (hdc, LF_FACESIZE, szFaceName) ;
GetTextMetrics (hdc, &tm) ;
cxGrid = max (3 * tm.tmAveCharWidth, 2 * tm.tmMaxCharWidth) ;
cyGrid = tm.tmHeight + 3 ;
TextOut (hdc, 0, 0, szBuffer,
wsprintf (szBuffer, TEXT (“ %s: Face Name = %s, CharSet = %i”),
stockfont[iFont].szStockFont,
szFaceName, tm.tmCharSet)) ;
SetTextAlign (hdc, TA_TOP | TA_CENTER) ;
// vertical and horizontal lines
for (i = 0 ; i < 17 ; i++)
{
MoveToEx (hdc, (i + 2) * cxGrid, 2 * cyGrid, NULL) ;
LineTo (hdc, (i + 2) * cxGrid, 19 * cyGrid) ;
MoveToEx (hdc, cxGrid, (i + 3) * cyGrid, NULL) ;
LineTo (hdc, 18 * cxGrid, (i + 3) * cyGrid) ;
}
// vertical and horizontal headings
for (i = 0 ; i < 16 ; i++)
{
TextOut (hdc, (2 * i + 5) * cxGrid / 2, 2 * cyGrid + 2, szBuffer,
wsprintf (szBuffer, TEXT (“%X-“), i)) ;
TextOut (hdc, 3 * cxGrid / 2, (i + 3) * cyGrid + 2, szBuffer,
wsprintf (szBuffer, TEXT (“-%X”), i)) ;
}
// characters
193](https://image.slidesharecdn.com/programmingwindows-140823083916-phpapp02/85/Programming-windows-193-320.jpg)


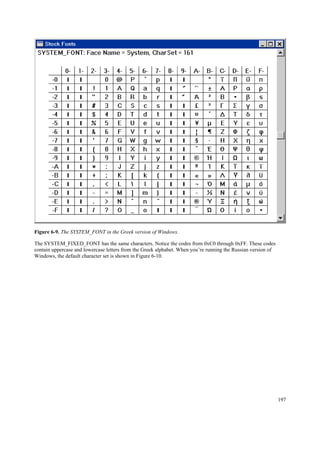


![#define TURKISH_CHARSET 162 // 1254 Latin 5 (Turkish)
#define VIETNAMESE_CHARSET 163 // 1258 Vietnamese
#define HEBREW_CHARSET 177 // 1255 Hebrew
#define ARABIC_CHARSET 178 // 1256 Arabic
#define BALTIC_CHARSET 186 // 1257 Baltic Rim
#define RUSSIAN_CHARSET 204 // 1251 Cyrillic (Slavic)
#define THAI_CHARSET 222 // 874 Thai
#define EASTEUROPE_CHARSET 238 // 1250 Latin 2 (Central Europe)
#define OEM_CHARSET 255 // Depends on country
Why does Windows have two different numbers—a character set ID and a code page ID—to refer to the same
character sets? It’s just one of the confusing quirks in Windows. Notice that the character set ID requires only 1 byte
of storage, which is the size of the character set field in the LOGFONT structure. (Back in the Windows 1.0 days,
memory and storage space were limited and every byte counted.) Notice that many different MS-DOS code pages
are used in other countries, but only one character set ID—OEM_CHARSET—is used to refer to the MS-DOS
character set.
You’ll also notice that these character set values agree with the “CharSet” value shown on the top line of the
STOKFONT program. In the American English version of Windows, we saw stock fonts that had character set IDs
of 0 (ANSI_CHARSET) and 255 (OEM_CHARSET). We saw 161 (GREEK_CHARSET) in the Greek version of
Windows, 204 (RUSSIAN_CHARSET) in the Russian version, and 128 (SHIFTJIS_CHARSET) in the Japanese
version.
In the code above, DBCS stands for double-byte character set, which is used in the Far East versions of Windows.
Other versions of Windows do not support DBCS fonts, so you can’t use those character set IDs.
CreateFont returns an HFONT value—a handle to a logical font. You can select this font into a device context using
SelectObject. You must eventually delete every logical font you create by calling DeleteObject.
The other part of the big font solution is the WM_INPUTLANGCHANGE message. Whenever you change the
keyboard layout using the popup menu in the desktop tray, Windows sends your window procedure the
WM_INPUTLANGCHANGE message. The wParam message parameter is the character set ID of the new
keyboard layout.
The KEYVIEW2 program shown in Figure 6-12 implements logic to change the font whenever the keyboard layout
changes.
Figure 6-12. The KEYVIEW2 program.
KEYVIEW2.C
/*--------------------------------------------------------
KEYVIEW2.C—Displays Keyboard and Character Messages
© Charles Petzold, 1998
--------------------------------------------------------*/
#include <windows.h>
LRESULT CALLBACK WndProc (HWND, UINT, WPARAM, LPARAM) ;
int WINAPI WinMain (HINSTANCE hInstance, HINSTANCE hPrevInstance,
PSTR szCmdLine, int iCmdShow)
{
static TCHAR szAppName[] = TEXT (“KeyView2”) ;
HWND hwnd ;
MSG msg ;
WNDCLASS wndclass ;
wndclass.style = CS_HREDRAW | CS_VREDRAW ;
wndclass.lpfnWndProc = WndProc ;
wndclass.cbClsExtra = 0 ;
wndclass.cbWndExtra = 0 ;
202](https://image.slidesharecdn.com/programmingwindows-140823083916-phpapp02/85/Programming-windows-202-320.jpg)
![wndclass.hInstance = hInstance ;
wndclass.hIcon = LoadIcon (NULL, IDI_APPLICATION) ;
wndclass.hCursor = LoadCursor (NULL, IDC_ARROW) ;
wndclass.hbrBackground = (HBRUSH) GetStockObject (WHITE_BRUSH) ;
wndclass.lpszMenuName = NULL ;
wndclass.lpszClassName = szAppName ;
if (!RegisterClass (&wndclass))
{
MessageBox (NULL, TEXT (“This program requires Windows NT!”),
szAppName, MB_ICONERROR) ;
return 0 ;
}
hwnd = CreateWindow (szAppName, TEXT (“Keyboard Message Viewer #2”),
WS_OVERLAPPEDWINDOW,
CW_USEDEFAULT, CW_USEDEFAULT,
CW_USEDEFAULT, CW_USEDEFAULT,
NULL, NULL, hInstance, NULL) ;
ShowWindow (hwnd, iCmdShow) ;
UpdateWindow (hwnd) ;
while (GetMessage (&msg, NULL, 0, 0))
{
TranslateMessage (&msg) ;
DispatchMessage (&msg) ;
}
return msg.wParam ;
}
LRESULT CALLBACK WndProc (HWND hwnd, UINT message, WPARAM wParam, LPARAM lParam)
{
static DWORD dwCharSet = DEFAULT_CHARSET ;
static int cxClientMax, cyClientMax, cxClient, cyClient, cxChar, cyChar ;
static int cLinesMax, cLines ;
static PMSG pmsg ;
static RECT rectScroll ;
static TCHAR szTop[] = TEXT (“Message Key Char “)
TEXT (“Repeat Scan Ext ALT Prev Tran”) ;
static TCHAR szUnd[] = TEXT (“_______ ___ ____ “)
TEXT (“______ ____ ___ ___ ____ ____”) ;
static TCHAR * szFormat[2] = {
TEXT (“%-13s %3d %-15s%c%6u %4d %3s %3s %4s %4s”),
TEXT (“%-13s 0x%04X%1s%c %6u %4d %3s %3s %4s %4s”) } ;
static TCHAR * szYes = TEXT (“Yes”) ;
static TCHAR * szNo = TEXT (“No”) ;
static TCHAR * szDown = TEXT (“Down”) ;
static TCHAR * szUp = TEXT (“Up”) ;
static TCHAR * szMessage [] = {
TEXT (“WM_KEYDOWN”), TEXT (“WM_KEYUP”),
TEXT (“WM_CHAR”), TEXT (“WM_DEADCHAR”),
TEXT (“WM_SYSKEYDOWN”), TEXT (“WM_SYSKEYUP”),
TEXT (“WM_SYSCHAR”), TEXT (“WM_SYSDEADCHAR”) } ;
HDC hdc ;
int i, iType ;
PAINTSTRUCT ps ;
TCHAR szBuffer[128], szKeyName [32] ;
TEXTMETRIC tm ;
203](https://image.slidesharecdn.com/programmingwindows-140823083916-phpapp02/85/Programming-windows-203-320.jpg)

![// Rearrange storage array
for (i = cLinesMax - 1 ; i > 0 ; i--)
{
pmsg[i] = pmsg[i - 1] ;
}
// Store new message
pmsg[0].hwnd = hwnd ;
pmsg[0].message = message ;
pmsg[0].wParam = wParam ;
pmsg[0].lParam = lParam ;
cLines = min (cLines + 1, cLinesMax) ;
// Scroll up the display
ScrollWindow (hwnd, 0, -cyChar, &rectScroll, &rectScroll) ;
break ; // ie, call DefWindowProc so Sys messages work
case WM_PAINT:
hdc = BeginPaint (hwnd, &ps) ;
SelectObject (hdc, CreateFont (0, 0, 0, 0, 0, 0, 0, 0,
dwCharSet, 0, 0, 0, FIXED_PITCH, NULL)) ;
SetBkMode (hdc, TRANSPARENT) ;
TextOut (hdc, 0, 0, szTop, lstrlen (szTop)) ;
TextOut (hdc, 0, 0, szUnd, lstrlen (szUnd)) ;
for (i = 0 ; i < min (cLines, cyClient / cyChar - 1) ; i++)
{
iType = pmsg[i].message == WM_CHAR ||
pmsg[i].message == WM_SYSCHAR ||
pmsg[i].message == WM_DEADCHAR ||
pmsg[i].message == WM_SYSDEADCHAR ;
GetKeyNameText (pmsg[i].lParam, szKeyName,
sizeof (szKeyName) / sizeof (TCHAR)) ;
TextOut (hdc, 0, (cyClient / cyChar - 1 - i) * cyChar, szBuffer,
wsprintf (szBuffer, szFormat [iType],
szMessage [pmsg[i].message
- WM_KEYFIRST],
pmsg[i].wParam,
(PTSTR) (iType ? TEXT (“ “) : szKeyName),
(TCHAR) (iType ? pmsg[i].wParam : ‘ ‘),
LOWORD (pmsg[i].lParam),
HIWORD (pmsg[i].lParam) & 0xFF,
0x01000000 & pmsg[i].lParam ? szYes : szNo,
0x20000000 & pmsg[i].lParam ? szYes : szNo,
0x40000000 & pmsg[i].lParam ? szDown : szUp,
0x80000000 & pmsg[i].lParam ? szUp : szDown)) ;
}
DeleteObject (SelectObject (hdc, GetStockObject (SYSTEM_FONT))) ;
EndPaint (hwnd, &ps) ;
return 0 ;
case WM_DESTROY:
PostQuitMessage (0) ;
return 0 ;
}
return DefWindowProc (hwnd, message, wParam, lParam) ;
205](https://image.slidesharecdn.com/programmingwindows-140823083916-phpapp02/85/Programming-windows-205-320.jpg)

![The main rule for using the caret is simple: a window procedure calls CreateCaret during the WM_SETFOCUS
message and DestroyWindow during the WM_KILLFOCUS message.
There are a few other rules: The caret is created hidden. After calling CreateCaret, the window procedure must call
ShowCaret for the caret to be visible. In addition, the window procedure must hide the caret by calling HideCaret
whenever it draws something on its window during a message other than WM_PAINT. After it finishes drawing on
the window, the program calls ShowCaret to display the caret again. The effect of HideCaret is additive: if you call
HideCaret several times without calling ShowCaret, you must call ShowCaret the same number of times before the
caret becomes visible again.
The TYPER Program
The TYPER program shown in Figure 6-13 brings together much of what we've learned in this chapter. You can
think of TYPER as an extremely rudimentary text editor. You can type in the window, move the cursor (I mean
caret) around with the cursor movement keys (or are they caret movement keys?), and erase the contents of the
window by pressing Escape. The contents of the window are also erased when you resize the window or change the
keyboard input language. There's no scrolling, no search and replace, no way to save files, no spelling checker, and
no anthropomorphous paper clip, but it's a start.
Figure 6-13. The TYPER program.
TYPER.C
/*--------------------------------------
TYPER.C -- Typing Program
(c) Charles Petzold, 1998
--------------------------------------*/
#include <windows.h>
#define BUFFER(x,y) *(pBuffer + y * cxBuffer + x)
LRESULT CALLBACK WndProc (HWND, UINT, WPARAM, LPARAM) ;
int WINAPI WinMain (HINSTANCE hInstance, HINSTANCE hPrevInstance,
PSTR szCmdLine, int iCmdShow)
{
static TCHAR szAppName[] = TEXT ("Typer") ;
HWND hwnd ;
MSG msg ;
WNDCLASS wndclass ;
wndclass.style = CS_HREDRAW | CS_VREDRAW ;
wndclass.lpfnWndProc = WndProc ;
wndclass.cbClsExtra = 0 ;
wndclass.cbWndExtra = 0 ;
wndclass.hInstance = hInstance ;
wndclass.hIcon = LoadIcon (NULL, IDI_APPLICATION) ;
wndclass.hCursor = LoadCursor (NULL, IDC_ARROW) ;
wndclass.hbrBackground = (HBRUSH) GetStockObject (WHITE_BRUSH) ;
wndclass.lpszMenuName = NULL ;
wndclass.lpszClassName = szAppName ;
if (!RegisterClass (&wndclass))
{
MessageBox (NULL, TEXT ("This program requires Windows NT!"),
szAppName, MB_ICONERROR) ;
207](https://image.slidesharecdn.com/programmingwindows-140823083916-phpapp02/85/Programming-windows-207-320.jpg)
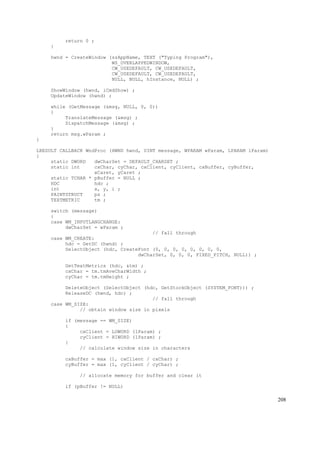


![mouse is outside the window's client area. You'll learn how to capture the mouse later in this chapter.
• If a system modal message box or a system modal dialog box is on the display, no other program can
receive mouse messages. System modal message boxes and dialog boxes prohibit switching to another
window while the box is active. An example of a system modal message box is the one that appears when
you shut down your Windows session.
Simple Mouse Processing: An Example
The CONNECT program, shown in Figure 7-1, does some simple mouse processing to let you get a good feel for
how Windows sends mouse messages to your program.
Figure 7-1. The CONNECT program.
CONNECT.C
/*--------------------------------------------------
CONNECT.C -- Connect-the-Dots Mouse Demo Program
(c) Charles Petzold, 1998
--------------------------------------------------*/
#include <windows.h>
#define MAXPOINTS 1000
LRESULT CALLBACK WndProc (HWND, UINT, WPARAM, LPARAM) ;
int WINAPI WinMain (HINSTANCE hInstance, HINSTANCE hPrevInstance,
PSTR szCmdLine, int iCmdShow)
{
static TCHAR szAppName[] = TEXT ("Connect") ;
HWND hwnd ;
MSG msg ;
WNDCLASS wndclass ;
wndclass.style = CS_HREDRAW | CS_VREDRAW ;
wndclass.lpfnWndProc = WndProc ;
wndclass.cbClsExtra = 0 ;
wndclass.cbWndExtra = 0 ;
wndclass.hInstance = hInstance ;
wndclass.hIcon = LoadIcon (NULL, IDI_APPLICATION) ;
wndclass.hCursor = LoadCursor (NULL, IDC_ARROW) ;
wndclass.hbrBackground = (HBRUSH) GetStockObject (WHITE_BRUSH) ;
wndclass.lpszMenuName = NULL ;
wndclass.lpszClassName = szAppName ;
if (!RegisterClass (&wndclass))
{
MessageBox (NULL, TEXT ("Program requires Windows NT!"),
szAppName, MB_ICONERROR) ;
return 0 ;
}
hwnd = CreateWindow (szAppName, TEXT ("Connect-the-Points Mouse Demo"),
WS_OVERLAPPEDWINDOW,
CW_USEDEFAULT, CW_USEDEFAULT,
CW_USEDEFAULT, CW_USEDEFAULT,
NULL, NULL, hInstance, NULL) ;
216](https://image.slidesharecdn.com/programmingwindows-140823083916-phpapp02/85/Programming-windows-216-320.jpg)
![ShowWindow (hwnd, iCmdShow) ;
UpdateWindow (hwnd) ;
while (GetMessage (&msg, NULL, 0, 0))
{
TranslateMessage (&msg) ;
DispatchMessage (&msg) ;
}
return msg.wParam ;
}
LRESULT CALLBACK WndProc (HWND hwnd, UINT message, WPARAM wParam, LPARAM lParam)
{
static POINT pt[MAXPOINTS] ;
static int iCount ;
HDC hdc ;
int i, j ;
PAINTSTRUCT ps ;
switch (message)
{
case WM_LBUTTONDOWN:
iCount = 0 ;
InvalidateRect (hwnd, NULL, TRUE) ;
return 0 ;
case WM_MOUSEMOVE:
if (wParam & MK_LBUTTON && iCount < 1000)
{
pt[iCount ].x = LOWORD (lParam) ;
pt[iCount++].y = HIWORD (lParam) ;
hdc = GetDC (hwnd) ;
SetPixel (hdc, LOWORD (lParam), HIWORD (lParam), 0) ;
ReleaseDC (hwnd, hdc) ;
}
return 0 ;
case WM_LBUTTONUP:
InvalidateRect (hwnd, NULL, FALSE) ;
return 0 ;
case WM_PAINT:
hdc = BeginPaint (hwnd, &ps) ;
SetCursor (LoadCursor (NULL, IDC_WAIT)) ;
ShowCursor (TRUE) ;
for (i = 0 ; i < iCount - 1 ; i++)
for (j = i + 1 ; j < iCount ; j++)
{
MoveToEx (hdc, pt[i].x, pt[i].y, NULL) ;
LineTo (hdc, pt[j].x, pt[j].y) ;
}
ShowCursor (FALSE) ;
SetCursor (LoadCursor (NULL, IDC_ARROW)) ;
EndPaint (hwnd, &ps) ;
return 0 ;
case WM_DESTROY:
PostQuitMessage (0) ;
217](https://image.slidesharecdn.com/programmingwindows-140823083916-phpapp02/85/Programming-windows-217-320.jpg)

![mouse back inside.
CONNECT stores a maximum of 1000 points. If the number of points is P, the number of lines CONNECT draws is
equal to P × (P - 1) / 2. With 1000 points, this involves almost 500,000 lines, which might take a minute or so to
draw, depending on your hardware. Because Windows 98 is a preemptive multitasking environment, you can switch
to other programs at this time. However, you can't do anything else with the CONNECT program (such as move it
or change the size) while the program is busy. In Chapter 20, we'll examine methods for dealing with problems such
as this.
Because CONNECT might take some time to draw the lines, it switches to an hourglass cursor and then back again
while processing the WM_PAINT message. This requires two calls to the SetCursor function using two stock
cursors. CONNECT also calls ShowCursor twice, once with a TRUE parameter and the second time with a FALSE
parameter. I'll discuss these calls in more detail later in this chapter, in the section "Emulating the Mouse with the
Keyboard".
Sometimes the word "tracking" is used to refer to the way that programs process mouse movement. Tracking does
not mean, however, that your program sits in a loop in its window procedure while attempting to follow the mouse's
movements on the display. The window procedure instead processes each mouse message as it comes and then
quickly returns control to Windows.
Processing Shift Keys
When CONNECT receives a WM_MOUSEMOVE message, it performs a bitwise AND operation on the value of
wParam and MK_LBUTTON to determine if the left button is depressed. You can also use wParam to determine
the state of the Shift keys. For instance, if processing must be dependent on the status of the Shift and Ctrl keys, you
might use logic that looks like this:
if (wParam & MK_SHIFT)
{
if (wParam & MK_CONTROL)
{
[Shift and Ctrl keys are down]
}
else
{
[Shift key is down]
}
{
else
{
if (wParam & MK_CONTROL]
{
[Ctrl key is down]
}
else
{
[neither Shift nor Ctrl key is down]
}
}
If you want to use both the left and right mouse buttons in your program, and if you also want to accommodate those
users with a one-button mouse, you can write your code so that Shift in combination with the left button is
equivalent to the right button. In that case, your mouse button-click processing might look something like this:
case WM_LBUTTONDOWN:
if (!(wParam & MK_SHIFT))
{
[left button logic]
return 0 ;
}
219](https://image.slidesharecdn.com/programmingwindows-140823083916-phpapp02/85/Programming-windows-219-320.jpg)
![// Fall through
case WM_RBUTTONDOWN:
[right button logic]
return 0 ;
The Window function GetKeyState (described in Chapter 6) can also return the status of the mouse buttons or shift
keys using the virtual key codes VK_LBUTTON, VK_RBUTTON, VK_MBUTTON, VK_SHIFT, and
VK_CONTROL. The button or key is down if the value returned from GetKeyState is negative. Because
GetKeyState returns mouse or key states as of the message currently being processed, the status information is
properly synchronized with the messages. Just as you cannot use GetKeyState for a key that has yet to be pressed,
you cannot use it for a mouse button that has yet to be pressed. Don't do this:
while (GetKeyState (VK_LBUTTON) >= 0) ; // WRONG !!!
The GetKeyState function will report that the left button is depressed only if the button is already depressed when
you process the message during which you call GetKeyState.
Mouse Double-Clicks
A mouse double-click is two clicks in quick succession. To qualify as a double-click, the two clicks must occur in
close physical proximity of one another (by default, about an area as wide as an average system font character and
half as high) and within a specific interval of time called the "double-click speed." You can change that time interval
in the Control Panel.
If you want your window procedure to receive double-click mouse messages, you must include the identifier
CS_DBLCLKS when initializing the style field in the window class structure before calling RegisterClass:
wndclass.style = CS_HREDRAW | CS_VREDRAW | CS_DBLCLKS ;
If you do not include CS_DBLCLKS in the window style and the user clicks the left mouse button twice in quick
succession, your window procedure receives these messages:
WM_LBUTTONDOWN
WM_LBUTTONUP
WM_LBUTTONDOWN
WM_LBUTTONUP
The window procedure might also receive other messages between these button messages. If you want to implement
your own double-click logic, you can use the Windows function GetMessageTime to obtain the relative times of the
WM_LBUTTONDOWN messages. This function is discussed in more detail in Chapter 8.
If you include CS_DBLCLKS in your window class style, the window procedure receives these messages for a
double-click:
WM_LBUTTONDOWN
WM_LBUTTONUP
WM_LBUTTONDBLCLK
WM_LBUTTONUP
The WM_LBUTTONDBLCLK message simply replaces the second WM_LBUTTONDOWN message.
Double-click messages are much easier to process if the first click of a double-click performs the same action as a
single click. The second click (the WM_LBUTTONDBLCLK message) then does something in addition to the first
click. For example, look at how the mouse works with the file lists in Windows Explorer. A single click selects the
file. Windows Explorer highlights the file with a reverse-video bar. A double-click performs two actions: the first
click selects the file, just as a single click does; the second click directs Windows Explorer to open the file. That's
fairly easy logic. Mouse-handling logic could get more complex if the first click of a double-click did not perform
the same action as a single click.
220](https://image.slidesharecdn.com/programmingwindows-140823083916-phpapp02/85/Programming-windows-220-320.jpg)


![fit in each column is
iNumInCol = cyClient / cyChar ;
When your program receives a mouse click message, you can obtain the cxMouse and cyMouse coordinates from
lParam. You then calculate which column of filenames the user is pointing at by using this formula:
iColumn = cxMouse / cxColWidth ;
The position of the filename in relation to the top of the column is
iFromTop = cyMouse / cyChar ;
Now you can calculate an index to the szFileNames array.
iIndex = iColumn * iNumInCol + iFromTop ;
If iIndex exceeds the number of files in the array, the user is clicking on a blank area of the display.
In many cases, hit-testing is more complex than this example suggests. When you display a graphical image
containing many parts, you must determine the coordinates for each item you display. In hit-testing calculations, you
must go backward from the coordinates to the object. This can become quite messy in a word-processing program
that uses variable font sizes, because you must work backward to find the character position with the string.
A Sample Program
The CHECKER1 program, shown in Figure 7-4, demonstrates some simple hit-testing. The program divides the
client area into a 5-by-5 array of 25 rectangles. If you click the mouse on one of the rectangles, the rectangle is filled
with an X. If you click there again, the X is removed.
Figure 7-4. The CHECKER1 program.
CHECKER1.C
/*-------------------------------------------------
CHECKER1.C -- Mouse Hit-Test Demo Program No. 1
(c) Charles Petzold, 1998
-------------------------------------------------*/
#include <windows.h>
#define DIVISIONS 5
LRESULT CALLBACK WndProc (HWND, UINT, WPARAM, LPARAM) ;
int WINAPI WinMain (HINSTANCE hInstance, HINSTANCE hPrevInstance,
PSTR szCmdLine, int iCmdShow)
{
static TCHAR szAppName[] = TEXT ("Checker1") ;
HWND hwnd ;
MSG msg ;
WNDCLASS wndclass ;
wndclass.style = CS_HREDRAW | CS_VREDRAW ;
wndclass.lpfnWndProc = WndProc ;
wndclass.cbClsExtra = 0 ;
wndclass.cbWndExtra = 0 ;
224](https://image.slidesharecdn.com/programmingwindows-140823083916-phpapp02/85/Programming-windows-224-320.jpg)
![wndclass.hInstance = hInstance ;
wndclass.hIcon = LoadIcon (NULL, IDI_APPLICATION) ;
wndclass.hCursor = LoadCursor (NULL, IDC_ARROW) ;
wndclass.hbrBackground = (HBRUSH) GetStockObject (WHITE_BRUSH) ;
wndclass.lpszMenuName = NULL ;
wndclass.lpszClassName = szAppName ;
if (!RegisterClass (&wndclass))
{
MessageBox (NULL, TEXT ("Program requires Windows NT!"),
szAppName, MB_ICONERROR) ;
return 0 ;
}
hwnd = CreateWindow (szAppName, TEXT ("Checker1 Mouse Hit-Test Demo"),
WS_OVERLAPPEDWINDOW,
CW_USEDEFAULT, CW_USEDEFAULT,
CW_USEDEFAULT, CW_USEDEFAULT,
NULL, NULL, hInstance, NULL) ;
ShowWindow (hwnd, iCmdShow) ;
UpdateWindow (hwnd) ;
while (GetMessage (&msg, NULL, 0, 0))
{
TranslateMessage (&msg) ;
DispatchMessage (&msg) ;
}
return msg.wParam ;
}
LRESULT CALLBACK WndProc (HWND hwnd, UINT message, WPARAM wParam, LPARAMlParam)
{
static BOOL fState[DIVISIONS][DIVISIONS] ;
static int cxBlock, cyBlock ;
HDC hdc ;
int x, y ;
PAINTSTRUCT ps ;
RECT rect ;
switch (message)
{
case WM_SIZE :
cxBlock = LOWORD (lParam) / DIVISIONS ;
cyBlock = HIWORD (lParam) / DIVISIONS ;
return 0 ;
case WM_LBUTTONDOWN :
x = LOWORD (lParam) / cxBlock ;
y = HIWORD (lParam) / cyBlock ;
if (x < DIVISIONS && y < DIVISIONS)
{
fState [x][y] ^= 1 ;
rect.left = x * cxBlock ;
rect.top = y * cyBlock ;
rect.right = (x + 1) * cxBlock ;
rect.bottom = (y + 1) * cyBlock ;
InvalidateRect (hwnd, &rect, FALSE) ;
}
else
MessageBeep (0) ;
225](https://image.slidesharecdn.com/programmingwindows-140823083916-phpapp02/85/Programming-windows-225-320.jpg)
![return 0 ;
case WM_PAINT :
hdc = BeginPaint (hwnd, &ps) ;
for (x = 0 ; x < DIVISIONS ; x++)
for (y = 0 ; y < DIVISIONS ; y++)
{
Rectangle (hdc, x * cxBlock, y * cyBlock,
(x + 1) * cxBlock, (y + 1) * cyBlock) ;
if (fState [x][y])
{
MoveToEx (hdc, x * cxBlock, y * cyBlock, NULL) ;
LineTo (hdc, (x+1) * cxBlock, (y+1) * cyBlock) ;
MoveToEx (hdc, x * cxBlock, (y+1) * cyBlock, NULL) ;
LineTo (hdc, (x+1) * cxBlock, y * cyBlock) ;
}
}
EndPaint (hwnd, &ps) ;
return 0 ;
case WM_DESTROY :
PostQuitMessage (0) ;
return 0 ;
}
return DefWindowProc (hwnd, message, wParam, lParam) ;
}
Figure 7-5 shows the CHECKER1 display. All 25 rectangles drawn by the program have the same width and the
same height. These width and height values are stored in cxBlock and cyBlock, which are recalculated whenever the
size of the client area changes. The WM_LBUTTONDOWN logic uses the mouse coordinates to determine which
rectangle has been clicked. It flags the current state of the rectangle in the array fState and invalidates the rectangle
to generate a WM_PAINT message.
226](https://image.slidesharecdn.com/programmingwindows-140823083916-phpapp02/85/Programming-windows-226-320.jpg)


![#define DIVISIONS 5
LRESULT CALLBACK WndProc (HWND, UINT, WPARAM, LPARAM) ;
int WINAPI WinMain (HINSTANCE hInstance, HINSTANCE hPrevInstance,
PSTR szCmdLine, int iCmdShow)
{
static TCHAR szAppName[] = TEXT ("Checker2") ;
HWND hwnd ;
MSG msg ;
WNDCLASS wndclass ;
wndclass.style = CS_HREDRAW | CS_VREDRAW ;
wndclass.lpfnWndProc = WndProc ;
wndclass.cbClsExtra = 0 ;
wndclass.cbWndExtra = 0 ;
wndclass.hInstance = hInstance ;
wndclass.hIcon = LoadIcon (NULL, IDI_APPLICATION) ;
wndclass.hCursor = LoadCursor (NULL, IDC_ARROW) ;
wndclass.hbrBackground = (HBRUSH) GetStockObject (WHITE_BRUSH) ;
wndclass.lpszMenuName = NULL ;
wndclass.lpszClassName = szAppName ;
if (!RegisterClass (&wndclass))
{
MessageBox (NULL, TEXT ("Program requires Windows NT!"),
szAppName, MB_ICONERROR) ;
return 0 ;
}
hwnd = CreateWindow (szAppName, TEXT ("Checker2 Mouse Hit-Test Demo"),
WS_OVERLAPPEDWINDOW,
CW_USEDEFAULT, CW_USEDEFAULT,
CW_USEDEFAULT, CW_USEDEFAULT,
NULL, NULL, hInstance, NULL) ;
ShowWindow (hwnd, iCmdShow) ;
UpdateWindow (hwnd) ;
while (GetMessage (&msg, NULL, 0, 0))
{
TranslateMessage (&msg) ;
DispatchMessage (&msg) ;
}
return msg.wParam ;
}
LRESULT CALLBACK WndProc (HWND hwnd, UINT message, WPARAM wParam, LPARAM lParam)
{
static BOOL fState[DIVISIONS][DIVISIONS] ;
static int cxBlock, cyBlock ;
HDC hdc ;
int x, y ;
PAINTSTRUCT ps ;
POINT point ;
RECT rect ;
switch (message)
{
case WM_SIZE :
cxBlock = LOWORD (lParam) / DIVISIONS ;
cyBlock = HIWORD (lParam) / DIVISIONS ;
return 0 ;
case WM_SETFOCUS :
229](https://image.slidesharecdn.com/programmingwindows-140823083916-phpapp02/85/Programming-windows-229-320.jpg)
![ShowCursor (TRUE) ;
return 0 ;
case WM_KILLFOCUS :
ShowCursor (FALSE) ;
return 0 ;
case WM_KEYDOWN :
GetCursorPos (&point) ;
ScreenToClient (hwnd, &point) ;
x = max (0, min (DIVISIONS - 1, point.x / cxBlock)) ;
y = max (0, min (DIVISIONS - 1, point.y / cyBlock)) ;
switch (wParam)
{
case VK_UP :
y-- ;
break ;
case VK_DOWN :
y++ ;
break ;
case VK_LEFT :
x-- ;
break ;
case VK_RIGHT :
x++ ;
break ;
case VK_HOME :
x = y = 0 ;
break ;
case VK_END :
x = y = DIVISIONS - 1 ;
break ;
case VK_RETURN :
case VK_SPACE :
SendMessage (hwnd, WM_LBUTTONDOWN, MK_LBUTTON,
MAKELONG (x * cxBlock, y * cyBlock)) ;
break ;
}
x = (x + DIVISIONS) % DIVISIONS ;
y = (y + DIVISIONS) % DIVISIONS ;
point.x = x * cxBlock + cxBlock / 2 ;
point.y = y * cyBlock + cyBlock / 2 ;
ClientToScreen (hwnd, &point) ;
SetCursorPos (point.x, point.y) ;
return 0 ;
case WM_LBUTTONDOWN :
x = LOWORD (lParam) / cxBlock ;
y = HIWORD (lParam) / cyBlock ;
if (x < DIVISIONS && y < DIVISIONS)
{
fState[x][y] ^= 1 ;
rect.left = x * cxBlock ;
230](https://image.slidesharecdn.com/programmingwindows-140823083916-phpapp02/85/Programming-windows-230-320.jpg)
![rect.top = y * cyBlock ;
rect.right = (x + 1) * cxBlock ;
rect.bottom = (y + 1) * cyBlock ;
InvalidateRect (hwnd, &rect, FALSE) ;
}
else
MessageBeep (0) ;
return 0 ;
case WM_PAINT :
hdc = BeginPaint (hwnd, &ps) ;
for (x = 0 ; x < DIVISIONS ; x++)
for (y = 0 ; y < DIVISIONS ; y++)
{
Rectangle (hdc, x * cxBlock, y * cyBlock,
(x + 1) * cxBlock, (y + 1) * cyBlock) ;
if (fState [x][y])
{
MoveToEx (hdc, x *cxBlock, y *cyBlock, NULL) ;
LineTo (hdc, (x+1)*cxBlock, (y+1)*cyBlock) ;
MoveToEx (hdc, x *cxBlock, (y+1)*cyBlock, NULL) ;
LineTo (hdc, (x+1)*cxBlock, y *cyBlock) ;
}
}
EndPaint (hwnd, &ps) ;
return 0 ;
case WM_DESTROY :
PostQuitMessage (0) ;
return 0 ;
}
return DefWindowProc (hwnd, message, wParam, lParam) ;
}
The WM_KEYDOWN logic in CHECKER2 determines the position of the cursor using GetCursorPos, converts the
screen coordinates to client-area coordinates using ScreenToClient, and divides the coordinates by the width and
height of the rectangular block. This produces x and y values that indicate the position of the rectangle in the 5-by-5
array. The mouse cursor might or might not be in the client area when a key is pressed, so x and y must be passed
through the min and max macros to ensure that they range from 0 through 4.
For arrow keys, CHECKER2 increments or decrements x and y appropriately. If the key is the Enter key or the
Spacebar, CHECKER2 uses SendMessage to send a WM_LBUTTONDOWN message to itself. This technique is
similar to the method used in the SYSMETS program in Chapter 6 to add a keyboard interface to the window scroll
bar. The WM_KEYDOWN logic finishes by calculating client-area coordinates that point to the center of the
rectangle, converting to screen coordinates using ClientToScreen, and setting the cursor position using
SetCursorPos.
Using Child Windows for Hit-Testing
Some programs (for example, the Windows Paint program) divide the client area into several smaller logical areas.
The Paint program has an area at the left for its icon-based tool menu and an area at the bottom for the color menu.
When Paint hit-tests these two areas, it must take into account the location of the smaller area within the entire client
area before determining the actual item being selected by the user.
Or maybe not. In reality, Paint simplifies both the drawing and hit-testing of these smaller areas through the use of
"child windows." The child windows divide the entire client area into several smaller rectangular regions. Each child
window has its own window handle, window procedure, and client area. Each child window procedure receives
mouse messages that apply only to its own window. The lParam parameter in the mouse message contains
coordinates relative to the upper left corner of the client area of the child window, not relative to the client area of
231](https://image.slidesharecdn.com/programmingwindows-140823083916-phpapp02/85/Programming-windows-231-320.jpg)
![the "parent" window (which is Paint's main application window).
Child windows used in this way can help you structure and modularize your programs. If the child windows use
different window classes, each child window can have its own window procedure. The different window classes can
also define different background colors and different default cursors. In Chapter 9, we'll look at "child window
controls," which are predefined windows that take the form of scroll bars, buttons, and edit boxes. Right now, let's
see how we can use child windows in the CHECKER program.
Child Windows in CHECKER
Figure 7-7 shows CHECKER3. This version of the program creates 25 child windows to process mouse clicks. It
does not have a keyboard interface, but one could be added as I'll demonstrate in CHECKER4 later in this chapter.
Figure 7-7. The CHECKER3 program.
CHECKER3.C
/*-------------------------------------------------
CHECKER3.C -- Mouse Hit-Test Demo Program No. 3
(c) Charles Petzold, 1998
-------------------------------------------------*/
#include <windows.h>
#define DIVISIONS 5
LRESULT CALLBACK WndProc (HWND, UINT, WPARAM, LPARAM) ;
LRESULT CALLBACK ChildWndProc (HWND, UINT, WPARAM, LPARAM) ;
TCHAR szChildClass[] = TEXT ("Checker3_Child") ;
int WINAPI WinMain (HINSTANCE hInstance, HINSTANCE hPrevInstance,
PSTR szCmdLine, int iCmdShow)
{
static TCHAR szAppName[] = TEXT ("Checker3") ;
HWND hwnd ;
MSG msg ;
WNDCLASS wndclass ;
wndclass.style = CS_HREDRAW | CS_VREDRAW ;
wndclass.lpfnWndProc = WndProc ;
wndclass.cbClsExtra = 0 ;
wndclass.cbWndExtra = 0 ;
wndclass.hInstance = hInstance ;
wndclass.hIcon = LoadIcon (NULL, IDI_APPLICATION) ;
wndclass.hCursor = LoadCursor (NULL, IDC_ARROW) ;
wndclass.hbrBackground = (HBRUSH) GetStockObject (WHITE_BRUSH) ;
wndclass.lpszMenuName = NULL ;
wndclass.lpszClassName = szAppName ;
if (!RegisterClass (&wndclass))
{
MessageBox (NULL, TEXT ("Program requires Windows NT!"),
szAppName, MB_ICONERROR) ;
return 0 ;
}
wndclass.lpfnWndProc = ChildWndProc ;
232](https://image.slidesharecdn.com/programmingwindows-140823083916-phpapp02/85/Programming-windows-232-320.jpg)
![wndclass.cbWndExtra = sizeof (long) ;
wndclass.hIcon = NULL ;
wndclass.lpszClassName = szChildClass ;
RegisterClass (&wndclass) ;
hwnd = CreateWindow (szAppName, TEXT ("Checker3 Mouse Hit-Test Demo"),
WS_OVERLAPPEDWINDOW,
CW_USEDEFAULT, CW_USEDEFAULT,
CW_USEDEFAULT, CW_USEDEFAULT,
NULL, NULL, hInstance, NULL) ;
ShowWindow (hwnd, iCmdShow) ;
UpdateWindow (hwnd) ;
while (GetMessage (&msg, NULL, 0, 0))
{
TranslateMessage (&msg) ;
DispatchMessage (&msg) ;
}
return msg.wParam ;
}
LRESULT CALLBACK WndProc (HWND hwnd, UINT message, WPARAM wParam, LPARAM lParam)
{
static HWND hwndChild[DIVISIONS][DIVISIONS] ;
int cxBlock, cyBlock, x, y ;
switch (message)
{
case WM_CREATE :
for (x = 0 ; x < DIVISIONS ; x++)
for (y = 0 ; y < DIVISIONS ; y++)
hwndChild[x][y] = CreateWindow (szChildClass, NULL,
WS_CHILDWINDOW | WS_VISIBLE,
0, 0, 0, 0,
hwnd, (HMENU) (y << 8 | x),
(HINSTANCE) GetWindowLong (hwnd, GWL_HINSTANCE),
NULL) ;
return 0 ;
case WM_SIZE :
cxBlock = LOWORD (lParam) / DIVISIONS ;
cyBlock = HIWORD (lParam) / DIVISIONS ;
for (x = 0 ; x < DIVISIONS ; x++)
for (y = 0 ; y < DIVISIONS ; y++)
MoveWindow (hwndChild[x][y],
x * cxBlock, y * cyBlock,
cxBlock, cyBlock, TRUE) ;
return 0 ;
case WM_LBUTTONDOWN :
MessageBeep (0) ;
return 0 ;
case WM_DESTROY :
PostQuitMessage (0) ;
return 0 ;
}
return DefWindowProc (hwnd, message, wParam, lParam) ;
}
LRESULT CALLBACK ChildWndProc (HWND hwnd, UINT message,
WPARAM wParam, LPARAM lParam)
233](https://image.slidesharecdn.com/programmingwindows-140823083916-phpapp02/85/Programming-windows-233-320.jpg)


![Because the C source code file and the .EXE file of CHECKER3 are larger than those for CHECKER1 (to say
nothing of my explanation of the programs), I will not try to convince you that CHECKER3 is "simpler" than
CHECKER1. But note that we no longer have to do any mouse hit-testing! If a child window in CHECKER3 gets a
WM_LBUTTONDOWN message the window has been hit, and that's all it needs to know.
Child Windows and the Keyboard
Adding a keyboard interface to CHECKER3 seems the logical last step in the CHECKER series. But in doing this, a
different approach might be appropriate. In CHECKER2, the position of the mouse cursor indicated which square
would get a check mark when the Spacebar was pressed. When we're dealing with child windows, we can take a cue
from the functioning of dialog boxes. In dialog boxes, a child window indicates that it has the input focus (and hence
will be toggled by the keyboard) with a flashing caret or a dotted rectangle.
We're not going to reproduce all the dialog box logic that exists internally in Windows; we're just going to get a
rough idea of how you can emulate dialog boxes in an application. When exploring how to do this, one thing you'll
discover is that the parent window and the child windows should probably share processing of keyboard messages.
The child window should toggle the check mark when the Spacebar or Enter key is pressed. The parent window
should move the input focus among the child windows when the cursor keys are pressed. The logic is complicated
somewhat by the fact that when you click on a child window, the parent window rather than the child window gets
the input focus.
CHECKER4.C is shown in Figure 7-8.
Figure 7-8. The CHECKER4 program.
CHECKER4.C
/*-------------------------------------------------
CHECKER4.C -- Mouse Hit-Test Demo Program No. 4
(c) Charles Petzold, 1998
-------------------------------------------------*/
#include <windows.h>
#define DIVISIONS 5
LRESULT CALLBACK WndProc (HWND, UINT, WPARAM, LPARAM) ;
LRESULT CALLBACK ChildWndProc (HWND, UINT, WPARAM, LPARAM) ;
int idFocus = 0 ;
TCHAR szChildClass[] = TEXT ("Checker4_Child") ;
int WINAPI WinMain (HINSTANCE hInstance, HINSTANCE hPrevInstance,
PSTR szCmdLine, int iCmdShow)
{
static TCHAR szAppName[] = TEXT ("Checker4") ;
HWND hwnd ;
MSG msg ;
WNDCLASS wndclass ;
wndclass.style = CS_HREDRAW | CS_VREDRAW ;
wndclass.lpfnWndProc = WndProc ;
wndclass.cbClsExtra = 0 ;
wndclass.cbWndExtra = 0 ;
wndclass.hInstance = hInstance ;
wndclass.hIcon = LoadIcon (NULL, IDI_APPLICATION) ;
wndclass.hCursor = LoadCursor (NULL, IDC_ARROW) ;
236](https://image.slidesharecdn.com/programmingwindows-140823083916-phpapp02/85/Programming-windows-236-320.jpg)
![wndclass.hbrBackground = (HBRUSH) GetStockObject (WHITE_BRUSH) ;
wndclass.lpszMenuName = NULL ;
wndclass.lpszClassName = szAppName ;
if (!RegisterClass (&wndclass))
{
MessageBox (NULL, TEXT ("Program requires Windows NT!"),
szAppName, MB_ICONERROR) ;
return 0 ;
}
wndclass.lpfnWndProc = ChildWndProc ;
wndclass.cbWndExtra = sizeof (long) ;
wndclass.hIcon = NULL ;
wndclass.lpszClassName = szChildClass ;
RegisterClass (&wndclass) ;
hwnd = CreateWindow (szAppName, TEXT ("Checker4 Mouse Hit-Test Demo"),
WS_OVERLAPPEDWINDOW,
CW_USEDEFAULT, CW_USEDEFAULT,
CW_USEDEFAULT, CW_USEDEFAULT,
NULL, NULL, hInstance, NULL) ;
ShowWindow (hwnd, iCmdShow) ;
UpdateWindow (hwnd) ;
while (GetMessage (&msg, NULL, 0, 0))
{
TranslateMessage (&msg) ;
DispatchMessage (&msg) ;
}
return msg.wParam ;
}
LRESULT CALLBACK WndProc (HWND hwnd, UINT message, WPARAM wParam, LPARAM lParam)
{
static HWND hwndChild[DIVISIONS][DIVISIONS] ;
int cxBlock, cyBlock, x, y ;
switch (message)
{
case WM_CREATE :
for (x = 0 ; x < DIVISIONS ; x++)
for (y = 0 ; y < DIVISIONS ; y++)
hwndChild[x][y] = CreateWindow (szChildClass, NULL,
WS_CHILDWINDOW | WS_VISIBLE,
0, 0, 0, 0,
hwnd, (HMENU) (y << 8 | x),
(HINSTANCE) GetWindowLong (hwnd, GWL_HINSTANCE),
NULL) ;
return 0 ;
case WM_SIZE :
cxBlock = LOWORD (lParam) / DIVISIONS ;
cyBlock = HIWORD (lParam) / DIVISIONS ;
for (x = 0 ; x < DIVISIONS ; x++)
for (y = 0 ; y < DIVISIONS ; y++)
MoveWindow (hwndChild[x][y],
x * cxBlock, y * cyBlock,
cxBlock, cyBlock, TRUE) ;
return 0 ;
237](https://image.slidesharecdn.com/programmingwindows-140823083916-phpapp02/85/Programming-windows-237-320.jpg)


![BLOKOUT1.C
/*-----------------------------------------
BLOKOUT1.C -- Mouse Button Demo Program
(c) Charles Petzold, 1998
-----------------------------------------*/
#include <windows.h>
LRESULT CALLBACK WndProc (HWND, UINT, WPARAM, LPARAM) ;
int WINAPI WinMain (HINSTANCE hInstance, HINSTANCE hPrevInstance,
PSTR szCmdLine, int iCmdShow)
{
static TCHAR szAppName[] = TEXT ("BlokOut1") ;
HWND hwnd ;
MSG msg ;
WNDCLASS wndclass ;
wndclass.style = CS_HREDRAW | CS_VREDRAW ;
wndclass.lpfnWndProc = WndProc ;
wndclass.cbClsExtra = 0 ;
wndclass.cbWndExtra = 0 ;
wndclass.hInstance = hInstance ;
wndclass.hIcon = LoadIcon (NULL, IDI_APPLICATION) ;
wndclass.hCursor = LoadCursor (NULL, IDC_ARROW) ;
wndclass.hbrBackground = (HBRUSH) GetStockObject (WHITE_BRUSH) ;
wndclass.lpszMenuName = NULL ;
wndclass.lpszClassName = szAppName ;
if (!RegisterClass (&wndclass))
{
MessageBox (NULL, TEXT ("Program requires Windows NT!"),
szAppName, MB_ICONERROR) ;
return 0 ;
}
hwnd = CreateWindow (szAppName, TEXT ("Mouse Button Demo"),
WS_OVERLAPPEDWINDOW,
CW_USEDEFAULT, CW_USEDEFAULT,
CW_USEDEFAULT, CW_USEDEFAULT,
NULL, NULL, hInstance, NULL) ;
ShowWindow (hwnd, iCmdShow) ;
UpdateWindow (hwnd) ;
while (GetMessage (&msg, NULL, 0, 0))
{
TranslateMessage (&msg) ;
DispatchMessage (&msg) ;
}
return msg.wParam ;
}
void DrawBoxOutline (HWND hwnd, POINT ptBeg, POINT ptEnd)
{
HDC hdc ;
hdc = GetDC (hwnd) ;
SetROP2 (hdc, R2_NOT) ;
SelectObject (hdc, GetStockObject (NULL_BRUSH)) ;
Rectangle (hdc, ptBeg.x, ptBeg.y, ptEnd.x, ptEnd.y) ;
241](https://image.slidesharecdn.com/programmingwindows-140823083916-phpapp02/85/Programming-windows-241-320.jpg)

![area of the window. The lParam parameter still indicates the position of the mouse in client-area coordinates. These
x and y coordinates, however, can be negative if the mouse is to the left of or above the client area. When you want
to release the mouse, call
ReleaseCapture () ;
which will returns things to normal.
In the 32-bit versions of Windows, mouse capturing is a bit more restrictive than it was in earlier versions of
Windows. Specifically, if the mouse has been captured, and if a mouse button is not currently down, and if the
mouse cursor passes over another window, the window underneath the cursor will receive the mouse messages
rather than the window that captured the mouse. This is necessary to prevent one program from messing up the
whole system by capturing the mouse and not releasing it.
To avoid problems, your program should capture the mouse only when the button is depressed in your client area.
You should release the capture when the button is released.
The BLOKOUT2 Program
The BLOKOUT2 program that demonstrates mouse capturing is shown in Figure 7-11.
Figure 7-11. The BLOKOUT2 program.
BLOKOUT2.C
/*---------------------------------------------------
BLOKOUT2.C -- Mouse Button & Capture Demo Program
(c) Charles Petzold, 1998
---------------------------------------------------*/
#include <windows.h>
LRESULT CALLBACK WndProc (HWND, UINT, WPARAM, LPARAM) ;
int WINAPI WinMain (HINSTANCE hInstance, HINSTANCE hPrevInstance,
PSTR szCmdLine, int iCmdShow)
{
static TCHAR szAppName[] = TEXT ("BlokOut2") ;
HWND hwnd ;
MSG msg ;
WNDCLASS wndclass ;
wndclass.style = CS_HREDRAW | CS_VREDRAW ;
wndclass.lpfnWndProc = WndProc ;
wndclass.cbClsExtra = 0 ;
wndclass.cbWndExtra = 0 ;
wndclass.hInstance = hInstance ;
wndclass.hIcon = LoadIcon (NULL, IDI_APPLICATION) ;
wndclass.hCursor = LoadCursor (NULL, IDC_ARROW) ;
wndclass.hbrBackground = (HBRUSH) GetStockObject (WHITE_BRUSH) ;
wndclass.lpszMenuName = NULL ;
wndclass.lpszClassName = szAppName ;
if (!RegisterClass (&wndclass))
{
MessageBox (NULL, TEXT ("Program requires Windows NT!"),
243](https://image.slidesharecdn.com/programmingwindows-140823083916-phpapp02/85/Programming-windows-243-320.jpg)


![WM_CHAR messages. And check this out: Make the window smaller than the screen size, begin blocking out a
rectangle within the client area, and then move the mouse cursor outside the client and to the right or bottom, and
finally release the mouse button. The program will have the coordinates of the entire rectangle. Just enlarge the
window to see it.
Capturing the mouse isn't something suited only for oddball applications. You should do it anytime you need to
track WM_MOUSEMOVE messages after a mouse button has been depressed in your client area until the mouse
button is released. Your program will be simpler, and the user's expectations will have been met.
The Mouse Wheel
"Build a better mousetrap and the world will beat a path to your door," my mother told me, unknowingly
paraphrasing Emerson. Of course, nowadays it might make more sense to build a better mouse.
The Microsoft IntelliMouse features an enhancement to the traditional mouse in the form of a little wheel between
the two buttons. You can press down on this wheel, in which case it functions as a middle mouse button, or you can
turn it with your index finger. This generates a special message named WM_MOUSEWHEEL. Programs that use
the mouse wheel respond to this message by scrolling or zooming a document. It sounds like an unnecessary
gimmick at first, but I must confess I got accustomed very quickly to using the mouse wheel for scrolling through
Microsoft Word and Microsoft Internet Explorer. I won't attempt to discuss all the ways the mouse wheel can be
used. Instead, I'll show how you can add mouse wheel logic to an existing program that scrolls data within its client
area, a program such as SYSMETS4. The final SYSMETS program is shown in Figure 7-12.
Figure 7-12. The SYSMETS program.
SYSMETS.C
/*---------------------------------------------------
SYSMETS.C -- Final System Metrics Display Program
(c) Charles Petzold, 1998
---------------------------------------------------*/
#include <windows.h>
#include "sysmets.h"
LRESULT CALLBACK WndProc (HWND, UINT, WPARAM, LPARAM) ;
int WINAPI WinMain (HINSTANCE hInstance, HINSTANCE hPrevInstance,
PSTR szCmdLine, int iCmdShow)
{
static TCHAR szAppName[] = TEXT ("SysMets") ;
HWND hwnd ;
MSG msg ;
WNDCLASS wndclass ;
wndclass.style = CS_HREDRAW | CS_VREDRAW ;
wndclass.lpfnWndProc = WndProc ;
wndclass.cbClsExtra = 0 ;
wndclass.cbWndExtra = 0 ;
wndclass.hInstance = hInstance ;
wndclass.hIcon = LoadIcon (NULL, IDI_APPLICATION) ;
wndclass.hCursor = LoadCursor (NULL, IDC_ARROW) ;
wndclass.hbrBackground = (HBRUSH) GetStockObject (WHITE_BRUSH) ;
wndclass.lpszMenuName = NULL ;
wndclass.lpszClassName = szAppName ;
246](https://image.slidesharecdn.com/programmingwindows-140823083916-phpapp02/85/Programming-windows-246-320.jpg)
![if (!RegisterClass (&wndclass))
{
MessageBox (NULL, TEXT ("Program requires Windows NT!"),
szAppName, MB_ICONERROR) ;
return 0 ;
}
hwnd = CreateWindow (szAppName, TEXT ("Get System Metrics"),
WS_OVERLAPPEDWINDOW | WS_VSCROLL | WS_HSCROLL,
CW_USEDEFAULT, CW_USEDEFAULT,
CW_USEDEFAULT, CW_USEDEFAULT,
NULL, NULL, hInstance, NULL) ;
ShowWindow (hwnd, iCmdShow) ;
UpdateWindow (hwnd) ;
while (GetMessage (&msg, NULL, 0, 0))
{
TranslateMessage (&msg) ;
DispatchMessage (&msg) ;
}
return msg.wParam ;
}
LRESULT CALLBACK WndProc (HWND hwnd, UINT message, WPARAM wParam, LPARAM lParam)
{
static int cxChar, cxCaps, cyChar, cxClient, cyClient, iMaxWidth ;
static int iDeltaPerLine, iAccumDelta ; // for mouse wheel logic
HDC hdc ;
int i, x, y, iVertPos, iHorzPos, iPaintBeg, iPaintEnd ;
PAINTSTRUCT ps ;
SCROLLINFO si ;
TCHAR szBuffer[10] ;
TEXTMETRIC tm ;
ULONG ulScrollLines ; // for mouse wheel logic
switch (message)
{
case WM_CREATE:
hdc = GetDC (hwnd) ;
GetTextMetrics (hdc, &tm) ;
cxChar = tm.tmAveCharWidth ;
cxCaps = (tm.tmPitchAndFamily & 1 ? 3 : 2) * cxChar / 2 ;
cyChar = tm.tmHeight + tm.tmExternalLeading ;
ReleaseDC (hwnd, hdc) ;
// Save the width of the three columns
iMaxWidth = 40 * cxChar + 22 * cxCaps ;
// Fall through for mouse wheel information
case WM_SETTINGCHANGE:
SystemParametersInfo (SPI_GETWHEELSCROLLLINES, 0, &ulScrollLines, 0) ;
// ulScrollLines usually equals 3 or 0 (for no scrolling)
// WHEEL_DELTA equals 120, so iDeltaPerLine will be 40
if (ulScrollLines)
iDeltaPerLine = WHEEL_DELTA / ulScrollLines ;
else
iDeltaPerLine = 0 ;
247](https://image.slidesharecdn.com/programmingwindows-140823083916-phpapp02/85/Programming-windows-247-320.jpg)


![return 0 ;
case WM_PAINT :
hdc = BeginPaint (hwnd, &ps) ;
// Get vertical scroll bar position
si.cbSize = sizeof (si) ;
si.fMask = SIF_POS ;
GetScrollInfo (hwnd, SB_VERT, &si) ;
iVertPos = si.nPos ;
// Get horizontal scroll bar position
GetScrollInfo (hwnd, SB_HORZ, &si) ;
iHorzPos = si.nPos ;
// Find painting limits
iPaintBeg = max (0, iVertPos + ps.rcPaint.top / cyChar) ;
iPaintEnd = min (NUMLINES - 1,
iVertPos + ps.rcPaint.bottom / cyChar) ;
for (i = iPaintBeg ; i <= iPaintEnd ; i++)
{
x = cxChar * (1 - iHorzPos) ;
y = cyChar * (i - iVertPos) ;
TextOut (hdc, x, y,
sysmetrics[i].szLabel,
lstrlen (sysmetrics[i].szLabel)) ;
TextOut (hdc, x + 22 * cxCaps, y,
sysmetrics[i].szDesc,
lstrlen (sysmetrics[i].szDesc)) ;
SetTextAlign (hdc, TA_RIGHT | TA_TOP) ;
TextOut (hdc, x + 22 * cxCaps + 40 * cxChar, y, szBuffer,
wsprintf (szBuffer, TEXT ("%5d"),
GetSystemMetrics (sysmetrics[i].iIndex))) ;
SetTextAlign (hdc, TA_LEFT | TA_TOP) ;
}
EndPaint (hwnd, &ps) ;
return 0 ;
case WM_DESTROY :
PostQuitMessage (0) ;
return 0 ;
}
return DefWindowProc (hwnd, message, wParam, lParam) ;
}
Rotating the wheel causes Windows to generate WM_MOUSEWHEEL messages to the window with the input
focus (not the window underneath the mouse cursor). As usual, lParam contains the position of the mouse; however,
the coordinates are relative to the upper left corner of the screen rather than the client area. Also as usual, the low
word of wParam contains a series of flags indicating the state of the mouse buttons and the Shift and Ctrl keys.
The new information is in the high word of wParam. This is a "delta" value that is currently likely to be either 120
or -120, depending on whether the wheel is rotated forward (that is, toward the front of the mouse, the end with the
buttons and cable) or backward. The values of 120 or -120 indicate that the document is to be scrolled three lines up
or down, respectively. The idea here is that future versions of the mouse wheel can have a finer gradation than the
251](https://image.slidesharecdn.com/programmingwindows-140823083916-phpapp02/85/Programming-windows-251-320.jpg)


![SetTimer (hwnd, 1, uiMsecInterval, NULL) ;
The first argument is a handle to the window whose window procedure will receive the WM_TIMER messages. The
second argument is the timer ID, which should be a nonzero number. I have arbitrarily set it to 1 in this example.
The third argument is a 32-bit unsigned integer that specifies an interval in milliseconds. A value of 60,000 will
deliver a WM_TIMER message once a minute.
You can stop the WM_TIMER messages at any time (even while processing a WM_TIMER message) by calling
KillTimer (hwnd, 1) ;
The second argument is the same timer ID used in the SetTimer call. It's considered good form to kill any active
timers in response to a WM_DESTROY message before your program terminates.
When your window procedure receives a WM_TIMER message, wParam is equal to the timer ID (which in the
above case is simply 1) and lParam is 0. If you need to set more than one timer, use a different timer ID for each.
The value of wParam will differentiate the WM_TIMER message passed to your window procedure. To make your
program more readable, you may want to use #define statements for the different timer IDs:
#define TIMER_SEC 1
#define TIMER_MIN 2
You can then set the two timers with two SetTimer calls:
SetTimer (hwnd, TIMER_SEC, 1000, NULL) ;
SetTimer (hwnd, TIMER_MIN, 60000, NULL) ;
The WM_TIMER logic might look something like this:
case WM_TIMER:
switch (wParam)
{
case TIMER_SEC:
[once-per-second processing]
break ;
case TIMER_MIN:
[once-per-minute processing]
break ;
}
return 0 ;
If you want to set an existing timer to a different elapsed time, you can simply call SetTimer again with a different
time value. You may want to do this in a clock program if it has an option to show or not show seconds. You'd
simply change the timer interval to between 1000 msec and 60,000 msec.
Figure 8-1 shows a simple program that uses the timer. This program, named BEEPER1, sets a timer for 1-second
intervals. When it receives a WM_TIMER message, it alternates coloring the client area blue and red and it beeps by
calling the function MessageBeep. (Although MessageBeep is often used as a companion to MessageBox, it's really
an all-purpose beep function. In PCs equipped with sound boards, you can use the various MB_ICON parameters
normally used with MessageBox as parameters to MessageBeep to make different sounds as selected by the user in
the Control Panel Sounds applet.)
BEEPER1 sets the timer while processing the WM_CREATE message in the window procedure. During the
WM_TIMER message, BEEPER1 calls MessageBeep, inverts the value of bFlipFlop, and invalidates the window to
generate a WM_PAINT message. During the WM_PAINT message, BEEPER1 obtains a RECT structure for the
size of the window by calling GetClientRect and colors the window by calling FillRect.
Figure 8-1. The BEEPER1 program.
255](https://image.slidesharecdn.com/programmingwindows-140823083916-phpapp02/85/Programming-windows-255-320.jpg)
![BEEPER1.C
/*-----------------------------------------
BEEPER1.C -- Timer Demo Program No. 1
(c) Charles Petzold, 1998
-----------------------------------------*/
#include <windows.h>
#define ID_TIMER 1
LRESULT CALLBACK WndProc (HWND, UINT, WPARAM, LPARAM) ;
int WINAPI WinMain (HINSTANCE hInstance, HINSTANCE hPrevInstance,
PSTR szCmdLine, int iCmdShow)
{
static TCHAR szAppName[] = TEXT ("Beeper1") ;
HWND hwnd ;
MSG msg ;
WNDCLASS wndclass ;
wndclass.style = CS_HREDRAW | CS_VREDRAW ;
wndclass.lpfnWndProc = WndProc ;
wndclass.cbClsExtra = 0 ;
wndclass.cbWndExtra = 0 ;
wndclass.hInstance = hInstance ;
wndclass.hIcon = LoadIcon (NULL, IDI_APPLICATION) ;
wndclass.hCursor = LoadCursor (NULL, IDC_ARROW) ;
wndclass.hbrBackground = (HBRUSH) GetStockObject (WHITE_BRUSH) ;
wndclass.lpszMenuName = NULL ;
wndclass.lpszClassName = szAppName ;
if (!RegisterClass (&wndclass))
{
MessageBox (NULL, TEXT ("Program requires Windows NT!"),
szAppName, MB_ICONERROR) ;
return 0 ;
}
hwnd = CreateWindow (szAppName, TEXT ("Beeper1 Timer Demo"),
WS_OVERLAPPEDWINDOW,
CW_USEDEFAULT, CW_USEDEFAULT,
CW_USEDEFAULT, CW_USEDEFAULT,
NULL, NULL, hInstance, NULL) ;
ShowWindow (hwnd, iCmdShow) ;
UpdateWindow (hwnd) ;
while (GetMessage (&msg, NULL, 0, 0))
{
TranslateMessage (&msg) ;
DispatchMessage (&msg) ;
}
return msg.wParam ;
}
LRESULT CALLBACK WndProc (HWND hwnd, UINT message, WPARAM wParam, LPARAM lParam)
{
static BOOL fFlipFlop = FALSE ;
HBRUSH hBrush ;
HDC hdc ;
256](https://image.slidesharecdn.com/programmingwindows-140823083916-phpapp02/85/Programming-windows-256-320.jpg)
![Because BEEPER1 audibly indicates every WM_TIMER message it receives, you can get a good idea of the erratic
nature of WM_TIMER messages by loading BEEPER1 and performing some other actions within Windows.
Here's a revealing experiment: First invoke the Display applet from the Control Panel, and select the Effects tab.
Make sure the "Show window contents while dragging" button is unchecked. Now try moving or resizing the
BEEPER1 window. This causes the program to enter a "modal message loop." Windows prevents anything from
interfering with the move or resize operation by trapping all messages through a message loop inside Windows
rather than the message loop in your program. Most messages to a program's window that come through this loop
are simply discarded, which is why BEEPER1 stops beeping. When you complete the move or resize, you'll notice
that BEEPER1 doesn't get all the WM_TIMER messages it has missed, although the first two messages might be
less than a second apart.
When the "Show window contents while dragging" button is checked, the modal message loop within Windows
attempts to pass on to your window procedure some of the messages it would otherwise have missed. This
sometimes works nicely, and sometimes it doesn't.
Method Two
The first method for setting the timer causes WM_TIMER messages to be sent to the normal window procedure.
With this second method, you can direct Windows to send the timer messages to another function within your
program.
The function that receives these timer messages is termed a "call-back" function. This is a function in your program
that is called from Windows. You tell Windows the address of this function, and Windows later calls the function.
This should sound familiar, because a program's window procedure is really just a type of call-back function. You
tell Windows the address of the window procedure when registering the window class, and then Windows calls the
function when sending messages to the program.
SetTimer is not the only Windows function that uses a call-back. The CreateDialog and DialogBox functions
(discussed in Chapter 11) use call-back functions to process messages in a dialog box; several Windows functions
(EnumChildWindow, EnumFonts, EnumObjects, EnumProps, and EnumWindow) pass enumerated information to
call-back functions; and several less commonly used functions (GrayString, LineDDA, and SetWindowHookEx) also
require call-back functions.
Like a window procedure, a call-back function must be defined as CALLBACK because it is called by Windows
from outside the code space of the program. The parameters to the call-back function and the value returned from
the call-back function depend on the purpose of the function. In the case of the call-back function associated with
the timer, the parameters are actually the same as the parameters to a window procedure although they are defined
differently. However, the timer call-back function does not return a value to Windows.
Let's name the call-back function TimerProc. (You can choose any name that doesn't conflict with something else.)
This function will process only WM_TIMER messages:
VOID CALLBACK TimerProc (HWND hwnd, UINT message, UINT iTimerID, DWORD dwTime)
{
[process WM_TIMER messages]
}
The hwnd parameter to TimerProc is the handle to the window specified when you call SetTimer. Windows will
send only WM_TIMER messages to TimerProc, so the message parameter will always equal WM_TIMER. The
iTimerID value is the timer ID, and dwTimer is a value compatible with the return value from the GetTickCount
function. This is the number of milliseconds that has elapsed since Windows was started.
As we saw in BEEPER1, the first method for setting a timer requires a SetTimer call that looks like this:
SetTimer (hwnd, iTimerID, iMsecInterval, NULL) ;
When you use a call-back function to process WM_TIMER messages, the fourth argument to SetTimer is instead the
address of the call-back function, like so:
257](https://image.slidesharecdn.com/programmingwindows-140823083916-phpapp02/85/Programming-windows-257-320.jpg)
![SetTimer (hwnd, iTimerID, iMsecInterval, TimerProc) ;
Let's look at some sample code so that you can see how this stuff fits together. The BEEPER2 program, shown in
Figure 8-2, is functionally the same as BEEPER1, except that Windows sends the timer messages to TimerProc
rather than to WndProc. Notice that TimerProc is declared at the top of the program along with WndProc.
Figure 8-2. The BEEPER2 program.
BEEPER2.C
/*----------------------------------------
BEEPER2.C -- Timer Demo Program No. 2
(c) Charles Petzold, 1998
----------------------------------------*/
#include <windows.h>
#define ID_TIMER 1
LRESULT CALLBACK WndProc (HWND, UINT, WPARAM, LPARAM) ;
VOID CALLBACK TimerProc (HWND, UINT, UINT, DWORD ) ;
int WINAPI WinMain (HINSTANCE hInstance, HINSTANCE hPrevInstance,
PSTR szCmdLine, int iCmdShow)
{
static char szAppName[] = "Beeper2" ;
HWND hwnd ;
MSG msg ;
WNDCLASS wndclass ;
wndclass.style = CS_HREDRAW | CS_VREDRAW ;
wndclass.lpfnWndProc = WndProc ;
wndclass.cbClsExtra = 0 ;
wndclass.cbWndExtra = 0 ;
wndclass.hInstance = hInstance ;
wndclass.hIcon = LoadIcon (NULL, IDI_APPLICATION) ;
wndclass.hCursor = LoadCursor (NULL, IDC_ARROW) ;
wndclass.hbrBackground = (HBRUSH) GetStockObject (WHITE_BRUSH) ;
wndclass.lpszMenuName = NULL ;
wndclass.lpszClassName = szAppName ;
if (!RegisterClass (&wndclass))
{
MessageBox (NULL, TEXT ("Program requires Windows NT!"),
szAppName, MB_ICONERROR) ;
return 0 ;
}
hwnd = CreateWindow (szAppName, "Beeper2 Timer Demo",
WS_OVERLAPPEDWINDOW,
CW_USEDEFAULT, CW_USEDEFAULT,
CW_USEDEFAULT, CW_USEDEFAULT,
NULL, NULL, hInstance, NULL) ;
ShowWindow (hwnd, iCmdShow) ;
UpdateWindow (hwnd) ;
while (GetMessage (&msg, NULL, 0, 0))
258](https://image.slidesharecdn.com/programmingwindows-140823083916-phpapp02/85/Programming-windows-258-320.jpg)

![Using the Timer for a Clock
A clock is the most obvious application for the timer, so let's look at two of them, one digital and one analog.
Building a Digital Clock
The DIGCLOCK program, shown in Figure 8-3, displays the current time using a simulated LED-like 7-segment
display.
Figure 8-3. The DIGCLOCK program.
DIGCLOCK.C
/*-----------------------------------------
DIGCLOCK.C -- Digital Clock
(c) Charles Petzold, 1998
-----------------------------------------*/
#include <windows.h>
#define ID_TIMER 1
LRESULT CALLBACK WndProc (HWND, UINT, WPARAM, LPARAM) ;
int WINAPI WinMain (HINSTANCE hInstance, HINSTANCE hPrevInstance,
PSTR szCmdLine, int iCmdShow)
{
static TCHAR szAppName[] = TEXT ("DigClock") ;
HWND hwnd ;
MSG msg ;
WNDCLASS wndclass ;
wndclass.style = CS_HREDRAW | CS_VREDRAW ;
wndclass.lpfnWndProc = WndProc ;
wndclass.cbClsExtra = 0 ;
wndclass.cbWndExtra = 0 ;
wndclass.hInstance = hInstance ;
wndclass.hIcon = LoadIcon (NULL, IDI_APPLICATION) ;
wndclass.hCursor = LoadCursor (NULL, IDC_ARROW) ;
wndclass.hbrBackground = (HBRUSH) GetStockObject (WHITE_BRUSH) ;
wndclass.lpszMenuName = NULL ;
wndclass.lpszClassName = szAppName ;
if (!RegisterClass (&wndclass))
{
MessageBox (NULL, TEXT ("Program requires Windows NT!"),
szAppName, MB_ICONERROR) ;
return 0 ;
}
hwnd = CreateWindow (szAppName, TEXT ("Digital Clock"),
WS_OVERLAPPEDWINDOW,
CW_USEDEFAULT, CW_USEDEFAULT,
CW_USEDEFAULT, CW_USEDEFAULT,
NULL, NULL, hInstance, NULL) ;
ShowWindow (hwnd, iCmdShow) ;
260](https://image.slidesharecdn.com/programmingwindows-140823083916-phpapp02/85/Programming-windows-260-320.jpg)
![UpdateWindow (hwnd) ;
while (GetMessage (&msg, NULL, 0, 0))
{
TranslateMessage (&msg) ;
DispatchMessage (&msg) ;
}
return msg.wParam ;
}
void DisplayDigit (HDC hdc, int iNumber)
{
static BOOL fSevenSegment [10][7] = {
1, 1, 1, 0, 1, 1, 1, // 0
0, 0, 1, 0, 0, 1, 0, // 1
1, 0, 1, 1, 1, 0, 1, // 2
1, 0, 1, 1, 0, 1, 1, // 3
0, 1, 1, 1, 0, 1, 0, // 4
1, 1, 0, 1, 0, 1, 1, // 5
1, 1, 0, 1, 1, 1, 1, // 6
1, 0, 1, 0, 0, 1, 0, // 7
1, 1, 1, 1, 1, 1, 1, // 8
1, 1, 1, 1, 0, 1, 1 } ; // 9
static POINT ptSegment [7][6] = {
7, 6, 11, 2, 31, 2, 35, 6, 31, 10, 11, 10,
6, 7, 10, 11, 10, 31, 6, 35, 2, 31, 2, 11,
36, 7, 40, 11, 40, 31, 36, 35, 32, 31, 32, 11,
7, 36, 11, 32, 31, 32, 35, 36, 31, 40, 11, 40,
6, 37, 10, 41, 10, 61, 6, 65, 2, 61, 2, 41,
36, 37, 40, 41, 40, 61, 36, 65, 32, 61, 32, 41,
7, 66, 11, 62, 31, 62, 35, 66, 31, 70, 11, 70 } ;
int iSeg ;
for (iSeg = 0 ; iSeg < 7 ; iSeg++)
if (fSevenSegment [iNumber][iSeg])
Polygon (hdc, ptSegment [iSeg], 6) ;
}
void DisplayTwoDigits (HDC hdc, int iNumber, BOOL fSuppress)
{
if (!fSuppress || (iNumber / 10 != 0))
DisplayDigit (hdc, iNumber / 10) ;
OffsetWindowOrgEx (hdc, -42, 0, NULL) ;
DisplayDigit (hdc, iNumber % 10) ;
OffsetWindowOrgEx (hdc, -42, 0, NULL) ;
}
void DisplayColon (HDC hdc)
{
POINT ptColon [2][4] = { 2, 21, 6, 17, 10, 21, 6, 25,
2, 51, 6, 47, 10, 51, 6, 55 } ;
Polygon (hdc, ptColon [0], 4) ;
Polygon (hdc, ptColon [1], 4) ;
OffsetWindowOrgEx (hdc, -12, 0, NULL) ;
}
void DisplayTime (HDC hdc, BOOL f24Hour, BOOL fSuppress)
{
SYSTEMTIME st ;
GetLocalTime (&st) ;
261](https://image.slidesharecdn.com/programmingwindows-140823083916-phpapp02/85/Programming-windows-261-320.jpg)
![if (f24Hour)
DisplayTwoDigits (hdc, st.wHour, fSuppress) ;
else
DisplayTwoDigits (hdc, (st.wHour %= 12) ? st.wHour : 12, fSuppress) ;
DisplayColon (hdc) ;
DisplayTwoDigits (hdc, st.wMinute, FALSE) ;
DisplayColon (hdc) ;
DisplayTwoDigits (hdc, st.wSecond, FALSE) ;
}
LRESULT CALLBACK WndProc (HWND hwnd, UINT message, WPARAM wParam, LPARAM lParam)
{
static BOOL f24Hour, fSuppress ;
static HBRUSH hBrushRed ;
static int cxClient, cyClient ;
HDC hdc ;
PAINTSTRUCT ps ;
TCHAR szBuffer [2] ;
switch (message)
{
case WM_CREATE:
hBrushRed = CreateSolidBrush (RGB (255, 0, 0)) ;
SetTimer (hwnd, ID_TIMER, 1000, NULL) ;
// fall through
case WM_SETTINGCHANGE:
GetLocaleInfo (LOCALE_USER_DEFAULT, LOCALE_ITIME, szBuffer, 2) ;
f24Hour = (szBuffer[0] == `1') ;
GetLocaleInfo (LOCALE_USER_DEFAULT, LOCALE_ITLZERO, szBuffer, 2) ;
fSuppress = (szBuffer[0] == `0') ;
InvalidateRect (hwnd, NULL, TRUE) ;
return 0 ;
case WM_SIZE:
cxClient = LOWORD (lParam) ;
cyClient = HIWORD (lParam) ;
return 0 ;
case WM_TIMER:
InvalidateRect (hwnd, NULL, TRUE) ;
return 0 ;
case WM_PAINT:
hdc = BeginPaint (hwnd, &ps) ;
SetMapMode (hdc, MM_ISOTROPIC) ;
SetWindowExtEx (hdc, 276, 72, NULL) ;
SetViewportExtEx (hdc, cxClient, cyClient, NULL) ;
SetWindowOrgEx (hdc, 138, 36, NULL) ;
SetViewportOrgEx (hdc, cxClient / 2, cyClient / 2, NULL) ;
SelectObject (hdc, GetStockObject (NULL_PEN)) ;
SelectObject (hdc, hBrushRed) ;
DisplayTime (hdc, f24Hour, fSuppress) ;
EndPaint (hwnd, &ps) ;
return 0 ;
262](https://image.slidesharecdn.com/programmingwindows-140823083916-phpapp02/85/Programming-windows-262-320.jpg)

![DIGCLOCK sets the window origin to the point (138, 36), which is the center of the window extents, and the
viewport origin to (cxClient / 2, cyClient / 2). This means that the clock display will be centered in DIGCLOCK's
client area but that DIGCLOCK can use axes with an origin of (0, 0) at the upper-left corner of the display.
The WM_PAINT processing then sets the current brush to the red brush created earlier and the current pen to the
NULL_PEN and calls the function in DIGCLOCK named DisplayTime.
Getting the Current Time
The DisplayTime function begins by calling the Windows function GetLocalTime, which takes as a single argument
the SYSTEMTIME structure, defined in WINBASE.H like so:
typedef struct _SYSTEMTIME
{
WORD wYear ;
WORD wMonth ;
WORD wDayOfWeek ;
WORD wDay ;
WORD wHour ;
WORD wMinute ;
WORD wSecond ;
WORD wMilliseconds ;
}
SYSTEMTIME, * PSYSTEMTIME ;
As is obvious, the SYSTEMTIME structure encodes the date as well as the time. The month is 1-based (that is,
January is 1), and the day of the week is 0-based (Sunday is 0). The wDay field is the current day of the month,
which is also 1-based.
The SYSTEMTIME structure is used primarily with the GetLocalTime and GetSystemTime functions. The
GetSystemTime function reports the current Coordinated Universal Time (UTC), which is roughly the same as
Greenwich mean time—the date and time at Greenwich, England. The GetLocalTime function reports the local time,
based on the time zone of the location of the computer. The accuracy of these values is entirely dependent on the
diligence of the user in keeping the time accurate and in indicating the correct time zone. You can check the time
zone set on your machine by double-clicking the time display in the task bar. A program to set your PC's clock from
an accurate, exact time source on the Internet is shown in Chapter 23.
Windows also has SetLocalTime and SetSystemTime functions, as well as some other useful time-related functions
that are discussed in /Platform SDK/Windows Base Services/General Library/Time.
Displaying Digits and Colons
DIGCLOCK might be somewhat simplified if it used a font that simulated a 7-segment display. Instead, it has to do
all the work itself using the Polygon function.
The DisplayDigit function in DIGCLOCK defines two arrays. The fSevenSegment array has 7 BOOL values for
each of the 10 decimal digits from 0 through 9. These values indicate which of the segments are illuminated (a 1
value) and which are not (a 0 value). In this array, the 7 segments are ordered from top to bottom and from left to
right. Each of the 7 segments is a 6-sided polygon. The ptSegment array is an array of POINT structures indicating
the graphical coordinates of each point in each of the 7 segments. Each digit is then drawn by this code:
for (iSeg = 0 ; iSeg < 7 ; iSeg++)
if (fSevenSegment [iNumber][iSeg])
Polygon (hdc, ptSegment [iSeg], 6) ;
Similarly (but more simply), the DisplayColon function draws the colons that separate the hour and minutes, and the
minutes and seconds. The digits are 42 units wide and the colons are 12 units wide, so with 6 digits and 2 colons, the
total width is 276 units, which is the size used in the SetWindowExtEx call.
264](https://image.slidesharecdn.com/programmingwindows-140823083916-phpapp02/85/Programming-windows-264-320.jpg)

![is shown in Figure 8-5.
Figure 8-5. The CLOCK program.
CLOCK.C
/*--------------------------------------
CLOCK.C -- Analog Clock Program
(c) Charles Petzold, 1998
--------------------------------------*/
#include <windows.h>
#include <math.h>
#define ID_TIMER 1
#define TWOPI (2 * 3.14159)
LRESULT CALLBACK WndProc (HWND, UINT, WPARAM, LPARAM) ;
int WINAPI WinMain (HINSTANCE hInstance, HINSTANCE hPrevInstance,
PSTR szCmdLine, int iCmdShow)
{
static TCHAR szAppName[] = TEXT ("Clock") ;
HWND hwnd;
MSG msg;
WNDCLASS wndclass ;
wndclass.style = CS_HREDRAW | CS_VREDRAW ;
wndclass.lpfnWndProc = WndProc ;
wndclass.cbClsExtra = 0 ;
wndclass.cbWndExtra = 0 ;
wndclass.hInstance = hInstance ;
wndclass.hIcon = NULL ;
wndclass.hCursor = LoadCursor (NULL, IDC_ARROW) ;
wndclass.hbrBackground = (HBRUSH) GetStockObject (WHITE_BRUSH) ;
wndclass.lpszMenuName = NULL ;
wndclass.lpszClassName = szAppName ;
if (!RegisterClass (&wndclass))
{
MessageBox (NULL, TEXT ("Program requires Windows NT!"),
szAppName, MB_ICONERROR) ;
return 0 ;
}
hwnd = CreateWindow (szAppName, TEXT ("Analog Clock"),
WS_OVERLAPPEDWINDOW,
CW_USEDEFAULT, CW_USEDEFAULT,
CW_USEDEFAULT, CW_USEDEFAULT,
NULL, NULL, hInstance, NULL) ;
ShowWindow (hwnd, iCmdShow) ;
UpdateWindow (hwnd) ;
while (GetMessage (&msg, NULL, 0, 0))
{
TranslateMessage (&msg) ;
DispatchMessage (&msg) ;
266](https://image.slidesharecdn.com/programmingwindows-140823083916-phpapp02/85/Programming-windows-266-320.jpg)
![}
return msg.wParam ;
}
void SetIsotropic (HDC hdc, int cxClient, int cyClient)
{
SetMapMode (hdc, MM_ISOTROPIC) ;
SetWindowExtEx (hdc, 1000, 1000, NULL) ;
SetViewportExtEx (hdc, cxClient / 2, -cyClient / 2, NULL) ;
SetViewportOrgEx (hdc, cxClient / 2, cyClient / 2, NULL) ;
}
void RotatePoint (POINT pt[], int iNum, int iAngle)
{
int i ;
POINT ptTemp ;
for (i = 0 ; i < iNum ; i++)
{
ptTemp.x = (int) (pt[i].x * cos (TWOPI * iAngle / 360) +
pt[i].y * sin (TWOPI * iAngle / 360)) ;
ptTemp.y = (int) (pt[i].y * cos (TWOPI * iAngle / 360) -
pt[i].x * sin (TWOPI * iAngle / 360)) ;
pt[i] = ptTemp ;
}
}
void DrawClock (HDC hdc)
{
int iAngle ;
POINT pt[3] ;
for (iAngle = 0 ; iAngle < 360 ; iAngle += 6)
{
pt[0].x = 0 ;
pt[0].y = 900 ;
RotatePoint (pt, 1, iAngle) ;
pt[2].x = pt[2].y = iAngle % 5 ? 33 : 100 ;
pt[0].x -= pt[2].x / 2 ;
pt[0].y -= pt[2].y / 2 ;
pt[1].x = pt[0].x + pt[2].x ;
pt[1].y = pt[0].y + pt[2].y ;
SelectObject (hdc, GetStockObject (BLACK_BRUSH)) ;
Ellipse (hdc, pt[0].x, pt[0].y, pt[1].x, pt[1].y) ;
}
}
void DrawHands (HDC hdc, SYSTEMTIME * pst, BOOL fChange)
{
static POINT pt[3][5] = { 0, -150, 100, 0, 0, 600, -100, 0, 0, -150,
0, -200, 50, 0, 0, 800, -50, 0, 0, -200,
0, 0, 0, 0, 0, 0, 0, 0, 0, 800 } ;
int i, iAngle[3] ;
POINT ptTemp[3][5] ;
iAngle[0] = (pst->wHour * 30) % 360 + pst->wMinute / 2 ;
267](https://image.slidesharecdn.com/programmingwindows-140823083916-phpapp02/85/Programming-windows-267-320.jpg)
![iAngle[1] = pst->wMinute * 6 ;
iAngle[2] = pst->wSecond * 6 ;
memcpy (ptTemp, pt, sizeof (pt)) ;
for (i = fChange ? 0 : 2 ; i < 3 ; i++)
{
RotatePoint (ptTemp[i], 5, iAngle[i]) ;
Polyline (hdc, ptTemp[i], 5) ;
}
}
LRESULT CALLBACK WndProc (HWND hwnd, UINT message, WPARAM wParam, LPARAM lParam)
{
static int cxClient, cyClient ;
static SYSTEMTIME stPrevious ;
BOOL fChange ;
HDC hdc ;
PAINTSTRUCT ps ;
SYSTEMTIME st ;
switch (message)
{
case WM_CREATE :
SetTimer (hwnd, ID_TIMER, 1000, NULL) ;
GetLocalTime (&st) ;
stPrevious = st ;
return 0 ;
case WM_SIZE :
cxClient = LOWORD (lParam) ;
cyClient = HIWORD (lParam) ;
return 0 ;
case WM_TIMER :
GetLocalTime (&st) ;
fChange = st.wHour != stPrevious.wHour ||
st.wMinute != stPrevious.wMinute ;
hdc = GetDC (hwnd) ;
SetIsotropic (hdc, cxClient, cyClient) ;
SelectObject (hdc, GetStockObject (WHITE_PEN)) ;
DrawHands (hdc, &stPrevious, fChange) ;
SelectObject (hdc, GetStockObject (BLACK_PEN)) ;
DrawHands (hdc, &st, TRUE) ;
ReleaseDC (hwnd, hdc) ;
stPrevious = st ;
return 0 ;
case WM_PAINT :
hdc = BeginPaint (hwnd, &ps) ;
SetIsotropic (hdc, cxClient, cyClient) ;
DrawClock (hdc) ;
DrawHands (hdc, &stPrevious, TRUE) ;
268](https://image.slidesharecdn.com/programmingwindows-140823083916-phpapp02/85/Programming-windows-268-320.jpg)

![The RotatePoint function is useful for drawing both the dots of the clock face and the clock hands, as we'll see
shortly.
The DrawClock function draws the 60 clock face dots starting with the one at the top (12:00 high). Each of them is
900 units from the origin, so the first is located at the point (0, 900) and each subsequent one is 6 additional
clockwise degrees from the vertical. Twelve of the dots are 100 units in diameter; the rest are 33 units. The dots are
drawn using the Ellipse function.
The DrawHands function draws the hour, minute, and second hands of the clock. The coordinates defining the
outlines of the hands (as they appear when pointing straight up) are stored in an array of POINT structures.
Depending upon the time, these coordinates are rotated using the RotatePoint function and are displayed with the
Windows Polyline function. Notice that the hour and minute hands are displayed only if the bChange parameter to
DrawHands is TRUE. When the program updates the clock hands, in most cases the hour and minute hands will not
need to be redrawn.
Now let's turn our attention to the window procedure. During the WM_CREATE message, the window procedure
obtains the current time and also stores it in the variable named dtPrevious. This variable will later be used to
determine whether the hour or minute has changed from the previous update.
The first time the clock is drawn is during the first WM_PAINT message. That's just a matter of calling the
SetIsotropic, DrawClock, and DrawHands functions, the latter with the bChange parameter set to TRUE.
During the WM_TIMER message, WndProc first obtains the new time and determines if the hour and minute hands
need to be redrawn. If so, all the hands are drawn with a white pen using the previous time, effectively erasing them.
Otherwise, only the second hand is erased using the white pen. Then, all the hands are drawn with a black pen.
Using the Timer for a Status Report
The final program in this chapter is something I alluded to in Chapter 5. It's the only good use I've found for the
GetPixel function.
WHATCLR (shown in Figure 8-7) displays the RGB color of the pixel currently under the hot point of the mouse
cursor.
Figure 8-7. The WHATCLR program.
WHATCLR.C
/*------------------------------------------
WHATCLR.C -- Displays Color Under Cursor
(c) Charles Petzold, 1998
------------------------------------------*/
#include <windows.h>
#define ID_TIMER 1
void FindWindowSize (int *, int *) ;
LRESULT CALLBACK WndProc (HWND, UINT, WPARAM, LPARAM) ;
int WINAPI WinMain (HINSTANCE hInstance, HINSTANCE hPrevInstance,
PSTR szCmdLine, int iCmdShow)
{
static TCHAR szAppName[] = TEXT ("WhatClr") ;
HWND hwnd ;
270](https://image.slidesharecdn.com/programmingwindows-140823083916-phpapp02/85/Programming-windows-270-320.jpg)

![POINT pt ;
RECT rc ;
TCHAR szBuffer [16] ;
switch (message)
{
case WM_CREATE:
hdcScreen = CreateDC (TEXT ("DISPLAY"), NULL, NULL, NULL) ;
SetTimer (hwnd, ID_TIMER, 100, NULL) ;
return 0 ;
case WM_TIMER:
GetCursorPos (&pt) ;
cr = GetPixel (hdcScreen, pt.x, pt.y) ;
SetPixel (hdcScreen, pt.x, pt.y, 0) ;
if (cr != crLast)
{
crLast = cr ;
InvalidateRect (hwnd, NULL, FALSE) ;
}
return 0 ;
case WM_PAINT:
hdc = BeginPaint (hwnd, &ps) ;
GetClientRect (hwnd, &rc) ;
wsprintf (szBuffer, TEXT (" %02X %02X %02X "),
GetRValue (cr), GetGValue (cr), GetBValue (cr)) ;
DrawText (hdc, szBuffer, -1, &rc,
DT_SINGLELINE | DT_CENTER | DT_VCENTER) ;
EndPaint (hwnd, &ps) ;
return 0 ;
case WM_DESTROY:
DeleteDC (hdcScreen) ;
KillTimer (hwnd, ID_TIMER) ;
PostQuitMessage (0) ;
return 0 ;
}
return DefWindowProc (hwnd, message, wParam, lParam) ;
}
WHATCLR does a little something different while still in WinMain. Because WHATCLR's window need only be
large enough to display a hexadecimal RGB value, it creates a nonsizeable window using the WS_BORDER
window style in the CreateWindow function. To calculate the size of the window, WHATCLR obtains an
information device context for the video display by calling CreateIC and then calls GetSystemMetrics. The
calculated width and height values of the window are passed to CreateWindow.
WHATCLR's window procedure creates a device context for the whole video display by calling CreateDC during
the WM_CREATE message. This device context is maintained for the lifetime of the program. During the
WM_TIMER message, the program obtains the pixel color at the current mouse cursor position. The RGB color is
displayed during WM_PAINT.
You may be wondering whether that device context handle obtained from the CreateDC function will let you
display something on any part of the screen rather than just obtain a pixel color. The answer is Yes. It's generally
considered impolite for one application to draw on another, but it could come in useful in some odd circumstances.
272](https://image.slidesharecdn.com/programmingwindows-140823083916-phpapp02/85/Programming-windows-272-320.jpg)

![using the Tab or cursor movement keys. A child window control can obtain the input focus, but once it does it won't
freely relinquish the input focus back to the parent window. This is a problem we'll struggle with throughout this
chapter.
The Windows programming documentation discusses child window controls in two places: First, the simple
standard controls that you've seen in countless dialog boxes are described in /Platform SDK/User Interface
Services/Controls. These are buttons (including check boxes and radio buttons), static controls (such as text labels),
edit boxes (which let you enter and edit lines or multiple lines of text), scroll bars, list boxes, and combo boxes.
With the exception of the combo box, these controls have been around since Windows 1.0. This section of the
Windows documentation also includes the rich edit control, which is similar to the edit box but allows editing
formatted text with different fonts and such, and application desktop toolbars.
There is also a collection of more esoteric and specialized controls that are perversely referred to as "common
controls." These are described in /Platform SDK/User Interface Services/Shell and Common Controls/Common
Controls. I won't be discussing the common controls in this chapter, but they'll appear in various programs
throughout the rest of the book. This section of the Windows documentation is a good place to look if you see
something in a Windows application that could be useful to your own application.
The Button Class
We'll begin our exploration of the button window class with a program named BTNLOOK ("button look"), which is
shown in Figure 9-1. BTNLOOK creates 10 child window button controls, one for each of the 10 standard styles of
buttons.
Figure 9-1. The BTNLOOK program.
BTNLOOK.C
/*----------------------------------------
BTNLOOK.C -- Button Look Program
(c) Charles Petzold, 1998
----------------------------------------*/
#include <windows.h>
struct
{
int iStyle ;
TCHAR * szText ;
}
button[] =
{
BS_PUSHBUTTON, TEXT ("PUSHBUTTON"),
BS_DEFPUSHBUTTON, TEXT ("DEFPUSHBUTTON"),
BS_CHECKBOX, TEXT ("CHECKBOX"),
BS_AUTOCHECKBOX, TEXT ("AUTOCHECKBOX"),
BS_RADIOBUTTON, TEXT ("RADIOBUTTON"),
BS_3STATE, TEXT ("3STATE"),
BS_AUTO3STATE, TEXT ("AUTO3STATE"),
BS_GROUPBOX, TEXT ("GROUPBOX"),
BS_AUTORADIOBUTTON, TEXT ("AUTORADIO"),
BS_OWNERDRAW, TEXT ("OWNERDRAW")
} ;
#define NUM (sizeof button / sizeof button[0])
LRESULT CALLBACK WndProc (HWND, UINT, WPARAM, LPARAM) ;
274](https://image.slidesharecdn.com/programmingwindows-140823083916-phpapp02/85/Programming-windows-274-320.jpg)
![int WINAPI WinMain (HINSTANCE hInstance, HINSTANCE hPrevInstance,
PSTR szCmdLine, int iCmdShow)
{
static TCHAR szAppName[] = TEXT ("BtnLook") ;
HWND hwnd ;
MSG msg ;
WNDCLASS wndclass ;
wndclass.style = CS_HREDRAW | CS_VREDRAW ;
wndclass.lpfnWndProc = WndProc ;
wndclass.cbClsExtra = 0 ;
wndclass.cbWndExtra = 0 ;
wndclass.hInstance = hInstance ;
wndclass.hIcon = LoadIcon (NULL, IDI_APPLICATION) ;
wndclass.hCursor = LoadCursor (NULL, IDC_ARROW) ;
wndclass.hbrBackground = (HBRUSH) GetStockObject (WHITE_BRUSH) ;
wndclass.lpszMenuName = NULL ;
wndclass.lpszClassName = szAppName ;
if (!RegisterClass (&wndclass))
{
MessageBox (NULL, TEXT ("This program requires Windows NT!"),
szAppName, MB_ICONERROR) ;
return 0 ;
}
hwnd = CreateWindow (szAppName, TEXT ("Button Look"),
WS_OVERLAPPEDWINDOW,
CW_USEDEFAULT, CW_USEDEFAULT,
CW_USEDEFAULT, CW_USEDEFAULT,
NULL, NULL, hInstance, NULL) ;
ShowWindow (hwnd, iCmdShow) ;
UpdateWindow (hwnd) ;
while (GetMessage (&msg, NULL, 0, 0))
{
TranslateMessage (&msg) ;
DispatchMessage (&msg) ;
}
return msg.wParam ;
}
LRESULT CALLBACK WndProc (HWND hwnd, UINT message, WPARAM wParam, LPARAM lParam)
{
static HWND hwndButton[NUM] ;
static RECT rect ;
static TCHAR szTop[] = TEXT ("message wParam lParam"),
szUnd[] = TEXT ("_______ ______ ______"),
szFormat[] = TEXT ("%-16s%04X-%04X %04X-%04X"),
szBuffer[50] ;
static int cxChar, cyChar ;
HDC hdc ;
PAINTSTRUCT ps ;
int i ;
switch (message)
{
case WM_CREATE :
cxChar = LOWORD (GetDialogBaseUnits ()) ;
cyChar = HIWORD (GetDialogBaseUnits ()) ;
for (i = 0 ; i < NUM ; i++)
hwndButton[i] = CreateWindow ( TEXT("button"),
275](https://image.slidesharecdn.com/programmingwindows-140823083916-phpapp02/85/Programming-windows-275-320.jpg)
![button[i].szText,
WS_CHILD | WS_VISIBLE | button[i].iStyle,
cxChar, cyChar * (1 + 2 * i),
20 * cxChar, 7 * cyChar / 4,
hwnd, (HMENU) i,
((LPCREATESTRUCT) lParam)->hInstance, NULL) ;
return 0 ;
case WM_SIZE :
rect.left = 24 * cxChar ;
rect.top = 2 * cyChar ;
rect.right = LOWORD (lParam) ;
rect.bottom = HIWORD (lParam) ;
return 0 ;
case WM_PAINT :
InvalidateRect (hwnd, &rect, TRUE) ;
hdc = BeginPaint (hwnd, &ps) ;
SelectObject (hdc, GetStockObject (SYSTEM_FIXED_FONT)) ;
SetBkMode (hdc, TRANSPARENT) ;
TextOut (hdc, 24 * cxChar, cyChar, szTop, lstrlen (szTop)) ;
TextOut (hdc, 24 * cxChar, cyChar, szUnd, lstrlen (szUnd)) ;
EndPaint (hwnd, &ps) ;
return 0 ;
case WM_DRAWITEM :
case WM_COMMAND :
ScrollWindow (hwnd, 0, -cyChar, &rect, &rect) ;
hdc = GetDC (hwnd) ;
SelectObject (hdc, GetStockObject (SYSTEM_FIXED_FONT)) ;
TextOut (hdc, 24 * cxChar, cyChar * (rect.bottom / cyChar - 1),
szBuffer,
wsprintf (szBuffer, szFormat,
message == WM_DRAWITEM ? TEXT ("WM_DRAWITEM") :
TEXT ("WM_COMMAND"),
HIWORD (wParam), LOWORD (wParam),
HIWORD (lParam), LOWORD (lParam))) ;
ReleaseDC (hwnd, hdc) ;
ValidateRect (hwnd, &rect) ;
break ;
case WM_DESTROY :
PostQuitMessage (0) ;
return 0 ;
}
return DefWindowProc (hwnd, message, wParam, lParam) ;
}
As you click on each button, the button sends a WM_COMMAND message to the parent window procedure, which
is the familiar WndProc. BTNLOOK's WndProc displays the wParam and lParam parameters of this message in the
right half of the client area, as shown in Figure 9-2.
The button with the style BS_OWNERDRAW is displayed on this window only with a background shading because
this is a style of button that the program is responsible for drawing. The button indicates it needs drawing by
WM_DRAWITEM messages containing an lParam message parameter that is a pointer to a structure of type
DRAWITEMSTRUCT. These messages are also displayed in BTNLOOK. I'll discuss owner-draw buttons in more
detail later in this chapter.
276](https://image.slidesharecdn.com/programmingwindows-140823083916-phpapp02/85/Programming-windows-276-320.jpg)
![Figure 9-2. The BTNLOOK display.
Creating the Child Windows
BTNLOOK defines a structure called button that contains button window styles and descriptive text strings for each
of the 10 types of buttons. The button window styles all begin with the letters BS, which stand for "button style."
The 10 button child windows are created in a for loop during WM_CREATE message processing in WndProc. The
CreateWindow call uses the following parameters:
Class name
TEXT ("button")
Window text
button[i].szText
Window style
WS_CHILD ¦ WS_VISIBLE ¦ button[i].iStyle
x position
cxChar
y position
cyChar * (1 + 2 * i)
Width
20 * xChar
Height
7 * yChar / 4
Parent window
hwnd
Child window ID
(HMENU) i
Instance handle
((LPCREATESTRUCT) lParam) -> hInstance
Extra parameters
NULL
277](https://image.slidesharecdn.com/programmingwindows-140823083916-phpapp02/85/Programming-windows-277-320.jpg)


![or keyboard input. This is the best method for indicating that a button option is currently unavailable.
You can reenable a child window by calling
EnableWindow (hwndChild, TRUE) ;
You can determine whether a child window is enabled by calling
IsWindowEnabled (hwndChild) ;
Buttons and Input Focus
As I noted earlier in this chapter, push buttons, check boxes, radio buttons, and owner-draw buttons receive the input
focus when they are clicked with the mouse. The control indicates it has the input focus with a dashed line that
surrounds the text. When the child window control gets the input focus, the parent window loses it; all keyboard
input then goes to the control rather than to the parent window. However, the child window control responds only to
the Spacebar, which now functions like the mouse. This situation presents an obvious problem: your program has
lost control of keyboard processing. Let's see what we can do about it.
As I discussed in Chapter 6, when Windows switches the input focus from one window (such as a parent) to another
(such as a child window control), it first sends a WM_KILLFOCUS message to the window losing the input focus.
The wParam parameter is the handle of the window that is to receive the input focus. Windows then sends a
WM_SETFOCUS message to the window receiving the input focus, with wParam specifying the handle of the
window losing the input focus. (In both cases, wParam might be NULL, which indicates that no window has or is
receiving the input focus.)
A parent window can prevent a child window control from getting the input focus by processing WM_KILLFOCUS
messages. Assume that the array hwndChild contains the window handles of all child windows. (These were saved
in the array during the CreateWindow calls that created the windows.) NUM is the number of child windows.
case WM_KILLFOCUS :
for (i = 0 ; i < NUM ; i++)
if (hwndChild [i] == (HWND) wParam)
{
SetFocus (hwnd) ;
break ;
}
return 0 ;
In this code, when the parent window detects that it's losing the input focus to one of its child window controls, it
calls SetFocus to restore the input focus to itself.
Here's a simpler (but less obvious) way of doing it:
case WM_KILLFOCUS :
if (hwnd == GetParent ((HWND) wParam))
SetFocus (hwnd) ;
return 0 ;
Both these methods have a shortcoming, however: they prevent the button from responding to the Spacebar, because
the button never gets the input focus. A better approach would be to let the button get the input focus but also to
include the facility for the user to move from button to button using the Tab key. At first this sounds impossible, but
I'll show you how to accomplish it with a technique called "window subclassing" in the COLORS1 program shown
later in this chapter.
Controls and Colors
As you can see in Figure 9-2, the display of many of the buttons doesn't look quite right. The push buttons are fine,
but the others are drawn with a rectangular gray background that simply shouldn't be there. This is because the
283](https://image.slidesharecdn.com/programmingwindows-140823083916-phpapp02/85/Programming-windows-283-320.jpg)

![COLOR_BTNSHADOW ButtonShadow 80-80-80
COLOR_GRAYTEXT GrayText 80-80-80
COLOR_BTNTEXT ButtonText 00-00-00
COLOR_INACTIVECAPTIONTEXT InactiveTitleText C0-C0-C0
COLOR_BTNHIGHLIGHT ButtonHighlight FF-FF-FF
COLOR_3DDKSHADOW ButtonDkShadow 00-00-00
COLOR_3DLIGHT ButtonLight C0-C0-C0
COLOR_INFOTEXT InfoText 00-00-00
COLOR_INFOBK InfoWindow FF-FF-FF
[no identifier; use value 25] ButtonAlternateFace B8-B4-B8
COLOR_HOTLIGHT HotTrackingColor 00-00-FF
COLOR_GRADIENTACTIVECAPT
ION
GradientActiveTitle 00-00-80
COLOR_GRADIENTINACTIVECA
PTION
GradientInactiveTitle 80-80-80
Default values for these 29 colors are provided by the display driver, and they might be a little different on different
machines.
Now for the bad news: Although many of these colors seem self-explanatory (for example,
COLOR_BACKGROUND is the color of the desktop area behind all the windows), the use of system colors in
recent versions of Windows has become quite chaotic. Back in the old days, Windows was visually much simpler
than it is today. Indeed, prior to Windows 3.0, only the first 13 system colors shown above were defined. With the
increased use of more visually complex controls using three-dimensional appearances, more system colors were
needed.
The Button Colors
This problem is particularly evident for buttons, each of which requires multiple colors. COLOR_BTNFACE is used
for the main surface color of the push buttons and the background color of the others. (This is also the system color
used for dialog boxes and message boxes.) COLOR_BTNSHADOW is used for suggesting a shadow at the right
and bottom sides of the push buttons and the insides of the checkbox squares and radio button circles. For push
buttons, COLOR_BTNTEXT is used for the text color; for the others it's COLOR_WINDOWTEXT. Several other
system colors are also used for various parts of the button designs.
So if we want to display buttons on the surface of our client area, one way to avoid the color clash is to yield to these
system colors. To begin, you use COLOR_BTNFACE for the background of your client area when defining the
window class:
wndclass.hbrBackground = (HBRUSH) (COLOR_BTNFACE + 1) ;
You can try this in the BTNLOOK program. Windows understands that when the value of hbrBackground in the
WNDCLASS structure is this low in value, it actually refers to a system color rather than an actual handle. Windows
requires that you add 1 when you use these identifiers and are specifying them in the hbrBackground field of the
WNDCLASS structure, but doing so has no profound purpose other than to prevent the value from being NULL. If
the system color happens to be changed while your program is running, the surface of your client area will be
invalidated and Windows will use the new COLOR_BTNFACE value. But now we've caused another problem.
285](https://image.slidesharecdn.com/programmingwindows-140823083916-phpapp02/85/Programming-windows-285-320.jpg)


![OWNDRAW.C
/*----------------------------------------
OWNDRAW.C -- Owner-Draw Button Demo Program
(c) Charles Petzold, 1996
----------------------------------------*/
#include <windows.h>
#define ID_SMALLER 1
#define ID_LARGER 2
#define BTN_WIDTH (8 * cxChar)
#define BTN_HEIGHT (4 * cyChar)
LRESULT CALLBACK WndProc (HWND, UINT, WPARAM, LPARAM) ;
HINSTANCE hInst ;
int WINAPI WinMain (HINSTANCE hInstance, HINSTANCE hPrevInstance,
PSTR szCmdLine, int iCmdShow)
{
static TCHAR szAppName[] = TEXT ("OwnDraw") ;
MSG msg ;
HWND hwnd ;
WNDCLASS wndclass ;
hInst = hInstance ;
wndclass.style = CS_HREDRAW | CS_VREDRAW ;
wndclass.lpfnWndProc = WndProc ;
wndclass.cbClsExtra = 0 ;
wndclass.cbWndExtra = 0 ;
wndclass.hInstance = hInstance ;
wndclass.hIcon = LoadIcon (NULL, IDI_APPLICATION) ;
wndclass.hCursor = LoadCursor (NULL, IDC_ARROW) ;
wndclass.hbrBackground = (HBRUSH) GetStockObject (WHITE_BRUSH) ;
wndclass.lpszMenuName = szAppName ;
wndclass.lpszClassName = szAppName ;
if (!RegisterClass (&wndclass))
{
MessageBox (NULL, TEXT ("This program requires Windows NT!"),
szAppName, MB_ICONERROR) ;
return 0 ;
}
hwnd = CreateWindow (szAppName, TEXT ("Owner-Draw Button Demo"),
WS_OVERLAPPEDWINDOW,
CW_USEDEFAULT, CW_USEDEFAULT,
CW_USEDEFAULT, CW_USEDEFAULT,
NULL, NULL, hInstance, NULL) ;
ShowWindow (hwnd, iCmdShow) ;
UpdateWindow (hwnd) ;
while (GetMessage (&msg, NULL, 0, 0))
{
TranslateMessage (&msg) ;
DispatchMessage (&msg) ;
}
return msg.wParam ;
}
void Triangle (HDC hdc, POINT pt[])
{
288](https://image.slidesharecdn.com/programmingwindows-140823083916-phpapp02/85/Programming-windows-288-320.jpg)


![COLORS1.C
/*----------------------------------------
COLORS1.C -- Colors Using Scroll Bars
(c) Charles Petzold, 1998
----------------------------------------*/
#include <windows.h>
LRESULT CALLBACK WndProc (HWND, UINT, WPARAM, LPARAM) ;
LRESULT CALLBACK ScrollProc (HWND, UINT, WPARAM, LPARAM) ;
int idFocus ;
WNDPROC OldScroll[3] ;
int WINAPI WinMain (HINSTANCE hInstance, HINSTANCE hPrevInstance,
PSTR szCmdLine, int iCmdShow)
{
static TCHAR szAppName[] = TEXT ("Colors1") ;
HWND hwnd ;
MSG msg ;
WNDCLASS wndclass ;
wndclass.style = CS_HREDRAW | CS_VREDRAW ;
wndclass.lpfnWndProc = WndProc ;
wndclass.cbClsExtra = 0 ;
wndclass.cbWndExtra = 0 ;
wndclass.hInstance = hInstance ;
wndclass.hIcon = LoadIcon (NULL, IDI_APPLICATION) ;
wndclass.hCursor = LoadCursor (NULL, IDC_ARROW) ;
wndclass.hbrBackground = CreateSolidBrush (0) ;
wndclass.lpszMenuName = NULL ;
wndclass.lpszClassName = szAppName ;
if (!RegisterClass (&wndclass))
{
MessageBox (NULL, TEXT ("This program requires Windows NT!"),
szAppName, MB_ICONERROR) ;
return 0 ;
}
hwnd = CreateWindow (szAppName, TEXT ("Color Scroll"),
WS_OVERLAPPEDWINDOW,
CW_USEDEFAULT, CW_USEDEFAULT,
CW_USEDEFAULT, CW_USEDEFAULT,
NULL, NULL, hInstance, NULL) ;
ShowWindow (hwnd, iCmdShow) ;
UpdateWindow (hwnd) ;
while (GetMessage (&msg, NULL, 0, 0))
{
TranslateMessage (&msg) ;
DispatchMessage (&msg) ;
}
return msg.wParam ;
}
LRESULT CALLBACK WndProc (HWND hwnd, UINT message, WPARAM wParam, LPARAM lParam)
{
static COLORREF crPrim[3] = { RGB (255, 0, 0), RGB (0, 255, 0),
RGB (0, 0, 255) } ;
static HBRUSH hBrush[3], hBrushStatic ;
static HWND hwndScroll[3], hwndLabel[3], hwndValue[3], hwndRect ;
293](https://image.slidesharecdn.com/programmingwindows-140823083916-phpapp02/85/Programming-windows-293-320.jpg)

![i = GetWindowLong ((HWND) lParam, GWL_ID) ;
For the three scroll bars, we have conveniently set the ID numbers to 0, 1, and 2, so WndProc can tell which scroll
bar is generating the message.
Because the handles to the child windows were saved in arrays when the windows were created, WndProc can
process the scroll bar message and set the new value of the appropriate scroll bar using the SetScrollPos call:
SetScrollPos (hwndScroll[i], SB_CTL, color[i], TRUE) ;
WndProc also changes the text of the child window at the bottom of the scroll bar:
wsprintf (szBuffer, TEXT ("%i"), color[I]) ;
SetWindowText (hwndValue[i], szBuffer) ;
The Automatic Keyboard Interface
Scroll bar controls can also process keystrokes, but only if they have the input focus. The following table shows how
keyboard cursor keys translate into scroll bar messages:
Cursor Key Scroll Bar Message wParam Value
Home SB_TOP
End SB_BOTTOM
Page Up SB_PAGEUP
Page Down SB_PAGEDOWN
Left or Up SB_LINEUP
Right or Down SB_LINEDOWN
In fact, the SB_TOP and SB_BOTTOM scroll bar messages can be generated only by using the keyboard. If you
want a scroll bar control to obtain the input focus when the scroll bar is clicked with the mouse, you must include
the WS_TABSTOP identifier in the window class parameter of the CreateWindow call. When a scroll bar has the
input focus, a blinking gray block is displayed on the scroll bar thumb.
To provide a full keyboard interface to the scroll bars, however, more work is necessary. First the WndProc window
procedure must specifically give a scroll bar the input focus. It does this by processing the WM_SETFOCUS
message, which the parent window receives when it obtains the input focus. WndProc simply sets the input focus to
one of the scroll bars:
SetFocus (hwndScroll[idFocus]) ;
where idFocus is a global variable.
But you also need some way to get from one scroll bar to another by using the keyboard, preferably by using the
Tab key. This is more difficult, because once a scroll bar has the input focus it processes all keystrokes. But the
scroll bar cares only about the cursor keys; it ignores the Tab key. The way out of this dilemma lies in a technique
called "window subclassing." We'll use it to add a facility to COLORS1 to jump from one scroll bar to another using
the Tab key.
Window Subclassing
The window procedure for the scroll bar controls is somewhere inside Windows. However, you can obtain the
address of this window procedure by a call to GetWindowLong using the GWL_WNDPROC identifier as a
parameter. Moreover, you can set a new window procedure for the scroll bars by calling SetWindowLong. This
295](https://image.slidesharecdn.com/programmingwindows-140823083916-phpapp02/85/Programming-windows-295-320.jpg)
![technique, which is called "window subclassing," is very powerful. It lets you hook into existing window
procedures, process some messages within your own program, and pass all other messages to the old window
procedure.
The window procedure that does preliminary scroll bar message processing in COLORS1 is named ScrollProc; it is
toward the end of the COLORS1.C listing. Because ScrollProc is a function within COLORS1 that is called by
Windows, it must be defined as a CALLBACK.
For each of the three scroll bars, COLORS1 uses SetWindowLong to set the address of the new scroll bar window
procedure and also obtain the address of the existing scroll bar window procedure:
OldScroll[i] = (WNDPROC) SetWindowLong (hwndScroll[i], GWL_WNDPROC,
(LONG) ScrollProc)) ;
Now the function ScrollProc gets all messages that Windows sends to the scroll bar window procedure for the three
scroll bars in COLORS1 (but not, of course, for scroll bars in other programs). The ScrollProc window procedure
simply changes the input focus to the next (or previous) scroll bar when it receives a Tab or Shift-Tab keystroke. It
calls the old scroll bar window procedure using CallWindowProc.
Coloring the Background
When COLORS1 defines its window class, it gives the background of its client area a solid black brush:
wndclass.hbrBackground = CreateSolidBrush (0) ;
When you change the settings of COLORS1's scroll bars, the program must create a new brush and put the new
brush handle in the window class structure. Just as we were able to get and set the scroll bar window procedure
using GetWindowLong and SetWindowLong, we can get and set the handle to this brush using GetClassWord and
SetClassWord.
You can create the new brush and insert the handle in the window class structure and then delete the old brush:
DeleteObject ((HBRUSH)
SetClassLong (hwnd, GCL_HBRBACKGROUND, (LONG)
CreateSolidBrush (RGB (color[0], color[1], color[2])))) ;
The next time Windows recolors the background of the window, Windows will use this new brush. To force
Windows to erase the background, we invalidate the right half of the client area:
InvalidateRect (hwnd, &rcColor, TRUE) ;
The TRUE (nonzero) value as the third parameter indicates that we want the background erased before repainting.
InvalidateRect causes Windows to put a WM_PAINT message in the message queue of the window procedure.
Because WM_PAINT messages are low priority, this message will not be processed immediately if you are still
moving the scroll bar with the mouse or the cursor keys. Alternatively, if you want the window to be updated
immediately after the color is changed, you can add the statement
UpdateWindow (hwnd) ;
after the InvalidateRect call. But this might slow down keyboard and mouse processing.
COLORS1's WndProc function doesn't process the WM_PAINT message but passes it to DefWindowProc.
Windows' default processing of WM_PAINT messages simply involves calling BeginPaint and EndPaint to validate
the window. Because we specified in the InvalidateRect call that the background should be erased, the BeginPaint
call causes Windows to generate a WM_ERASEBKGND (erase background) message. WndProc ignores this
message also. Windows processes it by erasing the background of the client area using the brush specified in the
window class.
It's always a good idea to clean up before termination, so during processing of the WM_DESTROY message,
296](https://image.slidesharecdn.com/programmingwindows-140823083916-phpapp02/85/Programming-windows-296-320.jpg)
![DeleteObject is called once more:
DeleteObject ((HBRUSH)
SetClassLong (hwnd, GCL_HBRBACKGROUND,
(LONG) GetStockObject (WHITE_BRUSH))) ;
Coloring the Scroll Bars and Static Text
In COLORS1, the interiors of the three scroll bars and the text in the six text fields are colored red, green, and blue.
The coloring of the scroll bars is accomplished by processing WM_CTLCOLORSCROLLBAR messages.
In WndProc we define a static array of three handles to brushes:
static HBRUSH hBrush [3] ;
During processing of WM_CREATE, we create the three brushes:
for (I = 0 ; I < 3 ; I++)
hBrush[0] = CreateSolidBrush (crPrim [I]) ;
where the crPrim array contains the RGB values of the three primary colors. During the
WM_CTLCOLORSCROLLBAR processing, the window procedure returns one of these three brushes:
case WM_CTLCOLORSCROLLBAR:
i = GetWindowLong ((HWND) lParam, GWL_ID) ;
return (LRESULT) hBrush [i] ;
These brushes must be destroyed during processing of the WM_DESTROY message:
for (i = 0 ; i < 3 ; i++)
DeleteObject (hBrush [i])) ;
The text in the static text fields is colored similarly by processing the WM_CTLCOLORSTATIC message and
calling SetTextColor. The text background is set using SetBkColor with the system color
COLOR_BTNHIGHLIGHT. This causes the text background to be the same color as the static rectangle control
behind the scrollbars and text displays. For static text controls, this text background color applies only to the
rectangle behind each character in the string and not to the entire width of the control window. To accomplish this,
the window procedure must also return a handle to a brush of the COLOR_BTNHIGHLIGHT color. This brush is
named hBrushStatic; it is created during the WM_CREATE message and destroyed during the WM_DESTROY
message.
By creating a brush based on the COLOR_BTNHIGHLIGHT color during the WM_CREATE message and using it
through the duration of the program, we've exposed ourselves to a little problem. If the COLOR_BTNHIGHLIGHT
color is changed while the program is running, the color of the static rectangle will change and the text background
color will change but the whole background of the text window controls will remain the old
COLOR_BTNHIGHLIGHT color.
To fix this problem, COLORS1 also processes the WM_SYSCOLORCHANGE message by simply recreating
hBrushStatic using the new color.
The Edit Class
The edit class is in some ways the simplest predefined window class and in other ways the most complex. When you
create a child window using the class name "edit," you define a rectangle based on the x position, y position, width,
and height parameters of the CreateWindow call. This rectangle contains editable text. When the child window
control has the input focus, you can type text, move the cursor, select portions of text using either the mouse or the
Shift key and a cursor key, delete selected text to the clipboard by pressing Ctrl-X, copy text by pressing Ctrl-C, and
insert text from the clipboard by pressing Ctrl-V.
297](https://image.slidesharecdn.com/programmingwindows-140823083916-phpapp02/85/Programming-windows-297-320.jpg)
![One of the simplest uses of edit controls is for single-line entry fields. But edit controls are not limited to single
lines, as I'll demonstrate in the POPPAD1 program shown in Figure 9-7. As we encounter various other topics in
this book, the POPPAD program will be enhanced to use menus, dialog boxes (to load and save files), and printing.
The final version will be a simple but complete text editor with surprisingly little overhead required in our code.
Figure 9-7. The POPPAD1 program.
POPPAD1.C
/*----------------------------------------
POPPAD1.C -- Popup Editor using child window edit box
(c) Charles Petzold, 1998
----------------------------------------*/
#include <windows.h>
#define ID_EDIT 1
LRESULT CALLBACK WndProc (HWND, UINT, WPARAM, LPARAM);
TCHAR szAppName[] = TEXT ("PopPad1") ;
int WINAPI WinMain (HINSTANCE hInstance, HINSTANCE hPrevInstance,
PSTR szCmdLine, int iCmdShow)
{
HWND hwnd ;
MSG msg ;
WNDCLASS wndclass ;
wndclass.style = CS_HREDRAW | CS_VREDRAW ;
wndclass.lpfnWndProc = WndProc ;
wndclass.cbClsExtra = 0 ;
wndclass.cbWndExtra = 0 ;
wndclass.hInstance = hInstance ;
wndclass.hIcon = LoadIcon (NULL, IDI_APPLICATION) ;
wndclass.hCursor = LoadCursor (NULL, IDC_ARROW) ;
wndclass.hbrBackground = (HBRUSH) GetStockObject (WHITE_BRUSH) ;
wndclass.lpszMenuName = NULL ;
wndclass.lpszClassName = szAppName ;
if (!RegisterClass (&wndclass))
{
MessageBox (NULL, TEXT ("This program requires Windows NT!"),
szAppName, MB_ICONERROR) ;
return 0 ;
}
hwnd = CreateWindow (szAppName, szAppName,
WS_OVERLAPPEDWINDOW,
CW_USEDEFAULT, CW_USEDEFAULT,
CW_USEDEFAULT, CW_USEDEFAULT,
NULL, NULL, hInstance, NULL) ;
ShowWindow (hwnd, iCmdShow) ;
UpdateWindow (hwnd) ;
while (GetMessage (&msg, NULL, 0, 0))
{
TranslateMessage (&msg) ;
298](https://image.slidesharecdn.com/programmingwindows-140823083916-phpapp02/85/Programming-windows-298-320.jpg)


![#define ID_LIST 1
#define ID_TEXT 2
LRESULT CALLBACK WndProc (HWND, UINT, WPARAM, LPARAM) ;
int WINAPI WinMain (HINSTANCE hInstance, HINSTANCE hPrevInstance,
PSTR szCmdLine, int iCmdShow)
{
static TCHAR szAppName[] = TEXT ("Environ") ;
HWND hwnd ;
MSG msg ;
WNDCLASS wndclass ;
wndclass.style = CS_HREDRAW | CS_VREDRAW ;
wndclass.lpfnWndProc = WndProc ;
wndclass.cbClsExtra = 0 ;
wndclass.cbWndExtra = 0 ;
wndclass.hInstance = hInstance ;
wndclass.hIcon = LoadIcon (NULL, IDI_APPLICATION) ;
wndclass.hCursor = LoadCursor (NULL, IDC_ARROW) ;
wndclass.hbrBackground = (HBRUSH) (COLOR_WINDOW + 1) ;
wndclass.lpszMenuName = NULL ;
wndclass.lpszClassName = szAppName ;
if (!RegisterClass (&wndclass))
{
MessageBox (NULL, TEXT ("This program requires Windows NT!"),
szAppName, MB_ICONERROR) ;
return 0 ;
}
hwnd = CreateWindow (szAppName, TEXT ("Environment List Box"),
WS_OVERLAPPEDWINDOW,
CW_USEDEFAULT, CW_USEDEFAULT,
CW_USEDEFAULT, CW_USEDEFAULT,
NULL, NULL, hInstance, NULL) ;
ShowWindow (hwnd, iCmdShow) ;
UpdateWindow (hwnd) ;
while (GetMessage (&msg, NULL, 0, 0))
{
TranslateMessage (&msg) ;
DispatchMessage (&msg) ;
}
return msg.wParam ;
}
void FillListBox (HWND hwndList)
{
int iLength ;
TCHAR * pVarBlock, * pVarBeg, * pVarEnd, * pVarName ;
pVarBlock = GetEnvironmentStrings () ; // Get pointer to environment block
while (*pVarBlock)
{
if (*pVarBlock != `=`) // Skip variable names beginning with `=`
{
pVarBeg = pVarBlock ; // Beginning of variable name
while (*pVarBlock++ != `=`) ; // Scan until `=`
pVarEnd = pVarBlock - 1 ; // Points to `=` sign
iLength = pVarEnd - pVarBeg ; // Length of variable name
306](https://image.slidesharecdn.com/programmingwindows-140823083916-phpapp02/85/Programming-windows-306-320.jpg)
![// Allocate memory for the variable name and terminating
// zero. Copy the variable name and append a zero.
pVarName = calloc (iLength + 1, sizeof (TCHAR)) ;
CopyMemory (pVarName, pVarBeg, iLength * sizeof (TCHAR)) ;
pVarName[iLength] = `0' ;
// Put the variable name in the list box and free memory.
SendMessage (hwndList, LB_ADDSTRING, 0, (LPARAM) pVarName) ;
free (pVarName) ;
}
while (*pVarBlock++ != `0') ; // Scan until terminating zero
}
FreeEnvironmentStrings (pVarBlock) ;
}
LRESULT CALLBACK WndProc (HWND hwnd, UINT message, WPARAM wParam, LPARAM lParam)
{
static HWND hwndList, hwndText ;
int iIndex, iLength, cxChar, cyChar ;
TCHAR * pVarName, * pVarValue ;
switch (message)
{
case WM_CREATE :
cxChar = LOWORD (GetDialogBaseUnits ()) ;
cyChar = HIWORD (GetDialogBaseUnits ()) ;
// Create listbox and static text windows.
hwndList = CreateWindow (TEXT ("listbox"), NULL,
WS_CHILD | WS_VISIBLE | LBS_STANDARD,
cxChar, cyChar * 3,
cxChar * 16 + GetSystemMetrics (SM_CXVSCROLL),
cyChar * 5,
hwnd, (HMENU) ID_LIST,
(HINSTANCE) GetWindowLong (hwnd, GWL_HINSTANCE),
NULL) ;
hwndText = CreateWindow (TEXT ("static"), NULL,
WS_CHILD | WS_VISIBLE | SS_LEFT,
cxChar, cyChar,
GetSystemMetrics (SM_CXSCREEN), cyChar,
hwnd, (HMENU) ID_TEXT,
(HINSTANCE) GetWindowLong (hwnd, GWL_HINSTANCE),
NULL) ;
FillListBox (hwndList) ;
return 0 ;
case WM_SETFOCUS :
SetFocus (hwndList) ;
return 0 ;
case WM_COMMAND :
if (LOWORD (wParam) == ID_LIST && HIWORD (wParam) == LBN_SELCHANGE)
{
// Get current selection.
iIndex = SendMessage (hwndList, LB_GETCURSEL, 0, 0) ;
iLength = SendMessage (hwndList, LB_GETTEXTLEN, iIndex, 0) + 1 ;
pVarName = calloc (iLength, sizeof (TCHAR)) ;
SendMessage (hwndList, LB_GETTEXT, iIndex, (LPARAM) pVarName) ;
307](https://image.slidesharecdn.com/programmingwindows-140823083916-phpapp02/85/Programming-windows-307-320.jpg)

![The next highest byte provides some additional control over the items desired:
iAttr Value Option
DDL_DRIVES 0x4000 Include drive letters
DDL_EXCLUSIVE 0x8000 Exclusive search only
The DDL prefix stands for "dialog directory list."
When the iAttr value of the LB_DIR message is DDL_READWRITE, the list box lists normal files, read-only files,
and files with the archive bit set. When the value is DDL_DIRECTORY, the list includes child subdirectories in
addition to these files with the directory names in square brackets. A value of DDL_DRIVES | DDL_DIRECTORY
expands the list to include all valid drives where the drive letters are shown between dashes.
Setting the topmost bit of iAttr lists the files with the indicated flag while excluding normal files. For a Windows file
backup program, for instance, you might want to list only files that have been modified since the last backup. Such
files have their archive bits set, so you would use DDL_EXCLUSIVE | DDL_ARCHIVE.
Ordering file lists
The lParam parameter is a pointer to a file specification string such as "*.*". This file specification does not affect
the subdirectories that the list box includes.
You'll want to use the LBS_SORT message for list boxes with file lists. The list box will first list files satisfying the
file specification and then (optionally) list subdirectory names. The first subdirectory listing will take this form:
[..]
This "double-dot" subdirectory entry lets the user back up one level toward the root directory. (The entry will not
appear if you're listing files in the root directory.) Finally, the specific subdirectory names are listed in this form:
[SUBDIR]
These are followed (also optionally) by a list of valid disk drives in the form
[-A-]
A head for Windows
A well-known UNIX utility named head displays the beginning lines of a file. Let's use a list box to write a similar
program for Windows. HEAD, shown in Figure 9-9, lists all files and child subdirectories in the list box. It allows
you to choose a file to display by double-clicking on the filename with the mouse or by pressing the Enter key when
the filename is selected. You can also change the subdirectory using either of these methods. The program displays
up to 8 KB of the beginning of the file in the right side of the client area of HEAD's window.
Figure 9-9. The HEAD program.
HEAD.C
/*----------------------------------------
HEAD.C -- Displays beginning (head) of file
309](https://image.slidesharecdn.com/programmingwindows-140823083916-phpapp02/85/Programming-windows-309-320.jpg)
![(c) Charles Petzold, 1998
----------------------------------------*/
#include <windows.h>
#define ID_LIST 1
#define ID_TEXT 2
#define MAXREAD 8192
#define DIRATTR (DDL_READWRITE | DDL_READONLY | DDL_HIDDEN | DDL_SYSTEM |
DDL_DIRECTORY | DDL_ARCHIVE | DDL_DRIVES)
#define DTFLAGS (DT_WORDBREAK | DT_EXPANDTABS | DT_NOCLIP | DT_NOPREFIX)
LRESULT CALLBACK WndProc (HWND, UINT, WPARAM, LPARAM) ;
LRESULT CALLBACK ListProc (HWND, UINT, WPARAM, LPARAM) ;
WNDPROC OldList ;
int WINAPI WinMain (HINSTANCE hInstance, HINSTANCE hPrevInstance,
PSTR szCmdLine, int iCmdShow)
{
static TCHAR szAppName[] = TEXT ("head") ;
HWND hwnd ;
MSG msg ;
WNDCLASS wndclass ;
wndclass.style = CS_HREDRAW | CS_VREDRAW ;
wndclass.lpfnWndProc = WndProc ;
wndclass.cbClsExtra = 0 ;
wndclass.cbWndExtra = 0 ;
wndclass.hInstance = hInstance ;
wndclass.hIcon = LoadIcon (NULL, IDI_APPLICATION) ;
wndclass.hCursor = LoadCursor (NULL, IDC_ARROW) ;
wndclass.hbrBackground = (HBRUSH) (COLOR_BTNFACE + 1) ;
wndclass.lpszMenuName = NULL ;
wndclass.lpszClassName = szAppName ;
if (!RegisterClass (&wndclass))
{
MessageBox (NULL, TEXT ("This program requires Windows NT!"),
szAppName, MB_ICONERROR) ;
return 0 ;
}
hwnd = CreateWindow (szAppName, TEXT ("head"),
WS_OVERLAPPEDWINDOW | WS_CLIPCHILDREN,
CW_USEDEFAULT, CW_USEDEFAULT,
CW_USEDEFAULT, CW_USEDEFAULT,
NULL, NULL, hInstance, NULL) ;
ShowWindow (hwnd, iCmdShow) ;
UpdateWindow (hwnd) ;
while (GetMessage (&msg, NULL, 0, 0))
{
TranslateMessage (&msg) ;
DispatchMessage (&msg) ;
}
return msg.wParam ;
}
LRESULT CALLBACK WndProc (HWND hwnd, UINT message, WPARAM wParam, LPARAM lParam)
{
static BOOL bValidFile ;
static BYTE buffer[MAXREAD] ;
310](https://image.slidesharecdn.com/programmingwindows-140823083916-phpapp02/85/Programming-windows-310-320.jpg)
![static HWND hwndList, hwndText ;
static RECT rect ;
static TCHAR szFile[MAX_PATH + 1] ;
HANDLE hFile ;
HDC hdc ;
int i, cxChar, cyChar ;
PAINTSTRUCT ps ;
TCHAR szBuffer[MAX_PATH + 1] ;
switch (message)
{
case WM_CREATE :
cxChar = LOWORD (GetDialogBaseUnits ()) ;
cyChar = HIWORD (GetDialogBaseUnits ()) ;
rect.left = 20 * cxChar ;
rect.top = 3 * cyChar ;
hwndList = CreateWindow (TEXT ("listbox"), NULL,
WS_CHILDWINDOW | WS_VISIBLE | LBS_STANDARD,
cxChar, cyChar * 3,
cxChar * 13 + GetSystemMetrics (SM_CXVSCROLL),
cyChar * 10,
hwnd, (HMENU) ID_LIST,
(HINSTANCE) GetWindowLong (hwnd, GWL_HINSTANCE),
NULL) ;
GetCurrentDirectory (MAX_PATH + 1, szBuffer) ;
hwndText = CreateWindow (TEXT ("static"), szBuffer,
WS_CHILDWINDOW | WS_VISIBLE | SS_LEFT,
cxChar, cyChar, cxChar * MAX_PATH, cyChar,
hwnd, (HMENU) ID_TEXT,
(HINSTANCE) GetWindowLong (hwnd, GWL_HINSTANCE),
NULL) ;
OldList = (WNDPROC) SetWindowLong (hwndList, GWL_WNDPROC,
(LPARAM) ListProc) ;
SendMessage (hwndList, LB_DIR, DIRATTR, (LPARAM) TEXT ("*.*")) ;
return 0 ;
case WM_SIZE :
rect.right = LOWORD (lParam) ;
rect.bottom = HIWORD (lParam) ;
return 0 ;
case WM_SETFOCUS :
SetFocus (hwndList) ;
return 0 ;
case WM_COMMAND :
if (LOWORD (wParam) == ID_LIST && HIWORD (wParam) == LBN_DBLCLK)
{
if (LB_ERR == (i = SendMessage (hwndList, LB_GETCURSEL, 0, 0)))
break ;
SendMessage (hwndList, LB_GETTEXT, i, (LPARAM) szBuffer) ;
if (INVALID_HANDLE_VALUE != (hFile = CreateFile (szBuffer,
GENERIC_READ, FILE_SHARE_READ, NULL,
OPEN_EXISTING, 0, NULL)))
311](https://image.slidesharecdn.com/programmingwindows-140823083916-phpapp02/85/Programming-windows-311-320.jpg)
![{
CloseHandle (hFile) ;
bValidFile = TRUE ;
lstrcpy (szFile, szBuffer) ;
GetCurrentDirectory (MAX_PATH + 1, szBuffer) ;
if (szBuffer [lstrlen (szBuffer) - 1] != `')
lstrcat (szBuffer, TEXT ("")) ;
SetWindowText (hwndText, lstrcat (szBuffer, szFile)) ;
}
else
{
bValidFile = FALSE ;
szBuffer [lstrlen (szBuffer) - 1] = `0' ;
// If setting the directory doesn't work, maybe it's
// a drive change, so try that.
if (!SetCurrentDirectory (szBuffer + 1))
{
szBuffer [3] = `:' ;
szBuffer [4] = `0' ;
SetCurrentDirectory (szBuffer + 2) ;
}
// Get the new directory name and fill the list box.
GetCurrentDirectory (MAX_PATH + 1, szBuffer) ;
SetWindowText (hwndText, szBuffer) ;
SendMessage (hwndList, LB_RESETCONTENT, 0, 0) ;
SendMessage (hwndList, LB_DIR, DIRATTR,
(LPARAM) TEXT ("*.*")) ;
}
InvalidateRect (hwnd, NULL, TRUE) ;
}
return 0 ;
case WM_PAINT :
if (!bValidFile)
break ;
if (INVALID_HANDLE_VALUE == (hFile = CreateFile (szFile,
GENERIC_READ, FILE_SHARE_READ, NULL, OPEN_EXISTING, 0, NULL)))
{
bValidFile = FALSE ;
break ;
}
ReadFile (hFile, buffer, MAXREAD, &i, NULL) ;
CloseHandle (hFile) ;
// i now equals the number of bytes in buffer.
// Commence getting a device context for displaying text.
hdc = BeginPaint (hwnd, &ps) ;
SelectObject (hdc, GetStockObject (SYSTEM_FIXED_FONT)) ;
SetTextColor (hdc, GetSysColor (COLOR_BTNTEXT)) ;
SetBkColor (hdc, GetSysColor (COLOR_BTNFACE)) ;
// Assume the file is ASCII
DrawTextA (hdc, buffer, i, &rect, DTFLAGS) ;
EndPaint (hwnd, &ps) ;
312](https://image.slidesharecdn.com/programmingwindows-140823083916-phpapp02/85/Programming-windows-312-320.jpg)


![So that you can see how these new files fit together, let's begin by creating a new project, called ICONDEMO. As
usual, in Developer Studio you pick New from the File menu, select the Projects tab, and choose Win32
Application. In the Project Name field, type ICONDEMO and click OK. At this point, Developer Studio creates five
files that it uses to maintain the workspace and the project. These include the text files ICONDEMO.DSW,
ICONDEMO.DSP, and ICONDEMO.MAK (assuming you've selected "Export makefile when saving project file"
from the Build tab of the Options dialog box displayed when you select Options from the Tools menu).
Now let's create a C source code file as usual. Select New from the File menu, select the Files tab, and click C++
Source File. In the File Name field, type ICONDEMO.C and click OK. At this point, Developer Studio has created
an empty ICONDEMO.C file. Type in the program shown in Figure 10-1, or pick the Insert menu and then the File
As Text option to copy in the source code from this book's companion CD-ROM.
Figure 10-1. The ICONDEMO program.
ICONDEMO.C
/*------------------------------------------
ICONDEMO.C -- Icon Demonstration Program
(c) Charles Petzold, 1998
------------------------------------------*/
#include <windows.h>
#include "resource.h"
LRESULT CALLBACK WndProc (HWND, UINT, WPARAM, LPARAM) ;
int WINAPI WinMain (HINSTANCE hInstance, HINSTANCE hPrevInstance,
PSTR szCmdLine, int iCmdShow)
{
TCHAR szAppName[] = TEXT ("IconDemo") ;
HWND hwnd ;
MSG msg ;
WNDCLASS wndclass ;
wndclass.style = CS_HREDRAW | CS_VREDRAW ;
wndclass.lpfnWndProc = WndProc ;
wndclass.cbClsExtra = 0 ;
wndclass.cbWndExtra = 0 ;
wndclass.hInstance = hInstance ;
wndclass.hIcon = LoadIcon (hInstance, MAKEINTRESOURCE (IDI_ICON)) ;
wndclass.hCursor = LoadCursor (NULL, IDC_ARROW) ;
wndclass.hbrBackground = GetStockObject (WHITE_BRUSH) ;
wndclass.lpszMenuName = NULL ;
wndclass.lpszClassName = szAppName ;
if (!RegisterClass (&wndclass))
{
MessageBox (NULL, TEXT ("This program requires Windows NT!"),
szAppName, MB_ICONERROR) ;
return 0 ;
}
hwnd = CreateWindow (szAppName, TEXT ("Icon Demo"),
WS_OVERLAPPEDWINDOW,
CW_USEDEFAULT, CW_USEDEFAULT,
CW_USEDEFAULT, CW_USEDEFAULT,
NULL, NULL, hInstance, NULL) ;
ShowWindow (hwnd, iCmdShow) ;
315](https://image.slidesharecdn.com/programmingwindows-140823083916-phpapp02/85/Programming-windows-315-320.jpg)


![#define IDI_APPLICATION MAKEINTRESOURCE(32512)
The second argument to LoadIcon raises an intriguing question: can the icon identifier be a character string? Yes,
and here's how: In the Developer Studio list of files for the ICONDEMO project, select IDONDEMO.RC. You'll see
a tree structure beginning at the top with IconDemo Resources, then the resource type Icon, and then the icon
IDI_ICON. If you right-click the icon identifier and select Properties from the menu, you can change the ID. In fact,
you can change it to a string by enclosing a name in quotation marks. This is the method I prefer for specifying the
names of resources and that I will use in general for the rest of this book.
I prefer using text names for icons (and some other resources) because the name can be the name of the program.
For example, suppose the program is named MYPROG. If you use the Icon Properties dialog box to specify the ID
of the icon as "MyProg" (with quotation marks), the resource script would contain the following statement:
MYPROG ICON DISCARDABLE myprog.ico
However, there will be no #define statement in RESOURCE.H that will indicate MYPROG as a numeric identifier.
The resource script will instead assume that MYPROG is a string identifier.
In your C program, you use the LoadIcon function to obtain a handle to the icon. Recall that you already probably
have a string variable indicating the name of the program:
static TCHAR szAppName [] = TEXT ("MyProg") ;
This means that the program can load the icon using the statement
hIcon = LoadIcon (hInstance, szAppName) ;
which looks a whole lot cleaner than the MAKEINTRESOURCE macro.
But if you really prefer numbers to names, you can use them instead of identifiers or strings. In the Icon Properties
dialog, enter a number in the ID field. The resource script will have an ICON statement that looks something like
this:
125 ICON DISCARDABLE myprog.ico
You can reference the icon using one of two methods. The obvious one is this:
hIcon = LoadIcon (hInstance, MAKEINTRESOURCE (125)) ;
The obscure method is this:
hIcon = LoadIcon (hInstance, TEXT ("#125")) ;
Windows recognizes the initial # character as prefacing a number in ASCII form.
Using Icons in Your Program
Although Windows uses icons in several ways to denote a program, many Windows programs specify an icon only
when defining the window class with the WNDCLASS structure and RegisterClass. As we've seen, this works well,
particularly when the icon file contains both standard and small image sizes. Windows will choose the best image
size in the icon file whenever it needs to display the icon image.
There is an enhanced version of RegisterClass named RegisterClassEx that uses a structure named WNDCLASSEX.
WNDCLASSEX has two additional fields: cbSize and hIconSm. The cbSize field indicates the size of the
WNDCLASSEX structure, and hIconSm is supposed to be set to the icon handle of the small icon. Thus, in the
WNDCLASSEX structure you set two icon handles associated with two icon files—one for a standard icon and one
for the small icon.
Is this necessary? Well, no. As we've seen, Windows already extracts the correctly sized icon images from a single
icon file. And RegisterClassEx seems to have lost the intelligence of RegisterClass. If the hIconSm field references
320](https://image.slidesharecdn.com/programmingwindows-140823083916-phpapp02/85/Programming-windows-320-320.jpg)
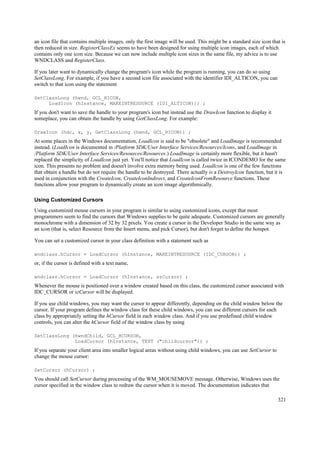
![SetCursor is fast if the cursor doesn't have to be changed.
Character String Resources
Having a resource for character strings may seem odd at first. Certainly we haven't had any problems using regular
old character strings defined as variables right in our source code.
Character string resources are primarily for easing the translation of your program to other languages. As you'll
discover later in this chapter and in the next chapter, menus and dialog boxes are also part of the resource script. If
you use character string resources rather than putting strings directly into your source code, all the text that your
program uses will be in one file—the resource script. If the text in this resource script is translated into another
language, all you need to do to create a foreign-language version of your program is relink the program. This
method is much safer than messing around with your source code. (However, aside from the next sample program, I
will not be using string tables for any other programs in this book. The reason is that string tables tend to make code
look more obscure and complicated rather than clarifying it.)
You create a string table by selecting Resource from the Insert menu and then selecting String Table. The strings
will be shown in a list at the right of the screen. Select a string by double-clicking it. For each string, you specify an
identifier and the string itself.
In the resource script, the strings show up in a multiline statement that looks something like this:
STRINGTABLE DISCARDABLE
BEGIN
IDS_STRING1, "character string 1"
IDS_STRING2, "character string 2"
[other string definitions]
END
If you were programming for Windows back in the old days and creating this string table manually in a text editor
(which you might correctly guess was easier than creating the string table in Developer Studio), you could substitute
left and right curly brackets for the BEGIN and END statements.
The resource script can have multiple string tables, but each ID must uniquely identify only a single string. Each
string can be only one line long with a maximum of 4097 characters. Use t and n for tabs and ends of lines. These
control characters are recognized by the DrawText and MessageBox functions.
Your program can use the LoadString call to copy a string resource into a buffer in the program's data segment:
LoadString (hInstance, id, szBuffer, iMaxLength) ;
The id argument refers to the ID number that precedes each string in the resource script; szBuffer is a pointer to a
character array that receives the character string; and iMaxLength is the maximum number of characters to transfer
into the szBuffer. The function returns the number of characters in the string.
The string ID numbers that precede each string are generally macro identifiers defined in a header file. Many
Windows programmers use the prefix IDS_ to denote an ID number for a string. Sometimes a filename or other
information must be embedded in the string when the string is displayed. In this case, you can put C formatting
characters in the string and use it as a formatting string in wsprintf.
All resource text—including the text in the string table—is stored in the .RES compiled resource file and in the
final .EXE file in Unicode format. The LoadStringW function loads the Unicode text directly. The LoadStringA
function (the only function available under Windows 98) performs a conversion of the text from Unicode to the
local code page.
Let's look at an example of a function that uses three character strings to display three error messages in a message
box. As you can see below, the RESOURCE.H header file contains three identifiers for these messages.
#define IDS_FILENOTFOUND 1
322](https://image.slidesharecdn.com/programmingwindows-140823083916-phpapp02/85/Programming-windows-322-320.jpg)
![#define IDS_FILETOOBIG 2
#define IDS_FILEREADONLY 3
The resource script has this string table:
STRINGTABLE
BEGIN
IDS_FILENOTFOUND, "File %s not found."
IDS_FILETOOBIG, "File %s too large to edit."
IDS_FILEREADONLY, "File %s is read-only."
END
The C source code file also includes this header file and defines a function to display a message box. (I'll also
assume that szAppName is a global variable that contains the program name.)
OkMessage (HWND hwnd, int iErrorNumber, TCHAR *szFileName)
{
TCHAR szFormat [40] ;
TCHAR szBuffer [60] ;
LoadString (hInst, iErrorNumber, szFormat, 40) ;
wsprintf (szBuffer, szFormat, szFilename) ;
return MessageBox (hwnd, szBuffer, szAppName,
MB_OK ¦ MB_ICONEXCLAMATION) ;
}
To display a message box containing the "file not found" message, the program calls
OkMessage (hwnd, IDS_FILENOTFOUND, szFileName) ;
Custom Resources
Windows also defines a "custom resource," also called the "user-defined resource" (where the user is you, the
programmer, rather than the lucky person who gets to use your program). The custom resource is convenient for
attaching miscellaneous data to your .EXE file and obtaining access to that data within the program. The data can be
in absolutely any format you want. The Windows functions that a program uses to access the custom resource cause
Windows to load the data into memory and return a pointer to it. You can do whatever you want with that data.
You'll probably find this to be a more convenient way to store and access miscellaneous private data than storing it
in external files and accessing it with file input functions.
For instance, suppose you have a file called BINDATA.BIN that contains a bunch of data that your program needs
for display purposes. This file can be in any format you choose. If you have a MYPROG.RC resource script in your
MYPROG project, you can create a custom resource in Developer Studio by selecting Resource from the Insert
menu and pressing the Custom button. Type in a type name by which the resource is to be known: for example,
BINTYPE. Developer Studio will then make up a resource name (in this case, IDR_BINTYPE1) and display a
window that lets you enter binary data. But you don't need to do that. Click the IDR_BINTYPE1 name with the right
mouse button, and select Properties. Then you can enter a filename: for example, BINDATA.BIN.
The resource script will then contain a statement like this:
IDR_BINTYPE1 BINTYPE BINDATA.BIN
This statement looks just like the ICON statement in ICONDEMO, except that the resource type BINTYPE is
something we've just made up. As with icons, you can use text names rather than numeric identifiers for the resource
name.
When you compile and link the program, the entire BINDATA.BIN file will be bound into the MYPROG.EXE file.
During program initialization (for example, while processing the WM_CREATE message), you can obtain a handle
to this resource:
323](https://image.slidesharecdn.com/programmingwindows-140823083916-phpapp02/85/Programming-windows-323-320.jpg)

![POEPOEM.C
/*-------------------------------------------
POEPOEM.C -- Demonstrates Custom Resource
(c) Charles Petzold, 1998
-------------------------------------------*/
#include <windows.h>
#include "resource.h"
LRESULT CALLBACK WndProc (HWND, UINT, WPARAM, LPARAM) ;
HINSTANCE hInst ;
int WINAPI WinMain (HINSTANCE hInstance, HINSTANCE hPrevInstance,
PSTR szCmdLine, int iCmdShow)
{
TCHAR szAppName [16], szCaption [64], szErrMsg [64] ;
HWND hwnd ;
MSG msg ;
WNDCLASS wndclass ;
LoadString (hInstance, IDS_APPNAME, szAppName,
sizeof (szAppName) / sizeof (TCHAR)) ;
LoadString (hInstance, IDS_CAPTION, szCaption,
sizeof (szCaption) / sizeof (TCHAR)) ;
wndclass.style = CS_HREDRAW | CS_VREDRAW ;
wndclass.lpfnWndProc = WndProc ;
wndclass.cbClsExtra = 0 ;
wndclass.cbWndExtra = 0 ;
wndclass.hInstance = hInstance ;
wndclass.hIcon = LoadIcon (hInstance, szAppName) ;
wndclass.hCursor = LoadCursor (NULL, IDC_ARROW) ;
wndclass.hbrBackground = (HBRUSH) GetStockObject (WHITE_BRUSH) ;
wndclass.lpszMenuName = NULL ;
wndclass.lpszClassName = szAppName ;
if (!RegisterClass (&wndclass))
{
LoadStringA (hInstance, IDS_APPNAME, (char *) szAppName,
sizeof (szAppName)) ;
LoadStringA (hInstance, IDS_ERRMSG, (char *) szErrMsg,
sizeof (szErrMsg)) ;
MessageBoxA (NULL, (char *) szErrMsg,
(char *) szAppName, MB_ICONERROR) ;
return 0 ;
}
hwnd = CreateWindow (szAppName, szCaption,
WS_OVERLAPPEDWINDOW | WS_CLIPCHILDREN,
CW_USEDEFAULT, CW_USEDEFAULT,
CW_USEDEFAULT, CW_USEDEFAULT,
NULL, NULL, hInstance, NULL) ;
ShowWindow (hwnd, iCmdShow) ;
UpdateWindow (hwnd) ;
while (GetMessage (&msg, NULL, 0, 0))
{
TranslateMessage (&msg) ;
325](https://image.slidesharecdn.com/programmingwindows-140823083916-phpapp02/85/Programming-windows-325-320.jpg)

![I was a child and she was a child
In this kingdom by the sea,
But we loved with a love that was more than love --
I and my Annabel Lee --
With a love that the winged seraphs of Heaven
Coveted her and me.
And this was the reason that, long ago,
In this kingdom by the sea,
A wind blew out of a cloud, chilling
My beautiful Annabel Lee;
So that her highborn kinsmen came
And bore her away from me,
To shut her up in a sepulchre
In this kingdom by the sea.
The angels, not half so happy in Heaven,
Went envying her and me --
Yes! that was the reason (as all men know,
In this kingdom by the sea)
That the wind came out of the cloud by night,
Chilling and killing my Annabel Lee.
But our love it was stronger by far than the love
Of those who were older than we --
Of many far wiser than we --
And neither the angels in Heaven above
Nor the demons down under the sea
Can ever dissever my soul from the soul
Of the beautiful Annabel Lee:
For the moon never beams, without bringing me dreams
Of the beautiful Annabel Lee;
And the stars never rise, but I feel the bright eyes
Of the beautiful Annabel Lee:
And so, all the night-tide, I lie down by the side
Of my darling -- my darling -- my life and my bride,
In her sepulchre there by the sea --
In her tomb by the sounding sea.
[May, 1849]
POEPOEM.ICO
327](https://image.slidesharecdn.com/programmingwindows-140823083916-phpapp02/85/Programming-windows-327-320.jpg)


![/*-----------------------------------------
MENUDEMO.C -- Menu Demonstration
(c) Charles Petzold, 1998
-----------------------------------------*/
#include <windows.h>
#include "resource.h"
#define ID_TIMER 1
LRESULT CALLBACK WndProc (HWND, UINT, WPARAM, LPARAM) ;
TCHAR szAppName[] = TEXT ("MenuDemo") ;
int WINAPI WinMain (HINSTANCE hInstance, HINSTANCE hPrevInstance,
PSTR szCmdLine, int iCmdShow)
{
HWND hwnd ;
MSG msg ;
WNDCLASS wndclass ;
wndclass.style = CS_HREDRAW | CS_VREDRAW ;
wndclass.lpfnWndProc = WndProc ;
wndclass.cbClsExtra = 0 ;
wndclass.cbWndExtra = 0 ;
wndclass.hInstance = hInstance ;
wndclass.hIcon = LoadIcon (NULL, IDI_APPLICATION) ;
wndclass.hCursor = LoadCursor (NULL, IDC_ARROW) ;
wndclass.hbrBackground = (HBRUSH) GetStockObject (WHITE_BRUSH) ;
wndclass.lpszMenuName = szAppName ;
wndclass.lpszClassName = szAppName ;
if (!RegisterClass (&wndclass))
{
MessageBox (NULL, TEXT ("This program requires Windows NT!"),
szAppName, MB_ICONERROR) ;
return 0 ;
}
hwnd = CreateWindow (szAppName, TEXT ("Menu Demonstration"),
WS_OVERLAPPEDWINDOW,
CW_USEDEFAULT, CW_USEDEFAULT,
CW_USEDEFAULT, CW_USEDEFAULT,
NULL, NULL, hInstance, NULL) ;
ShowWindow (hwnd, iCmdShow) ;
UpdateWindow (hwnd) ;
while (GetMessage (&msg, NULL, 0, 0))
{
TranslateMessage (&msg) ;
DispatchMessage (&msg) ;
}
return msg.wParam ;
}
LRESULT CALLBACK WndProc (HWND hwnd, UINT message, WPARAM wParam, LPARAM lParam)
{
static int idColor [5] = { WHITE_BRUSH, LTGRAY_BRUSH, GRAY_BRUSH,
DKGRAY_BRUSH, BLACK_BRUSH } ;
static int iSelection = IDM_BKGND_WHITE ;
HMENU hMenu ;
switch (message)
333](https://image.slidesharecdn.com/programmingwindows-140823083916-phpapp02/85/Programming-windows-333-320.jpg)
![{
case WM_COMMAND:
hMenu = GetMenu (hwnd) ;
switch (LOWORD (wParam))
{
case IDM_FILE_NEW:
case IDM_FILE_OPEN:
case IDM_FILE_SAVE:
case IDM_FILE_SAVE_AS:
MessageBeep (0) ;
return 0 ;
case IDM_APP_EXIT:
SendMessage (hwnd, WM_CLOSE, 0, 0) ;
return 0 ;
case IDM_EDIT_UNDO:
case IDM_EDIT_CUT:
case IDM_EDIT_COPY:
case IDM_EDIT_PASTE:
case IDM_EDIT_CLEAR:
MessageBeep (0) ;
return 0 ;
case IDM_BKGND_WHITE: // Note: Logic below
case IDM_BKGND_LTGRAY: // assumes that IDM_WHITE
case IDM_BKGND_GRAY: // through IDM_BLACK are
case IDM_BKGND_DKGRAY: // consecutive numbers in
case IDM_BKGND_BLACK: // the order shown here.
CheckMenuItem (hMenu, iSelection, MF_UNCHECKED) ;
iSelection = LOWORD (wParam) ;
CheckMenuItem (hMenu, iSelection, MF_CHECKED) ;
SetClassLong (hwnd, GCL_HBRBACKGROUND, (LONG)
GetStockObject
(idColor [LOWORD (wParam) - IDM_BKGND_WHITE])) ;
InvalidateRect (hwnd, NULL, TRUE) ;
return 0 ;
case IDM_TIMER_START:
if (SetTimer (hwnd, ID_TIMER, 1000, NULL))
{
EnableMenuItem (hMenu, IDM_TIMER_START, MF_GRAYED) ;
EnableMenuItem (hMenu, IDM_TIMER_STOP, MF_ENABLED) ;
}
return 0 ;
case IDM_TIMER_STOP:
KillTimer (hwnd, ID_TIMER) ;
EnableMenuItem (hMenu, IDM_TIMER_START, MF_ENABLED) ;
EnableMenuItem (hMenu, IDM_TIMER_STOP, MF_GRAYED) ;
return 0 ;
case IDM_APP_HELP:
MessageBox (hwnd, TEXT ("Help not yet implemented!"),
szAppName, MB_ICONEXCLAMATION | MB_OK) ;
return 0 ;
case IDM_APP_ABOUT:
MessageBox (hwnd, TEXT ("Menu Demonstration Programn")
TEXT ("(c) Charles Petzold, 1998"),
334](https://image.slidesharecdn.com/programmingwindows-140823083916-phpapp02/85/Programming-windows-334-320.jpg)


![to a menu. This function is used within Windows to construct a menu after loading the normal menu template from a
resource script. If you're brave, you can try using it yourself.
Floating Popup Menus
You can also make use of menus without having a top-level menu bar. You can instead cause a popup menu to
appear on top of any part of the screen. One approach is to invoke this popup menu in response to a click of the right
mouse button. The POPMENU program in Figure 10-8 shows how this is done.
Figure 10-8. The POPMENU program.
POPMENU.C
/*----------------------------------------
POPMENU.C -- Popup Menu Demonstration
(c) Charles Petzold, 1998
----------------------------------------*/
#include <windows.h>
#include "resource.h"
LRESULT CALLBACK WndProc (HWND, UINT, WPARAM, LPARAM) ;
HINSTANCE hInst ;
TCHAR szAppName[] = TEXT ("PopMenu") ;
int WINAPI WinMain (HINSTANCE hInstance, HINSTANCE hPrevInstance,
PSTR szCmdLine, int iCmdShow)
{
HWND hwnd ;
MSG msg ;
WNDCLASS wndclass ;
wndclass.style = CS_HREDRAW | CS_VREDRAW ;
wndclass.lpfnWndProc = WndProc ;
wndclass.cbClsExtra = 0 ;
wndclass.cbWndExtra = 0 ;
wndclass.hInstance = hInstance ;
wndclass.hIcon = LoadIcon (NULL, szAppName) ;
wndclass.hCursor = LoadCursor (NULL, IDC_ARROW) ;
wndclass.hbrBackground = (HBRUSH) GetStockObject (WHITE_BRUSH) ;
wndclass.lpszMenuName = NULL ;
wndclass.lpszClassName = szAppName ;
if (!RegisterClass (&wndclass))
{
MessageBox (NULL, TEXT ("This program requires Windows NT!"),
szAppName, MB_ICONERROR) ;
return 0 ;
}
hInst = hInstance ;
hwnd = CreateWindow (szAppName, TEXT ("Popup Menu Demonstration"),
WS_OVERLAPPEDWINDOW,
CW_USEDEFAULT, CW_USEDEFAULT,
CW_USEDEFAULT, CW_USEDEFAULT,
NULL, NULL, hInstance, NULL) ;
339](https://image.slidesharecdn.com/programmingwindows-140823083916-phpapp02/85/Programming-windows-339-320.jpg)
![ShowWindow (hwnd, iCmdShow) ;
UpdateWindow (hwnd) ;
while (GetMessage (&msg, NULL, 0, 0))
{
TranslateMessage (&msg) ;
DispatchMessage (&msg) ;
}
return msg.wParam ;
}
LRESULT CALLBACK WndProc (HWND hwnd, UINT message, WPARAM wParam, LPARAM lParam)
{
static HMENU hMenu ;
static int idColor [5] = { WHITE_BRUSH, LTGRAY_BRUSH, GRAY_BRUSH,
DKGRAY_BRUSH, BLACK_BRUSH } ;
static int iSelection = IDM_BKGND_WHITE ;
POINT point ;
switch (message)
{
case WM_CREATE:
hMenu = LoadMenu (hInst, szAppName) ;
hMenu = GetSubMenu (hMenu, 0) ;
return 0 ;
case WM_RBUTTONUP:
point.x = LOWORD (lParam) ;
point.y = HIWORD (lParam) ;
ClientToScreen (hwnd, &point) ;
TrackPopupMenu (hMenu, TPM_RIGHTBUTTON, point.x, point.y,
0, hwnd, NULL) ;
return 0 ;
case WM_COMMAND:
switch (LOWORD (wParam))
{
case IDM_FILE_NEW:
case IDM_FILE_OPEN:
case IDM_FILE_SAVE:
case IDM_FILE_SAVE_AS:
case IDM_EDIT_UNDO:
case IDM_EDIT_CUT:
case IDM_EDIT_COPY:
case IDM_EDIT_PASTE:
case IDM_EDIT_CLEAR:
MessageBeep (0) ;
return 0 ;
case IDM_BKGND_WHITE: // Note: Logic below
case IDM_BKGND_LTGRAY: // assumes that IDM_WHITE
case IDM_BKGND_GRAY: // through IDM_BLACK are
case IDM_BKGND_DKGRAY: // consecutive numbers in
case IDM_BKGND_BLACK: // the order shown here.
CheckMenuItem (hMenu, iSelection, MF_UNCHECKED) ;
iSelection = LOWORD (wParam) ;
CheckMenuItem (hMenu, iSelection, MF_CHECKED) ;
SetClassLong (hwnd, GCL_HBRBACKGROUND, (LONG)
GetStockObject
(idColor [LOWORD (wParam) - IDM_BKGND_WHITE])) ;
340](https://image.slidesharecdn.com/programmingwindows-140823083916-phpapp02/85/Programming-windows-340-320.jpg)


![ClientToScreen (hwnd, &point) ;
TrackPopupMenu (hMenu, TPM_RIGHTBUTTON, point.x, point.y,
0, hwnd, NULL) ;
Windows then displays the popup menu with the items File, Edit, Background, and Help. Selecting any of these
options causes the nested popup menus to appear to the right. The menu functions the same as a normal menu.
If you want to use the same menu for the program's main menu and with the TrackPopupMenu, you'll have a bit of a
problem because the function requires a popup menu handle. A workaround is provided in the Microsoft Knowledge
Base article ID Q99806.
Using the System Menu
Parent windows created with a style that includes WS_SYSMENU have a system menu box at the left of the caption
bar. If you like, you can modify this menu by adding your own menu commands. In the early days of Windows,
programs commonly put the "About" menu item on the system menu. While modifying the system menu is not
nearly as common these days, it remains a quick-and-dirty way to add a menu to a short program without defining it
in the resource script. The only restriction is this: the ID numbers you use to add commands to the system menu
must be lower than 0xF000. Otherwise, they will conflict with the IDs that Windows uses for the normal system
menu commands. And keep in mind that when you process WM_SYSCOMMAND messages in your window
procedure for these new menu items, you must pass the other WM_SYSCOMMAND messages to DefWindowProc.
If you don't, you'll effectively disable all normal options on the system menu.
The program POORMENU ("Poor Person's Menu"), shown in Figure 10-9, adds a separator bar and three
commands to the system menu. The last of these commands removes the additions.
Figure 10-9. The POORMENU program.
POORMENU.C
/*-----------------------------------------
POORMENU.C -- The Poor Person's Menu
(c) Charles Petzold, 1998
-----------------------------------------*/
#include <windows.h>
#define IDM_SYS_ABOUT 1
#define IDM_SYS_HELP 2
#define IDM_SYS_REMOVE 3
LRESULT CALLBACK WndProc (HWND, UINT, WPARAM, LPARAM) ;
static TCHAR szAppName[] = TEXT ("PoorMenu") ;
int WINAPI WinMain (HINSTANCE hInstance, HINSTANCE hPrevInstance,
PSTR szCmdLine, int iCmdShow)
{
HMENU hMenu ;
HWND hwnd ;
MSG msg ;
WNDCLASS wndclass ;
wndclass.style = CS_HREDRAW | CS_VREDRAW ;
wndclass.lpfnWndProc = WndProc ;
wndclass.cbClsExtra = 0 ;
343](https://image.slidesharecdn.com/programmingwindows-140823083916-phpapp02/85/Programming-windows-343-320.jpg)


![Again, iFlag is either MF_BYCOMMAND or MF_BYPOSITION. The iFlags parameter is a combination of all the
current flags. You can determine the current flags by testing against the MF_DISABLED, MF_GRAYED,
MF_CHECKED, MF_MENUBREAK, MF_MENUBARBREAK, and MF_SEPARATOR identifiers.
Or maybe by this time you're a little fed up with menus. In that case, you'll be pleased to know that if you no longer
need a menu in your program, you can destroy it:
DestroyMenu (hMenu) ;
This function invalidates the menu handle.
An Unorthodox Approach to Menus
Now let's step a little off the beaten path. Instead of having drop-down menus in your program, how about creating
multiple top-level menus without any popups and switching between the top-level menus using the SetMenu call?
Such a menu might remind old-timers of that character-mode classic, Lotus 1-2-3. The NOPOPUPS program, shown
in Figure 10-10, demonstrates how to do it. This program includes File and Edit items similar to those that
MENUDEMO uses but displays them as alternate top-level menus.
Figure 10-10. The NOPOPUPS program.
NOPOPUPS.C
/*-------------------------------------------------
NOPOPUPS.C -- Demonstrates No-Popup Nested Menu
(c) Charles Petzold, 1998
-------------------------------------------------*/
#include <windows.h>
#include "resource.h"
LRESULT CALLBACK WndProc (HWND, UINT, WPARAM, LPARAM) ;
int WINAPI WinMain (HINSTANCE hInstance, HINSTANCE hPrevInstance,
PSTR szCmdLine, int iCmdShow)
{
static TCHAR szAppName[] = TEXT ("NoPopUps") ;
HWND hwnd ;
MSG msg ;
WNDCLASS wndclass ;
wndclass.style = CS_HREDRAW | CS_VREDRAW ;
wndclass.lpfnWndProc = WndProc ;
wndclass.cbClsExtra = 0 ;
wndclass.cbWndExtra = 0 ;
wndclass.hInstance = hInstance ;
wndclass.hIcon = LoadIcon (NULL, IDI_APPLICATION) ;
wndclass.hCursor = LoadCursor (NULL, IDC_ARROW) ;
wndclass.hbrBackground = (HBRUSH) GetStockObject (WHITE_BRUSH) ;
wndclass.lpszMenuName = NULL ;
wndclass.lpszClassName = szAppName ;
if (!RegisterClass (&wndclass))
{
MessageBox (NULL, TEXT ("This program requires Windows NT!"),
szAppName, MB_ICONERROR) ;
347](https://image.slidesharecdn.com/programmingwindows-140823083916-phpapp02/85/Programming-windows-347-320.jpg)


![// Microsoft Developer Studio generated include file.
// Used by NoPopups.rc
#define IDM_FILE 40001
#define IDM_EDIT 40002
#define IDM_FILE_NEW 40003
#define IDM_FILE_OPEN 40004
#define IDM_FILE_SAVE 40005
#define IDM_FILE_SAVE_AS 40006
#define IDM_MAIN 40007
#define IDM_EDIT_UNDO 40008
#define IDM_EDIT_CUT 40009
#define IDM_EDIT_COPY 40010
#define IDM_EDIT_PASTE 40011
#define IDM_EDIT_CLEAR 40012
In Microsoft Developer Studio, you create three menus rather than one. You'll be selecting Resource from the Insert
menu three times. Each menu has a different text name. When the window procedure processes the WM_CREATE
message, Windows loads each menu resource into memory:
hMenuMain = LoadMenu (hInstance, TEXT ("MenuMain")) ;
hMenuFile = LoadMenu (hInstance, TEXT ("MenuFile")) ;
hMenuEdit = LoadMenu (hInstance, TEXT ("MenuEdit")) ;
Initially, the program displays the main menu:
SetMenu (hwnd, hMenuMain) ;
The main menu lists the three options using the character strings "MAIN:", "File...", and "Edit..." However,
"MAIN:" is disabled, so it doesn't cause WM_COMMAND messages to be sent to the window procedure. The File
and Edit menus begin "FILE:" and "EDIT:" to identify these as submenus. The last item in each menu is the
character string "(Main)"; this option indicates a return to the main menu. Switching among these three menus is
simple:
case WM_COMMAND :
switch (wParam)
{
case IDM_MAIN :
SetMenu (hwnd, hMenuMain) ;
return 0 ;
case IDM_FILE :
SetMenu (hwnd, hMenuFile) ;
return 0 ;
case IDM_EDIT :
SetMenu (hwnd, hMenuEdit) ;
return 0 ;
[other program lines]
}
break ;
During the WM_DESTROY message, NOPOPUPS sets the program's menu to the Main menu and destroys the File
and Edit menus with calls to DestroyMenu. The Main menu is destroyed automatically when the window is
destroyed.
Keyboard Accelerators
Keyboard accelerators are key combinations that generate WM_COMMAND (or, in some cases,
WM_SYSCOMMAND) messages. Most often, programs use keyboard accelerators to duplicate the action of
common menu options, but they can also perform nonmenu functions. For instance, some Windows programs have
an Edit menu that includes a Delete or Clear option; these programs conventionally assign the Del key as a keyboard
350](https://image.slidesharecdn.com/programmingwindows-140823083916-phpapp02/85/Programming-windows-350-320.jpg)


![POPPAD2.C -- Popup Editor Version 2 (includes menu)
(c) Charles Petzold, 1998
-----------------------------------------------------*/
#include <windows.h>
#include "resource.h"
#define ID_EDIT 1
LRESULT CALLBACK WndProc (HWND, UINT, WPARAM, LPARAM);
TCHAR szAppName[] = TEXT ("PopPad2") ;
int WINAPI WinMain (HINSTANCE hInstance, HINSTANCE hPrevInstance,
PSTR szCmdLine, int iCmdShow)
{
HACCEL hAccel ;
HWND hwnd ;
MSG msg ;
WNDCLASS wndclass ;
wndclass.style = CS_HREDRAW | CS_VREDRAW ;
wndclass.lpfnWndProc = WndProc ;
wndclass.cbClsExtra = 0 ;
wndclass.cbWndExtra = 0 ;
wndclass.hInstance = hInstance ;
wndclass.hIcon = LoadIcon (hInstance, szAppName) ;
wndclass.hCursor = LoadCursor (NULL, IDC_ARROW) ;
wndclass.hbrBackground = (HBRUSH) GetStockObject (WHITE_BRUSH) ;
wndclass.lpszMenuName = szAppName ;
wndclass.lpszClassName = szAppName ;
if (!RegisterClass (&wndclass))
{
MessageBox (NULL, TEXT ("This program requires Windows NT!"),
szAppName, MB_ICONERROR) ;
return 0 ;
}
hwnd = CreateWindow (szAppName, szAppName,
WS_OVERLAPPEDWINDOW,
GetSystemMetrics (SM_CXSCREEN) / 4,
GetSystemMetrics (SM_CYSCREEN) / 4,
GetSystemMetrics (SM_CXSCREEN) / 2,
GetSystemMetrics (SM_CYSCREEN) / 2,
NULL, NULL, hInstance, NULL) ;
ShowWindow (hwnd, iCmdShow) ;
UpdateWindow (hwnd) ;
hAccel = LoadAccelerators (hInstance, szAppName) ;
while (GetMessage (&msg, NULL, 0, 0))
{
if (!TranslateAccelerator (hwnd, hAccel, &msg))
{
TranslateMessage (&msg) ;
DispatchMessage (&msg) ;
}
}
return msg.wParam ;
}
354](https://image.slidesharecdn.com/programmingwindows-140823083916-phpapp02/85/Programming-windows-354-320.jpg)


![/*------------------------------------------
ABOUT1.C -- About Box Demo Program No. 1
(c) Charles Petzold, 1998
------------------------------------------*/
#include <windows.h>
#include "resource.h"
LRESULT CALLBACK WndProc (HWND, UINT, WPARAM, LPARAM) ;
BOOL CALLBACK AboutDlgProc (HWND, UINT, WPARAM, LPARAM) ;
int WINAPI WinMain (HINSTANCE hInstance, HINSTANCE hPrevInstance,
PSTR szCmdLine, int iCmdShow)
{
static TCHAR szAppName[] = TEXT ("About1") ;
MSG msg ;
HWND hwnd ;
WNDCLASS wndclass ;
wndclass.style = CS_HREDRAW | CS_VREDRAW ;
wndclass.lpfnWndProc = WndProc ;
wndclass.cbClsExtra = 0 ;
wndclass.cbWndExtra = 0 ;
wndclass.hInstance = hInstance ;
wndclass.hIcon = LoadIcon (hInstance, szAppName) ;
wndclass.hCursor = LoadCursor (NULL, IDC_ARROW) ;
wndclass.hbrBackground = (HBRUSH) GetStockObject (WHITE_BRUSH) ;
wndclass.lpszMenuName = szAppName ;
wndclass.lpszClassName = szAppName ;
if (!RegisterClass (&wndclass))
{
MessageBox (NULL, TEXT ("This program requires Windows NT!"),
szAppName, MB_ICONERROR) ;
return 0 ;
}
hwnd = CreateWindow (szAppName, TEXT ("About Box Demo Program"),
WS_OVERLAPPEDWINDOW,
CW_USEDEFAULT, CW_USEDEFAULT,
CW_USEDEFAULT, CW_USEDEFAULT,
NULL, NULL, hInstance, NULL) ;
ShowWindow (hwnd, iCmdShow) ;
UpdateWindow (hwnd) ;
while (GetMessage (&msg, NULL, 0, 0))
{
TranslateMessage (&msg) ;
DispatchMessage (&msg) ;
}
return msg.wParam ;
}
LRESULT CALLBACK WndProc (HWND hwnd, UINT message, WPARAM wParam, LPARAM lParam)
{
static HINSTANCE hInstance ;
switch (message)
{
case WM_CREATE :
363](https://image.slidesharecdn.com/programmingwindows-140823083916-phpapp02/85/Programming-windows-363-320.jpg)


![ABOUT2.C
/*------------------------------------------
ABOUT2.C -- About Box Demo Program No. 2
(c) Charles Petzold, 1998
------------------------------------------*/
#include <windows.h>
#include "resource.h"
LRESULT CALLBACK WndProc (HWND, UINT, WPARAM, LPARAM) ;
BOOL CALLBACK AboutDlgProc (HWND, UINT, WPARAM, LPARAM) ;
int iCurrentColor = IDC_BLACK,
iCurrentFigure = IDC_RECT ;
int WINAPI WinMain (HINSTANCE hInstance, HINSTANCE hPrevInstance,
PSTR szCmdLine, int iCmdShow)
{
static TCHAR szAppName[] = TEXT ("About2") ;
MSG msg ;
HWND hwnd ;
WNDCLASS wndclass ;
wndclass.style = CS_HREDRAW | CS_VREDRAW ;
wndclass.lpfnWndProc = WndProc ;
wndclass.cbClsExtra = 0 ;
wndclass.cbWndExtra = 0 ;
wndclass.hInstance = hInstance ;
wndclass.hIcon = LoadIcon (hInstance, szAppName) ;
wndclass.hCursor = LoadCursor (NULL, IDC_ARROW) ;
wndclass.hbrBackground = (HBRUSH) GetStockObject (WHITE_BRUSH) ;
wndclass.lpszMenuName = szAppName ;
wndclass.lpszClassName = szAppName ;
if (!RegisterClass (&wndclass))
{
MessageBox (NULL, TEXT ("This program requires Windows NT!"),
szAppName, MB_ICONERROR) ;
return 0 ;
}
hwnd = CreateWindow (szAppName, TEXT ("About Box Demo Program"),
WS_OVERLAPPEDWINDOW,
CW_USEDEFAULT, CW_USEDEFAULT,
CW_USEDEFAULT, CW_USEDEFAULT,
NULL, NULL, hInstance, NULL) ;
ShowWindow (hwnd, iCmdShow) ;
UpdateWindow (hwnd) ;
while (GetMessage (&msg, NULL, 0, 0))
{
TranslateMessage (&msg) ;
DispatchMessage (&msg) ;
}
return msg.wParam ;
}
373](https://image.slidesharecdn.com/programmingwindows-140823083916-phpapp02/85/Programming-windows-373-320.jpg)
![void PaintWindow (HWND hwnd, int iColor, int iFigure)
{
static COLORREF crColor[8] = { RGB ( 0, 0, 0), RGB ( 0, 0, 255),
RGB ( 0, 255, 0), RGB ( 0, 255, 255),
RGB (255, 0, 0), RGB (255, 0, 255),
RGB (255, 255, 0), RGB (255, 255, 255) } ;
HBRUSH hBrush ;
HDC hdc ;
RECT rect ;
hdc = GetDC (hwnd) ;
GetClientRect (hwnd, &rect) ;
hBrush = CreateSolidBrush (crColor[iColor - IDC_BLACK]) ;
hBrush = (HBRUSH) SelectObject (hdc, hBrush) ;
if (iFigure == IDC_RECT)
Rectangle (hdc, rect.left, rect.top, rect.right, rect.bottom) ;
else
Ellipse (hdc, rect.left, rect.top, rect.right, rect.bottom) ;
DeleteObject (SelectObject (hdc, hBrush)) ;
ReleaseDC (hwnd, hdc) ;
}
void PaintTheBlock (HWND hCtrl, int iColor, int iFigure)
{
InvalidateRect (hCtrl, NULL, TRUE) ;
UpdateWindow (hCtrl) ;
PaintWindow (hCtrl, iColor, iFigure) ;
}
LRESULT CALLBACK WndProc (HWND hwnd, UINT message, WPARAM wParam, LPARAM lParam)
{
static HINSTANCE hInstance ;
PAINTSTRUCT ps ;
switch (message)
{
case WM_CREATE:
hInstance = ((LPCREATESTRUCT) lParam)->hInstance ;
return 0 ;
case WM_COMMAND:
switch (LOWORD (wParam))
{
case IDM_APP_ABOUT:
if (DialogBox (hInstance, TEXT ("AboutBox"), hwnd, AboutDlgProc))
InvalidateRect (hwnd, NULL, TRUE) ;
return 0 ;
}
break ;
case WM_PAINT:
BeginPaint (hwnd, &ps) ;
EndPaint (hwnd, &ps) ;
PaintWindow (hwnd, iCurrentColor, iCurrentFigure) ;
return 0 ;
case WM_DESTROY:
PostQuitMessage (0) ;
return 0 ;
}
374](https://image.slidesharecdn.com/programmingwindows-140823083916-phpapp02/85/Programming-windows-374-320.jpg)


![GROUPBOX control is simply a frame with a title (either Color or Figure) that surrounds each of the two groups of
radio buttons. The eight radio buttons in the first group are mutually exclusive, as are the two radio buttons in the
second group.
When one of the radio buttons is clicked with the mouse (or when the Spacebar is pressed while the radio button has
the input focus), the child window sends its parent a WM_COMMAND message with the low word of wParam set
to the ID of the control. The high word of wParam is a notification code, and lParam is the window handle of the
control. For a radio button, this notification code is always BN_CLICKED, which equals 0. The dialog box window
procedure in Windows then passes this WM_COMMAND message to the dialog box procedure within ABOUT2.C.
When the dialog box procedure receives a WM_COMMAND message for one of the radio buttons, it turns on the
check mark for that button and turns off the check marks for all the other buttons in the group.
You might recall from Chapter 9 that checking and unchecking a button requires that you send the child window
control a BM_CHECK message. To turn on a button check mark, you use
SendMessage (hwndCtrl, BM_SETCHECK, 1, 0) ;
To turn off the check mark, you use
SendMessage (hwndCtrl, BM_SETCHECK, 0, 0) ;
The hwndCtrl parameter is the window handle of the child window button control.
But this method presents a little problem in the dialog box procedure, because you don't know the window handles
of all the radio buttons. You know only the one from which you're getting the message. Fortunately, Windows
provides you with a function to obtain the window handle of a dialog box control using the dialog box window
handle and the control ID:
hwndCtrl = GetDlgItem (hDlg, id) ;
(You can also obtain the ID value of a control from the window handle by using
id = GetWindowLong (hwndCtrl, GWL_ID) ;
but this is rarely necessary.)
You'll notice in the ABOUT2.H header file shown in Figure 11-3 that the ID values for the eight colors are
sequential from IDC_BLACK to IDC_WHITE. This arrangement helps in processing the WM_COMMAND
messages from the radio buttons. For a first attempt at checking and unchecking the radio buttons, you might try
something like the following in the dialog box procedure:
static int iColor ;
[other program lines]
case WM_COMMAND:
switch (LOWORD (wParam))
{
[other program lines]
case IDC_BLACK:
case IDC_RED:
case IDC_GREEN:
case IDC_YELLOW:
case IDC_BLUE:
case IDC_MAGENTA:
case IDC_CYAN:
case IDC_WHITE:
iColor = LOWORD (wParam) ;
for (i = IDC_BLACK, i <= IDC_WHITE, i++)
SendMessage (GetDlgItem (hDlg, i),
BM_SETCHECK, i == LOWORD (wParam), 0) ;
return TRUE ;
379](https://image.slidesharecdn.com/programmingwindows-140823083916-phpapp02/85/Programming-windows-379-320.jpg)
![[other program lines]
This approach works satisfactorily. You've saved the new color value in iColor, and you've also set up a loop that
cycles through all the ID values for the eight colors. You obtain the window handle of each of these eight radio
button controls and use SendMessage to send each handle a BM_SETCHECK message. The wParam value of this
message is set to 1 only for the button that sent the WM_COMMAND message to the dialog box window procedure.
The first shortcut is the special dialog box procedure SendDlgItemMessage:
SendDlgItemMessage (hDlg, id, iMsg, wParam, lParam) ;
It is equivalent to
SendMessage (GetDlgItem (hDlg, id), id, wParam, lParam) ;
Now the loop would look like this:
for (i = IDC_BLACK, i <= IDC_WHITE, i++)
SendDlgItemMessage (hDlg, i, BM_SETCHECK, i == LWORD (wParam), 0) ;
That's a little better. But the real breakthrough comes when you discover the CheckRadioButton function:
CheckRadioButton (hDlg, idFirst, idLast, idCheck) ;
This function turns off the check marks for all radio button controls with IDs from idFirst to idLast except for the
radio button with an ID of idCheck, which is checked. The IDs must be sequential. Now we can get rid of the loop
entirely and use:
CheckRadioButton (hDlg, IDC_BLACK, IDC_WHITE, LOWORD (wParam)) ;
That's how it's done in the dialog box procedure in ABOUT2.
A similar shortcut function is provided for working with check boxes. If you create a CHECKBOX dialog window
control, you can turn the check mark on and off using the function
CheckDlgButton (hDlg, idCheckbox, iCheck) ;
If iCheck is set to 1, the button is checked; if it's set to 0, the button is unchecked. You can obtain the status of a
check box in a dialog box by using
iCheck = IsDlgButtonChecked (hDlg, idCheckbox) ;
You can either retain the current status of the check mark as a static variable within the dialog box procedure or do
something like this to toggle the button on a WM_COMMAND message:
CheckDlgButton (hDlg, idCheckbox,
!IsDlgButtonChecked (hDlg, idCheckbox)) ;
If you define a BS_AUTOCHECKBOX control, you don't need to process the WM_COMMAND message at all.
You can simply obtain the current status of the button by using IsDlgButtonChecked before terminating the dialog
box. However, if you use the BS_AUTORADIOBUTTON style, IsDlgButtonChecked is not quite satisfactory
because you'd need to call it for each radio button until the function returned TRUE. Instead, you'd still trap
WM_COMMAND messages to keep track of which button gets pressed.
The OK and Cancel Buttons
ABOUT2 has two push buttons, labeled OK and Cancel. In the dialog box template in ABOUT2.RC, the OK button
has an ID of IDOK (defined in WINUSER.H as 1) and the Cancel button has an ID of IDCANCEL (defined as 2).
The OK button is the default:
380](https://image.slidesharecdn.com/programmingwindows-140823083916-phpapp02/85/Programming-windows-380-320.jpg)
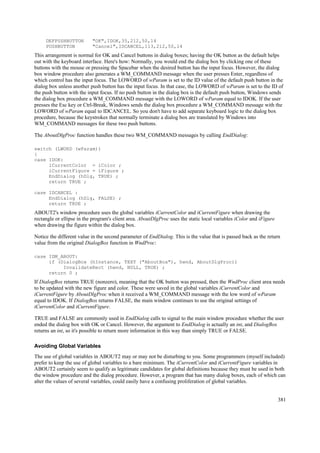


![particularly care for the normal rectangular push buttons and would prefer to create elliptical push buttons. You can
do this by registering a window class and using your own window procedure to process messages for your
customized child window. You then specify this window class in Developer Studio in the Properties dialog box
associated with a custom control. This translates into a CONTROL statement in the dialog box template. The
ABOUT3 program, shown in Figure 11-5, does exactly that.
Figure 11-5. The ABOUT3 program.
ABOUT3.C
/*------------------------------------------
ABOUT3.C -- About Box Demo Program No. 3
(c) Charles Petzold, 1998
------------------------------------------*/
#include <windows.h>
#include "resource.h"
LRESULT CALLBACK WndProc (HWND, UINT, WPARAM, LPARAM) ;
BOOL CALLBACK AboutDlgProc (HWND, UINT, WPARAM, LPARAM) ;
LRESULT CALLBACK EllipPushWndProc (HWND, UINT, WPARAM, LPARAM) ;
int WINAPI WinMain (HINSTANCE hInstance, HINSTANCE hPrevInstance,
PSTR szCmdLine, int iCmdShow)
{
static TCHAR szAppName[] = TEXT ("About3") ;
MSG msg ;
HWND hwnd ;
WNDCLASS wndclass ;
wndclass.style = CS_HREDRAW | CS_VREDRAW ;
wndclass.lpfnWndProc = WndProc ;
wndclass.cbClsExtra = 0 ;
wndclass.cbWndExtra = 0 ;
wndclass.hInstance = hInstance ;
wndclass.hIcon = LoadIcon (hInstance, szAppName) ;
wndclass.hCursor = LoadCursor (NULL, IDC_ARROW) ;
wndclass.hbrBackground = (HBRUSH) GetStockObject (WHITE_BRUSH) ;
wndclass.lpszMenuName = szAppName ;
wndclass.lpszClassName = szAppName ;
if (!RegisterClass (&wndclass))
{
MessageBox (NULL, TEXT ("This program requires Windows NT!"),
szAppName, MB_ICONERROR) ;
return 0 ;
}
wndclass.style = CS_HREDRAW | CS_VREDRAW ;
wndclass.lpfnWndProc = EllipPushWndProc ;
wndclass.cbClsExtra = 0 ;
wndclass.cbWndExtra = 0 ;
wndclass.hInstance = hInstance ;
wndclass.hIcon = NULL ;
wndclass.hCursor = LoadCursor (NULL, IDC_ARROW) ;
wndclass.hbrBackground = (HBRUSH) (COLOR_BTNFACE + 1) ;
wndclass.lpszMenuName = NULL ;
wndclass.lpszClassName = TEXT ("EllipPush") ;
385](https://image.slidesharecdn.com/programmingwindows-140823083916-phpapp02/85/Programming-windows-385-320.jpg)

![}
LRESULT CALLBACK EllipPushWndProc (HWND hwnd, UINT message,
WPARAM wParam, LPARAM lParam)
{
TCHAR szText[40] ;
HBRUSH hBrush ;
HDC hdc ;
PAINTSTRUCT ps ;
RECT rect ;
switch (message)
{
case WM_PAINT :
GetClientRect (hwnd, &rect) ;
GetWindowText (hwnd, szText, sizeof (szText)) ;
hdc = BeginPaint (hwnd, &ps) ;
hBrush = CreateSolidBrush (GetSysColor (COLOR_WINDOW)) ;
hBrush = (HBRUSH) SelectObject (hdc, hBrush) ;
SetBkColor (hdc, GetSysColor (COLOR_WINDOW)) ;
SetTextColor (hdc, GetSysColor (COLOR_WINDOWTEXT)) ;
Ellipse (hdc, rect.left, rect.top, rect.right, rect.bottom) ;
DrawText (hdc, szText, -1, &rect,
DT_SINGLELINE | DT_CENTER | DT_VCENTER) ;
DeleteObject (SelectObject (hdc, hBrush)) ;
EndPaint (hwnd, &ps) ;
return 0 ;
case WM_KEYUP :
if (wParam != VK_SPACE)
break ;
// fall through
case WM_LBUTTONUP :
SendMessage (GetParent (hwnd), WM_COMMAND,
GetWindowLong (hwnd, GWL_ID), (LPARAM) hwnd) ;
return 0 ;
}
return DefWindowProc (hwnd, message, wParam, lParam) ;
}
ABOUT3.RC (excerpts)
//Microsoft Developer Studio generated resource script.
#include "resource.h"
#include "afxres.h"
/////////////////////////////////////////////////////////////////////////////
// Dialog
ABOUTBOX DIALOG DISCARDABLE 32, 32, 180, 100
STYLE DS_MODALFRAME | WS_POPUP
FONT 8, "MS Sans Serif"
387](https://image.slidesharecdn.com/programmingwindows-140823083916-phpapp02/85/Programming-windows-387-320.jpg)
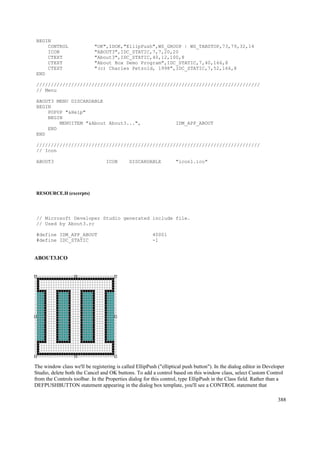


![#include <windows.h>
LRESULT CALLBACK WndProc (HWND, UINT, WPARAM, LPARAM) ;
BOOL CALLBACK ColorScrDlg (HWND, UINT, WPARAM, LPARAM) ;
HWND hDlgModeless ;
int WINAPI WinMain (HINSTANCE hInstance, HINSTANCE hPrevInstance,
PSTR szCmdLine, int iCmdShow)
{
static TCHAR szAppName[] = TEXT ("Colors2") ;
HWND hwnd ;
MSG msg ;
WNDCLASS wndclass ;
wndclass.style = CS_HREDRAW | CS_VREDRAW ;
wndclass.lpfnWndProc = WndProc ;
wndclass.cbClsExtra = 0 ;
wndclass.cbWndExtra = 0 ;
wndclass.hInstance = hInstance ;
wndclass.hIcon = LoadIcon (NULL, IDI_APPLICATION) ;
wndclass.hCursor = LoadCursor (NULL, IDC_ARROW) ;
wndclass.hbrBackground = CreateSolidBrush (0L) ;
wndclass.lpszMenuName = NULL ;
wndclass.lpszClassName = szAppName ;
if (!RegisterClass (&wndclass))
{
MessageBox (NULL, TEXT ("This program requires Windows NT!"),
szAppName, MB_ICONERROR) ;
return 0 ;
}
hwnd = CreateWindow (szAppName, TEXT ("Color Scroll"),
WS_OVERLAPPEDWINDOW | WS_CLIPCHILDREN,
CW_USEDEFAULT, CW_USEDEFAULT,
CW_USEDEFAULT, CW_USEDEFAULT,
NULL, NULL, hInstance, NULL) ;
ShowWindow (hwnd, iCmdShow) ;
UpdateWindow (hwnd) ;
hDlgModeless = CreateDialog (hInstance, TEXT ("ColorScrDlg"),
hwnd, ColorScrDlg) ;
while (GetMessage (&msg, NULL, 0, 0))
{
if (hDlgModeless == 0 || !IsDialogMessage (hDlgModeless, &msg))
{
TranslateMessage (&msg) ;
DispatchMessage (&msg) ;
}
}
return msg.wParam ;
}
LRESULT CALLBACK WndProc (HWND hwnd, UINT message, WPARAM wParam, LPARAM lParam)
{
switch (message)
{
case WM_DESTROY :
DeleteObject ((HGDIOBJ) SetClassLong (hwnd, GCL_HBRBACKGROUND,
(LONG) GetStockObject (WHITE_BRUSH))) ;
PostQuitMessage (0) ;
return 0 ;
393](https://image.slidesharecdn.com/programmingwindows-140823083916-phpapp02/85/Programming-windows-393-320.jpg)
![}
return DefWindowProc (hwnd, message, wParam, lParam) ;
}
BOOL CALLBACK ColorScrDlg (HWND hDlg, UINT message,
WPARAM wParam, LPARAM lParam)
{
static int iColor[3] ;
HWND hwndParent, hCtrl ;
int iCtrlID, iIndex ;
switch (message)
{
case WM_INITDIALOG :
for (iCtrlID = 10 ; iCtrlID < 13 ; iCtrlID++)
{
hCtrl = GetDlgItem (hDlg, iCtrlID) ;
SetScrollRange (hCtrl, SB_CTL, 0, 255, FALSE) ;
SetScrollPos (hCtrl, SB_CTL, 0, FALSE) ;
}
return TRUE ;
case WM_VSCROLL :
hCtrl = (HWND) lParam ;
iCtrlID = GetWindowLong (hCtrl, GWL_ID) ;
iIndex = iCtrlID - 10 ;
hwndParent = GetParent (hDlg) ;
switch (LOWORD (wParam))
{
case SB_PAGEDOWN :
iColor[iIndex] += 15 ; // fall through
case SB_LINEDOWN :
iColor[iIndex] = min (255, iColor[iIndex] + 1) ;
break ;
case SB_PAGEUP :
iColor[iIndex] -= 15 ; // fall through
case SB_LINEUP :
iColor[iIndex] = max (0, iColor[iIndex] - 1) ;
break ;
case SB_TOP :
iColor[iIndex] = 0 ;
break ;
case SB_BOTTOM :
iColor[iIndex] = 255 ;
break ;
case SB_THUMBPOSITION :
case SB_THUMBTRACK :
iColor[iIndex] = HIWORD (wParam) ;
break ;
default :
return FALSE ;
}
SetScrollPos (hCtrl, SB_CTL, iColor[iIndex], TRUE) ;
SetDlgItemInt (hDlg, iCtrlID + 3, iColor[iIndex], FALSE) ;
DeleteObject ((HGDIOBJ) SetClassLong (hwndParent, GCL_HBRBACKGROUND,
(LONG) CreateSolidBrush (
RGB (iColor[0], iColor[1], iColor[2])))) ;
InvalidateRect (hwndParent, NULL, TRUE) ;
return TRUE ;
}
return FALSE ;
394](https://image.slidesharecdn.com/programmingwindows-140823083916-phpapp02/85/Programming-windows-394-320.jpg)

![Figure 11-8. The COLORS2 display.
The modeless dialog box is created in COLORS2's WinMain function following the ShowWindow call for the
program's main window. Note that the window style for the main window includes WS_CLIPCHILDREN, which
allows the program to repaint the main window without erasing the dialog box.
The dialog box window handle returned from CreateDialog is stored in the global variable hDlgModeless and tested
during the message loop, as described above. In this program, however, it isn't necessary to store the handle in a
global variable or to test the value before calling IsDialogMessage. The message loop could have been written like
this:
while (GetMessage (&msg, NULL, 0, 0))
{
if (!IsDialogMessage (hDlgModeless, &msg))
{
TranslateMessage (&msg) ;
DispatchMessage (&msg) ;
}
}
Because the dialog box is created before the program enters the message loop and is not destroyed until the program
terminates, the value of hDlgModeless will always be valid. I included the logic in case you want to add some code
to the dialog box window procedure to destroy the dialog box:
case WM_CLOSE :
DestroyWindow (hDlg) ;
hDlgModeless = NULL ;
break ;
In the original COLORS1 program, SetWindowText set the values of the three numeric labels after converting the
integers to text with wsprintf. The code looked like this:
wsprintf (szBuffer, TEXT ("%i"), color[i]) ;
SetWindowText (hwndValue[i], szBuffer) ;
The value of i was the ID number of the current scroll bar being processed, and hwndValue was an array containing
the window handles of the three static text child windows for the numeric values of the colors.
396](https://image.slidesharecdn.com/programmingwindows-140823083916-phpapp02/85/Programming-windows-396-320.jpg)
![The new version uses SetDlgItemInt to set each text field of each child window to a number:
SetDlgItemInt (hDlg, iCtrlID + 3, color [iCtrlID], FALSE) ;
Although SetDlgItemInt and its companion, GetDlgItemInt, are most often used with edit controls, they can also be
used to set the text field of other controls, such as static text controls. The iCtrlID variable is the ID number of the
scroll bar; adding 3 to the number converts it to the ID for the corresponding numeric label. The third argument is
the color value. The fourth argument indicates whether the value in the third argument is to be treated as signed (if
the fourth argument is TRUE) or unsigned (if the fourth argument is FALSE). For this program, however, the values
range from 0 to 255, so the fourth argument has no effect.
In the process of converting COLORS1 to COLORS2, we passed more and more of the work to Windows. The
earlier version called CreateWindow 10 times; the new version calls CreateWindow once and CreateDialog once.
But if you think that we've reduced our CreateWindow calls to a minimum, get a load of this next program.
HEXCALC: Window or Dialog Box?
Perhaps the epitome of lazy programming is the HEXCALC program, shown in Figure 11-9. This program doesn't
call CreateWindow at all, never processes WM_PAINT messages, never obtains a device context, and never
processes mouse messages. Yet it manages to incorporate a 10-function hexadecimal calculator with a full keyboard
and mouse interface in fewer than 150 lines of source code. The calculator is shown in Figure 11-10.
Figure 11-9. The HEXCALC program.
HEXCALC.C
/*----------------------------------------
HEXCALC.C -- Hexadecimal Calculator
(c) Charles Petzold, 1998
----------------------------------------*/
#include <windows.h>
LRESULT CALLBACK WndProc (HWND, UINT, WPARAM, LPARAM) ;
int WINAPI WinMain (HINSTANCE hInstance, HINSTANCE hPrevInstance,
PSTR szCmdLine, int iCmdShow)
{
static TCHAR szAppName[] = TEXT ("HexCalc") ;
HWND hwnd ;
MSG msg ;
WNDCLASS wndclass ;
wndclass.style = CS_HREDRAW | CS_VREDRAW;
wndclass.lpfnWndProc = WndProc ;
wndclass.cbClsExtra = 0 ;
wndclass.cbWndExtra = DLGWINDOWEXTRA ; // Note!
wndclass.hInstance = hInstance ;
wndclass.hIcon = LoadIcon (hInstance, szAppName) ;
wndclass.hCursor = LoadCursor (NULL, IDC_ARROW) ;
wndclass.hbrBackground = (HBRUSH) (COLOR_BTNFACE + 1) ;
wndclass.lpszMenuName = NULL ;
wndclass.lpszClassName = szAppName ;
if (!RegisterClass (&wndclass))
{
MessageBox (NULL, TEXT ("This program requires Windows NT!"),
397](https://image.slidesharecdn.com/programmingwindows-140823083916-phpapp02/85/Programming-windows-397-320.jpg)
![szAppName, MB_ICONERROR) ;
return 0 ;
}
hwnd = CreateDialog (hInstance, szAppName, 0, NULL) ;
ShowWindow (hwnd, iCmdShow) ;
while (GetMessage (&msg, NULL, 0, 0))
{
TranslateMessage (&msg) ;
DispatchMessage (&msg) ;
}
return msg.wParam ;
}
void ShowNumber (HWND hwnd, UINT iNumber)
{
TCHAR szBuffer[20] ;
wsprintf (szBuffer, TEXT ("%X"), iNumber) ;
SetDlgItemText (hwnd, VK_ESCAPE, szBuffer) ;
}
DWORD CalcIt (UINT iFirstNum, int iOperation, UINT iNum)
{
switch (iOperation)
{
case `=`: return iNum ;
case `+': return iFirstNum + iNum ;
case `-': return iFirstNum - iNum ;
case `*': return iFirstNum * iNum ;
case `&': return iFirstNum & iNum ;
case `|': return iFirstNum | iNum ;
case `^': return iFirstNum ^ iNum ;
case `<`: return iFirstNum << iNum ;
case `>`: return iFirstNum >> iNum ;
case `/': return iNum ? iFirstNum / iNum: MAXDWORD ;
case `%': return iNum ? iFirstNum % iNum: MAXDWORD ;
default : return 0 ;
}
}
LRESULT CALLBACK WndProc (HWND hwnd, UINT message, WPARAM wParam, LPARAM lParam)
{
static BOOL bNewNumber = TRUE ;
static int iOperation = `=` ;
static UINT iNumber, iFirstNum ;
HWND hButton ;
switch (message)
{
case WM_KEYDOWN: // left arrow --> backspace
if (wParam != VK_LEFT)
break ;
wParam = VK_BACK ;
// fall through
case WM_CHAR:
if ((wParam = (WPARAM) CharUpper ((TCHAR *) wParam)) == VK_RETURN)
wParam = `=` ;
if (hButton = GetDlgItem (hwnd, wParam))
{
SendMessage (hButton, BM_SETSTATE, 1, 0) ;
398](https://image.slidesharecdn.com/programmingwindows-140823083916-phpapp02/85/Programming-windows-398-320.jpg)


![POPPAD Revisited
When we added a menu to POPPAD in Chapter 10, several standard menu options were left unimplemented. We are
now ready to add logic to POPPAD to open files, read them in, and save the edited files on disk. In the process, we'll
also add font selection and search-and-replace logic to POPPAD.
The files that contribute to the POPPAD3 program are shown in Figure 11-11.
Figure 11-11. The POPPAD3 program.
POPPAD.C
/*---------------------------------------
POPPAD.C -- Popup Editor
(c) Charles Petzold, 1998
---------------------------------------*/
#include <windows.h>
#include <commdlg.h>
#include "resource.h"
#define EDITID 1
#define UNTITLED TEXT ("(untitled)")
LRESULT CALLBACK WndProc (HWND, UINT, WPARAM, LPARAM) ;
BOOL CALLBACK AboutDlgProc (HWND, UINT, WPARAM, LPARAM) ;
// Functions in POPFILE.C
void PopFileInitialize (HWND) ;
BOOL PopFileOpenDlg (HWND, PTSTR, PTSTR) ;
BOOL PopFileSaveDlg (HWND, PTSTR, PTSTR) ;
BOOL PopFileRead (HWND, PTSTR) ;
BOOL PopFileWrite (HWND, PTSTR) ;
// Functions in POPFIND.C
HWND PopFindFindDlg (HWND) ;
HWND PopFindReplaceDlg (HWND) ;
BOOL PopFindFindText (HWND, int *, LPFINDREPLACE) ;
BOOL PopFindReplaceText (HWND, int *, LPFINDREPLACE) ;
BOOL PopFindNextText (HWND, int *) ;
BOOL PopFindValidFind (void) ;
// Functions in POPFONT.C
void PopFontInitialize (HWND) ;
BOOL PopFontChooseFont (HWND) ;
void PopFontSetFont (HWND) ;
void PopFontDeinitialize (void) ;
// Functions in POPPRNT.C
BOOL PopPrntPrintFile (HINSTANCE, HWND, HWND, PTSTR) ;
// Global variables
static HWND hDlgModeless ;
static TCHAR szAppName[] = TEXT ("PopPad") ;
404](https://image.slidesharecdn.com/programmingwindows-140823083916-phpapp02/85/Programming-windows-404-320.jpg)
![int WINAPI WinMain (HINSTANCE hInstance, HINSTANCE hPrevInstance,
PSTR szCmdLine, int iCmdShow)
{
MSG msg ;
HWND hwnd ;
HACCEL hAccel ;
WNDCLASS wndclass ;
wndclass.style = CS_HREDRAW | CS_VREDRAW ;
wndclass.lpfnWndProc = WndProc ;
wndclass.cbClsExtra = 0 ;
wndclass.cbWndExtra = 0 ;
wndclass.hInstance = hInstance ;
wndclass.hIcon = LoadIcon (hInstance, szAppName) ;
wndclass.hCursor = LoadCursor (NULL, IDC_ARROW) ;
wndclass.hbrBackground = (HBRUSH) GetStockObject (WHITE_BRUSH) ;
wndclass.lpszMenuName = szAppName ;
wndclass.lpszClassName = szAppName ;
if (!RegisterClass (&wndclass))
{
MessageBox (NULL, TEXT ("This program requires Windows NT!"),
szAppName, MB_ICONERROR) ;
return 0 ;
}
hwnd = CreateWindow (szAppName, NULL,
WS_OVERLAPPEDWINDOW,
CW_USEDEFAULT, CW_USEDEFAULT,
CW_USEDEFAULT, CW_USEDEFAULT,
NULL, NULL, hInstance, szCmdLine) ;
ShowWindow (hwnd, iCmdShow) ;
UpdateWindow (hwnd) ;
hAccel = LoadAccelerators (hInstance, szAppName) ;
while (GetMessage (&msg, NULL, 0, 0))
{
if (hDlgModeless == NULL || !IsDialogMessage (hDlgModeless, &msg))
{
if (!TranslateAccelerator (hwnd, hAccel, &msg))
{
TranslateMessage (&msg) ;
DispatchMessage (&msg) ;
}
}
}
return msg.wParam ;
}
void DoCaption (HWND hwnd, TCHAR * szTitleName)
{
TCHAR szCaption[64 + MAX_PATH] ;
wsprintf (szCaption, TEXT ("%s - %s"), szAppName,
szTitleName[0] ? szTitleName : UNTITLED) ;
SetWindowText (hwnd, szCaption) ;
}
void OkMessage (HWND hwnd, TCHAR * szMessage, TCHAR * szTitleName)
{
TCHAR szBuffer[64 + MAX_PATH] ;
405](https://image.slidesharecdn.com/programmingwindows-140823083916-phpapp02/85/Programming-windows-405-320.jpg)
![wsprintf (szBuffer, szMessage, szTitleName[0] ? szTitleName : UNTITLED) ;
MessageBox (hwnd, szBuffer, szAppName, MB_OK | MB_ICONEXCLAMATION) ;
}
short AskAboutSave (HWND hwnd, TCHAR * szTitleName)
{
TCHAR szBuffer[64 + MAX_PATH] ;
int iReturn ;
wsprintf (szBuffer, TEXT ("Save current changes in %s?"),
szTitleName[0] ? szTitleName : UNTITLED) ;
iReturn = MessageBox (hwnd, szBuffer, szAppName,
MB_YESNOCANCEL | MB_ICONQUESTION) ;
if (iReturn == IDYES)
if (!SendMessage (hwnd, WM_COMMAND, IDM_FILE_SAVE, 0))
iReturn = IDCANCEL ;
return iReturn ;
}
LRESULT CALLBACK WndProc (HWND hwnd, UINT message, WPARAM wParam, LPARAM lParam)
{
static BOOL bNeedSave = FALSE ;
static HINSTANCE hInst ;
static HWND hwndEdit ;
static int iOffset ;
static TCHAR szFileName[MAX_PATH], szTitleName[MAX_PATH] ;
static UINT messageFindReplace ;
int iSelBeg, iSelEnd, iEnable ;
LPFINDREPLACE pfr ;
switch (message)
{
case WM_CREATE:
hInst = ((LPCREATESTRUCT) lParam) -> hInstance ;
// Create the edit control child window
hwndEdit = CreateWindow (TEXT ("edit"), NULL,
WS_CHILD | WS_VISIBLE | WS_HSCROLL | WS_VSCROLL |
WS_BORDER | ES_LEFT | ES_MULTILINE |
ES_NOHIDESEL | ES_AUTOHSCROLL | ES_AUTOVSCROLL,
0, 0, 0, 0,
hwnd, (HMENU) EDITID, hInst, NULL) ;
SendMessage (hwndEdit, EM_LIMITTEXT, 32000, 0L) ;
// Initialize common dialog box stuff
PopFileInitialize (hwnd) ;
PopFontInitialize (hwndEdit) ;
messageFindReplace = RegisterWindowMessage (FINDMSGSTRING) ;
DoCaption (hwnd, szTitleName) ;
return 0 ;
case WM_SETFOCUS:
SetFocus (hwndEdit) ;
return 0 ;
406](https://image.slidesharecdn.com/programmingwindows-140823083916-phpapp02/85/Programming-windows-406-320.jpg)

![}
break ;
}
switch (LOWORD (wParam))
{
// Messages from File menu
case IDM_FILE_NEW:
if (bNeedSave && IDCANCEL == AskAboutSave (hwnd, szTitleName))
return 0 ;
SetWindowText (hwndEdit, TEXT ("0")) ;
szFileName[0] = `0' ;
szTitleName[0] = `0' ;
DoCaption (hwnd, szTitleName) ;
bNeedSave = FALSE ;
return 0 ;
case IDM_FILE_OPEN:
if (bNeedSave && IDCANCEL == AskAboutSave (hwnd, szTitleName))
return 0 ;
if (PopFileOpenDlg (hwnd, szFileName, szTitleName))
{
if (!PopFileRead (hwndEdit, szFileName))
{
OkMessage (hwnd, TEXT ("Could not read file %s!"),
szTitleName) ;
szFileName[0] = `0' ;
szTitleName[0] = `0' ;
}
}
DoCaption (hwnd, szTitleName) ;
bNeedSave = FALSE ;
return 0 ;
case IDM_FILE_SAVE:
if (szFileName[0])
{
if (PopFileWrite (hwndEdit, szFileName))
{
bNeedSave = FALSE ;
return 1 ;
}
else
{
OkMessage (hwnd, TEXT ("Could not write file %s"),
szTitleName) ;
return 0 ;
}
}
// fall through
case IDM_FILE_SAVE_AS:
if (PopFileSaveDlg (hwnd, szFileName, szTitleName))
{
DoCaption (hwnd, szTitleName) ;
if (PopFileWrite (hwndEdit, szFileName))
{
bNeedSave = FALSE ;
return 1 ;
}
else
408](https://image.slidesharecdn.com/programmingwindows-140823083916-phpapp02/85/Programming-windows-408-320.jpg)


![}
return DefWindowProc (hwnd, message, wParam, lParam) ;
}
BOOL CALLBACK AboutDlgProc (HWND hDlg, UINT message,
WPARAM wParam, LPARAM lParam)
{
switch (message)
{
case WM_INITDIALOG:
return TRUE ;
case WM_COMMAND:
switch (LOWORD (wParam))
{
case IDOK:
EndDialog (hDlg, 0) ;
return TRUE ;
}
break ;
}
return FALSE ;
}
POPFILE.C
/*------------------------------------------
POPFILE.C -- Popup Editor File Functions
------------------------------------------*/
#include <windows.h>
#include <commdlg.h>
static OPENFILENAME ofn ;
void PopFileInitialize (HWND hwnd)
{
static TCHAR szFilter[] = TEXT ("Text Files (*.TXT)0*.txt0")
TEXT ("ASCII Files (*.ASC)0*.asc0")
TEXT ("All Files (*.*)0*.*00") ;
ofn.lStructSize = sizeof (OPENFILENAME) ;
ofn.hwndOwner = hwnd ;
ofn.hInstance = NULL ;
ofn.lpstrFilter = szFilter ;
ofn.lpstrCustomFilter = NULL ;
ofn.nMaxCustFilter = 0 ;
ofn.nFilterIndex = 0 ;
ofn.lpstrFile = NULL ; // Set in Open and Close functions
ofn.nMaxFile = MAX_PATH ;
ofn.lpstrFileTitle = NULL ; // Set in Open and Close functions
ofn.nMaxFileTitle = MAX_PATH ;
ofn.lpstrInitialDir = NULL ;
ofn.lpstrTitle = NULL ;
ofn.Flags = 0 ; // Set in Open and Close functions
ofn.nFileOffset = 0 ;
ofn.nFileExtension = 0 ;
ofn.lpstrDefExt = TEXT ("txt") ;
411](https://image.slidesharecdn.com/programmingwindows-140823083916-phpapp02/85/Programming-windows-411-320.jpg)


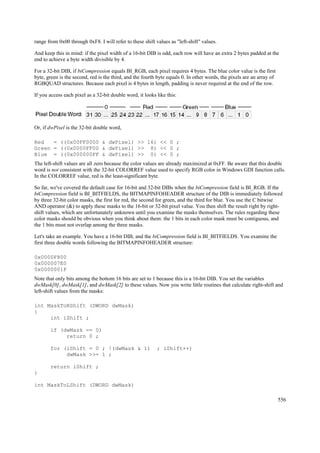


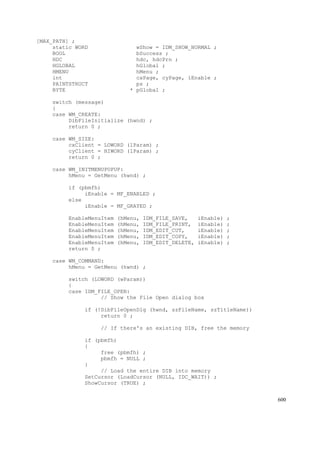


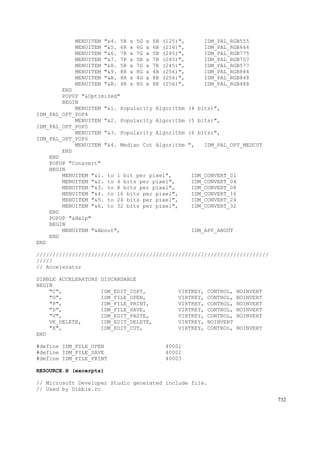


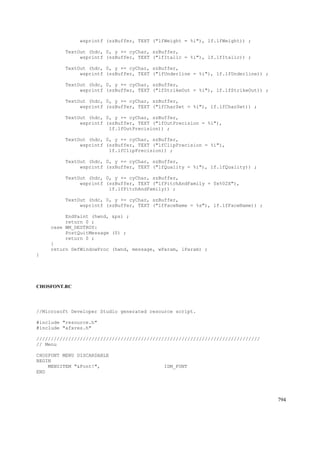


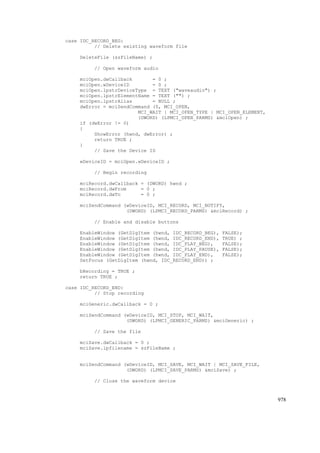


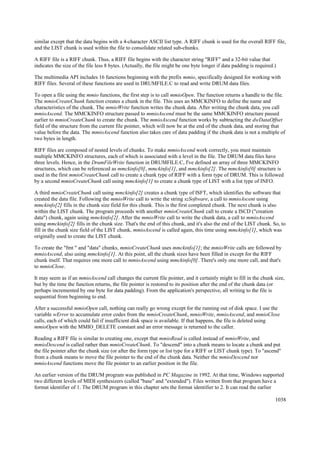


More Related Content
Viewers also liked (19)
Similar to Programming windows (7)


Recently uploaded (20)


Programming windows
- 1. Copyright© 1998 by Charles Petzold Converted from HTML to Word97 by anarchriz (http://surf.to/anarchriz), last update: 31 july 1999
- 2. Author's Note Visit my web site www.cpetzold.com for updated information regarding this book, including possible bug reports and new code listings. You can address mail regarding problems in this book to [email protected]. Although I'll also try to answer any easy questions you may have, I can't make any promises. I'm usually pretty busy, and my cat refuses to learn the Windows API. I'd like to thank everyone at Microsoft Press for another great job in putting together this book. I think this "10th Anniversary Edition" of Programming Windows is the best edition yet. Many other people at Microsoft (including some of the early developers of Microsoft Windows) also helped out when I was writing the earlier editions, and these fine people are listed in those editions. Thanks also to my family and friends, and in particular those more recent friends (you know who you are!) whose support has made this book possible. To you this book is dedicated. Charles Petzold October 5, 1998 2
- 3. Contents Author's Note ........................................................................................................................................2 Contents..................................................................................................................................................3 Section I: The Basics....................................................................................................................13 Chapter 1 -- Getting Started................................................................................................................13 The Windows Environment..................................................................................................................................13 A History of Windows......................................................................................................................................13 Aspects of Windows.........................................................................................................................................14 Dynamic Linking..............................................................................................................................................16 Windows Programming Options...........................................................................................................................17 APIs and Memory Models................................................................................................................................17 Language Options.............................................................................................................................................18 The Programming Environment........................................................................................................................18 API Documentation...........................................................................................................................................19 Your First Windows Program...............................................................................................................................19 A Character-Mode Model.................................................................................................................................19 The Windows Equivalent..................................................................................................................................20 The Header Files...............................................................................................................................................21 Program Entry Point..........................................................................................................................................21 The MessageBox Function................................................................................................................................22 Compile, Link, and Run....................................................................................................................................23 Chapter 2 -- An Introduction to Unicode...........................................................................................24 A Brief History of Character Sets.........................................................................................................................24 American Standards..........................................................................................................................................24 The World Beyond............................................................................................................................................25 Extending ASCII...............................................................................................................................................25 Double-Byte Character Sets..............................................................................................................................27 Unicode to the Rescue.......................................................................................................................................27 Wide Characters and C.........................................................................................................................................28 The char Data Type...........................................................................................................................................28 Wider Characters...............................................................................................................................................29 Wide-Character Library Functions...................................................................................................................30 Maintaining a Single Source.............................................................................................................................31 Wide Characters and Windows.............................................................................................................................32 Windows Header File Types.............................................................................................................................32 The Windows Function Calls............................................................................................................................33 Windows’ String Functions..............................................................................................................................34 Using printf in Windows...................................................................................................................................34 A Formatting Message Box..............................................................................................................................36 Internationalization and This Book...................................................................................................................37 Chapter 3 -- Windows and Messages..................................................................................................38 A Window of One’s Own.....................................................................................................................................38 An Architectural Overview...............................................................................................................................38 The HELLOWIN Program................................................................................................................................39 Thinking Globally.............................................................................................................................................42 The Windows Function Calls............................................................................................................................42 New Data Types................................................................................................................................................44 Getting a Handle on Handles............................................................................................................................44 Hungarian Notation...........................................................................................................................................45 Registering the Window Class..........................................................................................................................46 Creating the Window........................................................................................................................................50 Displaying the Window....................................................................................................................................51 3
- 4. The Message Loop............................................................................................................................................52 The Window Procedure....................................................................................................................................53 Processing the Messages...................................................................................................................................54 Playing a Sound File.........................................................................................................................................54 The WM_PAINT Message...............................................................................................................................55 The WM_DESTROY Message.........................................................................................................................56 The Windows Programming Hurdles...................................................................................................................56 Don’t Call Me, I’ll Call You.............................................................................................................................56 Queued and Nonqueued Messages...................................................................................................................57 Get In and Out Fast...........................................................................................................................................59 Chapter 4 -- An Exercise in Text Output...........................................................................................60 Painting and Repainting........................................................................................................................................60 The WM_PAINT Message...............................................................................................................................61 Valid and Invalid Rectangles............................................................................................................................61 An Introduction to GDI.........................................................................................................................................62 The Device Context..........................................................................................................................................62 Getting a Device Context Handle: Method One...............................................................................................63 The Paint Information Structure.......................................................................................................................63 Getting a Device Context Handle: Method Two...............................................................................................65 TextOut: The Details.........................................................................................................................................66 The System Font...............................................................................................................................................67 The Size of a Character.....................................................................................................................................68 Text Metrics: The Details.................................................................................................................................68 Formatting Text.................................................................................................................................................70 Putting It All Together......................................................................................................................................70 The SYSMETS1.C Window Procedure............................................................................................................76 Not Enough Room............................................................................................................................................77 The Size of the Client Area...............................................................................................................................77 Scroll Bars.............................................................................................................................................................78 Scroll Bar Range and Position..........................................................................................................................79 Scroll Bar Messages..........................................................................................................................................81 Scrolling SYSMETS.........................................................................................................................................83 Structuring Your Program for Painting.............................................................................................................86 Building a Better Scroll.........................................................................................................................................87 The Scroll Bar Information Functions..............................................................................................................87 How Low Can You Scroll?...............................................................................................................................88 The New SYSMETS.........................................................................................................................................89 But I Don’t Like to Use the Mouse...................................................................................................................94 Chapter 5 -- Basic Drawing.................................................................................................................95 The Structure of GDI............................................................................................................................................95 The GDI Philosophy.........................................................................................................................................95 The GDI Function Calls....................................................................................................................................96 The GDI Primitives...........................................................................................................................................97 Other Stuff.........................................................................................................................................................97 The Device Context..............................................................................................................................................98 Getting a Device Context Handle.....................................................................................................................98 Getting Device Context Information...............................................................................................................100 The DEVCAPS1 Program..............................................................................................................................100 The Size of the Device....................................................................................................................................103 Finding Out About Color................................................................................................................................107 The Device Context Attributes.......................................................................................................................109 Saving Device Contexts..................................................................................................................................110 Drawing Dots and Lines.....................................................................................................................................111 Setting Pixels...................................................................................................................................................111 Straight Lines..................................................................................................................................................112 4
- 5. The Bounding Box Functions.........................................................................................................................116 Bezier Splines.................................................................................................................................................122 Using Stock Pens............................................................................................................................................127 Creating, Selecting, and Deleting Pens...........................................................................................................128 Filling in the Gaps...........................................................................................................................................130 Drawing Modes...............................................................................................................................................130 Drawing Filled Areas..........................................................................................................................................132 The Polygon Function and the Polygon-Filling Mode....................................................................................133 Brushing the Interior.......................................................................................................................................137 The GDI Mapping Mode.....................................................................................................................................139 Device Coordinates and Logical Coordinates.................................................................................................140 The Device Coordinate Systems.....................................................................................................................140 The Viewport and the Window.......................................................................................................................141 Working with MM_TEXT..............................................................................................................................142 The Metric Mapping Modes...........................................................................................................................145 The “Roll Your Own” Mapping Modes..........................................................................................................147 The WHATSIZE Program..............................................................................................................................152 Rectangles, Regions, and Clipping.....................................................................................................................155 Working with Rectangles................................................................................................................................155 Random Rectangles.........................................................................................................................................156 Creating and Painting Regions........................................................................................................................160 Clipping with Rectangles and Regions...........................................................................................................161 The CLOVER Program...................................................................................................................................161 Chapter 6 -- The Keyboard...............................................................................................................166 Keyboard Basics.................................................................................................................................................166 Ignoring the Keyboard....................................................................................................................................166 Who’s Got the Focus?.....................................................................................................................................167 Queues and Synchronization...........................................................................................................................167 Keystrokes and Characters..............................................................................................................................168 Keystroke Messages............................................................................................................................................168 System and Nonsystem Keystrokes................................................................................................................168 Virtual Key Codes...........................................................................................................................................169 The lParam Information..................................................................................................................................172 Shift States......................................................................................................................................................173 Using Keystroke Messages.............................................................................................................................174 Enhancing SYSMETS for the Keyboard........................................................................................................175 Character Messages.............................................................................................................................................180 The Four Character Messages.........................................................................................................................181 Message Ordering...........................................................................................................................................181 Control Character Processing..........................................................................................................................183 Dead-Character Messages...............................................................................................................................183 Keyboard Messages and Character Sets.............................................................................................................184 The KEYVIEW1 Program..............................................................................................................................184 The Foreign-Language Keyboard Problem.....................................................................................................188 Character Sets and Fonts.................................................................................................................................190 What About Unicode?.....................................................................................................................................200 TrueType and Big Fonts.................................................................................................................................201 The Caret (Not the Cursor).................................................................................................................................206 The Caret Functions........................................................................................................................................206 The TYPER Program......................................................................................................................................207 Chapter 7 -- The Mouse.....................................................................................................................213 Mouse Basics......................................................................................................................................................213 Some Quick Definitions..................................................................................................................................214 The Plural of Mouse Is…................................................................................................................................214 Client-Area Mouse Messages.............................................................................................................................214 5
- 6. Simple Mouse Processing: An Example.........................................................................................................216 Processing Shift Keys.....................................................................................................................................219 Mouse Double-Clicks.....................................................................................................................................220 Nonclient-Area Mouse Messages.......................................................................................................................221 The Hit-Test Message.....................................................................................................................................222 Messages Beget Messages..............................................................................................................................223 Hit-Testing in Your Programs.............................................................................................................................223 A Hypothetical Example.................................................................................................................................223 A Sample Program..........................................................................................................................................224 Emulating the Mouse with the Keyboard.......................................................................................................227 Add a Keyboard Interface to CHECKER.......................................................................................................228 Using Child Windows for Hit-Testing............................................................................................................231 Child Windows in CHECKER........................................................................................................................232 Child Windows and the Keyboard..................................................................................................................236 Capturing the Mouse...........................................................................................................................................240 Blocking Out a Rectangle...............................................................................................................................240 The Capture Solution......................................................................................................................................242 The BLOKOUT2 Program..............................................................................................................................243 The Mouse Wheel...............................................................................................................................................246 Still to Come...................................................................................................................................................252 Chapter 8 -- The Timer......................................................................................................................253 Timer Basics.......................................................................................................................................................253 The System and the Timer..............................................................................................................................253 Timer Messages Are Not Asynchronous........................................................................................................254 Using the Timer: Three Methods........................................................................................................................254 Method One.....................................................................................................................................................254 Method Two....................................................................................................................................................257 Method Three..................................................................................................................................................259 Using the Timer for a Clock...............................................................................................................................260 Building a Digital Clock.................................................................................................................................260 Getting the Current Time................................................................................................................................264 Displaying Digits and Colons.........................................................................................................................264 Going International.........................................................................................................................................265 Building an Analog Clock...............................................................................................................................265 Using the Timer for a Status Report...................................................................................................................270 Chapter 9 -- Child Window Controls................................................................................................273 The Button Class.................................................................................................................................................274 Creating the Child Windows...........................................................................................................................277 The Child Talks to Its Parent..........................................................................................................................278 The Parent Talks to Its Child..........................................................................................................................279 Push Buttons...................................................................................................................................................280 Check Boxes...................................................................................................................................................281 Radio Buttons..................................................................................................................................................281 Group Boxes...................................................................................................................................................282 Changing the Button Text...............................................................................................................................282 Visible and Enabled Buttons...........................................................................................................................282 Buttons and Input Focus.................................................................................................................................283 Controls and Colors............................................................................................................................................283 System Colors.................................................................................................................................................284 The Button Colors...........................................................................................................................................285 The WM_CTLCOLORBTN Message............................................................................................................286 Owner-Draw Buttons......................................................................................................................................286 The Static Class...................................................................................................................................................290 The Scroll Bar Class...........................................................................................................................................291 The COLORS1 Program.................................................................................................................................292 6
- 7. The Automatic Keyboard Interface.................................................................................................................295 Window Subclassing.......................................................................................................................................295 Coloring the Background................................................................................................................................296 Coloring the Scroll Bars and Static Text.........................................................................................................297 The Edit Class.....................................................................................................................................................297 The Edit Class Styles......................................................................................................................................299 Edit Control Notification................................................................................................................................300 Using the Edit Controls...................................................................................................................................300 Messages to an Edit Control...........................................................................................................................301 The Listbox Class................................................................................................................................................302 List Box Styles................................................................................................................................................302 Putting Strings in the List Box........................................................................................................................303 Selecting and Extracting Entries.....................................................................................................................303 Receiving Messages from List Boxes.............................................................................................................304 A Simple List Box Application.......................................................................................................................305 Listing Files.....................................................................................................................................................308 Using file attribute codes................................................................................................................................308 Ordering file lists............................................................................................................................................309 A head for Windows.......................................................................................................................................309 HEAD.C..........................................................................................................................................................309 Chapter 10 -- Menus and Other Resources......................................................................................314 Icons, Cursors, Strings, and Custom Resources..................................................................................................314 Adding an Icon to a Program..........................................................................................................................314 Getting a Handle on Icons...............................................................................................................................318 Using Icons in Your Program.........................................................................................................................320 Using Customized Cursors..............................................................................................................................321 Character String Resources.............................................................................................................................322 Custom Resources...........................................................................................................................................323 Menus..................................................................................................................................................................328 Menu Concepts...............................................................................................................................................329 Menu Structure................................................................................................................................................329 Defining the Menu..........................................................................................................................................329 Referencing the Menu in Your Program.........................................................................................................330 Menus and Messages......................................................................................................................................330 A Sample Program..........................................................................................................................................332 Menu Etiquette................................................................................................................................................337 Defining a Menu the Hard Way......................................................................................................................337 Floating Popup Menus....................................................................................................................................339 Using the System Menu..................................................................................................................................343 Changing the Menu.........................................................................................................................................345 Other Menu Commands..................................................................................................................................346 An Unorthodox Approach to Menus...............................................................................................................347 Keyboard Accelerators........................................................................................................................................350 Why You Should Use Keyboard Accelerators...............................................................................................351 Some Rules on Assigning Accelerators..........................................................................................................351 The Accelerator Table.....................................................................................................................................351 Loading the Accelerator Table........................................................................................................................352 Translating the Keystrokes..............................................................................................................................352 Receiving the Accelerator Messages..............................................................................................................353 POPPAD with a Menu and Accelerators........................................................................................................353 POPPAD2.ICO...............................................................................................................................................358 Enabling Menu Items......................................................................................................................................359 Processing the Menu Options.........................................................................................................................359 Chapter 11 -- Dialog Boxes................................................................................................................362 Modal Dialog Boxes...........................................................................................................................................362 7
- 8. Creating an "About" Dialog Box....................................................................................................................362 The Dialog Box and Its Template...................................................................................................................366 The Dialog Box Procedure..............................................................................................................................368 Invoking the Dialog Box.................................................................................................................................369 Variations on a Theme....................................................................................................................................369 A More Complex Dialog Box.........................................................................................................................372 Working with Dialog Box Controls................................................................................................................378 The OK and Cancel Buttons...........................................................................................................................380 Avoiding Global Variables.............................................................................................................................381 Tab Stops and Groups.....................................................................................................................................382 Painting on the Dialog Box.............................................................................................................................383 Using Other Functions with Dialog Boxes.....................................................................................................384 Defining Your Own Controls..........................................................................................................................384 Modeless Dialog Boxes......................................................................................................................................390 Differences Between Modal and Modeless Dialog Boxes..............................................................................391 The New COLORS Program..........................................................................................................................392 HEXCALC: Window or Dialog Box?............................................................................................................397 The Common Dialog Boxes................................................................................................................................403 POPPAD Revisited.........................................................................................................................................404 Unicode File I/O..............................................................................................................................................422 Changing the Font...........................................................................................................................................422 Search and Replace.........................................................................................................................................422 The One-Function-Call Windows Program....................................................................................................423 Chapter 12 -- The Clipboard.............................................................................................................425 Simple Use of the Clipboard...............................................................................................................................425 The Standard Clipboard Data Formats............................................................................................................425 Memory Allocation.........................................................................................................................................426 Transferring Text to the Clipboard.................................................................................................................428 Getting Text from the Clipboard.....................................................................................................................429 Opening and Closing the Clipboard................................................................................................................429 The Clipboard and Unicode............................................................................................................................430 Beyond Simple Clipboard Use............................................................................................................................434 Using Multiple Data Items..............................................................................................................................435 Delayed Rendering..........................................................................................................................................436 Private Data Formats.......................................................................................................................................437 Becoming a Clipboard Viewer............................................................................................................................438 The Clipboard Viewer Chain..........................................................................................................................438 Clipboard Viewer Functions and Messages....................................................................................................439 A Simple Clipboard Viewer............................................................................................................................441 Section II: More Graphics.........................................................................................................444 Chapter 13 -- Using the Printer.........................................................................................................444 Printing Fundamentals........................................................................................................................................444 Printing and Spooling......................................................................................................................................444 The Printer Device Context.............................................................................................................................448 The Revised DEVCAPS Program...................................................................................................................450 The PrinterProperties Call...............................................................................................................................458 Checking for BitBlt Capability.......................................................................................................................458 The Simplest Printing Program.......................................................................................................................459 Printing Graphics and Text.................................................................................................................................460 Bare-Bones Printing........................................................................................................................................462 Implementing an Abort Procedure..................................................................................................................465 Adding a Printing Dialog Box........................................................................................................................467 Adding Printing to POPPAD..........................................................................................................................470 Chapter 14 -- Bitmaps and Bitblts....................................................................................................477 8
- 9. Bitmap Basics.....................................................................................................................................................477 Bitmap Dimensions.............................................................................................................................................478 Color and Bitmaps..........................................................................................................................................479 Real-World Devices .......................................................................................................................................479 Bitmap Support in GDI...................................................................................................................................481 The Bit-Block Transfer.......................................................................................................................................482 A Simple BitBlt...............................................................................................................................................482 Stretching the Bitmap......................................................................................................................................486 The StretchBlt Mode.......................................................................................................................................489 The Raster Operations.....................................................................................................................................489 The Pattern Blt................................................................................................................................................491 The GDI Bitmap Object......................................................................................................................................494 Creating a DDB...............................................................................................................................................494 The Bitmap Bits..............................................................................................................................................496 The Memory Device Context..........................................................................................................................497 Loading Bitmap Resources.............................................................................................................................497 The Monochrome Bitmap Format...................................................................................................................501 Brushes from Bitmaps.....................................................................................................................................504 Drawing on Bitmaps.......................................................................................................................................506 The Shadow Bitmap........................................................................................................................................510 Using Bitmaps in Menus.................................................................................................................................513 Nonrectangular Bitmap Images......................................................................................................................526 Some Simple Animation.................................................................................................................................531 Bitmaps Outside the Window.........................................................................................................................535 Chapter 15 -- The Device-Independent Bitmap...............................................................................545 The DIB File Format...........................................................................................................................................545 The OS/2-Style DIB........................................................................................................................................546 Bottoms Up!....................................................................................................................................................548 The DIB Pixel Bits..........................................................................................................................................548 The Expanded Windows DIB.........................................................................................................................549 Reality Check..................................................................................................................................................551 DIB Compression ...........................................................................................................................................553 Color Masking.................................................................................................................................................555 The Version 4 Header.....................................................................................................................................558 The Version 5 Header.....................................................................................................................................561 Displaying DIB Information...........................................................................................................................562 Displaying and Printing......................................................................................................................................570 Digging into the DIB.......................................................................................................................................570 Pixel to Pixel...................................................................................................................................................572 The Topsy-Turvy World of DIBs...................................................................................................................581 Sequential Display..........................................................................................................................................589 Stretching to Fit...............................................................................................................................................596 Color Conversion, Palettes, and Performance................................................................................................605 The Union of DIBs and DDBs............................................................................................................................606 Creating a DDB from a DIB...........................................................................................................................607 From DDB to DIB...........................................................................................................................................613 The DIB Section..............................................................................................................................................614 More DIB Section Differences.......................................................................................................................621 The File-Mapping Option...............................................................................................................................622 In Summary.....................................................................................................................................................623 Chapter 16 -- The Palette Manager..................................................................................................624 Using Palettes......................................................................................................................................................624 Video Hardware..............................................................................................................................................624 Displaying Gray Shades..................................................................................................................................625 The Palette Messages......................................................................................................................................632 9
- 10. The Palette Index Approach............................................................................................................................632 Querying the Palette Support..........................................................................................................................634 The System Palette..........................................................................................................................................635 Other Palette Functions...................................................................................................................................635 The Raster-Op Problem..................................................................................................................................636 Looking at the System Palette.........................................................................................................................636 Palette Animation................................................................................................................................................645 The Bouncing Ball..........................................................................................................................................645 One-Entry Palette Animation..........................................................................................................................650 Engineering Applications................................................................................................................................655 Palettes and Real-World Images.........................................................................................................................659 Palettes and Packed DIBs...............................................................................................................................659 The All-Purpose Palette..................................................................................................................................669 The Halftone Palette........................................................................................................................................675 Indexing Palette Colors...................................................................................................................................680 Palettes and Bitmap Objects...........................................................................................................................685 Palettes and DIB Sections...............................................................................................................................690 A Library for DIBs..............................................................................................................................................696 The DIBSTRUCT Structure............................................................................................................................697 The Information Functions..............................................................................................................................698 Reading and Writing Pixels............................................................................................................................704 Creating and Converting.................................................................................................................................708 The DIBHELP Header File and Macros.........................................................................................................710 The DIBBLE Program....................................................................................................................................712 Simple Palettes; Optimized Palettes................................................................................................................735 Converting Formats.........................................................................................................................................748 Chapter 17 -- Text and Fonts............................................................................................................753 Simple Text Output.............................................................................................................................................753 The Text Drawing Functions..........................................................................................................................753 Device Context Attributes for Text.................................................................................................................755 Using Stock Fonts...........................................................................................................................................756 Background on Fonts..........................................................................................................................................757 The Types of Fonts.........................................................................................................................................757 TrueType Fonts...............................................................................................................................................758 Attributes or Styles?........................................................................................................................................758 The Point Size.................................................................................................................................................759 Leading and Spacing.......................................................................................................................................759 The Logical Inch Problem...............................................................................................................................759 The Logical Font.................................................................................................................................................760 Logical Font Creation and Selection...............................................................................................................760 The PICKFONT Program...............................................................................................................................761 The Logical Font Structure.............................................................................................................................774 The Font-Mapping Algorithm.........................................................................................................................777 Finding Out About the Font............................................................................................................................778 Character Sets and Unicode............................................................................................................................780 The EZFONT System.....................................................................................................................................781 Font Rotation...................................................................................................................................................788 Font Enumeration................................................................................................................................................790 The Enumeration Functions............................................................................................................................790 The ChooseFont Dialog..................................................................................................................................791 Paragraph Formatting..........................................................................................................................................799 Simple Text Formatting..................................................................................................................................799 Working with Paragraphs................................................................................................................................800 Previewing Printer Output..............................................................................................................................808 The Fun and Fancy Stuff.....................................................................................................................................817 The GDI Path..................................................................................................................................................817 10
- 11. Extended Pens.................................................................................................................................................818 Four Sample Programs....................................................................................................................................821 Chapter 18 -- Metafiles......................................................................................................................830 The Old Metafile Format....................................................................................................................................830 Simple Use of Memory Metafiles...................................................................................................................830 Storing Metafiles on Disk...............................................................................................................................833 Old Metafiles and the Clipboard.....................................................................................................................834 Enhanced Metafiles.............................................................................................................................................837 The Basic Procedure.......................................................................................................................................837 Looking Inside................................................................................................................................................841 Metafiles and GDI Objects.............................................................................................................................846 Metafiles and Bitmaps....................................................................................................................................850 Enumerating the Metafile................................................................................................................................852 Embedding Images..........................................................................................................................................858 An Enhanced Metafile Viewer and Printer.....................................................................................................861 Displaying Accurate Metafile Images.............................................................................................................870 Scaling and Aspect Ratios...............................................................................................................................878 Mapping Modes in Metafiles..........................................................................................................................879 Mapping and Playing......................................................................................................................................882 Section III: Advanced Topics.....................................................................................................886 Chapter 19 -- The Multiple-Document Interface.............................................................................886 MDI Concepts.....................................................................................................................................................886 The Elements of MDI.....................................................................................................................................886 MDI Support...................................................................................................................................................887 A Sample MDI Implementation..........................................................................................................................888 Three Menus...................................................................................................................................................898 Program Initialization.....................................................................................................................................899 Creating the Children......................................................................................................................................900 More Frame Window Message Processing.....................................................................................................900 The Child Document Windows.......................................................................................................................901 Cleaning Up....................................................................................................................................................902 Chapter 20 -- Multitasking and Multithreading..............................................................................903 Modes of Multitasking........................................................................................................................................903 Multitasking Under DOS?..............................................................................................................................903 Nonpreemptive Multitasking..........................................................................................................................903 PM and the Serialized Message Queue...........................................................................................................904 The Multithreading Solution...........................................................................................................................905 Multithreaded Architecture.............................................................................................................................905 Thread Hassles................................................................................................................................................906 The Windows Advantage................................................................................................................................906 New! Improved! Now with Threads!..............................................................................................................907 Windows Multithreading....................................................................................................................................907 Random Rectangles Revisited........................................................................................................................908 The Programming Contest Problem................................................................................................................910 The Multithreaded Solution............................................................................................................................916 Any Problems?................................................................................................................................................923 The Benefits of Sleep......................................................................................................................................923 Thread Synchronization......................................................................................................................................924 The Critical Section........................................................................................................................................924 Event Signaling...................................................................................................................................................925 The BIGJOB1 Program...................................................................................................................................925 The Event Object............................................................................................................................................929 Thread Local Storage..........................................................................................................................................933 Chapter 21 -- Dynamic-Link Libraries.............................................................................................935 11
- 12. Library Basics.....................................................................................................................................................935 Miscellaneous DLL Topics.................................................................................................................................948 Chapter 22 -- Sound and Music........................................................................................................953 Windows and Multimedia...................................................................................................................................953 Multimedia Hardware.....................................................................................................................................953 An API Overview............................................................................................................................................953 Exploring MCI with TESTMCI......................................................................................................................954 MCITEXT and CD Audio...............................................................................................................................958 Waveform Audio.................................................................................................................................................962 Sound and Waveforms....................................................................................................................................962 Pulse Code Modulation...................................................................................................................................963 The Sampling Rate..........................................................................................................................................963 The Sample Size..............................................................................................................................................964 Generating Sine Waves in Software...............................................................................................................964 A Digital Sound Recorder...............................................................................................................................972 The MCI Alternative.......................................................................................................................................976 The MCI Command String Approach.............................................................................................................982 The Waveform Audio File Format..................................................................................................................986 Experimenting with Additive Synthesis.........................................................................................................987 Waking Up to Waveform Audio.....................................................................................................................994 MIDI and Music................................................................................................................................................1000 The Workings of MIDI.................................................................................................................................1001 The Program Change....................................................................................................................................1002 The MIDI Channel........................................................................................................................................1002 MIDI Messages.............................................................................................................................................1003 An Introduction to MIDI Sequencing...........................................................................................................1005 Playing a MIDI Synthesizer from the PC Keyboard.....................................................................................1010 A MIDI Drum Machine................................................................................................................................1023 The Multimedia time Functions....................................................................................................................1035 RIFF File I/O.................................................................................................................................................1037 Chapter 23 -- A Taste of the Internet..............................................................................................1040 Windows Sockets..............................................................................................................................................1040 Sockets and TCP/IP......................................................................................................................................1040 Network Time Services.................................................................................................................................1040 The NETTIME Program...............................................................................................................................1041 WinInet and FTP...............................................................................................................................................1046 Overview of the FTP API.............................................................................................................................1047 The Update Demo.........................................................................................................................................1048 About.................................................................................................................................................1052 About the Author..............................................................................................................................................1052 About This Electronic Book.............................................................................................................................1052 “Expanding” Graphics..................................................................................................................................1052 12
- 13. Section I: The Basics Chapter 1 -- Getting Started This book shows you how to write programs that run under Microsoft Windows 98, Microsoft Windows NT 4.0, and Windows NT 5.0. These programs are written in the C programming language and use the native Windows application programming interfaces (APIs). As I’ll discuss later in this chapter, this is not the only way to write programs that run under Windows. However, it is important to understand the Windows APIs regardless of what you eventually use to write your code. As you probably know, Windows 98 is the latest incarnation of the graphical operating system that has become the de facto standard for IBM-compatible personal computers built around 32-bit Intel microprocessors such as the 486 and Pentium. Windows NT is the industrial-strength version of Windows that runs on PC compatibles as well as some RISC (reduced instruction set computing) workstations. There are three prerequisites for using this book. First, you should be familiar with Windows 98 from a user’s perspective. You cannot hope to write applications for Windows without understanding its user interface. For this reason, I suggest that you do your program development (as well as other work) on a Windows-based machine using Windows applications. Second, you should know C. If you don’t know C, Windows programming is probably not a good place to start. I recommend that you learn C in a character-mode environment such as that offered under the Windows 98 MS-DOS Command Prompt window. Windows programming sometimes involves aspects of C that don’t show up much in character-mode programming; in those cases, I’ll devote some discussion to them. But for the most part, you should have a good working familiarity with the language, particularly with C structures and pointers. Some knowledge of the standard C run-time library is helpful but not required. Third, you should have installed on your machine a 32-bit C compiler and development environment suitable for doing Windows programming. In this book, I’ll be assuming that you’re using Microsoft Visual C++ 6.0, which can be purchased separately or as a part of the Visual Studio 6.0 package. That’s it. I’m not going to assume that you have any experience at all programming for a graphical user interface such as Windows. The Windows Environment Windows hardly needs an introduction. Yet it’s easy to forget the sea change that Windows brought to office and home desktop computing. Windows had a bumpy ride in its early years and was hardly destined to conquer the desktop market. A History of Windows Soon after the introduction of the IBM PC in the fall of 1981, it became evident that the predominant operating system for the PC (and compatibles) would be MS-DOS, which originally stood for Microsoft Disk Operating System. MS-DOS was a minimal operating system. For the user, MS-DOS provided a command-line interface to commands such as DIR and TYPE and loaded application programs into memory for execution. For the application programmer, MS-DOS offered little more than a set of function calls for doing file input/output (I/O). For other tasks—in particular, writing text and sometimes graphics to the video display—applications accessed the hardware of the PC directly. Due to memory and hardware constraints, sophisticated graphical environments were slow in coming to small computers. Apple Computer offered an alternative to character-mode environments when it released its ill-fated Lisa in January 1983, and then set a standard for graphical environments with the Macintosh in January 1984. Despite the Mac’s declining market share, it is still considered the standard against which other graphical environments are measured. All graphical environments, including the Macintosh and Windows, are indebted to the pioneering work 13
- 14. done at the Xerox Palo Alto Research Center (PARC) beginning in the mid-1970s. Windows was announced by Microsoft Corporation in November 1983 (post-Lisa but pre-Macintosh) and was released two years later in November 1985. Over the next two years, Microsoft Windows 1.0 was followed by several updates to support the international market and to provide drivers for additional video displays and printers. Windows 2.0 was released in November 1987. This version incorporated several changes to the user interface. The most significant of these changes involved the use of overlapping windows rather than the “tiled” windows found in Windows 1.0. Windows 2.0 also included enhancements to the keyboard and mouse interface, particularly for menus and dialog boxes. Up until this time, Windows required only an Intel 8086 or 8088 microprocessor running in “real mode” to access 1 megabyte (MB) of memory. Windows/386 (released shortly after Windows 2.0) used the “virtual 86” mode of the Intel 386 microprocessor to window and multitask many DOS programs that directly accessed hardware. For symmetry, Windows 2.1 was renamed Windows/286. Windows 3.0 was introduced on May 22, 1990. The earlier Windows/286 and Windows/386 versions were merged into one product with this release. The big change in Windows 3.0 was the support of the 16-bit protected-mode operation of Intel’s 286, 386, and 486 microprocessors. This gave Windows and Windows applications access to up to 16 megabytes of memory. The Windows “shell” programs for running programs and maintaining files were completely revamped. Windows 3.0 was the first version of Windows to gain a foothold in the home and the office. Any history of Windows must also include a mention of OS/2, an alternative to DOS and Windows that was originally developed by Microsoft in collaboration with IBM. OS/2 1.0 (character-mode only) ran on the Intel 286 (or later) microprocessors and was released in late 1987. The graphical Presentation Manager (PM) came about with OS/2 1.1 in October 1988. PM was originally supposed to be a protected-mode version of Windows, but the graphical API was changed to such a degree that it proved difficult for software manufacturers to support both platforms. By September 1990, conflicts between IBM and Microsoft reached a peak and required that the two companies go their separate ways. IBM took over OS/2 and Microsoft made it clear that Windows was the center of their strategy for operating systems. While OS/2 still has some fervent admirers, it has not nearly approached the popularity of Windows. Microsoft Windows version 3.1 was released in April 1992. Several significant features included the TrueType font technology (which brought scaleable outline fonts to Windows), multimedia (sound and music), Object Linking and Embedding (OLE), and standardized common dialog boxes. Windows 3.1 ran only in protected mode and required a 286 or 386 processor with at least 1 MB of memory. Windows NT, introduced in July 1993, was the first version of Windows to support the 32-bit mode of the Intel 386, 486, and Pentium microprocessors. Programs that run under Windows NT have access to a 32-bit flat address space and use a 32-bit instruction set. (I’ll have more to say about address spaces a little later in this chapter.) Windows NT was also designed to be portable to non-Intel processors, and it runs on several RISC-based workstations. Windows 95 was introduced in August 1995. Like Windows NT, Windows 95 also supported the 32-bit programming mode of the Intel 386 and later microprocessors. Although it lacked some of the features of Windows NT, such as high security and portability to RISC machines, Windows 95 had the advantage of requiring fewer hardware resources. Windows 98 was released in June 1998 and has a number of enhancements, including performance improvements, better hardware support, and a closer integration with the Internet and the World Wide Web. Aspects of Windows Both Windows 98 and Windows NT are 32-bit preemptive multitasking and multithreading graphical operating systems. Windows possesses a graphical user interface (GUI), sometimes also called a “visual interface” or “graphical windowing environment.” The concepts behind the GUI date from the mid-1970s with the work done at 14
- 15. the Xerox PARC for machines such as the Alto and the Star and for environments such as SmallTalk. This work was later brought into the mainstream and popularized by Apple Computer and Microsoft. Although somewhat controversial for a while, it is now quite obvious that the GUI is (in the words of Microsoft’s Charles Simonyi) the single most important “grand consensus” of the personal-computer industry. All GUIs make use of graphics on a bitmapped video display. Graphics provides better utilization of screen real estate, a visually rich environment for conveying information, and the possibility of a WYSIWYG (what you see is what you get) video display of graphics and formatted text prepared for a printed document. In earlier days, the video display was used solely to echo text that the user typed using the keyboard. In a graphical user interface, the video display itself becomes a source of user input. The video display shows various graphical objects in the form of icons and input devices such as buttons and scroll bars. Using the keyboard (or, more directly, a pointing device such as a mouse), the user can directly manipulate these objects on the screen. Graphics objects can be dragged, buttons can be pushed, and scroll bars can be scrolled. The interaction between the user and a program thus becomes more intimate. Rather than the one-way cycle of information from the keyboard to the program to the video display, the user directly interacts with the objects on the display. Users no longer expect to spend long periods of time learning how to use the computer or mastering a new program. Windows helps because all applications have the same fundamental look and feel. The program occupies a window —usually a rectangular area on the screen. Each window is identified by a caption bar. Most program functions are initiated through the program’s menus. A user can view the display of information too large to fit on a single screen by using scroll bars. Some menu items invoke dialog boxes, into which the user enters additional information. One dialog box in particular, that used to open a file, can be found in almost every large Windows program. This dialog box looks the same (or nearly the same) in all of these Windows programs, and it is almost always invoked from the same menu option. Once you know how to use one Windows program, you’re in a good position to easily learn another. The menus and dialog boxes allow a user to experiment with a new program and explore its features. Most Windows programs have both a keyboard interface and a mouse interface. Although most functions of Windows programs can be controlled through the keyboard, using the mouse is often easier for many chores. From the programmer’s perspective, the consistent user interface results from using the routines built into Windows for constructing menus and dialog boxes. All menus have the same keyboard and mouse interface because Windows —rather than the application program—handles this job. To facilitate the use of multiple programs, and the exchange of information among them, Windows supports multitasking. Several Windows programs can be displayed and running at the same time. Each program occupies a window on the screen. The user can move the windows around on the screen, change their sizes, switch between different programs, and transfer data from one program to another. Because these windows look something like papers on a desktop (in the days before the desk became dominated by the computer itself, of course), Windows is sometimes said to use a “desktop metaphor” for the display of multiple programs. Earlier versions of Windows used a system of multitasking called “nonpreemptive.” This meant that Windows did not use the system timer to slice processing time between the various programs running under the system. The programs themselves had to voluntarily give up control so that other programs could run. Under Windows NT and Windows 98, multitasking is preemptive and programs themselves can split into multiple threads of execution that seem to run concurrently. An operating system cannot implement multitasking without doing something about memory management. As new programs are started up and old ones terminate, memory can become fragmented. The system must be able to consolidate free memory space. This requires the system to move blocks of code and data in memory. Even Windows 1.0, running on an 8088 microprocessor, was able to perform this type of memory management. Under real-mode restrictions, this ability can only be regarded as an astonishing feat of software engineering. In Windows 1.0, the 640-kilobyte (KB) memory limit of the PC’s architecture was effectively stretched without 15
- 16. requiring any additional memory. But Microsoft didn’t stop there: Windows 2.0 gave the Windows applications access to expanded memory (EMS), and Windows 3.0 ran in protected mode to give Windows applications access to up to 16 MB of extended memory. Windows NT and Windows 98 blow away these old limits by being full-fledged 32-bit operating systems with flat memory space. Programs running in Windows can share routines that are located in other files called “dynamic-link libraries.” Windows includes a mechanism to link the program with the routines in the dynamic-link libraries at run time. Windows itself is basically a set of dynamic-link libraries. Windows is a graphical interface, and Windows programs can make full use of graphics and formatted text on both the video display and the printer. A graphical interface not only is more attractive in appearance but also can impart a high level of information to the user. Programs written for Windows do not directly access the hardware of graphics display devices such as the screen and printer. Instead, Windows includes a graphics programming language (called the Graphics Device Interface, or GDI) that allows the easy display of graphics and formatted text. Windows virtualizes display hardware. A program written for Windows will run with any video board or any printer for which a Windows device driver is available. The program does not need to determine what type of device is attached to the system. Putting a device-independent graphics interface on the IBM PC was not an easy job for the developers of Windows. The PC design was based on the principle of open architecture. Third-party hardware manufacturers were encouraged to develop peripherals for the PC and have done so in great number. Although several standards have emerged, conventional MS-DOS programs for the PC had to individually support many different hardware configurations. It was fairly common for an MS-DOS word-processing program to be sold with one or two disks of small files, each one supporting a particular printer. Windows programs do not require these drivers because the support is part of Windows. Dynamic Linking Central to the workings of Windows is a concept known as “dynamic linking.” Windows provides a wealth of function calls that an application can take advantage of, mostly to implement its user interface and display text and graphics on the video display. These functions are implemented in dynamic-link libraries, or DLLs. These are files with the extension .DLL or sometimes .EXE, and they are mostly located in the WINDOWSSYSTEM subdirectory under Windows 98 and the WINNTSYSTEM and WINNTSYSTEM32 subdirectories under Windows NT. In the early days, the great bulk of Windows was implemented in just three dynamic-link libraries. These represented the three main subsystems of Windows, which were referred to as Kernel, User, and GDI. While the number of subsystems has proliferated in recent versions of Windows, most function calls that a typical Windows program makes will still fall in one of these three modules. Kernel (which is currently implemented by the 16-bit KRNL386.EXE and the 32-bit KERNEL32.DLL) handles all the stuff that an operating system kernel traditionally handles—memory management, file I/O, and tasking. User (implemented in the 16-bit USER.EXE and the 32-bit USER32.DLL) refers to the user interface, and implements all the windowing logic. GDI (implemented in the 16-bit GDI.EXE and the 32-bit GDI32.DLL) is the Graphics Device Interface, which allows a program to display text and graphics on the screen and printer. Windows 98 supports several thousand function calls that applications can use. Each function has a descriptive name, such as CreateWindow. This function (as you might guess) creates a window for your program. All the Windows functions that an application may use are declared in header files. In your Windows program, you use the Windows function calls in generally the same way you use C library functions such as strlen. The primary difference is that the machine code for C library functions is linked into your program code, whereas the code for Windows functions is located outside of your program in the DLLs. When you run a Windows program, it interfaces to Windows through a process called “dynamic linking.” A Windows .EXE file contains references to the various dynamic-link libraries it uses and the functions therein. When a Windows program is loaded into memory, the calls in the program are resolved to point to the entries of the DLL functions, which are also loaded into memory if not already there. 16
- 17. When you link a Windows program to produce an executable file, you must link with special “import libraries” provided with your programming environment. These import libraries contain the dynamic-link library names and reference information for all the Windows function calls. The linker uses this information to construct the table in the .EXE file that Windows uses to resolve calls to Windows functions when loading the program. Windows Programming Options To illustrate the various techniques of Windows programming, this book has lots of sample programs. These programs are written in C and use the native Windows APIs. I think of this approach as “classical” Windows programming. It is how we wrote programs for Windows 1.0 in 1985, and it remains a valid way of programming for Windows today. APIs and Memory Models To a programmer, an operating system is defined by its API. An API encompasses all the function calls that an application program can make of an operating system, as well as definitions of associated data types and structures. In Windows, the API also implies a particular program architecture that we’ll explore in the chapters ahead. Generally, the Windows API has remained quite consistent since Windows 1.0. A Windows programmer with experience in Windows 98 would find the source code for a Windows 1.0 program very familiar. One way the API has changed has been in enhancements. Windows 1.0 supported fewer than 450 function calls; today there are thousands. The biggest change in the Windows API and its syntax came about during the switch from a 16-bit architecture to a 32-bit architecture. Versions 1.0 through 3.1 of Windows used the so-called segmented memory mode of the 16-bit Intel 8086, 8088, and 286 microprocessors, a mode that was also supported for compatibility purposes in the 32-bit Intel microprocessors beginning with the 386. The microprocessor register size in this mode was 16 bits, and hence the C int data type was also 16 bits wide. In the segmented memory model, memory addresses were formed from two components—a 16-bit segment pointer and a 16-bit offset pointer. From the programmer’s perspective, this was quite messy and involved differentiating between long, or far, pointers (which involved both a segment address and an offset address) and short, or near, pointers (which involved an offset address with an assumed segment address). Beginning in Windows NT and Windows 95, Windows supported a 32-bit flat memory model using the 32-bit modes of the Intel 386, 486, and Pentium processors. The C int data type was promoted to a 32-bit value. Programs written for 32-bit versions of Windows use simple 32-bit pointer values that address a flat linear address space. The API for the 16-bit versions of Windows (Windows 1.0 through Windows 3.1) is now known as Win16. The API for the 32-bit versions of Windows (Windows 95, Windows 98, and all versions of Windows NT) is now known as Win32. Many function calls remained the same in the transition from Win16 to Win32, but some needed to be enhanced. For example, graphics coordinate points changed from 16-bit values in Win16 to 32-bit values in Win32. Also, some Win16 function calls returned a two-dimensional coordinate point packed in a 32-bit integer. This was not possible in Win32, so new function calls were added that worked in a different way. All 32-bit versions of Windows support both the Win16 API to ensure compatibility with old applications and the Win32 API to run new applications. Interestingly enough, this works differently in Windows NT than in Windows 95 and Windows 98. In Windows NT, Win16 function calls go through a translation layer and are converted to Win32 function calls that are then processed by the operating system. In Windows 95 and Windows 98, the process is opposite that: Win32 function calls go through a translation layer and are converted to Win16 function calls to be processed by the operating system. At one time, there were two other Windows API sets (at least in name). Win32s (“s” for “subset”) was an API that allowed programmers to write 32-bit applications that ran under Windows 3.1. This API supported only 32-bit versions of functions already supported by Win16. Also, the Windows 95 API was once called Win32c (“c” for “compatibility”), but this term has been abandoned. At this time, Windows NT and Windows 98 are both considered to support the Win32 API. However, each operating system supports some features not supported by the other. Still, because the overlap is considerable, it’s 17
- 18. possible to write programs that run under both systems. Also, it’s widely assumed that the two products will be merged at some time in the future. Language Options Using C and the native APIs is not the only way to write programs for Windows 98. However, this approach offers you the best performance, the most power, and the greatest versatility in exploiting the features of Windows. Executables are relatively small and don’t require external libraries to run (except for the Windows DLLs themselves, of course). Most importantly, becoming familiar with the API provides you with a deeper understanding of Windows internals, regardless of how you eventually write applications for Windows. Although I think that learning classical Windows programming is important for any Windows programmer, I don’t necessarily recommend using C and the API for every Windows application. Many programmers—particularly those doing in-house corporate programming or those who do recreational programming at home—enjoy the ease of development environments such as Microsoft Visual Basic or Borland Delphi (which incorporates an object-oriented dialect of Pascal). These environments allow a programmer to focus on the user interface of an application and associate code with user interface objects. To learn Visual Basic, you might want to consult some other Microsoft Press books, such as Learn Visual Basic Now (1996), by Michael Halvorson. Among professional programmers—particularly those who write commercial applications—Microsoft Visual C++ with the Microsoft Foundation Class Library (MFC) has been a popular alternative in recent years. MFC encapsulates many of the messier aspects of Windows programming in a collection of C++ classes. Jeff Prosise’s Programming Windows with MFC, Second Edition (Microsoft Press, 1999) provides tutorials on MFC. Most recently, the popularity of the Internet and the World Wide Web has given a big boost to Sun Microsystems’ Java, the processor-independent language inspired by C++ and incorporating a toolkit for writing graphical applications that will run on several operating system platforms. A good Microsoft Press book on Microsoft J++, Microsoft’s Java development tool, is Programming Visual J++ 6.0 (1998), by Stephen R. Davis. Obviously, there’s hardly any one right way to write applications for Windows. More than anything else, the nature of the application itself should probably dictate the tools. But learning the Windows API gives you vital insights into the workings of Windows that are essential regardless of what you end up using to actually do the coding. Windows is a complex system; putting a programming layer on top of the API doesn’t eliminate the complexity—it merely hides it. Sooner or later that complexity is going to jump out and bite you in the leg. Knowing the API gives you a better chance at recovery. Any software layer on top of the native Windows API necessarily restricts you to a subset of full functionality. You might find, for example, that Visual Basic is ideal for your application except that it doesn’t allow you to do one or two essential chores. In that case, you’ll have to use native API calls. The API defines the universe in which we as Windows programmers exist. No approach can be more powerful or versatile than using this API directly. MFC is particularly problematic. While it simplifies some jobs immensely (such as OLE), I often find myself wrestling with other features (such as the Document/View architecture) to get them to work as I want. MFC has not been the Windows programming panacea that many hoped for, and few people would characterize it as a model of good object-oriented design. MFC programmers benefit greatly from understanding what’s going on in class definitions they use, and find themselves frequently consulting MFC source code. Understanding that source code is one of the benefits of learning the Windows API. The Programming Environment In this book, I’ll be assuming that you’re running Microsoft Visual C++ 6.0, which comes in Standard, Professional, and Enterprise editions. The less-expensive Standard edition is fine for doing the programs in this book. Visual C++ is also part of Visual Studio 6.0. The Microsoft Visual C++ package includes more than the C compiler and other files and tools necessary to compile and link Windows programs. It also includes the Visual C++ Developer Studio, an environment in which you can edit your source code; interactively create resources such as icons and dialog boxes; and edit, compile, run, and 18
- 19. debug your programs. If you’re running Visual C++ 5.0, you might need to get updated header files and import libraries for Windows 98 and Windows NT 5.0. These are available at Microsoft’s web site. Go to http://www.microsoft.com/msdn/, and choose Downloads and then Platform SDK (“software development kit”). You’ll be able to download and install the updated files in directories of your choice. To direct the Microsoft Developer Studio to look in these directories, choose Options from the Tools menu and then pick the Directories tab. The msdn portion of the Microsoft URL above stands for Microsoft Developer Network. This is a program that provides developers with frequently updated CD-ROMs containing much of what they need to be on the cutting edge of Windows development. You’ll probably want to investigate subscribing to MSDN and avoid frequent downloading from Microsoft’s web site. API Documentation This book is not a substitute for the official formal documentation of the Windows API. That documentation is no longer published in printed form; it is available only via CD-ROM or the Internet. When you install Visual C++ 6.0, you’ll get an online help system that includes API documentation. You can get updates to that documentation by subscribing to MSDN or by using Microsoft’s Web-based online help system. Start by linking to http://www.microsoft.com/msdn/, and select MSDN Library Online. In Visual C++ 6.0, select the Contents item from the Help menu to invoke the MSDN window. The API documentation is organized in a tree-structured hierarchy. Find the section labeled Platform SDK. All the documentation I’ll be citing in this book is from this section. I’ll show the location of documentation using the nested levels starting with Platform SDK separated by slashes. (I know the Platform SDK looks like a small obscure part of the total wealth of MSDN knowledge, but I assure you that it’s the essential core of Windows programming.) For example, for documentation on how to use the mouse in your Windows programs, you can consult /Platform SDK/User Interface Services/User Input/Mouse Input. I mentioned before that much of Windows is divided into the Kernel, User, and GDI subsystems. The kernel interfaces are in /Platform SDK/Windows Base Services, the user interface functions are in /Platform SDK/User Interface Services, and GDI is documented in /Platform SDK/Graphics and Multimedia Services/GDI. Your First Windows Program Now it’s time to do some coding. Let’s begin by looking at a very short Windows program and, for comparison, a short character-mode program. These will help us get oriented in using the development environment and going through the mechanics of creating and compiling a program. A Character-Mode Model A favorite book among programmers is The C Programming Language (Prentice Hall, 1978 and 1988) by Brian W. Kernighan and Dennis M. Ritchie, affectionately referred to as K&R. Chapter 1 of this book begins with a C program that displays the words “hello, world.” Here’s the program as it appeared on page 6 of the first edition of The C Programming Language: main () { printf (“hello, worldn”) ; } Yes, once upon a time C programmers used C run-time library functions such as printf without declaring them first. But this is the ‘90s, and we like to give our compilers a fighting chance to flag errors in our code. Here’s the revised code from the second edition of K&R: #include <stdio.h> 19
- 20. main () { printf (“hello, worldn”) ; } This program still isn’t really as small as it seems. It will certainly compile and run just fine, but many programmers these days would prefer to explicitly indicate the return value of the main function, in which case ANSI C dictates that the function actually returns a value: #include <stdio.h> int main () { printf (“hello, worldn”) ; return 0 ; } We could make this even longer by including the arguments to main, but let’s leave it at that—with an include statement, the program entry point, a call to a run-time library function, and a return statement. The Windows Equivalent The Windows equivalent to the “hello, world” program has exactly the same components as the character-mode version. It has an include statement, a program entry point, a function call, and a return statement. Here’s the program: /*-------------------------------------------------------------- HelloMsg.c—Displays “Hello, Windows 98!” in a message box © Charles Petzold, 1998 --------------------------------------------------------------*/ #include <windows.h> int WINAPI WinMain (HINSTANCE hInstance, HINSTANCE hPrevInstance, PSTR szCmdLine, int iCmdShow) { MessageBox (NULL, TEXT (“Hello, Windows 98!”), TEXT (“HelloMsg”), 0) ; return 0 ; } Before I begin dissecting this program, let’s go through the mechanics of creating a program in the Visual C++ Developer Studio. To begin, select New from the File menu. In the New dialog box, pick the Projects tab. Select Win32 Application. In the Location field, select a subdirectory. In the Project Name field, type the name of the project, which in this case is HelloMsg. This will be a subdirectory of the directory indicated in the Location field. The Create New Workspace button should be checked. The Platforms section should indicate Win32. Choose OK. A dialog box labeled Win32 Application - Step 1 Of 1 will appear. Indicate that you want to create an Empty Project, and press the Finish button. Select New from the File menu again. In the New dialog box, pick the Files tab. Select C++ Source File. The Add To Project box should be checked, and HelloMsg should be indicated. Type HelloMsg.c in the File Name field. Choose OK. Now you can type in the HELLOMSG.C file shown above. Or you can select the Insert menu and the File As Text option to copy the contents of HELLOMSG.C from the file on this book’s companion CD-ROM. Structurally, HELLOMSG.C is identical to the K&R “hello, world” program. The header file STDIO.H has been replaced with WINDOWS.H, the entry point main has been replaced with WinMain, and the C run-time library function printf has been replaced with the Windows API function MessageBox. However, there is much in the program that is new, including several strange-looking uppercase identifiers. 20
- 21. Let’s start at the top. The Header Files HELLOMSG.C begins with a preprocessor directive that you’ll find at the top of virtually every Windows program written in C: #include <windows.h> WINDOWS.H is a master include file that includes other Windows header files, some of which also include other header files. The most important and most basic of these header files are: • WINDEF.H Basic type definitions. • WINNT.H Type definitions for Unicode support. • WINBASE.H Kernel functions. • WINUSER.H User interface functions. • WINGDI.H Graphics device interface functions. These header files define all the Windows data types, function calls, data structures, and constant identifiers. They are an important part of Windows documentation. You might find it convenient to use the Find In Files option from the Edit menu in the Visual C++ Developer Studio to search through these header files. You can also open the header files in the Developer Studio and examine them directly. Program Entry Point Just as the entry point to a C program is the function main, the entry point to a Windows program is WinMain, which always appears like this: int WINAPI WinMain (HINSTANCE hInstance, HINSTANCE hPrevInstance, PSTR szCmdLine, int iCmdShow) This entry point is documented in /Platform SDK/User Interface Services/Windowing/Windows/Window Reference/Window Functions. It is declared in WINBASE.H like so (line breaks and all): int WINAPI WinMain( HINSTANCE hInstance, HINSTANCE hPrevInstance, LPSTR lpCmdLine, int nShowCmd ); You’ll notice I’ve made a couple of minor changes in HELLOMSG.C. The third parameter is defined as an LPSTR in WINBASE.H, and I’ve made it a PSTR. These two data types are both defined in WINNT.H as pointers to character strings. The LP prefix stands for “long pointer” and is an artifact of 16-bit Windows. I’ve also changed two of the parameter names from the WinMain declaration; many Windows programs use a system called “Hungarian notation” for naming variables. This system involves prefacing the variable name with a short prefix that indicates the variable’s data type. I’ll discuss this concept more in Chapter 3. For now, just keep in mind that the prefix i stands for int and sz stands for “string terminated with a zero.” The WinMain function is declared as returning an int. The WINAPI identifier is defined in WINDEF.H with the statement: #define WINAPI __stdcall This statement specifies a calling convention that involves how machine code is generated to place function call 21
- 22. arguments on the stack. Most Windows function calls are declared as WINAPI. The first parameter to WinMain is something called an “instance handle.” In Windows programming, a handle is simply a number that an application uses to identify something. In this case, the handle uniquely identifies the program. It is required as an argument to some other Windows function calls. In early versions of Windows, when you ran the same program concurrently more than once, you created multiple instances of that program. All instances of the same application shared code and read-only memory (usually resources such as menu and dialog box templates). A program could determine if other instances of itself were running by checking the hPrevInstance parameter. It could then skip certain chores and move some data from the previous instance into its own data area. In the 32-bit versions of Windows, this concept has been abandoned. The second parameter to WinMain is always NULL (defined as 0). The third parameter to WinMain is the command line used to run the program. Some Windows applications use this to load a file into memory when the program is started. The fourth parameter to WinMain indicates how the program should be initially displayed—either normally or maximized to fill the window, or minimized to be displayed in the task list bar. We’ll see how this parameter is used in Chapter 3. The MessageBox Function The MessageBox function is designed to display short messages. The little window that MessageBox displays is actually considered to be a dialog box, although not one with a lot of versatility. The first argument to MessageBox is normally a window handle. We’ll see what this means in Chapter 3. The second argument is the text string that appears in the body of the message box, and the third argument is the text string that appears in the caption bar of the message box. In HELLMSG.C, each of these text strings is enclosed in a TEXT macro. You don’t normally have to enclose all character strings in the TEXT macro, but it’s a good idea if you want to be ready to convert your programs to the Unicode character set. I’ll discuss this in much more detail in Chapter 2. The fourth argument to MessageBox can be a combination of constants beginning with the prefix MB_ that are defined in WINUSER.H. You can pick one constant from the first set to indicate what buttons you wish to appear in the dialog box: #define MB_OK 0x00000000L #define MB_OKCANCEL 0x00000001L #define MB_ABORTRETRYIGNORE 0x00000002L #define MB_YESNOCANCEL 0x00000003L #define MB_YESNO 0x00000004L #define MB_RETRYCANCEL 0x00000005L When you set the fourth argument to 0 in HELLOMSG, only the OK button appears. You can use the C OR (|) operator to combine one of the constants shown above with a constant that indicates which of the buttons is the default: #define MB_DEFBUTTON1 0x00000000L #define MB_DEFBUTTON2 0x00000100L #define MB_DEFBUTTON3 0x00000200L #define MB_DEFBUTTON4 0x00000300L You can also use a constant that indicates the appearance of an icon in the message box: #define MB_ICONHAND 0x00000010L #define MB_ICONQUESTION 0x00000020L #define MB_ICONEXCLAMATION 0x00000030L #define MB_ICONASTERISK 0x00000040L Some of these icons have alternate names: #define MB_ICONWARNING MB_ICONEXCLAMATION #define MB_ICONERROR MB_ICONHAND #define MB_ICONINFORMATION MB_ICONASTERISK 22
- 23. #define MB_ICONSTOP MB_ICONHAND There are a few other MB_ constants, but you can consult the header file yourself or the documentation in /Platform SDK/User Interface Services/Windowing/Dialog Boxes/Dialog Box Reference/Dialog Box Functions. In this program, the MessageBox function returns the value 1, but it’s more proper to say that it returns IDOK, which is defined in WINUSER.H as equaling 1. Depending on the other buttons present in the message box, the MessageBox function can also return IDYES, IDNO, IDCANCEL, IDABORT, IDRETRY, or IDIGNORE. Is this little Windows program really the equivalent of the K&R “hello, world” program? Well, you might think not because the MessageBox function doesn’t really have all the potential formatting power of the printf function in “hello, world.” But we’ll see in the next chapter how to write a version of MessageBox that does printf-like formatting. Compile, Link, and Run When you’re ready to compile HELLOMSG, you can select Build Hellomsg.exe from the Build menu, or press F7, or select the Build icon from the Build toolbar. (The appearance of this icon is shown in the Build menu. If the Build toolbar is not currently displayed, you can choose Customize from the Tools menu and select the Toolbars tab. Pick Build or Build MiniBar.) Alternatively, you can select Execute Hellomsg.exe from the Build menu, or press Ctrl+F5, or click the Execute Program icon (which looks like a red exclamation point) from the Build toolbar. You’ll get a message box asking you if you want to build the program. As normal, during the compile stage, the compiler generates an .OBJ (object) file from the C source code file. During the link stage, the linker combines the .OBJ file with .LIB (library) files to create the .EXE (executable) file. You can see a list of these library files by selecting Settings from the Project tab and clicking the Link tab. In particular, you’ll notice KERNEL32.LIB, USER32.LIB, and GDI32.LIB. These are “import libraries” for the three major Windows subsystems. They contain the dynamic-link library names and reference information that is bound into the .EXE file. Windows uses this information to resolve calls from the program to functions in the KERNEL32.DLL, USER32.DLL, and GDI32.DLL dynamic-link libraries. In the Visual C++ Developer Studio, you can compile and link the program in different configurations. By default, these are called Debug and Release. The executable files are stored in subdirectories of these names. In the Debug configuration, information is added to the .EXE file that assists in debugging the program and in tracing through the program source code. If you prefer working on the command line, the companion CD-ROM contains .MAK (make) files for all the sample programs. (You can tell the Developer Studio to generate make files by choosing Options from the Tools menu and selecting the Build tab. There’s a check box to check.) You’ll need to run VCVARS32.BAT located in the BIN subdirectory of the Developer Studio to set environment variables. To execute the make file from the command line, change to the HELLOMSG directory and execute: NMAKE /f HelloMsg.mak CFG=”HelloMsg _ Win32 Debug” or NMAKE /f HelloMsg.mak CFG=”HelloMsg _ Win32 Release” You can then run the .EXE file from the command line by typing: DEBUGHELLOMSG or RELEASEHELLOMSG I have made one change to the default Debug configuration in the project files on the companion CD-ROM for this book. In the Project Settings dialog box, after selecting the C/C++ tab, in the Preprocessor Definitions field I have defined the identifier UNICODE. I’ll have much more to say about this in the next chapter. 23
- 24. Chapter 2 -- An Introduction to Unicode In the first chapter, I promised to elaborate on any aspects of C that you might not have encountered in conventional character-mode programming but that play a part in Microsoft Windows. The subject of wide-character sets and Unicode almost certainly qualifies in that respect. Very simply, Unicode is an extension of ASCII character encoding. Rather than the 7 bits used to represent each character in strict ASCII, or the 8 bits per character that have become common on computers, Unicode uses a full 16 bits for character encoding. This allows Unicode to represent all the letters, ideographs, and other symbols used in all the written languages of the world that are likely to be used in computer communication. Unicode is intended initially to supplement ASCII and, with any luck, eventually replace it. Considering that ASCII is one of the most dominant standards in computing, this is certainly a tall order. Unicode impacts every part of the computer industry, but perhaps most profoundly operating systems and programming languages. In this respect, we are almost halfway there. Windows NT supports Unicode from the ground up. (Unfortunately, Windows 98 includes only a small amount of Unicode support.) The C programming language as formalized by ANSI inherently supports Unicode through its support of wide characters, which I’ll discuss in detail below. Of course, as usual, we as programmers are confronted with much of the dirty work. I’ve tried to ease the load by making all of the programs in this book “Unicode-ready.” What this means exactly will become more apparent as I discuss Unicode in this chapter. A Brief History of Character Sets It is uncertain when human beings began speaking, but writing seems to be about six thousand years old. Early writing was pictographic in nature. Alphabets—in which individual letters correspond to spoken sounds—came about just three thousand years ago. Although the various written languages of the world served fine for some time, several nineteenth-century inventors saw a need for something more. When Samuel F. B. Morse developed the telegraph between 1838 and 1854, he also devised a code to use with it. Each letter in the alphabet corresponded to a series of short and long pulses (dots and dashes). There was no distinction between uppercase and lowercase letters, but numbers and punctuation marks had their own codes. Morse code was not the first instance of written language being represented by something other than drawn or printed glyphs. Between 1821 and 1824, the young Louis Braille was inspired by a military system for writing and reading messages at night to develop a code for embossing raised dots into paper for reading by the blind. Braille is essentially a 6-bit code that encodes letters, common letter combinations, common words, and punctuation. A special escape code indicates that the following letter code is to be interpreted as uppercase. A special shift code allows subsequent letter codes to be interpreted as numbers. Telex codes, including Baudot (named after a French engineer who died in 1903) and a code known as CCITT #2 (standardized in 1931), were 5-bit codes that included letter shifts and figure shifts. American Standards Early computer character codes evolved from the coding used on Hollerith (“do not fold, spindle, or mutilate”) cards, invented by Herman Hollerith and first used in the 1890 United States census. A 6-bit character code known as BCDIC (“Binary-Coded Decimal Interchange Code”) based on Hollerith coding was progressively extended to the 8-bit EBCDIC in the 1960s and remains the standard on IBM mainframes but nowhere else. The American Standard Code for Information Interchange (ASCII) had its origins in the late 1950s and was finalized in 1967. During the development of ASCII, there was considerable debate over whether the code should be 6, 7, or 8 bits wide. Reliability considerations seemed to mandate that no shift character be used, so ASCII couldn’t be a 6-bit code. Cost ruled out the 8-bit version. (Bits were very expensive back then.) The final code had 26 lowercase letters, 26 uppercase letters, 10 digits, 32 symbols, 33 control codes, and a space, for a total of 128 codes. ASCII is currently documented in ANSI X3.4-1986, “Coded Character Sets—7-Bit American National Standard 24
- 25. Code for Information Interchange (7-Bit ASCII),” published by the American National Standards Institute. Figure 2- 1 shows ASCII (for the zillionth time), very similar to how it appears in the ANSI document. 0- 1- 2- 3- 4- 5- 6- 7- 0 NUL DLE SP 0 @ P ‘ p 1 SOH DC1 ! 1 A Q a q 2 STX DC2 “ 2 B R b r 3 ETX DC3 # 3 C S c s 4 EOT DC4 $ 4 D T d t 5 ENQ NAK % 5 E U e u 6 ACK SYN & 6 F V f v 7 BEL ETB ‘ 7 G W g w 8 BS CAN ( 8 H X h x 9 HT EM ) 9 I Y I y A LF SUB * : J Z j z B VT ESC + ; K [ k { C FF FS , < L l | D CR GS - = M ] m } E SO RS . > N ^ n ~ F SI US / ? O _ o DEL Figure 2-1. The ASCII character set. There are a lot of good things you can say about ASCII. The 26 letter codes are contiguous, for example. (This is not the case with EBCDIC.) Uppercase letters can be converted to lowercase and back by flipping one bit. The codes for the 10 digits are easily derived from the value of the digits. (In BCDIC, the code for the character “0” followed the code for the character “9”!) Best of all, ASCII is a very dependable standard. No other standard is as prevalent or as ingrained in our keyboards, video displays, system hardware, printers, font files, operating systems, and the Internet. The World Beyond The big problem with ASCII is indicated by the first word of the acronym. ASCII is truly an American standard, and it isn’t even good enough for other countries where English is spoken. Where is the British pound symbol (£), for instance? English uses the Latin (or Roman) alphabet. Among written languages that use the Latin alphabet, English is unusual in that very few words require letters with accent marks (or “diacritics”). Even for those English words where diacritics are traditionally proper, such as coöperate or résumé, the spellings without diacritics are perfectly acceptable. But north and south of the United States and across the Atlantic are many countries and languages where diacritics are much more common. These accent marks originally aided in adopting the Latin alphabet to the differences in spoken sounds among these languages. Journey farther east or south of Western Europe, and you’ll encounter languages that don’t use the Latin alphabet at all, such as Greek, Hebrew, Arabic, and Russian (which uses the Cyrillic alphabet). And if you travel even farther east, you’ll discover the ideographic Han characters of Chinese, which were also adopted in Japan and Korea. The history of ASCII since 1967 is mostly a history of attempts to overcome its limitations and make it more applicable to languages other than American English. In 1967, for example, the International Standards Organization (ISO) recommended a variant of ASCII with codes 0x40, 0x5B, 0x5C, 0x5D, 0x7B, 0x7C, and 0x7D “reserved for national use” and codes 0x5E, 0x60, and 0x7E labeled as “may be used for other graphical symbols when it is necessary to have 8, 9, or 10 positions for national use.” This is obviously not the best solution to internationalization because there’s no guarantee of consistency. But it indicates how desperate people were to successfully code symbols necessary to various languages. Extending ASCII By the time the early small computers were being developed, the 8-bit byte had been firmly established. Thus, if a 25
- 26. byte were used to store characters, 128 additional characters could be invented to supplement ASCII. When the original IBM PC was introduced in 1981, the video adapters included a ROM-based character set of 256 characters, which in itself was to become an important part of the IBM standard. The original IBM extended character set included some accented characters and a lowercase Greek alphabet (useful for mathematics notation), as well as some block-drawing and line-drawing characters. Additional characters were also assigned to the code positions of the ASCII control characters, because the bulk of these control characters were not required. This IBM extended character set was burned into countless ROMs on video boards and in printers, and it was used by numerous applications to decorate their character-mode displays. However, this character set did not include enough accented letters for all Western European languages that used the Latin alphabet, and it was not quite appropriate for Windows. Windows didn’t need line-drawing characters because it had an entire graphics system. In Windows 1.0 (released in November 1985), Microsoft didn’t entirely abandon the IBM extended character set, but it was relegated to secondary importance. The native Windows character set was called the “ANSI character set” because it was based on a draft ANSI and ISO standard, which eventually became ANSI/ISO 885911987, “American National Standard for Information Processing—8-Bit Single-Byte Coded Graphic Character Sets—Part 1: Latin Alphabet No 1.” This is also known more simply as “Latin 1.” The original version of the ANSI character set as printed in the Windows 1.0 Programmer’s Reference is shown in Figure 2-2. 0- 1- 2- 3- 4- 5- 6- 7- 8- 9- A- B- C- D- E- F- 0 * * 0 @ P ‘ p * * ° À Ð à ð 1 * * ! 1 A Q a q * * ¡ ± Á Ñ á ñ 2 * * “ 2 B R b r * * ¢ ² Â ò â ò 3 * * # 3 C S c s * * £ ³ Ã ó ã ó 4 * * $ 4 D T d t * * ¤ ´ Ä ô ä ô 5 * * % 5 E U e u * * ¥ µ Å õ å õ 6 * * & 6 F V f v * * ¦ ¶ Æ ö æ ö 7 * * ‘ 7 G W g w * * § · Ç * ç * 8 * * ( 8 H * h * * * ¨ ¸ È ø è ø 9 * * ) 9 I Y I y * * © ¹ É Ù é ù A * * * : J Z j z * * ª º Ê Ú ê ú B * * + ; K [ k { * * « » Ë Û ë û C * * , < L l | * * ¬ ¼ Ì Ü ì ü D * * - = M ] m } * * ½ Í Ý í ý E * * . > N ^ n ~ * * ® ¾ Î Þ î þ F * * / ? * _ o DEL * * ¯ ¿ Ï ß ï ÿ * - not applicable Figure 2-2. The Windows ANSI character set (based on ANSI/ISO 8859-1). The hollow rectangles indicate codes for which characters are not defined. This is close to how ANSI/ISO 8859-1 was ultimately defined. ANSI/ISO 8859-1 shows only graphic characters, not control characters, so it does not define the DEL. In addition, code 0xA0 is defined as a nonbreaking space (which means that it’s a space that shouldn’t be used to break a line when formatting), and code 0xAD is a soft hyphen (which means that it shouldn’t be displayed unless it’s used to break a word at the end of a line). Also, ANSI/ISO 8859-1 defines codes 0xD7 as a multiplication sign (×) and 0xF7 as a division sign (÷). Some fonts in Windows also define some of the characters from 0x80 through 0x9F, but these are not part of the ANSI/ISO 8859-1 standard. MS-DOS 3.3 (released in April 1987) introduced the concept of code pages to IBM PC users, a concept that was also carried over to Windows. A code page defines a mapping of character codes to characters. The original IBM character set became known as code page 437, or “MS-DOS Latin US.” Code page 850 is “MS-DOS Latin 1,” which replaces some of the line-drawing characters with additional accented letters (but which is not the Latin 1 ISO/ANSI standard shown in Figure 2-2 above). Other code pages were defined for other languages. The lower 128 codes are always the same; the higher 128 codes depend on the language for which the code page is defined. Under MS-DOS, if a user sets the PC’s keyboard, video display, and printer to a specific code page and then creates, 26
- 27. edits, and prints documents on the PC, all will be well. Everything’s consistent. However, if the user attempts to exchange documents with another user using a different code page or to change the code page on the machine, problems will result. Character codes are associated with the wrong characters. Applications can save code page information with documents in an attempt to reduce problems, but this strategy involves some work in converting between code pages. Although code pages originally provided only additional characters of the Latin alphabet beyond the unaccented characters, eventually code pages were devised where the higher 128 characters contained complete non-Latin alphabets, such as Hebrew, Greek, and Cyrillic. Such variety makes code page mix-ups potentially worse, of course; it’s one thing if a few accented letters appear incorrect and quite another if an entire text is an incomprehensible jumble. Code pages proliferated beyond all reason. Just to keep everyone on their toes, the MS-DOS code page 855 for Cyrillic is not the same as either the Windows code page 1251 for Cyrillic or the Macintosh code page 10007 for Cyrillic. Code pages in each environment are modifications of the standard character set for the environment. IBM OS/2 also supports a variety of EBCDIC code pages. But wait. It gets worse. Double-Byte Character Sets So far we’ve been looking at character sets of 256 characters. But the ideographic symbols of Chinese, Japanese, and Korean number about 21,000. How can these languages be accommodated while still maintaining some kind of compatibility with ASCII? The solution (if that’s the right word for it) is the double-byte character set (DBCS). A DBCS starts off with 256 codes, just like ASCII. Like any well-behaved code page, the first 128 of these codes are ASCII. However, some of the codes in the higher 128 are always followed by a second byte. The two bytes together (called a lead byte and a trail byte) define a single character, usually a complex ideograph. Although Chinese, Japanese, and Korean share many of the same ideographs, obviously the languages are different and often the same ideograph in the three different languages will represent three different things. Windows supports four different double-byte character sets: code page 932 (Japanese), 936 (Simplified Chinese), 949 (Korean), and 950 (Traditional Chinese). DBCS is supported in only the versions of Windows that are manufactured for these countries. The problem with a double-byte character set is not that characters are represented by 2 bytes. The problem is that some characters (in particular, the ASCII characters) are represented by 1 byte. This creates odd programming problems. For example, the number of characters in a character string cannot be determined by the byte size of the string. The string has to be parsed to determine its length, and each byte has to be examined to see if it’s the lead byte of a 2-byte character. If you have a pointer to a character somewhere in the middle of a DBCS string, what is the address of the previous character in the string? The customary solution is to parse the string starting at the beginning up to the pointer! Unicode to the Rescue The basic problem we have here is that the world’s written languages simply cannot be represented by 256 8-bit codes. The previous solutions involving code pages and DBCS have proven insufficient and awkward. What’s the real solution? As programmers, we have experience with problems of this sort. If there are too many things to be represented by 8- bit values, we try wider values, perhaps 16-bit values. (Duh.) And that’s the ridiculously simple concept behind Unicode. Rather than the confusion of multiple 256-character code mappings or double-byte character sets that have some 1-byte codes and some 2-byte codes, Unicode is a uniform 16-bit system, thus allowing the representation of 65,536 characters. This is sufficient for all the characters and ideographs in all the written languages of the world, including a bunch of math, symbol, and dingbat collections. 27
- 28. Understanding the difference between Unicode and DBCS is essential. Unicode is said to use (particularly in the context of the C programming language) “wide characters.” Each character in Unicode is 16 bits wide rather than 8 bits wide. Eight-bit values have no meaning in Unicode. In contrast, in a double-byte character set we’re still dealing with 8bit values. Some bytes define characters by themselves, and some bytes indicate that another byte is necessary to completely define a character. Whereas working with DBCS strings is quite messy, working with Unicode text is much like working with regular text. You’ll probably be pleased to learn that the first 128 Unicode characters (16-bit codes 0x0000 through 0x007F) are ASCII, while the second 128 Unicode characters (codex 0x0080 through 0x00FF) are the ISO 8859-1 extensions to ASCII. Various blocks of characters within Unicode are similarly based on existing standards. This is to ease conversion. The Greek alphabet uses codes 0x0370 through 0x03FF, Cyrillic uses codes 0x0400 through 0x04FF, Armenian uses codes 0x0530 through 0x058F, and Hebrew uses codes 0x0590 through 0x05FF. The ideographs of Chinese, Japanese, and Korean (referred to collectively as CJK) occupy codes 0x3000 through 0x9FFF. The best thing about Unicode is that there’s only one character set. There’s simply no ambiguity. Unicode came about through the cooperation of virtually every important company in the personal computer industry and is code- for-code identical with the ISO 10646-1 standard. The essential reference for Unicode is The Unicode Standard, Version 2.0 (Addison-Wesley, 1996), an extraordinary book that reveals the richness and diversity of the world’s written languages in a way that few other documents have. In addition, the book provides the rationale and details behind the development of Unicode. Are there any drawbacks to Unicode? Sure. Unicode character strings occupy twice as much memory as ASCII strings. (File compression helps a lot to reduce the disk space differential, however.) But perhaps the worst drawback is that Unicode remains relatively unused just yet. As programmers, we have our work cut out for us. Wide Characters and C To a C programmer, the whole idea of 16-bit characters can certainly provoke uneasy chills. That a char is the same width as a byte is one of the very few certainties of this life. Few programmers are aware that ANSI/ISO 9899-1990, the “American National Standard for Programming Languages—C” (also known as “ANSI C”) supports character sets that require more than one byte per character through a concept called “wide characters.” These wide characters coexist nicely with normal and familiar characters. ANSI C also supports multibyte character sets, such as those supported by the Chinese, Japanese, and Korean versions of Windows. However, these multibyte character sets are treated as strings of single-byte values in which some characters alter the meaning of successive characters. Multibyte character sets mostly impact the C run-time library functions. In contrast, wide characters are uniformly wider than normal characters and involve some compiler issues. Wide characters aren’t necessarily Unicode. Unicode is one possible wide-character encoding. However, because the focus in this book is Windows rather than an abstract implementation of C, I will tend to speak of wide characters and Unicode synonymously. The char Data Type Presumably, we are all quite familiar with defining and storing characters and character strings in our C programs by using the char data type. But to facilitate an understanding of how C handles wide characters, let’s first review normal character definition as it might appear in a Win32 program. The following statement defines and initializes a variable containing a single character: char c = ‘A’ ; The variable c requires 1 byte of storage and will be initialized with the hexadecimal value 0x41, which is the ASCII code for the letter A. You can define a pointer to a character string like so: 28
- 29. char * p ; Because Windows is a 32-bit operating system, the pointer variable p requires 4 bytes of storage. You can also initialize a pointer to a character string: char * p = “Hello!” ; The variable p still requires 4 bytes of storage as before. The character string is stored in static memory and uses 7 bytes of storage—the 6 bytes of the string in addition to a terminating 0. You can also define an array of characters, like this: char a[10] ; In this case, the compiler reserves 10 bytes of storage for the array. The expression sizeof (a) will return 10. If the array is global (that is, defined outside any function), you can initialize an array of characters by using a statement like so: char a[] = “Hello!” ; If you define this array as a local variable to a function, it must be defined as a static variable, as follows: static char a[] = “Hello!” ; In either case, the string is stored in static program memory with a 0 appended at the end, thus requiring 7 bytes of storage. Wider Characters Nothing about Unicode or wide characters alters the meaning of the char data type in C. The char continues to indicate 1 byte of storage, and sizeof (char) continues to return 1. In theory, a byte in C can be greater than 8 bits, but for most of us, a byte (and hence a char) is 8 bits wide. Wide characters in C are based on the wchar_t data type, which is defined in several header files, including WCHAR.H, like so: typedef unsigned short wchar_t ; Thus, the wchar_t data type is the same as an unsigned short integer: 16 bits wide. To define a variable containing a single wide character, use the following statement: wchar_t c = ‘A’ ; The variable c is the two-byte value 0x0041, which is the Unicode representation of the letter A. (However, because Intel microprocessors store multibyte values with the least-significant bytes first, the bytes are actually stored in memory in the sequence 0x41, 0x00. Keep this in mind if you examine memory storage of Unicode text.) You can also define an initialized pointer to a wide-character string: wchar_t * p = L”Hello!” ; Notice the capital L (for long) immediately preceding the first quotation mark. This indicates to the compiler that the string is to be stored with wide characters—that is, with every character occupying 2 bytes. The pointer variable p requires 4 bytes of storage, as usual, but the character string requires 14 bytes—2 bytes for each character with 2 bytes of zeros at the end. Similarly, you can define an array of wide characters this way: static wchar_t a[] = L”Hello!” ; The string again requires 14 bytes of storage, and sizeof (a) will return 14. You can index the a array to get at the individual characters. The value a[1] is the wide character ‘e’, or 0x0065. Although it looks more like a typo than anything else, that L preceding the first quotation mark is very important, and there must not be space between the two symbols. Only with that L will the compiler know you want the string to be stored with 2 bytes per character. Later on, when we look at wide-character strings in places other than 29
- 30. variable definitions, you’ll encounter the L preceding the first quotation mark again. Fortunately, the C compiler will often give you a warning or error message if you forget to include the L. You can also use the L prefix in front of single character literals, as shown here, to indicate that they should be interpreted as wide characters. wchar_t c = L’A’ ; But it’s usually not necessary. The C compiler will zero-extend the character anyway. Wide-Character Library Functions We all know how to find the length of a string. For example, if we have defined a pointer to a character string like so: char * pc = “Hello!” ; we can call iLength = strlen (pc) ; The variable iLength will be set equal to 6, the number of characters in the string. Excellent! Now let’s try defining a pointer to a string of wide characters: wchar_t * pw = L”Hello!” ; And now we call strlen again: iLength = strlen (pw) ; Now the troubles begin. First, the C compiler gives you a warning message, probably something along the lines of ‘function’ : incompatible types - from ‘unsigned short *’ to ‘const char *’ It’s telling you that the strlen function is declared as accepting a pointer to a char, and it’s getting a pointer to an unsigned short. You can still compile and run the program, but you’ll find that iLength is set to 1. What happened? The 6 characters of the character string “Hello!” have the 16-bit values: 0x0048 0x0065 0x006C 0x006C 0x006F 0x0021 which are stored in memory by Intel processors like so: 48 00 65 00 6C 00 6C 00 6F 00 21 00 The strlen function, assuming that it’s attempting to find the length of a string of characters, counts the first byte as a character but then assumes that the second byte is a zero byte denoting the end of the string. This little exercise clearly illustrates the differences between the C language itself and the run-time library functions. The compiler interprets the string L”Hello!” as a collection of 16-bit short integers and stores them in the wchar_t array. The compiler also handles any array indexing and the sizeof operator, so these work properly. But run-time library functions such as strlen are added during link time. These functions expect strings that comprise single-byte characters. When they are confronted with wide-character strings, they don’t perform as we’d like. Oh, great, you say. Now every C library function has to be rewritten to accept wide characters. Well, not every C library function. Only the ones that have string arguments. And you don’t have to rewrite them. It’s already been done. The wide-character version of the strlen function is called wcslen (“wide-character string length”), and it’s declared both in STRING.H (where the declaration for strlen resides) and WCHAR.H. The strlen function is declared like this: size_t __cdecl strlen (const char *) ; and the wcslen function looks like this: size_t __cdecl wcslen (const wchar_t *) ; 30
- 31. So now we know that when we need to find out the length of a wide-character string we can call iLength = wcslen (pw) ; The function returns 6, the number of characters in the string. Keep in mind that the character length of a string does not change when you move to wide characters—only the byte length changes. All your favorite C run-time library functions that take string arguments have wide-character versions. For example, wprintf is the wide-character version of printf. These functions are declared both in WCHAR.H and in the header file where the normal function is declared. Maintaining a Single Source There are, of course, certain disadvantages to using Unicode. First and foremost is that every string in your program will occupy twice as much space. In addition, you’ll observe that the functions in the wide-character run-time library are larger than the usual functions. For this reason, you might want to create two versions of your program—one with ASCII strings and the other with Unicode strings. The best solution would be to maintain a single source code file that you could compile for either ASCII or Unicode. That’s a bit of a problem, though, because the run-time library functions have different names, you’re defining characters differently, and then there’s that nuisance of preceding the string literals with an L. One answer is to use the TCHAR.H header file included with Microsoft Visual C++. This header file is not part of the ANSI C standard, so every function and macro definition defined therein is preceded by an underscore. TCHAR.H provides a set of alternative names for the normal run-time library functions requiring string parameters (for example, _tprintf and _tcslen). These are sometimes referred to as “generic” function names because they can refer to either the Unicode or non-Unicode versions of the functions. If an identifier named _UNICODE is defined and the TCHAR.H header file is included in your program, _tcslen is defined to be wcslen: #define _tcslen wcslen If UNICODE isn’t defined, _tcslen is defined to be strlen: #define _tcslen strlen And so on. TCHAR.H also solves the problem of the two character data types with a new data type named TCHAR. If the _UNICODE identifier is defined, TCHAR is wchar_t: typedef wchar_t TCHAR ; Otherwise, TCHAR is simply a char: typedef char TCHAR ; Now it’s time to address that sticky L problem with the string literals. If the _UNICODE identifier is defined, a macro called __T is defined like this: #define __T(x) L##x This is fairly obscure syntax, but it’s in the ANSI C standard for the C preprocessor. That pair of number signs is called a “token paste,” and it causes the letter L to be appended to the macro parameter. Thus, if the macro parameter is “Hello!”, then L##x is L”Hello!”. If the _UNICODE identifier is not defined, the __T macro is simply defined in the following way: #define __T(x) x Regardless, two other macros are defined to be the same as __T: #define _T(x) __T(x) #define _TEXT(x) __T(x) Which one you use for your Win32 console programs depends on how concise or verbose you’d like to be. Basically, you must define your string literals inside the _T or _TEXT macro in the following way: 31
- 32. _TEXT (“Hello!”) Doing so causes the string to be interpreted as composed of wide characters if the _UNICODE identifier is defined and as 8-bit characters if not. Wide Characters and Windows Windows NT supports Unicode from the ground up. What this means is that Windows NT internally uses character strings composed of 16-bit characters. Since much of the rest of the world doesn’t use 16-bit character strings yet, Windows NT must often convert character strings on the way into the operating system or on the way out. Windows NT can run programs written for ASCII, for Unicode, or for a mix of ASCII and Unicode. That is, Windows NT supports different API function calls that accept 8-bit or 16-bit character strings. (We’ll see how this works shortly.) Windows 98 has much less support of Unicode than Windows NT does. Only a few Windows 98 function calls support wide-character strings. (These functions are listed in Microsoft Knowledge Base article Q125671; they include MessageBox.) If you’re going to distribute only one .EXE file that must run under both Windows NT and Windows 98, it shouldn’t use Unicode or else it won’t run under Windows 98; in particular, the program shouldn’t call the Unicode versions of the Windows function calls. However, so that you can be in a better position to distribute a Unicode version of your program sometime in the future, you should probably attempt to have a single source that can be compiled for either ASCII or Unicode. That’s how all the programs in the book are written. Windows Header File Types As you saw in the first chapter, a Windows program includes the header file WINDOWS.H. This file includes a number of other header files, including WINDEF.H, which has many of the basic type definitions used in Windows and which itself includes WINNT.H. WINNT.H handles the basic Unicode support. WINNT.H begins by including the C header file CTYPE.H, which is one of many C header files that have a definition of wchar_t. WINNT.H defines new data types named CHAR and WCHAR: typedef char CHAR ; typedef wchar_t WCHAR ; // wc CHAR and WCHAR are the data types recommended for your use in a Windows program when you need to define an 8-bit character or a 16-bit character. That comment following the WCHAR definition is a suggestion for Hungarian notation: a variable based on the WCHAR data type can be preceded with the letters wc to indicate a wide character. The WINNT.H header file goes on to define six data types you can use as pointers to 8-bit character strings and four data types you can use as pointers to const 8-bit character strings. I’ve condensed the actual header file statements a bit to show the data types here: typedef CHAR * PCHAR, * LPCH, * PCH, * NPSTR, * LPSTR, * PSTR ; typedef CONST CHAR * LPCCH, * PCCH, * LPCSTR, * PCSTR ; The N and L prefixes stand for “near” and “long” and refer to the two different sizes of pointers in 16-bit Windows. There is no differentiation between near and long pointers in Win32. Similarly, WINNT.H defines six data types you can use as pointers to 16-bit character strings and four data types you can use as pointers to const 16-bit character strings: typedef WCHAR * PWCHAR, * LPWCH, * PWCH, * NWPSTR, * LPWSTR, * PWSTR ; typedef CONST WCHAR * LPCWCH, * PCWCH, * LPCWSTR, * PCWSTR ; So far, we have the data types CHAR (which is an 8-bit char) and WCHAR (which is a 16-bit wchar_t) and pointers to CHAR and WCHAR. As in TCHAR.H, WINNT.H defines TCHAR to be the generic character type. If the identifier UNICODE (without the underscore) is defined, TCHAR and pointers to TCHAR are defined based on WCHAR and pointers to WCHAR; if the identifier UNICODE is not defined, TCHAR and pointers to TCHAR are defined based on char and pointers to char: #ifdef UNICODE typedef WCHAR TCHAR, * PTCHAR ; 32
- 33. typedef LPWSTR LPTCH, PTCH, PTSTR, LPTSTR ; typedef LPCWSTR LPCTSTR ; #else typedef char TCHAR, * PTCHAR ; typedef LPSTR LPTCH, PTCH, PTSTR, LPTSTR ; typedef LPCSTR LPCTSTR ; #endif Both the WINNT.H and WCHAR.H header files are protected against redefinition of the TCHAR data type if it’s already been defined by one or the other of these header files. However, whenever you’re using other header files in your program, you should include WINDOWS.H before all others. The WINNT.H header file also defines a macro that appends the L to the first quotation mark of a character string. If the UNICODE identifier is defined, a macro called __TEXT is defined as follows: #define __TEXT(quote) L##quote If the identifier UNICODE is not defined, the __TEXT macro is defined like so: #define __TEXT(quote) quote Regardless, the TEXT macro is defined like this: #define TEXT(quote) __TEXT(quote) This is very similar to the way the _TEXT macro is defined in TCHAR.H, except that you need not bother with the underscore. I’ll be using the TEXT version of this macro throughout this book. These definitions let you mix ASCII and Unicode characters strings in the same program or write a single program that can be compiled for either ASCII or Unicode. If you want to explicitly define 8-bit character variables and strings, use CHAR, PCHAR (or one of the others), and strings with quotation marks. For explicit 16-bit character variables and strings, use WCHAR, PWCHAR, and append an L before quotation marks. For variables and characters strings that will be 8 bit or 16 bit depending on the definition of the UNICODE identifier, use TCHAR, PTCHAR, and the TEXT macro. The Windows Function Calls In the 16-bit versions of Windows beginning with Windows 1.0 and ending with Windows 3.1, the MessageBox function was located in the dynamic-link library USER.EXE. In the WINDOWS.H header files included in the Windows 3.1 Software Development Kit, the MessageBox function was defined like so: int WINAPI MessageBox (HWND, LPCSTR, LPCSTR, UINT) ; Notice that the second and third arguments to the function are pointers to constant character strings. When a Win16 program was compiled and linked, Windows left the call to MessageBox unresolved. A table in the program’s .EXE file allowed Windows to dynamically link the call from the program to the MessageBox function located in the USER library. The 32-bit versions of Windows (that is, all versions of Windows NT, as well as Windows 95 and Windows 98) include USER.EXE for 16-bit compatibility but also have a dynamic-link library named USER32.DLL that contains entry points for the 32-bit versions of the user interface functions, including the 32-bit version of MessageBox. But here’s the key to Windows support of Unicode: In USER32.DLL, there is no entry point for a 32-bit function named MessageBox. Instead, there are two entry points, one named MessageBoxA (the ASCII version) and the other named MessageBoxW (the wide-character version). Every Win32 function that requires a character string argument has two entry points in the operating system! Fortunately, you usually don’t have to worry about this. You can simply use MessageBox in your programs. As in the TCHAR header file, the various Windows header files perform the necessary tricks. Here’s how MessageBoxA is defined in WINUSER.H. This is quite similar to the earlier definition of MessageBox: WINUSERAPI int WINAPI MessageBoxA (HWND hWnd, LPCSTR lpText, LPCSTR lpCaption, UINT uType) ; And here’s MessageBoxW: 33
- 34. WINUSERAPI int WINAPI MessageBoxW (HWND hWnd, LPCWSTR lpText, LPCWSTR lpCaption, UINT uType) ; Notice that the second and third parameters to the MessageBoxW function are pointers to wide-character strings. You can use the MessageBoxA and MessageBoxW functions explicitly in your Windows programs if you need to mix and match ASCII and wide-character function calls. But most programmers will continue to use MessageBox, which will be the same as MessageBoxA or MessageBoxW depending on whether UNICODE is defined. Here’s the rather trivial code in WINUSER.H that does the trick: #ifdef UNICODE #define MessageBox MessageBoxW #else #define MessageBox MessageBoxA #endif Thus, all the MessageBox function calls that appear in your program will actually be MessageBoxW functions if the UNICODE identifier is defined and MessageBoxA functions if it’s not defined. When you run the program, Windows links the various function calls in your program to the entry points in the various Windows dynamic-link libraries. With just a few exceptions, however, the Unicode versions of the Windows functions are not implemented in Windows 98. The functions have entry points, but they usually return an error code. It is up to an application to take note of this error return and do something reasonable. Windows’ String Functions As I noted earlier, Microsoft C includes wide-character and generic versions of all C run-time library functions that require character string arguments. However, Windows duplicates some of these. For example, here is a collection of string functions defined in Windows that calculate string lengths, copy strings, concatenate strings, and compare strings: ILength = lstrlen (pString) ; pString = lstrcpy (pString1, pString2) ; pString = lstrcpyn (pString1, pString2, iCount) ; pString = lstrcat (pString1, pString2) ; iComp = lstrcmp (pString1, pString2) ; iComp = lstrcmpi (pString1, pString2) ; These work much the same as their C library equivalents. They accept wide-character strings if the UNICODE identifier is defined and regular strings if not. The wide-character version of the lstrlenW function is implemented in Windows 98. Using printf in Windows Programmers who have a background in character-mode, command-line C programming are often excessively fond of the printf function. It’s no surprise that printf shows up in the Kernighan and Ritchie “hello, world” program even though a simpler alternative (such as puts) could have been used. Everyone knows that enhancements to “hello, world” will need the formatted text output of printf eventually, so we might as well start using it at the outset. The bad news is that you can’t use printf in a Windows program. Although you can use most of the C run-time library in Windows programs—indeed, many programmers prefer to use the C memory management and file I/O functions over the Windows equivalents—Windows has no concept of standard input and standard output. You can use fprintf in a Windows program, but not printf. The good news is that you can still display text by using sprintf and other functions in the sprintf family. These functions work just like printf, except that they write the formatted output to a character string buffer that you provide as the function’s first argument. You can then do what you want with this character string (such as pass it to MessageBox). If you’ve never had occasion to use sprintf (as I didn’t when I first began programming for Windows), here’s a brief rundown. Recall that the printf function is declared like so: 34
- 35. int printf (const char * szFormat, ...) ; The first argument is a formatting string that is followed by a variable number of arguments of various types corresponding to the codes in the formatting string. The sprintf function is defined like this: int sprintf (char * szBuffer, const char * szFormat, ...) ; The first argument is a character buffer; this is followed by the formatting string. Rather than writing the formatted result in standard output, sprintf stores it in szBuffer. The function returns the length of the string. In character-mode programming, printf (“The sum of %i and %i is %i”, 5, 3, 5+3) ; is functionally equivalent to char szBuffer [100] ; sprintf (szBuffer, “The sum of %i and %i is %i”, 5, 3, 5+3) ; puts (szBuffer) ; In Windows, you can use MessageBox rather than puts to display the results. Almost everyone has experience with printf going awry and possibly crashing a program when the formatting string is not properly in sync with the variables to be formatted. With sprintf, you still have to worry about that and you also have a new worry: the character buffer you define must be large enough for the result. A Microsoft-specific function named _snprintf solves this problem by introducing another argument that indicates the size of the buffer in characters. A variation of sprintf is vsprintf, which has only three arguments. The vsprintf function is used to implement a function of your own that must perform printf-like formatting of a variable number of arguments. The first two arguments to vsprintf are the same as sprintf: the character buffer for storing the result and the formatting string. The third argument is a pointer to an array of arguments to be formatted. In practice, this pointer actually references variables that have been stored on the stack in preparation for a function call. The va_list, va_start, and va_end macros (defined in STDARG.H) help in working with this stack pointer. The SCRNSIZE program at the end of this chapter demonstrates how to use these macros. The sprintf function can be written in terms of vsprintf like so: int sprintf (char * szBuffer, const char * szFormat, ...) { int iReturn ; va_list pArgs ; va_start (pArgs, szFormat) ; iReturn = vsprintf (szBuffer, szFormat, pArgs) ; va_end (pArgs) ; return iReturn ; } The va_start macro sets pArg to point to the variable on the stack right above the szFormat argument on the stack. So many early Windows programs used sprintf and vsprintf that Microsoft eventually added two similar functions to the Windows API. The Windows wsprintf and wvsprintf functions are functionally equivalent to sprintf and vsprintf, except that they don’t handle floating-point formatting. Of course, with the introduction of wide characters, the sprintf functions blossomed in number, creating a thoroughly confusing jumble of function names. Here’s a chart that shows all the sprintf functions supported by Microsoft’s C run-time library and by Windows. ASCII Wide-Character Generic Variable Number of Arguments Standard Version sprintf swprintf _stprintf Max-Length Version _snprintf _snwprintf _sntprintf 35
- 36. Windows Version wsprintfA wsprintfW wsprintf Standard Version vsprintf vswprintf _vstprintf Max-Length Version _vsnprintf _vsnwprintf _vsntprintf Windows Version wvsprintfA wvsprintfW wvsprintf In the wide-character versions of the sprintf functions, the string buffer is defined as a wide-character string. In the wide-character versions of all these functions, the formatting string must be a wide-character string. However, it’s up to you to make sure that any other strings you pass to these functions are also composed of wide characters. A Formatting Message Box The SCRNSIZE program shown in Figure 2-3 shows how to implement a MessageBoxPrintf function that takes a variable number of arguments and formats them like printf. Figure 2-3. The SCRNSIZE program. SCRNSIZE.C /*----------------------------------------------------- SCRNSIZE.C—Displays screen size in a message box © Charles Petzold, 1998 -----------------------------------------------------*/ #include <windows.h> #include <tchar.h> #include <stdio.h> int CDECL MessageBoxPrintf (TCHAR * szCaption, TCHAR * szFormat, ...) { TCHAR szBuffer [1024] ; va_list pArgList ; // The va_start macro (defined in STDARG.H) is usually equivalent to: // pArgList = (char *) &szFormat + sizeof (szFormat) ; va_start (pArgList, szFormat) ; // The last argument to wvsprintf points to the arguments _vsntprintf (szBuffer, sizeof (szBuffer) / sizeof (TCHAR), szFormat, pArgList) ; // The va_end macro just zeroes out pArgList for no good reason va_end (pArgList) ; return MessageBox (NULL, szBuffer, szCaption, 0) ; } int WINAPI WinMain (HINSTANCE hInstance, HINSTANCE hPrevInstance, PSTR szCmdLine, int iCmdShow) { int cxScreen, cyScreen ; 36
- 37. cxScreen = GetSystemMetrics (SM_CXSCREEN) ; cyScreen = GetSystemMetrics (SM_CYSCREEN) ; MessageBoxPrintf (TEXT (“ScrnSize”), TEXT (“The screen is %i pixels wide by %i pixels high.”), cxScreen, cyScreen) ; return 0 ; } The program displays the width and height of the video display in pixels by using information obtained from the GetSystemMetrics function. GetSystemMetrics is a useful function for obtaining information about the sizes of various objects in Windows. Indeed, in Chapter 4 I’ll use the GetSystemMetrics function to show you how to display and scroll multiple lines of text in a Windows window. Internationalization and This Book Preparing your Windows programs for an international market involves more than using Unicode. Internationalization is beyond the scope of this book but is covered extensively in Developing International Software for Windows 95 and Windows NT by Nadine Kano (Microsoft Press, 1995). This book will restrict itself to showing programs that can be compiled either with or without the UNICODE identifier defined. This involves using TCHAR for all character and string definitions, using the TEXT macro for string literals, and taking care not to confuse bytes and characters. For example, notice the _vsntprintf call in SCRNSIZE. The second argument is the size of the buffer in characters. Typically, you’d use sizeof (szBuffer). But if the buffer has wide characters, that’s not the size of the buffer in characters but the size of the buffer in bytes. You must divide it by sizeof (TCHAR). Normally in the Visual C++ Developer Studio, you can compile a program in two different configurations: Debug and Release. For convenience, for the sample programs in this book, I have modified the Debug configuration so that the UNICODE identifier is defined. In those programs that use C run-time functions that require string arguments, the _UNICODE identifier is also defined in the Debug configuration. (To see where this is done, choose Settings from the Project menu and click the C/C++ tab.) In this way, the programs can be easily recompiled and linked for testing. All of the programs in this book—whether compiled for Unicode or not—run under Windows NT. With a few exceptions, the Unicode-compiled programs in this book will not run under Windows 98 but the non-Unicode versions will. The programs in this chapter and the first chapter are two of the few exceptions. MessageBoxW is one of the few wide-character Windows functions supported under Windows 98. If you replace _vsntprintf in SCRNSIZE.C with the Windows function wprintf (you’ll also have to eliminate the second argument to the function), the Unicode version of SCRNSIZE.C will not run under Windows 98 because Windows 98 does not implement wprintfW. As we’ll see later in this book (particularly in Chapter 6, which covers using the keyboard), it is not easy writing a Windows program that can handle the double-byte character sets of the Far Eastern versions of Windows. This book does not show you how, and for that reason some of the non-Unicode versions of the programs in this book do not run properly under the Far Eastern versions of Windows. This is one reason why Unicode is so important to the future of programming. Unicode allows programs to more easily cross national borders. 37
- 38. Chapter 3 -- Windows and Messages In the first two chapters, the sample programs used the MessageBox function to deliver text output to the user. The MessageBox function creates a “window.” In Windows, the word “window” has a precise meaning. A window is a rectangular area on the screen that receives user input and displays output in the form of text and graphics. The MessageBox function creates a window, but it is a special-purpose window of limited flexibility. The message box window has a title bar with a close button, an optional icon, one or more lines of text, and up to four buttons. However, the icons and buttons must be chosen from a small collection that Windows provides for you. The MessageBox function is certainly useful, but we’re not going to get very far with it. We can’t display graphics in a message box, and we can’t add a menu to a message box. For that we need to create our own windows, and now is the time. A Window of One’s Own Creating a window is as easy as calling the CreateWindow function. Well, not really. Although the function to create a window is indeed named CreateWindow and you can find documentation for this function at /Platform SDK/User Interface Services/Windowing/Windows/Window Reference/Window Functions, you’ll discover that the first argument to CreateWindow is something called a “window class name” and that a window class is connected to something called a “window procedure.” Perhaps before we try calling CreateWindow, a little background information might prove helpful. An Architectural Overview When programming for Windows, you’re really engaged in a type of object-oriented programming. This is most evident in the object you’ll be working with most in Windows, the object that gives Windows its name, the object that will soon seem to take on anthropomorphic characteristics, the object that might even show up in your dreams: the object known as the “window.” The most obvious windows adorning your desktop are application windows. These windows contain a title bar that shows the program’s name, a menu, and perhaps a toolbar and a scroll bar. Another type of window is the dialog box, which may or may not have a title bar. Less obvious are the various push buttons, radio buttons, check boxes, list boxes, scroll bars, and text-entry fields that adorn the surfaces of dialog boxes. Each of these little visual objects is a window. More specifically, these are called “child windows” or “control windows” or “child window controls.” The user sees these windows as objects on the screen and interacts directly with them using the keyboard or the mouse. Interestingly enough, the programmer’s perspective is analogous to the user’s perspective. The window receives the user input in the form of “messages” to the window. A window also uses messages to communicate with other windows. Getting a good feel for messages is an important part of learning how to write programs for Windows. Here’s an example of Windows messages: As you know, most Windows programs have sizeable application windows. That is, you can grab the window’s border with the mouse and change the window’s size. Often the program will respond to this change in size by altering the contents of its window. You might guess (and you would be correct) that Windows itself rather than the application is handling all the messy code involved with letting the user resize the window. Yet the application “knows” that the window has been resized because it can change the format of what it displays. How does the application know that the user has changed the window’s size? For programmers accustomed to only conventional character-mode programming, there is no mechanism for the operating system to convey information of this sort to the user. It turns out that the answer to this question is central to understanding the architecture of Windows. When a user resizes a window, Windows sends a message to the program indicating the new window 38
- 39. size. The program can then adjust the contents of its window to reflect the new size. “Windows sends a message to the program.” I hope you didn’t read that statement without blinking. What on earth could it mean? We’re talking about program code here, not a telegraph system. How can an operating system send a message to a program? When I say that “Windows sends a message to the program” I mean that Windows calls a function within the program—a function that you write and which is an essential part of your program’s code. The parameters to this function describe the particular message that is being sent by Windows and received by your program. This function in your program is known as the “window procedure.” You are undoubtedly accustomed to the idea of a program making calls to the operating system. This is how a program opens a disk file, for example. What you may not be accustomed to is the idea of an operating system making calls to a program. Yet this is fundamental to Windows’ architecture. Every window that a program creates has an associated window procedure. This window procedure is a function that could be either in the program itself or in a dynamic-link library. Windows sends a message to a window by calling the window procedure. The window procedure does some processing based on the message and then returns control to Windows. More precisely, a window is always created based on a “window class.” The window class identifies the window procedure that processes messages to the window. The use of a window class allows multiple windows to be based on the same window class and hence use the same window procedure. For example, all buttons in all Windows programs are based on the same window class. This window class is associated with a window procedure located in a Windows dynamic-link library that processes messages to all the button windows. In object-oriented programming, an object is a combination of code and data. A window is an object. The code is the window procedure. The data is information retained by the window procedure and information retained by Windows for each window and window class that exists in the system. A window procedure processes messages to the window. Very often these messages inform a window of user input from the keyboard or the mouse. For example, this is how a push-button window knows that it’s being “clicked.” Other messages tell a window when it is being resized or when the surface of the window needs to be redrawn. When a Windows program begins execution, Windows creates a “message queue” for the program. This message queue stores messages to all the windows a program might create. A Windows application includes a short chunk of code called the “message loop” to retrieve these messages from the queue and dispatch them to the appropriate window procedure. Other messages are sent directly to the window procedure without being placed in the message queue. If your eyes are beginning to glaze over with this excessively abstract description of the Windows architecture, maybe it will help to see how the window, the window class, the window procedure, the message queue, the message loop, and the window messages all fit together in the context of a real program. The HELLOWIN Program Creating a window first requires registering a window class, and that requires a window procedure to process messages to the window. This involves a bit of overhead that appears in almost every Windows program. The HELLOWIN program, shown in Figure 3-1, is a simple program showing mostly that overhead. Figure 3-1. The HELLOWIN program. HELLOWIN.C 39
- 40. /*------------------------------------------------------------ HELLOWIN.C—Displays “Hello, Windows 98!” in client area © Charles Petzold, 1998 ------------------------------------------------------------*/ #include <windows.h> LRESULT CALLBACK WndProc (HWND, UINT, WPARAM, LPARAM) ; Int WINAPI WinMain (HINSTANCE hInstance, HINSTANCE hPrevInstance, PSTR szCmdLine, int iCmdShow) { static TCHAR szAppName[] = TEXT (“HelloWin”) ; HWND hwnd ; MSG msg ; WNDCLASS wndclass ; wndclass.style = CS_HREDRAW | CS_VREDRAW ; wndclass.lpfnWndProc = WndProc ; wndclass.cbClsExtra = 0 ; wndclass.cbWndExtra = 0 ; wndclass.hInstance = hInstance ; wndclass.hIcon = LoadIcon (NULL, IDI_APPLICATION) ; wndclass.hCursor = LoadCursor (NULL, IDC_ARROW) ; wndclass.hbrBackground = (HBRUSH) GetStockObject (WHITE_BRUSH) ; wndclass.lpszMenuName = NULL ; wndclass.lpszClassName = szAppName ; if (!RegisterClass (&wndclass)) { MessageBox (NULL, TEXT (“This program requires Windows NT!”), szAppName, MB_ICONERROR) ; return 0 ; } hwnd = CreateWindow (szAppName, // window class name TEXT (“The Hello Program”), // window caption WS_OVERLAPPEDWINDOW, // window style CW_USEDEFAULT, // initial x position CW_USEDEFAULT, // initial y position CW_USEDEFAULT, // initial x size CW_USEDEFAULT, // initial y size NULL, // parent window handle NULL, // window menu handle hInstance, // program instance handle NULL) ; // creation parameters ShowWindow (hwnd, iCmdShow) ; UpdateWindow (hwnd) ; while (GetMessage (&msg, NULL, 0, 0)) { TranslateMessage (&msg) ; DispatchMessage (&msg) ; } return msg.wParam ; } LRESULT CALLBACK WndProc (HWND hwnd, UINT message, WPARAM wParam, LPARAM lParam) { HDC hdc ; PAINTSTRUCT ps ; 40
- 41. RECT rect ; switch (message) { case WM_CREATE: PlaySound (TEXT (“hellowin.wav”), NULL, SND_FILENAME | SND_ASYNC) ; return 0 ; case WM_PAINT: hdc = BeginPaint (hwnd, &ps) ; GetClientRect (hwnd, &rect) ; DrawText (hdc, TEXT (“Hello, Windows 98!”), -1, &rect, DT_SINGLELINE | DT_CENTER | DT_VCENTER) ; EndPaint (hwnd, &ps) ; return 0 ; case WM_DESTROY: PostQuitMessage (0) ; return 0 ; } return DefWindowProc (hwnd, message, wParam, lParam) ; } This program creates a normal application window, as shown in Figure 3-2, and displays, “Hello, Windows 98!” in the center of that window. If you have a sound board installed, you will also hear me saying the same thing. Figure 3-2. The HELLOWIN window. 41
- 42. A couple of warnings: If you use Microsoft Visual C++ to create a new project for this program, you need to make an addition to the object libraries the linker uses. Select the Settings option from the Project menu, and pick the Link tab. Select General from the Category list box, and add WINMM.LIB (“Windows multimedia”) to the Object/Library Modules text box. You need to do this because HELLOWIN makes use of a multimedia function call, and the multimedia object library isn’t included in a default project. Otherwise you’ll get an error message from the linker indicating that the PlaySound function is unresolved. HELLOWIN accesses a file named HELLOWIN.WAV, which is on the companion CD-ROM in the HELLOWIN directory. When you execute HELLOWIN.EXE, the default directory must be HELLOWIN. This is the case when you execute the program within Visual C++, even though the executable will be in the RELEASE or DEBUG subdirectory of HELLOWIN. Thinking Globally Most of HELLOWIN.C is overhead found in virtually every Windows program. Nobody really memorizes all the syntax to write this overhead; generally, Windows programmers begin a new program by copying an existing program and making appropriate changes to it. You’re free to use the programs on the companion CD-ROM in this manner. I mentioned above that HELLOWIN displays the text string in the center of its window. That’s not precisely true. The text is actually displayed in the center of the program’s “client area,” which in Figure 3-2 is the large white area within the title bar and the sizing border. This distinction will be important to us; the client area is that area of the window in which a program is free to draw and deliver visual output to the user. When you think about it, this program has an amazing amount of functionality in its 80-odd lines of code. You can grab the title bar with the mouse and move the window around the screen. You can grab the sizing borders and resize the window. When the window changes size, the program automatically repositions the text string in the center of its client area. You can click the maximize button and zoom HELLOWIN to fill the screen. You can click the minimize button and clear it from the screen. You can invoke all these options from the system menu (the small icon at the far left of the title bar). You can also close the window to terminate the program by selecting the Close option from the system menu, by clicking the close button at the far right of the title bar, or by double-clicking the system menu icon. We’ll be examining this program in detail for much of the remainder of the chapter. First, however, let’s take a more global look. HELLOWIN.C has a WinMain function like the sample programs in the first two chapters, but it also has a second function named WndProc. This is the window procedure. (In conversation among Windows programmers, it’s called the “win prock.”) Notice that there’s no code in HELLOWIN.C that calls WndProc. However, there is a reference to WndProc in WinMain, which is why the function is declared near the top of the program. The Windows Function Calls HELLOWIN makes calls to no fewer than 18 Windows functions. In the order they occur, these functions (with a brief description) are: • LoadIcon Loads an icon for use by a program. • LoadCursor Loads a mouse cursor for use by a program. • GetStockObject Obtains a graphic object, in this case a brush used for painting the window’s background. • RegisterClass Registers a window class for the program’s window. • MessageBox Displays a message box. 42
- 43. • CreateWindow Creates a window based on a window class. • ShowWindow Shows the window on the screen. • UpdateWindow Directs the window to paint itself. • GetMessage Obtains a message from the message queue. • TranslateMessage Translates some keyboard messages. • DispatchMessage Sends a message to a window procedure. • PlaySound Plays a sound file. • BeginPaint Initiates the beginning of window painting. • GetClientRect Obtains the dimensions of the window’s client area. • DrawText Displays a text string. • EndPaint Ends window painting. • PostQuitMessage Inserts a “quit” message into the message queue. • DefWindowProc Performs default processing of messages. These functions are described in the Platform SDK documentation, and they are declared in various header files, mostly in WINUSER.H. Uppercase Identifiers You’ll notice the use of quite a few uppercase identifiers in HELLOWIN.C. These identifiers are defined in the Windows header files. Several of these identifiers contain a two-letter or three-letter prefix followed by an underscore: CS_HREDRAW DT_VCENTER SND_FILENAME CS_VREDRAW IDC_ARROW WM_CREATE CW_USEDEFAULT IDI_APPLICATION WM_DESTROY DT_CENTER MB_ICONERROR WM_PAINT DT_SINGLELINE SND_ASYNC WS_OVERLAPPEDWINDOW These are simply numeric constants. The prefix indicates a general category to which the constant belongs, as indicated in this table: Prefix Constant CS Class style option CW Create window option DT Draw text option IDI ID number for an icon 43
- 44. IDC ID number for a cursor MB Message box options SND Sound option WM Window message WS Window style You almost never need to remember numeric constants when programming for Windows. Virtually every numeric constant has an identifier defined in the header files. New Data Types Some other identifiers used in HELLOWIN.C are new data types, also defined in the Windows header files using either typedef or #define statements. This was originally done to ease the transition of Windows programs from the original 16-bit system to future operating systems that would be based on 32-bit technology. This didn’t quite work as smoothly and transparently as everyone thought at the time, but the concept was fundamentally sound. Sometimes these new data types are just convenient abbreviations. For example, the UINT data type used for the second parameter to WndProc is simply an unsigned int, which in Windows 98 is a 32-bit value. The PSTR data type used for the third parameter to WinMain is a pointer to a nonwide character string, that is, a char *. Others are less obvious. For example, the third and fourth parameters to WndProc are defined as WPARAM and LPARAM, respectively. The origin of these names requires a bit of history. When Windows was a 16-bit system, the third parameter to WndProc was defined as a WORD, which was a 16-bit unsigned short integer, and the fourth parameter was defined as a LONG, which was a 32-bit signed long integer. That’s the reason for the “W” and “L” prefixes on the word “PARAM.” In the 32-bit versions of Windows, however, WPARAM is defined as a UINT and LPARAM is defined as a LONG (which is still the C long data type), so both parameters to the window procedure are 32-bit values. This may be a little confusing because the WORD data type is still defined as a 16-bit unsigned short integer in Windows 98, so the “W” prefix to “PARAM” creates somewhat of a misnomer. The WndProc function returns a value of type LRESULT. That’s simply defined as a LONG. The WinMain function is given a type of WINAPI (as is every Windows function call defined in the header files), and the WndProc function is given a type of CALLBACK. Both these identifiers are defined as __stdcall, which refers to a special calling sequence for function calls that occur between Windows itself and your application. HELLOWIN also uses four data structures (which I’ll discuss later in this chapter) defined in the Windows header files. These data structures are shown in the table below. Structure Meaning MSG Message structure WNDCLASS Window class structure PAINTSTRUCT Paint structure RECT Rectangle structure The first two data structures are used in WinMain to define two structures named msg and wndclass. The second two are used in WndProc to define two structures named ps and rect. Getting a Handle on Handles Finally, there are three uppercase identifiers for various types of “handles”: 44
- 45. Identifier Meaning HINSTANCE Handle to an “instance”—the program itself HWND Handle to a window HDC Handle to a device context Handles are used quite frequently in Windows. Before the chapter is over, you will also encounter HICON (a handle to an icon), HCURSOR (a handle to a mouse cursor), and HBRUSH (a handle to a graphics brush). A handle is simply a number (usually 32 bits in size) that refers to an object. The handles in Windows are similar to file handles used in conventional C or MS-DOS programming. A program almost always obtains a handle by calling a Windows function. The program uses the handle in other Windows functions to refer to the object. The actual value of the handle is unimportant to your program, but the Windows module that gives your program the handle knows how to use it to reference the object. Hungarian Notation You might also notice that some of the variables in HELLOWIN.C have peculiar-looking names. One example is szCmdLine, passed as a parameter to WinMain. Many Windows programmers use a variable-naming convention known as “Hungarian Notation,” in honor of the legendary Microsoft programmer Charles Simonyi. Very simply, the variable name begins with a lowercase letter or letters that denote the data type of the variable. For example, the sz prefix in szCmdLine stands for “string terminated by zero.” The h prefix in hInstance and hPrevInstance stands for “handle;” the i prefix in iCmdShow stands for “integer.” The last two parameters to WndProc also use Hungarian notation, although, as I explained before, wParam should more properly be named uiParam (ui for “unsigned integer”). But because these two parameters are defined using the data types WPARAM and LPARAM, I’ve chosen to retain their traditional names. When naming structure variables, you can use the structure name (or an abbreviation of the structure name) in lowercase either as a prefix to the variable name or as the entire variable name. For example, in the WinMain function in HELLOWIN.C, the msg variable is a structure of the MSG type; wndclass is a structure of the WNDCLASS type. In the WndProc function, ps is a PAINTSTRUCT structure and rect is a RECT structure. Hungarian notation helps you avoid errors in your code before they turn into bugs. Because the name of a variable describes both the use of a variable and its data type, you are much less likely to make coding errors involving mismatched data types. The variable name prefixes I’ll generally be using in this book are shown in the following table. Prefix Data Type C char or WCHAR or TCHAR by BYTE (unsigned char) n short I int X, y int used as x-coordinate or y-coordinate Cx, cy int used as x or y length; c stands for “count” b or f BOOL (int); f stands for “flag” w WORD (unsigned short) 45
- 46. L LONG (long) dw DWORD (unsigned long) Fn function S string Sz string terminated by 0 character h handle p pointer Registering the Window Class A window is always created based on a window class. The window class identifies the window procedure that processes messages to the window. More than one window can be created based on a single window class. For example, all button windows—including push buttons, check boxes, and radio buttons—are created based on the same window class. The window class defines the window procedure and some other characteristics of the windows that are created based on that class. When you create a window, you define additional characteristics of the window that are unique to that window. Before you create an application window, you must register a window class by calling RegisterClass. This function requires a single parameter, which is a pointer to a structure of type WNDCLASS. This structure includes two fields that are pointers to character strings, so the structure is defined two different ways in the WINUSER.H header file. First, there’s the ASCII version, WNDCLASSA: typedef struct tagWNDCLASSA { UINT style ; WNDPROC lpfnWndProc ; int cbClsExtra ; int cbWndExtra ; HINSTANCE hInstance ; HICON hIcon ; HCURSOR hCursor ; HBRUSH hbrBackground ; LPCSTR lpszMenuName ; LPCSTR lpszClassName ; } WNDCLASSA, * PWNDCLASSA, NEAR * NPWNDCLASSA, FAR * LPWNDCLASSA ; Notice some uses of Hungarian notation here: The lpfn prefix means “long pointer to a function.” (Recall that in the Win32 API there is no distinction between long pointers and near pointers. This is a remnant of 16-bit Windows.) The cb prefix stands for “count of bytes” and is often used for a variable that denotes a byte size. The h prefix is a handle, and the hbr prefix means “handle to a brush.” The lpsz prefix is a “long pointer to a string terminated with a zero.” The Unicode version of the structure is defined like so: typedef struct tagWNDCLASSW { UINT style ; WNDPROC lpfnWndProc ; int cbClsExtra ; int cbWndExtra ; HINSTANCE hInstance ; 46
- 47. HICON hIcon ; HCURSOR hCursor ; HBRUSH hbrBackground ; LPCWSTR lpszMenuName ; LPCWSTR lpszClassName ; } WNDCLASSW, * PWNDCLASSW, NEAR * NPWNDCLASSW, FAR * LPWNDCLASSW ; The only difference is that the last two fields are defined as pointers to constant wide-character strings rather than pointers to constant ASCII character strings. After WINUSER.H defines the WNDCLASSA and WNDCLASSW structures (and pointers to the structures), the header file defines WNDCLASS and pointers to WNDCLASS (some included for backward compatibility) based on the definition of the UNICODE identifier: #ifdef UNICODE typedef WNDCLASSW WNDCLASS ; typedef PWNDCLASSW PWNDCLASS ; typedef NPWNDCLASSW NPWNDCLASS ; typedef LPWNDCLASSW LPWNDCLASS ; #else typedef WNDCLASSA WNDCLASS ; typedef PWNDCLASSA PWNDCLASS ; typedef NPWNDCLASSA NPWNDCLASS ; typedef LPWNDCLASSA LPWNDCLASS ; #endif When I show subsequent structures in this book, I’ll just show the functionally equivalent definition of the structure, which for WNDCLASS is this: typedef struct { UINT style ; WNDPROC lpfnWndProc ; int cbClsExtra ; int cbWndExtra ; HINSTANCE hInstance ; HICON hIcon ; HCURSOR hCursor ; HBRUSH hbrBackground ; LPCTSTR lpszMenuName ; LPCTSTR lpszClassName ; } WNDCLASS, * PWNDCLASS ; I’ll also go easy on the various pointer definitions. There’s no reason for you to clutter up your code with variable types beginning with LP and NP. In WinMain, you define a structure of type WNDCLASS, generally like this: WNDCLASS wndclass ; You then initialize the 10 fields of the structure and call RegisterClass. The two most important fields in the WNDCLASS structure are the second and the last. The second field (lpfnWndProc) is the address of a window procedure used for all windows based on this class. In HELLOWIN.C, this window procedure is WndProc. The last field is the text name of the window class. This can be whatever you want. In programs that create only one window, the window class name is commonly set to the name of the program. The other fields describe some characteristics of the window class, as described below. Let’s take a look at each field of the WNDCLASS structure in order. The statement 47
- 48. wndclass.style = CS_HREDRAW | CS_VREDRAW ; combines two 32-bit “class style” identifiers with a C bitwise OR operator. The WINUSER.H header files defines a whole collection of identifiers with the CS prefix: #define CS_VREDRAW 0x0001 #define CS_HREDRAW 0x0002 #define CS_KEYCVTWINDOW 0x0004 #define CS_DBLCLKS 0x0008 #define CS_OWNDC 0x0020 #define CS_CLASSDC 0x0040 #define CS_PARENTDC 0x0080 #define CS_NOKEYCVT 0x0100 #define CS_NOCLOSE 0x0200 #define CS_SAVEBITS 0x0800 #define CS_BYTEALIGNCLIENT 0x1000 #define CS_BYTEALIGNWINDOW 0x2000 #define CS_GLOBALCLASS 0x4000 #define CS_IME 0x00010000 Identifiers defined in this way are often called “bit flags” because each identifier sets a single bit in a composite value. Only a few of these class styles are commonly used. The two identifiers used in HELLOWIN indicate that all windows created based on this class are to be completely repainted whenever the horizontal window size (CS_HREDRAW) or the vertical window size (CS_VREDRAW) changes. If you resize HELLOWIN’s window, you’ll see that the text string is redrawn to be in the new center of the window. These two identifiers ensure that this happens. We’ll see shortly how the window procedure is notified of this change in window size. The second field of the WNDCLASS structure is initialized by the statement: wndclass.lpfnWndProc = WndProc ; This sets the window procedure for this window class to WndProc, which is the second function in HELLOWIN.C. This window procedure will process all messages to all windows created based on this window class. In C, when you use a function name in a statement like this, you’re really referring to a pointer to a function. The next two fields are used to reserve some extra space in the class structure and the window structure that Windows maintains internally: wndclass.cbClsExtra = 0 ; wndclass.cbWndExtra = 0 ; A program can use this extra space for its own purposes. HELLOWIN does not use this feature, so 0 is specified. Otherwise, as the Hungarian notation indicates, the field would be set to a “count of bytes.” (I’ll use the cbWndExtra field in the CHECKER3 program shown in Chapter 7.) The next field is simply the instance handle of the program (which is one of the parameters to WinMain): wndclass.hInstance = hInstance ; The statement wndclass.hIcon = LoadIcon (NULL, IDI_APPLICATION) ; sets an icon for all windows created based on this window class. The icon is a small bitmap picture that represents the program to the user. When the program is running, the icon appears in the Windows taskbar and at the left side of the program window’s title bar. Later in this book, you’ll learn how to create customized icons for your Windows programs. Right now, we’ll take an easy approach and use a predefined icon. To obtain a handle to a predefined icon, you call LoadIcon with the first argument set to NULL. When you’re loading your own customized icons that are stored in your program’s .EXE file on disk, this argument would be set to hInstance, the instance handle of the program. The second argument identifies the icon. For the predefined icons, this argument is an identifier beginning with the prefix IDI (“ID for an icon”) defined in WINUSER.H. The IDI_APPLICATION icon is simply a little picture of a window. The LoadIcon function returns a handle to this icon. We don’t really care about the actual value of the handle. It’s simply used to set the value of the hIcon field. This field is defined in the WNDCLASS structure to be of type HICON, which stands for “handle to an icon.” 48
- 49. The statement wndclass.hCursor = LoadCursor (NULL, IDC_ARROW) ; is similar to the previous statement. The LoadCursor function loads a predefined mouse cursor known as IDC_ARROW and returns a handle to the cursor. This handle is assigned to the bCursor field of the WNDCLASS structure. When the mouse cursor appears over the client area of a window that is created based on this class, the cursor becomes a small arrow. The next field specifies the background color of the client area of windows created based on this class. The hbr prefix of the hbrBackground field name stands for “handle to a brush.” A brush is a graphics term that refers to a colored pattern of pixels used to fill an area. Windows has several standard, or “stock,” brushes. The GetStockObject call shown here returns a handle to a white brush: wndclass.hbrBackground = GetStockObject (WHITE_BRUSH) ; This means that the background of the client area of the window will be solid white, which is a common choice. The next field specifies the window class menu. HELLOWIN has no application menu, so the field is set to NULL: wndclass.lpszMenuName = NULL ; Finally the class must be given a name. For a small program, this can be simply the name of the program, which is the “HelloWin” string stored in the szAppName variable. wndclass.lpszClassName = szAppName ; This string is composed of either ASCII characters or Unicode characters depending on whether the UNICODE identifier has been defined. When all 10 fields of the structure have been initialized, HELLOWIN registers the window class by calling RegisterClass. The only argument to the function is a pointer to the WNDCLASS structure. Actually, there’s a RegisterClassA function that takes a pointer to the WNDCLASSA structure, and a RegisterClassW function that takes a pointer to the WNDCLASSW structure. Which function the program uses to register the window class determines whether messages sent to the window will contain ASCII text or Unicode text. Now here’s a problem: If you have compiled the program with the UNICODE identifier defined, your program will call RegisterClassW. That’s fine if you’re running the program on Microsoft Windows NT. But if you’re running the program on Windows 98, the RegisterClassW function is not really implemented. There’s an entry point for the function, but it just returns a zero from the function call, indicating an error. This is a good opportunity for a Unicode program running under Windows 98 to inform the user of the problem and terminate. Here’s the way most of the programs in this book will handle the RegisterClass function call: if (!RegisterClass (&wndclass)) { MessageBox (NULL, TEXT (“This program requires Windows NT!”), szAppName, MB_ICONERROR) ; return 0 ; } The MessageBoxW function works properly because it is one of the few Unicode functions implemented in Windows 98. This code fragment assumes, of course, that RegisterClass is not failing for some other reason, such as a NULL lpfnWndProc field of the WNDCLASS structure. The GetLastError function helps you determine the cause of the error in cases like this. GetLastError is a general-purpose function in Windows to get extended error information when a function call fails. The documentation of the various functions will indicate whether you can use GetLastError to obtain this information. In the case of calling RegisterClassW in Windows 98, GetLastError returns 120. You can look in WINERROR.H to see that the value 120 corresponds to the identifier ERROR_CALL_NOT_IMPLEMENTED. You can also look up the error in /Platform SDK/Windows Base Services/Debugging and Error Handling/Error Codes/System Errors - Numerical Order. Some Windows programmers like to check the return value of every function call for errors. This certainly makes some sense, and here’s why: I’m sure you’re familiar with the rule that you always, always check for an error when 49
- 50. you’re allocating memory. Well, many Windows functions need to allocate some memory. For example, RegisterClass needs to allocate memory to store information about the window class. So you should be checking the function regardless. On the other hand, if RegisterClass fails because it can’t allocate the memory it needs, Windows has probably already ground to a halt. I do a minimum of error checking in the sample programs in this book. This is not because I don’t think error checking is a good idea, but because it would distract from what the programs are supposed to illustrate. Finally, a historical note: In some sample Windows programs, you might see the following code in WinMain: if (!hPrevInstance) { wndclass.cbStyle = CS_HREDRAW | CS_VREDRAW ; [other wndclass initialization] RegisterClass (&wndclass) ; } This comes under the category of “old habits die hard.” In 16-bit versions of Windows, if you started up a new instance of a program that was already running, the hPrevInstance parameter to WinMain would be the instance handle of the previous instance. To save memory, two or more instances were allowed to share the same window class. Thus, the window class was registered only if hPrevInstance was NULL, indicating that no other instances of the program were running. In 32-bit versions of Windows, hPrevInstance is always NULL. This code will still work properly, but it’s not necessary to check hPrevInstance. Creating the Window The window class defines general characteristics of a window, thus allowing the same window class to be used for creating many different windows. When you go ahead and create a window by calling CreateWindow, you specify more detailed information about the window. Programmers new to Windows are sometimes confused about the distinction between the window class and the window and why all the characteristics of a window can’t be specified in one shot. Actually, dividing the information in this way is quite convenient. For example, all push-button windows are created based on the same window class. The window procedure associated with this window class is located inside Windows itself, and it is responsible for processing keyboard and mouse input to the push button and defining the button’s visual appearance on the screen. All push buttons work the same way in this respect. But not all push buttons are the same. They almost certainly have different sizes, different locations on the screen, and different text strings. These latter characteristics are part of the window definition rather than the window class definition. While the information passed to the RegisterClass function is specified in a data structure, the information passed to the CreateWindow function is specified as separate arguments to the function. Here’s the CreateWindow call in HELLOWIN.C, complete with comments identifying the fields: hwnd = CreateWindow (szAppName, // window class name TEXT (“The Hello Program”), // window caption WS_OVERLAPPEDWINDOW, // window style CW_USEDEFAULT, // initial x position CW_USEDEFAULT, // initial y position CW_USEDEFAULT, // initial x size CW_USEDEFAULT, // initial y size NULL, // parent window handle NULL, // window menu handle hInstance, // program instance handle NULL) ; // creation parameters At this point I won’t bother to mention that there are actually a CreateWindowA function and a CreateWindowW function, which treat the first two parameters to the function as ASCII or Unicode, respectively. The argument marked “window class name” is szAppName, which contains the string “HelloWin”—the name of the 50
- 51. window class the program just registered. This is how the window we’re creating is associated with a window class. The window created by this program is a normal overlapped window. It will have a title bar; a system menu button to the left of the title bar; a thick window-sizing border; and minimize, maximize, and close buttons to the right of the title bar. That’s a standard style for windows, and it has the name WS_OVERLAPPEDWINDOW, which appears as the “window style” parameter in CreateWindow. If you look in WINUSER.H, you’ll find that this style is a combination of several bit flags: #define WS_OVERLAPPEDWINDOW (WS_OVERLAPPED | WS_CAPTION | WS_SYSMENU | WS_THICKFRAME | WS_MINIMIZEBOX | WS_MAXIMIZEBOX) The “window caption” is the text that will appear in the title bar of the window. The arguments marked “initial x position” and “initial y position” specify the initial position of the upper left corner of the window relative to the upper left corner of the screen. By using the identifier CW_USEDEFAULT for these parameters, we are indicating that we want Windows to use the default position for an overlapped window. (CW_USEDEFAULT is defined as 0x80000000.) By default, Windows positions successive newly created windows at stepped horizontal and vertical offsets from the upper left corner of the display. Similarly, the “initial x size” and “initial y size” arguments specify the initial width and height of the window. The CW_USEDEFAULT identifier again indicates that we want Windows to use a default size for the window. The argument marked “parent window handle” is set to NULL when creating a “top-level” window, such as an application window. Normally, when a parent-child relationship exists between two windows, the child window always appears on the surface of its parent. An application window appears on the surface of the desktop window, but you don’t need to find out the desktop window’s handle to call CreateWindow. The “window menu handle” is also set to NULL because the window has no menu. The “program instance handle” is set to the instance handle passed to the program as a parameter of WinMain. Finally, a “creation parameters” pointer is set to NULL. You could use this parameter to point to some data that you might later want to reference in your program. The CreateWindow call returns a handle to the created window. This handle is saved in the variable hwnd, which is defined to be of type HWND (“handle to a window”). Every window in Windows has a handle. Your program uses the handle to refer to the window. Many Windows functions require hwnd as an argument so that Windows knows which window the function applies to. If a program creates many windows, each has a different handle. The handle to a window is one of the most important handles that a Windows program (pardon the expression) handles. Displaying the Window After the CreateWindow call returns, the window has been created internally in Windows. What this means basically is that Windows has allocated a block of memory to hold all the information about the window that you specified in the CreateWindow call, plus some other information, all of which Windows can find later based on the window handle. However, the window does not yet appear on the video display. Two more calls are needed. The first is ShowWindow (hwnd, iCmdShow) ; The first argument is the handle to the window just created by CreateWindow. The second argument is the iCmdShow value passed as a parameter to WinMain. This determines how the window is to be initially displayed on the screen, whether it’s normal, minimized, or maximized. The user probably selected a preference when adding the program to the Start menu. The value you receive from WinMain and pass to ShowWindow is SW_SHOWNORMAL if the window is displayed normally, SW_SHOWMAXIMIZED if the window is to be maximized, and SW_SHOWMINNOACTIVE if the window is just to be displayed in the taskbar. The ShowWindow function puts the window on the display. If the second argument to ShowWindow is 51
- 52. SW_SHOWNORMAL, the client area of the window is erased with the background brush specified in the window class. The function call UpdateWindow (hwnd) ; then causes the client area to be painted. It accomplishes this by sending the window procedure (that is, the WndProc function in HELLOWIN.C) a WM_PAINT message. We’ll soon examine how WndProc deals with this message. The Message Loop After the UpdateWindow call, the window is fully visible on the video display. The program must now make itself ready to read keyboard and mouse input from the user. Windows maintains a “message queue” for each Windows program currently running under Windows. When an input event occurs, Windows translates the event into a “message” that it places in the program’s message queue. A program retrieves these messages from the message queue by executing a block of code known as the “message loop”: while (GetMessage (&msg, NULL, 0, 0)) { TranslateMessage (&msg) ; DispatchMessage (&msg) ; } The msg variable is a structure of type MSG, which is defined in the WINUSER.H header file like this: typedef struct tagMSG { HWND hwnd ; UINT message ; WPARAM wParam ; LPARAM lParam ; DWORD time ; POINT pt ; } MSG, * PMSG ; The POINT data type is yet another structure, defined in the WINDEF.H header file like this: typedef struct tagPOINT { LONG x ; LONG y ; } POINT, * PPOINT; The GetMessage call that begins the message loop retrieves a message from the message queue: GetMessage (&msg, NULL, 0, 0) This call passes to Windows a pointer to a MSG structure named msg. The second, third, and fourth arguments are set to NULL or 0 to indicate that the program wants all messages for all windows created by the program. Windows fills in the fields of the message structure with the next message from the message queue. The fields of this structure are: • hwnd The handle to the window which the message is directed to. In the HELLOWIN program, this is the same as the hwnd value returned from CreateWindow, because that’s the only window the program has. • message The message identifier. This is a number that identifies the message. For each message, there is a corresponding identifier defined in the Windows header files (most of them in WINUSER.H) that begins with the identifier WM (“window message”). For example, if you position the mouse pointer over HELLOWIN’s client area and press the left mouse button, Windows will put a message in the message queue with a message field equal to WM_LBUTTONDOWN, which is the value 0x0201. 52
- 53. • wParam A 32-bit “message parameter,” the meaning and value of which depend on the particular message. • lParam Another 32-bit message parameter dependent on the message. • time The time the message was placed in the message queue. • pt The mouse coordinates at the time the message was placed in the message queue. If the message field of the message retrieved from the message queue is anything except WM_QUIT (which equals 0x0012), GetMessage returns a nonzero value. A WM_QUIT message causes GetMessage to return 0. The statement: TranslateMessage (&msg) ; passes the msg structure back to Windows for some keyboard translation. (I’ll discuss this more in Chapter 6.) The statement DispatchMessage (&msg) ; again passes the msg structure back to Windows. Windows then sends the message to the appropriate window procedure for processing. What this means is that Windows calls the window procedure. In HELLOWIN, the window procedure is WndProc. After WndProc processes the message, it returns control to Windows, which is still servicing the DispatchMessage call. When Windows returns to HELLOWIN following the DispatchMessage call, the message loop continues with the next GetMessage call. The Window Procedure All that I’ve described so far is really just overhead. The window class has been registered, the window has been created, the window has been displayed on the screen, and the program has entered a message loop to retrieve messages from the message queue. The real action occurs in the window procedure. The window procedure determines what the window displays in its client area and how the window responds to user input. In HELLOWIN, the window procedure is the function named WndProc. A window procedure can have any name (as long as it doesn’t conflict with some other name, of course). A Windows program can contain more than one window procedure. A window procedure is always associated with a particular window class that you register by calling RegisterClass. The CreateWindow function creates a window based on a particular window class. More than one window can be created based on the same window class. A window procedure is always defined like this: LRESULT CALLBACK WndProc (HWND hwnd, UINT message, WPARAM wParam, LPARAM lParam) The four parameters to the window procedure are identical to the first four fields of the MSG structure. The first parameter is hwnd, the handle to the window receiving the message. This is the same handle returned from the CreateWindow function. For a program like HELLOWIN, which creates only one window, this is the only window handle the program knows about. If a program creates multiple windows based on the same window class (and hence the same window procedure), hwnd identifies the particular window receiving the message. The second parameter is the same as the message field in the MSG structure. It’s a number that identifies the message. The last two parameters are 32-bit message parameters that provide more information about the message. What these parameters contain is specific to each type of message. Sometimes a message parameter is two 16-bit values stuck together, and sometimes a message parameter is a pointer to a text string or to a data structure. Programs generally don’t call window procedures directly. The window procedure is almost always called from Windows itself. A program can indirectly call its own window procedure by calling a function named SendMessage, which we’ll examine in later chapters. 53
- 54. Processing the Messages Every message that a window procedure receives is identified by a number, which is the message parameter to the window procedure. The Windows header file WINUSER.H defines identifiers beginning with the prefix WM (“window message”) for each type of message. Generally, Windows programmers use a switch and case construction to determine what message the window procedure is receiving and how to process it accordingly. When a window procedure processes a message, it should return 0 from the window procedure. All messages that a window procedure chooses not to process must be passed to a Windows function named DefWindowProc. The value returned from DefWindowProc must be returned from the window procedure. In HELLOWIN, WndProc chooses to process only three messages: WM_CREATE, WM_PAINT, and WM_DESTROY. The window procedure is structured like this: switch (iMsg) { case WM_CREATE : [process WM_CREATE message] return 0 ; case WM_PAINT : [process WM_PAINT message] return 0 ; case WM_DESTROY : [process WM_DESTROY message] return 0 ; } return DefWindowProc (hwnd, iMsg, wParam, lParam) ; It is important to call DefWindowProc for default processing of all messages that your window procedure does not process. Otherwise behavior regarded as normal, such as being able to terminate the program, will not work. Playing a Sound File The very first message that a window procedure receives—and the first that HELLOWIN’s WndProc chooses to process—is WM_CREATE. WndProc receives this message while Windows is processing the CreateWindow function in WinMain. That is, when HELLOWIN calls CreateWindow, Windows does what it has to do and, in the process, Windows calls WndProc with the first argument set to the window handle and the second argument set to WM_CREATE (the value 1). WndProc processes the WM_CREATE message and returns controls back to Windows. Windows can then return to HELLOWIN from the CreateWindow call to continue further progress in WinMain. Often a window procedure performs one-time window initialization during WM_CREATE processing. HELLOWIN chooses to process this message by playing a waveform sound file named HELLOWIN.WAV. It does this using the simple PlaySound function, which is described in /Platform SDK/Graphics and Multimedia Services/Multimedia Audio/Waveform Audio and documented in /Platform SDK/Graphics and Multimedia Services/Multimedia Reference/Multimedia Functions. The first argument to PlaySound is the name of a waveform file. (It could also be a sound alias name defined in the Sounds section of the Control Panel or a program resource.) The second argument is used only if the sound file is a resource. The third argument specifies a couple of options. In this case, I’ve indicated that the first argument is a filename and that the sound is to be played asynchronously—that is, the PlaySound function call is to return as soon as the sound file starts playing without waiting for it to complete. That way the program can continue with its initialization. WndProc concludes WM_CREATE processing by returning 0 from the window procedure. 54
- 55. The WM_PAINT Message The second message that WndProc processes is WM_PAINT. This message is extremely important in Windows programming. It informs a program when part or all of the window’s client area is “invalid” and must be “updated,” which means that it must be redrawn or “painted.” How does a client area become invalid? When the window is first created, the entire client area is invalid because the program has not yet drawn anything on the window. The first WM_PAINT message (which normally occurs when the program calls UpdateWindow in WinMain) directs the window procedure to draw something on the client area. When you resize HELLOWIN’s window, the client area becomes invalid. You’ll recall that the style field of HELLOWIN’s wndclass structure was set to the flags CS_HREDRAW and CS_VREDRAW. This directs Windows to invalidate the whole window when the size changes. The window procedure then receives a WM_PAINT message. When you minimize HELLOWIN and then restore the window again to its previous size, Windows does not save the contents of the client area. Under a graphical environment, this would be too much data to retain. Instead, Windows invalidates the window. The window procedure receives a WM_PAINT message and itself restores the contents of its window. When you move windows around the screen so that they overlap, Windows does not save the area of a window covered by another window. When that area of the window is later uncovered, it is flagged as invalid. The window procedure receives a WM_PAINT message to repaint the contents of the window. WM_PAINT processing almost always begins with a call to BeginPaint: hdc = BeginPaint (hwnd, &ps) ; and ends with a call to EndPaint: EndPaint (hwnd, &ps) ; In both cases, the first argument is a handle to the program’s window, and the second argument is a pointer to a structure of type PAINTSTRUCT. The PAINTSTRUCT structure contains some information that a window procedure can use for painting the client area. I’ll discuss the fields of this structure in the next chapter; for now, we’ll just use it in the BeginPaint and EndPaint functions. During the BeginPaint call, Windows erases the background of the client area if it hasn’t been erased already. It erases the background using the brush specified in the hbrBackground field of the WNDCLASS structure used to register the window class. In the case of HELLOWIN, this is a stock white brush, which means that Windows erases the background of the window by coloring it white. The BeginPaint call validates the entire client area and returns a “handle to a device context.” A device context refers to a physical output device (such as a video display) and its device driver. You need the device context handle to display text and graphics in the client area of a window. Using the device context handle returned from BeginPaint, you cannot draw outside the client area, even if you try. EndPaint releases the device context handle so that it is no longer valid. If a window procedure does not process WM_PAINT messages (which is very rare), they must be passed on to DefWindowProc. DefWindowProc simply calls BeginPaint and EndPaint in succession so that the client area is validated. After WndProc calls BeginPaint, it calls GetClientRect: GetClientRect (hwnd, &rect) ; The first argument is the handle to the program’s window. The second argument is a pointer to a rectangle structure of type RECT. This structure has four LONG fields named left, top, right, and bottom. The GetClientRect function sets these four fields to the dimensions of the client area of the window. The left and top fields are always set to 0. Thus, the right and bottom fields represent the width and height of the client area in pixels. WndProc doesn’t do anything with this RECT structure except pass a pointer to it as the fourth argument to 55
- 56. DrawText: DrawText (hdc, TEXT (“Hello, Windows 98!”), -1, &rect, DT_SINGLELINE | DT_CENTER | DT_VCENTER) ; DrawText, as the name implies, draws text. Because this function draws something, the first argument is a handle to the device context returned from BeginPaint. The second argument is the text to draw, and the third argument is set to -1 to indicate that the text string is terminated with a zero character. The last argument to DrawText is a series of bit flags defined in WINUSER.H. (Although DrawText seems to be a GDI function call because it displays output, it’s actually considered part of the User module because it’s a fairly high-level drawing function. The function is documented in /Platform SDK/Graphics and Multimedia Services/GDI/Fonts and Text.) The flags indicate that the text should be displayed as a single line centered horizontally and vertically within the rectangle specified by the fourth argument. This function call thus causes the string “Hello, Windows 98!” to be displayed centered in the client area. Whenever the client area becomes invalid (as it does when you change the size of the window), WndProc receives a new WM_PAINT message. WndProc obtains the updated window size by calling GetClientRect and again displays the text in the next center of the window. The WM_DESTROY Message The WM_DESTROY message is another important message. This message indicates that Windows is in the process of destroying a window based on a command from the user. The message is a result of the user clicking on the Close button or selecting Close from the program’s system menu. (Later in this chapter, I’ll discuss in more detail how the WM_DESTROY message gets generated.) HELLOWIN responds to the WM_DESTROY message in a standard way by calling PostQuitMessage (0) ; This function inserts a WM_QUIT message in the program’s message queue. I mentioned earlier that GetMessage returns nonzero for any message other than WM_QUIT that it retrieves from the message queue. When GetMessage retrieves a WM_QUIT message, GetMessage returns 0. This causes WinMain to drop out of the message loop. The program then executes the following statement: return msg.wParam ; The wParam field of the structure is the value passed to the PostQuitMessage function (generally 0). The return statement exits from WinMain and terminates the program. The Windows Programming Hurdles Even with my explanation of HELLOWIN, the structure and workings of the program are probably still quite mysterious. In a short C program written for a character-mode environment, the entire program might be contained in the main function. In HELLOWIN, WinMain contains only program overhead necessary to register the window class, create the window, and retrieve and dispatch messages from the message queue. All the real action of the program occurs in the window procedure. In HELLOWIN, this action is not much— WndProc simply plays a sound file and displays a text string in its window. But in later chapters, you’ll find that almost everything a Windows program does is in response to a message to a window procedure. This is one of the major conceptual hurdles you must leap to begin writing Windows programs. Don’t Call Me, I’ll Call You Programmers are well acquainted with the idea of calling on the operating system to do something. For example, C programmers use the fopen function to open a file. The fopen function is implemented with a call to the operating system to open a file. No problem. 56
- 57. But Windows is different. Although Windows has a couple thousand function calls, Windows also makes calls to your program, specifically to the window procedure we have called WndProc. The window procedure is associated with a window class that the program registers by calling RegisterClass. A window that is created based on this window class uses this window procedure for processing all messages to the window. Windows sends a message to the window by calling the window procedure. Windows calls WndProc when a window is first created. Windows calls WndProc when the window is eventually destroyed. Windows calls WndProc when the window has been resized or moved or minimized. Windows calls WndProc when a user clicks on the window with the mouse. Windows calls WndProc when characters are typed from the keyboard. Windows calls WndProc when an item has been selected from a menu. Windows calls WndProc when a scroll bar is manipulated or clicked with the mouse. Windows calls WndProc to tell it when it must repaint its client area. All these calls to WndProc are in the form of messages. In most Windows programs, the bulk of the program is dedicated to handling these messages. The messages that Windows can send to a program are generally identified with names that begin with the letters WM and are defined in the WINUSER.H header file. Actually, the idea of a routine within a program that is called from outside the program is not unheard of in character-mode programming. The signal function in C can trap a Ctrl-C break or other interrupts from the operating system. Old programs written for MS-DOS often trapped hardware interrupts. But in Windows this concept is extended to cover everything. Everything that happens to a window is relayed to the window procedure in the form of a message. The window procedure then responds to this message in some way or passes the message to DefWindowProc for default processing. The wParam and lParam parameters to the window procedure are not used in HELLOWIN except as parameters to DefWindowProc. These parameters give the window procedure additional information about the message. The meaning of the parameters is message-dependent. Let’s look at an example. Whenever the client area of a window changes in size, Windows calls that window’s window procedure. The hwnd parameter to the window procedure is the handle of the window changing in size. (Remember that one window procedure could be handling messages for multiple windows that were created based on the same window class. The hwnd parameter lets the window procedure know which window is receiving the message.) The message parameter is WM_SIZE. The wParam parameter for a WM_SIZE message is the value SIZE_RESTORED, SIZE_MINIMIZED, SIZE_MAXIMIZED, SIZE_MAXSHOW, or SIZE_MAXHIDE (defined in the WINUSER.H header file as the numbers 0 through 4). That is, the wParam parameter indicates whether the window is being changed to a nonminimized or nonmaximized size, being minimized, being maximized, or being hidden. The lParam parameter contains the new size of the window. The new width (a 16-bit value) and the new height (a 16-bit value) are stuck together in the 32-bit lParam. The WINDEF.H header file defines some handy macros that help you extract these two values from lParam. We’ll do this in the next chapter. Sometimes messages generate other messages as a result of DefWindowProc processing. For example, suppose you run HELLOWIN and you eventually click the Close button, or suppose you select Close from the system menu using either the keyboard or the mouse. DefWindowProc processes this keyboard or mouse input. When it detects that you have selected the Close option, it sends a WM_SYSCOMMAND message to the window procedure. WndProc passes this message to DefWindowProc. DefWindowProc responds by sending a WM_CLOSE message to the window procedure. WndProc again passes this message to DefWindowProc. DefWindowProc responds to the WM_CLOSE message by calling DestroyWindow. DestroyWindow causes Windows to send a WM_DESTROY message to the window procedure. WndProc finally responds to this message by calling PostQuitMessage to put a WM_QUIT message in the message queue. This message causes the message loop in WinMain to terminate and the program to end. Queued and Nonqueued Messages I’ve talked about Windows sending messages to a window, which means that Windows calls the window procedure. 57
- 58. But a Windows program also has a message loop that retrieves messages from a message queue by calling GetMessage and dispatches these messages to the window procedure by calling DispatchMessage. So, does a Windows program poll for messages (much like a character-mode program polling for keyboard input) and then route these messages to some location? Or does it receive messages directly from outside the program? Well, both. Messages can be either “queued” or “nonqueued.” The queued messages are those that are placed in a program’s message queue by Windows. In the program’s message loop, the messages are retrieved and dispatched to the window procedure. The nonqueued messages are the results of calls by Windows directly to the window procedure. It is said that queued messages are “posted” to a message queue and that nonqueued messages are “sent” to the window procedure. In any case, the window procedure gets all the messages—both queued and nonqueued—for the window. The window procedure is “message central” for the window. The queued messages are primarily those that result from user input in the form of keystrokes (such as the WM_KEYDOWN and WM_KEYUP messages), characters that result from keystrokes (WM_CHAR), mouse movement (WM_MOUSEMOVE), and mouse-button clicks (WM_LBUTTONDOWN). Queued messages also include the timer message (WM_TIMER), the repaint message (WM_PAINT), and the quit message (WM_QUIT). The nonqueued messages are everything else. Nonqueued messages often result from calling certain Windows functions. For example, when WinMain calls CreateWindow, Windows creates the window and in the process sends the window procedure a WM_CREATE message. When WinMain calls ShowWindow, Windows sends the window procedure WM_SIZE and WM_SHOWWINDOW messages. When WinMain calls UpdateWindow, Windows sends the window procedure a WM_PAINT message. Queued messages signaling keyboard or mouse input can also result in nonqueued messages. For example, when you select a menu item with the keyboard or mouse, the keyboard or mouse message is queued but the eventual WM_COMMAND message indicating that a menu item has been selected is nonqueued. This process is obviously complex, but fortunately most of the complexity is Windows’ problem rather than our program’s. From the perspective of the window procedure, these messages come through in an orderly and synchronized manner. The window procedure can do something with these messages or ignore them. When I say that messages come through in an orderly and synchronized manner, I mean first that messages are not like hardware interrupts. While processing one message in a window procedure, the program will not be suddenly interrupted by another message. Although Windows programs can have multiple threads of execution, each thread’s message queue handles messages for only the windows whose window procedures are executed in that thread. In other words, the message loop and the window procedure do not run concurrently. When a message loop retrieves a message from its message queue and calls DispatchMessage to send the message off to the window procedure, DispatchMessage does not return until the window procedure has returned control back to Windows. However, the window procedure could call a function that sends the window procedure another message, in which case the window procedure must finish processing the second message before the function call returns, at which time the window procedure proceeds with the original message. For example, when a window procedure calls UpdateWindow, Windows calls the window procedure with a WM_PAINT message. When the window procedure finishes processing the WM_PAINT message, the UpdateWindow call will return controls back to the window procedure. This means that window procedures must be reentrant. In most cases, this doesn’t cause problems, but you should be aware of it. For example, suppose you set a static variable in the window procedure while processing a message and then you call a Windows function. Upon return from that function, can you be assured that the variable is still the same? Not necessarily—not if the particular Windows function you call generated another message and the window procedure changes the variable while processing that second message. This is one of the reasons why certain forms of compiler optimization must be turned off when compiling Windows programs. In many cases, the window procedure must retain information it obtains in one message and use it while processing 58
- 59. another message. This information must be saved in variables defined as static in the window procedure, or saved in global variables. Of course, you’ll get a much better feel for all of this in later chapters as the window procedures are expanded to process more messages. Get In and Out Fast Windows 98 and Windows NT are preemptive multitasking environments. This means that as one program is doing a lengthy job, Windows can allow the user to switch control to another program. This is a good thing, and it is one advantage of the current versions of Windows over the older 16-bit versions. However, because of the way that Windows is structured, this preemptive multitasking does not always work the way you might like. For example, suppose your program spends a minute or two processing a particular message. Yes, the user can switch to another program. But the user cannot do anything with your program. The user cannot move your program’s window, resize it, minimize it, close it, nothing. That’s because your window procedure is busy doing a lengthy job. Oh, it may not seem like the window procedure performs its own moving and sizing operations, but it does. That’s part of the job of DefWindowProc, which must be considered as part of your window procedure. If your program needs to perform lengthy jobs while processing particular messages, there are ways to do so politely that I’ll describe in Chapter 20. Even with preemptive multitasking, it’s not a good idea to leave your window sitting inert on the screen. It annoys users. It annoys users just as much as bugs, nonstandard behavior, and incomplete help files. Give the user a break, and return quickly from all messages. 59
- 60. Chapter 4 -- An Exercise in Text Output In the previous chapter, we explored the workings of a simple Windows 98 program that displayed a single line of text in the center of its window or, more precisely, the center of its client area. As we learned, the client area is that part of the total application window that is not taken up by the title bar, the window-sizing border, and, optionally, the menu bar, tool bars, status bar, and scroll bars. In short, the client area is the part of the window on which a program is free to draw and deliver visual information to the user. You can do almost anything you want with your program’s client area—anything, that is, except assume that it will be a particular size or that the size will remain constant while your program is running. If you are not accustomed to writing programs for a graphical windowing environment, these stipulations may come as a bit of a shock. You can’t think in terms of a fixed number of 80-character lines. Your program must share the video display with other Windows programs. The Windows user controls how the programs’ windows are arranged on the screen. Although it is possible for a programmer to create a window of a fixed size (which might be appropriate for calculators or similar utilities), users are usually able to size application windows. Your program must accept the size it’s given and do something reasonable with it. This works both ways. Just as your program may find itself with a client area barely large enough in which to say “Hello,” it may also someday be run on a big-screen, high-resolution video system and discover a client area large enough for two entire pages of text and plenty of closet space besides. Dealing intelligently with both eventualities is an important part of Windows programming. In this chapter, we will learn how a program displays something on the surface of its client area with more sophistication than that illustrated in the last chapter. When a program displays text or graphics in its client area, it is often said to be “painting” its client area. This chapter is about learning to paint. Although Windows has extensive Graphics Device Interface (GDI) functions for displaying graphics, in this chapter I’ll stick to displaying simple lines of text. I’ll also ignore the various font faces and font sizes that Windows makes available and use only Windows’ default “system font.” This may seem limiting, but it really isn’t. The problems we will encounter and solve in this chapter apply to all Windows programming. When you display a combination of text and graphics, the character dimensions of Windows’ default font often determine the dimensions of the graphics. Although this chapter is ostensibly about learning how to paint, it’s really about learning the basics of device- independent programming. Windows programs can assume little about the size of their client areas or even the size of text characters. Instead, they must use the facilities that Windows provides to obtain information about the environment in which the program runs. Painting and Repainting In character-mode environments, programs can generally write to any part of the video display. What the program puts on the display will stay there and not mysteriously disappear. The program can then discard the information needed to re-create the screen display. In Windows, you can draw text and graphics only in the client area of your window, and you cannot be assured that what you put will remain there until your program specifically writes over it. For instance, the user may move another program’s window on the screen so that it partially covers your application’s window. Windows will not attempt to save the area of your window that the other program covers. When the program is moved away, Windows will request that your program repaint this portion of your client area. Windows is a message-driven system. Windows informs applications of various events by posting messages in the application’s message queue or sending messages to the appropriate window procedure. Windows informs a window procedure that part of the window’s client area needs painting by posting a WM_PAINT message. 60
- 61. The WM_PAINT Message Most Windows programs call the function UpdateWindow during initialization in WinMain shortly before entering the message loop. Windows takes this opportunity to send the window procedure its first WM_PAINT message. This message informs the window procedure that the client area must be painted. Thereafter, that window procedure should be ready at almost any time to process additional WM_PAINT messages and even to repaint the entire client area of the window if necessary. A window procedure receives a WM_PAINT message whenever one of the following events occurs: • A previously hidden area of the window is brought into view when a user moves a window or uncovers a window. • The user resizes the window (if the window class style has the CS_HREDRAW and CW_VREDRAW bits set). • The program uses the ScrollWindow or ScrollDC function to scroll part of its client area. • The program uses the InvalidateRect or InvalidateRgn function to explicitly generate a WM_PAINT message. In some cases when part of the client area is temporarily written over, Windows attempts to save an area of the display and restore it later. This is not always successful. Windows may sometimes post a WM_PAINT message when: • Windows removes a dialog box or message box that was overlaying part of the window. • A menu is pulled down and then released. • A tool tip is displayed. In a few cases, Windows always saves the area of the display it overwrites and then restores it. This is the case whenever: • The mouse cursor is moved across the client area. • An icon is dragged across the client area. Dealing with WM_PAINT message requires that you alter the way you think about how you write to the video display. Your program should be structured so that it accumulates all the information necessary to paint the client area but paints only “on demand”—when Windows sends the window procedure a WM_PAINT message. If your program needs to update its client area at some other time, it can force Windows to generate this WM_PAINT message. This may seem a roundabout method of displaying something on the screen, but the structure of your program will benefit from it. Valid and Invalid Rectangles Although a window procedure should be prepared to update the entire client area whenever it receives a WM_PAINT message, it often needs to update only a smaller area, most often a rectangular area within the client area. This is most obvious when a dialog box overlies part of the client area. Repainting is required only for the rectangular area uncovered when the dialog box is removed. That area is known as an “invalid region” or “update region.” The presence of an invalid region in a client area is what prompts Windows to place a WM_PAINT message in the application’s message queue. Your window procedure receives a WM_PAINT message only if part of your client area is invalid. Windows internally maintains a “paint information structure” for each window. This structure contains, among other information, the coordinates of the smallest rectangle that encompasses the invalid region. This is known as the 61
- 62. “invalid rectangle.” If another region of the client area becomes invalid before the window procedure processes a pending WM_PAINT message, Windows calculates a new invalid region (and a new invalid rectangle) that encompasses both areas and stores this updated information in the paint information structure. Windows does not place multiple WM_PAINT messages in the message queue. A window procedure can invalidate a rectangle in its own client area by calling InvalidateRect. If the message queue already contains a WM_PAINT message, Windows calculates a new invalid rectangle. Otherwise, it places a WM_PAINT message in the message queue. A window procedure can obtain the coordinates of the invalid rectangle when it receives a WM_PAINT message (as we’ll see later in this chapter). It can also obtain these coordinates at any other time by calling GetUpdateRect. After the window procedure calls BeginPaint during the WM_PAINT message, the entire client area is validated. A program can also validate any rectangular area within the client area by calling the ValidateRect function. If this call has the effect of validating the entire invalid area, then any WM_PAINT message currently in the queue is removed. An Introduction to GDI To paint the client area of your window, you use Windows’ Graphics Device Interface (GDI) functions. Windows provides several GDI functions for writing text strings to the client area of the window. We’ve already encountered the DrawText function in the last chapter, but the most commonly used text output function is undoubtedly TextOut. This function has the following format: TextOut (hdc, x, y, psText, iLength) ; TextOut writes a character string to the client area of the window. The psText argument is a pointer to the character string, and iLength is the length of the string in characters. The x and y arguments define the starting position of the character string in the client area. (More details soon on how these work.) The hdc argument is a “handle to a device context,” and it is an important part of GDI. Virtually every GDI function requires this handle as the first argument to the function. The Device Context A handle, you’ll recall, is simply a number that Windows uses for internal reference to an object. You obtain the handle from Windows and then use the handle in other functions. The device context handle is your window’s passport to the GDI functions. With that device context handle you are free to paint your client area and make it as beautiful or as ugly as you like. The device context (also called simply the “DC”) is really just a data structure maintained internally by GDI. A device context is associated with a particular display device, such as a video display or a printer. For a video display, a device context is usually associated with a particular window on the display. Some of the values in the device context are graphics “attributes.” These attributes define some particulars of how GDI drawing functions work. With TextOut, for instance, the attributes of the device context determine the color of the text, the color of the text background, how the x-coordinate and y-coordinate in the TextOut function are mapped to the client area of the window, and what font Windows uses when displaying the text. When a program needs to paint, it must first obtain a handle to a device context. When you obtain this handle, Windows fills the internal device context structure with default attribute values. As you’ll see in later chapters, you can change these defaults by calling various GDI functions. Other GDI functions let you obtain the current values of these attributes. Then, of course, there are still other GDI functions that let you actually paint the client area of the window. After a program has finished painting its client area, it should release the device context handle. When a program releases the handle, the handle is no longer valid and must not be used. The program should obtain the handle and release the handle during the processing of a single message. Except for a device context created with a call to CreateDC (a function I won’t discuss in this chapter), you should not keep a device context handle around from one message to another. 62
- 63. Windows applications generally use two methods for getting a device context handle in preparation for painting the screen. Getting a Device Context Handle: Method One You use this method when you process WM_PAINT messages. Two functions are involved: BeginPaint and EndPaint. These two functions require the handle to the window, which is passed to the window procedure as an argument, and the address of a structure variable of type PAINTSTRUCT, which is defined in the WINUSER.H header file. Windows programmers usually name this structure variable ps and define it within the window procedure like so: PAINTSTRUCT ps ; While processing a WM_PAINT message, the window procedure first calls BeginPaint. The BeginPaint function generally causes the background of the invalid region to be erased in preparation for painting. The function also fills in the fields of the ps structure. The value returned from BeginPaint is the device context handle. This is commonly saved in a variable named hdc. You define this variable in your window procedure like so: HDC hdc ; The HDC data type is defined as a 32-bit unsigned integer. The program may then use GDI functions, such as TextOut, that require the handle to the device context. A call to EndPaint releases the device context handle. Typically, processing of the WM_PAINT message looks like this: case WM_PAINT: hdc = BeginPaint (hwnd, &ps) ; [use GDI functions] EndPaint (hwnd, &ps) ; return 0 ; The window procedure must call BeginPaint and EndPaint as a pair while processing the WM_PAINT message. If a window procedure does not process WM_PAINT messages, it must pass the WM_PAINT message to DefWindowProc, which is the default window procedure located in Windows. DefWindowProc processes WM_PAINT messages with the following code: case WM_PAINT: BeginPaint (hwnd, &ps) ; EndPaint (hwnd, &ps) ; return 0 ; The sequence of BeginPaint and EndPaint calls with nothing in between validates the previously invalid region. But don’t do this: case WM_PAINT: return 0 ; // WRONG !!! Windows places a WM_PAINT message in the message queue because part of the client area is invalid. Unless you call BeginPaint and EndPaint (or ValidateRect), Windows will not validate that area. Instead, Windows will send you another WM_PAINT message, and another, and another, and another…. The Paint Information Structure Earlier I mentioned a “paint information structure” that Windows maintains for each window. That’s what PAINTSTRUCT is. The structure is defined as follows: typedef struct tagPAINTSTRUCT { HDC hdc ; BOOL fErase ; RECT rcPaint ; BOOL fRestore ; BOOL fIncUpdate ; BYTE rgbReserved[32] ; 63
- 64. } PAINTSTRUCT ; Windows fills in the fields of this structure when your program calls BeginPaint. Your program can use only the first three fields. The others are used internally by Windows. The hdc field is the handle to the device context. In a redundancy typical of Windows, the value returned from BeginPaint is also this device context handle. In most cases, fErase will be flagged FALSE (0), meaning that Windows has already erased the background of the invalid rectangle. This happens earlier in the BeginPaint function. (If you want to do some customized background erasing in your window procedure, you can process the WM_ERASEBKGND message.) Windows erases the background using the brush specified in the hbrBackground field of the WNDCLASS structure that you use when registering the window class during WinMain initialization. Many Windows programs specify a white brush for the window background. This is indicated when the program sets up the fields of the window class structure with a statement like this: wndclass.hbrBackground = (HBRUSH) GetStockObject (WHITE_BRUSH) ; However, if your program invalidates a rectangle of the client area by calling InvalidateRect, the last argument of the function specifies whether you want the background erased. If this argument is FALSE (that is, 0), Windows will not erase the background and the fErase field of the PAINTSTRUCT structure will be TRUE (nonzero) after you call BeginPaint. The rcPaint field of the PAINTSTRUCT structure is a structure of type RECT. As you learned in Chapter 3, the RECT structure defines a rectangle with four fields named left, top, right, and bottom. The rcPaint field in the PAINTSTRUCT structure defines the boundaries of the invalid rectangle, as shown in Figure 4-1. The values are in units of pixels relative to the upper left corner of the client area. The invalid rectangle is the area that you should repaint. Figure 4-1. The boundaries of the invalid rectangle. 64
- 65. The rcPaint rectangle in PAINTSTRUCT is not only the invalid rectangle; it is also a “clipping” rectangle. This means that Windows restricts painting to within the clipping rectangle. More precisely, if the invalid region is not rectangular, Windows restricts painting to within that region. To paint outside the update rectangle while processing WM_PAINT messages, you can make this call: InvalidateRect (hwnd, NULL, TRUE) ; before calling BeginPaint. This invalidates the entire client area and causes BeginPaint to erase the background. A FALSE value in the last argument will not erase the background. Whatever was there will stay. It is usually most convenient for a Windows program to simply repaint the entire client area whenever it receives a WM_PAINT message, regardless of the rcPaint structure. For example, if part of the display output in the client area includes a circle but only part of the circle falls within the invalid rectangle, it makes little sense to draw only the invalid part of the circle. Draw the whole circle. When you use the device context handle returned from BeginPaint, Windows will not paint outside the rcPaint rectangle anyway. In the HELLOWIN program in Chapter 2, we didn’t care about invalid rectangles when processing the WM_PAINT message. If the area where the text was displayed happened to be within the invalid rectangle, DrawText restored it. If not, then at some point during processing of the DrawText call Windows determined it didn’t need to write anything on the display. But this determination takes time. A programmer concerned about performance and speed (and that includes all of us, I hope) will want to use the invalid rectangle during processing of the WM_PAINT message to avoid unnecessary GDI calls. This is particularly important if painting requires accessing disk files such as bitmaps. Getting a Device Context Handle: Method Two Although it is best to structure your program so that you can update the entire client area during the WM_PAINT message, you may also find it useful to paint part of the client area while processing messages other than WM_PAINT. Or you may need a device context handle for other purposes, such as obtaining information about the device context. To get a handle to the device context of the client area of the window, you call GetDC to obtain the handle and ReleaseDC after you’re done with it: hdc = GetDC (hwnd) ; [use GDI functions] ReleaseDC (hwnd, hdc) ; Like BeginPaint and EndPaint, the GetDC and ReleaseDC functions should be called in pairs. When you call GetDC while processing a message, you should call ReleaseDC before you exit the window procedure. Do not call GetDC in one message and ReleaseDC in another. Unlike the device context handle returned from BeginPaint, the device context handle returned from GetDC has a clipping rectangle equal to the entire client area. You can paint on any part of the client area, not merely on the invalid rectangle (if indeed there is an invalid rectangle). Unlike BeginPaint, GetDC does not validate any invalid regions. If you need to validate the entire client area, you can call ValidateRect (hwnd, NULL) ; Generally, you’ll use the GetDC and ReleaseDC calls in response to keyboard messages (such as in a word processing program) or mouse messages (such as in a drawing program). This allows the program to draw on the client area in prompt reaction to the user’s keyboard or mouse input without deliberately invalidating part of the client area to generate WM_PAINT messages. However, even if you paint during messages other than WM_PAINT, your program must still accumulate enough information to be able to update the display whenever you do receive a WM_PAINT message. A function similar to GetDC is GetWindowDC. While GetDC returns a device context handle for writing on the client area of the window, GetWindowDC returns a device context handle that lets you write on the entire window. For example, your program can use the device context handle returned from GetWindowDC to write on the 65
- 66. window’s title bar. However, your program would also have to process WM_NCPAINT (“nonclient paint”) messages as well. TextOut: The Details TextOut is the most common GDI function for displaying text. Its syntax is TextOut (hdc, x, y, psText, iLength) ; Let’s examine this function in more detail. The first argument is the handle to the device context—either the hdc value returned from GetDC or the hdc value returned from BeginPaint during processing of a WM_PAINT message. The attributes of the device context control the characteristics of this displayed text. For instance, one attribute of the device context specifies the text color. The default color (we discover with some degree of comfort) is black. The default device context also defines a text background color, and this is white. When a program writes text to the display, Windows uses this background color to fill in the rectangular space surrounding each character, called the “character box.” The text background color is not the same background you set when defining the window class. The background in the window class is a brush—which is a pattern that may or may not be a pure color—that Windows uses to erase the client area. It is not part of the device context structure. When defining the window class structure, most Windows applications use WHITE_BRUSH so that the default text background color in the default device context is the same color as the brush Windows uses to erase the background of the client area. The psText argument is a pointer to a character string, and iLength is the number of characters in the string. If psText points to a Unicode character string, then the number of bytes in the string is double the iLength value. The string should not contain any ASCII control characters such as carriage returns, linefeeds, tabs, or backspaces. Windows displays these control characters as boxes or solid blocks. TextOut does not recognize a zero byte (or for Unicode, a zero short integer) as denoting the end of a string. The function uses the iLength argument to determine the string’s length. The x and y arguments to TextOut define the starting point of the character string within the client area. The x value is the horizontal position; the y value is the vertical position. The upper left corner of the first character is positioned at the coordinate point (x, y). In the default device context, the origin (that is, the point where x and y both equal 0) is the upper left corner of the client area. If you use zero values for x and y in TextOut, the character string starts flush against the upper left corner of the client area. When you read the documentation of a GDI drawing function such as TextOut, you’ll find that the coordinates passed to the function are usually documented as “logical coordinates.” What this means exactly we’ll examine in more detail in Chapter 5. For now, be aware that Windows has a variety of “mapping modes” that govern how the logical coordinates specified in GDI drawing functions are translated to the physical pixel coordinates of the display. The mapping mode is defined in the device context. The default mapping mode is called MM_TEXT (using the identifier defined in the WINGDI.H header file). Under the MM_TEXT mapping mode, logical units are the same as physical units, which are pixels, relative to the upper left corner of the client area. Values of x increase as you move to the right in the client area, and values of y increase as you move down in the client area. (See Figure 4-2.) The MM_TEXT coordinate system is identical to the coordinate system that Windows uses to define the invalid rectangle in the PAINTSTRUCT structure. (Things are not quite as convenient with the other mapping modes, however.) 66
- 67. Figure 4-2. The x-coordinate and y-coordinate in the MM_TEXT mapping mode. The device context also defines a clipping region. As you’ve seen, the default clipping region is the entire client area for a device context handle obtained from GetDC and the invalid region for the device context handle obtained from BeginPaint. When you call TextOut, Windows will not display any part of the character string that lies outside the clipping region. If a character is partly within the clipping region, Windows displays only the portion of the character inside the region. Writing outside the client area of your window isn’t easy to do, so don’t worry about doing it inadvertently. The System Font The device context also defines the font that Windows uses when you call TextOut to display text. The default is a font called the “system font” or (using the identifier in the WINGDI.H header file) SYSTEM_FONT. The system font is the font that Windows uses by default for text strings in title bars, menus, and dialog boxes. In the early days of Windows, the system font was a fixed-pitch font, which means that all the characters had the same width, much like a typewriter. However, beginning with Windows 3.0, the system font became a variable-pitch font, which means that different characters have different widths. A “W” is wider than an “i”, for example. It has been well established by studies in reading that text printed with variable-pitch fonts is more readable than fixed- pitch font texts. It seems to have something to do with the letters being closer together, allowing the eyes and mind to more clearly see entire words rather than individual letters. As you might imagine, the change from fixed-pitch fonts to variable-pitch fonts broke a lot of early Windows code and required that programmers learn some new techniques for working with text. The system font is a “raster font,” which means that the characters are defined as blocks of pixels. (In Chapter 17, 67
- 68. we’ll work with TrueType fonts, which are defined by scaleable outlines.) To a certain extent, the size of the characters in the system font is based on the size of the video display. The system font is designed to allow at least 25 lines of 80-character text to fit on the screen. The Size of a Character To display multiple lines of text by using the TextOut function, you need to know the dimensions of characters in the font. You can space successive lines of text based on the height of the characters, and you can space columns of text across the client area based on the average width of the characters. What is the height and average width of characters in the system font? Well, I’m not going to tell you. Or rather, I can’t tell you. Or rather, I could tell you, but I might be wrong. The problem is that it all depends on the pixel size of the video display. Windows requires a minimum display size of 640 by 480, but many users prefer 800 by 600 or 1024 by 768. In addition, for these larger display sizes, Windows allows the user to select different sized system fonts. Just as a program can determine information about the sizes (or “metrics”) of user interface items by calling the GetSystemMetrics function, a program can determine font sizes by calling GetTextMetrics. GetTextMetrics requires a handle to a device context because it returns information about the font currently selected in the device context. Windows copies the various values of text metrics into a structure of type TEXTMETRIC defined in WINGDI.H. The TEXTMETRIC structure has 20 fields, but we’re interested in only the first seven: typedef struct tagTEXTMETRIC { LONG tmHeight ; LONG tmAscent ; LONG tmDescent ; LONG tmInternalLeading ; LONG tmExternalLeading ; LONG tmAveCharWidth ; LONG tmMaxCharWidth ; [other structure fields] } TEXTMETRIC, * PTEXTMETRIC ; The values of these fields are in units that depend on the mapping mode currently selected for the device context. In the default device context, this mapping mode is MM_TEXT, so the dimensions are in units of pixels. To use the GetTextMetrics function, you first need to define a structure variable, commonly called tm: TEXTMETRIC tm ; When you need to determine the text metrics, you get a handle to a device context and call GetTextMetrics: hdc = GetDC (hwnd) ; GetTextMetrics (hdc, &tm) ; ReleaseDC (hwnd, hdc) ; You can then examine the values in the text metric structure and probably save a few of them for future use. Text Metrics: The Details The TEXTMETRIC structure provides various types of information about the font currently selected in the device context. However, the vertical size of a font is defined by only five fields of the structure, four of which are shown in Figure 4-3. 68
- 69. Figure 4-3. Four values defining vertical character sizes in a font. The most important value is tmHeight, which is the sum of tmAscent and tmDescent. These two values represent the maximum vertical extents of characters in the font above and below the baseline. The term “leading” refers to space that a printer inserts between lines of text. In the TEXTMETRIC structure, internal leading is included in tmAscent (and thus in tmHeight) and is often the space in which accent marks appear. The tmInternalLeading field could be set to 0, in which case accented letters are made a little shorter so that the accent marks fit within the ascent of the character. The TEXTMETRIC structure also includes a field named tmExternalLeading, which is not included in the tmHeight value. This is an amount of space that the designer of the font suggests be added between successive rows of displayed text. You can accept or reject the font designer’s suggestion for including external leading when spacing lines of text. In the system fonts that I’ve encountered recently, tmExternalLeading has been zero, which is why I didn’t include it in Figure 4-3. (Despite my vow not to tell you the dimensions of a system font, Figure 4-3 is accurate for the system font that Windows uses by default for a 640 by 480 display.) The TEXTMETRIC structure contains two fields that describe character widths: the tmAveCharWidth field is a weighted average of lowercase characters, and tmMaxCharWidth is the width of the widest character in the font. For a fixed-pitch font, these values are the same. (For the font illustrated in Figure 4-3, these values are 7 and 14, respectively.) The sample programs in this chapter will require another character width—the average width of uppercase letters. You can calculate this fairly accurately as 150% of tmAveCharWidth. It’s important to realize that the dimensions of a system font are dependent on the pixel size of the video display on which Windows runs and, in some cases, on the system font size the user has selected. Windows provides a device- independent graphics interface, but you have to help. Don’t write your Windows programs so that they guess at character dimensions. Don’t hard-code any values. Use the GetTextMetrics function to obtain this information. 69
- 70. Formatting Text Because the dimensions of the system font do not change during a Windows session, you need to call GetTextMetrics only once when your program executes. A good place to make this call is while processing the WM_CREATE message in the window procedure. The WM_CREATE message is the first message the window procedure receives. Windows calls your window procedure with a WM_CREATE message when you call CreateWindow in WinMain. Suppose you’re writing a Windows program that displays several lines of text running down the client area. You’ll want to obtain values for the character width and height. Within the window procedure you can define two variables to save the average character width (cxChar) and the total character height (cyChar): static int cxChar, cyChar ; The prefix c added to the variables names stands for “count,” and in this case means a count of (or number of) pixels. In combination with x or y, the prefix refers to a width or height. These variables are defined as static because they must be valid when the window procedure processes other messages, such as WM_PAINT. Or you can define the variables globally outside of any function. Here’s the WM_CREATE code to obtain the width and height of characters in the system font: case WM_CREATE: hdc = GetDC (hwnd) ; GetTextMetrics (hdc, &tm) ; cxChar = tm.tmAveCharWidth ; cyChar = tm.tmHeight + tm.tmExternalLeading ; ReleaseDC (hwnd, hdc) ; return 0 ; Notice that I’ve included the tmExternalLeading field in the calculation of cyChar. Even though this field is 0 in the system fonts I’ve seen lately, it should be included if it’s ever nonzero because it makes for more readable line spacing. Each successive line of text is displayed cyChar pixels further down the window. You’ll often find it necessary to display formatted numbers as well as simple character strings. As I discussed in Chapter 2, you can’t use the traditional tool for this job (the beloved printf function), but you can use sprintf and the Windows version of sprintf, wsprintf. These functions work just like printf except that they put the formatted string into a character string. You can then use TextOut to write the string to the display. Very conveniently, the value returned from sprintf and wsprintf is the length of the string. You can pass that value to TextOut as the iLength argument. This code shows a typical wsprintf and TextOut combination: int iLength ; TCHAR szBuffer [40] ; [ other program lines ] iLength = wsprintf (szBuffer, TEXT (“The sum of %i and %i is %i”), iA, iB, iA + iB) ; TextOut (hdc, x, y, szBuffer, iLength) ; For something as simple as this, you could dispense with the iLength definition and combine the two statements into one: TextOut (hdc, x, y, szBuffer, wsprintf (szBuffer, TEXT (“The sum of %i and %i is %i”), iA, iB, iA + iB)) ; It ain’t pretty, but it works. Putting It All Together Now we seem to have everything we need to write a simple program that displays multiple lines of text on the screen. We know how to get a handle to a device context during the WM_PAINT message, how to use the TextOut function, and how to space text based on the size of a single character. The only thing left for us to do is to display something interesting. 70
- 71. In the previous chapter, we took a little peek at the interesting information available from the Windows GetSystemMetrics function. The function returns information about the size of various graphical items in Windows, such as icons, cursors, title bars, and scroll bars. These sizes vary with the display adapter and driver. GetSystemMetrics is an important function for achieving device-independent graphical output in your program. The function requires a single argument called an “index.” The index is one of 75 integer identifiers defined in the Windows header files. (The number of identifiers has increased with each release of Windows; the programmer’s documentation in Windows 1.0 listed only 26 of them.) GetSystemMetrics returns an integer, usually the size of the item specified in the argument. Let’s write a program that displays some of the information available from the GetSystemMetrics calls in a simple one-line-per-item format. Working with this information is easier if we create a header file that defines an array of structures containing both the Windows header-file identifiers for the GetSystemMetrics index and the text we want to display for each value returned from the call. This header file is called SYSMETS.H and is shown in Figure 4-4. Figure 4-4. The SYSMETS.H file. SYSMETS.H /*----------------------------------------------- SYSMETS.H—System metrics display structure -----------------------------------------------*/ #define NUMLINES ((int) (sizeof sysmetrics / sizeof sysmetrics [0])) struct { int iIndex ; TCHAR * szLabel ; TCHAR * szDesc ; } sysmetrics [] = { SM_CXSCREEN, TEXT (“SM_CXSCREEN”), TEXT (“Screen width in pixels”), SM_CYSCREEN, TEXT (“SM_CYSCREEN”), TEXT (“Screen height in pixels”), SM_CXVSCROLL, TEXT (“SM_CXVSCROLL”), TEXT (“Vertical scroll width”), SM_CYHSCROLL, TEXT (“SM_CYHSCROLL”), TEXT (“Horizontal scroll height”), SM_CYCAPTION, TEXT (“SM_CYCAPTION”), TEXT (“Caption bar height”), SM_CXBORDER, TEXT (“SM_CXBORDER”), TEXT (“Window border width”), SM_CYBORDER, TEXT (“SM_CYBORDER”), TEXT (“Window border height”), SM_CXFIXEDFRAME, TEXT (“SM_CXFIXEDFRAME”), TEXT (“Dialog window frame width”), SM_CYFIXEDFRAME, TEXT (“SM_CYFIXEDFRAME”), TEXT (“Dialog window frame height”), SM_CYVTHUMB, TEXT (“SM_CYVTHUMB”), TEXT (“Vertical scroll thumb height”), SM_CXHTHUMB, TEXT (“SM_CXHTHUMB”), TEXT (“Horizontal scroll thumb width”), SM_CXICON, TEXT (“SM_CXICON”), TEXT (“Icon width”), 71
- 72. SM_CYICON, TEXT (“SM_CYICON”), TEXT (“Icon height”), SM_CXCURSOR, TEXT (“SM_CXCURSOR”), TEXT (“Cursor width”), SM_CYCURSOR, TEXT (“SM_CYCURSOR”), TEXT (“Cursor height”), SM_CYMENU, TEXT (“SM_CYMENU”), TEXT (“Menu bar height”), SM_CXFULLSCREEN, TEXT (“SM_CXFULLSCREEN”), TEXT (“Full screen client area width”), SM_CYFULLSCREEN, TEXT (“SM_CYFULLSCREEN”), TEXT (“Full screen client area height”), SM_CYKANJIWINDOW, TEXT (“SM_CYKANJIWINDOW”), TEXT (“Kanji window height”), SM_MOUSEPRESENT, TEXT (“SM_MOUSEPRESENT”), TEXT (“Mouse present flag”), SM_CYVSCROLL, TEXT (“SM_CYVSCROLL”), TEXT (“Vertical scroll arrow height”), SM_CXHSCROLL, TEXT (“SM_CXHSCROLL”), TEXT (“Horizontal scroll arrow width”), SM_DEBUG, TEXT (“SM_DEBUG”), TEXT (“Debug version flag”), SM_SWAPBUTTON, TEXT (“SM_SWAPBUTTON”), TEXT (“Mouse buttons swapped flag”), SM_CXMIN, TEXT (“SM_CXMIN”), TEXT (“Minimum window width”), SM_CYMIN, TEXT (“SM_CYMIN”), TEXT (“Minimum window height”), SM_CXSIZE, TEXT (“SM_CXSIZE”), TEXT (“Min/Max/Close button width”), SM_CYSIZE, TEXT (“SM_CYSIZE”), TEXT (“Min/Max/Close button height”), SM_CXSIZEFRAME, TEXT (“SM_CXSIZEFRAME”), TEXT (“Window sizing frame width”), SM_CYSIZEFRAME, TEXT (“SM_CYSIZEFRAME”), TEXT (“Window sizing frame height”), SM_CXMINTRACK, TEXT (“SM_CXMINTRACK”), TEXT (“Minimum window tracking width”), SM_CYMINTRACK, TEXT (“SM_CYMINTRACK”), TEXT (“Minimum window tracking height”), SM_CXDOUBLECLK, TEXT (“SM_CXDOUBLECLK”), TEXT (“Double click x tolerance”), SM_CYDOUBLECLK, TEXT (“SM_CYDOUBLECLK”), TEXT (“Double click y tolerance”), SM_CXICONSPACING, TEXT (“SM_CXICONSPACING”), TEXT (“Horizontal icon spacing”), SM_CYICONSPACING, TEXT (“SM_CYICONSPACING”), TEXT (“Vertical icon spacing”), SM_MENUDROPALIGNMENT, TEXT (“SM_MENUDROPALIGNMENT”), TEXT (“Left or right menu drop”), SM_PENWINDOWS, TEXT (“SM_PENWINDOWS”), TEXT (“Pen extensions installed”), SM_DBCSENABLED, TEXT (“SM_DBCSENABLED”), TEXT (“Double-Byte Char Set enabled”), SM_CMOUSEBUTTONS, TEXT (“SM_CMOUSEBUTTONS”), TEXT (“Number of mouse buttons”), SM_SECURE, TEXT (“SM_SECURE”), TEXT (“Security present flag”), SM_CXEDGE, TEXT (“SM_CXEDGE”), TEXT (“3-D border width”), SM_CYEDGE, TEXT (“SM_CYEDGE”), TEXT (“3-D border height”), SM_CXMINSPACING, TEXT (“SM_CXMINSPACING”), TEXT (“Minimized window spacing width”), 72
- 73. SM_CYMINSPACING, TEXT (“SM_CYMINSPACING”), TEXT (“Minimized window spacing height”), SM_CXSMICON, TEXT (“SM_CXSMICON”), TEXT (“Small icon width”), SM_CYSMICON, TEXT (“SM_CYSMICON”), TEXT (“Small icon height”), SM_CYSMCAPTION, TEXT (“SM_CYSMCAPTION”), TEXT (“Small caption height”), SM_CXSMSIZE, TEXT (“SM_CXSMSIZE”), TEXT (“Small caption button width”), SM_CYSMSIZE, TEXT (“SM_CYSMSIZE”), TEXT (“Small caption button height”), SM_CXMENUSIZE, TEXT (“SM_CXMENUSIZE”), TEXT (“Menu bar button width”), SM_CYMENUSIZE, TEXT (“SM_CYMENUSIZE”), TEXT (“Menu bar button height”), SM_ARRANGE, TEXT (“SM_ARRANGE”), TEXT (“How minimized windows arranged”), SM_CXMINIMIZED, TEXT (“SM_CXMINIMIZED”), TEXT (“Minimized window width”), SM_CYMINIMIZED, TEXT (“SM_CYMINIMIZED”), TEXT (“Minimized window height”), SM_CXMAXTRACK, TEXT (“SM_CXMAXTRACK”), TEXT (“Maximum draggable width”), SM_CYMAXTRACK, TEXT (“SM_CYMAXTRACK”), TEXT (“Maximum draggable height”), SM_CXMAXIMIZED, TEXT (“SM_CXMAXIMIZED”), TEXT (“Width of maximized window”), SM_CYMAXIMIZED, TEXT (“SM_CYMAXIMIZED”), TEXT (“Height of maximized window”), SM_NETWORK, TEXT (“SM_NETWORK”), TEXT (“Network present flag”), SM_CLEANBOOT, TEXT (“SM_CLEANBOOT”), TEXT (“How system was booted”), SM_CXDRAG, TEXT (“SM_CXDRAG”), TEXT (“Avoid drag x tolerance”), SM_CYDRAG, TEXT (“SM_CYDRAG”), TEXT (“Avoid drag y tolerance”), SM_SHOWSOUNDS, TEXT (“SM_SHOWSOUNDS”), TEXT (“Present sounds visually”), SM_CXMENUCHECK, TEXT (“SM_CXMENUCHECK”), TEXT (“Menu check-mark width”), SM_CYMENUCHECK, TEXT (“SM_CYMENUCHECK”), TEXT (“Menu check-mark height”), SM_SLOWMACHINE, TEXT (“SM_SLOWMACHINE”), TEXT (“Slow processor flag”), SM_MIDEASTENABLED, TEXT (“SM_MIDEASTENABLED”), TEXT (“Hebrew and Arabic enabled flag”), SM_MOUSEWHEELPRESENT, TEXT (“SM_MOUSEWHEELPRESENT”), TEXT (“Mouse wheel present flag”), SM_XVIRTUALSCREEN, TEXT (“SM_XVIRTUALSCREEN”), TEXT (“Virtual screen x origin”), SM_YVIRTUALSCREEN, TEXT (“SM_YVIRTUALSCREEN”), TEXT (“Virtual screen y origin”), SM_CXVIRTUALSCREEN, TEXT (“SM_CXVIRTUALSCREEN”), TEXT (“Virtual screen width”), SM_CYVIRTUALSCREEN, TEXT (“SM_CYVIRTUALSCREEN”), TEXT (“Virtual screen height”), SM_CMONITORS, TEXT (“SM_CMONITORS”), TEXT (“Number of monitors”), SM_SAMEDISPLAYFORMAT, TEXT (“SM_SAMEDISPLAYFORMAT”), TEXT (“Same color format flag”) } ; The program that displays this information is called SYSMETS1. The SYSMETS1.C source code file is shown in 73
- 74. Figure 4-5. Most of the code should look familiar by now. The code in WinMain is virtually identical to that in HELLOWIN, and much of the code in WndProc has already been discussed. Figure 4-5. SYSMETS1.C. SYSMETS1.C /*---------------------------------------------------- SYSMETS1.C—System Metrics Display Program No. 1 © Charles Petzold, 1998 ----------------------------------------------------*/ #include <windows.h> #include “sysmets.h” LRESULT CALLBACK WndProc (HWND, UINT, WPARAM, LPARAM) ; int WINAPI WinMain (HINSTANCE hInstance, HINSTANCE hPrevInstance, PSTR szCmdLine, int iCmdShow) { static TCHAR szAppName[] = TEXT (“SysMets1”) ; HWND hwnd ; MSG msg ; WNDCLASS wndclass ; wndclass.style = CS_HREDRAW | CS_VREDRAW ; wndclass.lpfnWndProc = WndProc ; wndclass.cbClsExtra = 0 ; wndclass.cbWndExtra = 0 ; wndclass.hInstance = hInstance ; wndclass.hIcon = LoadIcon (NULL, IDI_APPLICATION) ; wndclass.hCursor = LoadCursor (NULL, IDC_ARROW) ; wndclass.hbrBackground = (HBRUSH) GetStockObject (WHITE_BRUSH) ; wndclass.lpszMenuName = NULL ; wndclass.lpszClassName = szAppName ; if (!RegisterClass (&wndclass)) { MessageBox (NULL, TEXT (“This program requires Windows NT!”), szAppName, MB_ICONERROR) ; return 0 ; } hwnd = CreateWindow (szAppName, TEXT (“Get System Metrics No. 1”), WS_OVERLAPPEDWINDOW, CW_USEDEFAULT, CW_USEDEFAULT, CW_USEDEFAULT, CW_USEDEFAULT, NULL, NULL, hInstance, NULL) ; ShowWindow (hwnd, iCmdShow) ; UpdateWindow (hwnd) ; while (GetMessage (&msg, NULL, 0, 0)) { TranslateMessage (&msg) ; DispatchMessage (&msg) ; } return msg.wParam ; } 74
- 75. LRESULT CALLBACK WndProc (HWND hwnd, UINT message, WPARAM wParam, LPARAM lParam) { static int cxChar, cxCaps, cyChar ; HDC hdc ; int i ; PAINTSTRUCT ps ; TCHAR szBuffer [10] ; TEXTMETRIC tm ; switch (message) { case WM_CREATE: hdc = GetDC (hwnd) ; GetTextMetrics (hdc, &tm) ; cxChar = tm.tmAveCharWidth ; cxCaps = (tm.tmPitchAndFamily & 1 ? 3 : 2) * cxChar / 2 ; cyChar = tm.tmHeight + tm.tmExternalLeading ; ReleaseDC (hwnd, hdc) ; return 0 ; case WM_PAINT : hdc = BeginPaint (hwnd, &ps) ; for (i = 0 ; i < NUMLINES ; i++) { TextOut (hdc, 0, cyChar * i, sysmetrics[i].szLabel, lstrlen (sysmetrics[i].szLabel)) ; TextOut (hdc, 22 * cxCaps, cyChar * i, sysmetrics[i].szDesc, lstrlen (sysmetrics[i].szDesc)) ; SetTextAlign (hdc, TA_RIGHT | TA_TOP) ; TextOut (hdc, 22 * cxCaps + 40 * cxChar, cyChar * i, szBuffer, wsprintf (szBuffer, TEXT (“%5d”), GetSystemMetrics (sysmetrics[i].iIndex))) ; SetTextAlign (hdc, TA_LEFT | TA_TOP) ; } EndPaint (hwnd, &ps) ; return 0 ; case WM_DESTROY : PostQuitMessage (0) ; return 0 ; } return DefWindowProc (hwnd, message, wParam, lParam) ; } Figure 4-6 shows SYSMETS1 running on a standard VGA. As you can see from the first two lines in the program’s client area, the screen width is 640 pixels and the screen height is 480 pixels. These two values, as well as many of the other values shown by the program, may be different for different types of video displays. 75
- 76. Figure 4-6. The SYSMETS1 display. The SYSMETS1.C Window Procedure The WndProc window procedure in the SYSMETS1.C program processes three messages: WM_CREATE, WM_PAINT, and WM_DESTROY. The WM_DESTROY message is processed in the same way as the HELLOWIN program in Chapter 3. The WM_CREATE message is the first message the window procedure receives. Windows generates the message when the CreateWindow function creates the window. During the WM_CREATE message, SYSMETS1 obtains a device context for the window by calling GetDC and gets the text metrics for the default system font by calling GetTextMetrics. SYSMETS1 saves the average character width in cxChar and the total height of the characters (including external leading) in cyChar. SYSMETS1 also saves an average width of uppercase letters in the static variable cxCaps. For a fixed-pitch font, cxCaps would equal cxChar. For a variable-width font, cxCaps is set to 150 percent of cxChar. The low bit of the tmPitchAndFamily field in the TEXTMETRIC structure is 1 for a variable-width font and 0 for a fixed-pitch font. SYSMETS1 uses this bit to calculate cxCaps from cxChar: cxCaps = (tm.tmPitchAndFamily & 1 ? 3 : 2) * cxChar / 2 ; SYSMETS1 does all window painting during the WM_PAINT message. As normal, the window procedure first obtains a handle to the device context by calling BeginPaint. A for statement loops through all the lines of the sysmetrics structure defined in SYSMETS.H. The three columns of text are displayed with three TextOut function calls. In each case, the third argument to TextOut (that is, the y starting position) is set to cyChar * i 76
- 77. This argument indicates the pixel position of the top of the character string relative to the top of the client area. The first TextOut statement displays the uppercase identifiers in the first of the three columns. The second argument to TextOut is 0 to begin the text at the left edge of the client area. The text is obtained from the szLabel field of the sysmetrics structure. I use the Windows function lstrlen to calculate the length of the string, which is required as the last argument to TextOut. The second TextOut statement displays the description of the system metrics value. These descriptions are stored in the szDesc field of the sysmetrics structure. In this case, the second argument to TextOut is set to 22 * cxCaps The longest uppercase identifier displayed in the first column is 20 characters, so the second column must begin at least 20 × cxCaps to the right of the beginning of the first column of text. I use 22 to add a little extra space between the columns. The third TextOut statement displays the numeric values obtained from the GetSystemMetrics function. The variable-width font makes formatting a column of right-justified numbers a little tricky. Fortunately, in all variable- width fonts used today, the digits from 0 through 9 all have the same width. Otherwise, displaying columns of numbers would be monstrous. However, the width of the digits is greater than the width of a space. Numbers can be one or more digits wide, so different numbers can begin at different horizontal positions. Wouldn’t it be easier if we could display a column of right-justified numbers by specifying the horizontal pixel position where the number ends rather than begins? This is what the SetTextAlign function lets us do (among other things). After SYSMETS1 calls SetTextAlign (hdc, TA_RIGHT | TA_TOP) ; Windows will interpret the coordinates passed to subsequent TextOut functions as specifying the top-right corner of the text string rather than the top-left corner. The TextOut function to display the column of numbers has its second argument set to 22 * cxCaps + 40 * cxChar The 40 × cxChar value accommodates the width of the second column and the width of the third column. Following the TextOut function, another call to SetTextAlign sets things back to normal for the next time through the loop. Not Enough Room One nasty little problem exists with the SYSMETS1 program: Unless you have a gigantic, big-screen, high- resolution video adapter, you can’t see many of the lines in the system metrics lists. If you make the window narrower, you can’t even see the values. SYSMETS1 is not aware of this problem. Otherwise we might have included a message box that said, “Sorry!” It’s not aware of the problem because the program doesn’t even know how large its client area is. It begins displaying the text at the top of the window and relies on Windows to clip everything that drifts beyond the bottom of the client area. Clearly, this is not desirable. Our first job in solving this problem is to determine how much of the program’s output can actually fit within the client area. The Size of the Client Area If you experiment with existing Windows applications, you’ll find that window sizes can vary widely. If a window is maximized, the client area occupies nearly the entire video display. The dimensions of a maximized client area are, in fact, available from the GetSystemMetrics call by using arguments of SM_CXFULLSCREEN and SM_CYFULLSCREEN (assuming that the window has only a title bar and no menu). The minimum size of a window can be quite small—sometimes almost nonexistent—virtually eliminating the client area. 77
- 78. In the last chapter, we used the GetClientRect function for determining the dimensions of the client area. There’s nothing really wrong with this function, but it’s a bit inefficient to call it every time you need to use this information. A much better method for determining the size of a window’s client is to process the WM_SIZE message within your window procedure. Windows sends a WM_SIZE message to a window procedure whenever the size of the window changes. The lParam variable passed to the window procedure contains the width of the client area in the low word and the height in the high word. To save these dimensions, you’ll want to define two static variables in your window procedure: static int cxClient, cyClient ; Like cxChar and cyChar, these variables are defined as static because they are set while processing one message and used while processing another message. You handle the WM_SIZE method like so: case WM_SIZE: cxClient = LOWORD (lParam) ; cyClient = HIWORD (lParam) ; return 0 ; You’ll see code like this in virtually every Windows program. LOWORD and HIWORD are macros that are defined in the Windows header file WINDEF.H. If you’re curious, the definitions of these macros look like this: #define LOWORD(l) ((WORD)(l)) #define HIWORD(l) ((WORD)(((DWORD)(l) >> 16) & 0xFFFF)) The two macros return WORD values—that is, 16-bit unsigned short integers that range from 0 through 0xFFFF. Typically you’ll store these values in 32-bit signed integers. That doesn’t involve any conversion problems and makes the values easier to use in any calculations you may later need. In many Windows programs, a WM_SIZE message will eventually be followed by a WM_PAINT message. How do we know this? Because when we define the window class we specify the class style as CS_HREDRAW | CS_VREDRAW This class style tells Windows to force a repaint if either the horizontal or vertical size changes. You can calculate the number of full lines of text displayable within the client area with the formula: cyClient / cyChar This can be 0 if the height of the client area is too small to display a full character. Similarly, the approximate number of lowercase characters you can display horizontally within the client area is equal to cxClient / cxChar If you determine cxChar and cyChar during the WM_CREATE message, don’t worry about dividing by 0 in these calculations. Your window procedure receives a WM_CREATE message when WinMain calls CreateWindow. The first WM_SIZE message comes a little later, when WinMain calls ShowWindow, at which point cxChar and cyChar have already been assigned positive nonzero values. Knowing the size of the window’s client area is the first step in providing a way for the user to move the text within the client area if the client area is not large enough to hold everything. If you’re familiar with other Windows-based applications that have similar requirements, you probably know what we need: this is a job for those wonderful inventions known as scroll bars. Scroll Bars Scroll bars are one of the best features of a graphical user interface. They are easy to use and provide excellent visual feedback. You can use scroll bars whenever you need to display anything—text, graphics, a spreadsheet, database records, pictures, Web pages—that requires more space than is available in the window’s client area. Scroll bars are positioned either vertically (for up and down movement) or horizontally (for left and right movement). You can click with the mouse the arrows at each end of a scroll bar or the area between the arrows. A “scroll box” (or “thumb”) travels the length of the scroll bar to indicate the approximate location of the material shown on the display in relation to the entire document. You can also drag the thumb with the mouse to move to a 78
- 79. particular location. Figure 4-7 shows the recommended use of a vertical scroll bar for text. Figure 4-7. The vertical scroll bar. Programmers sometimes have problems with scrolling terminology because their perspective is different from the user’s. A user who scrolls down wants to bring a lower part of the document into view; however, the program actually moves the document up in relation to the display window. The Window documentation and the header file identifiers are based on the user’s perspective: scroll up means moving toward the beginning of the document; scroll down means moving toward the end. It is easy to include a horizontal or vertical scroll bar in your application window. All you need do is include the window style (WS) identifier WS_VSCROLL (vertical scroll) or WS_HSCROLL (horizontal scroll) or both in the third argument to CreateWindow. The scroll bars specified in the CreateWindow function are always placed against the right side or bottom of the window and extend the full length or width of the client area. The client area does not include the space occupied by the scroll bar. The width of the vertical scroll bar and the height of the horizontal scroll bar are constant for a particular video driver and display resolution. If you need these values, you can obtain them (as you may have observed) from the GetSystemMetrics calls. Windows takes care of processing all mouse messages to the scroll bars. However, scroll bars do not have an automatic keyboard interface. If you want the cursor keys to duplicate some of the functionality of the scroll bars, you must explicitly provide logic for that (as we’ll do when we make another version of the SYSMETS program in the next chapter). Scroll Bar Range and Position Every scroll bar has an associated “range” and “position.” The scroll bar range is a pair of integers representing a minimum and maximum value associated with the scroll bar. The position is the location of the thumb within the range. When the thumb is at the top (or left) of the scroll bar, the position of the thumb is the minimum value of the range. At the bottom (or right) of the scroll bar, the thumb position is the maximum value of the range. 79
- 80. By default, the range of a scroll bar is 0 (top or left) through 100 (bottom or right), but it’s easy to change the range to something that is more convenient for the program: SetScrollRange (hwnd, iBar, iMin, iMax, bRedraw) ; The iBar argument is either SB_VERT or SB_HORZ, iMin and iMax are the new minimum and maximum positions of the range, and you set bRedraw to TRUE if you want Windows to redraw the scroll bar based on the new range. (If you will be calling other functions that affect the appearance of the scroll bar after you call SetScrollRange, you’ll probably want to set bRedraw to FALSE to avoid excessive redrawing.) The thumb position is always a discrete integral value. For instance, a scroll bar with a range of 0 through 4 has five thumb positions, as shown in Figure 4-8. Figure 4-8. Scroll bars with five thumb positions. You can use SetScrollPos to set a new thumb position within the scroll bar range: SetScrollPos (hwnd, iBar, iPos, bRedraw) ; The iPos argument is the new position and must be within the range of iMin and iMax. Windows provides similar functions (GetScrollRange and GetScrollPos) to obtain the current range and position of a scroll bar. When you use scroll bars within your program, you share responsibility with Windows for maintaining the scroll bars and updating the position of the scroll bar thumb. These are Windows’ responsibilities for scroll bars: • Handle all processing of mouse messages to the scroll bar. • Provide a reverse-video “flash” when the user clicks the scroll bar. • Move the thumb as the user drags the thumb within the scroll bar. 80
- 81. • Send scroll bar messages to the window procedure of the window containing the scroll bar. These are the responsibilities of your program: • Initialize the range and position of the scroll bar. • Process the scroll bar messages to the window procedure. • Update the position of the scroll bar thumb. • Change the contents of the client area in response to a change in the scroll bar. Like almost everything in life, this will make a lot more sense when we start looking at some code. Scroll Bar Messages Windows sends the window procedure WM_VSCROLL (vertical scroll) and WM_HSCROLL (horizontal scroll) messages when the scroll bar is clicked with the mouse or the thumb is dragged. Each mouse action on the scroll bar generates at least two messages, one when the mouse button is pressed and another when it is released. Like all messages, WM_VSCROLL and WM_HSCROLL are accompanied by the wParam and lParam message parameters. For messages from scroll bars created as part of your window, you can ignore lParam; that’s used only for scroll bars created as child windows, usually within dialog boxes. The wParam message parameter is divided into a low word and a high word. The low word of wParam is a number that indicates what the mouse is doing to the scroll bar. This number is referred to as a “notification code.” Notification codes have values defined by identifiers that begin with SB, which stands for “scroll bar.” Here’s how the notification codes are defined in WINUSER.H: #define SB_LINEUP 0 #define SB_LINELEFT 0 #define SB_LINEDOWN 1 #define SB_LINERIGHT 1 #define SB_PAGEUP 2 #define SB_PAGELEFT 2 #define SB_PAGEDOWN 3 #define SB_PAGERIGHT 3 #define SB_THUMBPOSITION 4 #define SB_THUMBTRACK 5 #define SB_TOP 6 #define SB_LEFT 6 #define SB_BOTTOM 7 #define SB_RIGHT 7 #define SB_ENDSCROLL 8 You use the identifiers containing the words LEFT and RIGHT for horizontal scroll bars, and the identifiers with UP, DOWN, TOP, and BOTTOM with vertical scroll bars. The notification codes associated with clicking the mouse on various areas of the scroll bar are shown in Figure 4-9. 81
- 82. Figure 4-9. Identifiers for the wParam values of scroll bar messages. If you hold down the mouse button on the various parts of the scroll bar, your program can receive multiple scroll bar messages. When the mouse button is released, you’ll get a message with a notification code of SB_ENDSCROLL. You can generally ignore messages with the SB_ENDSCROLL notification code. Windows will not change the position of the scroll bar thumb. Your application does that by calling SetScrollPos. When you position the mouse cursor over the scroll bar thumb and press the mouse button, you can move the thumb. This generates scroll bar messages with notification codes of SB_THUMBTRACK and SB_THUMBPOSITION. When the low word of wParam is SB_THUMBTRACK, the high word of wParam is the current position of the scroll bar thumb as the user is dragging it. This position is within the minimum and maximum values of the scroll bar range. When the low word of wParam is SB_THUMBPOSITION, the high word of wParam is the final position of the scroll bar thumb when the user released the mouse button. For other scroll bar actions, the high word of wParam should be ignored. To provide feedback to the user, Windows will move the scroll bar thumb when you drag it with the mouse as your program is receiving SB_THUMBTRACK messages. However, unless you process SB_THUMBTRACK or SB_THUMBPOSITION messages by calling SetScrollPos, the thumb will snap back to its original position when the user releases the mouse button. A program can process either the SB_THUMBTRACK or SB_THUMBPOSITION messages, but doesn’t usually process both. If you process SB_THUMBTRACK messages, you’ll move the contents of your client area as the user is dragging the thumb. If instead you process SB_THUMBPOSITION messages, you’ll move the contents of the client area only when the user stops dragging the thumb. It’s preferable (but more difficult) to process SB_THUMBTRACK messages; for some types of data your program may have a hard time keeping up with the messages. 82
- 83. As you’ll note, the WINUSER.H header files includes notification codes of SB_TOP, SB_BOTTOM, SB_LEFT, and SB_RIGHT, indicating that the scroll bar has been moved to its minimum or maximum position. However, you will never receive these notification codes for a scroll bar created as part of your application window. Although it’s not common, using 32-bit values for the scroll bar range is perfectly valid. However, the high word of wParam, which is only a 16-bit value, cannot properly indicate the position for SB_THUMBTRACK and SB_THUMBPOSITION actions. In this case, you need to use the function GetScrollInfo (described later in this chapter) to get this information. Scrolling SYSMETS Enough explanation. It’s time to put this stuff into practice. Let’s start simply. We’ll begin with vertical scrolling because that’s what we desperately need. The horizontal scrolling can wait. SYSMET2 is shown in Figure 4-10. This program is probably the simplest implementation of a scroll bar you’ll want in an application. Figure 4-10. The SYSMETS2 program. SYSMETS2.C /*---------------------------------------------------- SYSMETS2.C—System Metrics Display Program No. 2 © Charles Petzold, 1998 ----------------------------------------------------*/ #include <windows.h> #include “sysmets.h” LRESULT CALLBACK WndProc (HWND, UINT, WPARAM, LPARAM) ; int WINAPI WinMain (HINSTANCE hInstance, HINSTANCE hPrevInstance, PSTR szCmdLine, int iCmdShow) { static TCHAR szAppName[] = TEXT (“SysMets2”) ; HWND hwnd ; MSG msg ; WNDCLASS wndclass ; wndclass.style = CS_HREDRAW | CS_VREDRAW ; wndclass.lpfnWndProc = WndProc ; wndclass.cbClsExtra = 0 ; wndclass.cbWndExtra = 0 ; wndclass.hInstance = hInstance ; wndclass.hIcon = LoadIcon (NULL, IDI_APPLICATION) ; wndclass.hCursor = LoadCursor (NULL, IDC_ARROW) ; wndclass.hbrBackground = (HBRUSH) GetStockObject (WHITE_BRUSH) ; wndclass.lpszMenuName = NULL ; wndclass.lpszClassName = szAppName ; if (!RegisterClass (&wndclass)) { MessageBox (NULL, TEXT (“This program requires Windows NT!”), szAppName, MB_ICONERROR) ; return 0 ; } hwnd = CreateWindow (szAppName, TEXT (“Get System Metrics No. 2”), WS_OVERLAPPEDWINDOW | WS_VSCROLL, 83
- 84. CW_USEDEFAULT, CW_USEDEFAULT, CW_USEDEFAULT, CW_USEDEFAULT, NULL, NULL, hInstance, NULL) ; ShowWindow (hwnd, iCmdShow) ; UpdateWindow (hwnd) ; while (GetMessage (&msg, NULL, 0, 0)) { TranslateMessage (&msg) ; DispatchMessage (&msg) ; } return msg.wParam ; } LRESULT CALLBACK WndProc (HWND hwnd, UINT message, WPARAM wParam, LPARAM lParam) { static int cxChar, cxCaps, cyChar, cyClient, iVscrollPos ; HDC hdc ; int i, y ; PAINTSTRUCT ps ; TCHAR szBuffer[10] ; TEXTMETRIC tm ; switch (message) { case WM_CREATE: hdc = GetDC (hwnd) ; GetTextMetrics (hdc, &tm) ; cxChar = tm.tmAveCharWidth ; cxCaps = (tm.tmPitchAndFamily & 1 ? 3 : 2) * cxChar / 2 ; cyChar = tm.tmHeight + tm.tmExternalLeading ; ReleaseDC (hwnd, hdc) ; SetScrollRange (hwnd, SB_VERT, 0, NUMLINES - 1, FALSE) ; SetScrollPos (hwnd, SB_VERT, iVscrollPos, TRUE) ; return 0 ; case WM_SIZE: cyClient = HIWORD (lParam) ; return 0 ; case WM_VSCROLL: switch (LOWORD (wParam)) { case SB_LINEUP: iVscrollPos -= 1 ; break ; case SB_LINEDOWN: iVscrollPos += 1 ; break ; case SB_PAGEUP: iVscrollPos -= cyClient / cyChar ; break ; case SB_PAGEDOWN: iVscrollPos += cyClient / cyChar ; break ; case SB_THUMBPOSITION: 84
- 85. iVscrollPos = HIWORD (wParam) ; break ; default : break ; } iVscrollPos = max (0, min (iVscrollPos, NUMLINES - 1)) ; if (iVscrollPos != GetScrollPos (hwnd, SB_VERT)) { SetScrollPos (hwnd, SB_VERT, iVscrollPos, TRUE) ; InvalidateRect (hwnd, NULL, TRUE) ; } return 0 ; case WM_PAINT: hdc = BeginPaint (hwnd, &ps) ; for (i = 0 ; i < NUMLINES ; i++) { y = cyChar * (i - iVscrollPos) ; TextOut (hdc, 0, y, sysmetrics[i].szLabel, lstrlen (sysmetrics[i].szLabel)) ; TextOut (hdc, 22 * cxCaps, y, sysmetrics[i].szDesc, lstrlen (sysmetrics[i].szDesc)) ; SetTextAlign (hdc, TA_RIGHT | TA_TOP) ; TextOut (hdc, 22 * cxCaps + 40 * cxChar, y, szBuffer, wsprintf (szBuffer, TEXT (“%5d”), GetSystemMetrics (sysmetrics[i].iIndex))) ; SetTextAlign (hdc, TA_LEFT | TA_TOP) ; } EndPaint (hwnd, &ps) ; return 0 ; case WM_DESTROY: PostQuitMessage (0) ; return 0 ; } return DefWindowProc (hwnd, message, wParam, lParam) ; } The new CreateWindow call adds a vertical scroll bar to the window by including the WS_VSCROLL window style in the third argument: WS_OVERLAPPEDWINDOW | WS_VSCROLL WM_CREATE message processing in the WndProc window procedure has two additional lines to set the range and initial position of the vertical scroll bar: SetScrollRange (hwnd, SB_VERT, 0, NUMLINES - 1, FALSE) ; SetScrollPos (hwnd, SB_VERT, iVscrollPos, TRUE) ; The sysmetrics structure array has NUMLINES lines of text, so the scroll bar range is set to 0 through NUMLINES - 1. Each position of the scroll bar corresponds to a line of text displayed at the top of the client area. If the scroll bar thumb is at position 0, the first line will be positioned at the top of the client area. For positions greater than zero, other lines appear at the top. When the position is NUMLINES - 1, the last line of text appears at the top of the client area. 85
- 86. To help with processing of the WM_VSCROLL messages, a static variable named iVscrollPos is defined within the window procedure. This variable is the current position of the scroll bar thumb. For SB_LINEUP and SB_LINEDOWN, all we need to do is adjust the scroll position by 1. For SB_PAGEUP and SB_PAGEDOWN, we want to move the text by the context of one screen, or cyClient divided by cyChar. For SB_THUMBPOSITION, the new thumb position is the high word of wParam. The SB_ENDSCROLL and SB_THUMBTRACK messages are ignored. After the program calculates a new value of iVscrollPos based on the type of WM_VSCROLL message it receives, it makes sure that it is still between the minimum and maximum range value of the scroll bar by using the min and max macros. The program then compares the value of iVscrollPos with the previous position, which is obtained by calling GetScrollPos. If the scroll position has changed, it is updated by calling SetScrollPos, and the entire window is invalidated by a call to InvalidateRect. The InvalidateRect function generates a WM_PAINT message. When the original SYSMETS1 program processed WM_PAINT messages, the y-coordinate of each line was calculated as cyChar * i In SYSMETS2, the formula is cyChar * (i - iVscrollPos) The loop still displays NUMLINES lines of text, but for nonzero values of iVscrollPos this value is negative. The program is actually displaying the early lines of text above and outside the client area. Windows, of course, doesn’t allow these lines to appear on the screen, so everything looks all nice and neat. I told you we’d start simply. This is rather wasteful and inefficient code. We’ll fix it shortly, but first consider how we update the client area after a WM_VSCROLL message. Structuring Your Program for Painting The window procedure in SYSMETS2 does not directly repaint the client area after processing a scroll bar message. Instead, it calls InvalidateRect to invalidate the client area. This causes Windows to place a WM_PAINT message in the message queue. It is best to structure your Windows programs so that you do all your client-area painting in response to a WM_PAINT message. Because your program should be able to repaint the entire client area of the window at any time on receipt of a WM_PAINT message, painting in response to other messages will probably involve code that duplicates the functionality of your WM_PAINT logic. At first, you may rebel at this dictum because it seems such a roundabout way of doing things. In the early days of Windows, programmers found this concept difficult to master because it was so different from character-mode PC programming. And, as I mentioned earlier, there are frequently times when your program will respond to some keyboard or mouse logic by drawing something immediately. This is done for both convenience and efficiency. But in many cases it’s simply unnecessary. After you master the discipline of accumulating all the information you need to paint in response to a WM_PAINT message, you’ll be pleased with the results. As SYSMETS2 demonstrates, a program will often determine that it must repaint a particular area of the display while processing a message other than WM_PAINT. This is where InvalidateRect comes in handy. You can use it to invalidate specific rectangles of the client area or the entire client area. Simply marking areas of the window as invalid to generate WM_PAINT messages might not be entirely satisfactory in some applications. After you make an InvalidateRect call, Windows places a WM_PAINT message in the message queue and the window procedure eventually processes it. However, Windows treats WM_PAINT messages as low priority, so if a lot of other activity is occurring in the system, it may be awhile before your window procedure receives the WM_PAINT message. Everyone has seen blank, white “holes” in Windows after a dialog box is removed and the program is still waiting to refresh its window. If you prefer to update the invalid area immediately, you can call UpdateWindow after you call InvalidateRect: 86
- 87. UpdateWindow (hwnd) ; UpdateWindow causes the window procedure to be called immediately with a WM_PAINT message if any part of the client area is invalid. (UpdateWindow will not call the window procedure if the entire client area is valid.) In this case, the WM_PAINT message bypasses the message queue. The window procedure is called directly from Windows. When the window procedure has finished repainting, it exits and the UpdateWindow function returns control to the code that called it. You’ll note that UpdateWindow is the same function used in WinMain to generate the first WM_PAINT message. When a window is first created, the entire client area is invalid. UpdateWindow directs the window procedure to paint it. Building a Better Scroll SYSMETS2 works well, but it’s too inefficient a model to be imitated in other programs. Soon I’ll present a new version that corrects its deficiencies. Most interesting, perhaps, is that this new version will not use any of the four scroll bar functions discussed so far. Instead, it will use new functions unique to the Win32 API. The Scroll Bar Information Functions The scroll bar documentation (in /Platform SDK/User Interface Services/Controls/Scroll Bars) indicates that the SetScrollRange, SetScrollPos, GetScrollRange, and GetScrollPos functions are “obsolete.” This is not entirely accurate. While these functions have been around since Windows 1.0, they were upgraded to handle 32-bit arguments in the Win32 API. They are still perfectly functional and are likely to remain functional. Moreover, they are simple enough not to overwhelm a newcomer to Windows programming at the outset, which is why I continue to use them in this book. The two scroll bar functions introduced in the Win32 API are called SetScrollInfo and GetScrollInfo. These functions do everything the earlier functions do and add two new important features. The first feature involves the size of the scroll bar thumb. As you may have noticed, the size of the thumb was constant in the SYSMETS2 program. However, in some Windows applications you may have used, the size of the thumb is proportional to the amount of the document displayed in the window. This displayed amount is known as the “page size.” In arithmetic terms, Thumb size Page size Amount of document displayed = = Scroll length Range Total size of document You can use SetScrollInfo to set the page size (and hence the size of the thumb), as we’ll see in the SYSMETS3 program coming up shortly. The GetScrollInfo function adds a second important feature, or rather it corrects a deficiency in the current API. Suppose you want to use a range that is 65,536 or more units. Back in the days of 16-bit Windows, this was not possible. In Win32, of course, the functions are defined as accepting 32-bit arguments, and indeed they do. (Keep in mind that if you do use a range this large, the number of actual physical positions of the thumb is still limited by the pixel size of the scroll bar.) However, when you get a WM_VSCROLL or WM_HSCROLL message with a notification code of SB_THUMBTRACK or SB_THUMBPOSITION, only 16 bits are provided to indicate the current position of the thumb. The GetScrollInfo function lets you obtain the actual 32-bit value. The syntax of the SetScrollInfo and GetScrollInfo functions is SetScrollInfo (hwnd, iBar, &si, bRedraw) ; GetScrollInfo (hwnd, iBar, &si) ; The iBar argument is either SB_VERT or SB_HORZ, as in the other scroll bar functions. As with those functions also, it can be SB_CTL for a scroll bar control. The last argument for SetScrollInfo can be TRUE or FALSE to 87
- 88. indicate if you want Windows to redraw the scroll bar taking into account the new information. The third argument to both functions is a SCROLLINFO structure, which is defined like so: typedef struct tagSCROLLINFO { UINT cbSize ; // set to sizeof (SCROLLINFO) UINT fMask ; // values to set or get int nMin ; // minimum range value int nMax ; // maximum range value UINT nPage ; // page size int nPos ; // current position int nTrackPos ; // current tracking position } SCROLLINFO, * PSCROLLINFO ; In your program, you can define a structure of type SCROLLINFO like this: SCROLLINFO si ; Before calling SetScrollInfo or GetScrollInfo, you must set the cbSize field to the size of the structure: si.cbSize = sizeof (si) ; or si.cbSize = sizeof (SCROLLINFO) ; As you get acquainted with Windows, you’ll find several other structures that have a first field like this one to indicate the size of the structure. This field allows for a future version of Windows to expand the structure and add new features while still being compatible with previously compiled programs. You set the fMask field to one or more flags beginning with the SIF prefix. You can combine these flags with the C bitwise OR function (|). When you use the SIF_RANGE flag with the SetScrollInfo function, you must set the nMin and nMax fields to the desired scroll bar range. When you use the SIF_RANGE flag with the GetScrollInfo function, the nMin and nMax fields will be set to the current range on return from the function. The SIF_POS flag is similar. When used with the SetScrollInfo function, you must set the nPos field of the structure to the desired position. You use the SIF_POS flag with GetScrollInfo to obtain the current position. The SIF_PAGE flag lets you set and obtain the page size. You set nPage to the desired page size with the SetScrollInfo function. GetScrollInfo with the SIF_PAGE flag lets you obtain the current page size. Don’t use this flag if you don’t want a proportional scroll bar thumb. You use the SIF_TRACKPOS flag only with GetScrollInfo while processing a WM_VSCROLL or WM_HSCROLL message with a notification code of SB_THUMBTRACK or SB_THUMBPOSITION. On return from the function, the nTrackPos field of the SCROLLINFO structure will indicate the current 32-bit thumb position. You use the SIF_DISABLENOSCROLL flag only with the SetScrollInfo function. If this flag is specified and the new scroll bar arguments would normally render the scroll bar invisible, this scroll renders the scroll bar disabled instead. (I’ll explain this more shortly.) The SIF_ALL flag is a combination of SIF_RANGE, SIF_POS, SIF_PAGE, and SIF_TRACKPOS. This is handy when setting the scroll bar arguments during a WM_SIZE message. (The SIF_TRACKPOS flag is ignored when specified in a SetScrollInfo function.) It’s also handy when processing a scroll bar message. How Low Can You Scroll? In SYSMETS2, the scrolling range is set to a minimum of 0 and a maximum of NUMLINES - 1. When the scroll bar position is 0, the first line of information is at the top of the client area; when the scroll bar position is 88
- 89. NUMLINES - 1, the last line is at the top of the client area and no other lines are visible. You could say that SYSMETS2 scrolls too far. It really only needs to scroll far enough so that the last line of information appears at the bottom of the client area rather than at the top. We could make some changes to SYSMETS2 to accomplish this. Rather than set the scroll bar range when we process the WM_CREATE message, we could wait until we receive the WM_SIZE message: iVscrollMax = max (0, NUMLINES - cyClient / cyChar) ; SetScrollRange (hwnd, SB_VERT, 0, iVscrollMax, TRUE) ; Suppose NUMLINES equals 75, and suppose for a particular window size that cyClient divided by cyChar equals 50. In other words, we have 75 lines of information but only 50 can fit in the client area at any time. Using the two lines of code shown above, the range is set to a minimum of 0 and a maximum of 25. When the scroll bar position equals 0, the program displays lines 0 through 49. When the scroll bar position equals 1, the program displays lines 1 through 50; and when the scroll bar position equals 25 (the maximum), the program displays lines 25 through 74. Obviously we’d have to make changes to other parts of the program, but this is entirely doable. One nice feature of the new scroll bar functions is that when you use a scroll bar page size, much of this logic is done for you. Using the SCROLLINFO structure and SetScrollInfo, you’d have code that looked something like this: si.cbSize = sizeof (SCROLLINFO) ; si.cbMask = SIF_RANGE | SIF_PAGE ; si.nMin = 0 ; si.nMax = NUMLINES - 1 ; si.nPage = cyClient / cyChar ; SetScrollInfo (hwnd, SB_VERT, &si, TRUE) ; When you do this, Windows limits the maximum scroll bar position not to si.nMax but to si.nMax - si.nPage + 1. Let’s make the same assumptions as earlier: NUMLINES equals 75 (so si.nMax equals 74), and si.nPage equals 50. This means that the maximum scroll bar position is limited to 74 - 50 + 1, or 25. This is exactly what we want. What happens when the page size is as large as the scroll bar range? That is, in this example, what if nPage is 75 or above? Windows conveniently hides the scroll bar because it’s no longer needed. If you don’t want the scroll bar to be hidden, use SIF_DISABLENOSCROLL when calling SetScrollInfo and Windows will merely disable the scroll bar rather than hide it. The New SYSMETS SYSMETS3—our final version of the SYSMETS program in this chapter—is shown in Figure 4-11. This version uses the SetScrollInfo and GetScrollInfo functions, adds a horizontal scroll bar for left and right scrolling, and repaints the client area more efficiently. Figure 4-11. The SYSMETS3 program. SYSMETS3.C /*---------------------------------------------------- SYSMETS3.C—System Metrics Display Program No. 3 © Charles Petzold, 1998 ----------------------------------------------------*/ #include <windows.h> #include “sysmets.h” LRESULT CALLBACK WndProc (HWND, UINT, WPARAM, LPARAM) ; int WINAPI WinMain (HINSTANCE hInstance, HINSTANCE hPrevInstance, 89
- 90. PSTR szCmdLine, int iCmdShow) { static TCHAR szAppName[] = TEXT (“SysMets3”) ; HWND hwnd ; MSG msg ; WNDCLASS wndclass ; wndclass.style = CS_HREDRAW | CS_VREDRAW ; wndclass.lpfnWndProc = WndProc ; wndclass.cbClsExtra = 0 ; wndclass.cbWndExtra = 0 ; wndclass.hInstance = hInstance ; wndclass.hIcon = LoadIcon (NULL, IDI_APPLICATION) ; wndclass.hCursor = LoadCursor (NULL, IDC_ARROW) ; wndclass.hbrBackground = (HBRUSH) GetStockObject (WHITE_BRUSH) ; wndclass.lpszMenuName = NULL ; wndclass.lpszClassName = szAppName ; if (!RegisterClass (&wndclass)) { MessageBox (NULL, TEXT (“Program requires Windows NT!”), szAppName, MB_ICONERROR) ; return 0 ; } hwnd = CreateWindow (szAppName, TEXT (“Get System Metrics No. 3”), WS_OVERLAPPEDWINDOW | WS_VSCROLL | WS_HSCROLL, CW_USEDEFAULT, CW_USEDEFAULT, CW_USEDEFAULT, CW_USEDEFAULT, NULL, NULL, hInstance, NULL) ; ShowWindow (hwnd, iCmdShow) ; UpdateWindow (hwnd) ; while (GetMessage (&msg, NULL, 0, 0)) { TranslateMessage (&msg) ; DispatchMessage (&msg) ; } return msg.wParam ; } LRESULT CALLBACK WndProc (HWND hwnd, UINT message, WPARAM wParam, LPARAM lParam) { static int cxChar, cxCaps, cyChar, cxClient, cyClient, iMaxWidth ; HDC hdc ; int i, x, y, iVertPos, iHorzPos, iPaintBeg, iPaintEnd ; PAINTSTRUCT ps ; SCROLLINFO si ; TCHAR szBuffer[10] ; TEXTMETRIC tm ; switch (message) { case WM_CREATE: hdc = GetDC (hwnd) ; GetTextMetrics (hdc, &tm) ; cxChar = tm.tmAveCharWidth ; cxCaps = (tm.tmPitchAndFamily & 1 ? 3 : 2) * cxChar / 2 ; cyChar = tm.tmHeight + tm.tmExternalLeading ; ReleaseDC (hwnd, hdc) ; 90
- 91. // Save the width of the three columns iMaxWidth = 40 * cxChar + 22 * cxCaps ; return 0 ; case WM_SIZE: cxClient = LOWORD (lParam) ; cyClient = HIWORD (lParam) ; // Set vertical scroll bar range and page size si.cbSize = sizeof (si) ; si.fMask = SIF_RANGE | SIF_PAGE ; si.nMin = 0 ; si.nMax = NUMLINES - 1 ; si.nPage = cyClient / cyChar ; SetScrollInfo (hwnd, SB_VERT, &si, TRUE) ; // Set horizontal scroll bar range and page size si.cbSize = sizeof (si) ; si.fMask = SIF_RANGE | SIF_PAGE ; si.nMin = 0 ; si.nMax = 2 + iMaxWidth / cxChar ; si.nPage = cxClient / cxChar ; SetScrollInfo (hwnd, SB_HORZ, &si, TRUE) ; return 0 ; case WM_VSCROLL: // Get all the vertical scroll bar information si.cbSize = sizeof (si) ; si.fMask = SIF_ALL ; GetScrollInfo (hwnd, SB_VERT, &si) ; // Save the position for comparison later on iVertPos = si.nPos ; switch (LOWORD (wParam)) { case SB_TOP: si.nPos = si.nMin ; break ; case SB_BOTTOM: si.nPos = si.nMax ; break ; case SB_LINEUP: si.nPos -= 1 ; break ; case SB_LINEDOWN: si.nPos += 1 ; break ; case SB_PAGEUP: si.nPos -= si.nPage ; break ; case SB_PAGEDOWN: si.nPos += si.nPage ; break ; 91
- 92. case SB_THUMBTRACK: si.nPos = si.nTrackPos ; break ; default: break ; } // Set the position and then retrieve it. Due to adjustments // by Windows it may not be the same as the value set. si.fMask = SIF_POS ; SetScrollInfo (hwnd, SB_VERT, &si, TRUE) ; GetScrollInfo (hwnd, SB_VERT, &si) ; // If the position has changed, scroll the window and update it if (si.nPos != iVertPos) { ScrollWindow (hwnd, 0, cyChar * (iVertPos - si.nPos), NULL, NULL) ; UpdateWindow (hwnd) ; } return 0 ; case WM_HSCROLL: // Get all the vertical scroll bar information si.cbSize = sizeof (si) ; si.fMask = SIF_ALL ; // Save the position for comparison later on GetScrollInfo (hwnd, SB_HORZ, &si) ; iHorzPos = si.nPos ; switch (LOWORD (wParam)) { case SB_LINELEFT: si.nPos -= 1 ; break ; case SB_LINERIGHT: si.nPos += 1 ; break ; case SB_PAGELEFT: si.nPos -= si.nPage ; break ; case SB_PAGERIGHT: si.nPos += si.nPage ; break ; case SB_THUMBPOSITION: si.nPos = si.nTrackPos ; break ; default : break ; } // Set the position and then retrieve it. Due to adjustments // by Windows it may not be the same as the value set. 92
- 93. si.fMask = SIF_POS ; SetScrollInfo (hwnd, SB_HORZ, &si, TRUE) ; GetScrollInfo (hwnd, SB_HORZ, &si) ; // If the position has changed, scroll the window if (si.nPos != iHorzPos) { ScrollWindow (hwnd, cxChar * (iHorzPos - si.nPos), 0, NULL, NULL) ; } return 0 ; case WM_PAINT : hdc = BeginPaint (hwnd, &ps) ; // Get vertical scroll bar position si.cbSize = sizeof (si) ; si.fMask = SIF_POS ; GetScrollInfo (hwnd, SB_VERT, &si) ; iVertPos = si.nPos ; // Get horizontal scroll bar position GetScrollInfo (hwnd, SB_HORZ, &si) ; iHorzPos = si.nPos ; // Find painting limits iPaintBeg = max (0, iVertPos + ps.rcPaint.top / cyChar) ; iPaintEnd = min (NUMLINES - 1, iVertPos + ps.rcPaint.bottom / cyChar) ; for (i = iPaintBeg ; i <= iPaintEnd ; i++) { x = cxChar * (1 - iHorzPos) ; y = cyChar * (i - iVertPos) ; TextOut (hdc, x, y, sysmetrics[i].szLabel, lstrlen (sysmetrics[i].szLabel)) ; TextOut (hdc, x + 22 * cxCaps, y, sysmetrics[i].szDesc, lstrlen (sysmetrics[i].szDesc)) ; SetTextAlign (hdc, TA_RIGHT | TA_TOP) ; TextOut (hdc, x + 22 * cxCaps + 40 * cxChar, y, szBuffer, wsprintf (szBuffer, TEXT (“%5d”), GetSystemMetrics (sysmetrics[i].iIndex))) ; SetTextAlign (hdc, TA_LEFT | TA_TOP) ; } EndPaint (hwnd, &ps) ; return 0 ; case WM_DESTROY : PostQuitMessage (0) ; return 0 ; } return DefWindowProc (hwnd, message, wParam, lParam) ; } 93
- 94. This version of the program relies on Windows to maintain the scroll bar information and do a lot of the bounds checking. At the beginning of WM_VSCROLL and WM_HSCROLL processing, it obtains all the scroll bar information, adjusts the position based on the notification code, and then sets the position by calling SetScrollInfo. The program then calls GetScrollInfo. If the position was out of range in the SetScrollInfo call, the position is corrected by Windows and the correct value is returned in the GetScrollInfo call. SYSMETS3 uses the ScrollWindow function to scroll information in the window’s client area rather than repaint it. Although the function is rather complex (and has been superseded in recent versions of Windows by the even more complex ScrollWindowEx), SYSMETS3 uses it in a fairly simple way. The second argument to the function gives an amount to scroll the client area horizontally in pixels, and the third argument is an amount to scroll the client area vertically. The last two arguments to ScrollWindow are set to NULL. This indicates that the entire client area is to be scrolled. Windows automatically invalidates the rectangle in the client area “uncovered” by the scrolling operation. This generates a WM_PAINT message. InvalidateRect is no longer needed. Note that ScrollWindow is not a GDI function because it does not require a handle to a device context. It is one of the few non-GDI Windows functions that changes the appearance of the client area of a window. Rather peculiarly but conveniently, it is documented along with the scroll bar functions. The WM_HSCROLL processing traps the SB_THUMBPOSITION notification code and ignores SB_THUMBTRACK. Thus, if the user drags the thumb on the horizontal scroll bar, the program will not scroll the contents of the window horizontally until the user releases the mouse button. The WM_VSCROLL strategy is different: here, the program traps SB_THUMBTRACK messages and ignores SB_THUMBPOSITION. Thus, the program scrolls its contents vertically in direct response to the user dragging the thumb on the vertical scroll bar. This is considered preferable, but watch out: It is well known that when users find out a program scrolls in direct response to dragging the scroll bar thumb, they will frenetically jerk the thumb back and forth trying to bring the program to its knees. Fortunately, today’s fast PCs are much more likely to survive this torture test. But try your code out on a slow machine, and perhaps think about using the SB_SLOWMACHINE argument to GetSystemMetrics for alternative processing for slow machines. One way to speed up WM_PAINT processing is illustrated by SYSMETS3: The WM_PAINT code determines which lines are within the invalid rectangle and rewrites only those lines. The code is more complex, of course, but it is faster. But I Don’t Like to Use the Mouse In the early days of Windows, a significant number of users didn’t care for using the mouse, and indeed, Windows itself (and many Windows programs) did not require a mouse. Although mouseless PCs have now generally gone the way of monochrome displays and dot-matrix printers, it is still recommended that you write programs that duplicate mouse operations with the keyboard. This is particularly true for something as fundamental as scroll bars, because our keyboards have a whole array of cursor movement keys that should offer alternatives to the mouse. In the next chapter, you’ll learn how to use the keyboard and how to add a keyboard interface to this program. You’ll notice that SYSMETS3 seems to process WM_VSCROLL messages when the notification code equals SB_TOP and SB_BOTTOM. I mentioned earlier that a window procedure doesn’t receive these messages for scroll bars, so right now this is superfluous code. When we come back to this program in the next chapter, you’ll see the reason for including those operations. 94
- 95. Chapter 5 -- Basic Drawing The subsystem of Microsoft Windows responsible for displaying graphics on video displays and printers is known as the Graphics Device Interface (GDI). As you might imagine, GDI is an extremely important part of Windows. Not only do the applications you write for Windows use GDI for the display of visual information, but Windows itself uses GDI for the visual display of user interface items such as menus, scroll bars, icons, and mouse cursors. Unfortunately, a comprehensive discussion of GDI would require an entire book, and this is not that book. Instead, in this chapter I want to provide you with the basics of drawing lines and filled areas. This is enough GDI to get you through the next few chapters. In later chapters, we’ll look at GDI support of bitmaps, metafiles, and formatted text. The Structure of GDI From the programmer’s perspective, GDI consists of several hundred function calls and some associated data types, macros, and structures. But before we begin looking at some of these functions in detail, let’s step back and get a feel for the overall structure of GDI. The GDI Philosophy Graphics in Windows 98 and Microsoft Windows NT is handled primarily by functions exported from the dynamic- link library GDI32.DLL. In Windows 98, this GDI32.DLL makes use of the 16-bit GDI.EXE dynamic-link library for the actual implementation of many of the functions. In Windows NT, GDI.EXE is used only for 16-bit programs. These dynamic-link libraries call routines in device drivers for the video display and any printers you may have set up. The video driver accesses the hardware of the video display, and the printer driver converts GDI commands into codes or commands that the various printers understand. Obviously, different video display adapters and printers require different device drivers. A wide variety of display devices can be attached to PC compatibles. One of the primary goals of GDI is to support device-independent graphics. Windows programs should be able to run without problems on any graphics output device that Windows supports. GDI accomplishes this goal by providing facilities to insulate your programs from the particular characteristics of different output devices. The world of graphics output devices is divided into two broad groups: raster devices and vector devices. Most PC output devices are raster devices, which means that they represent images as a rectangular pattern of dots. This category includes video display adapters, dot-matrix printers, and laser printers. Vector devices, which draw images using lines, are generally limited these days to plotters. Much of traditional computer graphics programming (the type you’ll find in older books) is based solely on vectors. This means that a program using a vector graphics system is a level of abstraction away from the hardware. The output device uses pixels for a graphics representation, but the program doesn’t talk to the interface in terms of pixels. While you can certainly use the Windows GDI as a high-level vector drawing system, you can also use it for relatively low-level pixel manipulation. In this respect, Windows GDI is to traditional graphics interface languages what C is to other programming languages. C is well known for its high degree of portability among different operating systems and environments. Yet C is also well known for allowing a programmer to perform low-level system functions that are often impossible in other high-level languages. Just as C is sometimes thought of as a “high-level assembly language,” you can think of GDI as a high-level interface to the hardware of the graphics device. As you’ve seen, by default Windows uses a coordinate system based on pixels. Most traditional graphics languages use a “virtual” coordinate system with horizontal and vertical axes that range (for instance) from 0 to 32,767. Although some graphics languages don’t let you use pixel coordinates, Windows GDI lets you use either system (as well as additional coordinate systems based on physical measurements). You can use a virtual coordinate system and keep your program distanced from the hardware, or you can use the device coordinate system and snuggle right up to the hardware. 95
- 96. Some programmers think that when you’re working in terms of pixels, you’ve abandoned device independence. We’ve already seen in the last chapter that this is not necessarily the case. The trick is to use the pixels in a device- independent manner. This requires that the graphics interface language provide facilities for a program to determine the hardware characteristics of the device and make appropriate adjustments. For example, in the SYSMETS programs we used the pixel size of a standard system font character to space text on the screen. This approach allowed the programs to adjust to different display adapters with different resolutions, text sizes, and aspect ratios. You’ll see other methods in this chapter for determining display sizes. In the early days, many users ran Windows with a monochrome display. Even in more recent years, laptop users were restricted to gray shades. For this reason, GDI was constructed so that you can write a program without worrying much about color—that is, Windows can convert colors to gray shades. Even today, video displays used with Windows 98 have different color capabilities (16 color, 256 color, “high color,” and “true color”). Although ink-jet printers have brought low-cost hard-copy color to the masses, many users still prefer their black-only laser printers for high-quality output. It is possible to use these devices blindly, but your program can also determine how many colors are available on the particular display device and take best advantage of the hardware. Of course, just as you can write C programs that have subtle portability problems when they run on other computers, you can also inadvertently let device dependencies creep into your Windows programs. That’s part of the price of not being fully insulated from the hardware. You should also be aware of the limitations of Windows GDI. Although you can certainly move graphics objects around the display, GDI is generally a static display system with only limited animation support. If you need to write sophisticated animations for games, you should explore Microsoft DirectX, which provides the support you’ll need. The GDI Function Calls The several hundred function calls that comprise GDI can be classified in several broad groups: • Functions that get (or create) and release (or destroy) a device context As we saw in earlier chapters, you need a handle to a device context in order to draw. The BeginPaint and EndPaint functions (although technically a part of the USER module rather than the GDI module) let you do this during the WM_PAINT message, and GetDC and ReleaseDC functions let you do this during other messages. We’ll examine some other functions regarding device contexts shortly. • Functions that obtain information about the device context In the SYSMETS programs in Chapter 4, we used the GetTextMetrics function to obtain information about the dimensions of the font currently selected in the device context. Later in this chapter, we’ll look at the DEVCAPS1 program, which obtains other, more general, device context information. • Functions that draw something Obviously, once all the preliminaries are out of the way, this is the really important stuff. In the last chapter, we used the TextOut function to display some text in the client area of the window. As we’ll see, other GDI functions let us draw lines and filled areas. In Chapters 14 and 15, we’ll also see how to draw bit-mapped images. • Functions that set and get attributes of the device context An “attribute” of the device context determines various details regarding how the drawing functions work. For example, you can use SetTextColor to specify the color of any text you draw using TextOut or other text output functions. In the SYSMETS programs in Chapter 4, we used SetTextAlign to tell GDI that the starting position of the text string in the TextOut function should be the right side of the string rather than the left, which is the default. All attributes of the device context have default values that are set when the device context is obtained. For all Set functions, there are Get functions that let you obtain the current device context attributes. • Functions that work with GDI “objects” Here’s where GDI gets a bit messy. First an example: By default, any lines you draw using GDI are solid and of a standard width. You may wish to draw thicker lines or use lines composed of a series of dots or dashes. The line width and this line style are not attributes of the device context. Instead, they are characteristics of a “logical pen.” You can think of a pen as a collection of bundled attributes. You create a logical pen by specifying these characteristics in the CreatePen, CreatePenIndirect, or ExtCreatePen function. Although these functions are considered to be part of GDI, 96
- 97. unlike most GDI functions they do not require a handle to a device context. The functions return a handle to a logical pen. To use this pen, you “select” the pen handle into the device context. The current pen selected in the device context is considered an attribute of the device context. From then on, whatever lines you draw use this pen. Later on, you deselect the pen object from the device context and destroy the object. Destroying the pen is necessary because the pen definition occupies allocated memory space. Besides pens, you also use GDI objects for creating brushes that fill enclosed areas, for fonts, for bitmaps, and for other aspects of GDI. The GDI Primitives The types of graphics you display on the screen or the printer can themselves be divided into several categories, which are called “primitives.” These are: • Lines and curves Lines are the foundation of any vector graphics drawing system. GDI supports straight lines, rectangles, ellipses (including that subset of ellipses known as circles), “arcs” that are partial curves on the circumference of an ellipse, and Bezier splines, all of which I’ll discuss in this chapter. If you need to draw a different type of curve, you can draw it as a polyline, which is a series of very short lines that define a curve. GDI draws lines using the current pen selected in the device context. • Filled areas Whenever a series of lines or curves encloses an area, you can cause that area to be filled with the current GDI brush object. This brush can be a solid color, a pattern (which can be a series of horizontal, vertical, or diagonal hatch marks), or a bitmapped image that is repeated vertically or horizontally within the area. • Bitmaps A bitmap is a rectangular array of bits that correspond to the pixels of a display device. The bitmap is the fundamental tool of raster graphics. Bitmaps are generally used for displaying complex (often real- world) images on the video display or printer. Bitmaps are also used for displaying small images that must be drawn very quickly, such as icons, mouse cursors, and buttons that appear in application toolbars. GDI supports two types of bitmaps—the old (although still quite useful) “device-dependent” bitmap, which is a GDI object, and the newer (as of Windows 3.0) “device-independent” bitmap (or DIB), which can be stored in disk files. I’ll discuss bitmaps in Chapters 14 and 15. • Text Text is not quite as mathematical as other aspects of computer graphics; instead it is bound to hundreds of years of traditional typography, which many typographers and other observers appreciate as an art. For this reason, text is often the most complex part of any computer graphics system, but it is also (assuming literacy remains the norm) the most important. Data structures used for defining GDI font objects and for obtaining font information are among the largest in Windows. Beginning with Windows 3.1, GDI began supporting TrueType fonts, which are based on filled outlines that can be manipulated with other GDI functions. Windows 98 continues to support the older bitmap-based fonts for compatibility and small memory requirements. I’ll discuss fonts in Chapter 17. Other Stuff Other aspects of GDI are not so easily classifiable. These are: • Mapping modes and transforms Although by default you draw in units of pixels, you are not limited to doing that. The GDI mapping modes allow you to draw in units of inches (or rather, fractions of inches), millimeters, or anything you want. In addition, Windows NT supports a traditional “world transform” expressed as a 3-by-3 matrix. This allows for skewing and rotation of graphics objects. The world transform is not supported under Windows 98. • Metafiles A metafile is a collection of GDI commands stored in a binary form. Metafiles are used primarily to transfer representations of vector graphic drawings through the clipboard. I’ll discuss metafiles in 97
- 98. Chapter 18. • Regions A region is a complex area of any shape and is generally defined as a Boolean combination of simpler regions. More complex regions can be stored internally in GDI as a series of scan lines derived from the original definition of the region. You can use regions for outlining, filling, and clipping. • Paths A path is a collection of straight lines and curves stored internally in GDI. Paths can be used for drawing, filling, and clipping. Paths can also be converted to regions. • Clipping Drawing can be restricted to a particular section of the client area. This is known as clipping. The clipping area can be rectangular or nonrectangular, generally specified as a region or a path. • Palettes The use of a customized palette is generally restricted to displays that show 256 colors. Windows reserves only 20 of these colors for use by the system. You can alter the other 236 colors to accurately display the colors of real-world images stored in bitmaps. I’ll discuss palettes in Chapter 16. • Printing Although this chapter is restricted to the video display, almost everything you learn here can be applied to printing. I discuss printing in Chapter 13. The Device Context Before we begin drawing, let’s examine the device context with more rigor than we did in Chapter 4. When you want to draw on a graphics output device such as the screen or printer, you must first obtain a handle to a device context (or DC). In giving your program this handle, Windows is giving you permission to use the device. You then include the handle as an argument to the GDI functions to identify to Windows the device on which you wish to draw. The device context contains many “attributes” that determine how the GDI functions work on the device. These attributes allow GDI functions to have just a few arguments, such as starting coordinates. The GDI functions do not need arguments for everything else that Windows needs to display the object on the device. For example, when you call TextOut, you need specify in the function only the device context handle, the starting coordinates, the text, and the length of the text. You don’t need to specify the font, the color of the text, the color of the background behind the text, or the intercharacter spacing. These are all attributes that are part of the device context. When you want to change one of these attributes, you call a function that does so. Subsequent TextOut calls to that device context use the new attribute. Getting a Device Context Handle Windows provides several methods for obtaining a device context handle. If you obtain a video display device context handle while processing a message, you should release it before exiting the window procedure. After you release the handle, it is no longer valid. For a printer device context handle, the rules are not as strict. Again, we’ll look at printing in Chapter 13. The most common method for obtaining a device context handle and then releasing it involves using the BeginPaint and EndPaint calls when processing the WM_PAINT message: hdc = BeginPaint (hwnd, &ps) ; [other program lines] EndPaint (hwnd, &ps) ; The variable ps is a structure of type PAINTSTRUCT. The hdc field of this structure is the same handle to the device context that BeginPaint returns. The PAINSTRUCT structure also contains a RECT (rectangle) structure named rcPaint that defines a rectangle encompassing the invalid region of the window’s client area. With the device context handle obtained from BeginPaint you can draw only within this region. The BeginPaint call also validates this region. 98
- 99. Windows programs can also obtain a handle to a device context while processing messages other than WM_PAINT: hdc = GetDC (hwnd) ; [other program lines] ReleaseDC (hwnd, hdc) ; This device context applies to the client area of the window whose handle is hwnd. The primary difference between the use of these calls and the use of the BeginPaint and EndPaint combination is that you can draw on your entire client area with the handle returned from GetDC. However, GetDC and ReleaseDC don’t validate any possibly invalid regions of the client area. A Windows program can also obtain a handle to a device context that applies to the entire window and not only to the window’s client area: hdc = GetWindowDC (hwnd) ; [other program lines] ReleaseDC (hwnd, hdc) ; This device context includes the window title bar, menu, scroll bars, and frame in addition to the client area. Applications programs rarely use the GetWindowDC function. If you want to experiment with it, you should also trap the WM_NCPAINT (“nonclient paint”) message, which is the message Windows uses to draw on the nonclient areas of the window. The BeginPaint, GetDC, and GetWindowDC calls obtain a device context associated with a particular window on the video display. A much more general function for obtaining a handle to a device context is CreateDC: hdc = CreateDC (pszDriver, pszDevice, pszOutput, pData) ; [other program lines] DeleteDC (hdc) ; For example, you can obtain a device context handle for the entire display by calling hdc = CreateDC (TEXT (“DISPLAY”), NULL, NULL, NULL) ; Writing outside your window is generally impolite, but it’s convenient for some unusual applications. (Although this fact is not documented, you can also retrieve a device context for the entire screen by calling GetDC with a NULL argument.) In Chapter 13, we’ll use the CreateDC function to obtain a handle to a printer device context. Sometimes you need only to obtain some information about a device context and not do any drawing. In these cases, you can obtain a handle to an “information context” by using CreateIC. The arguments are the same as for the CreateDC function. For example, hdc = CreateIC (TEXT (“DISPLAY”), NULL, NULL, NULL) ; You can’t write to the device by using this information context handle. When working with bitmaps, it can sometimes be useful to obtain a “memory device context”: hdcMem = CreateCompatibleDC (hdc) ; [other program lines] DeleteDC (hdcMem) ; You can select a bitmap into the memory device context and use GDI functions to draw on the bitmap. I’ll discuss these techniques in Chapter 14. I mentioned earlier that a metafile is a collection of GDI function calls encoded in binary form. You can create a metafile by obtaining a metafile device context: hdcMeta = CreateMetaFile (pszFilename) ; [other program lines] hmf = CloseMetaFile (hdcMeta) ; During the time the metafile device context is valid, any GDI calls you make using hdcMeta are not displayed but become part of the metafile. When you call CloseMetaFile, the device context handle becomes invalid. The function returns a handle to the metafile (hmf). I’ll discuss metafiles in Chapter 18. 99
- 100. Getting Device Context Information A device context usually refers to a physical display device such as a video display or a printer. Often, you need to obtain information about this device, including the size of the display, in terms of both pixels and physical dimensions, and its color capabilities. You can get this information by calling the GetDeviceCap (“get device capabilities”) function: iValue = GetDeviceCaps (hdc, iIndex) ; The iIndex argument is one of 29 identifiers defined in the WINGDI.H header file. For example, the iIndex value of HORZRES causes GetDeviceCaps to return the width of the device in pixels; a VERTRES argument returns the height of the device in pixels. If hdc is a handle to a screen device context, that’s the same information you can get from GetSystemMetrics. If hdc is a handle to a printer device context, GetDeviceCaps returns the height and width of the printer display area in pixels. You can also use GetDeviceCaps to determine the device’s capabilities of processing various types of graphics. This is usually not important for dealing with the video display, but it becomes more important with working with printers. For example, most pen plotters can’t draw bitmapped images and GetDeviceCaps can tell you that. The DEVCAPS1 Program The DEVCAPS1 program, shown in Figure 5-1, displays some (but not all) of the information available from the GetDeviceCaps function using a device context for the video display. In Chapter 13, I’ll present a second, expanded version of this program, called DEVCAPS2, that gets information for the printer. Figure 5-1. The DEVCAPS1 program. DEVCAPS1.C /*--------------------------------------------------------- DEVCAPS1.C—Device Capabilities Display Program No. 1 © Charles Petzold, 1998 ---------------------------------------------------------*/ #include <windows.h> #define NUMLINES ((int) (sizeof devcaps / sizeof devcaps [0])) struct { int iIndex ; TCHAR * szLabel ; TCHAR * szDesc ; } devcaps [] = { HORZSIZE, TEXT (“HORZSIZE”), TEXT (“Width in millimeters:”), VERTSIZE, TEXT (“VERTSIZE”), TEXT (“Height in millimeters:”), HORZRES, TEXT (“HORZRES”), TEXT (“Width in pixels:”), VERTRES, TEXT (“VERTRES”), TEXT (“Height in raster lines:”), BITSPIXEL, TEXT (“BITSPIXEL”), TEXT (“Color bits per pixel:”), PLANES, TEXT (“PLANES”), TEXT (“Number of color planes:”), NUMBRUSHES, TEXT (“NUMBRUSHES”), TEXT (“Number of device brushes:”), NUMPENS, TEXT (“NUMPENS”), TEXT (“Number of device pens:”), NUMMARKERS, TEXT (“NUMMARKERS”), TEXT (“Number of device markers:”), NUMFONTS, TEXT (“NUMFONTS”), TEXT (“Number of device fonts:”), NUMCOLORS, TEXT (“NUMCOLORS”), TEXT (“Number of device colors:”), 100
- 101. PDEVICESIZE, TEXT (“PDEVICESIZE”), TEXT (“Size of device structure:”), ASPECTX, TEXT (“ASPECTX”), TEXT (“Relative width of pixel:”), ASPECTY, TEXT (“ASPECTY”), TEXT (“Relative height of pixel:”), ASPECTXY, TEXT (“ASPECTXY”), TEXT (“Relative diagonal of pixel:”), LOGPIXELSX, TEXT (“LOGPIXELSX”), TEXT (“Horizontal dots per inch:”), LOGPIXELSY, TEXT (“LOGPIXELSY”), TEXT (“Vertical dots per inch:”), SIZEPALETTE, TEXT (“SIZEPALETTE”), TEXT (“Number of palette entries:”), NUMRESERVED, TEXT (“NUMRESERVED”), TEXT (“Reserved palette entries:”), COLORRES, TEXT (“COLORRES”), TEXT (“Actual color resolution:”) } ; LRESULT CALLBACK WndProc (HWND, UINT, WPARAM, LPARAM) ; int WINAPI WinMain (HINSTANCE hInstance, HINSTANCE hPrevInstance, PSTR szCmdLine, int iCmdShow) { static TCHAR szAppName[] = TEXT (“DevCaps1”) ; HWND hwnd ; MSG msg ; WNDCLASS wndclass ; wndclass.style = CS_HREDRAW | CS_VREDRAW ; wndclass.lpfnWndProc = WndProc ; wndclass.cbClsExtra = 0 ; wndclass.cbWndExtra = 0 ; wndclass.hInstance = hInstance ; wndclass.hIcon = LoadIcon (NULL, IDI_APPLICATION) ; wndclass.hCursor = LoadCursor (NULL, IDC_ARROW) ; wndclass.hbrBackground = (HBRUSH) GetStockObject (WHITE_BRUSH) ; wndclass.lpszMenuName = NULL ; wndclass.lpszClassName = szAppName ; if (!RegisterClass (&wndclass)) { MessageBox (NULL, TEXT (“This program requires Windows NT!”), szAppName, MB_ICONERROR) ; return 0 ; } hwnd = CreateWindow (szAppName, TEXT (“Device Capabilities”), WS_OVERLAPPEDWINDOW, CW_USEDEFAULT, CW_USEDEFAULT, CW_USEDEFAULT, CW_USEDEFAULT, NULL, NULL, hInstance, NULL) ; ShowWindow (hwnd, iCmdShow) ; UpdateWindow (hwnd) ; while (GetMessage (&msg, NULL, 0, 0)) { TranslateMessage (&msg) ; DispatchMessage (&msg) ; } return msg.wParam ; } LRESULT CALLBACK WndProc (HWND hwnd, UINT message, WPARAM wParam, LPARAM lParam) { static int cxChar, cxCaps, cyChar ; TCHAR szBuffer[10] ; HDC hdc ; int i ; PAINTSTRUCT ps ; TEXTMETRIC tm ; 101
- 102. switch (message) { case WM_CREATE: hdc = GetDC (hwnd) ; GetTextMetrics (hdc, &tm) ; cxChar = tm.tmAveCharWidth ; cxCaps = (tm.tmPitchAndFamily & 1 ? 3 : 2) * cxChar / 2 ; cyChar = tm.tmHeight + tm.tmExternalLeading ; ReleaseDC (hwnd, hdc) ; return 0 ; case WM_PAINT: hdc = BeginPaint (hwnd, &ps) ; for (i = 0 ; i < NUMLINES ; i++) { TextOut (hdc, 0, cyChar * i, devcaps[i].szLabel, lstrlen (devcaps[i].szLabel)) ; TextOut (hdc, 14 * cxCaps, cyChar * i, devcaps[i].szDesc, lstrlen (devcaps[i].szDesc)) ; SetTextAlign (hdc, TA_RIGHT | TA_TOP) ; TextOut (hdc, 14 * cxCaps + 35 * cxChar, cyChar * i, szBuffer, wsprintf (szBuffer, TEXT (“%5d”), GetDeviceCaps (hdc, devcaps[i].iIndex))) ; SetTextAlign (hdc, TA_LEFT | TA_TOP) ; } EndPaint (hwnd, &ps) ; return 0 ; case WM_DESTROY: PostQuitMessage (0) ; return 0 ; } return DefWindowProc (hwnd, message, wParam, lParam) ; } As you can see, this program is quite similar to the SYSMETS1 program shown in Chapter 4. To keep the code short, I didn’t include scroll bars because I knew the information would fit on one screen. The results for a 256- color, 640-by-480 VGA are shown in Figure 5-2. 102
- 103. Figure 5-2. The DEVCAPS1 display for a 256-color, 640-by-480 VGA. The Size of the Device Suppose you want to draw a square with sides that are 1 inch in length. To do this, either you (the programmer) or Windows (the operating system) would need to know how many pixels corresponded to 1 inch on the video display. The GetDeviceCaps function helps you obtain information regarding the physical size of the output device, be it the video display or printer. Video displays and printers are two very different devices. But perhaps the least obvious difference is how the word “resolution” is used in connection with the device. With printers, we often indicate a resolution in dots per inch. For example, most laser printers have a resolution of 300 or 600 dots per inch. However, the resolution of a video display is given as the total number of pixels horizontally and vertically, for example, 1024 by 768. Most people couldn’t tell you the total number of pixels their printers display horizontally and vertically on a sheet of paper or the number of pixels per inch on their video displays. In this book I’m going to use the word “resolution” in the strict sense of a number of pixels per metrical unit, generally an inch. I’ll use the phrase “pixel size” or “pixel dimension” to indicate the total number of pixels that the device displays horizontally or vertically. The “metrical size” or “metrical dimension” is the size of the display area of the device in inches or millimeters. (For a printer page, this is not the whole size of the paper but only the printable area.) Dividing the pixel size by the metrical size gives you a resolution. Most video displays used with Windows these days have screens that are 33 percent wider than they are high. This represents an aspect ratio of 1.33:1 or (as it’s more commonly written) 4:3. Historically, this aspect ratio goes way back to when Thomas Edison was making movies. It remained the standard aspect ratio for motion pictures until various types of widescreen projection started to be used beginning in 1953. Television sets also have an aspect ratio of 4:3. 103
- 104. However, your Windows applications should not assume that the video display has a 4:3 aspect ratio. People who do mostly word processing sometimes prefer a video display that resembles the height and width of a sheet of paper. The most common alternative to a 4:3 display is a 3:4 display—essentially a standard display turned on its side. If the horizontal resolution of a device equals the vertical resolution, the device is said to have “square pixels.” Nowadays all video displays in common use with Windows have square pixels, but this was not always the case. (Nor should your applications assume that the video display always has square pixels.) When Windows was first introduced, the standard video adapter boards were the IBM Color Graphics Adapter (CGA), which had a pixel dimension area of 640 by 200 pixels; the Enhanced Graphics Adapter (EGA), which had a pixel dimension of 640 by 350 pixels; and the Hercules Graphics Card, which had a pixel dimension of 720 by 348 pixels. All these video boards used a display that had a 4:3 aspect ratio, but the number of pixels horizontally and vertically was not in the ratio 4:3. It’s quite easy for a user running Windows to determine the pixel dimensions of a video display. Run the Display applet in Control Panel, and select the Settings tab. In the area labeled Screen Area, you’ll probably see one of these pixel dimensions: • 640 by 480 pixels • 800 by 600 pixels • 1024 by 768 pixels • 1280 by 1024 pixels • 1600 by 1200 pixels All of these are in the ratio 4:3. (Well, all except the 1280 by 1024 pixel size. This should probably be considered an annoying anomaly rather than anything more significant. As we’ll see, all these pixel dimensions when combined with a 4:3 monitor are considered to yield square pixels.) A Windows application can obtain the pixel dimensions of the display from GetSystemMetrics with the SM_CXSCREEN and SM_CYSCREEN arguments. As you’ll note from the DEVCAPS1 program, a program can obtain the same values from GetDeviceCaps with the HORZRES (“horizontal resolution”) and VERTRES arguments. This is a use of the word “resolution” that means the pixel size rather than the pixels per metrical unit. That’s the simple part of the device size. Now the confusion begins. The first two device capabilities, HORZSIZE and VERTSIZE, are documented as “Width, in millimeters, of the physical screen” and “Height, in millimeters, of the physical screen” (in /Platform SDK/Graphics and Multimedia Services/GDI/Device Contexts/Device Context Reference/Device Context Functions/GetDeviceCaps). These seem like straightforward definitions until one begins to think through their implications. For example, given the nature of the interface between video display adapters and monitors, how can Windows really know the monitor size? And what if you have a laptop (in which the video driver conceivably could know the exact physical dimensions of the screen) and you attach an external monitor to it? And what if you attach a video projector to your PC? In the 16-bit versions of Windows (and in Windows NT), Windows uses a “standard” display size for the HORZSIZE and VERTSIZE values. Beginning with Windows 95, however, the HORZSIZE and VERTSIZE values are derived from the HORZRES, VERTRES, LOGPIXELSX, and LOGPIXELSY values. Here’s how it works. When you use the Display applet of the Control Panel to select a pixel size of the display, you can also select a size of your system font. The reason for this option is that the font used for the 640 by 480 display may be too small to read when you go up to 1024 by 768 or beyond. Instead, you’ll want a larger system font. These system font sizes are referred to on the Settings tab of the Display applet as Small Fonts and Large Fonts. In traditional typography, the size of the characters in a font is indicated by a “point size.” A point is approximately 1/72 inch and in computer typography is often assumed to be exactly 1/72 inch. 104
- 105. In theory, the point size of a font is the distance from the top of the tallest character in the font to the bottom of descenders in characters such as j, p, q, and y, excluding accent marks. For example, in a 10-point font this distance would be 10/72 inch. In terms of the TEXTMETRIC structure, the point size of the font is equivalent to the tmHeight field minus the tmInternalLeading field, as shown in Figure 5-3. (This figure is the same as Figure 4-3 in the last chapter.) Figure 5-3. The small font and the TEXTMETRIC fields. In real-life typography, the point size of a font is not so precisely related to the actual size of the font characters. The designer of the font might make the actual characters a bit larger or smaller than the point size would indicate. After all, font design is an art rather than a science. The tmHeight field of the TEXTMETRIC structure indicates how successive lines of text should be spaced on the screen or printer. This can also be measured in points. For example, a 12-point line spacing indicates the baselines of successive lines of text should be 12/72 (or 1/6) inch apart. You don’t want to use 10-point line spacing for a 10- point font because the successive lines of text could actually touch each other. This book is printed with a 10-point font and 13-point line spacing. A 10-point font is considered comfortable for reading. Anything much smaller than 10 points would be difficult to read for long periods of time. The Windows system font—regardless of whether it is the “small font” or the “large font” and regardless of what video pixel dimension you’ve selected—is assumed to be a 10-point font with a 12-point line spacing. I know this sounds odd. Why call the system fonts “small font” and “large font” if they’re both 10-point fonts? Here’s the key: When you select the small font or the large font in the Display applet of the Control Panel, you are actually selecting an assumed video display resolution in dots per inch. When you select the small font, you are saying that you want Windows to assume that the video display resolution is 96 dots per inch. When you select the large font, you want Windows to assume that the video display resolution is 120 dots per inch. Look at Figure 5-3 again. That’s the small font, which is based on a display resolution of 96 dots per inch. I said it’s a 10-point font. Ten points is 10/72 inch, which if you multiply by 96 dots per inch yields a result of 105
- 106. (approximately) 13 pixels. That’s tmHeight minus tmInternalLeading. The line spacing is 12 points, or 12/72 inch, which multiplied by 96 dots per inch yields 16 pixels. That’s tmHeight. Figure 5-4 shows the large font. This is based on a resolution of 120 dots per inch. Again, it’s a 10-point font, and 10/72 times 120 dots per inch equals 16 pixels (if you round down), which is tmHeight minus tmInternalLeading. The 12-point line spacing is equivalent to 20 pixels, which is tmHeight. (As in Chapter 4, let me emphasize again that I’m showing you actual metrics so that you can understand how this works. Do not code these numbers in your programs.) Figure 5-4. The large font and the FONTMETRIC fields. Within a Windows program you can use the GetDeviceCaps function to obtain the assumed resolution in dots per inch that the user selected in the Display applet of the Control Panel. To get these values—which in theory could be different if the video display doesn’t have square pixels—you use the indices LOGPIXELSX and LOGPIXELSY. The name LOGPIXELS stands for “logical pixels,” which basically means “not the actual resolution in pixels per inch.” The device capabilities that you obtain from GetDeviceCaps with the HORZSIZE and VERTSIZE indices are documented (as I indicated earlier) as “Width, in millimeters, of the physical screen” and “Height, in millimeters, of the physical screen.” These should be documented as a “logical width” and a “logical height,” because the values are derived from the HORZRES, VERTRES, LOGPIXELSX, and LOGPIXELSY values. The formulas are Horizontal Size (mm) = 25.4 × Horizontal Resolution (pixels)/ Logical Pixels X (dots per inch) Vertical Size (mm) = 25.4 × Vertical Resolution (pixels)/ Logical Pixels Y (dots per inch) The 25.4 constant is necessary to convert from inches to millimeters. 106
- 107. This may seem backward and illogical. After all, your video display has a size in millimeters that you can actually measure with a ruler (at least approximately). But Windows 98 doesn’t care about that size. Instead it calculates a display size in millimeters based on the pixel size of the display the user selects and also the resolution the user selects for sizing the system font. Change the pixel size of your display and according to GetDeviceCaps the metrical size changes. How much sense does that make? It makes more sense than you might suspect. Let’s suppose you have a 17-inch monitor. The actual display size will probably be about 12 inches by 9 inches. Suppose you were running Windows with the minimum required pixel dimensions of 640 by 480. This means that the actual resolution is 53 dots per inch. A 10-point font—perfectly readable on paper—on the screen would be only 7 pixels in height from the top of the A to the bottom of the q. Such a font would be ugly and just about unreadable. (Ask people who ran Windows on the old Color Graphics Adapter.) Now hook up a video projector to your PC. Let’s say the projected video display is a 4 feet wide and 3 feet high. That same 640 by 480 pixel dimension now implies a resolution of about 13 dots per inch. It would be ridiculous to try displaying a 10-point font under such conditions. A 10-point font should be readable on the video display because it is surely readable when printed. The 10-point font thus becomes an important frame of reference. When a Windows application is guaranteed that a 10-point screen font is of average size, it can then display smaller (but still readable) text using an 8-point font and larger text using fonts of point sizes greater than 10. Thus, it makes sense that the video resolution (in dots per inch) be implied by the pixel size of that 10-point font. In Windows NT, however, an older approach is used in defining the HORZSIZE and VERTSIZE values. This approach is consistent with 16-bit versions of Windows. The HORZRES and VERTRES values still indicate the number of pixels horizontally and vertically (of course), and LOGPIXELSX and LOGPIXELSY are still related to the font that you choose when setting the video resolution in the Display applet of the Control Panel. As with Windows 98, typical values of LOGPIXELSX and LOGPIXELSY are 96 and 120 dots per inch, depending on whether you select a small font or large font. The difference in Windows NT is that the HORZSIZE and VERTSIZE values are fixed to indicate a standard monitor size. For common adapters, the values of HORZSIZE and VERTSIZE you’ll obtain are 320 and 240 millimeters, respectively. These values are the same regardless of what pixel dimension you choose. Therefore, these values are inconsistent with the values you obtain from GetDeviceCaps with the HORZRES, VERTRES, LOGPIXELSX, and LOGPIXELSY indices. However, you can always calculate HORZSIZE and VERTSIZE values like those you’d obtain under Windows 98 by using the formulas shown earlier. What if your program needs the actual physical dimensions of the video display? Probably the best solution is to actually request them of the user with a dialog box. Finally, three other values from GetDeviceCaps are related to the video dimensions. The ASPECTX, ASPECTY, and ASPECTXY values are the relative width, height, and diagonal size of each pixel, rounded to the nearest integer. For square pixels, the ASPECTX and ASPECTY values will be the same. Regardless, the ASPECTXY value equals the square root of the sum of the squares of the ASPECTX and ASPECTY values, as you’ll recall from Pythagoras. Finding Out About Color A video display capable of displaying only black pixels and white pixels requires only one bit of memory per pixel. Color displays require multiple bits per pixels. The more bits, the more colors; or more specifically, the number of unique simultaneous colors is equal to 2 to the number of bits per pixel. A “full color” video display resolution has 24 bits per pixel—8 bits for red, 8 bits for green, and 8 bits for blue. Red, green, and blue are known as the “additive primaries.” Mixes of these three primary colors can create many other colors, as you can verify by peering at your color video display through a magnifying glass. A “high color” display resolution has 16 bits per pixel, generally 5 bits for red, 6 bits for green, and 5 bits for blue. More bits are used for the green primary because the human eye is more sensitive to variations in green than to the 107
- 108. other two primaries. A video adapter that displays 256 colors requires 8 bits per pixel. However, these 8-bit values are generally indices into a palette table that defines the actual colors. I’ll discuss this more in Chapter 16. Finally, a video board that displays 16 colors requires 4 bits per pixel. These 16 colors are generally fixed as dark and light versions of red, green, blue, cyan, magenta, yellow, two shades of gray, black, and white. These 16 colors date back to the old IBM CGA. Only in some odd programming jobs is it necessary to know how memory is organized on the video adapter board, but GetDeviceCaps will help you determine that. Video memory can be organized either with consecutive color bits for each pixel or with each color bit in a separate plane of memory. This call returns the number of color planes: iPlanes = GetDeviceCaps (hdc, PLANES) ; and this call returns the number of color bits per pixel: iBitsPixel = GetDeviceCaps (hdc, BITSPIXEL) ; One of these calls will return a value of 1. The number of colors that can be simultaneously rendered on the video adapter can be calculated by the formula iColors = 1 << (iPlanes * iBitsPixel) ; This value may or may not be the same as the number of colors obtainable with the NUMCOLORS argument: iColors = GetDeviceCaps (hdc, NUMCOLORS) ; I mentioned that 256-color video adapters use color palettes. In that case, GetDeviceCaps with the NUMCOLORS index returns the number of colors reserved by Windows, which will be 20. The remaining 236 colors can be set by a Windows program using the palette manager. For high-color and full-color display resolutions, GetDeviceCaps with the NUMCOLORS index often returns -1, making it a generally unreliable function for determining this information. Instead, use the iColors formula shown earlier that uses the PLANES and BITSPIXEL values. In most GDI function calls, you use a COLORREF value (which is simply a 32-bit unsigned long integer) to refer to a particular color. The COLORREF value specifies a color in terms of red, green, and blue intensities and is often called an “RGB color.” The 32 bits of the COLORREF value are set as shown in Figure 5-5. Figure 5-5. The 32-bit COLORREF value. Notice that the most-significant 8 bits are zero, and that each primary is specified as an 8-bit value. In theory, a COLORREF value can refer to 224 or about 16 million colors. The Windows header file WINGDI.H provides several macros for working with RGB color values. The RGB macro takes three arguments representing red, green, and blue values and combines them into an unsigned long: #define RGB(r,g,b) ((COLORREF)(((BYTE)® | ((WORD)((BYTE)(g)) << 8)) | (((DWORD)(BYTE)(b)) << 16))) Notice that the order of the three arguments is red, green, and blue. Thus, the value RGB (255, 255, 0) is 0x0000FFFF or yellow—the combination of red and green. When all three arguments are set to 0, the color is black; when all the arguments are set to 255, the color is white. The GetRValue, GetGValue, and GetBValue macros extract the primary color values from a COLORREF value. These macros are sometimes handy when you’re using a Windows function that returns RGB color values to your program. 108
- 109. On 16-color or 256-color video adapters, Windows can use “dithering” to simulate more colors than the device can display. Dithering involves a small pattern that combines pixels of different colors. You can determine the closest pure nondithered color of a particular color value by calling GetNearestColor: crPureColor = GetNearestColor (hdc, crColor) ; The Device Context Attributes As I noted above, Windows uses the device context to store “attributes” that govern how the GDI functions operate on the display. For instance, when you display some text using the TextOut function, you don’t have to specify the color of the text or the font. Windows uses the device context to obtain this information. When a program obtains a handle to a device context, Windows sets all the attributes to default values. (However, see the next section for how to override this behavior.) The following table shows many of the device context attributes supported under Windows 98, along with the default values and the functions to change or obtain their values. Device Context Attribute Default Function(s) to Change Function to Obtain Mapping Mode MM_TEX T SetMapMode GetMapMode Window Origin (0, 0) SetWindowOrgEx OffsetWindowOrgEx GetWindowOrgEx Viewport Origin (0, 0) SetViewportOrgEx OffsetViewportOrgEx GetViewportOrgEx Window Extents (1, 1) SetWindowExtEx SetMapMode ScaleWindowExtEx GetWindowExtEx Viewport Extents (1, 1) SetViewportExtEx SetMapMode ScaleViewportExtEx GetViewportExtEx Pen BLACK_P EN SelectObject SelectObject Brush WHITE_B RUSH SelectObject SelectObject Font SYSTEM_ FONT SelectObject SelectObject Bitmap None SelectObject SelectObject Current Position (0, 0) MoveToEx LineTo PolylineTo PolyBezierTo GetCurrentPosition Ex Background Mode OPAQUE SetBkMode GetBkMode 109
- 110. Background Color White SetBkColor GetBkColor Text Color Black SetTextColor GetTextColor Drawing Mode R2_COPY PEN SetROP2 GetROP2 Stretching Mode BLACKO NWHITE SetStretchBltMode GetStretchBltMode Polygon Fill Mode ALTERN ATE SetPolyFillMode GetPolyFillMode Intercharacter Spacing 0 SetTextCharacterExtra GetTextCharacterE xtra Brush Origin (0, 0) SetBrushOrgEx GetBrushOrgEx Clipping Region None SelectObject SelectClipRgn IntersectClipRgn OffsetClipRgn ExcludeClipRect SelectClipPath GetClipBox Saving Device Contexts Normally when you call GetDC or BeginPaint, Windows gives you a device context with default values for all the attributes. Any changes you make to the attributes are lost when the device context is released with the ReleaseDC or EndPaint call. If your program needs to use nondefault device context attributes, you’ll have to initialize the device context every time you obtain a new device context handle: case WM_PAINT: hdc = BeginPaint (hwnd, &ps) ; [initialize device context attributes] [paint client area of window] EndPaint (hwnd, &ps) ; return 0 ; Although this approach is generally satisfactory, you might prefer that changes you make to the attributes be saved when you release the device context so that they will be in effect the next time you call GetDC or BeginPaint. You can accomplish this by including the CS_OWNDC flag as part of the window class style when you register the window class: wndclass.style = CS_HREDRAW | CS_VREDRAW | CS_OWNDC ; Now each window that you create based on this window class will have its own private device context that continues to exist when the window is destroyed. When you use the CS_OWNDC style, you need to initialize the device context attributes only once, perhaps while processing the WM_CREATE message: case WM_CREATE: hdc = GetDC (hwnd) ; [initialize device context attributes] ReleaseDC (hwnd, hdc) ; 110
- 111. The attributes continue to be valid until you change them. The CS_OWNDC style affects only the device contexts retrieved from GetDC and BeginPaint and not device contexts obtained from the other functions (such as GetWindowDC). Employing CS_OWNDC was once discouraged because it required some memory overhead; nowadays it can improve performance in some graphics- intensive Windows NT applications. Even if you use CS_OWNDC, you should still release the device context handle before exiting the window procedure. In some cases you might want to change certain device context attributes, do some painting using the changed attributes, and then revert to the original device context. To simplify this process, you save the state of a device context by calling idSaved = SaveDC (hdc) ; Now you can change some attributes. When you want to return to the device context as it existed before the SaveDC call, you use RestoreDC (hdc, idSaved) ; You can call SaveDC any number of times before you call RestoreDC. Most programmers use SaveDC and RestoreDC in a different manner, however, much like PUSH and POP instructions in assembly language. When you call SaveDC, you don’t need to save the return value: SaveDC (hdc) ; You can then change some attributes and call SaveDC again. To restore the device context to a saved state, call RestoreDC (hdc, -1) ; This restores the device context to the state saved by the most recent SaveDC function. Drawing Dots and Lines In the first chapter, I discussed how the Windows Graphics Device Interface makes use of device drivers for the graphics output devices attached to your computer. In theory, all that a graphics device driver needs for drawing is a SetPixel function and a GetPixel function. Everything else could be handled with higher-level routines implemented in the GDI module. Drawing a line, for instance, simply requires that GDI call the SetPixel routine numerous times, adjusting the x- and y-coordinates appropriately. In reality, you can indeed do almost any drawing you need with only SetPixel and GetPixel functions. You can also design a neat and well-structured graphics programming system on top of these functions. The only problem is performance. A function that is several calls away from each SetPixel function will be painfully slow. It is much more efficient for a graphics system to do line drawing and other complex graphics operations at the level of the device driver, which can have its own optimized code to perform the operations. Moreover, some video adapter boards contain graphics coprocessors that allow the video hardware itself to draw the figures. Setting Pixels Even though the Windows GPI includes SetPixel and GetPixel functions, they are not commonly used. In this book, the only use of the SetPixel function is in the CONNECT program in Chapter 7, and the only use of GetPixel is in the WHATCLR program in Chapter 8. Still, they provide a convenient place to begin examining graphics. The SetPixel function sets the pixel at a specified x- and y-coordinate to a particular color: SetPixel (hdc, x, y, crColor) ; As in any drawing function, the first argument is a handle to a device context. The second and third arguments indicate the coordinate position. Mostly you’ll obtain a device context for the client area of your window, and x and y will be relative to the upper left corner of that client area. The final argument is of type COLORREF to specify the color. If the color you specify in the function cannot be realized on the video display, the function sets the pixel to the nearest pure nondithered color and returns that value from the function. 111
- 112. The GetPixel function returns the color of the pixel at the specified coordinate position: crColor = GetPixel (hdc, x, y) ; Straight Lines Windows can draw straight lines, elliptical lines (curved lines on the circumference of an ellipse), and Bezier splines. Windows 98 supports seven functions that draw lines: • LineTo Draws a straight line. • Polyline and PolylineTo Draw a series of connected straight lines. • PolyPolyline Draws multiple polylines. • Arc Draws elliptical lines. • PolyBezier and PolyBezierTo Draw Bezier splines. In addition, Windows NT supports three more line-drawing functions: • ArcTo and AngleArc Draw elliptical lines. • PolyDraw Draws a series of connected straight lines and Bezier splines. These three functions are not supported under Windows 98. Later in this chapter I’ll also be discussing some functions that draw lines but that also fill the enclosed area within the figure they draw. These functions are • Rectangle Draws a rectangle. • Ellipse Draws an ellipse. • RoundRect Draws a rectangle with rounded corners. • Pie Draws a part of an ellipse that looks like a pie slice. • Chord Draws part of an ellipse formed by a chord. Five attributes of the device context affect the appearance of lines that you draw using these functions: current pen position (for LineTo, PolylineTo, PolyBezierTo, and ArcTo only), pen, background mode, background color, and drawing mode. To draw a straight line, you must call two functions. The first function specifies the point at which the line begins, and the second function specifies the end point of the line: MoveToEx (hdc, xBeg, yBeg, NULL) ; LineTo (hdc, xEnd, yEnd) ; MoveToEx doesn’t actually draw anything; instead, it sets the attribute of the device context known as the “current position.” The LineTo function then draws a straight line from the current position to the point specified in the LineTo function. The current position is simply a starting point for several other GDI functions. In the default device context, the current position is initially set to the point (0, 0). If you call LineTo without first setting the current position, it draws a line starting at the upper left corner of the client area. A brief historical note: In the 16-bit versions of Windows, the function to set the current position was MoveTo. This function had just three arguments—the device context handle and x- and y-coordinates. The function returned the previous current position packed as two 16-bit values in a 32-bit unsigned long. However, in the 32-bit versions of 112
- 113. Windows, coordinates are 32-bit values. Because the 32-bit versions of C do not define a 64-bit integral data type, this change meant that MoveTo could no longer indicate the previous current position in its return value. Although the return value from MoveTo was almost never used in real-life programming, a new function was required, and this was MoveToEx. The last argument to MoveToEx is a pointer to a POINT structure. On return from the function, the x and y fields of the POINT structure will indicate the previous current position. If you don’t need this information (which is almost always the case), you can simply set the last argument to NULL as in the example shown above. And now the caveat: Although coordinate values in Windows 98 appear to be 32-bit values, only the lower 16 bits are used. Coordinate values are effectively restricted to -32,768 to 32,767. In Windows NT, the full 32-bit values are used. If you ever need the current position, you can obtain it by calling GetCurrentPositionEx (hdc, &pt) ; where pt is a POINT structure. The following code draws a grid in the client area of a window, spacing the lines 100 pixels apart starting from the upper left corner. The variable hwnd is assumed to be a handle to the window, hdc is a handle to the device context, and x and y are integers: GetClientRect (hwnd, &rect) ; for (x = 0 ; x < rect.right ; x+= 100) { MoveToEx (hdc, x, 0, NULL) ; LineTo (hdc, x, rect.bottom) ; } for (y = 0 ; y < rect.bottom ; y += 100) { MoveToEx (hdc, 0, y, NULL) ; LineTo (hdc, rect.right, y) ; } Although it seems like a nuisance to be forced to use two functions to draw a single line, the current position comes in handy when you want to draw a series of connected lines. For instance, you might want to define an array of 5 points (10 values) that define the outline of a rectangle: POINT apt[5] = { 100, 100, 200, 100, 200, 200, 100, 200, 100, 100 } ; Notice that the last point is the same as the first. Now you need only use MoveToEx for the first point and LineTo for the successive points: MoveToEx (hdc, apt[0].x, apt[0].y, NULL) ; for (i = 1 ; i < 5 ; i++) LineTo (hdc, apt[i].x, apt[i].y) ; Because LineTo draws from the current position up to (but not including) the point in the LineTo function, no coordinate gets written twice by this code. While overwriting points is not a problem with a video display, it might not look good on a plotter or with some drawing modes that I’ll discuss later in this chapter. When you have an array of points that you want connected with lines, you can draw the lines more easily using the Polyline function. This statement draws the same rectangle as in the code shown above: Polyline (hdc, apt, 5) ; The last argument is the number of points. We could also have represented this value by sizeof (apt) / sizeof (POINT). Polyline has the same effect on drawing as an initial MoveToEx followed by multiple LineTo functions. However, Polyline doesn’t use or change the current position. PolylineTo is a little different. This function uses the current position for the starting point and sets the current position to the end of the last line drawn. The code below draws the same rectangle as that last shown above: MoveToEx (hdc, apt[0].x, apt[0].y, NULL) ; PolylineTo (hdc, apt + 1, 4) ; 113
- 114. Although you can use Polyline and PolylineTo to draw just a few lines, the functions are most useful when you need to draw a complex curve. You do this by using hundreds or even thousands of very short lines. If they’re short enough and there are enough of them, together they’ll look like a curve. For example, suppose you need to draw a sine wave. The SINEWAVE program in Figure 5-6 shows how to do it. Figure 5-6. The SINEWAVE program. SINEWAVE.C /*----------------------------------------- SINEWAVE.C—Sine Wave Using Polyline © Charles Petzold, 1998 -----------------------------------------*/ #include <windows.h> #include <math.h> #define NUM 1000 #define TWOPI (2 * 3.14159) LRESULT CALLBACK WndProc (HWND, UINT, WPARAM, LPARAM) ; int WINAPI WinMain (HINSTANCE hInstance, HINSTANCE hPrevInstance, PSTR szCmdLine, int iCmdShow) { static TCHAR szAppName[] = TEXT (“SineWave”) ; HWND hwnd ; MSG msg ; WNDCLASS wndclass ; wndclass.style = CS_HREDRAW | CS_VREDRAW ; wndclass.lpfnWndProc = WndProc ; wndclass.cbClsExtra = 0 ; wndclass.cbWndExtra = 0 ; wndclass.hInstance = hInstance ; wndclass.hIcon = LoadIcon (NULL, IDI_APPLICATION) ; wndclass.hCursor = LoadCursor (NULL, IDC_ARROW) ; wndclass.hbrBackground = (HBRUSH) GetStockObject (WHITE_BRUSH) ; wndclass.lpszMenuName = NULL ; wndclass.lpszClassName = szAppName ; if (!RegisterClass (&wndclass)) { MessageBox (NULL, TEXT (“Program requires Windows NT!”), szAppName, MB_ICONERROR) ; return 0 ; } hwnd = CreateWindow (szAppName, TEXT (“Sine Wave Using Polyline”), WS_OVERLAPPEDWINDOW, CW_USEDEFAULT, CW_USEDEFAULT, CW_USEDEFAULT, CW_USEDEFAULT, NULL, NULL, hInstance, NULL) ; ShowWindow (hwnd, iCmdShow) ; UpdateWindow (hwnd) ; while (GetMessage (&msg, NULL, 0, 0)) 114
- 115. { TranslateMessage (&msg) ; DispatchMessage (&msg) ; } return msg.wParam ; } LRESULT CALLBACK WndProc (HWND hwnd, UINT message, WPARAM wParam, LPARAM lParam) { static int cxClient, cyClient ; HDC hdc ; int i ; PAINTSTRUCT ps ; POINT apt [NUM] ; switch (message) { case WM_SIZE: cxClient = LOWORD (lParam) ; cyClient = HIWORD (lParam) ; return 0 ; case WM_PAINT: hdc = BeginPaint (hwnd, &ps) ; MoveToEx (hdc, 0, cyClient / 2, NULL) ; LineTo (hdc, cxClient, cyClient / 2) ; for (i = 0 ; i < NUM ; i++) { apt[i].x = i * cxClient / NUM ; apt[i].y = (int) (cyClient / 2 * (1 - sin (TWOPI * i / NUM))) ; } Polyline (hdc, apt, NUM) ; return 0 ; case WM_DESTROY: PostQuitMessage (0) ; return 0 ; } return DefWindowProc (hwnd, message, wParam, lParam) ; } The program has an array of 1000 POINT structures. As the for loop is incremented from 0 through 999, the x fields of the POINT structure are set to incrementally increasing values from 0 to cxClient. The program sets the y fields of the POINT structure to sine curve values for one cycle and enlarged to fill the client area. The whole curve is drawn using a single Polyline call. Because the Polyline function is implemented at the device driver level, it is faster than calling LineTo 1000 times. The results are shown in Figure 5-7. 115
- 116. Figure 5-7. The SINEWAVE display. The Bounding Box Functions I next want to discuss the Arc function, which draws an elliptical curve. However, the Arc function does not make much sense without first discussing the Ellipse function, and the Ellipse function doesn’t make much sense without first discussing the Rectangle function, and if I discuss Ellipse and Rectangle, I might as well discuss RoundRect, Chord, and Pie. The problem is that the Rectangle, Ellipse, RoundRect, Chord, and Pie functions are not strictly line-drawing functions. Yes, the functions draw lines, but they also fill an enclosed area with the current area-filling brush. This brush is solid white by default, so it may not be obvious that these functions do more than draw lines when you first begin experimenting with them. The functions really belong in the later section “Drawing Filled Areas”, but I’ll discuss them here regardless. The functions I’ve listed above are all similar in that they are built up from a rectangular “bounding box.” You define the coordinates of a box that encloses the object—the bounding box—and Windows draws the object within this box. The simplest of these functions draws a rectangle: Rectangle (hdc, xLeft, yTop, xRight, yBottom) ; The point (xLeft, yTop) is the upper left corner of the rectangle, and (xRight, yBottom) is the lower right corner. A figure drawn using the Rectangle function is shown in Figure 5-8. The sides of the rectangle are always parallel to the horizontal and vertical sides of the display. 116
- 117. Figure 5-8. A figure drawn using the Rectangle function. Programmers who have experience with graphics programming are often familiar with “off-by-one” errors. Some graphics programming systems draw a figure to encompass the right and bottom coordinates, and some draw figures up to (but not including) the right and bottom coordinates. Windows uses the latter approach, but there’s an easier way to think about it. Consider the function call Rectangle (hdc, 1, 1, 5, 4) ; I mentioned above that Windows draws the figure within a “bounding box.” You can think of the display as a grid where each pixel is within a grid cell. The imaginary bounding box is drawn on the grid, and the rectangle is then drawn within this bounding box. Here’s how the figure would be drawn: The area separating the rectangle from the top and left of the client area is 1 pixel wide. As I mentioned earlier, Rectangle is not strictly just a line-drawing function. GDI also fills the enclosed area. However, because by default the area is filled with white, it might not be immediately obvious that GDI is filling the area. Once you know how to draw a rectangle, you also know how to draw an ellipse, because it uses the same arguments: Ellipse (hdc, xLeft, yTop, xRight, yBottom) ; A figure drawn using the Ellipse function is shown (with the imaginary bounding box) in Figure 5-9. 117
- 118. Figure 5-9. A figure drawn using the Ellipse function. The function to draw rectangles with rounded corners uses the same bounding box as the Rectangle and Ellipse functions but includes two more arguments: RoundRect (hdc, xLeft, yTop, xRight, yBottom, xCornerEllipse, yCornerEllipse) ; A figure drawn using this function is shown in Figure 5-10. Figure 5-10. A figure drawn using the RoundRect function. Windows uses a small ellipse to draw the rounded corners. The width of this ellipse is xCornerEllipse, and the height is yCornerEllipse. Imagine Windows splitting this small ellipse into four quadrants and using one quadrant for each of the four corners. The rounding of the corners is more pronounced for larger values of xCornerEllipse and yCornerEllipse. If xCornerEllipse is equal to the difference between xLeft and xRight, and yCornerEllipse is equal to the difference between yTop and yBottom, then the RoundRect function will draw an ellipse. The rounded rectangle in Figure 5-10 was drawn using corner ellipse dimensions calculated with the formulas below. xCornerEllipse = (xRight - xLeft) / 4 ; yCornerEllipse = (yBottom- yTop) / 4 ; 118
- 119. This is an easy approach, but the results admittedly don’t look quite right because the rounding of the corners is more pronounced along the larger rectangle dimension. To correct this problem, you’ll probably want to make xCornerEllipse equal to yCornerEllipse in real dimensions. The Arc, Chord, and Pie functions all take identical arguments: Arc (hdc, xLeft, yTop, xRight, yBottom, xStart, yStart, xEnd, yEnd) ; Chord (hdc, xLeft, yTop, xRight, yBottom, xStart, yStart, xEnd, yEnd) ; Pie (hdc, xLeft, yTop, xRight, yBottom, xStart, yStart, xEnd, yEnd) ; A line drawn using the Arc function is shown in Figure 5-11; figures drawn using the Chord and Pie functions are shown in Figures 5-12 and 5-13. Windows uses an imaginary line to connect (xStart, yStart) with the center of the ellipse. At the point at which that line intersects the ellipse, Windows begins drawing an arc in a counterclockwise direction around the circumference of the ellipse. Windows also uses an imaginary line to connect (xEnd, yEnd) with the center of the ellipse. At the point at which that line intersects the ellipse, Windows stops drawing the arc. Figure 5-11. A line drawn using the Arc function. Figure 5-12. A figure drawn using the Chord function. 119
- 120. Figure 5-13. A figure drawn using the Pie function. For the Arc function, Windows is now finished, because the arc is an elliptical line rather than a filled area. For the Chord function, Windows connects the endpoints of the arc. For the Pie function, Windows connects each endpoint of the arc with the center of the ellipse. The interiors of the chord and pie-wedge figures are filled with the current brush. You may wonder about this use of starting and ending positions in the Arc, Chord, and Pie functions. Why not simply specify starting and ending points on the circumference of the ellipse? Well, you can, but you would have to figure out what those points are. Windows’ method gets the job done without requiring such precision. The LINEDEMO program shown in Figure 5-14 draws a rectangle, an ellipse, a rectangle with rounded corners, and two lines, but not in that order. The program demonstrates that these functions that define closed areas do indeed fill them, because the lines are hidden behind the ellipse. The results are shown in Figure 5-15. Figure 5-14. The LINEDEMO program. LINEDEMO.C /*-------------------------------------------------- LINEDEMO.C—Line-Drawing Demonstration Program © Charles Petzold, 1998 --------------------------------------------------*/ #include <windows.h> LRESULT CALLBACK WndProc (HWND, UINT, WPARAM, LPARAM) ; int WINAPI WinMain (HINSTANCE hInstance, HINSTANCE hPrevInstance, PSTR szCmdLine, int iCmdShow) { static TCHAR szAppName[] = TEXT (“LineDemo”) ; HWND hwnd ; MSG msg ; WNDCLASS wndclass ; 120
- 121. wndclass.style = CS_HREDRAW | CS_VREDRAW ; wndclass.lpfnWndProc = WndProc ; wndclass.cbClsExtra = 0 ; wndclass.cbWndExtra = 0 ; wndclass.hInstance = hInstance ; wndclass.hIcon = LoadIcon (NULL, IDI_APPLICATION) ; wndclass.hCursor = LoadCursor (NULL, IDC_ARROW) ; wndclass.hbrBackground = (HBRUSH) GetStockObject (WHITE_BRUSH) ; wndclass.lpszMenuName = NULL ; wndclass.lpszClassName = szAppName ; if (!RegisterClass (&wndclass)) { MessageBox (NULL, TEXT (“Program requires Windows NT!”), szAppName, MB_ICONERROR) ; return 0 ; } hwnd = CreateWindow (szAppName, TEXT (“Line Demonstration”), WS_OVERLAPPEDWINDOW, CW_USEDEFAULT, CW_USEDEFAULT, CW_USEDEFAULT, CW_USEDEFAULT, NULL, NULL, hInstance, NULL) ; ShowWindow (hwnd, iCmdShow) ; UpdateWindow (hwnd) ; while (GetMessage (&msg, NULL, 0, 0)) { TranslateMessage (&msg) ; DispatchMessage (&msg) ; } return msg.wParam ; } LRESULT CALLBACK WndProc (HWND hwnd, UINT message, WPARAM wParam, LPARAM lParam) { static int cxClient, cyClient ; HDC hdc ; PAINTSTRUCT ps ; switch (message) { case WM_SIZE: cxClient = LOWORD (lParam) ; cyClient = HIWORD (lParam) ; return 0 ; case WM_PAINT: hdc = BeginPaint (hwnd, &ps) ; Rectangle (hdc, cxClient / 8, cyClient / 8, 7 * cxClient / 8, 7 * cyClient / 8) ; MoveToEx (hdc, 0, 0, NULL) ; LineTo (hdc, cxClient, cyClient) ; MoveToEx (hdc, 0, cyClient, NULL) ; LineTo (hdc, cxClient, 0) ; Ellipse (hdc, cxClient / 8, cyClient / 8, 7 * cxClient / 8, 7 * cyClient / 8) ; RoundRect (hdc, cxClient / 4, cyClient / 4, 121
- 122. 3 * cxClient / 4, 3 * cyClient / 4, cxClient / 4, cyClient / 4) ; EndPaint (hwnd, &ps) ; return 0 ; case WM_DESTROY: PostQuitMessage (0) ; return 0 ; } return DefWindowProc (hwnd, message, wParam, lParam) ; } Figure 5-15. The LINEDEMO display. Bezier Splines The word “spline” once referred to a piece of flexible wood, rubber, or metal used to draw curves on a piece of paper. For example, if you had some disparate graph points, and you wanted to draw a curve between them (either for interpolation or extrapolation), you’d first mark the points on a piece of graph paper. You’d then anchor a spline to the points and use a pencil to draw the curve along the spline as it bent around the points. Nowadays, of course, splines are mathematical formulas. They come in many different flavors, but the Bezier spline has become the most popular for computer graphics programming. It is a fairly recent addition to the arsenal of graphics tools available on the operating system level, and it comes from an unlikely source: In the 1960s, the Renault automobile company was switching over from a manual design of car bodies (which involved clay) to a computer-based design. Mathematical tools were required, and Pierre Bezier came up with a set of formulas that proved to be useful for this job. 122
- 123. Since then, the two-dimensional form of the Bezier spline has shown itself to be the most useful curve (after the straight line and ellipse) for computer graphics. In PostScript, the Bezier spline is used for all curves—even elliptical lines are approximated from Beziers. Bezier curves are also used to define the character outlines of PostScript fonts. (TrueType uses a simpler and faster form of spline.) A single two-dimensional Bezier spline is defined by four points—two end points and two control points. The ends of the curve are anchored at the two end points. The control points act as “magnets” to pull the curve away from the straight line between the two end points. This is best illustrated by an interactive program, called BEZIER, which is shown in Figure 5-16. Figure 5-16. The BEZIER program. BEZIER.C /*--------------------------------------- BEZIER.C—Bezier Splines Demo © Charles Petzold, 1998 ---------------------------------------*/ #include <windows.h> LRESULT CALLBACK WndProc (HWND, UINT, WPARAM, LPARAM) ; int WINAPI WinMain (HINSTANCE hInstance, HINSTANCE hPrevInstance, PSTR szCmdLine, int iCmdShow) { static TCHAR szAppName[] = TEXT (“Bezier”) ; HWND hwnd ; MSG msg ; WNDCLASS wndclass ; wndclass.style = CS_HREDRAW | CS_VREDRAW ; wndclass.lpfnWndProc = WndProc ; wndclass.cbClsExtra = 0 ; wndclass.cbWndExtra = 0 ; wndclass.hInstance = hInstance ; wndclass.hIcon = LoadIcon (NULL, IDI_APPLICATION) ; wndclass.hCursor = LoadCursor (NULL, IDC_ARROW) ; wndclass.hbrBackground = (HBRUSH) GetStockObject (WHITE_BRUSH) ; wndclass.lpszMenuName = NULL ; wndclass.lpszClassName = szAppName ; if (!RegisterClass (&wndclass)) { MessageBox (NULL, TEXT (“Program requires Windows NT!”), szAppName, MB_ICONERROR) ; return 0 ; } hwnd = CreateWindow (szAppName, TEXT (“Bezier Splines”), WS_OVERLAPPEDWINDOW, CW_USEDEFAULT, CW_USEDEFAULT, CW_USEDEFAULT, CW_USEDEFAULT, NULL, NULL, hInstance, NULL) ; ShowWindow (hwnd, iCmdShow) ; UpdateWindow (hwnd) ; while (GetMessage (&msg, NULL, 0, 0)) { 123
- 124. TranslateMessage (&msg) ; DispatchMessage (&msg) ; } return msg.wParam ; } void DrawBezier (HDC hdc, POINT apt[]) { PolyBezier (hdc, apt, 4) ; MoveToEx (hdc, apt[0].x, apt[0].y, NULL) ; LineTo (hdc, apt[1].x, apt[1].y) ; MoveToEx (hdc, apt[2].x, apt[2].y, NULL) ; LineTo (hdc, apt[3].x, apt[3].y) ; } LRESULT CALLBACK WndProc (HWND hwnd, UINT message, WPARAM wParam, LPARAM lParam) { static POINT apt[4] ; HDC hdc ; int cxClient, cyClient ; PAINTSTRUCT ps ; switch (message) { case WM_SIZE: cxClient = LOWORD (lParam) ; cyClient = HIWORD (lParam) ; apt[0].x = cxClient / 4 ; apt[0].y = cyClient / 2 ; apt[1].x = cxClient / 2 ; apt[1].y = cyClient / 4 ; apt[2].x = cxClient / 2 ; apt[2].y = 3 * cyClient / 4 ; apt[3].x = 3 * cxClient / 4 ; apt[3].y = cyClient / 2 ; return 0 ; case WM_LBUTTONDOWN: case WM_RBUTTONDOWN: case WM_MOUSEMOVE: if (wParam & MK_LBUTTON || wParam & MK_RBUTTON) { hdc = GetDC (hwnd) ; SelectObject (hdc, GetStockObject (WHITE_PEN)) ; DrawBezier (hdc, apt) ; if (wParam & MK_LBUTTON) { apt[1].x = LOWORD (lParam) ; apt[1].y = HIWORD (lParam) ; } if (wParam & MK_RBUTTON) { apt[2].x = LOWORD (lParam) ; apt[2].y = HIWORD (lParam) ; 124
- 125. } SelectObject (hdc, GetStockObject (BLACK_PEN)) ; DrawBezier (hdc, apt) ; ReleaseDC (hwnd, hdc) ; } return 0 ; case WM_PAINT: InvalidateRect (hwnd, NULL, TRUE) ; hdc = BeginPaint (hwnd, &ps) ; DrawBezier (hdc, apt) ; EndPaint (hwnd, &ps) ; return 0 ; case WM_DESTROY: PostQuitMessage (0) ; return 0 ; } return DefWindowProc (hwnd, message, wParam, lParam) ; } Because this program uses some mouse processing logic that we won’t learn about until Chapter 7, I won’t discuss its inner workings (which might be obvious nonetheless). Instead, you can use the program to experiment with manipulating Bezier splines. In this program, the two end points are set to be halfway down the client area, and ¼ and ¾ of the way across the client area. The two control points are manipulable, the first by pressing the left mouse button and moving the mouse, the second by pressing the right mouse button and moving the mouse. Figure 5-17 shows a typical display. Aside from the Bezier spline itself, the program also draws a straight line from the first control point to the first end point (also called the begin point) at the left, and from the second control point to the end point at the right. Bezier splines are considered to be useful for computer-assisted design work because of several characteristics. First, with a little practice, you can usually manipulate the curve into something close to a desired shape. 125
- 126. Figure 5-17. The BEZIER display. Second, the Bezier spline is very well controlled. In some splines, the curve does not pass through any of the points that define the curve. The Bezier spline is always anchored at the two end points. (This is one of the assumptions that is used to derive the Bezier formulas.) Also, some forms of splines have singularities where the curve veers off into infinity. In computer-based design work, this is rarely desired. The Bezier curve never does this; indeed, it is always bounded by a four-sided polygon (called a “convex hull”) that is formed by connecting the end points and control points. Third, another characteristic of the Bezier spline involves the relationship between the end points and the control points. The curve is always tangential to and in the same direction as a straight line draw from the begin point to the first control point. (This is visually illustrated by the Bezier program.) Also, the curve is always tangential to and in the same direction as a straight line drawn from the second control point to the end point. These are two other assumptions used to derive the Bezier formulas. Fourth, the Bezier spline is often aesthetically pleasing. I know this is a subjective criterion, but I’m not the only person who thinks so. Prior to the 32-bit versions of Windows, you’d have to create your own Bezier splines using the Polyline function. You would also need knowledge of the following parametric equations for the Bezier spline. The begin point is (x0, y0), and the end point is (x3, y3). The two control points are (x1, y1) and (x2, y2). The curve is drawn for values of t ranging from 0 to 1: x(t) = (1 - t)3 x0 + 3t (1 - t)2 x1 + 3t2 (1 - t) x2 + t3 x3 y(t) = (1 - t)3 y0 + 3t (1 - t)2 y1 + 3t2 (1 - t) y2 + t3 y3 You don’t need to know these formulas in Windows 98. To draw one or more connected Bezier splines, you simply 126
- 127. call PolyBezier (hdc, apt, iCount) ; or PolyBezierTo (hdc, apt, iCount) ; In both cases, apt is an array of POINT structures. With PolyBezier, the first four points indicate (in this order) the begin point, first control point, second control point, and end point of the first Bezier curve. Each subsequent Bezier requires only three more points because the begin point of the second Bezier curve is the same as the end point of the first Bezier curve, and so on. The iCount argument is always one plus three times the number of connected curves you’re drawing. The PolyBezierTo function uses the current position for the first begin point. The first and each subsequent Bezier spline requires only three points. When the function returns, the current position is set to the last end point. One note: when you draw a series of connected Bezier splines, the point of connection will be smooth only if the second control point of the first Bezier, the end point of the first Bezier (which is also the begin point of the second Bezier), and the first control point of the second Bezier are colinear; that is, they lie on the same straight line. Using Stock Pens When you call any of the line-drawing functions that I’ve discussed in this section, Windows uses the “pen” currently selected in the device context to draw the line. The pen determines the line’s color, its width, and its style, which can be solid, dotted, or dashed. The pen in the default device context is called BLACK_PEN. This pen draws a solid black line with a width of one pixel. BLACK_PEN is one of three “stock pens” that Windows provides. The other two are WHITE_PEN and NULL_PEN. NULL_PEN is a pen that doesn’t draw. You can also create your own customized pens. In your Windows programs, you refer to pens by using a handle. The Windows header file WINDEF.H defines the type HPEN, a handle to a pen. You can define a variable (for instance, hPen) using this type definition: HPEN hPen ; You obtain the handle to one of the stock pens by a call to GetStockObject. For instance, suppose you want to use the stock pen called WHITE_PEN. You get the pen handle like this: hPen = GetStockObject (WHITE_PEN) ; Now you must “select” that pen into the device context: SelectObject (hdc, hPen) ; Now the white pen is the current pen. After this call, any lines you draw will use WHITE_PEN until you select another pen into the device context or release the device context handle. Rather than explicitly defining an hPen variable, you can instead combine the GetStockObject and SelectObject calls in one statement: SelectObject (hdc, GetStockObject (WHITE_PEN)) ; If you then want to return to using BLACK_PEN, you can get the handle to that stock object and select it into the device context in one statement: SelectObject (hdc, GetStockObject (BLACK_PEN)) ; SelectObject returns the handle to the pen that had been previously selected into the device context. If you start off with a fresh device context and call hPen = SelectObject (hdc, GetStockobject (WHITE_PEN)) ; the current pen in the device context will be WHITE_PEN and the variable hPen will be the handle to BLACK_PEN. You can then select BLACK_PEN into the device context by calling SelectObject (hdc, hPen) ; 127
- 128. Creating, Selecting, and Deleting Pens Although the pens defined as stock objects are certainly convenient, you are limited to only a solid black pen, a solid white pen, or no pen at all. If you want to get fancier than that, you must create your own pens. Here’s the general procedure: You create a “logical pen,” which is merely a description of a pen, using the function CreatePen or CreatePenIndirect. These functions return a handle to the logical pen. You select the pen into the device context by calling SelectObject. You can then draw lines with this new pen. Only one pen can be selected into the device context at any time. After you release the device context (or after you select another pen into the device context) you can delete the logical pen you’ve created by calling DeleteObject. When you do so, the handle to the pen is no longer valid. A logical pen is a “GDI object,” one of six GDI objects a program can create. The other five are brushes, bitmaps, regions, fonts, and palettes. Except for palettes, all of these objects are selected into the device context using SelectObject. Three rules govern the use of GDI objects such as pens: • You should eventually delete all GDI objects that you create. • Don’t delete GDI objects while they are selected in a valid device context. • Don’t delete stock objects. These are not unreasonable rules, but they can be a little tricky sometimes. We’ll run through some examples to get the hang of how the rules work. The general syntax for the CreatePen function looks like this: hPen = CreatePen (iPenStyle, iWidth, crColor) ; The iPenStyle argument determines whether the pen draws a solid line or a line made up of dots or dashes. The argument can be one of the following identifiers defined in WINGDI.H. Figure 5-18 shows the kind of line that each style produces. Figure 5-18. The seven pen styles. For the PS_SOLID, PS_NULL, and PS_INSIDEFRAME styles, the iWidth argument is the width of the pen. An iWidth value of 0 directs Windows to use one pixel for the pen width. The stock pens are 1 pixel wide. If you specify a dotted or dashed pen style with a physical width greater than 1, Windows will use a solid pen instead. The crColor argument to CreatePen is a COLORREF value specifying the color of the pen. For all the pen styles except PS_INSIDEFRAME, when you select the pen into the device context, Windows converts the color to the nearest pure color that the device can render. The PS_INSIDEFRAME is the only pen style that can use a dithered color, and then only when the width is greater than 1. 128
- 129. The PS_INSIDEFRAME style has another peculiarity when used with functions that define a filled area. For all pen styles except PS_INSIDEFRAME, if the pen used to draw the outline is greater than 1 pixel wide, then the pen is centered on the border so that part of the line can be outside the bounding box. For the PS_INSIDEFRAME pen style, the entire line is drawn inside the bounding box. You can also create a pen by setting up a structure of type LOGPEN (“logical pen”) and calling CreatePenIndirect. If your program uses a lot of different pens that you initialize in your source code, this method is probably more efficient. To use CreatePenIndirect, first you define a structure of type LOGPEN: LOGPEN logpen ; This structure has three members: lopnStyle (an unsigned integer or UINT) is the pen style, lopnWidth (a POINT structure) is the pen width in logical units, and lopnColor (COLORREF) is the pen color. Windows uses only the x field of the lopnWidth structure to set the pen width; it ignores the y field. You create the pen by passing the address of the structure to CreatePenIndirect: hPen = CreatePenIndirect (&logpen) ; Note that the CreatePen and CreatePenIndirect functions do not require a handle to a device context. These functions create logical pens that have no connection with a device context until you call SelectObject. You can use the same logical pen for several different devices, such as the screen and a printer. Here’s one method for creating, selecting, and deleting pens. Suppose your program uses three pens—a black pen of width 1, a red pen of width 3, and a black dotted pen. You can first define static variables for storing the handles to these pens: static HPEN hPen1, hPen2, hPen3 ; During processing of WM_CREATE, you can create the three pens: hPen1 = CreatePen (PS_SOLID, 1, 0) ; hPen2 = CreatePen (PS_SOLID, 3, RGB (255, 0, 0)) ; hPen3 = CreatePen (PS_DOT, 0, 0) ; During processing of WM_PAINT (or any other time you have a valid handle to a device context), you can select one of these pens into the device context and draw with it: SelectObject (hdc, hPen2) ; [ line-drawing functions ] SelectObject (hdc, hPen1) ; [ line-drawing functions ] During processing of WM_DESTROY, you can delete the three pens you created: DeleteObject (hPen1) ; DeleteObject (hPen2) ; DeleteObject (hPen3) ; This is the most straightforward method of creating selecting, and deleting pens, but obviously your program must know what pens will be needed. You might instead want to create the pens during each WM_PAINT message and delete them after you call EndPaint. (You can delete them before calling EndPaint, but you have to be careful not to delete the pen currently selected in the device context.) You might want to create pens on the fly and combine the CreatePen and SelectObject calls in the same statement: SelectObject (hdc, CreatePen (PS_DASH, 0, RGB (255, 0, 0))) ; Now when you draw lines, you’ll be using a red dashed pen. When you’re finished drawing the red dashed lines, you can delete the pen. Whoops! How can you delete the pen when you haven’t saved the pen handle? Recall that SelectObject returns the handle to the pen previously selected in the device context. This means that you can delete the pen by selecting the stock BLACK_PEN into the device context and deleting the value returned from SelectObject: DeleteObject (SelectObject (hdc, GetStockObject (BLACK_PEN))) ; 129
- 130. Here’s another method. When you select a pen into a newly created device context, save the handle to the pen that SelectObject returns: hPen = SelectObject (hdc, CreatePen (PS_DASH, 0, RGB (255, 0, 0))) ; What is hPen? If this is the first SelectObject call you’ve made since obtaining the device context, hPen is a handle to the BLACK_PEN stock object. You can now select that pen into the device context and delete the pen you create (the handle returned from this second SelectObject call) in one statement: DeleteObject (SelectObject (hdc, hPen)) ; If you have a handle to a pen, you can obtain the values of the LOGPEN structure fields by calling GetObject: GetObject (hPen, sizeof (LOGPEN), (LPVOID) &logpen) ; If you need the pen handle currently selected in the device context, call hPen = GetCurrentObject (hdc, OBJ_PEN) ; I’ll discuss another pen creation function, ExtCreatePen, in Chapter 17. Filling in the Gaps The use of dotted and dashed pens raises the question: what happens to the gaps between the dots and dashes? Well, what do you want to happen? The coloring of the gaps depends on two attributes of the device context—the background mode and the background color. The default background mode is OPAQUE, which means that Windows fills in the gaps with the background color, which by default is white. This is consistent with the WHITE_BRUSH that many programs use in the window class for erasing the background of the window. You can change the background color that Windows uses to fill in the gaps by calling SetBkColor (hdc, crColor) ; As with the crColor argument used for the pen color, Windows converts this background color to a pure color. You can obtain the current background color defined in the device context by calling GetBkColor. You can also prevent Windows from filling in the gaps by changing the background mode to TRANSPARENT: SetBkMode (hdc, TRANSPARENT) ; Windows will then ignore the background color and not fill in the gaps. You can obtain the current background mode (either TRANSPARENT or OPAQUE) by calling GetBkMode. Drawing Modes The appearance of lines drawn on the display is also affected by the drawing mode defined in the device context. Imagine drawing a line that has a color based not only on the color of the pen but also on the color of the display area where the line is drawn. Imagine a way in which you could use the same pen to draw a black line on a white surface and a white line on a black surface without knowing what color the surface is. Could such a facility be useful to you? It’s made possible by the drawing mode. When Windows uses a pen to draw a line, it actually performs a bitwise Boolean operation between the pixels of the pen and the pixels of the destination display surface, where the pixels determine the color of the pen and display surface. Performing a bitwise Boolean operation with pixels is called a “raster operation,” or “ROP.” Because drawing a line involves only two pixel patterns (the pen and the destination), the Boolean operation is called a “binary raster operation,” or “ROP2.” Windows defines 16 ROP2 codes that indicate how Windows combines the pen pixels and the destination pixels. In the default device context, the drawing mode is defined as R2_COPYPEN, meaning that Windows simply copies the pixels of the pen to the destination, which is how we normally think about pens. There are 15 other ROP2 codes. Where do these 16 different ROP2 codes come from? For illustrative purposes, let’s assume a monochrome system 130
- 131. that uses 1 bit per pixel. The destination color (the color of the window’s client area) can be either black (which we’ll represent by a 0 pixel) or white (represented by a 1 pixel). The pen also can be either black or white. There are four combinations of using a black or white pen to draw on a black or white destination: a white pen on a white destination, a white pen on a black destination, a black pen on a white destination, and a black pen on a black destination. What is the color of the destination after you draw with the pen? One possibility is that the line is always drawn as black regardless of the pen color or the destination color. This drawing mode is indicated by the ROP2 code R2_BLACK. Another possibility is that the line is drawn as black except when both the pen and destination are black, in which case the line is drawn as white. Although this might be a little strange, Windows has a name for it. The drawing mode is called R2_NOTMERGEPEN. Windows performs a bitwise OR operation on the destination pixels and the pen pixels and then inverts the result. The table below shows all 16 ROP2 drawing modes. The table indicates how the pen (P) and destination (D) colors are combined for the result. The column labeled “Boolean Operation” uses C notation to show how the destination pixels and pen pixels are combined. Pen (P): Destination (D): 1 1 0 0 1 0 1 0 Boolean Operation Drawing Mode Results: 0 0 0 0 0 R2_BLACK 0 0 0 1 ~(P ¦ D) R2_NOTMERGEPEN 0 0 1 0 ~P & D R2_MASKNOTPEN 0 0 1 1 ~P R2_NOTCOPYPEN 0 1 0 0 P & ~D R2_MASKPENNOT 0 1 0 1 ~D R2_NOT 0 1 1 0 P ^ D R2_XORPEN 0 1 1 1 ~(P & D) R2_NOTMASKPEN 1 0 0 0 P & D R2_MASKPEN 1 0 0 1 ~(P ^ D) R2_NOTXORPEN 1 0 1 0 D R2_NOP 1 0 1 1 ~P ¦ D R2_MERGENOTPEN 1 1 0 0 P R2_COPYPEN (default) 1 1 0 1 P ¦ ~D R2_MERGEPENNOT 1 1 1 0 P ¦ D R2_MERGEPEN 1 1 1 1 1 R2_WHITE You can set a new drawing mode for the device context by calling SetROP2 (hdc, iDrawMode) ; The iDrawMode argument is one of the values listed in the “Drawing Mode” column of the table. You can obtain the current drawing mode by using the function: 131
- 132. iDrawMode = GetROP2 (hdc) ; The device context default is R2_COPYPEN, which simply transfers the pen color to the destination. The R2_NOTCOPYPEN mode draws white if the pen color is black and black if the pen color is white. The R2_BLACK mode always draws black, regardless of the color of the pen or the background. Likewise, the R2_WHITE mode always draws white. The R2_NOP mode is a “no operation.” It leaves the destination unchanged. We’ve been examining the drawing mode in the context of a monochrome system. Most systems are color, however. On color systems Windows performs the bitwise operation of the drawing mode for each color bit of the pen and destination pixels and again uses the 16 ROP2 codes described in the previous table. The R2_NOT drawing mode always inverts the destination color to determine the color of the line, regardless of the color of the pen. For example, a line drawn on a cyan destination will appear as magenta. The R2_NOT mode always results in a visible pen except if the pen is drawn on a medium gray background. I’ll demonstrate the use of the R2_NOT drawing mode in the BLOKOUT programs in Chapter 7. Drawing Filled Areas The next step up from drawing lines is filling enclosed areas. Windows’ seven functions for drawing filled areas with borders are listed in the table below. Function Figure Rectangle Rectangle with square corners Ellipse Ellipse RoundRect Rectangle with rounded corners Chord Arc on the circumference of an ellipse with endpoints connected by a chord Pie Pie wedge defined by the circumference of an ellipse Polygon Multisided figure PolyPolygo n Multiple multisided figures Windows draws the outline of the figure with the current pen selected in the device context. The current background mode, background color, and drawing mode are all used for this outline, just as if Windows were drawing a line. Everything we learned about lines also applies to the borders around these figures. The figure is filled with the current brush selected in the device context. By default, this is the stock object called WHITE_BRUSH, which means that the interior will be drawn as white. Windows defines six stock brushes: WHITE_BRUSH, LTGRAY_BRUSH, GRAY_BRUSH, DKGRAY_BRUSH, BLACK_BRUSH, and NULL_BRUSH (or HOLLOW_BRUSH). You can select one of the stock brushes into the device context the same way you select a stock pen. Windows defines HBRUSH to be a handle to a brush, so you can first define a variable for the brush handle: HBRUSH hBrush ; You can get the handle to the GRAY_BRUSH by calling GetStockObject: hBrush = GetStockObject (GRAY_BRUSH) ; You can select it into the device context by calling SelectObject: SelectObject (hdc, hBrush) ; Now when you draw one of the figures listed above, the interior will be gray. To draw a figure without a border, select the NULL_PEN into the device context: SelectObject (hdc, GetStockObject (NULL_PEN)) ; 132
- 133. If you want to draw the outline of the figure without filling in the interior, select the NULL_BRUSH into the device context: SelectObject (hdc, GetStockobject (NULL_BRUSH) ; You can also create customized brushes just as you can create customized pens. We’ll cover that topic shortly. The Polygon Function and the Polygon-Filling Mode I’ve already discussed the first five area-filling functions. Polygon is the sixth function for drawing a bordered and filled figure. The function call is similar to the Polyline function: Polygon (hdc, apt, iCount) ; The apt argument is an array of POINT structures, and iCount is the number of points. If the last point in this array is different from the first point, Windows adds another line that connects the last point with the first point. (This does not happen with the Polyline function.) The PolyPolygon function looks like this: PolyPolygon (hdc, apt, aiCounts, iPolyCount) ; The function draws multiple polygons. The number of polygons it draws is given as the last argument. For each polygon, the aiCounts array gives the number of points in the polygon. The apt array has all the points for all the polygons. Aside from the return value, PolyPolygon is functionally equivalent to the following code: for (i = 0, iAccum = 0 ; i < iPolyCount ; i++) { Polygon (hdc, apt + iAccum, aiCounts[i]) ; iAccum += aiCounts[i] ; } For both Polygon and PolyPolygon, Windows fills the bounded area with the current brush defined in the device context. How the interior is filled depends on the polygon-filling mode, which you can set using the SetPolyFillMode function: SetPolyFillMode (hdc, iMode) ; By default, the polygon-filling mode is ALTERNATE, but you can set it to WINDING. The difference between the two modes is shown in Figure 5-19. Figure 5-19. Figures drawn with the two polygon-filling modes: ALTERNATE (left) and WINDING (right). At first, the difference between alternate and winding modes seems rather simple. For alternate mode, you can imagine a line drawn from a point in an enclosed area to infinity. The enclosed area is filled only if that imaginary 133
- 134. line crosses an odd number of boundary lines. This is why the points of the star are filled but the center is not. The example of the five-pointed star makes winding mode seem simpler than it actually is. When you’re drawing a single polygon, in most cases winding mode will cause all enclosed areas to be filled. But there are exceptions. To determine whether an enclosed area is filled in winding mode, you again imagine a line drawn from a point in that area to infinity. If the imaginary line crosses an odd number of boundary lines, the area is filled, just as in alternate mode. If the imaginary line crosses an even number of boundary lines, the area can either be filled or not filled. The area is filled if the number of boundary lines going in one direction (relative to the imaginary line) is not equal to the number of boundary lines going in the other direction. For example, consider the object shown in Figure 5-20. The arrows on the lines indicate the direction in which the lines are drawn. Both winding mode and alternate mode will fill the three enclosed L-shaped areas numbered 1 through 3. The two smaller interior areas, numbered 4 and 5, will not be filled in alternate mode. But in winding mode, area number 5 is filled because you must cross two lines going in the same direction to get from the inside of that area to the outside of the figure. Area number 4 is not filled. You must again cross two lines, but the two lines go in opposite directions. If you doubt that Windows is clever enough to do this, the ALTWIND program in Figure 5-21 demonstrates that it is. Figure 5-20. A figure in which winding mode does not fill all interior areas. Figure 5-21. The ALTWIND program. ALTWIND.C /*----------------------------------------------- ALTWIND.C—Alternate and Winding Fill Modes © Charles Petzold, 1998 -----------------------------------------------*/ #include <windows.h> LRESULT CALLBACK WndProc (HWND, UINT, WPARAM, LPARAM) ; 134
- 135. int WINAPI WinMain (HINSTANCE hInstance, HINSTANCE hPrevInstance, PSTR szCmdLine, int iCmdShow) { static TCHAR szAppName[] = TEXT (“AltWind”) ; HWND hwnd ; MSG msg ; WNDCLASS wndclass ; wndclass.style = CS_HREDRAW | CS_VREDRAW ; wndclass.lpfnWndProc = WndProc ; wndclass.cbClsExtra = 0 ; wndclass.cbWndExtra = 0 ; wndclass.hInstance = hInstance ; wndclass.hIcon = LoadIcon (NULL, IDI_APPLICATION) ; wndclass.hCursor = LoadCursor (NULL, IDC_ARROW) ; wndclass.hbrBackground = (HBRUSH) GetStockObject (WHITE_BRUSH) ; wndclass.lpszMenuName = NULL ; wndclass.lpszClassName = szAppName ; if (!RegisterClass (&wndclass)) { MessageBox (NULL, TEXT (“Program requires Windows NT!”), szAppName, MB_ICONERROR) ; return 0 ; } hwnd = CreateWindow (szAppName, TEXT (“Alternate and Winding Fill Modes”), WS_OVERLAPPEDWINDOW, CW_USEDEFAULT, CW_USEDEFAULT, CW_USEDEFAULT, CW_USEDEFAULT, NULL, NULL, hInstance, NULL) ; ShowWindow (hwnd, iCmdShow) ; UpdateWindow (hwnd) ; while (GetMessage (&msg, NULL, 0, 0)) { TranslateMessage (&msg) ; DispatchMessage (&msg) ; } return msg.wParam ; } LRESULT CALLBACK WndProc (HWND hwnd, UINT message, WPARAM wParam, LPARAM lParam) { static POINT aptFigure [10] = { 10,70, 50,70, 50,10, 90,10, 90,50, 30,50, 30,90, 70,90, 70,30, 10,30 }; static int cxClient, cyClient ; HDC hdc ; int i ; PAINTSTRUCT ps ; POINT apt[10] ; switch (message) { case WM_SIZE: cxClient = LOWORD (lParam) ; cyClient = HIWORD (lParam) ; return 0 ; case WM_PAINT: hdc = BeginPaint (hwnd, &ps) ; 135
- 136. SelectObject (hdc, GetStockObject (GRAY_BRUSH)) ; for (i = 0 ; i < 10 ; i++) { apt[i].x = cxClient * aptFigure[i].x / 200 ; apt[i].y = cyClient * aptFigure[i].y / 100 ; } SetPolyFillMode (hdc, ALTERNATE) ; Polygon (hdc, apt, 10) ; for (i = 0 ; i < 10 ; i++) { apt[i].x += cxClient / 2 ; } SetPolyFillMode (hdc, WINDING) ; Polygon (hdc, apt, 10) ; EndPaint (hwnd, &ps) ; return 0 ; case WM_DESTROY: PostQuitMessage (0) ; return 0 ; } return DefWindowProc (hwnd, message, wParam, lParam) ; } The coordinates of the figure—scaled to an arbitrary 100-unit-by-100-unit area—are stored in the aptFigure array. These coordinates are scaled based on the width and height of the client area. The program displays the figure twice, once using the ALTERNATE filling mode and then using WINDING. The results are shown in Figure 5-22. 136
- 137. Figure 5-22. The ALTWIND display. Brushing the Interior The interiors of the Rectangle, RoundRect, Ellipse, Chord, Pie, Polygon, and PolyPolygon figures are filled with the current brush (sometimes also called a “pattern”) selected in the device context. A brush is a small 8-pixel-by-8- pixel bitmap that is repeated horizontally and vertically to fill the area. When Windows uses dithering to display more colors than are normally available on a display, it actually uses a brush for the color. On a monochrome system, Windows can use dithering of black and white pixels to create 64 different shades of gray. More precisely, Windows can create 64 different monochrome brushes. For pure black, all bits in the 8-by-8 bitmap are 0. One bit out of the 64 is made 1 (that is, white) for the first gray shade, two bits are white for the second gray shade, and so on, until all bits in the 8-by-8 bitmap are 1 for pure white. With a 16-color or 256-color video system, dithered colors are also brushes and Windows can display a much wider range of color than would normally be available. Windows has five functions that let you create logical brushes. You select the brush into the device context with SelectObject. Like logical pens, logical brushes are GDI objects. Any brush that you create must be deleted, but it must not be deleted while it is selected in a device context. Here’s the first function to create a logical brush: hBrush = CreateSolidBrush (crColor) ; The word Solid in this function doesn’t really mean that the brush is a pure color. When you select the brush into the device context, Windows may create a dithered bitmap and use that for the brush. You can also create a brush with “hatch marks” made up of horizontal, vertical, or diagonal lines. Brushes of this 137
- 138. style are most commonly used for coloring the interiors of bar graphs and when drawing to plotters. The function for creating a hatch brush is hBrush = CreateHatchBrush (iHatchStyle, crColor) ; The iHatchStyle argument describes the appearance of the hatch marks. Figure 5-23 shows the six available hatch style constants and what they look like. Figure 5-23. The six hatch brush styles. The crColor argument to CreateHatchBrush specifies the color of the hatch lines. When you select the brush into a device context, Windows converts this color to the nearest pure color available on the display. The area between the hatch lines is colored based on the current background mode and the background color. If the background mode is OPAQUE, the background color (which is also converted to a pure color) is used to fill in the spaces between the lines. If the background mode is TRANSPARENT, Windows draws the hatch lines without filling in the area between them. You can also create your own brushes based on bitmaps using CreatePatternBrush and CreateDIBPatternBrushPt. The fifth function for creating a logical brush encompasses the other four functions: hBrush = CreateBrushIndirect (&logbrush) ; The logbrush variable is a structure of type LOGBRUSH (“logical brush”). The three fields of this structure are shown below. The value of the lbStyle field determines how Windows interprets the other two fields: lbStyle (UINT) lbColor (COLORREF) lbHatch (LONG) BS_SOLID Color of brush Ignored BS_HOLLOW Ignored Ignored BS_HATCHED Color of hatches Hatch brush style BS_PATTERN Ignored Handle to bitmap BS_DIBPATTERNPT Ignored Pointer to DIB Earlier we used SelectObject to select a logical pen into a device context, DeleteObject to delete a logical pen, and GetObject to get information about a logical pen. You can use these same three functions with brushes. Once you have a handle to a brush, you can select the brush into a device context using SelectObject: SelectObject (hdc, hBrush) ; You can later delete a created brush with the DeleteObject function: DeleteObject (hBrush) ; Do not delete a brush that is currently selected in a device context. If you need to obtain information about a brush, you can call GetObject, GetObject (hBrush, sizeof (LOGBRUSH), (LPVOID) &logbrush) ; where logbrush is a structure of type LOGBRUSH. 138
- 139. The GDI Mapping Mode Up until now, all the sample programs have been drawing in units of pixels relative to the upper left corner of the client area. This is the default, but it’s not your only choice. One device context attribute that affects virtually all the drawing you do on the client area is the “mapping mode.” Four other device context attributes—the window origin, the viewport origin, the window extents, and the viewport extents—are closely related to the mapping mode attribute. Most of the GDI drawing functions require coordinate values or sizes. For instance, this is the TextOut function: TextOut (hdc, x, y, psText, iLength) ; The x and y arguments indicate the starting position of the text. The x argument is the position on the horizontal axis, and the y argument is the position on the vertical axis. Often the notation (x,y) is used to indicate this point. In TextOut, as in virtually all GDI functions, these coordinate values are “logical units.” Windows must translate the logical units into “device units,” or pixels. This translation is governed by the mapping mode, the window and viewport origins, and the window and viewport extents. The mapping mode also implies an orientation of the x-axis and the y-axis; that is, it determines whether values of x increase as you move toward the left or right side of the display and whether values of y increase as you move up or down the display. Windows defines eight mapping modes. These are listed in the following table using the identifiers defined in WINGDI.H. Increasing Value Mapping Mode Logical Unit x-axis y-axis MM_TEXT Pixel Right Down MM_LOMETRIC 0.1 mm Right Up MM_HIMETRIC 0.01 mm Right Up MM_LOENGLISH 0.01 in. Right Up MM_HIENGLISH 0.001 in. Right Up MM_TWIPS 1/1440 in. Right Up MM_ISOTROPIC Arbitrary (x = y) Selectable Selectable MM_ANISOTROPIC Arbitrary (x !=y) Selectable Selectable The words METRIC and ENGLISH refer to popular systems of measurement; LO and HI are “low” and “high” and refer to precision. “Twip” is a fabricated word meaning “twentieth of a point.” I mentioned earlier that a point is a unit of measurement in typography that is approximately 1/72 inch but that is often assumed in graphics programming to be exactly 1/72 inch. A “twip” is 1/20 point and hence 1/1440 inch. “Isotropic” and “anisotropic” are actually real words, meaning “identical in all directions” and “not isotropic,” respectively. You can set the mapping mode by using SetMapMode (hdc, iMapMode) ; where iMapMode is one of the eight mapping mode identifiers. You can obtain the current mapping mode by calling iMapMode = GetMapMode (hdc) ; The default mapping mode is MM_TEXT. In this mapping mode, logical units are the same as physical units, which allows us (or, depending on your perspective, forces us) to work directly in units of pixels. In a TextOut call that looks like this: 139
- 140. TextOut (hdc, 8, 16, TEXT (“Hello”), 5) ; the text begins 8 pixels from the left of the client area and 16 pixels from the top. If the mapping mode is set to MM_LOENGLISH like so, SetMapMode (hdc, MM_LOENGLISH) ; logical units are in terms of hundredths of an inch. Now the TextOut call might look like this: TextOut (hdc, 50, -100, TEXT (“Hello”), 5) ; The text begins 0.5 inch from the left and 1 inch from the top of the client area. (The reason for the negative sign in front of the y-coordinate will soon become clear when I discuss the mapping modes in more detail.) Other mapping modes allow programs to specify coordinates in terms of millimeters, a point size, or an arbitrarily scaled axis. If you feel comfortable working in units of pixels, you don’t need to use any mapping modes except the default MM_TEXT mode. If you need to display an image in inch or millimeter dimensions, you can obtain the information you need from GetDeviceCaps and do your own scaling. The other mapping modes are simply a convenient way to avoid doing your own scaling. Although the coordinates you specify in GDI functions are 32-bit values, only Windows NT can handle all 32 bits. In Windows 98, coordinates are limited to 16 bits and thus may range only from -32,768 to 32,767. Some Windows functions that use coordinates for the starting point and ending point of a rectangle also require that the width and height of the rectangle be 32,767 or less. Device Coordinates and Logical Coordinates You may ask: if I use the MM_LOENGLISH mapping mode, will I start getting WM_SIZE messages in terms of hundredths of an inch? Absolutely not. Windows continues to use device coordinates for all messages (such as WM_MOVE, WM_SIZE, and WM_MOUSEMOVE), for all non-GDI functions, and even for some GDI functions. Think of it this way: the mapping mode is an attribute of the device context, so the only time the mapping mode comes into play is when you use GDI functions that require a handle to the device context as one of the arguments. GetSystemMetrics is not a GDI function, so it will continue to return sizes in device units, which are pixels. And although GetDeviceCaps is a GDI function that requires a handle to a device context, Windows continues to return device units for the HORZRES and VERTRES indexes, because one of the purposes of this function is to provide a program with the size of the device in pixels. However, the values in the TEXTMETRIC structure that you obtain from the GetTextMetrics call are in terms of logical units. If the mapping mode is MM_LOENGLISH at the time the call is made, GetTextMetrics provides character widths and heights in terms of hundredths of an inch. To make things easy on yourself, when you call GetTextMetrics for information about the height and width of characters, the mapping mode should be set to the same mapping mode that you’ll be using when you draw text based on these sizes. The Device Coordinate Systems Windows maps logical coordinates that are specified in GDI functions to device coordinates. Before we discuss the logical coordinate system used with the various mapping modes, let’s examine the different device coordinate systems that Windows defines for the video display. Although we have been working mostly within the client area of our window, Windows uses two other device coordinate systems at various times. In all device coordinate systems, units are expressed in terms of pixels. Values on the horizontal x-axis increase from left to right, and values on the vertical y-axis increase from top to bottom. When we use the entire screen, we are working in terms of “screen coordinates.” The upper left corner of the screen is the point (0, 0). Screen coordinates are used in the WM_MOVE message (for nonchild windows) and in the following Windows functions: CreateWindow and MoveWindow (for nonchild windows), GetMessagePos, GetCursorPos, SetCursorPos, GetWindowRect, and WindowFromPoint. (This is not a complete list.) These are generally either functions that don’t have a window associated with them (such as the two cursor functions) or functions that must move or find a window based on a screen point. If you use CreateDC with a “DISPLAY” argument to obtain a device context for the entire screen, logical coordinates in GDI calls will be mapped to screen 140
- 141. coordinates by default. “Whole-window coordinates” refer to a program’s entire application window, including the title bar, menu, scroll bars, and border. For a common application window, the point (0, 0) is the upper left corner of the sizing border. Whole-window coordinates are rare in Windows, but if you obtain a device context from GetWindowDC, logical coordinates in GDI functions will be mapped to whole-window coordinates by default. The third device coordinate system—the one we’ve been working with the most—uses “client area coordinates.” The point (0, 0) is the upper left corner of the client area. When you obtain a device context using GetDC or BeginPaint, logical coordinates in GDI functions will be translated to client-area coordinates by default. You can convert client-area coordinates to screen coordinates and vice versa using the functions ClientToScreen and ScreenToClient. You can also obtain the position and size of the whole window in terms of screen coordinates using the GetWindowRect functions. These three functions provide enough information to translate from any one device coordinate system to the other. The Viewport and the Window The mapping mode defines how Windows maps logical coordinates that are specified in GDI functions to device coordinates, where the particular device coordinate system depends on the function you use to obtain the device context. To continue this discussion of the mapping mode, we need some additional terminology. The mapping mode is said to define the mapping of the “window” (logical coordinates) to the “viewport” (device coordinates). The use of these two terms is unfortunate. In other graphics interface systems, the viewport often implies a clipping region. And in Windows, the term “window” has a very specific meaning to describe the area that a program occupies on the screen. We’ll have to put aside our preconceptions of these terms during this discussion. The viewport is specified in terms of device coordinates (pixels). Most often the viewport is the same as the client area, but it can also refer to whole-window coordinates or screen coordinates if you’ve obtained a device context from GetWindowDC or CreateDC. The point (0, 0) is the upper left corner of the client area (or the whole window or the screen). Values of x increase to the right, and values of y increase going down. The window is specified in terms of logical coordinates, which might be pixels, millimeters, inches, or any other unit you want. You specify logical window coordinates in the GDI drawing functions. But in a very real sense, the viewport and the window are just mathematical constructs. For all mapping modes, Windows translates window (logical) coordinates to viewport (device) coordinates by the use of two formulas, xViewExt xViewport = (xWindow - xWinOrg) × ________ + xViewOrg xWinExt yViewExt yViewport = (yWindow - yWinOrg) × ________ + yViewOrg yWinExt where (xWindow, yWindow) is a logical point to be translated and (xViewport, yViewport) is the translated point in device coordinates, most likely client-area coordinates. These formulas use two points that specify an “origin” of the window and the viewport. The point (xWinOrg, yWinOrg) is the window origin in logical coordinates; the point (xViewOrg, yViewOrg) is the viewport origin in device coordinates. By default, these two points are set to (0, 0), but you can change them. The formulas imply that the logical point (xWinOrg, yWinOrg) is always mapped to the device point (xViewOrg, yViewOrg). If the window and viewport origins are left at their default (0, 0) values, the formulas simplify to xViewExt xViewport = xWindow × ________ xWinExt yViewExt yViewport = yWindow × ________ yWinExt 141
- 142. The formulas also include two points that specify “extents”: the point (xWinExt, yWinExt) is the window extent in logical coordinates; (xViewExt, yViewExt) is the viewport extent in device coordinates. In most mapping modes, the extents are implied by the mapping mode and cannot be changed. Each extent means nothing by itself, but the ratio of the viewport extent to the window extent is a scaling factor for converting logical units to device units. For example, when you set the MM_LOENGLISH mapping mode, Windows sets xViewExt to be a certain number of pixels and xWinExt to be the length in hundredths of an inch occupied by xViewExt pixels. The ratio gives you pixels per hundredths of an inch. The scaling factors are expressed as ratios of integers rather than floating point values for performance reasons. The extents can be negative. This implies that values on the logical x-axis don’t necessarily have to increase to the right and that values on the logical y-axis don’t necessarily have to increase going down. Windows can also translate from viewport (device) coordinates to window (logical) coordinates: xWinExt xWindow = (xViewport - xViewOrg) × ________ + xWinOrg xViewExt yWinExt yWindow = (yViewport - yViewOrg) × ________ + yWinOrg yViewExt Windows provides two functions that let you convert between device points to logical points in a program. The following function converts device points to logical points: DPtoLP (hdc, pPoints, iNumber) ; The variable pPoints is a pointer to an array of POINT structures, and iNumber is the number of points to be converted. For example, you’ll find this function useful for converting the size of the client area obtained from GetClientRect (which is always in terms of device units) to logical coordinates: GetClientRect (hwnd, &rect) ; DPtoLP (hdc, (PPOINT) &rect, 2) ; This function converts logical points to device points: LPtoDP (hdc, pPoints, iNumber) ; Working with MM_TEXT For the MM_TEXT mapping mode, the default origins and extents are shown below. Window origin: (0, 0) Can be changed Viewport origin: (0, 0) Can be changed Window extent: (1, 1) Cannot be changed Viewport extent: (1, 1) Cannot be changed The ratio of the viewport extent to the window extent is 1, so no scaling is performed between logical coordinates and device coordinates. The formulas to convert from window coordinates to viewport coordinates shown earlier reduce to these: xViewport = xWindow - xWinOrg + xViewOrg yViewport = yWindow - yWinOrg + yViewOrg This is a “text” mapping mode not because it is most suitable for text but because of the orientation of the axes. In most languages, text is read from left to right and top to bottom, and MM_TEXT defines values on the axes to increase the same way: 142
- 143. Windows provides the functions SetViewportOrgEx and SetWindowOrgEx for changing the viewport and window origins. These functions have the effect of shifting the axes so that the logical point (0, 0) no longer refers to the upper left corner. Generally, you’ll use either SetViewportOrgEx or SetWindowOrgEx but not both. Here’s how the functions work: If you change the viewport origin to (xViewOrg, yViewOrg), the logical point (0, 0) will be mapped to the device point (xViewOrg, yViewOrg). If you change the window origin to (xWinOrg, yWinOrg), the logical point (xWinOrg, yWinOrg) will be mapped to the device point (0, 0), which is the upper left corner. Regardless of any changes you make to the window and viewport origins, the device point (0, 0) is always the upper left corner of the client area. For instance, suppose your client area is cxClient pixels wide and cyClient pixels high. If you want to define the logical point (0, 0) to be the center of the client area, you can do so by calling SetViewportOrgEx (hdc, cxClient / 2, cyClient / 2, NULL) ; The arguments to SetViewportOrgEx are always in terms of device units. The logical point (0, 0) will now be mapped to the device point (cxClient / 2, cyClient / 2). Now you can use your client area as if it had the coordinate system shown below. The logical x-axis ranges from -cxClient/2 to +cxClient/2, and the logical y-axis ranges from -cyClient/2 to +cyClient/2. The lower right corner of the client area is the logical point (cxClient/2, cyClient/2). If you want to display text starting at the upper left corner of the client area, which is the device point (0, 0), you need to use negative coordinates: TextOut (hdc, -cxClient / 2, -cyClient / 2, “Hello”, 5) ; You can achieve the same result with SetWindowOrgEx as you did when you used SetViewportOrgEx: SetWindowOrgEx (hdc, -cxClient / 2, -cyClient / 2, NULL) ; The arguments to SetWindowOrgEx are always in terms of logical units. After this call, the logical point (-cxClient / 2, -cyClient / 2) is mapped to the device point (0, 0), the upper left corner of the client area. What you probably don’t want to do (unless you know what’s going to happen) is to use both function calls together: SetViewportOrgEx (hdc, cxClient / 2, cyClient / 2, NULL) ; SetWindowOrgEx (hdc, -cxClient / 2, -cyClient / 2, NULL) ; 143
- 144. This means that the logical point (-cxClient/2, -cyClient/2) is mapped to the device point (cxClient/2, cyClient/2), giving you a coordinate system that looks like this: You can obtain the current viewport and window origins from these functions: GetViewportOrgEx (hdc, &pt) ; GetWindowOrgEx (hdc, &pt) ; where pt is a POINT structure. The values returned from GetViewportOrgEx are in device coordinates; the values returned from GetWindowOrgEx are in logical coordinates. You might want to change the viewport or window origin to shift display output within the client area of your window—for instance, in response to scroll bar input from the user. For example, in the SYSMETS2 program in Chapter 4, we used the iVscrollPos value (the current position of the vertical scroll bar) to adjust the y-coordinates of the display output: case WM_PAINT: hdc = BeginPaint (hwnd, &ps) ; for (i = 0 ; i < NUMLINES ; i++) { y = cyChar * (i - iVscrollPos) ; [display text] } EndPaint (hwnd, &ps) ; return 0 ; We can achieve the same result using SetWindowOrgEx: case WM_PAINT: hdc = BeginPaint (hwnd, &ps) ; SetWindowOrgEx (hdc, 0, cyChar * iVscrollPos) ; for (i = 0 ; i < NUMLINES ; i++) { y = cyChar * i ; [display text] } EndPaint (hwnd, &ps) ; return 0 ; Now the calculation of the y-coordinate for the TextOut functions doesn’t require the iVscrollPos value. This means that you can put the text output calls in a separate function and not have to pass the iVscrollPos value to the function, because the display is adjusted by changing the window origin. If you have some experience working with rectangular (or Cartesian) coordinate systems, moving the logical point (0, 0) to the center of the client area as we did earlier may have seemed a reasonable action. However, there’s a slight problem with the MM_TEXT mapping mode. Usually a Cartesian coordinate system defines values on the y- axis as increasing as you move up the axis, whereas MM_TEXT defines the values to increase as you move down the axis. In this sense, MM_TEXT is an oddity, and the next five mapping modes do it correctly. 144
- 145. The Metric Mapping Modes Windows includes five mapping modes that express logical coordinates in physical measurements. Because logical coordinates on the x-axis and y-axis are mapped to identical physical units, these mapping modes help you to draw round circles and square squares, even on a device that does not feature square pixels. The five metric mapping modes are arranged below in order of lowest precision to highest precision. The two columns at the right show the size of the logical units in terms of inches (in.) and millimeters (mm.) for comparison. Mapping Mode Logical Unit Inch Millimeter MM_LOENGLISH 0.01 in. 0.01 0.254 MM_LOMETRIC 0.1 mm. 0.00394 0.1 MM_HIENGLISH 0.001 in. 0.001 0.0254 MM_TWIPS 1/1400 in. 0.000694 0.0176 MM_HIMETRIC 0.01 mm. 0.000394 0.01 The default window and viewport origins and extents are Window origin: (0, 0) Can be changed Viewport origin: (0, 0) Can be changed Window extent: (?, ?) Cannot be changed Viewport extent: (?, ?) Cannot be changed The question marks indicate that the window and viewport extents depend on the mapping mode and the resolution of the device. As I mentioned earlier, the extents aren’t important by themselves but take on meaning when expressed as ratios. Here are the translation formulas again: xViewExt xViewport = (xWindow - xWinOrg) × ________ + xViewOrg xWinExt yViewExt yViewport = (yWindow - yWinOrg) × ________ + yViewOrg yWinExt For MM_LOENGLISH, for example, Windows calculates the extents to be the following: xViewExt/xWinExt = number of horizontal pixels in 0.01 in. • yViewExt/yWinExt = negative number of vertical pixels in 0.01 in. Windows uses information available from GetDeviceCaps to set these extents. This is somewhat different in Windows 98 and Windows NT. First, here’s how it works in Windows 98: Suppose you have used the Display applet of the Control Panel to select a 96 dpi system font. GetDeviceCaps will return a value of 96 for both the LOGPIXELSX and LOGPIXELSY indexes. Windows uses these values for the viewport extents and sets the viewport and window extents as shown in the following table. Mapping Mode Viewport Extents (x, y) Window Extents (x, y) MM_LOMETRIC (96, 96) (254, -254) MM_HIMETRIC (96, 96) (2540, -2540) 145
- 146. MM_LOENGLISH (96, 96) (100, -100) MM_HIENGLISH (96, 96) (1000, -1000) MM_TWIPS (96, 96) (1440, -1440) Thus, for MM_LOENGLISH, the ratio 96 divided by 100 is the number of pixels in 0.01 inches. For MM_LOMETRIC, the ratio 96 divided by 254 is the number of pixels in 0.1 millimeters. Windows NT uses a different approach to set the viewport and window extents (an approach actually consistent with earlier 16-bit versions of Windows). The viewport extents are based on the pixel dimensions of the screen. This is information obtained from GetDeviceCaps using the HORZRES and VERTRES indexes. The window extents are based on the assumed size of the display, which GetDeviceCaps returns when you use the HORZSIZE and VERTSIZE indexes. As I mentioned earlier, these values are commonly 320 and 240 millimeters. If you’ve set the pixel dimensions of your display to 1024 by 768, here are the values of the viewport and window extents that Windows NT reports. Mapping Mode Viewport Extents (x, y) Window Extents (x, y) MM_LOMETRIC (1024, -768) (3200, 2400) MM_HIMETRIC (1024, -768) (32000, 24000) MM_LOENGLISH (1024, -768) (1260, 945) MM_HIENGLISH (1024, -768) (12598, 9449) MM_TWIPS (1024, -768) (18142, 13606) These window extents represent the number of logical units encompassing the full width and height of the display. A 320-millimeters wide screen is also 1260 MM_LOENGLISH units or 12.6 inches (320 divided by 25.4 millimeters per inch). Those negative signs in front of the y extents change the orientation of the axis. For these five mapping modes, y values increase as you move up the device. However, notice that the default window and viewport origins are both (0, 0). This has an interesting implication. When you first change to one of these five mapping modes, the coordinate system looks like the graph below. The only way you can display anything in the client area is to use negative values of y. For instance, this code, SetMapMode (hdc, MM_LOENGLISH) ; TextOut (hdc, 100, -100, “Hello”, 5) ; displays the text one inch from the top and left edges of the client area. To preserve your sanity, you’ll probably want to avoid this. One solution is to set the logical (0, 0) point to the lower left corner of the client area. Assuming that cyClient is the height of the client area in pixels, you can do this by calling SetViewportOrgEx: SetViewportOrgEx (hdc, 0, cyClient, NULL) ; 146
- 147. Now the coordinate system looks like this: This is the upper right quadrant of a rectangular coordinate system. Alternatively, you can set the logical (0, 0) point to the center of the client area: SetViewportOrgEx (hdc, cxClient / 2, cyClient / 2, NULL) ; The coordinate system looks like this: Now we have a real four-quadrant Cartesian coordinate system with equal logical units on the x-axis and y-axis in terms of inches, millimeters, or twips. You can also use the SetWindowOrgEx function to change the logical (0, 0) point, but the task is a little more difficult because the arguments to SetWindowOrgEx have to be in logical coordinates. You would first need to convert (cxClient, cyClient) to a logical coordinate using the DPtoLP function. Assuming that the variable pt is a structure of type POINT, this code changes the logical (0, 0) point to the center of the client area: pt.x = cxClient ; pt.y = cyClient ; DptoLP (hdc, &pt, 1) ; SetWindowOrgEx (hdc, -pt.x / 2, -pt.y / 2, NULL) ; The “Roll Your Own” Mapping Modes The two remaining mapping modes are named MM_ISOTROPIC and MM_ANISOTROPIC. These are the only two mapping modes for which Windows lets you change the viewport and window extents, which means that you can change the scaling factor that Windows uses to translate logical and device coordinates. The word isotropic means “equal in all directions”; anisotropic is the opposite—“not equal.” Like the metric mapping modes shown earlier, MM_ISOTROPIC uses equally scaled axes. Logical units on the x-axis have the same physical dimensions as logical units on the y-axis. This helps when you need to create images that retain the correct aspect ratio regardless of the aspect ratio of the display device. The difference between MM_ISOTROPIC and the metric mapping modes is that with MM_ISOTROPIC you can control the physical size of the logical unit. If you want, you can adjust the size of the logical unit based on the client area. This lets you draw images that are always contained within the client area, shrinking and expanding appropriately. The two clock programs in Chapter 8 have isotropic images. As you size the window, the clocks are resized appropriately. 147
- 148. A Windows program can handle the resizing of an image entirely through adjusting the window and viewport extents. The program can then use the same logical units in the drawing functions regardless of the size of the window. Sometimes MM_TEXT and the metric mapping modes are called “fully constrained” mapping modes. This means that you cannot change the window and viewport extents and the way Windows scales logical coordinates to device coordinates. MM_ISOTROPIC is a “partly constrained” mapping mode. Windows allows you to change the window and viewport extents, but it adjusts them so that x and y logical units represent the same physical dimensions. The MM_ANISOTROPIC mapping mode is “unconstrained.” You can change the window and viewport extents, and Windows doesn’t adjust the values. The MM_ISOTROPIC Mapping Mode The MM_ISOTROPIC mapping mode is ideal for using arbitrarily scaled axes while preserving equal logical units on the two axes. Rectangles with equal logical widths and heights are displayed as squares, and ellipses with equal logical widths and heights are displayed as circles. When you first set the mapping mode to MM_ISOTROPIC, Windows uses the same window and viewport extents that it uses with MM_LOMETRIC. (Don’t rely on this fact, however.) The difference is that you can now change the extents to suit your preferences by calling SetWindowExtEx and SetViewportExtEx. Windows will then adjust the extents so that the logical units on both axes represent equal physical distances. Generally, you’ll use arguments to SetWindowExtEx with the desired logical size of the logical windows, and arguments to SetViewportExtEx with the actual height and width of the client area. When Windows adjusts these extents, it has to fit the logical window within the physical viewport, which can result in a section of the client area falling outside the logical window. You should call SetWindowExtEx before you call SetViewportExtEx to make the most efficient use of space in the client area. For example, suppose you want a traditional one-quadrant virtual coordinate system where (0, 0) is at the lower left corner of the client area and the logical width and height ranges from 0 to 32,767. You want the x and y units to have the same physical dimensions. Here’s what you need to do: SetMapMode (hdc, MM_ISOTROPIC) ; SetWindowExtEx (hdc, 32767, 32767, NULL) ; SetViewportExtEx (hdc, cxClient, -cyClient, NULL) ; SetViewportOrgEx (hdc, 0, cyClient, NULL) ; If you then obtain the window and viewport extents using GetWindowExtEx and GetViewportExtEx, you’ll find that they are not the values you specified. Windows has adjusted the extents based on the aspect ratio of the display device so that logical units on the two axes represent the same physical dimensions. If the client area is wider than it is high (in physical dimensions), Windows adjusts the x extents so that the logical window is narrower than the client-area viewport. The logical window will be positioned at the left of the client area: Windows 98 will actually not allow you to display anything in the right side of the client area because it is limited to 16-bit signed coordinates. Windows NT uses a full 32-bits for coordinates, and you would be able to display something over in the right side. If the client area is higher than it is wide (in physical dimensions), Windows adjust the y extents. The logical 148
- 149. window will be positioned at the bottom of the client area: Windows 98 will not allow you to display anything at the top of the client area. If you prefer that the logical window always be positioned at the left and top of the client area, you can change the code to the following: SetMapMode (MM_ISOTROPIC) ; SetWindowExtEx (hdc, 32767, 32767, NULL) ; SetViewportExtEx (hdc, cxClient, -cyClient, NULL) ; SetWindowOrgEx (hdc, 0, 32767, NULL) ; In the SetWindowOrgEx call, we’re saying that we want the logical point (0, 32767) to be mapped to the device point (0, 0). Now, if the client area is higher than it is wide, the coordinates are arranged like this: For a clock program, you might want to use a four-quadrant Cartesian coordinate system with arbitrarily scaled axes in four directions in which the logical point (0, 0) is in the center of the client area. If you want each axis to range from 0 to 1000 (for instance), you use this code: SetMapMode (hdc, MM_ISOTROPIC) ; SetWindowExtEx (hdc, 1000, 1000, NULL) ; SetViewportExtEx (hdc, cxClient / 2, -cyClient / 2, NULL) ; SetViewportOrgEx (hdc, cxClient / 2, cyClient / 2, NULL) ; The logical coordinates look like this if the client area is wider than it is high: 149
- 150. The logical coordinates are also centered if the client area is higher than it is wide, as shown below. Keep in mind that no clipping is implied in window or viewport extents. When calling GDI functions, you are still free to use logical x and y values less than -1000 and greater than +1000. Depending on the shape of the client area, these points might or might not be visible. With the MM_ISOTROPIC mapping mode, you can make logical units larger than pixels. For instance, suppose you want a mapping mode with the point (0, 0) at the upper left corner of the display and values of y increasing as you move down (like MM_TEXT) but with logical coordinates in sixteenths of an inch. Here’s one way to do it: SetMapMode (hdc, MM_ISOTROPIC) ; SetWindowExtEx (hdc, 16, 16, NULL) ; SetViewportExtEx (hdc, GetDeviceCaps (hdc, LOGPIXELSX), GetDeviceCaps (hdc, LOGPIXELSY), NULL) ; The arguments to the SetWindowExtEx function indicate the number of logical units in one inch. The arguments to the SetViewportExtEx function indicate the number of physical units (pixels) in one inch. However, this approach would not be consistent with the metric mapping modes in Windows NT. These mapping modes use the pixel size and metric size of the display. To be consistent with the metric mapping modes, you can use this code: SetMapMode (hdc, MM_ISOTROPIC) ; SetWindowExtEx (hdc, 160 * GetDeviceCaps (hdc, HORZSIZE) / 254, 160 * GetDeviceCaps (hdc, VERTSIZE) / 254, NULL) ; SetViewportExtEx (hdc, GetDeviceCaps (hdc, HORZRES), GetDeviceCaps (hdc, VERTRES), NULL) ; In this code, the viewport extents are set to the pixel dimensions of the entire screen. The window extents are set to the assumed dimension of the screen in units of sixteenths of an inch. GetDeviceCaps with the HORZRES and VERTRES indexes return the dimensions of the device in millimeters. If we were working with floating-point numbers, we would convert the millimeters to inches by dividing by 25.4 and then convert inches to sixteenths of an inch by multiplying by 16. However, because we’re working with integers, we must multiply by 160 and divide by 254. 150
- 151. Of course, such a coordinate system makes logical units much larger than physical units. Everything you draw on the device will have coordinate values that map to an increment of 1/16 inch. You cannot draw two horizontal lines that are 1/32 inch apart because that would require a fractional logical coordinate. MM_ANISOTROPIC: Stretching the Image to Fit When you set the viewport and window extents in the MM_ISOTROPIC mapping mode, Windows adjusts the values so that logical units on the two axes have the same physical dimensions. In the MM_ANISOTROPIC mapping mode, Windows makes no adjustments to the values you set. This means that MM_ANISOTROPIC does not necessarily maintain the correct aspect ratio. One way you can use MM_ANISOTROPIC is to have arbitrary coordinates for the client area, as we did with MM_ISOTROPIC. This code sets the point (0, 0) at the lower left corner of the client area with the x and y axes ranging from 0 to 32,767: SetMapMode (hdc, MM_ANISOTROPIC) ; SetWindowExtEx (hdc, 32767, 32767, NULL) ; SetViewportExtEx (hdc, cxClient, -cyClient, NULL) ; SetViewportOrgEx (hdc, 0, cyClient, NULL) ; With MM_ISOTROPIC, similar code caused part of the client area to be beyond the range of the axes. With MM_ANISOTROPIC, the upper right corner of the client area is always the point (32767, 32767), regardless of its dimensions. If the client area is not square, logical x and y units will have different physical dimensions. In the previous section on the MM_ISOTROPIC mapping mode, I discussed how you might draw a round clock in the client area where the x and y axes ranged from -1000 to 1000. You can do something similar with MM_ANISOTROPIC: SetMapMode (hdc, MM_ANISOTROPIC) ; SetWindowExtEx (hdc, 1000, 1000, NULL) ; SetViewportExtEx (hdc, cxClient / 2, -cyClient / 2, NULL) ; SetViewportOrgEx (hdc, cxClient / 2, cyClient / 2, NULL) ; The difference with MM_ANISOTROPIC is that in general the clock would be drawn as an ellipse rather than a circle. Another way to use MM_ANISOTROPIC is to set x and y units to fixed but unequal values. For instance, if you have a program that displays only text, you may want to set coarse coordinates based on the height and width of a single character: SetMapMode (hdc, MM_ANISOTROPIC) ; SetWindowExtEx (hdc, 1, 1, NULL) ; SetViewportExtEx (hdc, cxChar, cyChar, NULL) ; Of course, I’ve assumed that cxChar and cyChar are the width and height of characters in that font. Now you can specify coordinates in terms of character rows and columns. For instance, the following statement displays text three characters from the left and two character rows from the top of the client area: TextOut (hdc, 3, 2, TEXT (“Hello”), 5) ; This might be more appropriate if you’re using a fixed-point font, as in the upcoming WHATSIZE program. When you first set the MM_ANISOTROPIC mapping mode, it always inherits the extents of the previously set mapping mode. This can be very convenient. One way of thinking about MM_ANISTROPIC is that it “unlocks” the extents; that is, it allows you to change the extents of an otherwise fully-constrained mapping mode. For instance, suppose you want to use the MM_LOENGLISH mapping mode because you want logical units to be 0.01 inch. But you don’t want the values along the y-axis to increase as you move up the screen—you prefer the MM_TEXT orientation, where y values increase moving down. Here’s the code: SIZE size ; [other program lines] SetMapMode (hdc, MM_LOENGLISH) ; SetMapMode (hdc, MM_ANISOTROPIC) ; GetViewportExtEx (hdc, &size) ; 151
- 152. SetViewportExtEx (hdc, size.cx, -size.cy, NULL) ; We first set the mapping mode to MM_LOENGLISH. Then we liberate the extents by setting the mapping mode to MM_ANISOTROPIC. The GetViewportExtEx function obtains the viewport extents in a SIZE structure. Then we call SetViewportExtEx with the extents, except that the y extent is made negative. The WHATSIZE Program A little Windows history: The first how-to-program-for-Windows article appeared in the December 1986 issue of Microsoft Systems Journal. The sample program in that article was called WSZ (“what size”), and it displayed the size of a client area in pixels, inches, and millimeters. A simplified version of that program is WHATSIZE, shown in Figure 5-24. The program shows the dimensions of the window’s client area in terms of the five metric mapping modes. Figure 5-24. The WHATSIZE program. WHATSIZE.C /*----------------------------------------- WHATSIZE.C—What Size is the Window? © Charles Petzold, 1998 -----------------------------------------*/ #include <windows.h> LRESULT CALLBACK WndProc (HWND, UINT, WPARAM, LPARAM) ; int WINAPI WinMain (HINSTANCE hInstance, HINSTANCE hPrevInstance, PSTR szCmdLine, int iCmdShow) { static TCHAR szAppName[] = TEXT (“WhatSize”) ; HWND hwnd ; MSG msg ; WNDCLASS wndclass ; wndclass.style = CS_HREDRAW | CS_VREDRAW; wndclass.lpfnWndProc = WndProc ; wndclass.cbClsExtra = 0 ; wndclass.cbWndExtra = 0 ; wndclass.hInstance = hInstance ; wndclass.hIcon = LoadIcon (NULL, IDI_APPLICATION) ; wndclass.hCursor = LoadCursor (NULL, IDC_ARROW) ; wndclass.hbrBackground = (HBRUSH) GetStockObject (WHITE_BRUSH) ; wndclass.lpszMenuName = NULL ; wndclass.lpszClassName = szAppName ; if (!RegisterClass (&wndclass)) { MessageBox (NULL, TEXT (“This program requires Windows NT!”), szAppName, MB_ICONERROR) ; return 0 ; } hwnd = CreateWindow (szAppName, TEXT (“What Size is the Window?”), WS_OVERLAPPEDWINDOW, CW_USEDEFAULT, CW_USEDEFAULT, CW_USEDEFAULT, CW_USEDEFAULT, NULL, NULL, hInstance, NULL) ; 152
- 153. ShowWindow (hwnd, iCmdShow) ; UpdateWindow (hwnd) ; while (GetMessage (&msg, NULL, 0, 0)) { TranslateMessage (&msg) ; DispatchMessage (&msg) ; } return msg.wParam ; } void Show (HWND hwnd, HDC hdc, int xText, int yText, int iMapMode, TCHAR * szMapMode) { TCHAR szBuffer [60] ; RECT rect ; SaveDC (hdc) ; SetMapMode (hdc, iMapMode) ; GetClientRect (hwnd, &rect) ; DPtoLP (hdc, (PPOINT) &rect, 2) ; RestoreDC (hdc, -1) ; TextOut (hdc, xText, yText, szBuffer, wsprintf (szBuffer, TEXT (“%-20s %7d %7d %7d %7d”), szMapMode, rect.left, rect.right, rect.top, rect.bottom)) ; } LRESULT CALLBACK WndProc (HWND hwnd, UINT message, WPARAM wParam, LPARAM lParam) { static TCHAR szHeading [] = TEXT (“Mapping Mode Left Right Top Bottom”) ; static TCHAR szUndLine [] = TEXT (“------------ ---- ----- --- ------“) ; static int cxChar, cyChar ; HDC hdc ; PAINTSTRUCT ps ; TEXTMETRIC tm ; switch (message) { case WM_CREATE: hdc = GetDC (hwnd) ; SelectObject (hdc, GetStockObject (SYSTEM_FIXED_FONT)) ; GetTextMetrics (hdc, &tm) ; cxChar = tm.tmAveCharWidth ; cyChar = tm.tmHeight + tm.tmExternalLeading ; ReleaseDC (hwnd, hdc) ; return 0 ; case WM_PAINT: hdc = BeginPaint (hwnd, &ps) ; SelectObject (hdc, GetStockObject (SYSTEM_FIXED_FONT)) ; SetMapMode (hdc, MM_ANISOTROPIC) ; SetWindowExtEx (hdc, 1, 1, NULL) ; SetViewportExtEx (hdc, cxChar, cyChar, NULL) ; TextOut (hdc, 1, 1, szHeading, lstrlen (szHeading)) ; TextOut (hdc, 1, 2, szUndLine, lstrlen (szUndLine)) ; 153
- 154. Show (hwnd, hdc, 1, 3, MM_TEXT, TEXT (“TEXT (pixels)”)) ; Show (hwnd, hdc, 1, 4, MM_LOMETRIC, TEXT (“LOMETRIC (.1 mm)”)) ; Show (hwnd, hdc, 1, 5, MM_HIMETRIC, TEXT (“HIMETRIC (.01 mm)”)) ; Show (hwnd, hdc, 1, 6, MM_LOENGLISH, TEXT (“LOENGLISH (.01 in)”)) ; Show (hwnd, hdc, 1, 7, MM_HIENGLISH, TEXT (“HIENGLISH (.001 in)”)) ; Show (hwnd, hdc, 1, 8, MM_TWIPS, TEXT (“TWIPS (1/1440 in)”)) ; EndPaint (hwnd, &ps) ; return 0 ; case WM_DESTROY: PostQuitMessage (0) ; return 0 ; } return DefWindowProc (hwnd, message, wParam, lParam) ; } For ease in displaying the information using the TextOut function, WHATSIZE uses a fixed-pitch font. Switching to a fixed-pitch font (which was the default prior to Windows 3.0) involves this simple statement: SelectObject (hdc, GetStockObject (SYSTEM_FIXED_FONT)) ; These are the same two functions used for selecting stock pens and brushes. WHATSIZE also uses the MM_ANISTROPIC mapping mode with logical units set to character dimensions, as shown earlier. When WHATSIZE needs to obtain the size of the client area for one of the six mapping modes, it saves the current device context, sets a new mapping mode, obtains the client-area coordinates, converts them to logical coordinates, and then restores the original mapping mode before displaying the information. This code is in WHATSIZE’s Show function: SaveDC (hdc) ; SetMapMode (hdc, iMapMode) ; GetClientRect (hwnd, &rect) ; DptoLP (hdc, (PPOINT) &rect, 2) ; RestoreDC (hdc, -1) ; Figure 5-25 shows a typical display from WHATSIZE. 154
- 155. Figure 5-25. A typical WHATSIZE display. Rectangles, Regions, and Clipping Windows includes several additional drawing functions that work with RECT (rectangle) structures and regions. A region is an area of the screen that is a combination of rectangles, polygons, and ellipses. Working with Rectangles These three drawing functions require a pointer to a rectangle structure: FillRect (hdc, &rect, hBrush) ; FrameRect (hdc, &rect, hBrush) ; InvertRect (hdc, &rect) ; In these functions, the rect parameter is a structure of type RECT with four fields: left, top, right, and bottom. The coordinates in this structure are treated as logical coordinates. FillRect fills the rectangle (up to but not including the right and bottom coordinates) with the specified brush. This function doesn’t require that you first select the brush into the device context. FrameRect uses the brush to draw a rectangular frame, but it does not fill in the rectangle. Using a brush to draw a frame may seem a little strange, because with the functions that you’ve seen so far (such as Rectangle) the border is drawn with the current pen. FrameRect allows you to draw a rectangular frame that isn’t necessarily a pure color. This frame is one logical unit wide. If logical units are larger than device units, the frame will be 2 or more pixels 155
- 156. wide. InvertRect inverts all the pixels in the rectangle, turning ones to zeros and zeros to ones. This function turns a white area to black, a black area to white, and a green area to magenta. Windows also includes nine functions that allow you to manipulate RECT structures easily and cleanly. For instance, to set the four fields of a RECT structure to particular values, you would conventionally use code that looks like this: rect.left = xLeft ; rect.top = xTop ; rect.right = xRight ; rect.bottom = xBottom ; By calling the SetRect function, however, you can achieve the same result with a single line: SetRect (&rect, xLeft, yTop, xRight, yBottom) ; The other eight functions can also come in handy when you want to do one of the following: • Move a rectangle a number of units along the x and y axes: OffsetRect (&rect, x, y) ; • Increase or decrease the size of a rectangle: InflateRect (&rect, x, y) ; • Set the fields of a rectangle equal to 0: SetRectEmpty (&rect) ; • Copy one rectangle to another: CopyRect (&DestRect, &SrcRect) ; • Obtain the intersection of two rectangles: IntersectRect (&DestRect, &SrcRect1, &SrcRect2) ; • Obtain the union of two rectangles: UnionRect (&DestRect, &SrcRect1, &SrcRect2) ; • Determine whether a rectangle is empty: bEmpty = IsRectEmpty (&rect) ; • Determine whether a point is in a rectangle: bInRect = PtInRect (&rect, point) ; In most cases, the equivalent code for these functions is simple. For example, you can duplicate the CopyRect function call with a field-by-field structure copy, accomplished by the statement DestRect = SrcRect ; Random Rectangles A fun program in any graphics system is one that runs “forever,” simply drawing a hypnotic series of images with random sizes and colors— for example, rectangles of a random size and color. You can create such a program in Windows, but it’s not quite as easy as it first seems. I hope you realize that you can’t simply put a while(TRUE) loop 156
- 157. in the WM_PAINT message. Sure, it will work, but the program will effectively prevent itself from processing other messages. The program cannot be exited or minimized. One acceptable alternative is setting a Windows timer to send WM_TIMER messages to your window function. (I’ll discuss the timer in Chapter 8.) For each WM_TIMER message, you obtain a device context with GetDC, draw a random rectangle, and then release the device context with ReleaseDC. But that takes some of the fun out of the program, because the program can’t draw the random rectangles as quickly as possible. It must wait for each WM_TIMER message, and that’s based on the resolution of the system clock. There must be plenty of “dead time” in Windows—time during which all the message queues are empty and Windows is just sitting around waiting for keyboard or mouse input. Couldn’t we somehow get control during that dead time and draw the rectangles, relinquishing control only when a message is added to a program’s message queue? That’s one of the purposes of the PeekMessage function. Here’s one example of a PeekMessage call: PeekMessage (&msg, NULL, 0, 0, PM_REMOVE) ; The first four parameters (a pointer to a MSG structure, a window handle, and two values indicating a message range) are identical to those of GetMessage. Setting the second, third, and fourth parameters to NULL or 0 indicates that we want PeekMessage to return all messages for all windows in the program. The last parameter to PeekMessage is set to PM_REMOVE if the message is to be removed from the message queue. You can set it to PM_NOREMOVE if the message isn’t to be removed. This is why PeekMessage is a “peek” rather than a “get”—it allows a program to check the next message in the program’s queue without actually removing it. GetMessage doesn’t return control to a program unless it retrieves a message from the program’s message queue. But PeekMessage always returns right away regardless whether a message is present or not. When there’s a message in the program’s message queue, the return value of PeekMessage is TRUE (nonzero) and the message can be processed as normal. When there is no message in the queue, PeekMessage returns FALSE (0). This allows us to replace the normal message loop, which looks like this: while (GetMessage (&msg, NULL, 0, 0)) { TranslateMessage (&msg) ; DispatchMessage (&msg) ; } return msg.wParam ; with an alternative message loop like this: while (TRUE) { if (PeekMessage (&msg, NULL, 0, 0, PM_REMOVE)) { if (msg.message == WM_QUIT) break ; TranslateMessage (&msg) ; DispatchMessage (&msg) ; } else { [other program lines to do some work] } } return msg.wParam ; Notice that the WM_QUIT message is explicitly checked. You don’t have to do this in a normal message loop, because the return value of GetMessage is FALSE (0) when it retrieves a WM_QUIT message. But PeekMessage uses its return value to indicate whether a message was retrieved, so the check of WM_QUIT is required. If the return value of PeekMessage is TRUE, the message is processed normally. If the value is FALSE, the program can do some work (such as displaying yet another random rectangle) before returning control to Windows. (Although the Windows documentation notes that you can’t use PeekMessage to remove WM_PAINT messages from the message queue, this isn’t really a problem. After all, GetMessage doesn’t remove WM_PAINT messages 157
- 158. from the queue either. The only way to remove a WM_PAINT message from the queue is to validate the invalid regions of the window’s client area, which you can do with ValidateRect, ValidateRgn, or a BeginPaint and EndPaint pair. If you process a WM_PAINT message normally after retrieving it from the queue with PeekMessage, you’ll have no problems. What you can’t do is use code like this to empty your message queue of all messages: while (PeekMessage (&msg, NULL, 0, 0, PM_REMOVE)) ; This statement removes and discards all messages from your message queue except WM_PAINT. If a WM_PAINT message is in the queue, you’ll be stuck inside the while loop forever.) PeekMessage was much more important in earlier versions of Windows than it is in Windows 98. This is because the 16-bit versions of Windows employed nonpreemptive multitasking (which I’ll discuss in Chapter 20). The Windows Terminal program used a PeekMessage loop to check for incoming data from a communications port. The Print Manager program used this technique for printing, and Windows applications that printed also generally used a PeekMessage loop. With the preemptive multitasking of Windows 98, programs can create multiple threads of execution, as we’ll see in Chapter 20. Armed only with the PeekMessage function, however, we can write a program that relentlessly displays random rectangles. The program, called RANDRECT, is shown in Figure 5-26. RANDRECT.C /*------------------------------------------ RANDRECT.C—Displays Random Rectangles © Charles Petzold, 1998 ------------------------------------------*/ #include <windows.h> #include <stdlib.h> // for the rand function LRESULT CALLBACK WndProc (HWND, UINT, WPARAM, LPARAM) ; void DrawRectangle (HWND) ; int cxClient, cyClient ; int WINAPI WinMain (HINSTANCE hInstance, HINSTANCE hPrevInstance, PSTR szCmdLine, int iCmdShow) { static TCHAR szAppName[] = TEXT (“RandRect”) ; HWND hwnd ; MSG msg ; WNDCLASS wndclass ; wndclass.style = CS_HREDRAW | CS_VREDRAW ; wndclass.lpfnWndProc = WndProc ; wndclass.cbClsExtra = 0 ; wndclass.cbWndExtra = 0 ; wndclass.hInstance = hInstance ; wndclass.hIcon = LoadIcon (NULL, IDI_APPLICATION) ; wndclass.hCursor = LoadCursor (NULL, IDC_ARROW) ; wndclass.hbrBackground = (HBRUSH) GetStockObject (WHITE_BRUSH) ; wndclass.lpszMenuName = NULL ; wndclass.lpszClassName = szAppName ; if (!RegisterClass (&wndclass)) { MessageBox (NULL, TEXT (“This program requires Windows NT!”), szAppName, MB_ICONERROR) ; 158
- 159. return 0 ; } hwnd = CreateWindow (szAppName, TEXT (“Random Rectangles”), WS_OVERLAPPEDWINDOW, CW_USEDEFAULT, CW_USEDEFAULT, CW_USEDEFAULT, CW_USEDEFAULT, NULL, NULL, hInstance, NULL) ; ShowWindow (hwnd, iCmdShow) ; UpdateWindow (hwnd) ; while (TRUE) { if (PeekMessage (&msg, NULL, 0, 0, PM_REMOVE)) { if (msg.message == WM_QUIT) break ; TranslateMessage (&msg) ; DispatchMessage (&msg) ; } else DrawRectangle (hwnd) ; } return msg.wParam ; } LRESULT CALLBACK WndProc (HWND hwnd, UINT iMsg, WPARAM wParam, LPARAM lParam) { switch (iMsg) { case WM_SIZE: cxClient = LOWORD (lParam) ; cyClient = HIWORD (lParam) ; return 0 ; case WM_DESTROY: PostQuitMessage (0) ; return 0 ; } return DefWindowProc (hwnd, iMsg, wParam, lParam) ; } void DrawRectangle (HWND hwnd) { HBRUSH hBrush ; HDC hdc ; RECT rect ; if (cxClient == 0 || cyClient == 0) return ; SetRect (&rect, rand () % cxClient, rand () % cyClient, rand () % cxClient, rand () % cyClient) ; hBrush = CreateSolidBrush ( RGB (rand () % 256, rand () % 256, rand () % 256)) ; hdc = GetDC (hwnd) ; FillRect (hdc, &rect, hBrush) ; ReleaseDC (hwnd, hdc) ; DeleteObject (hBrush) ; } Figure 5-26. The RANDRECT program. 159
- 160. This program actually runs so fast on today’s speedy machines that it no longer looks like a series of random rectangles! The program uses the SetRect and FillRect function I discussed above, basing rectangle coordinates and solid brush colors on random values obtained from the C rand function. I’ll show another version of this program using multiple threads of execution in Chapter 20. Creating and Painting Regions A region is a description of an area of the display that is a combination of rectangles, polygons, and ellipses. You can use regions for drawing or for clipping. You use a region for clipping (that is, restricting drawing to a specific part of your client area) by selecting the region into the device context. Like pens and brushes, regions are GDI objects. You should delete any regions that you create by calling DeleteObject. When you create a region, Windows returns a handle to the region of type HRGN. The simplest type of region describes a rectangle. You can create a rectangular region in one of two ways: hRgn = CreateRectRgn (xLeft, yTop, xRight, yBottom) ; or hRgn = CreateRectRgnIndirect (&rect) ; You can also create elliptical regions using hRgn = CreateEllipticRgn (xLeft, yTop, xRight, yBottom) ; or hRgn = CreateEllipticRgnIndirect (&rect) ; The CreateRoundRectRgn creates a rectangular region with rounded corners. Creating a polygonal region is similar to using the Polygon function: hRgn = CreatePolygonRgn (&point, iCount, iPolyFillMode) ; The point parameter is an array of structures of type POINT, iCount is the number of points, and iPolyFillMode is either ALTERNATE or WINDING. You can also create multiple polygonal regions using CreatePolyPolygonRgn. So what, you say? What makes these regions so special? Here’s the function that unleashes the power of regions: iRgnType = CombineRgn (hDestRgn, hSrcRgn1, hSrcRgn2, iCombine) ; This function combines two source regions (hSrcRgn1 and hSrcRgn2) and causes the destination region handle (hDestRgn) to refer to that combined region. All three region handles must be valid, but the region previously described by hDestRgn is destroyed. (When you use this function, you might want to make hDestRgn refer initially to a small rectangular region.) The iCombine parameter describes how the hSrcRgn1 and hSrcRgn2 regions are to be combined: iCombine Value New Region RGN_AND Overlapping area of the two source regions RGN_OR All of the two source regions RGN_XOR All of the two source regions, excluding the overlapping area RGN_DIFF All of hSrcRgn1 not in hSrcRgn2 RGN_COPY All of hSrcRgn1 (ignores hSrcRgn2) The iRgnType value returned from CombineRgn is one of the following: NULLREGION, indicating an empty region; SIMPLEREGION, indicating a simple rectangle, ellipse, or polygon; COMPLEXREGION, indicating a combination of rectangles, ellipses, or polygons; and ERROR, meaning that an error has occurred. 160
- 161. Once you have a handle to a region, you can use it with four drawing functions: FillRgn (hdc, hRgn, hBrush) ; FrameRgn (hdc, hRgn, hBrush, xFrame, yFrame) ; InvertRgn (hdc, hRgn) ; PaintRgn (hdc, hRgn) ; The FillRgn, FrameRgn, and InvertRgn functions are similar to the FillRect, FrameRect, and InvertRect functions. The xFrame and yFrame parameters to FrameRgn are the logical width and height of the frame to be painted around the region. The PaintRgn function fills in the region with the brush currently selected in the device context. All these functions assume the region is defined in logical coordinates. When you’re finished with a region, you can delete it using the same function that deletes other GDI objects: DeleteObject (hRgn) ; Clipping with Rectangles and Regions Regions can also play a role in clipping. The InvalidateRect function invalidates a rectangular area of the display and generates a WM_PAINT message. For example, you can use the InvalidateRect function to erase the client area and generate a WM_PAINT message: InvalidateRect (hwnd, NULL, TRUE) ; You can obtain the coordinates of the invalid rectangle by calling GetUpdateRect, and you can validate a rectangle of the client area using the ValidateRect function. When you receive a WM_PAINT message, the coordinates of the invalid rectangle are available from the PAINTSTRUCT structure that is filled in by the BeginPaint function. This invalid rectangle also defines a “clipping region.” You cannot paint outside the clipping region. Windows has two functions similar to InvalidateRect and ValidateRect that work with regions rather than rectangles: InvalidateRgn (hwnd, hRgn, bErase) ; and ValidateRgn (hwnd, hRgn) ; When you receive a WM_PAINT message as a result of an invalid region, the clipping region will not necessarily be rectangular in shape. You can create a clipping region of your own by selecting a region into the device context using either SelectObject (hdc, hRgn) ; or SelectClipRgn (hdc, hRgn) ; A clipping region is assumed to be measured in device coordinates. GDI makes a copy of the clipping region, so you can delete the region object after you select it in the device context. Windows also includes several functions to manipulate this clipping region, such as ExcludeClipRect to exclude a rectangle from the clipping region, IntersectClipRect to create a new clipping region that is the intersection of the previous clipping region and a rectangle, and OffsetClipRgn to move a clipping region to another part of the client area. The CLOVER Program The CLOVER program forms a region out of four ellipses, selects this region into the device context, and then draws a series of lines emanating from the center of the window’s client area. The lines appear only in the area defined by the region. The resulting display is shown in Figure 5-28. To draw this graphic by conventional methods, you would have to calculate the end point of each line based on formulas involving the circumference of an ellipse. By using a complex clipping region, you can draw the lines and let Windows determine the end points. The CLOVER program is shown in Figure 5-27. 161
- 162. CLOVER.C /*-------------------------------------------------- CLOVER.C—Clover Drawing Program Using Regions © Charles Petzold, 1998 --------------------------------------------------*/ #include <windows.h> #include <math.h> #define TWO_PI (2.0 * 3.14159) LRESULT CALLBACK WndProc (HWND, UINT, WPARAM, LPARAM) ; int WINAPI WinMain (HINSTANCE hInstance, HINSTANCE hPrevInstance, PSTR szCmdLine, int iCmdShow) { static TCHAR szAppName[] = TEXT (“Clover”) ; HWND hwnd ; MSG msg ; WNDCLASS wndclass ; wndclass.style = CS_HREDRAW | CS_VREDRAW ; wndclass.lpfnWndProc = WndProc ; wndclass.cbClsExtra = 0 ; wndclass.cbWndExtra = 0 ; wndclass.hInstance = hInstance ; wndclass.hIcon = LoadIcon (NULL, IDI_APPLICATION) ; wndclass.hCursor = LoadCursor (NULL, IDC_ARROW) ; wndclass.hbrBackground = (HBRUSH) GetStockObject (WHITE_BRUSH) ; wndclass.lpszMenuName = NULL ; wndclass.lpszClassName = szAppName ; if (!RegisterClass (&wndclass)) { MessageBox (NULL, TEXT (“This program requires Windows NT!”), szAppName, MB_ICONERROR) ; return 0 ; } hwnd = CreateWindow (szAppName, TEXT (“Draw a Clover”), WS_OVERLAPPEDWINDOW, CW_USEDEFAULT, CW_USEDEFAULT, CW_USEDEFAULT, CW_USEDEFAULT, NULL, NULL, hInstance, NULL) ; ShowWindow (hwnd, iCmdShow) ; UpdateWindow (hwnd) ; while (GetMessage (&msg, NULL, 0, 0)) { TranslateMessage (&msg) ; DispatchMessage (&msg) ; } return msg.wParam ; } LRESULT CALLBACK WndProc (HWND hwnd, UINT iMsg, WPARAM wParam, LPARAM lParam) { 162
- 163. static HRGN hRgnClip ; static int cxClient, cyClient ; double fAngle, fRadius ; HCURSOR hCursor ; HDC hdc ; HRGN hRgnTemp[6] ; int i ; PAINTSTRUCT ps ; switch (iMsg) { case WM_SIZE: cxClient = LOWORD (lParam) ; cyClient = HIWORD (lParam) ; hCursor = SetCursor (LoadCursor (NULL, IDC_WAIT)) ; ShowCursor (TRUE) ; if (hRgnClip) DeleteObject (hRgnClip) ; hRgnTemp[0] = CreateEllipticRgn (0, cyClient / 3, cxClient / 2, 2 * cyClient / 3) ; hRgnTemp[1] = CreateEllipticRgn (cxClient / 2, cyClient / 3, cxClient, 2 * cyClient / 3) ; hRgnTemp[2] = CreateEllipticRgn (cxClient / 3, 0, 2 * cxClient / 3, cyClient / 2) ; hRgnTemp[3] = CreateEllipticRgn (cxClient / 3, cyClient / 2, 2 * cxClient / 3, cyClient) ; hRgnTemp[4] = CreateRectRgn (0, 0, 1, 1) ; hRgnTemp[5] = CreateRectRgn (0, 0, 1, 1) ; hRgnClip = CreateRectRgn (0, 0, 1, 1) ; CombineRgn (hRgnTemp[4], hRgnTemp[0], hRgnTemp[1], RGN_OR) ; CombineRgn (hRgnTemp[5], hRgnTemp[2], hRgnTemp[3], RGN_OR) ; CombineRgn (hRgnClip, hRgnTemp[4], hRgnTemp[5], RGN_XOR) ; for (i = 0 ; i < 6 ; i++) DeleteObject (hRgnTemp[i]) ; SetCursor (hCursor) ; ShowCursor (FALSE) ; return 0 ; case WM_PAINT: hdc = BeginPaint (hwnd, &ps) ; SetViewportOrgEx (hdc, cxClient / 2, cyClient / 2, NULL) ; SelectClipRgn (hdc, hRgnClip) ; fRadius = _hypot (cxClient / 2.0, cyClient / 2.0) ; for (fAngle = 0.0 ; fAngle < TWO_PI ; fAngle += TWO_PI / 360) { MoveToEx (hdc, 0, 0, NULL) ; LineTo (hdc, (int) ( fRadius * cos (fAngle) + 0.5), (int) (-fRadius * sin (fAngle) + 0.5)) ; } EndPaint (hwnd, &ps) ; return 0 ; case WM_DESTROY: DeleteObject (hRgnClip) ; PostQuitMessage (0) ; 163
- 164. return 0 ; } return DefWindowProc (hwnd, iMsg, wParam, lParam) ; } Figure 5-27. The CLOVER program. Figure 5-28. The CLOVER display, drawn using a complex clipping region. Because regions always use device coordinates, the CLOVER program has to recreate the region every time it receives a WM_SIZE message. Years ago, the machines that ran Windows took several seconds to redraw this figure. Today’s fast machines draw it nearly instantaneously. CLOVER begins by creating four elliptical regions that are stored as the first four elements of the hRgnTemp array. Then the program creates three “dummy” regions: hRgnTemp [4] = CreateRectRgn (0, 0, 1, 1) ; hRgnTemp [5] = CreateRectRgn (0, 0, 1, 1) ; hRgnClip = CreateRectRgn (0, 0, 1, 1) ; The two elliptical regions at the left and right of the client area are combined: CombineRgn (hRgnTemp [4], hRgnTemp [0], hRgnTemp [1], RGN_OR) ; Similarly, the two elliptical regions at the top and bottom of the client area are combined: CombineRgn (hRgnTemp [5], hRgnTemp [2], hRgnTemp [3], RGN_OR) ; Finally these two combined regions are in turn combined into hRgnClip: CombineRgn (hRgnClip, hRgnTemp [4], hRgnTemp [5], RGN_XOR) ; The RGN_XOR identifier is used to exclude overlapping areas from the resultant region. Finally the six temporary 164
- 165. regions are deleted: for (i = 0 ; i < 6 ; i++) DeleteObject (hRgnTemp [i]) ; The WM_PAINT processing is simple, considering the results. The viewport origin is set to the center of the client area (to make the line drawing easier), and the region created during the WM_SIZE message is selected as the device context’s clipping region: SetViewportOrg (hdc, xClient / 2, yClient / 2) ; SelectClipRgn (hdc, hRgnClip) ; Now all that’s left is drawing the lines—360 of them, spaced 1 degree apart. The length of each line is the variable fRadius, which is the distance from the center to the corner of the client area: fRadius = hypot (xClient / 2.0, yClient / 2.0) ; for (fAngle = 0.0 ; fAngle < TWO_PI ; fAngle += TWO_PI / 360) { MoveToEx (hdc, 0, 0, NULL) ; LineTo (hdc, (int) ( fRadius * cos (fAngle) + 0.5), (int) (-fRadius * sin (fAngle) + 0.5)) ; } During processing of WM_DESTROY, the region is deleted: DeleteObject (hRgnClip) ; This is not the end of graphics programming in this book. Chapter 13 looks at printing, Chapters 14 and 15 at bitmaps, Chapter 17 at text and fonts, and Chapter 18 at metafiles. 165
- 166. Chapter 6 -- The Keyboard The keyboard and the mouse are the two standard sources of user input in Microsoft Windows 98, often complementing each other with some overlap. The mouse is, of course, much more utilized in today’s applications than those of a decade ago. We are even accustomed to using the mouse almost exclusively in some applications, such as games, drawing programs, music programs, and Web browsers. Yet while we could probably make do without the mouse, removing the keyboard from the average PC would be disastrous. Compared with the other components of the personal computer, the keyboard has a positively ancient ancestry beginning with the first Remington typewriter in 1874. Early computer programmers used keyboards to punch holes in Hollerith cards and later used keyboards on dumb terminals to communicate directly with large mainframe computers. The PC has been expanded somewhat to include function keys, cursor positioning keys, and (usually) a separate numeric keypad, but the principles of typing are basically the same. Keyboard Basics You’ve probably already surmised how a Windows program gets keyboard input: Keyboard input is delivered to your program’s window procedures in the form of messages. Indeed, when first learning about messages, the keyboard is an obvious example of the type of information that messages might deliver to applications. There are eight different messages that Windows uses to indicate various keyboard events. This may seem like a lot, but (as we’ll see) your program can safely ignore at least half of them. Also, in most cases, the keyboard information encoded in these messages is probably more than your program needs. Part of the job of handling the keyboard is knowing which messages are important and which are not. Ignoring the Keyboard Although the keyboard is often the primary source of user input in Windows programs, your program does not need to act on every keyboard message it receives. Windows handles many keyboard functions itself. For instance, you can usually ignore keystrokes that pertain to system functions. These keystrokes generally involve the Alt key. You do not need to monitor these actual keystrokes because Windows notifies a program of the effect of the keystrokes. (A program can monitor the keystrokes itself if it wants to, however.) The keystrokes that invoke a program’s menu come through a window’s window procedure, but they are usually passed on to DefWindowProc for default processing. Eventually, the window procedure gets a message indicating that a menu item has been selected. This is generally all the window procedure needs to know. (Menus are covered in Chapter 10.) Many Windows programs use keyboard accelerators to invoke common menu items. The accelerators usually involve the Ctrl key in combination with a function key or a letter key (for example, Ctrl-S to save a file). These keyboard accelerators are defined in a program’s resource script along with a program’s menu, as we’ll see in Chapter 10. Windows translates these keyboard accelerators into menu command messages. You don’t have to do the translation yourself. Dialog boxes also have a keyboard interface, but programs usually do not need to monitor the keyboard when a dialog box is active. The keyboard interface is handled by Windows, and Windows sends messages to your program about the effects of the keystrokes. Dialog boxes can contain edit controls for text input. These are generally small boxes in which the user types a character string. Windows handles all the edit control logic and gives your program the final contents of the edit control when the user is done. See Chapter 11 for more on dialog boxes. Edit controls don’t have to be limited to a single line, and they don’t have to be located only in dialog boxes. A multiline edit control in your program’s main window can function as a rudimentary text editor. (This is shown in the POPPAD programs in Chapters 9, 10, 11, and 13.) And Windows even has a fancier rich-text edit control that lets you edit and display formatted text. (See /Platform SDK/User Interface Services/Controls/Rich Edit Controls.) You’ll also find that when structuring your Windows programs, you can use child window controls to process keyboard and mouse input to deliver a higher level of information back to the parent window. Accumulate enough 166
- 167. of these controls and you’ll never have to be bothered with processing keyboard messages at all. Who’s Got the Focus? Like all personal computer hardware, the keyboard must be shared by all applications running under Windows. Some applications might have more than one window, and the keyboard must be shared by all the windows within the application. As you’ll recall, the MSG structure that a program uses to retrieve messages from the message queue includes a hwnd field. This field indicates the handle of the window that is to receive the message. The DispatchMessage function in the message loop sends that message to the window procedure associated with the window for which the message is intended. When a key on the keyboard is pressed, only one window procedure receives a keyboard message, and this message includes a handle to the window that is to receive the message. The window that receives a particular keyboard event is the window that has the input focus. The concept of input focus is closely related to the concept of the active window. The window with the input focus is either the active window or a descendant window of the active window—that is, a child of the active window, or a child of a child of the active window, and so forth. The active window is usually easy to identify. It is always a top-level window—that is, its parent window handle is NULL. If the active window has a title bar, Windows highlights the title bar. If the active window has a dialog frame (a form most commonly seen in dialog boxes) instead of a title bar, Windows highlights the frame. If the active window is currently minimized, Windows highlights its entry in the task bar by showing it as a depressed button. If the active window has child windows, the window with the input focus can be either the active window or one of its descendants. The most common child windows are controls such as push buttons, radio buttons, check boxes, scroll bars, edit boxes, and list boxes that appear in dialog boxes. Child windows are never themselves active windows. A child window can have the input focus only if it is a descendent of the active window. Child window controls indicate that they have the input focus generally by displaying a flashing caret or a dotted line. Sometimes no window has the input focus. This is the case if all your programs have been minimized. Windows continues to send keyboard messages to the active window, but these messages are in a different form from keyboard messages sent to active windows that are not minimized. A window procedure can determine when its window has the input focus by trapping WM_SETFOCUS and WM_KILLFOCUS messages. WM_SETFOCUS indicates that the window is receiving the input focus, and WM_KILLFOCUS signals that the window is losing the input focus. I’ll have more to say about these messages later in this chapter. Queues and Synchronization As the user presses and releases keys on the keyboard, Windows and the keyboard device driver translate the hardware scan codes into formatted messages. However, these messages are not placed in an application’s message queue right away. Instead, Windows stores these messages in something called the system message queue. The system message queue is a single message queue maintained by Windows specifically for the preliminary storage of user input from the keyboard and the mouse. Windows will take the next message from the system message queue and place it in an application’s message queue only when a Windows application has finished processing a previous user input message. The reasons for this two-step process—storing messages first in the system message queue and then passing them to the application message queue—involves synchronization. As we just learned, the window that is supposed to receive keyboard input is the window with the input focus. A user can be typing faster than an application can handle the keystrokes, and a particular keystroke might have the effect of switching focus from one window to another. Subsequent keystrokes should then go to another window. But they won’t if the subsequent keystrokes have already been addressed with a destination window and placed in an application message queue. 167
- 168. Keystrokes and Characters The messages that an application receives from Windows about keyboard events distinguish between keystrokes and characters. This is in accordance with the two ways you can view the keyboard. First, you can think of the keyboard as a collection of keys. The keyboard has only one key labeled “A.” Pressing that key is a keystroke. Releasing that key is also considered a keystroke. But the keyboard is also an input device that generates displayable characters or control characters. The “A” key can generate several different characters depending on the status of the Ctrl, Shift, and Caps Lock keys. Normally, the character is a lowercase “a.” If the Shift key is down or Caps Lock is toggled on, the character is an uppercase “A.” If Ctrl is down, the character is a Ctrl-A (which has meaning in ASCII but in Windows is probably a keyboard accelerator if anything). On some keyboards, the “A” keystroke might be preceded by a dead-character key or by Shift, Ctrl, or Alt in various combinations. The combinations could generate a lowercase or uppercase letter with an accent mark, such as à, á, â, ã, Ä, or Å. For keystroke combinations that result in displayable characters, Windows sends a program both keystroke messages and character messages. Some keys do not generate characters. These include the shift keys, the function keys, the cursor movement keys, and special keys such as Insert and Delete. For these keys, Windows generates only keystroke messages. Keystroke Messages When you press a key, Windows places either a WM_KEYDOWN or WM_SYSKEYDOWN message in the message queue of the window with the input focus. When you release a key, Windows places either a WM_KEYUP or WM_SYSKEYUP message in the message queue. Key Pressed Key Released Nonsystem Keystroke: WM_KEYDOWN WM_KEYUP System Keystroke: WM_SYSKEYDOWN WM_SYSKEYUP Usually the up and down messages occur in pairs. However, if you hold down a key so that the typematic (autorepeat) action takes over, Windows sends the window procedure a series of WM_KEYDOWN (or WM_SYSKEYDOWN) messages and a single WM_KEYUP (or WM_SYSKEYUP) message when the key is finally released. Like all queued messages, keystroke messages are time-stamped. You can retrieve the relative time a key was pressed or released by calling GetMessageTime. System and Nonsystem Keystrokes The “SYS” in WM_SYSKEYDOWN and WM_SYSKEYUP stands for “system” and refers to keystrokes that are more important to Windows than to Windows applications. The WM_SYSKEYDOWN and WM_SYSKEYUP messages are usually generated for keys typed in combination with the Alt key. These keystrokes invoke options on the program’s menu or system menu, or they are used for system functions such as switching the active window (Alt-Tab or Alt-Esc) or for system menu accelerators (Alt in combination with a function key such as Alt-F4 to close an application). Programs usually ignore the WM_SYSKEYUP and WM_SYSKEYDOWN messages and pass them to DefWindowProc. Because Windows takes care of all the Alt-key logic, you really have no need to trap these messages. Your window procedure will eventually receive other messages concerning the result of these keystrokes (such as a menu selection). If you want to include code in your window procedure to trap the system keystroke messages (as we will do in the KEYVIEW1 and KEYVIEW2 programs shown later in this chapter), pass the messages to DefWindowProc after you process them so that Windows can still use them for their intended purposes. But think about this for a moment. Almost everything that affects your program’s window passes through your window procedure first. Windows does something with the message only if you pass the message to DefWindowProc. For instance, if you add the lines case WM_SYSKEYDOWN: case WM_SYSKEYUP: 168
- 169. case WM_SYSCHAR: return 0 ; to a window procedure, you effectively disable all Alt-key operations when your program’s main window has the input focus. (I’ll discuss the WM_SYSCHAR message later in this chapter.) This includes Alt-Tab, Alt-Esc, and menu operations. Although I doubt you would want to do this, I trust you sense the power inherent in the window procedure. The WM_KEYDOWN and WM_KEYUP messages are usually generated for keys that are pressed and released without the Alt key. Your program can use or discard these keystroke messages. Windows doesn’t care about them. For all four keystroke messages, wParam is a virtual key code that identifies the key being pressed or released and lParam contains other data pertaining to the keystroke. Virtual Key Codes The virtual key code is stored in the wParam parameter of the WM_KEYDOWN, WM_KEYUP, WM_SYSKEYDOWN, and WM_SYSKEYUP messages. This code identifies the key being pressed or released. Ah, that ubiquitous word “virtual.” Don’t you love it? It’s supposed to refer to something that exists in the mind rather than in the real world, but only veteran programmers of DOS assembly language applications might figure out why the key codes so essential to Windows keyboard processing are considered virtual rather than real. To old-time programmers, the real keyboard codes are generated by the hardware of the physical keyboard. These are referred to in the Windows documentation as scan codes. On IBM compatibles, a scan code of 16 is the Q key, 17 is the W key, 18 is E, 19 is R, 20 is T, 21 is Y, and so on. You get the idea—the scan codes are based on the physical layout of the keyboard. The developers of Windows considered these scan codes too device-dependent. They thus attempted to treat the keyboard in a device-independent manner by defining the so-called virtual key codes. Some of these virtual key codes cannot be generated on IBM compatibles but may be found on other manufacturer’s keyboards, or perhaps on keyboards of the future. The virtual key codes you use most often have names beginning with VK_ defined in the WINUSER.H header file. The tables below show these names along with the numeric values (in both decimal and hexadecimal) and the IBM- compatible keyboard key that corresponds to the virtual key. The tables also indicate whether these keys are required for Windows to run properly. The tables show the virtual key codes in numeric order. Three of the first four virtual key codes refer to mouse buttons: Decimal He x WINUSER.H Identifier Required? IBM-Compatible Keyboard 1 01 VK_LBUTTON Mouse Left Button 2 02 VK_RBUTTON Mouse Right Button 3 03 VK_CANCEL X Ctrl-Break 4 04 VK_MBUTTON Mouse Middle Button You will never get these mouse button codes in the keyboard messages. They are found in mouse messages, as we’ll see in the next chapter. The VK_CANCEL code is the only virtual key code that involves pressing two keys at once (Ctrl-Break). Windows applications generally do not use this key. Several of the following keys—Backspace, Tab, Enter, Escape, and Spacebar—are commonly used by Windows programs. However, Windows programs generally use character messages (rather than keystroke messages) to process these keys. Decimal H WINUSER.H Identifier Required? IBM-Compatible Keyboard 169
- 170. ex 8 08 VK_BACK X Backspace 9 09 VK_TAB X Tab 12 0C VK_CLEAR Numeric keyboard 5 with Num Lock OFF 13 0D VK_RETURN X Enter (either one) 16 10 VK_SHIFT X Shift (either one) 17 11 VK_CONTROL X Ctrl (either one) 18 12 VK_MENU X Alt (either one) 19 13 VK_PAUSE Pause 20 14 VK_CAPITAL X Caps Lock 27 1B VK_ESCAPE X Esc 32 20 VK_SPACE X Spacebar Also, Windows programs usually do not need to monitor the status of the Shift, Ctrl, or Alt keys. The first eight codes listed in the following table are perhaps the most commonly used virtual key codes along with VK_INSERT and VK_DELETE: Decimal He x WINUSER.H Identifier Required? IBM-Compatible Keyboard 33 21 VK_PRIOR X Page Up 34 22 VK_NEXT X Page Down 35 23 VK_END X End 36 24 VK_HOME X Home 37 25 VK_LEFT X Left Arrow 38 26 VK_UP X Up Arrow 39 27 VK_RIGHT X Right Arrow 40 28 VK_DOWN X Down Arrow 41 29 VK_SELECT 42 2A VK_PRINT 43 2B VK_EXECUTE 44 2C VK_SNAPSHOT Print Screen 45 2D VK_INSERT X Insert 46 2E VK_DELETE X Delete 170
- 171. 47 2F VK_HELP Notice that many of the names (such as VK_PRIOR and VK_NEXT) are unfortunately quite different from the labels on the keys and also not consistent with the identifiers used in scroll bars. The Print Screen key is largely ignored by Windows applications. Windows itself responds to the key by storing a bitmap copy of the video display into the clipboard. VK_SELECT, VK_PRINT, VK_EXECUTE, and VK_HELP might be found on a hypothetical keyboard that few of us have ever seen. Windows also includes virtual key codes for the letter keys and number keys on the main keyboard. (The number pad is handled separately.) Decimal Hex WINUSER.H Identifier Required? IBM-Compatible Keyboard 48_57 30_39 None X 0 through 9 on main keyboard 65_90 41_5 A None X A through Z Notice that the virtual key codes are the ASCII codes for the numbers and letters. Windows programs almost never use these virtual key codes; instead, the programs rely on character messages for ASCII characters. The following keys are generated from the Microsoft Natural Keyboard and compatibles: Decimal He x WINUSER.H Identifier Required? IBM-Compatible Keyboard 91 5B VK_LWIN Left Windows key 92 5C VK_RWIN Right Windows key 93 5D VK_APPS Applications key The VK_LWIN and VK_RWIN keys are handled by Windows to open the Start menu or (in older versions) to launch the Task Manager. Together, they can log on or off Windows (in Microsoft Windows NT only), or log on or off a network (in Windows for Workgroups). Applications can process the application key by displaying help information or shortcuts. The following codes are for the keys on the numeric keypad (if present): Decim al Hex WINUSER.H Identifier Require d? IBM-Compatible Keyboard 96- 105 60- 69 VK_NUMPAD0 through VK_NUMPAD9 Numeric keypad 0 through 9 with Num Lock ON 106 6A VK_MULTIPLY Numeric keypad * 107 6B VK_ADD Numeric keypad + 108 6C VK_SEPARATOR 109 6D VK_SUBTRACT Numeric keypad- 110 6E VK_DECIMAL Numeric keypad . 111 6F VK_DIVIDE Numeric keypad / Finally, although most keyboards have 12 function keys, Windows requires only 10 but has numeric identifiers for 24. Again, programs generally use the function keys as keyboard accelerators so they usually don’t process the 171
- 172. keystrokes in this table: Decimal Hex WINUSER.H Identifier Required? IBM-Compatible Keyboard 112-121 70-79 VK_F1 through VK_F10 X Function keys F1 through F10 122-135 7A- 87 VK_F11 through VK_F24 Function keys F11 through F24 144 90 VK_NUMLOCK Num Lock 145 91 VK_SCROLL Scroll Lock Some other virtual key codes are defined, but they are reserved for keys specific to nonstandard keyboards or for keys most commonly found on mainframe terminals. Check /Platform SDK/User Interface Services/User Input/Virtual-Key Codes for a complete list. The lParam Information In the four keystroke messages (WM_KEYDOWN, WM_KEYUP, WM_SYSKEYDOWN, and WM_SYSKEYUP), the wParam message parameter contains the virtual key code as described above, and the lParam message parameter contains other information useful in understanding the keystroke. The 32 bits of lParam are divided into six fields as shown in Figure 6-1. Figure 6-1. The six keystroke-message fields of the lParam variable. Repeat Count The repeat count is the number of keystrokes represented by the message. In most cases, this will be set to 1. However, if a key is held down and your window procedure is not fast enough to process key-down messages at the typematic rate (which you can set in the Keyboard applet in the Control Panel), Windows combines several WM_KEYDOWN or WM_SYSKEYDOWN messages into a single message and increases the Repeat Count field accordingly. The Repeat Count is always 1 for a WM_KEYUP or WM_SYSKEYUP message. Because a Repeat Count greater than 1 indicates that typematic keystrokes are occurring faster than your program can process them, you may want to ignore the Repeat Count when processing the keyboard messages. Almost everyone has had the experience of “overscrolling” a word-processing document or spreadsheet because extra keystrokes have accumulated. If your program ignores the Repeat Count in cases where your program spends some time processing each keystroke, you can eliminate this problem. However, in other cases you will want to use the Repeat Count. You may want to try using the programs both ways and see which feels the most natural. OEM Scan Code The OEM Scan Code is the code generated by the hardware of the keyboard. This is familiar to middle-aged assembly language programmers as the value obtained from the ROM BIOS services of PC compatibles. (OEM 172
- 173. refers to the Original Equipment Manufacturer of the PC and in this context is synonymous with “IBM Standard.”) We don’t need this stuff anymore. Windows programs can almost always ignore the OEM Scan Code except when dependent on the physical layout of the keyboard, such as the KBMIDI program in Chapter 22. Extended Key Flag The Extended Key Flag is 1 if the keystroke results from one of the additional keys on the IBM enhanced keyboard. (The enhanced keyboard has 101 or 102 keys. Function keys are across the top. Cursor movement keys are separate from the numeric keypad, but the numeric keypad also duplicates the cursor movement keys.) This flag is set to 1 for the Alt and Ctrl keys at the right of the keyboard, the cursor movement keys (including Insert and Delete) that are not part of the numeric keypad, the slash (/) and Enter keys on the numeric keypad, and the Num Lock key. Windows programs generally ignore the Extended Key Flag. Context Code The Context Code is 1 if the Alt key is depressed during the keystroke. This bit will always be 1 for the WM_SYSKEYUP and WM_SYSKEYDOWN messages and 0 for the WM_KEYUP and WM_KEYDOWN messages, with two exceptions: • If the active window is minimized, it does not have the input focus. All keystrokes generate WM_SYSKEYUP and WM_SYSKEYDOWN messages. If the Alt key is not pressed, the Context Code field is set to 0. Windows uses WM_SYSKEYUP and WM_SYSKEYDOWN messages so that a minimized active window doesn’t process these keystrokes. • On some foreign-language keyboards, certain characters are generated by combining Shift, Ctrl, or Alt with another key. In these cases, the Context Code is set to 1 but the messages are not system keystroke messages. Previous Key State The Previous Key State is 0 if the key was previously up and 1 if the key was previously down. It is always set to 1 for a WM_KEYUP or WM_SYSKEYUP message, but it can be 0 or 1 for a WM_KEYDOWN or WM_SYSKEYDOWN message. A 1 indicates second and subsequent messages that are the result of typematic repeats. Transition State The Transition State is 0 if the key is being pressed and 1 if the key is being released. The field is set to 0 for a WM_KEYDOWN or WM_SYSKEYDOWN message and to 1 for a WM_KEYUP or WM_SYSKEYUP message. Shift States When you process a keystroke message, you may need to know whether any of the shift keys (Shift, Ctrl, and Alt) or toggle keys (Caps Lock, Num Lock, and Scroll Lock) are pressed. You can obtain this information by calling the GetKeyState function. For instance: iState = GetKeyState (VK_SHIFT) ; The iState variable will be negative (that is, the high bit is set) if the Shift key is down. The value returned from iState = GetKeyState (VK_CAPITAL) ; has the low bit set if the Caps Lock key is toggled on. This bit will agree with the little light on the keyboard. Generally, you’ll use GetKeyState with the virtual key codes VK_SHIFT, VK_CONTROL, and VK_MENU (which you’ll recall indicates the Alt key). You can also use the following identifiers with GetKeyState to determine if the left or right Shift, Ctrl, or Alt keys are pressed: VK_LSHIFT, VK_RSHIFT, VK_LCONTROL, VK_RCONTROL, VK_LMENU, VK_RMENU. These identifiers are used only with GetKeyState and GetAsyncKeyState (described below). 173
- 174. You can also obtain the state of the mouse buttons using the virtual key codes VK_LBUTTON, VK_RBUTTON, and VK_MBUTTON. However, most Windows programs that need to monitor a combination of mouse buttons and keystrokes usually do it the other way around—by checking keystrokes when they receive a mouse message. In fact, shift-state information is conveniently included in the mouse messages, as we’ll see in the next chapter. Be careful with GetKeyState. It is not a real-time keyboard status check. Rather, it reflects the keyboard status up to and including the current message being processed. For the most part, this is exactly what you want. If you need to determine if the user typed Shift-Tab, you can call GetKeyState with the VK_SHIFT parameter while processing the WM_KEYDOWN message for the Tab key. If the return value of GetKeyState is negative, you know that the Shift key was pressed before the Tab key. And it doesn’t matter if the Shift key has already been released by the time you get around to processing the Tab key. You know that the Shift key was down when Tab was pressed. GetKeyState does not let you retrieve keyboard information independent of normal keyboard messages. For instance, you may feel a need to hold up processing in your window procedure until the user presses the F1 function key: while (GetKeyState (VK_F1) >= 0) ; // WRONG !!! Don’t do it! This is guaranteed to hang your program (unless, of course, the WM_KEYDOWN message for F1 was retrieved from the message queue before you executed the statement). If you really need to know the current real- time state of a key, you can use GetAsyncKeyState. Using Keystroke Messages A Windows program gets information about each and every keystroke that occurs while the program is running. This is certainly helpful. However, most Windows programs ignore all but a few keystroke messages. The WM_SYSKEYDOWN and WM_SYSKEYUP messages are for Windows system functions, and you don’t need to look at them. If you process WM_KEYDOWN messages, you can usually also ignore WM_KEYUP messages. Windows programs generally use WM_KEYDOWN messages for keystrokes that do not generate characters. Although you may think that it’s possible to use keystroke messages in combination with shift-state information to translate keystroke messages into characters, don’t do it. You’ll have problems with non-English keyboards. For example, if you get a WM_KEYDOWN message with wParam equal to 0x33, you know the user pressed the 3 key. So far, so good. If you use GetKeyState and find out that the Shift key is down, you might assume that the user is typing a pound sign (#). Not necessarily. A British user is typing another type of pound sign, the one that looks like this: £. The WM_KEYDOWN messages are most useful for the cursor movement keys, the function keys, Insert, and Delete. However, Insert, Delete, and the function keys often appear as menu accelerators. Because Windows translates menu accelerators into menu command messages, you don’t have to process the keystrokes themselves. It was common for pre-Windows applications for MS-DOS to use the function keys extensively in combination with the Shift, Ctrl, and Alt keys. You can do something similar in your Windows programs (indeed, Microsoft Word uses the function keys extensively as command short cuts), but it’s not really recommended. If you want to use the function keys, they should duplicate menu commands. One objective in Windows is to provide a user interface that doesn’t require memorization or consultation of complex command charts. So, it comes down to this: Most of the time, you will process WM_KEYDOWN messages only for cursor movement keys, and sometimes for Insert and Delete. When you use these keys, you can check the Shift-key and Ctrl-key states through GetKeyState. Windows programs often use the Shift key in combination with the cursor keys to extend a selection in (for instance) a word-processing document. The Ctrl key is often used to alter the meaning of the cursor key. For example, Ctrl in combination with the Right Arrow key might mean to move the cursor one word to the right. One of the best ways to determine how to use the keyboard in your application is to examine how the keyboard is used in existing popular Windows programs. If you don’t like those definitions, you are free to do something different. But keep in mind that doing so might be detrimental to a user’s ability to learn your program quickly. 174
- 175. Enhancing SYSMETS for the Keyboard The three versions of the SYSMETS program in Chapter 4 were written without any knowledge of the keyboard. We were able to scroll the text only by using the mouse on the scroll bars. Now that we know how to process keystroke messages, let’s add a keyboard interface to the program. This is obviously a job for cursor movement keys. We’ll use most of these keys (Home, End, Page Up, Page Down, Up Arrow, and Down Arrow) for vertical scrolling. The Left Arrow and Right Arrow keys can take care of the less important horizontal scrolling. One obvious way to create a keyboard interface is to add some WM_KEYDOWN logic to the window procedure that parallels and essentially duplicates all the WM_VSCROLL and WM_HSCROLL logic. However, this is unwise, because if we ever wanted to change the scroll bar logic we’d have to make the same changes in WM_KEYDOWN. Wouldn’t it be better to simply translate each of these WM_KEYDOWN messages into an equivalent WM_VSCROLL or WM_HSCROLL message? Then we could perhaps fool WndProc into thinking that it’s getting a scroll bar message, perhaps by sending a phony message to the window procedure. Windows lets you do this. The function is named SendMessage, and it takes the same parameters as those passed to the window procedure: SendMessage (hwnd, message, wParam, lParam) ; When you call SendMessage, Windows calls the window procedure whose window handle is hwnd, passing to it these four function arguments. When the window procedure has completed processing the message, Windows returns control to the next statement following the SendMessage call. The window procedure you send the message to could be the same window procedure, another window procedure in the same program, or even a window procedure in another application. Here’s how we might use SendMessage for processing WM_KEYDOWN codes in the SYSMETS program: case WM_KEYDOWN: switch (wParam) { case VK_HOME: SendMessage (hwnd, WM_VSCROLL, SB_TOP, 0) ; break ; case VK_END: SendMessage (hwnd, WM_VSCROLL, SB_BOTTOM, 0) ; break ; case VK_PRIOR: SendMessage (hwnd, WM_VSCROLL, SB_PAGEUP, 0) ; break ; And so forth. You get the general idea. Our goal was to add a keyboard interface to the scroll bars, and that’s exactly what we’ve done. We’ve made the cursor movement keys duplicate scroll bar logic by actually sending the window procedure a scroll bar message. Now you can see why I included SB_TOP and SB_BOTTOM processing for WM_VSCROLL messages in the SYSMETS3 program. It wasn’t used then, but it’s used now for processing the Home and End keys. The SYSMETS4 program, shown in Figure 6-2, incorporates these changes. You’ll also need the SYSMETS.H file from Chapter 4 to compile this program. Figure 6-2. The SYSMETS4 program. SYSMETS4.C /*---------------------------------------------------- SYSMETS4.C—System Metrics Display Program No. 4 175
- 176. © Charles Petzold, 1998 ----------------------------------------------------*/ #include <windows.h> #include “sysmets.h” LRESULT CALLBACK WndProc (HWND, UINT, WPARAM, LPARAM) ; int WINAPI WinMain (HINSTANCE hInstance, HINSTANCE hPrevInstance, PSTR szCmdLine, int iCmdShow) { static TCHAR szAppName[] = TEXT (“SysMets4”) ; HWND hwnd ; MSG msg ; WNDCLASS wndclass ; wndclass.style = CS_HREDRAW | CS_VREDRAW ; wndclass.lpfnWndProc = WndProc ; wndclass.cbClsExtra = 0 ; wndclass.cbWndExtra = 0 ; wndclass.hInstance = hInstance ; wndclass.hIcon = LoadIcon (NULL, IDI_APPLICATION) ; wndclass.hCursor = LoadCursor (NULL, IDC_ARROW) ; wndclass.hbrBackground = (HBRUSH) GetStockObject (WHITE_BRUSH) ; wndclass.lpszMenuName = NULL ; wndclass.lpszClassName = szAppName ; if (!RegisterClass (&wndclass)) { MessageBox (NULL, TEXT (“Program requires Windows NT!”), szAppName, MB_ICONERROR) ; return 0 ; } hwnd = CreateWindow (szAppName, TEXT (“Get System Metrics No. 4”), WS_OVERLAPPEDWINDOW | WS_VSCROLL | WS_HSCROLL, CW_USEDEFAULT, CW_USEDEFAULT, CW_USEDEFAULT, CW_USEDEFAULT, NULL, NULL, hInstance, NULL) ; ShowWindow (hwnd, iCmdShow) ; UpdateWindow (hwnd) ; while (GetMessage (&msg, NULL, 0, 0)) { TranslateMessage (&msg) ; DispatchMessage (&msg) ; } return msg.wParam ; } LRESULT CALLBACK WndProc (HWND hwnd, UINT message, WPARAM wParam, LPARAM lParam) { static int cxChar, cxCaps, cyChar, cxClient, cyClient, iMaxWidth ; HDC hdc ; int i, x, y, iVertPos, iHorzPos, iPaintBeg, iPaintEnd ; PAINTSTRUCT ps ; SCROLLINFO si ; TCHAR szBuffer[10] ; TEXTMETRIC tm ; switch (message) { case WM_CREATE: hdc = GetDC (hwnd) ; 176
- 177. GetTextMetrics (hdc, &tm) ; cxChar = tm.tmAveCharWidth ; cxCaps = (tm.tmPitchAndFamily & 1 ? 3 : 2) * cxChar / 2 ; cyChar = tm.tmHeight + tm.tmExternalLeading ; ReleaseDC (hwnd, hdc) ; // Save the width of the three columns iMaxWidth = 40 * cxChar + 22 * cxCaps ; return 0 ; case WM_SIZE: cxClient = LOWORD (lParam) ; cyClient = HIWORD (lParam) ; // Set vertical scroll bar range and page size si.cbSize = sizeof (si) ; si.fMask = SIF_RANGE | SIF_PAGE ; si.nMin = 0 ; si.nMax = NUMLINES - 1 ; si.nPage = cyClient / cyChar ; SetScrollInfo (hwnd, SB_VERT, &si, TRUE) ; // Set horizontal scroll bar range and page size si.cbSize = sizeof (si) ; si.fMask = SIF_RANGE | SIF_PAGE ; si.nMin = 0 ; si.nMax = 2 + iMaxWidth / cxChar ; si.nPage = cxClient / cxChar ; SetScrollInfo (hwnd, SB_HORZ, &si, TRUE) ; return 0 ; case WM_VSCROLL: // Get all the vertical scroll bar information si.cbSize = sizeof (si) ; si.fMask = SIF_ALL ; GetScrollInfo (hwnd, SB_VERT, &si) ; // Save the position for comparison later on iVertPos = si.nPos ; switch (LOWORD (wParam)) { case SB_TOP: si.nPos = si.nMin ; break ; case SB_BOTTOM: si.nPos = si.nMax ; break ; case SB_LINEUP: si.nPos -= 1 ; break ; case SB_LINEDOWN: si.nPos += 1 ; break ; 177
- 178. case SB_PAGEUP: si.nPos -= si.nPage ; break ; case SB_PAGEDOWN: si.nPos += si.nPage ; break ; case SB_THUMBTRACK: si.nPos = si.nTrackPos ; break ; default: break ; } // Set the position and then retrieve it. Due to adjustments // by Windows it might not be the same as the value set. si.fMask = SIF_POS ; SetScrollInfo (hwnd, SB_VERT, &si, TRUE) ; GetScrollInfo (hwnd, SB_VERT, &si) ; // If the position has changed, scroll the window and update it if (si.nPos != iVertPos) { ScrollWindow (hwnd, 0, cyChar * (iVertPos - si.nPos), NULL, NULL) ; UpdateWindow (hwnd) ; } return 0 ; case WM_HSCROLL: // Get all the vertical scroll bar information si.cbSize = sizeof (si) ; si.fMask = SIF_ALL ; // Save the position for comparison later on GetScrollInfo (hwnd, SB_HORZ, &si) ; iHorzPos = si.nPos ; switch (LOWORD (wParam)) { case SB_LINELEFT: si.nPos -= 1 ; break ; case SB_LINERIGHT: si.nPos += 1 ; break ; case SB_PAGELEFT: si.nPos -= si.nPage ; break ; case SB_PAGERIGHT: si.nPos += si.nPage ; break ; case SB_THUMBPOSITION: 178
- 179. si.nPos = si.nTrackPos ; break ; default: break ; } // Set the position and then retrieve it. Due to adjustments // by Windows it might not be the same as the value set. si.fMask = SIF_POS ; SetScrollInfo (hwnd, SB_HORZ, &si, TRUE) ; GetScrollInfo (hwnd, SB_HORZ, &si) ; // If the position has changed, scroll the window if (si.nPos != iHorzPos) { ScrollWindow (hwnd, cxChar * (iHorzPos - si.nPos), 0, NULL, NULL) ; } return 0 ; case WM_KEYDOWN: switch (wParam) { case VK_HOME: SendMessage (hwnd, WM_VSCROLL, SB_TOP, 0) ; break ; case VK_END: SendMessage (hwnd, WM_VSCROLL, SB_BOTTOM, 0) ; break ; case VK_PRIOR: SendMessage (hwnd, WM_VSCROLL, SB_PAGEUP, 0) ; break ; case VK_NEXT: SendMessage (hwnd, WM_VSCROLL, SB_PAGEDOWN, 0) ; break ; case VK_UP: SendMessage (hwnd, WM_VSCROLL, SB_LINEUP, 0) ; break ; case VK_DOWN: SendMessage (hwnd, WM_VSCROLL, SB_LINEDOWN, 0) ; break ; case VK_LEFT: SendMessage (hwnd, WM_HSCROLL, SB_PAGEUP, 0) ; break ; case VK_RIGHT: SendMessage (hwnd, WM_HSCROLL, SB_PAGEDOWN, 0) ; break ; } return 0 ; case WM_PAINT: hdc = BeginPaint (hwnd, &ps) ; // Get vertical scroll bar position 179
- 180. si.cbSize = sizeof (si) ; si.fMask = SIF_POS ; GetScrollInfo (hwnd, SB_VERT, &si) ; iVertPos = si.nPos ; // Get horizontal scroll bar position GetScrollInfo (hwnd, SB_HORZ, &si) ; iHorzPos = si.nPos ; // Find painting limits iPaintBeg = max (0, iVertPos + ps.rcPaint.top / cyChar) ; iPaintEnd = min (NUMLINES - 1, iVertPos + ps.rcPaint.bottom / cyChar) ; for (i = iPaintBeg ; i <= iPaintEnd ; i++) { x = cxChar * (1 - iHorzPos) ; y = cyChar * (i - iVertPos) ; TextOut (hdc, x, y, sysmetrics[i].szLabel, lstrlen (sysmetrics[i].szLabel)) ; TextOut (hdc, x + 22 * cxCaps, y, sysmetrics[i].szDesc, lstrlen (sysmetrics[i].szDesc)) ; SetTextAlign (hdc, TA_RIGHT | TA_TOP) ; TextOut (hdc, x + 22 * cxCaps + 40 * cxChar, y, szBuffer, wsprintf (szBuffer, TEXT (“%5d”), GetSystemMetrics (sysmetrics[i].iIndex))) ; SetTextAlign (hdc, TA_LEFT | TA_TOP) ; } EndPaint (hwnd, &ps) ; return 0 ; case WM_DESTROY: PostQuitMessage (0) ; return 0 ; } return DefWindowProc (hwnd, message, wParam, lParam) ; } Character Messages Earlier in this chapter, I discussed the idea of translating keystroke messages into character messages by taking shift- state information into account. I warned you that shift-state information is not enough: you also need to know about country-dependent keyboard configurations. For this reason, you should not attempt to translate keystroke messages into character codes yourself. Instead, Windows does it for you. You’ve seen this code before: while (GetMessage (&msg, NULL, 0, 0)) { TranslateMessage (&msg) ; DispatchMessage (&msg) ; } This is a typical message loop that appears in WinMain. The GetMessage function fills in the msg structure fields with the next message from the queue. DispatchMessage calls the appropriate window procedure with this message. 180
- 181. Between these two functions is TranslateMessage, which takes on the responsibility of translating keystroke messages to character messages. If the keystroke message is WM_KEYDOWN or WM_SYSKEYDOWN, and if the keystroke in combination with the shift state produces a character, TranslateMessage places a character message in the message queue. This character message will be the next message that GetMessage retrieves from the queue after the keystroke message. The Four Character Messages There are four character messages: Characters Dead Characters Nonsystem Characters: WM_CHAR WM_DEADCHAR System Characters: WM_SYSCHAR WM_SYSDEADCHAR The WM_CHAR and WM_DEADCHAR messages are derived from WM_KEYDOWN messages. The WM_SYSCHAR and WM_SYSDEADCHAR messages are derived from WM_SYSKEYDOWN messages. (I’ll discuss what a dead character is shortly.) Here’s the good news: In most cases, your Windows program can process the WM_CHAR message while ignoring the other three character messages. The lParam parameter that accompanies the four character messages is the same as the lParam parameter for the keystroke message that generated the character code message. However, the wParam parameter is not a virtual key code. Instead, it is an ANSI or Unicode character code. These character messages are the first messages we’ve encountered that deliver text to the window procedure. They’re not the only ones. Other messages are accompanied by entire zero-terminated text strings. How does the window procedure know whether this character data is 8-bit ANSI or 16-bit Unicode? It’s simple: Any window procedure associated with a window class that you register with RegisterClassA (the ANSI version of RegisterClass) gets messages that contain ANSI character codes. Messages to window procedures that were registered with RegisterClassW (the wide-character version of RegisterClass) come with Unicode character codes. If your program registers its window class using RegisterClass, that’s really RegisterClassW if the UNICODE identifier was defined and RegisterClassA otherwise. Unless you’re explicitly doing mixed coding of ANSI and Unicode functions and window procedures, the character code delivered with the WM_CHAR message (and the three other character messages) is (TCHAR) wParam The same window procedure might be used with two window classes, one registered with RegisterClassA and the other registered with RegisterClassW. This means that the window procedure might get some messages with ANSI character codes and some messages with Unicode character codes. If your window procedure needs help to sort things out, it can call fUnicode = IsWindowUnicode (hwnd) ; The fUnicode variable will be TRUE if the window procedure for hwnd gets Unicode messages, which means the window is based on a window class that was registered with RegisterClassW. Message Ordering Because the character messages are generated by the TranslateMessage function from WM_KEYDOWN and WM_SYSKEYDOWN messages, the character messages are delivered to your window procedure sandwiched between keystroke messages. For instance, if Caps Lock is not toggled on and you press and release the A key, the window procedure receives the following three messages: Message Key or Code WM_KEYDOWN Virtual key code for ‘A’ (0x41) 181
- 182. WM_CHAR Character code for ‘a’ (0x61) WM_KEYUP Virtual key code for ‘A’ (0x41) If you type an uppercase A by pressing the Shift key, pressing the A key, releasing the A key, and then releasing the Shift key, the window procedure receives five messages: Message Key or Code WM_KEYDOWN Virtual key code VK_SHIFT (0x10) WM_KEYDOWN Virtual key code for ‘A’ (0x41) WM_CHAR Character code for ‘A’ (0x41) WM_KEYUP Virtual key code for ‘A’ (0x41) WM_KEYUP Virtual key code VK_SHIFT (0x10) The Shift key by itself does not generate a character message. If you hold down the A key so that the typematic action generates keystrokes, you’ll get a character message for each WM_KEYDOWN message: Message Key or Code WM_KEYDOWN Virtual key code for ‘A’ (0x41) WM_CHAR Character code for ‘a’ (0x61) WM_KEYDOWN Virtual key code for ‘A’ (0x41) WM_CHAR Character code for ‘a’ (0x61) WM_KEYDOWN Virtual key code for ‘A’ (0x41) WM_CHAR Character code for ‘a’ (0x61) WM_KEYDOWN Virtual key code for ‘A’ (0x41) WM_CHAR Character code for ‘a’ (0x61) WM_KEYUP Virtual key code for ‘A’ (0x41) If some of the WM_KEYDOWN messages have a Repeat Count greater than 1, the corresponding WM_CHAR message will have the same Repeat Count. The Ctrl Key in combination with a letter key generates ASCII control characters from 0x01 (Ctrl-A) through 0x1A (Ctrl-Z). Several of these control codes are also generated by the keys shown in the following table: Key Character Code Duplicated by ANSI C Escape Backspace 0x08 Ctrl-H b Tab 0x09 Ctrl-I t Ctrl-Enter 0x0A Ctrl-J n Enter 0x0D Ctrl-M r 182
- 183. Esc 0x1B Ctrl-[ The rightmost column shows the escape code defined in ANSI C to represent the character codes for these keys. Windows programs sometimes use the Ctrl key in combination with letter keys for menu accelerators (which I’ll discuss in Chapter 10). In this case, the letter keys are not translated into character messages. Control Character Processing The basic rule for processing keystroke and character messages is this: If you need to read keyboard character input in your window, you process the WM_CHAR message. If you need to read the cursor keys, function keys, Delete, Insert, Shift, Ctrl, and Alt, you process the WM_KEYDOWN message. But what about the Tab key? Or Enter or Backspace or Escape? Traditionally, these keys generate ASCII control characters, as shown in the preceding table. But in Windows they also generate virtual key codes. Should these keys be processed during WM_CHAR processing or WM_KEYDOWN processing? After a decade of considering this issue (and looking back over Windows code I’ve written over the years), I seem to prefer treating the Tab, Enter, Backspace, and Escape keys as control characters rather than as virtual keys. My WM_CHAR processing often looks something like this: case WM_CHAR: [other program lines] switch (wParam) { case ‘b’: // backspace [other program line break ; case ‘t’: // tab [other program lines] break ; case ‘n’: // linefeed [other program lines] break ; case ‘r’: // carriage return [other program lines] break ; default: // character codes [other program lines] break ; } return 0 ; Dead-Character Messages Windows programs can usually ignore WM_DEADCHAR and WM_SYSDEADCHAR messages, but you should definitely know what dead characters are and how they work. On some non-U.S. English keyboards, certain keys are defined to add a diacritic to a letter. These are called “dead keys” because they don’t generate characters by themselves. For instance, when a German keyboard is installed, the key that is in the same position as the +/= key on a U.S. keyboard is a dead key for the grave accent (‘) when shifted and the acute accent (´) when unshifted. When a user presses this dead key, your window procedure receives a WM_DEADCHAR message with wParam equal to ASCII or Unicode code for the diacritic by itself. When the user then presses a letter key that can be written with this diacritic (for instance, the A key), the window procedure receives a WM_CHAR message where wParam 183
- 184. is the ANSI code for the letter ‘a’ with the diacritic. Thus, your program does not have to process the WM_DEADCHAR message because the WM_CHAR message gives the program all the information it needs. The Windows logic even has built-in error handling: If the dead key is followed by a letter that can’t take a diacritic (such as ‘s’), the window procedure receives two WM_CHAR messages in a row—the first with wParam equal to the ASCII code for the diacritic by itself (the same wParam value delivered with the WM_DEADCHAR message) and the second with wParam equal to the ASCII code for the letter ‘s’. Of course, the best way to get a feel for this is to see it in action. You need to load a foreign keyboard that uses dead keys, such as the German keyboard that I described earlier. You do this in the Control Panel by selecting Keyboard and then the Language tab. Then you need an application that shows you the details of every keyboard message a program can receive. That’s the KEYVIEW1 program coming up next. Keyboard Messages and Character Sets The remaining sample programs in this chapter have flaws. They will not always run correctly under all versions of Windows. Their flaws are not something I deliberately introduced into the code; indeed, you might never notice them. These problems—I hesitate to call them “bugs”—reveal themselves only when switching among certain different keyboard languages and layouts, and when running the programs under Far Eastern versions of Windows that use multibyte character sets. However, the programs will work much better when compiled for Unicode and run under Windows NT. This is the promise I made in Chapter 2, and it demonstrates why Unicode is so important in simplifying the work involved in internationalization. The KEYVIEW1 Program The first step in understanding keyboard internationalization issues is to examine the contents of the keyboard and character messages that Windows delivers to your window procedure. The KEYVIEW1 program shown in Figure 6- 3 will help. This program displays in its client area all the information that Windows sends the window procedure for the eight different keyboard messages. Figure 6-3. The KEYVIEW1 program. KEYVIEW1.C /*-------------------------------------------------------- KEYVIEW1.C—Displays Keyboard and Character Messages © Charles Petzold, 1998 --------------------------------------------------------*/ #include <windows.h> LRESULT CALLBACK WndProc (HWND, UINT, WPARAM, LPARAM) ; int WINAPI WinMain (HINSTANCE hInstance, HINSTANCE hPrevInstance, PSTR szCmdLine, int iCmdShow) { static TCHAR szAppName[] = TEXT (“KeyView1”) ; HWND hwnd ; MSG msg ; WNDCLASS wndclass ; wndclass.style = CS_HREDRAW | CS_VREDRAW ; 184
- 185. wndclass.lpfnWndProc = WndProc ; wndclass.cbClsExtra = 0 ; wndclass.cbWndExtra = 0 ; wndclass.hInstance = hInstance ; wndclass.hIcon = LoadIcon (NULL, IDI_APPLICATION) ; wndclass.hCursor = LoadCursor (NULL, IDC_ARROW) ; wndclass.hbrBackground = (HBRUSH) GetStockObject (WHITE_BRUSH) ; wndclass.lpszMenuName = NULL ; wndclass.lpszClassName = szAppName ; if (!RegisterClass (&wndclass)) { MessageBox (NULL, TEXT (“This program requires Windows NT!”), szAppName, MB_ICONERROR) ; return 0 ; } hwnd = CreateWindow (szAppName, TEXT (“Keyboard Message Viewer #1”), WS_OVERLAPPEDWINDOW, CW_USEDEFAULT, CW_USEDEFAULT, CW_USEDEFAULT, CW_USEDEFAULT, NULL, NULL, hInstance, NULL) ; ShowWindow (hwnd, iCmdShow) ; UpdateWindow (hwnd) ; while (GetMessage (&msg, NULL, 0, 0)) { TranslateMessage (&msg) ; DispatchMessage (&msg) ; } return msg.wParam ; } LRESULT CALLBACK WndProc (HWND hwnd, UINT message, WPARAM wParam, LPARAM lParam) { static int cxClientMax, cyClientMax, cxClient, cyClient, cxChar, cyChar ; static int cLinesMax, cLines ; static PMSG pmsg ; static RECT rectScroll ; static TCHAR szTop[] = TEXT (“Message Key Char “) TEXT (“Repeat Scan Ext ALT Prev Tran”) ; static TCHAR szUnd[] = TEXT (“_______ ___ ____ “) TEXT (“______ ____ ___ ___ ____ ____”) ; static TCHAR * szFormat[2] = { TEXT (“%-13s %3d %-15s%c%6u %4d %3s %3s %4s %4s”), TEXT (“%-13s 0x%04X%1s%c %6u %4d %3s %3s %4s %4s”) } ; static TCHAR * szYes = TEXT (“Yes”) ; static TCHAR * szNo = TEXT (“No”) ; static TCHAR * szDown = TEXT (“Down”) ; static TCHAR * szUp = TEXT (“Up”) ; static TCHAR * szMessage [] = { TEXT (“WM_KEYDOWN”), TEXT (“WM_KEYUP”), TEXT (“WM_CHAR”), TEXT (“WM_DEADCHAR”), TEXT (“WM_SYSKEYDOWN”), TEXT (“WM_SYSKEYUP”), TEXT (“WM_SYSCHAR”), TEXT (“WM_SYSDEADCHAR”) } ; HDC hdc ; int i, iType ; PAINTSTRUCT ps ; TCHAR szBuffer[128], szKeyName [32] ; TEXTMETRIC tm ; 185
- 186. switch (message) { case WM_CREATE: case WM_DISPLAYCHANGE: // Get maximum size of client area cxClientMax = GetSystemMetrics (SM_CXMAXIMIZED) ; cyClientMax = GetSystemMetrics (SM_CYMAXIMIZED) ; // Get character size for fixed-pitch font hdc = GetDC (hwnd) ; SelectObject (hdc, GetStockObject (SYSTEM_FIXED_FONT)) ; GetTextMetrics (hdc, &tm) ; cxChar = tm.tmAveCharWidth ; cyChar = tm.tmHeight ; ReleaseDC (hwnd, hdc) ; // Allocate memory for display lines if (pmsg) free (pmsg) ; cLinesMax = cyClientMax / cyChar ; pmsg = malloc (cLinesMax * sizeof (MSG)) ; cLines = 0 ; // fall through case WM_SIZE: if (message == WM_SIZE) { cxClient = LOWORD (lParam) ; cyClient = HIWORD (lParam) ; } // Calculate scrolling rectangle rectScroll.left = 0 ; rectScroll.right = cxClient ; rectScroll.top = cyChar ; rectScroll.bottom = cyChar * (cyClient / cyChar) ; InvalidateRect (hwnd, NULL, TRUE) ; return 0 ; case WM_KEYDOWN: case WM_KEYUP: case WM_CHAR: case WM_DEADCHAR: case WM_SYSKEYDOWN: case WM_SYSKEYUP: case WM_SYSCHAR: case WM_SYSDEADCHAR: // Rearrange storage array for (i = cLinesMax - 1 ; i > 0 ; i--) { pmsg[i] = pmsg[i - 1] ; } // Store new message 186
- 187. pmsg[0].hwnd = hwnd ; pmsg[0].message = message ; pmsg[0].wParam = wParam ; pmsg[0].lParam = lParam ; cLines = min (cLines + 1, cLinesMax) ; // Scroll up the display ScrollWindow (hwnd, 0, -cyChar, &rectScroll, &rectScroll) ; break ; // i.e., call DefWindowProc so Sys messages work case WM_PAINT: hdc = BeginPaint (hwnd, &ps) ; SelectObject (hdc, GetStockObject (SYSTEM_FIXED_FONT)) ; SetBkMode (hdc, TRANSPARENT) ; TextOut (hdc, 0, 0, szTop, lstrlen (szTop)) ; TextOut (hdc, 0, 0, szUnd, lstrlen (szUnd)) ; for (i = 0 ; i < min (cLines, cyClient / cyChar - 1) ; i++) { iType = pmsg[i].message == WM_CHAR || pmsg[i].message == WM_SYSCHAR || pmsg[i].message == WM_DEADCHAR || pmsg[i].message == WM_SYSDEADCHAR ; GetKeyNameText (pmsg[i].lParam, szKeyName, sizeof (szKeyName) / sizeof (TCHAR)) ; TextOut (hdc, 0, (cyClient / cyChar - 1 - i) * cyChar, szBuffer, wsprintf (szBuffer, szFormat [iType], szMessage [pmsg[i].message - WM_KEYFIRST], pmsg[i].wParam, (PTSTR) (iType ? TEXT (“ “) : szKeyName), (TCHAR) (iType ? pmsg[i].wParam : ‘ ‘), LOWORD (pmsg[i].lParam), HIWORD (pmsg[i].lParam) & 0xFF, 0x01000000 & pmsg[i].lParam ? szYes : szNo, 0x20000000 & pmsg[i].lParam ? szYes : szNo, 0x40000000 & pmsg[i].lParam ? szDown : szUp, 0x80000000 & pmsg[i].lParam ? szUp : szDown)) ; } EndPaint (hwnd, &ps) ; return 0 ; case WM_DESTROY: PostQuitMessage (0) ; return 0 ; } return DefWindowProc (hwnd, message, wParam, lParam) ; } KEYVIEW1 displays the contents of each keystroke and character message that it receives in its window procedure. It saves the messages in an array of MSG structures. The size of the array is based on the size of the maximized window size and the fixed-pitch system font. If the user resizes the video display while the program is running (in which case KEYVIEW1 gets a WM_DISPLAYCHANGE message), the array is reallocated. KEYVIEW1 uses the standard C malloc function to allocate memory for this array. Figure 6-4 shows the KEYVIEW1 display after the word “Windows” has been typed. The first column shows the keyboard message. The second column shows the virtual key code for keystroke messages followed by the name of the key. This is obtained by using the GetKeyNameText function. The third column (labeled “Char”) shows the hexadecimal character code for character messages followed by the character itself. The remaining six columns 187
- 188. display the status of the six fields in the lParam message parameter. Figure 6-4. The KEYVIEW1 display. To ease the columnar display of this information, KEYVIEW1 uses a fixed-pitch font. As discussed in the last chapter, this requires calls to GetStockObject and SelectObject: SelectObject (hdc, GetStockObject (SYSTEM_FIXED_FONT)) ; KEYVIEW1 draws a header at the top of the client area identifying the nine columns. The text in this column is underlined. Although it’s possible to create an underlined font, I took a different approach here. I defined two character string variables named szTop (which has the text) and szUnd (which has the underlining) and displayed both of them at the same position at the top of the window during the WM_PAINT message. Normally, Windows displays text in an “opaque” mode, meaning that Windows erases the character background area while displaying a character. This would cause the second character string (szUnd) to erase the first (szTop). To prevent this, switch the device context into the “transparent” mode: SetBkMode (hdc, TRANSPARENT) ; This method of underlining is possible only when using a fixed-pitch font. Otherwise, the underline character wouldn’t necessarily be the same width as the character the underline is to appear under. The Foreign-Language Keyboard Problem If you’re running the American English version of Windows, you can install different keyboard layouts and pretend that you’re typing in a foreign language. You install foreign language keyboard layouts in the Keyboard applet in the Control Panel. Select the Language tab, and click Add. To see how dead keys work, you might want to install the German keyboard. I’ll also be discussing the Russian and Greek keyboard layouts, so you might want to install those as well. If the Russian and Greek keyboard layouts are not available in the list that the Keyboard applet displays, you might need to install multilanguage support. Select the Add/Remove Programs applet from the Control Panel, and choose the Windows Setup tab. Make sure the Multilanguage Support box is checked. In any case, you’ll need 188
- 189. to have your original Windows CD-ROM handy for these changes. After you install other keyboard layouts, you’ll see a blue box with a two-letter code in the tray at the right side of the task bar. It’ll be “EN” if the default is English. When you click on this icon, you get a list of all the installed keyboard layouts. You can change the keyboard for the currently active program by clicking on the one you want. This change affects only the currently active program. Now we’re ready to experiment. Compile the KEYVIEW1 program without the UNICODE identifier defined. (On this book’s companion disc, the non-Unicode version of KEYVIEW1 is located in the RELEASE subdirectory.) Run the program under the American English version of Windows, and type the letters “abcde.” The WM_CHAR messages are exactly what you expect: the ASCII character codes 0x61, 0x62, 0x63, 0x64, and 0x65 and the characters a, b, c, d, and e. Now, while still running KEYVIEW1, select the German keyboard layout. Press the = key and then a vowel (a, e, i, o, or u). The = key generates a WM_DEADCHAR message, and the vowel generates a WM_CHAR message with (respectively) the character codes 0xE1, 0xE9, 0xED, 0xF3, 0xFA, and the characters á, é, í, ó, and ú. This is how dead keys work. Now select the Greek keyboard layout. Type “abcde” and what do you get? You get WM_CHAR messages with the character codes 0xE1, 0xE2, 0xF8, 0xE4, 0xE5, and the characters á, â, ø, ä, and å. Something doesn’t seem to be right here. Shouldn’t you be getting letters in the Greek alphabet? Now switch to the Russian keyboard and again type “abcde.” Now you get WM_CHAR messages with the character codes 0xF4, 0xE8, 0xF1, 0xE2, and 0xF3, and the characters ô, è, ñ, â, and ó. Again, something is wrong. You should be getting letters in the Cyrillic alphabet. The problem is this: you have switched the keyboard to generate different character codes, but you haven’t informed GDI of this switch so that GDI can interpret these character codes by displaying the proper symbols. If you’re very brave, and you have a spare PC to play with, and if you have a Professional or Universal Subscription to Microsoft Developer Network (MSDN), you might want to install (for example) the Greek version of Windows. You can also install the same four keyboard layouts (English, Greek, German, and Russian). Now run KEYLOOK1. Switch to the English keyboard layout, and type “abcde”. You get the ASCII character codes 0x61, 0x62, 0x63, 0x64, and 0x65 and the characters a, b, c, d, and e. (And you can breathe a sigh of relief that ASCII still works, even in Greece.) Under this Greek version of Windows, switch to the Greek keyboard layout and type “abcde.” You get WM_CHAR messages with the character codes 0xE1, 0xE2, 0xF8, 0xE4, and 0xE5. These are the same character codes you got under the English version of Windows with the Greek keyboard layout installed. But now the displayed characters are a, b, y, d, and e. These are indeed the lowercase Greek letters alpha, beta, psi, delta, and epsilon. (What happened to gamma? Well, if you were using the Greek version of Windows for real, you’d probably be using a keyboard with Greek letters on the keycaps. The key corresponding to the English c happens to be a psi. The gamma is generated by the key corresponding to the English g. You can see the complete Greek keyboard layout on page 587 of Nadine Kano’s Developing International Software for Windows 95 and Windows NT. Still running KEYVIEW1 under the Greek version of Windows, switch to the German keyboard layout. Type the = key followed by a, then e, then i, then o, and then u. You get WM_CHAR messages with the character codes 0xE1, 0xE9, 0xED, 0xF3, and 0xFA. These are the same character codes as under the English version of Windows with the German keyboard installed. However, the displayed characters are a, i, n, s, and i, not the correct á, é, í, ó, and ú. Now switch to the Russian keyboard and type “abcde.” You get the character codes 0xF4, 0xE8, 0xF1, 0xE2, and 0xF3, which are the same as under the English version of Windows with the Russian keyboard installed. However, the displayed characters are t, q, r, b, and s, not letters in the Cyrillic alphabet. You can also install the Russian version of Windows. As you may have guessed by now, the English and Russian keyboard layouts will work, but not the German or Greek. 189
- 190. Now, if you’re really, really brave, you can install the Japanese version of Windows and run KEYVIEW1. If you type at your American keyboard, you can enter English text and everything will seem to work fine. However, if you switch to the German, Greek, or Russian keyboard layouts and try any of the exercises described above, you’ll see the characters displayed as dots. If you type capital letters—either accented German letters, Greek letters, or Russian letters—you’ll see the characters rendered as katakana, which is the Japanese alphabet generally used to spell words from other languages. You may have fun typing katakana, but it’s not German, Greek, or Russian. The Far East versions of Windows include a utility called the Input Method Editor (IME) that appears as a floating toolbar. This utility lets you use the normal keyboard for entering ideographs, which are the complex characters used in Chinese, Japanese, and Korean. Basically, you type combinations of letters and the composed symbols appear in another floating window. You then press Enter and the resultant character codes are sent to the active window (that is, KEYVIEW1). KEYVIEW1 responds with almost total nonsense—the WM_CHAR messages have character codes above 128, but the characters are meaningless. (Nadine Kano’s book has much more information on using the IME.) So, we’ve seen a couple examples of KEYLOOK1 displaying incorrect characters—when running the English version of Windows with the Russian or Greek keyboard layouts installed, when running the Greek version of Windows with the Russian or German keyboard layouts installed, and when running the Russian version of Windows with the German, Russian, or Greek keyboards installed. We’ve also seen errors when entering characters from the Input Method Editor in the Japanese version of Windows. Character Sets and Fonts The problem with KEYLOOK1 is a font problem. The font that it’s using to display characters on the screen is inconsistent with the character codes it’s receiving from the keyboard. So, let’s take a look at some fonts. As I’ll discuss in more detail in Chapter 17, Windows supports three types of fonts—bitmap fonts, vector fonts, and (beginning in Windows 3.1) TrueType fonts. The vector fonts are virtually obsolete. The characters in these fonts were composed of simple lines, but these lines did not define filled areas. The vector fonts had the benefit of being scaleable to any size, but the characters often looked anemic. TrueType fonts are outline fonts with characters defined by filled areas. TrueType fonts are scaleable; indeed the character definitions contain “hints” for avoiding rounding problems that could result in unsightly or unreadable text. It is with TrueType that Windows achieves a true WYSIWYG (“what you see is what you get”) display of text on the video display that accurately matches printer output. In bitmap fonts, each character is defined by an array of bits that correspond to the pixels of the video display. Bitmaps fonts can be scaleable to larger sizes, but they look jagged as a result. Bitmap fonts are often tweaked by their designers to be more easily readable on the video display. Thus, Windows uses bitmap fonts for the text that appears in title bars, menus, buttons, and dialog boxes. The bitmap font that you get in a default device context is known as the system font. You can obtain a handle to this font by calling the GetStockObject function with the identifier SYSTEM_FONT. The KEYVIEW1 program elects to use a fixed-pitch version of the system font, denoted by SYSTEM_FIXED_FONT. Another alternative in the GetStockObject function is OEM_FIXED_FONT. These three fonts have typeface names of (respectively) System, FixedSys, and Terminal. A program can use the typeface name to refer to the font in a CreateFont or CreateFontIndirect function call. These three fonts are stored in two sets of three files in the FONTS subdirectory of the Windows directory. The particular set of files that Windows uses depends on whether you’ve elected to display “Small Fonts” or “Large Fonts” in the Display applet of the Control Panel (that is, whether you want Windows to assume that the video display has a 96 dpi resolution or a 120 dpi resolution). This is all summarized in the following table: GetStockObject Identifier Typeface Name Small Font File Large Font File 190
- 191. SYSTEM_FONT System VGASYS.FON 8514SYS.FON SYSTEM_FIXED_FONT FixedSys VGAFIX.FON 8514FIX.FON OEM_FIXED_FONT Terminal VGAOEM.FON 8514OEM.FON In the file names, “VGA” refers to the Video Graphics Array, the video adapter that IBM introduced in 1987. It was IBM’s first PC video adapter to have a pixel display size of 640 by 480. If you select Small Fonts from the Display applet in the Control Panel (meaning that you want Windows to assume that the video display has a resolution of 96 dpi), Windows uses the filenames beginning with “VGA” for these three fonts. If you select Large Fonts (meaning that you want a resolution of 120 dpi), Windows uses the filenames beginning with “8514.” The 8514 was another video adapter that IBM introduced in 1987, and it had a maximum display size of 1024 by 768. Windows does not want you to see these files. The files have the system and hidden file attributes set, and if you use the Windows Explorer to view the contents of your FONTS subdirectory, you won’t see them at all, even if you’ve elected to view system and hidden files. Use the Find option from the Tools menu to search for files with a specification of *.FON. From there, you can double-click the filename to see what the font characters look like. For many standard controls and user interface items, Windows doesn’t use the System font. Instead, it uses a font with the typeface name MS Sans Serif. (MS stands for Microsoft.) This is also a bitmap font. The file (named SSERIFE.FON) contains fonts based on a 96-dpi video display, with point sizes of 8, 10, 12, 14, 18, and 24. You can get this font by using the DEFAULT_GUI_FONT identifier in GetStockObject. The point size Windows uses will be based on the display resolution you’ve selected in the Display applet of the Control Panel. So far, I’ve mentioned four of the identifiers you can use with GetStockObject to obtain a font for use in a device context. There are three others: ANSI_FIXED_FONT, ANSI_VAR_FONT, and DEVICE_DEFAULT_FONT. To begin approaching the problem of the keyboard and character displays, let’s take a look at all the stock fonts in Windows. The program that displays the fonts is named STOKFONT and is shown in Figure 6-5. Figure 6-5. The STOKFONT program. STOKFONT.C /*----------------------------------------- STOKFONT.C—Stock Font Objects © Charles Petzold, 1998 -----------------------------------------*/ #include <windows.h> LRESULT CALLBACK WndProc (HWND, UINT, WPARAM, LPARAM) ; int WINAPI WinMain (HINSTANCE hInstance, HINSTANCE hPrevInstance, PSTR szCmdLine, int iCmdShow) { static TCHAR szAppName[] = TEXT (“StokFont”) ; HWND hwnd ; MSG msg ; WNDCLASS wndclass ; wndclass.style = CS_HREDRAW | CS_VREDRAW ; wndclass.lpfnWndProc = WndProc ; wndclass.cbClsExtra = 0 ; wndclass.cbWndExtra = 0 ; wndclass.hInstance = hInstance ; 191
- 192. wndclass.hIcon = LoadIcon (NULL, IDI_APPLICATION) ; wndclass.hCursor = LoadCursor (NULL, IDC_ARROW) ; wndclass.hbrBackground = (HBRUSH) GetStockObject (WHITE_BRUSH) ; wndclass.lpszMenuName = NULL ; wndclass.lpszClassName = szAppName ; if (!RegisterClass (&wndclass)) { MessageBox (NULL, TEXT (“Program requires Windows NT!”), szAppName, MB_ICONERROR) ; return 0 ; } hwnd = CreateWindow (szAppName, TEXT (“Stock Fonts”), WS_OVERLAPPEDWINDOW | WS_VSCROLL, CW_USEDEFAULT, CW_USEDEFAULT, CW_USEDEFAULT, CW_USEDEFAULT, NULL, NULL, hInstance, NULL) ; ShowWindow (hwnd, iCmdShow) ; UpdateWindow (hwnd) ; while (GetMessage (&msg, NULL, 0, 0)) { TranslateMessage (&msg) ; DispatchMessage (&msg) ; } return msg.wParam ; } LRESULT CALLBACK WndProc (HWND hwnd, UINT message, WPARAM wParam, LPARAM lParam) { static struct { int idStockFont ; TCHAR * szStockFont ; } stockfont [] = { OEM_FIXED_FONT, “OEM_FIXED_FONT”, ANSI_FIXED_FONT, “ANSI_FIXED_FONT”, ANSI_VAR_FONT, “ANSI_VAR_FONT”, SYSTEM_FONT, “SYSTEM_FONT”, DEVICE_DEFAULT_FONT, “DEVICE_DEFAULT_FONT”, SYSTEM_FIXED_FONT, “SYSTEM_FIXED_FONT”, DEFAULT_GUI_FONT, “DEFAULT_GUI_FONT” } ; static int iFont, cFonts = sizeof stockfont / sizeof stockfont[0] ; HDC hdc ; int i, x, y, cxGrid, cyGrid ; PAINTSTRUCT ps ; TCHAR szFaceName [LF_FACESIZE], szBuffer [LF_FACESIZE + 64] ; TEXTMETRIC tm ; switch (message) { case WM_CREATE: SetScrollRange (hwnd, SB_VERT, 0, cFonts - 1, TRUE) ; return 0 ; case WM_DISPLAYCHANGE: InvalidateRect (hwnd, NULL, TRUE) ; return 0 ; case WM_VSCROLL: switch (LOWORD (wParam)) 192
- 193. { case SB_TOP: iFont = 0 ; break ; case SB_BOTTOM: iFont = cFonts - 1 ; break ; case SB_LINEUP: case SB_PAGEUP: iFont -= 1 ; break ; case SB_LINEDOWN: case SB_PAGEDOWN: iFont += 1 ; break ; case SB_THUMBPOSITION: iFont = HIWORD (wParam) ; break ; } iFont = max (0, min (cFonts - 1, iFont)) ; SetScrollPos (hwnd, SB_VERT, iFont, TRUE) ; InvalidateRect (hwnd, NULL, TRUE) ; return 0 ; case WM_KEYDOWN: switch (wParam) { case VK_HOME: SendMessage (hwnd, WM_VSCROLL, SB_TOP, 0) ; break ; case VK_END: SendMessage (hwnd, WM_VSCROLL, SB_BOTTOM, 0) ; break ; case VK_PRIOR: case VK_LEFT: case VK_UP: SendMessage (hwnd, WM_VSCROLL, SB_LINEUP, 0) ; break ; case VK_NEXT: case VK_RIGHT: case VK_DOWN: SendMessage (hwnd, WM_VSCROLL, SB_PAGEDOWN, 0) ; break ; } return 0 ; case WM_PAINT: hdc = BeginPaint (hwnd, &ps) ; SelectObject (hdc, GetStockObject (stockfont[iFont].idStockFont)) ; GetTextFace (hdc, LF_FACESIZE, szFaceName) ; GetTextMetrics (hdc, &tm) ; cxGrid = max (3 * tm.tmAveCharWidth, 2 * tm.tmMaxCharWidth) ; cyGrid = tm.tmHeight + 3 ; TextOut (hdc, 0, 0, szBuffer, wsprintf (szBuffer, TEXT (“ %s: Face Name = %s, CharSet = %i”), stockfont[iFont].szStockFont, szFaceName, tm.tmCharSet)) ; SetTextAlign (hdc, TA_TOP | TA_CENTER) ; // vertical and horizontal lines for (i = 0 ; i < 17 ; i++) { MoveToEx (hdc, (i + 2) * cxGrid, 2 * cyGrid, NULL) ; LineTo (hdc, (i + 2) * cxGrid, 19 * cyGrid) ; MoveToEx (hdc, cxGrid, (i + 3) * cyGrid, NULL) ; LineTo (hdc, 18 * cxGrid, (i + 3) * cyGrid) ; } // vertical and horizontal headings for (i = 0 ; i < 16 ; i++) { TextOut (hdc, (2 * i + 5) * cxGrid / 2, 2 * cyGrid + 2, szBuffer, wsprintf (szBuffer, TEXT (“%X-“), i)) ; TextOut (hdc, 3 * cxGrid / 2, (i + 3) * cyGrid + 2, szBuffer, wsprintf (szBuffer, TEXT (“-%X”), i)) ; } // characters 193
- 194. for (y = 0 ; y < 16 ; y++) for (x = 0 ; x < 16 ; x++) { TextOut (hdc, (2 * x + 5) * cxGrid / 2, (y + 3) * cyGrid + 2, szBuffer, wsprintf (szBuffer, TEXT (“%c”), 16 * x + y)) ; } EndPaint (hwnd, &ps) ; return 0 ; case WM_DESTROY: PostQuitMessage (0) ; return 0 ; } return DefWindowProc (hwnd, message, wParam, lParam) ; } This program is fairly simple. It uses the scroll bar and cursor movement keys to let you select one of the seven stock fonts to display. The program displays the 256 characters of the font in a grid. The headings at the top and left of the grid show the hexadecimal values of the character codes. At the top of the client area, STOKFONT shows the identifier it uses to select the font using the GetStockObject function. It also displays the typeface name of the font obtained from the GetTextFace function and the tmCharSet field of the TEXTMETRIC structure. This “character set identifier” turns out to be crucial in understanding how Windows deals with foreign-language versions of Windows. If you run STOKFONT under the American English version of Windows, the first screen you’ll see shows you the font obtained by using the OEM_FIXED_FONT identifier with the GetStockObject function. This is shown in Figure 6-6. Figure 6-6. The OEM_FIXED_FONT in the U.S. version of Windows. In this character set (as in all the others in this chapter), you’ll see some ASCII. But remember that ASCII is a 7-bit code that defines displayable characters for codes 0x20 through 0x7E. By the time IBM developed the original IBM PC the 8-bit byte had been firmly established, so a full 8 bits could be used for character codes. IBM decided to 194
- 195. extend the ASCII character set with a bunch of line- and block-drawing characters, accented letters, Greek letters, math symbols, and some miscellany. Many character-mode MS-DOS programs used the line-drawing characters in their on-screen displays, and many MS-DOS programs used some of the extended characters in their files. This particular character set posed a problem for the original developers of Windows. On the one hand, the line- and block-drawing characters are not needed in Windows because Windows has a complete graphics programming language. The 48 codes used for these characters could better be used for additional accented letters required by many Western European languages. On the other hand, the IBM character set was definitely a standard that couldn’t be ignored completely. So, the original developers of Windows decided to support the IBM character set but to relegate it to secondary importance—mostly for old MS-DOS applications that ran in a window and for Windows programs that needed to use files created by MS-DOS applications. Windows applications do not use the IBM character set, and over the years it has faded in importance. Still, however, if you need it you can use it. In this context, “OEM” means “IBM.” (Be aware that foreign-language versions of Windows do not necessarily support the same OEM character set as the American English version does. Other countries had their own MS-DOS character sets. That’s a whole subject in itself, but not one for this book.) Because the IBM character set was deemed inappropriate for Windows, a different extended character set was selected. This is called the “ANSI character set,” referring to the American National Standards Institute, but it’s actually an ISO (International Standards Organization) standard, namely standard 8859. It’s also known as Latin 1, Western European, or code page 1252. Figure 6-7 shows one version of the ANSI character set—the system font in the American English version of Windows. Figure 6-7. The SYSTEM_FONT in the U.S. version of Windows. 195
- 196. The thick vertical bars indicate codes for which characters are not defined. Notice that codes 0x20 through 0x7E are once again ASCII. Also, the ASCII control characters (0x00 through 0x1F, and 0x7F) are not associated with displayable characters. This is as it should be. The codes 0xC0 through 0xFF make the ANSI character set important to foreign-language versions of Windows. These codes provide 64 characters commonly found in Western European languages. The character 0xA0, which looks like a space, is actually defined as a nonbreaking space, such as the space in “WW II.” I say this is “one version” of the ANSI character set because of the presence of the characters for codes 0x80 through 0x9F. The fixed-pitch system font includes only two of these characters, as shown in Figure 6-8. Figure 6-8. The SYSTEM_FIXED_FONT in the U.S. version of Windows. In Unicode, codes 0x0000 through 0x007F are the same as ASCII, codes 0x0080 through 0x009F duplicate control characters 0x0000 through 0x001F, and codes 0x00A0 through 0x00FF are the same as the ANSI character set used in Windows. If you run the German version of Windows, you’ll get the same ANSI character sets when you call GetStockObject with the SYSTEM_FONT or SYSTEM_FIXED_FONT identifiers. This is true of other Western European versions of Windows as well. The ANSI character set was designed to have all the characters that are required in these languages. However, when you run the Greek version of Windows, the default character set is not the same. Instead, the SYSTEM_FONT is that shown in Figure 6-9. 196
- 197. Figure 6-9. The SYSTEM_FONT in the Greek version of Windows. The SYSTEM_FIXED_FONT has the same characters. Notice the codes from 0xC0 through 0xFF. These codes contain uppercase and lowercase letters from the Greek alphabet. When you’re running the Russian version of Windows, the default character set is shown in Figure 6-10. 197
- 198. Figure 6-10. The SYSTEM_FONT in the Russian version of Windows. Again, notice that uppercase and lowercase letters of the Cyrillic alphabet occupy codes 0xC0 and 0xFF. Figure 6-11 shows the SYSTEM_FONT from the Japanese version of Windows. The characters from 0xA5 through 0xDF are all part of the katakana alphabet. 198
- 199. Figure 6-11. The SYSTEM_FONT in the Japanese version of Windows. The Japanese system font shown in Figure 6-11 is different from those shown previously because it is actually a double-byte character set (DBCS) called Shift-JIS. (JIS stands for Japanese Industrial Standard.) Most of the character codes from 0x81 through 0x9F and from 0xE0 through 0xFF are really just the first byte of a 2-byte code. The second byte is usually in the range 0x40 through 0xFC. (See Appendix G in Nadine Kano’s book for a complete table of these codes.) So now we can see where the problem is in KEYVIEW1: If you have the Greek keyboard layout installed and you type “abcde,” regardless of the version of Windows you’re running, Windows generates WM_CHAR messages with the character codes 0xE1, 0xE2, 0xF8, 0xE4, and 0xE5. But these character codes will correspond to the characters a, b, y, d, and e only if you’re running the Greek version of Windows with the Greek system font. If you have the Russian keyboard layout installed and you type “abcde,” regardless of the version of Windows you’re running, Windows generates WM_CHAR messages with the character codes 0xF4, 0xE8, 0xF1, 0xE2, and 0xF3. But these character codes will correspond to the characters ô, è, ñ, â, and ó only if you’re running the Russian version of Windows or another language that uses the Cyrillic alphabet, and you’re using the Cyrillic system font. If you have the German keyboard layout installed and you type the = key (or the key in that same position) followed by the a, e, i, o, or u key, regardless of the version of Windows you’re running, Windows generates WM_CHAR messages with the character codes 0xE1, 0xE9, 0xED, 0xF3, and 0xFA. Only if you’re running a Western European or American version of Windows, which means that you have the Western European system font, will these character codes correspond to the characters á, é, í, ó, or ú. If you have the American English keyboard layout installed, you can type anything on your keyboard and Windows will generate WM_CHAR messages with character codes that correctly match to the proper characters. 199
- 200. What About Unicode? I claimed in Chapter 2 that Unicode support in Windows NT helps out in writing programs for an international market. Let’s try compiling KEYVIEW1 with the UNICODE identifier defined and running it under various versions of Windows NT. (On this book’s companion disc, the Unicode version of KEYVIEW1 is located in the DEBUG directory.) If the UNICODE identifier is defined when the program is compiled, the “KeyView1” window class is registered with the RegisterClassW rather than the RegisterClassA function. This means that any message delivered to WndProc that has character or text data will use 16-bit characters rather than 8-bit characters. In particular, the WM_CHAR message will deliver a 16-bit character code rather than an 8-bit character code. Run the Unicode version of KEYVIEW1 under the American English version of Windows NT. I’ll assume you’ve installed at least the other three keyboard layouts we’ve been experimenting with—that is, German, Greek, and Russian. With the American English version of Windows NT and either the English or German keyboard layout installed, the Unicode version of KEYVIEW1 will appear to work the same as the non-Unicode version. It will receive the same character codes (all of which will be 0xFF or lower in value) and display the same correct characters. This is because the first 256 characters of Unicode are the same as the ANSI character set used in Windows. Now switch to the Greek keyboard layout, and type “abcde.” The WM_CHAR messages will have the Unicode character codes 0x03B1, 0x03B2, 0x03C8, 0x03B4, and 0x03B5. Note that for the first time we’re seeing character codes with values higher than 0xFF. These Unicode character codes correspond to the Greek letters a, b, y, d, and e. However, all five characters are displayed as solid blocks! This is because the SYSTEM_FIXED_FONT only has 256 characters. Now switch to the Russian keyboard layout, and type “abcde.” KEYVIEW1 displays WM_CHAR messages with the Unicode character codes 0x0444, 0x0438, 0x0441, 0x0432, and 0x0443, corresponding to the Cyrillic characters ô, è, ñ, â, and ó. Once again, however, all five characters are displayed as solid blocks. In short, where the non-Unicode version of KEYVIEW1 displayed incorrect characters, the Unicode version of KEYVIEW1 displays solid blocks, indicating that the current font does not have that particular character. I hesitate to say that the Unicode version of KEYVIEW1 represents an “improvement” over the non-Unicode version, but it does. The non-Unicode version displays characters that are not correct. The Unicode version does not. The differences between the Unicode and non-Unicode versions of KEYVIEW1 are mostly in two areas. First, the WM_CHAR message is accompanied by a 16-bit character code rather than an 8-bit character code. The 8- bit character code in the non-Unicode version of KEYVIEW1 could have different meanings depending what keyboard layout is active. A code of 0xE1 could mean á if it came from the German keyboard, a if it came from the Greek keyboard, and á if it came from the Russian keyboard. In the Unicode version of the program, the 16-bit character code is totally unambiguous. The á character is 0x00E1, the a character is 0x03B1, and the á character is 0x0431. Second, the Unicode TextOutW function displays characters based on 16-bit character codes rather than on the 8-bit character codes of the non-Unicode TextOutA function. Because these 16-bit character codes are totally unambiguous, GDI can determine whether the font currently selected in the device context is capable of displaying each character. Running the Unicode version of KEYVIEW1 under the American version of Windows NT is somewhat deceptive, because it appears as if GDI is simply displaying character codes in the range 0x0000 through 0x00FF and not those above 0x00FF. That is, it appears as if there’s a simple one-to-one mapping between the character codes and the 256 characters of the system font. However, if you install the Greek or Russian versions of Windows NT, you’ll discover that this is not the case. For example, if you install the Greek version of Windows NT, the American English, German, Greek, and Russian keyboards will generate the same Unicode character codes as the American version of Windows NT. However, the 200
- 201. Greek version of Windows NT will not display German-accented characters or Russian characters because these characters are not in the Greek system font. Similarly, the Russian version of Windows NT will not display the German-accented characters or Greek characters because these characters are not in the Russian system font. Where the Unicode version of KEYVIEW1 makes the most dramatic difference is under the Japanese version of Windows NT. You enter Japanese characters from the IME and they display correctly. The only problem is formatting: because the Japanese characters are often visually complex, they are displayed twice as wide as other characters. TrueType and Big Fonts The bitmap fonts that we’ve been using (with the exception of the fonts in the Japanese version of Windows) contain a maximum of 256 characters. This is to be expected, because the format of the bitmap font file goes back to the early days of Windows when character codes were assumed to be mere 8-bit values. That’s why when we use the SYSTEM_FONT or the SYSTEM_FIXED_FONT, there are always some characters from some languages that we can’t display properly. (The Japanese system font is a bit different because it’s a double-byte character set; most of the characters are actually stored in TrueType Collection files with a filename extension of .TCC.) TrueType fonts can contain more than 256 characters. Not all TrueType fonts have more than 256 characters, but the ones shipped with Windows 98 and Windows NT do. Or rather, they do if you’ve installed multilanguage support. In the Add/Remove Programs applet of the Control Panel, click the Windows Setup tab and make sure Multilanguage Support is checked. This multilanguage support involves five character sets: Baltic, Central European, Cyrillic, Greek, and Turkish. The Baltic character set is used for Estonian, Latvian, and Lithuanian. The Central European character set is used for Albanian, Czech, Croatian, Hungarian, Polish, Romanian, Slovak, and Slovenian. The Cyrillic character set is used for Bulgarian, Belarusian, Russian, Serbian, and Ukrainian. The TrueType fonts shipped with Windows 98 support those five character sets, plus the Western European (ANSI) character set that is used for virtually all other languages except those in the Far East (Chinese, Japanese, and Korean). TrueType fonts that support multiple character sets are sometimes referred to as “big fonts.” The word “big” in this context does not refer to the size of the characters, but to their quantity. You can take advantage of big fonts even in a non-Unicode program, which means that you can use big fonts to display characters in several different alphabets. However, you need to go beyond the GetStockObject function in obtaining a font to select into a device context. The functions CreateFont and CreateFontIndirect create a logical font, similar to the way CreatePen creates a logical pen and CreateBrush creates a logical brush. CreateFont has 14 arguments that describe the font you want to create. CreateFontIndirect has one argument, but that argument is a pointer to a LOGFONT structure, which has 14 fields that correspond to the arguments of the CreateFont function. I’ll discuss these functions in more detail in Chapter 17. For now, we’ll look at the CreateFont function, but we’ll focus on only a couple arguments. All the other arguments can be set to zero. If you need a fixed-pitch font (as we’ve been using for the KEYVIEW1 program), set the thirteenth argument to CreateFont to FIXED_PITCH. If you need a font of a nondefault character set (as we will be needing), set the ninth argument to CreateFont to something called the “character set ID.” This character set ID will be one of the following values defined in WINGDI.H. I’ve added comments that indicate the code pages associated with these character sets: #define ANSI_CHARSET 0 // 1252 Latin 1 (ANSI) #define DEFAULT_CHARSET 1 #define SYMBOL_CHARSET 2 #define MAC_CHARSET 77 #define SHIFTJIS_CHARSET 128 // 932 (DBCS, Japanese) #define HANGEUL_CHARSET 129 // 949 (DBCS, Korean) #define HANGUL_CHARSET 129 // “ “ #define JOHAB_CHARSET 130 // 1361 (DBCS, Korean) #define GB2312_CHARSET 134 // 936 (DBCS, Simplified Chinese) #define CHINESEBIG5_CHARSET 136 // 950 (DBCS, Traditional Chinese) #define GREEK_CHARSET 161 // 1253 Greek 201
- 202. #define TURKISH_CHARSET 162 // 1254 Latin 5 (Turkish) #define VIETNAMESE_CHARSET 163 // 1258 Vietnamese #define HEBREW_CHARSET 177 // 1255 Hebrew #define ARABIC_CHARSET 178 // 1256 Arabic #define BALTIC_CHARSET 186 // 1257 Baltic Rim #define RUSSIAN_CHARSET 204 // 1251 Cyrillic (Slavic) #define THAI_CHARSET 222 // 874 Thai #define EASTEUROPE_CHARSET 238 // 1250 Latin 2 (Central Europe) #define OEM_CHARSET 255 // Depends on country Why does Windows have two different numbers—a character set ID and a code page ID—to refer to the same character sets? It’s just one of the confusing quirks in Windows. Notice that the character set ID requires only 1 byte of storage, which is the size of the character set field in the LOGFONT structure. (Back in the Windows 1.0 days, memory and storage space were limited and every byte counted.) Notice that many different MS-DOS code pages are used in other countries, but only one character set ID—OEM_CHARSET—is used to refer to the MS-DOS character set. You’ll also notice that these character set values agree with the “CharSet” value shown on the top line of the STOKFONT program. In the American English version of Windows, we saw stock fonts that had character set IDs of 0 (ANSI_CHARSET) and 255 (OEM_CHARSET). We saw 161 (GREEK_CHARSET) in the Greek version of Windows, 204 (RUSSIAN_CHARSET) in the Russian version, and 128 (SHIFTJIS_CHARSET) in the Japanese version. In the code above, DBCS stands for double-byte character set, which is used in the Far East versions of Windows. Other versions of Windows do not support DBCS fonts, so you can’t use those character set IDs. CreateFont returns an HFONT value—a handle to a logical font. You can select this font into a device context using SelectObject. You must eventually delete every logical font you create by calling DeleteObject. The other part of the big font solution is the WM_INPUTLANGCHANGE message. Whenever you change the keyboard layout using the popup menu in the desktop tray, Windows sends your window procedure the WM_INPUTLANGCHANGE message. The wParam message parameter is the character set ID of the new keyboard layout. The KEYVIEW2 program shown in Figure 6-12 implements logic to change the font whenever the keyboard layout changes. Figure 6-12. The KEYVIEW2 program. KEYVIEW2.C /*-------------------------------------------------------- KEYVIEW2.C—Displays Keyboard and Character Messages © Charles Petzold, 1998 --------------------------------------------------------*/ #include <windows.h> LRESULT CALLBACK WndProc (HWND, UINT, WPARAM, LPARAM) ; int WINAPI WinMain (HINSTANCE hInstance, HINSTANCE hPrevInstance, PSTR szCmdLine, int iCmdShow) { static TCHAR szAppName[] = TEXT (“KeyView2”) ; HWND hwnd ; MSG msg ; WNDCLASS wndclass ; wndclass.style = CS_HREDRAW | CS_VREDRAW ; wndclass.lpfnWndProc = WndProc ; wndclass.cbClsExtra = 0 ; wndclass.cbWndExtra = 0 ; 202
- 203. wndclass.hInstance = hInstance ; wndclass.hIcon = LoadIcon (NULL, IDI_APPLICATION) ; wndclass.hCursor = LoadCursor (NULL, IDC_ARROW) ; wndclass.hbrBackground = (HBRUSH) GetStockObject (WHITE_BRUSH) ; wndclass.lpszMenuName = NULL ; wndclass.lpszClassName = szAppName ; if (!RegisterClass (&wndclass)) { MessageBox (NULL, TEXT (“This program requires Windows NT!”), szAppName, MB_ICONERROR) ; return 0 ; } hwnd = CreateWindow (szAppName, TEXT (“Keyboard Message Viewer #2”), WS_OVERLAPPEDWINDOW, CW_USEDEFAULT, CW_USEDEFAULT, CW_USEDEFAULT, CW_USEDEFAULT, NULL, NULL, hInstance, NULL) ; ShowWindow (hwnd, iCmdShow) ; UpdateWindow (hwnd) ; while (GetMessage (&msg, NULL, 0, 0)) { TranslateMessage (&msg) ; DispatchMessage (&msg) ; } return msg.wParam ; } LRESULT CALLBACK WndProc (HWND hwnd, UINT message, WPARAM wParam, LPARAM lParam) { static DWORD dwCharSet = DEFAULT_CHARSET ; static int cxClientMax, cyClientMax, cxClient, cyClient, cxChar, cyChar ; static int cLinesMax, cLines ; static PMSG pmsg ; static RECT rectScroll ; static TCHAR szTop[] = TEXT (“Message Key Char “) TEXT (“Repeat Scan Ext ALT Prev Tran”) ; static TCHAR szUnd[] = TEXT (“_______ ___ ____ “) TEXT (“______ ____ ___ ___ ____ ____”) ; static TCHAR * szFormat[2] = { TEXT (“%-13s %3d %-15s%c%6u %4d %3s %3s %4s %4s”), TEXT (“%-13s 0x%04X%1s%c %6u %4d %3s %3s %4s %4s”) } ; static TCHAR * szYes = TEXT (“Yes”) ; static TCHAR * szNo = TEXT (“No”) ; static TCHAR * szDown = TEXT (“Down”) ; static TCHAR * szUp = TEXT (“Up”) ; static TCHAR * szMessage [] = { TEXT (“WM_KEYDOWN”), TEXT (“WM_KEYUP”), TEXT (“WM_CHAR”), TEXT (“WM_DEADCHAR”), TEXT (“WM_SYSKEYDOWN”), TEXT (“WM_SYSKEYUP”), TEXT (“WM_SYSCHAR”), TEXT (“WM_SYSDEADCHAR”) } ; HDC hdc ; int i, iType ; PAINTSTRUCT ps ; TCHAR szBuffer[128], szKeyName [32] ; TEXTMETRIC tm ; 203
- 204. switch (message) { case WM_INPUTLANGCHANGE: dwCharSet = wParam ; // fall through case WM_CREATE: case WM_DISPLAYCHANGE: // Get maximum size of client area cxClientMax = GetSystemMetrics (SM_CXMAXIMIZED) ; cyClientMax = GetSystemMetrics (SM_CYMAXIMIZED) ; // Get character size for fixed-pitch font hdc = GetDC (hwnd) ; SelectObject (hdc, CreateFont (0, 0, 0, 0, 0, 0, 0, 0, dwCharSet, 0, 0, 0, FIXED_PITCH, NULL)) ; GetTextMetrics (hdc, &tm) ; cxChar = tm.tmAveCharWidth ; cyChar = tm.tmHeight ; DeleteObject (SelectObject (hdc, GetStockObject (SYSTEM_FONT))) ; ReleaseDC (hwnd, hdc) ; // Allocate memory for display lines if (pmsg) free (pmsg) ; cLinesMax = cyClientMax / cyChar ; pmsg = malloc (cLinesMax * sizeof (MSG)) ; cLines = 0 ; // fall through case WM_SIZE: if (message == WM_SIZE) { cxClient = LOWORD (lParam) ; cyClient = HIWORD (lParam) ; } // Calculate scrolling rectangle rectScroll.left = 0 ; rectScroll.right = cxClient ; rectScroll.top = cyChar ; rectScroll.bottom = cyChar * (cyClient / cyChar) ; InvalidateRect (hwnd, NULL, TRUE) ; if (message == WM_INPUTLANGCHANGE) return TRUE ; return 0 ; case WM_KEYDOWN: case WM_KEYUP: case WM_CHAR: case WM_DEADCHAR: case WM_SYSKEYDOWN: case WM_SYSKEYUP: case WM_SYSCHAR: case WM_SYSDEADCHAR: 204
- 205. // Rearrange storage array for (i = cLinesMax - 1 ; i > 0 ; i--) { pmsg[i] = pmsg[i - 1] ; } // Store new message pmsg[0].hwnd = hwnd ; pmsg[0].message = message ; pmsg[0].wParam = wParam ; pmsg[0].lParam = lParam ; cLines = min (cLines + 1, cLinesMax) ; // Scroll up the display ScrollWindow (hwnd, 0, -cyChar, &rectScroll, &rectScroll) ; break ; // ie, call DefWindowProc so Sys messages work case WM_PAINT: hdc = BeginPaint (hwnd, &ps) ; SelectObject (hdc, CreateFont (0, 0, 0, 0, 0, 0, 0, 0, dwCharSet, 0, 0, 0, FIXED_PITCH, NULL)) ; SetBkMode (hdc, TRANSPARENT) ; TextOut (hdc, 0, 0, szTop, lstrlen (szTop)) ; TextOut (hdc, 0, 0, szUnd, lstrlen (szUnd)) ; for (i = 0 ; i < min (cLines, cyClient / cyChar - 1) ; i++) { iType = pmsg[i].message == WM_CHAR || pmsg[i].message == WM_SYSCHAR || pmsg[i].message == WM_DEADCHAR || pmsg[i].message == WM_SYSDEADCHAR ; GetKeyNameText (pmsg[i].lParam, szKeyName, sizeof (szKeyName) / sizeof (TCHAR)) ; TextOut (hdc, 0, (cyClient / cyChar - 1 - i) * cyChar, szBuffer, wsprintf (szBuffer, szFormat [iType], szMessage [pmsg[i].message - WM_KEYFIRST], pmsg[i].wParam, (PTSTR) (iType ? TEXT (“ “) : szKeyName), (TCHAR) (iType ? pmsg[i].wParam : ‘ ‘), LOWORD (pmsg[i].lParam), HIWORD (pmsg[i].lParam) & 0xFF, 0x01000000 & pmsg[i].lParam ? szYes : szNo, 0x20000000 & pmsg[i].lParam ? szYes : szNo, 0x40000000 & pmsg[i].lParam ? szDown : szUp, 0x80000000 & pmsg[i].lParam ? szUp : szDown)) ; } DeleteObject (SelectObject (hdc, GetStockObject (SYSTEM_FONT))) ; EndPaint (hwnd, &ps) ; return 0 ; case WM_DESTROY: PostQuitMessage (0) ; return 0 ; } return DefWindowProc (hwnd, message, wParam, lParam) ; 205
- 206. } Notice that KEYVIEW2 clears the screen and reallocates its storage space whenever the keyboard input language changes. There are two reasons for this: First, because KEYVIEW2 isn’t being specific about the font it wants, the size of the font characters can change when the input language changes. The program needs to recalculate some variables based on the new character size. Second, KEYVIEW2 doesn’t retain the character set ID in effect at the time it receives each character message. Thus, if the keyboard input language changed and KEYVIEW2 needed to redraw its client area, all the characters would be displayed with the new font. I’ll discuss fonts and character sets more in Chapter 17. If you’d like to research internationalization issues more, you can find documentation at /Platform SDK/Windows Base Services/International Features, but much essential information is also located in /Platform SDK/Windows Base Services/General Library/String Manipulation. The Caret (Not the Cursor) When you type text into a program, generally a little underline, vertical bar, or box shows you where the next character you type will appear on the screen. You may know this as a "cursor," but you'll have to get out of that habit when programming for Windows. In Windows, it's called the "caret." The word "cursor" is reserved for the little bitmap image that represents the mouse position. The Caret Functions There are five essential caret functions: • CreateCaret Creates a caret associated with a window. • SetCaretPos Sets the position of the caret within the window. • ShowCaret Shows the caret. • HideCaret Hides the caret. • DestroyCaret Destroys the caret. There are also functions to get the current caret position (GetCaretPos) and to get and set the caret blink time (GetCaretBlinkTime and SetCaretBlinkTime). In Windows, the caret is customarily a horizontal line or box that is the size of a character, or a vertical line that is the height of a character. The vertical line caret is recommended when you use a proportional font such as the Windows default system font. Because the characters in a proportional font are not of a fixed size, the horizontal line or box can't be set to the size of a character. If you need a caret in your program, you should not simply create it during the WM_CREATE message of your window procedure and destroy it during the WM_DESTROY message. The reason this is not advised is that a message queue can support only one caret. Thus, if your program has more than one window, the windows must effectively share the same caret. This is not as restrictive as it sounds. When you think about it, the display of a caret in a window makes sense only when the window has the input focus. Indeed, the existence of a blinking caret is one of the visual cues that allows a user to recognize that he or she may type text into a program. Since only one window has the input focus at any time, it doesn't make sense for multiple windows to have carets blinking all at the same time. A program can determine if it has the input focus by processing the WM_SETFOCUS and WM_KILLFOCUS messages. As the names imply, a window procedure receives a WM_SETFOCUS message when it receives the input focus and a WM_KILLFOCUS message when it loses the input focus. These messages occur in pairs: A window procedure will always receive a WM_SETFOCUS message before it receives a WM_KILLFOCUS message, and it always receives an equal number of WM_SETFOCUS and WM_KILLFOCUS messages over the course of the window's lifetime. 206
- 207. The main rule for using the caret is simple: a window procedure calls CreateCaret during the WM_SETFOCUS message and DestroyWindow during the WM_KILLFOCUS message. There are a few other rules: The caret is created hidden. After calling CreateCaret, the window procedure must call ShowCaret for the caret to be visible. In addition, the window procedure must hide the caret by calling HideCaret whenever it draws something on its window during a message other than WM_PAINT. After it finishes drawing on the window, the program calls ShowCaret to display the caret again. The effect of HideCaret is additive: if you call HideCaret several times without calling ShowCaret, you must call ShowCaret the same number of times before the caret becomes visible again. The TYPER Program The TYPER program shown in Figure 6-13 brings together much of what we've learned in this chapter. You can think of TYPER as an extremely rudimentary text editor. You can type in the window, move the cursor (I mean caret) around with the cursor movement keys (or are they caret movement keys?), and erase the contents of the window by pressing Escape. The contents of the window are also erased when you resize the window or change the keyboard input language. There's no scrolling, no search and replace, no way to save files, no spelling checker, and no anthropomorphous paper clip, but it's a start. Figure 6-13. The TYPER program. TYPER.C /*-------------------------------------- TYPER.C -- Typing Program (c) Charles Petzold, 1998 --------------------------------------*/ #include <windows.h> #define BUFFER(x,y) *(pBuffer + y * cxBuffer + x) LRESULT CALLBACK WndProc (HWND, UINT, WPARAM, LPARAM) ; int WINAPI WinMain (HINSTANCE hInstance, HINSTANCE hPrevInstance, PSTR szCmdLine, int iCmdShow) { static TCHAR szAppName[] = TEXT ("Typer") ; HWND hwnd ; MSG msg ; WNDCLASS wndclass ; wndclass.style = CS_HREDRAW | CS_VREDRAW ; wndclass.lpfnWndProc = WndProc ; wndclass.cbClsExtra = 0 ; wndclass.cbWndExtra = 0 ; wndclass.hInstance = hInstance ; wndclass.hIcon = LoadIcon (NULL, IDI_APPLICATION) ; wndclass.hCursor = LoadCursor (NULL, IDC_ARROW) ; wndclass.hbrBackground = (HBRUSH) GetStockObject (WHITE_BRUSH) ; wndclass.lpszMenuName = NULL ; wndclass.lpszClassName = szAppName ; if (!RegisterClass (&wndclass)) { MessageBox (NULL, TEXT ("This program requires Windows NT!"), szAppName, MB_ICONERROR) ; 207
- 208. return 0 ; } hwnd = CreateWindow (szAppName, TEXT ("Typing Program"), WS_OVERLAPPEDWINDOW, CW_USEDEFAULT, CW_USEDEFAULT, CW_USEDEFAULT, CW_USEDEFAULT, NULL, NULL, hInstance, NULL) ; ShowWindow (hwnd, iCmdShow) ; UpdateWindow (hwnd) ; while (GetMessage (&msg, NULL, 0, 0)) { TranslateMessage (&msg) ; DispatchMessage (&msg) ; } return msg.wParam ; } LRESULT CALLBACK WndProc (HWND hwnd, UINT message, WPARAM wParam, LPARAM lParam) { static DWORD dwCharSet = DEFAULT_CHARSET ; static int cxChar, cyChar, cxClient, cyClient, cxBuffer, cyBuffer, xCaret, yCaret ; static TCHAR * pBuffer = NULL ; HDC hdc ; int x, y, i ; PAINTSTRUCT ps ; TEXTMETRIC tm ; switch (message) { case WM_INPUTLANGCHANGE: dwCharSet = wParam ; // fall through case WM_CREATE: hdc = GetDC (hwnd) ; SelectObject (hdc, CreateFont (0, 0, 0, 0, 0, 0, 0, 0, dwCharSet, 0, 0, 0, FIXED_PITCH, NULL)) ; GetTextMetrics (hdc, &tm) ; cxChar = tm.tmAveCharWidth ; cyChar = tm.tmHeight ; DeleteObject (SelectObject (hdc, GetStockObject (SYSTEM_FONT))) ; ReleaseDC (hwnd, hdc) ; // fall through case WM_SIZE: // obtain window size in pixels if (message == WM_SIZE) { cxClient = LOWORD (lParam) ; cyClient = HIWORD (lParam) ; } // calculate window size in characters cxBuffer = max (1, cxClient / cxChar) ; cyBuffer = max (1, cyClient / cyChar) ; // allocate memory for buffer and clear it if (pBuffer != NULL) 208
- 209. free (pBuffer) ; pBuffer = (TCHAR *) malloc (cxBuffer * cyBuffer * sizeof (TCHAR)) ; for (y = 0 ; y < cyBuffer ; y++) for (x = 0 ; x < cxBuffer ; x++) BUFFER(x,y) = ` ` ; // set caret to upper left corner xCaret = 0 ; yCaret = 0 ; if (hwnd == GetFocus ()) SetCaretPos (xCaret * cxChar, yCaret * cyChar) ; InvalidateRect (hwnd, NULL, TRUE) ; return 0 ; case WM_SETFOCUS: // create and show the caret CreateCaret (hwnd, NULL, cxChar, cyChar) ; SetCaretPos (xCaret * cxChar, yCaret * cyChar) ; ShowCaret (hwnd) ; return 0 ; case WM_KILLFOCUS: // hide and destroy the caret HideCaret (hwnd) ; DestroyCaret () ; return 0 ; case WM_KEYDOWN: switch (wParam) { case VK_HOME: xCaret = 0 ; break ; case VK_END: xCaret = cxBuffer - 1 ; break ; case VK_PRIOR: yCaret = 0 ; break ; case VK_NEXT: yCaret = cyBuffer - 1 ; break ; case VK_LEFT: xCaret = max (xCaret - 1, 0) ; break ; case VK_RIGHT: xCaret = min (xCaret + 1, cxBuffer - 1) ; break ; case VK_UP: yCaret = max (yCaret - 1, 0) ; break ; 209
- 210. case VK_DOWN: yCaret = min (yCaret + 1, cyBuffer - 1) ; break ; case VK_DELETE: for (x = xCaret ; x < cxBuffer - 1 ; x++) BUFFER (x, yCaret) = BUFFER (x + 1, yCaret) ; BUFFER (cxBuffer - 1, yCaret) = ` ` ; HideCaret (hwnd) ; hdc = GetDC (hwnd) ; SelectObject (hdc, CreateFont (0, 0, 0, 0, 0, 0, 0, 0, dwCharSet, 0, 0, 0, FIXED_PITCH, NULL)) ; TextOut (hdc, xCaret * cxChar, yCaret * cyChar, & BUFFER (xCaret, yCaret), cxBuffer - xCaret) ; DeleteObject (SelectObject (hdc, GetStockObject (SYSTEM_FONT))) ; ReleaseDC (hwnd, hdc) ; ShowCaret (hwnd) ; break ; } SetCaretPos (xCaret * cxChar, yCaret * cyChar) ; return 0 ; case WM_CHAR: for (i = 0 ; i < (int) LOWORD (lParam) ; i++) { switch (wParam) { case `b': // backspace if (xCaret > 0) { xCaret-- ; SendMessage (hwnd, WM_KEYDOWN, VK_DELETE, 1) ; } break ; case `t': // tab do { SendMessage (hwnd, WM_CHAR, ` `, 1) ; } while (xCaret % 8 != 0) ; break ; case `n': // line feed if (++yCaret == cyBuffer) yCaret = 0 ; break ; case `r': // carriage return xCaret = 0 ; if (++yCaret == cyBuffer) yCaret = 0 ; break ; case `x1B': // escape for (y = 0 ; y < cyBuffer ; y++) 210
- 211. for (x = 0 ; x < cxBuffer ; x++) BUFFER (x, y) = ` ` ; xCaret = 0 ; yCaret = 0 ; InvalidateRect (hwnd, NULL, FALSE) ; break ; default: // character codes BUFFER (xCaret, yCaret) = (TCHAR) wParam ; HideCaret (hwnd) ; hdc = GetDC (hwnd) ; SelectObject (hdc, CreateFont (0, 0, 0, 0, 0, 0, 0, 0, dwCharSet, 0, 0, 0, FIXED_PITCH, NULL)) ; TextOut (hdc, xCaret * cxChar, yCaret * cyChar, & BUFFER (xCaret, yCaret), 1) ; DeleteObject ( SelectObject (hdc, GetStockObject (SYSTEM_FONT))) ; ReleaseDC (hwnd, hdc) ; ShowCaret (hwnd) ; if (++xCaret == cxBuffer) { xCaret = 0 ; if (++yCaret == cyBuffer) yCaret = 0 ; } break ; } } SetCaretPos (xCaret * cxChar, yCaret * cyChar) ; return 0 ; case WM_PAINT: hdc = BeginPaint (hwnd, &ps) ; SelectObject (hdc, CreateFont (0, 0, 0, 0, 0, 0, 0, 0, dwCharSet, 0, 0, 0, FIXED_PITCH, NULL)) ; for (y = 0 ; y < cyBuffer ; y++) TextOut (hdc, 0, y * cyChar, & BUFFER(0,y), cxBuffer) ; DeleteObject (SelectObject (hdc, GetStockObject (SYSTEM_FONT))) ; EndPaint (hwnd, &ps) ; return 0 ; case WM_DESTROY: PostQuitMessage (0) ; return 0 ; } return DefWindowProc (hwnd, message, wParam, lParam) ; } To keep things reasonably simple, TYPER uses a fixed-pitch font. Writing a text editor for a proportional font is, as you might imagine, much more difficult. The program obtains a device context in several places: during the WM_CREATE message, the WM_KEYDOWN message, the WM_CHAR message, and the WM_PAINT message. Each time, calls to GetStockObject and SelectObject select a fixed-pitch font with the current character set. 211
- 212. During the WM_SIZE message, TYPER calculates the character width and height of the window and saves these values in the variables cxBuffer and cyBuffer. It then uses malloc to allocate a buffer to hold all the characters that can be typed in the window. Notice that the size of this buffer in bytes is the product of cxBuffer, cyBuffer, and sizeof (TCHAR), which can be 1 or 2 depending on whether the program is compiled for 8-bit character processing or Unicode. The xCaret and yCaret variables store the character position of the caret. During the WM_SETFOCUS message, TYPER calls CreateCaret to create a caret that is the width and height of a character. It then calls SetCaretPos to set the caret position and ShowCaret to make the caret visible. During the WM_KILLFOCUS message, TYPER calls HideCaret and DestroyCaret. The WM_KEYDOWN processing mostly involves the cursor movement keys. Home and End send the caret to the beginning and end of a line, and Page Up and Page Down send the caret to the top and bottom of the window. The arrow keys work as you would expect. For the Delete key, TYPER must move everything remaining in the buffer from the next caret position to the end of the line and then display a blank space at the end of the line. The WM_CHAR processing handles the Backspace, Tab, Linefeed (Ctrl-Enter), Enter, Escape, and character keys. Notice that I've used Repeat Count in lParam when processing the WM_CHAR message (under the assumption that every character the user types is important) but not during the WM_KEYDOWN message (to prevent inadvertent overscrolling). The Backspace and Tab processing is simplified somewhat by the use of the SendMessage function. Backspace is emulated by the Delete logic, and Tab is emulated by a series of spaces. As I mentioned earlier, a program should hide the caret when drawing on the window during messages other than WM_PAINT. TYPER does this when processing the WM_KEYDOWN message for the Delete key and the WM_CHAR message for character keys. In both these cases, TYPER alters the contents of the buffer and then draws the new character or characters on the window. Although TYPER uses the same logic as KEYVIEW2 to switch between character sets as the user switches keyboard layouts, it does not work quite right for Far Eastern versions of Windows. TYPER does not make any allowance for the double-width characters. This raises issues that are better covered in Chapter 17, which explores fonts and text output in more detail. 212
- 213. Chapter 7 -- The Mouse The mouse is a pointing device with one or more buttons. Despite much experimentation with other alternative input devices such as touch screens and light pens, the mouse reigns supreme. Together with variations such as trackballs, which are common on laptop computers, the mouse is the only alternative input device to achieve a massive— virtually universal—penetration in the PC market. This was not always the case. Indeed, the early developers of Microsoft Windows felt that they shouldn't require users to buy a mouse in order to use the product. So they made the mouse an optional accessory and provided a keyboard interface to all operations in Windows and the "applets" distributed with Windows. (For example, check out the help information for the Windows Calculator to see how each button is obsessively assigned a keyboard equivalent.) Third-party software developers were also encouraged to duplicate mouse functions with a keyboard interface in their applications. The early editions of this book attempted to further disseminate this philosophy. In theory, Windows now requires a mouse. At least that's what the box says. However, you can unplug your mouse and Windows will boot up fine (aside from a message box informing you that a mouse is not attached). Trying to use Windows without the mouse is akin to playing the piano with your toes (at least initially), but you can definitely do it. For that reason, I still like the idea of providing keyboard equivalents for mouse actions. Touch typists in particular prefer keeping their hands on the keyboard, and I suppose everyone has had the experience of "losing" a mouse on a cluttered desk or having a mouse too clogged up with mouse gunk to work well. The keyboard equivalents usually don't cost much in terms of thought or effort, and they can deliver more functionality to users who prefer them. Just as the keyboard is usually identified with entering and manipulating text data, the mouse is identified with drawing and manipulating graphical objects. Indeed, most of the sample programs in this chapter draw some graphics, putting to use what we learned in Chapter 5. Mouse Basics Windows 98 can support a one-button, two-button, or three-button mouse, or it can use a joystick or light pen to mimic a mouse. In the early days, Windows applications avoided the use of the second or third buttons in deference to users who had a one-button mouse. However, the two-button mouse has become the de facto standard, so the traditional reticence to use the second button is no longer justified. Indeed, the second button is now the standard for invoking a "context menu," which is a menu that appears in a window outside the normal menu bar, or for special dragging operations. (Dragging will be explained shortly.) However, programs should not rely upon the presence of a two-button mouse. In theory, you can determine if a mouse is present by using our old friend the GetSystemMetrics function: fMouse = GetSystemMetrics (SM_MOUSEPRESENT) ; The value of fMouse will be TRUE (nonzero) if a mouse is installed and 0 if a mouse is not installed. However, in Windows 98 this function always returns TRUE whether a mouse is attached or not. In Microsoft Windows NT, it works correctly. To determine the number of buttons on the installed mouse, use cButtons = GetSystemMetrics (SM_CMOUSEBUTTONS) ; This function should also return 0 if a mouse is not installed. However, under Windows 98 the function returns 2 if a mouse is not installed. Left-handed users can switch the mouse buttons using the Windows Control Panel. Although an application can determine whether this has been done by calling GetSystemMetrics with the SM_SWAPBUTTON parameter, this is not usually necessary. The button triggered by the index finger is considered to be the left button, even if it's physically on the right side of the mouse. However, in a training program, you might want to draw a mouse on the screen, and in that case, you might want to know if the mouse buttons have been swapped. 213
- 214. You can set other mouse parameters in the Control Panel, such as the double-click speed. From a Windows application you can set or obtain this information using the SystemParametersInfo function. Some Quick Definitions When the Windows user moves the mouse, Windows moves a small bitmapped picture on the display. This is called the "mouse cursor." The mouse cursor has a single-pixel "hot spot" that points to a precise location on the display. When I refer to the position of the mouse cursor on the screen, I really mean the position of the hot spot. Windows supports several predefined mouse cursors that programs can use. The most common is the slanted arrow named IDC_ARROW (using the identifier defined in WINUSER.H). The hot spot is the tip of the arrow. The IDC_CROSS cursor (used in the BLOKOUT programs shown later in this chapter) has a hot spot in the center of a crosshair pattern. The IDC_WAIT cursor is an hourglass generally used by programs to indicate they are busy. Programmers can also design their own cursors. You'll learn how in Chapter 10. The default cursor for a particular window is specified when defining the window class structure, for instance: wndclass.hCursor = LoadCursor (NULL, IDC_ARROW) ; The following terms describe the actions you take with mouse buttons: • Clicking Pressing and releasing a mouse button. • Double-clicking Pressing and releasing a mouse button twice in quick succession. • Dragging Moving the mouse while holding down a button. On a three-button mouse, the buttons are called the left button, the middle button, and the right button. Mouse- related identifiers defined in the Windows header files use the abbreviations LBUTTON, MBUTTON, and RBUTTON. A two-button mouse has only a left button and a right button. The single button on a one-button mouse is a left button. The Plural of Mouse Is… And now, to demonstrate my bravery, I will confront one of the most perplexing issues in the field of alternative input devices: what is the plural of "mouse"? Although everyone knows that multiple rodents are called mice, no one seems to have a definitive answer for what we call multiple input devices. Neither "mice" nor "mouses" sounds quite right. My customary reference—the third edition of the American Heritage Dictionary of the English Language—says that either is acceptable (with "mice" preferred), while the third edition of the Microsoft Press Computer Dictionary avoids the issue entirely. The book Wired Style: Principles of English Usage in the Digital Age (HardWired, 1996) by the editors of Wired magazine indicates that "mouses" is preferred to avoid confusion with rodents. Doug Engelbart, who invented the mouse in 1964, is of no help at all in resolving this issue. I once asked him about the plural of mouse and so did the editors of Wired. He says he doesn't know. Finally, with an air of high authority, the Microsoft Manual of Style for Technical Publications instructs us to "Avoid using the plural mice; if you need to refer to more than one mouse, use mouse devices." This may sound like a cop-out, but it's really quite sensible advice when neither plural sounds right. Indeed, most sentences that might require a plural for "mouse" can be recast to avoid it. For example, rather than saying "People use mice almost as much as keyboards," try "People use the mouse almost as much as the keyboard." Client-Area Mouse Messages In the previous chapter, you saw how Windows sends keyboard messages only to the window that has the input focus. Mouse messages are different: a window procedure receives mouse messages whenever the mouse passes over the window or is clicked within the window, even if the window is not active or does not have the input focus. 214
- 215. Windows defines 21 messages for the mouse. However, 11 of these messages do not relate to the client area. These are called "nonclient-area messages," and Windows applications usually ignore them. When the mouse is moved over the client area of a window, the window procedure receives the message WM_MOUSEMOVE. When a mouse button is pressed or released within the client area of a window, the window procedure receives the messages in this table: Button Pressed Released Pressed (Second Click) Left WM_LBUTTONDOWN WM_LBUTTONUP WM_LBUTTONDBLCLK Middle WM_MBUTTONDOWN WM_MBUTTONUP WM_MBUTTONDBLCLK Right WM_RBUTTONDOWN WM_RBUTTONUP WM_RBUTTONDBLCLK Your window procedure receives MBUTTON messages only for a three-button mouse and RBUTTON messages only for a two-button mouse. The window procedure receives DBLCLK (double-click) messages only if the window class has been defined to receive them (as described in the section titled "Mouse Double-Clicks"). For all these messages, the value of lParam contains the position of the mouse. The low word is the x-coordinate, and the high word is the y-coordinate relative to the upper left corner of the client area of the window. You can extract these values using the LOWORD and HIWORD macros: x = LOWORD (lParam) ; y = HIWORD (lParam) ; The value of wParam indicates the state of the mouse buttons and the Shift and Ctrl keys. You can test wParam using these bit masks defined in the WINUSER.H header file. The MK prefix stands for "mouse key." MK_LBUTTON Left button is down MK_MBUTTON Middle button is down MK_RBUTTON Right button is down MK_SHIFT Shift key is down MK_CONTROL Ctrl key is down For example, if you receive a WM_LBUTTONDOWN message, and if the value wparam & MK_SHIFT is TRUE (nonzero), you know that the Shift key was down when the left button was pressed. As you move the mouse over the client area of a window, Windows does not generate a WM_MOUSEMOVE message for every possible pixel position of the mouse. The number of WM_MOUSEMOVE messages your program receives depends on the mouse hardware and on the speed at which your window procedure can process the mouse movement messages. In other words, Windows does not fill up a message queue with unprocessed WM_MOUSEMOVE messages. You'll get a good idea of the rate of WM_MOUSEMOVE messages when you experiment with the CONNECT program described below. If you click the left mouse button in the client area of an inactive window, Windows changes the active window to the window that is being clicked and then passes the WM_LBUTTONDOWN message to the window procedure. When your window procedure gets a WM_LBUTTONDOWN message, your program can safely assume the window is active. However, your window procedure can receive a WM_LBUTTONUP message without first receiving a WM_LBUTTONDOWN message. This can happen if the mouse button is pressed in one window, moved to your window, and released. Similarly, the window procedure can receive a WM_LBUTTONDOWN without a corresponding WM_LBUTTONUP message if the mouse button is released while positioned over another window. There are two exceptions to these rules: • A window procedure can "capture the mouse" and continue to receive mouse messages even when the 215
- 216. mouse is outside the window's client area. You'll learn how to capture the mouse later in this chapter. • If a system modal message box or a system modal dialog box is on the display, no other program can receive mouse messages. System modal message boxes and dialog boxes prohibit switching to another window while the box is active. An example of a system modal message box is the one that appears when you shut down your Windows session. Simple Mouse Processing: An Example The CONNECT program, shown in Figure 7-1, does some simple mouse processing to let you get a good feel for how Windows sends mouse messages to your program. Figure 7-1. The CONNECT program. CONNECT.C /*-------------------------------------------------- CONNECT.C -- Connect-the-Dots Mouse Demo Program (c) Charles Petzold, 1998 --------------------------------------------------*/ #include <windows.h> #define MAXPOINTS 1000 LRESULT CALLBACK WndProc (HWND, UINT, WPARAM, LPARAM) ; int WINAPI WinMain (HINSTANCE hInstance, HINSTANCE hPrevInstance, PSTR szCmdLine, int iCmdShow) { static TCHAR szAppName[] = TEXT ("Connect") ; HWND hwnd ; MSG msg ; WNDCLASS wndclass ; wndclass.style = CS_HREDRAW | CS_VREDRAW ; wndclass.lpfnWndProc = WndProc ; wndclass.cbClsExtra = 0 ; wndclass.cbWndExtra = 0 ; wndclass.hInstance = hInstance ; wndclass.hIcon = LoadIcon (NULL, IDI_APPLICATION) ; wndclass.hCursor = LoadCursor (NULL, IDC_ARROW) ; wndclass.hbrBackground = (HBRUSH) GetStockObject (WHITE_BRUSH) ; wndclass.lpszMenuName = NULL ; wndclass.lpszClassName = szAppName ; if (!RegisterClass (&wndclass)) { MessageBox (NULL, TEXT ("Program requires Windows NT!"), szAppName, MB_ICONERROR) ; return 0 ; } hwnd = CreateWindow (szAppName, TEXT ("Connect-the-Points Mouse Demo"), WS_OVERLAPPEDWINDOW, CW_USEDEFAULT, CW_USEDEFAULT, CW_USEDEFAULT, CW_USEDEFAULT, NULL, NULL, hInstance, NULL) ; 216
- 217. ShowWindow (hwnd, iCmdShow) ; UpdateWindow (hwnd) ; while (GetMessage (&msg, NULL, 0, 0)) { TranslateMessage (&msg) ; DispatchMessage (&msg) ; } return msg.wParam ; } LRESULT CALLBACK WndProc (HWND hwnd, UINT message, WPARAM wParam, LPARAM lParam) { static POINT pt[MAXPOINTS] ; static int iCount ; HDC hdc ; int i, j ; PAINTSTRUCT ps ; switch (message) { case WM_LBUTTONDOWN: iCount = 0 ; InvalidateRect (hwnd, NULL, TRUE) ; return 0 ; case WM_MOUSEMOVE: if (wParam & MK_LBUTTON && iCount < 1000) { pt[iCount ].x = LOWORD (lParam) ; pt[iCount++].y = HIWORD (lParam) ; hdc = GetDC (hwnd) ; SetPixel (hdc, LOWORD (lParam), HIWORD (lParam), 0) ; ReleaseDC (hwnd, hdc) ; } return 0 ; case WM_LBUTTONUP: InvalidateRect (hwnd, NULL, FALSE) ; return 0 ; case WM_PAINT: hdc = BeginPaint (hwnd, &ps) ; SetCursor (LoadCursor (NULL, IDC_WAIT)) ; ShowCursor (TRUE) ; for (i = 0 ; i < iCount - 1 ; i++) for (j = i + 1 ; j < iCount ; j++) { MoveToEx (hdc, pt[i].x, pt[i].y, NULL) ; LineTo (hdc, pt[j].x, pt[j].y) ; } ShowCursor (FALSE) ; SetCursor (LoadCursor (NULL, IDC_ARROW)) ; EndPaint (hwnd, &ps) ; return 0 ; case WM_DESTROY: PostQuitMessage (0) ; 217
- 218. return 0 ; } return DefWindowProc (hwnd, message, wParam, lParam) ; } CONNECT processes three mouse messages: • WM_LBUTTONDOWN CONNECT clears the client area. • WM_MOUSEMOVE If the left button is down, CONNECT draws a black dot on the client area at the mouse position and saves the coordinates. • WM_LBUTTONUP CONNECT connects every dot shown in the client area to every other dot. Sometimes this results in a pretty design, sometimes in a dense blob. (See Figure 7-2.) Figure 7-2. The CONNECT display. To use CONNECT, bring the mouse cursor into the client area, press the left button, move the mouse around a little, and then release the left button. CONNECT works best for a curved pattern of a few dots, which you can draw by moving the mouse quickly while the left button is depressed. CONNECT uses three GDI function calls that I discussed in Chapter 5: SetPixel draws a black pixel for each WM_MOUSEMOVE message when the left mouse button is depressed. (On high-resolution displays, these pixels might be nearly invisible.) Drawing the lines requires MoveToEx and LineTo. If you move the mouse cursor out of the client area before releasing the button, CONNECT does not connect the dots because it doesn't receive the WM_LBUTTONUP message. If you move the mouse back into the client area and press the left button again, CONNECT clears the client area. If you want to continue a design after releasing the button outside the client area, press the left button again while the mouse is outside the client area and then move the 218
- 219. mouse back inside. CONNECT stores a maximum of 1000 points. If the number of points is P, the number of lines CONNECT draws is equal to P × (P - 1) / 2. With 1000 points, this involves almost 500,000 lines, which might take a minute or so to draw, depending on your hardware. Because Windows 98 is a preemptive multitasking environment, you can switch to other programs at this time. However, you can't do anything else with the CONNECT program (such as move it or change the size) while the program is busy. In Chapter 20, we'll examine methods for dealing with problems such as this. Because CONNECT might take some time to draw the lines, it switches to an hourglass cursor and then back again while processing the WM_PAINT message. This requires two calls to the SetCursor function using two stock cursors. CONNECT also calls ShowCursor twice, once with a TRUE parameter and the second time with a FALSE parameter. I'll discuss these calls in more detail later in this chapter, in the section "Emulating the Mouse with the Keyboard". Sometimes the word "tracking" is used to refer to the way that programs process mouse movement. Tracking does not mean, however, that your program sits in a loop in its window procedure while attempting to follow the mouse's movements on the display. The window procedure instead processes each mouse message as it comes and then quickly returns control to Windows. Processing Shift Keys When CONNECT receives a WM_MOUSEMOVE message, it performs a bitwise AND operation on the value of wParam and MK_LBUTTON to determine if the left button is depressed. You can also use wParam to determine the state of the Shift keys. For instance, if processing must be dependent on the status of the Shift and Ctrl keys, you might use logic that looks like this: if (wParam & MK_SHIFT) { if (wParam & MK_CONTROL) { [Shift and Ctrl keys are down] } else { [Shift key is down] } { else { if (wParam & MK_CONTROL] { [Ctrl key is down] } else { [neither Shift nor Ctrl key is down] } } If you want to use both the left and right mouse buttons in your program, and if you also want to accommodate those users with a one-button mouse, you can write your code so that Shift in combination with the left button is equivalent to the right button. In that case, your mouse button-click processing might look something like this: case WM_LBUTTONDOWN: if (!(wParam & MK_SHIFT)) { [left button logic] return 0 ; } 219
- 220. // Fall through case WM_RBUTTONDOWN: [right button logic] return 0 ; The Window function GetKeyState (described in Chapter 6) can also return the status of the mouse buttons or shift keys using the virtual key codes VK_LBUTTON, VK_RBUTTON, VK_MBUTTON, VK_SHIFT, and VK_CONTROL. The button or key is down if the value returned from GetKeyState is negative. Because GetKeyState returns mouse or key states as of the message currently being processed, the status information is properly synchronized with the messages. Just as you cannot use GetKeyState for a key that has yet to be pressed, you cannot use it for a mouse button that has yet to be pressed. Don't do this: while (GetKeyState (VK_LBUTTON) >= 0) ; // WRONG !!! The GetKeyState function will report that the left button is depressed only if the button is already depressed when you process the message during which you call GetKeyState. Mouse Double-Clicks A mouse double-click is two clicks in quick succession. To qualify as a double-click, the two clicks must occur in close physical proximity of one another (by default, about an area as wide as an average system font character and half as high) and within a specific interval of time called the "double-click speed." You can change that time interval in the Control Panel. If you want your window procedure to receive double-click mouse messages, you must include the identifier CS_DBLCLKS when initializing the style field in the window class structure before calling RegisterClass: wndclass.style = CS_HREDRAW | CS_VREDRAW | CS_DBLCLKS ; If you do not include CS_DBLCLKS in the window style and the user clicks the left mouse button twice in quick succession, your window procedure receives these messages: WM_LBUTTONDOWN WM_LBUTTONUP WM_LBUTTONDOWN WM_LBUTTONUP The window procedure might also receive other messages between these button messages. If you want to implement your own double-click logic, you can use the Windows function GetMessageTime to obtain the relative times of the WM_LBUTTONDOWN messages. This function is discussed in more detail in Chapter 8. If you include CS_DBLCLKS in your window class style, the window procedure receives these messages for a double-click: WM_LBUTTONDOWN WM_LBUTTONUP WM_LBUTTONDBLCLK WM_LBUTTONUP The WM_LBUTTONDBLCLK message simply replaces the second WM_LBUTTONDOWN message. Double-click messages are much easier to process if the first click of a double-click performs the same action as a single click. The second click (the WM_LBUTTONDBLCLK message) then does something in addition to the first click. For example, look at how the mouse works with the file lists in Windows Explorer. A single click selects the file. Windows Explorer highlights the file with a reverse-video bar. A double-click performs two actions: the first click selects the file, just as a single click does; the second click directs Windows Explorer to open the file. That's fairly easy logic. Mouse-handling logic could get more complex if the first click of a double-click did not perform the same action as a single click. 220
- 221. Nonclient-Area Mouse Messages The 10 mouse messages discussed so far occur when the mouse is moved or clicked within the client area of a window. If the mouse is outside a window's client area but within the window, Windows sends the window procedure a "nonclient-area" mouse message. The nonclient area of a window includes the title bar, the menu, and the window scroll bars. You do not usually need to process nonclient-area mouse messages. Instead, you simply pass them on to DefWindowProc so that Windows can perform system functions. In this respect, the nonclient-area mouse messages are similar to the system keyboard messages WM_SYSKEYDOWN, WM_SYSKEYUP, and WM_SYSCHAR. The nonclient-area mouse messages parallel almost exactly the client-area mouse messages. The message identifiers include the letters "NC" to indicate "nonclient." If the mouse is moved within a nonclient area of a window, the window procedure receives the message WM_NCMOUSEMOVE. The mouse buttons generate these messages: Button Pressed Released Pressed (Second Click) Left WM_NCLBUTTONDOW N WM_NCLBUTTONUP WM_NCLBUTTONDBLCLK Middle WM_NCMBUTTONDOW N WM_NCMBUTTONUP WM_NCMBUTTONDBLCLK Right WM_NCRBUTTONDOW N WM_NCRBUTTONUP WM_NCRBUTTONDBLCLK The wParam and lParam parameters for nonclient-area mouse messages are somewhat different from those for client-area mouse messages. The wParam parameter indicates the nonclient area where the mouse was moved or clicked. It is set to one of the identifiers beginning with HT (standing for "hit-test") that are defined in the WINUSER.H. The lParam parameter contains an x-coordinate in the low word and a y-coordinate in the high word. However, these are screen coordinates, not client-area coordinates as they are for client-area mouse messages. For screen coordinates, the upper-left corner of the display area has x and y values of 0. Values of x increase as you move to the right, and values of y increase as you move down the screen. (See Figure 7-3.) You can convert screen coordinates to client-area coordinates and vice versa with these two Windows functions: ScreenToClient (hwnd, &pt) ; ClientToScreen (hwnd, &pt) ; where pt is a POINT structure. These two functions convert the values stored in the structure without preserving the old values. Note that if a screen-coordinate point is above or to the left of the window's client area, the x or y value of the client-area coordinate could be negative. 221
- 222. Figure 7-3. Screen coordinates and client-area coordinates. The Hit-Test Message If you've been keeping count, you know that so far we've covered 20 of the 21 mouse messages. The last message is WM_NCHITTEST, which stands for "nonclient hit test." This message precedes all other client-area and nonclient- area mouse messages. The lParam parameter contains the x and y screen coordinates of the mouse position. The wParam parameter is not used. Windows applications generally pass this message to DefWindowProc. Windows then uses the WM_NCHITTEST message to generate all other mouse messages based on the position of the mouse. For nonclient-area mouse messages, the value returned from DefWindowProc when processing WM_NCHITTEST becomes the wParam parameter in the mouse message. This value can be any of the wParam values that accompany the nonclient-area mouse messages plus the following: HTCLIENT Client area HTNOWHERE Not on any window HTTRANSPARENT A window covered by another window HTERROR Causes DefWindowProc to produce a beep If DefWindowProc returns HTCLIENT after it processes a WM_NCHITTEST message, Windows converts the screen coordinates to client-area coordinates and generates a client-area mouse message. If you remember how we disabled all system keyboard functions by trapping the WM_SYSKEYDOWN message, 222
- 223. you may wonder if you can do something similar by trapping mouse messages. Sure! If you include the lines case WM_NCHITTEST: return (LRESULT) HTNOWHERE ; in your window procedure, you will effectively disable all client-area and nonclient-area mouse messages to your window. The mouse buttons will simply not work while the mouse is anywhere within your window, including the system menu icon, the sizing buttons, and the close button. Messages Beget Messages Windows uses the WM_NCHITTEST message to generate all other mouse messages. The idea of messages giving birth to other messages is common in Windows. Let's take an example. As you may know, if you double-click the system menu icon of a Windows program, the window will be terminated. The double-click generates a series of WM_NCHITTEST messages. Because the mouse is positioned over the system menu icon, DefWindowProc returns a value of HTSYSMENU and Windows puts a WM_NCLBUTTONDBLCLK message in the message queue with wParam equal to HTSYSMENU. The window procedure usually passes that mouse message to DefWindowProc. When DefWindowProc receives the WM_NCLBUTTONDBLCLK message with wParam equal to HTSYSMENU, it puts a WM_SYSCOMMAND message with wParam equal to SC_CLOSE in the message queue. (This WM_SYSCOMMAND message is also generated when a user selects Close from the system menu.) Again the window procedure usually passes that message to DefWindowProc. DefWindowProc processes the message by sending a WM_CLOSE message to the window procedure. If the program wants to require confirmation from a user before terminating, the window procedure can trap WM_CLOSE. Otherwise, DefWindowProc processes WM_CLOSE by calling the DestroyWindow function. Among other chores, DestroyWindow sends a WM_DESTROY message to the window procedure. Normally, a window procedure processes WM_DESTROY with the code case WM_DESTROY: PostQuitMessage (0) ; return 0 ; The PostQuitMessage causes Windows to place a WM_QUIT message in the message queue. This message never reaches the window procedure because it causes GetMessage to return 0, which terminates the message loop and the program. Hit-Testing in Your Programs Earlier I discussed how Windows Explorer responds to mouse clicks and double-clicks. Obviously, the program (or more precisely the list view control that Windows Explorer uses) must first determine exactly which file or directory the user is pointing at with the mouse. This is called "hit-testing." Just as DefWindowProc must do some hit-testing when processing WM_NCHITTEST messages, a window procedure often must do hit-testing of its own within the client area. In general, hit-testing involves calculations using the x and y coordinates passed to your window procedure in the lParam parameter of the mouse message. A Hypothetical Example Here's an example. Suppose your program needs to display several columns of alphabetically sorted files. Normally, you would use the list view control because it does all the hit-testing work for you. But let's suppose you can't use it for some reason. You need to do it yourself. Let's assume that the filenames are stored in a sorted array of pointers to character strings named szFileNames. Let's also assume that the file list starts at the top of the client area, which is cxClient pixels wide and cyClient pixels high. The columns are cxColWidth pixels wide; the characters are cyChar pixels high. The number of files you can 223
- 224. fit in each column is iNumInCol = cyClient / cyChar ; When your program receives a mouse click message, you can obtain the cxMouse and cyMouse coordinates from lParam. You then calculate which column of filenames the user is pointing at by using this formula: iColumn = cxMouse / cxColWidth ; The position of the filename in relation to the top of the column is iFromTop = cyMouse / cyChar ; Now you can calculate an index to the szFileNames array. iIndex = iColumn * iNumInCol + iFromTop ; If iIndex exceeds the number of files in the array, the user is clicking on a blank area of the display. In many cases, hit-testing is more complex than this example suggests. When you display a graphical image containing many parts, you must determine the coordinates for each item you display. In hit-testing calculations, you must go backward from the coordinates to the object. This can become quite messy in a word-processing program that uses variable font sizes, because you must work backward to find the character position with the string. A Sample Program The CHECKER1 program, shown in Figure 7-4, demonstrates some simple hit-testing. The program divides the client area into a 5-by-5 array of 25 rectangles. If you click the mouse on one of the rectangles, the rectangle is filled with an X. If you click there again, the X is removed. Figure 7-4. The CHECKER1 program. CHECKER1.C /*------------------------------------------------- CHECKER1.C -- Mouse Hit-Test Demo Program No. 1 (c) Charles Petzold, 1998 -------------------------------------------------*/ #include <windows.h> #define DIVISIONS 5 LRESULT CALLBACK WndProc (HWND, UINT, WPARAM, LPARAM) ; int WINAPI WinMain (HINSTANCE hInstance, HINSTANCE hPrevInstance, PSTR szCmdLine, int iCmdShow) { static TCHAR szAppName[] = TEXT ("Checker1") ; HWND hwnd ; MSG msg ; WNDCLASS wndclass ; wndclass.style = CS_HREDRAW | CS_VREDRAW ; wndclass.lpfnWndProc = WndProc ; wndclass.cbClsExtra = 0 ; wndclass.cbWndExtra = 0 ; 224
- 225. wndclass.hInstance = hInstance ; wndclass.hIcon = LoadIcon (NULL, IDI_APPLICATION) ; wndclass.hCursor = LoadCursor (NULL, IDC_ARROW) ; wndclass.hbrBackground = (HBRUSH) GetStockObject (WHITE_BRUSH) ; wndclass.lpszMenuName = NULL ; wndclass.lpszClassName = szAppName ; if (!RegisterClass (&wndclass)) { MessageBox (NULL, TEXT ("Program requires Windows NT!"), szAppName, MB_ICONERROR) ; return 0 ; } hwnd = CreateWindow (szAppName, TEXT ("Checker1 Mouse Hit-Test Demo"), WS_OVERLAPPEDWINDOW, CW_USEDEFAULT, CW_USEDEFAULT, CW_USEDEFAULT, CW_USEDEFAULT, NULL, NULL, hInstance, NULL) ; ShowWindow (hwnd, iCmdShow) ; UpdateWindow (hwnd) ; while (GetMessage (&msg, NULL, 0, 0)) { TranslateMessage (&msg) ; DispatchMessage (&msg) ; } return msg.wParam ; } LRESULT CALLBACK WndProc (HWND hwnd, UINT message, WPARAM wParam, LPARAMlParam) { static BOOL fState[DIVISIONS][DIVISIONS] ; static int cxBlock, cyBlock ; HDC hdc ; int x, y ; PAINTSTRUCT ps ; RECT rect ; switch (message) { case WM_SIZE : cxBlock = LOWORD (lParam) / DIVISIONS ; cyBlock = HIWORD (lParam) / DIVISIONS ; return 0 ; case WM_LBUTTONDOWN : x = LOWORD (lParam) / cxBlock ; y = HIWORD (lParam) / cyBlock ; if (x < DIVISIONS && y < DIVISIONS) { fState [x][y] ^= 1 ; rect.left = x * cxBlock ; rect.top = y * cyBlock ; rect.right = (x + 1) * cxBlock ; rect.bottom = (y + 1) * cyBlock ; InvalidateRect (hwnd, &rect, FALSE) ; } else MessageBeep (0) ; 225
- 226. return 0 ; case WM_PAINT : hdc = BeginPaint (hwnd, &ps) ; for (x = 0 ; x < DIVISIONS ; x++) for (y = 0 ; y < DIVISIONS ; y++) { Rectangle (hdc, x * cxBlock, y * cyBlock, (x + 1) * cxBlock, (y + 1) * cyBlock) ; if (fState [x][y]) { MoveToEx (hdc, x * cxBlock, y * cyBlock, NULL) ; LineTo (hdc, (x+1) * cxBlock, (y+1) * cyBlock) ; MoveToEx (hdc, x * cxBlock, (y+1) * cyBlock, NULL) ; LineTo (hdc, (x+1) * cxBlock, y * cyBlock) ; } } EndPaint (hwnd, &ps) ; return 0 ; case WM_DESTROY : PostQuitMessage (0) ; return 0 ; } return DefWindowProc (hwnd, message, wParam, lParam) ; } Figure 7-5 shows the CHECKER1 display. All 25 rectangles drawn by the program have the same width and the same height. These width and height values are stored in cxBlock and cyBlock, which are recalculated whenever the size of the client area changes. The WM_LBUTTONDOWN logic uses the mouse coordinates to determine which rectangle has been clicked. It flags the current state of the rectangle in the array fState and invalidates the rectangle to generate a WM_PAINT message. 226
- 227. Figure 7-5. The CHECKER1 display. If the width or height of the client area is not evenly divisible by five, a small strip of client area at the left or bottom will not be covered by a rectangle. For error processing, CHECKER1 responds to a mouse click in this area by calling MessageBeep. When CHECKER1 receives a WM_PAINT message, it repaints the entire client area by drawing rectangles using the GDI Rectangle function. If the fState value is set, CHECKER1 draws two lines using the MoveToEx and LineTo functions. During WM_PAINT processing, CHECKER1 does not check whether each rectangular area lies within the invalid rectangle, but it could. One method for checking validity involves building a RECT structure for each rectangular block within the loop (using the same formulas as in the WM_LBUTTONDOWN logic) and checking whether that rectangle intersects the invalid rectangle (available as ps.rcPaint) by using the function IntersectRect. Emulating the Mouse with the Keyboard To use CHECKER1, you need to use the mouse. We'll be adding a keyboard interface to the program shortly, as we did for the SYSMETS program in Chapter 6. However, adding a keyboard interface to a program that uses the mouse cursor for pointing purposes requires that we also must worry about displaying and moving the mouse cursor. Even if a mouse device is not installed, Windows can still display a mouse cursor. Windows maintains something called a "display count" for this cursor. If a mouse is installed, the display count is initially 0; if not, the display count is initially -1. The mouse cursor is displayed only if the display count is non-negative. You can increment the display count by calling ShowCursor (TRUE) ; and decrement it by calling 227
- 228. ShowCursor (FALSE) ; You do not need to determine if a mouse is installed before using ShowCursor. If you want to display the mouse cursor regardless of the presence of the mouse, simply increment the display count by calling ShowCursor. After you increment the display count once, decrementing it will hide the cursor if no mouse is installed but leave it displayed if a mouse is present. Windows maintains a current mouse cursor position even if a mouse is not installed. If a mouse is not installed and you display the mouse cursor, it might appear in any part of the display and will remain in that position until you explicitly move it. You can obtain the cursor position by calling GetCursorPos (&pt) ; where pt is a POINT structure. The function fills in the POINT fields with the x and y coordinates of the mouse. You can set the cursor position by using SetCursorPos (x, y) ; In both cases, the x and y values are screen coordinates, not client-area coordinates. (This should be evident because the functions do not require a hwnd parameter.) As noted earlier, you can convert screen coordinates to client-area coordinates and vice versa by calling ScreenToClient and ClientToScreen. If you call GetCursorPos while processing a mouse message and you convert to client-area coordinates, these coordinates might be slightly different from those encoded in the lParam parameter of the mouse message. The coordinates returned from GetCursorPos indicate the current position of the mouse. The coordinates in lParam are the coordinates of the mouse at the time the message was generated. You'll probably want to write keyboard logic that moves the mouse cursor with the keyboard arrow keys and that simulates the mouse button with the Spacebar or Enter key. What you don't want to do is move the mouse cursor one pixel per keystroke. That forces a user to hold down an arrow key for too long a time to move it. If you need to implement a keyboard interface to the mouse cursor but still maintain the ability to position the cursor at precise pixel locations, you can process keystroke messages in such as way that when you hold down an arrow key the mouse cursor starts moving slowly but then speeds up. You'll recall that the lParam parameter in WM_KEYDOWN messages indicates whether the keystroke messages are the result of typematic action. This is an excellent application of that information. Add a Keyboard Interface to CHECKER The CHECKER2 program, shown in Figure 7-6, is the same as CHECKER1, except that it includes a keyboard interface. You can use the Left, Right, Up, and Down arrow keys to move the cursor among the 25 rectangles. The Home key sends the cursor to the upper left rectangle; the End key drops it down to the lower right rectangle. Both the Spacebar and Enter keys toggle the X mark. Figure 7-6. The CHECKER2 program. CHECKER2.C /*------------------------------------------------- CHECKER2.C -- Mouse Hit-Test Demo Program No. 2 (c) Charles Petzold, 1998 -------------------------------------------------*/ #include <windows.h> 228
- 229. #define DIVISIONS 5 LRESULT CALLBACK WndProc (HWND, UINT, WPARAM, LPARAM) ; int WINAPI WinMain (HINSTANCE hInstance, HINSTANCE hPrevInstance, PSTR szCmdLine, int iCmdShow) { static TCHAR szAppName[] = TEXT ("Checker2") ; HWND hwnd ; MSG msg ; WNDCLASS wndclass ; wndclass.style = CS_HREDRAW | CS_VREDRAW ; wndclass.lpfnWndProc = WndProc ; wndclass.cbClsExtra = 0 ; wndclass.cbWndExtra = 0 ; wndclass.hInstance = hInstance ; wndclass.hIcon = LoadIcon (NULL, IDI_APPLICATION) ; wndclass.hCursor = LoadCursor (NULL, IDC_ARROW) ; wndclass.hbrBackground = (HBRUSH) GetStockObject (WHITE_BRUSH) ; wndclass.lpszMenuName = NULL ; wndclass.lpszClassName = szAppName ; if (!RegisterClass (&wndclass)) { MessageBox (NULL, TEXT ("Program requires Windows NT!"), szAppName, MB_ICONERROR) ; return 0 ; } hwnd = CreateWindow (szAppName, TEXT ("Checker2 Mouse Hit-Test Demo"), WS_OVERLAPPEDWINDOW, CW_USEDEFAULT, CW_USEDEFAULT, CW_USEDEFAULT, CW_USEDEFAULT, NULL, NULL, hInstance, NULL) ; ShowWindow (hwnd, iCmdShow) ; UpdateWindow (hwnd) ; while (GetMessage (&msg, NULL, 0, 0)) { TranslateMessage (&msg) ; DispatchMessage (&msg) ; } return msg.wParam ; } LRESULT CALLBACK WndProc (HWND hwnd, UINT message, WPARAM wParam, LPARAM lParam) { static BOOL fState[DIVISIONS][DIVISIONS] ; static int cxBlock, cyBlock ; HDC hdc ; int x, y ; PAINTSTRUCT ps ; POINT point ; RECT rect ; switch (message) { case WM_SIZE : cxBlock = LOWORD (lParam) / DIVISIONS ; cyBlock = HIWORD (lParam) / DIVISIONS ; return 0 ; case WM_SETFOCUS : 229
- 230. ShowCursor (TRUE) ; return 0 ; case WM_KILLFOCUS : ShowCursor (FALSE) ; return 0 ; case WM_KEYDOWN : GetCursorPos (&point) ; ScreenToClient (hwnd, &point) ; x = max (0, min (DIVISIONS - 1, point.x / cxBlock)) ; y = max (0, min (DIVISIONS - 1, point.y / cyBlock)) ; switch (wParam) { case VK_UP : y-- ; break ; case VK_DOWN : y++ ; break ; case VK_LEFT : x-- ; break ; case VK_RIGHT : x++ ; break ; case VK_HOME : x = y = 0 ; break ; case VK_END : x = y = DIVISIONS - 1 ; break ; case VK_RETURN : case VK_SPACE : SendMessage (hwnd, WM_LBUTTONDOWN, MK_LBUTTON, MAKELONG (x * cxBlock, y * cyBlock)) ; break ; } x = (x + DIVISIONS) % DIVISIONS ; y = (y + DIVISIONS) % DIVISIONS ; point.x = x * cxBlock + cxBlock / 2 ; point.y = y * cyBlock + cyBlock / 2 ; ClientToScreen (hwnd, &point) ; SetCursorPos (point.x, point.y) ; return 0 ; case WM_LBUTTONDOWN : x = LOWORD (lParam) / cxBlock ; y = HIWORD (lParam) / cyBlock ; if (x < DIVISIONS && y < DIVISIONS) { fState[x][y] ^= 1 ; rect.left = x * cxBlock ; 230
- 231. rect.top = y * cyBlock ; rect.right = (x + 1) * cxBlock ; rect.bottom = (y + 1) * cyBlock ; InvalidateRect (hwnd, &rect, FALSE) ; } else MessageBeep (0) ; return 0 ; case WM_PAINT : hdc = BeginPaint (hwnd, &ps) ; for (x = 0 ; x < DIVISIONS ; x++) for (y = 0 ; y < DIVISIONS ; y++) { Rectangle (hdc, x * cxBlock, y * cyBlock, (x + 1) * cxBlock, (y + 1) * cyBlock) ; if (fState [x][y]) { MoveToEx (hdc, x *cxBlock, y *cyBlock, NULL) ; LineTo (hdc, (x+1)*cxBlock, (y+1)*cyBlock) ; MoveToEx (hdc, x *cxBlock, (y+1)*cyBlock, NULL) ; LineTo (hdc, (x+1)*cxBlock, y *cyBlock) ; } } EndPaint (hwnd, &ps) ; return 0 ; case WM_DESTROY : PostQuitMessage (0) ; return 0 ; } return DefWindowProc (hwnd, message, wParam, lParam) ; } The WM_KEYDOWN logic in CHECKER2 determines the position of the cursor using GetCursorPos, converts the screen coordinates to client-area coordinates using ScreenToClient, and divides the coordinates by the width and height of the rectangular block. This produces x and y values that indicate the position of the rectangle in the 5-by-5 array. The mouse cursor might or might not be in the client area when a key is pressed, so x and y must be passed through the min and max macros to ensure that they range from 0 through 4. For arrow keys, CHECKER2 increments or decrements x and y appropriately. If the key is the Enter key or the Spacebar, CHECKER2 uses SendMessage to send a WM_LBUTTONDOWN message to itself. This technique is similar to the method used in the SYSMETS program in Chapter 6 to add a keyboard interface to the window scroll bar. The WM_KEYDOWN logic finishes by calculating client-area coordinates that point to the center of the rectangle, converting to screen coordinates using ClientToScreen, and setting the cursor position using SetCursorPos. Using Child Windows for Hit-Testing Some programs (for example, the Windows Paint program) divide the client area into several smaller logical areas. The Paint program has an area at the left for its icon-based tool menu and an area at the bottom for the color menu. When Paint hit-tests these two areas, it must take into account the location of the smaller area within the entire client area before determining the actual item being selected by the user. Or maybe not. In reality, Paint simplifies both the drawing and hit-testing of these smaller areas through the use of "child windows." The child windows divide the entire client area into several smaller rectangular regions. Each child window has its own window handle, window procedure, and client area. Each child window procedure receives mouse messages that apply only to its own window. The lParam parameter in the mouse message contains coordinates relative to the upper left corner of the client area of the child window, not relative to the client area of 231
- 232. the "parent" window (which is Paint's main application window). Child windows used in this way can help you structure and modularize your programs. If the child windows use different window classes, each child window can have its own window procedure. The different window classes can also define different background colors and different default cursors. In Chapter 9, we'll look at "child window controls," which are predefined windows that take the form of scroll bars, buttons, and edit boxes. Right now, let's see how we can use child windows in the CHECKER program. Child Windows in CHECKER Figure 7-7 shows CHECKER3. This version of the program creates 25 child windows to process mouse clicks. It does not have a keyboard interface, but one could be added as I'll demonstrate in CHECKER4 later in this chapter. Figure 7-7. The CHECKER3 program. CHECKER3.C /*------------------------------------------------- CHECKER3.C -- Mouse Hit-Test Demo Program No. 3 (c) Charles Petzold, 1998 -------------------------------------------------*/ #include <windows.h> #define DIVISIONS 5 LRESULT CALLBACK WndProc (HWND, UINT, WPARAM, LPARAM) ; LRESULT CALLBACK ChildWndProc (HWND, UINT, WPARAM, LPARAM) ; TCHAR szChildClass[] = TEXT ("Checker3_Child") ; int WINAPI WinMain (HINSTANCE hInstance, HINSTANCE hPrevInstance, PSTR szCmdLine, int iCmdShow) { static TCHAR szAppName[] = TEXT ("Checker3") ; HWND hwnd ; MSG msg ; WNDCLASS wndclass ; wndclass.style = CS_HREDRAW | CS_VREDRAW ; wndclass.lpfnWndProc = WndProc ; wndclass.cbClsExtra = 0 ; wndclass.cbWndExtra = 0 ; wndclass.hInstance = hInstance ; wndclass.hIcon = LoadIcon (NULL, IDI_APPLICATION) ; wndclass.hCursor = LoadCursor (NULL, IDC_ARROW) ; wndclass.hbrBackground = (HBRUSH) GetStockObject (WHITE_BRUSH) ; wndclass.lpszMenuName = NULL ; wndclass.lpszClassName = szAppName ; if (!RegisterClass (&wndclass)) { MessageBox (NULL, TEXT ("Program requires Windows NT!"), szAppName, MB_ICONERROR) ; return 0 ; } wndclass.lpfnWndProc = ChildWndProc ; 232
- 233. wndclass.cbWndExtra = sizeof (long) ; wndclass.hIcon = NULL ; wndclass.lpszClassName = szChildClass ; RegisterClass (&wndclass) ; hwnd = CreateWindow (szAppName, TEXT ("Checker3 Mouse Hit-Test Demo"), WS_OVERLAPPEDWINDOW, CW_USEDEFAULT, CW_USEDEFAULT, CW_USEDEFAULT, CW_USEDEFAULT, NULL, NULL, hInstance, NULL) ; ShowWindow (hwnd, iCmdShow) ; UpdateWindow (hwnd) ; while (GetMessage (&msg, NULL, 0, 0)) { TranslateMessage (&msg) ; DispatchMessage (&msg) ; } return msg.wParam ; } LRESULT CALLBACK WndProc (HWND hwnd, UINT message, WPARAM wParam, LPARAM lParam) { static HWND hwndChild[DIVISIONS][DIVISIONS] ; int cxBlock, cyBlock, x, y ; switch (message) { case WM_CREATE : for (x = 0 ; x < DIVISIONS ; x++) for (y = 0 ; y < DIVISIONS ; y++) hwndChild[x][y] = CreateWindow (szChildClass, NULL, WS_CHILDWINDOW | WS_VISIBLE, 0, 0, 0, 0, hwnd, (HMENU) (y << 8 | x), (HINSTANCE) GetWindowLong (hwnd, GWL_HINSTANCE), NULL) ; return 0 ; case WM_SIZE : cxBlock = LOWORD (lParam) / DIVISIONS ; cyBlock = HIWORD (lParam) / DIVISIONS ; for (x = 0 ; x < DIVISIONS ; x++) for (y = 0 ; y < DIVISIONS ; y++) MoveWindow (hwndChild[x][y], x * cxBlock, y * cyBlock, cxBlock, cyBlock, TRUE) ; return 0 ; case WM_LBUTTONDOWN : MessageBeep (0) ; return 0 ; case WM_DESTROY : PostQuitMessage (0) ; return 0 ; } return DefWindowProc (hwnd, message, wParam, lParam) ; } LRESULT CALLBACK ChildWndProc (HWND hwnd, UINT message, WPARAM wParam, LPARAM lParam) 233
- 234. { HDC hdc ; PAINTSTRUCT ps ; RECT rect ; switch (message) { case WM_CREATE : SetWindowLong (hwnd, 0, 0) ; // on/off flag return 0 ; case WM_LBUTTONDOWN : SetWindowLong (hwnd, 0, 1 ^ GetWindowLong (hwnd, 0)) ; InvalidateRect (hwnd, NULL, FALSE) ; return 0 ; case WM_PAINT : hdc = BeginPaint (hwnd, &ps) ; GetClientRect (hwnd, &rect) ; Rectangle (hdc, 0, 0, rect.right, rect.bottom) ; if (GetWindowLong (hwnd, 0)) { MoveToEx (hdc, 0, 0, NULL) ; LineTo (hdc, rect.right, rect.bottom) ; MoveToEx (hdc, 0, rect.bottom, NULL) ; LineTo (hdc, rect.right, 0) ; } EndPaint (hwnd, &ps) ; return 0 ; } return DefWindowProc (hwnd, message, wParam, lParam) ; } CHECKER3 has two window procedures named WndProc and ChildWndProc. WndProc is still the window procedure for the main (or parent) window. ChildWndProc is the window procedure for the 25 child windows. Both window procedures must be defined as CALLBACK functions. Because a window procedure is associated with a particular window class structure that you register with Windows by calling the RegisterClass function, CHECKER3 requires two window classes. The first window class is for the main window and has the name "Checker3". The second window class is given the name "Checker3_Child". You don't have to choose quite so reasonable names as these, though. CHECKER3 registers both window classes in the WinMain function. After registering the normal window class, CHECKER3 simply reuses most of the fields in the wndclass structure for registering the Checker3_Child class. Four fields, however, are set to different values for the child window class: • The lpfnWndProc field is set to ChildWndProc, the window procedure for the child window class. • The cbWndExtra field is set to 4 bytes or, more precisely, sizeof (long). This field tells Windows to reserve 4 bytes of extra space in an internal structure that Windows maintains for each window based on this window class. You can use this space to store information that might be different for each window. • The hIcon field is set to NULL because child windows such as the ones in CHECKER3 do not require icons. • The pszClassName field is set to "Checker3_Child", the name of the class. The CreateWindow call in WinMain creates the main window based on the Checker3 class. This is normal. However, when WndProc receives a WM_CREATE message, it calls CreateWindow 25 times to create 25 child 234
- 235. windows based on the Checker3_Child class. The table below provides a comparison of the arguments to the CreateWindow call in WinMain and the CreateWindow call in WndProc that creates the 25 child windows. Argument Main Window Child Window window class "Checker3" "Checker3_Child" window caption "Checker3…" NULL window style WS_OVERLAPPED WINDOW WS_CHILDWINDOW |WS_VISIBLE horizontal position CW_USEDEFAULT 0 vertical position CW_USEDEFAULT 0 width CW_USEDEFAULT 0 height CW_USEDEFAULT 0 parent window handle NULL hwnd menu handle/child ID NULL (HMENU) (y << 8 | x) instance handle hInstance (HINSTANCE) GetWindowLong (hwnd, GWL_HINSTANCE) extra parameters NULL NULL Normally, the position and size parameters are required for child window, but in CHECKER3 the child windows are positioned and sized later in WndProc. The parent window handle is NULL for the main window because it is the parent. The parent window handle is required when using the CreateWindow call to create a child window. The main window doesn't have a menu, so that parameter is NULL. For child windows, the same parameter is called a "child ID" or a "child windows ID." This is a number that uniquely identifies the child window. The child ID becomes much more important when working with child window controls in dialog boxes, as we'll see in Chapter 11. For CHECKER3, I've simply set the child ID to a number that is a composite of the x and y positions that each child window occupies in the 5-by-5 array within the main window. The CreateWindow function requires an instance handle. Within WinMain, the instance handle is easily available because it is a parameter to WinMain. When the child window is created, CHECKER3 must use GetWindowLong to extract the hInstance value from the structure that Windows maintains for the window. (Rather than use GetWindowLong, I could have saved the value of hInstance in a global variable and used it directly.) Each child window has a different window handle that is stored in the hwndChild array. When WndProc receives a WM_SIZE message, it calls MoveWindow for each of the 25 child windows. The parameters to MoveWindow indicate the upper left corner of the child window relative to the parent window client-area coordinates, the width and height of the child window, and whether the child window needs repainting. Now let's take a look at ChildWndProc. This window procedure processes messages for all 25 child windows. The hwnd parameter to ChildWndProc is the handle to the child window receiving the message. When ChildWndProc processes a WM_CREATE message (which will happen 25 times because there are 25 child windows), it uses SetWindowWord to store a 0 in the extra area reserved within the window structure. (Recall that we reserved this space by using the cbWndExtra field when defining the window class.) ChildWndProc uses this value to store the current state (X or no X) of the rectangle. When the child window is clicked, the WM_LBUTTONDOWN logic simply flips the value of this integer (from 0 to 1 or from 1 to 0) and invalidates the entire child window. This area is the rectangle being clicked. The WM_PAINT processing is trivial because the size of the rectangle it draws is the same size as its client area. 235
- 236. Because the C source code file and the .EXE file of CHECKER3 are larger than those for CHECKER1 (to say nothing of my explanation of the programs), I will not try to convince you that CHECKER3 is "simpler" than CHECKER1. But note that we no longer have to do any mouse hit-testing! If a child window in CHECKER3 gets a WM_LBUTTONDOWN message the window has been hit, and that's all it needs to know. Child Windows and the Keyboard Adding a keyboard interface to CHECKER3 seems the logical last step in the CHECKER series. But in doing this, a different approach might be appropriate. In CHECKER2, the position of the mouse cursor indicated which square would get a check mark when the Spacebar was pressed. When we're dealing with child windows, we can take a cue from the functioning of dialog boxes. In dialog boxes, a child window indicates that it has the input focus (and hence will be toggled by the keyboard) with a flashing caret or a dotted rectangle. We're not going to reproduce all the dialog box logic that exists internally in Windows; we're just going to get a rough idea of how you can emulate dialog boxes in an application. When exploring how to do this, one thing you'll discover is that the parent window and the child windows should probably share processing of keyboard messages. The child window should toggle the check mark when the Spacebar or Enter key is pressed. The parent window should move the input focus among the child windows when the cursor keys are pressed. The logic is complicated somewhat by the fact that when you click on a child window, the parent window rather than the child window gets the input focus. CHECKER4.C is shown in Figure 7-8. Figure 7-8. The CHECKER4 program. CHECKER4.C /*------------------------------------------------- CHECKER4.C -- Mouse Hit-Test Demo Program No. 4 (c) Charles Petzold, 1998 -------------------------------------------------*/ #include <windows.h> #define DIVISIONS 5 LRESULT CALLBACK WndProc (HWND, UINT, WPARAM, LPARAM) ; LRESULT CALLBACK ChildWndProc (HWND, UINT, WPARAM, LPARAM) ; int idFocus = 0 ; TCHAR szChildClass[] = TEXT ("Checker4_Child") ; int WINAPI WinMain (HINSTANCE hInstance, HINSTANCE hPrevInstance, PSTR szCmdLine, int iCmdShow) { static TCHAR szAppName[] = TEXT ("Checker4") ; HWND hwnd ; MSG msg ; WNDCLASS wndclass ; wndclass.style = CS_HREDRAW | CS_VREDRAW ; wndclass.lpfnWndProc = WndProc ; wndclass.cbClsExtra = 0 ; wndclass.cbWndExtra = 0 ; wndclass.hInstance = hInstance ; wndclass.hIcon = LoadIcon (NULL, IDI_APPLICATION) ; wndclass.hCursor = LoadCursor (NULL, IDC_ARROW) ; 236
- 237. wndclass.hbrBackground = (HBRUSH) GetStockObject (WHITE_BRUSH) ; wndclass.lpszMenuName = NULL ; wndclass.lpszClassName = szAppName ; if (!RegisterClass (&wndclass)) { MessageBox (NULL, TEXT ("Program requires Windows NT!"), szAppName, MB_ICONERROR) ; return 0 ; } wndclass.lpfnWndProc = ChildWndProc ; wndclass.cbWndExtra = sizeof (long) ; wndclass.hIcon = NULL ; wndclass.lpszClassName = szChildClass ; RegisterClass (&wndclass) ; hwnd = CreateWindow (szAppName, TEXT ("Checker4 Mouse Hit-Test Demo"), WS_OVERLAPPEDWINDOW, CW_USEDEFAULT, CW_USEDEFAULT, CW_USEDEFAULT, CW_USEDEFAULT, NULL, NULL, hInstance, NULL) ; ShowWindow (hwnd, iCmdShow) ; UpdateWindow (hwnd) ; while (GetMessage (&msg, NULL, 0, 0)) { TranslateMessage (&msg) ; DispatchMessage (&msg) ; } return msg.wParam ; } LRESULT CALLBACK WndProc (HWND hwnd, UINT message, WPARAM wParam, LPARAM lParam) { static HWND hwndChild[DIVISIONS][DIVISIONS] ; int cxBlock, cyBlock, x, y ; switch (message) { case WM_CREATE : for (x = 0 ; x < DIVISIONS ; x++) for (y = 0 ; y < DIVISIONS ; y++) hwndChild[x][y] = CreateWindow (szChildClass, NULL, WS_CHILDWINDOW | WS_VISIBLE, 0, 0, 0, 0, hwnd, (HMENU) (y << 8 | x), (HINSTANCE) GetWindowLong (hwnd, GWL_HINSTANCE), NULL) ; return 0 ; case WM_SIZE : cxBlock = LOWORD (lParam) / DIVISIONS ; cyBlock = HIWORD (lParam) / DIVISIONS ; for (x = 0 ; x < DIVISIONS ; x++) for (y = 0 ; y < DIVISIONS ; y++) MoveWindow (hwndChild[x][y], x * cxBlock, y * cyBlock, cxBlock, cyBlock, TRUE) ; return 0 ; 237
- 238. case WM_LBUTTONDOWN : MessageBeep (0) ; return 0 ; // On set-focus message, set focus to child window case WM_SETFOCUS: SetFocus (GetDlgItem (hwnd, idFocus)) ; return 0 ; // On key-down message, possibly change the focus window case WM_KEYDOWN: x = idFocus & 0xFF ; y = idFocus >> 8 ; switch (wParam) { case VK_UP: y-- ; break ; case VK_DOWN: y++ ; break ; case VK_LEFT: x-- ; break ; case VK_RIGHT: x++ ; break ; case VK_HOME: x = y = 0 ; break ; case VK_END: x = y = DIVISIONS - 1 ; break ; default: return 0 ; } x = (x + DIVISIONS) % DIVISIONS ; y = (y + DIVISIONS) % DIVISIONS ; idFocus = y << 8 | x ; SetFocus (GetDlgItem (hwnd, idFocus)) ; return 0 ; case WM_DESTROY : PostQuitMessage (0) ; return 0 ; } return DefWindowProc (hwnd, message, wParam, lParam) ; } LRESULT CALLBACK ChildWndProc (HWND hwnd, UINT message, WPARAM wParam, LPARAM lParam) { HDC hdc ; PAINTSTRUCT ps ; RECT rect ; switch (message) { case WM_CREATE : SetWindowLong (hwnd, 0, 0) ; // on/off flag return 0 ; case WM_KEYDOWN: // Send most key presses to the parent window if (wParam != VK_RETURN && wParam != VK_SPACE) { SendMessage (GetParent (hwnd), message, wParam, lParam) ; return 0 ; } // For Return and Space, fall through to toggle the square 238
- 239. case WM_LBUTTONDOWN : SetWindowLong (hwnd, 0, 1 ^ GetWindowLong (hwnd, 0)) ; SetFocus (hwnd) ; InvalidateRect (hwnd, NULL, FALSE) ; return 0 ; // For focus messages, invalidate the window for repaint case WM_SETFOCUS: idFocus = GetWindowLong (hwnd, GWL_ID) ; // Fall through case WM_KILLFOCUS: InvalidateRect (hwnd, NULL, TRUE) ; return 0 ; case WM_PAINT : hdc = BeginPaint (hwnd, &ps) ; GetClientRect (hwnd, &rect) ; Rectangle (hdc, 0, 0, rect.right, rect.bottom) ; // Draw the "x" mark if (GetWindowLong (hwnd, 0)) { MoveToEx (hdc, 0, 0, NULL) ; LineTo (hdc, rect.right, rect.bottom) ; MoveToEx (hdc, 0, rect.bottom, NULL) ; LineTo (hdc, rect.right, 0) ; } // Draw the "focus" rectangle if (hwnd == GetFocus ()) { rect.left += rect.right / 10 ; rect.right -= rect.left ; rect.top += rect.bottom / 10 ; rect.bottom -= rect.top ; SelectObject (hdc, GetStockObject (NULL_BRUSH)) ; SelectObject (hdc, CreatePen (PS_DASH, 0, 0)) ; Rectangle (hdc, rect.left, rect.top, rect.right, rect.bottom) ; DeleteObject (SelectObject (hdc, GetStockObject (BLACK_PEN))) ; } EndPaint (hwnd, &ps) ; return 0 ; } return DefWindowProc (hwnd, message, wParam, lParam) ; } You'll recall that each child window has a unique "child window ID" number defined when the window is created by the CreateWindow call. In CHECKER3, this ID number is a combination of the x and y positions of the rectangle. A program can obtain a child window ID for a particular child window by calling: idChild = GetWindowLong (hwndChild, GWL_ID) ; This function does the same: idChild = GetDlgCtrlID (hwndChild) ; 239
- 240. As the function name suggests, it's primarily used with dialog boxes and control windows. It's also possible to obtain the handle of a child window if you know the handle of the parent window and the child window ID: hwndChild = GetDlgItem (hwndParent, idChild) ; In CHECKER4, the global variable idFocus is used to save the child ID number of the window that currently has the input focus. I mentioned earlier that child windows don't automatically get the input focus when you click on them with the mouse. Thus, the parent window in CHECKER4 processes the WM_SETFOCUS message by calling SetFocus (GetDlgItem (hwnd, idFocus)) ; thus setting the input focus to one of the child windows. ChildWndProc processes both WM_SETFOCUS and WM_KILLFOCUS messages. For WM_SETFOCUS, it saves the child window ID receiving the input focus in the global variable idFocus. For both messages, the window is invalidated, generating a WM_PAINT message. If the WM_PAINT message is drawing the child window with the input focus, it draws a rectangle with a PS_DASH pen style to indicate that the window has the input focus. ChildWndProc also processes WM_KEYDOWN messages. For anything but the Spacebar and Return keys, the WM_KEYDOWN message is sent to the parent window. Otherwise, the window procedure does the same thing as a WM_LBUTTONDOWN message. Processing the cursor movement keys is delegated to the parent window. In a manner similar to CHECKER2, this program obtains the x and y coordinates of the child window with the input focus and changes them based on the particular cursor key being pressed. The input focus is then set to the new child window with a call to SetFocus. Capturing the Mouse A window procedure normally receives mouse messages only when the mouse cursor is positioned over the client or nonclient area of the window. A program might need to receive mouse messages when the mouse is outside the window. If so, the program can "capture" the mouse. Don't worry: it won't bite. Blocking Out a Rectangle To examine why capturing the mouse might be necessary, let's look at the BLOKOUT1 program shown in Figure 7- 9. This program may seem functional, but it has a nasty flaw. Figure 7-9. The BLOKOUT1 program. 240
- 241. BLOKOUT1.C /*----------------------------------------- BLOKOUT1.C -- Mouse Button Demo Program (c) Charles Petzold, 1998 -----------------------------------------*/ #include <windows.h> LRESULT CALLBACK WndProc (HWND, UINT, WPARAM, LPARAM) ; int WINAPI WinMain (HINSTANCE hInstance, HINSTANCE hPrevInstance, PSTR szCmdLine, int iCmdShow) { static TCHAR szAppName[] = TEXT ("BlokOut1") ; HWND hwnd ; MSG msg ; WNDCLASS wndclass ; wndclass.style = CS_HREDRAW | CS_VREDRAW ; wndclass.lpfnWndProc = WndProc ; wndclass.cbClsExtra = 0 ; wndclass.cbWndExtra = 0 ; wndclass.hInstance = hInstance ; wndclass.hIcon = LoadIcon (NULL, IDI_APPLICATION) ; wndclass.hCursor = LoadCursor (NULL, IDC_ARROW) ; wndclass.hbrBackground = (HBRUSH) GetStockObject (WHITE_BRUSH) ; wndclass.lpszMenuName = NULL ; wndclass.lpszClassName = szAppName ; if (!RegisterClass (&wndclass)) { MessageBox (NULL, TEXT ("Program requires Windows NT!"), szAppName, MB_ICONERROR) ; return 0 ; } hwnd = CreateWindow (szAppName, TEXT ("Mouse Button Demo"), WS_OVERLAPPEDWINDOW, CW_USEDEFAULT, CW_USEDEFAULT, CW_USEDEFAULT, CW_USEDEFAULT, NULL, NULL, hInstance, NULL) ; ShowWindow (hwnd, iCmdShow) ; UpdateWindow (hwnd) ; while (GetMessage (&msg, NULL, 0, 0)) { TranslateMessage (&msg) ; DispatchMessage (&msg) ; } return msg.wParam ; } void DrawBoxOutline (HWND hwnd, POINT ptBeg, POINT ptEnd) { HDC hdc ; hdc = GetDC (hwnd) ; SetROP2 (hdc, R2_NOT) ; SelectObject (hdc, GetStockObject (NULL_BRUSH)) ; Rectangle (hdc, ptBeg.x, ptBeg.y, ptEnd.x, ptEnd.y) ; 241
- 242. This program demonstrates a little something that might be implemented in a Windows drawing program. You begin by depressing the left mouse button to indicate one corner of a rectangle. You then drag the mouse. The program draws an outlined rectangle with the opposite corner at the current mouse position. When you release the mouse, the program fills in the rectangle. Figure 7-10 shows one rectangle already drawn and another in progress. Figure 7-10. The BLOKOUT1 display. So, what's the problem? Try this: Press the left mouse button within BLOKOUT1's client area and then move the cursor outside the window. The program stops receiving WM_MOUSEMOVE messages. Now release the button. BLOKOUT1 doesn't get that WM_BUTTONUP message because the cursor is outside the client area. Move the cursor back within BLOKOUT1's client area. The window procedure still thinks the button is pressed. This is not good. The program doesn't know what's going on. The Capture Solution BLOKOUT1 shows some common program functionality, but the code is obviously flawed. This is the type of problem for which mouse capturing was invented. If the user is dragging the mouse, it should be no big deal if the cursor drifts out of the window for a moment. The program should still be in control of the mouse. Capturing the mouse is easier than baiting a mousetrap. You need only call SetCapture (hwnd) ; After this function call Windows sends all mouse messages to the window procedure for the window whose handle is hwnd. The mouse messages always come through as client-area messages, even when the mouse is in a nonclient 242
- 243. area of the window. The lParam parameter still indicates the position of the mouse in client-area coordinates. These x and y coordinates, however, can be negative if the mouse is to the left of or above the client area. When you want to release the mouse, call ReleaseCapture () ; which will returns things to normal. In the 32-bit versions of Windows, mouse capturing is a bit more restrictive than it was in earlier versions of Windows. Specifically, if the mouse has been captured, and if a mouse button is not currently down, and if the mouse cursor passes over another window, the window underneath the cursor will receive the mouse messages rather than the window that captured the mouse. This is necessary to prevent one program from messing up the whole system by capturing the mouse and not releasing it. To avoid problems, your program should capture the mouse only when the button is depressed in your client area. You should release the capture when the button is released. The BLOKOUT2 Program The BLOKOUT2 program that demonstrates mouse capturing is shown in Figure 7-11. Figure 7-11. The BLOKOUT2 program. BLOKOUT2.C /*--------------------------------------------------- BLOKOUT2.C -- Mouse Button & Capture Demo Program (c) Charles Petzold, 1998 ---------------------------------------------------*/ #include <windows.h> LRESULT CALLBACK WndProc (HWND, UINT, WPARAM, LPARAM) ; int WINAPI WinMain (HINSTANCE hInstance, HINSTANCE hPrevInstance, PSTR szCmdLine, int iCmdShow) { static TCHAR szAppName[] = TEXT ("BlokOut2") ; HWND hwnd ; MSG msg ; WNDCLASS wndclass ; wndclass.style = CS_HREDRAW | CS_VREDRAW ; wndclass.lpfnWndProc = WndProc ; wndclass.cbClsExtra = 0 ; wndclass.cbWndExtra = 0 ; wndclass.hInstance = hInstance ; wndclass.hIcon = LoadIcon (NULL, IDI_APPLICATION) ; wndclass.hCursor = LoadCursor (NULL, IDC_ARROW) ; wndclass.hbrBackground = (HBRUSH) GetStockObject (WHITE_BRUSH) ; wndclass.lpszMenuName = NULL ; wndclass.lpszClassName = szAppName ; if (!RegisterClass (&wndclass)) { MessageBox (NULL, TEXT ("Program requires Windows NT!"), 243
- 244. szAppName, MB_ICONERROR) ; return 0 ; } hwnd = CreateWindow (szAppName, TEXT ("Mouse Button & Capture Demo"), WS_OVERLAPPEDWINDOW, CW_USEDEFAULT, CW_USEDEFAULT, CW_USEDEFAULT, CW_USEDEFAULT, NULL, NULL, hInstance, NULL) ; ShowWindow (hwnd, iCmdShow) ; UpdateWindow (hwnd) ; while (GetMessage (&msg, NULL, 0, 0)) { TranslateMessage (&msg) ; DispatchMessage (&msg) ; } return msg.wParam ; } void DrawBoxOutline (HWND hwnd, POINT ptBeg, POINT ptEnd) { HDC hdc ; hdc = GetDC (hwnd) ; SetROP2 (hdc, R2_NOT) ; SelectObject (hdc, GetStockObject (NULL_BRUSH)) ; Rectangle (hdc, ptBeg.x, ptBeg.y, ptEnd.x, ptEnd.y) ; ReleaseDC (hwnd, hdc) ; } LRESULT CALLBACK WndProc (HWND hwnd, UINT message, WPARAM wParam, LPARAM lParam) { static BOOL fBlocking, fValidBox ; static POINT ptBeg, ptEnd, ptBoxBeg, ptBoxEnd ; HDC hdc ; PAINTSTRUCT ps ; switch (message) { case WM_LBUTTONDOWN : ptBeg.x = ptEnd.x = LOWORD (lParam) ; ptBeg.y = ptEnd.y = HIWORD (lParam) ; DrawBoxOutline (hwnd, ptBeg, ptEnd) ; SetCapture (hwnd) ; SetCursor (LoadCursor (NULL, IDC_CROSS)) ; fBlocking = TRUE ; return 0 ; case WM_MOUSEMOVE : if (fBlocking) { SetCursor (LoadCursor (NULL, IDC_CROSS)) ; DrawBoxOutline (hwnd, ptBeg, ptEnd) ; ptEnd.x = LOWORD (lParam) ; ptEnd.y = HIWORD (lParam) ; 244
- 245. DrawBoxOutline (hwnd, ptBeg, ptEnd) ; } return 0 ; case WM_LBUTTONUP : if (fBlocking) { DrawBoxOutline (hwnd, ptBeg, ptEnd) ; ptBoxBeg = ptBeg ; ptBoxEnd.x = LOWORD (lParam) ; ptBoxEnd.y = HIWORD (lParam) ; ReleaseCapture () ; SetCursor (LoadCursor (NULL, IDC_ARROW)) ; fBlocking = FALSE ; fValidBox = TRUE ; InvalidateRect (hwnd, NULL, TRUE) ; } return 0 ; case WM_CHAR : if (fBlocking & wParam == 'x1B') // i.e., Escape { DrawBoxOutline (hwnd, ptBeg, ptEnd) ; ReleaseCapture () ; SetCursor (LoadCursor (NULL, IDC_ARROW)) ; fBlocking = FALSE ; } return 0 ; case WM_PAINT : hdc = BeginPaint (hwnd, &ps) ; if (fValidBox) { SelectObject (hdc, GetStockObject (BLACK_BRUSH)) ; Rectangle (hdc, ptBoxBeg.x, ptBoxBeg.y, ptBoxEnd.x, ptBoxEnd.y) ; } if (fBlocking) { SetROP2 (hdc, R2_NOT) ; SelectObject (hdc, GetStockObject (NULL_BRUSH)) ; Rectangle (hdc, ptBeg.x, ptBeg.y, ptEnd.x, ptEnd.y) ; } EndPaint (hwnd, &ps) ; return 0 ; case WM_DESTROY : PostQuitMessage (0) ; return 0 ; } return DefWindowProc (hwnd, message, wParam, lParam) ; } BLOKOUT2 is the same as BLOKOUT1, except with three new lines of code: a call to SetCapture during the WM_LBUTTONDOWN message and calls to ReleaseCapture during the WM_LBUTTONDOWN and 245
- 246. WM_CHAR messages. And check this out: Make the window smaller than the screen size, begin blocking out a rectangle within the client area, and then move the mouse cursor outside the client and to the right or bottom, and finally release the mouse button. The program will have the coordinates of the entire rectangle. Just enlarge the window to see it. Capturing the mouse isn't something suited only for oddball applications. You should do it anytime you need to track WM_MOUSEMOVE messages after a mouse button has been depressed in your client area until the mouse button is released. Your program will be simpler, and the user's expectations will have been met. The Mouse Wheel "Build a better mousetrap and the world will beat a path to your door," my mother told me, unknowingly paraphrasing Emerson. Of course, nowadays it might make more sense to build a better mouse. The Microsoft IntelliMouse features an enhancement to the traditional mouse in the form of a little wheel between the two buttons. You can press down on this wheel, in which case it functions as a middle mouse button, or you can turn it with your index finger. This generates a special message named WM_MOUSEWHEEL. Programs that use the mouse wheel respond to this message by scrolling or zooming a document. It sounds like an unnecessary gimmick at first, but I must confess I got accustomed very quickly to using the mouse wheel for scrolling through Microsoft Word and Microsoft Internet Explorer. I won't attempt to discuss all the ways the mouse wheel can be used. Instead, I'll show how you can add mouse wheel logic to an existing program that scrolls data within its client area, a program such as SYSMETS4. The final SYSMETS program is shown in Figure 7-12. Figure 7-12. The SYSMETS program. SYSMETS.C /*--------------------------------------------------- SYSMETS.C -- Final System Metrics Display Program (c) Charles Petzold, 1998 ---------------------------------------------------*/ #include <windows.h> #include "sysmets.h" LRESULT CALLBACK WndProc (HWND, UINT, WPARAM, LPARAM) ; int WINAPI WinMain (HINSTANCE hInstance, HINSTANCE hPrevInstance, PSTR szCmdLine, int iCmdShow) { static TCHAR szAppName[] = TEXT ("SysMets") ; HWND hwnd ; MSG msg ; WNDCLASS wndclass ; wndclass.style = CS_HREDRAW | CS_VREDRAW ; wndclass.lpfnWndProc = WndProc ; wndclass.cbClsExtra = 0 ; wndclass.cbWndExtra = 0 ; wndclass.hInstance = hInstance ; wndclass.hIcon = LoadIcon (NULL, IDI_APPLICATION) ; wndclass.hCursor = LoadCursor (NULL, IDC_ARROW) ; wndclass.hbrBackground = (HBRUSH) GetStockObject (WHITE_BRUSH) ; wndclass.lpszMenuName = NULL ; wndclass.lpszClassName = szAppName ; 246
- 247. if (!RegisterClass (&wndclass)) { MessageBox (NULL, TEXT ("Program requires Windows NT!"), szAppName, MB_ICONERROR) ; return 0 ; } hwnd = CreateWindow (szAppName, TEXT ("Get System Metrics"), WS_OVERLAPPEDWINDOW | WS_VSCROLL | WS_HSCROLL, CW_USEDEFAULT, CW_USEDEFAULT, CW_USEDEFAULT, CW_USEDEFAULT, NULL, NULL, hInstance, NULL) ; ShowWindow (hwnd, iCmdShow) ; UpdateWindow (hwnd) ; while (GetMessage (&msg, NULL, 0, 0)) { TranslateMessage (&msg) ; DispatchMessage (&msg) ; } return msg.wParam ; } LRESULT CALLBACK WndProc (HWND hwnd, UINT message, WPARAM wParam, LPARAM lParam) { static int cxChar, cxCaps, cyChar, cxClient, cyClient, iMaxWidth ; static int iDeltaPerLine, iAccumDelta ; // for mouse wheel logic HDC hdc ; int i, x, y, iVertPos, iHorzPos, iPaintBeg, iPaintEnd ; PAINTSTRUCT ps ; SCROLLINFO si ; TCHAR szBuffer[10] ; TEXTMETRIC tm ; ULONG ulScrollLines ; // for mouse wheel logic switch (message) { case WM_CREATE: hdc = GetDC (hwnd) ; GetTextMetrics (hdc, &tm) ; cxChar = tm.tmAveCharWidth ; cxCaps = (tm.tmPitchAndFamily & 1 ? 3 : 2) * cxChar / 2 ; cyChar = tm.tmHeight + tm.tmExternalLeading ; ReleaseDC (hwnd, hdc) ; // Save the width of the three columns iMaxWidth = 40 * cxChar + 22 * cxCaps ; // Fall through for mouse wheel information case WM_SETTINGCHANGE: SystemParametersInfo (SPI_GETWHEELSCROLLLINES, 0, &ulScrollLines, 0) ; // ulScrollLines usually equals 3 or 0 (for no scrolling) // WHEEL_DELTA equals 120, so iDeltaPerLine will be 40 if (ulScrollLines) iDeltaPerLine = WHEEL_DELTA / ulScrollLines ; else iDeltaPerLine = 0 ; 247
- 248. return 0 ; case WM_SIZE: cxClient = LOWORD (lParam) ; cyClient = HIWORD (lParam) ; // Set vertical scroll bar range and page size si.cbSize = sizeof (si) ; si.fMask = SIF_RANGE | SIF_PAGE ; si.nMin = 0 ; si.nMax = NUMLINES - 1 ; si.nPage = cyClient / cyChar ; SetScrollInfo (hwnd, SB_VERT, &si, TRUE) ; // Set horizontal scroll bar range and page size si.cbSize = sizeof (si) ; si.fMask = SIF_RANGE | SIF_PAGE ; si.nMin = 0 ; si.nMax = 2 + iMaxWidth / cxChar ; si.nPage = cxClient / cxChar ; SetScrollInfo (hwnd, SB_HORZ, &si, TRUE) ; return 0 ; case WM_VSCROLL: // Get all the vertical scroll bar information si.cbSize = sizeof (si) ; si.fMask = SIF_ALL ; GetScrollInfo (hwnd, SB_VERT, &si) ; // Save the position for comparison later on iVertPos = si.nPos ; switch (LOWORD (wParam)) { case SB_TOP: si.nPos = si.nMin ; break ; case SB_BOTTOM: si.nPos = si.nMax ; break ; case SB_LINEUP: si.nPos -= 1 ; break ; case SB_LINEDOWN: si.nPos += 1 ; break ; case SB_PAGEUP: si.nPos -= si.nPage ; break ; case SB_PAGEDOWN: si.nPos += si.nPage ; break ; case SB_THUMBTRACK: si.nPos = si.nTrackPos ; 248
- 249. break ; default: break ; } // Set the position and then retrieve it. Due to adjustments // by Windows it may not be the same as the value set. si.fMask = SIF_POS ; SetScrollInfo (hwnd, SB_VERT, &si, TRUE) ; GetScrollInfo (hwnd, SB_VERT, &si) ; // If the position has changed, scroll the window and update it if (si.nPos != iVertPos) { ScrollWindow (hwnd, 0, cyChar * (iVertPos - si.nPos), NULL, NULL) ; UpdateWindow (hwnd) ; } return 0 ; case WM_HSCROLL: // Get all the vertical scroll bar information si.cbSize = sizeof (si) ; si.fMask = SIF_ALL ; // Save the position for comparison later on GetScrollInfo (hwnd, SB_HORZ, &si) ; iHorzPos = si.nPos ; switch (LOWORD (wParam)) { case SB_LINELEFT: si.nPos -= 1 ; break ; case SB_LINERIGHT: si.nPos += 1 ; break ; case SB_PAGELEFT: si.nPos -= si.nPage ; break ; case SB_PAGERIGHT: si.nPos += si.nPage ; break ; case SB_THUMBPOSITION: si.nPos = si.nTrackPos ; break ; default: break ; } // Set the position and then retrieve it. Due to adjustments // by Windows it may not be the same as the value set. si.fMask = SIF_POS ; SetScrollInfo (hwnd, SB_HORZ, &si, TRUE) ; GetScrollInfo (hwnd, SB_HORZ, &si) ; 249
- 250. // If the position has changed, scroll the window if (si.nPos != iHorzPos) { ScrollWindow (hwnd, cxChar * (iHorzPos - si.nPos), 0, NULL, NULL) ; } return 0 ; case WM_KEYDOWN : switch (wParam) { case VK_HOME : SendMessage (hwnd, WM_VSCROLL, SB_TOP, 0) ; break ; case VK_END : SendMessage (hwnd, WM_VSCROLL, SB_BOTTOM, 0) ; break ; case VK_PRIOR : SendMessage (hwnd, WM_VSCROLL, SB_PAGEUP, 0) ; break ; case VK_NEXT : SendMessage (hwnd, WM_VSCROLL, SB_PAGEDOWN, 0) ; break ; case VK_UP : SendMessage (hwnd, WM_VSCROLL, SB_LINEUP, 0) ; break ; case VK_DOWN : SendMessage (hwnd, WM_VSCROLL, SB_LINEDOWN, 0) ; break ; case VK_LEFT : SendMessage (hwnd, WM_HSCROLL, SB_PAGEUP, 0) ; break ; case VK_RIGHT : SendMessage (hwnd, WM_HSCROLL, SB_PAGEDOWN, 0) ; break ; } return 0 ; case WM_MOUSEWHEEL: if (iDeltaPerLine == 0) break ; iAccumDelta += (short) HIWORD (wParam) ; // 120 or -120 while (iAccumDelta >= iDeltaPerLine) { SendMessage (hwnd, WM_VSCROLL, SB_LINEUP, 0) ; iAccumDelta -= iDeltaPerLine ; } while (iAccumDelta <= -iDeltaPerLine) { SendMessage (hwnd, WM_VSCROLL, SB_LINEDOWN, 0) ; iAccumDelta += iDeltaPerLine ; } 250
- 251. return 0 ; case WM_PAINT : hdc = BeginPaint (hwnd, &ps) ; // Get vertical scroll bar position si.cbSize = sizeof (si) ; si.fMask = SIF_POS ; GetScrollInfo (hwnd, SB_VERT, &si) ; iVertPos = si.nPos ; // Get horizontal scroll bar position GetScrollInfo (hwnd, SB_HORZ, &si) ; iHorzPos = si.nPos ; // Find painting limits iPaintBeg = max (0, iVertPos + ps.rcPaint.top / cyChar) ; iPaintEnd = min (NUMLINES - 1, iVertPos + ps.rcPaint.bottom / cyChar) ; for (i = iPaintBeg ; i <= iPaintEnd ; i++) { x = cxChar * (1 - iHorzPos) ; y = cyChar * (i - iVertPos) ; TextOut (hdc, x, y, sysmetrics[i].szLabel, lstrlen (sysmetrics[i].szLabel)) ; TextOut (hdc, x + 22 * cxCaps, y, sysmetrics[i].szDesc, lstrlen (sysmetrics[i].szDesc)) ; SetTextAlign (hdc, TA_RIGHT | TA_TOP) ; TextOut (hdc, x + 22 * cxCaps + 40 * cxChar, y, szBuffer, wsprintf (szBuffer, TEXT ("%5d"), GetSystemMetrics (sysmetrics[i].iIndex))) ; SetTextAlign (hdc, TA_LEFT | TA_TOP) ; } EndPaint (hwnd, &ps) ; return 0 ; case WM_DESTROY : PostQuitMessage (0) ; return 0 ; } return DefWindowProc (hwnd, message, wParam, lParam) ; } Rotating the wheel causes Windows to generate WM_MOUSEWHEEL messages to the window with the input focus (not the window underneath the mouse cursor). As usual, lParam contains the position of the mouse; however, the coordinates are relative to the upper left corner of the screen rather than the client area. Also as usual, the low word of wParam contains a series of flags indicating the state of the mouse buttons and the Shift and Ctrl keys. The new information is in the high word of wParam. This is a "delta" value that is currently likely to be either 120 or -120, depending on whether the wheel is rotated forward (that is, toward the front of the mouse, the end with the buttons and cable) or backward. The values of 120 or -120 indicate that the document is to be scrolled three lines up or down, respectively. The idea here is that future versions of the mouse wheel can have a finer gradation than the 251
- 252. current mouse and would generate WM_MOUSEWHEEL messages with delta values of (for example) 40 and -40. These values would cause the document to be scrolled just one line up or down. To keep the program generalized, SYSMETS calls SystemParametersInfo with the SPI_GETWHEELSCROLLLINES during the WM_CREATE and WM_SETTINGCHANGE messages. This value indicates how many lines to scroll for a delta value of WHEEL_DELTA, which is defined in WINUSER.H. WHEEL_DELTA equals 120 and by default SystemParametersInfo returns 3, so the delta value associated with scrolling one line is 40. SYSMETS stores this value in iDeltaPerLine. During the WM_MOUSEWHEEL messages, SYSMETS adds the delta value to the static variable iAccumDelta. Then, if iAccumDelta is greater than or equal to iDeltaPerLine (or less than or equal to -iDeltaPerLine), SYSMETS generates WM_VSCROLL messages using SB_LINEUP or SB_LINEDOWN values. For each WM_VSCROLL message, iAccumDelta is decreased (or increased) by iDeltaPerLine. This code allows for delta values that are greater than, less than, or equal to the delta value required to scroll one line. Still to Come The only other outstanding mouse issue is the creation of customized mouse cursors. I'll cover this subject in Chapter 10 along with an introduction to other Windows resources. 252
- 253. Chapter 8 -- The Timer The Microsoft Windows timer is an input device that periodically notifies an application when a specified interval of time has elapsed. Your program tells Windows the interval, in effect saying, for example, "Give me a nudge every 10 seconds." Windows then sends your program recurrent WM_TIMER messages to signal the intervals. At first, the Windows timer might seem a less important input device than the keyboard and mouse, and certainly it is for many applications. But the timer is more useful than you may think, and not only for programs that display time, such as the Windows clock that appears in the taskbar and the two clock programs in this chapter. Here are some other uses for the Windows timer, some perhaps not so obvious: • Multitasking Although Windows 98 is a preemptive multitasking environment, sometimes it is more efficient for a program to return control to Windows as quickly as possible after processing a message. If a program must do a large amount of processing, it can divide the job into smaller pieces and process each piece upon receipt of a WM_TIMER message. (I'll have more to say on this subject in Chapter 20.) • Maintaining an updated status report A program can use the timer to display "real-time" updates of continuously changing information, such as a display of system resources or the progress of a certain task. • Implementing an "autosave" feature The timer can prompt a Windows program to save a user's work to disk whenever a specified period of time has elapsed. • Terminating "demo" versions of programs Some demonstration versions of programs are designed to terminate, say, 30 minutes after they begin. The timer can signal such applications when the time is up. • Pacing movement Graphical objects in a game or successive displays in a computer-assisted instruction program might need to proceed at a set rate. Using the timer eliminates the inconsistencies that might result from variations in microprocessor speed. • Multimedia Programs that play CD audio, sound, or music often let the audio data play in the background. A program can use the timer to periodically determine how much of the audio has played and to coordinate on-screen visual information. Another way to think of the timer is as a guarantee that a program can regain control sometime in the future after exiting the window procedure. Usually a program can't know when the next message is coming. Timer Basics You can allocate a timer for your Windows program by calling the SetTimer function. SetTimer includes an unsigned integer argument specifying a time-out interval that can range (in theory) from 1 msec (millisecond) to 4,294,967,295 msec, which is nearly 50 days. The value indicates the rate at which Windows sends your program WM_TIMER messages. For instance, an interval of 1000 msec causes Windows to send your program a WM_TIMER message every second. When your program is done using the timer, it calls the KillTimer function to stop the timer messages. You can program a "one-shot" timer by calling KillTimer during the processing of the WM_TIMER message. The KillTimer call purges the message queue of any pending WM_TIMER messages. Your program will never receive a stray WM_TIMER message following a KillTimer call. The System and the Timer The Windows timer is a relatively simple extension of the timer logic built into the PC's hardware and the ROM BIOS. Back in the pre-Windows days of MS-DOS programming, an application could implement a clock or a timer by trapping a BIOS interrupt called the "timer tick." This interrupt occurred every 54.925 msec, or about 18.2 times per second. This is the original 4.772720 MHz microprocessor clock of the original IBM PC divided by 218 . 253
- 254. Windows applications do not trap BIOS interrupts. Instead, Windows itself handles the hardware interrupts so that applications don't have to. For every timer that is currently set, Windows maintains a counter value that it decrements on every hardware timer tick. When this counter reaches 0, Windows places a WM_TIMER message in the appropriate application's message queue and resets the counter to its original value. Because a Windows application receives WM_TIMER messages through the normal message queue, you never have to worry about your program being "interrupted" by a sudden WM_TIMER message while doing other processing. In this way, the timer is similar to the keyboard and mouse: the driver handles the asynchronous hardware interrupt events, and Windows translates these events into orderly, structured, serialized messages. In Windows 98, the timer has the same 55-msec resolution as the underlying PC timer. In Microsoft Windows NT, the resolution of the timer is about 10 msec. A Windows application cannot receive WM_TIMER messages at a rate faster than this resolution—about 18.2 times per second under Windows 98 and about 100 times per second under Windows NT. Windows rounds down the time-out interval you specify in the SetTimer call to an integral multiple of clock ticks. For instance, a 1000-msec interval divided by 54.925 msec is 18.207 clock ticks, which is rounded down to 18 clock ticks, which is really a 989-msec interval. For intervals shorter than 55 msec, each clock tick generates a single WM_TIMER message. Timer Messages Are Not Asynchronous Because the timer is based on a hardware timer interrupt, programmers sometimes get led astray in thinking that their programs might get interrupted asynchronously to process WM_TIMER messages. However, the WM_TIMER messages are not asynchronous. The WM_TIMER messages are placed in the normal message queue and ordered with all the other messages. Therefore, if you specify 1000 msec in the SetTimer call, your program is not guaranteed to receive a WM_TIMER message every second or even (as I mentioned earlier) every 989 msec. If your application is busy for more than a second, it will not get any WM_TIMER messages during that time. You can demonstrate this to yourself using the programs shown in this chapter. In fact, Windows handles WM_TIMER messages much like WM_PAINT messages. Both these messages are low priority, and the program will receive them only if the message queue has no other messages. The WM_TIMER messages are similar to WM_PAINT messages in another respect. Windows does not keep loading up the message queue with multiple WM_TIMER messages. Instead, Windows combines multiple WM_TIMER messages in the message queue into a single message. Therefore, the application won't get a bunch of them at once, although it might get two WM_TIMER messages in quick succession. An application cannot determine the number of "missing" WM_TIMER messages that result from this process. Thus, a clock program cannot keep time by counting the WM_TIMER messages it receives. The WM_TIMER messages can only inform the application that the time is due to be updated. Later in this chapter, we'll write two clock applications that update themselves every second, and we'll see precisely how this is accomplished. For convenience, I'll be talking about the timer in terms of "getting a WM_TIMER message every second." But keep in mind that these messages are not precise clock tick interrupts. Using the Timer: Three Methods If you need a timer for the entire duration of your program, you'll probably call SetTimer from the WinMain function or while processing the WM_CREATE message, and KillTimer on exiting WinMain or in response to a WM_DESTROY message. You can use a timer in one of three ways, depending on the arguments to the SetTimer call. Method One This method, the easiest, causes Windows to send WM_TIMER messages to the normal window procedure of the application. The SetTimer call looks like this: 254
- 255. SetTimer (hwnd, 1, uiMsecInterval, NULL) ; The first argument is a handle to the window whose window procedure will receive the WM_TIMER messages. The second argument is the timer ID, which should be a nonzero number. I have arbitrarily set it to 1 in this example. The third argument is a 32-bit unsigned integer that specifies an interval in milliseconds. A value of 60,000 will deliver a WM_TIMER message once a minute. You can stop the WM_TIMER messages at any time (even while processing a WM_TIMER message) by calling KillTimer (hwnd, 1) ; The second argument is the same timer ID used in the SetTimer call. It's considered good form to kill any active timers in response to a WM_DESTROY message before your program terminates. When your window procedure receives a WM_TIMER message, wParam is equal to the timer ID (which in the above case is simply 1) and lParam is 0. If you need to set more than one timer, use a different timer ID for each. The value of wParam will differentiate the WM_TIMER message passed to your window procedure. To make your program more readable, you may want to use #define statements for the different timer IDs: #define TIMER_SEC 1 #define TIMER_MIN 2 You can then set the two timers with two SetTimer calls: SetTimer (hwnd, TIMER_SEC, 1000, NULL) ; SetTimer (hwnd, TIMER_MIN, 60000, NULL) ; The WM_TIMER logic might look something like this: case WM_TIMER: switch (wParam) { case TIMER_SEC: [once-per-second processing] break ; case TIMER_MIN: [once-per-minute processing] break ; } return 0 ; If you want to set an existing timer to a different elapsed time, you can simply call SetTimer again with a different time value. You may want to do this in a clock program if it has an option to show or not show seconds. You'd simply change the timer interval to between 1000 msec and 60,000 msec. Figure 8-1 shows a simple program that uses the timer. This program, named BEEPER1, sets a timer for 1-second intervals. When it receives a WM_TIMER message, it alternates coloring the client area blue and red and it beeps by calling the function MessageBeep. (Although MessageBeep is often used as a companion to MessageBox, it's really an all-purpose beep function. In PCs equipped with sound boards, you can use the various MB_ICON parameters normally used with MessageBox as parameters to MessageBeep to make different sounds as selected by the user in the Control Panel Sounds applet.) BEEPER1 sets the timer while processing the WM_CREATE message in the window procedure. During the WM_TIMER message, BEEPER1 calls MessageBeep, inverts the value of bFlipFlop, and invalidates the window to generate a WM_PAINT message. During the WM_PAINT message, BEEPER1 obtains a RECT structure for the size of the window by calling GetClientRect and colors the window by calling FillRect. Figure 8-1. The BEEPER1 program. 255
- 256. BEEPER1.C /*----------------------------------------- BEEPER1.C -- Timer Demo Program No. 1 (c) Charles Petzold, 1998 -----------------------------------------*/ #include <windows.h> #define ID_TIMER 1 LRESULT CALLBACK WndProc (HWND, UINT, WPARAM, LPARAM) ; int WINAPI WinMain (HINSTANCE hInstance, HINSTANCE hPrevInstance, PSTR szCmdLine, int iCmdShow) { static TCHAR szAppName[] = TEXT ("Beeper1") ; HWND hwnd ; MSG msg ; WNDCLASS wndclass ; wndclass.style = CS_HREDRAW | CS_VREDRAW ; wndclass.lpfnWndProc = WndProc ; wndclass.cbClsExtra = 0 ; wndclass.cbWndExtra = 0 ; wndclass.hInstance = hInstance ; wndclass.hIcon = LoadIcon (NULL, IDI_APPLICATION) ; wndclass.hCursor = LoadCursor (NULL, IDC_ARROW) ; wndclass.hbrBackground = (HBRUSH) GetStockObject (WHITE_BRUSH) ; wndclass.lpszMenuName = NULL ; wndclass.lpszClassName = szAppName ; if (!RegisterClass (&wndclass)) { MessageBox (NULL, TEXT ("Program requires Windows NT!"), szAppName, MB_ICONERROR) ; return 0 ; } hwnd = CreateWindow (szAppName, TEXT ("Beeper1 Timer Demo"), WS_OVERLAPPEDWINDOW, CW_USEDEFAULT, CW_USEDEFAULT, CW_USEDEFAULT, CW_USEDEFAULT, NULL, NULL, hInstance, NULL) ; ShowWindow (hwnd, iCmdShow) ; UpdateWindow (hwnd) ; while (GetMessage (&msg, NULL, 0, 0)) { TranslateMessage (&msg) ; DispatchMessage (&msg) ; } return msg.wParam ; } LRESULT CALLBACK WndProc (HWND hwnd, UINT message, WPARAM wParam, LPARAM lParam) { static BOOL fFlipFlop = FALSE ; HBRUSH hBrush ; HDC hdc ; 256
- 257. Because BEEPER1 audibly indicates every WM_TIMER message it receives, you can get a good idea of the erratic nature of WM_TIMER messages by loading BEEPER1 and performing some other actions within Windows. Here's a revealing experiment: First invoke the Display applet from the Control Panel, and select the Effects tab. Make sure the "Show window contents while dragging" button is unchecked. Now try moving or resizing the BEEPER1 window. This causes the program to enter a "modal message loop." Windows prevents anything from interfering with the move or resize operation by trapping all messages through a message loop inside Windows rather than the message loop in your program. Most messages to a program's window that come through this loop are simply discarded, which is why BEEPER1 stops beeping. When you complete the move or resize, you'll notice that BEEPER1 doesn't get all the WM_TIMER messages it has missed, although the first two messages might be less than a second apart. When the "Show window contents while dragging" button is checked, the modal message loop within Windows attempts to pass on to your window procedure some of the messages it would otherwise have missed. This sometimes works nicely, and sometimes it doesn't. Method Two The first method for setting the timer causes WM_TIMER messages to be sent to the normal window procedure. With this second method, you can direct Windows to send the timer messages to another function within your program. The function that receives these timer messages is termed a "call-back" function. This is a function in your program that is called from Windows. You tell Windows the address of this function, and Windows later calls the function. This should sound familiar, because a program's window procedure is really just a type of call-back function. You tell Windows the address of the window procedure when registering the window class, and then Windows calls the function when sending messages to the program. SetTimer is not the only Windows function that uses a call-back. The CreateDialog and DialogBox functions (discussed in Chapter 11) use call-back functions to process messages in a dialog box; several Windows functions (EnumChildWindow, EnumFonts, EnumObjects, EnumProps, and EnumWindow) pass enumerated information to call-back functions; and several less commonly used functions (GrayString, LineDDA, and SetWindowHookEx) also require call-back functions. Like a window procedure, a call-back function must be defined as CALLBACK because it is called by Windows from outside the code space of the program. The parameters to the call-back function and the value returned from the call-back function depend on the purpose of the function. In the case of the call-back function associated with the timer, the parameters are actually the same as the parameters to a window procedure although they are defined differently. However, the timer call-back function does not return a value to Windows. Let's name the call-back function TimerProc. (You can choose any name that doesn't conflict with something else.) This function will process only WM_TIMER messages: VOID CALLBACK TimerProc (HWND hwnd, UINT message, UINT iTimerID, DWORD dwTime) { [process WM_TIMER messages] } The hwnd parameter to TimerProc is the handle to the window specified when you call SetTimer. Windows will send only WM_TIMER messages to TimerProc, so the message parameter will always equal WM_TIMER. The iTimerID value is the timer ID, and dwTimer is a value compatible with the return value from the GetTickCount function. This is the number of milliseconds that has elapsed since Windows was started. As we saw in BEEPER1, the first method for setting a timer requires a SetTimer call that looks like this: SetTimer (hwnd, iTimerID, iMsecInterval, NULL) ; When you use a call-back function to process WM_TIMER messages, the fourth argument to SetTimer is instead the address of the call-back function, like so: 257
- 258. SetTimer (hwnd, iTimerID, iMsecInterval, TimerProc) ; Let's look at some sample code so that you can see how this stuff fits together. The BEEPER2 program, shown in Figure 8-2, is functionally the same as BEEPER1, except that Windows sends the timer messages to TimerProc rather than to WndProc. Notice that TimerProc is declared at the top of the program along with WndProc. Figure 8-2. The BEEPER2 program. BEEPER2.C /*---------------------------------------- BEEPER2.C -- Timer Demo Program No. 2 (c) Charles Petzold, 1998 ----------------------------------------*/ #include <windows.h> #define ID_TIMER 1 LRESULT CALLBACK WndProc (HWND, UINT, WPARAM, LPARAM) ; VOID CALLBACK TimerProc (HWND, UINT, UINT, DWORD ) ; int WINAPI WinMain (HINSTANCE hInstance, HINSTANCE hPrevInstance, PSTR szCmdLine, int iCmdShow) { static char szAppName[] = "Beeper2" ; HWND hwnd ; MSG msg ; WNDCLASS wndclass ; wndclass.style = CS_HREDRAW | CS_VREDRAW ; wndclass.lpfnWndProc = WndProc ; wndclass.cbClsExtra = 0 ; wndclass.cbWndExtra = 0 ; wndclass.hInstance = hInstance ; wndclass.hIcon = LoadIcon (NULL, IDI_APPLICATION) ; wndclass.hCursor = LoadCursor (NULL, IDC_ARROW) ; wndclass.hbrBackground = (HBRUSH) GetStockObject (WHITE_BRUSH) ; wndclass.lpszMenuName = NULL ; wndclass.lpszClassName = szAppName ; if (!RegisterClass (&wndclass)) { MessageBox (NULL, TEXT ("Program requires Windows NT!"), szAppName, MB_ICONERROR) ; return 0 ; } hwnd = CreateWindow (szAppName, "Beeper2 Timer Demo", WS_OVERLAPPEDWINDOW, CW_USEDEFAULT, CW_USEDEFAULT, CW_USEDEFAULT, CW_USEDEFAULT, NULL, NULL, hInstance, NULL) ; ShowWindow (hwnd, iCmdShow) ; UpdateWindow (hwnd) ; while (GetMessage (&msg, NULL, 0, 0)) 258
- 259. { TranslateMessage (&msg) ; DispatchMessage (&msg) ; } return msg.wParam ; } LRESULT CALLBACK WndProc (HWND hwnd, UINT message, WPARAM wParam, LPARAM lParam) { switch (message) { case WM_CREATE: SetTimer (hwnd, ID_TIMER, 1000, TimerProc) ; return 0 ; case WM_DESTROY: KillTimer (hwnd, ID_TIMER) ; PostQuitMessage (0) ; return 0 ; } return DefWindowProc (hwnd, message, wParam, lParam) ; } VOID CALLBACK TimerProc (HWND hwnd, UINT message, UINT iTimerID, DWORD dwTime) { static BOOL fFlipFlop = FALSE ; HBRUSH hBrush ; HDC hdc ; RECT rc ; MessageBeep (-1) ; fFlipFlop = !fFlipFlop ; GetClientRect (hwnd, &rc) ; hdc = GetDC (hwnd) ; hBrush = CreateSolidBrush (fFlipFlop ? RGB(255,0,0) : RGB(0,0,255)) ; FillRect (hdc, &rc, hBrush) ; ReleaseDC (hwnd, hdc) ; DeleteObject (hBrush) ; } Method Three The third method of setting the timer is similar to the second method, except that the hwnd parameter to SetTimer is set to NULL and the second parameter (normally the timer ID) is ignored. Instead, the function returns a timer ID: iTimerID = SetTimer (NULL, 0, wMsecInterval, TimerProc) ; The iTimerID returned from SetTimer will be 0 in the rare event that no timer is available. The first parameter to KillTimer (usually the window handle) must also be NULL. The timer ID must be the value returned from SetTimer: KillTimer (NULL, iTimerID) ; The hwnd parameter passed to the TimerProc timer function will also be NULL. This method for setting a timer is rarely used. It might come in handy if you do a lot of SetTimer calls at different times in your program and don't want to keep track of which timer IDs you've already used. Now that you know how to use the Windows timer, you're ready for a couple of useful timer applications. 259
- 260. Using the Timer for a Clock A clock is the most obvious application for the timer, so let's look at two of them, one digital and one analog. Building a Digital Clock The DIGCLOCK program, shown in Figure 8-3, displays the current time using a simulated LED-like 7-segment display. Figure 8-3. The DIGCLOCK program. DIGCLOCK.C /*----------------------------------------- DIGCLOCK.C -- Digital Clock (c) Charles Petzold, 1998 -----------------------------------------*/ #include <windows.h> #define ID_TIMER 1 LRESULT CALLBACK WndProc (HWND, UINT, WPARAM, LPARAM) ; int WINAPI WinMain (HINSTANCE hInstance, HINSTANCE hPrevInstance, PSTR szCmdLine, int iCmdShow) { static TCHAR szAppName[] = TEXT ("DigClock") ; HWND hwnd ; MSG msg ; WNDCLASS wndclass ; wndclass.style = CS_HREDRAW | CS_VREDRAW ; wndclass.lpfnWndProc = WndProc ; wndclass.cbClsExtra = 0 ; wndclass.cbWndExtra = 0 ; wndclass.hInstance = hInstance ; wndclass.hIcon = LoadIcon (NULL, IDI_APPLICATION) ; wndclass.hCursor = LoadCursor (NULL, IDC_ARROW) ; wndclass.hbrBackground = (HBRUSH) GetStockObject (WHITE_BRUSH) ; wndclass.lpszMenuName = NULL ; wndclass.lpszClassName = szAppName ; if (!RegisterClass (&wndclass)) { MessageBox (NULL, TEXT ("Program requires Windows NT!"), szAppName, MB_ICONERROR) ; return 0 ; } hwnd = CreateWindow (szAppName, TEXT ("Digital Clock"), WS_OVERLAPPEDWINDOW, CW_USEDEFAULT, CW_USEDEFAULT, CW_USEDEFAULT, CW_USEDEFAULT, NULL, NULL, hInstance, NULL) ; ShowWindow (hwnd, iCmdShow) ; 260
- 261. UpdateWindow (hwnd) ; while (GetMessage (&msg, NULL, 0, 0)) { TranslateMessage (&msg) ; DispatchMessage (&msg) ; } return msg.wParam ; } void DisplayDigit (HDC hdc, int iNumber) { static BOOL fSevenSegment [10][7] = { 1, 1, 1, 0, 1, 1, 1, // 0 0, 0, 1, 0, 0, 1, 0, // 1 1, 0, 1, 1, 1, 0, 1, // 2 1, 0, 1, 1, 0, 1, 1, // 3 0, 1, 1, 1, 0, 1, 0, // 4 1, 1, 0, 1, 0, 1, 1, // 5 1, 1, 0, 1, 1, 1, 1, // 6 1, 0, 1, 0, 0, 1, 0, // 7 1, 1, 1, 1, 1, 1, 1, // 8 1, 1, 1, 1, 0, 1, 1 } ; // 9 static POINT ptSegment [7][6] = { 7, 6, 11, 2, 31, 2, 35, 6, 31, 10, 11, 10, 6, 7, 10, 11, 10, 31, 6, 35, 2, 31, 2, 11, 36, 7, 40, 11, 40, 31, 36, 35, 32, 31, 32, 11, 7, 36, 11, 32, 31, 32, 35, 36, 31, 40, 11, 40, 6, 37, 10, 41, 10, 61, 6, 65, 2, 61, 2, 41, 36, 37, 40, 41, 40, 61, 36, 65, 32, 61, 32, 41, 7, 66, 11, 62, 31, 62, 35, 66, 31, 70, 11, 70 } ; int iSeg ; for (iSeg = 0 ; iSeg < 7 ; iSeg++) if (fSevenSegment [iNumber][iSeg]) Polygon (hdc, ptSegment [iSeg], 6) ; } void DisplayTwoDigits (HDC hdc, int iNumber, BOOL fSuppress) { if (!fSuppress || (iNumber / 10 != 0)) DisplayDigit (hdc, iNumber / 10) ; OffsetWindowOrgEx (hdc, -42, 0, NULL) ; DisplayDigit (hdc, iNumber % 10) ; OffsetWindowOrgEx (hdc, -42, 0, NULL) ; } void DisplayColon (HDC hdc) { POINT ptColon [2][4] = { 2, 21, 6, 17, 10, 21, 6, 25, 2, 51, 6, 47, 10, 51, 6, 55 } ; Polygon (hdc, ptColon [0], 4) ; Polygon (hdc, ptColon [1], 4) ; OffsetWindowOrgEx (hdc, -12, 0, NULL) ; } void DisplayTime (HDC hdc, BOOL f24Hour, BOOL fSuppress) { SYSTEMTIME st ; GetLocalTime (&st) ; 261
- 262. if (f24Hour) DisplayTwoDigits (hdc, st.wHour, fSuppress) ; else DisplayTwoDigits (hdc, (st.wHour %= 12) ? st.wHour : 12, fSuppress) ; DisplayColon (hdc) ; DisplayTwoDigits (hdc, st.wMinute, FALSE) ; DisplayColon (hdc) ; DisplayTwoDigits (hdc, st.wSecond, FALSE) ; } LRESULT CALLBACK WndProc (HWND hwnd, UINT message, WPARAM wParam, LPARAM lParam) { static BOOL f24Hour, fSuppress ; static HBRUSH hBrushRed ; static int cxClient, cyClient ; HDC hdc ; PAINTSTRUCT ps ; TCHAR szBuffer [2] ; switch (message) { case WM_CREATE: hBrushRed = CreateSolidBrush (RGB (255, 0, 0)) ; SetTimer (hwnd, ID_TIMER, 1000, NULL) ; // fall through case WM_SETTINGCHANGE: GetLocaleInfo (LOCALE_USER_DEFAULT, LOCALE_ITIME, szBuffer, 2) ; f24Hour = (szBuffer[0] == `1') ; GetLocaleInfo (LOCALE_USER_DEFAULT, LOCALE_ITLZERO, szBuffer, 2) ; fSuppress = (szBuffer[0] == `0') ; InvalidateRect (hwnd, NULL, TRUE) ; return 0 ; case WM_SIZE: cxClient = LOWORD (lParam) ; cyClient = HIWORD (lParam) ; return 0 ; case WM_TIMER: InvalidateRect (hwnd, NULL, TRUE) ; return 0 ; case WM_PAINT: hdc = BeginPaint (hwnd, &ps) ; SetMapMode (hdc, MM_ISOTROPIC) ; SetWindowExtEx (hdc, 276, 72, NULL) ; SetViewportExtEx (hdc, cxClient, cyClient, NULL) ; SetWindowOrgEx (hdc, 138, 36, NULL) ; SetViewportOrgEx (hdc, cxClient / 2, cyClient / 2, NULL) ; SelectObject (hdc, GetStockObject (NULL_PEN)) ; SelectObject (hdc, hBrushRed) ; DisplayTime (hdc, f24Hour, fSuppress) ; EndPaint (hwnd, &ps) ; return 0 ; 262
- 263. case WM_DESTROY: KillTimer (hwnd, ID_TIMER) ; DeleteObject (hBrushRed) ; PostQuitMessage (0) ; return 0 ; } return DefWindowProc (hwnd, message, wParam, lParam) ; } The DIGCLOCK window is shown in Figure 8-4. Figure 8-4. The DIGCLOCK display. Although you can't see it in Figure 8-4, the clock numbers are red. DIGCLOCK's window procedure creates a red brush during the WM_CREATE message and destroys it during the WM_DESTROY message. The WM_CREATE message also provides DIGCLOCK with an opportunity to set a 1-second timer, which is stopped during the WM_DESTROY message. (I'll discuss the calls to GetLocaleInfo shortly.) Upon receipt of a WM_TIMER message, DIGCLOCK's window procedure simply invalidates the entire window with a call to InvalidateRect. Aesthetically, this is not the best approach because it means that the entire window will be erased and redrawn every second, sometimes causing flickering in the display. A better solution is to invalidate only those parts of the window that need updating based on the current time. The logic to do this is rather messy, however. Invalidating the window during the WM_TIMER message forces all the program's real activity into WM_PAINT. DIGCLOCK begins the WM_PAINT message by setting the mapping mode to MM_ISOTROPIC. Thus, DIGCLOCK will use arbitrarily scaled axes that are equal in the horizontal and vertical directions. These axes (set by a call to SetWindowExtEx) are 276 units horizontally by 72 units vertically. Of course, these axes seem quite arbitrary, but they are based on the size and spacing of the clock numbers. 263
- 264. DIGCLOCK sets the window origin to the point (138, 36), which is the center of the window extents, and the viewport origin to (cxClient / 2, cyClient / 2). This means that the clock display will be centered in DIGCLOCK's client area but that DIGCLOCK can use axes with an origin of (0, 0) at the upper-left corner of the display. The WM_PAINT processing then sets the current brush to the red brush created earlier and the current pen to the NULL_PEN and calls the function in DIGCLOCK named DisplayTime. Getting the Current Time The DisplayTime function begins by calling the Windows function GetLocalTime, which takes as a single argument the SYSTEMTIME structure, defined in WINBASE.H like so: typedef struct _SYSTEMTIME { WORD wYear ; WORD wMonth ; WORD wDayOfWeek ; WORD wDay ; WORD wHour ; WORD wMinute ; WORD wSecond ; WORD wMilliseconds ; } SYSTEMTIME, * PSYSTEMTIME ; As is obvious, the SYSTEMTIME structure encodes the date as well as the time. The month is 1-based (that is, January is 1), and the day of the week is 0-based (Sunday is 0). The wDay field is the current day of the month, which is also 1-based. The SYSTEMTIME structure is used primarily with the GetLocalTime and GetSystemTime functions. The GetSystemTime function reports the current Coordinated Universal Time (UTC), which is roughly the same as Greenwich mean time—the date and time at Greenwich, England. The GetLocalTime function reports the local time, based on the time zone of the location of the computer. The accuracy of these values is entirely dependent on the diligence of the user in keeping the time accurate and in indicating the correct time zone. You can check the time zone set on your machine by double-clicking the time display in the task bar. A program to set your PC's clock from an accurate, exact time source on the Internet is shown in Chapter 23. Windows also has SetLocalTime and SetSystemTime functions, as well as some other useful time-related functions that are discussed in /Platform SDK/Windows Base Services/General Library/Time. Displaying Digits and Colons DIGCLOCK might be somewhat simplified if it used a font that simulated a 7-segment display. Instead, it has to do all the work itself using the Polygon function. The DisplayDigit function in DIGCLOCK defines two arrays. The fSevenSegment array has 7 BOOL values for each of the 10 decimal digits from 0 through 9. These values indicate which of the segments are illuminated (a 1 value) and which are not (a 0 value). In this array, the 7 segments are ordered from top to bottom and from left to right. Each of the 7 segments is a 6-sided polygon. The ptSegment array is an array of POINT structures indicating the graphical coordinates of each point in each of the 7 segments. Each digit is then drawn by this code: for (iSeg = 0 ; iSeg < 7 ; iSeg++) if (fSevenSegment [iNumber][iSeg]) Polygon (hdc, ptSegment [iSeg], 6) ; Similarly (but more simply), the DisplayColon function draws the colons that separate the hour and minutes, and the minutes and seconds. The digits are 42 units wide and the colons are 12 units wide, so with 6 digits and 2 colons, the total width is 276 units, which is the size used in the SetWindowExtEx call. 264
- 265. Upon entry to the DisplayTime function, the origin is at the upper left corner of the position of the leftmost digit. DisplayTime calls DisplayTwoDigits, which calls DisplayDigit twice, and after each time calls OffsetWindowOrgEx to move the window origin 42 units to the right. Similarly, the DisplayColon function moves the window origin 12 units to the right after drawing the colon. In this way, the functions can use the same coordinates for the digits and colons, regardless of where the object is to appear within the window. The only other tricky aspects of this code involve displaying the time in a 12-hour or 24-hour format and suppressing the leftmost hours digit if it's 0. Going International Although displaying the time as DIGCLOCK does is fairly foolproof, for any more complex displays of the date or time you should rely upon Windows' international support. The easiest way to format a date or time is to use the GetDateFormat and GetTimeFormat functions. These functions are documented in /Platform SDK/Windows Base Services/General Library/String Manipulation/String Manipulation Reference/String Manipulation Functions, but they are discussed in /Platform SDK/Windows Base Services/International Features/National Language Support. These functions accept SYSTEMTIME structures and format the date and time based on options the user has chosen in the Regional Settings applet of the Control Panel. DIGCLOCK can't use the GetDateFormat function because it knows how to display only digits and colons. However, DIGCLOCK should respect the user's preferences for displaying the time in a 12-hour or 24-hour format, and for suppressing (or not suppressing) the leading hours digit. You can obtain this information from the GetLocaleInfo function. Although GetLocaleInfo is documented in /Platform SDK/Windows Base Services/General Library/String Manipulation/String Manipulation Reference/String Manipulation Functions, the identifiers you use with this function are documented in /Platform SDK/Windows Base Services/International Features/National Language Support/National Language Support Constants. DIGCLOCK initially calls GetLocaleInfo twice while processing the WM_CREATE message—the first time with the LOCALE_ITIME identifier (to determine whether the 12-hour or 24-hour format is to be used) and then with the LOCALE_ITLZERO identifier (to suppress a leading zero on the hour display). The GetLocaleInfo function returns all information in strings, but in most cases it's fairly easy to convert this to integer data if necessary. DIGCLOCK stores the settings in two static variables and passes them to the DisplayTime function. If the user changes any system setting, the WM_SETTINGCHANGE message is broadcast to all applications. DIGCLOCK processes this message by calling GetLocaleInfo again. In this way, you can experiment with different settings by using the Regional Settings applet of the Control Panel. In theory, DIGCLOCK should probably also call GetLocaleInfo with the LOCALE_ STIME identifier. This returns the character that the user has selected for separating the hours, minutes, and seconds parts of the time. Because DIGCLOCK is set up to display only colons, this is what the user will get even if something else is preferred. To indicate whether the time is A.M. or P.M., an application can use GetLocaleInfo with the LOCALE_S1159 and LOCALE_S2359 identifiers. These identifiers let the program obtain strings that are appropriate for the user's country and language. We could also have DIGCLOCK process WM_TIMECHANGE messages, which notifies applications of changes to the system date or time. Because DIGCLOCK is updated every second by WM_TIMER messages, this is unnecessary. Processing WM_TIMECHANGE messages would make more sense for a clock that was updated every minute. Building an Analog Clock An analog clock program needn't concern itself with internationalization, but the complexity of the graphics more than make up for that simplification. To get it right, you'll need to know some trigonometry. The CLOCK program 265
- 266. is shown in Figure 8-5. Figure 8-5. The CLOCK program. CLOCK.C /*-------------------------------------- CLOCK.C -- Analog Clock Program (c) Charles Petzold, 1998 --------------------------------------*/ #include <windows.h> #include <math.h> #define ID_TIMER 1 #define TWOPI (2 * 3.14159) LRESULT CALLBACK WndProc (HWND, UINT, WPARAM, LPARAM) ; int WINAPI WinMain (HINSTANCE hInstance, HINSTANCE hPrevInstance, PSTR szCmdLine, int iCmdShow) { static TCHAR szAppName[] = TEXT ("Clock") ; HWND hwnd; MSG msg; WNDCLASS wndclass ; wndclass.style = CS_HREDRAW | CS_VREDRAW ; wndclass.lpfnWndProc = WndProc ; wndclass.cbClsExtra = 0 ; wndclass.cbWndExtra = 0 ; wndclass.hInstance = hInstance ; wndclass.hIcon = NULL ; wndclass.hCursor = LoadCursor (NULL, IDC_ARROW) ; wndclass.hbrBackground = (HBRUSH) GetStockObject (WHITE_BRUSH) ; wndclass.lpszMenuName = NULL ; wndclass.lpszClassName = szAppName ; if (!RegisterClass (&wndclass)) { MessageBox (NULL, TEXT ("Program requires Windows NT!"), szAppName, MB_ICONERROR) ; return 0 ; } hwnd = CreateWindow (szAppName, TEXT ("Analog Clock"), WS_OVERLAPPEDWINDOW, CW_USEDEFAULT, CW_USEDEFAULT, CW_USEDEFAULT, CW_USEDEFAULT, NULL, NULL, hInstance, NULL) ; ShowWindow (hwnd, iCmdShow) ; UpdateWindow (hwnd) ; while (GetMessage (&msg, NULL, 0, 0)) { TranslateMessage (&msg) ; DispatchMessage (&msg) ; 266
- 267. } return msg.wParam ; } void SetIsotropic (HDC hdc, int cxClient, int cyClient) { SetMapMode (hdc, MM_ISOTROPIC) ; SetWindowExtEx (hdc, 1000, 1000, NULL) ; SetViewportExtEx (hdc, cxClient / 2, -cyClient / 2, NULL) ; SetViewportOrgEx (hdc, cxClient / 2, cyClient / 2, NULL) ; } void RotatePoint (POINT pt[], int iNum, int iAngle) { int i ; POINT ptTemp ; for (i = 0 ; i < iNum ; i++) { ptTemp.x = (int) (pt[i].x * cos (TWOPI * iAngle / 360) + pt[i].y * sin (TWOPI * iAngle / 360)) ; ptTemp.y = (int) (pt[i].y * cos (TWOPI * iAngle / 360) - pt[i].x * sin (TWOPI * iAngle / 360)) ; pt[i] = ptTemp ; } } void DrawClock (HDC hdc) { int iAngle ; POINT pt[3] ; for (iAngle = 0 ; iAngle < 360 ; iAngle += 6) { pt[0].x = 0 ; pt[0].y = 900 ; RotatePoint (pt, 1, iAngle) ; pt[2].x = pt[2].y = iAngle % 5 ? 33 : 100 ; pt[0].x -= pt[2].x / 2 ; pt[0].y -= pt[2].y / 2 ; pt[1].x = pt[0].x + pt[2].x ; pt[1].y = pt[0].y + pt[2].y ; SelectObject (hdc, GetStockObject (BLACK_BRUSH)) ; Ellipse (hdc, pt[0].x, pt[0].y, pt[1].x, pt[1].y) ; } } void DrawHands (HDC hdc, SYSTEMTIME * pst, BOOL fChange) { static POINT pt[3][5] = { 0, -150, 100, 0, 0, 600, -100, 0, 0, -150, 0, -200, 50, 0, 0, 800, -50, 0, 0, -200, 0, 0, 0, 0, 0, 0, 0, 0, 0, 800 } ; int i, iAngle[3] ; POINT ptTemp[3][5] ; iAngle[0] = (pst->wHour * 30) % 360 + pst->wMinute / 2 ; 267
- 268. iAngle[1] = pst->wMinute * 6 ; iAngle[2] = pst->wSecond * 6 ; memcpy (ptTemp, pt, sizeof (pt)) ; for (i = fChange ? 0 : 2 ; i < 3 ; i++) { RotatePoint (ptTemp[i], 5, iAngle[i]) ; Polyline (hdc, ptTemp[i], 5) ; } } LRESULT CALLBACK WndProc (HWND hwnd, UINT message, WPARAM wParam, LPARAM lParam) { static int cxClient, cyClient ; static SYSTEMTIME stPrevious ; BOOL fChange ; HDC hdc ; PAINTSTRUCT ps ; SYSTEMTIME st ; switch (message) { case WM_CREATE : SetTimer (hwnd, ID_TIMER, 1000, NULL) ; GetLocalTime (&st) ; stPrevious = st ; return 0 ; case WM_SIZE : cxClient = LOWORD (lParam) ; cyClient = HIWORD (lParam) ; return 0 ; case WM_TIMER : GetLocalTime (&st) ; fChange = st.wHour != stPrevious.wHour || st.wMinute != stPrevious.wMinute ; hdc = GetDC (hwnd) ; SetIsotropic (hdc, cxClient, cyClient) ; SelectObject (hdc, GetStockObject (WHITE_PEN)) ; DrawHands (hdc, &stPrevious, fChange) ; SelectObject (hdc, GetStockObject (BLACK_PEN)) ; DrawHands (hdc, &st, TRUE) ; ReleaseDC (hwnd, hdc) ; stPrevious = st ; return 0 ; case WM_PAINT : hdc = BeginPaint (hwnd, &ps) ; SetIsotropic (hdc, cxClient, cyClient) ; DrawClock (hdc) ; DrawHands (hdc, &stPrevious, TRUE) ; 268
- 269. EndPaint (hwnd, &ps) ; return 0 ; case WM_DESTROY : KillTimer (hwnd, ID_TIMER) ; PostQuitMessage (0) ; return 0 ; } return DefWindowProc (hwnd, message, wParam, lParam) ; } The CLOCK screen display is shown in Figure 8-6. Figure 8-6. The CLOCK display. The isotropic mapping mode is once again ideal for such an application, and setting it is the responsibility of the SetIsotropic function in CLOCK.C. After calling SetMapMode, the function sets the window extents to 1000 and the viewport extents to half the width of the client area and the negative of half the height of the client area. The viewport origin is set to the center of the client area. As I discussed in Chapter 5, this creates a Cartesian coordinate system with the point (0,0) in the center of the client area and extending 1000 units in all directions. The RotatePoint function is where the trigonometry comes into play. The three parameters to the function are an array of one or more points, the number of points in that array, and the angle of rotation in degrees. The function rotates the points clockwise (as is appropriate for a clock) around the origin. For example, if the point passed to the function is (0,100)—that is, the position of 12:00—and the angle is 90 degrees, the point is converted to (100,0)— which is 3:00. It does this using these formulas: x' = x * cos (a) + y * sin (a) y' = y * cos (a) - x * sin (a) 269
- 270. The RotatePoint function is useful for drawing both the dots of the clock face and the clock hands, as we'll see shortly. The DrawClock function draws the 60 clock face dots starting with the one at the top (12:00 high). Each of them is 900 units from the origin, so the first is located at the point (0, 900) and each subsequent one is 6 additional clockwise degrees from the vertical. Twelve of the dots are 100 units in diameter; the rest are 33 units. The dots are drawn using the Ellipse function. The DrawHands function draws the hour, minute, and second hands of the clock. The coordinates defining the outlines of the hands (as they appear when pointing straight up) are stored in an array of POINT structures. Depending upon the time, these coordinates are rotated using the RotatePoint function and are displayed with the Windows Polyline function. Notice that the hour and minute hands are displayed only if the bChange parameter to DrawHands is TRUE. When the program updates the clock hands, in most cases the hour and minute hands will not need to be redrawn. Now let's turn our attention to the window procedure. During the WM_CREATE message, the window procedure obtains the current time and also stores it in the variable named dtPrevious. This variable will later be used to determine whether the hour or minute has changed from the previous update. The first time the clock is drawn is during the first WM_PAINT message. That's just a matter of calling the SetIsotropic, DrawClock, and DrawHands functions, the latter with the bChange parameter set to TRUE. During the WM_TIMER message, WndProc first obtains the new time and determines if the hour and minute hands need to be redrawn. If so, all the hands are drawn with a white pen using the previous time, effectively erasing them. Otherwise, only the second hand is erased using the white pen. Then, all the hands are drawn with a black pen. Using the Timer for a Status Report The final program in this chapter is something I alluded to in Chapter 5. It's the only good use I've found for the GetPixel function. WHATCLR (shown in Figure 8-7) displays the RGB color of the pixel currently under the hot point of the mouse cursor. Figure 8-7. The WHATCLR program. WHATCLR.C /*------------------------------------------ WHATCLR.C -- Displays Color Under Cursor (c) Charles Petzold, 1998 ------------------------------------------*/ #include <windows.h> #define ID_TIMER 1 void FindWindowSize (int *, int *) ; LRESULT CALLBACK WndProc (HWND, UINT, WPARAM, LPARAM) ; int WINAPI WinMain (HINSTANCE hInstance, HINSTANCE hPrevInstance, PSTR szCmdLine, int iCmdShow) { static TCHAR szAppName[] = TEXT ("WhatClr") ; HWND hwnd ; 270
- 271. int cxWindow, cyWindow ; MSG msg ; WNDCLASS wndclass ; wndclass.style = CS_HREDRAW | CS_VREDRAW ; wndclass.lpfnWndProc = WndProc ; wndclass.cbClsExtra = 0 ; wndclass.cbWndExtra = 0 ; wndclass.hInstance = hInstance ; wndclass.hIcon = LoadIcon (NULL, IDI_APPLICATION) ; wndclass.hCursor = LoadCursor (NULL, IDC_ARROW) ; wndclass.hbrBackground = (HBRUSH) GetStockObject (WHITE_BRUSH) ; wndclass.lpszMenuName = NULL ; wndclass.lpszClassName = szAppName ; if (!RegisterClass (&wndclass)) { MessageBox (NULL, TEXT ("This program requires Windows NT!"), szAppName, MB_ICONERROR) ; return 0 ; } FindWindowSize (&cxWindow, &cyWindow) ; hwnd = CreateWindow (szAppName, TEXT ("What Color"), WS_OVERLAPPED | WS_CAPTION | WS_SYSMENU | WS_BORDER, CW_USEDEFAULT, CW_USEDEFAULT, cxWindow, cyWindow, NULL, NULL, hInstance, NULL) ; ShowWindow (hwnd, iCmdShow) ; UpdateWindow (hwnd) ; while (GetMessage (&msg, NULL, 0, 0)) { TranslateMessage (&msg) ; DispatchMessage (&msg) ; } return msg.wParam ; } void FindWindowSize (int * pcxWindow, int * pcyWindow) { HDC hdcScreen ; TEXTMETRIC tm ; hdcScreen = CreateIC (TEXT ("DISPLAY"), NULL, NULL, NULL) ; GetTextMetrics (hdcScreen, &tm) ; DeleteDC (hdcScreen) ; * pcxWindow = 2 * GetSystemMetrics (SM_CXBORDER) + 12 * tm.tmAveCharWidth ; * pcyWindow = 2 * GetSystemMetrics (SM_CYBORDER) + GetSystemMetrics (SM_CYCAPTION) + 2 * tm.tmHeight ; } LRESULT CALLBACK WndProc (HWND hwnd, UINT message, WPARAM wParam, LPARAM lParam) { static COLORREF cr, crLast ; static HDC hdcScreen ; HDC hdc ; PAINTSTRUCT ps ; 271
- 272. POINT pt ; RECT rc ; TCHAR szBuffer [16] ; switch (message) { case WM_CREATE: hdcScreen = CreateDC (TEXT ("DISPLAY"), NULL, NULL, NULL) ; SetTimer (hwnd, ID_TIMER, 100, NULL) ; return 0 ; case WM_TIMER: GetCursorPos (&pt) ; cr = GetPixel (hdcScreen, pt.x, pt.y) ; SetPixel (hdcScreen, pt.x, pt.y, 0) ; if (cr != crLast) { crLast = cr ; InvalidateRect (hwnd, NULL, FALSE) ; } return 0 ; case WM_PAINT: hdc = BeginPaint (hwnd, &ps) ; GetClientRect (hwnd, &rc) ; wsprintf (szBuffer, TEXT (" %02X %02X %02X "), GetRValue (cr), GetGValue (cr), GetBValue (cr)) ; DrawText (hdc, szBuffer, -1, &rc, DT_SINGLELINE | DT_CENTER | DT_VCENTER) ; EndPaint (hwnd, &ps) ; return 0 ; case WM_DESTROY: DeleteDC (hdcScreen) ; KillTimer (hwnd, ID_TIMER) ; PostQuitMessage (0) ; return 0 ; } return DefWindowProc (hwnd, message, wParam, lParam) ; } WHATCLR does a little something different while still in WinMain. Because WHATCLR's window need only be large enough to display a hexadecimal RGB value, it creates a nonsizeable window using the WS_BORDER window style in the CreateWindow function. To calculate the size of the window, WHATCLR obtains an information device context for the video display by calling CreateIC and then calls GetSystemMetrics. The calculated width and height values of the window are passed to CreateWindow. WHATCLR's window procedure creates a device context for the whole video display by calling CreateDC during the WM_CREATE message. This device context is maintained for the lifetime of the program. During the WM_TIMER message, the program obtains the pixel color at the current mouse cursor position. The RGB color is displayed during WM_PAINT. You may be wondering whether that device context handle obtained from the CreateDC function will let you display something on any part of the screen rather than just obtain a pixel color. The answer is Yes. It's generally considered impolite for one application to draw on another, but it could come in useful in some odd circumstances. 272
- 273. Chapter 9 -- Child Window Controls Recall from Chapter 7 the programs in the CHECKER series. These programs display a grid of rectangles. When you click the mouse in a rectangle, the program draws an X. When you click again, the X disappears. Although the CHECKER1 and CHECKER2 versions of this program use only one main window, the CHECKER3 version uses a child window for each rectangle. The rectangles are maintained by a separate window procedure named ChildProc. If we wanted to, we could add a facility to ChildProc to send a message to its parent window procedure (WndProc) whenever a rectangle is checked or unchecked. Here's how: The child window procedure can determine the window handle of its parent by calling GetParent, hwndParent = GetParent (hwnd) ; where hwnd is the window handle of the child window. It can then send a message to the parent window procedure: SendMessage (hwndParent, message, wParam, lParam) ; What would message be set to? Well, anything you want, really, as long as the numeric value is set to WM_USER or above. These numbers represent a range of messages that do not conflict with the predefined WM_ messages. Perhaps for this message the child window could set wParam to its child window ID. The lParam could then be set to a 1 if the child window were being checked and a 0 if it were being unchecked. That's one possibility. This in effect creates a "child window control." The child window processes mouse and keyboard messages and notifies the parent window when the child window's state has changed. In this way, the child window becomes a high-level input device for the parent window. It encapsulates a specific functionality with regard to its graphical appearance on the screen, its response to user input, and its method of notifying another window when an important input event has occurred. Although you can create your own child window controls, you can also take advantage of several predefined window classes (and window procedures) that your program can use to create standard child window controls that you've undoubtedly seen in other Windows programs. These controls take the form of buttons, check boxes, edit boxes, list boxes, combo boxes, text strings, and scroll bars. For instance, if you want to put a button labeled "Recalculate" in a corner of your spreadsheet program, you can create it with a single CreateWindow call. You don't have to worry about the mouse logic or button painting logic or making the button flash when it's clicked. That's all done in Windows. All you have to do is trap WM_COMMAND messages—that's how the button informs your window procedure when it has been triggered. Is it really that simple? Well, almost. Child window controls are used most often in dialog boxes. As you'll see in Chapter 11, the position and size of the child window controls are defined in a dialog box template contained in the program's resource script. However, you can also use predefined child window controls on the surface of a normal window's client area. You create each child window with a CreateWindow call and adjust the position and size of the child windows with calls to MoveWindow. The parent window procedure sends messages to the child window controls, and the child window controls send messages back to the parent window procedure. As we've been doing since Chapter 3, to create your normal application window you first define a window class and register it with Windows using RegisterClass. You then create the window based on that class using CreateWindow. When you use one of the predefined controls, however, you do not register a window class for the child window. The class already exists within Windows and has a predefined name. You simply use the name as the window class parameter in CreateWindow. The window style parameter to CreateWindow defines more precisely the appearance and functionality of the child window control. Windows contains the window procedures that process messages to the child windows based on these classes. Using child window controls directly on the surface of your window involves tasks of a lower level than are required for using child window controls in dialog boxes, where the dialog box manager adds a layer of insulation between your program and the controls themselves. In particular, you'll discover that the child window controls you create on the surface of your window have no built-in facility to move the input focus from one control to another 273
- 274. using the Tab or cursor movement keys. A child window control can obtain the input focus, but once it does it won't freely relinquish the input focus back to the parent window. This is a problem we'll struggle with throughout this chapter. The Windows programming documentation discusses child window controls in two places: First, the simple standard controls that you've seen in countless dialog boxes are described in /Platform SDK/User Interface Services/Controls. These are buttons (including check boxes and radio buttons), static controls (such as text labels), edit boxes (which let you enter and edit lines or multiple lines of text), scroll bars, list boxes, and combo boxes. With the exception of the combo box, these controls have been around since Windows 1.0. This section of the Windows documentation also includes the rich edit control, which is similar to the edit box but allows editing formatted text with different fonts and such, and application desktop toolbars. There is also a collection of more esoteric and specialized controls that are perversely referred to as "common controls." These are described in /Platform SDK/User Interface Services/Shell and Common Controls/Common Controls. I won't be discussing the common controls in this chapter, but they'll appear in various programs throughout the rest of the book. This section of the Windows documentation is a good place to look if you see something in a Windows application that could be useful to your own application. The Button Class We'll begin our exploration of the button window class with a program named BTNLOOK ("button look"), which is shown in Figure 9-1. BTNLOOK creates 10 child window button controls, one for each of the 10 standard styles of buttons. Figure 9-1. The BTNLOOK program. BTNLOOK.C /*---------------------------------------- BTNLOOK.C -- Button Look Program (c) Charles Petzold, 1998 ----------------------------------------*/ #include <windows.h> struct { int iStyle ; TCHAR * szText ; } button[] = { BS_PUSHBUTTON, TEXT ("PUSHBUTTON"), BS_DEFPUSHBUTTON, TEXT ("DEFPUSHBUTTON"), BS_CHECKBOX, TEXT ("CHECKBOX"), BS_AUTOCHECKBOX, TEXT ("AUTOCHECKBOX"), BS_RADIOBUTTON, TEXT ("RADIOBUTTON"), BS_3STATE, TEXT ("3STATE"), BS_AUTO3STATE, TEXT ("AUTO3STATE"), BS_GROUPBOX, TEXT ("GROUPBOX"), BS_AUTORADIOBUTTON, TEXT ("AUTORADIO"), BS_OWNERDRAW, TEXT ("OWNERDRAW") } ; #define NUM (sizeof button / sizeof button[0]) LRESULT CALLBACK WndProc (HWND, UINT, WPARAM, LPARAM) ; 274
- 275. int WINAPI WinMain (HINSTANCE hInstance, HINSTANCE hPrevInstance, PSTR szCmdLine, int iCmdShow) { static TCHAR szAppName[] = TEXT ("BtnLook") ; HWND hwnd ; MSG msg ; WNDCLASS wndclass ; wndclass.style = CS_HREDRAW | CS_VREDRAW ; wndclass.lpfnWndProc = WndProc ; wndclass.cbClsExtra = 0 ; wndclass.cbWndExtra = 0 ; wndclass.hInstance = hInstance ; wndclass.hIcon = LoadIcon (NULL, IDI_APPLICATION) ; wndclass.hCursor = LoadCursor (NULL, IDC_ARROW) ; wndclass.hbrBackground = (HBRUSH) GetStockObject (WHITE_BRUSH) ; wndclass.lpszMenuName = NULL ; wndclass.lpszClassName = szAppName ; if (!RegisterClass (&wndclass)) { MessageBox (NULL, TEXT ("This program requires Windows NT!"), szAppName, MB_ICONERROR) ; return 0 ; } hwnd = CreateWindow (szAppName, TEXT ("Button Look"), WS_OVERLAPPEDWINDOW, CW_USEDEFAULT, CW_USEDEFAULT, CW_USEDEFAULT, CW_USEDEFAULT, NULL, NULL, hInstance, NULL) ; ShowWindow (hwnd, iCmdShow) ; UpdateWindow (hwnd) ; while (GetMessage (&msg, NULL, 0, 0)) { TranslateMessage (&msg) ; DispatchMessage (&msg) ; } return msg.wParam ; } LRESULT CALLBACK WndProc (HWND hwnd, UINT message, WPARAM wParam, LPARAM lParam) { static HWND hwndButton[NUM] ; static RECT rect ; static TCHAR szTop[] = TEXT ("message wParam lParam"), szUnd[] = TEXT ("_______ ______ ______"), szFormat[] = TEXT ("%-16s%04X-%04X %04X-%04X"), szBuffer[50] ; static int cxChar, cyChar ; HDC hdc ; PAINTSTRUCT ps ; int i ; switch (message) { case WM_CREATE : cxChar = LOWORD (GetDialogBaseUnits ()) ; cyChar = HIWORD (GetDialogBaseUnits ()) ; for (i = 0 ; i < NUM ; i++) hwndButton[i] = CreateWindow ( TEXT("button"), 275
- 276. button[i].szText, WS_CHILD | WS_VISIBLE | button[i].iStyle, cxChar, cyChar * (1 + 2 * i), 20 * cxChar, 7 * cyChar / 4, hwnd, (HMENU) i, ((LPCREATESTRUCT) lParam)->hInstance, NULL) ; return 0 ; case WM_SIZE : rect.left = 24 * cxChar ; rect.top = 2 * cyChar ; rect.right = LOWORD (lParam) ; rect.bottom = HIWORD (lParam) ; return 0 ; case WM_PAINT : InvalidateRect (hwnd, &rect, TRUE) ; hdc = BeginPaint (hwnd, &ps) ; SelectObject (hdc, GetStockObject (SYSTEM_FIXED_FONT)) ; SetBkMode (hdc, TRANSPARENT) ; TextOut (hdc, 24 * cxChar, cyChar, szTop, lstrlen (szTop)) ; TextOut (hdc, 24 * cxChar, cyChar, szUnd, lstrlen (szUnd)) ; EndPaint (hwnd, &ps) ; return 0 ; case WM_DRAWITEM : case WM_COMMAND : ScrollWindow (hwnd, 0, -cyChar, &rect, &rect) ; hdc = GetDC (hwnd) ; SelectObject (hdc, GetStockObject (SYSTEM_FIXED_FONT)) ; TextOut (hdc, 24 * cxChar, cyChar * (rect.bottom / cyChar - 1), szBuffer, wsprintf (szBuffer, szFormat, message == WM_DRAWITEM ? TEXT ("WM_DRAWITEM") : TEXT ("WM_COMMAND"), HIWORD (wParam), LOWORD (wParam), HIWORD (lParam), LOWORD (lParam))) ; ReleaseDC (hwnd, hdc) ; ValidateRect (hwnd, &rect) ; break ; case WM_DESTROY : PostQuitMessage (0) ; return 0 ; } return DefWindowProc (hwnd, message, wParam, lParam) ; } As you click on each button, the button sends a WM_COMMAND message to the parent window procedure, which is the familiar WndProc. BTNLOOK's WndProc displays the wParam and lParam parameters of this message in the right half of the client area, as shown in Figure 9-2. The button with the style BS_OWNERDRAW is displayed on this window only with a background shading because this is a style of button that the program is responsible for drawing. The button indicates it needs drawing by WM_DRAWITEM messages containing an lParam message parameter that is a pointer to a structure of type DRAWITEMSTRUCT. These messages are also displayed in BTNLOOK. I'll discuss owner-draw buttons in more detail later in this chapter. 276
- 277. Figure 9-2. The BTNLOOK display. Creating the Child Windows BTNLOOK defines a structure called button that contains button window styles and descriptive text strings for each of the 10 types of buttons. The button window styles all begin with the letters BS, which stand for "button style." The 10 button child windows are created in a for loop during WM_CREATE message processing in WndProc. The CreateWindow call uses the following parameters: Class name TEXT ("button") Window text button[i].szText Window style WS_CHILD ¦ WS_VISIBLE ¦ button[i].iStyle x position cxChar y position cyChar * (1 + 2 * i) Width 20 * xChar Height 7 * yChar / 4 Parent window hwnd Child window ID (HMENU) i Instance handle ((LPCREATESTRUCT) lParam) -> hInstance Extra parameters NULL 277
- 278. The class name parameter is the predefined name. The window style uses WS_CHILD, WS_VISIBLE, and one of the 10 button styles (BS_PUSHBUTTON, BS_DEFPUSHBUTTON, and so forth) that are defined in the button structure. The window text parameter (which for a normal window is the text that appears in the caption bar) is text that will be displayed with each button. I've simply used text that identifies the button style. The x position and y position parameters indicate the placement of the upper left corner of the child window relative to the upper left corner of the parent window's client area. The width and height parameters specify the width and height of each child window. Notice that I'm using a function named GetDialogBaseUnits to obtain the width and height of the characters in the default font. This is the function that dialog boxes use to obtain text dimensions. The function returns a 32-bit value comprising a width in the low word and a height in the high word. While GetDialogBaseUnits returns roughly the same values as can be obtained from the GetTextMetrics function, it's somewhat easier to use and will ensure more consistency with controls in dialog boxes. The child window ID parameter should be unique for each child window. This ID helps your window procedure identify the child window when processing WM_COMMAND messages from it. Notice that the child window ID is passed in the CreateWindow parameter normally used to specify the program's menu, so it must be cast to an HMENU. The instance handle parameter of the CreateWindow call looks a little strange, but we're taking advantage of the fact that during a WM_CREATE message lParam is actually a pointer to a structure of type CREATESTRUCT ("creation structure") that has a member hInstance. So we cast lParam into a pointer to a CREATESTRUCT structure and get hInstance out. (Some Windows programs use a global variable named hInst to give window procedures access to the instance handle available in WinMain. In WinMain, you need to simply set hInst = hInstance ; before creating the main window. In the CHECKER3 program in Chapter 7, we used GetWindowLong to obtain this instance handle: GetWindowLong (hwnd, GWL_HINSTANCE) Any of these methods is fine.) After the CreateWindow call, we needn't do anything more with these child windows. The button window procedure within Windows maintains the buttons for us and handles all repainting jobs. (The exception is the button with the BS_OWNERDRAW style; as I'll discuss later, this button style requires the program to draw the button.) At the program's termination, Windows destroys these child windows when the parent window is destroyed. The Child Talks to Its Parent When you run BTNLOOK, you see the different button types displayed on the left side of the client area. As I mentioned earlier, when you click a button with the mouse, the child window control sends a WM_COMMAND message to its parent window. BTNLOOK traps the WM_COMMAND message and displays the values of wParam and lParam. Here's what they mean: LOWORD (wParam) Child window ID HIWORD (wParam) Notification code lParam Child window handle If you're converting programs written for the 16-bit versions of Windows, be aware that these message parameters have been altered to accommodate 32-bit handles. 278
- 279. The child window ID is the value passed to CreateWindow when the child window is created. In BTNLOOK, these IDs are 0 through 9 for the 10 buttons displayed in the client area. The child window handle is the value that Windows returns from the CreateWindow call. The notification code indicates in more detail what the message means. The possible values of button notification codes are defined in the Windows header files: Button Notification Code Identifier Value BN_CLICKED 0 BN_PAINT 1 BN_HILITE or BN_PUSHED 2 BN_UNHILITE or BN_UNPUSHED 3 BN_DISABLE 4 BN_DOUBLECLICKED or BN_DBLCLK 5 BN_SETFOCUS 6 BN_KILLFOCUS 7 In reality, you'll never see most of these button values. The notification codes 1 through 4 are for an obsolete button style called BS_USERBUTTON. (It's been replaced with BS_OWNERDRAW and a different notification mechanism.) The notification codes 6 and 7 are sent only if the button style includes the flag BS_NOTIFY. The notification code 5 is sent only for BS_RADIOBUTTON, BS_AUTORADIOBUTTON, and BS_OWNERDRAW buttons, or for other buttons if the button style includes BS_NOTIFY. You'll notice that when you click a button with the mouse, a dashed line surrounds the text of the button. This indicates that the button has the input focus. All keyboard input now goes to the child window button control rather than to the main window. However, when the button control has the input focus, it ignores all keystrokes except the Spacebar, which now has the same effect as a mouse click. The Parent Talks to Its Child Although BTNLOOK does not demonstrate this fact, a window procedure can also send messages to the child window control. These messages include many of the window messages beginning with the prefix WM. In addition, eight button-specific messages are defined in WINUSER.H; each begins with the letters BM, which stand for "button message." These button messages are shown in the following table: Button Message Value BM_GETCHECK 0x00F0 BM_SETCHECK 0x00F1 BM_GETSTATE 0x00F2 BM_SETSTATE 0x00F3 BM_SETSTYLE 0x00F4 BM_CLICK 0x00F5 BM_GETIMAGE 0x00F6 279
- 280. BM_SETIMAGE 0x00F7 The BM_GETCHECK and BM_SETCHECK messages are sent by a parent window to a child window control to get and set the check mark of check boxes and radio buttons. The BM_GETSTATE and BM_SETSTATE messages refer to the normal, or pushed, state of a window when you click it with the mouse or press it with the Spacebar. We'll see how these messages work when we look at each type of button. The BM_SETSTYLE message lets you change the button style after the button is created. Each child window has a window handle and an ID that is unique among its siblings. Knowing one of these items allows you to get the other. If you know the window handle of the child, you can obtain the ID using id = GetWindowLong (hwndChild, GWL_ID) ; This function (along with SetWindowLong) was used in the CHECKER3 program in Chapter 7 to maintain data in a special area reserved when the window class was registered. The area accessed with the GWL_ID identifier is reserved by Windows when the child window is created. You can also use id = GetDlgCtrlID (hwndChild) ; Even though the "Dlg" part of the function name refers to a dialog box, this is really a general-purpose function. Knowing the ID and the parent window handle, you can get the child window handle: hwndChild = GetDlgItem (hwndParent, id) ; Push Buttons The first two buttons shown in BTNLOOK are "push" buttons. A push button is a rectangle enclosing text specified in the window text parameter of the CreateWindow call. The rectangle takes up the full height and width of the dimensions given in the CreateWindow or MoveWindow call. The text is centered within the rectangle. Push-button controls are used mostly to trigger an immediate action without retaining any type of on/off indication. The two types of push-button controls have window styles called BS_PUSHBUTTON and BS_DEFPUSHBUTTON. The "DEF" in BS_DEFPUSHBUTTON stands for "default." When used to design dialog boxes, BS_PUSHBUTTON controls and BS_DEFPUSHBUTTON controls function differently from one another. When used as child window controls, however, the two types of push buttons function the same way, although BS_DEFPUSHBUTTON has a heavier outline. A push button looks best when its height is 7/4 times the height of a text character, which is what BTNLOOK uses. The push button's width must accommodate at least the width of the text, plus two additional characters. When the mouse cursor is inside the push button, pressing the mouse button causes the button to repaint itself using 3D-style shading to appear as if it's been depressed. Releasing the mouse button restores the original appearance and sends a WM_COMMAND message to the parent window with the notification code BN_CLICKED. As with the other button types, when a push button has the input focus, a dashed line surrounds the text and pressing and releasing the Spacebar has the same effect as pressing and releasing the mouse button. You can simulate a push-button flash by sending the window a BM_SETSTATE message. This causes the button to be depressed: SendMessage (hwndButton, BM_SETSTATE, 1, 0) ; This call causes the button to return to normal: SendMessage (hwndButton, BM_SETSTATE, 0, 0) ; The hwndButton window handle is the value returned from the CreateWindow call. You can also send a BM_GETSTATE message to a push button. The child window control returns the current state 280
- 281. of the button: TRUE if the button is depressed and FALSE if it isn't depressed. Most applications do not require this information, however. And because push buttons do not retain any on/off information, the BM_SETCHECK and BM_GETCHECK messages are not used. Check Boxes A check box is a square box with text; the text usually appears to the right of the check box. (If you include the BS_LEFTTEXT style when creating the button, the text appears to the left; you'll probably want to combine this style with BS_RIGHT to right-justify the text.) Check boxes are usually incorporated in an application to allow a user to select options. The check box commonly functions as a toggle switch: clicking the box once causes a check mark to appear; clicking again toggles the check mark off. The two most common styles for a check box are BS_CHECKBOX and BS_AUTOCHECKBOX. When you use the BS_CHECKBOX style, you must set the check mark yourself by sending the control a BM_SETCHECK message. The wParam parameter is set to 1 to create a check mark and to 0 to remove it. You can obtain the current check state of the box by sending the control a BM_GETCHECK message. You might use code like this to toggle the X mark when processing a WM_COMMAND message from the control: SendMessage ((HWND) lParam, BM_SETCHECK, (WPARAM) !SendMessage ((HWND) lParam, BM_GETCHECK, 0, 0), 0) ; Notice the ! operator in front of the second SendMessage call. The lParam value is the child window handle that is passed to your window procedure in the WM_COMMAND message. When you later need to know the state of the button, send it another BM_GETCHECK message. Or you can retain the current check state in a static variable in your window procedure. You can also initialize a BS_CHECKBOX check box with a check mark by sending it a BM_SETCHECK message: SendMessage (hwndButton, BM_SETCHECK, 1, 0) ; For the BS_AUTOCHECKBOX style, the button control itself toggles the check mark on and off. Your window procedure can ignore WM_COMMAND messages. When you need the current state of the button, send the control a BM_GETCHECK message: iCheck = (int) SendMessage (hwndButton, BM_GETCHECK, 0, 0) ; The value of iCheck is TRUE or nonzero if the button is checked and FALSE or 0 if not. The other two check box styles are BS_3STATE and BS_AUTO3STATE. As their names indicate, these styles can display a third state as well—a gray color within the check box—which occurs when you send the control a WM_SETCHECK message with wParam equal to 2. The gray color indicates to the user that the selection is indeterminate or irrelevant. The check box is aligned with the rectangle's left edge and is centered within the top and bottom dimensions of the rectangle that were specified during the CreateWindow call. Clicking anywhere within the rectangle causes a WM_COMMAND message to be sent to the parent. The minimum height for a check box is one character height. The minimum width is the number of characters in the text, plus two. Radio Buttons A radio button is named after the row of buttons that were once quite common on car radios. Each button on a car radio is set for a different radio station, and only one button can be pressed at a time. In dialog boxes, groups of radio buttons are conventionally used to indicate mutually exclusive options. Unlike check boxes, radio buttons do not work as toggles—that is, when you click a radio button a second time, its state remains unchanged. The radio button looks very much like a check box except that it contains a little circle rather than a box. A heavy dot within the circle indicates that the radio button has been checked. The radio button has the window style BS_RADIOBUTTON or BS_AUTORADIOBUTTON, but the latter is used only in dialog boxes. 281
- 282. When you receive a WM_COMMAND message from a radio button, you should display its check by sending it a BM_SETCHECK message with wParam equal to 1: SendMessage (hwndButton, BM_SETCHECK, 1, 0) ; For all other radio buttons in the same group, you can turn off the checks by sending them BM_SETCHECK messages with wParam equal to 0: SendMessage (hwndButton, BM_SETCHECK, 0, 0) ; Group Boxes The group box, which has the BS_GROUPBOX style, is an oddity in the button class. It neither processes mouse or keyboard input nor sends WM_COMMAND messages to its parent. The group box is a rectangular outline with its window text at the top. Group boxes are often used to enclose other button controls. Changing the Button Text You can change the text in a button (or in any other window) by calling SetWindowText: SetWindowText (hwnd, pszString) ; where hwnd is a handle to the window whose text is being changed and pszString is a pointer to a null-terminated string. For a normal window, this text is the text of the caption bar. For a button control, it's the text displayed with the button. You can also obtain the current text of a window: iLength = GetWindowText (hwnd, pszBuffer, iMaxLength) ; The iMaxLength parameter specifies the maximum number of characters to copy into the buffer pointed to by pszBuffer. The function returns the string length copied. You can prepare your program for a particular text length by first calling iLength = GetWindowTextLength (hwnd) ; Visible and Enabled Buttons To receive mouse and keyboard input, a child window must be both visible (displayed) and enabled. When a child window is visible but not enabled, Windows displays the text in gray rather than black. If you don't include WS_VISIBLE in the window class when creating the child window, the child window will not be displayed until you make a call to ShowWindow: ShowWindow (hwndChild, SW_SHOWNORMAL) ; But if you include WS_VISIBLE in the window class, you don't need to call ShowWindow. However, you can hide the child window by this call to ShowWindow: ShowWindow (hwndChild, SW_HIDE) ; You can determine if a child window is visible by a call to IsWindowVisible (hwndChild) ; You can also enable and disable a child window. By default, a window is enabled. You can disable it by calling EnableWindow (hwndChild, FALSE) ; For button controls, this call has the effect of graying the button text string. The button no longer responds to mouse 282
- 283. or keyboard input. This is the best method for indicating that a button option is currently unavailable. You can reenable a child window by calling EnableWindow (hwndChild, TRUE) ; You can determine whether a child window is enabled by calling IsWindowEnabled (hwndChild) ; Buttons and Input Focus As I noted earlier in this chapter, push buttons, check boxes, radio buttons, and owner-draw buttons receive the input focus when they are clicked with the mouse. The control indicates it has the input focus with a dashed line that surrounds the text. When the child window control gets the input focus, the parent window loses it; all keyboard input then goes to the control rather than to the parent window. However, the child window control responds only to the Spacebar, which now functions like the mouse. This situation presents an obvious problem: your program has lost control of keyboard processing. Let's see what we can do about it. As I discussed in Chapter 6, when Windows switches the input focus from one window (such as a parent) to another (such as a child window control), it first sends a WM_KILLFOCUS message to the window losing the input focus. The wParam parameter is the handle of the window that is to receive the input focus. Windows then sends a WM_SETFOCUS message to the window receiving the input focus, with wParam specifying the handle of the window losing the input focus. (In both cases, wParam might be NULL, which indicates that no window has or is receiving the input focus.) A parent window can prevent a child window control from getting the input focus by processing WM_KILLFOCUS messages. Assume that the array hwndChild contains the window handles of all child windows. (These were saved in the array during the CreateWindow calls that created the windows.) NUM is the number of child windows. case WM_KILLFOCUS : for (i = 0 ; i < NUM ; i++) if (hwndChild [i] == (HWND) wParam) { SetFocus (hwnd) ; break ; } return 0 ; In this code, when the parent window detects that it's losing the input focus to one of its child window controls, it calls SetFocus to restore the input focus to itself. Here's a simpler (but less obvious) way of doing it: case WM_KILLFOCUS : if (hwnd == GetParent ((HWND) wParam)) SetFocus (hwnd) ; return 0 ; Both these methods have a shortcoming, however: they prevent the button from responding to the Spacebar, because the button never gets the input focus. A better approach would be to let the button get the input focus but also to include the facility for the user to move from button to button using the Tab key. At first this sounds impossible, but I'll show you how to accomplish it with a technique called "window subclassing" in the COLORS1 program shown later in this chapter. Controls and Colors As you can see in Figure 9-2, the display of many of the buttons doesn't look quite right. The push buttons are fine, but the others are drawn with a rectangular gray background that simply shouldn't be there. This is because the 283
- 284. buttons are designed to be displayed in dialog boxes, and in Windows 98 dialog boxes have a gray surface. Our window has a white surface because that's how we defined it in the WNDCLASS structure: wndclass.hbrBackground = (HBRUSH) GetStockObject (WHITE_BRUSH) ; We've been doing this because we often display text to the client area, and GDI uses the text color and background color defined in the default device context. These are always black and white. To make these buttons look a little better, we must either change the color of the client area to agree with the background color of the buttons or somehow change the button background color to be white. The first step to solving this problem is understanding Windows' use of "system colors." System Colors Windows maintains 29 system colors for painting various parts of the display. You can obtain and set these colors using GetSysColor and SetSysColors. Identifiers defined in the windows header files specify the system color. Setting a system color with SetSysColors changes it only for the current Windows session. You can change some (but not all) system colors using the Display section of the Windows Control Panel. The selected colors are stored in the Registry in Microsoft Windows NT and in the WIN.INI file in Microsoft Windows 98. The Registry and WIN.INI file use keywords for the 29 system colors (different from the GetSysColor and SetSysColors identifiers), followed by red, green, and blue values that can range from 0 to 255. The following table shows how the 29 system colors are identified applying the constants used for GetSysColor and SetSysColors and also the WIN.INI keywords. The table is arranged sequentially by the values of the COLOR_ constants, beginning with 0 and ending with 28. GetSysColor and SetSysColors Registry Key or WIN.INI Identifer Default RGB Value COLOR_SCROLLBAR Scrollbar C0-C0-C0 COLOR_BACKGROUND Background 00-80-80 COLOR_ACTIVECAPTION ActiveTitle 00-00-80 COLOR_INACTIVECAPTION InactiveTitle 80-80-80 COLOR_MENU Menu C0-C0-C0 COLOR_WINDOW Window FF-FF-FF COLOR_WINDOWFRAME WindowFrame 00-00-00 COLOR_MENUTEXT MenuText C0-C0-C0 COLOR_WINDOWTEXT WindowText 00-00-00 COLOR_CAPTIONTEXT TitleText FF-FF-FF COLOR_ACTIVEBORDER ActiveBorder C0-C0-C0 COLOR_INACTIVEBORDER InactiveBorder C0-C0-C0 COLOR_APPWORKSPACE AppWorkspace 80-80-80 COLOR_HIGHLIGHT Highlight 00-00-80 COLOR_HIGHLIGHTTEXT HighlightText FF-FF-FF COLOR_BTNFACE ButtonFace C0-C0-C0 284
- 285. COLOR_BTNSHADOW ButtonShadow 80-80-80 COLOR_GRAYTEXT GrayText 80-80-80 COLOR_BTNTEXT ButtonText 00-00-00 COLOR_INACTIVECAPTIONTEXT InactiveTitleText C0-C0-C0 COLOR_BTNHIGHLIGHT ButtonHighlight FF-FF-FF COLOR_3DDKSHADOW ButtonDkShadow 00-00-00 COLOR_3DLIGHT ButtonLight C0-C0-C0 COLOR_INFOTEXT InfoText 00-00-00 COLOR_INFOBK InfoWindow FF-FF-FF [no identifier; use value 25] ButtonAlternateFace B8-B4-B8 COLOR_HOTLIGHT HotTrackingColor 00-00-FF COLOR_GRADIENTACTIVECAPT ION GradientActiveTitle 00-00-80 COLOR_GRADIENTINACTIVECA PTION GradientInactiveTitle 80-80-80 Default values for these 29 colors are provided by the display driver, and they might be a little different on different machines. Now for the bad news: Although many of these colors seem self-explanatory (for example, COLOR_BACKGROUND is the color of the desktop area behind all the windows), the use of system colors in recent versions of Windows has become quite chaotic. Back in the old days, Windows was visually much simpler than it is today. Indeed, prior to Windows 3.0, only the first 13 system colors shown above were defined. With the increased use of more visually complex controls using three-dimensional appearances, more system colors were needed. The Button Colors This problem is particularly evident for buttons, each of which requires multiple colors. COLOR_BTNFACE is used for the main surface color of the push buttons and the background color of the others. (This is also the system color used for dialog boxes and message boxes.) COLOR_BTNSHADOW is used for suggesting a shadow at the right and bottom sides of the push buttons and the insides of the checkbox squares and radio button circles. For push buttons, COLOR_BTNTEXT is used for the text color; for the others it's COLOR_WINDOWTEXT. Several other system colors are also used for various parts of the button designs. So if we want to display buttons on the surface of our client area, one way to avoid the color clash is to yield to these system colors. To begin, you use COLOR_BTNFACE for the background of your client area when defining the window class: wndclass.hbrBackground = (HBRUSH) (COLOR_BTNFACE + 1) ; You can try this in the BTNLOOK program. Windows understands that when the value of hbrBackground in the WNDCLASS structure is this low in value, it actually refers to a system color rather than an actual handle. Windows requires that you add 1 when you use these identifiers and are specifying them in the hbrBackground field of the WNDCLASS structure, but doing so has no profound purpose other than to prevent the value from being NULL. If the system color happens to be changed while your program is running, the surface of your client area will be invalidated and Windows will use the new COLOR_BTNFACE value. But now we've caused another problem. 285
- 286. When you display text using TextOut, Windows uses values defined in the device context for the text background color (which erases the background behind the text) and the text color. The default values are white (background) and black (text), regardless of either the system colors or the hbrBackground field of the window class structure. So you need to use SetTextColor and SetBkColor to change your text and text background colors to the system colors. You do this after you obtain the handle to a device context: SetBkColor (hdc, GetSysColor (COLOR_BTNFACE)) ; SetTextColor (hdc, GetSysColor (COLOR_WINDOWTEXT)) ; Now the client-area background, text background, and text color are all consistent with the button colors. However, if the user changes the system colors while your program is running, you'll want to change the text background color and text color. You can do this using the following code: case WM_SYSCOLORCHANGE: InvalidateRect (hwnd, NULL, TRUE) ; break ; The WM_CTLCOLORBTN Message We've seen how we can adjust our client area color and text color to the background colors of the buttons. Can we adjust the colors of the buttons to the colors we prefer in our program? Well, in theory, yes, but in practice, no. What you probably don't want to do is use SetSysColors to change the appearance of the buttons. This will affect all programs currently running under Windows; it's something users would not appreciate very much. A better approach (again, in theory) is to process the WM_CTLCOLORBTN message. This is a message that button controls send to the parent window procedure when the child window is about to paint its client area. The parent window can use this opportunity to alter the colors that the child window procedure will use for painting. (In 16-bit versions of Windows, a message named WM_CTLCOLOR was used for all controls. This has been replaced with separate messages for each type of standard control.) When the parent window procedure receives a WM_CTLCOLORBTN message, the wParam message parameter is the handle to the button's device context and lParam is the button's window handle. When the parent window procedure gets this message, the button control has already obtained its device context. When processing a WM_CTLCOLORBTN message in your window procedure, you: • Optionally set a text color using SetTextColor • Optionally set a text background color using SetBkColor • Return a brush handle to the child window In theory, the child window uses the brush for coloring a background. It is your responsibility to destroy the brush when it is no longer needed. Here's the problem with WM_CTLCOLORBTN: Only the push buttons and owner-draw buttons send WM_CTLCOLORBTN to their parent windows, and only owner-draw buttons respond to the parent window processing of the message using the brush for coloring the background. This is fairly useless because the parent window is responsible for drawing owner-draw buttons anyway. Later on in this chapter, we'll examine cases in which messages similar to WM_CTLCOLORBTN but applying to other types of controls are more useful. Owner-Draw Buttons If you want to have total control over the visual appearance of a button but don't want to bother with keyboard and mouse logic, you can create a button with the BS_OWNERDRAW style. This is demonstrated in the OWNDRAW program shown in Figure 9-3. 286
- 287. Figure 9-3. The OWNDRAW program. 287
- 288. OWNDRAW.C /*---------------------------------------- OWNDRAW.C -- Owner-Draw Button Demo Program (c) Charles Petzold, 1996 ----------------------------------------*/ #include <windows.h> #define ID_SMALLER 1 #define ID_LARGER 2 #define BTN_WIDTH (8 * cxChar) #define BTN_HEIGHT (4 * cyChar) LRESULT CALLBACK WndProc (HWND, UINT, WPARAM, LPARAM) ; HINSTANCE hInst ; int WINAPI WinMain (HINSTANCE hInstance, HINSTANCE hPrevInstance, PSTR szCmdLine, int iCmdShow) { static TCHAR szAppName[] = TEXT ("OwnDraw") ; MSG msg ; HWND hwnd ; WNDCLASS wndclass ; hInst = hInstance ; wndclass.style = CS_HREDRAW | CS_VREDRAW ; wndclass.lpfnWndProc = WndProc ; wndclass.cbClsExtra = 0 ; wndclass.cbWndExtra = 0 ; wndclass.hInstance = hInstance ; wndclass.hIcon = LoadIcon (NULL, IDI_APPLICATION) ; wndclass.hCursor = LoadCursor (NULL, IDC_ARROW) ; wndclass.hbrBackground = (HBRUSH) GetStockObject (WHITE_BRUSH) ; wndclass.lpszMenuName = szAppName ; wndclass.lpszClassName = szAppName ; if (!RegisterClass (&wndclass)) { MessageBox (NULL, TEXT ("This program requires Windows NT!"), szAppName, MB_ICONERROR) ; return 0 ; } hwnd = CreateWindow (szAppName, TEXT ("Owner-Draw Button Demo"), WS_OVERLAPPEDWINDOW, CW_USEDEFAULT, CW_USEDEFAULT, CW_USEDEFAULT, CW_USEDEFAULT, NULL, NULL, hInstance, NULL) ; ShowWindow (hwnd, iCmdShow) ; UpdateWindow (hwnd) ; while (GetMessage (&msg, NULL, 0, 0)) { TranslateMessage (&msg) ; DispatchMessage (&msg) ; } return msg.wParam ; } void Triangle (HDC hdc, POINT pt[]) { 288
- 289. This program contains two buttons in the center of its client area, as shown in Figure 9-4. The button on the left has four triangles pointing to the center of the button. Clicking the button decreases the size of the window by 10 percent. The button on the right has four triangles pointing outward, and clicking this button increases the window size by 10 percent. If you need to display only an icon or a bitmap in the button, you can use the BS_ICON or BS_BITMAP style and set the bitmap using the BM_SETIMAGE message. The BS_OWNERDRAW button style, however, allows complete freedom in drawing the button. Figure 9-4. The OWNDRAW display. During the WM_CREATE message, OWNDRAW creates two buttons with the BS_OWNERDRAW style; the buttons are given a width of eight times the system font and four times the system font height. (When using predefined bitmaps to draw buttons, it's useful to know that these dimensions create buttons that are 64 by 64 pixels on a VGA.) The buttons are not yet positioned. During the WM_SIZE message, OWNDRAW positions the buttons in the center of the client area by calling MoveWindow. Clicking on the buttons causes them to generate WM_COMMAND messages. To process the WM_COMMAND message, OWNDRAW calls GetWindowRect to store the position and size of the entire window (not only the client area) in a RECT (rectangle) structure. This position is relative to the screen. OWNDRAW then adjusts the fields of this rectangle structure depending on whether the left or right button was clicked. Then the program repositions and resizes the window by calling MoveWindow. This generates another WM_SIZE message, and the buttons are repositioned in the center of the client area. If this were all the program did, it would be entirely functional but the buttons would not be visible. A button created with the BS_OWNERDRAW style sends its parent window a WM_DRAWITEM message whenever the button needs to be repainted. This occurs when the button is first created, when it is pressed or released, when it gains or loses the input focus, and whenever else it needs repainting. 289
- 290. During the WM_DRAWITEM message, the lParam message parameter is a pointer to a structure of type DRAWITEMSTRUCT. The OWNDRAW program stores this pointer in a variable named pdis. This structure contains the information necessary for a program to draw the button. (The same structure is also used for owner- draw list boxes and menu items.) The structure fields important for working with buttons are hDC (the device context for the button), rcItem (a RECT structure providing the size of the button), CtlID (the control window ID), and itemState (which indicates whether the button is pushed or has the input focus). OWNDRAW begins WM_DRAWITEM processing by calling FillRect to erase the surface of the button with a white brush and FrameRect to draw a black frame around the button. Then OWNDRAW draws four black-filled triangles on the button by calling Polygon. That's the normal case. If the button is currently being pressed, a bit of the itemState field of the DRAWITEMSTRUCT will be set. You can test this bit using the ODS_SELECTED constant. If the bit is set, OWNDRAW inverts the colors of the button by calling InvertRect. If the button has the input focus, the ODS_FOCUS bit of the itemState field will be set. In this case, OWNDRAW draws a dotted rectangle just inside the periphery of the button by calling DrawFocusRect. A word of warning when using owner-draw buttons: Windows obtains a device context for you and includes it as a field of the DRAWITEMSTRUCT structure. Leave the device context in the same state you found it. Any GDI objects selected into the device context must be unselected. Also, be careful not to draw outside the rectangle defining the boundaries of the button. The Static Class You create static child window controls by using "static" as the window class in the CreateWindow function. These are fairly benign child windows. They do not accept mouse or keyboard input, and they do not send WM_COMMAND messages back to the parent window. When you move or click the mouse over a static child window, the child window traps the WM_NCHITTEST message and returns a value of HTTRANSPARENT to Windows. This causes Windows to send the same WM_NCHITTEST message to the underlying window, which is usually the parent. The parent usually passes the message to DefWindowProc, where it is converted to a client-area mouse message. The first six static window styles simply draw a rectangle or a frame in the client area of the child window. The "RECT" static styles (left column below) are filled-in rectangles; the three "FRAME" styles (right column) are rectangular outlines that are not filled in. SS_BLACKRECT SS_BLACKFRAME SS_GRAYRECT SS_GRAYFRAME SS_WHITERECT SS_WHITEFRAME "BLACK," "GRAY," and "WHITE" do not mean the colors are black, gray, and white. Rather, the colors are based on system colors, as shown here: Static Control System Color BLACK COLOR_3DDKSHADOW GRAY COLOR_BTNSHADOW WHITE COLOR_BTNHIGHLIGHT The window text field of the CreateWindow call is ignored for these styles. The upper left corner of the rectangle begins at the x position and y position coordinates relative to the parent window. You can also use the SS_ETCHEDHORZ, SS_ETCHEDVERT, or SS_ETCHEDFRAME styles to create a shadowed-looking frame with the white and gray colors. The static class also includes three text styles: SS_LEFT, SS_RIGHT, and SS_CENTER. These create left-justified, 290
- 291. right-justified, and centered text. The text is given in the window text parameter of the CreateWindow call, and it can be changed later using SetWindowText. When the window procedure for static controls displays this text, it uses the DrawText function with DT_WORDBREAK, DT_NOCLIP, and DT_EXPANDTABS parameters. The text is wordwrapped within the rectangle of the child window. The background of these three text-style child windows is normally COLOR_BTNFACE, and the text itself is COLOR_WINDOWTEXT. You can intercept WM_CTLCOLORSTATIC messages to change the text color by calling SetTextColor and the background color by calling SetBkColor and by returning the handle to the background brush. This will be demonstrated in the COLORS1 program shortly. Finally, the static class also includes the window styles SS_ICON and SS_USERITEM. However, these styles have no meaning when they are used as child window controls. We'll look at them again when we discuss dialog boxes. The Scroll Bar Class When the subject of scroll bars first came up in Chapter 4, I discussed some of the differences between "window scroll bars" and "scroll bar controls." The SYSMETS programs use window scroll bars, which appear at the right and bottom of the window. You add window scroll bars to a window by including the identifier WS_VSCROLL or WS_HSCROLL or both in the window style when creating the window. Now we're ready to make some scroll bar controls, which are child windows that can appear anywhere in the client area of the parent window. You create child window scroll bar controls by using the predefined window class "scrollbar" and one of the two scroll bar styles SBS_VERT and SBS_HORZ. Unlike the button controls (and the edit and list box controls to be discussed later), scroll bar controls do not send WM_COMMAND messages to the parent window. Instead, they send WM_VSCROLL and WM_HSCROLL messages, just like window scroll bars. When processing the scroll bar messages, you can differentiate between window scroll bars and scroll bar controls by the lParam parameter. It will be 0 for window scroll bars and the scroll bar window handle for scroll bar controls. The high and low words of the wParam parameter have the same meaning for window scroll bars and scroll bar controls. Although window scroll bars have a fixed width, Windows uses the full rectangle dimensions given in the CreateWindow call (or later in the MoveWindow call) to size the scroll bar controls. You can make long, thin scroll bar controls or short, pudgy scroll bar controls. If you want to create scroll bar controls that have the same dimensions as window scroll bars, you can use GetSystemMetrics to obtain the height of a horizontal scroll bar: GetSystemMetrics (SM_CYHSCROLL) ; or the width of a vertical scroll bar: GetSystemMetrics (SM_CXVSCROLL) ; The scroll bar window style identifiers SBS_LEFTALIGN, SBS_RIGHTALIGN, SBS_TOP ALIGN, and SBS_BOTTOMALIGN are documented to give standard dimensions to scroll bars. However, these styles work only for scroll bars in dialog boxes. You can set the range and position of a scroll bar control with the same calls used for window scroll bars: SetScrollRange (hwndScroll, SB_CTL, iMin, iMax, bRedraw) ; SetScrollPos (hwndScroll, SB_CTL, iPos, bRedraw) ; SetScrollInfo (hwndScroll, SB_CTL, &si, bRedraw) ; The difference is that window scroll bars use a handle to the main window as the first parameter and SB_VERT or SB_HORZ as the second parameter. Amazingly enough, the system color named COLOR_SCROLLBAR is no longer used for scroll bars. The end buttons and thumb are based on COLOR_BTNFACE, COLOR_BTNHILIGHT, COLOR_BTNSHADOW, COLOR_BTNTEXT (for the little arrows), COLOR_DKSHADOW, and COLOR_BTNLIGHT. The large area 291
- 292. between the two end buttons is based on a combination of COLOR_BTNFACE and COLOR_BTNHIGHLIGHT. If you trap WM_CTLCOLORSCROLLBAR messages, you can return a brush from the message to override the color used for this area. Let's do it. The COLORS1 Program To see some uses of scroll bars and static child windows—and also to explore color in more depth—we'll use the COLORS1 program, shown in Figure 9-5. COLORS1 displays three scroll bars in the left half of the client area labeled "Red," "Green," and "Blue." As you scroll the scroll bars, the right half of the client area changes to the composite color indicated by the mix of the three primary colors. The numeric values of the three primary colors are displayed under the three scroll bars. Figure 9-5. The COLORS1 program. 292
- 293. COLORS1.C /*---------------------------------------- COLORS1.C -- Colors Using Scroll Bars (c) Charles Petzold, 1998 ----------------------------------------*/ #include <windows.h> LRESULT CALLBACK WndProc (HWND, UINT, WPARAM, LPARAM) ; LRESULT CALLBACK ScrollProc (HWND, UINT, WPARAM, LPARAM) ; int idFocus ; WNDPROC OldScroll[3] ; int WINAPI WinMain (HINSTANCE hInstance, HINSTANCE hPrevInstance, PSTR szCmdLine, int iCmdShow) { static TCHAR szAppName[] = TEXT ("Colors1") ; HWND hwnd ; MSG msg ; WNDCLASS wndclass ; wndclass.style = CS_HREDRAW | CS_VREDRAW ; wndclass.lpfnWndProc = WndProc ; wndclass.cbClsExtra = 0 ; wndclass.cbWndExtra = 0 ; wndclass.hInstance = hInstance ; wndclass.hIcon = LoadIcon (NULL, IDI_APPLICATION) ; wndclass.hCursor = LoadCursor (NULL, IDC_ARROW) ; wndclass.hbrBackground = CreateSolidBrush (0) ; wndclass.lpszMenuName = NULL ; wndclass.lpszClassName = szAppName ; if (!RegisterClass (&wndclass)) { MessageBox (NULL, TEXT ("This program requires Windows NT!"), szAppName, MB_ICONERROR) ; return 0 ; } hwnd = CreateWindow (szAppName, TEXT ("Color Scroll"), WS_OVERLAPPEDWINDOW, CW_USEDEFAULT, CW_USEDEFAULT, CW_USEDEFAULT, CW_USEDEFAULT, NULL, NULL, hInstance, NULL) ; ShowWindow (hwnd, iCmdShow) ; UpdateWindow (hwnd) ; while (GetMessage (&msg, NULL, 0, 0)) { TranslateMessage (&msg) ; DispatchMessage (&msg) ; } return msg.wParam ; } LRESULT CALLBACK WndProc (HWND hwnd, UINT message, WPARAM wParam, LPARAM lParam) { static COLORREF crPrim[3] = { RGB (255, 0, 0), RGB (0, 255, 0), RGB (0, 0, 255) } ; static HBRUSH hBrush[3], hBrushStatic ; static HWND hwndScroll[3], hwndLabel[3], hwndValue[3], hwndRect ; 293
- 294. COLORS1 puts its children to work. The program uses 10 child window controls: 3 scroll bars, 6 windows of static text, and 1 static rectangle. COLORS1 traps WM_CTLCOLORSCROLLBAR messages to color the interior sections of the three scroll bars red, green, and blue and traps WM_CTLCOLORSTATIC messages to color the static text. You can scroll the scroll bars using either the mouse or the keyboard. You can use COLORS1 as a development tool in experimenting with color and choosing attractive (or, if you prefer, ugly) colors for your own Windows programs. The COLORS1 display is shown in Figure 9-6, unfortunately reduced to gray shades for the printed page. Figure 9-6. The COLORS1 display. COLORS1 doesn't process WM_PAINT messages. Virtually all of the work in COLORS1 is done by the child windows. The color shown in the right half of the client area is actually the window's background color. A static child window with style SS_WHITERECT blocks out the left half of the client area. The three scroll bars are child window controls with the style SBS_VERT. These scroll bars are positioned on top of the SS_WHITERECT child. Six more static child windows of style SS_CENTER (centered text) provide the labels and the color values. COLORS1 creates its normal overlapped window and the 10 child windows within the WinMain function using CreateWindow. The SS_WHITERECT and SS_CENTER static windows use the window class "static"; the three scroll bars use the window class "scrollbar." The x position, y position, width, and height parameters of the CreateWindow calls are initially set to 0 because the position and sizing depend on the size of the client area, which is not yet known. COLORS1's window procedure resizes all 10 child windows using MoveWindow when it receives a WM_SIZE message. So whenever you resize the COLORS1 window, the size of the scroll bars changes proportionally. When the WndProc window procedure receives a WM_VSCROLL message, the high word of the lParam parameter is the handle to the child window. We can use GetWindowWord to get the window ID number: 294
- 295. i = GetWindowLong ((HWND) lParam, GWL_ID) ; For the three scroll bars, we have conveniently set the ID numbers to 0, 1, and 2, so WndProc can tell which scroll bar is generating the message. Because the handles to the child windows were saved in arrays when the windows were created, WndProc can process the scroll bar message and set the new value of the appropriate scroll bar using the SetScrollPos call: SetScrollPos (hwndScroll[i], SB_CTL, color[i], TRUE) ; WndProc also changes the text of the child window at the bottom of the scroll bar: wsprintf (szBuffer, TEXT ("%i"), color[I]) ; SetWindowText (hwndValue[i], szBuffer) ; The Automatic Keyboard Interface Scroll bar controls can also process keystrokes, but only if they have the input focus. The following table shows how keyboard cursor keys translate into scroll bar messages: Cursor Key Scroll Bar Message wParam Value Home SB_TOP End SB_BOTTOM Page Up SB_PAGEUP Page Down SB_PAGEDOWN Left or Up SB_LINEUP Right or Down SB_LINEDOWN In fact, the SB_TOP and SB_BOTTOM scroll bar messages can be generated only by using the keyboard. If you want a scroll bar control to obtain the input focus when the scroll bar is clicked with the mouse, you must include the WS_TABSTOP identifier in the window class parameter of the CreateWindow call. When a scroll bar has the input focus, a blinking gray block is displayed on the scroll bar thumb. To provide a full keyboard interface to the scroll bars, however, more work is necessary. First the WndProc window procedure must specifically give a scroll bar the input focus. It does this by processing the WM_SETFOCUS message, which the parent window receives when it obtains the input focus. WndProc simply sets the input focus to one of the scroll bars: SetFocus (hwndScroll[idFocus]) ; where idFocus is a global variable. But you also need some way to get from one scroll bar to another by using the keyboard, preferably by using the Tab key. This is more difficult, because once a scroll bar has the input focus it processes all keystrokes. But the scroll bar cares only about the cursor keys; it ignores the Tab key. The way out of this dilemma lies in a technique called "window subclassing." We'll use it to add a facility to COLORS1 to jump from one scroll bar to another using the Tab key. Window Subclassing The window procedure for the scroll bar controls is somewhere inside Windows. However, you can obtain the address of this window procedure by a call to GetWindowLong using the GWL_WNDPROC identifier as a parameter. Moreover, you can set a new window procedure for the scroll bars by calling SetWindowLong. This 295
- 296. technique, which is called "window subclassing," is very powerful. It lets you hook into existing window procedures, process some messages within your own program, and pass all other messages to the old window procedure. The window procedure that does preliminary scroll bar message processing in COLORS1 is named ScrollProc; it is toward the end of the COLORS1.C listing. Because ScrollProc is a function within COLORS1 that is called by Windows, it must be defined as a CALLBACK. For each of the three scroll bars, COLORS1 uses SetWindowLong to set the address of the new scroll bar window procedure and also obtain the address of the existing scroll bar window procedure: OldScroll[i] = (WNDPROC) SetWindowLong (hwndScroll[i], GWL_WNDPROC, (LONG) ScrollProc)) ; Now the function ScrollProc gets all messages that Windows sends to the scroll bar window procedure for the three scroll bars in COLORS1 (but not, of course, for scroll bars in other programs). The ScrollProc window procedure simply changes the input focus to the next (or previous) scroll bar when it receives a Tab or Shift-Tab keystroke. It calls the old scroll bar window procedure using CallWindowProc. Coloring the Background When COLORS1 defines its window class, it gives the background of its client area a solid black brush: wndclass.hbrBackground = CreateSolidBrush (0) ; When you change the settings of COLORS1's scroll bars, the program must create a new brush and put the new brush handle in the window class structure. Just as we were able to get and set the scroll bar window procedure using GetWindowLong and SetWindowLong, we can get and set the handle to this brush using GetClassWord and SetClassWord. You can create the new brush and insert the handle in the window class structure and then delete the old brush: DeleteObject ((HBRUSH) SetClassLong (hwnd, GCL_HBRBACKGROUND, (LONG) CreateSolidBrush (RGB (color[0], color[1], color[2])))) ; The next time Windows recolors the background of the window, Windows will use this new brush. To force Windows to erase the background, we invalidate the right half of the client area: InvalidateRect (hwnd, &rcColor, TRUE) ; The TRUE (nonzero) value as the third parameter indicates that we want the background erased before repainting. InvalidateRect causes Windows to put a WM_PAINT message in the message queue of the window procedure. Because WM_PAINT messages are low priority, this message will not be processed immediately if you are still moving the scroll bar with the mouse or the cursor keys. Alternatively, if you want the window to be updated immediately after the color is changed, you can add the statement UpdateWindow (hwnd) ; after the InvalidateRect call. But this might slow down keyboard and mouse processing. COLORS1's WndProc function doesn't process the WM_PAINT message but passes it to DefWindowProc. Windows' default processing of WM_PAINT messages simply involves calling BeginPaint and EndPaint to validate the window. Because we specified in the InvalidateRect call that the background should be erased, the BeginPaint call causes Windows to generate a WM_ERASEBKGND (erase background) message. WndProc ignores this message also. Windows processes it by erasing the background of the client area using the brush specified in the window class. It's always a good idea to clean up before termination, so during processing of the WM_DESTROY message, 296
- 297. DeleteObject is called once more: DeleteObject ((HBRUSH) SetClassLong (hwnd, GCL_HBRBACKGROUND, (LONG) GetStockObject (WHITE_BRUSH))) ; Coloring the Scroll Bars and Static Text In COLORS1, the interiors of the three scroll bars and the text in the six text fields are colored red, green, and blue. The coloring of the scroll bars is accomplished by processing WM_CTLCOLORSCROLLBAR messages. In WndProc we define a static array of three handles to brushes: static HBRUSH hBrush [3] ; During processing of WM_CREATE, we create the three brushes: for (I = 0 ; I < 3 ; I++) hBrush[0] = CreateSolidBrush (crPrim [I]) ; where the crPrim array contains the RGB values of the three primary colors. During the WM_CTLCOLORSCROLLBAR processing, the window procedure returns one of these three brushes: case WM_CTLCOLORSCROLLBAR: i = GetWindowLong ((HWND) lParam, GWL_ID) ; return (LRESULT) hBrush [i] ; These brushes must be destroyed during processing of the WM_DESTROY message: for (i = 0 ; i < 3 ; i++) DeleteObject (hBrush [i])) ; The text in the static text fields is colored similarly by processing the WM_CTLCOLORSTATIC message and calling SetTextColor. The text background is set using SetBkColor with the system color COLOR_BTNHIGHLIGHT. This causes the text background to be the same color as the static rectangle control behind the scrollbars and text displays. For static text controls, this text background color applies only to the rectangle behind each character in the string and not to the entire width of the control window. To accomplish this, the window procedure must also return a handle to a brush of the COLOR_BTNHIGHLIGHT color. This brush is named hBrushStatic; it is created during the WM_CREATE message and destroyed during the WM_DESTROY message. By creating a brush based on the COLOR_BTNHIGHLIGHT color during the WM_CREATE message and using it through the duration of the program, we've exposed ourselves to a little problem. If the COLOR_BTNHIGHLIGHT color is changed while the program is running, the color of the static rectangle will change and the text background color will change but the whole background of the text window controls will remain the old COLOR_BTNHIGHLIGHT color. To fix this problem, COLORS1 also processes the WM_SYSCOLORCHANGE message by simply recreating hBrushStatic using the new color. The Edit Class The edit class is in some ways the simplest predefined window class and in other ways the most complex. When you create a child window using the class name "edit," you define a rectangle based on the x position, y position, width, and height parameters of the CreateWindow call. This rectangle contains editable text. When the child window control has the input focus, you can type text, move the cursor, select portions of text using either the mouse or the Shift key and a cursor key, delete selected text to the clipboard by pressing Ctrl-X, copy text by pressing Ctrl-C, and insert text from the clipboard by pressing Ctrl-V. 297
- 298. One of the simplest uses of edit controls is for single-line entry fields. But edit controls are not limited to single lines, as I'll demonstrate in the POPPAD1 program shown in Figure 9-7. As we encounter various other topics in this book, the POPPAD program will be enhanced to use menus, dialog boxes (to load and save files), and printing. The final version will be a simple but complete text editor with surprisingly little overhead required in our code. Figure 9-7. The POPPAD1 program. POPPAD1.C /*---------------------------------------- POPPAD1.C -- Popup Editor using child window edit box (c) Charles Petzold, 1998 ----------------------------------------*/ #include <windows.h> #define ID_EDIT 1 LRESULT CALLBACK WndProc (HWND, UINT, WPARAM, LPARAM); TCHAR szAppName[] = TEXT ("PopPad1") ; int WINAPI WinMain (HINSTANCE hInstance, HINSTANCE hPrevInstance, PSTR szCmdLine, int iCmdShow) { HWND hwnd ; MSG msg ; WNDCLASS wndclass ; wndclass.style = CS_HREDRAW | CS_VREDRAW ; wndclass.lpfnWndProc = WndProc ; wndclass.cbClsExtra = 0 ; wndclass.cbWndExtra = 0 ; wndclass.hInstance = hInstance ; wndclass.hIcon = LoadIcon (NULL, IDI_APPLICATION) ; wndclass.hCursor = LoadCursor (NULL, IDC_ARROW) ; wndclass.hbrBackground = (HBRUSH) GetStockObject (WHITE_BRUSH) ; wndclass.lpszMenuName = NULL ; wndclass.lpszClassName = szAppName ; if (!RegisterClass (&wndclass)) { MessageBox (NULL, TEXT ("This program requires Windows NT!"), szAppName, MB_ICONERROR) ; return 0 ; } hwnd = CreateWindow (szAppName, szAppName, WS_OVERLAPPEDWINDOW, CW_USEDEFAULT, CW_USEDEFAULT, CW_USEDEFAULT, CW_USEDEFAULT, NULL, NULL, hInstance, NULL) ; ShowWindow (hwnd, iCmdShow) ; UpdateWindow (hwnd) ; while (GetMessage (&msg, NULL, 0, 0)) { TranslateMessage (&msg) ; 298
- 299. DispatchMessage (&msg) ; } return msg.wParam ; } LRESULT CALLBACK WndProc (HWND hwnd, UINT message, WPARAM wParam, LPARAM lParam) { static HWND hwndEdit ; switch (message) { case WM_CREATE : hwndEdit = CreateWindow (TEXT ("edit"), NULL, WS_CHILD | WS_VISIBLE | WS_HSCROLL | WS_VSCROLL | WS_BORDER | ES_LEFT | ES_MULTILINE | ES_AUTOHSCROLL | ES_AUTOVSCROLL, 0, 0, 0, 0, hwnd, (HMENU) ID_EDIT, ((LPCREATESTRUCT) lParam) -> hInstance, NULL) ; return 0 ; case WM_SETFOCUS : SetFocus (hwndEdit) ; return 0 ; case WM_SIZE : MoveWindow (hwndEdit, 0, 0, LOWORD (lParam), HIWORD (lParam), TRUE) ; return 0 ; case WM_COMMAND : if (LOWORD (wParam) == ID_EDIT) if (HIWORD (wParam) == EN_ERRSPACE || HIWORD (wParam) == EN_MAXTEXT) MessageBox (hwnd, TEXT ("Edit control out of space."), szAppName, MB_OK | MB_ICONSTOP) ; return 0 ; case WM_DESTROY : PostQuitMessage (0) ; return 0 ; } return DefWindowProc (hwnd, message, wParam, lParam) ; } POPPAD1 is a multiline editor (without any file I/O just yet) in less than 100 lines of C. (One drawback, however, is that the predefined multiline edit control is limited to 30,000 characters of text.) As you can see, POPPAD1 itself doesn't do very much. The predefined edit control is doing quite a lot. In this form, the program lets you explore what edit controls can do without any help from a program. The Edit Class Styles As noted earlier, you create an edit control using "edit" as the window class in the CreateWindow call. The window style is WS_CHILD, plus several options. As in static child window controls, the text in edit controls can be left- justified, right-justified, or centered. You specify this formatting with the window styles ES_LEFT, ES_RIGHT, and ES_CENTER. By default, an edit control has a single line. You can create a multiline edit control with the window style ES_MULTILINE. For a single-line edit control, you can normally enter text only to the end of the edit control rectangle. To create an edit control that automatically scrolls horizontally, you use the style ES_AUTOHSCROLL. For a multiline edit control, text wordwraps unless you use the ES_AUTOHSCROLL style, in which case you must press the Enter key to start a new line. You can also include vertical scrolling in a multiline edit control by using the style ES_AUTOVSCROLL. 299
- 300. When you include these scrolling styles in multiline edit controls, you might also want to add scroll bars to the edit control. You do so by using the same window style identifiers as for nonchild windows: WS_HSCROLL and WS_VSCROLL. By default, an edit control does not have a border. You can add one by using the style WS_BORDER. When you select text in an edit control, Windows displays it in reverse video. When the edit control loses the input focus, however, the selected text is no longer highlighted. If you want the selection to be highlighted even when the edit control does not have the input focus, you can use the style ES_NOHIDESEL. When POPPAD1 creates its edit control, the style is given in the CreateWindow call: WS_CHILD ¦ WS_VISIBLE ¦ WS_HSCROLL ¦ WS_VSCROLL ¦ WS_BORDER ¦ ES_LEFT ¦ ES_MULTILINE ¦ ES_AUTOHSCROLL ¦ ES_AUTOVSCROLL In POPPAD1, the dimensions of the edit control are later defined by a call to MoveWindow when WndProc receives a WM_SIZE message. The size of the edit control is simply set to the size of the main window: MoveWindow (hwndEdit, 0, 0, LOWORD (lParam), HIWORD (lParam), TRUE) ; For a single-line edit control, the height of the control must accommodate the height of a character. If the edit control has a border (as most do), use 1.5 times the height of a character (including external leading). Edit Control Notification Edit controls send WM_COMMAND messages to the parent window procedure. The meanings of the wParam and lParam variables are the same as for button controls: LOWORD (wParam) Child window ID HIWORD (wParam) Notification code lParam Child window handle The notification codes are shown below: EN_SETFOCUS Edit control has gained the input focus. EN_KILLFOCUS Edit control has lost the input focus. EN_CHANGE Edit control's contents will change. EN_UPDATE Edit control's contents have changed. EN_ERRSPACE Edit control has run out of space. EN_MAXTEXT Edit control has run out of space on insertion. EN_HSCROLL Edit control's horizontal scroll bar has been clicked. EN_VSCROLL Edit control's vertical scroll bar has been clicked. POPPAD1 traps only EN_ERRSPACE and EN_MAXTEXT notification codes and displays a message box in response. Using the Edit Controls If you use several single-line edit controls on the surface of your main window, you'll need to use window subclassing to move the input focus from one control to another. You can accomplish this much as COLORS1 does, 300
- 301. by intercepting Tab and Shift-Tab keystrokes. (Another example of window subclassing is shown later in this chapter in the HEAD program.) How you handle the Enter key is up to you. You can use it the same way as the Tab key or as a signal to your program that all the edit fields are ready. If you want to insert text into an edit field, you can do so by using SetWindowText. Getting text out of an edit control involves GetWindowTextLength and GetWindowText. We'll see examples of these facilities in our later revisions to the POPPAD program. Messages to an Edit Control I won't cover all the messages you can send to an edit control using SendMessage because there are quite a few of them, and several will be used in the later POPPAD revisions. Here's a broad overview. These messages let you cut, copy, or clear the current selection. A user selects the text to be acted upon by using the mouse or the Shift key and a cursor key, thereby highlighting the selected text in the edit control: SendMessage (hwndEdit, WM_CUT, 0, 0) ; SendMessage (hwndEdit, WM_COPY, 0, 0) ; SendMessage (hwndEdit, WM_CLEAR, 0, 0) ; WM_CUT removes the current selection from the edit control and sends it to the clipboard. WM_COPY copies the selection to the clipboard but leaves it intact in the edit control. WM_CLEAR deletes the selection from the edit control without passing it to the clipboard. You can also insert clipboard text into the edit control at the cursor position: SendMessage (hwndEdit, WM_PASTE, 0, 0) ; You can obtain the starting and ending positions of the current selection: SendMessage (hwndEdit, EM_GETSEL, (WPARAM) &iStart, (LPARAM) &iEnd) ; The ending position is actually the position of the last selected character plus 1. You can select text: SendMessage (hwndEdit, EM_SETSEL, iStart, iEnd) ; You can also replace a current selection with other text: SendMessage (hwndEdit, EM_REPLACESEL, 0, (LPARAM) szString) ; For multiline edit controls, you can obtain the number of lines: iCount = SendMessage (hwndEdit, EM_GETLINECOUNT, 0, 0) ; For any particular line, you can obtain an offset from the beginning of the edit buffer text: iOffset = SendMessage (hwndEdit, EM_LINEINDEX, iLine, 0) ; Lines are numbered starting at 0. An iLine value of -1 returns the offset of the line containing the cursor. You obtain the length of the line from iLength = SendMessage (hwndEdit, EM_LINELENGTH, iLine, 0) ; and copy the line itself into a buffer using iLength = SendMessage (hwndEdit, EM_GETLINE, iLine, (LPARAM) szBuffer) ; 301
- 302. The Listbox Class The final predefined child window control I'll discuss in this chapter is the list box. A list box is a collection of text strings displayed as a scrollable columnar list within a rectangle. A program can add or remove strings in the list by sending messages to the list box window procedure. The list box control sends WM_COMMAND messages to its parent window when an item in the list is selected. The parent window can then determine which item has been selected. A list box can be either single selection or multiple selection. The latter allows the user to select more than one item from the list box. When a list box has the input focus, it displays a dashed line surrounding an item in the list box. This cursor does not indicate the selected item in the list box. The selected item is indicated by highlighting, which displays the item in reverse video. In a single-selection list box, the user can select the item that the cursor is positioned on by pressing the Spacebar. The arrow keys move both the cursor and the current selection and can scroll the contents of the list box. The Page Up and Page Down keys also scroll the list box by moving the cursor but not the selection. Pressing a letter key moves the cursor and the selection to the first (or next) item that begins with that letter. An item can also be selected by clicking or double-clicking the mouse on the item. In a multiple-selection list box, the Spacebar toggles the selection state of the item where the cursor is positioned. (If the item is already selected, it is deselected.) The arrow keys deselect all previously selected items and move the cursor and selection, just as in single-selection list boxes. However, the Ctrl key and the arrow keys can move the cursor without moving the selection. The Shift key and arrow keys can extend a selection. Clicking or double-clicking an item in a multiple-selection list box deselects all previously selected items and selects the clicked item. However, clicking an item while pressing the Shift key toggles the selection state of the item without changing the selection state of any other item. List Box Styles You create a list box child window control with CreateWindow using "listbox" as the window class and WS_CHILD as the window style. However, this default list box style does not send WM_COMMAND messages to its parent, meaning that a program would have to interrogate the list box (via messages to the list box controls) regarding the selection of items within the list box. Therefore, list box controls almost always include the list box style identifier LBS_NOTIFY, which allows the parent window to receive WM_COMMAND messages from the list box. If you want the list box control to sort the items in the list box, you can also use LBS_SORT, another common style. By default, list boxes are single selection. Multiple-selection list boxes are relatively rare. If you want to create one, you use the style LBS_MULTIPLESEL. Normally, a list box updates itself when a new item is added to the scroll box list. You can prevent this by including the style LBS_NOREDRAW. You will probably not want to use this style, however. Instead, you can temporarily prevent the repainting of a list box control by using the WM_SETREDRAW message that I'll describe a little later. By default, the list box window procedure displays only the list of items without any border around it. You can add a border with the window style identifier WS_BORDER. And to add a vertical scroll bar for scrolling through the list with the mouse, you use the window style identifier WS_VSCROLL. The Windows header files define a list box style called LBS_STANDARD that includes the most commonly used styles. It is defined as (LBS_NOTIFY ¦ LBS_SORT ¦ WS_VSCROLL ¦ WS_BORDER) You can also use the WS_SIZEBOX and WS_CAPTION identifiers, but these will allow the user to resize the list box and to move it around its parent's client area. The width of a list box should accommodate the width of the longest string plus the width of the scroll bar. You can get the width of the vertical scroll bar using 302
- 303. GetSystemMetrics (SM_CXVSCROLL) ; You can calculate the height of the list box by multiplying the height of a character by the number of items you want to appear in view. Putting Strings in the List Box After you've created the list box, the next step is to put text strings in it. You do this by sending messages to the list box window procedure using the SendMessage call. The text strings are generally referenced by an index number that starts at 0 for the topmost item. In the examples that follow, hwndList is the handle to the child window list box control, and iIndex is the index value. In cases where you pass a text string in the SendMessage call, the lParam parameter is a pointer to a null-terminated string. In most of these examples, the SendMessage call can return LB_ERRSPACE (defined as -2) if the window procedure runs out of available memory space to store the contents of the list box. SendMessage returns LB_ERR (- 1) if an error occurs for other reasons and LB_OKAY (0) if the operation is successful. You can test SendMessage for a nonzero value to detect either of the two errors. If you use the LBS_SORT style (or if you are placing strings in the list box in the order that you want them to appear), the easiest way to fill up a list box is with the LB_ADDSTRING message: SendMessage (hwndList, LB_ADDSTRING, 0, (LPARAM) szString) ; If you do not use LBS_SORT, you can insert strings into your list box by specifying an index value with LB_INSERTSTRING: SendMessage (hwndList, LB_INSERTSTRING, iIndex, (LPARAM) szString) ; For instance, if iIndex is equal to 4, szString becomes the new string with an index value of 4—the fifth string from the top because counting starts at 0. Any strings below this point are pushed down. An iIndex value of -1 adds the string to the bottom. You can use LB_INSERTSTRING with list boxes that have the LBS_SORT style, but the list box contents will not be re-sorted. (You can also insert strings into a list box using the LB_DIR message, a topic I discuss in detail toward the end of this chapter.) You can delete a string from the list box by specifying the index value with the LB_DELETESTRING message: SendMessage (hwndList, LB_DELETESTRING, iIndex, 0) ; You can clear out the list box by using LB_RESETCONTENT: SendMessage (hwndList, LB_RESETCONTENT, 0, 0) ; The list box window procedure updates the display when an item is added to or deleted from the list box. If you have a number of strings to add or delete, you may want to temporarily inhibit this action by turning off the control's redraw flag: SendMessage (hwndList, WM_SETREDRAW, FALSE, 0) ; After you've finished, you can turn the redraw flag back on: SendMessage (hwndList, WM_SETREDRAW, TRUE, 0) ; A list box created with the LBS_NOREDRAW style begins with the redraw flag turned off. Selecting and Extracting Entries The SendMessage calls that carry out the tasks shown below usually return a value. If an error occurs, this value is set to LB_ERR (defined as -1). After you've put some items into a list box, you can find out how many items are in the list box: 303
- 304. iCount = SendMessage (hwndList, LB_GETCOUNT, 0, 0) ; Some of the other calls are different for single-selection and multiple-selection list boxes. Let's first look at single- selection list boxes. Normally, you'll let a user select from a list box. But if you want to highlight a default selection, you can use SendMessage (hwndList, LB_SETCURSEL, iIndex, 0) ; Setting iParam to -1 in this call deselects all items. You can also select an item based on its initial characters: iIndex = SendMessage (hwndList, LB_SELECTSTRING, iIndex, (LPARAM) szSearchString) ; The iIndex given as the iParam parameter to the SendMessage call is the index following which the search begins for an item with initial characters that match szSearchString. An iIndex value of -1 starts the search from the top. SendMessage returns the index of the selected item, or LB_ERR if no initial characters match szSearchString. When you get a WM_COMMAND message from the list box (or at any other time), you can determine the index of the current selection using LB_GETCURSEL: iIndex = SendMessage (hwndList, LB_GETCURSEL, 0, 0) ; The iIndex value returned from the call is LB_ERR if no item is selected. You can determine the length of any string in the list box: iLength = SendMessage (hwndList, LB_GETTEXTLEN, iIndex, 0) ; and copy the item into the text buffer: iLength = SendMessage (hwndList, LB_GETTEXT, iIndex, (LPARAM) szBuffer) ; In both cases, the iLength value returned from the call is the length of the string. The szBuffer array must be large enough for the length of the string and a terminating NULL. You may want to use LB_GETTEXTLEN to first allocate some memory to hold the string. For a multiple-selection list box, you cannot use LB_SETCURSEL, LB_GETCURSEL, or LB_SELECTSTRING. Instead, you use LB_SETSEL to set the selection state of a particular item without affecting other items that might also be selected: SendMessage (hwndList, LB_SETSEL, wParam, iIndex) ; The wParam parameter is nonzero to select and highlight the item and 0 to deselect it. If the lParam parameter is -1, all items are either selected or deselected. You can also determine the selection state of a particular item using iSelect = SendMessage (hwndList, LB_GETSEL, iIndex, 0) ; where iSelect is set to nonzero if the item indexed by iIndex is selected and 0 if it is not. Receiving Messages from List Boxes When a user clicks on a list box with the mouse, the list box receives the input focus. A parent window can give the input focus to a list box control by using SetFocus (hwndList) ; 304
- 305. When a list box has the input focus, the cursor movement keys, letter keys, and Spacebar can also be used to select items from the list box. A list box control sends WM_COMMAND messages to its parent. The meanings of the wParam and lParam variables are the same as for the button and edit controls: LOWORD (wParam) Child window ID HIWORD (wParam) Notification code lParam Child window handle The notification codes and their values are as follows: LBN_ERRSPACE -2 LBN_SELCHANGE 1 LBN_DBLCLK 2 LBN_SELCANCEL 3 LBN_SETFOCUS 4 LBN_KILLFOCUS 5 The list box control sends the parent window LBN_SELCHANGE and LBN_DBLCLK codes only if the list box window style includes LBS_NOTIFY. The LBN_ERRSPACE code indicates that the list box control has run out of space. The LBN_SELCHANGE code indicates that the current selection has changed; these messages occur as the user moves the highlight through the list box, toggles the selection state with the Spacebar, or clicks an item with the mouse. The LBN_DBLCLK code indicates that a list box item has been double-clicked with the mouse. (The notification code values for LBN_SELCHANGE and LBN_DBLCLK refer to the number of mouse clicks.) Depending on your application, you may want to use either LBN_SELCHANGE or LBN_DBLCLK messages or both. Your program will get many LBN_SELCHANGE messages, but LBN_DBLCLK messages occur only when the user double-clicks with the mouse. If your program uses double-clicks, you'll need to provide a keyboard interface that duplicates LBN_DBLCLK. A Simple List Box Application Now that you know how to create a list box, fill it with text items, receive messages from the list box, and extract strings, it's time to program an application. The ENVIRON program, shown in Figure 9-8, uses a list box in its client area to display the name of your current operating system environment variables (such as PATH and WINDIR). As you select an environment variable, the environment string is displayed across the top of the client area. Figure 9-8. The ENVIRON program. ENVIRON.C /*---------------------------------------- ENVIRON.C -- Environment List Box (c) Charles Petzold, 1998 ----------------------------------------*/ #include <windows.h> 305
- 306. #define ID_LIST 1 #define ID_TEXT 2 LRESULT CALLBACK WndProc (HWND, UINT, WPARAM, LPARAM) ; int WINAPI WinMain (HINSTANCE hInstance, HINSTANCE hPrevInstance, PSTR szCmdLine, int iCmdShow) { static TCHAR szAppName[] = TEXT ("Environ") ; HWND hwnd ; MSG msg ; WNDCLASS wndclass ; wndclass.style = CS_HREDRAW | CS_VREDRAW ; wndclass.lpfnWndProc = WndProc ; wndclass.cbClsExtra = 0 ; wndclass.cbWndExtra = 0 ; wndclass.hInstance = hInstance ; wndclass.hIcon = LoadIcon (NULL, IDI_APPLICATION) ; wndclass.hCursor = LoadCursor (NULL, IDC_ARROW) ; wndclass.hbrBackground = (HBRUSH) (COLOR_WINDOW + 1) ; wndclass.lpszMenuName = NULL ; wndclass.lpszClassName = szAppName ; if (!RegisterClass (&wndclass)) { MessageBox (NULL, TEXT ("This program requires Windows NT!"), szAppName, MB_ICONERROR) ; return 0 ; } hwnd = CreateWindow (szAppName, TEXT ("Environment List Box"), WS_OVERLAPPEDWINDOW, CW_USEDEFAULT, CW_USEDEFAULT, CW_USEDEFAULT, CW_USEDEFAULT, NULL, NULL, hInstance, NULL) ; ShowWindow (hwnd, iCmdShow) ; UpdateWindow (hwnd) ; while (GetMessage (&msg, NULL, 0, 0)) { TranslateMessage (&msg) ; DispatchMessage (&msg) ; } return msg.wParam ; } void FillListBox (HWND hwndList) { int iLength ; TCHAR * pVarBlock, * pVarBeg, * pVarEnd, * pVarName ; pVarBlock = GetEnvironmentStrings () ; // Get pointer to environment block while (*pVarBlock) { if (*pVarBlock != `=`) // Skip variable names beginning with `=` { pVarBeg = pVarBlock ; // Beginning of variable name while (*pVarBlock++ != `=`) ; // Scan until `=` pVarEnd = pVarBlock - 1 ; // Points to `=` sign iLength = pVarEnd - pVarBeg ; // Length of variable name 306
- 307. // Allocate memory for the variable name and terminating // zero. Copy the variable name and append a zero. pVarName = calloc (iLength + 1, sizeof (TCHAR)) ; CopyMemory (pVarName, pVarBeg, iLength * sizeof (TCHAR)) ; pVarName[iLength] = `0' ; // Put the variable name in the list box and free memory. SendMessage (hwndList, LB_ADDSTRING, 0, (LPARAM) pVarName) ; free (pVarName) ; } while (*pVarBlock++ != `0') ; // Scan until terminating zero } FreeEnvironmentStrings (pVarBlock) ; } LRESULT CALLBACK WndProc (HWND hwnd, UINT message, WPARAM wParam, LPARAM lParam) { static HWND hwndList, hwndText ; int iIndex, iLength, cxChar, cyChar ; TCHAR * pVarName, * pVarValue ; switch (message) { case WM_CREATE : cxChar = LOWORD (GetDialogBaseUnits ()) ; cyChar = HIWORD (GetDialogBaseUnits ()) ; // Create listbox and static text windows. hwndList = CreateWindow (TEXT ("listbox"), NULL, WS_CHILD | WS_VISIBLE | LBS_STANDARD, cxChar, cyChar * 3, cxChar * 16 + GetSystemMetrics (SM_CXVSCROLL), cyChar * 5, hwnd, (HMENU) ID_LIST, (HINSTANCE) GetWindowLong (hwnd, GWL_HINSTANCE), NULL) ; hwndText = CreateWindow (TEXT ("static"), NULL, WS_CHILD | WS_VISIBLE | SS_LEFT, cxChar, cyChar, GetSystemMetrics (SM_CXSCREEN), cyChar, hwnd, (HMENU) ID_TEXT, (HINSTANCE) GetWindowLong (hwnd, GWL_HINSTANCE), NULL) ; FillListBox (hwndList) ; return 0 ; case WM_SETFOCUS : SetFocus (hwndList) ; return 0 ; case WM_COMMAND : if (LOWORD (wParam) == ID_LIST && HIWORD (wParam) == LBN_SELCHANGE) { // Get current selection. iIndex = SendMessage (hwndList, LB_GETCURSEL, 0, 0) ; iLength = SendMessage (hwndList, LB_GETTEXTLEN, iIndex, 0) + 1 ; pVarName = calloc (iLength, sizeof (TCHAR)) ; SendMessage (hwndList, LB_GETTEXT, iIndex, (LPARAM) pVarName) ; 307
- 308. // Get environment string. iLength = GetEnvironmentVariable (pVarName, NULL, 0) ; pVarValue = calloc (iLength, sizeof (TCHAR)) ; GetEnvironmentVariable (pVarName, pVarValue, iLength) ; // Show it in window. SetWindowText (hwndText, pVarValue) ; free (pVarName) ; free (pVarValue) ; } return 0 ; case WM_DESTROY : PostQuitMessage (0) ; return 0 ; } return DefWindowProc (hwnd, message, wParam, lParam) ; } ENVIRON creates two child windows: a list box with the style LBS_STANDARD and a static window with the style SS_LEFT (left-justified text). ENVIRON uses the GetEnvironmentStrings function to obtain a pointer to a memory block containing all the environment variable names and values. ENVIRON parses through this block in its FillListBox function, using the message LB_ADDSTRING to direct the list box window procedure to place each string in the list box. When you run ENVIRON, you can select an environment variable using the mouse or the keyboard. Each time you change the selection, the list box sends a WM_COMMAND message to the parent window, which is WndProc. When WndProc receives a WM_COMMAND message, it checks to see whether the low word of wParam is ID_LIST (the child ID of the list box) and whether the high word of wParam (the notification code) is equal to LBN_SELCHANGE. If so, it obtains the index of the selection using the LB_GETCURSEL message and the text itself—the environment variable name—using LB_GETTEXT. The ENVIRON program uses the C function GetEnvironmentVariable to obtain the environment string corresponding to that variable and SetWindowText to pass this string to the static child window control, which displays the text. Listing Files I've been saving the best for last: LB_DIR, the most powerful list box message. This function call fills the list box with a file directory list, optionally including subdirectories and valid disk drives: SendMessage (hwndList, LB_DIR, iAttr, (LPARAM) szFileSpec) ; Using file attribute codes The iAttr parameter is a file attribute code. The least significant byte is a file attribute code that can be a combination of the values in the following table. iAttr Value Attribute DDL_READWRITE 0x0000 Normal file DDL_READONLY 0x0001 Read-only file DDL_HIDDEN 0x0002 Hidden file DDL_SYSTEM 0x0004 System file DDL_DIRECTORY 0x0010 Subdirectory DDL_ARCHIVE 0x0020 File with archive bit set 308
- 309. The next highest byte provides some additional control over the items desired: iAttr Value Option DDL_DRIVES 0x4000 Include drive letters DDL_EXCLUSIVE 0x8000 Exclusive search only The DDL prefix stands for "dialog directory list." When the iAttr value of the LB_DIR message is DDL_READWRITE, the list box lists normal files, read-only files, and files with the archive bit set. When the value is DDL_DIRECTORY, the list includes child subdirectories in addition to these files with the directory names in square brackets. A value of DDL_DRIVES | DDL_DIRECTORY expands the list to include all valid drives where the drive letters are shown between dashes. Setting the topmost bit of iAttr lists the files with the indicated flag while excluding normal files. For a Windows file backup program, for instance, you might want to list only files that have been modified since the last backup. Such files have their archive bits set, so you would use DDL_EXCLUSIVE | DDL_ARCHIVE. Ordering file lists The lParam parameter is a pointer to a file specification string such as "*.*". This file specification does not affect the subdirectories that the list box includes. You'll want to use the LBS_SORT message for list boxes with file lists. The list box will first list files satisfying the file specification and then (optionally) list subdirectory names. The first subdirectory listing will take this form: [..] This "double-dot" subdirectory entry lets the user back up one level toward the root directory. (The entry will not appear if you're listing files in the root directory.) Finally, the specific subdirectory names are listed in this form: [SUBDIR] These are followed (also optionally) by a list of valid disk drives in the form [-A-] A head for Windows A well-known UNIX utility named head displays the beginning lines of a file. Let's use a list box to write a similar program for Windows. HEAD, shown in Figure 9-9, lists all files and child subdirectories in the list box. It allows you to choose a file to display by double-clicking on the filename with the mouse or by pressing the Enter key when the filename is selected. You can also change the subdirectory using either of these methods. The program displays up to 8 KB of the beginning of the file in the right side of the client area of HEAD's window. Figure 9-9. The HEAD program. HEAD.C /*---------------------------------------- HEAD.C -- Displays beginning (head) of file 309
- 310. (c) Charles Petzold, 1998 ----------------------------------------*/ #include <windows.h> #define ID_LIST 1 #define ID_TEXT 2 #define MAXREAD 8192 #define DIRATTR (DDL_READWRITE | DDL_READONLY | DDL_HIDDEN | DDL_SYSTEM | DDL_DIRECTORY | DDL_ARCHIVE | DDL_DRIVES) #define DTFLAGS (DT_WORDBREAK | DT_EXPANDTABS | DT_NOCLIP | DT_NOPREFIX) LRESULT CALLBACK WndProc (HWND, UINT, WPARAM, LPARAM) ; LRESULT CALLBACK ListProc (HWND, UINT, WPARAM, LPARAM) ; WNDPROC OldList ; int WINAPI WinMain (HINSTANCE hInstance, HINSTANCE hPrevInstance, PSTR szCmdLine, int iCmdShow) { static TCHAR szAppName[] = TEXT ("head") ; HWND hwnd ; MSG msg ; WNDCLASS wndclass ; wndclass.style = CS_HREDRAW | CS_VREDRAW ; wndclass.lpfnWndProc = WndProc ; wndclass.cbClsExtra = 0 ; wndclass.cbWndExtra = 0 ; wndclass.hInstance = hInstance ; wndclass.hIcon = LoadIcon (NULL, IDI_APPLICATION) ; wndclass.hCursor = LoadCursor (NULL, IDC_ARROW) ; wndclass.hbrBackground = (HBRUSH) (COLOR_BTNFACE + 1) ; wndclass.lpszMenuName = NULL ; wndclass.lpszClassName = szAppName ; if (!RegisterClass (&wndclass)) { MessageBox (NULL, TEXT ("This program requires Windows NT!"), szAppName, MB_ICONERROR) ; return 0 ; } hwnd = CreateWindow (szAppName, TEXT ("head"), WS_OVERLAPPEDWINDOW | WS_CLIPCHILDREN, CW_USEDEFAULT, CW_USEDEFAULT, CW_USEDEFAULT, CW_USEDEFAULT, NULL, NULL, hInstance, NULL) ; ShowWindow (hwnd, iCmdShow) ; UpdateWindow (hwnd) ; while (GetMessage (&msg, NULL, 0, 0)) { TranslateMessage (&msg) ; DispatchMessage (&msg) ; } return msg.wParam ; } LRESULT CALLBACK WndProc (HWND hwnd, UINT message, WPARAM wParam, LPARAM lParam) { static BOOL bValidFile ; static BYTE buffer[MAXREAD] ; 310
- 311. static HWND hwndList, hwndText ; static RECT rect ; static TCHAR szFile[MAX_PATH + 1] ; HANDLE hFile ; HDC hdc ; int i, cxChar, cyChar ; PAINTSTRUCT ps ; TCHAR szBuffer[MAX_PATH + 1] ; switch (message) { case WM_CREATE : cxChar = LOWORD (GetDialogBaseUnits ()) ; cyChar = HIWORD (GetDialogBaseUnits ()) ; rect.left = 20 * cxChar ; rect.top = 3 * cyChar ; hwndList = CreateWindow (TEXT ("listbox"), NULL, WS_CHILDWINDOW | WS_VISIBLE | LBS_STANDARD, cxChar, cyChar * 3, cxChar * 13 + GetSystemMetrics (SM_CXVSCROLL), cyChar * 10, hwnd, (HMENU) ID_LIST, (HINSTANCE) GetWindowLong (hwnd, GWL_HINSTANCE), NULL) ; GetCurrentDirectory (MAX_PATH + 1, szBuffer) ; hwndText = CreateWindow (TEXT ("static"), szBuffer, WS_CHILDWINDOW | WS_VISIBLE | SS_LEFT, cxChar, cyChar, cxChar * MAX_PATH, cyChar, hwnd, (HMENU) ID_TEXT, (HINSTANCE) GetWindowLong (hwnd, GWL_HINSTANCE), NULL) ; OldList = (WNDPROC) SetWindowLong (hwndList, GWL_WNDPROC, (LPARAM) ListProc) ; SendMessage (hwndList, LB_DIR, DIRATTR, (LPARAM) TEXT ("*.*")) ; return 0 ; case WM_SIZE : rect.right = LOWORD (lParam) ; rect.bottom = HIWORD (lParam) ; return 0 ; case WM_SETFOCUS : SetFocus (hwndList) ; return 0 ; case WM_COMMAND : if (LOWORD (wParam) == ID_LIST && HIWORD (wParam) == LBN_DBLCLK) { if (LB_ERR == (i = SendMessage (hwndList, LB_GETCURSEL, 0, 0))) break ; SendMessage (hwndList, LB_GETTEXT, i, (LPARAM) szBuffer) ; if (INVALID_HANDLE_VALUE != (hFile = CreateFile (szBuffer, GENERIC_READ, FILE_SHARE_READ, NULL, OPEN_EXISTING, 0, NULL))) 311
- 312. { CloseHandle (hFile) ; bValidFile = TRUE ; lstrcpy (szFile, szBuffer) ; GetCurrentDirectory (MAX_PATH + 1, szBuffer) ; if (szBuffer [lstrlen (szBuffer) - 1] != `') lstrcat (szBuffer, TEXT ("")) ; SetWindowText (hwndText, lstrcat (szBuffer, szFile)) ; } else { bValidFile = FALSE ; szBuffer [lstrlen (szBuffer) - 1] = `0' ; // If setting the directory doesn't work, maybe it's // a drive change, so try that. if (!SetCurrentDirectory (szBuffer + 1)) { szBuffer [3] = `:' ; szBuffer [4] = `0' ; SetCurrentDirectory (szBuffer + 2) ; } // Get the new directory name and fill the list box. GetCurrentDirectory (MAX_PATH + 1, szBuffer) ; SetWindowText (hwndText, szBuffer) ; SendMessage (hwndList, LB_RESETCONTENT, 0, 0) ; SendMessage (hwndList, LB_DIR, DIRATTR, (LPARAM) TEXT ("*.*")) ; } InvalidateRect (hwnd, NULL, TRUE) ; } return 0 ; case WM_PAINT : if (!bValidFile) break ; if (INVALID_HANDLE_VALUE == (hFile = CreateFile (szFile, GENERIC_READ, FILE_SHARE_READ, NULL, OPEN_EXISTING, 0, NULL))) { bValidFile = FALSE ; break ; } ReadFile (hFile, buffer, MAXREAD, &i, NULL) ; CloseHandle (hFile) ; // i now equals the number of bytes in buffer. // Commence getting a device context for displaying text. hdc = BeginPaint (hwnd, &ps) ; SelectObject (hdc, GetStockObject (SYSTEM_FIXED_FONT)) ; SetTextColor (hdc, GetSysColor (COLOR_BTNTEXT)) ; SetBkColor (hdc, GetSysColor (COLOR_BTNFACE)) ; // Assume the file is ASCII DrawTextA (hdc, buffer, i, &rect, DTFLAGS) ; EndPaint (hwnd, &ps) ; 312
- 313. return 0 ; case WM_DESTROY : PostQuitMessage (0) ; return 0 ; } return DefWindowProc (hwnd, message, wParam, lParam) ; } LRESULT CALLBACK ListProc (HWND hwnd, UINT message, WPARAM wParam, LPARAM lParam) { if (message == WM_KEYDOWN && wParam == VK_RETURN) SendMessage (GetParent (hwnd), WM_COMMAND, MAKELONG (1, LBN_DBLCLK), (LPARAM) hwnd) ; return CallWindowProc (OldList, hwnd, message, wParam, lParam) ; } In ENVIRON, when we selected an environment variable—either with a mouse click or with the keyboard—the program displayed an environment string. If we used this select-display approach in HEAD, however, the program would be too slow because it would continually need to open and close files as you moved the selection through the list box. Instead, HEAD requires that the file or subdirectory be double-clicked. This presents a bit of a problem because list box controls have no automatic keyboard interface that corresponds to a mouse double-click. As we know, we should provide keyboard interfaces when possible. The solution? Window subclassing, of course. The list box subclass function in HEAD is named ListProc. It simply looks for a WM_KEYDOWN message with wParam equal to VK_RETURN and sends a WM_COMMAND message with an LBN_DBLCLK notification code back to the parent. The WM_COMMAND processing in WndProc uses the Windows function CreateFile to check for the selection from the list. If CreateFile returns an error, the selection is not a file, so it's probably a subdirectory. HEAD then uses SetCurrentDirectory to change the subdirectory. If SetCurrentDirectory doesn't work, the program assumes the user has selected a drive letter. Changing drives also requires a call to SetCurrentDirectory, except the preliminary dash needs to be avoided and a colon needs to be added. It sends an LB_RESETCONTENT message to the list box to clear out the contents and an LB_DIR message to fill the list box with files from the new subdirectory. The WM_PAINT message processing in WndProc opens the file using the Windows CreateFile function. This returns a handle to the file that can be passed to the Windows functions ReadFile and CloseHandle. And now, for the first time in this chapter, we encounter an issue involving Unicode. In a perfect world, perhaps, text files would be recognized by the operating system so that ReadFile could convert an ASCII file into Unicode text, or a Unicode file into ASCII text. But this is not the case. ReadFile just reads the bytes of the file without any conversion. This means that DrawTextA (in an executable compiled without the UNICODE identifier defined) would interpret the text as ASCII and DrawTextW (in the Unicode version) would assume the text is Unicode. So what the program should really be doing is trying to figure out whether the file has ASCII text or Unicode text and then calling DrawTextA or DrawTextW appropriately. Instead, HEAD takes a much simpler approach and uses DrawTextA regardless. 313
- 314. Chapter 10 -- Menus and Other Resources Most Microsoft Windows programs include a customized icon that Windows displays in the upper left corner of the title bar of the application window. Windows also displays the program's icon when the program is listed in the Start menu, shown in the taskbar at the bottom of the screen, listed in the Windows Explorer, or shown as a shortcut on the desktop. Some programs—most notably graphical drawing tools such as Windows Paint—use customized mouse cursors to represent different operations of the program. Many Windows programs use menus and dialog boxes. Along with scroll bars, menus and dialog boxes are the bread and butter of the Windows user interface. Icons, cursors, menus, and dialog boxes are all related. They are all types of Windows "resources." Resources are data and they are often stored in a program's .EXE file, but they do not reside in the executable program's data area. In other words, the resources are not immediately addressable by variables in the program's code. Instead, Windows provides functions that explicitly or implicitly load a program's resources into memory so that they can be used. We've already encountered two of these functions. They are LoadIcon and LoadCursor, and they have appeared in the sample programs in the assignment statements that define a program's window class structure. So far, these functions have loaded a binary icon or cursor image from within Windows and returned a handle to that icon or cursor. In this chapter, we'll begin by creating our own customized icons that are loaded from the program's own .EXE file. This book covers these resources: • Icons • Cursors • Character strings • Custom resources • Menus • Keyboard accelerators • Dialog boxes • Bitmaps The first six resources in the list are discussed in this chapter. Dialog boxes are covered in Chapter 11 and bitmaps in Chapter 14. Icons, Cursors, Strings, and Custom Resources One of the benefits of using resources is that many components of a program can be bound into the program's .EXE file. Without the concept of resources, a binary file such as an icon image would probably have to reside in a separate file that the .EXE would read into memory to use. Or the icon would have to be defined in the program as an array of bytes (which might make it tough to visualize the actual icon image). As a resource, the icon is stored in a separate editable file on the developer's computer but is bound into the .EXE file during the build process. Adding an Icon to a Program Adding resources to a program involves using some additional features of Visual C++ Developer Studio. In the case of icons, you use the Image Editor (also called the Graphics Editor) to draw a picture of your icon. This image is stored in an icon file with an extension .ICO. Developer Studio also generates a resource script (that is, a file with the extension .RC, sometimes also called a resource definition file) that lists all the program's resources and a header file (RESOURCE.H) that lets your program reference the resources. 314
- 315. So that you can see how these new files fit together, let's begin by creating a new project, called ICONDEMO. As usual, in Developer Studio you pick New from the File menu, select the Projects tab, and choose Win32 Application. In the Project Name field, type ICONDEMO and click OK. At this point, Developer Studio creates five files that it uses to maintain the workspace and the project. These include the text files ICONDEMO.DSW, ICONDEMO.DSP, and ICONDEMO.MAK (assuming you've selected "Export makefile when saving project file" from the Build tab of the Options dialog box displayed when you select Options from the Tools menu). Now let's create a C source code file as usual. Select New from the File menu, select the Files tab, and click C++ Source File. In the File Name field, type ICONDEMO.C and click OK. At this point, Developer Studio has created an empty ICONDEMO.C file. Type in the program shown in Figure 10-1, or pick the Insert menu and then the File As Text option to copy in the source code from this book's companion CD-ROM. Figure 10-1. The ICONDEMO program. ICONDEMO.C /*------------------------------------------ ICONDEMO.C -- Icon Demonstration Program (c) Charles Petzold, 1998 ------------------------------------------*/ #include <windows.h> #include "resource.h" LRESULT CALLBACK WndProc (HWND, UINT, WPARAM, LPARAM) ; int WINAPI WinMain (HINSTANCE hInstance, HINSTANCE hPrevInstance, PSTR szCmdLine, int iCmdShow) { TCHAR szAppName[] = TEXT ("IconDemo") ; HWND hwnd ; MSG msg ; WNDCLASS wndclass ; wndclass.style = CS_HREDRAW | CS_VREDRAW ; wndclass.lpfnWndProc = WndProc ; wndclass.cbClsExtra = 0 ; wndclass.cbWndExtra = 0 ; wndclass.hInstance = hInstance ; wndclass.hIcon = LoadIcon (hInstance, MAKEINTRESOURCE (IDI_ICON)) ; wndclass.hCursor = LoadCursor (NULL, IDC_ARROW) ; wndclass.hbrBackground = GetStockObject (WHITE_BRUSH) ; wndclass.lpszMenuName = NULL ; wndclass.lpszClassName = szAppName ; if (!RegisterClass (&wndclass)) { MessageBox (NULL, TEXT ("This program requires Windows NT!"), szAppName, MB_ICONERROR) ; return 0 ; } hwnd = CreateWindow (szAppName, TEXT ("Icon Demo"), WS_OVERLAPPEDWINDOW, CW_USEDEFAULT, CW_USEDEFAULT, CW_USEDEFAULT, CW_USEDEFAULT, NULL, NULL, hInstance, NULL) ; ShowWindow (hwnd, iCmdShow) ; 315
- 316. UpdateWindow (hwnd) ; while (GetMessage (&msg, NULL, 0, 0)) { TranslateMessage (&msg) ; DispatchMessage (&msg) ; } return msg.wParam ; } LRESULT CALLBACK WndProc (HWND hwnd, UINT message, WPARAM wParam, LPARAM lParam) { static HICON hIcon ; static int cxIcon, cyIcon, cxClient, cyClient ; HDC hdc ; HINSTANCE hInstance ; PAINTSTRUCT ps ; int x, y ; switch (message) { case WM_CREATE : hInstance = ((LPCREATESTRUCT) lParam)->hInstance ; hIcon = LoadIcon (hInstance, MAKEINTRESOURCE (IDI_ICON)) ; cxIcon = GetSystemMetrics (SM_CXICON) ; cyIcon = GetSystemMetrics (SM_CYICON) ; return 0 ; case WM_SIZE : cxClient = LOWORD (lParam) ; cyClient = HIWORD (lParam) ; return 0 ; case WM_PAINT : hdc = BeginPaint (hwnd, &ps) ; for (y = 0 ; y < cyClient ; y += cyIcon) for (x = 0 ; x < cxClient ; x += cxIcon) DrawIcon (hdc, x, y, hIcon) ; EndPaint (hwnd, &ps) ; return 0 ; case WM_DESTROY : PostQuitMessage (0) ; return 0 ; } return DefWindowProc (hwnd, message, wParam, lParam) ; } If you try compiling this program, you'll get an error because the RESOURCE.H file referenced at the top of the program does not yet exist. However, you do not create this RESOURCE.H file directly. Instead, you let Developer Studio create it for you. You do this by adding a resource script to the project. Select New from the File menu, select the Files tab, click Resource Script, and type ICONDEMO in the File Name field. Click OK. At this time, Developer Studio creates two new text files: ICONDEMO.RC, the resource script, and RESOURCE.H, a header file that will allow the C source code file and the resource script to refer to the same defined identifiers. Don't try to edit these two files directly; let Developer Studio maintain them for you. If you want to take a look at the resource script and RESOURCE.H without any interference from Developer Studio, try loading them into Notepad. Don't change them there unless you really know what you're doing. Also, keep in mind that Developer Studio will save new versions of these files only when you explicitly direct it to or when it rebuilds the project. 316
- 317. The resource script is a text file. It contains text representations of those resources that can be expressed in text, such as menus and dialog boxes. The resource script also contains references to binary files that contain nontext resources, such as icons and customized mouse cursors. Now that RESOURCE.H exists, you can try compiling ICONDEMO again. Now you get an error message indicating that IDI_ICON is not defined. This identifier occurs first in the statement wndclass.hIcon = LoadIcon (hInstance, MAKEINTRESOURCE (IDI_ICON)) ; That statement in ICONDEMO has replaced this statement found in previous programs in this book: wndclass.hIcon = LoadIcon (NULL, IDI_APPLICATION) ; It makes sense that we're changing this statement because we've been using a standard icon for our applications and our goal here is to use a customized icon. So let's create an icon. In the File View window of Developer Studio, you'll see two files listed now— ICONDEMO.C and ICONDEMO.RC. When you click ICONDEMO.C, you can edit the source code. When you click ICONDEMO.RC, you can add resources to that file or edit an existing resource. To add an icon, select Resource from the Insert menu. Click the resource you want to add, which is Icon, and then click the New button. You are now presented with a blank 32-pixel-by-32-pixel icon that is ready to be colored. You'll see a floating toolbar with a collection of painting tools and a bunch of available colors. Be aware that the color toolbar includes two options that are not exactly colors. These are sometimes referred to as "screen" and "inverse screen." When a pixel is colored with "screen," it is actually transparent. Whatever surface the icon is displayed against will show through. This allows you to create icons that appear to be nonrectangular. Before you get too far, double-click the area surrounding the icon. You'll get an Icon Properties dialog box that allows you to change the ID of the icon and its filename. Developer Studio will probably have set the ID to IDI_ICON1. Change that to IDI_ICON since that's how ICONDEMO refers to the icon. (The IDI prefix stands for "id for an icon.") Also, change the filename to ICONDEMO.ICO. For now, I want you to select a distinctive color (such as red) and draw a large B (standing for "big") on this icon. It doesn't have to be as neat as Figure 10-2. Figure 10-2. The standard (32×32) ICONDEMO file as displayed in Developer Studio. The program should now compile and run fine. Developer Studio has put a line in the ICONDEMO.RC resource script that equates the icon file (ICONDEMO.ICO) with an identifier (IDI_ICON). The RESOURCE.H header file contains a definition of the IDI_ICON identifier. (We'll take a look at this in more detail shortly.) Developer Studio compiles resources by using the resource compiler RC.EXE. The text resource script is converted into a binary form, which is a file with the extension .RES. This compiled resource file is then specified along with .OBJ and .LIB files in the LINK step. This is how the resources are added to the final .EXE file. 317
- 318. When you run ICONDEMO, the program's icon is displayed in the upper left corner of the title bar and in the taskbar. If you add the program to the Start Menu, or if you add a shortcut on your desktop, you'll see the icon there as well. ICONDEMO also displays the icon in its client area, repeated horizontally and vertically. Using the statement hIcon = LoadIcon (hInstance, MAKEINTRESOURCE (IDI_ICON)) ; the program obtains a handle to the icon. Using the statements cxIcon = GetSystemMetrics (SM_CXICON) ; cyIcon = GetSystemMetrics (SM_CYICON) ; it obtains the size of the icon. The program can then display the icon with multiple calls to DrawIcon (hdc, x, y, hIcon) ; where x and y are the coordinates of where the upper left corner of the displayed icon is positioned. With most video display adapters in current use, GetSystemMetrics with the SM_ CXICON and SM_CYICON indices will report that the size of an icon is 32 by 32 pixels. This is the size of the icon that we created in the Developer Studio. It is also the size of the icon as it appears on the desktop and the size of the icon displayed in the client area of the ICONDEMO program. It is not, however, the size of the icon displayed in the program's title bar or in the taskbar. That smaller icon size can be obtained from GetSystemMetrics with the SM_CXSMSIZE and SM_CYSMSIZE indices. (The first "SM" means "system metrics"; the embedded "SM" means "small.") For most display adapters in current use, the small icon size is 16 by 16 pixels. This can be a problem. When Windows reduces a 32-by-32 icon to a 16-by-16 size, it must eliminate every other row and column of pixels. For some complex icon images, this might cause distortions. For this reason, you should probably create special 16-by-16 icons for images where shrinkage is undesirable. Above the icon image in Developer Studio is a combo box labeled Device. To the right of that is a button. Pushing the button invokes a New Icon Image dialog box. Select Small (16x16). Now you can draw another icon. For now, use an S (for "small") as shown in Figure 10-3. Figure 10-3. The small (16×16) ICONDEMO file as displayed in Developer Studio. There's nothing else you need to do in the program. The second icon image is stored in the same ICONDEMO.ICO file and referenced with the same INI_ICON identifier. Windows will now automatically use the smaller icon when it's more appropriate, such as in the title bar and the taskbar. Windows uses the large image when displaying a shortcut on the desktop and when the program calls DrawIcon to adorn its client area. Now that we've mastered the practical stuff, let's take a closer look at what's going on under the hood. Getting a Handle on Icons If you take a look ICONDEMO.RC and RESOURCE.H, you'll see a bunch of stuff that Developer Studio generates to help it maintain the files. However, when the resource script is compiled, only a few lines are important. These critical excerpts from the ICONDEMO.RC and RESOURCE.H files are shown in Figure 10-4. ICONDEMO.RC (excerpts) //Microsoft Developer Studio generated resource script. 318
- 319. #include "resource.h" #include "afxres.h" ///////////////////////////////////////////////////////////////////////////// // Icon IDI_ICON ICON DISCARDABLE "icondemo.ico" RESOURCE.H (excerpts) // Microsoft Developer Studio generated include file. // Used by IconDemo.rc #define IDI_ICON 101 Figure 10-4. Excerpts from the ICONDEMO.RC and RESOURCE.H files. Figure 10-4 shows ICONDEMO.RC and RESOURCE.H files that look much like they would look if you were creating them manually in a normal text editor, just as Windows programmers did in the old days way back in the 1980s. The only real difference is the presence of AFXRES.H, which is a header file that includes many common identifiers used by Developer Studio when creating machine-generated MFC projects. I will not make use of AFXRES.H in this book. This line in ICONDEMO.RC, IDI_ICON ICON DISCARDABLE "icondemo.ico" is a resource script ICON statement. The icon has a numeric identifier of IDI_ICON, which equals 101. The DISCARDABLE keyword that Developer Studio adds indicates that Windows can discard the icon from memory, if necessary, to obtain some additional space. The icon can always be reloaded later by Windows without any special action by the program. The DISCARDABLE attribute is the default and doesn't need to be specified. Developer Studio puts the filename in quotes just in case the name or a directory path contains spaces. When the resource compiler stores the compiled resource in ICONDEMO.RES and the linker adds the resource to ICONDEMO.EXE, the resource is identified by just a resource type, which is RT_ICON, and an identifier, which is IDI_ICON or 101. A program can obtain a handle to this icon by calling the LoadIcon function: hIcon = LoadIcon (hInstance, MAKEINTRESOURCE (IDI_ICON)) ; Notice that ICONDEMO calls this function in two places—once when defining the window class and again in the window procedure to obtain a handle to the icon for drawing. LoadIcon returns a value of type HICON, a handle to an icon. The first argument to LoadIcon is the instance handle that indicates what file the resource comes from. Using hInstance means it comes from the program's own .EXE file. The second argument to LoadIcon is actually defined as a pointer to a character string. As we'll see shortly, you can identify resources by character strings instead of numeric identifiers. The macro MAKEINTRESOURCE ("make an integer into a resource string") makes a pointer out of the number like so: #define MAKEINTRESOURCE(i) (LPTSTR) ((DWORD) ((WORD) (i))) The LoadIcon function knows that if the high word of the second argument is 0, then the low word is a numeric identifier for the icon. The icon identifier must be a 16-bit value. Sample programs presented earlier in this book use predefined icons: LoadIcon (NULL, IDI_APPLICATION) ; Windows knows that this is a predefined icon because the hInstance parameter is set to NULL. And IDI_APPLICATION happens also to be defined in WINUSER.H in terms of MAKEINTRESOURCE: 319
- 320. #define IDI_APPLICATION MAKEINTRESOURCE(32512) The second argument to LoadIcon raises an intriguing question: can the icon identifier be a character string? Yes, and here's how: In the Developer Studio list of files for the ICONDEMO project, select IDONDEMO.RC. You'll see a tree structure beginning at the top with IconDemo Resources, then the resource type Icon, and then the icon IDI_ICON. If you right-click the icon identifier and select Properties from the menu, you can change the ID. In fact, you can change it to a string by enclosing a name in quotation marks. This is the method I prefer for specifying the names of resources and that I will use in general for the rest of this book. I prefer using text names for icons (and some other resources) because the name can be the name of the program. For example, suppose the program is named MYPROG. If you use the Icon Properties dialog box to specify the ID of the icon as "MyProg" (with quotation marks), the resource script would contain the following statement: MYPROG ICON DISCARDABLE myprog.ico However, there will be no #define statement in RESOURCE.H that will indicate MYPROG as a numeric identifier. The resource script will instead assume that MYPROG is a string identifier. In your C program, you use the LoadIcon function to obtain a handle to the icon. Recall that you already probably have a string variable indicating the name of the program: static TCHAR szAppName [] = TEXT ("MyProg") ; This means that the program can load the icon using the statement hIcon = LoadIcon (hInstance, szAppName) ; which looks a whole lot cleaner than the MAKEINTRESOURCE macro. But if you really prefer numbers to names, you can use them instead of identifiers or strings. In the Icon Properties dialog, enter a number in the ID field. The resource script will have an ICON statement that looks something like this: 125 ICON DISCARDABLE myprog.ico You can reference the icon using one of two methods. The obvious one is this: hIcon = LoadIcon (hInstance, MAKEINTRESOURCE (125)) ; The obscure method is this: hIcon = LoadIcon (hInstance, TEXT ("#125")) ; Windows recognizes the initial # character as prefacing a number in ASCII form. Using Icons in Your Program Although Windows uses icons in several ways to denote a program, many Windows programs specify an icon only when defining the window class with the WNDCLASS structure and RegisterClass. As we've seen, this works well, particularly when the icon file contains both standard and small image sizes. Windows will choose the best image size in the icon file whenever it needs to display the icon image. There is an enhanced version of RegisterClass named RegisterClassEx that uses a structure named WNDCLASSEX. WNDCLASSEX has two additional fields: cbSize and hIconSm. The cbSize field indicates the size of the WNDCLASSEX structure, and hIconSm is supposed to be set to the icon handle of the small icon. Thus, in the WNDCLASSEX structure you set two icon handles associated with two icon files—one for a standard icon and one for the small icon. Is this necessary? Well, no. As we've seen, Windows already extracts the correctly sized icon images from a single icon file. And RegisterClassEx seems to have lost the intelligence of RegisterClass. If the hIconSm field references 320
- 321. an icon file that contains multiple images, only the first image will be used. This might be a standard size icon that is then reduced in size. RegisterClassEx seems to have been designed for using multiple icon images, each of which contains only one icon size. Because we can now include multiple icon sizes in the same file, my advice is to use WNDCLASS and RegisterClass. If you later want to dynamically change the program's icon while the program is running, you can do so using SetClassLong. For example, if you have a second icon file associated with the identifier IDI_ALTICON, you can switch to that icon using the statement SetClassLong (hwnd, GCL_HICON, LoadIcon (hInstance, MAKEINTRESOURCE (IDI_ALTICON))) ; If you don't want to save the handle to your program's icon but instead use the DrawIcon function to display it someplace, you can obtain the handle by using GetClassLong. For example: DrawIcon (hdc, x, y, GetClassLong (hwnd, GCL_HICON)) ; At some places in the Windows documentation, LoadIcon is said to be "obsolete" and LoadImage is recommended instead. (LoadIcon is documented in /Platform SDK/User Interface Services/Resources/Icons, and LoadImage in /Platform SDK/User Interface Services/Resources/Resources.) LoadImage is certainly more flexible, but it hasn't replaced the simplicity of LoadIcon just yet. You'll notice that LoadIcon is called twice in ICONDEMO for the same icon. This presents no problem and doesn't involve extra memory being used. LoadIcon is one of the few functions that obtain a handle but do not require the handle to be destroyed. There actually is a DestroyIcon function, but it is used in conjunction with the CreateIcon, CreateIconIndirect, and CreateIconFromResource functions. These functions allow your program to dynamically create an icon image algorithmically. Using Customized Cursors Using customized mouse cursors in your program is similar to using customized icons, except that most programmers seem to find the cursors that Windows supplies to be quite adequate. Customized cursors are generally monochrome with a dimension of 32 by 32 pixels. You create a cursor in the Developer Studio in the same way as an icon (that is, select Resource from the Insert menu, and pick Cursor), but don't forget to define the hotspot. You can set a customized cursor in your class definition with a statement such as wndclass.hCursor = LoadCursor (hInstance, MAKEINTRESOURCE (IDC_CURSOR)) ; or, if the cursor is defined with a text name, wndclass.hCursor = LoadCursor (hInstance, szCursor) ; Whenever the mouse is positioned over a window created based on this class, the customized cursor associated with IDC_CURSOR or szCursor will be displayed. If you use child windows, you may want the cursor to appear differently, depending on the child window below the cursor. If your program defines the window class for these child windows, you can use different cursors for each class by appropriately setting the hCursor field in each window class. And if you use predefined child window controls, you can alter the hCursor field of the window class by using SetClassLong (hwndChild, GCL_HCURSOR, LoadCursor (hInstance, TEXT ("childcursor")) ; If you separate your client area into smaller logical areas without using child windows, you can use SetCursor to change the mouse cursor: SetCursor (hCursor) ; You should call SetCursor during processing of the WM_MOUSEMOVE message. Otherwise, Windows uses the cursor specified in the window class to redraw the cursor when it is moved. The documentation indicates that 321
- 322. SetCursor is fast if the cursor doesn't have to be changed. Character String Resources Having a resource for character strings may seem odd at first. Certainly we haven't had any problems using regular old character strings defined as variables right in our source code. Character string resources are primarily for easing the translation of your program to other languages. As you'll discover later in this chapter and in the next chapter, menus and dialog boxes are also part of the resource script. If you use character string resources rather than putting strings directly into your source code, all the text that your program uses will be in one file—the resource script. If the text in this resource script is translated into another language, all you need to do to create a foreign-language version of your program is relink the program. This method is much safer than messing around with your source code. (However, aside from the next sample program, I will not be using string tables for any other programs in this book. The reason is that string tables tend to make code look more obscure and complicated rather than clarifying it.) You create a string table by selecting Resource from the Insert menu and then selecting String Table. The strings will be shown in a list at the right of the screen. Select a string by double-clicking it. For each string, you specify an identifier and the string itself. In the resource script, the strings show up in a multiline statement that looks something like this: STRINGTABLE DISCARDABLE BEGIN IDS_STRING1, "character string 1" IDS_STRING2, "character string 2" [other string definitions] END If you were programming for Windows back in the old days and creating this string table manually in a text editor (which you might correctly guess was easier than creating the string table in Developer Studio), you could substitute left and right curly brackets for the BEGIN and END statements. The resource script can have multiple string tables, but each ID must uniquely identify only a single string. Each string can be only one line long with a maximum of 4097 characters. Use t and n for tabs and ends of lines. These control characters are recognized by the DrawText and MessageBox functions. Your program can use the LoadString call to copy a string resource into a buffer in the program's data segment: LoadString (hInstance, id, szBuffer, iMaxLength) ; The id argument refers to the ID number that precedes each string in the resource script; szBuffer is a pointer to a character array that receives the character string; and iMaxLength is the maximum number of characters to transfer into the szBuffer. The function returns the number of characters in the string. The string ID numbers that precede each string are generally macro identifiers defined in a header file. Many Windows programmers use the prefix IDS_ to denote an ID number for a string. Sometimes a filename or other information must be embedded in the string when the string is displayed. In this case, you can put C formatting characters in the string and use it as a formatting string in wsprintf. All resource text—including the text in the string table—is stored in the .RES compiled resource file and in the final .EXE file in Unicode format. The LoadStringW function loads the Unicode text directly. The LoadStringA function (the only function available under Windows 98) performs a conversion of the text from Unicode to the local code page. Let's look at an example of a function that uses three character strings to display three error messages in a message box. As you can see below, the RESOURCE.H header file contains three identifiers for these messages. #define IDS_FILENOTFOUND 1 322
- 323. #define IDS_FILETOOBIG 2 #define IDS_FILEREADONLY 3 The resource script has this string table: STRINGTABLE BEGIN IDS_FILENOTFOUND, "File %s not found." IDS_FILETOOBIG, "File %s too large to edit." IDS_FILEREADONLY, "File %s is read-only." END The C source code file also includes this header file and defines a function to display a message box. (I'll also assume that szAppName is a global variable that contains the program name.) OkMessage (HWND hwnd, int iErrorNumber, TCHAR *szFileName) { TCHAR szFormat [40] ; TCHAR szBuffer [60] ; LoadString (hInst, iErrorNumber, szFormat, 40) ; wsprintf (szBuffer, szFormat, szFilename) ; return MessageBox (hwnd, szBuffer, szAppName, MB_OK ¦ MB_ICONEXCLAMATION) ; } To display a message box containing the "file not found" message, the program calls OkMessage (hwnd, IDS_FILENOTFOUND, szFileName) ; Custom Resources Windows also defines a "custom resource," also called the "user-defined resource" (where the user is you, the programmer, rather than the lucky person who gets to use your program). The custom resource is convenient for attaching miscellaneous data to your .EXE file and obtaining access to that data within the program. The data can be in absolutely any format you want. The Windows functions that a program uses to access the custom resource cause Windows to load the data into memory and return a pointer to it. You can do whatever you want with that data. You'll probably find this to be a more convenient way to store and access miscellaneous private data than storing it in external files and accessing it with file input functions. For instance, suppose you have a file called BINDATA.BIN that contains a bunch of data that your program needs for display purposes. This file can be in any format you choose. If you have a MYPROG.RC resource script in your MYPROG project, you can create a custom resource in Developer Studio by selecting Resource from the Insert menu and pressing the Custom button. Type in a type name by which the resource is to be known: for example, BINTYPE. Developer Studio will then make up a resource name (in this case, IDR_BINTYPE1) and display a window that lets you enter binary data. But you don't need to do that. Click the IDR_BINTYPE1 name with the right mouse button, and select Properties. Then you can enter a filename: for example, BINDATA.BIN. The resource script will then contain a statement like this: IDR_BINTYPE1 BINTYPE BINDATA.BIN This statement looks just like the ICON statement in ICONDEMO, except that the resource type BINTYPE is something we've just made up. As with icons, you can use text names rather than numeric identifiers for the resource name. When you compile and link the program, the entire BINDATA.BIN file will be bound into the MYPROG.EXE file. During program initialization (for example, while processing the WM_CREATE message), you can obtain a handle to this resource: 323
- 324. hResource = LoadResource (hInstance, FindResource (hInstance, TEXT ("BINTYPE"), MAKEINTRESOURCE (IDR_BINTYPE1))) ; The variable hResource is defined with type HGLOBAL, which is a handle to a memory block. Despite its name, LoadResource does not actually load the resource into memory. The LoadResource and FindResource functions used together like this are essentially equivalent to the LoadIcon and LoadCursor functions. In fact, LoadIcon and LoadCursor use the LoadResource and FindResource functions. When you need access to the text, call LockResource: pData = LockResource (hResource) ; LockResource loads the resource into memory (if it has not already been loaded) and returns a pointer to it. When you're finished with the resource, you can free it from memory: FreeResource (hResource) ; The resource will also be freed when your program terminates, even if you don't call FreeResource. Let's look at a sample program that uses three resources—an icon, a string table, and a custom resource. The POEPOEM program, shown in Figure 10-5 beginning below, displays the text of Edgar Allan Poe's "Annabel Lee" in its client area. The custom resource is the file POEPOEM.TXT, which contains the text of the poem. The text file is terminated with a backslash (). Figure 10-5. The POEPOEM program, including an icon and a user-defined resource. 324
- 325. POEPOEM.C /*------------------------------------------- POEPOEM.C -- Demonstrates Custom Resource (c) Charles Petzold, 1998 -------------------------------------------*/ #include <windows.h> #include "resource.h" LRESULT CALLBACK WndProc (HWND, UINT, WPARAM, LPARAM) ; HINSTANCE hInst ; int WINAPI WinMain (HINSTANCE hInstance, HINSTANCE hPrevInstance, PSTR szCmdLine, int iCmdShow) { TCHAR szAppName [16], szCaption [64], szErrMsg [64] ; HWND hwnd ; MSG msg ; WNDCLASS wndclass ; LoadString (hInstance, IDS_APPNAME, szAppName, sizeof (szAppName) / sizeof (TCHAR)) ; LoadString (hInstance, IDS_CAPTION, szCaption, sizeof (szCaption) / sizeof (TCHAR)) ; wndclass.style = CS_HREDRAW | CS_VREDRAW ; wndclass.lpfnWndProc = WndProc ; wndclass.cbClsExtra = 0 ; wndclass.cbWndExtra = 0 ; wndclass.hInstance = hInstance ; wndclass.hIcon = LoadIcon (hInstance, szAppName) ; wndclass.hCursor = LoadCursor (NULL, IDC_ARROW) ; wndclass.hbrBackground = (HBRUSH) GetStockObject (WHITE_BRUSH) ; wndclass.lpszMenuName = NULL ; wndclass.lpszClassName = szAppName ; if (!RegisterClass (&wndclass)) { LoadStringA (hInstance, IDS_APPNAME, (char *) szAppName, sizeof (szAppName)) ; LoadStringA (hInstance, IDS_ERRMSG, (char *) szErrMsg, sizeof (szErrMsg)) ; MessageBoxA (NULL, (char *) szErrMsg, (char *) szAppName, MB_ICONERROR) ; return 0 ; } hwnd = CreateWindow (szAppName, szCaption, WS_OVERLAPPEDWINDOW | WS_CLIPCHILDREN, CW_USEDEFAULT, CW_USEDEFAULT, CW_USEDEFAULT, CW_USEDEFAULT, NULL, NULL, hInstance, NULL) ; ShowWindow (hwnd, iCmdShow) ; UpdateWindow (hwnd) ; while (GetMessage (&msg, NULL, 0, 0)) { TranslateMessage (&msg) ; 325
- 326. POEPOEM.RC (excerpts) //Microsoft Developer Studio generated resource script. #include "resource.h" #include "afxres.h" ///////////////////////////////////////////////////////////////////////////// // TEXT ANNABELLEE TEXT DISCARDABLE "poepoem.txt" ///////////////////////////////////////////////////////////////////////////// // Icon POEPOEM ICON DISCARDABLE "poepoem.ico" ///////////////////////////////////////////////////////////////////////////// // String Table STRINGTABLE DISCARDABLE BEGIN IDS_APPNAME "PoePoem" IDS_CAPTION """Annabel Lee"" by Edgar Allan Poe" IDS_ERRMSG "This program requires Windows NT!" END RESOURCE.H (excerpts) // Microsoft Developer Studio generated include file. // Used by PoePoem.rc #define IDS_APPNAME 1 #define IDS_CAPTION 2 #define IDS_ERRMSG 3 POEPOEM.TXT It was many and many a year ago, In a kingdom by the sea, That a maiden there lived whom you may know By the name of Annabel Lee; And this maiden she lived with no other thought Than to love and be loved by me. 326
- 327. I was a child and she was a child In this kingdom by the sea, But we loved with a love that was more than love -- I and my Annabel Lee -- With a love that the winged seraphs of Heaven Coveted her and me. And this was the reason that, long ago, In this kingdom by the sea, A wind blew out of a cloud, chilling My beautiful Annabel Lee; So that her highborn kinsmen came And bore her away from me, To shut her up in a sepulchre In this kingdom by the sea. The angels, not half so happy in Heaven, Went envying her and me -- Yes! that was the reason (as all men know, In this kingdom by the sea) That the wind came out of the cloud by night, Chilling and killing my Annabel Lee. But our love it was stronger by far than the love Of those who were older than we -- Of many far wiser than we -- And neither the angels in Heaven above Nor the demons down under the sea Can ever dissever my soul from the soul Of the beautiful Annabel Lee: For the moon never beams, without bringing me dreams Of the beautiful Annabel Lee; And the stars never rise, but I feel the bright eyes Of the beautiful Annabel Lee: And so, all the night-tide, I lie down by the side Of my darling -- my darling -- my life and my bride, In her sepulchre there by the sea -- In her tomb by the sounding sea. [May, 1849] POEPOEM.ICO 327
- 328. In the POEPOEM.RC resource script, the user-defined resource is given the type TEXT and the text name "AnnabelLee": ANNABELLEE TEXT POEPOEM.TXT During WM_CREATE processing in WndProc, a handle to the resource is obtained using FindResource and LoadResource. The resource is locked using LockResource, and a small routine replaces the backslash () at the end of the file with a 0. This is for the benefit of the DrawText function used later during the WM_PAINT message. Note the use of a child window scroll bar control rather than a window scroll bar. The child window scroll bar control has an automatic keyboard interface, so no WM_KEYDOWN processing is required in POEPOEM. POEPOEM also uses three character strings, the IDs of which are defined in the RESOURCE.H header file. At the outset of the program, the IDS_APPNAME and IDS_ CAPTION strings are loaded into memory using LoadString: LoadString (hInstance, IDS_APPNAME, szAppName, sizeof (szAppName) / sizeof (TCHAR)) ; LoadString (hInstance, IDS_CAPTION, szCaption, sizeof (szCaption) / sizeof (TCHAR)) ; Notice that these two calls precede RegisterClass. If you run the Unicode version of POEPOEM under Windows 98, these two function calls will fail. Despite the fact that LoadStringA is more complex than LoadStringW (because LoadStringA must convert the resource string from Unicode to ANSI, while LoadStringW just loads it directly), LoadStringW is not one of the few string functions that is supported under Windows 98. This means that when the RegisterClassW function fails under Windows 98, the MessageBoxW function (which is supported in Windows 98) cannot use strings loaded into the program using LoadStringW. For this reason, the program loads the IDS_APPNAME and IDS_ERRMSG strings using LoadStringA and then displays the customary message box using MessageBoxA: if (!RegisterClass (&wndclass)) { LoadStringA (hInstance, IDS_APPNAME, (char *) szAppName, sizeof (szAppName)) ; LoadStringA (hInstance, IDS_ERRMSG, (char *) szErrMsg, sizeof (szErrMsg)) ; MessageBoxA (NULL, (char *) szErrMsg, (char *) szAppName, MB_ICONERROR) ; return 0 ; } Notice the casting of the TCHAR string variables into char pointers. With all character strings used in POEPOEM defined as resources, the program is now easier for translators to convert to a foreign-language version. Of course, they'd also have to translate the text of "Annabel Lee"—which would be, I suspect, a more difficult task. Menus Do you remember the Monty Python skit about the cheese shop? Here's how it goes: A guy comes into a cheese shop and wants a particular type of cheese. The shop doesn't have it. So he asks for another type of cheese, and another, and another, and another (eventually totaling about 40 types, most of which are quite obscure), and still the answer is "No, no, no, no, no." Ultimately, there's a shooting involved. This whole unfortunate incident could have been avoided through the use of menus. A menu is a list of available options. A menu tells a hungry patron what the kitchen can serve up and—for a Windows program—tells the user what operations an application is capable of performing. A menu is probably the most important part of the consistent user interface that Windows programs offer, and adding a menu to your program is a relatively easy part of Windows programming. You define the menu in 328
- 329. Developer Studio. Each selectable menu item is given a unique ID number. You specify the name of the menu in the window class structure. When the user chooses a menu item, Windows sends your program a WM_COMMAND message containing that ID. After discussing menus, I'll conclude this chapter with a section on keyboard accelerators, which are key combinations that are used primarily to duplicate menu functions. Menu Concepts A window's menu bar is displayed immediately below the caption bar. This menu bar is sometimes called a program's "main menu" or the "top-level menu." Items listed in the top-level menu usually invoke drop-down menus, which are also called "popup menus" or "submenus." You can also define multiple nestings of popups: that is, an item on a popup menu can invoke another popup menu. Sometimes items in popup menus invoke a dialog box for more information. (Dialog boxes are covered in the next chapter.) Most parent windows have, to the far left of the caption bar, a display of the program's small icon. This icon invokes the system menu, which is really another popup menu. Menu items in popups can be "checked," which means that Windows draws a small check mark to the left of the menu text. The use of check marks lets the user choose different program options from the menu. These options can be mutually exclusive, but they don't have to be. Top-level menu items cannot be checked. Menu items in the top-level menu or in popup menus can be "enabled," "disabled," or "grayed." The words "active" and "inactive" are sometimes used synonymously with "enabled" and "disabled." Menu items flagged as enabled or disabled look the same to the user, but a grayed menu item is displayed in gray text. From the perspective of the user, enabled, disabled, and grayed menu items can all be "selected" (highlighted). That is, the user can click the mouse on a disabled menu item, or move the reverse-video cursor bar to a disabled menu item, or trigger the menu item by using the item's key letter. However, from the perspective of your program, enabled, disabled, and grayed menu items function differently. Windows sends your program a WM_COMMAND message only for enabled menu items. You use disabled and grayed menu items for options that are not currently valid. If you want to let the user know the option is not valid, make it grayed. Menu Structure When you create or change menus in a program, it's useful to think of the top-level menu and each popup menu as being separate menus. The top-level menu has a menu handle, each popup menu within a top-level menu has its own menu handle, and the system menu (which is also a popup) has a menu handle. Each item in a menu is defined by three characteristics. The first characteristic is what appears in the menu. This is either a text string or a bitmap. The second characteristic is either an ID number that Windows sends to your program in a WM_COMMAND message or the handle to a popup menu that Windows displays when the user chooses that menu item. The third characteristic describes the attribute of the menu item, including whether the item is disabled, grayed, or checked. Defining the Menu To use Developer Studio to add a menu to your program's resource script, select Resource from the Insert menu and pick Menu. (But you probably figured that out already.) You can then interactively define your menu. Each item in the menu has an associated Menu Item Properties dialog box that indicates the item's text string. If the Pop-up box is checked, the item invokes a popup menu and no ID is associated with the item. If the Pop-up box is not checked, the item generates a WM_COMMAND message with a specified ID. These two types of menu items will appear in the resource script as POPUP and MENUITEM statements, respectively. When you type the text for an item in a menu, you can type an ampersand (&) to indicate that the following character is to be underlined when Windows displays the menu. Such an underlined character is the character Windows searches for when you select a menu item using the Alt key. If you don't include an ampersand in the text, no underline will appear, and Windows will instead use the first letter of the menu item's text for Alt-key searches. 329
- 330. If you select the Grayed option in the Menu Items Properties dialog box, the menu item is inactive, its text is grayed, and the item does not generate a WM_COMMAND message. If you select the Inactive option, the menu item is inactive and does not generate a WM_COMMAND message but its text is displayed normally. The Checked option places a check mark next to a menu item. The Separator option causes a horizontal separator bar to be drawn on popup menus. For items in popup menus, you can use the columnar tab character t in the character string. Text following the t is placed in a new column spaced far enough to the right to accommodate the longest text string in the first column of the popup. We'll see how this works when we look at keyboard accelerators toward the end of this chapter. A a in the character string right-justifies the text that follows it. The ID values you specify are the numbers that Windows sends to the window procedure in menu messages. The ID values should be unique within a menu. By convention, I use identifiers beginning with the letters IDM ("ID for a Menu"). Referencing the Menu in Your Program Most Windows applications have only one menu in the resource script. You can give the menu a text name that is the same as the name of the program. Programmers often use the name of the program as the name of the menu so that the same character string can be used for the window class, the name of the program's icon, and the name of the menu. The program then makes reference to this menu in the definition of the window class: wndclass.lpszMenuName = szAppName ; Although specifying the menu in the window class is the most common way to reference a menu resource, that's not the only way to do it. A Windows application can load a menu resource into memory with the LoadMenu function, which is similar to the LoadIcon and LoadCursor functions described earlier. LoadMenu returns a handle to the menu. If you use a name for the menu in the resource script, the statement looks like this: hMenu = LoadMenu (hInstance, TEXT ("MyMenu")) ; If you use a number, the LoadMenu call takes this form: hMenu = LoadMenu (hInstance, MAKEINTRESOURCE (ID_MENU)) ; You can then specify this menu handle as the ninth parameter to CreateWindow: hwnd = CreateWindow (TEXT ("MyClass"), TEXT ("Window Caption"), WS_OVERLAPPEDWINDOW, CW_USEDEFAULT, CW_USEDEFAULT, CW_USEDEFAULT, CW_USEDEFAULT, NULL, hMenu, hInstance, NULL) ; In this case, the menu specified in the CreateWindow call overrides any menu specified in the window class. You can think of the menu in the window class as being a default menu for the windows based on the window class if the ninth parameter to CreateWindow is NULL. Therefore, you can use different menus for several windows based on the same window class. You can also have a NULL menu name in the window class and a NULL menu handle in the CreateWindow call and assign a menu to a window after the window has been created: SetMenu (hwnd, hMenu) ; This form lets you dynamically change a window's menu. We'll see an example of this in the NOPOPUPS program, shown later in this chapter. Any menu that is attached to a window is destroyed when the window is destroyed. Any menus not attached to a window should be explicitly destroyed by calls to DestroyMenu before the program terminates. Menus and Messages Windows usually sends a window procedure several different messages when the user selects a menu item. In most 330
- 331. cases, your program can ignore many of these messages and simply pass them to DefWindowProc. One such message is WM_INITMENU with the following parameters: wParam: Handle to main menu lParam: 0 The value of wParam is the handle to your main menu even if the user is selecting an item from the system menu. Windows programs generally ignore the WM_INITMENU message. Although the message exists to give you the opportunity to change the menu before an item is chosen, I suspect any changes to the top-level menu at this time would be disconcerting to the user. Your program also receives WM_MENUSELECT messages. A program can receive many WM_MENUSELECT messages as the user moves the cursor or mouse among the menu items. This is helpful for implementing a status bar that contains a full text description of the menu option. The parameters that accompany WM_MENUSELECT are as follows: LOWORD (wParam): Selected item: Menu ID or popup menu index HIWORD (wParam): Selection flags lParam: Handle to menu containing selected item WM_MENUSELECT is a menu-tracking message. The value of wParam tells you what item of the menu is currently selected (highlighted). The "selection flags" in the high word of wParam can be a combination of the following: MF_GRAYED, MF_DISABLED, MF_ CHECKED, MF_BITMAP, MF_POPUP, MF_HELP, MF_SYSMENU, and MF_MOUSESELECT. You may want to use WM_MENUSELECT if you need to change something in the client area of your window based on the movement of the highlight among the menu items. Most programs pass this message to DefWindowProc. When Windows is ready to display a popup menu, it sends the window procedure a WM_INITMENUPOPUP message with the following parameters: wParam: Popup menu handle LOWORD (lParam): Popup index HIWORD (lParam): 1 for system menu, 0 otherwise This message is important if you need to enable or disable items in a popup menu before it is displayed. For instance, suppose your program can copy text from the clipboard using the Paste command on a popup menu. When you receive a WM_INITMENUPOPUP message for that popup, you should determine whether the clipboard has text in it. If it doesn't, you should gray the Paste menu item. We'll see an example of this in the revised POPPAD program shown toward the end of this chapter. The most important menu message is WM_COMMAND. This message indicates that the user has chosen an enabled menu item from your window's menu. You'll recall from Chapter 8 that WM_COMMAND messages also result from child window controls. If you happen to use the same ID codes for menus and child window controls, you can differentiate between them by examining the value of lParam, which will be 0 for a menu item. Menus Controls LOWORD (wParam): Menu ID Control ID HIWORD (wParam): 0 Notification code lParam: 0 Child window handle 331
- 332. The WM_SYSCOMMAND message is similar to the WM_COMMAND message except that WM_SYSCOMMAND signals that the user has chosen an enabled menu item from the system menu: wParam: Menu ID lParam: 0 However, if the WM_SYSCOMMAND message is the result of a mouse click, LOWORD (lParam) and HIWORD (lParam) will contain the x and y screen coordinates of the mouse cursor's location. For WM_SYSCOMMAND, the menu ID indicates which item on the system menu has been chosen. For the predefined system menu items, the bottom four bits should be masked out by ANDing with 0xFFF0. The resultant value will be one of the following: SC_SIZE, SC_MOVE, SC_MINIMIZE, SC_MAXIMIZE, SC_NEXTWINDOW, SC_PREVWINDOW, SC_CLOSE, SC_VSCROLL, SC_HSCROLL, SC_ARRANGE, SC_RESTORE, and SC_TASKLIST. In addition, wParam can be SC_MOUSEMENU or SC_KEYMENU. If you add menu items to the system menu, the low word of wParam will be the menu ID that you define. To avoid conflicts with the predefined menu IDs, use values below 0xF000. It is important that you pass normal WM_SYSCOMMAND messages to DefWindowProc. If you do not, you'll effectively disable the normal system menu commands. The final message we'll look at is WM_MENUCHAR, which isn't really a menu message at all. Windows sends this message to your window procedure in one of two circumstances: if the user presses Alt and a character key that does not correspond to a menu item, or, when a popup is displayed, if the user presses a character key that does not correspond to an item in the popup. The parameters that accompany the WM_MENUCHAR message are as follows: LOWORD (wParam): Character code (ASCII or Unicode) HIWORD (wParam): Selection code lParam: Handle to menu The selection code is: • 0 No popup is displayed. • MF_POPUP Popup is displayed. • MF_SYSMENU System menu popup is displayed. Windows programs usually pass this message to DefWindowProc, which normally returns a 0 to Windows, which causes Windows to beep. We'll see a use for the WM_MENUCHAR message in the GRAFMENU program shown in Chapter 14. A Sample Program Let's look at a simple example. The MENUDEMO program, shown in Figure 10-6, has five items in the main menu —File, Edit, Background, Timer, and Help. Each of these items has a popup. MENUDEMO does the simplest and most common type of menu processing, which involves trapping WM_COMMAND messages and checking the low word of wParam. Figure 10-6. The MENUDEMO program. MENUDEMO.C 332
- 333. /*----------------------------------------- MENUDEMO.C -- Menu Demonstration (c) Charles Petzold, 1998 -----------------------------------------*/ #include <windows.h> #include "resource.h" #define ID_TIMER 1 LRESULT CALLBACK WndProc (HWND, UINT, WPARAM, LPARAM) ; TCHAR szAppName[] = TEXT ("MenuDemo") ; int WINAPI WinMain (HINSTANCE hInstance, HINSTANCE hPrevInstance, PSTR szCmdLine, int iCmdShow) { HWND hwnd ; MSG msg ; WNDCLASS wndclass ; wndclass.style = CS_HREDRAW | CS_VREDRAW ; wndclass.lpfnWndProc = WndProc ; wndclass.cbClsExtra = 0 ; wndclass.cbWndExtra = 0 ; wndclass.hInstance = hInstance ; wndclass.hIcon = LoadIcon (NULL, IDI_APPLICATION) ; wndclass.hCursor = LoadCursor (NULL, IDC_ARROW) ; wndclass.hbrBackground = (HBRUSH) GetStockObject (WHITE_BRUSH) ; wndclass.lpszMenuName = szAppName ; wndclass.lpszClassName = szAppName ; if (!RegisterClass (&wndclass)) { MessageBox (NULL, TEXT ("This program requires Windows NT!"), szAppName, MB_ICONERROR) ; return 0 ; } hwnd = CreateWindow (szAppName, TEXT ("Menu Demonstration"), WS_OVERLAPPEDWINDOW, CW_USEDEFAULT, CW_USEDEFAULT, CW_USEDEFAULT, CW_USEDEFAULT, NULL, NULL, hInstance, NULL) ; ShowWindow (hwnd, iCmdShow) ; UpdateWindow (hwnd) ; while (GetMessage (&msg, NULL, 0, 0)) { TranslateMessage (&msg) ; DispatchMessage (&msg) ; } return msg.wParam ; } LRESULT CALLBACK WndProc (HWND hwnd, UINT message, WPARAM wParam, LPARAM lParam) { static int idColor [5] = { WHITE_BRUSH, LTGRAY_BRUSH, GRAY_BRUSH, DKGRAY_BRUSH, BLACK_BRUSH } ; static int iSelection = IDM_BKGND_WHITE ; HMENU hMenu ; switch (message) 333
- 334. { case WM_COMMAND: hMenu = GetMenu (hwnd) ; switch (LOWORD (wParam)) { case IDM_FILE_NEW: case IDM_FILE_OPEN: case IDM_FILE_SAVE: case IDM_FILE_SAVE_AS: MessageBeep (0) ; return 0 ; case IDM_APP_EXIT: SendMessage (hwnd, WM_CLOSE, 0, 0) ; return 0 ; case IDM_EDIT_UNDO: case IDM_EDIT_CUT: case IDM_EDIT_COPY: case IDM_EDIT_PASTE: case IDM_EDIT_CLEAR: MessageBeep (0) ; return 0 ; case IDM_BKGND_WHITE: // Note: Logic below case IDM_BKGND_LTGRAY: // assumes that IDM_WHITE case IDM_BKGND_GRAY: // through IDM_BLACK are case IDM_BKGND_DKGRAY: // consecutive numbers in case IDM_BKGND_BLACK: // the order shown here. CheckMenuItem (hMenu, iSelection, MF_UNCHECKED) ; iSelection = LOWORD (wParam) ; CheckMenuItem (hMenu, iSelection, MF_CHECKED) ; SetClassLong (hwnd, GCL_HBRBACKGROUND, (LONG) GetStockObject (idColor [LOWORD (wParam) - IDM_BKGND_WHITE])) ; InvalidateRect (hwnd, NULL, TRUE) ; return 0 ; case IDM_TIMER_START: if (SetTimer (hwnd, ID_TIMER, 1000, NULL)) { EnableMenuItem (hMenu, IDM_TIMER_START, MF_GRAYED) ; EnableMenuItem (hMenu, IDM_TIMER_STOP, MF_ENABLED) ; } return 0 ; case IDM_TIMER_STOP: KillTimer (hwnd, ID_TIMER) ; EnableMenuItem (hMenu, IDM_TIMER_START, MF_ENABLED) ; EnableMenuItem (hMenu, IDM_TIMER_STOP, MF_GRAYED) ; return 0 ; case IDM_APP_HELP: MessageBox (hwnd, TEXT ("Help not yet implemented!"), szAppName, MB_ICONEXCLAMATION | MB_OK) ; return 0 ; case IDM_APP_ABOUT: MessageBox (hwnd, TEXT ("Menu Demonstration Programn") TEXT ("(c) Charles Petzold, 1998"), 334
- 335. szAppName, MB_ICONINFORMATION | MB_OK) ; return 0 ; } break ; case WM_TIMER: MessageBeep (0) ; return 0 ; case WM_DESTROY: PostQuitMessage (0) ; return 0 ; } return DefWindowProc (hwnd, message, wParam, lParam) ; } MENUDEMO.RC (excerpts) //Microsoft Developer Studio generated resource script. #include "resource.h" #include "afxres.h" ///////////////////////////////////////////////////////////////////////////// // Menu MENUDEMO MENU DISCARDABLE BEGIN POPUP "&File" BEGIN MENUITEM "&New", IDM_FILE_NEW MENUITEM "&Open", IDM_FILE_OPEN MENUITEM "&Save", IDM_FILE_SAVE MENUITEM "Save &As...", IDM_FILE_SAVE_AS MENUITEM SEPARATOR MENUITEM "E&xit", IDM_APP_EXIT END POPUP "&Edit" BEGIN MENUITEM "&Undo", IDM_EDIT_UNDO MENUITEM SEPARATOR MENUITEM "C&ut", IDM_EDIT_CUT MENUITEM "&Copy", IDM_EDIT_COPY MENUITEM "&Paste", IDM_EDIT_PASTE MENUITEM "De&lete", IDM_EDIT_CLEAR END POPUP "&Background" BEGIN MENUITEM "&White", IDM_BKGND_WHITE, CHECKED MENUITEM "&Light Gray", IDM_BKGND_LTGRAY MENUITEM "&Gray", IDM_BKGND_GRAY MENUITEM "&Dark Gray", IDM_BKGND_DKGRAY MENUITEM "&Black", IDM_BKGND_BLACK END POPUP "&Timer" BEGIN MENUITEM "&Start", IDM_TIMER_START MENUITEM "S&top", IDM_TIMER_STOP, GRAYED 335
- 336. END POPUP "&Help" BEGIN MENUITEM "&Help...", IDM_APP_HELP MENUITEM "&About MenuDemo...", IDM_APP_ABOUT END END RESOURCE.H (excerpts) // Microsoft Developer Studio generated include file. // Used by MenuDemo.rc #define IDM_FILE_NEW 40001 #define IDM_FILE_OPEN 40002 #define IDM_FILE_SAVE 40003 #define IDM_FILE_SAVE_AS 40004 #define IDM_APP_EXIT 40005 #define IDM_EDIT_UNDO 40006 #define IDM_EDIT_CUT 40007 #define IDM_EDIT_COPY 40008 #define IDM_EDIT_PASTE 40009 #define IDM_EDIT_CLEAR 40010 #define IDM_BKGND_WHITE 40011 #define IDM_BKGND_LTGRAY 40012 #define IDM_BKGND_GRAY 40013 #define IDM_BKGND_DKGRAY 40014 #define IDM_BKGND_BLACK 40015 #define IDM_TIMER_START 40016 #define IDM_TIMER_STOP 40017 #define IDM_APP_HELP 40018 #define IDM_APP_ABOUT 40019 The MENUDEMO.RC resource script should give you hints on defining the menu. The menu has a text name of "MenuDemo." Most items have underlined letters, which means you must type an ampersand (&) before the letter. The MENUITEM SEPARATOR statement results from checking the Separator box in the Menu Item Properties dialog box. Notice that one item in the menu has the Checked option and another has the Grayed option. Also, the five items in the Background popup menu should be entered in the order shown to ensure that the identifiers are in numeric order; the program relies on this. All the menu item identifiers are defined in RESOURCE.H. The MENUDEMO program simply beeps when it receives a WM_COMMAND message for most items in the File and Edit popups. The Background popup lists five stock brushes that MENUDEMO can use to color the background. In the MENUDEMO.RC resource script, the White menu item (with a menu ID of IDM_BKGND_WHITE) is flagged as CHECKED, which places a check mark next to the item. In MENUDEMO.C, the value of iSelection is initially set to IDM_BKGND_WHITE. The five brushes on the Background popup menu are mutually exclusive. When MENUDEMO.C receives a WM_COMMAND message where wParam is one of these five items on the Background popup, it must remove the check mark from the previously chosen background color and add a check mark to the new background color. To do this, it first gets a handle to its menu: hMenu = GetMenu (hwnd) ; The CheckMenuItem function is used to uncheck the currently checked item: CheckMenuItem (hMenu, iSelection, MF_UNCHECKED) ; 336
- 337. The iSelection value is set to the value of wParam, and the new background color is checked: iSelection = wParam ; CheckMenuItem (hMenu, iSelection, MF_CHECKED) ; The background color in the window class is then replaced with the new background color, and the window client area is invalidated. Windows erases the window, using the new background color. The Timer popup lists two options—Start and Stop. Initially, the Stop option is grayed (as indicated in the menu definition for the resource script). When you choose the Start option, MENUDEMO tries to start a timer and, if successful, grays the Start option and makes the Stop option active: EnableMenuItem (hMenu, IDM_TIMER_START, MF_GRAYED) ; EnableMenuItem (hMenu, IDM_TIMER_STOP, MF_ENABLED) ; On receipt of a WM_COMMAND message with wParam equal to IDM_TIMER_STOP, MENUDEMO kills the timer, activates the Start option, and grays the Stop option: EnableMenuItem (hMenu, IDM_TIMER_START, MF_ENABLED) ; EnableMenuItem (hMenu, IDM_TIMER_STOP, MF_GRAYED) ; Notice that it's impossible for MENUDEMO to receive a WM_COMMAND message with wParam equal to IDM_TIMER_START while the timer is going. Similarly, it's impossible to receive a WM_COMMAND with wParam equal to IDM_TIMER_STOP while the timer is not going. When MENUDEMO receives a WM_COMMAND message with the wParam parameter equal to IDM_APP_ABOUT or IDM_APP_HELP, it displays a message box. (In the next chapter, we'll change this to a dialog box.) When MENUDEMO receives a WM_COMMAND message with wParam equal to IDM_APP_EXIT, it sends itself a WM_CLOSE message. This is the same message that DefWindowProc sends the window procedure when it receives a WM_SYSCOMMAND message with wParam equal to SC_CLOSE. We'll examine this more in the POPPAD2 program shown near the end of this chapter. Menu Etiquette The format of the File and Edit popups in MENUDEMO is quite similar to those in other Windows programs. One of the objectives of Windows is to provide a user with a recognizable interface that does not require relearning basic concepts for each program. It certainly helps if the File and Edit menus look the same in every Windows program and use the same letters for selection in combination with the Alt key. Beyond the File and Edit popups, the menus of most Windows programs will probably be different. When designing a menu, you should look at existing Windows programs and aim for some consistency. Of course, if you think these other programs are wrong and you know the right way to do it, nobody's going to stop you. Also keep in mind that revising a menu usually requires revising only the resource script and not your program code. You can move menu items around at a later time without many problems. Although your program menu can have MENUITEM statements on the top level, these are not typical because they can be too easily chosen by mistake. If you do this, use an exclamation point after the text string to indicate that the menu item does not invoke a popup. Defining a Menu the Hard Way Defining a menu in a program's resource script is usually the easiest way to add a menu in your window, but it's not the only way. You can dispense with the resource script and create a menu entirely within your program by using two functions called CreateMenu and AppendMenu. After you finish defining the menu, you can pass the menu handle to CreateWindow or use SetMenu to set the window's menu. Here's how it's done. CreateMenu simply returns a handle to a new menu: 337
- 338. hMenu = CreateMenu () ; The menu is initially empty. AppendMenu inserts items into the menu. You must obtain a different menu handle for the top-level menu item and for each popup. The popups are constructed separately; the popup menu handles are then inserted into the top-level menu. The code shown in Figure 10-7 creates a menu in this fashion; in fact, it is the same menu that I used in the MENUDEMO program. For illustrative simplicity, the code uses ASCII character strings. Figure 10-7. C code that creates the same menu as used in the MENUDEMO program but without requiring a resource script file. hMenu = CreateMenu () ; hMenuPopup = CreateMenu () ; AppendMenu (hMenuPopup, MF_STRING, IDM_FILE_NEW, "&New") ; AppendMenu (hMenuPopup, MF_STRING, IDM_FILE_OPEN, "&Open...") ; AppendMenu (hMenuPopup, MF_STRING, IDM_FILE_SAVE, "&Save") ; AppendMenu (hMenuPopup, MF_STRING, IDM_FILE_SAVE_AS, "Save &As...") ; AppendMenu (hMenuPopup, MF_SEPARATOR, 0, NULL) ; AppendMenu (hMenuPopup, MF_STRING, IDM_APP_EXIT, "E&xit") ; AppendMenu (hMenu, MF_POPUP, hMenuPopup, "&File") ; hMenuPopup = CreateMenu () ; AppendMenu (hMenuPopup, MF_STRING, IDM_EDIT_UNDO, "&Undo") ; AppendMenu (hMenuPopup, MF_SEPARATOR, 0, NULL) ; AppendMenu (hMenuPopup, MF_STRING, IDM_EDIT_CUT, "Cu&t") ; AppendMenu (hMenuPopup, MF_STRING, IDM_EDIT_COPY, "&Copy") ; AppendMenu (hMenuPopup, MF_STRING, IDM_EDIT_PASTE, "&Paste") ; AppendMenu (hMenuPopup, MF_STRING, IDM_EDIT_CLEAR, "De&lete") ; AppendMenu (hMenu, MF_POPUP, hMenuPopup, "&Edit") ; hMenuPopup = CreateMenu () ; AppendMenu (hMenuPopup, MF_STRING¦ MF_CHECKED, IDM_BKGND_WHITE, "&White") ; AppendMenu (hMenuPopup, MF_STRING, IDM_BKGND_LTGRAY, "&Light Gray"); AppendMenu (hMenuPopup, MF_STRING, IDM_BKGND_GRAY, "&Gray") ; AppendMenu (hMenuPopup, MF_STRING, IDM_BKGND_DKGRAY, "&Dark Gray"); AppendMenu (hMenuPopup, MF_STRING, IDM_BKGND_BLACK, "&Black") ; AppendMenu (hMenu, MF_POPUP, hMenuPopup, "&Background") ; hMenuPopup = CreateMenu () ; AppendMenu (hMenuPopup, MF_STRING, IDM_TIMER_START, "&Start") ; AppendMenu (hMenuPopup, MF_STRING ¦ MF_GRAYED, IDM_TIMER_STOP, "S&top") ; AppendMenu (hMenu, MF_POPUP, hMenuPopup, "&Timer") ; hMenuPopup = CreateMenu () ; AppendMenu (hMenuPopup, MF_STRING, IDM_HELP_HELP, "&Help") ; AppendMenu (hMenuPopup, MF_STRING, IDM_APP_ABOUT, "&About MenuDemo...") ; AppendMenu (hMenu, MF_POPUP, hMenuPopup, "&Help") ; I think you'll agree that the resource script menu template is easier and clearer. I'm not recommending that you define a menu in this way, only showing that it can be done. Certainly you could cut down on the code size substantially by using some arrays of structures containing all the menu item character strings, IDs, and flags. But if you do that, you might as well take advantage of the third method Windows provides for defining a menu. The LoadMenuIndirect function accepts a pointer to a structure of type MENUITEMTEMPLATE and returns a handle 338
- 339. to a menu. This function is used within Windows to construct a menu after loading the normal menu template from a resource script. If you're brave, you can try using it yourself. Floating Popup Menus You can also make use of menus without having a top-level menu bar. You can instead cause a popup menu to appear on top of any part of the screen. One approach is to invoke this popup menu in response to a click of the right mouse button. The POPMENU program in Figure 10-8 shows how this is done. Figure 10-8. The POPMENU program. POPMENU.C /*---------------------------------------- POPMENU.C -- Popup Menu Demonstration (c) Charles Petzold, 1998 ----------------------------------------*/ #include <windows.h> #include "resource.h" LRESULT CALLBACK WndProc (HWND, UINT, WPARAM, LPARAM) ; HINSTANCE hInst ; TCHAR szAppName[] = TEXT ("PopMenu") ; int WINAPI WinMain (HINSTANCE hInstance, HINSTANCE hPrevInstance, PSTR szCmdLine, int iCmdShow) { HWND hwnd ; MSG msg ; WNDCLASS wndclass ; wndclass.style = CS_HREDRAW | CS_VREDRAW ; wndclass.lpfnWndProc = WndProc ; wndclass.cbClsExtra = 0 ; wndclass.cbWndExtra = 0 ; wndclass.hInstance = hInstance ; wndclass.hIcon = LoadIcon (NULL, szAppName) ; wndclass.hCursor = LoadCursor (NULL, IDC_ARROW) ; wndclass.hbrBackground = (HBRUSH) GetStockObject (WHITE_BRUSH) ; wndclass.lpszMenuName = NULL ; wndclass.lpszClassName = szAppName ; if (!RegisterClass (&wndclass)) { MessageBox (NULL, TEXT ("This program requires Windows NT!"), szAppName, MB_ICONERROR) ; return 0 ; } hInst = hInstance ; hwnd = CreateWindow (szAppName, TEXT ("Popup Menu Demonstration"), WS_OVERLAPPEDWINDOW, CW_USEDEFAULT, CW_USEDEFAULT, CW_USEDEFAULT, CW_USEDEFAULT, NULL, NULL, hInstance, NULL) ; 339
- 340. ShowWindow (hwnd, iCmdShow) ; UpdateWindow (hwnd) ; while (GetMessage (&msg, NULL, 0, 0)) { TranslateMessage (&msg) ; DispatchMessage (&msg) ; } return msg.wParam ; } LRESULT CALLBACK WndProc (HWND hwnd, UINT message, WPARAM wParam, LPARAM lParam) { static HMENU hMenu ; static int idColor [5] = { WHITE_BRUSH, LTGRAY_BRUSH, GRAY_BRUSH, DKGRAY_BRUSH, BLACK_BRUSH } ; static int iSelection = IDM_BKGND_WHITE ; POINT point ; switch (message) { case WM_CREATE: hMenu = LoadMenu (hInst, szAppName) ; hMenu = GetSubMenu (hMenu, 0) ; return 0 ; case WM_RBUTTONUP: point.x = LOWORD (lParam) ; point.y = HIWORD (lParam) ; ClientToScreen (hwnd, &point) ; TrackPopupMenu (hMenu, TPM_RIGHTBUTTON, point.x, point.y, 0, hwnd, NULL) ; return 0 ; case WM_COMMAND: switch (LOWORD (wParam)) { case IDM_FILE_NEW: case IDM_FILE_OPEN: case IDM_FILE_SAVE: case IDM_FILE_SAVE_AS: case IDM_EDIT_UNDO: case IDM_EDIT_CUT: case IDM_EDIT_COPY: case IDM_EDIT_PASTE: case IDM_EDIT_CLEAR: MessageBeep (0) ; return 0 ; case IDM_BKGND_WHITE: // Note: Logic below case IDM_BKGND_LTGRAY: // assumes that IDM_WHITE case IDM_BKGND_GRAY: // through IDM_BLACK are case IDM_BKGND_DKGRAY: // consecutive numbers in case IDM_BKGND_BLACK: // the order shown here. CheckMenuItem (hMenu, iSelection, MF_UNCHECKED) ; iSelection = LOWORD (wParam) ; CheckMenuItem (hMenu, iSelection, MF_CHECKED) ; SetClassLong (hwnd, GCL_HBRBACKGROUND, (LONG) GetStockObject (idColor [LOWORD (wParam) - IDM_BKGND_WHITE])) ; 340
- 341. InvalidateRect (hwnd, NULL, TRUE) ; return 0 ; case IDM_APP_ABOUT: MessageBox (hwnd, TEXT ("Popup Menu Demonstration Programn") TEXT ("(c) Charles Petzold, 1998"), szAppName, MB_ICONINFORMATION | MB_OK) ; return 0 ; case IDM_APP_EXIT: SendMessage (hwnd, WM_CLOSE, 0, 0) ; return 0 ; case IDM_APP_HELP: MessageBox (hwnd, TEXT ("Help not yet implemented!"), szAppName, MB_ICONEXCLAMATION | MB_OK) ; return 0 ; } break ; case WM_DESTROY: PostQuitMessage (0) ; return 0 ; } return DefWindowProc (hwnd, message, wParam, lParam) ; } POPMENU.RC (excerpts) //Microsoft Developer Studio generated resource script. #include "resource.h" #include "afxres.h" ///////////////////////////////////////////////////////////////////////////// // Menu POPMENU MENU DISCARDABLE BEGIN POPUP "MyMenu" BEGIN POPUP "&File" BEGIN MENUITEM "&New", IDM_FILE_NEW MENUITEM "&Open", IDM_FILE_OPEN MENUITEM "&Save", IDM_FILE_SAVE MENUITEM "Save &As", IDM_FILE_SAVE_AS MENUITEM SEPARATOR MENUITEM "E&xit", IDM_APP_EXIT END POPUP "&Edit" BEGIN MENUITEM "&Undo", IDM_EDIT_UNDO MENUITEM SEPARATOR MENUITEM "Cu&t", IDM_EDIT_CUT MENUITEM "&Copy", IDM_EDIT_COPY MENUITEM "&Paste", IDM_EDIT_PASTE 341
- 342. MENUITEM "De&lete", IDM_EDIT_CLEAR END POPUP "&Background" BEGIN MENUITEM "&White", IDM_BKGND_WHITE, CHECKED MENUITEM "&Light Gray", IDM_BKGND_LTGRAY MENUITEM "&Gray", IDM_BKGND_GRAY MENUITEM "&Dark Gray", IDM_BKGND_DKGRAY MENUITEM "&Black", IDM_BKGND_BLACK END POPUP "&Help" BEGIN MENUITEM "&Help...", IDM_APP_HELP MENUITEM "&About PopMenu...", IDM_APP_ABOUT END END END RESOURCE.H (excerpts) // Microsoft Developer Studio generated include file. // Used by PopMenu.rc #define IDM_FILE_NEW 40001 #define IDM_FILE_OPEN 40002 #define IDM_FILE_SAVE 40003 #define IDM_FILE_SAVE_AS 40004 #define IDM_APP_EXIT 40005 #define IDM_EDIT_UNDO 40006 #define IDM_EDIT_CUT 40007 #define IDM_EDIT_COPY 40008 #define IDM_EDIT_PASTE 40009 #define IDM_EDIT_CLEAR 40010 #define IDM_BKGND_WHITE 40011 #define IDM_BKGND_LTGRAY 40012 #define IDM_BKGND_GRAY 40013 #define IDM_BKGND_DKGRAY 40014 #define IDM_BKGND_BLACK 40015 #define IDM_APP_HELP 40016 #define IDM_APP_ABOUT 40017 The POPMENU.RC resource script defines a menu similar to the one in MENUDEMO.RC. The difference is that the top-level menu contains only one item—a popup named "MyMenu" that invokes the File, Edit, Background, and Help options. These four options will be arranged on the popup menu in a vertical list rather than on the main menu in a horizontal list. During the WM_CREATE message in WndProc, POPMENU obtains a handle to the first popup menu—that is, the popup with the text "MyMenu": hMenu = LoadMenu (hInst, szAppName) ; hMenu = GetSubMenu (hMenu, 0) ; During the WM_RBUTTONUP message, POPMENU obtains the position of the mouse pointer, converts the position to screen coordinates, and passes the coordinates to TrackPopupMenu: point.x = LOWORD (lParam) ; point.y = HIWORD (lParam) ; 342
- 343. ClientToScreen (hwnd, &point) ; TrackPopupMenu (hMenu, TPM_RIGHTBUTTON, point.x, point.y, 0, hwnd, NULL) ; Windows then displays the popup menu with the items File, Edit, Background, and Help. Selecting any of these options causes the nested popup menus to appear to the right. The menu functions the same as a normal menu. If you want to use the same menu for the program's main menu and with the TrackPopupMenu, you'll have a bit of a problem because the function requires a popup menu handle. A workaround is provided in the Microsoft Knowledge Base article ID Q99806. Using the System Menu Parent windows created with a style that includes WS_SYSMENU have a system menu box at the left of the caption bar. If you like, you can modify this menu by adding your own menu commands. In the early days of Windows, programs commonly put the "About" menu item on the system menu. While modifying the system menu is not nearly as common these days, it remains a quick-and-dirty way to add a menu to a short program without defining it in the resource script. The only restriction is this: the ID numbers you use to add commands to the system menu must be lower than 0xF000. Otherwise, they will conflict with the IDs that Windows uses for the normal system menu commands. And keep in mind that when you process WM_SYSCOMMAND messages in your window procedure for these new menu items, you must pass the other WM_SYSCOMMAND messages to DefWindowProc. If you don't, you'll effectively disable all normal options on the system menu. The program POORMENU ("Poor Person's Menu"), shown in Figure 10-9, adds a separator bar and three commands to the system menu. The last of these commands removes the additions. Figure 10-9. The POORMENU program. POORMENU.C /*----------------------------------------- POORMENU.C -- The Poor Person's Menu (c) Charles Petzold, 1998 -----------------------------------------*/ #include <windows.h> #define IDM_SYS_ABOUT 1 #define IDM_SYS_HELP 2 #define IDM_SYS_REMOVE 3 LRESULT CALLBACK WndProc (HWND, UINT, WPARAM, LPARAM) ; static TCHAR szAppName[] = TEXT ("PoorMenu") ; int WINAPI WinMain (HINSTANCE hInstance, HINSTANCE hPrevInstance, PSTR szCmdLine, int iCmdShow) { HMENU hMenu ; HWND hwnd ; MSG msg ; WNDCLASS wndclass ; wndclass.style = CS_HREDRAW | CS_VREDRAW ; wndclass.lpfnWndProc = WndProc ; wndclass.cbClsExtra = 0 ; 343
- 344. wndclass.cbWndExtra = 0 ; wndclass.hInstance = hInstance ; wndclass.hIcon = LoadIcon (NULL, IDI_APPLICATION) ; wndclass.hCursor = LoadCursor (NULL, IDC_ARROW) ; wndclass.hbrBackground = (HBRUSH) GetStockObject (WHITE_BRUSH) ; wndclass.lpszMenuName = NULL ; wndclass.lpszClassName = szAppName ; if (!RegisterClass (&wndclass)) { MessageBox (NULL, TEXT ("This program requires Windows NT!"), szAppName, MB_ICONERROR) ; return 0 ; } hwnd = CreateWindow (szAppName, TEXT ("The Poor-Person's Menu"), WS_OVERLAPPEDWINDOW, CW_USEDEFAULT, CW_USEDEFAULT, CW_USEDEFAULT, CW_USEDEFAULT, NULL, NULL, hInstance, NULL) ; hMenu = GetSystemMenu (hwnd, FALSE) ; AppendMenu (hMenu, MF_SEPARATOR, 0, NULL) ; AppendMenu (hMenu, MF_STRING, IDM_SYS_ABOUT, TEXT ("About...")) ; AppendMenu (hMenu, MF_STRING, IDM_SYS_HELP, TEXT ("Help...")) ; AppendMenu (hMenu, MF_STRING, IDM_SYS_REMOVE, TEXT ("Remove Additions")) ; ShowWindow (hwnd, iCmdShow) ; UpdateWindow (hwnd) ; while (GetMessage (&msg, NULL, 0, 0)) { TranslateMessage (&msg) ; DispatchMessage (&msg) ; } return msg.wParam ; } LRESULT CALLBACK WndProc (HWND hwnd, UINT message, WPARAM wParam, LPARAM lParam) { switch (message) { case WM_SYSCOMMAND: switch (LOWORD (wParam)) { case IDM_SYS_ABOUT: MessageBox (hwnd, TEXT ("A Poor-Person's Menu Programn") TEXT ("(c) Charles Petzold, 1998"), szAppName, MB_OK | MB_ICONINFORMATION) ; return 0 ; case IDM_SYS_HELP: MessageBox (hwnd, TEXT ("Help not yet implemented!"), szAppName, MB_OK | MB_ICONEXCLAMATION) ; return 0 ; case IDM_SYS_REMOVE: GetSystemMenu (hwnd, TRUE) ; return 0 ; } break ; case WM_DESTROY: 344
- 345. PostQuitMessage (0) ; return 0 ; } return DefWindowProc (hwnd, message, wParam, lParam) ; } The three menu IDs are defined near the top of POORMENU.C: #define IDM_ABOUT 1 #define IDM_HELP 2 #define IDM_REMOVE 3 After the program's window has been created, POORMENU obtains a handle to the system menu: hMenu = GetSystemMenu (hwnd, FALSE) ; When you first call GetSystemMenu, you should set the second parameter to FALSE in preparation for modifying the menu. The menu is altered with four AppendMenu calls: AppendMenu (hMenu, MF_SEPARATOR, 0, NULL) ; AppendMenu (hMenu, MF_STRING, IDM_SYS_ABOUT, TEXT ("About...")) ; AppendMenu (hMenu, MF_STRING, IDM_SYS_HELP, TEXT ("Help...")) ; AppendMenu (hMenu, MF_STRING, IDM_SYS_REMOVE, TEXT ("Remove Additions")); The first AppendMenu call adds the separator bar. Choosing the Remove Additions menu item causes POORMENU to remove these additions, which it accomplishes simply by calling GetSystemMenu again with the second parameter set to TRUE: GetSystemMenu (hwnd, TRUE) ; The standard system menu has the options Restore, Move, Size, Minimize, Maximize, and Close. These generate WM_SYSCOMMAND messages with wParam equal to SC_RESTORE, SC_MOVE, SC_SIZE, SC_MINIMUM, SC_MAXIMUM, and SC_CLOSE. Although Windows programs do not normally do so, you can process these messages yourself rather than pass them on to DefWindowProc. You can also disable or remove some of these standard options from the system menu using methods described below. The Windows documentation also includes some standard additions to the system menu. These use the identifiers SC_NEXTWINDOW, SC_PREVWINDOW, SC_VSCROLL, SC_HSCROLL, and SC_ARRANGE. You might find it appropriate to add these commands to the system menu in some applications. Changing the Menu We've already seen how the AppendMenu function can be used to define a menu entirely within a program and to add menu items to the system menu. Prior to Windows 3.0, you would have been forced to use the ChangeMenu function for this job. ChangeMenu was so versatile that it was one of the most complex functions in all of Windows (at least at that time). Times have changed. Many other current functions are now more complex than ChangeMenu ever was, and ChangeMenu has been replaced with five newer functions: • AppendMenu Adds a new item to the end of a menu. • DeleteMenu Deletes an existing item from a menu and destroys the item. • InsertMenu Inserts a new item into a menu. • ModifyMenu Changes an existing menu item. • RemoveMenu Removes an existing item from a menu. The difference between DeleteMenu and RemoveMenu is important if the item is a popup menu. DeleteMenu 345
- 346. destroys the popup menu—but RemoveMenu does not. Other Menu Commands In this section, you'll find some more functions useful for working with menus. When you change a top-level menu item, the change is not shown until Windows redraws the menu bar. You can force this redrawing by calling DrawMenuBar (hwnd) ; Notice that the argument to DrawMenuBar is a handle to the window rather than a handle to the menu. You can obtain the handle to a popup menu using hMenuPopup = GetSubMenu (hMenu, iPosition) ; where iPosition is the index (starting at 0) of the popup within the top-level menu indicated by hMenu. You can then use the popup menu handle with other functions (such as AppendMenu). You can obtain the current number of items in a top-level or popup menu by using iCount = GetMenuItemCount (hMenu) ; You can obtain the menu ID for an item in a popup menu from id = GetMenuItemID (hMenuPopup, iPosition) ; where iPosition is the position (starting at 0) of the item within the popup. In MENUDEMO, you saw how to check or uncheck an item in a popup menu using CheckMenuItem (hMenu, id, iCheck) ; In MENUDEMO, hMenu was the handle to the top-level menu, id was the menu ID, and the value of iCheck was either MF_CHECKED or MF_UNCHECKED. If hMenu is a handle to a popup menu, the id parameter can be a positional index rather than a menu ID. If an index is more convenient, you include MF_BYPOSITION in the third argument: CheckMenuItem (hMenu, iPosition, MF_CHECKED ¦ MF_BYPOSITION) ; The EnableMenuItem function works similarly to CheckMenuItem, except that the third argument is MF_ENABLED, MF_DISABLED, or MF_GRAYED. If you use EnableMenuItem on a top-level menu item that has a popup, you must also use the MF_BYPOSITION identifier in the third parameter because the menu item has no menu ID. We'll see an example of EnableMenuItem in the POPPAD2 program shown later in this chapter. HiliteMenuItem is similar to CheckMenuItem and EnableMenuItem but uses MF_HILITE and MF_UNHILITE. This highlighting is the reverse video that Windows uses when you move among menu items. You do not normally need to use HiliteMenuItem. What else do you need to do with your menu? Have you forgotten what character string you used in a menu? You can refresh your memory by calling iCharCount = GetMenuString (hMenu, id, pString, iMaxCount, iFlag) ; The iFlag is either MF_BYCOMMAND (where id is a menu ID) or MF_BYPOSITION (where id is a positional index). The function copies up to iMaxCount characters into pString and returns the number of characters copied. Or perhaps you'd like to know what the current flags of a menu item are: iFlags = GetMenuState (hMenu, id, iFlag) ; 346
- 347. Again, iFlag is either MF_BYCOMMAND or MF_BYPOSITION. The iFlags parameter is a combination of all the current flags. You can determine the current flags by testing against the MF_DISABLED, MF_GRAYED, MF_CHECKED, MF_MENUBREAK, MF_MENUBARBREAK, and MF_SEPARATOR identifiers. Or maybe by this time you're a little fed up with menus. In that case, you'll be pleased to know that if you no longer need a menu in your program, you can destroy it: DestroyMenu (hMenu) ; This function invalidates the menu handle. An Unorthodox Approach to Menus Now let's step a little off the beaten path. Instead of having drop-down menus in your program, how about creating multiple top-level menus without any popups and switching between the top-level menus using the SetMenu call? Such a menu might remind old-timers of that character-mode classic, Lotus 1-2-3. The NOPOPUPS program, shown in Figure 10-10, demonstrates how to do it. This program includes File and Edit items similar to those that MENUDEMO uses but displays them as alternate top-level menus. Figure 10-10. The NOPOPUPS program. NOPOPUPS.C /*------------------------------------------------- NOPOPUPS.C -- Demonstrates No-Popup Nested Menu (c) Charles Petzold, 1998 -------------------------------------------------*/ #include <windows.h> #include "resource.h" LRESULT CALLBACK WndProc (HWND, UINT, WPARAM, LPARAM) ; int WINAPI WinMain (HINSTANCE hInstance, HINSTANCE hPrevInstance, PSTR szCmdLine, int iCmdShow) { static TCHAR szAppName[] = TEXT ("NoPopUps") ; HWND hwnd ; MSG msg ; WNDCLASS wndclass ; wndclass.style = CS_HREDRAW | CS_VREDRAW ; wndclass.lpfnWndProc = WndProc ; wndclass.cbClsExtra = 0 ; wndclass.cbWndExtra = 0 ; wndclass.hInstance = hInstance ; wndclass.hIcon = LoadIcon (NULL, IDI_APPLICATION) ; wndclass.hCursor = LoadCursor (NULL, IDC_ARROW) ; wndclass.hbrBackground = (HBRUSH) GetStockObject (WHITE_BRUSH) ; wndclass.lpszMenuName = NULL ; wndclass.lpszClassName = szAppName ; if (!RegisterClass (&wndclass)) { MessageBox (NULL, TEXT ("This program requires Windows NT!"), szAppName, MB_ICONERROR) ; 347
- 348. return 0 ; } hwnd = CreateWindow (szAppName, TEXT ("No-Popup Nested Menu Demonstration"), WS_OVERLAPPEDWINDOW, CW_USEDEFAULT, CW_USEDEFAULT, CW_USEDEFAULT, CW_USEDEFAULT, NULL, NULL, hInstance, NULL) ; ShowWindow (hwnd, iCmdShow) ; UpdateWindow (hwnd) ; while (GetMessage (&msg, NULL, 0, 0)) { TranslateMessage (&msg) ; DispatchMessage (&msg) ; } return msg.wParam ; } LRESULT CALLBACK WndProc (HWND hwnd, UINT message, WPARAM wParam, LPARAM lParam) { static HMENU hMenuMain, hMenuEdit, hMenuFile ; HINSTANCE hInstance ; switch (message) { case WM_CREATE: hInstance = (HINSTANCE) GetWindowLong (hwnd, GWL_HINSTANCE) ; hMenuMain = LoadMenu (hInstance, TEXT ("MenuMain")) ; hMenuFile = LoadMenu (hInstance, TEXT ("MenuFile")) ; hMenuEdit = LoadMenu (hInstance, TEXT ("MenuEdit")) ; SetMenu (hwnd, hMenuMain) ; return 0 ; case WM_COMMAND: switch (LOWORD (wParam)) { case IDM_MAIN: SetMenu (hwnd, hMenuMain) ; return 0 ; case IDM_FILE: SetMenu (hwnd, hMenuFile) ; return 0 ; case IDM_EDIT: SetMenu (hwnd, hMenuEdit) ; return 0 ; case IDM_FILE_NEW: case IDM_FILE_OPEN: case IDM_FILE_SAVE: case IDM_FILE_SAVE_AS: case IDM_EDIT_UNDO: case IDM_EDIT_CUT: case IDM_EDIT_COPY: case IDM_EDIT_PASTE: case IDM_EDIT_CLEAR: MessageBeep (0) ; return 0 ; 348
- 349. } break ; case WM_DESTROY: SetMenu (hwnd, hMenuMain) ; DestroyMenu (hMenuFile) ; DestroyMenu (hMenuEdit) ; PostQuitMessage (0) ; return 0 ; } return DefWindowProc (hwnd, message, wParam, lParam) ; } NOPOPUPS.RC (excerpts) //Microsoft Developer Studio generated resource script. #include "resource.h" #include "afxres.h" ///////////////////////////////////////////////////////////////////////////// // Menu MENUMAIN MENU DISCARDABLE BEGIN MENUITEM "MAIN:", 0, INACTIVE MENUITEM "&File...", IDM_FILE MENUITEM "&Edit...", IDM_EDIT END MENUFILE MENU DISCARDABLE BEGIN MENUITEM "FILE:", 0, INACTIVE MENUITEM "&New", IDM_FILE_NEW MENUITEM "&Open...", IDM_FILE_OPEN MENUITEM "&Save", IDM_FILE_SAVE MENUITEM "Save &As", IDM_FILE_SAVE_AS MENUITEM "(&Main)", IDM_MAIN END MENUEDIT MENU DISCARDABLE BEGIN MENUITEM "EDIT:", 0, INACTIVE MENUITEM "&Undo", IDM_EDIT_UNDO MENUITEM "Cu&t", IDM_EDIT_CUT MENUITEM "&Copy", IDM_EDIT_COPY MENUITEM "&Paste", IDM_EDIT_PASTE MENUITEM "De&lete", IDM_EDIT_CLEAR MENUITEM "(&Main)", IDM_MAIN END RESOURCE.H (excerpts) 349
- 350. // Microsoft Developer Studio generated include file. // Used by NoPopups.rc #define IDM_FILE 40001 #define IDM_EDIT 40002 #define IDM_FILE_NEW 40003 #define IDM_FILE_OPEN 40004 #define IDM_FILE_SAVE 40005 #define IDM_FILE_SAVE_AS 40006 #define IDM_MAIN 40007 #define IDM_EDIT_UNDO 40008 #define IDM_EDIT_CUT 40009 #define IDM_EDIT_COPY 40010 #define IDM_EDIT_PASTE 40011 #define IDM_EDIT_CLEAR 40012 In Microsoft Developer Studio, you create three menus rather than one. You'll be selecting Resource from the Insert menu three times. Each menu has a different text name. When the window procedure processes the WM_CREATE message, Windows loads each menu resource into memory: hMenuMain = LoadMenu (hInstance, TEXT ("MenuMain")) ; hMenuFile = LoadMenu (hInstance, TEXT ("MenuFile")) ; hMenuEdit = LoadMenu (hInstance, TEXT ("MenuEdit")) ; Initially, the program displays the main menu: SetMenu (hwnd, hMenuMain) ; The main menu lists the three options using the character strings "MAIN:", "File...", and "Edit..." However, "MAIN:" is disabled, so it doesn't cause WM_COMMAND messages to be sent to the window procedure. The File and Edit menus begin "FILE:" and "EDIT:" to identify these as submenus. The last item in each menu is the character string "(Main)"; this option indicates a return to the main menu. Switching among these three menus is simple: case WM_COMMAND : switch (wParam) { case IDM_MAIN : SetMenu (hwnd, hMenuMain) ; return 0 ; case IDM_FILE : SetMenu (hwnd, hMenuFile) ; return 0 ; case IDM_EDIT : SetMenu (hwnd, hMenuEdit) ; return 0 ; [other program lines] } break ; During the WM_DESTROY message, NOPOPUPS sets the program's menu to the Main menu and destroys the File and Edit menus with calls to DestroyMenu. The Main menu is destroyed automatically when the window is destroyed. Keyboard Accelerators Keyboard accelerators are key combinations that generate WM_COMMAND (or, in some cases, WM_SYSCOMMAND) messages. Most often, programs use keyboard accelerators to duplicate the action of common menu options, but they can also perform nonmenu functions. For instance, some Windows programs have an Edit menu that includes a Delete or Clear option; these programs conventionally assign the Del key as a keyboard 350
- 351. accelerator for this option. The user can choose the Delete option from the menu by pressing an Alt-key combination or can use the keyboard accelerator simply by pressing the Del key. When the window procedure receives a WM_COMMAND message, it does not have to determine whether the menu or the keyboard accelerator was used. Why You Should Use Keyboard Accelerators You might ask: Why should I use keyboard accelerators? Why can't I simply trap WM_ KEYDOWN or WM_CHAR messages and duplicate the menu functions myself? What's the advantage? For a single-window application, you can certainly trap keyboard messages, but one simple advantage of using keyboard accelerators is that you don't need to duplicate the menu and keyboard accelerator logic. For applications with multiple windows and multiple window procedures, keyboard accelerators become very important. As we've seen, Windows sends keyboard messages to the window procedure for the window that currently has the input focus. For keyboard accelerators, however, Windows sends the WM_COMMAND message to the window procedure whose handle is specified in the Windows function TranslateAccelerator. Generally, this will be your main window, the same window that has the menu, which means that the logic for acting upon keyboard accelerators does not have to be duplicated in every window procedure. This advantage becomes particularly important if you use modeless dialog boxes (discussed in the next chapter) or child windows on your main window's client area. If a particular keyboard accelerator is defined to move among windows, only one window procedure has to include this logic. The child windows do not receive WM_COMMAND messages from the keyboard accelerators. Some Rules on Assigning Accelerators In theory, you can define a keyboard accelerator for almost any virtual key or character key in combination with the Shift key, Ctrl key, or Alt key. However, you should try to achieve some consistency with other applications and avoid interfering with Windows' use of the keyboard. You should avoid using Tab, Enter, Esc, and the Spacebar in keyboard accelerators because these are often used for system functions. The most common use of keyboard accelerators is for items on the program's Edit menu. The recommended keyboard accelerators for these items changed between Windows 3.0 and Windows 3.1, so it's become common to support both the old and the new accelerators, as shown in the following table: Function Old Accelerator New Accelerator Undo Alt+Backspace Ctrl+Z Cut Shift+Del Ctrl+X Copy Ctrl+Ins Ctrl+C Paste Shift+Ins Ctrl+V Delete or Clear Del Del Another common accelerator is the F1 function key to invoke help. Avoid use of the F4, F5, and F6 keys because these are often used for special functions in Multiple Document Interface (MDI) programs, which are discussed in Chapter 19. The Accelerator Table You can define an accelerator table in Developer Studio. For ease in loading the accelerator table in your program, give it the same text name as your program (and your menu and your icon). Each accelerator has an ID and a keystroke combination that you define in the Accel Properties dialog box. If you've already defined your menu, the menu IDs will be available in the combo box, so you don't have to retype them. 351
- 352. Accelerators can be either virtual key codes or ASCII characters in combination with the Shift, Ctrl, or Alt keys. You can specify that an ASCII character is to be typed with the Ctrl key by typing a ^ before the letter. You can also pick virtual key codes from a combo box. When you define keyboard accelerators for a menu item, you should include the key combination in the menu item text. The tab (t) character separates the text from the accelerator so that the accelerators align in a second column. To notate accelerator keys in a menu, use the text Ctrl, Shift, or Alt followed by a plus sign and the key (for example, Shift+F6 or Ctrl+F6). Loading the Accelerator Table Within your program, you use the LoadAccelerators function to load the accelerator table into memory and obtain a handle to it. The LoadAccelerators statement is similar to the LoadIcon, LoadCursor, and LoadMenu statements. First define a handle to an accelerator table as type HANDLE: HANDLE hAccel ; Then load the accelerator table: hAccel = LoadAccelerators (hInstance, TEXT ("MyAccelerators")) ; As with icons, cursors, and menus, you can use a number for the accelerator table name and then use that number in the LoadAccelerators statement with the MAKEINTRESOURCE macro or enclosed in quotation marks and preceded by a # character. Translating the Keystrokes We will now tamper with three lines of code that are common to all the Windows programs we've created so far in this book. The code is the standard message loop: while (GetMessage (&msg, NULL, 0, 0)) { TranslateMessage (&msg) ; DispatchMessage (&msg) ; } Here's how we change it to use the keyboard accelerator table: while (GetMessage (&msg, NULL, 0, 0)) { if (!TranslateAccelerator (hwnd, hAccel, &msg)) { TranslateMessage (&msg) ; DispatchMessage (&msg) ; } } The TranslateAccelerator function determines whether the message stored in the msg message structure is a keyboard message. If it is, the function searches for a match in the accelerator table whose handle is hAccel. If it finds a match, it calls the window procedure for the window whose handle is hwnd. If the keyboard accelerator ID corresponds to a menu item in the system menu, the message is WM_SYSCOMMAND. Otherwise, the message is WM_COMMAND. When TranslateAccelerator returns, the return value is nonzero if the message has been translated (and already sent to the window procedure) and 0 if not. If TranslateAccelerator returns a nonzero value, you should not call TranslateMessage and DispatchMessage but rather should loop back to the GetMessage call. The hwnd parameter in TranslateMessage looks a little out of place because it's not required in the other three functions in the message loop. Moreover, the message structure itself (the structure variable msg) has a member 352
- 353. named hwnd, which is also a handle to a window. Here's why the function is a little different: The fields of the msg structure are filled in by the GetMessage call. When the second parameter of GetMessage is NULL, the function retrieves messages for all windows belonging to the application. When GetMessage returns, the hwnd member of the msg structure is the window handle of the window that will get the message. However, when TranslateAccelerator translates a keyboard message into a WM_COMMAND or WM_SYSCOMMAND message, it replaces the msg.hwnd window handle with the hwnd window handle specified as the first parameter to the function. That is how Windows sends all keyboard accelerator messages to the same window procedure even if another window in the application currently has the input focus. TranslateAccelerator does not translate keyboard messages when a modal dialog box or message box has the input focus, because messages for these windows do not come through the program's message loop. In some cases in which another window in your program (such as a modeless dialog box) has the input focus, you may not want keyboard accelerators to be translated. You'll see how to handle this situation in the next chapter. Receiving the Accelerator Messages When a keyboard accelerator corresponds to a menu item in the system menu, TranslateAccelerator sends the window procedure a WM_SYSCOMMAND message. Otherwise, TranslateAccelerator sends the window procedure a WM_COMMAND message. The following table shows the types of WM_COMMAND messages you can receive for keyboard accelerators, menu commands, and child window controls: Accelerator Menu Control LOWORD (wParam) Accelerator ID Menu ID Control ID HIWORD (wParam) 1 0 Notification code lParam 0 0 Child window handle If the keyboard accelerator corresponds to a menu item, the window procedure also receives WM_INITMENU, WM_INITMENUPOPUP, and WM_MENUSELECT messages, just as if the menu option had been chosen. Programs usually enable and disable items in a popup menu when processing WM_INITMENUPOPUP, so you still have that facility when using keyboard accelerators. If the keyboard accelerator corresponds to a disabled or grayed menu item, TranslateAccelerator does not send the window procedure a WM_COMMAND or WM_SYSCOMMAND message. If the active window is minimized, TranslateAccelerator sends the window procedure WM_SYSCOMMAND messages—but not WM_COMMAND messages—for keyboard accelerators that correspond to enabled system menu items. TranslateAccelerator also sends that window procedure WM_COMMAND messages for accelerators that do not correspond to any menu items. POPPAD with a Menu and Accelerators In Chapter 9, we created a program called POPPAD1 that uses a child window edit control to implement a rudimentary notepad. In this chapter, we'll add File and Edit menus and call it POPPAD2. The Edit items will all be functional; we'll finish the File functions in Chapter 11 and the Print function in Chapter 13. POPPAD2 is shown in Figure 10-11. Figure 10-11. The POPPAD2 program. POPPAD2.C /*----------------------------------------------------- 353
- 354. POPPAD2.C -- Popup Editor Version 2 (includes menu) (c) Charles Petzold, 1998 -----------------------------------------------------*/ #include <windows.h> #include "resource.h" #define ID_EDIT 1 LRESULT CALLBACK WndProc (HWND, UINT, WPARAM, LPARAM); TCHAR szAppName[] = TEXT ("PopPad2") ; int WINAPI WinMain (HINSTANCE hInstance, HINSTANCE hPrevInstance, PSTR szCmdLine, int iCmdShow) { HACCEL hAccel ; HWND hwnd ; MSG msg ; WNDCLASS wndclass ; wndclass.style = CS_HREDRAW | CS_VREDRAW ; wndclass.lpfnWndProc = WndProc ; wndclass.cbClsExtra = 0 ; wndclass.cbWndExtra = 0 ; wndclass.hInstance = hInstance ; wndclass.hIcon = LoadIcon (hInstance, szAppName) ; wndclass.hCursor = LoadCursor (NULL, IDC_ARROW) ; wndclass.hbrBackground = (HBRUSH) GetStockObject (WHITE_BRUSH) ; wndclass.lpszMenuName = szAppName ; wndclass.lpszClassName = szAppName ; if (!RegisterClass (&wndclass)) { MessageBox (NULL, TEXT ("This program requires Windows NT!"), szAppName, MB_ICONERROR) ; return 0 ; } hwnd = CreateWindow (szAppName, szAppName, WS_OVERLAPPEDWINDOW, GetSystemMetrics (SM_CXSCREEN) / 4, GetSystemMetrics (SM_CYSCREEN) / 4, GetSystemMetrics (SM_CXSCREEN) / 2, GetSystemMetrics (SM_CYSCREEN) / 2, NULL, NULL, hInstance, NULL) ; ShowWindow (hwnd, iCmdShow) ; UpdateWindow (hwnd) ; hAccel = LoadAccelerators (hInstance, szAppName) ; while (GetMessage (&msg, NULL, 0, 0)) { if (!TranslateAccelerator (hwnd, hAccel, &msg)) { TranslateMessage (&msg) ; DispatchMessage (&msg) ; } } return msg.wParam ; } 354
- 355. AskConfirmation (HWND hwnd) { return MessageBox (hwnd, TEXT ("Really want to close PopPad2?"), szAppName, MB_YESNO | MB_ICONQUESTION) ; } LRESULT CALLBACK WndProc (HWND hwnd, UINT message, WPARAM wParam, LPARAM lParam) { static HWND hwndEdit ; int iSelect, iEnable ; switch (message) { case WM_CREATE: hwndEdit = CreateWindow (TEXT ("edit"), NULL, WS_CHILD | WS_VISIBLE | WS_HSCROLL | WS_VSCROLL | WS_BORDER | ES_LEFT | ES_MULTILINE | ES_AUTOHSCROLL | ES_AUTOVSCROLL, 0, 0, 0, 0, hwnd, (HMENU) ID_EDIT, ((LPCREATESTRUCT) lParam)->hInstance, NULL) ; return 0 ; case WM_SETFOCUS: SetFocus (hwndEdit) ; return 0 ; case WM_SIZE: MoveWindow (hwndEdit, 0, 0, LOWORD (lParam), HIWORD (lParam), TRUE) ; return 0 ; case WM_INITMENUPOPUP: if (lParam == 1) { EnableMenuItem ((HMENU) wParam, IDM_EDIT_UNDO, SendMessage (hwndEdit, EM_CANUNDO, 0, 0) ? MF_ENABLED : MF_GRAYED) ; EnableMenuItem ((HMENU) wParam, IDM_EDIT_PASTE, IsClipboardFormatAvailable (CF_TEXT) ? MF_ENABLED : MF_GRAYED) ; iSelect = SendMessage (hwndEdit, EM_GETSEL, 0, 0) ; if (HIWORD (iSelect) == LOWORD (iSelect)) iEnable = MF_GRAYED ; else iEnable = MF_ENABLED ; EnableMenuItem ((HMENU) wParam, IDM_EDIT_CUT, iEnable) ; EnableMenuItem ((HMENU) wParam, IDM_EDIT_COPY, iEnable) ; EnableMenuItem ((HMENU) wParam, IDM_EDIT_CLEAR, iEnable) ; return 0 ; } break ; case WM_COMMAND: if (lParam) { if (LOWORD (lParam) == ID_EDIT && (HIWORD (wParam) == EN_ERRSPACE || HIWORD (wParam) == EN_MAXTEXT)) MessageBox (hwnd, TEXT ("Edit control out of space."), szAppName, MB_OK | MB_ICONSTOP) ; return 0 ; } 355
- 356. else switch (LOWORD (wParam)) { case IDM_FILE_NEW: case IDM_FILE_OPEN: case IDM_FILE_SAVE: case IDM_FILE_SAVE_AS: case IDM_FILE_PRINT: MessageBeep (0) ; return 0 ; case IDM_APP_EXIT: SendMessage (hwnd, WM_CLOSE, 0, 0) ; return 0 ; case IDM_EDIT_UNDO: SendMessage (hwndEdit, WM_UNDO, 0, 0) ; return 0 ; case IDM_EDIT_CUT: SendMessage (hwndEdit, WM_CUT, 0, 0) ; return 0 ; case IDM_EDIT_COPY: SendMessage (hwndEdit, WM_COPY, 0, 0) ; return 0 ; case IDM_EDIT_PASTE: SendMessage (hwndEdit, WM_PASTE, 0, 0) ; return 0 ; case IDM_EDIT_CLEAR: SendMessage (hwndEdit, WM_CLEAR, 0, 0) ; return 0 ; case IDM_EDIT_SELECT_ALL: SendMessage (hwndEdit, EM_SETSEL, 0, -1) ; return 0 ; case IDM_HELP_HELP: MessageBox (hwnd, TEXT ("Help not yet implemented!"), szAppName, MB_OK | MB_ICONEXCLAMATION) ; return 0 ; case IDM_APP_ABOUT: MessageBox (hwnd, TEXT ("POPPAD2 (c) Charles Petzold, 1998"), szAppName, MB_OK | MB_ICONINFORMATION) ; return 0 ; } break ; case WM_CLOSE: if (IDYES == AskConfirmation (hwnd)) DestroyWindow (hwnd) ; return 0 ; case WM_QUERYENDSESSION: if (IDYES == AskConfirmation (hwnd)) return 1 ; else return 0 ; case WM_DESTROY: PostQuitMessage (0) ; return 0 ; 356
- 357. } return DefWindowProc (hwnd, message, wParam, lParam) ; } POPPAD2.RC (excerpts) //Microsoft Developer Studio generated resource script. #include "resource.h" #include "afxres.h" ///////////////////////////////////////////////////////////////////////////// // Icon POPPAD2 ICON DISCARDABLE "poppad2.ico" ///////////////////////////////////////////////////////////////////////////// // Menu POPPAD2 MENU DISCARDABLE BEGIN POPUP "&File" BEGIN MENUITEM "&New", IDM_FILE_NEW MENUITEM "&Open...", IDM_FILE_OPEN MENUITEM "&Save", IDM_FILE_SAVE MENUITEM "Save &As...", IDM_FILE_SAVE_AS MENUITEM SEPARATOR MENUITEM "&Print", IDM_FILE_PRINT MENUITEM SEPARATOR MENUITEM "E&xit", IDM_APP_EXIT END POPUP "&Edit" BEGIN MENUITEM "&UndotCtrl+Z", IDM_EDIT_UNDO MENUITEM SEPARATOR MENUITEM "Cu&ttCtrl+X", IDM_EDIT_CUT MENUITEM "&CopytCtrl+C", IDM_EDIT_COPY MENUITEM "&PastetCtrl+V", IDM_EDIT_PASTE MENUITEM "De&letetDel", IDM_EDIT_CLEAR MENUITEM SEPARATOR MENUITEM "&Select All", IDM_EDIT_SELECT_ALL END POPUP "&Help" BEGIN MENUITEM "&Help...", IDM_HELP_HELP MENUITEM "&About PopPad2...", IDM_APP_ABOUT END END ///////////////////////////////////////////////////////////////////////////// // Accelerator POPPAD2 ACCELERATORS DISCARDABLE BEGIN VK_BACK, IDM_EDIT_UNDO, VIRTKEY, ALT, NOINVERT VK_DELETE, IDM_EDIT_CLEAR, VIRTKEY, NOINVERT VK_DELETE, IDM_EDIT_CUT, VIRTKEY, SHIFT, NOINVERT VK_F1, IDM_HELP_HELP, VIRTKEY, NOINVERT VK_INSERT, IDM_EDIT_COPY, VIRTKEY, CONTROL, NOINVERT 357
- 358. VK_INSERT, IDM_EDIT_PASTE, VIRTKEY, SHIFT, NOINVERT "^C", IDM_EDIT_COPY, ASCII, NOINVERT "^V", IDM_EDIT_PASTE, ASCII, NOINVERT "^X", IDM_EDIT_CUT, ASCII, NOINVERT "^Z", IDM_EDIT_UNDO, ASCII, NOINVERT END RESOURCE.H (excerpts) // Microsoft Developer Studio generated include file. // Used by POPPAD2.RC #define IDM_FILE_NEW 40001 #define IDM_FILE_OPEN 40002 #define IDM_FILE_SAVE 40003 #define IDM_FILE_SAVE_AS 40004 #define IDM_FILE_PRINT 40005 #define IDM_APP_EXIT 40006 #define IDM_EDIT_UNDO 40007 #define IDM_EDIT_CUT 40008 #define IDM_EDIT_COPY 40009 #define IDM_EDIT_PASTE 40010 #define IDM_EDIT_CLEAR 40011 #define IDM_EDIT_SELECT_ALL 40012 #define IDM_HELP_HELP 40013 #define IDM_APP_ABOUT 40014 POPPAD2.ICO 358
- 359. The POPPAD2.RC resource script file contains the menu and the accelerator table. You'll notice that the accelerators are all indicated within the character strings of the Edit popup menu following the tab (t) character. Enabling Menu Items The major job in the window procedure now involves enabling and graying the options in the Edit menu, which is done when processing the WM_INITMENUPOPUP message. First the program checks to see if the Edit popup is about to be displayed. Because the position index of Edit in the menu (starting with File at 0) is 1, lParam equals 1 if the Edit popup is about to be displayed. To determine whether the Undo option can be enabled, POPPAD2 sends an EM_CANUNDO message to the edit control. The SendMessage call returns nonzero if the edit control can perform an Undo action, in which case the option is enabled; otherwise, the option is grayed: EnableMenuItem (wParam, IDM_UNDO, SendMessage (hwndEdit, EM_CANUNDO, 0, 0) ? MF_ENABLED : MF_GRAYED) ; The Paste option should be enabled only if the clipboard currently contains text. We can determine this through the IsClipboardFormatAvailable call with the CF_TEXT identifier: EnableMenuItem (wParam, IDM_PASTE, IsClipboardFormatAvailable (CF_TEXT) ? MF_ENABLED : MF_GRAYED) ; The Cut, Copy, and Delete options should be enabled only if text in the edit control has been selected. Sending the edit control an EM_GETSEL message returns an integer containing this information: iSelect = SendMessage (hwndEdit, EM_GETSEL, 0, 0) ; The low word of iSelect is the position of the first selected character; the high word of iSelect is the position of the character following the selection. If these two words are equal, no text has been selected: if (HIWORD (iSelect) == LOWORD (iSelect)) iEnable = MF_GRAYED ; else iEnable = MF_ENABLED ; The value of iEnable is then used for the Cut, Copy, and Delete options: EnableMenuItem (wParam, IDM_CUT, iEnable) ; EnableMenuItem (wParam, IDM_COPY, iEnable) ; EnableMenuItem (wParam, IDM_DEL, iEnable) ; Processing the Menu Options Of course, if we were not using a child window edit control for POPPAD2, we would now be faced with the problems involved with actually implementing the Undo, Cut, Copy, Paste, Clear, and Select All options from the Edit menu. But the edit control makes this process easy, because we merely send the edit control a message for each of these options: case IDM_UNDO : 359
- 360. SendMessage (hwndEdit, WM_UNDO, 0, 0) ; return 0 ; case IDM_CUT : SendMessage (hwndEdit, WM_CUT, 0, 0) ; return 0 ; case IDM_COPY : SendMessage (hwndEdit, WM_COPY, 0, 0) ; return 0 ; case IDM_PASTE : SendMessage (hwndEdit, WM_PASTE, 0, 0) ; return 0 ; case IDM_DEL : SendMessage (hwndEdit, WM_DEL, 0, 0) ; return 0 ; case IDM_SELALL : SendMessage (hwndEdit, EM_SETSEL, 0, -1) ; return 0 ; Notice that we could have simplified this even further by making the values of IDM_UNDO, IDM_CUT, and so forth equal to the values of the corresponding window messages WM_UNDO, WM_CUT, and so forth. The About option on the File popup invokes a simple message box: case IDM_ABOUT : MessageBox (hwnd, TEXT ("POPPAD2 (c) Charles Petzold, 1998"), szAppName, MB_OK ¦ MB_ICONINFORMATION) ; return 0 ; In the next chapter, we'll make this a dialog box. A message box is also invoked when you select the Help option from this menu or when you press the F1 accelerator key. The Exit option sends the window procedure a WM_CLOSE message: case IDM_EXIT : SendMessage (hwnd, WM_CLOSE, 0, 0) ; return 0 ; That is precisely what DefWindowProc does when it receives a WM_SYSCOMMAND message with wParam equal to SC_CLOSE. In previous programs, we have not processed the WM_CLOSE messages in our window procedure but have simply passed them to DefWindowProc. DefWindowProc does something simple with WM_CLOSE: it calls the DestroyWindow function. Rather than send WM_CLOSE messages to DefWindowProc, however, POPPAD2 processes them. (This fact is not so important now, but it will become very important in Chapter 11 when POPPAD can actually edit files.) case WM_CLOSE : if (IDYES == AskConfirmation (hwnd)) DestroyWindow (hwnd) ; return 0 ; AskConfirmation is a function in POPPAD2 that displays a message box asking for confirmation to close the program: AskConfirmation (HWND hwnd) { 360
- 361. return MessageBox (hwnd, TEXT ("Really want to close Poppad2?"), szAppName, MB_YESNO ¦ MB_ICONQUESTION) ; } The message box (as well as the AskConfirmation function) returns IDYES if the Yes button is selected. Only then does POPPAD2 call DestroyWindow. Otherwise, the program is not terminated. If you want confirmation before terminating a program, you must also process WM_ QUERYENDSESSION messages. Windows begins sending every window procedure a WM_QUERYENDSESSION message when the user chooses to shut down Windows. If any window procedure returns 0 from this message, the Windows session is not terminated. Here's how we handle WM_QUERYENDSESSION: case WM_QUERYENDSESSION : if (IDYES == AskConfirmation (hwnd)) return 1 ; else return 0 ; The WM_CLOSE and WM_QUERYENDSESSION messages are the only two messages you have to process if you want to ask for user confirmation before ending a program. That's why we made the Exit menu option in POPPAD2 send the window procedure a WM_CLOSE message—by doing so, we avoided asking for confirmation at yet a third point. If you process WM_QUERYENDSESSION messages, you may also be interested in the WM_ENDSESSION message. Windows sends this message to every window procedure that has previously received a WM_QUERYENDSESSION message. The wParam parameter is 0 if the session fails to terminate because another program has returned 0 from WM_QUERYENDSESSION. The WM_ENDSESSION message essentially answers the question: I told Windows it was OK to terminate me, but did I really get terminated? Although I've included the normal New, Open, Save, and Save As options in POPPAD2's File menu, they are currently nonfunctional. To process these commands, we need to use dialog boxes. And you're now ready to learn about them. 361
- 362. Chapter 11 -- Dialog Boxes Dialog boxes are most often used for obtaining additional input from the user beyond what can be easily managed through a menu. The programmer indicates that a menu item invokes a dialog box by adding an ellipsis (...) to the menu item. A dialog box generally takes the form of a popup window containing various child window controls. The size and placement of these controls are specified in a "dialog box template" in the program's resource script file. Although a programmer can define a dialog box template "manually," these days dialog boxes are usually interactively designed in the Visual C++ Developer Studio. Developer Studio then generates the dialog template. When a program invokes a dialog box based on a template, Microsoft Windows 98 is responsible for creating the dialog box popup window and the child window controls, and for providing a window procedure to process dialog box messages, including all keyboard and mouse input. The code within Windows that does all this is sometimes referred to as the "dialog box manager." Many of the messages that are processed by that dialog box window procedure located within Windows are also passed to a function within your own program, called a "dialog box procedure" or "dialog procedure." The dialog procedure is similar to a normal window procedure, but with some important differences. Generally, you will not be doing much within the dialog procedure beyond initializing the child window controls when the dialog box is created, processing messages from the child window controls, and ending the dialog box. Dialog procedures generally do not process WM_PAINT messages, nor do they directly process keyboard and mouse input. The subject of dialog boxes would normally be a big one because it involves the use of child window controls. However, we have already explored child window controls in Chapter 9. When you use child window controls in dialog boxes, the Windows dialog box manager picks up many of the responsibilities that we assumed in Chapter 9. In particular, the problems we encountered with passing the input focus among the scroll bars in the COLORS1 program disappear when working with dialog boxes. Windows handles all the logic necessary to shift input focus among controls in a dialog box. However, adding a dialog box to a program is a bit more involved than adding an icon or a menu. We'll begin with a simple dialog box to give you a feel for the interconnections between these various pieces. Modal Dialog Boxes Dialog boxes are either "modal" or "modeless." The modal dialog box is the most common. When your program displays a modal dialog box, the user cannot switch between the dialog box and another window in your program. The user must explicitly end the dialog box, usually by clicking a push button marked either OK or Cancel. The user can, however, switch to another program while the dialog box is still displayed. Some dialog boxes (called "system modal") do not allow even this. System modal dialog boxes must be ended before the user can do anything else in Windows. Creating an "About" Dialog Box Even if a Windows program requires no user input, it will often have a dialog box that is invoked by an About option on the menu. This dialog box displays the name and icon of the program, a copyright notice, a push button labeled OK, and perhaps some other information. (Perhaps a telephone number for technical support?) The first program we'll look at does nothing except display an About dialog box. The ABOUT1 program is shown in Figure 11-1. Figure 11-1. The ABOUT1 program. ABOUT1.C 362
- 363. /*------------------------------------------ ABOUT1.C -- About Box Demo Program No. 1 (c) Charles Petzold, 1998 ------------------------------------------*/ #include <windows.h> #include "resource.h" LRESULT CALLBACK WndProc (HWND, UINT, WPARAM, LPARAM) ; BOOL CALLBACK AboutDlgProc (HWND, UINT, WPARAM, LPARAM) ; int WINAPI WinMain (HINSTANCE hInstance, HINSTANCE hPrevInstance, PSTR szCmdLine, int iCmdShow) { static TCHAR szAppName[] = TEXT ("About1") ; MSG msg ; HWND hwnd ; WNDCLASS wndclass ; wndclass.style = CS_HREDRAW | CS_VREDRAW ; wndclass.lpfnWndProc = WndProc ; wndclass.cbClsExtra = 0 ; wndclass.cbWndExtra = 0 ; wndclass.hInstance = hInstance ; wndclass.hIcon = LoadIcon (hInstance, szAppName) ; wndclass.hCursor = LoadCursor (NULL, IDC_ARROW) ; wndclass.hbrBackground = (HBRUSH) GetStockObject (WHITE_BRUSH) ; wndclass.lpszMenuName = szAppName ; wndclass.lpszClassName = szAppName ; if (!RegisterClass (&wndclass)) { MessageBox (NULL, TEXT ("This program requires Windows NT!"), szAppName, MB_ICONERROR) ; return 0 ; } hwnd = CreateWindow (szAppName, TEXT ("About Box Demo Program"), WS_OVERLAPPEDWINDOW, CW_USEDEFAULT, CW_USEDEFAULT, CW_USEDEFAULT, CW_USEDEFAULT, NULL, NULL, hInstance, NULL) ; ShowWindow (hwnd, iCmdShow) ; UpdateWindow (hwnd) ; while (GetMessage (&msg, NULL, 0, 0)) { TranslateMessage (&msg) ; DispatchMessage (&msg) ; } return msg.wParam ; } LRESULT CALLBACK WndProc (HWND hwnd, UINT message, WPARAM wParam, LPARAM lParam) { static HINSTANCE hInstance ; switch (message) { case WM_CREATE : 363
- 364. hInstance = ((LPCREATESTRUCT) lParam)->hInstance ; return 0 ; case WM_COMMAND : switch (LOWORD (wParam)) { case IDM_APP_ABOUT : DialogBox (hInstance, TEXT ("AboutBox"), hwnd, AboutDlgProc) ; break ; } return 0 ; case WM_DESTROY : PostQuitMessage (0) ; return 0 ; } return DefWindowProc (hwnd, message, wParam, lParam) ; } BOOL CALLBACK AboutDlgProc (HWND hDlg, UINT message, WPARAM wParam, LPARAM lParam) { switch (message) { case WM_INITDIALOG : return TRUE ; case WM_COMMAND : switch (LOWORD (wParam)) { case IDOK : case IDCANCEL : EndDialog (hDlg, 0) ; return TRUE ; } break ; } return FALSE ; } ABOUT1.RC (excerpts) //Microsoft Developer Studio generated resource script. #include "resource.h" #include "afxres.h" ///////////////////////////////////////////////////////////////////////////// // Dialog ABOUTBOX DIALOG DISCARDABLE 32, 32, 180, 100 STYLE DS_MODALFRAME | WS_POPUP FONT 8, "MS Sans Serif" BEGIN DEFPUSHBUTTON "OK",IDOK,66,80,50,14 ICON "ABOUT1",IDC_STATIC,7,7,21,20 CTEXT "About1",IDC_STATIC,40,12,100,8 CTEXT "About Box Demo Program",IDC_STATIC,7,40,166,8 CTEXT "(c) Charles Petzold, 1998",IDC_STATIC,7,52,166,8 364
- 365. END ///////////////////////////////////////////////////////////////////////////// // Menu ABOUT1 MENU DISCARDABLE BEGIN POPUP "&Help" BEGIN MENUITEM "&About About1...", IDM_APP_ABOUT END END ///////////////////////////////////////////////////////////////////////////// // Icon ABOUT1 ICON DISCARDABLE "About1.ico" RESOURCE.H (excerpts) // Microsoft Developer Studio generated include file. // Used by About1.rc #define IDM_APP_ABOUT 40001 #define IDC_STATIC -1 ABOUT1.ICO You create the icon and the menu in this program the same way as described in the last chapter. Both the icon and the menu have text ID names of "About1." The menu has one option, which generates a WM_COMMAND message with an ID of IDM_APP_ABOUT. This causes the program to display the dialog box shown in Figure 11-2. 365
- 366. Figure 11-2. The ABOUT1 program's dialog box. The Dialog Box and Its Template To add a dialog box to an application in the Visual C++ Developer Studio, you begin by selecting Resource from the Insert menu and choosing Dialog Box. You are then presented with a dialog box with a title bar and caption ("Dialog") and OK and Cancel buttons. A Controls toolbar allows you to insert various controls in the dialog box. Developer Studio gives the dialog box a standard ID of IDD_DIALOG1. You can right-click this name (or the dialog box itself) and select Properties from the menu. For this program, change the ID to "AboutBox" (with quotation marks). To be consistent with the dialog box I created, change the X Pos and Y Pos fields to 32. This is to indicate where the dialog box is displayed relative to the upper left corner of the client area of the program's window. (I'll discuss dialog box coordinates in more detail shortly.) Now, still in the Properties dialog, select the Styles tab. Unclick the Title Bar check box because this dialog box does not have a title bar. Click the close button on the Properties dialog. Now it's time to actually design the dialog box. We won't be needing the Cancel button, so click that button and press the Delete key on your keyboard. Click the OK button, and move it to the bottom of the dialog. At the bottom of the Developer Studio window will be a small bitmap on a toolbar that lets you center the control horizontally in the window. Press that button. We want the program's icon to appear in the dialog box. To do so, press the Pictures button on the floating Controls toolbar. Move the mouse to the surface of the dialog box, press the left button, and drag a square. This is where the icon will appear. Press the right mouse button on this square, and select Properties from the menu. Leave the ID as IDC_STATIC. This identifier will be defined in RESOURCE.H as -1, which is used for all IDs that the C program does not refer to. Change the Type to Icon. You should be able to type the name of the program's icon in the Image field, or, if you've already created the icon, you can select the name ("About1") from the combo box. For the three static text strings in the dialog box, select Static Text from the Controls toolbar and position the text in the dialog window. Right-click the control, and select Properties from the menu. You'll type the text you want to appear in the Caption field of the Properties box. Select the Styles tab to select Center from the Align Text field. As you add these text strings, you may want to make the dialog box larger. Select it and drag the outline. You can also select and size controls. It's often easier to use the keyboard cursor movement keys for this. The arrow keys by themselves move the controls; the arrow keys with Shift depressed let you change the controls' sizes. The 366
- 367. coordinates and sizes of the selected control are shown in the lower right corner of the Developer Studio window. If you build the application and later look at the ABOUT1.RC resource script file, you'll see the dialog box template that Developer Studio generated. The dialog box that I designed has a template that looks like this: ABOUTBOX DIALOG DISCARDABLE 32, 32, 180, 100 STYLE DS_MODALFRAME | WS_POPUP FONT 8, "MS Sans Serif" BEGIN DEFPUSHBUTTON "OK",IDOK,66,80,50,14 ICON "ABOUT1",IDC_STATIC,7,7,21,20 CTEXT "About1",IDC_STATIC,40,12,100,8 CTEXT "About Box Demo Program",IDC_STATIC,7,40,166,8 CTEXT "(c) Charles Petzold, 1998",IDC_STATIC,7,52,166,8 END The first line gives the dialog box a name (in this case, ABOUTBOX). As is the case for other resources, you can use a number instead. The name is followed by the keywords DIALOG and DISCARDABLE, and four numbers. The first two numbers are the x and y coordinates of the upper left corner of the dialog box, relative to the client area of its parent when the dialog box is invoked by the program. The second two numbers are the width and height of the dialog box. These coordinates and sizes are not in units of pixels. They are instead based on a special coordinate system used only for dialog box templates. The numbers are based on the size of the font used for the dialog box (in this case, an 8-point MS Sans Serif font): x-coordinates and width are expressed in units of 1/4 of an average character width; y- coordinates and height are expressed in units of 1/8 of the character height. Thus, for this particular dialog box, the upper left corner of the dialog box is 5 characters from the left edge of the main window's client area and 2-1/2 characters from the top edge. The dialog itself is 40 characters wide and 10 characters high. This coordinate system allows you to use coordinates and sizes that will retain the general dimensions and look of the dialog box regardless of the resolution of the video display and the font you've selected. Because font characters are often approximately twice as high as they are wide, the dimensions on both the x-axis and the y-axis are nearly the same. The STYLE statement in the template is similar to the style field of a CreateWindow call. WS_POPUP and DS_MODALFRAME are normally used for modal dialog boxes, but we'll explore some alternatives later on. Within the BEGIN and END statements (or left and right brackets, if you'd prefer, when designing dialog box templates by hand), you define the child window controls that will appear in the dialog box. This dialog box uses three types of child window controls: DEFPUSHBUTTON (a default push button), ICON (an icon), and CTEXT (centered text). The format of these statements is control-type "text" id, xPos, yPos, xWidth, yHeight, iStyle The iStyle value at the end is optional; it specifies additional window styles using identifiers defined in the Windows header files. These DEFPUSHBUTTON, ICON, and CTEXT identifiers are used in dialog boxes only. They are shorthand for a particular window class and window style. For example, CTEXT indicates that the class of the child window control is "static" and that the style is WS_CHILD ¦ SS_CENTER ¦ WS_VISIBLE ¦ WS_GROUP Although this is the first time we've encountered the WS_GROUP identifier, we used the WS_CHILD, SS_CENTER, and WS_VISIBLE window styles when creating static child window text controls in the COLORS1 program in Chapter 9. For the icon, the text field is the name of the program's icon resource, which is also defined in the ABOUT1 resource script. For the push button, the text field is the text that appears inside the push button. This text is 367
- 368. equivalent to the text specified as the second argument in a CreateWindow call when you create a child window control in a program. The id field is a value that the child window uses to identify itself when sending messages (usually WM_COMMMAND messages) to its parent. The parent window of these child window controls is the dialog box window itself, which sends these messages to a window procedure in Windows. However, this window procedure also sends these messages to the dialog box procedure that you'll include in your program. The ID values are equivalent to the child window IDs used in the CreateWindow function when we created child windows in Chapter 9. Because the text and icon controls do not send messages back to the parent window, these values are set to IDC_STATIC, which is defined in RESOURCE.H as -1. The ID value for the push button is IDOK, which is defined in WINUSER.H as 1. The next four numbers set the position of the child window control (relative to the upper left corner of the dialog box's client area) and the size. The position and size are expressed in units of 1/4 of the average width and 1/8 of the height of a font character. The width and height values are ignored for the ICON statement. The DEFPUSHBUTTON statement in the dialog box template includes the window style WS_GROUP in addition to the window style implied by the DEFPUSHBUTTON keyword. I'll have more to say about WS_GROUP (and the related WS_TABSTOP style) when discussing the second version of this program, ABOUT2, a bit later. The Dialog Box Procedure The dialog box procedure within your program handles messages to the dialog box. Although it looks very much like a window procedure, it is not a true window procedure. The window procedure for the dialog box is within Windows. That window procedure calls your dialog box procedure with many of the messages that it receives. Here's the dialog box procedure for ABOUT1: BOOL CALLBACK AboutDlgProc (HWND hDlg, UINT message, WPARAM wParam, LPARAM lParam) { switch (message) { case WM_INITDIALOG : return TRUE ; case WM_COMMAND : switch (LOWORD (wParam)) { case IDOK : case IDCANCEL : EndDialog (hDlg, 0) ; return TRUE ; } break ; } return FALSE ; } The parameters to this function are the same as those for a normal window procedure; as with a window procedure, the dialog box procedure must be defined as a CALLBACK function. Although I've used hDlg for the handle to the dialog box window, you can use hwnd instead if you like. Let's note first the differences between this function and a window procedure: • A window procedure returns an LRESULT; a dialog box procedure returns a BOOL, which is defined in the Windows header files as an int. • A window procedure calls DefWindowProc if it does not process a particular message; a dialog box procedure returns TRUE (nonzero) if it processes a message and FALSE (0) if it does not. • A dialog box procedure does not need to process WM_PAINT or WM_DESTROY messages. A dialog box 368
- 369. procedure will not receive a WM_CREATE message; instead, the dialog box procedure performs initialization during the special WM_INITDIALOG message. The WM_INITDIALOG message is the first message the dialog box procedure receives. This message is sent only to dialog box procedures. If the dialog box procedure returns TRUE, Windows sets the input focus to the first child window control in the dialog box that has a WS_TABSTOP style (which I'll explain in the discussion of ABOUT2). In this dialog box, the first child window control that has a WS_TABSTOP style is the push button. Alternatively, during the processing of WM_INITDIALOG, the dialog box procedure can use SetFocus to set the focus to one of the child window controls in the dialog box and then return FALSE. The only other message this dialog box processes is WM_COMMAND. This is the message the push-button control sends to its parent window either when the button is clicked with the mouse or when the Spacebar is pressed while the button has the input focus. The ID of the control (which we set to IDOK in the dialog box template) is in the low word of wParam. For this message, the dialog box procedure calls EndDialog, which tells Windows to destroy the dialog box. For all other messages, the dialog box procedure returns FALSE to tell the dialog box window procedure within Windows that our dialog box procedure did not process the message. The messages for a modal dialog box don't go through your program's message queue, so you needn't worry about the effect of keyboard accelerators within the dialog box. Invoking the Dialog Box During the processing of WM_CREATE in WndProc, ABOUT1 obtains the program's instance handle and stores it in a static variable: hInstance = ((LPCREATESTRUCT) lParam)->hInstance ; ABOUT1 checks for WM_COMMAND messages where the low word of wParam is equal to IDM_APP_ABOUT. When it gets one, the program calls DialogBox: DialogBox (hInstance, TEXT ("AboutBox"), hwnd, AboutDlgProc) ; This function requires the instance handle (saved during WM_CREATE), the name of the dialog box (as defined in the resource script), the parent of the dialog box (which is the program's main window), and the address of the dialog procedure. If you use a numeric identifier rather than a name for the dialog box template, you can convert it to a string using the MAKEINTRESOURCE macro. Selecting About About1 from the menu displays the dialog box, as shown in Figure 11-2. You can end this dialog box by clicking the OK button with the mouse, by pressing the Spacebar, or by pressing Enter. For any dialog box that contains a default push button, Windows sends a WM_COMMAND message to the dialog box, with the low word of wParam equal to the ID of the default push button when Enter or the Spacebar is pressed. That ID is IDOK. You can also end the dialog box by pressing Escape. In that case Windows sends a WM_COMMAND message with an ID equal to IDCANCEL. The DialogBox function you call to display the dialog box will not return control to WndProc until the dialog box is ended. The value returned from DialogBox is the second parameter to the EndDialog function called within the dialog box procedure. (This value is not used in ABOUT1 but is used in ABOUT2.) WndProc can then return control to Windows. Even when the dialog box is displayed, however, WndProc can continue to receive messages. In fact, you can send messages to WndProc from within the dialog box procedure. ABOUT1's main window is the parent of the dialog box popup window, so the SendMessage call in AboutDlgProc would start off like this: SendMessage (GetParent (hDlg), . . . ) ; Variations on a Theme Although the dialog editor and other resource editors in the Visual C++ Developer Studio seemingly make it 369
- 370. unnecessary to even look at resource scripts, it is still helpful to learn resource script syntax. Particularly for dialog templates, knowing the syntax allows you to have a better feel for the scope and limitations of dialog boxes. You may even want to create a dialog box template manually if there's something you need to do that can't be done otherwise (such as in the HEXCALC program later in this chapter). The resource compiler and resource script syntax is documented in /Platform SDK/Windows Programming Guidelines/Platform SDK Tools/Compiling/Using the Resource Compiler. The window style of the dialog box is specified in the Properties dialog in the Developer Studio, which is translated into the STYLE line of the dialog box template. For ABOUT1, we used a style that is most common for modal dialog boxes: STYLE WS_POPUP ¦ DS_MODALFRAME However, you can also experiment with other styles. Some dialog boxes have a caption bar that identifies the dialog's purpose and lets the user move the dialog box around the display using the mouse. This is the style WS_CAPTION. When you use WS_CAPTION, the x and y coordinates specified in the DIALOG statement are the coordinates of the dialog box's client area, relative to the upper left corner of the parent window's client area. The caption bar will be shown above the y-coordinate. If you have a caption bar, you can put text in it using the CAPTION statement, following the STYLE statement, in the dialog box template: CAPTION "Dialog Box Caption" Or while processing the WM_INITDIALOG message in the dialog procedure, you can use SetWindowText (hDlg, TEXT ("Dialog Box Caption")) ; If you use the WS_CAPTION style, you can also add a system menu box with the WS_SYSMENU style. This style allows the user to select Move or Close from the system menu. Selecting Resizing from the Border list box of the Properties dialog (equivalent to the style WS_THICKFRAME) allows the user to resize the dialog box, although this is unusual. If you don't mind being even more unusual, you can also try adding a maximize box to the dialog box style. You can even add a menu to a dialog box. The dialog box template will include the statement MENU menu-name The argument is either the name or the number of a menu in the resource script. Menus are highly uncommon for modal dialog boxes. If you use one, be sure that all the ID numbers in the menu and the dialog box controls are unique, or if they're not, that they duplicate the same commands. The FONT statement lets you set something other than the system font for use with dialog box text. This was once uncommon in dialog boxes but is now quite normal. Indeed, Developer Studio selects the 8-point MS Sans Serif font by default in any dialog box you create. A Windows program can achieve a unique look by shipping a special font with a program that is used solely by the program for dialog boxes and other text output. Although the dialog box window procedure is normally within Windows, you can use one of your own window procedures to process dialog box messages. To do so, specify a window class name in the dialog box template: CLASS "class-name" There are some other considerations involved, but I'll demonstrate this approach in the HEXCALC program shown later in this chapter. When you call DialogBox, specifying the name of a dialog box template, Windows has almost everything it needs to create a popup window by calling the normal CreateWindow function. Windows obtains the coordinates and size of the window, the window style, the caption, and the menu from the dialog box template. Windows gets the instance handle and the parent window handle from the arguments to DialogBox. The only other piece of information it 370
- 371. needs is a window class (assuming the dialog box template does not specify one). Windows registers a special window class for dialog boxes. The window procedure for this window class has access to the address of your dialog box procedure (which you provide in the DialogBox call), so it can keep your program informed of messages that this popup window receives. Of course, you can create and maintain your own dialog box by creating the popup window yourself. Using DialogBox is simply an easier approach. You may want the benefit of using the Windows dialog manager, but you may not want to (or be able to) define the dialog template in a resource script. Perhaps you want the program to create a dialog box dynamically as it's running. The function to look at is DialogBoxIndirect, which uses data structures to define the template. In the dialog box template in ABOUT1.RC, the shorthand notation CTEXT, ICON, and DEFPUSHBUTTON is used to define the three types of child window controls we want in the dialog box. There are several others that you can use. Each type implies a particular predefined window class and a window style. The following table shows the equivalent window class and window style for some common control types: Control Type Window Class Window Style PUSHBUTTON button BS_PUSHBUTTON ¦ WS_TABSTOP DEFPUSHBUTTON button BS_DEFPUSHBUTTON ¦ WS_TABSTOP CHECKBOX button BS_CHECKBOX ¦ WS_TABSTOP RADIOBUTTON button BS_RADIOBUTTON ¦ WS_TABSTOP GROUPBOX button BS_GROUPBOX ¦ WS_TABSTOP LTEXT static SS_LEFT ¦ WS_GROUP CTEXT static SS_CENTER ¦ WS_GROUP RTEXT static SS_RIGHT ¦ WS_GROUP ICON static SS_ICON EDITTEXT edit ES_LEFT ¦ WS_BORDER ¦ WS_TABSTOP SCROLLBAR scrollbar SBS_HORZ LISTBOX listbox LBS_NOTIFY ¦ WS_BORDER ¦ WS_VSCROLL COMBOBOX combobox CBS_SIMPLE ¦ WS_TABSTOP The resource compiler is the only program that understands this shorthand notation. In addition to the window styles shown above, each of these controls has the style WS_CHILD ¦ WS_VISIBLE For all these control types except EDITTEXT, SCROLLBAR, LISTBOX, and COMBOBOX, the format of the control statement is control-type "text", id, xPos, yPos, xWidth, yHeight, iStyle For EDITTEXT, SCROLLBAR, LISTBOX, and COMBOBOX, the format is control-type id, xPos, yPos, xWidth, yHeight, iStyle which excludes the text field. In both statements, the iStyle parameter is optional. In Chapter 9, I discussed rules for determining the width and height of predefined child window controls. You might 371
- 372. want to refer back to that chapter for these rules, keeping in mind that sizes specified in dialog box templates are always in terms of 1/4 of the average character width and 1/8 of the character height. The "style" field of the control statements is optional. It allows you to include other window style identifiers. For instance, if you wanted to create a check box consisting of text to the left of a square box, you could use CHECKBOX "text", id, xPos, yPos, xWidth, yHeight, BS_LEFTTEXT Notice that the control type EDITTEXT automatically has a border. If you want to create a child window edit control without a border, you can use EDITTEXT id, xPos, yPos, xWidth, yHeight, NOT WS_BORDER The resource compiler also recognizes a generalized control statement that looks like CONTROL "text", id, "class", iStyle, xPos, yPos, xWidth, yHeight This statement allows you to create any type of child window control by specifying the window class and the complete window style. For example, instead of using PUSHBUTTON "OK", IDOK, 10, 20, 32, 14 you can use CONTROL "OK", IDOK, "button", WS_CHILD ¦ WS_VISIBLE ¦ BS_PUSHBUTTON ¦ WS_TABSTOP, 10, 20, 32, 14 When the resource script is compiled, these two statements are encoded identically in the .RES file and the .EXE file. In Developer Studio, you create a statement like this using the Custom Control option from the Controls toolbar. In the ABOUT3 program, shown in Figure 11-5, I show how you can use this to create a control whose window class is defined in your program. When you use CONTROL statements in a dialog box template, you don't need to include the WS_CHILD and WS_VISIBLE styles. Windows includes these in the window style when creating the child windows. The format of the CONTROL statement also clarifies what the Windows dialog manager does when it creates a dialog box. First, as I described earlier, it creates a popup window whose parent is the window handle that was provided in the DialogBox function. Then, for each control in the dialog template, the dialog box manager creates a child window. The parent of each of these controls is the popup dialog box. The CONTROL statement shown above is translated into a CreateWindow call that looks like hCtrl = CreateWindow (TEXT ("button"), TEXT ("OK"), WS_CHILD ¦ WS_VISIBLE ¦ WS_TABSTOP ¦ BS_PUSHBUTTON, 10 * cxChar / 4, 20 * cyChar / 8, 32 * cxChar / 4, 14 * cyChar / 8, hDlg, IDOK, hInstance, NULL) ; where cxChar and cyChar are the width and height of the dialog box font character in pixels. The hDlg parameter is returned from the CreateWindow call that creates the dialog box window. The hInstance parameter is obtained from the original DialogBox call. A More Complex Dialog Box The simple dialog box in ABOUT1 demonstrates the basics of getting a dialog box up and running; now let's try something a little more complex. The ABOUT2 program, shown in Figure 11-3, demonstrates how to manage controls (in this case, radio buttons) within a dialog box procedure and also how to paint on the client area of the dialog box. Figure 11-3. The ABOUT2 program. 372
- 373. ABOUT2.C /*------------------------------------------ ABOUT2.C -- About Box Demo Program No. 2 (c) Charles Petzold, 1998 ------------------------------------------*/ #include <windows.h> #include "resource.h" LRESULT CALLBACK WndProc (HWND, UINT, WPARAM, LPARAM) ; BOOL CALLBACK AboutDlgProc (HWND, UINT, WPARAM, LPARAM) ; int iCurrentColor = IDC_BLACK, iCurrentFigure = IDC_RECT ; int WINAPI WinMain (HINSTANCE hInstance, HINSTANCE hPrevInstance, PSTR szCmdLine, int iCmdShow) { static TCHAR szAppName[] = TEXT ("About2") ; MSG msg ; HWND hwnd ; WNDCLASS wndclass ; wndclass.style = CS_HREDRAW | CS_VREDRAW ; wndclass.lpfnWndProc = WndProc ; wndclass.cbClsExtra = 0 ; wndclass.cbWndExtra = 0 ; wndclass.hInstance = hInstance ; wndclass.hIcon = LoadIcon (hInstance, szAppName) ; wndclass.hCursor = LoadCursor (NULL, IDC_ARROW) ; wndclass.hbrBackground = (HBRUSH) GetStockObject (WHITE_BRUSH) ; wndclass.lpszMenuName = szAppName ; wndclass.lpszClassName = szAppName ; if (!RegisterClass (&wndclass)) { MessageBox (NULL, TEXT ("This program requires Windows NT!"), szAppName, MB_ICONERROR) ; return 0 ; } hwnd = CreateWindow (szAppName, TEXT ("About Box Demo Program"), WS_OVERLAPPEDWINDOW, CW_USEDEFAULT, CW_USEDEFAULT, CW_USEDEFAULT, CW_USEDEFAULT, NULL, NULL, hInstance, NULL) ; ShowWindow (hwnd, iCmdShow) ; UpdateWindow (hwnd) ; while (GetMessage (&msg, NULL, 0, 0)) { TranslateMessage (&msg) ; DispatchMessage (&msg) ; } return msg.wParam ; } 373
- 374. void PaintWindow (HWND hwnd, int iColor, int iFigure) { static COLORREF crColor[8] = { RGB ( 0, 0, 0), RGB ( 0, 0, 255), RGB ( 0, 255, 0), RGB ( 0, 255, 255), RGB (255, 0, 0), RGB (255, 0, 255), RGB (255, 255, 0), RGB (255, 255, 255) } ; HBRUSH hBrush ; HDC hdc ; RECT rect ; hdc = GetDC (hwnd) ; GetClientRect (hwnd, &rect) ; hBrush = CreateSolidBrush (crColor[iColor - IDC_BLACK]) ; hBrush = (HBRUSH) SelectObject (hdc, hBrush) ; if (iFigure == IDC_RECT) Rectangle (hdc, rect.left, rect.top, rect.right, rect.bottom) ; else Ellipse (hdc, rect.left, rect.top, rect.right, rect.bottom) ; DeleteObject (SelectObject (hdc, hBrush)) ; ReleaseDC (hwnd, hdc) ; } void PaintTheBlock (HWND hCtrl, int iColor, int iFigure) { InvalidateRect (hCtrl, NULL, TRUE) ; UpdateWindow (hCtrl) ; PaintWindow (hCtrl, iColor, iFigure) ; } LRESULT CALLBACK WndProc (HWND hwnd, UINT message, WPARAM wParam, LPARAM lParam) { static HINSTANCE hInstance ; PAINTSTRUCT ps ; switch (message) { case WM_CREATE: hInstance = ((LPCREATESTRUCT) lParam)->hInstance ; return 0 ; case WM_COMMAND: switch (LOWORD (wParam)) { case IDM_APP_ABOUT: if (DialogBox (hInstance, TEXT ("AboutBox"), hwnd, AboutDlgProc)) InvalidateRect (hwnd, NULL, TRUE) ; return 0 ; } break ; case WM_PAINT: BeginPaint (hwnd, &ps) ; EndPaint (hwnd, &ps) ; PaintWindow (hwnd, iCurrentColor, iCurrentFigure) ; return 0 ; case WM_DESTROY: PostQuitMessage (0) ; return 0 ; } 374
- 375. return DefWindowProc (hwnd, message, wParam, lParam) ; } BOOL CALLBACK AboutDlgProc (HWND hDlg, UINT message, WPARAM wParam, LPARAM lParam) { static HWND hCtrlBlock ; static int iColor, iFigure ; switch (message) { case WM_INITDIALOG: iColor = iCurrentColor ; iFigure = iCurrentFigure ; CheckRadioButton (hDlg, IDC_BLACK, IDC_WHITE, iColor) ; CheckRadioButton (hDlg, IDC_RECT, IDC_ELLIPSE, iFigure) ; hCtrlBlock = GetDlgItem (hDlg, IDC_PAINT) ; SetFocus (GetDlgItem (hDlg, iColor)) ; return FALSE ; case WM_COMMAND: switch (LOWORD (wParam)) { case IDOK: iCurrentColor = iColor ; iCurrentFigure = iFigure ; EndDialog (hDlg, TRUE) ; return TRUE ; case IDCANCEL: EndDialog (hDlg, FALSE) ; return TRUE ; case IDC_BLACK: case IDC_RED: case IDC_GREEN: case IDC_YELLOW: case IDC_BLUE: case IDC_MAGENTA: case IDC_CYAN: case IDC_WHITE: iColor = LOWORD (wParam) ; CheckRadioButton (hDlg, IDC_BLACK, IDC_WHITE, LOWORD (wParam)) ; PaintTheBlock (hCtrlBlock, iColor, iFigure) ; return TRUE ; case IDC_RECT: case IDC_ELLIPSE: iFigure = LOWORD (wParam) ; CheckRadioButton (hDlg, IDC_RECT, IDC_ELLIPSE, LOWORD (wParam)) ; PaintTheBlock (hCtrlBlock, iColor, iFigure) ; return TRUE ; } break ; case WM_PAINT: PaintTheBlock (hCtrlBlock, iColor, iFigure) ; break ; } return FALSE ; 375
- 376. } ABOUT2.RC (excerpts) //Microsoft Developer Studio generated resource script. #include "resource.h" #include "afxres.h" ///////////////////////////////////////////////////////////////////////////// // Dialog ABOUTBOX DIALOG DISCARDABLE 32, 32, 200, 234 STYLE DS_MODALFRAME | WS_POPUP | WS_CAPTION FONT 8, "MS Sans Serif" BEGIN ICON "ABOUT2",IDC_STATIC,7,7,20,20 CTEXT "About2",IDC_STATIC,57,12,86,8 CTEXT "About Box Demo Program",IDC_STATIC,7,40,186,8 LTEXT "",IDC_PAINT,114,67,74,72 GROUPBOX "&Color",IDC_STATIC,7,60,84,143 RADIOBUTTON "&Black",IDC_BLACK,16,76,64,8,WS_GROUP | WS_TABSTOP RADIOBUTTON "B&lue",IDC_BLUE,16,92,64,8 RADIOBUTTON "&Green",IDC_GREEN,16,108,64,8 RADIOBUTTON "Cya&n",IDC_CYAN,16,124,64,8 RADIOBUTTON "&Red",IDC_RED,16,140,64,8 RADIOBUTTON "&Magenta",IDC_MAGENTA,16,156,64,8 RADIOBUTTON "&Yellow",IDC_YELLOW,16,172,64,8 RADIOBUTTON "&White",IDC_WHITE,16,188,64,8 GROUPBOX "&Figure",IDC_STATIC,109,156,84,46,WS_GROUP RADIOBUTTON "Rec&tangle",IDC_RECT,116,172,65,8,WS_GROUP | WS_TABSTOP RADIOBUTTON "&Ellipse",IDC_ELLIPSE,116,188,64,8 DEFPUSHBUTTON "OK",IDOK,35,212,50,14,WS_GROUP PUSHBUTTON "Cancel",IDCANCEL,113,212,50,14,WS_GROUP END ///////////////////////////////////////////////////////////////////////////// // Icon ABOUT2 ICON DISCARDABLE "About2.ico" ///////////////////////////////////////////////////////////////////////////// // Menu ABOUT2 MENU DISCARDABLE BEGIN POPUP "&Help" BEGIN MENUITEM "&About", IDM_APP_ABOUT END END RESOURCE.H (excerpts) 376
- 377. // Microsoft Developer Studio generated include file. // Used by About2.rc #define IDC_BLACK 1000 #define IDC_BLUE 1001 #define IDC_GREEN 1002 #define IDC_CYAN 1003 #define IDC_RED 1004 #define IDC_MAGENTA 1005 #define IDC_YELLOW 1006 #define IDC_WHITE 1007 #define IDC_RECT 1008 #define IDC_ELLIPSE 1009 #define IDC_PAINT 1010 #define IDM_APP_ABOUT 40001 #define IDC_STATIC -1 ABOUT2.ICO The About box in ABOUT2 has two groups of radio buttons. One group is used to select a color, and the other group is used to select either a rectangle or an ellipse. The rectangle or ellipse is shown in the dialog box with the interior colored with the current color selection. If you press the OK button, the dialog box is ended, and the program's window procedure draws the selected figure in its own client area. If you press Cancel, the client area of the main window remains the same. The dialog box is shown in Figure 11-4. Although the ABOUT2 dialog box uses the predefined identifiers IDOK and IDCANCEL for the two push buttons, each of the radio buttons has its own identifier beginning with the letters IDC ("ID for a control"). These identifiers are defined in RESOURCE.H. 377
- 378. Figure 11-4. The ABOUT2 program's dialog box. When you create the radio buttons in the ABOUT2 dialog box, create them in the order shown. This ensures that Developer Studio defines sequentially valued identifiers, which is assumed by the program. Also, uncheck the Auto option for each radio button. The Auto Radio Button requires less code but is initially more mysterious. Give them the identifiers shown above in ABOUT2.RC. Check the Group option in the Properties dialog for the OK and Cancel buttons, and for the Figure group box, and for the first radio buttons (Black and Rectangle) in each group. Check the Tab Stop check box for these two radio buttons. When you have all the controls in the dialog box approximately positioned and sized, choose the Tab Order option from the Layout menu. Click each control in the order shown in the ABOUT2.RC resource script. Working with Dialog Box Controls In Chapter 9, you discovered that most child window controls send WM_COMMAND messages to the parent window. (The exception is scroll bar controls.) You also saw that the parent window can alter child window controls (for instance, checking or unchecking radio buttons or check boxes) by sending messages to the controls. You can similarly alter controls in a dialog box procedure. If you have a series of radio buttons, for example, you can check and uncheck the buttons by sending them messages. However, Windows also provides several shortcuts when working with controls in dialog boxes. Let's look at the way in which the dialog box procedure and the child window controls communicate. The dialog box template for ABOUT2 is shown in the ABOUT2.RC resource script in Figure 11-3. The 378
- 379. GROUPBOX control is simply a frame with a title (either Color or Figure) that surrounds each of the two groups of radio buttons. The eight radio buttons in the first group are mutually exclusive, as are the two radio buttons in the second group. When one of the radio buttons is clicked with the mouse (or when the Spacebar is pressed while the radio button has the input focus), the child window sends its parent a WM_COMMAND message with the low word of wParam set to the ID of the control. The high word of wParam is a notification code, and lParam is the window handle of the control. For a radio button, this notification code is always BN_CLICKED, which equals 0. The dialog box window procedure in Windows then passes this WM_COMMAND message to the dialog box procedure within ABOUT2.C. When the dialog box procedure receives a WM_COMMAND message for one of the radio buttons, it turns on the check mark for that button and turns off the check marks for all the other buttons in the group. You might recall from Chapter 9 that checking and unchecking a button requires that you send the child window control a BM_CHECK message. To turn on a button check mark, you use SendMessage (hwndCtrl, BM_SETCHECK, 1, 0) ; To turn off the check mark, you use SendMessage (hwndCtrl, BM_SETCHECK, 0, 0) ; The hwndCtrl parameter is the window handle of the child window button control. But this method presents a little problem in the dialog box procedure, because you don't know the window handles of all the radio buttons. You know only the one from which you're getting the message. Fortunately, Windows provides you with a function to obtain the window handle of a dialog box control using the dialog box window handle and the control ID: hwndCtrl = GetDlgItem (hDlg, id) ; (You can also obtain the ID value of a control from the window handle by using id = GetWindowLong (hwndCtrl, GWL_ID) ; but this is rarely necessary.) You'll notice in the ABOUT2.H header file shown in Figure 11-3 that the ID values for the eight colors are sequential from IDC_BLACK to IDC_WHITE. This arrangement helps in processing the WM_COMMAND messages from the radio buttons. For a first attempt at checking and unchecking the radio buttons, you might try something like the following in the dialog box procedure: static int iColor ; [other program lines] case WM_COMMAND: switch (LOWORD (wParam)) { [other program lines] case IDC_BLACK: case IDC_RED: case IDC_GREEN: case IDC_YELLOW: case IDC_BLUE: case IDC_MAGENTA: case IDC_CYAN: case IDC_WHITE: iColor = LOWORD (wParam) ; for (i = IDC_BLACK, i <= IDC_WHITE, i++) SendMessage (GetDlgItem (hDlg, i), BM_SETCHECK, i == LOWORD (wParam), 0) ; return TRUE ; 379
- 380. [other program lines] This approach works satisfactorily. You've saved the new color value in iColor, and you've also set up a loop that cycles through all the ID values for the eight colors. You obtain the window handle of each of these eight radio button controls and use SendMessage to send each handle a BM_SETCHECK message. The wParam value of this message is set to 1 only for the button that sent the WM_COMMAND message to the dialog box window procedure. The first shortcut is the special dialog box procedure SendDlgItemMessage: SendDlgItemMessage (hDlg, id, iMsg, wParam, lParam) ; It is equivalent to SendMessage (GetDlgItem (hDlg, id), id, wParam, lParam) ; Now the loop would look like this: for (i = IDC_BLACK, i <= IDC_WHITE, i++) SendDlgItemMessage (hDlg, i, BM_SETCHECK, i == LWORD (wParam), 0) ; That's a little better. But the real breakthrough comes when you discover the CheckRadioButton function: CheckRadioButton (hDlg, idFirst, idLast, idCheck) ; This function turns off the check marks for all radio button controls with IDs from idFirst to idLast except for the radio button with an ID of idCheck, which is checked. The IDs must be sequential. Now we can get rid of the loop entirely and use: CheckRadioButton (hDlg, IDC_BLACK, IDC_WHITE, LOWORD (wParam)) ; That's how it's done in the dialog box procedure in ABOUT2. A similar shortcut function is provided for working with check boxes. If you create a CHECKBOX dialog window control, you can turn the check mark on and off using the function CheckDlgButton (hDlg, idCheckbox, iCheck) ; If iCheck is set to 1, the button is checked; if it's set to 0, the button is unchecked. You can obtain the status of a check box in a dialog box by using iCheck = IsDlgButtonChecked (hDlg, idCheckbox) ; You can either retain the current status of the check mark as a static variable within the dialog box procedure or do something like this to toggle the button on a WM_COMMAND message: CheckDlgButton (hDlg, idCheckbox, !IsDlgButtonChecked (hDlg, idCheckbox)) ; If you define a BS_AUTOCHECKBOX control, you don't need to process the WM_COMMAND message at all. You can simply obtain the current status of the button by using IsDlgButtonChecked before terminating the dialog box. However, if you use the BS_AUTORADIOBUTTON style, IsDlgButtonChecked is not quite satisfactory because you'd need to call it for each radio button until the function returned TRUE. Instead, you'd still trap WM_COMMAND messages to keep track of which button gets pressed. The OK and Cancel Buttons ABOUT2 has two push buttons, labeled OK and Cancel. In the dialog box template in ABOUT2.RC, the OK button has an ID of IDOK (defined in WINUSER.H as 1) and the Cancel button has an ID of IDCANCEL (defined as 2). The OK button is the default: 380
- 381. DEFPUSHBUTTON "OK",IDOK,35,212,50,14 PUSHBUTTON "Cancel",IDCANCEL,113,212,50,14 This arrangement is normal for OK and Cancel buttons in dialog boxes; having the OK button as the default helps out with the keyboard interface. Here's how: Normally, you would end the dialog box by clicking one of these buttons with the mouse or pressing the Spacebar when the desired button has the input focus. However, the dialog box window procedure also generates a WM_COMMAND message when the user presses Enter, regardless of which control has the input focus. The LOWORD of wParam is set to the ID value of the default push button in the dialog box unless another push button has the input focus. In that case, the LOWORD of wParam is set to the ID of the push button with the input focus. If no push button in the dialog box is the default push button, Windows sends the dialog box procedure a WM_COMMAND message with the LOWORD of wParam equal to IDOK. If the user presses the Esc key or Ctrl-Break, Windows sends the dialog box procedure a WM_COMMAND message with the LOWORD of wParam equal to IDCANCEL. So you don't have to add separate keyboard logic to the dialog box procedure, because the keystrokes that normally terminate a dialog box are translated by Windows into WM_COMMAND messages for these two push buttons. The AboutDlgProc function handles these two WM_COMMAND messages by calling EndDialog: switch (LWORD (wParam)) { case IDOK: iCurrentColor = iColor ; iCurrentFigure = iFigure ; EndDialog (hDlg, TRUE) ; return TRUE ; case IDCANCEL : EndDialog (hDlg, FALSE) ; return TRUE ; ABOUT2's window procedure uses the global variables iCurrentColor and iCurrentFigure when drawing the rectangle or ellipse in the program's client area. AboutDlgProc uses the static local variables iColor and iFigure when drawing the figure within the dialog box. Notice the different value in the second parameter of EndDialog. This is the value that is passed back as the return value from the original DialogBox function in WndProc: case IDM_ABOUT: if (DialogBox (hInstance, TEXT ("AboutBox"), hwnd, AboutDlgProc)) InvalidateRect (hwnd, NULL, TRUE) ; return 0 ; If DialogBox returns TRUE (nonzero), meaning that the OK button was pressed, then the WndProc client area needs to be updated with the new figure and color. These were saved in the global variables iCurrentColor and iCurrentFigure by AboutDlgProc when it received a WM_COMMAND message with the low word of wParam equal to IDOK. If DialogBox returns FALSE, the main window continues to use the original settings of iCurrentColor and iCurrentFigure. TRUE and FALSE are commonly used in EndDialog calls to signal to the main window procedure whether the user ended the dialog box with OK or Cancel. However, the argument to EndDialog is actually an int, and DialogBox returns an int, so it's possible to return more information in this way than simply TRUE or FALSE. Avoiding Global Variables The use of global variables in ABOUT2 may or may not be disturbing to you. Some programmers (myself included) prefer to keep the use of global variables to a bare minimum. The iCurrentColor and iCurrentFigure variables in ABOUT2 certainly seem to qualify as legitimate candidates for global definitions because they must be used in both the window procedure and the dialog procedure. However, a program that has many dialog boxes, each of which can alter the values of several variables, could easily have a confusing proliferation of global variables. 381
- 382. You might prefer to conceive of each dialog box within a program as being associated with a data structure containing all the variables that can be altered by the dialog box. You would define these structures in typedef statements. For example, in ABOUT2 you might define a structure associated with the About box like so: typedef struct { int iColor, iFigure ; } ABOUTBOX_DATA ; In WndProc, you define and initialize a static variable based on this structure: static ABOUTBOX_DATA ad = { IDC_BLACK, IDC_RECT } ; Also in WndProc, replace all occurrences of iCurrentColor and iCurrentFigure with ad.iColor and ad.iFigure. When you invoke the dialog box, use DialogBoxParam rather than DialogBox. This function has a fifth argument that can be any 32-bit value you'd like. Generally, it is set to a pointer to a structure, in this case the ABOUTBOX_DATA structure in WndProc: case IDM_ABOUT: if (DialogBoxParam (hInstance, TEXT ("AboutBox"), hwnd, AboutDlgProc, &ad)) InvalidateRect (hwnd, NULL, TRUE) ; return 0 ; Here's the key: the last argument to DialogBoxParam is passed to the dialog procedure as lParam in the WM_INITDIALOG message. The dialog procedure would have two static variables (a structure and a pointer to a structure) based on the ABOUTBOX_DATA structure: static ABOUTBOX_DATA ad, * pad ; In AboutDlgProc this definition replaces the definitions of iColor and iFigure. At the outset of the WM_INITDIALOG message, the dialog procedure sets the values of these two variables from lParam: pad = (ABOUTBOX_DATA *) lParam ; ad = * pad ; In the first statement, pad is set to the lParam pointer. That is, pad actually points to the ABOUTBOX_DATA structure defined in WndProc. The second statement performs a field-by-field structure copy from the structure in WndProc to the local structure in DlgProc. Now, throughout AboutDlgProc, replace iFigure and iColor with ad.iColor and ad.iFigure except in the code for when the user presses the OK button. In that case, copy the contents of the local structure back to the structure in WndProc: case IDOK: * pad = ad ; EndDialog (hDlg, TRUE) ; return TRUE ; Tab Stops and Groups In Chapter 9, we used window subclassing to add a facility to COLORS1 that let us move from one scroll bar to another by pressing the Tab key. In a dialog box, window subclassing is unnecessary: Windows does all the logic for moving the input focus from one control to another. However, you have to help out by using the WS_TABSTOP and WS_GROUP window styles in the dialog box template. For all controls that you want to access using the Tab key, specify WS_TABSTOP in the window style. 382
- 383. If you refer back to the table, you'll notice that many of the controls include WS_TABSTOP as a default, while others do not. Generally the controls that do not include the WS_TABSTOP style (particularly the static controls) should not get the input focus because they can't do anything with it. Unless you set the input focus to a specific control in a dialog box during processing of the WM_INITDIALOG message and return FALSE from the message, Windows sets the input focus to the first control in the dialog box that has the WS_TABSTOP style. The second keyboard interface that Windows adds to a dialog box involves the cursor movement keys. This interface is of particular importance with radio buttons. After you use the Tab key to move to the currently checked radio button within a group, you need to use the cursor movement keys to change the input focus from that radio button to other radio buttons within the group. You accomplish this by using the WS_GROUP window style. For a particular series of controls in the dialog box template, Windows will use the cursor movement keys to shift the input focus from the first control that has the WS_GROUP style up to, but not including, the next control that has the WS_GROUP style. Windows will cycle from the last control in a dialog box to the first control, if necessary, to find the end of the group. By default, the controls LTEXT, CTEXT, RTEXT, and ICON include the WS_GROUP style, which conveniently marks the end of a group. You often have to add WS_GROUP styles to other types of controls. Look at the dialog box template in ABOUT2.RC. The four controls that have the WS_TABSTOP style are the first radio buttons of each group (explicitly included) and the two push buttons (by default). When you first invoke the dialog box, these are the four controls you can move among using the Tab key. Within each group of radio buttons, you use the cursor movement keys to change the input focus and the check mark. For example, the first radio button (Black) in the Color group box and the Figure group box have the WS_GROUP style. This means that you can use the cursor movement keys to move the focus from the Black radio button up to, but not including, the Figure group box. Similarly, the first radio button (Rectangle) in the Figure group box and DEFPUSHBUTTON have the WS_GROUP style, so you can use the cursor movement keys to move between the two radio buttons in this group: Rectangle and Ellipse. Both push buttons get the WS_GROUP style to prevent the cursor movement keys from doing anything when the push buttons have the input focus. When using ABOUT2, the dialog box manager in Windows performs some magic in the two groups of radio buttons. As expected, the cursor movement keys within a group of radio buttons shift the input focus and send a WM_COMMAND message to the dialog box procedure. But when you change the checked radio button within the group, Windows also assigns the newly checked radio button the WS_TABSTOP style. The next time you tab to that group, Windows will set the input focus to the checked radio button. An ampersand (&) in the text field causes the letter that follows to be underlined and adds another keyboard interface. You can move the input focus to any of the radio buttons by pressing the underlined letter. By pressing C (for the Color group box) or F (for the Figure group box), you can move the input focus to the currently checked radio button in that group. Although programmers normally let the dialog box manager take care of all this, Windows includes two functions that let you search for the next or previous tab stop or group item. These functions are hwndCtrl = GetNextDlgTabItem (hDlg, hwndCtrl, bPrevious) ; and hwndCtrl = GetNextDlgGroupItem (hDlg, hwndCtrl, bPrevious) ; If bPrevious is TRUE, the functions return the previous tab stop or group item; if FALSE, they return the next tab stop or group item. Painting on the Dialog Box ABOUT2 also does something relatively unusual: it paints on the dialog box. Let's see how this works. Within the dialog box template in ABOUT2.RC, a blank text control is defined with a position and size for the area we want to paint: 383
- 384. LTEXT "" IDC_PAINT, 114, 67, 72, 72 This area is 18 characters wide and 9 characters high. Because this control has no text, all that the window procedure for the "static" class does is erase the background when the child window control has to be repainted. When the current color or figure selection changes or when the dialog box itself gets a WM_PAINT message, the dialog box procedure calls PaintTheBlock, which is a function in ABOUT2.C: PaintTheBlock (hCtrlBlock, iColor, iFigure) ; In AboutDlgProc, the window handle hCtrlBlock had been set during the processing of the WM_INITDIALOG message: hCtrlBlock = GetDlgItem (hDlg, IDD_PAINT) ; Here's the PaintTheBlock function: void PaintTheBlock (HWND hCtrl, int iColor, int iFigure) { InvalidateRect (hCtrl, NULL, TRUE) ; UpdateWindow (hCtrl) ; PaintWindow (hCtrl, iColor, iFigure) ; } This invalidates the child window control, generates a WM_PAINT message to the control window procedure, and then calls another function in ABOUT2 called PaintWindow. The PaintWindow function obtains a device context handle for hCtrl and draws the selected figure, filling it with a colored brush based on the selected color. The size of the child window control is obtained from GetClientRect. Although the dialog box template defines the size of the control in terms of characters, GetClientRect obtains the dimensions in pixels. You can also use the function MapDialogRect to convert the character coordinates in the dialog box to pixel coordinates in the client area. We're not really painting the dialog box's client area—we're actually painting the client area of the child window control. Whenever the dialog box gets a WM_PAINT message, the child window control is invalidated and then updated to make it believe that its client area is now valid. We then paint on top of it. Using Other Functions with Dialog Boxes Most functions that you can use with child windows you can also use with controls in a dialog box. For instance, if you're feeling devious, you can use MoveWindow to move the controls around the dialog box and force the user to chase them around with the mouse. Sometimes you need to dynamically enable or disable certain controls in a dialog box, depending on the settings of other controls. This call, EnableWindow (hwndCtrl, bEnable) ; enables the control when bEnable is TRUE (nonzero) and disables it when bEnable is FALSE (0). When a control is disabled, it receives no keyboard or mouse input. Don't disable a control that has the input focus. Defining Your Own Controls Although Windows assumes much of the responsibility for maintaining the dialog box and child window controls, various methods let you slip some of your own code into this process. We've already seen a method that allows you to paint on the surface of a dialog box. You can also use window subclassing (discussed in Chapter 9) to alter the operation of child window controls. You can also define your own child window controls and use them in a dialog box. For example, suppose you don't 384
- 385. particularly care for the normal rectangular push buttons and would prefer to create elliptical push buttons. You can do this by registering a window class and using your own window procedure to process messages for your customized child window. You then specify this window class in Developer Studio in the Properties dialog box associated with a custom control. This translates into a CONTROL statement in the dialog box template. The ABOUT3 program, shown in Figure 11-5, does exactly that. Figure 11-5. The ABOUT3 program. ABOUT3.C /*------------------------------------------ ABOUT3.C -- About Box Demo Program No. 3 (c) Charles Petzold, 1998 ------------------------------------------*/ #include <windows.h> #include "resource.h" LRESULT CALLBACK WndProc (HWND, UINT, WPARAM, LPARAM) ; BOOL CALLBACK AboutDlgProc (HWND, UINT, WPARAM, LPARAM) ; LRESULT CALLBACK EllipPushWndProc (HWND, UINT, WPARAM, LPARAM) ; int WINAPI WinMain (HINSTANCE hInstance, HINSTANCE hPrevInstance, PSTR szCmdLine, int iCmdShow) { static TCHAR szAppName[] = TEXT ("About3") ; MSG msg ; HWND hwnd ; WNDCLASS wndclass ; wndclass.style = CS_HREDRAW | CS_VREDRAW ; wndclass.lpfnWndProc = WndProc ; wndclass.cbClsExtra = 0 ; wndclass.cbWndExtra = 0 ; wndclass.hInstance = hInstance ; wndclass.hIcon = LoadIcon (hInstance, szAppName) ; wndclass.hCursor = LoadCursor (NULL, IDC_ARROW) ; wndclass.hbrBackground = (HBRUSH) GetStockObject (WHITE_BRUSH) ; wndclass.lpszMenuName = szAppName ; wndclass.lpszClassName = szAppName ; if (!RegisterClass (&wndclass)) { MessageBox (NULL, TEXT ("This program requires Windows NT!"), szAppName, MB_ICONERROR) ; return 0 ; } wndclass.style = CS_HREDRAW | CS_VREDRAW ; wndclass.lpfnWndProc = EllipPushWndProc ; wndclass.cbClsExtra = 0 ; wndclass.cbWndExtra = 0 ; wndclass.hInstance = hInstance ; wndclass.hIcon = NULL ; wndclass.hCursor = LoadCursor (NULL, IDC_ARROW) ; wndclass.hbrBackground = (HBRUSH) (COLOR_BTNFACE + 1) ; wndclass.lpszMenuName = NULL ; wndclass.lpszClassName = TEXT ("EllipPush") ; 385
- 386. RegisterClass (&wndclass) ; hwnd = CreateWindow (szAppName, TEXT ("About Box Demo Program"), WS_OVERLAPPEDWINDOW, CW_USEDEFAULT, CW_USEDEFAULT, CW_USEDEFAULT, CW_USEDEFAULT, NULL, NULL, hInstance, NULL) ; ShowWindow (hwnd, iCmdShow) ; UpdateWindow (hwnd) ; while (GetMessage (&msg, NULL, 0, 0)) { TranslateMessage (&msg) ; DispatchMessage (&msg) ; } return msg.wParam ; } LRESULT CALLBACK WndProc (HWND hwnd, UINT message, WPARAM wParam, LPARAM lParam) { static HINSTANCE hInstance ; switch (message) { case WM_CREATE : hInstance = ((LPCREATESTRUCT) lParam)->hInstance ; return 0 ; case WM_COMMAND : switch (LOWORD (wParam)) { case IDM_APP_ABOUT : DialogBox (hInstance, TEXT ("AboutBox"), hwnd, AboutDlgProc) ; return 0 ; } break ; case WM_DESTROY : PostQuitMessage (0) ; return 0 ; } return DefWindowProc (hwnd, message, wParam, lParam) ; } BOOL CALLBACK AboutDlgProc (HWND hDlg, UINT message, WPARAM wParam, LPARAM lParam) { switch (message) { case WM_INITDIALOG : return TRUE ; case WM_COMMAND : switch (LOWORD (wParam)) { case IDOK : EndDialog (hDlg, 0) ; return TRUE ; } break ; } return FALSE ; 386
- 387. } LRESULT CALLBACK EllipPushWndProc (HWND hwnd, UINT message, WPARAM wParam, LPARAM lParam) { TCHAR szText[40] ; HBRUSH hBrush ; HDC hdc ; PAINTSTRUCT ps ; RECT rect ; switch (message) { case WM_PAINT : GetClientRect (hwnd, &rect) ; GetWindowText (hwnd, szText, sizeof (szText)) ; hdc = BeginPaint (hwnd, &ps) ; hBrush = CreateSolidBrush (GetSysColor (COLOR_WINDOW)) ; hBrush = (HBRUSH) SelectObject (hdc, hBrush) ; SetBkColor (hdc, GetSysColor (COLOR_WINDOW)) ; SetTextColor (hdc, GetSysColor (COLOR_WINDOWTEXT)) ; Ellipse (hdc, rect.left, rect.top, rect.right, rect.bottom) ; DrawText (hdc, szText, -1, &rect, DT_SINGLELINE | DT_CENTER | DT_VCENTER) ; DeleteObject (SelectObject (hdc, hBrush)) ; EndPaint (hwnd, &ps) ; return 0 ; case WM_KEYUP : if (wParam != VK_SPACE) break ; // fall through case WM_LBUTTONUP : SendMessage (GetParent (hwnd), WM_COMMAND, GetWindowLong (hwnd, GWL_ID), (LPARAM) hwnd) ; return 0 ; } return DefWindowProc (hwnd, message, wParam, lParam) ; } ABOUT3.RC (excerpts) //Microsoft Developer Studio generated resource script. #include "resource.h" #include "afxres.h" ///////////////////////////////////////////////////////////////////////////// // Dialog ABOUTBOX DIALOG DISCARDABLE 32, 32, 180, 100 STYLE DS_MODALFRAME | WS_POPUP FONT 8, "MS Sans Serif" 387
- 388. BEGIN CONTROL "OK",IDOK,"EllipPush",WS_GROUP | WS_TABSTOP,73,79,32,14 ICON "ABOUT3",IDC_STATIC,7,7,20,20 CTEXT "About3",IDC_STATIC,40,12,100,8 CTEXT "About Box Demo Program",IDC_STATIC,7,40,166,8 CTEXT "(c) Charles Petzold, 1998",IDC_STATIC,7,52,166,8 END ///////////////////////////////////////////////////////////////////////////// // Menu ABOUT3 MENU DISCARDABLE BEGIN POPUP "&Help" BEGIN MENUITEM "&About About3...", IDM_APP_ABOUT END END ///////////////////////////////////////////////////////////////////////////// // Icon ABOUT3 ICON DISCARDABLE "icon1.ico" RESOURCE.H (excerpts) // Microsoft Developer Studio generated include file. // Used by About3.rc #define IDM_APP_ABOUT 40001 #define IDC_STATIC -1 ABOUT3.ICO The window class we'll be registering is called EllipPush ("elliptical push button"). In the dialog editor in Developer Studio, delete both the Cancel and OK buttons. To add a control based on this window class, select Custom Control from the Controls toolbar. In the Properties dialog for this control, type EllipPush in the Class field. Rather than a DEFPUSHBUTTON statement appearing in the dialog box template, you'll see a CONTROL statement that 388
- 389. specifies this window class: CONTROL "OK" IDOK, "EllipPush", TABGRP, 64, 60, 32, 14 The dialog box manager uses this window class in a CreateWindow call when creating the child window control in the dialog box. The ABOUT3.C program registers the EllipPush window class in WinMain: wndclass.style = CS_HREDRAW ¦ CS_VREDRAW ; wndclass.lpfnWndProc = EllipPushWndProc ; wndclass.cbClsExtra = 0 ; wndclass.cbWndExtra = 0 ; wndclass.hInstance = hInstance ; wndclass.hIcon = NULL ; wndclass.hCursor = LoadCursor (NULL, IDC_ARROW) ; wndclass.hbrBackground = (HBRUSH) (COLOR_WINDOW + 1) ; wndclass.lpszMenuName = NULL ; wndclass.lpszClassName = TEXT ("EllipPush") ; RegisterClass (&wndclass) ; The window class specifies that the window procedure is EllipPushWndProc, which is also in ABOUT3.C. The EllipPushWndProc window procedure processes only three messages: WM_PAINT, WM_KEYUP, and WM_LBUTTONUP. During the WM_PAINT message, it obtains the size of its window from GetClientRect and obtains the text that appears in the push button from GetWindowText. It uses the Windows functions Ellipse and DrawText to draw the ellipse and the text. The processing of the WM_KEYUP and WM_LBUTTONUP messages is simple: case WM_KEYUP : if (wParam != VK_SPACE) break ; // fall through case WM_LBUTTONUP : SendMessage (GetParent (hwnd), WM_COMMAND, GetWindowLong (hwnd, GWL_ID), (LPARAM) hwnd) ; return 0 ; The window procedure obtains the handle of its parent window (the dialog box) using GetParent and sends a WM_COMMAND message with wParam equal to the control's ID. The ID is obtained using GetWindowLong. The dialog box window procedure then passes this message on to the dialog box procedure within ABOUT3. The result is a customized push button, as shown in Figure 11-6. You can use this same method to create other customized controls for dialog boxes. 389
- 390. Figure 11-6. A customized push button created by ABOUT3. Is that all there is to it? Well, not really. EllipPushWndProc is a bare-bones version of the logic generally involved in maintaining a child window control. For instance, the button doesn't flash like normal push buttons. To invert the colors on the interior of the push button, the window procedure would have to process WM_KEYDOWN (from the Spacebar) and WM_LBUTTONDOWN messages. The window procedure should also capture the mouse on a WM_LBUTTONDOWN message and release the mouse (and return the button's interior color to normal) if the mouse is moved outside the child window's client area while the button is still depressed. Only if the button is released while the mouse is captured should the child window send a WM_COMMAND message back to its parent. EllipPushWndProc also does not process WM_ENABLE messages. As mentioned above, a dialog box procedure can disable a window by using the EnableWindow function. The child window would then display gray rather than black text to indicate that it has been disabled and cannot receive messages. If the window procedure for a child window control needs to store data that are different for each created window, it can do so by using a positive value of cbWndExtra in the window class structure. This reserves space in the internal window structure that can be accessed by using SetWindowLong and GetWindowLong. Modeless Dialog Boxes At the beginning of this chapter, I explained that dialog boxes can be either "modal" or "modeless." So far we've been looking at modal dialog boxes, the more common of the two types. Modal dialog boxes (except system modal dialog boxes) allow the user to switch between the dialog box and other programs. However, the user cannot switch to another window in the program that initiated the dialog box until the modal dialog box is destroyed. Modeless dialog boxes allow the user to switch between the dialog box and the window that created it as well as between the dialog box and other programs. The modeless dialog box is thus more akin to the regular popup windows that your program might create. Modeless dialog boxes are preferred when the user would find it convenient to keep the dialog box displayed for a while. For instance, word processors often use modeless dialog boxes for the text Find and Change dialogs. If the Find dialog box were modal, the user would have to choose Find from the menu, enter the string to be found, end the dialog box to return to the document, and then repeat the entire process to search for another occurrence of the same string. Allowing the user to switch between the document and the dialog box is much more convenient. As you've seen, modal dialog boxes are created using DialogBox. The function returns a value only after the dialog box is destroyed. It returns the value specified in the second parameter of the EndDialog call that was used within 390
- 391. the dialog box procedure to terminate the dialog box. Modeless dialog boxes are created using CreateDialog. This function takes the same parameters as DialogBox: hDlgModeless = CreateDialog (hInstance, szTemplate, hwndParent, DialogProc) ; The difference is that the CreateDialog function returns immediately with the window handle of the dialog box. Normally, you store this window handle in a global variable. Although the use of the names DialogBox with modal dialog boxes and CreateDialog with modeless dialog boxes may seem arbitrary, you can remember which is which by keeping in mind that modeless dialog boxes are similar to normal windows. CreateDialog should remind you of the CreateWindow function, which creates normal windows. Differences Between Modal and Modeless Dialog Boxes Working with modeless dialog boxes is similar to working with modal dialog boxes, but there are several important differences. First, modeless dialog boxes usually include a caption bar and a system menu box. These are actually the default options when you create a dialog box in Developer Studio. The STYLE statement in the dialog box template for a modeless dialog box will look something like this: STYLE WS_POPUP ¦ WS_CAPTION ¦ WS_SYSMENU ¦ WS_VISIBLE The caption bar and system menu allow the user to move the modeless dialog box to another area of the display using either the mouse or the keyboard. You don't normally provide a caption bar and system menu with a modal dialog box, because the user can't do anything in the underlying window anyway. The second big difference: Notice that the WS_VISIBLE style is included in our sample STYLE statement. In Developer Studio, select this option from the More Styles tab of the Dialog Properties dialog. If you omit WS_VISIBLE, you must call ShowWindow after the CreateDialog call: hDlgModeless = CreateDialog ( . . . ) ; ShowWindow (hDlgModeless, SW_SHOW) ; If you neither include WS_VISIBLE nor call ShowWindow, the modeless dialog box will not be displayed. Programmers who have mastered modal dialog boxes often overlook this peculiarity and thus experience difficulties when first trying to create a modeless dialog box. The third difference: Unlike messages to modal dialog boxes and message boxes, messages to modeless dialog boxes come through your program's message queue. The message queue must be altered to pass these messages to the dialog box window procedure. Here's how you do it: When you use CreateDialog to create a modeless dialog box, you should save the dialog box handle returned from the call in a global variable (for instance, hDlgModeless). Change your message loop to look like while (GetMessage (&msg, NULL, 0, 0)) { if (hDlgModeless == 0 ¦¦ !IsDialogMessage (hDlgModeless, &msg)) { TranslateMessage (&msg) ; DispatchMessage (&msg) ; } } If the message is intended for the modeless dialog box, then IsDialogMessage sends it to the dialog box window procedure and returns TRUE (nonzero); otherwise, it returns FALSE (0). The TranslateMessage and DispatchMessage functions should be called only if hDlgModeless is 0 or if the message is not for the dialog box. If you use keyboard accelerators for your program's window, the message loop looks like this: 391
- 392. while (GetMessage (&msg, NULL, 0, 0)) { if (hDlgModeless == 0 ¦¦ !IsDialogMessage (hDlgModeless, &msg)) { if (!TranslateAccelerator (hwnd, hAccel, &msg)) { TranslateMessage (&msg) ; DispatchMessage (&msg) ; } } } Because global variables are initialized to 0, hDlgModeless will be 0 until the dialog box is created, thus ensuring that IsDialogMessage is not called with an invalid window handle. You must take the same precaution when you destroy the modeless dialog box, as explained below. The hDlgModeless variable can also be used by other parts of the program as a test of the existence of the modeless dialog box. For example, other windows in the program can send messages to the dialog box while hDlgModeless is not equal to 0. The final big difference: Use DestroyWindow rather than EndDialog to end a modeless dialog box. When you call DestroyWindow, set the hDlgModeless global variable to NULL. The user customarily terminates a modeless dialog box by choosing Close from the system menu. Although the Close option is enabled, the dialog box window procedure within Windows does not process the WM_CLOSE message. You must do this yourself in the dialog box procedure: case WM_CLOSE : DestroyWindow (hDlg) ; hDlgModeless = NULL ; break ; Note the difference between these two window handles: the hDlg parameter to DestroyWindow is the parameter passed to the dialog box procedure; hDlgModeless is the global variable returned from CreateDialog that you test within the message loop. You can also allow a user to close a modeless dialog box using push buttons. Use the same logic as for the WM_CLOSE message. Any information that the dialog box must "return" to the window that created it can be stored in global variables. If you'd prefer not using global variables, you can create the modeless dialog box by using CreateDialogParam and pass to it a structure pointer, as described earlier. The New COLORS Program The COLORS1 program described in Chapter 9 created nine child windows to display three scroll bars and six text items. At that time, the program was one of the more complex we had developed. Converting COLORS1 to use a modeless dialog box makes the program—and particularly its WndProc function—almost ridiculously simple. The revised COLORS2 program is shown in Figure 11-7. Figure 11-7. The COLORS2 program. COLORS2.C /*------------------------------------------------ COLORS2.C -- Version using Modeless Dialog Box (c) Charles Petzold, 1998 ------------------------------------------------*/ 392
- 393. #include <windows.h> LRESULT CALLBACK WndProc (HWND, UINT, WPARAM, LPARAM) ; BOOL CALLBACK ColorScrDlg (HWND, UINT, WPARAM, LPARAM) ; HWND hDlgModeless ; int WINAPI WinMain (HINSTANCE hInstance, HINSTANCE hPrevInstance, PSTR szCmdLine, int iCmdShow) { static TCHAR szAppName[] = TEXT ("Colors2") ; HWND hwnd ; MSG msg ; WNDCLASS wndclass ; wndclass.style = CS_HREDRAW | CS_VREDRAW ; wndclass.lpfnWndProc = WndProc ; wndclass.cbClsExtra = 0 ; wndclass.cbWndExtra = 0 ; wndclass.hInstance = hInstance ; wndclass.hIcon = LoadIcon (NULL, IDI_APPLICATION) ; wndclass.hCursor = LoadCursor (NULL, IDC_ARROW) ; wndclass.hbrBackground = CreateSolidBrush (0L) ; wndclass.lpszMenuName = NULL ; wndclass.lpszClassName = szAppName ; if (!RegisterClass (&wndclass)) { MessageBox (NULL, TEXT ("This program requires Windows NT!"), szAppName, MB_ICONERROR) ; return 0 ; } hwnd = CreateWindow (szAppName, TEXT ("Color Scroll"), WS_OVERLAPPEDWINDOW | WS_CLIPCHILDREN, CW_USEDEFAULT, CW_USEDEFAULT, CW_USEDEFAULT, CW_USEDEFAULT, NULL, NULL, hInstance, NULL) ; ShowWindow (hwnd, iCmdShow) ; UpdateWindow (hwnd) ; hDlgModeless = CreateDialog (hInstance, TEXT ("ColorScrDlg"), hwnd, ColorScrDlg) ; while (GetMessage (&msg, NULL, 0, 0)) { if (hDlgModeless == 0 || !IsDialogMessage (hDlgModeless, &msg)) { TranslateMessage (&msg) ; DispatchMessage (&msg) ; } } return msg.wParam ; } LRESULT CALLBACK WndProc (HWND hwnd, UINT message, WPARAM wParam, LPARAM lParam) { switch (message) { case WM_DESTROY : DeleteObject ((HGDIOBJ) SetClassLong (hwnd, GCL_HBRBACKGROUND, (LONG) GetStockObject (WHITE_BRUSH))) ; PostQuitMessage (0) ; return 0 ; 393
- 394. } return DefWindowProc (hwnd, message, wParam, lParam) ; } BOOL CALLBACK ColorScrDlg (HWND hDlg, UINT message, WPARAM wParam, LPARAM lParam) { static int iColor[3] ; HWND hwndParent, hCtrl ; int iCtrlID, iIndex ; switch (message) { case WM_INITDIALOG : for (iCtrlID = 10 ; iCtrlID < 13 ; iCtrlID++) { hCtrl = GetDlgItem (hDlg, iCtrlID) ; SetScrollRange (hCtrl, SB_CTL, 0, 255, FALSE) ; SetScrollPos (hCtrl, SB_CTL, 0, FALSE) ; } return TRUE ; case WM_VSCROLL : hCtrl = (HWND) lParam ; iCtrlID = GetWindowLong (hCtrl, GWL_ID) ; iIndex = iCtrlID - 10 ; hwndParent = GetParent (hDlg) ; switch (LOWORD (wParam)) { case SB_PAGEDOWN : iColor[iIndex] += 15 ; // fall through case SB_LINEDOWN : iColor[iIndex] = min (255, iColor[iIndex] + 1) ; break ; case SB_PAGEUP : iColor[iIndex] -= 15 ; // fall through case SB_LINEUP : iColor[iIndex] = max (0, iColor[iIndex] - 1) ; break ; case SB_TOP : iColor[iIndex] = 0 ; break ; case SB_BOTTOM : iColor[iIndex] = 255 ; break ; case SB_THUMBPOSITION : case SB_THUMBTRACK : iColor[iIndex] = HIWORD (wParam) ; break ; default : return FALSE ; } SetScrollPos (hCtrl, SB_CTL, iColor[iIndex], TRUE) ; SetDlgItemInt (hDlg, iCtrlID + 3, iColor[iIndex], FALSE) ; DeleteObject ((HGDIOBJ) SetClassLong (hwndParent, GCL_HBRBACKGROUND, (LONG) CreateSolidBrush ( RGB (iColor[0], iColor[1], iColor[2])))) ; InvalidateRect (hwndParent, NULL, TRUE) ; return TRUE ; } return FALSE ; 394
- 395. } COLORS2.RC (excerpts) //Microsoft Developer Studio generated resource script. #include "resource.h" #include "afxres.h" ///////////////////////////////////////////////////////////////////////////// // Dialog COLORSCRDLG DIALOG DISCARDABLE 16, 16, 120, 141 STYLE DS_MODALFRAME | WS_POPUP | WS_VISIBLE | WS_CAPTION CAPTION "Color Scroll Scrollbars" FONT 8, "MS Sans Serif" BEGIN CTEXT "&Red",IDC_STATIC,8,8,24,8,NOT WS_GROUP SCROLLBAR 10,8,20,24,100,SBS_VERT | WS_TABSTOP CTEXT "0",13,8,124,24,8,NOT WS_GROUP CTEXT "&Green",IDC_STATIC,48,8,24,8,NOT WS_GROUP SCROLLBAR 11,48,20,24,100,SBS_VERT | WS_TABSTOP CTEXT "0",14,48,124,24,8,NOT WS_GROUP CTEXT "&Blue",IDC_STATIC,89,8,24,8,NOT WS_GROUP SCROLLBAR 12,89,20,24,100,SBS_VERT | WS_TABSTOP CTEXT "0",15,89,124,24,8,NOT WS_GROUP END RESOURCE.H (excerpts) // Microsoft Developer Studio generated include file. // Used by Colors2.rc #define IDC_STATIC -1 Although the original COLORS1 program displayed scroll bars that were based on the size of the window, the new version keeps them at a constant size within the modeless dialog box, as shown in Figure 11-8. When you create the dialog box template, use explicit ID numbers of 10, 11, and 12 for the three scroll bars, and 13, 14, and 15 for the three static text fields displaying the current values of the scroll bars. Give each scroll bar a Tab Stop style, but remove the Group style from all six static text fields. 395
- 396. Figure 11-8. The COLORS2 display. The modeless dialog box is created in COLORS2's WinMain function following the ShowWindow call for the program's main window. Note that the window style for the main window includes WS_CLIPCHILDREN, which allows the program to repaint the main window without erasing the dialog box. The dialog box window handle returned from CreateDialog is stored in the global variable hDlgModeless and tested during the message loop, as described above. In this program, however, it isn't necessary to store the handle in a global variable or to test the value before calling IsDialogMessage. The message loop could have been written like this: while (GetMessage (&msg, NULL, 0, 0)) { if (!IsDialogMessage (hDlgModeless, &msg)) { TranslateMessage (&msg) ; DispatchMessage (&msg) ; } } Because the dialog box is created before the program enters the message loop and is not destroyed until the program terminates, the value of hDlgModeless will always be valid. I included the logic in case you want to add some code to the dialog box window procedure to destroy the dialog box: case WM_CLOSE : DestroyWindow (hDlg) ; hDlgModeless = NULL ; break ; In the original COLORS1 program, SetWindowText set the values of the three numeric labels after converting the integers to text with wsprintf. The code looked like this: wsprintf (szBuffer, TEXT ("%i"), color[i]) ; SetWindowText (hwndValue[i], szBuffer) ; The value of i was the ID number of the current scroll bar being processed, and hwndValue was an array containing the window handles of the three static text child windows for the numeric values of the colors. 396
- 397. The new version uses SetDlgItemInt to set each text field of each child window to a number: SetDlgItemInt (hDlg, iCtrlID + 3, color [iCtrlID], FALSE) ; Although SetDlgItemInt and its companion, GetDlgItemInt, are most often used with edit controls, they can also be used to set the text field of other controls, such as static text controls. The iCtrlID variable is the ID number of the scroll bar; adding 3 to the number converts it to the ID for the corresponding numeric label. The third argument is the color value. The fourth argument indicates whether the value in the third argument is to be treated as signed (if the fourth argument is TRUE) or unsigned (if the fourth argument is FALSE). For this program, however, the values range from 0 to 255, so the fourth argument has no effect. In the process of converting COLORS1 to COLORS2, we passed more and more of the work to Windows. The earlier version called CreateWindow 10 times; the new version calls CreateWindow once and CreateDialog once. But if you think that we've reduced our CreateWindow calls to a minimum, get a load of this next program. HEXCALC: Window or Dialog Box? Perhaps the epitome of lazy programming is the HEXCALC program, shown in Figure 11-9. This program doesn't call CreateWindow at all, never processes WM_PAINT messages, never obtains a device context, and never processes mouse messages. Yet it manages to incorporate a 10-function hexadecimal calculator with a full keyboard and mouse interface in fewer than 150 lines of source code. The calculator is shown in Figure 11-10. Figure 11-9. The HEXCALC program. HEXCALC.C /*---------------------------------------- HEXCALC.C -- Hexadecimal Calculator (c) Charles Petzold, 1998 ----------------------------------------*/ #include <windows.h> LRESULT CALLBACK WndProc (HWND, UINT, WPARAM, LPARAM) ; int WINAPI WinMain (HINSTANCE hInstance, HINSTANCE hPrevInstance, PSTR szCmdLine, int iCmdShow) { static TCHAR szAppName[] = TEXT ("HexCalc") ; HWND hwnd ; MSG msg ; WNDCLASS wndclass ; wndclass.style = CS_HREDRAW | CS_VREDRAW; wndclass.lpfnWndProc = WndProc ; wndclass.cbClsExtra = 0 ; wndclass.cbWndExtra = DLGWINDOWEXTRA ; // Note! wndclass.hInstance = hInstance ; wndclass.hIcon = LoadIcon (hInstance, szAppName) ; wndclass.hCursor = LoadCursor (NULL, IDC_ARROW) ; wndclass.hbrBackground = (HBRUSH) (COLOR_BTNFACE + 1) ; wndclass.lpszMenuName = NULL ; wndclass.lpszClassName = szAppName ; if (!RegisterClass (&wndclass)) { MessageBox (NULL, TEXT ("This program requires Windows NT!"), 397
- 398. szAppName, MB_ICONERROR) ; return 0 ; } hwnd = CreateDialog (hInstance, szAppName, 0, NULL) ; ShowWindow (hwnd, iCmdShow) ; while (GetMessage (&msg, NULL, 0, 0)) { TranslateMessage (&msg) ; DispatchMessage (&msg) ; } return msg.wParam ; } void ShowNumber (HWND hwnd, UINT iNumber) { TCHAR szBuffer[20] ; wsprintf (szBuffer, TEXT ("%X"), iNumber) ; SetDlgItemText (hwnd, VK_ESCAPE, szBuffer) ; } DWORD CalcIt (UINT iFirstNum, int iOperation, UINT iNum) { switch (iOperation) { case `=`: return iNum ; case `+': return iFirstNum + iNum ; case `-': return iFirstNum - iNum ; case `*': return iFirstNum * iNum ; case `&': return iFirstNum & iNum ; case `|': return iFirstNum | iNum ; case `^': return iFirstNum ^ iNum ; case `<`: return iFirstNum << iNum ; case `>`: return iFirstNum >> iNum ; case `/': return iNum ? iFirstNum / iNum: MAXDWORD ; case `%': return iNum ? iFirstNum % iNum: MAXDWORD ; default : return 0 ; } } LRESULT CALLBACK WndProc (HWND hwnd, UINT message, WPARAM wParam, LPARAM lParam) { static BOOL bNewNumber = TRUE ; static int iOperation = `=` ; static UINT iNumber, iFirstNum ; HWND hButton ; switch (message) { case WM_KEYDOWN: // left arrow --> backspace if (wParam != VK_LEFT) break ; wParam = VK_BACK ; // fall through case WM_CHAR: if ((wParam = (WPARAM) CharUpper ((TCHAR *) wParam)) == VK_RETURN) wParam = `=` ; if (hButton = GetDlgItem (hwnd, wParam)) { SendMessage (hButton, BM_SETSTATE, 1, 0) ; 398
- 399. Sleep (100) ; SendMessage (hButton, BM_SETSTATE, 0, 0) ; } else { MessageBeep (0) ; break ; } // fall through case WM_COMMAND: SetFocus (hwnd) ; if (LOWORD (wParam) == VK_BACK) // backspace ShowNumber (hwnd, iNumber /= 16) ; else if (LOWORD (wParam) == VK_ESCAPE) // escape ShowNumber (hwnd, iNumber = 0) ; else if (isxdigit (LOWORD (wParam))) // hex digit { if (bNewNumber) { iFirstNum = iNumber ; iNumber = 0 ; } bNewNumber = FALSE ; if (iNumber <= MAXDWORD >> 4) ShowNumber (hwnd, iNumber = 16 * iNumber + wParam - (isdigit (wParam) ? `0': `A' - 10)) ; else MessageBeep (0) ; } else // operation { if (!bNewNumber) ShowNumber (hwnd, iNumber = CalcIt (iFirstNum, iOperation, iNumber)) ; bNewNumber = TRUE ; iOperation = LOWORD (wParam) ; } return 0 ; case WM_DESTROY: PostQuitMessage (0) ; return 0 ; } return DefWindowProc (hwnd, message, wParam, lParam) ; } HEXCALC.RC (excerpts) //Microsoft Developer Studio generated resource script. #include "resource.h" #include "afxres.h" ///////////////////////////////////////////////////////////////////////////// // Icon 399
- 400. HEXCALC ICON DISCARDABLE "HexCalc.ico" ///////////////////////////////////////////////////////////////////////////// #include "hexcalc.dlg" HEXCALC.DLG /*--------------------------- HEXCALC.DLG dialog script ---------------------------*/ HexCalc DIALOG -1, -1, 102, 122 STYLE WS_OVERLAPPED | WS_CAPTION | WS_SYSMENU | WS_MINIMIZEBOX CLASS "HexCalc" CAPTION "Hex Calculator" { PUSHBUTTON "D", 68, 8, 24, 14, 14 PUSHBUTTON "A", 65, 8, 40, 14, 14 PUSHBUTTON "7", 55, 8, 56, 14, 14 PUSHBUTTON "4", 52, 8, 72, 14, 14 PUSHBUTTON "1", 49, 8, 88, 14, 14 PUSHBUTTON "0", 48, 8, 104, 14, 14 PUSHBUTTON "0", 27, 26, 4, 50, 14 PUSHBUTTON "E", 69, 26, 24, 14, 14 PUSHBUTTON "B", 66, 26, 40, 14, 14 PUSHBUTTON "8", 56, 26, 56, 14, 14 PUSHBUTTON "5", 53, 26, 72, 14, 14 PUSHBUTTON "2", 50, 26, 88, 14, 14 PUSHBUTTON "Back", 8, 26, 104, 32, 14 PUSHBUTTON "C", 67, 44, 40, 14, 14 PUSHBUTTON "F", 70, 44, 24, 14, 14 PUSHBUTTON "9", 57, 44, 56, 14, 14 PUSHBUTTON "6", 54, 44, 72, 14, 14 PUSHBUTTON "3", 51, 44, 88, 14, 14 PUSHBUTTON "+", 43, 62, 24, 14, 14 PUSHBUTTON "-", 45, 62, 40, 14, 14 PUSHBUTTON "*", 42, 62, 56, 14, 14 PUSHBUTTON "/", 47, 62, 72, 14, 14 PUSHBUTTON "%", 37, 62, 88, 14, 14 PUSHBUTTON "Equals", 61, 62, 104, 32, 14 PUSHBUTTON "&&", 38, 80, 24, 14, 14 PUSHBUTTON "|", 124, 80, 40, 14, 14 PUSHBUTTON "^", 94, 80, 56, 14, 14 PUSHBUTTON "<", 60, 80, 72, 14, 14 PUSHBUTTON ">", 62, 80, 88, 14, 14 } HEXCALC.ICO 400
- 401. Figure 11-10. The HEXCALC display. HEXCALC is a normal infix notation calculator that uses C notation for the operations. It works with unsigned 32- bit integers and does addition, subtraction, multiplication, division, and remainders; bitwise AND, OR, and exclusive OR operations; and left and right bit shifts. Division by 0 causes the result to be set to FFFFFFFF. You can use either the mouse or keyboard with HEXCALC. You begin by "clicking in" or typing the first number (up to eight hexadecimal digits), then the operation, and then the second number. You can then show the result by clicking the Equals button or by pressing either the Equals key or the Enter key. To correct your entries, use the Back button or the Backspace or Left Arrow key. Click the "display" box or press the Esc key to clear the current entry. What's so strange about HEXCALC is that the window displayed on the screen seems to be a hybrid of a normal overlapped window and a modeless dialog box. On the one hand, all the messages to HEXCALC are processed in a function called WndProc that appears to be a normal window procedure. The function returns a long, it processes the 401
- 402. WM_DESTROY message, and it calls DefWindowProc just like a normal window procedure. On the other hand, the window is created in WinMain with a call to CreateDialog that uses a dialog box template defined in HEXCALC.DLG. So is HEXCALC a normal overlapped window or a modeless dialog box? The simple answer is that a dialog box is a window. Normally, Windows uses its own internal window procedure to process messages to a dialog box window. Windows then passes these messages to a dialog box procedure within the program that creates the dialog box. In HEXCALC we are forcing Windows to use the dialog box template to create a window, but we're processing messages to that window ourselves. Unfortunately, there's something that the dialog box template needs that you can't add in the Dialog Editor in Developer Studio. For this reason, the dialog box template is contained in the HEXCALC.DLG file, which you might guess (correctly) was typed in manually. You can add a text file to any project by picking New from the File menu, picking the Files tab, and selecting Text File from the list of file types. A file such as this, containing additional resource definitions, needs to be included in the resource script. From the View menu, select Resource Includes. This displays a dialog box. In the Compile-time Directives edit field, type #include "hexcalc.dlg" This line will then be inserted into the HEXCALC.RC resource script, as shown above. A close look at the dialog box template in the HEXCALC.DLG file will reveal how HEXCALC uses its own window procedure for the dialog box. The top of the dialog box template looks like HexCalc DIALOG -1, -1, 102, 122 STYLE WS_OVERLAPPED ¦ WS_CAPTION ¦ WS_SYSMENU ¦ WS_MINIMIZEBOX CLASS "HexCalc" CAPTION "Hex Calculator" Notice the identifiers, such as WS_OVERLAPPED and WS_MINIMIZEBOX, which we might use to create a normal window by using a CreateWindow call. The CLASS statement is the crucial difference between this dialog box and the others we've created so far (and it is what the Dialog Editor in Developer Studio doesn't allow us to specify). When we omitted this statement in previous dialog box templates, Windows registered a window class for the dialog box and used its own window procedure to process the dialog box messages. The inclusion of a CLASS statement here tells Windows to send the messages elsewhere—specifically, to the window procedure specified in the HexCalc window class. The HexCalc window class is registered in the WinMain function of HEXCALC, just like a window class for a normal window. However, note this very important difference: the cbWndExtra field of the WNDCLASS structure is set to DLGWINDOWEXTRA. This is essential for dialog procedures that you register yourself. After registering the window class, WinMain calls CreateDialog: hwnd = CreateDialog (hInstance, szAppName, 0, NULL) ; The second argument (the string "HexCalc") is the name of the dialog box template. The third argument, which is normally the window handle of the parent window, is set to 0 because the window has no parent. The last argument, which is normally the address of the dialog procedure, isn't required because Windows won't be processing the messages and therefore can't send them to a dialog procedure. This CreateDialog call, in conjunction with the dialog box template, is effectively translated by Windows into a CreateWindow call that does the equivalent of hwnd = CreateWindow (TEXT ("HexCalc"), TEXT ("Hex Calculator"), WS_OVERLAPPED ¦ WS_CAPTION ¦ WS_SYSMENU ¦ WS_MINIMIZEBOX, CW_USEDEFAULT, CW_USEDEFAULT, 102 * 4 / cxChar, 122 * 8 / cyChar, NULL, NULL, hInstance, NULL) ; where the cxChar and cyChar variables are the width and height of the dialog font character. 402
- 403. We reap an enormous benefit from letting Windows make this CreateWindow call: Windows will not stop at creating the one popup window but will also call CreateWindow for all 29 child window push-button controls defined in the dialog box template. All these controls send WM_COMMAND messages to the window procedure of the parent window, which is none other than WndProc. This is an excellent technique for creating a window that must contain a collection of child windows. Here's another way HEXCALC's code size is kept down to a minimum: You'll notice that HEXCALC contains no header file normally required to define the identifiers for all the child window controls in the dialog box template. We can dispense with this file because the ID number for each of the push-button controls is set to the ASCII code of the text that appears in the control. This means that WndProc can treat WM_COMMAND messages and WM_CHAR messages in much the same way. In each case, the low word of wParam is the ASCII code of the button. Of course, a little massaging of the keyboard messages is necessary. WndProc traps WM_KEYDOWN messages to translate the Left Arrow key to a Backspace key. During processing of WM_CHAR messages, WndProc converts the character code to uppercase and the Enter key to the ASCII code for the Equals key. Calling GetDlgItem checks the validity of a WM_CHAR message. If the GetDlgItem function returns 0, the keyboard character is not one of the ID numbers defined in the dialog box template. If the character is one of the IDs, however, the appropriate button is flashed by sending it a couple of BM_SETSTATE messages: if (hButton = GetDlgItem (hwnd, wParam)) { SendMessage (hButton, BM_SETSTATE, 1, 0) ; Sleep (100) ; SendMessage (hButton, BM_SETSTATE, 0, 0) ; } This adds a nice touch to HEXCALC's keyboard interface, and with a minimum of effort. The Sleep function suspends the program for 100 milliseconds. This prevents the buttons from being "clicked" so quickly that they aren't noticeable. When WndProc processes WM_COMMAND messages, it always sets the input focus to the parent window: case WM_COMMAND : SetFocus (hwnd) ; Otherwise, the input focus would be shifted to one of the buttons whenever it was clicked with the mouse. The Common Dialog Boxes One of the primary goals of Windows when it was initially released was to promote a standardized user interface. For many common menu items, this happened fairly quickly. Almost every software manufacturer adopted the Alt- File-Open selection to open a file. However, the actual file-open dialog boxes were often quite dissimilar. Beginning with Windows 3.1, a solution to this problem became available. This is an enhancement called the "common dialog box library." This library consists of several functions that invoke standard dialog boxes for opening and saving files, searching and replacing, choosing colors, choosing fonts (all of which I'll demonstrate in this chapter), and printing (which I'll demonstrate in Chapter 13). To use these functions, you basically initialize the fields of a structure and pass a pointer to the structure to a function in the common dialog box library. The function creates and displays the dialog box. When the user makes the dialog box go away, the function you called returns control to your program and you obtain information from the structure you passed to it. You'll need to include the COMMDLG.H header file in any C source code file that uses the common dialog box library. The common dialog boxes are documented in /Platform SDK/User Interface Services/User Input/Common Dialog Box Library. 403
- 404. POPPAD Revisited When we added a menu to POPPAD in Chapter 10, several standard menu options were left unimplemented. We are now ready to add logic to POPPAD to open files, read them in, and save the edited files on disk. In the process, we'll also add font selection and search-and-replace logic to POPPAD. The files that contribute to the POPPAD3 program are shown in Figure 11-11. Figure 11-11. The POPPAD3 program. POPPAD.C /*--------------------------------------- POPPAD.C -- Popup Editor (c) Charles Petzold, 1998 ---------------------------------------*/ #include <windows.h> #include <commdlg.h> #include "resource.h" #define EDITID 1 #define UNTITLED TEXT ("(untitled)") LRESULT CALLBACK WndProc (HWND, UINT, WPARAM, LPARAM) ; BOOL CALLBACK AboutDlgProc (HWND, UINT, WPARAM, LPARAM) ; // Functions in POPFILE.C void PopFileInitialize (HWND) ; BOOL PopFileOpenDlg (HWND, PTSTR, PTSTR) ; BOOL PopFileSaveDlg (HWND, PTSTR, PTSTR) ; BOOL PopFileRead (HWND, PTSTR) ; BOOL PopFileWrite (HWND, PTSTR) ; // Functions in POPFIND.C HWND PopFindFindDlg (HWND) ; HWND PopFindReplaceDlg (HWND) ; BOOL PopFindFindText (HWND, int *, LPFINDREPLACE) ; BOOL PopFindReplaceText (HWND, int *, LPFINDREPLACE) ; BOOL PopFindNextText (HWND, int *) ; BOOL PopFindValidFind (void) ; // Functions in POPFONT.C void PopFontInitialize (HWND) ; BOOL PopFontChooseFont (HWND) ; void PopFontSetFont (HWND) ; void PopFontDeinitialize (void) ; // Functions in POPPRNT.C BOOL PopPrntPrintFile (HINSTANCE, HWND, HWND, PTSTR) ; // Global variables static HWND hDlgModeless ; static TCHAR szAppName[] = TEXT ("PopPad") ; 404
- 405. int WINAPI WinMain (HINSTANCE hInstance, HINSTANCE hPrevInstance, PSTR szCmdLine, int iCmdShow) { MSG msg ; HWND hwnd ; HACCEL hAccel ; WNDCLASS wndclass ; wndclass.style = CS_HREDRAW | CS_VREDRAW ; wndclass.lpfnWndProc = WndProc ; wndclass.cbClsExtra = 0 ; wndclass.cbWndExtra = 0 ; wndclass.hInstance = hInstance ; wndclass.hIcon = LoadIcon (hInstance, szAppName) ; wndclass.hCursor = LoadCursor (NULL, IDC_ARROW) ; wndclass.hbrBackground = (HBRUSH) GetStockObject (WHITE_BRUSH) ; wndclass.lpszMenuName = szAppName ; wndclass.lpszClassName = szAppName ; if (!RegisterClass (&wndclass)) { MessageBox (NULL, TEXT ("This program requires Windows NT!"), szAppName, MB_ICONERROR) ; return 0 ; } hwnd = CreateWindow (szAppName, NULL, WS_OVERLAPPEDWINDOW, CW_USEDEFAULT, CW_USEDEFAULT, CW_USEDEFAULT, CW_USEDEFAULT, NULL, NULL, hInstance, szCmdLine) ; ShowWindow (hwnd, iCmdShow) ; UpdateWindow (hwnd) ; hAccel = LoadAccelerators (hInstance, szAppName) ; while (GetMessage (&msg, NULL, 0, 0)) { if (hDlgModeless == NULL || !IsDialogMessage (hDlgModeless, &msg)) { if (!TranslateAccelerator (hwnd, hAccel, &msg)) { TranslateMessage (&msg) ; DispatchMessage (&msg) ; } } } return msg.wParam ; } void DoCaption (HWND hwnd, TCHAR * szTitleName) { TCHAR szCaption[64 + MAX_PATH] ; wsprintf (szCaption, TEXT ("%s - %s"), szAppName, szTitleName[0] ? szTitleName : UNTITLED) ; SetWindowText (hwnd, szCaption) ; } void OkMessage (HWND hwnd, TCHAR * szMessage, TCHAR * szTitleName) { TCHAR szBuffer[64 + MAX_PATH] ; 405
- 406. wsprintf (szBuffer, szMessage, szTitleName[0] ? szTitleName : UNTITLED) ; MessageBox (hwnd, szBuffer, szAppName, MB_OK | MB_ICONEXCLAMATION) ; } short AskAboutSave (HWND hwnd, TCHAR * szTitleName) { TCHAR szBuffer[64 + MAX_PATH] ; int iReturn ; wsprintf (szBuffer, TEXT ("Save current changes in %s?"), szTitleName[0] ? szTitleName : UNTITLED) ; iReturn = MessageBox (hwnd, szBuffer, szAppName, MB_YESNOCANCEL | MB_ICONQUESTION) ; if (iReturn == IDYES) if (!SendMessage (hwnd, WM_COMMAND, IDM_FILE_SAVE, 0)) iReturn = IDCANCEL ; return iReturn ; } LRESULT CALLBACK WndProc (HWND hwnd, UINT message, WPARAM wParam, LPARAM lParam) { static BOOL bNeedSave = FALSE ; static HINSTANCE hInst ; static HWND hwndEdit ; static int iOffset ; static TCHAR szFileName[MAX_PATH], szTitleName[MAX_PATH] ; static UINT messageFindReplace ; int iSelBeg, iSelEnd, iEnable ; LPFINDREPLACE pfr ; switch (message) { case WM_CREATE: hInst = ((LPCREATESTRUCT) lParam) -> hInstance ; // Create the edit control child window hwndEdit = CreateWindow (TEXT ("edit"), NULL, WS_CHILD | WS_VISIBLE | WS_HSCROLL | WS_VSCROLL | WS_BORDER | ES_LEFT | ES_MULTILINE | ES_NOHIDESEL | ES_AUTOHSCROLL | ES_AUTOVSCROLL, 0, 0, 0, 0, hwnd, (HMENU) EDITID, hInst, NULL) ; SendMessage (hwndEdit, EM_LIMITTEXT, 32000, 0L) ; // Initialize common dialog box stuff PopFileInitialize (hwnd) ; PopFontInitialize (hwndEdit) ; messageFindReplace = RegisterWindowMessage (FINDMSGSTRING) ; DoCaption (hwnd, szTitleName) ; return 0 ; case WM_SETFOCUS: SetFocus (hwndEdit) ; return 0 ; 406
- 407. case WM_SIZE: MoveWindow (hwndEdit, 0, 0, LOWORD (lParam), HIWORD (lParam), TRUE) ; return 0 ; case WM_INITMENUPOPUP: switch (lParam) { case 1: // Edit menu // Enable Undo if edit control can do it EnableMenuItem ((HMENU) wParam, IDM_EDIT_UNDO, SendMessage (hwndEdit, EM_CANUNDO, 0, 0L) ? MF_ENABLED : MF_GRAYED) ; // Enable Paste if text is in the clipboard EnableMenuItem ((HMENU) wParam, IDM_EDIT_PASTE, IsClipboardFormatAvailable (CF_TEXT) ? MF_ENABLED : MF_GRAYED) ; // Enable Cut, Copy, and Del if text is selected SendMessage (hwndEdit, EM_GETSEL, (WPARAM) &iSelBeg, (LPARAM) &iSelEnd) ; iEnable = iSelBeg != iSelEnd ? MF_ENABLED : MF_GRAYED ; EnableMenuItem ((HMENU) wParam, IDM_EDIT_CUT, iEnable) ; EnableMenuItem ((HMENU) wParam, IDM_EDIT_COPY, iEnable) ; EnableMenuItem ((HMENU) wParam, IDM_EDIT_CLEAR, iEnable) ; break ; case 2: // Search menu // Enable Find, Next, and Replace if modeless // dialogs are not already active iEnable = hDlgModeless == NULL ? MF_ENABLED : MF_GRAYED ; EnableMenuItem ((HMENU) wParam, IDM_SEARCH_FIND, iEnable) ; EnableMenuItem ((HMENU) wParam, IDM_SEARCH_NEXT, iEnable) ; EnableMenuItem ((HMENU) wParam, IDM_SEARCH_REPLACE, iEnable) ; break ; } return 0 ; case WM_COMMAND: // Messages from edit control if (lParam && LOWORD (wParam) == EDITID) { switch (HIWORD (wParam)) { case EN_UPDATE : bNeedSave = TRUE ; return 0 ; case EN_ERRSPACE : case EN_MAXTEXT : MessageBox (hwnd, TEXT ("Edit control out of space."), szAppName, MB_OK | MB_ICONSTOP) ; return 0 ; 407
- 408. } break ; } switch (LOWORD (wParam)) { // Messages from File menu case IDM_FILE_NEW: if (bNeedSave && IDCANCEL == AskAboutSave (hwnd, szTitleName)) return 0 ; SetWindowText (hwndEdit, TEXT ("0")) ; szFileName[0] = `0' ; szTitleName[0] = `0' ; DoCaption (hwnd, szTitleName) ; bNeedSave = FALSE ; return 0 ; case IDM_FILE_OPEN: if (bNeedSave && IDCANCEL == AskAboutSave (hwnd, szTitleName)) return 0 ; if (PopFileOpenDlg (hwnd, szFileName, szTitleName)) { if (!PopFileRead (hwndEdit, szFileName)) { OkMessage (hwnd, TEXT ("Could not read file %s!"), szTitleName) ; szFileName[0] = `0' ; szTitleName[0] = `0' ; } } DoCaption (hwnd, szTitleName) ; bNeedSave = FALSE ; return 0 ; case IDM_FILE_SAVE: if (szFileName[0]) { if (PopFileWrite (hwndEdit, szFileName)) { bNeedSave = FALSE ; return 1 ; } else { OkMessage (hwnd, TEXT ("Could not write file %s"), szTitleName) ; return 0 ; } } // fall through case IDM_FILE_SAVE_AS: if (PopFileSaveDlg (hwnd, szFileName, szTitleName)) { DoCaption (hwnd, szTitleName) ; if (PopFileWrite (hwndEdit, szFileName)) { bNeedSave = FALSE ; return 1 ; } else 408
- 409. { OkMessage (hwnd, TEXT ("Could not write file %s"), szTitleName) ; return 0 ; } } return 0 ; case IDM_FILE_PRINT: if (!PopPrntPrintFile (hInst, hwnd, hwndEdit, szTitleName)) OkMessage (hwnd, TEXT ("Could not print file %s"), szTitleName) ; return 0 ; case IDM_APP_EXIT: SendMessage (hwnd, WM_CLOSE, 0, 0) ; return 0 ; // Messages from Edit menu case IDM_EDIT_UNDO: SendMessage (hwndEdit, WM_UNDO, 0, 0) ; return 0 ; case IDM_EDIT_CUT: SendMessage (hwndEdit, WM_CUT, 0, 0) ; return 0 ; case IDM_EDIT_COPY: SendMessage (hwndEdit, WM_COPY, 0, 0) ; return 0 ; case IDM_EDIT_PASTE: SendMessage (hwndEdit, WM_PASTE, 0, 0) ; return 0 ; case IDM_EDIT_CLEAR: SendMessage (hwndEdit, WM_CLEAR, 0, 0) ; return 0 ; case IDM_EDIT_SELECT_ALL: SendMessage (hwndEdit, EM_SETSEL, 0, -1) ; return 0 ; // Messages from Search menu case IDM_SEARCH_FIND: SendMessage (hwndEdit, EM_GETSEL, 0, (LPARAM) &iOffset) ; hDlgModeless = PopFindFindDlg (hwnd) ; return 0 ; case IDM_SEARCH_NEXT: SendMessage (hwndEdit, EM_GETSEL, 0, (LPARAM) &iOffset) ; if (PopFindValidFind ()) PopFindNextText (hwndEdit, &iOffset) ; else hDlgModeless = PopFindFindDlg (hwnd) ; return 0 ; case IDM_SEARCH_REPLACE: SendMessage (hwndEdit, EM_GETSEL, 0, (LPARAM) &iOffset) ; hDlgModeless = PopFindReplaceDlg (hwnd) ; 409
- 410. return 0 ; case IDM_FORMAT_FONT: if (PopFontChooseFont (hwnd)) PopFontSetFont (hwndEdit) ; return 0 ; // Messages from Help menu case IDM_HELP: OkMessage (hwnd, TEXT ("Help not yet implemented!"), TEXT ("0")) ; return 0 ; case IDM_APP_ABOUT: DialogBox (hInst, TEXT ("AboutBox"), hwnd, AboutDlgProc) ; return 0 ; } break ; case WM_CLOSE: if (!bNeedSave || IDCANCEL != AskAboutSave (hwnd, szTitleName)) DestroyWindow (hwnd) ; return 0 ; case WM_QUERYENDSESSION : if (!bNeedSave || IDCANCEL != AskAboutSave (hwnd, szTitleName)) return 1 ; return 0 ; case WM_DESTROY: PopFontDeinitialize () ; PostQuitMessage (0) ; return 0 ; default: // Process "Find-Replace" messages if (message == messageFindReplace) { pfr = (LPFINDREPLACE) lParam ; if (pfr->Flags & FR_DIALOGTERM) hDlgModeless = NULL ; if (pfr->Flags & FR_FINDNEXT) if (!PopFindFindText (hwndEdit, &iOffset, pfr)) OkMessage (hwnd, TEXT ("Text not found!"), TEXT ("0")) ; if (pfr->Flags & FR_REPLACE || pfr->Flags & FR_REPLACEALL) if (!PopFindReplaceText (hwndEdit, &iOffset, pfr)) OkMessage (hwnd, TEXT ("Text not found!"), TEXT ("0")) ; if (pfr->Flags & FR_REPLACEALL) while (PopFindReplaceText (hwndEdit, &iOffset, pfr)) ; return 0 ; } break ; 410
- 411. } return DefWindowProc (hwnd, message, wParam, lParam) ; } BOOL CALLBACK AboutDlgProc (HWND hDlg, UINT message, WPARAM wParam, LPARAM lParam) { switch (message) { case WM_INITDIALOG: return TRUE ; case WM_COMMAND: switch (LOWORD (wParam)) { case IDOK: EndDialog (hDlg, 0) ; return TRUE ; } break ; } return FALSE ; } POPFILE.C /*------------------------------------------ POPFILE.C -- Popup Editor File Functions ------------------------------------------*/ #include <windows.h> #include <commdlg.h> static OPENFILENAME ofn ; void PopFileInitialize (HWND hwnd) { static TCHAR szFilter[] = TEXT ("Text Files (*.TXT)0*.txt0") TEXT ("ASCII Files (*.ASC)0*.asc0") TEXT ("All Files (*.*)0*.*00") ; ofn.lStructSize = sizeof (OPENFILENAME) ; ofn.hwndOwner = hwnd ; ofn.hInstance = NULL ; ofn.lpstrFilter = szFilter ; ofn.lpstrCustomFilter = NULL ; ofn.nMaxCustFilter = 0 ; ofn.nFilterIndex = 0 ; ofn.lpstrFile = NULL ; // Set in Open and Close functions ofn.nMaxFile = MAX_PATH ; ofn.lpstrFileTitle = NULL ; // Set in Open and Close functions ofn.nMaxFileTitle = MAX_PATH ; ofn.lpstrInitialDir = NULL ; ofn.lpstrTitle = NULL ; ofn.Flags = 0 ; // Set in Open and Close functions ofn.nFileOffset = 0 ; ofn.nFileExtension = 0 ; ofn.lpstrDefExt = TEXT ("txt") ; 411
- 412. ofn.lCustData = 0L ; ofn.lpfnHook = NULL ; ofn.lpTemplateName = NULL ; } BOOL PopFileOpenDlg (HWND hwnd, PTSTR pstrFileName, PTSTR pstrTitleName) { ofn.hwndOwner = hwnd ; ofn.lpstrFile = pstrFileName ; ofn.lpstrFileTitle = pstrTitleName ; ofn.Flags = OFN_HIDEREADONLY | OFN_CREATEPROMPT ; return GetOpenFileName (&ofn) ; } BOOL PopFileSaveDlg (HWND hwnd, PTSTR pstrFileName, PTSTR pstrTitleName) { ofn.hwndOwner = hwnd ; ofn.lpstrFile = pstrFileName ; ofn.lpstrFileTitle = pstrTitleName ; ofn.Flags = OFN_OVERWRITEPROMPT ; return GetSaveFileName (&ofn) ; } BOOL PopFileRead (HWND hwndEdit, PTSTR pstrFileName) { BYTE bySwap ; DWORD dwBytesRead ; HANDLE