Sap business Objects certification note paper1
1 like4,337 views

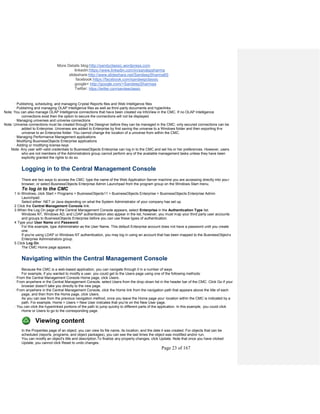
This document provides an overview of BusinessObjects Enterprise and InfoView. It defines Business Intelligence and describes how BusinessObjects Enterprise addresses the full spectrum of BI activities through reporting, query and analysis, performance management, and data integration products. It explains the role of the BusinessObjects Enterprise administrator and the key tools used for administration. It also describes the functions of InfoView and how to navigate and access different types of content through the InfoView interface.


![More Details blog:http://sandyclassic.wordpress.com
linkedin:https://www.linkedin.com/in/sandepsharma
slideshare:http://www.slideshare.net/SandeepSharma65
facebook:https://facebook.com/sandeepclassic
google+ http://google.com/+SandeepSharmaa
Twitter: https://twitter.com/sandeeclassic
Page 10 of 167
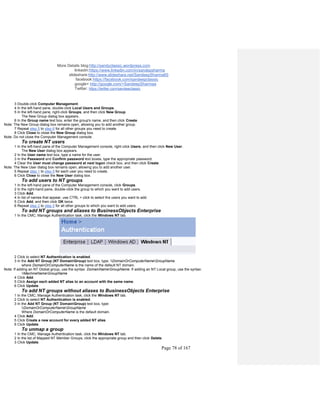
The folders, categories, and objects you can see in InfoView, the rights you have to schedule, the viewer you see, and so on, are
dependent on the account you log in with. As the administrator you can provide the necessary rights to users so they can orga nize
their folders and objects.
Accessing content
Now that you have logged in to BusinessObjects Enterprise you can access your content. The content types available through
InfoView are:
· Performance Management
· Crystal reports
· Web Intelligence documents
· OLAP Intelligence reports
· Third-party content such as PPT, DOC, XLS, TXT, and PDF
Note: If you have Dashboard Manager, you can also see corporate and personal dashboards. Dashboards and analytic applications are
discussed further in the Performance Management course.
Note:
· For reports created in Crystal Reports and Web Intelligence, you can:
· View on demand.
· Schedule.
· View a report instance.
· For reports created in OLAP Intelligence, you can:
· View a report on demand.
· Save a different view.
Try Practical
Concept not clear
Points to ponder
Where/How is it used?
To remember
Locating content
There are several ways to locate your content in InfoView:
· search
· filter
· browse folders and categories
Searching for objects
You can do a structured search to find objects in BusinessObjects Enterprise. Type the exact phrase and select a search text box,
such as title, description, or keyword. BusinessObjects Enterprise also has advanced search capabilities such as search by location,
owner, type, and time.
The objects displayed depend on how the BusinessObjects Enterprise administrator sets up the user account privileges. For
example, users in Marketing may see objects that differ from those seen by the users in Human Resources.
Note: A search includes all public folders you have rights to as well as your Favorites folder.
To search for an object
1 In the Search box, type the keywords that describe the object you're searching for.
2 Click the list next to the search box to select a search field.
The available search fields are:
· Search all fields
Comment [s1]: Public ,Private, Inbox Folder,
Corporate Personal Categories](https://image.slidesharecdn.com/sapbocertifcationnote-paper1-140601073927-phpapp01/85/Sap-business-Objects-certification-note-paper1-10-320.jpg)

![More Details blog:http://sandyclassic.wordpress.com
linkedin:https://www.linkedin.com/in/sandepsharma
slideshare:http://www.slideshare.net/SandeepSharma65
facebook:https://facebook.com/sandeepclassic
google+ http://google.com/+SandeepSharmaa
Twitter: https://twitter.com/sandeeclassic
Page 12 of 167
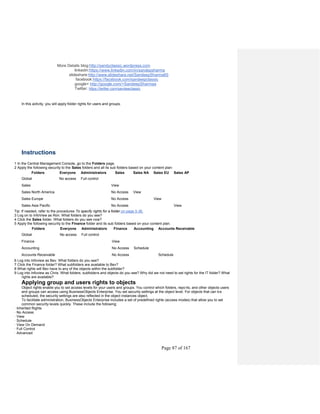
· When you copy objects to your personal folders, you can schedule and view them independently of other users. You can copy objects
individually, or you can copy an entire folder to your Favorites folder.
· The new copy of the report inherits all object rights from its new parent folder.
Moving reports
· The move command changes the location of the report objects from one folder to another.
· The report object retains its original set of object rights when it is moved.
Creating shortcuts
· The create shortcut command enables you to give users access to the report when you do not want them to access the folder in which
the actual report object is located.
· The shortcut inherits object rights from its parent folder, and these rights override the object rights set on the report itself.
Viewing and scheduling Crystal reports
There are three ways to view reports: on demand, by scheduling, and by viewing instances.
Note: The rights you have to schedule, the viewer you see, and so on, are dependent on the account you log in with. The content type also
determines what you can do. As the administrator you can provide the necessary rights to users so they can view, schedule, and/or
view on demand.
Viewing a report on demand
Viewing a report means you are viewing the object on demand; that is, BusinessObjects Enterprise runs the report and updates the
report data with the most current information from the database.
To view a Crystal report on demand
1 In InfoView, navigate to the report you want to view.
2 Click the report title.
The report opens in a viewer in the Workspace Panel.
Depending on the report viewer you are using, you can carry out the following when viewing a report:
· Refresh
· Find
· Toggle Group Tree
· Drill Down
· Zoom
· Scroll through pages
· Set parameters
· Export
Scheduling a report
Scheduling an object lets you run it automatically at specified times. When a scheduled object runs successfully, an instance is
created. An instance is a version of the object containing the data available at the time it was run; Instances created later contain
more recent data.
Scheduling can increase the overall performance of your BusinessObjects Enterprise deployment. This is because you can reduce
the processing load on your system by running reports at low traffic times.
By scheduling and viewing instances, you can ensure you have the latest information available for viewing, printing, and distributing.
For example, you can schedule a report object to run every night so it's available for you first thing in the morning.
To schedule a Crystal report
Comment [s2]: Think very Folder is like a hard
disk your personal folder is like u r own harddisk So
when u copy to your HDD then it will take all object
rights (means properties of files) from setting of ur
HDD.(Physical division)](https://image.slidesharecdn.com/sapbocertifcationnote-paper1-140601073927-phpapp01/85/Sap-business-Objects-certification-note-paper1-12-320.jpg)


![More Details blog:http://sandyclassic.wordpress.com
linkedin:https://www.linkedin.com/in/sandepsharma
slideshare:http://www.slideshare.net/SandeepSharma65
facebook:https://facebook.com/sandeepclassic
google+ http://google.com/+SandeepSharmaa
Twitter: https://twitter.com/sandeeclassic
Page 20 of 167
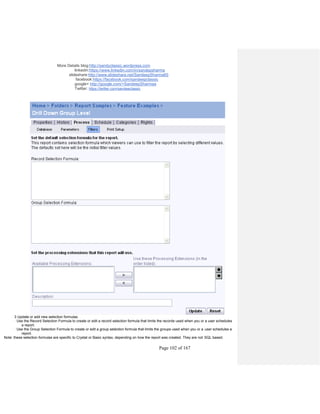
Web Application
Server
because it is responsible for converting reports pages into
DHTML rather than simply passing the EPF files to the browser.
Enhanced viewing and
formatting capabilities
No. When converting .epf pages to DHTML, formatting
limitations (such as no underlined fonts or dashed borders)
mean highly formatted reports may appear differently than in
Crystal Reports.
Yes. Reports are viewed in native
format (EPF) so they look almost
identical to reports viewed in Crystal
Reports.
Enhanced searching
capabilities
Yes (Advanced DHTML Viewer only). No.
Enhanced exporting
capabilities
Yes (Advanced DHTML can export to Microsoft Word and
Excel).
No.
Enhanced web
browser support
Yes. Support is standard across Netscape Navigator and
Internet Explorer. (Standard DHTML is also supported by IE 5.0
for Macintosh).
No. For example, ActiveX is only
support on Internet Explorer.
Customizable toolbars Yes. No.
Stop loading data
button
No. Yes.
Direct output to
printer
No. Reports are exported to PDF format on the server and must
be printed from Adobe Acrobat or the web browser where the
report is being viewed.
Yes.
To change the viewer for Crystal Reports
1 Click the Crystal Report Preferences tab.
2 In the View my reports using the area, select the report viewer you want to use when you display a report:
· ActiveX viewer
· DHTML viewer
· Advanced DHTML viewer
· Java viewer
Note: The DHTML viewer is selected by default for Internet Explorer browsers. The Java viewer is the default for Netscape browsers.
3 In the DHTML Viewer printing uses the area, choose Acrobat Reader printing control or ActiveX printing control.
4 In the Preferred measuring units for report page layout is area, select inches or millimeters.
5 Click OK.
Changing Web Intelligence viewing options
As with reports created in Crystal Reports, you select a view format for your Web Intelligence documents in the Preferences tab. The
view formats available are:
· HTML
Use this option if you want to navigate reports to view results, and refresh the report data to see the latest figures. Values displayed
in report tables and charts are static.
· Interactive
Use this option if you want to filter, sort, add simple calculations, or drill on the values displayed in the reports.
Note: The availability of this feature depends on how InfoView was installed and what user rights you have.
· Portable Document Format (PDF)
Use this option if you want to print a document or send it to someone who does not have access to InfoView or Web Intelligence.
Note: If you want added functionality select Interactive as the view option for Web Intelligence documents because you can pe rform a
number of actions on documents in InfoView without having to actually edit the document in the Web Intelligence report panel itself.
From InfoView in Interactive mode, you can:
· Filter data to limit the data shown in the report.
· Sort values to change the order of the information shown in the report.
· Add predefined calculations on data, such as adding up sums, counting totals, and calculating averages and percentages.
· Add and remove the variables that appear in the report.
· Analyze data in greater detail if the document has been set up for drill analysis.
· Format a document to your specific requirements.
To change the view format of a Web Intelligence document
1 Click Preferences on the navigation toolbar.
The Preferences page opens at the General Preferences tab.
Comment [s3]: Since in java or active X it is
coded So at client end it is not customizable.](https://image.slidesharecdn.com/sapbocertifcationnote-paper1-140601073927-phpapp01/85/Sap-business-Objects-certification-note-paper1-20-320.jpg)


![More Details blog:http://sandyclassic.wordpress.com
linkedin:https://www.linkedin.com/in/sandepsharma
slideshare:http://www.slideshare.net/SandeepSharma65
facebook:https://facebook.com/sandeepclassic
google+ http://google.com/+SandeepSharmaa
Twitter: https://twitter.com/sandeeclassic
Page 27 of 167
Import Wizard
A locally installed Windows application that guides administrators through the process of importing
users, groups, and folders from an existing BusinessObjects Enterprise, Crystal Enterprise or Info
implementation to BusinessObjects Enterprise. It also allows you to import users, groups, folders
and objects, events, server groups, repository objects, and calendars in BusinessObjects
Enterprise 11.
For Data Managers:
Tool Description
Universe
Designer
This semantic layer is the foundation for empowering end-user query and analysis. It abstracts the
complexity of data by using business language rather than data language to access, manipulate and
organize data.
Business
View
Manager
You can simplify data access for report designers by insulating them from the raw data structures. You
can build connections to multiple data sources, join tables, alias field names, create calculated fields,
and then surface this simplified structure as a Business View in BusinessObjects Enterprise. Report
designers can then use the Business View as the basis for their reports, rather than accessing the
data directly and building their own queries.
Data
Integrator
Provides an easy to use, graphical environment that simplifies and automates the most complex data
integration tasks.
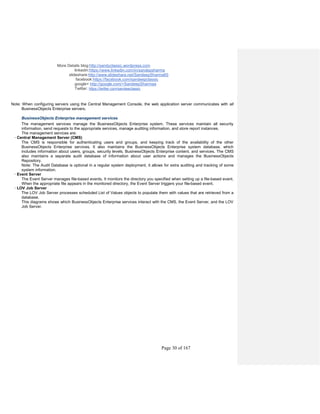
BusinessObjects Enterprise services
The BusinessObjects Enterprise system can be installed on a single machine, spread across different machines in an
intranet, or separated over a wide area network (WAN).
Note: For information on supported environments for BusinessObjects Enterprise installations, see the platforms.txt document
on the BusinessObjects Enterprise CD. You can also find this document on the Business Objects support Web site:
http://support.businessobjects.com.
For learning purposes, BusinessObjects Enterprise services can be grouped as follows:
Service group Servers
Web services Web Application Server, Web Component Adapter
Management
services
Central Management Server, Event Server, List of Values (LOV) Server
Storage services Input File Repository Server, Output File Repository Server
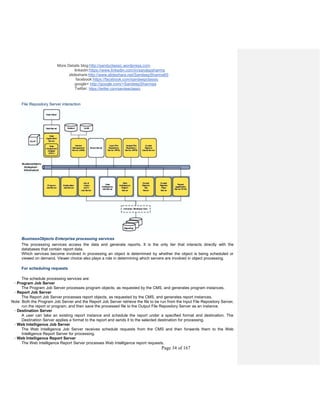
Processing
services
Program Job Server, Report Job Server, Destination Server, Web Intelligence Job Server,
Web Intelligence Report Server, Cache Server, Page Server, Report Application Server
This grouping is to enable learning only. In reality, BusinessObjects Enterprise web services must interact with
management and processing services, storage services must interact with management and processing
services, and so forth. This interaction will be emphasized in sections to follow.
Comment [s4]: Used to create LOV objects ?](https://image.slidesharecdn.com/sapbocertifcationnote-paper1-140601073927-phpapp01/85/Sap-business-Objects-certification-note-paper1-27-320.jpg)
![More Details blog:http://sandyclassic.wordpress.com
linkedin:https://www.linkedin.com/in/sandepsharma
slideshare:http://www.slideshare.net/SandeepSharma65
facebook:https://facebook.com/sandeepclassic
google+ http://google.com/+SandeepSharmaa
Twitter: https://twitter.com/sandeeclassic
Page 28 of 167
BusinessObjects Enterprise architecture
Enterprise Infrastructure
The Enterprise Infrastructure provides the basic messaging mechanism needed for BusinessObjects Enterprise
components to communicate with one another. The Enterprise Infrastructure is a series of services that are designed to
communicate via CORBA, which runs over TCP/IP.
Some CORBA applications use a Name server . The Name server service is a facility of the underlying CORBA
architecture that binds the BusinessObjects Enterprise servers together. The Name server provides a directory of the
servers registered in the BusinessObjects Enterprise environment and helps establish connections between clients and
these servers. The Name server service is a part of the Central Management Server.
The Enterprise Infrastructure establishes connections between clients and servers:
· It is the centerpiece of BusinessObjects Enterprise technology allowing the communication to happen between servers.
· A client object can transparently make requests to server objects using the Enterprise Infrastructure.
· A server object is a server that participates in serving requests to client objects.
· A client object is a client that makes requests to servers on the Enterprise Infrastructure.
Note: In the BusinessObjects Enterprise environment, all servers act as clients and servers to each other during transactions
between the servers.
When a BusinessObjects Enterprise server starts, it registers itself with the Name server in the CMS. The server will
provide information about itself, such as its IP address, TCP port, and description of the server, to the Name Shell.
Each individual server polls the CMS every 60 seconds to get an updated list of available servers in the system.
Comment [s5]: What are Events ? What is Event
Server?
Is Web Component Adapter work as an interface
between Java and C++?
Difference between WebI Report Server and Job
Server ?
OLAP cube resides in Web Apps Server?
Comment [s6]: Common Object Request
Broker Architecture is an architecture that
enables pieces of programs, called objects to
communicate with one another regardless of
what programming language they were written
in or what operating system they're running on.
An industry consortium known as the Object
Management Group developed CORBA
Corba is the foundation upon which the EJB
platform is built. All major application server
vendors (IBM, Oracle, Netscape/Sun, BEA,
Inprise, Sybase) are embedding a CORBA
implementation into their products. CORBA will
increasingly converge with the EJB standard.
CORBA is decreasing in importance as a
separate standard
CORBA provides a way to execute programs
written in any language no matter where they
reside in the network or what platform they run
on. It enables complex systems to be built
across an entire enterprise.
It allows programs at different locations and
developed by different vendors to communicate
in a network through an "interface broker."
It defines APIs, communication protocol, and
object/service information models to enable
heterogeneous applications written in various
languages running on various platforms to
interoperate. ...](https://image.slidesharecdn.com/sapbocertifcationnote-paper1-140601073927-phpapp01/85/Sap-business-Objects-certification-note-paper1-28-320.jpg)
![More Details blog:http://sandyclassic.wordpress.com
linkedin:https://www.linkedin.com/in/sandepsharma
slideshare:http://www.slideshare.net/SandeepSharma65
facebook:https://facebook.com/sandeepclassic
google+ http://google.com/+SandeepSharmaa
Twitter: https://twitter.com/sandeeclassic
Page 29 of 167
BusinessObjects Enterprise web services
The web services are server-side components that process requests from client applications and communicate these
requests to the appropriate server. They include support for report viewing and logic to understand and direct web
requests to the appropriate BusinessObjects Enterprise server.
Note: The Web Component Server (WCS) and Crystal Server Pages (CSP), part of Crystal Enterprise, are no longer
supported under BusinessObjects Enterprise architecture. However, the Crystal Software Development Kit (SDK) will
still work with non-proprietary web application servers.
BusinessObjects Enterprise web services include:
· web application server
The web application server uses the BusinessObjects Enterprise SDK (Java or .NET) to interface with the rest of the
BusinessObjects Enterprise services. It is responsible for processing requests from the browser, sending Crystal Server
Pages (.CSP) and Crystal Web Request (.CRW) requests to the Web Component Adapter, and formatting pages to be
returned to the web client. The web application server acts as a gateway between the browser and the rest of the
components in BusinessObjects Enterprise.
· Web Component Adapter (WCA)
The WCA runs within the application server and provides backward compatibility for applications developed using
Crystal Server Pages (.CSP) and Crystal Web Request (.CWR) requests. The WCA also handles OLAP Intelligence
view requests.
The diagram below shows which BusinessObjects Enterprise services the web application server interacts with.
Services that interact with the web application server
Comment [s7]: Is there a concept of Java
connecting to older VC++ code through JNI for that
this adapter is there…](https://image.slidesharecdn.com/sapbocertifcationnote-paper1-140601073927-phpapp01/85/Sap-business-Objects-certification-note-paper1-29-320.jpg)


Ad
More Related Content
What's hot (20)
Similar to Sap business Objects certification note paper1 (20)


Ad
More from Sandeep Sharma IIMK Smart City,IoT,Bigdata,Cloud,BI,DW (20)


Ad
Recently uploaded (20)


Sap business Objects certification note paper1
- 1. More Details blog:http://sandyclassic.wordpress.com linkedin:https://www.linkedin.com/in/sandepsharma slideshare:http://www.slideshare.net/SandeepSharma65 facebook:https://facebook.com/sandeepclassic google+ http://google.com/+SandeepSharmaa Twitter: https://twitter.com/sandeeclassic Page 1 of 167 BECP-Business Objects Enterprise Certified Professional. Paper 1 SABE 201 Table of Contents Lesson Descriptions Page No 1 Understanding BusinessObjects Enterprise 2 What is BusinessObjects Enterprise 2 Working in Info view 5 Working in the Central Management Console 18 2 BusinessObjects Enterprise Architecture 21 The BusinessObjects Enterprise architecture 21 Information process flows in BusinessObjects Enterprise 33 3 Planning The Content 41 The BusinessObjects Enterprise security model 41 Creating a content plan 48 4 Planning Application Security 51 Securing applications 51 5 Creating and Securing Folders, Users, and Groups 54 Creating folders, new users, and groups 54 Mapping third party accounts to BusinessObjects Enterprise 61 Applying security 70 6 Publishing and Configuring Content 78 Publishing 78 Configuring 80 7 Scheduling 102 Scheduling objects 102 Scheduling on events 121 Scheduling with business calendars 125 Managing instances 130 8 Delegated Administration 133 Understanding Delegated Administration 133
- 2. More Details blog:http://sandyclassic.wordpress.com linkedin:https://www.linkedin.com/in/sandepsharma slideshare:http://www.slideshare.net/SandeepSharma65 facebook:https://facebook.com/sandeepclassic google+ http://google.com/+SandeepSharmaa Twitter: https://twitter.com/sandeeclassic Page 2 of 167
- 3. More Details blog:http://sandyclassic.wordpress.com linkedin:https://www.linkedin.com/in/sandepsharma slideshare:http://www.slideshare.net/SandeepSharma65 facebook:https://facebook.com/sandeepclassic google+ http://google.com/+SandeepSharmaa Twitter: https://twitter.com/sandeeclassic Page 3 of 167 Lesson 1 Understanding BusinessObjects Enterprise BusinessObjects Enterprise is the Business Intelligence (BI) platform that supports the entire range of end-user reporting, query and analysis, and performance management uses. Understanding this infrastructure will help you successfully administer BusinessObjects Enterprise. In this lesson you will learn about: · What is BusinessObjects Enterprise? · Working in InfoView · Working in the Central Management Console What is BusinessObjects Enterprise? Introduction BusinessObjects Enterprise brings together features from across the Business Objects product line to meet the diverse needs of users, from presentation-quality reporting to in-depth data analysis. After completing this unit, you will be able to: · Define Business Intelligence and how Business Objects provides it. · Describe how BusinessObjects Enterprise fits in to the Business Objects solution. · Describe the responsibilities of a BusinessObjects Enterprise system administrator. · Describe the main BusinessObjects Enterprise interfaces for administering users and content. What is Business Intelligence? By understanding Business Intelligence (BI), you will better comprehend how a BusinessObjects Enterprise solution addresses the Business Intelligence product spectrum. Gartner defines Business Intelligence Gartner, Inc., a research and advisory firm that helps clients leverage technology, coined the term Business Intelligence in the late 1980s. Business Intelligence, as defined by Gartner, is an iterative user-centered process that includes accessing and exploring information, analyzing this information, and developing insights and understanding, which leads to improved and informed decision making. BI usage crosses the spectrum of users, both internally and externally throughout any enterprise, and includes rank and file workers, executives, analysts, and knowledge workers. Examples of internal and external BI applications include: · Generating a class list for a training session · Creating an employee performance review · Scheduling in a health care setting
- 4. More Details blog:http://sandyclassic.wordpress.com linkedin:https://www.linkedin.com/in/sandepsharma slideshare:http://www.slideshare.net/SandeepSharma65 facebook:https://facebook.com/sandeepclassic google+ http://google.com/+SandeepSharmaa Twitter: https://twitter.com/sandeeclassic Page 4 of 167 · Manufacturing computer parts Benefits of Business Intelligence Business Intelligence can help organizations to: · increase sales. · deepen customer relationships. · build better products. · provide better services. · streamline operations. · reduce costs. · make better decisions. Business Intelligence provides insights that enable business managers to make tactical decisions, as well as to establish, modify, or tune business strategies and processes in order to gain competitive advantage and improve business operations and profitabili ty. The role of BusinessObjects Enterprise BI is made up of related activities and technologies. Business Objects products, with BusinessObjects Enterprise as the infrastructure, address the full spectrum of BI activities. Business Objects has separated these activities into categories as they pertain to the Business Objects product suite.
- 5. More Details blog:http://sandyclassic.wordpress.com linkedin:https://www.linkedin.com/in/sandepsharma slideshare:http://www.slideshare.net/SandeepSharma65 facebook:https://facebook.com/sandeepclassic google+ http://google.com/+SandeepSharmaa Twitter: https://twitter.com/sandeeclassic Page 5 of 167 The categories are: · Reporting: Crystal Reports, Crystal Reports Explorer, BusinessObjects Enterprise Reporting is the process of accessing data, formatting it, and delivering it as information inside and outside the organization. It serves as the foundation of a broader Business Intelligence strategy by providing the most-requested pieces of information reliably and securely via the web or by being embedded in enterprise applications. · Query and Analysis: Web Intelligence, OLAP Intelligence Query and Analysis products let analysts and power users explore and interact with data from both relational and OLAP data sources. Users can navigate and analyze data to uncover root causes and identify trends. They can create their own queries from scratch, without having to understand complex database schemas or SQL, and easily add calculations to deliver more insight from the data. They can share that information with others across your enterprise and beyond. · Performance Management: Dashboard Manager, Performance Manager and BusinessObjects Analytics (Set Analysis, Predictive Analysis, Statistical Process Control). Performance management provides an innovative, flexible, and integrated framework for building and deploying metric driven Business Intelligence solutions. By providing stakeholders with a view of the business via a dashboard containing alerts, scorecards, analytics, and reports, users can monitor key business metrics, analyze performance issues, and set goals to get their operations back on track. Performance Management Analytics let you easily implement and customize prepackaged analytics and use a data warehouse to manage disparate data sources. · Business Intelligence Platform: Business View Manager, Universe Designer, Live Office Provides a common IT administrator platform to support all of your Business Intelligence tools and applications. It is open, scalable, and tightly integrated. · Data Integration: Data Integrator Data integration products from Business Objects allow you to access, integrate, transform, and deliver enterprise data from any source for reporting, query and analysis, and performance management. Administering BusinessObjects Enterprise The regular administrative tasks associated with BusinessObjects Enterprise can be roughly divided into the following categories: · User and group management · Creating and managing users and groups, including their rights to folders, objects, and applications For example, a BusinessObjects Enterprise administrator needs to give the appropriate rights to Data Managers and Report Designers who interact with BusinessObjects Enterprise. Data Managers build Universes and export them to BusinessObjects Enterprise. Report Designers design reports from these universes using Crystal Reports, Web Intelligence, or OLAP Intelligence and can then save the reports to BusinessObjects Enterprise. · Content management · Publishing, scheduling, and managing Crystal Reports files · Publishing, scheduling, and managing Web Intelligence files · Publishing and managing OLAP Intelligence files, third party documents, and hyperlinks · Managing universes, universe Connections, and universe restriction sets · Dashboards and Analytics · Server management · Installing, configuring, and managing servers Administration tools
- 6. More Details blog:http://sandyclassic.wordpress.com linkedin:https://www.linkedin.com/in/sandepsharma slideshare:http://www.slideshare.net/SandeepSharma65 facebook:https://facebook.com/sandeepclassic google+ http://google.com/+SandeepSharmaa Twitter: https://twitter.com/sandeeclassic Page 6 of 167 This section introduces new BusinessObjects Enterprise administrators to some of the available management tools. These tools can be accessed from the BusinessObjects Enterprise Admin Launchpad, located through BusinessObjects Enterprise from the BusinessObjects Enterprise XI program group on the Windows Start menu. Administrators use these applications to manage BusinessObjects Enterprise: · Central Management Console (CMC) The CMC is a web-based application that allows you to perform user management tasks such as setting up authentication and adding users and groups. It also allows you to publish, organize, and set security levels for all of your BusinessObjects Enterprise content and enables you to manage servers and create server groups. · Central Configuration Manager (CCM) The CCM is a locally installed Windows application server-management tool that allows you to configure each of your BusinessObjects Enterprise server components. Using the CCM, you can start, stop, enable, and disable servers. It also allows you to view and configure advanced server settings. Note: Server administration is discussed in the Administering Servers course. · Publishing Wizard The Publishing Wizard is a locally installed Windows application that enables both administrators and end users to add reports to BusinessObjects Enterprise. It can be used for mass publishing of reports. · Import Wizard The Import Wizard is a locally installed Windows application that guides administrators through the process of importing users, groups, folders, and objects from an existing BusinessObjects Enterprise or information implementation to BusinessObjects Enterprise. It also allows you to import events, server groups, repository objects, calendars, corporate categories, and universes in BusinessObjects Enterprise. · Business Views Manager Business Views is a multi-tier system that enables companies to build comprehensive and specific objects that help report designers and end users access the information they require. Business Views enable administrators to manage the integration and organization of operational data in one central location. Since all of the objects found in Business Views are saved to the Repository, the BusinessObjects Enterprise user must have access to the Repository before they can open, modify, and save different objects. · Universe Designer You create, modify, and update universes with Universe Designer. Designer provides a connection wizard which allows you to connect to your database middleware. You can create multiple connections with Designer, but only one connection can be defined for each universe. This database connection is saved with the universe. End-user applications In addition to InfoView, end-users can also work in the following applications: · Web Intelligence Web Intelligence is a web-based query, reporting and analysis tool within BusinessObjects Enterprise. It lets business users and power users create, modify and analyze reports in a single, easy-to-use interface without depending on IT. · InfoView InfoView is a web-based interface that end users access to view, schedule, and keep track of published reports. System administrators can use InfoView when testing changes in reports and documents. This course focuses on the front-end administration of BusinessObjects Enterprise, which primarily entails working in the CMC (Central Management Console) and testing changes in InfoView as well as publishing reports to the BusinessObjects Enterprise system using the Publishing Wizard. Working in InfoView Introduction
- 7. More Details blog:http://sandyclassic.wordpress.com linkedin:https://www.linkedin.com/in/sandepsharma slideshare:http://www.slideshare.net/SandeepSharma65 facebook:https://facebook.com/sandeepclassic google+ http://google.com/+SandeepSharmaa Twitter: https://twitter.com/sandeeclassic Page 7 of 167 While administering users and content primarily takes place in the Central Management Console, administrators also need to be familiar with InfoView so they can test changes they've made in the Central Management Console, as well as to handle any questions from end-users. After completing this unit, you will be able to: · Describe the functions of InfoView. · Access InfoView. · Describe the InfoView interface. · Differentiate BusinessObjects content types. · Locate content. · Differentiate the various ways to access content. · View a Crystal report on demand. · Schedule a Crystal Report. · View a Crystal report instance. · View a Web Intelligence document on demand. · Change the query. · Schedule a Web Intelligence document. · View a Web Intelligence document instance. What is InfoView? BusinessObjects Enterprise comes with InfoView, a web desktop that acts as a window to a broad range of useful business information around your company, including Crystal Reports, Web Intelligence documents, OLAP Intelligence reports, spreadsheets, and other documents. With BusinessObjects Enterprise, users can access this information and organize it to suit their preferences. Note: InfoView can be customized to suit your company's standards. In this case, InfoView will appear different than the out-of-the-box standard look with default settings. The features available in BusinessObjects Enterprise vary by content type, but in general, users can view information in their web browser, export it to other business applications (such as Microsoft Excel), and save information to their local machine. Note: BusinessObjects Enterprise can also provide access to a range of analytic tools to help users explore information in mo re detail. If you set the necessary security rights, users can use these features to modify reports, examine trends over time, or look for specific patterns in their corporate data. There are two ways to access InfoView: · Type the URL for your InfoView site directly in your web browser. · Select BusinessObjects Enterprise from the program group on the Windows Start menu. To access and log in to InfoView 1 Click Start > Programs > BusinessObjects XI>BusinessObjects Enterprise>BusinessObjects Enterprise Infoview. Choose either the .NET or the Java version of InfoView depending on what the system administrator of your company has set up. The Log On page appears. 2 In the Existing User area, enter your username and password. You will also need to enter the CMS system name if you are using .NET.
- 8. More Details blog:http://sandyclassic.wordpress.com linkedin:https://www.linkedin.com/in/sandepsharma slideshare:http://www.slideshare.net/SandeepSharma65 facebook:https://facebook.com/sandeepclassic google+ http://google.com/+SandeepSharmaa Twitter: https://twitter.com/sandeeclassic Page 8 of 167 Note: If you leave the username and password blank, you will be logged in as a guest. 3 Click the Authentication list to select the authentication type. Note: If you select NT Authentication and don't enter a user name or password, you'll be logged in using the account information of the local machine. 4 Click Log On. InfoView appears. Navigating in InfoView With its default settings, the main page of InfoView contains information on folders, objects, and so on.
- 9. More Details blog:http://sandyclassic.wordpress.com linkedin:https://www.linkedin.com/in/sandepsharma slideshare:http://www.slideshare.net/SandeepSharma65 facebook:https://facebook.com/sandeepclassic google+ http://google.com/+SandeepSharmaa Twitter: https://twitter.com/sandeeclassic Page 9 of 167 Note: Depending on your Preferences settings, your main page may look different. The main page for InfoView is made up of these areas: · Title bar This area contains the desktop logo and a message displaying your user account name. · Navigation bar This area contains buttons for Home, Toggle Navigation, New, Refresh (the Workspace Panel), Send (a document to various locations), My InfoView (a customizable area for you to set up your InfoView portal or portals), Search, Preferences, Log off, and Help. · Navigation panel This area displays folders or categories, depending on whether the Folders or Categories button is active, and buttons for Refresh (the Navigation Panel), Properties, Copy, Move, and Delete. The Folders area holds a Favorites folder, your Inbox, a Home link (that contains sample reports and documents). The Categories area contains all the Public or Personal categories that an administrator or an end user have set up. Note: Folders and subfolders are used to organize objects, while categories are a way to classify your information. For example, you could place your financial reports and documents into a folder named Finance and you could classify or tag your reports that deal with specific financial matters as Payroll, Accounts Payable, and Accounts Receivable. · Workspace panel This area displays the objects connected with a specific folder or subfolder as well as the objects connected to specific categories. The Workspace Panel also contains the options to Organize (Move, Copy, Add Shortcut, Add to Favorites), Delete, and Filter (by various types) in addition to Maximize, Restore, and Go Back Workspace Panel options. · Discussions area The Discussions feature of BusinessObjects Enterprise enables users to create and maintain comments and discussions on reports within the BusinessObjects Enterprise environment and to share that information across the organization.
- 10. More Details blog:http://sandyclassic.wordpress.com linkedin:https://www.linkedin.com/in/sandepsharma slideshare:http://www.slideshare.net/SandeepSharma65 facebook:https://facebook.com/sandeepclassic google+ http://google.com/+SandeepSharmaa Twitter: https://twitter.com/sandeeclassic Page 10 of 167 The folders, categories, and objects you can see in InfoView, the rights you have to schedule, the viewer you see, and so on, are dependent on the account you log in with. As the administrator you can provide the necessary rights to users so they can orga nize their folders and objects. Accessing content Now that you have logged in to BusinessObjects Enterprise you can access your content. The content types available through InfoView are: · Performance Management · Crystal reports · Web Intelligence documents · OLAP Intelligence reports · Third-party content such as PPT, DOC, XLS, TXT, and PDF Note: If you have Dashboard Manager, you can also see corporate and personal dashboards. Dashboards and analytic applications are discussed further in the Performance Management course. Note: · For reports created in Crystal Reports and Web Intelligence, you can: · View on demand. · Schedule. · View a report instance. · For reports created in OLAP Intelligence, you can: · View a report on demand. · Save a different view. Try Practical Concept not clear Points to ponder Where/How is it used? To remember Locating content There are several ways to locate your content in InfoView: · search · filter · browse folders and categories Searching for objects You can do a structured search to find objects in BusinessObjects Enterprise. Type the exact phrase and select a search text box, such as title, description, or keyword. BusinessObjects Enterprise also has advanced search capabilities such as search by location, owner, type, and time. The objects displayed depend on how the BusinessObjects Enterprise administrator sets up the user account privileges. For example, users in Marketing may see objects that differ from those seen by the users in Human Resources. Note: A search includes all public folders you have rights to as well as your Favorites folder. To search for an object 1 In the Search box, type the keywords that describe the object you're searching for. 2 Click the list next to the search box to select a search field. The available search fields are: · Search all fields Comment [s1]: Public ,Private, Inbox Folder, Corporate Personal Categories
- 11. More Details blog:http://sandyclassic.wordpress.com linkedin:https://www.linkedin.com/in/sandepsharma slideshare:http://www.slideshare.net/SandeepSharma65 facebook:https://facebook.com/sandeepclassic google+ http://google.com/+SandeepSharmaa Twitter: https://twitter.com/sandeeclassic Page 11 of 167 · Search title · Search keyword · Advanced search Tip: For searching purposes, implement a company policy where report designers need to fill in the report summary fields s o users can search on all fields for reports. Note: The Advanced Search option enables you to search by location, keyword, description, owner, title, type, and time. 3 Click the arrow to activate the search. A list of objects meeting your search parameters appears. To view an instance of the object, click the object title. Note: Depending on the rights given by the administrator, users may be unable to View and/or View Latest Instance. In addition, if there are no instances on the system, users may need to schedule the object first. Filtering objects You can filter objects by choosing an object type in the Filter drop-down list. The object types include Program, Web Intelligence documents, hyperlinks, text, object packages, Adobe Acrobat, rich text, Dashboard, Crystal Reports report objects as well as a suite of Microsoft products. When you log in to InfoView, you will see the My Folders folder, which contains: · Favorites Consider the Favorites folder as your own personalized version of InfoView. This view displays only the folders and reports that you selected or created. You can organize reports from another folder by copying or linking them to a folder of your choice in the Favorites folder. You can create new folders, move, rename, delete reports and folders, or create shortcuts from your Favorites folder. Note: the Favorites folder will be shown as a User folder to the Administrator in the CMC. · Inbox Your Inbox is a messaging system that is part of BusinessObjects Enterprise. You can send reports and documents or their associated shortcuts to colleagues that are also part of the same enterprise system. The Inbox is separate from your email address; it is only available to users of BusinessObjects Enterprise. Note: items with titles in bold in your inbox indicate that they are new items that have not been read. To navigate through folders 1 In the Folders area, expand the appropriate folder list. 2 Drag your mouse over the list of subfolders. The subfolders you can select are underlined as the mouse passes over them. 3 Click the subfolder of your choice. The objects in the folder appear. To navigate through categories 1 In the Category area, expand the appropriate folder list. 2 Click the category of your choice. The objects in the category appear. Note: Remember that the folders, categories, and objects you can see in InfoView, the rights you have to schedule, the viewer you see, and so on, are dependent on the account you log on with. As the administrator you can provide the necessary rights to users so they can organize their folders and objects. Organizing objects in folders Folders provide you with the ability to organize and facilitate content administration. In InfoView you can copy and move rep orts to folders, and create shortcuts to reports in folders. You can create new folders and subfolders, copy folders and objects, and create shortcuts to folders and objects only as long as you have the necessary rights. Note: As the administrator, you will determine the rights to provide the end user. You also have rights to view the contents of user folders. Copying reports · The copy command creates another copy of the report object in a different location.
- 12. More Details blog:http://sandyclassic.wordpress.com linkedin:https://www.linkedin.com/in/sandepsharma slideshare:http://www.slideshare.net/SandeepSharma65 facebook:https://facebook.com/sandeepclassic google+ http://google.com/+SandeepSharmaa Twitter: https://twitter.com/sandeeclassic Page 12 of 167 · When you copy objects to your personal folders, you can schedule and view them independently of other users. You can copy objects individually, or you can copy an entire folder to your Favorites folder. · The new copy of the report inherits all object rights from its new parent folder. Moving reports · The move command changes the location of the report objects from one folder to another. · The report object retains its original set of object rights when it is moved. Creating shortcuts · The create shortcut command enables you to give users access to the report when you do not want them to access the folder in which the actual report object is located. · The shortcut inherits object rights from its parent folder, and these rights override the object rights set on the report itself. Viewing and scheduling Crystal reports There are three ways to view reports: on demand, by scheduling, and by viewing instances. Note: The rights you have to schedule, the viewer you see, and so on, are dependent on the account you log in with. The content type also determines what you can do. As the administrator you can provide the necessary rights to users so they can view, schedule, and/or view on demand. Viewing a report on demand Viewing a report means you are viewing the object on demand; that is, BusinessObjects Enterprise runs the report and updates the report data with the most current information from the database. To view a Crystal report on demand 1 In InfoView, navigate to the report you want to view. 2 Click the report title. The report opens in a viewer in the Workspace Panel. Depending on the report viewer you are using, you can carry out the following when viewing a report: · Refresh · Find · Toggle Group Tree · Drill Down · Zoom · Scroll through pages · Set parameters · Export Scheduling a report Scheduling an object lets you run it automatically at specified times. When a scheduled object runs successfully, an instance is created. An instance is a version of the object containing the data available at the time it was run; Instances created later contain more recent data. Scheduling can increase the overall performance of your BusinessObjects Enterprise deployment. This is because you can reduce the processing load on your system by running reports at low traffic times. By scheduling and viewing instances, you can ensure you have the latest information available for viewing, printing, and distributing. For example, you can schedule a report object to run every night so it's available for you first thing in the morning. To schedule a Crystal report Comment [s2]: Think very Folder is like a hard disk your personal folder is like u r own harddisk So when u copy to your HDD then it will take all object rights (means properties of files) from setting of ur HDD.(Physical division)
- 13. More Details blog:http://sandyclassic.wordpress.com linkedin:https://www.linkedin.com/in/sandepsharma slideshare:http://www.slideshare.net/SandeepSharma65 facebook:https://facebook.com/sandeepclassic google+ http://google.com/+SandeepSharmaa Twitter: https://twitter.com/sandeeclassic Page 13 of 167 Note: Before scheduling objects, check your time zone setting on the Preferences page in InfoView. The default time zone is l ocal to the web server that is running BusinessObjects Enterprise, not to the Central Management Console (CMC) machine(s) that each user connects to. By setting your time zone, you ensure that your scheduled objects are processed in accordance with the time zone in which you are working. You must have your own account on the system in order to set your preferences. 1 Click Schedule. The Schedule page appears. 2 In the Run object list, select when you want to run this object. Note: If you want to set other options, do not click Schedule until you have made all your selections. For more information about scheduling options, refer to the Help section of the Product documentation. 3 Select the database logon information for this report. 4 Set any filters for this report. 5 Select the destination for this report. 6 Select the format for this report. 7 Set any print settings for this report. 8 Select the server group for this report. 9 Select any parameters for this report.
- 14. More Details blog:http://sandyclassic.wordpress.com linkedin:https://www.linkedin.com/in/sandepsharma slideshare:http://www.slideshare.net/SandeepSharma65 facebook:https://facebook.com/sandeepclassic google+ http://google.com/+SandeepSharmaa Twitter: https://twitter.com/sandeeclassic Page 14 of 167 10 Select a date and/or start time, if necessary. 11 On the Schedule page (in the Workspace Panel), click Schedule. Viewing a report instance Viewing a report instance, unlike viewing a report, means that you are viewing the result of a previously scheduled report. Because this report was run earlier, it contains historical, not current, data. You can see a list of instances by looking at an object's history, and you can click the link to any historical instance. If you have the rights to view objects on demand, you can view and refresh any instance to retrieve the latest data from the database BusinessObjects Enterprise saves a history of object instances for scheduled objects that have been run. The history list is arranged chronologically (with the most recent instances first) and contains information such as: · Instance Time · Run By · Parameters · Format · Status The Instance Time for a successful instance becomes a hyperlink to that instance. You can view the instance by clicking the hyperlink. Tip: · Sort instances chronologically by clicking the "Instance Time" column heading. Click the column again to reverse the sort order. Or, sort instances by owner (alphabetically and reverse-alphabetically) by clicking the Run By column heading. · Use the Delete, Pause, and Resume buttons in the History page to delete a selected object, to pause the publication of an object, or to resume a paused instance. Choose an object from the Selected column and click either Delete, Pause, or Resume. The object type determines if it can be viewed on demand or as an instance. The following table outlines the viewing capabilities of each object type. Viewing Crystal Reports Web Intelligence Documents OLAP Intelligence Reports View on demand Yes Yes Yes Schedule Yes Yes No View a instance Yes Yes No Save a different view No No Yes To view a Crystal report instance 1 Click the View Latest Instance link of the report you want to view. The latest instance of the report appears in the Workspace Panel.
- 15. More Details blog:http://sandyclassic.wordpress.com linkedin:https://www.linkedin.com/in/sandepsharma slideshare:http://www.slideshare.net/SandeepSharma65 facebook:https://facebook.com/sandeepclassic google+ http://google.com/+SandeepSharmaa Twitter: https://twitter.com/sandeeclassic Page 15 of 167 Tip: You can also click the History link and select the instance you want to view from the History list. You can see detailed status information for recurring and failed instances by clicking the link(s) under the Status column. 2 Click the link(s) under the Instance Time column to view the object instance. When you view a report object instance, it opens in a viewer. Exporting reports Successful instances of reports can be exported to several reporting formats, as well as to popular word processor and spreadsheet formats. Exporting reports makes distribution of information easier. Export format types for reports created in Crystal Reports are: · Crystal Reports · Adobe Acrobat · Microsoft Excel · Microsoft Excel (Data Only) · Microsoft Word (RTF) · Microsoft Word (Editable RTF) · Rich Text Format (RTF) To export a Crystal report
- 16. More Details blog:http://sandyclassic.wordpress.com linkedin:https://www.linkedin.com/in/sandepsharma slideshare:http://www.slideshare.net/SandeepSharma65 facebook:https://facebook.com/sandeepclassic google+ http://google.com/+SandeepSharmaa Twitter: https://twitter.com/sandeeclassic Page 16 of 167 1 In InfoView, navigate to the report you want to view. 2 Click the report title. The report opens in a viewer. 3 Click the Export this report button. (Hover your mouse over a button to see its name.) 4 In the Export window, select an export format from the list. 5 Specify the pages to export. 6 Click OK. Practice Activity: viewing and scheduling Crystal Reports Objective In this activity, you will: · Locate a Crystal report in InfoView to be viewed on demand, scheduled, and viewed as an instance. Instructions 1 Log on to InfoView as Administrator. 2 Navigate to the Report Samples > General Business folder. 3 Locate the Product Catalog report and click the report title to view the report on demand. The Product Catalog report displays in a viewer window. 4 Close the report viewer to return to the list of reports. 5 Schedule the Product Catalog report to Run Now, keeping the default settings. 6 On the report history page click Refresh. You should see one report instance. 7 Schedule the Product Catalog report again, this time scheduling it to: · Run Hourly, starting three minutes from now and ending four hours after that. · Use Excel (Data Only - accept all defaults) as the report format. 8 On the report history page, click Refresh. You should now see the first report instance, a recurring schedule job, and a second instance. If you don't see a second instance yet, wait a minute or so, then click Refresh again. 9 Click the link to view the latest instance. The report displays in a viewer window. Viewing and scheduling Web Intelligence documents Web Intelligence allows you to access, analyze, and share corporate data over intranets and extranets for both relational databases (RDBMS) and online analytical processing (OLAP) servers. You can create and edit Web Intelligence documents or analyze Web Intelligence reports. Using InfoView, you can upload Web Intelligence documents to the corporate repository or share documents with other users. The terms used in Web Intelligence are: · Universe The special semantic layer that isolates you from the technical issues of the database is called a universe. A universe maps to data in the database, but uses everyday terms that describe your business environment. This means that you can select exactly the data that interests you using your own business terminology. Universes are created by a universe designer using BusinessObjects Designer. The designer then makes universes available to you and other users so that you can access the data through an intuitive, user-friendly interface. · Object The elements within the database that you use to create reports are called objects. · Class
- 17. More Details blog:http://sandyclassic.wordpress.com linkedin:https://www.linkedin.com/in/sandepsharma slideshare:http://www.slideshare.net/SandeepSharma65 facebook:https://facebook.com/sandeepclassic google+ http://google.com/+SandeepSharmaa Twitter: https://twitter.com/sandeeclassic Page 17 of 167 Objects with similar types of data are grouped into classes. You can view and schedule a Web Intelligence document much like a report created in Crystal Reports. However, you can export a Web Intelligence document to Microsoft Excel and Adobe Acrobat only. Note: Web Intelligence documents do not exist in their native format (.wid) outside of the BusinessObjects Enterprise system. You can save them as Microsoft Excel spreadsheets or Adobe Acrobat PDFs. As well, you can save the document as Standard HTML, but only when scheduling the document. To view a Web Intelligence document on demand 1 In InfoView, navigate to the document you want to view. 2 Click the report's link. The document opens in the Workspace Panel. To edit the query in a Web Intelligence document 1 With the Web Intelligence document open in the Workspace Panel, click Document > Edit. The document opens in the Web Intelligence application. 2 Click Edit Query in the toolbar. 3 Change any objects or filters. 4 Click Run Query. The new query appears. 5 Click Save to save the changes. Tip: You can also save the document to your computer as a Microsoft Excel spreadsheet or an Adobe Acrobat PDF. To schedule a Web Intelligence document 1 Locate the report you want to schedule. 2 Click Schedule under the report link. The Schedule page opens. 3 Select the options for: · When · Destination · Format · Caching Options You can export the document as Microsoft Excel, Standard HTML, or Adobe Acrobat in the Caching Options. 4 Click Schedule. You are returned to the Instance page. 5 Click the instance you want to view. Tip: If the document's status is pending for too long, click Refresh to update the status. To view a Web Intelligence document instance 1 Click the View Latest Instance link of the document you want to view. The latest instance of the document appears in the Workspace Panel. Tip: You can also click the History link and select the instance you want to view from the History list. 2 Click the link(s) under the Instance Time column to launch the object instance. Note: You can see detailed status information for recurring and failed instances by clicking the link(s) under the Status column. Exporting Web Intelligence documents When you export a Web Intelligence document, you can save, save as, or view the document in PDF format. You can also choose t o export the document to another format when you schedule the document. Export format types for documents created in Web Intelligence are: · Microsoft Excel · Standard HTML (available when scheduling only) · Adobe Acrobat PDF To export a Web Intelligence document 1 With the Web Intelligence document open in the Workspace Panel, click Save or Save As. The Save Document page opens. 2 Select the options for exporting: · Title · Description · Keywords
- 18. More Details blog:http://sandyclassic.wordpress.com linkedin:https://www.linkedin.com/in/sandepsharma slideshare:http://www.slideshare.net/SandeepSharma65 facebook:https://facebook.com/sandeepclassic google+ http://google.com/+SandeepSharmaa Twitter: https://twitter.com/sandeeclassic Page 18 of 167 · Location · Categories (Public or Personal) 3 Click OK. 4 Click the button at the right end of the toolbar to go back to the last main page of the Workspace panel. Practice Activity: viewing and scheduling Web Intelligence documents Objective In this activity, you will: · Navigate the folder structure to locate a Web Intelligence document · View a Web Intelligence document on demand · Change the query for a Web Intelligence document · Schedule a Web Intelligence document · View a scheduled instance of a Web Intelligence document Instructions 1 Log in to Business Enterprise Infoview as Administrator. 2 Navigate the folder structure to locate the Web Intelligence Sample document (under Public folders). 3 Click the title of the Web Intelligence document in order to view on demand. 4 Click Document > Edit at the top of the page. 5 Click Edit Query to change the current query. 6 Add a filter showing only when country is one of USA, Canada or Mexico. 7 Run the new query and save the Web Intelligence document. 8 Close the Web Intelligence document. 9 In the action list select Schedule. 10 Click OK to schedule the Web Intelligence document to run now. 11 Refresh the instance as necessary until its status is `successful'. 12 Choose to view the scheduled instance. Personalizing InfoView The Preferences page enables users to modify the appearance of InfoView. You must have your own account on the s ystem in order to set up your preferences. The Preferences page displays a general tab and additional tabs for each end user application installed in BusinessObjects Enterprise. To access the Preferences page · From the title bar of InfoView, click Preferences. The Preferences page appears. The Preferences options include: · General preferences · My initial view is · My InfoView is · On my desktop · For each object, show me (these properties) · View my documents · My current locale is
- 19. More Details blog:http://sandyclassic.wordpress.com linkedin:https://www.linkedin.com/in/sandepsharma slideshare:http://www.slideshare.net/SandeepSharma65 facebook:https://facebook.com/sandeepclassic google+ http://google.com/+SandeepSharmaa Twitter: https://twitter.com/sandeeclassic Page 19 of 167 · My current time zone is · Crystal Reports preferences Note: This only appears if Crystal Reports is installed on the BusinessObjects Enterprise Web Application Server or Web Component Adapter. · Display my reports · View my reports using (Viewer) · DHTML viewer prints using the (printing control) · Preferred measuring units for report page layout is · Web Intelligence preferences Note: This only appears if Web Intelligence is installed on the BusinessObjects Enterprise Web Application Server. · Select a view format · Select a report panel · For each new drill session · General drill options · OLAP Intelligence preferences Note: This only appears if OLAP Intelligence is installed on the BusinessObjects Enterprise Web Application Server. · View my reports using (Viewer) Changing viewers Users can manually select their preferred viewer type through the Preferences page. Once there, they must click the appropriate application's Preferences tab. Note: As the BusinessObjects Enterprise administrator, you will select the viewer type that best suits your company's needs. As the administrator, you can disable some features in the BusinessObjects Enterprise viewers. A report viewer allows users to view, print, and export reports using a web browser without having a connection to the reporting database and without having the full client application installed locally. BusinessObjects Enterprise includes the following report viewers for Crystal Reports: Zero client · DHTML Viewer · Advanced DHTML Viewer Thin client · ActiveX Viewer · Java Viewer Zero-Client versus Thin-Client viewers When selecting a report viewer, the first decision is whether to use a zero-client viewer, a thin-client viewer, or a combination of both. Each viewer has advantages and disadvantages depending on the operating environment where you are deploying BusinessObjects Enterprise. Here are some examples: If your company... Then the ideal viewer may be... Locks down users' computers and requires a viewer with low administrative overhead The DHTML or the Advanced DHTML viewer Performs advanced searches on reports, such as field selection and setting search conditions The Advanced DHTML viewer Is concerned about increased stress on the Web Application Server The Java viewer or the ActiveX viewer Has standardized Internet Explorer on client computers The ActiveX viewer There are many factors to consider when deciding which viewer is best suited for your BusinessObjects Enterprise deployment. The following table outlines the major differences in functionality between Zero-Client and Thin-Client viewers. Functionality Zero-Client Thin-Client Can be used on locked-down workstations Yes, as no Administrator rights are required. No. Less stress on the No. Increased loading occurs on the Web Application Server Yes.
- 20. More Details blog:http://sandyclassic.wordpress.com linkedin:https://www.linkedin.com/in/sandepsharma slideshare:http://www.slideshare.net/SandeepSharma65 facebook:https://facebook.com/sandeepclassic google+ http://google.com/+SandeepSharmaa Twitter: https://twitter.com/sandeeclassic Page 20 of 167 Web Application Server because it is responsible for converting reports pages into DHTML rather than simply passing the EPF files to the browser. Enhanced viewing and formatting capabilities No. When converting .epf pages to DHTML, formatting limitations (such as no underlined fonts or dashed borders) mean highly formatted reports may appear differently than in Crystal Reports. Yes. Reports are viewed in native format (EPF) so they look almost identical to reports viewed in Crystal Reports. Enhanced searching capabilities Yes (Advanced DHTML Viewer only). No. Enhanced exporting capabilities Yes (Advanced DHTML can export to Microsoft Word and Excel). No. Enhanced web browser support Yes. Support is standard across Netscape Navigator and Internet Explorer. (Standard DHTML is also supported by IE 5.0 for Macintosh). No. For example, ActiveX is only support on Internet Explorer. Customizable toolbars Yes. No. Stop loading data button No. Yes. Direct output to printer No. Reports are exported to PDF format on the server and must be printed from Adobe Acrobat or the web browser where the report is being viewed. Yes. To change the viewer for Crystal Reports 1 Click the Crystal Report Preferences tab. 2 In the View my reports using the area, select the report viewer you want to use when you display a report: · ActiveX viewer · DHTML viewer · Advanced DHTML viewer · Java viewer Note: The DHTML viewer is selected by default for Internet Explorer browsers. The Java viewer is the default for Netscape browsers. 3 In the DHTML Viewer printing uses the area, choose Acrobat Reader printing control or ActiveX printing control. 4 In the Preferred measuring units for report page layout is area, select inches or millimeters. 5 Click OK. Changing Web Intelligence viewing options As with reports created in Crystal Reports, you select a view format for your Web Intelligence documents in the Preferences tab. The view formats available are: · HTML Use this option if you want to navigate reports to view results, and refresh the report data to see the latest figures. Values displayed in report tables and charts are static. · Interactive Use this option if you want to filter, sort, add simple calculations, or drill on the values displayed in the reports. Note: The availability of this feature depends on how InfoView was installed and what user rights you have. · Portable Document Format (PDF) Use this option if you want to print a document or send it to someone who does not have access to InfoView or Web Intelligence. Note: If you want added functionality select Interactive as the view option for Web Intelligence documents because you can pe rform a number of actions on documents in InfoView without having to actually edit the document in the Web Intelligence report panel itself. From InfoView in Interactive mode, you can: · Filter data to limit the data shown in the report. · Sort values to change the order of the information shown in the report. · Add predefined calculations on data, such as adding up sums, counting totals, and calculating averages and percentages. · Add and remove the variables that appear in the report. · Analyze data in greater detail if the document has been set up for drill analysis. · Format a document to your specific requirements. To change the view format of a Web Intelligence document 1 Click Preferences on the navigation toolbar. The Preferences page opens at the General Preferences tab. Comment [s3]: Since in java or active X it is coded So at client end it is not customizable.
- 21. More Details blog:http://sandyclassic.wordpress.com linkedin:https://www.linkedin.com/in/sandepsharma slideshare:http://www.slideshare.net/SandeepSharma65 facebook:https://facebook.com/sandeepclassic google+ http://google.com/+SandeepSharmaa Twitter: https://twitter.com/sandeeclassic Page 21 of 167 2 Click the Web Intelligence Document Preferences tab. 3 From the Select a view format area, choose an option: · HTML · Interactive · Portable Document Format (Adobe Reader required) 4 Click OK. 5 Click the button to the extreme right on the Workspace Panel toolbar to go back to the last main workspace page. Changing OLAP Intelligence viewing options As with reports created in Crystal Reports and Web Intelligence, you select a view format for your OLAP Intelligence documents in the Preferences tab. The view formats available are: · ActiveX · DHTML To change the viewer for OLAP Intelligence reports 1 Click the OLAP Intelligence Preferences tab. 2 In the View my reports using the area, select the report viewer you want to use when you display a report: · ActiveX viewer · DHTML viewer 3 Click OK. 4 Click the button to the extreme right on the Workspace Panel toolbar to go back to the last main workspace page. Practice Activity: Recommending a viewer Scenario Company A is running standardized Internet Explorer on their client machines. The majority of their BusinessObjects Enterprise users have View On Demand rights. The IT department wants to allow users increased functionality from their BusinessObjects Enterprise viewer for printing integrity and also give them the ability to stop data loading if necessary once the report viewing has be gun. Company B is sensitive to vulnerabilities and the IT department keeps the client systems in a `locked down' environment, preventing users from loading plug-ins or other software without administrative privileges. They are not using the RAS component and it is currently not loaded on the BusinessObjects Enterprise servers. Objective In this activity, you will: · Discuss the advantages and limitations of the different report viewer options · Determine the best report viewer for a given user's needs Instructions 1 List the viewers that are available in BusinessObjects Enterprise. 2 List at least 3 characteristics associated with each viewer. 3 Using the scenario outlined in this activity, decide which viewer is most appropriate for each company.
- 22. More Details blog:http://sandyclassic.wordpress.com linkedin:https://www.linkedin.com/in/sandepsharma slideshare:http://www.slideshare.net/SandeepSharma65 facebook:https://facebook.com/sandeepclassic google+ http://google.com/+SandeepSharmaa Twitter: https://twitter.com/sandeeclassic Page 22 of 167 Working in the Central Management Console Introduction You will use the Central Management Console (CMC) extensively to manage your BusinessObjects Enterprise system. This tool allows you to perform user management tasks such as setting up authentication and adding users and groups. After completing this unit, you will be able to: · Describe the purpose of the Central Management Console · Navigate in the Central Management Console · View content and properties · Set Central Management Console preferences What is the Central Management Console? The Central Management Console (CMC) allows you to create and manage BusinessObjects Enterprise users and groups. It also enables you to publish, organize, and set security levels for all of your BusinessObjects Enterprise content. Additionally, the CMC enables you to manage servers and create server groups. Note: The CMC is different from the Central Configuration Manager (CCM) in that the CMC is web-based. Because the CMC is a web- based application, you can perform all of these administrative tasks remotely. BusinessObjects Enterprise server administration is covered in the Administering Servers course. You can perform administrative tasks in the CMC such as: · Creating and managing users and groups including their rights to folders, objects, and applications
- 23. More Details blog:http://sandyclassic.wordpress.com linkedin:https://www.linkedin.com/in/sandepsharma slideshare:http://www.slideshare.net/SandeepSharma65 facebook:https://facebook.com/sandeepclassic google+ http://google.com/+SandeepSharmaa Twitter: https://twitter.com/sandeeclassic Page 23 of 167 · Publishing, scheduling, and managing Crystal Reports files and Web Intelligence files · Publishing and managing OLAP Intelligence files as well as third-party documents and hyperlinks Note: You can also manage OLAP Intelligence connections that have been created via InfoView in the CMC. If no OLAP Intelligence connections exist then the option to secure the connections will not be displayed. · Managing universes and universe connections Note: Universe connections must be created through the Designer before they can be managed in the CMC; only secured connections can be added to Enterprise. Universes are added to Enterprise by first saving the universe to a Windows folder and then exporting th e universe to an Enterprise folder. You cannot change the location of a universe from within the CMC. · Managing Performance Management applications · Modifying BusinessObjects Enterprise applications · Adding or modifying license keys Note: Any user with valid credentials to BusinessObjects Enterprise can log in to the CMC and set his or her preferences. However, users who are not members of the Administrators group cannot perform any of the available management tasks unless they have been explicitly granted the rights to do so. Logging in to the Central Management Console There are two ways to access the CMC: type the name of the Web Application Server machine you are accessing directly into your browser, or select BusinessObjects Enterprise Admin Launchpad from the program group on the Windows Start menu. To log in to the CMC 1 In Windows, click Start > Programs > BusinessObjects11 > BusinessObjects Enterprise > BusinessObjects Enterprise Admin Launchpad. Select either .NET or Java depending on what the System Administrator of your company has set up. 2 Click the Central Management Console link. 3 When the Log On page of the Central Management Console appears, select Enterprise in the Authentication Type list. Windows NT, Windows AD, and LDAP authentication also appear in the list; however, you must map your third party user accounts and groups to BusinessObjects Enterprise before you can use these types of authentication. 4 Type your User Name and Password. For this example, type Administrator as the User Name. This default Enterprise account does not have a password until you create one. If you're using LDAP or Windows NT authentication, you may log in using an account that has been mapped to the BusinessObjects Enterprise Administrators group. 5 Click Log On. The CMC Home page appears. Navigating within the Central Management Console Because the CMC is a web-based application, you can navigate through it in a number of ways. For example, if you wanted to modify a user, you could get to the Users page using one of the following methods: · From the Central Management Console Home page, click Users. · From anywhere in the Central Management Console, select Users from the drop-down list in the header bar of the CMC. Click Go if your browser doesn't take you directly to the new page. · From anywhere in the Central Management Console, click the Home link from the navigation path that appears above the title of each page, and then from the Home page, click Users. As you can see from the previous navigation method, once you leave the Home page your location within the CMC is indicated by a path. For example, Home > Users > New User indicates that you're on the New User page. · You can click the hyperlinked portions of the path to jump quickly to different parts of the application. In this example, you could click Home or Users to go to the corresponding page. Viewing content In the Properties page of an object, you can view its file name, its location, and the date it was created. For objects that can be scheduled (reports, programs, and object packages), you can see the last times the object was modified and/or run. You can modify an object's title and description.To finalize any property changes, click Update. Note that once you have clicked Update, you cannot click Reset to undo changes.
- 24. More Details blog:http://sandyclassic.wordpress.com linkedin:https://www.linkedin.com/in/sandepsharma slideshare:http://www.slideshare.net/SandeepSharma65 facebook:https://facebook.com/sandeepclassic google+ http://google.com/+SandeepSharmaa Twitter: https://twitter.com/sandeeclassic Page 24 of 167 For Microsoft Word, Excel, PowerPoint, Adobe Acrobat, Text, and Rich Text objects, a View button appears on the Properties page. Provided that you have the appropriate software installed on your browser machine, you can click View to open and view the object. Similarly, for report objects, a Preview button appears. The Preview button enables you to view a report on demand with all of your current report settings. BusinessObjects Enterprise connects to the report's data source(s) if no cached pages are available. To use the Preview function, the user will need to have rights at the View on Demand level or higher. (To preview a report with saved data, the user will need to have rights at the View level or higher.) By default, administrators have rights at the Full Control level (the highest rights setting) for all report objects. For object packages, the Scheduled package fails upon individual component failure check box is selected by default. (A component is an object in an object package.) This means that if one of the component instances in a package fails, the object package instance in the History will appear as Failed. If you do not want the object package instance to fail when one of the component instances fails, clear the Scheduled package fails upon individual component failure check box. Setting Central Management Console Preferences Similar to the Preferences area of InfoView, the Preferences area of the CMC allows you to customize your administrative view of BusinessObjects Enterprise. Options Description
- 25. More Details blog:http://sandyclassic.wordpress.com linkedin:https://www.linkedin.com/in/sandepsharma slideshare:http://www.slideshare.net/SandeepSharma65 facebook:https://facebook.com/sandeepclassic google+ http://google.com/+SandeepSharmaa Twitter: https://twitter.com/sandeeclassic Page 25 of 167 Viewer This list sets the default report viewer that is loaded when you view a report in the CMC. Maximum number of objects per page This option limits the number of objects listed on any page or tab in the CMC. This setting does not limit the number of objects displayed, simply the number displayed per page. Maximum number of characters for each page index When a list of objects spans multiple pages, the full list is sorted alphanumerically and indexed before being subdivided. At the top of every page, hyperlinks are displayed as an index to each of the remaining pages. This setting determines the number of characters that are included in each hyperlink. To specify an unlimited maximum number of characters, select the Unlimited check box. Measuring units for report page layout Specify inches or millimeters as the measuring units used by default when you customize a report's page layout on the report object's Print Setup tab. Time zone If you are managing BusinessObjects Enterprise remotely, use this list to specify your time zone. BusinessObjects Enterprise synchronizes scheduling patterns and events appropriately. For instance, if you select Eastern Time (US & Canada), and you schedule a report to run at 5:00 a.m. every day on a server that is located in San Francisco, then the server will run the report at 2:00 a.m. Pacific Time. My Password Click the Change Password link to change the password for the account under which you are currently ogged in. To set Central Management Console preferences · From the CMC Home page, click Preferences in the upper-right corner of the console and select any of the listed options. Lesson 2 BusinessObjects Enterprise Architecture BusinessObjects Enterprise architecture consists of web, management, processing, and storage services. Understanding this architecture will help you visualize how actions performed in client applications are processed by the services. After completing this lesson, you will be able to describe: · The BusinessObjects Enterprise architecture · Information process flows in BusinessObjects Enterprise The BusinessObjects Enterprise architecture Introduction A full deployment of BusinessObjects Enterprise is made up of client applications, BusinessObjects Enterprise services, and the organization's relational and/or OLAP data sources. This unit discusses the individual roles of the BusinessObjects Enterprise components and how they interact with each other and with organizational data sources. After completing this unit, you will be able to describe:
- 26. More Details blog:http://sandyclassic.wordpress.com linkedin:https://www.linkedin.com/in/sandepsharma slideshare:http://www.slideshare.net/SandeepSharma65 facebook:https://facebook.com/sandeepclassic google+ http://google.com/+SandeepSharmaa Twitter: https://twitter.com/sandeeclassic Page 26 of 167 · The client applications · The BusinessObjects Enterprise services BusinessObjects Enterprise client applications BusinessObjects Enterprise includes and/or interacts with most Business Objects client tools. Depending on the job role, different client tools are used. Listed below is each ptoential job role accompanied by a list of client tools which someone performing that role could potentially use. For Business Users: Tool Description BusinessObjects Enterprise InfoView A web-based interface that end users access to view, schedule, and keep track of published reports. Crystal Reports Explorer A web tool that enables users to do ad hoc reporting via the web and save reports to the Crystal Enterprise system. Web Intelligence A web-based tool that provides query, reporting, and analysis functionality for relational data sources all within one web-based product. Allows users create reports, perform ad hoc queries, analyze data, and apply report formatting. OLAP Intelligence (web client) Used for viewing, modifying and creating basic analytic reports based on OLAP data. Dashboard Manager A web-based tool used to monitor key performance indicators (KPIs) and proactively alert managers via email and dashboards with the information they need, wherever they are. Performance Manager Allows users to track and analyze key business metrics via management dashboards, scorecards, and alerting. For Report Designers: Tool Description Crystal Reports The industry standard reporting tool to create and integrate powerful reports in BusinessObjects Enterprise. Web Intelligence A web-based interface to provide query, reporting, and analysis functionality for relational and OLAP data sources all within one web-based product. Allows users to create reports, perform ad hoc queries, analyze data, and apply report formatting. OLAP Intelligence (full client) Used to build, format and analyze analytic OLAP reports. Dashboard Manager Dashboard Manager enables you to easily deploy powerful business intelligence (BI) dashboards. For Administrators: Tool Description Central Management Console The CMC web interface allows you to perform user management tasks such as setting up authentication and adding users and groups. It also allows you to publish, organize, and set security levels for all of your BusinessObjects Enterprise content and enables you to manage servers and create server groups. Central Configuration Manager The CCM is a Windows server-management tool that allows you to configure each of your BusinessObjects Enterprise server components. Using the CCM, you can start, stop, enable, and disable servers. It also allows you to view and configure advanced server settings. Publishing Wizard A locally installed Windows application that enables both administrators and end users to add reports to BusinessObjects Enterprise. It can be used for mass publishing of reports.
- 27. More Details blog:http://sandyclassic.wordpress.com linkedin:https://www.linkedin.com/in/sandepsharma slideshare:http://www.slideshare.net/SandeepSharma65 facebook:https://facebook.com/sandeepclassic google+ http://google.com/+SandeepSharmaa Twitter: https://twitter.com/sandeeclassic Page 27 of 167 Import Wizard A locally installed Windows application that guides administrators through the process of importing users, groups, and folders from an existing BusinessObjects Enterprise, Crystal Enterprise or Info implementation to BusinessObjects Enterprise. It also allows you to import users, groups, folders and objects, events, server groups, repository objects, and calendars in BusinessObjects Enterprise 11. For Data Managers: Tool Description Universe Designer This semantic layer is the foundation for empowering end-user query and analysis. It abstracts the complexity of data by using business language rather than data language to access, manipulate and organize data. Business View Manager You can simplify data access for report designers by insulating them from the raw data structures. You can build connections to multiple data sources, join tables, alias field names, create calculated fields, and then surface this simplified structure as a Business View in BusinessObjects Enterprise. Report designers can then use the Business View as the basis for their reports, rather than accessing the data directly and building their own queries. Data Integrator Provides an easy to use, graphical environment that simplifies and automates the most complex data integration tasks. BusinessObjects Enterprise services The BusinessObjects Enterprise system can be installed on a single machine, spread across different machines in an intranet, or separated over a wide area network (WAN). Note: For information on supported environments for BusinessObjects Enterprise installations, see the platforms.txt document on the BusinessObjects Enterprise CD. You can also find this document on the Business Objects support Web site: http://support.businessobjects.com. For learning purposes, BusinessObjects Enterprise services can be grouped as follows: Service group Servers Web services Web Application Server, Web Component Adapter Management services Central Management Server, Event Server, List of Values (LOV) Server Storage services Input File Repository Server, Output File Repository Server Processing services Program Job Server, Report Job Server, Destination Server, Web Intelligence Job Server, Web Intelligence Report Server, Cache Server, Page Server, Report Application Server This grouping is to enable learning only. In reality, BusinessObjects Enterprise web services must interact with management and processing services, storage services must interact with management and processing services, and so forth. This interaction will be emphasized in sections to follow. Comment [s4]: Used to create LOV objects ?
- 28. More Details blog:http://sandyclassic.wordpress.com linkedin:https://www.linkedin.com/in/sandepsharma slideshare:http://www.slideshare.net/SandeepSharma65 facebook:https://facebook.com/sandeepclassic google+ http://google.com/+SandeepSharmaa Twitter: https://twitter.com/sandeeclassic Page 28 of 167 BusinessObjects Enterprise architecture Enterprise Infrastructure The Enterprise Infrastructure provides the basic messaging mechanism needed for BusinessObjects Enterprise components to communicate with one another. The Enterprise Infrastructure is a series of services that are designed to communicate via CORBA, which runs over TCP/IP. Some CORBA applications use a Name server . The Name server service is a facility of the underlying CORBA architecture that binds the BusinessObjects Enterprise servers together. The Name server provides a directory of the servers registered in the BusinessObjects Enterprise environment and helps establish connections between clients and these servers. The Name server service is a part of the Central Management Server. The Enterprise Infrastructure establishes connections between clients and servers: · It is the centerpiece of BusinessObjects Enterprise technology allowing the communication to happen between servers. · A client object can transparently make requests to server objects using the Enterprise Infrastructure. · A server object is a server that participates in serving requests to client objects. · A client object is a client that makes requests to servers on the Enterprise Infrastructure. Note: In the BusinessObjects Enterprise environment, all servers act as clients and servers to each other during transactions between the servers. When a BusinessObjects Enterprise server starts, it registers itself with the Name server in the CMS. The server will provide information about itself, such as its IP address, TCP port, and description of the server, to the Name Shell. Each individual server polls the CMS every 60 seconds to get an updated list of available servers in the system. Comment [s5]: What are Events ? What is Event Server? Is Web Component Adapter work as an interface between Java and C++? Difference between WebI Report Server and Job Server ? OLAP cube resides in Web Apps Server? Comment [s6]: Common Object Request Broker Architecture is an architecture that enables pieces of programs, called objects to communicate with one another regardless of what programming language they were written in or what operating system they're running on. An industry consortium known as the Object Management Group developed CORBA Corba is the foundation upon which the EJB platform is built. All major application server vendors (IBM, Oracle, Netscape/Sun, BEA, Inprise, Sybase) are embedding a CORBA implementation into their products. CORBA will increasingly converge with the EJB standard. CORBA is decreasing in importance as a separate standard CORBA provides a way to execute programs written in any language no matter where they reside in the network or what platform they run on. It enables complex systems to be built across an entire enterprise. It allows programs at different locations and developed by different vendors to communicate in a network through an "interface broker." It defines APIs, communication protocol, and object/service information models to enable heterogeneous applications written in various languages running on various platforms to interoperate. ...
- 29. More Details blog:http://sandyclassic.wordpress.com linkedin:https://www.linkedin.com/in/sandepsharma slideshare:http://www.slideshare.net/SandeepSharma65 facebook:https://facebook.com/sandeepclassic google+ http://google.com/+SandeepSharmaa Twitter: https://twitter.com/sandeeclassic Page 29 of 167 BusinessObjects Enterprise web services The web services are server-side components that process requests from client applications and communicate these requests to the appropriate server. They include support for report viewing and logic to understand and direct web requests to the appropriate BusinessObjects Enterprise server. Note: The Web Component Server (WCS) and Crystal Server Pages (CSP), part of Crystal Enterprise, are no longer supported under BusinessObjects Enterprise architecture. However, the Crystal Software Development Kit (SDK) will still work with non-proprietary web application servers. BusinessObjects Enterprise web services include: · web application server The web application server uses the BusinessObjects Enterprise SDK (Java or .NET) to interface with the rest of the BusinessObjects Enterprise services. It is responsible for processing requests from the browser, sending Crystal Server Pages (.CSP) and Crystal Web Request (.CRW) requests to the Web Component Adapter, and formatting pages to be returned to the web client. The web application server acts as a gateway between the browser and the rest of the components in BusinessObjects Enterprise. · Web Component Adapter (WCA) The WCA runs within the application server and provides backward compatibility for applications developed using Crystal Server Pages (.CSP) and Crystal Web Request (.CWR) requests. The WCA also handles OLAP Intelligence view requests. The diagram below shows which BusinessObjects Enterprise services the web application server interacts with. Services that interact with the web application server Comment [s7]: Is there a concept of Java connecting to older VC++ code through JNI for that this adapter is there…
- 30. More Details blog:http://sandyclassic.wordpress.com linkedin:https://www.linkedin.com/in/sandepsharma slideshare:http://www.slideshare.net/SandeepSharma65 facebook:https://facebook.com/sandeepclassic google+ http://google.com/+SandeepSharmaa Twitter: https://twitter.com/sandeeclassic Page 30 of 167 Note: When configuring servers using the Central Management Console, the web application server communicates with all BusinessObjects Enterprise servers. BusinessObjects Enterprise management services The management services manage the BusinessObjects Enterprise system. These services maintain all security information, send requests to the appropriate services, manage auditing information, and store report instances. The management services are: · Central Management Server (CMS) The CMS is responsible for authenticating users and groups, and keeping track of the availability of the other BusinessObjects Enterprise services. It also maintains the BusinessObjects Enterprise system database, which includes information about users, groups, security levels, BusinessObjects Enterprise content, and services. The CMS also maintains a separate audit database of information about user actions and manages the BusinessObjects Repository. Note: The Audit Database is optional in a regular system deployment, it allows for extra auditing and tracking of some system information. · Event Server The Event Server manages file-based events. It monitors the directory you specified when setting up a file-based event. When the appropriate file appears in the monitored directory, the Event Server triggers your file-based event. · LOV Job Server The LOV Job Server processes scheduled List of Values objects to populate them with values that are retrieved from a database. This diagrams shows which BusinessObjects Enterprise services interact with the CMS, the Event Server, and the LOV Job Server.
- 31. More Details blog:http://sandyclassic.wordpress.com linkedin:https://www.linkedin.com/in/sandepsharma slideshare:http://www.slideshare.net/SandeepSharma65 facebook:https://facebook.com/sandeepclassic google+ http://google.com/+SandeepSharmaa Twitter: https://twitter.com/sandeeclassic Page 31 of 167 Services that interact with the CMS Note: All servers communicate with the CMS when they start up.
- 32. More Details blog:http://sandyclassic.wordpress.com linkedin:https://www.linkedin.com/in/sandepsharma slideshare:http://www.slideshare.net/SandeepSharma65 facebook:https://facebook.com/sandeepclassic google+ http://google.com/+SandeepSharmaa Twitter: https://twitter.com/sandeeclassic Page 32 of 167 Services that interact with the Event Server
- 33. More Details blog:http://sandyclassic.wordpress.com linkedin:https://www.linkedin.com/in/sandepsharma slideshare:http://www.slideshare.net/SandeepSharma65 facebook:https://facebook.com/sandeepclassic google+ http://google.com/+SandeepSharmaa Twitter: https://twitter.com/sandeeclassic Page 33 of 167 Services that interact with the LOV Job Server BusinessObjects Enterprise storage services The storage services are responsible for storing objects and object instances. The storage services are: · Input File Repository Server The Input File Repository Server manages all of the report and program objects that have been published to the system. It can store the following files: .RPT, .CAR, .EXE, .BAT, .JS, .XLS, .DOC, .PPT, .RTF, .TXT, .PDF,.WID. .RPT files are stored as report definition files only; they do not contain any data. · Output File Repository Server The Output File Repository Server manages all of the report instances generated by the Report Job Server and the program instances generated by the Program Job Server. It can store the following files: .RPT, .CSV, .XLS, .DOC, .RTF, .TXT, .PDF,.WID. .RPT files are stored as reports with saved data. The diagram below shows which BusinessObjects Enterprise services the File Repository Services interact with.
- 34. More Details blog:http://sandyclassic.wordpress.com linkedin:https://www.linkedin.com/in/sandepsharma slideshare:http://www.slideshare.net/SandeepSharma65 facebook:https://facebook.com/sandeepclassic google+ http://google.com/+SandeepSharmaa Twitter: https://twitter.com/sandeeclassic Page 34 of 167 File Repository Server interaction BusinessObjects Enterprise processing services The processing services access the data and generate reports. It is the only tier that interacts directly with the databases that contain report data. Which services become involved in processing an object is determined by whether the object is being scheduled or viewed on demand. Viewer choice also plays a role in determining which servers are involved in object processing. For scheduling requests The schedule processing services are: · Program Job Server The Program Job Server processes program objects, as requested by the CMS, and generates program instances. · Report Job Server The Report Job Server processes report objects, as requested by the CMS, and generates report instances. Note: Both the Program Job Server and the Report Job Server retrieve the file to be run from the Input File Repository Server, run the report or program, and then save the processed file to the Output File Repository Server as an instance. · Destination Server A user can take an existing report instance and schedule the report under a specified format and destination. The Destination Server applies a format to the report and sends it to the selected destination for processing. · Web Intelligence Job Server The Web Intelligence Job Server receives schedule requests from the CMS and then forwards them to the Web Intelligence Report Server for processing. · Web Intelligence Report Server The Web Intelligence Report Server processes Web Intelligence report requests.
- 35. More Details blog:http://sandyclassic.wordpress.com linkedin:https://www.linkedin.com/in/sandepsharma slideshare:http://www.slideshare.net/SandeepSharma65 facebook:https://facebook.com/sandeepclassic google+ http://google.com/+SandeepSharmaa Twitter: https://twitter.com/sandeeclassic Page 35 of 167 The following diagrams show which BusinessObjects Enterprise services interact with the Program Job Server, Report Job Server, and the Destination Server. Services that interact with the Program Job Server
- 36. More Details blog:http://sandyclassic.wordpress.com linkedin:https://www.linkedin.com/in/sandepsharma slideshare:http://www.slideshare.net/SandeepSharma65 facebook:https://facebook.com/sandeepclassic google+ http://google.com/+SandeepSharmaa Twitter: https://twitter.com/sandeeclassic Page 36 of 167 Services that interact with the Report Job Server
- 37. More Details blog:http://sandyclassic.wordpress.com linkedin:https://www.linkedin.com/in/sandepsharma slideshare:http://www.slideshare.net/SandeepSharma65 facebook:https://facebook.com/sandeepclassic google+ http://google.com/+SandeepSharmaa Twitter: https://twitter.com/sandeeclassic Page 37 of 167 Services that interact with the Destination Server
- 38. More Details blog:http://sandyclassic.wordpress.com linkedin:https://www.linkedin.com/in/sandepsharma slideshare:http://www.slideshare.net/SandeepSharma65 facebook:https://facebook.com/sandeepclassic google+ http://google.com/+SandeepSharmaa Twitter: https://twitter.com/sandeeclassic Page 38 of 167 Services that interact with the Web Intelligence Job Server and the Web Intelligence Report Server For viewing requests The viewing processing services are: · Cache Server The Cache Server is responsible for handling report viewing requests from the DHTML, ActiveX, and Java viewers. It checks whether or not it can fulfill the request with a cached report page. If not, it passes the request to the Page Server. The Cache Server stores Encapsulated Page Format (.EPF) and Encapsulated Tree Format (.ETF) files for a defined period of time. Note: .EPF and .ETF are both proprietary formats that can only be read by the crpe32.dll print engine in BusinessObjects Enterprise. · Page Server The Page Server is responsible for responding to page requests by processing reports and generating Encapsulated Page Format (.EPF) pages .The Page Server retrieves data for the report from the latest instance or directly from that database. After it has generated the report and converted it to .EPF, the Page Server then sends the .EPF file to the Cache Server. The diagrams below show which BusinessObjects Enterprise services interact with the Cache Server and the Page Server.
- 39. More Details blog:http://sandyclassic.wordpress.com linkedin:https://www.linkedin.com/in/sandepsharma slideshare:http://www.slideshare.net/SandeepSharma65 facebook:https://facebook.com/sandeepclassic google+ http://google.com/+SandeepSharmaa Twitter: https://twitter.com/sandeeclassic Page 39 of 167 Services that interact with the Cache Server.
- 40. More Details blog:http://sandyclassic.wordpress.com linkedin:https://www.linkedin.com/in/sandepsharma slideshare:http://www.slideshare.net/SandeepSharma65 facebook:https://facebook.com/sandeepclassic google+ http://google.com/+SandeepSharmaa Twitter: https://twitter.com/sandeeclassic Page 40 of 167 Services that interact with the Page Server. For Crystal Reports Explorer and Advanced DHTML requests Report Application Server The Report Application Server (RAS) processes all requests from the Advanced DHTML viewer, as well as requests from users who modify reports over the web using the Crystal Reports Explorer application. The diagram below shows which BusinessObjects Enterprise services interact with the RAS.
- 41. More Details blog:http://sandyclassic.wordpress.com linkedin:https://www.linkedin.com/in/sandepsharma slideshare:http://www.slideshare.net/SandeepSharma65 facebook:https://facebook.com/sandeepclassic google+ http://google.com/+SandeepSharmaa Twitter: https://twitter.com/sandeeclassic Page 41 of 167 Services that interact with the Report Application Server(RAS) Practice Activity: Defining the applications and servers Objective In this activity, you will: · Define the client applications in BusinessObjects Enterprise · Define the servers in BusinessObjects Enterprise Instructions · For this activity, you will need to access the resource CD that accompanies the training guide. · There are three flash exercises: · Defining applications · Hangman · Defining servers · The resource CD contains an HTML file called applications_servers.html which links to all three exercises. Note: The instructions are integrated into the exercise.
- 42. More Details blog:http://sandyclassic.wordpress.com linkedin:https://www.linkedin.com/in/sandepsharma slideshare:http://www.slideshare.net/SandeepSharma65 facebook:https://facebook.com/sandeepclassic google+ http://google.com/+SandeepSharmaa Twitter: https://twitter.com/sandeeclassic Page 42 of 167 Information process flows in BusinessObjects Enterprise Introduction The purpose of this unit is to explain process flows in BusinessObjects Enterprise. After completing this unit, you will be able to describe: · How information flows and how servers interact in BusinessObjects Enterprise. Process flows When certain tasks are performed in BusinessObjects Enterprise, such as logging in, scheduling a report, or viewing a report, information flows through the system and the various servers communicate with each other. The following section describes some of the process flows, step by step, as they would happen in the BusinessObjects Enterprise system. Log in to BusinessObjects Enterprise 1 The web client sends the schedule request in a URL typically via the web server to the web application server. 2 The web application server interprets the .jsp page and the values sent in the URL request and determines that the request is a login request. The web application server sends the username, password, and authentication type to the specified CMS for authentication.
- 43. More Details blog:http://sandyclassic.wordpress.com linkedin:https://www.linkedin.com/in/sandepsharma slideshare:http://www.slideshare.net/SandeepSharma65 facebook:https://facebook.com/sandeepclassic google+ http://google.com/+SandeepSharmaa Twitter: https://twitter.com/sandeeclassic Page 43 of 167 3 The CMS validates the username and password against the appropriate database (in this case BusinessObjects Enterprise authentication would be authenticated against the system database). Upon successful validation, the CMS creates a session for the user in its own memory. 4 The CMS sends a response to the web application server to let it know that the validation was successful. The web application server generates a logon token for the user session in its memory. For the rest of this session, the web application server uses the logon token to validate the user against the CMS. 5 The web application server formats the response to send to the client. The web application server sends the response back to the user's machine where it is rendered in the web client. Note: If the .csp request is directed to the web application server the Web Component Adapter is then involved View a report on demand 1 The web client sends the schedule request in a URL typically via the web server to the web application server. 2 The web application server interprets the requested page and the values sent in the URL request and determines that it is a request to view the first page of the selected report object. 3 The web application server sends a request to the CMS to ensure that the user has rights to view the object. The CMS checks the system database to verify the user rights. 4 The CMS sends a response to the web application server to confirm the user has sufficient rights to view the object. 5 The web application server sends a request to the Cache Server requesting the first page of the report object. 6 The Cache Server checks to see if the page already exists. Unless the report meets the requirements for On Demand report sharing (within 15 minutes of another On Demand request, same rights, DB login, parameters), the Cache Server sends a request for the Page Server to generate the page. 7 The Page Server requests the report instance from the Input File Repository Server. The Input File Repository Server streams a copy of the instance to the Page Server. The Page Server opens the report in its memory and checks to see if the report contains data.
- 44. More Details blog:http://sandyclassic.wordpress.com linkedin:https://www.linkedin.com/in/sandepsharma slideshare:http://www.slideshare.net/SandeepSharma65 facebook:https://facebook.com/sandeepclassic google+ http://google.com/+SandeepSharmaa Twitter: https://twitter.com/sandeeclassic Page 44 of 167 8 Since a report object does not have data, the Page Server connects to the Database to query for data. The Database returns data to the Page Server. The Page Server processes the report and then generates the first page of the report. The Page Server holds the report in temp files in memory until it reaches a 60 minute idle time. The temp files are then deleted from memory. 9 The Page Server sends the .epf page to the Cache Server. The Cache Server stores a copy of the .epf page in its cache directory. 10 The Cache Server sends the .epf page to the web application server. (If the DHTML viewer is used, the web application server converts the .epf to DHTML.) 11 The web application server sends the .epf page to the web server. The web server sends the .epf page to the user's machine where it is rendered in the viewer on the web client. Schedule a report 1 The web client sends the view request in a URL typically via the web server to the web application server. 2 The web application server interprets the .jsp page and the values sent in the URL request and determines that the request is a schedule request. The web application server sends the schedule time, database login values, parameter values, destination, and format to the specified CMS. 3 The CMS ensures that the user has rights to schedule the object. If the user has sufficient rights, the CMS adds a new record to the system database. The CMS also adds the instance to its list of pending schedules. View a report instance (Active X viewer)
- 45. More Details blog:http://sandyclassic.wordpress.com linkedin:https://www.linkedin.com/in/sandepsharma slideshare:http://www.slideshare.net/SandeepSharma65 facebook:https://facebook.com/sandeepclassic google+ http://google.com/+SandeepSharmaa Twitter: https://twitter.com/sandeeclassic Page 45 of 167 1 The web client sends the schedule request in a URL typically via the web server to the web application server. 2 The web application server interprets the requested page and the values sent in the URL request and determines that it is a request to view the first page of the selected report instance. The web application server sends a request to the CMS to ensure that the user has rights to view the instance. 3 The CMS checks the system database to verify the user rights. 4 The CMS sends a response to the web application server to confirm the user has sufficient rights to view the instance. 5 The web application server sends a request to the Cache Server requesting the first page of the report instance. 6 The Cache Server checks to see if the page already exists. If the page does exist, the Cache Server can return the page to the web application server. If the page does not exist, the Cache Server sends a request for the Page Server to generate the page. 7 The Page Server requests the report instance from the Output File Repository Server. The Output File Repository Server streams a copy of the instance to the Page Server. The Page Server opens the report in its memory and checks to see if the report contains data. Since an instance has data, the Page Server will find data and generate pages. The Page Server holds the report in temp files in memory until it reaches a 60 minute idle time. The temp files are then deleted from memory. 8 The Page Server sends the .epf page to the Cache Server. The Cache Server stores a copy of the .epf page in its cache directory. 9 The Page Server sends the .epf page to the web application server. (If the DHTML viewer is used, the web application server converts the .epf to DHTML.) 10 The web application server sends the .epf page to the web server. The web server sends the .epf page to the user's machine where it is rendered in the ActiveX viewer in the web client. View a Web Intelligence document on demand
- 46. More Details blog:http://sandyclassic.wordpress.com linkedin:https://www.linkedin.com/in/sandepsharma slideshare:http://www.slideshare.net/SandeepSharma65 facebook:https://facebook.com/sandeepclassic google+ http://google.com/+SandeepSharmaa Twitter: https://twitter.com/sandeeclassic Page 46 of 167 1 The web client sends the schedule request in a URL typically via the web server to the web application server. 2 The web application server interprets the requested page and the values sent in the URL request and determines that it is a request to view a Web Intelligence report. 3 The web application server sends a request to the CMS to ensure that the user has rights to view the object. The CMS checks the system database to verify the user rights. 4 The CMS sends a response to the web application server to confirm the user has sufficient rights to view the object. 5 The web application server sends a request to the Web Intelligence Report Server requesting the report. 6 The Web Intelligence Report Server requests the report from the Input File Repository Server. The Input File Repository Server streams a copy of the report to the Web Intelligence Report Server. The Web Intelligence Report Engine opens the report in its memory. The QT.dll generates the SQL from the universe that the report is based on. 7 The Connection Server connects to the database to run the query. The query data is passed through QT.dll to the Report Engine where the report is processed. 8 The Web Intelligence Report Server sends the finished report to the web application server. 9 The web application server sends the finished report to the web server. The web server sends the finished report to the user's machine where it is rendered in the web client. Process a Web Intelligence instance
- 47. More Details blog:http://sandyclassic.wordpress.com linkedin:https://www.linkedin.com/in/sandepsharma slideshare:http://www.slideshare.net/SandeepSharma65 facebook:https://facebook.com/sandeepclassic google+ http://google.com/+SandeepSharmaa Twitter: https://twitter.com/sandeeclassic Page 47 of 167 1 The CMS checks its pending schedule list every 15 seconds. When the CMS finds a report that is ready to be scheduled, the CMS evaluates whether there is an available Web Intelligence Job Server. The CMS sends the schedule request along with the report location and other processing information to the Web Intelligence Job Server. 2 The Web Intelligence Job Server forwards the request to the Web Intelligence Report Server. 3 The Web Intelligence Report Server requests the report from the Input File Repository Server. The Input File Repository Server streams a copy of the report to the Web Intelligence Report Server. The Web Intelligence Report Engine opens the report in its memory. The QT.dll generates the SQL from the Universe that the report is based on. 4 The Connection Server connects to the database to run the query. The query data is passed through QT.dll to the Report Engine where the report is processed. 5 The Web Intelligence Report Server sends the finished report to the Output File Repository Server. 6 The Web Intelligence Report Server notifies the Web Intelligence Job Server that the instance was a success. 7 The Web Intelligence Job Server updates the instance status to the CMS. 8 The CMS updates the instance record in the system database to change the instance status to Success. View an OLAP Intelligence instance
- 48. More Details blog:http://sandyclassic.wordpress.com linkedin:https://www.linkedin.com/in/sandepsharma slideshare:http://www.slideshare.net/SandeepSharma65 facebook:https://facebook.com/sandeepclassic google+ http://google.com/+SandeepSharmaa Twitter: https://twitter.com/sandeeclassic Page 48 of 167 1 The web client sends the schedule request in a URL typically via the web server to the web application server. 2 The web application server interprets the requested page and the values sent in the URL request and determines that it is a request to view an OLAP Intelligence report object. 3 The web application server sends a request to the CMS to ensure that the user has rights to view the object. The CMS checks the system database to verify the user rights. 4 The CMS sends a response to the web application server to confirm the user has sufficient rights to view the object. 5 The web application server sends a request to the Input File Repository Server to retrieve a copy of the OLAP Intelligence report. The Input File Repository Server streams a copy of the OLAP Intelligence report to the web application server. The web application server opens the report in its memory. 6 If using the DHTML OLAP Intelligence report viewer, the web application server connects to the OLAP server to request the view of data. The OLAP server returns the view of data to the web application server. The web application server formats the data into a DHTML page. 7 The web application server forwards the DHTML page to the web server. The web server sends the DHTML page to the user's machine where it is rendered on the web client. Practice Activity: Identifying process flows Objective In this activity, you will: · Identify information process flows in BusinessObjects Enterprise.
- 49. More Details blog:http://sandyclassic.wordpress.com linkedin:https://www.linkedin.com/in/sandepsharma slideshare:http://www.slideshare.net/SandeepSharma65 facebook:https://facebook.com/sandeepclassic google+ http://google.com/+SandeepSharmaa Twitter: https://twitter.com/sandeeclassic Page 49 of 167 Instructions · For this activity, you need to access the resource CD that accompanies the training guide. · There are seven flash exercises. Each exercise matches a process flow discussed in the Information process flows in BusinessObjects Enterprise unit. · The resource CD contains an HTML file called process_flows.html which links to all seven exercises. Note: The instructions are integrated into the exercises Lesson Summary Review Quiz: BusinessObjects Enterprise Architecture 1 What are the four groups of BusinessObjects Enterprise services? 2 What is the Central Management Server, and what role does it play in BusinessObjects Enterprise? 3 Which two servers are responsible for storing objects and object instances? 4 List the services involved when viewing a report, and the services involved when viewing a report instance. What inferences can you make about viewing instances instead of reports? View Report View Report Instance Summary After completing this lesson, you are now able to describe: · BusinessObjects Enterprise client applications · The BusinessObjects Enterprise services · The process to log on to BusinessObjects Enterprise · The process to schedule a Crystal report · The process to view a Crystal report instance · The process to view a Web Intelligence document on demand · The process to view a Web Intelligence instance · The process to view an OLAP Intelligence instance
- 50. More Details blog:http://sandyclassic.wordpress.com linkedin:https://www.linkedin.com/in/sandepsharma slideshare:http://www.slideshare.net/SandeepSharma65 facebook:https://facebook.com/sandeepclassic google+ http://google.com/+SandeepSharmaa Twitter: https://twitter.com/sandeeclassic Page 50 of 167 Lesson 3 Planning Your Content To ensure your BusinessObjects Enterprise system meets user requirements in an efficient and effective manner, plan the content requirements before deploying.This lesson takes you through the steps to plan an effective content management strategy. In this lesson you will learn about: · The BusinessObjects Enterprise security model · Creating a content plan The BusinessObjects Enterprise security model Introduction BusinessObjects Enterprise provides a sophisticated security model that enables system administrators to manage and secure content. Understanding how BusinessObjects Enterprise works ensures you will create a content plan that meets the security needs of your organization. After completing this unit, you will be able to: · Define the BusinessObjects Enterprise security model · Describe access levels for content · Distinguish between global and group/user rights · Describe how objects inherit rights · Calculate effective rights · Summarize security guidelines · Use categories to enhance organization of content Overview of the BusinessObjects Enterprise security model The BusinessObjects Enterprise security model uses a series of rights to manage user access to secure content and manage users' access to folders, categories, and objects. When granted, each right provides a user or group with permission to perform a particular action. Understanding the BusinessObjects Enterprise security model will enable you to map out a content management strategy for your organization. This strategy will outline the objects to be published to BusinessObjects Enterprise, the users and groups who have access to the objects, and the level of access that users need. Folders and Categories Content in BusinessObjects Enterprise can be organized into folders and categories. Folders are the primary method of organizing content. Every report or document must reside in a folder. A report or document can only reside in one folder. Object level rights are either set explicitly for the object or inherited from the folder in which the object resides.
- 51. More Details blog:http://sandyclassic.wordpress.com linkedin:https://www.linkedin.com/in/sandepsharma slideshare:http://www.slideshare.net/SandeepSharma65 facebook:https://facebook.com/sandeepclassic google+ http://google.com/+SandeepSharmaa Twitter: https://twitter.com/sandeeclassic Page 51 of 167 Organizing content into categories can make searching for content easier for users. The difference between folders and catego ries is that a document always resides in a folder as a storage location, but it may or may not be assigned to a category as a method of classification. Reports and documents may have multiple categories assigned to them. Access rights control which categories a user is able to see. Category rights do not inherit to the objects that are assigned the category. When searching for and viewing objects by category, you must have rights to the category and to the object. If you have rights to the category, but not to the object with the assigned category, you will not see the object. Object-level access Rights are the base units for controlling user access. Rights specify the individual actions that a user can perform on an object. You can set user access for folders, report objects, document objects, program objects, and other BusinessObjects Enterprise objects. Different types of objects may have different rights associated with them. For example, while you might schedule a Crystal Report or Web Intelligence Report, you could not schedule a Category. Access levels There are two methods of assigning user access in BusinessObjects Enterprise: · Pre-defined access levels Access levels are a predefined collection of individual rights that have been set up in the BusinessObjects Enterprise system to provide some of the most common user access requirements. It is recommended you use access levels whenever possible. · Advanced rights Advanced rights are the most granular level of access that can be assigned. By setting specific rights for an object, you may customize the actions that a user can perform on an object. Predefined access levels A predefined access level is a combination of specified individual rights that result in a particular access level for an object. These are the predefined access levels available in BusinessObjects Enterprise: · No Access The user or group is not able to access the object or folder. · View Set at the folder level, the user or group is able to view the folder, the objects contained within the folder, and all generated instances of each object. Set at the object level, the user can view the object, the history of the object, and all generated instances of the object. The user cannot schedule the object or refresh it against the data source. · Schedule In addition to the rights granted by the View access level, the user or group can generate instances by scheduling the object to run against the specified data source once or on a recurring basis. The user or group can view, delete, and pause the scheduling of instances that they own. They can also schedule to different formats and destinations, set parameters and database logon information, pick servers to process jobs, add contents to the folder, and copy the object or folder. · View On Demand In addition to the rights granted by the Schedule access level, the user gains the right to refresh data "on demand" from the data source. · Full Control In addition to the rights granted by the View on Demand access level, the user gains all of the available advanced rights. This is the only access level that allows users to delete objects (folders, objects, and instances). Full Control access allows users to modify all of the object's properties, including the object rights that are set on the folder or object. Note: Not all access levels are available for all object types. The access levels available for each type of object are determined by the object's function in the system. For example, it makes sense to be able to have Schedule rights for a report object, but it doesn't make sense to have Schedule rights for a user object. Advanced rights To provide you with full control over object security, BusinessObjects Enterprise allows you to make Advanced object rights settings for any user or group. These Advanced settings enable you to choose from a complete set of granular object rights. Each object or folder right can be:
- 52. More Details blog:http://sandyclassic.wordpress.com linkedin:https://www.linkedin.com/in/sandepsharma slideshare:http://www.slideshare.net/SandeepSharma65 facebook:https://facebook.com/sandeepclassic google+ http://google.com/+SandeepSharmaa Twitter: https://twitter.com/sandeeclassic Page 52 of 167 · Explicitly Granted The user or group will be given the designated access right. · Explicitly Denied The user or group will not be given the designated access right. If the user or group is granted the access right through another group membership, the denial will take precedence. · Inherited The user or group will be given the designated access right because the right was granted at a higher level of a folder or group hierarchy. · Not specified The right is not assigned to the user or group at any level, so it is not granted. Unlike an explicitly denied access right, the user or group could be granted the access right through another group membership, or inherit the rights from a higher group or folder level. Denied rights override granted rights If contradictory settings result in a right being both granted and denied to a user or group, the right is denied by default. This denial- based design ensures users and groups do not automatically acquire rights that are not explicitly granted. When setting Advanced rights, you have the choice to keep the rights inherited from either the parent folder or the parent gr oup and either add to or take away from them, or you have the ability to ignore the inherited rights and grant only the rights that you specify. The option you choose will depend on whether the specific rights you are setting vary drastically from the inherited rights. · If you are only granting or denying a couple of additional rights, it would be most efficient to keep the inherited rights. · If you are changing most of the inherited rights, it would be easier to deny the inherited rights and then specifically set the desired rights. How objects inherit rights Security in BusinessObjects Enterprise flows in the following manner: · Global security Global security is the default security set for the entire system. Global rights are not specific to any one object, but when a new top level folder is added to the system, this folder's default rights come from the global level. If there are any access levels that are common for the entire system, you should set these at the Global level. For example, if Administrators have Full Control access to all folders and objects, you can set this at the global level. · Folder level security Folder level security enables you to set access level rights for a folder and the objects contained within that folder. While top level folders inherit security from the global level, sub folders inherit the security of their parent folders. Rights set explicitly at the folder level override inherited rights. · Object level security Objects in BusinessObjects Enterprise inherit security from their parent folder. Rights set explicitly at the object level override inherited rights. Inheritance rules for object rights 1 Top level folders inherit the rights set at the global level. Rights from parent folders are inherited by sub folders or objects within the folder.
- 53. More Details blog:http://sandyclassic.wordpress.com linkedin:https://www.linkedin.com/in/sandepsharma slideshare:http://www.slideshare.net/SandeepSharma65 facebook:https://facebook.com/sandeepclassic google+ http://google.com/+SandeepSharmaa Twitter: https://twitter.com/sandeeclassic Page 53 of 167 2 Setting a different set of explicit rights at a lower folder or object level will override the inherited rights. Explicit rights always override any other rights. Group membership rules 1 Groups may contain subgroups and/or users.These member subgroups and users inherit the rights of their parent groups. Note: Group membership inheritance can be broken through the Advanced Rights tab
- 54. More Details blog:http://sandyclassic.wordpress.com linkedin:https://www.linkedin.com/in/sandepsharma slideshare:http://www.slideshare.net/SandeepSharma65 facebook:https://facebook.com/sandeepclassic google+ http://google.com/+SandeepSharmaa Twitter: https://twitter.com/sandeeclassic Page 54 of 167 . 2 When a user is a member of multiple groups, the user inherits the maximum access level according to all the groups. In the example below, the user Rachel is a member of three groups. Each group has a different access level on the Sales Reports folder. If Rachel gets the highest level of rights from all of her group membership, then she gets Schedule rights to the Sales Reports folder. 3 If rights are granted specifically for a user, then those rights override any inherited group rights. In this example, the user Rachel has been assigned explicit rights for the Sales Reports folder. These rights override her group inheritance, so she has No Access to the Sales Reports folder.
- 55. More Details blog:http://sandyclassic.wordpress.com linkedin:https://www.linkedin.com/in/sandepsharma slideshare:http://www.slideshare.net/SandeepSharma65 facebook:https://facebook.com/sandeepclassic google+ http://google.com/+SandeepSharmaa Twitter: https://twitter.com/sandeeclassic Page 55 of 167 Note: Once a group is listed at a certain level it will be listed on all the levels below. Currently, the interface does not allow you to remove the group from the security screen. If you wish to take away access from the group, you will have to give that group No Access right. Denied rights The Denied access level is extremely powerful. Any right that is explicitly Denied for a user or group for a folder or object will override any other access level set for that user or group for that folder or object. 1 Denied rights take precedence over granted rights. For example, the View access level includes the right to View Objects. Any folder that inherits View rights will be granted the View Objects right. If Advanced rights are set and the specific View Object right is denied, the denied right will take precedence. 2 To grant a right that has been specifically denied at a higher level, you must deny inheritance in the Advanced rights tab. For example, if Advanced rights are set at a parent folder and the View Object right is denied, sub folders will inherit the advanced rights, so the View Object right will continue to be denied. To grant the View Object right at a lower level, you must deny i nheritance, as well as grant the right. If you grant the right but maintain the inheritance, the inherited denied right takes precedence Content management recommendations · Assign security at the folder level to groups whenever possible. Avoid setting rights for specific users on specific report objects. This reduces the complexity of your security model. · Use pre-defined access levels whenever possible because it reduces the complexity of the security model. · Grant the Everyone group No Access at the global level to restrict access to the system. Then grant specific rights to the appropriate groups. · When securing reports and documents that are based on Universes or Business Views, ensure the users have appropriate rights to the Universes or Business Views. Calculating effective rights When a user attempts to perform an action on a BusinessObjects Enterprise object, BusinessObjects Enterprise determines the user's rights to that object. If the user possesses sufficient rights, BusinessObjects Enterprise permits the user to perform the requested action.
- 56. More Details blog:http://sandyclassic.wordpress.com linkedin:https://www.linkedin.com/in/sandepsharma slideshare:http://www.slideshare.net/SandeepSharma65 facebook:https://facebook.com/sandeepclassic google+ http://google.com/+SandeepSharmaa Twitter: https://twitter.com/sandeeclassic Page 56 of 167 · For each group that the user belongs to, determine the rights that the object inherits from its parent folder. To do this, you may need to follow inheritance up to the global level. In the example above: · Pedro is a member of both the Sales group and the Marketing group. · For the Q1_orders.rpt, the Sales group inherits the Schedule access level from the Orders Report Folder. The rights for the Sales group are explicitly set here, so we do not have to follow inheritance any further. · For the Q1_orders.rpt, the Marketing group inherits rights from the Orders Report Folder. These are inherited rights, so we need to continue to look up the folder structure to find the specified access level. In this case, the Marketing group inherits the View access level from the global level. Result: Sales group has Schedule access; Marketing group has View access. · Determine the maximum level of rights that a user inherits from all the groups that the user belongs to. Determine if any rights have been explicitly denied for any of the groups. The user will inherit the maximum level of rights from all of the groups that they belong to, unless any rights are denied for any of the groups. In the example above: · Pedro is a member of both the Sales group and the Marketing group. · The Sales group inherits Schedule access. · The Marketing group inherits View access. · Neither of these groups has any access explicitly denied. Result: Pedro inherits Schedule access. · Once you know the object's inherited rights, check any rights explicitly set at the object level for the groups the user belongs to. Determine if any rights have been explicitly denied for these groups. In the example above, the groups that Pedro belongs to have only inherited rights. This means that the inherited rights remai n. Result: The inherited Schedule access remains for Pedro. · Once you have calculated the rights for the group, check any rights set explicitly for the user. Determine if any rights have been explicitly denied for the user. In the example above: · The Advanced access level has been set for the user Pedro at the Q1_orders.rpt level. This will take precedence over inherited rights. · The Advanced level is also set to deny the View Objects right. This denies the ability for Pedro to view the report. Result: Pedro has Advanced access, with the View Object right denied. Note: To view the effective rights for users and groups that have been added to the system, use the Check User Rights button within the CMC. Practice
- 57. More Details blog:http://sandyclassic.wordpress.com linkedin:https://www.linkedin.com/in/sandepsharma slideshare:http://www.slideshare.net/SandeepSharma65 facebook:https://facebook.com/sandeepclassic google+ http://google.com/+SandeepSharmaa Twitter: https://twitter.com/sandeeclassic Page 57 of 167 Activity: calculating effective rights Objective In this activity, you will use your knowledge of content management security rules to calculate effective rights for users. Instructions Calculate the effective rights for Frank and Sue for each of the reports shown in the diagram, and record them in the table provided. Report User Effective Rights Q1_orders.rpt Frank Sue Q2_orders.rpt Frank Sue Q1_revenue.rpt Frank Sue Q2_revenue.rpt Frank Sue Summarizing security guidelines When planning your content management strategy, remember the following rules and recommendations: Object inheritance rules 1 Top level folders inherit the rights set at the global level. Rights from parent folders are inherited by sub folders or objects within the folder. 2 Setting a different set of explicit rights at a lower folder or object level will override the inherited rights. Explicit rights always override any other rights. Advanced rights inheritance rules
- 58. More Details blog:http://sandyclassic.wordpress.com linkedin:https://www.linkedin.com/in/sandepsharma slideshare:http://www.slideshare.net/SandeepSharma65 facebook:https://facebook.com/sandeepclassic google+ http://google.com/+SandeepSharmaa Twitter: https://twitter.com/sandeeclassic Page 58 of 167 1 When setting Advanced rights, you have the ability to accept inherited rights and then either add to or take away from them , or you have the ability to deny inherited rights and then set only the rights that you specify. 2 Denied rights take precedence over granted rights. 3 Advanced rights are inherited by lower level objects. 4 If you need to grant a right that has been specifically denied at a higher level, you must deny inheritance in the Advanced rights tab. Group membership rules 1 Groups may contain subgroups and/or users. Subgroups and users are treated as members of any group that they belong to and inherit the rights of the groups to which they belong. 2 When a user is a member of multiple groups, the user inherits the maximum access level according to all the groups. 3 If rights are granted specifically for a user, then those rights override any inherited group rights. Content management recommendations 1 Assign security at the folder level to groups whenever possible. Avoid setting rights for specific users on specific report objects. This reduces the complexity of your security model. 2 Use pre-defined access levels whenever possible because it reduces the complexity of the security model. 3 Grant the Everyone group No Access at the Global level to restrict access to the system. Then grant specific rights to the appropriate groups. 4 When securing reports and documents that are based on Universes or Business Views, ensure the users have appropriate rights to the Universes or Business Views. Securing categories Objects in BusinessObjects Enterprise may be placed into categories to enable users to search for and view objects in a particular category. Access rights can be granted to categories to control which categories a user has access to. Corporate categories are managed by the administrator and are available to users throughout the BusinessObjects Enterprise system. Personal categories are managed by and available to individual users in the system. Category inheritance rules 1 Categories may contain subcategories. These member subcategories inherit the rights of their parent category. 2 Category rights do not inherit to the objects in the categories. Users' object-level rights determine whether users can view, schedule, or manipulate an object.
- 59. More Details blog:http://sandyclassic.wordpress.com linkedin:https://www.linkedin.com/in/sandepsharma slideshare:http://www.slideshare.net/SandeepSharma65 facebook:https://facebook.com/sandeepclassic google+ http://google.com/+SandeepSharmaa Twitter: https://twitter.com/sandeeclassic Page 59 of 167 Creating a content plan Introduction A successful content management and system management plan enables you to set up and maintain your BusinessObjects Enterprise system most efficiently. The benefits of a well designed content plan include: · A dependable and secure implementation · Preventing information overload from users accessing too many objects · Unnecessary hits to data sources · Securing confidential information · An efficient structure for users to find the information they need A poorly-designed content and system management plan will result in increased support and maintenance for your system. After completing this unit, you will be able to: · Define a content plan · Define a logical content plan · Define a category plan What is a content plan? BusinessObjects Enterprise content management provides the ability to control which users have access to objects and what level of access users have to objects. The content management model involves: · Adding any new BusinessObjects Enterprise users and groups · Adding any new third party system users and groups · Setting up folder structures to organize content · Adding content to the folders · Determining where to publish which objects · Setting user and group access levels on folders and objects · Setting instance limits on the folders and objects · Setting up user and group access to Business Views and Universes · Creating and assigning categories for objects The content is the focus point of the content management model. Considerations for content planning A thorough content and system management plan will identify: · The types of objects that will be managed by the system and the folder structure to contain the objects · The number of objects that will be managed by the system · Which objects are based on Business Views or Universes · The number of users who will be accessing the system and the group structure to contain the users · Which users require access to each object in the system, and the level of access required · How long historical instances will be kept in the system · Whether your organization has existing Windows NT or LDAP groups that can be used within your content management plan · The corporate categories that will be used to organize the objects Analyzing stakeholder needs The first stage of planning is to analyze stakeholder requirements. The results will provide the information needed to create the content management plan. Your stakeholders are the people who will be affected by the implementation of your BusinessObjects Enterprise system. Stakeholders may include: · Users - people who are consumers of reports and information · Business managers - people who need to see the business value of the software implementation as it translates to increased employee productivity and return on investment (ROI) · IT/IS - people who will support and maintain the software implementation
- 60. More Details blog:http://sandyclassic.wordpress.com linkedin:https://www.linkedin.com/in/sandepsharma slideshare:http://www.slideshare.net/SandeepSharma65 facebook:https://facebook.com/sandeepclassic google+ http://google.com/+SandeepSharmaa Twitter: https://twitter.com/sandeeclassic Page 60 of 167 Based on this analysis, you will be able to plan a content management strategy that benefits your stakeholders by: · Increasing usability - users will be able to easily access the information they require, which will increase their effectiveness using the system. · Increasing user adoption - increased usability will make it easier for users to commit to using the system which will help improve ROI. · Reducing implementation time - proper planning reduces implementation challenges and helps to create a system that requires minimal maintenance over time. · Reducing user support time - increased usability of the system will help reduce the amount of time needed to support users · Increasing ROI - increased usability, increased user adoption, reduced implementation time, and reduced user support time all work together to increase the total ROI of the software implementation. Creating a logical content plan A logical content plan involves mapping out who needs access to what content, and then organizing users and content based on those needs. This is accomplished by: · Creating a logical folder structure · Creating logical groups · Specifying group access levels for the folders · Creating and assigning objects to categories Creating a folder structure and organizing objects The first step in setting up a content management plan is to assess the content that will be added to the system. This ensures you organize the content according to the users who will be accessing the content. This organization will in turn determine the folder structure to create. Some common organization groupings are: · business unit, department, or team · country or region · customer For example, if your Marketing department has a number of reports to manage in BusinessObjects Enterprise, you might organize these reports in a Marketing folder. If your Marketing department has reports for their North America region and other reports for their Europe region, you might organize these reports into Marketing North America and Marketing Europe folders. Creating a group structure and organizing users Once you have created a folder structure and have logically organized your objects, plan a group structure that will enable you to manage user access to the content most efficiently. The group structure often mirrors the folder structure. For example, if you have users in your Marketing department who require access to the reports in the Marketing folder, you can organize these users into a Marketing group and set access rights for the Marketing group on the Marketing folder Creating corporate categories Once you have defined your folder structure, group structure, and object security for objects in the system, you should define any corporate categories that need to be set up in the system. Objects can belong to multiple categories. Because objects do not inherit access rights from categories, a user will always have the same access rights for an object regardless of which category the user is viewing the object from. You may need to create special groups to be able to restrict access to particular categories. To reduce the number of groups that you have to maintain in the system, you should determine if any existing groups can be used for category access before creating groups specifically for this purpose.. Practice
- 61. More Details blog:http://sandyclassic.wordpress.com linkedin:https://www.linkedin.com/in/sandepsharma slideshare:http://www.slideshare.net/SandeepSharma65 facebook:https://facebook.com/sandeepclassic google+ http://google.com/+SandeepSharmaa Twitter: https://twitter.com/sandeeclassic Page 61 of 167 Activity: creating a logical content plan Scenario The Xtreme Bicycle Company is implementing BusinessObjects Enterprise to manage and distribute reports and other documents. They have presented you with the results of their stakeholder analysis. You need to create a logical content plan that meets stakeholder needs. Objective In this activity, you will address user requirements to create a logical content management plan that outlines: · Folders and sub folders to create · Objects to be stored in these folders · Groups and subgroups to create · The group membership for users · Access levels to folders and objects · Corporate categories to create Instructions 1 Read the stakeholder analysis below: Sales · All sales employees need to view instances of the Product Catalogue report, Inventory Report, and Order Processing Efficiency report as sales support tools. These reports will be scheduled by the Administrator. · All sales employees need to view and manipulate the Web Intelligence Sample report based on the existing universe. · The sales department has three regions: North America, Europe, and Asia Pacific. Sales employees in the region should be able to view instances of the reports for their region. These reports will be scheduled by the Administrator. They should have no access t o the other regions' sales reports. Finance · The Finance department uses Excel to analyze some of their data. Excel spreadsheets will be stored in BusinessObjects Enterprise. All members of the Finance department must be able to view the Excel spreadsheets. · The Accounting team needs to view instances of the Consolidated Balance Sheet Report and Consolidated Income Statement Report. These reports will be scheduled by the Administrator. These reports should not be available to members of other departments o r teams. · The Accounts Receivable team needs to view instances of the Customer Statement of Account reports. These reports are run on a monthly basis and are scheduled by the Administrator. These reports should not be available to members of other departments o r teams. · The Finance department requires easy ability to search for reports that are used in month-end processing. The Inventory Report, Consolidated Balance Sheet Report, and Consolidated Income Statement Report should be grouped in a category that is available to all members of the Finance group. IT · The BusinessObjects Enterprise Administrators need full control to all folders and objects on the system. · The BusinessObjects Enterprise Administrators need to view a number of system auditing reports. · The BusinessObjects Enterprise Administrators plan to schedule some system maintenance executables on a daily basis. · User accounts for members of the IT department are created in Windows NT and can be mapped to BusinessObjects Enterprise. 2 Open the Logic_Plan.xls spreadsheet. You can find this in the Lesson 3 folder on your resource CD. 3 On the Folder Structure & Content tab of the spreadsheet, specify: · The folders and sub folders to create · The objects that will be stored in these folders and sub folders 4 Check your answers with the Logic_Plan_solution.xls spreadsheet before continuing to step 5. 5 Read through this employee listing: Employee Description Rachel Sales Manager, North America
- 62. More Details blog:http://sandyclassic.wordpress.com linkedin:https://www.linkedin.com/in/sandepsharma slideshare:http://www.slideshare.net/SandeepSharma65 facebook:https://facebook.com/sandeepclassic google+ http://google.com/+SandeepSharmaa Twitter: https://twitter.com/sandeeclassic Page 62 of 167 Ron Sales Representative, North America Sophie Sales Manager, Europe Stephan Sales Representative, Europe Tasha Sales Manager, Asia Pacific Tai Sales Representative, Asia Pacific Ana Accounting Manager Adam Accountant Bev Accounts Receivable Manager Bruce Accounts Receivable Clerk Claire IT Manager Chris IT Help Desk Technician 6 On the Group Membership tab of the planning worksheet, specify: · The groups and subgroups to create · The group membership for users 7 Check your answers with the Logic_Plan_solution.xls spreadsheet before continuing to step 8. 8 On the Logical Content Plan tab of the planning worksheet, assign access levels to folders and objects 9 Check your answers with the Logic_Plan_solution.xls before continuing to step 10. 10 On the Category Plan tab of the planning worksheet, determine: · The categories to create · The security to set on the categories · The objects that should be associated with each category 11 Check your answers with the Logic_Plan_solution.xls. Lesson 4 Planning Application Security To ensure your BusinessObjects Enterprise system meets your security needs in an efficient and effective manner, it is best to plan your application security requirements prior to deployment. In this lesson you will learn about: · Securing applications Securing applications Introduction While planning the security of your BusinessObjects Enterprise system, you need to consider the security needs for users of BusinessObjects Enterprise applications. After completing this unit, you will be able to:
- 63. More Details blog:http://sandyclassic.wordpress.com linkedin:https://www.linkedin.com/in/sandepsharma slideshare:http://www.slideshare.net/SandeepSharma65 facebook:https://facebook.com/sandeepclassic google+ http://google.com/+SandeepSharmaa Twitter: https://twitter.com/sandeeclassic Page 63 of 167 · Describe the concept of application security · Describe rights for applications What is application security? Application security is used to control the functionality that users and groups have to these default BusinessObjects Enterprise applications: · Central Management Console (CMC) · Designer · Web Intelligence · InfoView Note: InfoView application rights do not apply to custom-built end user interfaces. Applying security to applications allows system administrators to provide more system management control to different departments or business units in a way that enables system administrators to maintain control of how much access the departments or business units have. For example, you may have a group of individuals from various departments who are responsible for some basic administrative tasks. In order for these users to perform these basic administrative tasks, they require access to the Central Management Console. As the system administrator, you can grant this group access to the Central Management Console while denying access to everyone else. Applying application rights The BusinessObjects Enterprise Applications section of the Central Management Console enables system administrators to manage BusinessObjects Enterprise applications and control which users have access to them. Each BusinessObjects Enterprise application has its own sets of rights that can be granted or denied. There are no global rights or predefined access levels for BusinessObjects Enterprise applications. To apply application rights 1 In the Central Management Console, select BusinessObjects Enterprise Applications. 2 In the BusinessObjects Enterprise Applications management area, select an application by clicking its link. 3 Click the Rights tab. The Rights tab appears. 4 Click Add/Remove to add users or groups you want to give access to the features. 5 On the Add/Remove page, in the Select Operation list, select Add/Remove Groups, Add Users, or Remove Users. Note: remember, you cannot remove the Everyone group. 6 Select the user or group to which you want to grant access to the features and click > (right arrow). Tip: If you have many users in your system, select the Add Users operation; then use the Look for text box to search for a particular account. 7 Click OK. 8 On the Rights tab change the drop down for access level to Advanced then click Advanced. Note: this step can vary depending on the application you choose. 9 For each feature, choose Explicitly Granted, Explicitly Denied, or Not Specified for the user or group. 10 Click OK. Application rights Application rights differ for each application in the system. With the exception of a few common rights, the rights you apply to an application are unique to that particular application. Central Management Console rights Administrators can secure the CMC application with these application rights: · Log in to the CMC and view this object in the CMC · Edit this object · Modify the rights users have to this object · Modify the rights users have on objects if rights being added are granted
- 64. More Details blog:http://sandyclassic.wordpress.com linkedin:https://www.linkedin.com/in/sandepsharma slideshare:http://www.slideshare.net/SandeepSharma65 facebook:https://facebook.com/sandeepclassic google+ http://google.com/+SandeepSharmaa Twitter: https://twitter.com/sandeeclassic Page 64 of 167 Designer rights Administrators can secure the Designer application with these application rights: · Log in to the Designer and view the object in the CMC. · Edit the object. · Modify the rights users have to the object. · Modify the rights users have on objects if rights being added are granted. · Check universe Integrity. · Refresh Structure Window. · Use Table Browser. · Apply Universe Constraints. · Link universes. Web Intelligence rights Administrators can secure the Web Intelligence application with these application rights: · Log in to Web Intelligence and view the object in the CMC. · Edit the object. · Modify the rights users have to the object. · Modify the rights users have on objects if rights being added are granted. · Allows interactive HTML viewing (as per license). · Allows use of the Web Intelligence HTML Report Panel. · Allows use of the Web Intelligence Java Report Panel. · Allows extending a document's scope of analysis. · Allows working in drill mode. · Allows creation of documents. · Allows use of the Formatting toolbar. · Allows use of the Formula Bar when creating documents in the Java Report Panel. InfoView rights Administrators can secure InfoView with these application rights: · Log in to InfoView and view the object in the CMC. · Edit the object. · Modify the rights users have to the object. · Modify the rights users have on objects if rights being added are granted. · Change user's preferences. · Organize. · Search for simple text. · Do an advanced search. · Filter object listing by object type. · View favorites folder. · View the Inbox. · Create Categories. · Assign Categories. · Send documents. · Create dashboards. · Create folders. Practice Activity: setting application security rights Scenario
- 65. More Details blog:http://sandyclassic.wordpress.com linkedin:https://www.linkedin.com/in/sandepsharma slideshare:http://www.slideshare.net/SandeepSharma65 facebook:https://facebook.com/sandeepclassic google+ http://google.com/+SandeepSharmaa Twitter: https://twitter.com/sandeeclassic Page 65 of 167 Your company has decided that the Guest account should not be allowed to organize content when logged in to InfoView. In orde r to accomplish this you need to apply user level application rights. Objectives · Use the Central Management Console to set user and group application rights for InfoView · Log in to InfoView to check user rights Instructions 1 Log in to InfoView as Guest. 2 Navigate to the Feature Samples folder and select the What's New document. 3 Click Organize and select Add to my Favorites. 4 Select the Favorites folder and click OK. 5 Navigate to the Favorites folder. A shortcut to the What's New report is created in the Favorites folder. 6 Log off of InfoView. 7 Log in to the Central Management Console as Administrator. 8 Click BusinessObjects Enterprise Applications on the CMC home page. 9 Click InfoView and display the Rights tab. 10 Add the Guest user to the list of users and groups. 11 Click Advanced for the Guest account and explicitly deny the Guest account the ability to organize in InfoView. Click OK to apply the changes. 12 Log in to InfoView again as Guest. 13 Click the Feature Samples folder. You should notice that Organize button is not enabled for the Guest account.
- 66. More Details blog:http://sandyclassic.wordpress.com linkedin:https://www.linkedin.com/in/sandepsharma slideshare:http://www.slideshare.net/SandeepSharma65 facebook:https://facebook.com/sandeepclassic google+ http://google.com/+SandeepSharmaa Twitter: https://twitter.com/sandeeclassic Page 66 of 167 Lesson 5 Creating and Securing Folders, Users, and Groups Now that you have created a content plan and a strategy for the necessary application security to deploy BusinessObjects Enterprise, you are prepared to create and secure folders, users, and groups. In this lesson you will learn about: · Creating folders, new users, and groups · Mapping third party accounts to BusinessObjects Enterprise · Applying security Creating folders, new users, and groups
- 67. More Details blog:http://sandyclassic.wordpress.com linkedin:https://www.linkedin.com/in/sandepsharma slideshare:http://www.slideshare.net/SandeepSharma65 facebook:https://facebook.com/sandeepclassic google+ http://google.com/+SandeepSharmaa Twitter: https://twitter.com/sandeeclassic Page 67 of 167 Introduction Creating an intuitive and logical organizational structure is the key to ensuring that your users can find the information th ey need quickly and easily. Understanding how users and groups are created will help you manage your BusinessObjects Enterprise deployment effectively. After completing this unit, you will be able to: · Create folders · List the default BusinessObjects Enterprise user and group accounts · Create users and groups · Describe how licenses are consumed in BusinessObjects Enterprise Creating folders Folders are objects used to organize documents. You can use folders to separate content into logical groups. Because you can set security at the folder level, you can use folders as a tool for controlling access to information. Creating and managing folders is typically the responsibility of the BusinessObjects Enterprise administrator, but end users can be given the option to create their own folders and control the objects within their folders in InfoView. Managing folders in BusinessObjects Enterprise is done in the Folders management area of the Central Management Console. To add the selected objects, you must create or select a folder on the host CMS. Only the folders for which you have full control access will appear. To create a new folder 1 Go to the Folders management area of the Central Management Console. 2 Click New Folder. The New Folder page appears. 3 On the Properties tab, type the name and description of the new folder. 4 Click OK. The new folder is added to the system, and the Properties tab is refreshed. 5 Repeat step 2 to step 4 for each folder you want to create. To create a new subfolder 1 Go to the Folders management area of the Central Management Console. The initial level of folders is displayed.
- 68. More Details blog:http://sandyclassic.wordpress.com linkedin:https://www.linkedin.com/in/sandepsharma slideshare:http://www.slideshare.net/SandeepSharma65 facebook:https://facebook.com/sandeepclassic google+ http://google.com/+SandeepSharmaa Twitter: https://twitter.com/sandeeclassic Page 68 of 167 2 In the Folder Title column, click the link to the folder where you want to add a subfolder. 3 Click the Subfolders tab. The Subfolders tab appears. 4 Click New Folder. 5 On the Properties tab, type the name and description of the new folder. 6 Click OK. The new folder is added to the system, and the Properties tab is refreshed. 7 Repeat step 2 to step 6 for each subfolder you want to create. To move objects between folders 1 Go to the Folders management area of the CMC. 2 Select the check box associated with the object(s) that you want to copy or move. 3 Click Copy/Move/Shortcut. The Copy/Move/Create Shortcut page appears. 4 Click Copy to if you want to copy the object or Move to if you want to move the object. Note: You can only select the Move to option if you have a selected a top level folder to move to. 5 Select the Destination folder to copy or move your object. 6 Click OK. Copying and moving folders When you copy or move a folder, the objects contained within it are also copied or moved. BusinessObjects Enterprise treats the folder's object rights differently, depending upon whether you copy or move a folder. · When you copy a folder, the newly created folder does not retain the object rights of the original. Instead, the copy inherits the object rights that are set on its new parent folder. · When you move a folder, all of the folder's object rights are retained. Note: When objects in the original folder are updated, copied objects are not updated. To move objects between folders 1 Go to the Folders management area of the CMC. 2 Select the check box associated with the folder that you want to copy or move.
- 69. More Details blog:http://sandyclassic.wordpress.com linkedin:https://www.linkedin.com/in/sandepsharma slideshare:http://www.slideshare.net/SandeepSharma65 facebook:https://facebook.com/sandeepclassic google+ http://google.com/+SandeepSharmaa Twitter: https://twitter.com/sandeeclassic Page 69 of 167 If the folder you want to copy or move is not at the top level, locate its parent folder. Then make your selection on the parent folder's Subfolders tab. Tip: Select multiple check boxes to copy or move several folders from their parent folder to a different folder. 3 Click Copy/Move. The Copy/Move Folder page appears. 4 Click Copy to if you want to copy the folder or Move to if you want to move the folder 5 Select the Destination folder to copy or move your object. Tip: If there are many folders on your system, use the Look for text box to search, or click Previous, Next, and Show Subfolders to browse the folder hierarchy. 6 Click OK. Practice Activity: Creating folders Scenario You have created a blueprint that outlines the specifics of your content plan. Your next step is to begin building the necessary folder structure and organizing the objects accordingly. Creating the folders initially helps to simplify the process by ensuring the necessary folder structure is already in place before you begin publishing and organizing your BusinessObjects content. Objective In this activity, you will: · Create a folder structure in BusinessObjects Enterprise · Set instance limits on folders · Move reports as necessary into their respective folders or subfolders
- 70. More Details blog:http://sandyclassic.wordpress.com linkedin:https://www.linkedin.com/in/sandepsharma slideshare:http://www.slideshare.net/SandeepSharma65 facebook:https://facebook.com/sandeepclassic google+ http://google.com/+SandeepSharmaa Twitter: https://twitter.com/sandeeclassic Page 70 of 167 Instructions 1 Create the following folder structure using the information listed in the table below. Tip: If needed, refer to To create a new folder on page 5-2. and To create a new subfolder on page 5-3.. Folders Subfolders Sales Sales North America Sales Europe Sales Asia Pacific Finance Accounting Accounts Receivable IT Audting Utilities 2 Move the appropriate reports or documents into their respective folders based on the criteria outlined in your content plan worksheet. Tip: If needed, refer to Organizing objects in folders on page 1-12. The default BusinessObjects Enterprise accounts After installation, the following users exist in the BusinessObjects Enterprise system database: · Administrator An account with full control rights to the BusinessObjects Enterprise system. The administrator password is blank by default. This is a special account that cannot be deleted. · Guest A default user account. The guest account is enabled with a blank password by default. Note: although you should not delete this account you can disable it, see Creating and Modifying a User Account. By default, the following groups exist in the BusinessObjects Enterprise system database: · Administrators Users belonging to the Administrators group are able to perform all functions in all of the BusinessObjects Enterprise applications. This group contains the Administrator user by default. · Everyone When a user is added to BusinessObjects Enterprise, they are automatically made a member of the Everyone group. Membership in the Everyone group is mandatory and cannot be changed. The Everyone group cannot be deleted. · New Sign-Up accounts The New Sign-Up Accounts group contains users who have created an account using the sign-up feature in InfoView. Users of this group can see reports and folders as identified by the administrator. · Universe Designer users Universe Designer users have access to the Universe Designer application. · BusinessObjects Enterprise NT users The BusinessObjects EnterpriseNT users group is created when BusinessObjects Enterprise is installed on a computer running Windows NT or Windows 2000. This group is also added to BusinessObjects Enterprise. Windows NT or Windows 2000 users that belong to the BusinessObjects Enterprise NT users group can view folders and reports, providing NT authentication has been enabled. Creating users and groups New users and groups are created in the CMC. Once a group is created, you can modify its membership to include other groups. Groups can include other groups as subgroups.
- 71. More Details blog:http://sandyclassic.wordpress.com linkedin:https://www.linkedin.com/in/sandepsharma slideshare:http://www.slideshare.net/SandeepSharma65 facebook:https://facebook.com/sandeepclassic google+ http://google.com/+SandeepSharmaa Twitter: https://twitter.com/sandeeclassic Page 71 of 167 Note: Group names must be unique. After a group is created, you can modify the properties. Properties can include: · Group Name · Description · Users · Subgroups · Member of · Rights Note: For more information on creating group accounts, refer to the Administrator's Guide. To create groups In this procedure you will be creating a number of groups using the information listed in the following table: 1 Open the CMC, and then click Groups. 2 Click New Group. The New Group page appears. 3 Type the group name and description. 4 Click OK. 5 If the new group is a subgroup, click the Member of tab, and then follow these steps: 1 Click Member of. 2 In the list of Available groups click the correct group, and then click the > (Add) button. 3 Click OK. 4 Click Groups in the navigation path to return to the group list page. Creating and modifying a user account When you create a new user account in the CMC, you first must specify the user's properties, before you configure group memberships for the user. After a user account has been created, you can modify the account properties. The properties that can be modified include: · Account Name The account name is the unique identifier for a user account and is the username entered when logging in to BusinessObjects Enterprise. · Full Name This optional field is used to capture the user's full name. It is recommended that you use this field, particularly when managing many users. · Description
- 72. More Details blog:http://sandyclassic.wordpress.com linkedin:https://www.linkedin.com/in/sandepsharma slideshare:http://www.slideshare.net/SandeepSharma65 facebook:https://facebook.com/sandeepclassic google+ http://google.com/+SandeepSharmaa Twitter: https://twitter.com/sandeeclassic Page 72 of 167 This optional field is used to add information about the user, such as their position, department, or geographic location. · Home folder The Home folder is created automatically when you create a new user. This folder becomes the user's Favorites folder in InfoView. While you can't change the folder name, clicking this link will take you to this folder's page in the Central Management Console. From there you can publish objects to this folder and manage existing objects. · Password Settings User password settings allow you to change the password and password settings for the user. Note: Global password settings can be configured in the Authentication area of the Central Management Console. · Connection Type This option specifies how the user connects to the BusinessObjects Enterprise system based on the license agreement. · Account Disabled This check box allows the administrator to deactivate the user account, instead of permanently deleting the account. This is useful when administering users who will be temporarily denied system access. For example, employees taking parental leave. Note: Select the Account Disabled check box to disable the Guest account. This will make it unavailable for use. · Assign Alias If a user has multiple accounts within BusinessObjects Enterprise, use this feature to link the accounts. This will result in the user having multiple BusinessObjects Enterprise login credentials that map to one BusinessObjects Enterprise account. To create users 1 In the CMC home page, click Users. 2 Click New User. 3 Select the authentication type. 4 Type the account name, full name, email, and description information. 5 Clear the User must change password at next logon check box. 6 Click OK. 7 Click the Member of tab, and then click Member of. 8 In the list of Available groups click the group(s) that the user should be a member of, and then click the > (Add) button. 9 Click OK. 10 Click Users in the navigation path to return to the user list page. The user is added to the system and is automatically added to the Everyone group. An Inbox is also automatically created for the user. You can now assign the user to a group or specify rights for the user. Note: A user is automatically granted Full Rights to their Inbox. Deleting a user or group account Accounts that you have created in BusinessObjects Enterprise can easily be deleted from the respective user or group area in the CMC. Note: When you delete a group, users or groups that are members of that group are not deleted. To delete an account you first select the check box that appears following the account(s), and then click Delete. · When you delete an account from the system, the account is permanently removed. If you think a user may need the account in the future, disable the account rather than deleting it. Practice Activity: creating new users and groups Scenario You have built the necessary folder structure and organized the report objects based on your content plan spreadsheet. Your next step will be to create the users and organize them into appropriate groups. As some users and groups will exist nowhere else except in BusinessObjects Enterprise, you will create those from scratch. You will add the remaining users and groups later by mapping them to existing Windows NT groups.
- 73. More Details blog:http://sandyclassic.wordpress.com linkedin:https://www.linkedin.com/in/sandepsharma slideshare:http://www.slideshare.net/SandeepSharma65 facebook:https://facebook.com/sandeepclassic google+ http://google.com/+SandeepSharmaa Twitter: https://twitter.com/sandeeclassic Page 73 of 167 Objective In this activity, you will: · Create BusinessObjects Enterprise groups · Create BusinessObjects Enterprise users · Add these users to the appropriate group · Modify user and group accounts Instructions In the Central Management Console: 1 Create the following groups, giving subgroups the group membership listed below. Tip: If needed, refer to To create groups on page 5-8. Group Name Subgroup of Description Sales An umbrella group that contains only regional sales subgroups and no users. Sales North America Sales All North American sales employees Sales EU Sales All European sales employees Sales AP Sales All Asia Pacific sales employees Finance An umbrella group that contains only Finance subgroups and no users. Accounting Finance All Accounting employees Accounts Receivables Finance All Accounts Receivable employees 2 On the Groups page, verify that the above groups were successfully created. 3 Create the following users, giving them the group membership listed in the table below: Tip: If needed, refer to To create users on page 5-9. Account Group Membership Rachel Sales North America Ron Sales North America Sophie Sales EU Stephan Sales EU Tasha Sales AP Tai Sales AP Ana Accounting Adam Accounting Bev Accounts Receivable Bruce Accounts Receivable 4 On the Users page, verify that all the above users were successfully created and added to correct groups. While looking at the Member Of tab for a few users, you noticed that the Sales North America group name is inconsistent with the other regional sales groups. 5 Rename the Sales North America group to Sales NA. HR just emailed you their latest Employee Changes spreadsheet. Adam is going on a one-year leave of absence. 6 Modify Adam's user account accordingly. Consuming licenses in BusinessObjects Enterprise BusinessObjects Enterprise is a scalable product that provides you with the ability to add license keys as the demand for Business Intelligence information increases in your organization. You can purchase the following types of licences: · Named
- 74. More Details blog:http://sandyclassic.wordpress.com linkedin:https://www.linkedin.com/in/sandepsharma slideshare:http://www.slideshare.net/SandeepSharma65 facebook:https://facebook.com/sandeepclassic google+ http://google.com/+SandeepSharmaa Twitter: https://twitter.com/sandeeclassic Page 74 of 167 Named user licenses are associated with specific users and allow people to access the system based on their user name and password. This provides named users with access to the system regardless of how many other people are connected. You may want to purchase named user licenses for people in your organization who require access to BusinessObjects Enterprise at all times . · Processor Processor licenses are based on the number of processors that are running BusinessObjects Enterprise. To determine the number of processor licenses you require, count the number of processors on any servers running any component of BusinessObjects Enterprise. Processor licences are not used in conjuction with Named licences. Mapping third party accounts to BusinessObjects Enterprise Introduction BusinessObjects Enterprise includes the ability to map third party authentication types into your deployment. After completing this unit, you will be able to: · Describe authentication types · Describe single sign-on · Map NT accounts · Map AD accounts · Map LDAP accounts Overview of authentication types Authentication is defined as the process of determining the identity of a person attempting to access the system, a process that usually involves the transfer of a user name and a password. This process is distinct from authorization. Authorization is the process of giving individuals access to objects and the ability to complete system tasks based on their identity. BusinessObjects Enterprise is fully customizable, therefore authentication processes can vary from system to system. BusinessObjects Enterprise supports these authentication types: · BusinessObjects Enterprise · Windows NT · Windows Active Directory · Lightweight Directory Access Protocol (LDAP) BusinessObjects Enterprise authentication The system default, BusinessObjects Enterprise authentication, is used in environments that prefer to maintain a distinct set of accounts for use with BusinessObjects Enterprise. BusinessObjects Enterprise authentication is always enabled; it cannot be disabled. · BusinessObjects Enterprise authentication is ideal for environments that do not currently have a hierarchy of users and groups in a Windows NT/2000 or LDAP directory. Microsoft Windows NT authentication BusinessObjects Enterprise supports the use of an existing Windows NT (Windows NT/2000) account directory. By mapping NT accounts to BusinessObjects Enterprise, users are able to log in to InfoView with their NT user name and password, eliminating the need to recreate user and group accounts in BusinessObjects Enterprise. NT authentication is enabled using the Manage Authentication section of the CMC. Note: For more information on Windows NT authentication, consult your BusinessObjects Enterprise Administrator's Guide.
- 75. More Details blog:http://sandyclassic.wordpress.com linkedin:https://www.linkedin.com/in/sandepsharma slideshare:http://www.slideshare.net/SandeepSharma65 facebook:https://facebook.com/sandeepclassic google+ http://google.com/+SandeepSharmaa Twitter: https://twitter.com/sandeeclassic Page 75 of 167 Active Directory authentication Windows AD security plug-in enables you to map user accounts and groups from your Windows 2000 Active Directory (AD) system to BusinessObjects Enterprise; it also enables BusinessObjects Enterprise to verify all login requests that specify Windows AD Authentication. Users are authenticated against the Windows AD system, and have their membership in a mapped AD group verified before the Crystal Management Server (CMS) grants them an active BusinessObjects Enterprise session. All of the BusinessObjects Enterprise client tools support AD authentication except the Import Wizard. Active directory authentication can be implemented in custom Enterprise applications. LDAP authentication Lightweight Directory Access Protocol (LDAP) is a set of protocols used to access information stored in directories. A very common use for an LDAP directory is to maintain user and group account information. BusinessObjects Enterprise supports the use of an existing LDAP account directory, eliminating the need to recreate user and group accounts in BusinessObjects Enterprise. By mapping your LDAP groups to BusinessObjects Enterprise, users are able to log in to Enterprise with their LDAP user name and password. Directories that support LDAP include: · Sun iPlanet Directory Server · Lotus Domino Directory Server · IBM Secureway · Novell Directory Services (NDS) LDAP authentication is enabled using the Manage Authentication section of the CMC. Single Sign-on The term single sign-on is used to describe a situation where a user can access two or more applications or systems while providing their login credentials only once, thus making it easier for users to interact with the system. Single sign-on to BusinessObjects Enterprise can be provided by different authentication tools such as Windows NT, Windows AD, or LDAP with SiteMinder. Within the context of BusinessObjects Enterprise, the different levels of single sign-on are: · Single sign-on to BusinessObjects Enterprise · Single sign-on to database · End-to-end single sign-on Single sign-on to BusinessObjects Enterprise Single sign-on to BusinessObjects Enterprise means that once users have logged in to the operating system they can access BusinessObjects Enterprise without having to provide their login credentials again. When they log in to the operating system, a login token is created. The system uses this token to authenticate the users and grant them access to BusinessObjects Enterprise and its components. The term "anonymous single sign-on" also refers to single sign-on to BusinessObjects Enterprise, but it specifically refers to the single sign-on functionality for the Guest user account. When the Guest user account is enabled, which it is by default, anyone can log in to BusinessObjects Enterprise as Guest and will have single sign-on access to BusinessObjects Enterprise. Single sign-on to database Once users are logged on to BusinessObjects Enterprise, single sign-on to the database enables them to perform actions that require database access, in particular, viewing Crystal Reports and Web Intelligence documents, without having to provide their logon credentials again. Single sign-on to the database can be combined with single sign-on to BusinessObjects Enterprise, to provide users with even easier access to the resources they need. In BusinessObjects Enterprise single sign-on to the database is supported through Windows AD using Kerberos.
- 76. More Details blog:http://sandyclassic.wordpress.com linkedin:https://www.linkedin.com/in/sandepsharma slideshare:http://www.slideshare.net/SandeepSharma65 facebook:https://facebook.com/sandeepclassic google+ http://google.com/+SandeepSharmaa Twitter: https://twitter.com/sandeeclassic Page 76 of 167 Note: Kerberos is a security protocol created at MIT. It governs the use of an encrypted token that enables a secure way to pass a logon token from one application to the next. End-to-end single sign-on End-to-end single sign-on refers to a configuration where users have both single sign-on access to BusinessObjects Enterprise at the front-end and single sign-on access to the databases at the back-end. Thus, users need to provide their login credentials only once, when they log in to the operating system, to have access to BusinessObjects Enterprise and to be able to perform actions that require database access, such as viewing reports. In BusinessObjects Enterprise XI end-to-end single sign-on is supported through Windows AD and Kerberos. Note: For more information about SSO, see the BusinessObjects Enterprise Administration Guide. Mapping NT accounts to BusinessObjects Enterprise BusinessObjects Enterprise supports user and group accounts that can be mapped using Windows NT, Windows Active Directory and LDAP. Mapping NT accounts to BusinessObjects Enterprise To simplify administration, BusinessObjects Enterprise supports user and group accounts that are created using Windows NT. However, before users can use their NT user name and password to log in to BusinessObjects Enterprise, their NT user account needs to be mapped to BusinessObjects Enterprise. When you map an NT account, you can choose to create a new BusinessObjects Enterprise account or link to an existing BusinessObjects Enterprise account. You can map NT accounts to BusinessObjects Enterprise through Windows, by using the User Manager in Windows NT or Computer Management in Windows 2000, or through the CMC. Note: NT accounts refer to both Windows NT and 2000 account. To map NT users and groups using Windows NT 1 From the Windows Administrative Tools program group, click User Manager. Note: Ensure that you have selected the domain that contains the BusinessObjects NT users group. 2 Select the BusinessObjects NT Users group. Note: The BusinessObjects NT users group is created automatically in Windows NT when you install BusinessObjects Enterprise on Windows NT. 3 From the User menu, click Properties. 4 Click Add. 5 Select the group(s) and/or user(s); then click Add. 6 Click OK to add the group(s) and/or user(s). 7 Click OK to complete the process. Tip: Users will now be able to log in to InfoView using their NT account if they use the following format: NTDomainNameNTusername or NTMachineNameLocalUserName Users do not have to specify the NT Domain Name if it is specified in the Default NT Domain text box on the Windows NT tab. To map NT users and groups using Windows 2000 1 From the Windows Administrative Tools program group, click Computer Management. 2 Under System Tools, select Local Users and Groups. 3 Click the Groups folder. 4 Select the BusinessObjects NT Users and from the Action menu, select Properties. 5 Click Add. 6 Select the group(s) and/or user(s); then click Add. 7 Click OK to add the group(s) and/or user(s). 8 Click OK or Apply (and then Close) to complete the process. Tip: Users will now be able to log on to InfoView using their NT account if they use the following format: NTDomainNameNTusername or NTMachineNameLocalUserName Users do not have to specify the NT Domain Name if it is specified in the "Default NT Domain" field on the Windows NT tab.
- 77. More Details blog:http://sandyclassic.wordpress.com linkedin:https://www.linkedin.com/in/sandepsharma slideshare:http://www.slideshare.net/SandeepSharma65 facebook:https://facebook.com/sandeepclassic google+ http://google.com/+SandeepSharmaa Twitter: https://twitter.com/sandeeclassic Page 77 of 167 To map NT users and groups using BusinessObjects Enterprise Before starting this procedure, ensure you have the NT domain and group information. 1 Go to the Authentication management area of the CMC. 2 Click the Windows NT tab. 3 Ensure that the NT Authentication is enabled check box is selected. 4 If you will be using single sign-on, select the Single Sign On is enabled check box. Note: If you select this option, you must also configure the IIS for single sign-on. For details, see the BusinessObjects Enterprise Administrator's Guide. Failing to configure IIS could compromise your system security if the account that IIS runs under belongs to a mapped group, because users who use one of the web applications would automatically have the same access privileges as the IIS machine account. 5 To change the Default NT domain, click the domain name. Complete the Default NT Domain text box. 6 By typing the default NT domain name, users do not have to specify the NT domain name when they log in to BusinessObjects Enterprise via NT authentication. Also, you don't have to specify the NT domain name when you map groups. 7 In the Mapped NT Member Groups area, enter the NT domaingroup in the Add NT Group (NT DomainGroup) text box. If you want to map a local NT group, you must type NTmachinenamegroupname. 8 Click Add. 9 The group is added to the list. Defining Account Aliases for NT 1 New Alias Options allow you to specify how NT aliases are mapped to Enterprise accounts. Select either: · Assign each added NT alias to an account with the same name Use this option when you know users have an existing Enterprise account with the same name; that is, NT aliases will be assigned to existing users (auto alias creation is turned on). Users who do not have an existing Enterprise account, or who do not have the same name in their Enterprise and NT account, are added as new NT users. or · Create a new account for every added NT alias Use this option when you want the system to create a new account for each user. The system ensures that the users are created with unique names. For example, if BusinessObjects Enterprise user bsmith already exists and an NT user with the same is added, the new user will be bsmith01. 2 Update Options allow you to specify if NT aliases are automatically created for all new users. Select either: · New aliases will be added and new users will be created Use this option to automatically create a new alias for every NT user mapped to BusinessObjects Enterprise. New NT accounts are added for users without BusinessObjects Enterprise accounts, or for all users if you selected the Create a new account for every added NT alias option. or · No new aliases will be added and new users will not be created Use this option when the NT directory you are mapping contains many users, but only a few of them will use BusinessObjects Enterprise. BusinessObjects Enterprise does not automatically create aliases and Enterprise accounts for all users. Instead, it creates aliases (and accounts, if required) only for users who log in to BusinessObjects Enterprise. 3 New User Options allow you to specify properties of the new Enterprise accounts that are created to map to NT accounts. Select either: · New users are created as named users New user accounts are configured to use named user licenses. Named user licenses are associated with specific users and allow people to access the system based on their user name and password. This provides named users with access to the system regardless of how many other people are connected. You must have a named user license available for each user account created using this option . · New users are created as concurrent users New user accounts are configured to use concurrent user licenses. Concurrent licenses specify the number of people who can connect to BusinessObjects Enterprise at the same time. This type of licensing is very flexible because a small concurrent license can support a large user base. For example, depending on how often and how long users access BusinessObjects Enterprise, a 100 user concurrent license could support 250, 500, or 700 users. 4 Click Update. A message appears stating that it will take several seconds to update the member groups. 5 Click OK. To create NT groups 1 Click Start, point to Settings, and then click Control Panel. 2 In Control Panel, double-click Administrative Tools.
- 78. More Details blog:http://sandyclassic.wordpress.com linkedin:https://www.linkedin.com/in/sandepsharma slideshare:http://www.slideshare.net/SandeepSharma65 facebook:https://facebook.com/sandeepclassic google+ http://google.com/+SandeepSharmaa Twitter: https://twitter.com/sandeeclassic Page 78 of 167 3 Double-click Computer Management. 4 In the left-hand pane, double-click Local Users and Groups. 5 In the left-hand pane, right-click Groups, and then click New Group. The New Group dialog box appears. 6 In the Group name text box, enter the group's name, and then click Create. Note: The New Group dialog box remains open, allowing you to add another group. 7 Repeat step 5 to step 6 for all other groups you need to create. 8 Click Close to close the New Group dialog box. Note: Do not close the Computer Management console. To create NT users 1 In the left-hand pane of the Computer Management console, right-click Users, and then click New User. The New User dialog box appears. 2 In the User name text box, type a name for the user. 3 In the Password and Confirm password text boxes, type the appropriate password. 4 Clear the User must change password at next logon check box, and then click Create. Note: The New User dialog box remains open, allowing you to add another user. 5 Repeat step 1 to step 5 for each user you need to create. 6 Click Close to close the New User dialog box. To add users to NT groups 1 In the left-hand pane of the Computer Management console, click Groups. 2 In the right-hand pane, double-click the group to which you want to add users. 3 Click Add. 4 In list of names that appear, use CTRL + click to select the users you want to add. 5 Click Add, and then click OK twice. 6 Repeat step 2 to step 5 for all other groups to which you want to add users. To add NT groups and aliases to BusinessObjects Enterprise 1 In the CMC, Manage Authentication task, click the Windows NT tab. 2 Click to select NT Authentication is enabled. 3 In the Add NT Group (NT DomainGroup) text box, type: DomainOrComputerNameGroupName where DomainOrComputerName is the name of the default NT domain. Note: If adding an NT Global group, use the syntax: DomainNameGroupName. If adding an NT Local group, use the syntax: MachineNameGroupName 4 Click Add. 5 Click Assign each added NT alias to an account with the same name. 6 Click Update. To add NT groups without aliases to BusinessObjects Enterprise 1 In the CMC, Manage Authentication task, click the Windows NT tab. 2 Click to select NT Authentication is enabled. 3 In the Add NT Group (NT DomainGroup) text box, type: DomainOrComputerNameGroupName Where DomainOrComputerName is the default domain. 4 Click Add. 5 Click Create a new account for every added NT alias. 6 Click Update. To unmap a group 1 In the CMC, Manage Authentication task, click the Windows NT tab. 2 In the list of Mapped NT Member Groups, click the appropriate group and then click Delete. 3 Click Update.
- 79. More Details blog:http://sandyclassic.wordpress.com linkedin:https://www.linkedin.com/in/sandepsharma slideshare:http://www.slideshare.net/SandeepSharma65 facebook:https://facebook.com/sandeepclassic google+ http://google.com/+SandeepSharmaa Twitter: https://twitter.com/sandeeclassic Page 79 of 167 Viewing mapped NT users and groups There are two methods to view mapped users and groups in BusinessObjects Enterprise. The method you use depends on the way the groups and users have been mapped. To view users and groups that have been added using Windows NT/2000 or BusinessObjects Enterprise 1 Go to the Groups management area of the CMC. 2 If you added users and groups through Windows NT/2000, then click BusinessObjects NT Users. 3 If you added users and groups through the CMC, then select the appropriate group. 4 Click the Users tab. 5 Click OK to the message which states that accessing the user list may take several seconds. 6 Click Refresh. 7 Click OK. To view users and groups that have been added using BusinessObjects Enterprise 1 Go to the Authentication management area of the CMC. 2 Click the Windows NT tab. The "Mapped NT Member Groups" area displays the groups that have been mapped to BusinessObjects Enterprise. You can view the groups and users by selecting the appropriate group from the Groups management area and then clicking the Users tab. Unmapping NT groups Similar to mapping, it is possible to unmap groups using the administrative tool in Windows NT/2000, or BusinessObjects Enterprise. To unmap NT users and groups using Windows NT 1 From the Administrative Tools program group, click User Manager. 2 Select BusinessObjects NT Users. 3 From the User menu, click Properties. 4 Select the user(s) or group(s); then click Remove. 5 Click OK. The user or group will no longer be able to access BusinessObjects Enterprise. Note: The only exceptions to this occur when a user has an alias to an Enterprise account. To restrict access, disable or delete the user's Enterprise account. For more information, see the BusinessObjects Enterprise Administrator's Guide. To unmap NT users and groups using Windows 2000 1 From the Administrative Tools program group, click Computer Management. 2 Under System Tools, select Local Users and Groups. 3 Click the Groups folder. 4 Select BusinessObjects NT Users. 5 From the Action menu, click Properties. 6 Select the user(s) or group(s); then click Remove. 7 Click OK or Apply (and then Close) to complete the process. 8 The user or group will no longer be able to access BusinessObjects Enterprise. Note: The only exceptions to this occur when a user has an alias to an Enterprise account. To restrict access, disable or delete the user's Enterprise account. For more information, see the BusinessObjects Enterprise Administrator's Guide. To unmap NT groups using BusinessObjects Enterprise 1 Go to the Authentication management area of the CMC. 2 Click the Windows NT tab. 3 In the Mapped NT Member Groups area, select the NT group you would like to remove. 4 Click Delete. 5 Click Update. The users in this group will not be able to access BusinessObjects Enterprise. Tip: To deny NT Authentication for all groups, clear the "NT Authentication is enabled" check box and click Update. Note: The only exceptions to this occur when a user has an alias to an Enterprise account. To restrict access, disable or delete the user's Enterprise account. For more information, see the BusinessObjects Enterprise Administrator's Guide.
- 80. More Details blog:http://sandyclassic.wordpress.com linkedin:https://www.linkedin.com/in/sandepsharma slideshare:http://www.slideshare.net/SandeepSharma65 facebook:https://facebook.com/sandeepclassic google+ http://google.com/+SandeepSharmaa Twitter: https://twitter.com/sandeeclassic Page 80 of 167 Configuring NT Single Sign-On You can configure BusinessObjects Enterprise to allow users to use various BusinessObjects Enterprise applications without being prompted to log on. Users need only to enter their NT user name and password information once at the beginning of the NT session. For instance, if you have set up NT single sign-on, when you launch the CMC, NT authentication occurs in the background. You are not required to enter any additional information. Note: This feature is available if you are using a Microsoft Internet Information Server (IIS) web server and users are using Internet Explorer as their web browser. See the Platforms.txt file included with your product distribution for a complete list of version requirements. For information on configuration settings, see the BusinessObjects Enterprise Administration Guide. Practice Activity: Mapping NT accounts to BusinessObjects Enterprise Scenario Now it is time for the second phase of adding users and groups to BusinessObjects Enterprise. As a result of corporate reorganizing, the Corporate Networking department has split into two teams: Networking and IT. The networking group already exists in Windows NT. However, you need to create an NT group for the new IT team. The IT team will need access to several corporate systems, including BusinessObjects Enterprise. Objective In this activity, you will: · Create an NT group · Create NT users · Add users to the NT group Instructions In Windows, create NT groups and users: 1 Create the NT group IT_NTBE 2 Create the following NT users: · Chris · Claire 3 Add these users to the IT_NTBE group Tip: If needed, refer to these detailed procedures: · To create NT groups on page 5-20. · To create NT users on page 5-20. · To add users to NT groups on page 5-20. In the BusinessObjects Enterprise Central Management Console, add the NT group: 1 Add the IT_NTBE group with aliases. Tip: If needed, refer to the detailed procedures in To add NT groups and aliases to BusinessObjects Enterprise on page 5-20. 2 After you have added the IT_NTBE group, go to the Central Management Console Users page. The users from the IT_NTBE group now appear in BusinessObjects Enterprise.
- 81. More Details blog:http://sandyclassic.wordpress.com linkedin:https://www.linkedin.com/in/sandepsharma slideshare:http://www.slideshare.net/SandeepSharma65 facebook:https://facebook.com/sandeepclassic google+ http://google.com/+SandeepSharmaa Twitter: https://twitter.com/sandeeclassic Page 81 of 167 · On the properties page for Ron what authentication type is listed (Ron was created in the Create New Users and Groups activity earlier in the course)? What about for Claire? · What implication will the Windows NT authentication type have for Claire? Mapping AD accounts to BusinessObjects Enterprise Once you have mapped your AD users and groups, all of the BusinessObjects Enterprise client tools support AD authentication, except the Import Wizard and Java InfoView. You can also create your own applications that support AD authentication. For mor e information, see the developer documentation available on your product CD. Note: AD authentication only works for servers running on Windows systems. Mapping AD accounts To simplify administration, BusinessObjects Enterprise supports AD authentication for user and group accounts. However, before users can use their AD user name and password to log in to BusinessObjects Enterprise, their AD user account needs to be mapped to BusinessObjects Enterprise. When you map an AD account, you can choose to create a new BusinessObjects Enterprise account or link to an existing BusinessObjects Enterprise account. To map AD accounts to BusinessObjects Enterprise, use the Central Management Console (CMC) in BusinessObjects Enterprise. To map AD users and groups Before starting this procedure, ensure that you have the appropriate AD domain and group information. As well, you must have created a domain user account on your AD server for BusinessObjects Enterprise to use when authenticating AD users and groups. 1 Go to the Authentication management area of the CMC. 2 Click the Windows AD tab. 3 Ensure that the Windows Active Directory Authentication is enabled check box is selected. 4 In the AD Administration Credentials area, enter the name and password of the domain user account you've set up on your AD server for BusinessObjects Enterprise to use when authenticating AD users and groups. Administration credentials can use one of the following formats: · NT name (DomainNameUserName) · UPN (user@DNS_domain_name) Administration credentials must be entered to enable AD authentication, map groups, check rights, and so on. 5 Complete the Default AD Domain field. A default domain must be entered to enable AD authentication and map groups. Note: · Groups from the default domain can be mapped without specifying the domain name prefix. · By entering the Default AD Domain name, users do not have to specify the AD domain name when they log in to BusinessObjects Enterprise via AD authentication. 6 In the Mapped AD Member Groups area, enter the AD domaingroup in the Add AD Group (DomainGroup) field. Groups can be mapped using one of the following formats: · NT name (DomainNameGroupName) · DN (cn=GroupName, ......, dc=DomainName, dc=com) Note: If you want to map a local AD group, you can use only the NT name format (ServerNameGroupName). 7 Click Add. The group is added to the list. 8 New Alias Options allow you to specify how AD aliases are mapped to Enterprise accounts. Select either: · Assign each added AD alias to an account with the same name Use this option when you know users have an existing Enterprise account with the same name; that is, AD aliases will be assigned to existing users (auto alias creation is turned on). Users who do not have an existing Enterprise account, or who do not have the same name in their Enterprise and AD account, are added as new AD users. · Create a new account for every added AD alias
- 82. More Details blog:http://sandyclassic.wordpress.com linkedin:https://www.linkedin.com/in/sandepsharma slideshare:http://www.slideshare.net/SandeepSharma65 facebook:https://facebook.com/sandeepclassic google+ http://google.com/+SandeepSharmaa Twitter: https://twitter.com/sandeeclassic Page 82 of 167 Use this option when you want to create a new account for each user. If the user has already created an account through the sign-up feature in InfoView, the user will have separate AD and Enterprise accounts. 9 Update Options allow you to specify if AD aliases are automatically created for all new users. Select either: · New aliases will be added and new users will be created Use this option to automatically create a new alias for every AD user mapped to BusinessObjects Enterprise. New AD accounts are added for users without BusinessObjects Enterprise accounts, or for all users if you selected the "Create a new account for every added AD alias" option. · No new aliases will be added and new users will not be created Use this option when the AD directory you are mapping contains many users, but only a few of them will use BusinessObjects Enterprise. BusinessObjects Enterprise does not automatically create aliases and Enterprise accounts for all users. Instead, it creates aliases (and accounts, if required) only for users who log in to BusinessObjects Enterprise. 10 New User Options allow you to specify properties of the new Enterprise accounts that are created to map to AD accounts. Select either: · New users are created as named users New user accounts are configured to use named user licenses. Named user licenses are associated with specific users and allow people to access the system based on their user name and password. This provides named users with access to the system regardless of how many other people are connected. You must have a named user license available for each user account created using this option. · New users are created as concurrent users New user accounts are configured to use concurrent user licenses. Concurrent licenses specify the number of people who can connect to BusinessObjects Enterprise at the same time. This type of licensing is very flexible because a small concurrent license can s upport a large user base. For example, depending on how often and how long users access BusinessObjects Enterprise, a 100 user concurrent license could support 250, 500, or 700 users. 11 Click Update. A message appears stating that it will take several seconds to update the member groups. 12 Click OK. To view mapped AD users and groups in BusinessObjects Enterprise 1 Go to the Groups management area of the CMC. 2 Under Group Name, click the hyperlink to a Windows AD group. 3 Click the Users tab. Note: You can view the groups by clicking the Windows AD tab from the Authentication management area and then viewing the "Mapped AD Member Groups" area; users cannot be viewed from the Windows AD tab. Unmapping AD users and groups Similar to mapping, it is possible to unmap users and groups using BusinessObjects Enterprise. To unmap AD groups using BusinessObjects Enterprise 1 Go to the Authentication management area of the CMC. 2 Click the Windows AD tab. 3 In the Mapped AD Member Groups area, select the AD group you would like to remove. 4 Click Delete. 5 Click Update. The users in the deleted group will no longer be able to access BusinessObjects Enterprise. Tip: To deny AD authentication for all users, clear the Windows Active Directory Authentication is enabled check box and click Update. Note: The only exceptions to this occur when a user has an alias other than the one assigned for AD authentication, or if your implementation allows users to create their own accounts through the sign-up feature. To restrict access, disable or delete the user's Enterprise account and disable the ability for guests to add users anonymously. For more information, see BusinessObjects Enterprise Online Help. To unmap AD users using BusinessObjects Enterprise 1 Go to the Users management area of the CMC. 2 Click the name of the user whose account you want to unmap. 3 On the Properties tab, for the user's AD alias clear the Enabled check box. 4 Click Update. This user can no longer log in using AD authentication. To further restrict access, disable or delete the user's other aliases, their Enterprise account, and disable the ability for guests to add users anonymously. For more information, see BusinessObjects Enterprise Online Help.
- 83. More Details blog:http://sandyclassic.wordpress.com linkedin:https://www.linkedin.com/in/sandepsharma slideshare:http://www.slideshare.net/SandeepSharma65 facebook:https://facebook.com/sandeepclassic google+ http://google.com/+SandeepSharmaa Twitter: https://twitter.com/sandeeclassic Page 83 of 167 Configuring AD single sign-on Installation of Active Directory plug-in for BusinessObjects Enterprise updates your WCA and enables you to use AD single sign-on. However, for AD single sign-on to work, you have to configure the IIS Business Objects virtual directory. Note: · AD single sign-on is not supported on client machines running on Windows 98. · By default, AD single sign-on is not enabled. · For configuration options, see the BusinessObjects Enterprise Administration Guide. Configuring Kerberos single sign-on When using Kerberos with Windows AD, you can choose whether you want to provide end-to-end single sign-on, or whether you want users to provide their login credentials when they log in to BusinessObjects Enterprise. If users are required to log in to BusinessObjects Enterprise, the system uses their login credential and the associated login token to provide single sign-on access to the databases. In order to support Kerberos single sign-on, you have to configure the Windows AD security plug-in in the CMC to use Kerberos authentication. This includes: · Ensuring Windows AD authentication is enabled. · Setting up an AD Administrator account. This account requires read access to Active Directory only; it does not require any other rights. · Enabling Kerberos single sign-on and setting the service principal name (SPN) to use a service account. Note: BusinessObjects Enterprise currently supports single sign-on to the database with Windows AD using Kerberos for the Windows platform only. It requires a Microsoft Internet Information Services (IIS) web server and users require Internet Explorer (IE) as their web browser. For more information on configuration options, see the BusinessObjects Enterprise Administration Guide. Mapping LDAP accounts to BusinessObjects Enterprise To simplify administration, BusinessObjects Enterprise supports LDAP authentication for user and group accounts, allowing you to leverage your existing LDAP directory. To use LDAP authentication, you need to first ensure that you have your respective LDA P directory set up. To enable LDAP authentication, you must have detailed information regarding your LDAP directory including the server name, and administration credentials. Attribute mapping While users still need their username and password to log in to BusinessObjects Enterprise, this feature enables administrators to map other LDAP attributes. For example, as the administrator you can choose to see real names when managing LDAP users, instead of user ID codes. This feature is enabled using the Configuration Wizard in the LDAP Authentication Management area of the CMC. For more information about configuring the LDAP host using the Configuration Wizard, see the BusinessObjects Enterprise Administration Guide. Identify where to configure and map LDAP groups Once you have configured BusinessObjects Enterprise to use LDAP authentication, you can then map LDAP groups to BusinessObjects Enterprise accounts. Your LDAP accounts are mapped to BusinessObjects Enterprise by creating a new account or by creating a mapping to an existing BusinessObjects Enterprise account. To map LDAP groups using BusinessObjects Enterprise 1 Go to the Authentication management area of the Central Management Console. 2 Click the LDAP tab. If LDAP authorization is configured, the LDAP summary page appears. 3 In the Mapped LDAP Member Groups area, specify your LDAP group (either by common name or distinguished name) in the Add LDAP group (by cn or dn) field, and then click Add.
- 84. More Details blog:http://sandyclassic.wordpress.com linkedin:https://www.linkedin.com/in/sandepsharma slideshare:http://www.slideshare.net/SandeepSharma65 facebook:https://facebook.com/sandeepclassic google+ http://google.com/+SandeepSharmaa Twitter: https://twitter.com/sandeeclassic Page 84 of 167 You can add more than one LDAP group by repeating this step. To remove a group, highlight the LDAP group and click Delete. 4 New Alias Options allow you to specify how LDAP aliases are mapped to Enterprise accounts. Select either: · Assign each added LDAP alias to an account with the same name Use this option when you know users have an existing Enterprise account with the same name; that is, LDAP aliases will be assigned to existing users (auto alias creation is turned on). Users who do not have an existing Enterprise account, or who do not have the same name in their Enterprise and LDAP account, are added as new LDAP users. or · Create a new account for every added LDAP alias Use this option when you want to create a new account for each user. 5 Update Options allow you to specify if LDAP aliases are automatically created for all new users. Select either: · New aliases will be added and new users will be created Use this option to automatically create a new alias for every LDAP user mapped to BusinessObjects Enterprise. New LDAP accounts are added for users without BusinessObjects Enterprise accounts, or for all users if you selected the "Create a new account for every added LDAP alias" option. or · No new aliases will be added and new users will not be created Use this option when the LDAP directory you are mapping contains many users, but only a few of them will use BusinessObjects Enterprise. BusinessObjects Enterprise does not automatically create aliases and Enterprise accounts for all users. Instead, it creates aliases (and accounts, if required) only for users who log in to BusinessObjects Enterprise. 6 New User Options allow you to specify properties of the new Enterprise accounts that are created to map to LDAP accounts. Select either: · New users are created as named users New user accounts are configured to use named user licenses. Named user licenses are associated with specific users and allow people to access the system based on their user name and password. This provides named users with access to the system regardless of how many other people are connected. You must have a named user license available for each user account created using this option . or · New users are created as concurrent users New user accounts are configured to use concurrent user licenses. Concurrent licenses specify the number of people who can connect to BusinessObjects Enterprise at the same time. This type of licensing is very flexible because a small concurrent license can s upport a large user base. For example, depending on how often and how long users access BusinessObjects Enterprise, a 100 user concurrent license could support 250, 500, or 700 users. 7 Click Update. To unmap LDAP groups using BusinessObjects Enterprise 1 Go to the Authentication management area of the Central Management Console. 2 Click the LDAP tab. If LDAP authorization is configured, the LDAP summary page will appear. 3 In the Mapped LDAP Member Groups area, select the LDAP group you would like to remove. 4 Click Delete. 5 Click Update. The users in this group will not be able to access BusinessObjects Enterprise. Tip: To deny LDAP Authentication for all groups, clear the LDAP Authentication is enabled check box and click Update. Tip: The only exceptions to this occur when a user has an alias to an Enterprise account, or if your implementation allows users to create their own accounts through the sign-up feature. To restrict access, disable or delete the user's Enterprise account and disable the ability for guests to add users anonymously. To unmap LDAP users using BusinessObjects Enterprise 1 Go to the Users management area of the CMC. 2 Click the name of the user whose account you want to unmap. 3 On the Properties tab, for the user's LDAP alias clear the Enabled check box. 4 Click Update. This user can no longer log in using LDAP authentication. To further restrict access, disable or delete the user's other aliases, their Enterprise account, and disable the ability for guests to add users anonymously. For more information, see BusinessObjects Enterprise Online Help. Configuring LDAP single sign-on with SiteMinder
- 85. More Details blog:http://sandyclassic.wordpress.com linkedin:https://www.linkedin.com/in/sandepsharma slideshare:http://www.slideshare.net/SandeepSharma65 facebook:https://facebook.com/sandeepclassic google+ http://google.com/+SandeepSharmaa Twitter: https://twitter.com/sandeeclassic Page 85 of 167 SiteMinder is a third party user access and authentication tool that you can use with the LDAP security plug-in to create single sign- on to BusinessObjects Enterprise. In order to use SiteMinder, you need to configure the single sign-on authentication for the LDAP plug-in. For more information about SiteMinder and how to install it, refer to the SiteMinder documentation. For more information on the LDAP security plug-in, see the BusinessObjects Enterprise Online Help. Note: When you install BusinessObjects Enterprise, the LDAP authentication plug-in is installed automatically, but not enabled by default. Applying security Introduction This unit will describe how to apply security at appropriate levels to administer user and group rights efficiently. After completing this unit, you will be able to apply: · Global-level rights · Group and user rights to folders · Group rights to objects · Rights to universes, universe connections, and restriction sets · Group and user rights to categories Use the Central Management Console (CMC) to view the object rights that a user or group has to any folder, report, or other BusinessObjects Enterprise object. The Rights tab for a folder will look similar to this example: · The Name column lists all users and groups who have been given rights to the object or folder. · The Object column shows whether the entry is a User or a Group. · The Access level column shows how each user's or group's rights are determined. · The Net Access column displays the net effect of whatever is selected in the Access Level column. Applying rights to groups, folders, and objects Global security is the default security set for the entire system. Global rights are not specific to any one object, but when a new top level folder is added to the system, this folder's default rights come from the global level. If there are any access levels that will be common for the entire system, you should set these at the Global level. As an example, if Administrators should have Full Control access to all folders and objects, you can set this at the global level. To apply global-level rights 1 Go to the Settings management area of the Central Management Console. 2 Click the Rights tab. 3 Add groups as necessary that require global right's settings. 4 Change the access level of the built-in BusinessObjects Enterprise groups or added groups as necessary depending on your content security plan. 5 Click Update. Practice Activity: Applying global-level rights to groups Scenario You have created BusinessObjects Enterprise groups and users, and have published your content to the BusinessObjects Enterprise system. Before users can go in and look at their objects and schedule instances, you must secure the content as specified in the content plan.
- 86. More Details blog:http://sandyclassic.wordpress.com linkedin:https://www.linkedin.com/in/sandepsharma slideshare:http://www.slideshare.net/SandeepSharma65 facebook:https://facebook.com/sandeepclassic google+ http://google.com/+SandeepSharmaa Twitter: https://twitter.com/sandeeclassic Page 86 of 167 Objective In this activity, you will: · Modify the global rights for an existing group · Add a group at the global level, and grant them rights Instructions 1 Go to the Settings management area of the CMC. 2 Click the Rights tab. 3 Change the access level for the Everyone group to No Access. 4 Leave the Administrator group set to Full Control. 5 Add the IT group. 6 Set the IT group's access level to Full Control. 7 Click Update. 8 Verify the change by going to the Objects management area of the CMC. 9 Click the link for the Consolidated Balance Sheet report. 10 Click the Rights tab. 11 Notice that the Administrators group has the Full Control access level to the report. The Everyone group has No Access to the report. 12 Launch Infoview and log in as Claire 13 Navigate to public folders. · What can Claire see? Why? 14 Log off as Claire and log on as Rachel. · What can Rachel see in the public folders? Why? Applying group and user rights to folders Folder level security enables you to set access level rights for a folder and the objects contained within that folder. While top-level folders inherit security from the global level, subfolders inherit the security of their parent folders. Note: Rights set explicitly at the folder level override inherited rights. To specify rights for a folder 1 On the Folders page of the Central Management Console, select a folder. 2 Click the Rights tab. 3 Click Add/Remove to add groups or users to this folder. The Add/Remove page appears. 4 In the Select Operation list, select Add/Remove Groups, Add Users, or Remove Users. The page is refreshed and displays options that depend upon whether you are working with users or with groups. The example above shows the options that are available when you are working with groups. 5 Select the user/group whose rights you want to specify and click the arrows to specify whether the user/group does or does not have access to the folder. Tip: If you have many users on your system, select the Add Users operation; then use the Look for text box to search for a particular account. 6 Click OK. You are returned to the Rights tab. . Practice Activity: Applying group and user rights to folders Objective
- 87. More Details blog:http://sandyclassic.wordpress.com linkedin:https://www.linkedin.com/in/sandepsharma slideshare:http://www.slideshare.net/SandeepSharma65 facebook:https://facebook.com/sandeepclassic google+ http://google.com/+SandeepSharmaa Twitter: https://twitter.com/sandeeclassic Page 87 of 167 In this activity, you will apply folder rights for users and groups. Instructions 1 In the Central Management Console, go to the Folders page. 2 Apply the following security to the Sales folders and all its sub folders based on your content plan: Folders Everyone Administrators Sales Sales NA Sales EU Sales AP Global No access Full control Sales View Sales North America No Access View Sales Europe No Access View Sales Asia Pacific No Access View Tip: If needed, refer to the procedures To specify rights for a folder on page 5-36. 3 Log on to InfoView as Ron. What folders do you see? 4 Click the Sales folder. What folders do you see now? 5 Apply the following security to the Finance folder and its sub folders based on your content plan. Folders Everyone Administrators Finance Accounting Accounts Receivable Global No access Full control Finance View Accounting No Access Schedule Accounts Receivable No Access Schedule 6 Log into Infoview as Bev. What folders do you see? 7 Click the Finance folder? What subfolders are available to Bev? 8 What rights will Bev have to any of the objects within the subfolder? 9 Log into Infoview as Chris. What folders, subfolders and objects do you see? Why did we not need to set rights for the IT folder? What rights are available? Applying group and users rights to objects Object rights enable you to set access levels for your users and groups. You control which folders, reports, and other objects users and groups can access using BusinessObjects Enterprise. You set security settings at the object level. For objects that can be scheduled, the security settings are also reflected in the object instances object. To facilitate administration, BusinessObjects Enterprise includes a set of predefined rights (access modes) that allow you to set common security levels quickly. These include the following: · Inherited Rights · No Access · View · Schedule · View On Demand · Full Control · Advanced
- 88. More Details blog:http://sandyclassic.wordpress.com linkedin:https://www.linkedin.com/in/sandepsharma slideshare:http://www.slideshare.net/SandeepSharma65 facebook:https://facebook.com/sandeepclassic google+ http://google.com/+SandeepSharmaa Twitter: https://twitter.com/sandeeclassic Page 88 of 167 In addition to setting user and group rights for report objects from the Objects management area, you can also set user and group rights at the folder level. When you set rights at the folder level, these limits will be in effect for all objects that inherit rights from the folder (including any objects found within the subfolders). To add groups or users to an object's rights settings 1 In the Objects management area of the CMC, select an object by clicking its link. 2 Click the Rights tab. The Rights tab appears. 3 Click Add/Remove. 4 Select an option in the Select Operation list. 5 Select the group(s) or user(s) you would like to add or remove. 6 Click the > arrow to add the group(s) or user(s); click the < arrow to remove the group(s) or user(s). 7 Click OK. To change a group or user's report rights 1 In the Objects management area of the CMC, select an object by clicking its link. 2 Click the Rights tab. The Rights tab appears. 3 Change the access level for a group or user by selecting a right from the appropriate list in the Access Level column, and then click Update. If you select Advanced from the list, you grant or deny granular rights from the Advanced Rights page. Admin tool: Objects Rights table The rights table application (located on the Admin Launchpad) displays a matrix of rights of users and user groups on different objects. Applying rights to universes There are two types of access rights that can be set for universes. Security can be set to control which universes a user or group has rights to view or access. This is done using the Rights tab for universe objects. Access levels can also be assigned to control the level of access that users have to specific objects or classes within a universe. This is done by applying object level security to a universe.
- 89. More Details blog:http://sandyclassic.wordpress.com linkedin:https://www.linkedin.com/in/sandepsharma slideshare:http://www.slideshare.net/SandeepSharma65 facebook:https://facebook.com/sandeepclassic google+ http://google.com/+SandeepSharmaa Twitter: https://twitter.com/sandeeclassic Page 89 of 167 Applying object level security to universes Object level security can be assigned within a universe to control the level of access that users have to objects or classes within the universe. The level of access applied to the objects or classes is assigned within the universe Designer. In the universe Designer an object can be assigned one of the following access levels: · Public · Controlled · Restricted · Confidential · Private The Object Level Security tab in the Central Management Console is used to assign users or groups to the appropriate access levels. For example, if the Salary field is assigned the Confidential access level in the universe Designer, and the Human Resources group is assigned Confidential access for the universe in the Central Management Console, then members of the Human Resources group will be able to see the Salary field, but other users who do not have Confidential access will not see this field. Object Level Security can be assigned at the global level for all universes by selecting the Object Level Security tab within the Universes tab of the Central Management Console. Object Level Security can also be assigned for individual universes on the Object Level Security tab for the universe object. To apply object level security to a universe object 1 In the Universes management area of the CMC, select a universe by clicking its link. 2 Click the Object Level Security tab. The Object Level Security tab appears. 3 Click Add/Remove. 4 Select an option in the Select Operation list. 5 Select the group(s) or user(s) you would like to add or remove. 6 Click the > arrow to add the group(s) or user(s); click the < arrow to remove the group(s) or user(s). 7 Click OK. To change object level security for a universe object 1 In the Universes management area of the CMC, select a universe by clicking its link. 2 Click the Object Level Security tab. The Object Level Security tab appears.
- 90. More Details blog:http://sandyclassic.wordpress.com linkedin:https://www.linkedin.com/in/sandepsharma slideshare:http://www.slideshare.net/SandeepSharma65 facebook:https://facebook.com/sandeepclassic google+ http://google.com/+SandeepSharmaa Twitter: https://twitter.com/sandeeclassic Page 90 of 167 3 Change the access level for a group or user by selecting a right from the appropriate list in the Object Level Security column, and then click Update. Applying group and user rights to categories Like folders, categories are used for organizing documents in BusinessObjects Enterprise. Categories provide an alternative organizational structure that makes it easier for users to sort and find documents. By creating categories, and setting appropriate rights for them, you can organize data according to multiple criteria and improve both security and navigation. For example, if you currently organize your files into departmental folders, you could use categories to create an alternate filing system that divides content according to different roles in your organization, such as managers or VPs. You can associate documents with multiple categories, and you can create subcategories within categories. BusinessObjects Enterprise provides two types of categories: · Corporate categories are created by the administrator, or other users who have been granted access to these categories. · Personal categories can be created by each user to organize their own personal documents. To create a category 1 Go to the Categories management area of the CMC. 2 Click New Category. 3 On the Properties tab, type the name and description of the new category. 4 Click OK. The new category is added to the system, and its Properties tab is refreshed. You can now use the Documents, Subcategories, a nd Rights tabs to add objects and to change settings for this category. To create a new subcategory at any level 1 Go to the Categories management area of the CMC. The initial level of categories is displayed. 2 In the Title column, click the link for the category where you want to add a subcategory. 3 Click the Subcategories tab. Tip: You can browse through existing subcategories to add a new category elsewhere in the hierarchy. When you have found the right parent category, go to its Subcategories tab. The Subcategories tab appears. 4 Click New Category. 5 On the Properties tab, type the name and description of the new folder. 6 Click OK.
- 91. More Details blog:http://sandyclassic.wordpress.com linkedin:https://www.linkedin.com/in/sandepsharma slideshare:http://www.slideshare.net/SandeepSharma65 facebook:https://facebook.com/sandeepclassic google+ http://google.com/+SandeepSharmaa Twitter: https://twitter.com/sandeeclassic Page 91 of 167 The new category is added to the system, and its Properties tab is refreshed. You can now use the Documents, Subcategories, a nd Rights tabs to add objects and to change settings for this category. To delete a category When you delete a category, all subcategories within it are removed entirely from the system. Unlike folder deletion, the reports and other objects contained within the category are not deleted from the system. This is because objects do not reside in categories, they are only tagged to them. 1 Go to the Categories management area of the CMC. 2 Select the check box associated with the category you want to delete. If the category you want to delete is not at the top level, locate its parent category. Then make your selection on the parent category's Subcategories tab. Tip: Select multiple check boxes to delete several categories from their parent category. 3 Click Delete, and then click OK to confirm. Practice Activity: Creating categories Scenario You have added the necessary users, folders, and groups to BusinessObjects Enterprise according to your content plan. The next step involves creating the category object that will be used to categorize your month end reports. Objective In this activity, you will: · Create a category in BusinessObjects Enterprise · Add objects to the category Instructions 1 Log on to the CMC as Administrator. 2 Create a new category named Month End Reports as specified in your content plan. 3 Add these reports to the Month End Reports category: · Inventory Report (by category) · Consolidated Income Statement · Consolidated Balance Sheet To specify rights for a category Follow this procedure to change the object rights for a new category that you have just created. By default, new objects that you add to a category inherit the object rights that are specified for the category. 1 Once you've created the category, click its Rights tab. 2 Click Add/Remove to add groups or users to this category. The Add/Remove page appears. 3 In the Select Operation list, select Add/Remove Groups, Add Users, or Remove Users. The page is refreshed and displays options that depend upon whether you are working with users or with groups. 4 Select the user/group whose rights you want to specify and click the arrows to specify whether the user/group does or does not have access to the category. Tip: If you have many users on your system, select the Add Users operation; then use the Look for text box to search for a particular account. 5 Click OK. You are returned to the Rights tab. 6 Change the Access Level for each user or group, as required.
- 92. More Details blog:http://sandyclassic.wordpress.com linkedin:https://www.linkedin.com/in/sandepsharma slideshare:http://www.slideshare.net/SandeepSharma65 facebook:https://facebook.com/sandeepclassic google+ http://google.com/+SandeepSharmaa Twitter: https://twitter.com/sandeeclassic Page 92 of 167 7 Click Update. To move or copy a category When you move or copy a category, any object assigned to the category maintains its association with it. BusinessObjects Enterprise treats the category's object rights differently, depending upon whether you copy or move the category: · When you copy a category, the new category does not retain the object rights of the original. Instead, the copy inherits the object rights that are set on its new parent category. For instance, if you copy a private Sales category into a Public category, the contents of the new Sales category will be accessible to all users who have rights to the Public category. · When you move a category, all of the category's object rights are retained. For instance, if you move a private Sales category into a publicly accessible category, the Sales category will remain inaccessible to most users. 1 Go to the Categories management area of the CMC. 2 Select the check box associated with the category that you want to copy or move. If the category you want to copy or move is not at the top level, locate its parent category. Then make your selection on the parent category's Subcategories tab. Tip: Select multiple check boxes to copy or move several categories from their parent category to a different category. 3 Click Copy/Move. The Copy/Move Category page appears. 4 Select the action to perform: · Copy to: makes a copy of the category. · Move to: moves the category. 5 Select the Destination category from the list Tip: If there are many categories on your system, use the Look for text box to search, or click Previous, Next, and Show Subcategories to browse the category hierarchy. 6 Click OK. The category you selected is copied or moved, as requested, to the new destination.. Practice Activity: Applying group and user rights to categories Scenario You have created and added reports to the category specified in your content plan. The next step involves applying security to the category. Objective In this activity, you will: · Assign a group to a category and specify the appropriate rights Instructions 1 Log on to the CMC as Administrator. 2 Navigate to the Month End Reports category. 3 On the Rights tab, apply the appropriate rights according to your content plan for Finance group.
- 93. More Details blog:http://sandyclassic.wordpress.com linkedin:https://www.linkedin.com/in/sandepsharma slideshare:http://www.slideshare.net/SandeepSharma65 facebook:https://facebook.com/sandeepclassic google+ http://google.com/+SandeepSharmaa Twitter: https://twitter.com/sandeeclassic Page 93 of 167 Lesson 6 Publishing and Configuring Content When you create reports in BusinessObjects Enterprise you have the ability to publish these reports to users in various ways. In this lesson you will learn about: · Publishing reports and other objects Publishing Introduction Publishing is the process of adding objects to the BusinessObjects Enterprise environment and making them available to authorized users. After completing this unit, you will be able to: · Describe publishing methods. · Publish a Crystal Report using Save As and through the CMC. · Configure a Crystal Report. · Publish a Web Intelligence document using Save As. · Publish reports through the Publishing Wizard. · Describe other objects you can publish and configure. · Describe the process flow for publishing Crystal Reports.
- 94. More Details blog:http://sandyclassic.wordpress.com linkedin:https://www.linkedin.com/in/sandepsharma slideshare:http://www.slideshare.net/SandeepSharma65 facebook:https://facebook.com/sandeepclassic google+ http://google.com/+SandeepSharmaa Twitter: https://twitter.com/sandeeclassic Page 94 of 167 · Explain how you would publish in a real world environment. Report publishing methods The available publishing methods depend on the object you are publishing. The publishing methods available are: · The Save As command This is available to anyone working in Crystal Reports, OLAP Intelligence, or Web Intelligence who has rights to add objects to BusinessObjects Enterprise. · The Central Management Console(CMC) This is available to anyone with administrator rights in BusinessObjects Enterprise. · The Publishing Wizard This is available to anyone with a locally installed copy of the Publishing Wizard and who has rights to add objects to BusinessObjects Enterprise. Each of these publishing methods will be described in more detail on the following pages. There are several types of objects that you can publish to BusinessObjects Enterprise. They include reports (from Crystal Reports, OLAP Intelligence, and Web Intelligence), programs, third party objects and hyperlinks, as well as object packages, which consist of report and/or program objects. The setting to configure for publishing depends on the type of object you want to publish. Once the object has been published, it will appear in the folder you specified in InfoView (or other web desktops) and in the Objects area of the CMC. Note: · When you publish a report object to BusinessObjects Enterprise, only the structure of the report (the template information) is saved; The published report object contains no saved data. · BusinessObjects Enterprise supports reports created in versions 6 through XI of Crystal Reports. Once published to Business Objects Enterprise, reports are saved, processed, and displayed in XI format. Publishing Crystal reports For Crystal Reports files, you can publish report objects to BusinessObjects Enterprise using: · The Save As command in Crystal Reports · The Central Management Console · The Publishing Wizard To publish a Crystal report using Save As If you have installed Crystal Reports, you can use the Save As command to add objects to BusinessObjects Enterprise from within the designer itself. To configure reports after publishing them through Crystal Reports, you must go into the Central Management Console. 1 In the Crystal Reports designer, open the report you want to publish. 2 On the File menu, click Save As. 3 In the Save As dialog box, click Enterprise Folders. 4 When prompted, log in to the Central Management Server (CMS). 5 Specify the folder where you want to save the report, then click Save. Note: .rpt will be added to your report name unless you remove them before publishing. To publish a Crystal report through the CMC 1 Go to the Objects area of the CMC. 2 Click New Object. The New Object page appears. By default, Report is selected as the object type.
- 95. More Details blog:http://sandyclassic.wordpress.com linkedin:https://www.linkedin.com/in/sandepsharma slideshare:http://www.slideshare.net/SandeepSharma65 facebook:https://facebook.com/sandeepclassic google+ http://google.com/+SandeepSharmaa Twitter: https://twitter.com/sandeeclassic Page 95 of 167 3 Under the Browse for an existing report option, type the full path to the object, or click Browse to perform a search. 4 Select from the following check boxes: · Generate Thumbnail for the report This displays a preview image to the user in BusinessObjects Enterprise. · Use Object Repository when refreshing report This automatically refreshes an object's repository fields against the repository each time the report runs. 5 If you want to place the object in a category, select the category from the list. Tip: To search for a specific category, type some key words in the Look For text box, and then click Find Now. 6 From the Destination field, select the appropriate folder. Tip: · To expand a folder, select it and click Show Subfolders. · To search for a specific folder or object package, type some key words in the Look For text box, and then click Find Now. 7 Click OK. When the object has been added to the system, the CMC displays the Properties screen. If necessary, you can now modify the object's properties, such as its title and description, the database login information, scheduling information, user rights, and so on.
- 96. More Details blog:http://sandyclassic.wordpress.com linkedin:https://www.linkedin.com/in/sandepsharma slideshare:http://www.slideshare.net/SandeepSharma65 facebook:https://facebook.com/sandeepclassic google+ http://google.com/+SandeepSharmaa Twitter: https://twitter.com/sandeeclassic Page 96 of 167 Configuring a Crystal report Configuring a report refers to all the settings you need to make so that the report will run within the BusinessObjects Enterprise environment, as opposed to running as a stand-alone report in Crystal Reports. When you publish any object to BusinessObjects Enterprise, it is stored on an Input FRS. Meta information for this object-such as object properties, data source information, and selection formulas-is also copied to the CMS system database. The meta information from the system database is what initially appears in the configuration tabs for the object in the CMC after publishing. As you change these configuration settings in the CMC, you are modifying the object's meta information stored in the system database. You are not, however, modifying the settings on the object stored in the Input FRS. This means when you subsequentl y refresh the object against the one stored in the Input FRS, you could overwrite any changes you made to the object's settings in the CMC. Fortunately, there are options that allow you to exclude certain meta information from being refreshed. This section explains report configuration settings available in the CMC. Report configuration options What you can configure depends on the object type. Crystal Reports files have the following configuration tabs in the Central Management Console:
- 97. More Details blog:http://sandyclassic.wordpress.com linkedin:https://www.linkedin.com/in/sandepsharma slideshare:http://www.slideshare.net/SandeepSharma65 facebook:https://facebook.com/sandeepclassic google+ http://google.com/+SandeepSharmaa Twitter: https://twitter.com/sandeeclassic Page 97 of 167 · Properties · History · Process · Schedule · Categories · Rights Properties tab On the Properties tab of a report object, you can: · Add or change the report title. · Add or change the report description. · Preview the report on demand. This enables you to view a report on demand with all of your current report settings. In addition to setting report properties, you can also set the following from this tab: · Refresh Options In the Refresh Options sublink, you can set the following: · Properties to refresh You can set report refresh options that determine which settings of a report object are updated when you refresh it in BusinessObjects Enterprise. To preserve your changes to the values of report elements when you refresh a report, clear the appropriate report refresh opt ion. Note: If you select Current and Default Parameter Values, BusinessObjects Enterprise ensures that changes to either the default value of a parameter or to the current value of a parameter are updated in the report object when the report is refreshed. · Use Object Repository when refreshing report The repository is a central location that stores shared report elements such as text objects, bitmaps, custom functions, and Business Views. As you update objects stored in your repository, you need to update the published Crystal reports that reference those repository objects. When you refresh a report in this way, the old repository objects stored in the report are replaced with the latest versions from the repository. Note: Although refreshing with the repository is faster, you can also refresh reports by setting options that compare reports to their original source .rpt files. Tip: If you use Crystal Reports to open reports directly from your BusinessObjects Enterprise folders, you can update repository objects at that time. You can also refresh repository objects when you publish reports. Tip: Once you have enabled repository refresh for each report, you can refresh multiple reports simultaneously using the Obje ct Repository Helper. The Object Repository Helper is available from Administrative Tools area in the BusinessObjects Enterprise Admin Launchpad. · Links Crystal Reports lets you use hyperlinks to navigate from one report object to another. This navigation is available only in the new script-based DHTML viewers (zero-client, and server-side viewers) included in BusinessObjects Enterprise. The Links sublink lists all the links in the report. They can be either relative or absolute. Relative links are those between reports in the same object package, and absolute links are links to specific report objects or instances. To view hyperlinked reports, you must publish both the home and destination reports to the same BusinessObjects Enterprise system. (A home report is one that contains a hyperlink to another report, the destination report.) Note: The most efficient way to hyperlink between published reports is first to publish the individual reports, then create the hyperlinks between them. To do so, create the reports without hyperlinks in Crystal Reports, and publish them to BusinessObjects Enterprise. Next, use Crystal Reports to log in to your BusinessObjects Enterprise system and create the hyperlinks between the home and destination reports. (For details, see the Crystal Reports Online Help.) To change options on the Properties tab 1 In the Objects management area of the CMC, select a report object by clicking its link. 2 On the Properties tab, you can modify: · Title field · Description field · Show report thumbnail option 3 When you have finished modifying these properties, click Update. 4 Click Refresh Options. Here you can choose to select all, clear all, or individually select or clear options related to refreshing the object. 5 When you have finished modifying these properties, click Update.
- 98. More Details blog:http://sandyclassic.wordpress.com linkedin:https://www.linkedin.com/in/sandepsharma slideshare:http://www.slideshare.net/SandeepSharma65 facebook:https://facebook.com/sandeepclassic google+ http://google.com/+SandeepSharmaa Twitter: https://twitter.com/sandeeclassic Page 98 of 167 History tab The History tab displays all of the instances for a selected object. The Instance Time column displays the title of the instances and the date of the last update for each instance. The Status column displays the status of each instance. The Run By column indicates which user scheduled the instance. For report objects, the Format column displays which format the report is, or will be stored in and the Parameters column indicates what parameters were, or will be, used for each instance. In addition to setting report properties, you can also set the object limits from this tab. · Limits In the Limits page you can set limits to automate regular clean-ups of old BusinessObjects Enterprise content. At the object level, you can limit the number of instances that remain on the system for the object or for each user or group; you can also limit the number of days that an instance remains on the system for a user or group. Process tab By selecting a particular server or server group, you can balance the load of your scheduling or viewing, as specific reports can be processed using specific servers. You can choose your settings so that BusinessObjects Enterprise will: · Use the first available server · Attempt to use the servers belonging to a selected group first (and, if the servers from that group are not available, use any available server) · Use only servers that belong to a specific group In addition to setting which servers process the report, you can also set the following from this tab. · Database You can select your database type and set the default database login information on the Database page for a report. The database sublink displays the data source or data sources for your report object and its instances. You can choose to prompt the user for a login name and password when the user views a report on demand. · Parameters Parameter fields (with preset values) enable users to view and to specify the data that they want to see. Through a BusinessObjects Enterprise application such as InfoView, your users are either able to use the report with the preset default value(s) or choose another value or values. This tab is only available if the report object contains parameters. · Filters On the Filter page, you set the default selection formulas for the report. Selection formulas are similar to parameter fields in that they are used to filter results so that only the required information is displayed. Unlike parameters, end users will not be prompted for selection formula values when they view or refresh the report. When users schedule reports through a web-based client such as InfoView, they can choose to modify the selection formula for the reports. By default, if any formulas are set in the CMC, th ey will be used by the web-based client. · Print Setup You can choose to print a report (each time it runs) using the Report Job Server's default printer or a different printer. By selecting the Printer destination, BusinessObjects Enterprise prints your report after it is processed. The Report Job Server must run under an account that has sufficient privileges to access the printer you specify. Note: For more information on print settings, see Printer and page layout in Lesson 7 Scheduling. To change database settings 1 In the Objects management area of the CMC, select a report object by clicking its link. 2 Click the Process tab, and then click the database link. The Database page appears.
- 99. More Details blog:http://sandyclassic.wordpress.com linkedin:https://www.linkedin.com/in/sandepsharma slideshare:http://www.slideshare.net/SandeepSharma65 facebook:https://facebook.com/sandeepclassic google+ http://google.com/+SandeepSharmaa Twitter: https://twitter.com/sandeeclassic Page 99 of 167 3 In the Data Source(s) list, select the data source. 4 Select Use original database logon information from the report or Use custom database logon information specified here. If you select the first option, you can specify a user name and password to be used with the original report database.
- 100. More Details blog:http://sandyclassic.wordpress.com linkedin:https://www.linkedin.com/in/sandepsharma slideshare:http://www.slideshare.net/SandeepSharma65 facebook:https://facebook.com/sandeepclassic google+ http://google.com/+SandeepSharmaa Twitter: https://twitter.com/sandeeclassic Page 100 of 167 If you select the second option, you can specify a server name (or a DSN in the case of an ODBC data source), a database name, a user name, and a password for a number of predefined database drivers, or for a custom database driver that you've specified. If you've changed the default table prefix in your database, specify a custom table prefix here. The predefined database drivers include: ODBC drivers and native Oracle, DB2, Sybase, and Informix drivers. 5 In the When viewing report area, select from the following options: · Prompt the user for database logon when viewing This option will prompt users for a password when they refresh a report after viewing it once. Note: This option has no effect on a scheduled instance. Also, BusinessObjects Enterprise only prompts users when they first refresh a report; that is, if they refresh the report a second time, they will not be prompted. · Use SSO context for database logon Single sign-on to BusinessObjects Enterprise means that once users have logged in to the operating system they can access BusinessObjects Enterprise without having to provide their login credentials again. When they log in to the operating system, a login token is created. The system uses this token to authenticate the users and grant them access to BusinessObjects Enterprise and its components. · Use same database logon as when report is run This enables the report to be run using the login credentials already received by the system. 6 Click Update. To view parameter settings 1 In the Objects management area of the CMC, select a report object by clicking its link. 2 Click the Process tab, then click Parameters. A list of all the parameters with their values for the object appears. 3 Under the Value column, click the value you want to change. A page opens that allows you to change the parameter value.
- 101. More Details blog:http://sandyclassic.wordpress.com linkedin:https://www.linkedin.com/in/sandepsharma slideshare:http://www.slideshare.net/SandeepSharma65 facebook:https://facebook.com/sandeepclassic google+ http://google.com/+SandeepSharmaa Twitter: https://twitter.com/sandeeclassic Page 101 of 167 4 Select the Prompt the user for new value(s) when viewing check box if you want your users to be prompted when they view a report instance through a BusinessObjects Enterprise application such as InfoView. 5 Select the Clear the current parameter value(s) check box if you want to clear the current value that is set for the specified parameter. 6 Depending on the parameter value type, choose a value from Available Values or type a value in the Enter a Value text box. 7 Click Submit. You will notice that the new values are listed in the Value column. To view the selection formula 1 In the Objects management area of the CMC, select a report object by clicking its link. 2 Click the Process tab, then click Filters. The Filters page appears.
- 102. More Details blog:http://sandyclassic.wordpress.com linkedin:https://www.linkedin.com/in/sandepsharma slideshare:http://www.slideshare.net/SandeepSharma65 facebook:https://facebook.com/sandeepclassic google+ http://google.com/+SandeepSharmaa Twitter: https://twitter.com/sandeeclassic Page 102 of 167 3 Update or add new selection formulas. · Use the Record Selection Formula to create or edit a record selection formula that limits the records used when you or a user schedules a report. · Use the Group Selection Formula to create or edit a group selection formula that limits the groups used when you or a user schedules a report. Note: these selection formulas are specific to Crystal or Basic syntax, depending on how the report was created. They are not SQL based.
- 103. More Details blog:http://sandyclassic.wordpress.com linkedin:https://www.linkedin.com/in/sandepsharma slideshare:http://www.slideshare.net/SandeepSharma65 facebook:https://facebook.com/sandeepclassic google+ http://google.com/+SandeepSharmaa Twitter: https://twitter.com/sandeeclassic Page 103 of 167 4 In the processing extensions area, where appropriate, select a processing extension from the Available Processing Extensions list, then click Add. 5 If you change either one of the selection formulas, click Update. Scheduling tab During the publishing process, you specify how often an object is run. You can choose to set a schedule (recurring), or you can choose to let users set the schedule themselves (on demand). In addition to setting how often to run the report, you can also set the following from this tab: · Notification · Alert Notification · Destination · Format · Schedule For Note: For more information about each scheduling option, see Lesson 7 Scheduling. Categories tab You can assign your report to a personal or corporate category through the Category tab. Categories are similar to folders in that they are a method of organizing objects. However, while an object always resides in a specified folder, it may or may not be assigned to one or several categories as an additional method of classification. Note: For more information about categories, see Applying group and user rights to categories on page 5-41. Rights tab Tip: On the Rights tab you can set the rights that specifc users and groups have to the object. Note: For more information about group and user rights, see Applying security on page 5-33. Practice Activity: Publishing reports through the CMC Scenario Someone from your internal sale's department used Crystal Reports to create a North American Sale's Report and has notified you it is available for publishing. Since you are currently logged into the Central Management Console under the 'Administrators' account you decide publish it right from the CMC. Objective In this activity, you will: · Publish reports using the CMC. · Configure report properties. Instructions 1 Log into the CMC using the 'Administrator' account and click on 'Objects'. 2 Insert the resource CD that comes with your training manual. Click New Object and navigate to the Sales Folder to find the North American Sales Report. 3 Save the report in the Sales folder for North America. 4 Once the report has been successfully published choose the option to Preview.
- 104. More Details blog:http://sandyclassic.wordpress.com linkedin:https://www.linkedin.com/in/sandepsharma slideshare:http://www.slideshare.net/SandeepSharma65 facebook:https://facebook.com/sandeepclassic google+ http://google.com/+SandeepSharmaa Twitter: https://twitter.com/sandeeclassic Page 104 of 167 5 You notice from the group tree that the report has the filter set to include 'Canada' and 'USA' but does not include 'Mexico'. Update the report object's filter to include 'Mexico'. 6 On the 'Properties' page 'Preview' the report to check and make sure the filter is correct. Publishing Web Intelligence documents Web Intelligence documents are report objects similar to Crystal Reports except that they are created over the web, through InfoView. While Crystal Reports may report from various data sources, Web Intelligence documents only report from a universe data source. Web Intelligence objects are only published by using Save As because they cannot exist outside of the BusinessObjects Enterprise system. Once published, the configuration options for Web Intelligence objects are the same as Crystal Reports except for the Caching Options in the Schedule tab (for more information see Caching Options on page 7-17.) To publish a Web Intelligence document using Save As 1 In InfoView, open the report you want to publish. 2 Click Document and select Save as from the drop down list. The Save As dialog box appears. Note: You can also change the Save to my computer as... to save the file on your local machine as an Excel or PDF file. 3 Type a title, description, and any keywords you want to identify the report. 4 In the Location text box, specify a location to save the report. By default the Location text box will be the personal folder of the user logged in to InfoView. To change the default, click Change and select a personal or public folder from the list. 5 Click OK. Publishing with the Publishing Wizard As with the Central Management Console, when configuring settings in the Publishing Wizard, you are modifying the metadata stored by the CMS database, but you are not modifying the actual report that has been published to the Input FRS. Once the object has been published, it will appear in the folder you specified in InfoView (or other web desktop) and in the Objects management a rea of the CMC. You can always modify the object settings in the Central Management Console after the object has been published.
- 105. More Details blog:http://sandyclassic.wordpress.com linkedin:https://www.linkedin.com/in/sandepsharma slideshare:http://www.slideshare.net/SandeepSharma65 facebook:https://facebook.com/sandeepclassic google+ http://google.com/+SandeepSharmaa Twitter: https://twitter.com/sandeeclassic Page 105 of 167 The wizard is made up of a series of screens. Only the screens applicable to the objects or folders you are publishing appear. For example, the settings for parameters and schedule format do not appear when you publish OLAP Intelligence applications. The following steps are categorized by task to describe the different options available throughout the publishing process. Publishing a Crystal report through the Publishing Wizard To log in to BusinessObjects Enterprise 1 From the BusinessObjects Enterprise XI program group, click Publishing Wizard. The Publishing Wizard appears. 2 Click Next. 3 In the System text box, type the name of the CMS to which you want to add objects. 4 In the User Name and Password text boxes, type your BusinessObjects Enterprise credentials. 5 From the Authentication list, select the appropriate authentication type. 6 Click Next. The Select Files dialog box appears. To add objects 1 Depending on the type of object you are adding, click either Add Files or Add Folders. 2 Navigate to and select the object you want to add. If you are adding a folder, you can choose to also add its subfolders by selecting the Include Subfolders check box. Tip: Ensure the appropriate file type is listed in the Files of type field; by default this value is set to Report (*.rpt). 3 Repeat steps 1 and 2 for each of the objects you want to add. 4 Click Next. Note: If the Specify Object Type dialog box appears, choose a file type for each unrecognized object, and then click Next. The Specify Location dialog box appears. To create and select a folder on the CMS
- 106. More Details blog:http://sandyclassic.wordpress.com linkedin:https://www.linkedin.com/in/sandepsharma slideshare:http://www.slideshare.net/SandeepSharma65 facebook:https://facebook.com/sandeepclassic google+ http://google.com/+SandeepSharmaa Twitter: https://twitter.com/sandeeclassic Page 106 of 167 To add the selected objects, you must create or select a folder on the host CMS. Only the folders that you have full control access to will appear. 1 Click the folder you want to add the objects to and then click + to the left of the folder to view the subfolders. To add a new folder to the CMS, select a parent folder and then click New Folder. The new folder appears and can be renamed. To add a new object package to the CMS, select a parent folder and then click New Object Package. The new object package appears and can be renamed. To delete a folder or object package, select the item and click Delete. Note: From the wizard, you can delete only new folders and object packages. (New folders are green; existing folders are yell ow.) If you are adding multiple objects and want to place them in separate directories, see To duplicate the folder structure on page 6-16. 2 Click Next. The Specify folder Hierarchy dialog box appears if it is needed. To duplicate the folder structure If you are adding multiple objects from a directory and its subdirectories, you are asked if you want to duplicate the existing folder hierarchy on the CMS. 1 Choose a folder hierarchy option. To place all of the objects in a single folder, select Put files in the same location. To recreate all of the folders and subfolders on the CMS as they appear on your hard drive, select Duplicate the folder hierarchy. Choose the topmost folder that you want to include in the folder hierarchy. 2 Click Next. The Confirm Location dialog box appears. To move objects between folders 1 In the Confirm Location dialog box, move objects to the desired folders by selecting each object and then clicking Move Up or Move Down. Tip: You can also add folders and object packages by selecting a parent folder and clicking the New Folder or New Object Package button. To delete a folder or object packages, select it and click the Delete button. You can drag-and-drop objects to place them where you want. And you can right-click objects to rename them. By default, objects are displayed using their titles. You can display the objects' local file names by clicking the Show file names button. 2 Click Next when you are finished. The Specify Categories Dialog box appears. To add objects to a category If you want to add the selected objects to a category, you can create or select a category on the host CMS. 1 In the Specify Categories dialog box, click the category you want to add the objects to. Click + to the left of the folder to view the subfolders. To add a new category to the CMS, select a parent category and then click the New Category button. The new category appears and can be renamed.
- 107. More Details blog:http://sandyclassic.wordpress.com linkedin:https://www.linkedin.com/in/sandepsharma slideshare:http://www.slideshare.net/SandeepSharma65 facebook:https://facebook.com/sandeepclassic google+ http://google.com/+SandeepSharmaa Twitter: https://twitter.com/sandeeclassic Page 107 of 167 2 In the File list, choose the object that you want to add to the category, and then click the Insert File button. To delete a category or to remove an object from a category, select the item and click Delete. 3 Click Next. The Specify Schedule dialog box appears if it is needed. To change scheduling options The Specify Schedule dialog box allows you to schedule each report, program, and/or object package that you are publishing to run at specific intervals. Note: This dialog box appears only for objects that can be scheduled. 1 Select the object you want to schedule. 2 Select one of three intervals: · Run once only Selecting the Run once only option provides two more sets of options: · When finished this wizard This option runs the object once when you've finished publishing it. The object is not run again until you reschedule it. · At the specified date and time This option runs the object once at a date and time you specify. The object is not run again until you reschedule it. · Let users update the object This option does not schedule the object. Instead, it leaves the task of scheduling up to the user. · Run on a recurring schedule Once you have selected this option, click the Set Recurrence button to set the scheduling options. The Pick a recurrence schedule dialog box appears. The options in this dialog box allow you to choose when and how often the report runs. Select the appropriate options and click OK. 3 Click Next after you have set the schedule for each object you are publishing. The Specify Repository Refresh dialog box appears if it is needed. To enable repository refresh
- 108. More Details blog:http://sandyclassic.wordpress.com linkedin:https://www.linkedin.com/in/sandepsharma slideshare:http://www.slideshare.net/SandeepSharma65 facebook:https://facebook.com/sandeepclassic google+ http://google.com/+SandeepSharmaa Twitter: https://twitter.com/sandeeclassic Page 108 of 167 You can choose to refresh an object's repository fields if the object references the repository. To complete this task, the Publishing Wizard needs to connect to your BusinessObjects Enterprise Repository database from the local machine. 1 Select a report, and then select the Use Object Repository when refreshing report check box. Tip: Click Enable All to refresh all objects that reference the repository; click Disable All to refresh none of the objects. 2 Click Next when you are finished. The Specify Keep Saved Data dialog box appears. To keep a report's saved data You can choose whether or not you want to keep a report's saved data. Note: This dialog box appears only when you publish report objects with saved data. 1 Select a report, and then select the Keep Saved data when publishing report check box.
- 109. More Details blog:http://sandyclassic.wordpress.com linkedin:https://www.linkedin.com/in/sandepsharma slideshare:http://www.slideshare.net/SandeepSharma65 facebook:https://facebook.com/sandeepclassic google+ http://google.com/+SandeepSharmaa Twitter: https://twitter.com/sandeeclassic Page 109 of 167 Tip: Click the Enable All button if you want to keep saved data with all the objects you are publishing; click the Disable All button if you don't want to save the data of any of the objects. 2 Click Next when you are finished. The Change Default Values dialog box appears. To publish objects without making modifications Note: You can publish objects without changing any of the default properties, or you can go through the remaining screens and make changes. If you use the default values, your object may not schedule properly if the database login information is not correct, or if the parameter values are invalid. 1 Select Publish without modifying properties. 2 Click Next through the wizard's remaining dialog boxes. To review or modify objects before publishing 1 Select Review or modify properties. 2 Click Next. The Review Object Properties dialog box appears. To change object properties 1 In the Review Object Properties dialog box, select the object you want to modify. 2 Enter a new title or description. 3 Click Next. The Specify Database Credentials dialog box appears if it is needed. To enter database login information Some objects use data sources that require login information. If objects you are adding are of this type, follow these steps: 1 Double-click the object, or click + to the left of the object to expose the database.
- 110. More Details blog:http://sandyclassic.wordpress.com linkedin:https://www.linkedin.com/in/sandepsharma slideshare:http://www.slideshare.net/SandeepSharma65 facebook:https://facebook.com/sandeepclassic google+ http://google.com/+SandeepSharmaa Twitter: https://twitter.com/sandeeclassic Page 110 of 167 2 Select the database and change the login information in the appropriate text boxes. If the database does not require a user name or password, leave the text boxes blank. Note: Enter user name and password information carefully. If it is entered incorrectly, the object cannot retrieve data from the database. 3 Once you have completed the login information for each object using a different database, click Next. The Set Report Parameters dialog box appears if it is needed. To set parameters Some objects contain parameters for data selection. Before such an object can be scheduled, you must set the parameters in order to determine the default prompts. 1 Select the object whose prompts you want to change. The object's prompts and default values appear in a list on the right side of the screen. 2 Click Edit Prompt to change the value of a prompt. Depending on the type of parameter you have chosen, different dialog boxes appear. 3 If you want to set the prompts to contain a null value (where possible), then click Set Prompts to NULL. 4 Click Next after you have finished editing the prompts for each object. The Schedule Format dialog box appears. To set the schedule format You can choose a schedule format for each report that you publish. For some of the formats, you can customize the schedule format options. Note: This option only applies to objects that can be scheduled: Crystal reports, Web Intelligence documents, program objects , and object packages. 1 Select the object whose schedule format you want to change. 2 Select a format from the list (Crystal Report, Excel, Word, and so on). Where applicable, customize the schedule format options. For example, if you select Paginated Text, enter the number of lines per page. 3 Click Next. The final dialog box appears.
- 111. More Details blog:http://sandyclassic.wordpress.com linkedin:https://www.linkedin.com/in/sandepsharma slideshare:http://www.slideshare.net/SandeepSharma65 facebook:https://facebook.com/sandeepclassic google+ http://google.com/+SandeepSharmaa Twitter: https://twitter.com/sandeeclassic Page 111 of 167 To finalize the objects to be added After you have provided all of required information for the objects, the Publishing Wizard displays a final list of the objects to be published. 1 After ensuring all the objects you want to publish have been added to the list, click Next. The objects are added to the CMS, scheduled, and run as specified. When the processing is done, you are returned to the final screen of the Publishing Wizard. 2 To view the details for an object, select it from the list. 3 Click Finish to close the wizard. Practice Activity: Publishing with the Publishing Wizard Scenario You have been notified by your corporate report designer that the necessary sale's reports have been developed and tested, and are ready to be published into your BusinessObjects Enterprise architecture for viewing. Since you have already created the Sale's folder structure that was specified in the content plan, you can use the Publishing Wizard to bring in all these reports at once, and publish them into their respective folders. Objective
- 112. More Details blog:http://sandyclassic.wordpress.com linkedin:https://www.linkedin.com/in/sandepsharma slideshare:http://www.slideshare.net/SandeepSharma65 facebook:https://facebook.com/sandeepclassic google+ http://google.com/+SandeepSharmaa Twitter: https://twitter.com/sandeeclassic Page 112 of 167 In this activity, you will use the Publishing Wizard to: · Publish reports · Configure report properties Instructions 1 In the Windows Explorer, browse to your resource CD. 2 Locate the 2 Sales reports for Europe and Asia Pacific located in the Sales reports folder. 3 Go to Start > Program Files > BusinessObjects > Publishing Wizard. 4 Log in to your BusinessObjects Enterprise system as Administrator. 5 Choose the option to Add Files. Navigate to the Sale's Reports folder and use your shift key (sequential items) or ctrl key (individual items) to highlight the 2 reports so they will both be published at once. 6 Choose to add them to the Sales main folder, and then under Confirm Location move each file to its respective subfolder. 7 The reports do not need to be added to a category but they should be scheduled to run every Thursday night at 3:30am so the Sales team can view the reports Friday morning. 8 Click Next to accept the default settings and Finish to complete the publishing process. 9 Login to Infoview as Sophie and navigate to the Sales Europe subfolder. Is Sophie able to view the report? 10 Log out and back in as Administrator. Is the Administrator able to view the report? Publishing other objects Other objects that can be published through the Publishing Wizard include: · OLAP Intelligence reports (.car files) · Program objects · Object packages · Hyperlinks and third party documents: .doc, .ppt .xls, .txt, .pdf files Publishing OLAP Intelligence reports OLAP Intelligence reports provide and analytical, interactive interface that can be used to display business data based on multidimensional cubes. All components on a page share the same viewpoint (orientation and member) of an OLAP cube. By changing the view in one component, you change the view in all components on the same page. You can publish OLAP Intelligence reports: · Using Save As from the OLAP Intelligence designer. · From the Publishing Wizard. Note: To publish .car files from the Publishing Wizard, you must have OLAP Intelligence installed. The behind the scenes process to publish a OLAP Intelligence object is the same as that described for Crystal Reports. Similarly, the CMS's system database also stores meta information for the OLAP Intelligence object that you can modify, as described in Configuring a Crystal report on page 6-4. Publishing program objects A program object is an object in BusinessObjects Enterprise that represents an application. Publishing a program object to BusinessObjects Enterprise allows you to use BusinessObjects Enterprise to schedule and run the program object and to manage user rights to the program object. Three types of applications can be published to BusinessObjects Enterprise as program objects: · Executable Executable programs are binary files, batch files, or shell scripts. They generally have file extensions such as: .com, .exe, .bat, .sh. You can publish any executable program that can be run from the command line on the machine that runs the Program Job Server. · Java You can publish any Java program to BusinessObjects Enterprise as a Java program object. For Java program objects to have access to Java SDK objects, your class must implement the IProgramBase interface from the BusinessObjects Enterprise Java SDK (com.businessobjects.sdk.plugin.desktop.program.IProgramBase). For details, see the BusinessObjects Enterprise Java SDK Guide. · Script
- 113. More Details blog:http://sandyclassic.wordpress.com linkedin:https://www.linkedin.com/in/sandepsharma slideshare:http://www.slideshare.net/SandeepSharma65 facebook:https://facebook.com/sandeepclassic google+ http://google.com/+SandeepSharmaa Twitter: https://twitter.com/sandeeclassic Page 113 of 167 Script program objects are JScript and VBScript scripts. They are run on Windows using an embedded COM object and can-once published-reference the BusinessObjects Enterprise SDK objects. For details, see the BusinessObjects Enterprise COM SDK Guide. You can publish program objects to BusinessObjects Enterprise using: · The Central Management Console. · The Publishing Wizard. To publish a program object with the CMC 1 Go to the Objects area of the CMC. 2 Click New Object. The New Object page appears. 3 Select Program from the list of object types to the left of the page. 4 In the File name box, enter the path to the file. 5 Select the program type. 6 If you want to place the object in a category, select the category from the list. Tip: To search for a specific category, type some key words in the Look For field, then click Find Now. 7 In the list of top-level folders, select the appropriate folder, then click Show Subfolders. Tip: To search for a specific folder or object package, type some key words in the Look For text box, then click Find Now. 8 Repeat step 7 until your destination folder or object package appears in the Destination text box. 9 Click OK. When the object has been added to the system, the CMC displays the program object's configuration tabs with the Properties tab selected. Publishing a program object through the Publishing Wizard Some of the steps involved when publishing a program object through the Publishing Wizard are the same as for Crystal Reports. The steps that are the same reference Publishing with the Publishing Wizard on page 6-15. The steps that are different are outlined in the following procedure. To log in to BusinessObjects Enterprise For this procedure, see To log in to BusinessObjects Enterprise on page 6-15. To add objects For this procedure, see To add objects on page 6-16.
- 114. More Details blog:http://sandyclassic.wordpress.com linkedin:https://www.linkedin.com/in/sandepsharma slideshare:http://www.slideshare.net/SandeepSharma65 facebook:https://facebook.com/sandeepclassic google+ http://google.com/+SandeepSharmaa Twitter: https://twitter.com/sandeeclassic Page 114 of 167 To create and select a folder on the CMS For this procedure, see To create and select a folder on the CMS on page 6-16. To duplicate the folder structure For this procedure, see To duplicate the folder structure on page 6-16. To move objects between folders For this procedure, see To move objects between folders on page 6-17. To add objects to a category For this procedure, see To add objects to a category on page 6-17. To change scheduling options For this procedure, see To change scheduling options on page 6-17. To select a program type 1 Select a program. 2 Specify one of three program types (for more information on program types, see Publishing program objects on page 6-23. ): · binary/batch · java · script 3 Once you have specified the type of each program you are adding, click Next. The Program Credentials dialog box appears. To specify program credentials You must specify login credentials that the program will run under, otherwise scheduled program object jobs will fail. For more information, see Setting default login credentials for program objects 1 In the Program Credentials dialog box, select a program. 2 In the User Name and Password text boxes, specify the user credentials for the account for the program to run as. The rights of the program are limited to those of the account that it runs as. 3 Once you have specified the user credentials for each program to run as, click Next. The Change Default Values dialog box appears. To publish objects without making modifications For this procedure, see To publish objects without making modifications To review or modify objects before publishing For this procedure, see To review or modify objects before publishing To change object properties For this procedure, see To enter database login information For this procedure, see To enter database login information To set the schedule format For this procedure, see To set the schedule format To add extra files for programs Some programs require access to other files in order to run. 1 Select a program. 2 Click Add to navigate to and select the necessary file. 3 Once you have added all necessary extra files for each program, click Next. The Command line for Program dialog box appears. To specify command line arguments For each program, you can specify any command line arguments supported by your program's command line interface. They are passed directly to the command line interface, without parsing. 1 Select a program. 2 Under the Process tab click Parameters, type the command line arguments for your program, using the same format you would use at the command line itself. 3 Once you have specified all necessary command line arguments for each program, click Update. To finalize the objects to be added For this procedure, see To finalize the objects to be added.
- 115. More Details blog:http://sandyclassic.wordpress.com linkedin:https://www.linkedin.com/in/sandepsharma slideshare:http://www.slideshare.net/SandeepSharma65 facebook:https://facebook.com/sandeepclassic google+ http://google.com/+SandeepSharmaa Twitter: https://twitter.com/sandeeclassic Page 115 of 167 Configuring a program object Configuring a program object refers to all the settings you need to make so the program object will run within the BusinessObjects Enterprise environment, as opposed to running as a stand-alone application. The behind the scenes process to publish a program object is the same as that described for Crystal Reports. Similarly, the C MS's system database also stores meta information for the program object which you can modify, as described in Configuring a Crystal report. Program objects have the same configuration tabs as reports. For the most part, they also have the same configuration options. However, the options and sublinks on the Properties, Process, and Schedule tabs are different, as explained below. Properties tab In addition to the title and description fields, the Properties tab for a program object indicates the program type. Once published, you cannot change the specified program type for an object. Process tab Since you cannot view programs on demand, the only servers you can specify here are the Program Job Servers to be used for scheduling. In addition to setting which server processes the program object, you can also set the following from this tab. · Logon This is where you can assign credentials specifically for this program object, which will override the global program object credentials specified under Object Settings within the Objects management area (described in To specify default login credentials for a program object.). · Parameters This is where you can specify command line arguments, as well as a working directory for your program object. Arguments are passed directly to the command line interface, without parsing. By default, when a program object runs, BusinessObjects Enterprise creates a temporary subdirectory in the Program Job Server's working directory, and uses this subdirectory as the working directory for the program. The subdirectory is automatically deleted when the program finishes running. You can specify an alternative working directory for the program object by modifying the Working Directory text box on the Parameters page of the object. Alternatively, you can modify the default setting for the working directory for the Program Job Server. Note: The account under which the program runs must have appropriate rights to the folder that you set as the working directory. The level of file permissions required depend on what the program does; however, the program's account generally needs read, write, and execute permissions to the working directory. Schedule tab When scheduling program objects, you can specify notification, destination and schedule for options only. These options work in the same way as for reports, and are described in Scheduling tab on page 6-9. Authentication and program objects Be aware of potential security risks associated with the publication of program objects. The level of file permissions for the account under which a program object runs will determine what modifications, if any, the program can make to files. As the administrator, you can choose to enable or disable any of the types of program objects. To protect the system against abuse you can select: · The types of program objects users can run · The credentials to run program objects. Enabling or disabling a type of program object The first level of security that you can configure is the types of program objects available for use. As the administrator, you have the ability to enable or disable any of the three types of program objects. To enable or disable a type of program object 1 From the Central Management Console Home page, click Objects.
- 116. More Details blog:http://sandyclassic.wordpress.com linkedin:https://www.linkedin.com/in/sandepsharma slideshare:http://www.slideshare.net/SandeepSharma65 facebook:https://facebook.com/sandeepclassic google+ http://google.com/+SandeepSharmaa Twitter: https://twitter.com/sandeeclassic Page 116 of 167 2 On the Objects page, click Object Settings. 3 On the Object Settings page, click the Program Objects tab. 4 On the Program Objects tab, disable or enable the program types by selecting the appropriate check boxes under Allow users to. 5 Click Update. Setting default login credentials for program objects As the administrator, you can set up a specific user account for the program and assign it appropriate rights, in order to have the program object run as that account. Alternatively, users who publish program objects to BusinessObjects Enterprise can assign their own credentials to a program object to give the program access to the system. Thus, the program will run under that user account, and the rights of the program will be limited to those of the user. If you choose not to specify a user account for a program object, it runs under the default system account, which generally has rights locally but not across the network. To specify default login credentials for a program object 1 In the Objects management area of the CMC, click the Object Settings button. 2 Click the Program Objects tab, and then select Schedule with the following operating system credentials option. 3 In the User Name and Password text boxes, type the credentials for the user account under which the program should run. 4 Click Update. To specify login credentials for a specific program object 1 In the Objects management area of the CMC, click the link for the program object.
- 117. More Details blog:http://sandyclassic.wordpress.com linkedin:https://www.linkedin.com/in/sandepsharma slideshare:http://www.slideshare.net/SandeepSharma65 facebook:https://facebook.com/sandeepclassic google+ http://google.com/+SandeepSharmaa Twitter: https://twitter.com/sandeeclassic Page 117 of 167 2 Click the Logon tab. The Logon page appears. 3 In the User Name and Password text boxes, type the credentials for the user account under which the program should run. 4 Click Update. To specify command line arguments 1 In the Objects management area of the CMC, select the program object by clicking its link. 2 Click the Process tab, then select the Parameters sublink. The Parameters page appears. 3 In the Arguments text box, type the command line arguments for your program, using the same format you would use at the command line itself. For example, if your program has a loops option, to set the loops value to 100, you would type -loops 100 To set a working directory for a program object 1 In the Objects management area of the CMC, select the program object by clicking its link. 2 Click the Parameters tab. The Parameters page appears. 3 In the Working Directory field, type the full path to the directory that you want to set as the program object's working directory. For example, in Windows, if you created a working directory named working_directory, type C:working_directory On UNIX, type /working_directory To modify the default working directory for the Program Job Server 1 Go to the Servers management area of the CMC. 2 Click the hyperlink for Program Job Server. The Properties page appears.
- 118. More Details blog:http://sandyclassic.wordpress.com linkedin:https://www.linkedin.com/in/sandepsharma slideshare:http://www.slideshare.net/SandeepSharma65 facebook:https://facebook.com/sandeepclassic google+ http://google.com/+SandeepSharmaa Twitter: https://twitter.com/sandeeclassic Page 118 of 167 3 In the Temp Directory text box, type the full path to the directory you want to set as the working directory for the Program Job Server. Publishing third party objects and hyperlinks You can publish .doc, .xls, .ppt, .rtf, .pdf, and .txt files · From the Central Management Console · From the Publishing Wizard Hyperlinks can only be published from the Central Management Console. Configuration options As you cannot schedule hyperlinks or third party objects, their only configuration options are: · Properties · Categories · Rights Publishing with Live Office The BusinessObjects Enterprise enables you to extend data from Crystal Reports or Business Views by using Microsoft Office. You can use Live Office with Microsoft Excel, PowerPoint, and Word. Using Live Office, you can design Microsoft Office documents that combine relational data with data from other sources. By publishing these Microsoft Office documents to BusinessObjects Enterprise, you enable authorized users to view the documents and refresh the data against the data source. BusinessObjects Enterprise security protects published documents against access by unauthorized users. For more information, see the Live Office User's Guide. Summary of publishing options The following table summarizes the pros and cons of the different publishing methods available. Publishing Method Pros Cons
- 119. More Details blog:http://sandyclassic.wordpress.com linkedin:https://www.linkedin.com/in/sandepsharma slideshare:http://www.slideshare.net/SandeepSharma65 facebook:https://facebook.com/sandeepclassic google+ http://google.com/+SandeepSharmaa Twitter: https://twitter.com/sandeeclassic Page 119 of 167 CMC · Can publish remotely · Allows you to publish in conjunction with other administrative task · Allows you to configure all options from the same interface · Can only publish one object at a time · Does not work with OLAP Intelligence or Web Intelligence files · Requires administrator rights to BusinessObjects Enterprise Publishing Wizard · Can publish objects in batches · Can publish all object types, except Web Intelligence documents · Can publish local folders structure · You must have the Publishing Wizard installed locally Save As command in Application · Works for Crystal Reports, OLAP Intelligence, and Web Intelligence files using the Save As command · You must have the designer application installed locally · Does not work with any other objects Choosing the right publishing tool Use the following table to determine which publishing method to use for the object type you are working with. Object type CMC Publishing Wizard Save As command in Application Crystal Reports Yes Yes Yes OLAP Intelligence Reports No Yes Yes Web Intelligence Reports No No Yes Program objects Yes Yes No Object packages Yes Yes No Third-party documents Yes Yes No Hyperlinks Yes No No Use the Crystal Publishing Wizard when you: · Have access to the locally installed application. · Need to publish multiple objects or an entire directory. Use the Crystal Management Console when you: · Need to publish just a few objects. · Have administrative rights to BusinessObjects Enterprise. · Need to work remotely.. Use one of the Report designers when you: · Design reports with Crystal Reports. · Create other objects with BusinessObjects Enterprise plug-in components such as OLAP Intelligence. The publishing process Publishing a Crystal report This is the process flow when publishing a Crystal report to BusinessObjects Enterprise using the Central Management Console: Tip: As the instructor explains these steps, trace the steps on the diagram below. 1 From the Central Management Console on the Web Client, browse to select the report to be added to BusinessObjects Enterprise. In this case, the report resides on the client machine. After entering all required information and specifying which folder in BusinessObjects Enterprise to add the report to, click OK to submit the request. The request and the report object are streamed to the web application server. 2 The web application server will send a request to the CMS to ensure the user has rights to add the report to the specified folder.
- 120. More Details blog:http://sandyclassic.wordpress.com linkedin:https://www.linkedin.com/in/sandepsharma slideshare:http://www.slideshare.net/SandeepSharma65 facebook:https://facebook.com/sandeepclassic google+ http://google.com/+SandeepSharmaa Twitter: https://twitter.com/sandeeclassic Page 120 of 167 3 The CMS checks against the system database to confirm the rights. 4 The CMS responds to the web application server to confirm that the user has valid rights. 5 The web application server sends the report to the Input FRS where it is added to the file system. 6 The web application server updates the CMS to notify it of all properties of the report object including its location in the Input FRS. 7 The CMS updates its system database with the information about this new object. Publishing a Crystal Report Publishing versus migrating Note: This section applies only to Crystal Reports and OLAP Intelligence reports. For training purposes, you are working with one BusinessObjects Enterprise system. In reality, however, your organization might have at least two systems set up: a test system and a production system. It is best practice to first deploy any changes to BusinessObjects Enterprise on your test system before implementing them on your production system. Changes can refer to many things, such as installing or upgrading BusinessObjects Enterprise, changing security settings, or publishing new objects. In most organizations you would not publish directly to your production BusinessObjects Enterprise system. Instead, the process would be similar to the following: A typical report publishing process
- 121. More Details blog:http://sandyclassic.wordpress.com linkedin:https://www.linkedin.com/in/sandepsharma slideshare:http://www.slideshare.net/SandeepSharma65 facebook:https://facebook.com/sandeepclassic google+ http://google.com/+SandeepSharmaa Twitter: https://twitter.com/sandeeclassic Page 121 of 167 1 Report designers or program developers publish the reports or program objects to the BusinessObjects Enterprise test system using the Central Management Console, the Publishing Wizard, or the Save As command in Crystal Reports, OLAP Intelligence, or Web Intelligence. 2 The designers, developers, or administrator verify in the BusinessObjects Enterprise test system that the reports or programs are configured correctly. 3 The administrator migrates the reports or programs to the BusinessObjects Enterprise production system using the Import Wizard. Note: Migrating from a test to a production environment is discussed in the Administering Servers course, while migrating to a new version of BusinessObjects Enterprise is discussed in Designing and Deploying a Solution. Review Quiz: Publishing Content 1 When you copy a folder to another folder, the folder that you copy will inherit the rights set on its new parent folder. True or False? Why? 2 What options are available to limit the number of instances contained in a folder? 3 What are the different ways to publish reports to BusinessObjects Enterprise? 4 When would you use the Publishing Wizard to publish reports, and why? 5 How can you publish Web Intelligence documents and why are they published this way? Summary After completing this lesson, you are now able to: · Describe publishing methods · Publish a Crystal Report using "Save As" and through the CMC · Configure a Crystal Report · Publish a Web Intelligence document using "Save As" · Publish reports through the Publishing Wizard
- 122. More Details blog:http://sandyclassic.wordpress.com linkedin:https://www.linkedin.com/in/sandepsharma slideshare:http://www.slideshare.net/SandeepSharma65 facebook:https://facebook.com/sandeepclassic google+ http://google.com/+SandeepSharmaa Twitter: https://twitter.com/sandeeclassic Page 122 of 167 · Describe other objects you can publish and configure Lesson 7 Scheduling Scheduling ensures reports contain the most recent data and enables you to run resource intensive reports during non-peak hours. Learning about the different scheduling options will help you maximize the BI potential of BusinessObjects Enterprise. In this lesson you will learn about: · Scheduling objects · Scheduling on events · Scheduling with business calendars · Managing instances Scheduling objects Introduction Scheduling an object lets you run it automatically at specified times. You can schedule report objects, program objects, object packages, Web Intelligence documents, and List of Values objects. After completing this unit, you will be able to: · Describe the benefits of scheduling reports · List scheduling options · Schedule a Crystal Reports file · Schedule a Web Intelligence document · Describe the benefits of scheduling a list of values (LOV) · Schedule an LOV object · Describe the benefits of scheduling program objects · Schedule a program object · Describe the benefits of scheduling object packages · Schedule an object package Scheduling options When a scheduled object runs successfully, an instance is created. An instance is a version of the object containing the data available at the time it was run-instances created later contain more recent data. Your instance uses all of the settings that you have set in the Central Management Console for the original object. Scheduling provides several benefits. When you schedule Crystal Report files and Web Intelligence documents you can limit user access to the data source, as well as enable processing intensive reports to run during low traffic hours. When processing volume is controlled efficiently, your system will run at its maximum performance level. By scheduling and viewing instances, you can ensure you have the latest information available for viewing, printing, and distributing. For example, you can schedule a report to run every night so it's available for you first thing in the morning.
- 123. More Details blog:http://sandyclassic.wordpress.com linkedin:https://www.linkedin.com/in/sandepsharma slideshare:http://www.slideshare.net/SandeepSharma65 facebook:https://facebook.com/sandeepclassic google+ http://google.com/+SandeepSharmaa Twitter: https://twitter.com/sandeeclassic Page 123 of 167 Note: If a user schedules reports, and the reports are later deleted from BusinessObjects Enterprise, the schedule for these reports will also be deleted. This means the schedule would need to be recreated. To avoid this scenario, create a specific user account in BusinessObjects Enterprise that can be used by administrators to set up recurring schedules. After scheduling an object, users can see a list of the object's instances by looking at its history, and they can click the link to any historical instance. For Crystal Reports and Web Intelligence files, a user with the necessary rights to view objects on demand can view and refresh any instance to retrieve the latest data from the database. In the CMC, you can choose from various notification, distribution, and format options, as well as schedule objects with events or to specified users and groups.You can also manage an object's historical instances and control how many instances are available for each object. When you specify the destination settings through the CMC, these settings are also reflected in the default scheduling settings for InfoView; that is, if a user selects the Default destination setting in InfoView, the object will be delivered to the specified destination as set through the CMC. Note: · When using BusinessObjects Enterprise to schedule and run objects, your end users should use a web-based client such as InfoView or a custom web application. InfoView is designed primarily for scheduling instances and viewing reports (whereas the CMC enables you to manage and administer object properties and settings in addition to scheduling and viewing reports). · The scheduling options available depend on the type of object you are publishing. Recurrence patterns When scheduling an object, you choose the recurrence pattern you want, for example, Daily or Weekly, and then the run option, for example, "Every week on." You then specify additional parameters to control exactly when and how often the object will be run. The recurrence options are: · On Demand When you schedule a report to run "On Demand", a report instance runs only when users schedule a report through their web application (InfoView or a custom web application). · Once This option enables you to schedule an object to run once, whether it is run immediately, or at a specific time. You can also schedule an object with events. · Daily When you schedule an object to run daily, you can choose to have the object run every day at a specified time, every set number of hours and minutes, or every specified number of days. A separate instance is created each time an object is run. You can also schedule an object with events. · Weekly When you schedule an object to run weekly, you choose the day of the week and the time when you want it to run. You can also schedule an object with events. · Monthly You can schedule an object so that it runs on a monthly basis, on a certain day of the month or specified day of the week, on every set number of months, on the first Monday of the month, or on the last day of the month. You can also schedule an object with events. · Calendar The object will be run on the dates specified in a specified calendar. The calendar must have been previously created. For more information on scheduling with calendars, see Scheduling with business calendars on page 7-39.. Each scheduling option has these fields that you should complete: · Number of retries allowed This number indicates the number of times a job server will attempt to process a report if the first attempt is not successful. By default, the number is zero. · Retry interval in seconds BusinessObjects Enterprise will wait for the specified number of seconds to pass before attempting to process a report again (if the first attempt failed). The default setting is 1800 seconds. To set a recurrence pattern for an object 1 In the Objects management area of the CMC, select a report object by clicking its link. 2 Click the Schedule tab 3 Select a recurrence option and run time. 4 Click Update.
- 124. More Details blog:http://sandyclassic.wordpress.com linkedin:https://www.linkedin.com/in/sandepsharma slideshare:http://www.slideshare.net/SandeepSharma65 facebook:https://facebook.com/sandeepclassic google+ http://google.com/+SandeepSharmaa Twitter: https://twitter.com/sandeeclassic Page 124 of 167 Notifications You can set notifications at the object level, and you can apply it to all objects that can be scheduled in BusinessObjects Enterprise. You can select unique notification options for each object, sending different types of notification for different conditions. When you schedule an object, the scheduled instance either succeeds or fails. The conditions required for an instance's success or failure depend on the type of object you schedule: · Report objects A report instance runs successfully if it doesn't encounter any errors while processing the report or accessing the database. A report instance may fail if the user does not provide the correct parameters or logon information. · Program objects For program objects, the program must run in order to succeed. If the program does not run, the instance is considered a failure. If the program runs, but does not perform the tasks it is supposed to, it is still considered a successful instance because the program object ran. BusinessObjects Enterprise does not monitor problems with the program object's code. · Object packages An object package may fail if one of its components fails. To change this setting, click the object package's Properties tab and clear the "Scheduled package fails upon individual component failure" option. You can also set scheduling options for individual objects within an object package. Note: You cannot set audit or email notification for object packages, but you can set any type of notification for the individual objects in the object package. You can also schedule object packages with events on the Schedule tab. Caution: If notification fails, then the object instance fails. For example, if an email notification sends a message to an invalid email address, then the notification fails and the object instance is recorded as a failure in the object's history. Notification types You can choose to notify using: · Audit notification Auditing provides a historical record of reports. To use audit notification, you must configure the auditing database and enable auditing for the servers. If you use auditing to monitor your BusinessObjects Enterprise system, you can use audit notification. When you select audit notification, information about the scheduled object is written to the auditing database. You can choose to have a notification sent to the auditing database when the job runs successfully, when it fails to run, or both. Note: Auditing is discussed in more detail in the Administering Servers course. · Email notification You can send an email as a notification of an object instance's success or failure. You can choose the sender and recipients of the email message. You can send an email when the instance fails and when it succeeds. For example, you could send your administrator an email if the report fails, but when the report succeeds you can automatically send a notification to everyone who needs the report to let them know it is now available. · Event notification You can choose a BusinessObjects Enterprise event that will be triggered based on the completion of the object instance. Notification of a scheduled object's success or failure is not the same as alert notification. Alert notification must be built into the design of the report. For example, alert notification can send an email to you whenever a specific value in the report exceeds $1000000. In this case, the notification is not related to the contents of the report - it is related to whether or not the report object instance has failed or succeeded. To set notification for an instance's success or failure 1 In the Objects management area of the CMC, select a report object by clicking its link. 2 Click the Schedule tab, then click the Notification link. 3 Click the notification type (or types) you want to use. Note: If the notification type is already being used, it will be labeled "Enabled". If not, it will be labeled "Not in use". 4 Choose the specific settings for the notification: · Audit notification To send a record to the auditing database when the job succeeds, select "A job has been run successfully." To send a record when the job fails, select "A job has failed to run." · Email notification Choose whether you want to send a notification when the job fails or when it succeeds. To specify the contents and recipients of the email notification, select "Set the values to be used here" and provide the From and To email addresses, the email subject line, and the message. Note: By default, the notification is sent to the server's default email destination.
- 125. More Details blog:http://sandyclassic.wordpress.com linkedin:https://www.linkedin.com/in/sandepsharma slideshare:http://www.slideshare.net/SandeepSharma65 facebook:https://facebook.com/sandeepclassic google+ http://google.com/+SandeepSharmaa Twitter: https://twitter.com/sandeeclassic Page 125 of 167 5 Click Update. Alert notifications Alerts are custom messages created in Crystal Reports that appear when certain conditions are met by data in a report. Alerts may indicate action to be taken by the user or information about report data. If the alert condition (as defined in the report) is true, the alert is triggered and its message is displayed. In BusinessObjects Enterprise, you can choose to send alert notification when scheduling a report. If you enable alert notification, messages are sent through an SMTP server. You can configure email delivery options, specify the "To," "Cc," and "From" fields for the email, add subject and message information, set a URL for the viewer you want the email recipient to use, and set the maximum number of alert records to send. Note: · The Alert Notification link is available only if the report object contains alerts. · Alerts are triggered in the report object even if you disable alert notification. · To enable alert notification, you must also ensure that the Report Job Server's SMTP destination is enabled and configured. To set alert notification 1 In the Objects management area of the CMC, select a report object by clicking its link. 2 Click the Schedule tab, and then click the Alert Notification link. The Alert Notification page appears.
- 126. More Details blog:http://sandyclassic.wordpress.com linkedin:https://www.linkedin.com/in/sandepsharma slideshare:http://www.slideshare.net/SandeepSharma65 facebook:https://facebook.com/sandeepclassic google+ http://google.com/+SandeepSharmaa Twitter: https://twitter.com/sandeeclassic Page 126 of 167 3 Clear the Enable alert notification check box if you do not want to send an alert notification. 4 Select either Use the Job Server's defaults or Set the values to be used at schedule time here. If you select the first option, BusinessObjects Enterprise will deliver the alert notification using the Report Job Server's default settings. You can change these settings in the Servers management area. If you select the second option, you can specify the email settings: · From Type a return address or distribution list. · To Type the addresses or distribution list that you want to send the report to. · Cc Type the addresses or distribution list that you want to send a copy of the alert notification to.
- 127. More Details blog:http://sandyclassic.wordpress.com linkedin:https://www.linkedin.com/in/sandepsharma slideshare:http://www.slideshare.net/SandeepSharma65 facebook:https://facebook.com/sandeepclassic google+ http://google.com/+SandeepSharmaa Twitter: https://twitter.com/sandeeclassic Page 127 of 167 · Subject Complete the subject field. · Message Type a short message, if required. Note: Separate multiple addresses or distribution lists using semicolons. 5 Type the URL for the viewer in which you want the email recipient to view the report. Alternatively, you can select the def ault viewer by clicking Use default. The viewer URL appears in the hyperlink that is sent in the alert notification email. You can set the default URL by clicking Object Settings on the main page of the objects management area of the Central Management Console. Note: · You must use World Wide Web Consortium (W3C) URL encoding when typing the viewer URL. For example, replace spaces in the path with %20. For more information, see http://www.w3.org/ · Type the maximum number of alert records to be included in the alert notification. The hyperlink in the alert notification displays a report page that contains the records that triggered the alert. Use this field to limit the number of records displayed. Tip: The Alert Name and Status fields are set in Crystal Reports. 6 Click Update. Destination Using BusinessObjects Enterprise, you can specify the output destination of a scheduled object. By default, when you schedule an object, the instances will be saved on the Output File Repository Server (FRS). Choosing a destination provides you with the flexibility to deliver objects across your enterprise solution in different and applicable ways. For example, you are able to schedule objects that will be sent via email to other users. For program and report objects you can specify any of the available destinations. However, for object packages and Web Intelligence documents you cannot do this, because the recipients must have access to the BusinessObjects Enterprise system to be able to open these types of objects. For example, you cannot specify Unmanaged Disk as a destination for a Web Intelligence document. This table summarizes which destinations you can configure for which types of objects. Object type Unm. Disk Email (SMTP) Inbox FTP File Link File Link Report - - - - - - Object Package No No No No - - Program - - - - - - Web Intelligence document No No No - - - Note: You can also schedule objects that, upon generation, will be printed. For more information, see Printer and page layout on page 7- 18.. When users schedule objects to specific destinations (other than the default FRS location), BusinessObjects Enterprise generates a unique name for each output file. To generate a file name, users can use a combination of ID, name or title of the object, owner information, or the date and time information. Default destination support By default, scheduled objects and program instances are saved to the Output File Repository Server (FRS). If you want to save instances to the Output FRS only and not to any other destinations, select this option. To set your destination to default 1 In the Objects management area of the CMC, select an object by clicking its link. 2 Click the Schedule tab, then click the Destination link. The Destination tab appears. 3 Ensure that the Clean up instance after scheduling option is cleared. Only select this option when specifying a destination other than "Default". When this option is selected, the system will automatically delete the report or program instance from the Output File Repository Server to keep the number of instances on the server to a minimum. 4 Select Default from the Destination list. 5 Click Update.
- 128. More Details blog:http://sandyclassic.wordpress.com linkedin:https://www.linkedin.com/in/sandepsharma slideshare:http://www.slideshare.net/SandeepSharma65 facebook:https://facebook.com/sandeepclassic google+ http://google.com/+SandeepSharmaa Twitter: https://twitter.com/sandeeclassic Page 128 of 167 Unmanaged disk You can specify the location where an instance will be saved when it is scheduled by you or another user. The system will save an output instance to both the Output File Repository Server and the specified destination. Note: · The location must be a local or mapped directory on the processing server. For servers using Windows, the location can also be a Universal Naming Convention (UNC) path. · The processing server must have sufficient rights to the specified location. · You must have this destination feature enabled on the Job Server in order to schedule an object to an unmanaged disk. · You cannot specify Unmanaged Disk as a destination for Web Intelligence documents. To set your destination to unmanaged disk 1 In the Objects management area of the CMC, select an object by clicking its link. 2 Click the Schedule tab, then click the Destination link. The Destination tab appears. 3 Select Unmanaged Disk from the Destination list. 4 If you want, select the Clean up instance after scheduling option.
- 129. More Details blog:http://sandyclassic.wordpress.com linkedin:https://www.linkedin.com/in/sandepsharma slideshare:http://www.slideshare.net/SandeepSharma65 facebook:https://facebook.com/sandeepclassic google+ http://google.com/+SandeepSharmaa Twitter: https://twitter.com/sandeeclassic Page 129 of 167 When selected, the system automatically deletes the report or program instance from the Output File Repository Server to keep the number of instances on the server to a minimum. 5 Select either Use the Job Server's defaults or Set the values to be used at schedule time here. If you select the first option, BusinessObjects Enterprise will schedule an object using the Job Server's default settings. You can change these settings in the Servers management area. If you select the second option, you can set the file name properties and enter user information: · Destination Directory Enter a local location, mapped location, or a UNC path. · Default File Name (randomly generated) Select this option if you want BusinessObjects Enterprise to generate a random file name. · Specified File Name Select this option if you want to specify a file name-you can also add a variable to the file name. To add a variable, choose a placeholder for a variable property from the list and click Add. When the instance is run, the variable will be replaced with the specified information from the instance. For example, if you add the variable "Owner," when you schedule an object, its file name will include the object owner's name. · User Name Specify a user who has permission to write files to the destination directory. · Password Type the password for the user. Note: You can specify a user name and password only for servers using Windows. 6 Click Update. FTP BusinessObjects Enterprise enables you and your users to schedule an object to a File Transfer Protocol (FTP) server. To connect to the FTP server, you must specify a user who has the necessary rights to upload files to the server. In this case, the system will save the output instance to the Output File Repository Server as well as send it to specified destination. Note: · You must have this destination feature enabled in the Job Server in order to schedule an object to an FTP server. · You cannot specify FTP as a destination for Web Intelligence documents. To set an FTP server as the destination 1 In the Objects management area of the CMC, select an object by clicking its link. 2 Click the Schedule tab, then click the Destination link. The Destination tab appears. 3 Select FTP from the Destination list.
- 130. More Details blog:http://sandyclassic.wordpress.com linkedin:https://www.linkedin.com/in/sandepsharma slideshare:http://www.slideshare.net/SandeepSharma65 facebook:https://facebook.com/sandeepclassic google+ http://google.com/+SandeepSharmaa Twitter: https://twitter.com/sandeeclassic Page 130 of 167 4 If you want, select the Clean up instance after scheduling option. When selected, the system automatically deletes the report or program instance from the Output File Repository Server to keep the number of instances on the server to a minimum. 5 Select either Use the Job Server's defaults or Set the values to be used at schedule time here. If you select the first option, BusinessObjects Enterprise will schedule an object using the Job Server's default settings. You can change these settings in the Servers management area.
- 131. More Details blog:http://sandyclassic.wordpress.com linkedin:https://www.linkedin.com/in/sandepsharma slideshare:http://www.slideshare.net/SandeepSharma65 facebook:https://facebook.com/sandeepclassic google+ http://google.com/+SandeepSharmaa Twitter: https://twitter.com/sandeeclassic Page 131 of 167 If you select the second option, you can set the FTP and file name properties: · Host Enter the FTP host information. · Port Enter the FTP port number (the default is 21). · FTP User Name Specify a user who has the necessary rights to upload an object to the FTP server. · FTP Password Enter the user's password. · Account Enter the FTP account information, if required. Account is part of the standard FTP protocol, but it is rarely implemented. Provide the appropriate account only if your FTP server requires it. · Destination Directory Enter the FTP directory that you want the object to be saved to. · Default File Name (randomly generated) Select this option if you want BusinessObjects Enterprise to generate a random file name. · Specified File Name Select this option if you want to enter a file name-you can also add a variable to the file name. To add a variable, choose a placeholder for a variable property from the list and click Add. 6 Click Update. Email (SMTP) With Simple Mail Transfer Protocol (SMTP) mail support, you and your users can do the following: · Send an object as an attachment in the email. · Specify the "To," "Cc," and "From" in the email. · Add subject information. · Include additional information in the body message, which will accompany the object that is being delivered. When you select the Email (SMTP) destination, the system will save the instance to the Output File Repository Server as well as email it to the specified destinations. BusinessObjects Enterprise supports Multipurpose Internet Mail Extensions (MIME) encoding. Note: · You must have this destination feature enabled and configured in the Report Job Server in order to schedule an object to be sent via email. · You cannot specify Email (SMTP) as a destination if the object is a Web Intelligence document. To send an object by email 1 In the Objects management area of the CMC, select an object by clicking its link. 2 Click the Schedule tab, then click the Destination link. The Destination tab appears. 3 Select Email (SMTP) from the Destination list.
- 132. More Details blog:http://sandyclassic.wordpress.com linkedin:https://www.linkedin.com/in/sandepsharma slideshare:http://www.slideshare.net/SandeepSharma65 facebook:https://facebook.com/sandeepclassic google+ http://google.com/+SandeepSharmaa Twitter: https://twitter.com/sandeeclassic Page 132 of 167
- 133. More Details blog:http://sandyclassic.wordpress.com linkedin:https://www.linkedin.com/in/sandepsharma slideshare:http://www.slideshare.net/SandeepSharma65 facebook:https://facebook.com/sandeepclassic google+ http://google.com/+SandeepSharmaa Twitter: https://twitter.com/sandeeclassic Page 133 of 167 4 If you want, select the Clean up instance after scheduling option. When selected, the system automatically deletes the report or program instance from the Output File Repository Server to keep the number of instances on the server to a minimum. 5 Select either Use the Job Server's defaults or Set the values to be used at schedule time here. If you select the first option, BusinessObjects Enterprise will schedule an object using the Job Server's default settings. You can change these settings in the Servers management area. If you select the second option, you can specify the email settings and the file name properties: · From Enter a return address. · To Enter an address or addresses that you want to send the object to. Separate multiple addresses with semicolons. · Cc Enter an address or addresses that you want to send a carbon copy of the object to. · Subject Complete the subject field. · Message Type a short message, if required. · Add viewer hyperlink to message body Click Add if you want to add the URL for the viewer in which you want the email recipient to view the object. You can set the default URL by clicking Object Settings on the main page of the Objects management area of the Central Management Console. · Attach object instance to email message Clear this check box if you do not want a copy of the instance attached to the email. · Default File Name (randomly generated) Select this option if you want BusinessObjects Enterprise to generate a random file name. · Specified File Name Select this option if you want to enter a file name-you can also add a variable to the file name. To add a variable, choose a placeholder for a variable property from the list and click Add. 6 Click Update. Inbox support You can configure objects, or a schedule instance of the object, to send their output instances to the inboxes of one or more users in BusinessObjects Enterprise. In this case, the system will save the instance to both the Output File Repository Server and the inboxes. Instead of sending the actual file to the inboxes, you can choose to send a shortcut. To send an object to inboxes 1 In the Objects management area of the CMC, select an object by clicking its link. 2 Click the Schedule tab, then click the Destination link. The Destination tab appears. 3 Select Inbox from the Destination list.
- 134. More Details blog:http://sandyclassic.wordpress.com linkedin:https://www.linkedin.com/in/sandepsharma slideshare:http://www.slideshare.net/SandeepSharma65 facebook:https://facebook.com/sandeepclassic google+ http://google.com/+SandeepSharmaa Twitter: https://twitter.com/sandeeclassic Page 134 of 167 4 If you want, select the Clean up instance after scheduling option. When selected, the system automatically deletes the report or program instance from the Output File Repository Server to keep the number of instances on the server to a minimum. 5 Select either Use the Job Server's defaults or Set the values to be used at schedule time here. 6 If you select the first option, BusinessObjects Enterprise will schedule an object using the Job Server's default settings. You can change these settings in the Servers management area.
- 135. More Details blog:http://sandyclassic.wordpress.com linkedin:https://www.linkedin.com/in/sandepsharma slideshare:http://www.slideshare.net/SandeepSharma65 facebook:https://facebook.com/sandeepclassic google+ http://google.com/+SandeepSharmaa Twitter: https://twitter.com/sandeeclassic Page 135 of 167 · Send Document as · Shortcut The system will send a shortcut to the instance, rather than send a copy of the instance itself. · Copy The system will send a copy of the instance. · Send List · Operation Specify who should receive the report instance. You can select individual users or user groups. · Look for Use this feature to search for a specific user. Type the name and then click FInd now. 7 Click Update. Formats For report objects only, you can select the format that a report instance will be saved in when it is generated by BusinessObjects Enterprise. This format will be saved to the destination you have selected for the report object and its instances. For Crystal Reports, you can select from these formats: · Crystal Report · Excel · Excel (Data Only) · Word · Acrobat · Rich Text · Editable Rich Text · Plain Text · Paginated Text · Tab-separated Text · Tab-separated Values · Character-separated Values For Web Intelligence reports, you can select from these formats: · Web Intelligence · Excel · Acrobat For Excel, paginated text, tab-separated values, and character-separated values, you specify certain formatting properties for the report. For example, if you select character-separated values, you can enter characters for the separator and delimiter; you can also select the two check boxes: "Same number formats as in report" and "Same date formats as in report." Note: · If you choose to print the report when it is scheduled (by checking the "Print in Crystal Reports format using the selected printer when scheduling" check box on the Print Setup page), the report instance is automatically sent to the printer in Crystal Reports format. This does not conflict with the format you select when scheduling the report. · The difference between Excel and Excel (Data only) is that Excel attempts to preserve the look and feel of your original report, while Excel (Data only) saves only the data, with each cell representing a field. · The tab-separated values format places a tab character between values; the character-separated values format places a specified character between values. Each of these two formats produce data lists. In contrast, the tab-separated text format attempts to preserve the formatting of the report. To select a format for the report 1 In the Objects management area of the Central Management Console, select a report object by clicking its link. 2 On the Schedule tab, click the Format link. The Format page appears. 3 Select a format from the Format list. 4 Complete any fields that appear below the list and select (where appropriate) the check boxes that appear. 5 Click Update. Caching Options Note: This option is only available for Web Intelligence documents Caching options allows you to select formats to pre-load the cache with when scheduling Web Intelligence documents.
- 136. More Details blog:http://sandyclassic.wordpress.com linkedin:https://www.linkedin.com/in/sandepsharma slideshare:http://www.slideshare.net/SandeepSharma65 facebook:https://facebook.com/sandeepclassic google+ http://google.com/+SandeepSharmaa Twitter: https://twitter.com/sandeeclassic Page 136 of 167 Available formats to cache: · Excel · Standard HTML · Acrobat Scheduling an object for a user or group The Schedule For feature is intended to be used for: · Reports that are based on Business Views · Web Intelligence documents (which are based on universes) Business Views and Universes enable the system to generate reports that contain information for specific users only. Using the Schedule For feature, you can schedule an object and specify for which users you want the system to run the object. The system will run and generate individual instances of the report, one for each user specified. Each instance will contain data that is relevant to the individual user only. For example, you can schedule a sales report and on the Schedule For page specify the user names for all your sales representatives. At the specified time, the system runs the report object and generates the individual report instances. Each instance would contain sales information for the individual sales representative only. Tip: When you use the Schedule For feature, you may also want to specify a Destination other than the default for the report. By specifying a different destination, you ensure that the report instances are automatically distributed across your system to the respective users. For example, in case of the sales report, you could have the system automatically distribute the report instances to the inbox of each sales representative. For more information on destination options see Destination on page 7-8.. To schedule an object for a user or group 1 In the Objects management area of the CMC, select a report object by clicking its link. 2 On the Schedule tab, click the Schedule For link. The Schedule For page appears.
- 137. More Details blog:http://sandyclassic.wordpress.com linkedin:https://www.linkedin.com/in/sandepsharma slideshare:http://www.slideshare.net/SandeepSharma65 facebook:https://facebook.com/sandeepclassic google+ http://google.com/+SandeepSharmaa Twitter: https://twitter.com/sandeeclassic Page 137 of 167 3 Select who you want to schedule the object for: · Schedule only for myself · Schedule for specified users and user groups Note: If you select the "Schedule for specified users and user groups" option, you must select one or more users or groups. If you don't, the system will generate an instance for every user in your system. 4 Complete any fields that appear below the list and, where appropriate, select the check boxes that appear. 5 Click Update. Printer and page layout You can choose to print a report instance when scheduling it; report instances are always printed in Crystal Reports format. The Print Setup page contains two areas: the first area specifies whether or not a report instance is printed, and if printed, the printer to use, the number of copies, whether or not to collate, and the page range; the second area specifies custom layout settings for changing the page size and orientation (regardless of whether the report instance is printed or not). Note: To select printer and page layout options, click the Process tab and then the Print Setup sub-link. · Specifying a printer You can choose to print a report (each time it runs) using the Report Job Server's default printer or a different printer. By selecting the Printer destination, BusinessObjects Enterprise prints your report after it is processed. Note: The Report Job Server must run under an account that has sufficient privileges to access the printer you specify. · Specifying page layout When viewing or scheduling a report instance to any format, you can first specify page layout criteria such as page orientat ion, page size, and so on. The settings you choose in this section of the Print Setup page affect how you'll see a report instance when displaying it.
- 138. More Details blog:http://sandyclassic.wordpress.com linkedin:https://www.linkedin.com/in/sandepsharma slideshare:http://www.slideshare.net/SandeepSharma65 facebook:https://facebook.com/sandeepclassic google+ http://google.com/+SandeepSharmaa Twitter: https://twitter.com/sandeeclassic Page 138 of 167 Note: Page layout settings are not specifically related only to scheduling a report to a printer, but also to the overall look of the report. The overall look is affected by the properties of the device for which the report is displayed in (that is, the font metrics and other layout settings of the display and/or the printer). Scheduling Crystal Reports documents To schedule a Crystal Reports document 1 In the Objects management area of the CMC, select a report object by clicking its link. 2 On the Process tab, click the appropriate sub-link to specify: · Processing server · Database information · Parameter values · Filtering criteria · Print setup 3 Under the appropriate sub-link or the Process tab, fill in the information, and then click Update. 4 Click the Schedule tab. 5 Click the appropriate sub-link to specify different options: Note: For more information about each sub-link when scheduling, go to the page indicated beside each option: · Notification (see Notifications.) · Alert notification (see Alert notifications.) · Destination (see Destination.) · Format (see Formats.) · Schedule For (see Scheduling an object for a user or group.) 6 Under the appropriate sub-link, fill in the information, and then click Update. 7 Click the Schedule tab. 8 Select the schedule frequency. 9 Specify a run time and date for the report. 10 Click the Schedule button. The History tab appears displaying the status of the scheduled job. 11 Click Refresh to update the History tab. The status should now say "Success" or "Failed". If it still says "Running", continue clicking Refresh until the status changes. 12 If the status says "Success", click the link to view the report instance. If the status says "Failure", click the link to learn why it failed. Tip: Use the Schedule Manager from the Administrative Tools section of the Admin Launchpad to change the scheduling properties of multiple reports at the same time. Scheduling Web Intelligence documents To schedule a Web Intelligence document 1 In the Objects management area of the CMC, select a report object by clicking its link. 2 Click the Schedule tab. 3 Click the appropriate sub-link to specify different options: Note: For more information about each sub-link when scheduling, go to the page indicated beside each option. · Notification (see Notifications.) · Alert notification (see Alert notifications.) · Destination (see Destination.) · Format (see Formats.) · Caching Options (see Caching Options.) · Schedule For (see Scheduling an object for a user or group.) 4 Under the appropriate sub-link, fill in the information, and then click Update. 5 Click the Schedule tab. 6 Select the schedule frequency. 7 Specify a run time and date for the report. 8 Click the Schedule button. The History tab appears displaying the status of the scheduled job. 9 Click Refresh to update the History tab. The status should now say "Success" or "Failed". If it still says "Running", continue clicking Refresh until the status changes.
- 139. More Details blog:http://sandyclassic.wordpress.com linkedin:https://www.linkedin.com/in/sandepsharma slideshare:http://www.slideshare.net/SandeepSharma65 facebook:https://facebook.com/sandeepclassic google+ http://google.com/+SandeepSharmaa Twitter: https://twitter.com/sandeeclassic Page 139 of 167 10 If the status says "Success", click the link to view the report instance. If the status says "Failure", click the link to learn why it failed. Practice Activity: Scheduling Crystal Reports and Web Intelligence documents Scenario The Xtreme Bike Company is on a massive drive to boost revenues, both by increasing the sales effort and increasing their product offerings. To that end, the people in Sales need to view sales reports on a daily basis, and to view an updated product catal og every week. Since salespeople are constantly emailing customers the product catalog, they would like to have it in PDF format. Objective In this activity, you will schedule reports: · on a recurring basis · using differing output formats Instructions 1 Schedule the World Sales Report to run: · Daily, at midnight · Starting today and lasting until the end of the year · Allowing 10 retries 2 On the History tab that displays, verify that the status says recurring, and verify the scheduling information. 3 Verify that the report will run by clicking Run Now, and refresh the History tab to see whether the report ran successfully or not. 4 Schedule the Product Catalog report to run: · In PDF format · Weekly, on Tuesday · Starting today and lasting until the end of the year · Allowing 10 retries 5 On the History tab that displays, verify that the status says recurring, and verify the scheduling information. 6 Verify that the report will run by clicking Run Now, and refresh the History tab to see whether the report ran successfully or not. 7 Log on to InfoView as Rachel. 8 Navigate to the Sales folder, click the World Sales Report, and then click View latest instance. Scheduling lists of values (LOV) objects Dynamic cascading prompts allow users to enter values that determine the data returned at report run time. Because dynamic cascading prompts are created as a special kind of report based on a database, the values presented to the user in the prompt change to reflect the current values in the database. Dynamic cascading prompts can also reflect grouping relationships in the data. For example, when you select a Country, the next prompt displayed might offer the values for the regions that belong to the s elected country. As you select one prompt value and the next prompt is displayed, it is like drilling down in a grouped Crystal Report to see the next level of data. Dynamic prompts in BusinessObjects Enterprise are implemented through the use of List of Values (LOV) objects. The LOV objects can be created in either the Business Views Manager or in Crystal Reports. The values in a LOV object can be refreshed when a
- 140. More Details blog:http://sandyclassic.wordpress.com linkedin:https://www.linkedin.com/in/sandepsharma slideshare:http://www.slideshare.net/SandeepSharma65 facebook:https://facebook.com/sandeepclassic google+ http://google.com/+SandeepSharmaa Twitter: https://twitter.com/sandeeclassic Page 140 of 167 user accesses the report containing the dynamic prompt. The values in a LOV object can also be scheduled to refresh. LOV objects are scheduled through the Business View Manager. LOV objects are stored in the BusinessObjects Enterprise repository. Report designers can reuse existing prompts stored in the repository in multiple reports A LOV object is represented by two parts: · The LOV object is stored in the repository in the CMS system database as an app object · The LOV report is stored in the Input FRS An LOV object that is added to BusinessObjects Enterprise uses a Business View as its datasource. It is possible to design a LOV object without using a Business View as the datasource; however, once the LOV object is added to BusinessObjects Enterprise, a Business View is created for the LOV object. It is recommended that you create Business Views to act as the LOV datasource and then create the LOV from the Business View so that you have control over the number of Business Views in your system. When you schedule an LOV object, the report in the Input FRS is updated. The server that processes the LOV report checks to see if there have been any updates to the Business View upon which the LOV is based and will update the LOV report with changes if necessary. An instance that is populated with the LOV values is also created in the Output FRS. Note: It is strongly recommended that you create and manage all List of Values objects using the Business View Manager. This enables you to control the number of Business Views created for LOV objects. LOV objects can be added to BusinessObjects Enterprise using these methods: · Create a dynamic prompt when designing a report and saving the report to Enterprise folders. · Create a dynamic report when designing a report that is saved to an unmanaged location and then added to BusinessObjects Enterprise through the CMC or the Publishing Wizard. · Migrating an LOV from one environment to another using the Import Wizard. Note: If the LOV object in the source environment has an .rpt created, the LOV object and its .rpt will be migrated to the destination. To schedule a LOV object through the Business View Manager To schedule a LOV object through the Business View Manager 1 In the Business View Manager Repository Explorer, right click a LOV object and select Schedule List of Values. The Schedule window appears, for example: 2 Schedule the report to obtain saved data up to a certain cascading field. 3 Select to Run the report Now or Later on recurring basis or based on a calendar and click OK. The Schedule window is accessed.
- 141. More Details blog:http://sandyclassic.wordpress.com linkedin:https://www.linkedin.com/in/sandepsharma slideshare:http://www.slideshare.net/SandeepSharma65 facebook:https://facebook.com/sandeepclassic google+ http://google.com/+SandeepSharmaa Twitter: https://twitter.com/sandeeclassic Page 141 of 167 4 Wait a few minutes and then right click on the LOV object in the Business View Manager Repository Explorer and select Edit List of Value. Check the status of the instance under scheduled status. It should be successful. Practice Activity: Scheduling a LOV report Scenario The Xtreme Bike Company wants to utilize dynamic cascading prompts within their reporting environment that allows for the use of dynamically updated parameters based on the customer name field. Objective In this activity, you will schedule a report that is associated with a dynamic parameter prompt.
- 142. More Details blog:http://sandyclassic.wordpress.com linkedin:https://www.linkedin.com/in/sandepsharma slideshare:http://www.slideshare.net/SandeepSharma65 facebook:https://facebook.com/sandeepclassic google+ http://google.com/+SandeepSharmaa Twitter: https://twitter.com/sandeeclassic Page 142 of 167 Instructions 1 In the Windows Explorer, browse to your resource CD. 2 Copy the Customer Orders Report (found in the Lesson 7 folder) to your local hard drive. 3 Publish the Customer Orders Report to the Report Samples > General Business folder. 4 In the CMC, navigate to the Report Samples > General Business folder and locate the Customer Orders Report. 5 Click the report link and select the Schedule tab. 6 Schedule the report to run once now. 7 Refresh the History page to view the schedule status. 8 Did the report schedule successfully? Why or why not? 9 Is there a way to verify the cause for the failed status? 10 On the Process tab, select the Parameters option. 11 Click the Value option for My Parameter. 12 Select the Wheels Inc. customer name from the Available Values list. 13 Reschedule the report to run once now. 14 Does the report schedule successfully? 15 View the report instance to verify that only Wheels Inc is listed. Scheduling program objects Program objects allow you to write, publish, and schedule scripts or Java programs that run against BusinessObjects Enterprise, and perform maintenance tasks, such as deleting instances from the history. Furthermore, you can design these scripts and Java programs to access BusinessObjects Enterprise session information. This ensures that the scheduled program objects retain the security rights or restrictions of the user who scheduled the job. (Your scripts or java programs require access to the BusinessObjects Enterprise SDK. For details, see the BusinessObjects Enterprise COM SDK Guide or the BusinessObjects Enterprise Java SDK Guide.) When you publish a program object or its associated files to BusinessObjects Enterprise, they are stored in the File Repository Server (FRS). Each time a BusinessObjects Enterprise program runs, the program and files are passed to the Program Job Server, and BusinessObjects Enterprise creates a program instance. Unlike report instances, which you can view in their completed format, program instances exist as records in the object history. BusinessObjects Enterprise stores the program's standard out and standard error in a text output file. This file appears when you click a program instance in the object History. Note: In order for a program object to be successfully scheduled and run, you must provide logon information for the account that th e program object will run as. To schedule a program object 1 Go to the Objects management area of the CMC. 2 Click the link for the program object you want to schedule. 3 Click the Process tab, and then click the Log On sublink. 4 On the Log On screen, enter the log on credentials to be used by the program object, and then click Update. 5 To specify parameters and a working directory for this object, click the Parameters sublink, specify the parameters and working directory, and then click Update. 6 To specify a different processing server for this object, click the Process tab again, select the server(s), and then click Update. 7 Click the Schedule tab. 8 Select the schedule frequency. 9 Select a scheduling option from the drop-down list. 10 Specify what time the object should run. 11 Specify the duration. 12 Click the Schedule button. This takes you to the History tab, where you will see that the scheduled job is currently running. 13 Click Refresh to update the History tab. The status should now say "Success" or "Failed". If it still says "Running", continue clicking Refresh until the status changes. 14 If the status says "Success", click the link to view the output text file. If the status says "Failed", click the link to learn why it failed. Scheduling object packages
- 143. More Details blog:http://sandyclassic.wordpress.com linkedin:https://www.linkedin.com/in/sandepsharma slideshare:http://www.slideshare.net/SandeepSharma65 facebook:https://facebook.com/sandeepclassic google+ http://google.com/+SandeepSharmaa Twitter: https://twitter.com/sandeeclassic Page 143 of 167 You can schedule objects in batches using the object packages feature. Object packages function as distinct objects in BusinessObjects Enterprise. They can be composed of any combination of report and program objects published to the BusinessObjects Enterprise system. Other types of objects, such as Excel, Word, Acrobat, Text, Rich Text, PowerPoint, and Hyperlink objects, cannot be added to object packages. Using object packages to schedule batches of objects simplifies authentication. In terms of reports, it allows users to view synchronized data across report instances. If multiple reports in a package have one or more parameters of the same name and type, you can set the parameter value once while scheduling the package, and it will propagate to all those reports. When scheduling published objects in batches using the CMC, you first publish an object package. Then, you copy existing objects into the object package. Finally, you schedule the object package as you would any object. Alternatively, you can publish objects directly to an object package, and then you can schedule that object package as you would any object. Note: You must configure the processing information of each of the components of an object package individually. For example, if you want a report object in an object package to print when scheduled, you must configure it through the Print Setup link available on the report object's Process tab. To create an object package 1 Go to the Objects management area of the CMC. 2 Click New Object, and then click the Object Package tab. The Object Package tab appears. 3 Type the name and description of the object package you want to create. 4 Specify a category if desired. 5 Select a destination folder. Note: You cannot place an object package in the top level folder or inside other object packages. 6 Click OK. Note: When the object package has been added to the system, the CMC displays the Properties page. You can now modify the properties, contents, scheduling information, destination, user rights, object settings, and notification for the object package. To add objects to an object package 1 Go to the first page of the Objects management area of the CMC. 2 Select the check boxes associated with each object you want to place in the object package. 3 Click Copy/Move/Shortcut. The Copy/Move/Create Shortcut page appears. 4 Select Copy to.
- 144. More Details blog:http://sandyclassic.wordpress.com linkedin:https://www.linkedin.com/in/sandepsharma slideshare:http://www.slideshare.net/SandeepSharma65 facebook:https://facebook.com/sandeepclassic google+ http://google.com/+SandeepSharmaa Twitter: https://twitter.com/sandeeclassic Page 144 of 167 5 Select the object package you created as the Destination for the objects; then click OK. To schedule an object package 1 Go to the Objects page of the CMC. 2 Click the object package you want to schedule. 3 Click the Schedule tab for this object package. 4 To specify a different destination for this object click Destination, and then click Update. 5 To specify a different processing server for this object, do so on the Process tab, and then click Update. 6 Click the Schedule tab. 7 Select the schedule frequency. 8 Select a scheduling option from the drop-down list. 9 Specify what time the object should run. 10 Specify the duration. 11 Click the Schedule button. The History tab appears displaying the status of the scheduled job. 12 Click Refresh to update the History tab. The status should now say "Success" or "Failed". If it still says "Running", continue clicking Refresh until the status changes. 13 Click the link for the object package instance. 14 On the next page you will see the instances of the component objects in the package. Click their links to view those object. To share parameters for all report objects in the package 1 From the Objects page, click an object package link. The object package page appears. 2 Click the Objects tab. 3 Click the link for one of the reports that has the common parameter. 4 Click the Process tab. 5 Click the Parameters subtab. 6 In the Value column, click the link for the common parameter's value. 7 Enter a value for this parameter, and then select the Propagate value(s) to other reports in package option. 8 Click Update. The Results of Parameter Propagation confirmation page displays: · A summary listing the number of reports containing this parameter · The number of reports that successfully received the propagated value. · The number of reports that did not receive the propagated value. · A detailed listing of the report names to which the parameter value was passed. 9 Click the object package name in the navigation path, and follow the steps in To schedule an object package on page 7-27.. Authentication and object packages Object packages simplifies both Enterprise and database authentication. You enter your Enterprise authentication only once to schedule the object package, including all of its component objects. Consequently, you must have scheduling rights for each o f the objects inside the object package.If you attempt to schedule a package that contains one or more component objects to which you do not have schedule rights, the component instance(s) fail(s). For database authentication, you specify database logon information for each report component object in the object package. (If you copied the report into the object package, it initially inherits the database logon information of the original report.) Practice Activity: Scheduling object packages Scenario Since the people in Accounting generally want to look at both the Consolidated Income Statement report and Consolidated Balance Sheet report at the same time, you would like to schedule these to run simultaneously as an object package.
- 145. More Details blog:http://sandyclassic.wordpress.com linkedin:https://www.linkedin.com/in/sandepsharma slideshare:http://www.slideshare.net/SandeepSharma65 facebook:https://facebook.com/sandeepclassic google+ http://google.com/+SandeepSharmaa Twitter: https://twitter.com/sandeeclassic Page 145 of 167 Moreover, both of the reports are filtered by Statement Date, where the Statement Date is a parameter value. Since the reports only make sense when based on the same Statement Date, you need to set up the package so you only need to specify the parameter once, and it will be used in both reports. Objective In this activity, you will: · Create an object package · Share a parameter value with all component objects · Schedule an object package Instructions 1 Create an object package called Financial Statements that contains these reports: · Consolidated Income Statement · Consolidated Balance Sheet 2 Configure the object package so the parameter "Statement Date" has a default value of December 31, 2001, and is shared by b oth reports in the package. 3 Schedule the object package to · run once a month · on the last day of the month · starting today and ending a year from now. 4 Ensure that the Schedule Package fails if one of the included report components fail 5 From the History tab, verify the schedule has been set correctly. 6 From the History Tab, run the report now to test that future instances will run Scheduling on events Introduction Event-based scheduling provides you with additional control over scheduling reports: you can set up events so that reports are processed only after a specified event occurs. After completing this unit, you will be able to: · Define an event · Create an event · Schedule objects with events What is an event? Working with events consists of two steps: creating an event and scheduling a report with events. That is, once you create an event, you can select it as a dependency when you schedule a report. The scheduled job is then processed only when the event occurs. Events can only be created via the CMC. You can create three kinds of events: · File events When you define a file-based event, you specify a file name that the Event Server should monitor for a particular file. When the file appears, the Event Server triggers the event. For instance, you might want to make some reports dependent upon the regular file output of other programs or scripts. · Schedule events When you define a schedule-based event, you select a report whose existing recurrence schedule will serve as the trigger for your event. In this way, schedule-based events allow you to set up contingencies or conditions between scheduled reports. For instance, you might want certain large reports to run sequentially, or you might want a particular sales summary report to run only when a detailed sales report is run successfully. · Custom events When you create a custom event, you create a shortcut for triggering an event manually. Your custom event occurs only when you or another administrator clicks the corresponding "Trigger this event" button in the CMC.
- 146. More Details blog:http://sandyclassic.wordpress.com linkedin:https://www.linkedin.com/in/sandepsharma slideshare:http://www.slideshare.net/SandeepSharma65 facebook:https://facebook.com/sandeepclassic google+ http://google.com/+SandeepSharmaa Twitter: https://twitter.com/sandeeclassic Page 146 of 167 When working with events, keep in mind that an object's recurrence schedule still determines how frequently the report runs. For instance, a daily report that is dependent upon a file-based event will run, at most, once a day (so long as the file that you specify appears every day). In addition, the event must occur within the time frame established when you actually schedule the event -based report. Creating events The process to create an event depends on the event type. File-based events File-based events wait for a particular file (the trigger) to appear before the event occurs. Before scheduling a report that waits for a file-based event to occur, you must first create the file-based event in the Events management area of the CMC. Then you can schedule the report and select this event. File-based events are monitored by the Event Server. When the file that you specify appears, the Event Server triggers the event. The Crystal Management Server (CMS) then releases any schedule requests that are dependent on the event. For instance, suppose that you want your daily reports to run after your database analysis program has finished and written its automatic log file. To do this, you specify the log file in your file-based event, and then schedule your daily reports with this event as a dependency. When the log file appears, the event is triggered and the reports are processed. Note: If the file already exists prior to the creation of the event, the event is not triggered. In this case, the event is triggered only when the file is removed and then recreated. If you want an event to be triggered multiple times, you must remove and recreate the file each time. To create a file-based event 1 Go to the Events management area of the Central Management Console. 2 Click New Event. The New Event page appears. 3 In the Type list, select File. 4 Type a name for the event in the Event Name field. 5 Complete the Description field. 6 In the Server list, select the Event Server that will monitor the specified file. 7 Type a filename in the Filename field. Note: Type the absolute path to the file that the Event Server should look for (for example, C:folderfilename, or /home/folder/filename). The drive and directory that you specify must be visible to the Event Server. Ideally, the directory should be on a local drive. 8 Click OK. Schedule-based events Schedule-based events are dependent upon scheduled reports. That is, a schedule-based event is triggered when a particular report has been processed. When you create this type of event, it can be based on the success or failure of a scheduled report, or it can be based simply on the completion of the job. Most importantly, you must associate your schedule-based event with at least two scheduled reports. The first report serves as the trigger for the event: when the report is processed, the event occurs. The second report is dependent upon the event: when the event occurs, this second report runs. For instance, suppose that you want reports A and B to run only after report C has run. To do this, you create a schedule-based event in the Events management area. You specify the "Success" option for the event, which means that the event is triggered only when report C runs successfully. Then, you schedule reports A and B with events, and select your new schedule-based event as the dependency. Schedule report C with events, and set report C to trigger the schedule-based event upon successful completion. Now, when report C runs successfully, the schedule-based event is triggered, and reports A and B are subsequently processed. To create a schedule-based event 1 Go to the Events management area of the Central Management Console. 2 Click New Event. The New Event page appears. 3 In the Type list, select Schedule. 4 Type a name for the event in the Event Name field. 5 Complete the Description field. 6 In the "Event based on" area, select from these options:
- 147. More Details blog:http://sandyclassic.wordpress.com linkedin:https://www.linkedin.com/in/sandepsharma slideshare:http://www.slideshare.net/SandeepSharma65 facebook:https://facebook.com/sandeepclassic google+ http://google.com/+SandeepSharmaa Twitter: https://twitter.com/sandeeclassic Page 147 of 167 · Success The event is triggered only upon successful completion of a specified report. · Failure The event is triggered only upon non-successful completion of a specified report. · Success or Failure The event is triggered upon completion of a specified report, regardless of whether that report was processed successfully or not. 7 Click OK. Custom events A custom event occurs only when you explicitly click its "Trigger this event" button. As with all other events, a report based on a custom event runs only when the event is triggered within the time frame established by the report's schedule parameters. Custom events are useful because they allow you to set up a shortcut that, when clicked, triggers any dependent schedule requests. Tip: When developing your own web applications, you can trigger Custom events from within your own code, as required. For details, see the Web Developer's Guides available from the BusinessObjects Enterprise Launchpad. For instance, you may have a scenario where you want to schedule a number of reports, but you want to run them after you have updated information in your database. To do this, create a new custom event, and schedule the reports with that event. When you update the data in the database and you need to run the reports, return to the event in the CMC and trigger it manually, BusinessObjects Enterprise then runs the reports. Note: You can trigger a custom event multiple times. For example, you might schedule two sets of event-based reports to run daily-one set runs in the morning, and one set runs in the afternoon. When you first trigger the related custom event in the morning, one s et of reports is run; when you trigger the event again in the afternoon, the remaining set of reports is run. If you neglect to trigger the event in the morning and trigger it only in the afternoon, both sets of reports run at that time. To create a custom event 1 Go to the Events management area of the Central Management Console. 2 Click New Event. 3 In the Type list, select Custom. 4 Type a name for the event in the Event Name field. 5 Complete the Description field. 6 Click OK. Note: Before you trigger this custom event, schedule a report that is dependent upon this event. To trigger a custom event 1 Go to the Events management area of the CMC. 2 In the Event Name column, select a custom event by clicking its link. 3 Click Trigger this event. A message appears: "This event has been triggered." Scheduling with events The following section describes the different ways to schedule with events. To select an event to wait for 1 In the Objects management area of the Central Management Console, select an object by clicking its link. 2 Click the Schedule tab. The Schedule page appears. 3 From the list on the left of the page, select a recurrence pattern: Once, Daily, Weekly, Monthly, or by Calendar. 4 In the Run list, select a run option that contains the words, "with events."
- 148. More Details blog:http://sandyclassic.wordpress.com linkedin:https://www.linkedin.com/in/sandepsharma slideshare:http://www.slideshare.net/SandeepSharma65 facebook:https://facebook.com/sandeepclassic google+ http://google.com/+SandeepSharmaa Twitter: https://twitter.com/sandeeclassic Page 148 of 167 5 Select and complete the schedule parameters for your object (scheduling option, Start Date, End Date, and so on). 6 In the Available Events area, select from the list of events and click Add. For example, the report object above is set to wait for a Custom-based event to occur before the report is processed. 7 To update the default scheduling information, click Update. If you don't click Update, any changes you made to the scheduling information are not saved. 8 Click the Schedule button to schedule the object. To trigger a schedule-based event or events upon completion 1 In the Objects management area of the Central Management Console, select an object by clicking its link. 2 Click the Schedule tab. 3 From the list on the left of the page, select a recurrence pattern: Once, Daily, Weekly, Monthly, or by Calendar. 4 In the Run list, select a run option that contains the words, "with events."
- 149. More Details blog:http://sandyclassic.wordpress.com linkedin:https://www.linkedin.com/in/sandepsharma slideshare:http://www.slideshare.net/SandeepSharma65 facebook:https://facebook.com/sandeepclassic google+ http://google.com/+SandeepSharmaa Twitter: https://twitter.com/sandeeclassic Page 149 of 167 5 Select and complete the schedule parameters for your object (scheduling option, Start Date, End Date, and so on). 6 In the Available Schedule Events area, select from the list of events and click Add. For example, the report object above is set to trigger a Schedule-based event only if the report is successfully processed. Note: You can only select schedule-based events in this list. 7 To update the default scheduling information, click Update. If you don't click Update, any changes you made to the scheduling information are not saved. 8 Click the Schedule button to schedule the object. Specifying event rights You can grant or deny users and groups access to events. Depending how you organize your events, you may have specific events that you want to be available only for certain employees or departments. For example, you may want certain events to be triggered only by management or IT. Users will only be able to see events they have the rights to see, so you can use rights to hide events that aren't applicable to a particular group. For example, by granting only the IT Admin group access to IT-related events, those events won't appear for a user from the HR Admin group; this makes the event list easier for the HR Admin group to navigate. By default, events inherit rights from the users' parent folders.
- 150. More Details blog:http://sandyclassic.wordpress.com linkedin:https://www.linkedin.com/in/sandepsharma slideshare:http://www.slideshare.net/SandeepSharma65 facebook:https://facebook.com/sandeepclassic google+ http://google.com/+SandeepSharmaa Twitter: https://twitter.com/sandeeclassic Page 150 of 167 To grant access to an event 1 Go to the Events management area of the CMC. 2 Select the event you want to grant access to. 3 Click the Rights tab. 4 Click Add/Remove to add users or groups that you want to give access to the event. The Add/Remove page appears. 5 In the Select Operation list, select Add/Remove Groups, Add Users, or Remove Users. 6 Select the user or group you want to grant access to the specified event. Tip: If you have many users on your system, select the Add Users operation; then use the "Look for" field to search for a particular account. 7 Click OK. 8 On the Rights tab, change the Access Level for each user or group, as required. 9 To choose specific rights, choose Advanced. 10 Click Update. Practice Activity: Scheduling on events Scenario The Inventory Report (by Category) provides vital information to the Xtreme world-wide and regional sales managers and is required to be scheduled and published daily for the Sales group. Before the Inventory Report (by Category) runs, a check should be made that the Xtreme database has been updated. Every night data is uploaded to the Xtreme warehouse, upon completion a file named 'db_update.txt' is created and placed on the root of the c: drive at midnight, then automatically deleted 4 hours later. Your objective is to schedule the Inventory Report (by Category) based on a file event. If the 'dbupdcomp.txt' file is present, an instance of the report will be generated. Objective In this activity, you will: · Create a file-based event · Schedule a report based on an event Instructions 1 Create a file-based event called "Xtreme DB Updated". For the file location, specify: c:db_update.txt Tip: In needed, refer to the procedures in To create a file-based event on page 7-31.. 2 Schedule the Inventory Report (by Category) in the Sales folder to run: · Daily, with events · Starting now and going to the end of the year · Based on the Xtreme DB Updated event Tip: If needed, refer to the procedures in To select an event to wait for on page 7-37 3 When the History tab displays, verify that the recurring job appears and that its scheduling information is correct. 4 Click Refresh. What happens on the History tab, and why? 5 Navigate to the root directory and create a blank text file named db_update.txt. 6 Go back to the History tab for this report in the CMC. Refresh the instance history again. What happens now and why? 7 Go back to History tab for this report in the Central Management Console. Refresh the instance history again. What happens now, and why?
- 151. More Details blog:http://sandyclassic.wordpress.com linkedin:https://www.linkedin.com/in/sandepsharma slideshare:http://www.slideshare.net/SandeepSharma65 facebook:https://facebook.com/sandeepclassic google+ http://google.com/+SandeepSharmaa Twitter: https://twitter.com/sandeeclassic Page 151 of 167 Scheduling with business calendars Introduction Calendars allow you to create more complex processing schedules than the standard scheduling options, by combining unique scheduling dates with recurring ones. Calendars are particularly useful when you want to run a recurring job on an irregular schedule, or if you want to provide users with sets of regular scheduling dates to choose from. After completing this unit, you will be able to: · Define a business calendar · Create a business calendar · Schedule objects with a business calendar What is a business calendar? Calendars make it easy for you to schedule complex recurring jobs efficiently. A calendar is a customized list of run dates for scheduled jobs. You can create calendars to provide your users with sets of common scheduling dates. When users schedule objects, they can use calendars to run jobs on the predefined dates. For example, if you want a report object to run every business day except for your country's statutory holidays, you can crea te a calendar with the holidays marked as "non-run" days, on which the report object cannot be run. BusinessObjects Enterprise will run the job every day you have specified as a "run" day in your calendar. You can set up as many calendars as you want in BusinessObjects Enterprise. Calendars you create appear in the Calendar selection list available when you choose to schedule an object using a calendar. When you apply the calendar to a job, BusinessObjects Enterprise runs the job on the run dates as scheduled. You can apply calendars to any object that can be scheduled, including report objects, LOV objects, program objects, and object packages. Creating a calendar You create calendars through the Central Management Console, in the Calendars management area. Tip: It is good practice to create a calendar for users to use as a template for creating new calendars. They can copy this template calendar and modify it as necessary. For example, you can create a default Weekdays calendar that includes all days as run dates except weekends and company holidays. To create a calendar 1 Go to the Calendars management area of the Central Management Console. 2 Click New Calendar. 3 On the Properties tab, type the name and description of the new calendar. 4 Click OK. The new calendar is added to the system, and its Properties tab is refreshed. You can now use the Dates tab to add run dates to this calendar. Adding dates to a calendar You can add dates to a calendar using a number of different formats. You can choose specific dates using a yearly, quarterly, or monthly view of the calendar, or you can choose recurring dates using general formats based on the day of the month or week. Specific dates To add a specific date to a calendar, use the Yearly, Quarterly, and Monthly formats to add dates to the calendars. The Yearly format displays the run schedule for the entire year. The Quarterly format displays the run dates for the current quarter. You can also view the Monthly format for the calendar, which displays the run dates for the current month. In all three formats, you can change the displayed time range by clicking the previous and next buttons.
- 152. More Details blog:http://sandyclassic.wordpress.com linkedin:https://www.linkedin.com/in/sandepsharma slideshare:http://www.slideshare.net/SandeepSharma65 facebook:https://facebook.com/sandeepclassic google+ http://google.com/+SandeepSharmaa Twitter: https://twitter.com/sandeeclassic Page 152 of 167 You can add specific dates in the Monthly calendar format. To add dates for the Yearly and Quarterly calendar formats, click a month to open it in the Monthly format, where you can select specific days as run dates. For example, if your company ships products according to an irregular schedule that cannot be defined using the daily or weekly settings, you can create a list of these dates in a "Shipping dates" calendar. The Shipping department can now check the inventory after each shipment by scheduling a report that uses the calendar to run at the end of each shipping day. Recurring dates To create a recurring pattern of monthly run dates, use the generic Monthly formats. You can add the generic dates based on the day of the week or the day of the month. To view existing run dates, you must use the Yearly, Quarterly, or Monthly format; the g eneric formats are used to add dates to the calendar. Although you can set a recurring schedule using the standard scheduling options, calendars allow you to specify several different recurring run patterns at once. You can also run instances on dates that do not follow the pattern by adding individual days to a calendar. For example, to schedule a report object to run on the first four days of every month, and on the second and fourth Friday of every month, first create a new calendar object and name it. Then, use the Generic Monthly, by Day of Month format to add the first four days of the month to this calendar. When you update the calendar, the Yearly format appears with the new run dates.
- 153. More Details blog:http://sandyclassic.wordpress.com linkedin:https://www.linkedin.com/in/sandepsharma slideshare:http://www.slideshare.net/SandeepSharma65 facebook:https://facebook.com/sandeepclassic google+ http://google.com/+SandeepSharmaa Twitter: https://twitter.com/sandeeclassic Page 153 of 167 To add every second and fourth Friday to the calendar, use the Generic Monthly, by Day of Week format. To add dates to a calendar 1 Go to the Calendars management area of the Central Management Console. 2 Click the link for the calendar you want to change.
- 154. More Details blog:http://sandyclassic.wordpress.com linkedin:https://www.linkedin.com/in/sandepsharma slideshare:http://www.slideshare.net/SandeepSharma65 facebook:https://facebook.com/sandeepclassic google+ http://google.com/+SandeepSharmaa Twitter: https://twitter.com/sandeeclassic Page 154 of 167 3 Click the Dates tab. 4 In the "Select a calendar displaying format" list, choose from one of the five calendar format options: · Yearly Yearly displays the calendar's run dates for the year. To change the year displayed, you can click the Previous Year and Next Year buttons. To add a date from the Yearly format, click a month to open it in Monthly format, where you can add run dates to specific days. · Quarterly Quarterly displays the calendar's run dates for the current calendar quarter. You can change the displayed quarter using the Previous Quarter and Next Quarter buttons. To add a date from the Quarterly format, click a month to open it in Monthly format, where you can add run dates to specific days. · Monthly Monthly displays the calendar's run dates for the current month. You can change the displayed year using the Previous Month and Next Month buttons. To add a date from the Yearly format, click a month to open it in Monthly format, where you can add run dates to specific days. · Generic Monthly, by Day of Week Generic Monthly, by Day of Week allows you to add general recurring dates based on the day of the week. The dates are applied to the months specified between the Start and End Dates. Week 1 starts on the Sunday of the week of the Start Date you specify. Note that this format does not display the currently selected dates from the calendar; it only allows you to add new dates and update the schedule. · Generic Monthly, by Day of Month Generic Monthly, by Day of Month allows you to add general recurring dates based on the day of the month. The dates are appli ed to the months specified between the Start and End Dates. This format allows you to add new dates and update the schedule; it does not display currently selected dates from the calendar. 5 Click the days of the month that you want to include as run days for the calendar. To remove a run day, click the day again. Tip: For the Monthly and Generic Monthly, by Day of Week formats, you can select multiple dates at once by clicking the row or column headings. 6 To add the new dates to the calendar, click Update. If you added dates using a generic format, the Yearly format will automatically appear, displaying the new dates. Note: When you change an existing calendar, BusinessObjects Enterprise checks all currently scheduled instances in your system. Objects that use the edited calendar are automatically updated to run on the revised date schedule. Deleting calendars When you delete a calendar, objects can no longer use it for scheduling jobs. If existing scheduled jobs use the deleted calendar, you will need to select a new calendar or create another schedule for them. To delete a calendar 1 Go to the Calendars management area of the Central Management Console. 2 Select the check box associated with the calendar you want to delete. Tip: Select multiple check boxes to delete several calendars. 3 Click Delete, and click OK to confirm. Specifying calendar rights You can grant or deny users and groups access to calendars. Depending how you organize your calendars, you may have specific sets of dates that you want to be available only for certain employees or departments. For example, your finance team may use a series of financial tracking dates that aren't useful for other departments. Users will only be able to see the calendars the y have the rights to see, so you can use rights to hide calendars that aren't applicable to a particular group. By default, calendars inherit rights from the users' parent folders. To grant access to a calendar 1 Go to the Calendars management area of the CMC. 2 Select the calendar you want to grant access to. 3 Click the Rights tab. 4 Click Add/Remove to add users or groups that you want to give access to the selected calendar. The Add/Remove page appears. 5 In the Select Operation list, select Add/Remove Groups, Add Users, or Remove Users. 6 Select the user or group you want to grant access to the specified calendar.
- 155. More Details blog:http://sandyclassic.wordpress.com linkedin:https://www.linkedin.com/in/sandepsharma slideshare:http://www.slideshare.net/SandeepSharma65 facebook:https://facebook.com/sandeepclassic google+ http://google.com/+SandeepSharmaa Twitter: https://twitter.com/sandeeclassic Page 155 of 167 If you have many users on your system, select the Add Users operation; then use the "Look for" field to search for a particular account. 7 Click OK. 8 On the Rights tab, change the Access Level for each user or group, as required. 9 To choose specific rights, choose Advanced. 10 Click Update. Scheduling objects with a business calendar When you schedule an object according to a calendar, it will run on each date specified in the calendar, creating a new instance each time it runs. You can choose the time of day the instance will run, and for how long, but the dates that the object runs are controlled by the calendar you choose. You can also schedule objects with calendars and events. To schedule an object with a calendar 1 In the Objects management area of the Central Management Console, select an object by clicking its link. 2 Click the Schedule tab. The Schedule tab appears. 3 Select the Calendar option. The page refreshes. 4 In the Run list, select either: · Calendar When you select this option, the object runs on all specified run dates in the calendar. To specify a start time and end time for the scheduled job on each run date, choose values from the lists. · Calendar, with events Choose this option to use an event or events that you have already defined. When you select this option, the object and its associated events run on all specified run dates in the calendar. Choose a start time and end time for the scheduled job and its events to run on each run date. 5 In the Calendar to run for list, choose the calendar that provides the scheduled dates you want. 6 Complete these fields: · Number of retries allowed This number indicates the number of times a job server will attempt to process an object if the first attempt is not successful. By default, the number is zero. · Retry interval in seconds BusinessObjects Enterprise will wait for the specified number of seconds to pass before attempting to process an object again (if the first attempt failed). The default setting is 1800 seconds. 7 Click Schedule to schedule the object. 8 To update the default scheduling information, click Update. If you don't click Update, any changes you made to the scheduling information are not saved after this instance. Practice Activity: Schedule an object with a business calendar Scenario The Inventory Report (by Category) provides product stock level information to the Xtreme salespeople. It is already scheduled and published daily, after the inventory database is updated, for the Sales group. The Xtreme Bike Company has decided to close for the December holidays, and the schedule for this recurring report needs to b e adjusted. The most efficient way to schedule the report is to run it based on a Business Calendar, which will define the active business days in December. Objective
- 156. More Details blog:http://sandyclassic.wordpress.com linkedin:https://www.linkedin.com/in/sandepsharma slideshare:http://www.slideshare.net/SandeepSharma65 facebook:https://facebook.com/sandeepclassic google+ http://google.com/+SandeepSharmaa Twitter: https://twitter.com/sandeeclassic Page 156 of 167 In this activity, you will: · Define a new business calendar · Schedule a report to use a business calendar and events Instructions 1 Create a new Calendar called "Holiday Schedule": · For December of the current year · Select all weekdays EXCEPT those falling on or between December 25th and the 31st. Tip: Select all the weekdays first, and then de-select the weekdays you want to exclude. · Click Update when done. Tip: If needed, refer to the procedures in To create a calendar on page 7-39. and To add dates to a calendar on page 7-43.. 2 Schedule the Inventory Report (by Category) to run: · Using the Holiday Schedule calendar, with events · Starting December 1st of the current year, and ending on January 1st of next year. · Based on the Xtreme DB Update file event. Tip: If needed, refer to the procedures in To schedule an object with a calendar 3 When the History tab displays, verify that the scheduling information is correct. Managing instances Introduction After completing this unit, you will be able to: · Define instance limits · Set instance limits What is instance management? When report objects are scheduled, they create report instances. Report instances are reports that contain historical data. Every time a report is scheduled, a new instance is created. BusinessObjects Enterprise enables you to set instance limits to control ho w many historical instances are kept for each object. Limiting the number of historical instances provides several benefits: · Improves usability by reducing the number of instances users must search through. · Saves storage space by reducing the number of reports that must be stored. · Simplifies backup by reducing the number of reports that you must include. You can set instance limits at these levels: · Global limits Global limits are the system defaults for the entire system, providing the starting point for instance limit inheritance. Any limits set for objects below this level take precedence. · Folder level limits Folder level limits set instance limits for all objects contained within the folder. Top level folders inherit instance limits from the global level. Subfolders inherit instance limits from parent folders. Instance limits set explicitly at the folder level override inherited instance limits. · Object level limits Objects in BusinessObjects Enterprise inherit instance limits from their parent folder. Object level instance limits override the inherited rights.
- 157. More Details blog:http://sandyclassic.wordpress.com linkedin:https://www.linkedin.com/in/sandepsharma slideshare:http://www.slideshare.net/SandeepSharma65 facebook:https://facebook.com/sandeepclassic google+ http://google.com/+SandeepSharmaa Twitter: https://twitter.com/sandeeclassic Page 157 of 167 Monitoring object history Report instances are reports with saved data. That is, report instances contain data from the time the report was last run. The History page displays all of the report instances for a selected report object. · The Instance Time column displays the title of the report instances and the date of the last update for each instance. · The Status column displays the status of each report instance. · The Format column displays which format the report is, or will be stored in. · Information about who ran the report instances and what parameters are found in the report instances are listed in the Run By and the Parameters columns. Instance Manager The Instance Manager is an administrative tool in the Administration Launchpad that allows you to search for instances. You can filter instances by status, by user, or by both status and user. The search options for object status are: · All Statuses · Success · Failed Pending · Running · Pending · Recurring · Paused When you view an instance in the Instance Manager, you can see the object name, the date the instance was created, the file path location, the run time, and the user who created the instance. You also have the option to delete the instance. Setting instance limits Limits allow you to delete report instances on a regular basis. You set limits to automate regular clean-ups of old BusinessObjects Enterprise content. Limits that you set on a folder affect all objects that are contained within the folder. At the folder level, you can limit the number of instances that remain on the system for each object or for each user or group; you can also limit the num ber of days that an instance remains on the system for a user or group. The available settings are: · Delete excess instances when there are more than N instances of an object To limit the number of instances per object, select this check box. Then type the maximum number of instances that you want to remain on the system. The default value is 100. · Delete excess instances for the following users/groups To limit the number of instances per user or group, click Add/Remove in this area. Select from the available users and groups and click OK. Then type the maximum number of instances in the Instance Limit column. The default value is 100. · Delete instances after N days for the following users/groups To limit the age of instances per user or group, click Add/Remove in this area. Select from the available users and groups and click OK. Then type the maximum age of instances in the Maximum Days column. The default value is 100. To set instance limits on folders 1 Once you've created the new folders and subfolders, click the Limits tab. 2 Modify the available settings according to the types of instance limits that you want to implement, and click Update after each change. The available settings are: · Delete excess instances when there are more than N instances of an object. · Delete excess instances for the following users/group. · Delete instances after N days for the following users/groups. To set instance limits 1 In the Objects management area of the CMC, select an object by clicking its link. 2 On the History tab, click the Limits link. The Limits page appears.
- 158. More Details blog:http://sandyclassic.wordpress.com linkedin:https://www.linkedin.com/in/sandepsharma slideshare:http://www.slideshare.net/SandeepSharma65 facebook:https://facebook.com/sandeepclassic google+ http://google.com/+SandeepSharmaa Twitter: https://twitter.com/sandeeclassic Page 158 of 167 3 Make your settings according to the types of limits you want to set for your instances. The options are: · Delete excess instances when there are more than N instances of an object To limit the number of instances per object, select this check box. Then type the maximum number of instances that you want to remain on the system. The default is 100. · Delete excess instances for the following users/groups To limit the number of instances per user or group, click Add/Remove in this area. Select from the available users and groups and click OK. Then type the maximum number of instances in the Instance Limit column. The default is 100. · Delete instances after N days for the following users/groups To limit the number of days that instances are saved for users or groups, click Add/Remove in this area. Select from the available users and groups and click OK. Then type the maximum age of instances in the Maximum Days column. The default value is 100. 4 Click Update. Practice Activity: Setting Instant Limits Scenario You have been monitoring the scheduling activity through the CMC and have decided it is necessary to set scheduled instance limitations to relinquish some of the burden on your Output File Repository Server. Objective In this activity, you will: · Set global instance limits · Set folder level instance limits Instructions 1 Log into the CMC using the 'Administrator' account. 2 Set the global setting for instance limits to 50.
- 159. More Details blog:http://sandyclassic.wordpress.com linkedin:https://www.linkedin.com/in/sandepsharma slideshare:http://www.slideshare.net/SandeepSharma65 facebook:https://facebook.com/sandeepclassic google+ http://google.com/+SandeepSharmaa Twitter: https://twitter.com/sandeeclassic Page 159 of 167 3 Set the 'Sales' main folder level setting for 20. How will this affect the instance limits for the subfolders? 4 Set the 'Finance' folder limit to 30 days.
- 160. More Details blog:http://sandyclassic.wordpress.com linkedin:https://www.linkedin.com/in/sandepsharma slideshare:http://www.slideshare.net/SandeepSharma65 facebook:https://facebook.com/sandeepclassic google+ http://google.com/+SandeepSharmaa Twitter: https://twitter.com/sandeeclassic Page 160 of 167 Lesson 8 Delegated Administration This lesson describes how you can distribute administration responsibilities to the various business units and departments that use the BusinessObjects Enterprise system. In this lesson you will learn about: · Understanding and implementing delegated administration Understanding Delegated Administration Introduction Typically, a company's IT department or its system administrators are responsible for managing the entire BusinessObjects Enterprise system. This can become a drain on IT resources. Many companies would like to be able to distribute some of the administration responsibilities to the various business units and departments that use the BusinessObjects Enterprise system. Delegated administration in BusinessObjects Enterprise enables system administrators to grant limited sets of administrative rights to various groups of administrators while still restricting access to the entire system. After completing this unit, you will be able to: · Define delegated administration · Describe the delegated administration security model · Delegate administration of users and groups · Delegate administration of servers and server groups · Delegate administration of calendars, events, categories, inboxes, universes, universe connections, and OLAP Intelligence connections What is delegated administration? Delegated administration enables system administrators to provide more system management control and responsibility to different departments or business units in a way that enables the system administrator to maintain control of how much access the departments or business units have. BusinessObjects Enterprise allows you to delegate administration for: · Users and groups · Servers and server groups · Calendars · Events · Categories · Inboxes · Universes and universe connections · OLAP Intelligence connections · BusinessObjects Enterprise Applications Here are some examples of the use of delegated administration: · The IT department wants to grant responsibility for managing folders and reports to the individual departments. Each department will have a number of folder administrators who will require Full Control access to their folder and the objects within their folder. The folder administrators will require access to grant rights to users in their department without being able to grant rights to users in other departments. · Departmental folder administrators understand the business requirements of their users. The IT department does not want to have to create the calendars and events required by the departments. The IT department wants to grant responsibility for creating and managing calendars and events to the departmental folder administrators.
- 161. More Details blog:http://sandyclassic.wordpress.com linkedin:https://www.linkedin.com/in/sandepsharma slideshare:http://www.slideshare.net/SandeepSharma65 facebook:https://facebook.com/sandeepclassic google+ http://google.com/+SandeepSharmaa Twitter: https://twitter.com/sandeeclassic Page 161 of 167 · A BusinessObjects Enterprise deployment has servers in multiple geographic locations. Each location has its own IT support staff. The regional support staff require the ability to start and stop the servers in their local office without having the ability to stop and start servers in other offices. The delegated administration security model Identifying access levels Rights are the base units for controlling user access. When setting up delegated administration, you will be setting rights for users and groups against objects such as users, groups, servers, server groups, calendars, events, and BusinessObjects Enterprise Applications. Even though these types of objects behave differently than report and folder objects, BusinessObjects Enterprise manages these objects in a similar fashion. There are two types of access levels used in delegated administration: · Predefined · Advanced Predefined access levels The available predefined access levels are: · No Access The user or group is not able to access the object or folder. · View The user or group is able to view the object. · Full Control This access level grants all of the available advanced rights. This level allows users to view the object and modify all of the object's properties, including the object rights that are set on the object. Advanced access levels To provide you with complete control over object security, BusinessObjects Enterprise allows you to make Advanced object rights settings for any user or group. These Advanced settings enable you to choose from a complete set of granular object rights. The available advanced access rights vary depending upon the type of object. Access Inheritance Rules Delegated administration is configured at two levels: · Global Level Global Level rights are set from the Rights button on the main object configuration page. Access set at the Global level controls whether a user will be able to see this section of the CMC or not. Global level access also controls which objects and level of access to the objects will be available to the user within the section of the CMC. · Object Level Object Level rights are configured on the Rights tab of each object. These access rights control which actions a user will be able to perform on each object. Inheritance rules The following rules describe the relationship between rights set at the Global level and Object level for delegated administration. Note: While the examples and diagrams show delegated server administration, these rules also apply to users and groups. 1 Rights set at the Global level for an object are inherited by individual objects. For example: if you grant the Everyone group Full Control access at the Global level on the Servers page, the members of the Everyone group will be able to view and modify all servers in the system. A common practice is to set No Access for the Everyone group at the Global level. This will prevent your entire user base from having rights to view and modify servers in the system.
- 162. More Details blog:http://sandyclassic.wordpress.com linkedin:https://www.linkedin.com/in/sandepsharma slideshare:http://www.slideshare.net/SandeepSharma65 facebook:https://facebook.com/sandeepclassic google+ http://google.com/+SandeepSharmaa Twitter: https://twitter.com/sandeeclassic Page 162 of 167 2 Rights set at the Object level override the rights set at the Global level. For example: If you grant the Sales Admins group Full Control to a specific server, then members of the Sales Admins group will be able to view and modify the server. 3 If a user is a member of multiple groups, the user's access level is the maximum of all rights granted to the groups that t he user is a member of unless rights are specifically set for the user. For example: If a user is a member of the Everyone group which has been granted No Access at the Global level and a member of the Sales Admins group which has been granted Full Control access at the Sales group, then the user will be granted Full control access for the server object (inherited No Access vs. Full Control).
- 163. More Details blog:http://sandyclassic.wordpress.com linkedin:https://www.linkedin.com/in/sandepsharma slideshare:http://www.slideshare.net/SandeepSharma65 facebook:https://facebook.com/sandeepclassic google+ http://google.com/+SandeepSharmaa Twitter: https://twitter.com/sandeeclassic Page 163 of 167 4 Access granted to a specific user overrides access inherited from group membership. For example: If a user from the Sales Admins group is specifically granted View access for a server, then this will override the rights that the user is granted through their membership in the Sales Admins group. 5 Denied rights take precedence over granted rights. For example: The View access level includes the right to View Objects. Any group object that inherits View rights will be granted the View Objects right. If Advanced rights are set for the group object and the specific View Object right is denied, the denied right will take precedence.
- 164. More Details blog:http://sandyclassic.wordpress.com linkedin:https://www.linkedin.com/in/sandepsharma slideshare:http://www.slideshare.net/SandeepSharma65 facebook:https://facebook.com/sandeepclassic google+ http://google.com/+SandeepSharmaa Twitter: https://twitter.com/sandeeclassic Page 164 of 167 Delegating administration of users and groups Delegated administration of user objects and group objects enables two types of administration: · The ability to view, modify, add, or delete existing user objects and group objects from the User and Groups tabs of the Central Management Console. · The ability to view and assign access levels to user objects and group objects when setting rights on other objects such as folders, reports, servers, server groups, calendars, events, or BusinessObjects Enterprise Applications. User and group inheritance rules Because of the relationship between user objects and group objects, access to view or modify group objects often results in access to view or modify user objects. The following guidelines explain how the access levels for user objects and group objects are related and how they are affected by inheritance. 1 If a group has been granted rights to view or modify a group object, the group inherits rights to view or modify the user o bjects who are members of the group object. For example, the Sales Admins group is granted rights to view the Sales group object. Members of the Sales Admins group will be able to view the user objects who belong to the Sales group object.
- 165. More Details blog:http://sandyclassic.wordpress.com linkedin:https://www.linkedin.com/in/sandepsharma slideshare:http://www.slideshare.net/SandeepSharma65 facebook:https://facebook.com/sandeepclassic google+ http://google.com/+SandeepSharmaa Twitter: https://twitter.com/sandeeclassic Page 165 of 167 2 If No Access is granted at the Global level for user objects, you will still be able to view and modify user objects if you have been granted the rights to view or modify the group objects that the user objects are members of. If you wish to deny the ability for users or groups to see a particular user object, you must specifically grant No Access to that user object. 3 The effective access level granted for group objects and user objects is the maximum of the combined access levels assigned to the groups to which a delegated administrator belongs (excepting if there are rights that have been specifically denied or if rights have been assigned specifically to the delegated administrator user). For example, the Sales Admins group is given No Access to view users at the Global level for user objects. The Sales Admins group is also given View access to the Sales Users group object. Therefore, members of the Sales Admins group can view the Sales Users group object and also view the user objects in the Sales Users group object. Recommendations for setting up delegated administration of users and groups To grant delegated administrators access to view, modify, add, or delete user objects and group objects on the User and Groups tabs of the Central Management Console: 1 Grant No Access to the Everyone group at the Global level for both Group objects. This prevents all system users from being able to view and modify groups.
- 166. More Details blog:http://sandyclassic.wordpress.com linkedin:https://www.linkedin.com/in/sandepsharma slideshare:http://www.slideshare.net/SandeepSharma65 facebook:https://facebook.com/sandeepclassic google+ http://google.com/+SandeepSharmaa Twitter: https://twitter.com/sandeeclassic Page 166 of 167 2 Grant No Access to the Everyone group at the Global level for User objects. This prevents all system users from being able to view and modify other users. 3 Create specific groups to hold power users to whom you wish to delegate responsibility. Add the power users to these groups. For example, if you wish to have some users who will be Folder Administrators for the Sales group, create a group called Sales Admins, and add the power users to this group. Grant View access to this group at the Global level for Group objects and User objects so that these groups will be able to see the Group and User administration sections of the CMC. 4 Grant specific access to group objects to the specific delegated administration groups. It is preferable to set access at the group object level instead of at the individual user object level as this will minimize the complexity of your delegated administration model. For example, grant the Sales Admins group Full Control access to the Sales group. Note: If you have granted View access at the Global level to these groups, they will inherit View rights to all objects within the Groups and Users sections of the CMC. This will enable them to view, but not modify Groups and Users. The delegated administration of servers enables system administrators to set up groups of server administrators and then grant access for these server administrators to view and modify BusinessObjects Enterprise servers. To make the administration more efficient, system administrators may organize servers into server groups and then grant access to the server groups instead of to the individual server objects. Implementing delegated administration When you implement delegated administration for user and group objects, you need to configure rights at: · The global level · The object level · The folder level - for users and groups only Setting delegated administration at the global level When you set delegated administration at the Global level, you determine: · Whether a user will see the section in the Central Management Console · The level of access a user will have for individual objects The following steps apply to group objects, user objects, server objects, server group objects, calendar objects, and event objects. To configure delegated administration at the global level 1 Go to the Central Management Console Home page. 2 Select the administration page for the object type for which you wish to set Global rights. 3 Select the Rights button at the top of the page. 4 Select Add/Remove to select the user or group to which you will be granting rights to the object. 5 Select the group to which you will be granting rights from the Available Groups list. To select a specific user instead of a group, select Add Users from the Select Operation dropdown box, then select the user from the Available Users list. 6 Select the > to add your group to the Groups with an access level list box. 7 Select OK. 8 Select the appropriate level of access from the Access Level dropdown box. 9 Select Update to save the changes. 10 To set Advanced rights, select the Advanced link. 11 Select the rights that you wish to explicitly grant or deny. 12 Select OK. How to set delegated administration at the Object level When you set delegated administration at the Object level, you determine the level of access a user will have for individual objects. The following steps apply to group objects, user objects, server objects, server group objects, calendar objects, event objects, category objects, inbox objects, universe connection objects, universe objects, and OLAP Intelligence connection obejcts. To configure delegated administration at the object level: 1 Go to the Central Management Console Home page. 2 Select the administration page for the object type for which you wish to set object rights. 3 Select the object to which you wish to grant administrative rights. 4 Select the Rights tab for the object.
- 167. More Details blog:http://sandyclassic.wordpress.com linkedin:https://www.linkedin.com/in/sandepsharma slideshare:http://www.slideshare.net/SandeepSharma65 facebook:https://facebook.com/sandeepclassic google+ http://google.com/+SandeepSharmaa Twitter: https://twitter.com/sandeeclassic Page 167 of 167 5 Select Add/Remove to select the user or group to which you will be granting rights to the object. 6 Select the group to which you will be granting rights from the Available Groups list. To select a specific user instead of a group, select Add Users from the Select Operation dropdown box, then select the user from the Available Users list. 7 Select the > to add your group to the Groups with an access level list box. 8 Select OK. 9 Select the appropriate level of access from the Access Level dropdown box. 10 Select Update to save the changes. 11 To set Advanced rights, select the Advanced link. 12 Select the rights that you wish to explicitly grant or deny. 13 Select OK. Delegating administration of servers and server groups Because the relationship between server objects and server group objects is the same as that between user and group objects, server and server group objects follow the same inheritance rules. If you set access rights for server groups, those access rights are inherited by the server objects that are members of the server groups. The following guidelines will assist you in setting up delegated administration for servers: 1 Grant the Everyone group No Access at the Global level of the Servers page. Grant the Everyone group No Access at the Global level of the Server Groups page. This prevents all system users from having access to the Servers and Server Groups section of the CMC, and therefore they will have no access to the server and server group objects. 2 Create a group that will hold the users who will be server administrators, and add the users to that group. Grant the server adminsitrators group View rights at the Global level so that they can see this section of the CMC. For example: Create a Server Admins group and add your server administrator users to it. 3 Create a server group that will hold the servers that are meant to be administered, and add the servers to that group. For example: Create an All Servers server group and add your servers to it. 4 Grant Full Control access for the delegated administrator group for the object to be administered. For example: Grant the Server Admins group Full Control access to the All Servers server group. The result of this will be that members of the Server Admins group will be able to go to the Servers page of the CMC and view and configure servers. Delegating administration of calendars, events, inboxes, categories, universe connections, universes, and OLAP Intelligence connections You may wish to set up delegated administration of other BusinessObjects Enterprise objects if you wish to give certain power users access to manage calendars, events, inboxes, categories, universe connections, universes, or OLAP Intelligence connections. The following guidelines will assist you in setting up delegated administration for other BusinessObjects Enterprise objects: 1 Grant the Everyone group No Access at the Global level of the appropriate page. This prevents all system users from having access to the section of the CMC, and therefore they will have no access to the objects in the section. 2 Create a group that will hold the users who will be delegated administrators for the objects, and add the users to that group. For example: Create a Calendar Admins group and add your power users to it. 3 Grant Full Control access for the delegated administrator group at the Global level of the page. For example: Grant the Calendar Admins group Full Control access at the Global level of the Calendars page. The result of this will be that members of the Calendar Admins group will be able to go to the Calendars page of the CMC and create and configure calendars. Note: One difference between setting delegated administration for these types of objects vs. setting delegated administration for users, groups, servers, and server groups is that these objects don't have any groups that hold them, therefore you may only set acc ess at the Global level or the individual object level. You cannot set access for a group of objects.