Server configuration
Download as PPT, PDF2 likes4,380 views

The document discusses File Transfer Protocol (FTP), Network File System (NFS), and Samba server configuration. It provides details on FTP such as its history, components, modes, and how to configure an FTP server in Linux. It describes NFS including its history, versions, configuration files, and steps to configure NFS client and server. It also explains Samba, its components, purpose, and how to configure a Samba server using both command line and graphical tools.


Server configuration
- 2. Group Members: Rida Shaukat Samia Tariq Ayesha Talat 2
- 3. Topics: FTP Server NFS Server SAMBA Server 3
- 5. FTP History: Short form File Transfer Protocol FTP was first proposed on April 16, 1971 Developed by Abhay Bhushan Implementation on hosts at MIT FTP was later defined by RFC 959 that was published in 1985. 5
- 6. What is FTP? FTP is the standard network protocol FTP is used for the transfer of computer files between a FTP client and FTP server on a computer network. FTP is built on a client-server model architecture and uses separate control and data connections between the client and the server. 6
- 7. FTP Client FTP Server Software that connects your computer to a server Provides a reliable means to transfer data between two computers Also known as FTP site Stores all the files and databases for clients FTP client connects to the server in order to access the files 7
- 8. FTP Modes: There are following FTP modes : ACTIVE MODE FTP PASSIVE MODE FTP 8
- 9. FTP Modes (Cont): ACTIVE MODE FTP: Active mode was originally the only method of FTP, and is therefore often the default mode for FTP When a client and server intend to transfer data, they usually start a Control Connection first in order to negotiate the details of the Data Connection prior to opening it and transferring data. 9
- 10. 10
- 11. FTP Modes (Cont): Passive MODE FTP: Passive FTP is a more secure form of data transfer In which the flow of data is set up and initiated by the File Transfer Program (FTP) client rather than by the FTP server program. 11
- 12. 12
- 13. FTP Server Config. In LINUX: Now we are going to learn how to setup a FTP server in simple steps. So let's start now: 13
- 14. FTP Server Config. (Cont): 14
- 15. FTP Server Config. (Cont): 15
- 16. FTP Server Config. (Cont): 16
- 17. FTP Server Config. (Cont): 17
- 19. What is NFS? NFS stand for Network File System. Network File System (NFS) is a distributed file system Allowing a user on a client computer to access files over a computer network much like local storage is accessed. 19
- 20. Where did it come from? NFS was developed by Sun Microsystems in 1980. NFS is used to share files between Linux / Unix systems. Red Hat Enterprise Linux 6 supports NFSv2, NFSv3, and NFSv4 clients. By default RHEL6 use NFSv4 if the server supports it. TCP 2049 is the default port number for NFS. 20
- 21. Benefits: NFS allows local access to remote files. It uses standard client/server architecture for file sharing between all *nix based machines. With NFS it is not necessary that both machines run on the same OS. With the help of NFS we can configure centralized storage solutions. Can be secured with Firewalls 21
- 23. NFS Services: 23
- 24. Files for NFS Configurations: /etc/exports It’s a main configuration file of NFS, all exported files and directories are defined in this file. /etc/fstab To mount a NFS directory on your system across the reboots, we need to make an entry in/etc/fstab. /etc/sysconfig/nfs Configuration file of NFS to control on which port rpc and other services are listening. 24
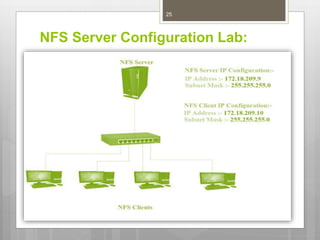
- 25. NFS Server Configuration Lab: 25
- 26. NFS Server Configuration steps: Step 1 Configure the NIC (Network Interface Card). Execute the following command to configure NIC. (#setup) Step 2 Restart the Network Service by executing the following command. (#service network restart) Step 3 Then check your NIC Configuration with the help of following command. (# Ifconfig) 26
- 27. NFS Server Configuration steps (Cont): Step 4:- -In the next step we need to install NFS packages on our NFS Server as well as on NFS Client machine. We can install it via “yum” (Red Hat Linux) and “apt-get” (Debian and Ubuntu) package installers. -To install NFS packages using “yum” in RHEL 6 execute following command it: # yum install nfs-utils nfs-utils-lib #yum install rpcbind (not required with NFSv4) - To install NFS packages using “apt-get” in Debian or Ubuntu execute following command it: #apt-get install nfs-utils nfs-utils-lib 27
- 28. NFS Server Configuration steps (Cont): Step 5 -In this step you have to verify that NFS Server packages are installed. -To verify the “nfs-utils” package execute the following command:- (#rpm –qa nfs-utils* ) -To verify the “rpc-bind” package execute the following command:- (#rpm –qa rpcbind* ) Step 6 In the next step, create a new directory to share with client and named it whatever you want, you can also share an already existing directory with NFS. To create a new directory executes the following command:- ( #mkdir /nfsshare ) 28
- 29. NFS Server Configuration steps (Cont): Step 7 -Now we need to make an entry in “/etc/exports” and restart the services to make our directory shareable in the network. /nfsshare 172.18.209.10(rw, sync) -In the above example, there is a directory in / partition named “nfsshare” is being shared with client IP “172.18.209.10” with read and write (rw) privilege, you can also use hostname of the client in the place of IP in above example. 29
- 30. NFS Server Configuration steps (Cont): -Some other options we can use in “/etc/exports” file for file sharing is as follows. ro:With the help of this option we can provide read only access to the shared files i.e client will only be able to read. rw: This option allows the client server to both read and write access within the shared directory. sync: Sync confirms requests to the shared directory only once the changes have been committed. no_root_squash: This phrase allows root to connect to the designated directory. 30
- 31. NFS Server Configuration steps (Cont): Step 8:- Now start the rpcbind and nfs service by using the following command. #service rpcbind start (not required with NFSv4) (#service nfs start ) Step 9:- To turn on the above services at boot time, execute the following command. #chkconfig rpcbind on (not required with NFSv4 #chkconfig nfs on Step 10:- Now execute the following command to show the available shares your NFS server. #showmount -e 31
- 32. NFS Client Configuration steps: Step 1 Configure the NIC (Network Interface Card). Execute the following command to configure NIC. (#setup) Where eth0 is your NIC number. Step 2 If you’re NIC not configured, then first configure your NIC. To configure NIC, execute the following command:- #setup Then restart the network service:- #service network restart And then check the connectivity with NFS Server:- #ping 172.18.209.9 32
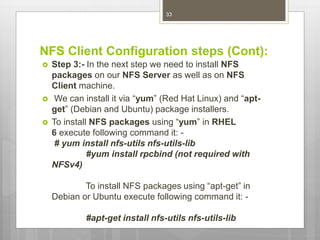
- 33. NFS Client Configuration steps (Cont): Step 3:- In the next step we need to install NFS packages on our NFS Server as well as on NFS Client machine. We can install it via “yum” (Red Hat Linux) and “apt- get” (Debian and Ubuntu) package installers. To install NFS packages using “yum” in RHEL 6 execute following command it: - # yum install nfs-utils nfs-utils-lib #yum install rpcbind (not required with NFSv4) To install NFS packages using “apt-get” in Debian or Ubuntu execute following command it: - #apt-get install nfs-utils nfs-utils-lib 33
- 34. NFS Client Configuration steps (Cont): Step 4 -In this step you have to verify that NFS Server packages are installed. To verify the “nfs-utils” package execute the following command:- ( #rpm –qa nfs-utils* ) -To verify the “rpc-bind” package execute the following command:- ( #rpm –qa rpcbind* Step 5:- -at the NFS client end, we need to mount that directory in our server to access it locally. To do so, first we need to find out that share available on the remote server or NFS Server. -Execute the following command to find out the available share on the NFS Server. ( #showmount –e 172.18.209.9 ) Note: - where 172.18.209.9 is the NFS Server IP address. 34
- 35. NFS Client Configuration steps (Cont): Step 6:- -Use the following command to mount that NFS share on our client machine. #mount –t nfs 172.18.209:/nfsshare /mnt -The above command will mount that shared directory in “/mnt/” on the client server. You can verify it following command. #mount | grep nfs 35
- 36. NFS Client Configuration steps (Cont): Step 7:- In the previous step we mounted the nfs shared directory on to nfs client temporarily, to mount an NFS directory permanently on your system across the reboots, we need to make an entry in “/etc/fstab“. Now edit the “/etc/fstab” file and add the following line to this file. #vim /etc/fstab 172.18.209.9:/nfsshare /mnt nfs defaults 0 0 36
- 37. Samba server 37
- 38. What is Samba? Samba is a popular freeware program that allows end users to access and use files, printers, and other commonly shared resources on a company's intranet or on the Internet. Samba is often referred to as a network file system and can be installed on a variety of operating system platforms. Samba uses the SMB protocol to share files and printers across a network connection. 38
- 39. Why we use Samba? Samba is useful if you have a network of both Windows and Linux machines Samba is a strong network service for file and print sharing Samba is reliable software that runs on reliable Unix operating system Samba has a very nice cost advantage: it's free. Share one or more Distributed filesystem (Dfs) 39
- 40. Where did it come from? It’s developed by Australian Andrew Tridgell. Released under GNU General Public Licence. The name Samba come from SMB (Server Message Block) 40
- 41. What is SMB? SMB stands for – Server Message Block. It is a protocol by which a lot of PC related machines share files and printers and other information such as lists of available files and printers. Operating systems that support this natively include Windows NT, OS/2, and Linux. 41
- 42. SMB Components: Smbd daemon: This provides the file and print services to SMB clients smb.conf: This is the configuration file for smbd. nmbd daemon: This daemon provides NetBIOS name serving and browsing support. smbpasswd: This allows the user to change the password used for their SMB sessions. 42
- 43. SMB Components(Cont): • smbclient: This is an smb client program implement a simple FTP-like client on a Linux or Unix box. • smbstatus: This programs lists the current Samba connections. smbmount: This mounting program enables mounting of server directories on a box. SWAT: Swat allows a Samba administrator to configure the smb.conf file via a Web browser. 43
- 44. Configuring a Samba Server(Cont): Configuring Samba The default configuration file (/etc/samba/smb.conf) allows users to view their home directories as a Samba share. It also shares all printers configured for the system as Samba shared printers Command- Line Configuration Graphical Configuration 44
- 45. Configuring a Samba Server(Cont): Graphical Configuration To configure Samba using a graphical interface, use the Samba Server Configuration Tool. The Samba Server Configuration Tool is a graphical interface for managing Samba shares, users, and basic server settings. It modifies the configuration files in the /etc/samba/directory. 45
- 46. Configuring a Samba Server(Cont): Graphical Configuration Samba Server Configuration Tool from the desktop, go to the Main Menu Button (on the Panel) => System Settings => Server Settings => Samba or type the command redhat-config-samba 46
- 47. Configuring a Samba Server(Cont): Graphical Configuration Samba Server Configuration Tool from the desktop, go to the Main Menu Button (on the Panel) => System Settings => Server Settings => Samba or type the command redhat-config-samba 47
- 48. Configuring a Samba Server(Cont): Create Samba user. The step by step procedure below show how to add user to Samba Server using the graphical Samba Server Configuration tool, To create samba user go to Preferences tab, then click on Samba Users to open the Samba Users window On the Samba Users window, click Add User button to open the Create New Samba User window. 48
- 49. Configuring a Samba Server(Cont): Command Line Configuration 1. • Installing Samba 2. • Create test directory and files 3. • Add Samba user and group 4. • Samba Configuration file 49
- 50. Configuring a Samba Server: Installing Samba Use yum to install the Samba package 50
- 51. Configuring a Samba Server: Creating Samba Test Directory and Files 51
- 52. Configuring a Samba Server: Adding the Samba User Creating the Samba Group 52
- 53. Configuring a Samba Server: Configuring Samba Samba uses /etc/samba/smb.conf as its configuration file. 53
- 54. 54
- 55. 55