


Start Building a Game and Get the Basic Structure Running
- 1. START BUILDING A GAME AND GET THE BASIC STRUCTURE RUNNING Part 4: Advanced Scripting 1 Advanced Scripting
- 2. Easing into Unity's scripting documentation (1) It's great that Unity has so many classes in the Scripting Reference for us to use in a Unity project. Yet, for a beginner to scripting, even the amount of features available in the Scripting Reference can be overwhelming. The good news is the Scripting Reference is exactly what the name implies. It's a reference. It's not meant to be a document you have to totally understand before you can begin writing scripts. A reference is a document you search when you need to know how to write the code to perform a specific task. That's great, right? Sure it is, sort of. As a beginner, how do you know what to search for? This reminds me of school. Ask the teacher how to spell a word and the teacher always responded with "Look it up in the dictionary." Ok, but how do you find out how to spell a word in a dictionary if you don't know how to spell it to find it? I always thought the teacher's answer was rather lame and a waste of energy. I didn't want a definition, just how to spell it. 2 Advanced Scripting
- 3. Easing into Unity's scripting documentation (2) Let's assume that you wanted to lerp between two vectors. Say what? Now seriously, how in the world would a beginner know words like this in the first place? What the heck is a "lerp"? Would you know to search for that word in the Scripting Reference? Obviously, most beginners wouldn't know a great deal of the terms, classes, variables, and methods available in Unity. This book is about teaching you the basics of C# so that you can understand code examples presented in the Scripting Reference, and be able to implement similar code in your Unity projects. Right now, you are at the beginning of your coding education. Learning the fundamentals of C# coding is the easy part, it's like learning how to read and write a sentence. 3 Advanced Scripting
- 4. Easing into Unity's scripting documentation (3) Now that you can read the C# code examples in the Scripting reference, it's time to establish a logical approach to access the information it contains. Yes, reading the Unity Manual and at least glancing through the Reference Manual is a requirement. You may understand C#, but now you also have to know how to access the power in Unity, and C# is your key to unlocking that power. The Scripting Reference is only a good reference if you have a basic understanding of what you are looking for, and that knowledge comes from reading the manuals. 4 Advanced Scripting The easiest way to view Unity's documentation is to click on Help in Unity's menu bar.
- 5. Reading the Unity Reference Manual first This manual provides a general overview of the main features (classes) you will be accessing while writing your code. A lot of the terminology you need to know is here. At a minimum, read and absorb the terms used and become familiar with the class names in the sections on Physics Components, The GameObject, and Transform Component. You will need to know class names to use the Scripting Reference effectively. 5 Advanced Scripting
- 6. Finding code examples in the Scripting Reference as needed The Scripting Reference contains all the example code for each class. If you already know what you're looking for, then either do a search for the word or select it from the left panel. Since there are so many classes available, knowing beforehand what you need is what makes reading the Reference Manual a necessity. 6 Advanced Scripting
- 7. Setup the State Machine and add a Player GameObject We're going to use a State Machine to control the game, so let's get some ideas of what we want: • The State classes for the State Machine • The BeginState class, which is a splash screen displayed when the game starts • The SetupState class, which provides game options • The PlayState classes, which are two levels of gameplay • The WonState classes, which show a graphic and proceed to the next level • The LostState classes, which show a graphic, and replay the level or restart the game • A Player GameObject • A script to hold game data 7 Advanced Scripting
- 8. Scenes and States diagram The following Scenes and States diagram shows three Scenes and nine States that we'll use to control game flow: As you can see from this diagram, there are five more States and another Scene added to the project. We're almost starting fresh. Much of the code that was added in Developing the State Machine has been removed, and some new code has been added for this chapter. 8 Advanced Scripting
- 9. Time for action – setting up nine States and three Scenes We're going to modify some States and create some new ones. We're also going to use three Scenes. In Unity 1. Create three Scenes: Scene0, Scene1, and Scene2. 2. In the menu, open File | Build Settings.... 3. Add the three Scenes to Scenes in Build. 4. Temporarily add some GameObjects to Scene1 and Scene2 for testing. 5. Open Scene1 and add a Cube GameObject. 6. Open Scene2 and add two Sphere GameObjects. 7. Reload Scene0 8. Double-click on BeginState to edit 9 Advanced Scripting
- 10. Time for action – setting up nine States and three Scenes In Visual Studio (Code) 1. Edit the BeginState constructor method as follows to add an if statement for loading Scene0: public BeginState (StateManager managerRef) { manager = managerRef; if(Application.loadedLevelName != "Scene0") Application.LoadLevel("Scene0"); } 10 Advanced Scripting
- 11. Time for action – setting up nine States and three Scenes In Visual Studio (Code) 2. Make new C# classes for the new States. The following State Machine files: • The BeginState file • The SetupState file • The PlayStateScene1_1 file: (1 of 2 available States in Scene1) • The PlayStateScene1_2 file: (2 of 2 available States in Scene1) • The WonStateScene1 file • The LostStateScene1 file • The PlayStateScene2 file • The WonStateScene2 file • The LostStateScene2 file • The StateManager file • The IStateBase file 3. Verify that the StateManager script is attached to the GameManager GameObject 11 Advanced Scripting
- 12. The following is the code of the BeginState class: 12 Advanced Scripting
- 13. The following is the code of the SetupState class: 13 Advanced Scripting
- 14. The following is the code of the PlayStateScene 1_1: (1 of 2 available States in Scene1) class: 14 Advanced Scripting
- 15. The following is the code of the PlayStateScene 1_2: (2 of 2 available States in Scene1) class: 15 Advanced Scripting
- 16. The following is the code of the WonStateScene1 class: 16 Advanced Scripting
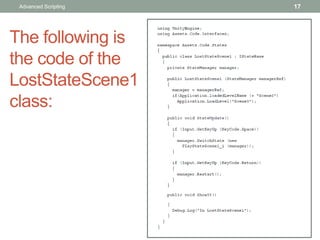
- 17. The following is the code of the LostStateScene1 class: 17 Advanced Scripting
- 18. The following is the code of the PlayStateScene2 class: 18 Advanced Scripting
- 19. The following is the code of the WonStateScene2 class: 19 Advanced Scripting
- 20. The following is the code of the LostStateScene2 class: 20 Advanced Scripting
- 21. The following is the code of the StateManager class: 21 Advanced Scripting
- 22. The following is the code of the IStateBase class: 22 Advanced Scripting
- 23. What just happened? You just created nine States that the game can be in. You also created three Scenes that the game will use, determined by the State the game is in. Notice the if statement added in step 9. How did I know about Application. loadedLevelName to be able to use it? I knew I wanted the States to control the loading of the Scenes, so how is a Scene loaded using code? I searched the Scripting Reference using terms like scene and load. It didn't actually show exactly what I wanted, but I did see things like Application.LoadLevelAdditive. That sounded like what I wanted to do, so I clicked it. That provided all kinds of links, but to find everything that's available, I needed to look at the class itself. Obviously, the class name is Application. 23 Advanced Scripting
- 24. What just happened? Reading that page showed me the variable loadedLevelName. This allows me to check if the Scene (level) I want is loaded. If not, then Application.LoadLevel() is called to load the Scene I want for that particular State. The following screenshot is a side-by-side view of the Project panel and the Inspector panel, showing StateManager as a Component of GameManager: 24 Advanced Scripting