Starting Raspberry Pi
Download as pptx, pdf0 likes1,372 views
The document provides a comprehensive guide on setting up and using a Raspberry Pi, including installation of the operating system, VNC setup, and Qt development environment. It outlines necessary hardware, installation steps for various operating systems, and configuration for serial port communications. Additionally, it includes references for further resources and tips for effective experimentation with the Raspberry Pi model B.
1 of 20
Downloaded 59 times


Ad
Recommended
How To Build A Computer
How To Build A Computeriamsoccer17 Putting together a computer involves screwing the motherboard, CPU, CPU fan, graphics card, and memory into the case, then adding the hard drive, CD/DVD drive, and power supply. All components are then plugged into the power supply and motherboard. Once assembled, the operating system installs with a few button presses, followed by installing drivers from the motherboard CD.
Building a Personal Computer: A detailed guide
Building a Personal Computer: A detailed guideAnand Prithviraj This document provides a comprehensive guide to building a personal computer, detailing necessary hardware components such as the cabinet, motherboard, processor, RAM, and video cards. It includes suggestions for compatible components and assembly instructions, with safety precautions for handling delicate parts. The document also emphasizes efficient usage based on individual needs, whether for office work, gaming, or video editing.
How to Build a Computer from Scratch.
How to Build a Computer from Scratch.Ron Edrote This document provides an overview of the steps for building a computer from scratch. It begins by explaining the benefits of custom building a PC and outlines three general categories for machine performance levels - low, middle, and high. It then describes the basic components that make up all computers, including the processor, motherboard, case, RAM, graphics card, hard drives, optical drive, and power supply. The document concludes by discussing important considerations for choosing each component when shopping and building a custom PC.
How to build a computer
How to build a computerjwongster This document provides instructions on how to build a basic computer. It outlines the key components needed which include a case, power supply, motherboard, processor, heat sink and fan, RAM, hard drive, optical disc drive, graphics card, modem, and sound card. The motherboard serves as the central component that hosts all the other hardware. Together, these parts allow the computer to power on, process commands, store and access data, display graphics, connect to the internet, and produce sound.
How to build a computer
How to build a computerUSA Discussion Group This document provides information on the key components needed to build a computer, including the case, power supply, motherboard, CPU, memory, video card, storage, and optical drive. It explains that the motherboard, CPU, and memory are the three most important components, with the motherboard requiring a compatible CPU socket and chipset. Brief definitions are given for each component, such as the motherboard serving as the main circuit board that connects other components, the CPU performing instructions, and memory storing programs and applications. The document recommends purchasing components from Newegg and concludes by thanking the reader for learning about how to build a computer.
Building a basic computer
Building a basic computerRobert Sand The document outlines the key components needed to build a basic computer, including the motherboard, central processing unit (CPU), random-access memory (RAM), hard disk drive, compact disk (CD) drive, graphics card, case and power supply, operating system, input devices, and monitor. The motherboard connects and controls all other components, and each requires specific types of CPU, RAM, graphics card, and power supply. Storage devices like hard drives and optical drives interface using standard connections and hold software and data for the computer.
Build Gaming PC Presentation
Build Gaming PC PresentationRith Jo This document provides a parts list and requirements for building a mid-range gaming PC. It includes the motherboard, CPU, RAM, graphics card, case, cooling fans, power supply, hard drive, optical drive, keyboard, mouse, monitor, and operating system. Pictures are included to show how to install the components. The total cost of the parts listed is $1286. The computer is designed specifically for gaming and to provide high performance.
Bm 170-android-2.1 r2e
Bm 170-android-2.1 r2edundunlost This document provides release notes for Android 2.1 on the BM-170 device. It describes the installation process, known issues, and hardware/software support in this pre-release version. The user should not use this software in production and it is intended for development, testing and demonstration only. Installation requires upgrading the SDGBoot bootloader if older than version 1283. The document outlines steps for reflashing the device and provides information on USB, WiFi, Bluetooth, and other functionality.
Hardware
Hardwarekaran saini This document provides instructions for installing Debian Linux on a computer. It describes the basic computer hardware components, how to set up the BIOS, create a Debian installation medium, and guide the user through the installation process. Key steps include setting the boot sequence in the BIOS to boot from the Debian installer, partitioning the disk during installation, configuring the network and time zone, creating a root and ordinary user, downloading packages from a network mirror, and installing the bootloader to make the system bootable.
Raymond Payne: How to Build a Computer - Hardware Basics
Raymond Payne: How to Build a Computer - Hardware BasicsRaymond Payne The document outlines the basic components needed to build a computer, including the CPU, motherboard, RAM, graphics card, hard drive, optical drive, case, and power supply. Each component's function and importance are described, highlighting considerations such as performance needs for different users like gamers and graphic designers. It also encourages consideration of additional features and personal preferences when assembling the computer.
Embedded_Linux_Booting
Embedded_Linux_BootingRashila Rr The embedded Linux boot process involves multiple stages beginning with ROM code that initializes hardware and loads the first stage bootloader, X-Loader. The X-Loader further initializes hardware and loads the second stage bootloader, U-Boot, which performs additional initialization and loads the Linux kernel. The kernel then initializes drivers and mounts the root filesystem to launch userspace processes. Booting can occur from flash memory, an eMMC/SD card, over a network using TFTP/NFS, or locally via UART/USB depending on the boot configuration and available devices.
Bootstrap process of u boot (NDS32 RISC CPU)
Bootstrap process of u boot (NDS32 RISC CPU)Macpaul Lin The bootstrap procedure of the u-boot bootloader involves:
1. Relocating the binary from flash/ROM to DRAM without adjustments through memory remapping.
2. Performing a general relocation of the binary in DRAM which involves adjusting addresses.
3. Initializing hardware and memory before jumping to the main initialization code.
Readme
ReadmeTealc1 This document provides release notes and documentation for Adrenaline v1.2.0, a multiplayer first-person shooter game. It includes sections on controls, chat commands, adding custom music, system requirements, frequently asked questions, credits, related websites, IRC support, and the license. The controls section outlines movement, weapon selection, chat, and other in-game controls. The chat commands section lists commands for changing teams, viewing stats, and other information. Custom music can be added by copying files to the music directory. System requirements and troubleshooting tips are also provided.
2.3
2.3Frya Lora This document provides step-by-step instructions for installing computer hardware components and peripherals. It begins with the disassembly process, explaining how to safely remove parts like the power supply, hard drive, memory and motherboard. It then describes the assembly process, covering preparation, installing the CPU, heat sink, memory and motherboard. Other steps include connecting the power supply, installing graphics/video cards, internal drives and add-in cards. The document concludes with connecting peripherals like the monitor, keyboard, mouse and network cable.
U-Boot Porting on New Hardware
U-Boot Porting on New HardwareRuggedBoardGroup The document provides a comprehensive guide on porting U-Boot for the RuggedBoard A5D2X, covering its architecture, code flow, compilation, and flashing processes. It also outlines embedded system classifications, the boot process of both a PC and the RuggedBoard, and includes detailed information on adding new commands and drivers in U-Boot. The guide emphasizes practical steps for development with additional resources for community support and future sessions on Linux kernel porting and Yocto BSP.
Aplus essentials-exam-cram
Aplus essentials-exam-cramPeter Sonko The document provides details about various components of a computer system including motherboard components, RAM types, CPU types, and BIOS settings. It discusses the purposes and properties of motherboard components such as CPU slot, RAM slots, expansion card slots, and ports. It also compares different RAM types such as SRAM, DRAM, SDRAM, DDR SDRAM, DDR2 SDRAM, and DDR3 SDRAM in terms of features and specifications. The document provides information about configuring and applying BIOS settings to change boot options, set passwords, and configure hardware settings.
Ps3 linux
Ps3 linuxKeith Wright This document provides instructions for installing and using Linux on a PlayStation 3 (PS3). It discusses preparing the hard drive, installing bootloaders like Kboot or Petitboot, choosing a Linux distribution like Fedora or Yellowdog, optimizing performance, and using PS3 features under Linux like the Cell processor and Blu-ray drive. Tips are provided for sound configuration, wireless networking, and media playback using tools like Mplayer or a Flash plugin.
Embedding Linux On The Encore Simputer
Embedding Linux On The Encore SimputerSatpal Parmar The document discusses porting the Linux kernel to run on the Encore Simputer, an ARM-based handheld device. It describes building the kernel from source, adding support for the Simputer's hardware including memory, display and peripherals. Finally, it mentions porting the 2.6 test kernel to the Simputer and thanks the audience.
Building
BuildingSatpal Parmar The document discusses building an embedded Linux system on a Samsung 2410 platform. It covers basic concepts like cross-development environments, developing on a host machine to target embedded devices. It also covers configuring and building the Linux kernel, creating a root filesystem with BusyBox utilities, setting up the boot process, and developing device drivers. The goal is to provide guidance on creating a custom embedded Linux system targeting specific hardware.
Device Tree for Dummies (ELC 2014)
Device Tree for Dummies (ELC 2014)Thomas Petazzoni This document provides a comprehensive overview of embedded Linux development, focusing on kernel and device tree usage. It details the transition from using ATAGs for hardware description to the adoption of device trees, emphasizing their structure, syntax, and implementation in booting processes. The content includes practical examples of device tree binding and organization, as well as best practices for developing and implementing device drivers.
Embedded Linux BSP Training (Intro)
Embedded Linux BSP Training (Intro)RuggedBoardGroup The document outlines an embedded Linux BSP training organized by YoctoTutor and RuggedBoard, covering various topics like embedded OS components, boot loaders, Linux kernel, and root file systems. It includes details on different embedded systems classifications, the boot process, and provides instructions for compiling U-Boot and Linux kernel for the RuggedBoard. Additionally, it discusses the use of various tools and libraries for programming and demonstrates the experience of the presenter, Vasu, in embedded technologies.
Hw notes- aim Technologies
Hw notes- aim TechnologiesSayyed Abdul Rahman The document provides information about organizing an ESDP (Enterprise Skill Development Program) on computer hardware maintenance and networking from August 27th to October 8th 2014 in Kakinada, India. It then discusses the main hardware components of a computer including the system unit, motherboard, CPU, RAM, expansion cards, storage devices, optical drives, sound cards, and network interface cards.
UNIT 2 P1
UNIT 2 P1OriginalGSM The document discusses the specifications of a CYBERPOWER POWER MEGA PRO 3000 3D computer. It describes the CPU as an Intel Xeon E5-2690 Eight-Core 2.90GHz processor. It has 64GB of DDR3 RAM and a 1TB Samsung 840 EVO solid state drive for storage. The document explains the functions of the CPU, storage, and memory in processing and temporarily storing files to speed up the computer. It also summarizes the functions of various components of a typical computer motherboard.
Computer systems|Computer Networking & Communication System Assignment - Netw...
Computer systems|Computer Networking & Communication System Assignment - Netw...freeassignmenthelp The document outlines the process of selecting computer components based on intended use, such as building a server, gaming PC, office PC, or home PC. It emphasizes the importance of component compatibility and provides specifications for vital parts, including motherboards, CPUs, RAM, and storage devices. Additionally, the document discusses routine maintenance, testing plans, and the significance of researching various brands before making component choices.
Intrack14dec tips tricks_clean
Intrack14dec tips tricks_cleanchinitooo This document provides tips and tricks for optimizing disk space usage in Virtual PC 2004 virtual machines. It discusses four relevant disk size metrics: maximum capacity, used size, current file size, and compressed file size. It recommends deleting unnecessary files from the virtual machine that are leftovers from installation, only needed temporarily, or applicable cache files to reduce the used disk size. Specific file examples are provided such as emptying the DLL cache folder and deleting Windows service pack files.
Linux Device Driver parallelism using SMP and Kernel Pre-emption
Linux Device Driver parallelism using SMP and Kernel Pre-emptionHemanth Venkatesh The document discusses driver parallelism in Linux, emphasizing the concepts of concurrency and parallelism, kernel pre-emption, and SMP architecture. It explores the challenges of maintaining cache coherency and atomic operations in multiprocessor systems along with the design considerations for USB subsystems. Ultimately, it highlights the importance of effective locking mechanisms to enhance performance and avoid race conditions in driver development.
Dx diag
Dx diagDuvan Pinzón The system report summarizes the hardware and software configuration of a Windows XP system. It includes details about the processor, memory, graphics card, sound devices, and installed drivers. A Nvidia GeForce 9400 GT graphics card and Realtek audio devices are listed. The system has 2 GB of RAM and is running Windows XP SP3 in Spanish.
Tac Presentation October 72014- Raspberry PI
Tac Presentation October 72014- Raspberry PICliff Samuels Jr. The document provides an overview of low-cost computing using platforms like Raspberry Pi and Arduino, detailing their specifications and applications. It outlines the activities performed by the Technology and Automation Committee, such as workshops, training, and community service projects. Additionally, it includes setup instructions and potential projects for these single-board computers.
Beagle board101 esc-boston-2009b
Beagle board101 esc-boston-2009bMichael Hallak-Stamler - The document provides an overview of the Beagle Board, including its features, community, and typical uses. It discusses booting the board and describes the five phases of the boot process from the ROM loading the bootloader to the kernel loading the root file system. Examples of community projects using the board are also listed.
101 1.1 hardware settings
101 1.1 hardware settingsAcácio Oliveira This document provides information about the objectives for a Junior Level Linux Certification exam, with a focus on determining and configuring hardware settings. It discusses key areas like enabling/disabling peripherals, configuring systems with or without external devices, differentiating mass storage types, and setting correct hardware IDs. It also covers tools for listing hardware information like lsusb and lspci, and concepts around sysfs, udev, hald and dbus.
More Related Content
What's hot (19)
Hardware
Hardwarekaran saini This document provides instructions for installing Debian Linux on a computer. It describes the basic computer hardware components, how to set up the BIOS, create a Debian installation medium, and guide the user through the installation process. Key steps include setting the boot sequence in the BIOS to boot from the Debian installer, partitioning the disk during installation, configuring the network and time zone, creating a root and ordinary user, downloading packages from a network mirror, and installing the bootloader to make the system bootable.
Raymond Payne: How to Build a Computer - Hardware Basics
Raymond Payne: How to Build a Computer - Hardware BasicsRaymond Payne The document outlines the basic components needed to build a computer, including the CPU, motherboard, RAM, graphics card, hard drive, optical drive, case, and power supply. Each component's function and importance are described, highlighting considerations such as performance needs for different users like gamers and graphic designers. It also encourages consideration of additional features and personal preferences when assembling the computer.
Embedded_Linux_Booting
Embedded_Linux_BootingRashila Rr The embedded Linux boot process involves multiple stages beginning with ROM code that initializes hardware and loads the first stage bootloader, X-Loader. The X-Loader further initializes hardware and loads the second stage bootloader, U-Boot, which performs additional initialization and loads the Linux kernel. The kernel then initializes drivers and mounts the root filesystem to launch userspace processes. Booting can occur from flash memory, an eMMC/SD card, over a network using TFTP/NFS, or locally via UART/USB depending on the boot configuration and available devices.
Bootstrap process of u boot (NDS32 RISC CPU)
Bootstrap process of u boot (NDS32 RISC CPU)Macpaul Lin The bootstrap procedure of the u-boot bootloader involves:
1. Relocating the binary from flash/ROM to DRAM without adjustments through memory remapping.
2. Performing a general relocation of the binary in DRAM which involves adjusting addresses.
3. Initializing hardware and memory before jumping to the main initialization code.
Readme
ReadmeTealc1 This document provides release notes and documentation for Adrenaline v1.2.0, a multiplayer first-person shooter game. It includes sections on controls, chat commands, adding custom music, system requirements, frequently asked questions, credits, related websites, IRC support, and the license. The controls section outlines movement, weapon selection, chat, and other in-game controls. The chat commands section lists commands for changing teams, viewing stats, and other information. Custom music can be added by copying files to the music directory. System requirements and troubleshooting tips are also provided.
2.3
2.3Frya Lora This document provides step-by-step instructions for installing computer hardware components and peripherals. It begins with the disassembly process, explaining how to safely remove parts like the power supply, hard drive, memory and motherboard. It then describes the assembly process, covering preparation, installing the CPU, heat sink, memory and motherboard. Other steps include connecting the power supply, installing graphics/video cards, internal drives and add-in cards. The document concludes with connecting peripherals like the monitor, keyboard, mouse and network cable.
U-Boot Porting on New Hardware
U-Boot Porting on New HardwareRuggedBoardGroup The document provides a comprehensive guide on porting U-Boot for the RuggedBoard A5D2X, covering its architecture, code flow, compilation, and flashing processes. It also outlines embedded system classifications, the boot process of both a PC and the RuggedBoard, and includes detailed information on adding new commands and drivers in U-Boot. The guide emphasizes practical steps for development with additional resources for community support and future sessions on Linux kernel porting and Yocto BSP.
Aplus essentials-exam-cram
Aplus essentials-exam-cramPeter Sonko The document provides details about various components of a computer system including motherboard components, RAM types, CPU types, and BIOS settings. It discusses the purposes and properties of motherboard components such as CPU slot, RAM slots, expansion card slots, and ports. It also compares different RAM types such as SRAM, DRAM, SDRAM, DDR SDRAM, DDR2 SDRAM, and DDR3 SDRAM in terms of features and specifications. The document provides information about configuring and applying BIOS settings to change boot options, set passwords, and configure hardware settings.
Ps3 linux
Ps3 linuxKeith Wright This document provides instructions for installing and using Linux on a PlayStation 3 (PS3). It discusses preparing the hard drive, installing bootloaders like Kboot or Petitboot, choosing a Linux distribution like Fedora or Yellowdog, optimizing performance, and using PS3 features under Linux like the Cell processor and Blu-ray drive. Tips are provided for sound configuration, wireless networking, and media playback using tools like Mplayer or a Flash plugin.
Embedding Linux On The Encore Simputer
Embedding Linux On The Encore SimputerSatpal Parmar The document discusses porting the Linux kernel to run on the Encore Simputer, an ARM-based handheld device. It describes building the kernel from source, adding support for the Simputer's hardware including memory, display and peripherals. Finally, it mentions porting the 2.6 test kernel to the Simputer and thanks the audience.
Building
BuildingSatpal Parmar The document discusses building an embedded Linux system on a Samsung 2410 platform. It covers basic concepts like cross-development environments, developing on a host machine to target embedded devices. It also covers configuring and building the Linux kernel, creating a root filesystem with BusyBox utilities, setting up the boot process, and developing device drivers. The goal is to provide guidance on creating a custom embedded Linux system targeting specific hardware.
Device Tree for Dummies (ELC 2014)
Device Tree for Dummies (ELC 2014)Thomas Petazzoni This document provides a comprehensive overview of embedded Linux development, focusing on kernel and device tree usage. It details the transition from using ATAGs for hardware description to the adoption of device trees, emphasizing their structure, syntax, and implementation in booting processes. The content includes practical examples of device tree binding and organization, as well as best practices for developing and implementing device drivers.
Embedded Linux BSP Training (Intro)
Embedded Linux BSP Training (Intro)RuggedBoardGroup The document outlines an embedded Linux BSP training organized by YoctoTutor and RuggedBoard, covering various topics like embedded OS components, boot loaders, Linux kernel, and root file systems. It includes details on different embedded systems classifications, the boot process, and provides instructions for compiling U-Boot and Linux kernel for the RuggedBoard. Additionally, it discusses the use of various tools and libraries for programming and demonstrates the experience of the presenter, Vasu, in embedded technologies.
Hw notes- aim Technologies
Hw notes- aim TechnologiesSayyed Abdul Rahman The document provides information about organizing an ESDP (Enterprise Skill Development Program) on computer hardware maintenance and networking from August 27th to October 8th 2014 in Kakinada, India. It then discusses the main hardware components of a computer including the system unit, motherboard, CPU, RAM, expansion cards, storage devices, optical drives, sound cards, and network interface cards.
UNIT 2 P1
UNIT 2 P1OriginalGSM The document discusses the specifications of a CYBERPOWER POWER MEGA PRO 3000 3D computer. It describes the CPU as an Intel Xeon E5-2690 Eight-Core 2.90GHz processor. It has 64GB of DDR3 RAM and a 1TB Samsung 840 EVO solid state drive for storage. The document explains the functions of the CPU, storage, and memory in processing and temporarily storing files to speed up the computer. It also summarizes the functions of various components of a typical computer motherboard.
Computer systems|Computer Networking & Communication System Assignment - Netw...
Computer systems|Computer Networking & Communication System Assignment - Netw...freeassignmenthelp The document outlines the process of selecting computer components based on intended use, such as building a server, gaming PC, office PC, or home PC. It emphasizes the importance of component compatibility and provides specifications for vital parts, including motherboards, CPUs, RAM, and storage devices. Additionally, the document discusses routine maintenance, testing plans, and the significance of researching various brands before making component choices.
Intrack14dec tips tricks_clean
Intrack14dec tips tricks_cleanchinitooo This document provides tips and tricks for optimizing disk space usage in Virtual PC 2004 virtual machines. It discusses four relevant disk size metrics: maximum capacity, used size, current file size, and compressed file size. It recommends deleting unnecessary files from the virtual machine that are leftovers from installation, only needed temporarily, or applicable cache files to reduce the used disk size. Specific file examples are provided such as emptying the DLL cache folder and deleting Windows service pack files.
Linux Device Driver parallelism using SMP and Kernel Pre-emption
Linux Device Driver parallelism using SMP and Kernel Pre-emptionHemanth Venkatesh The document discusses driver parallelism in Linux, emphasizing the concepts of concurrency and parallelism, kernel pre-emption, and SMP architecture. It explores the challenges of maintaining cache coherency and atomic operations in multiprocessor systems along with the design considerations for USB subsystems. Ultimately, it highlights the importance of effective locking mechanisms to enhance performance and avoid race conditions in driver development.
Dx diag
Dx diagDuvan Pinzón The system report summarizes the hardware and software configuration of a Windows XP system. It includes details about the processor, memory, graphics card, sound devices, and installed drivers. A Nvidia GeForce 9400 GT graphics card and Realtek audio devices are listed. The system has 2 GB of RAM and is running Windows XP SP3 in Spanish.
Similar to Starting Raspberry Pi (20)
Tac Presentation October 72014- Raspberry PI
Tac Presentation October 72014- Raspberry PICliff Samuels Jr. The document provides an overview of low-cost computing using platforms like Raspberry Pi and Arduino, detailing their specifications and applications. It outlines the activities performed by the Technology and Automation Committee, such as workshops, training, and community service projects. Additionally, it includes setup instructions and potential projects for these single-board computers.
Beagle board101 esc-boston-2009b
Beagle board101 esc-boston-2009bMichael Hallak-Stamler - The document provides an overview of the Beagle Board, including its features, community, and typical uses. It discusses booting the board and describes the five phases of the boot process from the ROM loading the bootloader to the kernel loading the root file system. Examples of community projects using the board are also listed.
101 1.1 hardware settings
101 1.1 hardware settingsAcácio Oliveira This document provides information about the objectives for a Junior Level Linux Certification exam, with a focus on determining and configuring hardware settings. It discusses key areas like enabling/disabling peripherals, configuring systems with or without external devices, differentiating mass storage types, and setting correct hardware IDs. It also covers tools for listing hardware information like lsusb and lspci, and concepts around sysfs, udev, hald and dbus.
computer archtecture lab, computer hardware , problem and solutons in computer
computer archtecture lab, computer hardware , problem and solutons in computerGS Kosta The document provides details about a Computer Hardware and Maintenance lab course, including:
- 11 required experiments that students must complete, such as assembling a PC, installing operating systems, hardware/software troubleshooting.
- Tasks for students to complete in the lab including identifying PC components, assembling/disassembling a PC, installing various operating systems, completing basic Linux commands and system administration tasks, and hardware/software troubleshooting.
- A list of recommended equipment for the lab including a computer hardware trainer, old computing systems, and examples of antique computer components.
ChromePad - Chromium OS for ThinkPad
ChromePad - Chromium OS for ThinkPadAndrewWright224 This document is a comprehensive guide on installing and configuring Chromium OS on a ThinkPad X220, detailing the hardware and software requirements, including the need for Coreboot to enhance performance. It emphasizes the advantages of open-source Chromium OS for Android development over Chrome OS, alongside instructions for upgrades and modifications to the X220 laptop. Key topics covered include hardware compatibility, detailed installation instructions, and configuration processes for both Coreboot and BeagleBone Black.
ChromePad - Chromium OS ThinkPad X220
ChromePad - Chromium OS ThinkPad X220AndrewWright224 The document is a comprehensive guide for installing and upgrading Chromium OS on a Lenovo ThinkPad X220, primarily for Android development. It details the process of setting up hardware upgrades, installing Coreboot for improved performance, and configuring various system settings to enhance the experience. The guide also includes specific requirements, instructions, and links to resources necessary for successfully modifying the ThinkPad X220.
Raspi_TOR_Access_Point_BenMoore
Raspi_TOR_Access_Point_BenMooreBenjamin Moore This document provides instructions for creating a wireless access point on a Raspberry Pi that routes all internet traffic through the TOR anonymity network. It involves installing an operating system on the Pi, configuring software like hostapd and dhcpd, and setting up network address translation. The access point is given a static IP and broadcasts an SSID of "TEC383" with WPA2 encryption. All configurations are saved so the access point will restart automatically with these settings.
Lab Handson: Power your Creations with Intel Edison!
Lab Handson: Power your Creations with Intel Edison!Codemotion The document provides a comprehensive overview of the Intel IoT Developer Kit, detailing its components, including the Intel Edison and Galileo boards. It outlines the setup process, developer environments, programming languages, and resources available for creating IoT applications. Additionally, it emphasizes the importance of the IoT platform for innovators looking to prototype and produce wearable computing products.
Raspberry with laptop
Raspberry with laptopProf Kingstan The document provides instructions for using a laptop as an output display and input device for a Raspberry Pi board. It explains how to connect the Raspberry Pi and laptop to the same network, find the IP addresses, use Putty and Xming software to enable remote desktop functionality from the laptop, and provides startup and shutdown commands.
Getting started with Intel IoT Developer Kit
Getting started with Intel IoT Developer KitSulamita Garcia This document provides an overview of setting up an Intel IoT Developer Kit including the hardware components, installing software, and running sample codes. It discusses the Galileo and Edison boards, microSD cards, IDEs, MRAA and UPM libraries, and connecting devices. It also demonstrates how to set up environments for C/C++ with Eclipse, JavaScript with XDK, and Arduino, and describes where to find documentation and sample codes for getting started with the kits and sensors.
Presentation on Computer Peripheral by Atharva Jawalkar
Presentation on Computer Peripheral by Atharva JawalkarAtharva Jawalkar The document provides a comprehensive overview of various computer hardware components including keyboards, mice, motherboards, CPUs, and more. It highlights their functions, types, troubleshooting tips, and connections used in systems, touching on peripherals such as printers, scanners, and storage devices like HDDs and SSDs. Additionally, it outlines basic operational principles for components like BIOS, RAM, and graphics cards, along with their installation and maintenance instructions.
Raspberry pi technical documentation
Raspberry pi technical documentationGR Techno Solutions This document provides instructions for setting up and accessing a Raspberry Pi without a monitor or keyboard. It outlines downloading and writing the Raspbian OS image to an SD card using Win32DiskImager. It then explains how to use Advanced IP Scanner or the router's configuration page to find the Raspberry Pi's IP address after connecting it to the network via Ethernet. Finally, it describes establishing an SSH connection to the Raspberry Pi using PuTTY on a PC or the Terminal on a Mac to access the command prompt remotely for initial setup and configuration without needing a monitor or keyboard attached to the Raspberry Pi itself.
Hardware hacking
Hardware hackingTavish Naruka The document discusses hardware hacking and embedded systems, focusing on protocols like RS-232, SPI, and I2C. It includes techniques for sniffing and interfacing with USB devices, hardware hacks, and examples of projects involving microcontrollers and routers. The summary emphasizes the use of standard communication protocols, tools, and libraries for software/system design in electronics.
How to Hack Edison
How to Hack EdisonShotaro Uchida The document provides an overview and introduction to using the Intel Edison board, including what Edison is, how to power it up and boot it, connecting to WiFi using ConnMan, getting started with Yocto to build a custom Linux image, and connecting hardware like GPIO. Key topics covered include using MRAA to control GPIO pins from code, booting processes involving the boot ROM and U-Boot, and recommendations to use the mini breakout board or buy from Fry's for beginners.
Feature satip4
Feature satip4TELE-satellite fra 1. The document describes how to set up a self-made IPTV system using inexpensive hardware like a Raspberry Pi.
2. A Raspberry Pi board running XBMC software can be used as an IPTV receiver and connected to a TV to receive streaming video channels.
3. TSReader Pro software on a PC is used to receive TV signals, demux channels, and stream them over the network to be displayed on the Raspberry Pi IPTV receiver.
Raspberry Pi tutorial
Raspberry Pi tutorial艾鍗科技 The document serves as a tutorial on Raspberry Pi, covering its hardware specifications, software architecture, boot process, and embedded Linux components. It provides detailed instructions on setting up the operating system, utilizing various drivers, and configuring the system for specific tasks, including i2c communication and OS backup. Additionally, it includes links for further information and resources related to Raspberry Pi programming and management.
Computer Systems Servicing COC1-COC2
Computer Systems Servicing COC1-COC2melody77776 This document provides instructions for creating a multiboot USB drive using Yumi and Qemu. It describes installing Windows XP and 7 ISOs using Yumi, selecting "Try an Unlisted ISO" rather than the listed Windows options. All ISOs are installed to subdirectories rather than the root. Qemu is used to test the drive before customizing the boot menu descriptions and background. Ensuring the drive boots as expected in Qemu validates the installation process before finalizing the multiboot configuration.
Feature satip4
Feature satip4TELE-satellite bul The document describes how to set up a basic home IPTV system using inexpensive hardware. A Raspberry Pi small computer is used as the IPTV receiver and connected to a TV. A PC with a digital TV tuner card and TSReader Pro software is used as the IPTV server to receive and stream channels over the home network. The TSReader Pro software demuxes the TV channels and streams each one to a different port. An M3U playlist file lists the IP addresses and ports so that the Raspberry Pi running XBMC media software can access and display the streamed channels as an IPTV service.
Feature satip4
Feature satip4TELE-satellite ned 1. The document describes how to set up a simple home IPTV network using a Raspberry Pi as the receiver and TSReader Pro software on a PC to stream TV channels over the network.
2. Key components needed include a Raspberry Pi board, SD card, power supply, keyboard/mouse, and MPEG2 license key. XBMC media software is loaded onto the Raspberry Pi to display streamed IPTV channels.
3. TSReader Pro runs on the PC and uses its demuxing function to separate channels from the transport stream and stream each individually over the network. This allows multiple channels to be viewed on the Raspberry Pi using XBMC without being limited to just one channel.
Feature satip4
Feature satip4TELE-satellite esp The document discusses setting up a homemade IPTV system using a Raspberry Pi. Key points:
- A Raspberry Pi is a small, inexpensive computer that can be used as an IPTV receiver and turned any TV into a media center using XBMC software.
- To set up IPTV, a PC is used as the server with a digital TV receiver and TSReader Pro to receive streams and send to the network. A Raspberry Pi connected to a TV receives the streams via the network.
- The Raspberry Pi needs MPEG2 and other licenses purchased separately to properly decode video formats, which are entered into a configuration file on the SD card.
- With TSReader Pro, received
Ad
More from LloydMoore (14)
Chosing The Right Language for your project
Chosing The Right Language for your projectLloydMoore When starting a new software project the language chosen can be key to the success or failure of the project. Often times the language that gets chosen gets little to no attention, and the “default” language of the individual or group gets used.
We are not going to look at any specific programming language; we are going to walk through a list of language properties that can inform the choice of a programming language for a specific project.
The goal of this talk is to get you to think of a programming language as a set of features and properties, then match those properties to the task at hand to choose the programming language.
Cuda Without a Phd - A practical guick start
Cuda Without a Phd - A practical guick startLloydMoore This document provides an overview of CUDA, NVIDIA's framework for developing applications on GPU hardware, emphasizing the benefits of using GPU for massively parallel processing. It outlines the architecture of GPUs compared to CPUs, explains the setup required for CUDA, and presents a simple example of computing the hypotenuse of triangles using both CPU and GPU implementations. The document also touches on kernel execution, debugging techniques, and additional resources for further learning in CUDA development.
Less Magical Numbers - A coding standard proposal
Less Magical Numbers - A coding standard proposalLloydMoore This document discusses improving the use of constants or "magic numbers" in code by providing more context and traceability information. It recommends adding comments to constants to indicate where values come from, required precision levels, and any associated requirements documentation. This helps make numbers less arbitrary and prevents issues like a project that failed verification when a constant had inconsistent precision between software components, taking a month to resolve. More transparent handling of constants can prevent problems and make code more self-documenting.
Debugging Intermittent Issues - A How To
Debugging Intermittent Issues - A How ToLloydMoore The document addresses the challenges of debugging intermittent issues in software, emphasizing the need for establishing a controlled baseline to manage variables affecting outcomes. It discusses the importance of statistics in evaluating baseline failure rates and the necessity of running multiple trials to identify if issues are resolved. Additionally, it highlights the potential for multi-causal problems, suggesting that each issue may need separate investigation to fully understand and address the failures.
Successful Software Projects - What you need to consider
Successful Software Projects - What you need to considerLloydMoore The document outlines the components of successful software projects, emphasizing the importance of various stages such as planning, construction, verification, validation, and hardening. It discusses critical activities such as defining project requirements, conducting code reviews, performing integration tests, and implementing security measures. Ultimately, it stresses the need for careful selection of activities based on project needs and the necessity of creating a comprehensive budget before project initiation.
A Slice Of Rust - A quick look at the Rust programming language
A Slice Of Rust - A quick look at the Rust programming languageLloydMoore The document provides an overview of key aspects of Rust programming, including its development environment, coding style, language evolution, and unique features such as the borrow checker and macro systems. It highlights the differences from C++, such as Rust's emphasis on idiomatic code and composition over inheritance, as well as its efficient compile-time checks. Additionally, it discusses the importance of crates.io for package management and explores the efficiency of Rust's match statements compared to C++.
What Have We Lost - A look at some historical techniques
What Have We Lost - A look at some historical techniquesLloydMoore The document discusses various simpler software development techniques that have been overshadowed by modern approaches. It covers topics such as link time overlays, CSV file formats, simple serial protocols, and bare metal coding, highlighting their advantages and disadvantages. The content serves as a review for developers, encouraging a return to some of these effective but often overlooked methods.
Raspberry pi robotics
Raspberry pi roboticsLloydMoore The document discusses the advantages and limitations of the Raspberry Pi as a development platform, detailing its specifications and addressing its shortcomings. It introduces the rpi-dev motor controller and its enhancements, providing a flexible solution for real-time applications by integrating with the PSoC ecosystem. Additionally, the document outlines open-source resources and sample code to support development projects using the Raspberry Pi and PSoC board.
High Reliabilty Systems
High Reliabilty SystemsLloydMoore This presentation discusses practices and techniques for improving software reliability without adhering strictly to formal guidelines. It covers causes of failures, recommended coding practices, watchdog timers, memory management, and error handling. Key strategies include ensuring thorough testing, establishing proper validation boundaries, and employing safe coding practices to mitigate risks from environmental factors.
Real Time Debugging - What to do when a breakpoint just won't do
Real Time Debugging - What to do when a breakpoint just won't doLloydMoore The document presents a detailed overview of real-time debugging techniques, categorizing real-time conditions into soft and hard real-time requirements and discussing the implications of using various debugging methods such as breakpoints, printf(), memory buffers, and more advanced tools like protocol analyzers and logic analyzers. It emphasizes the complexities involved in debugging real-time systems, particularly due to interruptions in processes, and recommends practices such as designing for test, utilizing the appropriate tools, and adopting a holistic approach to problem-solving. Key takeaways include the necessity for additional hardware in hard real-time scenarios, the importance of system design for debugging, and the use of statistical methods to validate fixes.
PSoC USB HID
PSoC USB HIDLloydMoore The document provides an overview of USB protocols, covering aspects such as USB classes, endpoints, transfer types, and enumeration. It details an example project to configure a PSoC device to communicate with a PC as a joystick, including hardware and software configurations. Additional resources and contact information for further queries are also included.
Using PSoC Creator
Using PSoC CreatorLloydMoore The document discusses the use of PSoC Creator IDE for developing hardware and software for robotics projects, focusing on prebuilt components and a bubble level project using a 3-axis accelerometer. It details the capabilities of the PSoC processor and its programming features, including a schematic capture tool and a comprehensive API. Additional resources and contact information for further inquiries are also provided.
Using the Cypress PSoC Processor
Using the Cypress PSoC ProcessorLloydMoore The document provides an overview of the Cypress PSoC (Programmable Systems on Chip) processors, focusing on the PSoC 3 and PSoC 5 models, which integrate programmable analog and digital functionalities with traditional processing cores. It outlines the key features, advantages, development tools, and best practices for utilizing these processors in various applications, particularly in robotics. Additional resources and contact information are also provided for further assistance.
C for Microcontrollers
C for MicrocontrollersLloydMoore This document discusses optimization techniques for programming microcontrollers, emphasizing the importance of understanding hardware and compiler options. It highlights strategies for memory usage, code structure, and power management in resource-constrained environments. The presentation aims to guide developers in making informed decisions to improve efficiency while potentially sacrificing maintainability.
Ad
Recently uploaded (20)
Mastering AI Workflows with FME - Peak of Data & AI 2025
Mastering AI Workflows with FME - Peak of Data & AI 2025Safe Software Harness the full potential of AI with FME: From creating high-quality training data to optimizing models and utilizing results, FME supports every step of your AI workflow. Seamlessly integrate a wide range of models, including those for data enhancement, forecasting, image and object recognition, and large language models. Customize AI models to meet your exact needs with FME’s powerful tools for training, optimization, and seamless integration
Viral>Wondershare Filmora 14.5.18.12900 Crack Free Download
Viral>Wondershare Filmora 14.5.18.12900 Crack Free DownloadPuppy jhon ➡ 🌍📱👉COPY & PASTE LINK👉👉👉 ➤ ➤➤ https://drfiles.net/
Wondershare Filmora Crack is a user-friendly video editing software designed for both beginners and experienced users.
FIDO Seminar: Targeting Trust: The Future of Identity in the Workforce.pptx
FIDO Seminar: Targeting Trust: The Future of Identity in the Workforce.pptxFIDO Alliance FIDO Seminar: Targeting Trust: The Future of Identity in the Workforce
Providing an OGC API Processes REST Interface for FME Flow
Providing an OGC API Processes REST Interface for FME FlowSafe Software This presentation will showcase an adapter for FME Flow that provides REST endpoints for FME Workspaces following the OGC API Processes specification. The implementation delivers robust, user-friendly API endpoints, including standardized methods for parameter provision. Additionally, it enhances security and user management by supporting OAuth2 authentication. Join us to discover how these advancements can elevate your enterprise integration workflows and ensure seamless, secure interactions with FME Flow.
Data Validation and System Interoperability
Data Validation and System InteroperabilitySafe Software A non-profit human services agency with specialized health record and billing systems. Challenges solved include access control integrations from employee electronic HR records, multiple regulations compliance, data migrations, benefits enrollments, payroll processing, and automated reporting for business intelligence and analysis.
Your startup on AWS - How to architect and maintain a Lean and Mean account J...
Your startup on AWS - How to architect and maintain a Lean and Mean account J...angelo60207 Prevent infrastructure costs from becoming a significant line item on your startup’s budget! Serial entrepreneur and software architect Angelo Mandato will share his experience with AWS Activate (startup credits from AWS) and knowledge on how to architect a lean and mean AWS account ideal for budget minded and bootstrapped startups. In this session you will learn how to manage a production ready AWS account capable of scaling as your startup grows for less than $100/month before credits. We will discuss AWS Budgets, Cost Explorer, architect priorities, and the importance of having flexible, optimized Infrastructure as Code. We will wrap everything up discussing opportunities where to save with AWS services such as S3, EC2, Load Balancers, Lambda Functions, RDS, and many others.
Down the Rabbit Hole – Solving 5 Training Roadblocks
Down the Rabbit Hole – Solving 5 Training RoadblocksRustici Software Feeling stuck in the Matrix of your training technologies? You’re not alone. Managing your training catalog, wrangling LMSs and delivering content across different tools and audiences can feel like dodging digital bullets. At some point, you hit a fork in the road: Keep patching things up as issues pop up… or follow the rabbit hole to the root of the problems.
Good news, we’ve already been down that rabbit hole. Peter Overton and Cameron Gray of Rustici Software are here to share what we found. In this webinar, we’ll break down 5 training roadblocks in delivery and management and show you how they’re easier to fix than you might think.
Scaling GenAI Inference From Prototype to Production: Real-World Lessons in S...
Scaling GenAI Inference From Prototype to Production: Real-World Lessons in S...Anish Kumar Presented by: Anish Kumar
LinkedIn: https://www.linkedin.com/in/anishkumar/
This lightning talk dives into real-world GenAI projects that scaled from prototype to production using Databricks’ fully managed tools. Facing cost and time constraints, we leveraged four key Databricks features—Workflows, Model Serving, Serverless Compute, and Notebooks—to build an AI inference pipeline processing millions of documents (text and audiobooks).
This approach enables rapid experimentation, easy tuning of GenAI prompts and compute settings, seamless data iteration and efficient quality testing—allowing Data Scientists and Engineers to collaborate effectively. Learn how to design modular, parameterized notebooks that run concurrently, manage dependencies and accelerate AI-driven insights.
Whether you're optimizing AI inference, automating complex data workflows or architecting next-gen serverless AI systems, this session delivers actionable strategies to maximize performance while keeping costs low.
Bridging the divide: A conversation on tariffs today in the book industry - T...
Bridging the divide: A conversation on tariffs today in the book industry - T...BookNet Canada A collaboration-focused conversation on the recently imposed US and Canadian tariffs where speakers shared insights into the current legislative landscape, ongoing advocacy efforts, and recommended next steps. This event was presented in partnership with the Book Industry Study Group.
Link to accompanying resource: https://bnctechforum.ca/sessions/bridging-the-divide-a-conversation-on-tariffs-today-in-the-book-industry/
Presented by BookNet Canada and the Book Industry Study Group on May 29, 2025 with support from the Department of Canadian Heritage.
Introduction to Typescript - GDG On Campus EUE
Introduction to Typescript - GDG On Campus EUEGoogle Developer Group On Campus European Universities in Egypt Interested in leveling up your JavaScript skills? Join us for our Introduction to TypeScript workshop.
Learn how TypeScript can improve your code with dynamic typing, better tooling, and cleaner architecture. Whether you're a beginner or have some experience with JavaScript, this session will give you a solid foundation in TypeScript and how to integrate it into your projects.
Workshop content:
- What is TypeScript?
- What is the problem with JavaScript?
- Why TypeScript is the solution
- Coding demo
Crypto Super 500 - 14th Report - June2025.pdf
Crypto Super 500 - 14th Report - June2025.pdfStephen Perrenod This OrionX's 14th semi-annual report on the state of the cryptocurrency mining market. The report focuses on Proof-of-Work cryptocurrencies since those use substantial supercomputer power to mint new coins and encode transactions on their blockchains. Only two make the cut this time, Bitcoin with $18 billion of annual economic value produced and Dogecoin with $1 billion. Bitcoin has now reached the Zettascale with typical hash rates of 0.9 Zettahashes per second. Bitcoin is powered by the world's largest decentralized supercomputer in a continuous winner take all lottery incentive network.
Agentic AI: Beyond the Buzz- LangGraph Studio V2
Agentic AI: Beyond the Buzz- LangGraph Studio V2Shashikant Jagtap Presentation given at the LangChain community meetup London
https://lu.ma/9d5fntgj
Coveres
Agentic AI: Beyond the Buzz
Introduction to AI Agent and Agentic AI
Agent Use case and stats
Introduction to LangGraph
Build agent with LangGraph Studio V2
FIDO Seminar: Authentication for a Billion Consumers - Amazon.pptx
FIDO Seminar: Authentication for a Billion Consumers - Amazon.pptxFIDO Alliance FIDO Seminar: Authentication for a Billion Consumers - Amazon
“From Enterprise to Makers: Driving Vision AI Innovation at the Extreme Edge,...
“From Enterprise to Makers: Driving Vision AI Innovation at the Extreme Edge,...Edge AI and Vision Alliance For the full video of this presentation, please visit: https://www.edge-ai-vision.com/2025/06/from-enterprise-to-makers-driving-vision-ai-innovation-at-the-extreme-edge-a-presentation-from-sony-semiconductor-solutions/
Amir Servi, Edge Deep Learning Product Manager at Sony Semiconductor Solutions, presents the “From Enterprise to Makers: Driving Vision AI Innovation at the Extreme Edge” tutorial at the May 2025 Embedded Vision Summit.
Sony’s unique integrated sensor-processor technology is enabling ultra-efficient intelligence directly at the image source, transforming vision AI for enterprises and developers alike. In this presentation, Servi showcases how the AITRIOS platform simplifies vision AI for enterprises with tools for large-scale deployments and model management.
Servi also highlights his company’s collaboration with Ultralytics and Raspberry Pi, which brings YOLO models to the developer community, empowering grassroots innovation. Whether you’re scaling vision AI for industry or experimenting with cutting-edge tools, this presentation will demonstrate how Sony is accelerating high-performance, energy-efficient vision AI for all.
FME for Good: Integrating Multiple Data Sources with APIs to Support Local Ch...
FME for Good: Integrating Multiple Data Sources with APIs to Support Local Ch...Safe Software Have-a-skate-with-Bob (HASB-KC) is a local charity that holds two Hockey Tournaments every year to raise money in the fight against Pancreatic Cancer. The FME Form software is used to integrate and exchange data via API, between Google Forms, Google Sheets, Stripe payments, SmartWaiver, and the GoDaddy email marketing tools to build a grass-roots Customer Relationship Management (CRM) system for the charity. The CRM is used to communicate effectively and readily with the participants of the hockey events and most importantly the local area sponsors of the event. Communication consists of a BLOG used to inform participants of event details including, the ever-important team rosters. Funds raised by these events are used to support families in the local area to fight cancer and support PanCan research efforts to find a cure against this insidious disease. FME Form removes the tedium and error-prone manual ETL processes against these systems into 1 or 2 workbenches that put the data needed at the fingertips of the event organizers daily freeing them to work on outreach and marketing of the events in the community.
June Patch Tuesday
June Patch TuesdayIvanti Ivanti’s Patch Tuesday breakdown goes beyond patching your applications and brings you the intelligence and guidance needed to prioritize where to focus your attention first. Catch early analysis on our Ivanti blog, then join industry expert Chris Goettl for the Patch Tuesday Webinar Event. There we’ll do a deep dive into each of the bulletins and give guidance on the risks associated with the newly-identified vulnerabilities.
No-Code Workflows for CAD & 3D Data: Scaling AI-Driven Infrastructure
No-Code Workflows for CAD & 3D Data: Scaling AI-Driven InfrastructureSafe Software When projects depend on fast, reliable spatial data, every minute counts.
AI Clearing needed a faster way to handle complex spatial data from drone surveys, CAD designs and 3D project models across construction sites. With FME Form, they built no-code workflows to clean, convert, integrate, and validate dozens of data formats – cutting analysis time from 5 hours to just 30 minutes.
Join us, our partner Globema, and customer AI Clearing to see how they:
-Automate processing of 2D, 3D, drone, spatial, and non-spatial data
-Analyze construction progress 10x faster and with fewer errors
-Handle diverse formats like DWG, KML, SHP, and PDF with ease
-Scale their workflows for international projects in solar, roads, and pipelines
If you work with complex data, join us to learn how to optimize your own processes and transform your results with FME.
FIDO Seminar: Perspectives on Passkeys & Consumer Adoption.pptx
FIDO Seminar: Perspectives on Passkeys & Consumer Adoption.pptxFIDO Alliance FIDO Seminar: Perspectives on Passkeys & Consumer Adoption
FIDO Seminar: Evolving Landscape of Post-Quantum Cryptography.pptx
FIDO Seminar: Evolving Landscape of Post-Quantum Cryptography.pptxFIDO Alliance FIDO Seminar: Evolving Landscape of Post-Quantum Cryptography
Introduction to Typescript - GDG On Campus EUE
Introduction to Typescript - GDG On Campus EUEGoogle Developer Group On Campus European Universities in Egypt
“From Enterprise to Makers: Driving Vision AI Innovation at the Extreme Edge,...
“From Enterprise to Makers: Driving Vision AI Innovation at the Extreme Edge,...Edge AI and Vision Alliance
Starting Raspberry Pi
- 1. Lloyd Moore, President [email protected] www.CyberData-Robotics.com Seattle Robotics Society 1/19/2013
- 2. Agenda Overview of the Raspberry Pi Installing the OS Setting up VNC Setting up Qt locally Serial port communications Resources Using a Mac
- 3. Overview of the Raspberry Pi (Model B) Broadcom BCM2835 SOC • 700 Mhz ARM 11 processor • Hardware floating point • Videocore 4 GPU (Open GL ES2.0) 512 MB RAM + SD Card for mass storage Camera connector – camera coming soon! JTAG connector Low level I/O • 12 GPIO • UART (3.3V TTL) • SPI, with two CS lines • I2C Full schematics available
- 4. Additional Hardware To get started with the system you will need to add: • USB Keyboard • USB Mouse • SD Memory Card: 4GB or larger, Class 10 or better • Micro USB cable (Dollar stores have these cheap, and so does Amazon! http://www.amazon.com/gp/product/B003ES5ZSW/ref=oh_details_o00_s00_i01 ) • 5V USB Power Plug, 700mA or better (Can also use a bench supply, etc.) • Ethernet cable and wired network, wireless USB adapters also available • HDMI cable and monitor • Can also use HDMI to DVI converter/cable (Amazon has these cheap! http://www.amazon.com/gp/product/B004S4R5CK/ref=oh_details_o00_s00_i0o) May also want: • Multiple SD cards – really handy for experimenting • 1/8” stereo audio cable • 26 position IDC connectors and ribbon cable (Fry’s) • USB hub
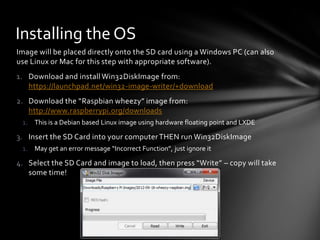
- 5. Installing the OS Image will be placed directly onto the SD card using a Windows PC (can also use Linux or Mac for this step with appropriate software). 1. Download and install Win32DiskImage from: https://launchpad.net/win32-image-writer/+download 2. Download the “Raspbian wheezy” image from: http://www.raspberrypi.org/downloads 1. This is a Debian based Linux image using hardware floating point and LXDE 3. Insert the SD Card into your computer THEN run Win32DiskImage 1. May get an error message “Incorrect Function”, just ignore it 4. Select the SD Card and image to load, then press “Write” – copy will take some time!
- 6. First OS Run Install the SD card, attach USB keyboard, USB mouse, monitor into the Pi and apply power to the Pi. First screen configuration 1. Set time zone 2. Set memory allocation between CPU and GPU, 448M/64M standard 3. Enable SSH, if desired 4. Set boot behavior – straight to desktop or not, we’ll turn this on for now 5. Expand_rootfs and reboot Use the command sudo raspi-config to run the configuration program at any time after the first boot.
- 7. Demo – Walk around the OS Points of Interest Start Menu Button Logout Button Multiple Desktops File Manager CPU Graph LX Terminal nano At this point you should also update the OS! 1. Open LX Terminal 2. sudo apt-get update 3. sudo apt-get upgrade
- 8. Setup VNC – Optional Step By setting up VNC you eliminate the need for a dedicated keyboard, mouse and monitor for the Raspberry Pi. 1. Open a command window: Accessories -> LXTerminal 2. Type: sudo apt-get install tightvncserver 3. Run vncserver and enter a password – srs_demo for the demo image 4. Edit /etc/init.d/bootmisc.sh to start vnc server on boot up A. sudo nano /etc/init.d/bootmisc.sh B. Scroll to end of text and add: su –c “vncserver :1 –geometry 1200x800 – depth 16” pi & C. Ctl-o, Ctl-x to save and exit D. Note: There are other more formal ways to do this – this one is simple! 5. Download and install Tight VNC Viewer for your desktop from: http://www.tightvnc.com/download.php
- 9. Setup Qt Development Environment From a console window type: sudo apt-get install g++-4.7 sudo apt-get install qt4-dev-tools sudo apt-get install qtcreator Qt Creator will now show up in the programming menu:
- 10. Configure Your Tool Chain Start Qt Creator and then choose Tools->Options->Build&Run->Tool Chains Configure as shown by clicking Add->GCC:
- 11. Configure Qt Versions On the same panel choose Qt Versions and configure as shown (may already be configured):
- 12. Configuring the Serial Port 3 wire serial port located on GPIO Pins 6 (GND), 8(Tx), 10(Rx) Device name is: /dev/ttyAMA0 Voltage levels are 3.3V, and directly connected to SOC!!!! The good news is this will directly connect to a microcontroller! Not good for a PC! I’m using a level shifter for the demo to connect to the PC. AdaFruit has one for $10 (http://adafruit.com/products/954) Default is to use this for an OS console port, need to disable functionality:
- 13. Configuring the Serial Port Disable the console output in /boot/cmdline.txt • In a console window type: sudo nano /boot/cmdline.txt Remove all references to /dev/ttyAMA0 Ctl-o <Enter> Ctl-x (to write the file back out and exit) • Typical modified line will appear as: dwc_otg.lpm_enable=0 root=/dev/mmcblk0p2 rootfstype=ext4 elevator=deadline rootwait Disable the getty in /etc/inittab In a console window type: • sudo nano /etc/inittab • comment last line: T0:23: respawn /sbin/getty –L ttyAMA0 115200 vt100 • Ctl-o <Enter> Ctl-x (to write the file back out and exit) Restart the Raspberry Pi for this to take effect • sudo reboot
- 14. The Demo Program Can use standard GCC/Eclipse to program, however Qt provides a nice IDE and is cross platform environment (Windows, Linux, Mac, Android, Embedded Linux, Windows CE, iOS on the way) And it is FREE! (LGPL v2.1 and commercial licenses available) Will also be using QtExtSerialPort, a free Qt compatible serial port abstraction (MIT license) Will simply open the serial port set 57600N81 and send out “Hello World” Located in ~/SerialPi/SerialPi in the demo image, the project file is named SerialPi.pro
- 15. Configure SerialPi Project The first time you open the SerialPi project you will be asked to configure it for the types of builds that you want to create. Configure the project as shown:
- 16. Configure No Deployment Runtime Normally for embedded development you build on a host computer and deploy to a target computer. This can be faster overall but is much more complex to set up. To configure this project to run locally choose: 1. Deployment: Projects->Run Settings, 2. Run: Add->Deploy Configuration and set the path to the executable
- 17. Demo – Run Program in Qt
- 18. Few More Things Gertboard Kit– Plugs into the IO header on the Raspberry Pi and contains: 12 buffered I/O lines 3 pushbutton switches 6 open collector drivers (50V 0.5A) 48V 4A motor controller 28 pin, DIP, Atmega controller 2 channel 12 bit ADC 2 channel 10 bit DAC BCM2835 Library – Open source library containing drivers and examples for: SPI GPIO Adapteva Project - $99 board, 16 cores, 26GFLOPS: http://arstechnica.com/information-technology/2012/09/99-raspberry-pi-sized- supercomputer-touted-in-kickstarter-project/
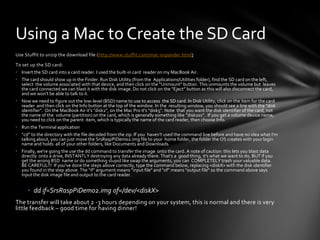
- 19. Using a Mac to Create the SD Card Use Stuffit to unzip the download file (http://www.stuffit.com/mac-expander.html) To set up the SD card: • Insert the SD card into a card reader. I used the built-in card reader on my MacBook Air. • The card should show up in the Finder. Run Disk Utility (from the Applications/Utilities folder), find the SD card on the left, select the volume associated with that device, and then click on the "Unmount" button. This unmounts the volume but leaves the card connected we can blast it with the disk image. Do not click on the “Eject” button as this will also disconnect the card, and we won’t be able to talk to it. • Now we need to figure out the low-level (BSD) name to use to access the SD card. In Disk Utility, click on the item for the card reader and then click on the Info button at the top of the window. In the resulting window, you should see a line with the "disk identifier". On the MacBook Air it's "disk2", on the Mac Pro it's "disk5". Note that you want the disk identifier of the card, not the name of the volume (partition) on the card, which is generally something like “disk2s1”. If you get a volume device name, you need to click on the parent item, which is typically the name of the card reader, then choose Info. • Run the Terminal application • “cd” to the directory with the file decoded from the zip. If you haven't used the command line before and have no idea what I'm talking about, you can just move the SrsRaspPiDemo2.img file to your home folder, the folder the OS creates with your login name and holds all of your other folders, like Documents and Downloads. • Finally, we're going the use the dd command to transfer the image onto the card. A note of caution: this lets you blast data directly onto a drive, INSTANTLY destroying any data already there. That's a good thing, it's what we want to do, BUT if you get the wrong BSD name or do something stupid like swap the arguments, you can COMPLETELY trash your valuable data. BE CAREFUL!!! If you've done the steps above correctly, type the command below, replacing <diskX> with the disk identifier you found in the step above. The "if" argument means "input file" and "of" means "output file" so the command above says input the disk image file and output to the card reader. • dd if=SrsRaspPiDemo2.img of=/dev/<diskX> The transfer will take about 2 -3 hours depending on your system, this is normal and there is very little feedback – good time for having dinner!
- 20. References Raspberry Pi Home Page: http://www.raspberrypi.org/ Tight VNC Home Page: http://www.tightvnc.com/ Qt Home Page: http://qt-project.org/ QExtSerialPort Home Page: http://code.google.com/p/qextserialport/ Gertboard: http://www.raspberrypi.org/archives/tag/gertboard BCM2835 Drivers: http://www.open.com.au/mikem/bcm2835/index.html BCM2835 Peripherals Datasheet: http://www.raspberrypi.org/wp- content/uploads/2012/02/BCM2835-ARM-Peripherals.pdf MagPi Magazine: http://www.themagpi.com/ Image of today’s session (8GB SD Card): http://www.CyberData- Robotics/Transfer/RaspPiImage.zip (Will be available until 2/28/2013)