SlideShare a Scribd company logo
Summary
In this tutorial, you will:
● Create a WebGL build
● Publish it directly on Unity Play, using the WebGL
Publisher package
1.Overview
When your real-time experience is ready, you need to create a build to share it with others. A build is a standalone, playable version
of your game. There are different kinds of build you can create — this tutorial focuses on WebGL builds, which you can publish
online for others to play.
In this tutorial, you will:
● Create a WebGL build
● Publish it directly on Unity Play, using the WebGL Publisher package
2.Before you begin
To build your project, you will need:
● The WebGL Build Support module added to your Unity installation
● The WebGL Publisher package, installed for your Unity version via the Package Manager
Follow the instructions in this step to make sure that you are ready to begin this tutorial.
Check for the Build Support module
To check whether you have the necessary Build Support module installed:
1. Open the Unity Hub.
2. Select the Projects tab, and identify the version of Unity you are using in
the project you want to build.
3. Select the Installs tab and search for the version in the list available. If the
WebGL Build Support module is installed, a WebGL icon will be present at
the bottom of the version tile.
4. If the WebGL icon is not present, add the WebGL Build Support module to your version of Unity.
Check for the WebGL
Publisher package
To check for this package:
1. Open the project you want to publish
in Unity Editor.
2. Open the Package Manager by
selecting Window > Package Manager.
3. Use the drop-down filter menu in the
upper-left corner of the window to select
In Project packages.
4. Search for WebGL Publisher. If it’s
listed and up-to-date, you’re ready to
build and publish your real-time
experience. If not, install or update the
package now.
Important:
● If you can’t find the package when searching, try using the
previous name of the same package: Share WebGL Game.
Make sure that you update the package to the current version.
● If you currently have a preview version of this package
installed, make sure that you update it to the latest version. If
you don’t, you will find that the instructions in this tutorial do not
exactly match the process required to build and publish your
project.
3.Introduction to WebGL builds
What is a WebGL build?
WebGL builds are a collection of files which contain your real-time experience. You can play them in your browser
locally, or publish them on Unity Play or other online hosting platforms.
What sort of projects can I use to create WebGL builds?
Generally speaking, the smaller the size of a Unity project, the more suitable it is for WebGL builds. Designers and developers often
spend significant effort optimizing their experiences to make sure that they are small enough to give users a good experience when
they load them online.
The Microgames, Create with Code challenges, and Junior Programmer portfolio projects on Unity Learn should all be suitable for
creating WebGL builds.
How can I share WebGL builds of my projects?
You can publish the collections of files that make up a WebGL build on a range of different online hosting platforms. You can publish
4.Create a WebGL build
To create a build of your real-time experience:
1. Open the project in the Unity Editor. If you don’t have your own project in mind, why not try
one of our Microgames?
Important: Make sure that you’ve installed the WebGL Build Support module for the version
of Unity that project uses.
2. In the Unity Editor top menu, go to File > Build Settings. You can also use the shortcut
Ctrl + Shift + B (Windows) or Cmd + Shift + B (macOS).
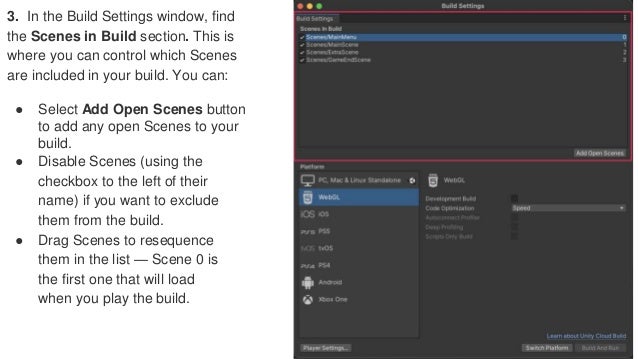
3. In the Build Settings window, find
the Scenes in Build section. This is
where you can control which Scenes
are included in your build. You can:
● Select Add Open Scenes button
to add any open Scenes to your
build.
● Disable Scenes (using the
checkbox to the left of their
name) if you want to exclude
them from the build.
● Drag Scenes to resequence
them in the list — Scene 0 is
the first one that will load
when you play the build.
4. Select Player Settings, at the bottom left of the Build Settings window. This opens the Project Settings
window.
5. In the Project Settings window, update the Company Name, Product Name and Version fields with
details for your build.
● The Version field here refers to the version of this build in relation to your project, rather than the Unity version you are using.
● The settings below the top set of fields are beyond the scope of this tutorial — you don’t need to configure these settings
to create a basic WebGL build.
6. Close the Project Settings window and return to the Build Settings window.
7. Find the Platform selection and select WebGL from the list available. This will change the settings and configuration options
available to the right of the list.
8. In most cases, a Switch Platform button will be present available at the bottom right of the
window. If this is present, select it to prepare to create a WebGL build.
9. Now you’re ready to build your real-time experience! You can:
● Select Build to create the build.
● Select Build And Run to create the build and immediately run it in your default
browser.
10. Choose a filename and location to save your build files, then select Save to continue.
Important: Don’t save your build in the Assets folder Unity project; you can create a separate
folder for builds in the root directory or choose a new location that you prefer.
11. Finally, wait for Unity to create your build. Depending on the size and configuration of
your project, this can take some time and slow down other computer operations while the
build is underway. Don’t worry if the Unity Editor is shown as non-responsive in Task
Manager (Windows) or Activity Monitor (macOS) — unless it is interrupted with a force quit it
will finish creating your build.
5.About your build files
Your WebGL build consists of an index.html file, as well as other folders, files and assets that the
game will need to run. The index.html file is a loader file; it functions as a launcher for your game.
However, without the other files in their correct locations it won’t work properly, as it is dependent
on them to run your build.
If you need to move the build files to a different location, make sure to move everything together —
we recommend zipping the files to do this.
Sharing your WebGL build with others
The best way to share your WebGL build with others is by hosting it online. However, you can give
a zipped folder of your WebGL build to others directly.
6.Publish your WebGL build on Unity Play
To publish your WebGL build on Unity
Play:
1. Make sure that you have installed the
WebGL publisher package and checked
for updates.
2. In the Unity Editor, go to the main
menu and select Publish > WebGL
Project.
3. In the WebGL Publish window, select
Get started.
4. Find the build that you created in the list and select Publish.
Note:
● If you created your build in a previous Unity
Editor session, you will not see your build
listed. In that case, select Locate Existing
Build and navigate to the folder containing
your build.
● You can create a WebGL build from this
point in the process and publish it directly,
but you will not be able to configure the
Scene order or project settings if you do
so.
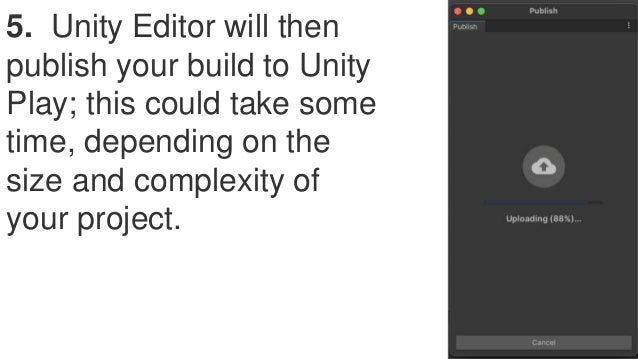
5. Unity Editor will then
publish your build to Unity
Play; this could take some
time, depending on the
size and complexity of
your project.
6. Partway through the uploading
process, the Unity Play page for
your build will open in edit mode in
your default browser window.
You’ll be able to:
● Name your build
● Add a short description
● Provide a thumbnail
image — we recommend
taking one in the Unity
Editor, from Play Mode
● Tag the assets and
tutorials you used to make
your real-time experience
7. Copy the URL directly from your navigation bar or use
the Share button to share your real-time experience with
others.
7.Publishing your build in other places online
There are other places you might want to upload your real-time experience as a creator.
Game hosting platforms
If a platform can host user-submitted
HTML5 games, it should be able to
host your WebGL build. These
platforms will have their own
guidance to help you with the
process.
One popular option for creators at
the moment include:
Personal sites and portfolios
You can also upload your build to a
personal website or portfolio. Many
website platforms (such as
Squarespace and Wix) have options
to host WebGL content integrated
into their platform tools.
8.Summary
In this tutorial, you created a WebGL build and uploaded it to Unity Play. You also
reviewed guidance for hosting builds of your real-time experiences in other online
locations.
Sharing your work is a great way to engage with the wider creator community and connect
with users — we can’t wait to see what you create!
Next steps
If you choose to publish a game on Unity Play, you’ll be invited to participate in our monthly
showcases. These are a great way to increase interaction with your game and get player
feedback. Your game might also be played and reviewed on our showcase Twitch streams!
Ad

More Related Content

Similar to Unity - Deploying your project on Web GL (20)

Github plugin setup in anypointstudio
Github plugin setup in anypointstudioGithub plugin setup in anypointstudio
Github plugin setup in anypointstudio
Rajkattamuri
 
Gwt portlet
Gwt portletGwt portlet
Gwt portlet
prabakaranbrick
 
Migrating Unity3D projects to Windows 8
Migrating Unity3D projects to Windows 8Migrating Unity3D projects to Windows 8
Migrating Unity3D projects to Windows 8
282productions
 
Git hub plugin setup and working with Git hub on anypoint studio
Git hub plugin setup and working with Git hub on anypoint studioGit hub plugin setup and working with Git hub on anypoint studio
Git hub plugin setup and working with Git hub on anypoint studio
Sudha Ch
 
Emergency androidstudiochapter
Emergency androidstudiochapterEmergency androidstudiochapter
Emergency androidstudiochapter
Aravindharamanan S
 
Git Tutorial EclipseCon France 2014 - Git Exercise 01 - installation and conf...
Git Tutorial EclipseCon France 2014 - Git Exercise 01 - installation and conf...Git Tutorial EclipseCon France 2014 - Git Exercise 01 - installation and conf...
Git Tutorial EclipseCon France 2014 - Git Exercise 01 - installation and conf...
msohn
 
Getting started windows store unity
Getting started windows store unityGetting started windows store unity
Getting started windows store unity
Meng-Ru (Raymond) Tsai
 
Akashdeepsinghjandu13
Akashdeepsinghjandu13Akashdeepsinghjandu13
Akashdeepsinghjandu13
Akashdeep Singh Jandu
 
How to Install and Set up Android Studio.pptx
How to Install and Set up Android Studio.pptxHow to Install and Set up Android Studio.pptx
How to Install and Set up Android Studio.pptx
MSivani
 
Using The EGit Eclipse Plugin With Git Hub
Using The EGit Eclipse Plugin With Git HubUsing The EGit Eclipse Plugin With Git Hub
Using The EGit Eclipse Plugin With Git Hub
Loiane Groner
 
Jenkins and visual regression – Exove
Jenkins and visual regression – ExoveJenkins and visual regression – Exove
Jenkins and visual regression – Exove
Exove
 
Using The EGit Eclipse Plugin With Git Hub
Using The EGit Eclipse Plugin With Git HubUsing The EGit Eclipse Plugin With Git Hub
Using The EGit Eclipse Plugin With Git Hub
guest4bce3214
 
Getting started with android studio
Getting started with android studioGetting started with android studio
Getting started with android studio
Reham Maher El-Safarini
 
Introduction to Bitreactive
Introduction to BitreactiveIntroduction to Bitreactive
Introduction to Bitreactive
Ghassen Chaieb
 
Petrel Ocean wizards and developers tools 2013
Petrel Ocean wizards and developers tools 2013Petrel Ocean wizards and developers tools 2013
Petrel Ocean wizards and developers tools 2013
SohrabRoshan
 
Netbeans gui tutorial
Netbeans gui tutorialNetbeans gui tutorial
Netbeans gui tutorial
stephan EL'wiin Shaarawy
 
Homestead demo
Homestead demoHomestead demo
Homestead demo
Saranga Tripathy
 
Headless Android
Headless AndroidHeadless Android
Headless Android
Opersys inc.
 
Android session 1
Android session 1Android session 1
Android session 1
Ahesanali Suthar
 
Android Development Tools and Installation
Android Development Tools and InstallationAndroid Development Tools and Installation
Android Development Tools and Installation
Prof. Erwin Globio
 
Github plugin setup in anypointstudio
Github plugin setup in anypointstudioGithub plugin setup in anypointstudio
Github plugin setup in anypointstudio
Rajkattamuri
 
Migrating Unity3D projects to Windows 8
Migrating Unity3D projects to Windows 8Migrating Unity3D projects to Windows 8
Migrating Unity3D projects to Windows 8
282productions
 
Git hub plugin setup and working with Git hub on anypoint studio
Git hub plugin setup and working with Git hub on anypoint studioGit hub plugin setup and working with Git hub on anypoint studio
Git hub plugin setup and working with Git hub on anypoint studio
Sudha Ch
 
Emergency androidstudiochapter
Emergency androidstudiochapterEmergency androidstudiochapter
Emergency androidstudiochapter
Aravindharamanan S
 
Git Tutorial EclipseCon France 2014 - Git Exercise 01 - installation and conf...
Git Tutorial EclipseCon France 2014 - Git Exercise 01 - installation and conf...Git Tutorial EclipseCon France 2014 - Git Exercise 01 - installation and conf...
Git Tutorial EclipseCon France 2014 - Git Exercise 01 - installation and conf...
msohn
 
How to Install and Set up Android Studio.pptx
How to Install and Set up Android Studio.pptxHow to Install and Set up Android Studio.pptx
How to Install and Set up Android Studio.pptx
MSivani
 
Using The EGit Eclipse Plugin With Git Hub
Using The EGit Eclipse Plugin With Git HubUsing The EGit Eclipse Plugin With Git Hub
Using The EGit Eclipse Plugin With Git Hub
Loiane Groner
 
Jenkins and visual regression – Exove
Jenkins and visual regression – ExoveJenkins and visual regression – Exove
Jenkins and visual regression – Exove
Exove
 
Using The EGit Eclipse Plugin With Git Hub
Using The EGit Eclipse Plugin With Git HubUsing The EGit Eclipse Plugin With Git Hub
Using The EGit Eclipse Plugin With Git Hub
guest4bce3214
 
Introduction to Bitreactive
Introduction to BitreactiveIntroduction to Bitreactive
Introduction to Bitreactive
Ghassen Chaieb
 
Petrel Ocean wizards and developers tools 2013
Petrel Ocean wizards and developers tools 2013Petrel Ocean wizards and developers tools 2013
Petrel Ocean wizards and developers tools 2013
SohrabRoshan
 
Android Development Tools and Installation
Android Development Tools and InstallationAndroid Development Tools and Installation
Android Development Tools and Installation
Prof. Erwin Globio
 

Recently uploaded (20)

ThousandEyes Partner Innovation Updates for May 2025
ThousandEyes Partner Innovation Updates for May 2025ThousandEyes Partner Innovation Updates for May 2025
ThousandEyes Partner Innovation Updates for May 2025
ThousandEyes
 
Designing Low-Latency Systems with Rust and ScyllaDB: An Architectural Deep Dive
Designing Low-Latency Systems with Rust and ScyllaDB: An Architectural Deep DiveDesigning Low-Latency Systems with Rust and ScyllaDB: An Architectural Deep Dive
Designing Low-Latency Systems with Rust and ScyllaDB: An Architectural Deep Dive
ScyllaDB
 
Cyber Awareness overview for 2025 month of security
Cyber Awareness overview for 2025 month of securityCyber Awareness overview for 2025 month of security
Cyber Awareness overview for 2025 month of security
riccardosl1
 
Noah Loul Shares 5 Steps to Implement AI Agents for Maximum Business Efficien...
Noah Loul Shares 5 Steps to Implement AI Agents for Maximum Business Efficien...Noah Loul Shares 5 Steps to Implement AI Agents for Maximum Business Efficien...
Noah Loul Shares 5 Steps to Implement AI Agents for Maximum Business Efficien...
Noah Loul
 
Heap, Types of Heap, Insertion and Deletion
Heap, Types of Heap, Insertion and DeletionHeap, Types of Heap, Insertion and Deletion
Heap, Types of Heap, Insertion and Deletion
Jaydeep Kale
 
Procurement Insights Cost To Value Guide.pptx
Procurement Insights Cost To Value Guide.pptxProcurement Insights Cost To Value Guide.pptx
Procurement Insights Cost To Value Guide.pptx
Jon Hansen
 
2025-05-Q4-2024-Investor-Presentation.pptx
2025-05-Q4-2024-Investor-Presentation.pptx2025-05-Q4-2024-Investor-Presentation.pptx
2025-05-Q4-2024-Investor-Presentation.pptx
Samuele Fogagnolo
 
Linux Support for SMARC: How Toradex Empowers Embedded Developers
Linux Support for SMARC: How Toradex Empowers Embedded DevelopersLinux Support for SMARC: How Toradex Empowers Embedded Developers
Linux Support for SMARC: How Toradex Empowers Embedded Developers
Toradex
 
How analogue intelligence complements AI
How analogue intelligence complements AIHow analogue intelligence complements AI
How analogue intelligence complements AI
Paul Rowe
 
#StandardsGoals for 2025: Standards & certification roundup - Tech Forum 2025
#StandardsGoals for 2025: Standards & certification roundup - Tech Forum 2025#StandardsGoals for 2025: Standards & certification roundup - Tech Forum 2025
#StandardsGoals for 2025: Standards & certification roundup - Tech Forum 2025
BookNet Canada
 
Splunk Security Update | Public Sector Summit Germany 2025
Splunk Security Update | Public Sector Summit Germany 2025Splunk Security Update | Public Sector Summit Germany 2025
Splunk Security Update | Public Sector Summit Germany 2025
Splunk
 
Role of Data Annotation Services in AI-Powered Manufacturing
Role of Data Annotation Services in AI-Powered ManufacturingRole of Data Annotation Services in AI-Powered Manufacturing
Role of Data Annotation Services in AI-Powered Manufacturing
Andrew Leo
 
Enhancing ICU Intelligence: How Our Functional Testing Enabled a Healthcare I...
Enhancing ICU Intelligence: How Our Functional Testing Enabled a Healthcare I...Enhancing ICU Intelligence: How Our Functional Testing Enabled a Healthcare I...
Enhancing ICU Intelligence: How Our Functional Testing Enabled a Healthcare I...
Impelsys Inc.
 
Generative Artificial Intelligence (GenAI) in Business
Generative Artificial Intelligence (GenAI) in BusinessGenerative Artificial Intelligence (GenAI) in Business
Generative Artificial Intelligence (GenAI) in Business
Dr. Tathagat Varma
 
Mobile App Development Company in Saudi Arabia
Mobile App Development Company in Saudi ArabiaMobile App Development Company in Saudi Arabia
Mobile App Development Company in Saudi Arabia
Steve Jonas
 
What is Model Context Protocol(MCP) - The new technology for communication bw...
What is Model Context Protocol(MCP) - The new technology for communication bw...What is Model Context Protocol(MCP) - The new technology for communication bw...
What is Model Context Protocol(MCP) - The new technology for communication bw...
Vishnu Singh Chundawat
 
TrsLabs - Fintech Product & Business Consulting
TrsLabs - Fintech Product & Business ConsultingTrsLabs - Fintech Product & Business Consulting
TrsLabs - Fintech Product & Business Consulting
Trs Labs
 
Build Your Own Copilot & Agents For Devs
Build Your Own Copilot & Agents For DevsBuild Your Own Copilot & Agents For Devs
Build Your Own Copilot & Agents For Devs
Brian McKeiver
 
Greenhouse_Monitoring_Presentation.pptx.
Greenhouse_Monitoring_Presentation.pptx.Greenhouse_Monitoring_Presentation.pptx.
Greenhouse_Monitoring_Presentation.pptx.
hpbmnnxrvb
 
HCL Nomad Web – Best Practices und Verwaltung von Multiuser-Umgebungen
HCL Nomad Web – Best Practices und Verwaltung von Multiuser-UmgebungenHCL Nomad Web – Best Practices und Verwaltung von Multiuser-Umgebungen
HCL Nomad Web – Best Practices und Verwaltung von Multiuser-Umgebungen
panagenda
 
ThousandEyes Partner Innovation Updates for May 2025
ThousandEyes Partner Innovation Updates for May 2025ThousandEyes Partner Innovation Updates for May 2025
ThousandEyes Partner Innovation Updates for May 2025
ThousandEyes
 
Designing Low-Latency Systems with Rust and ScyllaDB: An Architectural Deep Dive
Designing Low-Latency Systems with Rust and ScyllaDB: An Architectural Deep DiveDesigning Low-Latency Systems with Rust and ScyllaDB: An Architectural Deep Dive
Designing Low-Latency Systems with Rust and ScyllaDB: An Architectural Deep Dive
ScyllaDB
 
Cyber Awareness overview for 2025 month of security
Cyber Awareness overview for 2025 month of securityCyber Awareness overview for 2025 month of security
Cyber Awareness overview for 2025 month of security
riccardosl1
 
Noah Loul Shares 5 Steps to Implement AI Agents for Maximum Business Efficien...
Noah Loul Shares 5 Steps to Implement AI Agents for Maximum Business Efficien...Noah Loul Shares 5 Steps to Implement AI Agents for Maximum Business Efficien...
Noah Loul Shares 5 Steps to Implement AI Agents for Maximum Business Efficien...
Noah Loul
 
Heap, Types of Heap, Insertion and Deletion
Heap, Types of Heap, Insertion and DeletionHeap, Types of Heap, Insertion and Deletion
Heap, Types of Heap, Insertion and Deletion
Jaydeep Kale
 
Procurement Insights Cost To Value Guide.pptx
Procurement Insights Cost To Value Guide.pptxProcurement Insights Cost To Value Guide.pptx
Procurement Insights Cost To Value Guide.pptx
Jon Hansen
 
2025-05-Q4-2024-Investor-Presentation.pptx
2025-05-Q4-2024-Investor-Presentation.pptx2025-05-Q4-2024-Investor-Presentation.pptx
2025-05-Q4-2024-Investor-Presentation.pptx
Samuele Fogagnolo
 
Linux Support for SMARC: How Toradex Empowers Embedded Developers
Linux Support for SMARC: How Toradex Empowers Embedded DevelopersLinux Support for SMARC: How Toradex Empowers Embedded Developers
Linux Support for SMARC: How Toradex Empowers Embedded Developers
Toradex
 
How analogue intelligence complements AI
How analogue intelligence complements AIHow analogue intelligence complements AI
How analogue intelligence complements AI
Paul Rowe
 
#StandardsGoals for 2025: Standards & certification roundup - Tech Forum 2025
#StandardsGoals for 2025: Standards & certification roundup - Tech Forum 2025#StandardsGoals for 2025: Standards & certification roundup - Tech Forum 2025
#StandardsGoals for 2025: Standards & certification roundup - Tech Forum 2025
BookNet Canada
 
Splunk Security Update | Public Sector Summit Germany 2025
Splunk Security Update | Public Sector Summit Germany 2025Splunk Security Update | Public Sector Summit Germany 2025
Splunk Security Update | Public Sector Summit Germany 2025
Splunk
 
Role of Data Annotation Services in AI-Powered Manufacturing
Role of Data Annotation Services in AI-Powered ManufacturingRole of Data Annotation Services in AI-Powered Manufacturing
Role of Data Annotation Services in AI-Powered Manufacturing
Andrew Leo
 
Enhancing ICU Intelligence: How Our Functional Testing Enabled a Healthcare I...
Enhancing ICU Intelligence: How Our Functional Testing Enabled a Healthcare I...Enhancing ICU Intelligence: How Our Functional Testing Enabled a Healthcare I...
Enhancing ICU Intelligence: How Our Functional Testing Enabled a Healthcare I...
Impelsys Inc.
 
Generative Artificial Intelligence (GenAI) in Business
Generative Artificial Intelligence (GenAI) in BusinessGenerative Artificial Intelligence (GenAI) in Business
Generative Artificial Intelligence (GenAI) in Business
Dr. Tathagat Varma
 
Mobile App Development Company in Saudi Arabia
Mobile App Development Company in Saudi ArabiaMobile App Development Company in Saudi Arabia
Mobile App Development Company in Saudi Arabia
Steve Jonas
 
What is Model Context Protocol(MCP) - The new technology for communication bw...
What is Model Context Protocol(MCP) - The new technology for communication bw...What is Model Context Protocol(MCP) - The new technology for communication bw...
What is Model Context Protocol(MCP) - The new technology for communication bw...
Vishnu Singh Chundawat
 
TrsLabs - Fintech Product & Business Consulting
TrsLabs - Fintech Product & Business ConsultingTrsLabs - Fintech Product & Business Consulting
TrsLabs - Fintech Product & Business Consulting
Trs Labs
 
Build Your Own Copilot & Agents For Devs
Build Your Own Copilot & Agents For DevsBuild Your Own Copilot & Agents For Devs
Build Your Own Copilot & Agents For Devs
Brian McKeiver
 
Greenhouse_Monitoring_Presentation.pptx.
Greenhouse_Monitoring_Presentation.pptx.Greenhouse_Monitoring_Presentation.pptx.
Greenhouse_Monitoring_Presentation.pptx.
hpbmnnxrvb
 
HCL Nomad Web – Best Practices und Verwaltung von Multiuser-Umgebungen
HCL Nomad Web – Best Practices und Verwaltung von Multiuser-UmgebungenHCL Nomad Web – Best Practices und Verwaltung von Multiuser-Umgebungen
HCL Nomad Web – Best Practices und Verwaltung von Multiuser-Umgebungen
panagenda
 
Ad

Unity - Deploying your project on Web GL

  • 1. Summary In this tutorial, you will: ● Create a WebGL build ● Publish it directly on Unity Play, using the WebGL Publisher package
  • 2. 1.Overview When your real-time experience is ready, you need to create a build to share it with others. A build is a standalone, playable version of your game. There are different kinds of build you can create — this tutorial focuses on WebGL builds, which you can publish online for others to play. In this tutorial, you will: ● Create a WebGL build ● Publish it directly on Unity Play, using the WebGL Publisher package
  • 3. 2.Before you begin To build your project, you will need: ● The WebGL Build Support module added to your Unity installation ● The WebGL Publisher package, installed for your Unity version via the Package Manager Follow the instructions in this step to make sure that you are ready to begin this tutorial. Check for the Build Support module To check whether you have the necessary Build Support module installed: 1. Open the Unity Hub. 2. Select the Projects tab, and identify the version of Unity you are using in the project you want to build. 3. Select the Installs tab and search for the version in the list available. If the WebGL Build Support module is installed, a WebGL icon will be present at the bottom of the version tile. 4. If the WebGL icon is not present, add the WebGL Build Support module to your version of Unity.
  • 4. Check for the WebGL Publisher package To check for this package: 1. Open the project you want to publish in Unity Editor. 2. Open the Package Manager by selecting Window > Package Manager. 3. Use the drop-down filter menu in the upper-left corner of the window to select In Project packages. 4. Search for WebGL Publisher. If it’s listed and up-to-date, you’re ready to build and publish your real-time experience. If not, install or update the package now.
  • 5. Important: ● If you can’t find the package when searching, try using the previous name of the same package: Share WebGL Game. Make sure that you update the package to the current version. ● If you currently have a preview version of this package installed, make sure that you update it to the latest version. If you don’t, you will find that the instructions in this tutorial do not exactly match the process required to build and publish your project.
  • 6. 3.Introduction to WebGL builds What is a WebGL build? WebGL builds are a collection of files which contain your real-time experience. You can play them in your browser locally, or publish them on Unity Play or other online hosting platforms. What sort of projects can I use to create WebGL builds? Generally speaking, the smaller the size of a Unity project, the more suitable it is for WebGL builds. Designers and developers often spend significant effort optimizing their experiences to make sure that they are small enough to give users a good experience when they load them online. The Microgames, Create with Code challenges, and Junior Programmer portfolio projects on Unity Learn should all be suitable for creating WebGL builds. How can I share WebGL builds of my projects? You can publish the collections of files that make up a WebGL build on a range of different online hosting platforms. You can publish
  • 7. 4.Create a WebGL build To create a build of your real-time experience: 1. Open the project in the Unity Editor. If you don’t have your own project in mind, why not try one of our Microgames? Important: Make sure that you’ve installed the WebGL Build Support module for the version of Unity that project uses. 2. In the Unity Editor top menu, go to File > Build Settings. You can also use the shortcut Ctrl + Shift + B (Windows) or Cmd + Shift + B (macOS).
  • 8. 3. In the Build Settings window, find the Scenes in Build section. This is where you can control which Scenes are included in your build. You can: ● Select Add Open Scenes button to add any open Scenes to your build. ● Disable Scenes (using the checkbox to the left of their name) if you want to exclude them from the build. ● Drag Scenes to resequence them in the list — Scene 0 is the first one that will load when you play the build.
  • 9. 4. Select Player Settings, at the bottom left of the Build Settings window. This opens the Project Settings window. 5. In the Project Settings window, update the Company Name, Product Name and Version fields with details for your build.
  • 10. ● The Version field here refers to the version of this build in relation to your project, rather than the Unity version you are using. ● The settings below the top set of fields are beyond the scope of this tutorial — you don’t need to configure these settings to create a basic WebGL build. 6. Close the Project Settings window and return to the Build Settings window. 7. Find the Platform selection and select WebGL from the list available. This will change the settings and configuration options available to the right of the list.
  • 11. 8. In most cases, a Switch Platform button will be present available at the bottom right of the window. If this is present, select it to prepare to create a WebGL build.
  • 12. 9. Now you’re ready to build your real-time experience! You can: ● Select Build to create the build. ● Select Build And Run to create the build and immediately run it in your default browser. 10. Choose a filename and location to save your build files, then select Save to continue. Important: Don’t save your build in the Assets folder Unity project; you can create a separate folder for builds in the root directory or choose a new location that you prefer. 11. Finally, wait for Unity to create your build. Depending on the size and configuration of your project, this can take some time and slow down other computer operations while the build is underway. Don’t worry if the Unity Editor is shown as non-responsive in Task Manager (Windows) or Activity Monitor (macOS) — unless it is interrupted with a force quit it will finish creating your build.
  • 13. 5.About your build files Your WebGL build consists of an index.html file, as well as other folders, files and assets that the game will need to run. The index.html file is a loader file; it functions as a launcher for your game. However, without the other files in their correct locations it won’t work properly, as it is dependent on them to run your build. If you need to move the build files to a different location, make sure to move everything together — we recommend zipping the files to do this. Sharing your WebGL build with others The best way to share your WebGL build with others is by hosting it online. However, you can give a zipped folder of your WebGL build to others directly.
  • 14. 6.Publish your WebGL build on Unity Play To publish your WebGL build on Unity Play: 1. Make sure that you have installed the WebGL publisher package and checked for updates. 2. In the Unity Editor, go to the main menu and select Publish > WebGL Project. 3. In the WebGL Publish window, select Get started.
  • 15. 4. Find the build that you created in the list and select Publish. Note: ● If you created your build in a previous Unity Editor session, you will not see your build listed. In that case, select Locate Existing Build and navigate to the folder containing your build. ● You can create a WebGL build from this point in the process and publish it directly, but you will not be able to configure the Scene order or project settings if you do so.
  • 16. 5. Unity Editor will then publish your build to Unity Play; this could take some time, depending on the size and complexity of your project.
  • 17. 6. Partway through the uploading process, the Unity Play page for your build will open in edit mode in your default browser window. You’ll be able to: ● Name your build ● Add a short description ● Provide a thumbnail image — we recommend taking one in the Unity Editor, from Play Mode ● Tag the assets and tutorials you used to make your real-time experience
  • 18. 7. Copy the URL directly from your navigation bar or use the Share button to share your real-time experience with others.
  • 19. 7.Publishing your build in other places online There are other places you might want to upload your real-time experience as a creator. Game hosting platforms If a platform can host user-submitted HTML5 games, it should be able to host your WebGL build. These platforms will have their own guidance to help you with the process. One popular option for creators at the moment include: Personal sites and portfolios You can also upload your build to a personal website or portfolio. Many website platforms (such as Squarespace and Wix) have options to host WebGL content integrated into their platform tools.
  • 20. 8.Summary In this tutorial, you created a WebGL build and uploaded it to Unity Play. You also reviewed guidance for hosting builds of your real-time experiences in other online locations. Sharing your work is a great way to engage with the wider creator community and connect with users — we can’t wait to see what you create! Next steps If you choose to publish a game on Unity Play, you’ll be invited to participate in our monthly showcases. These are a great way to increase interaction with your game and get player feedback. Your game might also be played and reviewed on our showcase Twitch streams!