SlideShare a Scribd company logo
pg. 1
pg. 2
Overview
This guide presents the instructions and other information concerning the lab activities for this course
Table of Contents
Lab 1 - Preparing Network Infrastructure – VLAN/NTP/DHCP .....................................................................3
1. Creating VLAN on Switch ..................................................................................................................4
2. Lab 2 – Configuring Voice Port..............................................................................................................9
2.1. Configuring T1 Port to support MGCP ..............................................................................................9
2.2 Configuring T1 Port to support SIP ............................................................................................11
2.3 Configuring E1 Port to support H323.........................................................................................13
3 Configuring POTS Dial Peers ...............................................................................................................14
3.2 Configuring IOS Dial Peer for Inbound PSTN Calls ......................................................................14
3.3 Configuring IOS to support outbound PSTN calls – 911, Local, Long Distance & International .15
4 Creating Voice over IP Dial Peer .........................................................................................................16
5 Preparing SIP Gateway to route calls from PSTN to Cisco Unified CUCM 10.5 ..................................17
6. Investigate dial peer matches.............................................................................................................17
7. Configure CUCME to Support Endpoints ............................................................................................18
7.1 Configure IP Telephony Service for SCCP Phone ........................................................................18
Creating SCCP Extension.........................................................................................................................18
7.2 Create Phone and Assign Extension to Phone............................................................................19
pg. 3
Lab 1 - Preparing Network Infrastructure – VLAN/NTP/DHCP
In this infrastructure, HQ Site and SiteC Devices (Router and 2x Phone) are connected to Cisco Catalyst
Switch 3560 known as SW. R2 or SiteB Router has a built in EtherSwitch Module. On device name
SW, first 3 port are connected to HQ devices while last 3 port are connected SiteC devices
Now telnet to 192.168.10.1Y (where Y is your POD number). Use the username/password provided to
you by your instructore.
Username: ____________________
Password:______________________
POD # ________________________
pg. 4
Task Lists
1. Creating VLAN on Switch
Objective – Create voice vlan and data vlan to be assigned to IP Phone. IP Phones are connected
to their respective port however in order to communicate, they must obtain IP Address from the
network. In this case, we will configure IOS Router as a DHCP
Go to www.Google.com and type: putty and download the putty client on your PC
A Windows installer for everything except PuTTYtel
putty-0.66-installer.exe (example)
Open Putty
IP Address: 192.168.10.1Y (where Y is your POD/Rack Number)
pg. 5
Login username your username:
Username: student
password: voicebootcamp
Once you have logged on to your AccessServer, type: show hosts
pg. 6
Troubleshooting – ERROR
If you get the following
Type: clear line 33 (last 2 digit of the 2033 in circle above)
If you see the prompt: HQ> or SB> type: enable
Enable password: cisco (if asked)
Repeat the above Now open 3 more PUTTY – one for SB, SC and SWITCH
pg. 7
Configure the following VLAN based on their devices
We will configure the following VLAN on your Switch (hostname SW)
HQ –
- Voice vlan – 10Y
- Data vlan – 20Y
SiteC
- Voice VLAN 50Y
- Data vlan 60Y
- Creating VLAN
o sw(config)vlan 10Y
o sw(config-vlan)#name HQVoice
o sw(config)#vlan 20Y
o sw(config-vlan)#name HQData
o sw(config)#vlan 50Y
o sw(config-vlan)#name SCVoice
o sw(config)#vlan 60Y
o sw(config-vlan)#name SCData
HQ Devices
interface FastEthernet0/1
description ***Trunk to HQ Router***
switchport trunk encapsulation dot1q
switchport trunk native vlan 20Y
switchport mode trunk
interface range FastEthernet0/2 - 3
switchport access vlan 20Y
switchport mode access
switchport voice vlan 10Y
pg. 8
spanning-tree portfast
For SiteC Devices
interface FastEthernet0/6
switchport trunk encapsulation dot1q
switchport trunk native vlan 60Y
switchport mode trunk
interface range FastEthernet0/7 - 8
switchport access vlan 60Y
switchport mode access
switchport voice vlan 50Y
spanning-tree portfast
pg. 9
2. Lab 2 – Configuring Voice Port
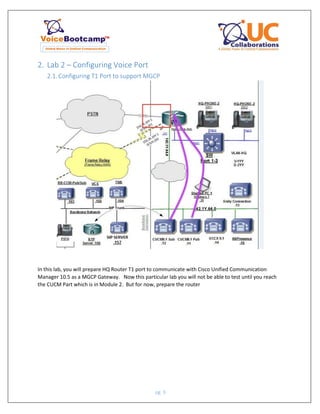
2.1. Configuring T1 Port to support MGCP
In this lab, you will prepare HQ Router T1 port to communicate with Cisco Unified Communication
Manager 10.5 as a MGCP Gateway. Now this particular lab you will not be able to test until you reach
the CUCM Part which is in Module 2. But for now, prepare the router
pg. 10
Go to HQ Router and type the following commands
 Use PuTTY login to your HQ Router in and change to enable mode
Card type T1 0 2  this command may not be available on all routers. Skip it in that case
Isdn switch-type primary-ni
Network-clock-participate wic 2
Controller t1 0/2/0
Framing esf
Linecode b8zs
Pri-group timeslot 1-4 service mgcp  Define first 4 port to use MGCP
Ccm-manager mgcp  use MGCP process
Ccm-manager fallback  Use for SRST fall back.
Ccm-manager music-on-hold  Enable Music on Hold over MGCP
Ccm-manager redundant-host 142.1Y.64.21  Backup CallManager
Mgcp call-agent 142.1Y.64.22  Register with Active CUCM
mgcp bind control source FastEthernet0/0.10Y  source address of control/media traffic
mgcp bind media source FastEthernet0/0.10Y
mgcp
interface serial 0/2/0:23
isdn bind-l3 ccm-manager  Bind D-Channel with CUCM
Verify (T1 will not be establish at this moment)
HQ# show isdn status
Global ISDN Switchtype = primary-ni
ISDN Serial0/2/0:23 interface
dsl 0, interface ISDN Switchtype = primary-ni
Layer 1 Status:
DEACTIVATED
Layer 2 Status:
TEI = 0, Ces = 1, SAPI = 0, State = TEI_ASSIGNED
Layer 3 Status:
0 Active Layer 3 Call(s)
Active dsl 0 CCBs = 0
The Free Channel Mask: 0x00000000
Number of L2 Discards = 0, L2 Session ID = 16
Total Allocated ISDN CCBs = 0
This port will be TEI_ASSIGNED until we
configured MGCP in CallManager/CUCM
pg. 11
2.2Configuring SiteB Router to support SIP
In this lab, you will configure SiteB (R2) router as a SIP Gateway. T1 will be configured to communicate
with Service Provider and then we must create an inbound dial peer to accept calls
 Use PuTTY login to your SiteB in and change to enable mode
 In the enable mode, enter the show running-config command No MGCP commands are
currently configured on the gateway.
 In global configuration mode, enter the following commands
Card type T1 0 2  this command may not be available on all routers. Skip it in that case
Isdn switch-type primary-ni
Network-clock-participate wic 2
Controller t1 0/2/0
Framing esf
Linecode b8zs
Pri-group timeslot 1-4  Define first 4 ports
pg. 12
SiteB# show isdn status
Global ISDN Switchtype = primary-ni
ISDN Serial0/2/0:23 interface
dsl 0, interface ISDN Switchtype = primary-ni
Layer 1 Status:
DEACTIVATED
Layer 2 Status:
TEI = 0, Ces = 1, SAPI = 0, State = MULTIPLE_FRAME_ESTABLISHED
Layer 3 Status:
0 Active Layer 3 Call(s)
Active dsl 0 CCBs = 0
The Free Channel Mask: 0x00000000
Number of L2 Discards = 0, L2 Session ID = 16
Total Allocated ISDN CCBs = 0
pg. 13
2.3Configuring E1 Port to support H323
Prepare SiteC (R3) router to communicate with service provider via E1. SiteC is in Hong Kong.
 Use PuTTY login to your SiteC Router in and change to enable mode
 In the enable mode, enter the show running-config command No MGCP commands are
currently configured on the gateway.
 In global configuration mode, enter the following commands
pg. 14
Card type E1 0 2  this command may not be available on all routers. Skip it in that case
Isdn switch-type primary-ni
Network-clock-participate wic 2
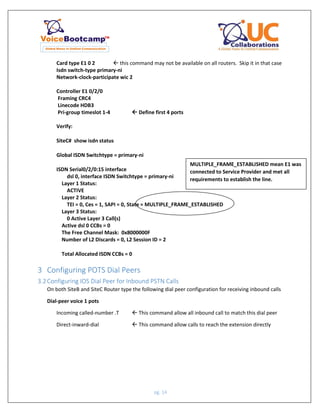
Controller E1 0/2/0
Framing CRC4
Linecode HDB3
Pri-group timeslot 1-4  Define first 4 ports
Verify:
SiteC# show isdn status
Global ISDN Switchtype = primary-ni
ISDN Serial0/2/0:15 interface
dsl 0, interface ISDN Switchtype = primary-ni
Layer 1 Status:
ACTIVE
Layer 2 Status:
TEI = 0, Ces = 1, SAPI = 0, State = MULTIPLE_FRAME_ESTABLISHED
Layer 3 Status:
0 Active Layer 3 Call(s)
Active dsl 0 CCBs = 0
The Free Channel Mask: 0x8000000F
Number of L2 Discards = 0, L2 Session ID = 2
Total Allocated ISDN CCBs = 0
3 Configuring POTS Dial Peers
3.2Configuring IOS Dial Peer for Inbound PSTN Calls
On both SiteB and SiteC Router type the following dial peer configuration for receiving inbound calls
Dial-peer voice 1 pots
Incoming called-number .T  This command allow all inbound call to match this dial peer
Direct-inward-dial  This command allow calls to reach the extension directly
MULTIPLE_FRAME_ESTABLISHED mean E1 was
connected to Service Provider and met all
requirements to establish the line.
pg. 15
3.3Configuring IOS to support outbound PSTN calls – 911, Local, Long Distance &
International
On SiteB Router, type the following dial peer
911 Dial Peer
Dial-peer voice 911 port
Destination-pattern 911
port 0/2/0:23
forward-digit 3
7 Digit Local Dialing (local calls)
Dial-peer voice 7 pots
Destination-pattern 9[2-9]……
port 0/2/0:23
11 Digit Long Distance Dialing
Dial-peer voice 11 pots
Destination-pattern 91[2-9]..[2-9]……
port 0/2/0:23
forward-digit 11
NOTE: Forward-digit is required because router will otherwise drop 9 and 1
110 Digit International Dialing
Dial-peer voice 110 pots
Destination-pattern 9011T
port 0/2/0:23
prefix 011
pg. 16
On SiteC Router
999 Dial Peer
Dial-peer voice 911 port
Destination-pattern 999
port 0/2/0:15
forward-digit 3
7 Digit Local Dialing (local calls)
Dial-peer voice 7 pots
Destination-pattern 9[2-9]……
port 0/2/0:15
11 Digit Long Distance Dialing
Dial-peer voice 11 pots
Destination-pattern 91[2-9]..[2-9]……
port 0/2/0:15
forward-digit 11
NOTE: Forward-digit is required because router will otherwise drop 9 and 1
110 Digit International Dialing (only on SiteC)
Dial-peer voice 111 pots
Destination-pattern 900T
port 0/2/0:15
4 Creating Voice over IP Dial Peer
When user dials 197230Y3001, router will convert these to 4 digit (using translation pattern
which will be configured later)
SiteB Router
Dial-peer voice 100 voip
destination-pattern 3…  Y = your partner rack #
session target ipv4:142.1Y.65.21  IP address of your partner router
codec g711ulaw
pg. 17
5 Preparing SIP Gateway to route calls from PSTN to Cisco Unified
CUCM 10.5
Configure this on SiteB Router
voice service voip
sip  Enable SIP mode configuration
session transport tcp  Ensure TCP is used for transport protocol
bind all source-interface loopback0  Ensure source traffic for control/Media is VLAN 301
Dial Peer to Allow Incoming call from PSTN – PSTN User dial 197230Y3XXX to SiteB Phone
dial-peer voice 1 pots (this is already done)
incoming called-number .T  Allows all incoming call to match this dial peer
direct-inward-dial  allow call to reach internal Phone. Bypass 2nd Dial Tone
Dial Peer for Outbound call to PSTN
dial-peer voice 911 pots
destination-patter 911  match any extension start with 911
port 0/2/0:23  send the call to CUCM Ip address
forward-digit 3
Convert 11/10 Digit incoming PSTN number to 4 digit extension
voice translation-rule 1  Enable Translation Rule
rule 1 /^197230Y3/ /3/  match the pattern
rule 2 /^97230Y3/ /3/
voice translation-profile DID  create a translation profile
translate called 1  Translate called/DNIS number
voice-port 0/2/0:23
translation-profile incoming DID  apply the translation rule in Voice port.
6. Investigate dial peer matches
When you dial a number and not sure why the call is failing or want to know which dial peer the
call is using, type the following command in privilege mode
Debug voice dial-peer all
Make a call and see what dial peer it uses.
pg. 18
This can be done on either SiteB or SiteC router
7. Configure CUCME to Support Endpoints
Setup Cisco Unified Communication Manager Express on SiteC Router.
7.1Configure IP Telephony Service for SCCP Phone
telephony-service
max-ephones 15
max-dn 15
ip source-address 142.10Y.66.254 port 2000
auto assign 1 to 15
system message VoiceBootcamp Rack Y  where Y is your Rack number
max-conferences 4 gain
Creating SCCP Extension
Create extension for 4001, 4002, and 4011
Ephone-dn 1 octo-line
number 4001  Define the extension
name SiteC Phone 1  Define Calling Party Name
Label My Extension 4001  Define a label for each button
Description 852240Y4001  Define External Mask for SiteC Phone.
Ephone-dn 2 octo-line
number 4002  Define the extension
name SiteC Phone 2  Define Calling Party Name
Label My Extension 4002  Define a label for each button
Description 852240Y4002  Define External Mask for SiteC Phone.
pg. 19
7.2Create Phone and Assign Extension to Phone
Create Ephone for Phone 1 and Phone 2 for Site C.
THIS IS SCCP Base Phone
Ephone 1
mac-address 0200.4C4F.4FDD  MAC Address of your IP Phone 1
button 1:1
type 7965
Ephone 2
mac-address 0200.4C4F.4FCC  MAC Address of your IP Phone 2
button 1:2
type 7965
Register IP BLUE Phone to CUCME
Installed VTGO IP Blue (www.ipblue.com) Download MultiTab Version
Then open Phone Instance 7 and 8
pg. 20
Module 2 – Cisco Unified Communication Manager Part 1 (CIPTV1)
1. Cisco Prime Collaboration Deployment – Installation
Activity Objective
Purpose of this lab is to use Prime Collaboration Deployment to install your Cisco CUCM Clusters. We
are going to build two clusters. One Cluster is for HQ with Publisher and Subscriber. One cluster in SiteB
(branch office) with only one publisher. SiteC - (Brach Office C) will be Unified Communication Express.
(CME)
Prime Collaboration already has the necessary ISO Files needed for this lab. However, you will need to
follow the instruction to create the Virtual Machine
Three part involve here
1st part – Create Virtual Machine
2nd
Part – Using Prime Collaboration to start the installation process
3rd
part – Time to Enjoy the City   as it will take 4 to 8 hours to complete the installation
pg. 21
Figure 1
Vmware Hosts Server
142.1Y.64.200 – rYhostssrv200.corp.voicebootcamp.ca
RY – HQ – CCNP Collab – Cisco Unified CM Publisher 10.5
RY – HQ – CCNP Collab – Cisco Unity Connection 10.5
RY – HQ – CCNP Collab – Telepresence VCS Control
142.1Y.64.210 – rYhostssrv210.corp.voicebootcamp.ca
RY – HQ – CCNP Collab – Cisco Unified CM Subscriber 10.5
RY – HQ – CCNP Collab – Cisco Unified CCX 10.5 Primary
RY – HQ – CCNP Collab – Telepresence TMS
142.1Y.64.231 – rYhostssrv231.corp.voicebootcamp.ca
RY – SB – CCNP Collab – Cisco Unified CM Publisher 10.5
RY – HQ – CCNP Collab – Cisco Unified Presence 10.5
RY – HQ – CCNP Collab – Telepresence Conductor Server
RY – HQ – CCNP Collab – Telepresence Server
IP Address Schema
Subnet Mask: 255.255.255.0
Default Gateway: 142.1Y.64.1
DNS: 172.16.1.120
DNS: ccnpcollabY.com
NTP Server: 135.11.11.11
Secret Phrase – voicebootcamp
Figure 2
Server Hostname IP Address
HQ CUCM Pub ucmpub 142.1Y.64.21
HQ CUCM Sub ucmsub 142.1Y.64.22
SB CUCM Pub sbucmpub 142.1Y.65.21
HQ CUC cuc 142.1Y.64.23
HQ UCCX uccx 142.1Y.64.24
HQ IM im 142.1Y.64.25
TeleVCS Vcs 142.1Y.64.26
TeleTMS Tms 142.1Y.64.27
TeleConductor Conductor 142.1Y.64.28
pg. 22
2. Creating Virtual Machine for Cisco Unified Collaboration Servers
 Go to https://vmc.corp.voicebootcamp.ca:9443/vsphere-client/#
o Login as – corppodY  where Y is your POD number)
o Password: voicebootcamp
 From the left menu bar – select vmc  Student – Data Center 1  POD 6 – CCNP, CCI
Collaboration & UCCE
 Create Virtual Machine based on Figure 1
 Now from this point onward, you will create Virtual Machine from OVAF Template provided to
us by Cisco. These OVF Template are pre-define parameters that are used to configure Virtual
Machine based on Cisco’s requirement.
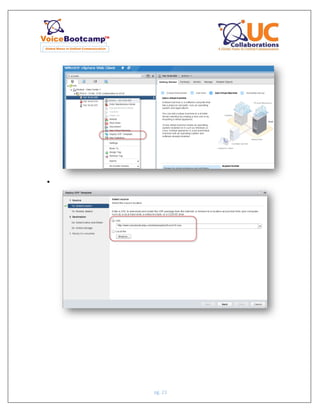
 Right click on the necessary server based on the Virtual Machine that you are creating, and click
Deploy OVF Template
o OVF Template URL
 CUCM - http://www.voicebootcamp.com/download/ovf/cucm10.ova
 CUC - http://www.voicebootcamp.com/download/ovf/cuc10.ova
 UCCX - http://www.voicebootcamp.com/download/ovf/uccx10.ova
 IM - http://www.voicebootcamp.com/download/ovf/im10.ova
pg. 23

pg. 24



pg. 25

pg. 26


pg. 27

 NOW Repeat this for all other Servers. You must create all the server from Figure 1
 Your pod should look sometime similar to this Figure below
pg. 28

3. Preparing Cisco Prime Collaboration Server for ESX Hosts
In order to use Cisco Prime Collaboration Deployment we must add all the Vmware Hosts. Cisco
Prime Collaboration server has all the necessary ISO Files that are needed to complete these labs.
You cannot use Prime Collaboration to install Telepresence therefore those vmware are already
installed for you
Login to https://pcd.corp.voicebootcamp.ca
Username: administrator
Password: voicebootcamp
pg. 29
Add EXI Hosts
Each POD has 3 ESXi Hosts
142.1Y.64.200
142.1Y.64.210
142.1Y.64.231
Username: root
password: voicebootcamp
From Inventory Menu of PCD click on ESXi Hosts
pg. 30
Repeat this for other two servers
pg. 31
Result should look something similar to this based on your Rack
Add New Clusters
HQ CUCM Cluster – Publisher & Subscriber
SB CUCM Cluster – Publisher
UCCX & Unity & Presence Individual clusters
Go to Inventory  Clusters
Add HQ CUCM Cluster
Click Next  Add Nodes
pg. 32
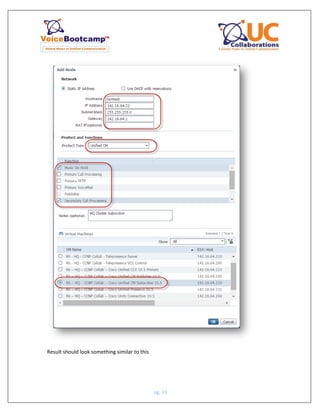
Please use the IP Address from Figure 2 Table and define it as per the VM you are configuring
Now add the 2nd
NODE Subscriber by repeating this process.
pg. 33
Result should look something similar to this
pg. 34
Click Next to Configure Cluster Wide Settings
OS Administration & Application Credentials
Username: administrator
Password: voicebootcamp
Security Password: voicebootcamp
Certificate Information – as per the image
pg. 35
Click Next to Configure DNS Settings (Optional)
Select both hostname and Assign the following DNS Settings
Primary DNS – 172.16.1.120
Domain: ccnpcollabY.com  Y is your POD Number
Click Next to Configure NTP Settings
NTP Server: 135.11.11.11 (this is for all POD)
pg. 36
Click Next to Configure NIC Settings (Optional)
Leave Default Settings
Click Next to Configure Time Zones
Time zone – Los Angeles
Click Finish to complete this task.
pg. 37
Add SiteB CUCM Cluster
NOTE **** Follow the same procedure to install SiteB CUCM Cluster ****
pg. 38
Add CUC Cluster
Rest of the settings are the same as above.
pg. 39
Add UCCX Cluster
Repeat this process for UCCX Cluster.
pg. 40
Add Presence Cluster – IMPORTANT this must be added to RY – HQ – CUCM Cluster with publisher
and subscriber
Go to
pg. 41
Enter the rest of the information just like the above server
Start The Installation Task
Goto Task Menu  Select Install
pg. 42
Click Next To Choose Installation Files
pg. 43
Now select Installation File for Presence
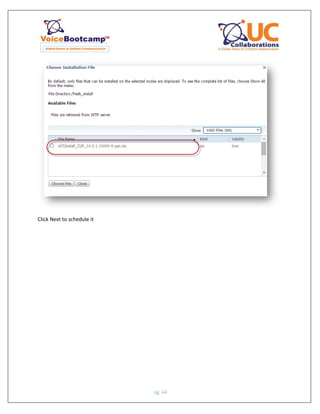
pg. 44
Click Next to schedule it
pg. 45
Click Next to define sequence of installation
pg. 46
Now Repeat this installation task for UCCX and CUC Clusters as well
pg. 47
Configure Initial Settings on Unified Communications Servers
Activity Objective
In this activity, you will configure Cisco Unified Communications initial settings and activate
services. After completing this activity, you will be able to meet these objectives:
 View and configure the initial settings of Cisco Unified Communications Manager
(CUCM)
 View and configure the initial settings of Cisco Unity Connection (CUC)
 View and configure the initial settings of Cisco Unified IM and Presence (CUPS or IMP)
 Activate and manage required services
 Configure Cisco Unified Communications Manager enterprise and service parameters
 Verify Enterprise Licensing
Device Name Username/Password IP Address
HQ Publisher Administrator/voicebootcamp 142.1Y.64.21
HQ Subscriber Administrator/voicebootcamp 142.1Y.64.22
pg. 48
SB Publisher Administrator/voicebootcamp 142.1Y.65.21
Task 1: Manage Network and Feature Services
In this task, you will explore CUCM settings and make some basic configuration changes
Step 1 Connect to your Pod Desktop (Candidate PC), where X is your pod number as illustrated in lab 0. Login as
Administrator with the password administrator or Go to https://142.1Y.64.21
Step 2 Access the Cisco Unified Communications Manager (CUCM) with a web browser. Open the following URL:
https://142.1Y.64.21/ccmadmin. Note the icon on your desktop
Step 3 Our Voice lab does not contain or require a Public Key Infrastructure (PKI) or a Certificate Authority (CA).
Don’t worry if you get any security messages. Simply accept everything anywhere throughout this class.
Here is an example
Step 4 Log in with the Username Administrator and Password voicebootcamp
Step 5 Don’t worry if you get an “error” on backup devices.
Step 6 Navigate to System > Server. Click Find. Note the 3 servers present.
Step 7 Click on rYhqucmpub. Change the Hostname/IP Address to 142.1Y.64.21
Click Save and OK on the pop up.
Step 8 Once again, navigate to System > Server. Click Find. Note the 2 servers
present.
pg. 49
Step 9 Click on rYhqcucmsub. Change the Hostname/IP Address to 142.1Y.64.22
Click Save and OK on the pop up
Note The subscriber has already been configured with its IP address during the installation procedure, because
installation requires the subscriber to be added as a server before installing it.
Step 10 Navigate to System > Cisco Unified CM. Click Find. Note the 2 servers present. CUPS
is not a call processing server.
Step 11 Click on CM_CUCMPub. Change the Cisco Unified Communications Manager Name
to 142.1Y.64.21. Click Save, Apply Config, Reset and OK On all pop ups.
Step 12 Once again, navigate to System > Cisco Unified CM. Click Find. Note the 2 servers
present.
Step 13 Click on CM_CUCMSub. Change the Cisco Unified Communications Manager Name
to 142.1Y.64.22. Click Save, Apply Config, Reset and OK on all pop ups.
Step 14 On the upper right section of the Cisco Unified CM Administration screen, under
Navigation, select Cisco Unified Serviceability. Click Go
Step 15 Go to Tools > Service Activation.
Step 16 From the Service Activation page, select the publisher 142.1Y.64.21 from the
Select Server drop-down list. Click Go.
Step 17 From the list of services, activate the Cisco CallManager, Cisco TFTP,Cisco IP Voice
Media Streaming App, Cisco DirSync, Cisco Dialed Number Analyzer Server, Cisco
Dialed Number Analyzer, Cisco CTI Manager, Self Provisioning IVR, Cisco AXL Web
Service and Cisco Serviceability Reporter services. If a service is already activated,
you don’t need to “activate it again”. Just leave the box checked. You may have other
services activated, if so, leave them as is. The Cisco CallManager service is responsible
for call processing, while the Cisco TFTP service hosts the configuration files for the IP
phones. The Cisco Serviceability Reporter service generates various daily reports,
which can be accessed in the Cisco Unified Communications Manager Serviceability web
interface.
Step 18 Click Save to activate these services. There will be a pop-up window that
informs you that service activation will take a while. Confirm by clicking
OK. Wait for the page to refresh.
Step 19 Under Select Server, now choose your Subscriber which is 142.1Y.64.22.
Click Go.
Step 20 Activate your Cisco CallManager, Cisco TFTP, Cisco IP Voice Media
Streaming App, Cisco CTIManager, Cisco AXL Web Service and Cisco
Serviceability Reporter services. Click Save and OK as needed.
Step 21 Browse to Tools > Control Center – Feature Services.
Step 22 At the Select Server page, select 142.1Y.64.21. Click Go.
Step 23 Verify that the all the services you just activated are started. Again, it is OK
if other services are started as well.
pg. 50
Step 24 Note that if ANY time you get an annoying message like this one while
surfing to a web enabled device in class, either just try again to the web link,
or shut down your Pod Desktop web browser in full, and open it up again to
the correct URL
Step 25 In the upper right, return to Cisco Unified CM Administration. Click Go.
Step 26 Under System > Enterprise Parameters scroll down to the Phone URL
Parameters section. Note that the phone URLs include the hostname (CUCMPub).
Step 27 To remove DNS reliance, change only the hostname and domain part of all
phone URLs to the appropriate IP address and click Save and Apply Config
and Reset. For example change:
http://hYhqcucmpub:8080/ccmcip/authenticate.jsp
to http://12.1Y.64.21:8080/ccmcip/authenticate.jsp
Activity Verification
You have completed this task when you attain these results:
 Verify CUCM settings
 Verify that all required services are started.
Task 2: Configure Cisco Unified
Communications Manager Enterprise and
Service Parameters
In this task, you will enable the dependency records and verify the automatically created URLs.
You will also enable the CDR service parameters
Configure Enterprise Parameters
Step 1 In CUCM, navigate to System > Enterprise Parameters.
Step 2 In the CCMAdmin Parameters pane, activate the Enable Dependency Records
parameter by setting the value to True.
pg. 51
Note Dependency records help you to determine which records in the database use other records. For example, you
can determine which devices (such as CTI route points or phones) use a particular CSS. If you need to delete a record
from Cisco Unified Communications Manager, you can use dependency records to show which records are associated
with the record that you want to delete. You then can reconfigure those records so that they are associated with a
different record
Step 3 Under the Enterprise Parameters Configuration pane, change the Advertise G.722
Codec to Disabled.
Step 4 Click OK in the pop-up window, and then click Save and Apply Config.
Step 5 In CUCM, navigate to System > Service Parameters and choose the publisher server
at 142.1Y.64.21 (Active). Wait for the window to refresh and then choose the Cisco
CallManager (Active) service from the drop-down list.
Step 6 Set the CDR Enabled Flag value to True in the System parameters
Note The CDR Enabled Flag parameter determines whether CDRs (Call Detail Records) are generated. Valid values
specify True (CDRs are generated) or False (CDRs are not generated).
Step 7 Set the CDR Log Calls with Zero Duration Flag to True in the System parameters.
Step 8 Scroll down to the Clusterwide Parameters (Device—General) section .
Set the parameter Call Diagnostics Enabled value to Enabled Only When CDR
Enabled Flag is True.
Note The Call Diagnostics Enabled parameter determines whether CMRs—also called diagnostic records—are
generated. Generating CMRs without corresponding CDRs can cause uncontrolled disk-space consumption.
Therefore, you should always enable CDRs when CMRs are enabled. If you choose Enabled Only When CDR
Enabled Flag is True and the CDR Enabled Flag service parameter is set to False, no CMRs will be generated
Step 9 Save the changes.
Step 10 Repeat thee steps for the subscriber server at 142.1.64.21 and save the
Changes
Note There is no need to repeat Step 8 for the subscriber server because the parameter that is changed in Step 8 is
a clusterwide parameter and is automatically applied to all servers.
Activity Verification
You have completed this task when you attain these results:
 The Dependency Records parameter is enabled.
 The CDR parameters are enabled
pg. 52
Lab 2. Managing User Accounts in Cisco Unified Communications Manager
Lab 3: Implementing IP Phones
Lab 4: Implementing PSTN Gateways
Lab 5: Configuring Cisco Unified Communications Manager Call-Routing Components
Lab 6: Implementing Digit Manipulation
Lab 7: Implementing Calling Privileges in Cisco Unified Communications Manager
Lab 8: Implementing Cisco Unified Border Element (CUBE) for calls to and from the Actual PSTN
Lab 9: Implementing Call Coverage in Cisco Unified Communications Manager
Lab 10: Integrating Cisco Unity Connection with Cisco Unified Communications Manager
Lab 11: Implementing Unity Connection Voice Mailboxes
Lab 12: Enable Cisco Unified Communications Manager IM and Presence Service and the Jabber Client
Lab 13: Install and Operate Cisco Unified RTMT
Lab 14: Backing Up Cisco Unified Communications Manager Using the Disaster Recovery System

More Related Content

What's hot (20)

PPTX
Hyper-Converged Infrastructure: Concepts
Nick Scuola
 
PDF
CCNA - Switching Concepts made easy
sushmil123
 
PPTX
Présentation VOIP
Cynapsys It Hotspot
 
PPT
Cisco Call Manager
Ousmane CAMARA
 
PDF
3 cucm database
pasabakac
 
PPTX
Juniper SRX Quickstart 12.1R3 by Thomas Schmidt
Nam Nguyen
 
PDF
Mise en place de deux réseaux LAN interconnectés par un réseau WAN
Ghassen Chaieb
 
PPTX
Vxlan deep dive session rev0.5 final
KwonSun Bae
 
PDF
10 step-to-configure-cisco-call-manager-express
Nguyen Thanh
 
PDF
Collaboration Architecture Design: Cisco Collaboration Administration: Easy ...
Cisco Canada
 
PDF
Diameter Processing with Kamailio
Carsten Bock
 
PPTX
Transitioning IPv4 to IPv6
Jhoni Guerrero
 
PDF
Building DataCenter networks with VXLAN BGP-EVPN
Cisco Canada
 
PPTX
9 ipv6-routing
Olivier Bonaventure
 
PDF
L’ Administration des Réseaux en Pratique
Amadou Dia
 
PPTX
Wireless Penetration Testing
Mohammed Adam
 
PDF
TechWiseTV Workshop: Software-Defined Access
Robb Boyd
 
PDF
"SRv6の現状と展望" ENOG53@上越
Kentaro Ebisawa
 
PDF
RUCKUS Unleashed & SmartZone
Carla Nadin
 
PDF
Formation elastix
bincoul
 
Hyper-Converged Infrastructure: Concepts
Nick Scuola
 
CCNA - Switching Concepts made easy
sushmil123
 
Présentation VOIP
Cynapsys It Hotspot
 
Cisco Call Manager
Ousmane CAMARA
 
3 cucm database
pasabakac
 
Juniper SRX Quickstart 12.1R3 by Thomas Schmidt
Nam Nguyen
 
Mise en place de deux réseaux LAN interconnectés par un réseau WAN
Ghassen Chaieb
 
Vxlan deep dive session rev0.5 final
KwonSun Bae
 
10 step-to-configure-cisco-call-manager-express
Nguyen Thanh
 
Collaboration Architecture Design: Cisco Collaboration Administration: Easy ...
Cisco Canada
 
Diameter Processing with Kamailio
Carsten Bock
 
Transitioning IPv4 to IPv6
Jhoni Guerrero
 
Building DataCenter networks with VXLAN BGP-EVPN
Cisco Canada
 
9 ipv6-routing
Olivier Bonaventure
 
L’ Administration des Réseaux en Pratique
Amadou Dia
 
Wireless Penetration Testing
Mohammed Adam
 
TechWiseTV Workshop: Software-Defined Access
Robb Boyd
 
"SRv6の現状と展望" ENOG53@上越
Kentaro Ebisawa
 
RUCKUS Unleashed & SmartZone
Carla Nadin
 
Formation elastix
bincoul
 

Viewers also liked (18)

PDF
Sample Technical Guide
lisalugo
 
PDF
Jobs Flashcards
English Lessons
 
DOC
Cipt2 implementing cisco unified communications ip telephony part 2
bestip
 
DOCX
Ceh certified ethical hacker
bestip
 
PDF
Cisco web ex_meeting_server
Michael Ganschuk
 
PDF
Cisco Spark Hybrid Services & Cloud Collaboration
Cisco Canada
 
PDF
Using Flashcards and Teaching English
David Deubelbeiss
 
PDF
Cisco jabber presentation
abbyfavali
 
PDF
Deploying IP/MPLS VPN - Cisco Networkers 2010
Febrian ‎
 
PPTX
Introduction to Java programming - Java tutorial for beginners to teach Java ...
Duckademy IT courses
 
PDF
Alphorm.com Support de la Formation Cisco CCNP SWITCH (examen 300-115)
Alphorm
 
PDF
Alphorm.com Formation Cisco CCNP TSHOOT
Alphorm
 
PPSX
C++ Programming Language
Mohamed Loey
 
PPTX
The sounds of english
Jedalyn Salvador
 
PPTX
Organic farming
Clarizze Ramos
 
PPTX
Phonetics & phonology (The way Vowels and Consonant of English are articulated)
AishaKoukab
 
ODP
1 million downloaded Spoken English e-book
Sujai.G Pillai
 
PPTX
Introduction to java
Veerabadra Badra
 
Sample Technical Guide
lisalugo
 
Jobs Flashcards
English Lessons
 
Cipt2 implementing cisco unified communications ip telephony part 2
bestip
 
Ceh certified ethical hacker
bestip
 
Cisco web ex_meeting_server
Michael Ganschuk
 
Cisco Spark Hybrid Services & Cloud Collaboration
Cisco Canada
 
Using Flashcards and Teaching English
David Deubelbeiss
 
Cisco jabber presentation
abbyfavali
 
Deploying IP/MPLS VPN - Cisco Networkers 2010
Febrian ‎
 
Introduction to Java programming - Java tutorial for beginners to teach Java ...
Duckademy IT courses
 
Alphorm.com Support de la Formation Cisco CCNP SWITCH (examen 300-115)
Alphorm
 
Alphorm.com Formation Cisco CCNP TSHOOT
Alphorm
 
C++ Programming Language
Mohamed Loey
 
The sounds of english
Jedalyn Salvador
 
Organic farming
Clarizze Ramos
 
Phonetics & phonology (The way Vowels and Consonant of English are articulated)
AishaKoukab
 
1 million downloaded Spoken English e-book
Sujai.G Pillai
 
Introduction to java
Veerabadra Badra
 
Ad

Similar to VoiceBootcamp Ccnp collaboration lab guide v1.0 sample (20)

PPT
ACIT - CCNA Training Course Topic - Switch Stp ACIT
Sleek International
 
PPT
managing your network environment
scooby_doo
 
PPT
05 module managing your network enviornment
Asif
 
DOC
Exam viewer2
Jorgito Leal
 
PDF
Packettracersimulationlabl3routing 130306235157-phpapp02
A.S.M Shmimul Islam.
 
PPT
Cisco data center support
Krunal Shah
 
DOCX
Lab 9 instructions
trayyoo
 
PPTX
Switching techniques in networking and uses
lochanraj1
 
PPTX
CCNA_LAB_MANUAL_part1.pptx
SanathKumarV3
 
DOCX
CCNA Connecting NetworksSA ExamLab 13 CCNA Connecting Netwo.docx
keturahhazelhurst
 
PPT
Wan Interface Configuration
Kishore Kumar
 
PPT
Day 13.1..1 catalyst switch
CYBERINTELLIGENTS
 
PPTX
ENSA_Module_10.pptx
SkyBlue659156
 
PDF
corporate network
Kaushal Kishore
 
PDF
Lab 3.5.1 basic frame relay
Manuel Garcia Meza
 
PPT
lab1
guest575c3e
 
PDF
Hướng dẫn cài đặt switch planet layer 3
3c telecom
 
DOCX
All contents are Copyright © 1992–2012 Cisco Systems, Inc. A.docx
galerussel59292
 
DOC
Labpractice1 configuringbasicroutingandswitchingwithanswer-121214084802-phpapp02
Abhilash Kuniyil
 
ACIT - CCNA Training Course Topic - Switch Stp ACIT
Sleek International
 
managing your network environment
scooby_doo
 
05 module managing your network enviornment
Asif
 
Exam viewer2
Jorgito Leal
 
Packettracersimulationlabl3routing 130306235157-phpapp02
A.S.M Shmimul Islam.
 
Cisco data center support
Krunal Shah
 
Lab 9 instructions
trayyoo
 
Switching techniques in networking and uses
lochanraj1
 
CCNA_LAB_MANUAL_part1.pptx
SanathKumarV3
 
CCNA Connecting NetworksSA ExamLab 13 CCNA Connecting Netwo.docx
keturahhazelhurst
 
Wan Interface Configuration
Kishore Kumar
 
Day 13.1..1 catalyst switch
CYBERINTELLIGENTS
 
ENSA_Module_10.pptx
SkyBlue659156
 
corporate network
Kaushal Kishore
 
Lab 3.5.1 basic frame relay
Manuel Garcia Meza
 
Hướng dẫn cài đặt switch planet layer 3
3c telecom
 
All contents are Copyright © 1992–2012 Cisco Systems, Inc. A.docx
galerussel59292
 
Labpractice1 configuringbasicroutingandswitchingwithanswer-121214084802-phpapp02
Abhilash Kuniyil
 
Ad

Recently uploaded (20)

PDF
Tips for Writing the Research Title with Examples
Thelma Villaflores
 
PPTX
national medicinal plants board mpharm.pptx
SHAHEEN SHABBIR
 
PPTX
Rules and Regulations of Madhya Pradesh Library Part-I
SantoshKumarKori2
 
PPTX
FAMILY HEALTH NURSING CARE - UNIT 5 - CHN 1 - GNM 1ST YEAR.pptx
Priyanshu Anand
 
PDF
A guide to responding to Section C essay tasks for the VCE English Language E...
jpinnuck
 
PPTX
Qweb Templates and Operations in Odoo 18
Celine George
 
PPTX
Various Psychological tests: challenges and contemporary trends in psychologi...
santoshmohalik1
 
PPTX
TOP 10 AI TOOLS YOU MUST LEARN TO SURVIVE IN 2025 AND ABOVE
digilearnings.com
 
PPTX
Gupta Art & Architecture Temple and Sculptures.pptx
Virag Sontakke
 
PDF
Exploring-the-Investigative-World-of-Science.pdf/8th class curiosity/1st chap...
Sandeep Swamy
 
PPTX
Command Palatte in Odoo 18.1 Spreadsheet - Odoo Slides
Celine George
 
PPTX
MALABSORPTION SYNDROME: NURSING MANAGEMENT.pptx
PRADEEP ABOTHU
 
PPTX
quizbeenutirtion-230726075512-0387d08e.pptx
domingoriahlyne
 
PPTX
Constitutional Design Civics Class 9.pptx
bikesh692
 
PPTX
Introduction to pediatric nursing in 5th Sem..pptx
AneetaSharma15
 
PPTX
How to Manage Resupply Subcontracting in Odoo 18
Celine George
 
PPTX
GENERAL METHODS OF ISOLATION AND PURIFICATION OF MARINE__MPHARM.pptx
SHAHEEN SHABBIR
 
PPTX
Joint Mobility : Fundamentals of Joint Mobility
Sreeraj S R
 
PPTX
10CLA Term 3 Week 4 Study Techniques.pptx
mansk2
 
PPTX
Electrophysiology_of_Heart. Electrophysiology studies in Cardiovascular syste...
Rajshri Ghogare
 
Tips for Writing the Research Title with Examples
Thelma Villaflores
 
national medicinal plants board mpharm.pptx
SHAHEEN SHABBIR
 
Rules and Regulations of Madhya Pradesh Library Part-I
SantoshKumarKori2
 
FAMILY HEALTH NURSING CARE - UNIT 5 - CHN 1 - GNM 1ST YEAR.pptx
Priyanshu Anand
 
A guide to responding to Section C essay tasks for the VCE English Language E...
jpinnuck
 
Qweb Templates and Operations in Odoo 18
Celine George
 
Various Psychological tests: challenges and contemporary trends in psychologi...
santoshmohalik1
 
TOP 10 AI TOOLS YOU MUST LEARN TO SURVIVE IN 2025 AND ABOVE
digilearnings.com
 
Gupta Art & Architecture Temple and Sculptures.pptx
Virag Sontakke
 
Exploring-the-Investigative-World-of-Science.pdf/8th class curiosity/1st chap...
Sandeep Swamy
 
Command Palatte in Odoo 18.1 Spreadsheet - Odoo Slides
Celine George
 
MALABSORPTION SYNDROME: NURSING MANAGEMENT.pptx
PRADEEP ABOTHU
 
quizbeenutirtion-230726075512-0387d08e.pptx
domingoriahlyne
 
Constitutional Design Civics Class 9.pptx
bikesh692
 
Introduction to pediatric nursing in 5th Sem..pptx
AneetaSharma15
 
How to Manage Resupply Subcontracting in Odoo 18
Celine George
 
GENERAL METHODS OF ISOLATION AND PURIFICATION OF MARINE__MPHARM.pptx
SHAHEEN SHABBIR
 
Joint Mobility : Fundamentals of Joint Mobility
Sreeraj S R
 
10CLA Term 3 Week 4 Study Techniques.pptx
mansk2
 
Electrophysiology_of_Heart. Electrophysiology studies in Cardiovascular syste...
Rajshri Ghogare
 

VoiceBootcamp Ccnp collaboration lab guide v1.0 sample

  • 2. pg. 2 Overview This guide presents the instructions and other information concerning the lab activities for this course Table of Contents Lab 1 - Preparing Network Infrastructure – VLAN/NTP/DHCP .....................................................................3 1. Creating VLAN on Switch ..................................................................................................................4 2. Lab 2 – Configuring Voice Port..............................................................................................................9 2.1. Configuring T1 Port to support MGCP ..............................................................................................9 2.2 Configuring T1 Port to support SIP ............................................................................................11 2.3 Configuring E1 Port to support H323.........................................................................................13 3 Configuring POTS Dial Peers ...............................................................................................................14 3.2 Configuring IOS Dial Peer for Inbound PSTN Calls ......................................................................14 3.3 Configuring IOS to support outbound PSTN calls – 911, Local, Long Distance & International .15 4 Creating Voice over IP Dial Peer .........................................................................................................16 5 Preparing SIP Gateway to route calls from PSTN to Cisco Unified CUCM 10.5 ..................................17 6. Investigate dial peer matches.............................................................................................................17 7. Configure CUCME to Support Endpoints ............................................................................................18 7.1 Configure IP Telephony Service for SCCP Phone ........................................................................18 Creating SCCP Extension.........................................................................................................................18 7.2 Create Phone and Assign Extension to Phone............................................................................19
  • 3. pg. 3 Lab 1 - Preparing Network Infrastructure – VLAN/NTP/DHCP In this infrastructure, HQ Site and SiteC Devices (Router and 2x Phone) are connected to Cisco Catalyst Switch 3560 known as SW. R2 or SiteB Router has a built in EtherSwitch Module. On device name SW, first 3 port are connected to HQ devices while last 3 port are connected SiteC devices Now telnet to 192.168.10.1Y (where Y is your POD number). Use the username/password provided to you by your instructore. Username: ____________________ Password:______________________ POD # ________________________
  • 4. pg. 4 Task Lists 1. Creating VLAN on Switch Objective – Create voice vlan and data vlan to be assigned to IP Phone. IP Phones are connected to their respective port however in order to communicate, they must obtain IP Address from the network. In this case, we will configure IOS Router as a DHCP Go to www.Google.com and type: putty and download the putty client on your PC A Windows installer for everything except PuTTYtel putty-0.66-installer.exe (example) Open Putty IP Address: 192.168.10.1Y (where Y is your POD/Rack Number)
  • 5. pg. 5 Login username your username: Username: student password: voicebootcamp Once you have logged on to your AccessServer, type: show hosts
  • 6. pg. 6 Troubleshooting – ERROR If you get the following Type: clear line 33 (last 2 digit of the 2033 in circle above) If you see the prompt: HQ> or SB> type: enable Enable password: cisco (if asked) Repeat the above Now open 3 more PUTTY – one for SB, SC and SWITCH
  • 7. pg. 7 Configure the following VLAN based on their devices We will configure the following VLAN on your Switch (hostname SW) HQ – - Voice vlan – 10Y - Data vlan – 20Y SiteC - Voice VLAN 50Y - Data vlan 60Y - Creating VLAN o sw(config)vlan 10Y o sw(config-vlan)#name HQVoice o sw(config)#vlan 20Y o sw(config-vlan)#name HQData o sw(config)#vlan 50Y o sw(config-vlan)#name SCVoice o sw(config)#vlan 60Y o sw(config-vlan)#name SCData HQ Devices interface FastEthernet0/1 description ***Trunk to HQ Router*** switchport trunk encapsulation dot1q switchport trunk native vlan 20Y switchport mode trunk interface range FastEthernet0/2 - 3 switchport access vlan 20Y switchport mode access switchport voice vlan 10Y
  • 8. pg. 8 spanning-tree portfast For SiteC Devices interface FastEthernet0/6 switchport trunk encapsulation dot1q switchport trunk native vlan 60Y switchport mode trunk interface range FastEthernet0/7 - 8 switchport access vlan 60Y switchport mode access switchport voice vlan 50Y spanning-tree portfast
  • 9. pg. 9 2. Lab 2 – Configuring Voice Port 2.1. Configuring T1 Port to support MGCP In this lab, you will prepare HQ Router T1 port to communicate with Cisco Unified Communication Manager 10.5 as a MGCP Gateway. Now this particular lab you will not be able to test until you reach the CUCM Part which is in Module 2. But for now, prepare the router
  • 10. pg. 10 Go to HQ Router and type the following commands  Use PuTTY login to your HQ Router in and change to enable mode Card type T1 0 2  this command may not be available on all routers. Skip it in that case Isdn switch-type primary-ni Network-clock-participate wic 2 Controller t1 0/2/0 Framing esf Linecode b8zs Pri-group timeslot 1-4 service mgcp  Define first 4 port to use MGCP Ccm-manager mgcp  use MGCP process Ccm-manager fallback  Use for SRST fall back. Ccm-manager music-on-hold  Enable Music on Hold over MGCP Ccm-manager redundant-host 142.1Y.64.21  Backup CallManager Mgcp call-agent 142.1Y.64.22  Register with Active CUCM mgcp bind control source FastEthernet0/0.10Y  source address of control/media traffic mgcp bind media source FastEthernet0/0.10Y mgcp interface serial 0/2/0:23 isdn bind-l3 ccm-manager  Bind D-Channel with CUCM Verify (T1 will not be establish at this moment) HQ# show isdn status Global ISDN Switchtype = primary-ni ISDN Serial0/2/0:23 interface dsl 0, interface ISDN Switchtype = primary-ni Layer 1 Status: DEACTIVATED Layer 2 Status: TEI = 0, Ces = 1, SAPI = 0, State = TEI_ASSIGNED Layer 3 Status: 0 Active Layer 3 Call(s) Active dsl 0 CCBs = 0 The Free Channel Mask: 0x00000000 Number of L2 Discards = 0, L2 Session ID = 16 Total Allocated ISDN CCBs = 0 This port will be TEI_ASSIGNED until we configured MGCP in CallManager/CUCM
  • 11. pg. 11 2.2Configuring SiteB Router to support SIP In this lab, you will configure SiteB (R2) router as a SIP Gateway. T1 will be configured to communicate with Service Provider and then we must create an inbound dial peer to accept calls  Use PuTTY login to your SiteB in and change to enable mode  In the enable mode, enter the show running-config command No MGCP commands are currently configured on the gateway.  In global configuration mode, enter the following commands Card type T1 0 2  this command may not be available on all routers. Skip it in that case Isdn switch-type primary-ni Network-clock-participate wic 2 Controller t1 0/2/0 Framing esf Linecode b8zs Pri-group timeslot 1-4  Define first 4 ports
  • 12. pg. 12 SiteB# show isdn status Global ISDN Switchtype = primary-ni ISDN Serial0/2/0:23 interface dsl 0, interface ISDN Switchtype = primary-ni Layer 1 Status: DEACTIVATED Layer 2 Status: TEI = 0, Ces = 1, SAPI = 0, State = MULTIPLE_FRAME_ESTABLISHED Layer 3 Status: 0 Active Layer 3 Call(s) Active dsl 0 CCBs = 0 The Free Channel Mask: 0x00000000 Number of L2 Discards = 0, L2 Session ID = 16 Total Allocated ISDN CCBs = 0
  • 13. pg. 13 2.3Configuring E1 Port to support H323 Prepare SiteC (R3) router to communicate with service provider via E1. SiteC is in Hong Kong.  Use PuTTY login to your SiteC Router in and change to enable mode  In the enable mode, enter the show running-config command No MGCP commands are currently configured on the gateway.  In global configuration mode, enter the following commands
  • 14. pg. 14 Card type E1 0 2  this command may not be available on all routers. Skip it in that case Isdn switch-type primary-ni Network-clock-participate wic 2 Controller E1 0/2/0 Framing CRC4 Linecode HDB3 Pri-group timeslot 1-4  Define first 4 ports Verify: SiteC# show isdn status Global ISDN Switchtype = primary-ni ISDN Serial0/2/0:15 interface dsl 0, interface ISDN Switchtype = primary-ni Layer 1 Status: ACTIVE Layer 2 Status: TEI = 0, Ces = 1, SAPI = 0, State = MULTIPLE_FRAME_ESTABLISHED Layer 3 Status: 0 Active Layer 3 Call(s) Active dsl 0 CCBs = 0 The Free Channel Mask: 0x8000000F Number of L2 Discards = 0, L2 Session ID = 2 Total Allocated ISDN CCBs = 0 3 Configuring POTS Dial Peers 3.2Configuring IOS Dial Peer for Inbound PSTN Calls On both SiteB and SiteC Router type the following dial peer configuration for receiving inbound calls Dial-peer voice 1 pots Incoming called-number .T  This command allow all inbound call to match this dial peer Direct-inward-dial  This command allow calls to reach the extension directly MULTIPLE_FRAME_ESTABLISHED mean E1 was connected to Service Provider and met all requirements to establish the line.
  • 15. pg. 15 3.3Configuring IOS to support outbound PSTN calls – 911, Local, Long Distance & International On SiteB Router, type the following dial peer 911 Dial Peer Dial-peer voice 911 port Destination-pattern 911 port 0/2/0:23 forward-digit 3 7 Digit Local Dialing (local calls) Dial-peer voice 7 pots Destination-pattern 9[2-9]…… port 0/2/0:23 11 Digit Long Distance Dialing Dial-peer voice 11 pots Destination-pattern 91[2-9]..[2-9]…… port 0/2/0:23 forward-digit 11 NOTE: Forward-digit is required because router will otherwise drop 9 and 1 110 Digit International Dialing Dial-peer voice 110 pots Destination-pattern 9011T port 0/2/0:23 prefix 011
  • 16. pg. 16 On SiteC Router 999 Dial Peer Dial-peer voice 911 port Destination-pattern 999 port 0/2/0:15 forward-digit 3 7 Digit Local Dialing (local calls) Dial-peer voice 7 pots Destination-pattern 9[2-9]…… port 0/2/0:15 11 Digit Long Distance Dialing Dial-peer voice 11 pots Destination-pattern 91[2-9]..[2-9]…… port 0/2/0:15 forward-digit 11 NOTE: Forward-digit is required because router will otherwise drop 9 and 1 110 Digit International Dialing (only on SiteC) Dial-peer voice 111 pots Destination-pattern 900T port 0/2/0:15 4 Creating Voice over IP Dial Peer When user dials 197230Y3001, router will convert these to 4 digit (using translation pattern which will be configured later) SiteB Router Dial-peer voice 100 voip destination-pattern 3…  Y = your partner rack # session target ipv4:142.1Y.65.21  IP address of your partner router codec g711ulaw
  • 17. pg. 17 5 Preparing SIP Gateway to route calls from PSTN to Cisco Unified CUCM 10.5 Configure this on SiteB Router voice service voip sip  Enable SIP mode configuration session transport tcp  Ensure TCP is used for transport protocol bind all source-interface loopback0  Ensure source traffic for control/Media is VLAN 301 Dial Peer to Allow Incoming call from PSTN – PSTN User dial 197230Y3XXX to SiteB Phone dial-peer voice 1 pots (this is already done) incoming called-number .T  Allows all incoming call to match this dial peer direct-inward-dial  allow call to reach internal Phone. Bypass 2nd Dial Tone Dial Peer for Outbound call to PSTN dial-peer voice 911 pots destination-patter 911  match any extension start with 911 port 0/2/0:23  send the call to CUCM Ip address forward-digit 3 Convert 11/10 Digit incoming PSTN number to 4 digit extension voice translation-rule 1  Enable Translation Rule rule 1 /^197230Y3/ /3/  match the pattern rule 2 /^97230Y3/ /3/ voice translation-profile DID  create a translation profile translate called 1  Translate called/DNIS number voice-port 0/2/0:23 translation-profile incoming DID  apply the translation rule in Voice port. 6. Investigate dial peer matches When you dial a number and not sure why the call is failing or want to know which dial peer the call is using, type the following command in privilege mode Debug voice dial-peer all Make a call and see what dial peer it uses.
  • 18. pg. 18 This can be done on either SiteB or SiteC router 7. Configure CUCME to Support Endpoints Setup Cisco Unified Communication Manager Express on SiteC Router. 7.1Configure IP Telephony Service for SCCP Phone telephony-service max-ephones 15 max-dn 15 ip source-address 142.10Y.66.254 port 2000 auto assign 1 to 15 system message VoiceBootcamp Rack Y  where Y is your Rack number max-conferences 4 gain Creating SCCP Extension Create extension for 4001, 4002, and 4011 Ephone-dn 1 octo-line number 4001  Define the extension name SiteC Phone 1  Define Calling Party Name Label My Extension 4001  Define a label for each button Description 852240Y4001  Define External Mask for SiteC Phone. Ephone-dn 2 octo-line number 4002  Define the extension name SiteC Phone 2  Define Calling Party Name Label My Extension 4002  Define a label for each button Description 852240Y4002  Define External Mask for SiteC Phone.
  • 19. pg. 19 7.2Create Phone and Assign Extension to Phone Create Ephone for Phone 1 and Phone 2 for Site C. THIS IS SCCP Base Phone Ephone 1 mac-address 0200.4C4F.4FDD  MAC Address of your IP Phone 1 button 1:1 type 7965 Ephone 2 mac-address 0200.4C4F.4FCC  MAC Address of your IP Phone 2 button 1:2 type 7965 Register IP BLUE Phone to CUCME Installed VTGO IP Blue (www.ipblue.com) Download MultiTab Version Then open Phone Instance 7 and 8
  • 20. pg. 20 Module 2 – Cisco Unified Communication Manager Part 1 (CIPTV1) 1. Cisco Prime Collaboration Deployment – Installation Activity Objective Purpose of this lab is to use Prime Collaboration Deployment to install your Cisco CUCM Clusters. We are going to build two clusters. One Cluster is for HQ with Publisher and Subscriber. One cluster in SiteB (branch office) with only one publisher. SiteC - (Brach Office C) will be Unified Communication Express. (CME) Prime Collaboration already has the necessary ISO Files needed for this lab. However, you will need to follow the instruction to create the Virtual Machine Three part involve here 1st part – Create Virtual Machine 2nd Part – Using Prime Collaboration to start the installation process 3rd part – Time to Enjoy the City   as it will take 4 to 8 hours to complete the installation
  • 21. pg. 21 Figure 1 Vmware Hosts Server 142.1Y.64.200 – rYhostssrv200.corp.voicebootcamp.ca RY – HQ – CCNP Collab – Cisco Unified CM Publisher 10.5 RY – HQ – CCNP Collab – Cisco Unity Connection 10.5 RY – HQ – CCNP Collab – Telepresence VCS Control 142.1Y.64.210 – rYhostssrv210.corp.voicebootcamp.ca RY – HQ – CCNP Collab – Cisco Unified CM Subscriber 10.5 RY – HQ – CCNP Collab – Cisco Unified CCX 10.5 Primary RY – HQ – CCNP Collab – Telepresence TMS 142.1Y.64.231 – rYhostssrv231.corp.voicebootcamp.ca RY – SB – CCNP Collab – Cisco Unified CM Publisher 10.5 RY – HQ – CCNP Collab – Cisco Unified Presence 10.5 RY – HQ – CCNP Collab – Telepresence Conductor Server RY – HQ – CCNP Collab – Telepresence Server IP Address Schema Subnet Mask: 255.255.255.0 Default Gateway: 142.1Y.64.1 DNS: 172.16.1.120 DNS: ccnpcollabY.com NTP Server: 135.11.11.11 Secret Phrase – voicebootcamp Figure 2 Server Hostname IP Address HQ CUCM Pub ucmpub 142.1Y.64.21 HQ CUCM Sub ucmsub 142.1Y.64.22 SB CUCM Pub sbucmpub 142.1Y.65.21 HQ CUC cuc 142.1Y.64.23 HQ UCCX uccx 142.1Y.64.24 HQ IM im 142.1Y.64.25 TeleVCS Vcs 142.1Y.64.26 TeleTMS Tms 142.1Y.64.27 TeleConductor Conductor 142.1Y.64.28
  • 22. pg. 22 2. Creating Virtual Machine for Cisco Unified Collaboration Servers  Go to https://vmc.corp.voicebootcamp.ca:9443/vsphere-client/# o Login as – corppodY  where Y is your POD number) o Password: voicebootcamp  From the left menu bar – select vmc  Student – Data Center 1  POD 6 – CCNP, CCI Collaboration & UCCE  Create Virtual Machine based on Figure 1  Now from this point onward, you will create Virtual Machine from OVAF Template provided to us by Cisco. These OVF Template are pre-define parameters that are used to configure Virtual Machine based on Cisco’s requirement.  Right click on the necessary server based on the Virtual Machine that you are creating, and click Deploy OVF Template o OVF Template URL  CUCM - http://www.voicebootcamp.com/download/ovf/cucm10.ova  CUC - http://www.voicebootcamp.com/download/ovf/cuc10.ova  UCCX - http://www.voicebootcamp.com/download/ovf/uccx10.ova  IM - http://www.voicebootcamp.com/download/ovf/im10.ova
  • 27. pg. 27   NOW Repeat this for all other Servers. You must create all the server from Figure 1  Your pod should look sometime similar to this Figure below
  • 28. pg. 28  3. Preparing Cisco Prime Collaboration Server for ESX Hosts In order to use Cisco Prime Collaboration Deployment we must add all the Vmware Hosts. Cisco Prime Collaboration server has all the necessary ISO Files that are needed to complete these labs. You cannot use Prime Collaboration to install Telepresence therefore those vmware are already installed for you Login to https://pcd.corp.voicebootcamp.ca Username: administrator Password: voicebootcamp
  • 29. pg. 29 Add EXI Hosts Each POD has 3 ESXi Hosts 142.1Y.64.200 142.1Y.64.210 142.1Y.64.231 Username: root password: voicebootcamp From Inventory Menu of PCD click on ESXi Hosts
  • 30. pg. 30 Repeat this for other two servers
  • 31. pg. 31 Result should look something similar to this based on your Rack Add New Clusters HQ CUCM Cluster – Publisher & Subscriber SB CUCM Cluster – Publisher UCCX & Unity & Presence Individual clusters Go to Inventory  Clusters Add HQ CUCM Cluster Click Next  Add Nodes
  • 32. pg. 32 Please use the IP Address from Figure 2 Table and define it as per the VM you are configuring Now add the 2nd NODE Subscriber by repeating this process.
  • 33. pg. 33 Result should look something similar to this
  • 34. pg. 34 Click Next to Configure Cluster Wide Settings OS Administration & Application Credentials Username: administrator Password: voicebootcamp Security Password: voicebootcamp Certificate Information – as per the image
  • 35. pg. 35 Click Next to Configure DNS Settings (Optional) Select both hostname and Assign the following DNS Settings Primary DNS – 172.16.1.120 Domain: ccnpcollabY.com  Y is your POD Number Click Next to Configure NTP Settings NTP Server: 135.11.11.11 (this is for all POD)
  • 36. pg. 36 Click Next to Configure NIC Settings (Optional) Leave Default Settings Click Next to Configure Time Zones Time zone – Los Angeles Click Finish to complete this task.
  • 37. pg. 37 Add SiteB CUCM Cluster NOTE **** Follow the same procedure to install SiteB CUCM Cluster ****
  • 38. pg. 38 Add CUC Cluster Rest of the settings are the same as above.
  • 39. pg. 39 Add UCCX Cluster Repeat this process for UCCX Cluster.
  • 40. pg. 40 Add Presence Cluster – IMPORTANT this must be added to RY – HQ – CUCM Cluster with publisher and subscriber Go to
  • 41. pg. 41 Enter the rest of the information just like the above server Start The Installation Task Goto Task Menu  Select Install
  • 42. pg. 42 Click Next To Choose Installation Files
  • 43. pg. 43 Now select Installation File for Presence
  • 44. pg. 44 Click Next to schedule it
  • 45. pg. 45 Click Next to define sequence of installation
  • 46. pg. 46 Now Repeat this installation task for UCCX and CUC Clusters as well
  • 47. pg. 47 Configure Initial Settings on Unified Communications Servers Activity Objective In this activity, you will configure Cisco Unified Communications initial settings and activate services. After completing this activity, you will be able to meet these objectives:  View and configure the initial settings of Cisco Unified Communications Manager (CUCM)  View and configure the initial settings of Cisco Unity Connection (CUC)  View and configure the initial settings of Cisco Unified IM and Presence (CUPS or IMP)  Activate and manage required services  Configure Cisco Unified Communications Manager enterprise and service parameters  Verify Enterprise Licensing Device Name Username/Password IP Address HQ Publisher Administrator/voicebootcamp 142.1Y.64.21 HQ Subscriber Administrator/voicebootcamp 142.1Y.64.22
  • 48. pg. 48 SB Publisher Administrator/voicebootcamp 142.1Y.65.21 Task 1: Manage Network and Feature Services In this task, you will explore CUCM settings and make some basic configuration changes Step 1 Connect to your Pod Desktop (Candidate PC), where X is your pod number as illustrated in lab 0. Login as Administrator with the password administrator or Go to https://142.1Y.64.21 Step 2 Access the Cisco Unified Communications Manager (CUCM) with a web browser. Open the following URL: https://142.1Y.64.21/ccmadmin. Note the icon on your desktop Step 3 Our Voice lab does not contain or require a Public Key Infrastructure (PKI) or a Certificate Authority (CA). Don’t worry if you get any security messages. Simply accept everything anywhere throughout this class. Here is an example Step 4 Log in with the Username Administrator and Password voicebootcamp Step 5 Don’t worry if you get an “error” on backup devices. Step 6 Navigate to System > Server. Click Find. Note the 3 servers present. Step 7 Click on rYhqucmpub. Change the Hostname/IP Address to 142.1Y.64.21 Click Save and OK on the pop up. Step 8 Once again, navigate to System > Server. Click Find. Note the 2 servers present.
  • 49. pg. 49 Step 9 Click on rYhqcucmsub. Change the Hostname/IP Address to 142.1Y.64.22 Click Save and OK on the pop up Note The subscriber has already been configured with its IP address during the installation procedure, because installation requires the subscriber to be added as a server before installing it. Step 10 Navigate to System > Cisco Unified CM. Click Find. Note the 2 servers present. CUPS is not a call processing server. Step 11 Click on CM_CUCMPub. Change the Cisco Unified Communications Manager Name to 142.1Y.64.21. Click Save, Apply Config, Reset and OK On all pop ups. Step 12 Once again, navigate to System > Cisco Unified CM. Click Find. Note the 2 servers present. Step 13 Click on CM_CUCMSub. Change the Cisco Unified Communications Manager Name to 142.1Y.64.22. Click Save, Apply Config, Reset and OK on all pop ups. Step 14 On the upper right section of the Cisco Unified CM Administration screen, under Navigation, select Cisco Unified Serviceability. Click Go Step 15 Go to Tools > Service Activation. Step 16 From the Service Activation page, select the publisher 142.1Y.64.21 from the Select Server drop-down list. Click Go. Step 17 From the list of services, activate the Cisco CallManager, Cisco TFTP,Cisco IP Voice Media Streaming App, Cisco DirSync, Cisco Dialed Number Analyzer Server, Cisco Dialed Number Analyzer, Cisco CTI Manager, Self Provisioning IVR, Cisco AXL Web Service and Cisco Serviceability Reporter services. If a service is already activated, you don’t need to “activate it again”. Just leave the box checked. You may have other services activated, if so, leave them as is. The Cisco CallManager service is responsible for call processing, while the Cisco TFTP service hosts the configuration files for the IP phones. The Cisco Serviceability Reporter service generates various daily reports, which can be accessed in the Cisco Unified Communications Manager Serviceability web interface. Step 18 Click Save to activate these services. There will be a pop-up window that informs you that service activation will take a while. Confirm by clicking OK. Wait for the page to refresh. Step 19 Under Select Server, now choose your Subscriber which is 142.1Y.64.22. Click Go. Step 20 Activate your Cisco CallManager, Cisco TFTP, Cisco IP Voice Media Streaming App, Cisco CTIManager, Cisco AXL Web Service and Cisco Serviceability Reporter services. Click Save and OK as needed. Step 21 Browse to Tools > Control Center – Feature Services. Step 22 At the Select Server page, select 142.1Y.64.21. Click Go. Step 23 Verify that the all the services you just activated are started. Again, it is OK if other services are started as well.
  • 50. pg. 50 Step 24 Note that if ANY time you get an annoying message like this one while surfing to a web enabled device in class, either just try again to the web link, or shut down your Pod Desktop web browser in full, and open it up again to the correct URL Step 25 In the upper right, return to Cisco Unified CM Administration. Click Go. Step 26 Under System > Enterprise Parameters scroll down to the Phone URL Parameters section. Note that the phone URLs include the hostname (CUCMPub). Step 27 To remove DNS reliance, change only the hostname and domain part of all phone URLs to the appropriate IP address and click Save and Apply Config and Reset. For example change: http://hYhqcucmpub:8080/ccmcip/authenticate.jsp to http://12.1Y.64.21:8080/ccmcip/authenticate.jsp Activity Verification You have completed this task when you attain these results:  Verify CUCM settings  Verify that all required services are started. Task 2: Configure Cisco Unified Communications Manager Enterprise and Service Parameters In this task, you will enable the dependency records and verify the automatically created URLs. You will also enable the CDR service parameters Configure Enterprise Parameters Step 1 In CUCM, navigate to System > Enterprise Parameters. Step 2 In the CCMAdmin Parameters pane, activate the Enable Dependency Records parameter by setting the value to True.
  • 51. pg. 51 Note Dependency records help you to determine which records in the database use other records. For example, you can determine which devices (such as CTI route points or phones) use a particular CSS. If you need to delete a record from Cisco Unified Communications Manager, you can use dependency records to show which records are associated with the record that you want to delete. You then can reconfigure those records so that they are associated with a different record Step 3 Under the Enterprise Parameters Configuration pane, change the Advertise G.722 Codec to Disabled. Step 4 Click OK in the pop-up window, and then click Save and Apply Config. Step 5 In CUCM, navigate to System > Service Parameters and choose the publisher server at 142.1Y.64.21 (Active). Wait for the window to refresh and then choose the Cisco CallManager (Active) service from the drop-down list. Step 6 Set the CDR Enabled Flag value to True in the System parameters Note The CDR Enabled Flag parameter determines whether CDRs (Call Detail Records) are generated. Valid values specify True (CDRs are generated) or False (CDRs are not generated). Step 7 Set the CDR Log Calls with Zero Duration Flag to True in the System parameters. Step 8 Scroll down to the Clusterwide Parameters (Device—General) section . Set the parameter Call Diagnostics Enabled value to Enabled Only When CDR Enabled Flag is True. Note The Call Diagnostics Enabled parameter determines whether CMRs—also called diagnostic records—are generated. Generating CMRs without corresponding CDRs can cause uncontrolled disk-space consumption. Therefore, you should always enable CDRs when CMRs are enabled. If you choose Enabled Only When CDR Enabled Flag is True and the CDR Enabled Flag service parameter is set to False, no CMRs will be generated Step 9 Save the changes. Step 10 Repeat thee steps for the subscriber server at 142.1.64.21 and save the Changes Note There is no need to repeat Step 8 for the subscriber server because the parameter that is changed in Step 8 is a clusterwide parameter and is automatically applied to all servers. Activity Verification You have completed this task when you attain these results:  The Dependency Records parameter is enabled.  The CDR parameters are enabled
  • 52. pg. 52 Lab 2. Managing User Accounts in Cisco Unified Communications Manager Lab 3: Implementing IP Phones Lab 4: Implementing PSTN Gateways Lab 5: Configuring Cisco Unified Communications Manager Call-Routing Components Lab 6: Implementing Digit Manipulation Lab 7: Implementing Calling Privileges in Cisco Unified Communications Manager Lab 8: Implementing Cisco Unified Border Element (CUBE) for calls to and from the Actual PSTN Lab 9: Implementing Call Coverage in Cisco Unified Communications Manager Lab 10: Integrating Cisco Unity Connection with Cisco Unified Communications Manager Lab 11: Implementing Unity Connection Voice Mailboxes Lab 12: Enable Cisco Unified Communications Manager IM and Presence Service and the Jabber Client Lab 13: Install and Operate Cisco Unified RTMT Lab 14: Backing Up Cisco Unified Communications Manager Using the Disaster Recovery System