Windows Deployment Services (WDS) is used to install Windows operating systems on client machines. It provides faster installation than previous methods by copying only two files from the installation media. WDS requires a configured DNS, DHCP server, and domain controller to provide network services and authentication support during installation. The documentation then provides step-by-step instructions for configuring a WDS server by adding the role, specifying installation folders and network settings, and importing operating system installation images.
Gestion de la dette technique – Le tier legacy-2023.pptxIdentity Days
Une conférence proposée par Loïc Veirman, Guillaume Mathieu et Jean-François Fernandez.
Au programme :
Gestion de la dette technique dans un modèle à plusieurs Tiers Active Directory
– Contextualisation : qu’est-ce que la dette technique ? Pourquoi la gestion est inévitable ?
– Deepdive : présentation des tiers legacy, isolement des DC dédiés (mnémonique, etc)
– Analyse de risque : ca ne règle pas tout !
Quand la dette technique touche le Cloud : obsolescence à grande vitesse
– Dépréciation des méthodes d’authentification héritées : Legacy MFA, Legacy SSPR
– Dépréciation des modules PowerShell AzureAD et MsOnline : présentation du module MGGraph et des outils de conversion de scripts.
– Dépréciation des API : au revoir Azure AD Graph
– Il est venu le temps de nettoyer vos applications Azure AD et supprimer les permissions API à risque
Azure AD pod Identity et son remplaçant les Azure AD Workload Identity
The document provides an overview of Active Directory Domain Services (ADDS). It discusses the key components and concepts of ADDS including physical/logical blocks, folders created during installation, protocols used, partitions, forest/tree/domain structure, objects, replication, roles, trusts, and the process for installing and configuring ADDS. The installation process involves adding the AD DS role, selecting features, promoting the server, and configuring options including DNS, database paths, and sysvol folder.
This is the planning part of a two-part session for system programmers and their managers who are planning on upgrading to z/OS V2.5. In part one, the focus is on preparing your current system for upgrading to either release. The system requirements to run and how to prepare your system for the upgrade are discussed. Part two covers the only upgrade details for upgrading to z/OS V2.5 from either V2.3 or V2.4. It is strongly recommended that you attend both sessions for an upgrade picture for z/OS V2.5.
The general availability date for z/OS V2.5 was for September 30, 2021.
Datacenter and cloud architectures continue to evolve to address the needs of large-scale multi-tenant data centers and clouds. These needs are centered around dimensions such as scalability in computing, storage, and bandwidth, scalability in network services, efficiency in resource utilization, agility in service creation, cost efficiency, service reliability, and security. Data centers are interconnected across the wide area network via routing and transport technologies to provide a pool of resources, known as the cloud. High-speed optical interfaces and dense wavelength-division multiplexing optical transport are used to provide for high-capacity transport intra- and inter-datacenter. This presentation will provide some brief descriptions on the working principles of Cloud & Data Center Networks.
Logging is important for troubleshooting a DNS service. Conveniently with BIND 9, almost all problems will show up somewhere in the log output, but only if the logging is enabled and configured correctly.
In this webinar, we’ll discuss the BIND 9 logging configuration and best practices in searching through large log-files to find the entries of interest. In addition, we’ll release log-management tools used by Men & Mice Services.
Group Policy allows centralized management of users, computers, applications and settings through Active Directory. It requires a domain controller with AD DS installed and computers and users must be joined to the domain. The Group Policy Management Console is used to create and link Group Policy Objects to domains or organizational units to apply policies to computers and users.
SAS is a programming language that can be learned quickly. New users can write simple SAS programs within hours. SAS programs involve DATA and PROC steps - DATA steps input and process data, while PROC steps perform operations and output. The example SAS program reads student data from cards, assigns the values to variables in a DATA step, and prints the output in a PROC PRINT step. Additional PROC SORT and formatting options are demonstrated. The log file provides feedback on program execution and errors.
This document discusses the relationship between DB2 and storage management. It describes how DB2 uses storage through tablespaces, indexes, and other objects that are stored on disk as VSAM data sets. It also discusses how DB2 interacts with DFSMS to manage data sets and how storage groups and SMS can be used to simplify storage administration for DB2 objects. While DB2 provides storage management features, there is still a gap between DBA and storage administration that tools can help address.
Educational seminar lessons learned from customer db2 for z os health check...John Campbell
This presentation presented at the Polish DB2 User Group introduces and discusses the most common issues uncovered by the DB2 for z/OS Development SWAT Team from 360 Degree DB2 for z/OS Continuous Availability Assessment (DB2 360) Studies.
Emc data domain technical deep dive workshopsolarisyougood
The document provides an overview of EMC Data Domain products and services. It discusses Data Domain systems which provide scalable and high performance protection storage for backup and archive data. The systems integrate with leading backup and archiving applications. The document also summarizes Data Domain software options such as Boost, Encryption, Replicator and Extended Retention which provide additional functionality.
Virtualization software allows operating systems and applications to run within a "virtual machine" environment on top of a physical host computer. This provides benefits like running different operating systems at the same time, consolidating multiple physical servers onto fewer hosts to reduce hardware costs, and easily testing or restoring systems using snapshots. VirtualBox in particular provides near-native performance for virtual machines while allowing different operating systems to run applications written for other platforms.
Users and groups are used on GNU/Linux for access control that is, to control access to the system's files, directories, and peripherals. Linux offers relatively simple/coarse access control mechanisms by default.
The combination of StackPointCloud with NetApp creates NetApp Kubernetes Service, the industry’s first complete Kubernetes platform for multi-cloud deployments and a complete cloud-based stack for Azure, Google Cloud, AWS, and NetApp HCI. Further, Trident is a fully supported open source project maintained by NetApp, designed from the ground up to help meet the sophisticated persistence demands of containerized applications.
The document describes IBM DB2's High Availability Disaster Recovery (HADR) multiple standby configuration. It allows a primary database to have one principal standby and up to two auxiliary standbys. The principal standby supports all sync modes, while auxiliary standbys use super async mode. Takeovers can occur from any standby and DB2 will automatically reconfigure other standbys to connect to the new primary if they are in its target list. The document provides details on configuration, initialization, failover behavior and an example deployment across four servers.
Cloud computing that provides cheap and pay-as-you-go computing resources is rapidly gaining momentum as an alternative to traditional IT Infrastructure. As more and more consumers delegate their tasks to cloud providers, Service Level Agreements(SLA) between consumers and providers emerge as a key aspect. Due to the dynamic nature of the cloud, continuous monitoring on Quality of Service (QoS)
attributes is necessary to enforce SLAs. Also numerous other factors such as trust (on the cloud provider) come into consideration, particularly for enterprise customers that may outsource its critical data. This complex nature of the cloud landscape warrants a sophisticated means of managing SLAs. This paper proposes a mechanism for managing SLAs in a cloud computing environment using the Web Service Level Agreement(WSLA) framework, developed for SLA monitoring and SLA enforcement
in a Service Oriented Architecture (SOA). We use the third
party support feature of WSLA to delegate monitoring and enforcement tasks to other entities in order to solve the trust issues. We also present a real world use case to validate our proposal.
Linux High Availability provides concise summaries of key concepts:
- High availability (HA) clustering allows services to take over work from others that go down, through IP and service takeover. It is designed for uptime, not performance or load balancing.
- Downtime is expensive for businesses due to lost revenue and customer dissatisfaction. Statistics show significant drops in availability even at 99.9% uprates.
- To achieve high availability, systems must be designed with simplicity, failure preparation, and reliability testing in mind. Complexity often undermines reliability.
- Myths exist around technologies like virtualization and live migration providing complete high availability solutions. True HA requires eliminating all single points of
Active Directory Introduction
Active Directory Basics
Components of Active Directory
Active Directory hierarchical structure.
Active Directory Database.
Flexible Single Master Operations (FSMO)Role
Active Directory Services.
Some useful Tool
This document provides guidance on installing and uninstalling the SAP HANA client on various operating systems, including UNIX, Linux, macOS, and Microsoft Windows. It describes the available clients, default installation paths, and procedures for installing and uninstalling the client using either a graphical or command line interface. Log files are created during installation and stored in /var/tmp.
Domino Tech School - Upgrading to Notes/Domino V10: Best PracticesChristoph Adler
Are you looking to deploy Domino V10 but don’t know where to start? Upgrade servers or clients first? Should I upgrade the ODS? If you have questions like these, this session is for you. Get a complete understanding of the process to upgrade to Domino V10, and learn from best practices and tips from the field.
This document provides instructions for implementing group policies (GPOs) in Windows Server 2016. It discusses how to create users and join them to a domain, set up roaming profiles, introduce GPO concepts, configure settings within user and computer GPOs for software installation, folder redirection, templates and security, and link GPOs to Active Directory. Specific settings covered include password policy, mapping network drives, and deploying software applications.
This document discusses setting up a file server configuration and installation in Linux. It involves installing and configuring FTP, SAMBA, NFS, and DHCP servers to share files over a network. Users are added and files are shared on the server. Screenshots are provided to show the file sharing functionality. Key benefits are larger file sharing capacity and reduced storage usage. Limitations and future enhancements are also mentioned.
The document is a slide presentation about running Linux on IBM Power systems. It discusses why Linux is widely used, best practices for installing and configuring Linux on Power systems, and options for deploying Linux workloads including the Integrated Facility for Linux (IFL). The IFL allows customers to activate unused cores and memory on Power 770, 780, and 795 systems running only Linux at a lower cost than other hardware platforms.
This was a quick presentation I made at our local Rockford SpiceCorps. The idea was to show an alternative way of easing the logon process from a maintenance standpoint, specifically for admins who were not script-savvy.
Introduction to failover clustering with sql serverEduardo Castro
In this presentation we review the basic requirements to install a SQL Server Failover Cluster.
Regards,
Eduardo Castro Martinez
http://ecastrom.blogspot.com
http://comunidadwindows.org
1) To access the TSO service at the University of Georgia, users must identify themselves by entering their USERID and password during the LOGON process.
2) The Interactive System Productivity Facility/Program Development Facility (ISPF/PDF) is a component of TSO that facilitates interaction with the TSO service. This guide describes how to use ISPF/PDF.
3) Key conventions used in this guide include showing commands in UPPERCASE and information the user provides in lowercase. "Next to" indicates the character position immediately to the right of the indicating arrow.
Installing and configuring windows deployment servicesprasadmvreddy
This document provides instructions for installing and configuring Windows Deployment Services (WDS) on a Windows Server 2008 R2 machine. It outlines setting up the server with the WDS role, adding boot and install images, and configuring the server properties. WDS allows administrators to remotely deploy Windows operating systems over the network without needing physical access to each client computer. The steps covered include installing WDS via the GUI or PowerShell, selecting the remote install folder, adding boot and install images from Windows 7 installation files, and configuring boot and PXE response settings.
1. The document provides instructions for installing Windows Server 2008, including hardware requirements, installation media requirements, and a 14-step installation process.
2. Key steps in the installation process include selecting installation options, accepting license terms, selecting disk and partition, and changing the default administrator password.
3. The installation takes approximately 20 minutes to copy and extract files, then the server will reboot for initial configuration.
- The document provides steps to set up a domain controller virtual machine in Hyper-V, install Windows Server 2012, and promote the server to a domain controller. It includes instructions on enabling Hyper-V, creating a virtual switch and VM, installing Windows Server 2012, assigning a static IP, adding the AD DS role, and promoting the server. The goal is to have a fully functioning domain controller VM to use for additional SharePoint server configuration.
The document provides instructions for configuring Windows Deployment Services (WDS) in Windows Server 2008. It describes configuring WDS using the configuration wizard, adding Windows PE and Windows installation images, configuring the boot menu, and adding a capture image. It also describes how to PXE boot a client to install Windows using WDS, but notes this cannot be demonstrated in the virtual environment. The objectives, prerequisites, estimated time, and computer used are also outlined.
Migrating dhcp from windows server 2003 to 2012 r2laonap166
This document provides steps to migrate a DHCP server role from Windows Server 2003 to Windows Server 2012 R2. It involves installing Windows Server Migration Tools on both servers, exporting the DHCP configuration and data from Windows Server 2003, uninstalling the DHCP role, installing the DHCP role on Windows Server 2012 R2, and importing the previously exported DHCP configuration and data. Key steps include exporting the DHCP data to a shared folder, verifying roles on Windows Server 2003, uninstalling DHCP on Windows Server 2003, installing DHCP on Windows Server 2012 R2, importing the DHCP data from the shared folder, and authorizing the new DHCP server.
This document provides a checklist for building an MS Windows Server 2008 machine. It outlines 14 high-level steps: 1) Prepare required paperwork; 2) Configure hardware or virtual machine; 3) Prepare the server environment; 4) Install Windows Server OS; 5) Customize the desktop and power settings; 6) Configure core server settings; 7) Install necessary agents and add-ons; and 8) Mark the build complete upon installing required VMware or hardware tools. It also provides additional pages of detailed instructions for each step.
ELW_Symantec_SD 7 1 Upgrade and Install_Draft1_Charles_editedElizabeth Wilcox
This document provides step-by-step instructions for installing or upgrading ServiceDesk 7.1 using a domain service account. It outlines prerequisites including required server roles, SQL Server version, and accounts. The installation/upgrade section describes 57 steps to configure IIS, firewall settings, SQL components, and ServiceDesk settings. It notes potential issues with timeouts during the upgrade process and provides a workaround.
Understanding Windows Azure’s Active Directory (AD) and PowerShell ToolsEPC Group
Understanding Windows Azure’s Active Directory (AD) and PowerShell Tools
Web: www.epcgroup.net | E-mail: [email protected] | Phone: (888) 381-9725 | Twitter: @epcgroup
* SharePoint Server 2013, Office 365, Windows Azure, Amazon Web Services (AWS), SharePoint Server 2010 & SharePoint 2007: Review, Architecture Development, Planning, Configuration & Implementations, Upgrades, Global Initiatives, Training, and Post Go-live Support with Extensive Knowledge Transfer | Custom Branding and Responsive Web Design (RWD)
* Health Check & Assessments (Roadmap Preparation to Upgrade to 2013 or 2010) - Including Custom Code & Solution Review
* Enterprise Content Management Systems based on Microsoft SharePoint 2013, Office 365 Hybrid Cloud (Both On-premises and cloud)
* Enterprise Metadata Design, Taxonomy | Retention Schedule Dev | Disposition Workflow, and Records Management | eDiscovery | Microsoft Exchange 2013 Migration \ Integration | Roadmap, Requirements Gathering, Planning, Designing & Performing the Actual Implementation
* Best Practices Consulting on SharePoint 2013, Office 365, SharePoint 2010, 2007 | EPC Group has completed over 900+ initiatives
* Intranet, Knowledge Management, Internet & Extranet-Facing as Well as Mobility (BYOD Roadmap), Cloud, Hybrid, and Cross-Browser | Cross-Platform Solutions for SharePoint 2013 with Proven Past-performance
*Upgrades or Migrations of Existing Deployments or Other LOB Systems (Documentum, LiveLink, FileNet, SAP, etc.)
* Custom Apps, Custom Application Development, Custom Feature, Master Pages, Web Parts, Security Model, Usability (UI) & Workflow Development (Visual Studio 2012, Visual Studio 2013)
* Migration Initiatives to SharePoint 2013 \ Office 365 and those organizations with both on-premises and cloud assets for a SharePoint Hybrid Architecture and Deployment
* Key Performance Indicators, Dashboard & Business Intelligence Reporting Solutions (PerformancePoint 2013, SQL Server 2012 R2, SQL Server 2014, BI, KPIs, PowerPivot, Scorecards, Big Data) and Power BI
* Experts in Global \ Enterprise Infrastructure, Security, Hardware Configuration & Disaster Recovery (Global performance considerations)
* Tailored SharePoint "in the trenches" Training on SharePoint 2013, 2010, 2007 + Office 365
* Support Contracts (Ongoing Support your Organization's 2013, 2010, or 2007 Implementations)
* .NET Development, Custom applications, BizTalk Server experts
* Project Server 2013, 2010, and 2007 Implementations
* SharePoint Roadmap & Governance Development: 6, 12, 18, 24 and 36 months (Steering Committee & Code Review Board Development)
* EPC Group's HybridCloudAdvisor.com - Navigating the Ever Changing World of the Hybrid Cloud to include SLA development & consulting services | advisory | best practices around PaaS, IaaS, SaaS, VDI, Windows Azure, AWS as well as security, compliance & and regulatory
The document provides instructions for installing and configuring Microsoft Commerce Server 2007, 2009, and the 2009 template for SharePoint 2010. It includes steps for installing Commerce Server 2007 and business applications, requirements for Commerce Server 2009 on Server 2008 R2, installing and upgrading Commerce Server 2009, installing the 2009 template for SharePoint 2010, and configuring a Commerce Server contemporary site for SharePoint 2010.
Adding a windows server 2012 domain controller to an existing windows server ...Ravi Kumar Lanke
This document provides steps to add a Windows Server 2012 domain controller to an existing Windows Server 2003 network. It involves checking the domain functional level, setting up the Windows Server 2012 machine with the correct IP address, adding the Active Directory Domain Services role, promoting the server to a domain controller, and configuring DHCP to point to the new domain controller. The process takes around 19 steps and ensures proper integration of the new domain controller.
Windows Server 2008 R2 builds on Windows Server 2008 with new virtualization, management, and integration tools. It provides greater control, efficiency, and ability to respond to business needs. The document then outlines an 18 step process for installing Windows Server 2008, which includes inserting the installation media, selecting options, accepting licenses, installing to a hard disk, setting the administrator password, and initial configuration.
The document discusses how to create a virtual hard drive (VHD) and install an operating system on it to enable dual booting. It describes using Disk Management or Diskpart to create a VHD, installing an OS using Windows AIK, and making the VHD bootable using bcdedit commands. Troubleshooting tips are provided for issues encountered like the OS not booting from the VHD and ensuring the correct device and osdevice settings in the BCD file. Appendices provide details on bcdedit and Diskpart commands.
This document provides instructions for installing a CCcam server on a Windows system using a virtual machine (VM) running Linux. It describes downloading and configuring Clarkconnect, a Linux distribution, as the VM operating system using VMware Player. It also covers configuring the network and installing CCcam within the VM. The final step summarizes configuring the CCcam server remotely using WinSCP after installation is complete.
Windows Server 2012 Installation and Configurtion SuperiorgrwAwais Amjad
Superior University Students prepared slides.
Installation of Win Server 2012..
Installation of Active Directory ...
Configuring Active Directory..
Installation of DNS...
ADDING CLIENTS TO SERVER...
Overview..
Active directory installation on windows server 2012Ricardo Solís
Active Directory Domain Services (AD DS) is an extensible and scalable directory service that can be used to efficiently manage network resources. AD DS uses DNS to organize computers into domains with a hierarchical structure defined on an Internet-wide basis or privately. To install AD DS on Windows Server 2012, the AD DS role is added using the Add Roles and Features Wizard, which installs required binaries. Then the Active Directory Domain Services Configuration Wizard is used to configure the role by selecting options like the forest type and domain/forest functional levels. This promotes the server to a domain controller and completes the AD DS installation.
Install and Configure DHCP role on Windows Server 2012abdualziz-aljohani
This document provides instructions for installing and configuring DHCP server role on Windows Server 2012 and setting up a DHCP failover scope for high availability. It describes steps to install the DHCP role, complete post-installation configuration, authorize the DHCP server, configure an IP address scope, set up failover between two servers for the scope, and verify the failover configuration. Figures and screenshots are referenced to illustrate the interface.
- The document provides step-by-step instructions for setting up Active Directory on a Windows Server 2008 R2 server. It describes installing the Active Directory Domain Services role, promoting the server to a domain controller using the dcpromo.exe wizard, configuring a new forest and domain, and completing the initial configuration tasks. Key steps include assigning an IP address, installing the AD DS role, running dcpromo.exe to promote the server and create a new domain in a new forest, selecting options for the forest function level and DNS server, and rebooting the server once installation is complete.
Creating a windows server 2008 r2 forestRaghu nath
This document provides instructions for installing Windows Server 2008 R2 and configuring it as a domain controller for the contoso.com forest. It outlines installing Windows Server 2008 R2, adding the AD DS role, and promoting the server to a domain controller for the new contoso.com forest using the Active Directory Installation Wizard. Key steps include installing Windows Server 2008 R2, selecting the Windows Server 2008 R2 Standard edition, accepting the license terms, installing to the selected partition, and setting the administrator password during initial setup.
The document provides step-by-step instructions for configuring a SQL Server 2012/2014 failover cluster on a 2-node Windows Server 2012 cluster. It includes connecting the nodes to iSCSI storage, initializing and formatting disks, installing Windows Failover Clustering and .NET Framework 3.5, and installing SQL Server as a failover clustered instance on the first node then adding the second node.
V-Ray 1.5 for 3ds Max Installation Guide provides instructions for installing V-Ray 1.5 rendering software. It describes preparing for the installation by checking system requirements and obtaining the installer and hardware lock. It then details the process for a clean installation of V-Ray 1.5 on a workstation, including installing the hardware lock drivers, starting the license service, and checking the status. Installation on render slaves is also outlined, with fewer steps since they do not require the license components.
Technology Trends in 2025: AI and Big Data AnalyticsInData Labs
At InData Labs, we have been keeping an ear to the ground, looking out for AI-enabled digital transformation trends coming our way in 2025. Our report will provide a look into the technology landscape of the future, including:
-Artificial Intelligence Market Overview
-Strategies for AI Adoption in 2025
-Anticipated drivers of AI adoption and transformative technologies
-Benefits of AI and Big data for your business
-Tips on how to prepare your business for innovation
-AI and data privacy: Strategies for securing data privacy in AI models, etc.
Download your free copy nowand implement the key findings to improve your business.
DevOpsDays Atlanta 2025 - Building 10x Development Organizations.pptxJustin Reock
Building 10x Organizations with Modern Productivity Metrics
10x developers may be a myth, but 10x organizations are very real, as proven by the influential study performed in the 1980s, ‘The Coding War Games.’
Right now, here in early 2025, we seem to be experiencing YAPP (Yet Another Productivity Philosophy), and that philosophy is converging on developer experience. It seems that with every new method we invent for the delivery of products, whether physical or virtual, we reinvent productivity philosophies to go alongside them.
But which of these approaches actually work? DORA? SPACE? DevEx? What should we invest in and create urgency behind today, so that we don’t find ourselves having the same discussion again in a decade?
Quantum Computing Quick Research Guide by Arthur MorganArthur Morgan
This is a Quick Research Guide (QRG).
QRGs include the following:
- A brief, high-level overview of the QRG topic.
- A milestone timeline for the QRG topic.
- Links to various free online resource materials to provide a deeper dive into the QRG topic.
- Conclusion and a recommendation for at least two books available in the SJPL system on the QRG topic.
QRGs planned for the series:
- Artificial Intelligence QRG
- Quantum Computing QRG
- Big Data Analytics QRG
- Spacecraft Guidance, Navigation & Control QRG (coming 2026)
- UK Home Computing & The Birth of ARM QRG (coming 2027)
Any questions or comments?
- Please contact Arthur Morgan at [email protected].
100% human made.
Andrew Marnell: Transforming Business Strategy Through Data-Driven InsightsAndrew Marnell
With expertise in data architecture, performance tracking, and revenue forecasting, Andrew Marnell plays a vital role in aligning business strategies with data insights. Andrew Marnell’s ability to lead cross-functional teams ensures businesses achieve sustainable growth and operational excellence.
AI and Data Privacy in 2025: Global TrendsInData Labs
In this infographic, we explore how businesses can implement effective governance frameworks to address AI data privacy. Understanding it is crucial for developing effective strategies that ensure compliance, safeguard customer trust, and leverage AI responsibly. Equip yourself with insights that can drive informed decision-making and position your organization for success in the future of data privacy.
This infographic contains:
-AI and data privacy: Key findings
-Statistics on AI data privacy in the today’s world
-Tips on how to overcome data privacy challenges
-Benefits of AI data security investments.
Keep up-to-date on how AI is reshaping privacy standards and what this entails for both individuals and organizations.
Designing Low-Latency Systems with Rust and ScyllaDB: An Architectural Deep DiveScyllaDB
Want to learn practical tips for designing systems that can scale efficiently without compromising speed?
Join us for a workshop where we’ll address these challenges head-on and explore how to architect low-latency systems using Rust. During this free interactive workshop oriented for developers, engineers, and architects, we’ll cover how Rust’s unique language features and the Tokio async runtime enable high-performance application development.
As you explore key principles of designing low-latency systems with Rust, you will learn how to:
- Create and compile a real-world app with Rust
- Connect the application to ScyllaDB (NoSQL data store)
- Negotiate tradeoffs related to data modeling and querying
- Manage and monitor the database for consistently low latencies
Dev Dives: Automate and orchestrate your processes with UiPath MaestroUiPathCommunity
This session is designed to equip developers with the skills needed to build mission-critical, end-to-end processes that seamlessly orchestrate agents, people, and robots.
📕 Here's what you can expect:
- Modeling: Build end-to-end processes using BPMN.
- Implementing: Integrate agentic tasks, RPA, APIs, and advanced decisioning into processes.
- Operating: Control process instances with rewind, replay, pause, and stop functions.
- Monitoring: Use dashboards and embedded analytics for real-time insights into process instances.
This webinar is a must-attend for developers looking to enhance their agentic automation skills and orchestrate robust, mission-critical processes.
👨🏫 Speaker:
Andrei Vintila, Principal Product Manager @UiPath
This session streamed live on April 29, 2025, 16:00 CET.
Check out all our upcoming Dev Dives sessions at https://community.uipath.com/dev-dives-automation-developer-2025/.
UiPath Community Berlin: Orchestrator API, Swagger, and Test Manager APIUiPathCommunity
Join this UiPath Community Berlin meetup to explore the Orchestrator API, Swagger interface, and the Test Manager API. Learn how to leverage these tools to streamline automation, enhance testing, and integrate more efficiently with UiPath. Perfect for developers, testers, and automation enthusiasts!
📕 Agenda
Welcome & Introductions
Orchestrator API Overview
Exploring the Swagger Interface
Test Manager API Highlights
Streamlining Automation & Testing with APIs (Demo)
Q&A and Open Discussion
Perfect for developers, testers, and automation enthusiasts!
👉 Join our UiPath Community Berlin chapter: https://community.uipath.com/berlin/
This session streamed live on April 29, 2025, 18:00 CET.
Check out all our upcoming UiPath Community sessions at https://community.uipath.com/events/.
What is Model Context Protocol(MCP) - The new technology for communication bw...Vishnu Singh Chundawat
The MCP (Model Context Protocol) is a framework designed to manage context and interaction within complex systems. This SlideShare presentation will provide a detailed overview of the MCP Model, its applications, and how it plays a crucial role in improving communication and decision-making in distributed systems. We will explore the key concepts behind the protocol, including the importance of context, data management, and how this model enhances system adaptability and responsiveness. Ideal for software developers, system architects, and IT professionals, this presentation will offer valuable insights into how the MCP Model can streamline workflows, improve efficiency, and create more intuitive systems for a wide range of use cases.
Massive Power Outage Hits Spain, Portugal, and France: Causes, Impact, and On...Aqusag Technologies
In late April 2025, a significant portion of Europe, particularly Spain, Portugal, and parts of southern France, experienced widespread, rolling power outages that continue to affect millions of residents, businesses, and infrastructure systems.
Procurement Insights Cost To Value Guide.pptxJon Hansen
Procurement Insights integrated Historic Procurement Industry Archives, serves as a powerful complement — not a competitor — to other procurement industry firms. It fills critical gaps in depth, agility, and contextual insight that most traditional analyst and association models overlook.
Learn more about this value- driven proprietary service offering here.
How Can I use the AI Hype in my Business Context?Daniel Lehner
𝙄𝙨 𝘼𝙄 𝙟𝙪𝙨𝙩 𝙝𝙮𝙥𝙚? 𝙊𝙧 𝙞𝙨 𝙞𝙩 𝙩𝙝𝙚 𝙜𝙖𝙢𝙚 𝙘𝙝𝙖𝙣𝙜𝙚𝙧 𝙮𝙤𝙪𝙧 𝙗𝙪𝙨𝙞𝙣𝙚𝙨𝙨 𝙣𝙚𝙚𝙙𝙨?
Everyone’s talking about AI but is anyone really using it to create real value?
Most companies want to leverage AI. Few know 𝗵𝗼𝘄.
✅ What exactly should you ask to find real AI opportunities?
✅ Which AI techniques actually fit your business?
✅ Is your data even ready for AI?
If you’re not sure, you’re not alone. This is a condensed version of the slides I presented at a Linkedin webinar for Tecnovy on 28.04.2025.
How Can I use the AI Hype in my Business Context?Daniel Lehner
Ad
Windows Deployment Services Tutorial
1. Page 1 of 58
Windows Deployment Services Tutorial
Created by. Travis Kench - [email protected] - 5/1/2013
Minimum Requirements:
Windows Server 2008 R2 Server (Joined to a domain)
The Windows Automated Installation Kit for Windows 7
Active Directory / DNS / DHCP (These functions need to be running on your existing network to follow
the instructions in this tutorial.)
Note: I am installing Windows Deployment Services on Server 2008 R2 x64 that doesn’t have DHCP on it so
the screen shots are going to reflect this setup. If you are installing WDS on a server that has DHCP installed on
it there are a few minor changes that I have explained within the notes sections on some of the steps.
Table of Contents
STEP 1: Installing the Windows Deployment Services Role on Windows Server 2008 R2 (Pgs. 1-5)
STEP 2: Configuring the Windows Deployment Server settings (Pgs. 6-8)
STEP 3: Configuring your WDS server node properties (Pgs. 9-13)
STEP 4: Configuring the DHCP scope options for WDS (Pgs. 14-16)
STEP 5: Adding your first boot image (Pgs. 17-20)
STEP 6: Creating a capture image (Pgs. 21-25)
STEP 7: Creating a discover image (Pgs. 26-30)
STEP 8: Configuring the WDS server node’s default boot image (Pgs. 31-32)
STEP 9: Uploading drivers into WDS (Pgs. 33-37)
STEP 10: Injecting drivers into your images (Pgs. 38-42)
STEP 11: Adding a Windows 7 x64 OS DVD install boot image to your server (Pgs. 43-46)
STEP 12: Creating your custom build to deploy to your clients (Pgs. 47-51)
STEP 13: Uploading your custom built Install Image to the WDS server (Pgs. 52-54)
STEP 14: Downloading your customized Windows 7 image to a client (Pgs. 55-58)
2. Page 2 of 58
1) Installing the Windows Deployment Services Role on Windows Server 2008 R2.
a. Perform the following steps under a Domain Administrator user account. Go to the Start Menu
> Administrative Tools > Server Manager.
b. Right-click on Roles and select Add Roles.
3. Page 3 of 58
c. Click Next on the Before You Begin page.
d. Check the box Windows Deployment Services role and click Next.
4. Page 4 of 58
e. On the Overview of Windows Deployment Services page click Next.
f. On the Select Role Services page make sure both Deployment Server and Transport Server
are both checked and click Next.
5. Page 5 of 58
g. On the Confirm Installation Selections page click Install.
h. On the Installation Results page if everything installed successfully you can click Close.
6. Page 6 of 58
2) Configuring the Windows Deployment Server settings.
a. You should now be back at the Server Manager page. In the left pane expand Roles then expand
Windows Deployment Services. Expand Servers and right-click on your servers name and
select Configure Server. Note: If there is not a server listed under the Servers node, right-click
the Servers node and click Add Server to add the local computer. You will need to select the
first option for Local Computer (the computer that this MMC snap-in is running on).
b. Click Next at the following screen.
7. Page 7 of 58
c. You will need to Browse to a path where you want the Windows Deployment Services
RemoteInstall directory to be stored. Note: I installed it on the desktop but only for testing
purposes. It’s recommended to store this share on a partition other than the one the OS is
installed on but you can install it on the OS partition if need be. Once you choose a directory
location click Next.
d. You will not see this prompt if you installed the RemoteInstall share on a partition other than the
one the OS was installed on however if you needed to install it on the OS partition you can click
Yes to continue.
8. Page 8 of 58
e. Since we are installing Windows Deployment Services on a server that isn’t holding the DHCP
role you will need to leave the check boxes in the screenshot below unchecked and click Next.
Note: If you were installing WDS on a server that has DHCP already installed you would check
both of the boxes and click next.
f. Select Respond to all client computers (known and unknown) and then click Next.
9. Page 9 of 58
3) Configuring your WDS server node properties.
a. Right-click on your Windows Deployment Services server node and select Properties.
b. PXE Response Tab: Select Respond to all client computers (known and unknown).
10. Page 10 of 58
c. AD DS Tab: Select Same domain as the Windows Deployment Services server.
d. Boot Tab: Select under known and unknown clients to Always continue the PXE boot as
shown in the screenshot below. Note: We will be revisiting this tab once we create boot images
to set the default boot images.
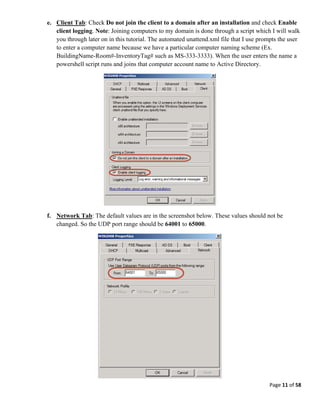
11. Page 11 of 58
e. Client Tab: Check Do not join the client to a domain after an installation and check Enable
client logging. Note: Joining computers to my domain is done through a script which I will walk
you through later on in this tutorial. The automated unattend.xml file that I use prompts the user
to enter a computer name because we have a particular computer naming scheme (Ex.
BuildingName-Room#-InventoryTag# such as MS-333-3333). When the user enters the name a
powershell script runs and joins that computer account name to Active Directory.
f. Network Tab: The default values are in the screenshot below. These values should not be
changed. So the UDP port range should be 64001 to 65000.
12. Page 12 of 58
g. Advanced Tab: Select Allow Windows Deployment Services to dynamically discover valid
domain servers (recommended) and also select Do not authorize this Windows Deployment
Services server in DHCP.
h. Multicast Tab: Unless you are using IPv6 you will want to select Obtain IP address from
DHCP and you will also want to select Separate clients into three sessions (slow, medium,
fast).
13. Page 13 of 58
i. DHCP Tab: Make sure that the below settings are left unchecked. You can now select Apply
and OK. Note: If you are installing WDS on a server that has DHCP installed on it you will need
to check both of the boxes below and click Apply and OK.
14. Page 14 of 58
4) Configuring the DHCP scope options for WDS
a. Remote into the server that is holding your DHCP role. Note: If you are not configuring your
DHCP scope options through the Server Options tab as I am going to walk you through you will
need to perform all the DHCP steps below on each DHCP scope that will have computers trying
to boot into Windows Deployment Services.
b. Right-click the Server Options menu item and select Configure Options.
15. Page 15 of 58
c. If you have been using PXE boot on your network you are going to have to remove Option 60
because it will conflict with the Windows Deployment Services server and prevent your clients
from booting to the network. You can remove it by simply unchecking the Option 60 box under
the available options as in the picture below then click Apply. Note: If you are installing WDS
on a server that has DHCP on it you will need to enable Option 60.
d. Configure DHCP scope Option 66: The string value needs to be your Windows Deployment Services
server IP and not the one I am using in the example below.
16. Page 16 of 58
e. Configure DHCP scope Option 67: The String value needs to be set to wdsnbp.com and then you can
click Apply and OK.
IMPORTANT NOTE
If you have clients that do not support PXE booting you can create CD/DVD boot discs.
17. Page 17 of 58
5) Adding your first boot image (Note: You will be using this image to create your discover and
capture images below).
a. You will need a Windows Server 2008 R2 Installation DVD to proceed with the following steps.
b. Under your Windows Deployment Services server node you need to right-click on Boot Images
and select Add Boot Image.
18. Page 18 of 58
c. You are now going to Browse to your Windows Server 2008 R2 Installation DVD then
navigate to the sources folder and select the boot.wim file.
d. You will now see the following window. I just left the default names to distinguish the base boot
image from any custom discover or capture images that we will be creating in the next section.
19. Page 19 of 58
e. Click Next at the following screenshot.
f. Click Finish at the following screenshot.
20. Page 20 of 58
g. You should now see the boot image that you just created in the right side pane.
21. Page 21 of 58
6) Creating a capture image.
a. Right-click on the Microsoft Windows Setup (x64) boot image that you just created and select
Create Capture Image.
b. Input your desired name for the Capture Image as well as input a description to distinguish it
from other images that will be created and then click Browse and save it to your preferred
location. Note: I created a folder within the WDS folder structure located under the Remote
Install Boot directory called Custom Boot Images as you can see from the screenshot below.
22. Page 22 of 58
c. Once you have the fields below filled out you can click Next.
d. You should now see the following screen. Select the checkbox Add image to the Windows
Deployment Server now and then click Finish.
23. Page 23 of 58
e. In the following window you will need to Browse to the directory that you saved this boot image
file to and then click Next.
f. Click Next at the following screenshot.
24. Page 24 of 58
g. Click Next at the following screenshot.
h. Click Finish at the following screenshot.
25. Page 25 of 58
i. You should now see the Capture Image (x64) boot image that you just created in the following
screenshot.
26. Page 26 of 58
7) Creating a discover image.
a. Right-click on the Microsoft Windows Setup (x64) and select Create Discover Image.
b. Input your desired name for your Discover Image name as well as input a description to
distinguish it from other images that will be created and then click Browse and save it to your
preferred location for your custom boot images. You will need to enter your WDS servers name
in the last box and then click Next. .
27. Page 27 of 58
c. Click Finish at the following screen
d. This image does not automatically prompt you to add it to WDS boot images. You manually
have to add this image. Right-click on Boot Images and select Add Boot Image.
28. Page 28 of 58
e. Click Browse and navigate to the location in which you saved your discover image and click
Next.
f. Click Next at the following screenshot.
29. Page 29 of 58
g. Click Next at the following screenshot.
h. Click Finish at the following screenshot.
30. Page 30 of 58
i. You should now see the Discover Image (x64) boot image that you just created in the following
screenshot.
31. Page 31 of 58
8) Configuring the WDS server node’s default boot image.
a. Right-click on your Windows Deployment Services server node and select Properties.
b. Boot Tab: Click Select under x64 architecture. When the Select Default Boot Image window
pops up chose Discover Image (x64) and click OK.
32. Page 32 of 58
c. At the following window click Apply and OK.
.
33. Page 33 of 58
9) Uploading drivers into WDS.
a. Download the driver files from the computers manufacturers’ site. Use 7-zip (www.7-zip.org) to
extract the driver packages to folders. Note: To make life easier you can download drivers in
bulk from www.driverpacks.net .
b. Once you have your drivers organized into folders you can begin adding drive packages to the
WDS server. Right-click the Drivers folder and select Add Driver Package.
34. Page 34 of 58
c. Select all driver packages from a folder and the click Browse and navigate to the folder that
has your extracted driver packages and click Next.
d. Click Next at the following screenshot.
35. Page 35 of 58
e. Click Next at the following screenshot.
f. Click Next at the following screenshot.
36. Page 36 of 58
g. Some packages may fail because they are unsigned. Click Next at the following screenshot.
h. In the screenshot below select Create a new driver group named: and name the group then
click Next. Note: I name my driver groups based on each computers model that I am working
with.
37. Page 37 of 58
i. Uncheck Modify the filters for this group now and click Finish.
j. You should now see the driver group you created along with all the imported drivers from the
folder you specified.
38. Page 38 of 58
10) Injecting drivers into your images.
a. Go into Boot Images and right-click on the Discover Image (x64) and select Add Driver
Packages to Image. Note: If a computer you’re working on fails to boot into the WDS server
and you know that the computer supports PXE booting the culprit is more than likely a missing
NIC driver. In this case you would follow this section and inject your missing NIC driver into the
Capture Image rather than the Discover Image.
b. Click Next at the following screenshot.
39. Page 39 of 58
c. The screenshot below has the default search criteria. I am going to try to simplify this process
below. Click on the line that says Package Class and select Remove.
40. Page 40 of 58
d. Click Add and change the Attribute Type to Driver Group Name. You should now see any
driver groups that you have created in the drop down list next to the add button. Click Add to
add your driver group to the search criteria and then select OK. Note: You can add multiple
driver groups to an image.
41. Page 41 of 58
e. In the search criteria you should see the driver group that you added. Click Search for Packages
and it will list all the packages that are located within the group you selected. Click Next to
continue.
42. Page 42 of 58
f. Click Next at the following screen.
43. Page 43 of 58
11) Adding a Windows 7 x64 OS DVD install boot image to your server
a. Right-click on Install Images and select Add Install Image.
b. Create an image group name for your OS installation in which you can group multiple image
builds under and then click Next.
44. Page 44 of 58
c. Browse to your Windows 7 x64 install disc and navigate to the sources directory and select
install.wim and click Next.
d. Select the Windows 7 Professional x64 OS, check Use default name and description for each
of the selected images and click Next.
45. Page 45 of 58
e. Click Next at the following screenshot.
f. Click Finish at the next screenshot.
46. Page 46 of 58
g. You should now see the Install Image that you just created.
47. Page 47 of 58
12) Creating your custom build to deploy to your clients.
a. Install your flavor of Windows 7 (x86/x64).
b. You must create your image in Audit Mode. To enter Audit Mode you need to press Shift-Ctrl-
F3 at the following screen. If you do not follow these steps and create your image outside of
Audit Mode when you Sysprep with your custom unattend.xml file the default profile will not
copy across to all users. When you create your image in Audit Mode you have to think of it as
once you boot into Audit Mode anything that you do under this local administrator account is
going to be copied to all users as their default profile so anything you want your users to have for
customizations you must do in Audit Mode.
48. Page 48 of 58
c. After you press Shift-Ctrl-F3 your computer will reboot into Audit Mode in which you will see
the Sysprep Preparation Tool window in which you can click Cancel because we are not ready to
sysprep the image yet. Note: Each time you reboot your computer from now on until you
Sysprep it will prompt you with this window because it is still in Audit Mode.
d. The days of running updates manually are becoming simpler. All the normal applications that
you would normally install one by one such as Flash / Shockwave / Air / Java / Adobe Reader /
Quicktime and some other programs can be automated with the use of a free program that you
can use to build your images or update them which is called Ninite (www.ninite.com) . There is a
Pro version that gives you remote management of application packages that you can buy but the
free version is a great tool to use also. All you have to do is go to www.ninite.com and on the
main page you can click on each program you want to have packaged up for installation and it
will give you an executable that you can run which basically goes out to the manufacturers sites
and downloads the most current versions of the programs. You can run this executable more than
once and if there are newer versions of the programs it will download and install them for you
without toolbars.
e. Install any other programs or customizations you want your users to have.
f. In order for your computers to automatically join your domain with the name that you will input
you will need to create a powershell script. Create a file called joinDomain.ps1, include the code
below in it and save the file to the C:Windows directory. Make sure that you put in your
networks information in the fields that have quotes around them.
$credential = New-Object
System.Management.Automation.PsCredential("YourDomainName.orgadministrator",
(ConvertTo-SecureString "YourAdministratorPassword" -AsPlainText -Force))
Add-Computer -DomainName "YourDomainName.org" -Credential $credential
49. Page 49 of 58
g. This step is an extra for those of you who would like your computers to automatically join a
wireless network.
i. Open a command prompt.
ii. To see a list of all your saved wlan profiles, use the following command:
netsh wlan show profiles
iii. If you want to see the details of your profiles, use this command:
netsh wlan show all
iv. When you’re ready to export a profile, use the following syntax:
netsh wlan export profile name=”YourWifiProfileName”
folder=PathToLocationToSaveWlanExport
v. Once you have your file exported rename it ssid.xml and save it to the C:Windows
directory.
h. Within the C:WindowsSetup directory create a new folder called Scripts.
i. Create a file called SetupComplete.cmd and include the following code in it then save it to the
C:WindowsSetupScripts directory.
powershell Set-ExecutionPolicy Unrestricted
powershell C:WindowsjoinDomain.ps1
Netsh wlan add profile filename="C:windowsssid.xml"
Netsh wlan connect YourWifiProfileName
del /Q /F C:windowsssid.xml
cscript //b C:windowssystem32slmgr.vbs /ato
del /Q /F C:windowssystem32sysprepunattend.xml
del /Q /F C:Windowspantherunattend.xml
del /Q /F C:WindowsjoinDomain.ps1
j. Now we are ready to Sysprep with our unattend.xml file that you will need to create with the
Windows WAIK (http://www.microsoft.com/en-us/download/details.aspx?id=5753). If you have
already created your unattend.xml file you can copy it to the C:WindowsSystem32sysprep
directory.
k. Here is a copy of my current unattend.xml file that is in production. Feel free to modify it to suit
your needs.
Unattend.xml
<?xml version="1.0" encoding="utf-8"?>
<unattend xmlns="urn:schemas-microsoft-com:unattend">
<settings pass="specialize">
<component name="Microsoft-Windows-Deployment" processorArchitecture="x86"
publicKeyToken="31bf3856ad364e35" language="neutral" versionScope="nonSxS"
xmlns:wcm="http://schemas.microsoft.com/WMIConfig/2002/State"
xmlns:xsi="http://www.w3.org/2001/XMLSchema-instance">
<RunSynchronous>
51. Page 51 of 58
<PlainText>true</PlainText>
</AdministratorPassword>
<LocalAccounts>
<LocalAccount wcm:action="add">
<Description>Local Administrator</Description>
<DisplayName>Administrator</DisplayName>
<Group>Administrators</Group>
<Name>Administrator</Name>
</LocalAccount>
</LocalAccounts>
</UserAccounts>
<RegisteredOrganization>YOUR COMPANY NAME</RegisteredOrganization>
<RegisteredOwner>YOUR COMPANY NAME</RegisteredOwner>
<ShowWindowsLive>false</ShowWindowsLive>
<TimeZone>Eastern Standard Time</TimeZone>
<DoNotCleanTaskBar>true</DoNotCleanTaskBar>
<Display>
<HorizontalResolution>1440</HorizontalResolution>
<VerticalResolution>900</VerticalResolution>
<RefreshRate>60</RefreshRate>
<ColorDepth>32</ColorDepth>
</Display>
</component>
</settings>
<settings pass="generalize">
<component name="Microsoft-Windows-Security-SPP" processorArchitecture="wow64"
publicKeyToken="31bf3856ad364e35" language="neutral" versionScope="nonSxS"
xmlns:wcm="http://schemas.microsoft.com/WMIConfig/2002/State"
xmlns:xsi="http://www.w3.org/2001/XMLSchema-instance">
<SkipRearm>8</SkipRearm>
</component>
</settings>
<cpi:offlineImage
cpi:source="catalog:E:/isos/en_windows_7_professional_with_sp1_vl_build_x64_dvd_u_677791/sources/instal
l_windows 7 professional.clg" xmlns:cpi="urn:schemas-microsoft-com:cpi" />
</unattend>
l. To sysprep the machine utilizing the unattend.xml file you will need to open up a command
prompt and change directory so that you are located in C:WindowsSystem32sysprep
directory and run the following command. If the Sysprep Preparation Tool is open you should
click Cancel before running the command below.
sysprep /generalize /oobe /shutdown /unattend:unattend.xml
m. Your image is now sysprepped and ready to be uploaded to the WDS server.
52. Page 52 of 58
13) Uploading your custom built Install Image to the WDS server.
a. Restart your computer and boot from your network card. You should now see the following
window. In which you will select Capture Image (x64).
b. Click Next at the following screenshot.
53. Page 53 of 58
c. Select the volume to capture then input a name and description for your install image and click
Next.
54. Page 54 of 58
d. Click Browse and save your install image to a directory that has enough space. Note: You can save
your install image to the same partition as the image that you are capturing as long as it has enough free
space because at this stage the image is going to be converted to a .wim file which it will upload to the
WDS server. Check the box for Upload image to a Windows Deployment Services server (optional). In
the server name input your WDS servers name. You will be prompted to enter credentials for a user that
has administative rights to the WDS server. Click the image group name box and select the image group
that you want your install image uploaded to.
e. The image capture has started once you start seeing the progress bar move.
f. When your computer finishes this task it will reboot and prompt you to enter a computer name.
55. Page 55 of 58
14) Downloading your customized Windows 7 image to a client.
a. Restart your computer and boot from your network card. You should now see the following
window. In which you will select Discover Image (x64).
b. Select Next at the following window.
56. Page 56 of 58
c. You will be prompted for user credentials to access the image store. Note: By default only
administrators have access to login to this prompt such as
YOURDOMAINNAMEadministrator. If you need another user or specific user group to be able
to login to this server to perform imaging functions you will have to grant them security rights on
the WDS reminst share located on the computer where you installed the WDS program directory.
d. You will now select the custom install image that you want applied to the computer and click
Next. I am using the clean Windows 7 Pro x64 install.wim that we uploaded to the WDS server
for my example but these directions are for any install images that you upload to your WDS
server.
57. Page 57 of 58
e. Just as a precaution I always delete all the partitions for a clean install so I am going to walk you
through the process. If your image has multiple partitions this will allow space for them to use.
If you want a data partition left you can choose to keep it. The image that you are downloading
already has partitions built into the image. Click Drive options (advanced).
f. Select each individual partition and click Delete.
58. Page 58 of 58
g. If you have deleted all partitions you should have a hard drive with all the unallocated space that
will be used for the install image that you will be downloading. Click Next.
h. This is just a screenshot to show you where you should be at this point. It is going to download
the install image now. Once the computer is done it will reboot. Note: The speed of the
download will depend on many things including: server hardware, network hardware, and
computer hardware. An image download in my environment for a 30 gig install image is
generally about 20-30 minutes to give you an idea of how quick the process is generally.